*
Upon registering your product
at morphyrichards.co.uk
3 Year
Guarantee
*
Please read and keep these instructions for future use
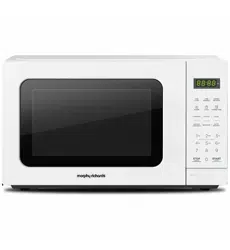
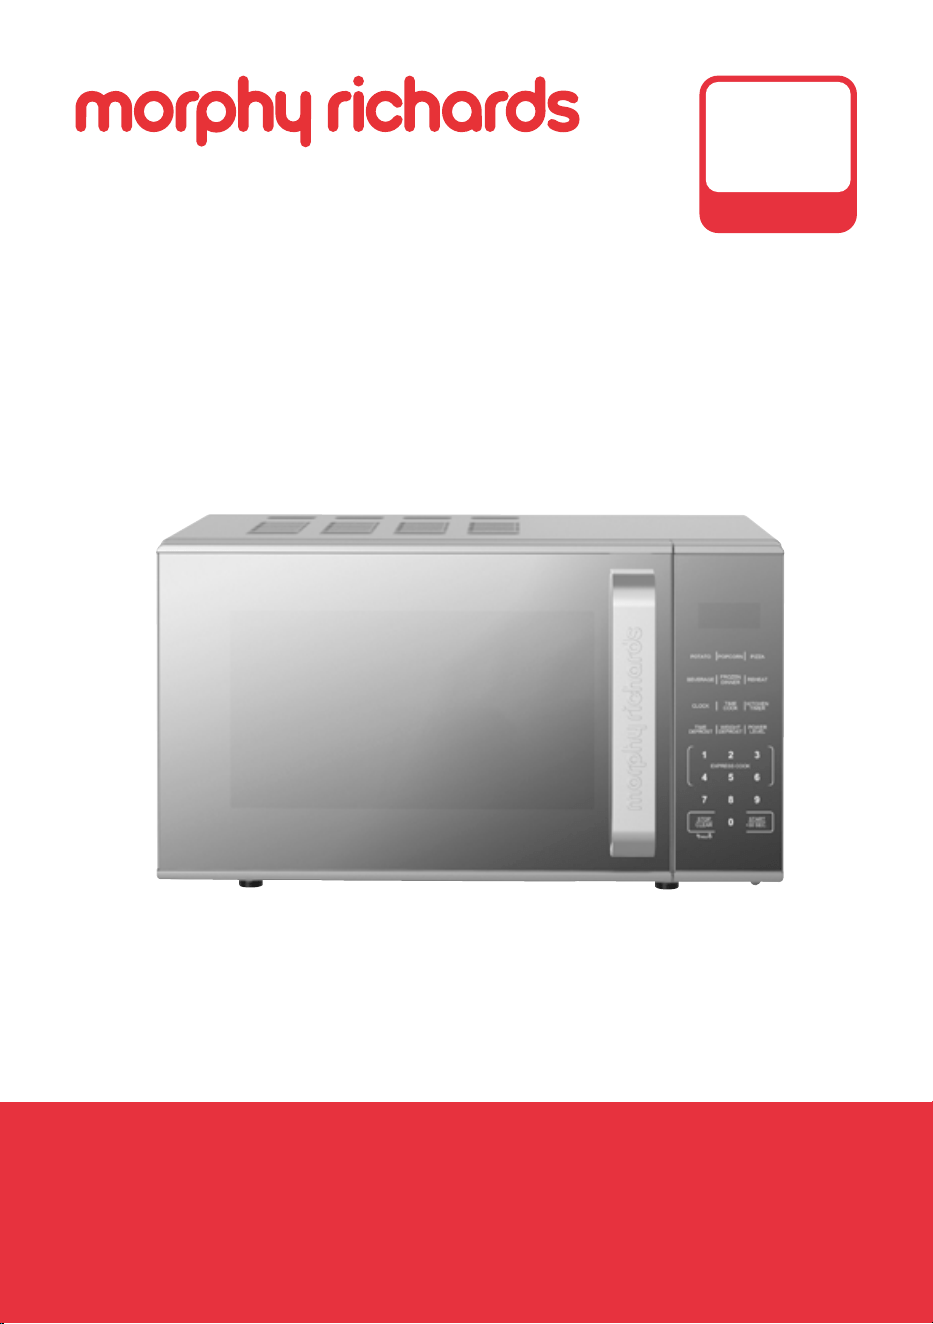
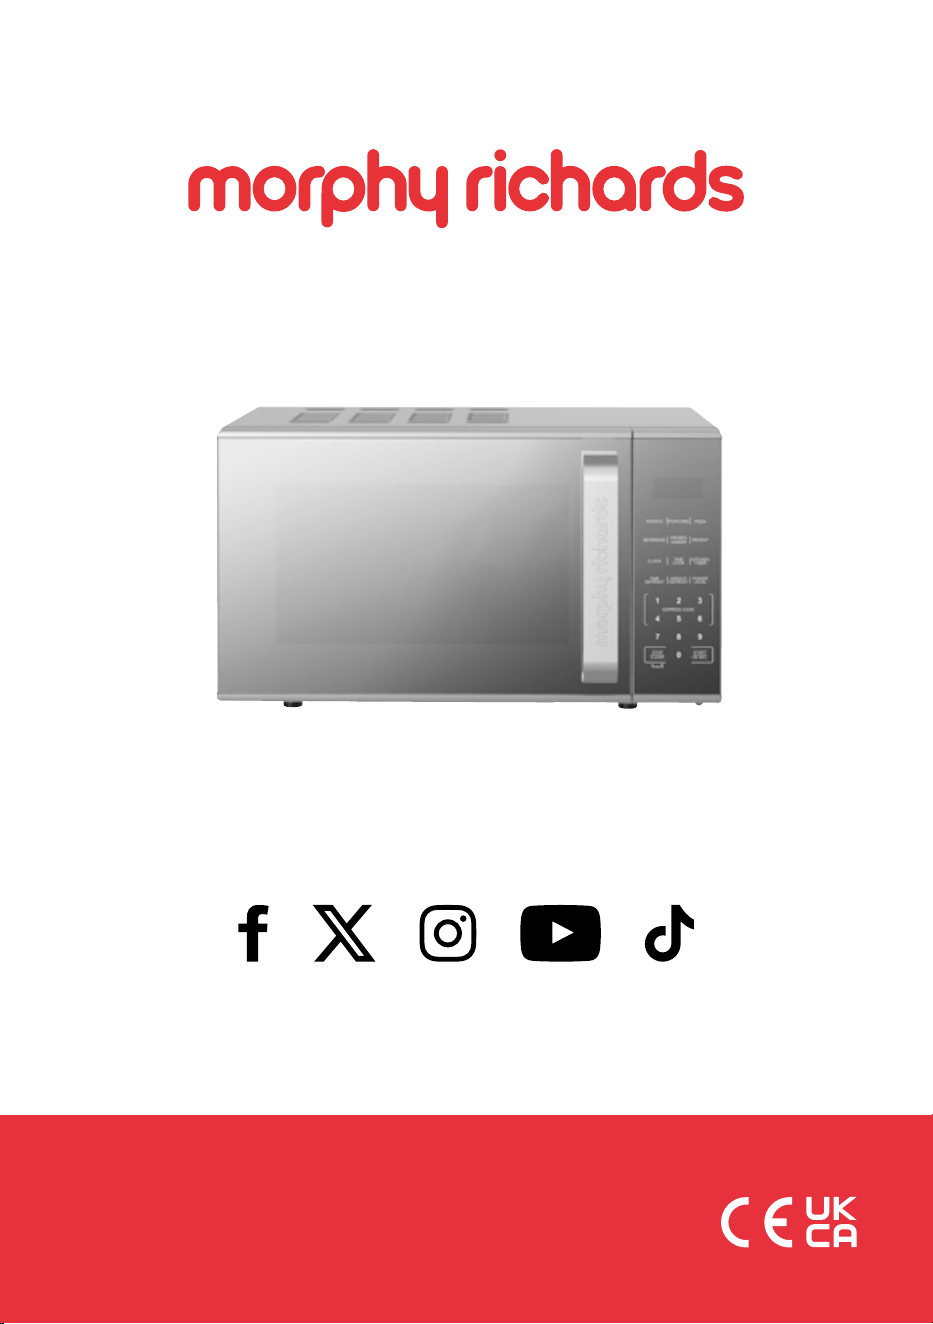
User Manual
Model No.
511442
800W
20L Digital
Microwave

2
HEALTH AND SAFETY
The use of any electrical appliance requires
the following common sense safety rules.
Read these instructions carefully and retain
for future reference.
• This appliance can be used by children
aged from 8 years and above with reduced
physical, sensory or mental capabilities or
lack of experience and knowledge if they
have been given supervision or instruction
concerning use of the appliance in a safe
way and understand the hazards involved.
• Children shall not play with the appliance.
Cleaning and user maintenance shall not be
made by children without supervision.
• Keep appliance and cord out of the reach
of children less than 8 years of age.
• WARNING: If the door or door seals are
damaged, the oven must not be operated
until it has been repaired by a competent
person.
• WARNING: It is hazardous for anyone other
than a competent person to carry out any
service or repair operation that involves the

3
HEALTH AND SAFETY
removal of a cover which gives protection
against exposure to microwave energy.
• WARNING: Liquids and other foods must
not be heated in sealed containers since
they are liable to explode.
• This appliance is intended for household
use only. It is not suitable for use in sta
kitchen areas in shops, oces and other
commercial environments.
• If the supply cable is damaged, it must be
replaced by the manufacturer, its service
agent or similarly qualied persons in order
to avoid a hazard.
• This appliance is not intended to be to
be operated on an extension cable or by
means of an external timer or separate
remote control system.
• This product belongs to Group 2 Class
B appliances and is suitable for use
in domestic establishments and in
establishments directly connected to a
low voltage power supply network which
supplies buildings used for domestic
purposes.

4
HEALTH AND SAFETY
LOCATION
• Always locate your appliance away
from the edge of the worktop.
• Ensure that the appliance is used
on a rm, flat, heat resistant
surface.
• Do not use the appliance
outdoors or near water.
• See microwave oven installation
for more details.
MAINS CABLE
• The mains cable should reach
from the socket to the appliance
without straining the connections.
• Do not let the mains cable hang
over the edge of the worktop or
open space where a child could
reach it.
• Do not let the cable run across a
cooker or hot area which might
damage the cable.
OTHER SAFETY CONSIDERATIONS
• The microwave oven is intended
for heating food and beverages.
Drying of food or clothing and
heating of warming pads, slippers,
sponges, damp cloth and similar
may lead to risk of injury and
ignition of re.
• When heating food in plastic or
paper containers, keep an eye
on the oven due to possibility
of ignition.
• If smoke is emitted, switch o or
unplug the appliance and keep
the door closed in order to stifle
any flames.
• Microwave heating of beverages
can result in delayed eruptive
boiling, therefore care must
be taken when handling the
container.
• The contents of feeding bottles
and baby food jars MUST
be stirred or shaken and the
temperature checked before
consumption, in order to avoid
burns.
• Eggs in their shell and whole
hard-boiled eggs should not be
heated in microwave ovens since
they may explode, even after
microwave heating has ended.
• Details for cleaning can be found
in the Care and Cleaning section
of the manual.
• The oven should be cleaned
regularly and any food deposits
removed.
• Failure to maintain the oven in
a clean condition could lead to
deterioration of the surface that
could adversely aect the life of
the appliance and possibly result
in a hazardous situation.
• The use of attachments or tools
not recommended by Morphy
Richards may cause re, electric
shock or injury.
• Only use utensils that are suitable
for use in microwave ovens.
5
HEALTH AND SAFETY
ELECTRICAL DETAILS
MICROWAVE OVEN INSTALLATION
• Check that the voltage on the rating plate of your appliance
corresponds with your house electricity supply which must be A.C.
(Alternating Current).
• Should the fuse in the mains plug require changing, replace it with a
fuse of the same rating as originally tted.
• The power consumption in standby mode is 0.72W.
• The period after which the equipment reaches low power mode is
20 minutes.
• WARNING: This appliance must be earthed.
• IMPORTANT: Select a level surface that provides enough space for
the outlet vents.
• A minimum clearance of 5cm is required between the oven and side
walls, at least 10cm at the back and at least 30cm above.
• Place the microwave oven as far away from radios and TVs as possible.
Using the oven may cause interference with the reception.
• Plug the oven into a suitable 13amp mains socket, make sure the
voltage is the same as on the rating label (do not use extension cables
or mains socket adaptors).
• WARNING: Do not install the microwave oven over a cooker or other
heat producing appliance. This will damage the appliance.
• Do not cover any of the ventilation on the microwave oven, the outer
casing can get hot.
PERSONAL SAFETY
• WARNING: Misuse of appliance could cause potential injury.
• WARNING: Take extra care when removing cookware from
the microwave as the cookware may be very hot.
6
8
5 4
3 2
7
1
15
17
18
19
16
9
10
11
12
14
13
6
PRODUCT REVIEW
7
PRODUCT REVIEW
BEFORE FIRST USE
• Remove all stickers and labels from the appliance (excluding the
rating label).
• Wash the Turntable Ring Assembly and the Glass Turntable with
warm soapy water and dry thoroughly before use.
• Wipe the inside of the microwave cavity with a damp cloth and dry
thoroughly.
• Place the Turntable Ring Assembly in the centre of the oven to
support the Glass Turntable.
• Place the Glass Turntable on the Turntable Ring Assembly with the
centre tting onto the Turntable Shaft.
• IMPORTANT: Never place the Glass Turntable upside down.
• IMPORTANT: Both the Glass Turntable and the Turntable Ring
Assembly MUST always be used during cooking.
• Note: The Glass Turntable rotates clockwise or anti-clockwise
randomly, this is normal.
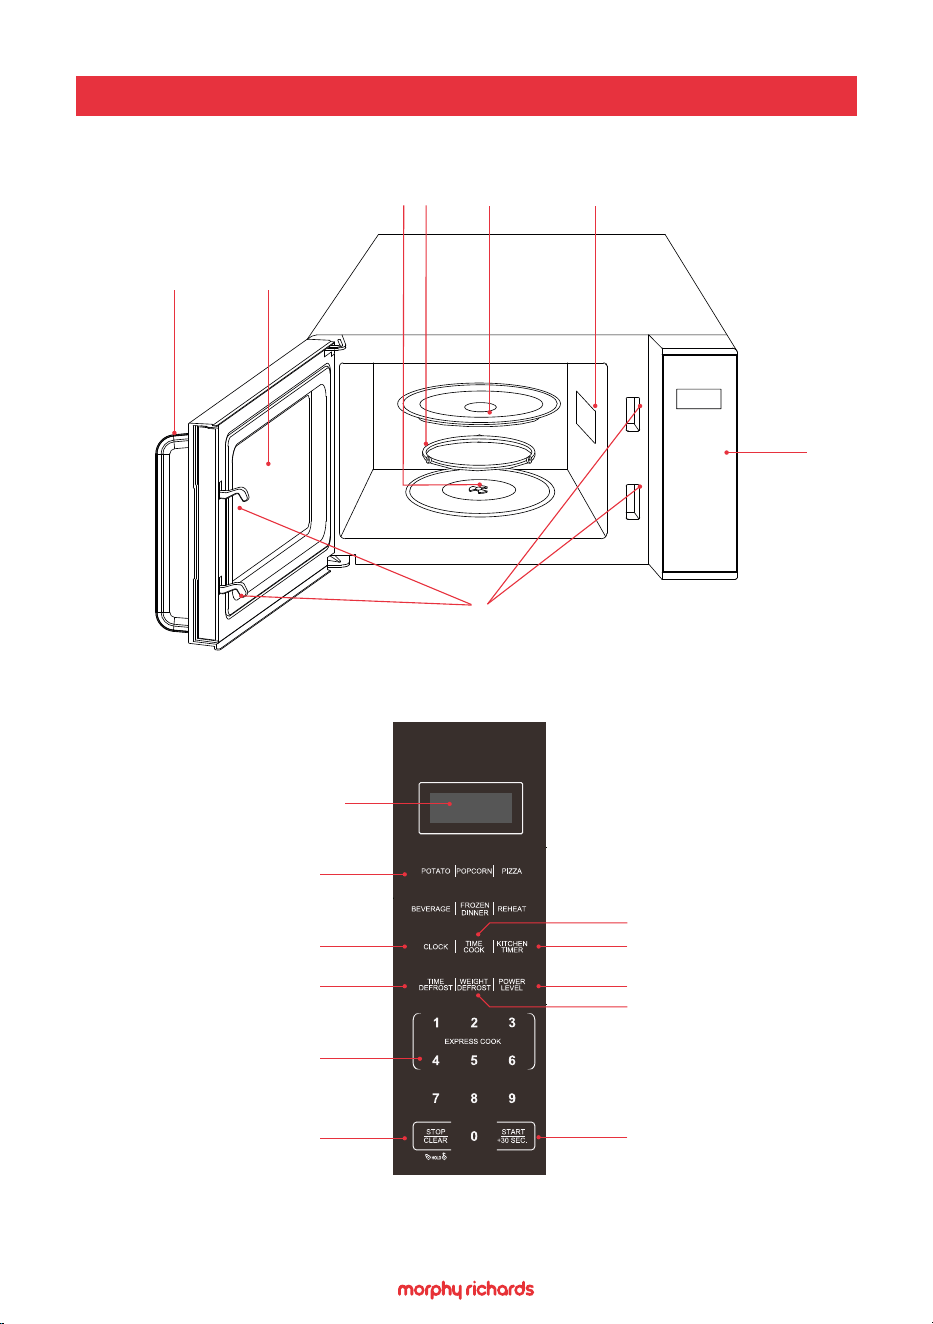
1. Door Safety Lock System
2. Viewing Window
3. Handle
4. Turntable Ring Assembly
5. Turntable Shaft
6. Control Panel
7. Waveguide Cover
8. Glass Turntable
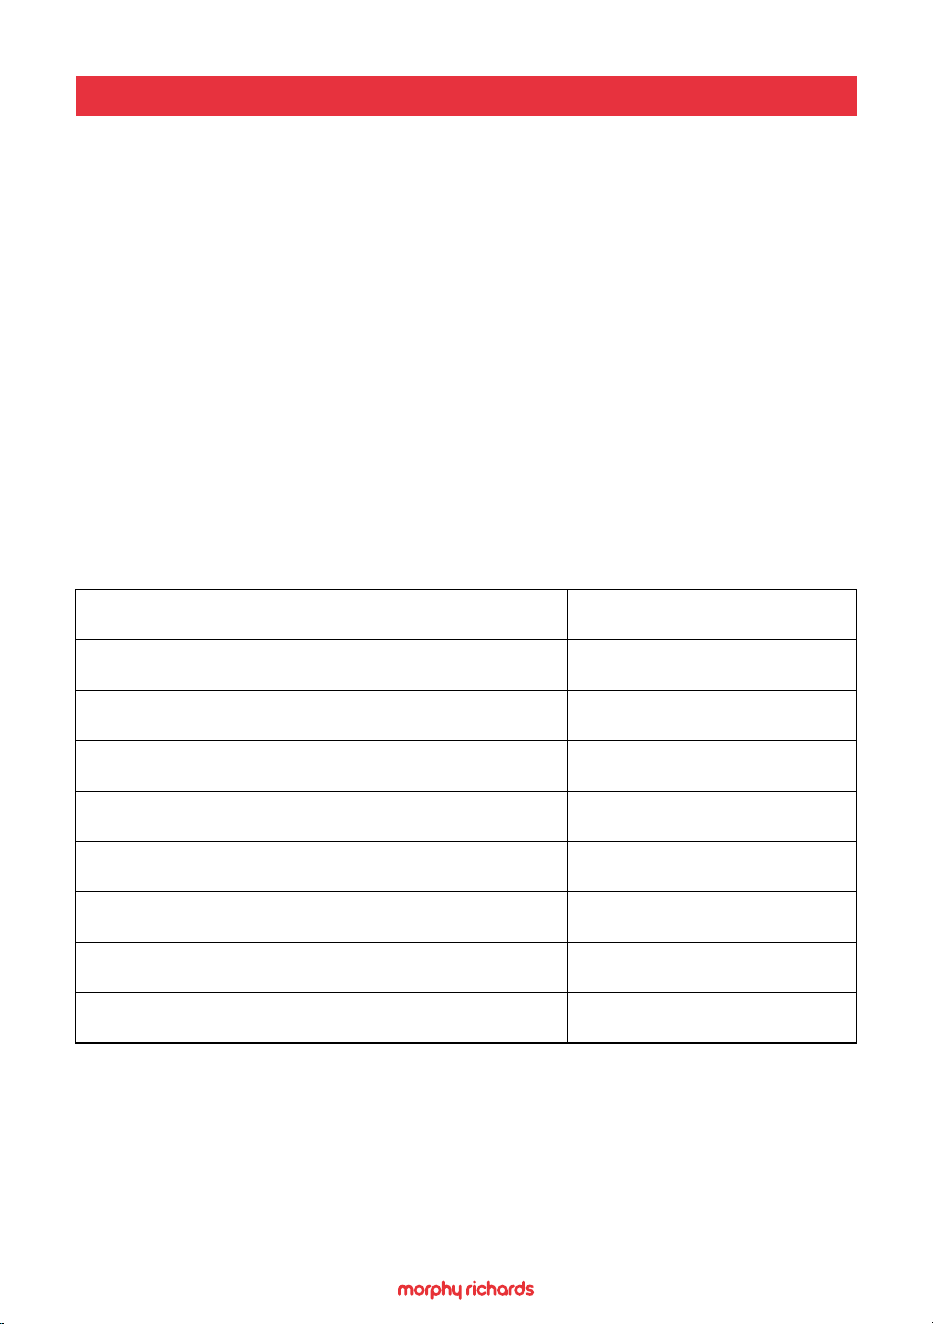
9. Led Display
10. Auto Cook Food Buttons
11. Clock Set Button
12. Time Defrost Button
13. Number Buttons / Express
Cook
14. Stop/Clear/Child Lock Button
15. Start/+30 Sec Button
16. Weight Defrost Button
17. Power Level Button
18. Kitchen Timer Button
19. Time Cook Button
8
UTENSILS GUIDE
• The ideal cooking utensil used for microwave cooking is transparent
as it allows energy to pass through the container and heat the food.
• Microwaves cannot penetrate metal, so metal utensils or dishes with
metallic trim should not be used.
• Do not use recycled paper products when microwave cooking, as
they may contain small metal fragments which may cause sparks
and/or res.
• Round/oval dishes are recommended rather than square/oblong
ones as food in the corners tends to overcook.
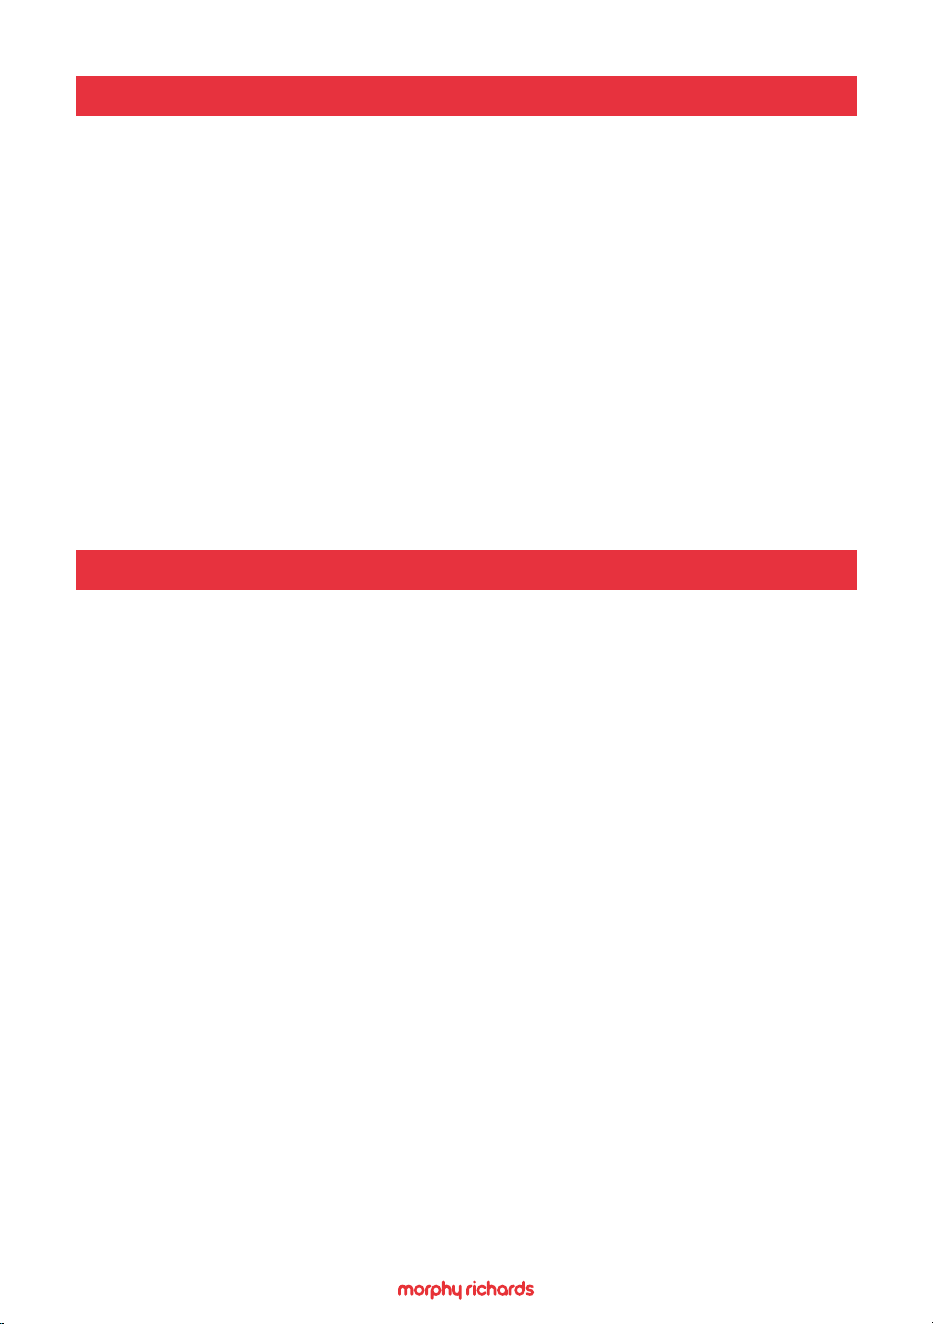
• Note: The list below is a general guide to help you select the correct
utensils.
Cookware Microwave Safe
Heat–Resistant Glass Yes
Non Heat–Resistant Glass No
Heat–Resistant Ceramics Yes
Microwave–Safe Plastic Dish Yes
Kitchen Paper Yes
Metal Tray No
Metal Rack No
Aluminium Foil & Aluminium Tray No
9
SETTING THE CLOCK (12H OR 24H DISPLAY)
USING YOUR MICROWAVE
1. When the microwave is plugged in a beep will be heard and the
screen will display 1:01.
2. Press the Clock button once to select 12 hour display or press twice
to select 24 hour display, the LED display will begin to flash.
3. Using the number buttons, set the correct time.
4. Press the clock or Start/+30 Sec. button to conrm and exit the
clock setting mode.
• Note: During setting, if there is no operation to the buttons within
30 seconds, the microwave will return to standby.
• Note: During cooking, you can check the current clock time by
pressing the Clock button.
Microwave Cooking
Remember that cooking instructions are intended only as a guide. If
you have followed the instructions and the food is still not piping hot
throughout, simply return it to the microwave.
1. Check that the microwave is set to the correct time.
2. Put the food in a microwavable container, place onto the glass
turntable and close the door.
3. Press the Time Cook button once and using the number buttons set
the cooking time.
4. Press the Power Level button until the desired level is reached. (See
the Microwave Power Chart below).
5. Press the Start/+30Sec button to begin cooking.
6. If the door is opened to turn the food during operation, close the
door and press the Start/+30Sec button once to re-start the
cooking procedure.
7. When the cooking time has nished the display will show ‘End’. 4
beeps will sound every 2 minutes until the user presses any button
or opens the microwave door.
10
USING YOUR MICROWAVE
• Note: During cooking, you can check the current power level by
pressing the Power Level button.
• Note: You can pause cooking by pressing the Stop/Clear button
once. To resume cooking press the Start/+30Sec button. To cancel
cooking press the Stop/Clear button twice.
• Note: While the microwave is in operation if any valid button is
pressed a beep will be heard. If an invalid button is pressed 2 beeps
will be heard.
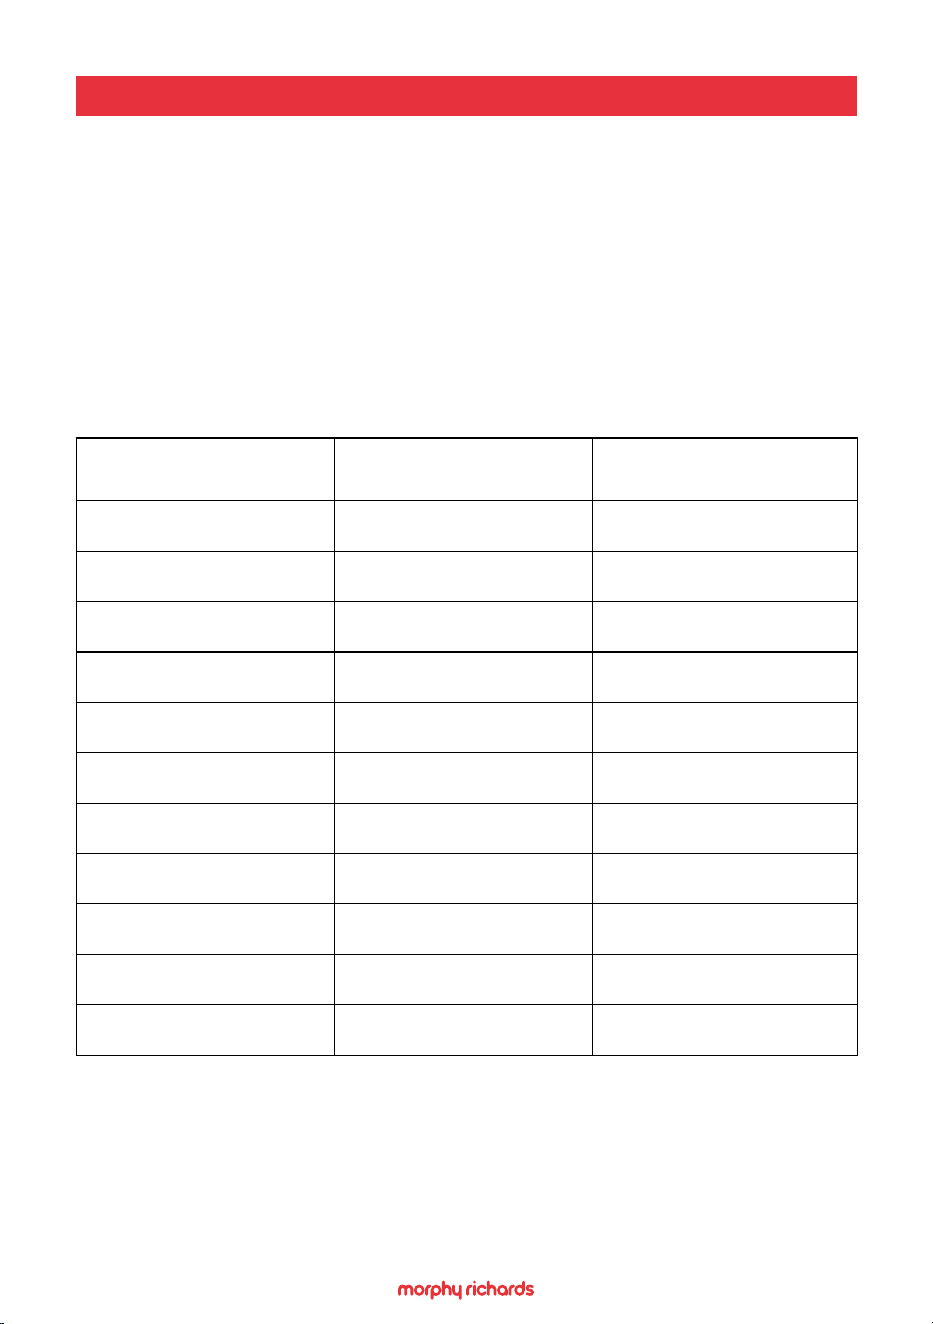
No. of times to press
power level button
Microwave
Power Level
Display
1 100% P100
2 90% P-90
3 80% P-80
4 70% P-70
5 60% P-60
6 50% P-50
7 40% P-40
8 30% P-30
9 20% P-20
10 10% P-10
11 0% P-00
• Note: The maximum cooking time is 99 minutes and 99 seconds.
• Note: During cooking, you can check the current power level by
pressing Power Level button.
• IMPORTANT: Never operate the microwave when it is empty.

11
USING YOUR MICROWAVE
Pause/Cancel
You can pause cooking by pressing the Stop/Clear button once. To
resume cooking press the Start/+30Sec button. To cancel cooking press
the Stop/Clear button twice.
Setting the Timer
1. In standby mode or during cooking, press the Kitchen Timer button
once.
2. Use the number buttons to set desired time. The longest time that
can be set is 99 minutes and 99 seconds.
3. Press the Start/+30 Sec. or Kitchen Timer button to conrm.
4. When the countdown ends, a beep will sound.
• Note: You can check the countdown time by pressing Kitchen Timer
button. To cancel cooking press the Stop/Clear button.
Quick Cooking
The microwave oven will operate at HIGH power (100%) and cannot be
changed. The longest cooking time for this function is 10 minutes.
1. Just press the Start/+30Sec button once to start cooking with 100%
power level for 30 seconds.
2. Each press on the same button will increase cooking time by 30
seconds.
• Note: You can pause cooking by pressing the Stop/Clear button
once. To resume cooking press the Start/+30Sec button. To cancel
cooking press the Stop/Clear button twice.
Express Cooking
1. To use the Express function, press the required number button (1 to
6) once, while the microwave is in standby mode.
2. The microwave starts cooking at full power for the corresponding
time (in minutes) to the number on the button that has been
selected.
12
USING YOUR MICROWAVE
Auto Cooking
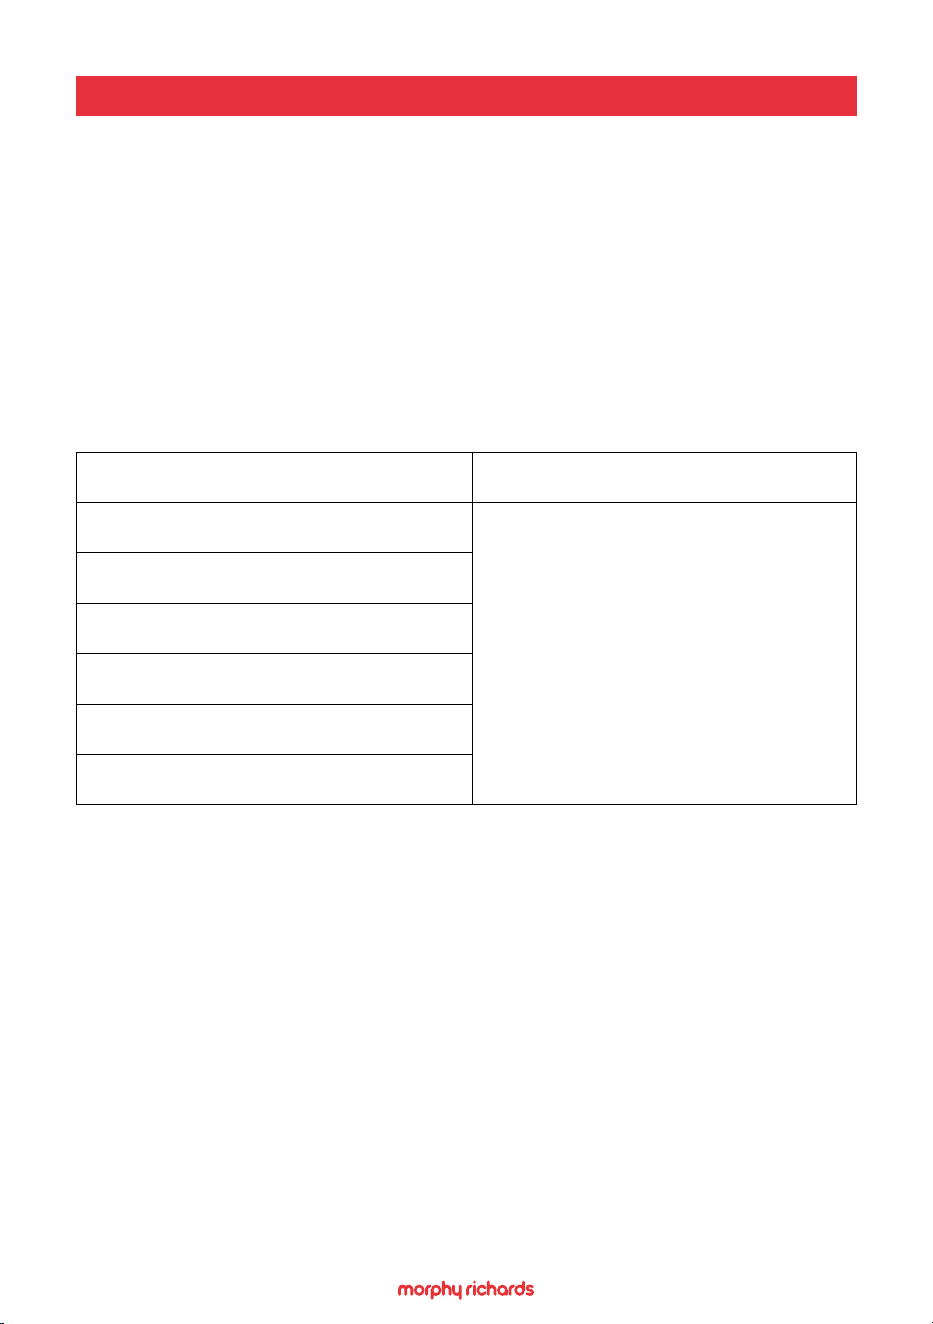
For the foods listed in the table below, it is not necessary to programme
the cooking power or time. Just select the food type that you wish to
cook as well as the weight or servings of the food.
1. Press the required Auto Cook food button once or repeatedly to
select the food weight or servings.
2. Press the Start/+30Sec button to start cooking.
Auto Cook Foods Microwave Safe
Potatoes (230g serving, 1 -2 servings)
The result of auto cook depends on
factors such as the shape and size
of food, your personal preference to
how well done the food is and even
how well you happen to place food
in the oven. If you nd the result is
not quite satisfactory, adjust the
cooking time accordingly.
Popcorn (100g)
Pizza (150g, 300g, 450g)
Beverage (200ml/cup, 1-3 cups)
Frozen Dinner (250g, 500g)
Reheat (200g – 800g)
• Note: You may need to turn food over at the middle of cooking time
to obtain uniform cooking.
• Note: You can pause cooking by pressing the Stop/Clear button
once. To resume cooking press the Start/+30Sec button. To cancel
cooking press the Stop/Clear button twice.

13
USING YOUR MICROWAVE
Time Defrost
1. While the microwave is in standby mode, press the Time Defrost
button once.
2. Use the number buttons to set the defrost time.
3. Press Start/+30 Sec. button to start defrosting.
4. During defrosting, the microwave will pause and beep to remind the
user to turn food over. Press the Start/+30 Sec. button to resume
defrosting.
• Note: The maximum defrosting time is 99 minutes and 99 seconds.
Weight Defrost
When using the Weight Defrost function, the defrosting time and power
are adjusted automatically when the food weight is programmed.
1. In standby mode, press the Weight Defrost button once.
2. Using the number buttons, set the food weight.
3. Press the Start/+30Sec. button to start defrosting.
4. During defrosting, the microwave will pause and beep to remind the
user to turn food over. Press the Start/+30 Sec. button to resume
defrosting.
Child Lock Function
Use this feature to lock the control panel so that children cannot use
the oven unsupervised or when you are cleaning the control panel. All
the buttons are rendered inoperable in this mode.
1. To set the lock, press and hold the Stop/Clear button for about 3
seconds. A beep will be heard, the display will show ‘Loc’ for about
5 seconds and the microwave will enter child lock mode.
2. To cancel the lock, press and hold the Stop/Clear button for about 3
seconds. A beep will be heard.

14
HINTS AND TIPS
Food Arrangement
• Place thicker food towards outside of dish and spread it evenly.
Do not overlap if possible.
Cooking Time Length
• Start cooking with a shorter time setting and extend it accordingly.
Over cooking may result in smoking and burnt food.
Cooking Food Evenly
• Food such as chicken, burgers or steak should be turned once
during cooking.
• Depending on the type of food, stir it from outside to centre of dish
once or twice during cooking
Allow Standing Time
• After cooking is complete, leave the food in the microwave for a
short period, this allows it to complete its cooking cycle and when
opening the door allow any steam to escape before removing the
food.
Checking if the Food is Cooked
• Colour and rmness of food help to determine if it is done, these
include:
• Steam coming out from all parts of food, not just the edges.
• The joints of poultry can be moved easily and shows no signs
of blood.
• Pork or poultry shows no signs of blood.
• Fish is opaque and can be sliced easily with a fork.
Browning Dish
• When using a browning dish or self-heating container, always place
a heat-resistant insulator such as a porcelain plate under it to
prevent damage to the turntable and rotating ring.
15
HINTS AND TIPS
CARE AND CLEANING
Microwave Safe Plastic Wrap
• When cooking food with high fat content, do not allow the plastic
wrap to come into contact with food as it may melt.
Microwave Safe Plastic Cookware
• Some microwave safe plastic cookware may not be suitable for
cooking foods with high fat and sugar content, check the cookware
manufacturer’s instructions. Also, the heating time specied by the
cookware manufacturer must not be exceeded.
• IMPORTANT: ALWAYS switch o your microwave oven and unplug
from power supply before cleaning.
Your microwave oven should be cleaned regularly to prevent grease and
food particles from building up on the inside surface. The accumulated
grease/food particles may cause a re hazard.
It is important to clean the interior, use a mild detergent solution, such
as washing-up liquid with warm water on a soft cloth. It is suggested to
place half a lemon in a bowl and add 300ml water inside the oven. Then
heat it on 100% power setting for 10 minutes. Wipe the oven clean with
a soft, dry cloth.
Removable Parts
• The Glass Turntable may be cleaned in the sink. Be careful not to
chip or scratch the edges as this may cause the Glass Turntable to
break during use.
• The Turntable Ring Assembly should be cleaned regularly.
• Do not immerse the Glass Turntable in cold water.
For best performance and safety, the inner door panel and the oven
front frame should be free of food residue. To prevent damage to the
operating parts inside the oven, water should not be allowed to seep
into the ventilation openings.

16
ADDITIONAL INFORMATION
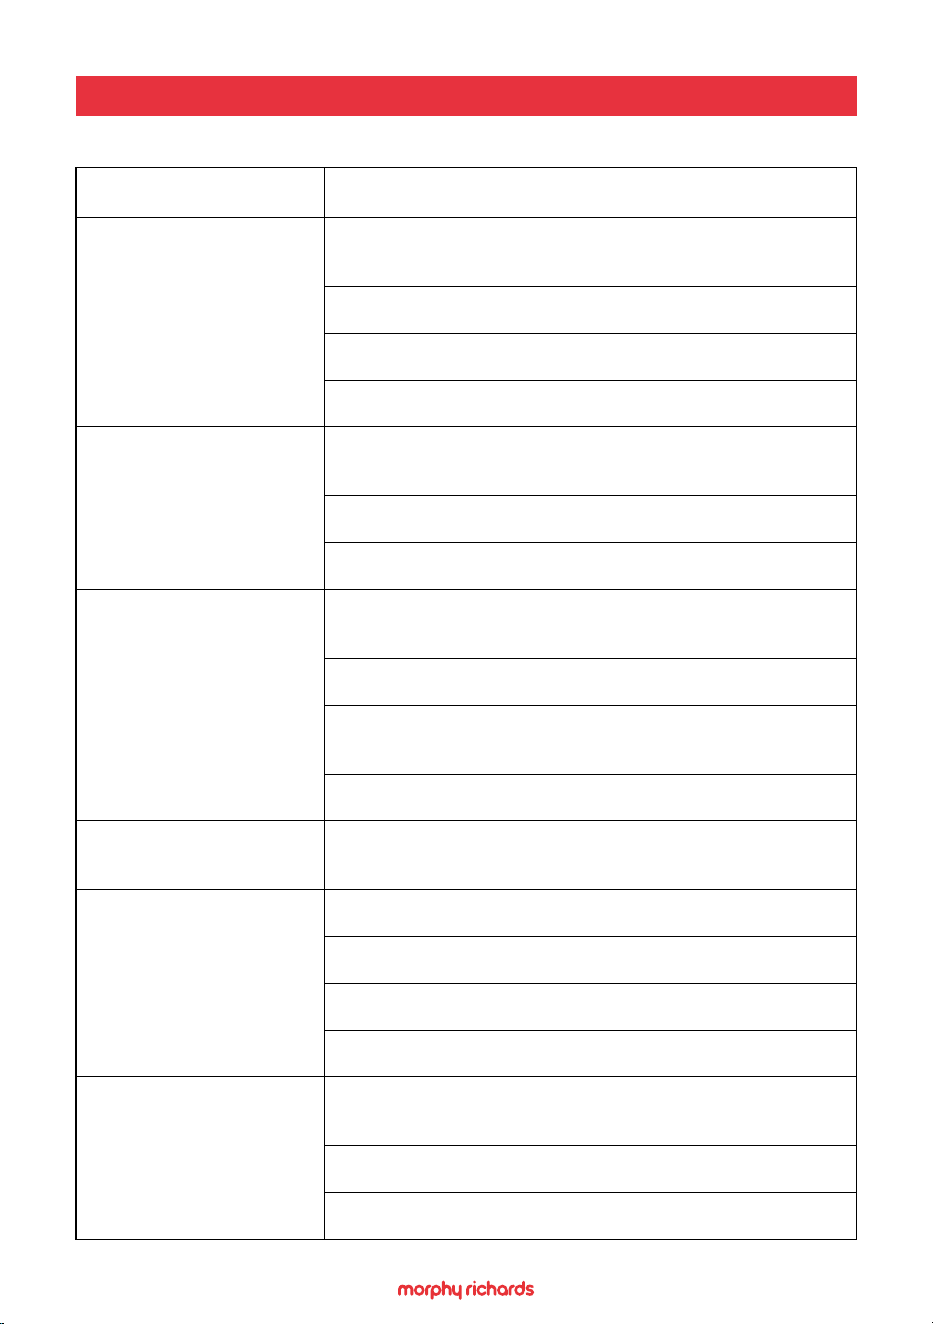
Button Adhesion Protection
• If any button becomes depressed for 1 minute, the program will stop
immediately. FAIL will illuminate on the display and a 'beep' will be
heard.
• If the button remains depressed, a 'beep' will be heard every minute
until the button is released.
• When the depressed button has been released, press the STOP/
CLEAR button to return to standby.
• NOTE: While Button Adhesion Protection is activated all buttons will
be rendered inoperable.
17
TROUBLESHOOTING
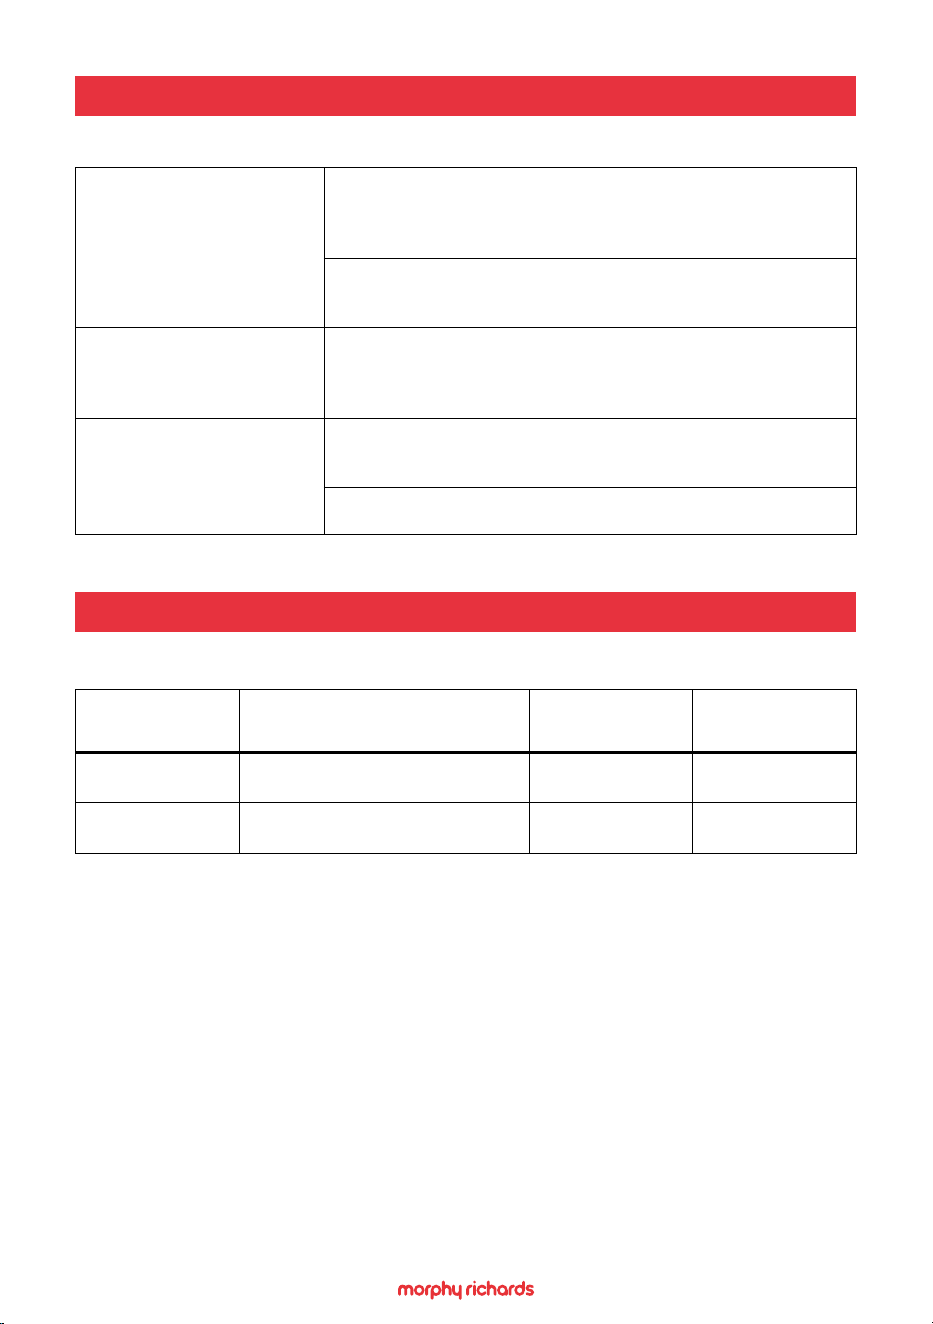
Problem Solution
Microwave will not
start.
Plug not secure in power socket, or not switched
on.
Door is open.
Wrong operation is set.
Plug fuse has blown.
Arcing or sparking.
Materials which should be avoided in a microwave
oven are used, such as metal.
Check the oven isn’t empty.
Check there is no spilled food in the oven.
Unevenly cooked
food.
Materials which should be avoided in a microwave
oven are used.
Check the food has been defrosted completely.
Selected power setting for the cooking time is
incorrect.
Food has not been turned or stirred.
Overcooked food.
Check the correct power setting for the cooking
time is being used.
Undercooked food.
Materials to be avoided in microwave oven are used.
Check the food has been defrosted completely.
Check oven ventilation has not been restricted.
Power setting for the cooking time is incorrect
Incomplete
defrosting.
Materials to be avoided in a microwave oven are
used.
Power settings for cooking time is incorrect.
Food has not been turned or stirred.
18
TROUBLESHOOTING
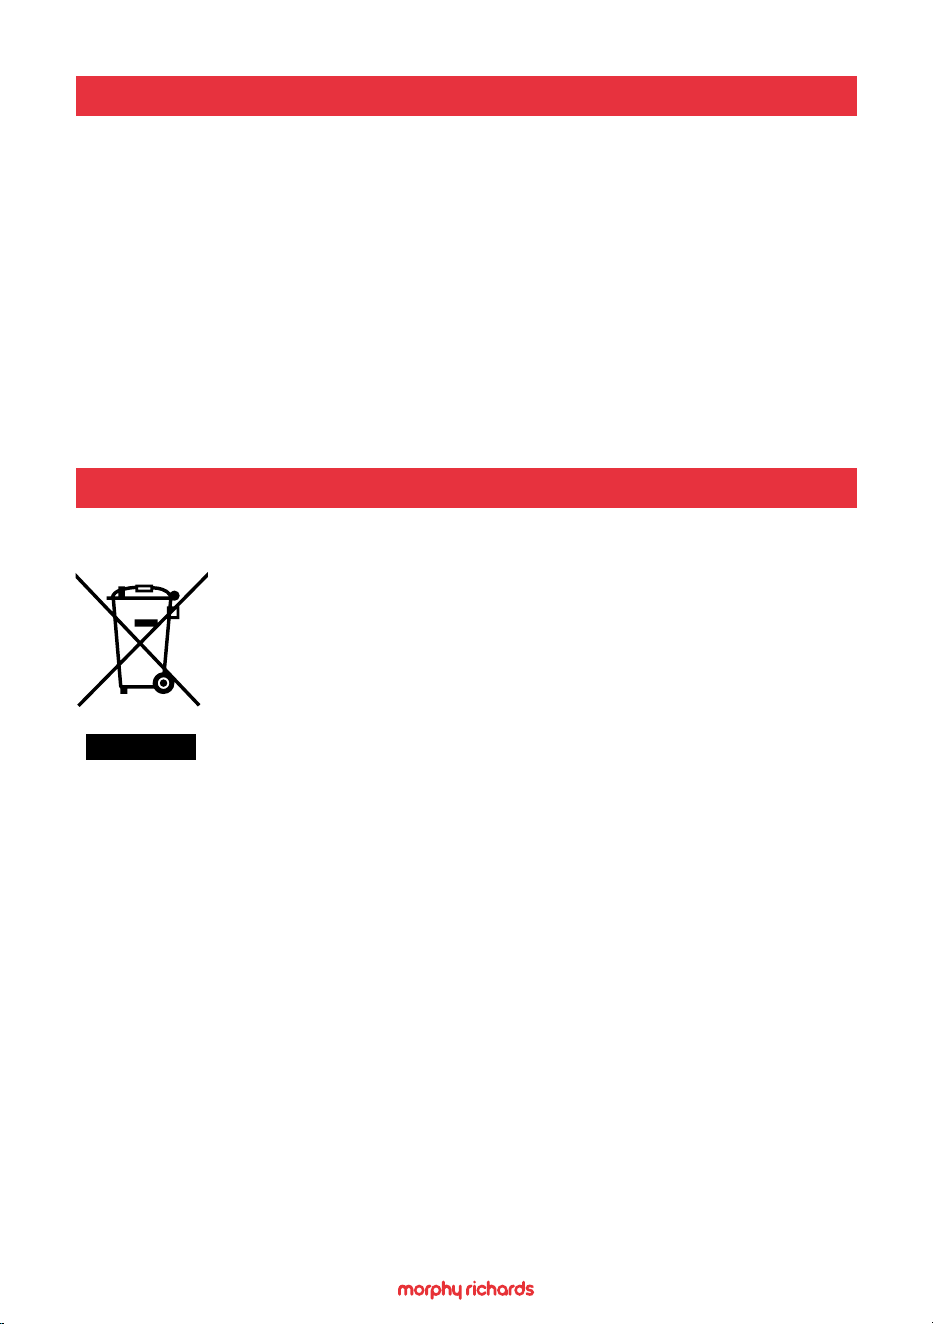
Noise comes from
the turntable.
Check there is no food residue exists between the
turntable ring assembly and the cavity bottom when
the oven is turned on.
Check the Glass Turntable and/or Ring Assembly are
tted correctly.
FAIL shows on display
Button Adhesion Protection may have activated.
Press, the Stop/Clear button to return the
microwave to standby.
Oven light does
not illuminate.
The light bulb has burned out. A new bulb must be
tted by a qualied service engineer.
Start/+30Sec button has not been pressed
SPARES
Part Number Description
Qty Per
Product
Features Key
Number
30096 Glass Turntable 1 8
30097 Turntable Ring Assembly 1 4
19
CONTACT US
If you are having a problem with your appliance, please contact our
Helpline, as we are more likely to be able to help than the store you
purchased the item from. Please have the product name, model number
and serial number to hand when you contact us to help us deal with
your enquiry quicker.
email: hello@morphyrichards.co.uk
www.morphyrichards.co.uk
For electrical products sold within the European
Community, at the end of the electrical products useful
life, it should not be disposed of with household waste.
Please recycle where facilities exist.
Check with your Local Authority or retailer for recycling
advice in your country.
PRODUCT RECYCLING
20
NOTES
21
NOTES
22
Your standard 2 year guarantee is extended for an additional 1 year
when you register the product within 28 days of purchase with Morphy
Richards. If you do not register the product with Morphy Richards within
28 days, your product is guaranteed for 2 years.
To validate your 3 year guarantee,
scan the QR code or register online
at www.morphyrichards.co.uk
N.B. Each qualifying product needs to be registered with Morphy
Richards individually. Please note that the 2 year guarantee is only
available in the UK. Please refer to the 2 year guarantee for more
information.
YOUR 2 YEAR GUARANTEE
It is important to retain the retailer’s receipt as proof of purchase.
Staple your receipt to the back cover for future reference.
Please quote the following information if the product develops a fault.
These numbers can be found on the base of the product.
Model no.
Serial no.
All Morphy Richards products are individually tested before leaving the
factory. In the unlikely event of any appliance proving to be faulty within
28 days of purchase, it should be returned to the place of purchase
for it to be replaced. If the fault develops after 28 days and within 24
months of original purchase, you should contact the Helpline quoting
Model number and Serial number on the product, or write to Morphy
Richards at the address shown. You may be asked to return a copy of
proof of purchase.
Subject to the exclusions set out on the next page (see Exclusions), the
faulty appliance will then be repaired or replaced as appropriate and
dispatched usually within 7 working days of receipt.
If, for any reason, this item is replaced or repaired during the 2 year
REGISTERING YOUR 3 YEAR GUARANTEE

23
guarantee period, the guarantee on the new item will be calculated
from the original purchase date. Therefore it is vital to retain your
original till receipt or invoice to indicate the date of initial purchase.
To qualify for the 2 year guarantee, the appliance must have been used
according to the instructions supplied.
The appliance is intended for domestic use only. Misuse or use for
commercial or any other purpose will render the guarantee invalid.
Exclusions
Morphy Richards shall not be liable to replace or repair the goods under
the terms of the guarantee where:
1. The fault has been caused or is attributable to accidental use,
misuse, negligent use or used contrary to the manufacturer’s
recommendations or where the fault has been caused by power
surges or damage caused in transit.
2. The appliance has been used on a voltage supply other than that
stamped on the products.
3. Repairs have been attempted by persons other than our service
sta (or authorised dealer).
4. The appliance has been used for hire purposes or non domestic use.
5. The appliance is second hand or refurbished.
6. Morphy Richards reserves the right not to carry out any type of
servicing under the guarantee at its discretion.
This guarantee does not confer any rights other than those expressly
set out above and does not cover any claims for consequential loss
or damage. This guarantee is oered as an additional benet and
does not aect your statutory rights as a consumer. Morphy Richards
products are intended for household use only. See usage limitations
within the location safety instructions.
Disclaimer
Morphy Richards has a policy of continuous improvement in product
quality and design. The company, therefore reserves the right to
change the specication of its models at any time.
REGISTERING YOUR 3 YEAR GUARANTEE
morphyrichards.co.uk
MW511442MUK Rev1
@morphyrichardsuk #loveyourmorphy
Morphy Richards
9 Cabot Lane, Poole, Dorset, BH17 7BY, UK