
Technical Support and E-Warranty Certificate www.vevor.com/support
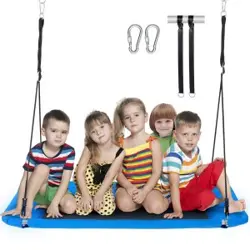
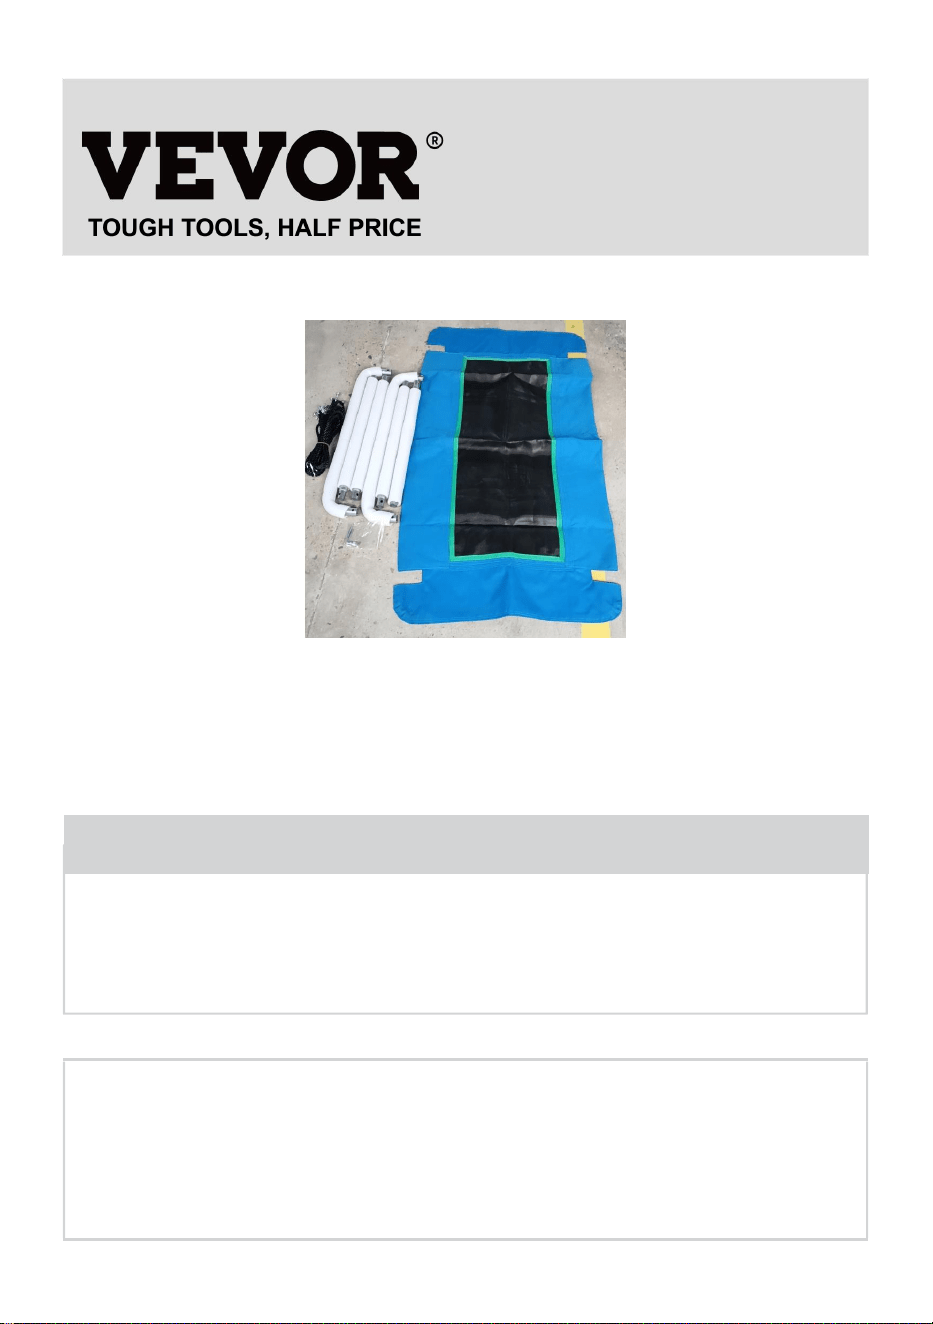
Multi-person Swing Seat
We continue to be committed to provide you tools with competitive price.
"Save Half", "Half Price" or any other similar expressions used by us only represents an
estimate of savings you might benefit from buying certain tools with us compared to the major
top brands and does not necessarily mean to cover all categories of tools offered by us. You
are kindly reminded to verify carefully when you are placing an order with us if you are
actually saving half in comparison with the top major brands.
1
MODEL: YXS-BQ01
Have product questions? Need technical support? Please feel free to
contact us:
Technical Support and E-Warranty Certificate
www.vevor.com/support
NEED HELP? CONTACT US!
This is the original instruction, please read all manual instructions
carefully before operating. VEVOR reserves a clear interpretation of our
user manual. The appearance of the product shall be subject to the
product you received. Please forgive us that we won't inform you again if
there are any technology or software updates on our product.
Multi-person Swing
Seat
2
INSTRUCTIONS
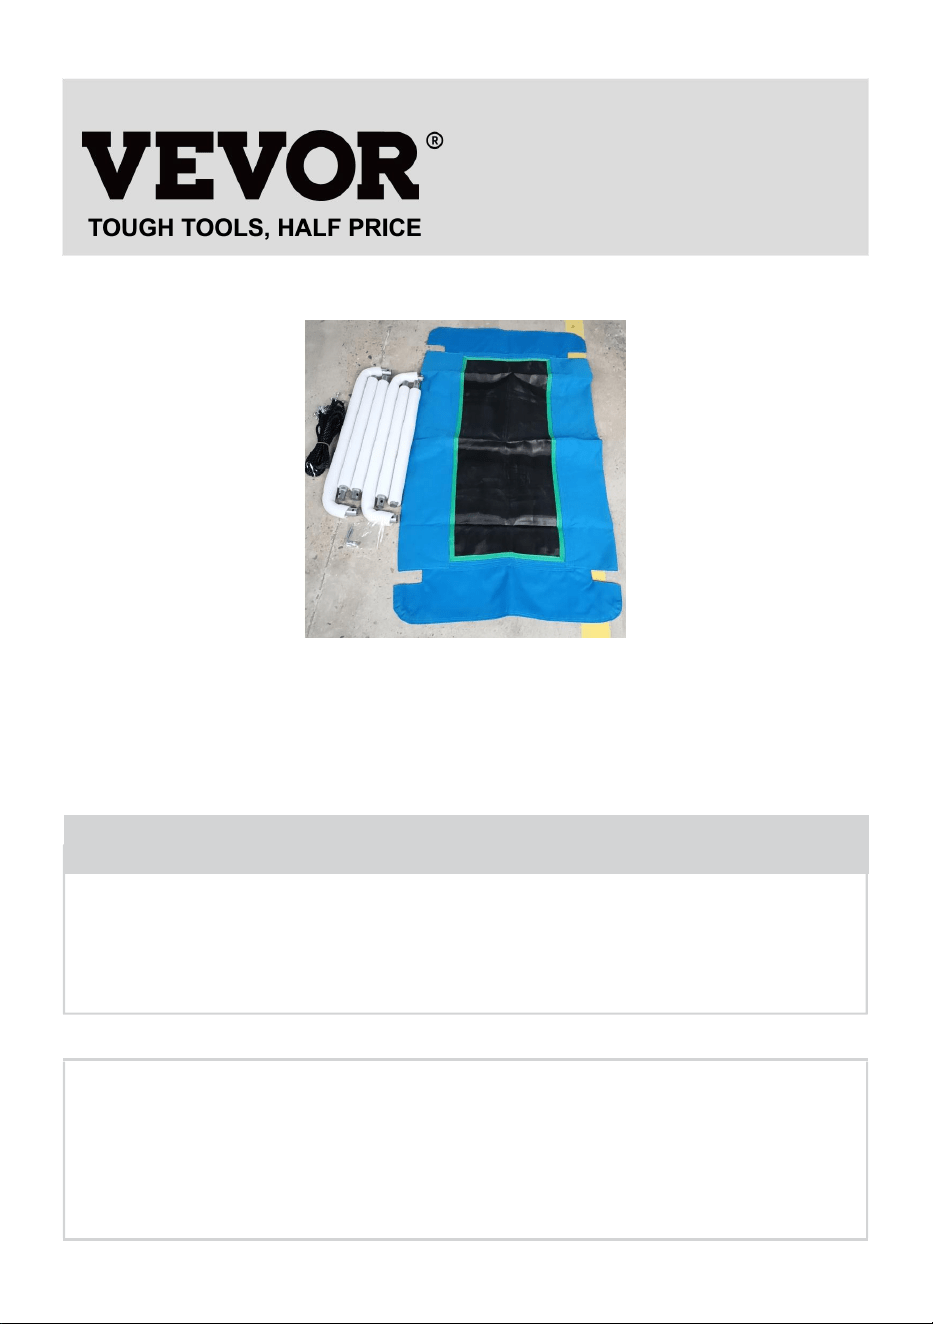
Thank you very much for choosing this Multi-person Swing Seat.
- Please read all of the instructions before using it. The information will help you
achieve the best possible results.
The products carried in this catalog may be different in color than the actual item.
IMPORTANT SAFETY INSTRUCTIONS
MAXIMUM WEIGHT SHOULD NOT EXCEED 700 lbs(340kg)
SAFE PLAY AREA
1.Please preserve this manual and the packing carefully for later reference. If you
give this product to a third party, remember to hand over this manual as well.
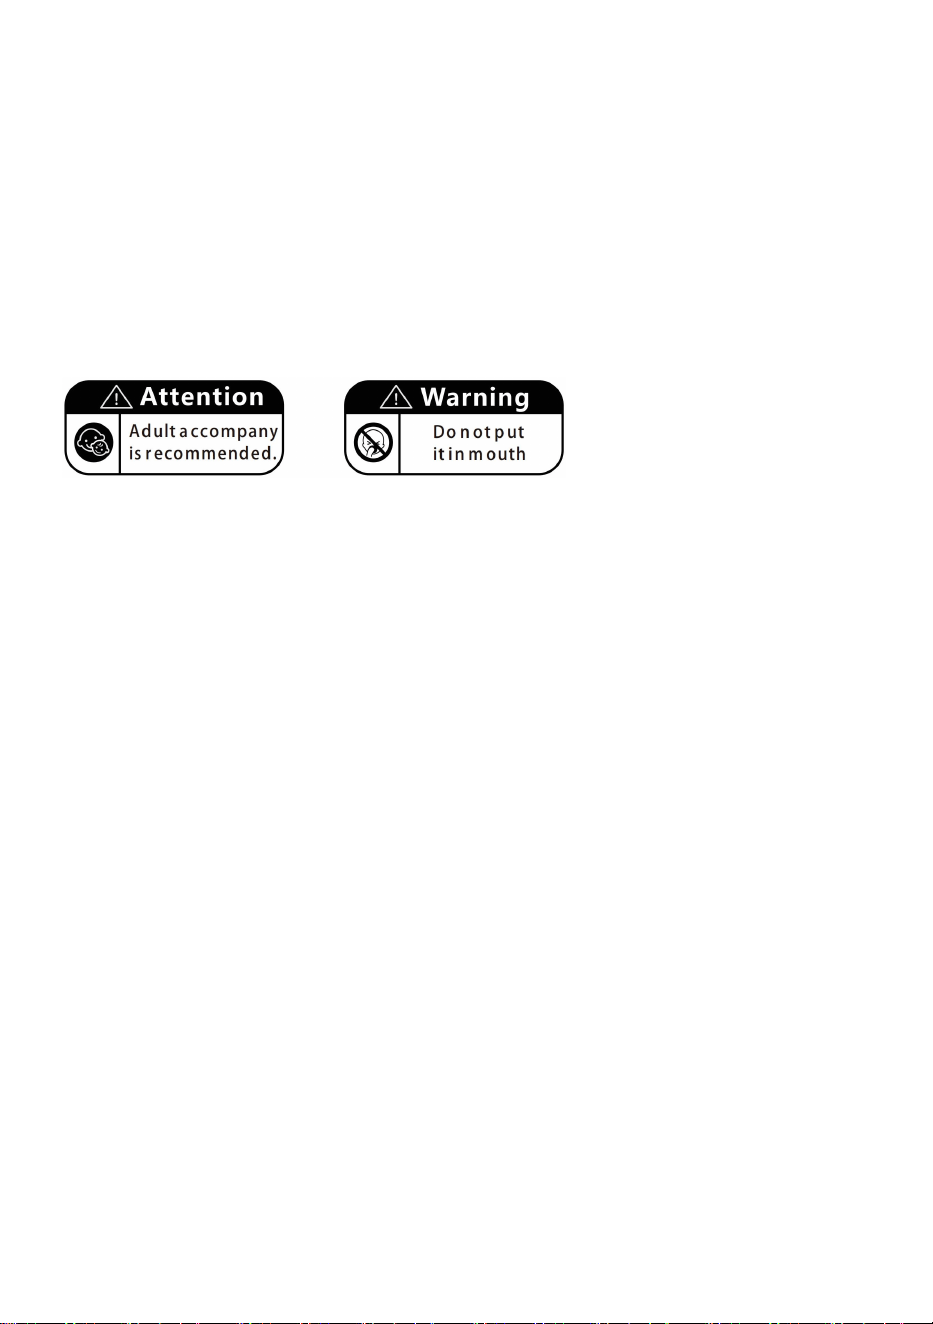
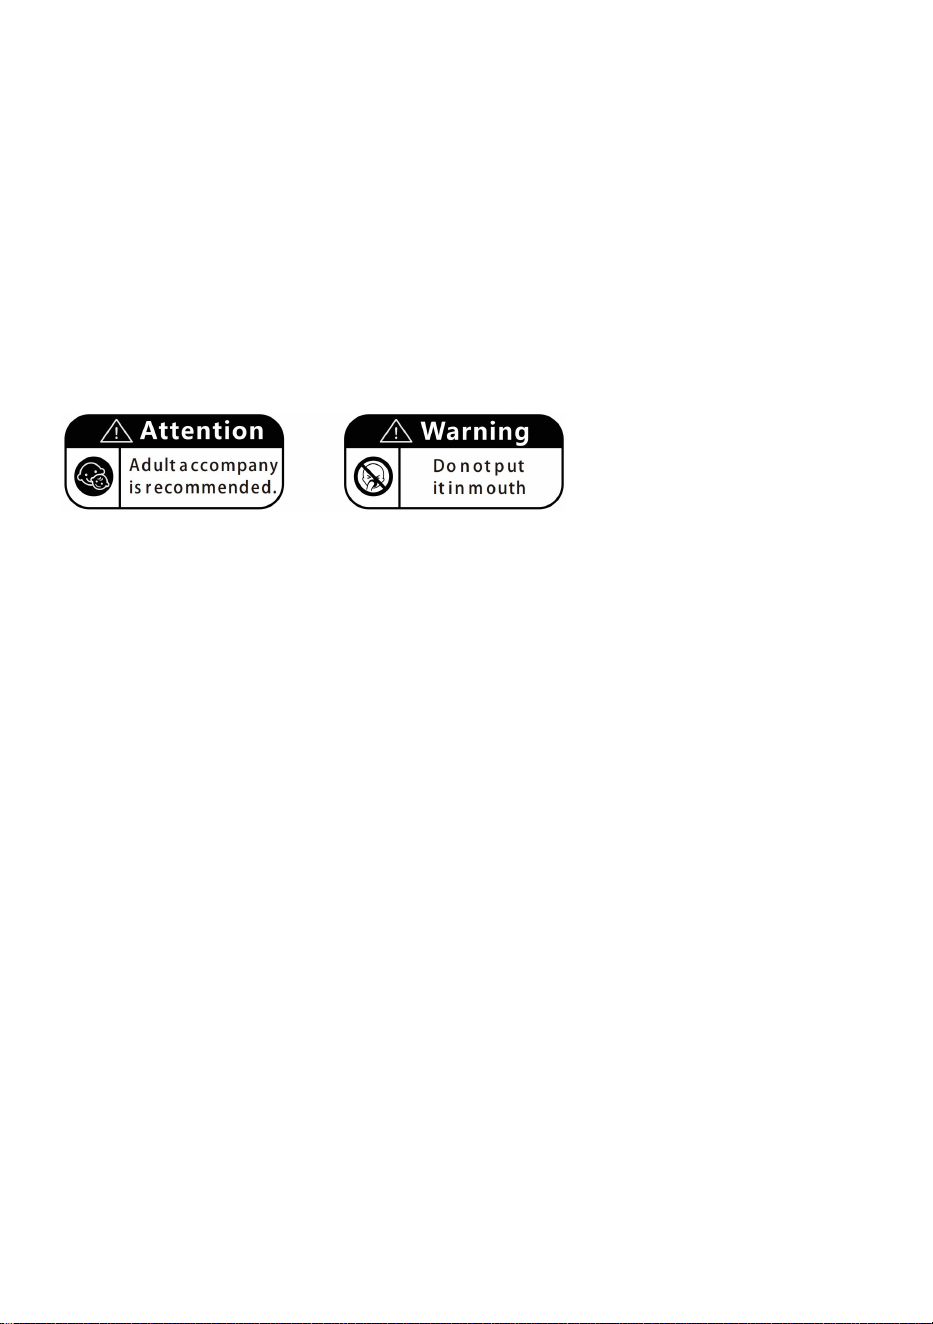
2.This product is NOT meant for commercial use, but is ONLY intended for
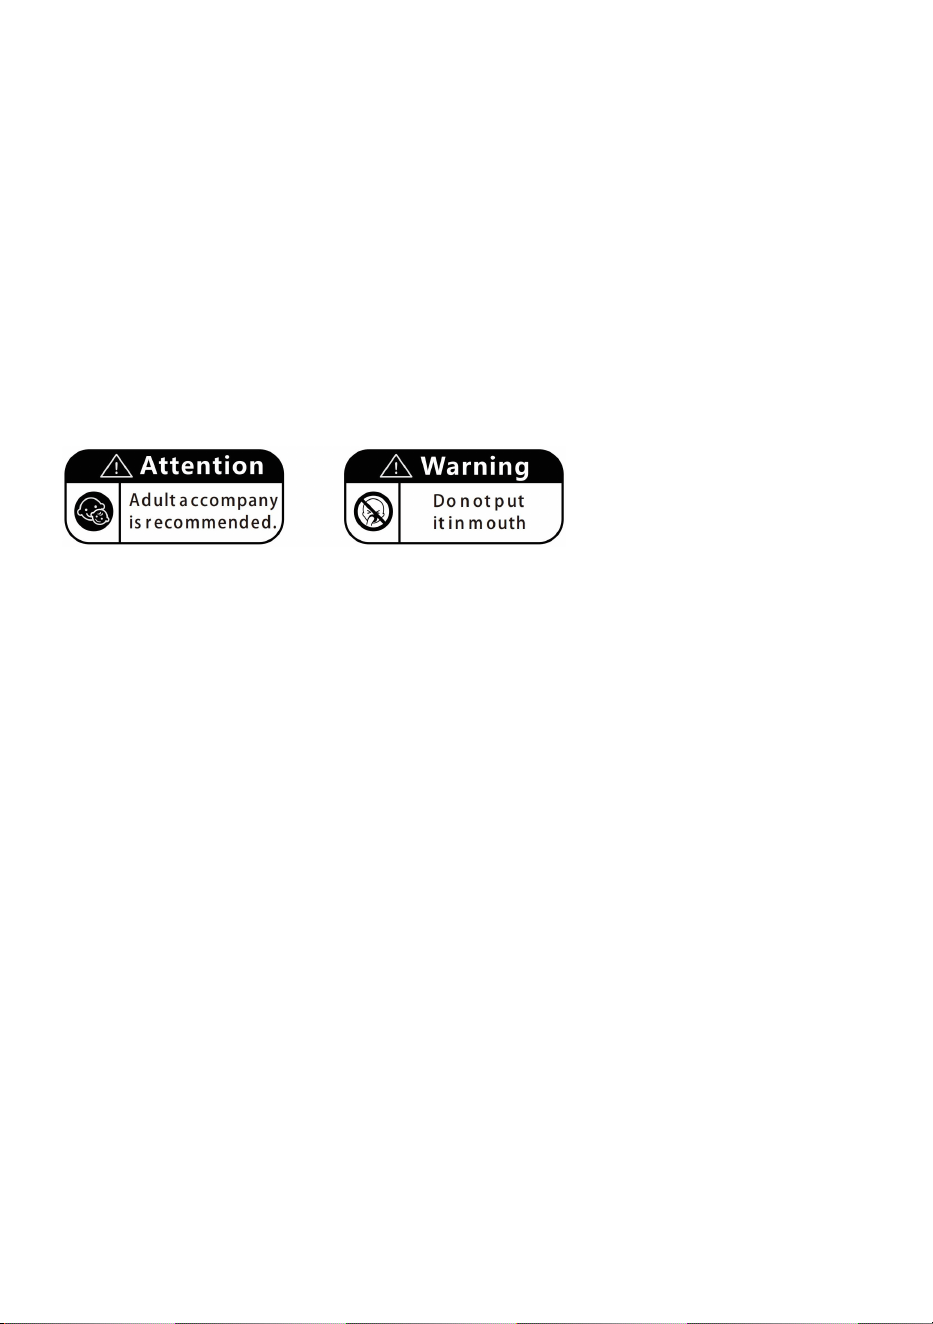
domestic use. To be used only under the supervision of adults. Never leave your
child unsupervised on the swing in order to avoid the risk of falling down.
3.Follow the assembly and maintenance instructions, in order to prevent your child
from falling, tumbling down and to prevent the tearing of ropes.
4.We recommend that you set up the swing on an even surface and maintain a
distance of at least 2m from other structures or obstacles, e.g., fence, garage,
house, projecting branches, clotheslines, or electric cables.
5.Not suitable for children below 3 years of age. Risk of strangulation!
6.Children below 3 years of age are still unable to maintain their balance.
7.Since children have different development patterns, please check beforehand if
your child is able to maintain his balance.
8.The recommended height from the ground to the swing seat is 20 inches (50cm).
SAVE THESE INSTRUCTIONS
3
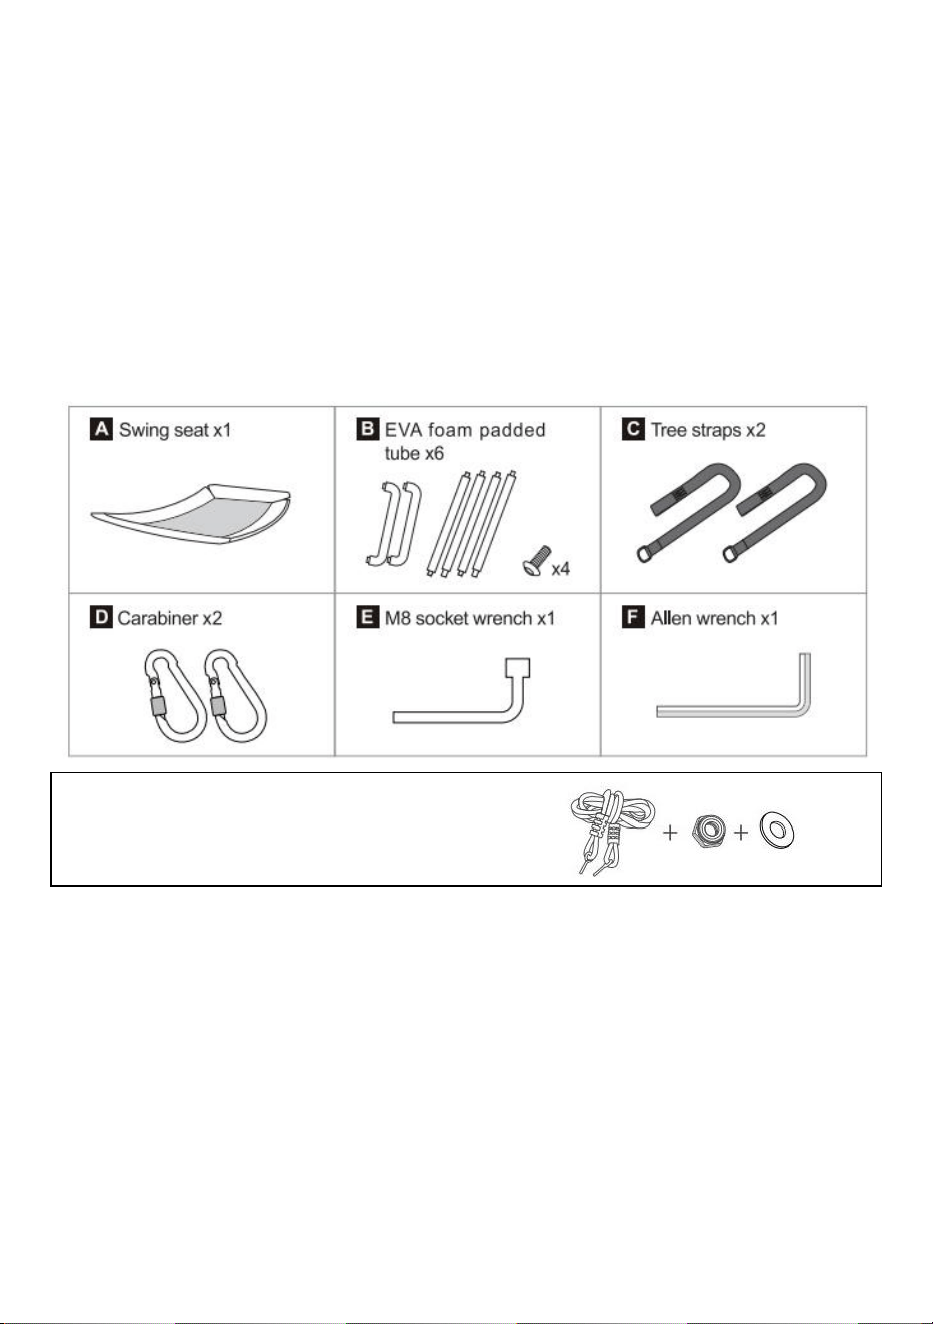
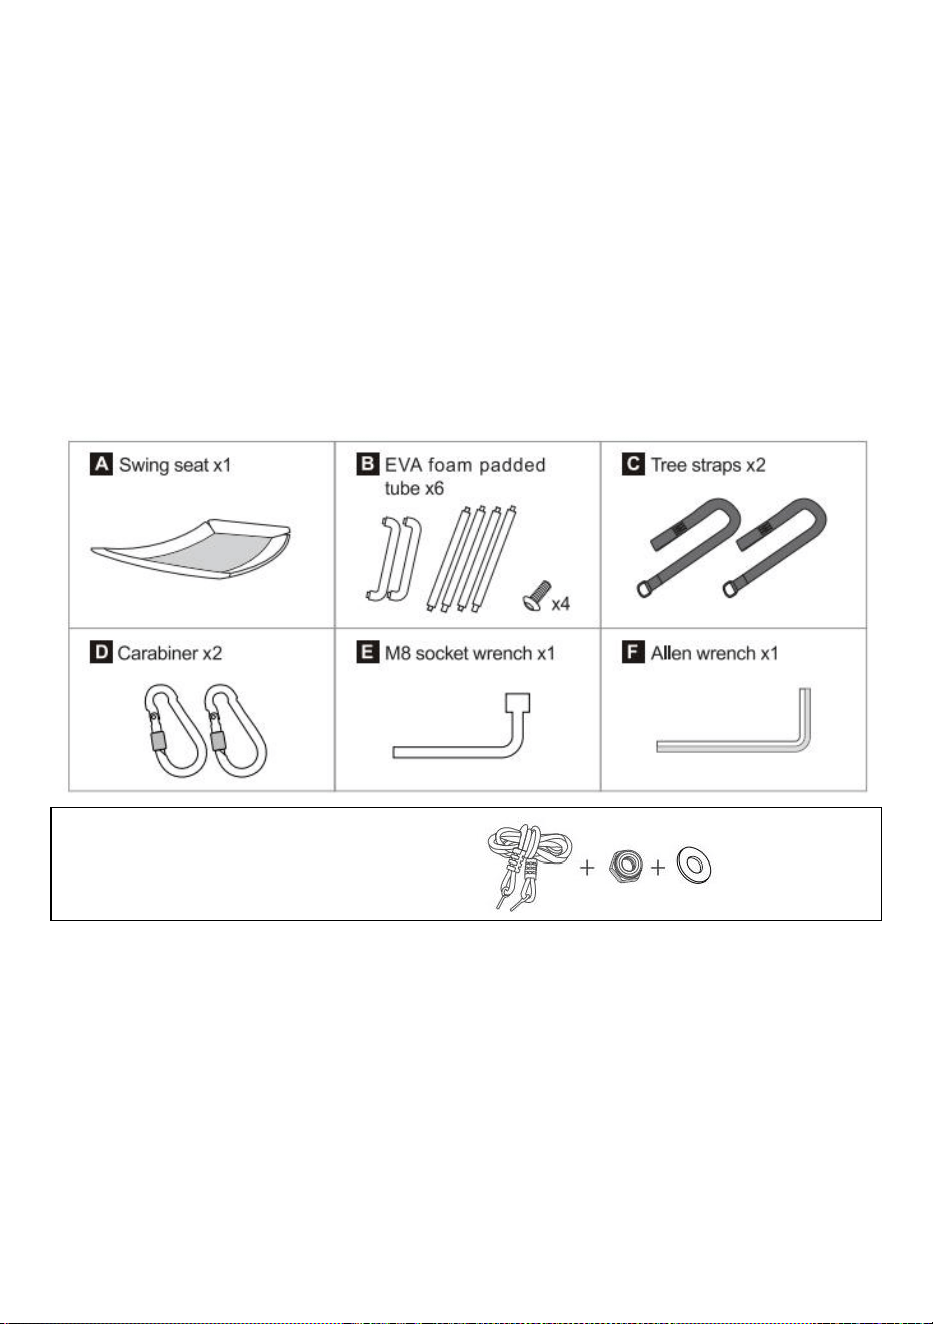
Assembly and Use
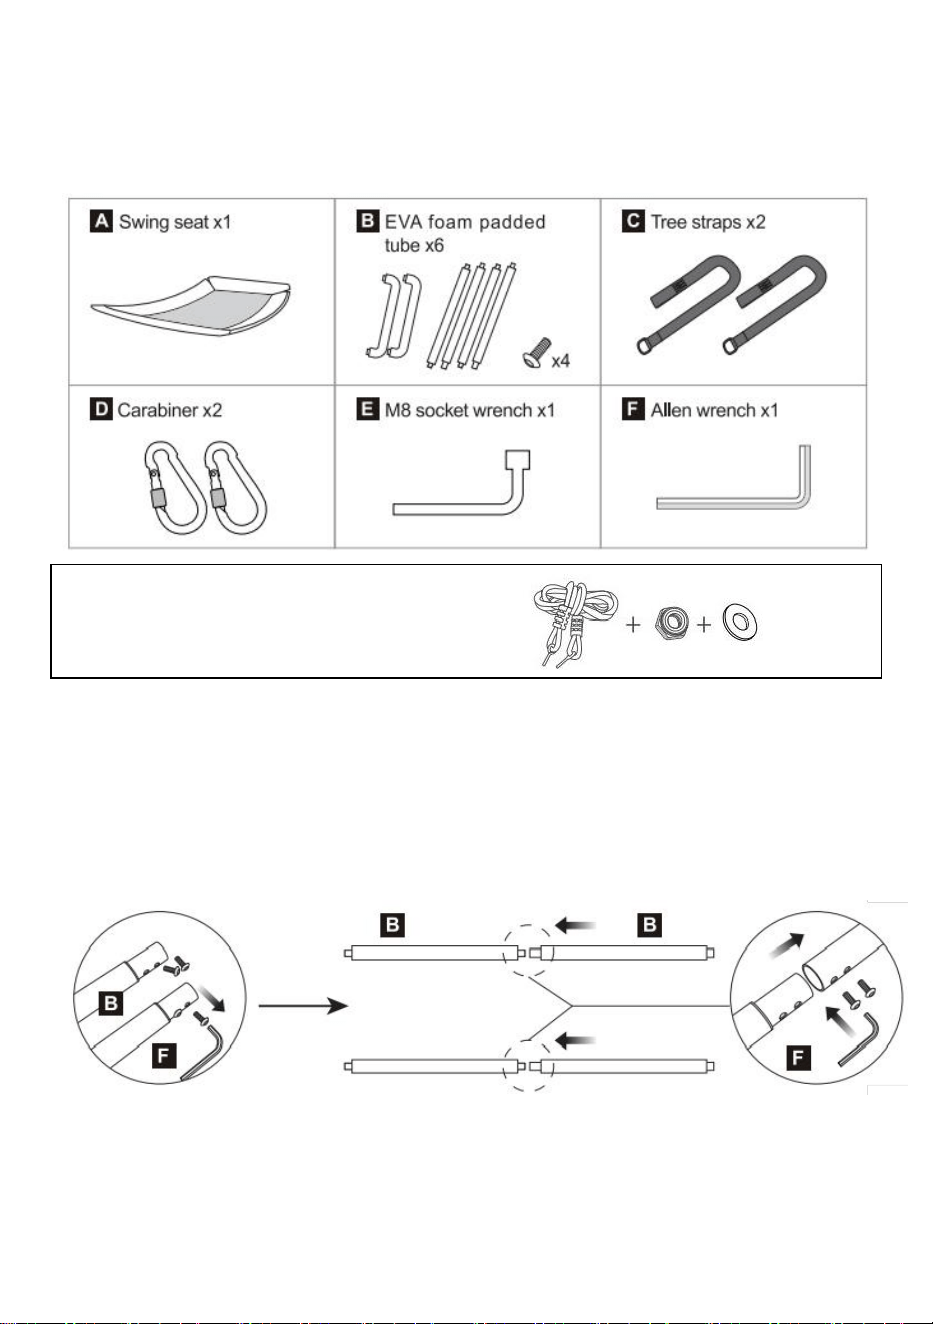
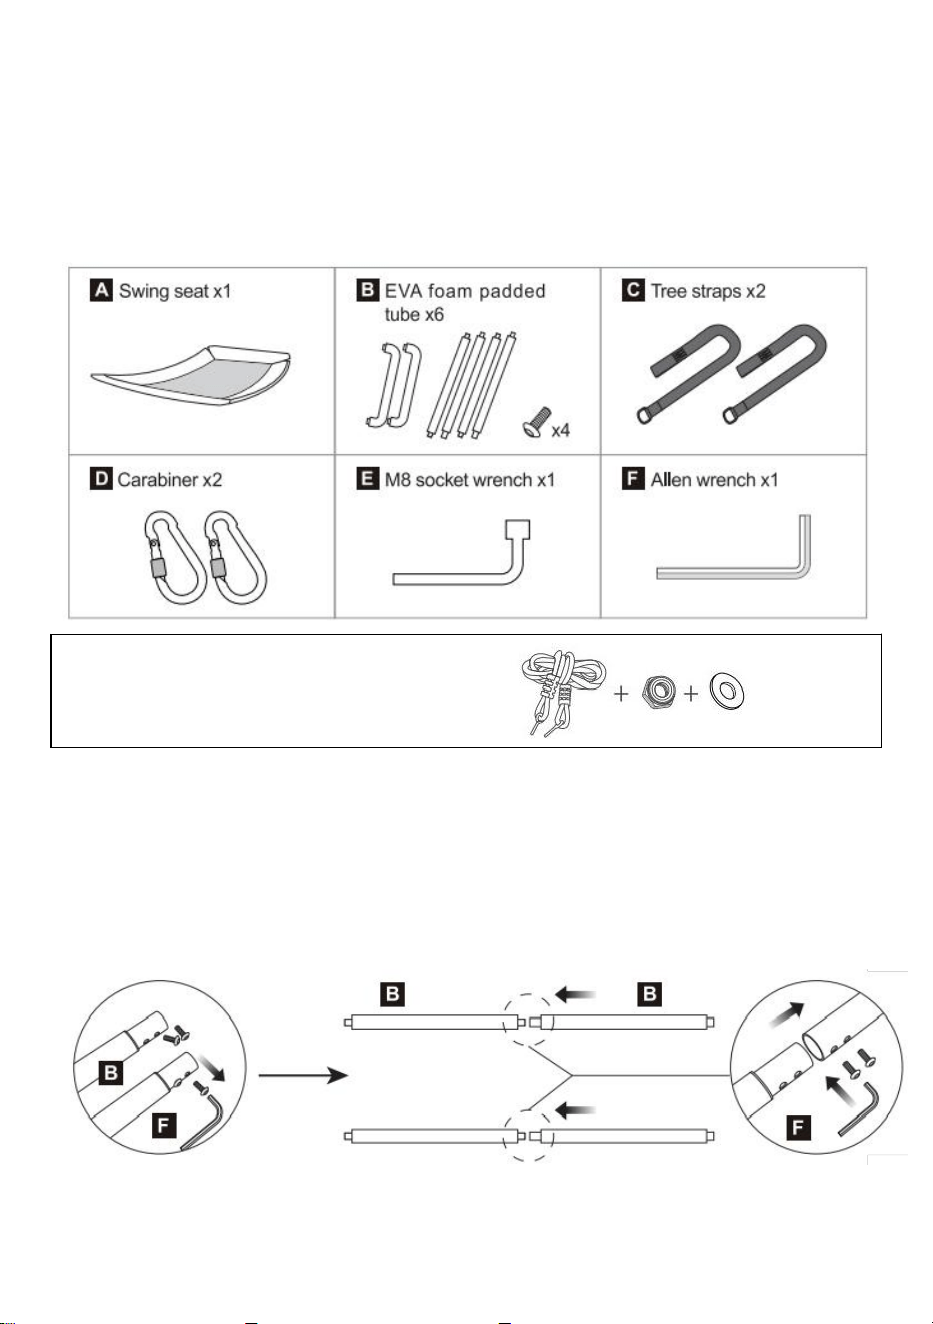
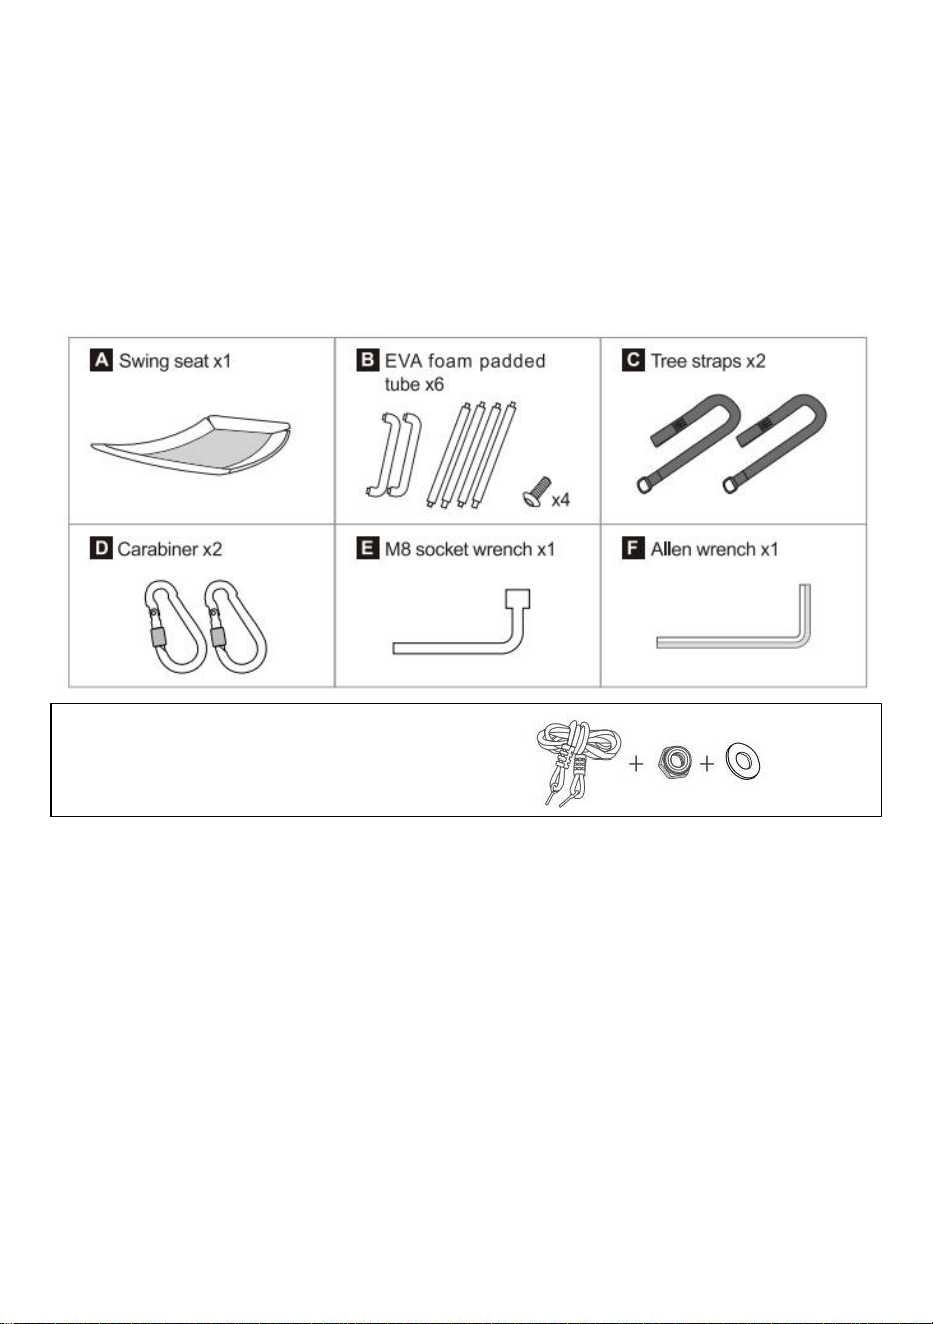
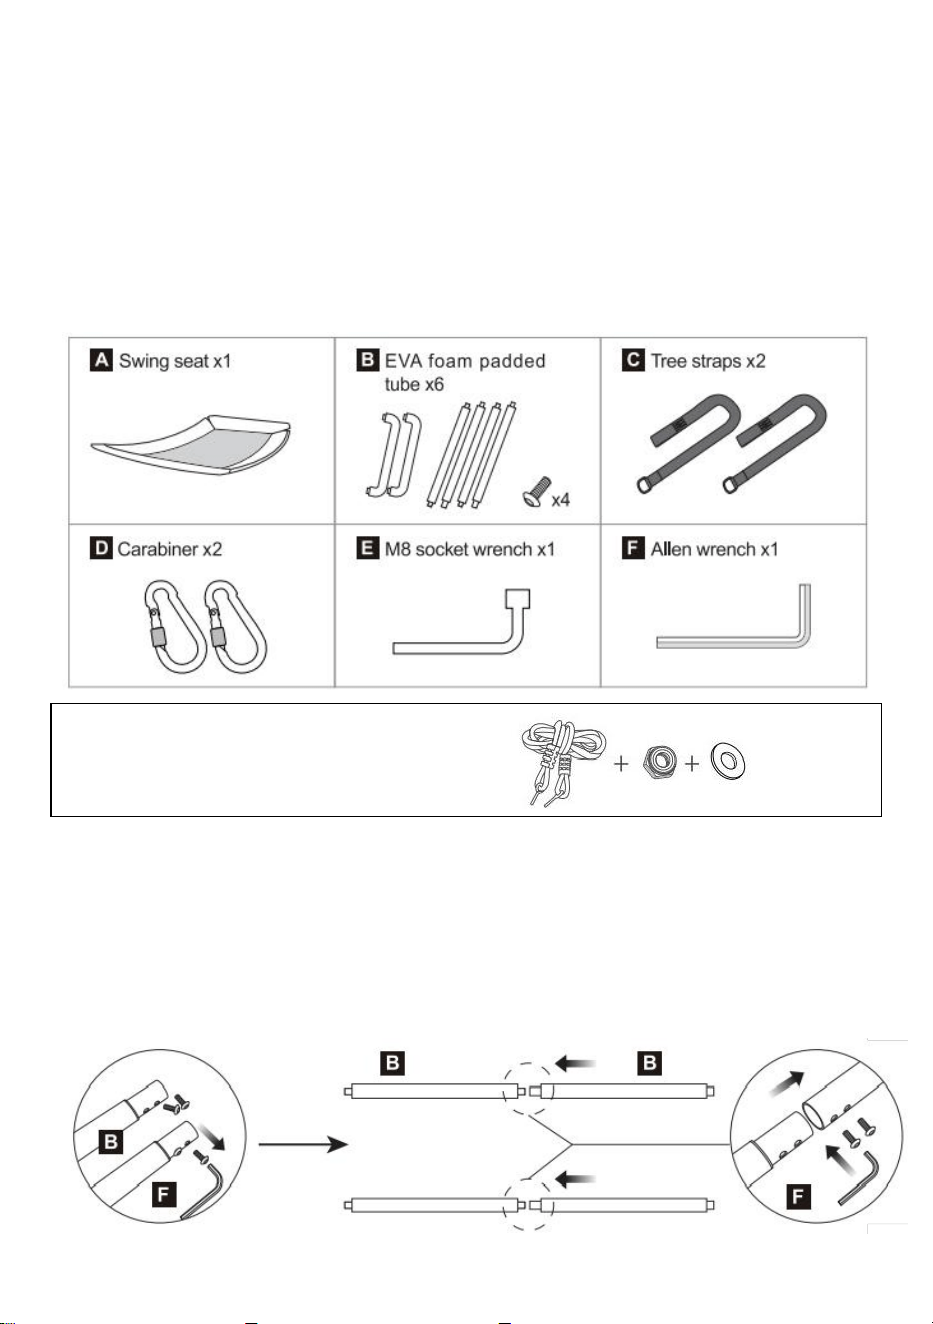
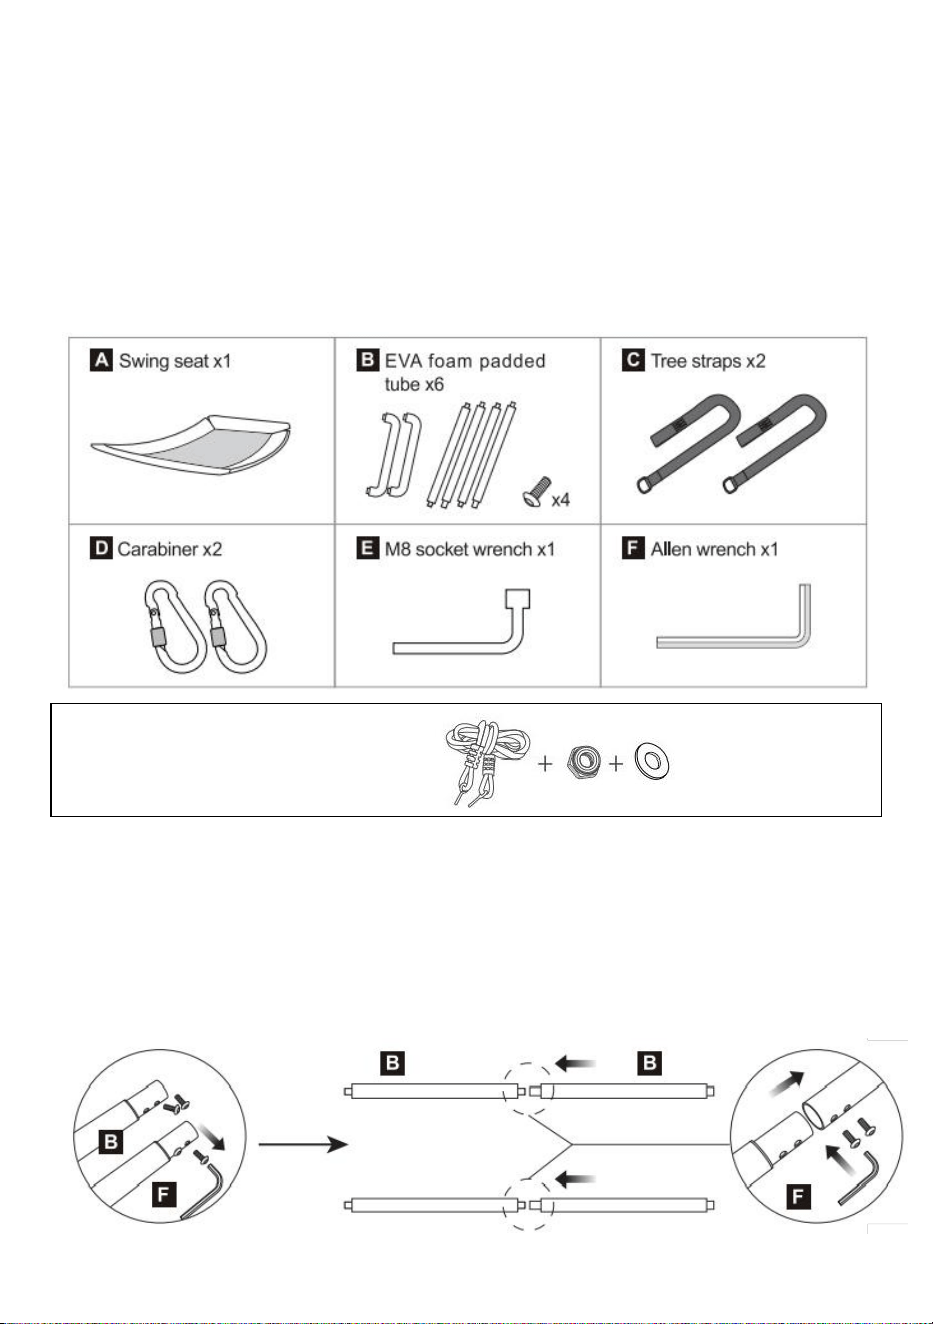
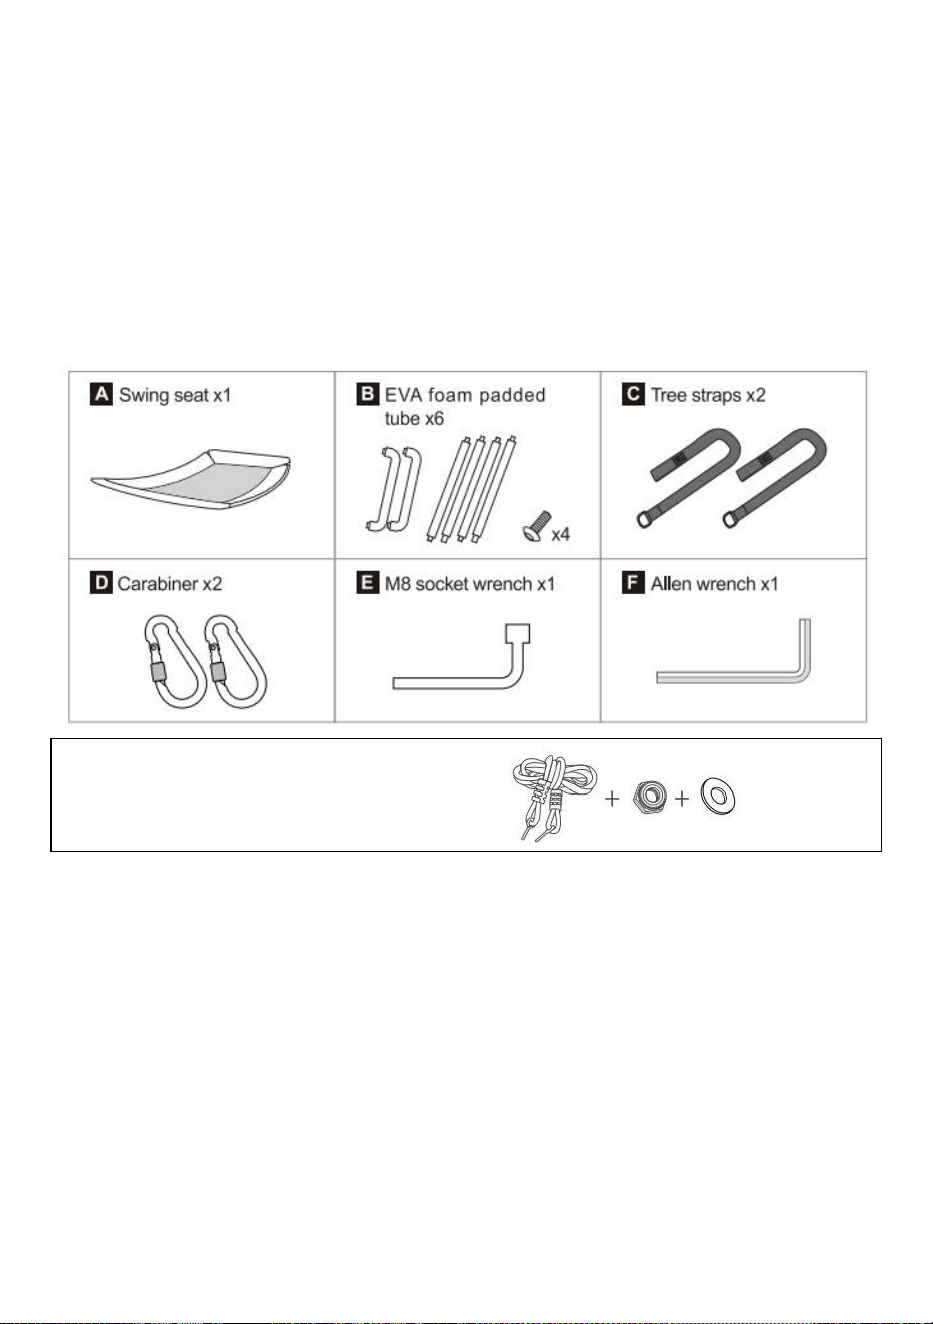
PART LIST
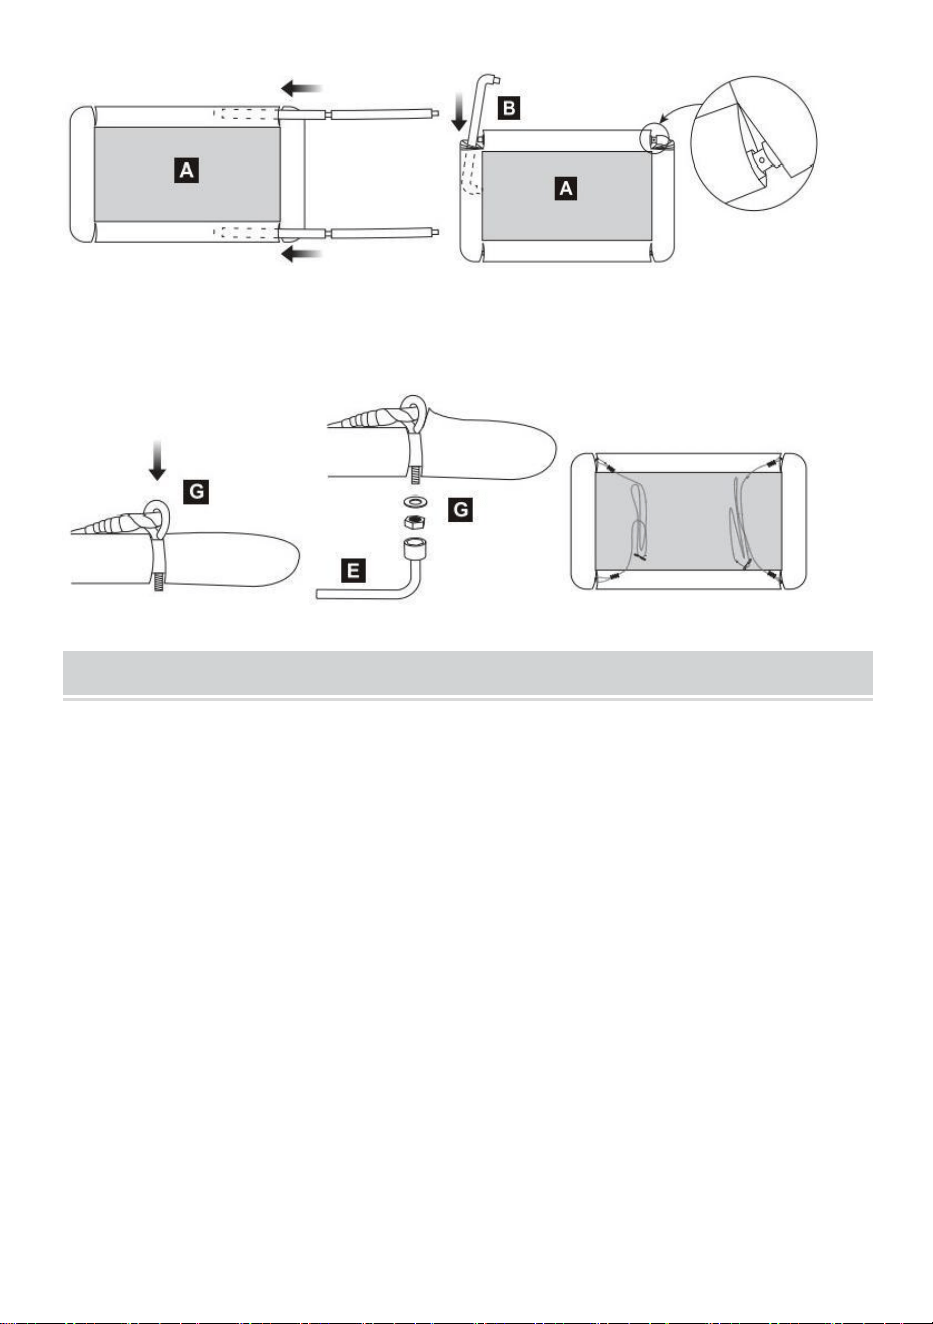
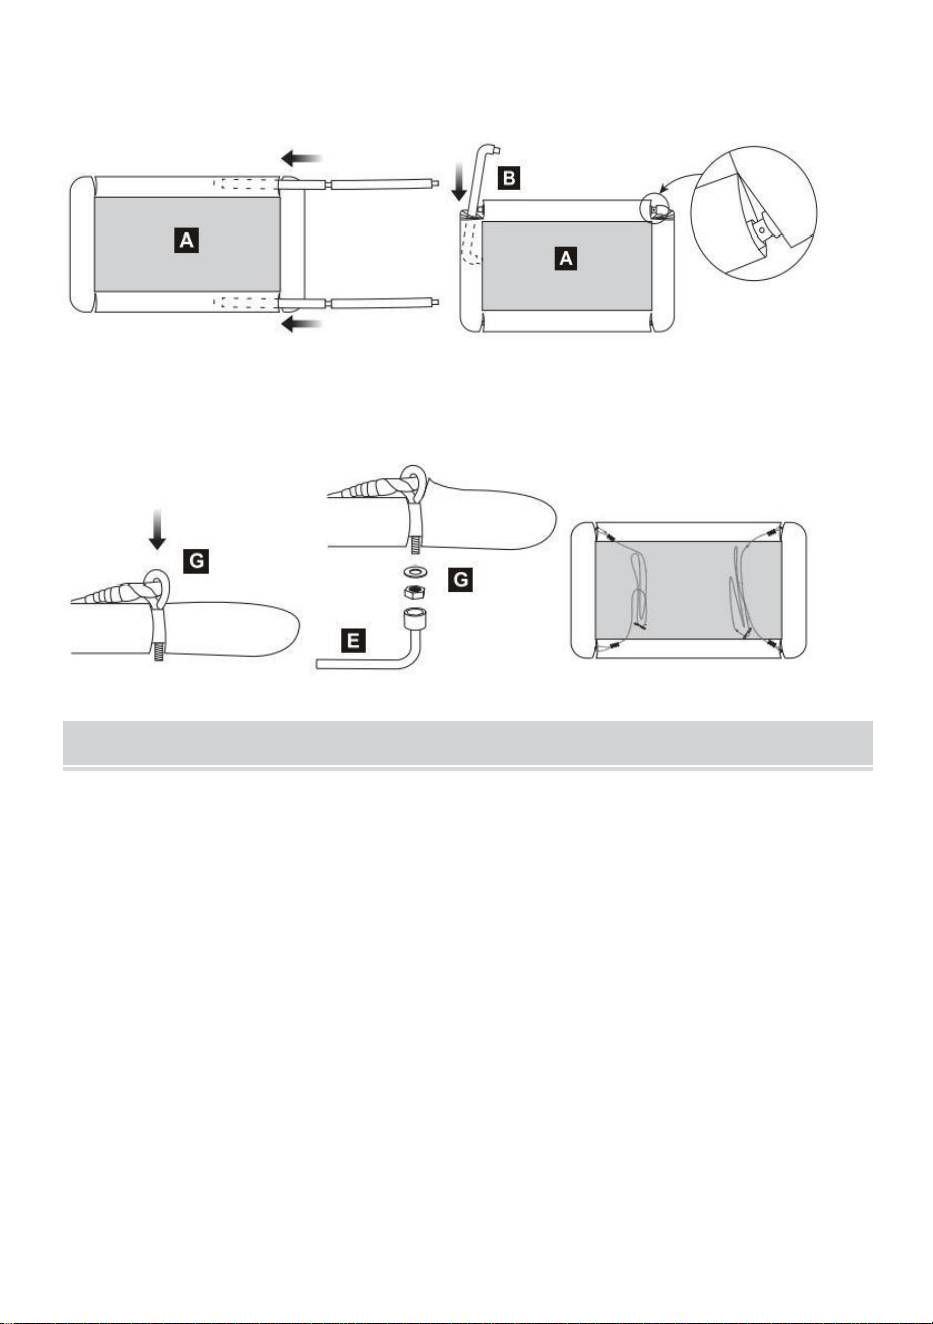
G Suspension Rope x2,Screw and Spacer x4
SWING ASSEMBLY INSTRUCTION
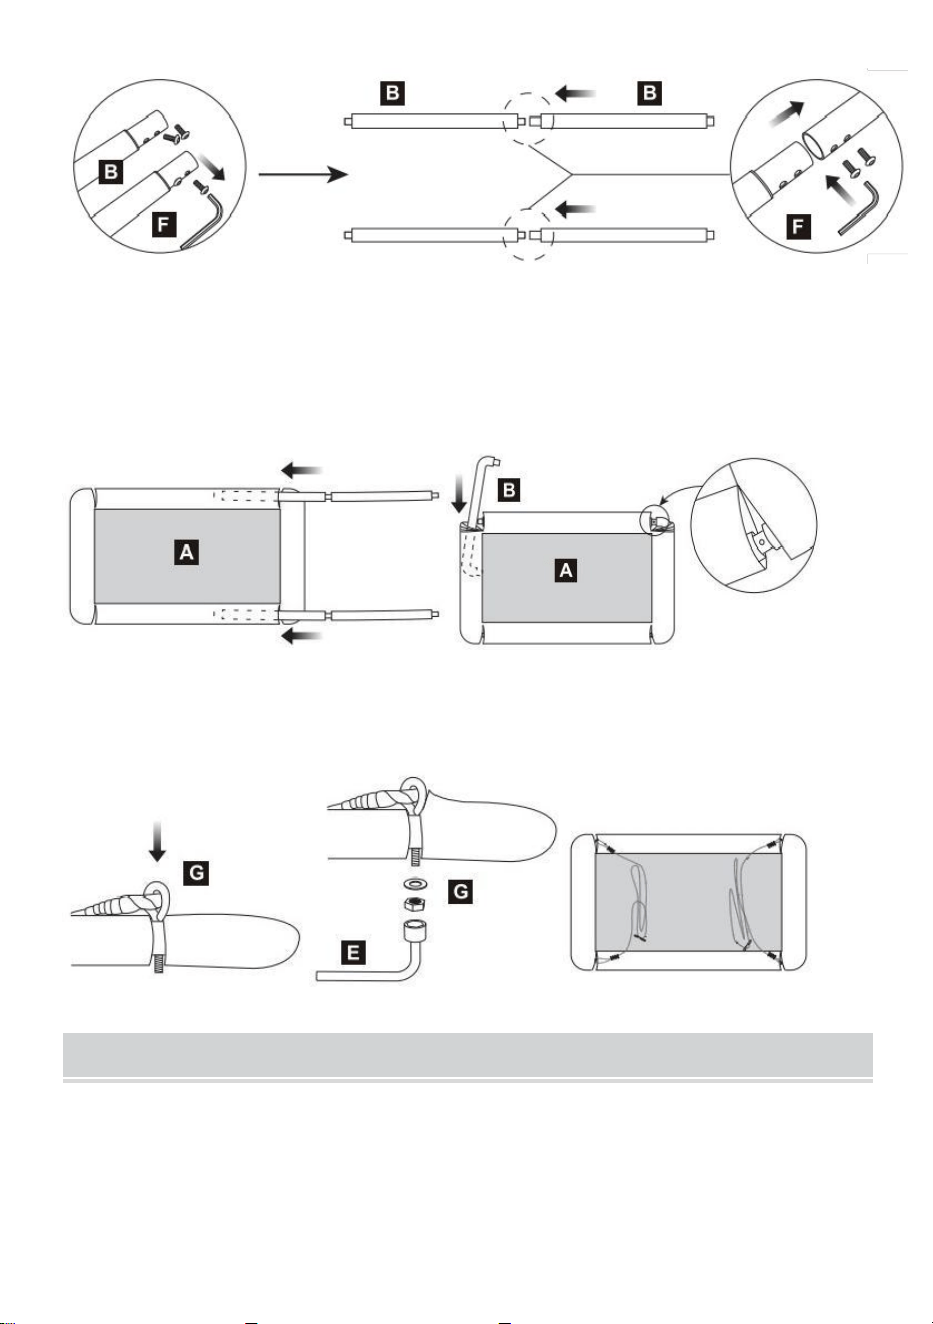
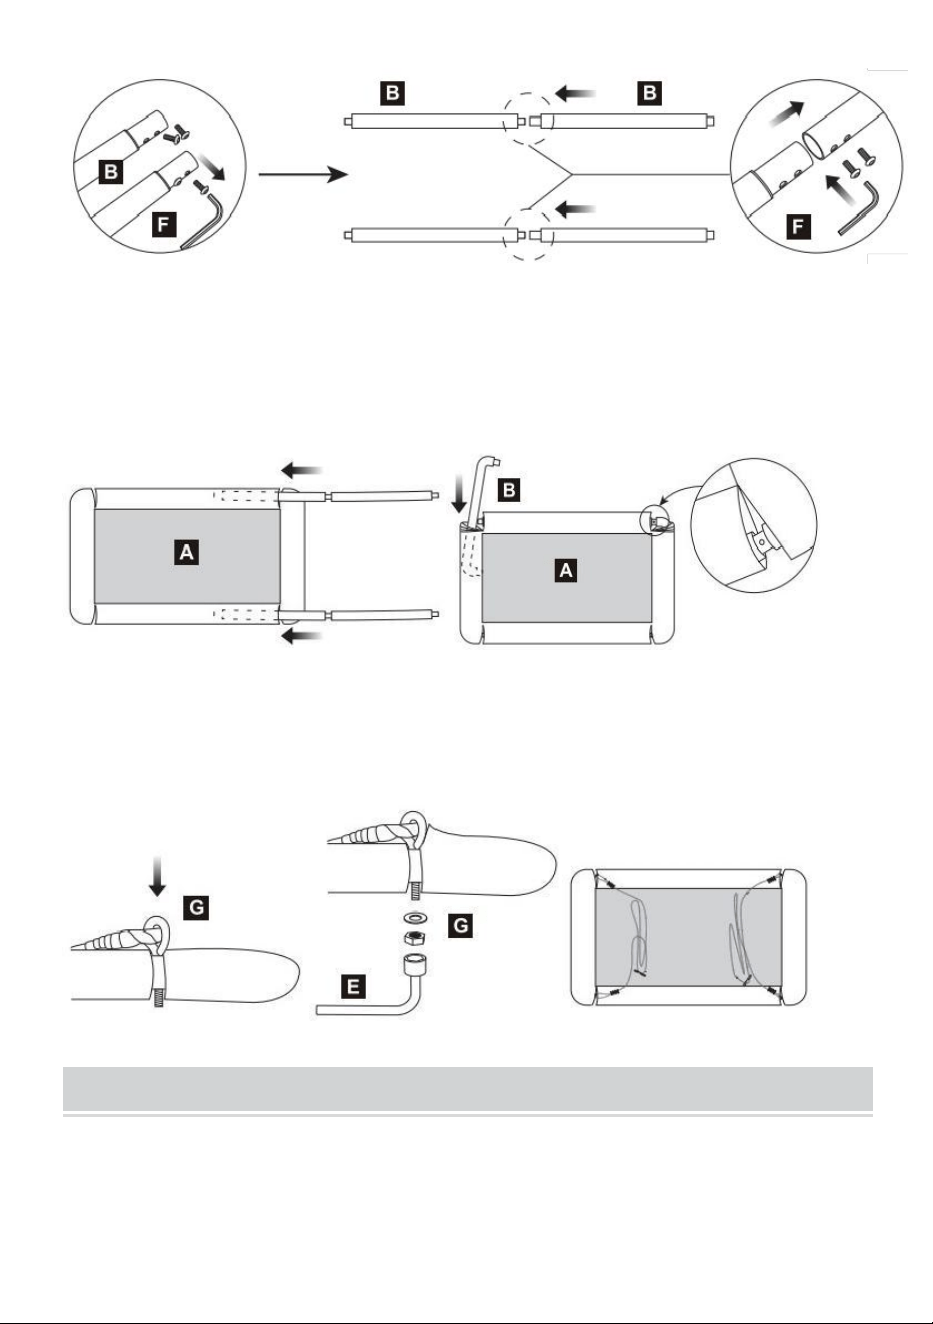
1. Screw off the screws on the tube with an Allen wrench.
2. 2.Assemble long tubes:connect two joints and insert the screws into the holes.
3.Use the spanner to tighten it.
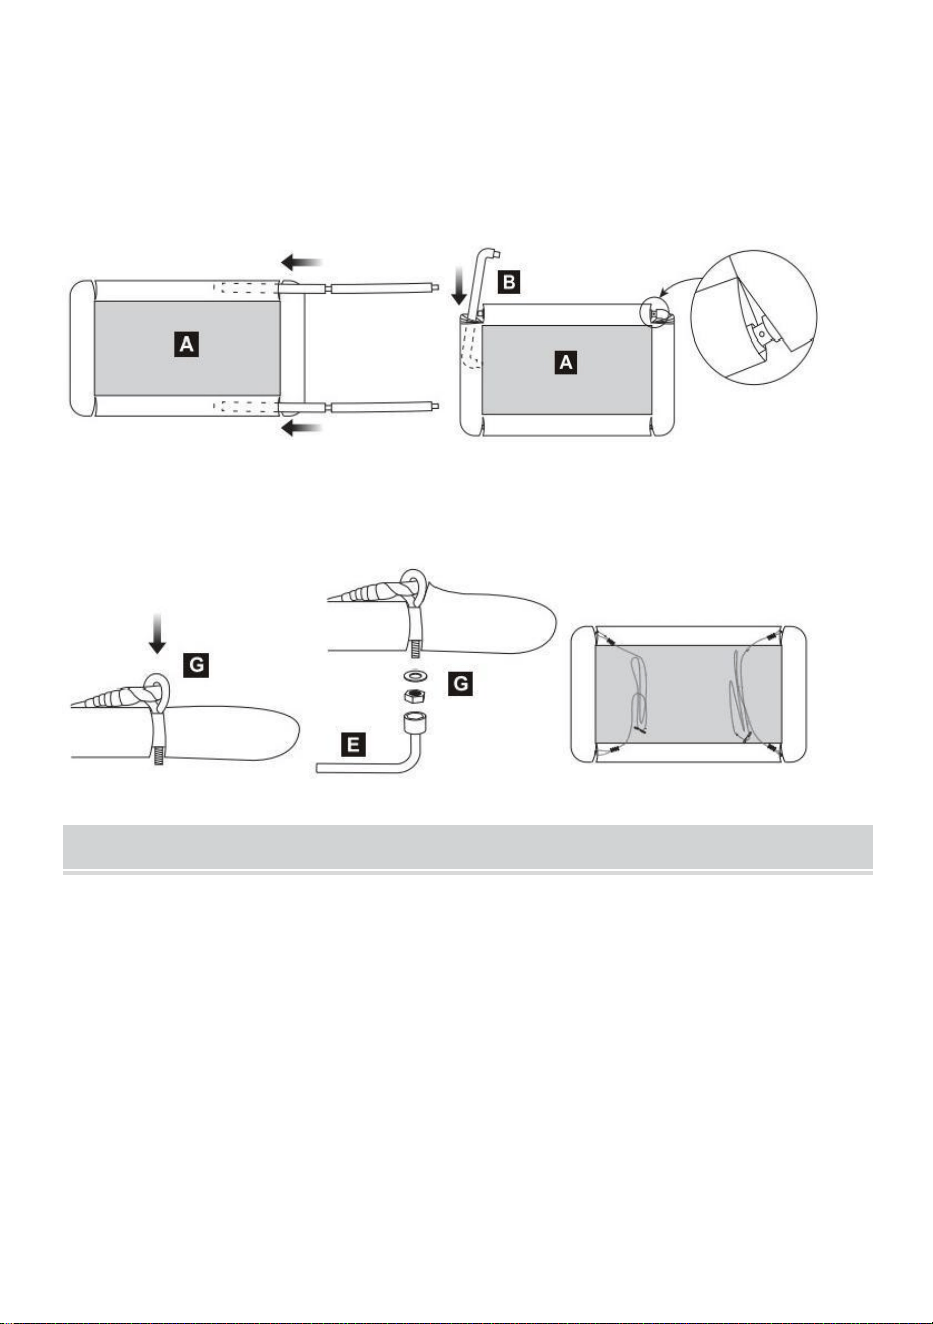
4. Insert 4 tubes into the swing seat.
5. Connect two joints at the left side of swing, and make sure two holes align.
6. Align the pipe ends at the right side of swing,then push down the short tube
gently until it is even.
4
7.Insert the bolt into the hole at the front side of swing.
8.Put the washer and nut onto the bolt, and tighten with a wrench. Please make sure all
the screws are tightened for your safety.
MAINTENANCE
1.Always pay attention to the following points if the swing was not in use for a
longer period (Especially at the beginning of a new season!).
2.Lubricate all metal parts.Check all the caps on screws and sharp edges and
replace them, if required.Check the swing seats, chains, ropes and other
accessories for any signs of wear.
3.Check the ropes and rings constantly for decay, wear and tear resistance.The
best way to check this is to turn the ropes till their inside becomes visible!Check
the knots regularly for tightness. Examine the wood regularly for decay and cracks.
4.Also check if wood shavings are sticking out from the swing board.These should
be abraded in order to avoid injuries.Do not expose the swing to the weather
during longer periods of rain and in autumn/winter.
5.Always replace defective parts with original spares.
5
Manufacturer: NingBo YongXu Industrial Products Manufacturing
Co.,Ltd
Address: 13-1 Haikou Village,Xidian town,Ninghai county,Ningbo
city, ZhejingProvince, China
Imported to AUS: SIHAO PTY LTD. 1 ROKEVA STREETEASTWOOD
NSW 2122 Australia
Imported to USA: Sanven Technology Ltd. Suite 250, 9166 Anaheim
Place, Rancho Cucamonga, CA 91730
REP
EC
E-CrossStu GmbH
Mainzer Landstr.69, 60329 Frankfurt am Main.
REP
UK
YH CONSULTING LIMITED.
C/O YH Consulting Limited Office 147, Centurion House,
London Road, Staines-upon-Thames, Surrey, TW18 4AX


Teknisk support och e-garanticertifikat www.vevor.com/support
Gungstol för flera personer
We continue to be committed to provide you tools with competitive price.
"Save Half", "Half Price" or any other similar expressions used by us only represents an
estimate of savings you might benefit from buying certain tools with us compared to the major
top brands and does not necessarily mean to cover all categories of tools offered by us. You
are kindly reminded to verify carefully when you are placing an order with us if you are
actually saving half in comparison with the top major brands.

1
MODELL: YXS-BQ01
Have product questions? Need technical support? Please feel free to
contact us:
Technical Support and E-Warranty Certificate
www.vevor.com/support
NEED HELP? CONTACT US!
This is the original instruction, please read all manual instructions
carefully before operating. VEVOR reserves a clear interpretation of our
user manual. The appearance of the product shall be subject to the
product you received. Please forgive us that we won't inform you again if
there are any technology or software updates on our product.
Multi-person Swing
Seat

2
INSTRUKTIONER
Tack så mycket för att du valde denna Swing Seat för flera personer .
- Läs alla instruktioner innan du använder den. Informationen hjälper dig att uppnå
bästa möjliga resultat.
Produkterna i denna katalog kan ha en annan färg än den faktiska varan.
VIKTIGA SÄKERHETSINSTRUKTIONER
MAXIMALVIKT BÖR INTE ÖVERstiga 7 0 0 lbs ( 340 kg)
SÄKERT LEKOMRÅDE
1. Bevara denna bruksanvisning och förpackningen noggrant för senare referens.
Om du ger denna produkt till en tredje part, kom ihåg att även lämna över denna
manual.
2.Denna produkt är INTE avsedd för kommersiellt bruk, utan är ENDAST avsedd
för hushållsbruk. Får endast användas under uppsikt av vuxna. Lämna aldrig ditt
barn utan tillsyn på gungan för att undvika risken att falla ner.
3.Följ monterings- och underhållsinstruktionerna för att förhindra att ditt barn faller,
ramlar ner och för att förhindra att rep slits sönder.
4.Vi rekommenderar att du ställer upp gungan på ett jämnt underlag och håller ett
avstånd på minst 2m från andra strukturer eller hinder, t.ex. staket, garage, hus,
utskjutande grenar, klädsnor eller elkablar.
5.Ej lämplig för barn under 3 år. Risk för strypning!
6. Barn under 3 år kan fortfarande inte upprätthålla balansen.
7. Eftersom barn har olika utvecklingsmönster, kontrollera i förväg om ditt barn kan
behålla sin balans.
8. Rekommenderad höjd från marken till gungsätet är 20 tum (50 cm).
SPARA DESSA INSTRUKTIONER
3
Montering och användning
DEL LISTA
G Upphängningsrep x2,skruv och distansbricka x4
SVÄNGA MONTERING INSTRUKTION
3. Skruva bort skruvarna på röret med en insexnyckel.
4. 2.Sätt ihop långa rör: anslut två leder och sätt in skruvarna i hålen.
3. Använd nyckeln för att dra åt den.
4. Sätt in 4 rör i gungsätet.
5. Anslut två leder på vänster sida av svingen och se till att två hål är i linje.
4
6. Rikta in rörändarna på höger sida av svingen, tryck sedan försiktigt ner det korta
röret tills det är jämnt.
7.Sätt in bult in i h ole på framsidan av gungan.
8. Sätt brickan och muttern på bulten och dra åt med en skiftnyckel. Se till att alla
skruvar är åtdragna för din säkerhet.
MAINTENANCE
1. Var alltid uppmärksam på följande punkter om gungan inte har använts under
en längre period (särskilt i början av en ny säsong!).
2.Smörj alla metalldelar.Kontrollera alla lock på skruvar och vassa kanter och byt
ut dem vid behov.Kontrollera gungstolarna , kedjorna , repen och andra tillbehör
för tecken på slitage.
3.Kontrollera repen och ringarna ständigt för ruttnande , slitagemotstånd. Det
bästa sättet att kontrollera detta är att vända repen tills deras insida blir synlig!
Kontrollera regelbundet att knutarna är täta. Undersök träet regelbundet för röta
och sprickor.
4.Kontrollera även om träspån sticker ut från gungbrädan. Dessa bör nötas för att
undvika skador. Utsätt inte gungan för väder och vind under längre perioder av
regn och på höst/vinter.
5
5. Byt alltid ut defekta delar med originalreservdelar.
Tillverkare: NingBo YongXu Industrial Products Manufacturing
Co.,Ltd
Adress: 13-1 Haikou Village, Xidian stad, Ninghai län, Ningbo stad,
Zhejingprovinsen, Kina
Importerad till AUS: SIHAO PTY LTD. 1 ROKEVA STREETEASTWOOD
NSW 2122 Australien
Importerad till USA: Sanven Technology Ltd. Suite 250, 9166 Anaheim
Place, Rancho Cucamonga, CA 91730
REP
EC
E-CrossStu GmbH
Mainzer Landstr.69, 60329 Frankfurt am Main.
REP
UK
YH CONSULTING LIMITED.
C/O YH Consulting Limited Office 147, Centurion House,
London Road, Staines-upon-Thames, Surrey, TW18 4AX

6


Soporte técnico y certificado de garantía electrónica www.vevor.com/support
Asiento de columpio para varias
personas
We continue to be committed to provide you tools with competitive price.
"Save Half", "Half Price" or any other similar expressions used by us only represents an
estimate of savings you might benefit from buying certain tools with us compared to the major
top brands and does not necessarily mean to cover all categories of tools offered by us. You
are kindly reminded to verify carefully when you are placing an order with us if you are
actually saving half in comparison with the top major brands.

1
MODELO: YXS-BQ01
Have product questions? Need technical support? Please feel free to
contact us:
Technical Support and E-Warranty Certificate
www.vevor.com/support
NEED HELP? CONTACT US!
This is the original instruction, please read all manual instructions
carefully before operating. VEVOR reserves a clear interpretation of our
user manual. The appearance of the product shall be subject to the
product you received. Please forgive us that we won't inform you again if
there are any technology or software updates on our product.
Multi-person Swing
Seat

2
INSTRUCCIONES
Muchas gracias por elegir este columpio para varias personas .
- Lea todas las instrucciones antes de usarlo. La información le ayudará a lograr
los mejores resultados posibles.
Los productos mostrados en este catálogo pueden ser de color diferente al
artículo real.
INSTRUCCIONES DE SEGURIDAD IMPORTANTES
EL PESO MÁXIMO NO DEBE EXCEDER LOS 7 0 0 libras ( 340 kg)
ZONA DE JUEGOS SEGURA
1. Conserve este manual y el embalaje con cuidado para futuras consultas. Si
entrega este producto a un tercero, recuerde entregarle también este manual.
2. Este producto NO está destinado a uso comercial, sino SÓLO para uso
doméstico. Debe utilizarse únicamente bajo la supervisión de adultos. Nunca deje
a su hijo sin supervisión en el columpio para evitar el riesgo de caídas.
3. Siga las instrucciones de montaje y mantenimiento, para evitar que su hijo se
caiga, se tambalee y se rompan las cuerdas.
4. Le recomendamos que instale el columpio sobre una superficie nivelada y
mantenga una distancia de al menos 2 m de otras estructuras u obstáculos, por
ejemplo, cercas, garajes, casas, ramas salientes, tendederos o cables eléctricos.
5. No apto para niños menores de 3 años. ¡Peligro de estrangulamiento!
6.Los niños menores de 3 años todavía no pueden mantener el equilibrio.
7. Dado que los niños tienen diferentes patrones de desarrollo, verifique de
antemano si su hijo puede mantener el equilibrio.
8.La altura recomendada desde el suelo hasta el asiento del columpio es de 20
pulgadas (50 cm).
3
GUARDE ESTAS INSTRUCCIONES
Montaje y uso
PARTE LISTA
Cuerda de suspensión G x2, tornillo y espaciador x4
BALANCEARSE ASAMBLEA INSTRUCCIÓN
5. Destornille los tornillos del tubo con una llave Allen.
6. 2. Ensamble los tubos largos: conecte dos uniones e inserte los tornillos en los
orificios.
3. Utilice la llave para apretarlo.
4
4. Inserte 4 tubos en el asiento del columpio.
5. Conecte dos uniones en el lado izquierdo del columpio y asegúrese de que los
dos orificios estén alineados.
6. Alinee los extremos del tubo en el lado derecho del columpio, luego empuje
hacia abajo suavemente el tubo corto hasta que quede parejo.
7.Insertar el tornillo dentro del Agujero en la parte delantera del columpio.
8. Coloque la arandela y la tuerca en el perno y apriételas con una llave.Asegúrese de
que todos los tornillos estén bien apretados para su seguridad.
MAINTENANCE
1. Preste siempre atención a los siguientes puntos si el columpio no va a utilizarse
durante un periodo prolongado (¡especialmente al comienzo de una nueva
temporada!).
5
2. Lubrique todas las partes metálicas. Revise todas las tapas de los tornillos y los
bordes afilados y reemplácelos , si es necesario. Revise los asientos del
columpio , las cadenas , las cuerdas y otros accesorios para detectar signos de
desgaste.
3. Revise las cuerdas y los anillos constantemente para comprobar si presentan
deterioro , desgaste o resistencia al desgarro. La mejor manera de comprobarlo
es girar las cuerdas hasta que se vea su interior. Revise los nudos con regularidad
para comprobar que estén bien apretados. Examine la madera con regularidad
para comprobar si presenta deterioro o grietas.
4. Compruebe también si sobresalen virutas de madera de las tablas del columpio.
Estas deben rasparse para evitar lesiones. No exponga el columpio a la
intemperie durante períodos prolongados de lluvia y en otoño/invierno.
5. Reemplace siempre las piezas defectuosas con repuestos originales.
Fabricante: NingBo YongXu Industrial Products Manufacturing Co.,
Ltd.
DIRECCIÓN: 13-1 Haikou Village, ciudad de Xidian, condado de
Ninghai, ciudad de Ningbo, provincia de Zhejing, China
Importado a AUS: SIHAO PTY LTD. 1 ROKEVA STREETEASTWOOD
NSW 2122 Australia
Importado a EE. UU.: Sanven Technology Ltd. Suite 250, 9166 Anaheim
Lugar, Rancho Cucamonga, CA 91730
REP
EC
E-CrossStu GmbH
Mainzer Landstr.69, 60329 Frankfurt am Main.
REP
UK
YH CONSULTING LIMITED.
C/O YH Consulting Limited Office 147, Centurion House,
London Road, Staines-upon-Thames, Surrey, TW18 4AX

6


Supporto tecnico e certificato di garanzia elettronica www.vevor.com/support
Sedile altalena multi-persona
We continue to be committed to provide you tools with competitive price.
"Save Half", "Half Price" or any other similar expressions used by us only represents an
estimate of savings you might benefit from buying certain tools with us compared to the major
top brands and does not necessarily mean to cover all categories of tools offered by us. You
are kindly reminded to verify carefully when you are placing an order with us if you are
actually saving half in comparison with the top major brands.

1
MODELLO: YXS-BQ01
Have product questions? Need technical support? Please feel free to
contact us:
Technical Support and E-Warranty Certificate
www.vevor.com/support
NEED HELP? CONTACT US!
This is the original instruction, please read all manual instructions
carefully before operating. VEVOR reserves a clear interpretation of our
user manual. The appearance of the product shall be subject to the
product you received. Please forgive us that we won't inform you again if
there are any technology or software updates on our product.
Multi-person Swing
Seat
2
ISTRUZIONI
Grazie mille per aver scelto questo seggiolino altalena multi-persona .
- Si prega di leggere tutte le istruzioni prima di utilizzarlo. Le informazioni ti
aiuteranno a ottenere i migliori risultati possibili.
I prodotti rappresentati in questo catalogo potrebbero avere un colore diverso
rispetto all'articolo reale.
IMPORTANTI ISTRUZIONI DI SICUREZZA
IL PESO MASSIMO NON DEVE SUPERARE 7 0 0 libbre ( 340kg)
AREA GIOCO SICURA
1. Si prega di conservare con cura questo manuale e l'imballaggio per riferimento
futuro. Se si consegna questo prodotto a terzi, ricordarsi di consegnare anche
questo manuale.
2. Questo prodotto NON è destinato all'uso commerciale, ma è SOLO destinato
all'uso domestico. Da utilizzare solo sotto la supervisione di adulti. Non lasciare
mai il bambino senza supervisione sull'altalena per evitare il rischio di caduta.
3. Seguire le istruzioni di montaggio e manutenzione per evitare che il bambino
cada, cada a terra e che le corde si strappino.
4. Si consiglia di installare l'altalena su una superficie piana e di mantenere una
distanza di almeno 2 m da altre strutture o ostacoli, ad esempio recinzioni, garage,
case, rami sporgenti, fili per stendere i panni o cavi elettrici.
5. Non adatto a bambini di età inferiore a 3 anni. Rischio di strangolamento!
6. I bambini di età inferiore ai 3 anni non sono ancora in grado di mantenere
l'equilibrio.
7. Poiché i bambini hanno modelli di sviluppo diversi, verifica in anticipo se il tuo
bambino è in grado di mantenere l'equilibrio.
8. L'altezza consigliata dal suolo al sedile dell'altalena è di 50 cm (20 pollici).
3
SALVA QUESTE ISTRUZIONI
Montaggio e utilizzo
PARTE LISTA
G Corda di sospensione x2, Vite e distanziatore x4
OSCILLAZIONE ASSEMBLAGGIO ISTRUZIONE
7. Svitare le viti sul tubo con una chiave a brugola.
8. 2. Assemblare i tubi lunghi: collegare due giunti e inserire le viti nei fori.
3. Utilizzare la chiave inglese per stringere.
4
4. Inserire 4 tubi nel sedile dell'altalena.
5. Collegare due giunti sul lato sinistro dell'altalena e assicurarsi che i due fori
siano allineati.
6. Allineare le estremità del tubo sul lato destro dell'altalena, quindi spingere
delicatamente verso il basso il tubo corto finché non è uniforme.
7.Inserire il bullone dentro il foro nella parte anteriore dello swing.
8. Posizionare la rondella e il dado sul bullone e serrare con una chiave. Per la vostra
sicurezza, assicuratevi che tutte le viti siano ben serrate.
MAINTENANCE
1. Prestare sempre attenzione ai seguenti punti se l'altalena non viene utilizzata
per un lungo periodo (soprattutto all'inizio di una nuova stagione!).
2. Lubrificare tutte le parti metalliche. Controllare tutti i tappi delle viti e gli spigoli
vivi e sostituirli , se necessario. Controllare i sedili dell'altalena , le catene , le
corde e gli altri accessori per eventuali segni di usura.
3. Controllare costantemente le corde e gli anelli per verificarne la
decomposizione , l'usura e la resistenza allo strappo. Il modo migliore per
verificarlo è girare le corde finché il loro interno non diventa visibile! Controllare
regolarmente i nodi per verificarne la tenuta. Esaminare regolarmente il legno per
5
verificarne la decomposizione e le crepe.
4. Controllare anche che non fuoriescano trucioli di legno dall'altalena. Questi
devono essere abrasi per evitare lesioni. Non esporre l'altalena alle intemperie
durante lunghi periodi di pioggia e in autunno/inverno.
5. Sostituire sempre le parti difettose con ricambi originali.
Produttore: NingBo YongXu Industrial Products Manufacturing
Co.,Ltd
Indirizzo: 13-1 Villaggio di Haikou, città di Xidian, contea di Ninghai,
città di Ningbo, provincia di Zhejing, Cina
Importato in AUS: SIHAO PTY LTD. 1 ROKEVA STREETEASTWOOD
NSW 2122 Australia
Importato negli USA: Sanven Technology Ltd. Suite 250, 9166 Anaheim
Luogo, Rancho Cucamonga, CA 91730
REP
EC
E-CrossStu GmbH
Mainzer Landstr.69, 60329 Frankfurt am Main.
REP
UK
YH CONSULTING LIMITED.
C/O YH Consulting Limited Office 147, Centurion House,
London Road, Staines-upon-Thames, Surrey, TW18 4AX

6


Wsparcie techniczne i certyfikat gwarancji elektronicznej www.vevor.com/support
Wieloosobowe siedzisko huśtawki
We continue to be committed to provide you tools with competitive price.
"Save Half", "Half Price" or any other similar expressions used by us only represents an
estimate of savings you might benefit from buying certain tools with us compared to the major
top brands and does not necessarily mean to cover all categories of tools offered by us. You
are kindly reminded to verify carefully when you are placing an order with us if you are
actually saving half in comparison with the top major brands.

1
MODEL: YXS-BQ01
Have product questions? Need technical support? Please feel free to
contact us:
Technical Support and E-Warranty Certificate
www.vevor.com/support
NEED HELP? CONTACT US!
This is the original instruction, please read all manual instructions
carefully before operating. VEVOR reserves a clear interpretation of our
user manual. The appearance of the product shall be subject to the
product you received. Please forgive us that we won't inform you again if
there are any technology or software updates on our product.
Multi-person Swing
Seat

2
INSTRUKCJE
Dziękujemy bardzo za wybranie tej huśtawki wieloosobowej .
- Przed użyciem przeczytaj wszystkie instrukcje. Informacje te pomogą Ci
osiągnąć najlepsze możliwe rezultaty.
Produkty prezentowane w tym katalogu mogą różnić się kolorem od rzeczywistego
produktu.
WAŻNE INSTRUKCJE BEZPIECZEŃSTWA
MAKSYMALNA WAGA NIE POWINNA PRZEKRACZAĆ 7 0 0 funty ( 340 kg)
BEZPIECZNY PLAC ZABAW
1. Zachowaj tę instrukcję i opakowanie starannie do późniejszego wykorzystania.
Jeśli przekazujesz ten produkt osobie trzeciej, pamiętaj, aby przekazać również tę
instrukcję.
2. Ten produkt NIE jest przeznaczony do użytku komercyjnego, ale TYLKO do
użytku domowego. Do użytku wyłącznie pod nadzorem osób dorosłych. Nigdy nie
pozostawiaj dziecka bez nadzoru na huśtawce, aby uniknąć ryzyka upadku.
3. Postępuj zgodnie z instrukcją montażu i konserwacji, aby zapobiec upadkowi
dziecka, przewróceniu się i rozerwaniu lin.
4. Zalecamy ustawienie huśtawki na równej powierzchni i zachowanie odległości
co najmniej 2 m od innych konstrukcji lub przeszkód, np. ogrodzenia, garażu,
domu, wystających gałęzi, sznurów do wieszania prania lub kabli elektrycznych.
5. Nieodpowiednie dla dzieci poniżej 3 roku życia. Ryzyko uduszenia!
6. Dzieci poniżej 3 roku życia nadal nie potrafią utrzymać równowagi.
7. Ponieważ dzieci rozwijają się w różny sposób, sprawdź wcześniej, czy Twoje
dziecko jest w stanie utrzymać równowagę.
8. Zalecana wysokość od podłoża do siedziska huśtawki wynosi 20 cali (50 cm).
3
ZAPISZ TE INSTRUKCJE
Montaż i użytkowanie
CZĘŚĆ LISTA
Lina zawieszenia G x2, śruba i dystans x4
HUŚTAĆ SIĘ MONTAŻ INSTRUKCJA
9. Odkręć śruby na rurce za pomocą klucza imbusowego.
10. 2. Złóż długie rury: połącz dwa złącza i włóż śruby do otworów.
3. Dokręć kluczem.

4
4. Włóż 4 rurki do siedziska huśtawki.
5. Połącz dwa złącza po lewej stronie huśtawki i upewnij się, że dwa otwory są
wyrównane.
6. Wyrównaj końce rury po prawej stronie huśtawki, a następnie delikatnie dociśnij
krótszą rurę, aż będzie równa.
7.Włóż śruba do otwór z przodu huśtawki.
8. Na śrubę nałóż podkładkę i nakrętkę , a następnie dokręć kluczem. Proszę upewnić
się, że wszystkie śruby są dokręcone, ze względów bezpieczeństwa.
MAINTENANCE
1. Zawsze zwracaj uwagę na poniższe punkty, jeśli huśtawka nie była używana
przez dłuższy czas (szczególnie na początku nowego sezonu!).
2. Nasmaruj wszystkie części metalowe. Sprawdź wszystkie zaślepki na śrubach i
ostre krawędzie i wymień je , jeśli to konieczne. Sprawdź, czy siedzenia huśtawki ,
łańcuchy , liny i inne akcesoria nie noszą śladów zużycia.
3. Ciągle sprawdzaj liny i pierścienie pod kątem gnicia , zużycia i odporności na
rozdarcia. Najlepszym sposobem sprawdzenia tego jest obracanie lin, aż ich
wnętrze stanie się widoczne! Regularnie sprawdzaj, czy węzły są dobrze
zaciśnięte. Regularnie sprawdzaj drewno pod kątem gnicia i pęknięć.
5
4. Sprawdź również, czy z deski huśtawki nie wystają wióry. Należy je zetrzeć, aby
uniknąć obrażeń. Nie wystawiaj huśtawki na działanie warunków atmosferycznych
podczas dłuższych okresów deszczu oraz jesienią i zimą.
5. Uszkodzone części należy zawsze wymieniać na oryginalne części zamienne.
Producent: NingBo YongXu Industrial Products Manufacturing
Co.,Ltd
Adres: 13-1 Wieś Haikou, miasto Xidian, hrabstwo Ninghai, miasto
Ningbo, prowincja Zhejing, Chiny
Importowane do AUS: SIHAO PTY LTD. 1 ROKEVA
STREETEASTWOOD NSW 2122 Australia
Importowane do USA: Sanven Technology Ltd. Suite 250, 9166 Anaheim
Miejsce, Rancho Cucamonga, CA 91730
REP
EC
E-CrossStu GmbH
Mainzer Landstr.69, 60329 Frankfurt am Main.
REP
UK
YH CONSULTING LIMITED.
C/O YH Consulting Limited Office 147, Centurion House,
London Road, Staines-upon-Thames, Surrey, TW18 4AX

6


Technischer Support und E-Garantie-Zertifikat www.vevor.com/support
Mehrpersonen-Schaukelsitz
We continue to be committed to provide you tools with competitive price.
"Save Half", "Half Price" or any other similar expressions used by us only represents an
estimate of savings you might benefit from buying certain tools with us compared to the major
top brands and does not necessarily mean to cover all categories of tools offered by us. You
are kindly reminded to verify carefully when you are placing an order with us if you are
actually saving half in comparison with the top major brands.

1
MODELL: YXS-BQ01
Have product questions? Need technical support? Please feel free to
contact us:
Technical Support and E-Warranty Certificate
www.vevor.com/support
NEED HELP? CONTACT US!
This is the original instruction, please read all manual instructions
carefully before operating. VEVOR reserves a clear interpretation of our
user manual. The appearance of the product shall be subject to the
product you received. Please forgive us that we won't inform you again if
there are any technology or software updates on our product.
Multi-person Swing
Seat
2
ANWEISUNGEN
Vielen Dank, dass Sie sich für diesen Mehrpersonen-Schaukelsitz entschieden
haben .
- Bitte lesen Sie vor der Anwendung alle Anweisungen sorgfältig durch. Die
Informationen helfen Ihnen, die bestmöglichen Ergebnisse zu erzielen.
Die Farbe der in diesem Katalog aufgeführten Produkte kann vom tatsächlichen
Artikel abweichen.
WICHTIGE SICHERHEITSHINWEISE
Das Maximalgewicht sollte 7 0 0 nicht überschreiten. Pfund ( 340 kg)
SICHERER SPIELBEREICH
1.Bitte bewahren Sie dieses Handbuch und die Verpackung sorgfältig auf, damit
Sie später darin nachschlagen können. Wenn Sie das Produkt an Dritte
weitergeben, denken Sie daran, auch dieses Handbuch mitzugeben.
2. Dieses Produkt ist NICHT für den gewerblichen Gebrauch bestimmt, sondern
NUR für den Hausgebrauch. Nur unter Aufsicht von Erwachsenen verwenden.
Lassen Sie Ihr Kind nie unbeaufsichtigt auf der Schaukel, um Sturzgefahr zu
vermeiden.
3. Beachten Sie die Montage- und Wartungsanleitung, um Stürze oder
Herunterfallen Ihres Kindes sowie das Reißen der Seile zu verhindern.
4. Wir empfehlen, die Schaukel auf einer ebenen Fläche aufzustellen und einen
Abstand von mindestens 2 m zu anderen Strukturen oder Hindernissen
einzuhalten, z. B. Zaun, Garage, Haus, hervorstehenden Ästen, Wäscheleinen
oder Elektrokabeln.
5.Nicht für Kinder unter 3 Jahren geeignet. Strangulationsgefahr!
6. Kinder unter 3 Jahren sind noch nicht in der Lage, ihr Gleichgewicht zu halten.
7. Da Kinder unterschiedliche Entwicklungsverläufe haben, prüfen Sie bitte vorher,
ob Ihr Kind in der Lage ist, das Gleichgewicht zu halten.
3
8. Die empfohlene Höhe vom Boden bis zum Schaukelsitz beträgt 50 cm.
BEWAHREN SIE DIESE ANWEISUNGEN AUF
Montage und Verwendung
TEIL LISTE
G Aufhängungsseil x2, Schraube undAbstandshalter x4
SWING MONTAGE ANWEISUNG
11. Die Schrauben am Rohr mit einem Inbusschlüssel lösen.
12. 2. Lange Rohre zusammenbauen: zwei Gelenke verbinden und die Schrauben
in die Löcher stecken.
3.Ziehen Sie es mit dem Schraubenschlüssel fest.
4
4. Stecken Sie 4 Rohre in den Schaukelsitz.
5. Verbinden Sie zwei Gelenke auf der linken Seite der Schaukel und stellen Sie
sicher, dass die beiden Löcher ausgerichtet sind.
6. Richten Sie die Rohrenden an der rechten Seite der Schaukel aus und drücken
Sie dann das kurze Rohr vorsichtig nach unten, bis es eben ist.
7.Legen Sie den Bolzen in die Loch an der Vorderseite der Schaukel.
8. Setzen Sie die Unterlegscheibe und die Mutter auf die Schraube und ziehen Sie sie
mit einem Schraubenschlüssel fest. Bitte stellen Sie zu Ihrer Sicherheit sicher, dass alle
Schrauben festgezogen sind.
MAINTENANCE
1. Beachten Sie unbedingt die folgenden Punkte, wenn die Schaukel längere Zeit
nicht benutzt wurde (insbesondere zu Beginn einer neuen Saison!).
5
2. Schmieren Sie alle Metallteile. Überprüfen Sie alle Kappen auf Schrauben und
scharfen Kanten und ersetzen Sie sie bei Bedarf . Überprüfen Sie Schaukelsitze ,
Ketten , Seile und anderes Zubehör auf Anzeichen von Verschleiß.
3. Überprüfen Sie Seile und Ringe regelmäßig auf Fäulnis , Verschleiß und
Reißfestigkeit. Am besten überprüfen Sie dies, indem Sie die Seile drehen, bis ihr
Inneres sichtbar wird! Überprüfen Sie die Knoten regelmäßig auf Festigkeit.
Untersuchen Sie das Holz regelmäßig auf Fäulnis und Risse.
4. Kontrollieren Sie außerdem, ob Holzspäne aus dem Schaukelbrett herausragen.
Diese sollten abgerieben werden um Verletzungen vorzubeugen. Bei längeren
Regenperioden und im Herbst/Winter sollte die Schaukel nicht der Witterung
ausgesetzt werden.
5. Ersetzen Sie defekte Teile immer durch Originalersatzteile.
Hersteller: NingBo YongXu Industrial Products Manufacturing Co.,
Ltd.
Adresse: 13-1 Dorf Haikou, Stadt Xidian, Kreis Ninghai, Stadt
Ningbo, Provinz Zhejing, China
Nach AUS importiert: SIHAO PTY LTD. 1 ROKEVA
STREETEASTWOOD NSW 2122 Australien
Importiert in die USA: Sanven Technology Ltd. Suite 250, 9166 Anaheim
Ort, Rancho Cucamonga, CA 91730
REP
EC
E-CrossStu GmbH
Mainzer Landstr.69, 60329 Frankfurt am Main.
REP
UK
YH CONSULTING LIMITED.
C/O YH Consulting Limited Office 147, Centurion House,
London Road, Staines-upon-Thames, Surrey, TW18 4AX

6


Assistance technique et certificat de garantie électronique www.vevor.com/support
Siège pivotant pour plusieurs
personnes
We continue to be committed to provide you tools with competitive price.
"Save Half", "Half Price" or any other similar expressions used by us only represents an
estimate of savings you might benefit from buying certain tools with us compared to the major
top brands and does not necessarily mean to cover all categories of tools offered by us. You
are kindly reminded to verify carefully when you are placing an order with us if you are
actually saving half in comparison with the top major brands.


1
MODÈLE : YXS-BQ01
Have product questions? Need technical support? Please feel free to
contact us:
Technical Support and E-Warranty Certificate
www.vevor.com/support
NEED HELP? CONTACT US!
This is the original instruction, please read all manual instructions
carefully before operating. VEVOR reserves a clear interpretation of our
user manual. The appearance of the product shall be subject to the
product you received. Please forgive us that we won't inform you again if
there are any technology or software updates on our product.
Multi-person Swing
Seat

2
INSTRUCTIONS
Merci beaucoup d'avoir choisi cette balançoire multi-personnes .
- Veuillez lire toutes les instructions avant de l'utiliser. Ces informations vous
aideront à obtenir les meilleurs résultats possibles.
Les produits présentés dans ce catalogue peuvent avoir une couleur différente de
celle de l'article réel.
CONSIGNES DE SÉCURITÉ IMPORTANTES
LE POIDS MAXIMUM NE DOIT PAS DÉPASSER 7 0 0 livres ( 340 kg)
ZONE DE JEU SÉCURISÉE
1. Veuillez conserver soigneusement ce manuel et l'emballage pour référence
ultérieure. Si vous donnez ce produit à un tiers, n'oubliez pas de lui remettre
également ce manuel.
2. Ce produit n'est PAS destiné à un usage commercial, mais est UNIQUEMENT
destiné à un usage domestique. À utiliser uniquement sous la surveillance
d'adultes. Ne laissez jamais votre enfant sans surveillance sur la balançoire afin
d'éviter tout risque de chute.
3.Suivez les instructions de montage et d'entretien, afin d'éviter que votre enfant
ne tombe, ne dégringole et d'éviter l'arrachement des cordes.
4. Nous vous recommandons d'installer la balançoire sur une surface plane et de
maintenir une distance d'au moins 2 m par rapport aux autres structures ou
obstacles, par exemple une clôture, un garage, une maison, des branches
saillantes, des cordes à linge ou des câbles électriques.
5. Ne convient pas aux enfants de moins de 3 ans. Risque d'étranglement !
6. Les enfants de moins de 3 ans sont encore incapables de maintenir leur
équilibre.
7. Étant donné que les enfants ont des modèles de développement différents,
veuillez vérifier au préalable si votre enfant est capable de maintenir son équilibre.
3
8. La hauteur recommandée entre le sol et le siège de la balançoire est de 20
pouces (50 cm).
CONSERVEZ CES INSTRUCTIONS
Montage et utilisation
PARTIE LISTE
Corde de suspension G x2, vis et entretoise x4
BALANÇOIRE ASSEMBLÉE INSTRUCTION
13. Dévissez les vis du tube avec une clé Allen.
14. 2. Assemblez les tubes longs : connectez deux joints et insérez les vis dans les
trous.
3. Utilisez la clé pour le serrer.

4
4. Insérez 4 tubes dans le siège pivotant.
5. Connectez deux joints sur le côté gauche de la balançoire et assurez-vous que
les deux trous sont alignés.
6. Alignez les extrémités du tuyau sur le côté droit de la balançoire, puis poussez
doucement le tube court vers le bas jusqu'à ce qu'il soit uniforme.
7.Insérer le boulon dans le trou à l'avant de la balançoire.
8. Placez la rondelle et l'écrou sur le boulon et serrez avec une clé. Veuillez vous
assurer que toutes les vis sont serrées pour votre sécurité.
MAINTENANCE
1. Faites toujours attention aux points suivants si la balançoire n'a pas été utilisée
pendant une période prolongée (surtout au début d'une nouvelle saison !).
2. Lubrifiez toutes les pièces métalliques. Vérifiez tous les capuchons sur les vis et

5
les bords tranchants et remplacez-les , si nécessaire. Vérifiez les sièges de
balançoire , les chaînes , les cordes et autres accessoires pour tout signe d'usure.
3. Vérifiez régulièrement que les cordes et les anneaux ne s'abîment pas et ne
résistent pas à l'usure . La meilleure façon de vérifier cela est de tourner les
cordes jusqu'à ce que leur intérieur devienne visible ! Vérifiez régulièrement que
les nœuds sont bien serrés. Examinez régulièrement le bois pour détecter les
signes de pourriture et de fissures.
4. Vérifiez également si des copeaux de bois dépassent de la planche de
balançoire. Ceux-ci doivent être abrasés afin d'éviter les blessures. N'exposez pas
la balançoire aux intempéries pendant les longues périodes de pluie et en
automne/hiver.
5. Remplacez toujours les pièces défectueuses par des pièces de rechange
d'origine.
Fabricant : NingBo YongXu Industrial Products Manufacturing Co.,
Ltd
Adresse: 13-1 Village de Haikou, ville de Xidian, comté de Ninghai,
ville de Ningbo, province de Zhejing, Chine
Importé en Australie : SIHAO PTY LTD. 1 ROKEVA
STREETEASTWOOD NSW 2122 Australie
Importé aux États-Unis : Sanven Technology Ltd. Suite 250, 9166
Anaheim
Lieu, Rancho Cucamonga, CA 91730
REP
EC
E-CrossStu GmbH
Mainzer Landstr.69, 60329 Frankfurt am Main.
REP
UK
YH CONSULTING LIMITED.
C/O YH Consulting Limited Office 147, Centurion House,
London Road, Staines-upon-Thames, Surrey, TW18 4AX

6


Technische ondersteuning en e-garantiecertificaat www.vevor.com/support
Schommelstoel voor meerdere
personen
We continue to be committed to provide you tools with competitive price.
"Save Half", "Half Price" or any other similar expressions used by us only represents an
estimate of savings you might benefit from buying certain tools with us compared to the major
top brands and does not necessarily mean to cover all categories of tools offered by us. You
are kindly reminded to verify carefully when you are placing an order with us if you are
actually saving half in comparison with the top major brands.


1
MODEL: YXS-BQ01
Have product questions? Need technical support? Please feel free to
contact us:
Technical Support and E-Warranty Certificate
www.vevor.com/support
NEED HELP? CONTACT US!
This is the original instruction, please read all manual instructions
carefully before operating. VEVOR reserves a clear interpretation of our
user manual. The appearance of the product shall be subject to the
product you received. Please forgive us that we won't inform you again if
there are any technology or software updates on our product.
Multi-person Swing
Seat

2
INSTRUCTIES
Hartelijk dank dat u voor deze Multi-persoons Schommelstoel hebt gekozen .
- Lees alle instructies voordat u het gebruikt. De informatie zal u helpen om de
best mogelijke resultaten te behalen.
De producten in deze catalogus kunnen qua kleur afwijken van het daadwerkelijke
artikel.
BELANGRIJKE VEILIGHEIDSINSTRUCTIES
HET MAXIMALE GEWICHT MAG NIET OVERSCHRIJDEN 7 0 0 pond ( 340
kg)
VEILIGE SPEELPLEK
1.Bewaar deze handleiding en de verpakking zorgvuldig voor latere referentie. Als
u dit product aan een derde geeft, vergeet dan niet om deze handleiding ook te
overhandigen.
2. Dit product is NIET bedoeld voor commercieel gebruik, maar is ALLEEN
bedoeld voor huishoudelijk gebruik. Mag alleen worden gebruikt onder toezicht
van volwassenen. Laat uw kind nooit zonder toezicht op de schommel zitten om
het risico op vallen te voorkomen.
3. Volg de montage- en onderhoudsinstructies om te voorkomen dat uw kind valt,
naar beneden valt of dat de touwen scheuren.
4. Wij adviseren u de schommel op een vlakke ondergrond te plaatsen en een
afstand van minimaal 2 meter aan te houden tot andere constructies of obstakels,
zoals een hek, garage, huis, uitstekende takken, waslijnen of elektrische kabels.
5.Niet geschikt voor kinderen jonger dan 3 jaar. Wurgingsgevaar!
6. Kinderen jonger dan 3 jaar kunnen nog niet hun evenwicht bewaren.
7. Omdat kinderen een verschillend ontwikkelingspatroon hebben, controleer dan
vooraf of uw kind zijn evenwicht kan bewaren.
8. De aanbevolen hoogte van de grond tot aan de schommelzitting is 50 cm.
3
BEWAAR DEZE INSTRUCTIES
Montage en gebruik
DEEL LIJST
G Ophangkabel x2, Schroef enAfstandhouder x4
SCHOMMEL MONTAGE INSTRUCTIE
15. Draai de schroeven op de buis los met een inbussleutel.
16. 2. Monteer de lange buizen: verbind de twee verbindingen en draai de
schroeven in de gaten.
3. Gebruik de sleutel om het vast te draaien.

4
4. Plaats 4 buizen in de schommelstoel.
5. Verbind de twee gewrichten aan de linkerkant van de schommel en zorg ervoor
dat de twee gaten op één lijn liggen.
6. Lijn de uiteinden van de pijp uit aan de rechterkant van de schommel en duw de
korte buis voorzichtig naar beneden totdat deze gelijk is.
7.Plaats de bout in de gat aan de voorkant van de schommel.
8. Plaats de ring en de moer op de bout en draai ze vast met een sleutel. Zorg ervoor
dat alle schroeven goed vastgedraaid zijn, voor uw eigen veiligheid.
MAINTENANCE
1. Let altijd op de volgende punten als de schommel voor een langere periode niet
gebruikt is (vooral aan het begin van een nieuw seizoen!).
2. Smeer alle metalen onderdelen. Controleer alle doppen op schroeven en
5
scherpe randen en vervang deze indien nodig . Controleer de schommelzitjes ,
kettingen , touwen en andere accessoires op tekenen van slijtage.
3. Controleer de touwen en ringen voortdurend op rotting , slijtage en
scheurbestendigheid. De beste manier om dit te controleren is door de touwen te
draaien totdat hun binnenkant zichtbaar wordt! Controleer de knopen regelmatig
op strakheid. Onderzoek het hout regelmatig op rotting en scheuren.
4. Controleer ook of er houtsnippers uit het schommelplankje steken. Schuur deze
weg om verwondingen te voorkomen. Stel de schommel niet bloot aan
weersinvloeden tijdens langdurige regenval en in de herfst/winter.
5. Vervang defecte onderdelen altijd door originele reserveonderdelen.
Fabrikant: NingBo YongXu Industrial Products Manufacturing
Co.,Ltd
Adres: 13-1 Haikou Village, Xidian-stad, Ninghai-provincie,
Ningbo-stad, provincie Zhejing, China
Geïmporteerd naar AUS: SIHAO PTY LTD. 1 ROKEVA
STREETEASTWOOD NSW 2122 Australië
Geïmporteerd naar de VS: Sanven Technology Ltd. Suite 250, 9166
Anaheim
Plaats, Rancho Cucamonga, CA 91730
REP
EC
E-CrossStu GmbH
Mainzer Landstr.69, 60329 Frankfurt am Main.
REP
UK
YH CONSULTING LIMITED.
C/O YH Consulting Limited Office 147, Centurion House,
London Road, Staines-upon-Thames, Surrey, TW18 4AX

6


