
Oxford
Modular Travel System/Stroller
Your model may look different than the one shown.
TR489, CV489
Call 1-800-544-1108
Visit www.maxicosi.com
Text 1-812-652-2525
(US and Canada only, carrier fees may apply)
©2025 Dorel Juvenile Group, Inc. (800) 544-1108 www.maxicosi.com. Styles, colors, and labeling may vary. Made in CHINA. Distributed by Dorel
Juvenile Group, Inc., 2525 State St., Columbus, IN 47201-7494. Dorel Juvenile Canada, 2233 Argentia Road, Suite 110, Mississauga, ON L5N 2X7.
Representante exclusivo en Chile: DOREL JUVENILE CHILE S.A. Av. del Parque 4161, oficina 602 A, Huechuraba, Santiago, Chile - Fono: 56 2 24971500
- www.infanti.cl - www.dorel.cl. Importado y distribuido en Perú por: COMEXA COMERCIALIZADORA EXTRANJERA S.A. SUCURSAL DEL PERÚ -
Los Libertadores 455, San Isidro, Lima 27, Lima, Perú RUC 20431062870 – Fono: 4413029 – www.infanti.com.pe. En Centro América, Caribe y
Ecuador por: Best Brands Group S.A. – Av. Balboa, Bay Mall Plaza, Planta Baja, local 9, Panamá. - Fono: (507) 300 2884. En Colombia por:
Baby Universe S.A.S. - Vía 40 No. 77-29, Barranquilla, Colombia - Fono: (575) 353 1110 Importador: DJGM, S.A. DE C.V. Gabriel Mancera
No. 1041 Col. Del Valle, Benito Juárez C.P. 03100 México, Ciudad de México R.F.C. DJG140305GN9 Tel. (55) 67199202
Learn More
Email [email protected]
4358-8804 12.05.25
32
• Failure to follow these instructions could result in the death or serious injury of your child.
• NEVER LEAVE CHILD UNATTENDED. ALWAYS keep child in view when in stroller.
• AVOID SERIOUS INJURY from falling or sliding out. ALWAYS use seat belt. Check frequently to
make sure it is secure.
• Child may slip into leg openings and strangle. NEVER use in reclined carriage position unless the
carriage is fully zipped and assembled.
• ALWAYS keep fingers away from moving parts, when folding, unfolding, or adjusting stroller to
prevent finger entrapment.
• ALWAYS make sure stroller is FULLY OPEN AND LOCKED before using.
WARNING
• ALWAYS use the brakes when stroller is stopped.
• ALWAYS remove protective material and poly bags and dispose before assembly.
• NEVER put hot liquids in the cup holder.
• NEVER use stroller on stairs or escalators.
• NEVER rollerblade with stroller.
• NEVER allow children to play with or hang onto the stroller.
• NEVER allow children to climb into the stroller unassisted. Stroller may tip over and injure child.
• NEVER place or hang parcels, bags, or accessories on the product, handle, or canopy. The stroller
may become unstable, or tip over.
• This product may become unstable if package carrying accessories, other than those recommended
by the manufacturer, are added.
• This product will become unstable if the manufacturer’s recommended loads are exceeded.
• ONLY use this stroller with ONE child at a time.
Read all instructions before assembly and use of product. Keep these instructions for future use.
STROLLER is suitable for a child, who can sit up unassisted, up to 55 lb (25 kg) and 40 in. (101 cm), and WHEN SEATED, the
midpoint of the child’s head is at or below the top of the stroller seat.
Storage maximum weight is 22 lb (10 kg).
Cup holder maximum weight is 2 lb (0.9 kg). Adult assembly required.
32
Table of Contents
Parts List ........................................................... 3
Assembly ..........................................................4
Using the Parking Brake ...................................10
Using the Swivel Locks ..................................... 11
Using the Bumper Bar ......................................12
Adjusting the Canopy .......................................14
Adjusting the Handlebar ...................................17
Adjusting the Seat and Legrest .........................18
Converting the Seat to Carriage Mode ...............22
Securing Your Child in the Stroller .....................27
Adjusting the Harness Straps ............................ 30
Folding the Stroller ........................................... 31
Car Seat Compatibility ......................................33
Care and Maintenance .....................................36
Warranty .........................................................41
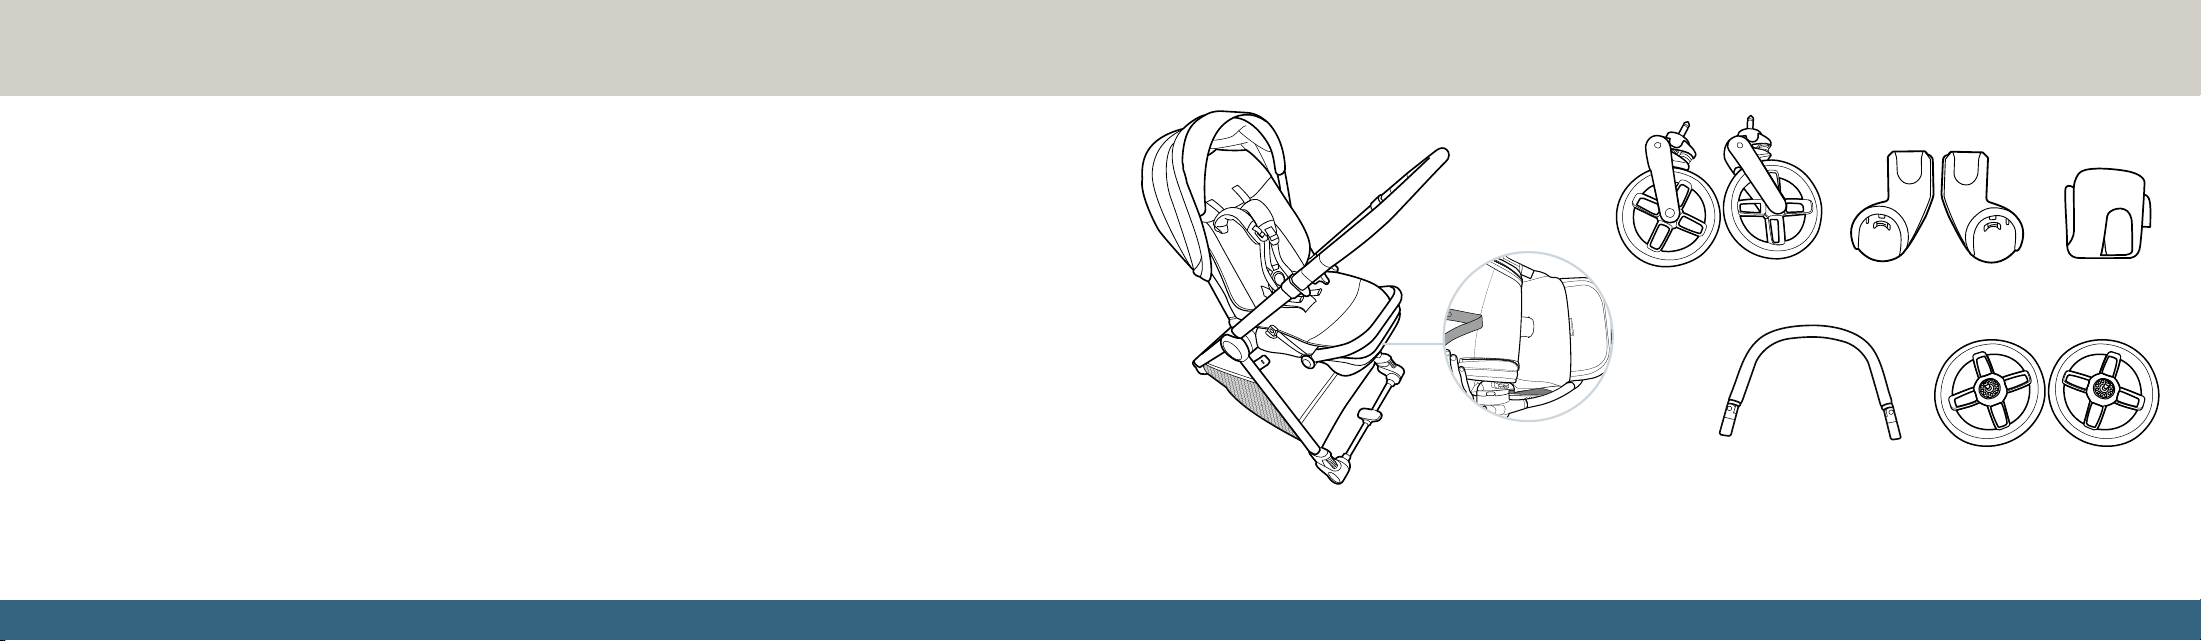
Parts List
Rear Wheels
Front Wheels
Stroller Frame and Seat
Car Seat Adapters Cup Holder
Bumper Bar
Lay out and identify all the parts. Do not return this product to the place of purchase. To
address any issues or for help with assembly, contact Consumer Care at 1-800-544-1108,
[email protected], maxicosi.com, or by text at 1-812-652-2525. Include the model
number (TR489) and manufacture date located on a label on the stroller frame.
Carriage Coverings
(located in legrest storage area)
54
CLICK
CLICK
CLICK
CLICK
CLICK
CLICK
CLICK
CLICK
Assembly
CLICK
CLICK
CLICK
CLICK
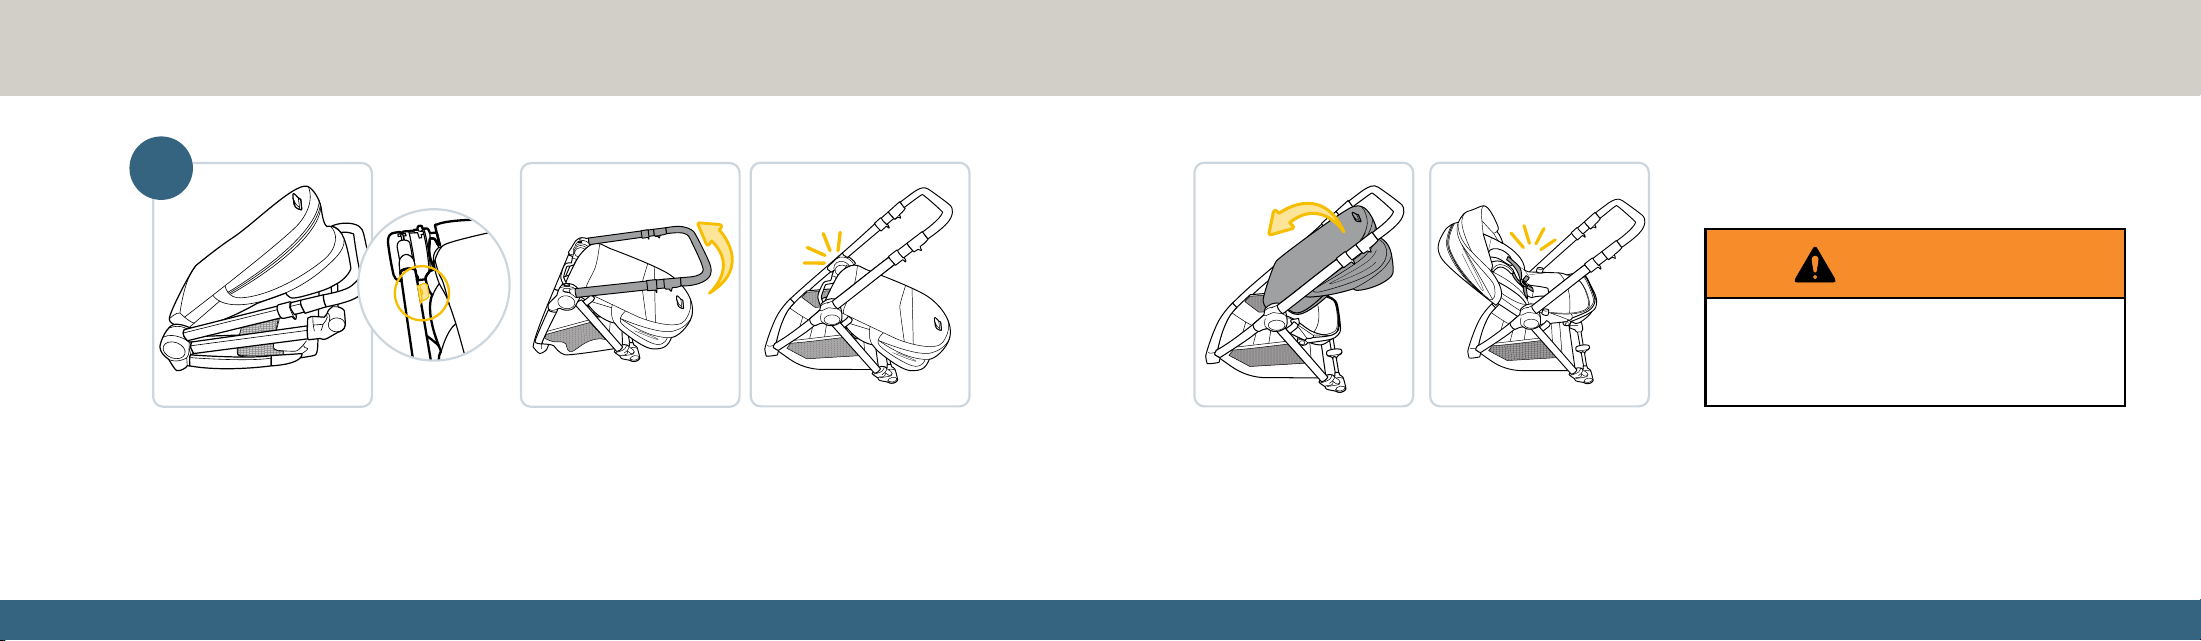
1
Unfold the Stroller Frame
Lay the stroller frame flat on the ground. Lift and release the stroller’s frame lock. Pull up on the
handlebar until the stroller fully unfolds. It will click into place.
CLICK
CLICK
CLICK
CLICK
ALWAYS keep fingers away from moving
parts when folding, unfolding, or adjusting
stroller to prevent finger entrapment.
WARNING
CLICK
CLICK
CLICK
CLICK
CLICK
CLICK
CLICK
CLICK
Unfold the seat by lifting it up from the top and pulling it
back until it clicks into place.
continued on next page
76
CLICK
CLICK
CLICK
CLICK
CLICK
CLICK
CLICK
CLICK
CLICK
CLICK
CLICK
CLICK
CLICK
CLICK
CLICK
CLICK
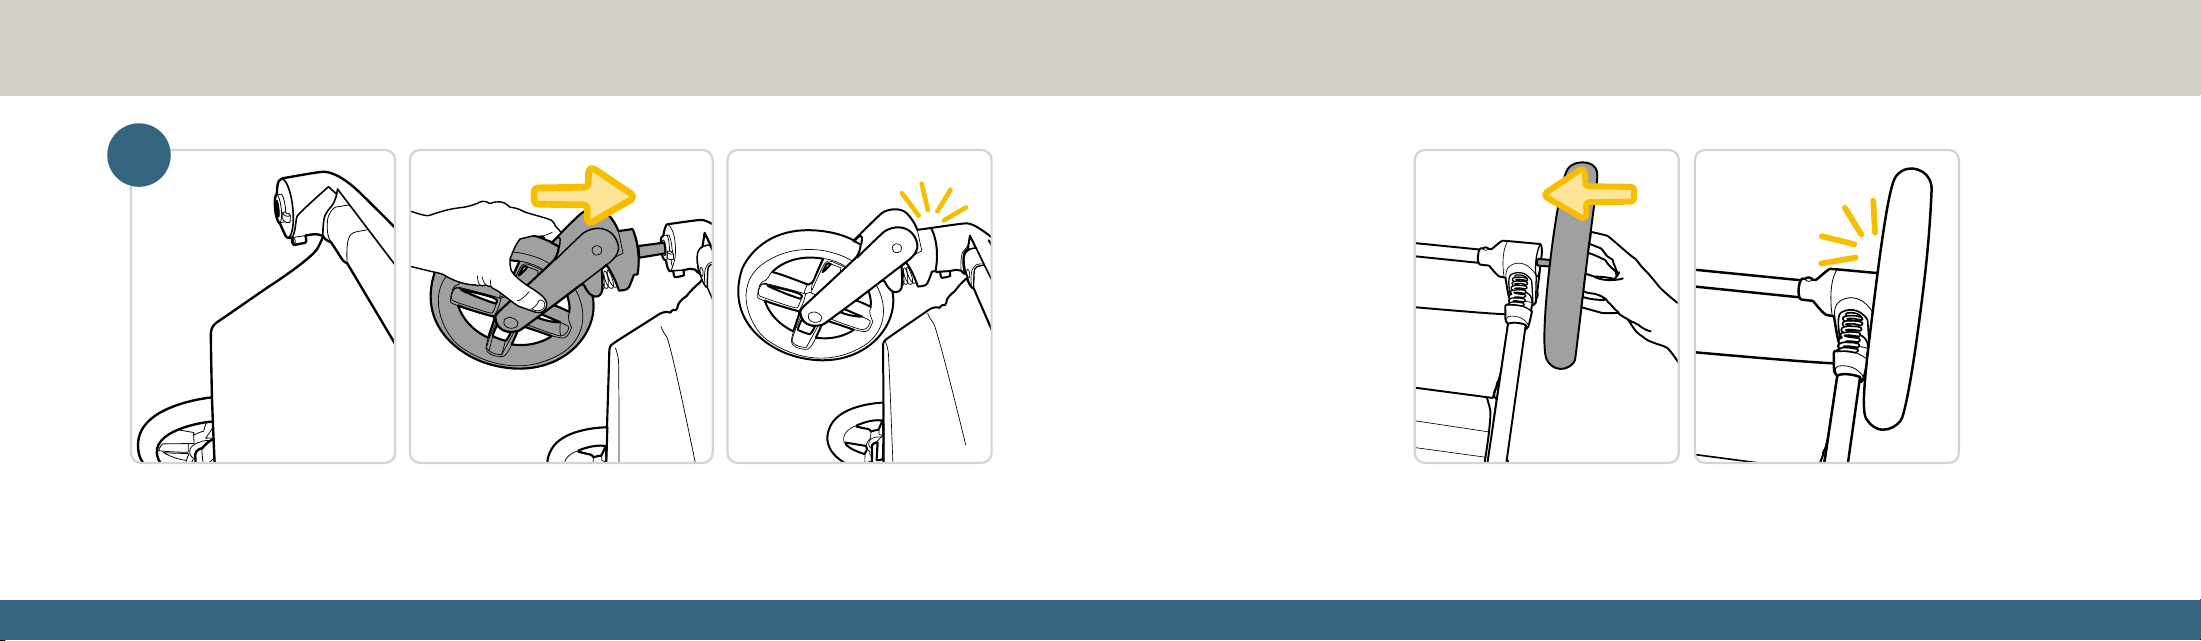
2
Install the Wheels
To install the front wheels: Slide each front wheel into the housing on the front of the stroller frame until
each wheel clicks into place. Pull gently on each wheel to ensure they are installed securely.
CLICK
CLICK
CLICK
CLICK
To install the rear wheels: Slide each rear wheel into the housing
at the back of the stroller frame until each wheel clicks into place.
Pull gently on each wheel to ensure they are installed securely.
continued on next page
98
CLICK
CLICK
CLICK
CLICK
CLICK
CLICK
CLICK
CLICK
3
Install the Bumper Bar
Line up the bumper bar with the buttons on the sides of the stroller frame. There are
openings on the side of the bumper bar where the release buttons will fit in. Make sure
these openings face inward, towards the stroller. The bumper bar cannot be installed
unless these openings are facing inward. Slide the bumper bar over the buttons to
install it. Pull gently on the bumper bar to ensure it has been installed securely.
CLICK
CLICK
CLICK
CLICK
ALWAYS ensure bumper bar
is in the upright locked position
before using the stroller.
WARNING
CLICK
CLICK
CLICK
CLICK
CLICK
CLICK
CLICK
CLICK
4
Install the Cup Holder
The cup holder should be installed on the stroller frame just below the right fold
release lever. Hook the cup holder onto the side of the handlebar. Pull gently on
the cup holder to make sure it is installed securely.
CLICK
CLICK
CLICK
CLICK
Make sure the placement
of the cup holder does
not interfere with the
handlebar’s ability to
extend. To extend the
handlebar, see page 17.
1110
Using the Parking Brake
Always use the parking brake when standing still, even if only for a few moments!
Press down on the lever between the rear wheels to lock the parking brake. Lift
the lever up to release the brake.
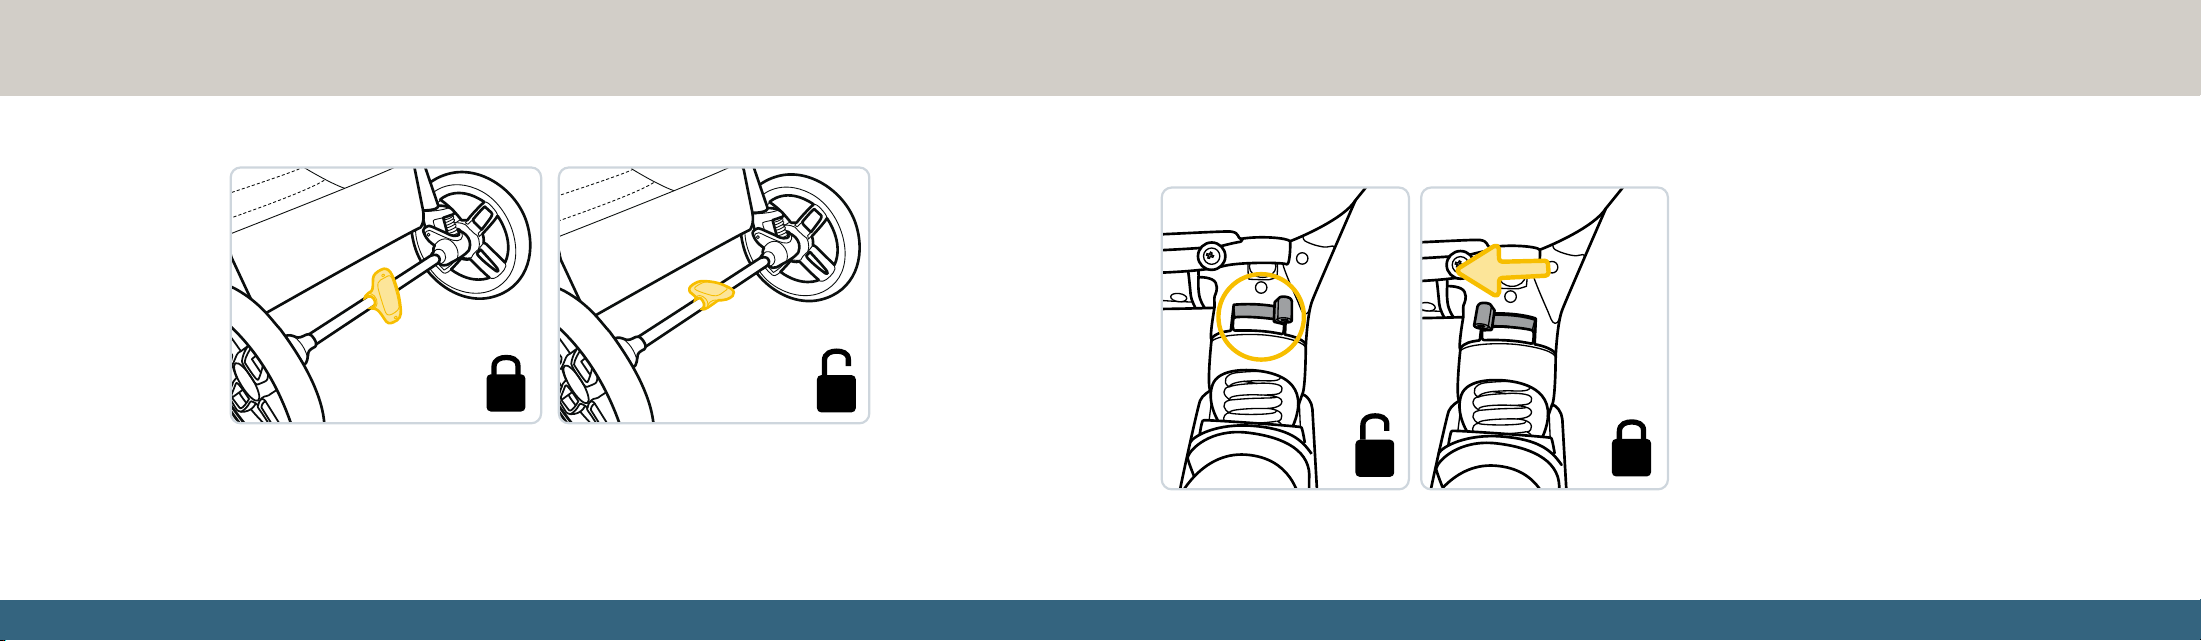
Using the Swivel Locks
The stroller’s front wheels have swivel wheel locks that
will prevent the front wheels from turning side to side.
Use these locks when pushing the stroller in a straight
direction for long periods of time.
To use the swivel locks: Locate the swivel lock above
and behind each front wheel. Flip the lock from right to
left to engage the lock. Repeat for the other wheel.
The front wheels will not be able to swivel while the
lock is engaged.
To unlock: Flip the swivel lock left to right. Repeat for
the other wheel. The front wheels will be able to swivel.
1312
Using the Bumper Bar
ALWAYS ensure the bumper
bar is installed securely
before using the stroller.
WARNING
Open the bumper bar to access to the stroller seat without completely
removing the bar.
To open the bumper bar: Press the release button on one side of the bumper
bar. While pressing the button, pull one side of the bumper bar out and away
from the stroller. The bar will be able to move while open.
To remove the bumper bar: Press both release buttons on either side of the bumper
bar. Pull the bumper bar out and away from the stroller.
1514
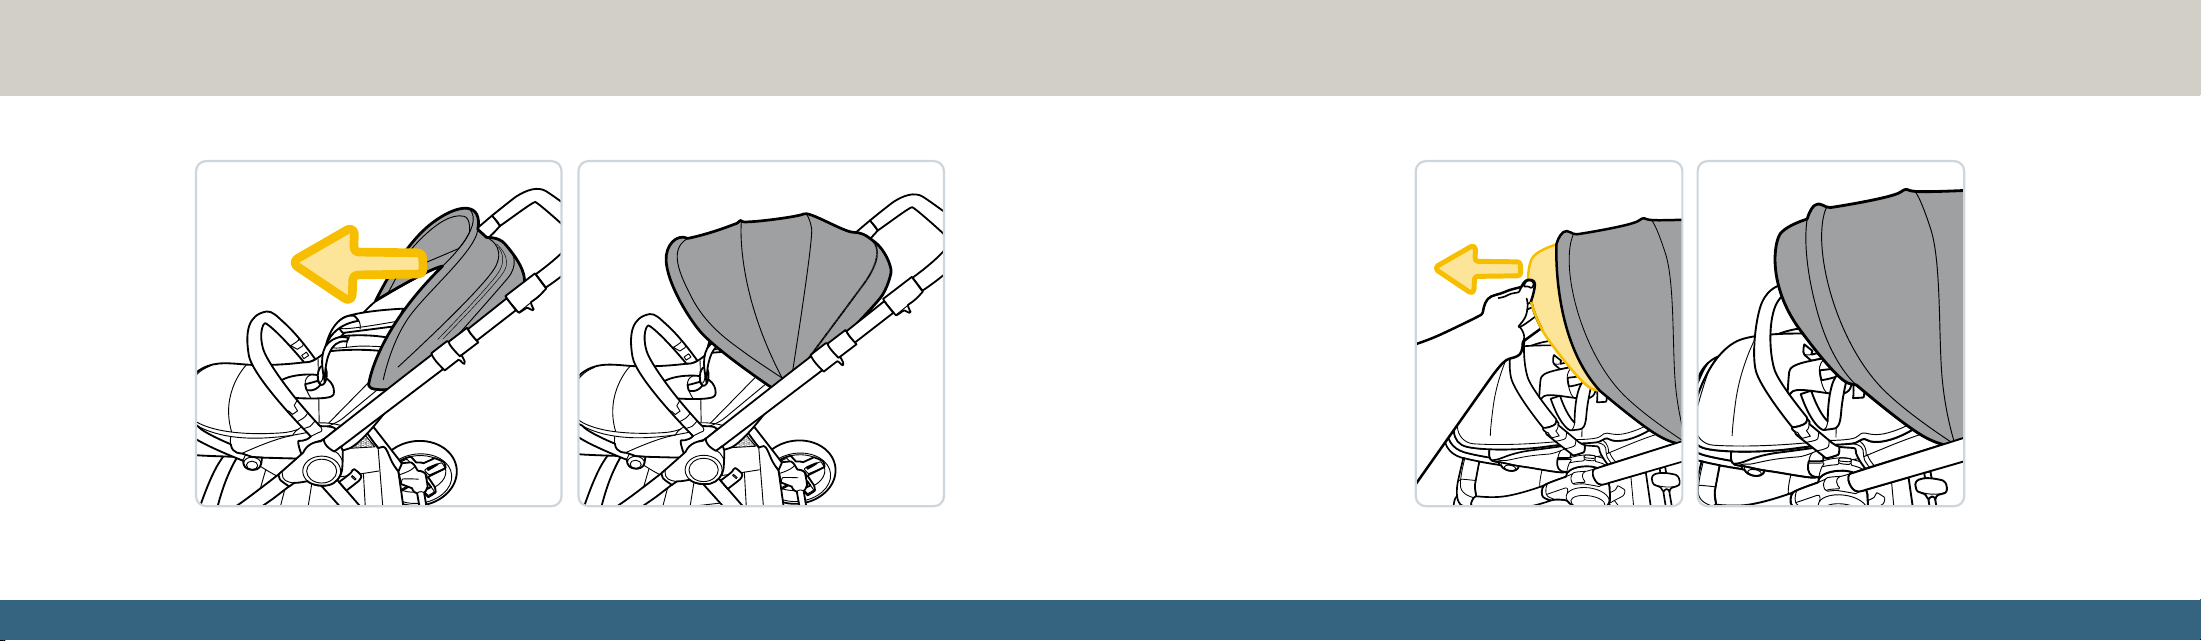
Adjusting the Canopy
Extend the canopy by pulling it forward. For additional coverage, extend the visor from inside the canopy.
continued on next page
1716
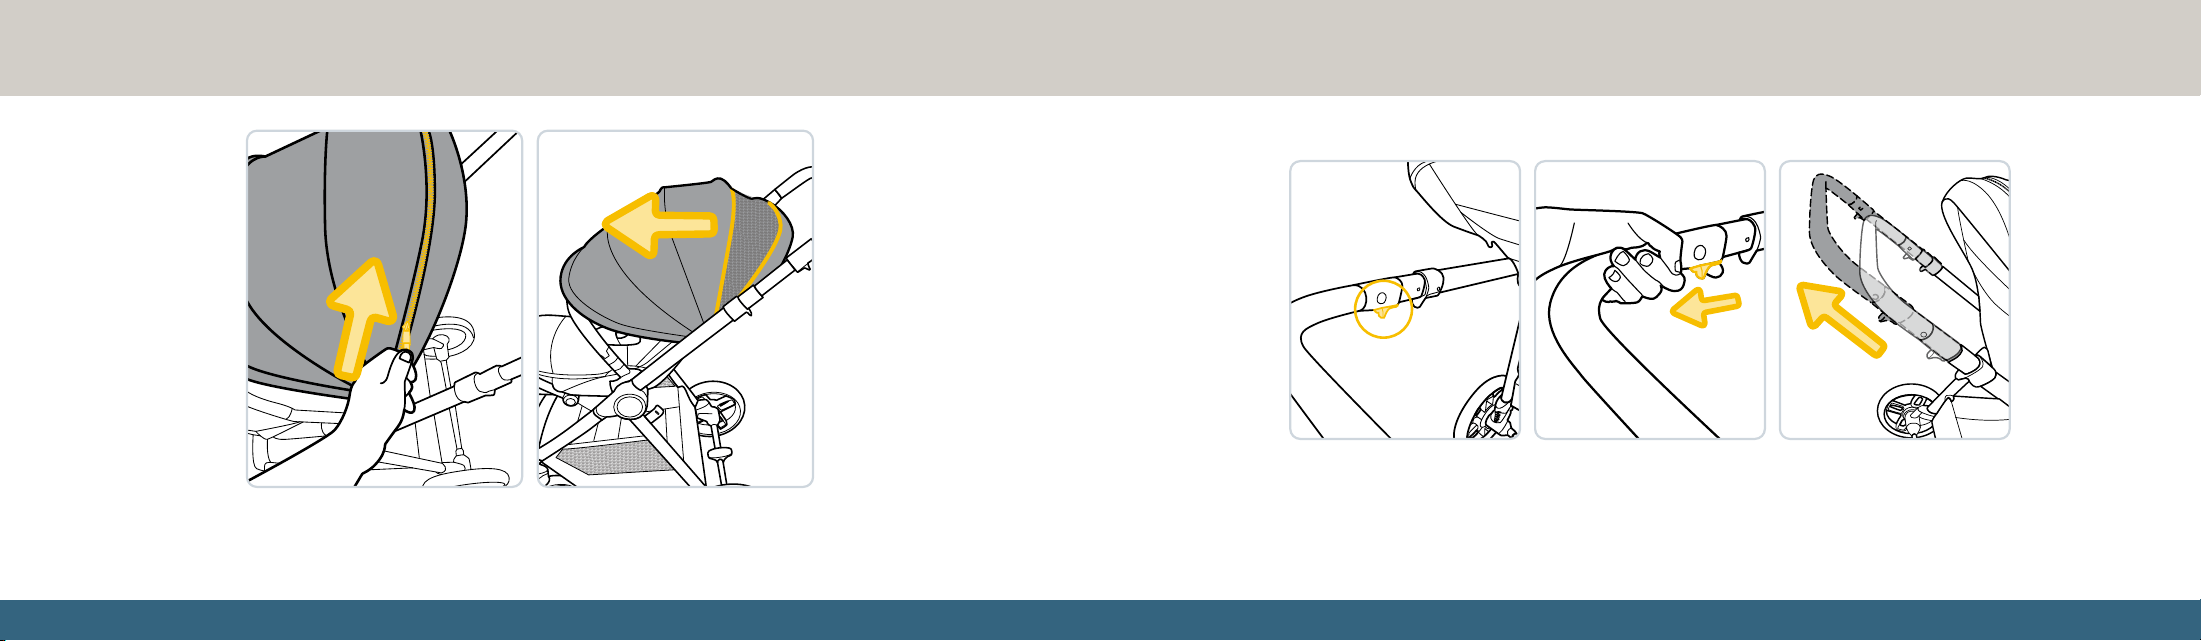
Unzip the canopy to reveal an additional mesh panel. Pull the canopy
forward until the panel is fully extended.
Adjusting the Handlebar
Pull the handlebar adjustment levers on both sides of the handlebar. While pulling both levers,
adjust the handlebar to the desired height.
There are five possible height positions.
1918
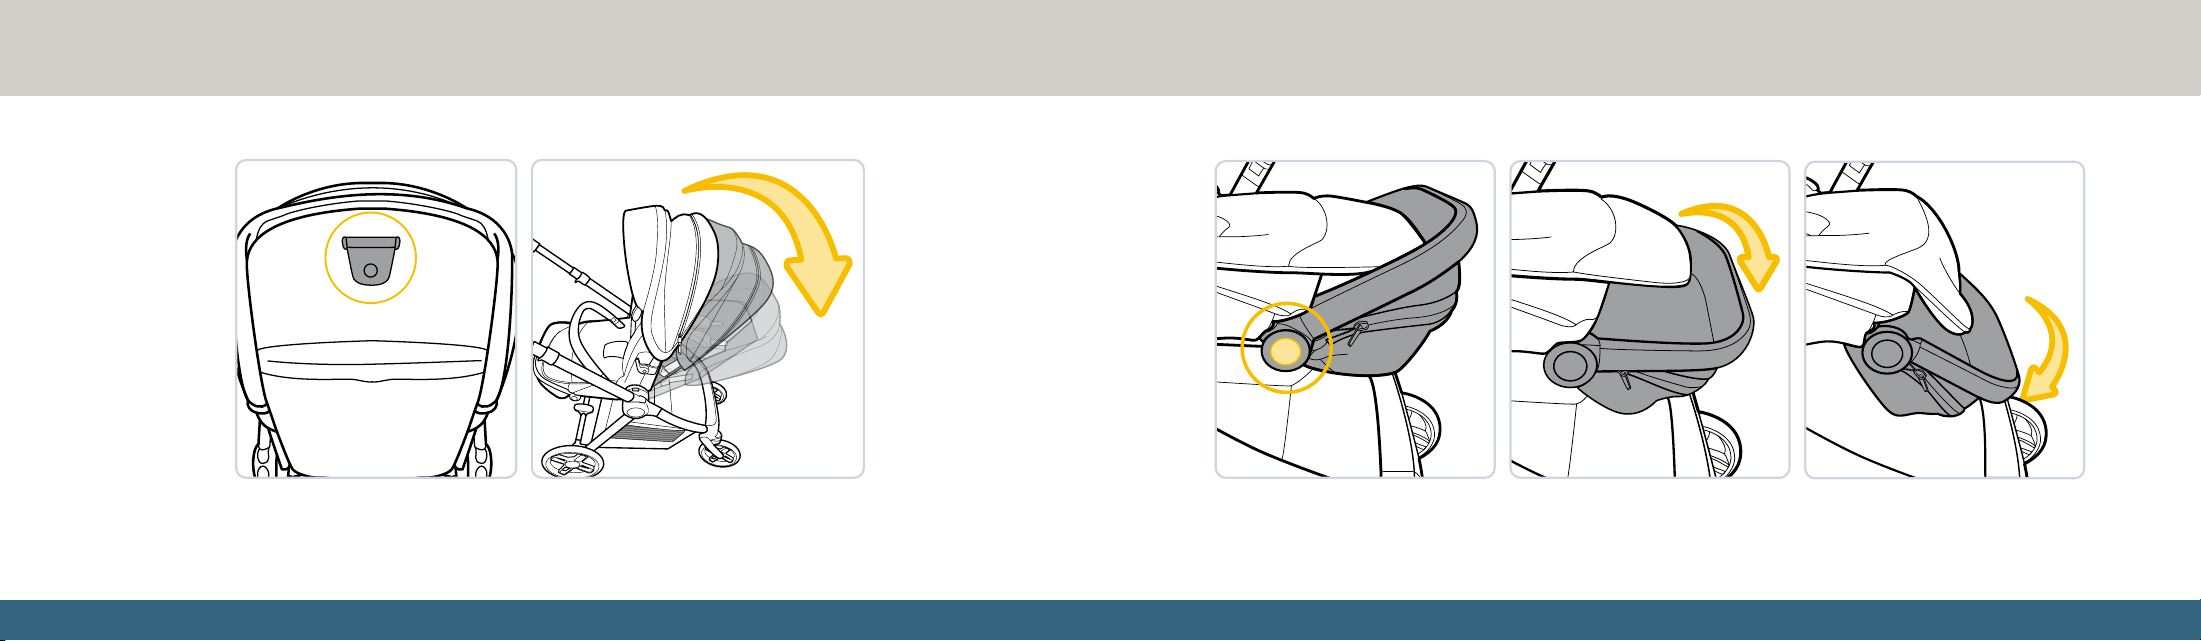
Adjusting the Stroller Seat and Legrest
To adjust the seat position: While lifting the recline lever on the back of the
seat, push forward to push the seat upright, or pull back to recline the seat.
To adjust the legrest position: Press the round buttons on both sides of the legrest while moving the legrest
up or down to the desired position.

2120
The stroller seat can also be removed from the stroller and reinstalled.
To remove the stroller seat: Press down on the lock buttons on either side of
the stroller seat. Once both lock buttons are fully pressed down, lift the seat out
of the stroller.
To install the stroller seat: Slide the seat down onto the slots on the sides of
the stroller frame.
The seat can be installed parent-facing or world-facing.
2322
Converting the Seat to Carriage Mode
Before converting the seat into carriage
mode, you MUST remove the bumper bar.
To remove the bumper bar, see page 13.
Before converting the seat into carriage
mode, the seat MUST be in the proper
position. Fully recline the stroller seat,
so that the seat lays as flat as possible.
Adjust the legrest so that it is parallel with
the ground. To adjust the seat and legrest,
pages 18–19.
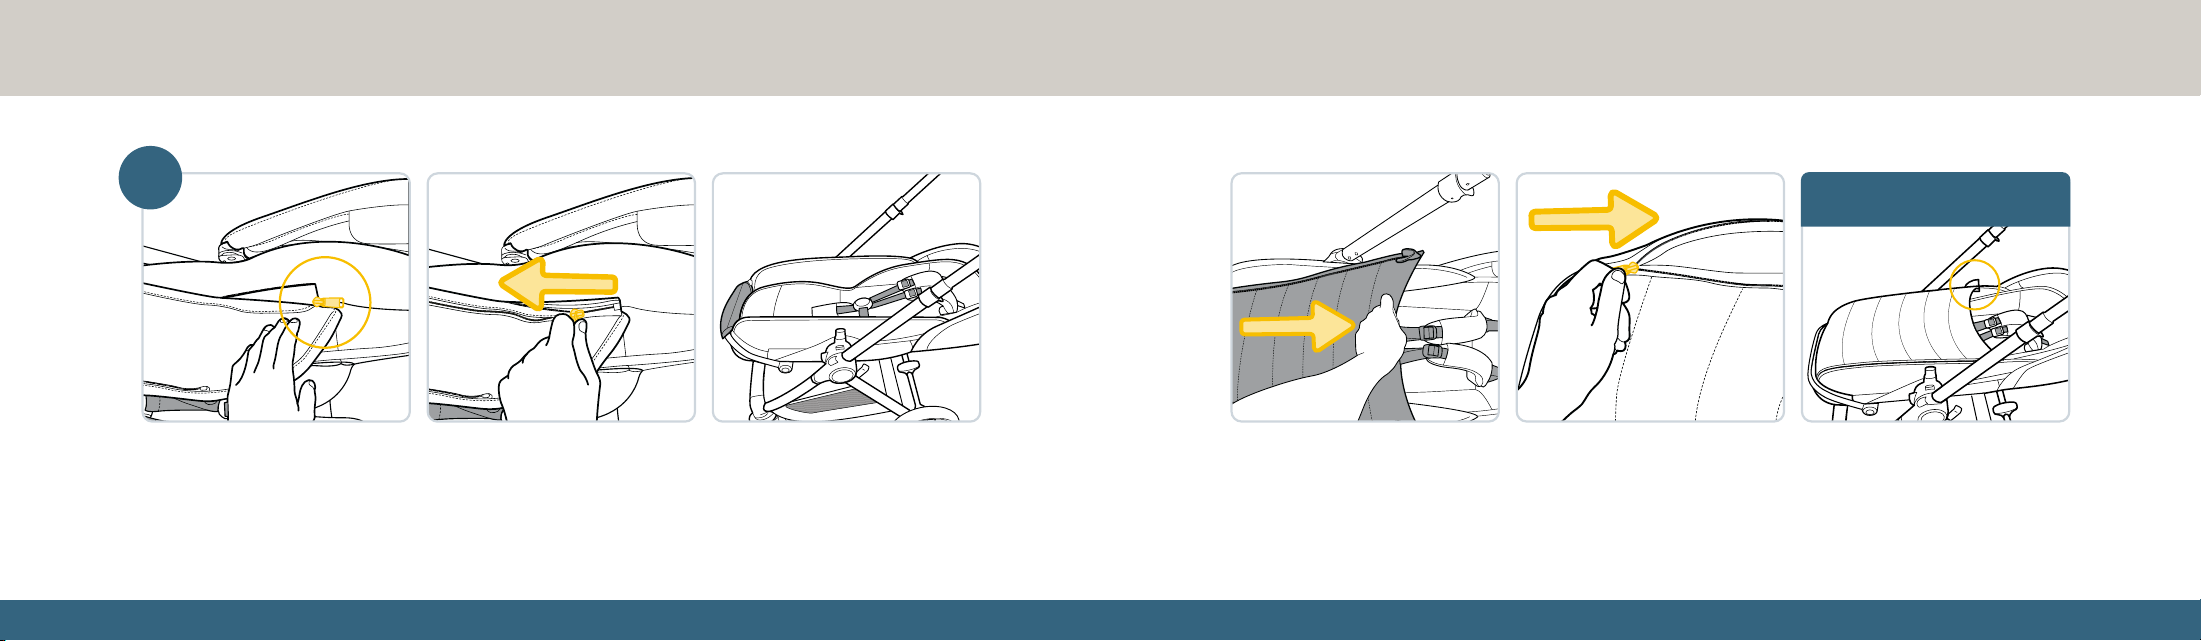
Remove the Carriage Coverings
from the Legrest Storage Area
The carriage coverings are located in a storage area
underneath the legrest.
Locate the snap where the seat pad meets the legrest.
Unfasten the snap and pull the seat pad away to access
the storage area.
Unzip the cover of the storage area and pull it away to access
the carriage coverings.
Pull the carriage coverings out from the
storage area. There will be three coverings,
a middle covering and two side coverings.
Once the coverings are removed, place the
seat pad back over the storage area and use
the snaps to reconnect it.
continued on next page
1
2524
Attach the Coverings to the Stroller
Match the zipper on one side covering with the zipper located under the seat pad on that side, near the
harness covers. Use the zippers to fasten the side covering to the stroller. Repeat for the other side.
Pull the middle covering up and place it over the stroller seat. Use the zippers on either side of the middle
covering to finish fastening the carriage. When fully zipped, the zippers should rest underneath the flaps on
the side of the middle covering.
continued on next page
2
FINISHED!
2726
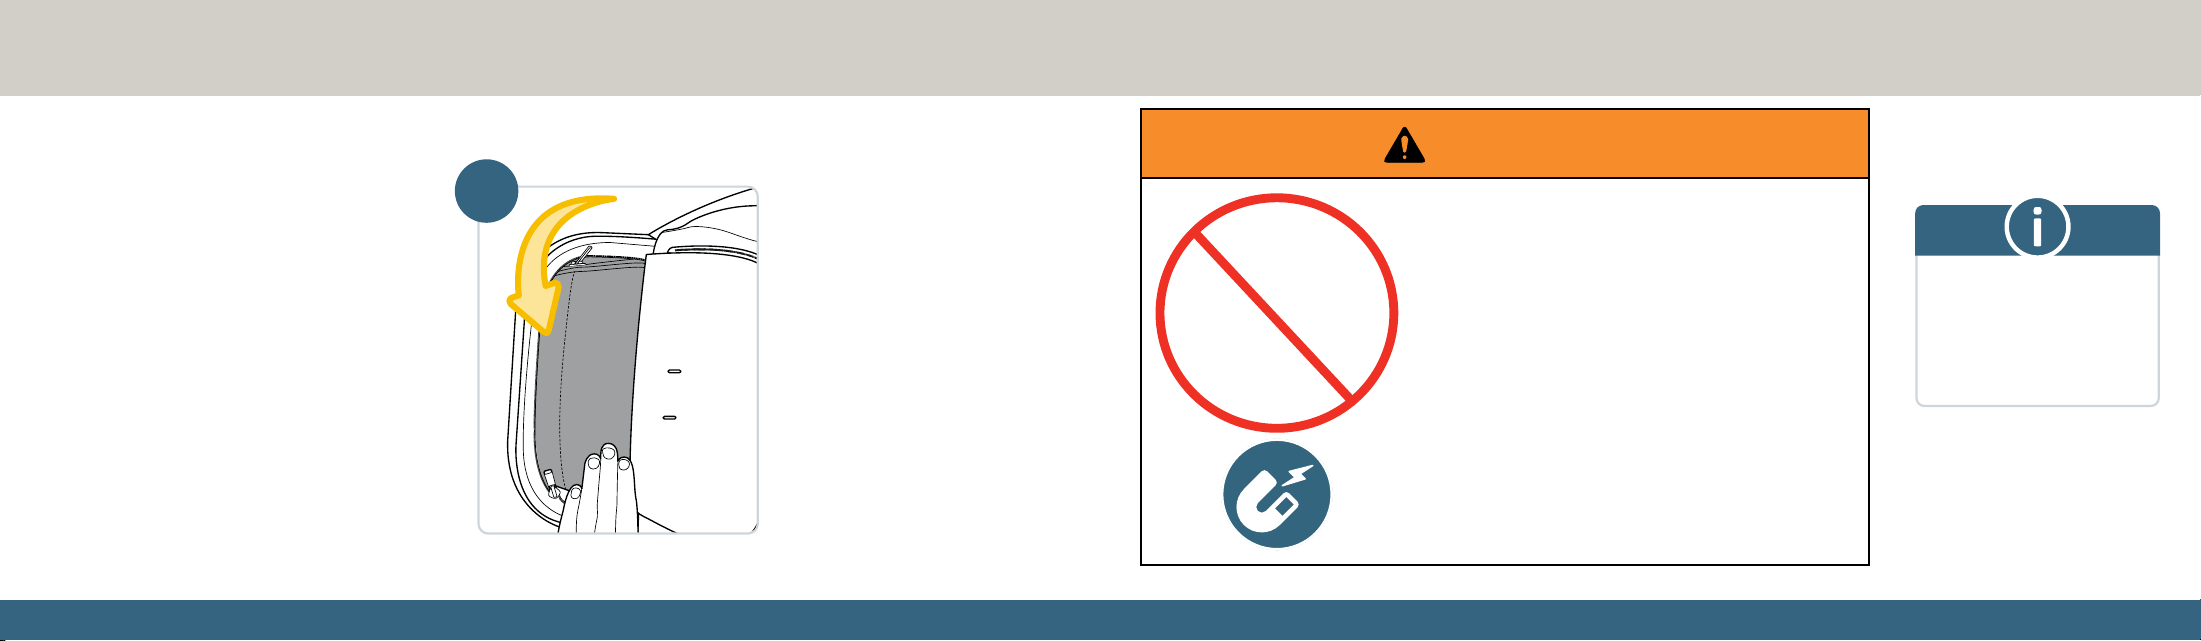
WARNING
Once the carriage coverings are
inside the storage area, fully close
the storage area using the zipper.
Re-fasten the snaps beneath the
seat pad to cover the storage area.
Return the seat to an upright
position and re-install the bumper
bar before using the stroller.
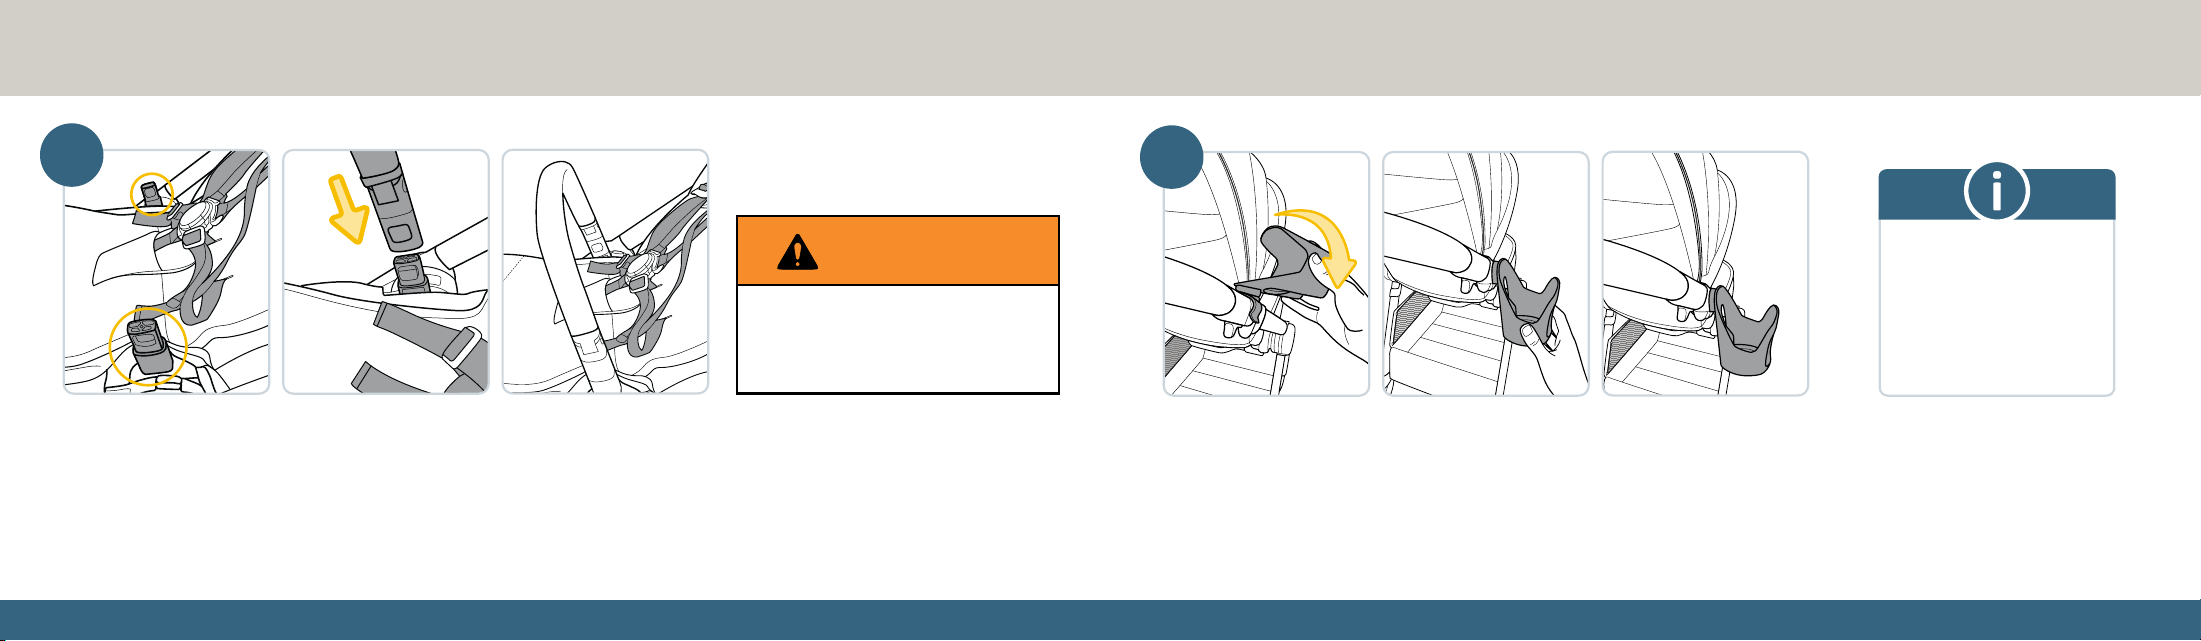
Securing Your Child In the Stroller
IMPLANTED
ELECTRONIC MEDICAL
DEVICES
Do not use this chest clip with children who have an
implanted electronic medical device.
A magnet is used to help secure the chest clip
locking mechanism together which may interfere
with the proper
function of an implanted electronic medical device.
Parents or caregivers who have an implanted
electronic device should keep their device away
from the chest clip and consult their doctor
and medical device manufacturer for specific
information before using this chest clip.
If a parent/caregiver or child has an implanted electronic
medical device, please contact Dorel.
Before placing your child in
the stroller, open or remove
the bumper bar. To open
or remove the bumper bar,
see pages 12–13.
continued on next page
3
Converting Back to Seat Mode
Unfasten the snaps and open up the storage
space underneath the legrest. Unfasten the
two zippers on the middle carriage covering,
followed by the zippers on each of the side
coverings. Pull the coverings away from
the stroller seat and roll them back up into
the legrest storage area. It is easiest to put
the side coverings in first, followed by the
middle covering.
2928
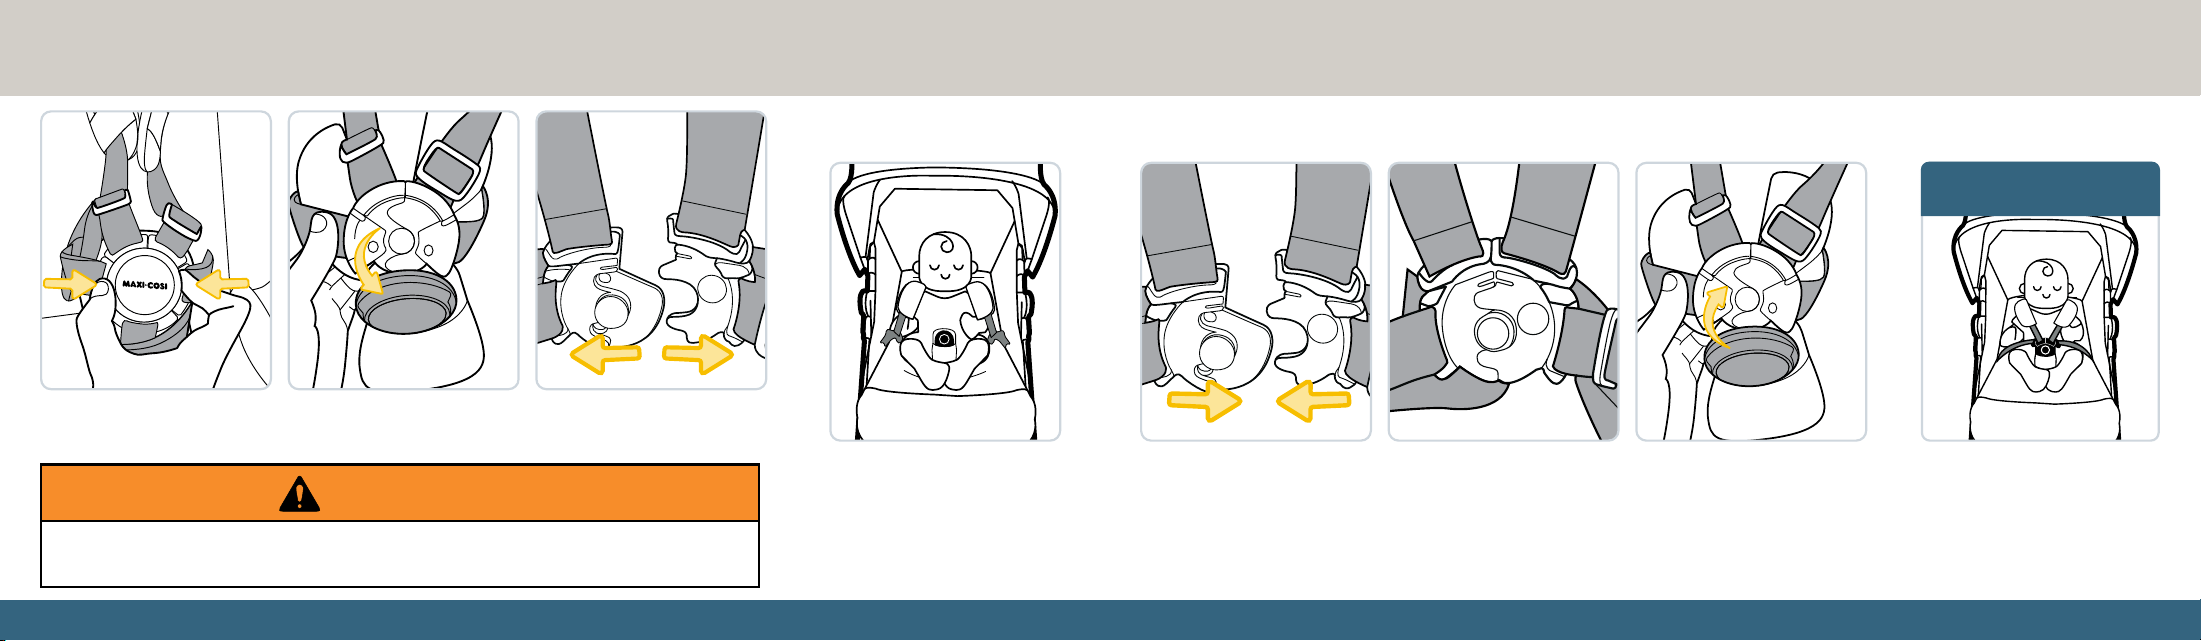
Press both buttons on the sides of the center buckle to release the magnetic center cover.
Remove the center cover and separate both sides of the buckle.
Place your child in the stroller
seat with the buckle strap
between their legs.
Place the two halves of the buckle over each other. They will snap into place magnetically.
Place the magnetic center cover over the two halves. It will snap into place magnetically. Pull
gently on the buckle to ensure it is secure and locked.
FINISHED!
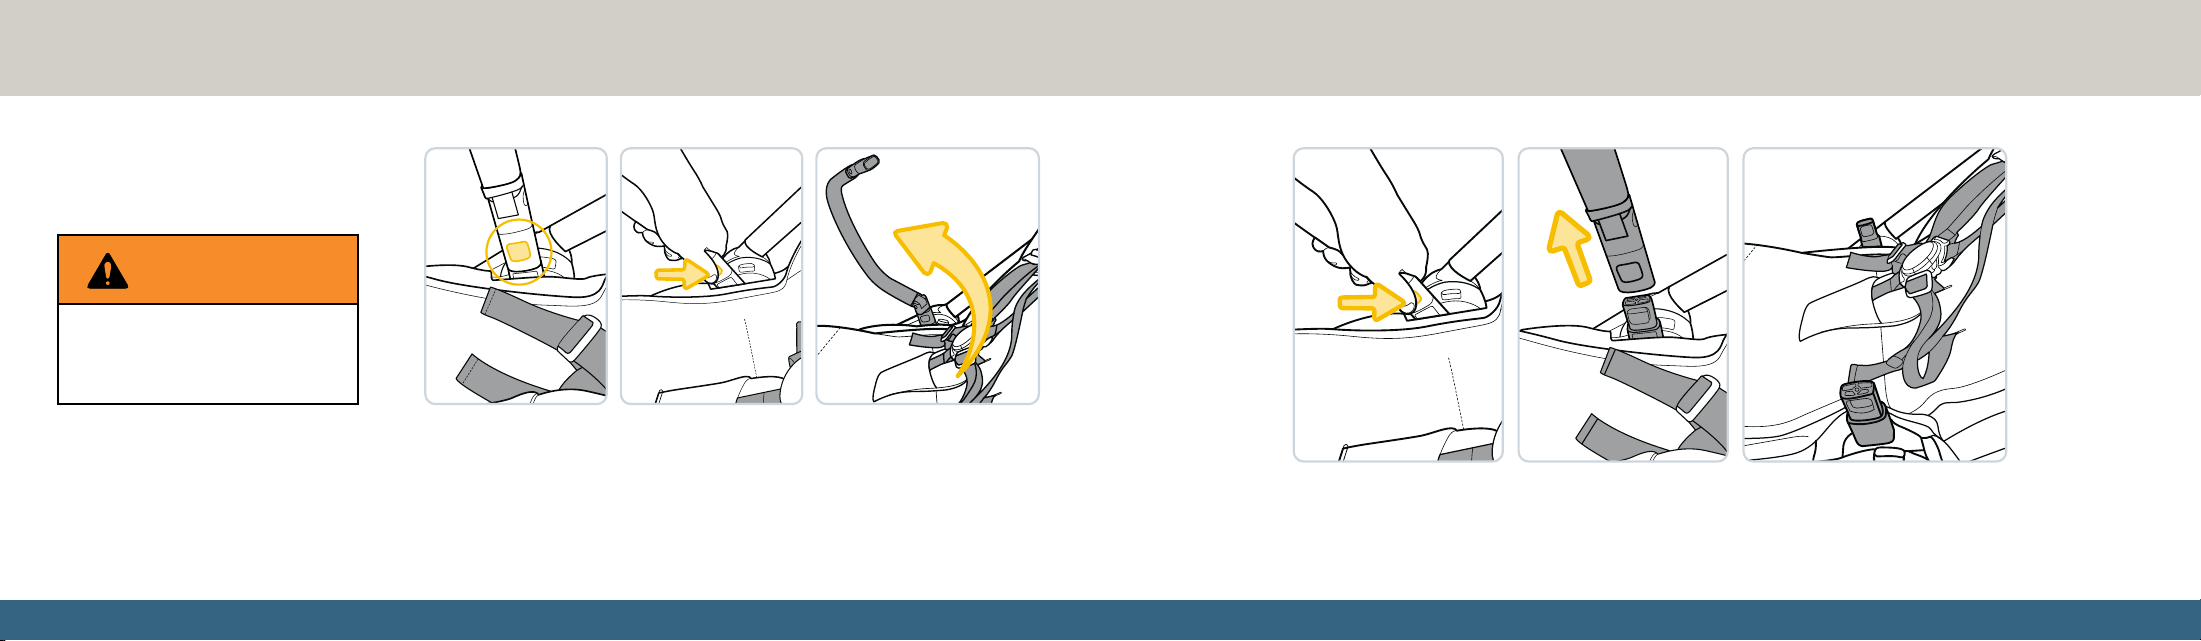
• NEVER leave child unattended.
• AVOID SERIOUS INJURY from falling or sliding out. ALWAYS use seat belt.
WARNING
3130
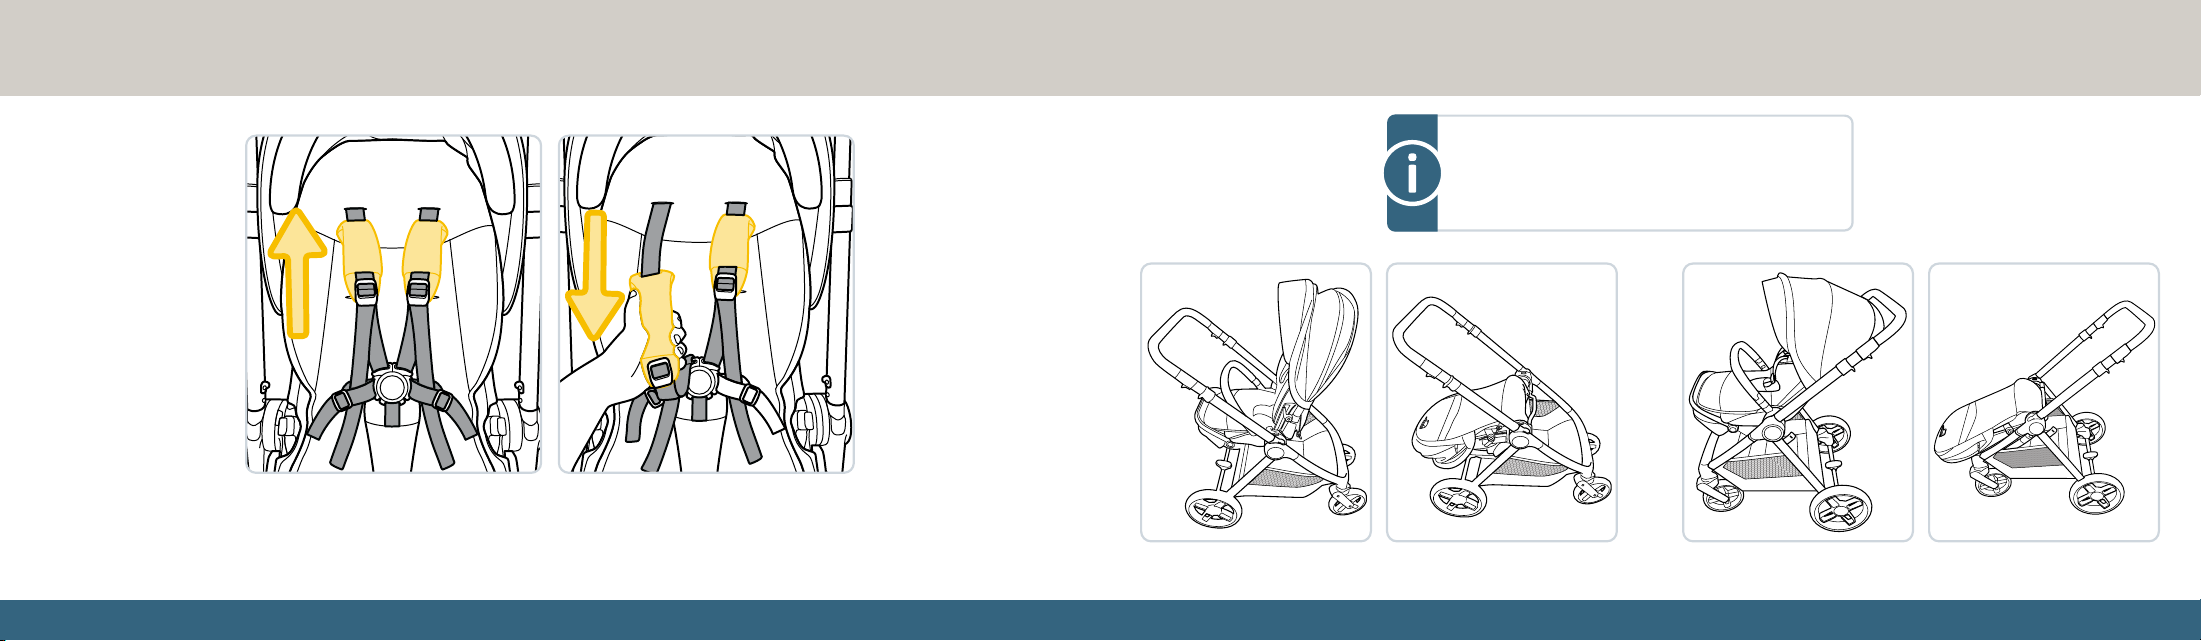
Adjusting the Harness Straps
You may need to adjust the harness strap height to better fit your child.
To adjust the harness straps: Push or pull the harness covers up or down
until snug with your child’s shoulders.
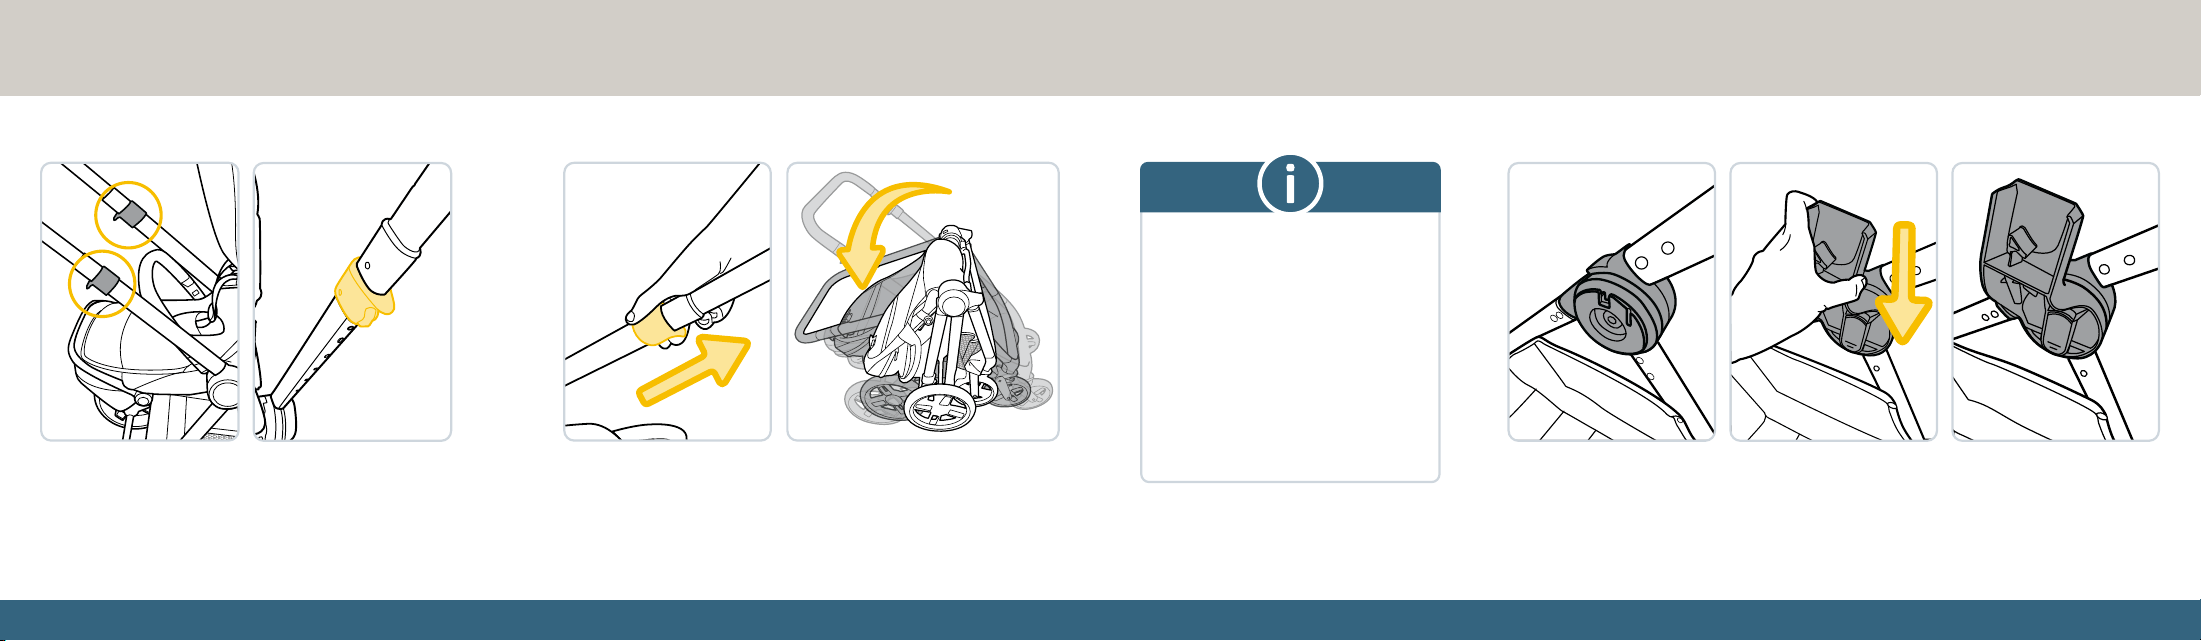
Folding the Stroller
Parent-facing World-facing
Before folding the stroller, use the stroller seat’s
recline lever to fold the seat fully forward. To
adjust the seat position, see page 18.
continued on next page
3332
Locate the two fold release levers on the sides of
the stroller frame. On the right release lever, push
and hold the fold lock button.
While pushing in the lock button, pull both fold release levers
and pull the handlebar down and towards your body.
Car Seat Compatibility
This stroller is compatible with the
Maxi-Cosi Ambra Infant Car Seat.
Before attaching a car seat to this
stroller, you MUST remove the
stroller seat first. To remove the
stroller seat, see page 20.
Car seats MUST be installed
parent-facing, also known as
rear-facing.
Before attaching a car seat, it is necessary to install the car seat adapters first.
To install the car seat adapters: Slide the adapters down into the slots on the
side of the stroller frame. Each adapter can only fit into one side; DO NOT force an
adapter into an incorrect slot.
3534
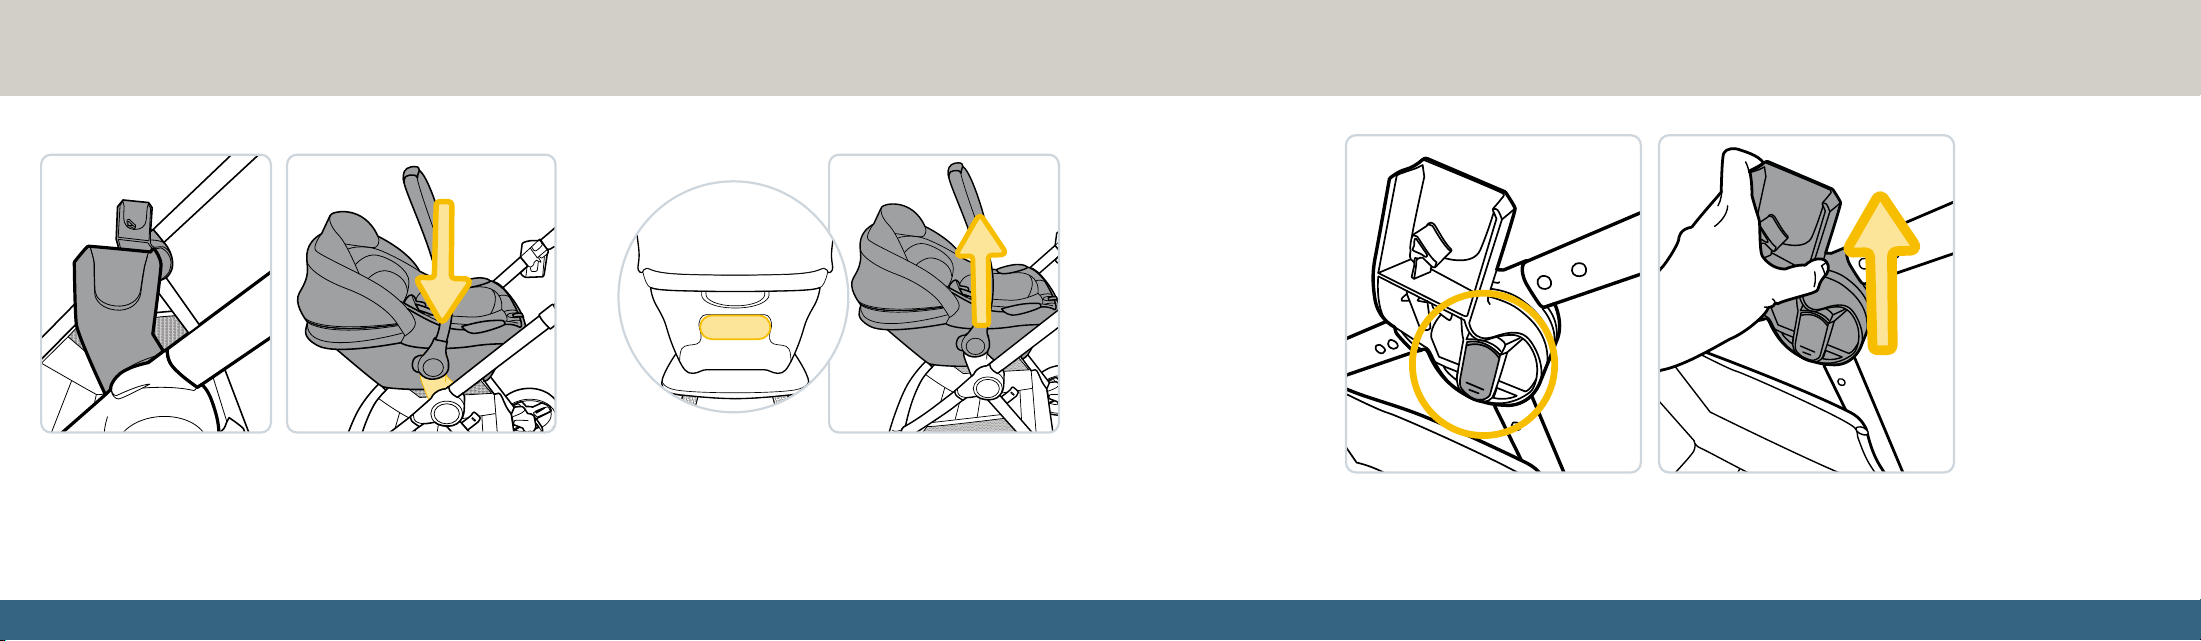
Once the adapters are attached, lower the car seat onto the
adapters. It will click into place. Pull gently on the car seat’s
handlebar to ensure it is attached to the stroller securely.
To remove the car seat: Press and hold the release
handle on your car seat, then lift the car seat off the
stroller. Consult your car seat’s instruction manual for
more detailed instructions.
To remove the car seat adapters from the stroller: Press the release
buttons on each adapter. While holding the buttons down, slide each adapter
up and out from the stroller frame.
3736
Care and Maintenance
NEVER place heavy objects on top of the stroller.
Clean dust and general stains on the cloth and frame of the
stroller with a damp cloth and warm, soapy water.
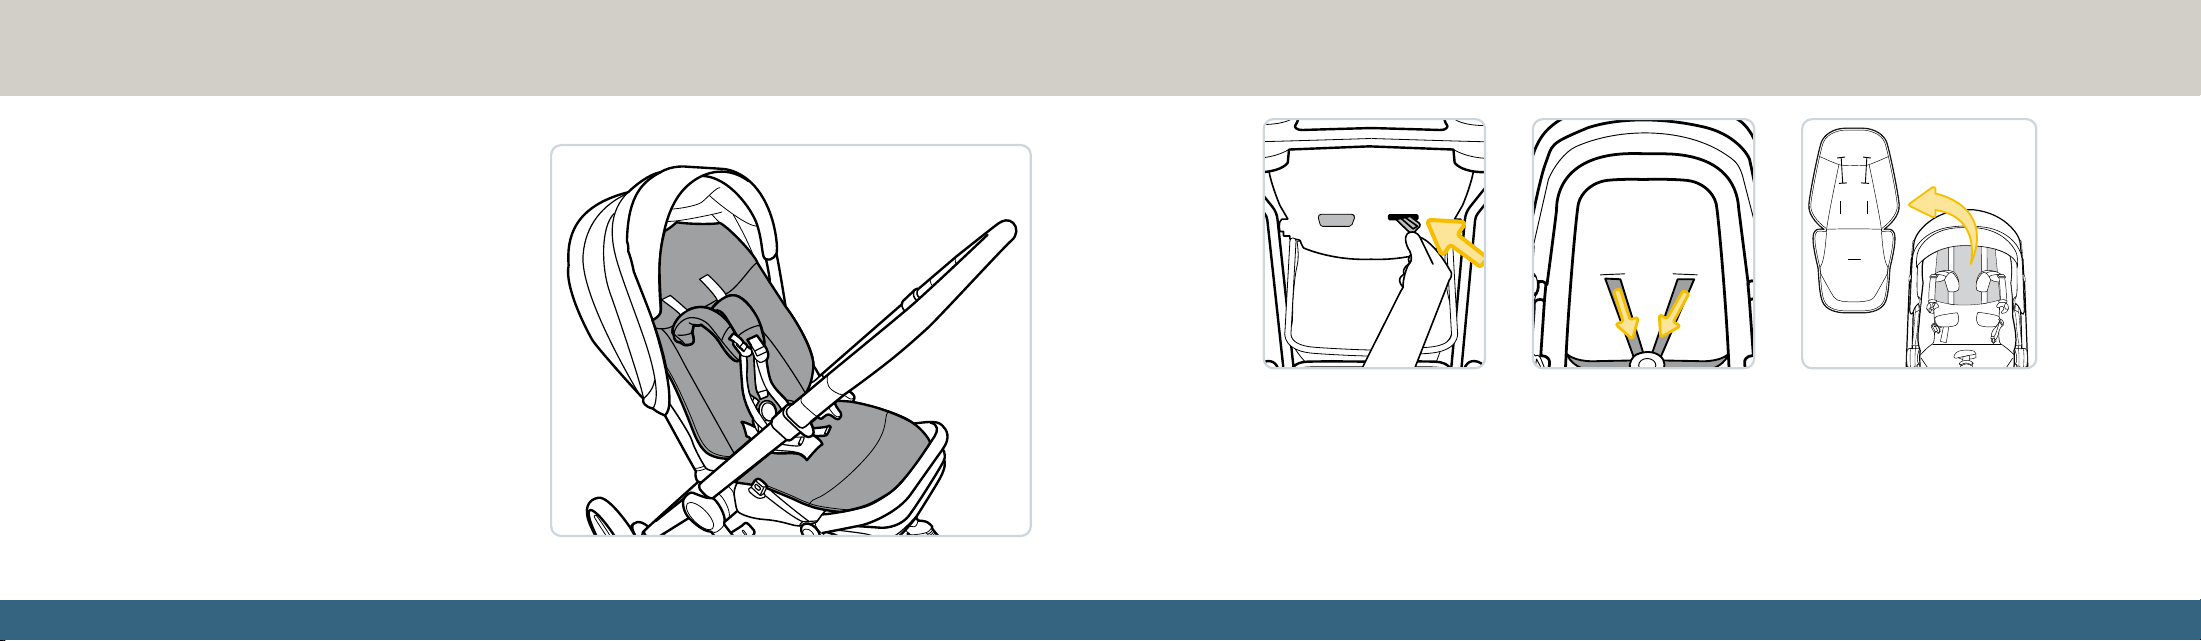
The seat pad and harness covers are machine washable.
Wash with cold water on a gentle cycle. Tumble dry on low
heat. DO NOT dry clean. DO NOT iron.
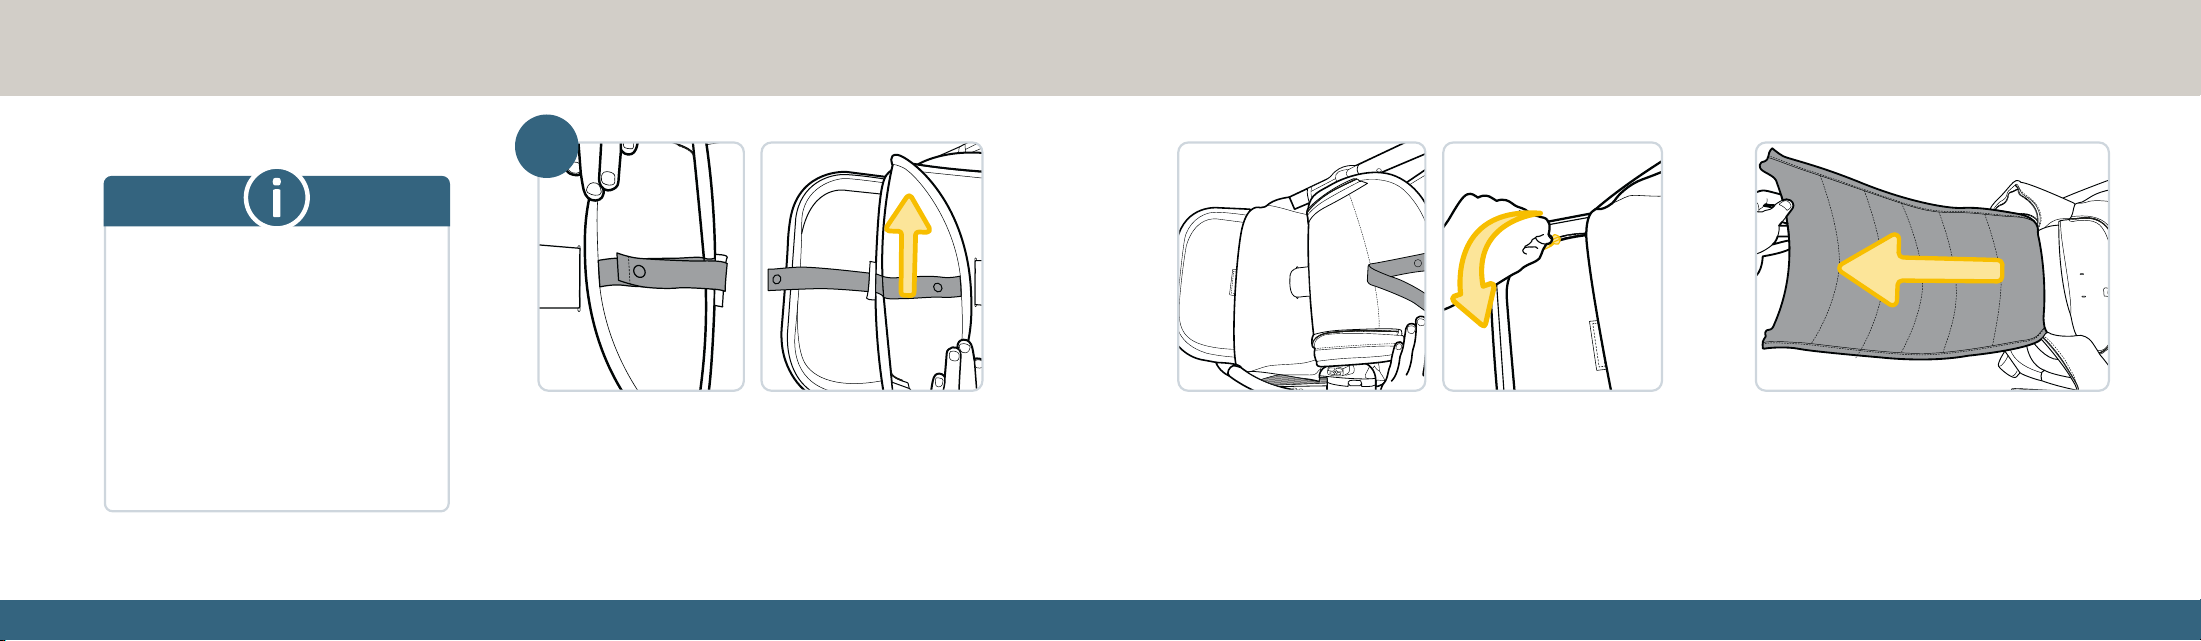
To remove the seat pad and harness covers for
cleaning: Locate the harness strap retainers on the back
of the stroller. They may be obscured by the flap on the
seatback. Push the harness strap retainers through the
harness slots; you may need to turn the retainers sideways
to fit them through.
From the front of the stroller seat, pull the harness straps
out from the harness slots.
Once the harness strap retainers are pushed through, you
may unbuckle the harness covers and remove them and
the seat pad for cleaning.
To install the seat pad: Pull the seat pad over the
seat, pulling the harness and buckle straps through
the appropriate slots. Push the harness strap retainers
through the harness slots; you may need to turn the
retainers sideways to fit them through.
3938
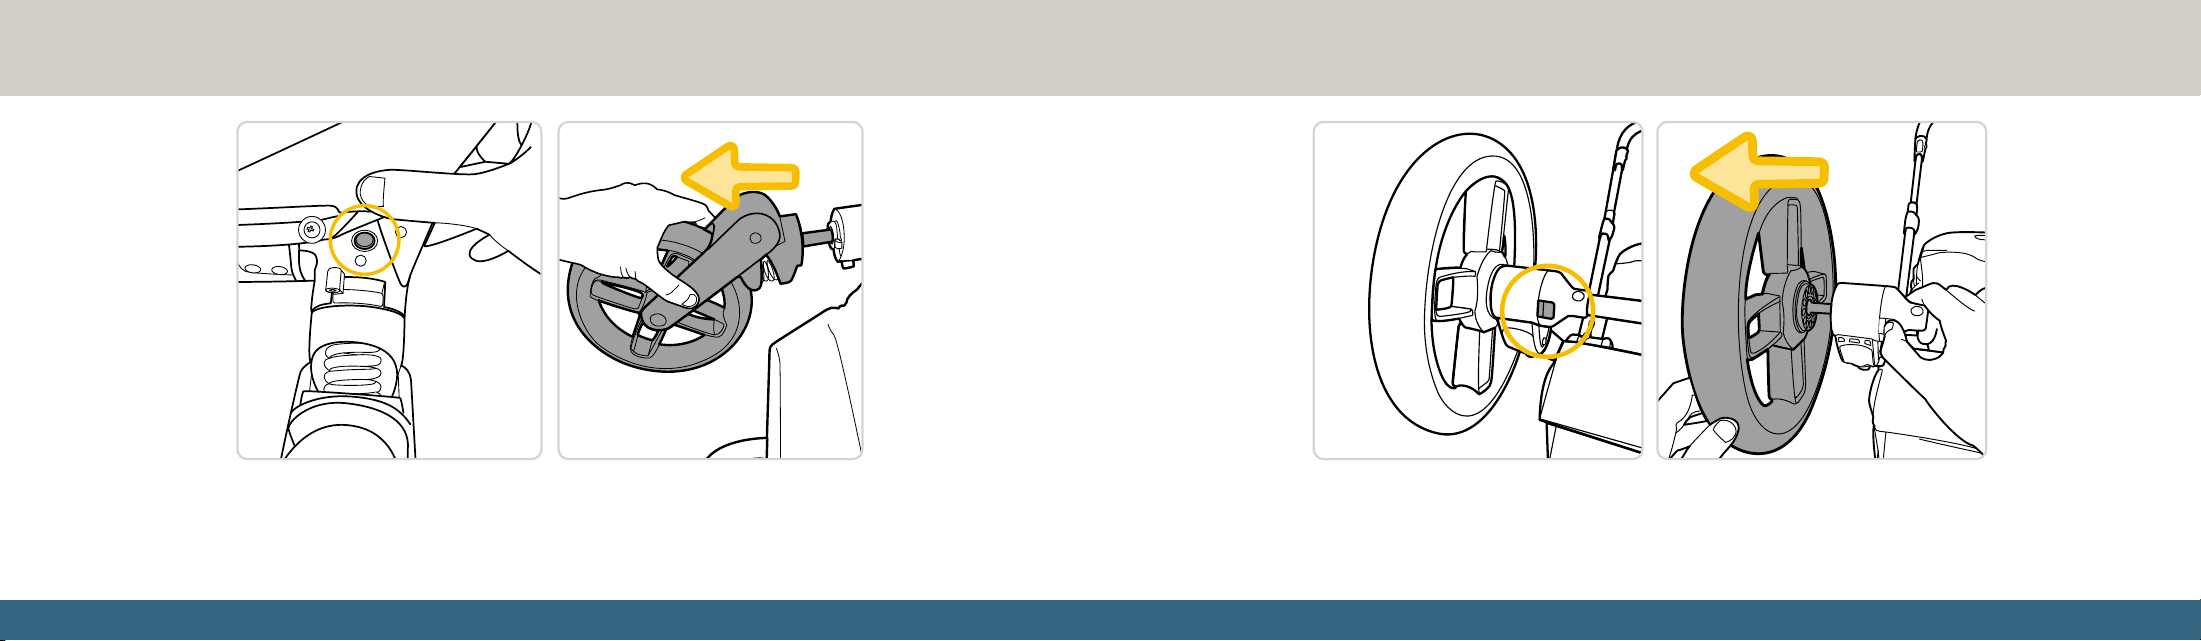
To remove the front wheels: Locate the front wheel release button above and
behind the front wheels, just above the swivel locks. While pressing the button
down, remove the front wheel from the stroller. Repeat for the other wheel.
To install the front wheels, see page 6.
To remove the rear wheels: Locate the rear wheel release button where the rear
wheels meet the stroller frame. While pushing the button in, pull the rear wheel out
from the stroller. Repeat for the other wheel.
To install the rear wheels, see page 7.
4140
Dorel Juvenile Group, Inc. warrants to the original purchaser that this product (Oxford Modular Travel System) is free from material
and workmanship defects when used under normal conditions for a period of two (2) years from the date of purchase. Should the
product contain defects in material or workmanship, Dorel Juvenile Group, Inc. will repair or replace the product, at our option,
free of charge. Purchaser will be responsible for all costs associated with packaging and shipping the product to Dorel Juvenile
Group Consumer Care Department at the address noted on back cover and all other freight or insurance costs associated with
the return. Dorel Juvenile Group will bear the cost of shipping the repaired or replaced product to the purchaser. Product should
be returned in its original package accompanied by a proof of purchase, either a sales receipt or other proof that the product is
within the warranty period. This warranty is void if the owner repairs or modifies the product or the product has been damaged as
a result of misuse. This warranty excludes any liability other than that expressly stated previously, including but not limited to, any
incidental or inconsequential damages.
SOME STATES DO NOT ALLOW THE EXCLUSION OR LIMITATION OF INCIDENTAL OR CONSEQUENTIAL DAMAGES, SO THE ABOVE
LIMITATION OR EXCLUSION MAY NOT APPLY TO YOU. THIS WARRANTY GIVES YOU SPECIFIC LEGAL RIGHTS, AND YOU MAY ALSO
HAVE OTHER RIGHTS THAT MAY VARY FROM STATE TO STATE.
Warranty
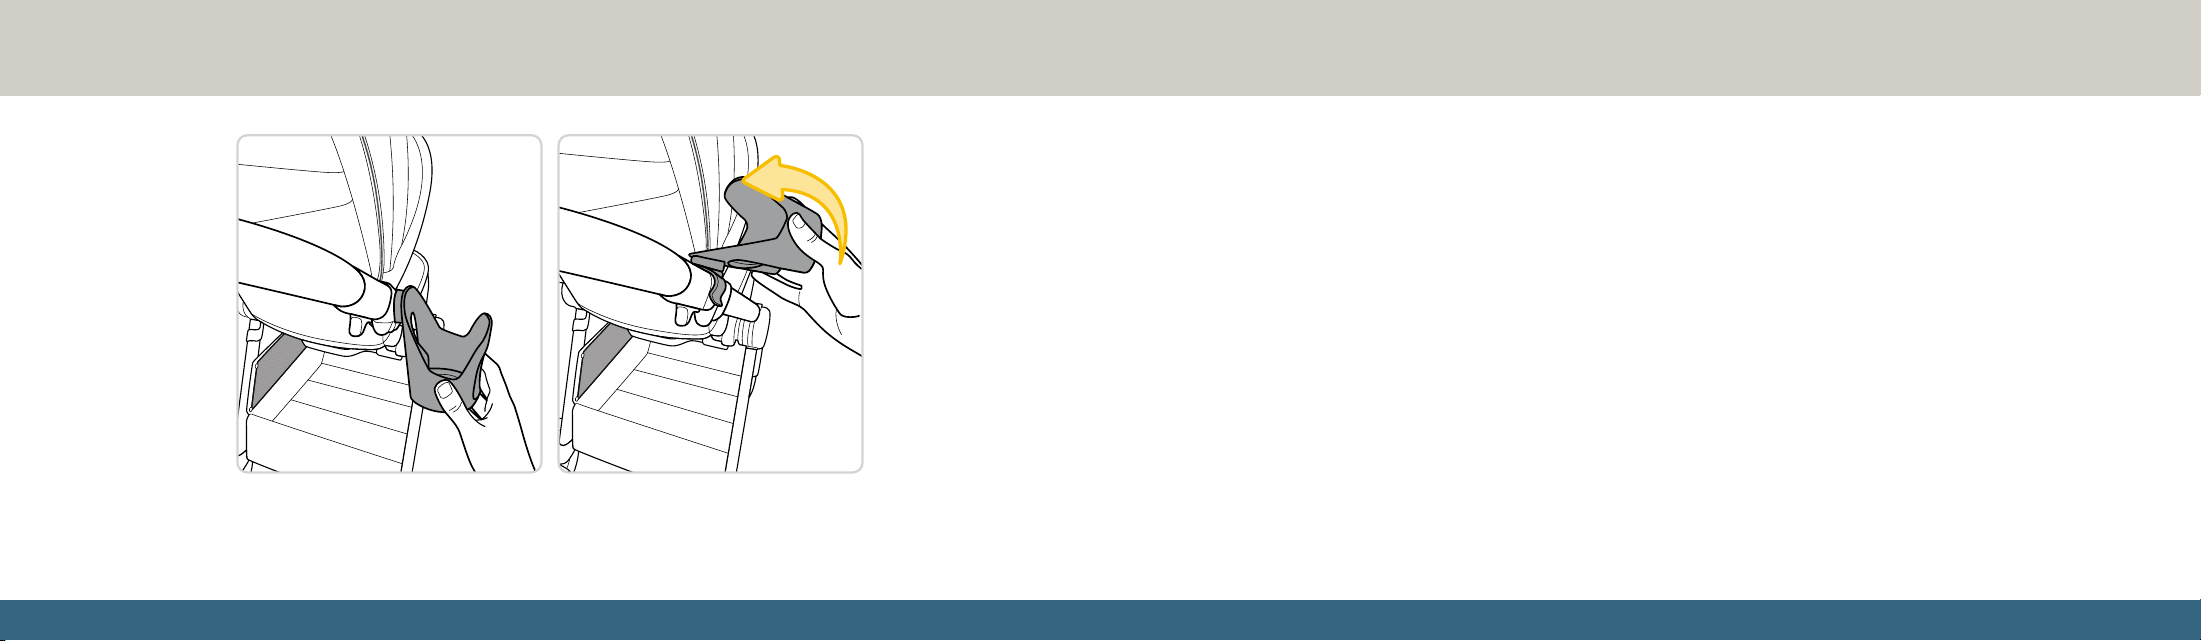
To remove the cup holder: Unhook the cupholder from the stroller frame,
then pull it up and away from the stroller.
To install the cup holder, see page 9.
