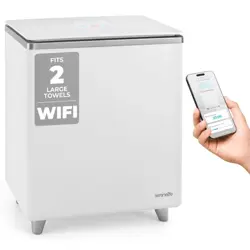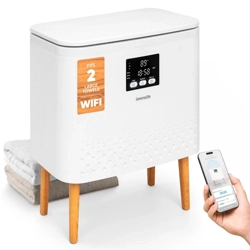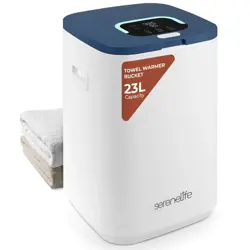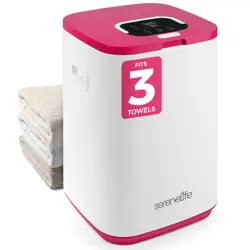
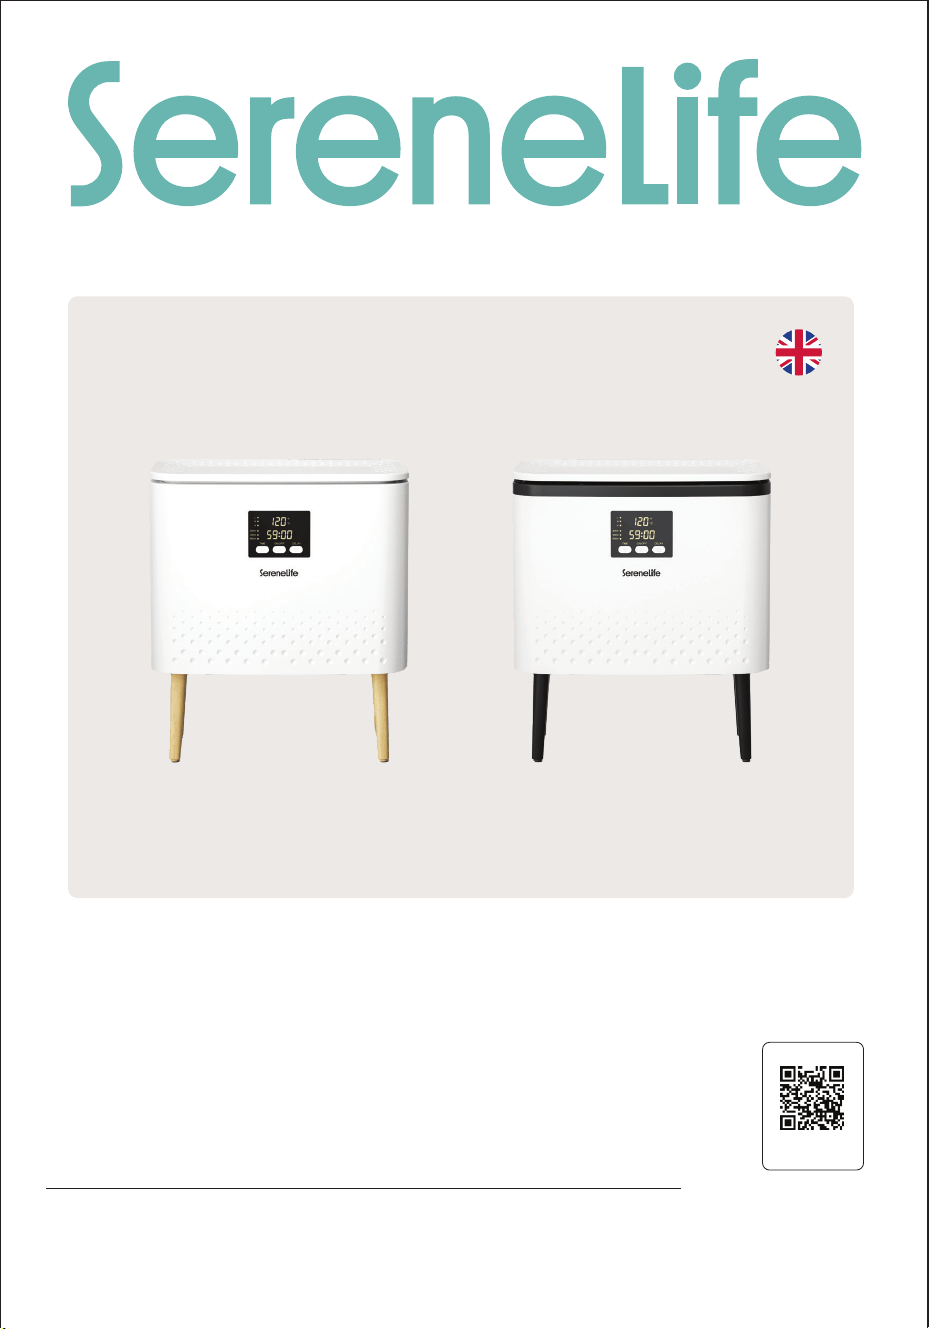
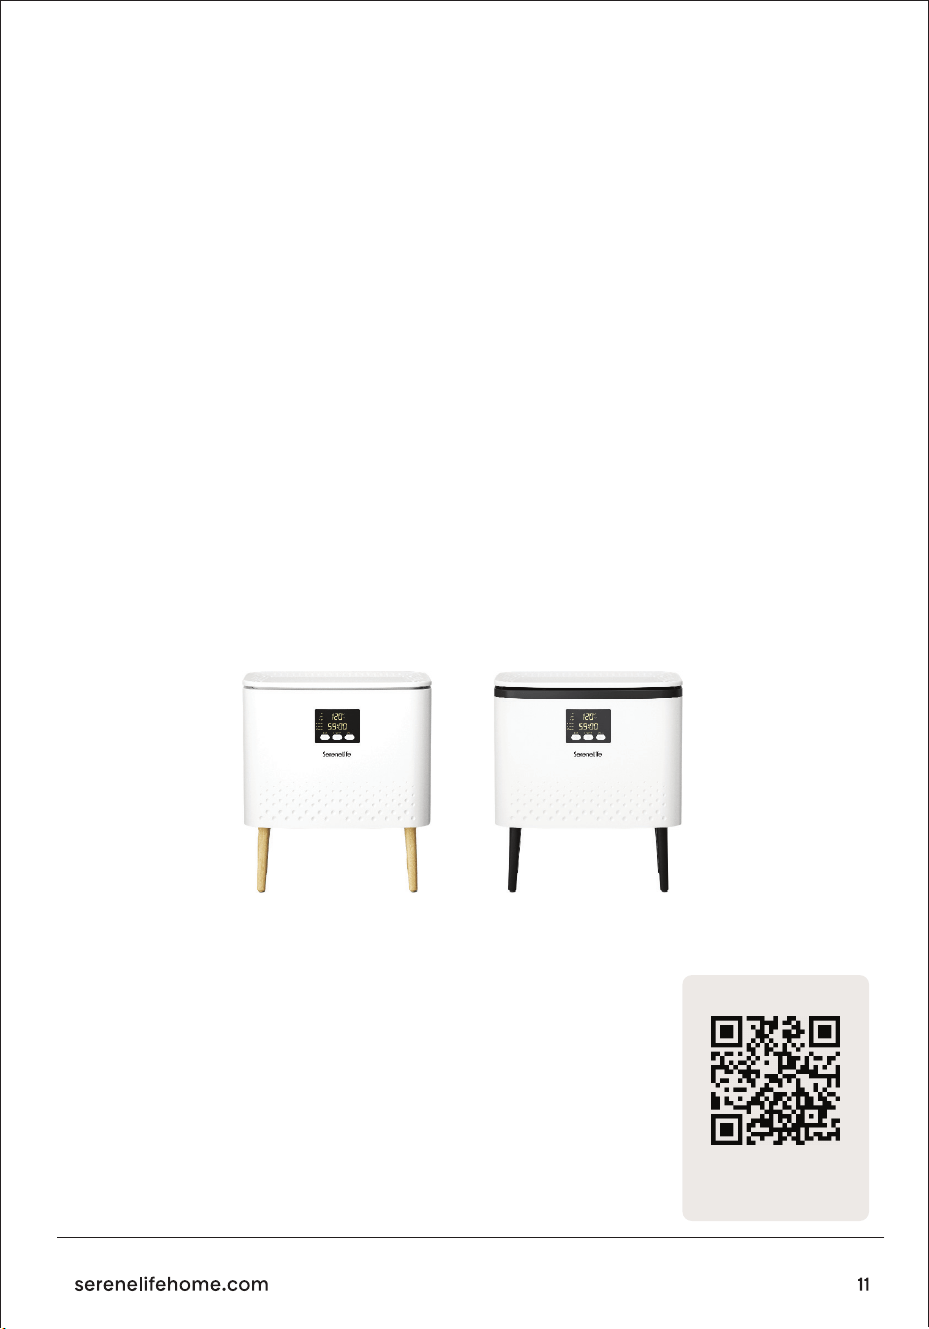
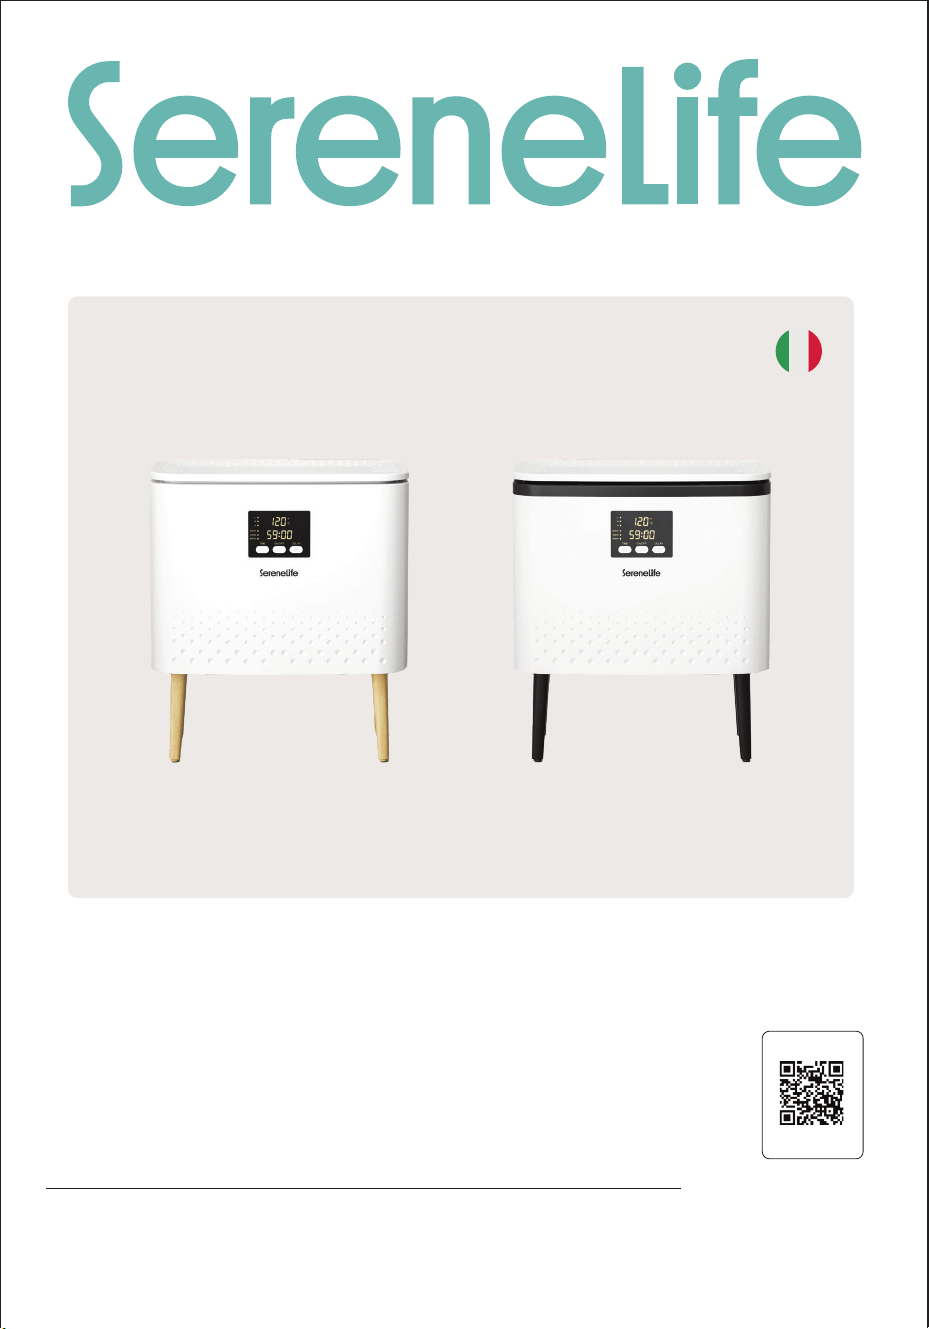
SLTLR625 - SLTLR725
user guide
rectangular towel
warmer bucket
Visit Our Website
SCAN ME
serenelifehome.com
ENG

CONTENTS
READ AND SAVE THESE INSTRUCTIONS
WARNING:
BE SURE TO READ ALL INSTRUCTIONS, WARNINGS AND
PRECAUTIONS CAREFULLY BEFORE USING THIS PRODUCT.
FAILURE TO DO SO COULD RESULT IN INJURY TO YOU
OR DAMAGE TO THE UNIT.
FEATURES & TECHNICAL SPECS
CAUTION
IMPORTANT SAFETY INSTRUCTIONS
FCC INFORMATION
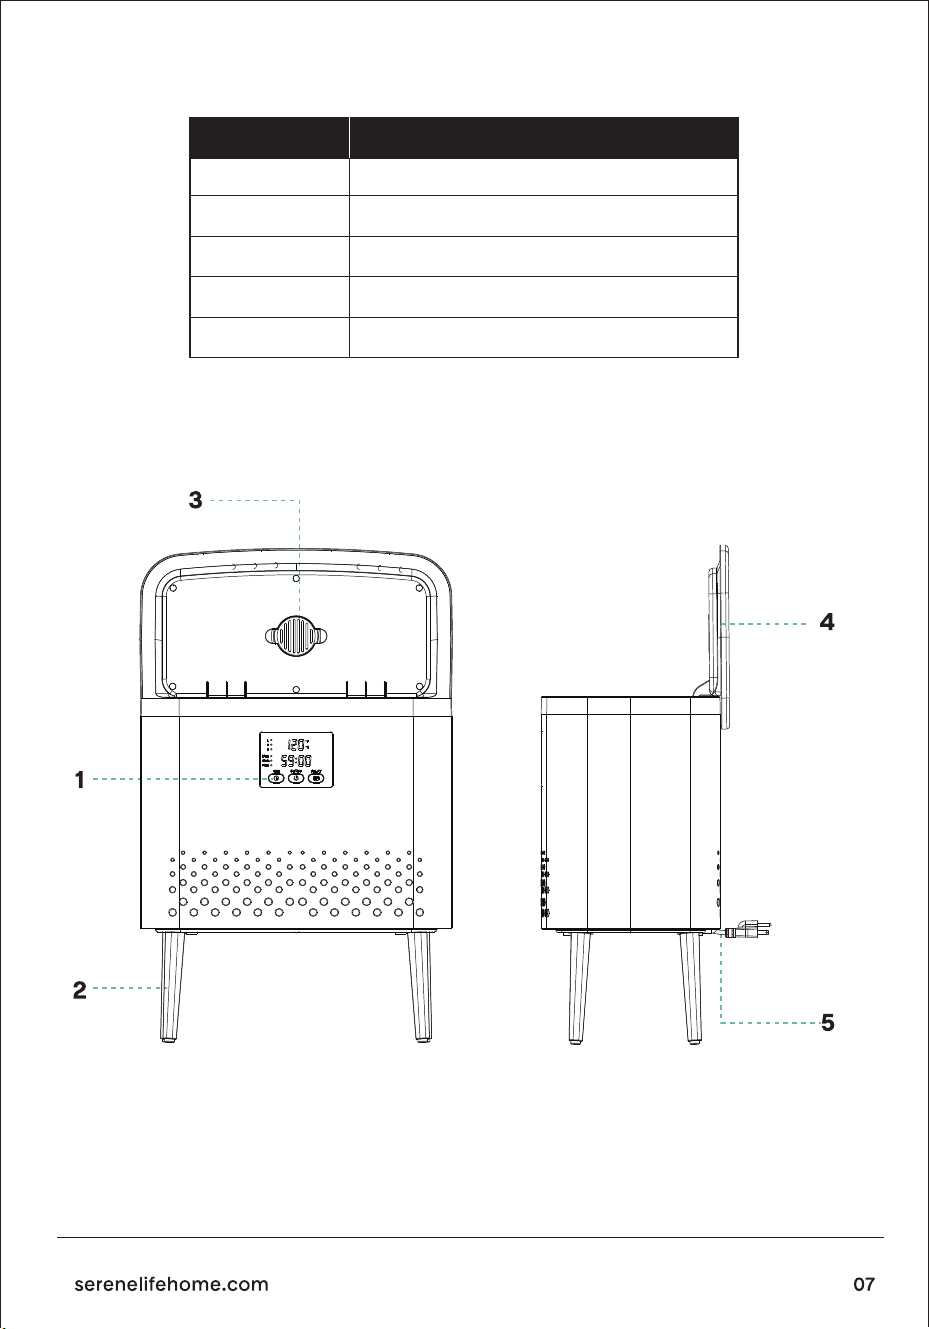
LOCATION OF PARTS AND CONTROLS
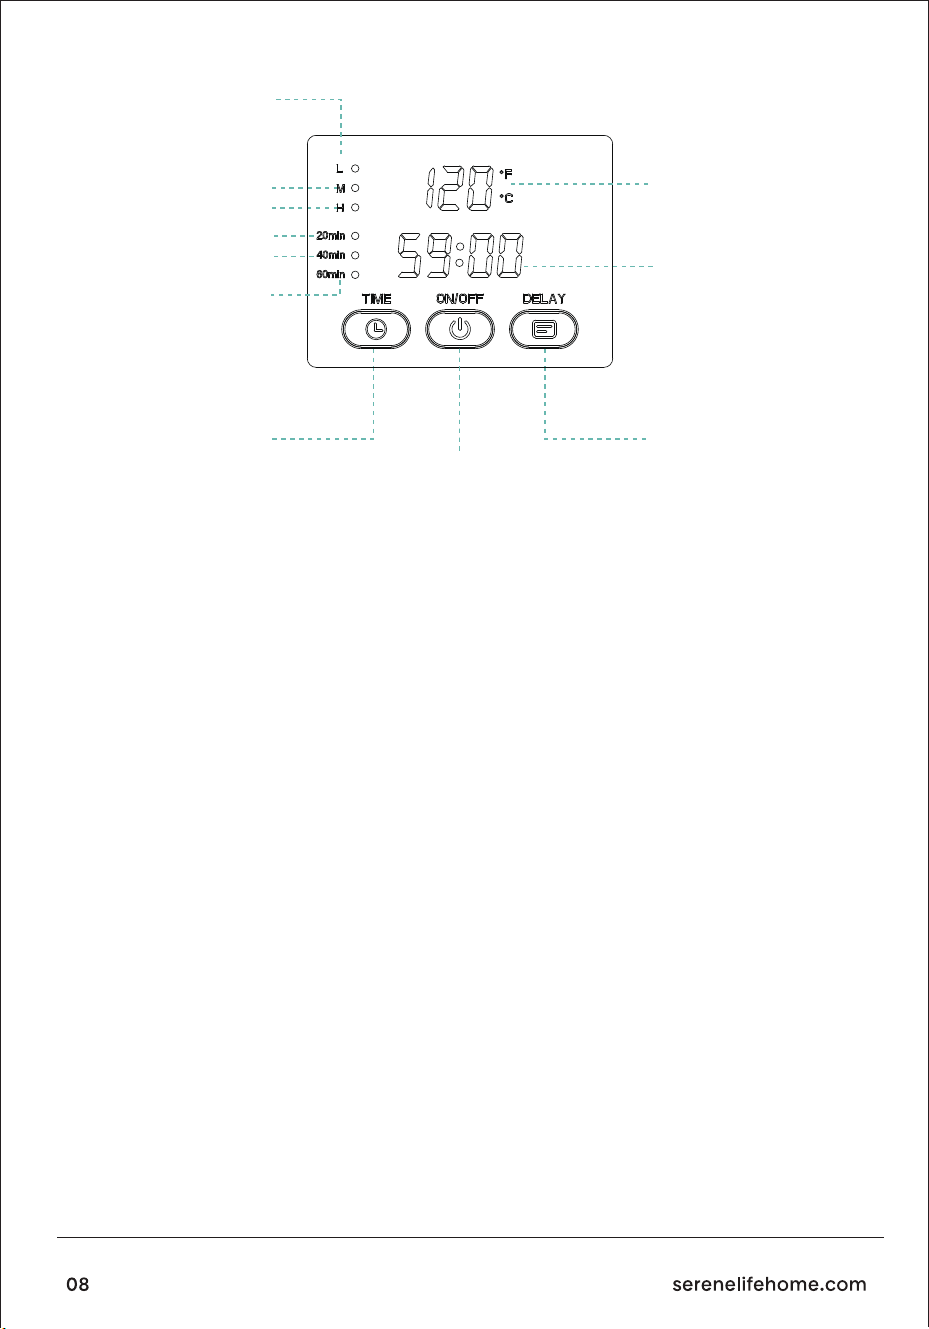
LED SCREEN
DISPLAY INSTRUCTIONS
FRAGRANCE DISC INSTRUCTIONS
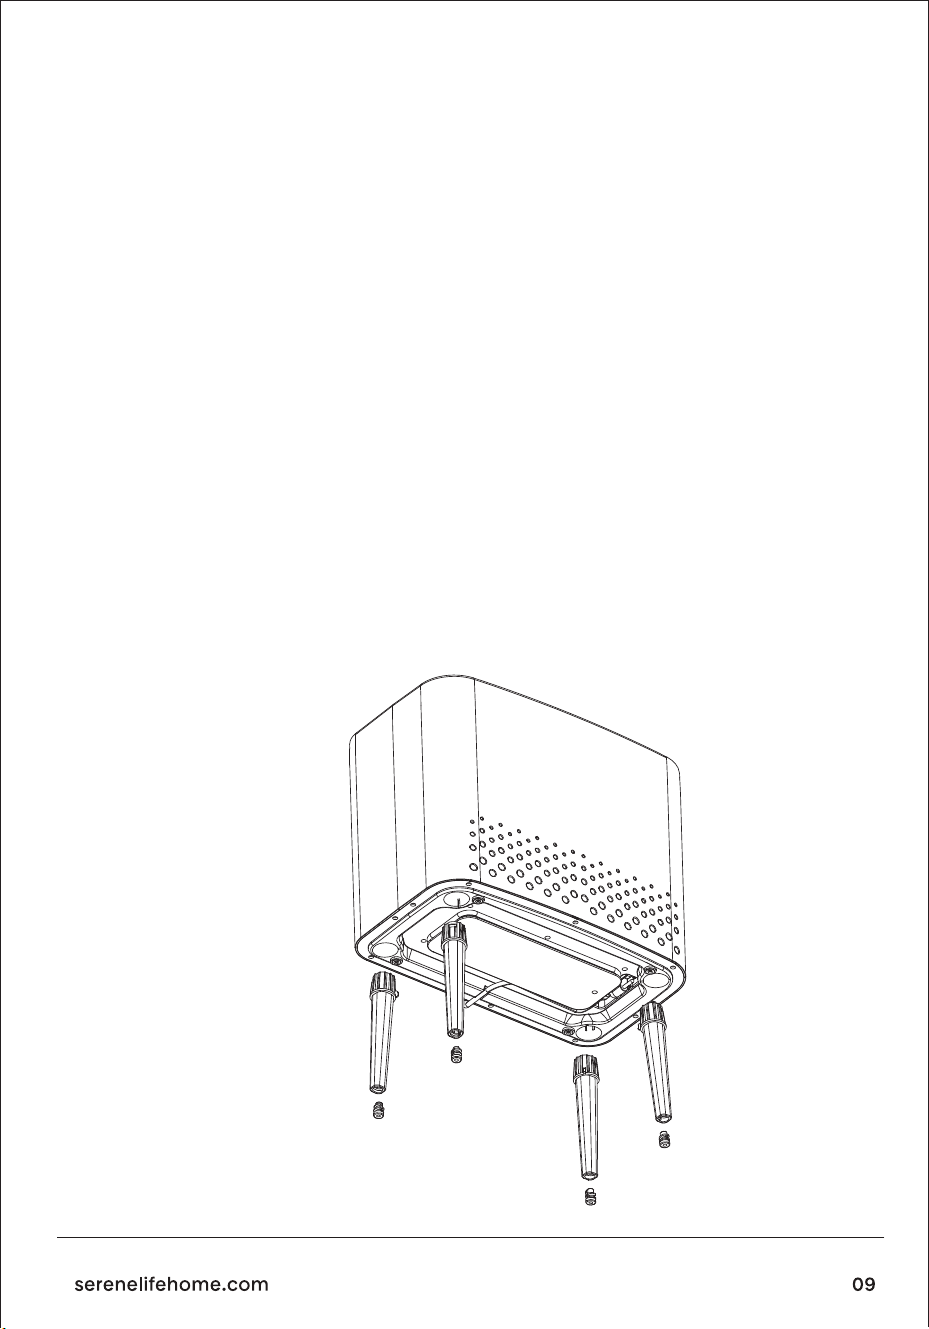
SET UP INSTRUCTION
USING THE TOWEL & BLANKET WARMER
TIPS FOR BEST RESULTS
CARE AND MAINTENANCE
REGISTER PRODUCT
3
4
5
6
7
8
9
9
9
10
11
11
11

Features:
•Perfectly Size for Two Large Bath Towels
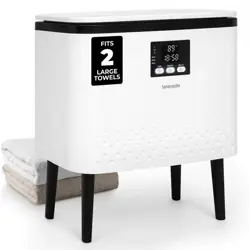
• Holds 2 Large Bath Towels or a Personal Throw Blanket
• Simple Single-Touch Control
• On/O Button
• Automatically Turns O After Time Duration
• Lid Keeps Hands Free when Filling and Emptying the Towel and Blanket Warmer
• Double-walled Insulated Lid Keeps Heat in While Staying Cool to the Touch
• Overheat Protection and Water-Resistant Design
• Built-in Indicator Light
• Convenient for Transporting Towel Warmer Bucket
• Designed to conserve Power and Energy Consumption
• Can Warm Towels, Robes, Blankets, or Other Fabric Items
What's in the Box:
Technical Specs:
• Towel Warmer
• Aromatherapy Tablet
• Desiccant
• Construction Material: Stainless Sheet
• Power Supply: 450W
• Power Output: 220V - 240V AC
• Frequency Response: 50/60Hz
• Volume: 20L (5.28gal)
• Time Duration: 20, 40, 60 minutes
• Power Cord Length: 5.91 ft. (180 cm)
• Weight Capacity: 110.2 Lbs. (50 kg)
• Temperature Range: Adjustable from 90°F to 140°F (32°C to 135°C)
• Product Dimensions (L x W x H):
17.32” x 10.01” x 19.68” -inches (44 x 25 x 50 cm)
CAUTION
To reduce the risk of serious injury, please note that this is not a toy.
Do not allow children to operate or play near the towel & blanket warmer.
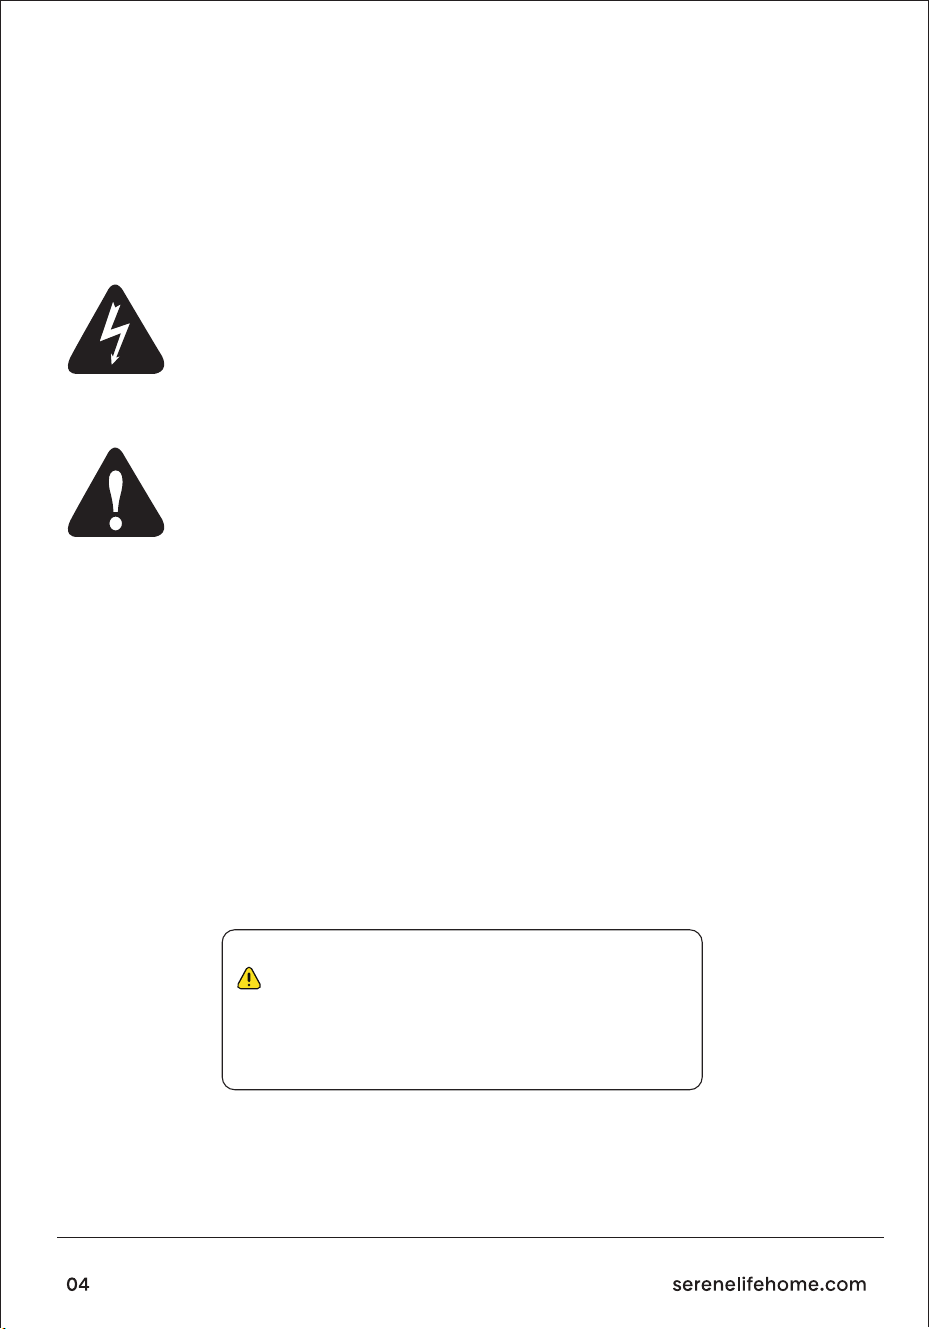
The lightning ash with arrow-head symbol within an equilateral
triangle is intended to alert the user to the presence of uninsulated
“dangerous voltage” within the unit’s enclosure that may be of
sucient magnitude to constitute a risk of electric shock.
The exclamation point within an equilateral triangle is intended to
alert the user to the presence of important operating and maintenance
(servicing) instructions in the literature accompanying the unit.
TO REDUCE THE RISK OF FIRE OR ELECTRIC SHOCK, DO NOT EXPOSE THIS
UNIT TO RAIN OR MOISTURE.
ALL OF THE SAFETY AND OPERATING INSTRUCTIONS SHOULD BE READ,
ADHERED TO AND FOLLOWED BEFORE THE UNIT IS OPERATED.
• FOR HOUSEHOLD USE ONLY
• FOR ADULT USE ONLY
• FOR DRY FABRIC ITEMS ONLY
CALIFORNIA PROP 65 WARNING
WARNING:
This product contains Cadmium which is known to the state of
California to cause cancer, birth defects and other reproductive
harm. Do not ingest.
For more info go to: www.P65warnings.ca.gov

SAVE THESE INSTRUCTIONS
Important Safety Instructions
WARNING:
TO REDUCE RISK OF FIRE, ELECTRIC SHOCK, OR SERIOUS INJURY TO
PERSONS WHEN USING THE APPLIANCE, FOLLOW BASIC PRECAUTIONS
INCLUDING THE FOLLOWING:
• Read all instructions before using the appliance.
• Always unplug the unit from the electrical outlet immediately after using.
• Do not use appliance for anything other than its intended use.
• Do not place or store the unit where it can fall or be pulled into a tub or sink.
• Do not place in or drop into water or other liquid.
• Do not reach for a unit that has fallen into water. Unplug it immediately.
• Care should be taken so that objects do not fall into and/or liquids are not
spilled onto the unit.
• This unit should never be left unattended when plugged in.
• Close supervision is necessary when this unit is used near children or disabled
persons.
• Use this unit for its intended use as described in this manual.
• Never operate this unit if it has a damaged cord or plug, if it is not working
properly, or if it has been dropped, damaged, or dropped in water.
• Keep cords away from heated surfaces. Do not wrap the cord around the
exterior of the appliance or let the cord hang over a table or counter edge.
• Do not use outdoors.
• Do not alter the safety plug or use an extension cord with this device.
• Do not operate with a voltage converter.
• Do not touch hot surfaces.
• Do not use accessory attachments not recommended by the manufacturer as
this may case injuries.

FCC INFORMATION
CAUTION:
WARNING:
Note:
Changes or modications not expressly approved by the party responsible for
compliance could void the user’s authority to operate the equipment.
Changes or modications to this unit not expressly approved by the party
responsible for compliance could void the user’s authority to operate the
equipment.
This device complies with Part 15 of the FCC Rules.
Operation is subject to the following two conditions:
1. This device may not cause harmful interference.
2. This device must accept any interference received including interference that
may cause undesired operation.
This equipment has been tested and found to comply with the limits for a Class B
digital device, pursuant to Part 15 of the FCC Rules. These limits are designed to
provide reasonable protection against harmful interference in a residential
installation. This unit generates, uses and can radiate radio frequency energy
and if not installed and used in accordance with the instructions, may cause
harmful interference to radio communications. However, there is no guarantee
that interference will not occur in a particular installation. If this equipment does
cause harmful interference to radio or television reception, which can be
determined by turning the equipment o and on, the user is encouraged to try
and correct the interference by one or more of the following measures:
• Reorient or relocate the receiving antenna.
• Increase the separation between the equipment and receiver.
• Connect the equipment to an outlet on a circuit dierent from that to which
the receiver is connected.
• Consult the dealer or an experienced radio/TV technician for help.
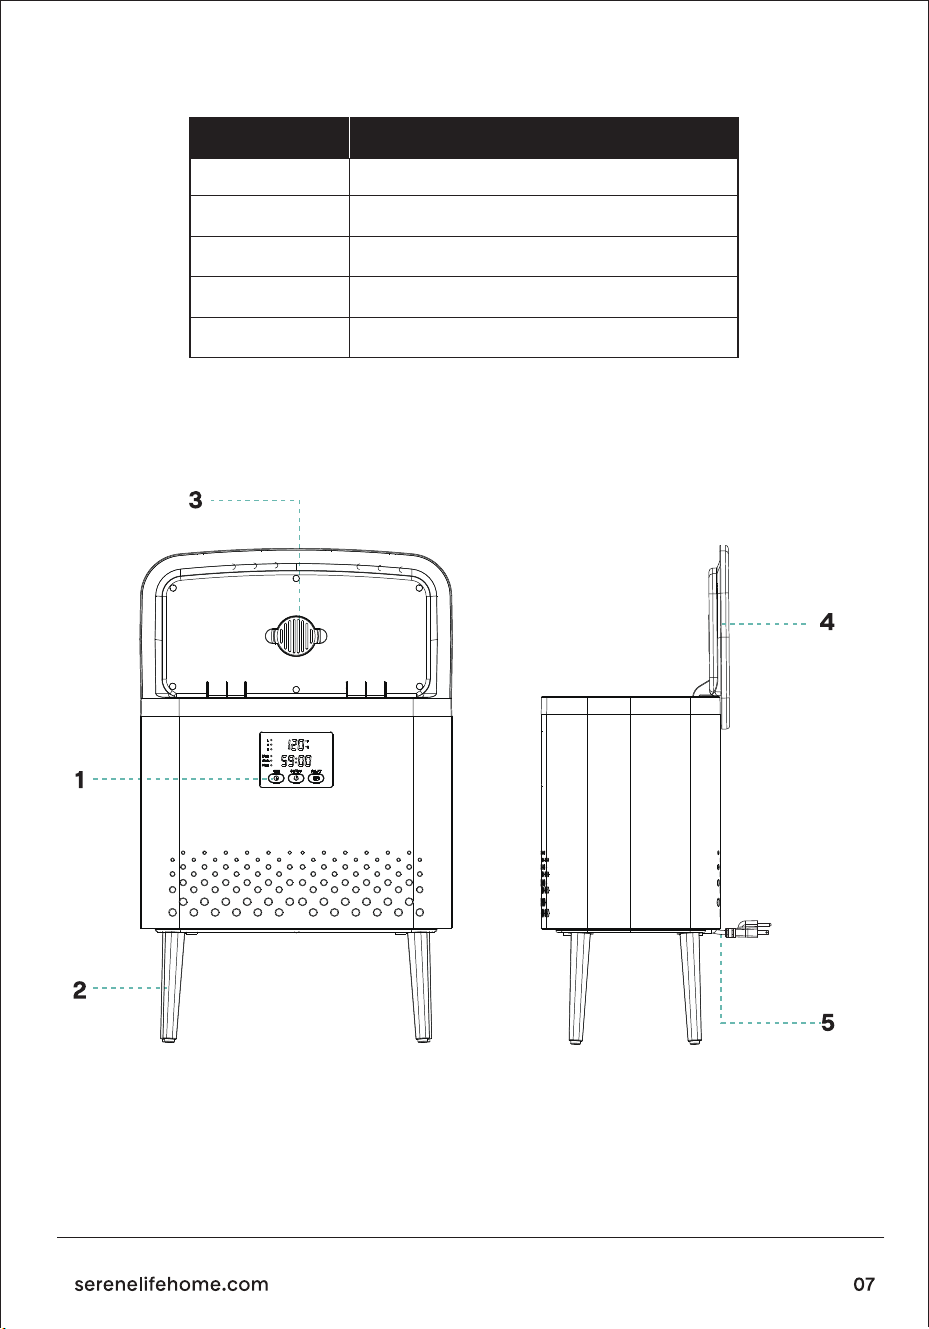
LOCATION OF PARTS AND CONTROLS
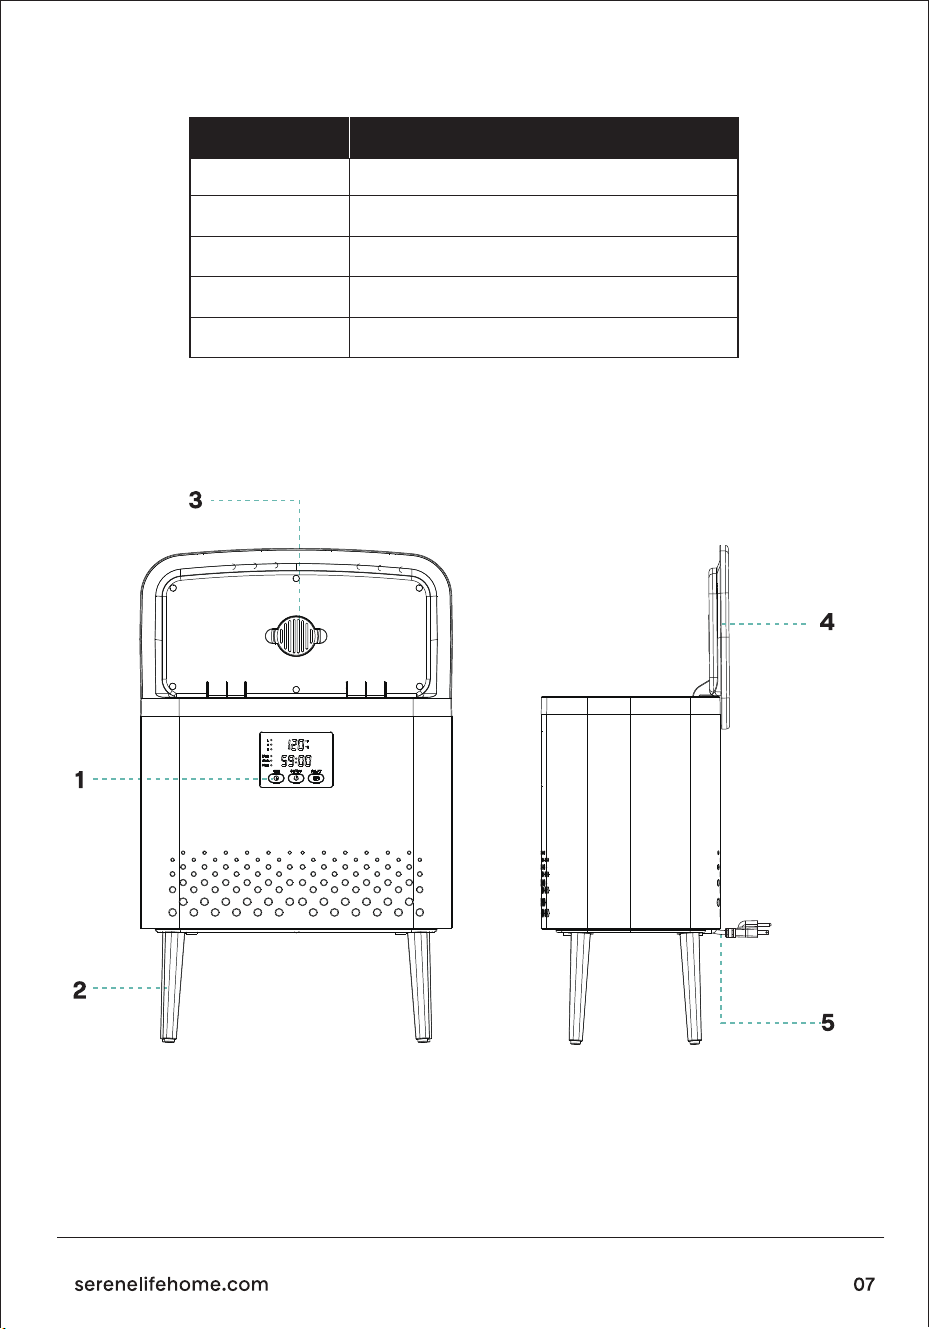
No.
1
2
3
4
5
PART NAME
On/O Button
Feet
Fragrance Disc
Lid
Power Cord
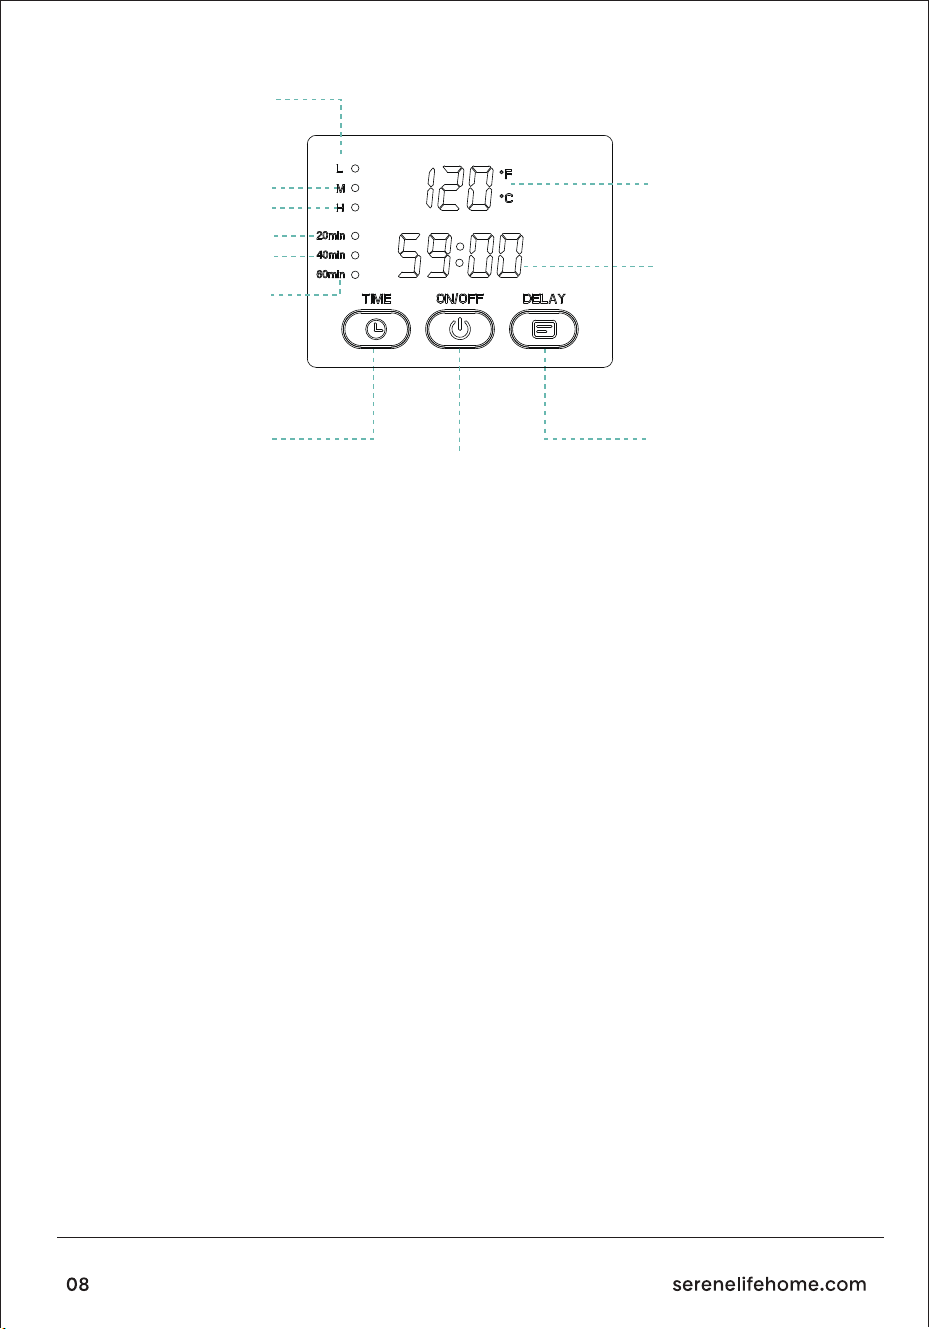
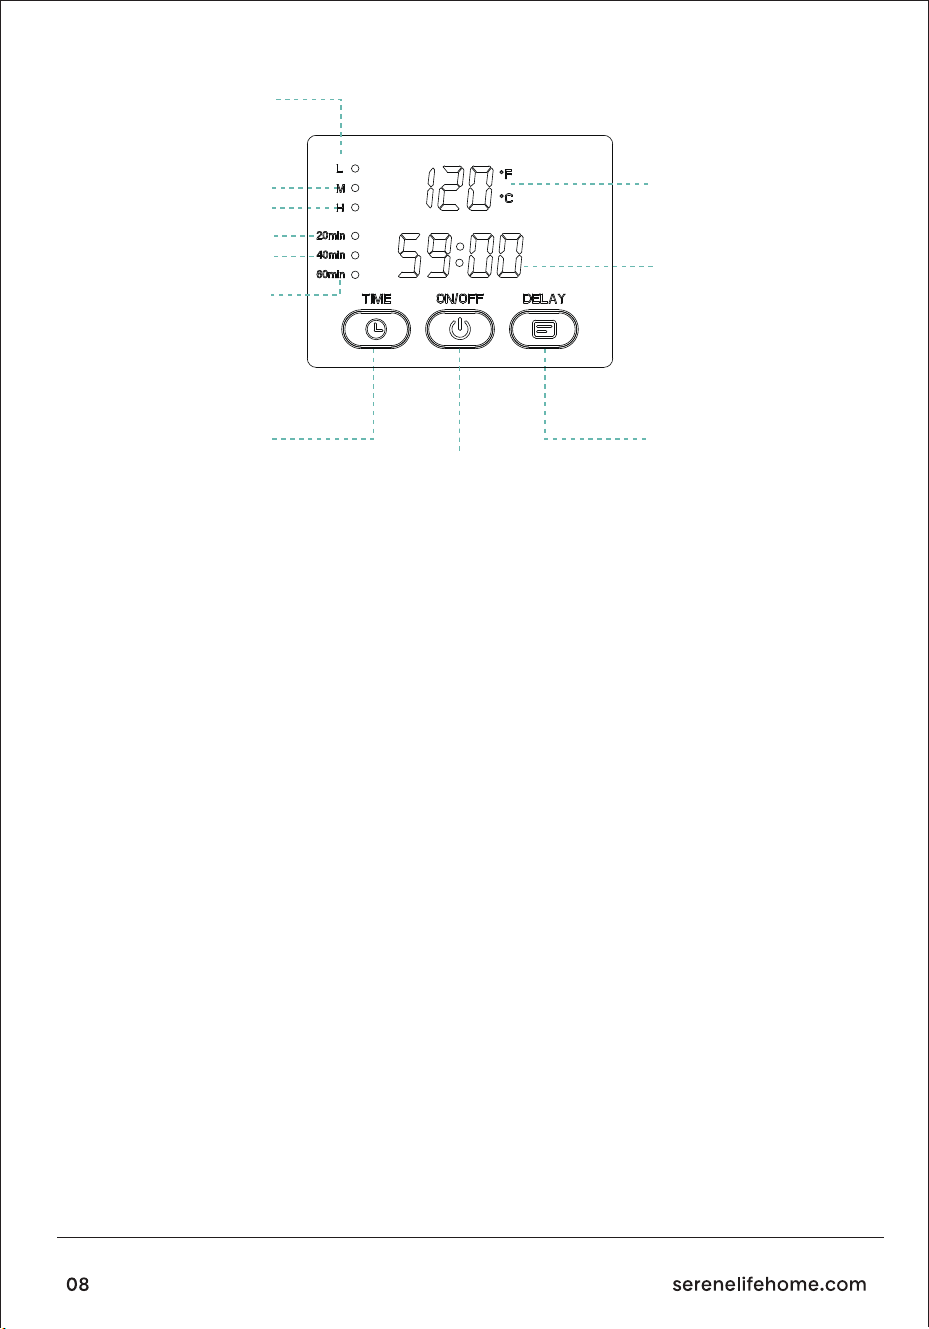
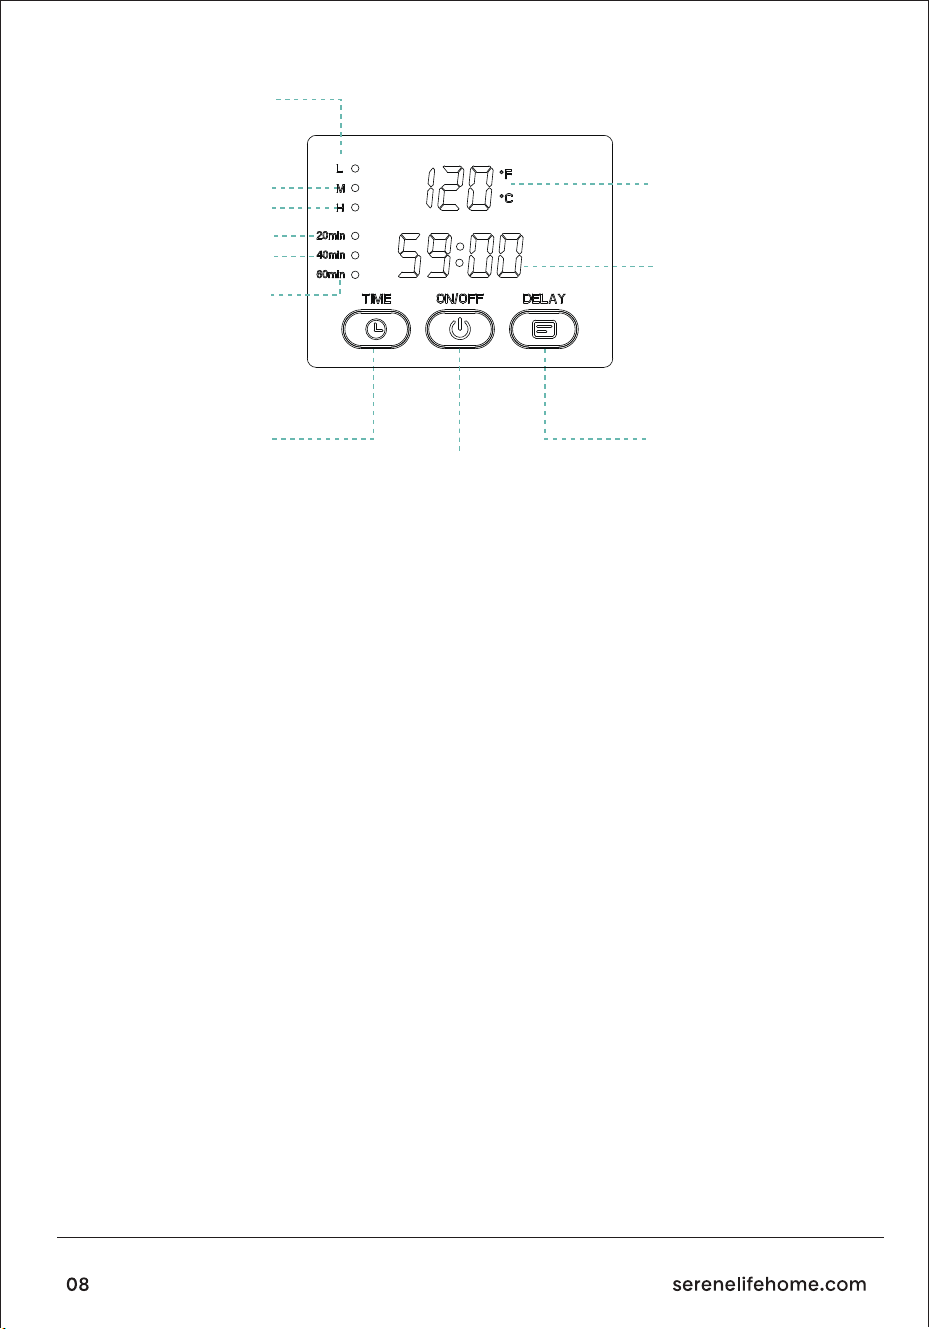
LED SCREEN
DISPLAY INSTRUCTIONS
Low Temperature
High Temperature
Timer Setting 60 mins
Timer Button
Timer Setting 40 mins
Timer Setting 20 mins
Medium Temperature
Real-Time Temperature
Display
Time Display
DELAY Button
switch key
1. Press the switch button to start the device, long press to turn o the device
2. After the device is started, the time separator symbol starts ashing If no
operation is performed within 5 seconds after startup, the device will
automatically set a working time of 20 minutes in high temperature mode
3. After turning on, two points in the time display zone will start ashing.
Press the reservation button within 10 seconds to set the delayed start time
(from 30 minutes to 24 hours, with each press increasing the time by 30 minutes).
4. After setting the reservation time, press the timer button within 10 seconds to
set the working time (switching between 20,40, and 60 minutes).
5. After setting the working hours, press the power button to set the low
temperature mode, medium temperature mode, and high temperature mode.
6. When the temperature of the barrel wall is above 50ºC (122ºF), the
background light of the switch will turn red, indicating a high temperature.
Do not touch it.
1. Appointment light: It ashes when the appointment is being selected, remains
continuously lit during the appointment, and turns o at the end of the
appointment time.
2. Time light: It ashes when selecting the time, stays on while in operation, and
turns o at the end of the working period.
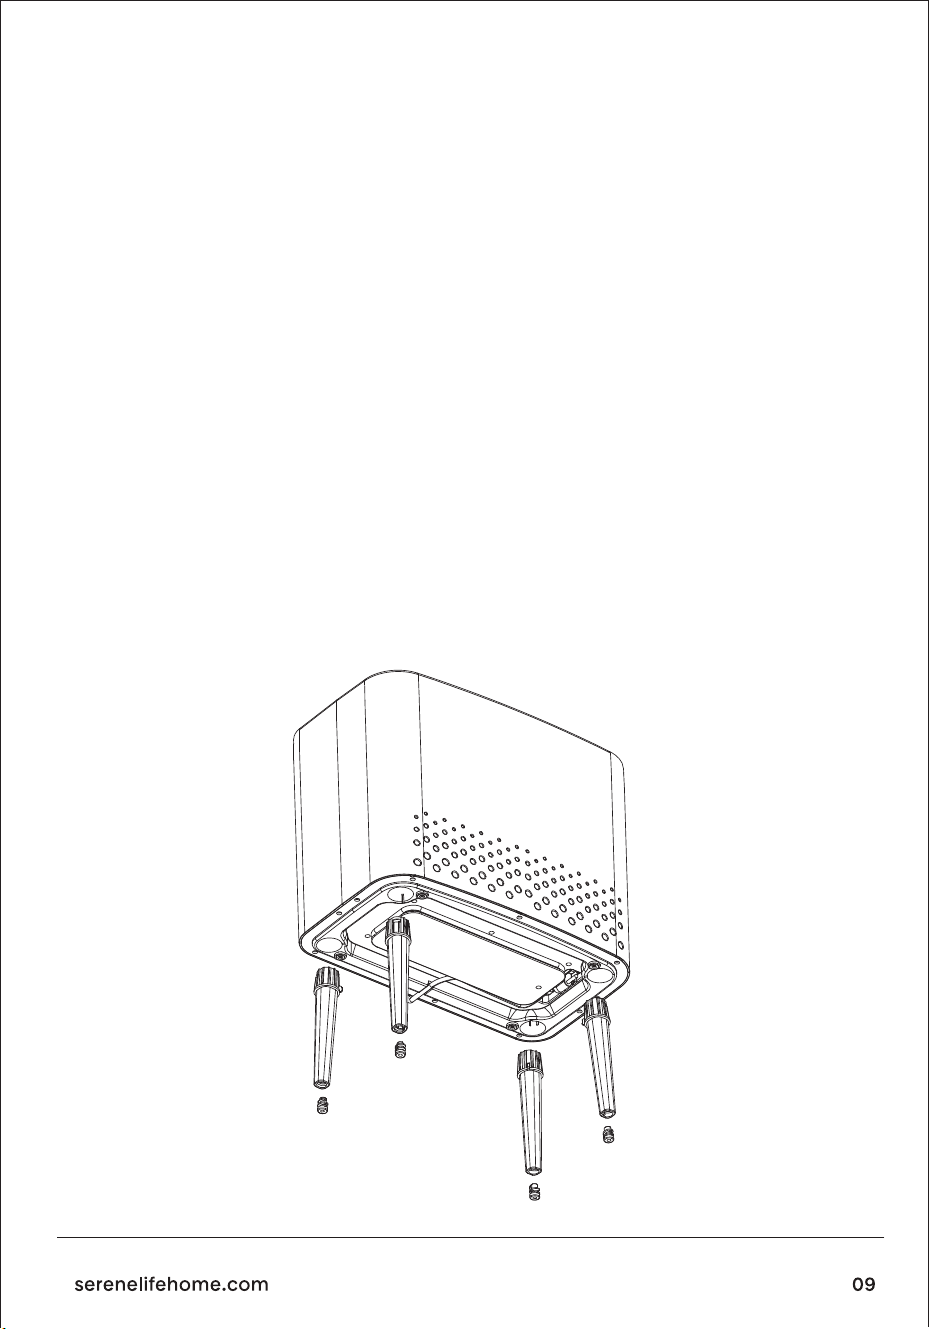
FRAGRANCE DISC INSTRUCTIONS
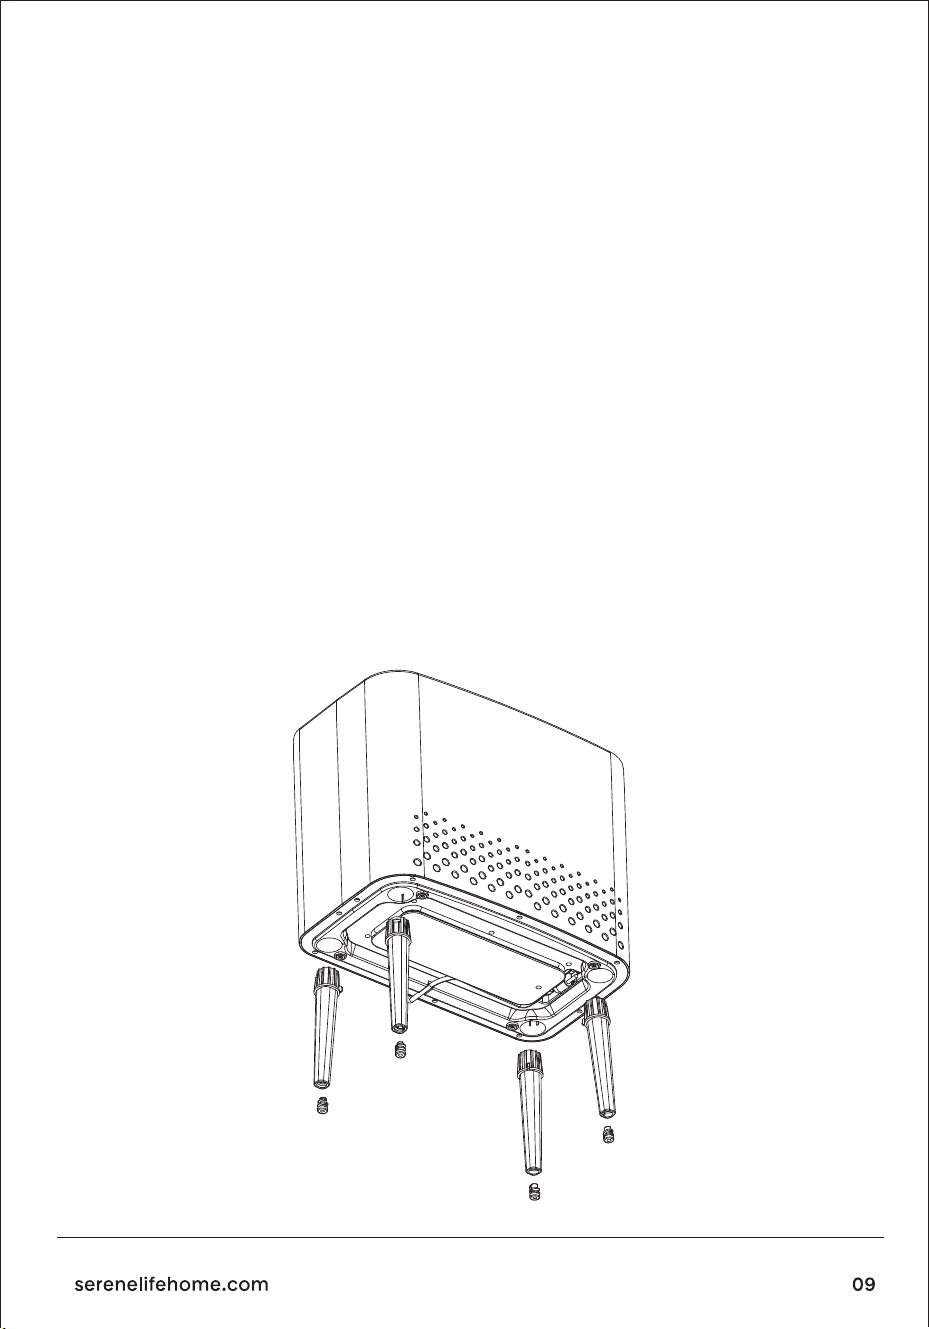
SET UP INSTRUCTION
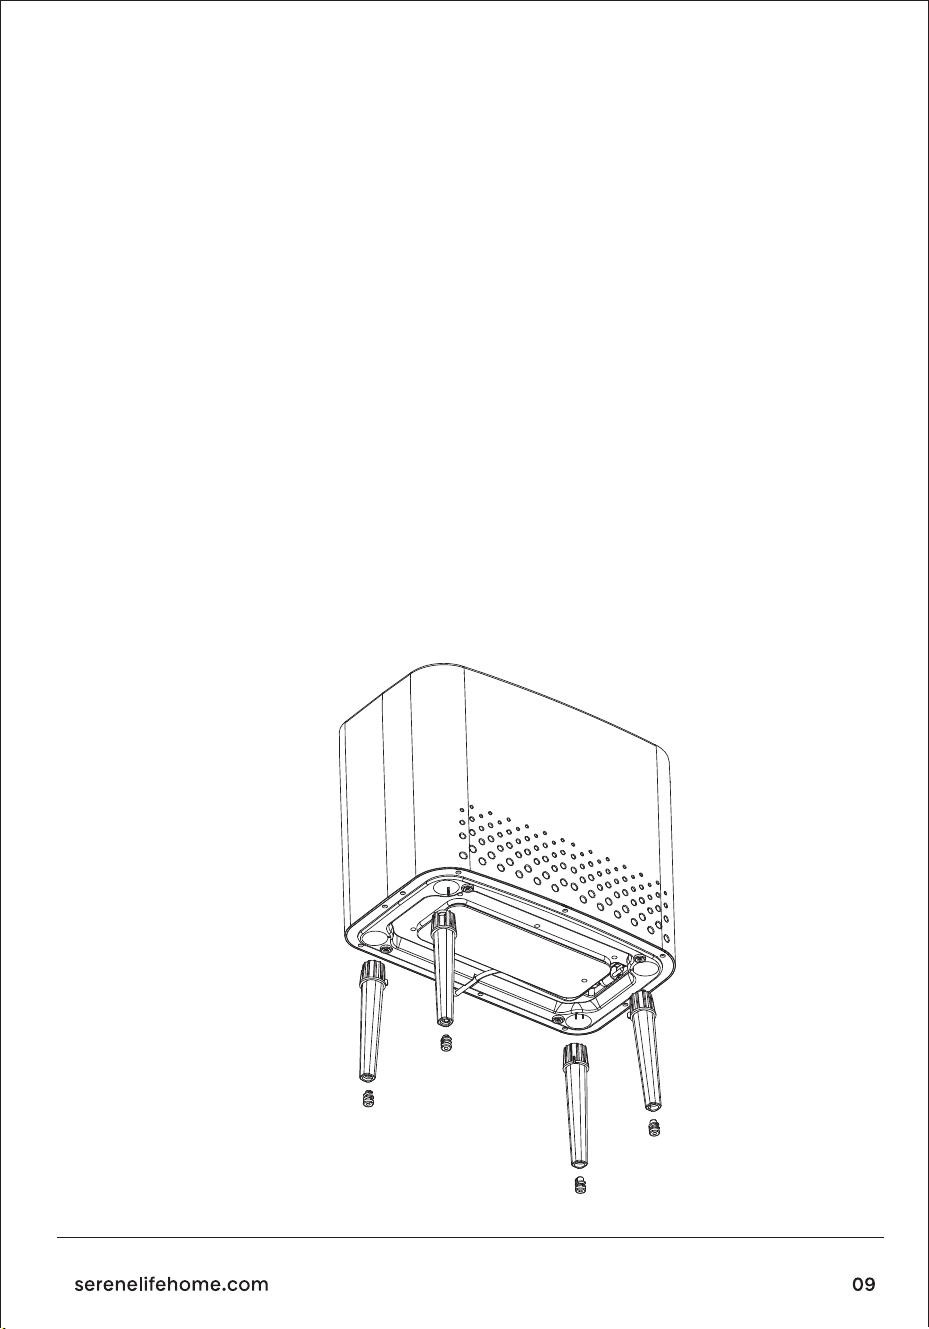
Install the support feet.
This fragrance disc additionally design is for some users who like to use
aromatherapy tablets or essential oils when warming towels.
3. Screen display instructions: Press the time button to cycle between 20, 40,
and 60, with the corresponding small round light ashing. The small round light
remains on during operation and turns o when the work is complete.
When not selecting an appointment, choose TIME. The screen will display the
time and ash when not in operation. During normal work, it stays ON
continuously while counting down. To make an appointment, rst select the
appointment and then choose the time. Click on the appointment, and the
screen will display the appointment time, blinking at rst. After conrmation,
the light remains on, counting down the appointment time. Once the
appointment time ends, the appointment light turns o, the time light stays on,
and the screen displays the countdown to the selected heating time.
1. Remove the Fragrance Disc from its sealed plastic bag.
2. Slide it into the Fragrance Disc Holder located on the underside of the lid.

Usage Instructions
USING THE TOWEL & BLANKET WARMER
1. Open the cover and take out the rubber feet and foot pads from the inside of
the machine body.
2. Lock the foot pads into the holes at the bottom of the rubber feet.
3. Align the rubber feet with the holes of the bottom case and snap them in.
1. Open the Lid and remove any packaging contents.
2. Place the Towel Warmer on a dry, level, hard surface.
3. Insert Plug into a standard 120V outlet.
1. Insert the power cord into an electrical outlet.
2. Open the LID and place ONLY DRY towel(s) or a blanket inside.
NOTE: Placing damp or wet towels inside the towel warmer can damage the
unit and pose serious safety risks.
3. Close the LID.
4. Press the ON/OFF BUTTON.
5. Please do not touch the inner wall of the product; otherwise, there is a risk of
scalding. The temperature of the barrel can reach 130+/- 8°C/46.4°F in about 5
minutes, and it can maintain this temperature for about 15 minutes. At this point,
the temperature of the towel can reach more than 50°C/122°F, which is a
relatively warm and comfortable temperature for human contact. The towel
bucket is indirectly heated to keep the towel temperature around 55°C/131°F.
The work indicator light goes out 80 minutes after starting the machine,
indicating that the product has completed a work cycle.
6. With 30 seconds of fast heating, 15 minutes is typically sucient for heating
two bath towels.
7. Open the LID to remove the towel(s) or blanket. Press down on the handle of
the lid and then pull up to open the lid of the product.
Note: To avoid damaging the unit, gently raise the lid when removing items.
8. Press the ON/OFF BUTTON at any time to stop or start the heating cycle.
NOTE: This Towel & Blanket Warmer has a 3-prong grounding plug.
To reduce the risk of electric shock, plug the power cord into a grounded
(earthed) electrical outlet that is easily accessible.
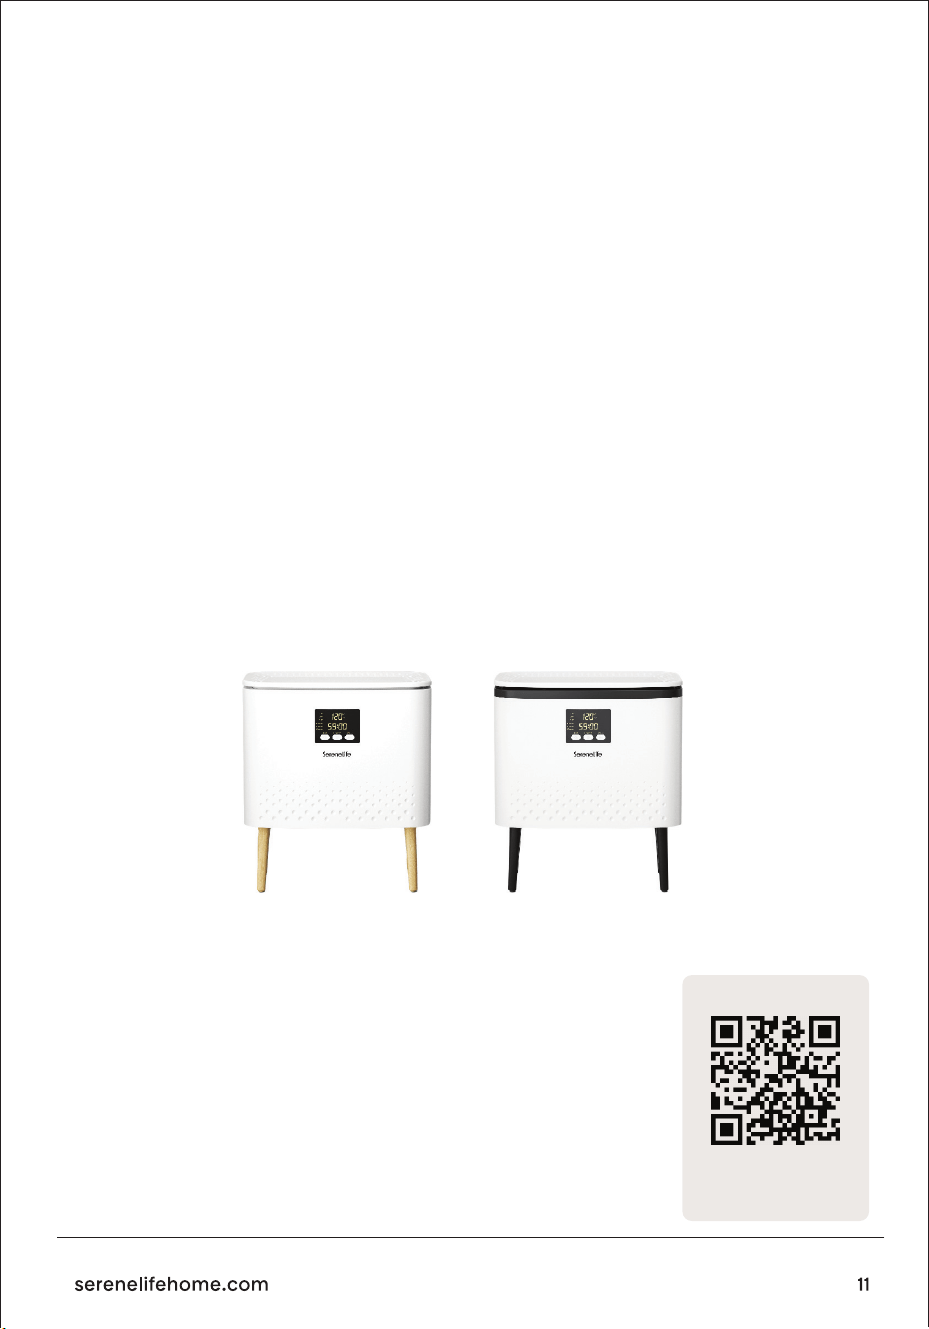
The Towel & Blanket Warmer can comfortably warm up two large cotton bath
towels or a personal throw blanket.
TIPS FOR BEST RESULTS
1. Use cotton or cotton blend towels or fabrics.
2. For fast and even heating, loosely pile 1 towel into the Towel & Blanket Warmer.
Tightly rolled or folded towels will take longer to heat thoroughly.
Two towels will take longer to heat than one.
3. Use only with DRY fabrics. Note: DO NOT use with damp or wet particles.
4. Avoid using delicate fabrics that cannot withstand high heat.
Any fabric indicating that a cool iron must be used may not be able to withstand
the heat of the towel warmer, resulting in damage to the fabric and the Towel &
Blanket Warmer.
5. Once the heating cycle has begun, keep the lid closed. This will prevent heat
from escaping. Opening the lid mid-cycle may result in slower heating times.
Note: Condensation on the lid and Interior of the unit Is normal.
CARE AND MAINTENANCE
REMOVE THE POWER CORD FROM THE ELECTRICAL OUTLET BEFORE
CLEANING. WIPE WITH A DRY CLOTH ONLY WHEN UNIT IS COOL TO THE
TOUCH.
Register Product
SLTLR625 SLTLR725
Thank you for choosing SereneLife. By registering your product,
you ensure that you receive the full benets of our exclusive
warranty and personalized customer support. Complete the form
to access expert support and to keep your SereneLife purchase in
perfect condition.
Start Here
SLTLR625
Model Number:
Serenelifehome.com/pages/register
Scan the QR code to view the
user manual in multiple languages
GER
Für Benutzerhandbücher
Benutzerhandbücher verfügbar in
Italian l German l Polish l Turkish l Dutch
und geben Sie Ihre Modellnummer ein
SCANNEN SIE DEN QR-CODE
POL
Aby uzyskać instrukcje użytkownika
w wielu językach,
Instrukcje obsługi dostępne w
Italian l German l Polish l Turkish l Dutch
i wprowadź numer swojego modelu
ZESKANUJ KOD QR
TUR
Birden fazla dilde kullanıcı kılavuzları için,
Kullanım Kılavuzları şurada mevcuttur:
Italian l German l Polish l Turkish l Dutch
ve model numaranızı girin
QR KODUNU TARAYIN
DUT
Voor gebruikershandleidingen
in meerdere talen,
Gebruikershandleidingen beschikbaar in
Italian l German l Polish l Turkish l Dutch
en voer uw modelnummer in
SCAN DE QR-CODE
ENG UK
For user guides in multiple languages,
User Manuals available in
Italian l German l Polish l Turkish l Dutch
and enter your model number
SCAN THE QR CODE
Para guías de usuario en varios idiomas,
Manuales de usuario disponibles en
Italian l German l Polish l Turkish l Dutch
e ingrese su número de modelo
ESCANEE EL CÓDIGO QR
SPA
Pour les guides d'utilisation en plusieurs langues,
Manuels d'utilisation disponibles en
Italian l German l Polish l Turkish l Dutch
et entrez votre numéro de modèle
SCANNEZ LE CODE QR
FRE
Per le guide utente in più lingue,
Manuali utente disponibili in
Italian l German l Polish l Turkish l Dutch
e inserisci il numero del tuo modello
SCANSIONA IL CODICE QR
ITA
Questions or Comments?
We are here to help!
Phone: 1.718.535.1800
Serenelifehome.com/ContactUs
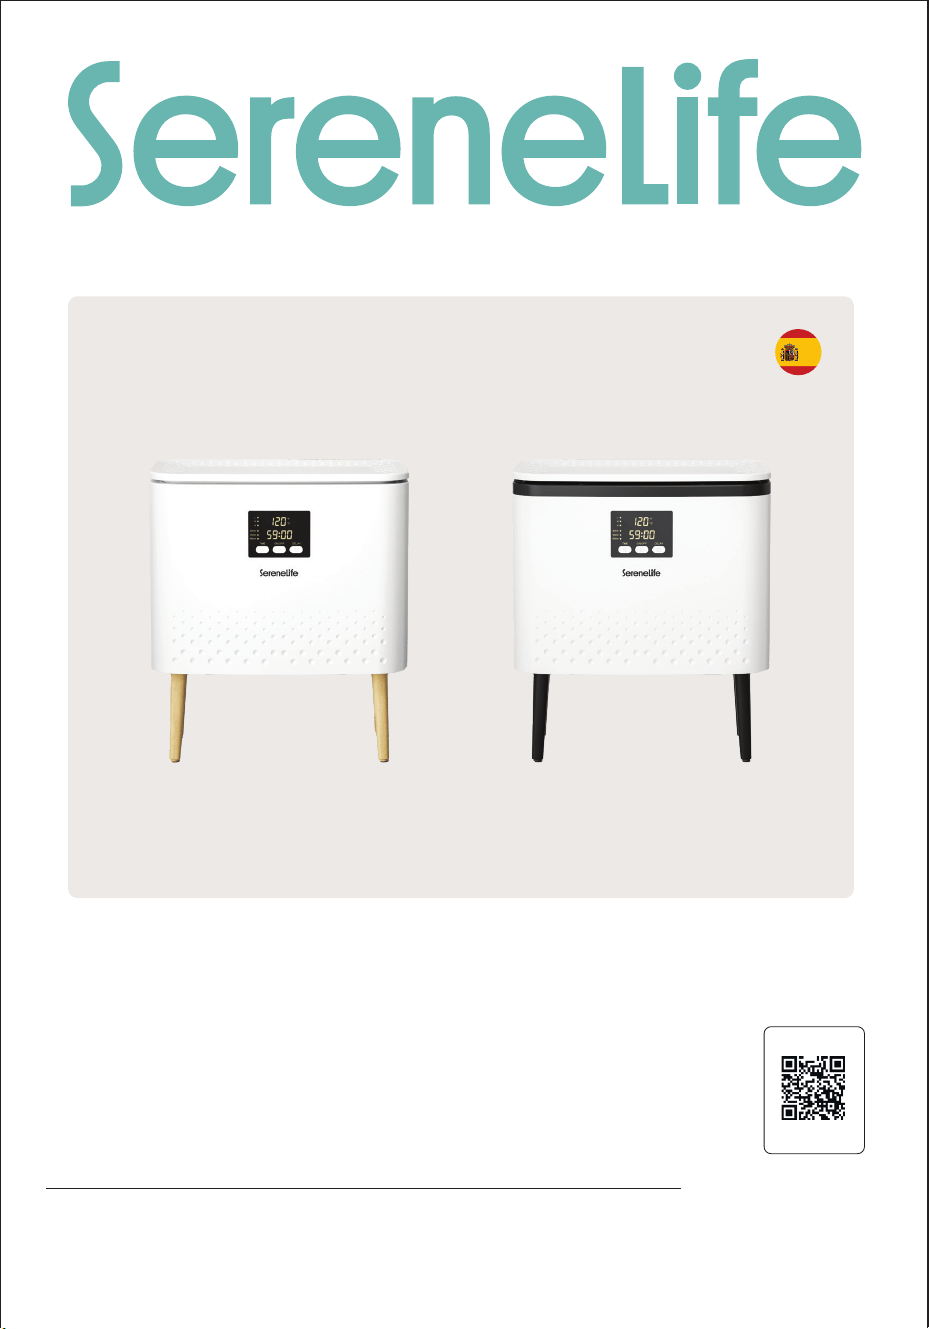
SLTLR625 - SLTLR725
manual del usuario
Calentador rectangular
para Toallas y Mantas
Visite nuestro
sitio web
ESCANÉAME
serenelifehome.com
SPA

CONTENIDOS
LEA Y GUARDE ESTAS INSTRUCCIONES
ADVERTENCIA:
ASEGÚRESE DE LEER CUIDADOSAMENTE TODAS LAS
INSTRUCCIONES, ADVERTENCIAS Y PRECAUCIONES ANTES DE
UTILIZAR ESTE PRODUCTO. NO HACERLO PUEDE RESULTAR EN
LESIONES PARA USTED O DAÑAS A LA UNIDAD.
3
4
5
6
7
8
9
9
9
10
11
11
11
CARACTERÍSTICAS Y ESPECIFICACIONES TÉCNICAS
PRECAUCIÓN
INSTRUCCIONES DE SEGURIDAD IMPORTANTES
INFORMACIÓN DE LA FCC
UBICACIÓN DE PIEZAS Y CONTROLES
PANTALLA LED
INSTRUCCIONES DE VISUALIZACIÓN
INSTRUCCIONES DEL DISCO DE FRAGANCIA
INSTRUCCIONES DE INSTALACIÓN
UTILIZAR EL CALENTADOR DE TOALLAS Y MANTAS
CONSEJOS PARA OBTENER MEJORES RESULTADOS
CUIDADO Y MANTENIMIENTO
REGISTRO DEL PRODUCTO

Características:
• Tamaño perfecto para dos toallas de baño grandes
• Tiene capacidad para 2 toallas de baño grandes o una manta personal
• Control sencillo con un solo toque
• Botón Encendido / Apagado
• Apagado automático después de un tiempo
• La tapa mantiene las manos libre, para llenar y vaciar el calentador
de toallas y mantas
• La tapa aislante de doble pared mantiene el calor mientras se mantiene
fría al tacto
• Protección contra el sobrecalentamiento y diseño resistente al agua
• Luz indicadora integrada
• Cómodo cubo para transportar el calentador de toallas
• Diseñado para ahorrar energía y reducir el consumo
• Puede calentar toallas, batas, mantas u otros artículos de tela
Contenido del paquete:
Especicaciones técnicas:
• Calentador de toallas
• Tableta de aromaterapia
• Desecador
• Material de fabricación: Hoja de acero inoxidable
• Fuente de alimentación: 450 vatios
• Potencia de salida: 220V - 240V CA (AC)
• Respuesta en frecuencia: 50/60 Hz
• Volumen: 20 Litros (5.28gal)
• Tiempo de duración: 20, 40, 60 minutos
• Longitud del cable de alimentación: 5.91 pies (180 cm)
• Capacidad de peso: 110.2 libras (50 kg)
• Rango de temperatura: Ajustable desde 90°F a 140°F (32°C a 135°C)
• Dimensiones del producto (Largo x Ancho x Alto):
17.32” x 10.01” x 19.68” -pulgadas (44 x 25 x 50 cm)
PRECAUCIÓN
PARA REDUCIR EL RIESGO DE LESIONES GRAVES, POR FAVOR TENGA EN CUENTA QUE ESTO NO ES UN
JUGUETE. NO PERMITA QUE LOS NIÑOS MANIPULEN O JUEGUEN CERCA DEL CALENTADOR DE TOALLAS
Y DE MANTAS.
El símbolo del rayo con punta de echa, dentro de un triángulo equilátero, está
diseñado para alertar al usuario de la presencia de "voltaje peligroso" sin
aislamiento, dentro de la caja de la unidad,
que puede ser de magnitud suciente para constituir un riesgo de descarga
eléctrica.
El signo de exclamación, dentro de un triángulo equilátero, está
diseñado para alertar al usuario de la presencia de instrucciones
importantes de funcionamiento y mantenimiento (servicio) en la
documentación que acompaña la unidad.
PARA REDUCIR EL RIESGO DE INCENDIO O DESCARGA ELÉCTRICA,
NO EXPONGA ESTA UNIDAD A LA LLUVIA NI A LA HUMEDAD.
TODAS LAS INSTRUCCIONES DE SEGURIDAD Y FUNCIONAMIENTO DEBEN SER LEÍDAS, DEBEN SER
CUMPLIDAS Y DEBEN SER SEGUIDAS ANTES DE QUE LA UNIDAD SEA PUESTA EN FUNCIONAMIENTO.
• SÓLO PARA USO DOMÉSTICO.
• SÓLO PARA USO DE ADULTOS.
• SÓLO PARA PRENDAS DE TEJIDO SECO.
Advertencia de la Proposición 65 de California
Advertencia:
Este producto puede exponerlo a productos químicos, los
cuales son conocidos en el Estado de California por causar
cáncer, defectos de nacimiento y otros daños de reproducción.
No ingerir. Para más información ir a: www.P65warnings.ca.gov

GUARDE ESTAS INSTRUCCIONES
Instrucciones de Seguridad Importantes
ADVERTENCIA:
PARA REDUCIR EL RIESGO DE INCENDIO, DESCARGA ELÉCTRICA O LESIONES GRAVES A
PERSONAS, AL UTILIZAR ESTE APARATO, SIGA LAS PRECAUCIONES BÁSICAS INCLUYENDO LAS
SIGUIENTES:
• Lea todas las instrucciones antes de utilizar el aparato.
• Siempre desconecte la unidad del tomacorriente eléctrico inmediatamente
después de utilizar.
• No utilice el aparato para otra cosa distinta para la que fue diseñado.
• No coloque ni guarde la unidad donde pueda caerse o ser arrastrada hacia
una bañera o un fregadero.
• No lo coloque ni lo deje caer en agua u otro líquido.
• No intente agarrar una unidad que se haya caído al agua. Desconecte
inmediatamente.
• Tenga cuidado de que no caigan objetos dentro del aparato y / o que se
derramen líquidos sobre la unidad.
• No deje la unidad sin supervisión mientras esté conectada.
• Se requiere una supervisión cercana cuando sea utilizado cerca de niños o
personas discapacitadas.
• Utilice este aparato únicamente, como se describe en este manual.
• Nunca utilice esta unidad si tiene un cable o enchufe dañados, si no funciona
correctamente o si se ha caído, se ha dañado o si ha caído al agua.
• Mantenga el cable de alimentación alejado de supercies calientes.
No enrolle el cable alrededor del exterior del aparato ni lo deje colgar del
borde de una mesa o al borde del mostrador.
• No utilice en exteriores.
• No modique el enchufe de seguridad ni utilice con un cable de extensión.
• No utilice con un convertidor de voltaje.
• No toque las supercies calientes.
• No utilice accesorios no recomendados por el fabricante; ya que podría
causar lesiones.

INFORMACIÓN DE LA FCC
PRECAUCIÓN:
ADVERTENCIA:
Nota:
Los cambios o modicaciones no aprobados expresamente por la parte
responsable del cumplimiento podrían anular la autoridad del usuario para
operar el equipo.
Los cambios o modicaciones no aprobados expresamente por la parte
responsable del cumplimiento podrían anular la autoridad del usuario para
operar el equipo.
Este dispositivo cumple con la parte 15 de las normas de la FCC.
Su funcionamiento está sujeto a las siguientes dos condiciones:
1. Este dispositivo no debe causar interferencias perjudiciales.
2. Este dispositivo debe aceptar cualquier interferencia, incluyendo interferencias
que puedan causar un funcionamiento no deseado.
Este equipo ha sido probado y se ha comprobado que cumple con los límites para un dispositi-
vo digital de Clase B, de conformidad con la Parte 15 de las normas de la FCC. Estos límites están
diseñados para proporcionar una protección razonable contra interferencias perjudiciales en
una instalación residencial. Este equipo genera, utiliza y puede irradiar energía de radiofrecuen-
cia y, si no se instala y utiliza de acuerdo con las instrucciones, puede causar interferencias
perjudiciales a las comunicaciones por radio. Sin embargo, no hay garantía de que no se
produzcan interferencias en una instalación en particular. Si este equipo causa interferencias
perjudiciales en la recepción de radio o televisión, lo cual puede ser determinado encendiendo
y apagando el equipo, se recomienda al usuario que intente corregir la interferencia mediante
una o más de las siguientes medidas:
• Reoriente o reubique la antena receptora.
• Aumente la distancia entre el equipo y el receptor.
• Conecte el equipo a un tomacorriente en un circuito diferente al que está
conectado el receptor.
• Consulte al distribuidor o a un técnico experto en radio y televisión
experimentado, para obtener ayuda.
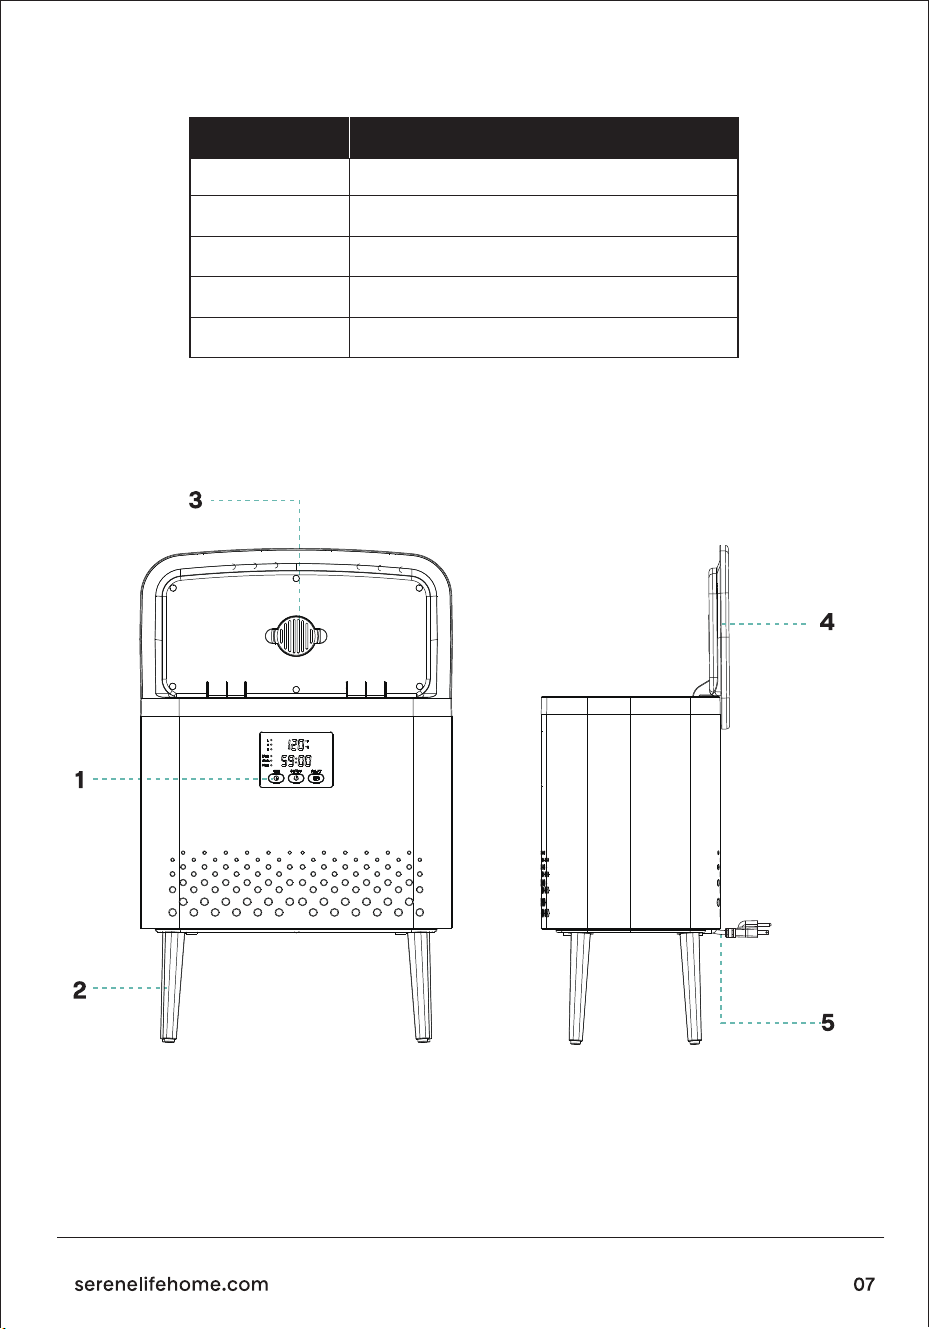
UBICACIÓN DE PIEZAS Y CONTROLES
No.
1
2
3
4
5
NOMBRE DE LA PIEZA
Botón Encendido / Apagado
Patas
Disco de Fragancia
Tapa
Cable de alimentación
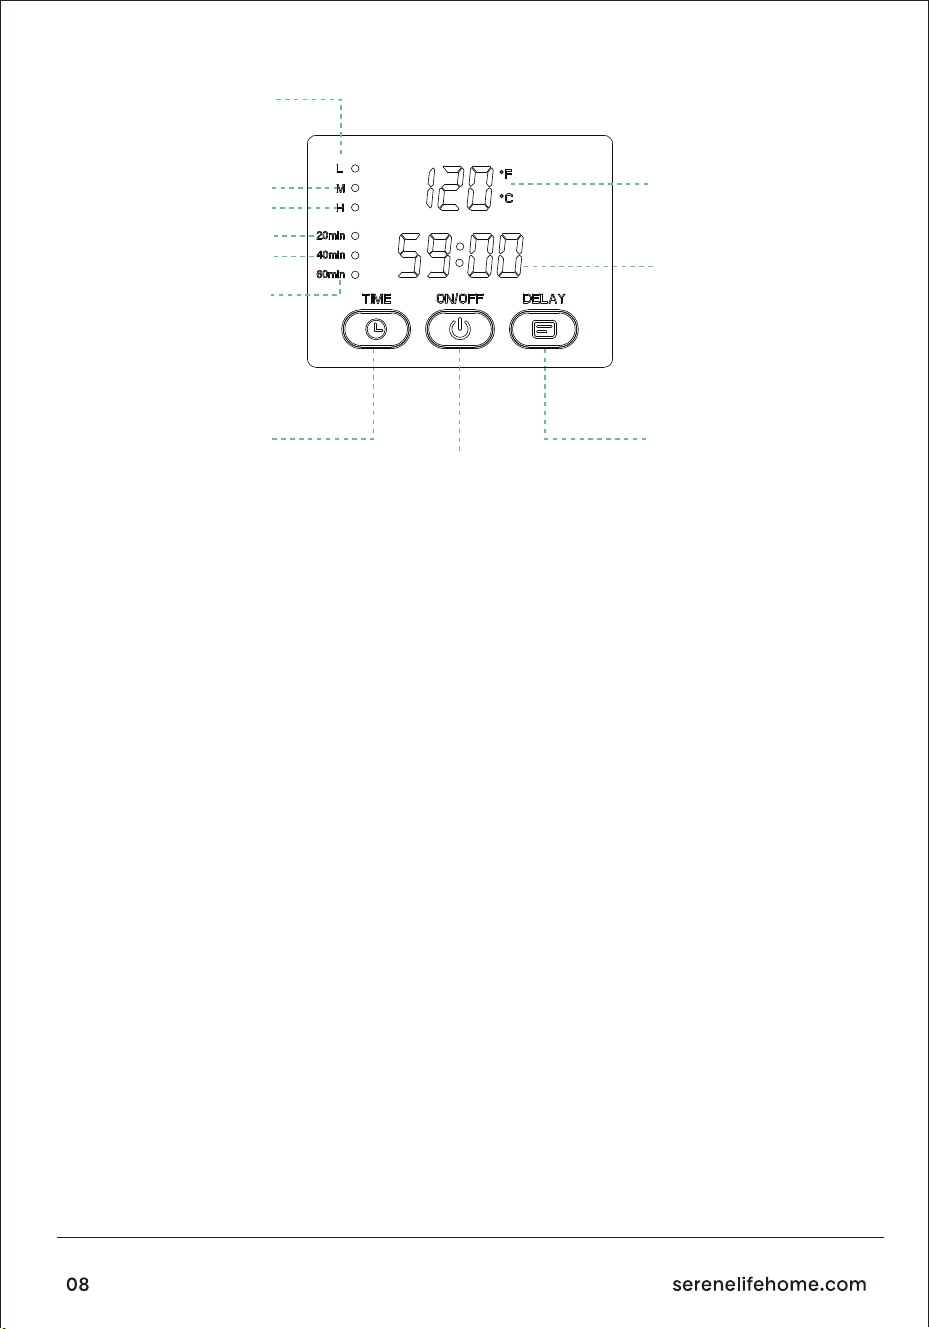
PANTALLA LED
INSTRUCCIONES DE VISUALIZACIÓN
Temperatura baja
Temperatura Alta
Ajuste del temporizador 60 minutos
Botón de hora
Ajuste del temporizador 40 minutos
Ajuste del temporizador 20 minutos
Temperatura media
Visualización
de la temperatura
en tiempo real
Visualización
de la hora
Botón de RETARDO
Tecla de cambio
1. Luz de programación: Parpadea cuando la programación ha sido seleccionada,
permanece encendida de forma continua durante el tiempo programado y se apaga al
nalizar el tiempo programado.
2. Luz de Tiempo: Parpadea al seleccionar el tiempo, permanece encendido durante el
funcionamiento y se apaga al nal del periodo de trabajo.
1. Presione el botón de cambio para iniciar el dispositivo, mantenga presionado
para apagar el dispositivo.
2. Después de que el dispositivo haya iniciado, el símbolo de separador del
tiempo comienza a parpadear; si no se realiza ninguna operación dentro de los
5 segundos posteriores al inicio, el dispositivo establecerá automáticamente un
tiempo de trabajo de 20 minutos en modo de alta temperatura.
3. Después de encender, dos puntos en la zona de visualización de la hora
comenzarán a parpadear. Presione el botón de reserva dentro de los
10 segundos, para establecer la hora de inicio retardado (de 30 minutos a
24 horas, con cada pulsación aumenta el tiempo en 30 minutos).
4. Después de congurar la hora de reserva, presione el botón del
temporizador dentro de los 10 segundos para congurar el tiempo de trabajo
(cambiar entre 20, 40 y 60 minutos).
5. Después de congurar las horas de trabajo, presione el botón de encendido
para congurar el modo de temperatura baja, el modo de temperatura media
y el modo de temperatura alta.
6. Cuando la temperatura de la pared del barril sea superior a
50ºC (122ºF), la luz
de fondo del interruptor se volverá roja, indicando una temperatura alta. No lo toque.
INSTRUCCIONES DEL DISCO DE FRAGANCIA
INSTRUCCIONES DE INSTALACIÓN
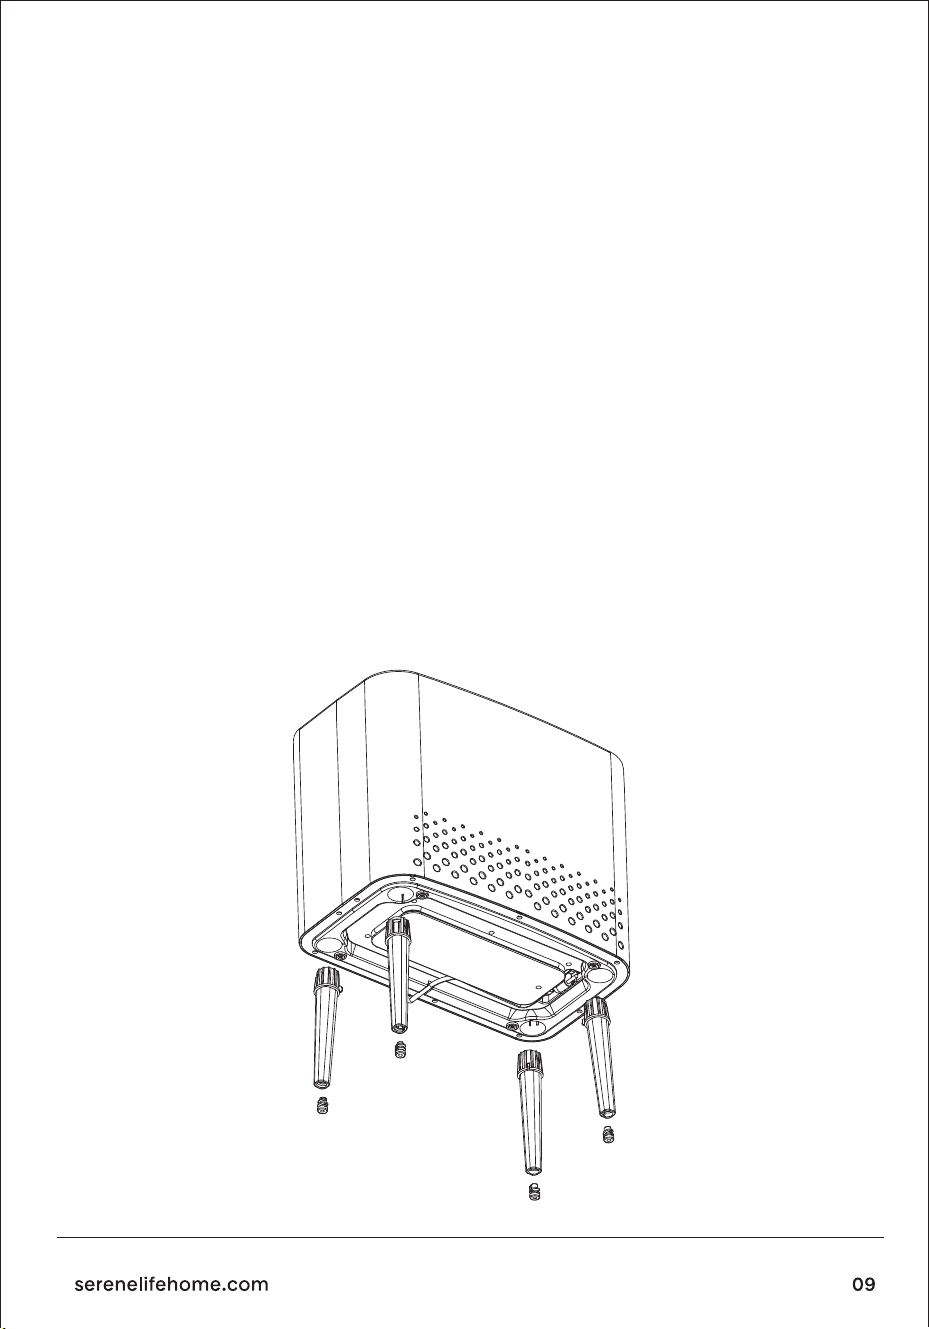
Instale las patas de soporte
Este disco de fragancia está diseñado adicionalmente, para algunos usuarios que les gusta utilizar
tabletas de aromaterapia o aceites esenciales al calentar toallas.
3. Instrucciones de visualización de pantalla: Presione el botón de tiempo, para alternar
entre 20, 40 y 60 minutos con la pequeña luz redonda correspondiente parpadeando.
La pequeña luz redonda permanece encendida durante el funcionamiento y se apaga
cuando el trabajo está completo. Cuando no seleccione una programación, seleccione
HORA (TIME). La pantalla mostrará la hora y parpadeará cuando no esté en
funcionamiento. Durante el funcionamiento normal, permanece encendida de forma
continua mientras realiza la cuenta regresiva. Para programar, primero seleccione la
programación, y luego elija la hora. Haga clic en programación y la pantalla mostrará la
hora programada parpadeando al inicio. Después de conrmar, la luz permanecerá
encendida, indicando la cuenta regresiva de la programación de la hora. Una vez
nalizada la programación de hora, la luz de programación se apagará, la luz de la hora
permanecerá encendida y la pantalla mostrará la cuenta regresiva, para seleccionar el
tiempo de calentamiento.
1. Retire el disco de fragancia de su bolsa plástica sellada.
2. Deslícelo en el porta discos de fragancia situado en la parte inferior de la tapa.

Instrucciones de Uso
UTILIZAR EL CALENTADOR DE TOALLAS Y MANTAS
1. Abra la cubierta y extraiga las patas de goma y las almohadillas de las patas
del interior del cuerpo de la máquina.
2. Asegure las almohadillas de las patas dentro de los oricios de la parte inferior
de las patas de goma.
3. Alinee las patas de goma con los oricios de la carcasa inferior y encájelas.
1. Abra la tapa y retire cualquier contenido del empaque.
2. Coloque el calentador de toallas sobre una supercie seca, nivelada y dura.
3. Inserte el enchufe dentro de un tomacorriente estándar de 120 V.
1. Inserte el cable de alimentación a un tomacorriente eléctrico.
2. Abra la TAPA y coloque SÓLO toallas o mantas SECAS en el interior.
NOTA: Colocar toallas húmedas o mojadas, dentro del calentador de toallas,
puede dañar el aparato y presentar un grave peligro de seguridad.
3. Cierre la TAPA.
4. Presione el BOTÓN ENCENDIDO / APAGADO.
5. Por favor no toque la pared interior del producto; de lo contrario, hay un riesgo
de sufrir quemaduras. La temperatura del compartimento puede alcanzar 130°
+/- 8° C / 46.4° F en aproximadamente 5 minutos y puede mantener esta
temperatura durante unos 15 minutos. En este punto, la temperatura de la toalla
puede superar los 50° C / 122° F, lo que es una temperatura relativamente cálida
y cómoda para el contacto humano. El compartimento de toallas se calienta
indirectamente para mantener la temperatura de las toallas a unos 55° C / 131° F.
La luz indicadora de funcionamiento se apaga 80 minutos después de iniciar la
máquina, indicando que el producto ha completado un ciclo de trabajo.
6. Con 30 segundos de calentamiento rápido, 15 minutos suelen ser sucientes
para calentar dos toallas grandes.
7. Abra la TAPA para retirar la(s) toalla(s) o la manta. Presione el asa de la tapa hacia
abajo y luego levántela, para abrir la tapa del producto. NOTA: Para evitar dañar
a la unidad, levante suavemente la tapa al retirar artículos.
8. Presione el BOTÓN ENCENDIDO / APAGADO en cualquier momento,
para detener o iniciar el ciclo de calentamiento.
NOTA: Este calentador de toallas y mantas tiene un enchufe de tres clavijas con conexión a
tierra. Para reducir el riesgo de descarga eléctrica, enchufe el cable
de alimentación a un tomacorriente eléctrico con conexión a tierra de fácil acceso.
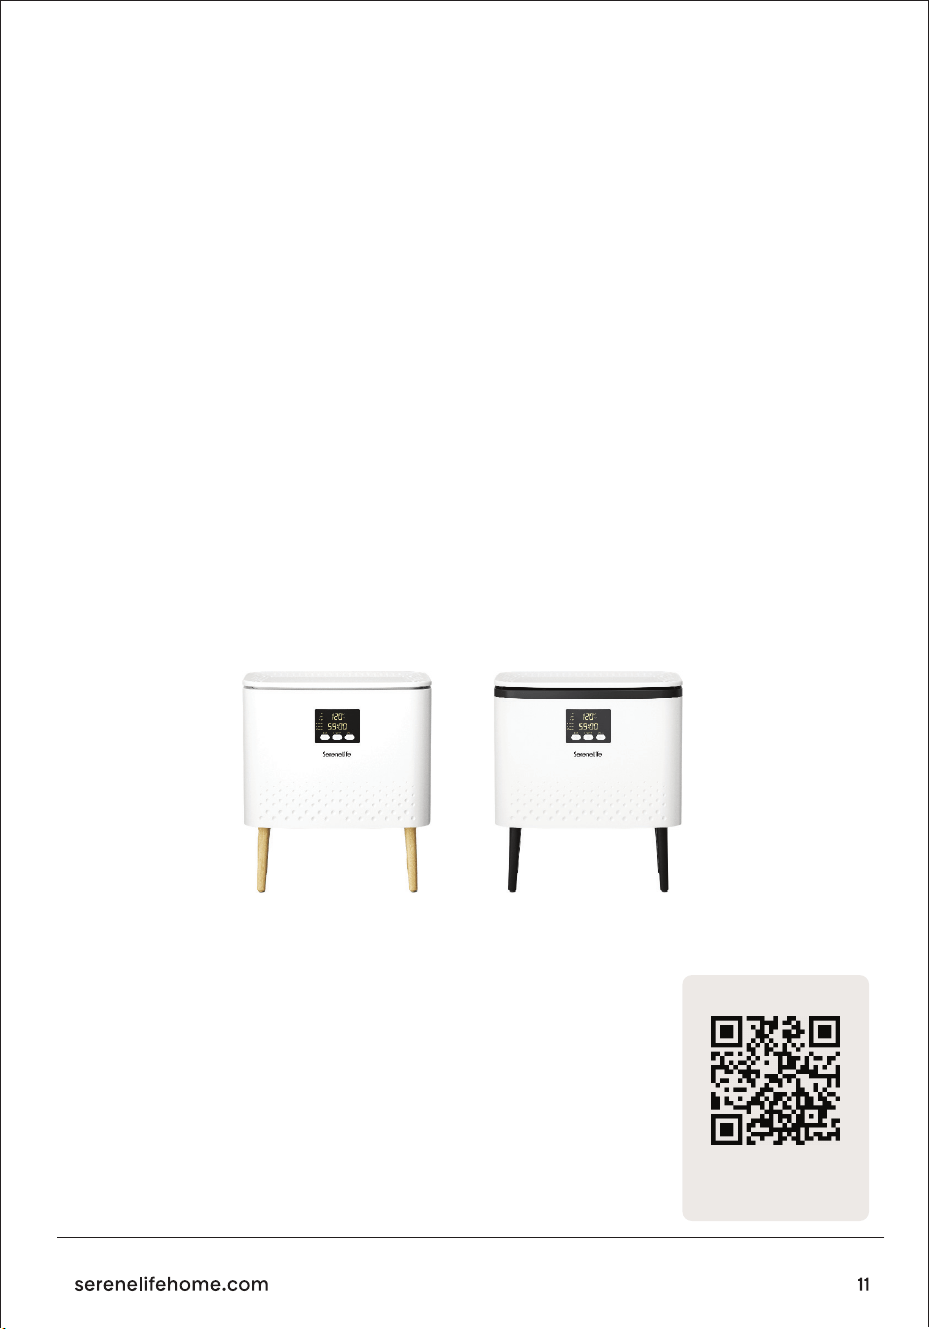
El calentador de toallas y mantas puede calentar, cómodamente, dos toallas
de algodón de baño grandes o una manta personal ligera.
CONSEJOS PARA OBTENER MEJORES RESULTADOS
1. Utilice toallas o tejidos de algodón o mezcla de algodón.
2. Para un calentamiento rápido y uniforme, apile 1 toalla sin apretar en el
calentador de toallas. Las toallas enrolladas o muy dobladas tardarán más,
para calentarse completamente. Dos toallas tardarán más en calentarse que una.
3. Utilice únicamente tejidos SECOS. Nota: NO utilice con tejidos húmedos o
mojados.
4. Evite utilizar tejidos delicados que no puedan soportar altas temperaturas.
Cualquier tejido que indique que debe plancharse a baja temperatura puede
resultar dañado por el calor del calentador de toallas, lo que podría dañar la
tela y el calentador de toallas y mantas.
5. Una vez que el ciclo de calentamiento haya comenzado, mantenga la tapa
cerrada. Esto evitará que se escape el calor. Abrir la tapa a mitad del ciclo podría
prolongar el tiempo de calentamiento. Nota: La condensación en la tapa y en el
interior de la unidad es normal.
CUIDADO Y MANTENIMIENTO
RETIRE EL CABLE DE ALIMENTACIÓN DEL TOMACORRIENTE ELÉCTRICO
ANTES DE LIMPIAR. LIMPIE CON UN PAÑO SECO SÓLO CUANDO LA UNIDAD
ESTÉ FRÍA AL TACTO.
REGISTRO DEL PRODUCTO
SLTLR625 SLTLR725
Gracias por elegir SereneLife. Al registrar su producto, se asegura
de recibir todos los benecios de nuestra garantía exclusiva y soporte
personalizado de atención al cliente.
Complete el formulario, para acceder al soporte de expertos y mantener su
compra SereneLife en perfectas condiciones.
Comience aquí
SLTLR625
Número de Modelo:
Serenelifehome.com/pages/registro
Scan the QR code to view the
user manual in multiple languages
GER
Für Benutzerhandbücher
Benutzerhandbücher verfügbar in
Italian l German l Polish l Turkish l Dutch
und geben Sie Ihre Modellnummer ein
SCANNEN SIE DEN QR-CODE
POL
Aby uzyskać instrukcje użytkownika
w wielu językach,
Instrukcje obsługi dostępne w
Italian l German l Polish l Turkish l Dutch
i wprowadź numer swojego modelu
ZESKANUJ KOD QR
TUR
Birden fazla dilde kullanıcı kılavuzları için,
Kullanım Kılavuzları şurada mevcuttur:
Italian l German l Polish l Turkish l Dutch
ve model numaranızı girin
QR KODUNU TARAYIN
DUT
Voor gebruikershandleidingen
in meerdere talen,
Gebruikershandleidingen beschikbaar in
Italian l German l Polish l Turkish l Dutch
en voer uw modelnummer in
SCAN DE QR-CODE
ENG UK
For user guides in multiple languages,
User Manuals available in
Italian l German l Polish l Turkish l Dutch
and enter your model number
SCAN THE QR CODE
Para guías de usuario en varios idiomas,
Manuales de usuario disponibles en
Italian l German l Polish l Turkish l Dutch
e ingrese su número de modelo
ESCANEE EL CÓDIGO QR
SPA
Pour les guides d'utilisation en plusieurs langues,
Manuels d'utilisation disponibles en
Italian l German l Polish l Turkish l Dutch
et entrez votre numéro de modèle
SCANNEZ LE CODE QR
FRE
Per le guide utente in più lingue,
Manuali utente disponibili in
Italian l German l Polish l Turkish l Dutch
e inserisci il numero del tuo modello
SCANSIONA IL CODICE QR
ITA
Preguntas o comentarios?
¡Estamos aquí para ayudar!
Phone: 1.718.535.1800
Serenelifehome.com/ContactUs
SLTLR625 - SLTLR725
Guide d’utilisation
Chaue-serviettes rectangulaire
Seau chauant
FRE
Visitez notre site
Internet
SCANNE MOI
serenelifehome.com

TABLE DES MATIÈRES
LIRE ET CONSERVER CES INSTRUCTIONS
AVERTISSEMENT :
ASSUREZ-VOUS DE LIRE ATTENTIVEMENT TOUTES LES
INSTRUCTIONS, AVERTISSEMENTS ET PRÉCAUTIONS AVANT
D’UTILISER CE PRODUIT. LE NON-RESPECT DE CES CONSIGNES
PEUT ENTRAÎNER DES BLESSURES OU ENDOMMAGER L’APPAREIL.
CARACTÉRISTIQUES ET SPÉCIFICATIONS TECHNIQUES
PRÉCAUTION
INSTRUCTIONS IMPORTANTES DE SÉCURITÉ
INFORMATIONS FCC
EMPLACEMENT DES PIÈCES ET COMMANDES
ÉCRAN LED
INSTRUCTIONS D’AFFICHAGE
INSTRUCTIONS POUR LE DISQUE PARFUMÉ
INSTRUCTIONS D’INSTALLATION
UTILISATION DU CHAUFFE-SERVIETTES & COUVERTURES
CONSEILS POUR DES RÉSULTATS OPTIMAUX
ENTRETIEN ET NETTOYAGE
ENREGISTREMENT DU PRODUIT
3
4
5
6
7
8
9
9
9
10
11
11
11

Caractéristiques:
• Taille idéale pour deux grandes serviettes de bain
• Peut contenir 2 grandes serviettes de bain ou une couverture personnelle
• Commande simple à une seule touche
• Bouton Marche/Arrêt
• Arrêt automatique après la durée programmée
• Le couvercle reste en position ouverte pour garder les mains libres
• Couvercle isolé à double paroi : conserve la chaleur tout en restant froid au
toucher
• Protection contre la surchaue et conception résistante à l’eau
• Voyant lumineux intégré
• Facile à transporter
• Conçu pour économiser énergie et consommation électrique
• Peut chauer serviettes, peignoirs, couvertures ou autres textiles
Contenu de la boîte:
Spécications techniques:
• Chaue-serviettes
• Pastille d’aromathérapie
• Dessiccant
• Matériau de construction : tôle d’acier inoxydable
• Puissance : 450W
• Alimentation : 220V - 240V AC
• Fréquence : 50/60Hz
• Volume : 20L (5.28gal)
• Durée : 20, 40, 60 minutes
• Longueur du cordon: 5,91 pieds (180 cm)
• Capacité de charge: 110,2 Lbs, (50 kg)
• Plage de température : réglable de 32°C à 60°C (90°F à 140°F)
• Dimensions (L × l × H) : 17,32” x 10,01” x 19,68” -inches (44 x 25 x 50 cm)
PRÉCAUTION
Pour réduire le risque de blessures graves, notez que ce produit n’est pas un jouet.
Ne laissez pas les enfants l’utiliser ni jouer à proximité du chaue-serviettes.
avertit de la présence d’une tension dangereuse non isolée.
signale des instructions importantes de fonctionnement/entretien.
POUR RÉDUIRE LES RISQUES D’INCENDIE OU DE CHOC ÉLECTRIQUE,
NE PAS EXPOSER CET APPAREIL À LA PLUIE OU À L’HUMIDITÉ.
TOUTES LES INSTRUCTIONS DE SÉCURITÉ ET D’UTILISATION DOIVENT
ÊTRE LUES, RESPECTÉES ET SUIVIES AVANT UTILISATION.
• POUR USAGE DOMESTIQUE UNIQUEMENT
• POUR UTILISATION PAR ADULTES UNIQUEMENT
• POUR TEXTILES SECS UNIQUEMENT
AVERTISSEMENT PROP 65 CALIFORNIE
AVERTISSEMENT:
Ce produit contient du cadmium, reconnu par l’État de
Californie comme pouvant provoquer cancer, malformations
congénitales ou autres atteintes à la reproduction.
Ne pas ingérer. infos : www.P65warnings.ca.gov

CONSERVEZ CES INSTRUCTIONS
Instructions Importantes de Sécurité
AVERTISSEMENT:
POUR RÉDUIRE LE RISQUE D’INCENDIE, DE CHOC ÉLECTRIQUE OU DE
BLESSURES GRAVES LORS DE L’UTILISATION DE L’APPAREIL, RESPECTEZ
LES PRÉCAUTIONS SUIVANTES :
• Lisez toutes les instructions avant d’utiliser l’appareil.
• Débranchez toujours l’appareil immédiatement après utilisation.
• N’utilisez pas l’appareil à d’autres ns que celles prévues.
• Ne placez pas et ne rangez pas l’appareil dans un endroit où il pourrait tomber
dans une baignoire ou un évier.
• Ne plongez pas l’appareil dans l’eau ou tout autre liquide.
• Ne tentez pas de récupérer l’appareil s’il est tombé dans l’eau. Débranchez-le
immédiatement.
• Veillez à ce qu’aucun objet ne tombe dans l’appareil et qu’aucun liquide ne
s’y renverse.
• Ne laissez jamais l’appareil branché sans surveillance.
• Une surveillance étroite est nécessaire en présence d’enfants ou de personnes
handicapées.
• Utilisez cet appareil uniquement comme décrit dans ce manuel.
• N’utilisez jamais l’appareil s’il a un cordon ou une che endommagée,
s’il ne fonctionne pas correctement, s’il est tombé ou a été immergé.
• Maintenez les cordons éloignés des surfaces chaudes. Ne les enroulez pas
autour de l’appareil et ne les laissez pas pendre d’une table ou d’un comptoir.
• N’utilisez pas à l’extérieur.
• Ne modiez pas la che de sécurité et n’utilisez pas de rallonge.
• N’utilisez pas avec un convertisseur de tension.
• Ne touchez pas les surfaces chaudes.
• N’utilisez pas d’accessoires non recommandés par le fabricant,
cela pourrait causer des blessures.

INFORMATIONS FCC
ATTENTION :
AVERTISSEMENT:
Remarque:
Les changements ou modications non expressément approuvés par la partie responsable
peuvent annuler le droit de l’utilisateur à utiliser cet appareil.
Les modications de cet appareil non expressément approuvées peuvent annuler
le droit de l’utilisateur à l’utiliser.
Cet appareil est conforme à la partie 15 des règlements FCC.
Son fonctionnement est soumis aux conditions suivantes :
1. Cet appareil ne doit pas causer d’interférences nuisibles.
2. Cet appareil doit accepter toute interférence reçue, y compris celles pouvant
provoquer un fonctionnement indésirable.
Cet appareil a été testé et jugé conforme aux limites pour un dispositif numérique de classe B
(partie 15 des règlements FCC). Ces limites assurent une protection raisonnable contre les
interférences nuisibles en usage résidentiel. Cet appareil génère, utilise et peut émettre des
ondes radio. S’il n’est pas utilisé conformément aux instructions, il peut causer des interférences.
En cas d’interférences avec la réception radio/TV (vériable en allumant/éteignant l’appareil),
essayez :
• Réorienter ou déplacer l’antenne.
• Augmenter la distance entre l’appareil et le récepteur.
• Brancher l’appareil sur une prise d’un autre circuit.
• Consulter un revendeur ou un technicien radio/TV qualié.
EMPLACEMENT DES PIÈCES ET COMMANDES
No.
1
2
3
4
5
NOM DE LA PIÈCE
Bouton Marche/Arrêt
Pieds
Disque parfumé
Couvercle
Cordon d’alimentation
ÉCRAN LED
INSTRUCTIONS D’AFFICHAGE
Température Basse
Température Haute
Minuterie 60 min
Bouton Temps
Minuterie 40 min
Minuterie 20 min
Température Moyenne
Achage
Température en
Temps Réel
Achage de l'heure
DELAY
Touche Switch
1. Appuyez sur le bouton « Switch » pour démarrer, maintenir pour éteindre.
2. Après démarrage, si aucune action sous 5 secs, le mode par défaut est
20 min en haute température.
3. Deux points de l’acheur clignotent dans les 10 sec, vous pouvez régler
un départ diéré (30 min à 24h, par pas de 30 min).
4. Après réglage diéré, appuyez sur « Timer » sous 10 secs pour choisir la durée
(20, 40 ou 60 min).
5. Après réglage, utilisez le bouton d’alimentation pour choisir température basse,
moyenne ou haute.
6. Si la paroi interne dépasse 50ºC (122ºF), le bouton Switch s’éclaire en rouge
risque de brûlure, ne pas toucher.
1. Voyant de programmation : clignote lors de la sélection, reste allumé pendant
le délai, s’éteint à la n.
2. Voyant de temps : clignote lors du choix, reste allumé en fonctionnement,
s’éteint à la n du cycle.
INSTRUCTIONS POUR LE DISQUE PARFUMÉ
INSTRUCTIONS D’INSTALLATION
Installer les pieds de support.
Conçu pour les utilisateurs qui souhaitent ajouter des pastilles aromatiques
ou des huiles essentielles.
3. Fonctionnement de l’écran : Appuyez sur « Time » pour alterner entre 20, 40
et 60 min (lumière ronde clignotante).
Pendant le cycle, la lumière reste allumée puis s’éteint en n de travail.
Hors programmation, l’écran ache le temps en clignotant.
En fonctionnement normal, l’écran reste allumé en décomptant.
Pour programmer un départ : sélectionnez d’abord le délai, puis la durée.
L’écran clignote, puis reste allumé en compte à rebours.
1. Retirez le disque de son emballage plastique.
2. Glissez-le dans le support sous le couvercle.

Instructions d’utilisation
UTILISATION DU CHAUFFE-SERVIETTES
1. Ouvrez le couvercle et sortez les pieds en caoutchouc et patins.
2. Fixez les patins dans les trous des pieds.
3. Alignez les pieds avec les trous sous l’appareil et enclenchez.
1. Ouvrez le couvercle et retirez l’emballage.
2. Placez l’appareil sur une surface plane et sèche.
3. Branchez sur une prise 120V standard.
1. Branchez le cordon.
2. Placez uniquement des textiles secs.
REMARQUE : les textiles humides peuvent endommager l’appareil.
3. Fermez le couvercle.
4. Appuyez sur le bouton ON/OFF.
5. Ne touchez pas la paroi interne : risque de brûlure. La température atteint env.
130°C (266°F ±8) en 5 min, maintenue 15 min. Les serviettes dépassent alors
50°C (122°F) (température confortable). La température des serviettes se
stabilise autour de 55°C (131°F). Le voyant s’éteint après 80 min = n du cycle.
6. Avec préchauage rapide (30 secs), 15 min susent pour 2 serviettes.
7. Ouvrez le couvercle doucement pour retirer.
8. Appuyez sur ON/OFF pour arrêter/démarrer à tout moment.
REMARQUE: che 3 broches avec terre utiliser une prise mise à la terre.
Peut chauer 2 grandes serviettes de bain ou une couverture.
CONSEILS POUR DES RÉSULTATS OPTIMAUX
LS POUR DES RÉSULTATS OPTIMAUX
1. Utilisez des serviettes en coton ou mélange coton.
2. Pour un chauage homogène, insérez une serviette sans la serrer.
Deux serviettes ou serviettes roulées prennent plus de temps.
3. Utilisez uniquement avec des textiles secs.
REMARQUE : ne pas utiliser avec textiles humides.
4. Évitez les tissus délicats. Tout textile indiquant repassage doux peut être
endommagé.
5. Une fois le cycle lancé, gardez le couvercle fermé. Ouvrir ralentit le chauage.
REMARQUE : condensation normale.
ENTRETIEN ET NETTOYAGE
Débranchez avant nettoyage. Essuyez uniquement avec chion sec une
fois refroidi.
ENREGISTRER LE PRODUIT
SLTLR625 SLTLR725
Merci d’avoir choisi Serenelife. En enregistrant votre produit,
vous bénéciez de la garantie exclusive et du support person-
nalisé. Remplissez le formulaire pour assistance experte et
maintenir votre produit en parfait état.
Commencez ici
SLTLR625
Numéro de modèle:
Serenelifehome.com/pages/registre
Scan the QR code to view the
user manual in multiple languages
GER
Für Benutzerhandbücher
Benutzerhandbücher verfügbar in
Italian l German l Polish l Turkish l Dutch
und geben Sie Ihre Modellnummer ein
SCANNEN SIE DEN QR-CODE
POL
Aby uzyskać instrukcje użytkownika
w wielu językach,
Instrukcje obsługi dostępne w
Italian l German l Polish l Turkish l Dutch
i wprowadź numer swojego modelu
ZESKANUJ KOD QR
TUR
Birden fazla dilde kullanıcı kılavuzları için,
Kullanım Kılavuzları şurada mevcuttur:
Italian l German l Polish l Turkish l Dutch
ve model numaranızı girin
QR KODUNU TARAYIN
DUT
Voor gebruikershandleidingen
in meerdere talen,
Gebruikershandleidingen beschikbaar in
Italian l German l Polish l Turkish l Dutch
en voer uw modelnummer in
SCAN DE QR-CODE
ENG UK
For user guides in multiple languages,
User Manuals available in
Italian l German l Polish l Turkish l Dutch
and enter your model number
SCAN THE QR CODE
Para guías de usuario en varios idiomas,
Manuales de usuario disponibles en
Italian l German l Polish l Turkish l Dutch
e ingrese su número de modelo
ESCANEE EL CÓDIGO QR
SPA
Pour les guides d'utilisation en plusieurs langues,
Manuels d'utilisation disponibles en
Italian l German l Polish l Turkish l Dutch
et entrez votre numéro de modèle
SCANNEZ LE CODE QR
FRE
Per le guide utente in più lingue,
Manuali utente disponibili in
Italian l German l Polish l Turkish l Dutch
e inserisci il numero del tuo modello
SCANSIONA IL CODICE QR
ITA
Questions ou commentaires?
Nous sommes ici pour aider!
Phone: 1.718.535.1800
Serenelifehome.com/ContactUs
SLTLR625 - SLTLR725
Manuale d'uso
Scaldasalviette rettangolare
ITA
Visita il nostro
sito web
SCANSIONAMI
serenelifehome.com

INDICE
LEGGERE E CONSERVARE QUESTE ISTRUZIONI
AVVERTENZA:
LEGGERE ATTENTAMENTE TUTTE LE ISTRUZIONI, LE AVVERTENZE E LE
PRECAUZIONI PRIMA DI UTILIZZARE QUESTO PRODOTTO. LA MANCATA
OSSERVANZA POTREBBE CAUSARE LESIONI O DANNI ALL'APPARECCHIO.
Caratteristiche e speciche tecniche
Precauzioni
Importanti avvertenze di sicurezza
Informazioni FCC
Posizione delle parti e dei comandi
Indicatore LED
Istruzioni sul display
Istruzioni per i dischetti profumati
Istruzioni di montaggio
Utilizzo dello scaldasalviette e scaldacoperte
Suggerimenti per ottenere risultati ottimali
Cura e manutenzione
Registrazione del prodotto
3
4
5
6
7
8
9
9
9
10
11
11
11

Caratteristiche:
• Dimensioni perfette per due grandi teli da bagno
• Spazio per 2 grandi teli da bagno o una coperta personale
• Facile da usare con un solo pulsante
• Pulsante di accensione/spegnimento
• Si spegne automaticamente allo scadere del tempo impostato
• Il coperchio rimane aperto per avere le mani libere durante il riempimento o lo svuota-
mento dello scaldasalviette e scaldacoperte
• Il coperchio isolato a doppia parete mantiene il calore all'interno e rimane freddo
all'esterno
• Protezione dal surriscaldamento e design resistente all'acqua
• Spia di controllo integrata
• Comodo per il trasporto del secchio scaldasalviette
• Design a risparmio energetico per ridurre il consumo di elettricità
• Riscalda asciugamani, accappatoi, coperte o altri tessuti
Contenuto della confezione:
Dati tecnici:
• Scaldasalviette
• Pastiglia per aromaterapia
• Essiccante
• Materiale dell'involucro: lamiera di acciaio inossidabile
• Alimentazione: 450 W
• Potenza di uscita: 120 V CA
• Frequenza: 60 Hz
• Volume: 20 l (5.28gal)
• Durata: 20, 40, 60 minuti
• Lunghezza cavo: 1,8 m (180 cm)
• Portata: 50 kg (110,2 Lbs)
Intervallo di temperatura: regolabile da 32 °C a 60 °C (90°F à 140°F)
Dimensioni del prodotto (L x P x A): 44 × 25,5 × 50 cm (17,32” x 10,01” x 19,68”)
ATTENZIONE
Per ridurre il rischio di lesioni gravi, tenere presente che questo non è un giocattolo. Non consen-
tire ai bambini di utilizzare lo scaldasalviette e scaldacoperte o di giocare nelle vicinanze.
Il simbolo del fulmine con la punta della freccia in un triangolo equilatero ha lo
scopo di avvertire l'utente della presenza di “tensione pericolosa” non isolata
all'interno dell'involucro, che può essere sucientemente forte da causare una
scossa elet
Il punto esclamativo in un triangolo equilatero ha lo scopo di avvertire l'utente della
presenza di importanti istruzioni per l'uso e la manutenzione nella documentazione
allegata.
PER RIDURRE IL RISCHIO DI INCENDIO O SCOSSA ELETTRICA, NON ESPORRE L'APPARECCHIO
ALLA PIOGGIA O ALL'UMIDITÀ.
TOUTES LES INSTRUCTIONS DE SÉCURITÉ ET D’UTILISATION DOIVENT
ÊTRE LUES, RESPECTÉES ET SUIVIES AVANT UTILISATION.
• SOLO PER USO DOMESTICO
• SOLO PER ADULTI
• SOLO PER TESSUTI ASCIUTTI
AVVISO CALIFORNIA PROP 65
AVVISO:
Questo prodotto contiene cadmio, classicato dallo Stato della California
come cancerogeno e pericoloso per la riproduzione e lo sviluppo.
Non ingerire.
Per ulteriori informazioni: www.P65warnings.ca.gov

CONSERVARE QUESTE ISTRUZIONI
Avvertenze importanti relative alla sicurezza
AVVERTENZA:
PER RIDURRE IL RISCHIO DI INCENDI, SCOSSE ELETTRICHE O GRAVI LESIONI DURANTE L'UTILIZ-
ZO DELL'APPARECCHIO, ATTIENERSI ALLE PRECAUZIONI DI BASE, TRA CUI LE SEGUENTI:
• Leggere attentamente tutte le istruzioni prima di utilizzare l'apparecchio.
• Scollegare sempre la spina di alimentazione dalla presa di corrente immediatamente dopo
l'uso.
• Utilizzare l'apparecchio esclusivamente per lo scopo previsto.
• Non posizionare o riporre l'apparecchio in modo tale che possa cadere nella vasca da bagno
o nel lavandino.
• Non immergerlo in acqua o altri liquidi e non lasciarlo cadere in essi.
• Non cercare mai di recuperare l'apparecchio se è caduto in acqua. Staccare immediatamente
la spina.
• Assicurarsi che nessun oggetto cada nell'apparecchio e che non vi vengano versati liquidi
sopra.
• Non lasciare mai l'apparecchio incustodito mentre è collegato alla presa di corrente.
• Prestare particolare attenzione quando l'apparecchio viene utilizzato in presenza di bambini
o persone con capacità limitate.
• Utilizzare l'apparecchio solo come descritto nelle presenti istruzioni.
• Non utilizzare mai l'apparecchio se il cavo di alimentazione o la spina sono danneggiati, se
non funziona correttamente, se è caduto o è stato danneggiato o se è caduto in acqua.
• Tenere i cavi lontani da superci calde. Non avvolgere il cavo attorno all'apparecchio e non
lasciarlo penzolare dai bordi del tavolo o del piano di lavoro.
• Non utilizzare all'aperto.
• Non modicare mai la spina di sicurezza e non utilizzare prolunghe con questo apparecchio.
• Non utilizzare l'apparecchio con un convertitore di tensione.
• Non toccare le superci calde.
• Utilizzare solo accessori raccomandati dal produttore, altrimenti sussiste il pericolo di lesioni.

Informazioni FCC
ATTENZIONE:
AVVERTENZA:
Nota:
Qualsiasi modica o alterazione non espressamente approvata dall'ente responsabile della
conformità può invalidare il diritto dell'utente all'uso dell'apparecchio.
Qualsiasi modica o alterazione a questo dispositivo non espressamente approvata dall'ente
responsabile della conformità potrebbe invalidare il diritto dell'utente di utilizzare il dispositivo.
Questo apparecchio è conforme alla parte 15 delle norme FCC.
Il suo funzionamento è soggetto alle due condizioni seguenti:
1. Questo dispositivo non deve causare interferenze dannose.
2. Questo dispositivo deve accettare le interferenze ricevute, comprese quelle che potrebbero
causare un funzionamento indesiderato.
Questo apparecchio è stato testato e soddisfa i limiti previsti per un apparecchio digitale di
classe B ai sensi della parte 15 delle norme FCC. Tali limiti sono stati stabiliti per garantire una
protezione ragionevole contro interferenze dannose in ambienti residenziali. Questo apparec-
chio genera, utilizza e può emettere energia ad alta frequenza e, se non installato e utilizzato
secondo le istruzioni, può causare interferenze dannose alle comunicazioni radio. Tuttavia, non è
possibile garantire che non si verichino interferenze in una determinata installazione. Se
questo dispositivo causa interferenze dannose alla ricezione radio o televisiva, che possono
essere rilevate accendendo e spegnendo il dispositivo, l'utente dovrebbe cercare di eliminare
l'interferenza con una o più delle seguenti misure:
• Riorientare l'antenna ricevente o posizionarla in un altro punto.
• Aumentare la distanza tra l'apparecchio e il ricevitore.
• Collegare l'apparecchio a una presa di corrente che non sia collegata allo stesso circuito del
ricevitore.
• Rivolgersi al rivenditore o a un tecnico esperto in radio/televisione.
POSIZIONE DEI COMPONENTI E DEI COMANDI
No.
1
2
3
4
5
NOME DEL COMPONENTE
Pulsante di accensione/spegnimento
Piedini
Disco profumato
Coperchio
Cavo di alimentazione
SCHERMO LED
ISTRUZIONI DI VISUALIZZAZIONE
Bassa temperatura
Alta temperatura
Impostazione timer 60 minuti
Pulsante tempo
Impostazione timer 40 minuti
Impostazione timer 20 minuti
Temperatura media
Display temperatura in
tempo reale -
Pulsante DELAY -
Display tempo
Display tempo
Pulsante tempo
1. Premere il tasto interruttore per avviare l'apparecchio; premendo a lungo il tasto l'apparec-
chio si spegne.
2. Dopo l'avvio dell'apparecchio, il simbolo di separazione del tempo inizia a lampeggiare. Se
entro 5 secondi dall'avvio non viene eseguita alcuna operazione, l'apparecchio imposta
automaticamente un tempo di funzionamento di 20 minuti in modalità alta temperatura.
3. Dopo l'accensione, i due punti nell'area di visualizzazione dell'ora iniziano a lampeggiare.
Premere il tasto di prenotazione entro 10 secondi per ritardare l'ora di avvio (da 30 minuti a 24
ore, con incrementi di 30 minuti).
4. Dopo aver impostato il tempo di ritardo, premere il pulsante del timer entro 10 secondi per
impostare il tempo di lavoro (commutazione tra 20, 40 e 60 minuti).
5. Dopo aver impostato il tempo di lavoro, premere il pulsante di accensione per selezionare la
modalità a bassa temperatura, la modalità a media temperatura o la modalità ad alta tempera-
tura.
6. Se la temperatura della parete del fusto supera i 50 °C (122ºF), la retroilluminazione dell'inter-
ruttore si illumina di rosso. Ciò indica una temperatura elevata: non toccare.
1. Indicatore di appuntamento (Appointment Light): lampeggia durante la selezione di un
appuntamento, rimane acceso durante l'appuntamento e si spegne al termine dell'orario
dell'appuntamento.
2. Indicatore di tempo (Time Light): lampeggia durante la selezione dell'ora, rimane acceso
durante il funzionamento e si spegne al termine del tempo di lavoro.
ISTRUZIONI PER IL DISCO PROFUMATO
ISTRUZIONI DI MONTAGGIO
Installazione dei piedini.
Questo disco profumato è progettato per gli utenti che desiderano utilizzare pastiglie per
aromaterapia o oli essenziali durante il riscaldamento degli asciugamani.
3. Istruzioni sullo schermo: premere il tasto tempo per passare da 20, 40 e 60 minuti; la piccola
spia rotonda corrispondente lampeggia. La spia rotonda rimane accesa durante il funzionamen-
to e si spegne al termine dell'operazione. Se non viene selezionato alcun appuntamento,
selezionare TIME. Lo schermo mostra l'ora e lampeggia quando il dispositivo non è in funzione.
Durante il normale funzionamento, il display rimane acceso e conta alla rovescia. Per impostare
un appuntamento, selezionare prima l'appuntamento e poi l'ora. Cliccare sull'appuntamento e
lo schermo mostrerà inizialmente l'ora dell'appuntamento lampeggiante. Dopo la conferma, la
spia rimane accesa e conta alla rovescia l'ora dell'appuntamento. Una volta scaduto l'orario
dell'appuntamento, l'indicatore dell'appuntamento si spegne, l'indicatore dell'ora rimane
acceso e lo schermo mostra il conto alla rovescia del tempo di riscaldamento selezionato.
1. Rimuovere il disco profumato dalla busta di plastica sigillata.
2. Inserire il disco profumato nel supporto per dischi profumati nella parte inferiore del
coperchio.

ISTRUZIONI PER L'USO
UTILIZZO DELLO SCALDACAPIASTRI E COPERTE
1. Aprire il coperchio e rimuovere i piedini in gomma e i cuscinetti dall'interno dell'apparecchio.
2. Bloccare i cuscinetti nei fori dei piedini in gomma.
3. Allineare i piedini in gomma ai fori della base e ssarli con un clic
1. Aprire il coperchio e rimuovere tutto il contenuto dell'imballaggio.
2. Posizionare lo scaldasalviette su una supercie asciutta, piana e rigida.
3. Inserire la spina in una presa standard da 120 V.
1. Collegare il cavo di alimentazione a una presa di corrente.
2. Aprire il COPERCHIO e inserire SOLO asciugamani asciutti o una coperta. NOTA: l'inserimento
di asciugamani umidi o bagnati può danneggiare l'apparecchio e comportare gravi rischi
per la sicurezza.
3. Chiudere il COPERCHIO.
4. Premere il PULSANTE ON/OFF.
5. Non toccare la parete interna dell'apparecchio, poiché sussiste il pericolo di ustioni. La
temperatura del contenitore può raggiungere i 130 ± 8 °C (circa 266 °F) in circa 5 minuti e
mantenersi tale per circa 15 minuti. A questo punto, la temperatura dell'asciugamano può
superare i 50 °C (122 °F), che è una temperatura piacevole al contatto con la pelle. Il conteni-
tore degli asciugamani viene riscaldato indirettamente, quindi la temperatura degli
asciugamani è di circa 55 °C (131 °F). L'indicatore di funzionamento si spegne 80 minuti
dopo l'avvio, indicando che il ciclo di lavoro è terminato.
6. Con un riscaldamento rapido di 30 secondi, in genere bastano 15 minuti per riscaldare due
asciugamani da bagno.
7. Aprire il COPERCHIO per estrarre gli asciugamani o la coperta. Premere la maniglia del
coperchio verso il basso e poi tirarla verso l'alto per aprire il coperchio. NOTA: per proteggere
l'apparecchio, sollevare con cautela il coperchio quando si estraggono gli oggetti.
8. Premere il PULSANTE ON/OFF in qualsiasi momento per avviare o interrompere il ciclo di
riscaldamento.
NOTA:
Questo scaldasalviette e scaldacoperte è dotato di una spina con messa a terra a tre poli. Per
ridurre il rischio di scossa elettrica, collegare il cavo di alimentazione a una presa con messa a
terra facilmente accessibile.
Lo scaldacapiastri e coperte può riscaldare comodamente due grandi asciugamani di cotone o
una coperta personale.
Suggerimenti per ottenere risultati ottimali
1. Utilizzare asciugamani o tessuti in cotone o misto cotone.
2. Per un riscaldamento rapido e uniforme, posizionare un asciugamano senza arricciarlo
nell'asciugamani e coperte. Gli asciugamani arrotolati o piegati con forza richiedono più
tempo per riscaldarsi completamente. Due asciugamani richiedono più tempo di uno solo.
3. Utilizzare solo con tessuti asciutti. Nota: non utilizzare con tessuti umidi o bagnati.
4. Evitare tessuti delicati che non tollerano temperature elevate. I tessuti che possono essere
trattati solo con ferro da stiro freddo potrebbero essere danneggiati dal calore dello
scaldasalviette.
5. Una volta avviato il ciclo di riscaldamento, tenere il coperchio chiuso. Ciò impedisce la
dispersione di calore. L'apertura del coperchio durante il ciclo può prolungare il tempo di
riscaldamento. Nota: la formazione di condensa sul coperchio e all'interno dell'apparecchio è
normale
Cura e manutenzione
Prima di pulire l'apparecchio, scollegare il cavo di alimentazione dalla presa di corrente. Pulire
solo con un panno asciutto quando l'apparecchio si è rareddato.
Registrazione del prodotto
SLTLR625 SLTLR725
Grazie per aver scelto SereneLife. Registrando il vostro prodotto
potrete usufruire di tutti i vantaggi della nostra garanzia esclu-
siva e dell'assistenza clienti personalizzata. Compila il modulo
per ricevere assistenza da parte di esperti e mantenere il tuo
scaldasalviette SereneLife in perfette condizioni.
Inizia qui
SLTLR625
Numero di modello:
Serenelifehome.com/pages/registre
Scan the QR code to view the
user manual in multiple languages
GER
Für Benutzerhandbücher
Benutzerhandbücher verfügbar in
Italian l German l Polish l Turkish l Dutch
und geben Sie Ihre Modellnummer ein
SCANNEN SIE DEN QR-CODE
POL
Aby uzyskać instrukcje użytkownika
w wielu językach,
Instrukcje obsługi dostępne w
Italian l German l Polish l Turkish l Dutch
i wprowadź numer swojego modelu
ZESKANUJ KOD QR
TUR
Birden fazla dilde kullanıcı kılavuzları için,
Kullanım Kılavuzları şurada mevcuttur:
Italian l German l Polish l Turkish l Dutch
ve model numaranızı girin
QR KODUNU TARAYIN
DUT
Voor gebruikershandleidingen
in meerdere talen,
Gebruikershandleidingen beschikbaar in
Italian l German l Polish l Turkish l Dutch
en voer uw modelnummer in
SCAN DE QR-CODE
ENG UK
For user guides in multiple languages,
User Manuals available in
Italian l German l Polish l Turkish l Dutch
and enter your model number
SCAN THE QR CODE
Para guías de usuario en varios idiomas,
Manuales de usuario disponibles en
Italian l German l Polish l Turkish l Dutch
e ingrese su número de modelo
ESCANEE EL CÓDIGO QR
SPA
Pour les guides d'utilisation en plusieurs langues,
Manuels d'utilisation disponibles en
Italian l German l Polish l Turkish l Dutch
et entrez votre numéro de modèle
SCANNEZ LE CODE QR
FRE
Per le guide utente in più lingue,
Manuali utente disponibili in
Italian l German l Polish l Turkish l Dutch
e inserisci il numero del tuo modello
SCANSIONA IL CODICE QR
ITA
Domande o Commenti?
Siamo qui per aiutarti!
Phone: 1.718.535.1800
Serenelifehome.com/ContactUs
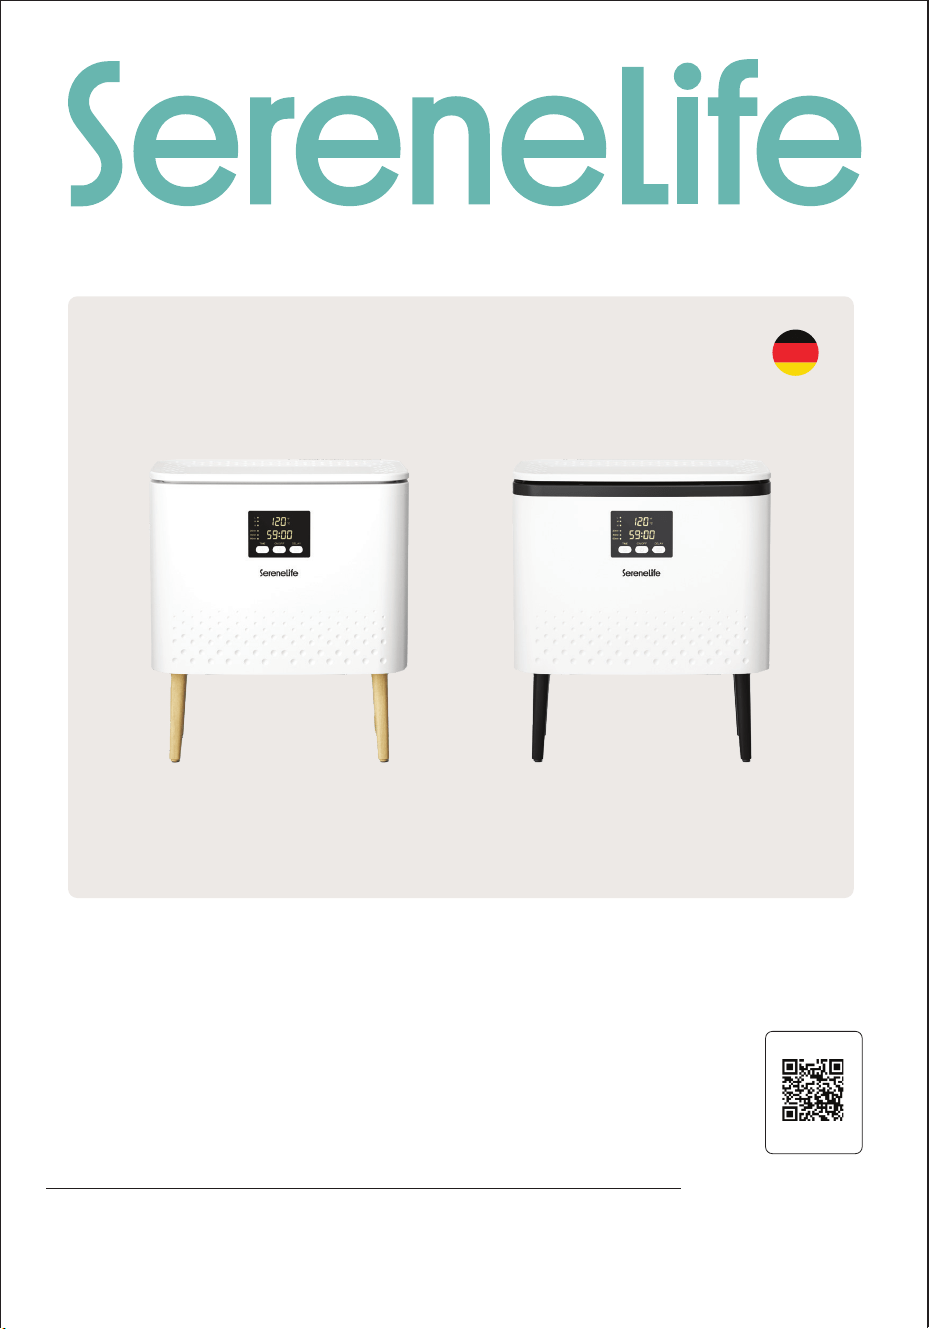
SLTLR625 - SLTLR725
Benutzerhandbuch
Rectangular Towel Warmer Bucket
Besuche unsere
Webseite
SCAN MICH
serenelifehome.com
GER

INHALTSVERZEICHNIS
LESEN UND BEWAHREN SIE DIESE ANLEITUNGEN AUF
WARNUNG:
LESEN SIE ALLE ANLEITUNGEN, WARNHINWEISE UND VORSICHTSMASSNAHMEN
SORGFÄLTIG, BEVOR SIE DIESES PRODUKT VERWENDEN. DAS NICHTBEACHTEN KANN
ZU VERLETZUNGEN ODER BESCHÄDIGUNGEN DES GERÄTES FÜHREN..
Merkmale & Technische Daten
Vorsicht
Wichtige Sicherheitshinweise
FCC-Informationen
Lage der Teile und Bedienelemente
LED-Anzeige
Display-Anweisungen
Duftscheiben-Anleitung
Aufbauanleitung
Verwendung des Handtuch- & Deckenwärmers
Tipps für beste Ergebnisse
Pege und Wartung
Produkt registrieren
3
4
5
6
7
8
9
9
9
10
11
11
11

Merkmale:
• Perfekte Größe für zwei große Badetücher
• Platz für 2 große Badetücher oder eine persönliche Decke
• Einfache Ein-Knopf-Bedienung
• Ein-/Aus-Taste
• Schaltet sich nach Ablauf der Zeitdauer automatisch aus
• Deckel bleibt oen, um Hände frei zu haben beim Befüllen oder Entleeren des Handtuch-
und Deckenwärmers
• Doppelwandiger isolierter Deckel hält die Wärme innen und bleibt außen kühl
• Überhitzungsschutz und wasserbeständiges Design
• Eingebaute Kontrollleuchte
• Bequem für den Transport des Handtuchwärmer-Eimers
• Energiesparendes Design zur Reduzierung des Stromverbrauchs
• Erwärmt Handtücher, Bademäntel, Decken oder andere Textilien
Lieferumfang:
Technische Daten:
• Handtuchwärmer
• Aromatherapie-Tablette
• Trockenmittel
• Gehäusematerial: Edelstahlblech
• Stromversorgung: 450 W
• Ausgangsleistung: 120 V AC
• Frequenz: 60 Hz
• Volumen: 20 l (5.28gal)
• Zeitdauer: 20, 40, 60 Minuten
• Kabellänge: 1,8 m (180 cm)
• Tragfähigkeit: 50 kg (110,2 Lbs)
Temperaturbereich: einstellbar von 32 °C bis 60 °C (90°F à 140°F)
Produktabmessungen (L x B x H): 44 × 25,5 × 50 cm
(17,32” x 10,01” x 19,68”)
VORSICHT
Um das Risiko schwerer Verletzungen zu verringern, beachten Sie bitte, dass es sich hierbei nicht
um ein Spielzeug handelt. Kindern darf nicht gestattet werden, den Handtuch- & Deckenwärmer
zu bedienen oder in der Nähe damit zu spielen.
Das Blitzsymbol mit Pfeilspitze in einem gleichseitigen Dreieck soll den
Benutzer auf das Vorhandensein von nicht isolierter „gefährlicher Spannung“
innerhalb des Gehäuses aufmerksam machen, die stark genug sein kann, um
einen elektrischen Schlag zu verursachen.
Das Ausrufezeichen in einem gleichseitigen Dreieck soll den Benutzer auf wichtige
Bedienungs- und Wartungshinweise in den beiliegenden Unterlagen hinweisen.
UM DAS RISIKO VON FEUER ODER STROMSCHLAG ZU VERRINGERN, SETZEN SIE DAS GERÄT
KEINEM REGEN ODER FEUCHTIGKEIT AUS.
ALLE SICHERHEITS- UND BEDIENUNGSANWEISUNGEN MÜSSEN VOR INBETRIEBNAHME
GELESEN, BEACHTET UND BEFOLGT WERDEN
• NUR FÜR DEN HAUSGEBRAUCH
• SOLO PER ADULTI
• SOLO PER TESSUTI ASCIUTTI
KALIFORNIEN PROP 65 WARNUNG
WARNUNG:
Dieses Produkt enthält Cadmium, das im US-Bundesstaat Kalifornien als
krebserregend sowie fortpanzungs- und entwicklungsgefährdend
eingestuft ist. Nicht verschlucken.
Weitere Informationen unter: www.P65warnings.ca.gov

BEWAHREN SIE DIESE ANLEITUNGEN AUF
Wichtige Sicherheitshinweise
WARNUNG:
UM DAS RISIKO VON FEUER, STROMSCHLAG ODER SCHWEREN VERLETZUNGEN BEIM
GEBRAUCH DES GERÄTES ZU VERRINGERN, BEFOLGEN SIE DIE GRUNDLEGENDE
VORSICHTSMASSNAHMEN, EINSCHLIESSLICH DER FOLGENDEN:
• Lesen Sie alle Anweisungen vor der Verwendung des Gerätes sorgfältig durch.
• Ziehen Sie den Netzstecker des Gerätes immer sofort nach der Verwendung aus der
Steckdose.
• Verwenden Sie das Gerät ausschließlich für den vorgesehenen Zweck.
• Platzieren oder lagern Sie das Gerät niemals so, dass es in eine Badewanne oder ein
Waschbecken fallen kann.
• Nicht ins Wasser oder andere Flüssigkeiten stellen oder hineinfallen lassen.
• Greifen Sie niemals nach dem Gerät, wenn es ins Wasser gefallen ist. Ziehen Sie sofort
den Netzstecker.
• Achten Sie darauf, dass keine Gegenstände in das Gerät fallen oder Flüssigkeiten darauf
verschüttet werden.
• Lassen Sie das Gerät niemals unbeaufsichtigt, solange es eingesteckt ist.
• Besondere Vorsicht ist geboten, wenn das Gerät in der Nähe von Kindern oder Personen
mit eingeschränkten Fähigkeiten verwendet wird.
• Verwenden Sie das Gerät nur wie in dieser Anleitung beschrieben.
• Betreiben Sie das Gerät niemals, wenn das Netzkabel oder der Stecker beschädigt ist, es
nicht ordnungsgemäß funktioniert, heruntergefallen oder beschädigt ist oder ins Wasser
gefallen ist.
• Halten Sie Kabel von heißen Oberächen fern. Wickeln Sie das Kabel nicht um das Gerät
und lassen Sie es nicht über Tisch- oder Arbeitsplattenkanten hängen.
• Nicht im Freien verwenden.
• Verändern Sie niemals den Sicherheitstecker und verwenden Sie keine Verlängerungska-
bel mit diesem Gerät.
• Betreiben Sie das Gerät nicht mit einem Spannungswandler.
• Heiße Oberächen nicht berühren.
• Verwenden Sie nur Zubehörteile, die vom Hersteller empfohlen werden, da andernfalls
Verletzungsgefahr besteht.

FCC-Informationen
VORSICHT:
WARNUNG:
Hinweis:
Änderungen oder Modikationen, die nicht ausdrücklich von der für die Konformität verantwortli-
chen Stelle genehmigt wurden, können die Berechtigung des Benutzers zum Betrieb des Gerätes
ungültig machen.
Änderungen oder Modikationen an diesem Gerät, die nicht ausdrücklich von der für die Konfor-
mität verantwortlichen Stelle genehmigt wurden, können die Berechtigung des Benutzers zum
Betrieb des Gerätes ungültig machen.
Dieses Gerät entspricht Teil 15 der FCC-Vorschriften.
Der Betrieb unterliegt den folgenden zwei Bedingungen:
1. Dieses Gerät darf keine schädlichen Störungen verursachen.
2. Dieses Gerät muss empfangene Störungen akzeptieren, einschließlich solcher, die einen
unerwünschten Betrieb verursachen können.
Dieses Gerät wurde getestet und entspricht den Grenzwerten für ein digitales Gerät der Klasse B
gemäß Teil 15 der FCC-Vorschriften. Diese Grenzwerte sollen einen angemessenen Schutz
gegen schädliche Störungen in Wohngebieten gewährleisten. Dieses Gerät erzeugt, nutzt und
kann Hochfrequenzenergie abstrahlen und, wenn es nicht gemäß den Anweisungen installiert
und betrieben wird, schädliche Störungen des Funkverkehrs verursachen. Es kann jedoch nicht
garantiert werden, dass bei einer bestimmten Installation keine Störungen auftreten. Wenn
dieses Gerät schädliche Störungen beim Radio- oder Fernsehempfang verursacht, was durch
Ein- und Ausschalten des Gerätes festgestellt werden kann, sollte der Benutzer versuchen, die
Störung mit einer oder mehreren der folgenden Maßnahmen zu beheben:
• Richten Sie die Empfangsantenne neu aus oder stellen Sie sie an einen anderen Ort.
• Vergrößern Sie den Abstand zwischen dem Gerät und dem Empfänger.
• Schließen Sie das Gerät an eine Steckdose an, die an einem anderen Stromkreis liegt als der
Empfänger.
• Wenden Sie sich an den Händler oder einen erfahrenen Radio-/Fernsehtechniker.
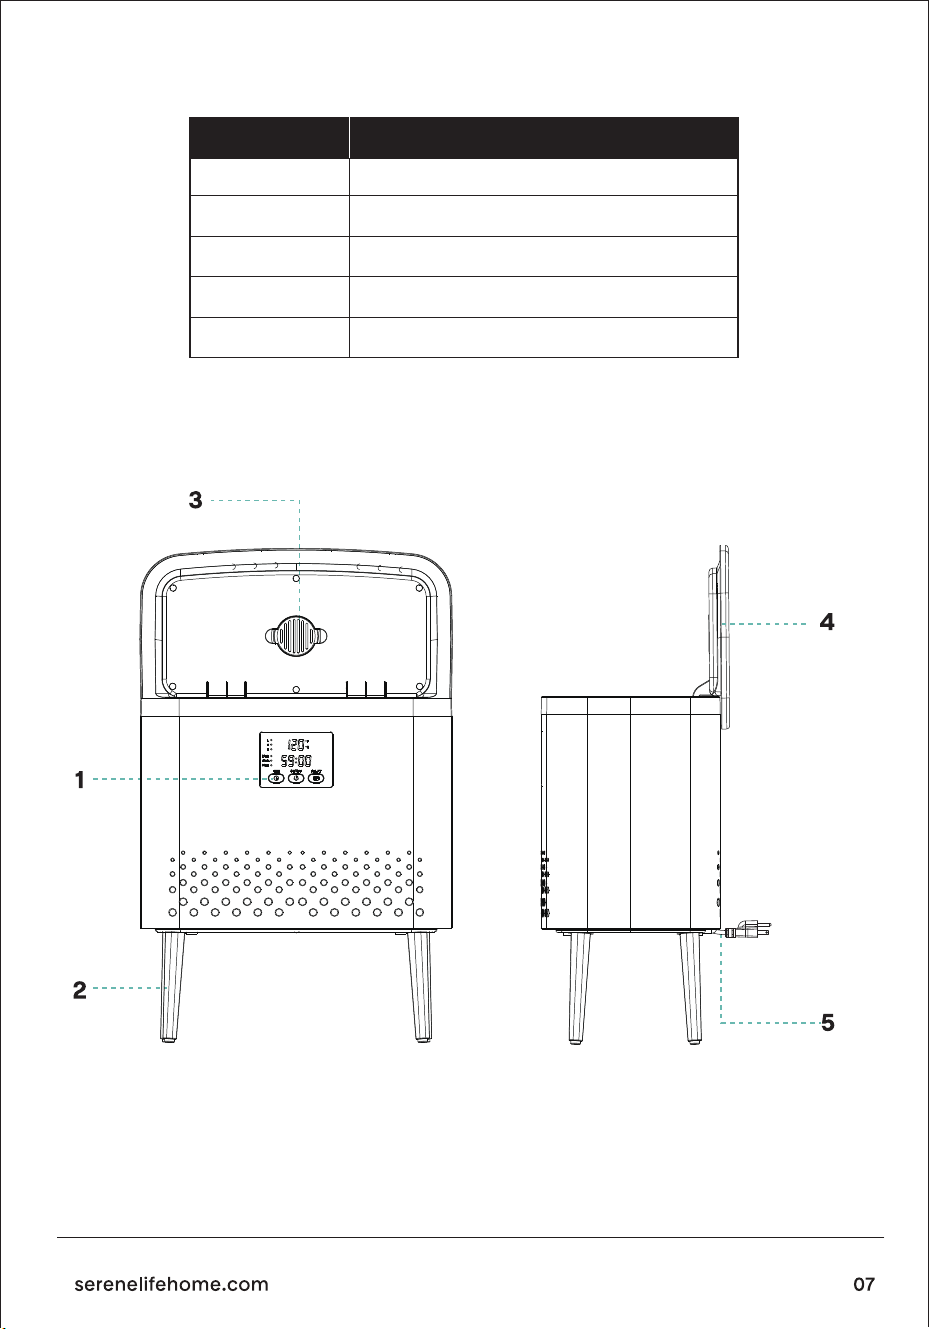
STANDORTE DER TEILE UND BEDIENELEMENTE
Nr.
1
2
3
4
5
TEILNAME
Ein-/Aus-Taste
Standfüße
Duftscheibe
Deckel
Netzkabel
LED-BILDSCHIRM
ANZEIGEANWEISUNGEN
Niedrige Temperatur
Hohe Temperatur
Timer-Einstellung 60 Min.
Zeitschalt-Taste
Timer-Einstellung 40 Min
Timer-Einstellung 20 Min
Mittlere Temperatur
Echtzeit-Temperaturanzeige
Zeitanzeige
VERZÖGERUNG-Taste
Schaltertaste
1. Drücken Sie die Schaltertaste, um das Gerät zu starten; langes Drücken schaltet das Gerät
aus.
2. Nach dem Start des Geräts beginnt das Trennsymbol der Zeit zu blinken. Erfolgt innerhalb
von 5 Sekunden nach dem Start keine Bedienung, stellt das Gerät automatisch eine
Arbeitszeit von 20 Minuten im Hochtemperaturmodus ein.
3. Nach dem Einschalten beginnen die zwei Punkte im Zeitanzeigebereich zu blinken.
Drücken Sie innerhalb von 10 Sekunden die Reservierungstaste, um die Startzeit zu
verzögern (von 30 Minuten bis 24 Stunden, jeweils in 30-Minuten-Schritten).
4. Nach dem Einstellen der Verzögerungszeit drücken Sie innerhalb von 10 Sekunden die
Timer-Taste, um die Arbeitszeit einzustellen (Umschalten zwischen 20, 40 und 60 Minuten).
5. Nach der Einstellung der Arbeitszeit drücken Sie die Einschalttaste, um den Niedrigtem-
peraturmodus, den Mitteltemperaturmodus oder den Hochtemperaturmodus zu wählen.
6. Wenn die Temperatur der Fasswand über 50 °C (122ºF) liegt, leuchtet die Hintergrundbe-
leuchtung des Schalters rot auf. Dies weist auf eine hohe Temperatur hin – bitte nicht
berühren.
1. Terminanzeige (Appointment Light): Sie blinkt, während ein Termin ausgewählt wird,
leuchtet kontinuierlich während des Termins und schaltet sich am Ende der Terminzeit aus.
2. Zeitanzeige (Time Light): Sie blinkt beim Auswählen der Zeit, bleibt während des Betriebs
eingeschaltet und schaltet sich am Ende der Arbeitszeit aus.
ANLEITUNG ZUR DUFTSCHEIBE
AUFBAUANLEITUNG
Installieren der Standfüße.
Dieses Duftscheiben-Design ist für Benutzer gedacht, die Aromatherapie-Tabletten oder
ätherische Öle beim Erwärmen von Handtüchern verwenden möchten.
3. Bildschirmanweisungen: Drücken Sie die Zeittaste, um zwischen 20, 40 und 60 Minuten zu
wechseln; die entsprechende kleine runde Lampe blinkt. Die kleine runde Lampe bleibt
während des Betriebs eingeschaltet und erlischt, wenn der Vorgang abgeschlossen ist. Wenn
kein Termin ausgewählt wird, wählen Sie TIME. Der Bildschirm zeigt die Zeit an und blinkt, wenn
das Gerät nicht in Betrieb ist. Während des normalen Betriebs bleibt die Anzeige durchgehend
eingeschaltet und zählt herunter. Um einen Termin einzustellen, wählen Sie zuerst den Termin
und dann die Zeit. Klicken Sie auf den Termin, und der Bildschirm zeigt zunächst blinkend die
Terminzeit an. Nach Bestätigung bleibt die Lampe eingeschaltet und zählt die Terminzeit
herunter. Sobald die Terminzeit abgelaufen ist, erlischt die Terminanzeige, die Zeitanzeige bleibt
eingeschaltet, und der Bildschirm zeigt den Countdown der ausgewählten Heizzeit an.
1. Entfernen Sie die Duftscheibe aus der versiegelten Plastiktüte.
2. Schieben Sie die Duftscheibe in den Duftscheibenhalter an der Unterseite des Deckels.

GEBRAUCHSANWEISUNG
VERWENDUNG DES HANDTUCH- & DECKENWÄRMERS
1. Önen Sie die Abdeckung und entnehmen Sie die Gummifüße sowie die Fußpolster aus dem
Geräteinneren.
2. Verriegeln Sie die Fußpolster in den Löchern der Gummifüße.
3. Richten Sie die Gummifüße an den Löchern des Bodengehäuses aus und klicken Sie sie ein.
1. Önen Sie den Deckel und entfernen Sie alle Verpackungsinhalte.
2. Stellen Sie den Handtuchwärmer auf eine trockene, ebene und harte Oberäche.
3. Stecken Sie den Stecker in eine standardmäßige 120V-Steckdose.
1. Stecken Sie das Netzkabel in eine Steckdose.
2. Önen Sie den DECKEL und legen Sie NUR TROCKENE Handtücher oder eine Decke hinein.
HINWEIS: Das Einlegen von feuchten oder nassen Handtüchern kann das Gerät beschädigen
und ernsthafte Sicherheitsrisiken darstellen.
3. Schließen Sie den DECKEL.
4. Drücken Sie die EIN/AUS-TASTE.
5. Bitte berühren Sie die Innenwand des Geräts nicht, da Verbrennungsgefahr besteht. Die
Temperatur des Behälters kann in etwa 5 Minuten 130 ± 8°C (ca. 266°F) erreichen und etwa
15 Minuten lang halten. Zu diesem Zeitpunkt kann die Temperatur des Handtuchs über
50°C (122°F) betragen, was für den menschlichen Kontakt angenehm ist. Der Handtuchbe-
hälter wird indirekt erhitzt, sodass die Temperatur der Handtücher etwa 55°C (131°F)
beträgt. Die Betriebsanzeige erlischt 80 Minuten nach dem Start, was anzeigt, dass der
Arbeitszyklus abgeschlossen ist.
6. Mit 30 Sekunden Schnellaufheizung reichen in der Regel 15 Minuten, um zwei Badetücher
zu erwärmen.
7. Önen Sie den DECKEL, um die Handtücher oder die Decke zu entnehmen. Drücken Sie den
Gri des Deckels nach unten und ziehen Sie ihn dann nach oben, um den Deckel zu önen.
HINWEIS: Zum Schutz des Geräts den Deckel beim Herausnehmen der Gegenstände
vorsichtig anheben.
8. Drücken Sie die EIN/AUS-TASTE jederzeit, um den Heizzyklus zu starten oder zu stoppen.
HINWEIS:
Dieser Handtuch- und Deckenwärmer verfügt über einen dreipoligen Erdungsstecker. Um das
Risiko eines elektrischen Schlags zu verringern, stecken Sie das Netzkabel in eine geerdete
Steckdose, die leicht zugänglich ist.
Der Handtuch- & Deckenwärmer kann bequem zwei große Baumwoll-Badetücher oder eine
persönliche Decke erwärmen.
Tipps für beste Ergebnisse
1. Verwenden Sie Handtücher oder Stoe aus Baumwolle oder Baumwollmischung.
2. Für schnelles und gleichmäßiges Erwärmen legen Sie ein Handtuch locker in den Handtuch-
& Deckenwärmer. Fest aufgerollte oder gefaltete Handtücher brauchen länger, um vollstän-
dig zu erwärmen. Zwei Handtücher benötigen länger als eines.
3. Nur mit trockenen Stoen verwenden. Hinweis: Nicht mit feuchten oder nassen Stoen
verwenden.
4. Vermeiden Sie empndliche Stoe, die hohe Temperaturen nicht vertragen. Stoe, die nur
mit kühlem Bügeleisen behandelt werden dürfen, könnten durch die Hitze des
Handtuchwärmers beschädigt werden.
5. Sobald der Heizzyklus gestartet ist, halten Sie den Deckel geschlossen. Dies verhindert
Wärmeverlust. Das Önen des Deckels während des Zyklus kann die Erwärmungszeit
verlängern. Hinweis: Kondensation am Deckel und im Inneren des Geräts ist normal.
Pege und Wartung
Vor der Reinigung das Netzkabel aus der Steckdose ziehen. Nur mit einem trockenen Tuch
abwischen, wenn das Gerät abgekühlt ist.
Produkt registrieren
SLTLR625 SLTLR725
Vielen Dank, dass Sie sich für SereneLife entschieden haben. Durch die
Registrierung Ihres Produkts erhalten Sie alle Vorteile unserer exklusiv-
en Garantie und persönlichen Kundensupport. Füllen Sie das Formular
aus, um Expertenunterstützung zu erhalten und Ihren
SereneLife-Handtuchwärmer in einwandfreiem Zustand zu halten.
Start hier
SLTLR625
Modellnummer:
Serenelifehome.com/pages/registre
Scan the QR code to view the
user manual in multiple languages
GER
Für Benutzerhandbücher
Benutzerhandbücher verfügbar in
Italian l German l Polish l Turkish l Dutch
und geben Sie Ihre Modellnummer ein
SCANNEN SIE DEN QR-CODE
POL
Aby uzyskać instrukcje użytkownika
w wielu językach,
Instrukcje obsługi dostępne w
Italian l German l Polish l Turkish l Dutch
i wprowadź numer swojego modelu
ZESKANUJ KOD QR
TUR
Birden fazla dilde kullanıcı kılavuzları için,
Kullanım Kılavuzları şurada mevcuttur:
Italian l German l Polish l Turkish l Dutch
ve model numaranızı girin
QR KODUNU TARAYIN
DUT
Voor gebruikershandleidingen
in meerdere talen,
Gebruikershandleidingen beschikbaar in
Italian l German l Polish l Turkish l Dutch
en voer uw modelnummer in
SCAN DE QR-CODE
ENG UK
For user guides in multiple languages,
User Manuals available in
Italian l German l Polish l Turkish l Dutch
and enter your model number
SCAN THE QR CODE
Para guías de usuario en varios idiomas,
Manuales de usuario disponibles en
Italian l German l Polish l Turkish l Dutch
e ingrese su número de modelo
ESCANEE EL CÓDIGO QR
SPA
Pour les guides d'utilisation en plusieurs langues,
Manuels d'utilisation disponibles en
Italian l German l Polish l Turkish l Dutch
et entrez votre numéro de modèle
SCANNEZ LE CODE QR
FRE
Per le guide utente in più lingue,
Manuali utente disponibili in
Italian l German l Polish l Turkish l Dutch
e inserisci il numero del tuo modello
SCANSIONA IL CODICE QR
ITA
Fragen oder Kommentare?
Wir sind für Sie da!
Phone: 1.718.535.1800
Serenelifehome.com/ContactUs
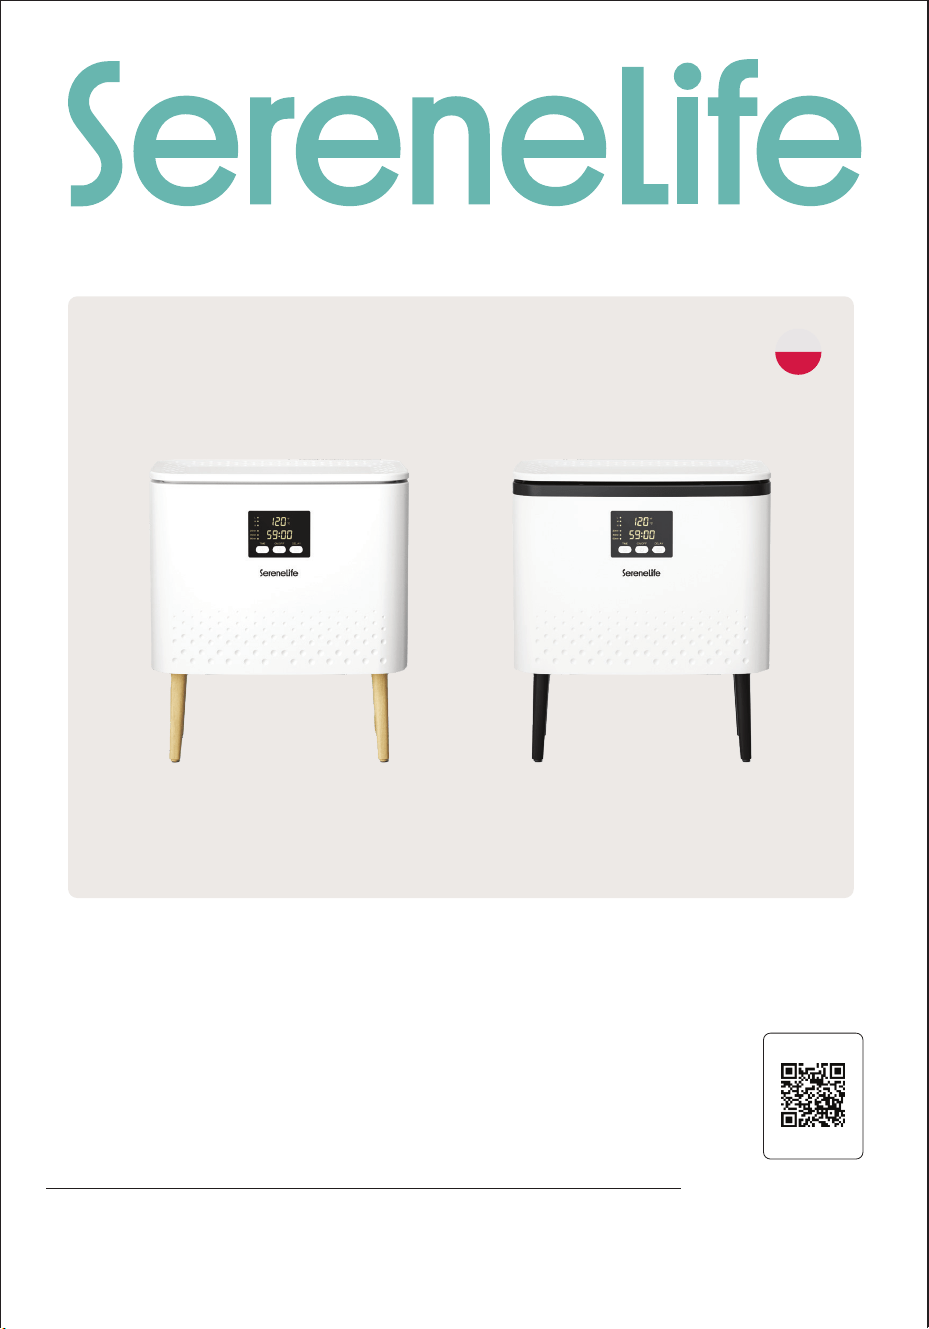
SLTLR625 - SLTLR725
Instrukcja obsługi
Prostokątny podgrzewacz do
ręczników i koców
Odwiedz nasza
strone internetowa
ZESKANUJ MNIE
serenelifehome.com
POL

SPIS TREŚCI
PRZECZYTAJ I ZACHOWAJ TE INSTRUKCJE
OSTRZEŻENIE:
UPEWNIJ SIĘ, ŻE DOKŁADNIE PRZECZYTAŁEŚ WSZYSTKIE INSTRUKCJE, OSTRZEŻENIA
ŚRODKI OSTROŻNOŚCI PRZED UŻYCIEM TEGO PRODUKTU. NIEPRZESTRZEGANIE ICH
MOŻE PROWADZIĆ DO URAZÓW LUB USZKODZENIA URZĄDZENIA.
CECHY I SPECYFIKACJE TECHNICZNE
ŚRODKI OSTROŻNOŚCI
WAŻNE INSTRUKCJE BEZPIECZEŃSTWA
INFORMACJE FCC
UMIEJSCOWIENIE ELEMENTÓW I PANEL STEROWANIA
WYŚWIETLACZ LED
INSTRUKCJE WYŚWIETLANIA
INSTRUKCJE DOTYCZĄCE PŁYTY Z AROMATEM
INSTRUKCJE INSTALACJI
KORZYSTANIE Z PODGRZEWACZA RĘCZNIKÓW I KOCÓW
WSKAZÓWKI DLA NAJLEPSZYCH EFEKTÓW
PIELĘGNACJA I KONSERWACJA
REJESTRACJA PRODUKTU
3
4
5
6
7
8
9
9
9
10
11
11
11

Cechy:
• Idealny rozmiar na dwa duże ręczniki kąpielowe
• Pomieści 2 duże ręczniki kąpielowe lub osobisty koc
• Prosta obsługa jednym przyciskiem
• Przycisk włączania/wyłączania
• Automatyczne wyłączanie po upływie czasu
• Pokrywa pozwala na swobodne napełnianie i opróżnianie podgrzewacza ręczników i
koców
• Podwójna izolacyjna pokrywa utrzymuje ciepło, pozostając chłodna w dotyku
• Zabezpieczenie przed przegrzaniem i wodoodporna konstrukcja
• Wbudowana lampka kontrolna
• Wygodny uchwyt do przenoszenia podgrzewacza ręczników
• Zaprojektowany z myślą o oszczędności energii i zmniejszeniu zużycia
• Może podgrzewać ręczniki, szlafroki, koce lub inne artykuły tekstylne
Zawartość opakowania:
Dane techniczne:
• Podgrzewacz ręczników
• Tabletka do aromaterapii
• Osuszacz
• Materiał wykonania: blacha ze stali nierdzewnej
• Zasilanie: 450 W
• Moc wyjściowa: 120 V AC (prąd zmienny)
• Pasmo przenoszenia: 60 Hz
• Pojemność: 20 litrów
• Czas pracy: 20, 40, 60 minut
• Długość przewodu zasilającego: 5,91 stopy (1,8 m)
• Nośność: 110,2 funta (50 kg)
• Waga produktu: 8,1 funta (3,6 kg)
• Zakres temperatur: regulowany od 90°F do 140°F (32°C do 135°C)
• Wymiary produktu (długość x szerokość x wysokość): 17,32” x 10,01” x 19,68” – cale (44,5
cm x 25,4 cm x 50,8 cm)
OSTRZEŻENIE
ABY ZMNIEJSZYĆ RYZYKO POWAŻNYCH OBRAŻEŃ, NALEŻY PAMIĘTAĆ, ŻE NIE JEST TO ZABAWKA.
NIE POZWALAJ DZIECIOM OBSŁUGIWAĆ ANI BAWIĆ SIĘ W POBLIŻU PODGRZEWACZA RĘCZNIKÓW
I KOCÓW.
Symbol błyskawicy ze strzałką wewnątrz trójkąta równobocznego ostrzega
użytkownika o obecności „niebezpiecznego napięcia” wewnątrz obudowy
urządzenia, które może być wystarczająco wysokie, aby spowodować ryzyko
porażenia prądem elektrycznym.
Symbol wykrzyknika wewnątrz trójkąta równobocznego ostrzega użytkownika o
obecności ważnych instrukcji dotyczących obsługi i konserwacji (serwisu) w
dokumentacji dołączonej do urządzenia.
ABY ZREDUKOWAĆ RYZYKO POŻARU LUB PORAŻENIA PRĄDEM ELEKTRYCZNYM, NIE NALEŻY
NARAŻAĆ URZĄDZENIA NA DZIAŁANIE DESZCZU ANI WILGOCI.
WAŻNE INSTRUKCJE DOTYCZĄCE BEZPIECZEŃSTWA
WSZYSTKIE INSTRUKCJE BEZPIECZEŃSTWA ORAZ OBSŁUGI NALEŻY PRZECZYTAĆ,
PRZESTRZEGAĆ I STOSOWAĆ, ZANIM URZĄDZENIE ZOSTANIE URUCHOMIONE
-WYŁĄCZNIE DO UŻYTKU DOMOWEGO
- WYŁĄCZNIE DO UŻYTKU PRZEZ DOROSŁYCH
- WYŁĄCZNIE DO SUCHYCH TKANIN
Ostrzeżenie California Proposition 65
OSTRZEŻENIE:
Ten produkt może narażać użytkownika na działanie substancji
chemicznych, które w stanie Kalifornia są uznawane za powodujące raka,
wady wrodzone lub inne problemy zdrowotne związane z reprodukcją.
Nie spożywać.
Aby uzyskać więcej informacji, odwiedź stronę: www.P65warnings.ca.gov

Zachowaj poniższe instrukcje
OSTRZEŻENIE
ABY ZMNIEJSZYĆ RYZYKO POŻARU, PORAŻENIA PRĄDEM ELEKTRYCZNYM LUB POWAŻNYCH
OBRAŻEŃ PODCZAS KORZYSTANIA Z TEGO URZĄDZENIA, NALEŻY PRZESTRZEGAĆ NASTĘPU-
JĄCYCH PODSTAWOWYCH ŚRODKÓW OSTROŻNOŚCI:
• Przed użyciem urządzenia należy przeczytać wszystkie instrukcje.
• Zawsze odłączaj urządzenie od gniazdka elektrycznego natychmiast po zakończeniu
użytkowania.
• Nie używaj urządzenia do celów innych niż te, do których zostało przeznaczone.
• Nie umieszczaj ani nie przechowuj urządzenia w miejscach, gdzie może spaść lub zostać
wepchnięte do wanny albo zlewu.
• Nie wkładaj ani nie upuszczaj urządzenia do wody ani do innej cieczy.
• Nie chwytaj urządzenia, które wpadło do wody. Natychmiast je odłącz.
• Upewnij się, że do urządzenia nie wpadają przedmioty ani nie rozlewane są na nie płyny.
• Nie pozostawiaj urządzenia bez nadzoru, gdy jest podłączone do prądu.
• Stosuj szczególną ostrożność, gdy urządzenie jest używane w pobliżu dzieci lub osób
niepełnosprawnych.
• Używaj wyłącznie zgodnie z opisem w niniejszej instrukcji.
• Nie używaj urządzenia, jeśli przewód zasilający lub wtyczka są uszkodzone, jeśli nie działa
prawidłowo, upadło lub zostało zanurzone w wodzie.
• Trzymaj przewód zasilający z dala od źródeł ciepła. Nie owijaj przewodu wokół obudowy
ani nie pozwalaj, by zwisał z krawędzi stołu czy blatu.
• Nie używaj na zewnątrz.
• Nie usuwaj ani nie modykuj zabezpieczenia wtyczki i nie używaj z przedłużaczem.
• Nie używaj z konwerterem napięcia.
• Nie dotykaj gorących powierzchni.
• Nie używaj akcesoriów niewskazanych przez producenta, gdyż może to spowodować
obrażenia.

INFORMACJE FCC
UWAGA:
Uwaga:
Zmiany lub modykacje, które nie zostały wyraźnie zatwierdzone przez stronę odpowiedzialną za
zgodność, mogą unieważnić uprawnienia użytkownika do obsługi urządzenia.
To urządzenie zostało przetestowane i uznane za zgodne z limitami dla cyfrowego sprzętu klasy B,
zgodnie z częścią 15 przepisów FCC. Limity te mają na celu zapewnienie rozsądnej ochrony przed
szkodliwymi zakłóceniami w instalacjach domowych.
To urządzenie jest zgodne z częścią 15 przepisów FCC.
Jego działanie podlega dwóm warunkom:
1. Urządzenie nie może powodować szkodliwych zakłóceń.
2. Urządzenie musi akceptować wszelkie zakłócenia, w tym zakłócenia mogące powodować
niepożądane działanie.
Urządzenie to generuje, wykorzystuje i może emitować energię o częstotliwości radiowej, a jeśli
nie jest zainstalowane i używane zgodnie z instrukcjami, może powodować szkodliwe zakłóce-
nia w komunikacji radiowej. Nie ma jednak gwarancji, że zakłócenia nie wystąpią w konkretnej
instalacji.
Jeżeli urządzenie powoduje szkodliwe zakłócenia w odbiorze radia lub telewizji, co można
sprawdzić, wyłączając i włączając urządzenie, użytkownik powinien spróbować usunąć zakłóce-
nia stosując jedną lub więcej z poniższych metod:
• Zmień kierunek lub położenie anteny odbiorczej.
• Zwiększ odległość między urządzeniem a odbiornikiem.
• Podłącz urządzenie do gniazdka na obwodzie innym niż ten, do którego podłączony jest
odbiornik.
• Skonsultuj się z dealerem lub doświadczonym technikiem radio/TV w celu uzyskania
pomocy.
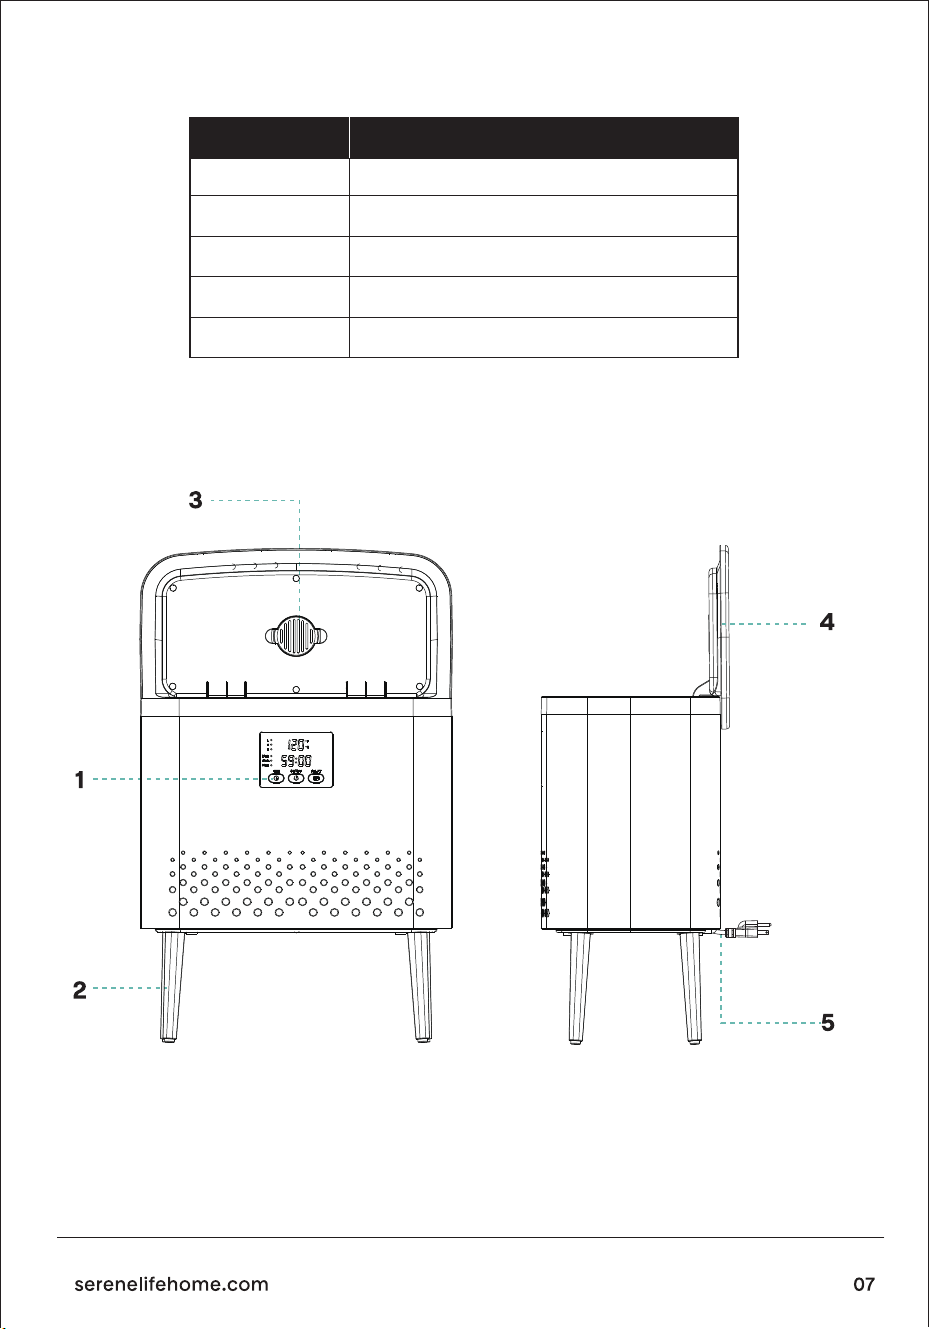
LOKALIZACJA ELEMENTÓW I PANELU STEROWANIA
Nr.
1
2
3
4
5
Nazwa elementu
Przycisk włączania / wyłączania
Stópki
Dysk zapachowy
Pokrywa
Przewód zasilający
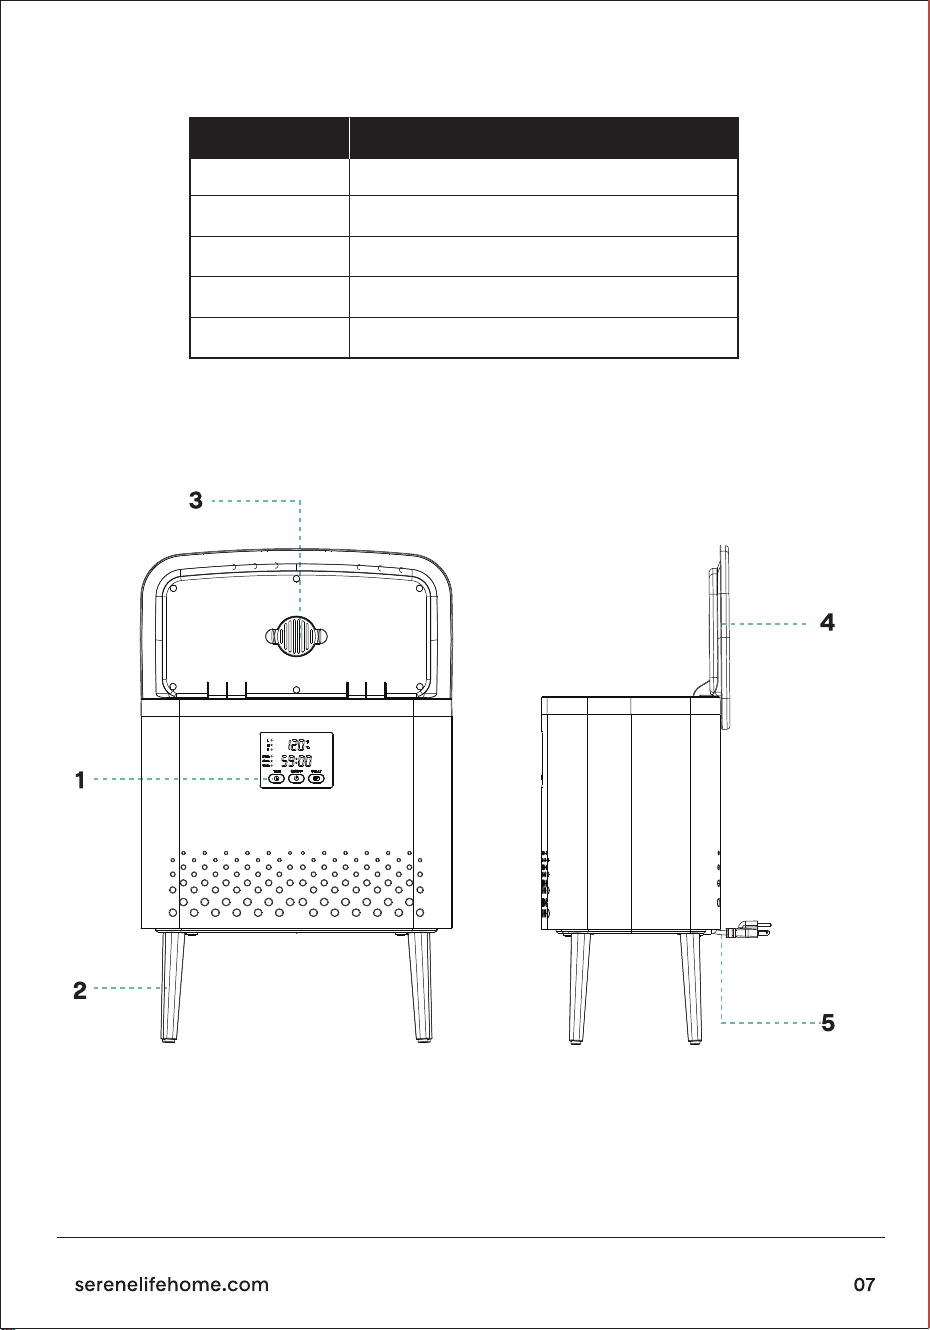
LOKALIZACJA ELEMENTÓW I PANELU STEROWANIA
Nr.
1
2
3
4
5
Nazwa elementu
Przycisk włączania / wyłączania
Stópki
Dysk zapachowy
Pokrywa
Przewód zasilający
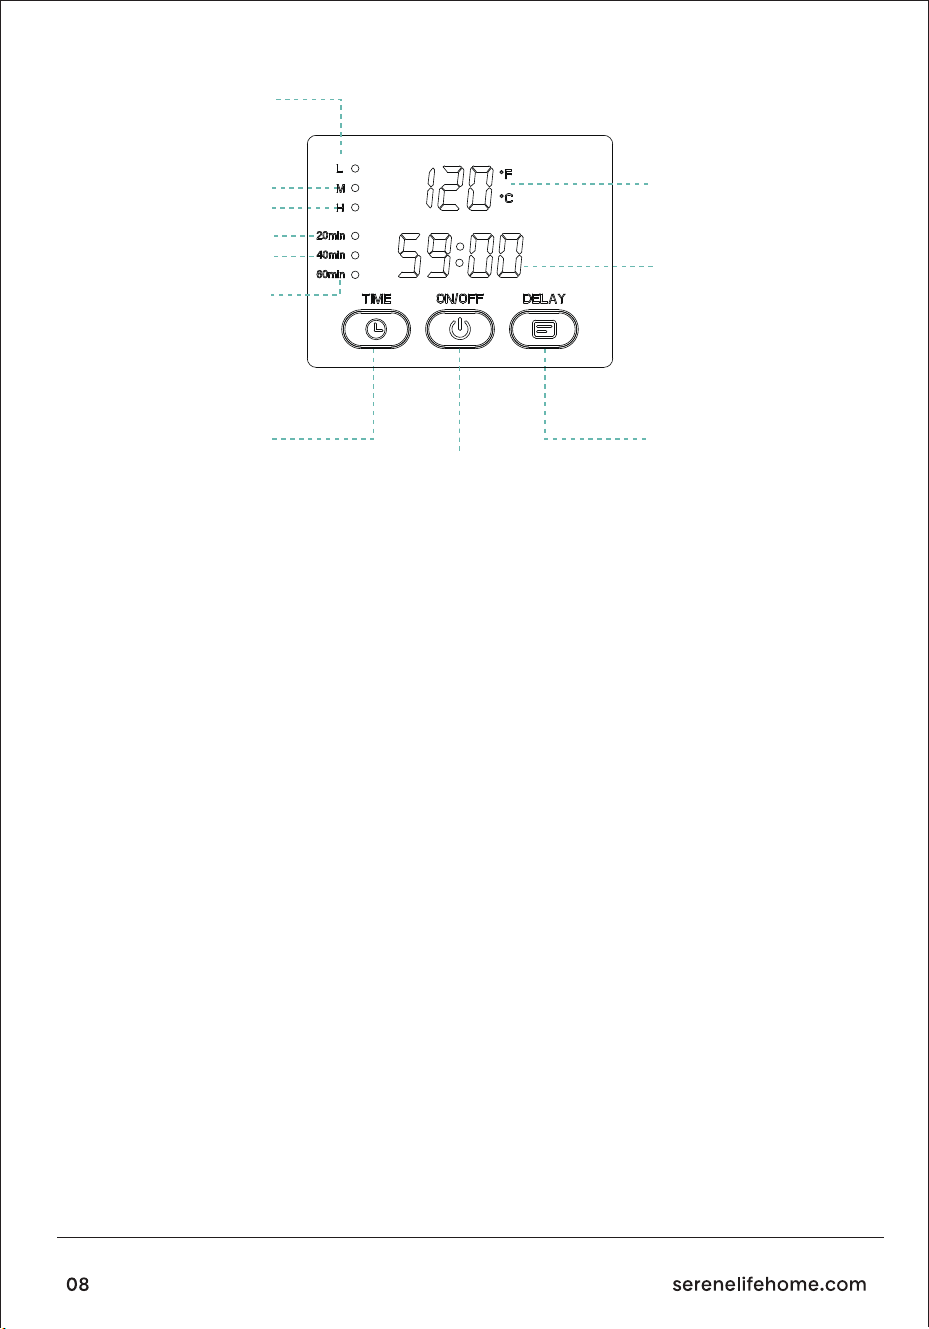
WYŚWIETLACZ LED
INSTRUKCJA WYŚWIETLANIA
Niska temperatura
Wysoka temperatura
Ustawienie timera: 60 minut
Przycisk timera
Ustawienie timera: 40 minut
Ustawienie timera: 20 minut
Średnia temperatura
Wyświetlacz aktualnej
temperatury
Wyświetlacz czasu
Przycisk opóźnienia
Przycisk zasilania
1. Naciśnij przycisk zmiany, aby uruchomić urządzenie, przytrzymaj, aby wyłączyć urządzenie.
2. Po uruchomieniu urządzenia symbol separatora czasu zacznie migać; jeśli w ciągu 5 sekund
od uruchomienia nie zostanie wykonana żadna operacja, urządzenie automatycznie ustawi
czas pracy 20 minut w trybie wysokiej temperatury.
3. Po włączeniu dwa punkty w obszarze wyświetlania godziny zaczną migać. Naciśnij przycisk
rezerwacji w ciągu 10 sekund, aby ustawić opóźniony czas rozpoczęcia (od 30 minut do 24
godzin, każde naciśnięcie zwiększa czas o 30 minut).
4. Po ustawieniu czasu rezerwowego należy w ciągu 10 sekund nacisnąć przycisk timera, aby
ustawić czas pracy (przełączać między 20, 40 i 60 minutami).
5. Po ustawieniu czasu pracy naciśnij przycisk włączania, aby ustawić tryb niskiej temperatury,
tryb średniej temperatury i tryb wysokiej temperatury.
6. Gdy temperatura ścianki bębna przekroczy 50 stopni Celsjusza, podświetlenie przełącznika
zmieni kolor na czerwony, sygnalizując wysoką temperaturę. Nie dotykaj urządzenia.
1. Dioda programowania: miga po wybraniu programu, świeci się ciągle przez zapro-
gramowany czas i gaśnie po upływie zaprogramowanego czasu.
2. Dioda czasu: miga podczas wybierania czasu, świeci się podczas pracy i gaśnie po
zakończeniu pracy.
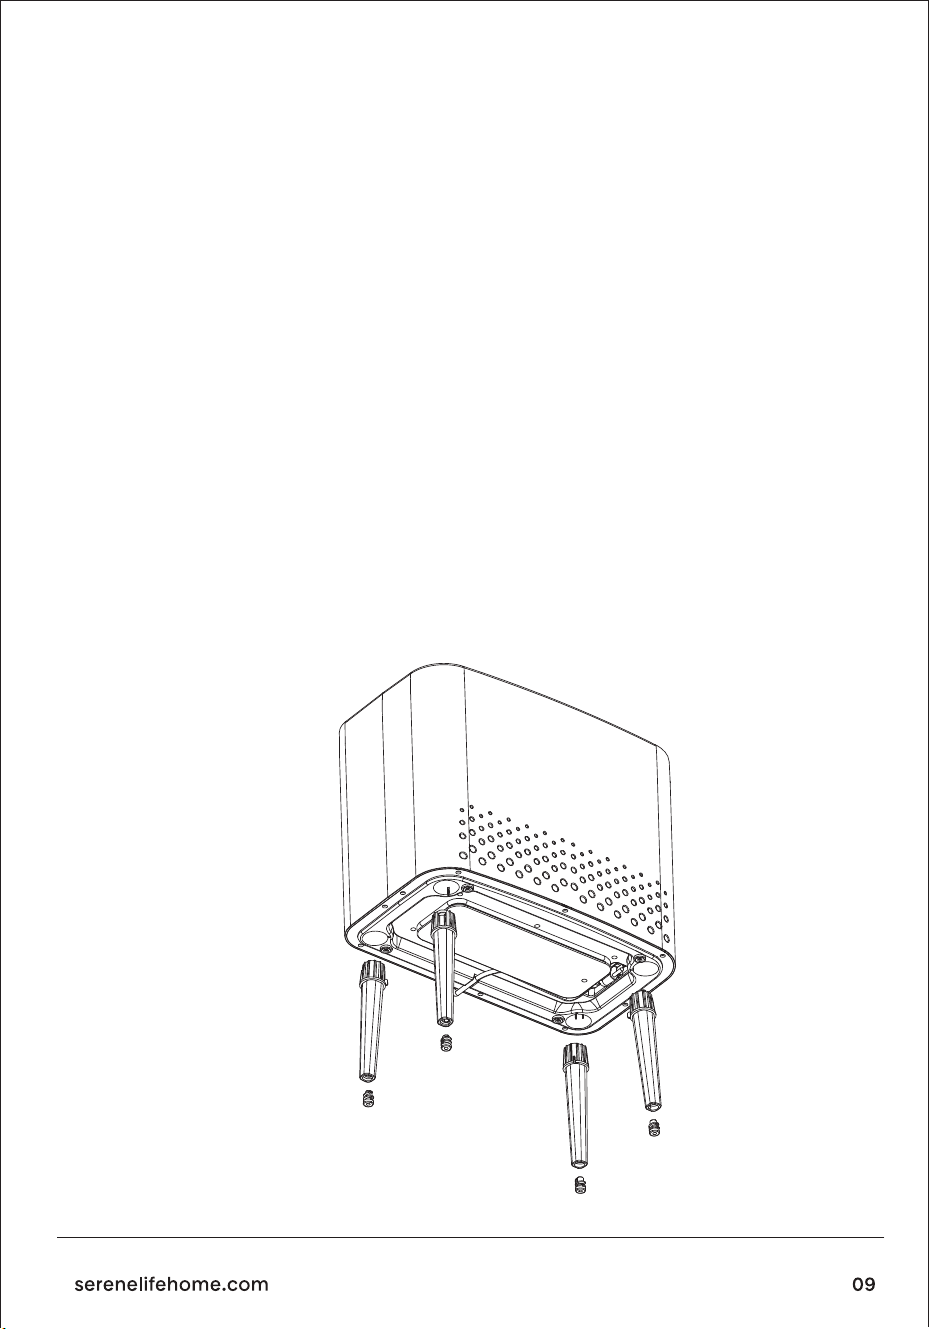
INSTRUKCJA DOTYCZĄCA PŁYTY Z ZAPACHEM
INSTRUKCJA INSTALACJI
Zainstaluj nóżki
Ta płyta zapachowa została zaprojektowana dodatkowo dla niektórych użytkowników, którzy
lubią używać tabletek do aromaterapii lub olejków eterycznych podczas podgrzewania
ręczników.
3. Instrukcje wyświetlania ekranu: Naciśnij przycisk czasu, aby przełączać między 20, 40 i 60
minutami, a odpowiednia mała okrągła lampka będzie migać. Mała okrągła lampka pozostaje
włączona podczas pracy i gaśnie po zakończeniu pracy. Jeśli nie wybrano programu, wybierz
CZAS (TIME). Ekran wyświetla godzinę i miga, gdy urządzenie nie pracuje. Podczas normalnej
pracy pozostaje włączony przez cały czas odliczania. Aby zaprogramować, najpierw wybierz
program, a następnie godzinę. Kliknij program, a ekran wyświetli zaprogramowaną godzinę,
migając na początku. Po potwierdzeniu lampka pozostanie włączona, wskazując odliczanie
zaprogramowanego czasu. Po zakończeniu programowania czasu lampka programowania
zgaśnie, lampka godziny pozostanie włączona, a na wyświetlaczu pojawi się odliczanie, aby
wybrać czas nagrzewania.
1. Wyjmij dysk zapachowy z zamkniętej plastikowej torebki.
2. Wsuń go do uchwytu na dyski zapachowe znajdującego się w dolnej części pokrywy.

Instrukcja obsługi
KORZYSTANIE Z GRZEJNIKA DO RĘCZNIKÓW I KOCÓW
1. Otwórz pokrywę i wyjmij gumowe nóżki oraz podkładki z wnętrza korpusu urządzenia.
2. Zamocuj podkładki nóżek w otworach w dolnej części gumowych nóżek.
3. Wyrównaj gumowe nóżki z otworami w dolnej obudowie i wsuń je na miejsce.
1. Otwórz pokrywę i wyjmij całą zawartość opakowania.
2. Umieść podgrzewacz ręczników na suchej, równej i twardej powierzchni.
3. Włóż wtyczkę do standardowego gniazdka elektrycznego 120 V.
1. Podłącz przewód zasilający.
2. Otwórz pokrywę i umieść wyłącznie suche ręczniki lub koce.
3. UWAGA: Wilgotne lub mokre tkaniny mogą uszkodzić urządzenie i stwarzać poważne
zagrożenie dla bezpieczeństwa.
4. Zamknąć pokrywę.
5. Nacisnąć przycisk ON/OFF.
6. Nie dotykać wewnętrznej ścianki: ryzyko poparzenia. Temperatura bębna może osiągnąć
około 130°C (266°F ± 8) w ciągu 5 minut i utrzymać się przez 15 minut. Ręczniki osiągają
wówczas temperaturę ponad 50°C (122°F) komfortową do użytkowania. Wiadro nagrzewa
się pośrednio, utrzymując temperaturę ręczników na poziomie około 55°C (131°F). Po 80
minutach lampka kontrolna gaśnie, sygnalizując zakończenie cyklu.
7. Dzięki szybkiemu podgrzewaniu (30 sekund) wystarczy 15 minut na dwie ręczniki.
8. Aby wyjąć ręczniki, należy delikatnie otworzyć pokrywę, naciskając uchwyt.
9. W dowolnym momencie można zatrzymać/wznowić działanie za pomocą przycisku
ON/OFF.
UWAGA:
Ten podgrzewacz ręczników i koców ma trzybolcową wtyczkę z uziemieniem. Aby zmniejszyć
ryzyko porażenia prądem, podłącz przewód zasilający do łatwo dostępnego gniazdka elektry-
cznego z uziemieniem.
Grzejnik do ręczników i koców może wygodnie ogrzać dwa duże bawełniane ręczniki
kąpielowe lub lekki koc osobisty.
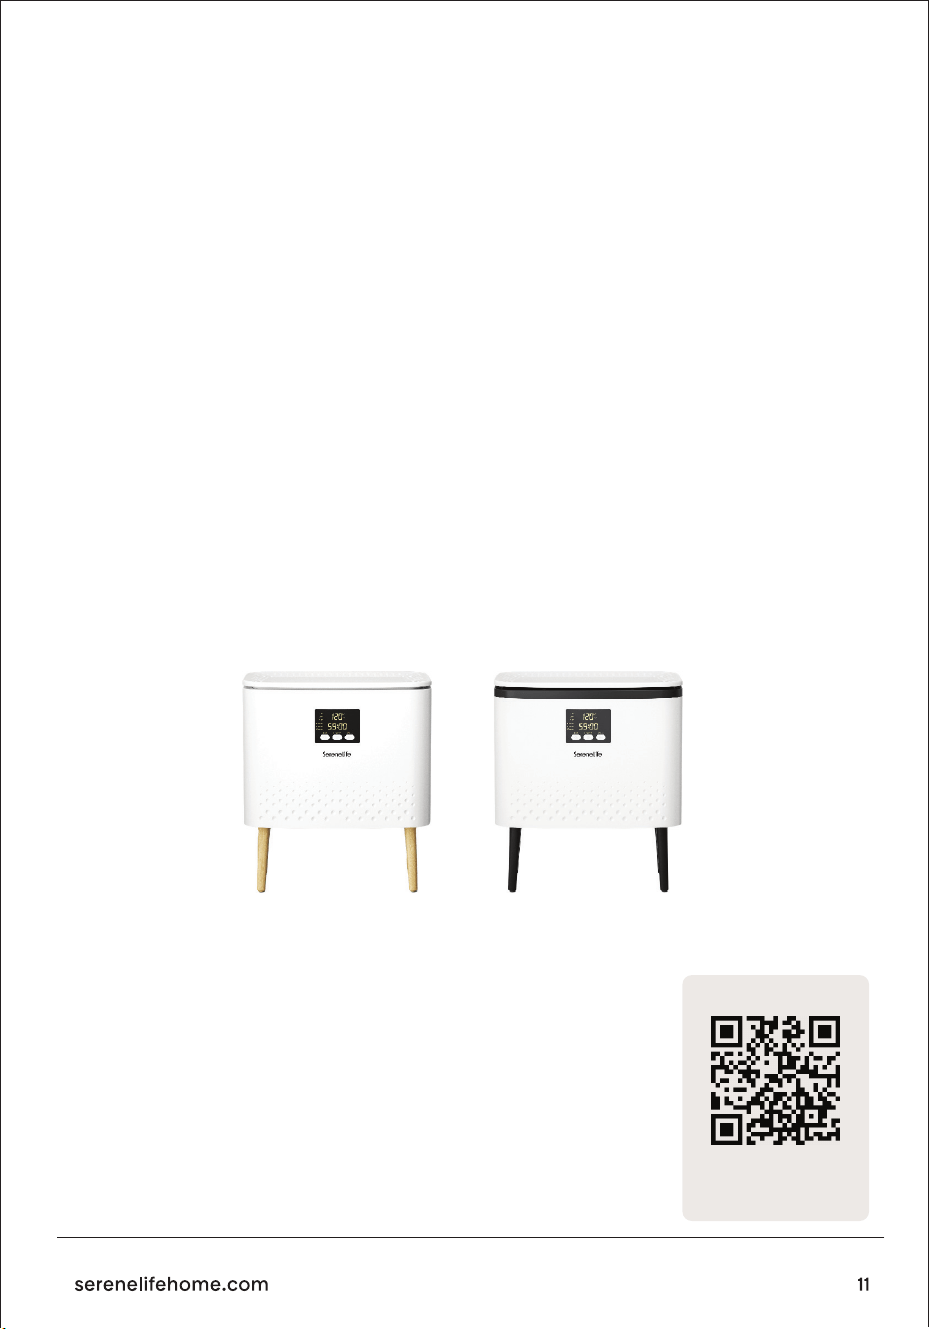
WSKAZÓWKI DOTYCZĄCE UZYSKANIA NAJLEPSZYCH WYNIKÓW
1. Używaj ręczników lub tkanin bawełnianych lub mieszanych.
2. Aby zapewnić szybkie i równomierne ogrzanie, ułóż 1 ręcznik bez ściskania na podgrze-
waczu ręczników. Ręczniki zwinięte lub mocno złożone będą potrzebowały więcej czasu, aby
całkowicie się nagrzać.
Dwa ręczniki będą się nagrzewać dłużej niż jeden.
3.Używaj wyłącznie SUCHYCH tkanin. Uwaga: NIE używaj wilgotnych lub mokrych tkanin.
4.Unikaj delikatnych tkanin, które nie są odporne na wysokie temperatury.
Wszelkie tkaniny z oznaczeniem, że należy je prasować w niskiej temperaturze, mogą ulec
uszkodzeniu pod wpływem ciepła podgrzewacza ręczników, co może spowodować uszkodze-
nie tkaniny oraz podgrzewacza ręczników i koców.
5.Po rozpoczęciu cyklu podgrzewania należy pozostawić pokrywę zamkniętą.
Zapobiegnie to ucieczce ciepła. Otwarcie pokrywy w połowie cyklu może wydłużyć czas
podgrzewania.
Uwaga: Kondensacja na pokrywie i wewnątrz urządzenia jest zjawiskiem normalnym.
PIELĘGNACJA I KONSERWACJA
PRZED CZYSZCZENIEM WYJĄĆ KABEL ZASILAJĄCY Z GNIAZDA ELEKTRYCZNEGO.
CZYSZCZYĆ SUCHĄ ŚCIERECZKĄ TYLKO PO OSTUDZENIU URZĄDZENIA.
REJESTRACJA PRODUKTU
SLTLR625 SLTLR725
Dziękujemy za wybór SereneLife. Rejestrując swój produkt, zapewnia
sobie pełne korzyści wynikające z naszej ekskluzywnej gwarancji oraz
spersonalizowanej obsługi klienta. Wypełnij formularz, aby uzyskać
dostęp do wsparcia ekspertów i utrzymać swój zakup SereneLife w
idealnym stanie.t
Rozpocznij tutaj
SLTLR625
Numer modelu:
Serenelifehome.com/pages/registre
Scan the QR code to view the
user manual in multiple languages
GER
Für Benutzerhandbücher
Benutzerhandbücher verfügbar in
Italian l German l Polish l Turkish l Dutch
und geben Sie Ihre Modellnummer ein
SCANNEN SIE DEN QR-CODE
POL
Aby uzyskać instrukcje użytkownika
w wielu językach,
Instrukcje obsługi dostępne w
Italian l German l Polish l Turkish l Dutch
i wprowadź numer swojego modelu
ZESKANUJ KOD QR
TUR
Birden fazla dilde kullanıcı kılavuzları için,
Kullanım Kılavuzları şurada mevcuttur:
Italian l German l Polish l Turkish l Dutch
ve model numaranızı girin
QR KODUNU TARAYIN
DUT
Voor gebruikershandleidingen
in meerdere talen,
Gebruikershandleidingen beschikbaar in
Italian l German l Polish l Turkish l Dutch
en voer uw modelnummer in
SCAN DE QR-CODE
ENG UK
For user guides in multiple languages,
User Manuals available in
Italian l German l Polish l Turkish l Dutch
and enter your model number
SCAN THE QR CODE
Para guías de usuario en varios idiomas,
Manuales de usuario disponibles en
Italian l German l Polish l Turkish l Dutch
e ingrese su número de modelo
ESCANEE EL CÓDIGO QR
SPA
Pour les guides d'utilisation en plusieurs langues,
Manuels d'utilisation disponibles en
Italian l German l Polish l Turkish l Dutch
et entrez votre numéro de modèle
SCANNEZ LE CODE QR
FRE
Per le guide utente in più lingue,
Manuali utente disponibili in
Italian l German l Polish l Turkish l Dutch
e inserisci il numero del tuo modello
SCANSIONA IL CODICE QR
ITA
Pytania lub uwagi?
Jesteśmy tutaj, aby pomóc!
Phone: 1.718.535.1800
Serenelifehome.com/ContactUs
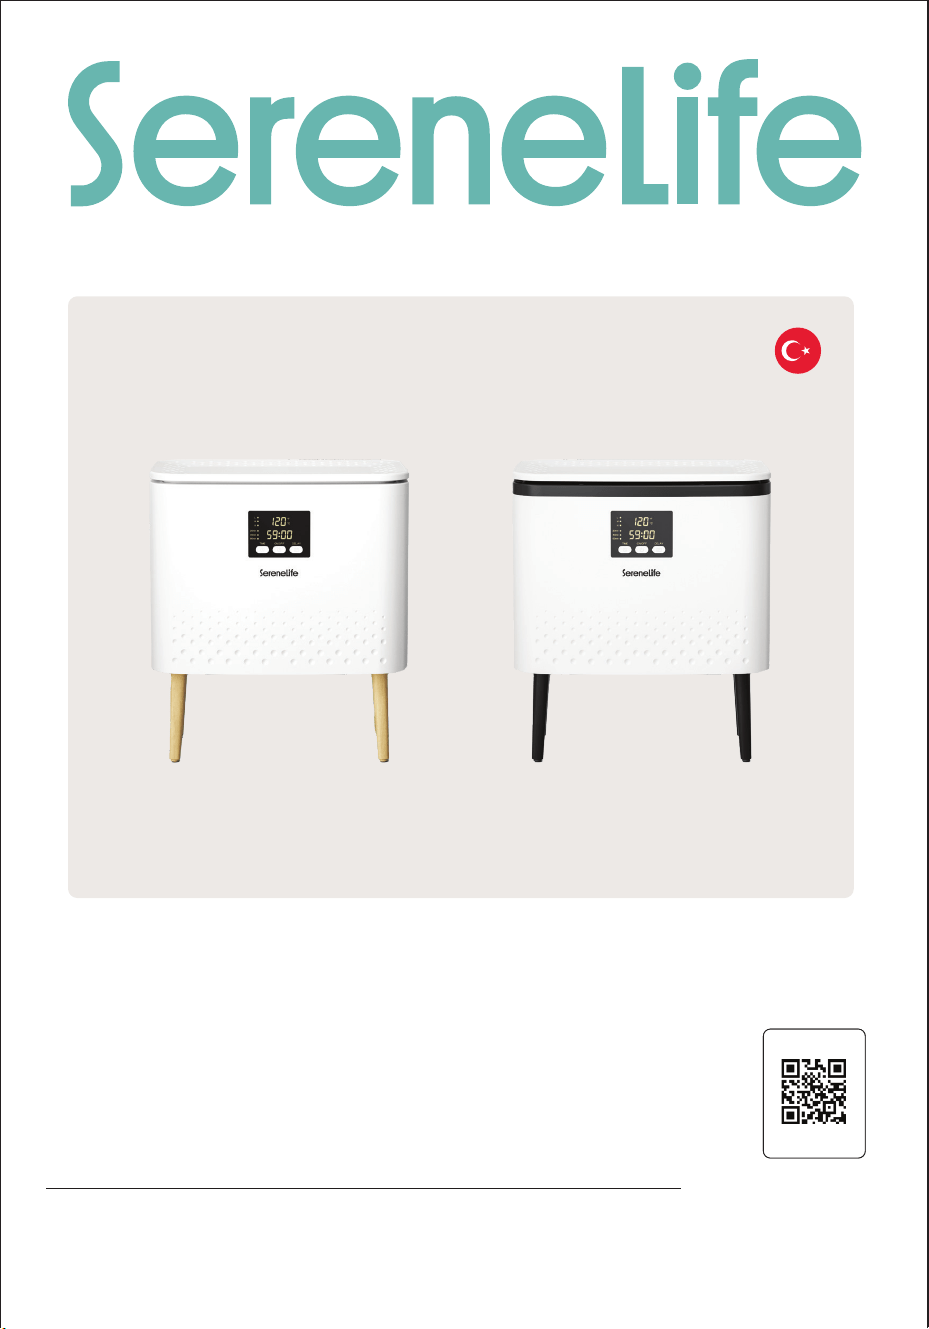
SLTLR625 - SLTLR725
kullanım kılavuzu
dikdörtgen havlu
ısıtıcı kova
TUR
İnternet sitemizi
ziyaret edin
BENİ TARA
PyleUSA.com

İÇİNDEKİLER
BU TALİMATLARI OKUYUN VE SAKLAYIN
UYARI:
BU ÜRÜNÜ KULLANMADAN ÖNCE TÜM TALİMATLARI, UYARILARI VE ÖNLEMLERİ
DİKKATLİCE OKUDUĞUNUZDAN EMİN OLUN. BUNUN YAPILMAMASI, SİZİN
YARALANMANIZA VEYA ÜNİTENİN HASAR GÖRMESİNE NEDEN OLABİLİR.
ÖZELLİKLER VE TEKNİK ÖZELLİKLER
DİKKAT
ÖNEMLİ GÜVENLİK TALİMATLARI
INFORMACJE FCC
PARÇALARIN VE KONTROLLERİN KONUMU
LED EKRAN
GÖSTERGE TALİMATLARI
KOKU DİSKİ TALİMATLARI
KURULUM TALİMATLARI
HAVLU VE BATTANİYE ISITICININ KULLANIMI
EN İYİ SONUÇLAR İÇİN İPUÇLARI
BAKIM VE TEMİZLİK
ÜRÜN KAYDI
3
4
5
6
7
8
9
9
9
10
11
11
11

Özellikler:
• İki Büyük Banyo Havlusu İçin Mükemmel Boyut
• 2 Büyük Banyo Havlusu veya Kişisel Bir TV Battaniyesi Alır
• Basit Tek Dokunuşlu Kontrol
• Açma/Kapama Düğmesi
• Süre Dolunca Otomatik Olarak Kapanır
• Kapak, Havlu ve Battaniye Isıtıcıyı Doldururken ve Boşaltırken Ellerinizin Serbest Kalmasını
Sağlar
• Çift Duvarlı Yalıtımlı Kapak, Isıyı İçeride Tutar ve Dokunulduğunda Serin Kalır
• Aşırı Isınma Koruması ve Suya Dayanıklı Tasarım
• Dahili Gösterge Işığı
• Havlu Isıtıcı Kovayı Taşımak İçin Kullanışlıdır
• Güç ve Enerji Tüketimini Azaltacak Şekilde Tasarlanmıştır
• Havluları, Bornozları, Battaniyeleri veya Diğer Kumaş Ürünleri Isıtabilir
Kutu İçeriği:
Teknik Özellikler:
• Havlu Isıtıcı
• Aromaterapi Tableti
• Nem Alıcı
• Gövde Malzemesi: Paslanmaz Sac
• Güç Kaynağı: 450W
• Güç Çıkışı: 120V AC
• Frekans Yanıtı: 60Hz
• Hacim: 20L (5.28gal)
• Süre: 20, 40, 60 dakika
• Güç Kablosu Uzunluğu: 5.91 ft (180 cm).
• Taşıma Kapasitesi: 110.2 Lbs (50 kg).
• Sıcaklık Aralığı: 90°F ile 140°F arasında ayarlanabilir (32°C to 135°C)
• Ürün Boyutları (U x G x Y): 17.32” x 10.01” x 19.68” -inches
(44,5 cm x 25,4 cm x 50,8 cm)
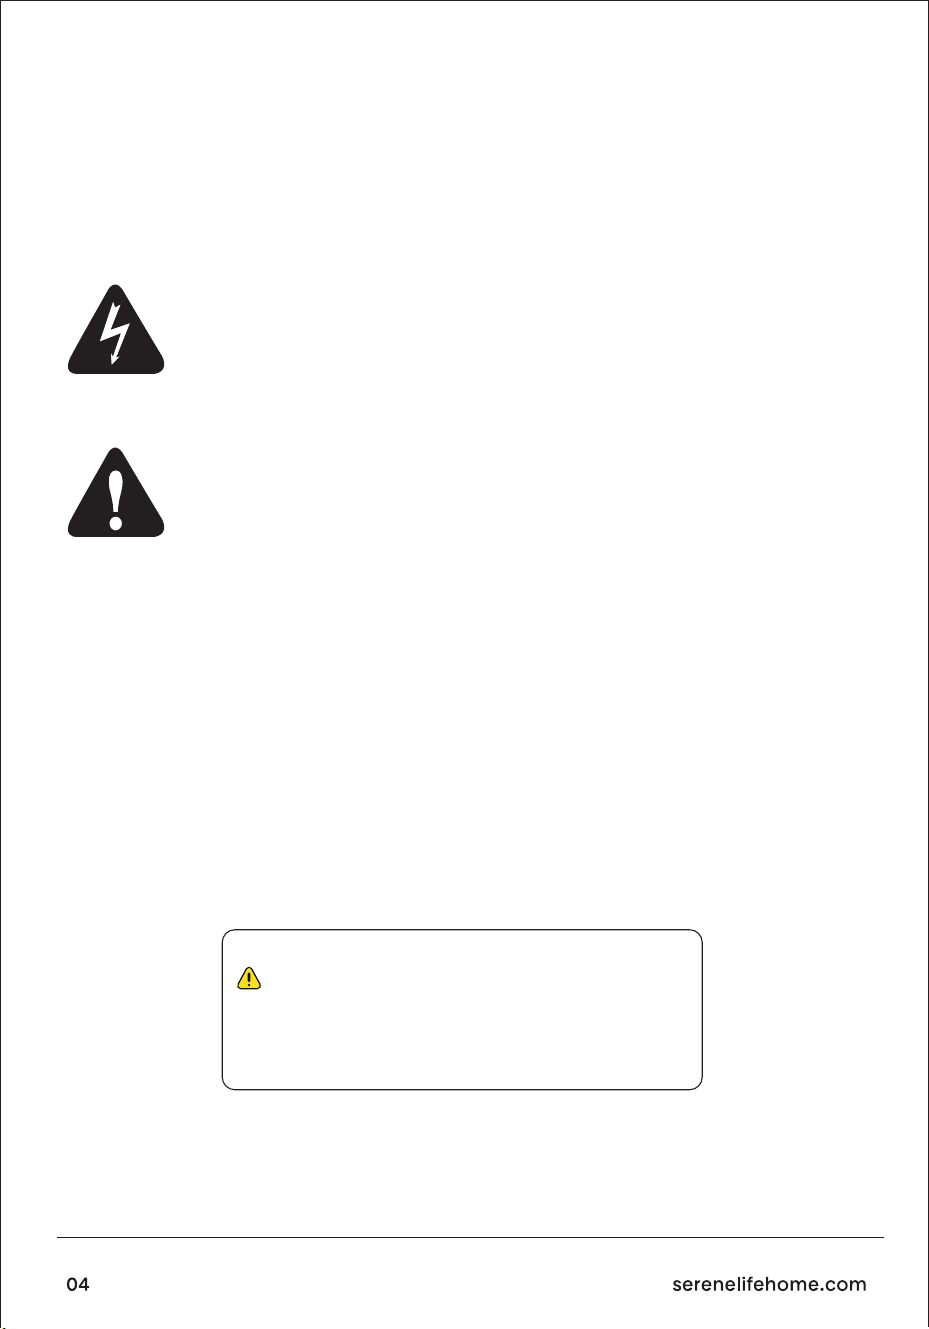
DİKKAT
Ciddi yaralanma riskini azaltmak için lütfen bunun bir oyuncak olmadığını unutmayın. Çocukların
havlu ve battaniye ısıtıcıyı kullanmasına veya yakınında oynamasına izin vermeyin.
Eşkenar üçgen içindeki ok uçlu yıldırım sembolü, ünite muhafazası içinde
yalıtımsız “tehlikeli voltaj” bulunduğu ve bunun elektrik çarpması riski
oluşturabilecek büyüklükte olabileceği konusunda kullanıcıyı uyarmak içindir.
Eşkenar üçgen içindeki ünlem işareti, üniteyle birlikte verilen dokümanlarda önemli
kullanım ve bakım (servis) talimatlarının bulunduğu konusunda kullanıcıyı uyarmak
içindir.
YANGIN VEYA ELEKTRİK ÇARPMASI RİSKİNİ AZALTMAK İÇİN BU ÜNİTEYİ YAĞMURA VEYA NEME
MARUZ BIRAKMAYIN.
ÜNİTE ÇALIŞTIRILMADAN ÖNCE TÜM GÜVENLİK VE KULLANIM TALİMATLARI OKUNMALI,
UYGULANMALI VE TAKİP EDİLMELİDİR.
-YALNIZCA EVDE KULLANIM İÇİNDİR
- YALNIZCA YETİŞKİN KULLANIMI İÇİNDİR
- YALNIZCA KURU KUMAŞ ÜRÜNLER İÇİNDİR
CALIFORNIA PROP 65 UYARISI
UYARI:
Bu ürün, California eyaletine göre kansere, doğum kusurlarına
ve diğer üreme zararlarına neden olduğu bilinen Kadmiyum
içerir. Yutmayın.
Daha fazla bilgi için: www.P65warnings.ca.gov

BU TALİMATLARI SAKLAYIN
Önemli Güvenlik Talimatları
UYARI:
CİHAZI KULLANIRKEN YANGIN, ELEKTRİK ÇARPMASI VEYA KİŞİLERDE CİDDİ YARALANMA
RİSKİNİ AZALTMAK İÇİN AŞAĞIDAKİLER DAHİL OLMAK ÜZERE TEMEL ÖNLEMLERE UYUN:
• Cihazı kullanmadan önce tüm talimatları okuyun.
• Kullandıktan hemen sonra üniteyi her zaman elektrik prizinden çekin.
• Cihazı, amacı dışında hiçbir iş için kullanmayın.
• Üniteyi küvete veya lavaboya düşebileceği ya da içine çekilebileceği bir yere koymayın
veya saklamayın.
• Suya veya başka bir sıvıya koymayın ya da içine düşürmeyin.
• Suya düşmüş bir üniteyi almak için uzanmayın. Hemen şini çekin.
• Üniteye nesnelerin düşmemesi ve/veya ünite üzerine sıvı dökülmemesi için dikkat
edilmelidir.
• Bu ünite, şe takılıyken asla gözetimsiz bırakılmamalıdır.
• Bu ünite çocukların veya engelli kişilerin yakınında kullanıldığında yakından gözetim
gereklidir.
• Bu üniteyi, bu kılavuzda açıklandığı şekilde amacına uygun kullanın.
• Kordonu veya şi hasarlıysa, düzgün çalışmıyorsa, düşürüldüyse, hasar gördüyse veya
suya düşürüldüyse bu üniteyi asla çalıştırmayın.
• Kabloları ısıtılmış yüzeylerden uzak tutun. Kabloyu cihazın dışına sarmayın veya kablonun
bir masa ya da tezgâh kenarından sarkmasına izin vermeyin.
• Açık havada kullanmayın.
• Güvenlik şinde değişiklik yapmayın ve bu cihazla uzatma kablosu kullanmayın.
• Voltaj dönüştürücü ile çalıştırmayın.
• Sıcak yüzeylere dokunmayın.
• Üretici tarafından önerilmeyen aksesuarları kullanmayın; bu, yaralanmalara neden
olabilir.

FCC BİLGİLERİ
DİKKAT:
UYARI:
Uyumluluktan sorumlu tarafça açıkça onaylanmayan değişiklikler veya modikasyonlar, kullanıcının
ekipmanı çalıştırma yetkisini geçersiz kılabilir.
Uyumluluktan sorumlu tarafça açıkça onaylanmayan bu ünite üzerindeki değişiklikler veya
modikasyonlar, kullanıcının ekipmanı çalıştırma yetkisini geçersiz kılabilir.
Bu cihaz, FCC Kuralları’nın 15. Bölümü ile uyumludur.
Çalıştırma aşağıdaki iki koşula tabidir:
1. Bu cihaz zararlı parazite neden olmamalıdır.
2. Bu cihaz, istenmeyen çalışmaya neden olabilecek parazitler dâhil olmak üzere alınan her türlü
paraziti kabul etmelidir.
Bu ekipman test edilmiş ve FCC Kuralları’nın 15. Bölümü uyarınca Sınıf B dijital cihaz sınırlarına
uygun bulunmuştur. Bu sınırlar, konut kurulumlarında zararlı parazite karşı makul koruma
sağlamak üzere tasarlanmıştır. Bu ünite radyo frekansı enerjisi üretir, kullanır ve yayabilir;
talimatlara uygun olarak kurulup kullanılmadığında radyo iletişimlerine zararlı parazite neden
olabilir. Ancak belirli bir kurulumda parazitin oluşmayacağı garanti edilmez. Bu ekipman, cihazı
kapatıp açarak belirlenebilecek şekilde radyo veya televizyon alımında zararlı parazite neden
olursa, kullanıcının aşağıdaki önlemlerden birini veya birkaçını deneyerek paraziti gidermesi
önerilir:
• Alıcı antenin yönünü değiştirin veya yerini değiştirin.
• Ekipman ile alıcı arasındaki mesafeyi artırın.
• Ekipmanı, alıcının bağlı olduğu devreden farklı bir devredeki prize bağlayın.
• Yardım için satıcıya veya deneyimli bir radyo/TV teknisyenine danışın.
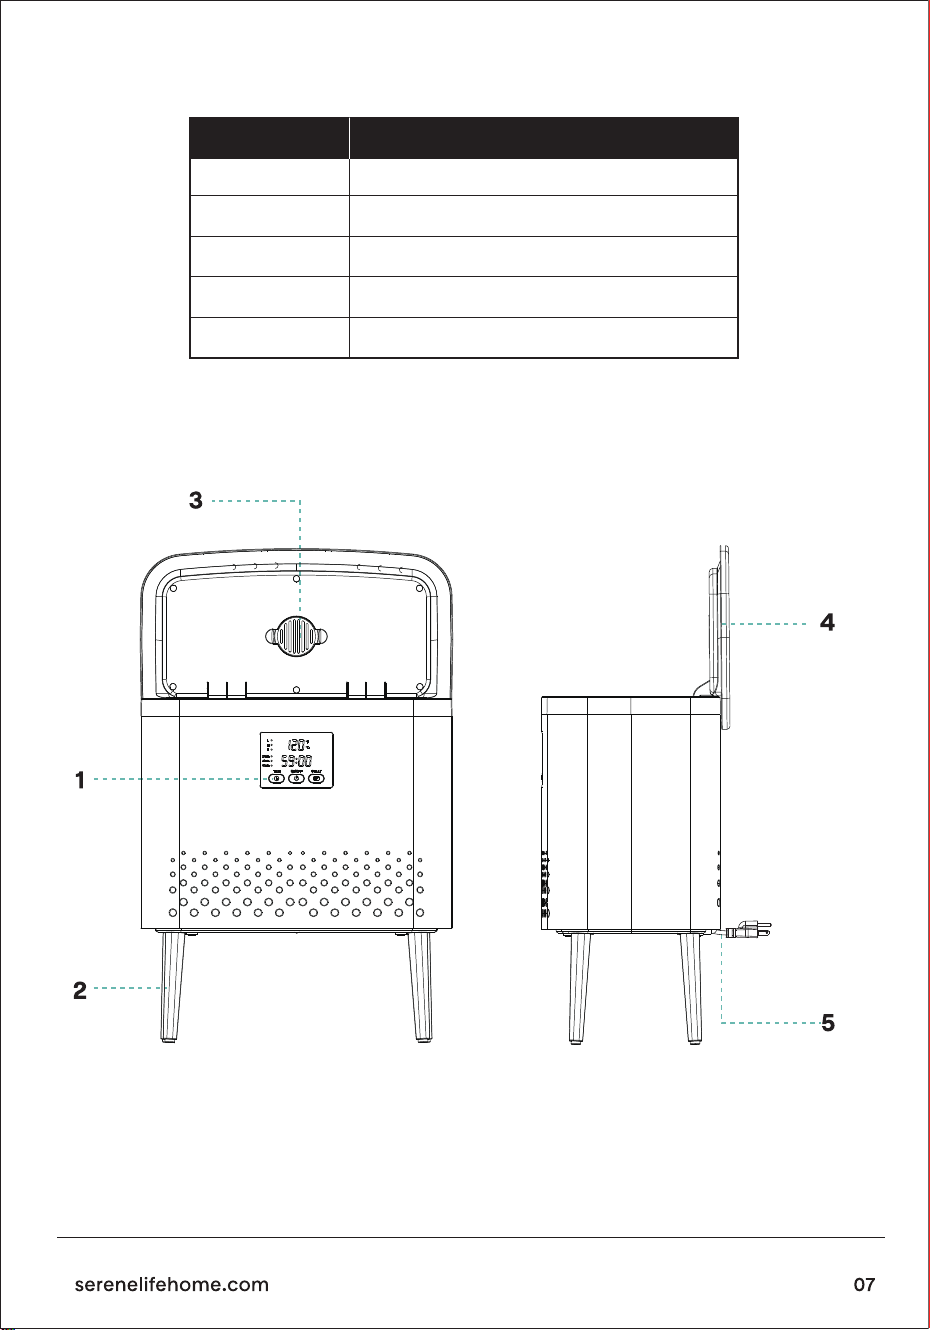
PARÇALARIN VE KONTROLLERİN KONUMU
No.
1
2
3
4
5
PARÇA ADI
Açma/Kapama Düğmesi
Ayaklar
Koku diski
Kapak
Güç kablosu
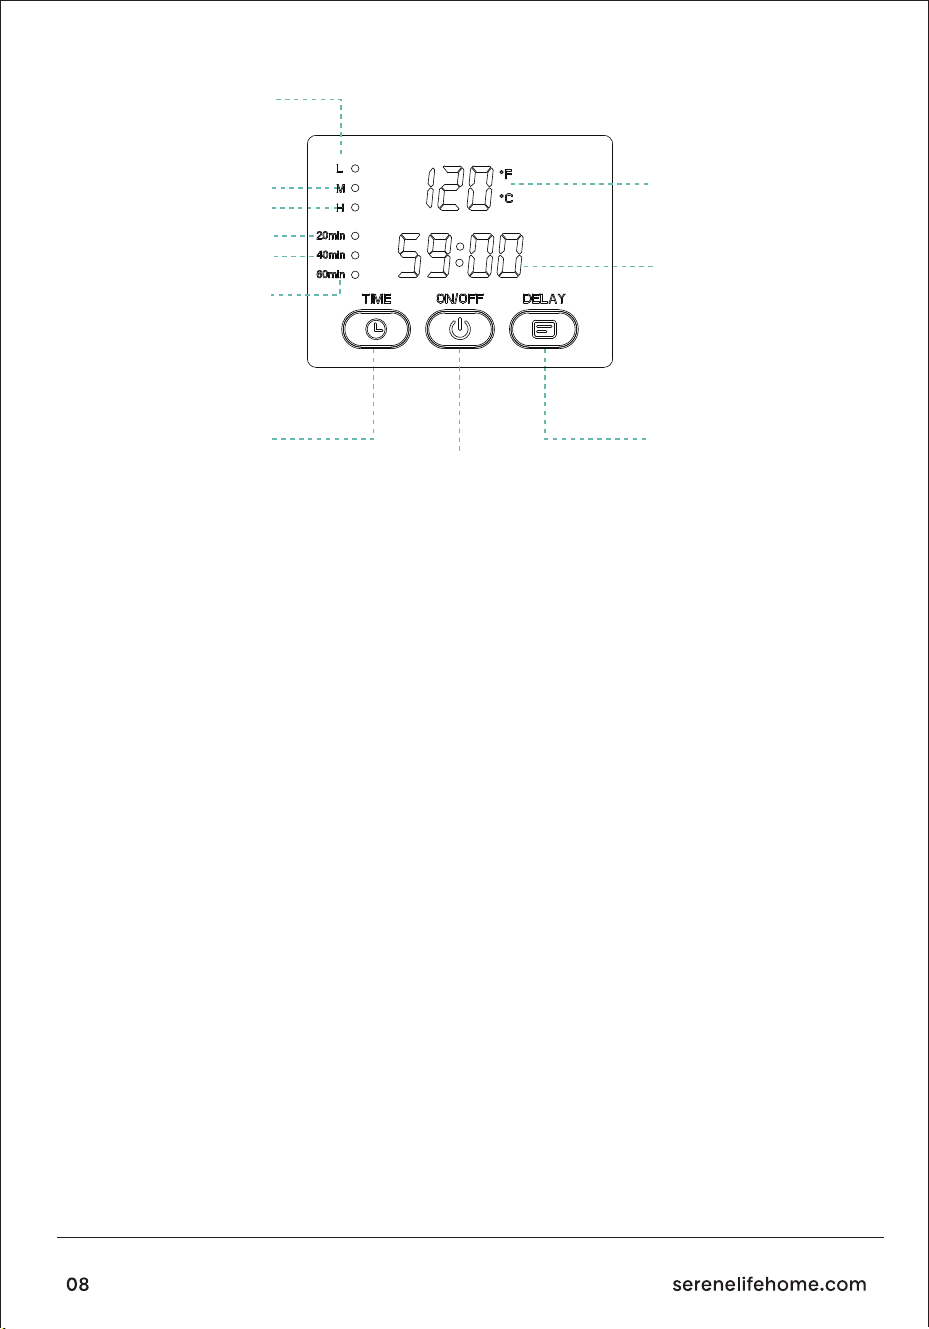
LED EKRAN
GÖSTERGE TALİMATLARI
Düşük Sıcaklık
Yüksek Sıcaklık
Zamanlayıcı Ayarı 60 dk
Zaman Düğmesi
Zamanlayıcı Ayarı 40 dk
Zamanlayıcı Ayarı 20 dk
Orta Sıcaklık
Gerçek Zamanlı Sıcaklık
Zaman Göstergesi
GECİKTİRME Düğmesi
anahtar tuşu
1. Anahtar düğmesine basarak cihazı başlatın; kapatmak için uzun basın.
2. Cihaz başladıktan sonra zaman ayırıcı sembolü yanıp sönmeye başlar. Başlatmadan sonra 5
saniye içinde işlem yapılmazsa cihaz, yüksek sıcaklık modunda otomatik olarak 20 dakikalık
çalışma süresi ayarlar.
3. Açtıktan sonra zaman gösterim alanındaki iki nokta yanıp sönmeye başlar. Gecikmeli başlat-
ma süresini ayarlamak için 10 saniye içinde rezervasyon düğmesine basın (30 dakikadan 24
saate kadar; her basışta süre 30 dakika artar).
4. Rezervasyon süresini ayarladıktan sonra, çalışma süresini ayarlamak için 10 saniye içinde
zamanlayıcı düğmesine basın (20, 40 ve 60 dakika arasında geçiş yapar).
5. Çalışma süresini ayarladıktan sonra, düşük sıcaklık modu, orta sıcaklık modu ve yüksek sıcaklık
modunu ayarlamak için güç düğmesine basın.
6. Kova duvarının sıcaklığı 50°C’nin üzerine çıktığında, anahtarın arka plan ışığı kırmızıya döner
ve yüksek sıcaklığı gösterir. Dokunmayın.
1. Randevu ışığı: Randevu seçilirken yanıp söner, randevu süresince sürekli yanar ve randevu
süresi sonunda söner.
2. Süre ışığı: Süre seçilirken yanıp söner, çalışma sırasında yanık kalır ve çalışma süresi sonunda
söner.
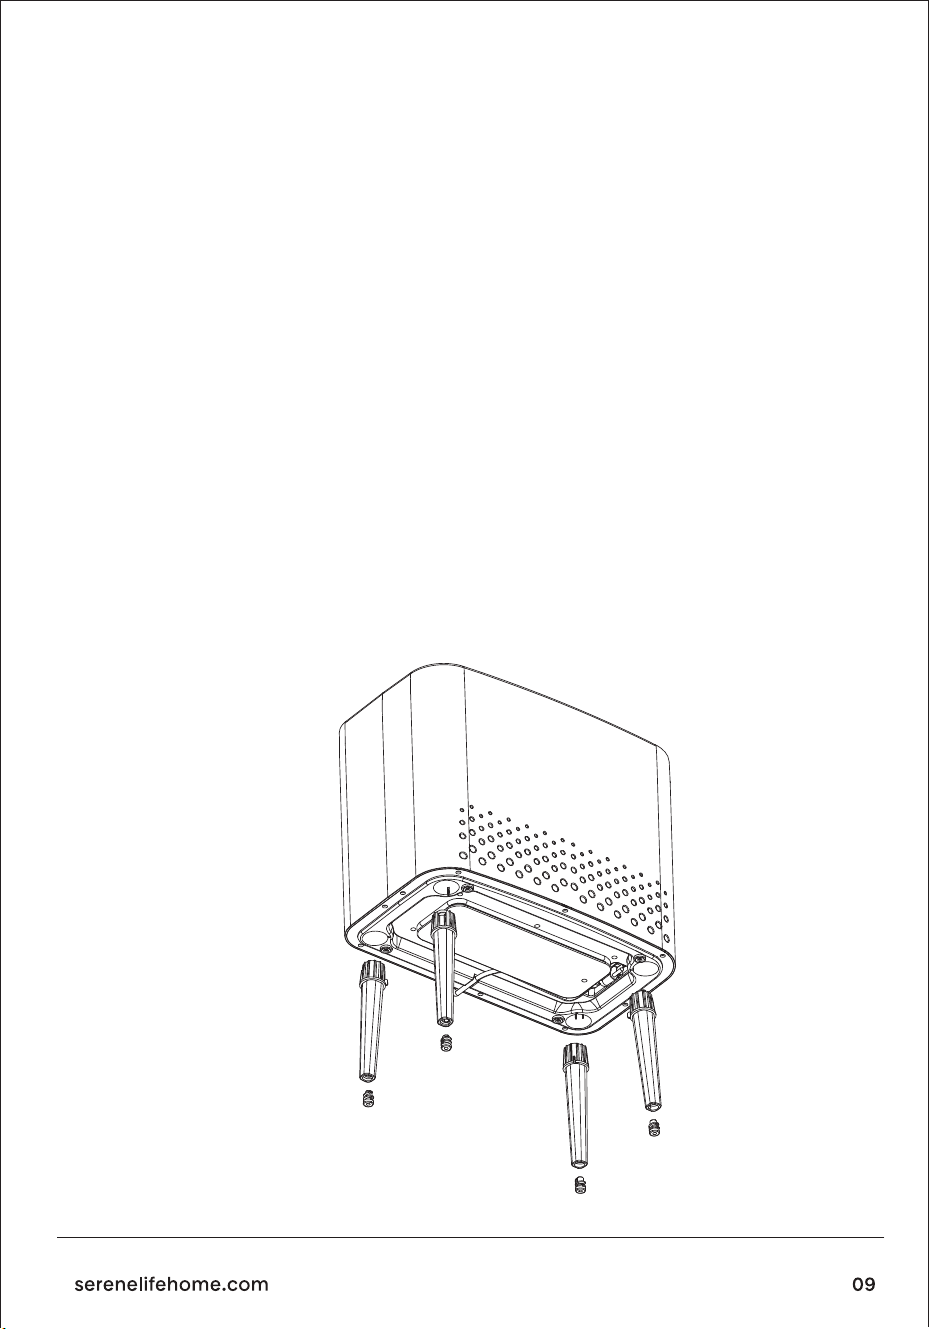
KOKU DİSKİ TALİMATLARI
KURULUM TALİMATLARI
Destek ayaklarını takın.
Bu koku diski, havluları ısıtırken aromaterapi tabletleri veya esansiyel yağlar kullanmayı seven
bazı kullanıcılar için ek bir tasarımdır.
3. Ekran gösterimi talimatları: Zaman düğmesine basarak 20, 40 ve 60 arasında dolaşın; ilgili
küçük yuvarlak ışık yanıp söner. Küçük yuvarlak ışık çalışma sırasında yanık kalır ve çalışma
tamamlandığında söner. Randevu seçmiyorsanız TIME’ı seçin. Ekran, çalışmıyorken süreyi
gösterir ve yanıp söner. Normal çalışma sırasında geri sayım yaparken sürekli AÇIK kalır. Randevu
ayarlamak için önce randevuyu seçin, ardından süreyi seçin. Randevuya tıkladığınızda ekran
randevu süresini gösterir; başlangıçta yanıp söner. Onaydan sonra ışık sürekli yanar ve randevu
süresini geri sayar. Randevu süresi bittiğinde randevu ışığı söner, süre ışığı yanık kalır ve ekranda
seçilen ısıtma süresinin geri sayımı görüntülenir.
1. Koku Diskini mühürlü plastik poşetinden çıkarın.
2. Kapağın alt yüzeyinde bulunan Koku Diski Yuvasına kaydırarak yerleştirin.

Kullanım Talimatları
HAVLU VE BATTANİYE ISITICININ KULLANIMI
1. Kapağı açın ve makine gövdesinin içinden kauçuk ayakları ve ayak pedlerini çıkarın.
2. Ayak pedlerini kauçuk ayakların altındaki deliklere kilitleyin.
3. Kauçuk ayakları alt kasadaki deliklerle hizalayın ve yerine oturtun.
1. Kapağı açın ve ambalaj içeriğini çıkarın.
2. Havlu Isıtıcıyı kuru, düz ve sert bir yüzeye yerleştirin.
3. Fişi standart bir 120V prize takın.
1. Güç kablosunu bir elektrik prizine takın.
2. KAPAĞI açın ve içine SADECE KURU havlu(lar) veya bir battaniye yerleştirin.
NOT: Nemli veya ıslak havluların havlu ısıtıcıya konulması üniteye zarar verebilir ve ciddi
güvenlik riskleri oluşturabilir.
3. KAPAĞI kapatın.
4. AÇMA/KAPAMA DÜĞMESİNE basın.
5. Lütfen ürünün iç duvarına dokunmayın; aksi halde yanma (haşlanma) riski vardır. Kovanın
sıcaklığı yaklaşık 5 dakika içinde 130+/-8°C/46.4°F’ye ulaşabilir ve bu sıcaklığı yaklaşık 15
dakika koruyabilir. Bu noktada havlunun sıcaklığı 50°C/122°F’nin üzerine çıkabilir; bu, insan
teması için nispeten sıcak ve konforlu bir sıcaklıktır. Havlu kovası dolaylı olarak ısıtılarak havlu
sıcaklığı yaklaşık 55°C/131°F civarında tutulur. Çalışma gösterge ışığı, makine çalışmaya
başladıktan 80 dakika sonra söner; bu, ürünün bir çalışma döngüsünü tamamladığını gösterir.
6. 30 saniyelik hızlı ısıtma ile, iki banyo havlusunu ısıtmak için genellikle 15 dakika yeterlidir.
7. Havlu(ları) veya battaniyeyi çıkarmak için KAPAĞI açın. Kapağın tutamağına bastırın ve
ardından yukarı çekerek ürünün kapağını açın.
Not: Üniteye zarar vermemek için, ürünleri çıkarırken kapağı nazikçe kaldırın.
8. Isıtma döngüsünü durdurmak veya başlatmak için istediğiniz zaman AÇMA/KAPAMA
DÜĞMESİNE basın.
NOT: Bu Havlu ve Battaniye Isıtıcı, 3 uçlu topraklı şe sahiptir.
Elektrik çarpması riskini azaltmak için güç kablosunu, kolayca erişilebilen topraklı bir elektrik
prizine takın.
Havlu ve Battaniye Isıtıcı, iki büyük pamuklu banyo havlusunu veya kişisel bir TV battaniyesini
rahatça ısıtabilir.
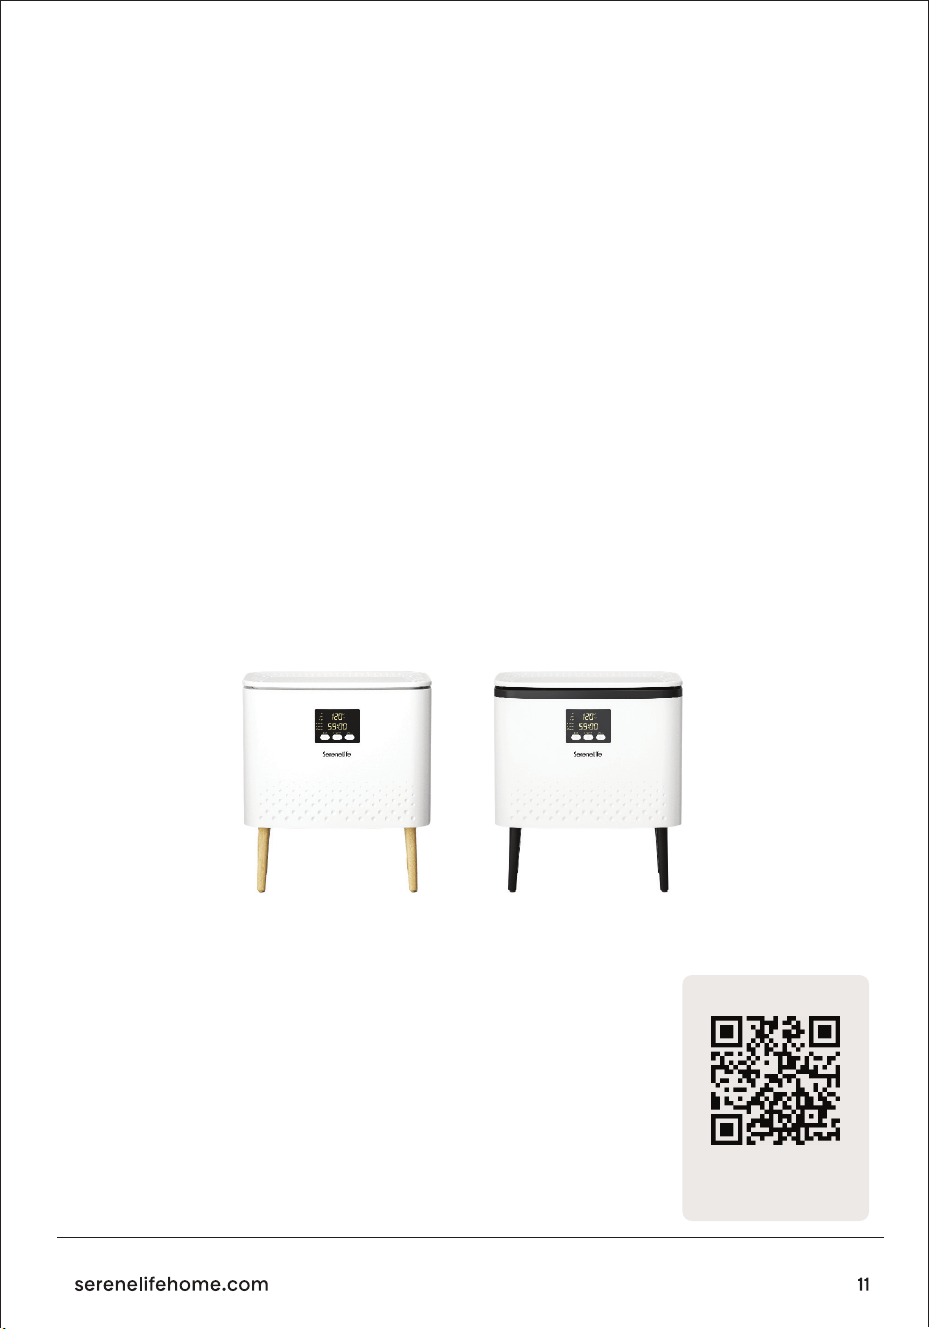
EN İYİ SONUÇLAR İÇİN İPUÇLARI
1. Pamuk veya pamuk karışımlı havlular ya da kumaşlar kullanın.
2. Hızlı ve eşit ısınma için 1 havluyu Havlu ve Battaniye Isıtıcının içine gevşekçe yerleştirin.
Sıkı sarılmış veya katlanmış havluların tamamen ısınması daha uzun sürer.
İki havlunun ısınması bir havluya göre daha uzun sürer.
3. Yalnızca KURU kumaşlarla kullanın. Not: Nemli veya ıslak parçalarla KULLANMAYIN.
4. Yüksek ısıya dayanamayacak hassas kumaşları kullanmaktan kaçının.
Üzerinde yalnızca düşük ısıda ütü yapılması gerektiği belirtilen kumaşlar, havlu ısıtıcının ısısına
dayanamayabilir; bu da kumaşın ve Havlu ve Battaniye Isıtıcının zarar görmesine neden
olabilir.
5. Isıtma döngüsü başladıktan sonra kapağı kapalı tutun. Bu, ısının kaçmasını önler. Döngü
sırasında kapağın açılması ısınma sürelerinin uzamasına neden olabilir.
Not: Kapakta ve ünitenin iç kısmında yoğuşma olması normaldir.
BAKIM VE TEMİZLİK
TEMİZLEME ÖNCESİNDE GÜÇ KABLOSUNU ELEKTRİK PRİZİNDEN ÇIKARIN. ÜNİTE
DOKUNULDUĞUNDA SERİN OLDUĞUNDA SADECE KURU BİR BEZLE SİLİN.
Ürün Kaydı
SLTLR625 SLTLR725
SereneLife’ı tercih ettiğiniz için teşekkür ederiz. Ürününüzü kaydeder-
ek, özel garantimizin tüm avantajlarından ve kişiselleştirilmiş müşteri
desteğinden yararlanmanızı sağlarsınız. Uzman desteğine erişmek ve
SereneLife satın alımınızı mükemmel durumda tutmak için formu
doldurun.
Buradan Başlayın
SLTLR625
Model Numarası:
Serenelifehome.com/pages/registre
Scan the QR code to view the
user manual in multiple languages
GER
Für Benutzerhandbücher
Benutzerhandbücher verfügbar in
Italian l German l Polish l Turkish l Dutch
und geben Sie Ihre Modellnummer ein
SCANNEN SIE DEN QR-CODE
POL
Aby uzyskać instrukcje użytkownika
w wielu językach,
Instrukcje obsługi dostępne w
Italian l German l Polish l Turkish l Dutch
i wprowadź numer swojego modelu
ZESKANUJ KOD QR
TUR
Birden fazla dilde kullanıcı kılavuzları için,
Kullanım Kılavuzları şurada mevcuttur:
Italian l German l Polish l Turkish l Dutch
ve model numaranızı girin
QR KODUNU TARAYIN
DUT
Voor gebruikershandleidingen
in meerdere talen,
Gebruikershandleidingen beschikbaar in
Italian l German l Polish l Turkish l Dutch
en voer uw modelnummer in
SCAN DE QR-CODE
ENG UK
For user guides in multiple languages,
User Manuals available in
Italian l German l Polish l Turkish l Dutch
and enter your model number
SCAN THE QR CODE
Para guías de usuario en varios idiomas,
Manuales de usuario disponibles en
Italian l German l Polish l Turkish l Dutch
e ingrese su número de modelo
ESCANEE EL CÓDIGO QR
SPA
Pour les guides d'utilisation en plusieurs langues,
Manuels d'utilisation disponibles en
Italian l German l Polish l Turkish l Dutch
et entrez votre numéro de modèle
SCANNEZ LE CODE QR
FRE
Per le guide utente in più lingue,
Manuali utente disponibili in
Italian l German l Polish l Turkish l Dutch
e inserisci il numero del tuo modello
SCANSIONA IL CODICE QR
ITA
Sorulariniz veya yorumlariniz var mi?
Yardim etmek için buradayiz!
Phone: 1.718.535.1800
PyleUSA.com/ContactUs
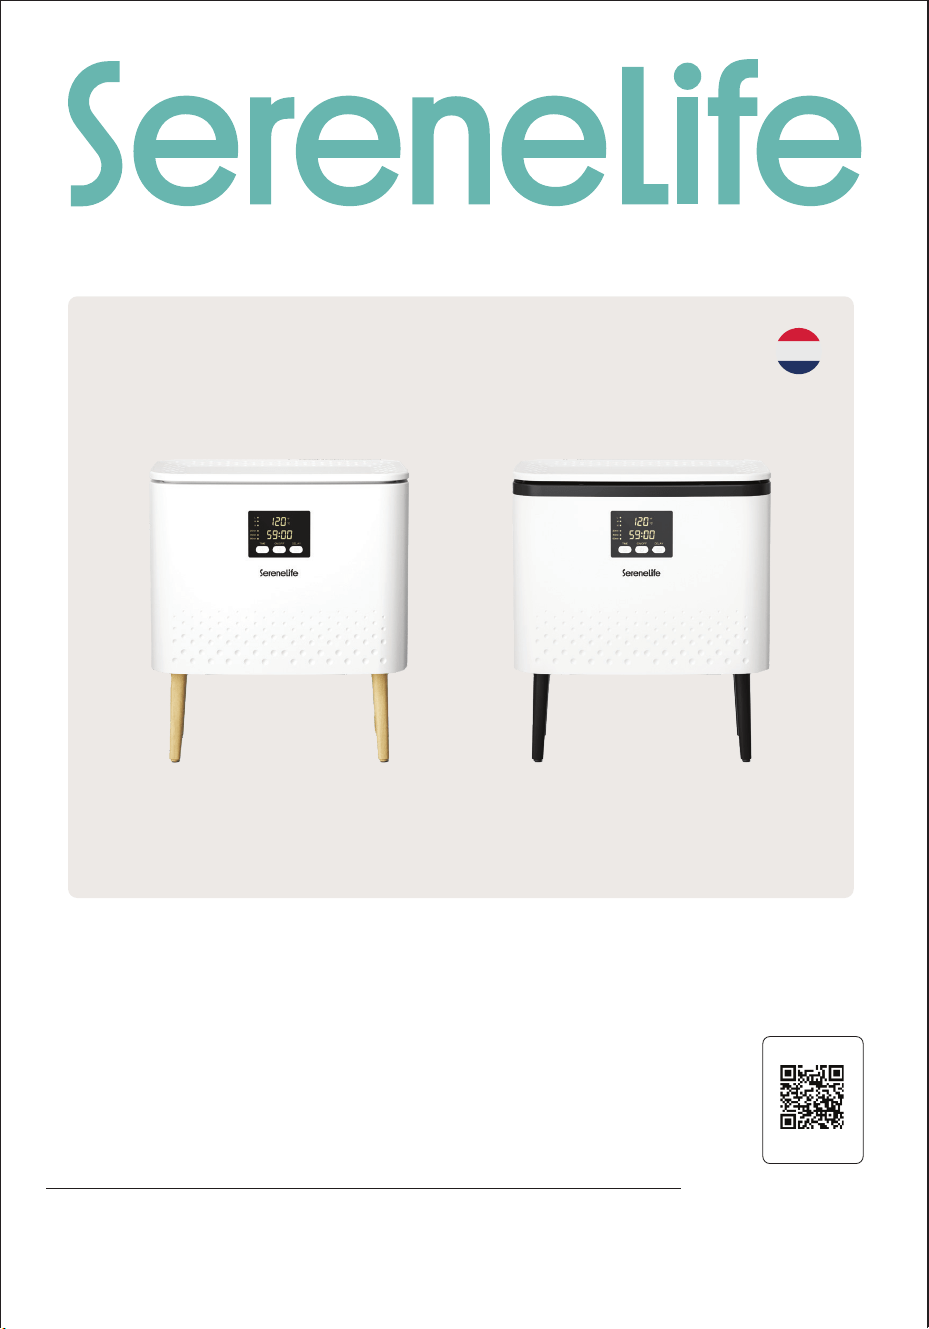
SLTLR625 - SLTLR725
Gebruikershandleiding
Rechthoekige
handdoekverwarmer
Bezoek onze
website
SCAN MIJ
serenelifehome.com
DUT

INHOUD
LEES EN BEWAAR DEZE INSTRUCTIES
WAARSCHUWING:
LEES ALLE INSTRUCTIES, WAARSCHUWINGEN EN VOORZORGSMAATREGELEN
ZORGVULDIG VOORDAT JE DIT PRODUCT GEBRUIKT.
HET NIET OPVOLGEN HIERVAN KAN LEIDEN TOT LETSEL OF SCHADE AAN HET
APPARAAT.
KENMERKEN & TECHNISCHE SPECIFICATIES
WAARSCHUWING
BELANGRIJKE VEILIGHEIDSINSTRUCTIES
FCC-INFORMATIE
LOCATIE VAN ONDERDELEN EN BEDIENINGEN
LED-SCHERM
DISPLAY-INSTRUCTIES
INSTRUCTIES GEURDISC
INSTALLATIE-INSTRUCTIES
GEBRUIK VAN DE HANDDOEK- & DEKENVERWARMER
TIPS VOOR HET BESTE RESULTAAT
VERZORGING EN ONDERHOUD
PRODUCT REGISTREREN
3
4
5
6
7
8
9
9
9
10
11
11
11

Kenmerken:
• Perfect formaat voor twee grote badhanddoeken
• Geschikt voor twee grote badhanddoeken of een persoonlijke omslagdeken
• Eenvoudige bediening met één druk op de knop
• Aan/uit-knop
• Schakelt automatisch uit na de ingestelde tijd
• Deksel blijft open staan bij het vullen en legen van de handdoek- en dekenverwarmer
• Dubbelwandig geïsoleerd deksel houdt warmte vast en blijft koel aan de buitenkant
• Oververhittingsbeveiliging en waterbestendig ontwerp
• Ingebouwd indicatielampje
• Handige emmerstijl voor eenvoudig verplaatsen
• Ontworpen om energieverbruik te besparen
• Verwarmt handdoeken, badjassen, dekens en andere stoen items
Wat zit er in de doos:
Technische specicaties:
• Handdoekverwarmer
• Aromatherapietablet
• Vochtabsorberend zakje
• Materiaal: Roestvrij staal
• Vermogen: 450W
• Voedingsspanning: 220V–240V AC
• Frequentie: 50/60Hz
• Inhoud: 20L (5.28gal)
• Tijdinstellingen: 20, 40, 60 minuten
• Lengte netsnoer: 5,91 ft (180 cm)
• Draagvermogen: 110,2 lbs (50 kg)
• Temperatuurbereik: Instelbaar van 90°F tot 140°F (32°C tot 135°C)
• Productafmetingen (L × B × H): 17,32" × 10,01" × 19,68" inch (44 × 25 × 50 cm)
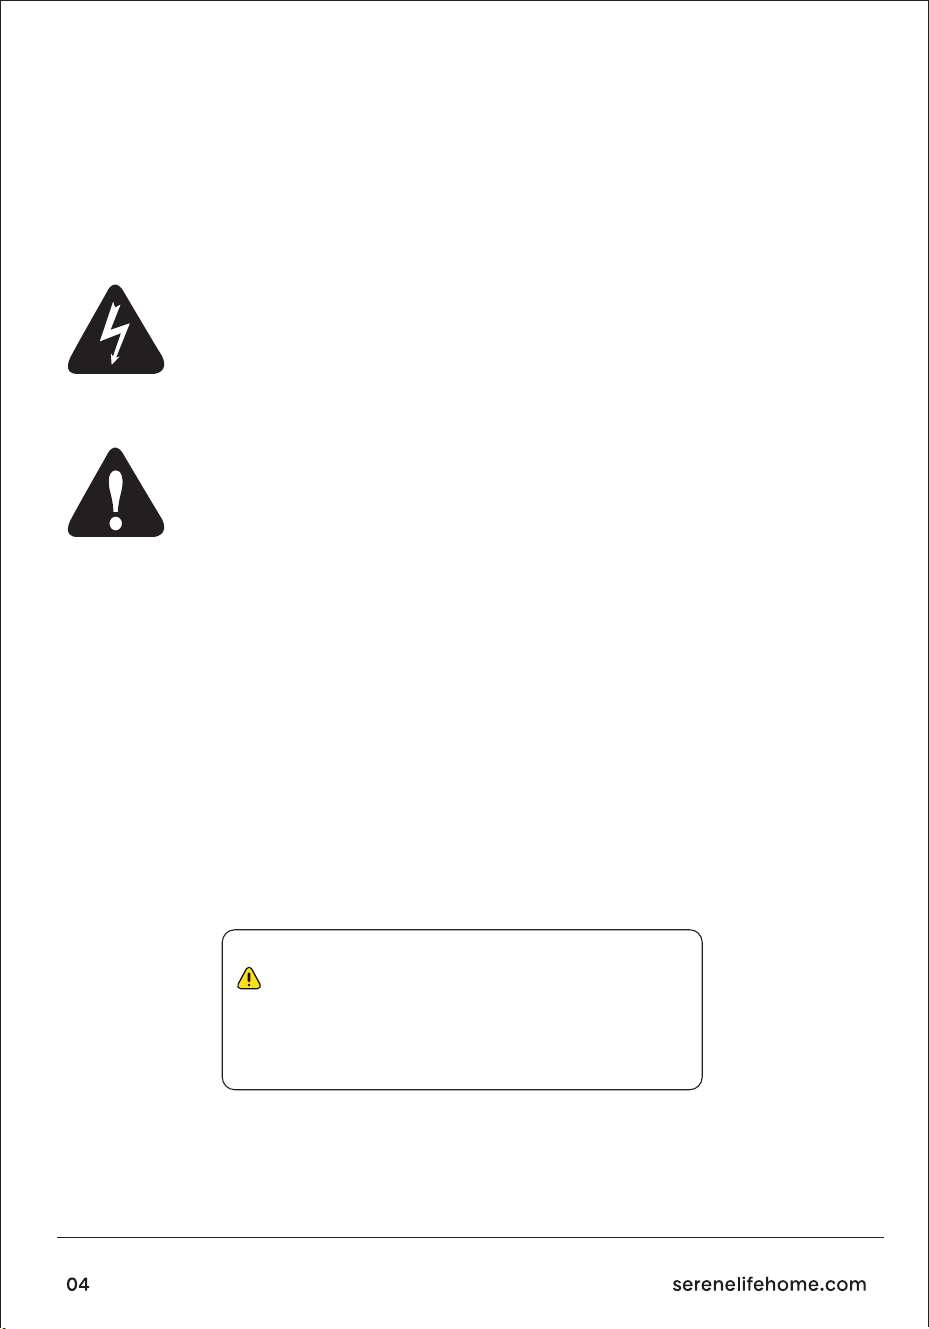
LET OP
Om het risico op ernstig letsel te verminderen, houd er rekening mee dat dit geen speelgoed is.
Laat kinderen dit apparaat niet bedienen of in de buurt van de handdoek- en dekenverwarmer
spelen.
Het bliksemsymbool met pijlpunt in een gelijkzijdige driehoek waarschuwt
voor de aanwezigheid van niet-geïsoleerde “gevaarlijke spanning” in de
behuizing van het apparaat, die sterk genoeg kan zijn om een risico op
elektrische schok te vormen.
Het uitroepteken in een gelijkzijdige driehoek wijst op belangrijke bedienings- en
onderhoudsinstructies (service) in de documentatie die bij het apparaat is geleverd.
OM HET RISICO OP BRAND OF ELEKTRISCHE SCHOK TE VERMINDEREN, STEL DIT APPARAAT
NIET BLOOT AAN REGEN OF VOCHT.
LEES, VOLG EN BEWAAR ALLE VEILIGHEIDS- EN BEDIENINGSINSTRUCTIES VOORDAT JE HET
APPARAAT GEBRUIKT.
• ALLEEN VOOR HUISHOUDELIJK GEBRUIK
• ALLEEN VOOR GEBRUIK DOOR VOLWASSENEN
• ALLEEN VOOR DROGE STOFFEN MATERIALEN
CALIFORNIA PROP 65 WAARSCHUWING
WAARSCHUWING:
Dit product bevat cadmium, waarvan in de staat Californië
bekend is dat het kanker, aangeboren afwijkingen en andere
voortplantingsschade kan veroorzaken. Niet inslikken.
Voor meer info ga naar: www.P65warnings.ca.gov

BEWAAR DEZE INSTRUCTIES
Belangrijke veiligheidsinstructies
WAARSCHUWING:
OM HET RISICO OP BRAND, ELEKTRISCHE SCHOK OF ERNSTIG LETSEL BIJ GEBRUIK VAN DIT
APPARAAT TE VERMINDEREN, VOLG DE BASISVOORZORGSMAATREGELEN HIERONDER:
• Lees alle instructies voordat je het apparaat gebruikt.
• Haal na gebruik altijd de stekker uit het stopcontact.
• Gebruik het apparaat alleen waarvoor het bedoeld is.
• Plaats of bewaar het apparaat niet op een plek waar het in een bad of gootsteen kan vallen
of worden getrokken.
• Plaats het apparaat niet in water of andere vloeistoen en dompel het niet onder.
• Raak een apparaat dat in water is gevallen niet aan. Haal direct de stekker uit het stopcon-
tact.
• Zorg ervoor dat er geen voorwerpen in of op het apparaat vallen en dat er geen vloeistoen
op worden gemorst.
• Laat het apparaat niet onbeheerd achter wanneer het is aangesloten.
• Houd toezicht wanneer het apparaat wordt gebruikt in de buurt van kinderen of mensen
met een beperking.
• Gebruik het apparaat zoals beschreven in deze handleiding.
• Gebruik het apparaat niet als het snoer of de stekker beschadigd is, als het niet goed werkt,
is gevallen, beschadigd is of in water is gevallen.
• Houd het snoer uit de buurt van hete oppervlakken. Wikkel het snoer niet om het apparaat
en laat het niet over de rand van een tafel of aanrecht hangen.
• Gebruik het apparaat niet buitenshuis.
• Verwijder of wijzig de veiligheidsstekker niet en gebruik geen verlengsnoer met dit appa-
raat.
• Gebruik geen spanningsomvormer.
• Raak geen hete oppervlakken aan.
• Gebruik geen accessoires die niet door de fabrikant worden aanbevolen, dit kan letsel
veroorzaken.

FCC-INFORMATIE
LET OP:
WAARSCHUWING:
Wijzigingen of aanpassingen die niet uitdrukkelijk zijn goedgekeurd door de partij die verantwoor-
delijk is voor naleving, kunnen je het recht ontnemen om dit apparaat te gebruiken.
Wijzigingen of aanpassingen aan dit apparaat die niet uitdrukkelijk zijn goedgekeurd door de partij
die verantwoordelijk is voor naleving, kunnen je het recht ontnemen om het apparaat te gebruik-
en.
Dit apparaat voldoet aan Deel 15 van de FCC-regels.
Het gebruik is onderworpen aan de volgende twee voorwaarden:
1. Dit apparaat mag geen schadelijke interferentie veroorzaken.
2. Dit apparaat moet alle ontvangen interferentie accepteren, inclusief interferentie die
ongewenste werking kan veroorzaken.
Opmerking:
Dit apparaat is getest en voldoet aan de limieten voor een Klasse B digitaal apparaat, overeen-
komstig Deel 15 van de FCC-regels. Deze limieten zijn bedoeld om redelijke bescherming te
bieden tegen schadelijke interferentie in een woonomgeving. Dit apparaat genereert, gebruikt
en kan radiofrequentie-energie uitstralen en kan, indien het niet volgens de instructies wordt
geïnstalleerd en gebruikt, schadelijke interferentie veroorzaken bij radiocommunicatie. Er is
echter geen garantie dat er in een specieke installatie geen interferentie zal optreden.
Als dit apparaat schadelijke interferentie veroorzaakt bij radio- of televisieontvangst, wat kan
worden vastgesteld door het apparaat uit en weer aan te zetten, wordt je aangeraden om de
interferentie te corrigeren met een of meer van de volgende maatregelen:
• Richt of verplaats de ontvangstantenne.
• Vergroot de afstand tussen het apparaat en de ontvanger.
• Sluit het apparaat aan op een stopcontact op een ander circuit dan dat waarop de ontvan-
ger is aangesloten.
• Raadpleeg de dealer of een ervaren radio-/tv-technicus voor hulp.
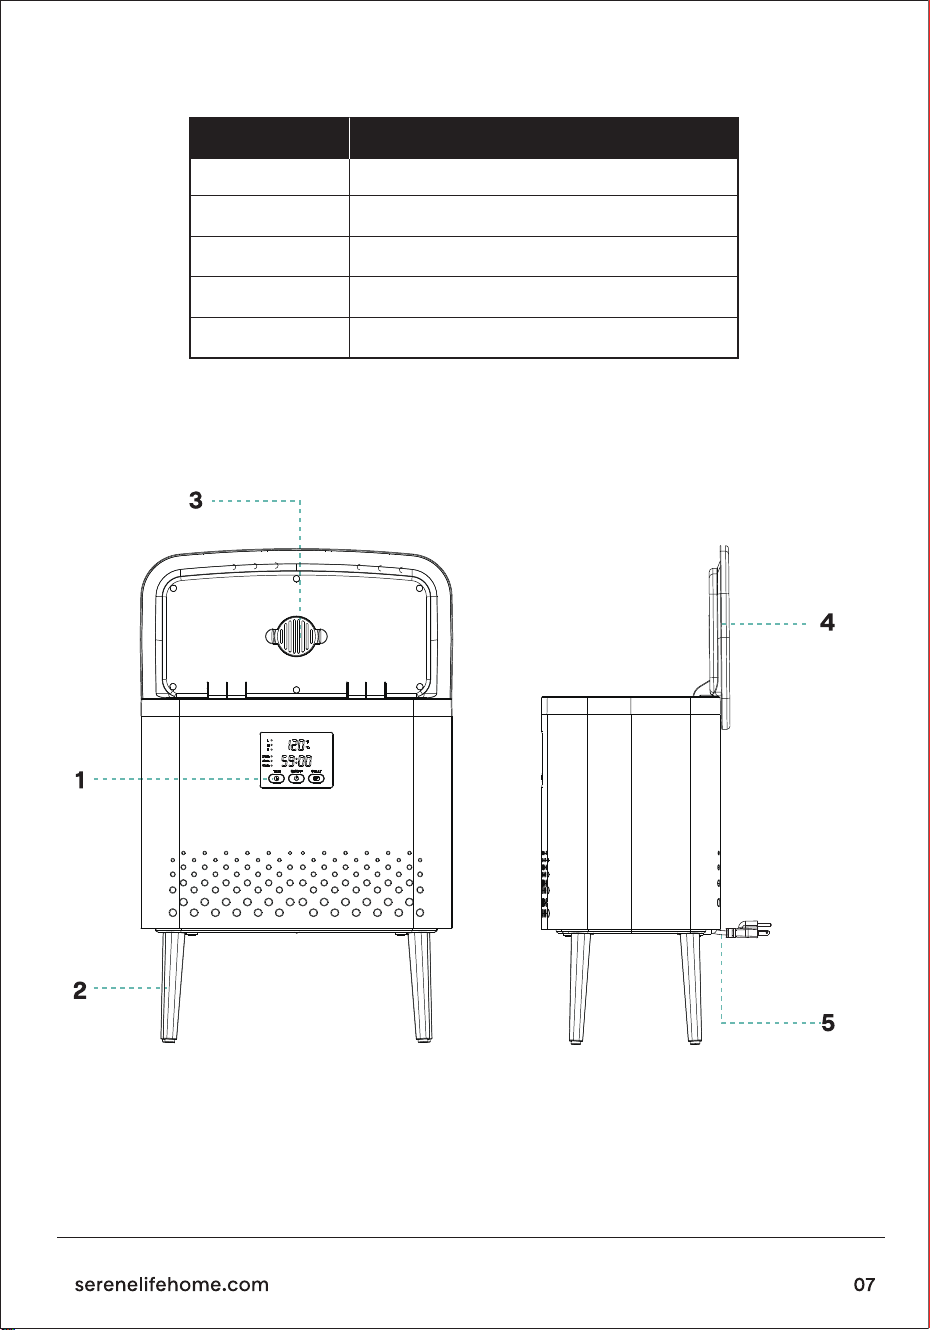
LOKALIZACJA ELEMENTÓW I PANELU STEROWANIA
Nr.
1
2
3
4
5
ONDERDEEL
Aan/uit-knop
Voetjes
Geurschijf
Deksel
Netsnoer
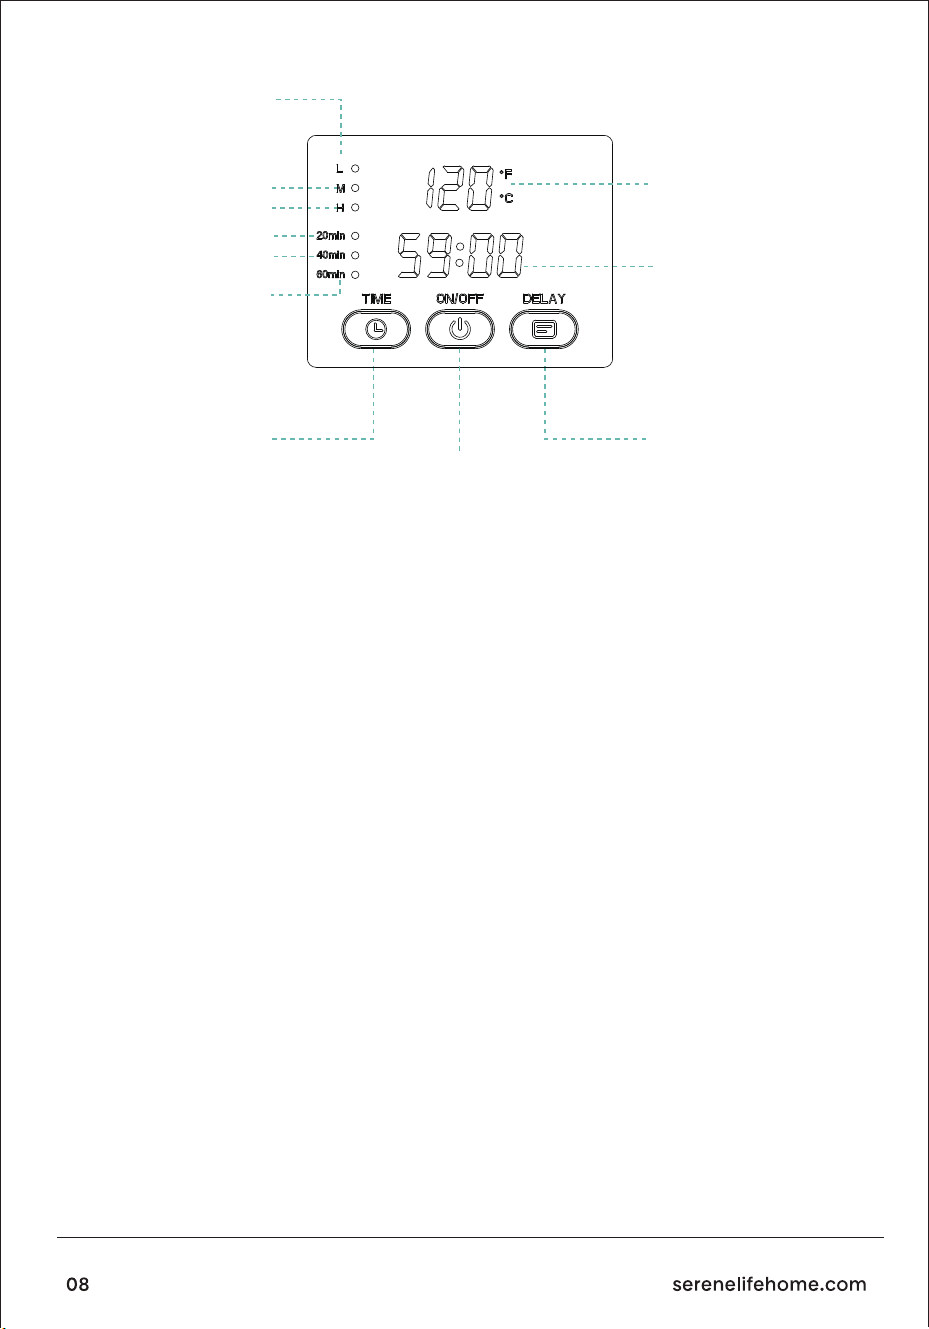
LED-SCHERM
DISPLAY-INSTRUCTIES
Lage temperatuur
Hoge temperatuur
Timerinstelling 60 min
Timerknop
Timerinstelling 40 min
Timerinstelling 20 min
Middelmatige temperatuur
Realtime
temperatuurweergave
Tijdweergave
DELAY-knop
Aan/uit-knop
1. Druk op de aan/uit-knop om het apparaat te starten. Houd de knop ingedrukt om het
apparaat uit te schakelen.
2. Nadat het apparaat is gestart, begint het tijdscheidingsteken te knipperen als er binnen 5
seconden geen handeling wordt uitgevoerd. Het apparaat schakelt automatisch naar een
werktijd van 20 minuten in de hoge temperatuurstand.
3. Na het inschakelen knipperen de dubbele punten in de tijdweergave. Druk binnen 10
seconden op de reserveringsknop om de vertraagde starttijd in te stellen (van 30 minuten
tot 24 uur, elke druk verhoogt met 30 minuten).
4. Nadat de reserveringstijd is ingesteld, druk je binnen 10 seconden op de timerknop om de
werktijd in te stellen (wissel tussen 20, 40 en 60 minuten).
5. Nadat de werktijd is verstreken, druk je op de aan/uit-knop om te schakelen tussen lage,
middelmatige en hoge temperatuur.
6. Wanneer de temperatuur van de interne wand hoger is dan 50°C (122°F), wordt de
achtergrondverlichting van de knop rood om een hoge temperatuur aan te geven. Raak
het apparaat niet aan.
1. Afspraakaanduiding: Knippert wanneer de timer wordt ingesteld, blijft branden tijdens de
ingestelde periode en schakelt uit wanneer de tijd is verstreken.
2. Tijdsaanduiding: Knippert tijdens het instellen van de tijd, blijft branden tijdens gebruik en
schakelt uit aan het einde van de werktijd.
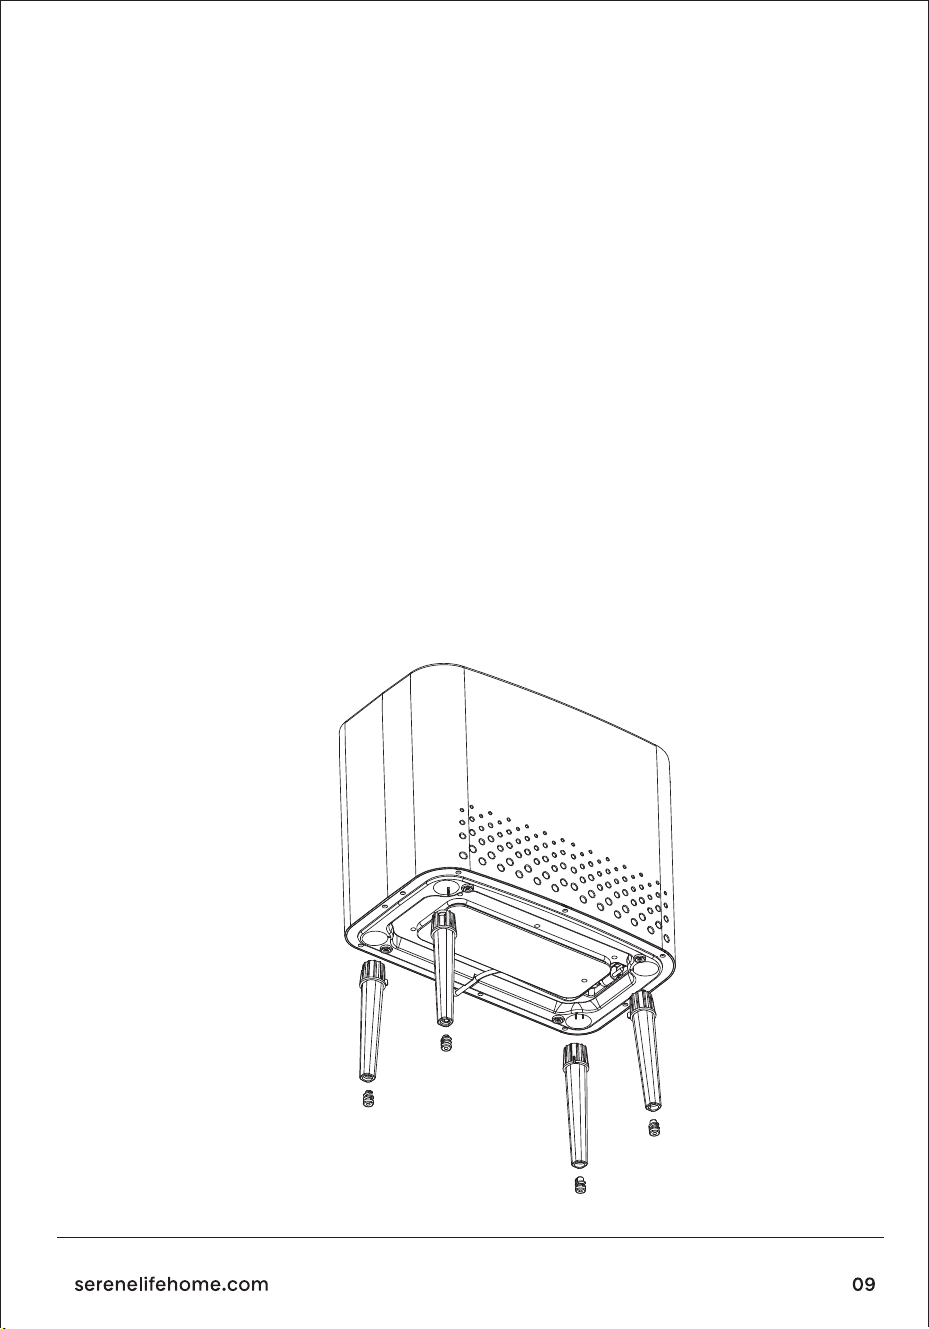
INSTRUCTIES GEURSCHIJF
INSTALLATIE-INSTRUCTIE
Monteer de steunvoetjes.
Deze geurschijf is een extra functie voor gebruikers die aromatherapietabletten of essentiële
oliën willen gebruiken tijdens het verwarmen van handdoeken.
3. Instructies schermweergave: Druk op de timerknop om te wisselen tussen 20, 40 en 60
minuten, waarbij het bijbehorende kleine ronde lampje knippert. Het kleine ronde lampje blijft
branden tijdens gebruik en schakelt uit wanneer de cyclus is voltooid. Wanneer je geen timer
instelt, kies dan TIME. Het scherm toont de tijd en knippert wanneer het apparaat niet in
gebruik is. Tijdens normaal gebruik blijft het continu branden terwijl het aftelt. Wil je een timer
instellen, selecteer dan eerst de gewenste starttijd en daarna de werktijd. Druk op de
timerknop, het scherm toont de ingestelde tijd en knippert in het begin. Na bevestiging blijft
het lampje branden en telt het af naar de ingestelde starttijd. Zodra de ingestelde starttijd is
verstreken, gaat het timerlampje uit, blijft het tijdlampje branden en toont het scherm de
resterende opwarmtijd.
1. Haal de geurschijf uit de verzegelde plastic verpakking.
2. Plaats deze in de houder voor de geurschijf aan de onderzijde van het deksel.

Gebruiksinstructies
GEBRUIK VAN DE HANDDOEK- & DEKENVERWARMER
1. Open het deksel en haal de rubberen voetjes en voetpads uit de binnenkant van de behuizing.
2. Plaats de voetpads in de openingen aan de onderkant van de rubberen voetjes.
3. Lijn de rubberen voetjes uit met de openingen in de onderzijde van de behuizing en klik ze
vast.
1. Open het deksel en verwijder al het verpakkingsmateriaal.
2. Plaats de handdoekverwarmer op een droge, vlakke en harde ondergrond.
3. Steek de stekker in een standaard 120V-stopcontact.
1. Steek de stekker in een stopcontact.
2. Open het deksel en plaats ALLEEN DROGE handdoek(en) of een deken in het apparaat.
3. LET OP: Het plaatsen van vochtige of natte handdoeken in de handdoekverwarmer kan het
apparaat beschadigen en ernstige veiligheidsrisico’s veroorzaken.
4. Sluit het deksel.
5. Druk op de AAN/UIT-knop.
6. Raak de binnenwand van het apparaat niet aan, dit kan brandwonden veroorzaken. De
temperatuur van de binnenwand kan na ongeveer 5 minuten oplopen tot 130°F–140°F
(54,4°C–60°C) en kan deze temperatuur ongeveer 15 minuten vasthouden. Op dat moment
kan de temperatuur van de handdoek boven de 50°C / 122°F uitkomen, wat warm maar
comfortabel aanvoelt voor het menselijk lichaam. De handdoek wordt indirect verwarmd
om een temperatuur van ongeveer 55°C / 131°F te behouden. Het indicatielampje gaat uit
na 80 minuten na het starten van het apparaat, wat aangeeft dat de werkcyclus is voltooid.
7. Met 30 seconden snelle verwarming is 15 minuten doorgaans voldoende om twee
badhanddoeken te verwarmen.
8. Open het deksel om de handdoek(en) of deken te verwijderen. Druk de handgreep omlaag
en trek vervolgens omhoog om het deksel te openen.
9. Let op: Til bij het verwijderen van items voorzichtig het deksel op om schade aan het
apparaat te voorkomen.
10. Druk op elk moment op de AAN/UIT-knop om de verwarmingscyclus te starten of te
stoppen.
LET OP: Deze handdoek- en dekenverwarmer heeft een geaarde 3-polige stekker.
Om het risico op elektrische schokken te verminderen, sluit je het netsnoer aan op een geaard
stopcontact dat goed bereikbaar is.
De handdoek- en dekenverwarmer kan comfortabel tot twee grote katoenen badhanddoeken
of een persoonlijke omslagdeken verwarmen.
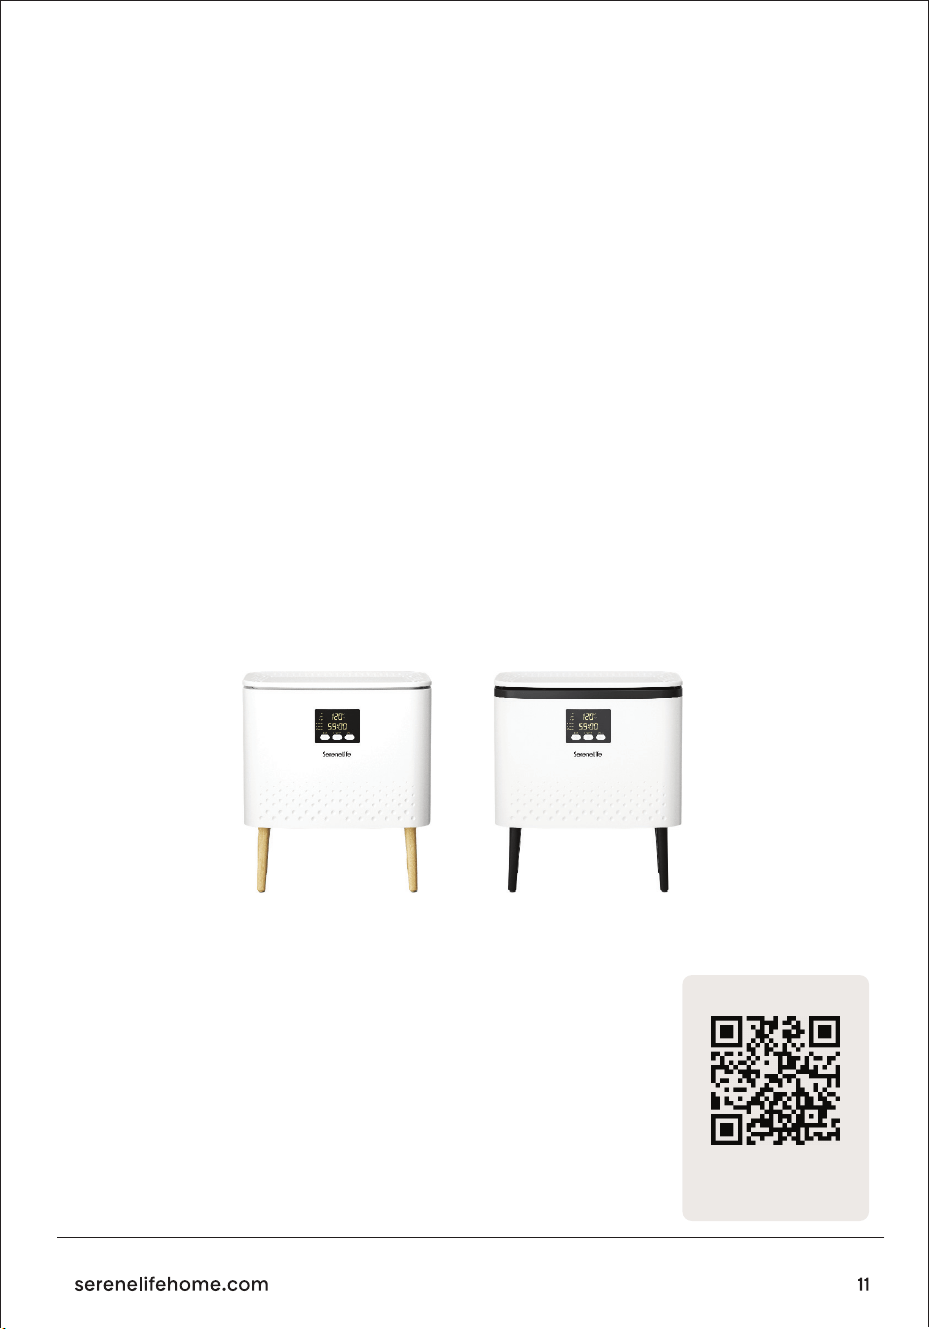
TIPS VOOR HET BESTE RESULTAAT
1. Gebruik katoenen of katoenmix handdoeken of stoen.
2. Voor snelle en gelijkmatige verwarming plaats je één handdoek losjes in de handdoek- en
dekenverwarmer. Strak opgerolde of gevouwen handdoeken hebben meer tijd nodig om
volledig op te warmen. Twee handdoeken hebben meer tijd nodig dan één.
3. Gebruik alleen DROGE stoen. Let op: gebruik geen vochtige of natte materialen.
4. Vermijd het gebruik van delicate stoen die niet bestand zijn tegen hoge temperaturen.
Stoen die alleen geschikt zijn voor koele wasprogramma’s kunnen mogelijk de warmte
van de handdoekverwarmer niet verdragen, wat kan leiden tot schade aan zowel de stof
als het apparaat.
5. Houd het deksel gesloten zodra de verwarmingscyclus is gestart. Dit voorkomt dat
warmte ontsnapt. Het openen van het deksel tijdens de cyclus kan de opwarmtijd
verlengen.
6. Let op: condensatie op het deksel en in de binnenkant van het apparaat is normaal.
VERZORGING EN ONDERHOUD
HAAL DE STEKKER UIT HET STOPCONTACT VOORDAT JE HET APPARAAT REINIGT. MAAK HET
ALLEEN SCHOON MET EEN DROGE DOEK WANNEER HET IS AFGEKOELD EN VEILIG KAN
WORDEN AANGERAAKT.
Product registreren
SLTLR625 SLTLR725
Bedankt dat je hebt gekozen voor SereneLife. Door je product te
registreren, proteer je van alle voordelen van onze exclusieve
garantie en persoonlijke klantenservice. Vul het formulier in om
toegang te krijgen tot deskundige ondersteuning en om je
SereneLife-aankoop in perfecte staat te houden.
Begin Hier
SLTLR625
Modelnummer:
Serenelifehome.com/pages/registre
Scan the QR code to view the
user manual in multiple languages
GER
Für Benutzerhandbücher
Benutzerhandbücher verfügbar in
Italian l German l Polish l Turkish l Dutch
und geben Sie Ihre Modellnummer ein
SCANNEN SIE DEN QR-CODE
POL
Aby uzyskać instrukcje użytkownika
w wielu językach,
Instrukcje obsługi dostępne w
Italian l German l Polish l Turkish l Dutch
i wprowadź numer swojego modelu
ZESKANUJ KOD QR
TUR
Birden fazla dilde kullanıcı kılavuzları için,
Kullanım Kılavuzları şurada mevcuttur:
Italian l German l Polish l Turkish l Dutch
ve model numaranızı girin
QR KODUNU TARAYIN
DUT
Voor gebruikershandleidingen
in meerdere talen,
Gebruikershandleidingen beschikbaar in
Italian l German l Polish l Turkish l Dutch
en voer uw modelnummer in
SCAN DE QR-CODE
ENG UK
For user guides in multiple languages,
User Manuals available in
Italian l German l Polish l Turkish l Dutch
and enter your model number
SCAN THE QR CODE
Para guías de usuario en varios idiomas,
Manuales de usuario disponibles en
Italian l German l Polish l Turkish l Dutch
e ingrese su número de modelo
ESCANEE EL CÓDIGO QR
SPA
Pour les guides d'utilisation en plusieurs langues,
Manuels d'utilisation disponibles en
Italian l German l Polish l Turkish l Dutch
et entrez votre numéro de modèle
SCANNEZ LE CODE QR
FRE
Per le guide utente in più lingue,
Manuali utente disponibili in
Italian l German l Polish l Turkish l Dutch
e inserisci il numero del tuo modello
SCANSIONA IL CODICE QR
ITA
Pytania lub uwagi?
Jesteśmy tutaj, aby pomóc!
Phone: 1.718.535.1800
Serenelifehome.com/ContactUs
Vragen of opmerkingen?
We staan voor je klaar!
Telefoon: 1.718.535.1800
Serenelifehome.com/ContactUs