Rev.23.03
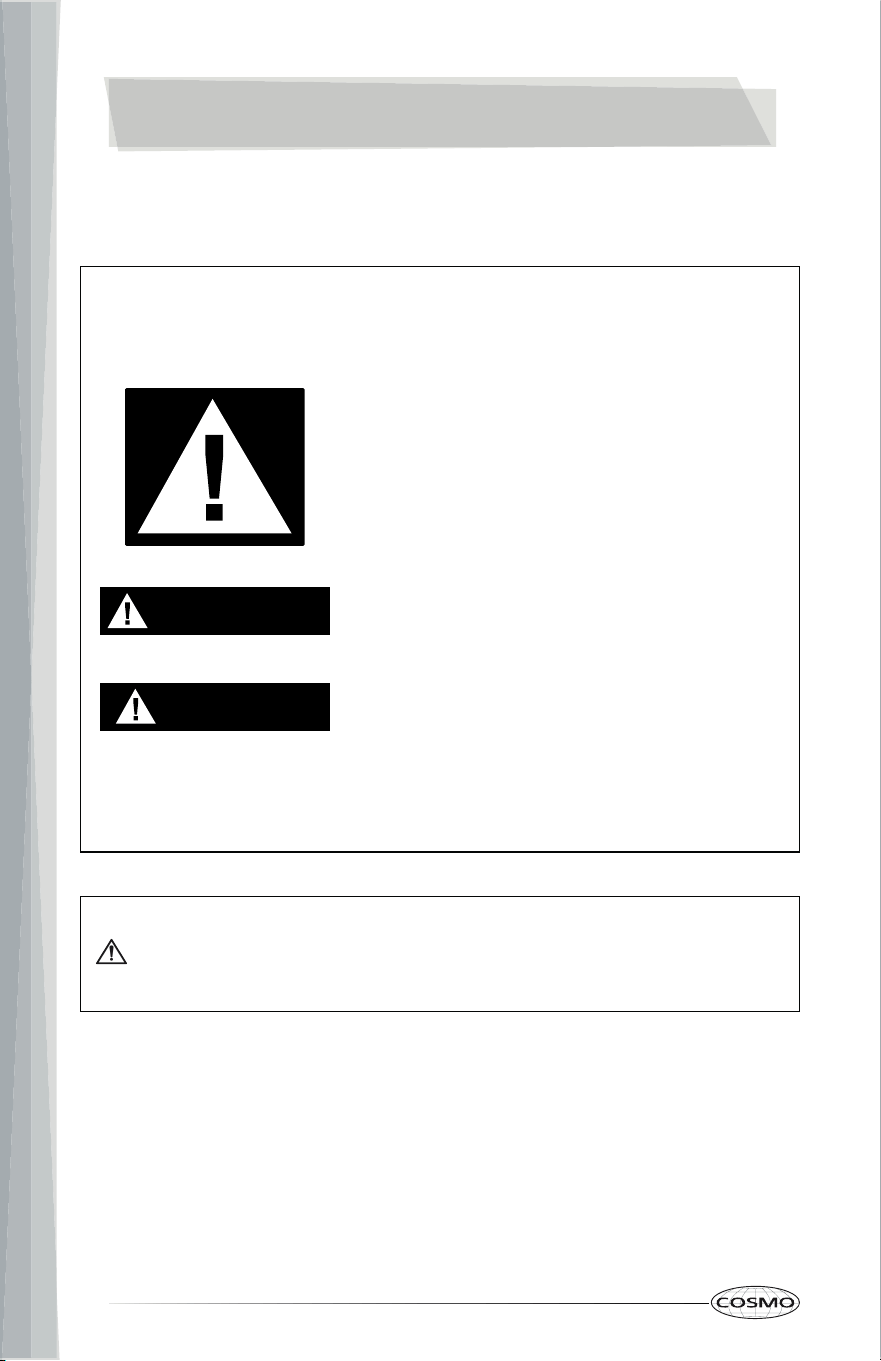
ELECTRIC COOKTOP
COS-304TBECC
COS-365TBECC
USER MANUAL & INSTALLATION
INSTRUCTIONS
READ AND SAVE THESE INSTRUCTIONS.
FOR RESIDENTIAL USE ONLY.
PLEASE LEAVE THESE INSTRUCTIONS WITH THIS UNIT FOR
THE OWNER.
PLEASE RETAIN THESE INSTRUCTIONS FOR FUTURE
REFERENCE.
IMPORTANT:
INSTALLER:
OWNER:
DROP-IN COOKTOP

2
THANK YOU FOR YOUR PURCHASE
Thank you for your purchase. We know that you have many brands and
products to choose from and we are honored to know that you have decided
to take one of our products into your home and hope that you enjoy it.
COSMO Appliances are designed according to the strictest safety and
performance standard for the North American market. We follow the most
advanced manufacturing philosophy. Each appliance leaves the factory after
thorough quality inspection and testing. Our distributors and our service
partners are ready to answer any questions you may have regarding how to
install, use and care for your products. We hope that this manual will help you
learn to use the product in the safest and most effective manner.
Before using this product, please read through this manual carefully. Keep
this user manual in a safe place for future reference. Please ensure that other
persons using this product are familiar with these instructions as well.
If you have any questions or concerns, please contact the dealer from whom you
purchased the product, or contact our Customer Support at:
1-888-784-3108
Reach us online at:
www.cosmoappliances.com

3
COOKTOP SAFETY .............................................................................................. 4
Important Safety Instructions ................................................................................. 6
INSTALLATION REQUIREMENTS ........................................................................ 11
Tools and Parts .......................................................................................................... 11
Location Requirements ........................................................................................... 12
Product Dimensions ................................................................................................. 13
Cutout Dimensions ................................................................................................... 14
Clearances ................................................................................................................. 15
Electrical Requirements ........................................................................................... 17
INSTALLATION INSTRUCTIONS ......................................................................... 19
Preparation ............................................................................................................... 19
Install Clamping Brackets ...................................................................................... 20
Install Cooktop ......................................................................................................... 22
Electrical Connection .............................................................................................. 23
Complete Installation ............................................................................................. 26
OVERVIEW ......................................................................................................... 28
Cooktop Layout ....................................................................................................... 28
Control Panel ........................................................................................................... 29
FEATURES .......................................................................................................... 30
Timer .......................................................................................................................... 30
Lock ............................................................................................................................. 31
OPERATION ....................................................................................................... 32
Before Using the Cooktop ..................................................................................... 32
Cooking Areas.......................................................................................................... 34
Hot Surface Indicator ............................................................................................. 35
Using the Cooktop Elements ................................................................................. 35
Using the Proper Cookware .................................................................................. 37
COOKTOP CARE AND MAINTENANCE ............................................................. 39
Cleaning .................................................................................................................... 39
TROUBLESHOOTING ......................................................................................... 42
LIMITED WARRANTY ........................................................................................ 44
TABLE OF CONTENTS
READ ALL INSTRUCTIONS BEFORE USING THE APPLIANCE
Your safety and the safety of others are very important.
We have provided many important safety messages in this manual and on
your appliance. Always read and obey all safety messages.
This is the safety
alert symbol.
This symbol alerts you to potential hazards
that can kill or hurt you and others.
All safety messages will follow the safety alert
symbol and either the word "WARNING" or
"CAUTION." These words mean:
You can be killed or seriously injured if you
don't follow instructions.
A potentially hazardous situation which, if not
avoided, could result in minor or moderate
injury.
All safety messages will tell you what the potential hazard is, tell you how
to r
educe the chance of injury, and tell you what can happen if the
instructions are not followed.
California Proposition 65 Warning
WARNING:
Cancer and Reproductive Harm - www.P65Warnings.ca.gov.
4
COOKTOP SAFETY
WARNING
CAUTION
5
WARNING
• This appliance is intended for normal residential use. It is not approved
for commercial use, outdoor installation, or any other application not
specifically allowed by this manual.
• This appliance requires connection to a 3-prong or 4-prong, 240VAC
single-phase (split-phase), 60Hz grounded electrical source. When
installed, appliance must be electrically grounded in accordance with
local codes or, in the absence of local codes, with the National Electrical
Code, NFPA 70 or CSA Standards C22.1-94, or the Canadian Electrical
Code, Part 1 and C22.2.
• ATTENTION INSTALLER: All cooktops must be hard wired (direct wired)
into an approved junction box. A "plug and receptacle" is not permitted
on these products.
• Proper installation is the responsibility of the installer. Any adjustment
and service should be performed only by qualified cooktop installers or
service technicians.
• Product failure due to improper installation is not covered under
warranty.
6
IMPORTANT SAFETY
INSTRUCTIONS
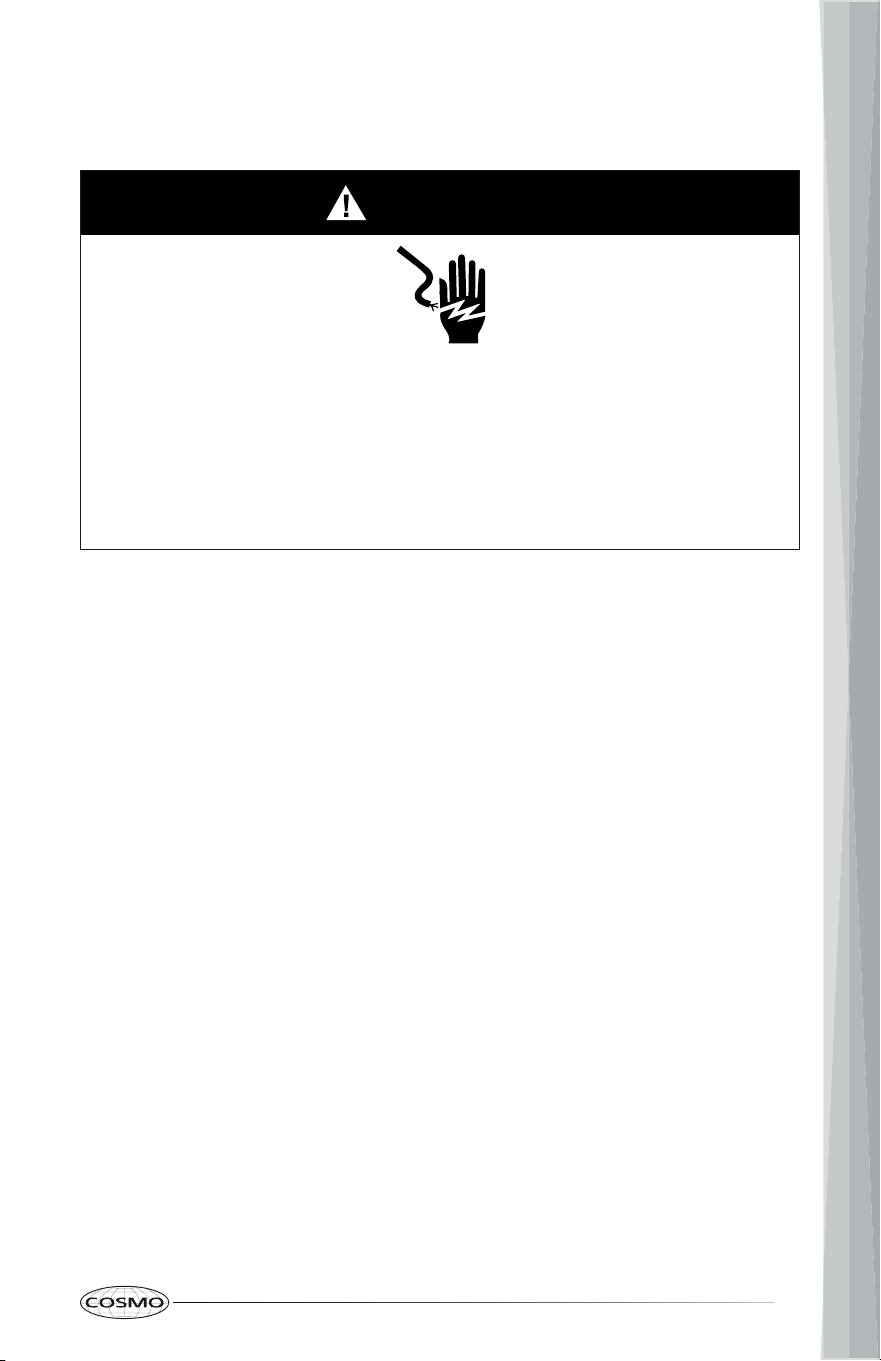
WARNING: To reduce the risk of fire, electrical shock, injury to persons, or
damage when using the cooktop, follow basic precautions, including the
following:
• For Personal Safety, remove
house fuse or open circuit
breaker before beginning
installation. Failure to do so
could result in serious injury or
death.
• ATTENTION INSTALLER - All
cooktops must be hard wired
(direct wired) into an approved
junction box. A "plug and
receptacle" is not permitted on
these products.
• Proper installation is the
responsibility of the installer and
product failure due to improper
installation is NOT covered
under warranty.
• WARNING: Installations with
Aluminum House Wiring Require
Attention:
- Improper connection of
Aluminum house wiring to
appliance copper leads can
result in an electrical hazard
or fire. Use only connectors
designed for joining copper
to aluminum and follow the
manufacturer’s recommend
procedure closely.
- Aluminum to Copper wiring
connections must conform
with the National Electrical
code, local codes and
industry-accepted wiring
practices.
- If an anti-oxidant
compound is added to the
wiring connectors, the
compound should be UL-
Listed and suitable for the
application materials,
voltage and temperature.
- Connectors for joining
Aluminum and Copper
wiring may be larger in size
than standard connectors. It
is recommended to use a
double gang, or larger,
electrical box to enclose the
connectors joining
Aluminum and Copper
wiring.
• Use this appliance only for its
intended purpose as described
in this manual.
• Never use your appliance for
warming or heating the room.
READ AND SAVE THESE INSTRUCTIONS
7
IMPORTANT SAFETY
INSTRUCTIONS
• Be sure your appliance is
properly installed and grounded
by a qualified technician.
• To eliminate the risk of burns or
fire due to reaching over heated
surface elements, cabinet
storage located above the
surface units should be avoided.
If cabinet storage space is to be
provided, the risk can be
reduced by installing a range
hood that projects horizontally a
minimum of 5" beyond the
bottom of the cabinets. Cabinet
installation above the cooktop
may be no deeper than 13".
• This appliance is not intended
for use by people (including
children) whose physical,
sensory or mental capacities are
impaired or who lack the
necessary experience or
knowledge/expertise to do so,
unless such persons are
supervised or are trained to
operate the appliance by a
person who accepts
responsibility for their safety.
• CAUTION: Do not store items of
interest to children in cabinets
above a cooktop – children
climbing on the cooktop to
reach items could be seriously
injured.
• Do Not Leave Children Alone –
Children should not be left alone
or unattended in area where
cooktop is in use. They should
never be allowed to sit or stand
on any part of the cooktop.
• User Servicing – Do not repair or
replace any part of the cooktop
unless specifically recommended
in the manual. All other servicing
should be referred to a qualified
technician.
• Before performing any service,
unplug the cooktop or
disconnect the power supply at
the household distribution panel
by removing the fuse or
switching off the circuit breaker.
• Storage on Cooktop –
Flammable materials should not
be stored near surface units.
• Do Not Use Water on Grease
Fires – Smother fire or flame or
use dry chemical or foam-type
extinguisher.
• Use Only Dry Potholders – Moist
or damp potholders on hot
surfaces may result in burns
from steam. Do not let potholder
touch hot heating elements. Do
not use a towel or other bulky
cloth.
READ AND SAVE THESE INSTRUCTIONS
8
IMPORTANT SAFETY
INSTRUCTIONS
• DO NOT TOUCH SURFACE UNITS
OR AREAS NEAR UNITS – Surface
units may be hot even though
they are dark in color. Areas
near surface units may become
hot enough to cause burns.
During and after use, do not
touch, or let clothing or other
flammable materials contact
surface units or areas near units
until they have had sufficient
time to cool. Among these areas
are the coil elements, the
cooktop, and surfaces facing the
cooktop.
• Do Not Cook on Broken Cooktop
– If cooktop should break,
cleaning solutions and spillovers
may penetrate the broken
cooktop and create a risk of
electric shock. Turn off the
device to avoid the possibility of
electric shock. Contact a
qualified technician
immediately.
• Avoid scratching or impacting
cooktops, or control panels. The
cooktop can be scratched with
items such as knives, sharp
instruments, rings or other
jewelry, and rivets on clothing.
Doing so may lead to glass
breakage.
• If the power supply cord gets
damaged, have it replaced by
the manufacturer, the latter’s
service agent or by qualified
personnel in order to avoid
danger.
• Never Leave Surface Units
Unattended at High Heat
Settings – Boilover causes
smoking and greasy spillovers
that may ignite.
• Do Not Heat Unopened Food
Containers – Build-up of
pressure may cause container to
burst and result in injury.
• Wear Proper Apparel – Loose-
fitting or hanging garments
should never be worn while
using the appliance.
• Use Proper Pan Size – This
appliance is equipped with one
or more surface units of different
size. Select utensils having flat
bottoms large enough to cover
the surface unit heating
element. The use of undersized
utensils will expose a portion of
the heating element to direct
contact and may result in
ignition of clothing. Proper
relationship of utensil to heating
element will also improve
efficiency.
READ AND SAVE THESE INSTRUCTIONS
9
IMPORTANT SAFETY
INSTRUCTIONS
• Glazed Cooking Utensils – Only
certain types of glass,
glass/ceramic, ceramic,
earthenware, or other glazed
utensils are suitable for cooktop
service without breaking due to
the sudden change in
temperature.
• Utensil Handles Should Be
Turned Inward and Not Extend
Over Adjacent Surface Units – To
reduce the risk of burns, ignition
of flammable materials, and
spillage due to unintentional
contact with the utensil, the
handle of a utensil should be
positioned so that it is turned
inward, and does not extend
over adjacent surface units.
• Metal objects, such as knives,
forks, spoons and lids should not
be left on the grill’s cooking
surface as they may get hot.
• Do not place or store items that
can melt or catch fire on the
glass cooktop, even when it is
not being used. If the cooktop is
inadvertently turned on, they
may ignite. Heat from the
cooktop after it is turned off may
cause them to ignite also.
• Maintenance – Keep cooktop
area clear and free from
combustible materials, gasoline,
and other flammable vapors
and liquids.
• Do not let cooking grease or
other flammable materials
accumulate in or near the
cooktop. Grease on the cooktop
may ignite.
• Clean Cooktop With Caution – If
a wet sponge or cloth is used to
wipe spills on a hot cooking
area, be careful to avoid steam
burn. Some cleaners can
produce noxious fumes if
applied to a hot surface.
• Use care when touching the
cooktop. The glass surface of the
cooktop will retain heat after the
controls have been turned off.
• Clean Only Parts Listed in
Manual.
• Do not use replacement parts
that have not been
recommended by the
manufacturer (e.g. parts made
at home using a 3D printer).
READ AND SAVE THESE INSTRUCTIONS
10
IMPORTANT SAFETY
INSTRUCTIONS
• Proper Disposal of Your
Appliance – Dispose of or recycle
your appliance in accordance
with Federal and Local
Regulations. Contact your local
authorities for the
environmentally safe disposal or
recycling of your appliance.
For units with ventilating hood –
• Clean Ventilating Hoods
Frequently – Grease should not
be allowed to accumulate on
hood or filter.
• When flaming foods under the
vent hood, turn the fan on.
READ AND SAVE THESE INSTRUCTIONS
11
INSTALLATION REQUIREMENTS
TOOLS AND PARTS
Gather the required tools and parts before starting installation. Read and
follow the instructions provided with any tools listed here.
Tools Needed
• Tape measure
• Phillips screwdriver
• Marker or pencil
• Drill and drill bit (for clamping
bracket installation on wooden
countertops)
• Heavy-duty double-sided
adhesive tape and silicone (for
clamping bracket installation on
granite and marble countertops)
• Safety glasses
• Gloves
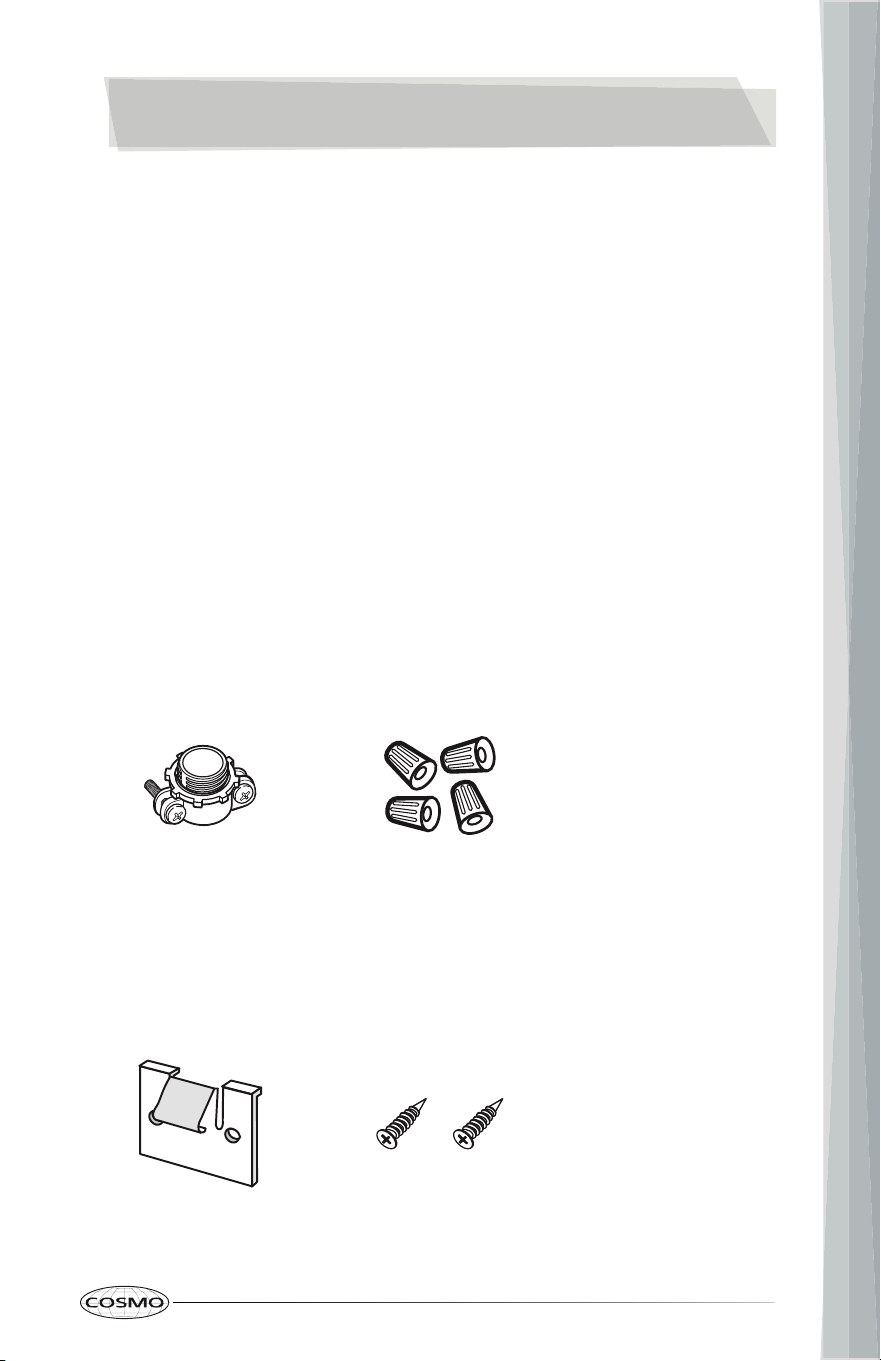
Parts Needed
UL Listed or CSA Approved
Conduit Connector
Parts Supplied
Clamping Brackets (4) Clamping Screws (8)
UL Listed or CSA Approved
Wire Connector

12
LOCATION REQUIREMENTS
IMPORTANT: Observe all governing codes and ordinances.
• This cooktop is for indoor household use only.
• It is the installer's responsibility to comply with installation clearances
specified on the model/serial/rating plate. The model/serial/rating plate
is located on the underside of the cooktop base.
• The cooktop must be installed in a level countertop.
• The cooktop should be installed in a location away from strong draft
areas, such as windows, doors, and strong heating vents or fans.
• The cooktop should be located for convenient use in the kitchen.
• To eliminate the risk of burns or fire by reaching over the heated surface
units, cabinet storage space located above the surface units should be
avoided. If cabinet storage is to be provided, the risk can be reduced by
installing a range hood that projects horizontally a minimum of 5" (12.7
cm) beyond the bottom of the cabinets.
• For cooktop installation in a solid surface material such as granite, quartz
or any other natural or synthetic solid surface, it is recommended that the
cutout be prepared by a professional cabinet or countertop installer.
Cooktop cutouts in wood or wood-laminate countertops may be able to
be prepared using a saber saw and electric drill.
• An approved built-in under counter oven may be installed below the
cooktop. Refer to oven manufacturer’s installation instructions for
appropriate clearances, dimensions, and cutout dimensions.
• A ventilation hood may be installed above the cooktop. See the
ventilation hood installation instructions for the appropriate dimensions
and clearances.
• Grounded electrical supply is required. See "Electrical Requirements"
section.
IMPORTANT: To avoid damage to your cabinets, check with your builder or
cabinet supplier to make sure that the materials used will not discolor,
delaminate, or sustain other damage.
13
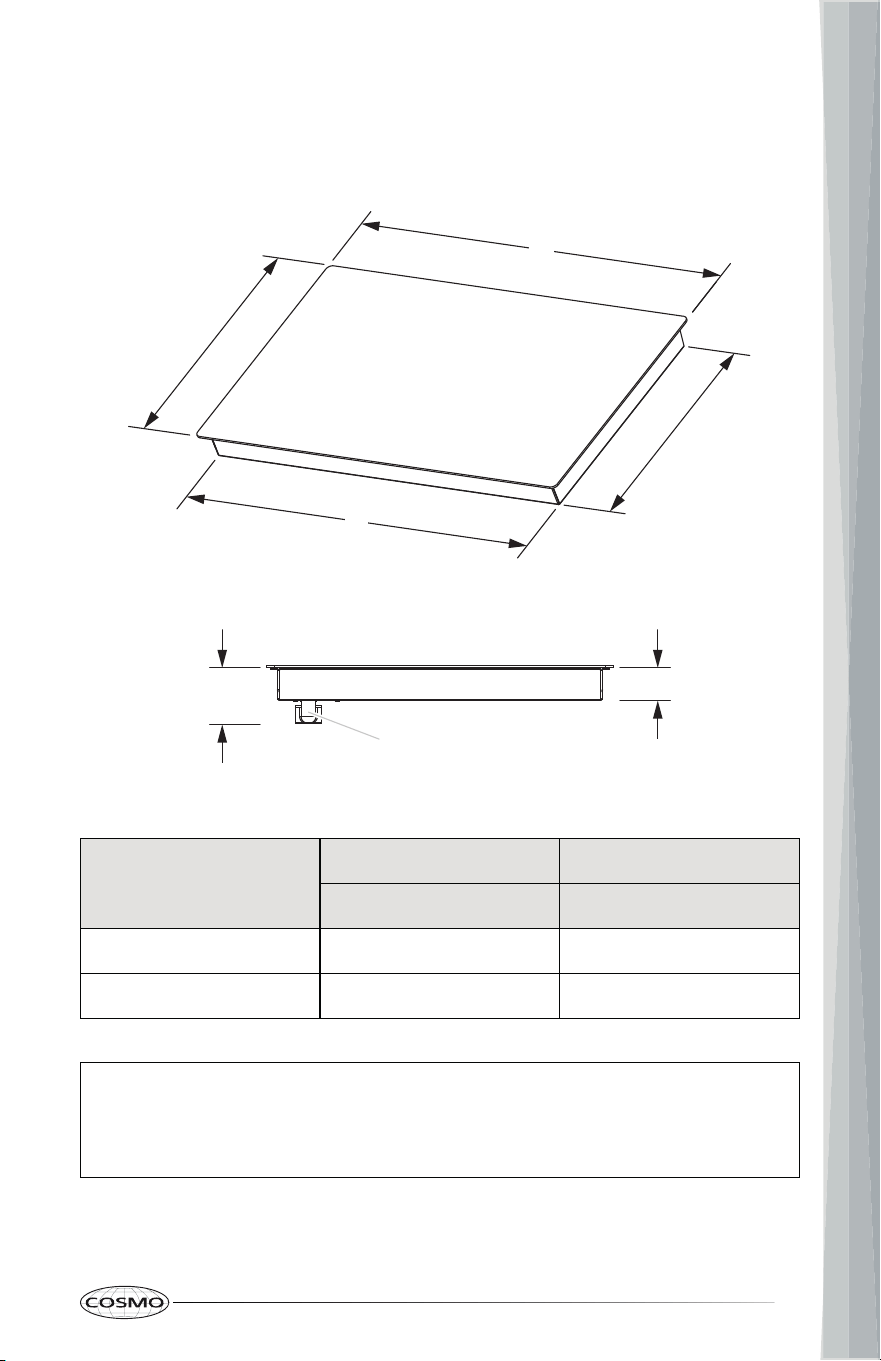
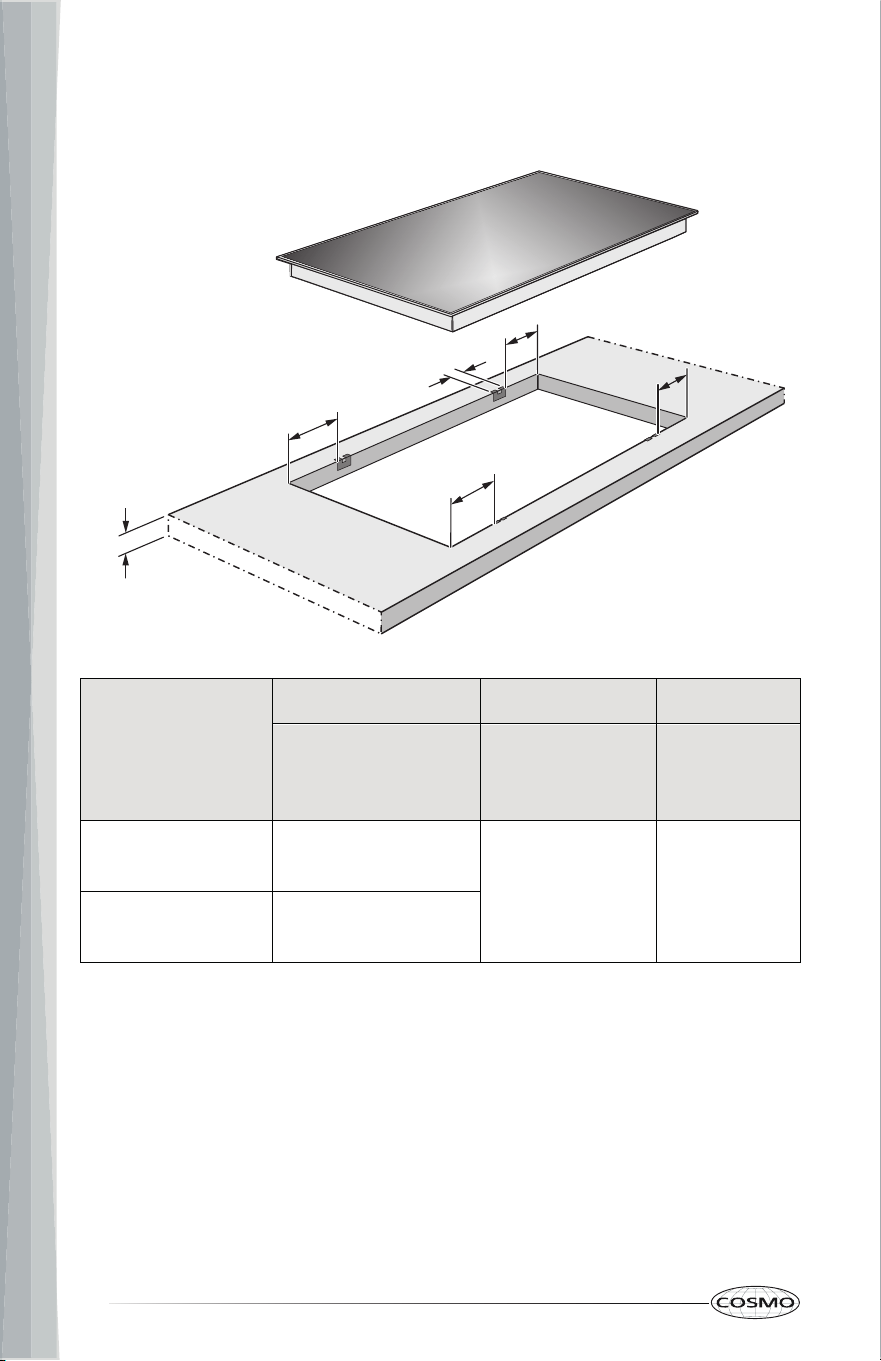
PRODUCT DIMENSIONS
Dimensions given are maximum dimensions across all models.
21"
(533 mm)
19 ⁷⁄₁₆"
(493 mm)
A
B
FRONTREAR
2 ³⁄₄"
(69 mm)
1 ³⁄₄"
(44 mm)
Power Cord
Conduit
Model
A
B
Surface Width Base Width
COS-304TBECC (30") 30" (762 mm) 28 ⁷⁄₁₆" (722 mm)
COS-365TBECC (36") 36" (915 mm)
NOTE:
• Power cord is located at the rear right bottom of the cooktop.
• Length of power cord is approximately 47 ¹⁄₄" (120 cm).
34 ⁷⁄₁₆" (875 mm)
14
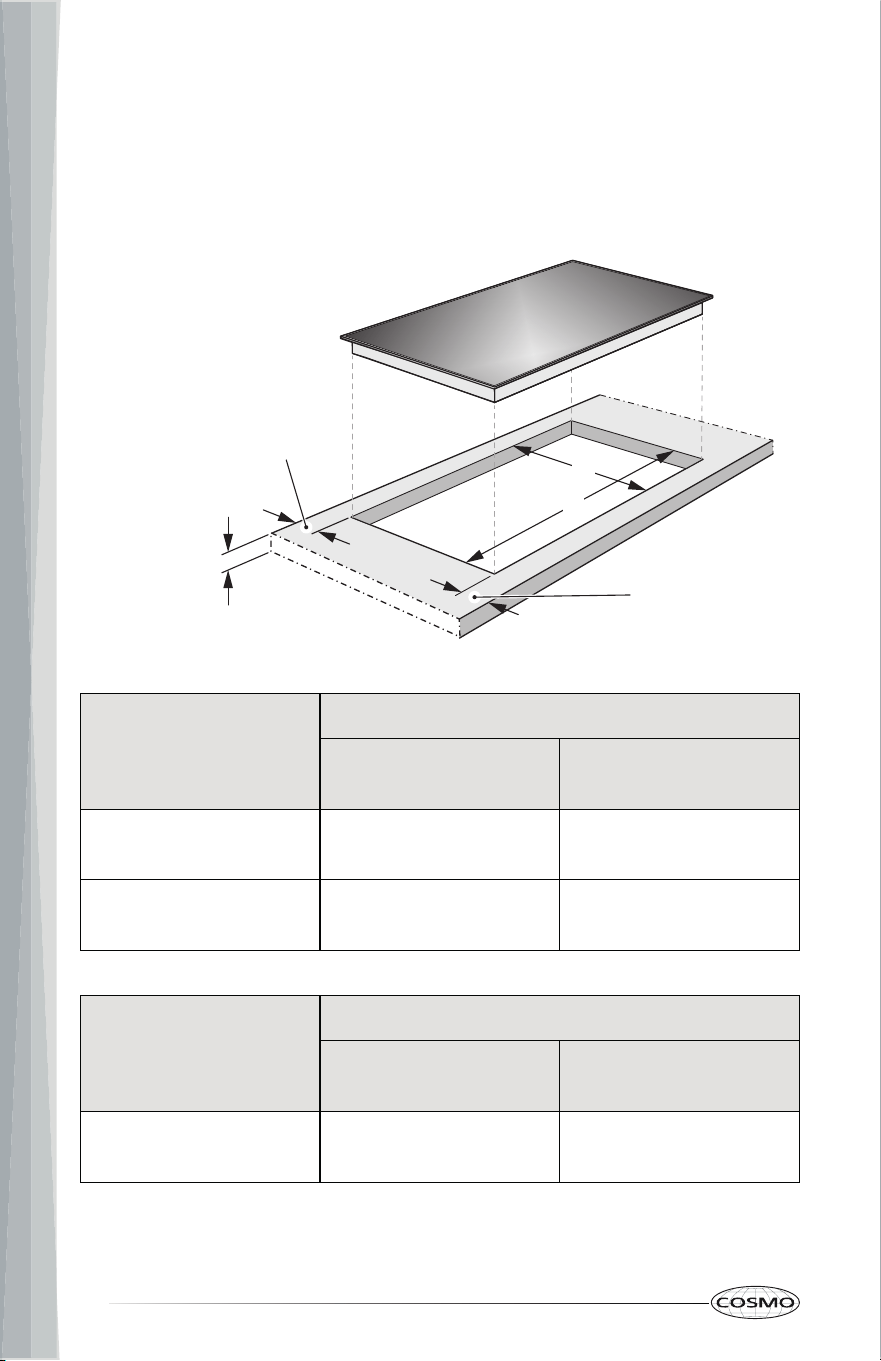
CUTOUT DIMENSIONS
IMPORTANT: To avoid damage to your cabinets, check with your builder or
cabinet supplier to make sure that the materials used will not discolor,
delaminate or sustain other damage.
C
D
2 ³⁄₈" (6 cm)
min. distance
from front
edge of cutout
and front edge
of countertop
2" (5 cm)
min. distance
between rear
edge of cutout
and the wall
behind the
cooktop
1 ³⁄₁₆" (30 mm)
min. thickness
of the
countertop
surface
Model
C
Cutout Width
Recommended
Cutout Width
COS-304TBECC (30")
(730 mm)
28 ³⁄₄" – 28 ¹³⁄₁₆"
(730 – 732 mm)
COS-365TBECC (36")
(885 mm)
34 ³⁄₄" – 34 ¹³⁄₁₆"
(883 – 885 mm)
Model
D
Cutout Depth
Recommended
Cutout Depth
COS-304TBECC (30")
COS-365TBECC (36")
19 ¹¹⁄₁₆" – 19 ¹³⁄₁₆"
(500 – 503 mm)
(503 mm)
28 ³⁄₄"
34 ¹³⁄₁₆"
19 ¹³⁄₁₆"
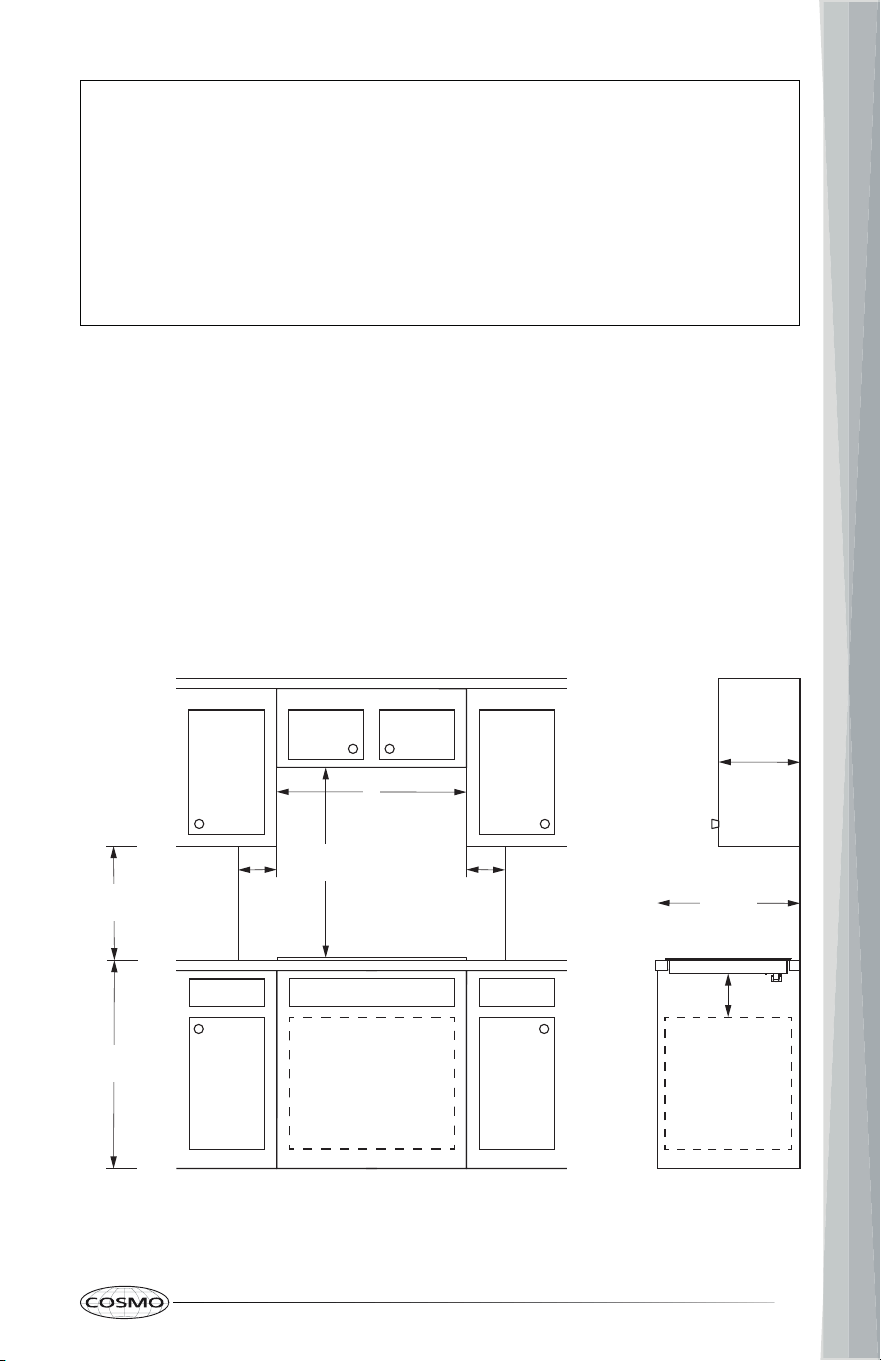
15
13 in
(33 cm)
Overhead
Cabinet
Depth
36 in
(91.4 cm)
18 in
(45.7 cm)
30 in
(76.2 cm)
E
2 in
(5 cm)
to right
wall
2 in
(5 cm)
to left
wall
24 in
(61 cm)
Lower
Cabinet
Depth
5 in
(12.7 cm)
to built-in under
counter oven
any combustible
surfaces
NOTE:
• For cooktop installation in a solid surface material such as granite ,
quartz or any other natural or synthetic solid surface, it i s
recommended that the cutout be prepared by a professional cabine t
or countertop installer. Cooktop cutouts in wood or wood-laminat e
countertops may be able to be prepared using a saber saw an d
electric drill.
• The countertop surface thickness should be at least 1 ³⁄₁₆" (30 mm).
CLEARANCES
IMPORTANT: If installing the cooktop in combination with a range hood,
microwave hood combination, or built-in under counter oven, follow their
specific product installation instructions for dimensional clearances above the
cooktop surface or below the cooktop.
GIVEN DIMENSIONS ARE MINIMUM CLEARANCES.
16
Model
E
Overhead Cabinet Horizontal Clearance
COS-304TBECC (30") 30" (76.2 cm)
COS-365TBECC (36") 36" (91.4 cm)
NOTE:
• 30" (76.2 cm) minimum clearance between top of cooktop platfo rm
and bottom of the overhead cabinet.
•
•
18" (45.7 cm) minimum clearance from countertop to underside o f
nearest cabinets on both sides of cooktop.
2 ³⁄₈" (6 cm) minimum clearance from front edge of cutout and front
edge of countertop.
• 2" (5 cm) minimum clearance between rear edge of cutout and the wal l
behind the cooktop.
• 2" (5 cm) minimum clearance from cutout to nearest vertical wall o r
cabinet on left or right side of the cooktop below the 18" (45.7 cm )
minimum clearance height.
• 5" (12.7 cm) minimum vertical clearance from the cooktop bottom to
built-in under counter oven, microwave, warming drawer, or a ny
combustible surfaces, such as a cabinet drawer.
17
ELECTRICAL REQUIREMENTS
ELECTRICAL SHOCK HAZARD
• Disconnect power before servicing.
• Use 8 gauge copper wire.
• Electrically ground cooktop.
• Failure to follow these instructions can result in death, fire, or electrical
shock.
WARNING
If codes permit and a separate ground wire is used, it is recommended that a
qualified electrical installer determine that the ground path and wire gauge
are in accordance with local codes.
Check with a qualified electrical installer if you are not sure the cooktop is
properly grounded.
Make sure that the electrical connection, grounding, and wire size are
adequate and in conformance with all local codes and ordinances, or in their
absence, with the National Electrical Code, ANSI/NFPA No. 70 - latest edition
in the United States, or with CSA Standard C22.1, Canadian Electrical Code,
Part 1 in Canada.
A copy of the above code standards can be obtained from:
• National Fire Protection Association
1 Batterymarch Park
Quincy, MA 02169
• CSA International
8501 East Pleasant Valley Road
Cleveland, OH 44131-5575

18
Before You Make the Electrical Connection:
To properly install your cooktop, you must determine the type of electrical
connection you will be using and follow the instructions provided for it here.
• This appliance must be supplied with the proper voltage and frequency,
and connected to an individual, properly grounded, 50 amp (minimum)
branch circuit protected by a circuit breaker or time-delay fuse.
• The cooktop is rated for 240V. The model/serial/rating plate is located on
the metal cabinet underneath the cooktop.
• The cooktop is equipped with a 3-wire power cord.
• A single-phase (split-phase), 3-wire or 4-wire, AC 240 Volt 60 hertz
electrical system is required. It is the personal responsibility of the cooktop
owner to provide the correct electrical service for this cooktop.
• The cooktop should be connected directly to the junction box through
flexible, armored or nonmetallic sheathed, copper cable. The flexible,
armored cable extending from the fuse box or circuit breaker box should
be connected directly to the junction box.
• Locate the junction box to allow as much slack as possible between the
junction box and the cooktop so that the cooktop can be moved if
servicing becomes necessary in the future.
• Do not cut the conduit. Use the length of conduit provided.
• A UL listed or CSA approved conduit connector must be provided at each
end of the power supply cable (at the cooktop and at the junction box). A
listed conduit connector is already provided at the cooktop.
• If the house has aluminum wiring follow the procedure below:
- Connect the aluminum wiring using special connectors and/or tools
designed and UL listed for joining copper to aluminum.
- Follow the electrical connector manufacturer’s recommended
procedure. Aluminum/copper connection must conform with local
codes and industry accepted wiring practices.
- If an anti-oxidant compound is added to the wiring connectors, the
compound should be UL-Listed and suitable for the application
materials, voltage and temperature.
- Connectors for joining Aluminum and Copper wiring may be larger in
size than standard connectors. It is recommended to use a double
gang, or larger, electrical box to enclose the connectors joining
Aluminum and Copper wiring.
19
INSTALLATION INSTRUCTIONS
IMPORTANT: This appliance shall be installed only by authorized persons and
in accordance with the manufacturer's installation instructions, municipal
building codes, and electrical wiring regulations.
PREPARATION
EXCESSIVE WEIGHT HAZARD
• Use two or more people to move and install cooktop. Failure to do so
can result in back or other injury.
LACERATION, FOREIGN OBJECT, CRUSH HAZARD
• When installing, moving, or servicing any appliance, wear proper
protective equipment, including cut resistant gloves, steel-toed shoes,
and safety glasses.
• When preparing cooktop opening, make sure the inside of the cabinet
and the cooktop do not interfere with each other. (See the "Clearances"
section.)
• Remove packaging materials package from the cooktop before
beginning installation.
• Be sure to keep all literature, manual(s), etc. in a safe place for future
reference.
• Make sure you have all the tools and materials you need before starting
the installation of the cooktop.
• Your home must provide the adequate electrical service needed to safely
and properly use your cooktop. (Refer to the "Electrical Requirements"
section, and make sure all local codes and ordinances are followed
exactly as stated.)
WARNING
CAUTION
20
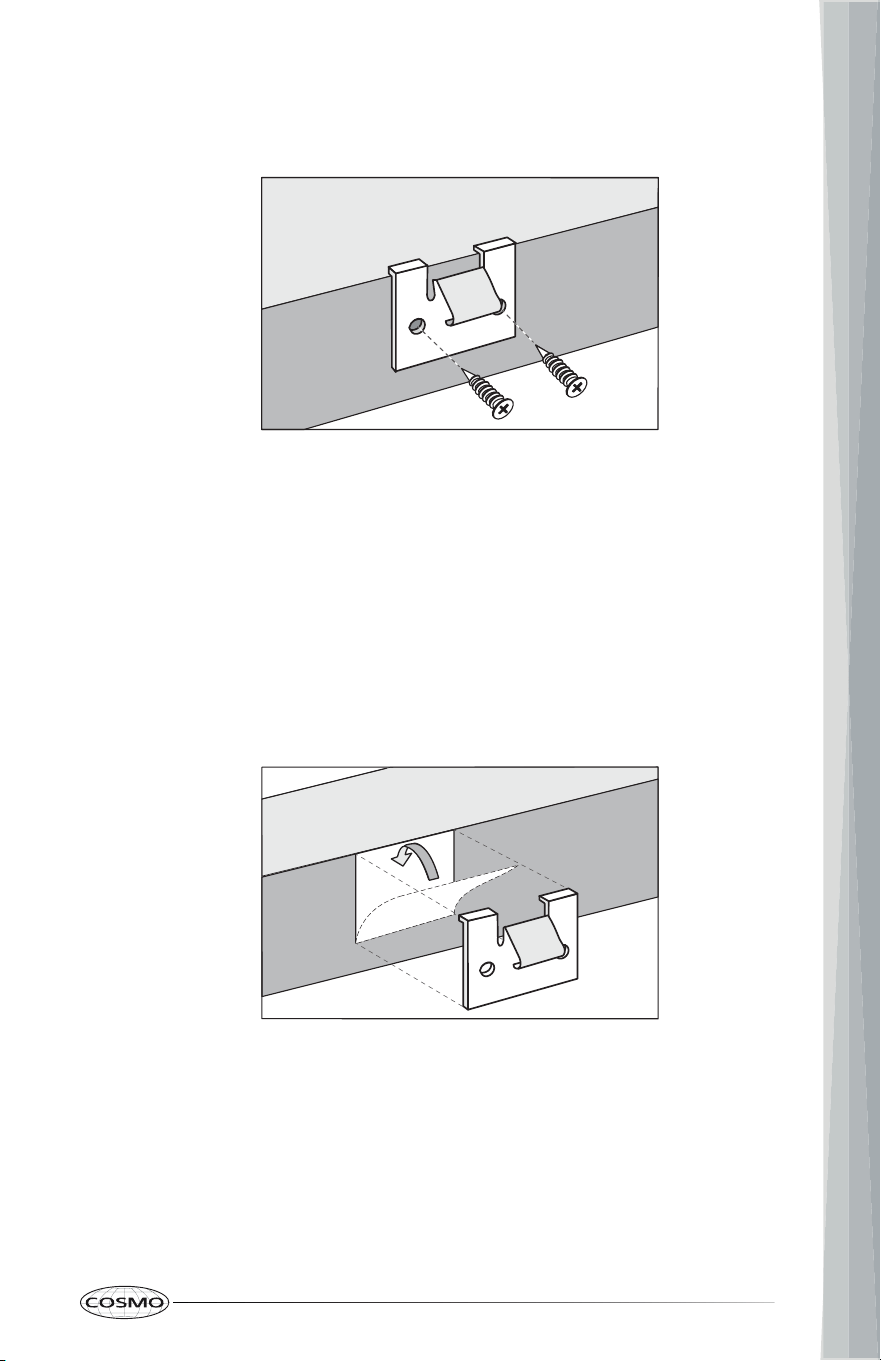
INSTALL CLAMPING BRACKETS
Wooden Countertops
Make sure any cut surfaces on the wooden countertop are sealed with a
special varnish, silicone rubber, or resin to prevent the wood from swelling as
a result of moisture. The sealant must be temperature-resistant. Ensure that
the sealant does not get on the top surface of the countertop.
1. Position the clamping brackets on the top front and rear edges of the
cutout as shown in the illustration above.
F
F
F
F
G
H
Model
F G H
Suggested Bracket
Assembling
Distance
Countertop
Surface
Thickness
Bracket
Width
COS-304TBECC
(30") (125 mm)
2"
(50 mm) (30 – 40 mm)
COS-365TBECC
(36")
(155 mm)
4 ¹⁵⁄₁₆"
6 ¹⁄₈"
1 ³⁄₁₆" – 1 ⁹⁄₁₆"
21
2. Fasten the clamping brackets using the clamping screws supplied with
the cooktop.
Granite and Marble Countertops
You will need heavy-duty double-sided adhesive tape and silicone (not
included with the cooktop) to fasten the spring clamps.
1. Attach the adhesive tape along the top front and rear edges of the
cutout in the clamping bracket positions shown in the illustration on
previous page.
2. Position the clamping brackets on the top front and rear edges of the
cutout and press them firmly into place.
3. Coat the side edges and the lower edges of the clamping brackets with
silicone.
22
INSTALL COOKTOP
EXCESSIVE WEIGHT HAZARD
• Use two or more people to move and install cooktop. Failure to do so
can result in back or other injury.
LACERATION, FOREIGN OBJECT, CRUSH HAZARD
• When installing, moving, or servicing any appliance, wear proper
protective equipment, including cut resistant gloves, steel-toed shoes,
and safety glasses.
IMPORTANT:
• Do not use sealant between the cooktop and the countertop. Using
sealant under the cooktop could result in damage to the cooktop and the
countertop if the cooktop ever needs to be removed for servicing.
• If the cooktop is being installed into a blind counter (one with no cabinet
opening below), electrical wire connections must be made before putting
the cooktop into the cutout opening.
• The foam strip around bottom of the four edges of the cooktop glass
helps avoid damage to the underside of the cooktop glass from debris
and helps the cooktop sit flat on slightly uneven counters.
1. Using 2 or more people, feed the cooktop power cord down through the
counter cutout and place the cooktop centered into the cutout. Make
sure that the front edge of the cooktop is parallel to the front edge of the
countertop.
2. Using both hands, press down evenly on the sides of the cooktop. Make
sure that the foam strip below the edges of the cooktop glass sit flush
with the countertop on all sides.
WARNING
CAUTION

23
ELECTRICAL CONNECTION
IMPORTANT:
• Before installation or servicing, disconnect the power supply by either
removing the fuse, shutting off the main power or manually "tripping" the
circuit breaker.
• Installation work and repairs should only be performed by a qualified
technician in accordance with all applicable codes and standards.
Repairs and service by unqualified persons could be dangerous and the
manufacturer will not be held responsible.
• Before connecting the appliance to the power supply, make sure that the
voltage and frequency listed on the rating label correspond with the
household electrical supply. This data must correspond to prevent
appliance damage. Consult an electrician if in doubt.
• Connect the cooktop cable to the junction box through the UL listed or
CSA approved conduit connector.
• When making the wire connections, use the entire length of conduit
provided. The conduit must not be shortened.
The cooktop must connect to a single-phase (split-phase), 3-wire or 4-wire,
AC 240 Volt 60 hertz electrical system. This appliance must be supplied with
the proper voltage and frequency, and connected to an individual, properly
grounded, 50 amp (minimum) branch circuit protected by a circuit breaker or
time-delay fuse.
ELECTRICAL SHOCK HAZARD
• Disconnect power before servicing.
• Use 8 gauge copper wire.
• Electrically ground cooktop.
• Failure to follow these instructions can result in death, fire, or electrical
shock.
WARNING
24
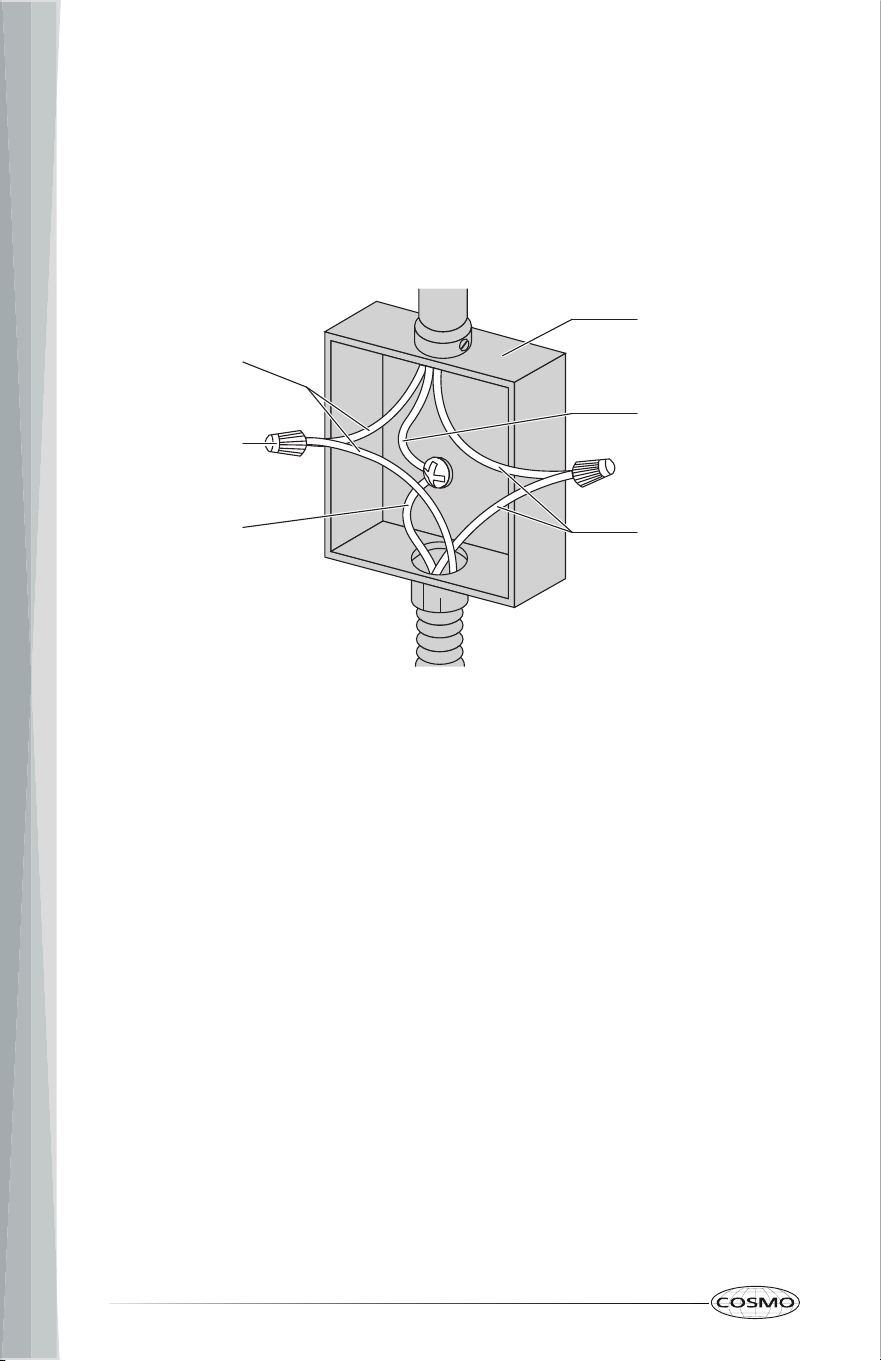
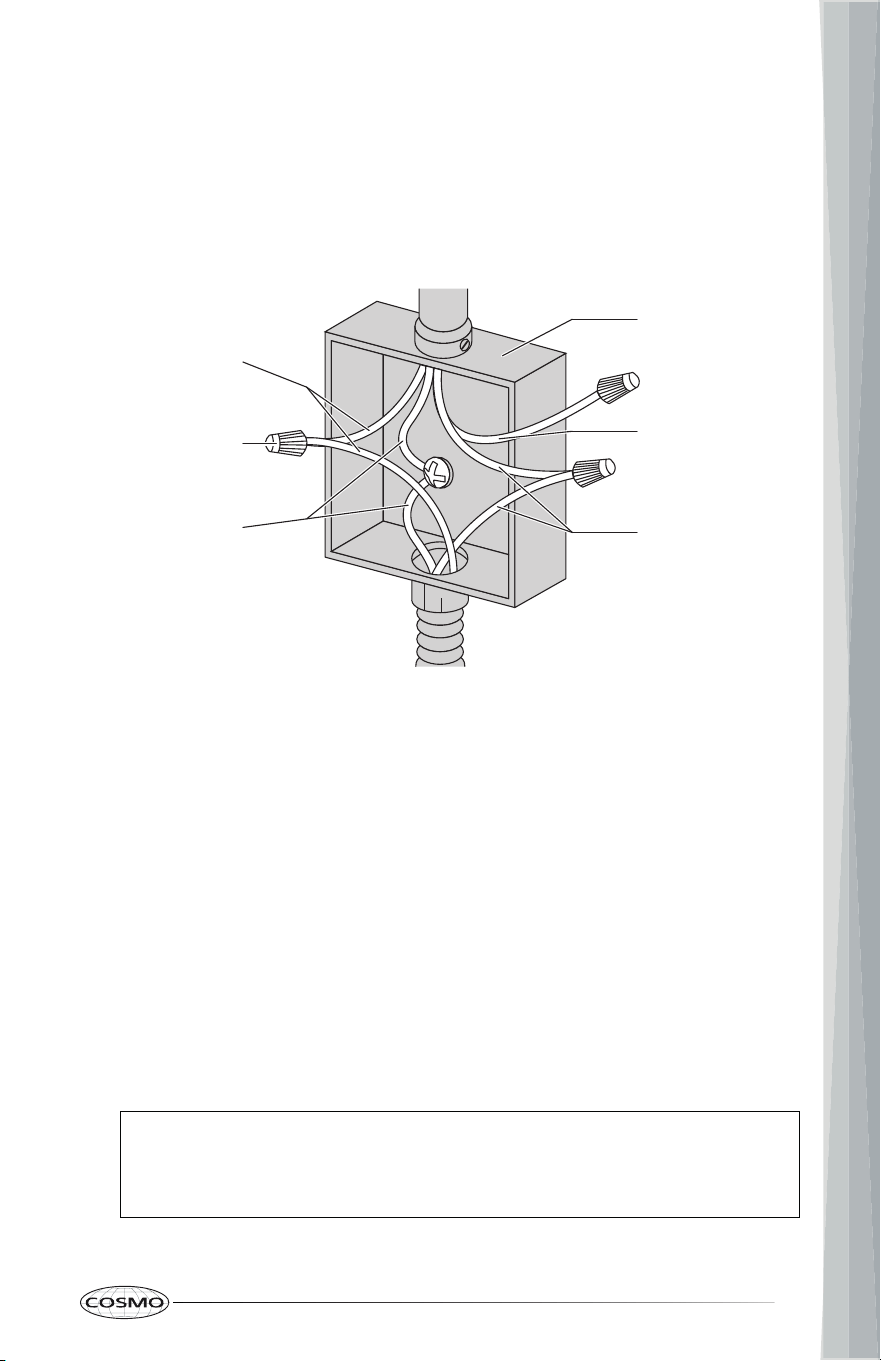
3-WIRE POWER SUPPLY CONNECTION
IMPORTANT: Use the 3-wire cable from power supply where local codes
permit connecting the frame-ground conductor to the neutral (white) junction
box wire.
1. Disconnect power.
2. Remove junction box cover, if present.
3. Connect the flexible cable conduit from the cooktop to the junction box
using a UL listed or CSA approved conduit connector.
4. Tighten screws on conduit connector if present.
5. Connect the two black wires together using the UL listed wire connectors.
6. Connect the two red wires together using the UL listed wire connectors.
7. Connect the green wire to the white (neutral) wire in the junction box
using the UL listed wire connectors.
8. Install junction box cover, and reconnect power.
3-Wire Cable from Power Supply
3-Wire Cable from Cooktop
Red Wires
Black Wires
Green
Ground Wire
White Wire
Junction Box
UL Listed or CSA
Approved Wire
Connector
25
1. Disconnect power.
2. Remove junction box cover, if present.
3. Connect the flexible cable conduit from the cooktop to the junction box
using a UL listed or CSA approved conduit connector.
4. Tighten screws on conduit connector if present.
5. Connect the two black wires together using the UL listed wire connectors.
6. Connect the two red wires together using the UL listed wire connectors.
7. Connect the green wire from the cooktop cable to the green or bare
ground wire (in the junction box) using the UL listed wire connectors.
8. Put a UL listed wire connector on the end of the white (neutral) wire in the
junction box.
NOTE:
• Do not connect the bare ground wire to the neutral (white) wire in
the junction box.
9. Install junction box cover, and reconnect power.
4-WIRE POWER SUPPLY CONNECTION
IMPORTANT: Use the 4-wire cable from power supply where local codes do
not permit connecting the frame-ground conductor to the neutral (white)
junction box wire.
4-Wire Cable from Power Supply
3-Wire Cable from Cooktop
Red Wires
Black Wires
Green
Ground Wires
White Wire
Junction Box
UL Listed or CSA
Approved Wire
Connector

26
COMPLETE INSTALLATION
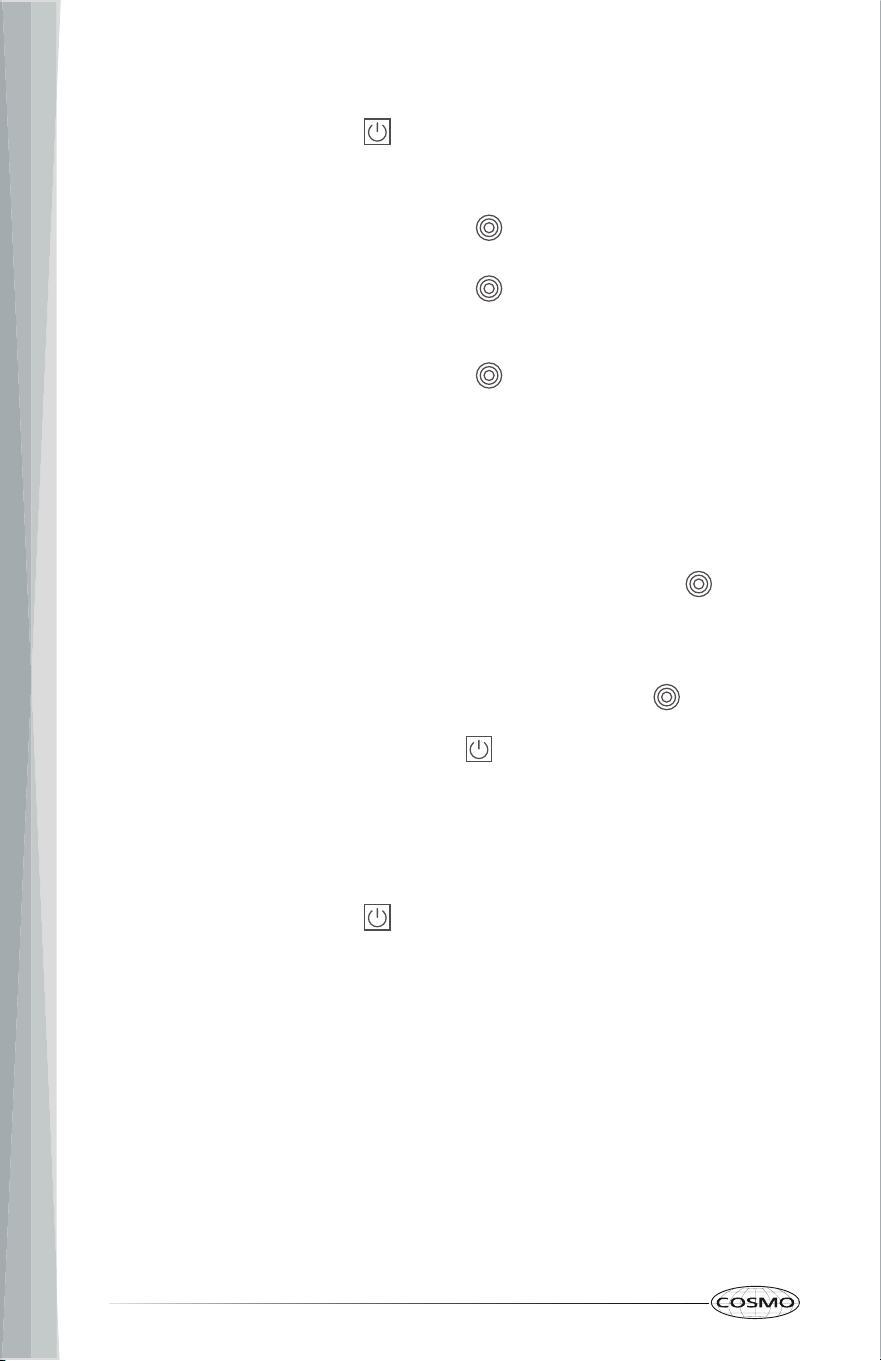
CHECKING OPERATION OF THE SURFACE HEATING
ELEMENTS
Control Panel
Left Heating
Elements
Standard
Heating Elements
STANDARD SURFACE HEATING ELEMENTS
3 seconds to turn on the1. Touch the power keypad
cooktop.
2. Touch the element keypad
3. Touch the number 9 on the element power settings to select the highest
power level.
The elements should glow red and radiate heat, and they should cycle on
and off periodically.
4. Touch 0 on the element power settings to turn off the element, or touch
the power keypad to turn off the cooktop.
The element display next to the element keypads will show "H" and
indicate the element surfaces are still hot.
for approximately
for the desired element.

27
TRIPLE SURFACE HEATING ELEMENT
SYNCHRONIZE LEFT HEATING ELEMENTS
3 seconds to turn on the1. Touch the power keypad
cooktop.
2. Activate the triple element:
- Touch the triple element keypad
element.
most and middle elements (Dual Element). One indicator light at the
triple element keypad will turn on.
- Touch the triple element keypad again to activate the entire
element (Triple Element). One more indicator light at the triple
element keypad will turn on.
3. Touch the number 9 on the element power settings to select the highest
power level.
The elements should glow red and radiate heat, and they should cycle on
and off periodically.
4. Touch 0 on the element power settings to turn off the element, or touch
the power keypad to turn off the cooktop.
The element display next to the element keypad will show "H" and
indicate the element surface is still hot.
1. Touch the power keypad 3 seconds to turn on the
cooktop.
2. Touch the Sync keypad to connect the two elements. The indicator light
at the Sync keypad will turn on, and the element display of the connected
elements will flash simultaneously.
3. Touch the number 9 on the element power settings to select the highest
power level.
The two connected elements and the bridge elements between the two
connected elements should glow red and radiate heat, and they should
cycle on and off periodically.
4. Touch 0 on the element power settings to turn off the element, or touch
the power keypad to turn off the cooktop.
The element display next to the element keypads will show "H" and
indicate the element surfaces are still hot.
for approximately
to activate the inner most
- Touch the triple element keypad again to activate the inner
for approximately
28
OVERVIEW
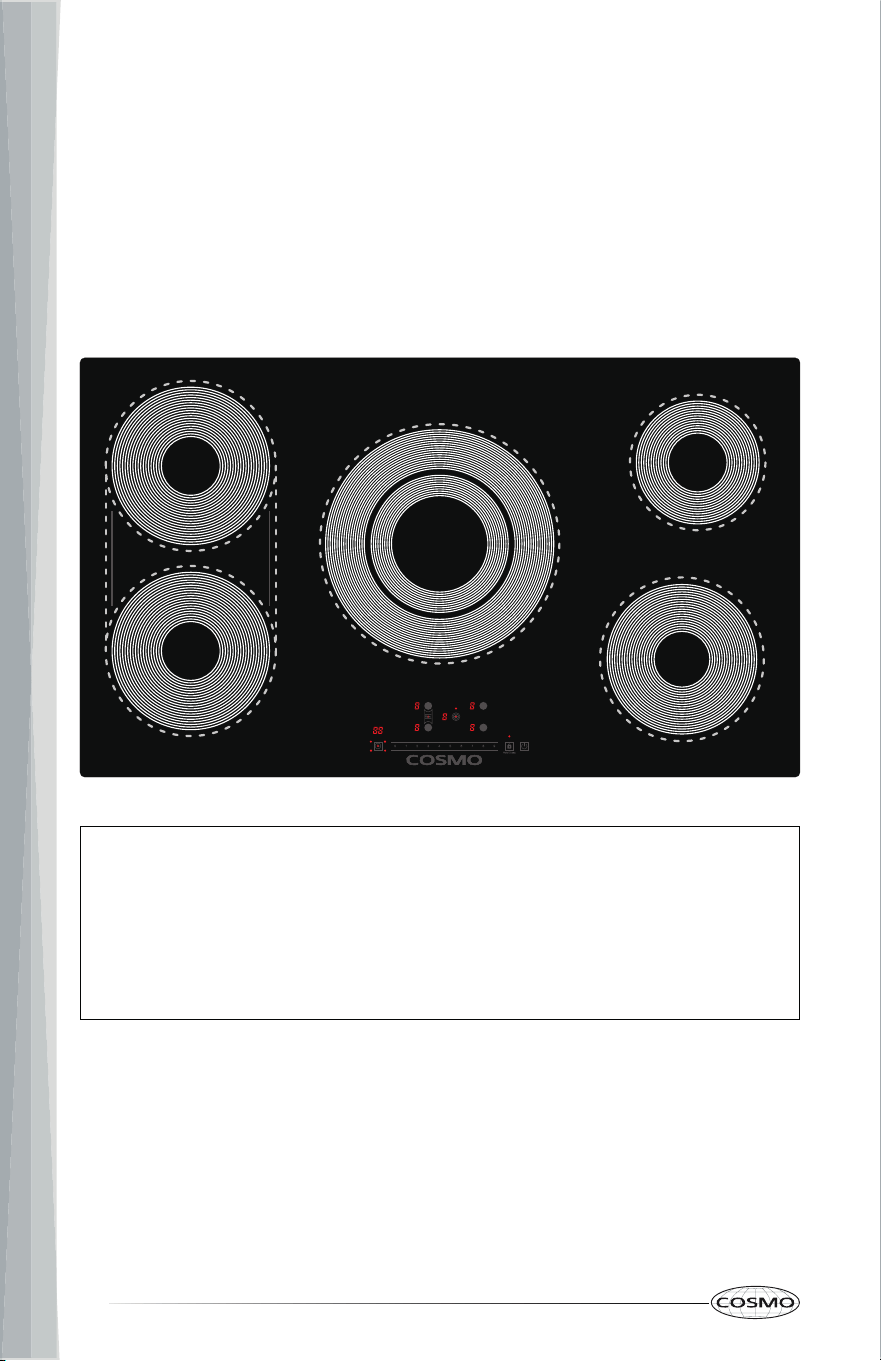
COOKTOP LAYOUT
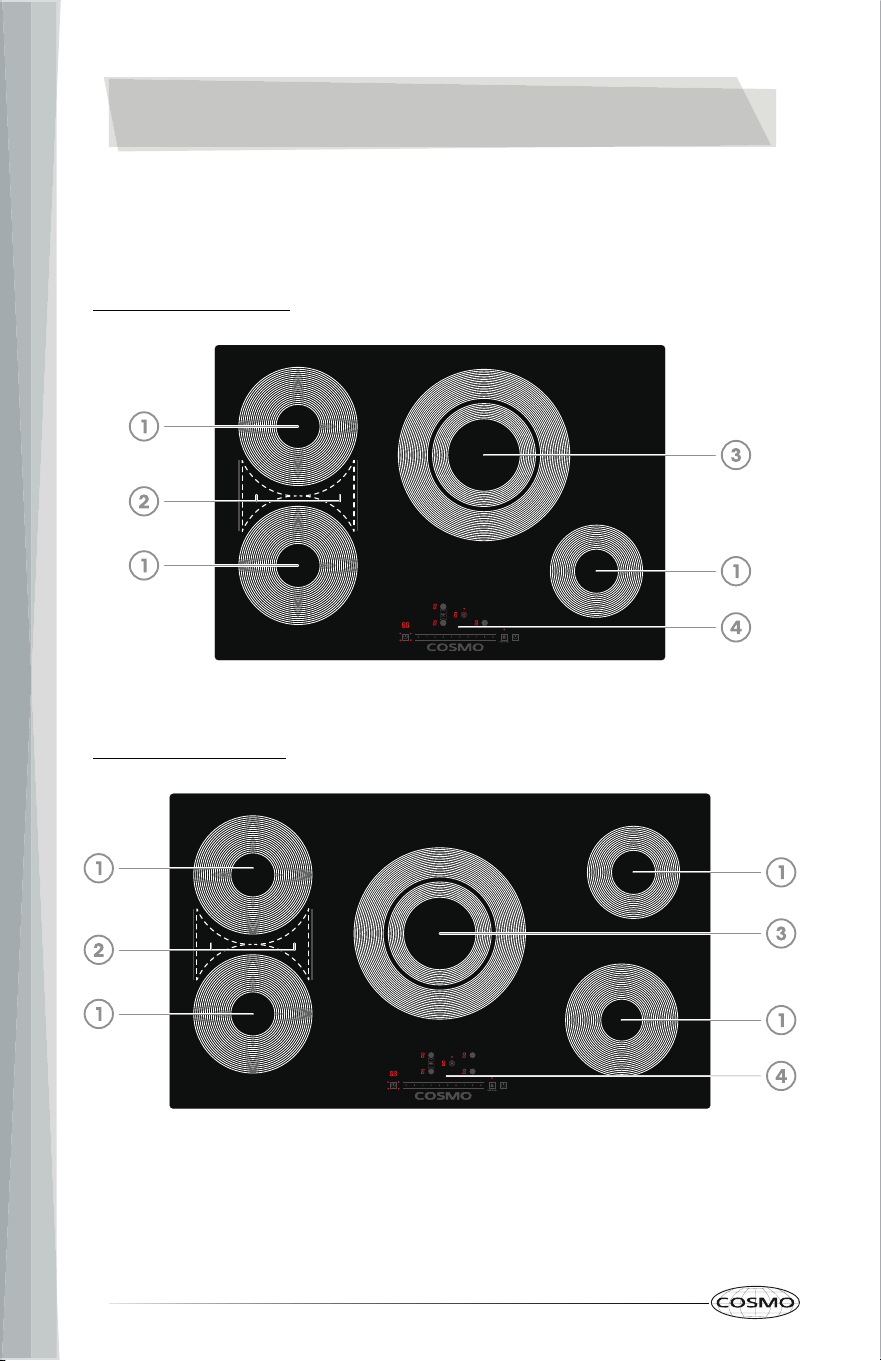
COS-304TBECC (30")
COS-365TBECC (36")
1. Single Heating Element
2. Synchornize Bridge Element
3. Triple Heating Element
4. Control Panel
29
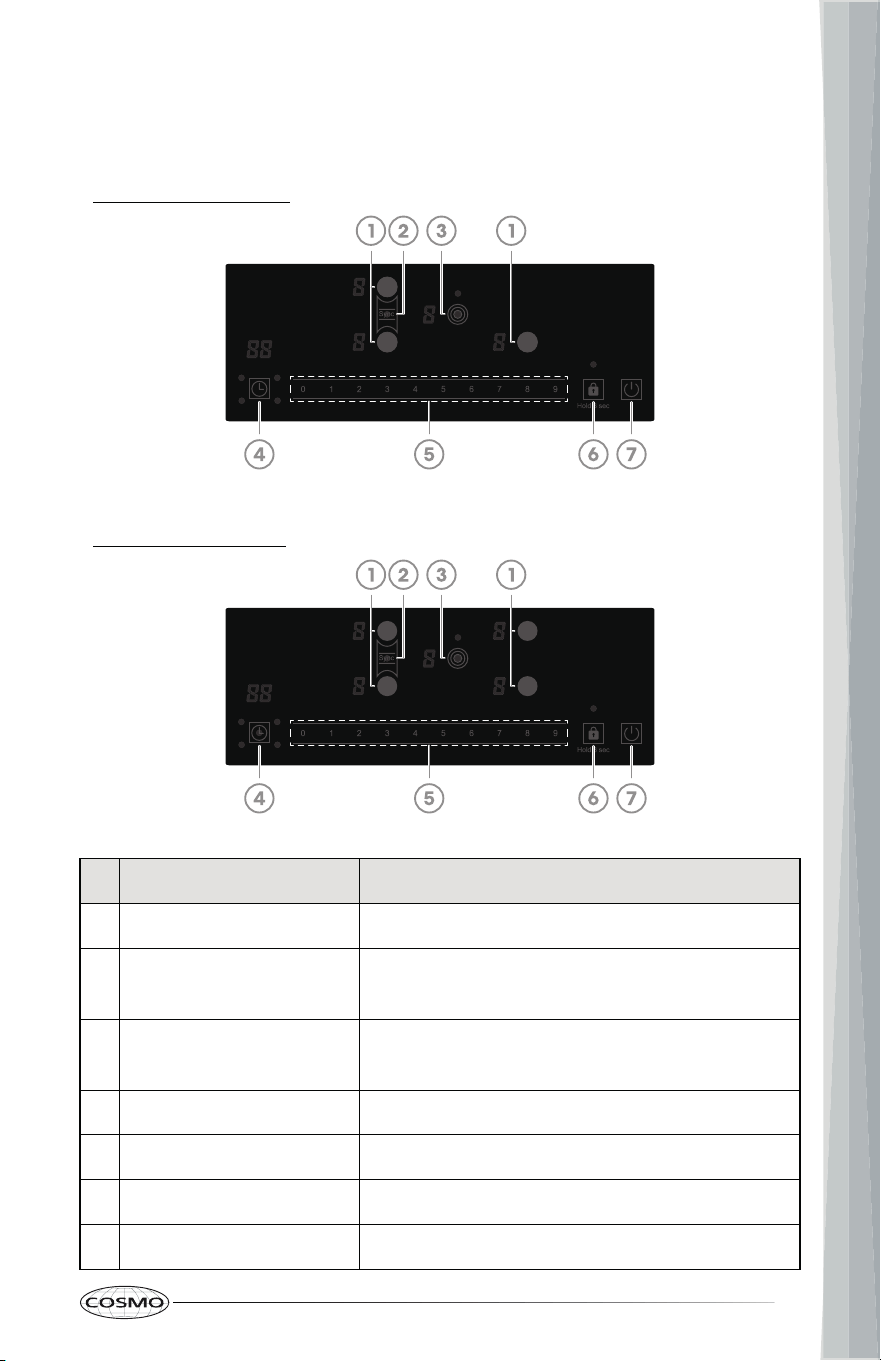
CONTROL PANEL
# Keypad Description
1 Element To select the heating elements.
2 Sync
To turn the synchronization of left heating
elements on and off.
3 Triple Element
To select the triple heating element and
adjust the ring size.
4 Timer To set or cancel the timer.
5 Element Power Settings To set the power level of heating elements.
6 Lock To activate and deactivate cooktop keypads.
7 Power To turn the cooktop on and off.
COS-304TBECC (30")
COS-365TBECC (36")
30
FEATURES
TIMER
Set the heating element to operate for a specific length of time up to 99
minutes and the heating element turns off automatically at the end of the
cooking time.
NOTE:
• The heating element must be turned on before setting the timer.
• If more than one timer is set for multiple heating elements, the timer
display will always show the first ending countdown time.
Setting the Timer
(Example: Set front-right heating element to cook at power level 2
and turn off automatically after 30 minutes.)
1. Touch the power keypad
cooktop.
2. Touch the front-right element keypad
3. Touch 2 on the element power settings. The element display will show a
4.
solid "2" and the element will glow red and radiate heat.
Touch the timer keypad repeatedly to select the timer for front-righ t
heating element. The indicator light at the timer keypad turns on for t he
heating element selected.
5. Touch 3 and 0 on the element power settings to set the cooking time. Th e
display above the timer keypad will show a solid "30" and the countdow n
timer in minute steps will start running.
When the countdown timer reaches the end of last minute "01", a n end
tone (quick 5 beeps) sounds and the element turns off automatically. Th e
element display next to the element keypad will show "H" and indicat e
the element surface is still hot.
for approximately 3 seconds to turn on t he
.

31
Canceling the Timer
All Timers
all timers.
Individual Timer
1. Touch the timer keypad for approximately 3 seconds to cancel
LOCK
The Lock feature locks most keypads (except the power keypad) to avoid
unintended use of the cooktop.
1. Touch the timer keypad
The indicator light at the timer keypad turns on for the heating
element selected.
2. Touch 0 twice on the element power settings to set 0-minute cooking
time. The timer will be canceled.
• Press and hold the lock keypad for 3 seconds to activate or
deactivate the cooktop keypads. The display above the timer keypad will
show "Lo" when the lock is activated.
repeatedly to select the desired timer.
32
OPERATION
BEFORE USING THE COOKTOP
Read all instructions before using.
• Do not cook on a broken cooktop. If the cooktop is broken, cleaning
solutions and spillovers may penetrate the broken cooktop and create a
risk of electric shock. Contact a qualified technician immediately.
• Do not place hot cookware over the keypads or indicator lights on the
control panel. Placing hot cookware on the control panel can damage
the electronic underneath.
• Do not place or store items that can melt or catch fire on the glass
cooktop, even when it is not being used.
• Never leave surface units unattended at high heat settings. Boilovers
cause smoking and greasy spills that may catch on fire.
• Keep flammable items away from the cooktop.
• Turn off all controls when done cooking.
• Turn cookware handles inward and not extend over adjacent surface
units to reduce the risk of burns, ignition of flammable materials, and
spillage due to unintentional contact with the cookware.
• Always place the pan in the center of the surface unit you are cooking
on. Proper contact of cookware to heating element also will improve
efficiency.
• Clean cooktop with caution. If a wet sponge or cloth is used to wipe
spills on a hot cooking area, be careful to avoid steam burn. Some
cleaners can produce noxious fumes if applied to a hot surface.
WARNING
33
• Never cook directly on the glass. Always use cookware.
• Do not use the glass cooktop surface as a cutting board.
• Do not place any cookware, utensils, or leave excess water spills on
control key pads. This may result in unresponsive touch pads and
turning off the cooktop if present for several seconds.
• Do not slide metal or glass across the cooktop surface. Cookware with
rough or uneven bottoms can mark or scratch the cooktop surface.
• Do not place sealed containers on the cooktop.
• Do not place aluminum foil or plastic items such as salt and pepper
shakers, spoon holders, or plastic wrappings or any other material on
the cooktop when it is in use.
• Do not turn surface units on before placing cookware.
• Always turn the surface units off before removing cookware.
• The surface element may appear to have cooled after it has been
turned off. The element may still be hot and touching the element
before it has cooled sufficiently can cause burns.
• Only certain types of glass, glass-ceramic, ceramic, earthenware, or
other glazed cookware are suitable for cooktop service without
breaking due to the sudden change in temperature.
• Choose proper heating element size. For smaller pots and pans, use the
smaller heating elements. For larger pots and pans, use the larger
heating elements. Select pans that have flat bottoms large enough to
cover the heating elements. Using undersized pans exposes a portion of
the heating element to direct contact and may result in clothing
burning.
• Immediately clean spills on the cooking area to prevent a tough
cleaning chore later.
• Do not use a steel-wool pad or scrub pad or abrasive cleaning pads.
They can scratch the surface.
CAUTION
34
COOKING AREAS
The cooking areas on your cooktop are identified by permanent circles on the
glass cooktop surface.
For the most efficient cooking, fit the pan size to the element size. Pans should
not extend more than 1/2" to 1" beyond the cooking area.
When a control is turned on, a glow can be seen through the glass cooktop
surface.
NOTE:
• It is normal for the cooktop elements to cycle on and off during
cooking, even on higher settings.
• Do not place hot cookware over the keypads or indicator lights in the
control panel. Placing hot cookware on the control panel can damage
the electronic underneath.

35
HOT SURFACE INDICATOR
The element display next to the element keypad shows "H" after the element
is turned off, and indicates that element surface is still hot. When the surface
has cooled to approximately 150°F and the hot surface indicator "H"
disappears in the element display, the glass surface may still feel slightly hot
to touch.
USING THE COOKTOP ELEMENTS
The cooktop elements have a 2-hour heating time limit, after which the
control will automatically turn off the elements to avoid the elements being
left on accidentally. If desired, the cooktop elements can be restarted after
the time limit expires.
Turning on a Single Element
1. Touch the power keypad
cooktop.
2. Touch the element keypad
3. Touch the number from 1 to 9 on the element power settings to select the
desired power level.
The elements should glow red and radiate heat, and they should cycle on
and off periodically.
4. To change the power level, touch the element keypad for that
element again if another element keypad was touched, and touch the
number from 1 to 9 on the element power settings to select the desired
power level.
5. To turn off an element, touch the element keypad
again if another element keypad was touched and touch 0 on the
element power settings; or touch the power keypad
cooktop.
The element display next to the element keypads will show "H" and
indicate the element surfaces are still hot.
for approximately 3 seconds to turn on the
for the desired element.
for that element
to turn off the
36
Synchronizing the Left Heating Elements
Turning on the Triple Element
3. Touch the number from 1 to 9 on the element power settings to select the
desired power level.
The elements should glow red and radiate heat, and they should cycle on
and off periodically.
5. To turn off the element, touch the triple element keypad again if
another element keypad was touched and touch 0 on the element power
settings; or touch the power keypad to turn off the cooktop.
The element display next to the element keypad will show "H" and
indicate the element surface is still hot.
1. Touch the power keypad
cooktop.
2. Touch the Sync keypad to connect the two elements. The indicator light
at the Sync keypad will turn on, and the element display of the connected
elements will flash simultaneously.
3. Touch the number from 1 to 9 on the element power settings to select the
desired power level.
The two connected elements and the bridge elements between the two
connected elements should glow red and radiate heat, and they should
cycle on and off periodically.
4. To disconnect the left elements and turn off the bridge elements, touch
the Sync keypad for approximately 3 seconds. The indicator light at the
Sync keypad will turn off.
3 seconds to turn on the1. Touch the power keypad
cooktop.
2. Activate the triple element:
- Touch the triple element keypad
element.
most and middle elements (Dual Element). One indicator light at the
triple element keypad will turn on.
- Touch the triple element keypad again to activate the entire
element (Triple Element). One more indicator light at the triple
element keypad will turn on.
for approximately
to activate the inner most
- Touch the triple element keypad again to activate the inner
4. To change the power level, touch the triple element keypad
element again if another element keypad was touched, and touch t he
number from 1 to 9 on the element power settings to select the desir ed
power level.
for th at
for approximately 3 seconds to turn on the
37
5. To turn off an element, touch the element keypad
again if any other element keypads were touched and touch 0 on the
element power settings, or touch the power keypad
cooktop.
The element display next to the element keypads will show "H" and
indicate the element surfaces are still hot.
USING THE PROPER COOKWARE
The size and type of cookware will influence the settings needed for the best
cooking results. Cookware should have flat bottoms that make good contact
with the entire surface heating element.
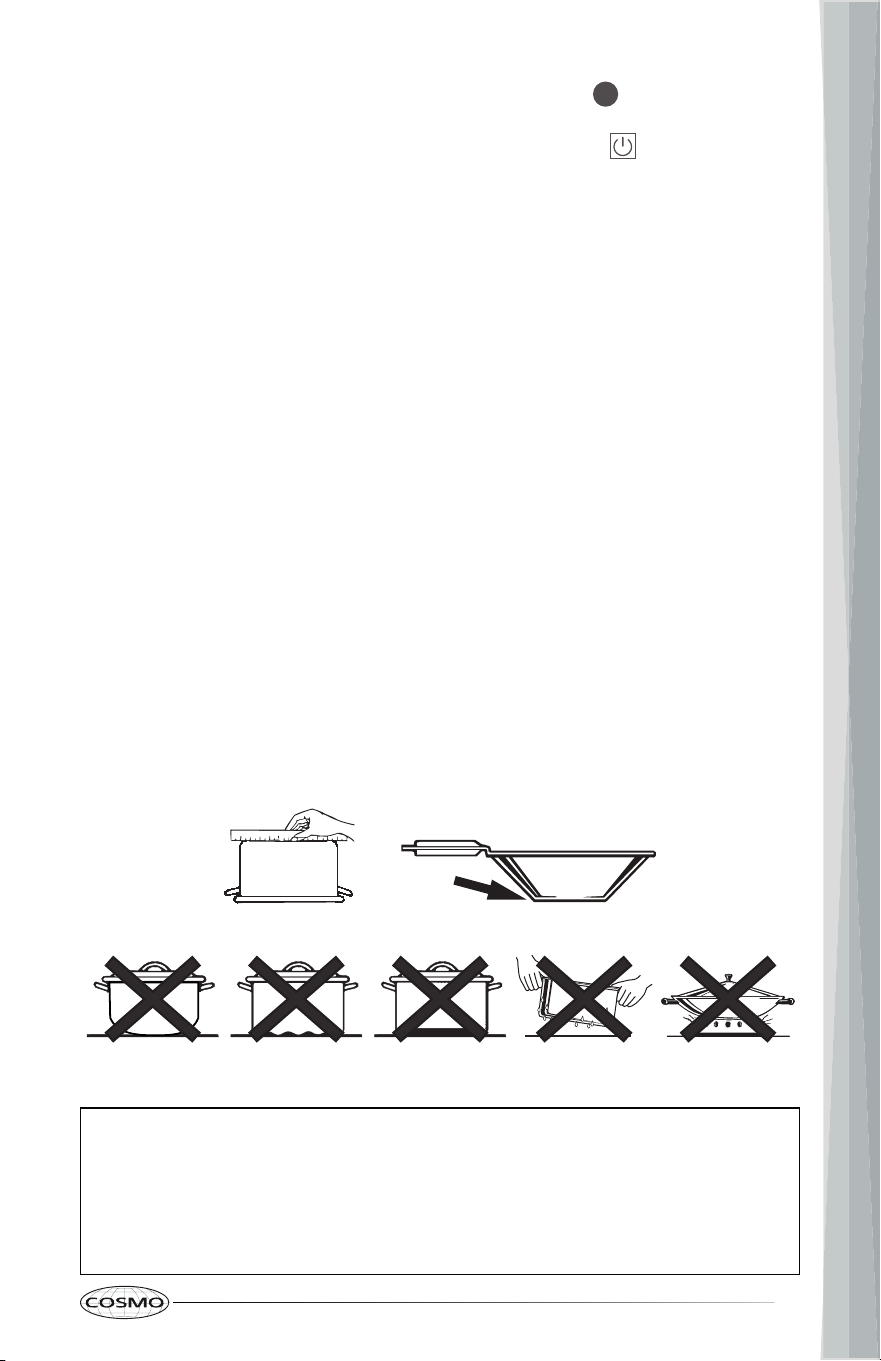
Cookware Recommendations
NOTE:
• Flat bottom and straight sides
• Heavy-gauge pans
• Pan sizes that match the amount of food to be prepared and the size of
the surface element
• Weight of handle does not tilt pan. Pan is well balanced
• Tight-fitting lids
• Flat bottom woks
• Do not use woks that have support rings. This type of wok will not heat
on glass surface elements.
• Do not use foil or foil-type containers. Foil may melt onto the glass. Do
not use the cooktop if metal has melted on it.
for that element
to turn off the

38
Choosing Cookware
The cookware material determines how evenly and quickly heat is transferred
from the surface element to the pan bottom.
Recommended
• Aluminum - Excellent heat conductor. Some types of food will cause
it to darken (anodized aluminum cookware resists staining and
pitting). If aluminum pans slide across the ceramic cooktop, they may
leave metal marks which will resemble scratches. Remove these
marks immediately. Because of its low melting point, thin weight
aluminum should not be used.
• Copper - Excellent heat conductor but discolors easily. May leave
metal marks on glass-ceramic (see Aluminum above). Do not let
these pots boil dry. Overheated metal can bond to glass cooktops.
An overheated copper bottom pot will leave a residue that will
permanently stain the cooktop if not removed immediately.
• Stainless Steel - Slow heat conductor with uneven cooking results. Is
durable, easy to clean and resists staining.
• Enamel (painted) on Cast Iron - Bottom of pan must be smooth
coated and smooth.
Not Recommended
• Enamel (painted) on Steel - Heating empty pans can cause
permanent damage to cooktop glass. The enamel can melt and
bond to the ceramic cooktop.
• Cast iron - A poor heat conductor, slow to absorb heat but retains
heat very well. Will scratch the glass surface. Not recommended
unless designed specifically for use on ceramic cooktops.
• Glass-ceramic - Slow heat conductor. Poor performance, and will
scratch the glass surface.
• Stoneware - Poor performance, and may scratch the glass surface.

39
COOKTOP CARE AND MAINTENANCE
CLEANING
IMPORTANT:
• Before cleaning, make sure all controls are off and the cooktop is cool.
• Always follow label instructions on cleaning products. Soap, water and a
soft cloth or sponge are suggested first unless otherwise noted.
• Do not use abrasive cleaning products.
GENERAL CLEANING
• Before using the cooktop for the first time, clean it with a ceramic cooktop
cleaner. This helps protect the top and makes cleanup easier.
• Regular use of ceramic cooktop cleaner will help keep the cooktop
looking new.
• If any sugar or food containing sugar spills, or plastic or foil melts on the
cooktop, remove the material IMMEDIATELY with a metal razor scraper
while the cooking surface is still hot to avoid the risk of damage to the
glass-ceramic surface. When used correctly, the scraper will not damage
the cooktop surface.
• For your safety, please use an oven mitt or pot holder while scraping the
hot cooking surface.
• If water or food containing water spills, remove the spill IMMEDIATELY
with a dry paper towel.
• Do not use scrub pads or abrasive cleaning pads. They may damage your
cooktop surface.
Cleaning Method:
• Use ceramic cooktop cleaner on the glass cooktop. Other creams may not
be as effective or may scratch, damage or stain the cooktop surface.
• Use a paper towel or non-scratch cleaning pad to clean the entire
cooktop surface.
• Rinse with clear water and use a dry cloth or paper towel to remove all
cleaning residue.
40
NOTE:
• Any damage or failure of the product resulting from the items
below may not be covered under the Limited Warranty.
- Sugary spillovers (such as preserves, ketchup, tomato sauce,
jellies, fudge, candy, syrups, or chocolate) or melted plastics
can cause pitting on the surface of your cooktop.
- If food or water containing calcium (such as baking powder,
wine, milk, spinach, or broccoli) is spilled on the cooktop, it can
permanently stain or discolor the surface.
BURNED-ON RESIDUE
• Allow the cooktop to cool.
• For additional protection, after all residue has been removed, polish the
entire surface with ceramic cooktop cleaner and a paper towel.
Cleaning Methods:
• Spread a few drops of ceramic cooktop cleaner on the entire burned
residue area. Using a non-scratch cleaning pad for ceramic cooktops, rub
the residue area, applying pressure as needed. Leave the cleaner on for
10 minutes before rinsing it off.
• Rinse with clear water and wipe the cooktop surface with a clean, dry
paper towel. If any residue remains, repeat the steps listed above as
needed.
NOTE:
• Damage to your glass surface may occur if you use scrub pads
other than those recommended.
HEAVY BURNED-ON RESIDUE
• Allow the cooktop to cool.
• For additional protection, after all residue has been removed, polish the
entire surface with ceramic cooktop cleaner and a paper towel.

41
Cleaning Methods:
• While the cooktop is still warm, use a single-edge razor blade scraper at
approximately a 30° to 45° angle against the glass surface and scrape
the soil. It will be necessary to apply pressure to the razor scraper in order
to remove the residue.
• When the cooking surface is completely cooled, spread a few drops of
ceramic cooktop cleaner on the entire burned residue area. Using a non-
scratch cleaning pad for ceramic cooktops, rub the residue area, applying
pressure as needed. Leave the cleaner on for 10 minutes before rinsing it
off.
• Rinse with clear water and wipe the cooktop surface with a clean, dry
paper towel.
NOTE:
• Do not use a dull or nicked blade.
METAL MARKS AND SCRATCHES
• Cookware with rough or uneven bottoms can mark or scratch the cooktop
surface. Carefully check the bottom of pans.
• Do not slide metal or glass across the cooktop surface.
• Do not use cookware with any dirt build-up on the bottom.
• Always clean the cooktop surface before cooking.
• Be careful not to place aluminum baking sheets or aluminum frozen
entrée containers on a hot cooktop surface. It will leave shinny dots or
markings on the cooktop surface. These markings are permanent and
cannot be cleaned off.
Cleaning Methods:
• Be careful not to slide pots and pans across your cooktop. It will leave
metal markings on the cooktop surface. These marks are removable using
the ceramic cooktop cleaner with a non-scratch cleaning pad for ceramic
cooktops.
• If pots with a thin overlay of aluminum or copper are allowed to boil dry,
the overlay may leave black discoloration on the cooktop. This should be
removed immediately before heating again or the discoloration may be
permanent.

42
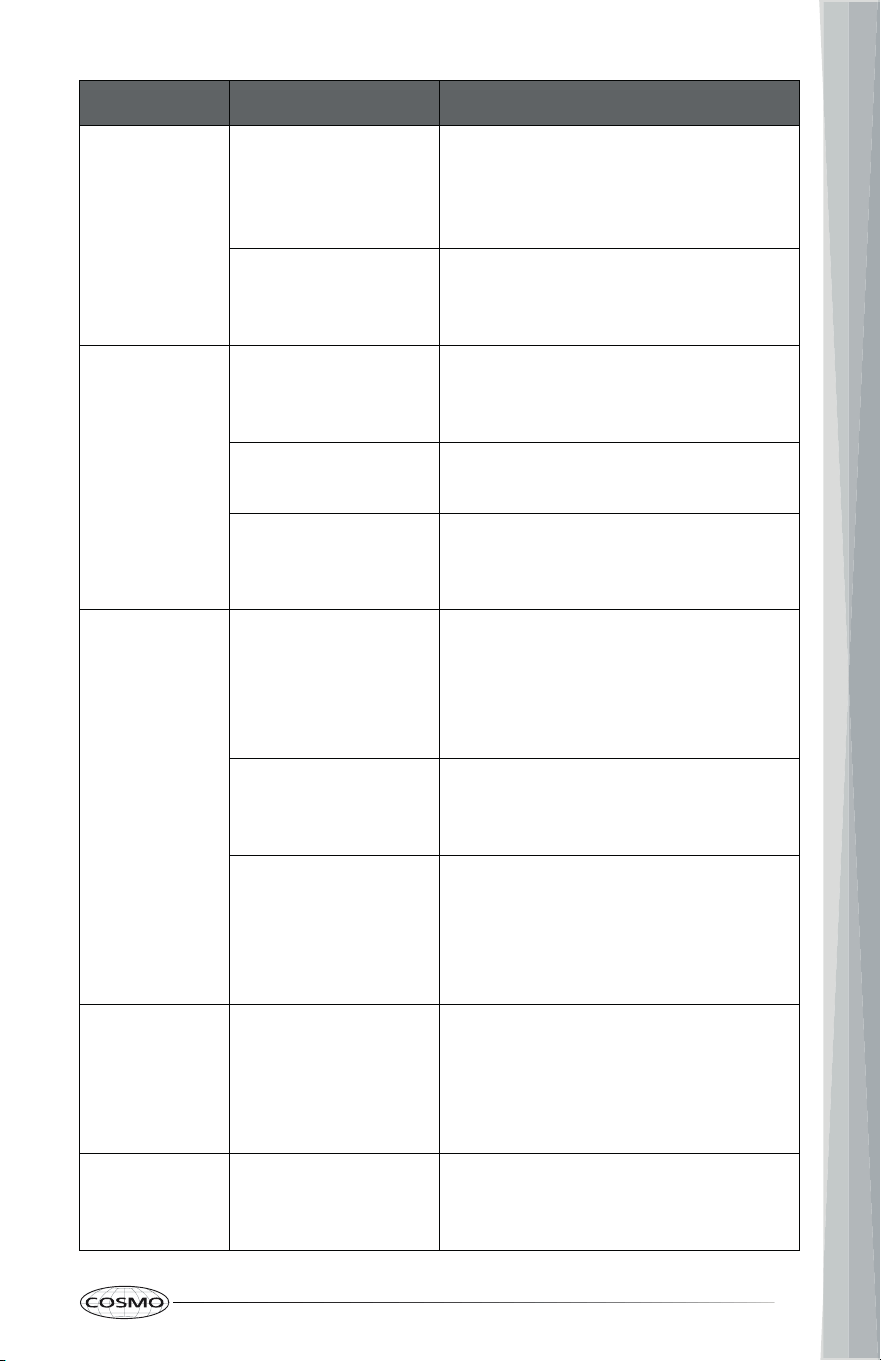
TROUBLESHOOTING
First try the solutions suggested here to possibly avoid the cost of a service
call.
COOKTOP PROBLEMS
PROBLEM POSSIBLE CAUSE SOLUTION
Surface units
do not work
properly
There is no power to
the cooktop.
Make sure electrical plug is plugged
into a live, properly grounded outlet.
Replace the fuse or reset the circuit
breaker.
Cooktop controls
improperly set.
Check to see the correct control is
set for the surface unit you are
using.
Excessive
heat around
cookware on
cooktop
The cookware is not
the proper size for
the element or
burner.
Use cookware with a bottom surface
approximately the same size as the
cooking area, element, or surface
burner. Cookware should not extend
more than 1" (2.5 cm) outside the
cooking area. Adjust the power level
or burner flame appropriately.
Frequent
cycling on
and off of
surface units
The element cycle
on and off to
maintain the heat
setting.
This is normal even when the
element is on the highest setting.
Surface unit
stops
glowing
when
changed to a
lower setting
The unit is still on
and hot.
This is normal.
Cooking
results are
not what
expected
Using incorrect
cookware.
See the "Using The Proper
Cookware" section.
The control knob is
not set to the
proper heat level.
See the "Using The Cooktop
Elements" section.
43
PROBLEM POSSIBLE CAUSE SOLUTION
Unable to
maintain a
rolling boil or
will not cook
fast enough
Using improper
cookware.
Use pans with flat bottoms and that
match the diameter of the cooktop
element selected. See the "Using The
Proper Cookware" section.
Using large
cookware without
lid.
Large pots and pans can lose a lot
of heat from the top. Cover pot or
pan with a lid to retain heat better.
Areas of
discoloration
on the
cooktop
Food spillovers not
cleaned before next
use.
See the "Cleaning" section.
Cooktop is not
cleaned thoroughly.
See the "Cleaning" section.
Mineral deposits
from water and
food.
Remove using a glass-ceramic
cooktop cleaning crème. Use
cookware with clean, dry bottoms.
Scratches or
abrasions on
cooktop
surface
Coarse particles
such as salt or sand
between cooktop
and utensils can
cause scratches.
Be sure the cooktop surface and
bottoms of utensils are clean before
using. Small scratches do not affect
cooking and will become less visible
with time.
Cookware with
rough bottom has
been used.
Use smooth, flat-bottomed
cookware.
Cleaning materials
not recommended
for glass-ceramic
cooktop have been
used.
See the "Cleaning" section.
Metal marks
Scraping of metal
utensils on cooktop
surface.
Do not slide metal utensils on
cooktop surface. Use a glass-
ceramic cooktop cleaning crème to
remove the marks. See the
"Cleaning" section.
Brown
streaks or
specks
Boilovers are
cooked onto
surface.
Use a blade scraper to remove soil.
See the "Cleaning" section.

44
LIMITED WARRANTY
WARRANTY AND SERVICE
TO RECEIVE WARRANTY SERVICE, YOUR PRODUCT MUST BE REGISTERED.
TO REGISTER AND REVIEW FULL WARRANTY DETAILS, VISIT:
WWW.COSMOAPPLIANCES.COM/WARRANTY
SCAN TO REGISTER
CUSTOMER SUPPORT
TO CHAT WITH US LIVE FOR ASSISTANCE, VISIT:
WWW.COSMOAPPLIANCES.COM/CHAT
SCAN TO CHAT
45
IMPORTANT
Do Not Return This Product To The Store
If you have a problem with this product, please contact COSMO Customer
Support at
+1 (888) 784-3108
DATED PROOF OF PURCHASE, MODEL #, AND SERIAL # REQUIRED FOR
WARRANTY SERVICE.
IMPORTANT
Ne pas Réexpédier ce Produit au Magasin
Pour tout problème concernant ce produit, veuillez contacter le service des
consommateurs Cosmo Customer Support au
+1 (888) 784-3108
UNE PREUVE D’ACHAT DATEE EST REQUISE POUR BENEFICIER DE LA GARANTIE.
IMPORTANTE
No regrese este producto a la tienda
Si tiene algún problema con este producto, por favor contacte el ayuda al
cliente COSMO al
+1 (888) 784-3108
(Válido solo en E.U.A.)
NECESITA UNA PRUEBA DE DE COMPRA FECHADA, NÚMERO DE MODELO Y DE
SERIE PARA EL SERVICIO DE LA GARANTÍA.
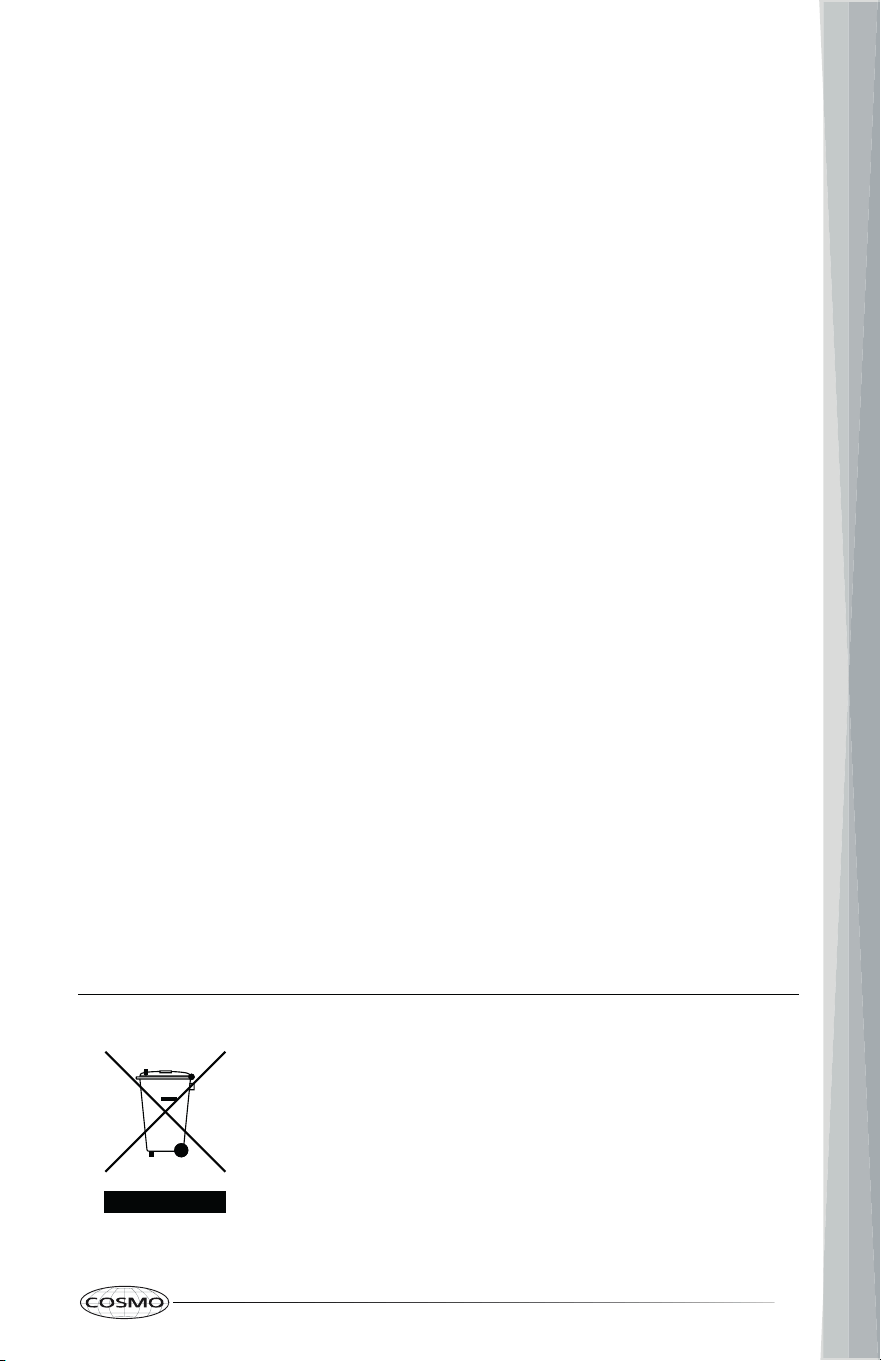
Correct disposal of this product:
This marking indicates that this appliance should not be
disposed with other household wastes. To prevent
possible harm to the environment or human health from
uncontrolled waste disposal, recycle it responsibly to
promote the sustainable reuse of material resources.

MEMO

MEMO