日本語
EnglishDeutschFrançaisEspañol
简体中文
Русский
한국어
アルトホルン / バリトン /
ユーフォニアム / チューバ / スーザフォン
取扱説明書
Alto (Tenor) Horn/Baritone/
Euphonium/Tuba/Sousaphone
Owner’s Manual
Althorn/Bariton/
Euphonium/Tuba/Sousaphon
Benutzerhandbuch
Alto/Baryton/
Euphonium/Tuba/Sousaphone
Mode d’emploi
Trompa alto/Barítono/
Eufonio/Tuba/Sousafón
Manual de instrucciones
Trompas Alto (Tenor)/Baritono/
Bombardino/Tuba/Sousafone
Manual de instruções
中音号/次中音号/上低音号/
大号 / 苏萨风号
使用说明书
Альтгорн/Баритон (Тенор)/
Эуфониум (баритон)/Туба/Сузафон
Руководство пользователя
알토 호른 / 바리톤 /
유포늄 / 튜바 / 수자폰
사용설명서
中音號 / 細管上低音號 /
粗管上低音號 / 低音號 / 蘇沙號
使用說明書
Português
繁體中文
JA
EN
DE
FR
ES
PT
ZH-CH
RU
KO
ZH-TW

2
このたびは、ヤマハ管楽器をお買い上げいただき、まことにありがとうございます。
楽器を正しく組み立て性能をフルに発揮させるため、また永く良い状態で楽器を
お使いいただくために、この取扱説明書をよくお読みください。
P. 3
You are now the owner of a high quality musical instrument. ank you for choosing Yamaha.
For instructions on the proper assembly of the instrument, and how to keep the instrument in optimum
condition for as long as possible, we urge you to read this Owner’s Manual thoroughly.
P. 3
Sie sind nun der stolze Besitzer eines hochwertigen Musikinstruments. Vielen Dank, dass Sie sich für ein
Instrument der Marke Yamaha entschiedenen haben. Um mit den Handgri en zum Zusammensetzen
und Zerlegen des Instruments vertraut zu werden und dieses über Jahre hinweg in optimalem Zustand
halten zu können, raten wir Ihnen, diese Anleitung aufmerksam durchzulesen.
P. 3
Vous êtes dès à présent le propriétaire d’un instrument de musique de haute qualité.
Nous vous remercions d’avoir choisi Yamaha. En ce qui concerne les instructions relatives à un assem-
blage adéquat de l’instrument et sur la façon de garder l’instrument dans des conditions optimales aussi
longtemps que possible, nous vous conseillons vivement de lire entièrement le présent Mode d’emploi.
P. 3
P. 3
Usted es ahora propietario de un instrumento musical de alta calidad. Le agradecemos su elección de un
instrumento Yamaha. Le aconsejamos que lea todo este manual de instrucciones para ver las instruc-
ciones para el montaje correcto del instrumento y para aprender a conservar el instrumento en óptimas
condiciones durante tanto tiempo como sea posible.
Agora você é o proprietário de um instrumento musical de alta qualidade. Obrigado por escolher a marca
Yamaha. Aconselhamos que leia cuidadosamente todo o manual do proprietário para ver as instruções de
montagem adequada do instrumento, bem como manter em ótimas condições de uso pelo máximo de
tempo possível.
P. 3
现在您已经是高品质乐器的主人了 ! 在此 , 我们衷心感谢您选择雅马哈乐器 ,
同时也恳请您完整阅读该使用说明书 , 从而可以充分了解有关乐器正确组装
及如何使您的乐器尽可能长久地处于最佳状况的使用说明。
P. 3
P. 3
야마하 악기를 구입해 주셔서 감사합니다 . 악기의 알맞은 조립 방법 및 보관을 위해
본 사용설명서를 반드시 읽어주시기 바랍니다 .
P. 3
Вы стали обладателем высококачественного музыкального инструмента. Благодарим Вас
за выбор продукции Yamaha. Для получения инструкций по правильной сборке данного
инструмента и его длительном хранении в оптимальных условиях мы настоятельно
рекомендуем Вам внимательно прочитать настоящее руководство.
P. 3
您現在擁有高品質的樂器。感謝您選擇 Yamaha。
我們強烈建議您完整閱讀本使用說明書,以便了解如何正確組裝樂器,並且
使樂器盡可能長時間保持在最佳狀態。
3
Alto (Tenor) Horn/Baritone/
Euphonium/Tuba/Sousaphone
Owner’s Manual
Do not throw or swing the instrument when others
are close by.
The mouthpiece or other parts may fall off hitting other
people. Always treat the instrument gently.
Keep the oil, polish, etc., out of children’s mouths.
Keep the oil, polish, etc., out of children’s reach and do
maintenance when children are not present.
Keep small parts out of the reach of infants.
Your children may accidentally swallow them.
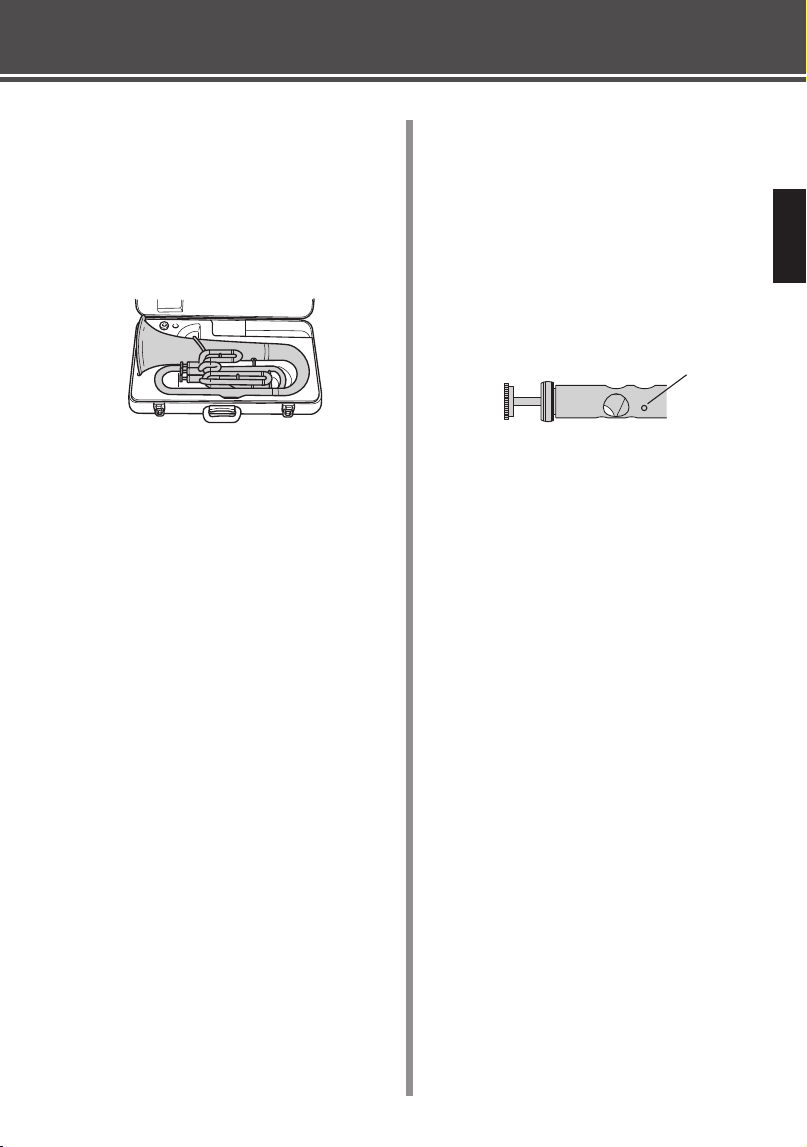
Take care when storing this very large instrument.
The case is very large so always lay the case on its side
to prevent the case from falling over, or to prevent n-
gers from getting pinched by the case’s lid. Also, close
the lid after removing the instrument from the case.
Be careful when carrying heavy instruments.
Be care not to catch your finger in the gap be-
tween the pipes when you transport the instru-
ment or operate the 5th valve lever, any of the
valve slides or any other movable parts.
Be sure to secure the three bell screws rmly be-
fore use so that the bell will not accidently detach
when transporting or playing the Sousaphone.
The precautions given below concern the proper and safe use of the instrument, and are to pro-
tect you and others from any damage or injuries. Please follow and obey these precautions.
If children are using the instrument, a guardian should clearly explain these precautions to the child and make sure
they are fully understood and obeyed. After reading this manual, please keep it in a safe place for future reference.
About the Icons
: This icon indicates points which should be paid attention to. : This icon indicates actions that are prohibited.
Caution
Precautions
Please read before using
Disobeying the points indicated with this mark
may lead to injury.
In regards to brass instruments with a plate nish, the color of the nish may change over time however, it should
be of no concern in regards to the instrument’s performance. Discoloration in its early stage can easily be removed
with maintenance. (As discoloration progresses, it may be dif cult to remove.)
* Please use the accessories that are speci ed for use with the particular type of nish found on the instrument. Also, metal pol-
ishes remove a thin layer of the nish’s top coat which will make the nish thinner. Please be aware of this before using polish.
NOTICE
Be aware of climatic conditions such as temperature, humidity, etc. Keep the instrument away from heat sources such as heaters,
etc. Also, do not use or store the instrument in any extreme conditions of temperature or humidity. Doing so may result in damage to
key balance, linkage, or pads, resulting in problems during performance.
Never use benzene or thinner for maintenance on instruments with a lacquer nish. Doing so may result in damage to the nish’s
top coat.
Take care not to dis gure the instrument. Placing the instrument where it is unstable may cause the instrument to fall or drop
resulting in dis gurement. Take care as to where and how you place the instrument.
Do not modify the instrument. Besides voiding the warranty, modi cation of the instrument may make repairs impossible.

4
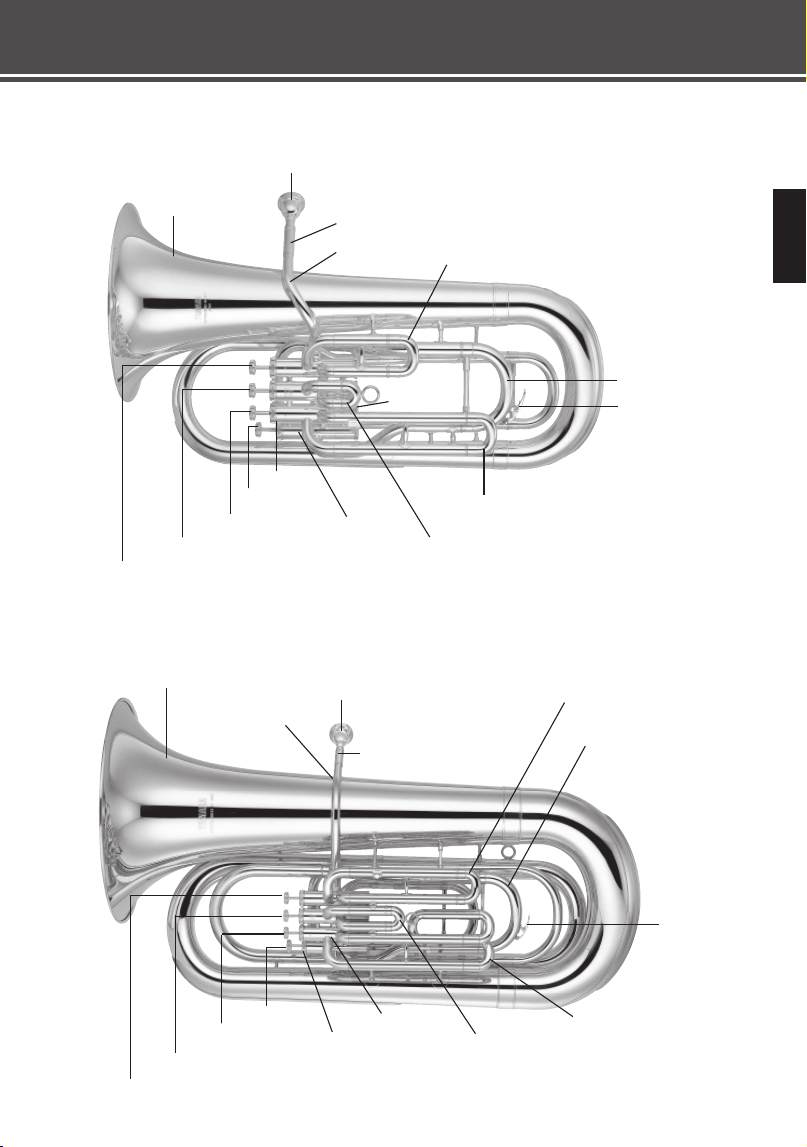
Nomenclature
Alto(Tenor) Horn
Bell
Mouthpiece
Mouthpiece Receiver
Leadpipe
1st Valve
2nd Valve
3rd Valve
1st Valve Slide
Main Tuning Slide
Water Key
3rd Valve SlideValve Casing
Cap
Cap
e 4th piston on the YBH-621
is a side action type. ( is is not
a compensating instrument.)
Bell
Mouthpiece
Mouthpiece Receiver
Leadpipe
1st Valve
2nd Valve
3rd Valve
1st Valve Slide
2nd Valve Slide
Main Tuning Slide
3rd Valve Slide
Valve Casing
Water Key
Cap
Cap
Baritone
5
Nomenclature
Bell
Bell
Mouthpiece
Mouthpiece
Mouthpiece Receiver
Mouthpiece Receiver
Leadpipe
Leadpipe
1st Valve
1st Valve
2nd Valve
2nd Valve
3rd Valve
3rd Valve
1st Valve Slide
1st Valve Slide
2nd Valve Slide
2nd Valve Slide
Main Tuning Slide
Main Tuning Slide
3rd Valve Slide
3rd Valve Slide
Valve Casing
Valve Casing
Water Key
Water Key
Cap
Cap
Cap
4th Valve
4th Valve
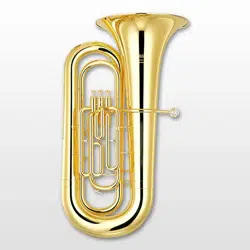
Euphonium
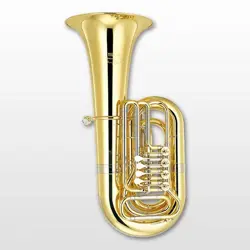
Top Action Tuba
6
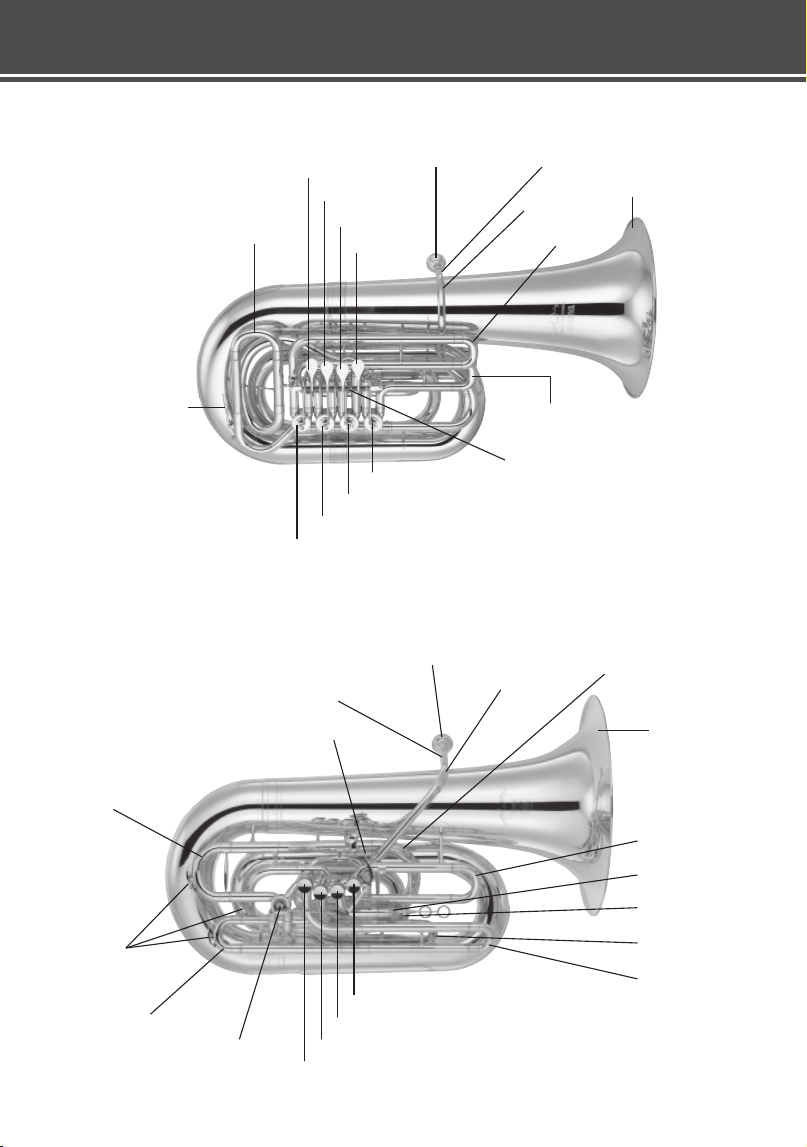
Nomenclature
Rotary Tuba
Bell
Leadpipe
1st Valve Slide
2nd Valve Slide
Main Tuning Slide
Water Key
4th Valve
3rd Valve
2nd Valve
1st Valve
4th Valve Slide
1st Rotary Valve
2nd Rotary Valve
3rd Rotary Valve
4th Rotary Valve
Mouthpiece
Front Action Tuba
Mouthpiece
Leadpipe
Bell
Water Key
Main Tuning Slide
4th Valve
3rd Valve
2nd Valve
1st Valve
5th Rotary Valve
1st Valve Slide
2nd Valve Slide
Secondary Main Tuning Slide
5th Valve Slide
3rd Valve Slide
4th Valve Slide 1
4th Valve Slide 2
* Refer to page 11 for details of the secondary
main tuning slide.
5th Valve Lever
Mouthpiece Receiver
Mouthpiece Receiver
7
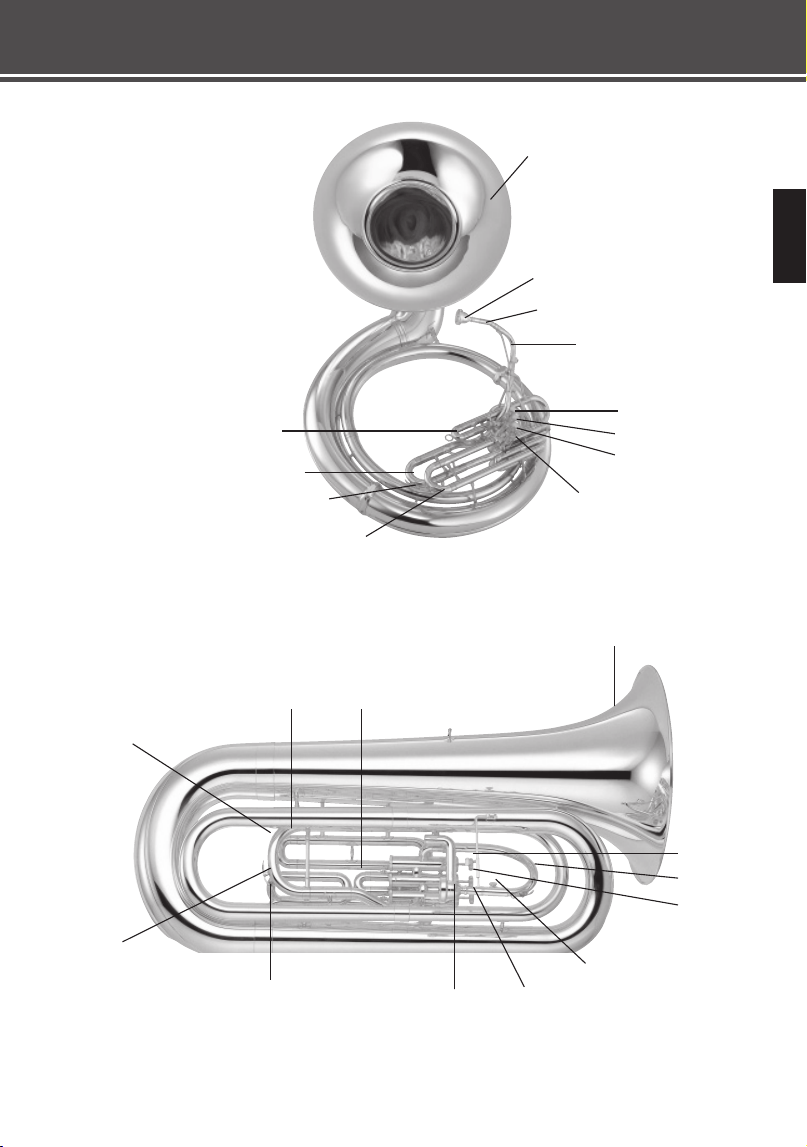
Nomenclature
Sousaphone
Bell
Mouthpiece
Leadpipe
1st Valve
2nd Valve
3rd Valve
1st Valve Slide
Main Tuning Slide
3rd Valve Slide
Water Key
Cap
* The contents of this manual apply to the latest speci cations as of the publishing date.
To obtain the latest manual, access the Yamaha website then download the manual le.
Bit
Marching Tuba
1st Valve Slide
2nd Valve Slide
1st Valve
2nd Valve
3rd Valve
Leadpipe
Mouthpiece
3rd Valve Slide
Water Key
Main Tuning Slide
Bell
Mouthpiece Receiver
8
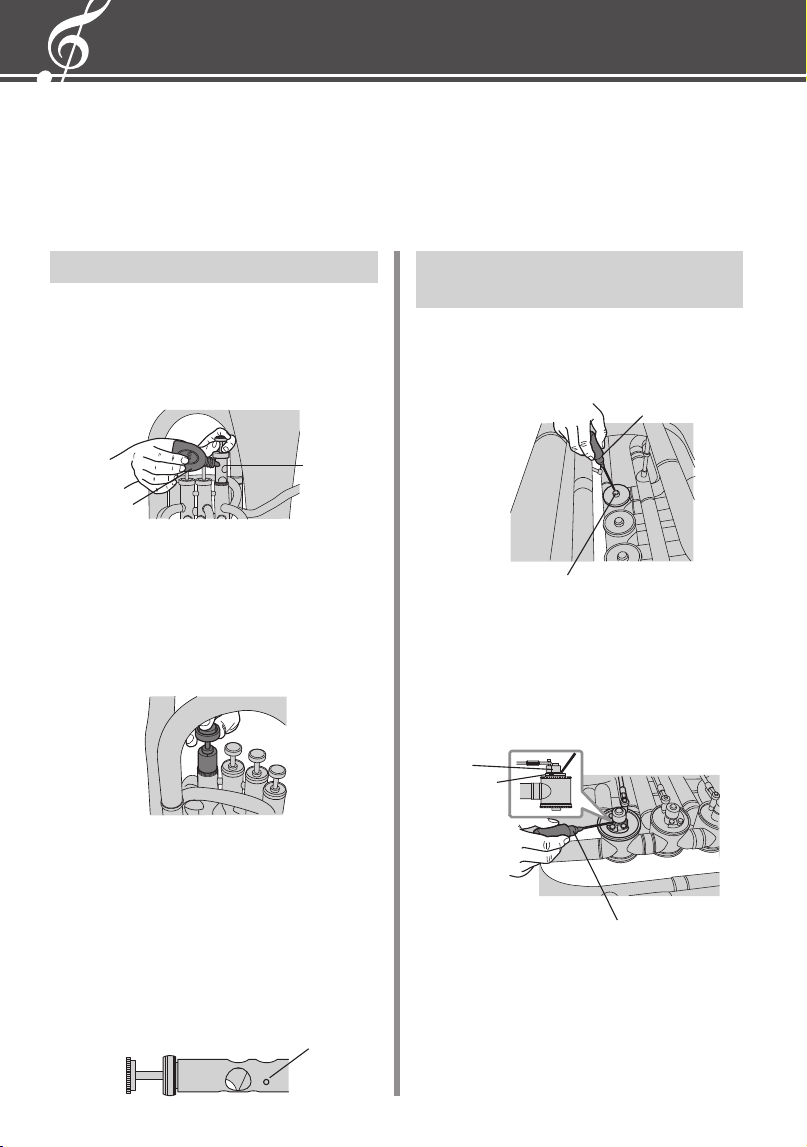
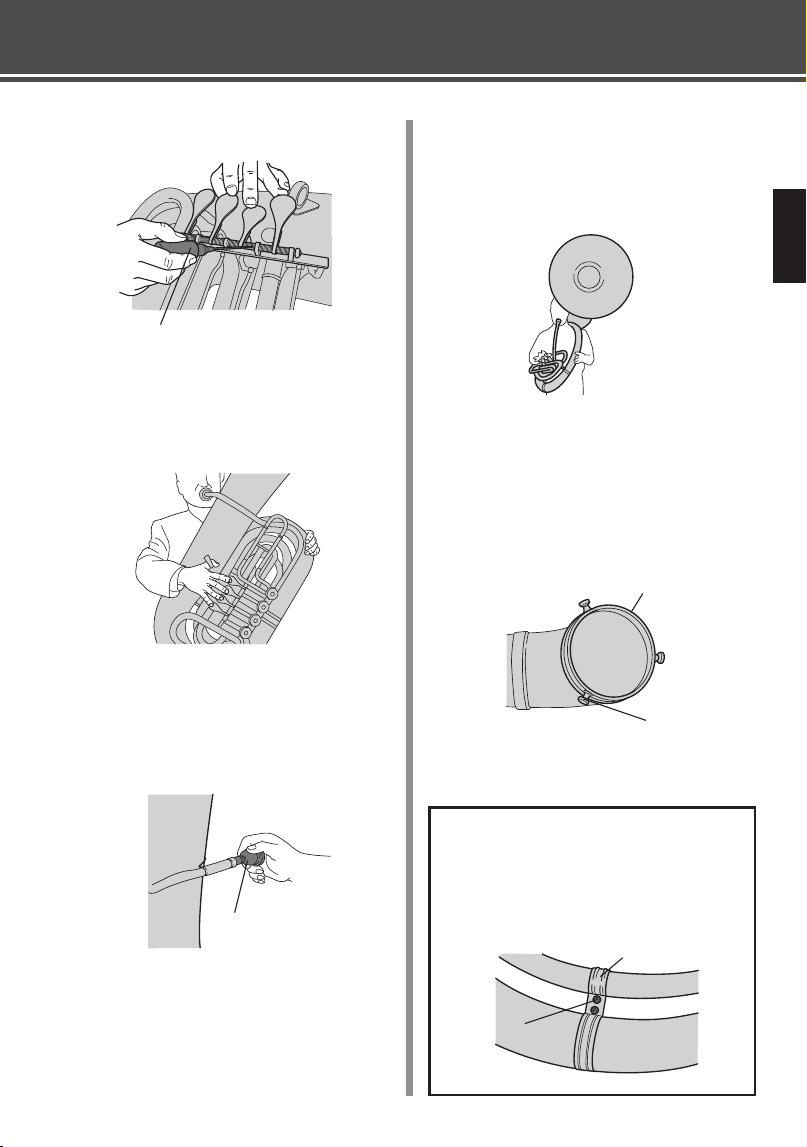
Applying Oil
Apply oil to the pistons
1.
Unscrew the valve cap and pull the piston
straight out of the valve casing until about half
of the valve piston is exposed.
2.
Apply about 10 drops of valve oil on the pis-
ton.
* Do not apply too much oil.
3.
Slowly return the piston into the valve casing.
At this time, make sure the valve guide ts into
the slot inside the valve casing. After the valve
cap is tightened rmly, move the piston up and
down a few times to evenly distribute the oil
over the piston.
* Each piston ts into its corresponding casing.
Make sure the number stamped on the piston
matches the number stamped on the casing before
returning the piston into the valve casing.
* e pistons must be oiled to function properly
and smoothly.
* As for certain products (YCB-623, etc.), there is
one small hole on the side of each piston to allow
air in the valve case to escape or to maintain the
rotation angle of each piston. is is a vent hole
and is not used for lubrication.
Applying oil to the rotors
(Rotary Tuba Only)
1.
Remove the valve cap and apply some rotor
spindle oil to the spindle and in the center of
the rotor.
* Do not apply too much oil.
2.
Apply some rotor spindle oil to the rotor spin-
dle and its receiver. After closing the valve cap,
move the lever a few times to distribute the oil
evenly.
Valve oil
Rotor spindle oil
Rotor spindle
Backside of the
instrument
Receiver
Rotor spindle
Rotor spindle oil
Before You Play
Piston
* Do not apply too much oil.
NOTICE
Be careful not to hit and dent the instrument or apply unreasonable force to it, since the metal parts
are very thin.
Instrument’s front
Vent hole
9
Lever oil
Assembling the Sousaphone
Connect the bell to the body so that the bell is fac-
ing the same direction as the player’s face.
1.
Loosen the bell screws. Firmly holding on to
the bell on both sides, rotate the bell slowly
while inserting the bell into the bell joint on
the main body. After the bell is positioned,
tighten the three bell screws so that each screw
applies the same amount of pressure against
the bell.
* During rests, make sure that the bell screws are
tightened rmly.
Bell joint receiver
Bell screw
Copper bracing
Main coil
Before You Play
Setting the Mouthpiece
Insert the mouthpiece until it just ts snugly and
is no longer loose in the leadpipe.
Mouthpiece
* NEVER force the mouthpiece into the leadpipe,
or hit it. e mouthpiece may become stuck in the
leadpipe.
3.
Apply some lever oil to the lever shafts.
* Do not apply too much oil.
4.
While moving the levers, blow some air
through the instrument to distribute the oil
evenly.
Never loosen the screws on the copper brac-
ing holding the main coils together. Doing
so may cause the coils to separate resulting
in injury. Also, regularly check that the at-
tachment screws on the main tubing are
tightened rmly.
Completed assembly
Attachment screw
10
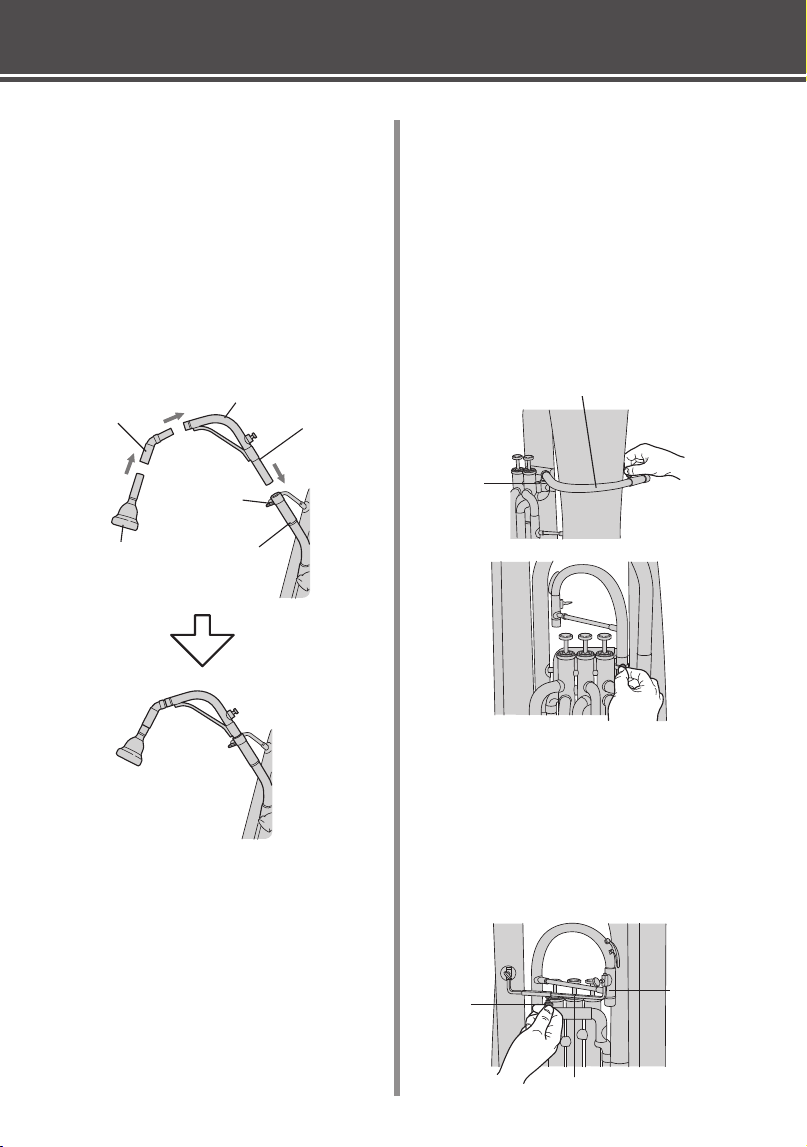
Assembling the Leadpipe
(Sousaphone only)
e sousaphone uses a multi-piece leadpipe. is
leadpipe in combination with a bit allows the
player to adjust the mouthpiece to a comfortable
position to best t individual needs.
1.
Apply some slide grease to the middle section
of the leadpipe and then insert it into the lead-
pipe receiver. Next, tighten the screw on the
receiver to secure the middle pipe in place.
Assembling the Marching Tuba
(Marching series only)
e leadpipe on one of the marching series tuba
models can be switched to convert the instrument
between marching use and regular concert use. (An
“M” at the end of the product number indicates a
marching series tuba.)
1.
Loosen screws A and B to remove the regular
concert leadpipe, then attach the marching
leadpipe and tighten screws A and B.
A
B
C
E
Bit
Leadpipe
Middle pipe
Receiver Screw
Leadpipe receiver
Mouthpiece
* e marching type leadpipe may become stuck or
di cult to remove if left in the tuba. Please use
caution.
2.
Insert the square support on the backside of
the instrument and use screw E to adjust the
leadpipe angle, then tighten screws C and D to
secure it.
Concert leadpipe
Marching
leadpipe
Backside
Square support
Before You Play
D
* If the bit is left on the leadpipe, it may become
stuck in place. After playing, make sure that the
bit is removed from the leadpipe and remove
moisture from the bit.
* e YSH-411 is supplied with two di erent bits.
Both can be connected together if necessary.
11
Main tuning slide
Before You Play
Tuning the Instrument
Slide the main tuning slide in or out to tune the
instrument. Since temperatures have an effect
on the instrument’s pitch, blow some warm air
through the instrument to warm up the instru-
ment before tuning.
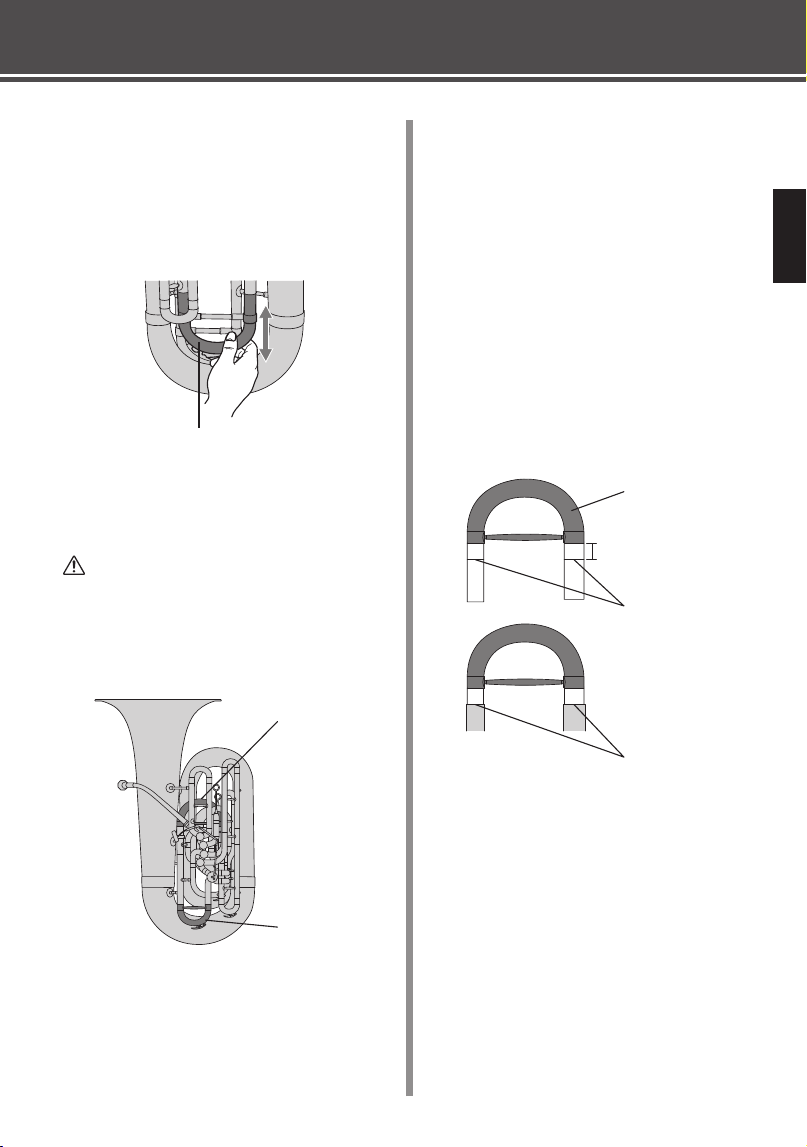
About the secondary main tuning
slide (YCB-623/YBB-623 only)
CAUTION
Never hold the secondary main tuning slide when
you lift the instrument. e secondary main tuning
slide would separate from the instrument, causing
it to fall and resulting in possible injury or damage
to the instrument.
The YCB-623 and YBB-623 are both equipped
with a secondary main tuning slide. Normally,
adjust the main tuning slide in or out to tune the
instrument. The secondary main tuning slide is
used as a secondary mechanism for tuning the in-
strument supplementary.
You can tune the instrument nely by using the
secondary main tuning slide during, before and
after playing.
Adjust the secondary main tuning slide to
the home position
The secondary main tuning slide is inserted all
the way inside to the end of the instrument when
shipped from the factory. Before you play, pull
out the secondary main tuning slide to the home
position. You can see the reference line on the
secondary main tuning slide, indicating the home
position when the secondary main tuning slide is
pulled out to 25 mm (1 inch). After adjusting the
secondary main tuning slide to the home position,
tune the instrument by the main tuning slide.
Secondary main
tuning slide
Reference line
Adjust the secondary
main tuning slide to the
reference line.
25 mm (1 inch)
is instrument is designed that the normal pitch
(with the secondary main tuning slide adjusted
to the home position above) is almost the same as
that of a conventional tuba (with the main slide
inserted to the end of the instrument). If the pitch
is low, due to the following conditions, move the
secondary main tuning slide further inside to ad-
just the pitch higher.
• When using in cold regions
• When the instrument is not warm enough
If the pitch is high, pull out the secondary main
tuning slide from the home position.
Main tuning slide
Secondary main tuning slide
12
In case you need to play the pitch of a speci c note
higher or lower depending on the chord or musical
temperament, you can adjust the pitch temporarily
by operating the secondary main tuning slide with
your left hand as you play.
CAUTION
Hold the top of the U-shaped secondary main
tuning slide when operating the secondary main
tuning slide during your play to avoid injury by
catching your ngers in the gap between the pipes.
About the 5th Valve Extension
(YFB-621/YCB-822 Only)
e YFB-621 and YCB-822 are both supplied with
an extension for the 5th valve that can be installed
between the 5th valve slide and the instrument’s
main 5th valve tubing. The 5th valve lowers the
instrument’s pitch. e 5th valve’s pitch changes as
described below when the extension is removed.
Normally, the 5th valve is used in combination
with the 4th valve, etc., to correct pitch in the
instrument’s lower range, however the pitch may
be slightly higher or lower depending upon the
mouthpiece being used.
• With the 5th Valve Extension installed
(as shipped from the factory)
YFB-621: 4/3 steps lower
YCB-822: 2 steps lower
5th valve slide
5th valve slide
5th valve extension
Instrument (5th valve slide)
Instrument (5th valve slide)
• Without the 5th Valve Extension
YFB-621: 2/3 steps lower
YCB-822: 4/3 steps lower
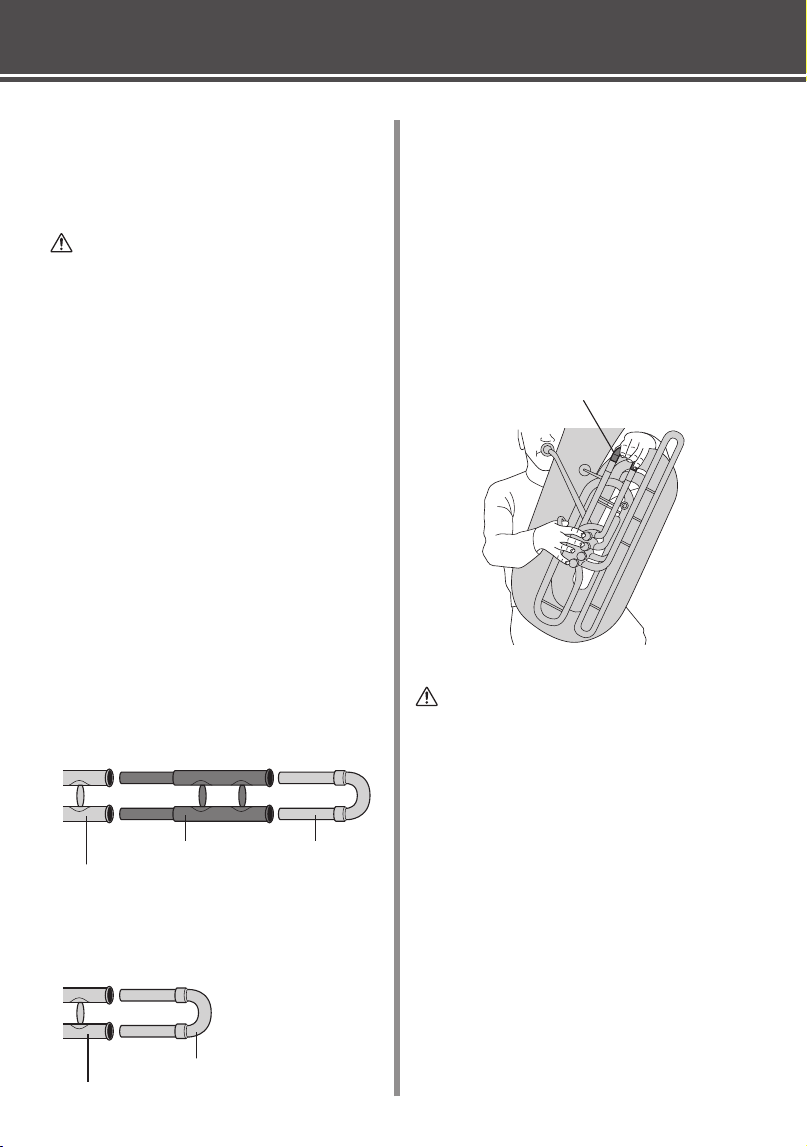
About the 1st valve slide
(YCB-623/YBB-623 only)
You can tune the pitch by sliding the 1st valve
slide with your left hand while pressing only the
1st piston.
e 1st valve slide is designed with a short length.
When you press the 1st piston during your play,
tune the pitch by sliding the 1st valve slide while
listening carefully to the sound. is playing style
is the one of characteristics of the B
b
/C front ac-
tion tuba.
1st valve slide
CAUTION
Hold the top of the U-shaped each tuning slide
or valve slide when operating each tuning slide
or valve slide during your play to avoid injury by
catching your ngers in the gap between the pipes.
Before You Play
13
Putting the instrument in the
case
Always store the instrument in its case when tak-
ing a break, during transport, and after playing.
Always remove and disassemble the leadpipe as-
sembly before placing the sousaphone or marching
tuba series instruments in their case.
* e bell on the euphonium or tuba may be posi-
tioned opposite of that shown in the above illustra-
tion depending upon valve position and case design.
About the mouthpiece
e mouthpiece that is supplied with your instru-
ment is a standard mouthpiece. e mouthpiece
is designed to fit into the mouthpiece receiver
without being loose. Do not treat the mouthpiece
roughly, drop, or damage the mouthpiece, etc.
About the Compensating System
e pitch of long tubular instruments such as the
euphonium becomes slightly higher than the true
pitch when multiple valves (the 4th valve in com-
bination with the 1st-3rd valves, etc.) are depressed
at the same time. e compensating system pro-
vides pitch correction in such cases. It also allows
the playing of fast passages in the low range with-
out having to change ngerings for the 1st through
3rd valves when the 4th valve is depressed.
The YEP-642/YEP-842/YBB-632/YEB-632 are
equipped with a compensating system.
The compensating system on the YBH-831 cor-
rects the pitch when the third valve is used in com-
bination with the rst and/or second valves.
About the small hole on the side
of the piston
Piston for the YCB-623/YBB-623
ere is one small hole on the side of each piston
to evacuate air in the valve case. After operating
a valve slide without pressing a piston, and then
when subsequently pressing a piston, a pop noise is
generated caused by internal pressure change. is
small hole can help prevent generating pop noises.
Vent hole
Piston for the baritone YBH-831
ere is one small hole on the side of each piston
to maintain the rotation angle of each piston. is
hole is neither a vent hole nor a lubrication hole.
Before You Play
14
After Playing
After playing the instrument, make sure that moisture or dirt is removed from it using the
procedure described below.
Valve slide maintenance
1.
Depress the piston or lever that corresponds to
the valve slide you want to clean, and remove
the slide.
* Removing the valve slide without holding the piston
down creates a drop in air pressure within the pipe,
creating a suction which can result in poor piston
function or damage to the inside of the pipe.
2.
Remove moisture from the slide. Also, remove
moisture from the water key.
* e valve slides are made of brass or nickel silver
which are both excellent at resisting corrosion.
However, corrosion may appear if moisture is left
in the instrument for an extended period of time.
Please use caution.
Oil the pistons
As done before playing the instrument, apply some
valve oil to the pistons and move them up and
down a few times. (See page 8)
Oil the rotors (Rotary tuba only)
As done before playing the instrument, apply some
rotor spindle oil to the rotors and move the levers
a few times. (See page 8)
Water Key
Maintenance
Water Pot Maintenance
(YEP-842 Euphonium only)
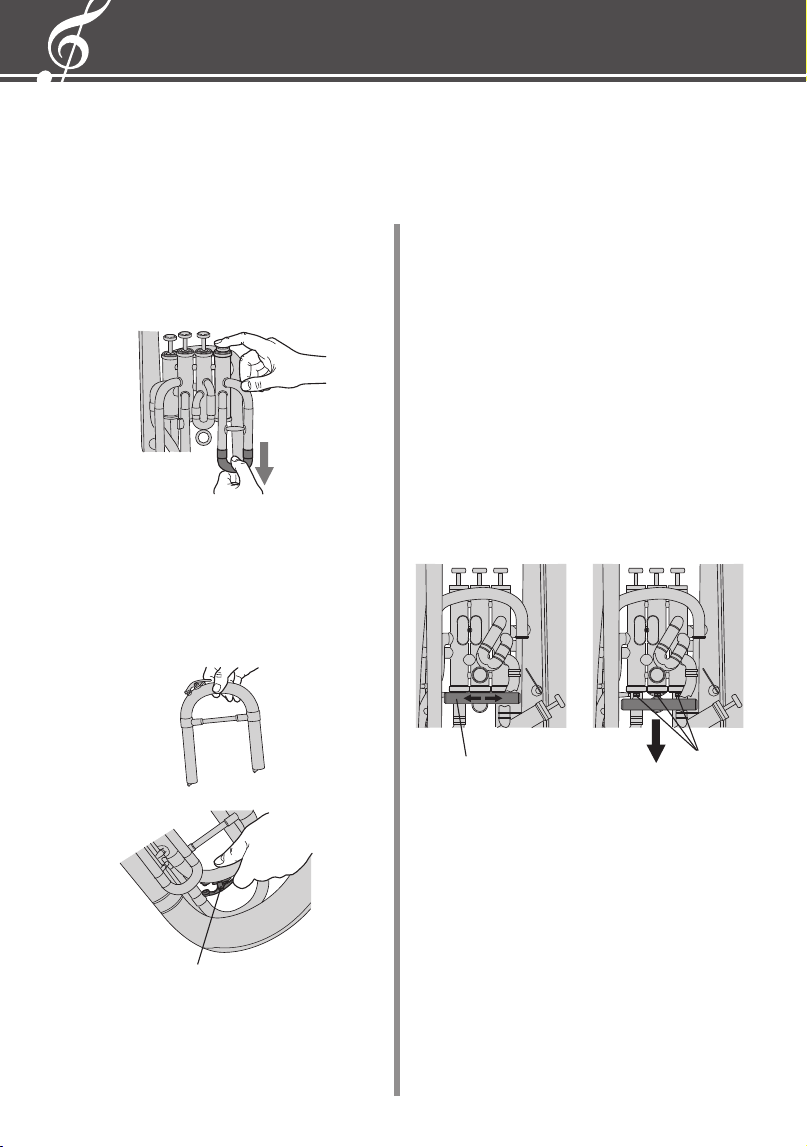
1.
Slide the water pot to the left or right to release,
then slide it down to remove.
2.
Remove any moisture or oil from the water pot
onto a cloth, etc. Clean the inside of the water pot
with running water.
3.
Align the holes on the water pot with the nipples
on the bottom of the valve casings then, as you
did when removing the water pot, slide it to the
left or right (either direction is OK) to reattach.
water pot
Nipple

15
Once or Twice a Month Mainte-
nance
Piston and valve casing maintenance
The pistons and valve casings are designed with
very little clearance between each other therefore,
it is very important that these precision parts be
handled with care.
1.
Wrap a cleaning rod with gauze so that no
metal is exposed.
2.
Remove dirt from the inside of the valve cas-
ings.
* In models that are equipped with valve springs
under the valves, remove the springs from the
valve casing before cleaning.
3.
Use the gauze to remove dirt from the pistons.
4.
After applying valve oil, gently return the pis-
ton to its corresponding valve casing. At this
time, make sure that the valve guide properly
ts into the notch.
After rmly tightening the valve cap, move the
piston up and down a few times to distribute
the oil evenly.
Cleaning rod
Gauze
* Exposed metal can damage the instrument.
Body maintenance
Use a polishing cloth to gently wipe the instru-
ment’s surface. If dirt or tarnish is obvious, the
following products can be used.
For lacquer nishes
Polishing cloth + lacquer polish
For silver plate
Silver cloth + silver polish
For a beautiful shine, bu the instrument with a
silicone cloth.
e piston is the most important part of
the instrument. Never treat the pistons
roughly, drop the piston, or let the piston
fall, etc. If the piston becomes damaged or
dented, never return it to the valve casing.
Contact the dealer from whom you pur-
chased the instrument.
Maintenance
* Do not apply too much oil.
* Make sure that the number stamped on the valve
casing matches the number stamped on the piston.
16
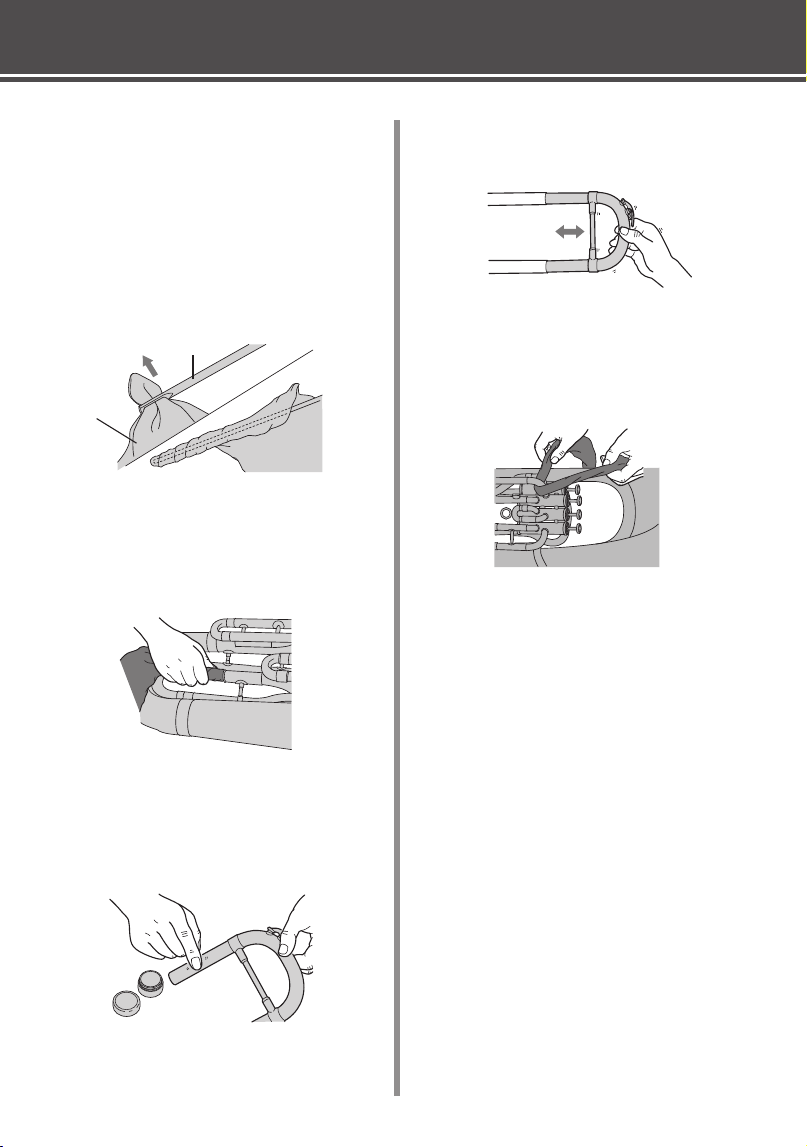
Valve slide maintenance
1.
Wrap a cleaning rod with gauze so that no bare
metal is exposed.
3.
Use the gauze to remove dirt from the valve
slide’s surface then apply a little slide grease
to the surface of the inner section of the valve
slide.
4.
Slide the valve slide in and out a few times to
distribute the grease evenly.
Other maintenance
Use a ne gauze to carefully clean those places that
are di cult to clean such as the backsides of slides,
etc.
Maintenance
Rotor and valve casing maintenance
As done before and after playing, apply some rotor
spindle oil to the rotors and valve casing.
Also, apply some lever oil to the lever shaft.
Gauze
Cleaning rod
* Exposed metal can result in damage to the instru-
ment.
2.
Remove dirt from the inside of the inner and
outer sections of the valve slide.
17
Maintenance
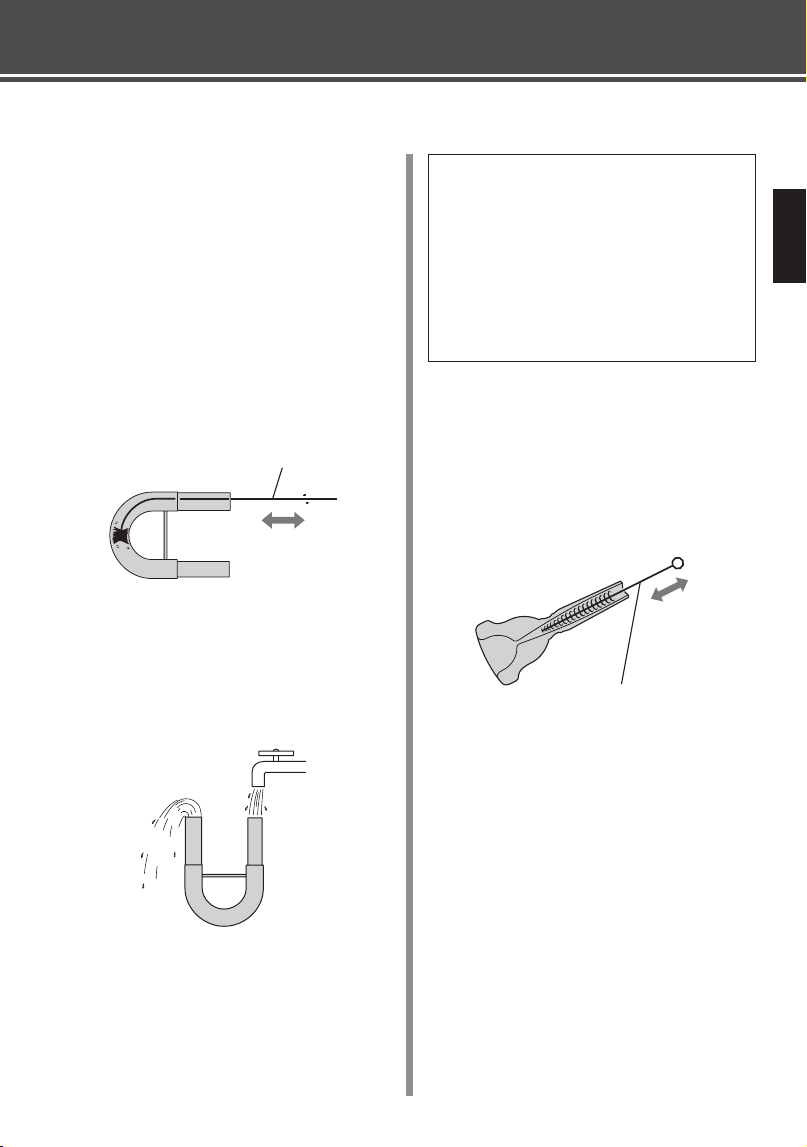
Twice Yearly Maintenance
Cleaning the instrument
1.
Make a brass soap water solution.
Prepare a brass soap water solution using be-
tween 10 to 15 parts warm water (30° C to
40° C) and 1 part brass soap.
Before putting the instrument into the soap
water solution, remove the pistons, valve cas-
ing parts, and slide valves.
2.
With the instrument removed from the water,
apply some soap water solution to a flexible
cleaner and use the cleaner to clean the inside
of the instrument’s pipes.
3.
After cleaning the instrument, use clean water
to thoroughly rinse out the brass soap water
solution. After completely removing all mois-
ture with a gauze, apply oil and grease, and
then reassemble the instrument.
Flexible cleaner
CAUTION! When cleaning the internal
parts on a rotary tuba.
Never dismantle the rotors. Also, when rins-
ing the pipes with water, run water through
tuning slides in the opposite direction of the
airflow. If water is run through the instru-
ment from the leadpipe, dirt can become
clogged in the valves causing the valves to
become sluggish.
Cleaning the mouthpiece
1.
Dip the mouthpiece brush in the brass soap
water solution and use the brush to clean the
throat of the mouthpiece. Rinse the mouth-
piece out with clean water.
Mouthpiece brush
18
Troubleshooting
Tone is not clear and pitch is poor.
• e valve felt or cork is damaged.
Replace the felt or cork with a new one.
• A large amount of dirt has accumulated
inside the instrument.
Wash it out.
• ere is a large dent in the tubing or air is
leaking. Or the mouthpiece is loose and air is
leaking from around the mouthpiece.
Contact the dealer from whom you pur-
chased the instrument.
No sound.
• e holes in the pistons are not aligned with
the holes in the valve casings.
Make sure that the number stamped on the
piston matches the number stamped on the
valve casing.
e valves are sluggish.
• Dirt has accumulated between the pistons
and valve casings.
Clean the inside of the valves.
• Dust has scratched the inside of the valve
casings.
Wash out the dust as soon as possible.
• Dropping or hitting the piston has damaged
it.
Never use the instrument with a damaged
piston. Contact the dealer from whom you
purchased the instrument.
• e pistons or valve casings are corroded.
Contact the dealer from whom you pur-
chased the instrument.
e rotors are sluggish.
• Dirt has accumulated between the rotors and
valve casings.
Oil the lever mechanisms with lever oil.
Contact the dealer from whom you pur-
chased the instrument.
e valve slide is stuck and cannot be
removed. e slide is sluggish.
• ere is dirt or dust inside the slide.
oroughly remove dirt and apply some
slide grease that matches the type of slide.
Or apply some tuning slide oil to the slide.
• Dropping or hitting the slide has caused a
dent, or the slide was bent while cleaning.
Contact the dealer from whom you pur-
chased the instrument.
e screw is too tight and cannot be
removed.
• e screw is corroded.
• Hitting the instrument has damaged the
screw.
Contact the dealer from whom you pur-
chased the instrument.
Air does not pass through the instru-
ment.
• e piston is in the wrong valve casing.
Set the piston into its proper valve casing.
e mouthpiece cannot be removed.
• e instrument was dropped or hit with the
mouthpiece attached. Or, the mouthpiece
was inserted with too much force.
• e instrument has been left for a long
period of time with the mouthpiece inserted
in the instrument.
Contact the dealer from whom you pur-
chased the instrument.
e instrument makes an abnormal
sound when played.
• Solder on the instrument has come loose, or
a foreign object is in the pipe.
Contact the dealer from whom you pur-
chased the instrument.

19
Troubleshooting
e piston makes a metallic sound
when moved.
• e felt is torn or lost.
Replace the felt with a new one.
• e screws on the piston valve or valve casing
are loose.
Firmly tighten the screws.
• e piston shaft is bent.
Contact the dealer from whom you pur-
chased the instrument.
e rotor lever makes a metallic sound
when moved.
• ere is contact or scraping with the lever’s
springs.
Oil the lever mechanisms with lever oil.
• e lever comes into contact with the pipes.
Contact the dealer from whom you pur-
chased the instrument.
• e screws are loose.
Firmly tighten the screws.
• e rotor and valve casing have come loose.
Contact the dealer from whom you pur-
chased the instrument.
Water leaks from the slides.
• Not enough grease.
Apply grease to the slides.

20
MEMO

21
運指表
/Fingering Chart/Gri tabelle/Tablature/
Tabla de digitaciones/Tabela de digitação/
指法表
/
Аппликатура
/
운지법
/
指法表
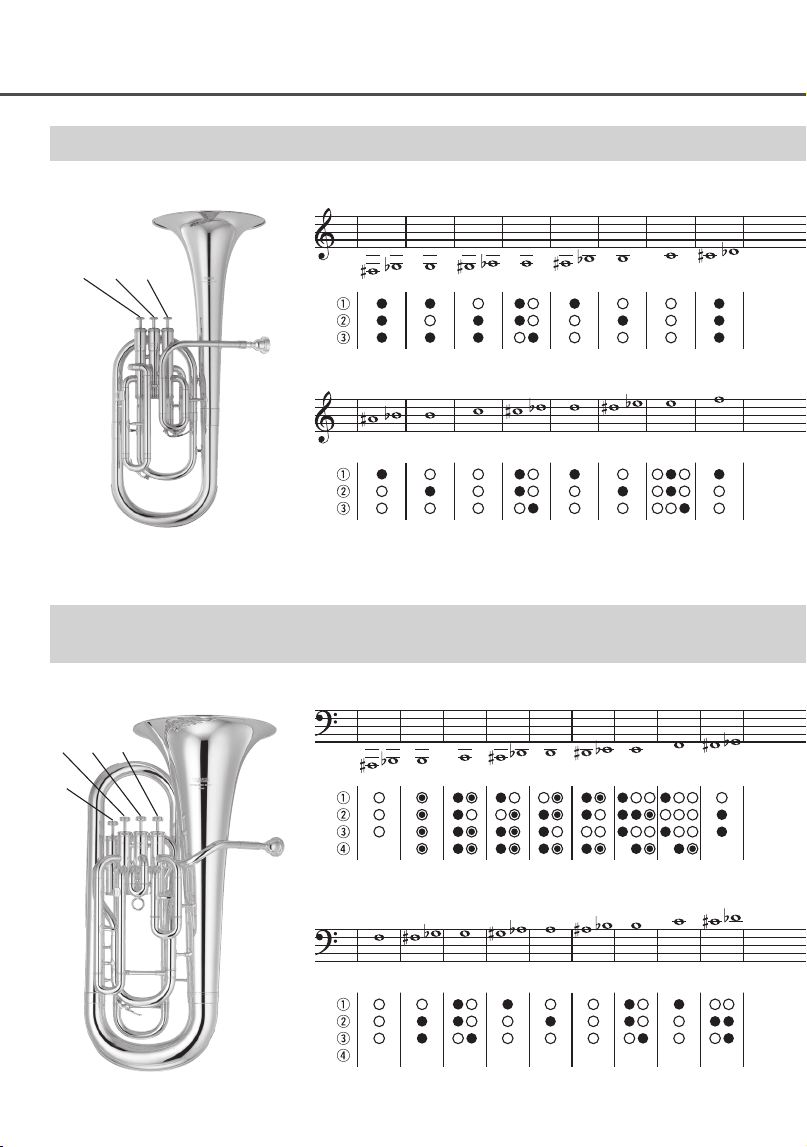
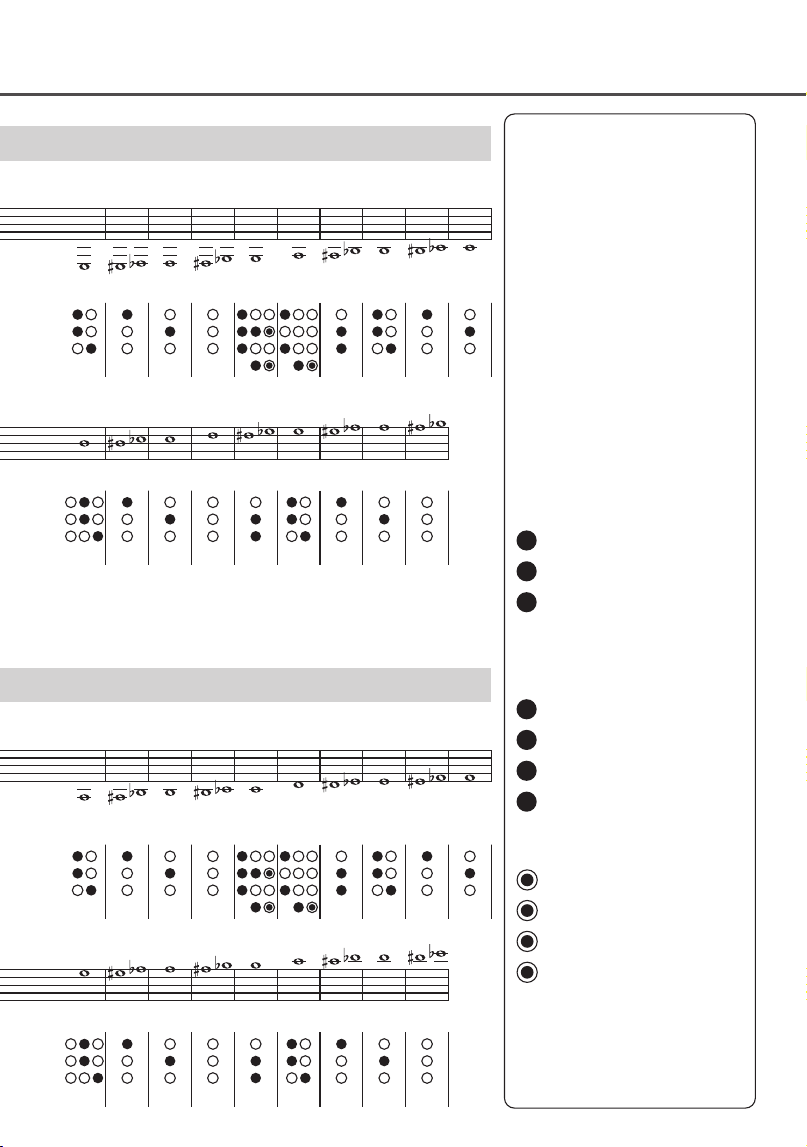
運指には様々な種類がありますが、ここで
は代表的な中音域の運指を紹介しています。
ここに掲載されていない音域で演奏したい
ときは、演奏の習熟度に合わせて指導者に
相談しましょう。
使用するマウスピースの種類や、楽器の種
類、演奏のコンディションなどによって、
狙ったピッチに合わせにくいことがありま
す。吹奏のときに適切な抜差管を操作する
ことで、ピッチを調整してください。
is ngering chart shows a typical middle
sound range. If you want to nd more ngering
information that is not listed here, consult with
your instructor according to your playing level.
e actual sound pitch may di er from the one
you expect or desire depending on the type of
mouthpiece, the particular instrument, and
the condition of your lips. Adjust the pitch by
operating a relevant valve slide while you play.
Diese Gri tabelle zeigt einen typischen mitt-
leren Tonbereich. Wenn Sie weitere Informa-
tionen zu den Fingersätzen benötigen, die hier
nicht aufgeführt sind, wenden Sie sich bitte ent-
sprechend Ihrem Spielniveau an Ihren Lehrer.
Die tatsächliche Tonhöhe kann von der erwarteten
oder gewünschten Tonhöhe abweichen, je nach
Art des Mundstücks, des jeweiligen Instruments
und des Zustands Ihrer Lippen. Die Tonhöhe
kann durch Betätigung eines entsprechenden Ven-
tilzuges während des Spielens eingestellt werden.
Cette tablature représente une tessiture médiane
type. Si vous recherchez d’autres informations
concernant la tablature qui ne sont pas réper-
toriées ici, adressez-vous à votre formateur en
fonction de votre niveau de jeu.
Selon le type de boisseau, l’instrument et l’état de vos
lèvres, la hauteur de ton réelle peut di érer de vos
attentes ou de vos souhaits. Pour régler la hauteur de
ton, actionnez le piston adapté pendant le jeu.
Esta tabla de digitaciones muestra un rango de
sonido medio típico. Si desea buscar más in-
formación sobre la digitación no incluida aquí,
hable con su instructor para que le informe de
lo que usted necesita en función de su nivel.
El tono real del sonido puede ser distinto
del que espera o desea en función del tipo de
boquilla, el instrumento concreto y el estado de
sus labios. Ajuste el tono moviendo la bomba
del pistón correspondiente mientras toca.
Esta tabela de digitação mostra uma faixa
comum de som médio. Se quiser informações
adicionais sobre dedilhado, fale com seu instru-
tor de acordo com seu nível.
O tom real pode ser diferente do que você
espera ou deseja, dependendo do tipo de bocal,
do instrumento e da condição dos seus lábios.
Ajuste o tom operando uma bomba de pisto
relevante enquanto toca.
此指法表显示了典型中音范围。如
果您想查看此处未列出的更多指法
信息,请根据您的演奏水平咨询您
的导师。
实际音高可能与您预期或想要实现
的音高不同,具体取决于号嘴类型、
特定乐器和您的嘴唇情况。请在演
奏时操作相关调音管进行调音。
На аппликатуре показан типичный сред-
ний диапазон звуковых частот. Если вас
интересует дополнительная информация об
аппликатуре, не указанная здесь, проконсуль-
тируйтесь со своим инструктором, учитывая
свой уровень владения инструментом.
Фактическая высота тона может отличаться
от ожидаемой или желаемой в зависимости
от типа мундштука, особенностей кон-
кретного инструмента и состояния в
аших
губ. Регулируйте высоту тона с помощью
соответствующего крона во время игры.
이 운지법 표는 전형적인 중간 음역대를 보
여 줍니다. 여기에 나열되지 않은 운지법 정
보를 더 찾으려면 본인의 연주 수준에 따라
강사에게 문의하십시오.
실제 피치는 마우스피스의 유형, 특정 악기
및 입술의 상태에 따라 예상하거나 원하는
피치와 다를 수 있습니다. 연주하는 동안 해
당 밸브 슬라이드를 조작하여 피치를 조정
하십시오.
此指法表呈現典型的中音域。若您
想尋找更多此處未列出的指法資
訊,請根據您的演奏程度請教老師。
實際音高可能與您期望或想像的不
同,這取決於吹嘴種類、特定樂器,
以及嘴型。演奏時操作對應的調音
管即可調整音高。
22
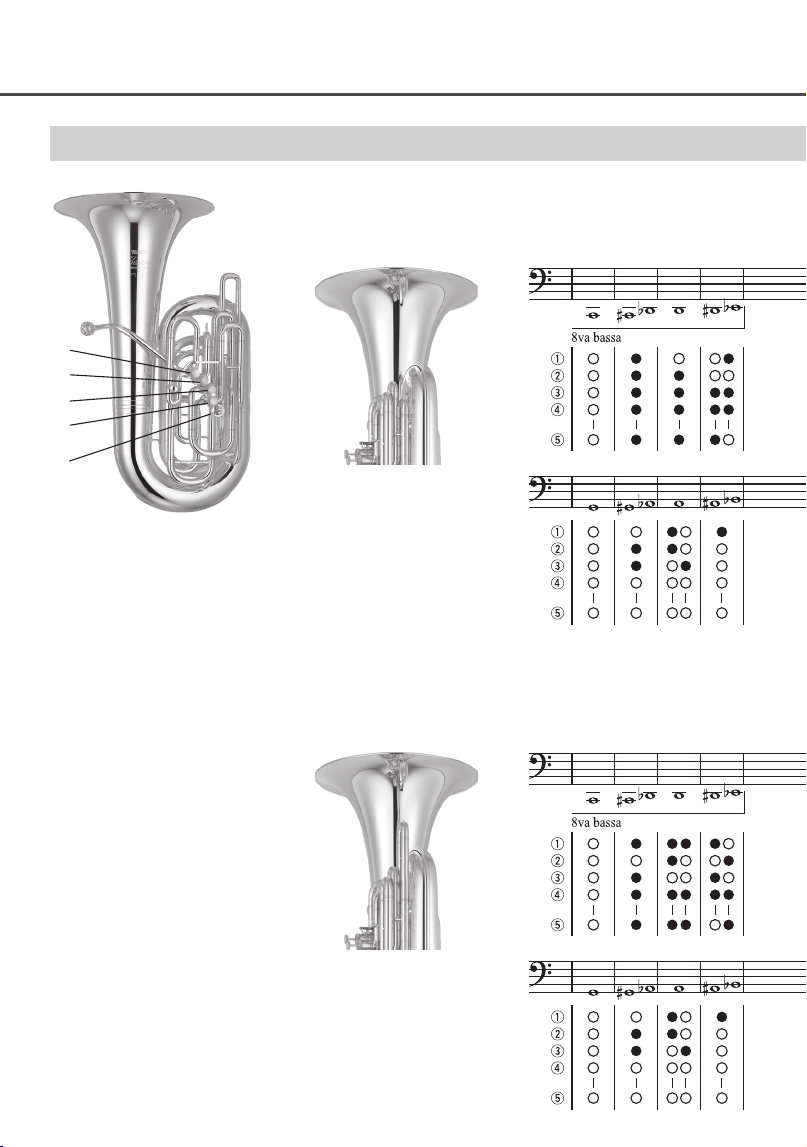
バリトン、ユーフォニアム
Baritone/Euphonium
次中音号 / 上低音号
Баритон (Тенор)/ Эуфониум (баритон)
바리톤 / 유포늄
細管上低音號 / 粗管上低音號
inC
運指表
/Fingering Chart/Gri tabelle/Tablature/Tabla de digitaciones/
Tabela de digitação/
指法表
/
Аппликатура
/
운지법
/
指法表
inEb
アルトホルン
Alto (Tenor) Horn
中音号
Альтгорн
알토 호른
中音號
e w q
r
e w q
23
運指表
/Fingering Chart/Gri tabelle/Tablature/Tabla de digitaciones/
Tabela de digitação/
指法表
/
Аппликатура
/
운지법
/
指法表
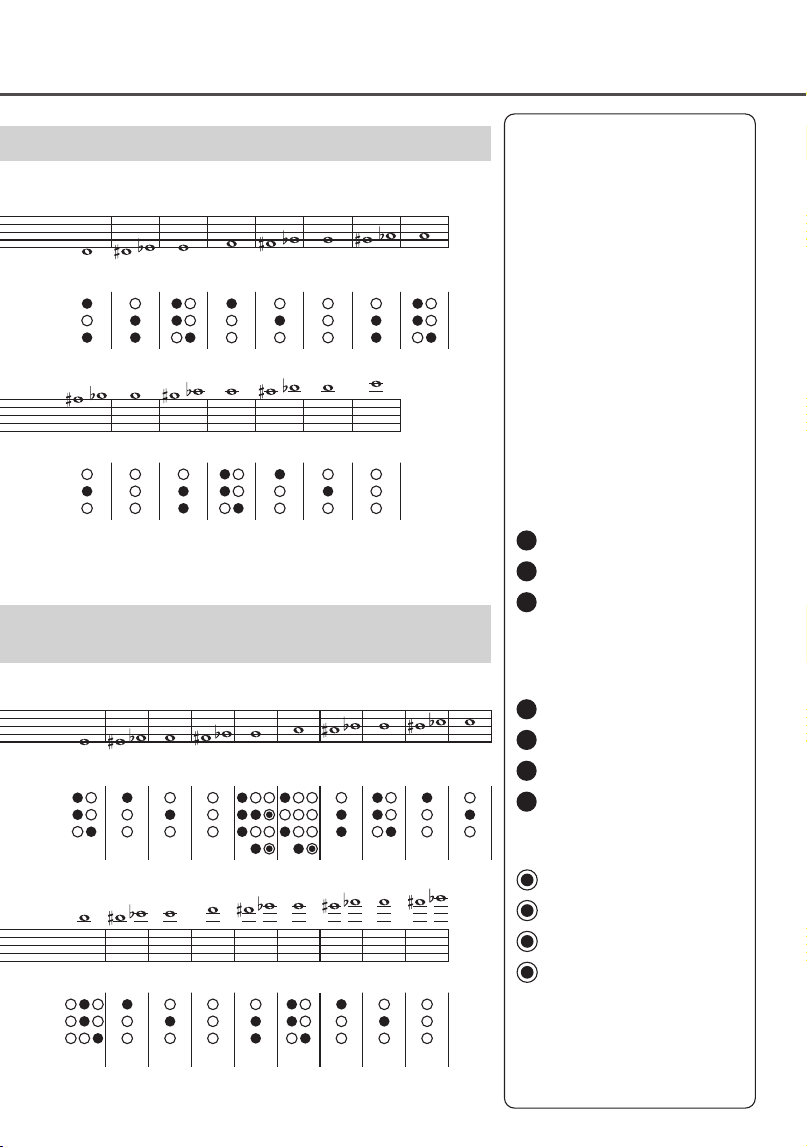
3 本ピストンモデル
3 valve instruments
Instrumente mit 3 Ventilen
Instruments à 3 pistons
Instrumentos de 3 cilindros
Instrumento com 3 válvulas
三个活塞乐器
3-помповые инструменты.
3 밸브 악기
3 活塞樂器
4 本ピストンモデル
4 valve instruments
Instrumente mit 4 Ventilen
Instruments à 4 pistons
Instrumentos de 4 cilindros
Instrumento com 4 válvulas
四个活塞乐器
4-помповые инструменты.
4 밸브 악기
4 活塞樂器
4 本コンペンセイティングモデル
4 valve compensating instruments
Instrumente mit 4 Ventilen und
Kompensationssystem
Instruments à 4 pistons compensés
Instrumentos compensadores de
4 cilindros
Instrumentos compensadores
com 4 pistos
带有省力双管构造的四个活塞乐器
4-помповые инструменты c
квартвентилем
4 밸브 보정 악기
4 活塞補償式樂器
この表では、3/4 本バルブの基本的
な運指を記載しています。
This chart indicates the basic finger-
ings for 3 and 4 valve instruments.
Die Tabelle führt die grundlegenden Griffe
für Instrumente mit 3 bzw. 4 Ventilen an.
B Le tableau indique les doigtés de base
pour les instruments à 3 et 4 pistons.
Esta tabla indica las digitaciones básicos
para los instrumentos de 3 y 4 cilindros.
Esta tabela indica a digitação básica
para instrumentos com 3 e 4 válvulas.
此指法表对应三个活塞与四个活塞乐器
的基本指法。
На этой диаграмме показана
основная расстановка пальцев для
3- и 4-помповых инструментов.
본 차트에서는 쓰리 및 포 밸브 악기에
대한 기본 핑거링을 보여주고 있습니다 .
此圖為 3 活塞與 4 活塞樂器的基本指
法表。
24
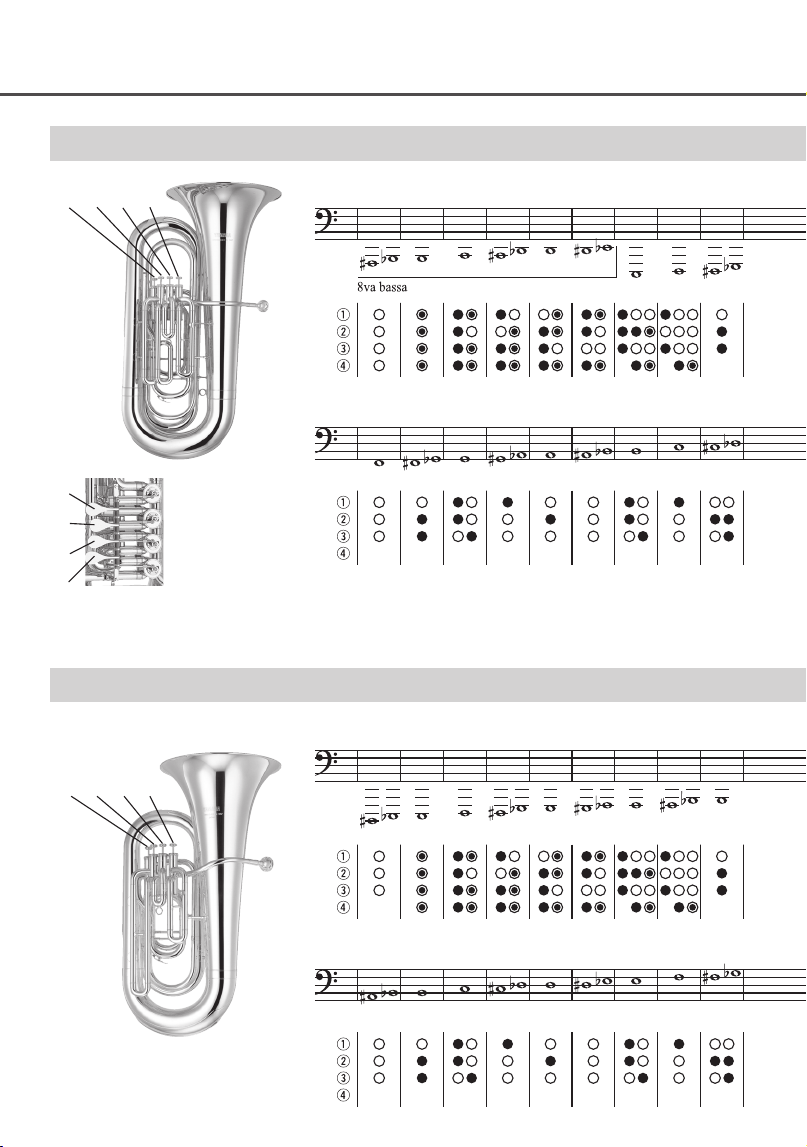
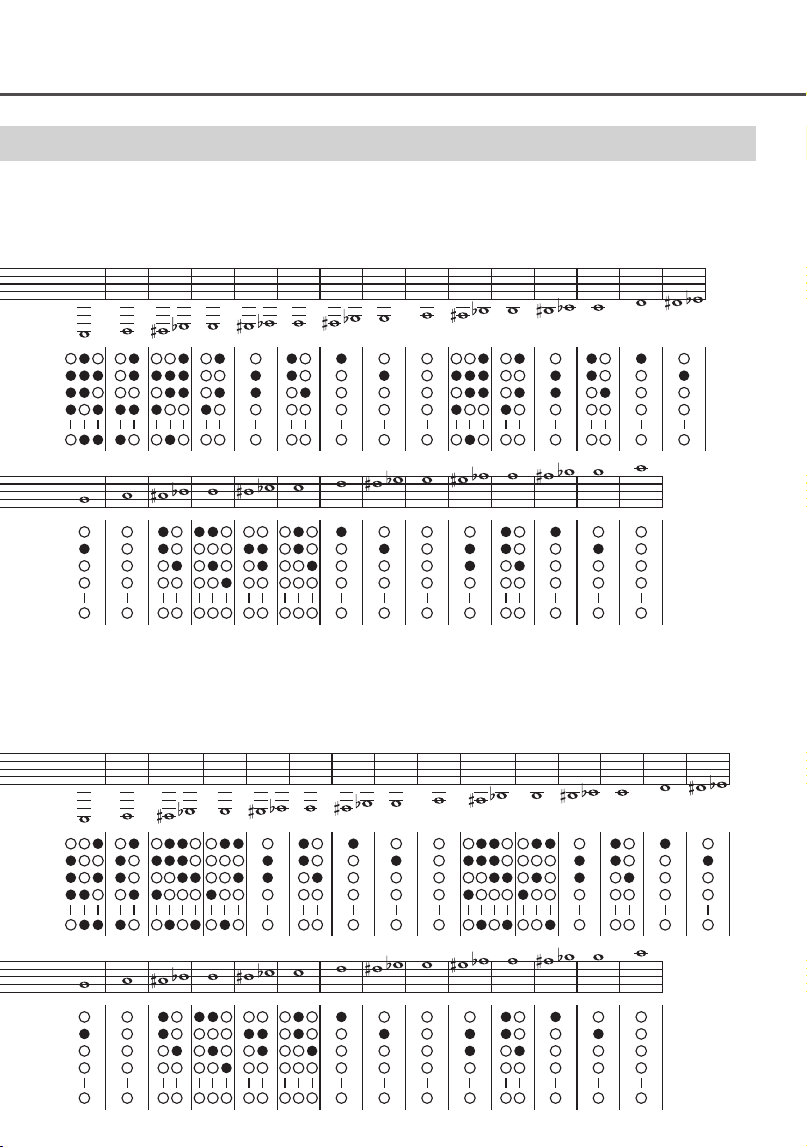
inC
inC
Eb チューバ
E
b
Tuba
E
b
调大号
Туба E
b
E
b
튜바
E
b
調低音號
Bb チューバ
B
b
Tuba
B
b
调大号
Туба B
b
B
b
튜바
B
b
調低音號
ロータリーチューバ
Rotary Tuba
Drehventiltuba
Tuba à pistons rotatifs
Tuba de cilindros
Tuba de rotor
转阀式大号
Педальная туба
로터리 튜바
轉閥式低音號
運指表
/Fingering Chart/Gri tabelle/Tablature/Tabla de digitaciones/
Tabela de digitação/
指法表
/
Аппликатура
/
운지법
/
指法表
r e w q
q
e
w
r
r e w q
25
3 本ピストンモデル
3 valve instruments
Instrumente mit 3 Ventilen
Instruments à 3 pistons
Instrumentos de 3 cilindros
Instrumento com 3 válvulas
三个活塞乐器
3-помповые инструменты.
3 밸브 악기
3 活塞樂器
4 本ピストンモデル
4 valve instruments
Instrumente mit 4 Ventilen
Instruments à 4 pistons
Instrumentos de 4 cilindros
Instrumento com 4 válvulas
四个活塞乐器
4-помповые инструменты.
4 밸브 악기
4 活塞樂器
4 本コンペンセイティングモデル
4 valve compensating instruments
Instrumente mit 4 Ventilen und
Kompensationssystem
Instruments à 4 pistons compensés
Instrumentos compensadores de
4 cilindros
Instrumentos compensadores
com 4 pistos
带有省力双管构造的四个活塞乐器
4-помповые инструменты c
квартвентилем
4 밸브 보정 악기
4 活塞補償式樂器
この表では、3/4 本バルブの基本的
な運指を記載しています。
This chart indicates the basic finger-
ings for 3 and 4 valve instruments.
Die Tabelle führt die grundlegenden Griffe
für Instrumente mit 3 bzw. 4 Ventilen an.
B Le tableau indique les doigtés de base
pour les instruments à 3 et 4 pistons.
Esta tabla indica las digitaciones básicos
para los instrumentos de 3 y 4 cilindros.
Esta tabela indica a digitação básica
para instrumentos com 3 e 4 válvulas.
此指法表对应三个活塞与四个活塞乐器
的基本指法。
На этой диаграмме показана
основная расстановка пальцев для
3- и 4-помповых инструментов.
본 차트에서는 쓰리 및 포 밸브 악기에
대한 기본 핑거링을 보여주고 있습니다 .
此圖為 3 活塞與 4 活塞樂器的基本指
法表。
運指表
/Fingering Chart/Gri tabelle/Tablature/Tabla de digitaciones/
Tabela de digitação/
指法表
/
Аппликатура
/
운지법
/
指法表
26
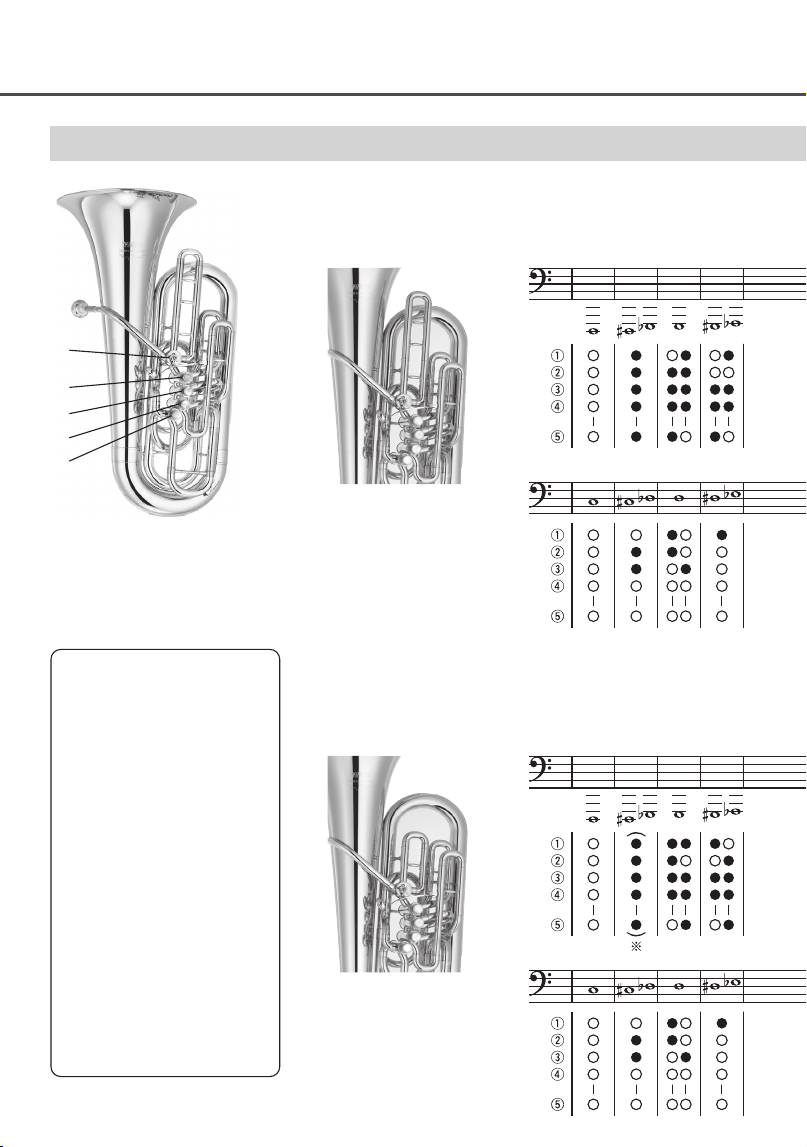
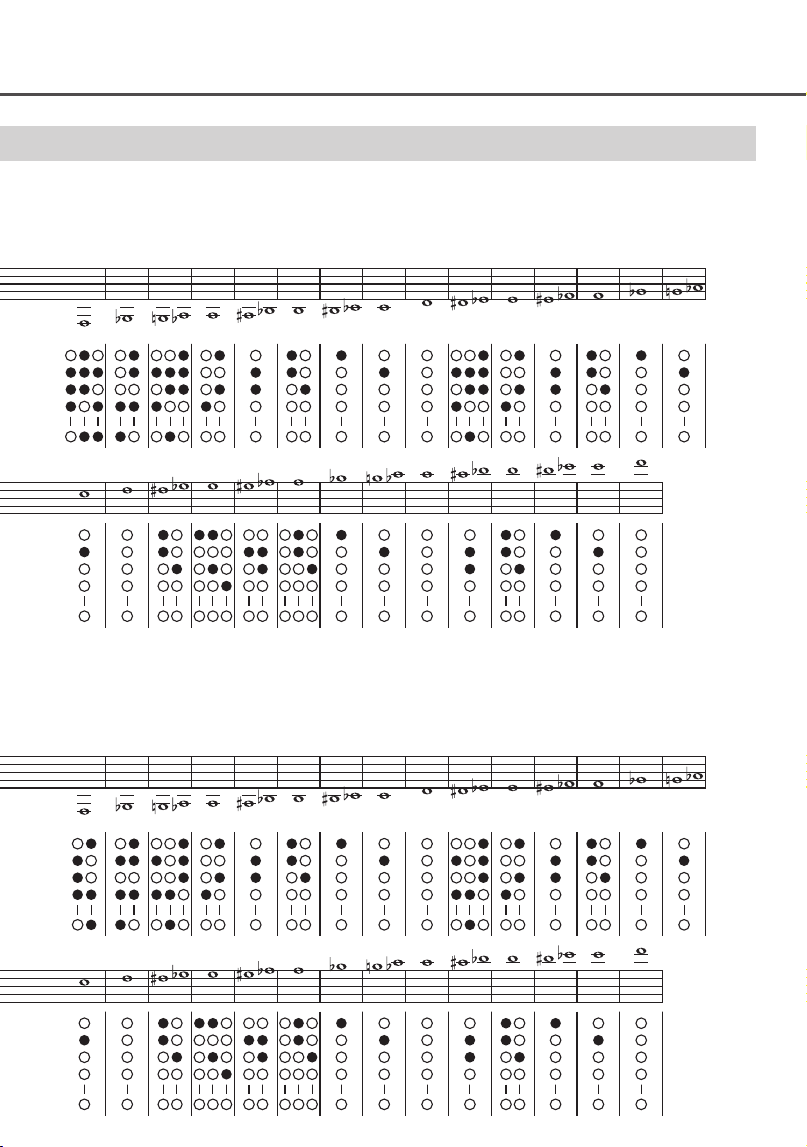
4/3音の第5バルブの運指表
/ 4/3 tone 5th Slide (Longer Whole step down) /
4/3 de tono, bomba del quinto pistón (tono más largo) / 5ª bomba 4/3 tom
(понижение на увеличенный тон)
/
4/3음 5th 슬라이드(롱거 홀 스텝 다운)
/
運指表
/Fingering Chart/Gri tabelle/Tablature/Tabla de digitaciones/
Tabela de digitação/
指法表
/
Аппликатура
/
운지법
/
指法表
C チューバ
C Tuba
C
调大号
Туба C
C
튜바
C 調低音號
2音の第5バルブの運指表(YCB822のみ)
/ 2 tones 5th Slide (Two Whole steps down,
complets vers le bas, modèle YCB822 uniquement) / 2 tonos, bomba del quinto
五调音管指法表(偏低 2 个全音阶,仅 YCB822)
/
5-й крон: 2тона (понижение на два
用於 YCB822)
t
q
e
w
r
inC
inC
27
4/3-Ton Fünfter Zug (Längerer Ganztonschritt abwärts) / 5e coulisse 4/3son (incrément le plus long vers le bas) /
(passo mais baixo completo mais longo) /
4/3 音阶第五调音管指法表(更长,偏低 1 个全音阶)
/
5-й крон: 4/3тона
4/3 音調第 5 活塞閥滑管 (下降較多全音)
運指表
/Fingering Chart/Gri tabelle/Tablature/Tabla de digitaciones/
Tabela de digitação/
指法表
/
Аппликатура
/
운지법
/
指法表
YCB822 only) / 2 Töne Fünfter Zug (Zwei Ganztonschritte abwärts, nur YCB822) / 5e coulisse 2sons (deux incréments
pistón (dos tonos, solo YCB822) / 5º bomba 2 tons (dois passos mais baixos completos, apenas YCB822) /
2 音阶第
тона, только YCB822)
/
2음 5th 슬라이드(2 홀 스텝 다운, YCB822만 해당)
/
2 音調第 5 活塞閥滑管 (下降兩個全音,僅適
28
運指表
/Fingering Chart/Gri tabelle/Tablature/Tabla de digitaciones/
Tabela de digitação/
指法表
/
Аппликатура
/
운지법
/
指法表
F チューバ
F Tuba
F
调大号
Туба F
F
튜바
F 調低音號
4/3音の第5バルブの運指表
/ 4/3 tone 5th Slide (Longer Whole step down) /
4/3 de tono, bomba del quinto pistón (tono más largo) / 5ª bomba 4/3 tom
(понижение на увеличенный тон)
/
4/3음 5th 슬라이드(롱거 홀 스텝 다운)
/
2/3音の第5バルブの運指表(YFB621のみ)
/ 2/3 tone 5th Slide (Longer Half
(demi-incrément le plus long vers le bas, modèle YFB621 uniquement) /
baixo mais longo, apenas YFB621) /
2/3 音阶第五调音管指法表(更长,
2/3음 5th 슬라이드(롱거 하프 스텝 다운, YFB621만 해당)
/
t
q
e
w
r
inC
inC
(※)この運指はピッチがかなり
高くなります。
(※)
This fingering allows you to
produce very high pitches.
(※)
Mit diesem Fingersatz können
Sie sehr hohe Töne erzeugen.
(※)
Cette tablature vous permet
de produire des hauteurs de
ton très élevées.
(※)
Esta digitación le permite
generar tonos muy altos.
(※)
Esta digitação permite produ-
zir tons muito altos.
(※)
此指法可让您演奏出非常高的
音。
(※)
Данная аппликатура позво-
ляет брать очень высокие
ноты.
(※)
이 운지법을 사용하면 매우 높
은 피치를 연주할 수 있습니다.
(※) 這個指法可以讓您演奏出極高
的音高。
29
運指表
/Fingering Chart/Gri tabelle/Tablature/Tabla de digitaciones/
Tabela de digitação/
指法表
/
Аппликатура
/
운지법
/
指法表
4/3-Ton Fünfter Zug (Längerer Ganztonschritt abwärts) / 5e coulisse 4/3son (incrément le plus long vers le bas) /
(passo mais baixo completo mais longo) /
4/3 音阶第五调音管指法表(更长,偏低 1 个全音阶)
/
5-й крон: 4/3тона
4/3 音調第 5 活塞閥滑管 (下降較多全音)
step 2 down, YFB621 only) / 2/3-Ton Fünfter Zug (Längerer Halbtonschritt abwärts, nur YFB621) / 5e coulisse 2/3son
2/3 de tono, bomba del quinto pistón (medio tono más largo, solo YFB621) / 5º bomba 2/3 tom (meio passo mais
偏低 1 个半音阶,仅 YFB621)
/
5-й крон: 2/3тона (понижение на увеличенный полутон, только YFB621)
/
2/3 音調第 5 活塞閥滑管 (下降較多半音,僅適用於 YFB621)

© 2013 Yamaha Corporation
Published 02/2023
2023
年
2
月
发行
POCP-B0
〒430-8650 静岡県浜松市中区中沢町 10-1
VGD8590