Pr
Montre sportive GPS intelligente
oduct User Manual
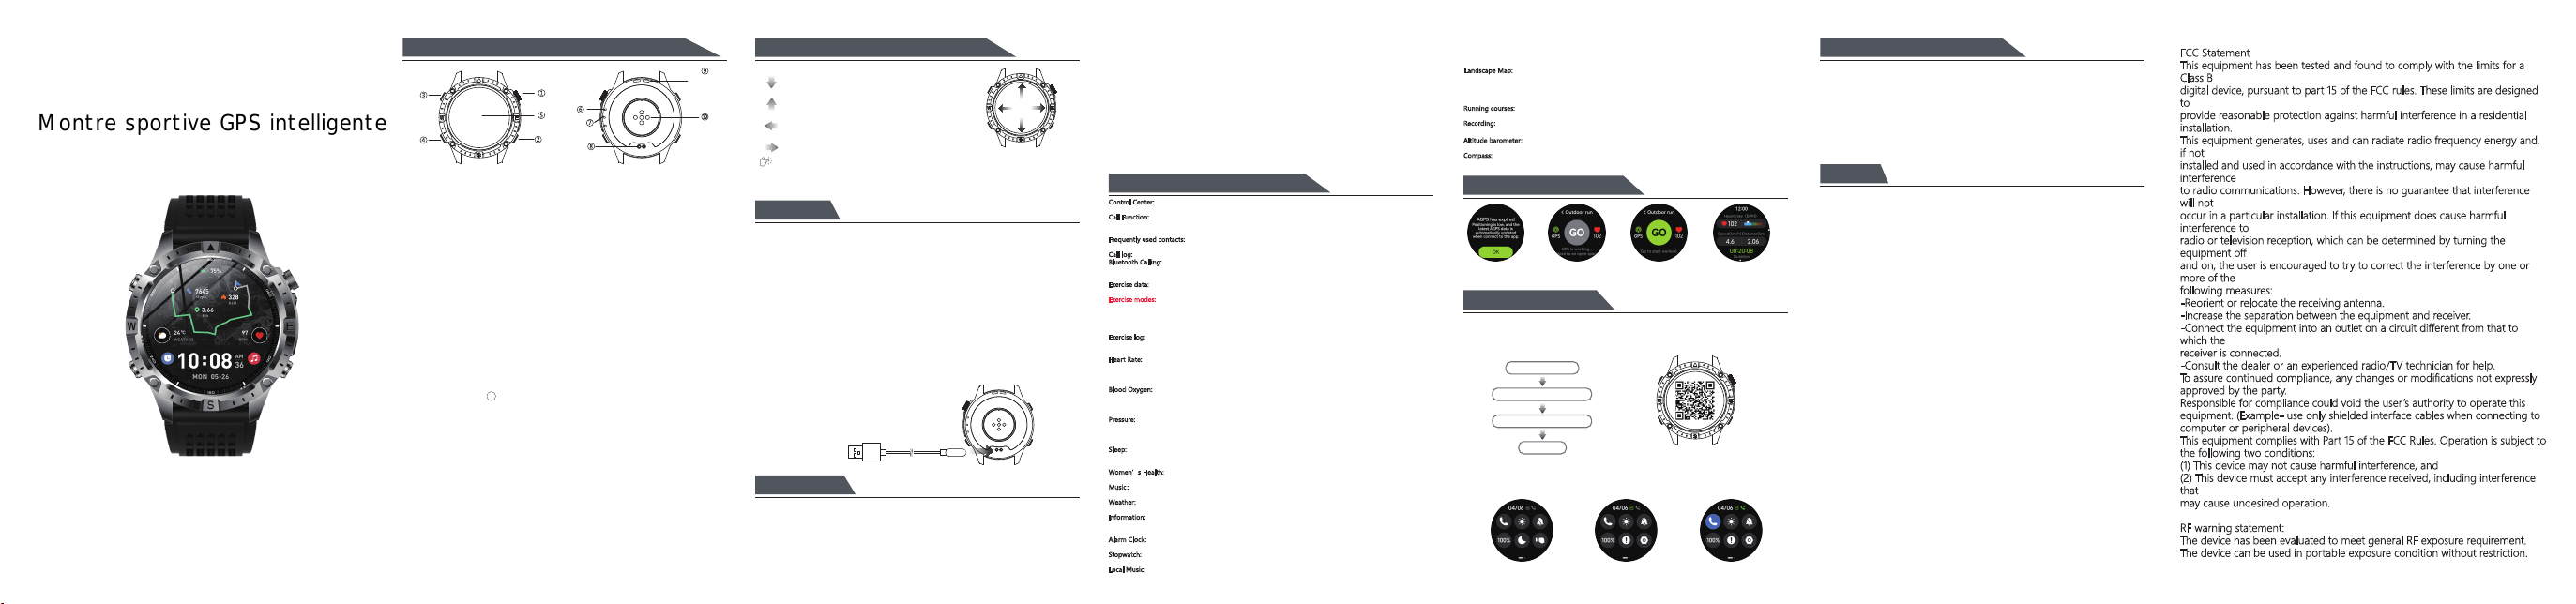
1. .PRODUCT INTRODUCTION&BUTTON DEFINITIONS
2.TOUCH SCREEN CONTROL DEFINITIONS
Swipe down: dial interface swipe down to
openstatus bar.
Swipe up: dial interface swipe up to enter
notification information interface
Swipe left: dial interface swipe left to enter
shortcut function
Swipe right: dial interface swipe right to enter
main menu interface
On the watch face interface, press and hold the watch face for 2-3 seconds
to switch watch faces. Swipe left or right to switch watch faces, and click to
select a.
3.Charge
1. When the watch indicates low battery power, please charge it immediately.
The charging time is 2-3 hours.
2. The watch uses magnetic charging. Align the charging contacts on the
charging cord with the charging port on the watch to begin charging. Continue
until the watch’s screen displays a charging indicator.
3. During charging, in order to ensure stable charging, the watch will turn off its
screen for charging. Pressing a button can wake the watch up. When the
watch’s battery is low, it needs to be charged for 3-5 minutes before it can be
woken up. This is a normal situation. Please wait for 5 minutes before checking
the charging status of the watch.
4. Please use a charger with a rated output voltage of 5V and a rated output
current of 0.5A to 2A, or the USB port of a computer, to charge the watch.
5. When your watch is not in use for an extended period, please fully charge it
and then turn it off and store it. Do not leave it in a depleted state for an
extended period. This could damage the battery due to prolonged depletion.
4.Use GPS
1. In order to get a better experience, please connect and bind the APP when
using the GPS function for the first time. Within about 3 minutes after binding, the
"GloryFitPro" app will send GPS ephemeris orbit and other data to the watch via
Bluetooth in the background. After the ephemeris is successfully sent, the GPS
positioning time can be greatly shortened. If the sending is not successful, the
watch will pop up the "AGPS has expired" reminder when you open the sports with
GPS function for the first time. AGPS expiration will cause the positioning time to
be too long, affecting the positioning experience. You can try to unbind and bind the
watch APP again. And wait for 2 minutes before trying to use the GPS function.
If APGS is sent successfully, the "AGPS has expired" reminder will not pop up when you
open the GPS function for the first time.
2. At 09:00 every morning, the "GloryFitPro" app will re-acquire the latest GPS ephemeris
data of the day. The watch obtains the latest GPS ephemeris data when Bluetooth is
connected.
3. The GPS positioning time is too long and whether the GPS track drifts are greatly
affected by environmental factors. Choosing an open place or away from high-rise
buildings will help GPS to quickly locate and reduce the deviation of the track.
6.GPS usage interface
AGPS has expired GPS location detected GPS location established Positioning complete
In motion
7.APP connection
Scan the watch’s QR code or visit major app marketplaces to download and install the
“GloryFitPro” app.
When you first open the app, a permission pop-up window will appear. Please click “Allow”
to ensure that the app has the necessary permissions.
Open GloryFit and set
Personal informations
Switch to “Device”page and
click”Add device”or“Scanning”icon
Find your device in the scan list
Binding completed
During the connection process, there will be pop-up prompts indicating confirmation of pairing
with the watch or phone. Please click to confirm the pairing.
Once the connection is established, the call icon and data connection icon in the watch’s
status bar will turn green. In the gray state, it indicates that there is no connection.
5.Overview of key features
Control Center: Bluetooth call activation/deactivation, brightness adjustment, mute switch, power-saving mode
switch, system information, settings, etc. (+ manual additions can be made).
Call Function:
This feature requires connecting to audio Bluetooth. When entering dial mode, you can input the
phone number as needed and then dial by pressing keys 7 or 9. Long-press keys 2 for 2 seconds to input
asterisks (*) and dashes (#).
Frequently used contacts:
These need to be added in the contact list section of the app. The added contacts will
be automatically synchronized with the device. A maximum of 100 contacts and 1 SOS contact can be added.
Call log:
The most recent 10 call records can be saved.
Bluetooth Calling:
After the watch is connected to the app, a pop-up window for Bluetooth calling will appear.
The user must grant permission for the connection request. Once connected, the user can use the Bluetooth
calling feature.
Exercise data:
Displays the steps, distance, and calorie data recorded on that day, as well as the steps data from
the past seven days. Users can set their target step count, distance, and calorie goals through the app’s settings.
Exercise modes:
The device comes with 14 pre-installed exercise modes by default: outdoor running, outdoor
walking, indoor walking, indoor running, outdoor cycling, indoor cycling, swimming in a pool, open-water
swimming, triathlon, hiking, elliptical trainer, rowing machine, dance, and free training. Additionally, users can
manually select and add over 160 additional exercise modes to the watch. The watch can support up to 24
built-in exercise modes, allowing users to switch between them as needed.
Exercise log: This interface stores your last 10 exercise sessions. Historical records allow you to view the duration
of exercise, heart rate, and more.
Calorie counts, etc.
Heart Rate:
When you enter the heart rate measurement interface, the bottom green light illuminates to begin
the measurement. There will be a vibration alert approximately 45 seconds after the measurement is complete. If
it indicates that the watch is not worn, you need to properly reattach it. The device can display the user’s
current heart rate range and the 24-hour heart rate curve.
Blood Oxygen:
When entering the blood oxygen measurement interface, the bottom red light illuminates to
begin the measurement. A vibration alert is provided approximately 45-60 seconds after the measurement is
complete. This measurement is based on PPG technology. It displays the user’s recent seven readings of blood
oxygen levels.
Pressure:
When entering the pressure test interface, the bottom green light illuminates to begin the
measurement. There will be a vibration alert approximately 45 seconds after the measurement is complete. If it
indicates that the watch is not worn, the user must properly reattach the watch. The current pressure data for the
user during that period, as well as a comparison curve from the time of recording, can be displayed.
Sleep:
The watch displays data on sleep for the current day. Data from the previous 7 days can be viewed on the
app. This data is automatically cleared after a certain period. The watch’s data for the current day is cleared at
18:00 each day, and new sleep data is recorded.
Women’s Health:
After connecting the watch to the app, set the account gender to female. The app’s female
health reminders can be viewed on the watch.
3[YOI
After connecting the watch to an app, it can control the pause, play, volume adjustment, and song
switching of a phone’s music player.
Weather:
Once the watch is connected to the app, this weather interface will display real-time weather
temperatures and weather conditions.
Information:
After connecting the watch to the app, you can open notifications related to the information on the
app’s side. The watch can receive corresponding message notifications, and it can store up to the last 8
messages.
Alarm Clock:
After connecting the watch to an app, you can set one-time alarms and recurring alarms. A
maximum of 5 alarms can be set.
Stopwatch:
Clicking the Start button initiates the timer, clicking the Pause button halts it, and clicking the Reset
button resets it to zero.
Local Music:
After connecting the watch to an app, you can operate it through the app. You can transfer music in
MP3 format from your phone’s local storage to the watch, allowing you to play music independently through
the watch or by connecting it to an earbud.
(Note: 1. To connect a Bluetooth headset, you need to unbind the original device. 2. The watch’s storage
capacity is limited, and there are restrictions on the number of songs that can be imported. The actual limit
depends on the size of each individual song.)
Landscape Map:
After connecting the watch to the app, open the “Landscape Map” on the app interface, load
the map locally, and match the specified area’s landscape map with the watch. Do not perform any other
actions during the transmission process. Support for tracing and returning: After clicking “Record Track” within
the map and performing a movement, save this route. Subsequent tracing and returning can be done using
“My Routes”.
8.Disconnection method
IOS: In the app’s “Devices” interface, locate the “Unbind” option. Click on it
to unbind. Then, navigate to the “Settings-Bluetooth” interface within the
phone’s system, click on the ! symbol next to the device, and select “Ignore this
device.” This will allow you to unbind from the phone’s system, ensuring that
you are no longer connected. Otherwise, you will not be able to reconnect the
next time.
Android: On the “Devices” interface of the app, locate the “Unlink” option.
Click it to disconnect from your phone.
9.Note
1. Do not charge the device when there is water damage present.
2. This device is not a medical device, and the data and information provided are
for reference purposes only.
3. Water-resistant claim.
This product meets the 3ATM waterproof standard (can withstand a static water
pressure of 30 meters for 10 minutes) and is suitable for use in scenarios
involving swimming in pools and open water, snorkeling, and other shallow water
activities. After each immersion, please inspect all openings. Residual water stains
can affect microphone sound quality and air pressure height monitoring. Use a
lint-free cloth to dry them or shake off the watch to expel the water, and place it
in a well-ventilated area to dry. Do not heat it, use compressed air or sprays, or
insert any sharp objects into the openings.
This product is not suitable for the following usage scenarios. Damage caused by
exposing the device to liquids in non-compatible situations is not covered by the
warranty.
· Activities such as hot-water showers, thermal baths, and saunas performed in
environments with high temperatures and humidity.
· Engage in activities that involve exposure to shower gels, shampoos, soap
solutions, and other personal care products. The chemicals present in these items
can potentially have adverse effects on the waterproof seals and acoustic
membranes. If contact occurs unintentionally, clean the area with water and soak
it for 15 minutes.
· Scuba diving, technical diving, and diving activities at depths exceeding 30
meters.
4. Please do not place the device in direct sunlight, such as on the dashboard of a
car or on a windowsill.
5. Do not place the device near heat sources or exposed flames, such as
electromagnetic cooktops, microwaves, ovens, water heaters, open fires, candles,
or any other area where high temperatures may be generated.
6. Do not allow children or pets to chew on the device or its accessories, as this
could cause harm to them or lead to malfunction of the device.
7. This equipment is not a toy. Children should use it under the supervision of an
adult.
8. This device is equipped with an in-built battery that cannot be removed. Please
do not replace the battery yourself.
4. Save the data after the exercise, and the APP will synchronize the exercise data.
The exercise trajectory and exercise data can be queried in detail on the APP.
Running courses: The watch comes with a range of running courses, and users follow the instructions provided
within the courses to engage in proper exercise routines.
Recording:
Enable the recording feature. Click to start recording and save the notes. There is a limit on the number
of
r
eco
r
dings that can be sa
v
ed, which depends on the actual size
o
f the files in te
rms
of memo
r
y usage.
Altitude barometer:
Activate the altitude barometer feature to view the elevation and atmospheric pressure data
for your current location.
Compass:
Activate the compass feature. Make the corresponding gestures based on the diagram. Once the
compass is calibrated, you can view the direction of your current location.
BT Call and APP
Disconnected
APP Connected
BT Call Disconnected
APP Connected
BT Call Connected
button 3
button 4
button 1
air pressure
hole
heart rate
sensor
button 2
charging port
speaker
display
MIC
Definition of button③(sports button):
Definition of button Flashlight on/off:
Note:
Short press:
A. Enter the sports mode list
B. Short press to light up the screen when the screen is off
C. Long press for 2S during sports; stop and end the sports
Water sports refer to water sports such as swimming, diving, rafting, rowing,
sailing, etc. In this mode, to prevent accidental touches by water drops, the touch
function will be turned off by default during sports, and button operation will be
preferred. You can also control it by unlocking the touch function.
Key definition in water sports mode:
Button①: Short press to unlock the touch function. After unlocking, if the interface
has been flipped down, you can flip the page up through "button①".
Button②: Short press to pause the current sports mode. Short press again to
continue the current sports and lock the touch screen.
Button③: Short press to flip the page down, long press to end the sports mode. (If
the sports duration is too short, no data will be recorded. When the pop-up window
prompts whether to end, short press "button③" to continue the sports. Short press
"button②" to exit the sports.)
Press and hold for 2 seconds: Open the voice assistant/custom shortcut function.
Supplement: Customers can choose one of the return key/shortcut key. If the shortcut
function is not set, short press to return to the previous level, and long press the voice
assistant. If the shortcut function is set, follow the setting items to achieve it.
4
Button①definition:
Button②definition:
Power button
Short press: Short press once on the watch face interface to turn off the screen.
Short press once on the application list interface to return to the watch face
interface. Short press once again to turn off the screen.
Long press for 2s: power on/off, restart, SOS (long press to display menu selection).
Press and hold for 12 seconds: force restart the device.
Return key/shortcut key:
Short press:
A. Other pages return to the previous level/customized shortcut functions.
B. Short press while the screen is idle to light up the screen.
C. Pause/continue during exercise.
D. Short press when there is an incoming call to mute.
FCC Statement
This equipment has been tested and found to comply with the limits for a
Class B
digital device, pursuant to part 15 of the FCC rules. These limits are designed
to
provide reasonable protection against harmful interference in a residential
installation.
This equipment generates, uses and can radiate radio frequency energy and,
if not
installed and used in accordance with the instructions, may cause harmful
interference
to radio communications. However, there is no guarantee that interference
will not
occur in a particular installation. If this equipment does cause harmful
interference to
radio or television reception, which can be determined by turning the
equipment off
and on, the user is encouraged to try to correct the interference by one or
more of the
following measures:
-Reorient or relocate the receiving antenna.
-Increase the separation between the equipment and receiver.
-Connect the equipment into an outlet on a circuit different from that to
which the
receiver is connected.
-Consult the dealer or an experienced radio/TV technician for help.
To assure continued compliance, any changes or modifications not expressly
approved by the party.
Responsible for compliance could void the user’s authority to operate this
equipment. (Example- use only shielded interface cables when connecting to
computer or peripheral devices).
This equipment complies with Part 15 of the FCC Rules. Operation is subject to
the following two conditions:
(1) This device may not cause harmful interference, and
(2) This device must accept any interference received, including interference
that
may cause undesired operation.
RF warning statement:
The device has been evaluated to meet general RF exposure requirement.
The device can be used in portable exposure condition without restriction.