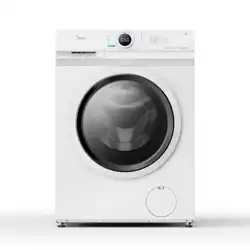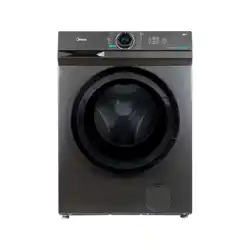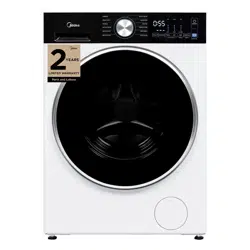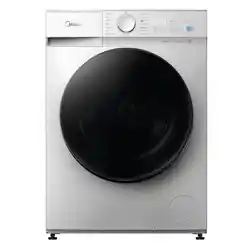
MODEL:
MFV3EW100BA10
USER MANUAL
EN
WASHING MACHINE
Front Loading
Read This Manual
Read all instructions and
explanations for the installation
before use. Follow the instructions
carefully. Keep the operation
instructions handy for later use.
If the appliance is sold or passed
on, ensure that the new owner
always receives this operation
instructions.

Thank you for choosing Midea! Before using your new Midea product,
please read this user manual thoroughly to ensure that you know how to
operate the features and functions that your new appliance offers in a safe
way.
THANK YOU LETTER
01
CONTENTS
THANK YOU LETTER
SAFETY INSTRUCTIONS
SPECIFICATIONS
PRODUCT OVERVIEW
QUICK START GUIDE
PRODUCT INSTALLATION
OPERATION INSTRUCTIONS
CLEANING AND MAINTENANCE
TROUBLE SHOOTING
TRADEMARKS, COPYRIGHTS AND LEGAL STATEMENT
DISPOSAL AND RECYCLING
DATA PROTECTION NOTICE
WARRANTY CARD
01
02
07
08
09
12
16
29
3
4
3
5
3
6
3
7
38
02
SAFETY INSTRUCTIONS
Please read the user manual carefully before using the appliance. It provides
important information on safety, installation, operation and maintenance. This
will protect you and prevent damage to the appliance. An improper usage can
cause personal injuries and damage to properties. Failing to follow these
instructions shall void any warranty.
Keep the user manual for future reference. If the appliance is sold or passed
on, make sure that the new owner always receives these safety instructions.
Intended Use
• This appliance is intended to be used in domestic household and similar
household installation environments.
• This appliance is intended to wash textiles in household amounts suitable for
domestic appliances.
• This appliance is intended for indoor usage only, not intended for outdoor,
built in or commercial usage.
• Persons with reduced physical, sensory or mental capabilities or lack of
experience and knowledge unless they have been given supervision or
instruction concerning use of the appliance in a safe way and understand the
hazards involved.
All other types of usage are not permitted. Manufacturer is not liable for
damage caused by improper usage or incorrect operation.
NOTE
Safety with Children
• Children under 3 years shall be kept away from the appliance or continuously
supervised.
• Children should be supervised that they do not play with the appliance.
• Children from the age of 8 can use the appliance safely after they have been
given appropriate supervision or instruction concerning use of appliance.
• Cleaning and maintenance shall not be made by children without
supervision.
• Children as well as pets may climb into the appliance. Check the appliance
before every operation.
• Glass door may become very hot during washing. Keep children and pets far
away from the appliance while it is operating.
• All washing detergents, fabric softener and cleaning agents are to be kept in
a safe place out of the reach of children.
03
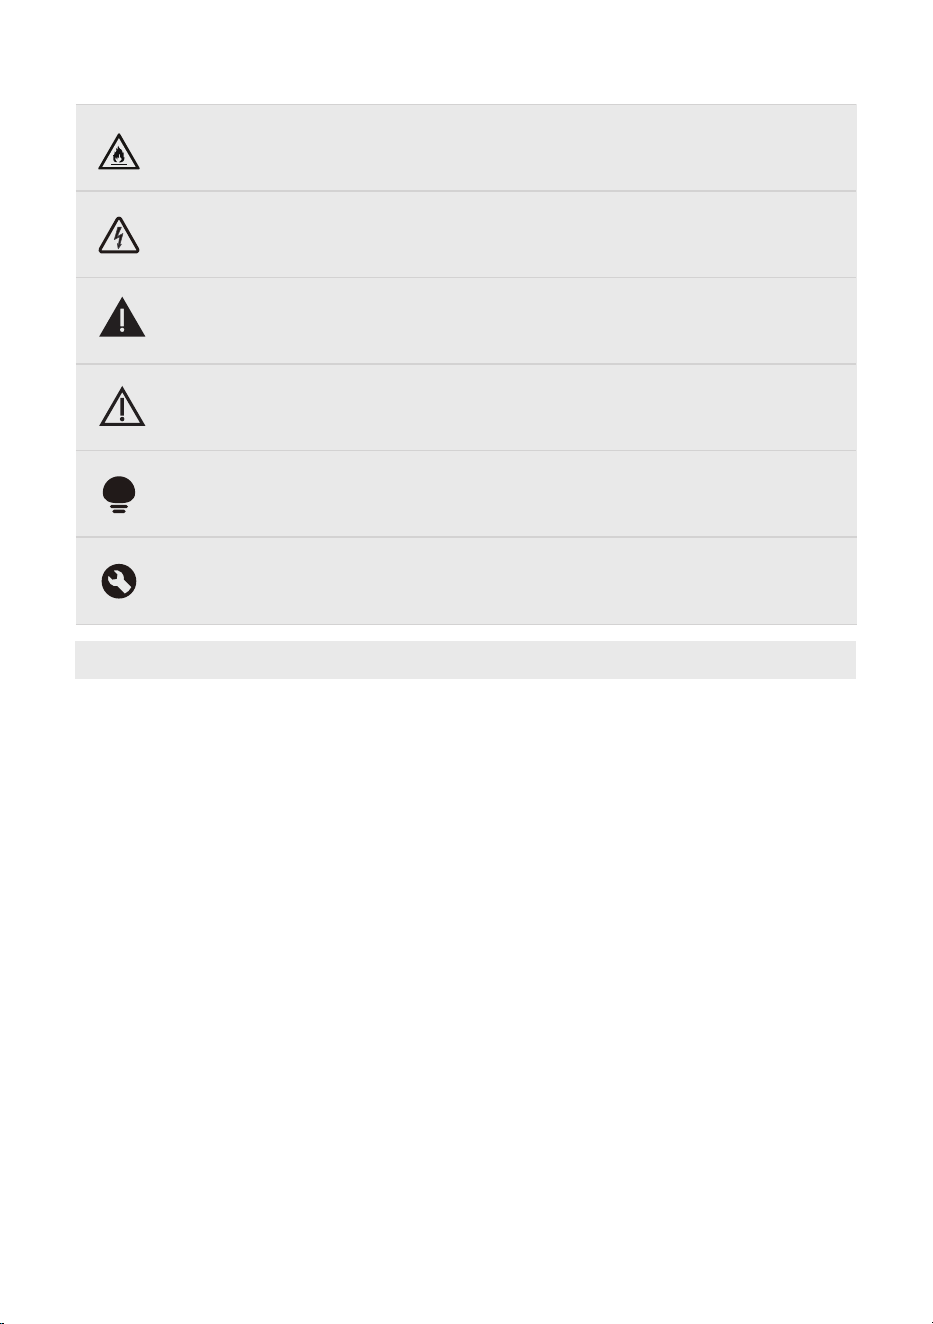
DANGER
This symbol indicates that there are dangers to the life and health of
persons due to extremely flammable gas.
WARNING OF ELECTRICAL VOLTAGE
This symbol indicates that there is a danger to life and health of
persons due to voltage.
WARNING
The signal word indicates a hazard with a medium level of risk which, if
not avoided, may result in death or serious injury.
CAUTION
The signal word indicates a hazard with a low degree of risk which, if
not avoided, may result in minor or moderate injury.
NOTE
The signal word indicates important information (e.g. damage to
property), but not danger.
OBSERVE INSTRUCTIONS
This symbol indicates that a service technician should only operate and
maintain this appliance in accordance with the operating instructions.
Explanation of Symbols
Installation Location and Surrounding
• Do not install the appliance on a carpet floor. Because an obstruction of the
openings by a carpet can damage the appliance.
• Keep the appliance clear from heating sources and direct sunlight to avoid
plastic and rubber parts to corrode.
• Do not use the appliance in humid environments or rooms containing
explosive or caustic gas.
• The appliance must not be installed behind a lockable door, a sliding door or
a door with a hinge on the opposite side to that of the appliance.
• Do not operate the appliance in rooms with a temperature of below 5°C. This
can cause damages by frost to components, like hoses, which may burst or
split. If it is unavoidable, make sure to drain the water completely from the
appliance after every use. (see “Cleaning of drain pump”)
• Never use flammable sprays or substances in the immediate proximity of the
appliance.
• This appliance is intended for use at altitudes of up to 4000m above sea
level.
• Must not be installed in a non- stationary location like on a ship.
04
Installation
• Pay attention to the chapter “Product Installation”.
• Remove all packaging material and transport bolts before operating the
appliance. Otherwise, serious damage may result.
• Before setting up the appliance, check it for any externally visible damage.
Do not install or use a damaged appliance.
• This appliance is equipped with a single inlet valve and can be connected to
the cold water supply only.
• After installation the appliance, it shall be calibrated. (see “Quick Start
Guide”)
• Before washing laundry for the first time, the appliance shall be operated
once a machine cleaning program. (see “Quick Start Guide”)
• Do not put any excessively heavy objects on the appliance, like water
containers or heating devices.
Electrical Connection
• Connect the appliance to a grounded outlet socket protected by a fuse
complying with the data in the "Technical specifications” table.
• If needed, the grounding installation has to be made by a qualified
electrician. Ensure that the appliance is installed in accordance with the local
regulations.
• Don´t use multiple plugs, extension cords or similar. Risk of overheating!
• The electrical socket must be easily accessible after installation so that the
appliance can be disconnected from the electricity supply if needed.
• The appliance must not have an external switching device such as a timer or
connected to a circuit that is regularly switched on and off.
• Always pull at the plug, not at the cable.
• Do not pull the plug out of the mains outlet if there is flammable gas around.
Risk of explosion!
• Make sure the supply cable is not trapped by the appliance, or it can get
damaged.
• Always unplug the appliance if it is not being used.
Electric Shock HazardWARNING:
• If the supply cord is damaged, it must be replaced by the manufacturer, its
service agent or similarly qualified persons in order to avoid a hazard.
• If the appliance is damaged, it must not be operated unless repaired by the
manufacturer, its service agent or similarly qualified persons. Never try to
repair an appliance which is defective or presumed to defective.
• Never pour water over the appliance for cleaning purpose.
• Do not make any technical alterations to the appliance.
• Do not climb or sit on the appliance.
• Never pull out power plug with wet hands.

05
Water Connections
• The water inlet pressure should be between a maximum of 1 MPa (10bar) and
a minimum of 0.05MPa (0.5 bar).
• The new hose-sets supplied with the appliance are to be used and that old
hose-sets should not be reused.
• The water inlet and outlet hoses have to be securely installed and remain
undamaged. Risk of water leakage!
• Check regularly the connections of the water inlet hose, the water tap and
the outlet hose for possible problems due to changes of water pressure. If
the connections loosen or leak, close the water tap and get it repaired.
• If you connect the drain hose to a sink, check that the water can drain
quickly enough to prevent the sink from flooding. Make sure that the drain
hose is properly secured so that it does not slip due to the force of the water
flowing out.
• Close the tap if you are using the appliance for a longer period of time like
on vacation, especially if there is no floor drain in the immediate proximity.
Operation
• Pay attention to the maximum load quantity of this appliance and the
reduced load quantity of the single programs. The load quantity is expressed
in kilogram dry laundry. (see “Program Settings)
• Make sure that all pockets are emptied. Sharp and rigid items such as coins,
brooches, nails, screws, stones etc. may cause serious damages to appliance
components, which can therefore cause damage to the laundry.
• Take care to remove lighters and matches before washing the laundry.
• Items that have been soiled with substances such as cooking oil, acetone,
alcohol, petrol, kerosene, spot removers, turpentine, wax and wax removers
should be washed manual in hot water with an extra amount of detergent
before being washed in the appliance.
• Items containing foam rubber (latex foam), shower caps, water proof
textiles, rubber backed articles and clothes or pillows fitted with foam
rubber pads should not be washed in the machine.
• Washing detergents, fabric softener or washing additives should be used
and dosed as recommended in the instructions by manufacture.
• If you would like to descale the appliance, only use a proprietary natural
citric acid based descaling agent.
• If the detergent gets into your eyes, rinse them thoroughly with lukewarm
water immediately. If swallowed, consult a doctor immediately and present
the packaging or label of the detergent.
• Please do not close the door with excessive force. If it is found difficult to
close the door, please check if the laundry are properly inserted and
distributed.
• Take care when opening the door after using the steam function. Take a step
back and wait until the steam has evaporated. Risk of scalding!
• Never try to open the door forcefully. The door will unlock shortly after the
end of a program.
Maintenance
CAUTION
• Pay attention to the chapter “Cleaning and Maintenance”.
• Always unplug the appliance and close the water tap before cleaning and
maintenance and after each use.
• Never use any flammable, explosive or toxic cleaning solvents. Do not use
gasoline and alcohol etc. as detergents. Only select detergents that are
suitable for machine washing. Risk of fire and explosion!
• Do not remove the drain pump filter while there is still water in the
appliance. Big quantities of hot water can leak out. Risk of scalding!
Repairs shall only be carried out by the manufacturer, its service agent or
similarly qualified persons in order to avoid a hazard. Manufacturer will not be
responsible for damages caused by the intervention of not authorized
persons. Failing to follow these instructions shall void any warranty.
Transport
CAUTION
Before transporting the appliance prepare it to following instructions:
• Unplug the appliance and close the water inlet tap.
• Remove the water inlet and the drain hose from the house installations.
• Let the water drain completely from the appliance. (see “Cleaning the Drain
Pump”)
• Important: Re-install the 4 transport bolts in the back of the appliance. (see
“Remove Transport Bolts”).
• Check if the door and the detergent dispenser are closed properly.
• This appliance is heavy. Transport with care. Never hold any protruding part
of the machine when lifting. The machine door cannot be used as a handle.
Incorrect transportation can cause personal injuries and damage to properties.
Ensure that the appliance is properly secured during transportation.
06
SPECIFICATIONS
07
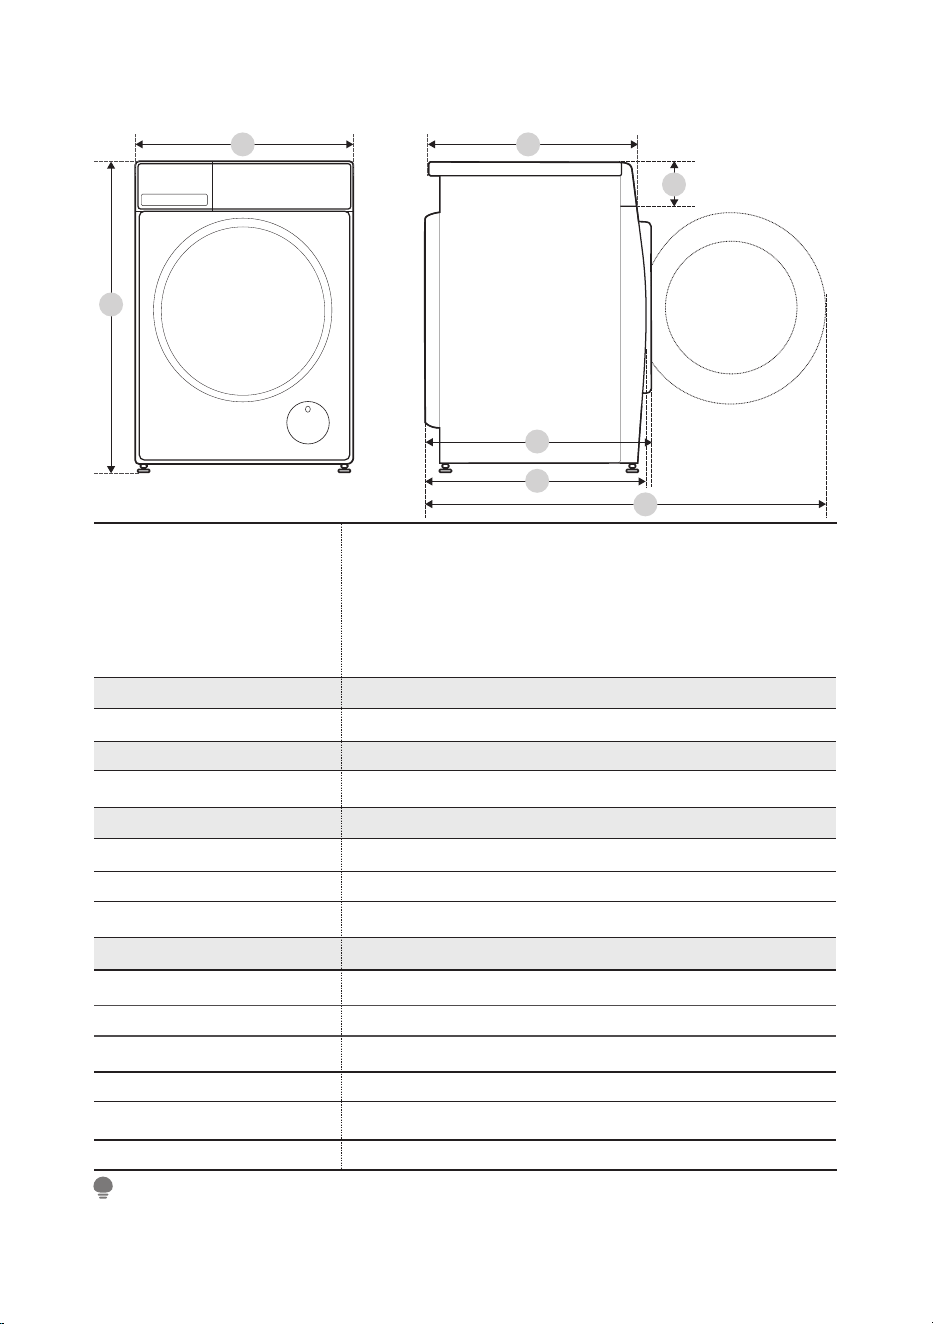
Model
The washing capacity is the maximum load quantity in kg dry weight that can be washed at one time.
Make sure that the laundry loaded into the appliance does not exceed the rated capacity.
NOTE
MFV3EW100BA10
595mm
850mm
535mm
64kg
1950W
600mm
580mm
1045mm
135mm
MAX. Current
Standard Water Pressure
Power Supply
220-240V~,50Hz
0.05MPa~1MPa
10A
10.0kg
Washing Capacity
Dimension
A
B
C
Weight
Rated Power
Reference Dimension
D
E
F
G
A
B
E
F
D
G
C
PRODUCT OVERVIEW
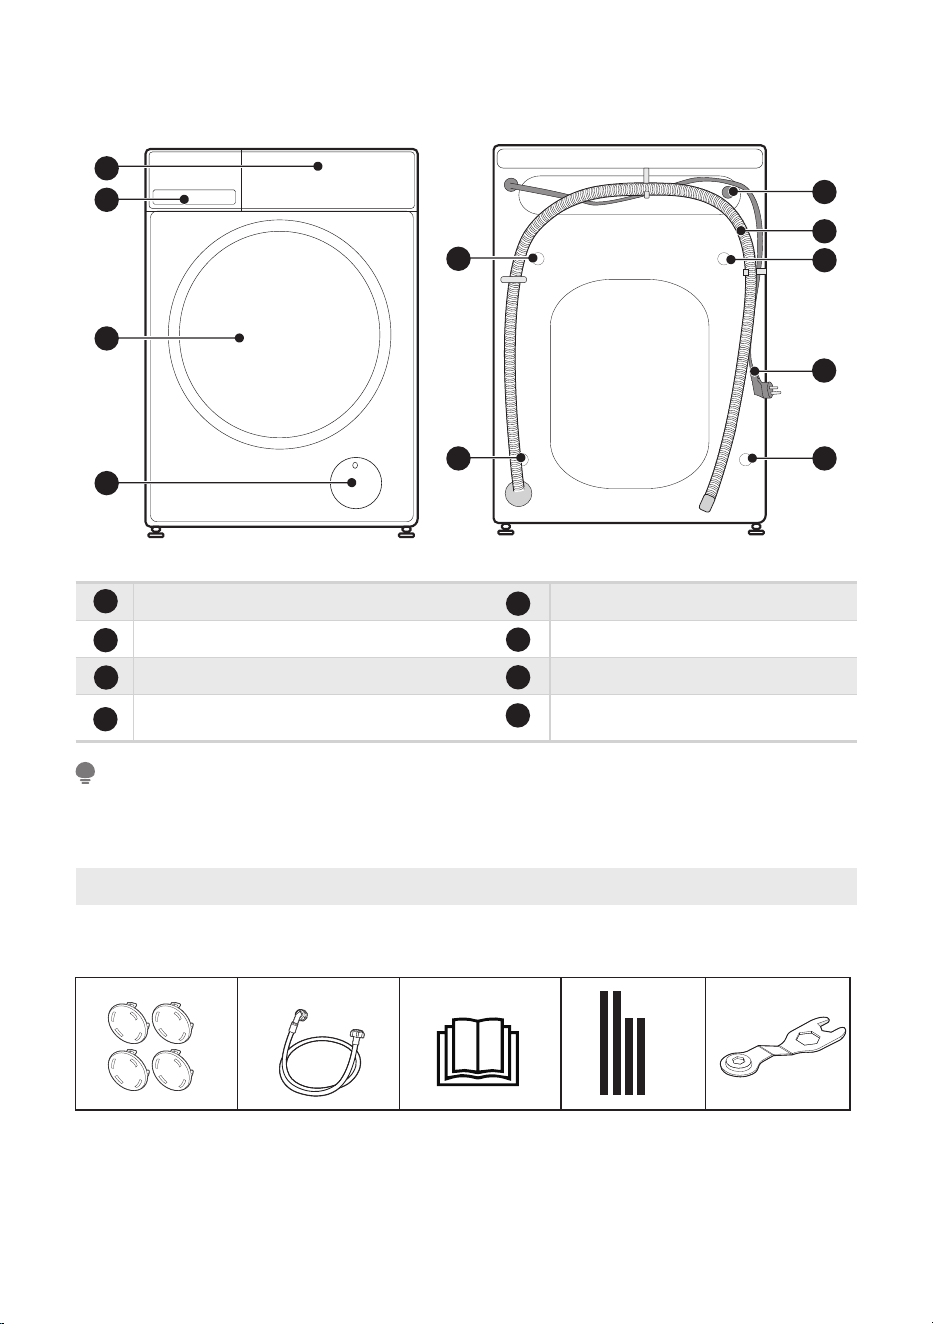
The illustration above is for reference only. Please take the appearance of the actual
product as reference.
Accessories
4 x Cover
caps
1 x Supply hose
cold water
1 x User Manual
NOTE
08
Spanner
(optional)
1
2
3
4
5
Door
Detergent dispenser
Control panel
Drain hose
Power supply cord
Service flap
Inlet valve
Transport bolts
6
1
2
3
4
5
8
8
7
7
88
8
6
Acoustic sponge
(optional)
09
QUICK START GUIDE
Before operation, please make sure the machine is installed properly. See chapter
product installation.
Calibration of Appliances
WARNING
The appliance is able to detect the amount of laundry loaded to optimize performance by
minimizing energy and water consumption, saving you money and time. For this reason,
it’s recommended to calibrate the appliance for best use.
1. Remove all accessories from the drum and close the door.
2. Insert the mains plug to the socket.
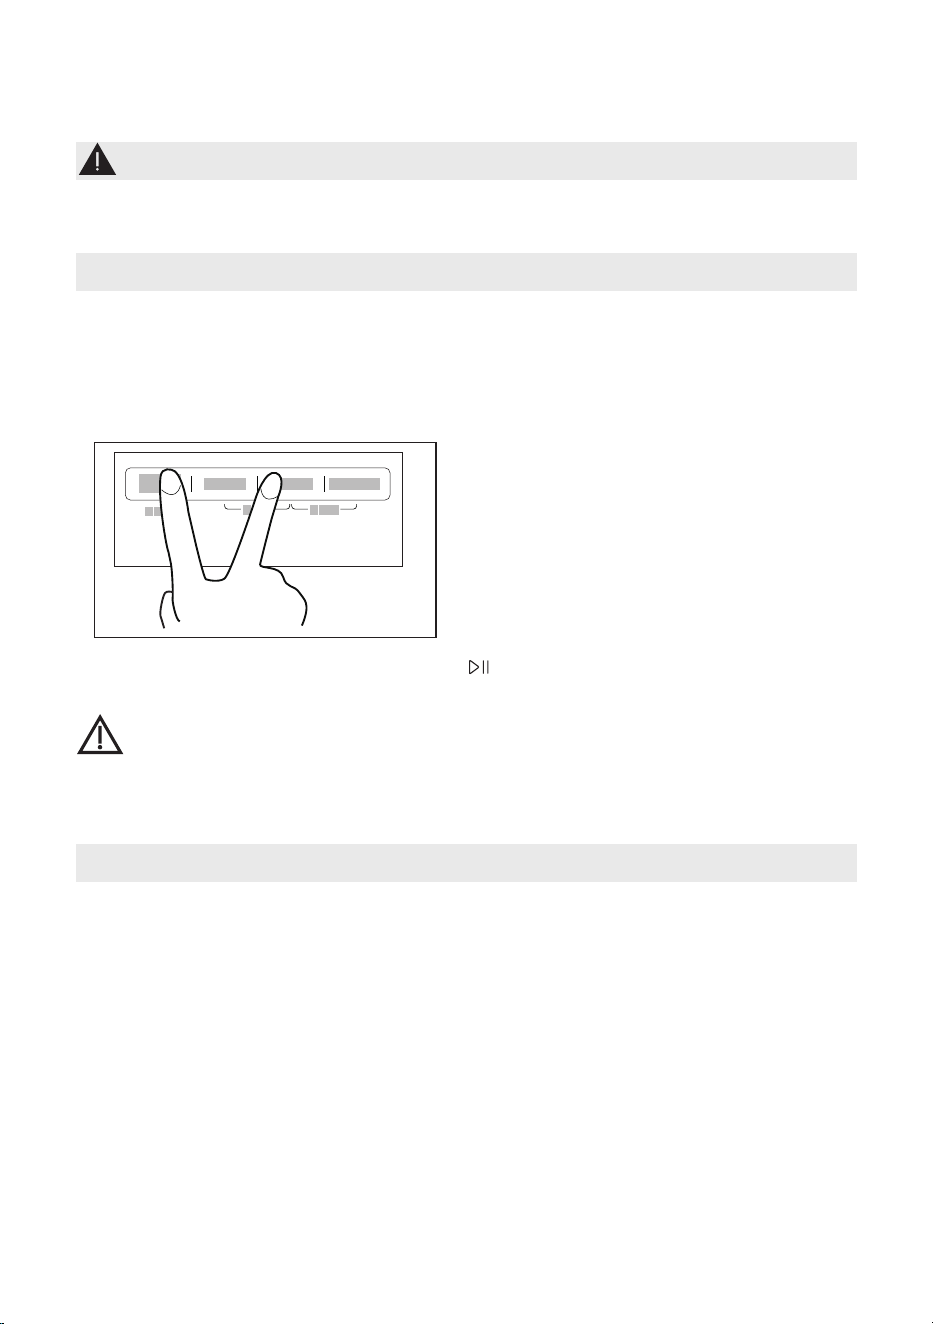
3. Switch on the washing machine, press the option “Water Level” and “Spin”
simultaneously until “t19” is displayed.
4. Start the calibration program by pressing .
The appliance is successfully calibrated when “PAS” will be displayed.
CAUTION
When “FAL” will be displayed, the calibration of appliance failed. Repeat the calibration of
appliance. If situation persists, please contact the customer service.
Drum Clean
Your appliance was thoroughly checked before it left the factory. To remove any residual
water and to neutralize potential odors, it’s recommended to clean your appliance
before first use. For this reason, clean the washing machine by running the "DRUM
CLEAN" program or “COTTON” program with the optional temperature of 90°C. Always
run the DRUM CLEAN program without laundry and add 1 table spoon of heavy-duty
detergent.
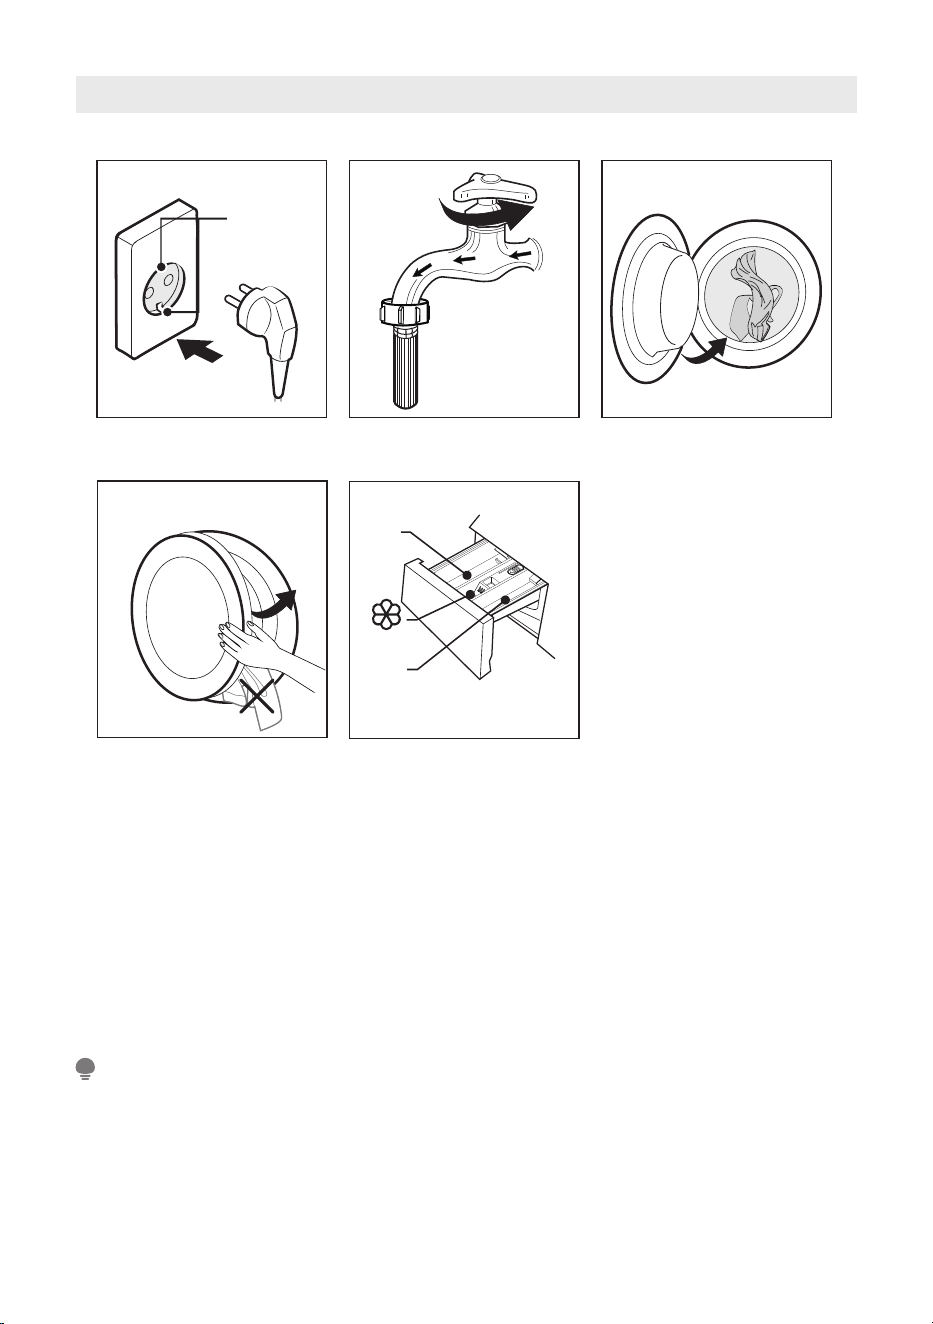
Ⅱ
I
Main
wash
Prewash
Softener
10
4. Close the door
5. Add the detergents and
washing aids
1. Before Washing
1. Insert the mains plug 2. Open the water tap 3. Load the laundry
NOTE
When closing the door, please make sure that your clothing does not get caught
between the sealing ring and the appliance door to prevent water from leaking
during operation or damaging the sealing ring by pulling.
•
Earth
terminal
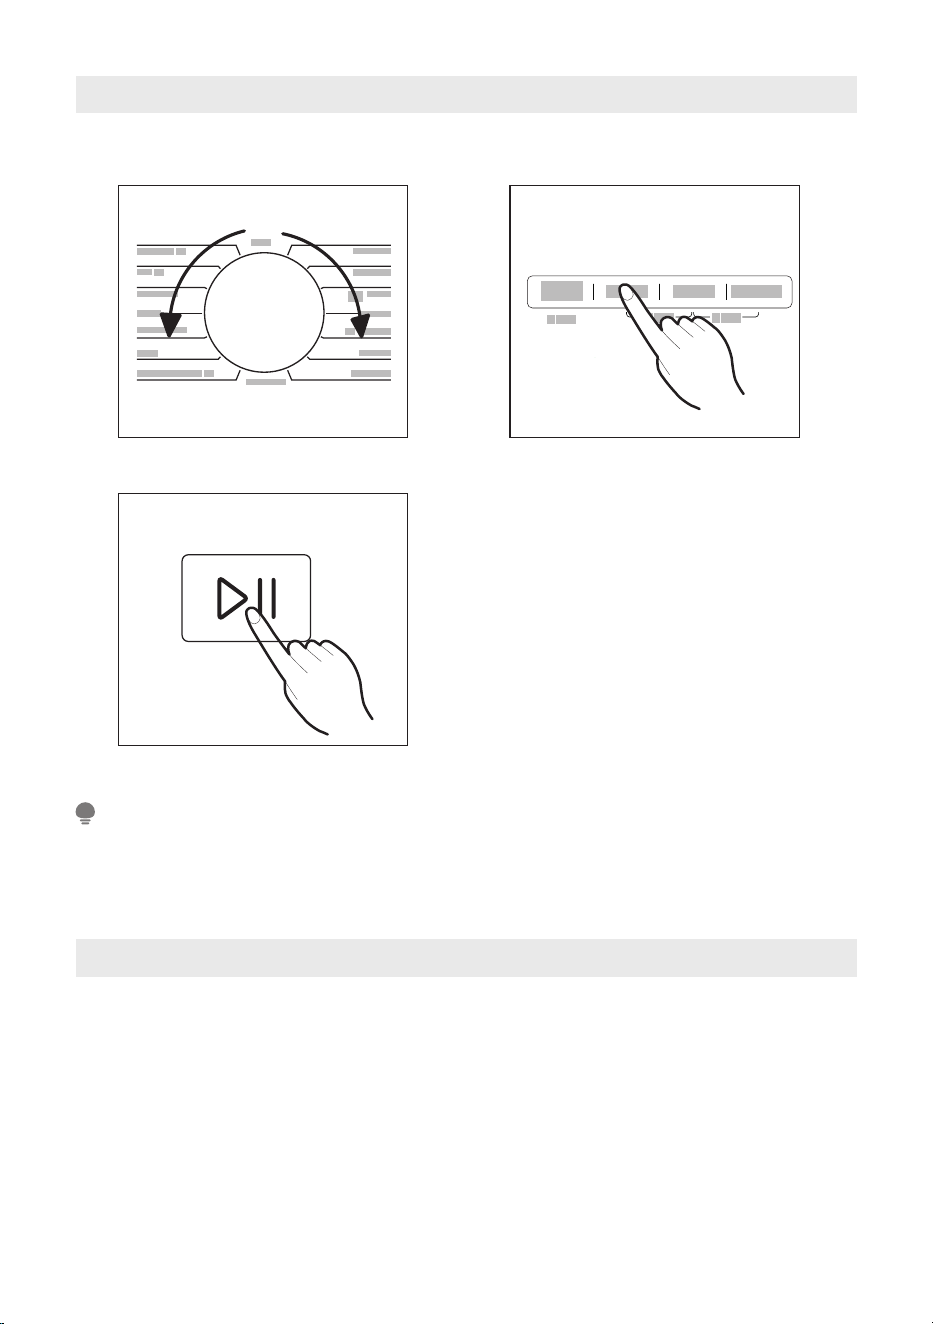
3. After Washing
An acoustic signal is given and “End” will be displayed.
2. Washing
11
The illustration above is for reference only. Please take the appearance of the
actual product as reference.
NOTE
1.Select program
2.Select function or remain
default settings
3.Press Start/Pause to
start the program
PRODUCT INSTALLATION
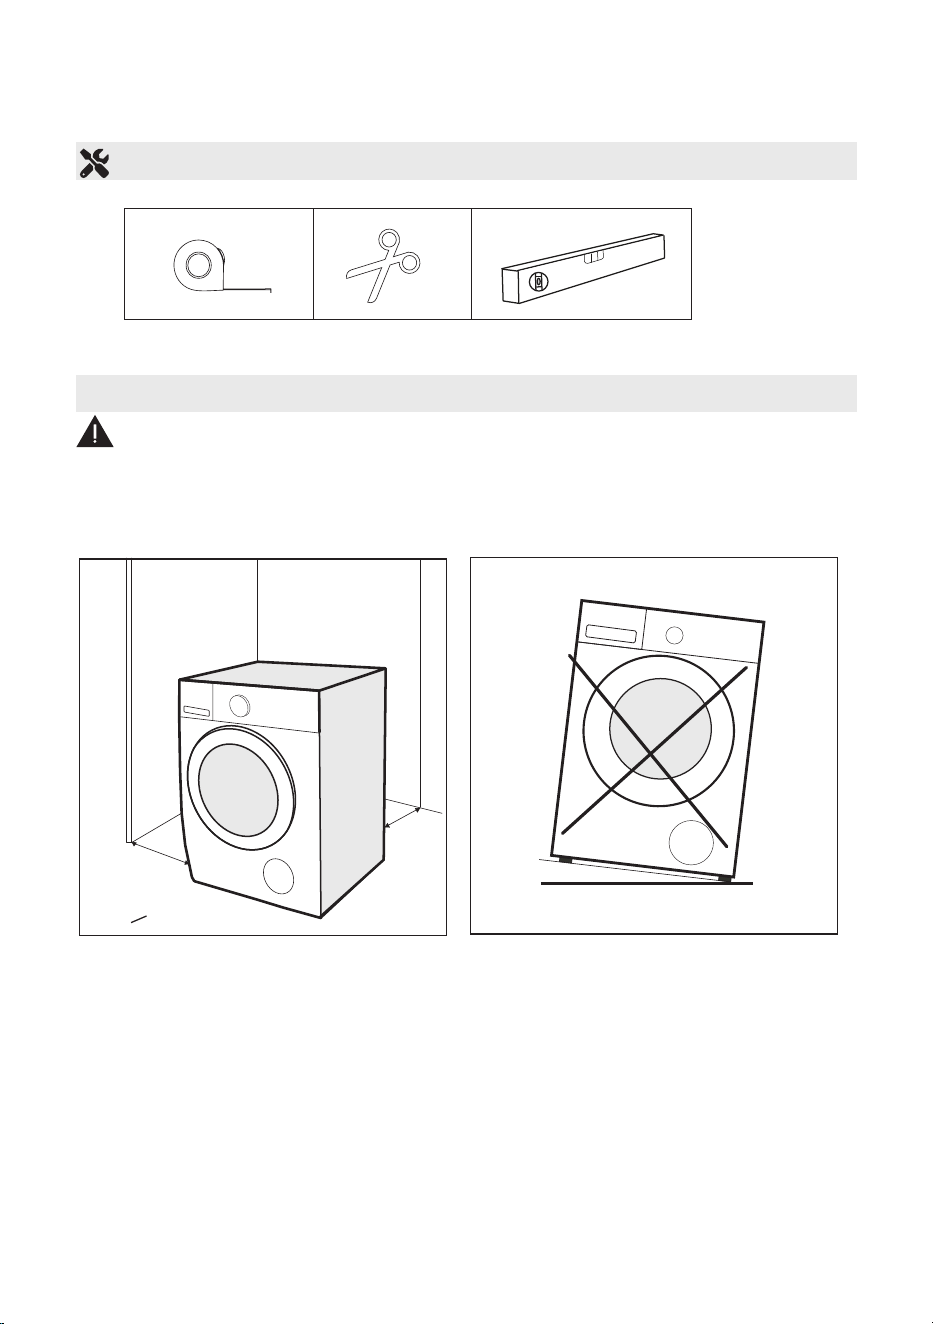
Before installing the washing machine, the location characterized as follows shall be
selected:
1. Rigid, dry, and level surface.
2.Avoid direct sunlight.
3.Sufficient ventilation.
4.Room temperature is above 5 °C .
5.Keep far away from the heat sources such as coal or gas burning appliances.
•
•
•
•
Stability is important to prevent the product from moving!
Make sure the washing machine is standing leveled and stable.
Make sure that the product does not stand onto the power cord.
Make sure to maintain the minimum distances from the walls as shown in the picture.
Installation Area
w
w
W> 20mm
Tools Needed If Installation By Yourself
12
WARNING
Tape measure
Spirit level
Scissors or Knife
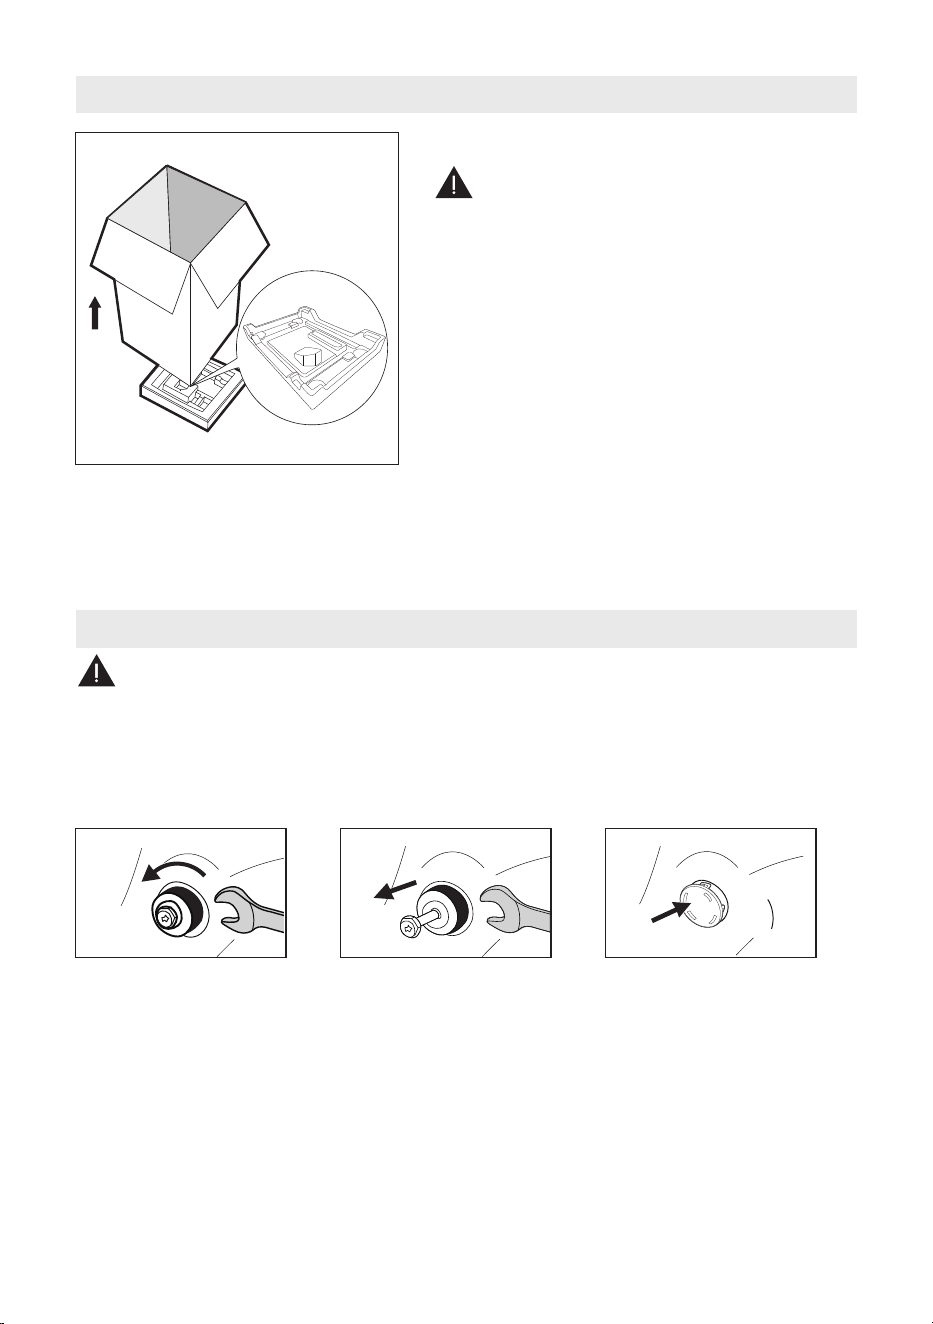
• Packaging material (e.g. foils, styrofoam)
can be dangerous for children.
• There is a risk of suffocation ! Keep all
packaging well away from children.
1. Remove the cardboard box and styrofoam packing.
2. Lift the washing machine and remove the base packaging.
3. Remove the tape securing the power supply cord and drain hose.
4. Remove the inlet hose from the drum.
You must remove the transport bolts from the backside before using the product.
1. Loosen the 4
transport bolts with
a spanner.
3. Close the holes by
using the cover caps.
2. Remove the bolts
including the rubber
parts and keep them
for future use.
Unpacking the Washing Machine
Remove Transport Bolts
13
WARNING
WARNING
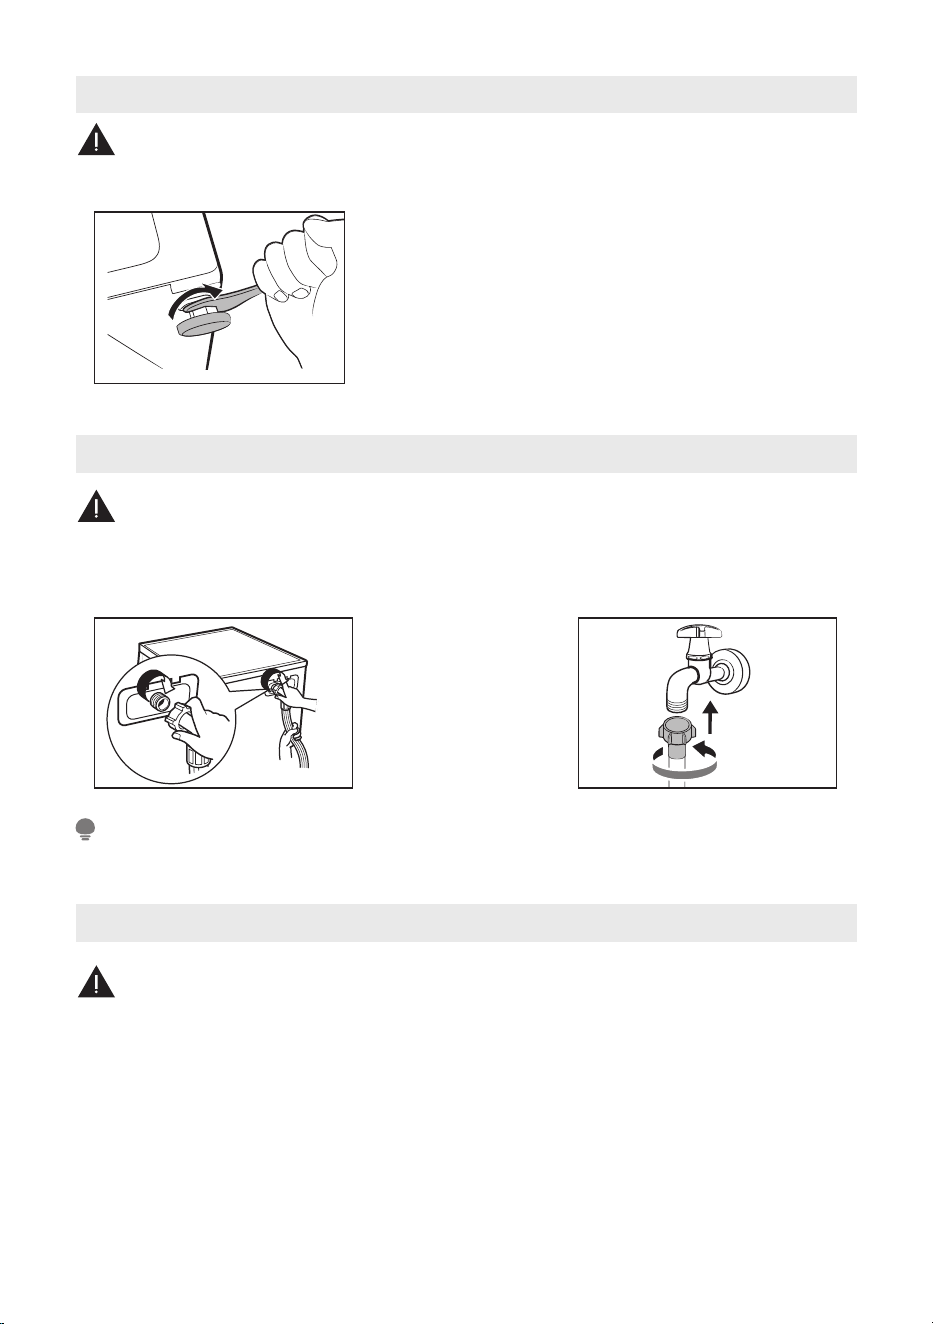
Levelling the Washing Machine
The lock nuts on all four feet must be screwed tightly against the housing.
1. Loosen the lock nut.
2. Turn the feet until it reaches the floor.
3. Adjust the feet and lock the nuts with a spanner.
Make sure the washing machine is level using a
spirit level.
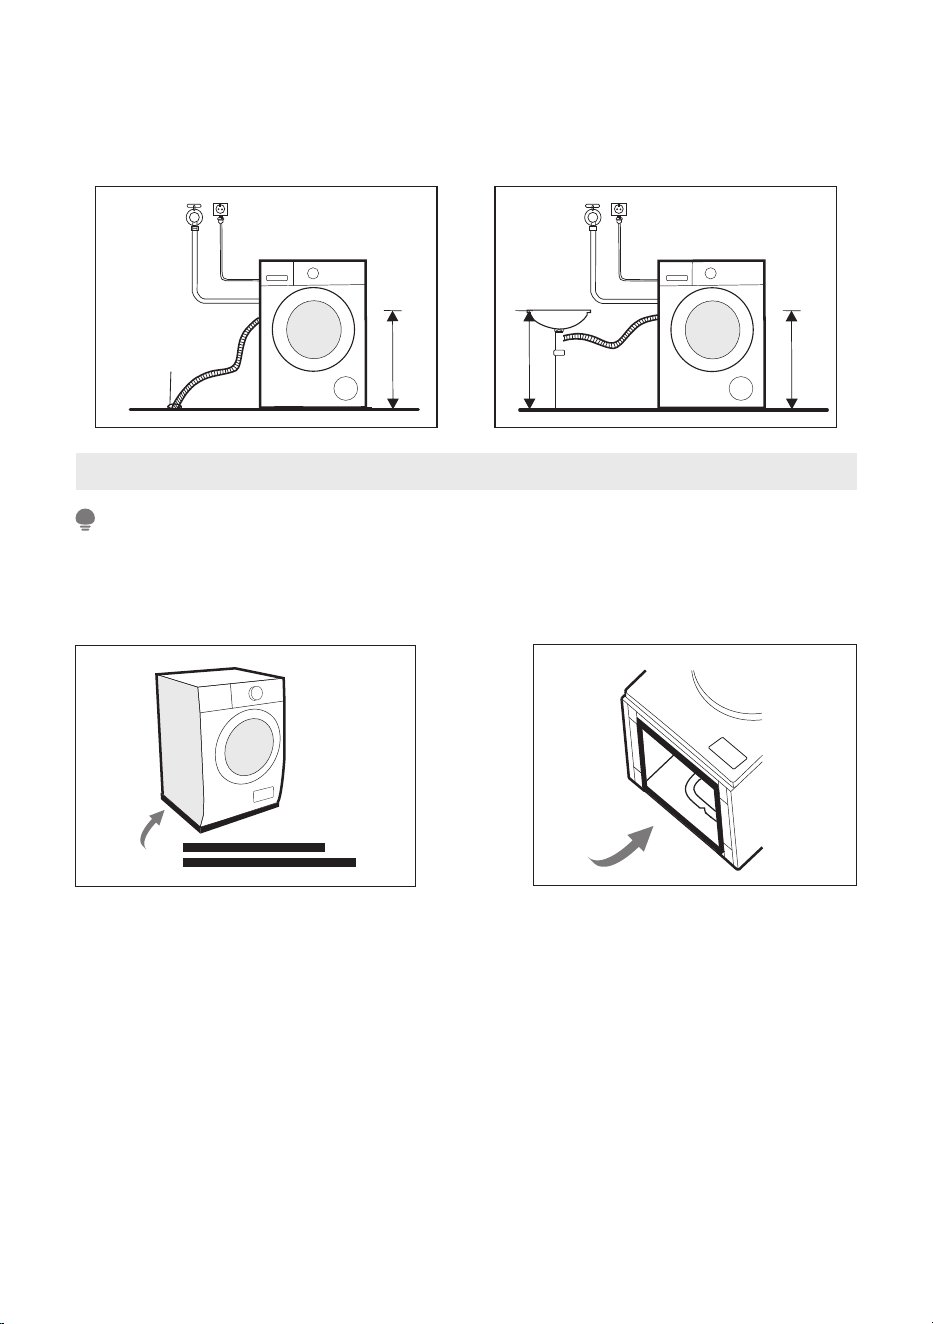
Connect the Water Supply Hose
To prevent leakage or water damage, follow the instructions in this chapter.
• Do not kink, crush or modify water inlet hose.
Connect the angled
end of the water supply
hose to the water inlet
valve of the washing
machine.
Connect the other end
of the water inlet hose
to the cold water tap
connection.
• Tighten the connecting screw hand-tight. Check if the connections are tight.
•
•
•
Do not kink or protract the drain hose.
Position drain hose properly, otherwise damage might result in water leakage.
It is not allowed to remove the buckle of drain pipe.
NOTE
Drain Hose
14
WARNING
WARNING
WARNING
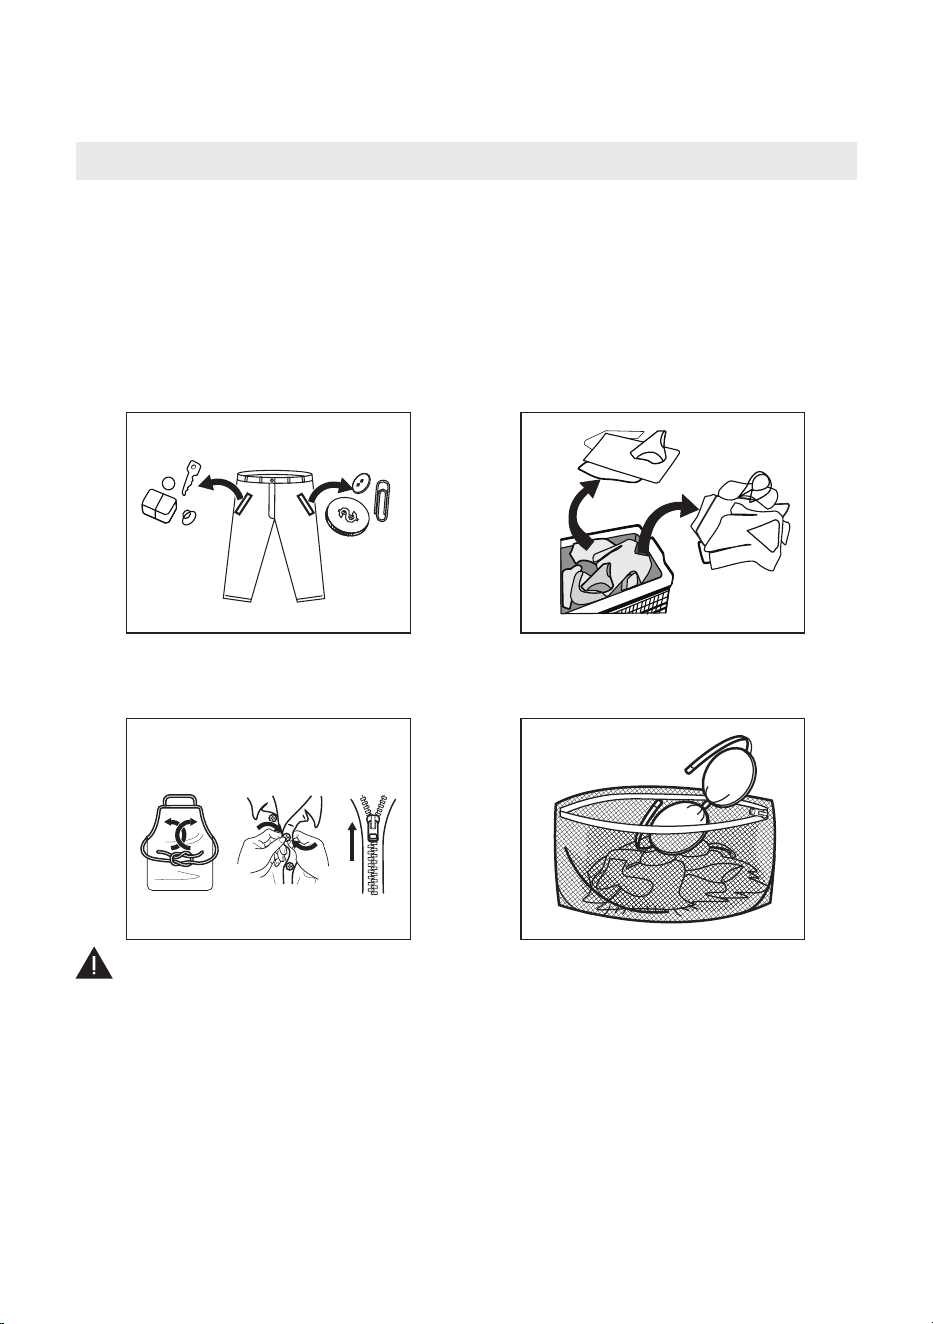
There are two ways to place the end of drain hose:
2. Connect it to the branch drain
pipe of a sink.
M
a
x
.
1
00
cm
Mi
n. 60
cm
Ma
x.
100
c
m
Water
drain
Max
.
10
0cm
Mi
n.
6
0
cm
1.Put it into the water drain.
15
NOTE
•
noise caused by the machine while working, in order to provide you with a more
peaceful and quiet living environment.
Please make sure to assemble the acoustic sponges, which can effectively reduce the
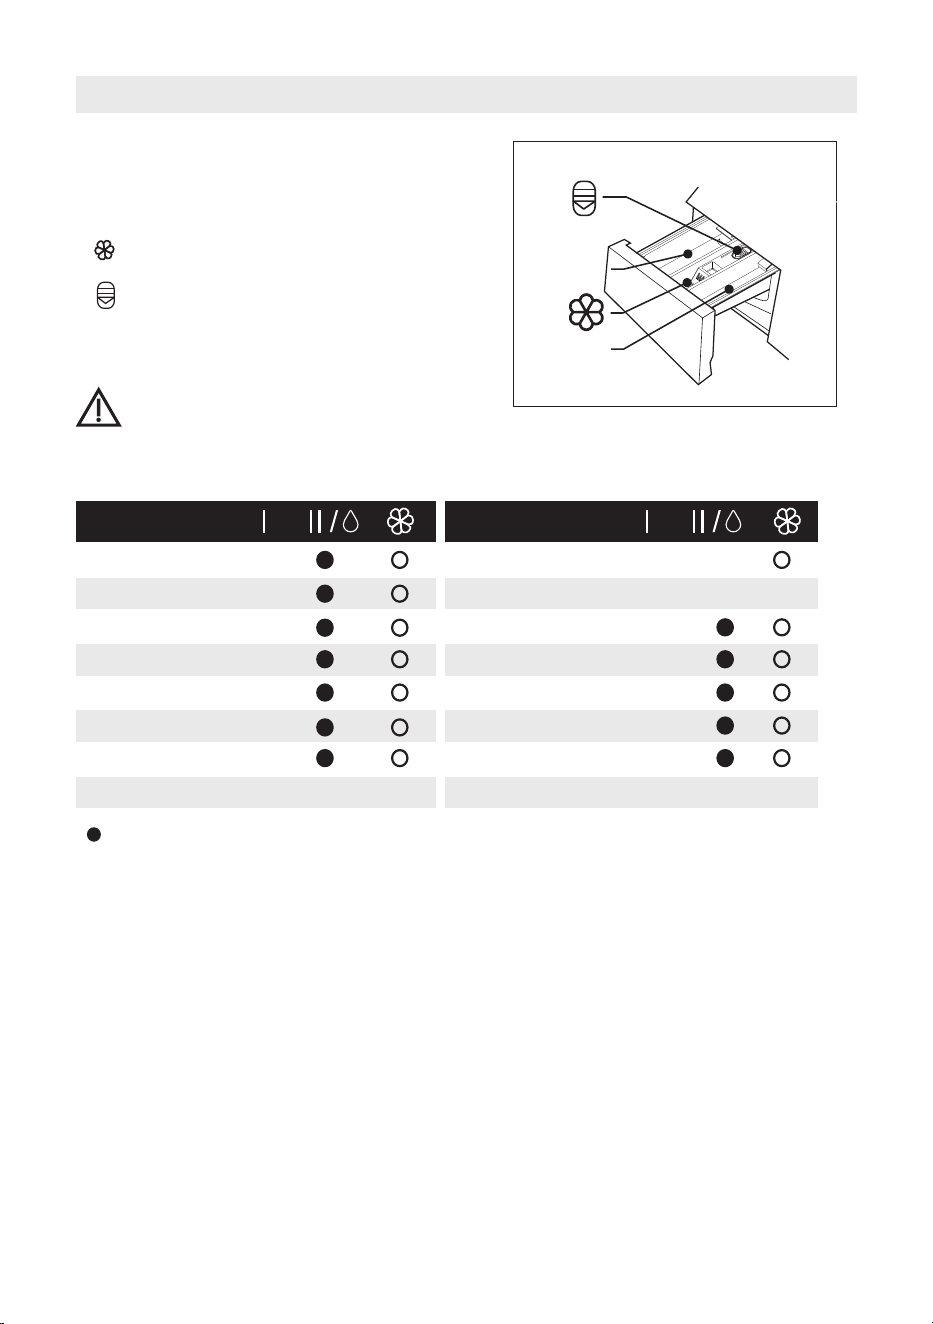
Acoustic Sponge
1. Get the machine laid on the floor, using some soft material like foam or clothes
between the machine and floor for a protection;
2. Stick the 2x longer sponges to the longer bottom edges of machine, and the 2x
shorter sponges to the shorter bottom edges.
2x
2x
OPERATION INSTRUCTIONS
• The ambient temperature of the washing machine should be between 5°C and
40°C. If used under 0°C, the inlet valve and draining system may be damaged. If
the appliance is installed under freezing conditions, it should be transferred to
normal ambient temperature to ensure the water supply hose and drain hose can
unfreeze before use.
• Please check your laundry care labels and the dosing recommendation of the
detergent manufacture before wash. Use non-foaming or less-foaming detergent
suitable for properly.washing machine
3. Tie together long textile
strips and belts, close
zips and button
1. Take all items out of the
pockets
4. Put small items into a
laundry bag
Before Each Washing
2. Sort laundry according to
color and type of fabric
16
• Do not wash textiles to which adhered any volatile or flammable substance such as
cleaning agent, dry cleaning agent, spot remover, acetone, gasoline, kerosene, beauty
oil, massage oil, animal oil, machinery oil, dry cleaning oil, volatile agent, alcohol,
turpentine, wax, wax remover, banana water, disinfectant tablets, resin, etc.
• Washing single laundry items may easily create big imbalance. Therefore it is
suggested to add one or two more laundry items to the wash so that spin can be done
smoothly.
Do not wash and spin water-proof clothing or textiles. •
WARNING
17
Detergent Dispenser
Program
COTTON
MIX
PET HAIR
JEANS
DELICATE
20°C
HEALTH GUARD
DRUM CLEAN
RINSE & SPIN
SPIN ONLY
BED LINEN
SPORTS
WOOL
ECO40-60
QUICK 15’
Program
Means must ○ Means optional
• If you use detergent pods or similar, place them directly in the washing machine
drum.
CAUTION
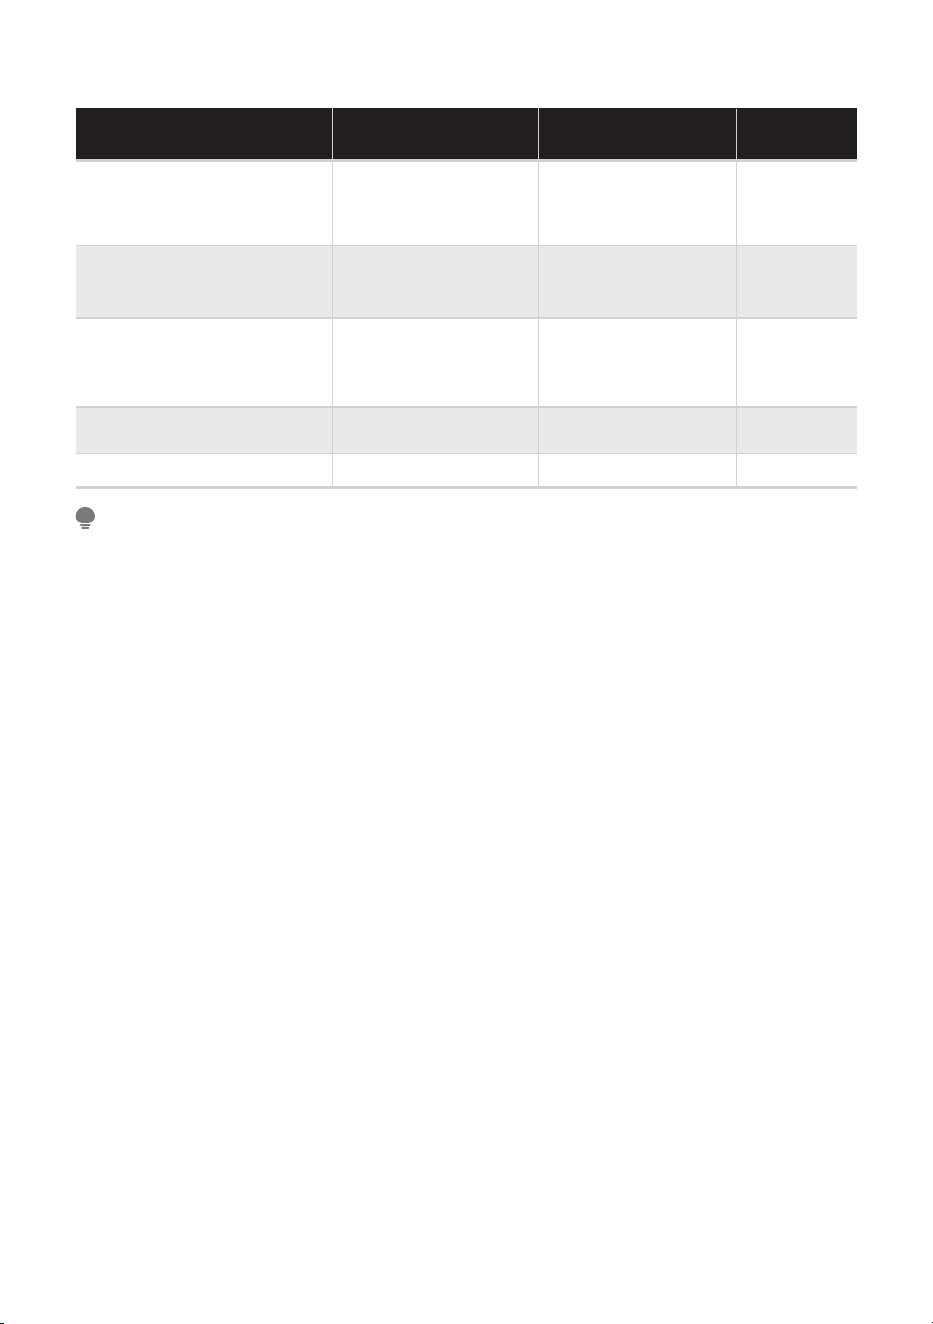
Pre wash
Main wash
Softener
Release button to
pull out the dispenser
I
Ⅱ
Ⅱ
I
Detergent Recommendation
• Please choose the suitable type of detergent to receive best washing performance
results and a minimum of water and energy consumption.
• To achieve the best cleaning result a proper detergent dosing is important.
• Use a reduced detergent amount if the drum is not filled completely.
• Always adjust the amount of detergent to the water hardness, if your tap water is soft,
use less detergent.
• Dose according to how dirty your articles of clothes are, less dirty articles of clothes
require less detergent.
• Highly concentrated (compact detergent) requires particularly accurate dosing.
Following signs indicate an overdosing of detergent:
- heavy foam formation
- poor washing and rinsing result
Following signs indicate an underdosing of detergent:
- laundry turns grey
- built-up of limescale deposits on the drum, the heating element and/or the laundry
Heavy-duty detergent
with bleaching agents
or optical brighteners
Colour detergent without
bleaching agent but
optical brighteners
Color or mild
detergent without
optical brighteners
Mild washing detergent
Special wool detergent
COTTON, ECO 40-60
COTTON
COTTON,
SPORTS
DELICATE, WOOL
40 60/90/
20/30
30/40/60
Washing
temp. °C
Program
Recommended washing
detergent
Type of laundry
and textile
Dye-resistant and
heavy-duty cotton
Coloured laundry
made from cotton
or mixed fabric
Coloured laundry
made from easy
care or synthetic
fibres
Delicate textiles,
silk, viscose
Wool
30/40
30/40
NOTE
18
WOOL
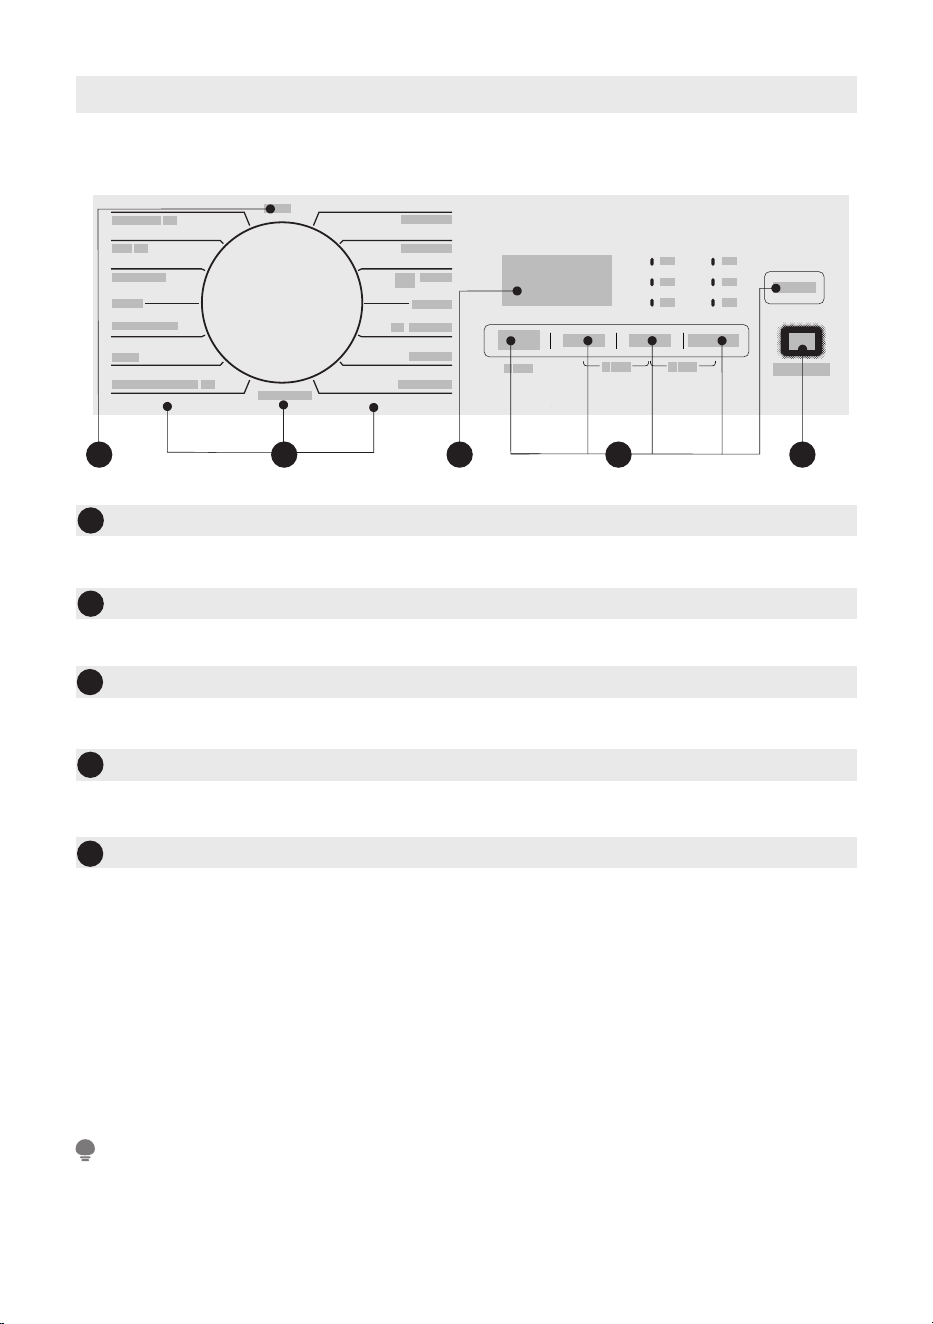
Control Panel
19
NOTE
•
product as reference.
The illustration above is for reference only. Please take the appearance of the actual
1
5
2
3
1
1
2
1
4
3
OFF
Turn the appliance off.
Start/Pause
Program
Option
This allows you to select additional functions.
5
Display
Start or pause your program.
Choose appropriate program according to the laundry type.
The display shows settings, estimated remaining time, options and status
messages.
4
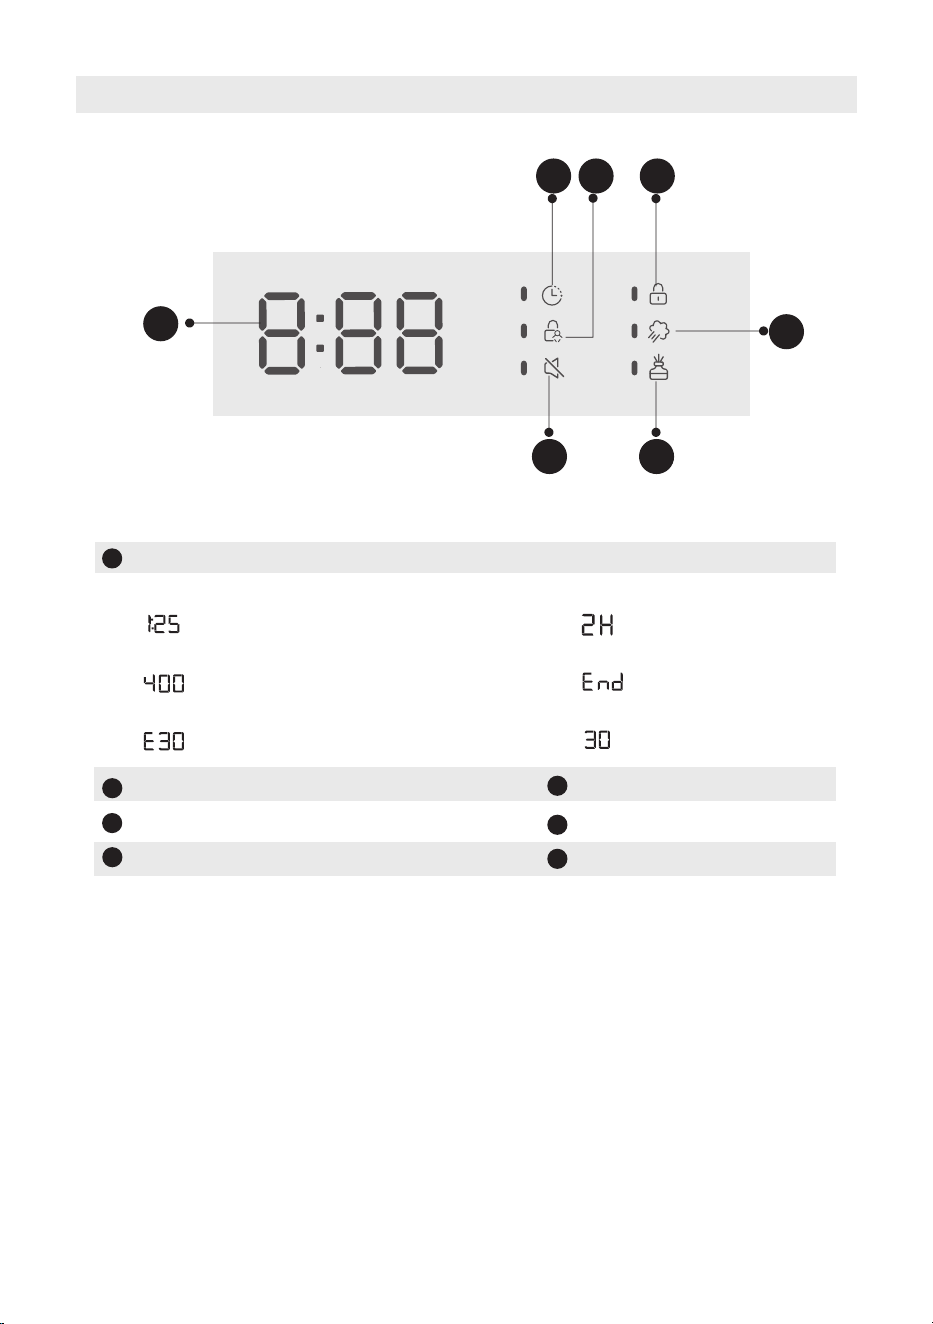
Display
20
Wash Time Delay end
Speed End
Error Temp
Display
A
Mute
B
Steam
D
Perfume+
C
Door Lock
E
Child Lock
F
G
Delay end
A
B C
D
EG F
programs will contribute to energy and water savings.
• The rated capacity is the maximum load quantity in kg dry weight that can be washed at one
time. Make sure that the laundry loaded into the appliance does not exceed the rated capacity.
• Loading the household washing machine up to the load quantity indicated for the respective
Program Settings
NOTE
21
Program
Load(kg) Display Time (h:min)
COTTON
MIX
PET HAIR
JEANS
DELICATE
20°C
HEALTH GUARD
DRUM CLEAN
RINSE & SPIN
SPIN ONLY
BED LINEN
SPORTS
WOOL
ECO40-60
QUICK 15’
10.0
10.0
10.0
10.0
3.0
5.0
5.0
--
10.0
10.0
10.0
5.0
2.0
10.0
2.0
10.0
3:00
1:30
2:04
1:35
0:50
1:01
2:39
1:18
0:20
0:12
1:48
0:47
0:59
3:59
0:15
10.0
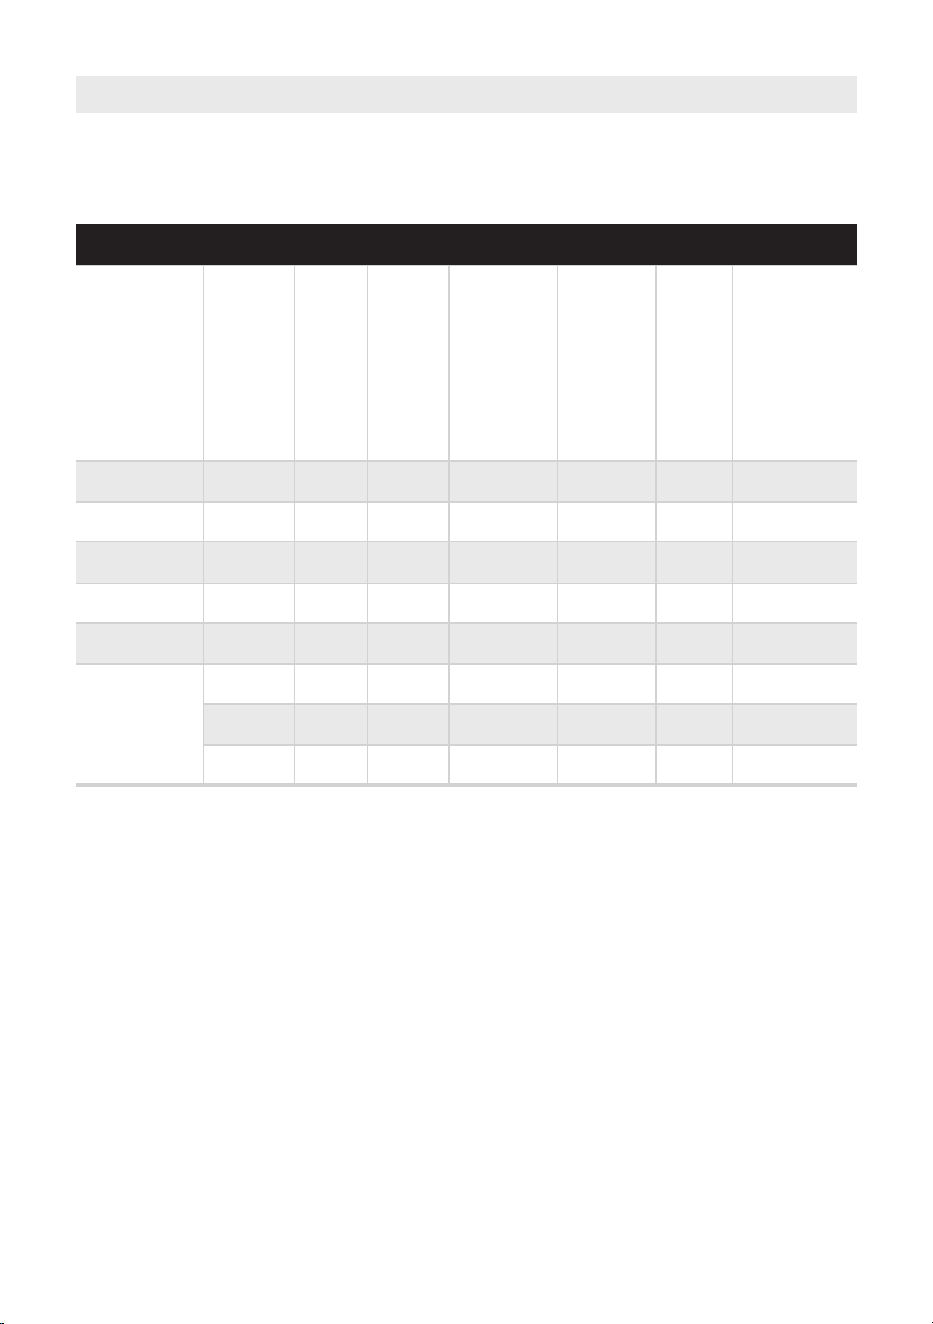
Consumption per
program
Nominal Load
Capacity
[kg]
Temperature [℃]
Program duration
[hh:mm]
Energy Consumption
[kWh]
Water Consumption
[L]
Highest temperature
1)
[℃]
Residual Moisture
[%] / Spin Speed
2)
[rpm]
COTTON
3)
ECO 40-60
10.0
10.0
5.0
2.0
10.0
10.0
5.0
2.5
--
--
--
3:05
1:30
1:01
1:48
0:15
3:59
3:00
3:00
1.640
0.889
0.195
0.030
0.920
0.800
0.530
0.199
60
40
20
40
Cold
34
31
24
85
85
51
31
85
70.0
50.0
41.0
53%/1400
53%/1400
70%/800
65%/1000
53.9%/1351
65%/1000
60
40
20
40
Cold
20℃
MIX
BED LINEN
QUICK 15'
53.9%/1351
53.9%/1351
Consumption Data
22
MFV3EW100BA10
The listed consumption data are measured in accordance with EN 60456. The
actual consumption data may vary from the given data. The load quantity, type of
fabric, composition of the laundry, selected level of soiling and options as well as
ambient conditions can influence the consumption data.
1: The highest temperature in degrees Celcius that the laundry reaches for at least
5 minutes during the program.
2: The residual moisture of the laundry in percent reached at the end of the
program at the specified spin speed
3: The ECO 40-60 program is the energy saving program and is suitable for
washing normally soiled cotton laundry. It's the most efficient program in terms
of energy consumption for cotton laundry. It’s used to assess the compliance
with the Delegated Regulation of the EU Commission 2019/2023 Ecodesign
and 2019/2014 Energy Labeling, measured in accordance with EN 60456.
23
• If there is any interruption of the power supply while the appliance is operating, a special
memory stores the selected program. The appliance will continue the program
when the power supply is re-established.
The most efficient programs in terms of energy consumption are generally those that
perform at lower temperatures and longer program duration.
Loading the household washing machine to the maximum loading quantity of the
respective program can save energy and water.
The noise level and the residual moisture content of the laundry are influenced by the
spin speed during the final spin: the higher the spin speed at final spin, the lower the
residual moisture content of the laundry, but the higher the noise level.
NOTE
CAUTION
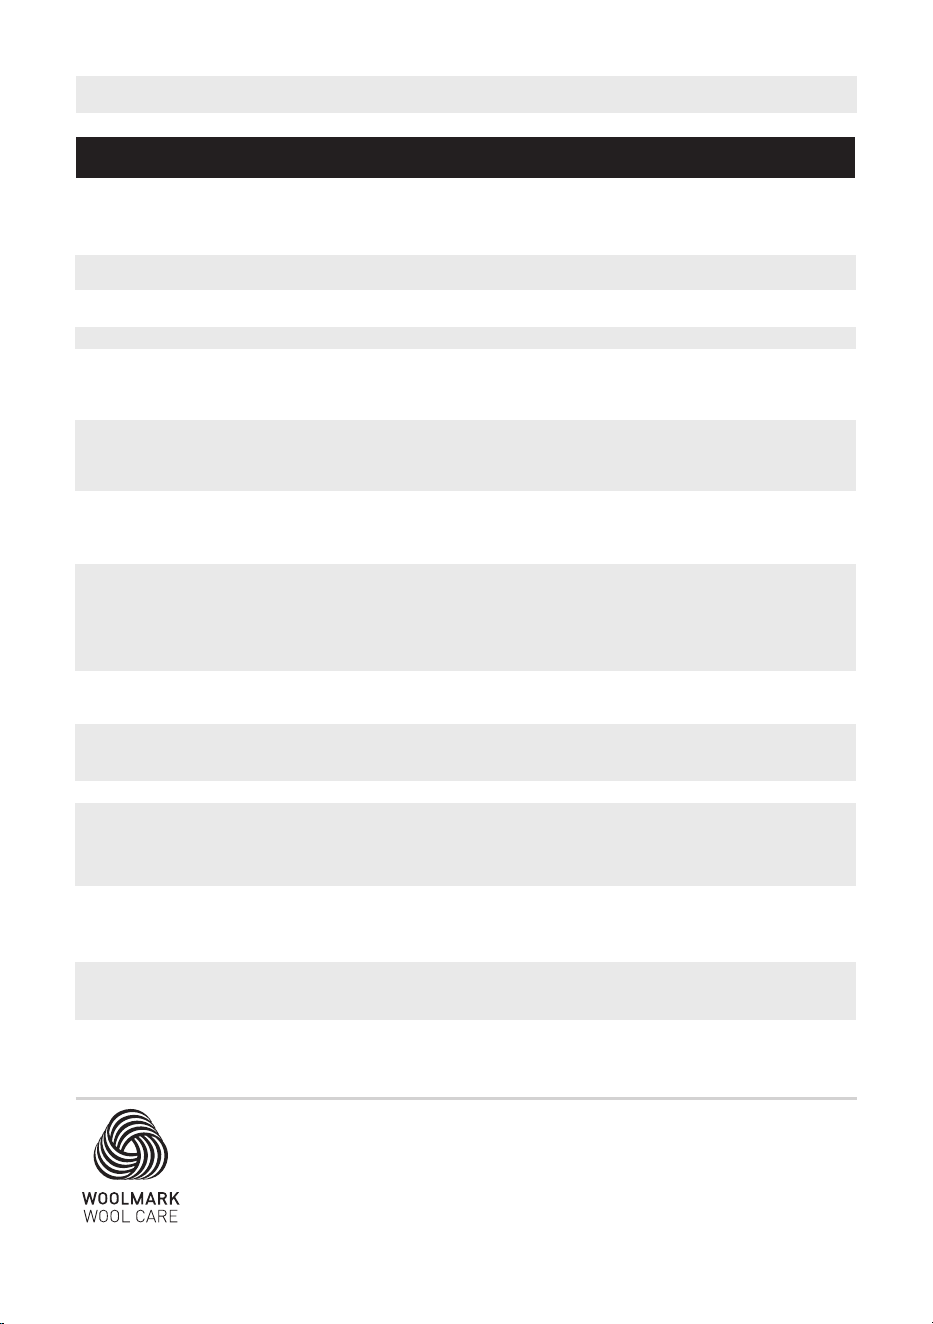
The chart describes the characteristics of the individual programs.
24
Programs
COTTON
This program is suitable for washing heavy-duty cotton items.
Note:
Use Mix program to wash mixed loads type made of cotton and
synthetics.
Program Description
MIX
For washing mixed loads made of cotton, synthetic including mixed
fabric.
JEANS
HEALTH GUARD
For washing mixed loads made of cotton, synthetic including mixed
fabric. Particularly suitable for increased hygiene requirements.
Note:
Do not exceed the maximum loading quantity.
Special cleaning program for your washing machine to remove dirt
and limescale deposits. Clean your washing machine regularly to
keep laundry washing sustainable.
Note:
Always run the Drum Clean program without laundry and add 1 table
spoon of heavy-duty detergent.
DRUM CLEAN
QUICK 15'
An extra short program for barely worn and new garments that need
to be rinsed.
Note:
You can use fabric softener to freshen up your garments.
DELICATE
For washable delicates, e.g. made of silk, satin, viscose fiber or
blended fabrics.
Note:
Reduce the spin speed for crease sensitive delicates.
WOOL
Gentle wash program to prevent shrinkage for machine-washable wool
or wool blend fabrics.
Note:
Reduce the spin speed for very delicate woolen garments.
20°C
Able to clean lightly soiled cotton laundry at a nominal temperature
of 20 °C.
Note:
Do not exceed the maximum loading quantity.
Able to clean normally soiled cotton laundry. For loads that can be
washed at 40 °C or 60 °C in the same program.
Energy saving washing program.
ECO 40-60
RINSE&SPIN
For barely worn and new garments that need to be rinsed.
Note:
You can use fabric softener to freshen up your garments.
SPIN ONLY
For textiles that need to be spun.
Note:
Only pumping takes place at a set spin speed of 0 rpm.
PET HAIR
Clean the pet hair and fur from clothing deeply, restrain growth of
germ.
Specially for jeans.
BED LINEN
This program is specially designed for washing bed linen.
SPORTS
Special program for iron-free sportswear and active wear.
Note:
Do not use fabric softener.
Close hook and loop fasteners and zippers.
The wool wash cycle of this machine has been tested and approved by
The Woolmark Company for the washing of machine washable wool
products provided that the products are washed according to the
instructions on the garment label and those issued by the manufacturer
of this washing machine.
M2203:MFV3EW100BA10
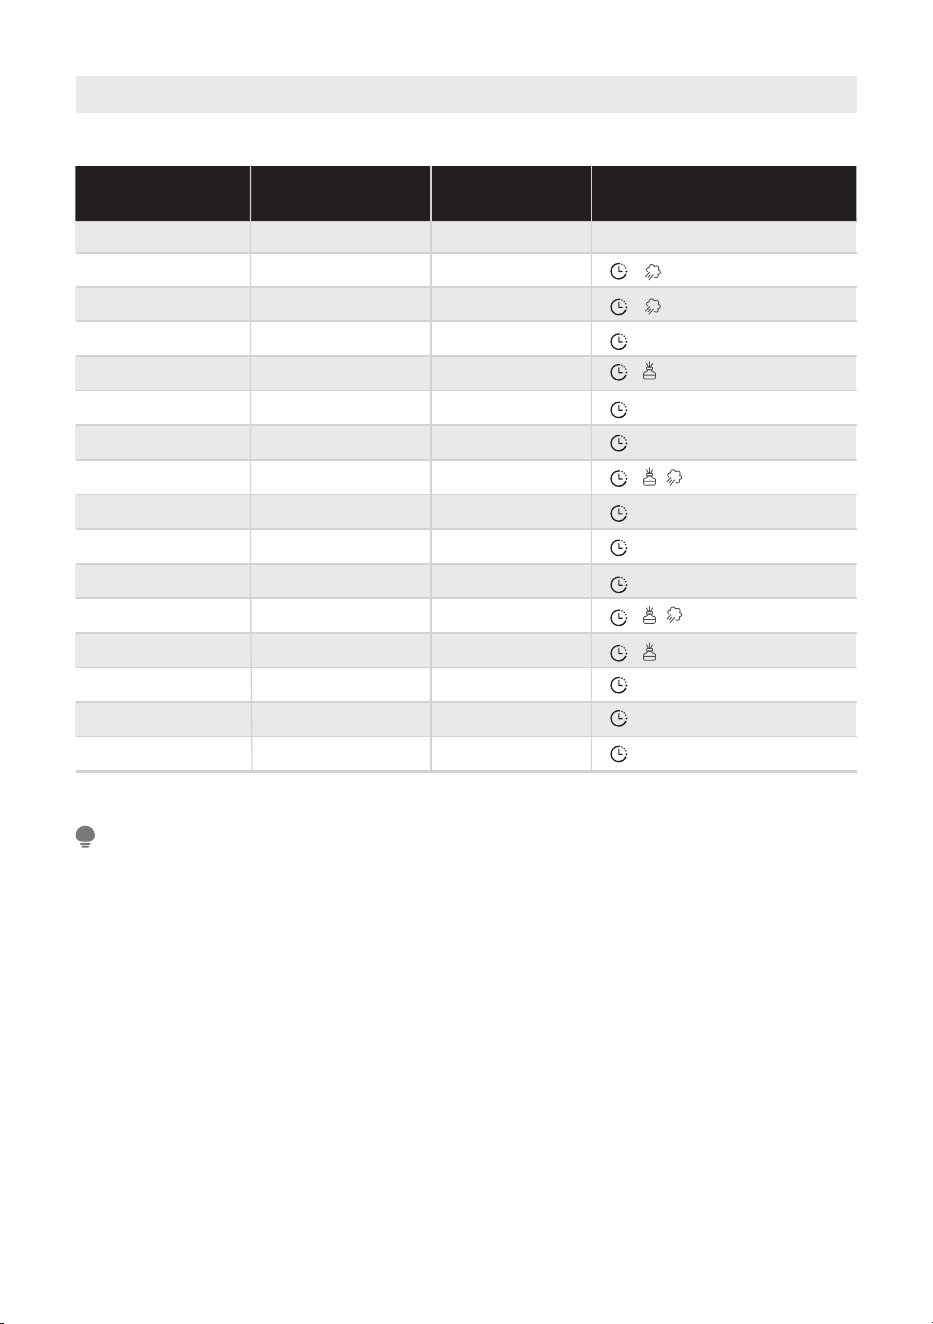
Option
25
Default
Temperature(℃)
Default spin
speed(rpm)
Program
Additional
Options
The charts shows which program offers which option for adjustment.
COTTON
MIX
PET HAIR
JEANS
DELICATE
20°C
HEALTH GUARD
DRUM CLEAN
RINSE & SPIN
SPIN ONLY
BED LINEN
SPORTS
WOOL
ECO40-60
QUICK 15’
40
40
40
30
30
20
60
90
--
--
40
20
Cold
--
Cold
14-
14-
14-
12-
800
800
10-
800
--
10-
10-
10-
800
600
--
800
In "Default spin speed" 14-, 12-, and 10- mean speeds of 1400, 1200, and 1000.
NOTE
26
Spinning
If needed, the spin speed can be adjusted in the following steps by pressing the
button: 0-400-600-800-1000-1200-1400.
Temperature
If needed, the washing temperature can be adjusted in the following steps by
pressing the button:
Cold - 20°C - 30°C - 40°C - 60°C - 90°C.
Temp
Spin
Water Level
Adjust the water level of the main wash.
Water Level: AU, L-1, L-2, L-3, L-4
Water
Level
Perfume+
The function helps to modify the water flow mode and time. Then help the fibers
to absorb softener more efficiently. As a result, with dosing the same amount of
softener, we can achieve better fragrance left on the cloths.
Perfume+
Steam
Special pre-treatment of textiles in which warm steam penetrates deep into the
textile fibers to increase the effectiveness of the washing performance.
Steam
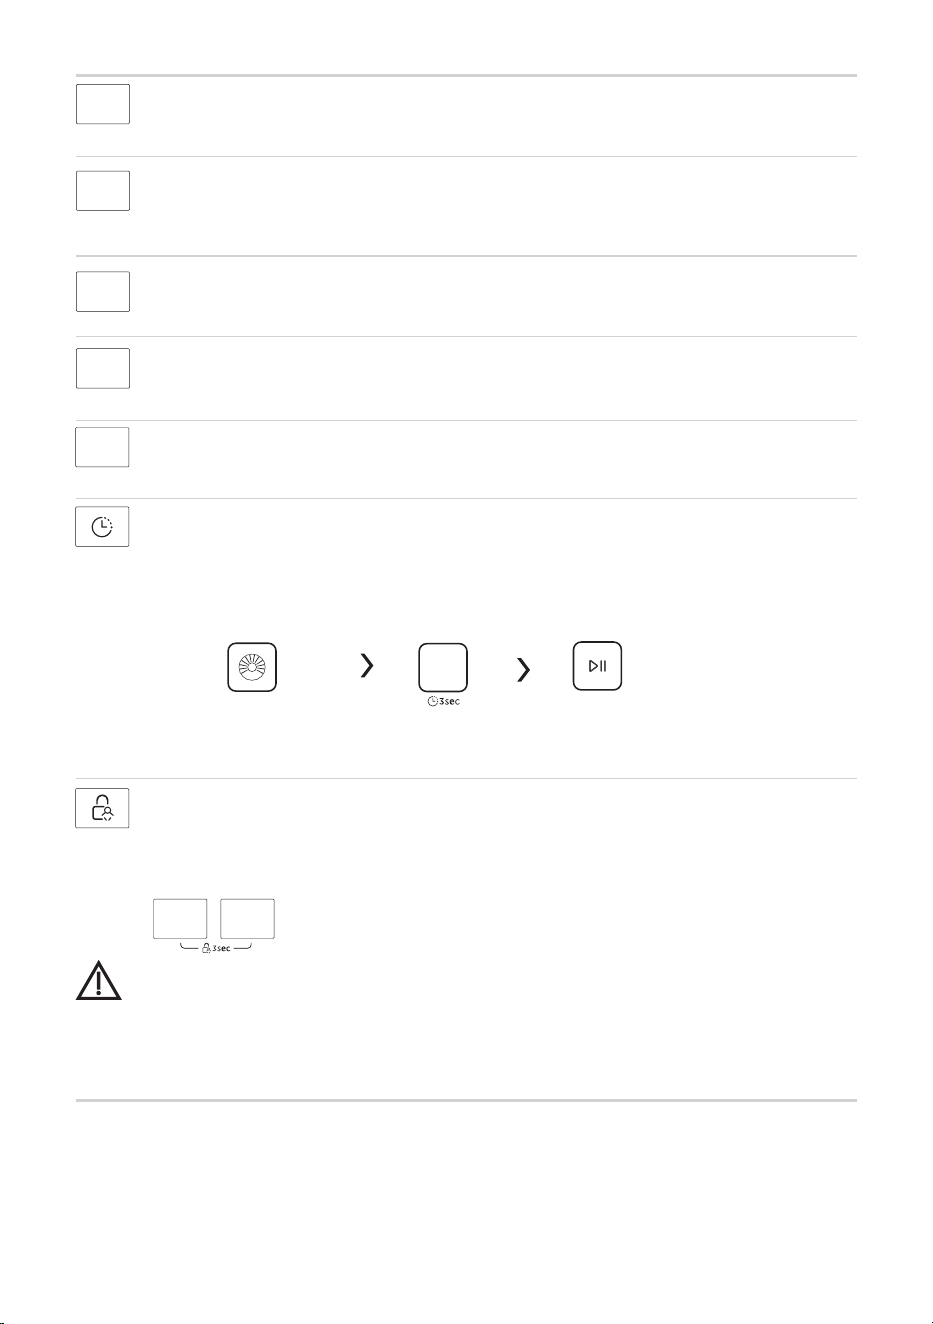
Delay end
1. Select a program.
2. Press the water level button for 3 seconds and select a time between 1 and
24 hours.
3. Press [Start/Pause] to start the time-delayed end program.
This function is used to set a time-delayed end of the wash program.
Water
Level
To cancel the delayed end function, press the “Water Level” button
again before starting the program until the display shows 0 hours.
for 3 seconds
Choose program Setting time Start
Child Lock
The child lock is intended to prevent children from using the controls
inappropriately.
This setting deactivates the function of all buttons with the exception of the
On/Off button.
When the Child Lock is activated, the display will alternately show “CL” and the
remaining time.
Pressing any other button will cause the Child Lock indicator to flash. When the program
ends, “CL” and “End” will alternate on the display.
Temp
Spin
Press and simultaneously for 3 seconds until
the buzzer beeps. The child lock is now activated.
The child lock can only be deactivated again by pressing
the two buttons simultaneously again!
[Temp] [Spin]
CAUTION
27
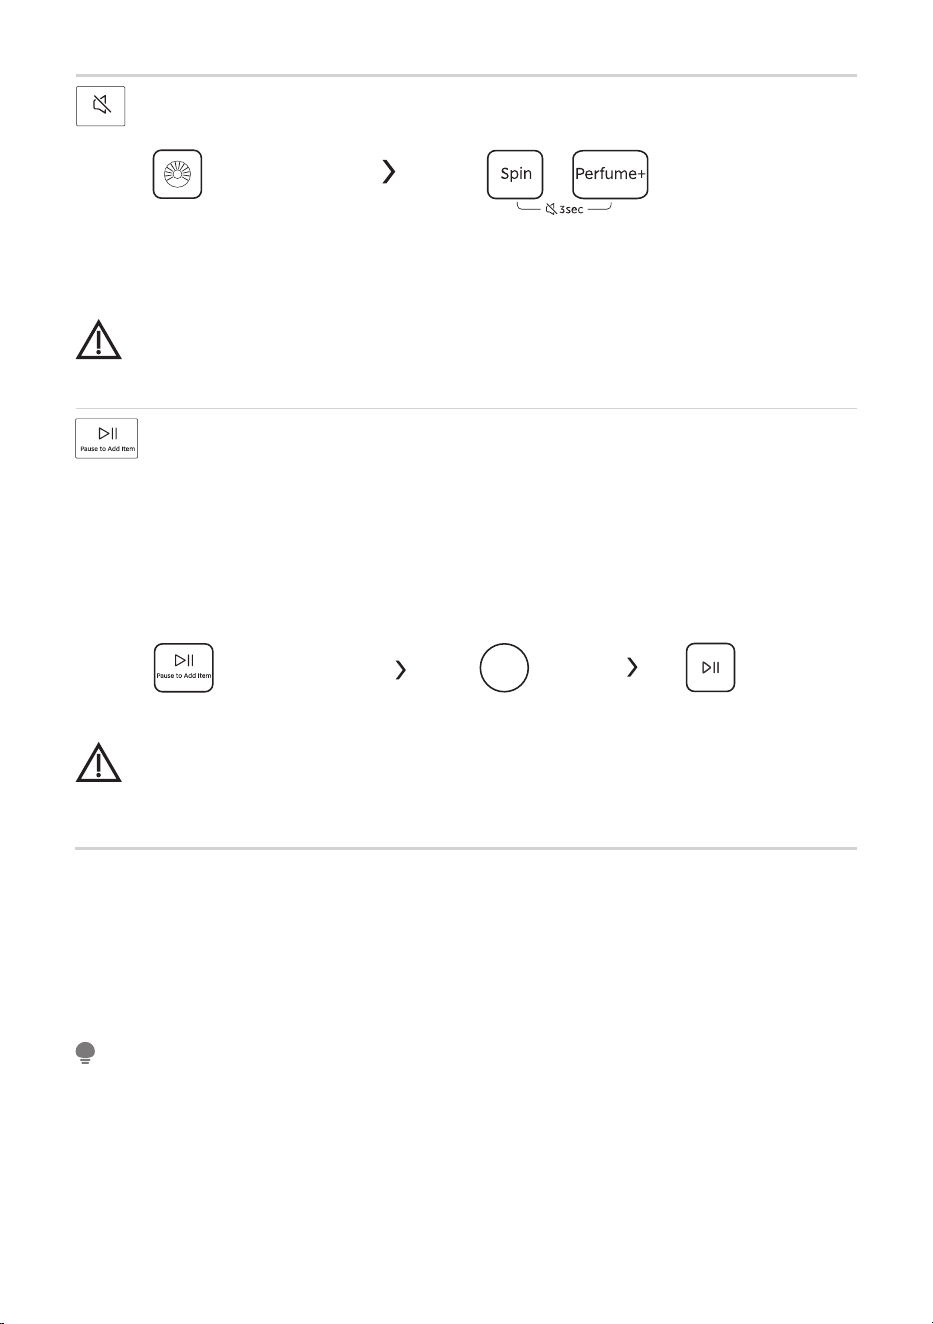
Mute the buzzer
To act the buzzer function, press the two buttons again for 3 seconds. The
setting until the next reset.will be kept
• MuAfter ting the buzzer function, the sounds will not be activated any more.
CAUTION
Press [Spin] and [Perfume+] simultaneously
for 3 seconds, until the buzzer is mute.
Choose the Program
Reload
You can use this function to add forgotten laundry items. After starting the wash
program, the door releases, provided the water level and temperature do not
pose a risk.
1. press the [Pause Add Item] button for 3 seconds
2. the washing program is paused and the door is released
3. reload the laundry and close the door
4. press the [Start/Pause] button and the wash program will continue
Clothes
Press Reload Reload the laundry
Start
• Don't use the Reload function when the water level over the edge of the
inner tub or the temperature is higher.
CAUTION
Usage counter
NOTE
1 Please press “Water Level” and “ on control panel
continuously for around 5 seconds until the device display shows digits--the value
can indicate the times of equipment usage.
2.Press “Water Level” and “Steam” on control panel simultaneously and continuously
for around 5 seconds and customer can resume to normal operation.
. Steam” simultaneously and
28
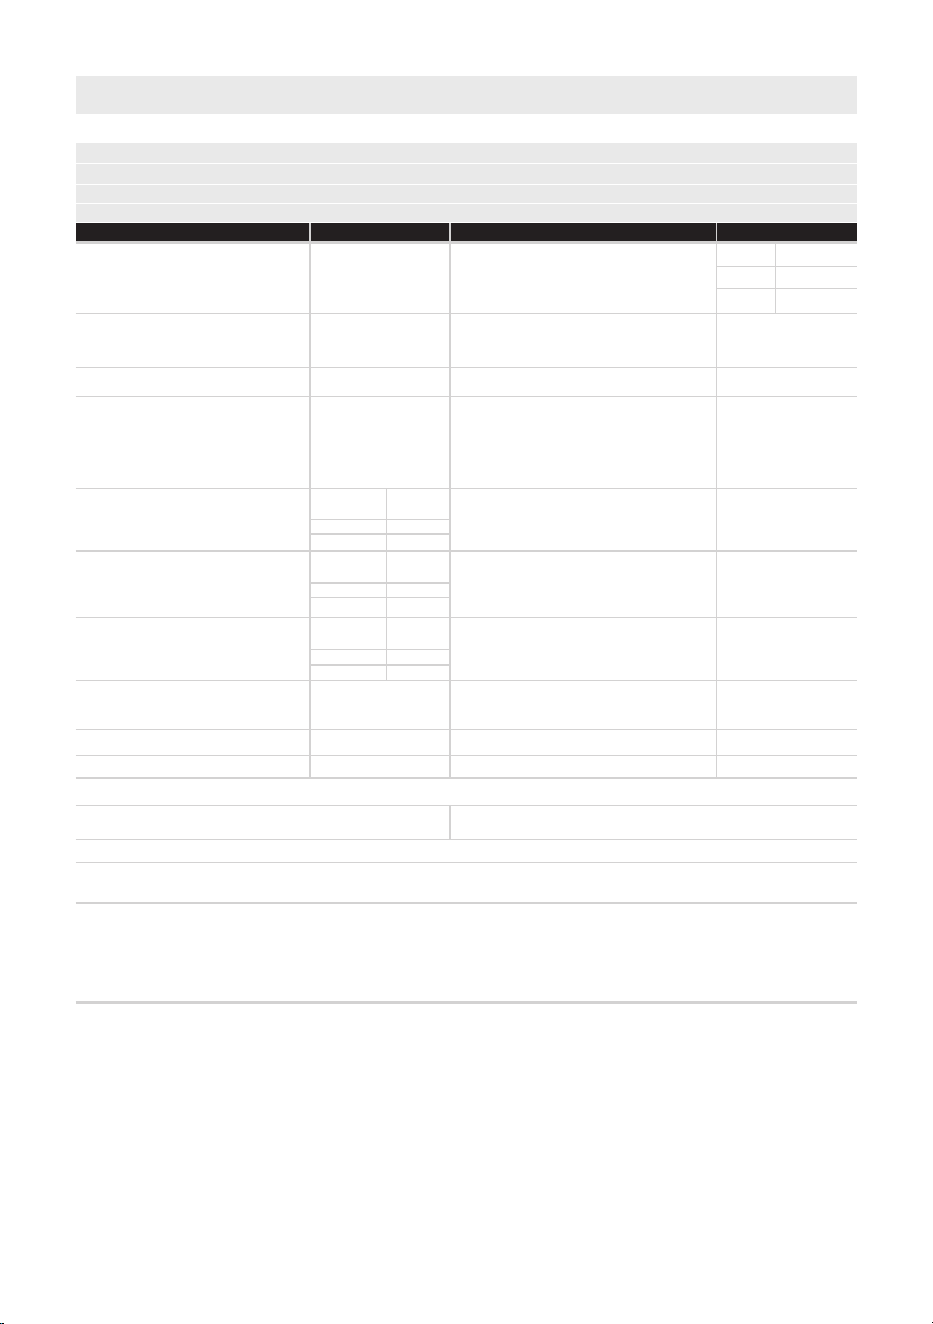
b
Rated capacity( )(kg)
a , c
Dimensions in cm( )( )
Height
Width
Depth
b
Energy efficiency index( )
(EEI )
w
b
Energy efficiency class( )
b
Washing efficiency index( )
b
Rinsing effectiveness (g/kg)( )
Maximum temperature inside the
b
treated textile ( )(℃)
Rated
capacity
Half
Quarter
Weighted remaining moisture
b
content ( )(%)
b
Spin speed( )(rpm)
b
Spin-drying efficiency class ( )
b
Programme duration( )(h:min)
Type
Airborne acoustical noise
b
emissions in the spinning phase( )
(dB(A) re l pW)
Airborne acoustical noise
b
emission class ( )(spinning phase)
Off-mode (W) (if applicable)
Delay start (W) (if applicable)
Standby mode (W)(if applicable)
Networked standby (W)(if applicable)
a , c
Minimum duration of the guarantee offered by the supplier ( ) ( ):
This product has been designed to release silver
ions during the washing cycle
Additional information:
Weblink to the supplier's website, where the information in point 9 of Annex ll to Commission Regulation
1
(EU)2019/2023( ) is found:
a
( )
b
( ) for the eco 40-60 programme.
c
( ) changes to this item shall not be considered relevant for the purposes of paragraph 4 of Article 4 of Regulation
(EU)2017/1369.
d
( ) it the product database automatically generates the definitive content of this cell, the supplier shall not enter
these data.
this item shall not be considered relevant for the purposes of Article 2(6) of Regulation (EU) 2017/1369,
a , c
Supplier's name or trade mark( )( ):
a , c
Supplier's address( )( ):
a
Model identifier( ):
General product parameters:
MFV3EW100BA10
Parameter Value Parameter Value
Rated
capacity
Half
Quarter
Rated
capacity
Half
Quarter
10.0
1.031
72
0.50
4.00
NO
A
d
( )
free-standing
d
( )
d
( )
Energy consumption in kWh per
cycle, based on the eco 40-60
programme at a combination of
full and partial loads. Actual
energy consumption will depend
on how the appliance is used.
Water consumption in litre per cycle,
based on the eco 40-60 programme at
a combination of full and partial loads.
Actual water consumption will depend
on how the appliance is used and on
the hardness of the water.
1) The actual energy consumption will depend on how the appliance is used.
2) The actual water consumption will depend on how the appliance is used and on the
hardness of the water.
3) Delivery of the spare parts within 15 working days after having received the order.
Product Data Sheet concerning (EU) 2019/2014
The product data sheet for your appliance can be found online.
Go to https://eprel.ec.europe.eu and enter the model identifier for your appliance to
download the data sheet.
The model identifier for your appliance can be found in the technical specifications
section.
46.8
0.462
34
31
24
1351
1351
1351
3:59
3:00
3:00
B
53.9
52
5.0
A
85
60
60
Product Fiche
N/A
0.50
CLEANING AND MAINTENANCE
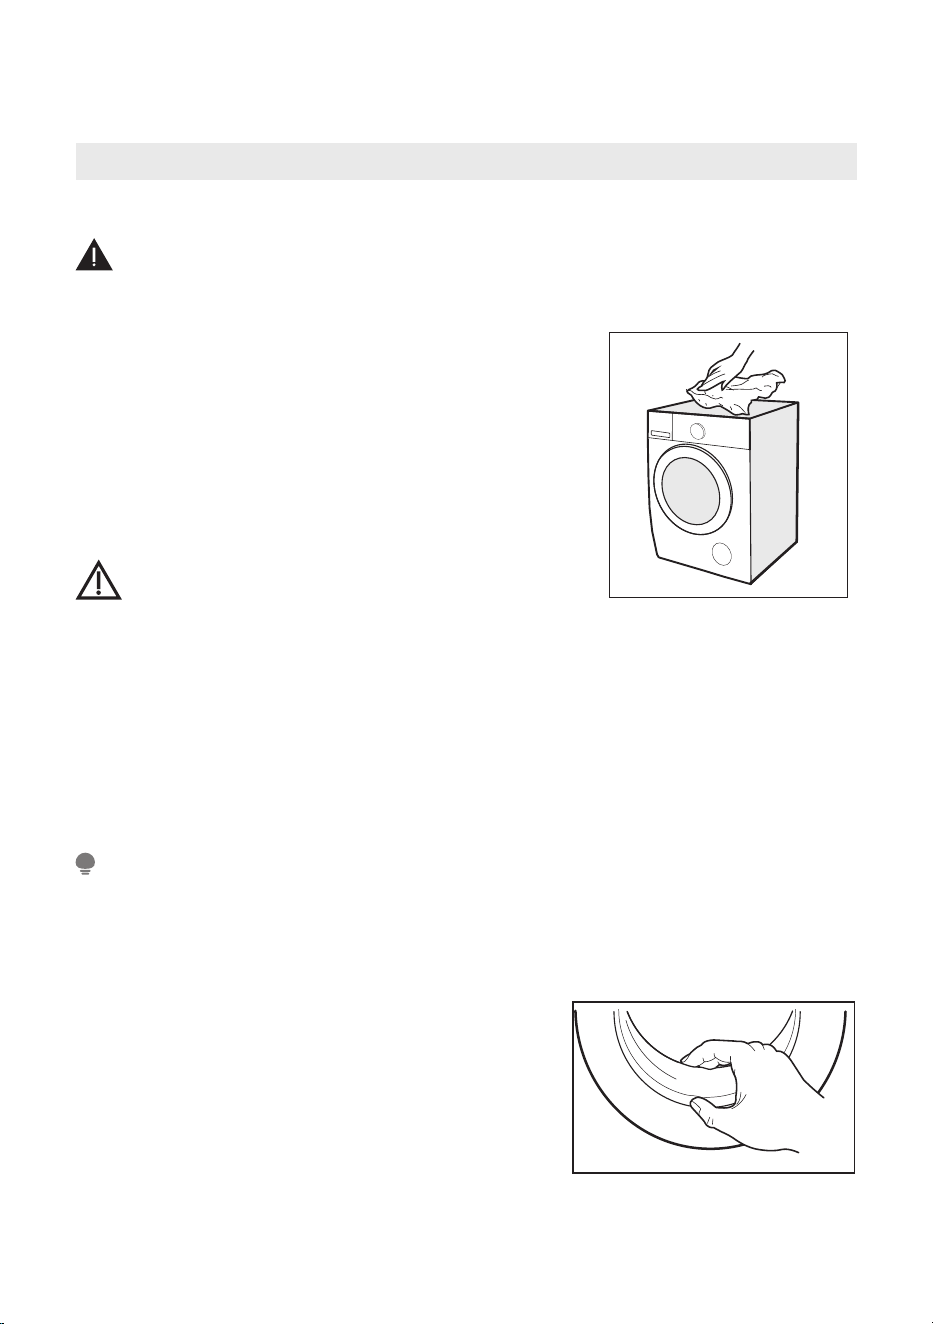
• Always unplug the appliance and close the water tap before cleaning and maintenance.
Cleaning the Cabinet
Cleaning and Care
Proper maintenance of the appliance can extend its
working life. The surface can be cleaned with diluted non-
abrasive neutral detergents when necessary. If there is
any water overflow, use a towel to wipe it off immediately.
Never use sharp items to clean the appliance. It's
recommended to clean the cabinet as needed.
• Never use abrasive or caustic agents. Such as formic acids or its diluted solvents or
similar substances, like alcohol or chemical products.
29
Cleaning the Drum
• Keep any laundry away from the machine while cleaning the drum.
Cleaning the Door Seal and Glass
Any rust stains left inside the drum must be removed immediately using
chlorine-free cleaning agents. Never use steel wool for cleaning the drum!
NOTE
After 60 wash programs, U01 is displayed as a reminder on the control panel.
Please follow the reminder and carry out the cleaning of the drum to ensure normal
operation of the appliance.
After 60 wash programs, U01 is displayed as a
reminder on the control panel. Please follow the
reminder and carry out the cleaning of the door
seal to ensure normal operation of the appliance.
Wipe the glass and seal after each wash to
remove lint and stains. If lint builds up it can
cause leakages.
Remove any coins, buttons and other objects
from the seal after each wash.
Clean your washing machine regularly to keep laundry washing sustainably. The cleaning
recommendation is described in the corresponding chapter.
WARNING
CAUTION
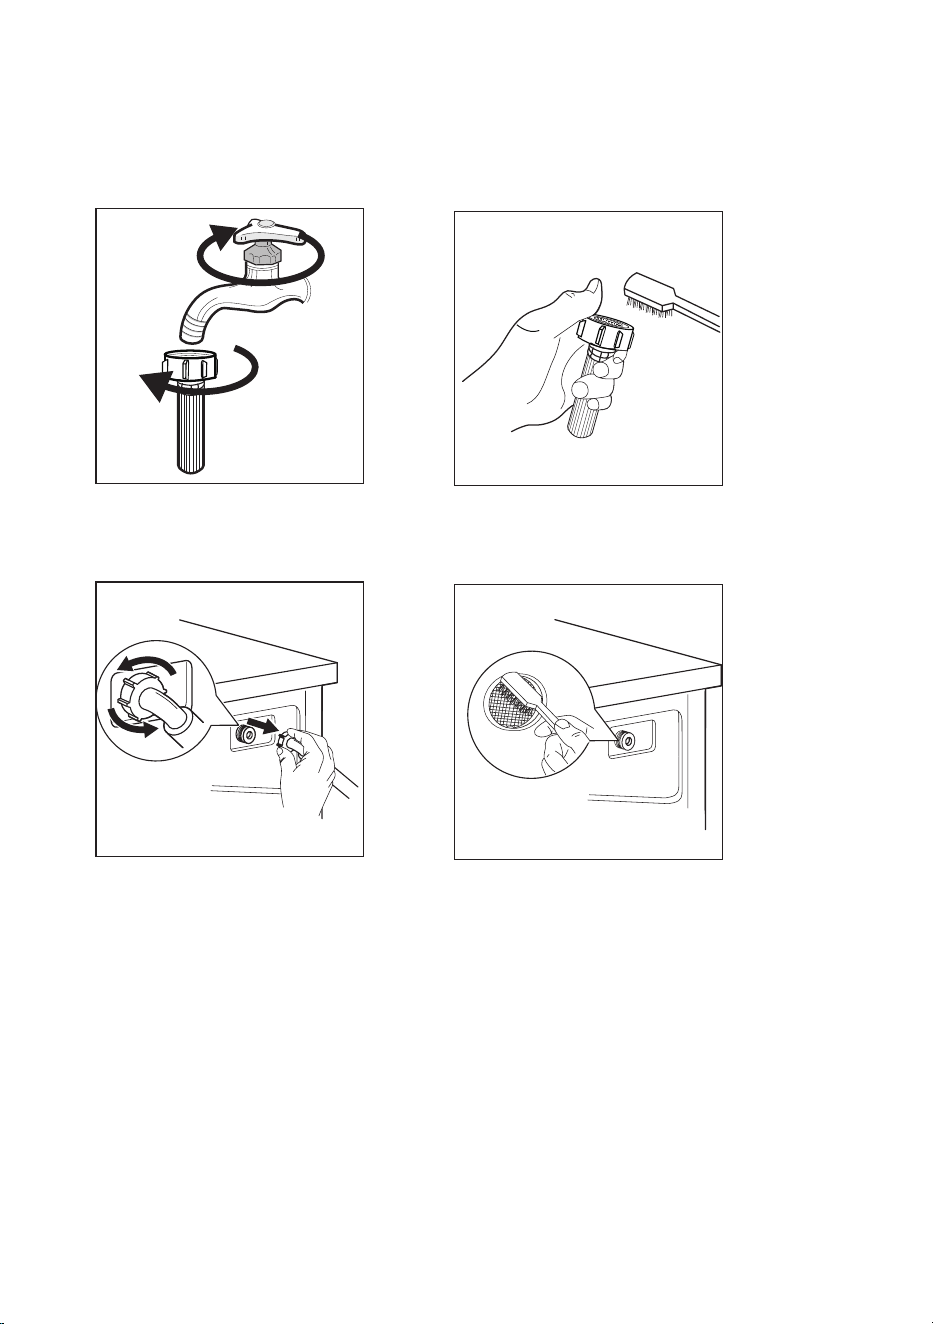
Cleaning the Inlet Filter
1. Close the tap and remove
the water supply hose from it.
2. Clean the filter with a brush.
3. Unscrew the water supply
hose from the backside of
the appliance.
4. Clean the filter with a brush.
30
5. Reconnect the water supply hose again.
6. After 60 wash programs, U01 is displayed as a reminder on the control panel. Please
follow the reminder and carry out the cleaning of the inlet filter to ensure normal
operation of the appliance.
Clean the filter as needed. A diminishing water flow is a sign that the filter may be blocked.
NOTE
31
Cleaning the Detergent Dispenser
•
•
• Clean the inside of the detergent box with a brush.
•
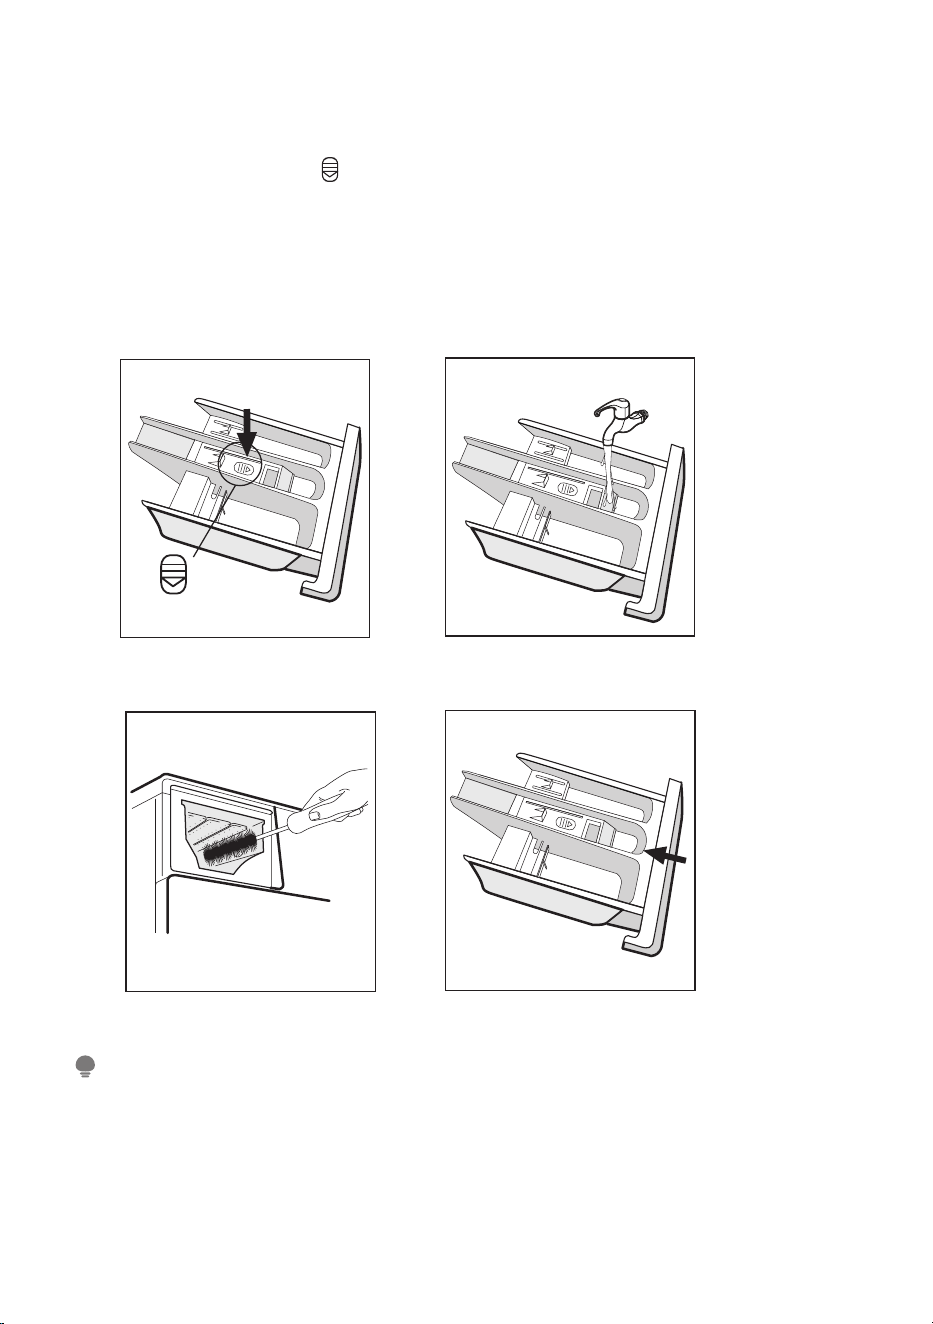
Press down the release [ ] on the softener cover and pull the detergent dispenser
out of the detergent box.
Lift the softener cover off the detergent dispenser and wash both items with water.
Restore the softener cover and push the dispenser back into the detergent box.
1. Press the release and
remove the detergent
dispenser
2. Clean the detergent
dispenser and the softener
cover under water
3. Clean the detergent box
with a soft brush
4. Insert the detergent
dispenser
• Do not use abrasive or caustic agents to clean plastic parts.
•
Always leave the detergent drawer slightly open so that it can dry properly.
After 60 wash programs, U01 is displayed as a reminder on the control panel. Please
follow the reminder and carry out the cleaning of the detergent dispenser to ensure
normal operation of the appliance.
•
Limescale and detergent residues can build up on the detergent dispenser. It's therefore
recommended to clean the detergent dispenser if needed.
32
Cleaning the Drain Pump Filter
• Make sure that the washing machine has finished the washing program and
load is removed of drum. Switch it off and unplug the washing machine
before cleaning the drain pump filter.
• Be careful of hot water. Wait for water cooling down. Risk of scalding!
• After 60 wash programs, U01 is displayed as a reminder on the control panel.
Please follow the reminder and carry out the cleaning of the drain pump filter
to ensure normal operation of the appliance.
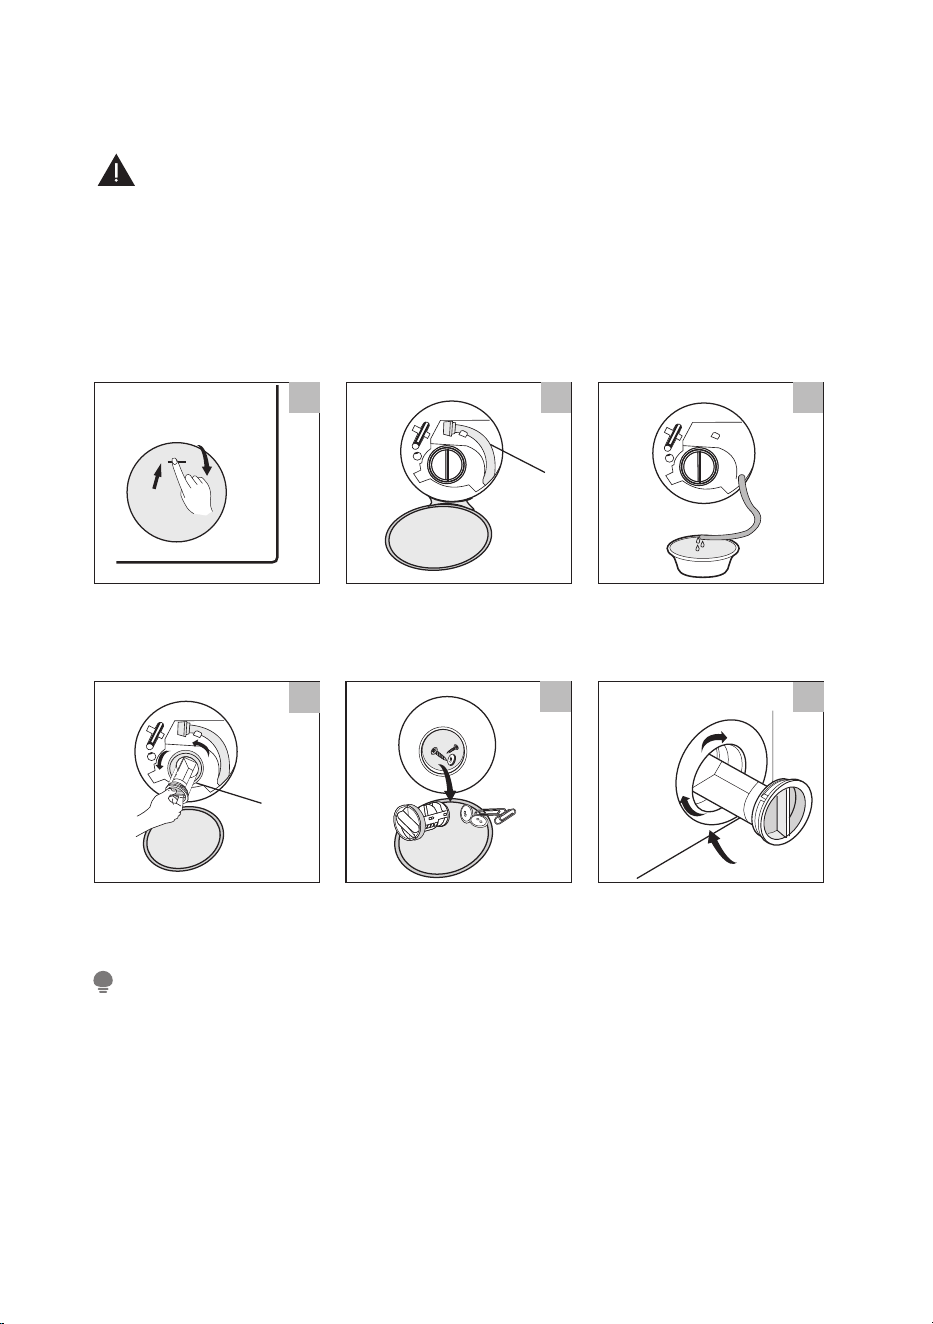
2
3
Open the lower cover
cap
Pull out the emergency
drain hose, and take
off the hose cap
After the water has
flown out completely,
reinsert the drain hose
5
4
6
Open the pump filter by
turning to the counter
clockwise
Remove extraneous
objects
Carefully reinsert the
pump filter and screw
the lower cover cap in
clockwise
• Make sure that hose cap of emergency drain hose are reinstalled properly,
otherwise water may leak.
• Some appliances don’t have emergency drain hose, so step 2 and step 3 can be
skipped.
• When the washing machine is under operation and depending on the program
selected there can be hot water in the pump. Never remove the pump cover during
a washing program, always wait until the washing machine has ended the operation
and load is removed of drum.
If there is a problem with the drain pump, clean it according to the following cleaning
instructions.
NOTE
WARNING
1
Emergency
drain hose
Filter cap
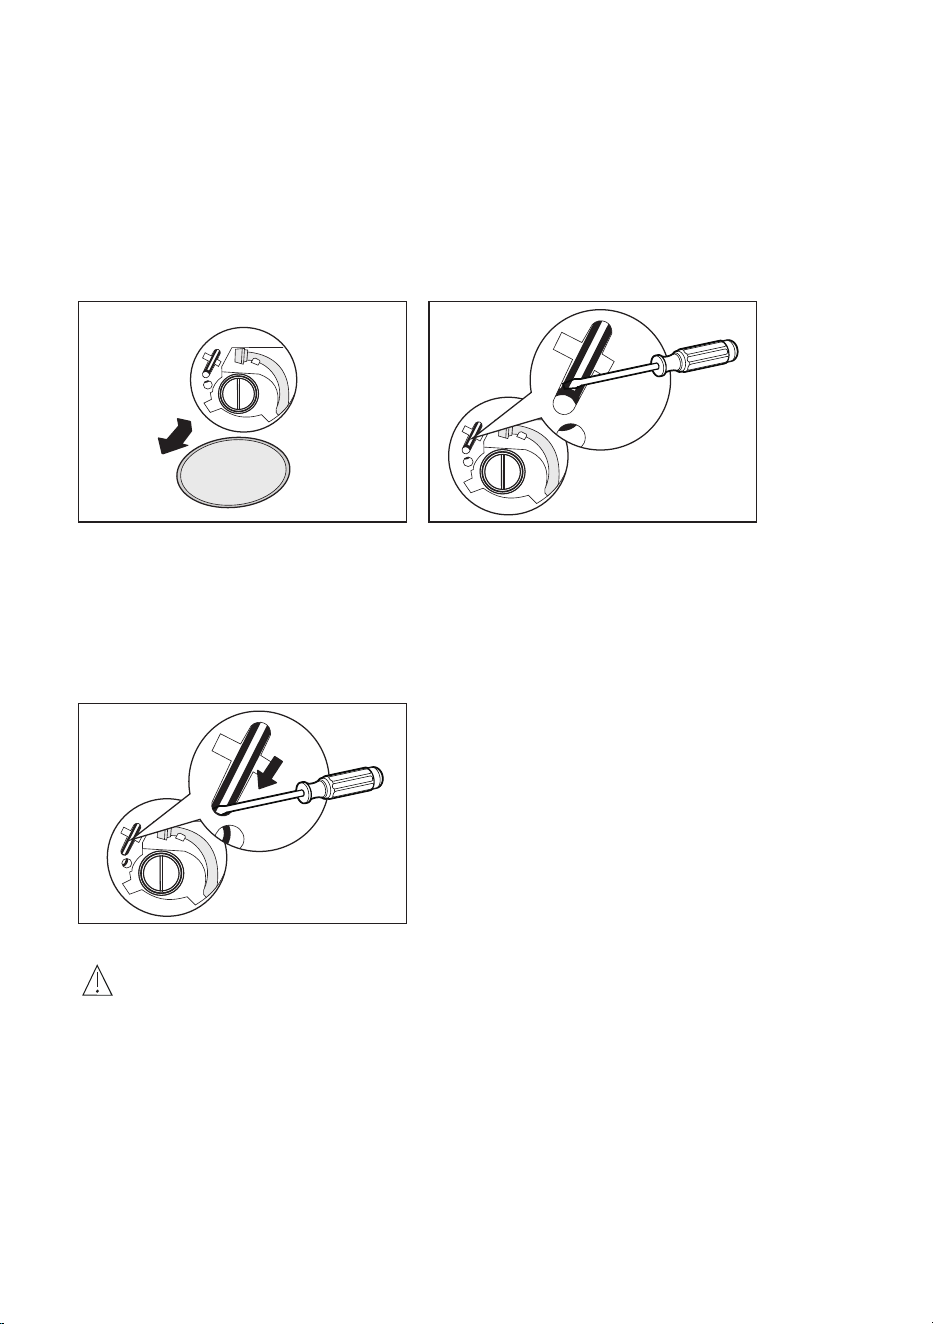
1.Open filter door.
Emergency door pull cord
2.Using a straight screwdriver
(or other non-sharp tool),
insert int
o the emergency door
pull c
ord.
Emergency Door Release
In case of power failure or other circumstances and door cannot be opened.
If it is necessary to open the door under this circumstances, please pull
down the pull cord inside emergency door and restore the pull cord after
opening the door.
The machine is not allowed to use the emergency switch pull cord
during washing. If need to run machine urgently, it is recommended to
open door after water is cooled, to avoid getting burn caused by high
temperature residual water outflow from the machine tub.
3.Pull down the emergency door
pull c
ord (refer to direction of the
arr
ow in the picture).
If unlocked successfully, you will
find the door lock ic
on will go out.
CAUTION
33
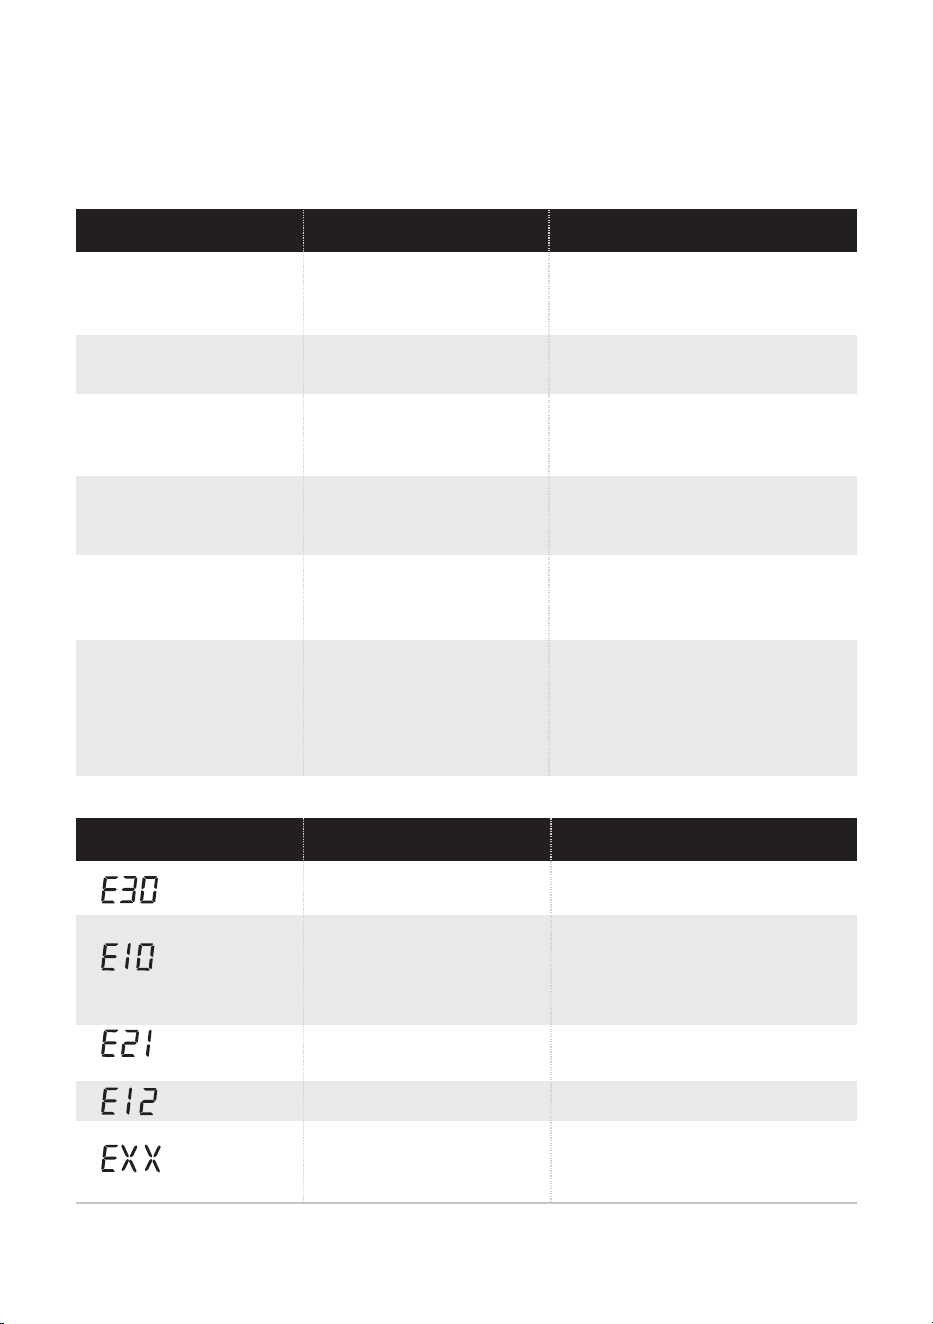
Whenever there is a problem with the appliance, check if you can solve it following the
tables below. If the problem persists, please contact the customer service.
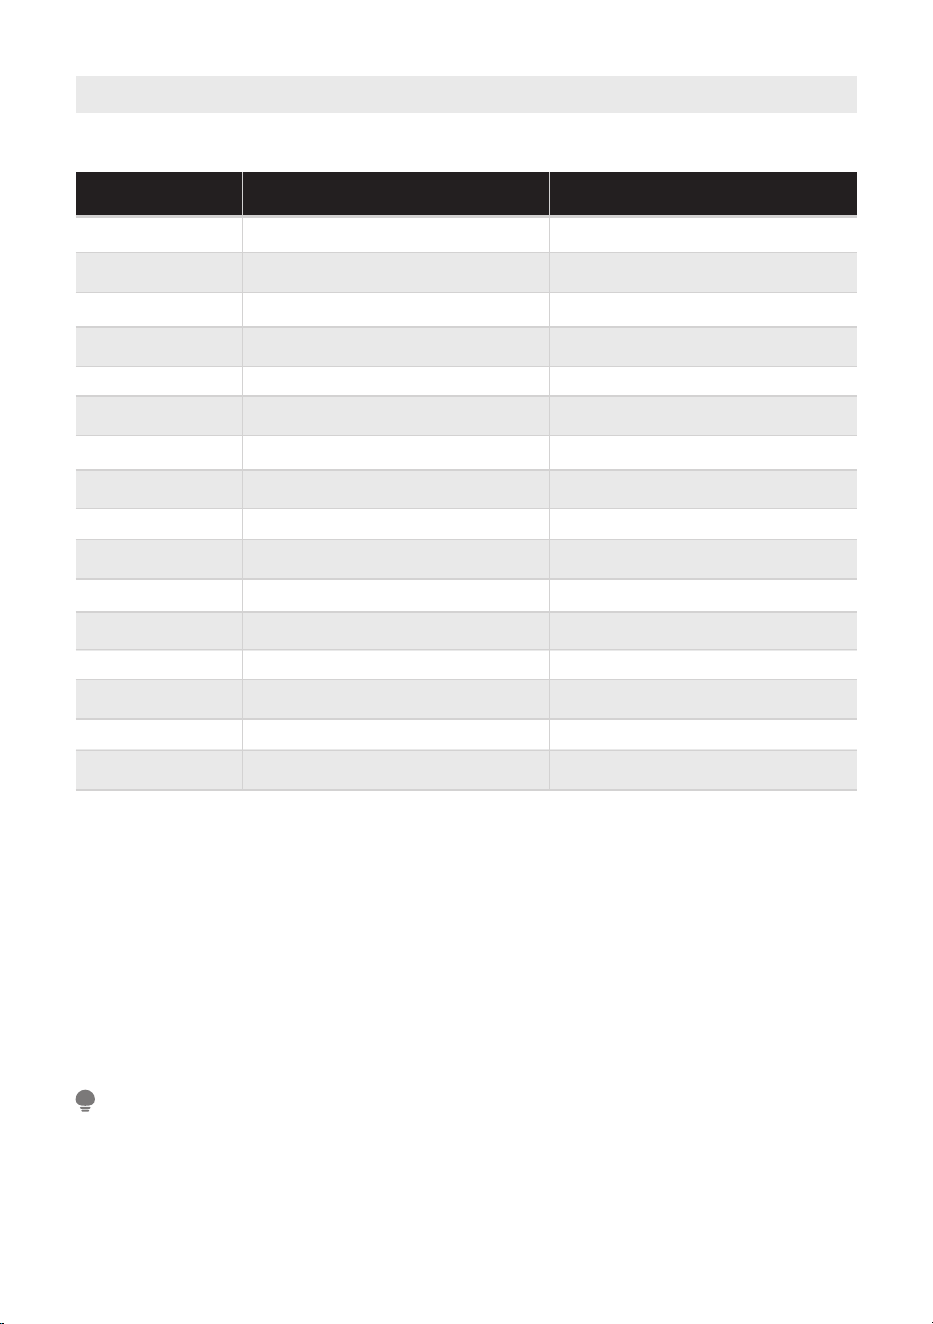
Description
Possible Cause
Solution
Check if the water pressure
is high enough.
Straighten the water pipe.
Clean the inlet valve filter.
Check the drain hose and pump
filter for blockage.
Water injecting
problem during
washing program.
Overtime water
draining
Restart the appliance. If
problem persists, please
contact the customer service.
Others
Water overflow
Restart the appliance.
Close the door properly
and restart.
Door is not closed
properly.
Description
Possible Cause
Solution
Check the laundry.
Close the door properly
and restart.
Door is not closed
properly. Clothes are
stuck.
Safety protection
is activated.
Disconnect the power and
restart.
Water leakage
Connections are
not tight enough.
Check and fasten the water
inlet hose.
Check and clean the outlet hose.
Clean and wipe the
detergent dispenser dry.
Abnormal noise
Check if the fixing bolts
have been removed.
Make sure the appliance is
installed on a solid and
level floor.
Leveling the appliance again.
Indicator or display
does not work
PC board or harness
have connection
problems.
Switch off the power and
check if the mains plug
is connected properly.
Appliance does
not start
Detergent residues
in the detergent
dispenser
Detergent is damp
and/or clotted.
Door can´t be
opened
Fixing bolts are still in
place.
Floor is not solid or level.
Error Codes
TROUBLE SHOOTING
34

TRADEMARKS, COPYRIGHTS
AND LEGAL STATEMENT
logo, word marks, trade name, trade dress and all versions thereof are valuable
assets of Midea Group and/or its affiliates (“Midea”), to which Midea owns trademarks,
copyrights and other intellectual property rights, and all good will derived from using
any part of an Midea trademark. Use of Midea trademark for commercial purposes
without the prior written consent of Midea may constitute trademark infringement or
unfair competition in violation of relevant laws.
This manual is created by Midea and Midea reserves all copyrights thereof. No entity or
individual may use, duplicate, modify, distribute in whole or in part this manual, or
bundle or sell with other products without the prior written consent of Midea.
All the described functions and instructions were up to date at the time of printing this
manual. However, the actual product may vary due to improved functions and designs.
35
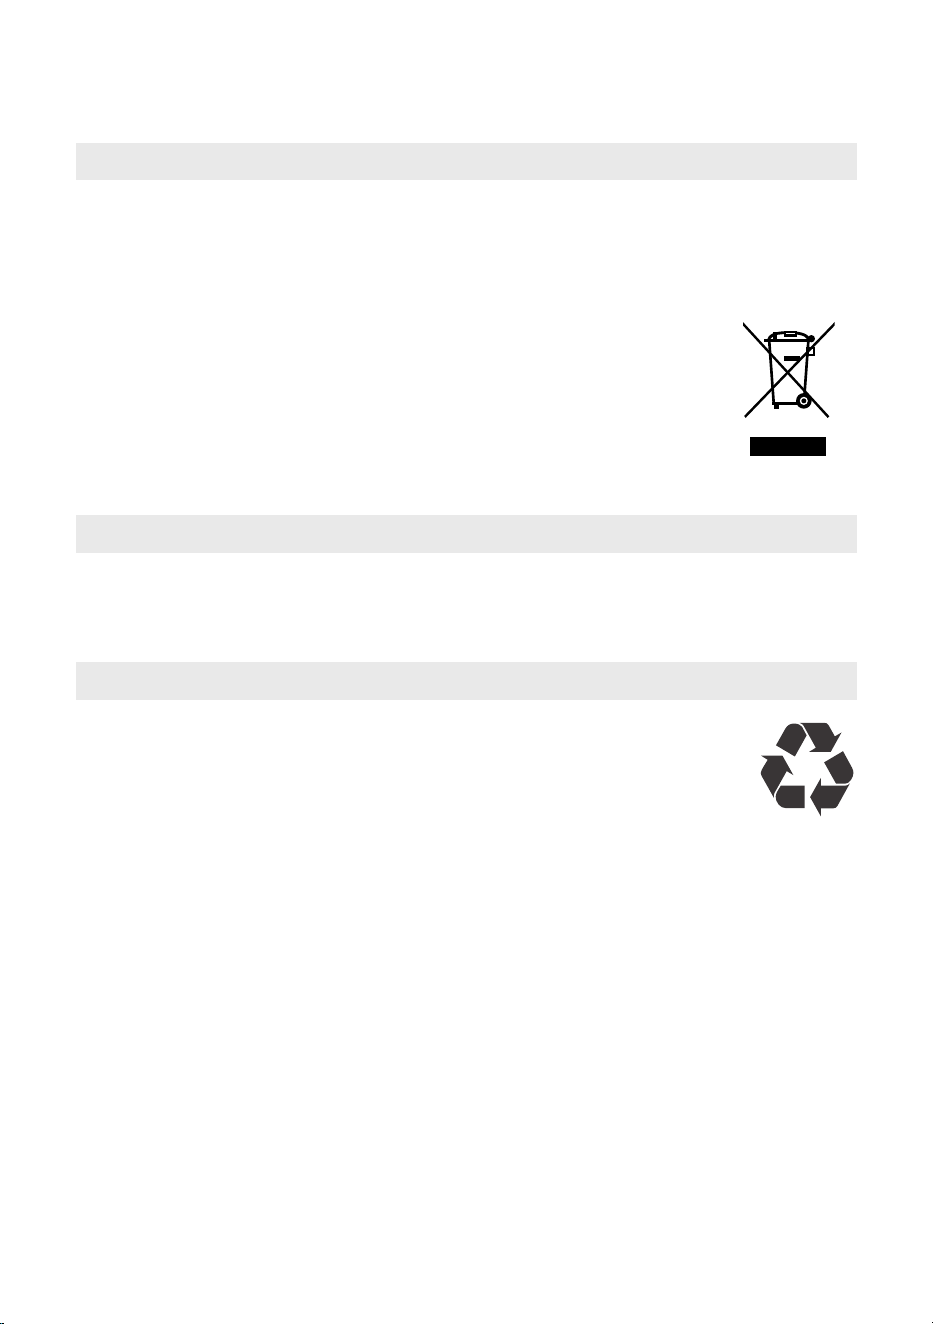
DISPOSAL AND RECYCLING
Important Instructions for Environment
This symbol indicates that this product shall not be disposed with
other household wastes at the end of its service life. Used device
must be returned to offcial collection point for recycling of
electrical electronic devices. To find these collection systems
please contact to your local authorities or retailer where the
product was purchased. Each household performs important role
in recovering and recycling of old appliance. Appropriate disposal
of used appliance helps prevent potential negative consequences
for the environment and human health.
Compliance with RoHS Directive
The product you have purchased complies with EU RoHS Directive (2011/65/EU). It does
not contain harmful and prohibited materials specified in the Directive.
Package Information
Packaging materials of the product are manufactured from recyclable
materials in accordance with our National Environment Regulations. Do not
dispose of the packaging materials together with the domestic or other
wastes. Take them to the packaging material collection points designated
by the local authorities.
Compliance with the WEEE Directive and Disposing of the Waster Product:
This product complies with EU WEEE Directive (2012/19/EU). This product bears a
classification symbol for waster electrical and electronic equipment (WEEE).
36

DATA PROTECTION NOTICE
For the provision of the services agreed with the customer,
we agree to comply without restriction with all stipulations of applicable data protection
law, in line with agreed countries within which services to the customer will be delivered,
as well as, where applicable, the EU General Data Protection Regulation (GDPR).
Generally, our data processing is to fulfil our obligation under contract with you and for
product safety reasons, to safeguard your rights in connection with warranty and
product registration questions. In some cases, but only if appropriate data protection is
ensured, personal data might be transferred to recipients located outside of the
European Economic Area.
Further information are provided on request. You can contact our Data Protection
Officer via MideaDPO@midea.com. To exercise your rights such as right to object your
personal date being processed for direct marketing purposes, please contact us via
[email protected]om. To find further information, please follow the QR Code.
37

Your device / serial number
Purchase date:
Place of purchase:
We provide a guarantee for this appliance in accordance with the
following conditions: You have a manufacturer’s warranty of
years from the date of purchase (proof of purchase must be
provided). Our General Terms and Conditions apply.
WARRANTY CARD
NOTES
Do you have any questions ?
We are happy to support you !
http://www.midea.com
38
In case of questions, please contact our local customer service center.
Never try to repair an appliance which is defective or presumed to
defective. You may put your own and future users' lives in danger.
Only authorised specialists are allowed to carry out this repair work.
• Improper repair will void the warranty and subsequent damages
can't be recognized!
Risk of electric shock
•
Spare parts for your appliance are available for a minimum of 10 years
.
following EU COMMISSION REGULATION 2019/2023 ANNEX II Ecodesign
requirements
Transport
IMPORTANT STEPS WHEN MOVING THE APPLIANCE
•
• Check if the door and the detergent dispenser are closed properly.
• Remove the water inlet pipe and the outlet hose from the house
installations.
• Let the water drain completely from the appliance (see “
”)
• Important: Re-install the 4 transport bolts in the back of the appliance.
• This appliance is heavy. Transport with care. Never hold any protruding
part of the appliance when lifting. The appliance door can not be used as a
handle.
Unplug the appliance and close the water inlet tap.
Cleaning the
Drain Pump Filter
Customer Service
39
WARNING
•
When lifting the machine, there is a risk of cuts in the lower area.
Protective gloves must be worn.
CAUTION
xxx