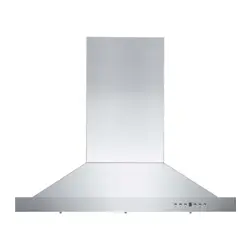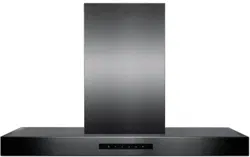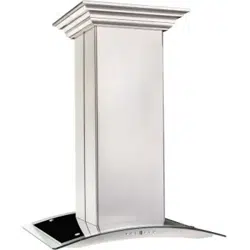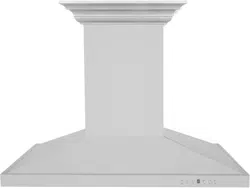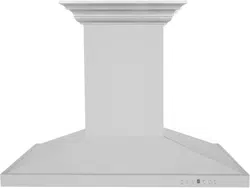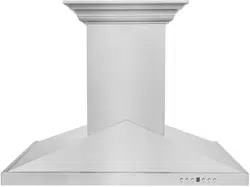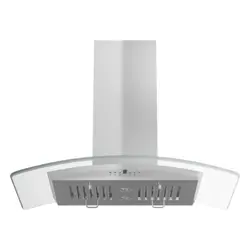

ISLAND RANGE HOODS
www.zlinekitchen.com
Installation and User Manual

ZLINE Kitchen and Bath provides Attainable Luxury, where the kitchen and bath of your dreams
is never out of reach. Through our unique designs and unparalleled quality, we’re dedicated to
providing you an elevated experience in the heart of your home. With an endless selection of
features and finishes, our inspiration is your reality.

ZLINE is fueled by a passion for innovation; A relentless pursuit of bringing the
highest end luxury designs and professional features into everyone’s homes.
Because we continually strive to improve our products, we may change
specifications and designs without prior notice.
Scan the QR code to view the most up-to-date version of the Installation
Manual and User Manual.
WARNING: This product can expose you to chemicals including nickel, which is known to the
State of California to cause cancer. For more information, go to www.P65Warnings.ca.gov.

IMPORTANT SAFETY INSTRUCTIONS . . . . . . . . . . . . . . . . . . . . . . . . . . 1
BEFORE INSTALLATION . . . . . . . . . . . . . . . . . . . . . . . . . . . . . . . . . . . . . . 4
INSTALLATION . . . . . . . . . . . . . . . . . . . . . . . . . . . . . . . . . . . . . . . . . . . . . 7
Island Range Hood . . . . . . . . . . . . . . . . . . . . . . . . . . . . . 7
Designer Island Range Hood . . . . . . . . . . . . . . . . . . . . . . . . 13
Island Crownsound
™
Installation . . . . . . . . . . . . . . . . . . . . . . 21
OPERATION . . . . . . . . . . . . . . . . . . . . . . . . . . . . . . . . . . . . . . . . . . . . . . 23
REPLACING PARTS . . . . . . . . . . . . . . . . . . . . . . . . . . . . . . . . . . . . . . . . . 24
How To Replace The Button Panel . . . . . . . . . . . . . . . . . . . .24
How To Replace The Circuit Board . . . . . . . . . . . . . . . . . . . . .25
How To Replace The Light Bulbs In Your Range Hood . . . . . . . . . . .26
How To Replace The Capacitor . . . . . . . . . . . . . . . . . . . . . . .27
How To Replace The Transformer . . . . . . . . . . . . . . . . . . . . . .28
How To Replace Professional Series Baffle Channels And Filters . . . . . 31
How To Replace Or Change Charcoal Filters . . . . . . . . . . . . . . .33
How To Clean And Replace The Grease Cup . . . . . . . . . . . . . . .34
FREQUENTLY ASKED QUESTIONS . . . . . . . . . . . . . . . . . . . . . . . . . . . 35
TROUBLESHOOTING . . . . . . . . . . . . . . . . . . . . . . . . . . . . . . . . . . . . . . . 38
WARRANTY . . . . . . . . . . . . . . . . . . . . . . . . . . . . . . . . . . . . . . . . . . . . . . . 41
TABLE OF CONTENTS

1
General Safety
IMPORTANT SAFETY INSTRUCTIONS
WARNING
If the information in this manual is not followed exactly, a fire or explosion may
result causing property damage, personal injury, or death.
• Before beginning installation, please read and follow these important instructions for the
safety of your home and the people living in it.
• The instructions in this manual are intended for qualified installers and certified service
technicians. Installation and electrical wiring must be completed by qualified professionals
and in accordance with applicable codes and standards.
• DO NOT attempt to install this appliance yourself. Injury could result from installing the
unit due to lack of appropriate electrical and technical background.
• The installer should leave these instructions with the consumer who should retain for local
inspectors’ use and for future reference.
• Due to the size and weight of ZLINE range hoods, two-person installation is highly
recommended.
• Use care when handling the range hood, chimney cover, baffle filters, and any parts or
accessories, as sharp edges may lead to injury. Use of gloves during installation is highly
recommended.
• The manufacturer will not be responsible for any damage to property or to persons
caused by incorrect installation, improper use of the appliance, or failure to heed the
warnings listed.
• The manufacturer reserves the right to make changes to its products when considered
necessary and useful, without affecting the essential safety and operating characteristics.
• This appliance is designed for general ventilating use only. DO NOT use to exhaust
hazardous or explosive materials and vapors.
• The combustion air flow needed for safe operation of fuel-burning equipment may
be affected by this unit’s operation. Follow heating equipment guidelines and safety
standards such as those published by the National Fire Protection Association (NFPA),
American Society of Heating, Refrigeration and Air Conditioning Engineers (ASHRAE),
and local code and government authorities.
• Sufficient air is needed for proper combustion and exhausting of gases through the
ducting installed with range hoods to prevent back drafting.
• Before servicing or cleaning the unit, fully disconnect the hood from power to avoid risk
of electric shock and injury.

2
General Safety
IMPORTANT SAFETY INSTRUCTIONS
• Ducted range hoods MUST ALWAYS be vented to the outdoors or in some instances
converted to recirculate the air. All ZLINE hoods come with a transition piece with a
built-in damper.
• Some existing installations may already have an external damper at the exit point of the
home. In this case, the damper in the transition piece of your hood needs to be removed,
as these two dampers work against each other and will reduce the performance
of the hood.
• Please consult an HVAC or installation professional for advice to comply with local
regulations and ensure appropriate ventilation.
• When cutting or drilling into a wall or ceiling, be careful not to damage electrical wiring
or other hidden utilities.
• All electrical wiring must be properly installed, insulated, and grounded. ZLINE range
hoods come with a grounded 3-prong plug that must be plugged into a dedicated 15-
amp circuit. Manipulating the plug or cutting the electrical cord will void your warranty.
• Electrical installation must be in accordance with the National Electrical Code ANSI/
NPA70-latest edition and/or local codes.
• Old duct work should be cleaned or replaced, if necessary, to avoid the possibility of a
grease fire or other hazard. Check all joints on duct work to ensure proper connection;
all joints should be properly taped/secured.
• When the range hood ventilates air out of the room, the vented air must be replaced; this
is called makeup air. If a makeup air system is needed, but not used, a hood may not
function as expected due to negative air pressure.
• ZLINE does not currently provide makeup air units. Always consult applicable building
codes regarding minimum and maximum air flow rates. Certain states may require
additional items such as makeup air for larger CFM range hoods.
• Keep the motor, fans, baffle channels, filters, tunnels, grease cups, and grease-laden
surfaces clean. Grease should not be allowed to accumulate inside or on the surface of
the range hood; clean surfaces frequently.
• Take care when cleaning the range hood in spray form: never direct spray of water or
cleaners onto the electrical wiring, motor, button panel, or light bulbs.
• After installation, use a stainless steel cleaning product or wipe to eliminate any residues
from protective film after removal.

3
General Safety
IMPORTANT SAFETY INSTRUCTIONS
• When cleaning stainless steel, only use a stainless steel cleaner product with a soft
sponge, or use a cloth with a warm soap and water solution. Never use abrasive
powders or liquids.
• To reduce the risk of fire and to disperse air properly, make sure to vent air outside.
DO NOT vent exhaust into spaces between walls, crawl spaces, ceilings, attics,
basements, or garages.
• All ZLINE range hoods are ETL-listed, ensuring all parts were tested for safety and meet
industry standards and regulations.
• You must purchase appropriate flexible ducting and any additional items to vent the
hood in accordance with government codes.
• Please verify with local and state regulations on the proper venting method for your
hood. Many agencies have CFM rating specifications for your hood.
• Always turn the range hood on when cooking at high heat or when cooking flaming
foods. Use high settings on the cooking range below only when necessary.
• Never leave range top surface units underneath a range hood unattended at high
settings. Boilovers can cause smoking and greasy spillovers that may ignite. Heat oils
slowly on low or medium settings.
• Always use appropriate cookware and utensils; always use cookware appropriate for
the size of the surface element on your range top underneath a range hood.
• To reduce the risk of injury in the event of a range top grease fire, smother flames with
a close fitting lid, cookie sheet, or metal tray, then turn off the burner. Never pick up a
flaming pan — you may be severely burned.
• Keep flammable or combustible material away from flames. If flames do not go out
immediately, evacuate and call the fire department. DO NOT use water, including wet
dishcloths or towels — a violent steam explosion will result.
• Carefully inspect all items for damages upon delivery. Upon acceptance of the range
hood, owner assumes responsibility for its safe arrival.
• Before installing your unit, test the range hood for proper functionality by plugging it into
an appropriate outlet and testing the fan and lights. Do not install any appliance if they
have missing or broken parts. If units arrive damaged, contact ZLINE Customer Service
at 1-614-777-5004 for help.

4
Range Hood Measurements
BEFORE INSTALLATION
RANGE HOOD MEASUREMENTS
NOTE: The recommended height to install your hood is 30" (762 mm) minimum and 36"
(914 mm) maximum above your range top or cook top. For outdoor installation, the hood should
be installed between 36" (914 mm) and 42" (1067 mm) above the grill. These distances allow
for optimal venting efficiency. The height of your chimney will vary depending on model of hood,
as well as the height of your kitchen ceiling. Consult an HVAC or installation professional for
ventilation advice.
5
Parts
PARTS
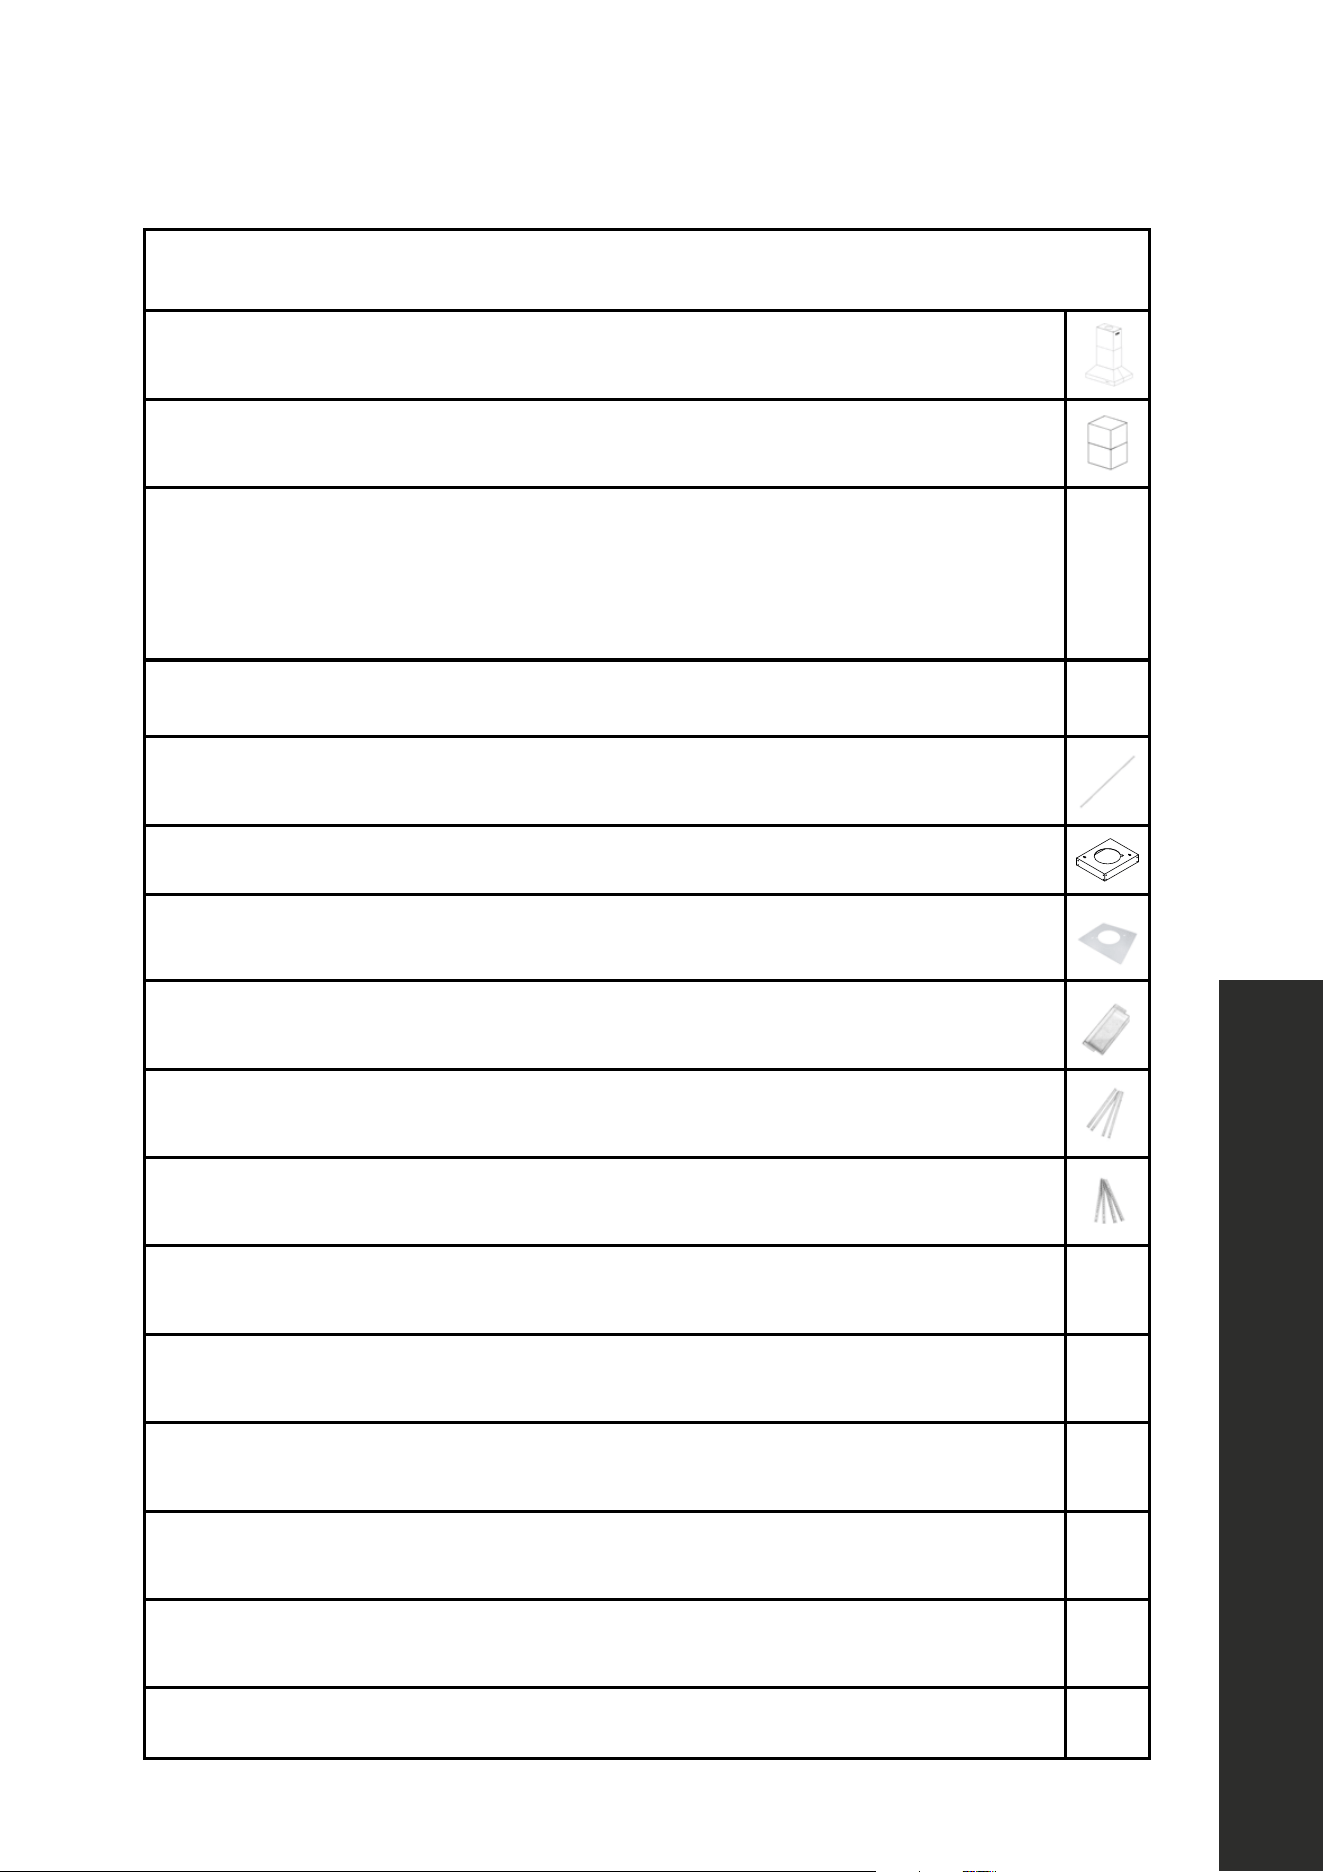
Unpack your range hood upon delivery and inspect to ensure all parts are included:
Main hood with lights and button panel pre-installed
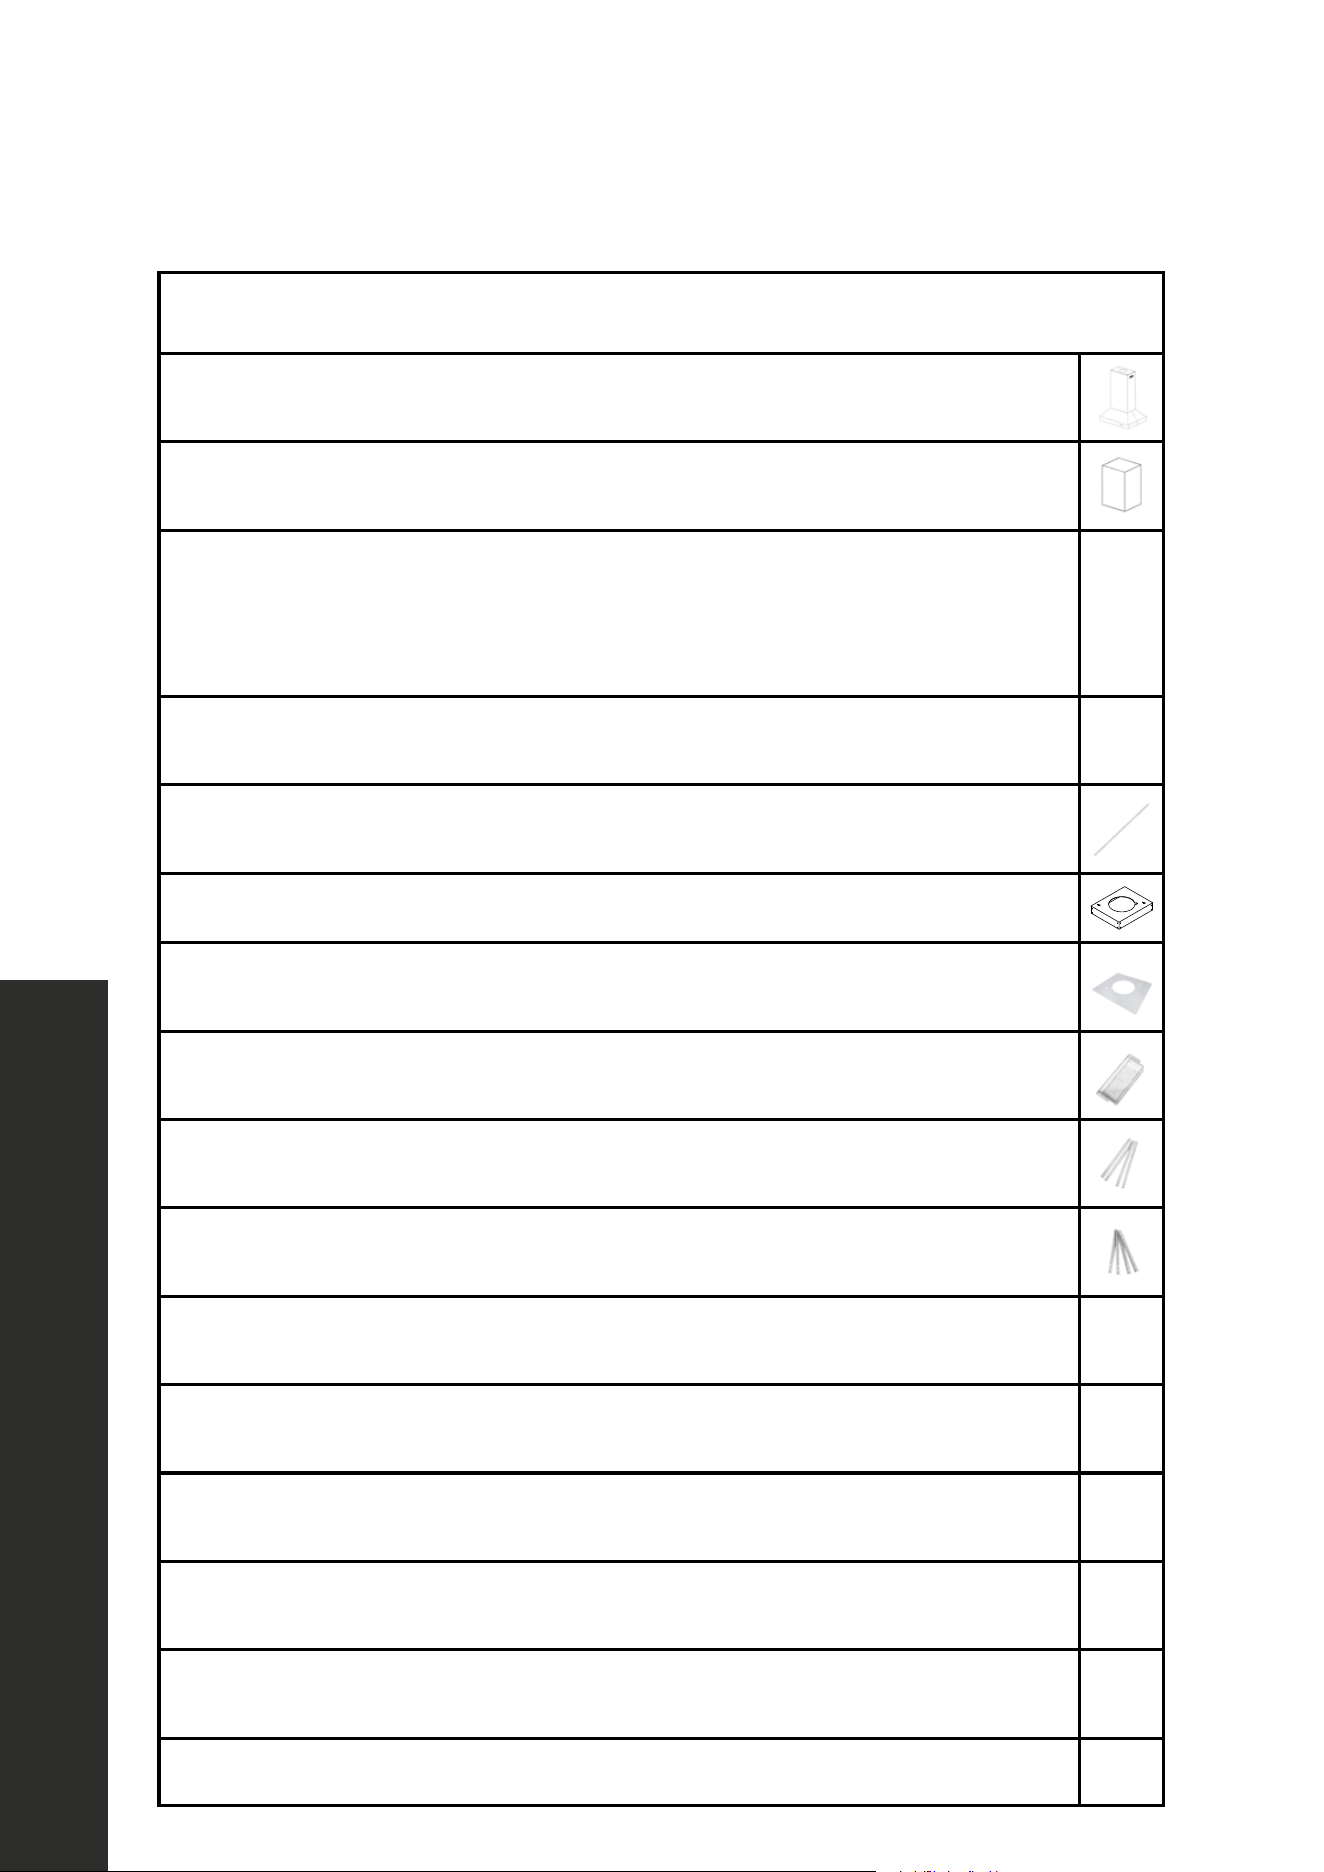
Adjustable chimney covers — two 19" (483 mm) telescoping pieces
Transition piece (for 6" or 8")*
*Island hoods with single motors come with a square-to-round transition piece
that includes a back draft damper. The ducting with these hoods is 6" (152 mm). Dual
motor hoods come with a square-to-round transition piece for 8" (203 mm) ducting.
Baffle filters
Baffle channel (if applicable, varies by model)
Chimney mounting bracket
Crown molding bracket (if applicable)
Grease cup
Four long angle brackets
Four short angle brackets
Anchor A
Screw/Washer C/D
Screw F
Screw G
Screw H
Nut I
BEFORE INSTALLATION

6
Ducting
BEFORE INSTALLATION
DUCTING REQUIREMENTS
NOTES:
• Ducting is not provided with your ZLINE range hood. It’s recommended to use solid
ducting made of galvanized steel or another appropriate rigid metal ducting whenever
possible for the lowest noise and highest flow.
• Use a maximum of 40' (12192 mm) of ductwork. Try to minimize the use of elbows.
• You must establish a minimum of 12" (305 mm) of vertical airflow from the top of the hood
before executing any 90° turn. No more than 3 elbows are allowed; each 90° turn you
make equates to 5' (1524 mm) lost when accounting for the maximum 40' (12192 mm).
• Do not use any reducers on ducting smaller than the appropriate diameter (6" or 8" —
152 mm or 203 mm).
• Any existing or additional dampers should be inspected for proper operation.
• Always consult an HVAC or installation professional to determine the best ducting option
for your range hood, as each kitchen and home layout will vary.
EXAMPLES OF PROPER AND IMPROPER DUCTING:

7
Mounting Directions
INSTALLATION
ISLAND RANGE HOOD
MOUNTING DIRECTIONS
Scan for an island hood installation
tutorial video. Please note that
depending on model of range hood,
some installation processes may vary.
NOTE: The following instructions are intended for qualified installers and certified service
technicians. While instructions are recommended by ZLINE, some professionals may use
different methods to achieve proper installation. Depending on which model hood you
purchase, some installation methods may differ from the video above and the instructions to
follow. Consult an HVAC or installation professional for the best option for you.
1. Install the chimney mounting bracket. Measure to the ceiling above the range top where
the hood will be installed. Ensure the bracket will be secured to solid wood backing;
2x4 beams installed in the roof joists work best (this is also where you’ll want a qualified
electrician to install a dedicated 15-amp circuit).
Pre-mark holes and then secure the bracket to the ceiling using 4 screws/washers (C/D).
You may fasten the screws into anchors (A) if desired for extra stability. NOTE: The front and
back sides of the bracket are slightly longer than the sides. Figure 1
Figure 1
8
Mounting Directions
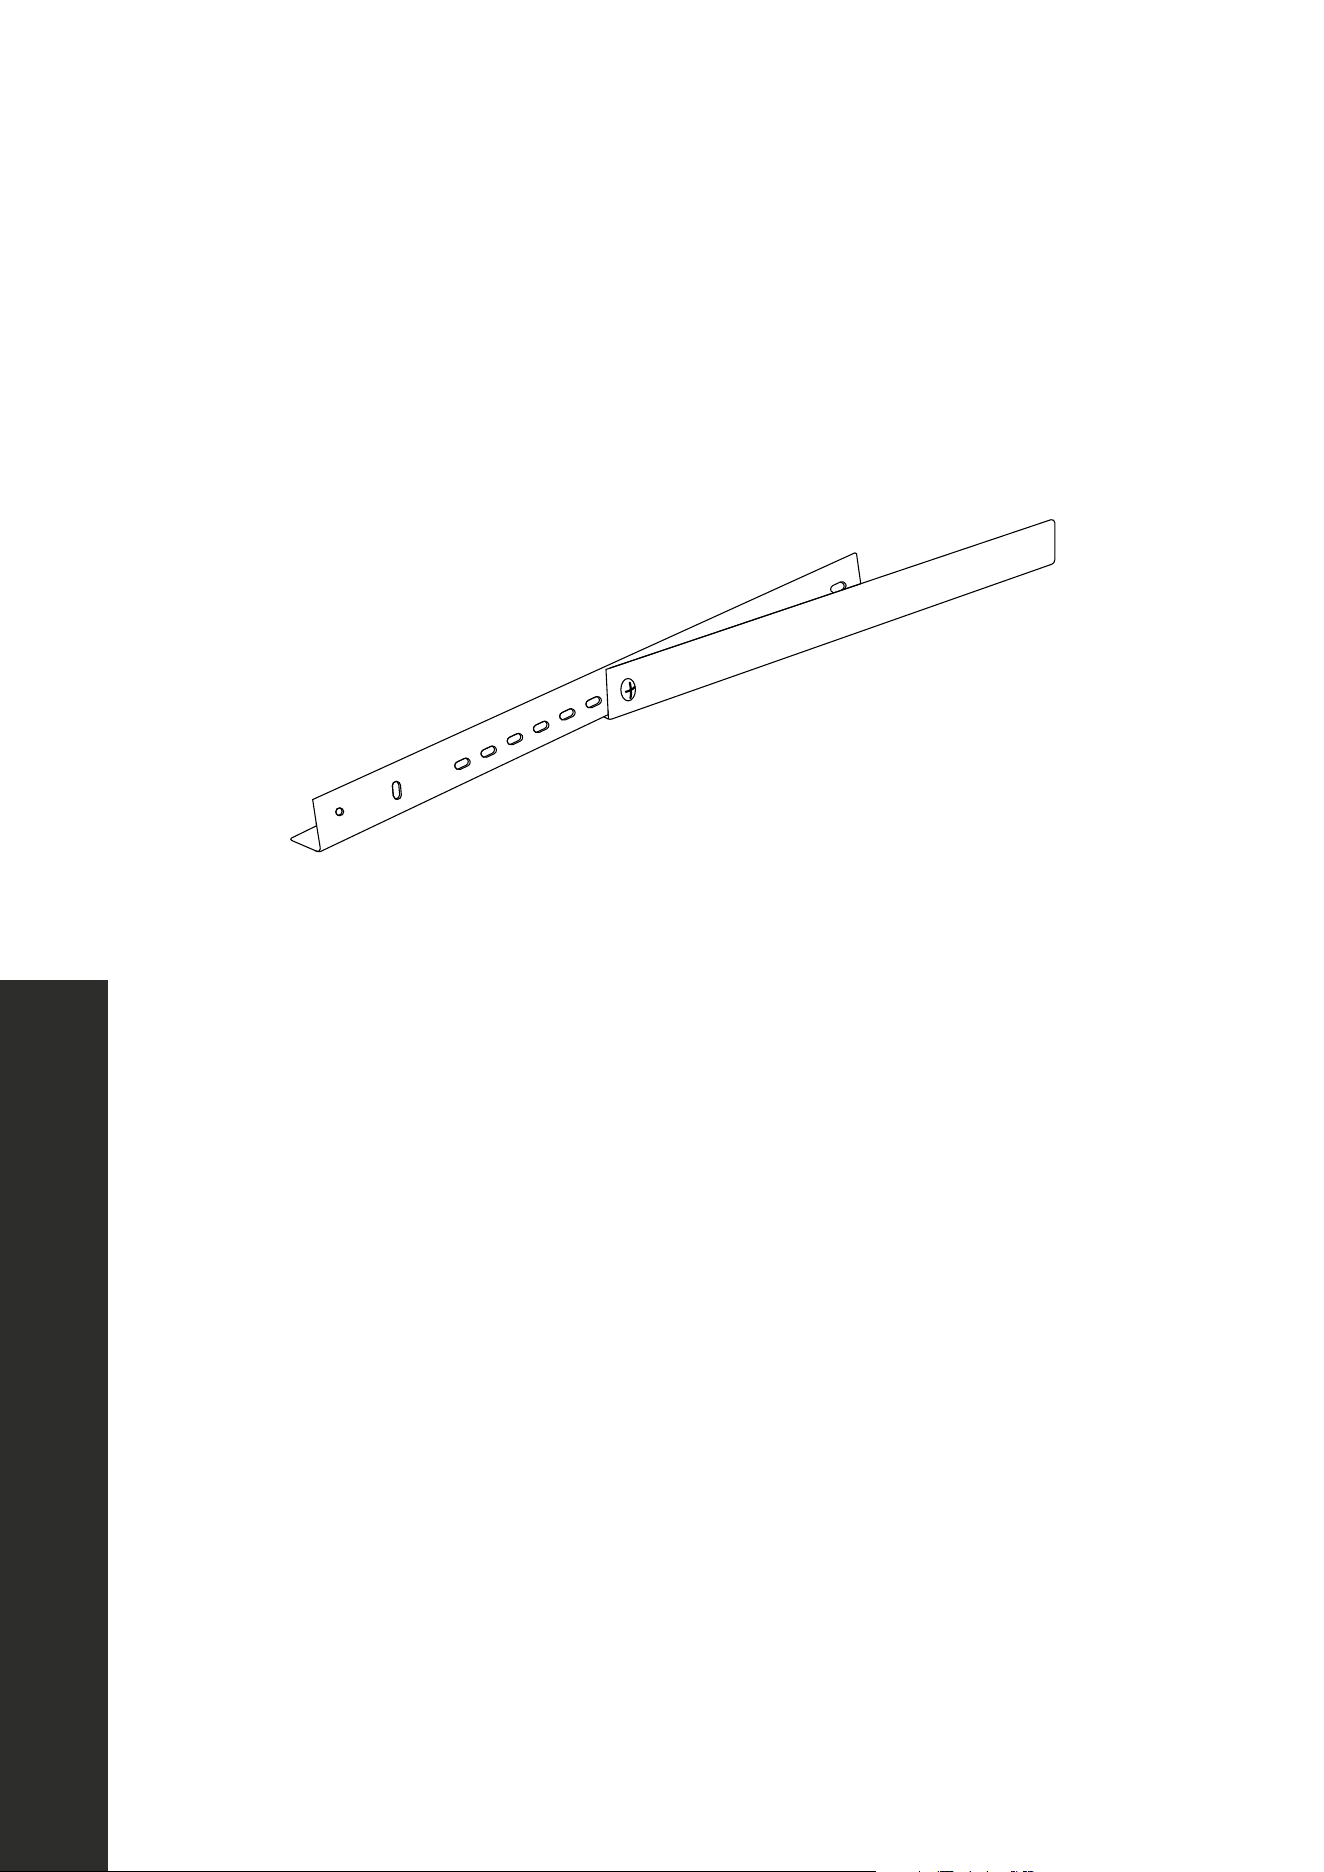
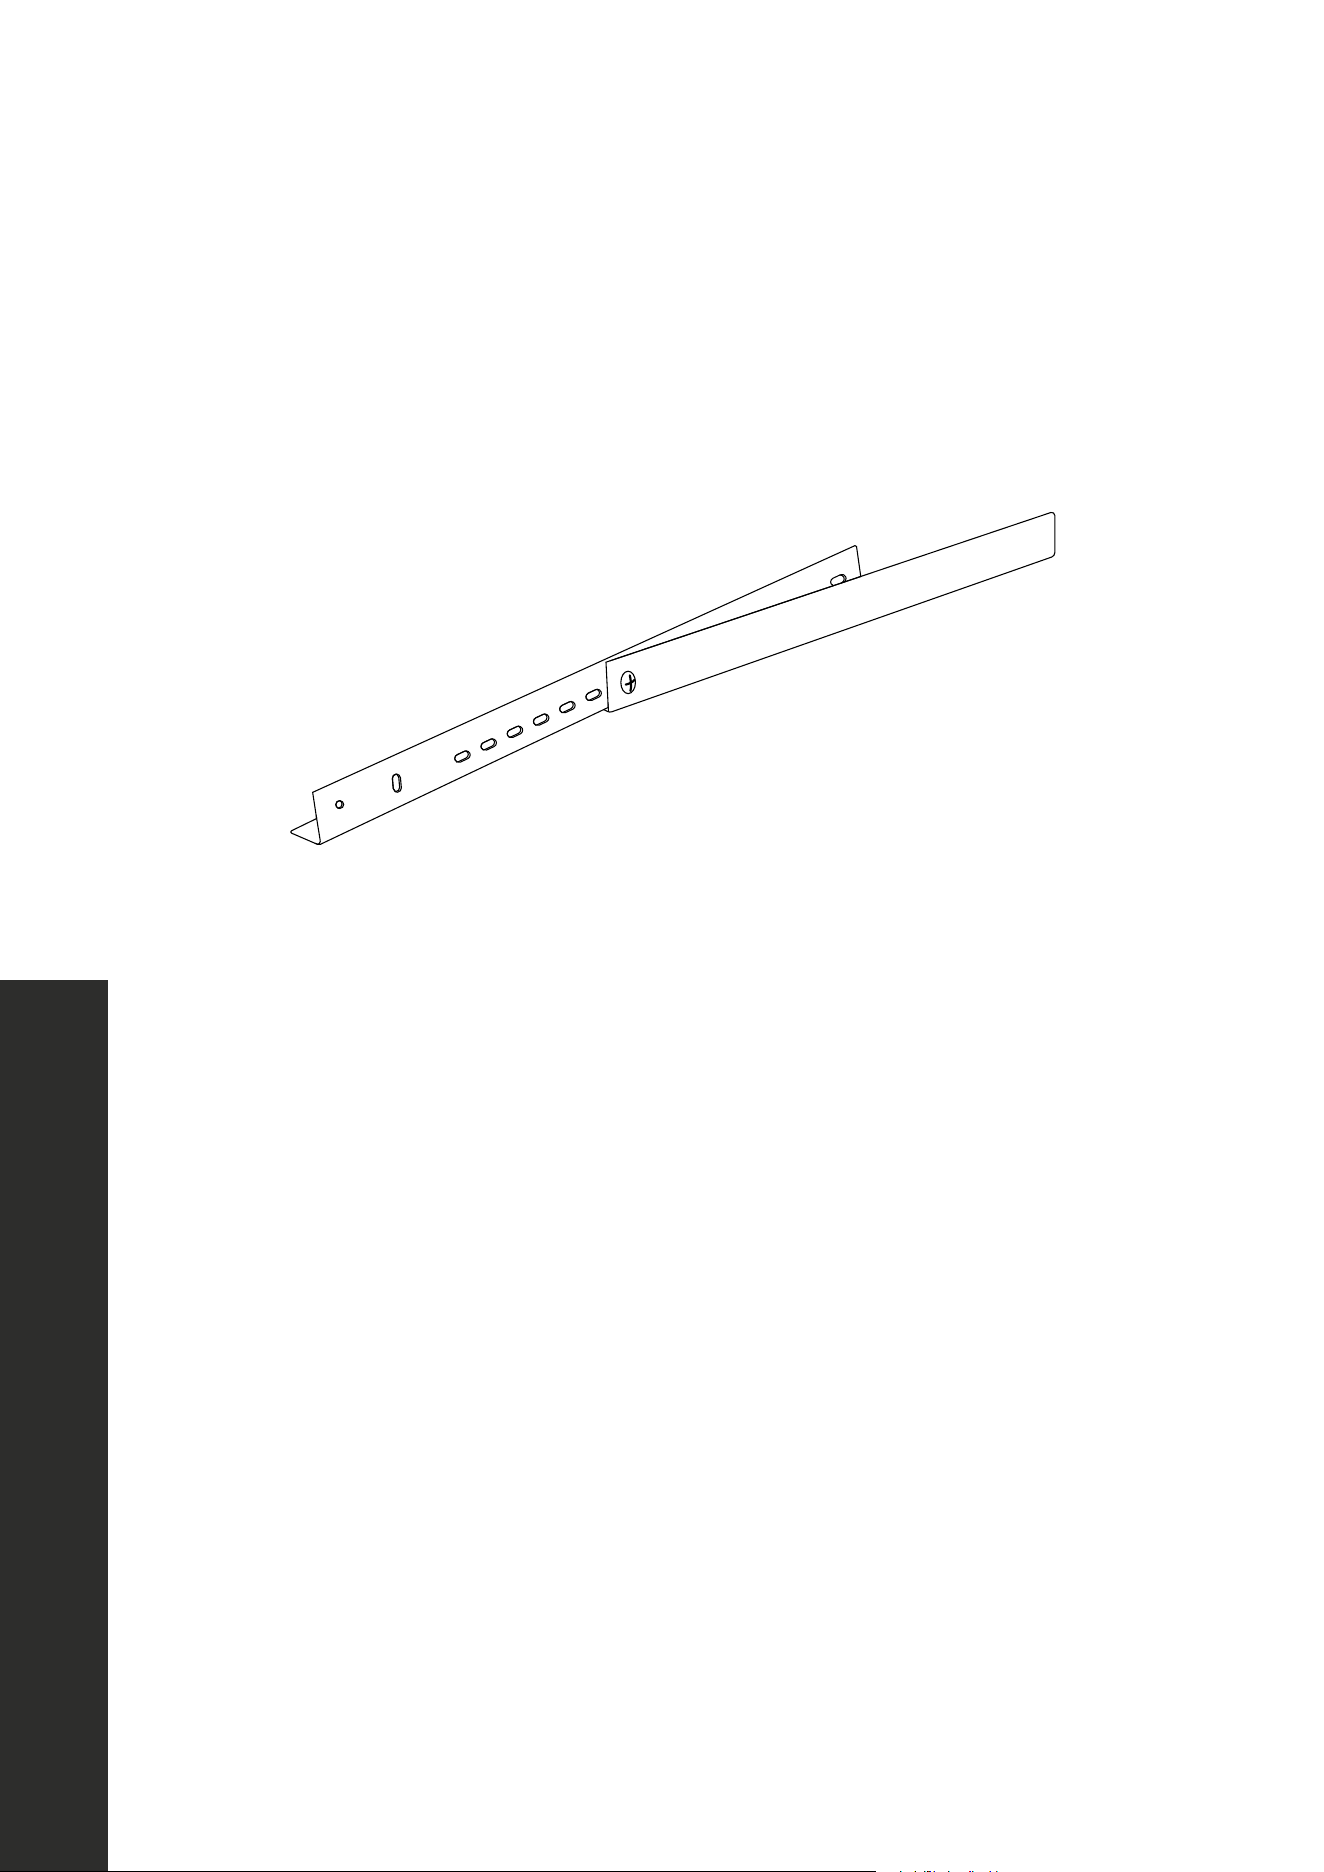
2. Measure from the top of the range top to the top of the ceiling to determine proper length
to install the angle brackets. The long angle brackets attach to the range hood, while the
short brackets attach to the chimney bracket.
3. Once the height is determined, use 4 screws (H) and nuts (I) to combine the brackets,
making sure to use the correct screw hole on each of the four short brackets. Figure 2
Figure 2
4. Use 16 screws (F) to attach the angle brackets to the four corners at the top of the
chimney mounting bracket. Use a level to ensure the brackets are level. Figure 3
Figure 3
INSTALLATION
ISLAND RANGE HOOD

9
Mounting Directions
5. Use 4 or 6 screws (G) — the number depends on range hood model — to attach the
transition piece to the top of the hood. Ensure the dampers in the transition piece open
upward, not downward. NOTE: In some models, the transition piece will already be
installed. Figure 4
Figure 4
6. Secure your ducting to the transition piece using foil-backed tape or a clamp to hold it
into place top of the hood. Try and minimize the use of elbows; more elbows and longer
runs create higher static pressure.
7. Using at least one helper, slide the chimney pieces onto the angle brackets and up to the
ceiling in order to install the range hood; use 16 screws (H), 4 for each side, to secure
the hood to the bottom of the angle brackets. Figure 5
Figure 5
Screw
INSTALLATION
ISLAND RANGE HOOD

10
Mounting Directions
8. With the hood securely mounted, slide the chimney pieces down to the hood in order to
connect your ducting and power cord. The hood comes with a grounded 3-prong plug
that must be plugged into a dedicated 15-amp circuit previously installed in the ceiling.
The cord is 36" (914 mm) long. Figure 6
9. Run the electrical cord up the chimney, outside of the ducting, and plug into the outlet;
then, secure the ducting to your home’s ductwork.
Figure 6
10. Slide the top telescoping chimney piece up to the top of the ceiling and secure it in place
with the 2 screws (F) on the left and right sides. Figure 7
Figure 7
INSTALLATION
ISLAND RANGE HOOD

11
Mounting Directions
11 . Install the plastic grease cup by sliding it into brackets located at the bottom of the motor.
Refer to page 34 for more about grease cup installation.
12. Install the baffle channel and baffle filters. Depending on the model, not all range hoods
include a baffle channel or tunnel. Figure 8
Figure 8
NOTE: Some existing home installations may already have an external damper at the
exit point of the home. In this case, the damper in the transition piece of your range hood
needs to be removed, as these two dampers work against each other and will reduce the
performance of the range hood.
Scan here for a baffle channel
installation video.
INSTALLATION
ISLAND RANGE HOOD
12
Crown Molding Installation
CROWN MOLDING INSTALLATION
If you purchased specialty crown molding to install with your island range hood, follow
these instructions before attaching the ducting and chimney.
1. Secure the crown molding bracket to the ceiling directly above the range hood by using
the hardware provided with the crown molding. Then secure the chimney mounting
bracket onto the crown molding bracket with 4 screws/washers (C/D) similar to step 1
on page 7.
Figure 9
2. Attach ducting and electrical connections as noted on page 10.
3. Attach the telescoping chimney sections to the range hood as noted on page 10, then
connect the chimney to the crown molding bracket.
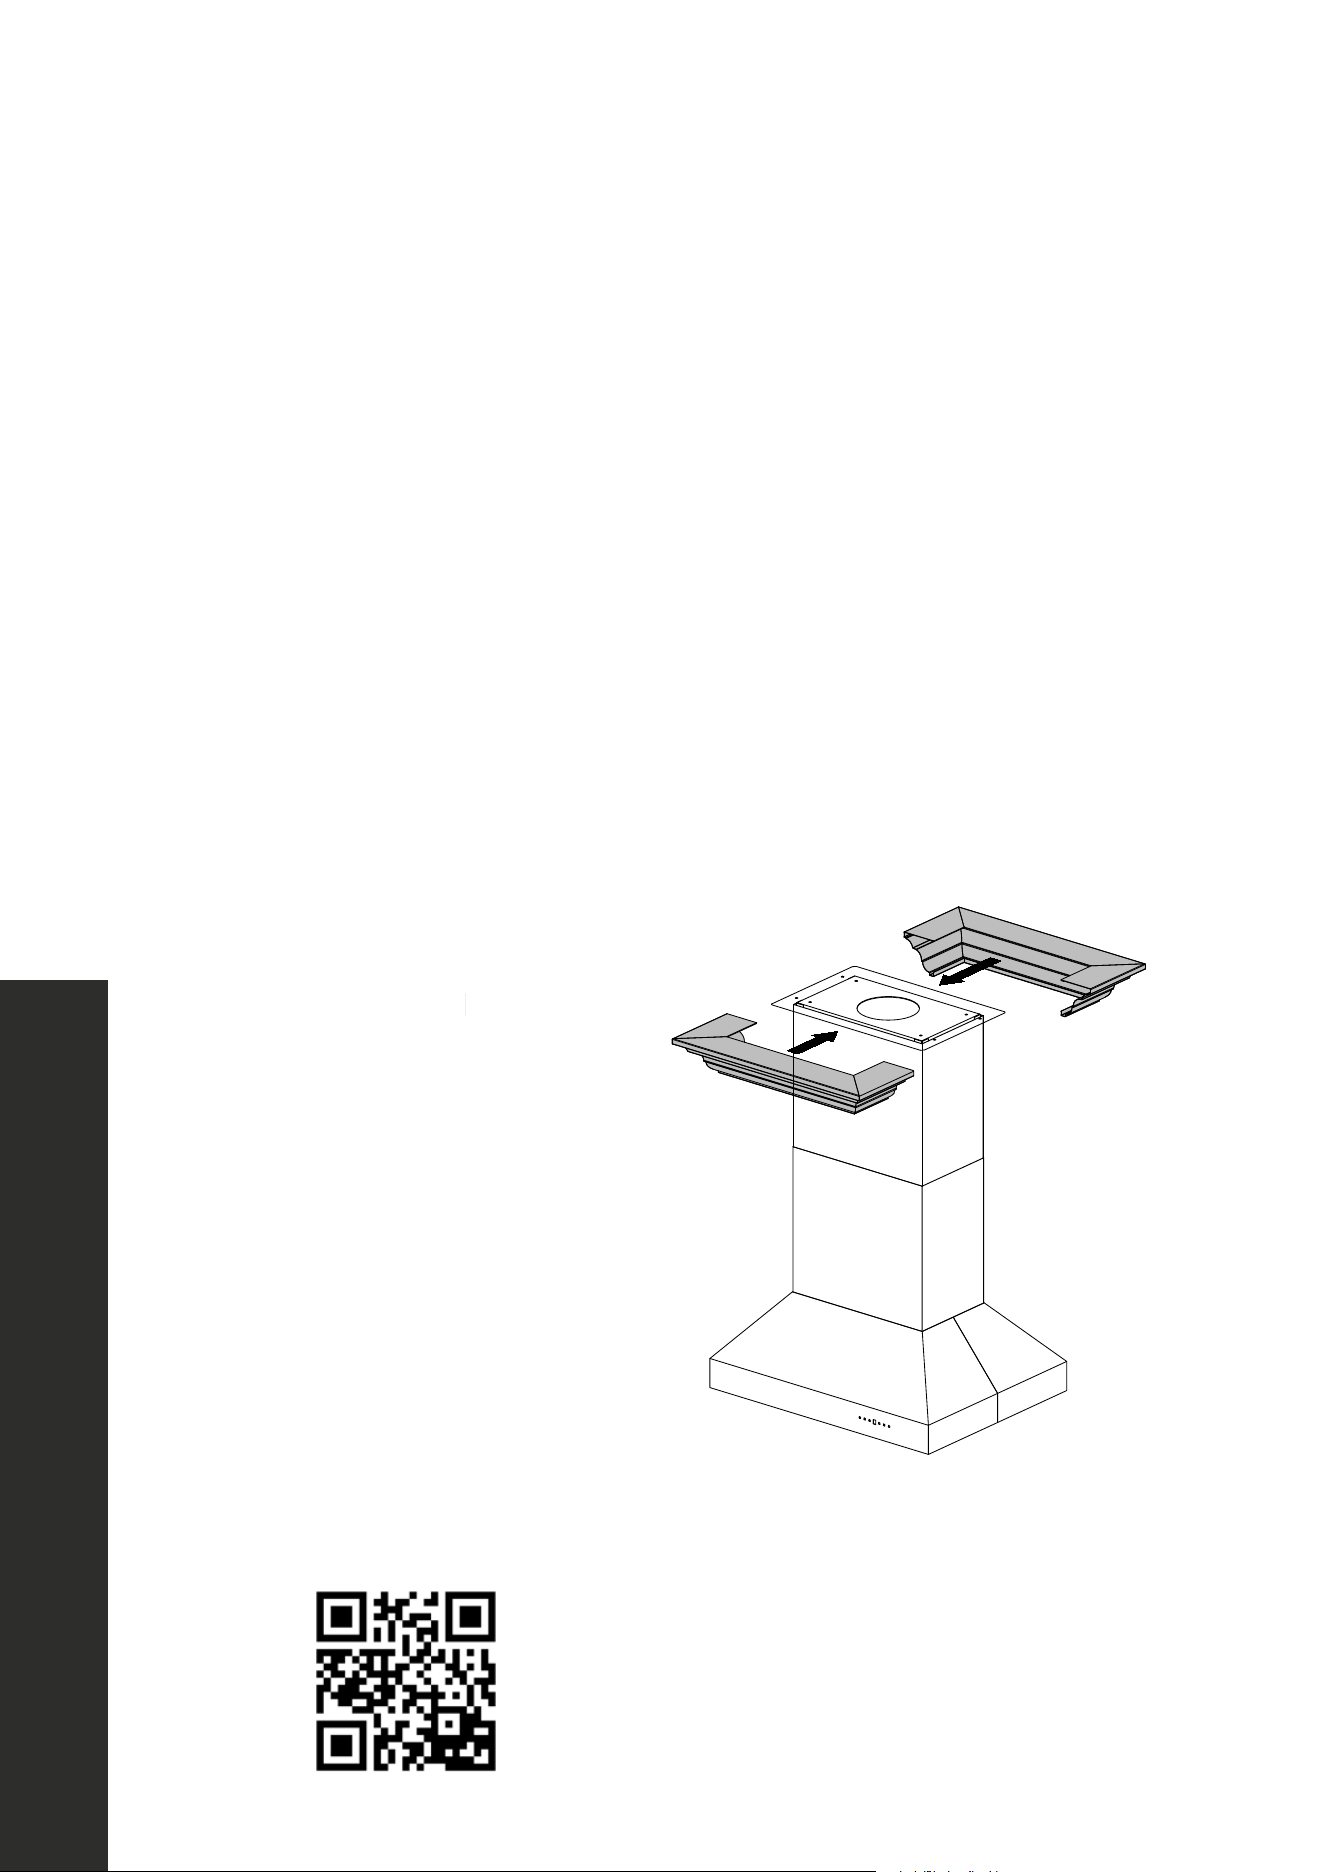
4. Slide the two pieces of crown molding onto each side of the crown bracket and secure
into place. The crown should cover the small gap between the top of the chimney and
the ceiling above. Ensure that it installs properly and is level.
Screw:A/C/D
Screw:E
Screw:H
Figure 9 Figure 10
Scan for a crown molding installation
tutorial video. Please note that depending on
model of crown molding, some installation
processes may vary.
INSTALLATION
ISLAND RANGE HOOD

13
Designer Island Hood Installation
RANGE HOOD MEASUREMENTS
Scan for a designer island hood installation
tutorial video. Please note that depending
on model of island hood, some installation
processes may vary.
INSTALLATION
DESIGNER ISLAND RANGE HOOD
14
Designer Island Hood Parts
INSTALLATION
ISLAND RANGE HOOD
PARTS
Unpack your range hood upon delivery and inspect to ensure all parts are included:
Main hood with lights and button panel pre-installed
One-piece designer chimney (varies in size depending on model)
Transition piece (for 6" or 8")*
*Island hoods with single motors come with a square-to-round transition piece that
includes a back draft damper. The ducting with these hoods is 6" (152 mm). Dual
motor hoods come with a square-to-round transition piece for 8" (203 mm) ducting.
Baffle filters
Baffle channel (if applicable, varies by model)
Chimney mounting bracket
Crown molding bracket
Grease cup
Four long angle brackets
Four short angle brackets
Anchor A
Screw/Washer C/D
Screw F
Screw G
Screw H
Nut I

15
Designer Island Hood Installation
MOUNTING DIRECTIONS
Like other island hoods, use a maximum of 40' (12192 mm) of ductwork and minimize use of
elbows. You must establish a minimum of 12" (305 mm) of vertical airflow from the top of the
hood before executing any 90° turn. No more than 3 elbows are allowed; each 90° turn
you make equates to 5' (1524 mm) lost when accounting for the maximum 40' (12192 mm).
NOTE: The following instructions are intended for qualified installers and certified service
technicians. Please be aware the method to mount a designer island hood is more involved
than a traditional island hood due to the need for a custom-cut, one-piece chimney. While
these instructions are recommended by ZLINE, some professionals may use different methods
to achieve proper installation.
1. Install the flat crown molding bracket. Measure to the ceiling above the range top where
the hood will be installed. Ensure the crown molding bracket will be secured to solid
wood backing; 2x4 beams installed in the roof joists work best. Pre-mark holes and then
secure the bracket to the ceiling using 4 screws/washers (C/D). You may fasten the
screws into anchors (A) if desired for extra stability. Figure 1
Figure 1
2. Mount the top chimney mounting bracket onto the crown molding bracket using 4 screws/
washers (C/D). NOTE: Like the island hood, the front and back sides of the designer
chimney bracket are slightly longer than the sides, so install accordingly. Figure 1
INSTALLATION
DESIGNER ISLAND RANGE HOOD
16
3. Measure from the top of the range top to the top of the ceiling to determine proper length
to install the angle brackets. The long angle brackets attach to the range hood, while the
short brackets attach to the chimney bracket.
4. Once the height is determined, use 4 screws (H) and nuts (I) to combine the brackets,
making sure to use the correct screw hole on each of the four short brackets. Figure 2
Figure 2
5. Use 16 screws (F) to attach the transition piece to the top of the hood. Ensure the dampers
in the transition piece open upward, not downward. Figure 3
Figure 3
6. Secure your ducting to the transition piece using foil-backed tape or a clamp to hold it
into place top of the hood. Try and minimize the use of elbows; more elbows and longer
runs create higher static pressure.
Designer Island Hood Installation
INSTALLATION
ISLAND RANGE HOOD

17
Designer Island Hood Installation
7. Use 16 screws (H) to attach the angle brackets to the four corners at the bottom of the
range hood. Use a level to ensure the brackets are vertically level. Figure 4. NOTE: Do
not secure the angle brackets to the chimney bracket on the ceiling at this time.
Figure 4
Screw
8. Have a trained professional cut your one-piece designer chimney to the desired length;
you must leave a 2 1/4" (57 mm) gap between the chimney and ceiling in order to
install the crown molding, which will hide any jagged cuts and offer a seamless transition
to the ceiling. Figure 5
Figure 5
INSTALLATION
DESIGNER ISLAND RANGE HOOD

18
Designer Island Hood Installation
9. Slide the chimney piece onto the angle brackets attached to the range hood. Figure 6.
NOTE: Do not secure the angle brackets to the chimney bracket on the ceiling at this time.
Figure 6
10. Have at least one helper lift and hold the range hood and chimney up to where it will
hang above the range top. Then, complete your ducting and power cord connections.
The hood comes with a grounded 3-prong plug that must be plugged into a dedicated
15-amp circuit installed in the ceiling. Figure 7
11 . Run the electrical cord up the chimney, outside of the ducting, and plug into the outlet;
then, secure the ducting to your home’s ductwork. Figure 7
Figure 7
INSTALLATION
ISLAND RANGE HOOD
19
Designer Island Hood Installation
12. With ducting and electrical connections complete, and while still using at least one
helper to hold the range hood in place, use 16 screws (H), 4 for each side, to attach the
upper angle brackets to the four corners at the top of the chimney bracket. This should
fully secure your range hood. Figure 8
Figure 8
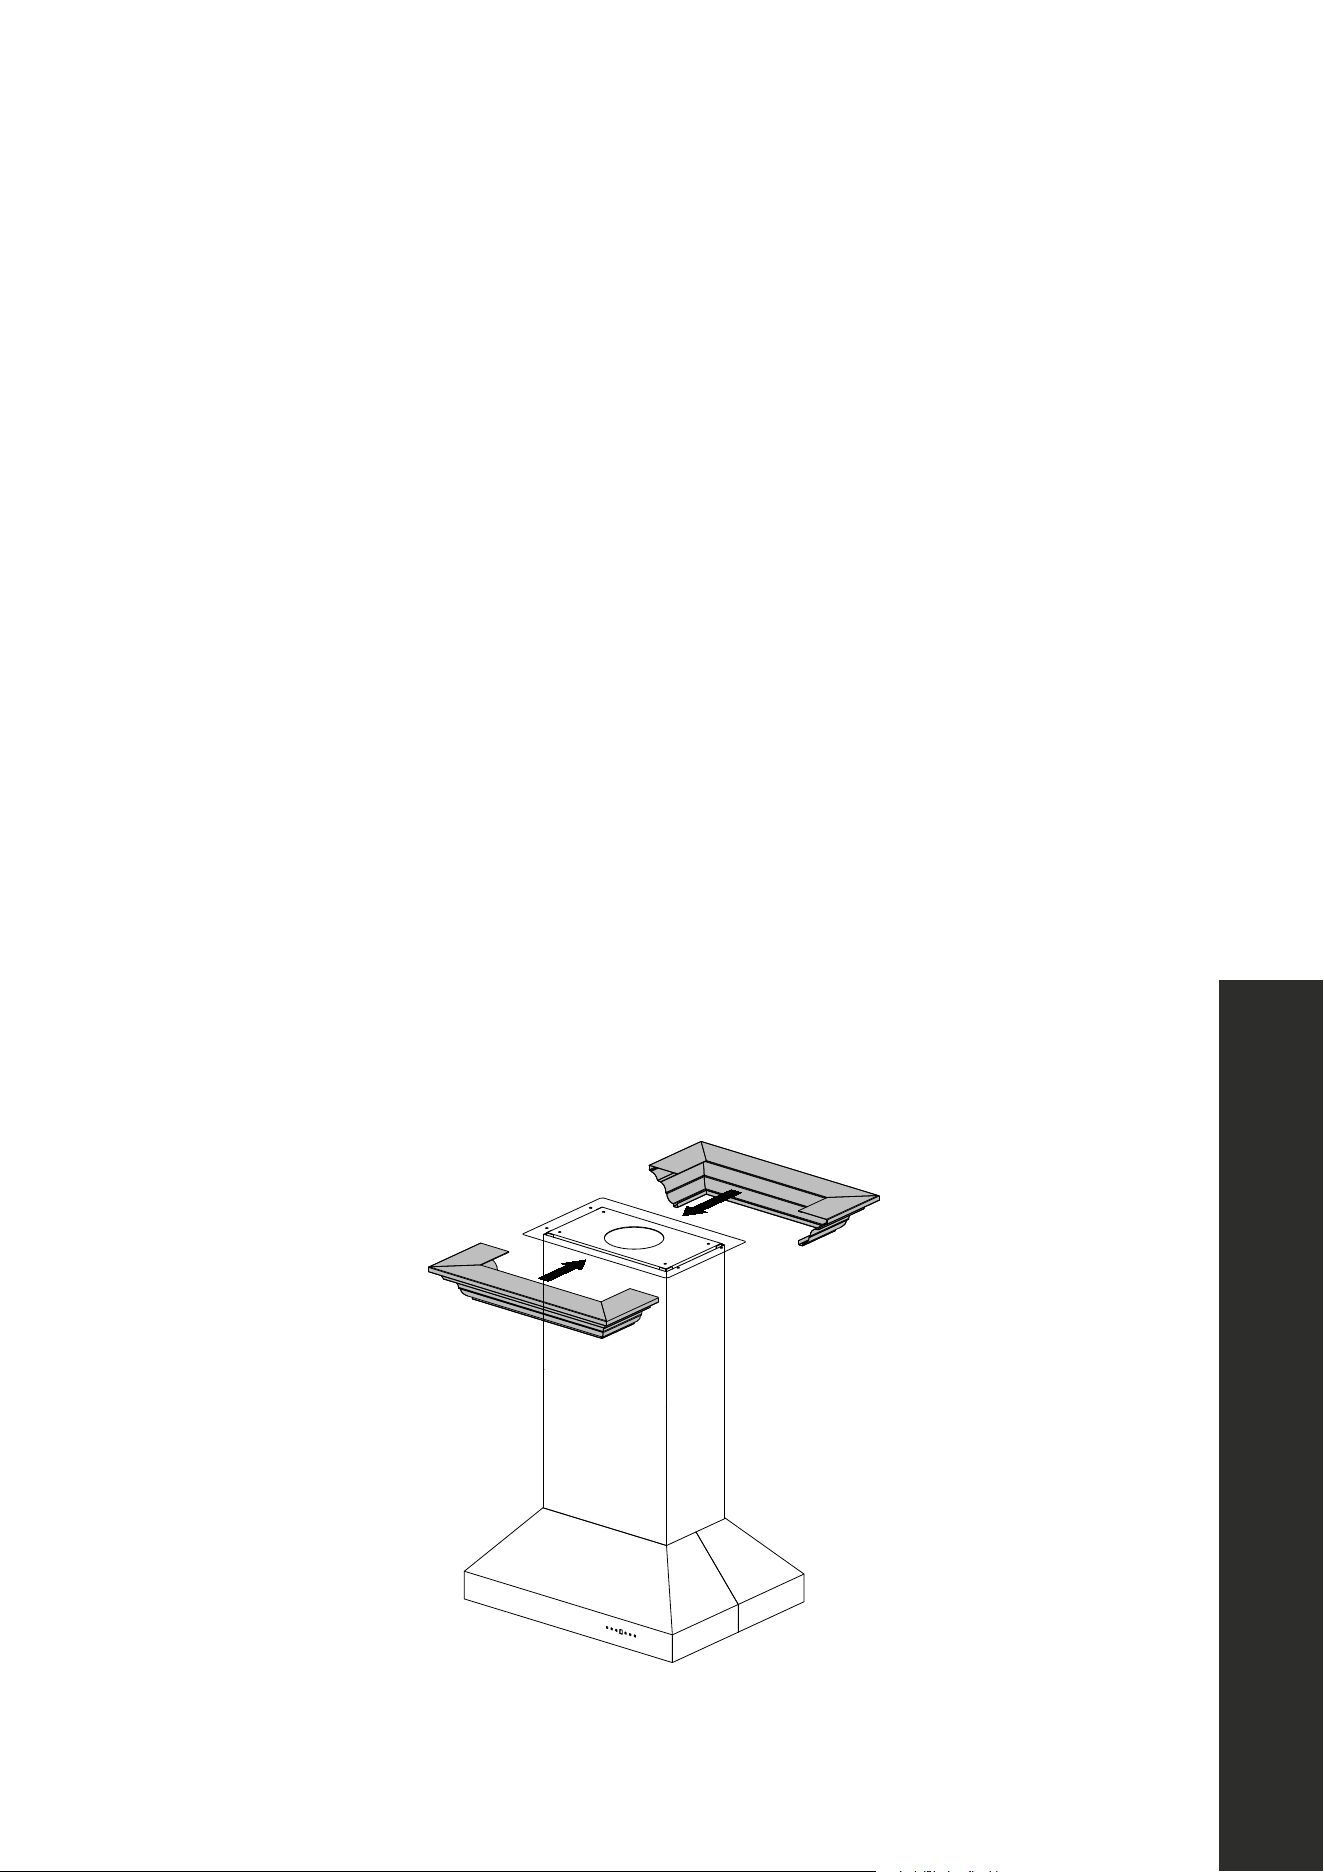
13. Slide the two pieces of crown molding onto each side of the crown bracket and secure
into place. The crown should cover the small gap between the top of the chimney and
the ceiling above. Figure 9
Screw:A/C/D
Screw:E
Screw:H
Figure 9
INSTALLATION
DESIGNER ISLAND RANGE HOOD

20
Designer Island Hood Installation
14. Install the plastic grease cup, baffle channel and baffle filters in a similar fashion as
noted on page 11. Figure 10
Figure 10
NOTE: Some existing home installations may already have an external damper at the
exit point of the home. In this case, the damper in the transition piece of your range hood
needs to be removed, as these two dampers work against each other and will reduce the
performance of the range hood.
Scan here for a baffle channel
installation video.
INSTALLATION
ISLAND RANGE HOOD
21
CrownSound
™
Installation
ELECTRIC POWER RATING
Frequency: 120VAC/60 HZ | Power: 10W
If you’ve purchased a ZLINE range hood with CrownSound
™
, follow these installation steps.
NOTE: Recirculating your range hood is not possible with CrownSound
™
installation.
1.
Scan here for a CrownSound
™
installation tutorial video.
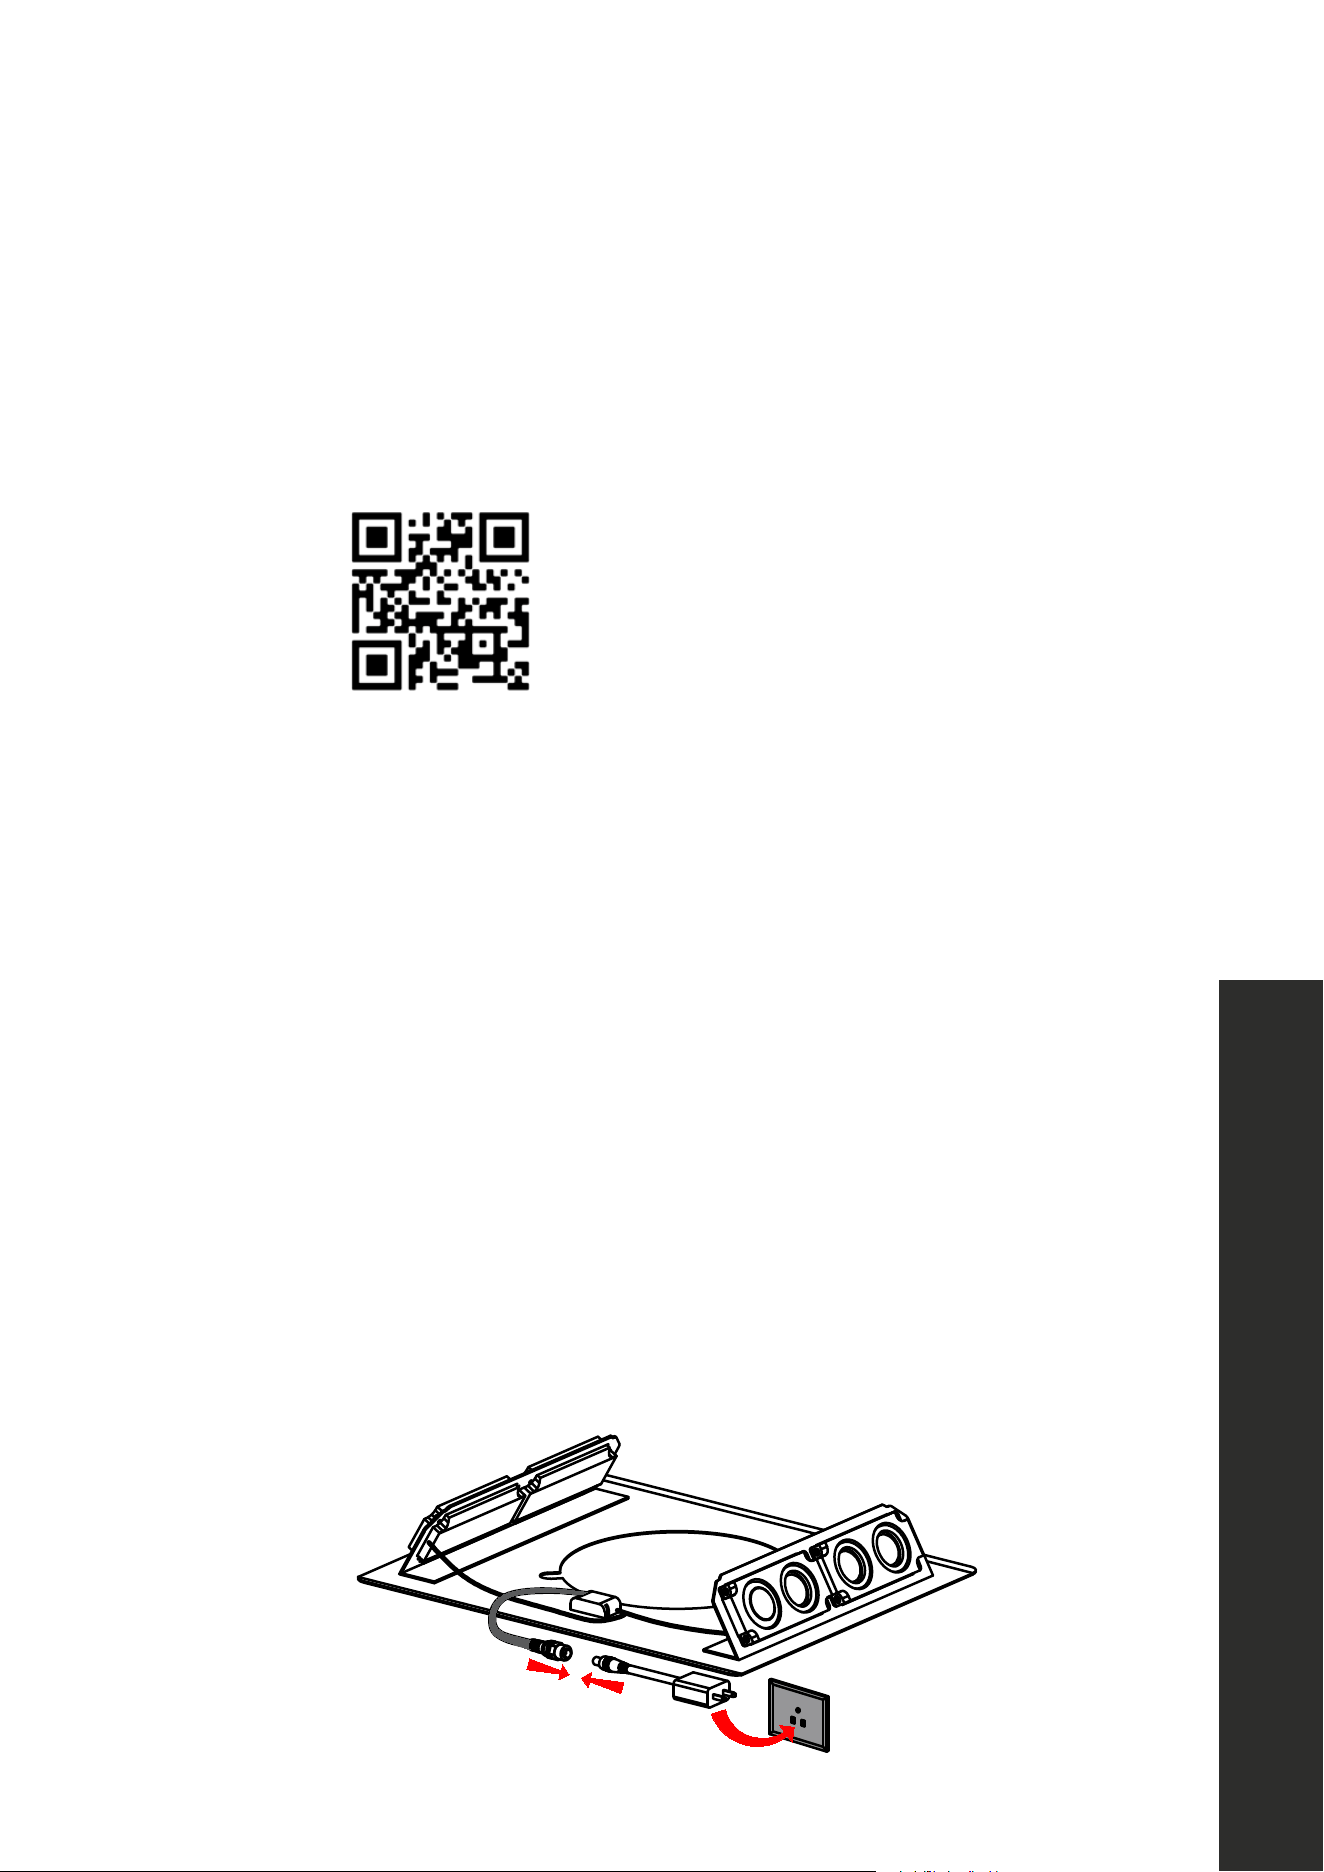
Attach crown molding bracket to ceiling using hardware provided. Figure 1
Figure 1
2. Attach ducting and electrical connections. Plug the speakers into an outlet behind the
chimney. When the connection is successful, a chime will sound. Figure 2
Screw:A/C/D
Screw:E
Screw:H
Figure 2
INSTALLATION
ISLAND CROWNSOUND
™
INSTALLATION
22
CrownSound
™
d Installation
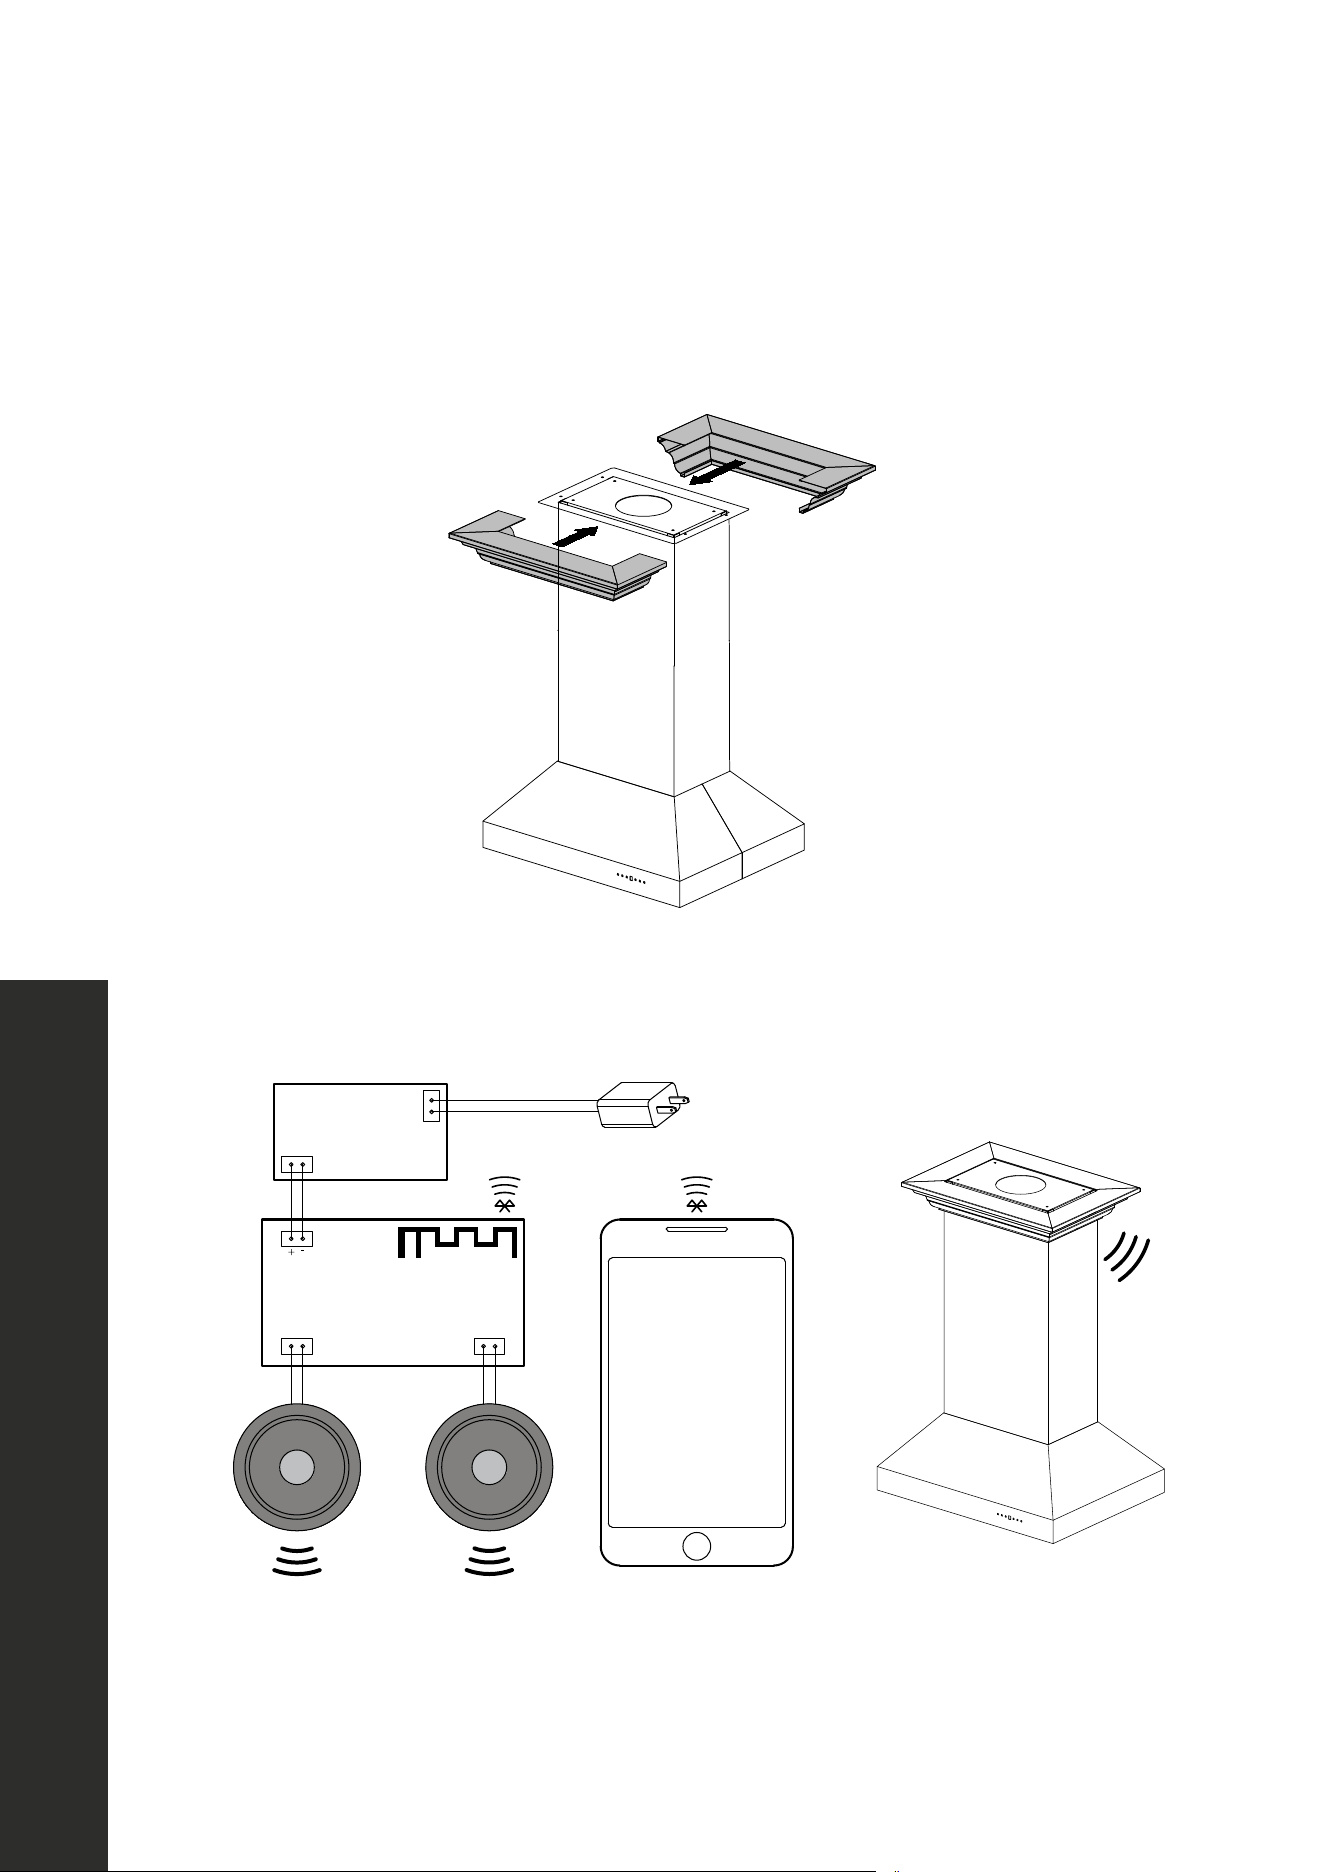
3. Extend the chimney up to the transformer. Slide the two-piece crown molding onto the
crown bracket and secure into place. The crown should cover the gap. Ensure that it
installs properly and is level. Figure 3
Screw: A/C/D
Screw: E
Screw: H
Figure 3
4. Open the phone’s Bluetooth settings and find “ZLINE Audio.“ When the connection is
successful, a chime will sound. Figure 4
Figure 4
Power adapter
Stereo Bluetooth Digital
Amplifier Board
+ -
+ -
+ -
Bluetooth
Output
Intput
110V / 60Hz
Left
Right
Loudspeaker
5V 2A
Power adapter
Stereo Bluetooth Digital
Amplifier Board
+ -
+ -
+ -
Bluetooth
Output
Intput
110V / 60Hz
Left
Right
Loudspeaker
5V 2A
Input
NOTE: CrownSound
™
moldings carry a one-year parts warranty. Replacement speakers
are available from ZLINE’s parts store at www.zlineparts.com, or call 1-614-777-5004 to
speak with a Customer Service representative.
INSTALLATION
ISLAND CROWNSOUND
™
INSTALLATION

23
Button/Control Panel Operation
OPERATION
BUTTON FUNCTIONS (SOME MODELS HAVE DIFFERENT CONTROL PANEL LAYOUTS)
Button Control Panel Operational Manual
!
!
!
Power
Power-Off Delay
Low Speed
Medium 1 Speed
Light
High Speed
Medium 2 Speed
Blower Speed Indicator
Power: Turn ON/OFF the range hood and activate the power-off delay timer.
Light: Turn ON/OFF; some models have bright, dim, and OFF settings.
Blower Speed Indicator: Shows current blower (motor) speed (1–4).
1- Low Speed: Light frying/boiling.
2–3 - Medium Speeds: Frying/wok cooking/heavy boiling.
4 - High Speed: Intensive frying/wok cooking.
Adjusting the motor speed:
• Press the power button once to turn on the system.
• Press the speed buttons for the desired speed.
• The motor speed indicator shows the motor speed level.
Adjusting the timer function:
• Turn the hood on at any speed and press the power-off delay button to enter timer mode;
a “3” flashes in the display and the power-off timer will begin to count down.
• When the motor speed indicator reaches zero, the motor will shut down.
Power
Power-Off Delay
Low Speed
Medium 1 Speed
Light
High speed
Medium 2 Speed
Power: Turn ON/OFF the range hood and activate power-off delay timer.
Light: Turn ON/OFF; some models have bright, dim, and OFF settings.
Blower Speed Indicator: Shows current motor speed (1–4).
1- Low Speed: Light frying/boiling.
2–3 - Medium Speeds: Frying/wok cooking/heavy boiling.
3 - High Speed: Intensive frying/wok cooking.
Adjusting the motor speed:
• Press the power button once to turn on the system.
• Press the speed buttons for the desired speed.
• The selected motor speed will light up when chosen.
Adjusting the timer function:
• Turn the hood on at any speed and press the power-off delay button to enter the timer
mode. The“power” flashes in the display, and the power-off delay will begin to count
down. After five minutes, the motor will shut down.
• When the motor speed indicator reaches zero, the motor will shut down.
24
Replacing the Button Panel
REPLACING PARTS
HOW TO REPLACE THE BUTTON PANEL
1. Remove baffle filters from
underneath the hood.
2. Locate the back of the button panel.
3. Remove screws from each side of the
button panel.
4. Disconnect the panel from the cord
connecting to the circuit board, an
overlay of which is included below.
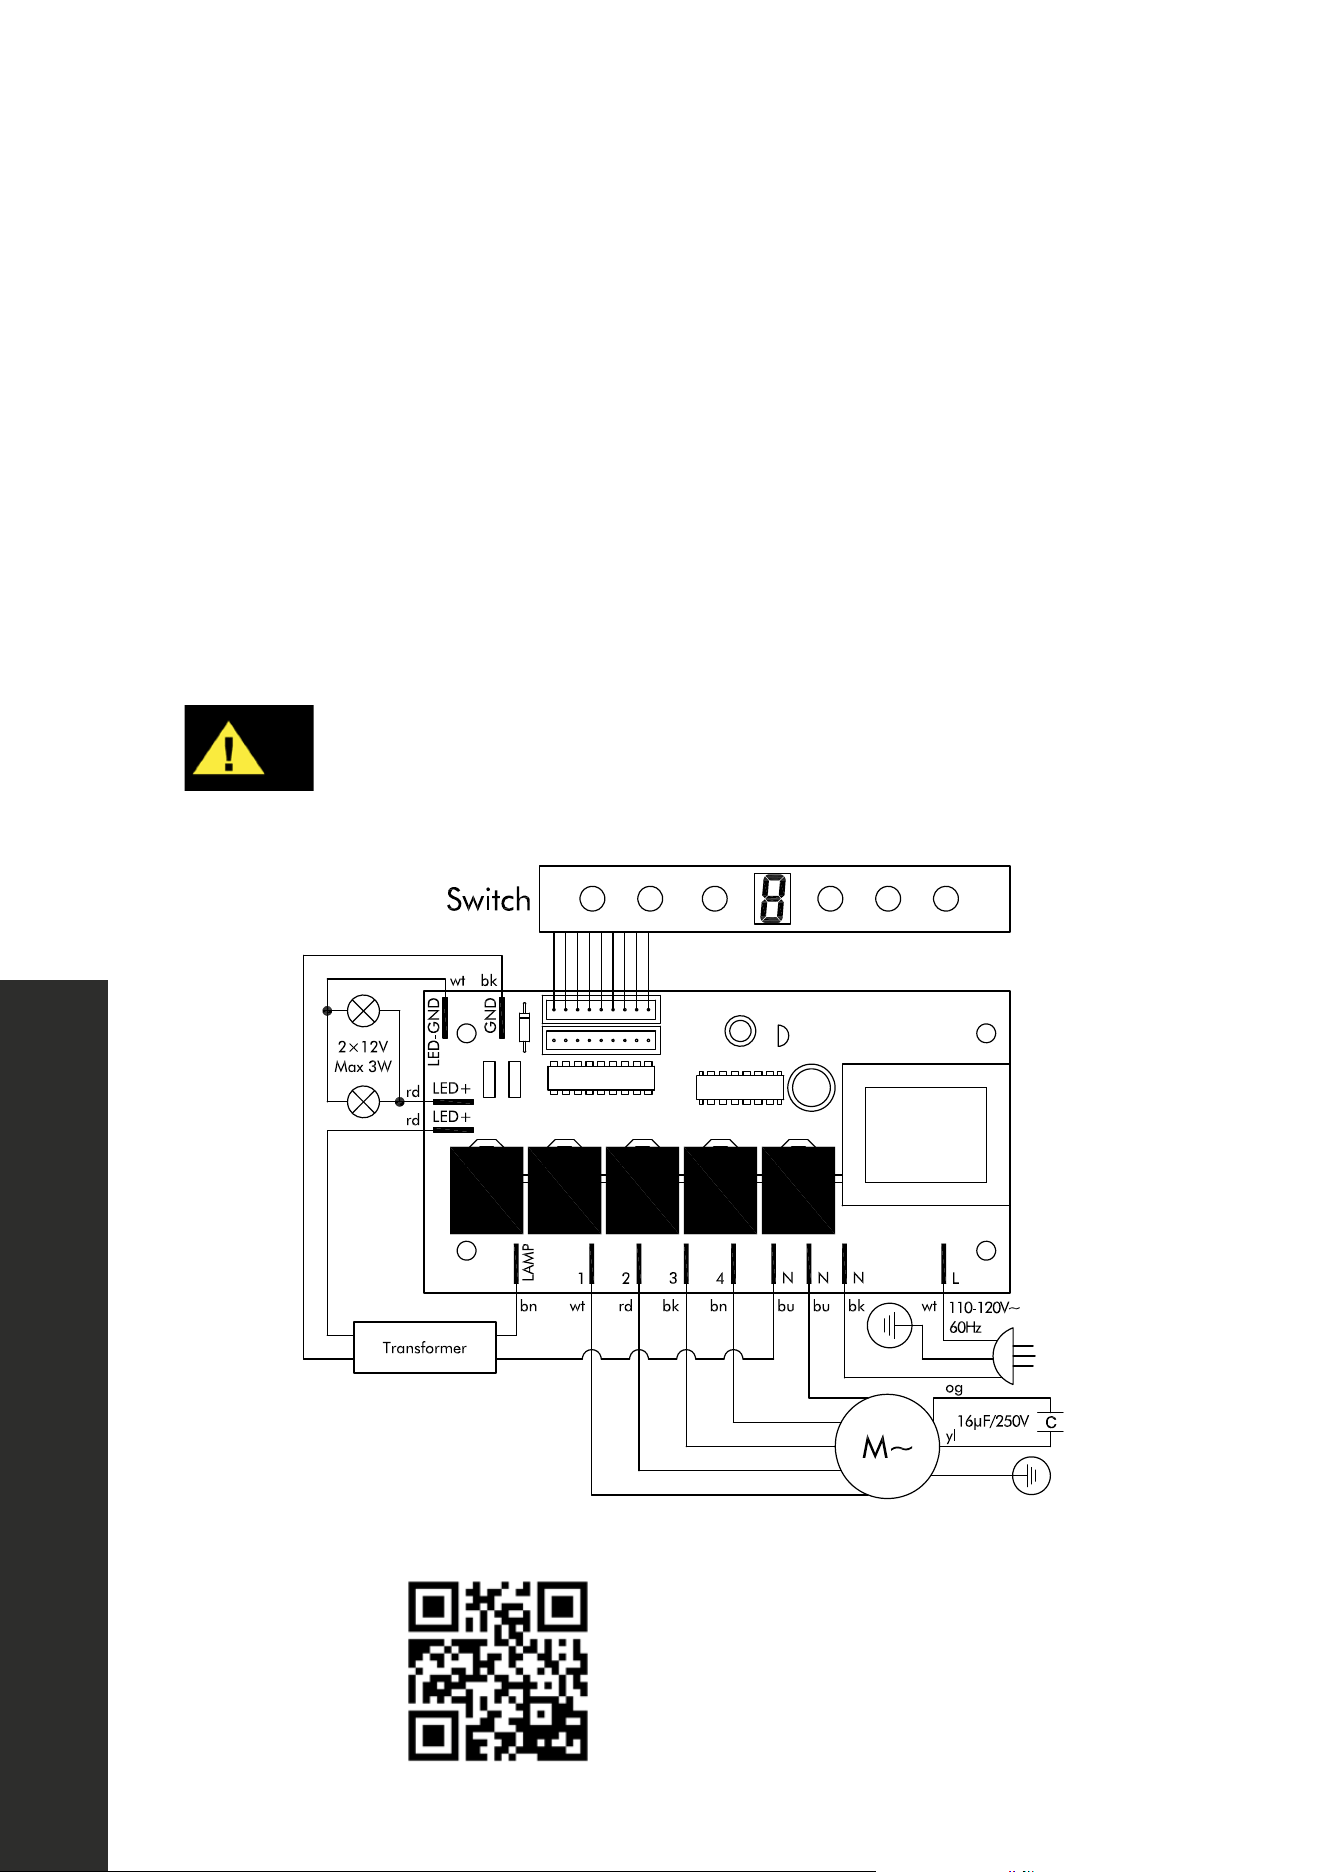
WARNING
Never work on or clean the range hood while the power is on. Always unplug
the unit or switch the electrical breaker to the off position.
ground
ground
Scan for a button panel
installation tutorial video
25
Replacing the Circuit Board
REPLACING PARTS
HOW TO REPLACE THE CIRCUIT BOARD
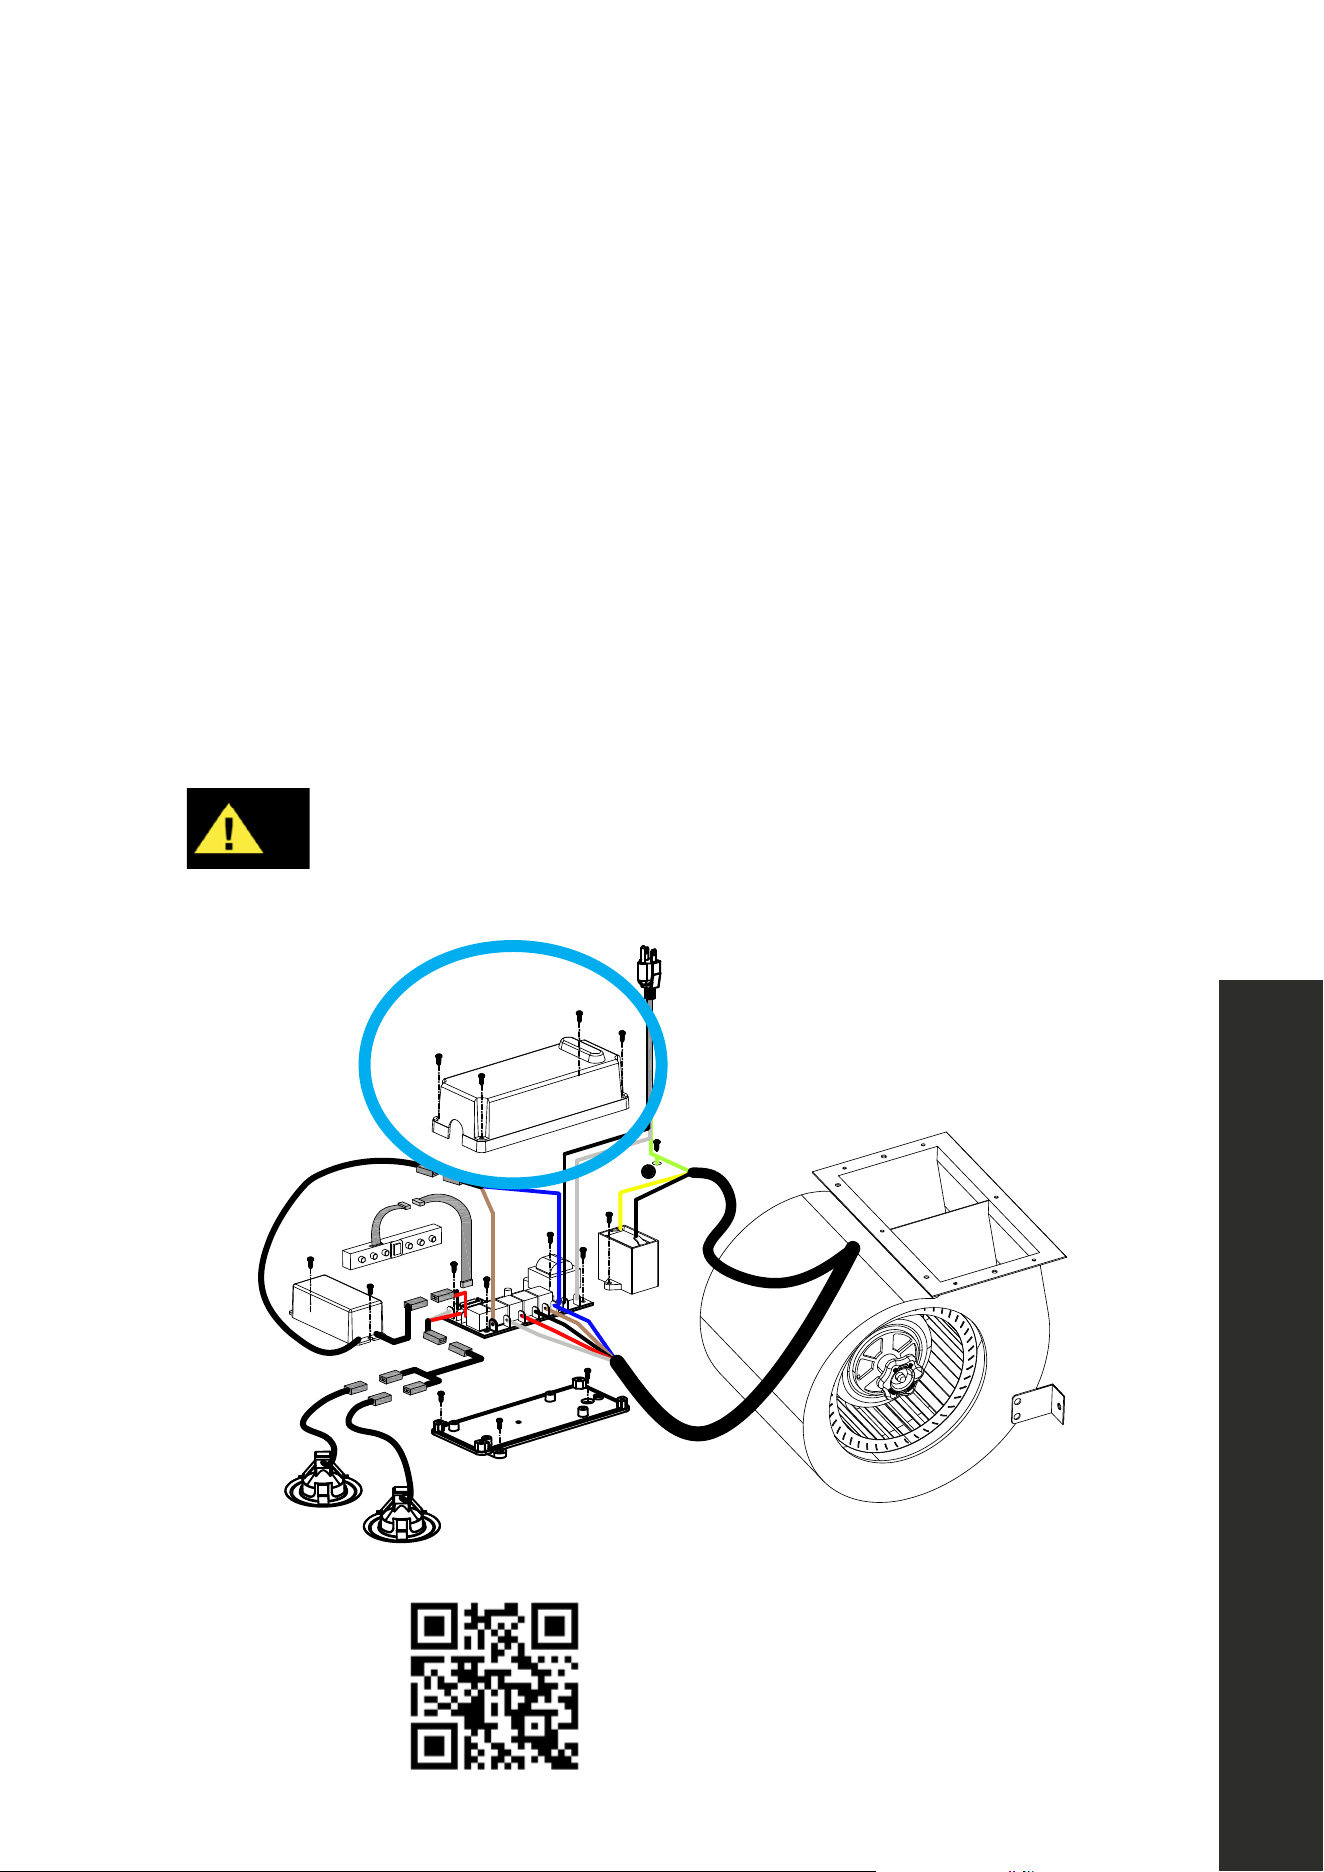
1. Turn the power off at the breaker and unplug the range hood.
2. Remove screws from the top of the circuit board cover (circled in blue below).
3. Take a picture of the wiring layout (this will help you put the circuit board back
together properly).
4. Remove the wiring connected to the existing circuit board. The terminals have a
locking pin in the middle to prevent them from accidentally coming loose. Removal
may necessitate using a needle-nose pliers to unlock the terminals.
5. Remove the screws from the circuit board.
6. Replace the wiring and screws to reassemble the new circuit board per the diagram
below (and aligning with the image you took earlier).
WARNING
Never work on or clean the range hood while power is on. Always unplug
the unit or switch the electrical breaker to the off position.
ground
ground
Scan for a circuit board
installation tutorial video

26
REPLACING PARTS
Replacing Light Bulbs
HOW TO REPLACE THE LIGHT BULBS IN YOUR RANGE HOOD
1. Turn the power off at the breaker and unplug the range hood.
2. Remove baffle filters from underneath the hood.
3. Squeeze the LED light assembly out until it falls out of the socket as noted in the
images below.
4. Disconnect the light wire from the plug wire inside the range hood.
5. Reconnect the new LED light casting by filtering the light wire into the socket and plugging
it into the plug wire inside the hood.
6. Press the new light assembly until it firmly fits in the socket.
7. Reconnect power and turn on the lights as noted on page 23.
WARNING
Never work on or clean the range hood while power is on. Always unplug the
unit or switch the electrical breaker to the off position.
NOTE: As island range hood models vary, the placement and location of light kits and light
bulbs may differ slightly, but the replacement methods are the same.
Scan for a light bulb
installation tutorial video
27
REPLACING PARTS
Replacing the Capacitor
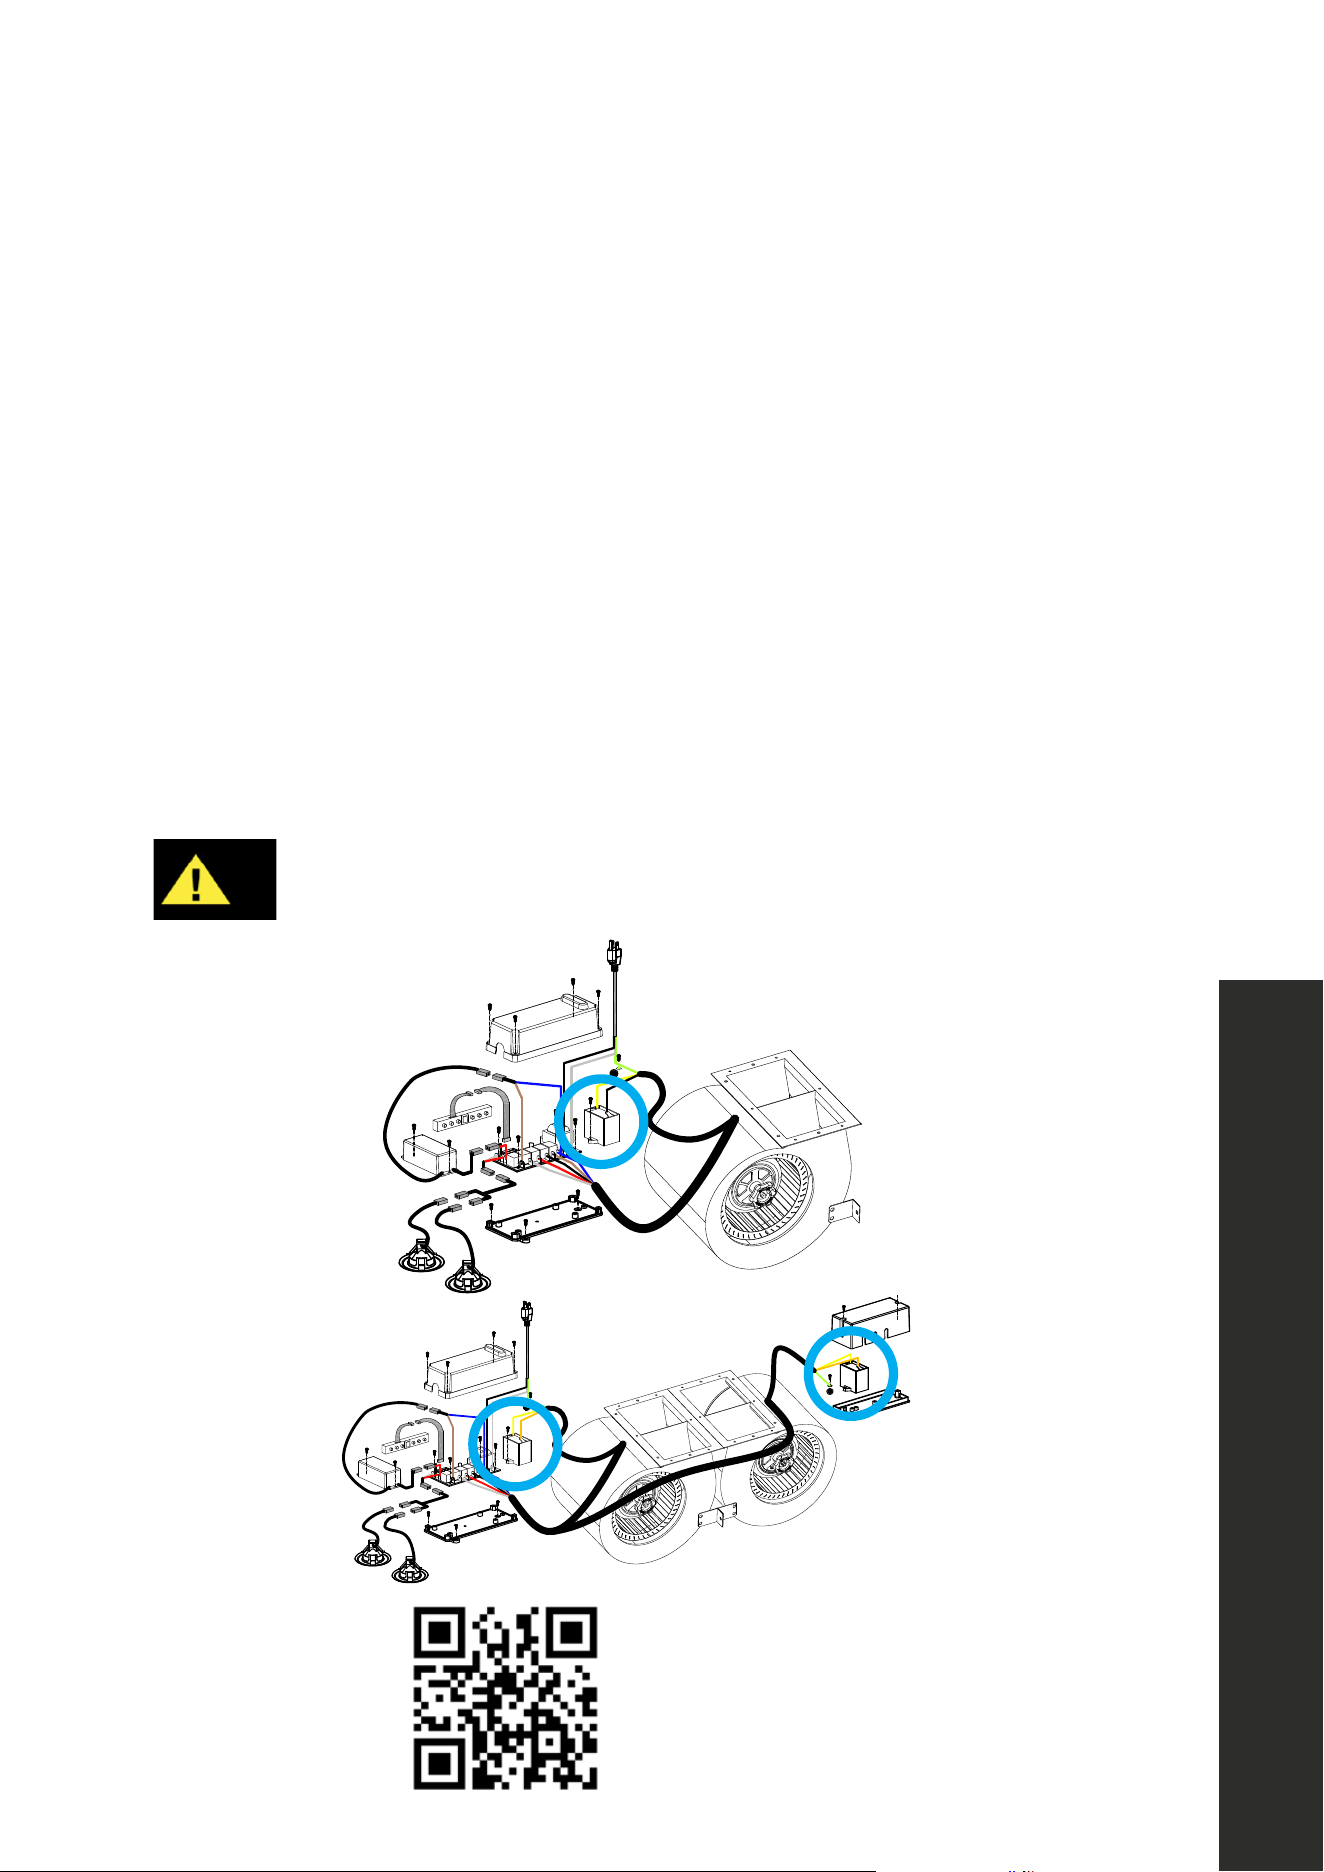
HOW TO REPLACE THE CAPACITOR
1. Turn the power off at the breaker and unplug the range hood.
2. Remove screws from the circuit board cover in a similar fashion as page 25.
3. Remove the screw securing the capacitor (circled in blue) to the circuit board. Figure 1
4. Remove the wiring connected to the existing capacitor. The terminals have a locking pin
in the middle to prevent them from accidentally coming loose. Removal may necessitate
using needle-nose pliers to unlock the terminals.
5. Connect the new capacitor with the same wire connectors.
6. Replace the screw on the capacitor and re-screw in the circuit board cover.
NOTE: Capacitors provide power to the range hood motor. If you have a unit with dual
motors, there will be two capacitors (circled in blue). Figure 2
WARNING
Never work on or clean the range hood while power is on. Always unplug the
unit or switch the electrical breaker to the off position.
Figure 1
Figure 2
ground
ground
ground
ground
ground
Scan for a capacitor
installation tutorial video.
28
REPLACING PARTS
Replacing the Transformer
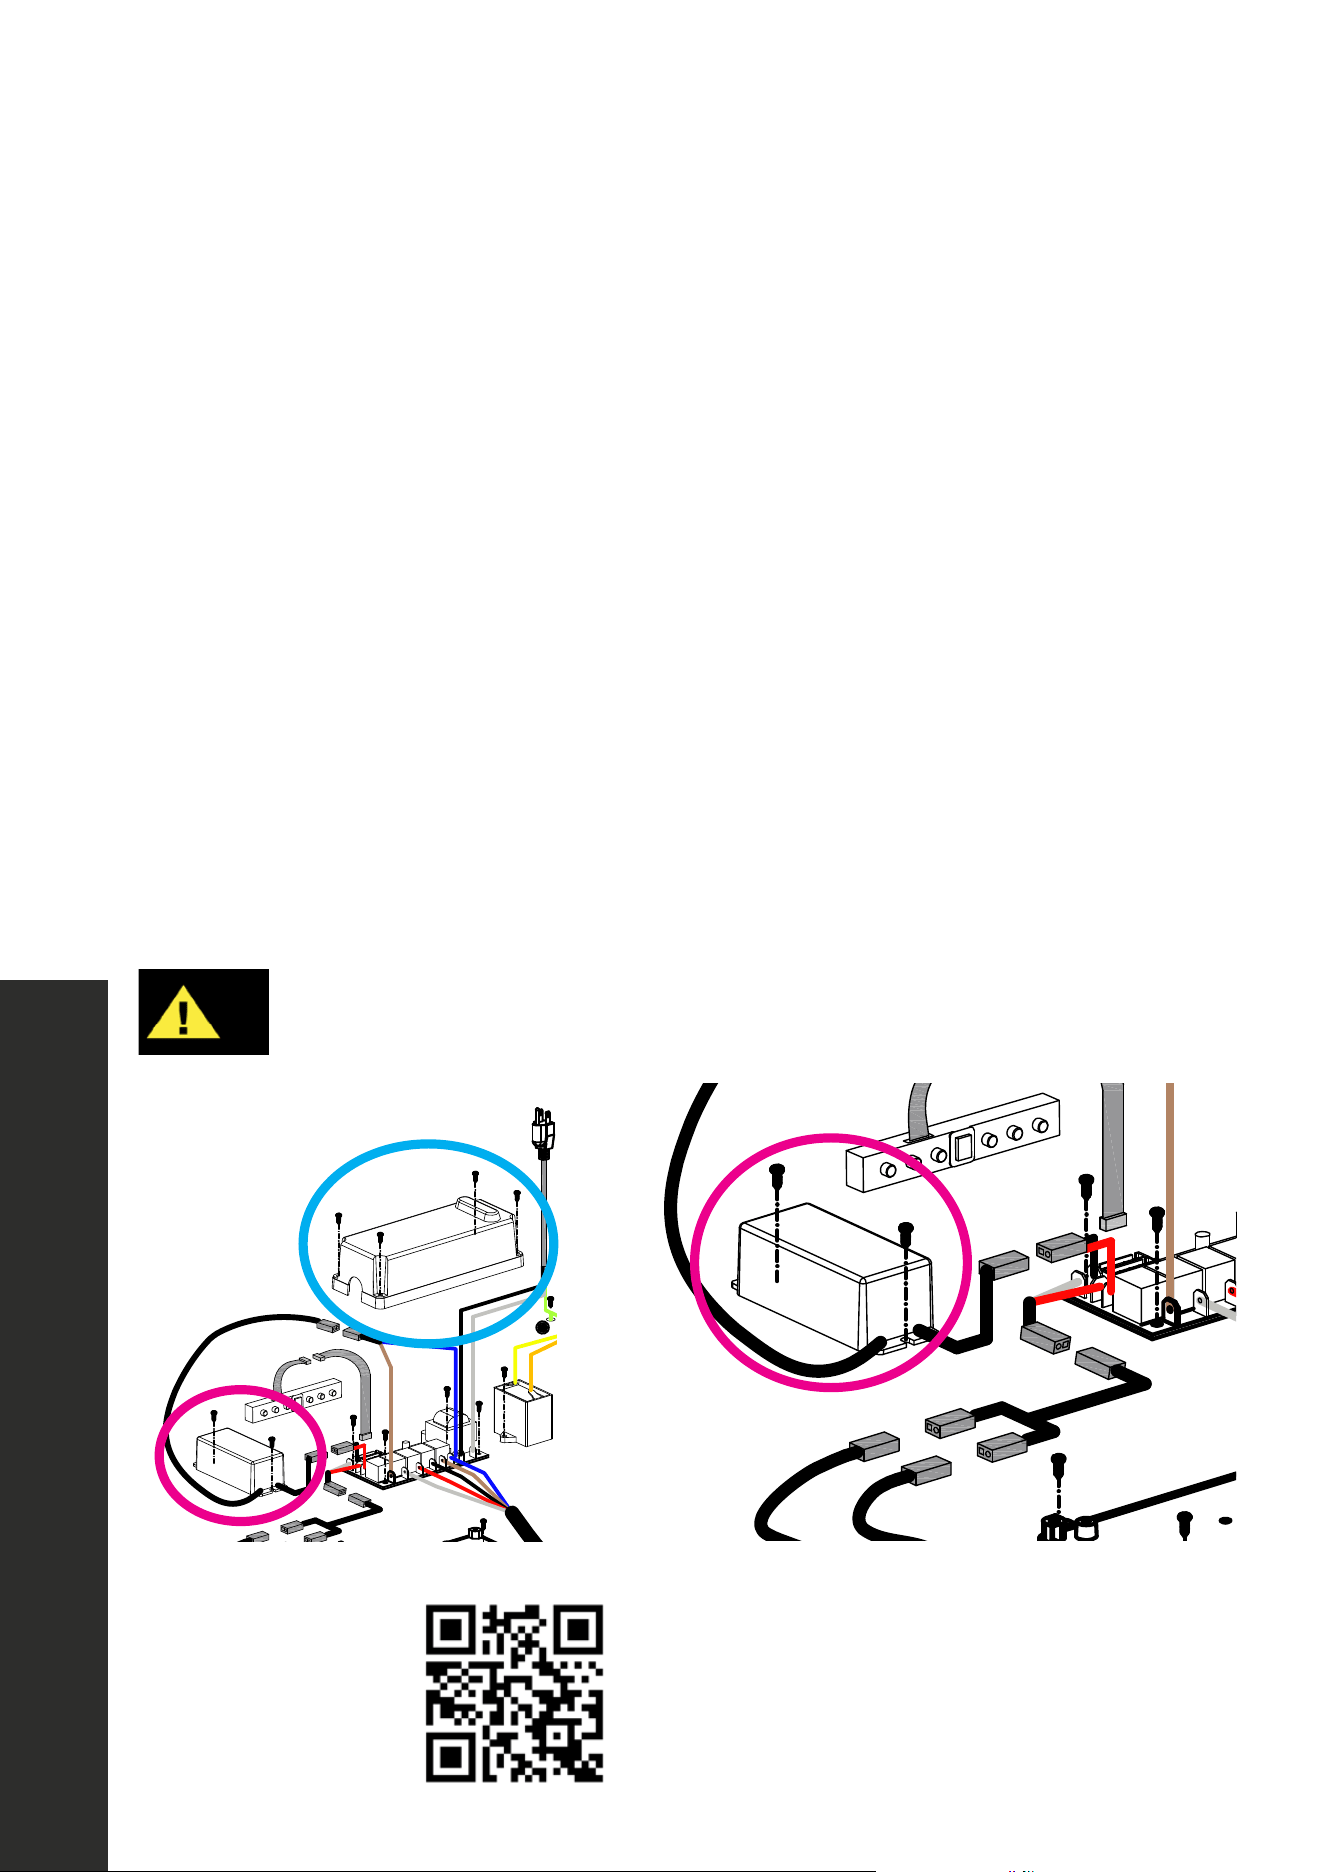
HOW TO REPLACE THE TRANSFORMER
1. Turn the power off at the breaker and unplug the range hood.
2. Remove screws from the circuit board (circled in blue) cover in a similar fashion. Figure 1
3. Locate the wire coming from the transformer (circled in pink) to the circuit board and remove the
two wired connections from the circuit board.
4. Remove the two screws securing the transformer. Figure 2
5. Locate where the transformer connects to the light bulbs; disconnect the wires.
6. Once disconnected, remove the old transformer and connect the new wiring from your new
transformer to the light bulb following the reverse from above.
7. Replace both screws to secure the new transformer.
8. Re-connect the wire from the new transformer to the circuit board.
9. After testing the lights to ensure they work, screw the circuit board cover back on.
NOTE: Transformers provide power to your range hood’s lights. For units made before 2017 with
three or more lights, there will be dual transformers.
WARNING
Never work on or clean the range hood while power is on. Always unplug the unit or
switch the electrical breaker to the off position.
Figure 1 Figure 2
ground
ground
ground
ground
ground
Scan for a transformer
installation tutorial video
29
REPLACING PARTS
Electrical and Circuit Board Diagram
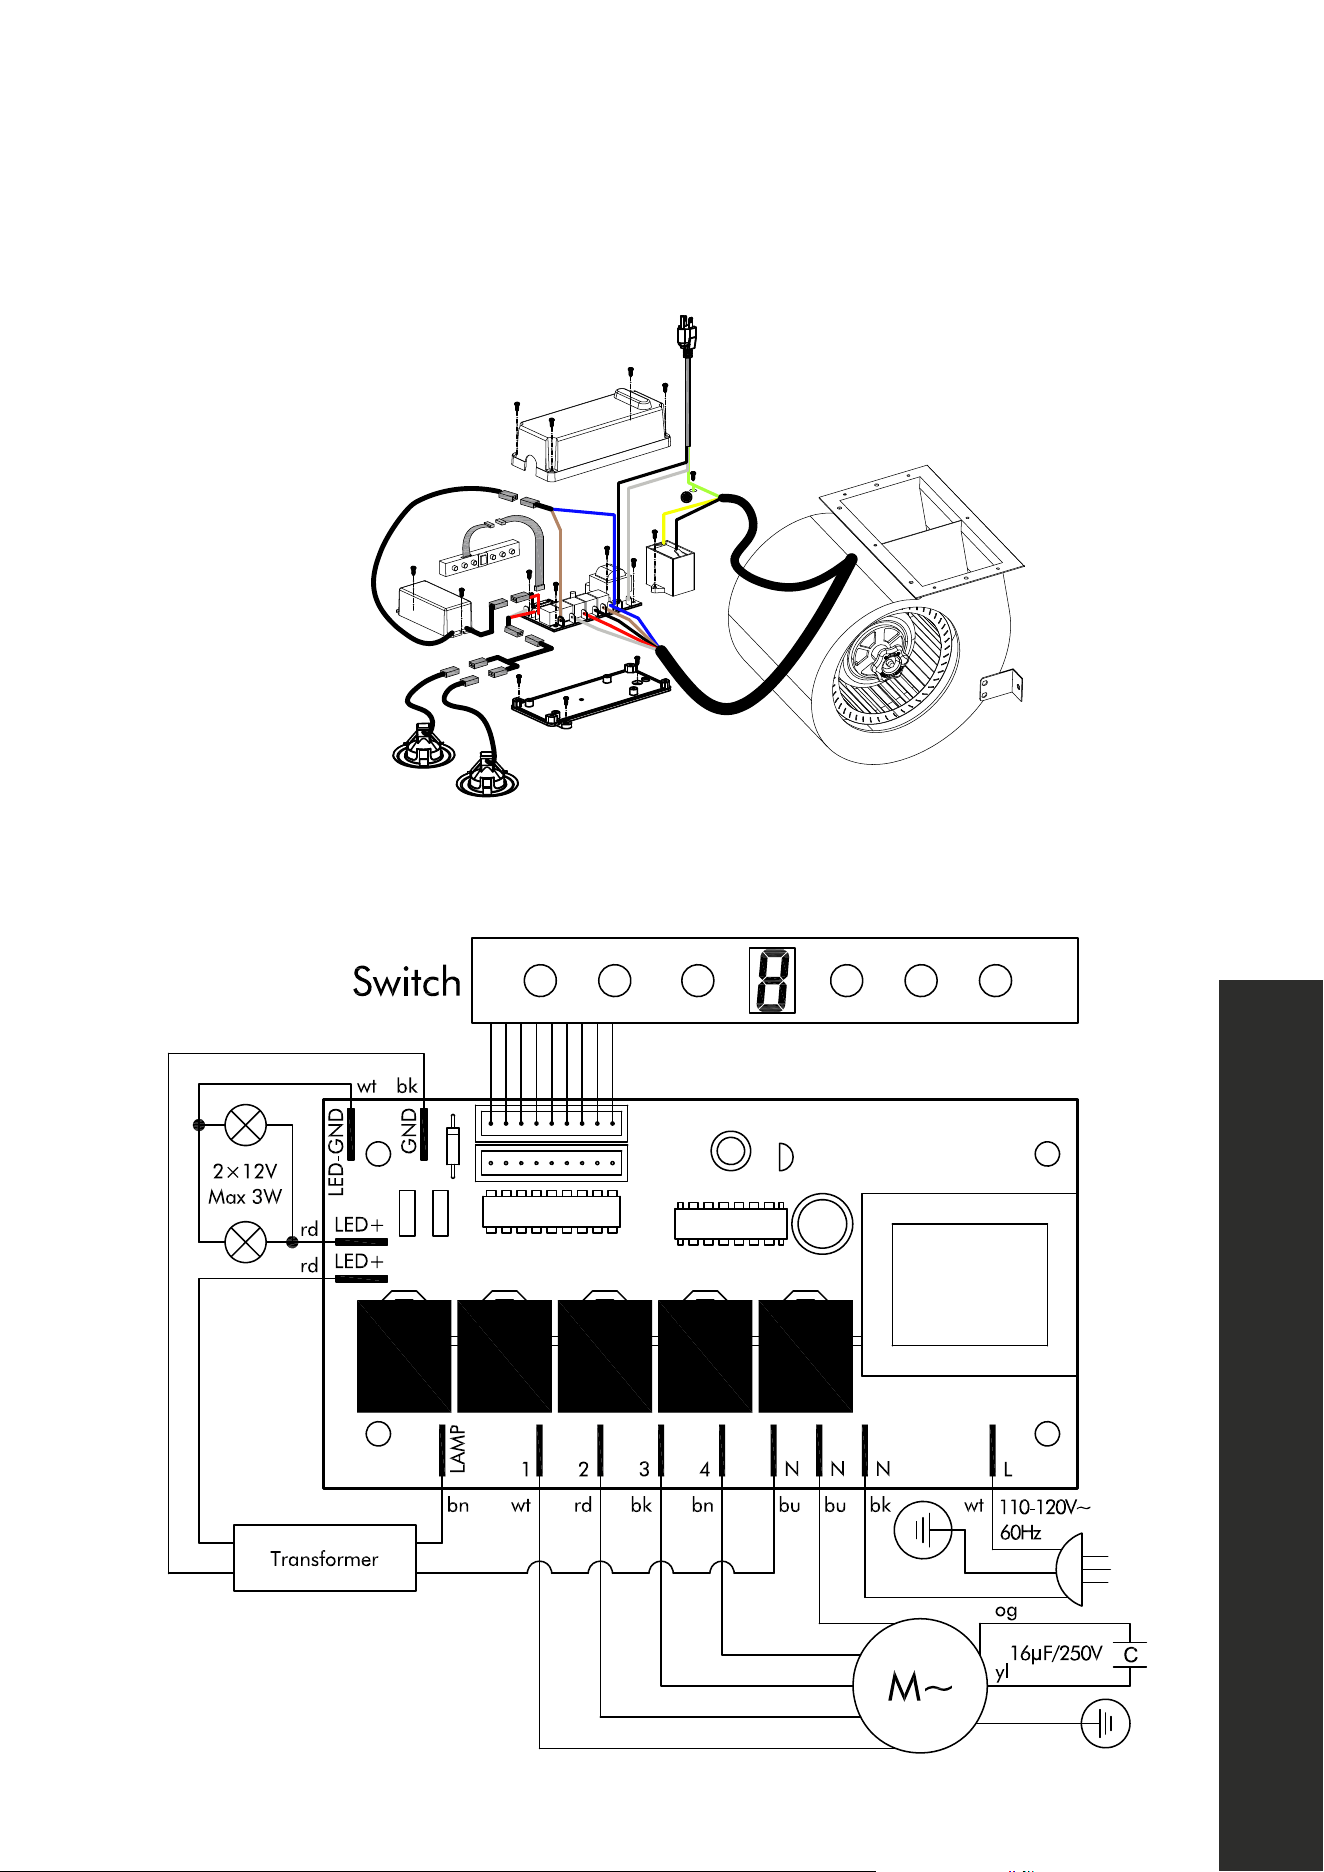
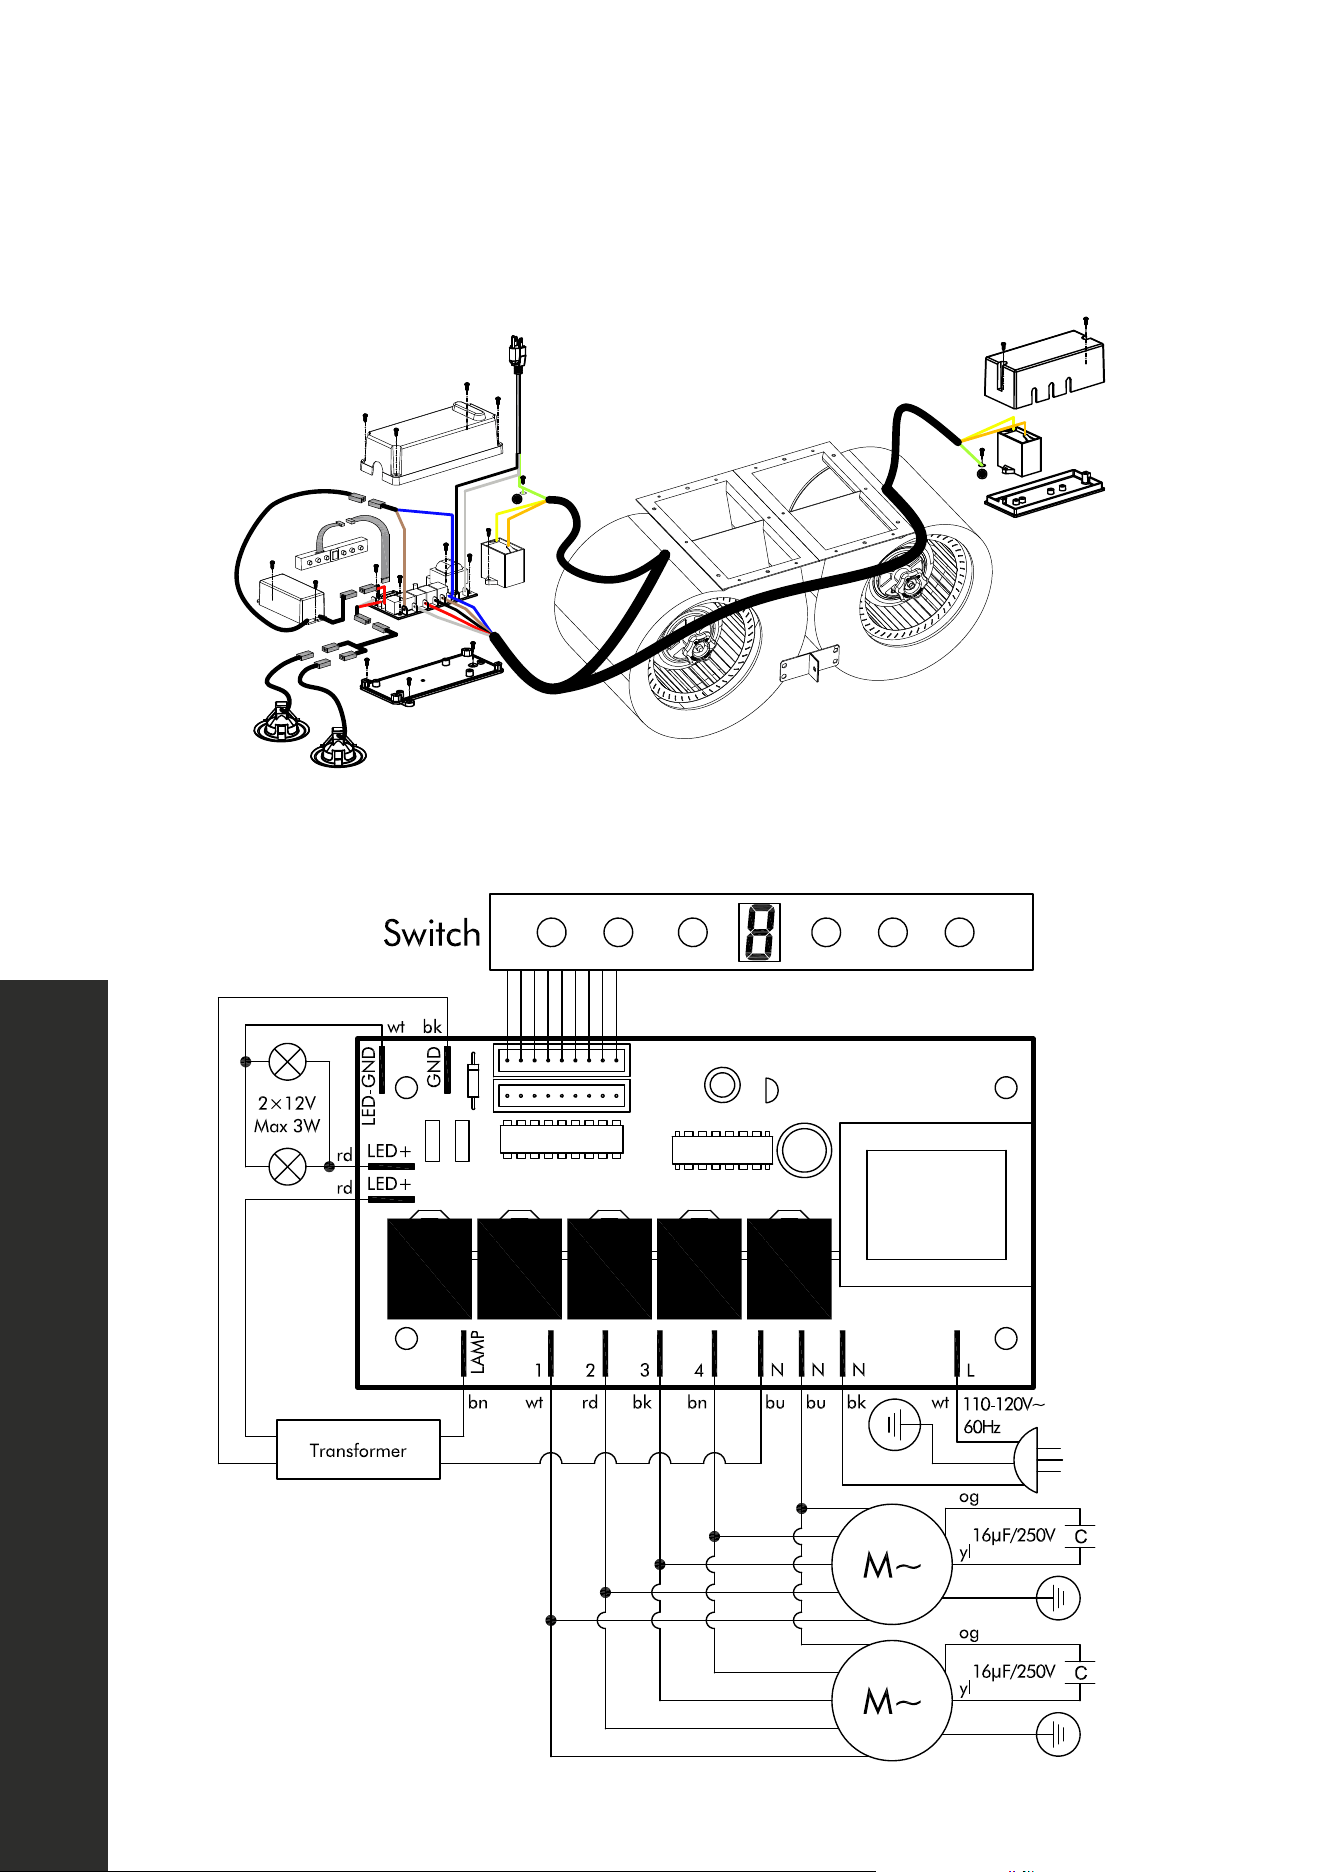
SINGLE MOTOR ELECTRICAL DIAGRAM
ground
ground
30
Electrical and Circuit Board Diagram
REPLACING PARTS
DUAL MOTOR ELECTRICAL DIAGRAM
ground
ground
ground

31
REPLACING PARTS
Replacing Baffle Filters
HOW TO REPLACE PROFESSIONAL SERIES BAFFLE CHANNELS AND FILTERS
Covering models 597i, 697i, and KECOMi.
ZLINE’s professional series range hoods are equipped with two removable dishwasher-safe
baffle channels in which the filters rest. To install the channels, place them inside the hood
under the front and back edges of the hood. The channels are kept in place by installation
pieces on the sides and back of each channel. Figure 1
WARNING
Never work on or clean the range hood while power is on. Always unplug the
unit or switch the electrical breaker to the off position.
NOTE: Baffle channels will already be in place on some island range hood models. See
Figure 1 for positioning.
To install the filters, first install the removable baffle channel. Next, take the filter and put
one end into the permanent baffle channel. Push back into place and pull down, sliding the
bottom of the filter in. Position the filters so they rest on both lips of the baffle channels. The
edges of the baffle filters should have open slats on the outside edges. Figure 2
Figure 1 Figure 2
32
Replacing Baffle Filters
REPLACING PARTS
WARNING
Edges on the baffle filters and baffle channels may be sharp — please use
caution when installing and removing. Use of gloves during installation is
highly recommended. Do not attempt to disassemble baffle filters, as the
process may result in injury.
HOW TO REPLACE SPRING-LOADED BAFFLE FILTERS
If your range hood has baffle filters with a knob, to remove the filter from the hood, pull back
toward the wall and then tilt the knob side of the baffle filter downward.
Release
Scan for a
baffle filter
installation
tutorial video
Scan for a
baffle filter
use and care
tutorial video

33
Replacing Charcoal Filters
REPLACING PARTS
HOW TO REPLACE OR CHANGE CHARCOAL FILTERS
It is recommended to use ducting to direct vent your range hood whenever possible. If you
have a recirculating kit installed on your under cabinet hood, carbon charcoal filters are
available to recirculate the air through your hood.
Filter Support Screws
1. Remove the baffle filters to access your hood’s motor(s).
2. Locate the existing support screws securing the filters on each side.
3. For each motor side, position the filter over its support screw and rotate to lock into place.
NOTE: Charcoal filter replacement is recommended every 6 months. Replace more often
if you cook often or if your cooking habits generate more grease. You can purchase
replacement filters at www.zlineparts.com.
WARNING
Never work on or clean the range hood while power is on. Always unplug the
unit or switch the electrical breaker to the off position.
Scan for a charcoal filter
installation tutorial video

34
Replacing the Grease Cup
REPLACING PARTS
HOW TO CLEAN AND REPLACE THE GREASE CUP
A removable plastic grease cup is designed to catch excess grease at the bottom of the
motor. It’s recommended to remove it every 2–3 months, wash it, then re-install it.
To remove or install the grease cup, remove the baffle filters on your hood and slide the cup
it into brackets located at the bottom of the motor. See below.
WARNING
Never work on or clean the range hood while power is on. Always unplug the
unit or switch the electrical breaker to the off position.
Scan for a grease cup
installation tutorial video
Slide into place

35
Frequently Asked Questions
FREQUENTLY ASKED QUESTIONS
NOTE: Some of these questions are specific to certain types of ZLINE range hoods and as
such may not be applicable to some models.
Are ZLINE range hoods considered type 1 or type 2?
Type 1 — these types of range hoods are used with ranges, range tops, and appliances that
produce grease and smoke.
Why is my range hood white?
This is a protective layer that is placed on all ZLINE range hoods to prevent shipping damage.
This should be easily removable by peeling off.
Why are my range hood baffle filters blue?
This is a protective layer that is placed on ZLINE’s baffle filters to prevent shipping damage.
This should be easily removable by peeling off.
What size hood should I choose for CFM (Cubic Feet Per Minute) purposes?
1. You must determine the output of the cooktop burners of your range; this is measured in
British Thermal Units (BTUs).
2. You should provide 100 CFM of airflow per linear foot of range. To determine this,
divide the BTU rating of your range by 100. This will give you the CFM rating needed of
your range hood. For example: If your range is 35,000 BTUs, your range hood should
have a rating of 350 CFMs or greater.
3. To determine the size of the range hood for satisfactory capture of fumes and gases,
it’s recommended to go at least one size larger than the width of your range, or 3" to
6" (76 mm to 152 mm) wider. At minimum, the hood should be the same size of your
range. The range hood width also should cover 100% of the back burners and 50% of
the front burners.
4. The height of your range hood should be 30" to 36" (762 mm to 914 mm) above
your cooktop.
How loud is the range hood?
A sone is measure of loudness — the higher the sone rating, the louder the sound of the
hood. The sound of 1 sone is comparable to that of a quiet refrigerator. Keep in mind that
other factors such as the size of the blowers can affect the loudness of the range hood. The
higher the CFM, the louder the sone rating will be.

36
Frequently Asked Questions
FREQUENTLY ASKED QUESTIONS
Can my hood be ductless?
It is better to duct your range hood to the outside, but if this is not possible, ductless is an
acceptable alternative. Many ZLINE range hoods have the capability to be converted to
ductless. Ductless is when the air circulates through charcoal filters to remove odors, grease,
smoke, etc. The clean air is then re-circulated back into your home. Charcoal filters are not
reusable and need to be replaced every six months or sooner, depending on cooking style
and frequency.
What type of stainless steel are ZLINE hoods made of?
ZLINE indoor stainless steel range hoods are made with a 430 grade stainless steel. ZLINE
outdoor hoods are made of 304 grade stainless steel. The 304 grade is stronger and more
resistant to rust and corrosion.
Can I stain my unfinished wooden designer hood?
No — unfinished wood range hoods are only compatible with paint.
Do I need a chimney extension or a shortening kit when I purchase my hood?
Most ZLINE island range hoods come with two 19" (483 mm) adjustable/telescoping
chimney covers. Designer island range hoods come with a one-piece chimney. Ensure you
check chimney dimensions before installing — short kits and longer extensions are available
at www.zlineparts.com.
How many amps are produced on the highest fan setting?
For dual motors, up to 3.317 amps are produced. For single motors, it is 1.678 amps.
What type of motor is inside a range hood?
ZLINE hoods are equipped with a squirrel-cage motor.
Is the width of my range hoods description, the actual size?
No — the actual width of the range hood will be slightly less than the generic description
of the range hood in order to better fit cabinet cutouts. For instance, a 30" (762 mm) range
hood will actually measure 29 1/2" (749 mm).

37
Frequently Asked Questions
FREQUENTLY ASKED QUESTIONS
How do I clean my baffle filters and how often?
Your baffle filters should be washed with hot water and soap once per month or placed in a
dishwasher for cleaning. Make sure filters are completely dry before reinstalling. Re-place
the filters if they become damaged or too dirty to clean.
Can I clean my charcoal filter?
No — charcoal odor filters cannot be washed and must be discarded and replaced when
they become noticeably dirty and/or have stopped filtering the odors. They should be
replaced at least every six months.
What is the best way to duct my range hood?
For maximum performance, match your duct size to the original size of the fan’s ducting.
Use the shortest amount of ducting and keep it as straight as possible. Do not exceed 40'
(12192 mm) of ducting. For every 90° elbow, deduct 5' (1524 mm) from the total.
Do I have to exhaust the range hood to the outdoors?
Yes. If installing a range hood that has ductwork connected to it (any hoods that do NOT
recirculate the air back into the room), to properly exhaust the air, be sure to duct the air
outside. DO NOT vent exhaust air back into the spaces within the walls, ceilings, attics,
crawl spaces, or garages. A buildup of humidity and grease could cause damage and/or
a fire risk to your home.
How many devices can the CrownSound
™
speakers sync to at a time?
Only 1 device can sync at a time.
What is the decibel rating of the Bluetooth speakers?
Up to 100 decibels.
What is the range of the speakers?
Up to 50' (15240 mm). If the connection is weak, move closer to the speakers or remove
obstacles that are between the device and the speakers.
38
Troubleshooting
TROUBLESHOOTING
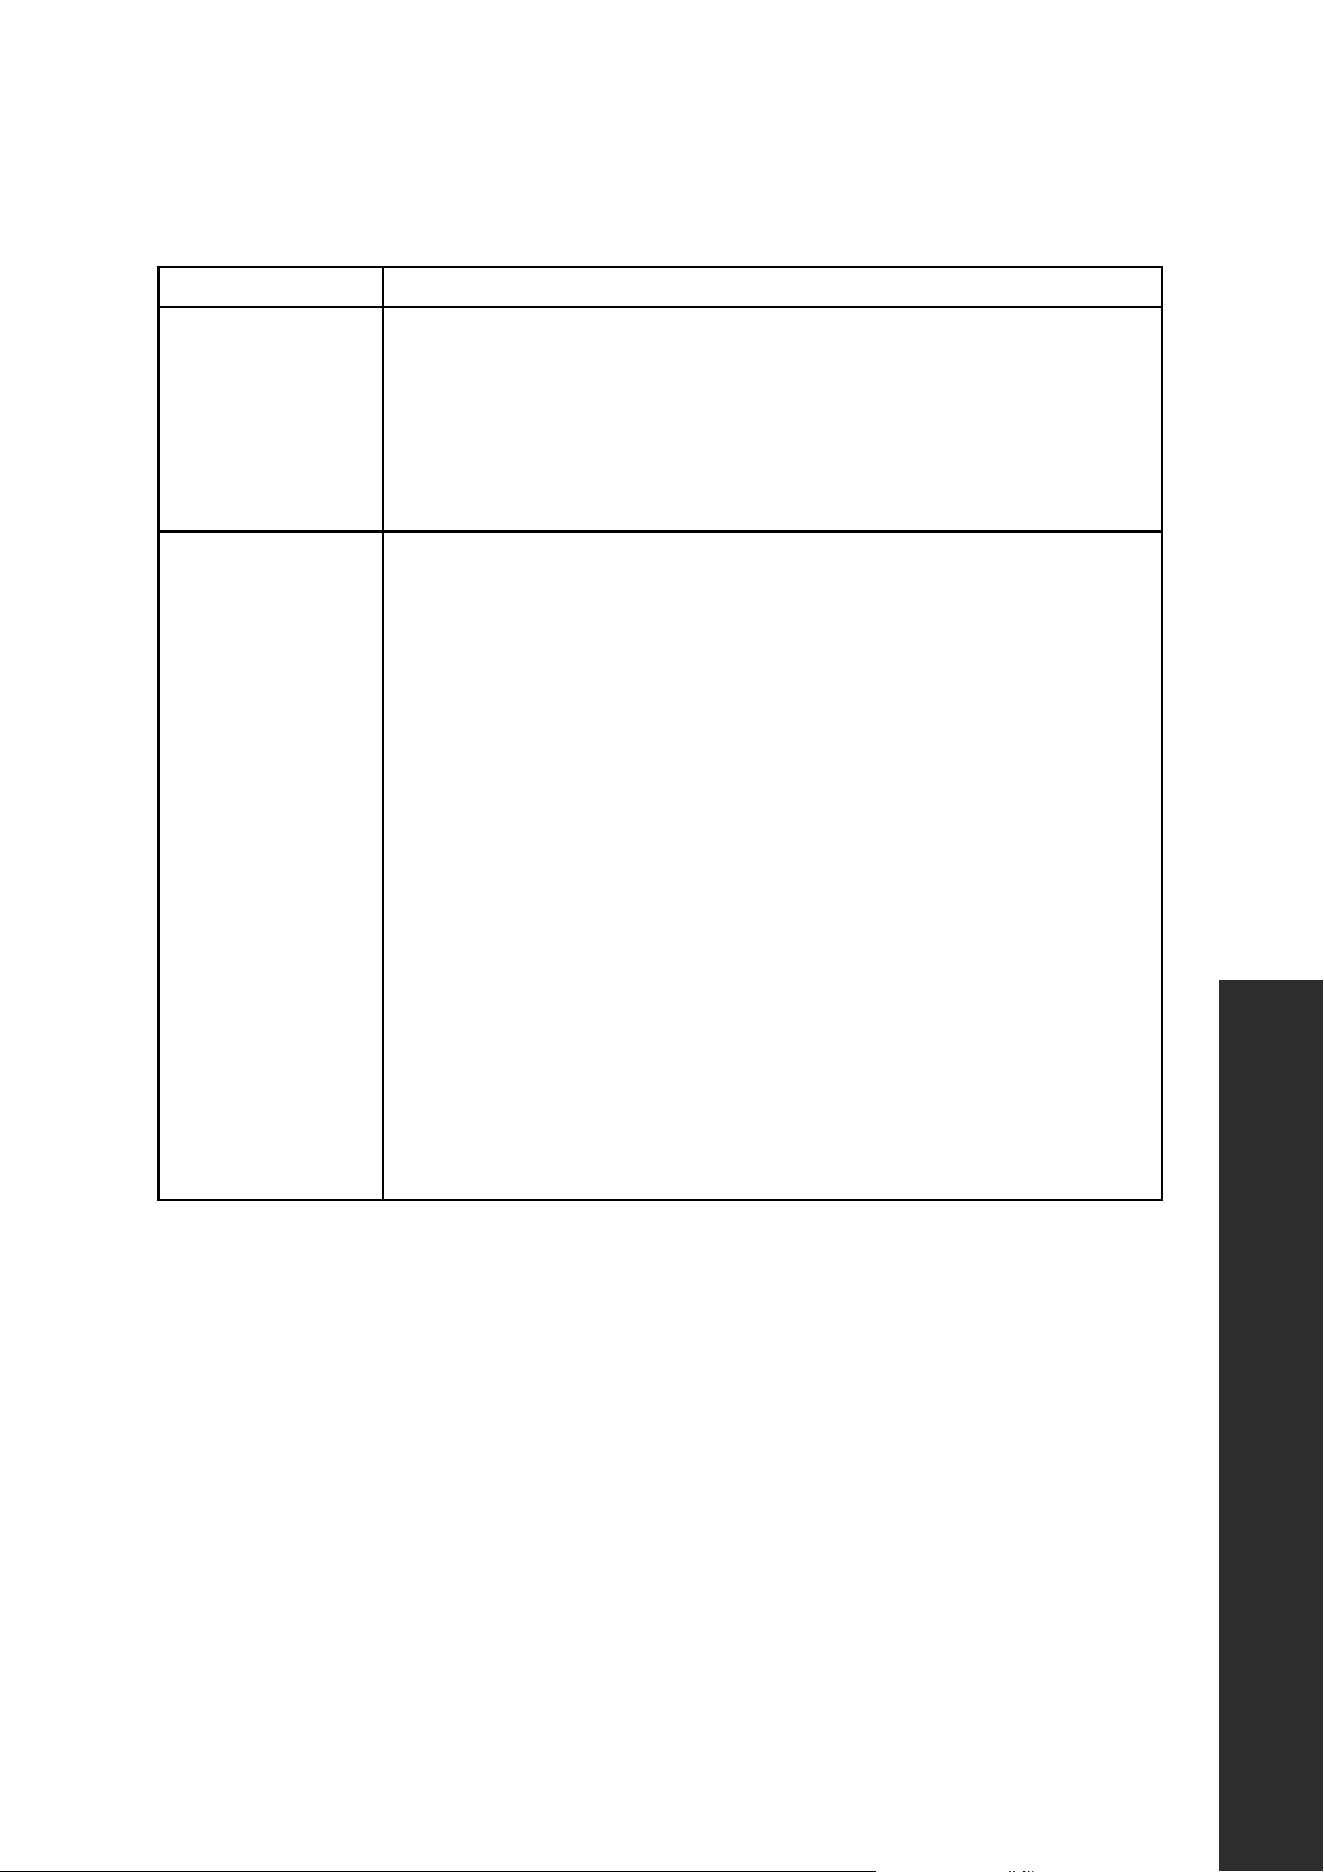
ISSUE POSSIBLE CAUSE SOLUTION
“ZLINE Audio”
won’t appear in the
Bluetooth settings.
Check if the electrical
connections are secure.
A chime will sound if the
connection is successful.
Turn off and on your smart phone’s
Bluetooth settings to allow time for
the CrownSound
™
to pair. If “ZLINE
Audio” still will not appear, call
ZLINE Customer Service at
1-614-777-5004 for help.
What do I do if the
hood is working but
pulling air slower
than normal?
Check your baffle filters
for buildup and clean or
replace it if needed.
If the problem still persists, check
for obstructions in your ductwork. A
common obstruction is buildup in the
roof or wall cap, such as bird nests,
leaves, or other debris.
My range hood will
not operate.
Check that there
is power to
the range hood.
The most common issue is that
the circuit breaker is off or the
fuse has blown.
Make sure the speed has been
selected at the range hood controls.
Turn off the power to the range hood
and check that all wires are properly
connected. Refer to your specific
model’s installation instructions for
proper wiring.
My hood is making a
rattling noise.
The motor is loose.
Turn off the power and remove the
filter and check that all screws are
secure and tight around the motor.
The duct work
connection is loose.
Turn off the power to the unit and
check that the ductwork connection
to the pipe is tight. Add duct tape
if necessary.
39
Troubleshooting
TROUBLESHOOTING
ISSUE POSSIBLE CAUSE / SOLUTION
My range
hood does
not have power.
Check electrical connections.
Check that all connections to the circuit board are secure.
If problem still exists, please call our customer service line.
Noisy Motor
Were the fan speeds checked fan speeds prior to installation?
Is the ducting clear?
Check to make sure motor is attached to housing.
Is the backdraft damper on the transition piece functioning properly?
Does it open when the hood is engaged?
If it is stuck, it will sound like motor noise but it’s really the damper.
Was a damper installed on the roof or side vent?
Check that the damper is fully functioning by engaging the hood and
checking if it opens and closes properly.
If the motor is accessible, the motor knob can be tightened.
40
Troubleshooting
TROUBLESHOOTING
ISSUE POSSIBLE CAUSE / SOLUTION
My range hood is
not pulling.
Was the unit plugged in and was the fan checked before
installation?
What distance is the hood mounted above the cook top?
Make sure the distance is 30"–36"/762–914 mm (indoor)
or 36"–42"/914–1067 mm (outdoor).
Is the range hood width the correct size for the cook top? Outdoor
units should be at least 1 size larger, if not 2.
Does the hood have enough BTU output in relationship to either their
gas or electric stove cook top?
Does the hood have enough BTU output in relationship to either
their gas or electric stove cook top?
Remember — BTU output per burner/100 - for gas, and wattage
output per burner/10 - for electric.
Are the baffle filters or mesh filters installed correctly? When were
they last cleaned?
Is the ducting clear?
Is the damper opening properly once the hood is turned on?
Is there air coming out of the upper chimney section?
When tissue is placed on the baffle filters under the hood, does it
hold the tissue?
How many elbows and how long is the ducting run?
Should be no more than 2–3 elbows and no more than a 40'
(12192 mm) run to exit — for every elbow subtract 5' (1524 mm).
Is the air recirculating? When were the carbon filters last changed?
The carbon filters need changed every 3–6 months based on your
cooking habits.

WARRANTY
COVERAGE
ZLINE Kitchen and Bath (“ZLINE”) range hood parts will be warrantied for three years from
the original date of product delivery for the original purchaser of the product.
ZLINE warranty periods begin from the original date of product delivery and solely cover
the original purchaser of the product, delivered new and in its original carton. ZLINE will
provide free-of-charge, non-consumable replacement parts for the components that failed
due to manufacturing defects.
Additionally, range hoods purchased on or after January 2017 carry a lifetime warranty on
the motor. It is the responsibility of the customer to install all replacement parts and motors, as
ZLINE does not perform service repairs on its range hood products.
ZLINE’s liability is limited to the original purchase price of the product. Additional injuries,
losses, damages, or other inconveniences caused by product malfunction or defects in
materials are not covered under the terms of this warranty.
TERMS
ZLINE warranties apply only to the original purchaser of a ZLINE product installed for normal
residential use. This is defined as a single-family, residential dwelling in a non-commercial
setting. Any warranty claim stemming from installation, operation, or any other use within a
commercial setting is not covered under this limited warranty. Commercial settings include,
but are not limited to: schools, churches, hotels, restaurants, vacation rentals such as Airbnb,
daycare centers, private clubs, fire stations, common areas in multi-family dwellings, nursing
homes, food service locations, and institutional food service locations such as hospitals or
correctional facilities.
This warranty is non-transferable and will not under any circumstance be extended based on
the date of installation — the warranty period takes effect from the date of delivery and only
covers the original purchaser. The warranty applies only to products installed in the contiguous
United States and the District of Columbia.

Out-of-pocket payments will not be reimbursed for replacement parts unless prior approval is
received from ZLINE. Unapproved out-of-pocket payments for parts will not be reimbursed.
Out-of-pockets for any type of service will not be reimbursed, as ZLINE does not perform
service repairs on its range hood products. All warranty procedures must be followed to
maintain warranty coverage.
If ZLINE is unable to replace the defective part after a reasonable number of attempts, ZLINE
reserves the right to offer to replace the product or provide the original purchaser a full refund
of the purchase price of the product (not including installation, removal, or other charges that
were not included in the original purchase price).
The original purchaser of the product must provide the original proof of purchase, including
the purchase date, when filing a claim to obtain replacement parts or refunds. Additionally,
the original purchaser of the product must provide the serial number of the product when filing
a claim to obtain replacement parts or refunds.
This warranty shall not apply to any ZLINE product in which the original factory serial
number has been removed, altered, or cannot be readily determined for any reason. Further,
ZLINE is not responsible for damage resulting from, but not limited to: shipment, delivery, or
improper installation; negligence or improper maintenance, misuse, or abuse of the product;
unauthorized alteration, modification, or tampering with the product; accident, fire, floods,
pest infestations, pandemics, natural disasters, or any other unpreventable or unexplained
acts of nature, commonly referred to as “acts of God”; flare-up fires or damages caused
by improper electric supply, electrical line current, voltage, or power surges; and service
to correct installation not in accordance with the instructions contained in ZLINE’s product
manuals and/or with local government codes.
Additionally, this range hood warranty does not apply to aesthetic damage, scratches,
or natural wear caused by normal use; second-hand, open box products, or products
purchased from an unauthorized retailer; consumable parts including, but not limited to, metal
and charcoal filters; and damages, problems, or any type of performance-related issues
stemming from alteration or tampering with the range hood, including, but not limited to,
painting stainless steel, black stainless, DuraSnow
®
, or designer- or wood-finished range
hoods, and cutting the 3-prong plug to manually hardwire the hood.
WARRANTY

Information contained within ZLINE’s installation and user manuals, in addition to product
information included on ZLINE’s website and all related digital listings, do not cover every
possible condition and situation that may occur during the installation or operation of
ZLINE products.
ZLINE reserves the right to make changes at any time to its products when considered safe,
necessary, and useful. Always check the ZLINE website for the most up-to-date version of its
product manuals: www.zlinekitchen.com/pages/manuals.
Do not install or operate any ZLINE product if it has missing or broken parts or if it arrives
damaged due to shipping. If ZLINE products arrive damaged, contact ZLINE Customer
Experience at 1-614-777-5004 for help. Failure to report a damaged appliance prior to
installation or operation may void the warranty. ZLINE does not perform service repairs on its
range hood products.
ZLINE disclaims responsibility for damage or injury caused by improper installation or use of
any of its products. ZLINE is under no obligation, by law or otherwise, to provide concessions,
including repairs, prorates, rebates, discounts, or replacements, once the warranty has expired.
SERIAL NUMBER LOCATION
The rating tag shows the model and serial number of your
range hood. Please write down the model number and
serial number of your appliance. The serial number is
located behind the baffle filters near the motor. Both are
needed to obtain warranty service. Do not remove
permanently affixed labels, warnings, or plates from the
product. This will void the warranty. You may also consider
attaching your receipt or proof of purchase to this manual.
WARRANTY

WARRANTY
CUSTOMER SERVICE AND PARTS INFORMATION
Please contact ZLINE Customer Service for questions and
troubleshooting help at 1-614-777-5004 or visit
www.zlinekitchen.com/contact to utilize our online Customer
Experience Portal.
Scan the QR code to view the most up-to-date version of ZLINE’s
range hood Installation and User Manuals.
Need to purchase a part or accessory for your ZLINE product? Visit
www.zlineparts.com, ZLINE’s official parts distribution partner.