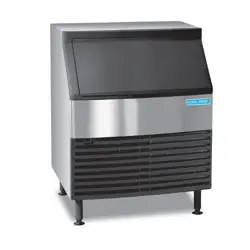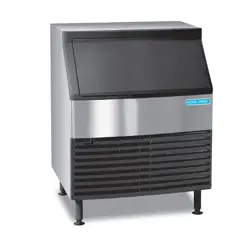
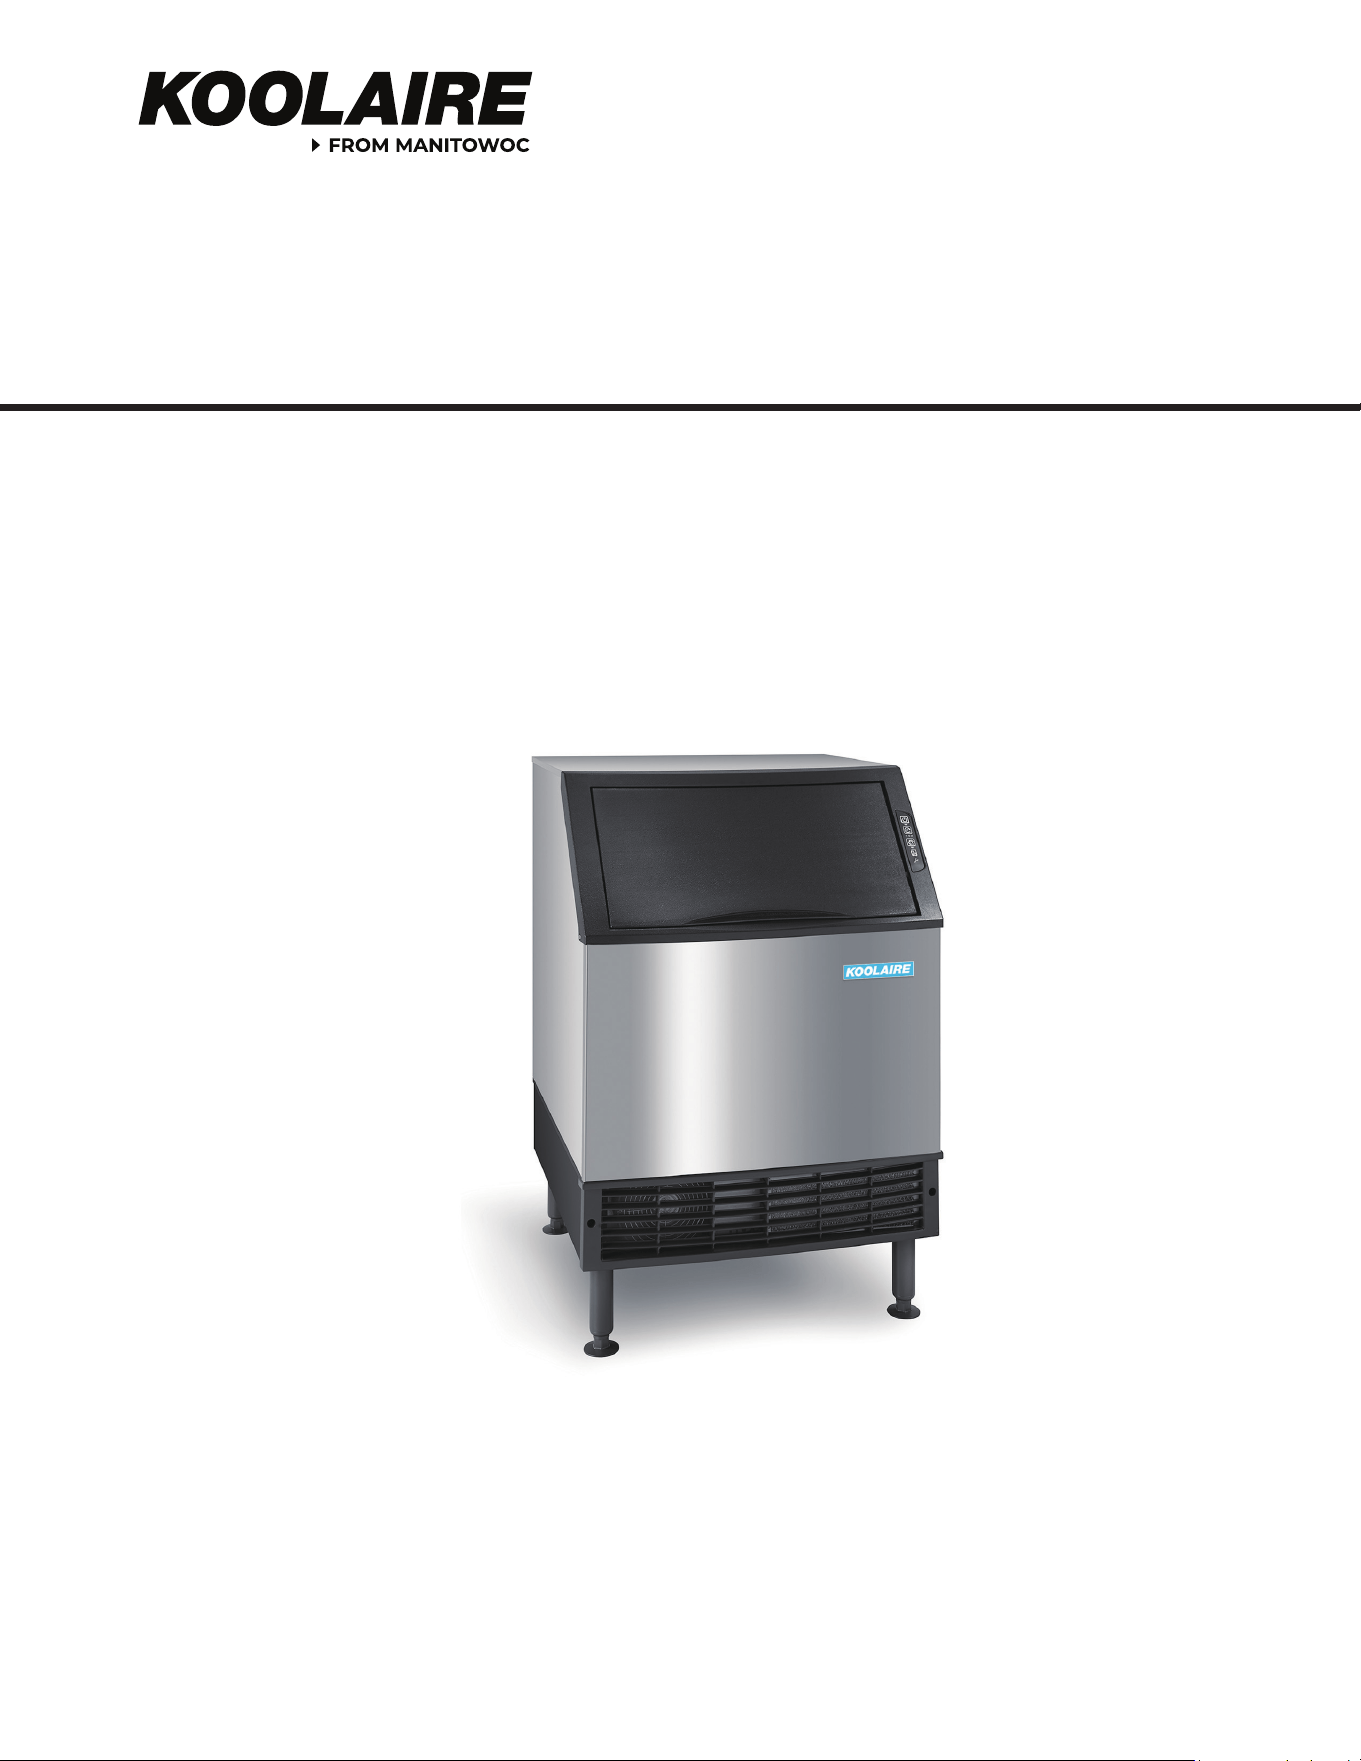
KP0150 & KP0250
UnderCounter Ice Machines
Installation, Operation and Maintenance Manual
,
Caution
Read this instruction before operating this equipment.
Part Number: 040010062 Ver00 11/25

Safety Notices
Safety Notices
Read these precautions to prevent personal injury:
• Read this manual thoroughly before operating,
installing or performing maintenance on the
equipment. Failure to follow instructions in this
manual can cause property damage, injury or death.
• Routine adjustments and maintenance procedures
outlined in this manual are not covered by the
warranty.
• Proper installation, care and maintenance are essential
for maximum performance and trouble-free operation
of your equipment.
Visit our website www.manitowocice.com for manual
updates, translations, or contact information for
service agents in your area.
• This equipment contains high voltage electricity and
refrigerant charge. Installation and repairs are to be
performed by properly trained technicians aware of
the dangers of dealing with high voltage electricity
and refrigerant under pressure. The technician must
also be certified in proper refrigerant handling
and servicing procedures. All lockout and tag out
procedures must be followed when working on this
equipment.
• This equipment is intended for indoor use only. Do
not install or operate this equipment in outdoor areas.
Definitons
DANGER
Indicates a hazardous situation that, if not avoided, will
result in death or serious injury. This applies to the most
extreme situations.
n
Warning
Indicates a hazardous situation that, if not avoided,
could result in death or serious injury.
,
Caution
Indicates a hazardous situation that, if not avoided,
could result in minor or moderate injury.
Notice
Indicates information considered important, but not
hazard-related (e.g. messages relating to property
damage).
NOTE: Indicates useful, extra information about the
procedure you are performing.

n
Warning
Follow these precautions to prevent personal injury during installation of this equipment:
• Installation must comply with all applicable equipment
fire and health codes with the authority having
jurisdiction.
• To avoid instability the installation area must be capable
of supporting the combined weight of the equipment
and product. Additionally the equipment must be level
side to side and front to back.
• Ice machines require a deflector when installed on an ice
storage bin. Prior to using a non-OEM ice storage system
with this ice machine, contact the bin manufacturer to
assure their ice deflector is compatible.
• Prior to installing a non-OEM ice storage system with
this ice machine, follow the manufacturers installation
procedures and verify the location and installation
meets the local/national mechanical codes and stability
requirements.
• Remove all removable panels before lifting and
installing and use appropriate safety equipment during
installation and servicing. Two or more people are
required to lift or move this appliance to prevent tipping
and/or injury.Remove all removable panels before lifting
and installing and use appropriate safety equipment
during installation and servicing. Two or more people
are required to lift or move this appliance to prevent
tipping and/or injury.
• Legs or casters must be installed and the legs/casters
must be screwed in completely. When casters are
installed the mass of this unit will allow it to move
uncontrolled on an inclined surface. These units must be
tethered/secured to comply with all applicable codes.
Swivel casters must be mounted on the front and rigid
casters must be mounted on the rear. Lock the front
casters after installation is complete.
• Connect to a potable water supply only.
• Do not damage the refrigeration circuit when installing,
maintaining or servicing the unit.
• This equipment contains refrigerant charge. Installation
of the line sets must be performed by a properly trained
and EPA certified refrigeration technician aware of the
dangers of dealing with refrigerant charged equipment.
DANGER
A3
Follow these flammable refrigeration system requirements during installation, use or repair of this equipment:
• Refer to nameplate - Ice machine models may contain
up to 500 grams of R290(propane) refrigerant. R290
(propane) is flammable in concentrations of air between
approximately 2.1% and 9.5%by volume (LEL lower
explosion limit and UEL upper explosion limit). An
ignition source at a temperature higher than 878°F
(470°C) is needed for a combustion to occur. Refer to
nameplate to identify the type of refrigerant in your
equipment.
• To minimize the risk of ignition due to improper
installation, replacement parts or service procedures,
only refrigeration technicians with flammable
refrigerant training who are aware of the dangers of
dealing with high voltage electricity and refrigerant
under pressure are allowed to work on this equipment.
• All replacement parts must be like components
obtained from the equipment manufacturers authorized
replacement part network.
• This equipment must be installed in accordance with
the ASHRAE 15 Safety Standard for Refrigeration
Systems.
• This equipment can not be installed in corridors or
hallways of public buildings.
• Installation must comply with all applicable equipment
fire and health codes with the authority having
jurisdiction.
• Minimum room size may be required, refer to ice
machine label.
• Multiple R290 units can be installed in a single room,
but their cumulative refrigerant charge needs to be
considered when determining the safe room size.
• All lockout and tag out procedures must be followed
when working on this equipment.
• This equipment contains high voltage electricity
and refrigerant charge. Shorting electrical wires to
refrigeration tubing may result in an explosion. All
electrical power must be disconnected from the system
before servicing the system. Refrigerant leaks, can result
in serious injury or death from explosion, fire, or contact
with refrigerant or lubricant mists.
• Do not damage the refrigeration circuit when installing,
maintaining or servicing the unit. Never use sharp
objects or tools to remove ice or frost. Do not use
mechanical devices or other means to accelerate the
defrosting process.
• Well-ventilated areas are recommended for installation
and storage.
• Leak pressure, leak hole size, wind speed, and the
presence of objects like furniture within the room can
also affect the concentration and distribution of R290
during a leak.
n
Warning
Follow these electrical requirements during
installation of this equipment.
• All field wiring must conform to all applicable
codes of the authority having jurisdiction. It is
the responsibility of the end user to provide the
disconnect means to satisfy local codes. Refer to rating
plate for proper voltage.
• This appliance must be grounded.
• This equipment must be positioned so that the plug is
accessible unless other means for disconnection from
the power supply (e.g., circuit breaker or disconnect
switch) is provided.
• Check all wiring connections, including factory
terminals, before operation. Connections can become
loose during shipment and installation.
DANGER
Do not operate equipment that has been misused,
abused, neglected, damaged, or altered/modified
from that of original manufactured specifications. This
appliance is not intended for use by persons (including
children) with reduced physical, sensory or mental
capabilities, or lack of experience and knowledge, unless
they have been given supervision concerning use of the
appliance by a person responsible for their safety. Do
not allow children to play with, clean or maintain this
appliance without proper supervision.
n
Warning
Follow these precautions to prevent personal injury
while operating or maintaining this equipment:
• Read this manual thoroughly before operating,
installing or performing maintenance on the
equipment. Failure to follow instructions in this
manual can cause property damage, injury or death.
• Crush/Pinch Hazard. Keep hands clear of moving
components. Components can move without warning
unless power is disconnected and all potential energy
is removed.
• Moisture collecting on the floor will create a slippery
surface. Clean up any water on the floor immediately
to prevent a slip hazard.
• Objects placed or dropped in the bin can affect
human health and safety. Locate and remove any
objects immediately.
• Never use sharp objects or tools to remove ice or frost.
Do not use mechanical devices or other means to
accelerate the defrosting process.
• When using cleaning fluids or chemicals, rubber
gloves and eye protection (and/or face shield) must
be worn.
n
Warning
Temporary electrical installations of more than 600 volts
may be used only during periods of tests, emergencies,
or construction-like activities.
Temporary wiring must be removed immediately upon
completion of the project or purpose for which the
wiring was installed.

DANGER
Follow these precautions to prevent personal injury during use and maintenance of this equipment:
• It is the responsibility of the equipment owner to
perform a Personal Protective Equipment Hazard
Assessment to ensure adequate protection during
maintenance procedures.
• Do Not Store Or Use Gasoline Or Other Flammable
Vapors Or Liquids In The Vicinity Of This Or Any Other
Appliance. Never use flammable oil soaked cloths or
combustible cleaning solutions for cleaning.
• All covers and access panels must be in place and
properly secured when operating this equipment.
• Risk of fire/shock. All minimum clearances must be
maintained. Do not obstruct vents or openings.
• Failure to disconnect power at the main power supply
disconnect could result in serious injury or death. The
power switch DOES NOT disconnect all incoming power.
• All utility connections and fixtures must be maintained
in accordance with the authority having jurisdiction.
• Turn off and lockout all utilities (gas, electric, water)
according to approved practices during maintenance or
servicing.
• Units with power cords must be plugged into individual
branch circuits. During movement, cleaning or repair it
is necessary to unplug both power cords.
• Never use a high-pressure water jet for cleaning on
the interior or exterior of this unit. Do not use power
cleaning equipment, steel wool, scrapers or wire brushes
on stainless steel or painted surfaces.
• Two or more people are required to move this
equipment to prevent tipping.
• Locking the front casters after moving is the owner’s and
operator’s responsibility. When casters are installed, the
mass of this unit will allow it to move uncontrolled on an
inclined surface. These units must be tethered/secured
to comply with all applicable codes.
• The on-site supervisor is responsible for ensuring that
operators are made aware of the inherent dangers of
operating this equipment.
• Do not operate any appliance with a damaged cord
or plug. All repairs must be performed by a qualified
service company.
• Do not store or use electrical appliances inside the ice
machine or ice storage areas.

Table of Contents
Part Number: 040010062 Ver00 11/25 8
Safety Notices
Safety Notices ..................................................................................................................... 4
Definitons ...........................................................................................................................4
Section 1
General Information
Model Numbers ................................................................................................................ 11
Shipping Weight .................................................................................................................................. 11
Machine Preparation .......................................................................................................11
How to read a model number ........................................................................................................11
Accessories ........................................................................................................................12
Bin Caster ...............................................................................................................................................12
Arctic Pure Water Filter system ....................................................................................................... 12
Manitowoc De-scaler and Sanitizer .............................................................................................. 12
LuminIce® ............................................................................................................................................... 12
Warranty ...........................................................................................................................12
Warranty Registration ........................................................................................................................12
Section 2
Installation
Location of Ice Machine ...................................................................................................13
Installation Requirements ...............................................................................................13
Minimum Cut-Out For Built-In Installations ...................................................................13
Heat of Rejection .............................................................................................................. 14
Leveling the Ice Machine .................................................................................................................. 14
Electrical Service ..............................................................................................................14
Electrical Requirements .................................................................................................................... 14
Voltage .................................................................................................................................................... 14
Fuse/Circuit Breaker ........................................................................................................................... 14
Total Circuit Ampacity ....................................................................................................................... 15
Ground Fault Circuit Interrupter .................................................................................................... 15
Maximum Breaker Size & Total Amperage Chart ..................................................................... 15
Water Supply and Drain Line Requirements ..................................................................16
WATER CONNECTIONS ....................................................................................................................... 16
DRAIN CONNECTIONS ....................................................................................................................... 16
Water Supply ......................................................................................................................................... 16
Water Inlet Lines .................................................................................................................................. 16
Cooling Tower Applications ............................................................................................................. 16
Water Supply & Drain Line Sizing Connections ........................................................................ 17
Ice Thickness Adjustment ................................................................................................18
Refrigerant Charge ...........................................................................................................18
Starting the Ice Machine .................................................................................................. 18
Installation Checklist .......................................................................................................................... 18
Section 3
Operation
Touch Pad Features ..........................................................................................................19
Ice Making Sequence of Operation ................................................................................. 20
Service Limits ........................................................................................................................................ 20

9 Part Number: 040010062 Ver00 11/25
Table of Contents (continued)
Section 4
Maintenance
De-scaling and Sanitizing ................................................................................................21
General .................................................................................................................................................... 21
Detailed De-scaling/Sanitizing Procedure ................................................................................. 21
Remedial De-scaling Procedure ..................................................................................................... 21
Detailed De-scaling and Sanitizing Procedure ..............................................................21
De-scaling Procedure .........................................................................................................................21
Sanitizing Procedure .......................................................................................................................... 22
Remove Parts for De-scaling or Sanitizing ................................................................................. 23
Remedial De-scaling ........................................................................................................24
Ice Machine Inspection ....................................................................................................24
Exterior Cleaning..............................................................................................................24
LuminIce® Bulb Maintenance ..........................................................................................24
BULB REPLACEMENT .......................................................................................................................... 24
CLEAN-UP PROCEDURE ..................................................................................................................... 24
Cleaning the Air Condenser Filter ................................................................................... 24
Cleaning the Air Condenser .............................................................................................24
Bin Removal ......................................................................................................................25
Removal from Service/Winterization .............................................................................25
GENERAL ................................................................................................................................................. 25
Section 5
Troubleshooting
Checklist ............................................................................................................................27
Service Limit Feature .......................................................................................................28
Part Number: 040010062 Ver00 11/25 10
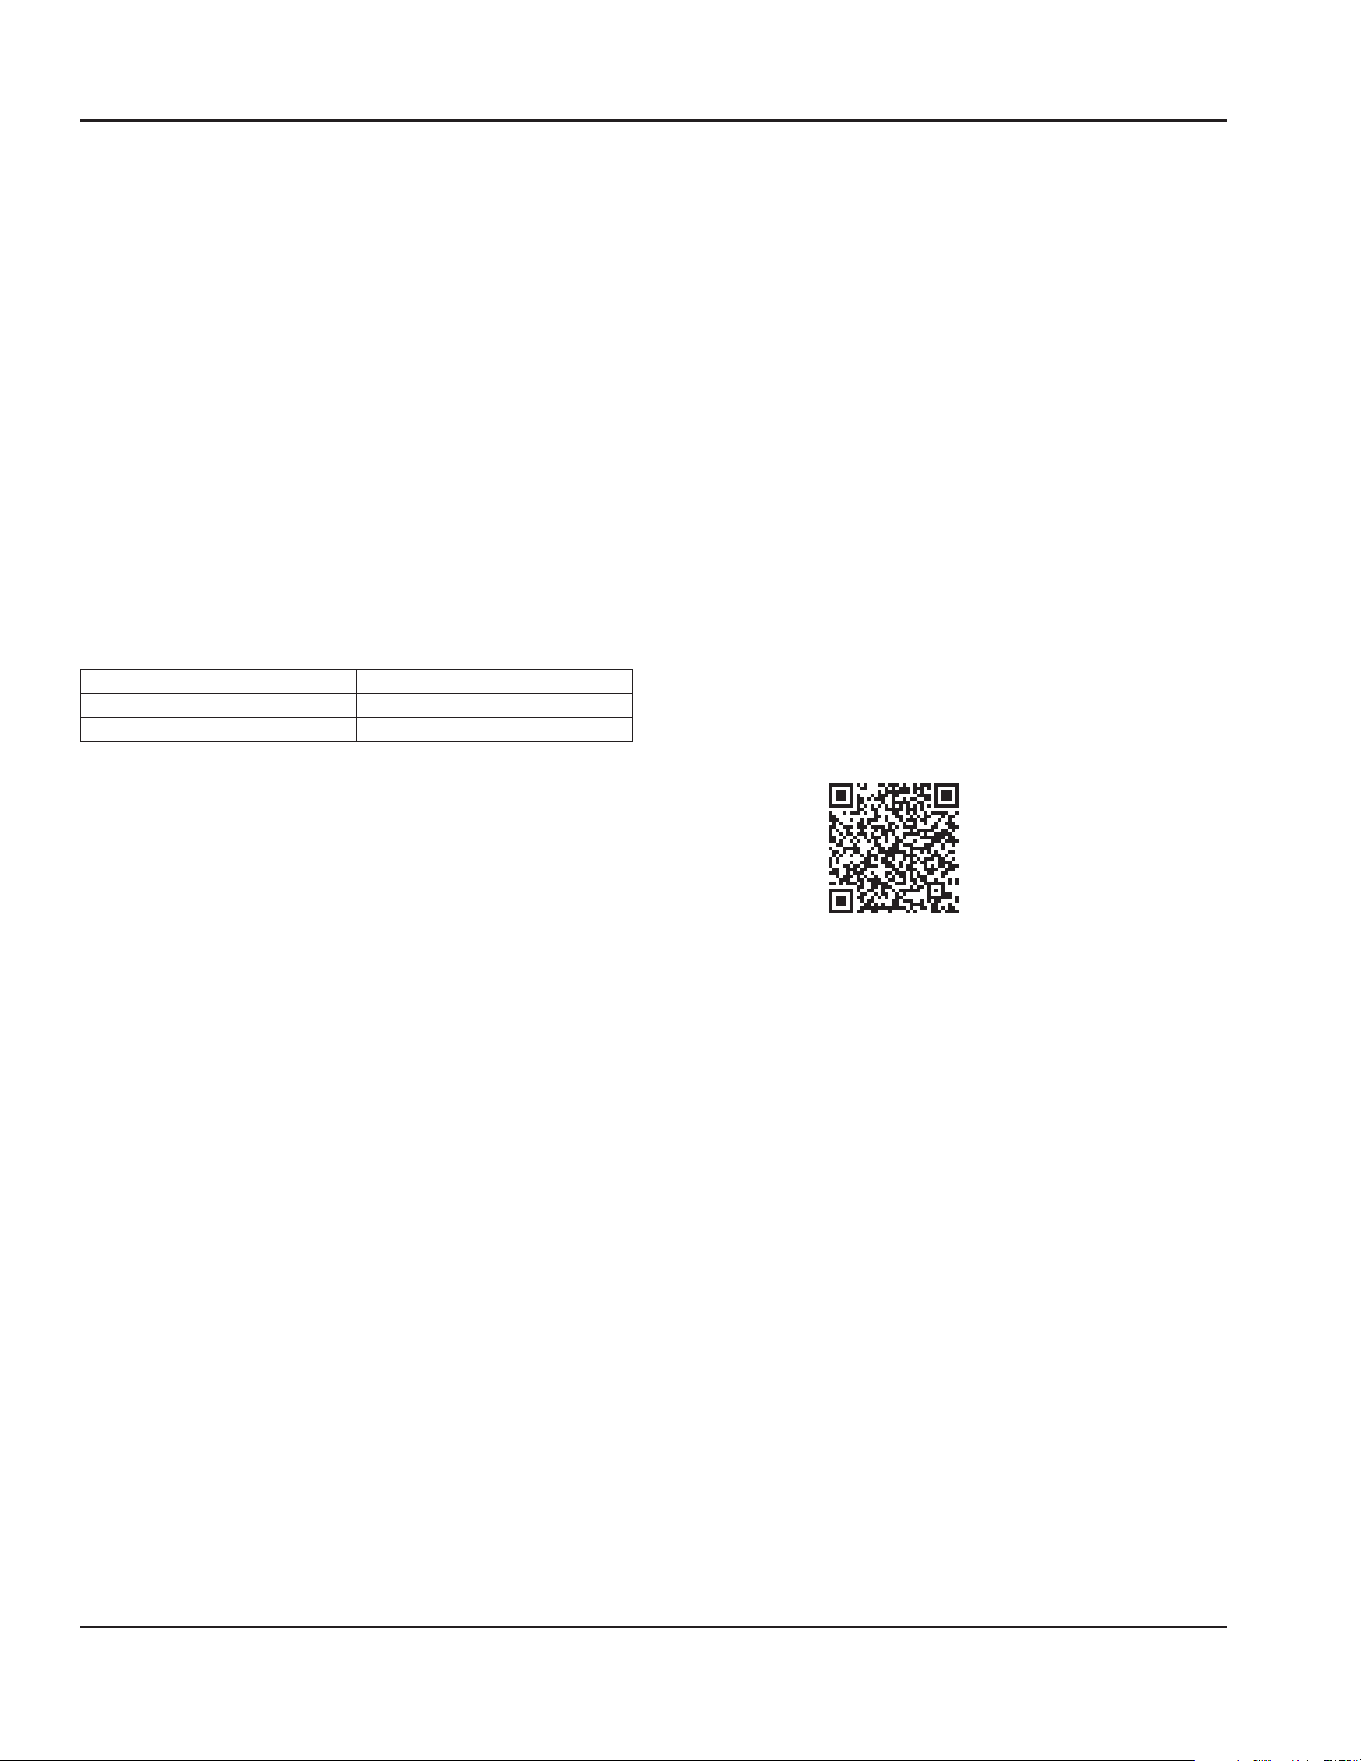
Model Numbers
This manual covers the following models:
Self-Contained
Air-Cooled
Self-Contained
Water-Cooled
KDP0150A --
KYP0150A --
KDP0250A --
KYP0250A --
SHIPPING WEIGHT
Model Family Shipping Weight
KP0150 153 lbs (69 kg)
KP0250 160 lbs (73 kg)
Machine Preparation
• Before moving the unit into position, secure the door
closed and protect any finished flooring.
• Remove and recycle packing materials. Do not discard
any hardware.
• Use an appliance dolly to move the unit near the
opening.
NOTE: If the unit has been on its back or side, it must stand
upright for a minimum of 24 hours before connecting
power.
HOW TO READ A MODEL NUMBER
Ice type
D-Dice
Y-Half-dice
Norninal production
@70/50
0150-Produces~150#/day
0250-Produces~250#/day
Refrigerant type
P-R290(propane)
K D P 0 1 5 0 A - 161 B
Ice machine series
K-K Series
Condenser type
A----Air Cooled
W----Water Cooled
Electrical configuration
161-115/60/1
Power cord option
Blank-Junction Box
B-NEMA plug(USA)
NOTE: These products are hermetically sealed and contain R290 gas.
Section 1
General Information
11 Part Number: 040010062 Ver00 11/25
General Information Section 1
Accessories
Contact your Koolaire distributor for replacement parts for
accessories.
BIN CASTER
Replaces standard legs.
ARCTIC PURE WATER FILTER SYSTEM
Engineered specifically for Koolaire ice machines,
Arctic Pure water filters are an efficient, dependable, and
affordable method of inhibiting scale formation, filtering
sediment, and removing chlorine taste and odor.
MANITOWOC DE-SCALER AND SANITIZER
Manitowoc Ice Machine de-scaler and Sanitizer are available
in convenient 16 oz. (473 ml) and 1 gal (3.78 l) bottles.
These are the only solutions approved for use with Koolaire
products.
De-scaler PN. Sanitizer PN.
16 oz. 9405463 16 oz. 9405653
1 gal. 9405803 1 gal. 9405813
LUMINICE®
The LuminIce™ growth inhibitor recirculates the air in the
ice machine foodzone over a UV bulb. This process will
inhibit the growth of common micro-organisms on all
exposed foodzone surfaces.
Replacement Luminice II Bulb: K00528
(includes bulb & additional instructions).
NOTE: LuminIce® bulbs require replacement on a yearly
basis.
Cleanup Procedure for Accidental Bulb Breakage
The cleanup procedure is identical to the procedure used
to clean up compact fluorescent (CFL) or fluorescent tube
lights. These lights contain a small amount of mercury
sealed within a glass tube. Breaking these types of lights
will release mercury and mercury vapor. The broken bulb
can continue to release mercury vapor until it is cleaned up
and removed.
The latest EPA procedures can be viewed on their website at
www.epa.gov/cfl/cflcleanup.html.
Warranty
For warranty information visit:
www.manitowocice.com/Service/Warranty
• Warranty Coverage Information
• Warranty Registration
• Warranty Verification
Warranty coverage begins the day the ice machine is
installed.
WARRANTY REGISTRATION
Completing the warranty registration process is a quick and
easy way to protect your investment.
Scan the QR code with your smart device or enter the link in
a web browser to complete your warranty registration.
WWW.MANITOWOCICE.COM/SERVICE/WARRANTY#WARRANTY-
REGISTRATION
Registering your product insures warranty coverage and
streamlines the process if any warranty work is required.
To obtain a printed copy of warranty terms, please contact Manitowoc Ice at
800-545-5720.
Part Number: 040010062 Ver00 11/25 12
Location of Ice Machine
The location selected for the ice machine must meet the
following criteria. If any of these criteria are not met, select
another location.
• The location must be indoors.
• The location must be free of airborne and other
contaminants.
• The air temperature must be at least 40°F (4°C), but
must not exceed 100°F (38°C).
• The location must not be near heat-generating
equipment or in direct sunlight and protected from
weather..
• The location must be capable of supporting the weight
of the ice machine and a full bin of ice.
• The location must allow enough clearance for water,
drain and electrical connections in the rear of the ice
machine.
• The location must not obstruct airflow through or
around the ice machine (condenser airflow is in and
out the front). Refer to the chart below for clearance
requirements.
• The location must not be near garbage or other
contaminants.
• Minimum room size required, refer to ice machine label.
• The ice machine must use legs or be sealed to the floor.
Before sealing to the floor, the rubber bumpers on the
bottom of the ice machine must be removed.
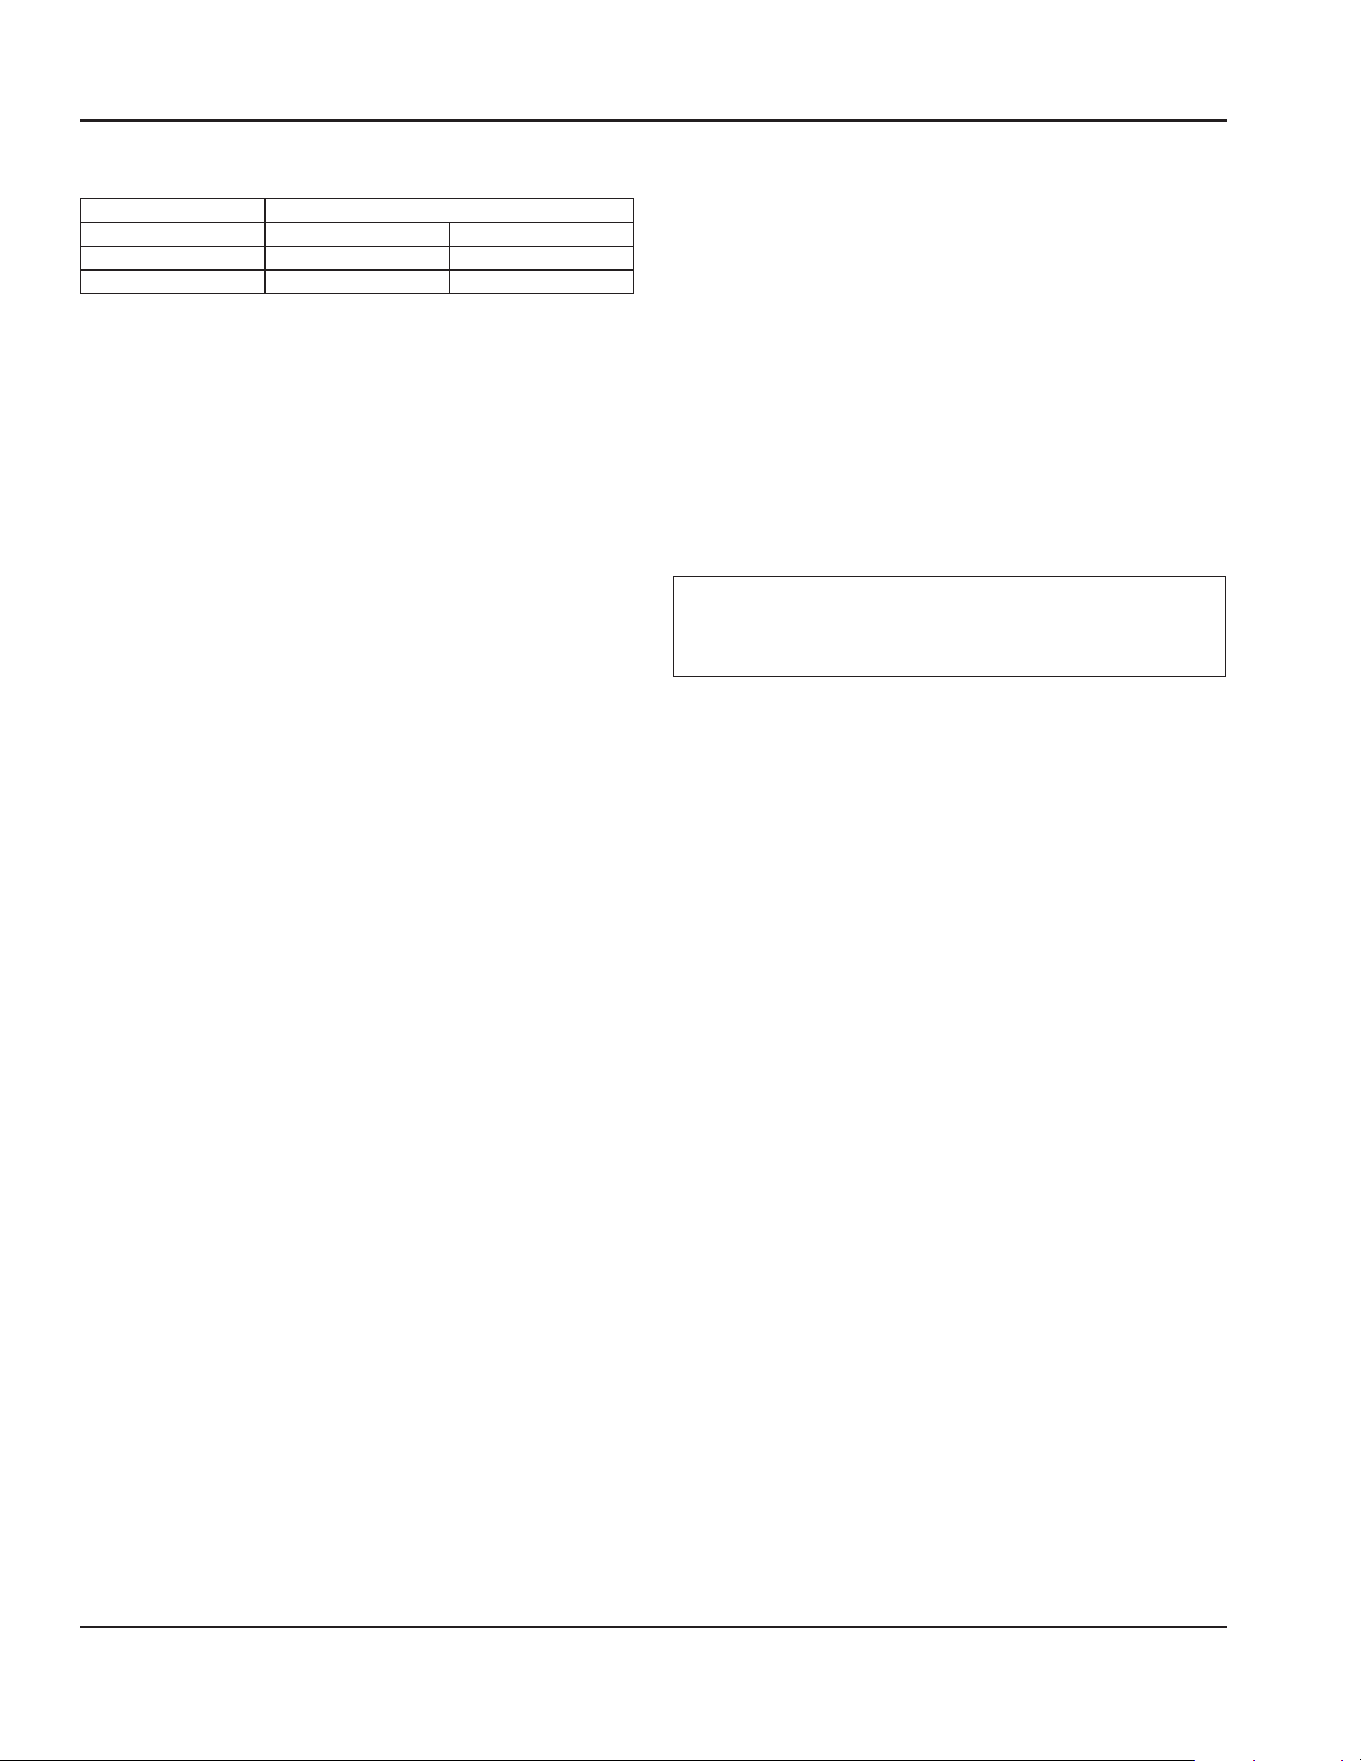
Location
Self-Contained
Air-Cooled
Self-Contained
Water-Cooled
Top/Sides 5 (127 mm) 5 (127 mm)
Back 5 (127 mm) 5 (127 mm)
NOTE: The ice machine may be built into a cabinet. There
is no minimum clearance requirement for the top or left
and right sides of the ice machine. The listed values are
recommended for efficient operation and servicing only.
Installation Requirements
• The ice machine must be level.
• Vent the ice machine and bin drains separately.
• Bin drain termination must have an air gap.
• The ice machine and bin must be de-scaled and
sanitized after installation.
• The drain line must contain a union or other suitable
means of disconnection at the ice machine.
• The water inlet and electrical connection must contain a
service loop to allow future access.
• The location must not allow exhaust fan heat and/or
grease to enter the condenser.
Minimum Cut-Out For Built-In Installations
The ice machine may be built into a cabinet. If built into a
cabinet, ice machine must be removable for de-scaling and
sanitizing procedures.
Cut-Out Dimensions K150/K250
Width
31.0” (79 cm)
Depth
33.5” (85 cm)
Height
43.5” (111 cm)
Section 2
Installation
13 Part Number: 040010062 Ver00 11/25
Installation Section 2
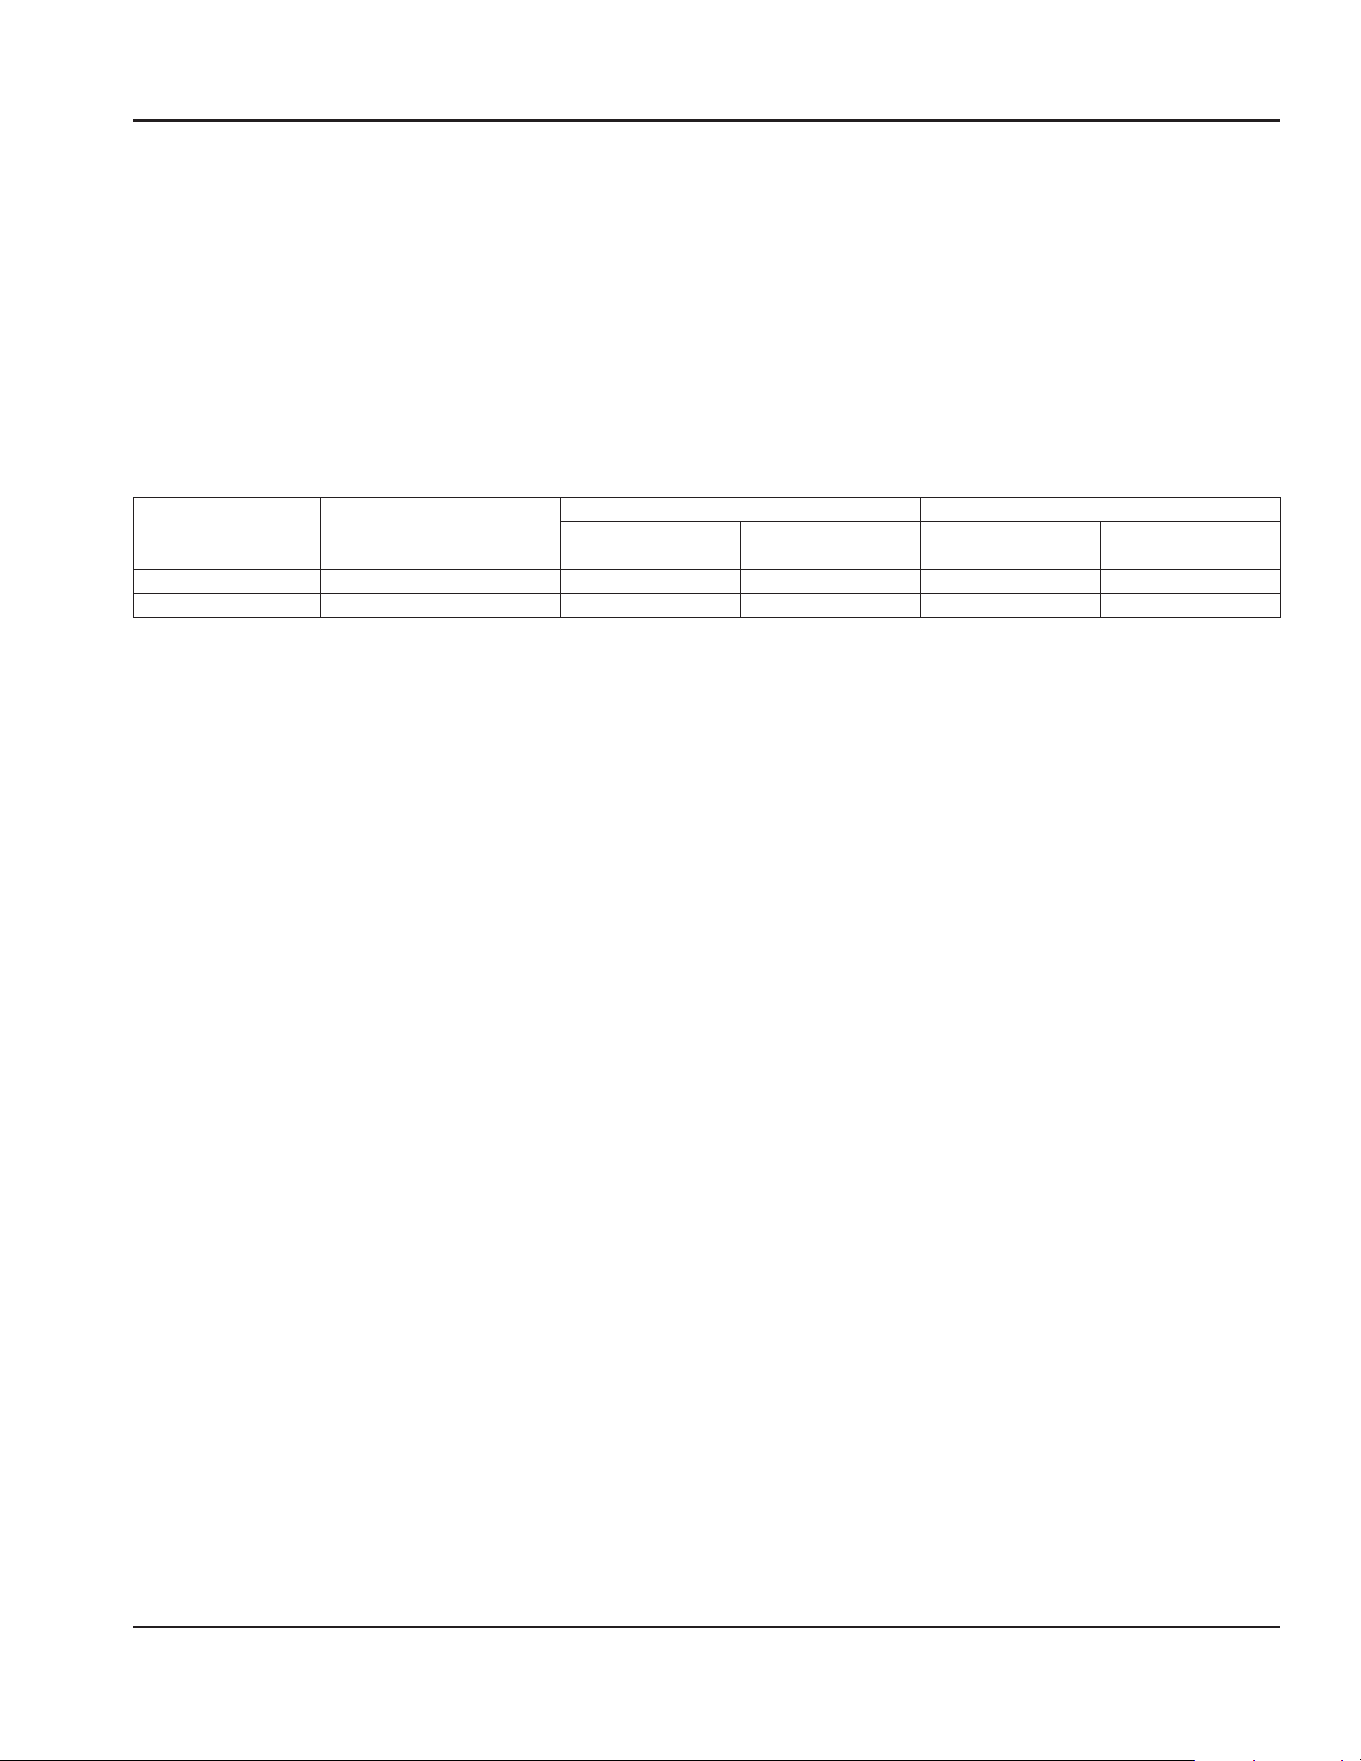
Heat of Rejection
Series Ice Machine Heat of Rejection*
Ice Machine Air Conditioning** Peak
KP150 2400 2900
KP250 2800 3300
* B.T.U./Hour
** Because the heat of rejection varies during the ice
making cycle, the figure shown is an average.
Ice machines, like other refrigeration equipment, reject
heat through the condenser. It is helpful to know the
amount of heat rejected by the ice machine when sizing air
conditioning equipment where self-contained air-cooled
ice machines are installed.
LEVELING THE ICE MACHINE
1. Screw the leveling legs onto the bottom of the ice
machine.
2. Screw the foot of each leg in as far as possible.
3. Move the ice machine into its final position.
4. Level the ice machine by using a level on top of the ice
machine. Turn each foot as necessary to level the ice
machine from front to back and side to side.
Electrical Service
ELECTRICAL REQUIREMENTS
All electrical work, including wire routing and grounding,
must conform to local, state and national electrical codes.
The following precautions must be observed:
• The ice machine must be grounded.
• A separate fuse/circuit breaker
(dedicated circuit) must be provided for each ice
machine.
• A qualified electrician must determine proper wire size
dependent upon location, materials used and length
of run (minimum circuit ampacity can be used to help
select the wire size).
n
Warning
All wiring must conform to local, state and national
codes.
VOLTAGE
The maximum allowable voltage variation is ±10% of the
rated voltage on the ice machine model/serial number
plate at start-up (when the electrical load is highest).
The 115/1/60 ice machines are factory pre-wired with an 8'
power cord and NEMA 5-15P-plug configuration.
The 208-230/1/60 and 230/50/1 ice machines are factory
pre-wired with an 8' power cord only, no plug is supplied.
FUSE/CIRCUIT BREAKER
A separate electrical disconnect, which disconnects all
poles and has 1/8” (3 mm) contact separation, must be
provided for fixed wiring. Circuit breakers must be H.A.C.R.
rated in USA.
Part Number: 040010062 Ver00 11/25 14
Section 2 Installation
TOTAL CIRCUIT AMPACITY
The total circuit ampacity is used to help select the wire size
of the electrical supply.
The wire size (or gauge) is also dependent upon location,
materials used, length of run, etc., so it must be determined
by a qualified electrician.
GROUND FAULT CIRCUIT INTERRUPTER
We do not recommend the use of a
GFCI/GFI circuit protection with our equipment. If a GFCI/
GFI is required by code, use a GFCI/GFI breaker rather than
an outlet, which is more prone to intermittent nuisance
trips than panel circuit breakers.
MAXIMUM BREAKER SIZE & TOTAL AMPERAGE CHART
NOTE: Due to continuous product improvements, this information is for reference only. Please refer to the ice machine data
plate to verify electrical data. Model/Serial tag information overrides information listed on this page.
Ice Machine Voltage Phase Cycle
Air-Cooled Water-Cooled
Maximum Fuse/
Circuit Breaker
Total Amps
Maximum Fuse/
Circuit Breaker
Total Amps
KP150 115/1/60 15 5.0 – –
KP250 115/1/60 15 7.0 15 6.0

15 Part Number: 040010062 Ver00 11/25
Installation Section 2
Water Supply and Drain Line Requirements
WATER CONNECTIONS
• Local water conditions may require treatment of the
water to inhibit scale formation, filter sediment, and
remove chlorine odor and taste.
• All water and drains must conform to all applicable
codes of the authority having jurisdiction. It is the
responsibility of the end user to satisfy all local codes.
• Connect ice making water inlet to potable water only.
• Install a water shut-off valve for potable water and water
cooled condenser lines.
• Do not connect the ice machine to a hot water supply.
Verify hot water restrictors installed on other equipment
are functioning correctly. (Check valves on sink, faucets,
dishwashers, etc.)
• Install a water regulating valve if water pressure exceeds
the maximum valve rating.
• Insulate water and drain lines to prevent condensation.
DRAIN CONNECTIONS
Follow these guidelines when installing drain lines to
prevent drain water from flowing back into the ice machine
and storage bin:
• Drain lines must have a 1.5 inch drop per 5 feet (2.5 cm
per meter) of run and must not create traps.
• The floor drain must be large enough to accommodate
drainage from all drains.
• Run separate bin and ice machine drain lines. Insulate
them to prevent condensation.
• Install a tee at the ice making water drain outlet and
install an 8.0” (20 cm) vent above the ice making water
drain line.
• Drain termination must have an air gap that meets local
code.
WATER SUPPLY
Local water conditions may require treatment of the water
to inhibit scale formation, filter sediment, remove chlorine,
and improve taste and clarity.
WATER INLET LINES
Follow these guidelines to install water inlet lines:
• Do not connect the ice machine to a hot water supply.
Be sure all hot water restrictors installed for other
equipment are working. (Check valves on sink faucets,
dishwashers, etc.)
• If water pressure exceeds the maximum (80 psig-
551.5kPa) recommended pressure, obtain a water
pressure regulator from your Manitowoc distributor.
• Install a water shut-off valve and union for both the
ice-making and condenser water lines.
• Insulate water inlet lines to prevent condensation..
COOLING TOWER APPLICATIONS
(Water-Cooled Models)
A water cooling tower installation does not require
modification of the ice machine. The water regulator valve
for the condenser continues to control the refrigeration
discharge pressure.
It is necessary to know the amount of heat rejection and
the pressure drop through the condenser and water valves
(inlet and outlet) when using a cooling tower on an ice
machine.
• Water entering the condenser must not exceed 90°F
(32°C).
• Water flow through the condenser must not exceed 5
gallons (19 liters) per minute.
• Allow for a pressure drop of 7 psi (48 kPa) between the
condenser water inlet and the outlet of the ice machine.
• Water exiting the condenser must not exceed 110°F
(43°C).
Part Number: 040010062 Ver00 11/25 16
Section 2 Installation
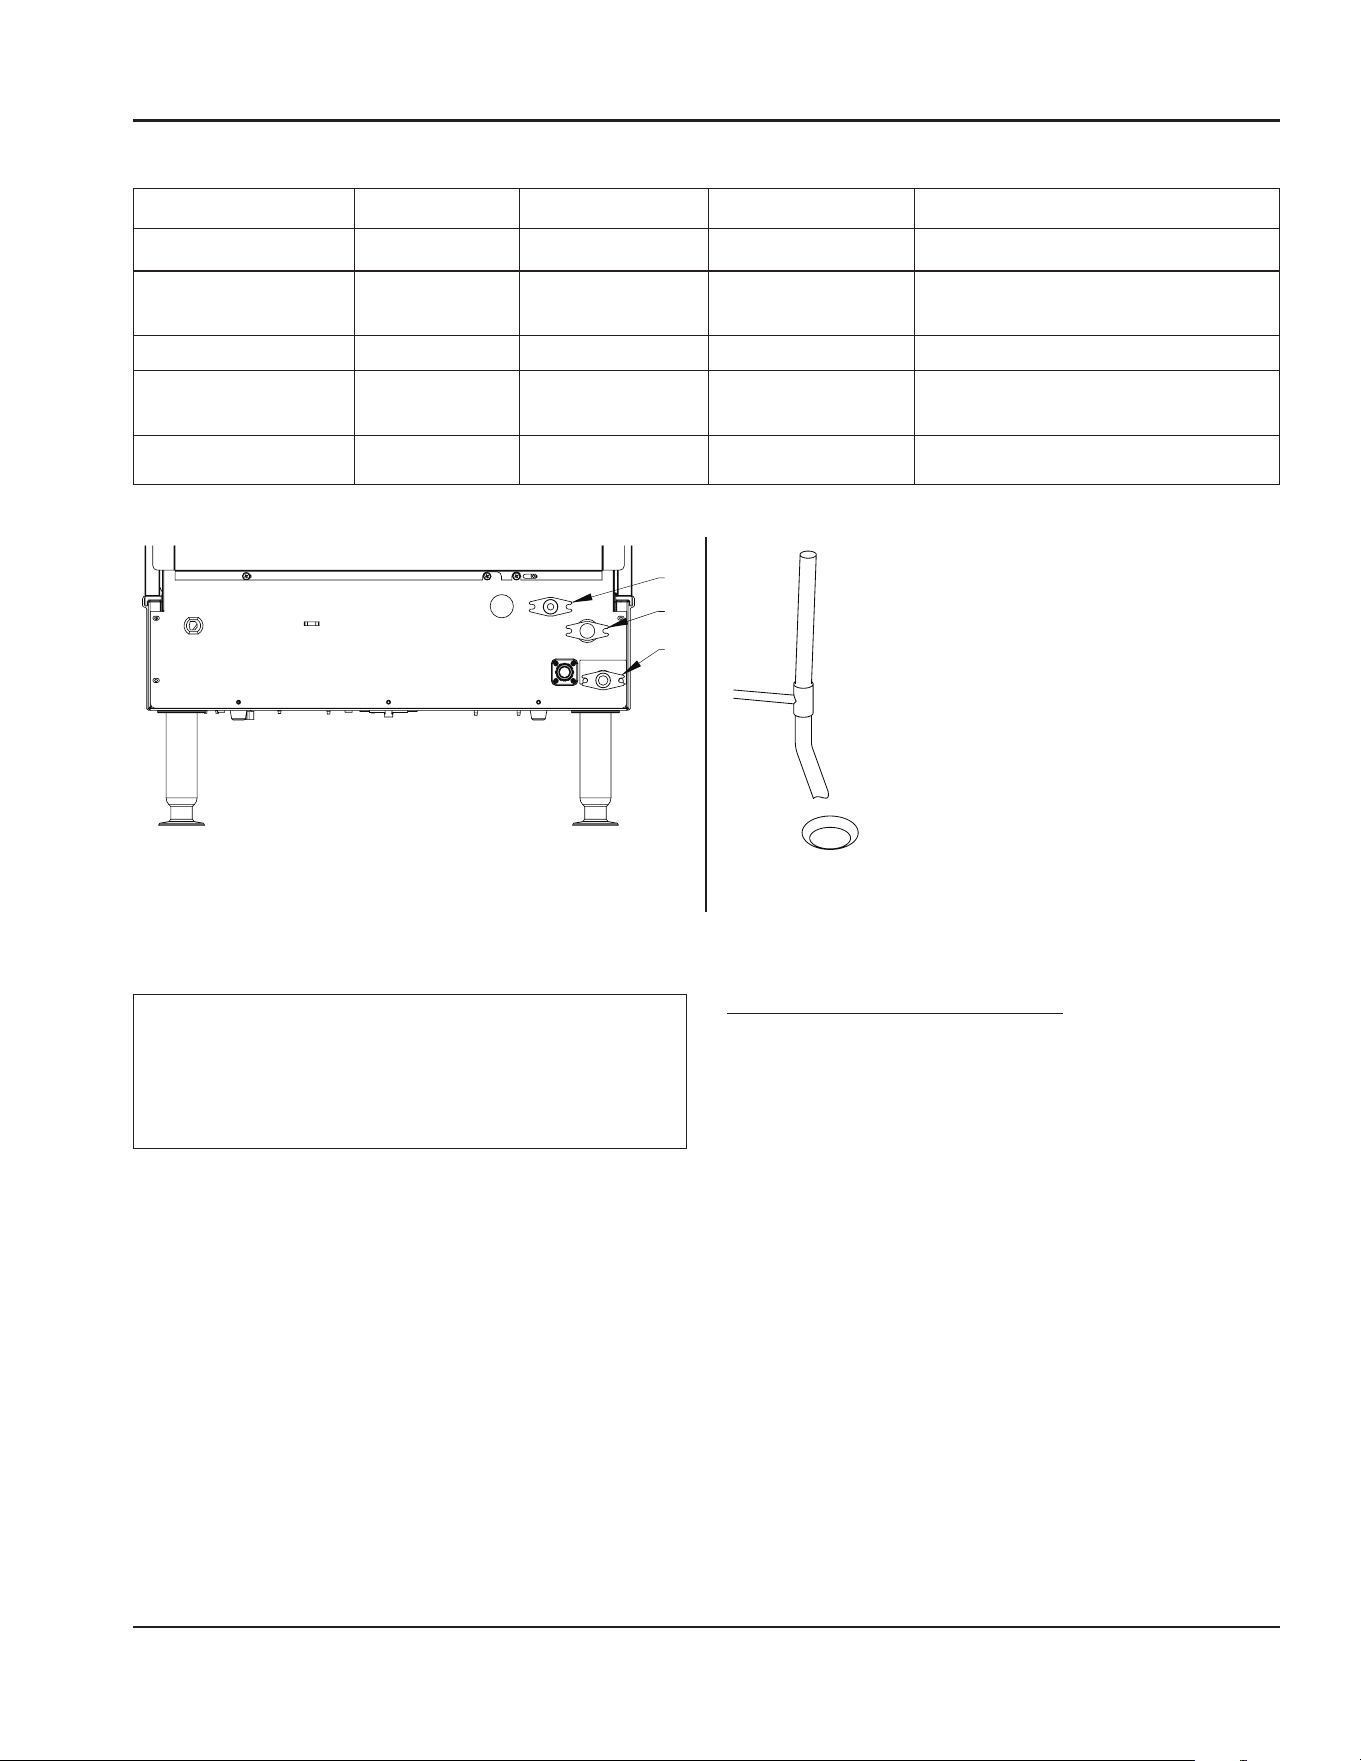
WATER SUPPLY & DRAIN LINE SIZING CONNECTIONS
Location Water Temperature Water Pressure Ice Machine Fitting Tubing Size Up To The Ice Machine Fitting
A=Ice Making Water Inlet
40°F (4°C) Min.
90°F (32°C) Max.
20 psi (137.9 kPa) Min.
80 psi (551.5 kPa) Max.
3/8 Female Pipe Thread 3/8 (9.5 mm) minimum inside diameter
B=Ice Making Water Outlet --- --- 1/2 Female Pipe Thread 1/2 (12.7 mm) minimum inside diameter
C=Bin Drain --- --- 1/2 Female Pipe Thread 1/2 (12.7 mm) minimum inside diameter
D=Condenser Water Inlet
40°F (4°C) Min.
90°F (32°C) Max.
20 psi (137.9 kPa) Min.
150 psi (1034.2 kPa) Max
3/8 Female Pipe Thread 3/8 (9.5 mm) minimum inside diameter
E=Condenser Water Drain --- --- 1/2 Female Pipe Thread 1/2 (12.7 mm) minimum inside diameter
Min.=Minimum, Max.=Maximum
%
"
#
&
$
KP0150/KP0250
Floor Drain - Open and Vent 8” (20cm)
Above B = Ice Making Water Drain Outlet
Water Supply & Drain Locations
,
Caution
Do not apply heat to water inlet valve or water drain
fittings. Heating will damage the nonmetallic connector.
Do not over tighten fittings. Two turns after hand tight is
the maximum.
INSTALLATION NOTE(SWITZERLAND)
The connection to the drinking water network must
be made with a certified backflow preventer type EA
(EN13959) and with a certified connection hose (EN13618
or EN61770) on site.
17 Part Number: 040010062 Ver00 11/25
Installation Section 2
Ice Thickness Adjustment
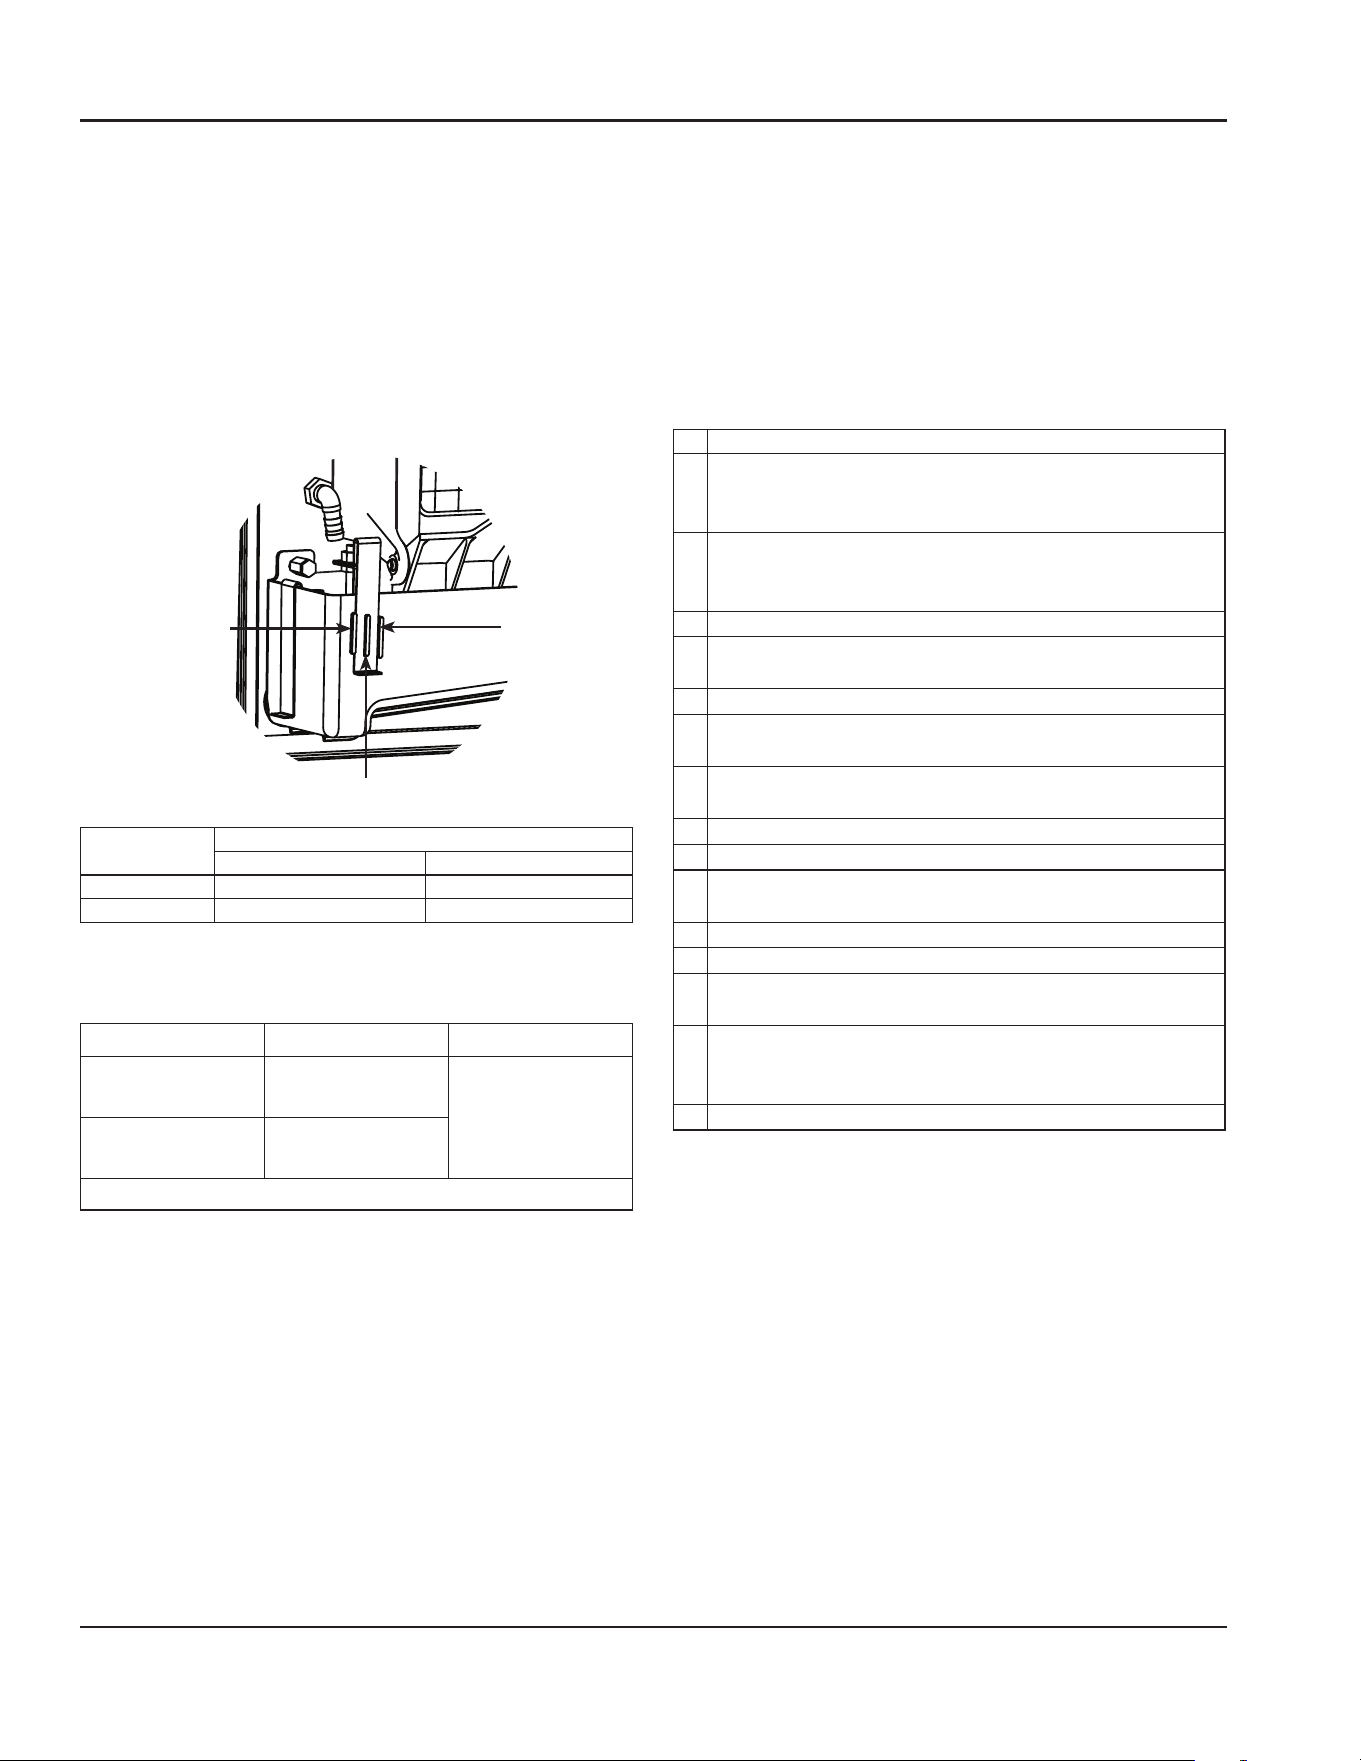
The ice thickness can be adjusted to three levels.
1. Pull forward on the bottom of the bracket until clear of
the tab.
2. Slide the bracket over the desired tab and release.
• The center position is the normal factory setting.
• To increase bridge thickness, raise the water level.
• To decrease bridge thickness, lower the water level.
Thicker Bridge
Thinner Bridge
Factory Default Location
Model
Total ice weight from one cycle
Minimum - Maximum Minimum - Maximum
KP150 1.13 - 1.36 lbs 513 - 617 grams
KP250 2.26 - 2.93 lbs 1025 - 1329 grams
Refrigerant Charge
Model Amount Type
KP150
4.9 OZ
140 g
R290
KP250
5.3 OZ
150 g
*Model/serial tag information overrides all data listed in this chart.
Starting the Ice Machine
Starting the ice machine and completing the Operational
Checks are the responsibilities of the owner/operator.
Adjustments and maintenance procedures outlined in this
manual are not covered by the warranty.
The ice machine and bin must be sanitized prior to
operation.
INSTALLATION CHECKLIST
√ Checklist Item
Has the ice machine been installed where ambient
temperatures will remain in the range of 40° – 100°F
(4° – 38°C)?
Has the ice machine been installed where the
incoming water temperature will remain in the range
of 40° – 90°F (4° – 32°C)?
Has all of the internal packing been removed?
Is there proper clearance around the ice machine for
air circulation?
Is the ice machine level?
Are all electrical leads free from contact with
refrigeration lines and moving equipment?
Has the supply voltage been tested and checked
against the rating on the nameplate?
Are all electrical and water connections complete?
Is the ice machine grounded and polarity correct?
Is there a separate drain for the water-cooled
condenser?
Is there a separate vented drain for the bin?
Has the On/Off button been pressed?
Has the owner/operator completed the warranty
registration card?
Has the owner/operator been instructed regarding
maintenance and the use of Manitowoc De-scaler and
Sanitizer?
Has the ice machine and bin been sanitized?
Part Number: 040010062 Ver00 11/25 18
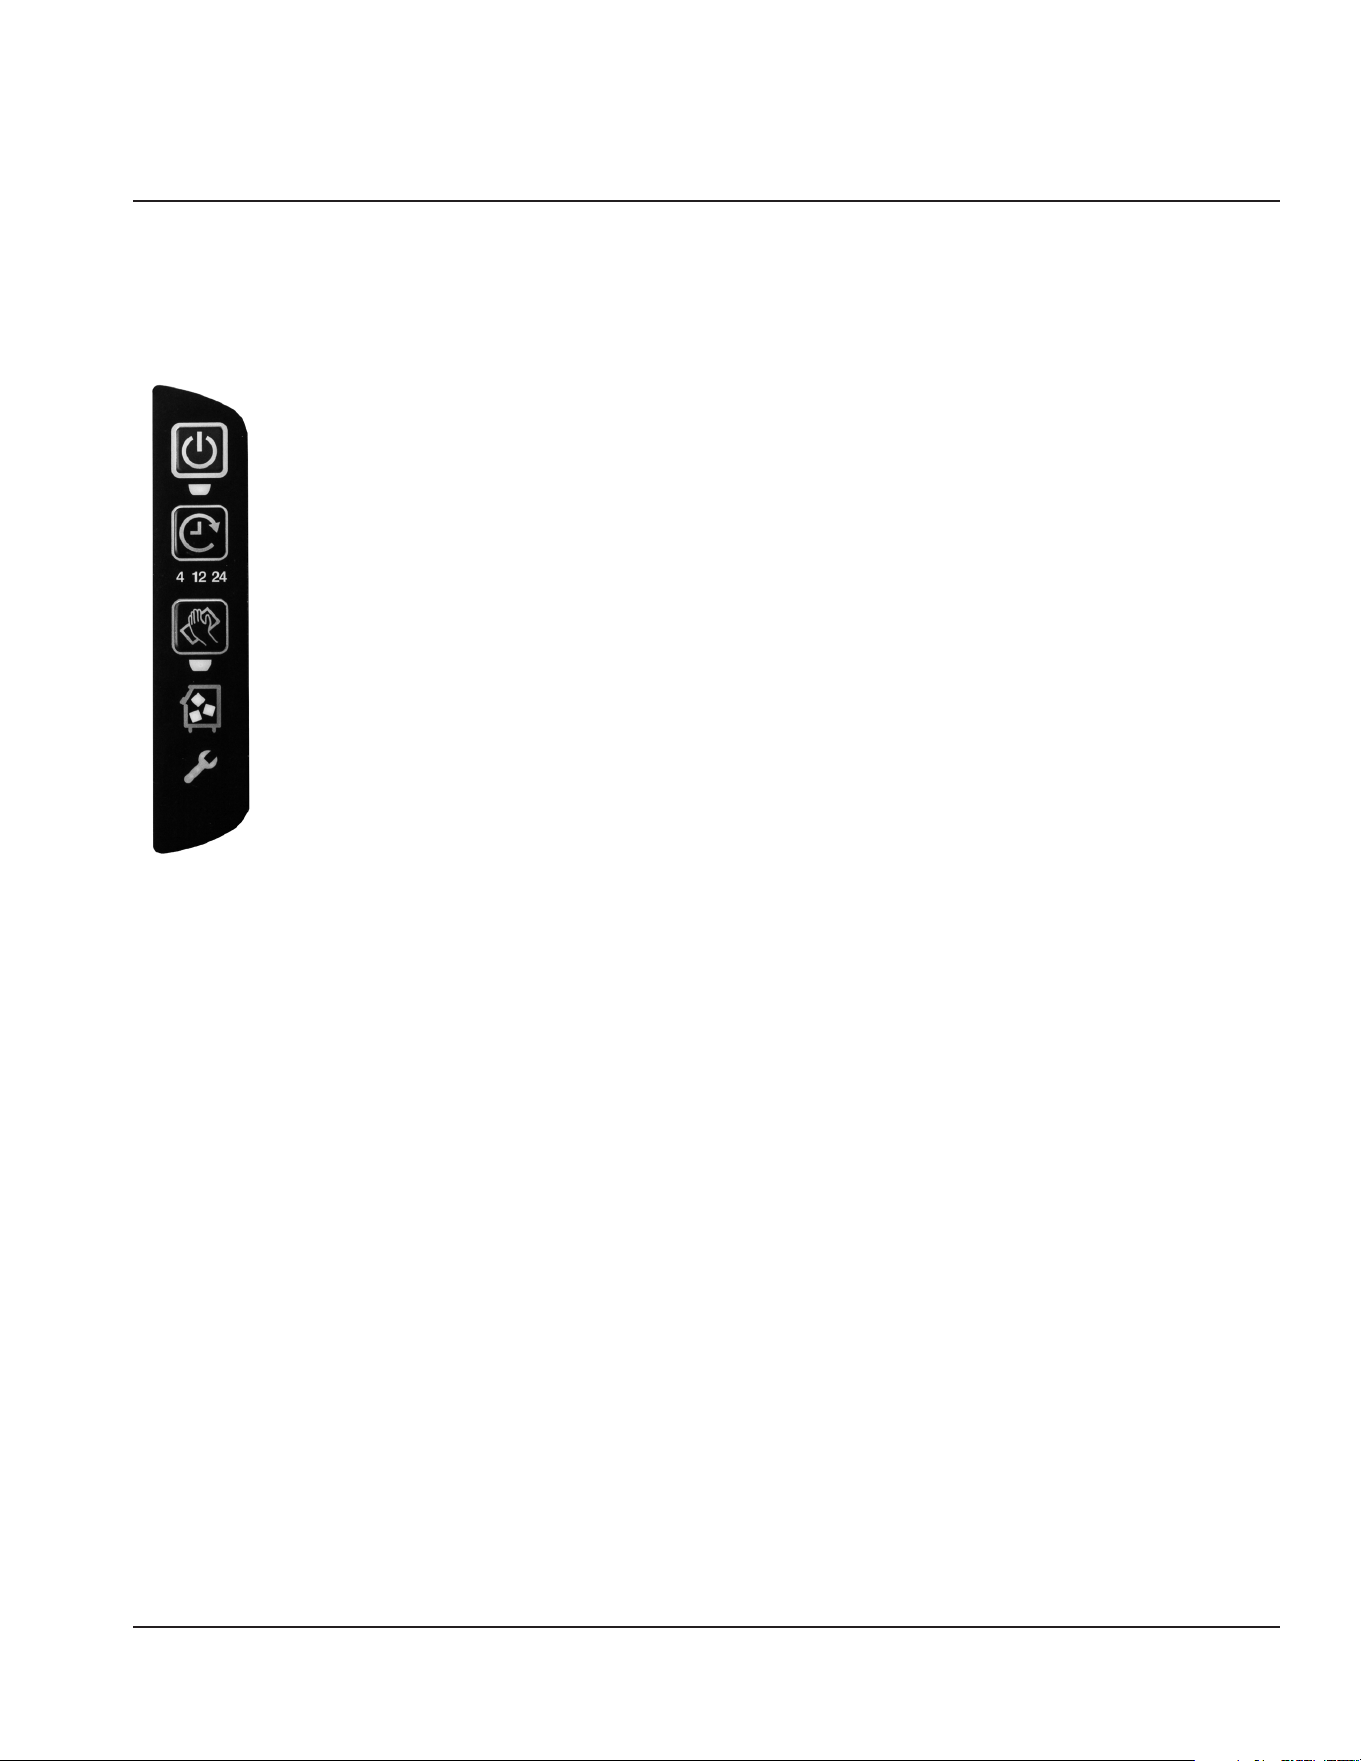
Touch Pad Features
The touch pad offers a series of pressure sensitive buttons
to control ice machine operation and provide operational
status.
On/Off - Blue = Machine Is On
Off = Machine Is Off
Delay - Blue = Delay Mode Is On
Off = Delay Mode Is Off
Clean - Yellow = Clean Cycle Is On
Off = Cleaning Is Off
Flashing = Cleaning Is Paused
Bin Full - Blue = Bin Is Full
Off = Bin Is Not Full
Service - Red = Service Limit
Off = Doesn’t Need Service
NOTE: Touch pad is to be activated with finger tips only. Do
not disassemble touch pad.
ON/OFF BUTTON
The On/Off button is used to start and stop ice making.
• Pressing the On/Off button for 3 seconds will power off
the unit.
The blue light indicates whether the ice machine is Ice
Making (light on) or Off (light off).
NOTE: If ice is on the evaporator (during the freeze or
harvest cycle) and the On/Off button is pressed, the next
cycle will have a thick slab of ice. Press the On/Off button
and allow the ice to melt off the evaporator, then start a
new freeze cycle.
DELAY BUTTON
Pressing the Delay button will start a delay period. The ice
machine will finish the freeze and harvest cycle and then
start the delay period.
• Pressing the button once will start a 4 hour delay period.
• Pressing the button twice will start a 12 hour delay
period.
• Pressing the button three times will start a 24 hour
delay period.
• Pressing the button four times will cancel the delay
periods.
NOTE: The delay period will be canceled if power is
interrupted to the ice machine. When power is restored, the
ice machine will remain Off.
CLEAN BUTTON
Pressing the Clean button for 3 seconds with the machine
off will start a clean cycle. After the clean cycle is complete,
the ice machine will automatically start an ice making cycle.
• Pressing the Clean button again within 45 seconds of
the clean cycle starting will abort the clean cycle.
• Pressing the On/Off button anytime during the clean
cycle will de-energize the On/Off LED and the ice
machine will stop after the clean cycle is complete.
• Pressing the Clean button will pause the clean cycle.
The On/Off and Clean lights will flash on/off to indicate
pause mode. Pressing the Clean button again will
continue the clean cycle from the point of interruption.
NOTE: Opening the ice damper for 30 seconds will cancel
the clean cycle.
BIN FULLICON
The Bin Full light energizes when the bin is full or is de-
energized if the bin is not full.
SERVICE ICON
The Service light indicates the machine needs attention.
Refer to Section 5 for more information if this light is
energized.
Section 3
Operation

19 Part Number: 040010062 Ver00 11/25
Operation Section 3
Ice Making Sequence of Operation
NOTE: The On/Off button must be powered On - light blue
and the ice damper must be closed before the ice machine
will start.
Water Purge Cycle
The ice machine purges any remaining water from the
water trough down the drain.
Freeze Cycle
Prechill - The refrigeration system chills the evaporator
before water flow over the evaporator starts. The water inlet
valve energizes during the pre-chill and remains on until
the ice thickness float switch is satisfied.
Freeze - With water trough thermistor , the following
sequence occurs in the frezze cycle:
• When the water temperature reaches 34°F, the water
pump will de-energize for 25 seconds, then re-
energizes.
• When the water pump restarts the water inlet solenoid
energizes for 7 seconds.
• Water flowing across the evaporator will start to freeze
and build ice on the evaporator. After a sheet of ice
has formed, the harvest float switch signals the control
board to start a harvest cycle.
Harvest Cycle
Every fourth cycle, any remaining wateris purged down
the drain as refrigerant gas warms the evaporator. When
the evaporator warms, the sheet of cubes slides off the
evaporator and into the storage bin. If all cubes fall clear of
the ice damper, the ice machine starts another freeze cycle.
Full Bin Cycle
If the ice damper is held open by ice cubes, the ice machine
shuts off. When the ice damper closes, the ice machine
starts a new cycle at the water purge.
Optional Cycle Bypass - Water Purge
To bypass this feature and purge every harvest cycle:
1. Press & hold the Clean button for 3 seconds while in
the ice making cycle.
2. Press the Delay button.
3. The Service light will flash red, 5 times to indicate
bypass. The machine will purge water every cycle.
4. Repeat steps to reinstate fourth cycle -water purge.
5. The Service light will flash red, 6 times to indicate
fourth cycle - water purge.
NOTE: Bypassing the Water Purge will increase water usage.
Control Board Timers
The control board has the following non-adjustable timers:
• The ice machine is locked into the freeze cycle for 6
minutes before a harvest cycle can be initiated.
• The maximum freeze time is 45 minutes, at which time
the control board automatically initiates a harvest
sequence.
• The maximum harvest time is 7 minutes. When harvest
is complete the control board automatically initiates a
freeze sequence.
• If the ice damper does not open and close within
the 7 minute harvest cycle, the ice machine enters
a water thaw cycle for 170 seconds. If the damper
does not open and close within the 170 second thaw
cycle, a second thaw cycle starts. The control board
automatically initiates a freeze sequence when the thaw
cycle(s) is complete.
SERVICE LIMITS
Service limits are stored and indicated by the control board.
The number of cycles required to stop the ice machine
varies for each service limit.
Service limits can be reset by pressing the On/Off button
and starting a new ice making cycle.
A service limit is indicated by an energized Service Light
on the touch pad. Refer to Section 5 if you receive a service
limit indication.
• Service Limit 1 - If the freeze time reaches 45 minutes,
the control board automatically initiates a harvest cycle.
After 6 consecutive 45-minute freeze cycles occur, the
ice machine stops.
• Service Limit 2 - If the harvest time reaches 3.5 minutes,
the control board automatically energizes the water
pump and extends the harvest cycle another 3.5
minutes (7 minutes total). If the ice damper does not
open and close within the 7 minute harvest cycle, the
ice machine enters a water thaw cycle for 170 seconds.
If the damper does not open and close within the
170second thaw cycle, a second thaw cycle starts. The
control board automatically initiates a freeze sequence
when the thaw cycle(s) is complete. If 3 consecutive
7minute harvest and thaw cycles occur, the ice machine
stops.
• Service Limit 3 - If the freeze time reaches 4 minutes
and water is not sensed, the ice machine stops and
initiates a 30 minute delay period. The ice machine will
automatically restart at the end of the 30 minute delay
period. If 100 consecutive failures occur, the ice machine
stops.
Part Number: 040010062 Ver00 11/25 20
De-scaling and Sanitizing
GENERAL
De-scale and sanitize the ice machine every six months
for efficient operation. If the ice machine requires more
frequent de-scaling, consult a qualified service company to
test the water quality and recommend appropriate water
treatment. An Extremely dirty ice machine must be taken
apart for de-scaling and sanitaizing.
Sanitizing for Exterior, Remedial, and Detailed procedures
can be performed independently and more frequently than
de-scaling when needed.
,
Caution
Use only Koolaire approved Ice Machine De-scaler and
Sanitizer. Using a non Manitowoc de-scaler or sanitizer
may result in bodily harm and/or cause damage to the
ice machine that is not covered under the warranty. Do
not use de-scaler or sanitizer quantities that exceed the
amounts listed in this manual. Do not use these solutions
in a manner inconsistent with their labeling. Read and
understand all labels printed on bottles before use.
DETAILED DE‑SCALING/SANITIZING PROCEDURE
This procedure must be performed a minimum of once
every six months.
• The ice machine and bin must be disassembled
de-scaled and sanitized.
• All ice produced during the de-scaling and sanitizing
procedures must be discarded.
REMEDIAL DE‑SCALING PROCEDURE
• This procedure de-scales all components in the water
flow path, and is used between the bi-yearly detailed
de-scaling and sanitizing procedure.
Detailed De-scaling and Sanitizing Procedure
Ice machine de-scaler is used to remove lime scale and
mineral deposits.
Ice machine sanitizer disinfects and removes algae and
slime.
Touch Pad Operation
Pressing and holding the Clean button for 3 seconds starts
the clean cycle. The Clean and On/Off lights energize
indicating the clean cycle has started and ice making will
automatically start when the clean cycle is complete.
• Setting the ice machine to stop after the clean cycle:
Press the On/Off button. The On/Off light will de-
energize, indicating the ice machine will stop after the
clean cycle.
• Pausing the clean cycle: Press the Clean button. The
clean light will flash indicating the clean cycle has
paused. Pressing the Clean button again will restart the
clean cycle.
NOTE: If the ice damper is open for 2 seconds, the clean
cycle will pause. If the damper is open for 30 seconds,
the clean cycle will be canceled.
DE‑SCALING PROCEDURE
Step 1 Open the bin door to access the evaporator
compartment. Ice must not be on the evaporator during
the de-scaling/sanitize cycle. Follow one of the methods
below:
• Press the On/Off button for 3 seconds at the end of a
harvest cycle after ice falls from the evaporator.
• Press the On/Off button for 3 seconds and allow the ice
to melt.
Step 2 Remove all ice from the bin.
Step 3 To start a clean cycle, press the Clean button.
Water will flow through the water dump valve and down
the drain. Wait until the water trough refills, then add
the proper amount of ice machine de-scaler to the water
trough.
Model Amount of De-scaler
KP150 2 ounces (60 ml)
KP250 5 ounces (150 ml)
,
Caution
Do not mix De-scaler and Sanitizer solutions together.
It is a violation of Federal law to use these solutions in a
manner inconsistent with their labeling.
Section 4
Maintenance
21 Part Number: 040010062 Ver00 11/25
Maintenance Section 4
n
Waring
Wear rubber gloves and safety goggles (and/or face
shield) when handling Ice Machine De-scaler or Sanitizer.
Step 4 Wait until the clean cycle is complete
(approximately 22minutes) then press the On/Off button
and disconnect power and water supplies to the ice
machine.
n
Warning
Disconnect the electric power to the ice machine at the
electric service switch box.
Step 5 Remove parts for de-scaling.
Refer to the “Remove Parts for De-scaling or Sanitizing” on
page 23. Continue with step 6 when the parts have been
removed.
Step 6 Mix a solution of de-scaler and warm water.
Depending on the amount of mineral buildup, a larger
quantity of solution may be required. Use the ratio in the
table below to mix enough solution to thoroughly clean all
parts.
Solution Type Water Mixed with
De-scaler 1 gal. (4 l)
16 oz (500 ml)
de-scaler
,
Caution
Do not immerse electrical connectors or motors for any
components in water, de-scaler, or sanitizer solutions.
Step 7 Use half of the de-scaler and water solution to
clean all components. The de-scaler solution will foam
when it contacts lime scale and mineral deposits; once the
foaming stops, use a soft bristle brush, sponge, or cloth (not
a wire brush) to carefully clean the parts. Soak the parts for
5 minutes (15 – 20 minutes for heavily scaled parts). Rinse
all components with clean water.
Step 8 While components are soaking, use half of the
de-scaler and water solution to clean all foodzone surfaces
of the ice machine and bin. Use a nylon brush or cloth to
thoroughly clean the following ice machine areas:
• Evaporator plastic parts – including top, bottom, and
sides
• Bin bottom, sides, and top
Rinse all areas thoroughly with clean water.
SANITIZING PROCEDURE
NOTE: Sanitizing can be performed independently and
more frequently than de-scaling when needed.
Step 9 Mix a solution of sanitizer and warm water.
Solution Type Water Mixed With
Sanitizer 3 gal. (12 l) 2 oz (60 ml) sanitizer
Step 10 Use half of the sanitizer and water solution to
sanitize all removed components(Refer to “Remove Parts for
De-scaling or Sanitizing” on page 23). Use a spray bottle
to liberally apply the solution to all surfaces of the removed
parts or soak the removed parts in the sanitizer and water
solution. Do not rinse parts after sanitizing.
Step 11 Use half of the sanitizer and water solution to
sanitize all foodzone surfaces of the ice machine and bin.
Use a spray bottle to liberally apply the solution. When
sanitizing, pay particular attention to the following areas:
• Evaporator plastic parts - including top, bottom, and
sides
• Bin bottom, sides, and top
Do not rinse the sanitized areas.
Step 12 Apply food grade lubricant to all o-rings, then
replace all removed components. Wait 10 minutes and then
reapply power and water to the ice machine
Step 13 Press the Clean button. Water will flow through
the water dump valve and down the drain. Wait until the
water trough refills, then add the proper amount of ice
machine sanitizer to the water trough.
Model Amount of Sanitizer
KP150 1 ounce (30 ml)
KP250 2 ounces (60 ml)
Step 14 Close and secure all panels and bin door. The
ice machine will automatically start ice making after the
sanitize cycle is complete (approximately 22 minutes).
Part Number: 040010062 Ver00 11/25 22
Section 4 Maintenance
REMOVE PARTS FOR DE‑SCALING OR SANITIZING
Notice
Electrical connectors must never be exposed to any
liquids.
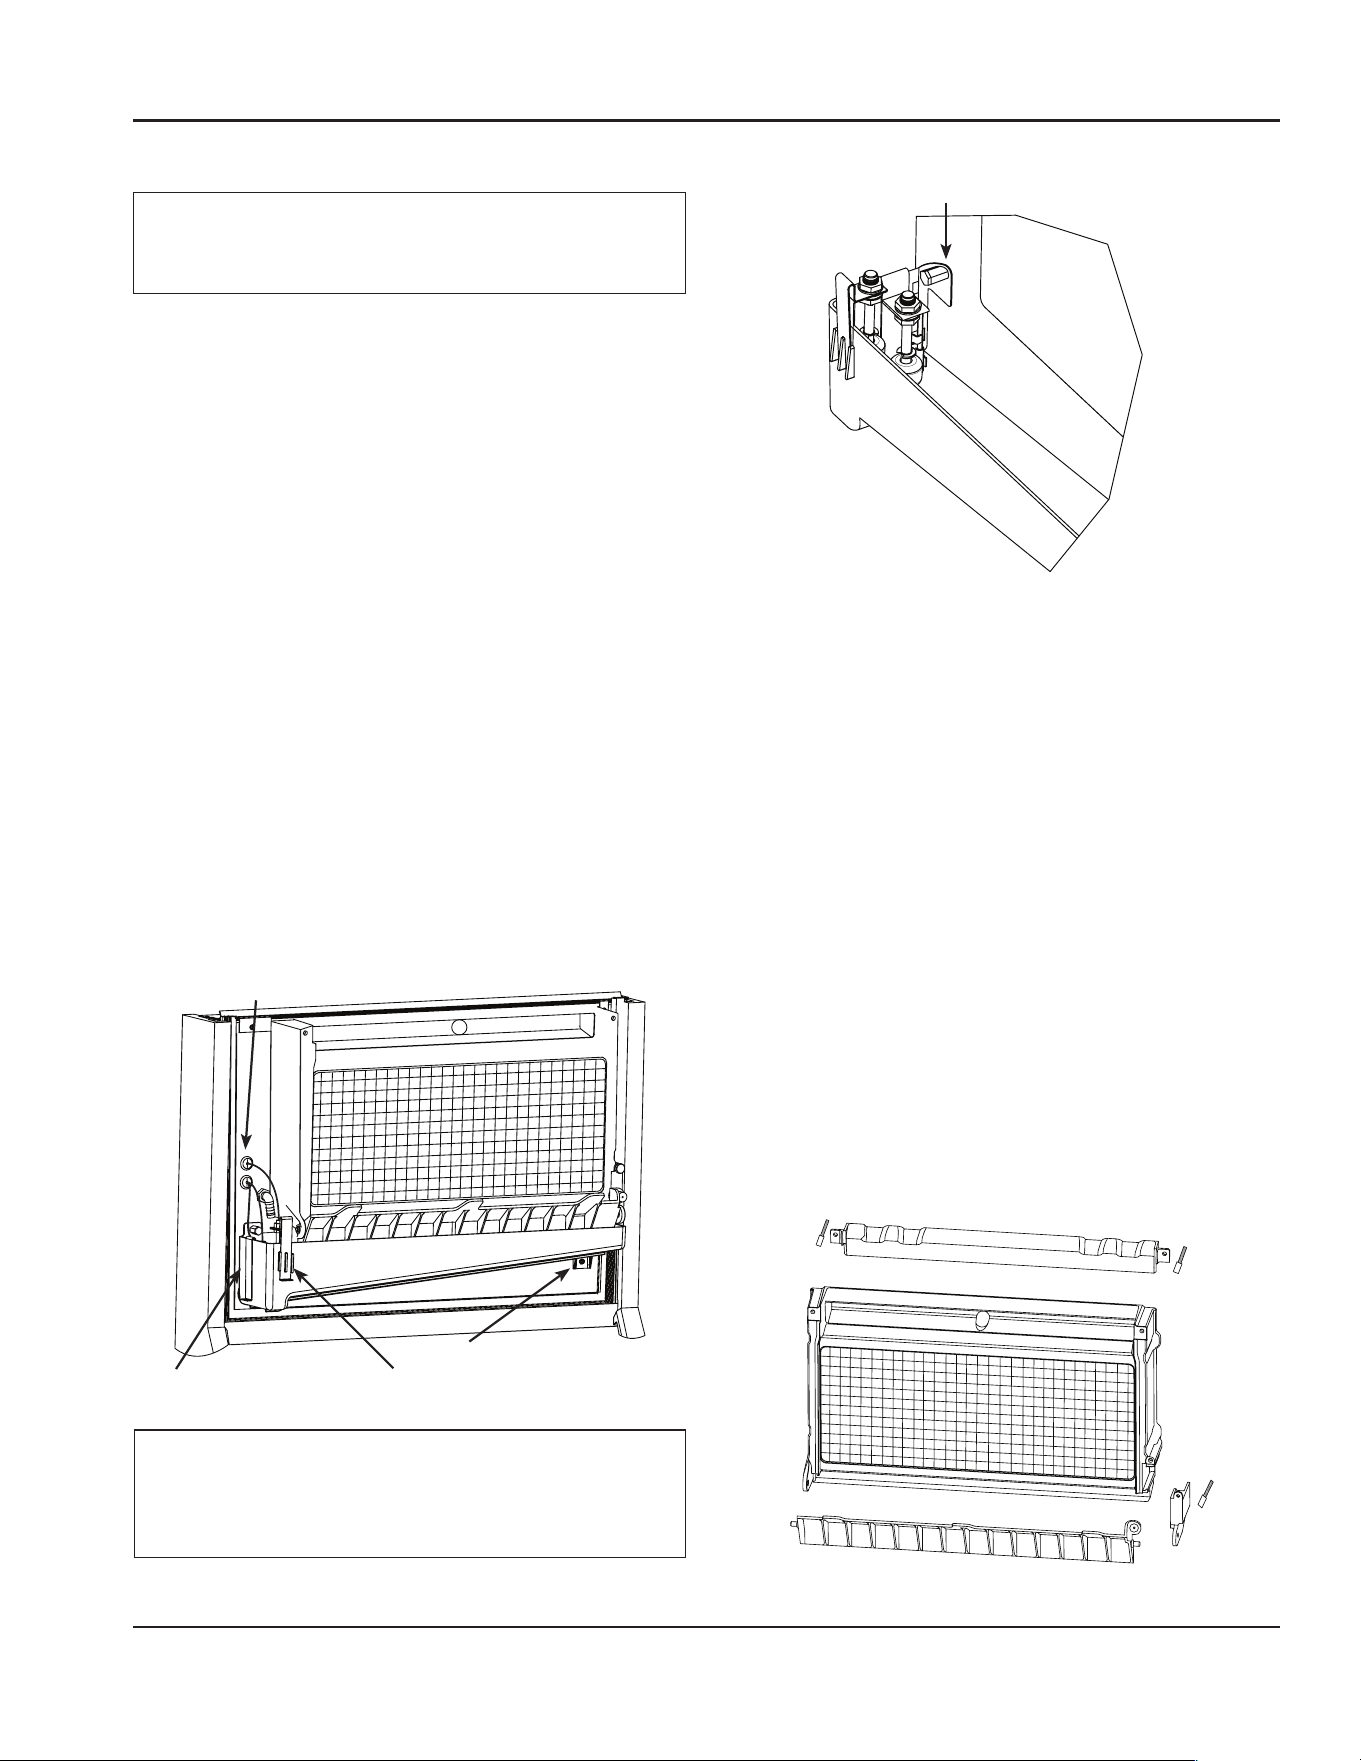
A. Remove the ice thickness and harvest float switch.
Pull forward on the bottom of the bracket until clear of the
tab, then slide bracket upward to remove the bracket and
float switch as an assembly.
NOTE: At this point, the component can easily be
cleaned. If complete removal is desired, follow the wires
to the bulkhead grommet (exit point) in the back wall.
Pull the wire connector through the bulkhead grommet,
then disconnect the wire leads from the connector.
Important
Reversing the mounting location of the ice thickness and
the harvest floats will result in a safety limit 2 failure.
• The ice thickness float must be mounted to the front of
the water trough and the electrical connection must be
in the top bulkhead grommet.
• The harvest float must be mounted to the side of the
water trough and the electrical connection must be in
the bottom bulkhead grommet.
• The wire connectors for each float are different and will
not allow incorrect electrical bulkhead connection.
Wire Connectors Are Located Behind Bulkhead,
Pull Through Grommet To Disconnect
Harvest Float Switch & Bracket Ice Thickness Float Switch & Bracket
Lower Thumbscrew
,
Caution
Do not disassemble the float switches for de-scaling
and/or sanitizing - incorrect reassembly will result in an
ice machine that will not harvest.
Thumbscrew & Thermistor Bracket
B. Remove water trough thermistor and water trough.
• While supporting the water trough, remove the upper
thumbscrew and lift off the thermistor.
• Continue supporting the water trough and remove the
thumbscrew from beneath the water trough.
• Remove the water trough from the bin area.
NOTE: At this point, the thermistor can easily be
cleaned. If complete removal is desired, follow the wires
to the bulkhead grommet (exit point) in the back wall.
Pull the wire connector through the bulkhead grommet,
then disconnect the wire leads from the connector.
C. Remove the ice damper and water distribution
tube.
• Remove thumbscrew from bin switch cover.
• Support ice damper and then pull bin switch cover and
ice damper forward to remove.
• Remove thumbscrews from the water distribution tube,
then remove.
Remove Thumbscrew From Bin Switch Cover,
Support The Damper, and Remove
Remove Thumbscrews From Distribution Tube and Remove
23 Part Number: 040010062 Ver00 11/25
Maintenance Section 4
Remedial De-scaling
This procedure de-scales all components in the water flow
path, and is uesed to de-scale the ice machine between the
bi-yearly detailed de-scaling and sanitinzing procedure.
Ice machine de-scaler is used to remove lime scale and
mineral deposits.
Step 1 Press the On/Off button after ice falls from the
evaporator at the end of a Harvest cycle. Or, press the On/
Off button and allow the ice to melt off the evaporator.
,
Caution
Never use anything to force ice from the evaporator.
Damage may result.
Step 2 To start a clean cycle, press the Clean button.
Water will flow through the water dump valve and down
the drain. Wait until the water trough refills, then add
the proper amount of ice machine de-scaler to the water
trough.
Model Amount of De-scaler
KP150 2 ounce (60 ml)
KP250 5 ounces (150 ml)
Step 3 Wait until the clean cycle is complete
(approximately 22 minutes) then press the On/Off button.
Ice Machine Inspection
Check all water fittings and lines for leaks. Also, make sure
the refrigeration tubing is not rubbing or vibrating against
other tubing, panels, etc.
Do not put anything (boxes, etc.) in front of the ice machine.
There must be adequate airflow through and around the
ice machine to maximize ice production and ensure long
component life.
Exterior Cleaning
Clean the area around the ice machine as often as necessary
to maintain cleanliness and efficient operation.
Wipe surfaces with a damp cloth rinsed in water to remove
dust and dirt from the outside of the ice machine. If a greasy
residue persists, use a damp cloth rinsed in a mild dish soap
and water solution. Wipe dry with a clean, soft cloth.
Clean up any fallen ice or water spills as they occur.
LuminIce® Bulb Maintenance
It is recommended to check the LuminIce bulb during De-
scaling & Sanitizing Procedure.
LuminIce bulbs require replacement on a yearly basis. The
bulb will still illuminate after 12 months, the effectiveness of
the bulb diminishes as operational hours increase. To retain
maximum effectiveness, replace the bulb on a 12 month
schedule.
BULB REPLACEMENT
LuminIce II has an indicator light on the device that will
illuminate blue when operating normal or red when the
bulb needs replacement.
• Replace with a Luminice II bulb with white bulb base:
K00528.
CLEAN‑UP PROCEDURE
Accidental Bulb Breakage
The clean up procedure is identical to the procedure used
to clean up compact fluorescent (CFL) or fluorescent tube
lights. These lights contain a small amount of mercury
sealed within a glass tube. Breaking these types of lights
will release mercury and mercury vapor. The broken bulb
can continue to release mercury vapor until it is cleaned up
and removed.
The latest EPA procedures can be viewed on their website
at: www.epa.gov/cfl/cflcleanup.html.
Cleaning the Air Condenser Filter
The washable aluminum filter on self-contained ice
machines is designed to catch dust, dirt, lint and grease.
Clean the filter with a mild soap and water.
Air filter must be inspected monthly and cleaned bi-
monthly.
Cleaning the Air Condenser
A dirty condenser restricts airflow, resulting in excessively
high operating temperatures. This reduces ice production
and shortens component life.
• Clean the condenser at least every six months.
• Shine a flashlight through the condenser to check for
dirt between the fins.
• Blow compressed air from the inside out (opposite
direction of airflow).
• If dirt still remains, call a service agent to clean the
condenser.
Part Number: 040010062 Ver00 11/25 24
Section 4 Maintenance
Bin Removal
NOTE: Although not required and dependent on your
installation, removing the bin may allow easier access.
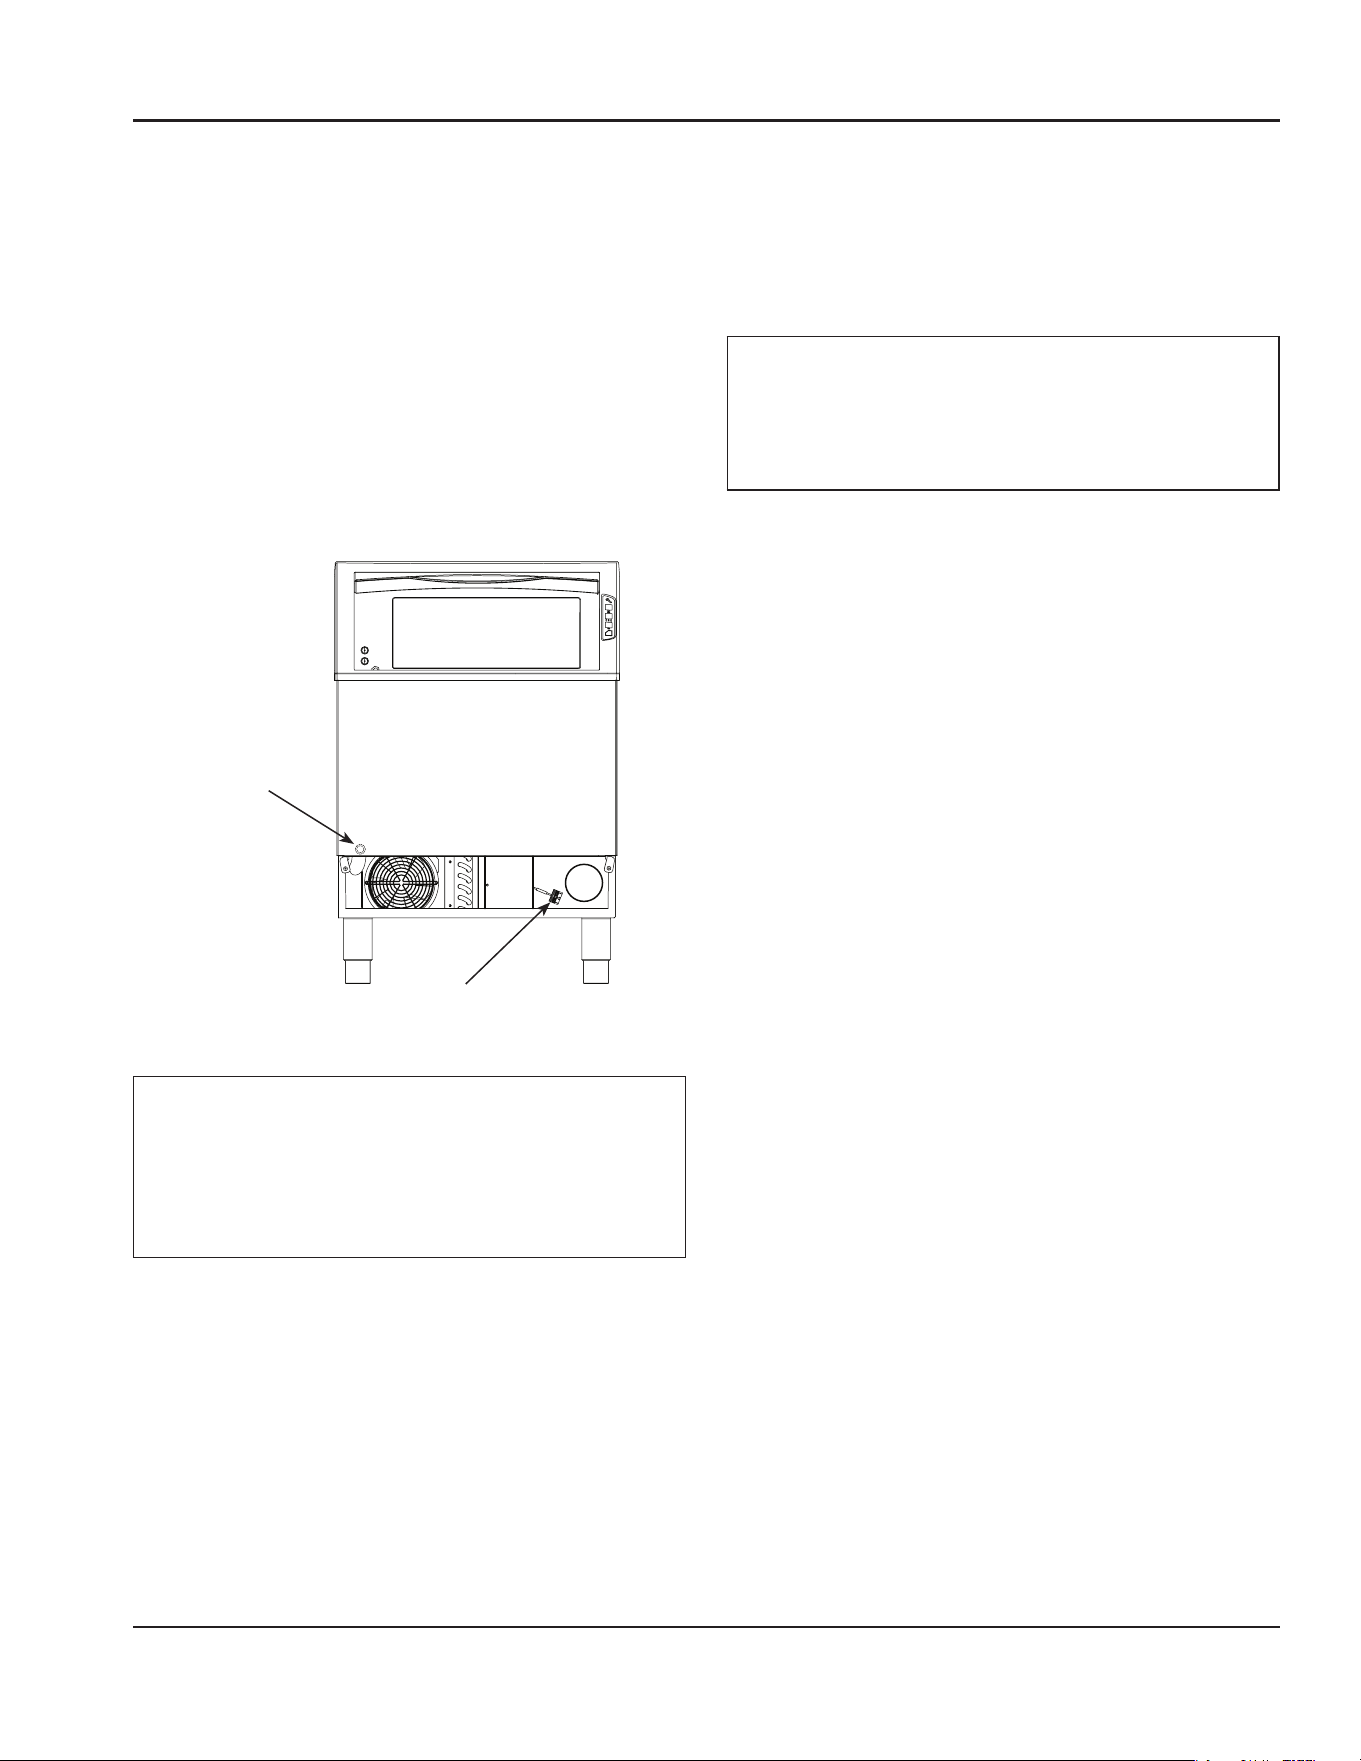
• Disconnect power and remove all ice from bin.
• Remove air filter and louvered front panel/grill from
lower front of machine.
• Loosen screws and rotate clips to release bin from base.
• Disconnect bin drain line clamp and remove bin drain
line.
• Disconnect touch pad communication cable from the
control board harness .
• Slide bin forward to remove.
%JTDPOOFDU#JO
%SBJO-JOF$MBNQ
BOE3FNPWFUIF
#JO%SBJO-JOF
#PUUPN-FGU
$PSOFS6OEFS#JO
%JTDPOOFDU$PNNVOJDBUJPO
$BCMFGSPN$POUSPM#PY)BSOFTT
,
Caution
When reinstalling the bin, the bin seal gasket must seal
tightly to the cabinet. Confirm the bin seal gasket is
not pinched or folded. A water tight seal is required to
prevent future condensation and/or water leakage from
entering the ice machine base and damaging the unit.
Removal from Service/Winterization
GENERAL
Special precautions must be taken if the ice machine is to
be removed from service for an extended period of time or
exposed to ambient temperatures of 32°F (0°C) or below.
Notice
If water is allowed to remain in the ice machine in
freezing temperatures, severe damage to some
components could result. Damage of this nature is not
covered by the warranty.
Step 1 De-scaled and sanitize the ice machine.
Step 2 Press the On/Off button for 3 seconds to turn off
the ice machine.
Step 3 Turn off the water supply, disconnect and drain
the incoming ice-making water line at the rear of the ice
machine, and drain the water trough.
Step 4 Energize the ice machine, wait one minute for the
water inlet valve to open, and blow compressed air in both
the incoming water and the drain openings in the rear of
the ice machine to remove all water.
Step 5 Press the On/Off button for 3 seconds and
disconnect the electric power at the circuit breaker or the
electric service switch.
Step 6 Fill spray bottle with sanitizer and spray all interior
food zone surfaces. Do not rinse and allow to air dry.
Step 7 Replace all panels.

25 Part Number: 040010062 Ver00 11/25
Maintenance Section 4
THIS PAGE INTENTIONALLY LEFT BLANK
Part Number: 040010062 Ver00 11/25 26
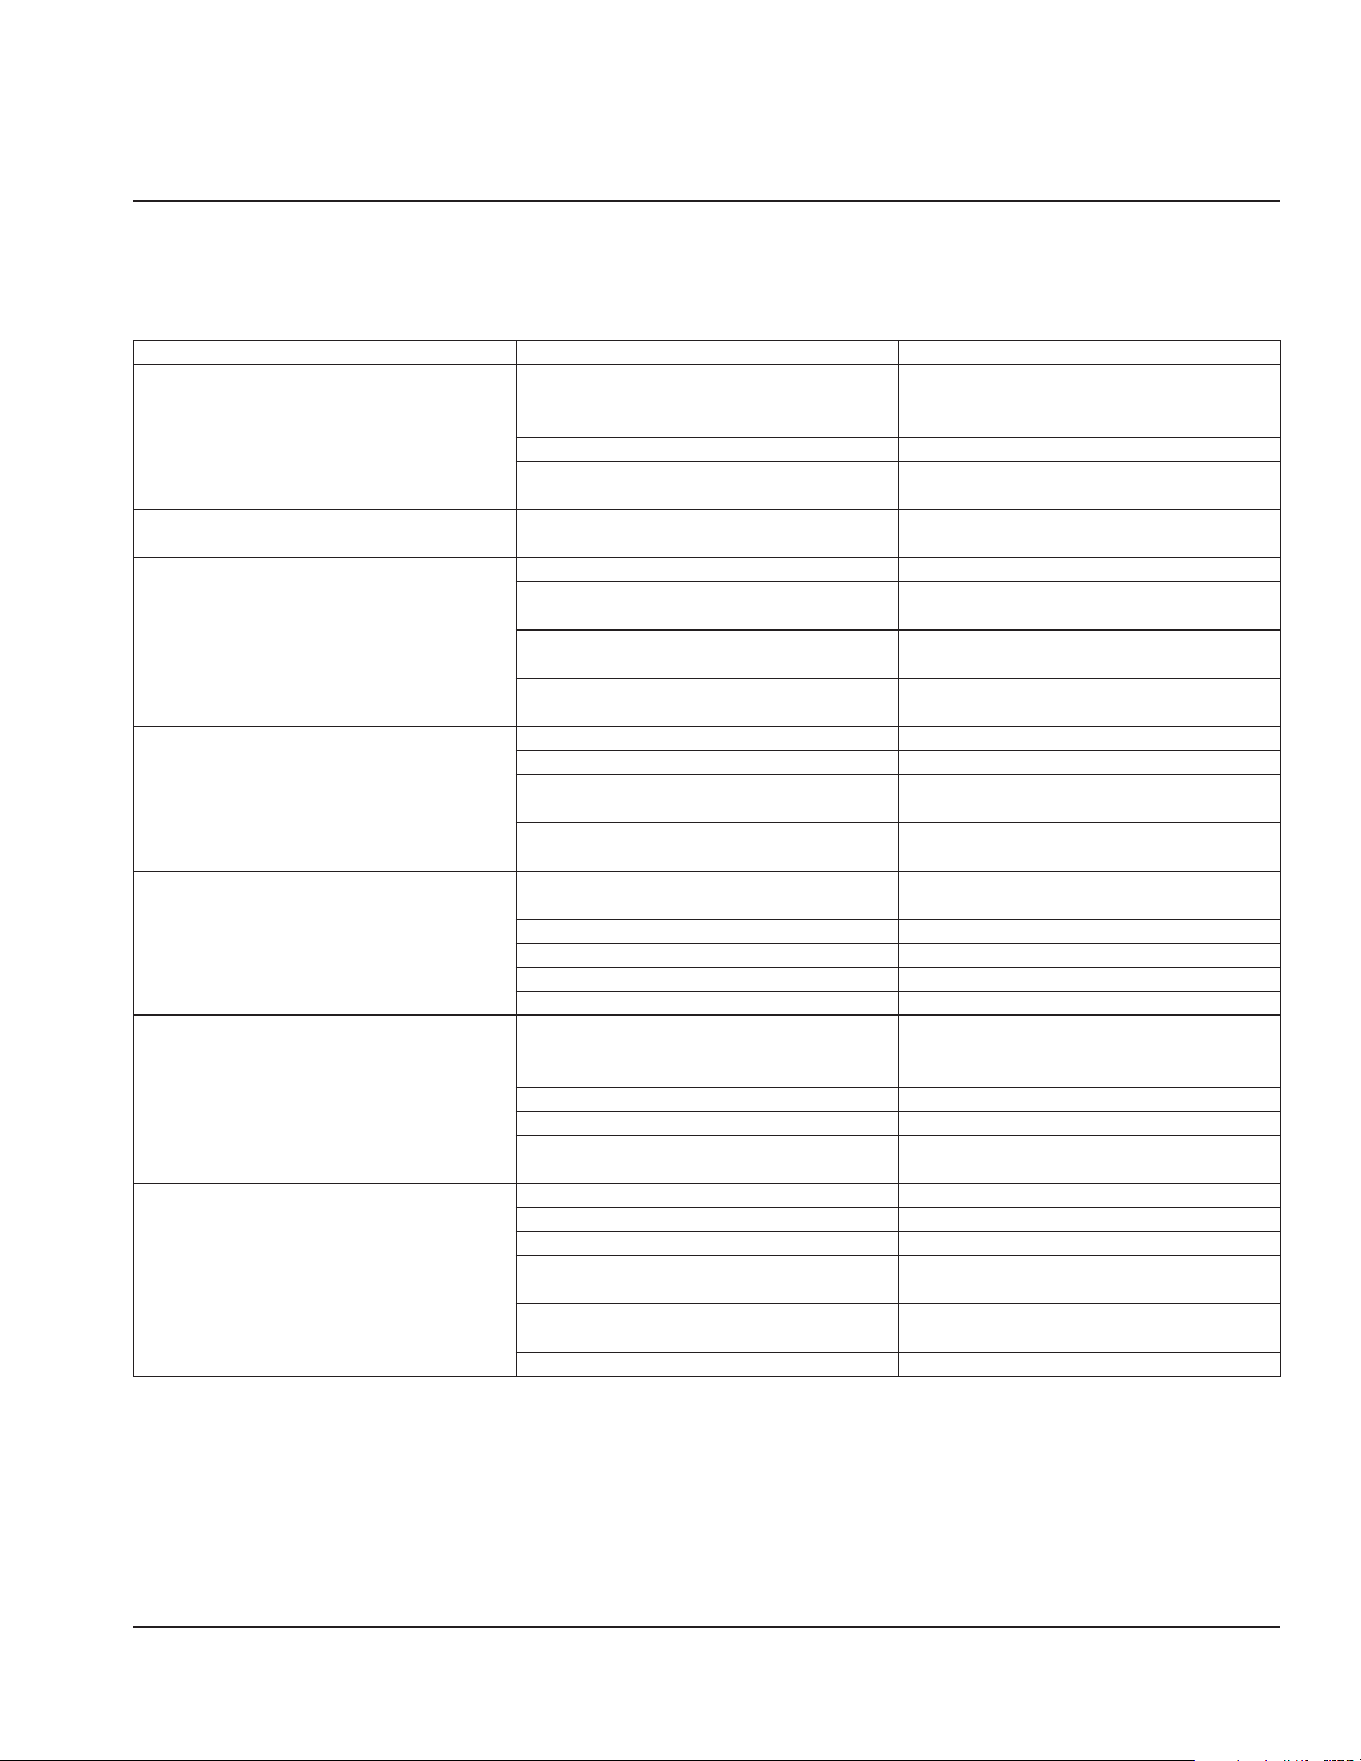
Checklist
If a problem arises during operation of your ice machine, follow the checklist below before calling service. Routine
adjustments and maintenance procedures are not covered by the warranty.
Problem Possible Cause To Correct
Ice machine does not operate.
No electrical power to the ice machine. Replace the fuse/reset the breaker/turn
on the main switch/plug power cord into
receptacle.
Ice machine needs to be turned on. Press the On/Off button to start ice making.
Damper in open position (down). Damper must be in upright position and
capable of swinging freely.
Ice machine stops, and can be restarted by
turning the ice machine OFF and then ON.
Service limit feature stopping the ice
machine.
Refer to “Service Limit Feature” on the next
page.
Ice sheet is thick.
Water trough level is too high. Adjust ice thickness float.
Power button was turned off/on during
freeze cycle and ice remained on evaporator.
Allow ice to thaw and release from
evaporator, then restart.
Ice damper was opened then closed in the
harvest cycle before the ice released.
Allow ice to thaw and release from
evaporator, then restart.
Long harvest cycles with repeated service
limit indication.
Call for service.
Ice machine does not release ice or is slow to
harvest.
Ice machine is dirty. De-scale and sanitize the ice machine.
Ice machine is not level. Level the ice machine.
Low air temperature around ice machine
(air-cooled models).
Air temperature must be at least 40°F (4°C).
Water regulating valve leaks in harvest mode
(water-cooled models).
Replace water regulating valve.
Ice machine does not cycle into harvest
mode.
The six-minute freeze time lock-in has not
expired yet.
Wait for freeze lock-in to expire.
Harvest float switch is dirty. De-scaler and sanitize the ice machine.
Harvest float switch wire is disconnected. Connect the wire.
Harvest float switch is out of adjustment. Adjust the harvest float switch.
Uneven ice fill (thin at top of evaporator). See “Shallow or Incomplete Cubes” below.
Ice quality is poor (soft or not clear).
Poor incoming water quality. Contact a qualified service company to test
the quality of the incoming water and make
appropriate filter recommendations.
Water filtration is poor. Replace the filter.
Ice machine is dirty. De-scaler and sanitize the ice machine.
Water softener is working improperly (if
applicable).
Repair the water softener.
Ice machine produces shallow or incomplete
cubes, or the ice fill pattern on the
evaporator is incomplete.
Ice thickness switch is out of adjustment. Adjust the ice thickness switch.
Water trough level is too high or too low. Check the water level.
Water filtration is poor. Replace the filter.
Hot incoming water. Connect the ice machine to a cold water
supply.
Incorrect incoming water pressure. Water pressure must be 20 – 80 psi (137.9 –
551.5 kPa)
Ice machine is not level. Level the ice machine.
Section 5
Troubleshooting
27 Part Number: 040010062 Ver00 11/25
Troubleshooting Section 5
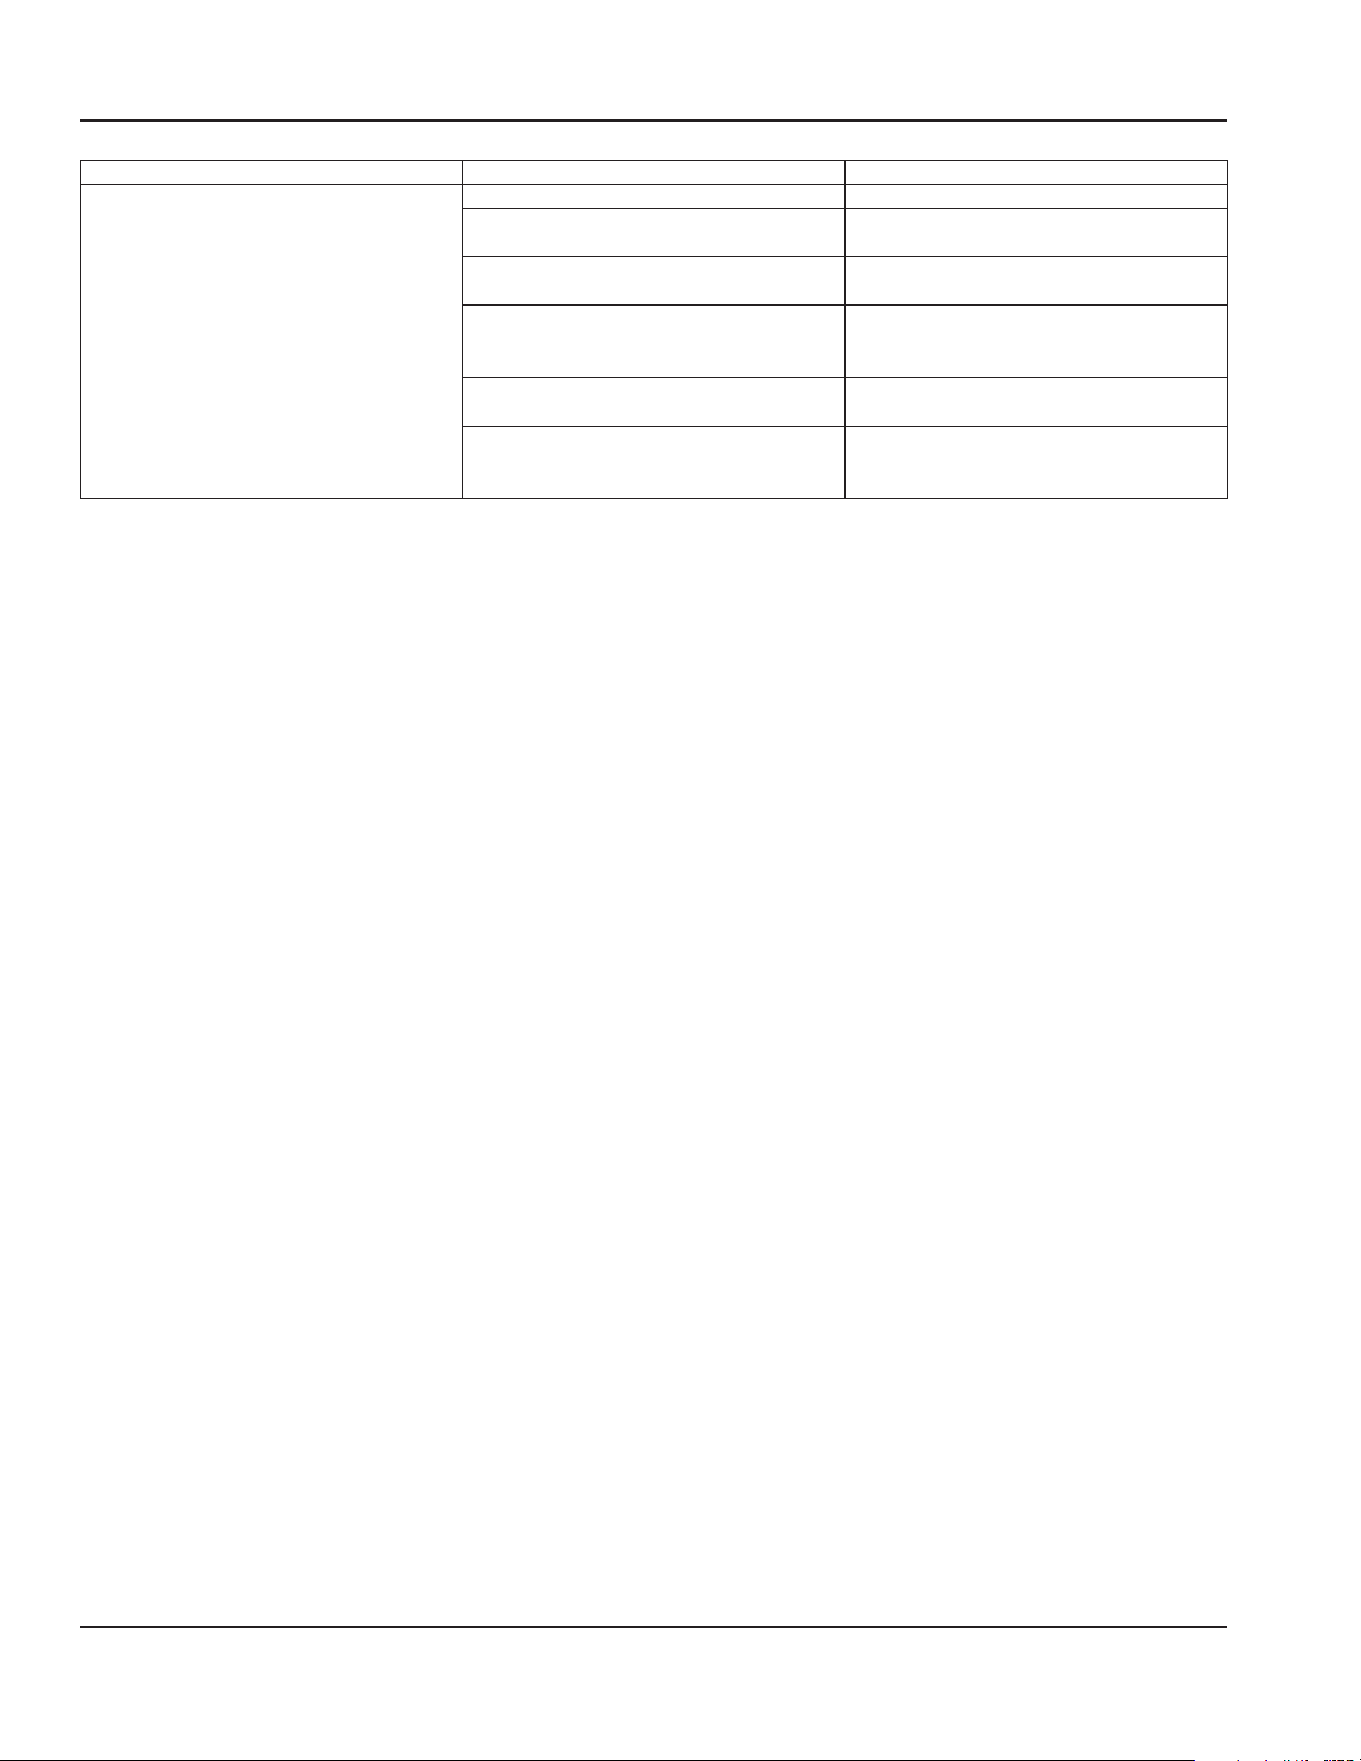
Problem Possible Cause To Correct
Low ice capacity.
The condenser is dirty. Clean the condenser.
High air temperature around ice machine
(air-cooled models).
Air temperature must not exceed 100°F
(38°C).
Inadequate clearance around the ice
machine.
Provide adequate clearance.
Objects stacked around ice machine,
blocking airflow to condenser (air-cooled
models)
Remove items blocking airflow.
Hot incoming water. Connect the ice machine to a cold water
supply.
Incorrect incoming water pressure.
Water pressure is too low or water filter is
restricted.
Water pressure must be 20 – 80 psi (137.9 –
551.5 kPa). Refer to section 2 for plumbing
requirements. Replace water filter.
Service Limit Feature
In addition to the standard service controls, such as the
high pressure cutout, your Koolaire ice machine features
built-in service limits, which will stop the ice machine if
conditions arise which could cause a major component
failure.
Before calling for service, re-start the ice machine using the
following procedure:
1. Press the On/Off button and turn off the ice machine,
then press the On/Off button again to start the ice
machine.
A. If the service limit feature has stopped the ice
machine, it will restart after a short delay. Proceed
to step 2.
B. If the ice machine does not restart, see “Ice
machine does not operate” on the previous page.
2. Allow the ice machine to run to determine if the
condition is recurring.
A. If the ice machine stops again, the condition has
recurred. Call for service.
B. If the ice machine continues to run, the condition
has corrected itself. Allow the ice machine to
continue running.

MANITOWOC ICE
2110 SOUTH 26TH STREET, MANITOWOC, WI 54220
800-545-5720
WWW.MANITOWOCICE.COM
©2025 Manitowoc Ice except where explicitly stated otherwise. All rights reserved.
Part Number: 040010062 Ver00 11/25