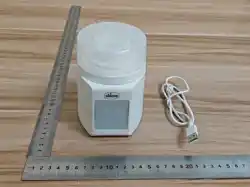

PORTABLE
Bole Warmer + Sterilizer
IS0257ES_02 06/26 ©2026 Artsana USA, Inc. ChiccoUSA.com
Owner’s Manual
Read all instructions BEFORE
assembly and USE of product.
KEEP INSTRUCTIONS
FOR FUTURE USE.
2
3
WARNING
WHEN USING THIS ELECTRICAL EQUIPMENT, BASIC SAFETY PRECAUTIONS
SHOULD ALWAYS BE FOLLOWED INCLUDING THE FOLLOWING:
Take Time to Read This Owner’s Manual
BURN HAZARD
To avoid risk of burns:
• Bottle warmer components and water temperature can be very hot. Avoid direct
contact with hot water and steam. Handle with care.
• DO NOT touch surfaces that may be hot. Wait until all parts of the unit have cooled
before touching them or cleaning.
• Bottles will be hot; remove with care.
• Before serving, be sure the contents of the bottle is at a safe temperature.
• DO NOT move the bottle warmer while warming or sterilizing.
• DO NOT obstruct the steam outlets on the top of the sterilizing lid.
• NEVER use without liquid.
WARNINGS WARNINGS
WARNING
• This appliance must not be used by children. This is NOT a toy. Keep out of reach
of children.
• Close supervision is necessary when any appliance is used near children.
• For household and portable use in a dry location only.
• Only use this appliance for its intended use. DO NOT modify or alter the bottle warmer.
• DO NOT use accessories, spare parts, or any components not supplied or approved by
Chicco as they may cause injuries or damage.
• DO NOT use with any bottle that is not intended to be heated.
• DO NOT place on or near a hot gas or electric burner, or in a heated oven.
• NOT for space heating purposes.
• Inspect carefully before each use. DO NOT operate any appliance after the appliance
malfunctions or is dropped or damaged in any manner. If the bottle warmer is faulty
and/or not working correctly, switch it off immediately.
4
5
WARNINGS WARNINGS
WARNING
• To protect against electrical shock DO NOT immerse the bottle warmer in water.
• DO NOT use if the bottle warmer accidentally falls into water or becomes submerged.
• This product has a built-in lithium battery that cannot be replaced.
• Use only with Listed/Certified Information Technology Equipment Power Supply.
• Under abusive conditions, liquid may be ejected from the battery; avoid contact. If
contact accidentally occurs, flush with water. If liquid contacts eyes, additionally seek
medical help. Liquid ejected from the battery may cause irritation or burns.
• DO NOT use an appliance that is damaged or modified. Damaged or modified batteries
may exhibit unpredictable behavior resulting in fire, explosion or risk of injury.
• DO NOT expose an appliance to fire or excessive temperature. Exposure to fire or
temperature above 265°F (130°C) may cause explosions.
WARNING
• Follow all charging instructions and do not charge the appliance outside of the
temperature range specified in the instructions. Charging improperly or at
temperatures outside of the specified range may damage the battery and increase the
risk of fire.
• Have servicing performed by a qualified repair person using only identical replacement
parts. This will ensure that the safety of the product is maintained.
• DO NOT modify or attempt to repair the appliance except as indicated in the
instructions for use and care.
6
7
ADAPTER LIST
Below is a list of included adapters and their compatible boles. You can nd the
adapter leer printed on the side of the adapter.
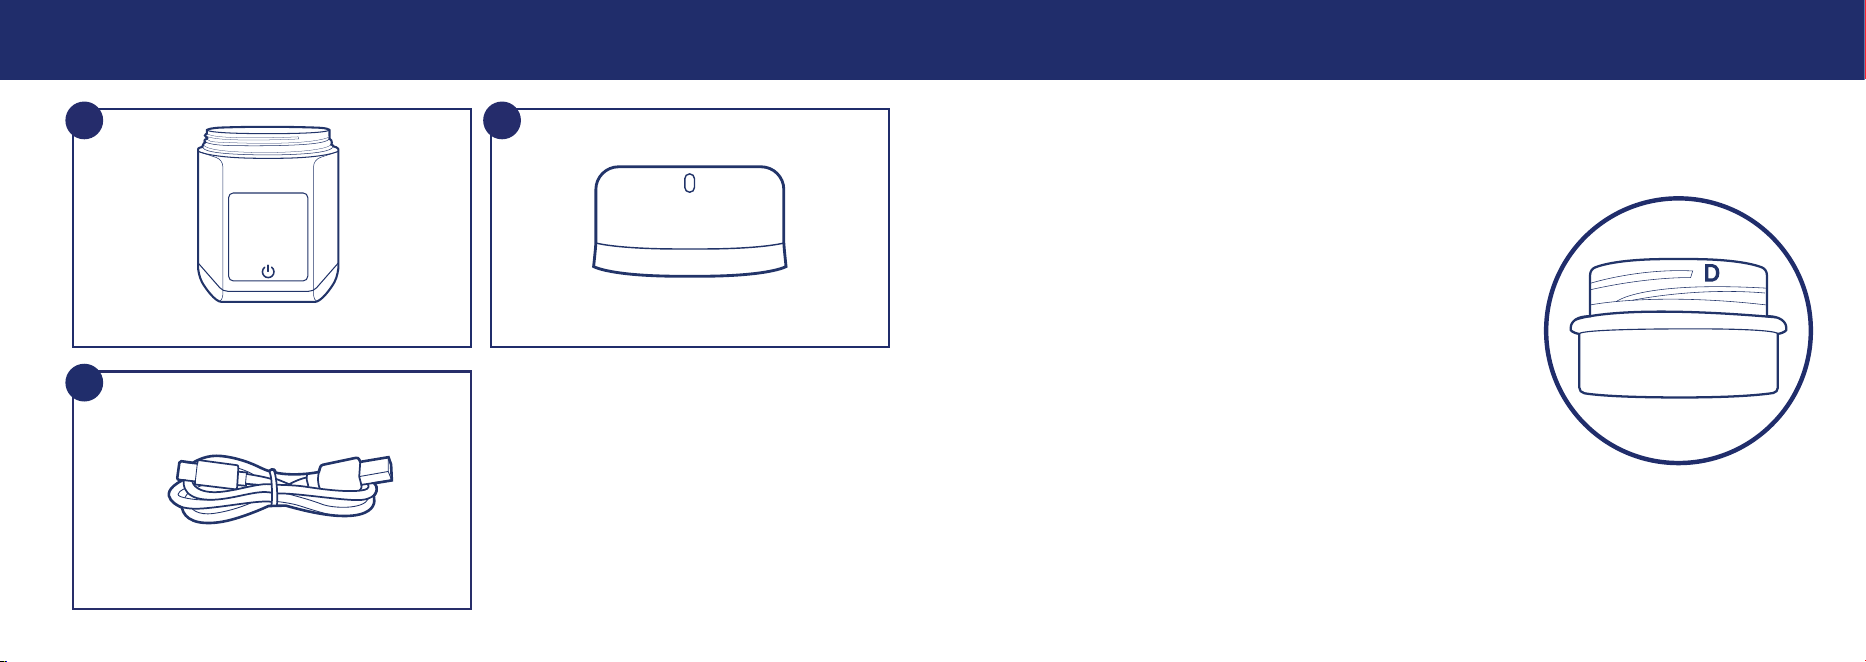
• Adapter A - Dr. Brown’s Narrow / Medela
• Adapter C - Chicco / Avent
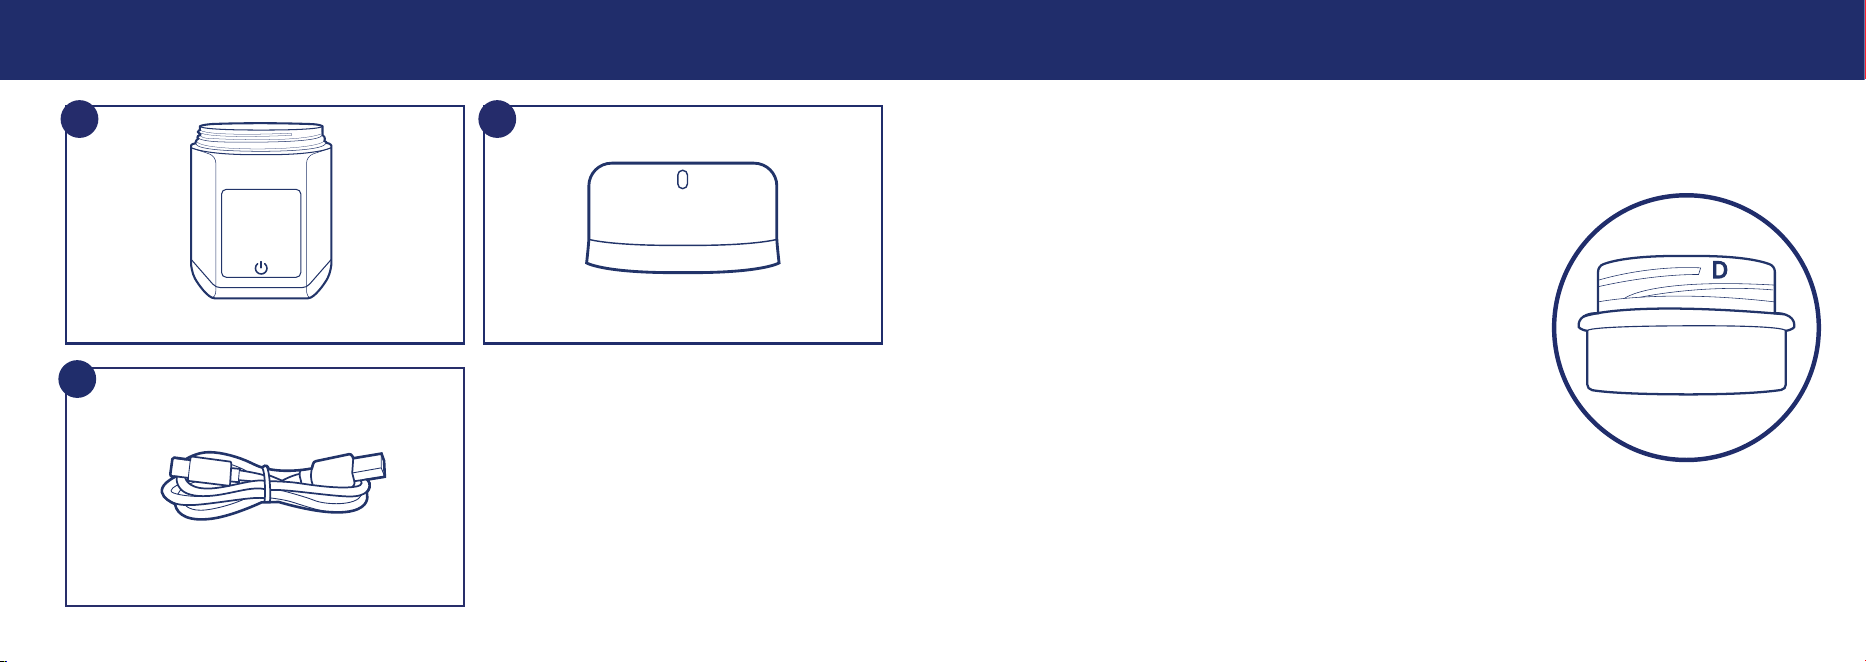
• Adapter D - MAM
• Adapter F - Tommee Tippee
• Adapter H - Comotomo Gen 1 / Haakaa / Boon Nursh
• Adapter I - Lansinoh / Pigeon / Eveno Wide
• Adapter J - Dr. Brown’s Wide
• Adapter K - Comotomo Gen 2
PARTS LIST
A
C
B
Bole Warmer Sterilizing Lid
Charging Cord
Compatible with most popular brands, including:
AVENT®, DR. BROWN’S®, MAM®, TOMMEE TIPPEE® and
COMOTOMO®.
AVENT®, DR. BROWN’S®, MAM®, TOMMEE TIPPEE® and
COMOTOMO® are all registered trademarks of their
respective owners.
This product is not licensed by, ailiated with, or
endorsed by Avent Limited, Dr. Brown’s Company, MAM
Babyartikel Gesellschaft MBH, Mayborn (UK) Limited
or Comotomo.
8
9
CHARGING THE BATTERY
1
2
3
CHARGING THE BATTERY
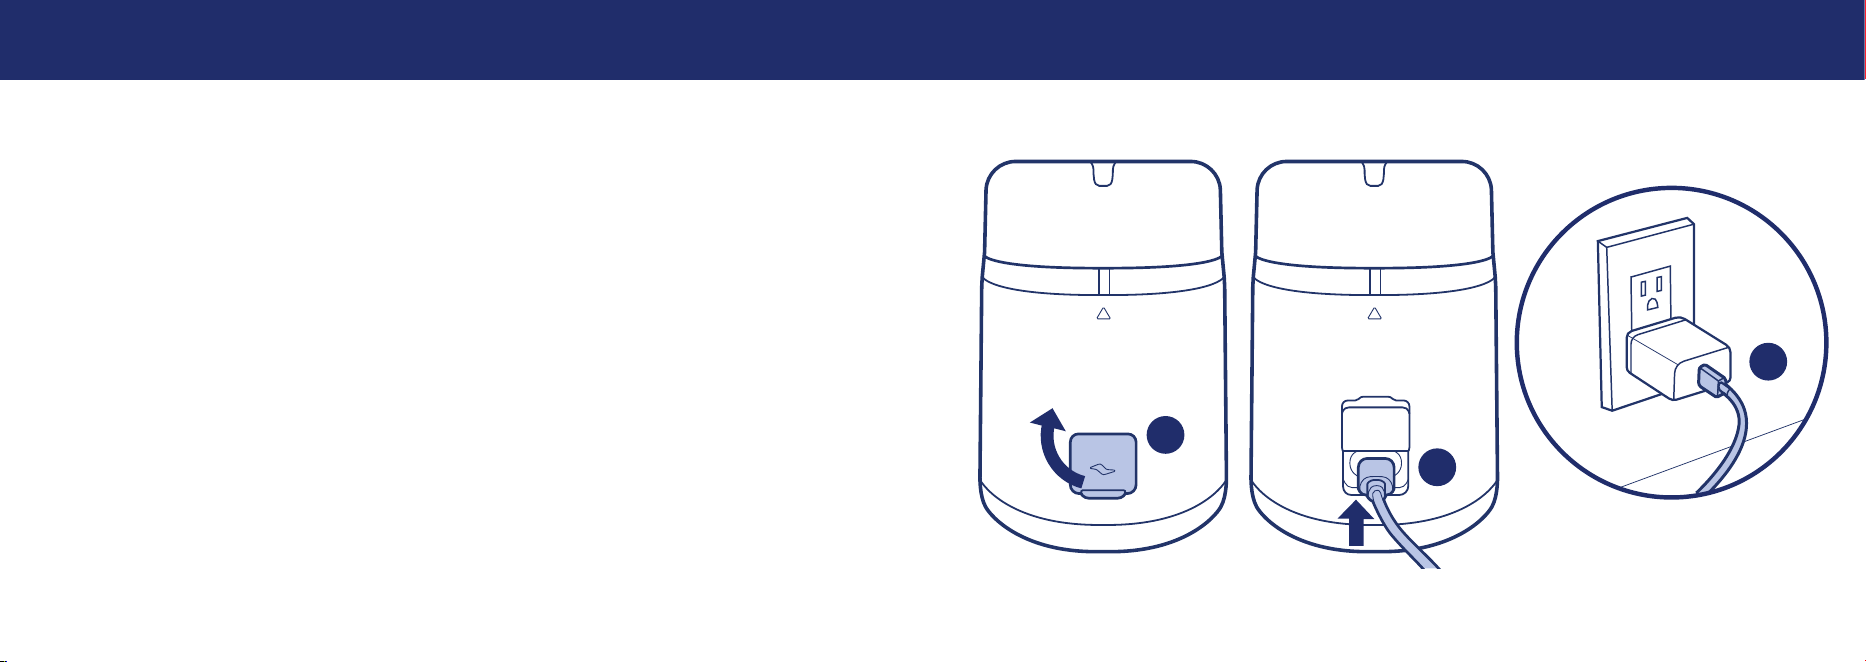
Before charging the baery make sure the bole warmer is turned o. The bole
warmer cannot be used while charging. Charge the baery fully before using.
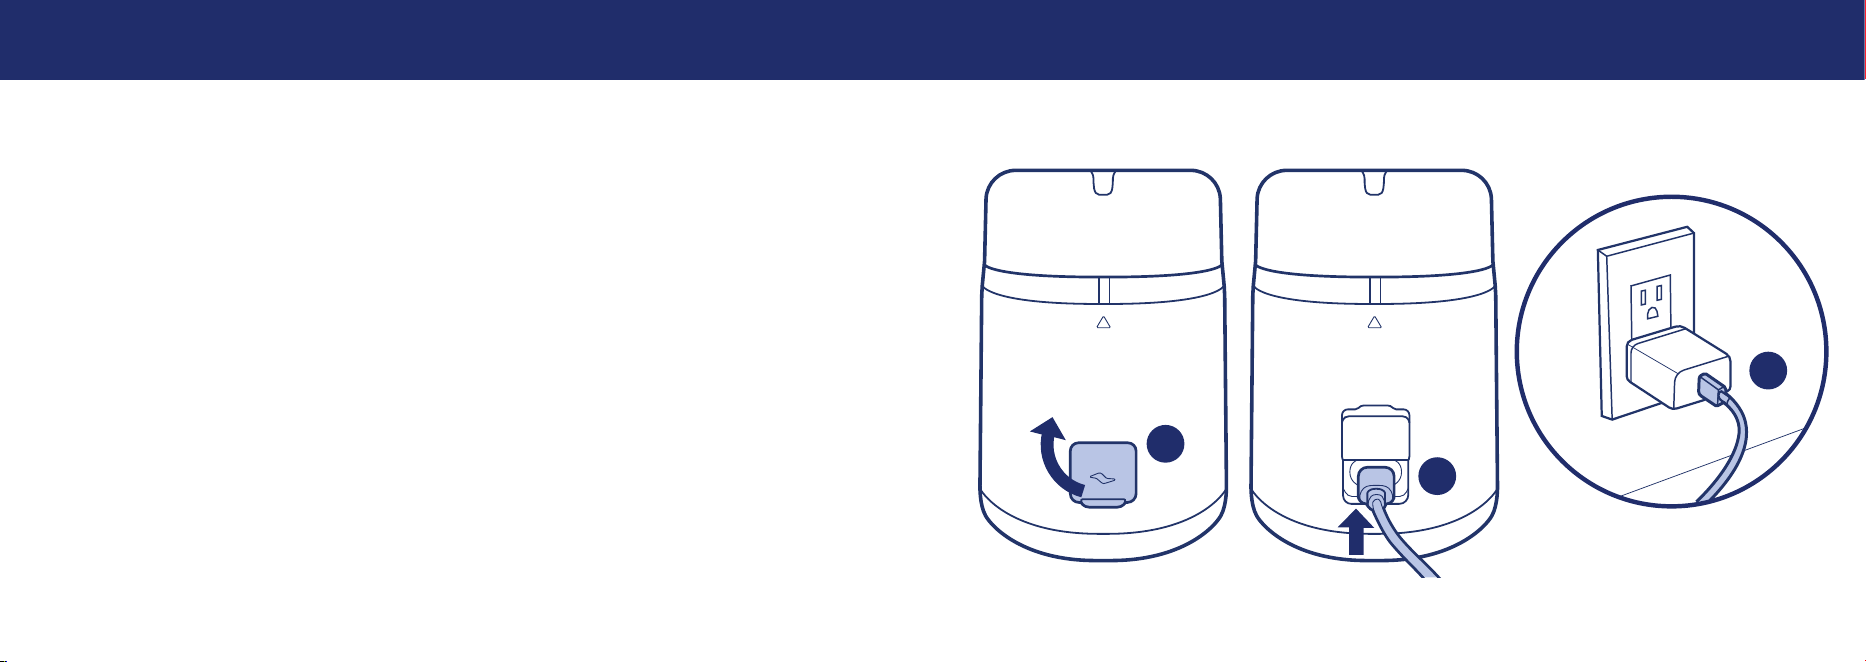
1 Lift up on the charging port protector on the back of the bole warmer.
2 Connect the included USB-C end of the charging cord to bole warmer.
3 Plug the USB-A end of the charging cord into a compatible fast-charging power supply
(5-20V main adapter) that is plugged into an outlet to charge.
• For faster charging, a fast-charging power supply (5-20V main adapter) can be
used with a compatible cable (USBC-USBC).
10
11
CHARGING THE BATTERY
5
4
CHARGING THE BATTERY
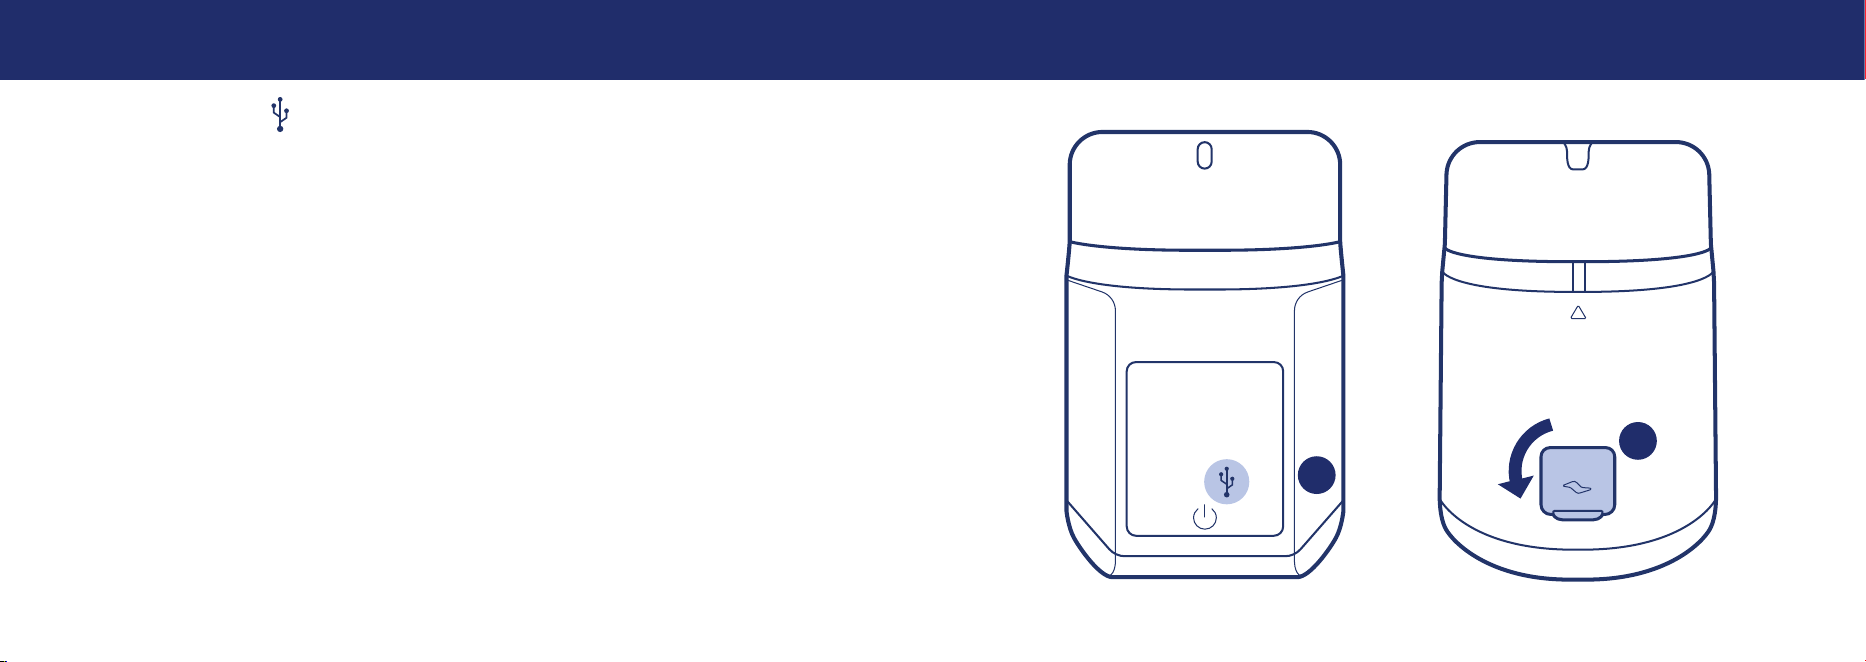
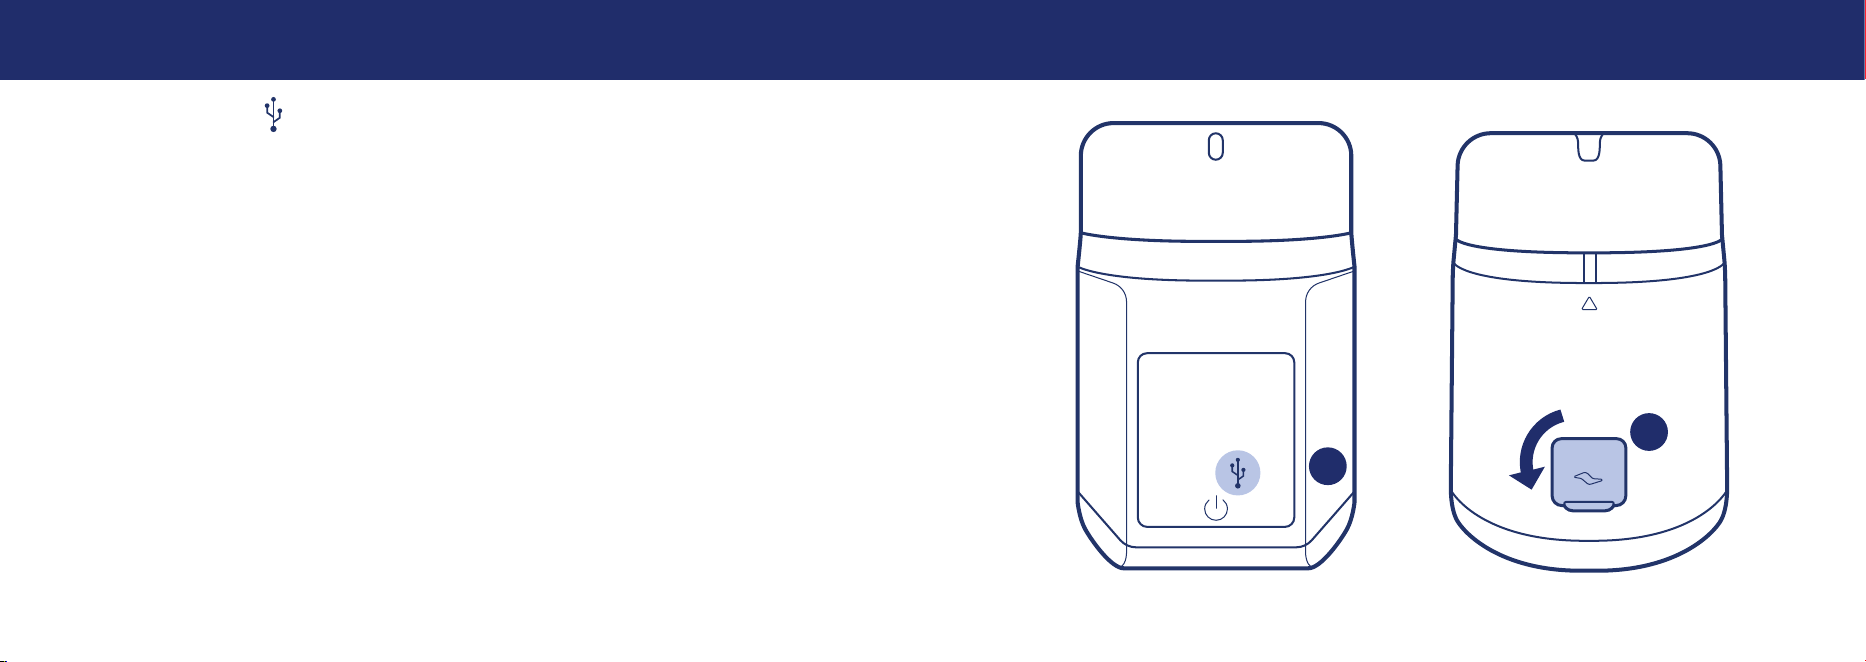
4 The charging icon will light up. When the bole warmer is fully charged the
charging icon will turn o.
5 Unplug the cord from the back of the bole warmer and push the charging port
protector back into place.
12
13
USING THE BOTTLE WARMER
4B
4A
1
USING THE BOTTLE WARMER
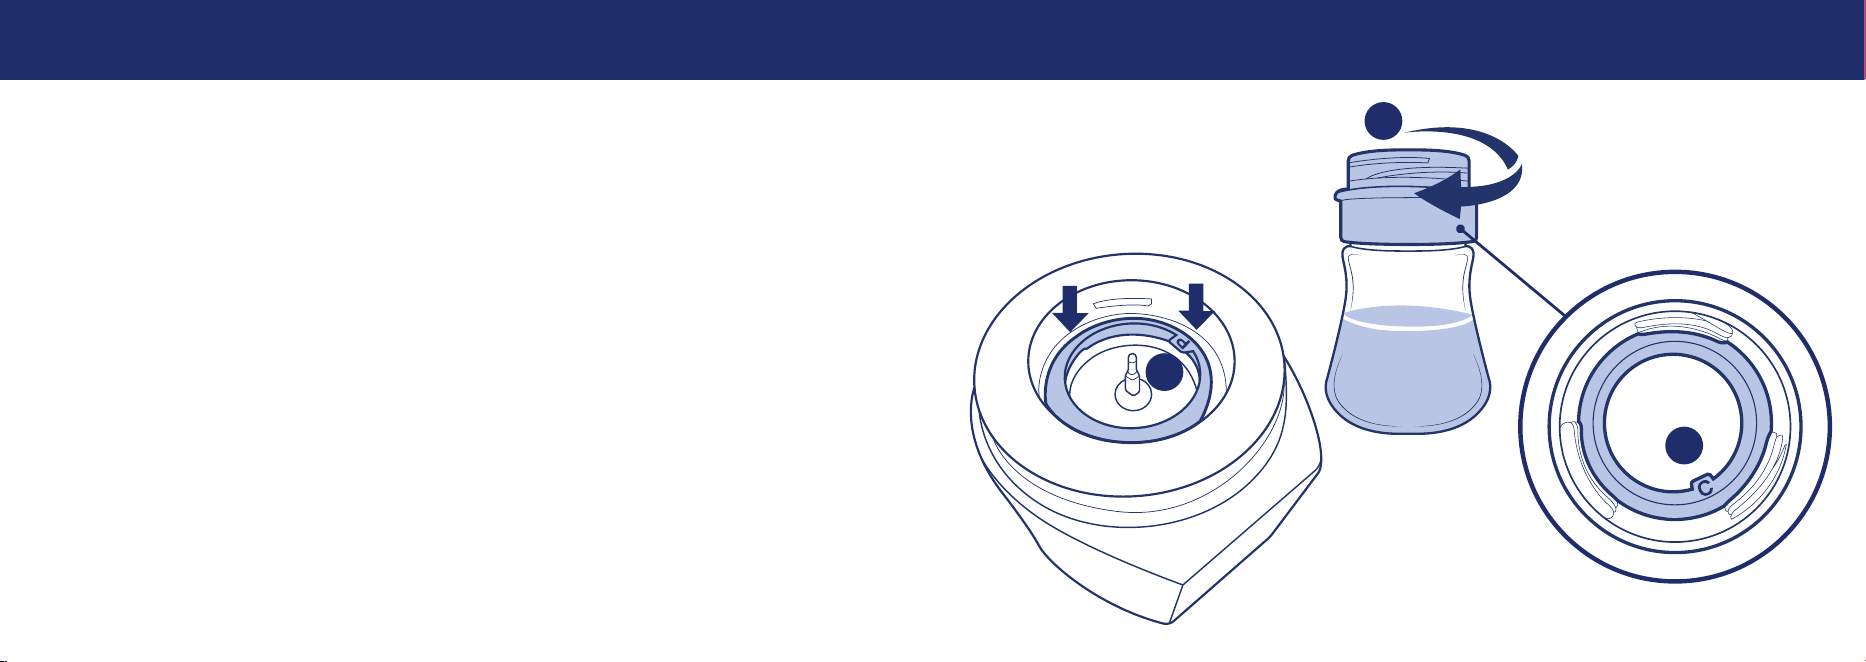
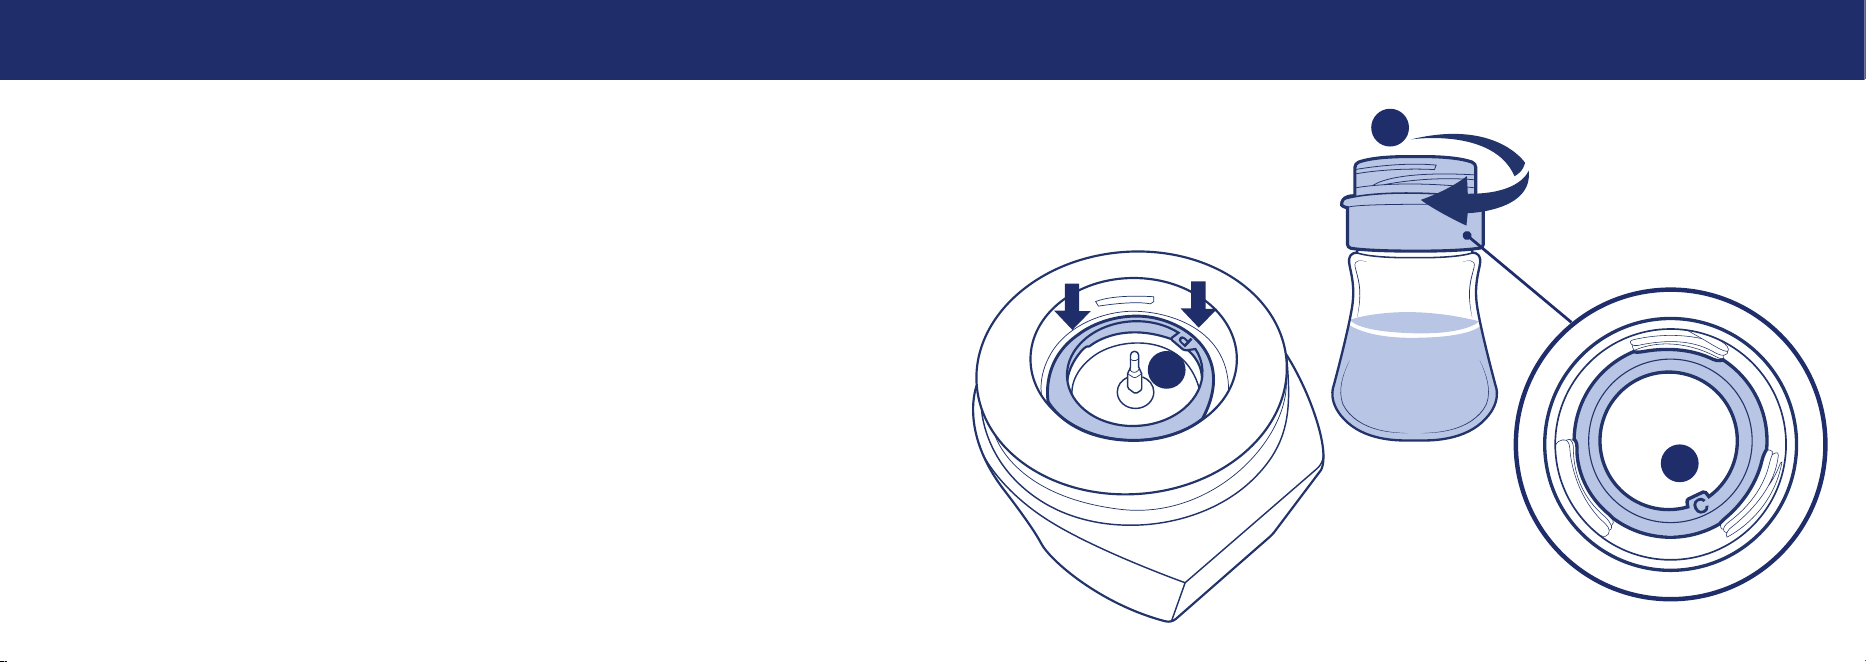
1 Make sure the seal inside the bole warmer is fully pushed down with the ‘P’ tab
facing up.
2 Find the correct adapter for the bole that is being warmed. Refer to page 7.
3 Pour the amount of liquid (water or milk) you want to heat into the bole.
• NEVER use with less than 30ml of liquid inside the bole when warming.
• NEVER use frozen liquid with this bole warmer.
4 To prevent leaking, make sure the seal is pushed down rmly into the adapter with the
leer tab facing up (4A). Firmly screw the adapter on to the bole (4B).
14
15
USING THE BOTTLE WARMER
6
5
7
USING THE BOTTLE WARMER
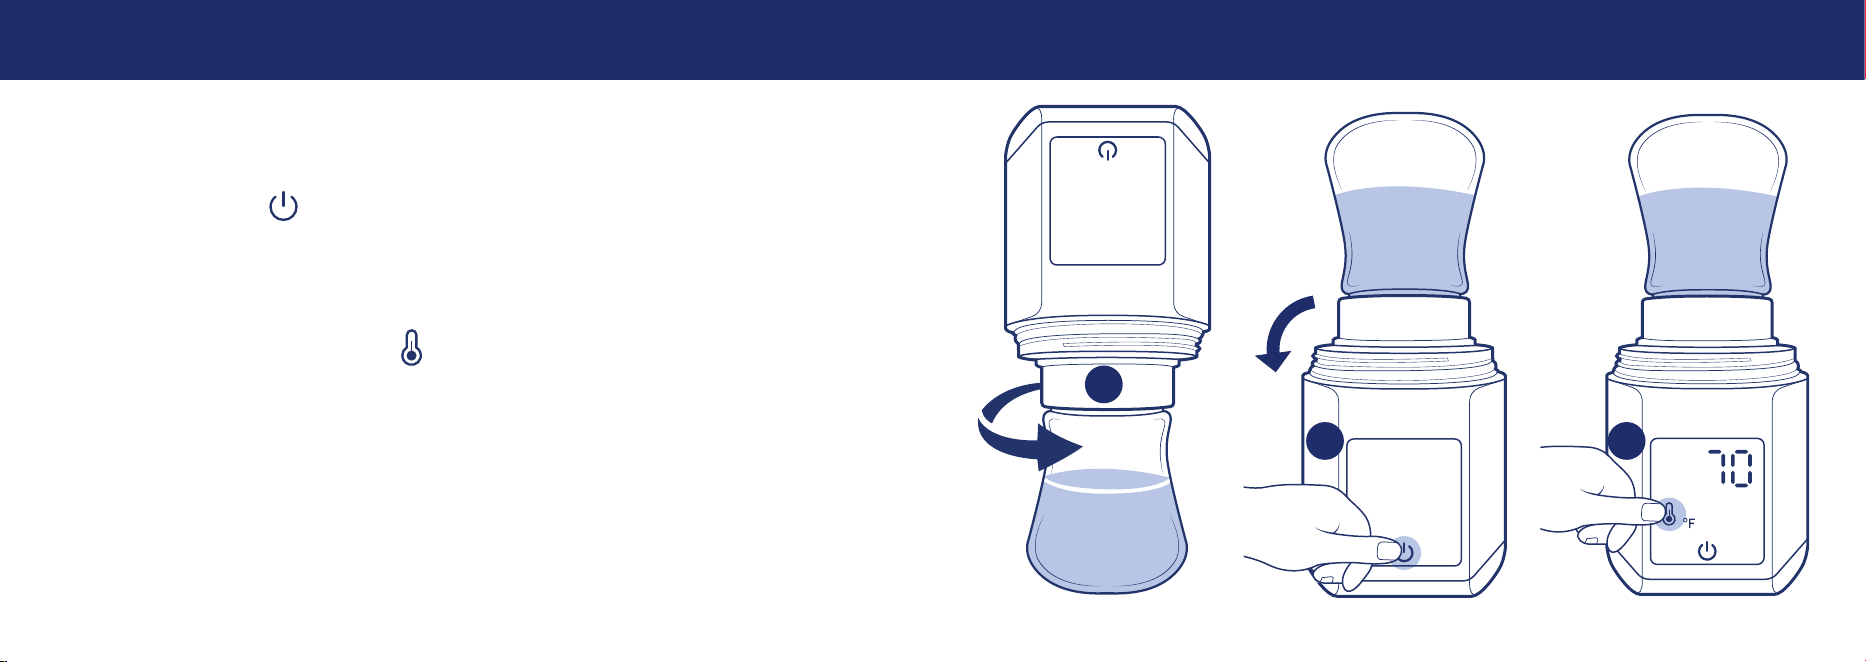
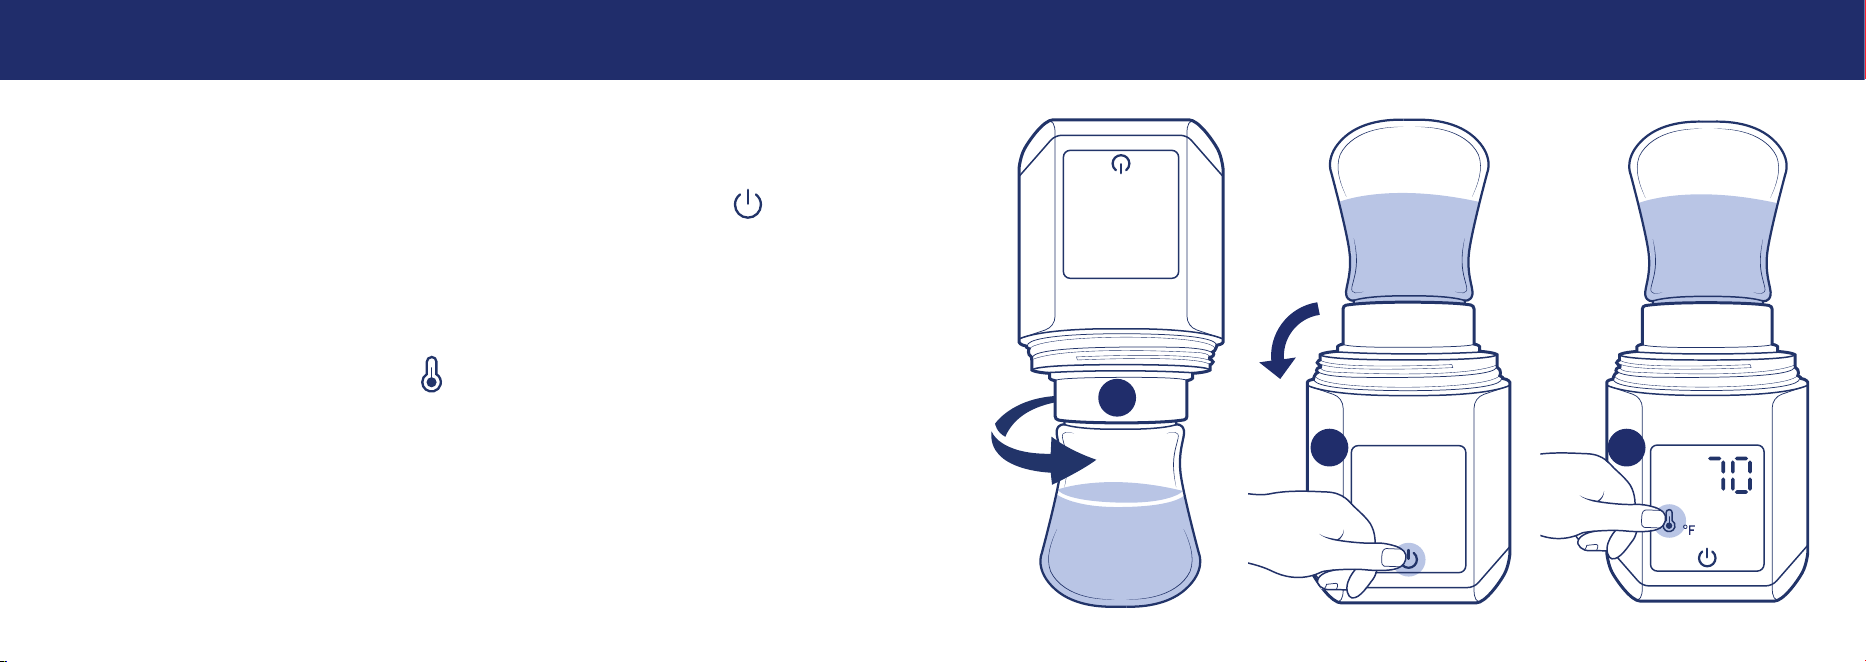
5 Turn the bole warmer upside down and screw it rmly onto the bole.
6 Flip the bole warmer over and place on a at stable surface. Press and hold
the power buon for 2 seconds to turn on the interface.
• The baery charge status will ash on the display for a few seconds before being
replaced by the initial temperature detected by the sensor.
7 Press the ashing warming icon .
• Pressing the warming icon again will switch the bole warmer from °F to °C.
16
17
USING THE BOTTLE WARMER
8 9
10
USING THE BOTTLE WARMER
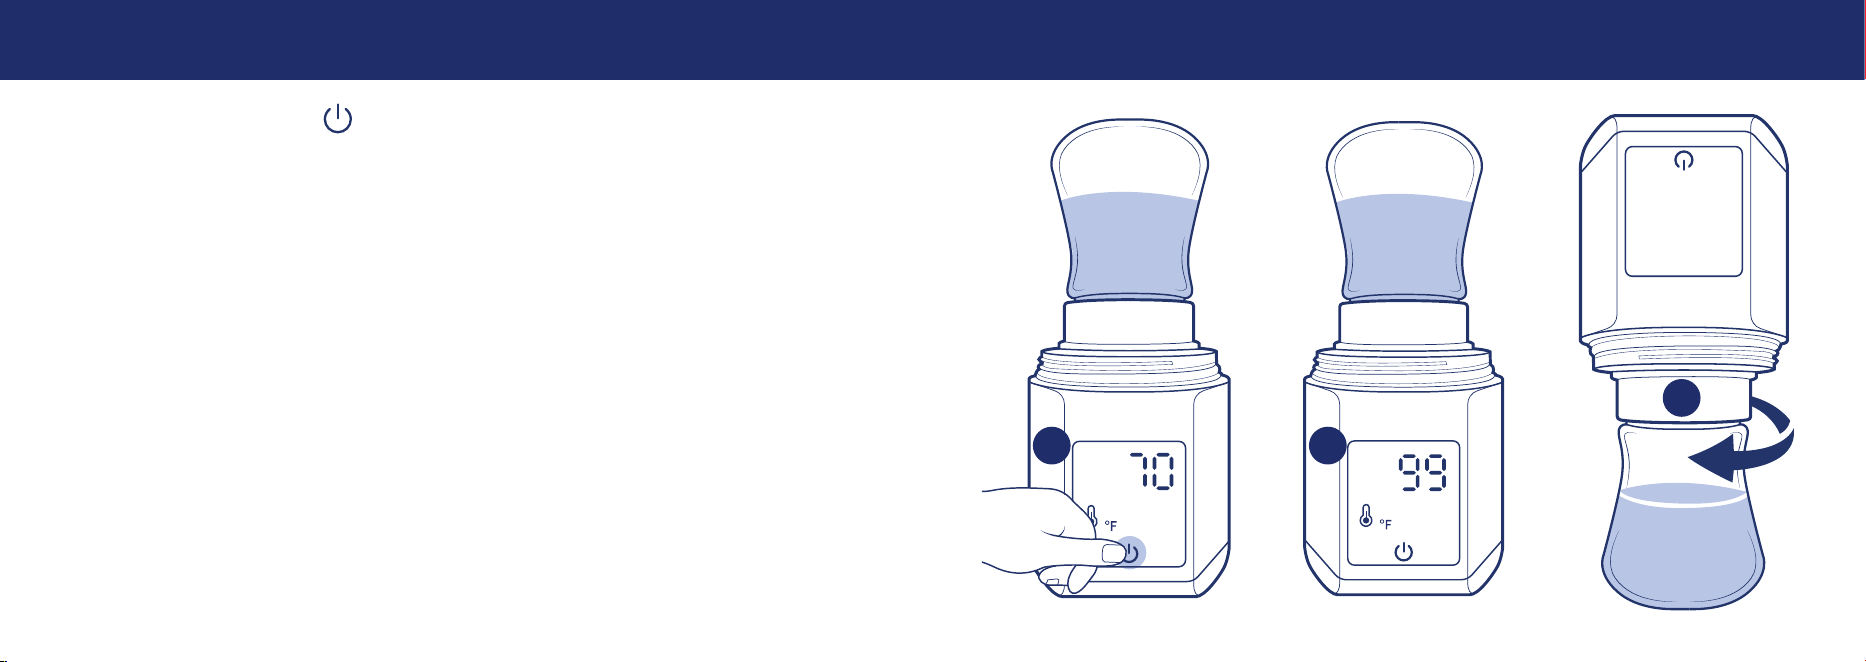
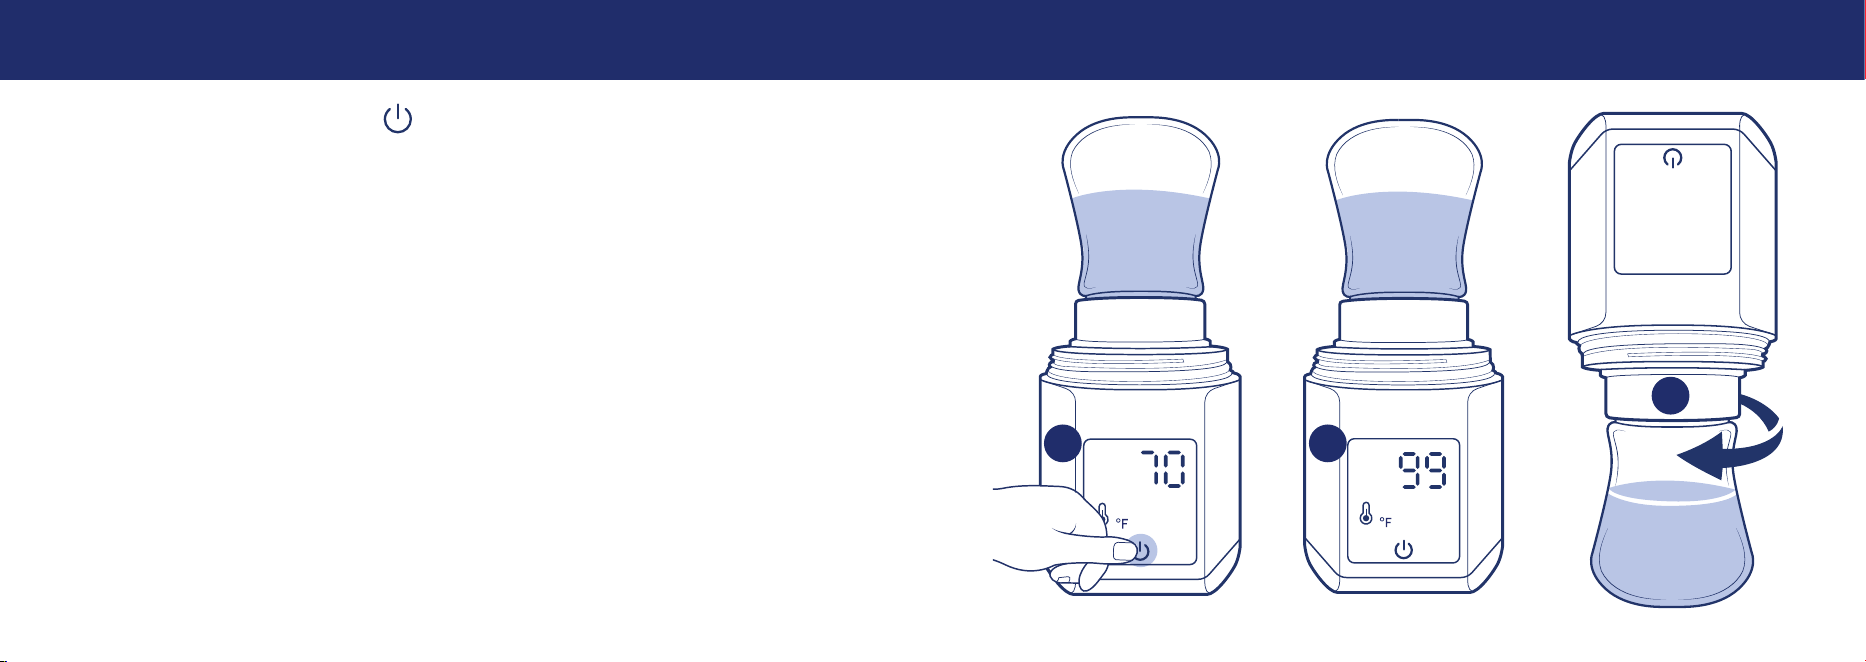
8 Press the power buon to start the warming cycle.
9 The bole warmer will start warming until it reaches the target temperature
of 99 °F (37 °C). The bole warmer will beep to indicate the warming cycle is complete,
the liquid temperature will be displayed in real time and will turn o automatically.
• To stop the unit in the middle of a warming cycle press and hold the power buon
for 2 seconds to turn it o.
10 Flip the bole warmer upside down and carefully unscrew the bole.

18
19
HELPFUL HINTS:
• After one minute of inactivity the bole warmer will automatically shut o.
• If the baery icon begins ashing during operation the baery charge level
may be insuicient to complete the cycle. Recharge the baery. Refer to page 8.
• If you notice any leaking, unscrew the bole and check that the seals in the
adapter and bole warmer are properly positioned and the adapter is rmly
screwed onto the bole. Refer to page 12.
USING THE BOTTLE WARMER
USING THE BOTTLE WARMER
HELPFUL HINTS:
• ALWAYS CHECK THE TEMPERATURE OF THE CONTENTS BEFORE SERVING:
Gently stir the contents to ensure the temperature is even; check the temperature
by squeezing a few drops onto the inside of your wrist.
• It’s recommended to consume the heated liquid immediately after warming.
• Never reheat milk a second time. Any leftover milk must be discarded.
• The heating time may vary depending on the quantity to be heated, the starting
temperature (room temperature, refrigerator), and the type and size of the
container used (plastic, glass bole).
20
21
STERILIZING SETUP
2A
2B
1B
STERILIZING SETUP
This product can be used to sanitize the heating plate, adapter, and seals used when
warming or small items like nipples and paciers (excluding boles). Before rst use,
skip to Step 1 of ‘How to Run a Sterilizing Cycle’ and run through a cycle with nothing
inside. All items to be sterilized must always be washed and rinsed thoroughly before
sterilization.
STERILIZING HEATING PLATE, ADAPTERS, AND SEALS:
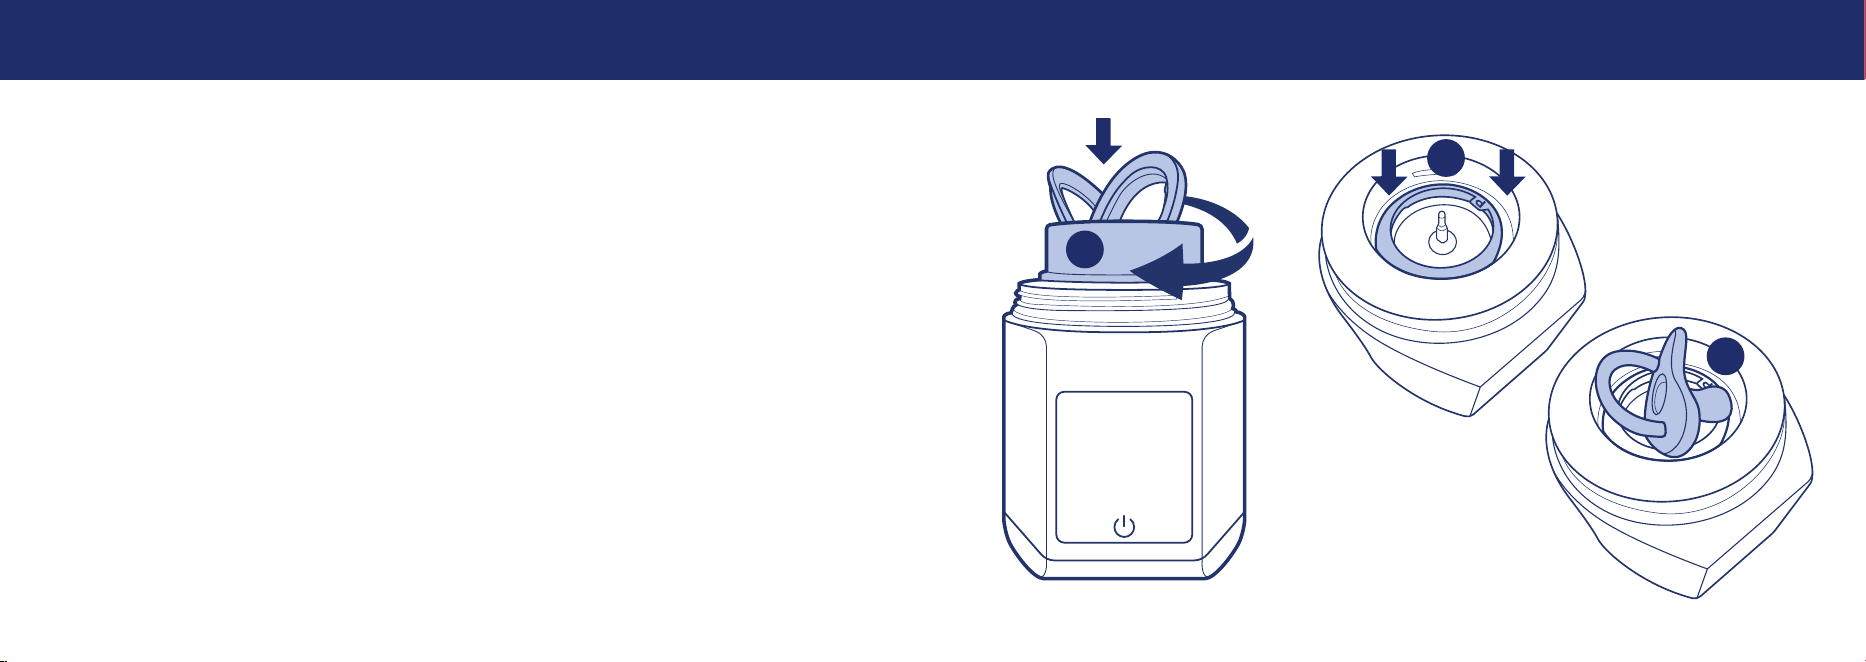
1A Remove the seal from the inside of the bole warmer and the seal from the
inside of the adapter.
1B Screw the adapter into the bole warmer and place the two seals on top of
the adapter.
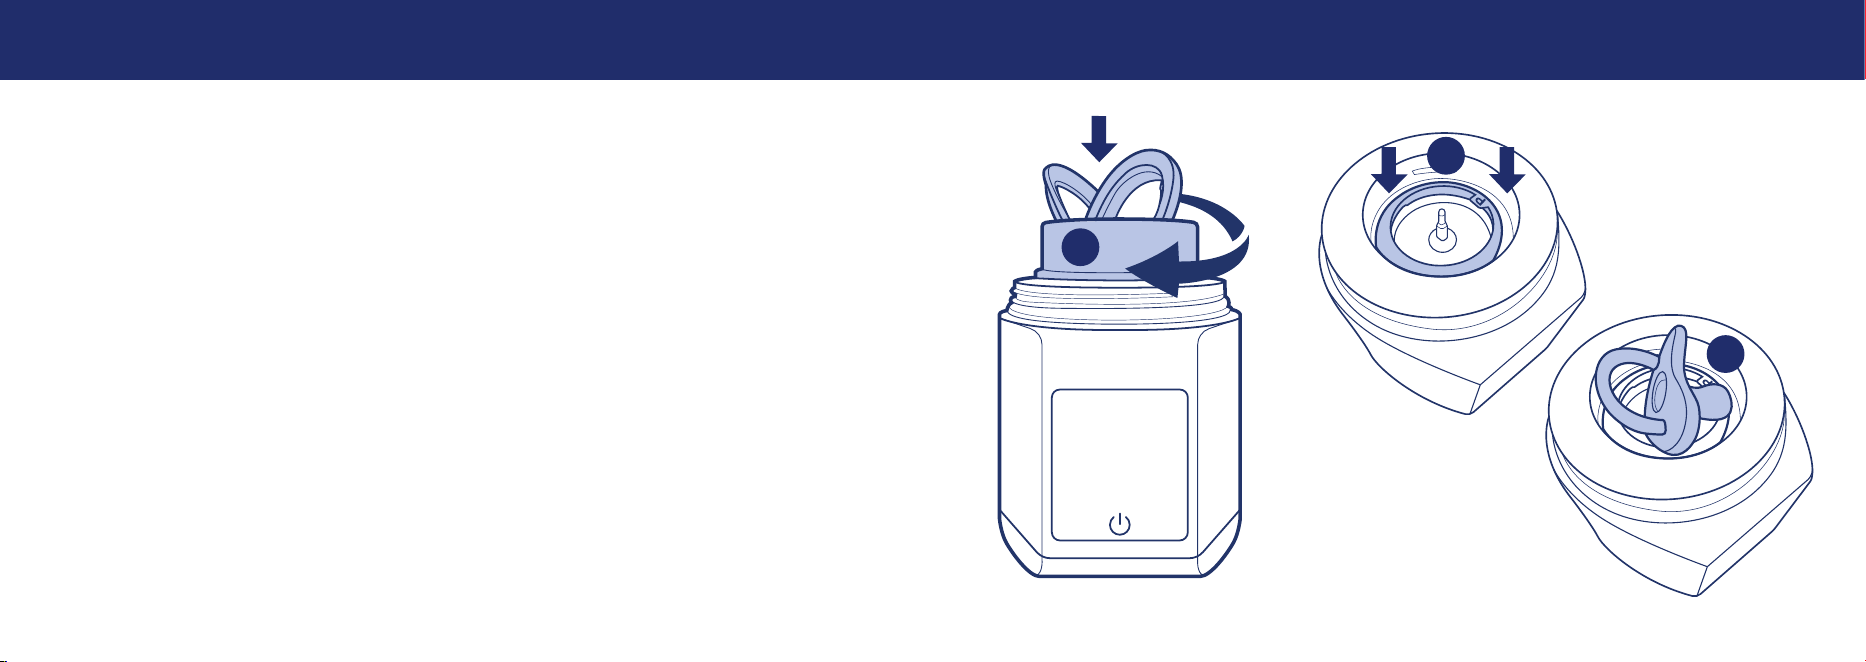
STERILIZING PACIFIERS AND SMALL ITEMS:
2A Make sure the seal inside the bole warmer is fully pushed down with the ‘P’ tab facing
up. DO NOT screw any bole adapters into the central body.
2B Place small items on top of the seal. Make sure they don’t completely cover the
heating plate.
22
23
HOW TO RUN A STERILIZING CYCLE
2
3
1
HOW TO RUN A STERILIZING CYCLE
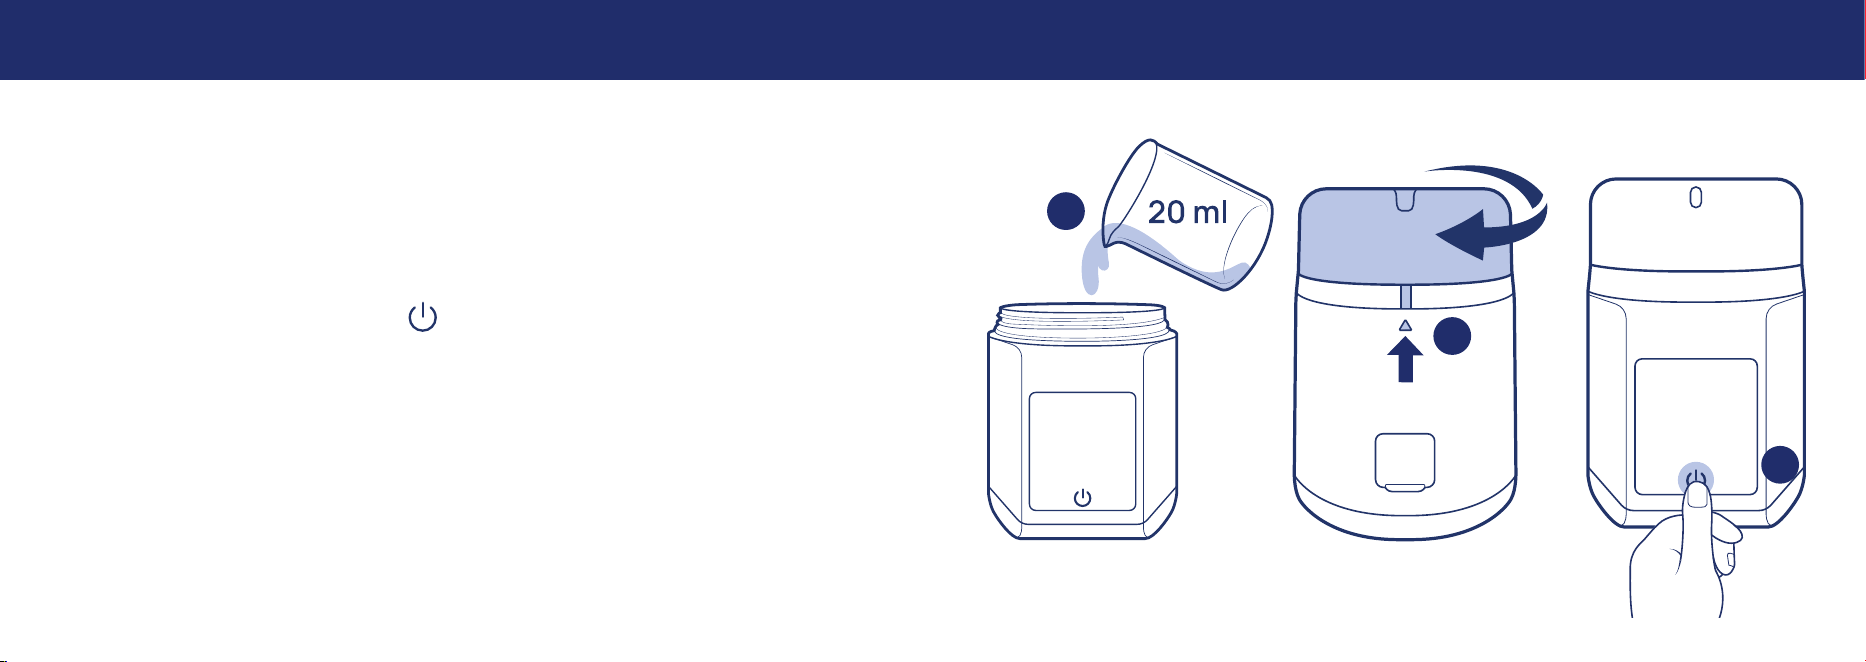
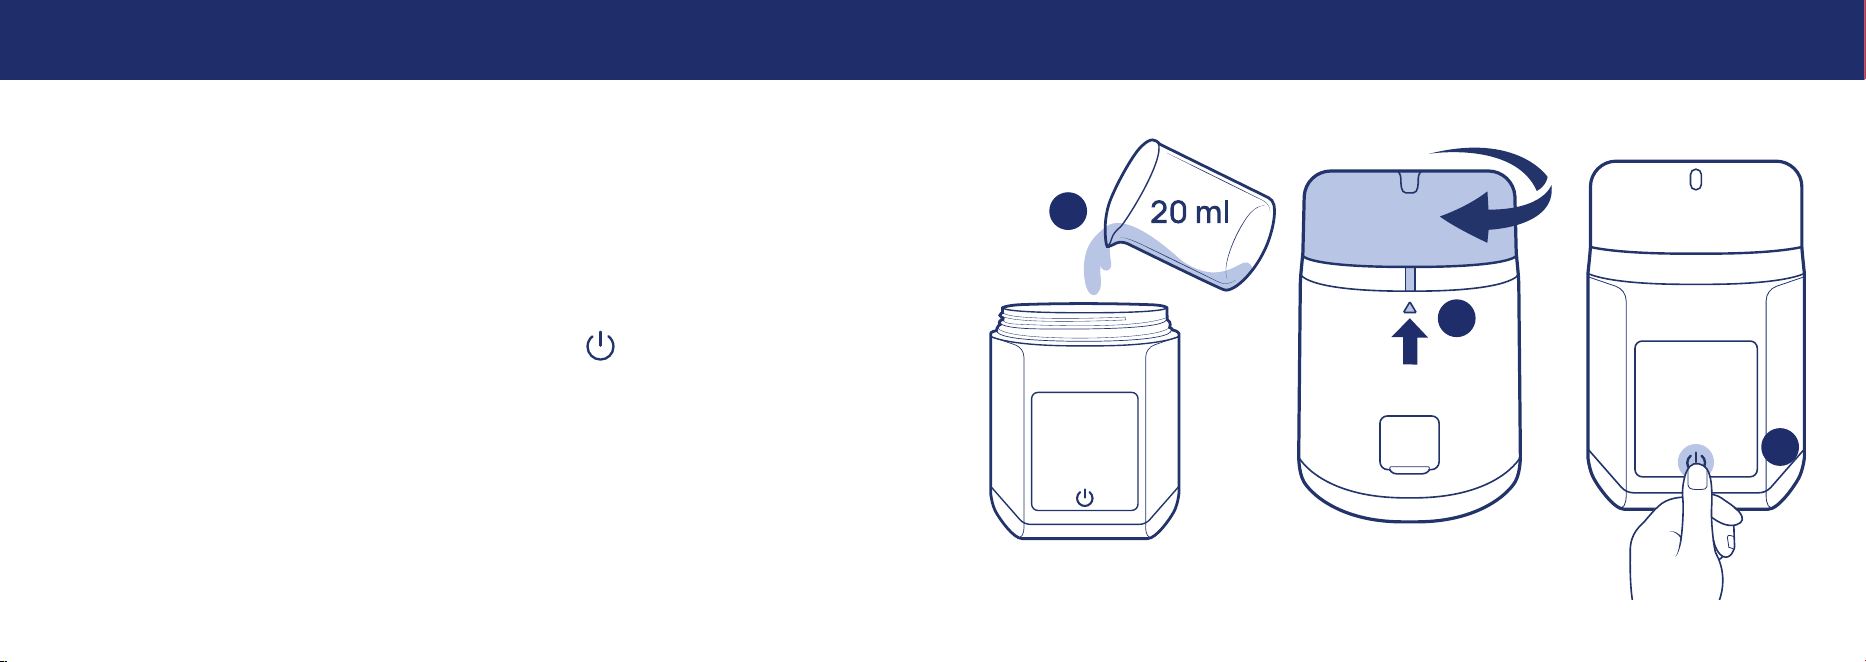
1 Place the bole warmer on a at stable surface. Pour 20 ml of water into the center of
the bole warmer onto the heating plate.
2 Screw the sterilizing lid onto the bole warmer until the arrow lines up with the mark
on the back of the bole warmer. Make sure nothing is obstructing the steam vents on
the sterilizing lid before starting the sterilizing cycle.
3 Press and hold the power buon for 2 seconds to turn on the interface.
• The baery charge status will ash on the display for a few seconds before being
replaced by the initial temperature detected by the sensor.
24
25
HOW TO RUN A STERILIZING CYCLE
4
5
HOW TO RUN A STERILIZING CYCLE
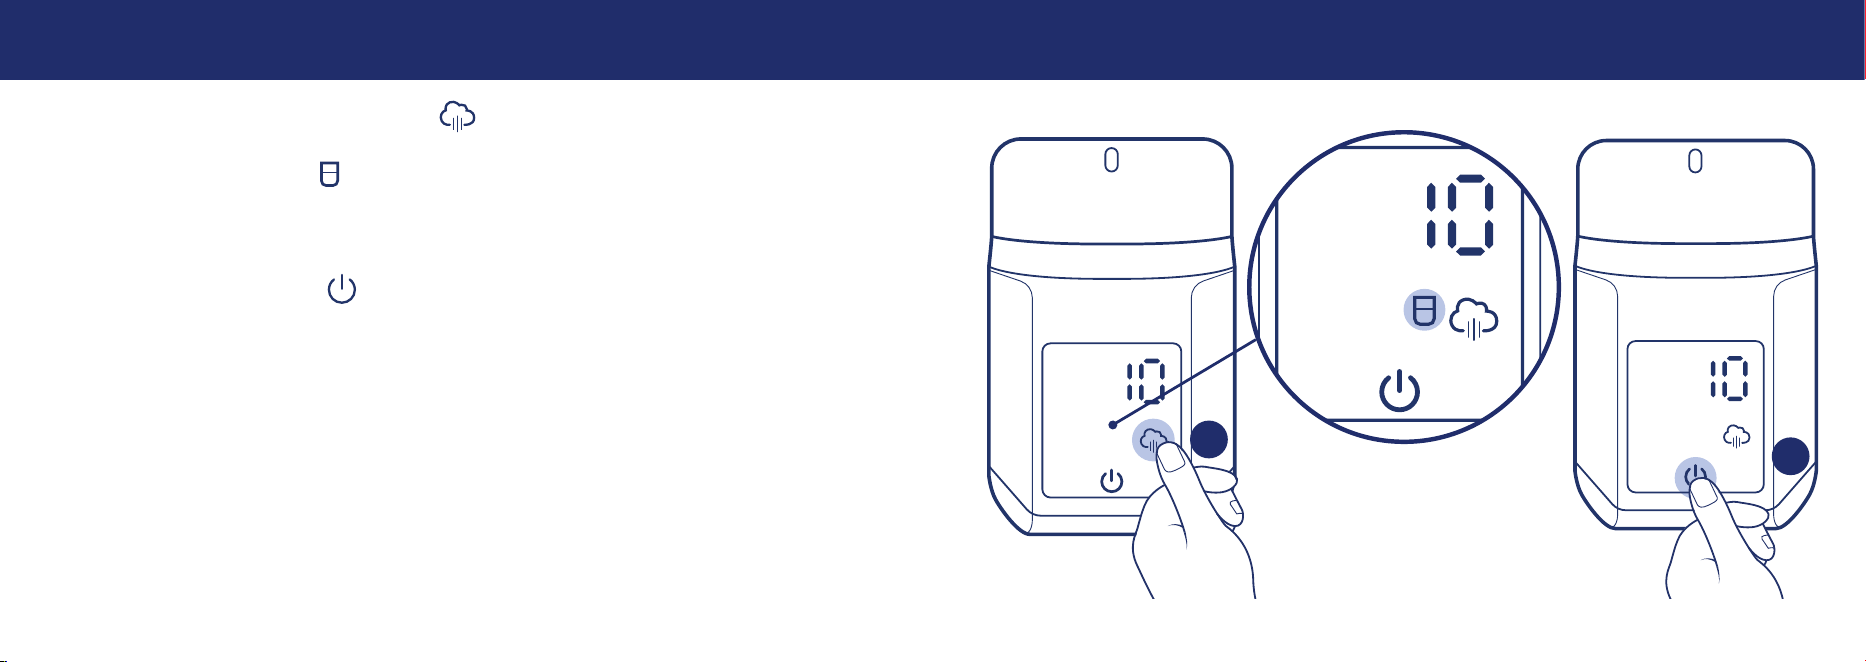
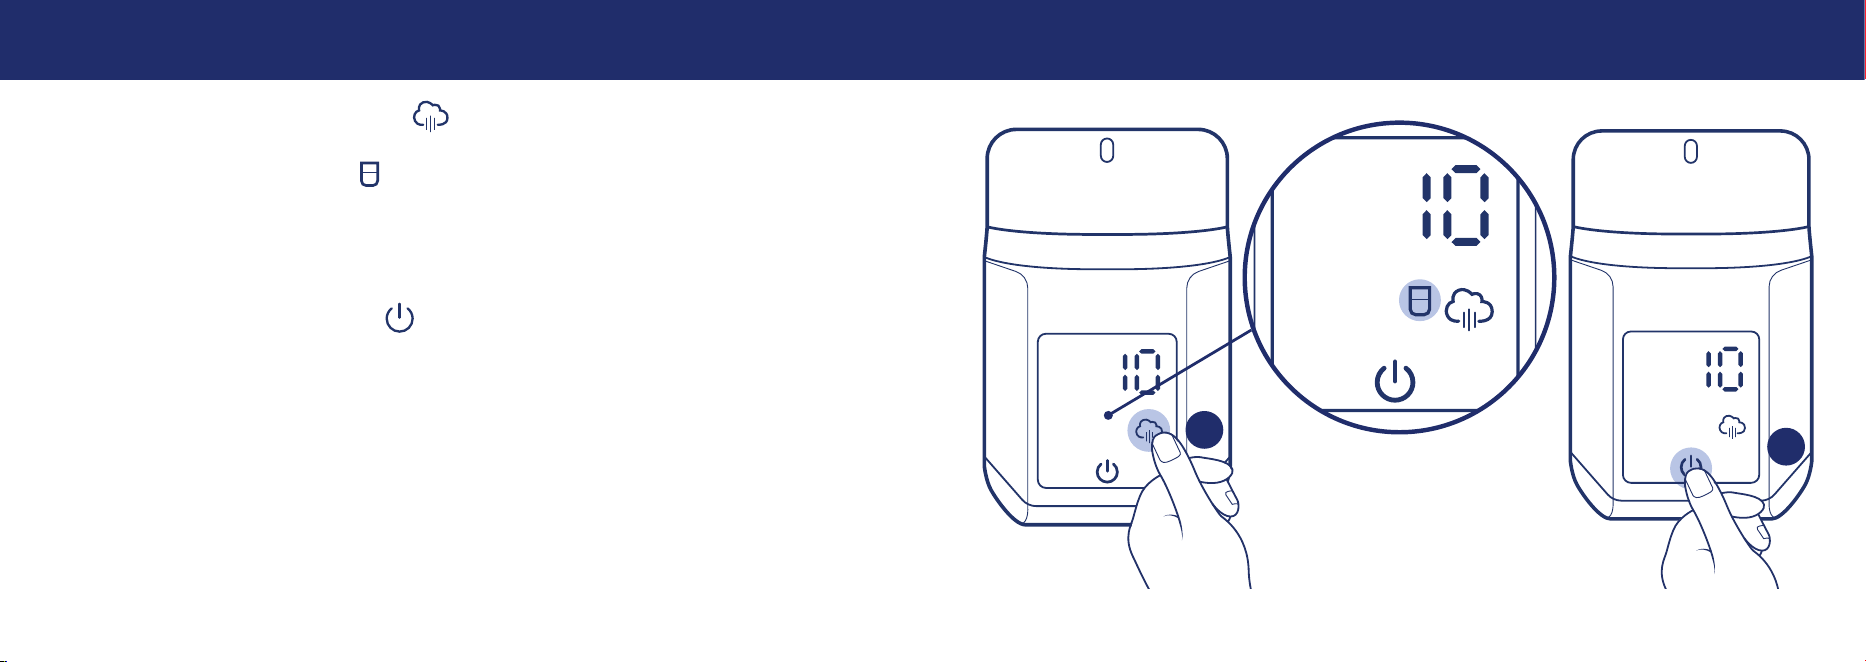
4 Press the ashing sterilizing buon .
• If the lid warning icon lights up it means the sterilizing lid is not properly screwed
onto the bole warmer. Double check that the arrow is correctly lined up with mark on
the back of the bole warmer.
5 Press the power buon to start the sterilizing cycle. The number 10 will stop
blinking and become steady once the sterilizing cycle begins.
• To stop the unit in the middle of a sterilizing cycle press and hold the power buon
for 2 seconds to turn it o.
26
27
HOW TO RUN A STERILIZING CYCLE
6
7
HOW TO RUN A STERILIZING CYCLE
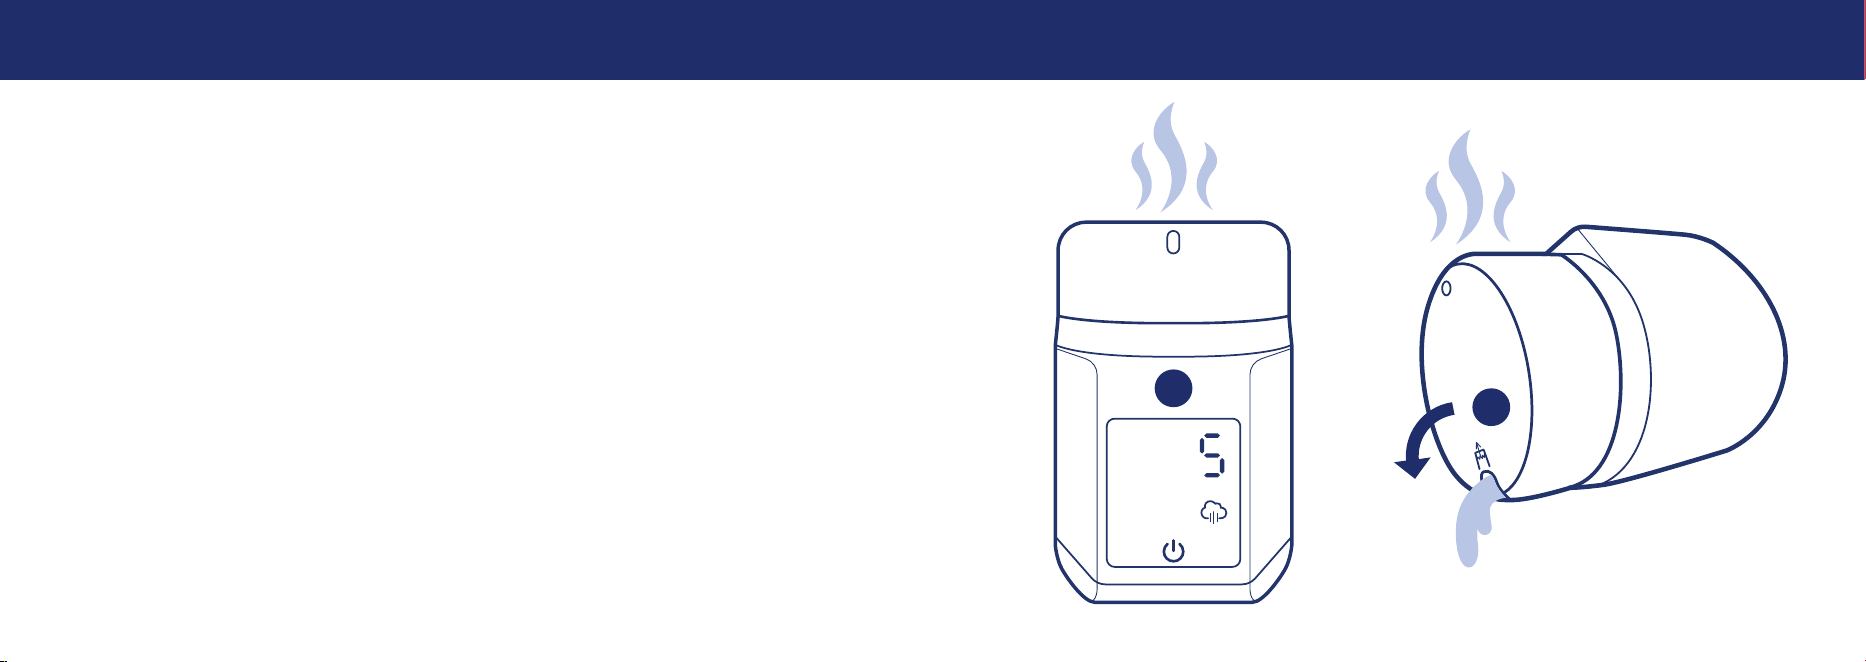
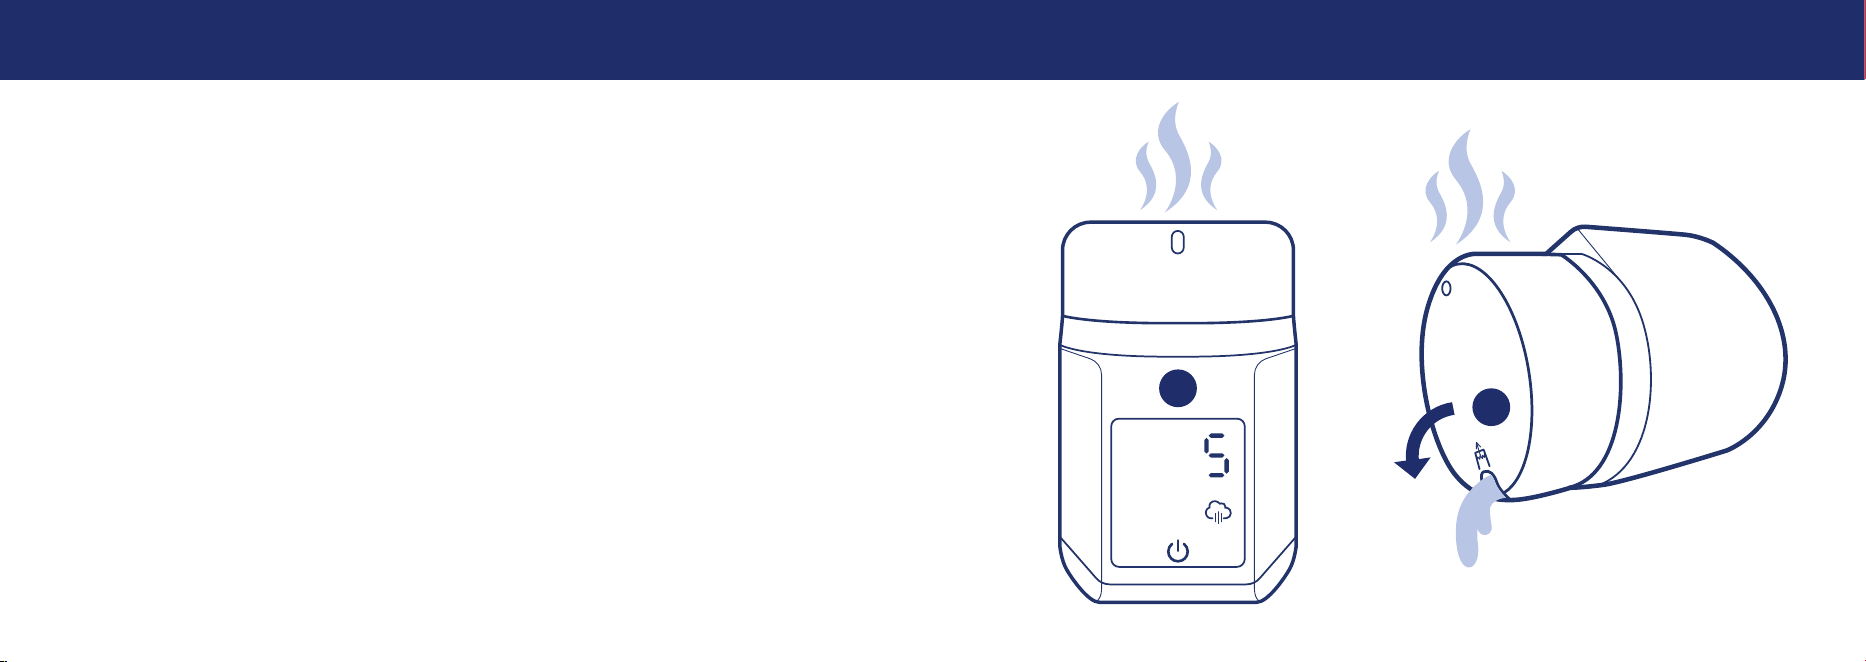
6 After the sterilizing cycle is complete a 5 minute cool down timer will start.
DO NOT touch the sterilizing lid until the timer is up.
7 Sterilizing lid will be hot! Carefully pour the remaining water out of pour spout in the
top of sterilizing lid. The sterilizing lid can now be removed.
AFTER STERILIZING CYCLE:
If the sterilizing lid is not removed the items inside will remain sterilized for up to 24 hours.
Always wash your hands before removing any sterilized items.
28
29
CLEANING & MAINTENANCE CLEANING & MAINTENANCE
This product requires regular maintenance. The cleaning and maintenance of the bole
warmer must only be carried out by an adult.
AFTER EACH USE
Allow the warmer to cool down completely.
CLEANING
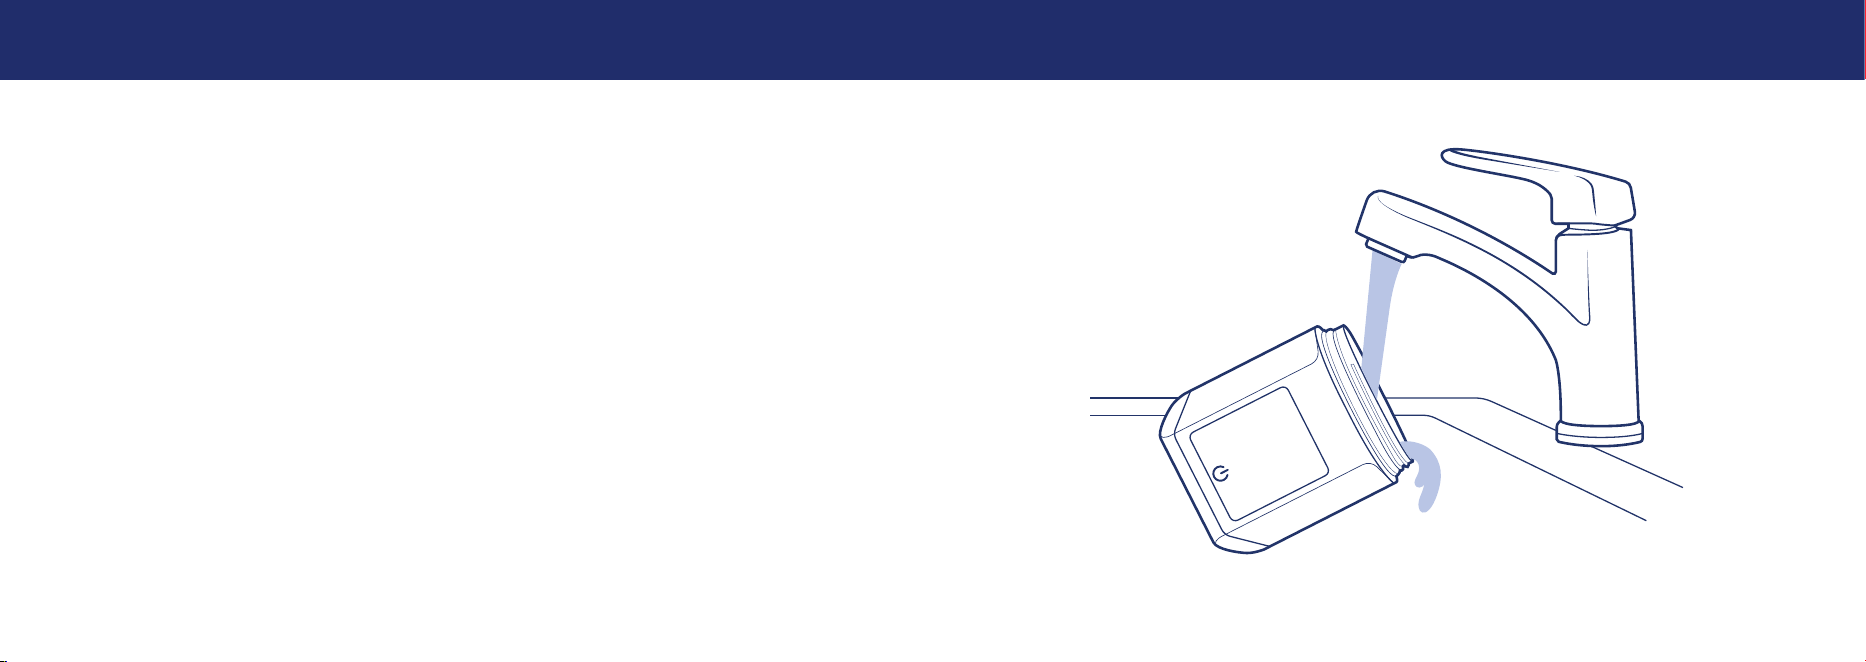
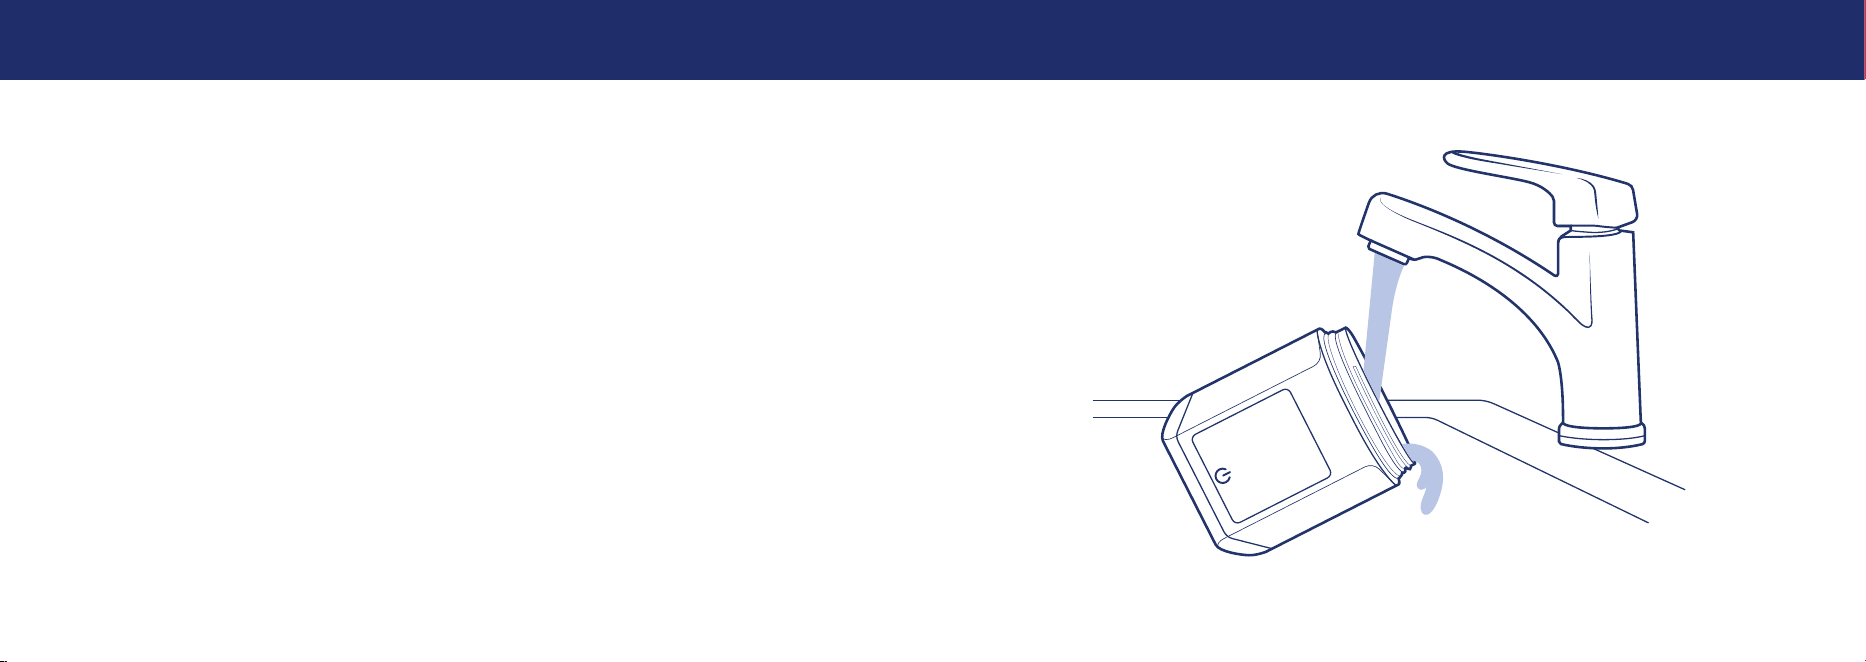
After the bole warmer has cooled down completely the heating plate can be
rinsed under the faucet. Dry with a soft cloth to remove any residual liquid from the
heating plate.
After each use, remove adapters and seals. Hand wash in warm soapy water or use
top rack of dishwasher.
Dry bole warmer, adapters, and seals thoroughly before storing in a cool, dry place.
DO NOT use any bleach, scouring pads, or any other harsh chemicals. The bole warmer
is NOT dishwasher safe. Adapters and seals are top-rack dishwasher safe.
30
31
DESCALING THE BOTTLE WARMER
2
DESCALING THE BOTTLE WARMER
The normal use of this bole warmer can cause the formation of scale residue on the
heating plate. Excessive scale residue may cause incorrect operation of the appliance
and/or cause permanent damage.
1 To descale the bole warmer, make sure it is unplugged and has cooled down
completely.
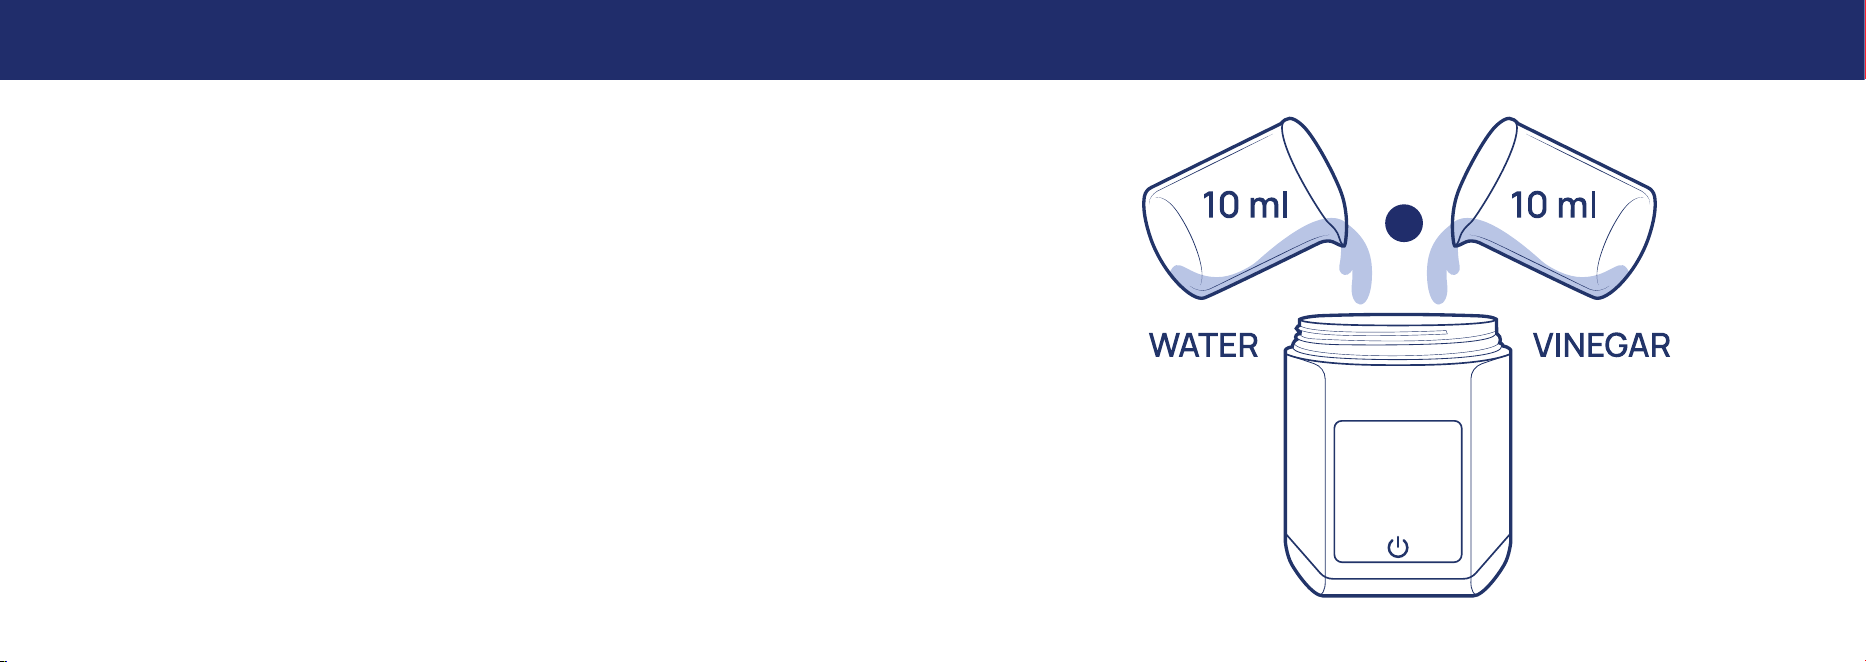
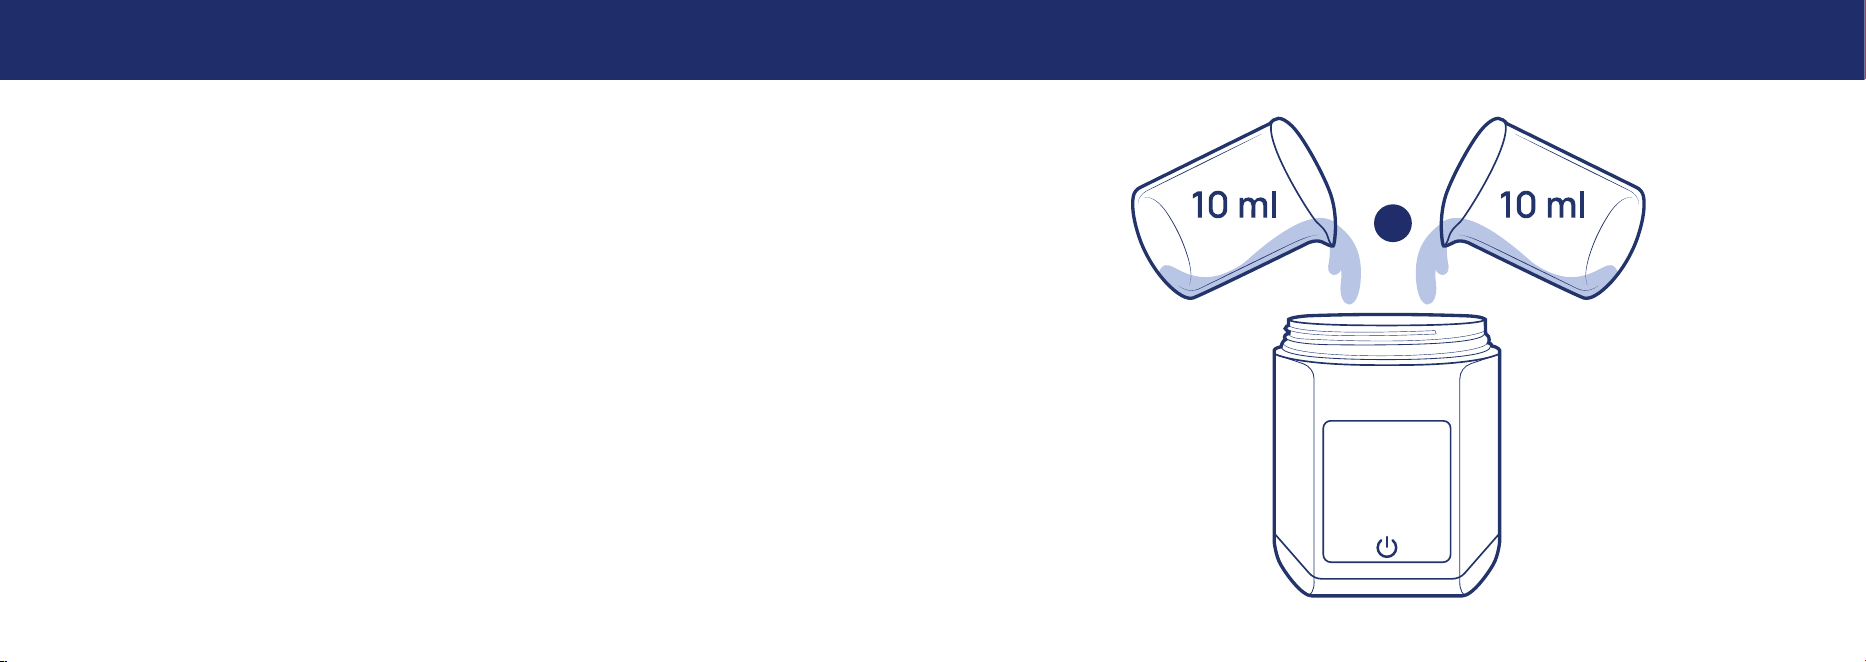
2 Remove ‘P’ seal and pour 10 ml of water and 10 ml of vinegar directly onto the
heating plate.
3 Let soak overnight. DO NOT run the bole warmer while soaking.
4 After it has soaked overnight, empty out the water and vinegar solution and rinse under
water. Dry thoroughly with a soft cloth and insert ‘P’ seal.
5 Perform a warming cycle by inserting 150ml of water into a bole.

32
33
TROUBLESHOOTING & REPAIR
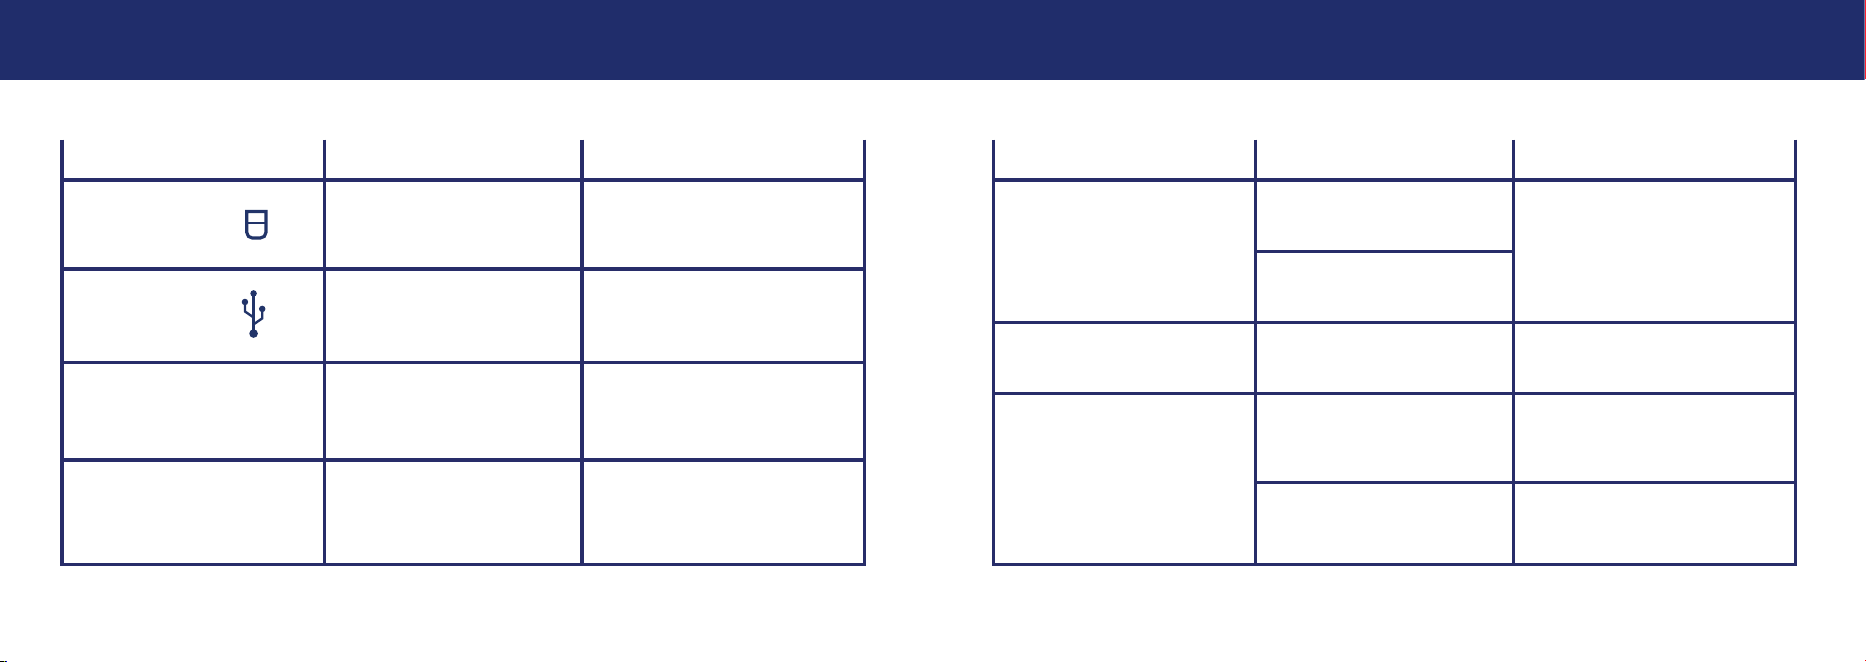
The bole warmer will
not turn on.
There is no power.
Recharge the baery.
Refer to page 8.
PROBLEM POSSIBLE CAUSE SOLUTION
Using tap water with
high mineral content,
softened water,
or treated water.
Rapid scale build-up.
Use distilled water.
The warmer needs to be
descaled. Refer to page 30.
Excessive scale deposits
on the heating plate.
Noise – Incomplete cycle.
The warmer needs to be
descaled. Refer to page 30.
The power buon has
not been pressed
long enough.
Be sure to press down on
the power buon for at
least 2 seconds.
TROUBLESHOOTING & REPAIR
PROBLEM POSSIBLE CAUSE SOLUTION
The charging cord or the
adapter have not been
plugged in correctly, or
they are damaged
and the bole warmer
is not charging.
Check that the cord
and adapter have been
plugged in correctly, and
that they are in good
condition. Should the
product still not work,
contact Customer Service.
Product is on and/or
heating/sterilizing
cycle is running.
Charging does not
start when plugged in.
Turn o the bole warmer
by holding the power buon
for 2 seconds. Recharge the
baery. Refer to page 8.
34
35
TROUBLESHOOTING & REPAIR
E5 error appears on the
display and cycle stops.
PROBLEM POSSIBLE CAUSE SOLUTION
Insuicient liquid and
thermostat tripping.
Allow the bole warmer to
cool down completely and
restart the cycle following
the instructions.
Overheating of the
heating plate.
Charging cord or adapter
not compatible.
E7 error appears
on the display.
Use a compatible 5-20V
main adapter to charge.
Items are stained
at the end of the
sterilization cycle.
There are scale deposits
in the appliance.
The warmer needs to be
descaled. Refer to page 30.
High mineral content
in the tap water.
Use distilled water.
TROUBLESHOOTING & REPAIR
Icon ashing
PROBLEM POSSIBLE CAUSE SOLUTION
Sterilizing lid is missing or
not properly aached.
Tighten the sterilizing lid.
Refer to page 22.
Icon ashing
Baery is low and needs
to be charged.
Recharge the baery.
Refer to page 8.
The warming/sterilizing
cycle cannot be started.
Baery is low and needs
to be charged.
Recharge the baery.
Refer to page 8.
Liquid is not
suiciently hot.
Heating started before
bole warmer has cooled.
Allow bole warmer to cool
completely. Start with room
temperature liquid.

36
37
WARNING:
Changes or modifications not expressly approved by the party
responsible for compliance could void the user’s authority to operate the equipment.
FCC INFORMATION
NOTE: This equipment has been tested and found to comply with the limits for a Class B digital device, pursuant to
Part 15 of the FCC Rules. These limits are designed to provide reasonable protection against harmful interference in
a residential installation. This equipment generates, uses and can radiate radio frequency energy and, if not installed
and used in accordance with the instructions, may cause harmful interference to radio communications. However,
there is no guarantee that interference will not occur in a particular installation. If this equipment does cause harmful
interference to radio or television reception, which can be determined by turning the equipment o and on, the user is
encouraged to try to correct the interference by one or more of the following measures:
• Reorient or relocate the receiving antenna.
• Increase the separation between the equipment and receiver.
• Connect the equipment into an outlet on a circuit dierent from that to which the receiver is connected.
• Consult the dealer or experienced radio/TV technician for help.
FCC Compliance Statement:
This device complies with Part 15 of the FCC Rules. Operation is subject to the following two conditions:
(1) this device may not cause harmful interference, and
(2) this device must accept any interference received, including interference that may cause undesired operation.
TROUBLESHOOTING & REPAIR
PROBLEM POSSIBLE CAUSE SOLUTION
Baery is low and needs
to be charged.
Recharge the baery.
Refer to page 8.
Insuicient liquid and
thermostat tripping.
Allow the bole warmer to
cool down completely and
restart the cycle following
the instructions.
The sterilization cycle
ends before the set
10 minutes.
Baery is low and needs
to be charged.
Recharge the baery.
Refer to page 8.
The heating cycle ends
before 99 °F (37 °C)
appears on the display.
Insuicient liquid and
thermostat tripping.
Allow the bole warmer to
cool down completely and
restart the cycle following
the instructions.
38
39
CONTACT US
If you have any problems with your Chicco product,
or any questions regarding use, please do not return this
product to the store. Contact us in one of the following ways:
Call Chicco Customer Service:
1-877-424-4226
Visit our website:
ChiccoUSA.com
Email us:
INFORMATION
WARNING!
Hot Surface
WARNING!
Hot Steam
Model: N0358
DC: 5-20V 3A Max (60W Max)
Power: 60W
Rechargeable lithium baery: 14.8V 5000mAh
Made in China
41
ADVERTENCIA
ADVERTENCIAS
PORTÁTIL
Calentador y esterilizador de biberones
Manual del dueño
Lea todas las instrucciones ANTES
de montar y USAR el producto.
GUARDE ESTAS INSTRUCCIONES
PARA USO FUTURO.
SIEMPRE DEBE SEGUIR LAS PRECAUCIONES BÁSICAS DE SEGURIDAD
CUANDO USE EQUIPOS ELÉCTRICOS, INCLUIDO LO SIGUIENTE:
Tómese un momento para leer esta guía del usuario
PELIGRO DE QUEMADURAS
Para evitar el riesgo de quemaduras:
•
Los componentes del calentador de biberones y la temperatura del agua pueden estar muy
calientes. Evite el contacto directo con el agua caliente y el vapor. Manipular con cuidado.
• NO toque las superficies que puedan estar calientes. Espere a que todas las piezas de
la unidad se hayan enfriado antes de tocarlas o limpiarlas.
• Los biberones estarán calientes; retírelos con cuidado.
•
Antes de servir, asegúrese de que el contenido del biberón esté a una temperatura segura.
• NO mueva el calentador de biberones mientras está calentando o esterilizando.
• NO obstruya las salidas de vapor en la parte superior de la tapa de esterilización.
• NUNCA lo use sin líquido.
• Este aparato no puede ser usado por niños. NO es un juguete. Manténgalo alejado del
alcance de los niños.
42
43
ADVERTENCIASADVERTENCIAS
ADVERTENCIA
• Es necesaria una estrecha supervisión cuando se use el aparato cerca de niños.
• Para uso doméstico y portátil solamente en lugares secos.
• Use este aparato solo para su utilización indicada. NO modifique ni altere el calentador
de biberones.
• NO use accesorios, piezas de repuesto ni ningún otro componente no suministrado ni
aprobado por Chicco, ya que pueden producir lesiones y daños.
• NO lo use ningún biberón que no esté previsto para calentarse.
•
NO lo coloque sobre ni cerca de un quemador de gas o eléctrico caliente, ni en un horno caliente.
• NO es apto para usar como calentador de espacios.
•
Inspecciónelo cuidadosamente antes de cada uso. NO utilice ningún aparato después de un
mal funcionamiento o de haberlo dejado caer o dañado de algún otro modo. Si el calentador
de biberones está defectuoso o no funciona correctamente, apáguelo de inmediato.
• Para protegerlo de descargas eléctricas, NO sumerja el calentador de biberones en agua.
•
NO lo use si el calentador de biberones se cae accidentalmente en el agua o queda sumergido.
• Este producto tiene una batería de litio integrada que no puede reemplazarse.
•
Úselo solo con una fuente de alimentación para equipos de tecnología de la información
homologada/certiÿcada.
ADVERTENCIA
•
En condiciones abusivas, la batería puede expulsar líquido; evite el contacto. Si ocurre
contacto por accidente, enjuague con agua. Si el líquido entra en contacto con los ojos,
busque atención médica adicional. El líquido expulsado de la batería puede causar irritación
o quemaduras.
•
NO use ningún aparato que esté dañado o modificado. Las baterías dañadas o modificadas
pueden presentar un comportamiento impredecible que podría resultar en incendios,
explosiones o riesgo de lesiones.
•
NO exponga ningún aparato al fuego ni a temperaturas excesivas. La exposición al fuego o a
temperaturas superiores a 265 °F (130 °C) puede causar explosiones.
•
Siga todas las instrucciones de carga y no cargue el aparato fuera del rango de temperatura
especificado en las instrucciones. Cargar incorrectamente o a temperaturas fuera del rango
especificado podría dañar la batería y aumentar el riesgo de incendio.
•
Procure que el mantenimiento lo realice una persona calificada para reparaciones que use
únicamente piezas de repuesto idénticas. Esto garantizará que se mantenga la seguridad
del producto.
•
NO modifique ni intente reparar el aparato, excepto según se indique en las instrucciones de
uso y cuidado.
44
45
LISTA DE ADAPTADORES
A continuación aparece una lista de los adaptadores incluidos y los biberones
compatibles. Puede encontrar la letra del adaptador impresa en el lateral del adaptador.
• Adaptador A - Dr. Brown’s Narrow / Medela
• Adaptador C - Chicco / Avent
• Adaptador D - MAM
• Adaptador F - Tommee Tippee
• Adaptador H - Comotomo Gen 1 / Haakaa / Boon Nursh
• Adaptador I - Lansinoh / Pigeon / Eveno Wide
• Adaptador J - Dr. Brown’s Wide
• Adaptador K - Comotomo Gen 2
LISTA DE PIEZAS
A
C
B
Calentador de biberones Tapa esterilizadora
Cable de carga
Compatible con las marcas más populares, incluidas:
AVENT®, DR. BROWN’S®, MAM®, TOMMEE TIPPEE® y
COMOTOMO®.
AVENT®, DR. BROWN’S®, MAM®, TOMMEE TIPPEE®
y COMOTOMO® son todas marcas comerciales
registradas de sus respectivos propietarios.
Este producto no tiene licencia de, ni está aliado o
patrocinado por Avent Limited, Dr. Brown’s Company,
MAM Babyartikel Gesellschaft MBH, Mayborn (UK)
Limited o Comotomo.
46
47
CÓMO CARGAR LA BATERÍA
1
2
3
CÓMO CARGAR LA BATERÍA
Antes de cargar la batería, asegúrese de que el calentador de biberones esté apagado.
El calentador de biberones no puede usarse mientras se está cargando. Cargue la
batería por completo antes de usarlo.
1 Levante el protector del puerto de carga en la parte posterior del calentador
de biberones.
2 Conecte el extremo del cable de carga USB-C incluido al calentador de biberones.
3 Enchufe el extremo USB-A del cable de carga en un suministro de alimentación de
carga rápida (adaptador principal 5-20 V) que esté enchufado en la pared.
• Para una carga más rápida, puede usar un suministro de energía de carga rápida
(adaptador principal 5-20 V) con un cable compatible (USBC-USBC).
48
49
CÓMO CARGAR LA BATERÍA
5
4
CÓMO CARGAR LA BATERÍA
4 El icono de carga se iluminará. Cuando el calentador de biberones esté
completamente cargado, se apagará el icono de carga.
5 Desenchufe el cable de la parte posterior del calentador de biberones y vuelva a
empujar el protector del puerto de carga en su lugar.
50
51
CÓMO USAR EL CALENTADOR DE BIBERONES
4B
4A
1
CÓMO USAR EL CALENTADOR DE BIBERONES
1 Asegúrese de que el sello dentro del calentador de biberones esté totalmente
empujado en el fondo y que la pestaña con la ‘P’ quede hacia arriba.
2 Encuentre el adaptador correcto para el biberón que va a calentar.
Consulte la página 45.
3 Vierta la cantidad de líquido (agua o leche) que quiera calentar en el biberón.
• NUNCA use menos de 30 ml de líquido dentro del biberón cuando lo caliente.
• NUNCA use este calentador de biberones con líquido congelado.
4 Para evitar fugas, asegúrese de que el sello esté rmemente apretado dentro del
adaptador con la pestaña de la letra hacia arriba (4A). Enrosque rmemente el
adaptador en el biberón (4B).
52
53
CÓMO USAR EL CALENTADOR DE BIBERONES
6
5
7
CÓMO USAR EL CALENTADOR DE BIBERONES
5 Dele la vuelta al calentador de biberones y enrósquelo rmemente en el biberón.
6 Vuelva a darle la vuelta al calentador de biberones y colóquelo sobre una supercie
plana y estable. Oprima y mantenga oprimido el botón de encendido durante 2
segundos para encender la interfaz.
• El estado de carga de la batería parpadeará en pantalla durante unos segundos antes
de ser reemplazado por la temperatura inicial detectada por el sensor.
7 Oprima el icono de calentamiento .
• Oprima el icono de calentamiento de nuevo para cambiar la temperatura del
calentador de biberones de °F a °C.
54
55
CÓMO USAR EL CALENTADOR DE BIBERONES
8 9
10
CÓMO USAR EL CALENTADOR DE BIBERONES
8 Oprima el botón de encendido para iniciar el ciclo de calentamiento.
9 El calentador de biberones empezará a calentar hasta que alcance la temperatura
de 99 °F (37 °C). El calentador de biberones pitará para indicar que el ciclo de
calentamiento está completo, la temperatura del líquido se mostrará en tiempo real
y se apagará automáticamente.
• Para detener la unidad en el medio de un ciclo de calentamiento, oprima y mantenga
oprimido el botón de encendido durante 2 segundos para apagarlo.
10 Dele la vuelta al calentador de biberones y desenrosque con cuidado el biberón.

56
57
CONSEJOS ÚTILES:
• El calentador de biberones se apagará automáticamente después de un minuto
de inactividad.
• Si el icono de la batería comienza a parpadear durante el funcionamiento, es
posible que el nivel de carga de la batería sea insuciente para completar el ciclo.
Recargue la batería. Consulte la página 46.
• Si nota fugas, desenrosque el biberón y compruebe que los sellos del adaptador y
del calentador de biberones estén situados correctamente y que el adaptador esté
rmemente enroscado en el biberón. Consulte la página 50.
CÓMO USAR EL CALENTADOR DE BIBERONES
CÓMO USAR EL CALENTADOR DE BIBERONES
CONSEJOS ÚTILES:
• COMPRUEBE SIEMPRE LA TEMPERATURA DEL CONTENIDO ANTES DE SERVIRLO:
Remueva con cuidado el contenido para asegurarse de que la temperatura
sea homogénea; compruebe la temperatura apretando unas gotas en el interior
de su muñeca.
• Se recomienda consumir el líquido calentado inmediatamente después de calentarlo.
• Nunca vuelva a calentar la leche una segunda vez. Toda leche que sobre debe
desecharse.
• El tiempo de calentamiento puede variar dependiendo de la cantidad de líquido a
calentar, la temperatura inicial (temperatura ambiente o refrigerador) y el tiempo y
tamaño del recipiente usado (biberón de plástico o vidrio).
58
59
CONFIGURACIÓN PARA ESTERILIZAR
2A
2B
1B
CONFIGURACIÓN PARA ESTERILIZAR
Este producto puede usarse para higienizar la placa de calentamiento, el adaptador
y los sellos utilizados para calentar, o también artículos pequeños como tetinas y
chupetes (excluidos los biberones). Antes del primer uso, omita el Paso 1 de “Cómo
realizar un ciclo de esterilización” y ponga en funcionamiento un ciclo sin nada dentro.
Siempre debe lavar y enjuagar bien todos los artículos antes de esterilizarlos.
ESTERILIZACIÓN DE LA PLACA DE CALENTAMIENTO, LOS ADAPTADORES Y LOS SELLOS:
1A Retire el sello del interior del calentador de biberones y el sello del interior del
adaptador.
1B Desenrosque el adaptador del interior del calentador de biberones y coloque los dos
sellos en la parte superior del adaptador.
CÓMO ESTERILIZAR CHUPETES Y PEQUEÑOS ARTÍCULOS:
2A Asegúrese de que el sello dentro del calentador de biberones esté totalmente
empujado en el fondo y que la pestaña con la “P” quede hacia arriba. NO enrosque
ningún adaptador de biberón en el cuerpo central.
2B Ponga los artículos pequeños encima del sello. Asegúrese de que no cubran por
completo la placa de calentamiento.
60
61
CÓMO REALIZAR UN CICLO DE ESTERILIZACIÓN
2
3
1
CÓMO REALIZAR UN CICLO DE ESTERILIZACIÓN
1 Coloque el calentador de biberones sobre una supercie plana y estable. Vierta 20 ml
de agua en el centro del calentador de biberones sobre la placa de calentamiento.
2 Enrosque la tapa esterilizadora en el calentador de biberones hasta que la echa
quede alineada con la marca en la parte posterior del calentador de biberones.
Asegúrese de que no haya nada obstruyendo las salidas de vapor de la tapa
esterilizadora antes de empezar el ciclo de esterilización.
3 Oprima y mantenga oprimido el botón de encendido durante 2 segundos para
encender la interfaz.
• El estado de carga de la batería parpadeará en pantalla durante unos segundos
antes de ser reemplazado por la temperatura inicial detectada por el sensor.
62
63
CÓMO REALIZAR UN CICLO DE ESTERILIZACIÓN
CÓMO REALIZAR UN CICLO DE ESTERILIZACIÓN
4 Oprima el botón de esterilización parpadeante.
• Si el icono de advertencia de la tapa se enciende, signica que la tapa
esterilizadora no está correctamente enroscada en el calentador de biberones.
Vuelva a comprobar que la echa esté correctamente alineada con la marca en la
parte posterior del calentador de biberones.
5 Oprima el botón de encendido para iniciar el ciclo de esterilización.
El número 10 debería dejar de parpadear y mantenerse jo cuando comience el
ciclo de esterilización.
• Para detener la unidad en medio de un ciclo de esterilización, oprima y mantenga
oprimido el botón de encendido durante 2 segundos para apagarlo.
4
5
64
65
CÓMO REALIZAR UN CICLO DE ESTERILIZACIÓN
6
7
CÓMO REALIZAR UN CICLO DE ESTERILIZACIÓN
6 Después de que el ciclo de esterilización esté completo, comenzará un
temporizador de enfriamiento de 5 minutos. NO toque la tapa esterilizadora
hasta que termine el temporizador.
7 ¡La tapa esterilizadora estará caliente! Vierta con cuidado el agua restante por la
boquilla de vertido de la parte superior de la tapa esterilizadora. Ya puede retirar la
tapa esterilizadora.
DESPUÉS DEL CICLO DE ESTERILIZACIÓN:
Si no retira la tapa esterilizadora, los artículos en su interior permanecerán estériles
durante 24 horas como máximo. Lávese siempre las manos antes de retirar los
artículos esterilizados.
66
67
LIMPIEZA Y MANTENIMIENTOLIMPIEZA Y MANTENIMIENTO
Este producto requiere mantenimiento con regularidad. La limpieza y el mantenimiento del
calentador de biberones solo puede realizarlos un adulto.
DESPUÉS DE CADA USO
Deje que el calentador se enfríe por completo.
LIMPIEZA
Después de que el calentador de biberones se haya enfriado por completo, puede
enjuagar la placa de calentamiento bajo el grifo. Seque con un paño suave para retirar
cualquier líquido residual de la placa de calentamiento.
Retire los adaptadores y sellos después de cada uso. Lávelos a mano en agua jabonosa
templada o use la bandeja superior del lavaplatos.
Seque bien el calentador de biberones, los adaptadores y los sellos antes de guardarlos
en un lugar fresco y seco.
NO use lejía, estropajos ni ningún producto químico fuerte. El calentador de biberones NO
puede lavarse en el lavaplatos. Los adaptadores y sellos pueden lavarse de forma segura
en la bandeja superior del lavaplatos.
68
69
CÓMO DESCALCIFICAR EL CALENTADOR DE BIBERONES
2
AGUA VINAGRE
CÓMO DESCALCIFICAR EL CALENTADOR DE BIBERONES
El uso normal de este calentador de biberones puede provocar la formación de residuos
de cal en la placa de calentamiento. Una cantidad excesiva de residuos de cal puede
provocar el funcionamiento incorrecto del aparato o provocar daños permanentes.
1 Para descalcicar el calentador de biberones, asegúrese de que esté desenchufado y
se haya enfriado por completo.
2 Retire el sello “P” y vierta 10 ml de agua y 10 ml de vinagre directamente en la placa
de calentamiento.
3 Déjelo en remojo hasta el día siguiente. NO encienda el calentador de biberones
mientras está en remojo.
4 Después de que haya estado en remojo hasta el día siguiente, vacíe la solución de
agua y vinagre, y enjuáguelo con agua. Séquelo por completo con un paño suave e
inserte el sello “P”.
5 Ponga en marcha un ciclo de calentamiento con 150 ml de agua en un biberón.

70
71
RESOLUCIÓN DE PROBLEMAS Y REPARACIÓN
El calentador de
biberones no se
enciende.
No hay energía.
Recargue la batería.
Consulte la página 46.
PROBLEMA CAUSA POSIBLE SOLUCIÓN
Usar agua del grifo con
alto contenido de
minerales, agua suavizada
o agua tratada.
Acumulación rápida de cal.
Use agua destilada.
Es necesario
descalcicar el calentador.
Consulte la página 68.
Depósitos excesivos
de cal en la placa de
calentamiento.
Ruido – ciclo incompleto.
Es necesario
descalcicar el calentador.
Consulte la página 68.
El botón de encendido no
se oprimió durante
suciente tiempo.
Asegúrese de oprimir el
botón de encendido durante
2 segundos como mínimo.
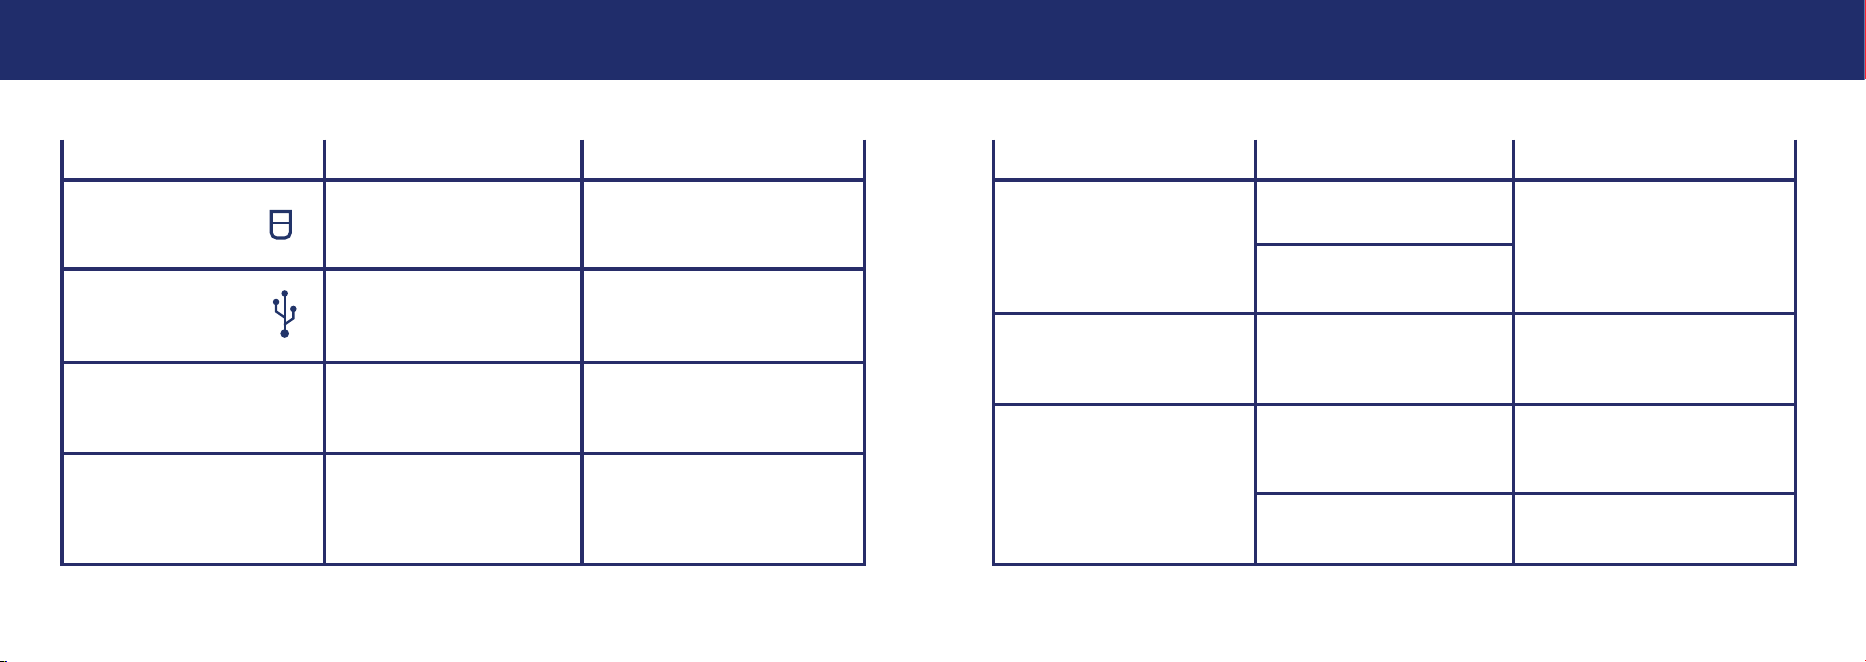
RESOLUCIÓN DE PROBLEMAS Y REPARACIÓN
PROBLEMA CAUSA POSIBLE SOLUCIÓN
Es posible que el cable
de cargar o el adaptador
no estén enchufados
correctamente, o que
estén dañados y el
calentador de biberones
no esté cargando.
Compruebe que el cable
y el adaptador estén
enchufados correctamente,
y que estén en buen
estado. Si el producto sigue
sin funcionar, comuníquese
con el Servicio de atención
al cliente.
El producto está
encendido y/o el ciclo
de calentamiento/
esterilización está
funcionando.
No comienza a cargar
cuando está enchufado.
Apague el calentador de
biberones al mantener oprimido
el botón de encendido durante
2 segundos. Recargue la
batería. Consulte la página 46.
72
73
RESOLUCIÓN DE PROBLEMAS Y REPARACIÓN
Aparece el error E5
en la pantalla y se
detiene el ciclo.
PROBLEMA CAUSA POSIBLE SOLUCIÓN
Líquido insuciente y
salta el termostato.
Deje que el calentador de
biberones se enfríe por
completo y reinicie el ciclo
siguiendo las instrucciones.
Sobrecalentamiento de la
placa de calentamiento.
El cable de carga o
el adaptador no es
compatible.
Aparece el error E7
en la pantalla.
Use un adaptador
principal de 5-20 V
compatible para cargar.
Los artículos aparecen
manchados al nal del
ciclo de esterilización.
Hay depósitos de cal
en el aparato.
Es necesario
descalcicar el calentador.
Consulte la página 68.
Alto contenido de mineral
en el agua del grifo.
Use agua destilada.
RESOLUCIÓN DE PROBLEMAS Y REPARACIÓN
Icono parpadeante
PROBLEMA CAUSA POSIBLE SOLUCIÓN
Falta la tapa
esterilizadora o no está
adecuadamente sujeta.
Apriete la tapa
esterilizadora.
Consulte la página 60.
Icono parpadeante
La batería está baja y es
necesario cargarla.
Recargue la batería.
Consulte la página 46.
No puede iniciarse el
ciclo de calentamiento/
esterilización.
La batería está baja y es
necesario cargarla.
Recargue la batería.
Consulte la página 46.
El líquido no está
sucientemente caliente.
El calentamiento
empezó antes de que el
calentador de biberones
estuviese frío.
Deje que el calentador de
biberones se enfríe por
completo. Empiece con líquido
a temperatura ambiente.

74
75
INFORMACIÓN DE LA FCC
ADVERTENCIA:
Los cambios o modificaciones no aprobados expresamente por la parte
responsable del cumplimiento podrían anular la autoridad del usuario para operar el equipo.
NOTA:
Este equipo ha sido probado y ha demostrado cumplir con los límites para un dispositivo digital de Clase B,
según la Parte 15 de las normas FCC. Estos límites están diseñados para proporcionar una protección razonable contra
interferencias en una instalación residencial. Este equipo genera, utiliza y puede irradiar energía de radiofrecuencia
y, si no se instala y utiliza de acuerdo con las instrucciones, puede causar interferencias perjudiciales en las
comunicaciones por radio. Sin embargo, no hay garantía que la interferencia no ocurrirá en una instalación en particular.
Si este equipo causa interferencias perjudiciales en la recepción de televisión, lo cual puede determinarse apagando
el equipo y encendiéndolo, se recomienda al usuario que intente corregir la interferencia mediante una o más de las
siguientes medidas:
• Cambie la orientación o ubicación de la antena receptora.
• Aumente la separación entre el equipo y el receptor.
• Conectar el equipo a una toma de corriente de un circuito distinto de aquél al que está conectado el receptor.
• Consulte al distribuidor oa un técnico experimentado en radio / TV para obtener ayuda.
Declaración de cumplimiento con la FCC:
Este dispositivo cumple con la Parte 15 de las Normas de la FCC. La operación está sujeta a las siguientes dos
condiciones:
(1) este dispositivo no puede causar interferencia dañina, y
(2) este dispositivo tiene que aceptar cualquier interferencia que reciba, incluyendo interferencia que pueda
causar un funcionamiento no deseado.
RESOLUCIÓN DE PROBLEMAS Y REPARACIÓN
PROBLEMA CAUSA POSIBLE SOLUCIÓN
La batería está baja y es
necesario cargarla.
Recargue la batería.
Consulte la página 46.
Líquido insuciente y
salta el termostato.
Deje que el calentador de
biberones se enfríe por
completo y reinicie el ciclo
siguiendo las instrucciones.
El ciclo de esterilización
termina antes de los 10
minutos establecidos.
La batería está baja y es
necesario cargarla.
Recargue la batería.
Consulte la página 46.
El ciclo de calentamiento
termina antes de
que aparezca 99 °F
(37 °C) en la pantalla.
Líquido insuciente y
salta el termostato.
Deje que el calentador de
biberones se enfríe por
completo y reinicie el ciclo
siguiendo las instrucciones.
76
77
COMUNÍQUESE CON NOSOTROS
Si tiene problemas con su producto Chicco, o cualquier
pregunta relativa al uso, no devuelva este producto a la tienda.
Comuníquese con nosotros de uno de los modos siguientes:
Llame al servicio de atención al cliente de Chicco:
1-877-424-4226
Visite nuestro sitio web:
ChiccoUSA.com
Escríbanos a:
INFORMACIÓN
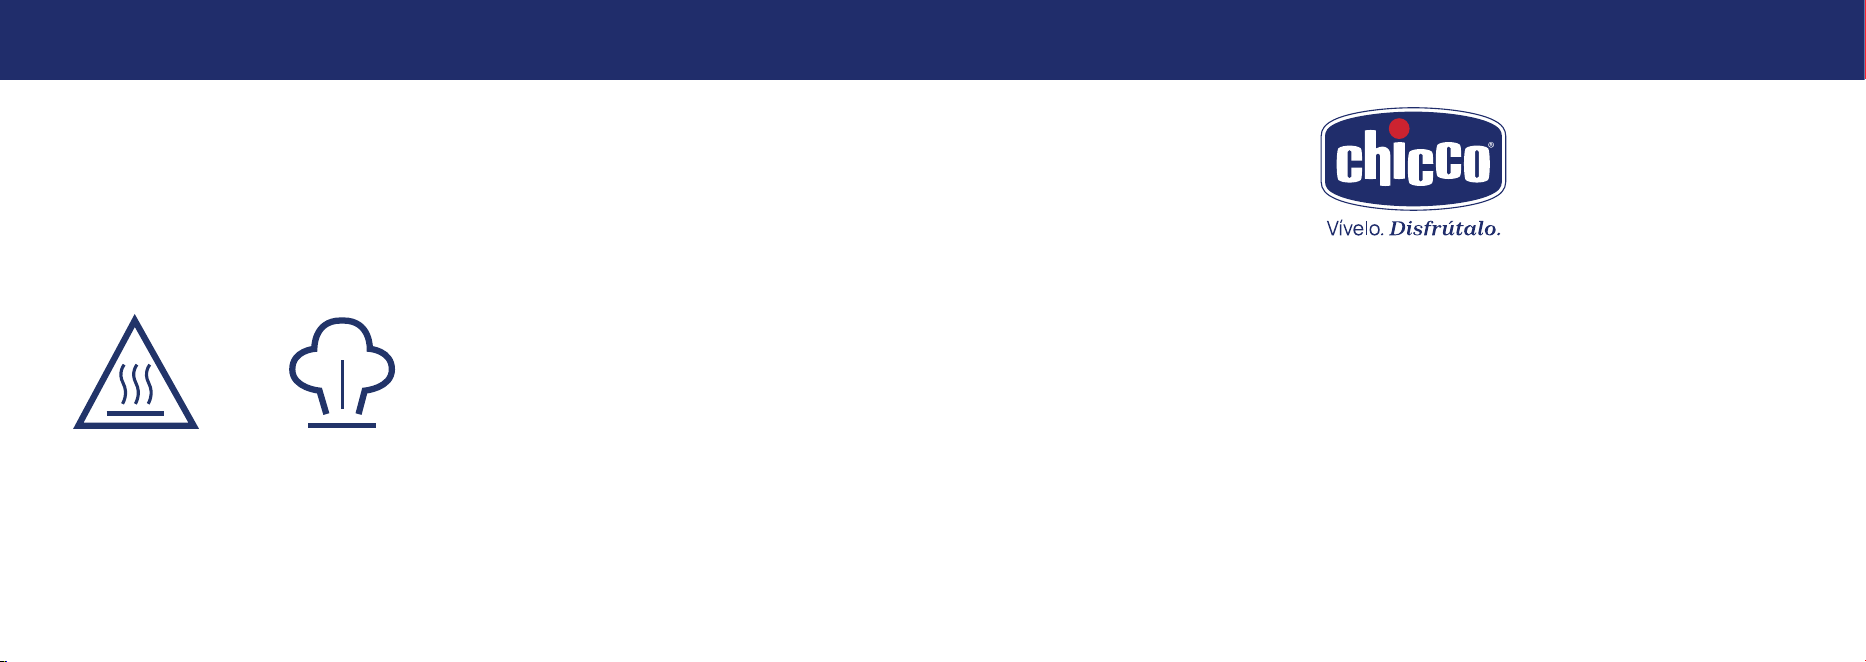
¡ADVERTENCIA!
Supercie caliente
¡ADVERTENCIA!
Vapor caliente
Modelo: N0358
CC: 5-20 V 3 A Máx (60 W Máx)
Energía: 60W
Batería de litio recargable: 14.8V 5000mAh
Hecho en China