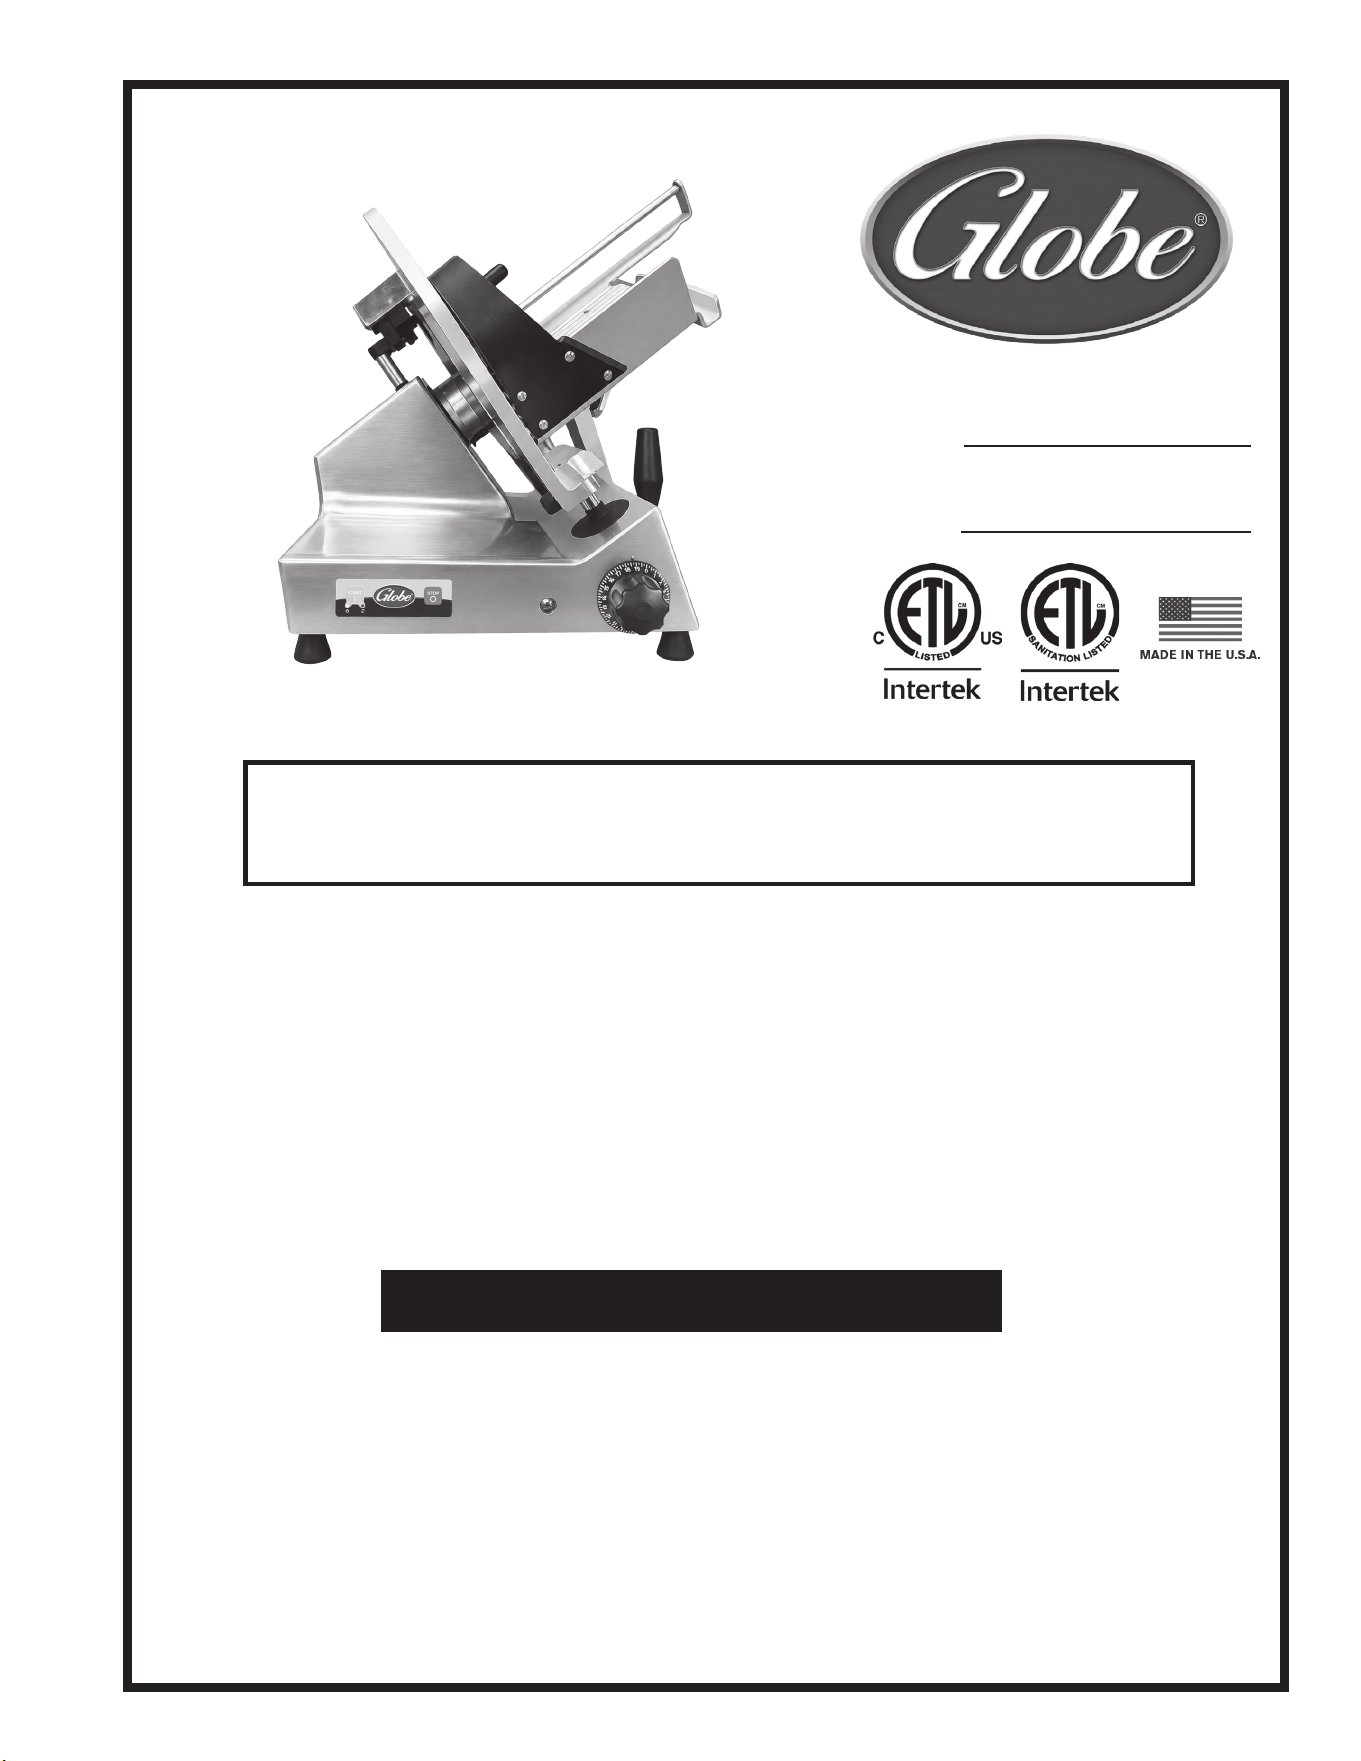
Instruction Manual for the Globe Slicer
Models: S213 & S213A with Frozen Option
Model #:
Serial #:
Model S213
This manual contains important safety instructions that
must be strictly followed when using this equipment.
- IMPORTANT SAFETY NOTICE -
For additional Technical Support call Globe at 1-866-260-0522.
For all after sales support, visit www.globefoodequip.com
• Complete the Warranty Registration
• Find an Authorized Servicer
• View Parts Catalogs
Maintain and use this manual as a reference for training.


Page 3
ATTENTION OWNERS AND OPERATORS ...................................................................................................... 5
KEY COMPONENTS OF THE SLICER ............................................................................................................ 6
GLOBE SLICER SAFETY TIPS ........................................................................................................................ 7
FROZEN SLICER BEST PRACTICES .............................................................................................................. 8
INSTALLATION ................................................................................................................................................. 9-10
OPERATING INSTRUCTIONS .......................................................................................................................... 11-12
CLEANING & SANITIZING ................................................................................................................................ 13-16
INSPECTIONS, SIMPLE MAINTENANCE AND REPAIR ................................................................................. 17-19
SETTINGS MODE ............................................................................................................................................. 21-23
TROUBLESHOOTING GUIDE .......................................................................................................................... 24
GLOBE FOOD EQUIPMENT CO.
2153 DRYDEN RD.
DAYTON, OH 45439
Toll Free: 800-347-5423
PHONE: 937-299-5493
E-MAIL: [email protected]
WEBSITE: www.globefoodequip.com
© Globe Food Equipment Company, 2026 900105 Ver. 1 Rev. - 07-2026
Index

Page 5
Attention Owners and Operators
Globe’s equipment is designed to provide years of safe and productive processing of food products as long as the
equipment is used in accordance with the instructions in this manual and is properly maintained. Importantly, unless
the operator is adequately trained and supervised, there is a possibility of serious injury. Owners of this equipment
bear the responsibility to make certain this equipment is used properly and safely. Strictly follow all of the instructions
contained in this manual and the requirements of local, state and federal law.
Owners should not permit anyone to touch this equipment unless they are over 18 years of age, are adequately
trained and supervised, and have read and understand this manual. Owners should also ensure that no customers,
visitors or other unauthorized personnel come in contact with this equipment. Please remember that Globe cannot
anticipate every circumstance or environment in which its equipment will be operated. It is the responsibility of the
owner and the operator to remain alert to any hazards posed by the function of this equipment, particularly the sharp
knife blade and all moving parts. If you are ever uncertain about a particular task or the proper method of operating
this equipment, ask your supervisor.
To prevent illness caused by the spread of food-borne pathogens, it is important to properly clean and sanitize the
entire slicer as any surface of the slicer can become contaminated. It is the responsibility of the slicer owner/operator
to follow all guidelines, instructions and laws as established by your local and state health departments and the
manufacturers of chemical sanitizers.
When cleaning your slicer, pay particular attention to cracks, broken seams and any area that may collect food debris.
If your slicer, or any of its parts, is damaged or broken, it may become more difcult to properly clean and sanitize the
unit. If your slicer is damaged or needs repair, contact an experienced service individual immediately to ensure the
slicer can be properly sanitized. If you have any questions, please contact Globe at 937-299-5493.
This manual offers information to supplement your procedures to improve the sanitization of your machine and contains
a Safety Tips section listing a number of precautions to follow to help promote safe use of this equipment. Throughout
the manual you will see additional warnings to help alert you to potential hazards.
Warnings affecting your personal safety are indicated by:
Warnings related to possible damage to the equipment are indicated by:
A wall chart with safety instructions is included with this equipment. This wall chart should be posted near the slicer
within easy view of the operator. You should make certain that this manual is available for easy reference by any
operator. Globe has put several warning labels in the English language on the slicer. French and Spanish labels
are also available and can replace the English labels at the owner’s discretion. If the warning labels, the wall chart,
or this manual are misplaced, damaged or illegible, or if you require additional copies, please contact your nearest
representative or Globe directly for these items at no charge.
Please remember this manual, the wall chart and the warning labels do not replace the need to be alert,
to properly train and supervise operators, and to use common sense when using this equipment.
or
Page 6
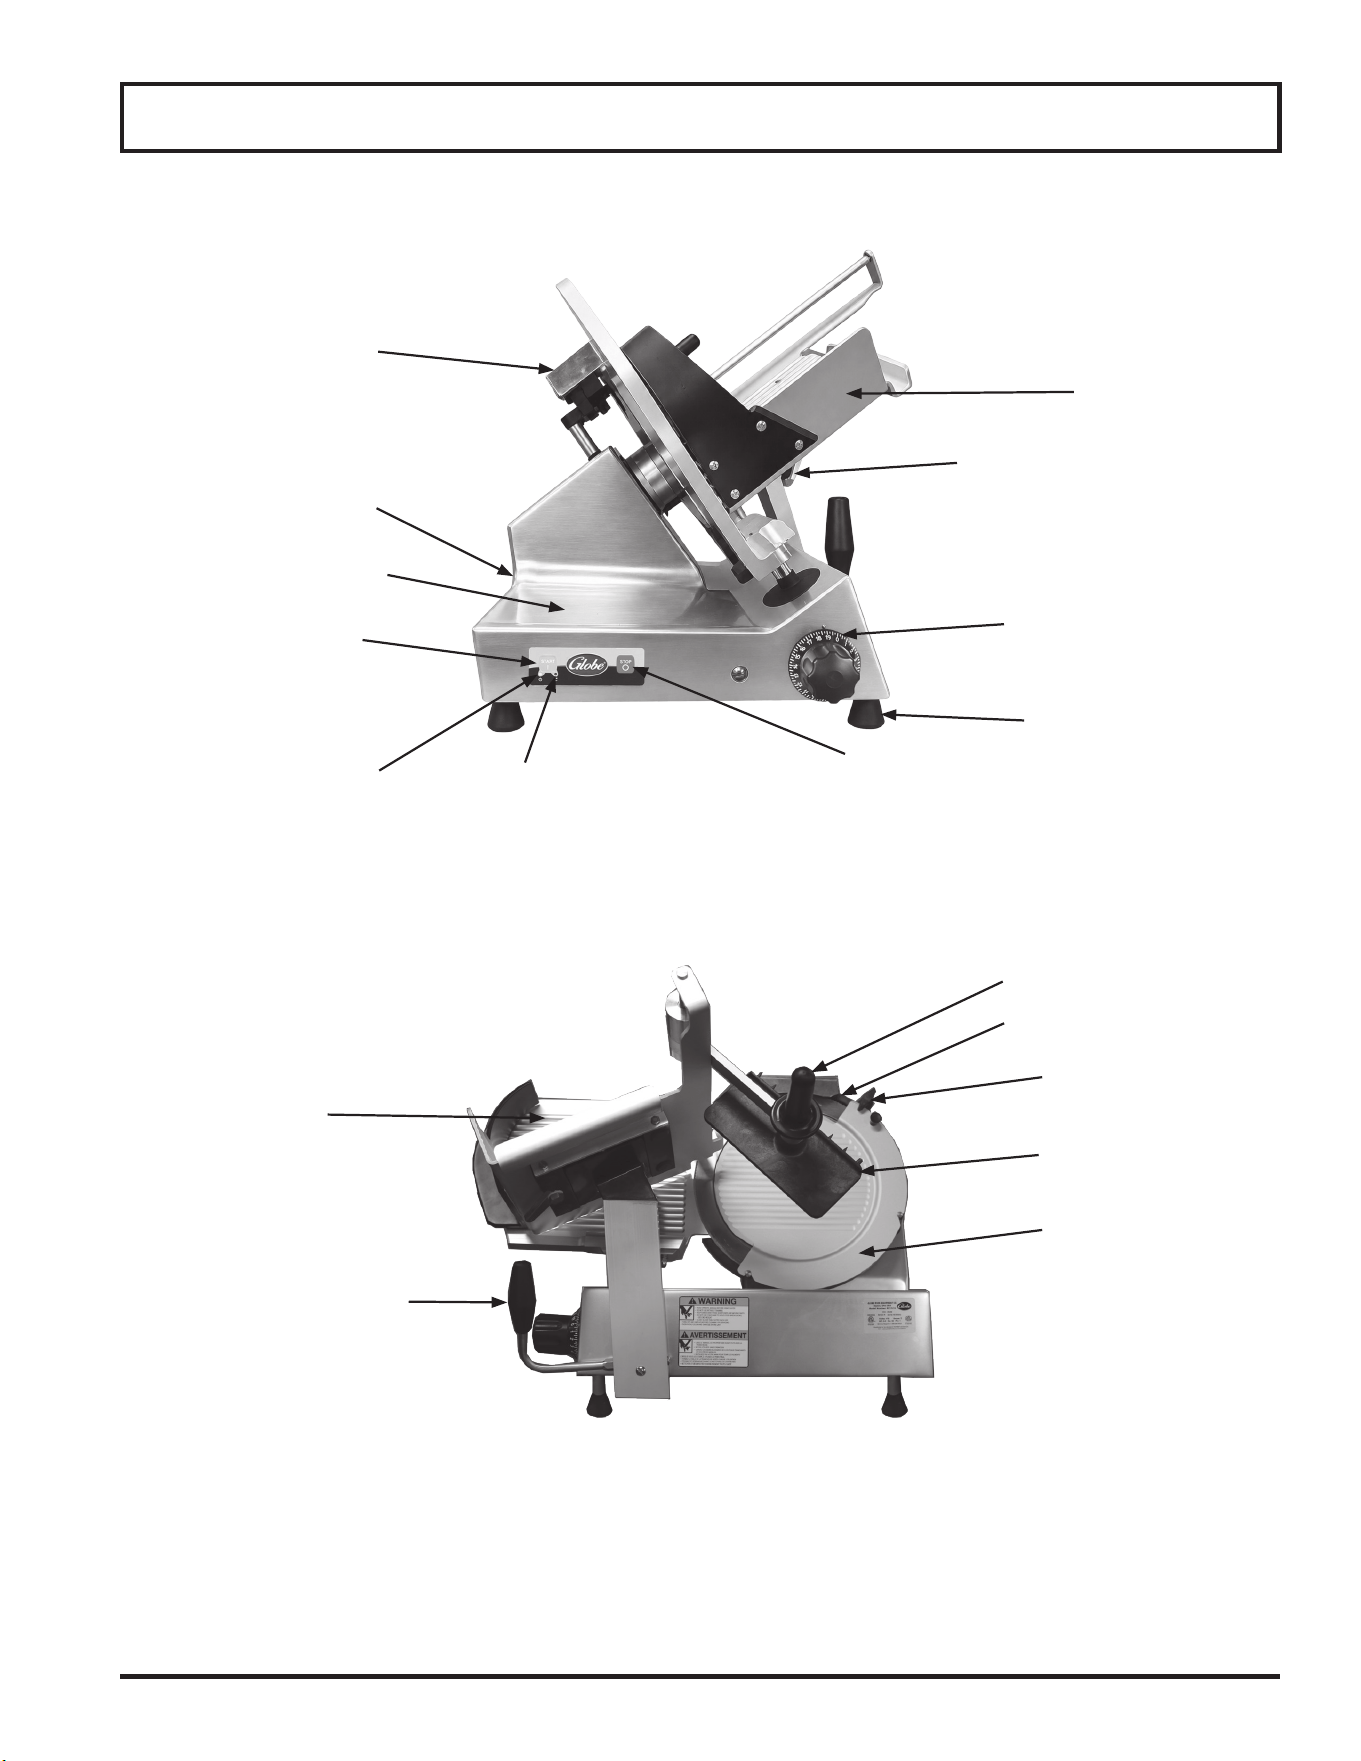
Key Components of the Slicer
Knife Cover
Carriage Tray
Carriage Handle
Slice Thickness Dial
Receiving Area
Gauge Plate
Power Cord
Model S213
Knife Ring Guard
End Weight Handle
Dummy Knife Sharpener
Power Indicator
Light (Plugged in)
Run Indicator
Light (Knife running)
Stop Button
Start Button
Knife Cover
Lock Knob
End Weight Face
Standard Foot
Carriage Lock Lever

Page 7
Globe Slicer Safety Tips
SHARP KNIFE BLADE
TO AVOID SERIOUS PERSONAL INJURY:
• NEVER touch slicer before reading and completely understanding everything in this instruction manual.
You must be at least 18 years old and have had proper training and authorization from your supervisor.
• ONLY install the slicer on a level nonamable nonskid surface located in a clean, well-lit work area away
from children and visitors.
• ALWAYS ground slicer utilizing proper power source.
• NEVER TOUCH KNIFE. Keep hands and arms away from all moving parts, hold only the carriage
handle.
• NEVER OPERATE slicer without knife cover and knife sharpener securely installed.
• NEVER HOLD THE FOOD PRODUCT WHILE SLICING. Hold only the carriage handle to slice.
• DO NOT CATCH SLICES WITH YOUR HAND. Let slices drop onto the receiving area.
• ALWAYS turn knife motor OFF and turn the slice thickness dial clockwise until it stops after each use.
• BEFORE CLEANING, SERVICING, OR REMOVING ANY PARTS always turn knife motor OFF, turn the
slice thickness dial clockwise until it stops and unplug power cord.
• ALWAYS properly clean and sanitize your slicer. To prevent illness or death caused by the spread of
food-borne pathogens, it is important to properly clean and sanitize the entire slicer as any surface of
the slicer can become contaminated. It is the responsibility of the slicer owner/operator to follow all
guidelines, instructions and laws as established by your local and state health departments and the
manufacturers of chemical sanitizers.
• USE ONLY PROPERLY INSTALLED GLOBE SLICER ACCESSORIES.

Page 8
Frozen Slicer Best Practices
S213-FROZEN is NOT recommended for thick cuts of frozen or semi-frozen meat.
Damage to equipment can occur.
• USE FROZEN/PARTIALLY FROZEN MEAT ONLY: Intended for thinly sliced frozen meat; do
not use with fresh, completely thawed, or standard deli products.
• PAR-FREEZE UNTIL FIRM TO TOUCH: Freeze raw meat until rm and semi-frozen to prevent
the blade from dragging, ripping, or tearing the product.
• PREVENT SLICER MECHANICAL STRAINS: Avoid slicing completely solid, deep-frozen meat
blocks to prevent blade chipping or motor strain.
• ALWAYS RESET DIAL TO ZERO: Make sure the slice thickness dial is set to zero before
adding meat to the carriage tray or starting the slicer.
• ADJUST DIAL INCREMENTALLY: Open the slice thickness dial gradually from zero until the
desired thinness is achieved to prevent blade jamming.

Page 9
Installation
UNPACKING
1. Inspect the package carefully before unpacking. Note any damage on the delivery paperwork and take
pictures.
2. Unpack the slicer immediately after receipt. If the machine is found to be damaged, immediately contact us
at [email protected] or call 1-800-347-5423 ext. 253. Please include your name, serial #, item that
is damaged, explanation of the damage and photographs if possible. The damage must be reported to Globe
within 7 days from the time of shipment. Refer to Globe’s Freight Damage policy for more information. https://
globefoodequip.com/support/order-return-policy.html
3. With the slicer you should receive wall chart, lubricating oil, stiff bristled brush and an instruction manual.
Contact Globe or your local supplier if you did not receive all of these items.
TO AVOID SERIOUS PERSONAL INJURY
PROPERLY INSTALL SLICER IN ADEQUATE WORK AREA
• ALWAYS install equipment in a work area with adequate light and space.
• ONLY operate on a solid, level, nonskid surface that is nonammable.
• NEVER operate slicer with a damaged power cord or power plug.
• NEVER operate slicer with an extension cord.
• NEVER bypass, alter, or modify this equipment in any way from its original condition. Doing so can
create hazards and will void warranty.
• NEVER operate slicer without the knife cover and knife sharpener securely installed.
• NEVER operate slicer without the warning labels attached to slicer (see Key Components, Simple
Maintenance and Repair section) and the Globe wall chart posted within view of operator.
INSTALLATION:
1. Read this manual thoroughly before installation and operation. DO NOT proceed with installation and
operation if you have any questions or if you do not understand everything in the manual. Contact your local
representative or Globe rst. Make sure to clean and sanitize your entire slicer before use. Refer to this
manual for cleaning and sanitizing guidelines.
2. Select a location for the slicer that has a level, solid, nonskid surface that is nonammable and is in a well-lit
work area that is away from children and visitors.
USE AT LEAST TWO PEOPLE TO LIFT SLICER BY THE SLICER BASE UP TO OPERATING
LOCATION. NEVER ATTEMPT TO LIFT SLICER ALONE.
3. Remove slicer from the corrugated box.
NEVER USE SLICER WITHOUT FOUR RUBBER FEET SECURELY INSTALLED ON UNIT.
4. Make sure rubber feet are rmly tightened.
Page 10
Installation
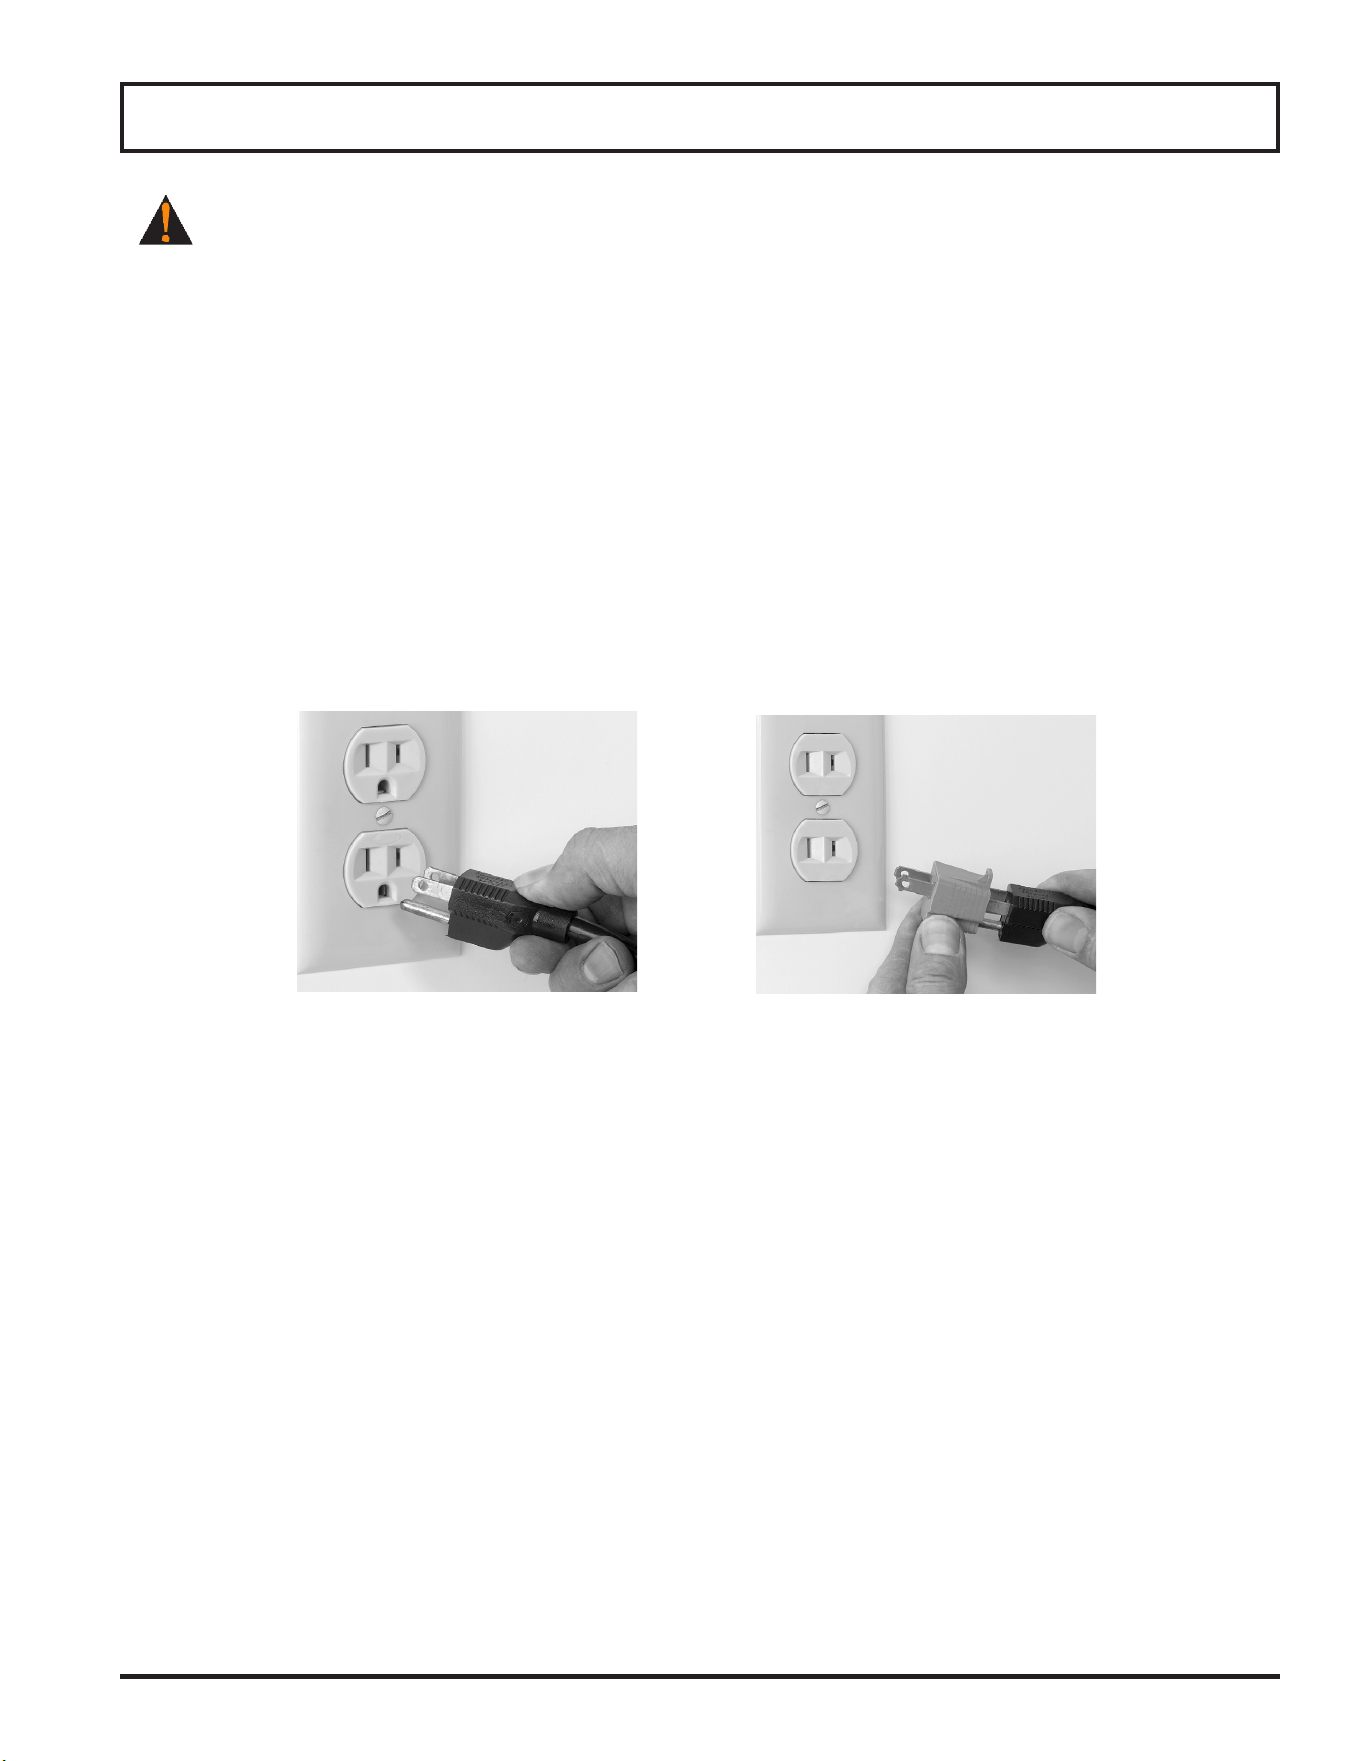
Figure 9-1 Correct Figure 9-2 Incorrect
THIS MACHINE IS PROVIDED WITH A THREE-PRONG GROUNDING PLUG. THE OUTLET TO
WHICH THIS PLUG IS CONNECTED MUST BE PROPERLY GROUNDED. IF THE RECEPTACLE IS NOT
THE PROPER GROUNDING TYPE, CONTACT AN ELECTRICIAN. DO NOT, UNDER ANY
CIRCUMSTANCES, CUT OR REMOVE THE THIRD GROUND PRONG FROM THE POWER CORD OR
USE ANY ADAPTER PLUG (Fig. 9-1 and Fig. 9-2).
5. Inspect slicer to make sure all parts have been provided.
6. Make sure knife cover and dummy knife sharpener are in place.
7. Make sure warning labels are properly positioned and legible and the instruction manual is available near slicer.
8. Complete warranty registration online at www.globefoodequip.com/support/warranty-registration-form.
9. Post the provided wall chart in a visible area near slicer. Refer to the wall chart and the Owner’s Manual
for proper cleaning, sanitizing and inspection of the slicer.
10. Refer to the procedures outlined in Cleaning & Sanitizing section to clean the slicer before use.
11. Contact your local representative, or Globe directly, if you have questions or problems with the installation or
operation of the slicer.

Page 11
Operating Instructions
SHARP KNIFE BLADE
TO AVOID SERIOUS PERSONAL INJURY:
• NEVER touch slicer before reading and completely understanding everything in this instruction manual.
You must be at least 18 years old and have had proper training and authorization from your supervisor.
• ONLY install slicer on a level nonskid, nonammable surface located in a clean, well-lit work area away
from children and visitors.
• ALWAYS ground slicer utilizing proper power source.
• NEVER TOUCH KNIFE. Keep hands and arms away from all moving parts, hold only the carriage
handle.
• NEVER OPERATE slicer without knife cover and knife sharpener securely installed.
• NEVER HOLD FOOD PRODUCT WHILE SLICING. Hold only the carriage handle to slice.
• DO NOT CATCH SLICES WITH YOUR HAND. Let slices drop onto the receiving area.
• ALWAYS turn knife motor OFF and turn slice thickness dial clockwise until it stops after each use.
• BEFORE CLEANING, SERVICING, OR REMOVING ANY PARTS always turn knife motor OFF, turn
slice thickness dial clockwise until it stops and unplug power cord.
MANUAL SLICER OPERATION (S213 & S213A)
1. Plug in power cord (Models S213 & S213A).
Note: Product must be at 20ºF or higher.
Note: When the slicer is plugged in the white POWER indicator light will illuminate.
Note: If carriage lock lever is not secure, slicing performance will be poor and excessive noise could
occur.
2. Make sure all knobs are tightened before using slicer.
3. With knife motor turned OFF, pull carriage completely towards you and place food product onto carriage. Slice
only boneless product that is 20ºF or higher. Use end weight to hold food product in place.
Note: It is recommended that the slice thickness dial is not open past 1/8 inch when slicing boneless,
frozen product.
4. Rotate slice thickness dial counterclockwise to the desired setting.
5. Push START button to turn on knife motor.
Note: The green RUN indicator light will illuminate.
Note: Circle on display will spin (Model S213A only).
DO NOT HOLD THE FOOD PRODUCT WITH YOUR HAND. NEVER PUT YOUR HAND ON OR AROUND
CARRIAGE WHEN SLICER IS UNDER POWER. THE CARRIAGE HANDLE IS THE ONLY PART OF THE
SLICER YOU SHOULD TOUCH WHILE SLICING.
6. Use carriage handle to manually push carriage back and forth. The carriage handle is the only part of slicer you
should touch while slicing. Do not catch slices with your hand. Let slices drop onto receiving area.
Page 12
Operating Instructions
IF A PRODUCT NEEDS TO BE ADJUSTED DURING SLICING, ALWAYS PULL THE CARRIAGE ALL THE
WAY TOWARDS YOU. TURN OFF KNIFE MOTOR, AND CLOSE GAUGE PLATE PRIOR TO
ADJUSTING THE PRODUCT AND THE END WEIGHT.
7. After the last slice stroke, pull carriage all the way towards you. Push the STOP button to turn knife motor OFF.
Note: The green RUN indicator light will go out.
Note: Circle on display will stop spinning (Model S213A only).
8. Turn slice thickness dial clockwise until it stops to close gauge plate. Unload and load food product.
9. Unplug slicer after each days use or before cleaning and servicing.
AUTOMATIC SLICER OPERATION (Model S213A only)
1. Make sure all knobs are tightened before using slicer.
2. With knife motor turned OFF, pull carriage completely towards you and place food product onto carriage.
Slice only boneless product that is 20ºF or highter with the slicer. Use end weight to hold food product in place.
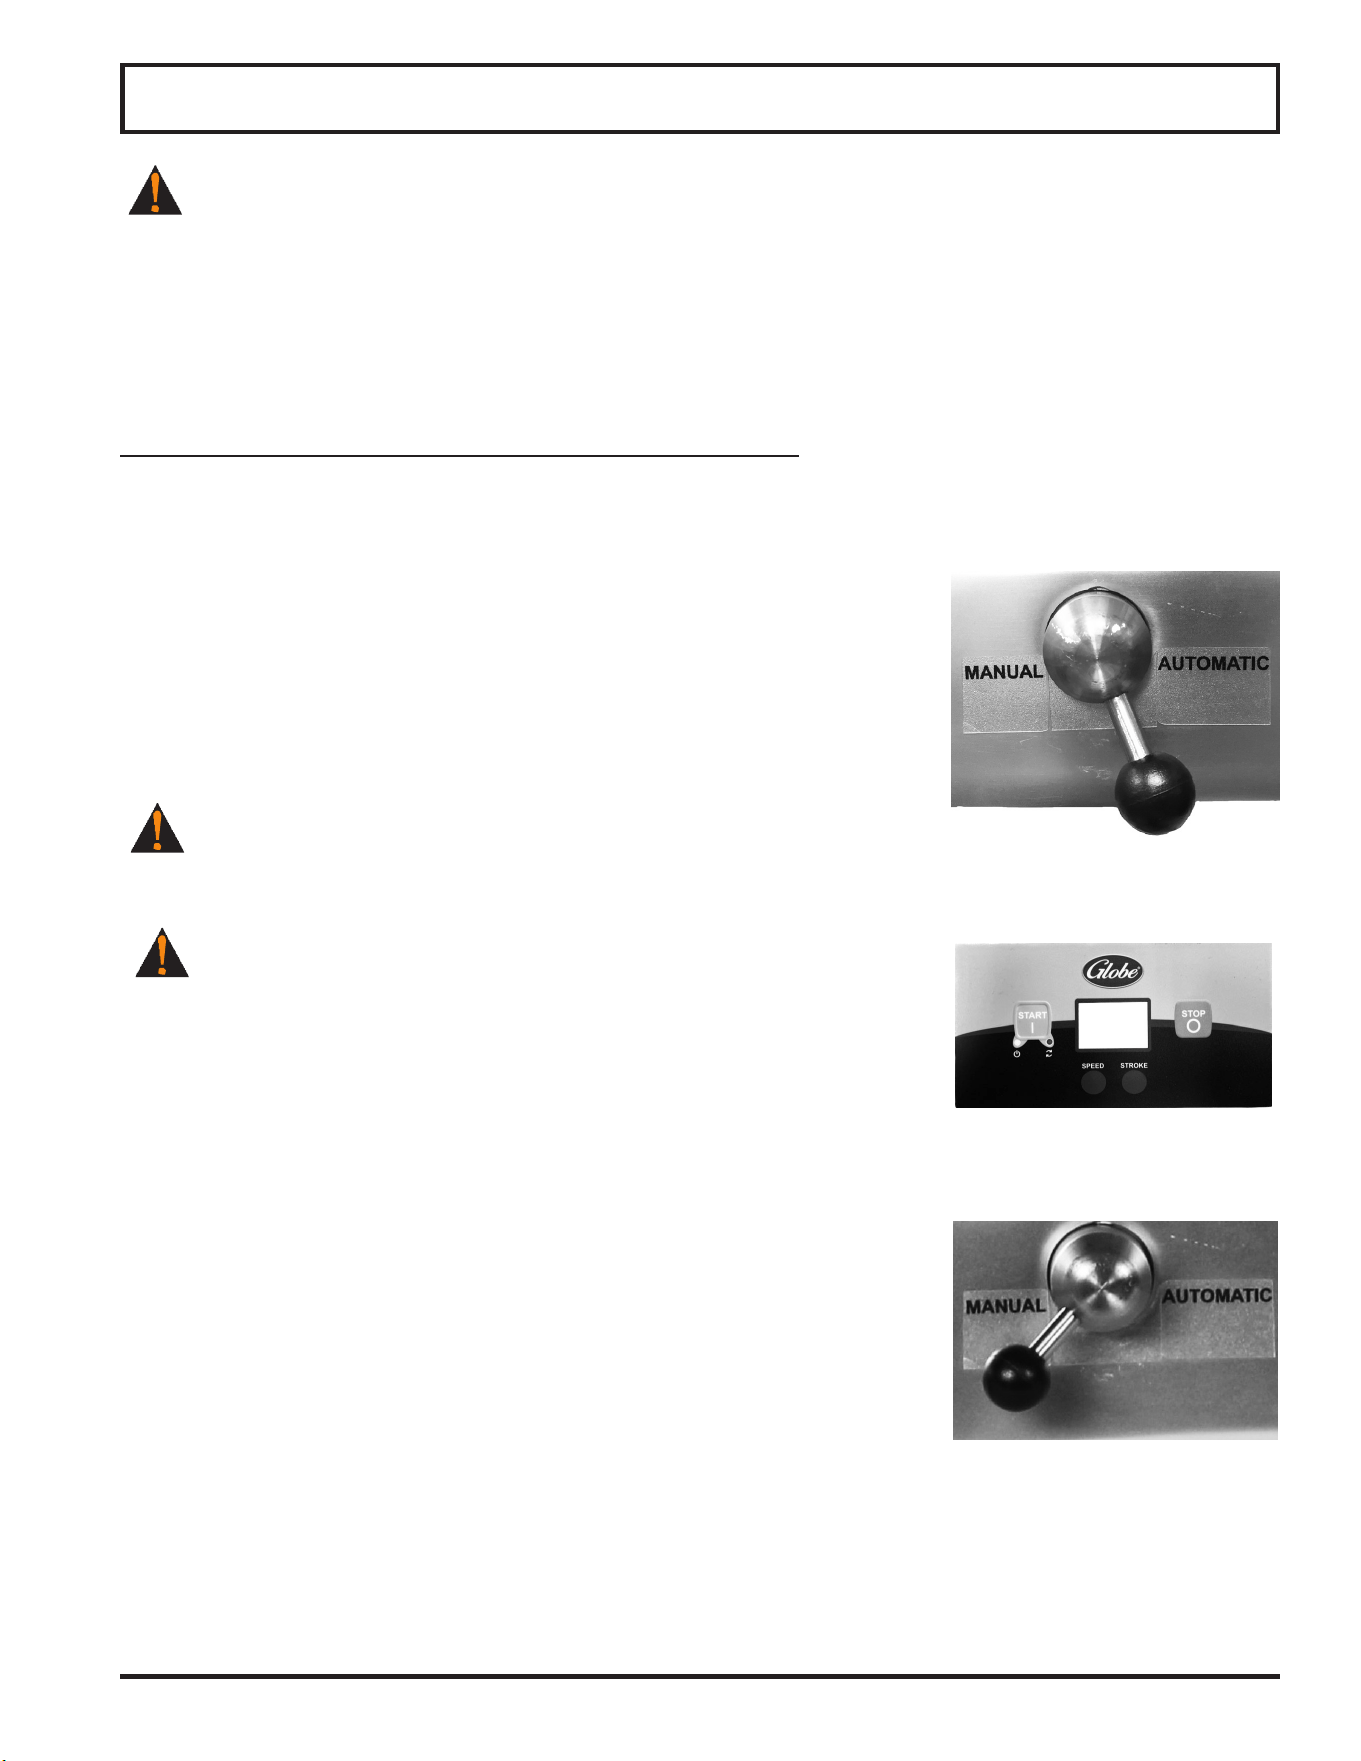
3. To make carriage move automatically, move the auto engage lever into
''AUTOMATIC'' position (Fig. 12-1).
Note: To return to ''MANUAL'' mode, press STOP button and move auto
engage lever to ''MANUAL'' position.
Note: It is recommended that the slice thickness dial is not open past 1/8
inch when slicing boneless, frozen product.
4. Rotate slice thickness dial counterclockwise to the desired setting.
BE ALERT. THE NEXT STEP WILL CAUSE CARRIAGE TO MOVE
AUTOMATICALLY ON START UP.
5. Push START button to turn on knife motor.
Note: The green RUN indicator light will illuminate.
Note: The circle on display will spin.
NEVER ATTEMPT TO ADJUST, LOAD OR UNLOAD CARRIAGE WHEN
SLICER IS IN AUTOMATIC OPERATION.
6. To adjust the speed of the carriage, select the SPEED button (Fig. 12-2).
Note: When the auto engage lever is in the AUTOMATIC position, up to
two speed settings are available with the SPEED button.
7. To adjust the stroke of the carriage, select the STROKE button.
Note: When the auto engage lever is in the AUTOMATIC position, up to
two stroke lengths are available with the STROKE button.
8. To stop the automatic movement of the carriage, press STOP button and move
the auto engage lever to the ''Manual'' position (Fig. 12-3).
9. To stop knife motor, press STOP button. Pressing the STOP button while the
auto engage lever is in the automatic position will stop the carriage and shut the
knife motor off.
Note: The green RUN indicator light will go out.
Note: The circle on display will stop spinning.
Figure 12-1
Figure 12-3
Figure 12-2
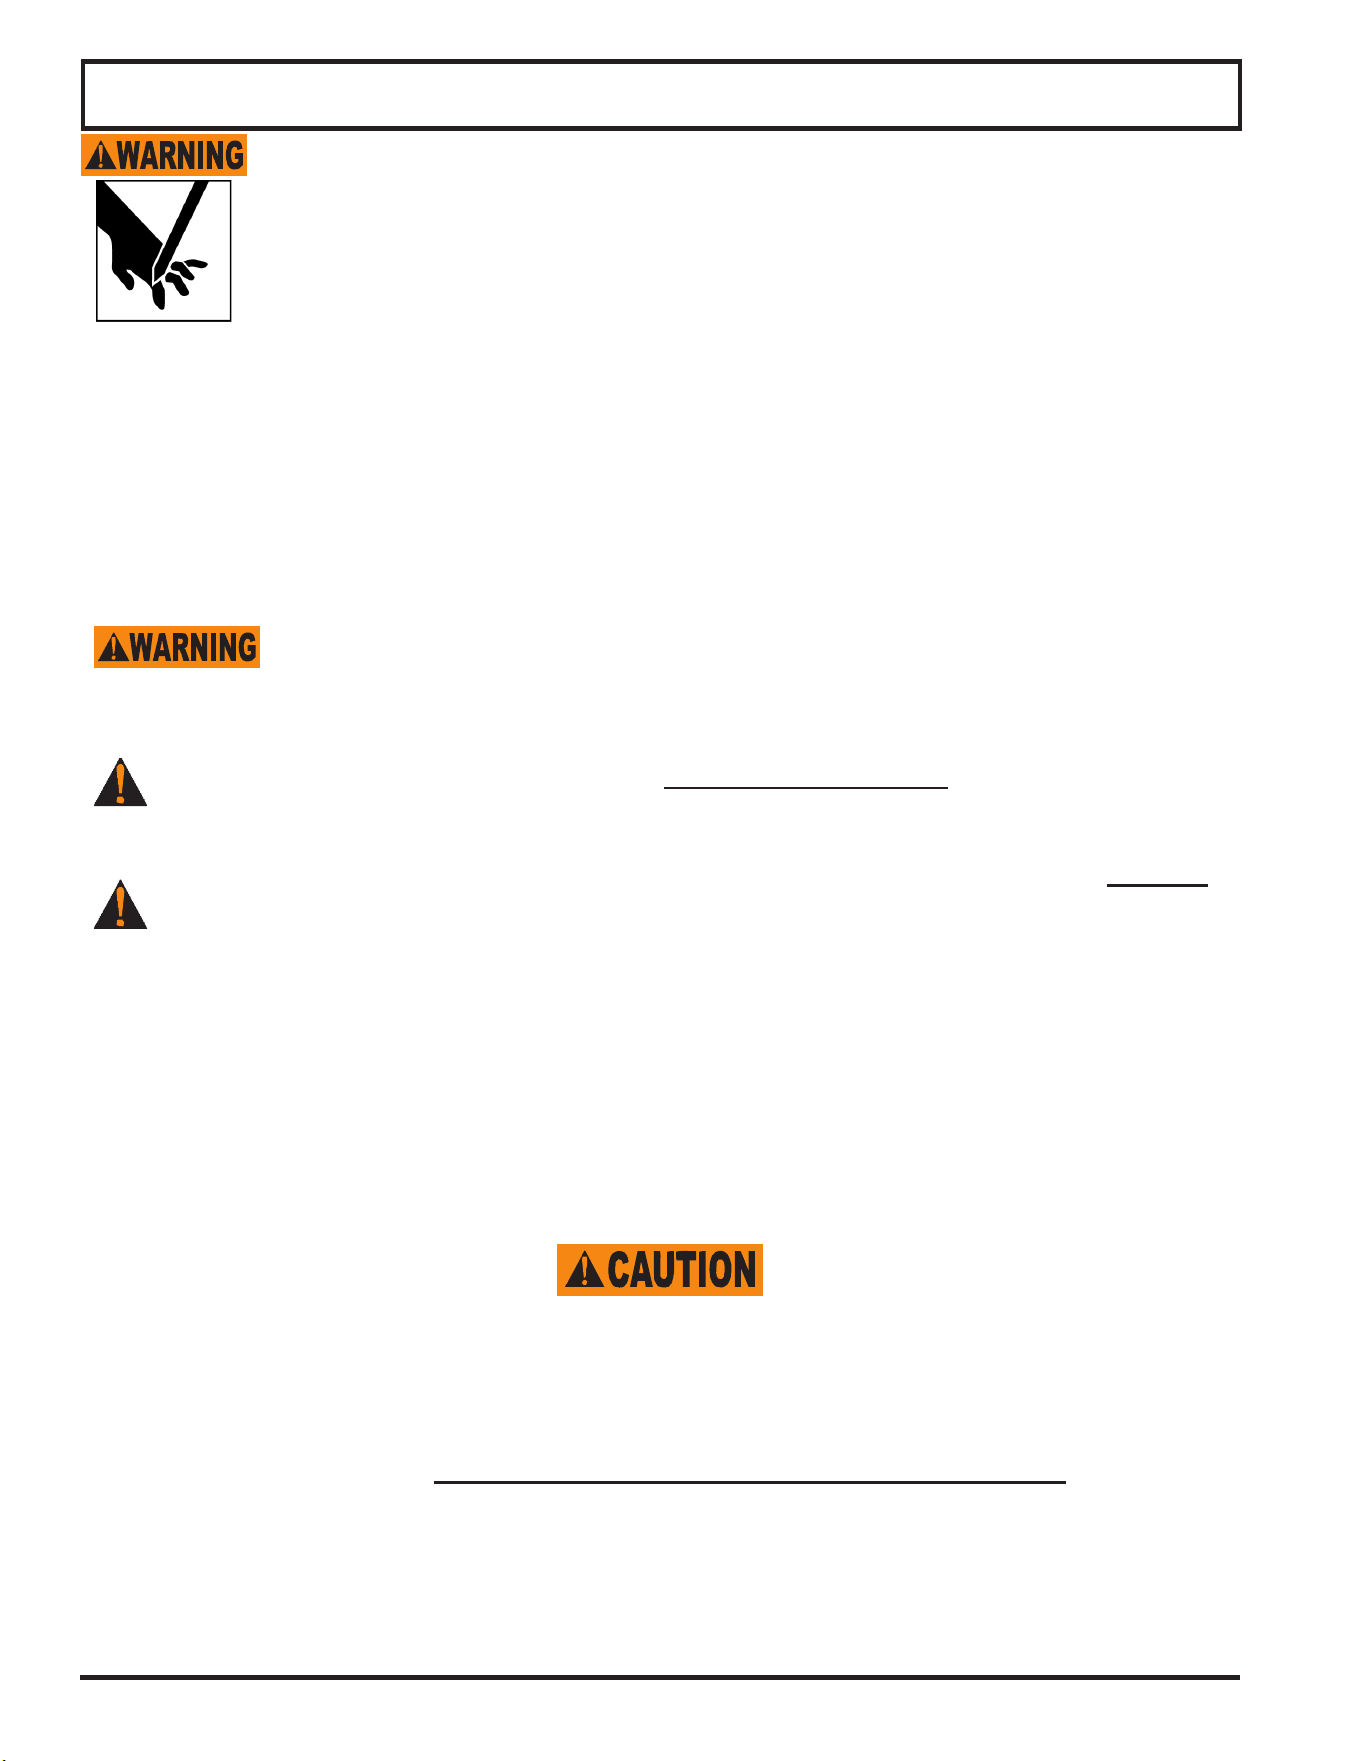
Page 13
Cleaning & Sanitizing
SHARP KNIFE BLADE
TO AVOID SERIOUS PERSONAL INJURY TO THE SLICER OPERATOR AND CUSTOMERS:
• NEVER touch slicer before reading and completely understanding everything in this instruction manual.
You must be at least 18 years old and have had proper training and authorization from your supervisor.
• BEFORE CLEANING, SERVICING OR REMOVING ANY PARTS always turn knife motor OFF, turn slice
thickness dial clockwise until it stops and unplug power cord.
• NEVER attempt to clean slicer with knife running.
• NEVER attempt to remove knife ring guard from slicer. The knife ring guard must remain on slicer for
proper operation, sharpening and cleaning.
To prevent illness or death caused by the spread of food-borne pathogens, it is important
to properly clean and sanitize the entire slicer as any surface of the slicer can become
contaminated. It is the responsibility of the slicer owner/operator to follow all guidelines,
instructions and laws as established by your local and state health departments and the
manufacturers of chemical sanitizers.
ONCE YOUR SLICER MAKES CONTACT WITH FOOD PRODUCT, THE ENTIRE SLICER, INCLUDING
REMOVABLE PARTS, MUST BE THOROUGHLY CLEANED AND SANITIZED. THIS PROCESS IS TO
BE REPEATED AT LEAST EVERY 4 HOURS USING THESE PROCEDURES AND INFORMATION; AND
MUST COMPLY WITH ADDITIONAL LAWS FROM YOUR STATE AND LOCAL HEALTH DEPARTMENTS.
AS WITH ALL FOOD CONTACT SURFACES, IT IS EXTREMELY IMPORTANT TO PROPERLY SANITIZE
THE ENTIRE SLICER AND TO CLOSELY FOLLOW THE INSTRUCTIONS ON YOUR QUATERNARY
SANITIZER CONTAINER TO MAKE SURE PROPER SANITATION IS ACHIEVED TO KILL POTENTIALLY
HARMFUL BACTERIA.
Note: It may be desirable to wear cut proof safety gloves during the cleaning operation.
IMPORTANT: If a chemical sanitizer other than iodine or quaternary ammonium is used, it must be applied in
accordance with the EPA-registered label use instructions. Excessive amounts of sanitizer and use of products
not formulated for stainless steel or aluminum may VOID your warranty.
Sanitizer concentration must comply with section 4-501.114, Manual and Mechanical Warewashing Equipment,
Chemical Sanitization - Temperature, pH, Concentration, and Hardness of the FDA Food Code.
For more information on proper kitchen and equipment sanitation, visit www.servsafe.com provided by the
National Restaurant Association (NRA).
• DO NOT hose down, pressure wash or pour water on slicer.
• NEVER use a scrubber pad, steel wool or abrasive material to clean slicer.
• ALWAYS turn slicer OFF and unplug power cord BEFORE cleaning.
• It is extremely important to follow the instructions on the sanitizer container to make sure proper
sanitation is achieved. Allow the parts to air dry before placing them back on slicer!
DO NOT use bleach, products containing sodium hypochlorite or other caustic/strong detergents on slicer base or
removable parts. These products will discolor and destroy the parts.
Slicer components are easily disassembled without the use of special tools. It is recommended to wear cut proof
safety gloves during the cleaning operation.
Page 14
Cleaning & Sanitizing
DISASSEMBLY & CLEANING
1. Push STOP button to turn off knife motor.
2. Turn slice thickness dial clockwise past zero (0) until it stops so gauge plate covers
knife edge.
3. Unplug power cord.
Note: When slicer is unplugged the white POWER indicator light will go out.
4. Pull carriage toward you (home position).
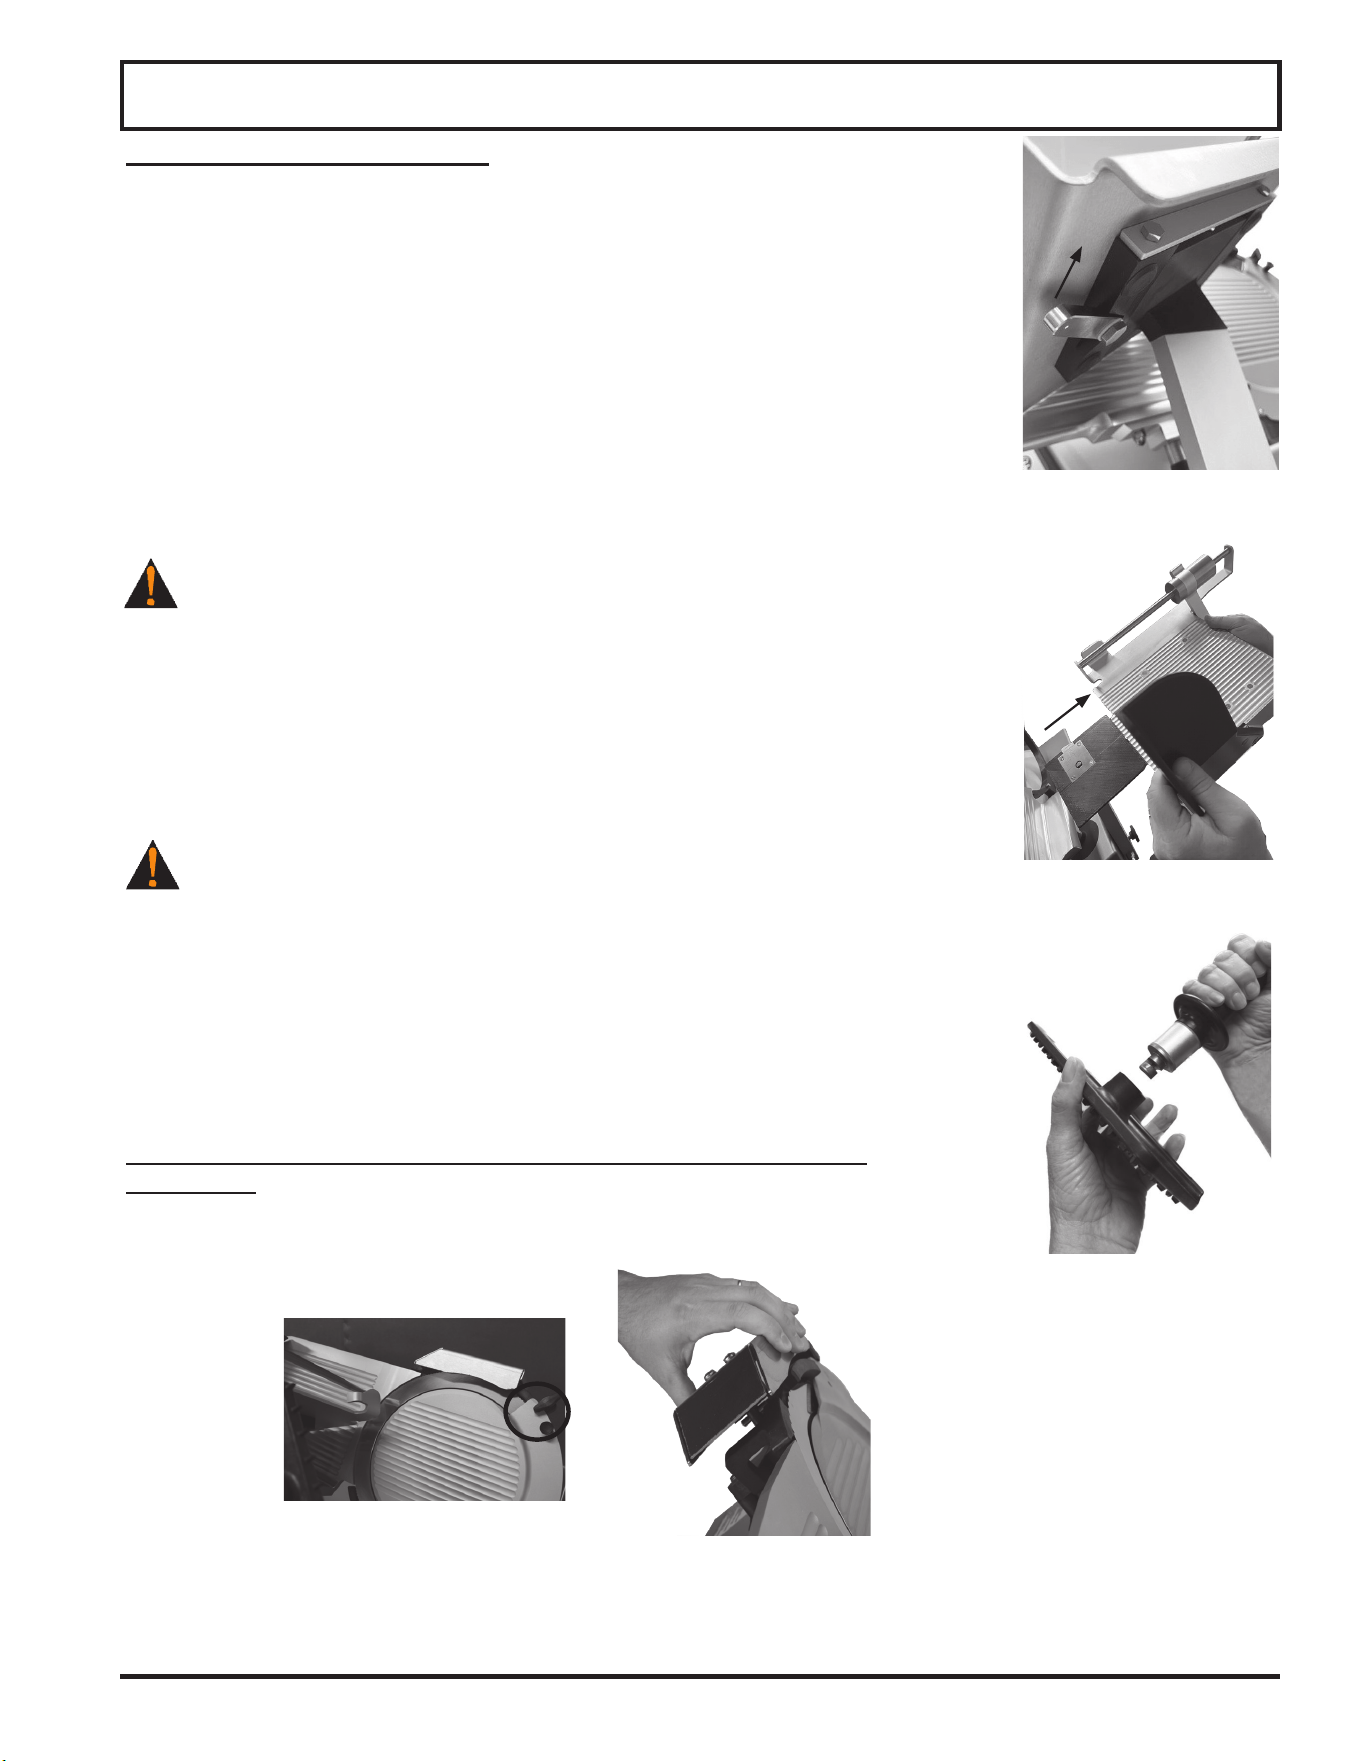
5. Unlock the carriage lock lever that fastens the carriage to the carriage arm
(Fig. 14-1).
6. Remove the carriage tray from carriage arm (Fig. 14-2).
7. Turn the removable end weight face counterclockwise to remove the end weight
face from the camlock shaft and handle (Fig. 14-3).
BE ALERT. THE NEXT STEP WILL EXPOSE KNIFE.
8. Remove knife cover. Turn knife cover lock knob counterclockwise. Hold the knife
cover lock knob and pull knife cover forward to remove knife cover from top pin
(Fig. 14-4).
9. Hold the knife cover lock knob. Carefully tilt knife cover and pull knife cover up and
to the right to remove the knife cover from bottom pins.
10. Remove dummy knife sharpener. Pull dummy knife sharpener up and away to
remove from slicer (Fig. 14-5).
BE ALERT. SLICER KNIFE EDGE IS EXPOSED. ALWAYS BE AWARE OF
THE PLACEMENT OF YOUR HANDS/FINGERS IN RELATION TO KNIFE.
Place all removable parts in a three compartment sink with warm water and
a mild detergent solution; soak, clean, and thoroughly scrub all surfaces using
a solution of mild detergent and warm water. Removable parts include: removable
end weight face, carriage tray, knife cover and knife sharpener.
Rinse removable parts with fresh, clean water. Following the instructions on your
quaternary sanitizer label, soak the removable end weight face, carriage tray,
knife cover and knife sharpener in a proper solution of quaternary sanitizer for a
minimum of two minutes. Allow these parts to air dry.
An important step to kill bacteria is to allow the parts to air dry before
reassembly!
Figure 14-2
Figure 14-1
Figure 14-5
Figure 14-4
Figure 14-3
Page 15
BE ALERT. THE SLICER KNIFE IS FULLY EXPOSED. ALWAYS BE AWARE OF
THE PLACEMENT OF YOUR HANDS/FINGERS IN RELATIONSHIP TO THE
KNIFE.
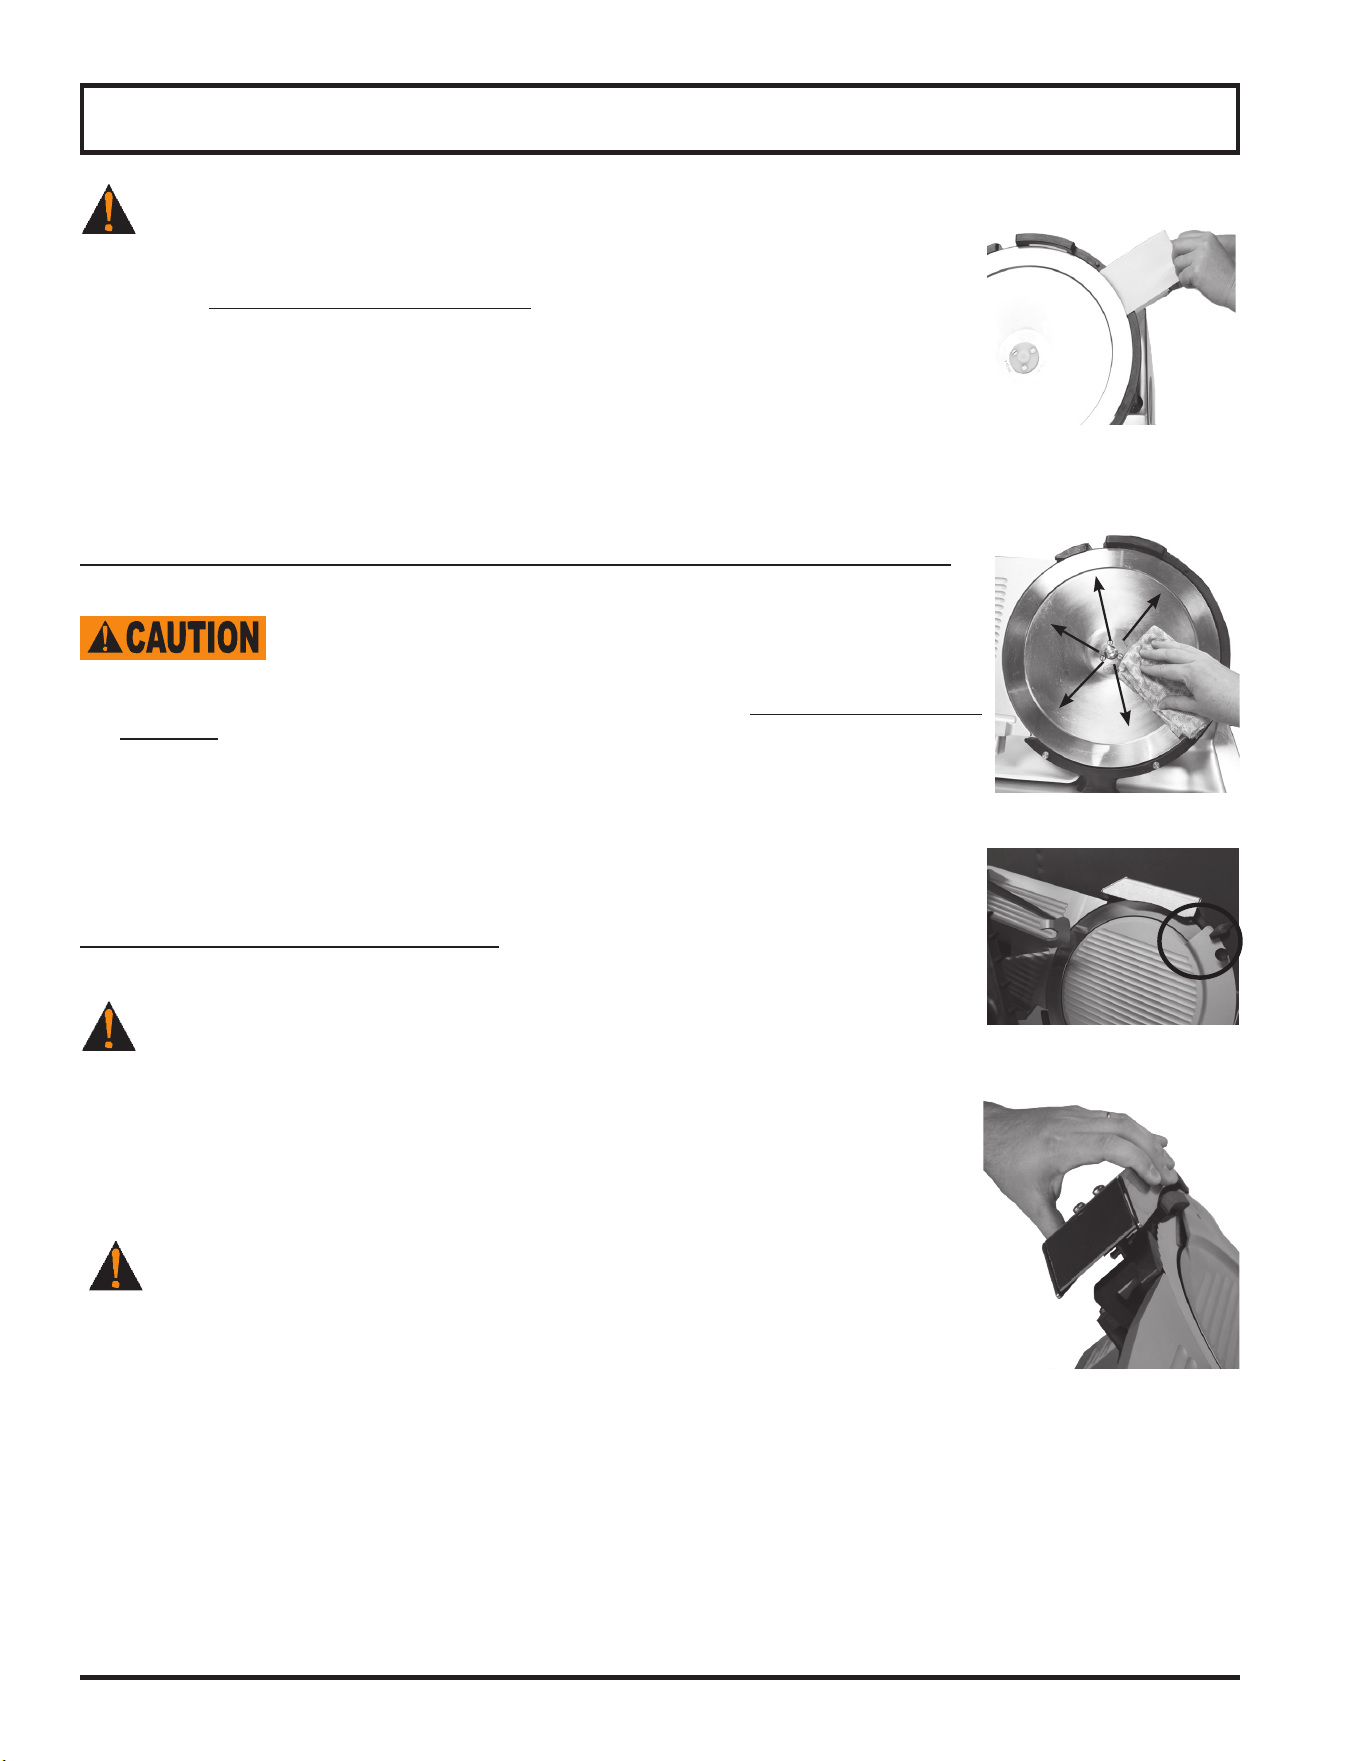
11. Next, clean knife ring guard. Soak a clean cloth in a mild detergent and warm water
solution. Ring out excess water from cloth. Carefully insert the cloth between knife
and knife ring guard (Fig. 15-1). While holding the cloth between knife and knife ring
guard, work it along the entire inside surface of ring guard. Repeat this procedure as
necessary. Spray sanitizer on all surfaces and let air dry.
12. The knife must also be cleaned and sanitized. Carefully wash and rinse the top and
bottom of knife by wiping from the center of knife outward (Fig. 15-2). Spray both
sides of knife with a non-bleach, non-chlorine sanitizer following the instructions on your
quaternary sanitizer container to make sure proper sanitation is achieved. Allow slicer
parts to air dry.
An important step to kill bacteria is to allow the parts to air dry before reassembly!
After cleaning and sanitizing the knife, the rest of the entire slicer must
be fully cleaned, sanitized and left to air dry before reattaching slicer
parts and using the slicer.
13. Soak a clean cloth in a mild detergent and warm water solution. Wring out excess water
from cloth. With the gauge plate completely closed, wipe gauge plate off by starting at
knife and pulling towards you. Never wipe gauge plate towards knife. Spray or wipe a
sanitizer on the gauge plate and allow it to air dry.
14. With a clean cloth soaked in mild detergent, wipe down all remaining surfaces of slicer
to remove food, debris and grease/oil. Use a nylon brush to scrub difcult areas. Use a
clean, wet cloth to rinse the entire slicer. Finish by spraying sanitizer on all surfaces and
then let air dry.
REINSTALL REMOVABLE PARTS
After cleaning, sanitizing, and allowing the parts to air dry, they must be reinstalled.
BE ALERT. SLICER KNIFE IS EXPOSED. ALWAYS BE AWARE OF THE
PLACEMENT OF YOUR HANDS/FINGERS IN RELATIONSHIP TO KNIFE.
1. Reinstall the knife cover. Align the knife cover with the pins located at the bottom and
the top of the knife guard. The locator pin at the top of the knife ring guard must be set
through the knife cover and pressed into place. Once the knife cover hole is seated
over the pin, turn the knife cover lock knob clockwise to secure knife cover (Fig. 15-3).
2. Reinstall dummy knife sharpener (Fig. 15-4).
NEVER OPERATE SLICER WITHOUT DUMMY KNIFE SHARPENER IN-
STALLED. MAKE SURE IT IS IN PLACE AND FULLY SEATED ON TOP OF
SLICER BEFORE OPERATING.
Cleaning & Sanitizing
Figure 15-2
Figure 15-3
Figure 15-4
Figure 15-1
Page 16
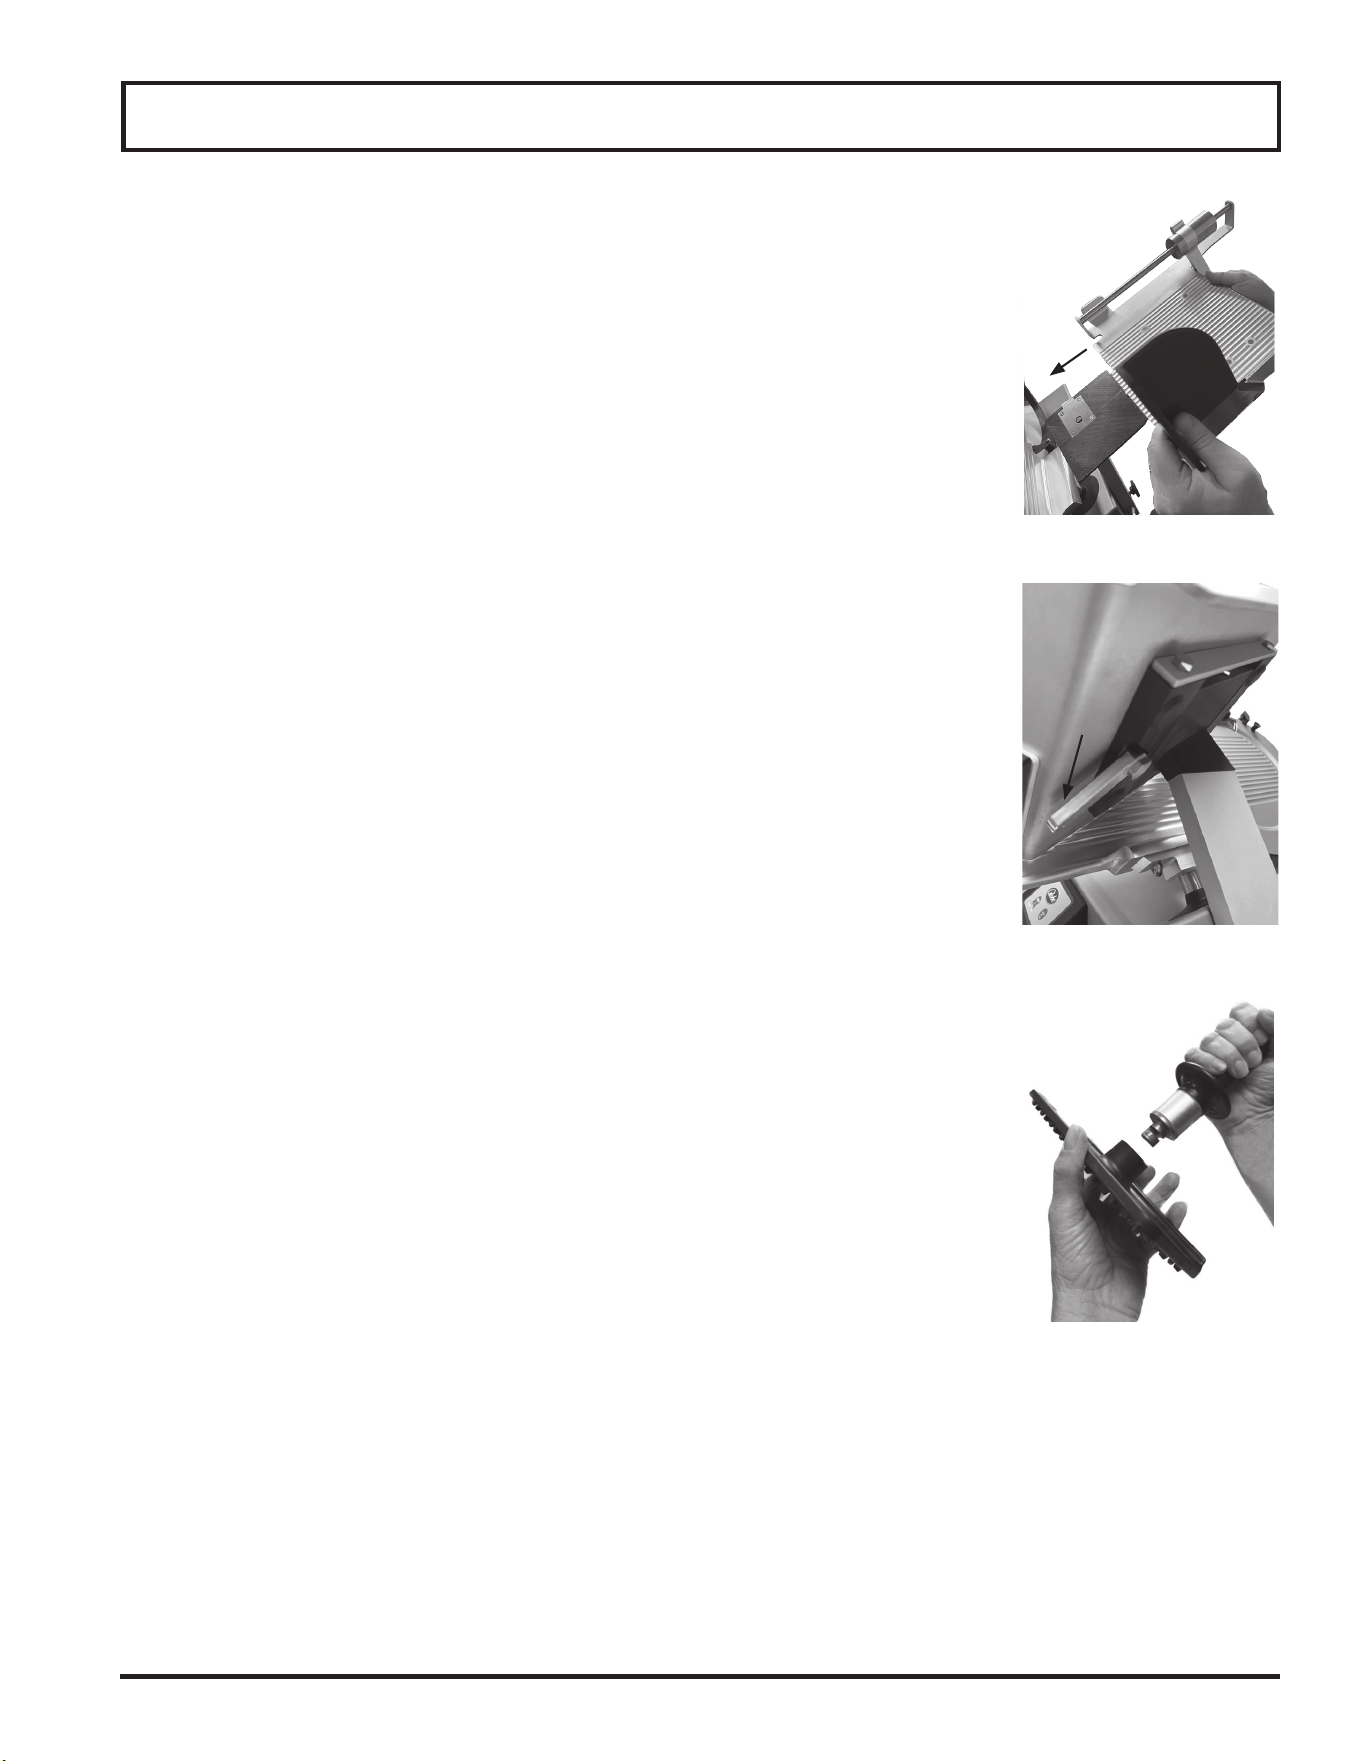
3. Install the cleaned and sanitized carriage tray on the carriage arm (Fig. 16-1).
4. Lock the carriage lock lever to secure carriage tray to the carriage arm (Fig. 16-2).
5. Reinstall removable end weight face on the camlock shaft and handle.
6. Turn removable end weight face clockwise to secure to camlock shaft and handle
(Fig 16-3). Refer to Inspection, Simple Maintenance, and Repair section for
instructions on how to lubricate the end weight slide rod.
7. Plug in power cord.
Note: When slicer is plugged in, the white POWER indicator light will
illuminate.
Note: When carriage is not returned to operating position (to the left), the
knife motor will not start and display will show ''ATTENTION Carriage
Removed Install Carriage to Resume'' (Model S213A only).
Note: If carriage lock lever is not secure, slicing performance will be poor and
excessive noise could occur.
Figure 16-3
Cleaning & Sanitizing
Figure 16-1
Figure 16-2
Page 17
Inspections, Simple Maintenance, and Repair
SHARP KNIFE BLADE
TO AVOID SERIOUS PERSONAL INJURY:
• NEVER touch slicer before reading and completely understanding everything in this instruction
manual. You must be at least 18 years old and have had proper training and authorization from your
supervisor.
• BEFORE CLEANING, SERVICING, OR REMOVING ANY PARTS always turn OFF and unplug
slicer and turn slice thickness dial clockwise past zero (0) until it stops.
• NEVER TOUCH KNIFE. Keep hands and arms away from all moving parts.
• DO NOT tamper with, bypass or remove any safety devices, guards, START/STOP button or touch
pad controls.
• AFTER EACH USE, ALWAYS turn slicer OFF and turn the slice thickness dial clockwise past zero
(0) until it stops.
• USE ONLY PROPERLY INSTALLED GLOBE PARTS AND ACCESSORIES.
INSPECTING THE SLICER
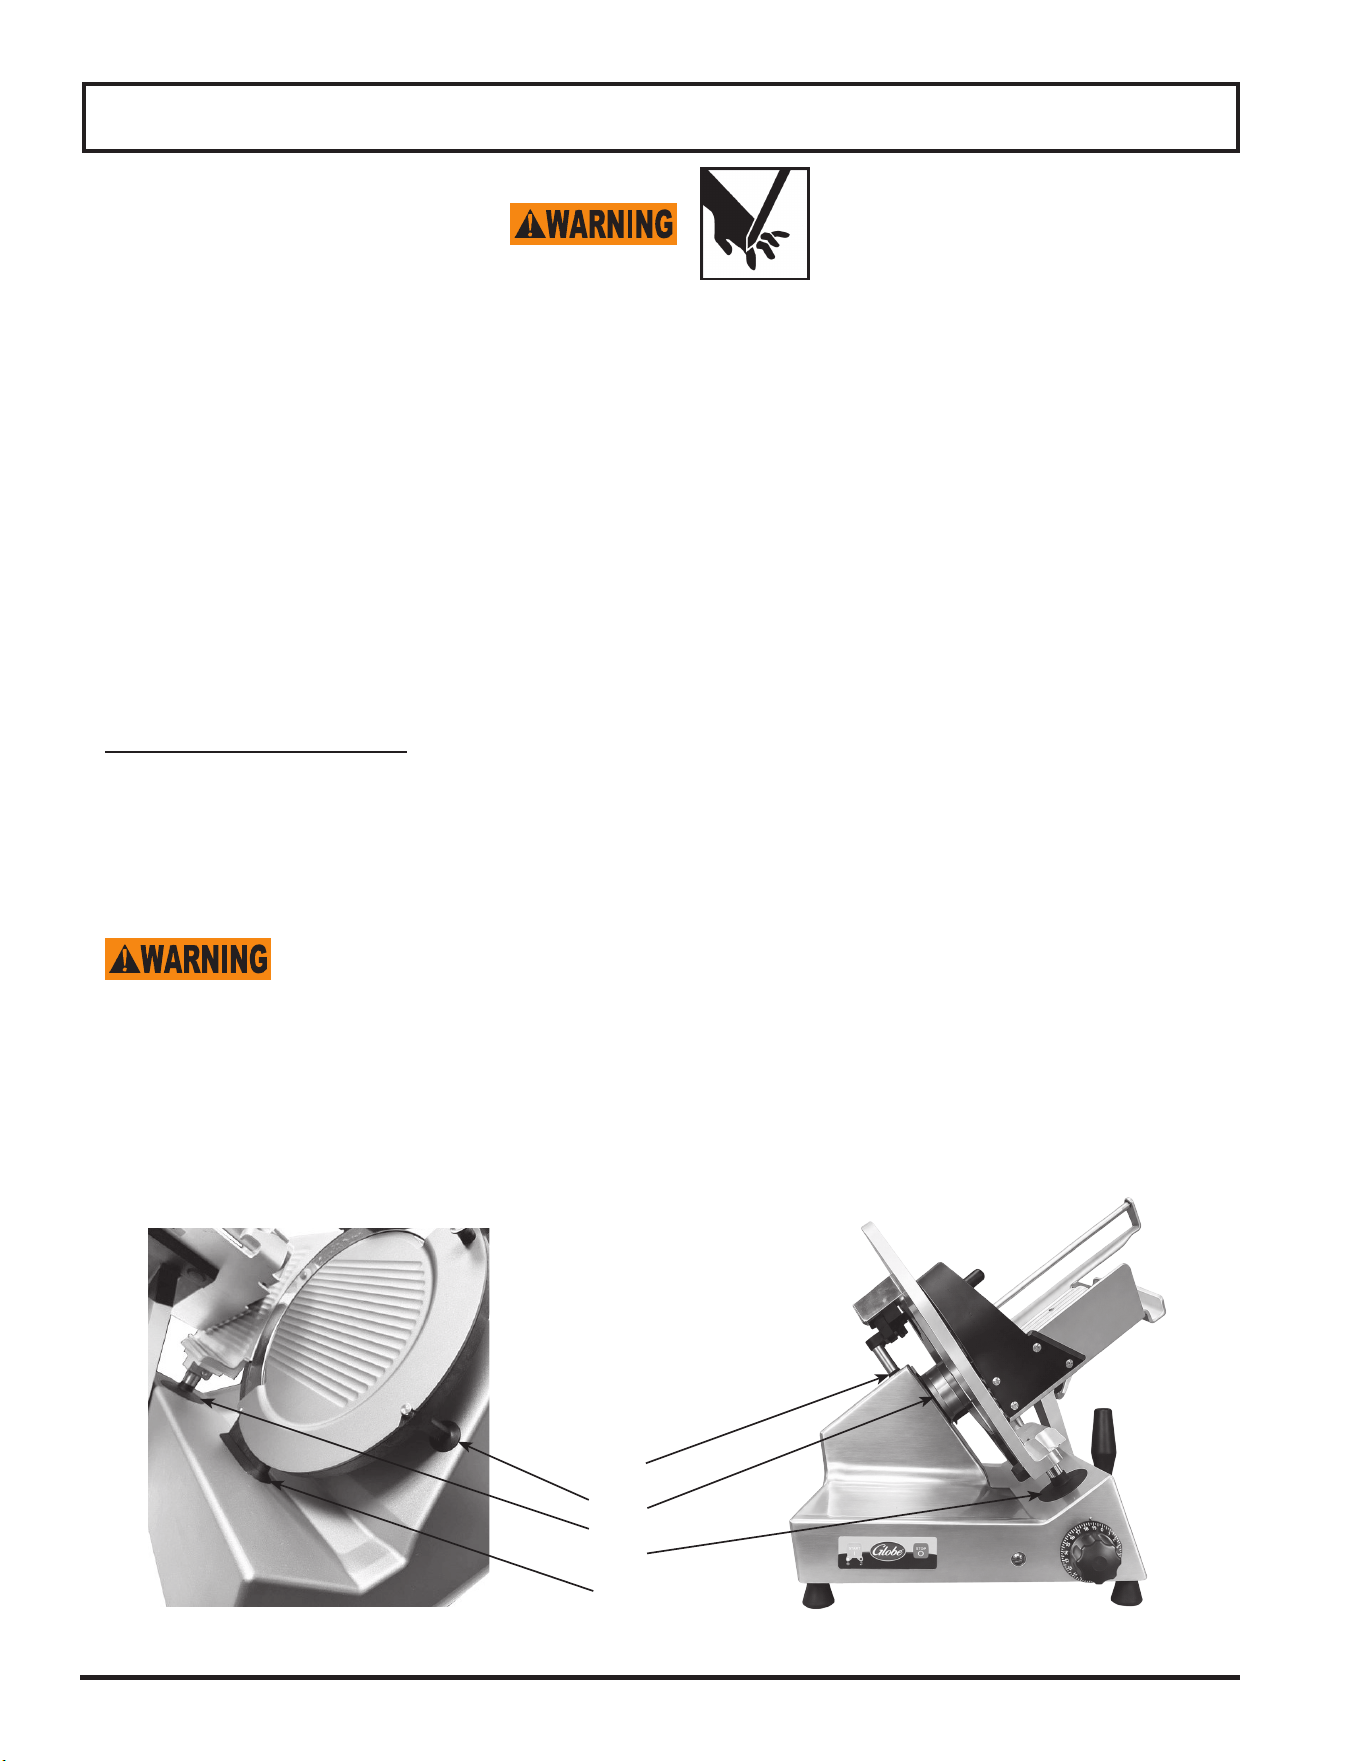
INSPECT THE SLICER FOR DAMAGED OR BROKEN PARTS INCLUDING GASKETS & SEALS. A thorough
visual inspection should be made of the entire slicer and its parts. Globe urges the owner/operator to inspect all
components daily and for an authorized service agent to inspect the entire slicer at least every 6 months, including
all parts that are detachable for cleaning and sanitizing. This inspection should include looking for damaged parts,
broken seals or gaskets, and areas that may be more difcult to clean and sanitize.
IF A SEAL OR GASKET IS FOUND TO NOT PROPERLY SEAL, IS DAMAGED OR IS
MISSING, THE SLICER MUST BE REMOVED FROM SERVICE UNTIL IT IS REPAIRED BY
AN AUTHORIZED SERVICER.
Slicer Seals and Gaskets Identied
SLICER INSPECTION
I
N
S
P
E
C
T
Page 18
LUBRICATION
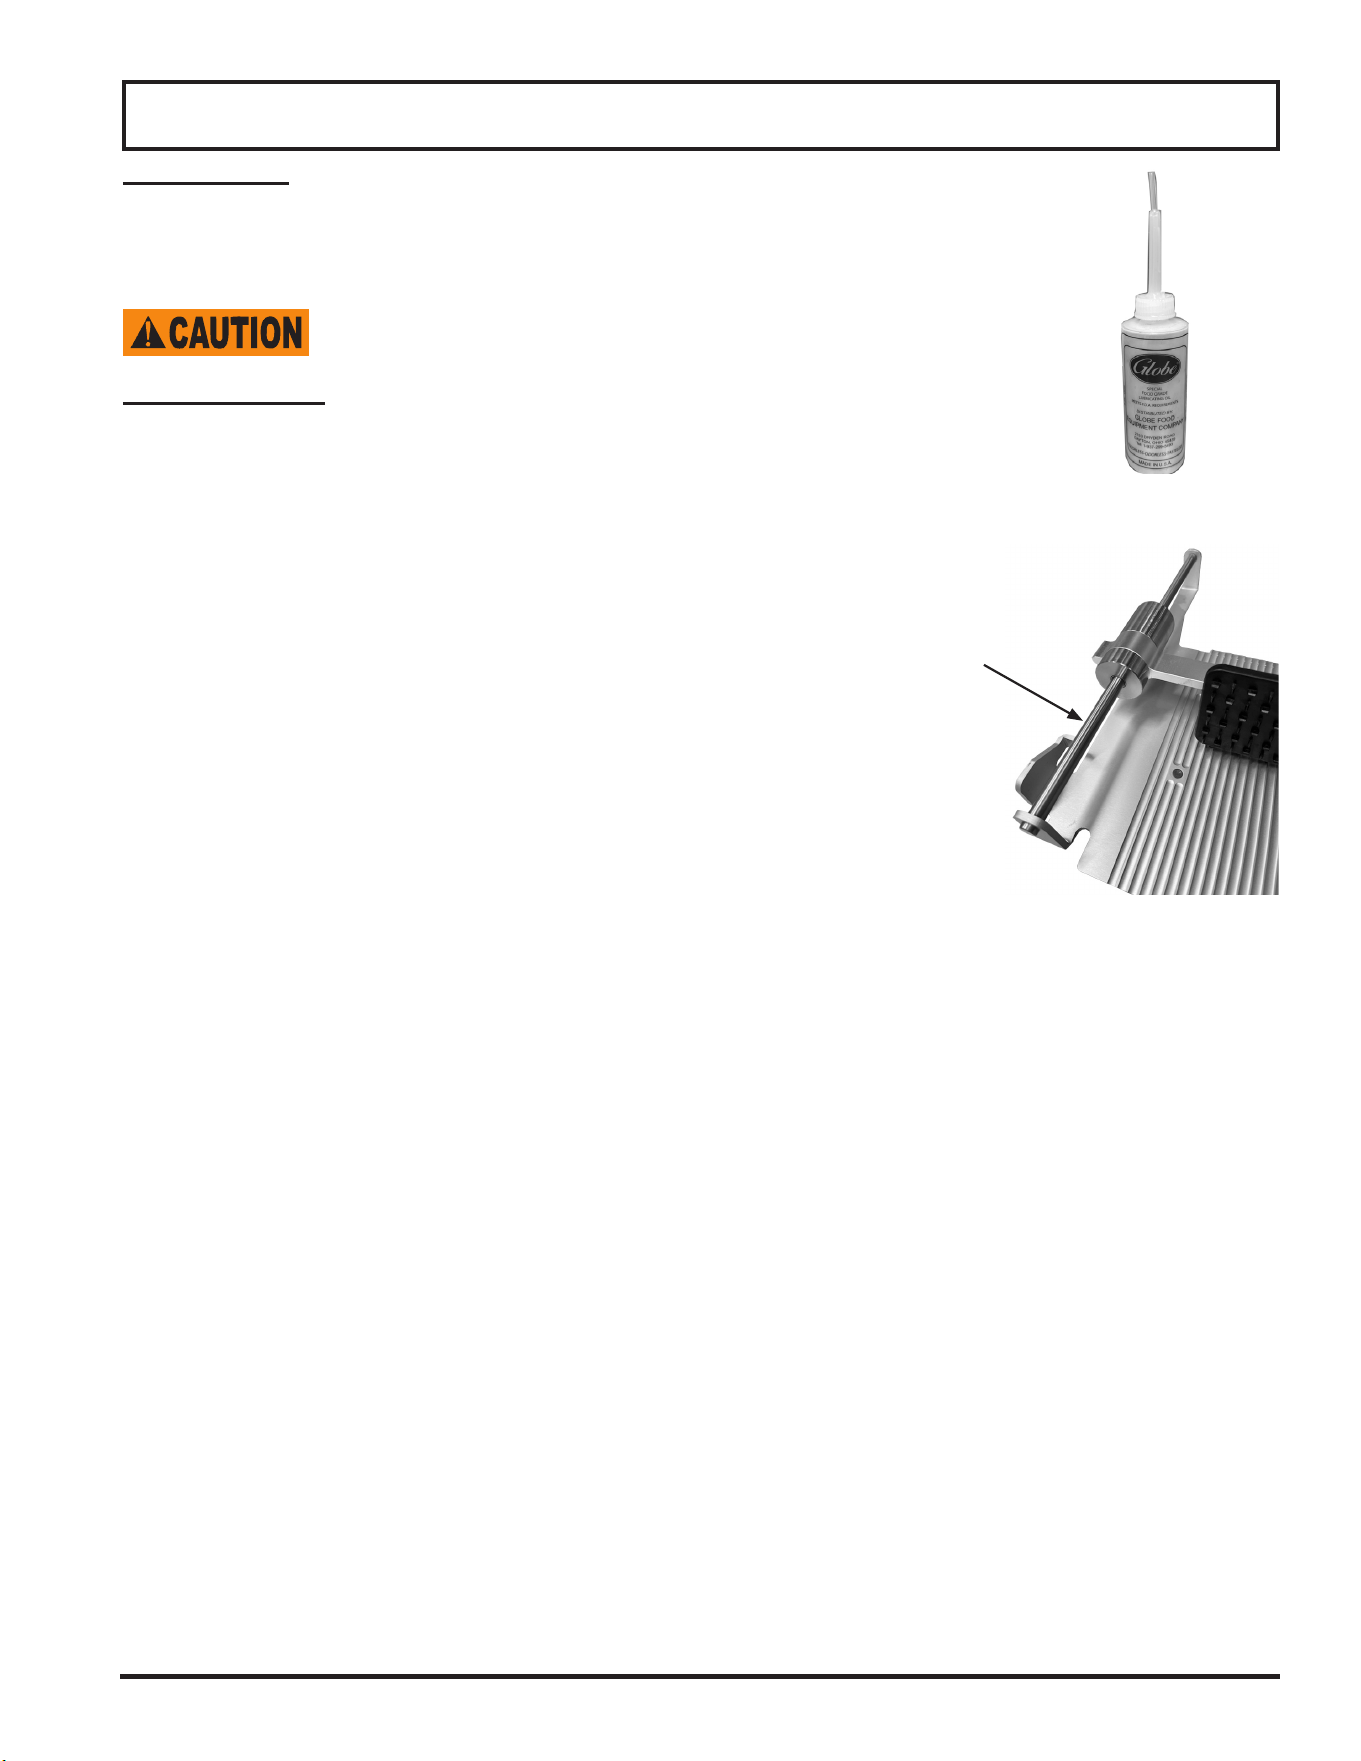
Various slicer parts need to be lubricated periodically using Globe oil
(Fig. 18-1). Globe oil is a light, tasteless, odorless mineral oil that will not
contaminate or impart odors or taste to sliced food products.
DO NOT USE VEGETABLE OIL TO LUBRICATE
SLICER. VEGETABLE OIL WILL DAMAGE THE
SLICER!
End Weight Shaft
The end weight shaft should be lubricated with a few drops of Globe oil, every
week or when excessive drag is felt.
1. Apply a few drops of Globe oil to end weight shaft (Fig. 18-2).
2. Slide end weight up and down to distribute oil.
3. Wipe off any excess oil that drips onto slicer.
Inspections, Simple Maintenance, and Repair
End
Weight
Shaft
Figure 18-1
Figure 18-2
Page 19
Inspections, Simple Maintenance, and Repair
Transport Shaft
The transport shaft reservoir should be lubricated with Globe oil, once a
year or when excessive drag is felt.
1. Unplug slicer before servicing.
KEEP HANDS AND FINGERS CLEAR OF THE
TRANSPORT SHAFT AT ALL TIMES. THE
TRANSPORT SHAFT WILL MOVE WHEN THE
SLICER IS PLACED ON END.
USE TWO PEOPLE TO TILT THE SLICER ON END
IN ORDER TO GAIN ACCESS TO THE
TRANSPORT RESERVOIR. DAMAGE TO SLICER
CAN OCCUR.
2. Use two people to place slicer on end in order to gain access to the
transport shaft reservoir on the bottom of the slicer.
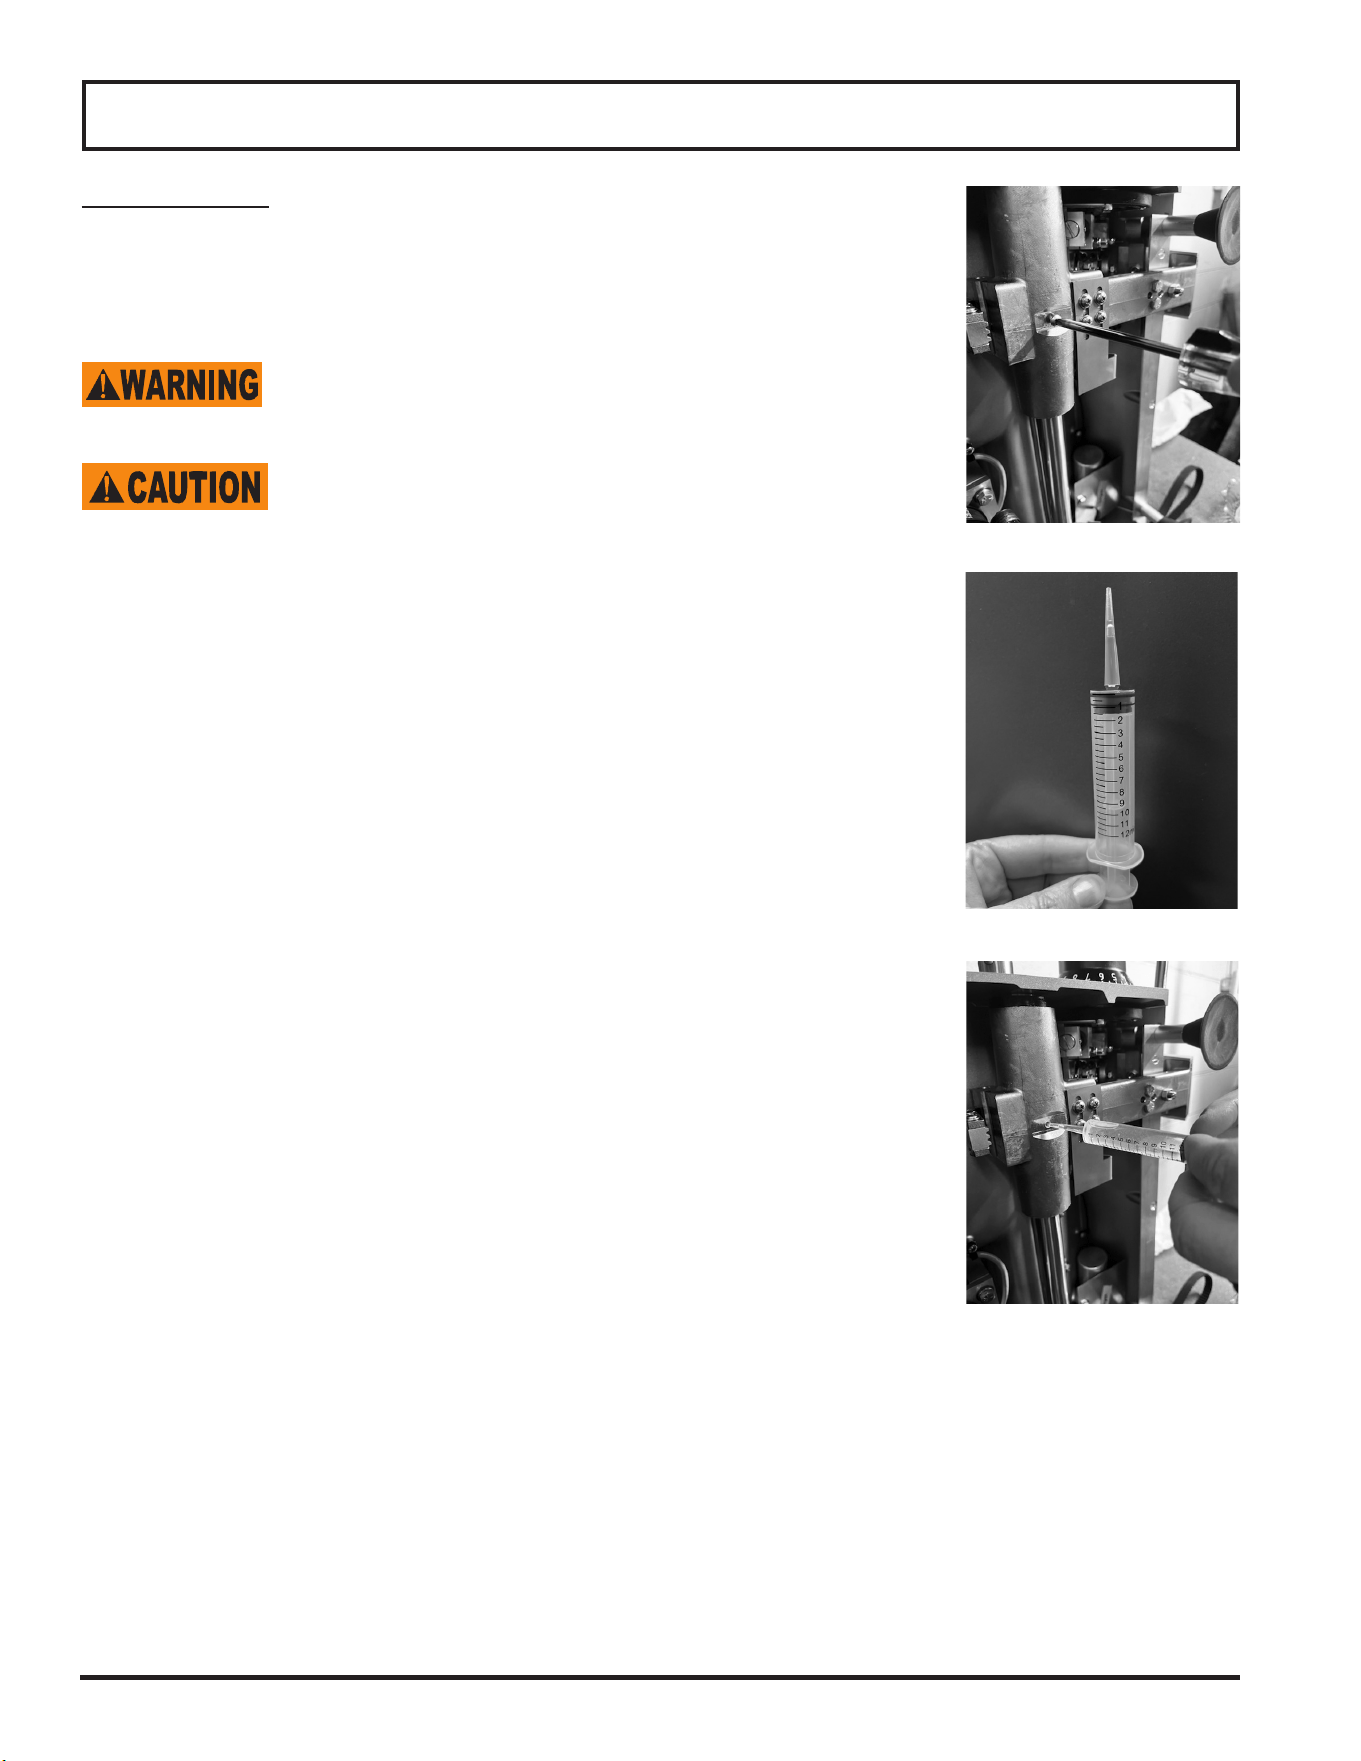
3. Remove the hex head screw from the transport shaft reservoir
(Fig. 19-1).
4. Add Globe oil to a 12 ml (cc) syringe (Fig. 19-2).
Note: Fill the transport shaft reservoir with Globe oil until the
transport shaft reservoir starts to overow with the
Globe oil.
5. Use the syringe to add Globe oil to the transport shaft reservoir
(Fig. 19-3).
6. Install the hex head screw on the transport shaft reservoir.
7. Use two people to lower the slicer back to operating position.
8. Use the carriage handle to push the carriage tray back and forth
several times to distribute the oil on the transport shaft.
Figure 19-1
Figure 19-3
Figure 19-2


Page 21
Settings Mode (Model S213A only)
Settngs Mode is made up of four sub menu displays: Options, Counters, Service and Information. Refer to the table
below for the options and actions of each available menu display.
Entering Settings Mode
Two options are available for entering the settings mode.
Option One:
1. Unplug the slicer.
2. While holding down the STOP button, plug in the slicer. During start up the display will show ''Entering Settings
Mode.''
Note: Once Settings Mode has been entered, use the STOP button to navigate through selections and
the START button to select the option.
MENUS OPTIONS ACTION
Options
Language Setup
(Model S213A only)
''ATTENTION'' screens will alternate
between Language 1 and Language
2 displaying each for 5 seconds.
No action required.
Language 1 Displays primary language. No action required.
English Displays language options English,
French and Spanish.
Select START button to select
language.
Press STOP button once language
selection has been made.
Select START button to Save and
Exit.
French Displays language options English,
French and Spanish.
Select START button to select
language.
Press STOP button once language
selection has been made.
Select START button to Save and
Exit.
Spanish Displays language options English,
French and Spanish.
Select START button to select
language.
Press STOP button once language
selection has been made.
Select START button to Save and
Exit.
Language 2 Displays secondary language. No action required.
English Displays language options English,
French and Spanish.
Select START button to select
language.
Press STOP button once language
selection has been made.
Select START button to Save and
Exit.
French Displays language options English,
French and Spanish.
Select START button to select
language.
Press STOP button once language
selection has been made.
Select START button to Save and
Exit.
Spanish Displays language options English,
French and Spanish.
Select START button to select
language.
Press STOP button once language
selection has been made.
Select START button to Save and
Exit.

Page 22
Settings Mode (Model S213A only)
MENUS OPTIONS ACTION
Counters
Total Slices Counts the number of strokes made
with the knife running.
No action required.
Manual Slices Displays the total number of slices in
manual mode.
No action required.
Speed 1
Stroke
1
Displays the total number of slices in
speed 1 stroke 1.
No action required.
2
N/A N/A
3 Displays the total number of slices in
speed 1 stroke 3.
No action required.
Speed 2
Stroke
1 N/A N/A
2 N/A N/A
3 N/A N/A
Speed 3
Stroke
1 N/A N/A
2 N/A N/A
3 N/A N/A
Speed 4
Stroke
1 N/A N/A
2 N/A N/A
3 N/A N/A

Page 23
Settings Mode (Model S213A only)
MENUS OPTIONS ACTION
Service
System Inputs Used to determine if the machine
sensors are functioning properly.
Select a button or sensor to test
machine.
Example: When the START button
is selected and the safety sensor
is working properly, ''Start'' on the
display will illuminate.
Operations
In Service (HRS) Displays the total amount of time the
slicer has been plugged in.
No action required.
Knife Motor Displays the total amount of time in
hours that the knife motor has ran.
No action required.
Carriage Motor Displays the total amount of time in
hours that the slicer has been used
in auto mode.
No action required.
Power Cycles Displays the total amount of times
the slicer has been connected to
power.
No action required.
Carriage Stalls Displays the total amount of times
the carriage has stalled in auto mode
No action required.
Reset
Knife Motor Displays the Reset Knife Timer. Press STOP to verify reset operation.
Information
Communication For Diagnostics and Debug Qualied Service Technician Only
About Displays the Model Number No action required.
Displays Rated Input Voltage No action required.
Displays Software version No action required.

Page 24
Troubleshooting Guide
PROBLEM CAUSE SOLUTION
Knife motor will not start Slicer not plugged in Plug in slicer
Overload reset button tripped Press the reset button located
underneath the slicer
Carriage not in home position Pull carriage to operator to start
Carriage tray not installed Install carriage tray
Ragged cuts-poor yield Dull knife Sharpen knife. Make sure knife and
stones are clean
Chipped knife Sharpen or have new knife installed
Knife-gauge plate gap too wide Call for service to adjust gauge plate
Knife too small Have new knife installed
Part scraping knife Knife cover Lock knife cover lock knob
Carriage Adjust carriage tray.
Gauge plate Call for service to adjust gauge plate
If problems persist and the assigned solution does not remedy the issue, please call our Service
Department at 866-260-0522.