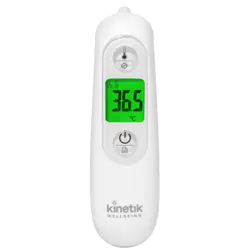

Inner Ear
Thermometer
User Manual
ET-100E

Contents
Introduction
Specification
Cautions
How to take a temperature
Product disposal
Cleaning and storage
Replacing the batteries
Explanation of symbols
Quality warranty
3
6
10
12
15
16
17
18
19
2
Support
About Age-Exact
4
5

Introduction
Please read the instructions carefully before using.
The infrared thermometer is an electronic thermometer using an infrared sensor
to measure human body temperature in people of all ages, its operation is based
on measuring the natural thermal radiation emanating from the ear canal.
3

4
Phone
+44 1483 937 969
Post
Kinetik Medical Devices Ltd
Unit 11 Perrywood Business Park,
Honeycrock Lane,
Salfords,
Redhill,
RH1 5JQ
Live Chat
Simply visit www.kinetikwellbeing.com
and send us a message.
Email
customercar[email protected]
Support
Our manual should provide you with all the information you need to set up & use
this product. If you have a question, have a look at our troubleshooting page! For
further assistance, why not contact our customer care team directly? We’re here
to help! Our customer care team are available from 9am - 5pm, Monday to Friday
(excluding bank holidays). We promise to respond to all queries and will ensure to
resolve any issue you may be having. You can reach us by...
5
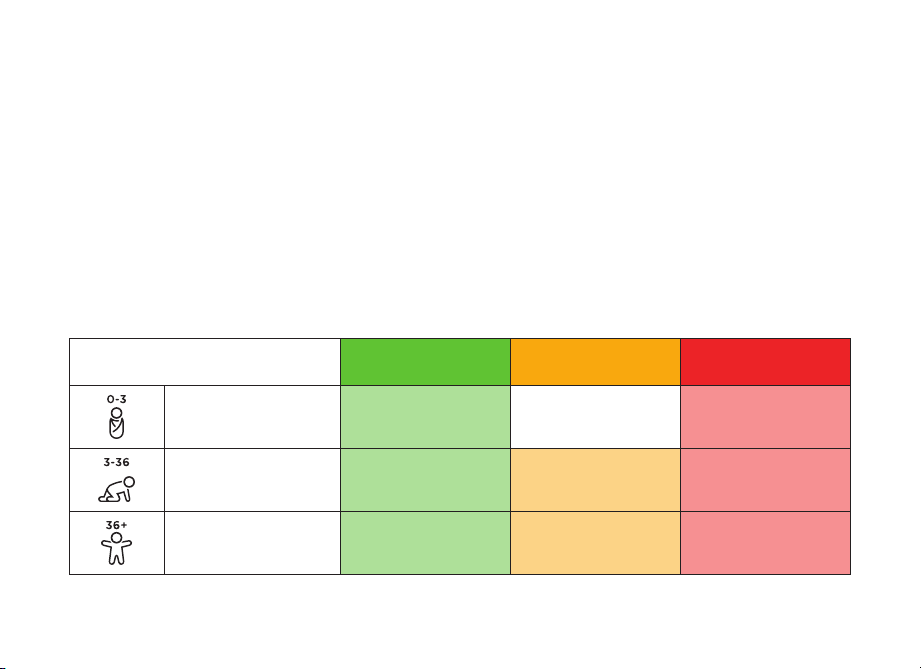
About Age-Exact
™
The Kinetik Wellbeing Inner Ear Thermometer is expertly designed to deliver precise
and reliable temperature readings for every stage of life. Research shows that fever
thresholds vary by age
*
.
Our innovative Age-Exact
™
technology accounts for these age-specific differences,
providing a clear, colour-coded result that instantly indicates whether the
temperature is normal, a low-grade fever, or a high fever.
*
Herzog L, Phillips S. Addressing Concerns About Fever.
Clinical Pediatrics. 2011; 50(#5): 383-390.
Age Range
Babies:
Under 3 months old
≥35.8 - ≤37.4 °C
≥35.4 - ≤37.6 °C
≥35.4 - ≤37.7 °C
>37.6 - ≤38.5 °C
>37.7 - ≤39.4 °C
>37.4 °C
>38.5 °C
>39.4 °C
Children:
3 months to 3 years
Over 36 months
Red
High
Yellow
Low-grade fever
Green
Within normal range

6
Specification
This appliance conforms to the standard of ISO 80601-2-56-2017AMD.1:2018
Medical electrical equipment -- Part 2-56: Particular requirements for basic safety
and essential performance of clinical thermometers for body temperature
measurement. This device complies with the requirements of IEC 60601-1, IEC
60601-1-11 and IEC 60601-1-2.
Range of displayed temperature:
34.0°C ~ 44.0°C (93.2°F ~ 111.2°F).
Display ‘Lo’ when the temperature is lower than the displayed temperature range.
Display ‘H
I’ when the temperature is higher than the displayed temperature range.
Operating ambient:
Temperature: 16°C ~ 35°C (60.8°F ~ 95.0°F).
Humidity: ≤85%RH.
Atmospheric pressure: 700 ~ 1060hPa.
Altitude: <3000m.

7
Storage and transport condition:
Temperature: -25°C to 55°C (-13°F to 131°F).
Humidity: ≤85%RH.
Display resolution temperature range:
0.1°C (0.1°F).
Accuracy:
±0.2°C (35.0°C ~ 42.0°C) / ±0.4°F (95.0°F ~ 107.6°F).
±0.3°C (<35.0°C/>42.0°C) / ±0.5°F (<95.0°F/>107.6°F).
Temperature value:
Display the maximum temperature in measuring process.
Display:
Liquid crystal illuminated display, 3 digits. Tricolor illuminated display:
Green: Normal temperature.
Orange: Low fever.
Red: High fever.
8
Temperature unit:
Centigrade or fahrenheit.
Display of memory:
Last ten memories.
Low voltage display:
The LCD displays ‘ ’.
Power consumption:
≤30mW.
Battery:
Two 1.5V alkaline batteries (AA).
Battery life:
2,500 measurements.
Dimensions:
147mm x 47mm x 40mm.
Net weight:
60g (not including batteries).
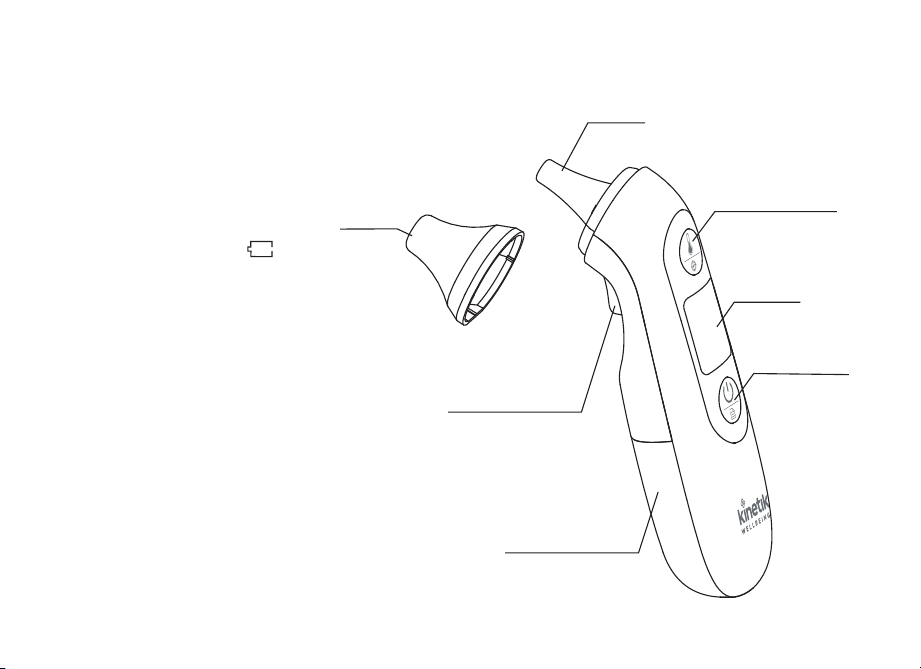
Cap
LCD
Battery cover
On/Recall
button
Probe
Scan/Age
Exact button
Probe cover
eject button

9
Shelf life:
3 years.
Beeper sign:
On/off, measuring finish.
Calibration frequency:
If used privately no calibration is needed. For professional use it is recommend to
check once a year.
Manufacturing and Calibration date:
See manufacturing date on label.
Self-check test:
Press the ‘On/Recall’ button to turn on the thermometer and all of the symbols (see
Fig A)
should be displayed on the LCD in one second.

10
1. Before measuring, the thermometer shall be stabilised for at least 30 minutes
under operating condition.
2. A new disposable probe cover is required for each measurement, otherwise
inaccurate readings will occur.
3. Please keep your ear canal clear, if not, the measuring result shall be inaccurate.
4. The symbol ‘ ’ on the LCD shows you can measure in the ear.
5. Please don't scratch the probe membrane, if scratched the thermometer shall
lose efficacy.
6. If the LCD freezes and does not change when pressing any button, please take
the batteries out, wait a few seconds and reinsert them.
7. Please don't use the thermometer if your ear canal is inflamed.
8. Do not expose this thermometer to electric shock.
9. Do not expose the thermometer to direct sunlight or to water.
10. Do not use near strong electromagnetic fields, i.e. Keep it away from any radio
systems and mobile phones.
11. Do not modify this device without authorization of the manufacturer.
12. This device must always be kept in a clean, dry area.
13. If the temperature is not in the normal range, please consult your doctor.
14. Do not drop/impact the thermometer, otherwise it may affect the accuracy of
the measurement.
15. This device includes small parts, don't inhale or swallow them.
16. Do not apply a strong shock to, drop, step on, or vibrate the main unit.
17. Keep out of reach of children.
Cautions

11
Notes:
• In order to avoid spreading germs, please use a new disposable probe cover for
each measurement.
• Check to ensure the probe cover is fitted on firmly
before use (please see the diagrams
right). If the
probe cover is broken, discard and apply a new one
immediately. Remove the protective cap before using the ear thermometer and
fit a new probe cover. You will hear a “click” sound then the probe cover is fitted
correctley. To remove the probe cover pull the probe cover eject button.
1. Before measuring, the thermometer shall be stabilised for at least 30 minutes
under operating condition.
2. A new disposable probe cover is required for each measurement, otherwise
inaccurate readings will occur.
3. Please keep your ear canal clear, if not, the measuring result shall be inaccurate.
4. The symbol ‘ ’ on the LCD shows you can measure in the ear.
5. Please don't scratch the probe membrane, if scratched the thermometer shall
lose efficacy.
6. If the LCD freezes and does not change when pressing any button, please take
the batteries out, wait a few seconds and reinsert them.
7. Please don't use the thermometer if your ear canal is inflamed.
8. Do not expose this thermometer to electric shock.
9. Do not expose the thermometer to direct sunlight or to water.
10. Do not use near strong electromagnetic fields, i.e. Keep it away from any radio
systems and mobile phones.
11. Do not modify this device without authorization of the manufacturer.
12. This device must always be kept in a clean, dry area.
13. If the temperature is not in the normal range, please consult your doctor.
14. Do not drop/impact the thermometer, otherwise it may affect the accuracy of
the measurement.
15. This device includes small parts, don't inhale or swallow them.
16. Do not apply a strong shock to, drop, step on, or vibrate the main unit.
17. Keep out of reach of children.

12
How to take a temperature
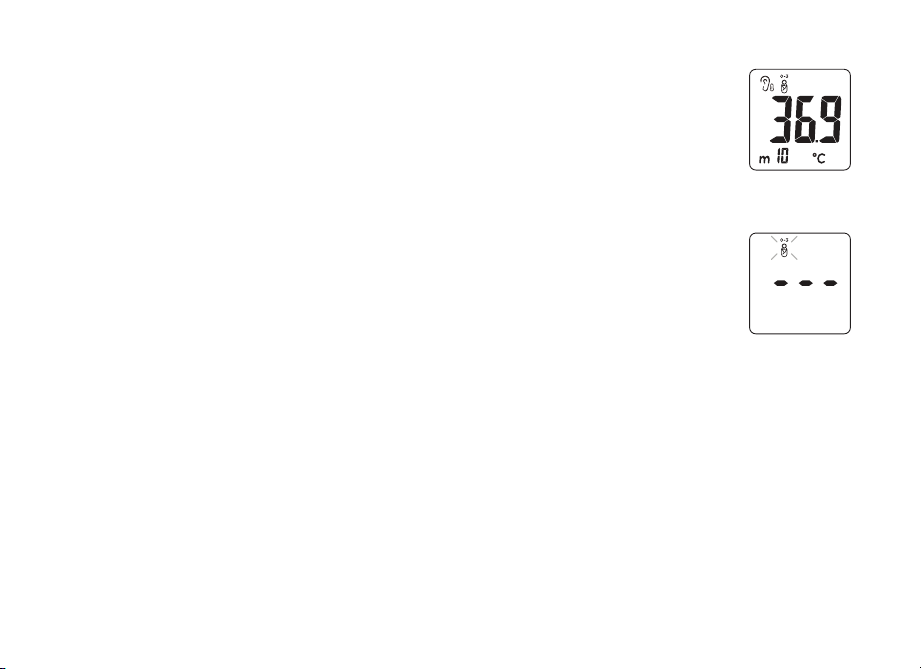
1.
Press the ‘On/Recall’ button to turn on the thermometer;
a beep is heard, and the LCD displays all icons for 1
second (Fig A). The display then shows the Ear symbol,
Age symbol and --- °C (Fig B); now it is ready for use.
Note: If the probe cover symbol is flashing on the LCD
as Fig C this indicates the disposable cover is not
fitted correctley. Refit the probe cover until the probe
cover symbol stays off as Fig B.
2. Insert the thermometer into the ear canal, press
‘Scan/Age-Exact’ button then release it. When you
hear a beep the measurement is complete and
displays on the LCD (Fig D).
For children under 1 year. Pull the ear straight back.
For children ages 1 year to adult. Pull the ear up and back.
Fig A
Fig C
Fig D
Newborn - 1 year 1 year - adult
Fig B
13
3. Memory Recall: Press the ‘On/Recall’ button to turn on the
thermometer, a beep is heard, and the LCD displays all icons for 1
second. Then shows Ear symbol, Age symbol and --- °C. Press and
release the ‘On/Recall’ button repeatedly it will scroll through the
memories (Fig E).
4. Changing the Age Exact Temp Range: Press the ‘On/Recall’ button
to turn on the thermometer, a beep is heard, and the LCD displays all
icons for 1 second. Then shows Ear symbol, Age symbol and --- °C.
Press and hold ‘Scan/Age Exact’ button for 3 seconds. ‘Age Exact’
symbol flashes, release button (Fig F). Press and release ‘Scan/Age
Exact’ button to cycle through ‘0-3’, ‘3-36’ & ‘36+’ age ranges. After no
press of the ‘Scan/Age Exact’ button for 3 seconds the ‘Age Exact’
temp range is set. The ‘Age Exact’ symbol is solid and the display
shows Ear symbol, Age symbol and --- °C. Insert the thermometer into
the ear canal, press ‘Scan/Age Exact’ button then release it. When you
hear a beep the measurement is complete and displays on the LCD.
Fig F
Fig E

14
5. Changing from Celsius to Fahrenheit: Press the ‘On/Recall’ button to
turn on the thermometer, a beep is heard, and the LCD displays all icons
for 1 second. Then shows Ear symbol, Age symbol and --- °C. To switch
the display between °C and °F, press and hold the ‘On/Recall’ button for
3 seconds, the display will switch to C-F °F (°F icon is flashing) (Fig G),
release the ‘On/Recall’ button at this time, the screen will display --- °C.
To change back, press and hold the ‘On/Recall’ button again for 3
seconds, the screen will display C-F °F (°C icon is flashing), release the
‘On/Recall’ button at this time, the screen will display --- °C.
6. Auto off: The thermometer shall automatically turn off if no button is
pressed for one minute.
7. Manual off: To manually turn off the thermometer press and hold the
‘On/Recall’ button for 5 seconds (Fig H).
8. The LCD will display ‘Err’ and cannot display temperature when the
ambient temperature is out of the range of 10°C to 40°C.
Note: Before measuring, the thermometer shall be stabilized at the operating
ambient condition for at least 30 minutes.
Fig H
Fig G

15
Please ensure the environmental protection. Batteries do not belong to the
domestic waste. Please hand them in at the collection point or the municipal
recycle material centre as special waste.
This symbol on products and/or accompanying document means that
consumed electronic products must not be mixed with conventional
domestic waste. Take these products to the corresponding collection
points for correct treatment and recycling, where they will be accepted free of
charge. For more information on the close set collection point, please enquire with
your local authorities.
Product disposal

16
Cleaning and storage
1. Store the thermometer and the disposable probe cover in a dry location free
from dust
and contamination and away from direct sunlight. The ambient
temperature of the storage location should remain fairly constant and within
the range of -25°C to 55°C.
2. Use an alcohol swab or cotton swab moistened with alcohol (70% Isopropy) to
clean the thermometer casing and the measuring probe. Ensure that no liquid
enters the interior of the thermometer.
3. Never use abrasive cleaning agents, thinners or gasoline
for cleaning and never immerse the instrument in water
or other cleaning liquids. Take care not to scratch the
surface of the probe membrance or display.

17
Replacing the batteries
1. When the voltage of the batteries is low, the LCD will display the symbol ‘ ’,
please replace the batteries. The thermometer cannot work accurately under
the condition of low voltage.
2. The thermometer is supplied with two 1.5V ALKALINE BATTERIES (AA).
Insert the new batteries when the low voltage symbol appears on the LCD.
3. Remove the battery cover and take out the old batteries.
4. Place two new alkaline batteries according to the ‘+’ or ‘-’.
5. The disposal of the probe cover, battery and device shall comply with the local
environment requirements.
6. The disposal of the battery and the device shall comply with the local
environment requirements.
18
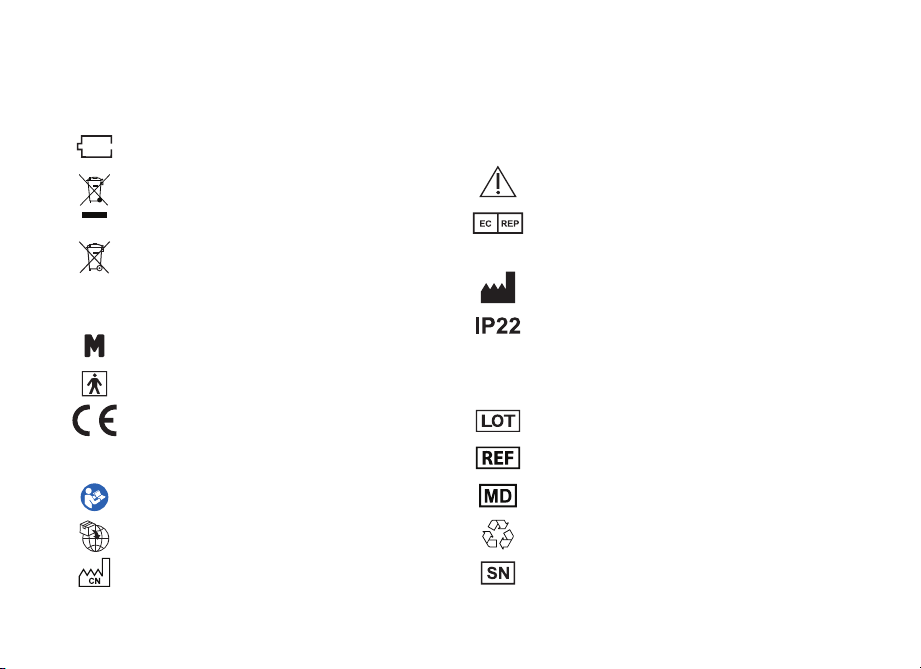
Explanation of symbols
Battery is empty
Product disposal instructions for
electronic devices
The battery in this product complies
with the requirements stated in
European Directives 2006/66/EEC
Memory
Type BF equipment
CE conformity marking
Subject temperature is under 34°C
Follow instructions for use
Importer’s information
Date of Manufacture / Made in China
Subject temperature is above 44°C
Read IFU carefully
Authorised representative in the
European Community
Manufactured by
Classification according to the
degree of protection against ingress
of water as detailed in IEC 60529
Lot Number
Catalogue Number / Model Number
Medical Device
Recyclable
Serial Number
Lo°C or Lo°F
H
I°C or HI°F

ET-100E_UK_IB_20250509_v6
19
Quality warranty
This thermometer is guaranteed for one year under proper use according the
operating manual from the date that the product is sent out the factory. The
manufacturer will make available on request circuit diagrams, component part
lists, descriptions, calibration instructions, or other information that will assist
service personnel to repair those parts of device.
Shanghai International Holding Corp. GmbH (Europe)
Eiffestrasse 80, 20537 Hamburg Germany
Hangzhou Hua’an Medical & Health Instruments Co., Ltd.
Building 2, 1 # Fuzhu Nan RD, Wuchang Town,
Yuhang District 310023 Hangzhou, Zhejiang China
Share Info GmbH
Am Schulzentrum 12, 41564 Kaarst, Germany

www.kinetikwellbeing.com
