Before operating this product, please read
this user manual carefully.
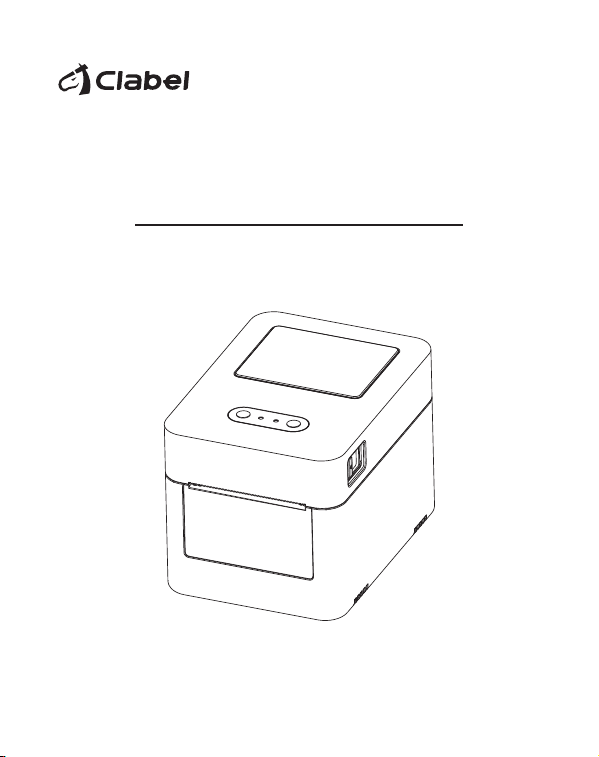
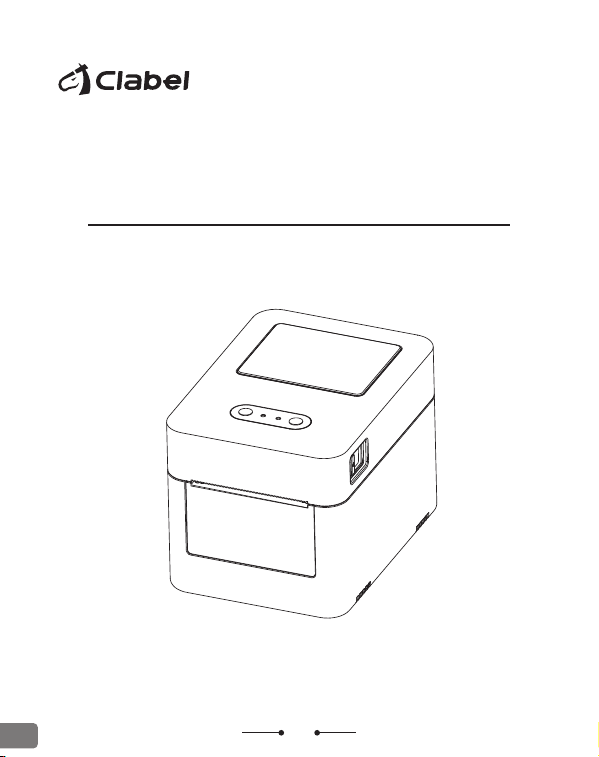
CT327D Label Printer
User Manual
English Version
Unboxing checklist
Exterior components
Installation guide
Button functions
Indicator light explanation
Software download
Troubleshooting
Specifications
Contents
................................. 01
.............................. 02
.................................... 03
..................................... 05
..................... 06
................................ 06
..................................... 09
......................................... 11
Deutsche Version
Stückliste
Außenkomponenten
Installationsanleitung
Tastenfunktion
Erklärung Anzeigeleuchte
Software-Download
Fehlerbehebung
Technische Daten
Inhalt
................................................ 15
.............................. 16
............................ 17
........................................ 19
...................... 20
............................... 20
..................................... 24
................................... 26
Version française
Liste d'emballage
Composants externes
Guide de montage
Fonctions des boutons
Présentation de témoin
Téléchargement de logiciel
Dépannage
Spécifications et paramètres
Contenu
.................................... 29
............................. 30
.................................. 31
........................... 33
......................... 34
.................... 34
.............................................. 37
................. 39
Versione Italiana
Lista di disimballaggio
Componenti esterni
Guida di installazione
Funzione tasto
Descrizione dell’indicatore luminoso
Scarica il software
Risoluzione dei guasti
Specifiche
Contenuto
............................ 42
................................ 43
............................. 44
......................................... 46
... 47
.................................. 47
............................ 50
............................................... 52
Versión Española
Lista de empaque
Componentes exteriores
Guía de instalación
Funciones de teclas
Descripción del indicador luminoso
Descarga de software
Solución de fallas
Especificación y parámetros
Contenido
.................................... 55
........................ 56
................................. 57
................................ 59
...... 60
............................. 60
................................... 63
.................. 65
Русская версия
Контрольный список для распаковки
Элементы экстерьера
Руководство по установке
Функции кнопок
Описание индикаторов
Загрузка программного обеспечения
Устранение неполадок
Технические характеристики
Содержание
.. 68
........................... 69
................... 70
................................... 72
....................... 73
.. 73
........................ 76
............. 78
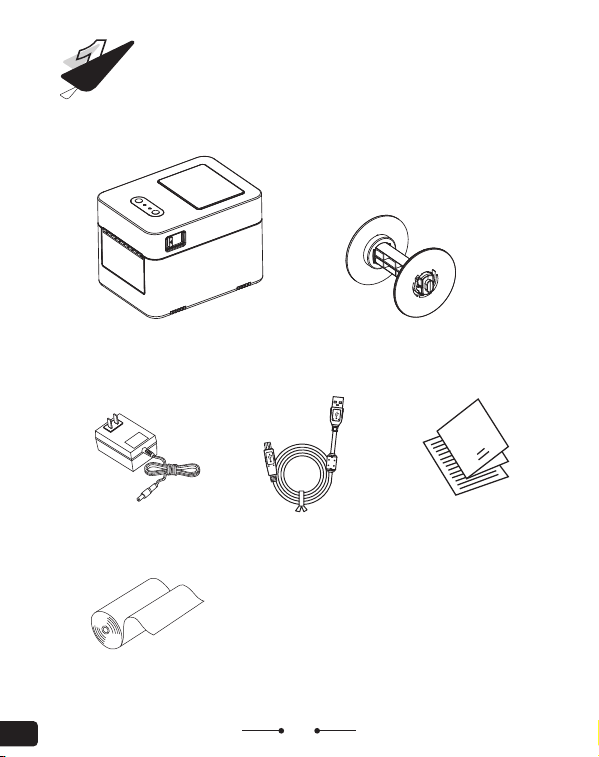
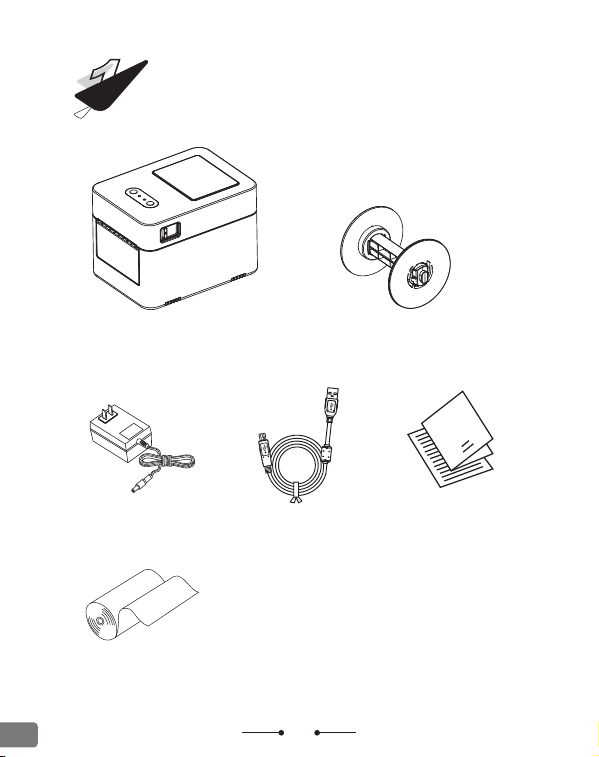
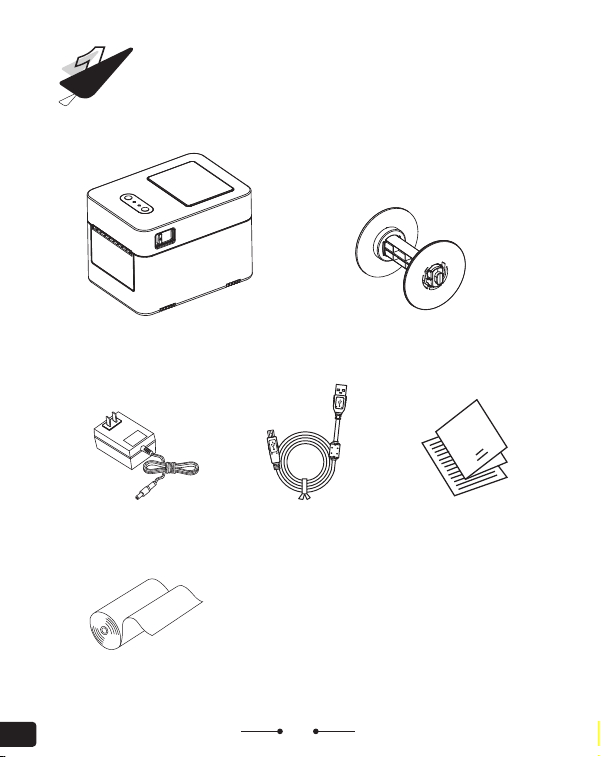
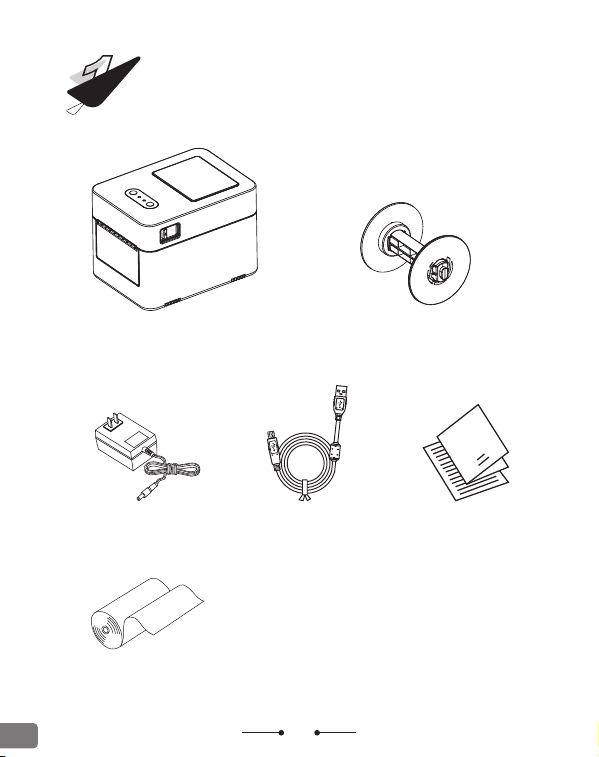
Unboxing checklist
1
Manual
Printer*1
User Manual*1Data Cable*1Adapter*1
Label Axis and Baffle*1
01
White Labels
EN
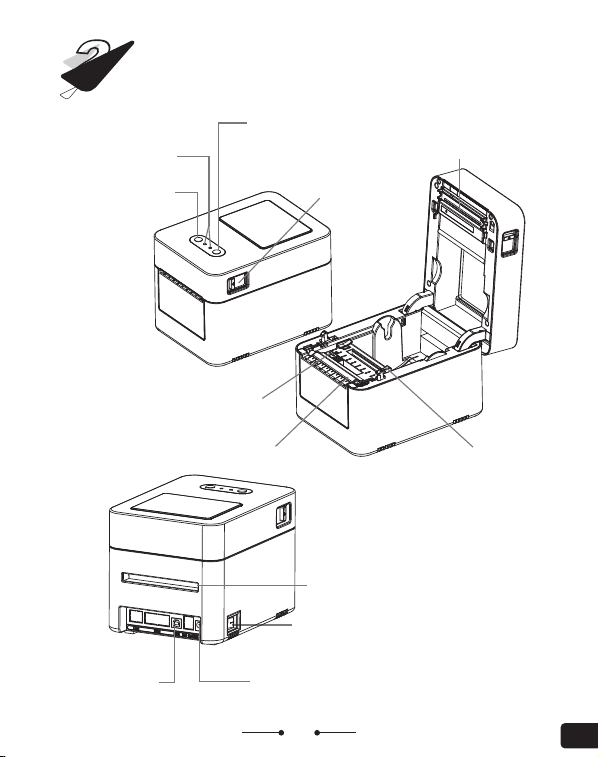
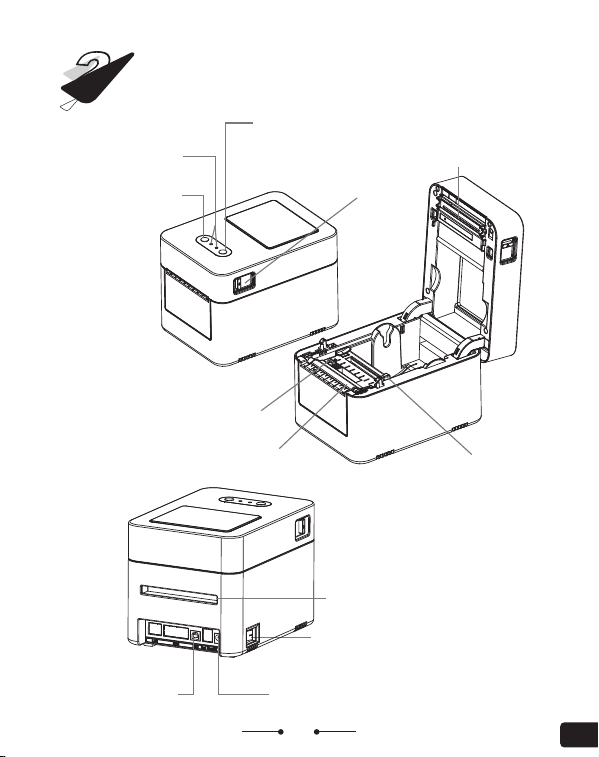
Exterior components
2
02
EN
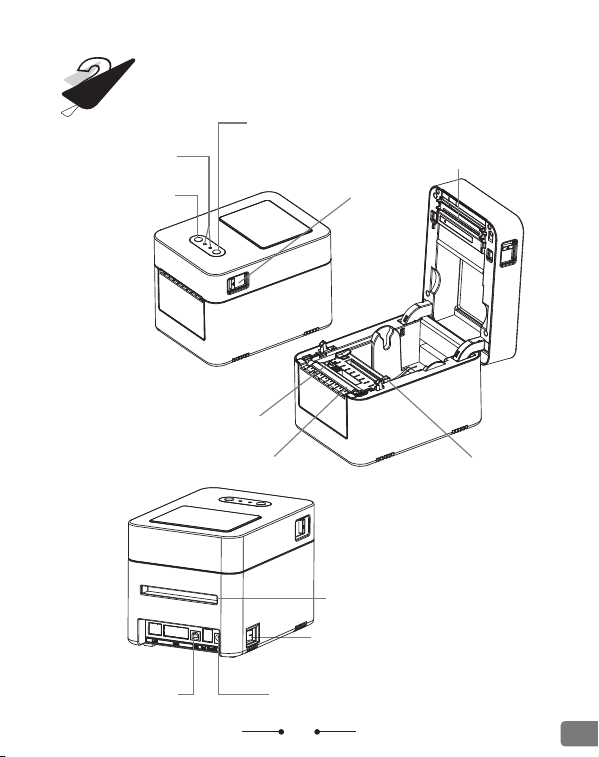
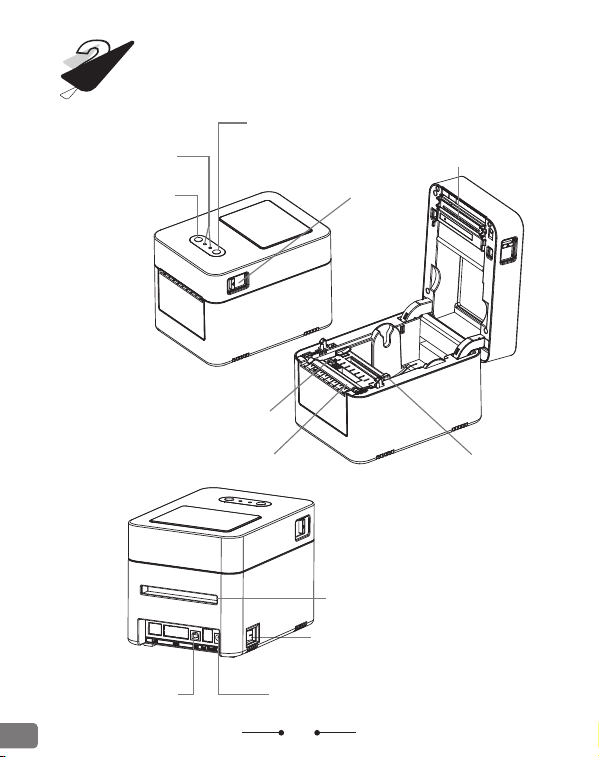
LED Indicator
Pause Button
Paper
Feed Button
Cover Release
Button
(POWER indicator,
ERROR indicator)
Sensors
Print Head
Paper Guide Slider
Rubber Roller
Power InterfaceUSB Port
Rear Paper Feed Slot
(Supports external paper feed)
Power Switch
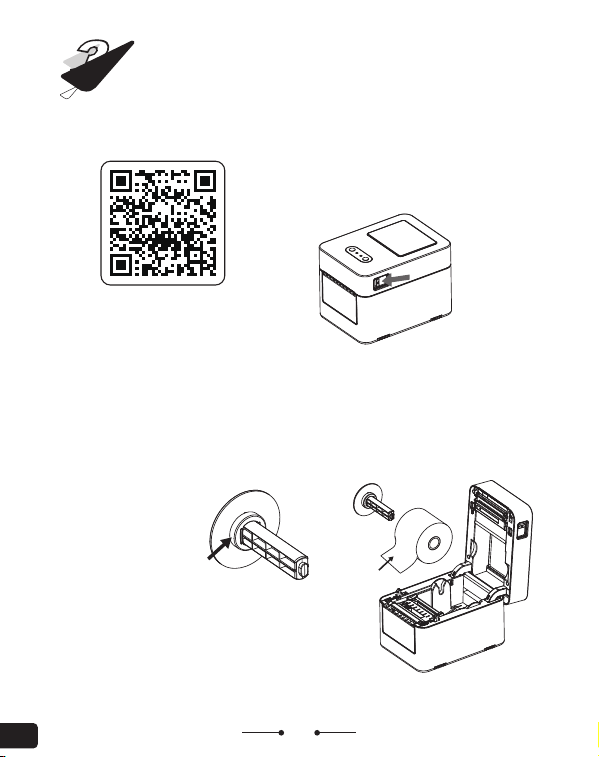
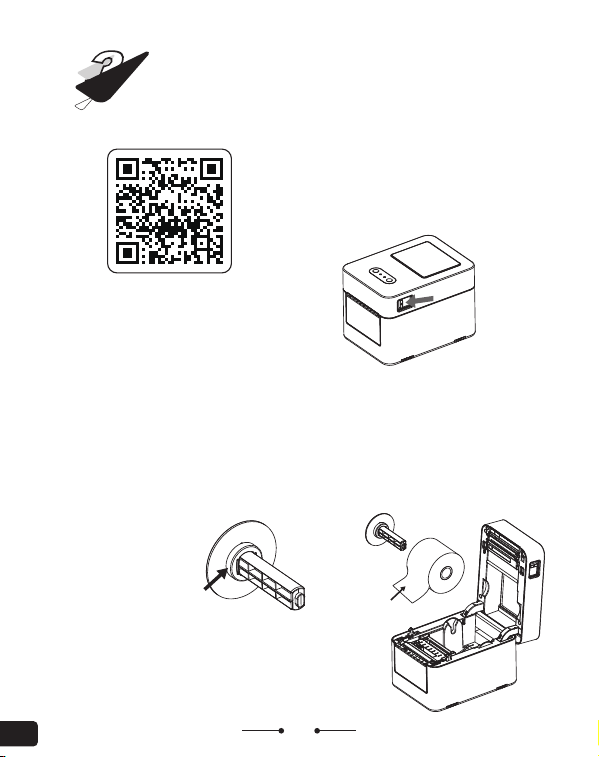
Installation guide
3
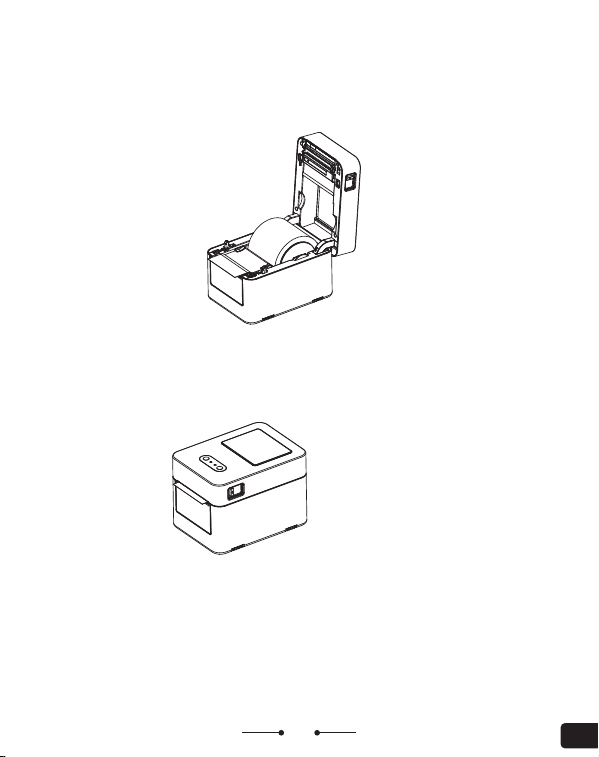
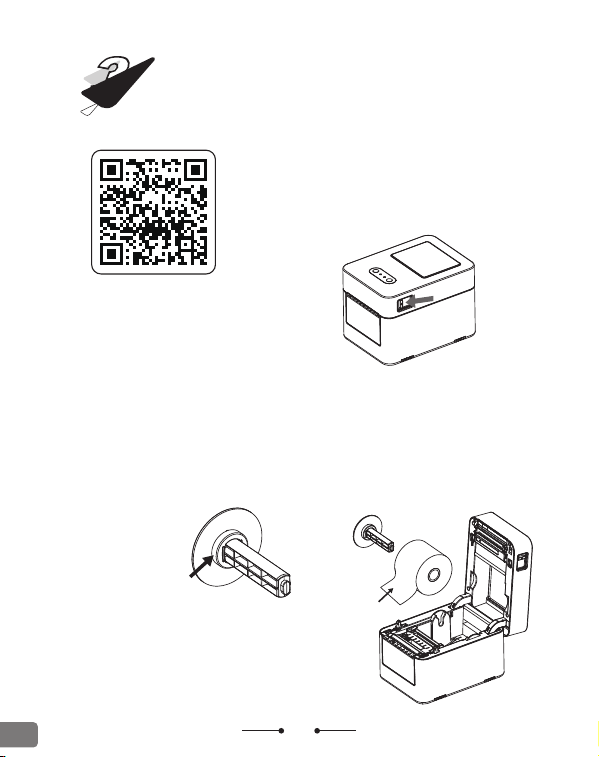
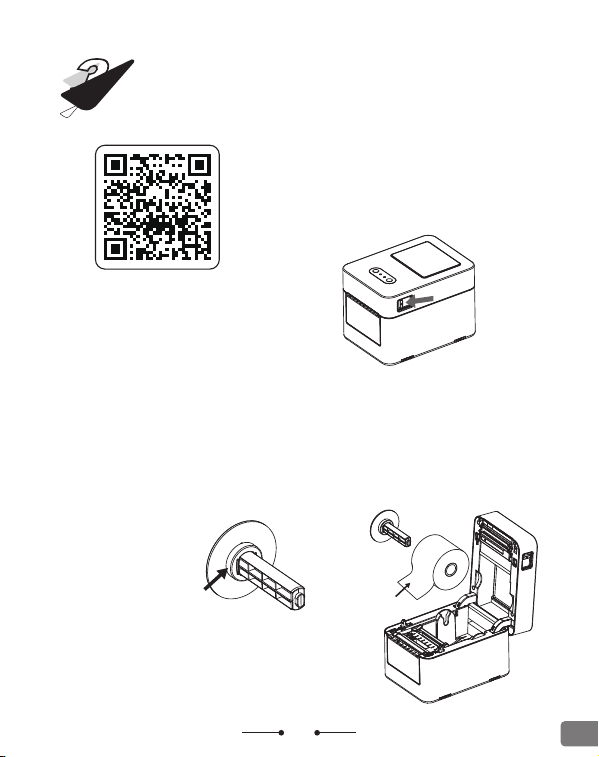
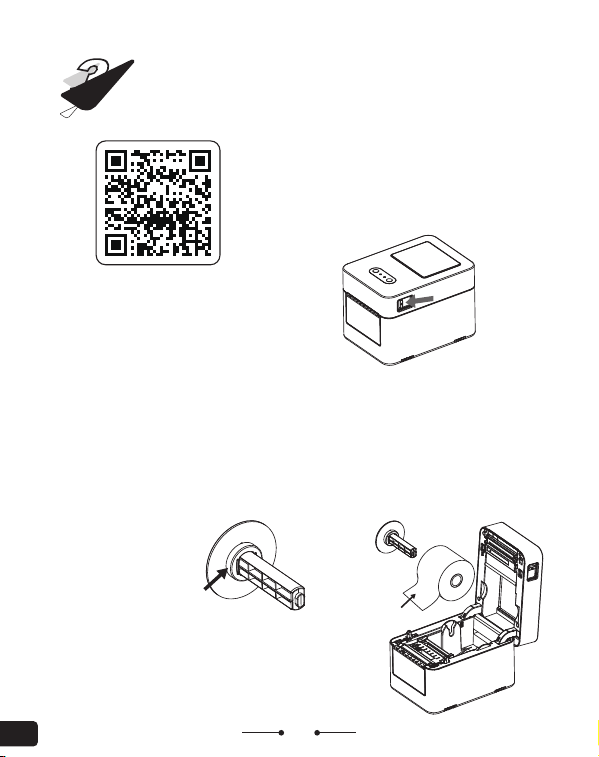
1. Pull the cover release buttons
on both sides and lift the top
cover.
2. Place the label roll onto the label spindle, align it to the
left with the print side facing up, then push the right paper
guide to secure it. (The paper guide is not required for
wider rolls.)
03
EN
Print side up
Label Paper
Installation Guide
When using label rolls with a
25mm core, please remove the
protruding component on the
inner side of the baffle.
04
EN
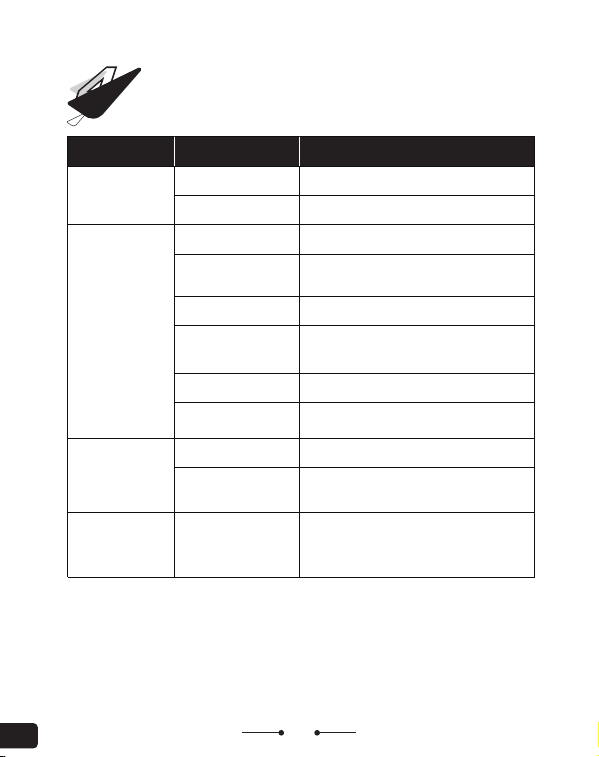
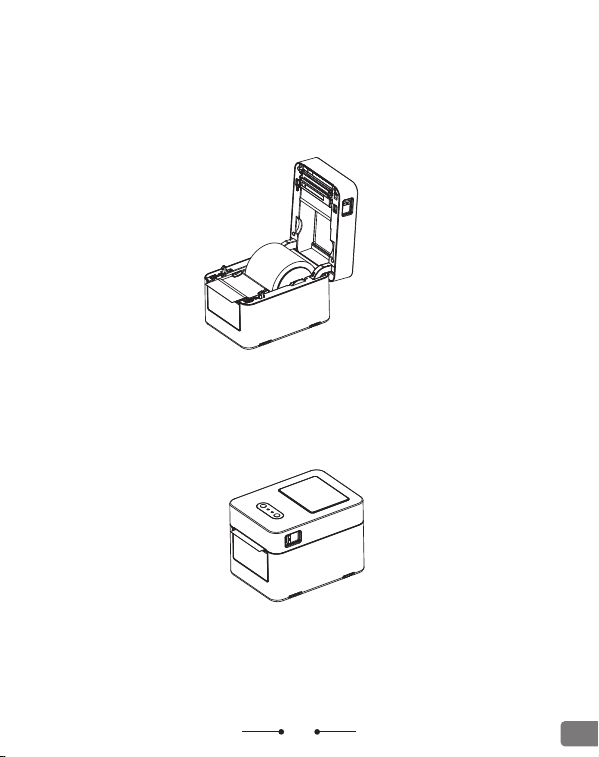
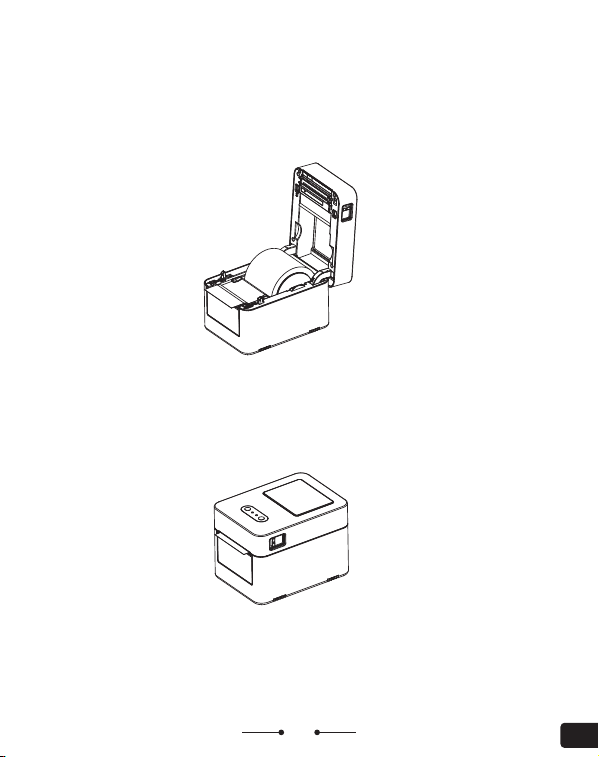
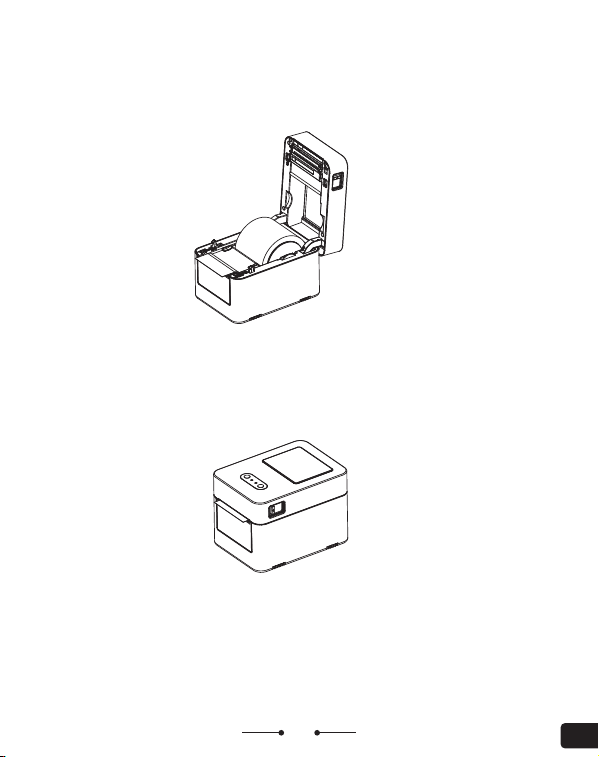
3. Pull the label paper to the paper exit slot, and push the
paper guide slider to secure the label.
4. Close the top cover of the printer to complete the
installation.
05
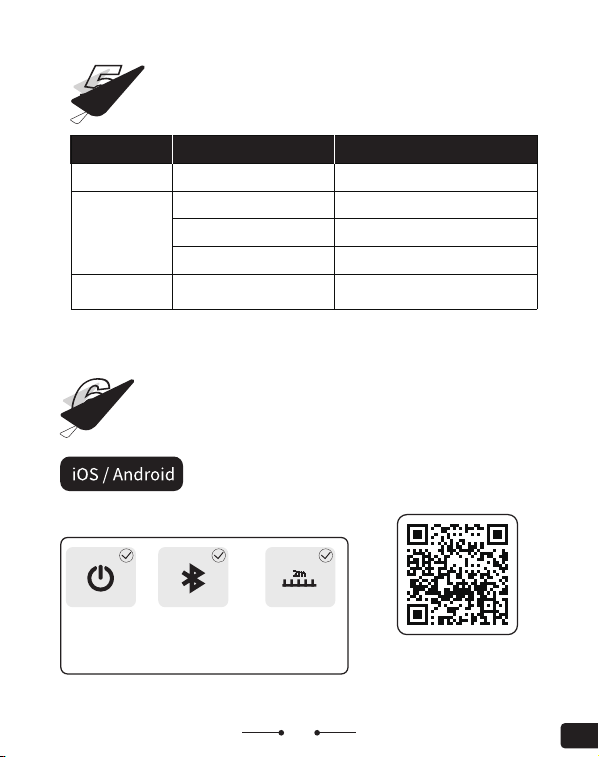
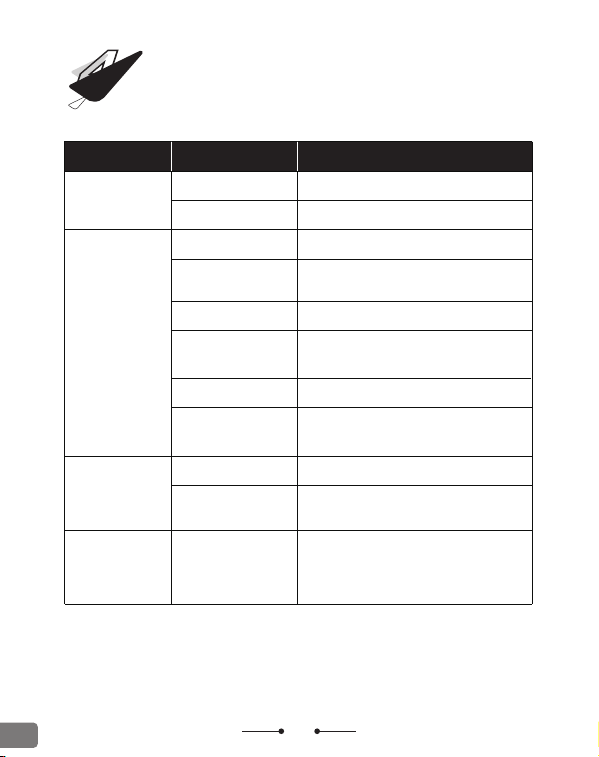
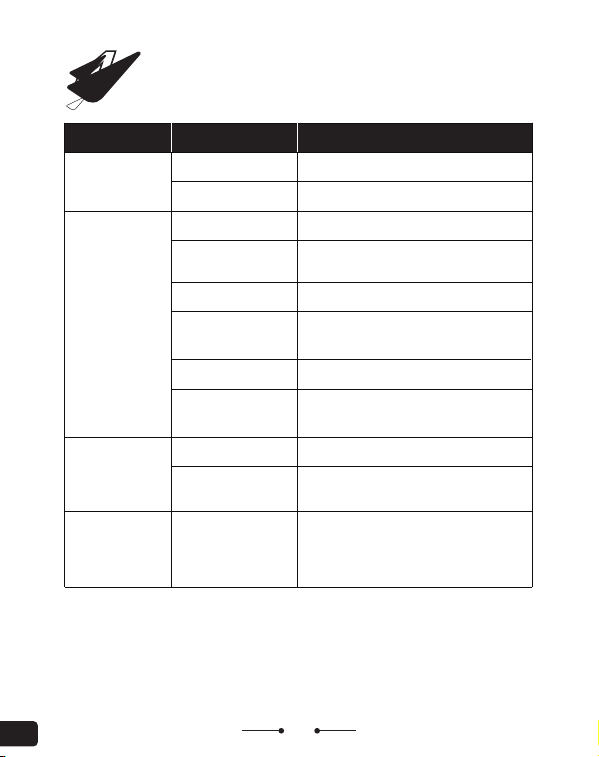
ButtonFunctionsOperation Method
Power Switch
Power on
Toggle to "I"
Power offToggle to "O"
Paper Feed
Button
Feed one labelClick
Calibrate paper
Press and hold Feed button until red
light turns on,then release
Continue printingClick while paused
Print a test page
Power off, Hold down the paper feed button
while turning on the machine; release the
button when the red light turns off.
Feed 10 mm paperSingle press in receipt mode
Continuous paper feed;
stops when you let go
Long press in receipt mode
Pause button
Pause printingClick while in print mode
Switch Mode
Power off, press and hold Pause button
while turning on the printer, release when
green light turns off
Paper Feed
Button +
Pause button
Restore factory
settings
Power off, press and hold both pause and
paper feed buttons while turning on the
printer, release when both red and green
lights turn off
Button functions
4
EN
06
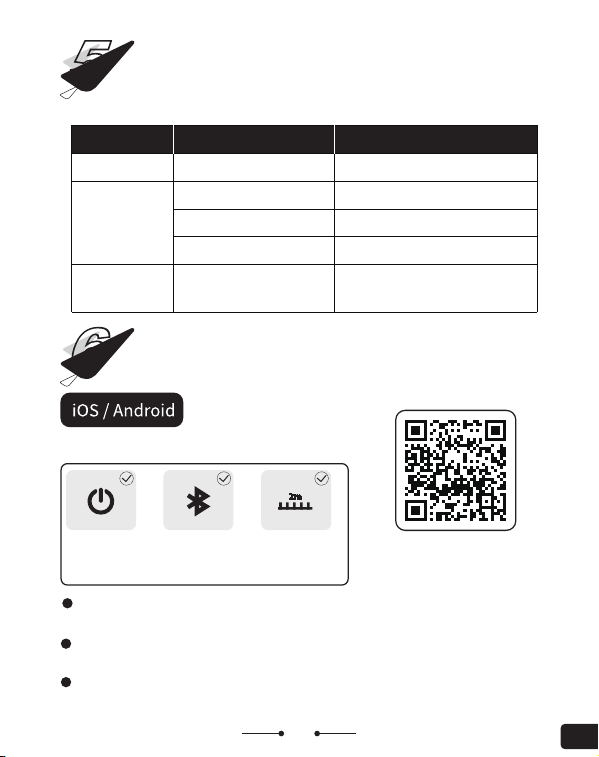
Software download
6
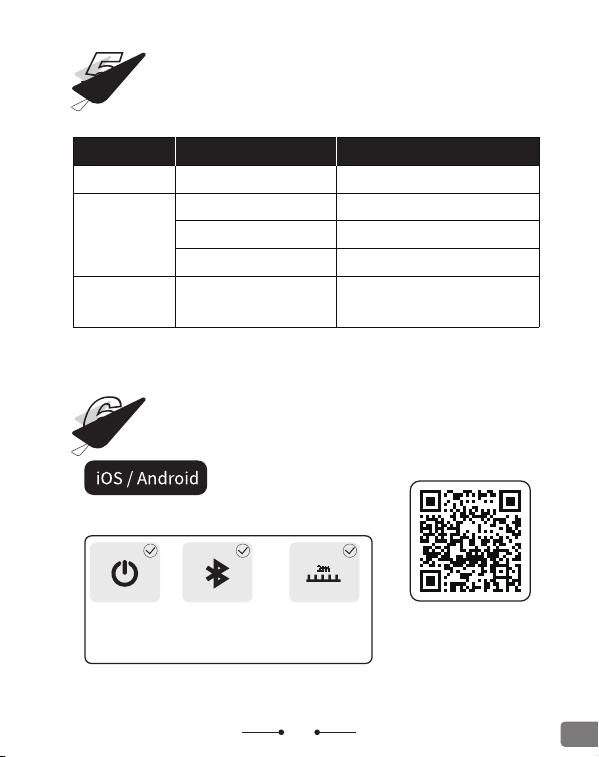
Scan the QR code to see the
Bluetooth connection tutorial
Printing Precondition
The printer
is turned on
The mobile phone's
Bluetooth is
turned on
Keep the mobile
phone and printer
within 2m of each
other
Indicator light explanation
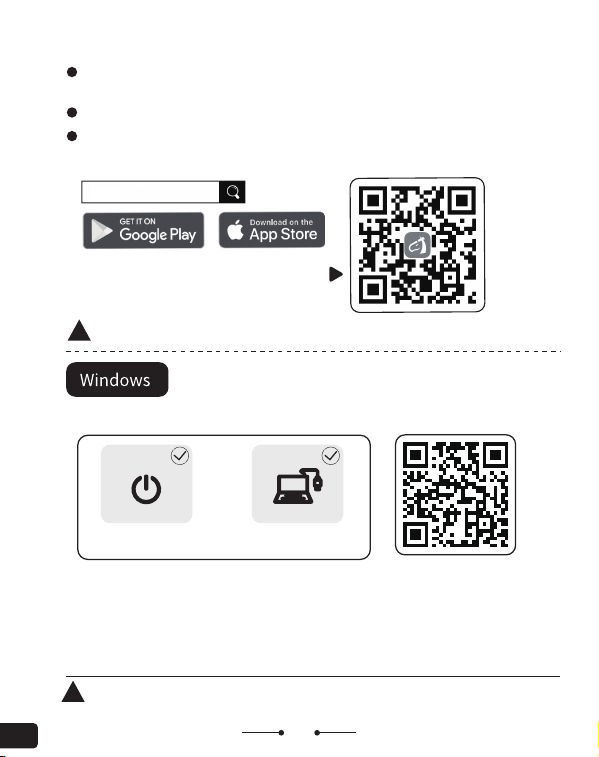
5
Indicator Light
StatusStatus Description
GreenAlways OnThe printer is ready.
Red
Always On
Printing paused
Slow blinkingOpen the printer cover
BlinkingThe printer is out of paper
Green + RedAlternating flash
The printer is overheating. Please wait
for it to cool down before using it again.
EN
07
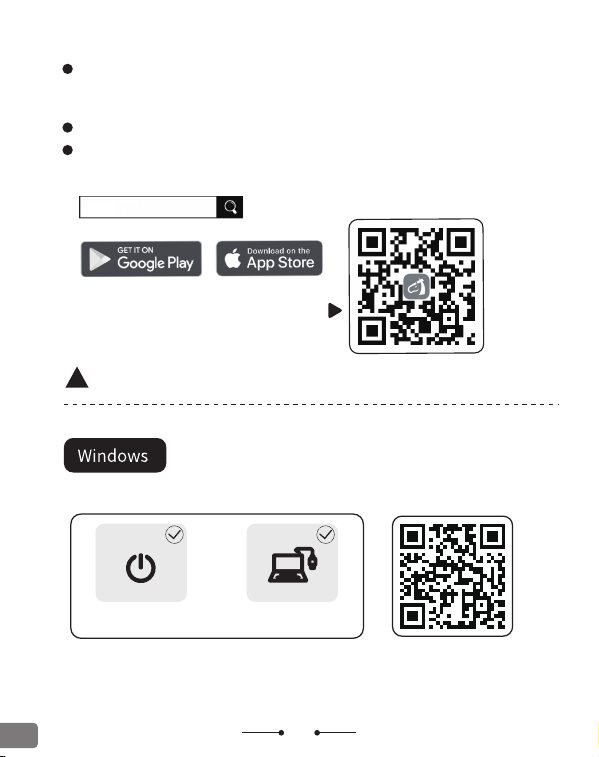
Download label editing app "Clabel"from Google Play
Store or Apple APP Store and install it.
Please follow the software instructions below.
Note: Please enter 0000 or 1234 if a PIN code is required for
Bluetooth connection
Mobile printing is only available for the Bluetooth version.
Download the drivers from the above website and read the driver
installation/software installation instructions on the website.
Visit the website: https://ga.ctaiot.com
Download "Clabel " and Drivers.
Clabel
Scan the QR code below with your
phone to download "Clabel".
Scannen Sie den QR-Code, um
das Computer-Installations-
Tutorial anzusehen
Note: Printing from the computer only supports USB connection, Bluetooth
connection is not supported.
Printing Precondition
The printer
is turned on
The printer is connected
to the computer
EN
08
EN
Notice before installation
This driver is applicable to the CLABEL brand label printer.
Make sure the printer is turned on before installation and
connected to the computer with a data cable.Setup will
automatically detect printer status,Help you install printer
drivers easily.
If you confirm that the above steps are ready,please select
the installation method.
Net PrinterUSB Printer
Simple and smart with CLABEL
Clabel
Install lmmediately
Agree Clabel trade
User agreement
Custom installation
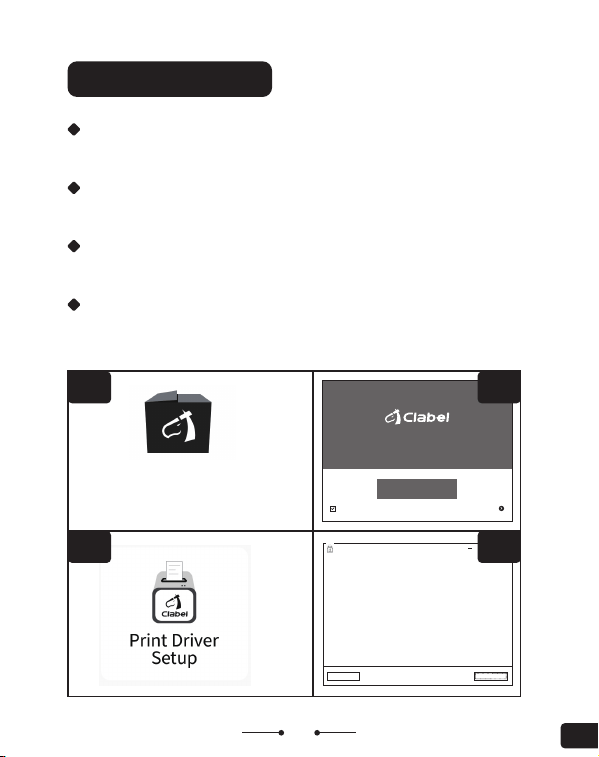
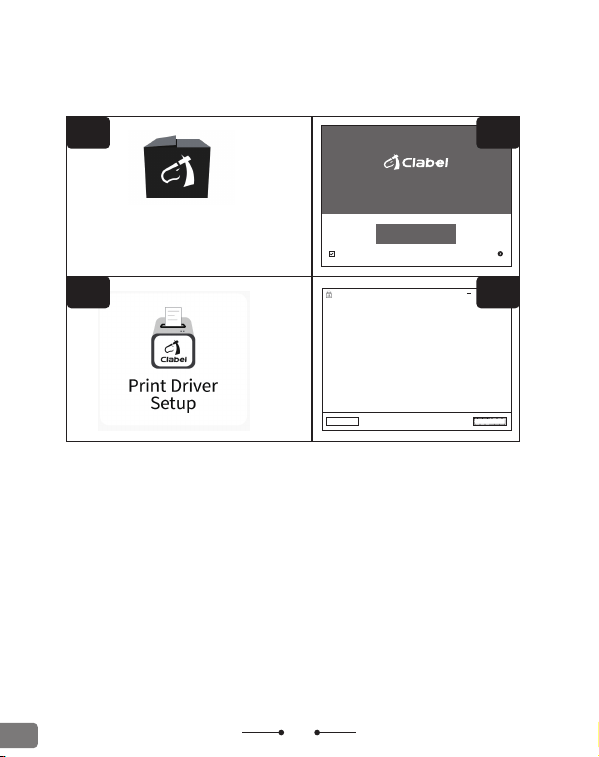
Windows Installation
Step 1
Click to open the downloaded "Clabel" installation package (fig.1).
Step 2
Click "Install Now" (fig.2).
Step 3
Click to open the downloaded print driver package (fig.3).
Step 4
Connect the printer to the computer via USB. Click USB Printing and
follow the prompts to proceed to the next step (fig.4).
fig.1fig.2
fig.3fig.4
Clabel Setup
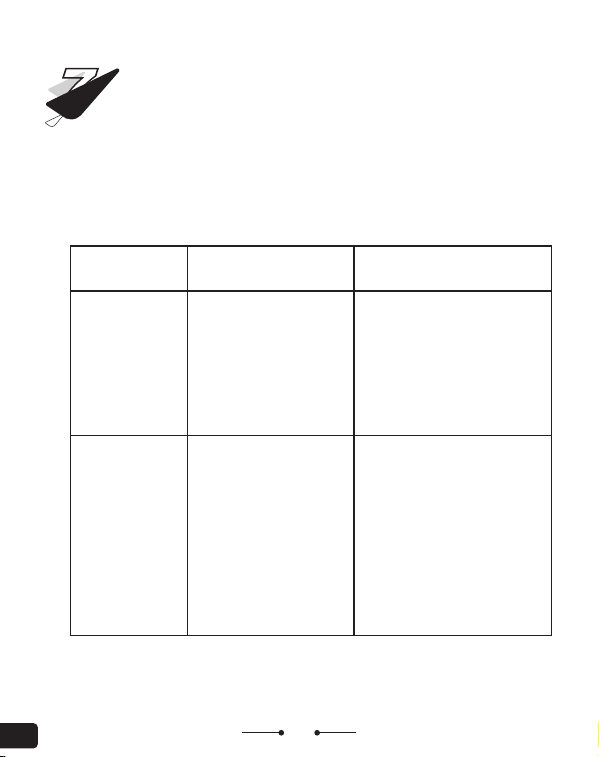
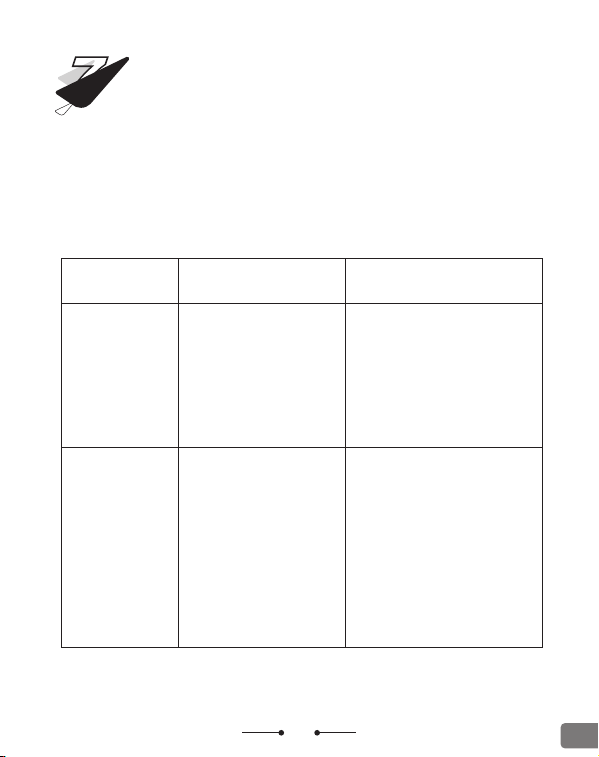
Troubleshooting
7
Printing not
centered, offset
Symptom
Bluetooth
connection failed
CauseSolution
- Low version of mobile
phone.
- Bluetooth permissions
not enabled.
- Machine only supports Android
9.0, iOS13 or above.
- Please be enable location
permissions on your smartphone.
(Note: Due to system requirements,
your Android phone will use your
location when connecting. You
need to enable location.)
- Incorrect label size
selection.
- Improper software
operation.
- Gap mismatch.
- Paper guide is not
locked to the left.
- Please select the appropriate
label size before printing.
- Adjust the content through the
adjustment button on the APP.
- Click the Function Keys on the
printer to find the paper gap.
- Check if the paper guide in the
paper compartment is locked to
the left and close to the label.
- Visit our product page to watch
videos.
09
The table below lists typical issues that general users might encounter
and their suggested solutions.
If the printer still does not function properly after you have followed
the recommended troubleshooting steps, please contact our
after-sales team at [email protected]om for further assistance.
EN
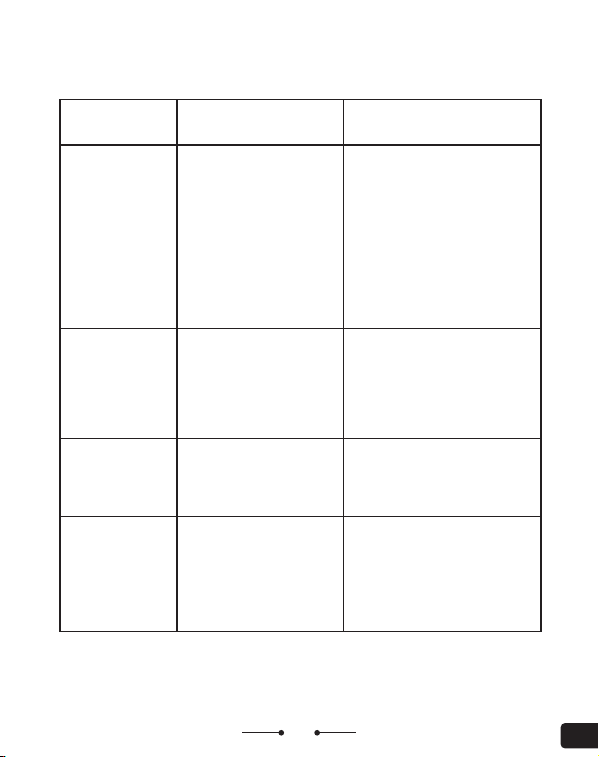
Unclear and
pixelated
printing
Labels are
ejected normally,
but no content
appears on labels
- Frame dropping
occurred during printing.
- Unclear font.
- Label installation error
- Print a self-test page and
check if the black lines on the
self-test page are normal.
- Select a different font in the
application and adjust the
font size and boldness.
- Adjust the printing density
to make the printing effect
clearer. Select Print Content >
Print > Print Settings > Print
Density.
- Check whether the printable
side faces downward
- Print the self-check page. If
no content is printed on the
self-check page, the printer is
malfunctioning
Many blank labels
are printed
-Incorrect label size
setting
-Sensor blocked by
foreign objects
-Set a correct label size
-Clean the sensor
Failed to print
content on left
and right edges
- Incorrect label size
setting
- Exceeding the
maximum effective print
width of the printer
- Set a correct label size
- Replace the label with one
that is within the maximum
effective print width
SymptomCauseSolution
10
EN
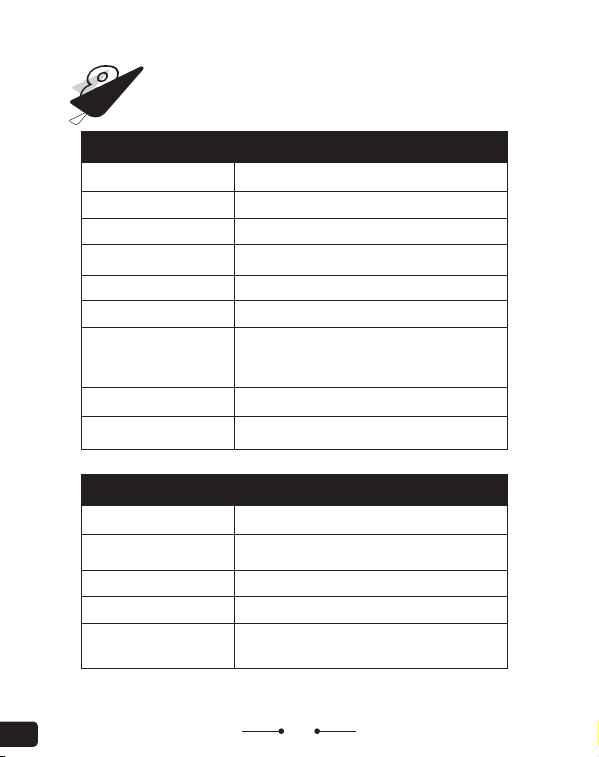
Specifications
8
11
Print technology
Print speed
Print resolution
Printing Specification
Thermal printing
152mm/s
203dpi
Maximum label diameter
Paper Specification
100mm
0.06~0.25mm
(including liner)
CODE128、EAN128、ITF、CODE39、CODE93、EAN13、EAN13
+2、EAN13+5、EAN 8、EAN8+2、EAN8+5、CODABAR、
POSTNET、UPC-A、UPC-A+2、UPC-A+5、UPC-E、UPC-E+
2、UPC-E+5、CPOST、MSI、MSIC、PLESSEY、ITF14、EAN14
USB + Bluetooth
Android 9 iOS13, Windows XP, Win7, Win10 and Above
Interface
Supported operation system
QR code
Barcode
QR CODE
Paper thickness
Gap Paper, Receipt Paper,black Standard Paper,
Perforated Paper
20-85mm
10mm
Label width
Minimum label height
Media type
EN
Maximum printing width
Maximum printing length
80mm
300mm
12
Product Name
Model
Input Parameter
BT Frequency Band
Tx Power upto
Machine size
Machine weight
Other Specifications
Label Printer
CT327D
24V⎓1.25A
2.402~2.480 GHZ
+6dBm
142×195×142mm
0.92kg
Shenzhen Dudian Technology Co., Ltd.
2nd Floor, Comprehensive Building, Liuxian Road 3, District 71,
Xin'an Street, Bao'an District, Shenzhen, China
E-mail: [email protected]
Made in China
Raccolta differenziata. Verifica le disposizioni del tuo Comune
C&E Connection E-Commerce(DE)GmbH
Zum Linnergraben 20, 65933, Frankfurt am Main, Germany
info@ce-connection.de
ECREP
EN

13
FCC Warning
This device complies with Part 15 of the FCC Rules. Operation is subject to the
following two conditions:
(1) This device may not cause harmful interference, and (2) this device must
accept any interference received, including interference that may cause
undesired operation.
NOTE 1: This equipment has been tested and found to comply with the limits
for a Class B digital device, pursuant to part 15 of the FCC Rules. These limits
are designed to provide reasonable protection against harmful interference in
a residential installation. This equipment generates, uses and can radiate radio
frequency energy and, if not installed and used in accordance with the
instructions, may cause harmful interference to radio communications.
However, there is no guarantee that interference will not occur in a particular
installation. If this equipment does cause harmful interference to radio or
television reception, which can be determined by turning the equipment off
and on, the user is encouraged to try to correct the interference by one or more
of the following measures:
- Reorient or relocate the receiving antenna.
- Increase the separation between the equipment and receiver.
-Connect the equipment into an outlet on a circuit different from that to which
the receiver is connected.
-Consult the dealer or an experienced radio/TV technician for help.
NOTE 2: Any changes or modifications to this unit not expressly approved by
the party responsible for compliance could void the user's authority to operate
the equipment.
RF Exposure Statement
To maintain compliance with FCC'S RF Exposure guidelines, This equipment
should be installed and operated with minimum 20cm between the radiator
and your body. This device and its antenna(s) must not be co-located or
operation in conjunction with any other antenna or transmitter.
EN
14
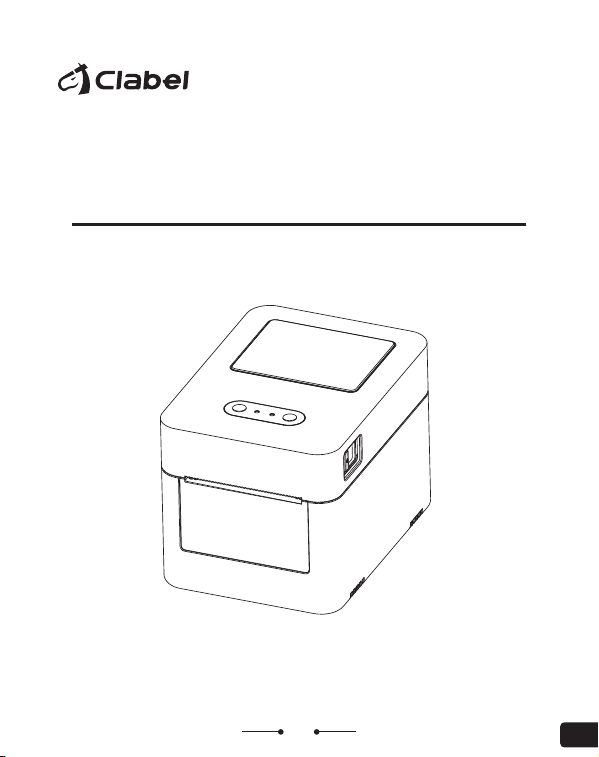
Vor Inbetriebnahme des Produktes bitte lesen das
Benutzerhandbuch sorgfältig durch.
CT327D Etikettendrucker
Benutzerhandbuch
DE
Stückliste
1
Bedienu-
ngshandbuch
Drucker*1
Bedienungs-
handbuch*1
Datenkabel*1Adapter*1
Etikettenhalter und Anschlag*1
weiße Etiketten
15
DE
Außenkomponenten
2
LED-Anzeige
Pause-Taste
Papierausgabe
-Taste
Taste zum Öffnen
des Deckels
(POWER-Anzeige,
ERROR-Anzeige)
Sensor
Druckkopf
Papierführungsschieber
Gummiwalze
16
DE
Stromanschluss
USB-Anschluss
Papierzufuhr an der
Rückseite
(unterstützt die Papierzufuhr über eine
externe Halterung)
Ein-/Ausschalter
17
Installationsanleitung
3
1.Ziehen Sie die Taste zum Öffnen
des Deckels auf beiden Seiten und
heben Sie die obere Abdeckung an.
2. Legen Sie die Papierrolle auf die Etikettenachse, linksbündig
mit der bedruckbaren Seite nach oben, und schieben Sie dann
die rechte Papierführung an, um sie zu fixieren (bei breiteren
Papierrollen ist die Papierführung nicht erforderlich).
Druckseite
nach oben
Anleitung zum
Installation von Etiketten
DE
Bei Verwendung von Etikettenrollen
mit 25-mm-Kern das vorstehende
Teil an der Blendeninnenseite
entfernen.
18
DE
3. Ziehen Sie das Etikettenpapier bis zum Papierausgabeschlitz
und schieben Sie den Papierführungsschieber, um das Etikett
zu fixieren.
4. Schließen Sie die obere Abdeckung des Druckers, um die
Installation abzuschließen.
19
Tastenfunktion
4
TasteFunktionBedienung
Ein-/Ausschalter
EinschaltenAuf „I“ stellen
AusschaltenAuf „O“ stellen
Papierausgabe
-Ta ste
Ein Blatt Papier ausgeben
Klicken Sie auf
Testpapier
Halten Sie die Papierausgabetaste
gedrückt, bis die rote Leuchte aufleuchtet,
dann lassen Sie die Taste los.
Weiter druckenIm Pausenmodus einmal drücken
Testseite drucken
Gerät aus, halten Sie diePapierausgabetaste
gedrückt und schalten Gerät ein, bis die rote
Leuchte aufleuchtet, dann lassen Sie die Taste los.
Papiervorschub 10 mm
Im Belegmodus einmal drücken
Das Papier läuft
kontinuierlich; sobald
man loslässt, stoppt es
Im Belegmodus gedrückt halten
Pause-Taste
Druck unterbrechenIm Druckmodus klicken Sie auf
Modus wechseln
Gerät aus, halten Sie die Pause-Taste gedrückt
und schalten Gerät ein, lassen Sie die Taste los,
sobald die rote Leuchte erlischt
Papierausgabe
-Taste+Pause-
Taste
Auf Werkseinstellungen
zurücksetzen
Gerät aus, halten Sie die Pause-Taste und die
Papierausgabetaste gedrückt und schalten
Gerät ein, loslassen wenn rote und grüne
LED erlöschen
DE
20
Erklärung anzeigeleuchte
5
Software-Download
6
Scannen Sie den Code,
um das Bluetooth
-Verbindungstutorial
anzusehen.
Voraussetzungen fürs Drucken
Der Drucker ist
eingeschaltet
Die Bluetooth
-Funktion
des Handys
ist aktiviert
Halten Sie das
Mobiltelefon und
den Drucker in einem
Abstand von weniger
als 2 m zueinander
Anzeigeleuchte
StatusErklärung Status
GrünDauerhaft anDer Drucker ist bereit
Rot
Dauerhaft an
Druckvorgang unterbrochen
Langsames BlinkenDruckerabdeckung öffnen
BlitztDer Drucker hat kein Papier mehr
Grün + RotAbwechselndes Blinken
Der Drucker ist überhitzt. Bitte warten
Sie, bis das Gerät abgekühlt ist, bevor
Sie es wieder verwenden.
DE
21
Laden Sie die Etikettenbearbeitungs-App"Clabel " aus
dem Google Play Store oder dem Apple APP Store herunter
und installieren Sie sie.
Bitte bedienen Software wie unten beschrieben.
Achtung: Für Verbindungsaufbau via Bluetooth ist die Eingabe
einer PIN erforderlich. Bitte geben 0000 oder 1234 ein.
Drucken via Smartphone nur bei Bluetooth-Variante möglich.
Clabel
Zum Herunterladen von „Clabel “
QR-Code unten mit Hilfe von Smartphone
scannen.
Scannen Sie den QR-Code the
computer installation tutorial.
Der Drucker ist
eingeschaltet
Der Drucker ist mit dem
Computer verbunden
Voraussetzungen fürs Drucken
DE
22
Treiber bei der oben genannten Website herunterladen und auf
der Website Anleitungen zur Installation des Treibers bzw. der
Software durchlesen.
Website https://ga.ctaiot.com
Besuchen und „Clabel “ sowie Treiber herunterladen.
Hinweis: Der Druck von einem Computer unterstützt nur
USB-Verbindungen, Bluetooth-Verbindungen werden nicht unterstützt.
DE
Installation bei Windows
Schritt 1
Das heruntergeladene Installationspaket „Clabel“ via Anklicken
starten (Abb. 1).
Schritt 2
Auf „sofort installieren“ klicken (Abb. 2)
Schritt 3
Das heruntergeladene Programmpaket des Drucktreibers via Anklicken
starten (Abb. 3).
Schritt 4
Den Drucker via USB-Anschluss an PC anschließen. Auf USB-Drucken
klicken und wie angegeben fortsetzen(Abb. 4).
23
DE
Notice before installation
This driver is applicable to the CLABEL brand label printer.
Make sure the printer is turned on before installation and
connected to the computer with a data cable.Setup will
automatically detect printer status,Help you install printer
drivers easily.
If you confirm that the above steps are ready,please select
the installation method.
Net PrinterUSB Printer
Simple and smart with CLABEL
Clabel
Install lmmediately
Agree Clabel trade
User agreement
Custom installation
Abb.1Abb.2
Abb.3
Abb.4
Clabel Setup
Fehlerbehebung
7
24
DE
Druckergebnis
nicht mittig bzw.
versetzt
Probleme
Bluetooth-
Verbindungsaufbau
fehlgeschlagen
Mögliche UrsachenLösungen
- Version des
Smartphones zu niedrig.
- Berechtigung von
Bluetooth nicht
freigeschaltet.
- Das Gerät ist nur kompatibel mit
Android 9.0, iOS13 oder höher.
- Bitte am Smartphone die
Berechtigung zur Ortung freischalten.
(Achtung: aufgrund von Systeman-
forderungen des Android-Smart-
phones ist beim Verbindungsaufbau
eine Ortung erforderlich. Daher ist die
Ortungsfunktion freizuschalten.
- Die ausgewählte
Etikettengröße passt
nicht.
- Fehlbedienung der
Software.
- Das Spiel passt nicht.
- Papieranschlag ist
nicht nach links
verrastet
- Vor Druckvorgang bitte
Etikettengröße entsprechend
auswählen.
- Der Inhalt lässt sich mit Hilfe der
Einstelltasten der APP anpassen.
- Funktionstaste am Drucker
betätigen, um das richtige Spiel
des Papiers festzustellen.
- In der Papierkammer überprüfen,
ob der Papieranschlag links
verrastet ist und am Etikett anliegt.
- Unsere Produktseite besuchen
und Video anschauen
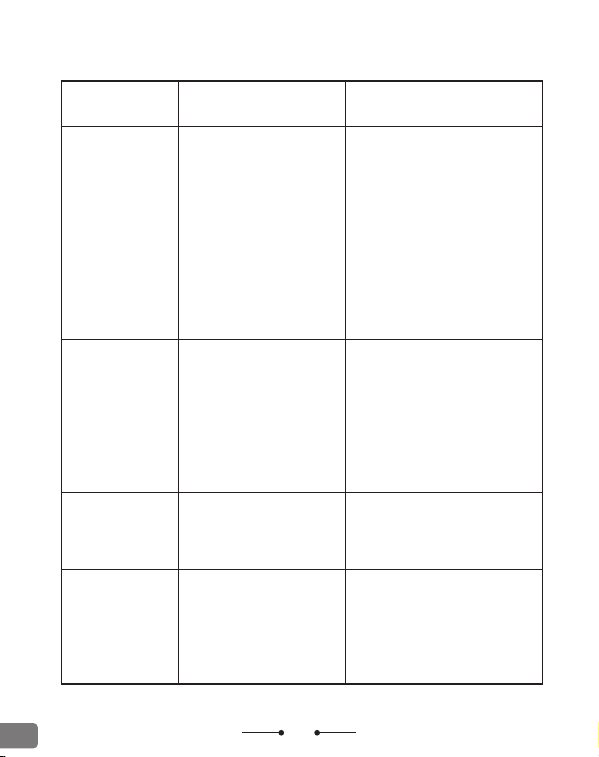
Die folgende Tabelle enthält häufige Probleme und Lösungen für
normale Benutzer;
Wenn Sie bereits unsere empfohlenen Methoden zur Fehlerbehebung
ausprobiert haben und der Drucker immer noch nicht ordnungs-
gemäß funktioniert, kontaktieren Sie unser Kundendienstteam per
E-Mail: [email protected], um weitere Unterstützungen zu
erhalten.
25
DE
Druckergebnis
nicht scharf und
körnig
Der Drucker zieht
nur Papier, kein
Inhalt
- Bildrahmenbruch beim
Druckvorgang.
- Beschriftung unscharf
- Falsche Etiketteninstal-
lation
- Selbsttestseite drucken und
prüfen, ob die schwarzen
Linien auf der Selbsttestseite in
Ordnung sind.
- Eine andere Schriftart in der
APP auswählen und
Schriftgröße anpassen bzw.
Fettschrift auswählen.
- Bitte Druckintensität
anpassen, damit das
Druckergebnis schärfer wird.
Dabei Druckinhalt > Drucken >
Druckeinstellungen >
Druckauflösung auswählen
- Überprüfen Sie, ob die
Druckseite nach unten
installiert ist oder falsch
herum ist.
- Drucken Sie eine
Selbsttestseite; wenn die
Selbsttestseite keinen Inhalt
druckt, liegt ein Fehler im
Drucker vor.
Drucken von
vielen leeren
Seiten
- Falsche Einstellung der
Etikettengröße.
- Sensor wird durch
Fremdkörper blockiert.
- Stellen Sie die Etiketen-
größe korrekt ein.
- Reinigen Sie den Sensor.
Inhalt auf beiden
Seiten fehlt
- Falsche Einstellung der
Etikettengröße.
- Überschreitung der
maximalen effektiven
Druckbreite des
Druckers.
- Stellen Sie die Etiketten-
größe korrekt ein.
- Verwenden Sie Etiketten
innerhalb der maximalen
effektiven Druckbreite.
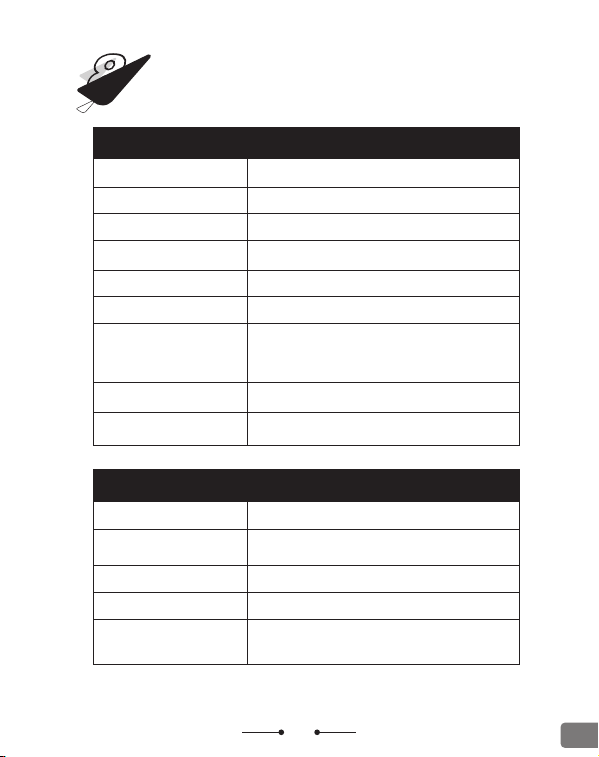
ProblemeMögliche UrsachenLösungen
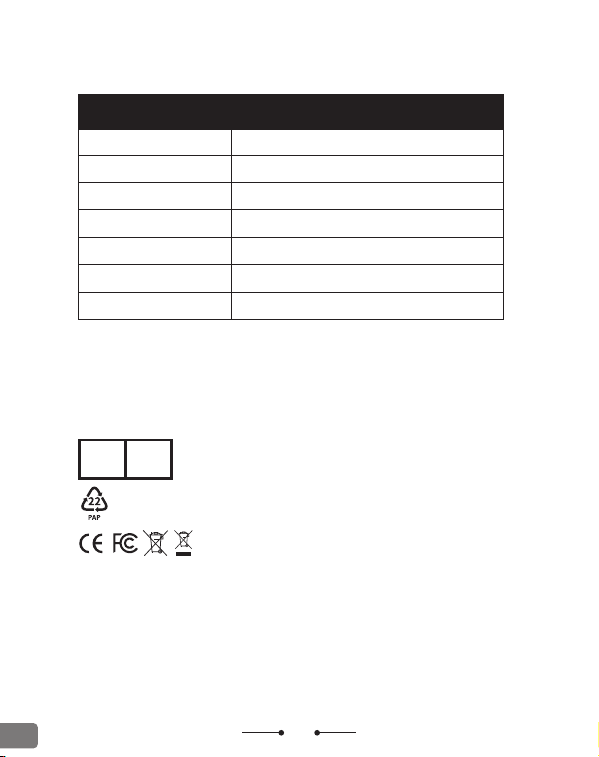
Technische Daten
8
26
DE
Drucktechnologie
Druckgeschwindigkeit
Druckauflösung
Druckspezifikationen
Thermodruck
152mm/s
203dpi
Maximaler Etikettendurchmesser
Papierformat
100mm
0.06~0.25mm
(inklusive Trägerpapier)
CODE128、EAN128、ITF、CODE39、CODE93、EAN13、EAN13
+2、EAN13+5、EAN 8、EAN8+2、EAN8+5、CODABAR、
POSTNET、UPC-A、UPC-A+2、UPC-A+5、UPC-E、UPC-E+
2、UPC-E+5、CPOST、MSI、MSIC、PLESSEY、ITF14、EAN14
USB + Bluetooth
Android 9, iOS13, Windows XP, Win7, Win10 und höher
Schnittstelle
Unterstützte Betriebssysteme
QR-Code
Barcode
QR CODE
Papierdicke
Papier mit Spiel, Kassenbonpapier,
Schwarzes Standardpapier,Perforiertes Papier
20-85mm
10mm
Etikettenbreite
Minimale Etikettenhöhe
Medientyp
Maximale Druckbreite
Maximale Druckhöhe
80mm
300mm
27
DE
Produktname
Modellnummer
Stromeingang
BT Frequency Band
BT-Frequenzband
Größe des Geräts
Gewicht des Geräts
Weitere Spezifikationen
Etikettendrucker
CT327D
24V⎓1.25A
2.402~2.480 GHZ
+6dBm
142×195×142mm
0.92kg
Shenzhen Dudian Technology Co., Ltd.
2nd Floor, Comprehensive Building, Liuxian Road 3, District 71,
Xin'an Street, Bao'an District, Shenzhen, China
E-mail: [email protected]
Hergestellt in China
Raccolta differenziata. Verifica le disposizioni del tuo Comune
C&E Connection E-Commerce(DE)GmbH
Zum Linnergraben 20, 65933, Frankfurt am Main, Germany
info@ce-connection.de
ECREP
Avant d'opérer ce produit, lisez attentivement ce
guide de l'utilisateur.
Imprimante d'étiquettes CT327D
Manuel Utilisateur
28
FR
Liste d'emballage
1
Manuel
d'utilisation
Imprimante*1
Câble de données*1
Manuel
d'utilisation*1
Adaptateur*1
29
Étiquettes blanches
FR
Axe d'étiquettes et butée*1
Composants externes
2
Voyant LED
Bouton Pause
Bouton
d'alimentation
Papier
Bouton
d'ouverture
Voyant d'alimentation
(POWER),
voyant d'erreur (ERROR)
Capteur
Tête d'impression
Languette
Rouleau de
Caoutchouc
30
FR
Prise d'alimentationPort USB
Fente d'alimentation Arrière
(Compatible avec un bac
d'alimentation externe)
Interrupteur
d'alimentation
31
Guide de montage
3
1. Tirez sur les boutons de
déverrouillage du capot des deux
côtés et soulevez le capot
supérieur.
2. Chargez le rouleau d'étiquettes sur l'axe, en l'alignant à
gauche avec la face d'impression vers le haut, puis poussez
le guide-papier droit pour le fixer (pour les rouleaux plus larges,
le guide-papier n'est pas nécessaire).
FR
Guide d'installation
des étiquettes
Côté impression
vers le haut
Lors de l'utilisation de rouleaux
d'étiquettes avec mandrin de 25 mm,
retirez la pièce saillante à l’intérieur
du déflecteur.
3. Tirez le papier jusqu'à la fente de sortie et poussez le curseur
du guide-papier pour bloquer l'étiquette.
4. Fermez le capot supérieur de l'imprimante pour terminer
l'installation.
32
FR
33
FR
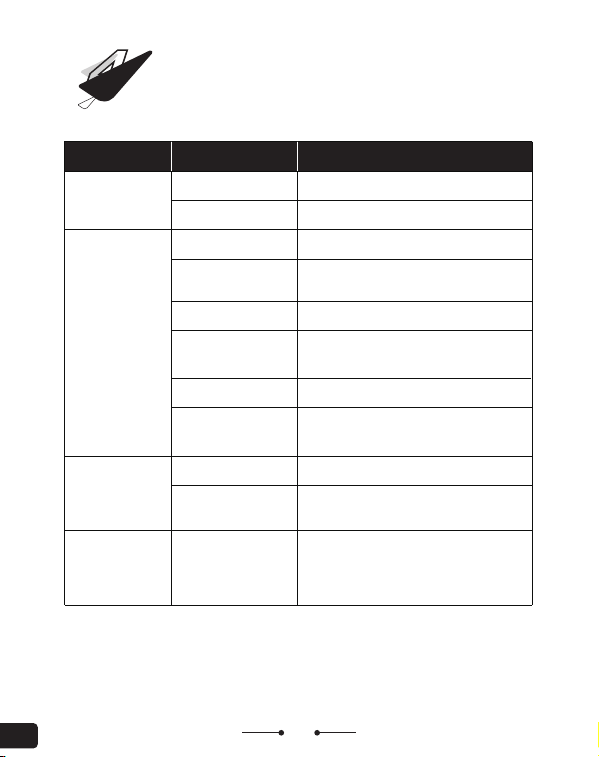
Fonctions des boutons
4
BoutonsFonctionsMéthodes d'opération
Interrupteur
d'alimentat-
ion
Mettre sous
tension l'appareil
Basculer à « I »
Mettre hors
tension l'appareil
Basculer à « O »
Imprimer une page
Cliquez
Papier de test
L'imprimante étant éteinte, maintenez la
Bouton d'alimentation papier et allumez-la ;
relâchez la touche lorsque le voyant rouge s'éteint.
Continuer l'impression
Cliquez lorsque l'appareil est en mode veille
Imprimer une page
de test
Maintenez le bouton d'avance du papier
enfoncé puis rallumez l'appareil ; relâchez-le
lorsque le voyant rouge s'éteint.
Avance du papier : 10 mm
Appuyer une fois en mode ticket
Le papier défile en
continu ; il suffit de
relâcher pour l'arrêter
Maintenir enfoncé en mode ticket,
relâcher pour arrêter
Suspendre l'impression
Cliquez sur
Changer de mode
L'imprimante étant éteinte, maintenez la
Bouton Pause et allumez-la ; relâchez la
touche lorsque le voyant vert s'éteint.
Bouton
d'alimentation
Papier+Bouton
Pause
Réinitialisation aux
paramètres d'usine
L'imprimante étant éteinte, maintenez les
Bouton Pause et Bouton d'alimentation
papier et allumez-la ; relâchez les deux
touches lorsque les voyants rouge et
vert s'éteignent.
Bouton Pause
Bouton
d'alimentation
Papier
34
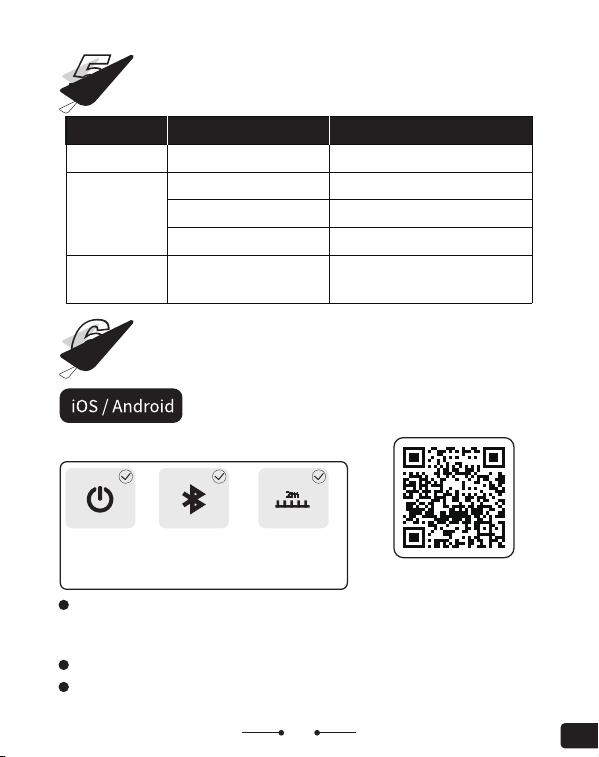
Présentation de témoin
5
Téléchargement de logiciel
6
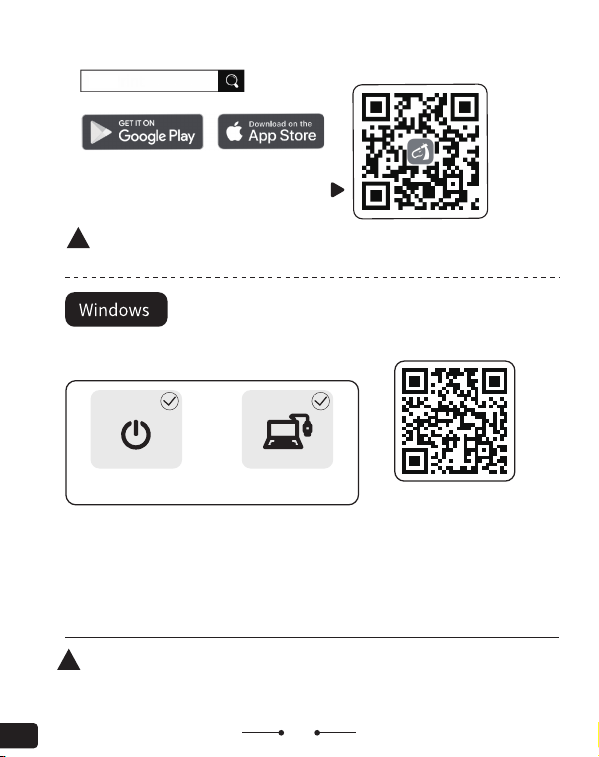
Téléchargez l'application d'édition d'étiquettes
"Clabel" depuis la boutique de jeux de Google ou la
boutique d'applications d'Apple et installez-la.
Opérez ce logiciel conformément aux instructions du logiciel suivantes.
Attention : si le code PIN est nécessaire au moment de connexion
Bluetooth, saisissez 0000 ou 1234.
Scannez le code pour voir le
tutoriel de connexion Bluetooth.
Conditions préalables d’impression
L'imprimante
est allumée
Le Bluetooth
du téléphone
portable est
allumé
Maintenez le téléphone
portable et l'imprimante
à moins de 2m l'un
de l'autre
Lampe témoin
ÉtatsDescription
VertAllumé en permanenceL'imprimante est prête
Rouge
Allumé en permanence
Impression en pause
Flash lentOuvrir le capot de l'imprimante
Clignotement rapideL'imprimante est à court de papier
Vert + RougeClignotement alterné
L'imprimante est en surchauffe. Veuillez
attendre qu'elle refroidisse avant de la
réutiliser.
FR
35
Téléchargez le pilote du site Web ci-dessus et lisez les instructions
d'installation du pilote/logiciel sur ce site Web.
L'impression depuis le téléphone portable ne s'adapte qu'à la
version Bluetooth.
Accédez au site Web : https://ga.ctaiot.com
Pour télécharger « Clabel » et le pilote.
Clabel
Scannez le code QR ci-dessous avec votre
téléphone portable pour télécharger
« Clabel».
Scannez le code pour voir
le tutoriel d'installation
de l'ordinateur.
Remarque : L'impression depuis l'ordinateur ne prend en charge que les
connexions USB, les connexions Bluetooth ne sont pas prises en charge.
L'imprimante
est allumée
L'imprimante est
connectée à l'ordinateur
Conditions préalables d’impression
FR
36
FR
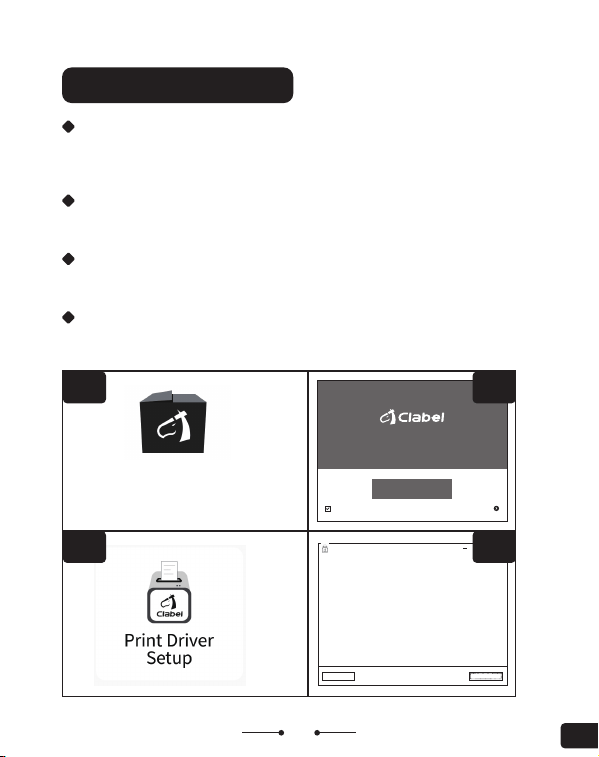
Notice before installation
This driver is applicable to the CLABEL brand label printer.
Make sure the printer is turned on before installation and
connected to the computer with a data cable.Setup will
automatically detect printer status,Help you install printer
drivers easily.
If you confirm that the above steps are ready,please select
the installation method.
Net PrinterUSB Printer
Simple and smart with CLABEL
Clabel
Install lmmediately
Agree Clabel trade
User agreement
Custom installation
fig.1fig.2
fig.3fig.4
Clabel Setup
Installation sur Windows
Étape 1
Cliquez sur le paquet d'installation « Clabel » téléchargé pour
l'ouvrir (fig. 1).
Étape 2
Cliquez sur « Installer immédiatement » (fig. 2)
Étape 3
Cliquez sur le paquet de pilote d'impression téléchargé (fig. 3).
Étape 4
Connectez l'imprimante au PC via le connecteur USB. Cliquez sur
« Impression USB » et passez à l'étape suivante selon les instructions(fig. 4).
37
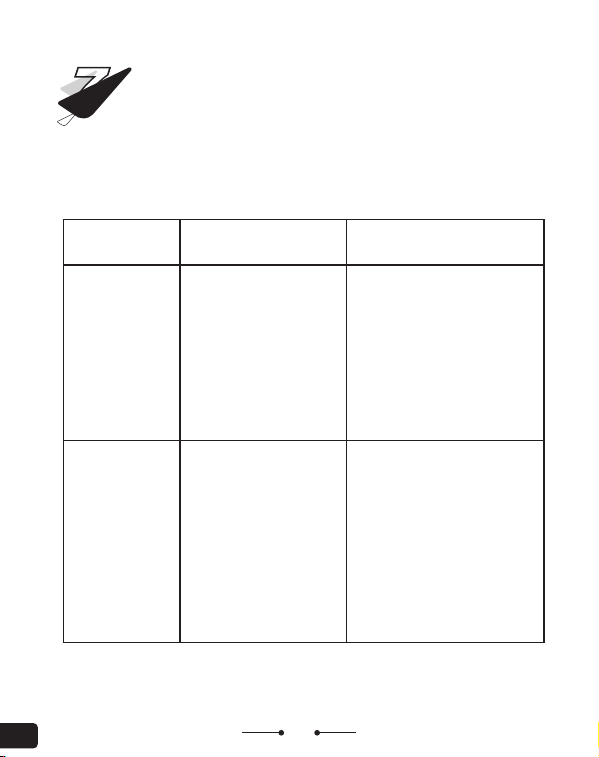
Dépannage
7
L'impression n'est
pas au centre,
soit décalée
Symptômes
Connexion
Bleutooth
échouée
CausesRésolutions
- La version du
téléphone portable est
trop inférieure.
- L'autorisation
Bluetooth n'est pas
activée.
- L'appareil ne s'adapte qu'à
Android 9.0, iOS13 ou à une
version plus supérieure.
- Activez l'autorisation de
position dans votre
smartphone. (Attention : pour
répondre aux exigences du
système portable, votre position
est nécessaire au moment de
connexion du téléphone
portable Android, vous devriez
donc activer l'autorisation de
position.)
- La taille de l'étiquette
choisie est incorrecte.
- L'opération du logiciel
est inappropriée.
- L'écart est
incompatible.
- La languette n'est pas
verrouillée vers la
gauche
- Choisissez la taille de
l'étiquette correspondante
avant l'impression.
- Vous pouvez régler les
contenus à l'aide des boutons
de réglage dans l'APP.
- Cliquez sur le bouton
fonctionnel pour trouver l'écart
du papier.
- Vérifiez que la languette dans
le compartiment est verrouillée
à gauche en approchant des
étiquettes.
- Accédez à notre page de
produit pour voir la vidéo
Le tableau ci-dessous répertorie les problèmes courants et leurs
solutions;Si le problème persiste après avoir suivi les étapes
proposées, contactez notre service après-vente à:
[email protected] pour plus d'assistances.
FR
38
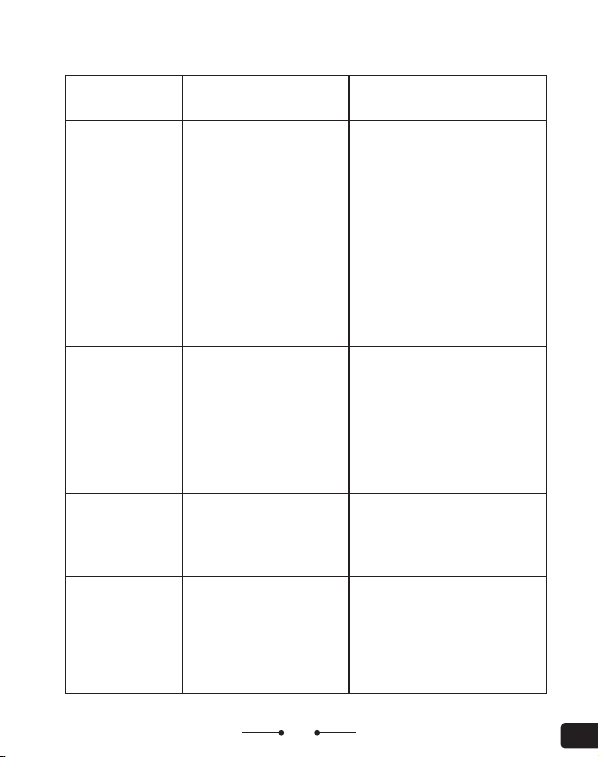
L'impression n'est
pas claire et est
pixélisée
Le papier se
déroule sans
impression
- Perte de trames
pendant l'impression.
- La police n'est pas claire
- Installation des
étiquettes incorrecte
- Imprimez la page
d'auto-examen pour vérifier les
lignes noires sur celle-ci.
- Choisissez une autre police
dans l'APP en réglant la taille de
la police et en rendant les
caractères en gras.
- Réglez la densité d'impression
pour obtenir un effet
d'impression plus clair.
Choisissez Contenus >
Impression > Réglages
d'impression > Densité
d'impression
- Vérifiez que la face
d'impression est orientée
vers le bas, autrement dit que
l'orientation de l'installation
est correcte
- Imprimez une page de test.
Si cette page ne contient rien,
cela indique un défaut de
l'imprimante
Du papier blanc
est imprimé
- Les dimensions des
étiquettes sont
incorrectement configurées
- Le capteur est obstrué par
des corps étrangers
- Configurez correctement les
dimensions des étiquettes
-Nettoyez le capteur
Le contenu
d'impression sur
les deux côtés est
manquant
- Les dimensions des
étiquettes sont
incorrectement
configurées
- La largeur d'impression
maximale effective de
l'imprimante est dépassée
- Configurez correctement les
dimensions des étiquettes
- Remplacez par des
étiquettes dans la largeur
d'impression maximale
effective
SymptômesCausesRésolutions
FR
39
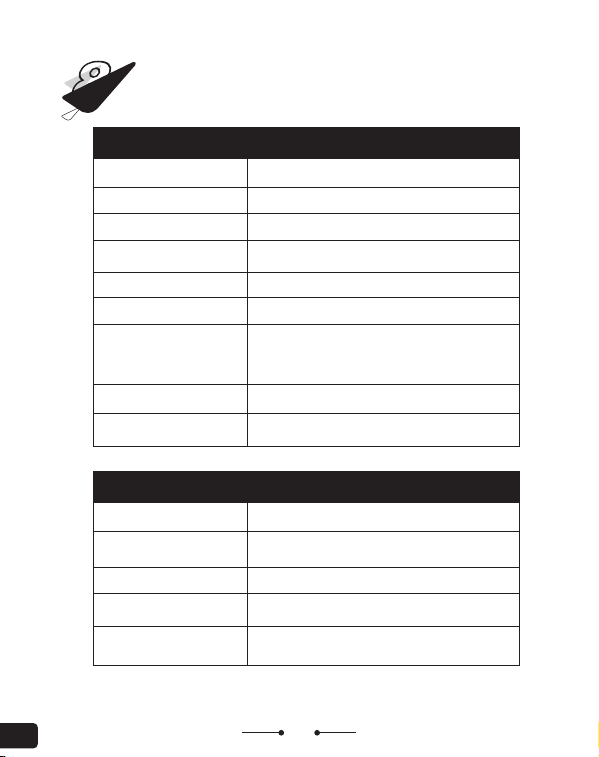
Spécifications et paramètres
8
Technologie d'impression
Vitesse d'impression
Résolution d'impression
Format à imprimer
Thermique
152mm/s
203dpi
Format du papier
100mm
0.06~0.25mm
CODE128、EAN128、ITF、CODE39、CODE93、EAN13、EAN13
+2、EAN13+5、EAN 8、EAN8+2、EAN8+5、CODABAR、
POSTNET、UPC-A、UPC-A+2、UPC-A+5、UPC-E、UPC-E+
2、UPC-E+5、CPOST、MSI、MSIC、PLESSEY、ITF14、EAN14
USB + Bluetooth
Android 9, iOS13, Windows XP, Win7,
Windows 10 et versions ultérieures
Interface
Code QR
Code-barres
QR CODE
Papier prédécoupé, Papier de caisse,
Papier standard noir,Papier perforé
20-85mm
10mm
Largeur de l'étiquette
Type de média
Largeur d'impression
maximale
Longueur maximale
d'impression
Système d'exploitation
pris en charge
Diamètre maximal
des étiquettes
Hauteur minimale
des étiquettes
Épaisseur du papier
(support inclus)
FR
80mm
300mm
40
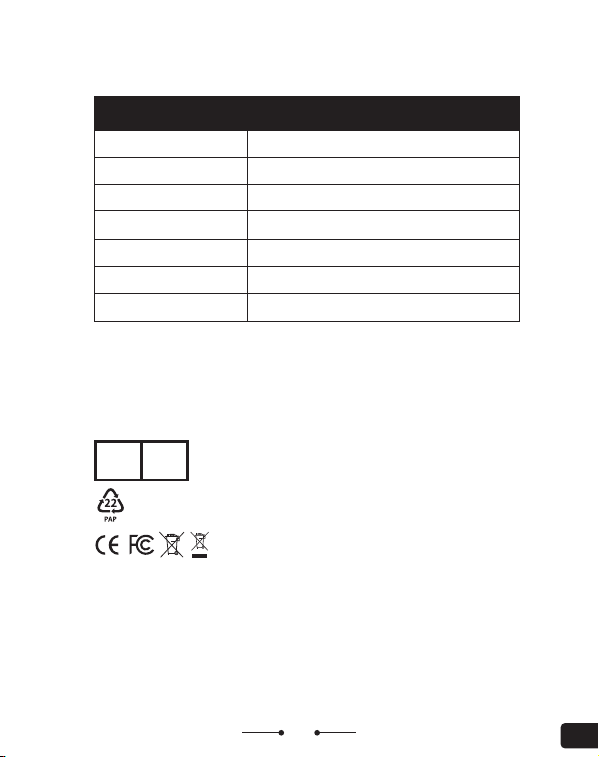
Nom du produit
Modèle de produit
Entrée d'alimentation
Bande de fréquence BT
Puissance Tx jusqu'à
Taille de la machine
Poids de la machine
D'autres formats
Imprimante d'étiquettes
CT327D
24V⎓1.25A
2.402~2.480 GHZ
+6dBm
142×195×142mm
0.92kg
Shenzhen Dudian Technology Co., Ltd.
2nd Floor, Comprehensive Building, Liuxian Road 3, District 71,
Xin'an Street, Bao'an District, Shenzhen, China
E-mail: [email protected]
Fabriqué en Chine
Raccolta differenziata. Verifica le disposizioni del tuo Comune
C&E Connection E-Commerce(DE)GmbH
Zum Linnergraben 20, 65933, Frankfurt am Main, Germany
info@ce-connection.de
ECREP
FR
Prima di utilizzare il prodotto, leggere
attentamente questo manuale.
Stampante per etichette CT327D
Manuale Utente
41
IT
Lista di disimballaggio
1
Manuale
d'uso
Stampante*1
Cavo dati*1Manuale d'uso*1Adattatore*1
etichette bianche
42
Albero portatarghette
e deflettore*1
IT
Componenti esterni
2
43
Spia LED
Pausa
Pulsante Di
Alimentazione Carta
Pulsante
Di Apertura
(Spia di alimentazione
POWER,
spia di errore ERROR)
Sensore
Testa di stampa
Cursore Di
Inceppamento
Rullo In Gomma
IT
Presa Di AlimentazionePorta USB
Sporgenza posteriore per
l'alimentazione della carta
(Compatibile con l'alimentazione
tramite supporto esterno)
Interruttore Di
Alimentazione
44
Guida di installazione
3
1. Tirare i pulsanti di rilascio del
coperchio su entrambi i lati e
sollevare il coperchio superiore.
2. Caricare il rotolo di etichette sul mandrino, allineandolo a
sinistra con il lato di stampa rivolto verso l'alto, quindi
spingere la guida della carta destra per fissarlo (per rotoli di
carta più larghi, la guida non è necessaria).
Guida all'installazione
delle etichette
con il lato da
stampare
rivolto verso l'alto
IT
Quando si usano rotoli di etichette
con nucleo da 25 mm, rimuovere
la parte sporgente all'interno del
deflettore.
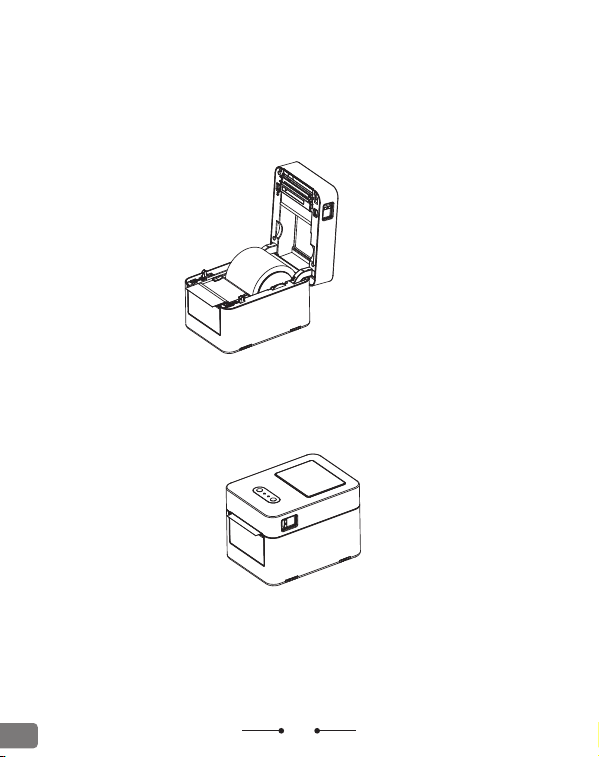
45
3. Tirare la carta per etichette verso la fessura di uscita e
spingere il cursore della guida della carta per bloccare
l'etichetta.
4. Chiudere il coperchio superiore della stampante per
completare l'installazione.
IT
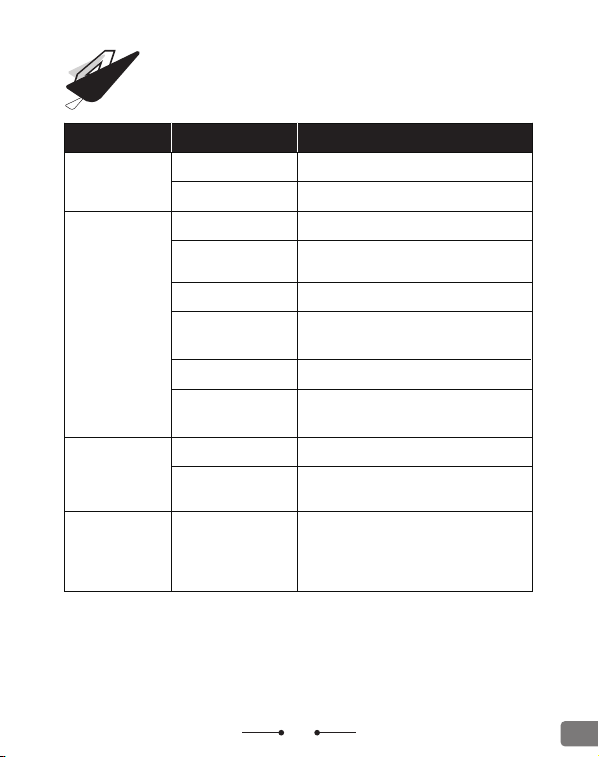
46
Funzione tasto
4
TastoFunzioneMetodo operativo
Interruttore
di alimenta-
zione
AccendiPassa a "I"
SpegniPassa a "O"
Stampa una pagina
Clicca
Foglio di prova
Tenere premuto il pulsante di avanzamento
carta; quando si accende la spia rossa,
rilasciare il pulsante
Continua a stampare
Fare clic mentre è in pausa
Stampa della pagina
di autotest
Con la stampante spenta, tenere premuto il
Pulsante di alimentazione carta e accenderla;
rilasciare il tasto quando la spia rossa si spegne.
Avanzamento carta 10 mm
Premere una volta in modalità ricevuta
Avanzamento continuo
della carta; basta lasciare
la leva per arrestarlo
Tenere premuto in modalità ricevuta,
rilasciare per fermare
Sospendi la stampa
Fare clic mentre la stampante è in funzione
Cambia modalità
Con la stampante spenta, tenere premuto il
tasto Pausa e accenderla; rilasciare il tasto
quando la spia verde si spegne.
Pulsante Di
Alimentazione
Carta+Pausa
Ripristina impostazioni
di fabbrica
Con la stampante spenta, tenere premuti i
tasti Pausa e Pulsante di alimentazione
carta e accenderla; rilasciare entrambi i
tasti quando sia la spia rossa che quella
verde si spengono.
Pausa
Pulsante Di
Alimentazione
Carta
IT
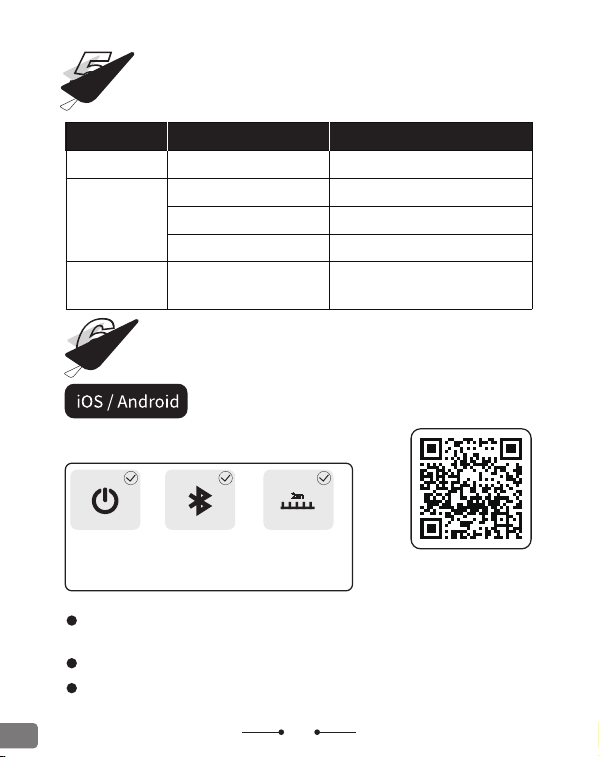
47
Descrizione dell’indicatore luminoso
5
Indicatore
luminoso
StatoDescrizione dello stato
VerdeSempre accesoLa stampante è pronta
Rosso
Sempre acceso
Stampa in pausa
Flash lentoAprire il coperchio della stampante
Lampeggio veloceLa stampante ha finito la carta
Verde + Rossolampeggiamento alternato
La stampante si è surriscaldata;
attendere che si raffreddi prima di
utilizzarla
Scarica il software
6
Scarica l'app per la modifica delle etichette "Clabel"da Google
Play Store o Apple APP Store e installala.
Per utilizzare il software, seguire le istruzioni riportate di seguito.
Nota: se è necessario un codice PIN per la connessione via Bluetooth,
immettere 0000 o 1234 per ottenerlo.
Scansiona il codice per
visualizzare il tutorial sulla
connessione Bluetooth.
Prerequisito per la stampa
La stampante
è accesa
Il Bluetooth
del cellulare
è acceso
Tenere il cellulare e la
stampante a meno di
2m di distanza
IT
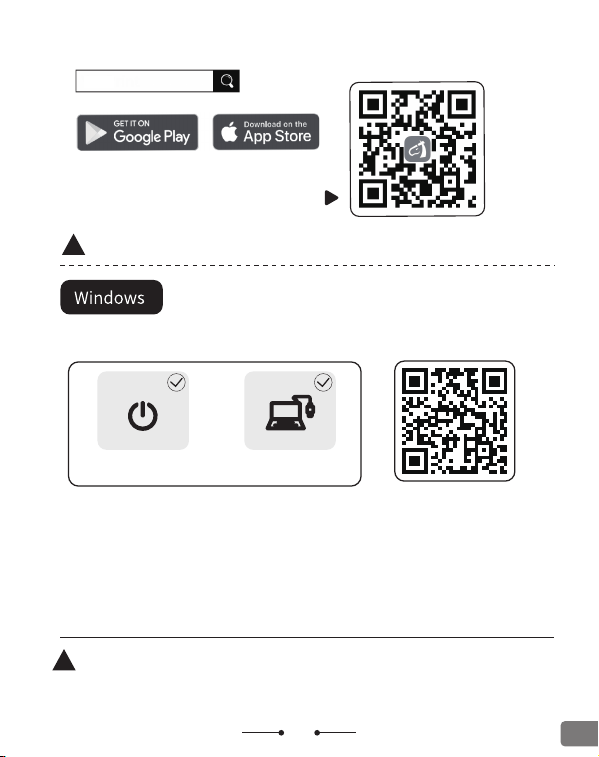
48
Scarica il driver dall'URL sopra indicato e leggere le istruzioni
per l'installazione del driver/software sul sito web.
La stampa mobile è disponibile solo per la versione Bluetooth.
Visita il sito web: https://ga.ctaiot.com
Per scaricare "Clabel" e il driver.
Clabel
Scansiona il codice QR qui sotto con il
vostro cellulare per scaricare
"Clabel ".
Scansiona il codice per
visualizzare il tutorial
sull'installazione del computer.
Nota: La stampa dal computer supporta solo la connessione
USB, non è supportata la connessione Bluetooth.
Prerequisito per la stampa
La stampante
è accesa
La stampante è
collegata al computer
IT
49
IT
Notice before installation
This driver is applicable to the CLABEL brand label printer.
Make sure the printer is turned on before installation and
connected to the computer with a data cable.Setup will
automatically detect printer status,Help you install printer
drivers easily.
If you confirm that the above steps are ready,please select
the installation method.
Net PrinterUSB Printer
Simple and smart with CLABEL
Clabel
Install lmmediately
Agree Clabel trade
User agreement
Custom installation
fig.1fig.2
fig.3fig.4
Clabel Setup
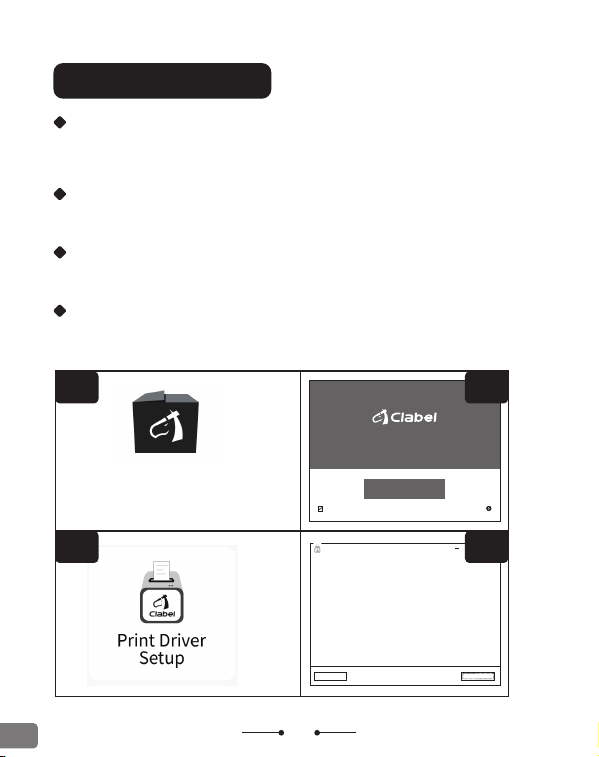
Installazione Windows
Passo 1
Fare clic per aprire il pacchetto di installazione "Clabel"
scaricato(fig.1).
Passo 2
Fate clic su "Installa ora" (fig.2)
Passo 3
Fate clic per aprire il pacchetto del driver di stampa scaricato(fig.3).
Passo 4
Collegare la stampante al computer tramite USB. Fate clic su Stampa
USB e seguite le istruzioni per il passaggio successivo(fig.4).
50
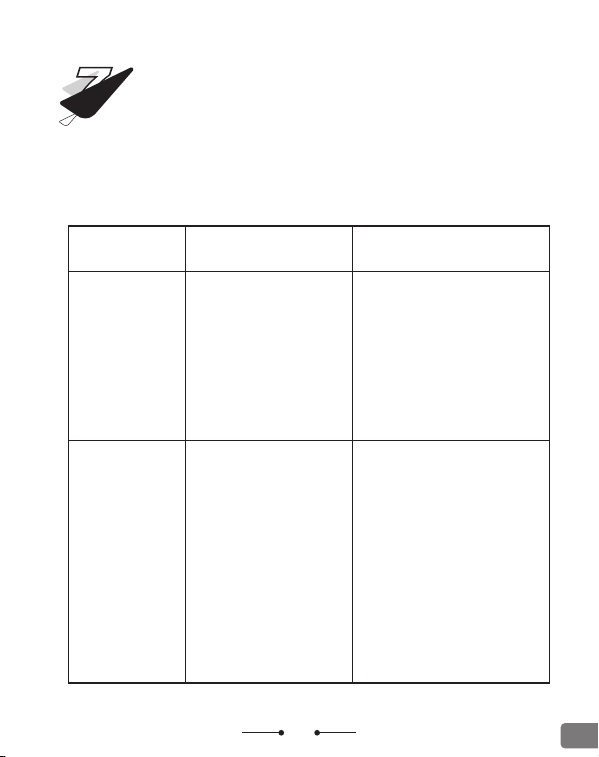
Risoluzione dei guasti
7
Stampa non
centrata, offset
Problemi
Connessione
Bluetooth non
riuscita
Possibili fattoriSoluzione
- Versione bassa del
cellulare.
- Le autorizzazioni
Bluetooth non sono
abilitate.
- La macchina è compatibile
solo con Android 9.0, iOS13 o
superiore.
- Apri il permesso di
localizzazione nel tuo
smartphone. (Nota: a causa
dei requisiti del sistema di
telefonia mobile, i telefoni
Android utilizzeranno la vostra
posizione durante la
connessione; dovrete quindi
attivare la localizzazione.)
- Scelta errata delle
dimensioni
dell'etichetta.
- Funzionamento
improprio del software.
- Lo spazio non
corrisponde.
- Inceppamento carta
non bloccato a sinistra
- Prima di stampare,
selezionare il formato
dell'etichetta appropriato.
- I contenuti possono essere
regolati utilizzando il
pulsante di regolazione
dell'APP.
- Fare clic sul pulsante
Funzione della stampante per
individuare lo spazio per la
carta.
- Verificare che l'inceppamen-
to carta nel vano carta sia
bloccato sul lato sinistro e
vicino all'etichetta.
- Vai alla pagina del prodotto
per vedere il video
Nella tabella seguente sono riportati i problemi più frequenti per gli operatori
generali e le soluzioni dei problemi;Se avete risolto il problema come
suggeriamo e la stampante non funziona correttamente, contattare la casella
postale del team post-vendita: [email protected]om per ottenere
maggiore assistenza.
IT
51
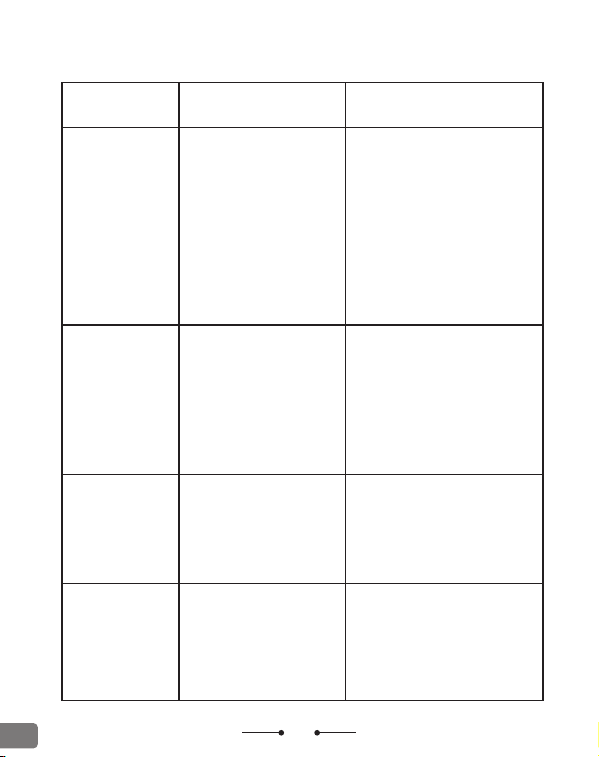
Stampa non
chiara
e pixelata
Quando si stampa,
va via solo la carta,
e non c'è nessun
contenuto
- La rottura del frame si
verifica durante la
stampa.
- Carattere poco chiaro
- Errore di installazione
delle etichette
- Stampa la pagina di autotest e
verificare che la linea nera sulla
pagina di autotest sia normale.
- Seleziona un altro carattere
nell'applicazione e regolate la
dimensione del carattere e il
carattere grassetto.
- Regolare la consistenza di
stampa per ottenere una
stampa più chiara. Selezionare
Contenuto di stampa > Stampa
> Impostazioni di stampa >
Risoluzione di stampa.
- Controllare se la superficie
di stampa è installata verso il
basso e se è installata al
contrario.
- Stampare la pagina di
auto-controllo, se la pagina di
auto-controllo è stampata
senza contenuto, indica un
guasto della stampante
Stampare un
sacco di carta
vuota
- La dimensione
dell'etichetta è impostata in
modo errato
- Il sensore è oscurato da
oggetti estranei
- Impostare correttamente le
dimensioni dell'etichetta
- Pulire il sensore
Manca il contenuto
stampato sui lati
sinistro e destro
- La dimensione
dell'etichetta è impostata
in modo errato
- Supera la massima
efficace larghezza di
stampa della stampante
- Impostare correttamente la
dimensione dell'etichetta
- Sostituire l'etichetta con
quella entro la massima
larghezza di stampa efficace
ProblemiPossibili fattoriSoluzione
IT
52
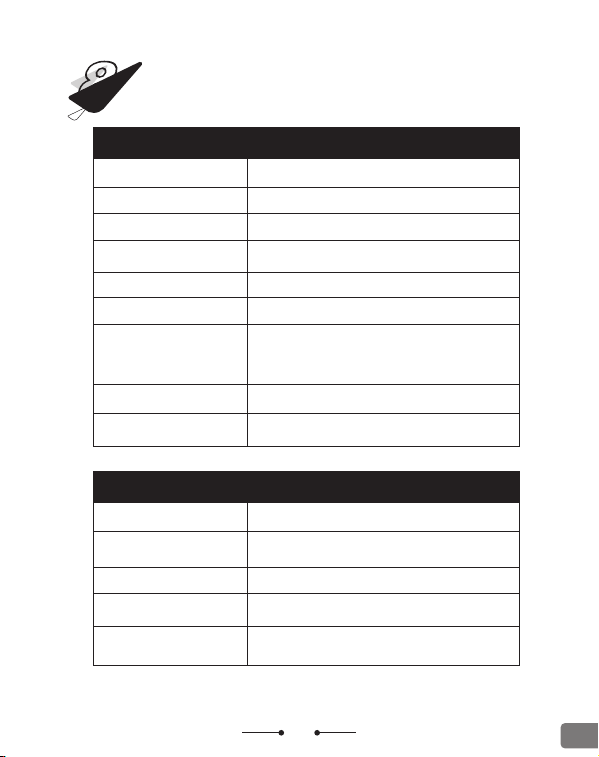
Specifiche
8
Tecnologia di stampa
Velocità di stampa
Risoluzione di stampa
Specifiche di stampa
Stampa termica
152mm/s
203dpi
Specifiche della carta
100mm
0.06~0.25mm
CODE128、EAN128、ITF、CODE39、CODE93、EAN13、EAN13
+2、EAN13+5、EAN 8、EAN8+2、EAN8+5、CODABAR、
POSTNET、UPC-A、UPC-A+2、UPC-A+5、UPC-E、UPC-E+
2、UPC-E+5、CPOST、MSI、MSIC、PLESSEY、ITF14、EAN14
USB + Bluetooth
Android 9, iOS13, Windows XP, Win7,
Windows 10 e versioni successive
Interfaccia
Codice QR
Codice a barre
QR CODE
Carta a strappo, Carta per scontrini,
Carta standard nera,Carta perforata
20-85mm
10mm
Larghezza etichetta
Tipo di supporto
Larghezza massima
di stampa
Lunghezza massima
di stampa
Sistema operativo
supportato
Diametro massimo
dell'etichetta
Altezza minima
dell'etichetta
Spessore della carta
(compresa la carta di fondo)
IT
80mm
300mm
53
Nome del prodotto
Modello di prodotto
Potenza assorbita
Banda di frequenza BT
Potenza Tx fino a
Dimensioni della macchina
Peso macchina
Altre specifiche
Stampante per etichette
CT327D
24V⎓1.25A
2.402~2.480 GHZ
+6dBm
142×195×142mm
0.92kg
Shenzhen Dudian Technology Co., Ltd.
2nd Floor, Comprehensive Building, Liuxian Road 3, District 71,
Xin'an Street, Bao'an District, Shenzhen, China
E-mail: [email protected]
Prodotto in Cina
Raccolta differenziata. Verifica le disposizioni del tuo Comune
C&E Connection E-Commerce(DE)GmbH
Zum Linnergraben 20, 65933, Frankfurt am Main, Germany
info@ce-connection.de
ECREP
IT
54
Antes de operar este producto, por favor lea en detalle
este manual de usuario como guía.
Impresora de etiqueta CT327D
Manual De Usuario
ES
55
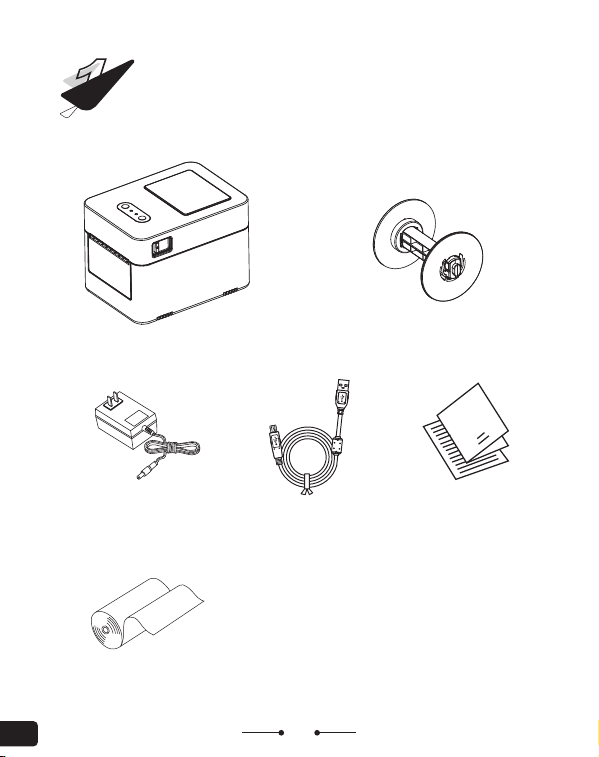
Lista de empaque
1
Manual
de uso
Impresora*1
Cable de datos*1Manual de uso*1Adaptador*1
Etiquetas Blancas de
Eje de etiquetas
y deflector*1
ES
56
Componentes exteriores
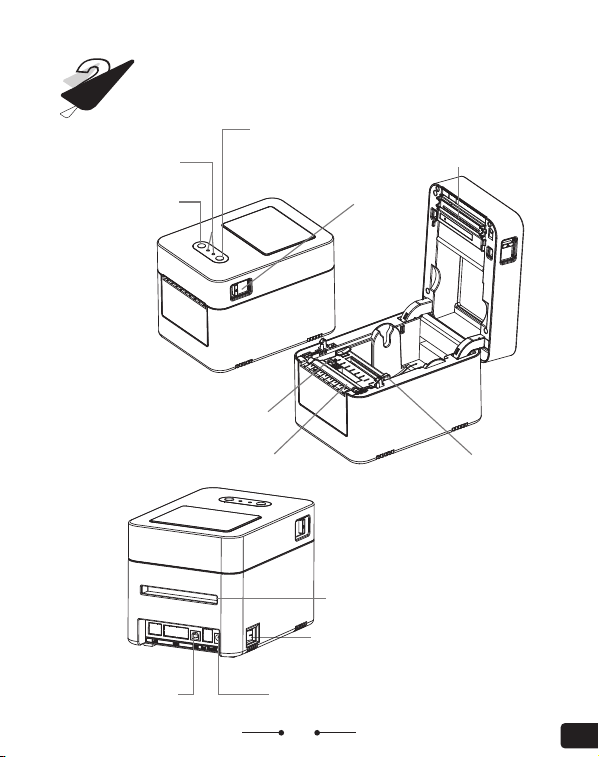
2
Indicador LED
Botón De Pausa
Botón De
Alimentación
De Papel
Botón De
Apertura
Indicador de alimentación
(POWER), indicador
de error (ERROR)
Sensor
Cabezal De
Impresión
Bloque Deslizante
De Guía De Papel
Rodillo De
Caucho
ES
Conector De AlimentaciónPuerto USB
Bandeja de Alimentación Trasera
(Compatible con la alimentación
mediante un soporte externo)
Interruptor De
Alimentación
57
Guía de instalación
3
1. Tire de los botones de
liberación de la tapa situados
a ambos lados y levante la
tapa superior.
2. Coloque el rollo de etiquetas en el eje, alineándolo a la
izquierda con el lado de impresión hacia arriba, luego
empuje la guía de papel derecha para asegurarlo (para
rollos de papel más anchos, la guía de papel no es necesaria).
Guía de instalación
de etiquetas
Con la cara
de impresión
hacia arriba
ES
Al usar rollos de etiquetas con
núcleo de 25 mm, retire la pieza
sobresaliente en el interior del
deflector.
58
ES
3. Tire del papel de etiquetas hacia la ranura de salida y
empuje el deslizador de la guía de papel para sujetar
la etiqueta.
4. Cierre la tapa superior de la impresora para completar
la instalación.
59
ES
Funciones de teclas
4
TeclaFunciónMétodo de operación
Interruptor
de aliment-
ación
EncendidoMoverse hasta “I”
ApagadoMoverse hasta “O”
Imprimir una copiaHaga clic
Papel de prueba
Mantén pulsado el botón de avance de
papel; cuando se encienda la luz roja,
suéltalo.
Continuar imprimiendo
Hacer clic mientras está en pausa
Imprimir página de
prueba
Con la impresora apagada, mantenga pulsado
el Botón de alimentación de papel y enciéndala;
suelte el botón cuando la luz roja se apague.
Avance del papel: 10 mm
Pulsar una vez en modo recibo
El papel se desplaza de
forma continua; al soltar,
se detiene
Mantener pulsado en modo recibo,
soltar para detener
Pausar impresión
Haga clic en el modo de impresión
Cambiar de modo
Con la impresora apagada, mantenga pulsado
el botón de pausa y enciéndala; suelte el
botón cuando la luz verde se apague.
Botón De
Alimentación
De Papel+Botón
de pausa
Restablecer la
configuración de
fábrica
Con la impresora apagada, mantenga
pulsados los botónes de pausa y Botón de
alimentación de papel y enciéndala; suelte
ambos botones cuando tanto la luz roja
como la verde se apaguen.
Botón de pausa
Botón De
Alimentación
De Papel
60
ES
Descripción del indicador
luminoso
5
Descarga de software
6
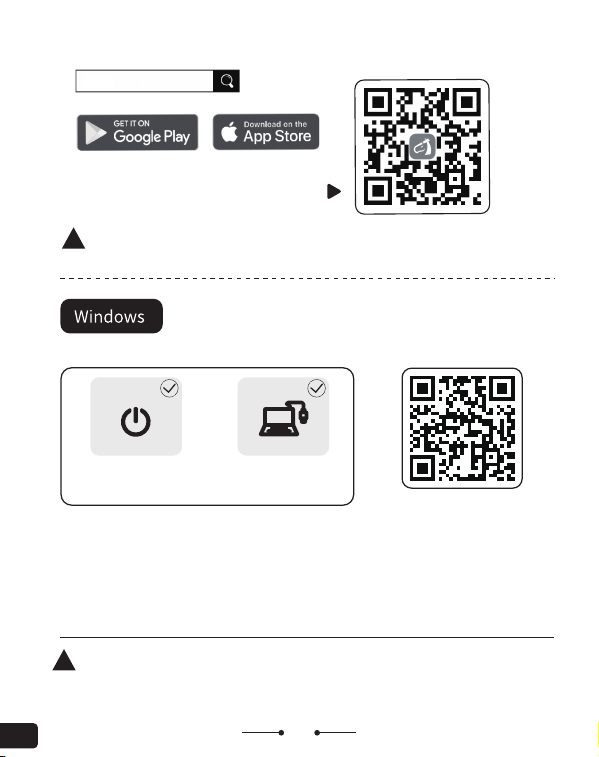
Descargue la aplicación de edición de etiquetas "Clabel "
de la Google Play Store o la Apple APP Store e instálela.
Por favor opere el software en función de la siguiente
descripción de software.
Nota: Si se necesita el código PIN al conectar el bluetooth,
por favor introduzca 0000 ó 1234.
Escanea el código para
ver el tutorial de
conexión Bluetooth.
Requisitos previos para la impresión
La impresora
está encendida
El Bluetooth del
teléfono móvil
está encendido
Mantenga el teléfono
móvil y la impresora
a menos de 2m de
distancia
Indicador
luminoso
EstadoDescripción de estado
VerdeSiempre encendidoLa impresora está lista
Rojo
Siempre encendido
Impresión en pausa
Flash lentoAbrir la tapa de la impresora
Parpadeo rápido
La impresora se ha quedado sin papel
Verde + RojoParpadeo alterno
La impresora se ha sobrecalentado;
espere a que se enfríe antes de volver
a utilizarla.
61
ES
Del sitio web anterior se descarga el driver, y se leen las
instrucciones de instalación de driver/software en el sitio web.
La impresión por móvil es solamente aplicable a la versión
bluetooth.
Se tiene acceso al sitio web :https://ga.ctaiot.com
Para descargar "Clabel " y el driver.
Clabel
Con el móvil se escanea el siguiente
código QR para descargar "Clabel".
Escanea el código para ver
el tutorial de instalación de
la computadora.
Nota: La impresión desde el ordenador solo admite conexión USB, no se admite
conexión Bluetooth.
Requisitos previos para la impresión
La impresora
está encendida
La impresora está
conectada a la
computadora
62
ES
Notice before installation
This driver is applicable to the CLABEL brand label printer.
Make sure the printer is turned on before installation and
connected to the computer with a data cable.Setup will
automatically detect printer status,Help you install printer
drivers easily.
If you confirm that the above steps are ready,please select
the installation method.
Net PrinterUSB Printer
Simple and smart with CLABEL
Clabel
Install lmmediately
Agree Clabel trade
User agreement
Custom installation
fig.1fig.2
fig.3fig.4
Clabel Setup
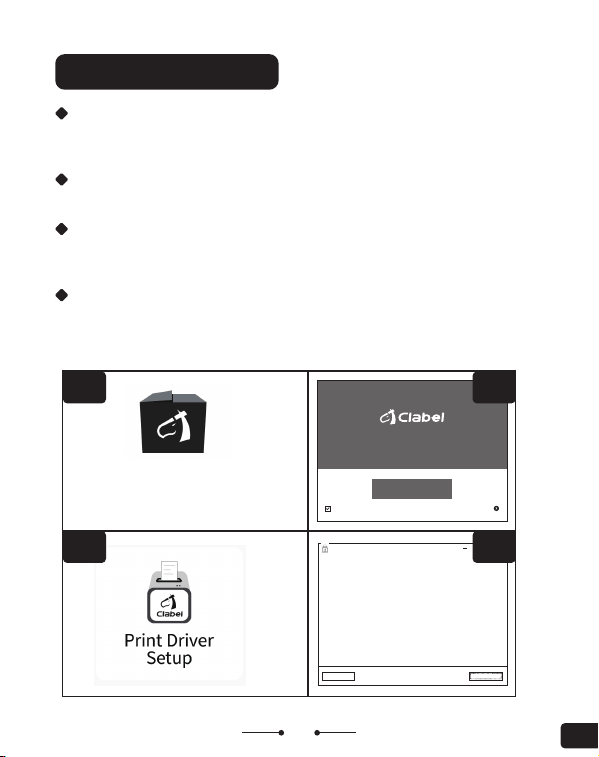
Instalación de Windows
Paso 1
Se pulsa el paquete de instalación “Clabel” descargado para
abrirlo (fig.1).
Paso 2
Se pulsa “Instalar enseguida” (fig.2)
Paso 3
Se hace un clic en el paquete de driver de impresión descargado para
abrirlo (fig.3).
Paso 4
Con la interfaz USB la impresora se conecta a la computadora. Se hace
un clic en Impresión USB y se procede al próximo paso según el
recordatorio (fig.4).
63
ES
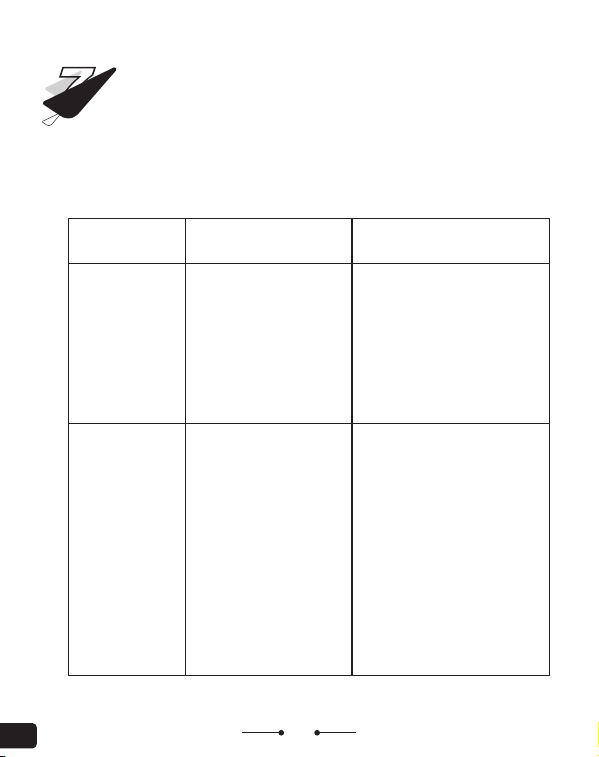
Solución de fallas
7
La impresión está
desviada en lugar
de estar centrada
Problemas
El bluetooth ha
fallado en
conexión
Factores posiblesMétodos de solución
- La versión del móvil es
inferior.
- La competencia de
bluetooth no está
habilitada.
- La máquina es solamente
aplicable a la versión Android
9.0, iOS13 o superior.
- Por favor habilite la
autoridad de posicionamiento
en el móvil inteligente. (Nota:
A requerimiento del sistema
del móvil, se utiliza su
posición al conectar un móvil
Android, usted necesita activar
la posición.)
- Las dimensiones de
etiqueta elegidas son
incorrectas.
- La operación de
software es
inadecuada.
- La holgura no es
coincidente.
- El bloque deslizante
de guía de papel no
está bloqueado en la
izquierda.
- Antes de impresión, por
favor elija las dimensiones de
etiqueta correspondientes.
- No se puede ajustar el
contenido a través del botón
de ajuste en la APP.
- Se pulsa la tecla funcional
en la impresora para
encontrar la holgura de
papel.
- Se verifica si el bloque
deslizante de guía de papel
en el depósito de papel está
bloqueado en la izquierda, y
está próximo a la etiqueta.
- Entra en nuestra página de
producto para ver vídeos.
La siguiente tabla muestra los problemas y soluciones más comunes para los
usuarios;Si ha seguido nuestros métodos de solución de problemas
recomendados y la impresora sigue funcionando mal, póngase en contacto
con el equipo de posventa en Clabel.ser[email protected]om para obtener más
ayuda.
64
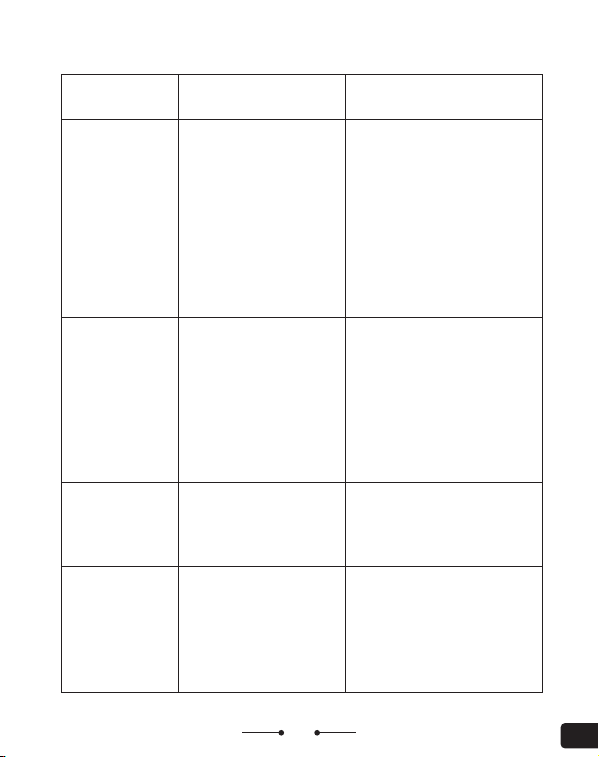
La impresión no
es clara, sino
está pixelada
Impresión de
papel únicamente,
sin contenido
- Se produce la
interrupción de
fotograma durante la
impresión.
- Las letras no son claras.
- Error de instalación de
etiquetas
- Se imprime la página de auto
comprobación para inspeccionar
si es normal la línea negra en ella.
- En el programa de aplicación se
elige otra fuente de letras, se
ajusta el tamaño de fuente y se
pone la fuente en negrita.
- Por favor ajuste la densidad de
impresión para que el efecto de
impresión sea más claro. Elegir
contenido de impresión > Imprimir
> Configuración de impresión >
Resolución de impresión.
- Compruebe si la cara de
impresión está instalada
hacia abajo, no hay
instalación inversa.
- Imprima la página de
autocomprobación. Si la
página de autocomprobación
se imprime sin contenido,
indica que la impresora está
fallada.
Impresion de
mucho papel
en blanco
- Ajuste incorrecto del
tamaño de etiquetas.
- Sensor bloqueado por
objetos extraños.
- Ajuste correcto del tamaño
de etiquetas.
- Limpieza del sensor
Desaparición de
las impresiones
laterales izquierda
y derecha
- Ajuste incorrecto del
tamaño de etiquetas.
- Se ha superado la
anchura de impresión
efectiva máxima de la
impresora.
- Ajuste correcto del tamaño
de etiquetas.
- Sustituya la etiqueta por
una que esté dentro de la
anchura de impresión
efectiva máxima de la
impresora.
ProblemasFactores posiblesMétodos de solución
ES
65
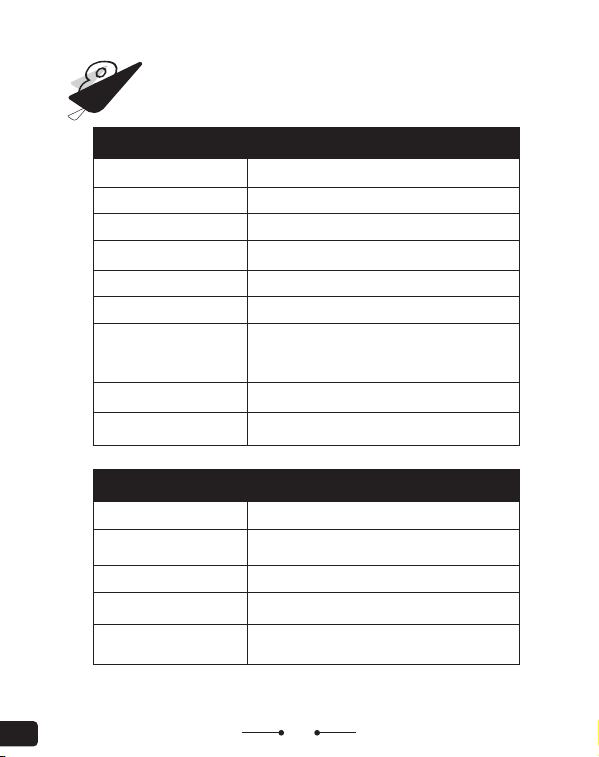
Especificación y parámetros
8
Tecnología de impresión
Velocidad de impresión
Velocidad de impresión
Especificaciones de impresión
Tecnología de impresión
152mm/s
203dpi
Especificaciones de papel
100mm
0.06~0.25mm
CODE128、EAN128、ITF、CODE39、CODE93、EAN13、EAN13
+2、EAN13+5、EAN 8、EAN8+2、EAN8+5、CODABAR、
POSTNET、UPC-A、UPC-A+2、UPC-A+5、UPC-E、UPC-E+
2、UPC-E+5、CPOST、MSI、MSIC、PLESSEY、ITF14、EAN14
USB + Bluetooth
Android 9, iOS13, Windows XP, Win7,
Windows 10 y versiones posteriores
Interfaz
Código QR
Código de barras
Código QR
Papel intersticial, Papel de recibos,
Papel estándar negro,Papel perforado
20-85mm
10mm
Ancho de etiqueta
Tipo de medios
Ancho máximo de
impresión
Longitud máxima de
impresión
Sistema operativo
compatible
Diámetro máximo
de etiquetas
Altura mínima de
etiquetas
Espesor de papel
( incl. papel soporte)
ES
80mm
300mm
66
ES
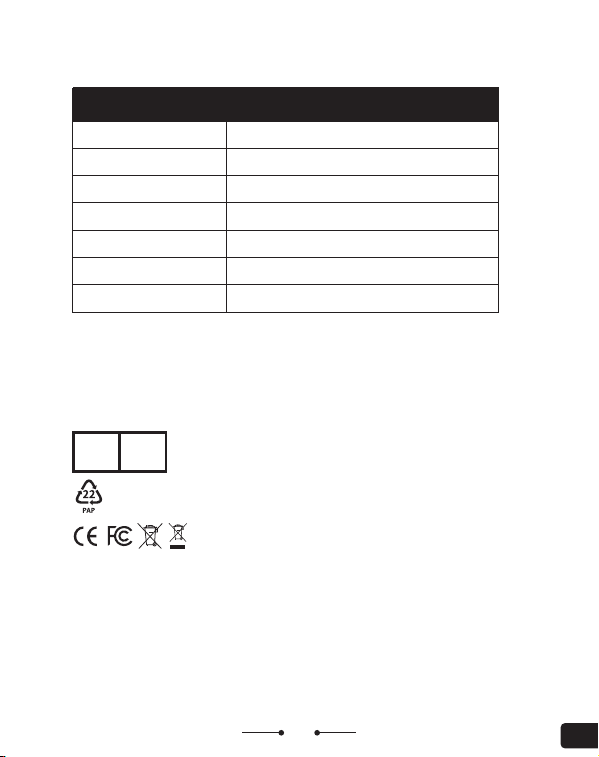
Nombre del producto
Modelo de producto
Entrada de alimentación
Banda de frecuencia BT
Potencia Tx hasta
Tamaño de la máquina
Peso de la máquina
Otras especificaciones
Impresora de etiquetas
CT327D
24V⎓1.25A
2.402~2.480 GHZ
+6dBm
142×195×142mm
0.92kg
Shenzhen Dudian Technology Co., Ltd.
2nd Floor, Comprehensive Building, Liuxian Road 3, District 71,
Xin'an Street, Bao'an District, Shenzhen, China
E-mail: [email protected]
Hecho en China
Raccolta differenziata. Verifica le disposizioni del tuo Comune
C&E Connection E-Commerce(DE)GmbH
Zum Linnergraben 20, 65933, Frankfurt am Main, Germany
info@ce-connection.de
ECREP
67
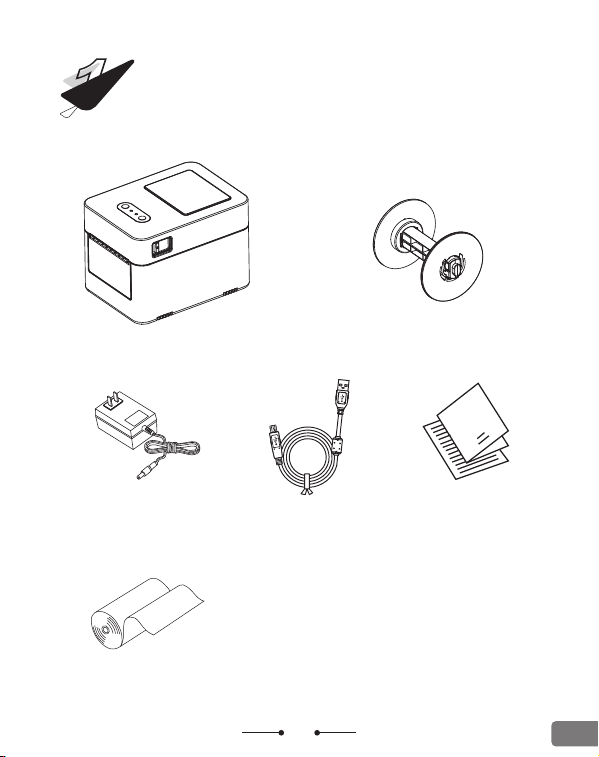
Перед началом эксплуатации данного изделия
внимательно ознакомьтесь с настоящим
руководством пользователя.
Принтер для печати этикеток CT327D
Руководство пользователя
RUS
68
RUS
Контрольный список
для распаковки
1
Руководство
Принтер*1
кабель*1Руководство
пользователя*1
адаптер*1
Этикетки
Ось этикеток и упор*1
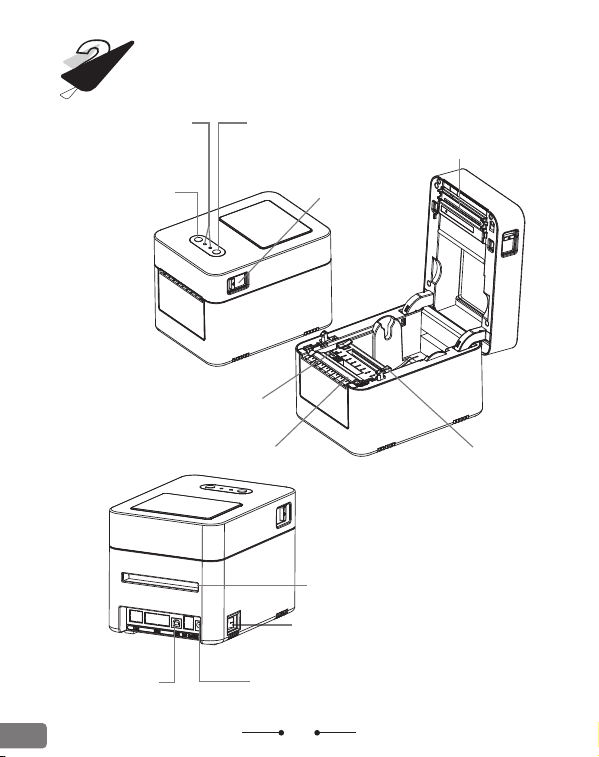
Элементы экстерьера
2
69
Светодиодные
индикаторы
Кнопка паузы
Кнопка
подачи бумаги
Кнопка открытия
крышки
(индикатор питания POWER,
индикатор ошибки ERROR)
датчик
Печатающая
головка
Скользящий элемент
из картона
резиновый валик
Разъем питанияUSB-разъем
Задний лоток для бумаги
(поддерживает подачу бумаги
с помощью внешнего держателя)
Выключатель питания
RUS
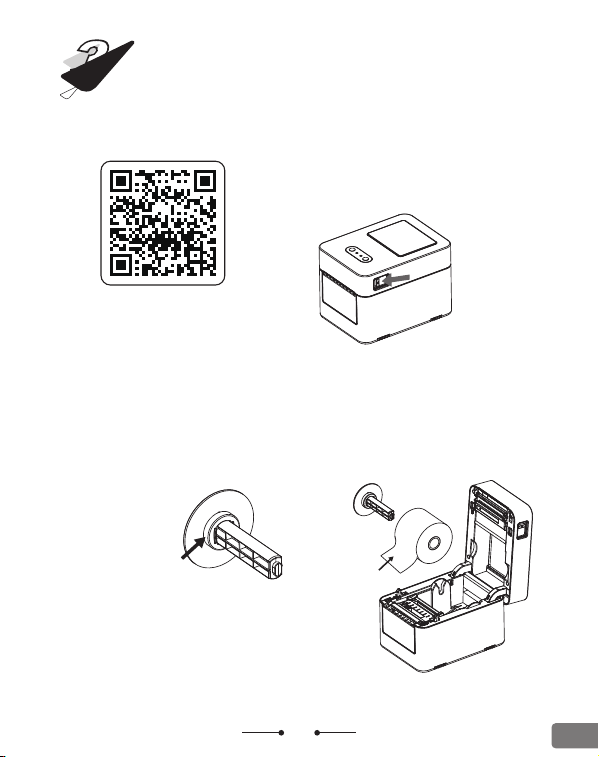
Руководство по установке
3
1. Потяните за кнопки открывания
с обеих сторон и поднимите
верхнюю крышку.
2. Установите рулон бумаги в держатель для этикеток,
расположив его слева, и зафиксируйте с помощью
правой стопорной планки (при использовании широкого
рулона стопорная планка не требуется).
70
печатной
стороной вверх
Инструкция по
установке этикеток
При использовании рулонов
этикеток с сердечником
диаметром 25 мм необходимо
удалить выступающий элемент
на внутренней стороне перегородки.
RUS
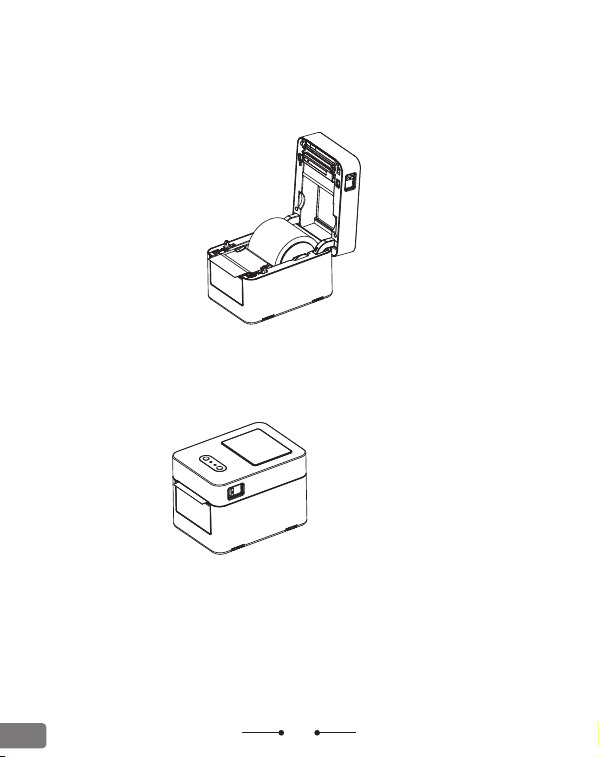
71
3. Подтяните рулон этикеток к выходу и нажмите на зажим,
чтобы зафиксировать этикетки.
4. Закройте верхнюю крышку принтера, чтобы завершить
установку.
RUS
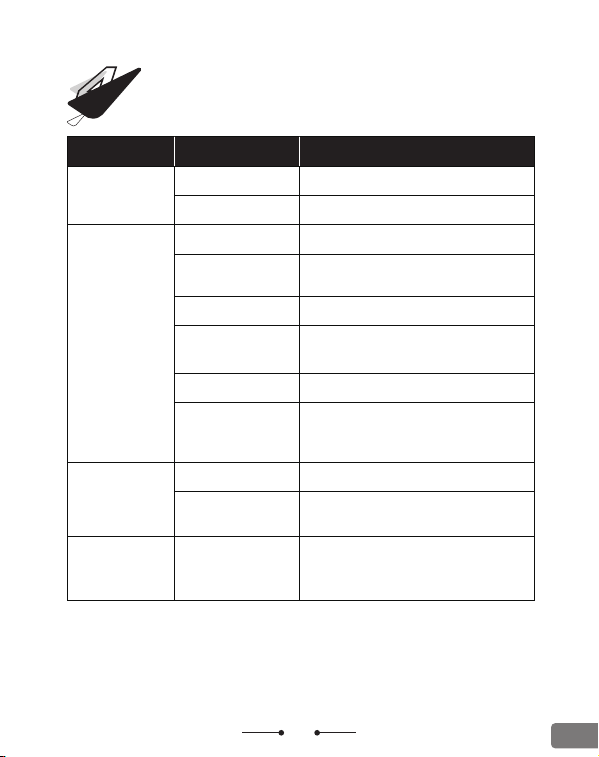
72
кнопкаФункцииПорядок действий
Выключатель
питания
Включение
Переведите в положение «I»
ВыключитьПереведите в положение «O»
Кнопка
подачи
бумаги
Один лист бумагиНажмите
Тестовая бумага
Удерживайте кнопку подачи бумаги,
пока не загорится красный индикатор,
затем отпустите кнопку
Продолжить печатьЩелкните в режиме паузы
Распечатать страницу
самопроверки
Удерживайте кнопку подачи бумаги, затем
включите устройство; когда красный
индикатор погаснет, отпустите кнопку.
Зазор 10 ммЩелкните в режиме векселя
Непрерывная подача
бумаги; при отпускании
руки подача
останавливается
Длительное нажатие в режиме
«Билеты»
Кнопка паузы
Приостановить печать
В режиме печати нажмите
Переключить
режим
Удерживайте кнопку «Пауза», затем
включите устройство; когда зеленый
индикатор погаснет, отпустите кнопку
Кнопка подачи
бумаги+Кнопка
паузы
Восстановить
заводские
настройки
Нажмите и удерживайте кнопки «Пауза»
и «Подача бумаги», затем включите
устройство. Когда красный и зеленый
индикаторы погаснут, отпустите кнопки.
Функции кнопок
4
RUS
73
Загрузка программного
обеспечения
6
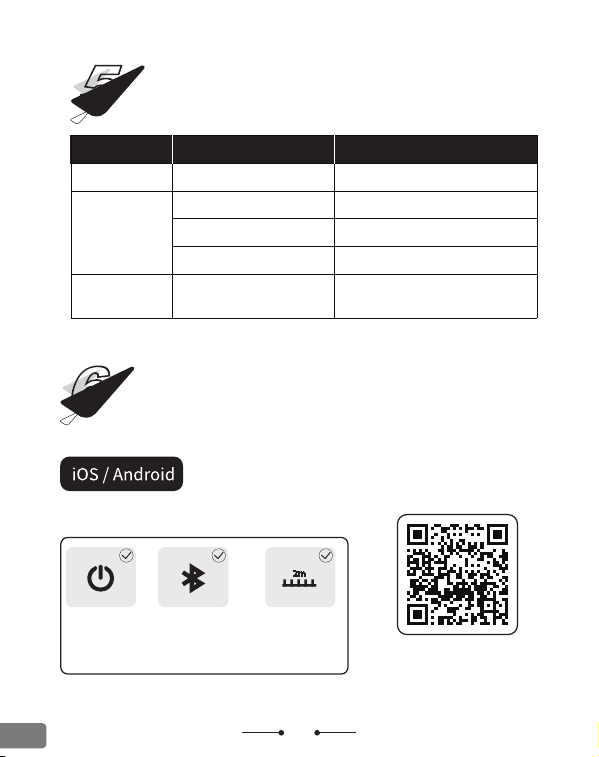
Отсканируйте QR-код, чтобы
посмотреть инструкцию по
подключению по Bluetooth
Предпосылки для печати
Принтер
включен
Bluetooth на
мобильном
телефоне
включен
Держите мобильный
телефон и принтер на
расстоянии не более
2 метров друг от друга
Описание индикаторов
5
Цвет индикатора
СостояниеОписание состояния
ЗеленыйПостоянное свечениеПринтер готов к работе
Красный
Постоянное свечение
Печать приостановлена
Медленная вспышкаОткрыть крышку принтера
Быстрое миганиеВ принтере закончилась бумага
Зеленый+
Красный
попеременное мигание
Принтер перегрелся. Подождите,
пока устройство остынет, прежде
чем продолжить работу.
RUS
74
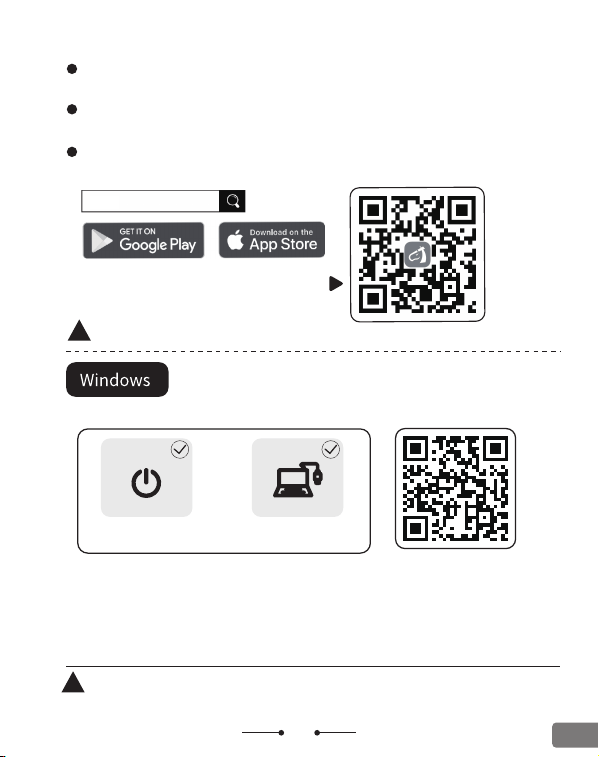
Загрузите приложение для редактирования этикеток «Clabel»
из Google Play Store или Apple App Store и установите его.
Пожалуйста, следуйте приведенным ниже инструкциям по
использованию программы.
Примечание: если для подключения по Bluetooth
требуется ввести PIN-код, введите 0000 или 1234.
Мобильная печать доступна только для версии с Bluetooth.
Загрузите драйверы с указанного выше веб-сайта и ознакомьтесь
с инструкциями по установке драйверов и программного обеспечения,
размещенными на этом сайте.
Посетите сайт: https://ga.ctaiot.com
Скачать «Clabel» и драйверы.
Clabel
Отсканируйте QR-код справа с помощью
мобильного телефона, чтобы загрузить
приложение «Clabel».
Отсканируйте QR-код, чтобы
посмотреть руководство по
установке на компьютер
Примечание: для печати с компьютера поддерживается только
подключение по USB; подключение по Bluetooth не поддерживается.
Предпосылки для печати
Принтер
включен
Принтер подключен
к компьютеру
RUS
75
Notice before installation
This driver is applicable to the CLABEL brand label printer.
Make sure the printer is turned on before installation and
connected to the computer with a data cable.Setup will
automatically detect printer status,Help you install printer
drivers easily.
If you confirm that the above steps are ready,please select
the installation method.
Net PrinterUSB Printer
Simple and smart with CLABEL
Clabel
Install lmmediately
Agree Clabel trade
User agreement
Custom installation
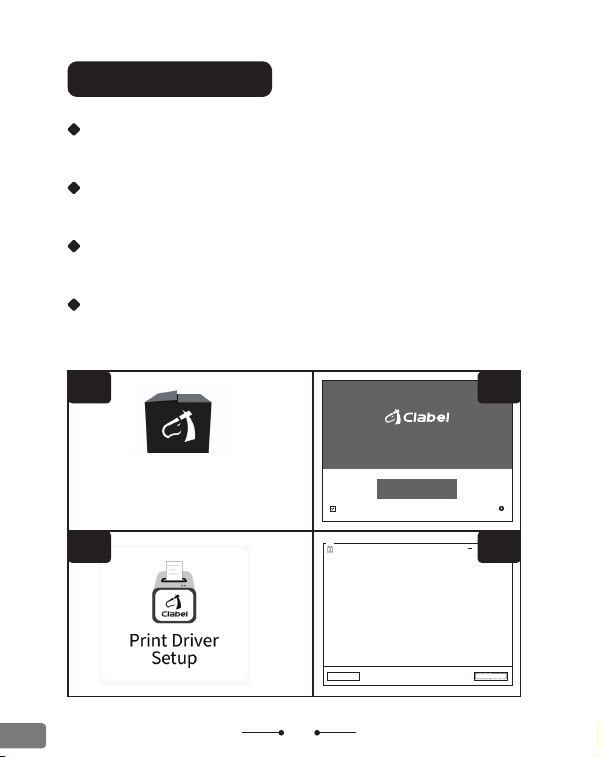
Установка Windows
Шаг 1
Щелкните, чтобы открыть загруженный установочный пакет «Clabel» (рис. 1).
Шаг 2
Нажмите «Установить сейчас» (рис. 2).
Шаг 3
Щелкните, чтобы открыть загруженный пакет драйверов принтера (рис. 3).
Шаг 4
Подключите принтер к компьютеру через USB. Нажмите «Печать через USB»
и следуйте инструкциям на экране, чтобы перейти к следующему шагу (рис. 4).
рис. 1
рис. 2
рис. 3рис. 4
Clabel Setup
RUS
Устранение неполадок
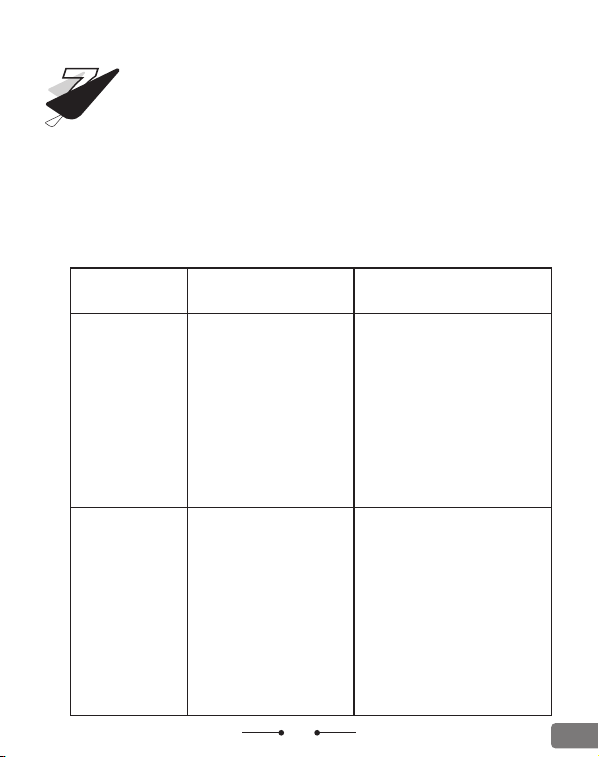
7
Печать не по
центру,
смещение
Симптом
Сбой
подключения
по Bluetooth
ПричинаРешение
- Устаревшая версия
мобильного телефона.
- Разрешения Bluetooth
не включены.
- Устройство поддерживает
только Android 9.0, iOS 13 или
более поздние версии.
- Пожалуйста, включите
разрешение на определение
местоположения на вашем
смартфоне. (Примечание: в связи
с системными требованиями при
подключении ваш телефон
Android будет использовать
данные о вашем
местоположении. Необходимо
включить функцию определения
местоположения.)
- Неправильный выбор
размера этикетки.
- Неправильная работа
программного
обеспечения.
- Несоответствие
зазора.
- Направляющая для
бумаги не
зафиксирована слева.
- Перед печатью выберите
подходящий размер этикетки.
- Настройте содержание с
помощью кнопки настройки в
приложении.
- Нажмите функциональные
клавиши на принтере, чтобы
найти зазор для бумаги.
- Убедитесь, что направляющая
бумаги в лотке зафиксирована
слева и находится близко к
этикетке.
- Посетите страницу нашего
продукта, чтобы посмотреть
видео.
76
В приведенной ниже таблице перечислены типичные проблемы,
с которыми могут столкнуться обычные пользователи, а также
предлагаемые способы их решения.
Если принтер по-прежнему не работает должным образом после
выполнения рекомендуемых действий по устранению неполадок,
обратитесь в нашу службу послепродажного обслуживания по
адресу Clabel.ser[email protected]om для получения
дополнительной помощи.
RUS
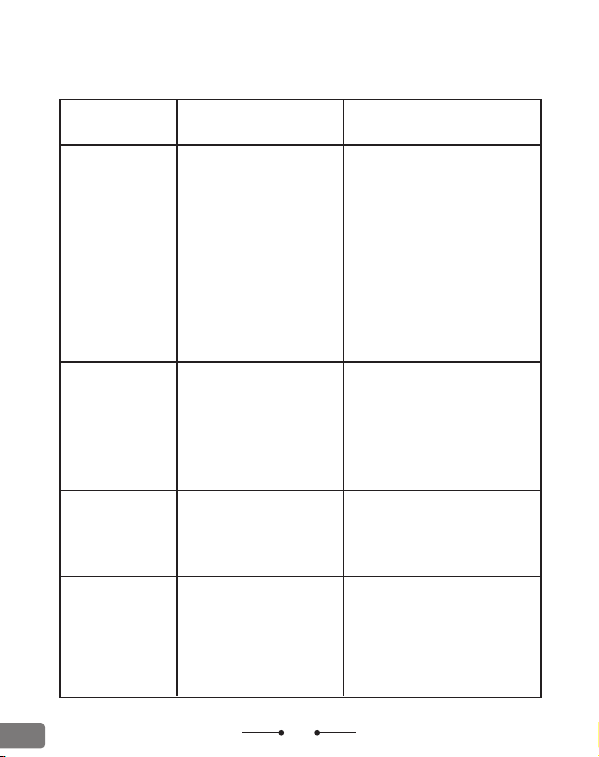
Нечеткая и
пикселизиро-
ванная печать
Этикетки выходят
нормально, но
на них ничего
не печатается
- Во время печати
произошел пропуск
кадров.
- Нечеткий шрифт.
- Ошибка установки
этикетки
- Распечатайте страницу
самопроверки и проверьте,
нормально ли отображаются
чёрные линии на ней.
- Выберите в приложении
другой шрифт и настройте
его размер и насыщенность.
- Отрегулируйте плотность
печати, чтобы изображение
было чётче. Выберите
«Печать содержимого» >
«Печать» > «Настройки
печати» > «Плотность
печати».
- Убедитесь, что сторона для
печати обращена вниз
- Распечатайте страницу
самопроверки. Если на
странице самопроверки
ничего не напечатано, это
означает, что принтер
неисправен
Печатается
много пустых
этикеток
-Неправильная
настройка размера
этикетки
-Датчик заблокирован
посторонними предметами
-Установите правильный
размер этикетки
-Очистите датчик
Не удалось
напечатать
содержимое по
левому и
правому краям
- Неправильная
настройка размера
этикетки
- Превышение
максимальной
эффективной ширины
печати принтера
- Установите правильный
размер этикетки
- Замените этикетку на
такую, ширина которой не
превышает максимальную
эффективную ширину
печати
СимптомПричинаРешение
77
RUS
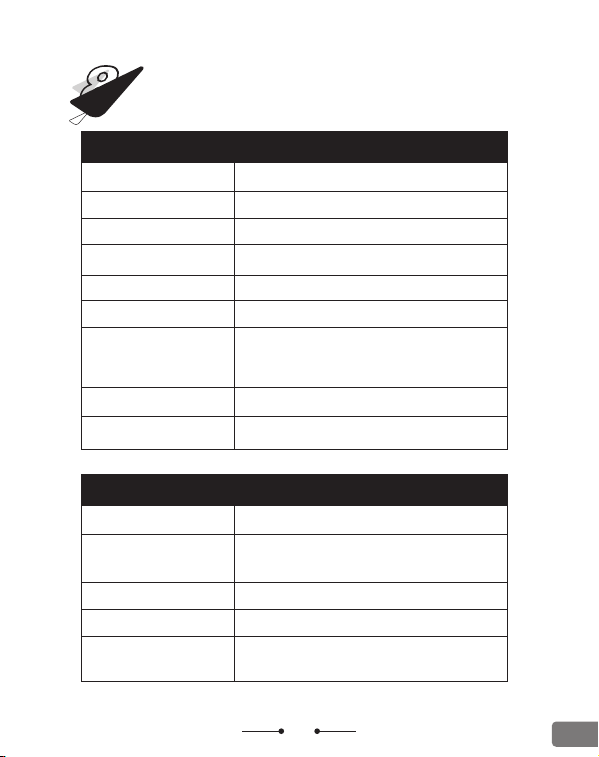
Технические характеристики
8
78
Технологии печати
Скорость печати
Разрешение печати
Технические характеристики печати
Термопечать
152mm/s
203dpi
Максимальный
диаметр этикетки
Характеристики бумаги
100mm
0.06~0.25mm
(с учетом подложки)
CODE128、EAN128、ITF、CODE39、CODE93、EAN13、EAN13
+2、EAN13+5、EAN 8、EAN8+2、EAN8+5、CODABAR、
POSTNET、UPC-A、UPC-A+2、UPC-A+5、UPC-E、UPC-E+
2、UPC-E+5、CPOST、MSI、MSIC、PLESSEY、ITF14、EAN14
USB + Bluetooth
Android 9, iOS 13, Windows XP, Windows 7,
Windows 10 и более поздние версии
Интерфейс
Поддерживаемые
операционные системы
QR-код
Штрих-код
QR-код
Толщина бумаги
Бумага для печати с промежутками, Бумага
для чеков, Стандартная бумага черного цвета,
Перфорированная бумага
20-85mm
10mm
Ширина этикетки
Тип носителя
Максимальная
ширина печати
Максимальная
длина печати
80mm
300mm
Минимальная высота
штрихкода
RUS
79
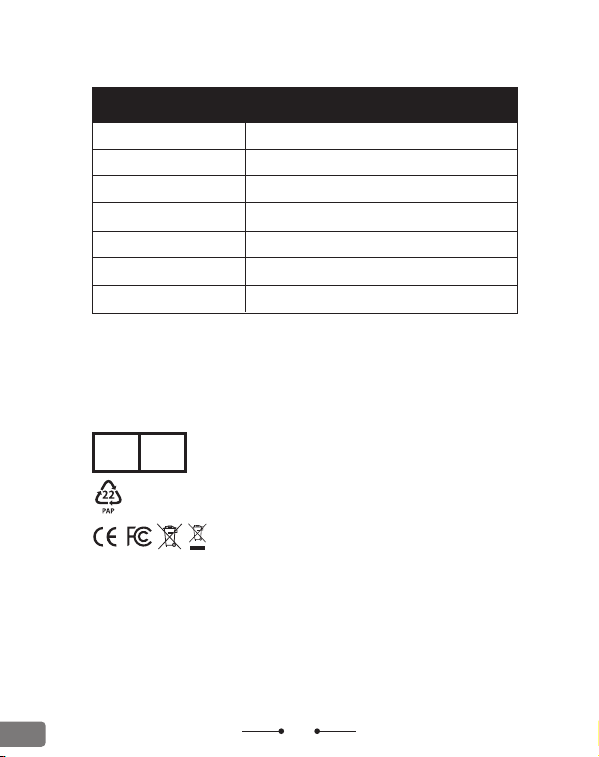
Название продукта
Модель
Входной параметр
Диапазон частот BT
Мощность Tx до
Размеры машины
Вес машины
Прочие технические характеристики
Принтер для этикеток
CT327D
24V⎓1.25A
2.402~2.480 GHZ
+6dBm
142×195×142mm
0.92kg
Компания «Shenzhen Dudian Technology Co., Ltd.»
2-й этаж, многофункциональное здание, ул. Люсянь, 3, район 71,
улица Синьань, район Баоань, Шэньчжэнь, Китай
Электронная почта: Clabel.ser[email protected]om
Сделано в Китае
Raccolta differenziata. Verifica le disposizioni del tuo Comune
C&E Connection E-Commerce(DE)GmbH
Zum Linnergraben 20, 65933, Frankfurt am Main, Germany
info@ce-connection.de
ECREP
RUS