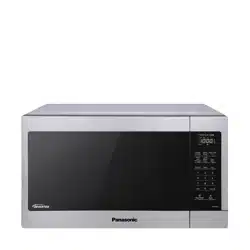
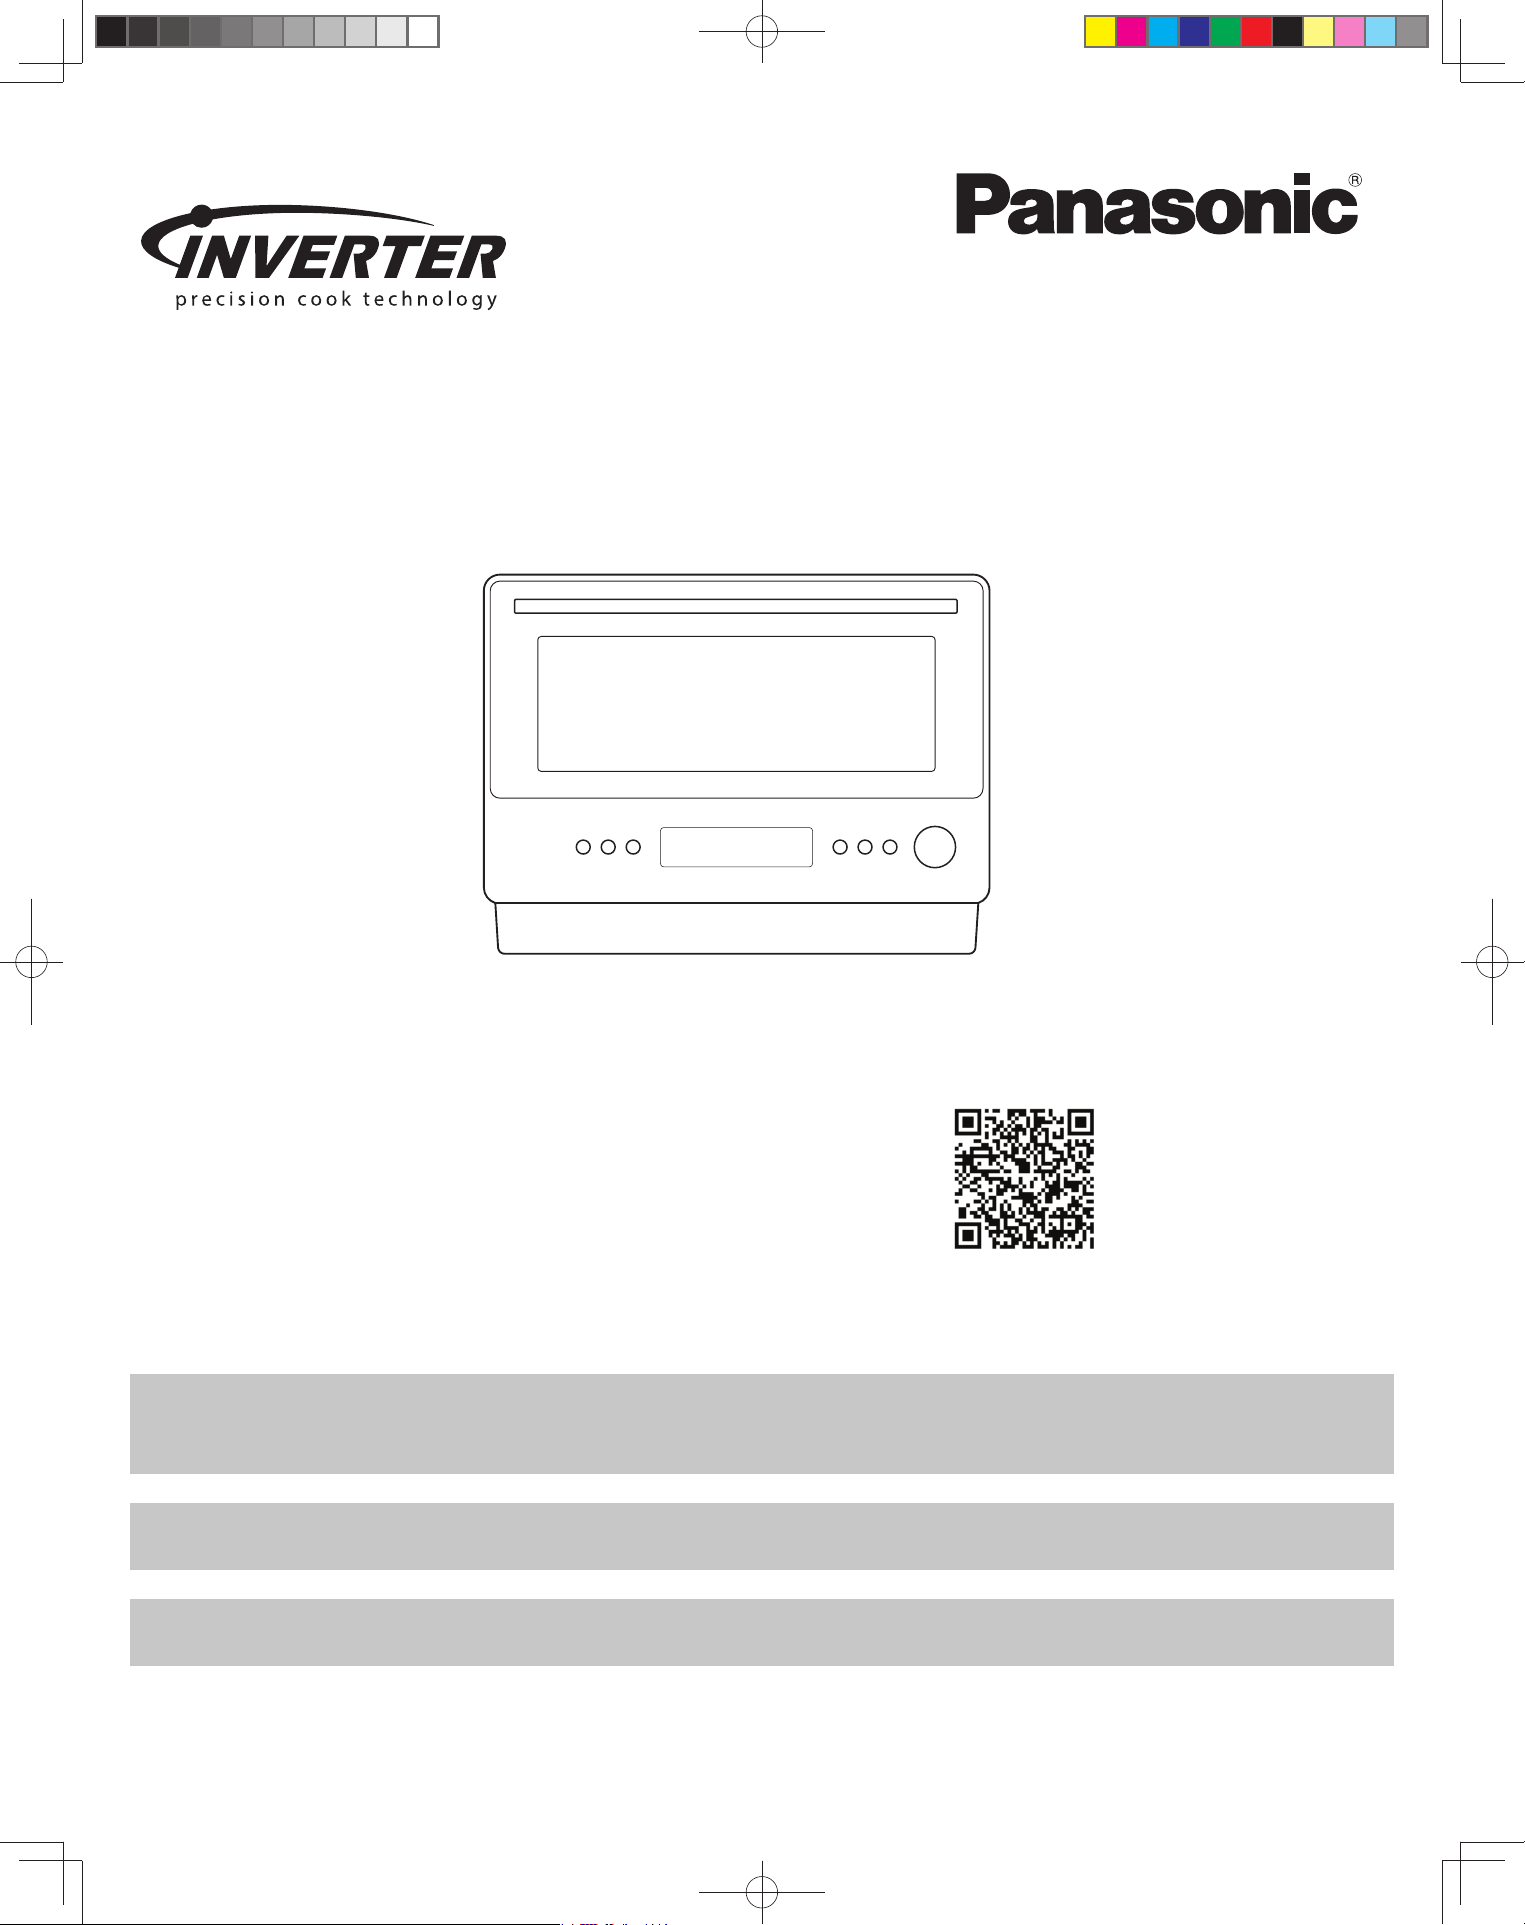
Owner’s Manual
Microwave Oven
Household Use Only
Model No.
NN-SF57RM
PLEASE READ THESE INSTRUCTIONS CAREFULLY BEFORE USING THIS PRODUCT,
AND SAVE THIS MANUAL FOR FUTURE USE.
Scan this code for product registration
To register your product and for all other assistance, please contact us via the web at:
http://shop.panasonic.com/support (U.S.A Only)
For microwave oven safety reference, please visit the FDA’s web page at:
http://www.fda.gov/radiation-emittingproducts/resourcesforyouradiationemittingproducts/ucm252762.htm
Para obtener instrucciones en español, por favor visite la página web en:
http://shop.panasonic.com/support
F0003DB70AP
PA0326-0
Printed in China
© Panasonic Corporation 2026
NN-SF57RM
F0003DB70AP_EN.indd 1F0003DB70AP_EN.indd 1 2026/3/2 16:26:122026/3/2 16:26:12
2
CONTENTS
Safety Information
IMPORTANT SAFETY INSTRUCTIONS ............................................................................................................................................... 3-5
Installation and Grounding Instructions ........................................................................................................................................ 5-6
Food Preparation .................................................................................................................................................................................... 6-7
Location of Controls .................................................................................................................................................................................. 9
Control Panel ..............................................................................................................................................................................................10
Dial Feature .................................................................................................................................................................................................11
Operation
Using the Microwave for the First Time ...........................................................................................................................................12
Setting the Clock .......................................................................................................................................................................................12
Sensor Reheat ............................................................................................................................................................................................13
Setting the Child Safety Lock ...............................................................................................................................................................14
Cooking ........................................................................................................................................................................................................14
Keep Warm ..................................................................................................................................................................................................15
Quick 30 .......................................................................................................................................................................................................16
Add Time .....................................................................................................................................................................................................16
Defrost ..........................................................................................................................................................................................................17
Defrosting Tips & Techniques ..............................................................................................................................................................17
Popcorn ........................................................................................................................................................................................................18
Beverage ......................................................................................................................................................................................................19
Sensor Cook ................................................................................................................................................................................................20
Sensor Cook Chart ............................................................................................................................................................................. 21-22
Microwave shortcuts ........................................................................................................................................................................ 23-24
Defrosting Chart........................................................................................................................................................................................24
Reheating Chart ........................................................................................................................................................................................25
Cooking Chart ..................................................................................................................................................................................... 26-27
Food Characteristics
and Cooking Techniques ...................................................................................................................... 28-29
Maintenance
Care and Cleaning of Your Microwave Oven ..................................................................................................................................30
Shop Accessories ......................................................................................................................................................................................30
Before Requesting Service ....................................................................................................................................................................31
Limited Warranty (Only for U.S.A.) ......................................................................................................................................................32
General Information
Cookware Guide ......................................................................................................................................................................................... 8
Speci cations .............................................................................................................................................................................................33
User’s Record ..............................................................................................................................................................................................33
F0003DB70AP_EN.indd 2F0003DB70AP_EN.indd 2 2026/3/2 16:26:122026/3/2 16:26:12
3
IMPORTANT SAFETY INSTRUCTIONS
Your safety and the safety of others are very important.
We have provided important safety messages in this manual and on your appliance. Always read and obey all safety
messages.
This is the safety alert symbol. It is used to alert you to potential hazards that can kill or hurt you and others.
All safety messages will follow the safety alert symbol and either the word “DANGER”, “WARNING” or “CAUTION”.
These words mean:
You can be killed or seriously injured if you don’t immediately follow instructions.
You can be killed or seriously injured if you don’t follow instructions.
You can be exposed to a potentially hazardous situation which, if not avoided, may result
in minor or moderate injury.
All safety messages will tell you what the potential hazard is, tell you how to reduce the chance of injury, and tell you what can
happen if the instructions are not followed.
DANGER
CAUTION
WARNING
PRECAUTIONS TO AVOID POSSIBLE EXPOSURE
TO EXCESSIVE MICROWAVE ENERGY
(a) DO NOT attempt to operate this oven with the door open,
since open-door operation can result in harmful exposure to
microwave energy. It is important not to defeat or tamper
with the safety interlocks.
(b) DO NOT place any object between the oven front face and
the door, or allow soil or cleaner residue to accumulate on
sealing surfaces.
(c) DO NOT operate the oven if it is damaged. It is particularly
important that the oven door close properly and that there is
no damage to the:
(1) door (bent),
(2) hinges and latches (broken or loosened),
(3) door seals and sealing surfaces.
(d) The oven should not be adjusted or repaired by anyone
except properly qualified service personnel.
Thank you for purchasing a Panasonic Microwave Oven
Your microwave oven is a cooking appliance and you should use as much care as you use with a stove or any other cooking appliance.
When using this electric appliance, basic safety precautions should be followed, including the following:
To reduce the risk of burns, electric shock, fire, injury to persons, or exposure to
excessive microwave energy:
1. Read all instructions before using this appliance.
2. Read and follow the specific “PRECAUTIONS TO AVOID POSSIBLE EXPOSURE TO EXCESSIVE MICROWAVE ENERGY,” above.
3. This appliance must be grounded. Connect only to a properly grounded outlet. See “GROUNDING INSTRUCTIONS” found on page 5.
4. As with any cooking appliance, DO NOT leave oven unattended while in use.
5. Install or locate this appliance only in accordance with the installation instructions found on page 5.
6. DO NOT cover or block any openings on this appliance.
7. DO NOT store this appliance outdoors. DO NOT use this product near water (for example, near a kitchen sink, in a wet basement, or
near a swimming pool or similar locations).
8. Use this appliance only for its intended use as described in this manual. DO NOT use corrosive chemicals, vapors or non-food products
in this appliance. This type of oven is specifically designed to heat or cook food. It is not designed for industrial or laboratory use. The
use of corrosive chemicals in heating or cleaning will damage the appliance and may result in radiation leaks.
9. When cleaning surfaces of the door and oven that come together on closing the door, use only mild, non-abrasive soaps or
detergents applied with a sponge or soft cloth.
WARNING
F0003DB70AP_EN.indd 3F0003DB70AP_EN.indd 3 2026/3/2 16:26:122026/3/2 16:26:12
4
10. DO NOT allow children to use this appliance, unless closely supervised by an adult. DO NOT assume that because a child has mastered
one cooking skill he/she can cook everything.
11. HOT CONTENTS CAN CAUSE SEVERE BURNS. DO NOT ALLOW CHILDREN TO USE THE MICROWAVE. Use caution when removing hot
items.
12. DO NOT operate this appliance if it has a damaged cord or plug, if it is not working properly, or if it has been damaged or dropped.
13. DO NOT immerse cord or plug in water.
14. Keep cord away from heated surfaces.
15. DO NOT let cord hang over edge of a table or counter.
16. This appliance should be serviced only by qualified service personnel. Contact the nearest authorized service center for examination,
repair or adjustment.
17. Some products such as whole eggs, with or without shell, narrow neck bottles and sealed containers (for example, closed glass jars)
may explode and should not be heated in this oven.
18. To reduce the risk of fire in the oven cavity:
(a) DO NOT overcook food. Carefully attend appliance when paper, plastic, or other combustible materials are placed inside
the oven to facilitate cooking.
(b) Remove wire twist-ties from paper or plastic bags before placing bag in oven.
(c) If material inside the oven ignites, keep oven door closed, turn oven off, and disconnect the power cord, or shut off
power at the fuse or circuit breaker panel.
(d) DO NOT use the cavity for storage purposes. DO NOT leave paper products, cooking utensils or food in the cavity
when not in use.
19. Superheated Liquids: Liquids, such as water, coffee or tea are able to be overheated beyond the boiling point without showing
evidence (or signs) of boiling. Visible bubbling is not always present when the container is removed from the microwave oven. THIS
COULD RESULT IN VERY HOT LIQUIDS SUDDENLY BOILING OVER WHEN THE CONTAINER IS DISTURBED OR A UTENSIL IS INSERTED INTO
THE LIQUID. To reduce the risk of injury to persons:
(a) STIR THE LIQUID BOTH BEFORE AND HALFWAY THROUGH HEATING.
(b) DO NOT heat water and oil, or fats together. The film of oil will trap steam, and may cause a violent eruption.
(c) DO NOT use straight-sided containers with narrow necks.
(d) After heating, allow the container to stand in the microwave oven for a short time before removing the container.
20. DO NOT cook directly on the flat table. It can crack, and cause injury or damage to the oven.
21. DO NOT place any items on top of the microwave. Doing so may impact the operation and reliability of the appliance.
SAVE THESE INSTRUCTIONS
For proper use of your oven, read remaining safety cautions and operating instructions.
IMPORTANT SAFETY INSTRUCTIONS (continued)
F0003DB70AP_EN.indd 4F0003DB70AP_EN.indd 4 2026/3/2 16:26:122026/3/2 16:26:12
5
IMPORTANT SAFETY INSTRUCTIONS (continued)
Installation and Grounding Instructions
Examine Your Oven
Unpack oven, remove all packing material and examine the oven
for any damage such as dents, broken door latches or cracks in the
door. Notify dealer immediately if oven is damaged. DO NOT install
if oven is damaged.
Placement of Oven
1. The oven must be placed on a flat, stable surface, at a height of
36 in (91.6 cm) from the ground. Place the front surface of the
door 3 in (7.6 cm) or more from the counter
top edge to avoid accidental tipping of the microwave oven
during normal use. For proper operation, the oven must have
sufficient air flow. Allow 6 in(15 cm) of space on the top of the
oven, 4 in (10 cm) at back and 2 in (5 cm) on both sides. If one
side of the oven is placed flush to a wall, the other side or top
must not be blocked. Do not remove feet.
(a) DO NOT block air vents. If they are blocked during
operation, the oven may overheat and be damaged.
(b) DO NOT place oven near a hot, damp surface such as a
gas or electric range, sink, or dishwasher.
(c) DO NOT operate oven when room humidity is excessive.
2. This oven is manufactured for household use only. It is not
approved or tested for mobile vehicle, marine, or commercial
use.
Fan Motor Operation
After using the oven, the fan may rotate to cool the electric
components and “
” rotates in the display window.
You can take out the food from the oven while the fan operates. It
is recommended to keep the oven plugged in until the fan motor
completely stops operating.
Installation
DO NOT block air vents. If they are blocked during operation, the
oven may overheat. If the oven overheats, a thermal safety device
will turn the oven off. The oven will remain inoperable until it has
cooled.
WARNING: IMPROPER USE OF THE GROUNDING
PLUG CAN RESULT IN A RISK OF ELECTRIC SHOCK.
Consult a qualified electrician or service person if the grounding
instructions are not completely understood, or if doubt exists as to
whether the appliance is properly grounded. If it is necessary to use
an extension cord, use only a three-wire extension cord that has a
three-prong polarized grounding plug, and a three-slot receptacle
that will accept the plug of the appliance. The marked rating of the
extension cord should be equal to or greater than the electrical
rating of the appliance.
Grounding Instructions
THIS APPLIANCE MUST BE GROUNDED.
In the event of an electrical short circuit, grounding reduces the
risk of electric shock by providing an escape wire for the electric
current. This appliance is equipped with a cord having a grounding
wire with a grounding plug.
TO AVOID THE RISK OF SHOCK:
DO NOT remove outer panel from oven. Repairs must be done only
by a qualified service person.
TO REDUCE THE RISK OF EXPOSURE TO MICROWAVE ENERGY:
DO NOT tamper with, or make any adjustments or repairs to Door,
Control Panel Frame, Safety Interlock Switches, or any other part of
the oven. Microwave leakage may result.
TO AVOID THE RISK OF ARCING DAMAGE OR FIRE:
1. DO NOT operate the microwave oven empty, cook small food
portions unattended, or use metal containers. When using
the microwave oven without water or food, or cook too small
a serving, microwave energy cannot be absorbed and will
continuously reflect throughout the cavity. This will cause arcing
and damage the oven cavity, door or other components.
2. DO NOT store flammable materials next to, on top of, or in the
oven.
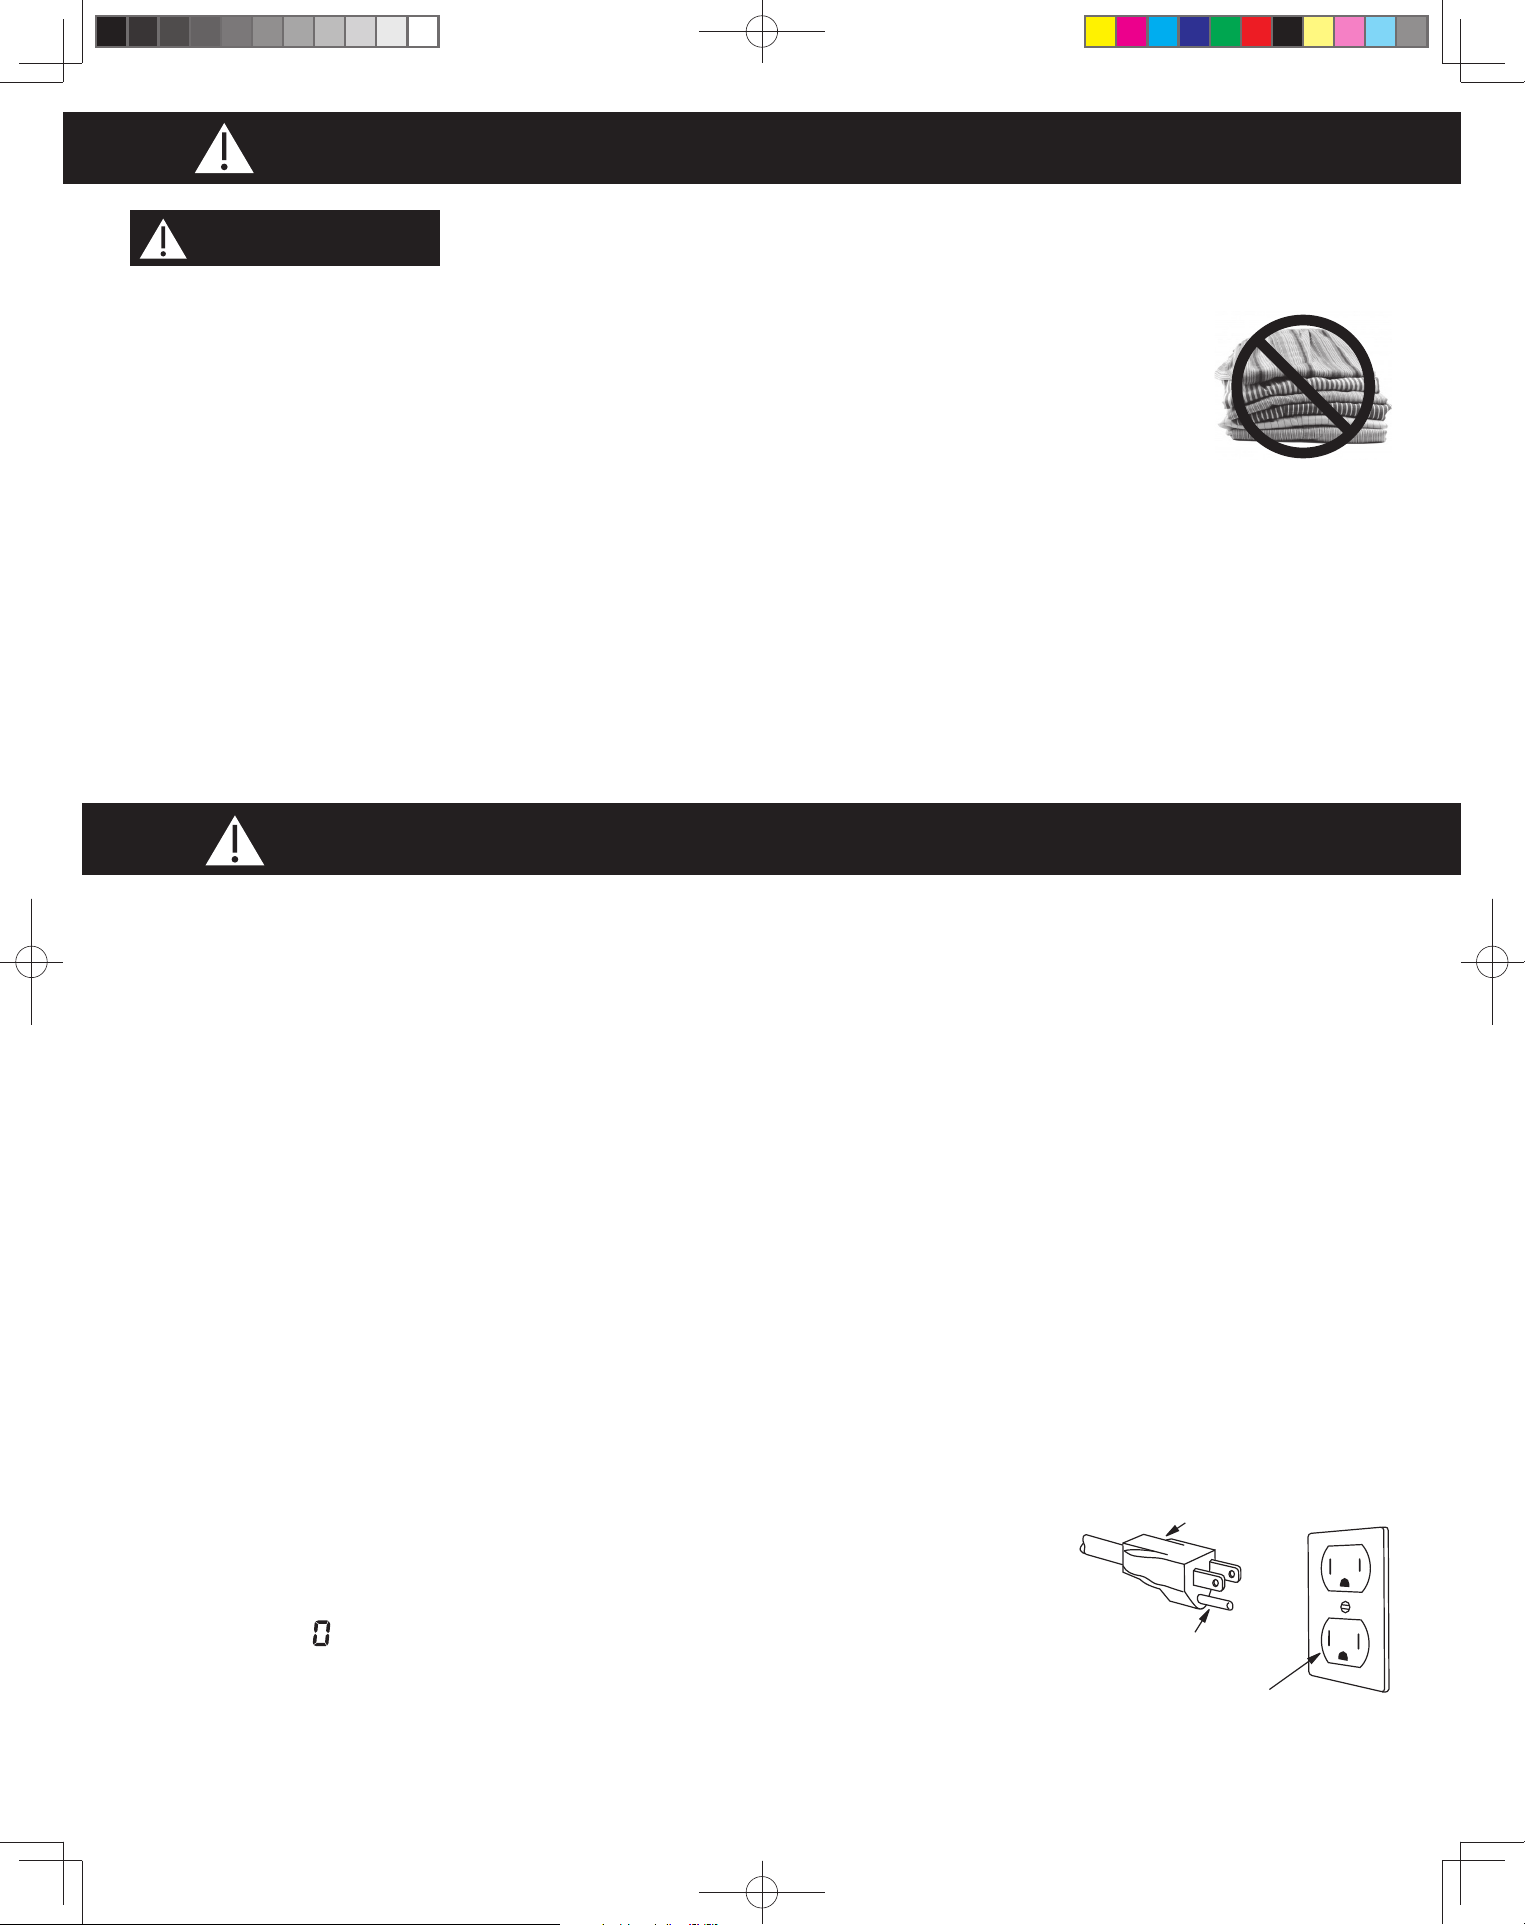
3. DO NOT dry clothes, newspapers or other
materials in the oven, or use newspaper or
paper bags for cooking.
4. DO NOT hit or strike Control Panel. Damage
to controls may occur.
5. DO NOT use recycled paper products
unless the paper product is labeled as safe for microwave oven
use. Recycled paper products may contain impurities, which may
cause sparking.
TO AVOID THE RISK OF SCALDING:
POT HOLDERS should always be used when removing items from
the oven. Heat is transferred from the HOT food to the cooking
container and from the container to the Flat Table. The Flat Table
can also be very HOT after removing the cooking container from the
oven.
3-Pronged Plug
Ground Plug
3-Prong Receptacle
Safety Precautions
WARNING
F0003DB70AP_EN.indd 5F0003DB70AP_EN.indd 5 2026/3/2 16:26:122026/3/2 16:26:12
6
The plug must be plugged into an outlet that is properly installed
and grounded.
• Plug into properly installed and grounded three-prong
outlet.
• DO NOT remove ground prong.
• DO NOT use an adapter.
Power Supply
1. A short power-supply cord is provided to reduce the risks
resulting from becoming entangled in or tripping over a
longer cord.
2. Longer cord sets or extension cords are available and may be
used if care is exercised in their use. DO NOT let cord hang over
edge of a table or counter.
3. If a long cord or extension cord is used,
(1) the marked electrical rating of the cord set or extension
cord should be at least as great as the electrical rating of
the appliance,
(2) the extension cord must be a grounding-type three-wire
cord, and
(3) the longer cord should be arranged so that it will not
drape over the countertop or tabletop where it can be
pulled on by children or tripped over accidentally.
Wiring Requirements
The oven must be operated on a SEPARATE CIRCUIT. No other
appliance should share the circuit with the microwave oven.
If it does, the branch circuit fuse may blow or the circuit breaker
may trip. The oven must be plugged into at least a 20 A, 120 V,
60Hz GROUNDED OUTLET. Where a standard two-prong outlet
is encountered, it is the personal responsibility and obligation of
the consumer to have it replaced with a properly grounded three-
prong outlet. The VOLTAGE used must be the same as specified
on this microwave oven (120 V, 60 Hz). Using a higher voltage is
dangerous and may result in a fire or oven damage. Using a lower
voltage will cause slow cooking. Panasonic is NOT responsible for
any damages resulting from the use of the oven with any voltage
other than specified.
TV / RADIO / WIRELESS EQUIPMENT INTERFERENCE
This product has been tested and found to comply with the
limits for Microwave Oven , pursuant to Part 18 of the FCC Rules.
This product can radiate radio frequency energy, which could
cause interference to such products as radio, TV, baby monitor,
cordless phone, Bluetooth, wireless router, etc., which can be
confirmed by turning this product off and on. If present, the user is
encouraged to try to correct by taking one or more of the following
countermeasures:
(1) Increase the spacing distance between the microwave oven
and other product receiving the interference.
(2) If possible, use a properly installed receiver antenna and/or
reorient the receiving antenna of the other product receiving
the interference.
(3) Plug the microwave oven into a different outlet from the other
product receiving the interference.
(4) Clean door and sealing surfaces of the oven. (See Care and
Cleaning of Your Microwave Oven)
Installation and Grounding Instructions
(continued)
Food Preparation
Follow these Safety Precautions when cooking in your oven.
IMPORTANT
Proper cooking depends upon the power, the time setting
and quantity of food. If you use a smaller portion than
recommended but cook at the time for the recommended
portion, fire could result.
1) HOME CANNING / STERILIZING / DRYING FOODS / SMALL
QUANTITIES OF FOODS
• DO NOT use your oven for home canning. Your oven cannot
maintain the food at the proper canning temperature. The food
may be contaminated and then spoil.
• DO NOT use the microwave oven to sterilize objects (baby
bottles, etc.). It is difficult to keep the oven at the high
temperature needed for sterilization.
• DO NOT dry meats, herbs, fruits or vegetables in your oven.
Small quantities of food or foods with low moisture content can
dry out, scorch or catch on fire if overheated.
• DO NOT prepare small food portions at high power. This can
cause energy concentration at a fixed spot, which can lead to
arcing and damage to your oven. Select a lower cook power
setting when preparing small portions.
2) POPCORN
Popcorn may be popped in a microwave oven corn popper.
Microwave popcorn that pops in its own package is also available.
Follow popcorn manufacturers’ directions and use a brand suitable
for the cooking power of your microwave oven.
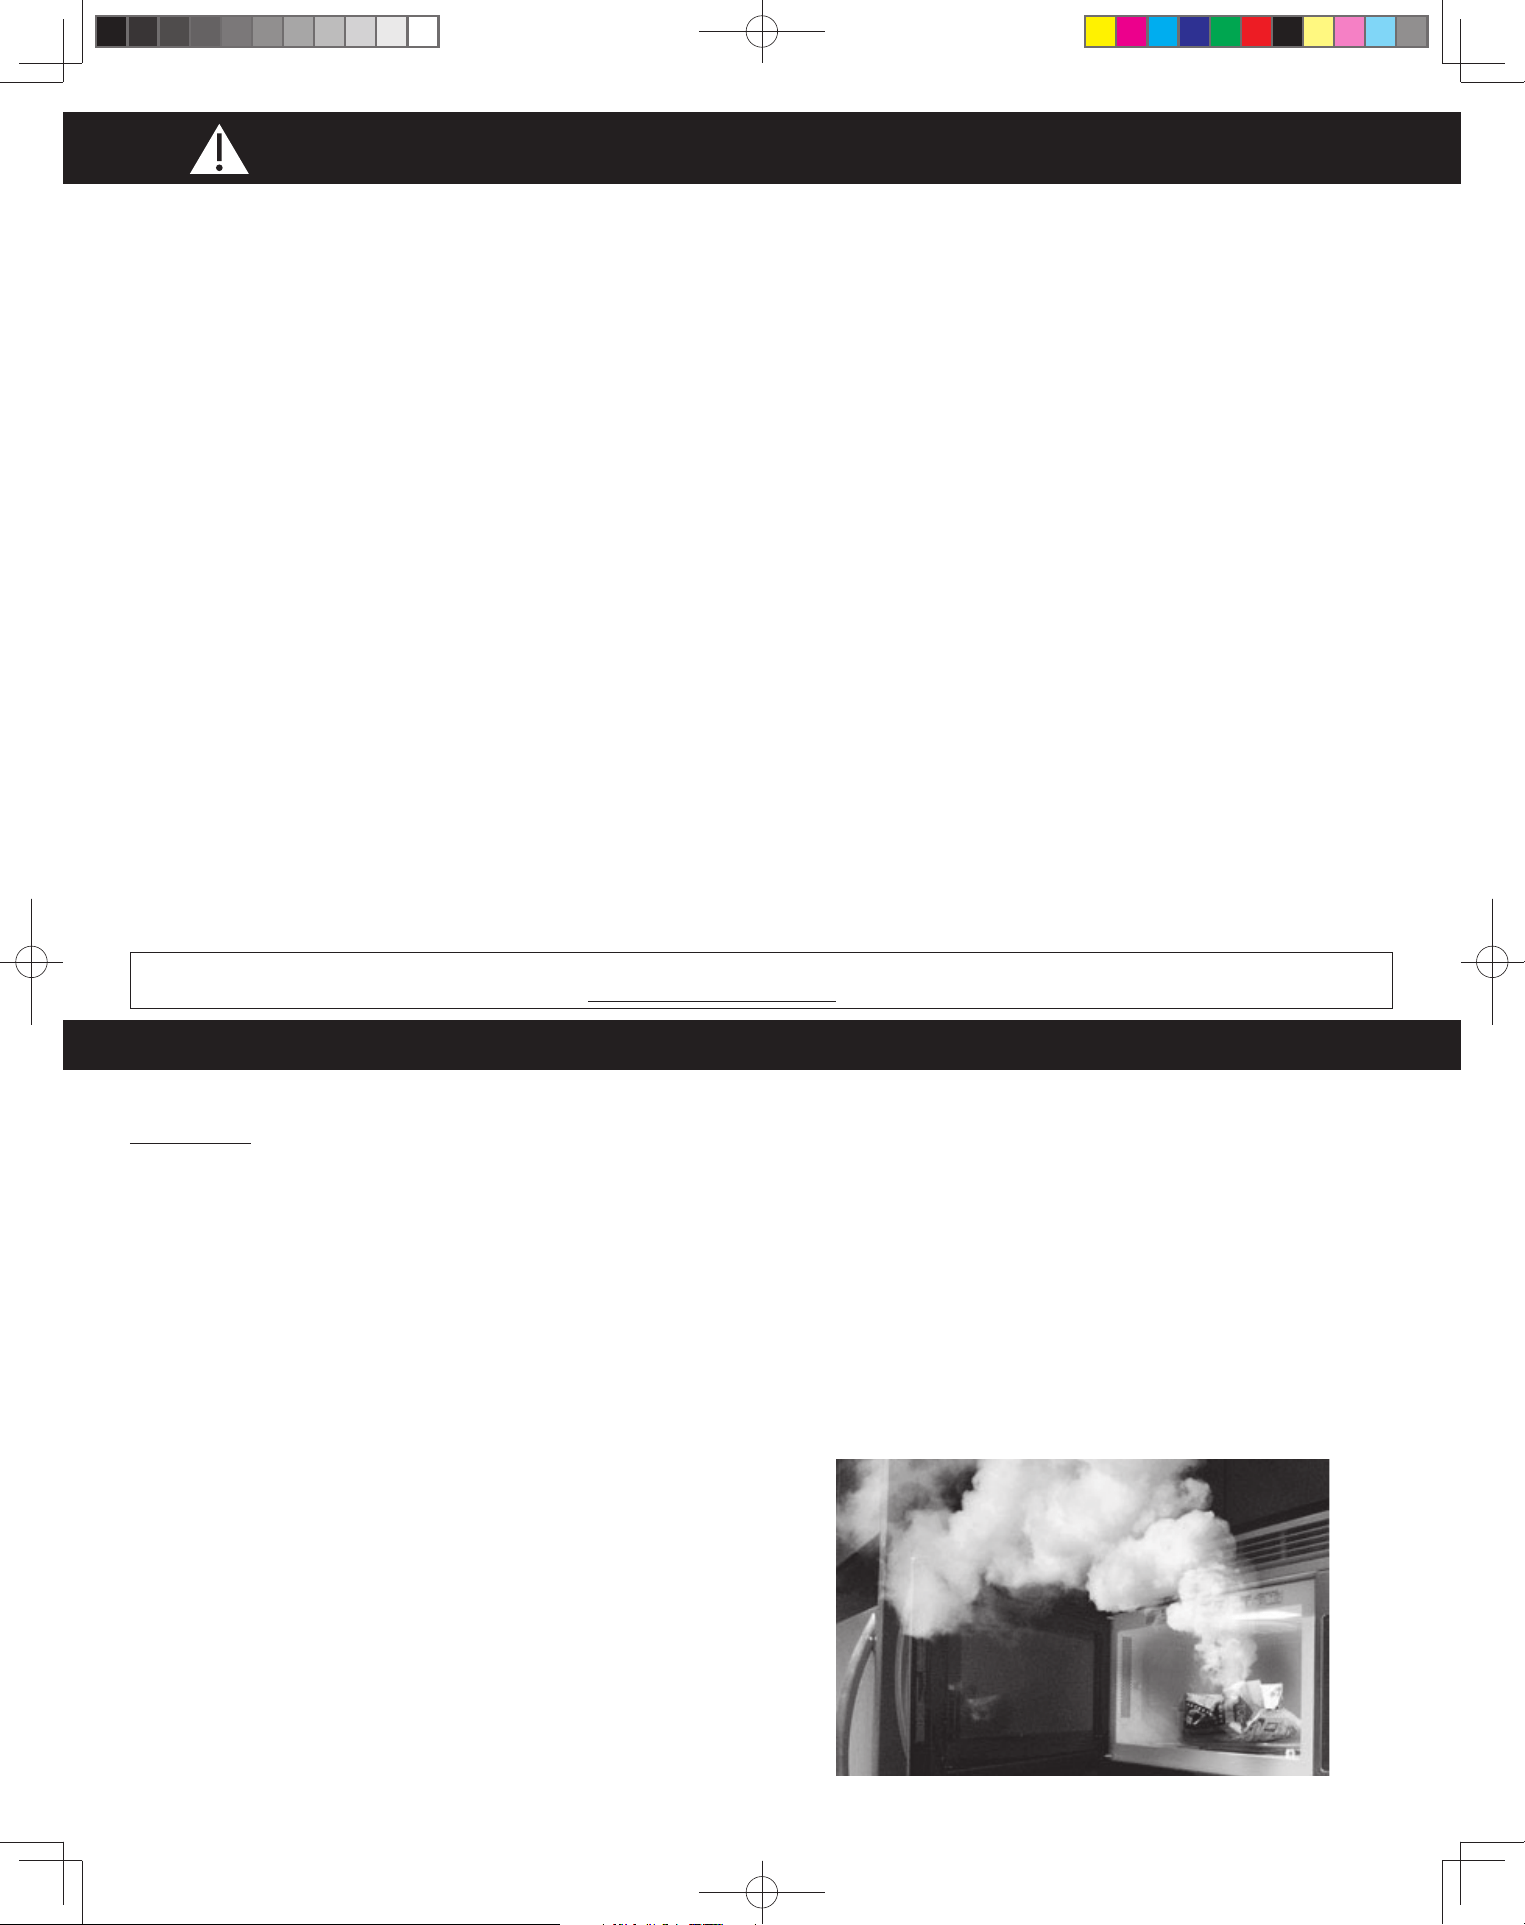
CAUTION: When using pre-packaged microwave popcorn, you can
follow recommended package instructions or use the Popcorn Pad
(refer to page 18). Otherwise, the popcorn may not pop adequately
or may ignite and cause a fire. Never leave the oven unattended
when popping popcorn. Allow the popcorn bag to cool before
opening, and always open the bag facing away from your face and
body to prevent steam burns.
If you have questions or concerns about any issue relating to your personal information, please contact the Panasonic Corporation of
North America Office of Ethics and Compliance at [email protected].
F0003DB70AP_EN.indd 6F0003DB70AP_EN.indd 6 2026/3/2 16:26:122026/3/2 16:26:12
7
3) DEEP FAT FRYING
• DO NOT deep fat fry in your microwave oven. Cooking oils
may burst into flames and may cause damage to the oven and
may result in burns. Microwave utensils may not withstand the
temperature of the hot oil, and can shatter or melt.
4) FOODS WITH NONPOROUS SKINS
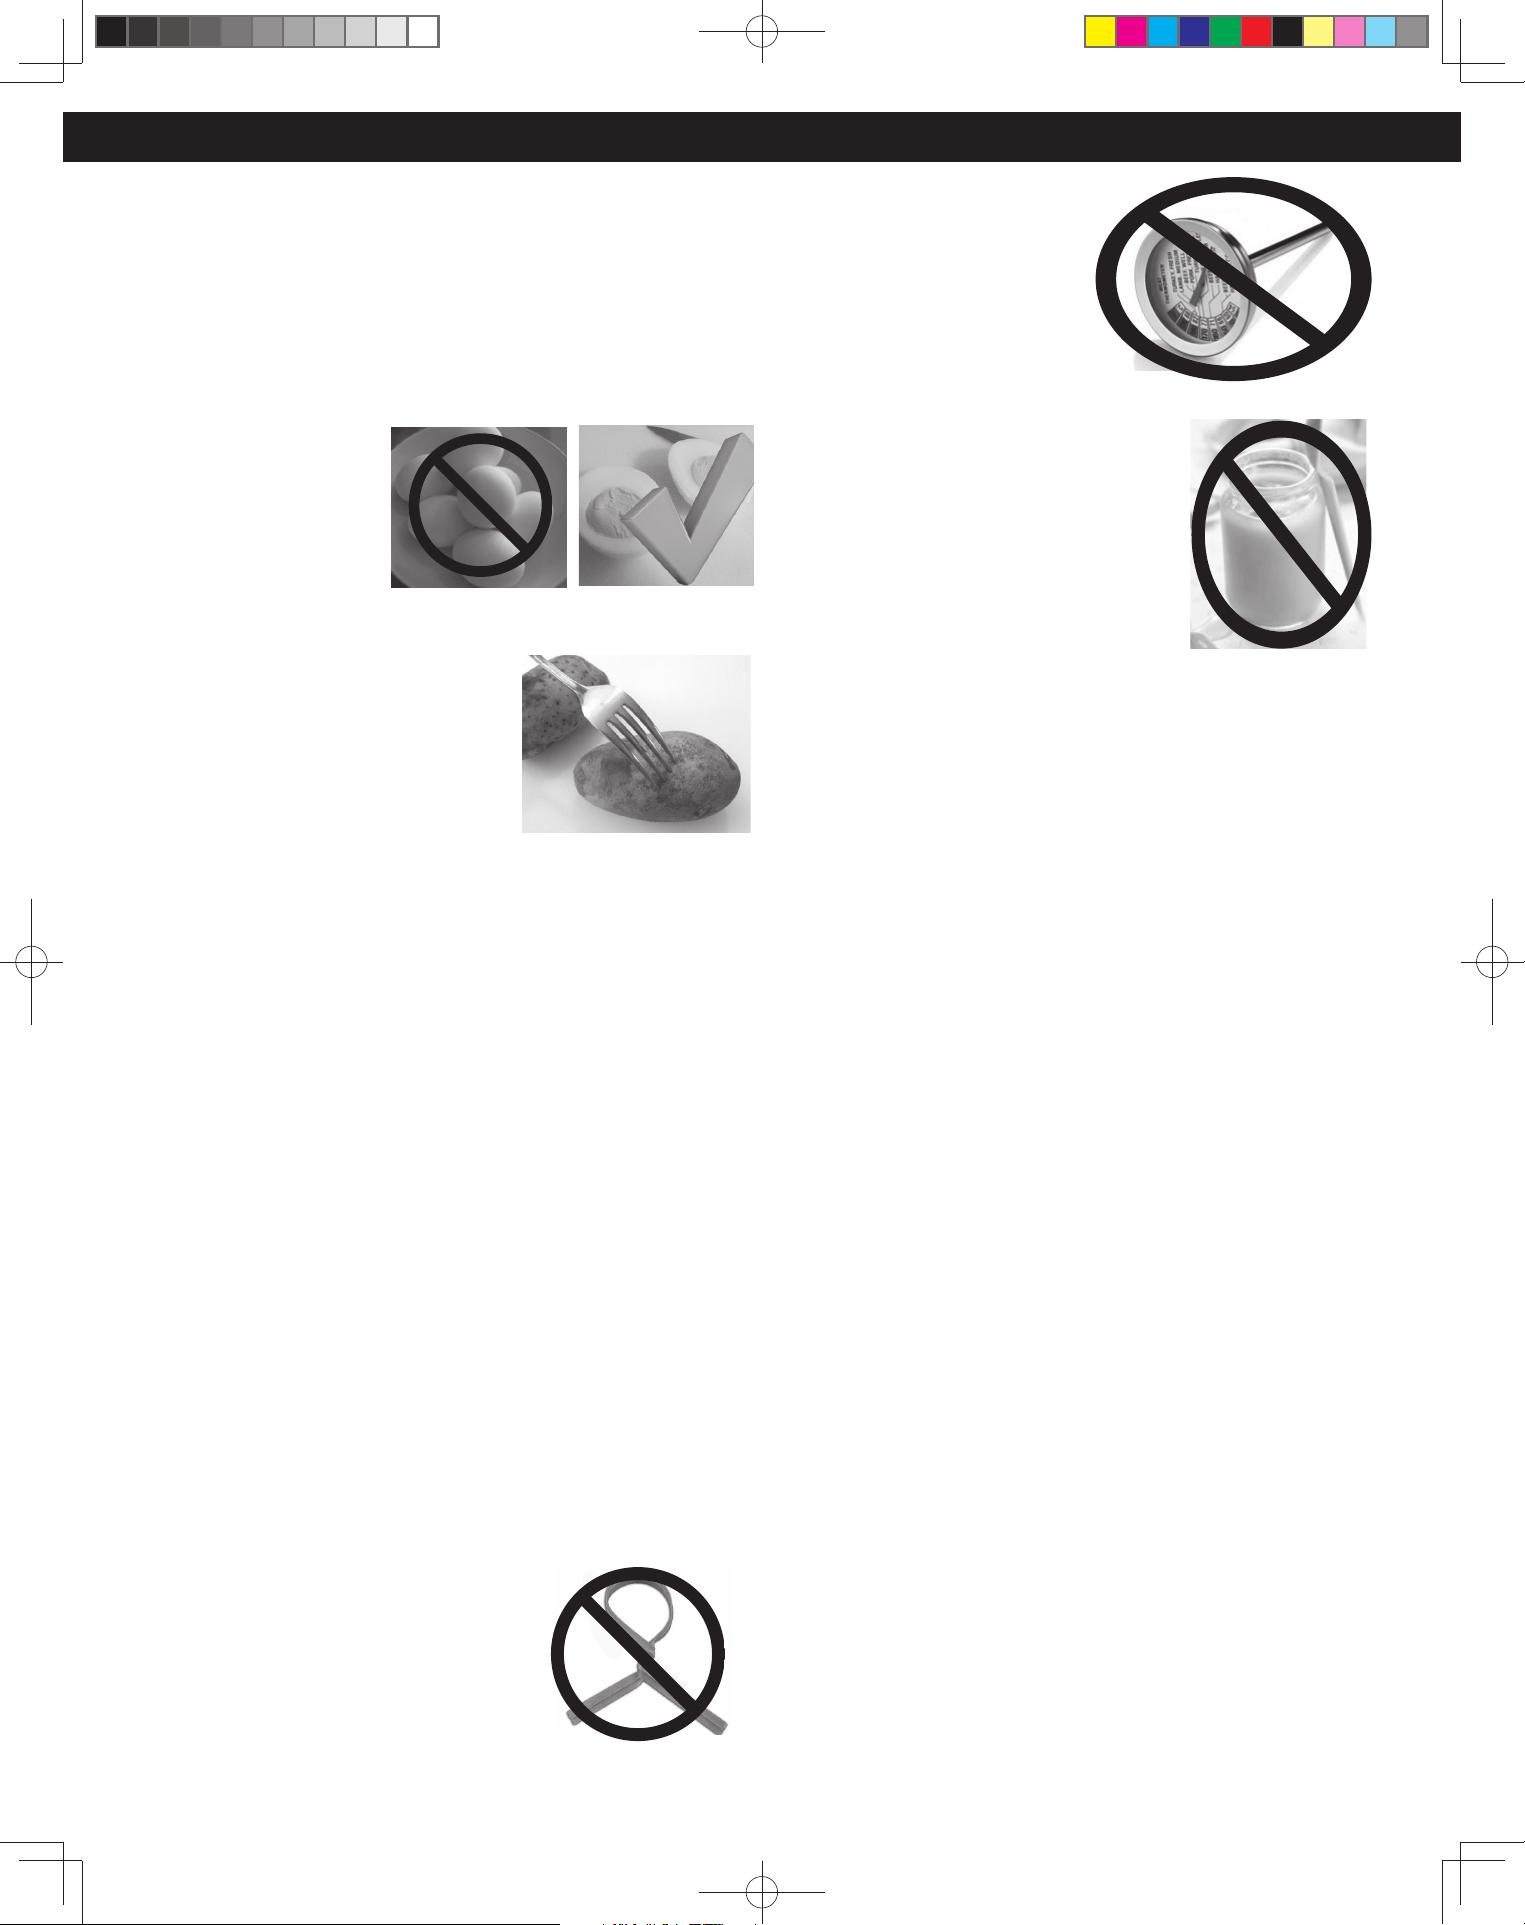
• DO NOT COOK / REHEAT WHOLE EGGS, WITH OR WITHOUT
THE SHELL.
Steam buildup in whole
eggs may cause them
to explode, and possibly
damage the oven or
cause injury. Reheating
SLICED hard-boiled eggs
and cooking SCRAMBLED eggs is safe.
• Potatoes, apples, whole squash
and sausages are examples of
foods with nonporous skins. These
types of foods must be pierced
before microwave cooking to
prevent them from exploding.
CAUTION: Cooking dry or old
potatoes can cause fire.
5) FLAT TABLE / COOKING CONTAINERS
• Cooking containers get hot during microwaving. Heat is
transferred from the HOT food to the container and the Flat
Table. Use pot holders when removing containers from the
oven or when removing lids or plastic wrap covers from cooking
containers, to avoid burns.
• The Flat Table will get hot during cooking. It should be allowed
to cool before handling or before paper products, such as paper
plates or microwave popcorn bags, are placed in the oven for
microwave cooking.
• Dishes with metallic trim should not be used, as arcing
may occur.
6) PAPER TOWELS / CLOTHS
• DO NOT use paper towels or cloths that contain a synthetic fiber
woven into them. The synthetic fiber may cause the towel to
ignite. Use paper toweling under supervision.
7) BROWNING DISHES / OVEN COOKING BAGS
• Browning dishes or grills are designed for microwave cooking
only. Always follow instructions provided by the manufacturer.
DO NOT preheat browning dish more than six minutes.
• If an oven cooking bag is used for microwave cooking, prepare
according to package directions. DO
NOT use a wire twist-tie to close bag.
Instead use plastic ties, cotton string or
a strip cut from the open end of the bag.
8) THERMOMETERS
• DO NOT use a conventional
meat thermometer in
your oven. Arcing may
occur. Microwave safe
thermometers are available
for both meat and candy.
9) BABY FORMULA / BABY FOOD
• DO NOT heat baby formula or baby
food in the microwave oven. The glass
jar or surface of the food may appear
warm while the interior can be so hot
as to burn the infant’s mouth and
esophagus.
10) REHEATING PASTRY PRODUCTS
• When reheating pastry products, check temperatures of any
fillings before eating. Some foods have fillings, which heat faster
and can be extremely hot, while the surface remains warm to the
touch (for example, jelly donuts).
11) GENERAL OVEN USAGE GUIDELINES
• DO NOT use the oven for any purpose other than the
preparation of food.
• To prevent injury, do not allow anyone to lean, hang, sit or
place heavy items on the open door of the appliance.
Severe personal injury could result.
Food Preparation (continued)
F0003DB70AP_EN.indd 7F0003DB70AP_EN.indd 7 2026/3/2 16:26:122026/3/2 16:26:12
8
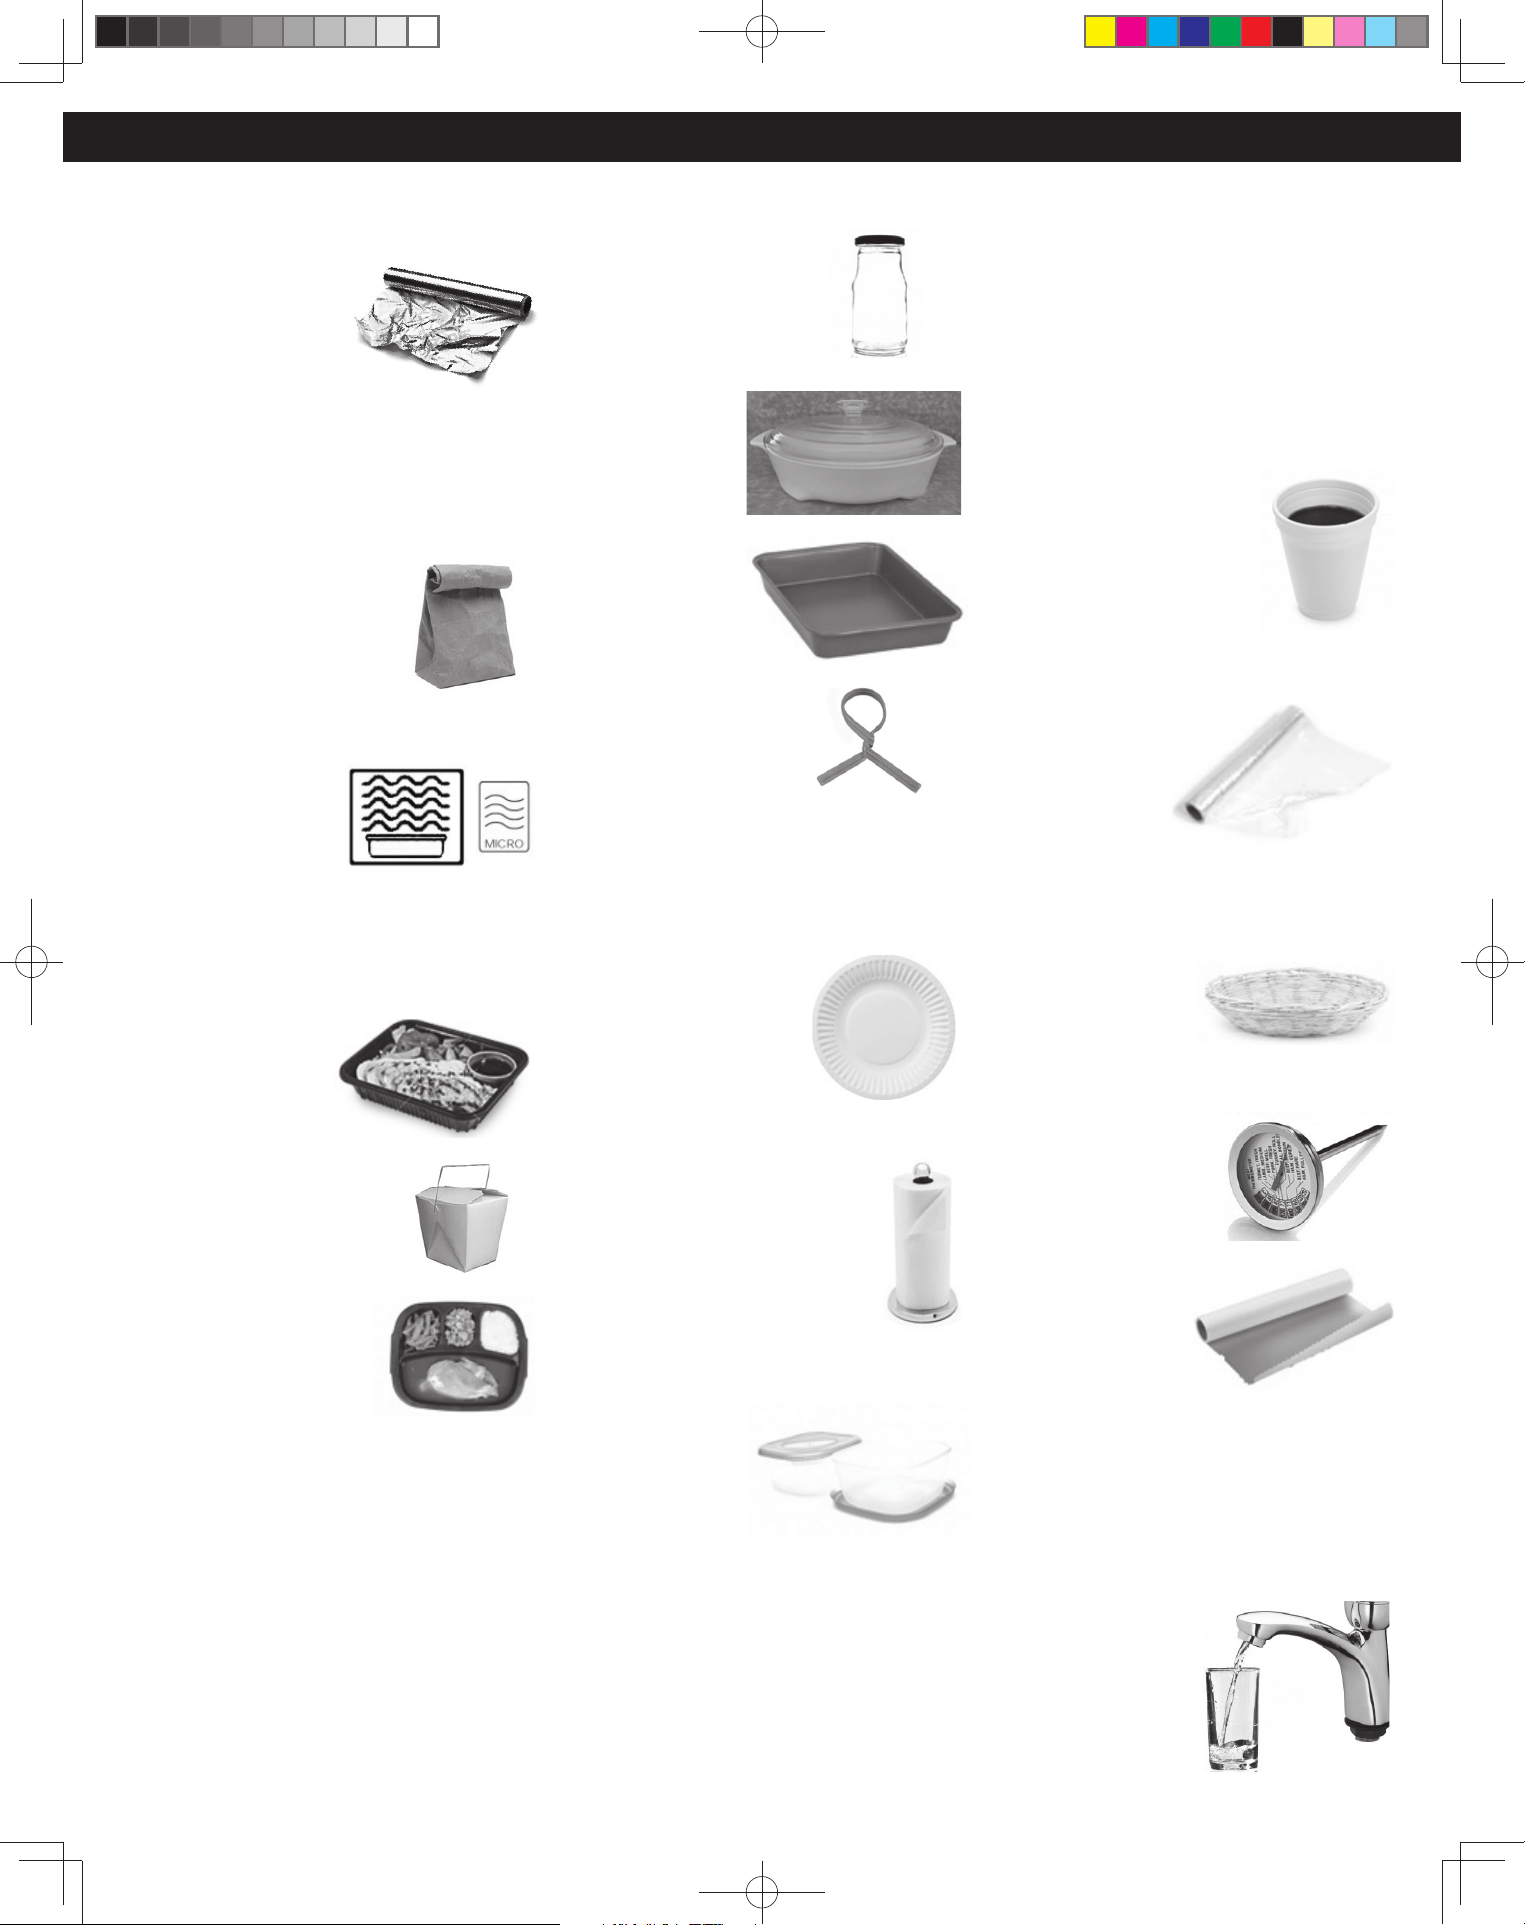
Aluminum Foil
It is not recommended
to use. Arcing can occur
if foil is too close to oven
wall or door and cause
damage to your oven.
Browning Dish
Yes. Only use browning dishes that are designed
for microwave cooking. Check browning dish
information for instructions/heating chart. Do
not preheat for more than six minutes.
Brown Paper Bags
No. They may cause a fire in
the oven.
Microwave Safe
Yes. If labeled Microwave Safe, check
manufacturers’ directions for use in
microwave heating.
Some dinnerware
may state on the back
of the dish, “Oven-
Microwave Safe”.
Dinnerware
If unlabeled, use CONTAINER TEST below.
Disposable Polyester Paperboard Dishes
Yes. Some frozen foods
are packaged in these
dishes. Also can be
purchased in some
grocery stores.
Fast Food Cartons with
Metal Handle
No. Metal handle may cause
arcing.
Frozen Dinner Trays
If made for the microwave,
then yes. If it contains metal,
then no.
Glass Jars
No. Most glass jars are not
heat resistant.
Heat Resistant Oven
Glassware/Ceramic
Yes, but only ones for
microwave cooking
and browning.
(See CONTAINER
TEST below.)
Metal Bakeware
No. Metal can cause
arcing and damage to
your oven.
Metal Twist-Ties
No. May cause arcing
which could cause a fire in
the oven.
Oven Cooking Bag
Yes. Follow manufacturers’ directions. Close bag
with the nylon tie provided, a strip cut from the
end of the bag, or a piece of cotton string. Do
not close with metal twist-tie. Make six
1
⁄2-inch
slits near the closure.
Paper Plates/Cups
Yes. Use to warm cooked
foods, and to cook foods that
require short cooking time,
such as hot dogs. Do not
microwave paper cups; they
may overheat and ignite.
Towels & Napkins
Yes, only paper napkins/towels. Use
to warm rolls and sandwiches, only
if labeled safe for microwave use.
Do NOT use recycled paper towels.
Parchment Paper
Yes. Use as a cover to prevent splattering.
Plastic Cookware
Yes, with caution.
Should be labeled,
“Suitable for
Microwave Heating.”
Check Microwave Safe manufacturers’ directions
for recommended uses. Some microwave safe
plastic containers are not suitable for cooking
foods with high fat or sugar content. The heat
from hot food may cause warping.
Plastic, Melamine
No. This material absorbs microwave energy.
Dishes get HOT!
Plastic Foam Cups
Yes, with caution. Plastic foam
will melt if foods reach a high
temperature. Use short term
only to reheat foods to a low
serving temperature. Do not
microwave paper cups; they
may overheat and ignite.
Plastic Wrap
Yes. Use to cover
food during cooking
to retain moisture
and prevent
splattering.
Should be labeled “Suitable for Microwave
Heating”. Check package directions.
Straw, Wicker, Wood
Yes, short term only.
Use only for short term
reheating and to bring
food to a low serving
temperature. Wood may dry out, split or crack.
Thermometers
Only microwave safe
thermometers can be
used, NOT conventional
thermometers.
Wax Paper
Yes. Use as a cover to
prevent splattering
and to retain moisture.
Cookware Guide
CONTAINER TEST
TO TEST A CONTAINER FOR SAFE MICROWAVE OVEN USE: Fill a microwave safe cup with cool water and place it in
the microwave oven along side the empty container to be tested; heat one (1) minute at P10 (HIGH). If the container is
microwave oven safe (transparent to microwave energy), the empty container should remain comfortably cool and the
water should be hot. If the container is hot, it has absorbed some microwave energy and should NOT be used. This test
cannot be used for plastic containers.
This section answers the question, “Can I use in the Microwave?”
F0003DB70AP_EN.indd 8F0003DB70AP_EN.indd 8 2026/3/2 16:26:122026/3/2 16:26:12
9
Location of Controls
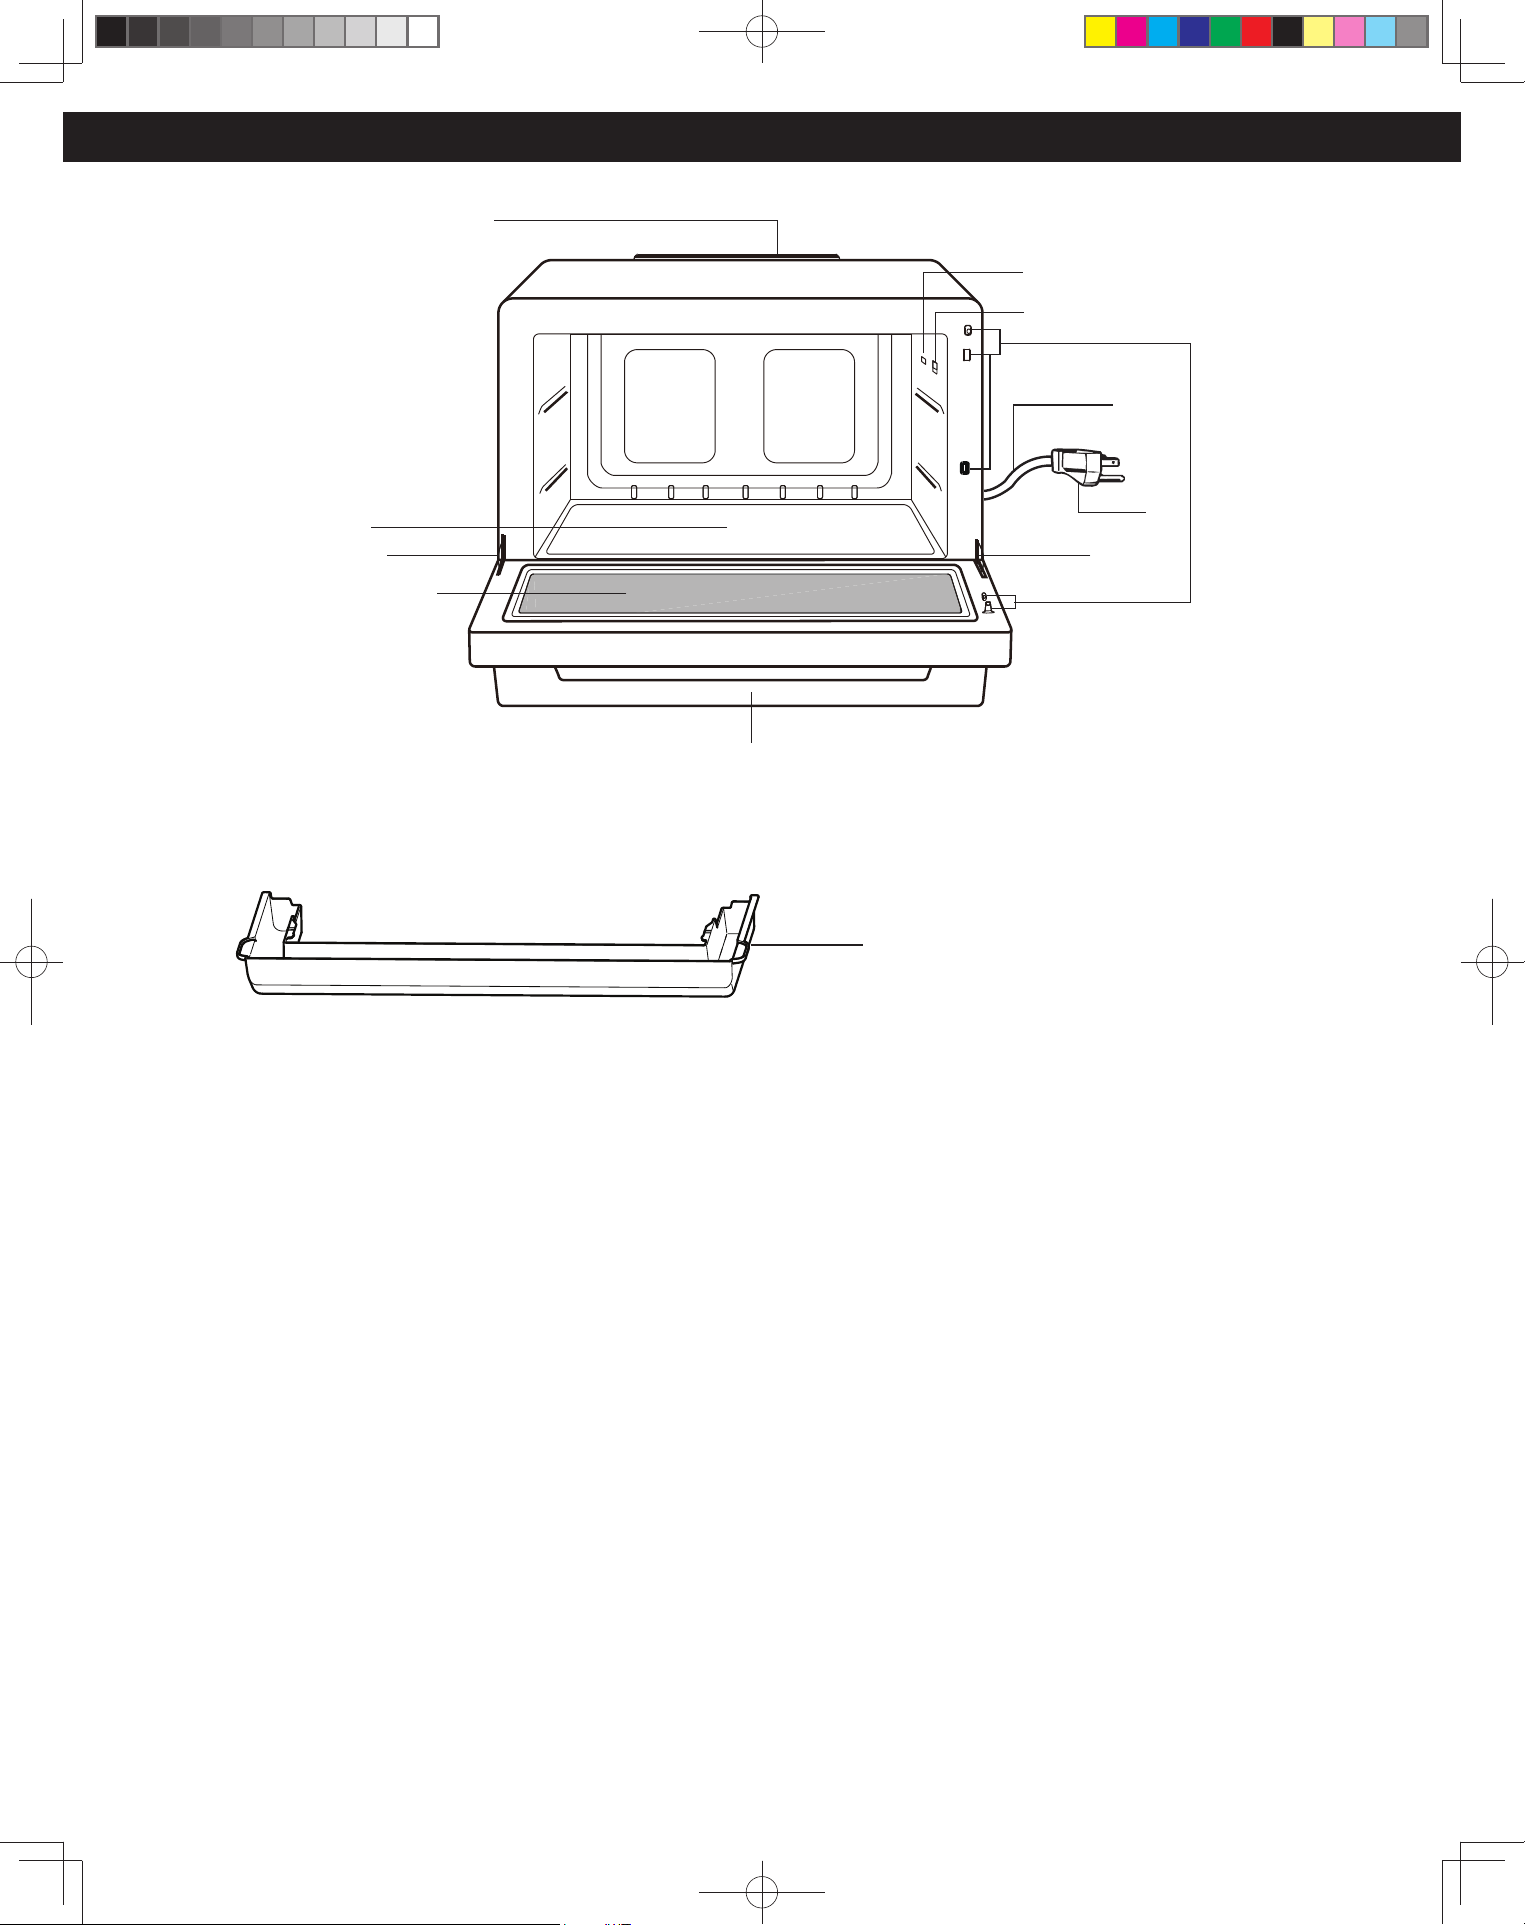
q Door Handle
Pull the door handle downwards to open. When
you open the oven door during cooking, the
cooking is stopped temporarily without clearing
the programmed settings. The cooking is resumed
as soon as the door is closed and the Dial is
pressed. The oven lamp lights as soon as the oven
door is opened.
w Oven Window
e Soft Close Door System
r Exhaust Air Vent
t Oven Light
Oven light will turn on during cooking but will be
off with the door open for 1 minute .
y Flat Table
If the flat table is hot, allow it to cool
down before
cleaning. Do not directly place the food on the
flat table. Place it on a container or container rack
special for the microwave oven.
u Door Hinges
To prevent injury when opening or closing the
door, keep fingers away from the door hinges.
i Power Supply Cord
o Power Supply Plug
a IR Sensor
s Trim Cover
This is a decorative cover. If soiled, please rinse
it with clean water only. Do not put it in the
dishwasher.
NOTE:
The illustration is for reference only.
r
y
o
i
u
u
q
w
e
t
s
a
F0003DB70AP_EN.indd 9F0003DB70AP_EN.indd 9 2026/3/2 16:26:122026/3/2 16:26:12
10
Child Safety Lock
Setting
Control Panel
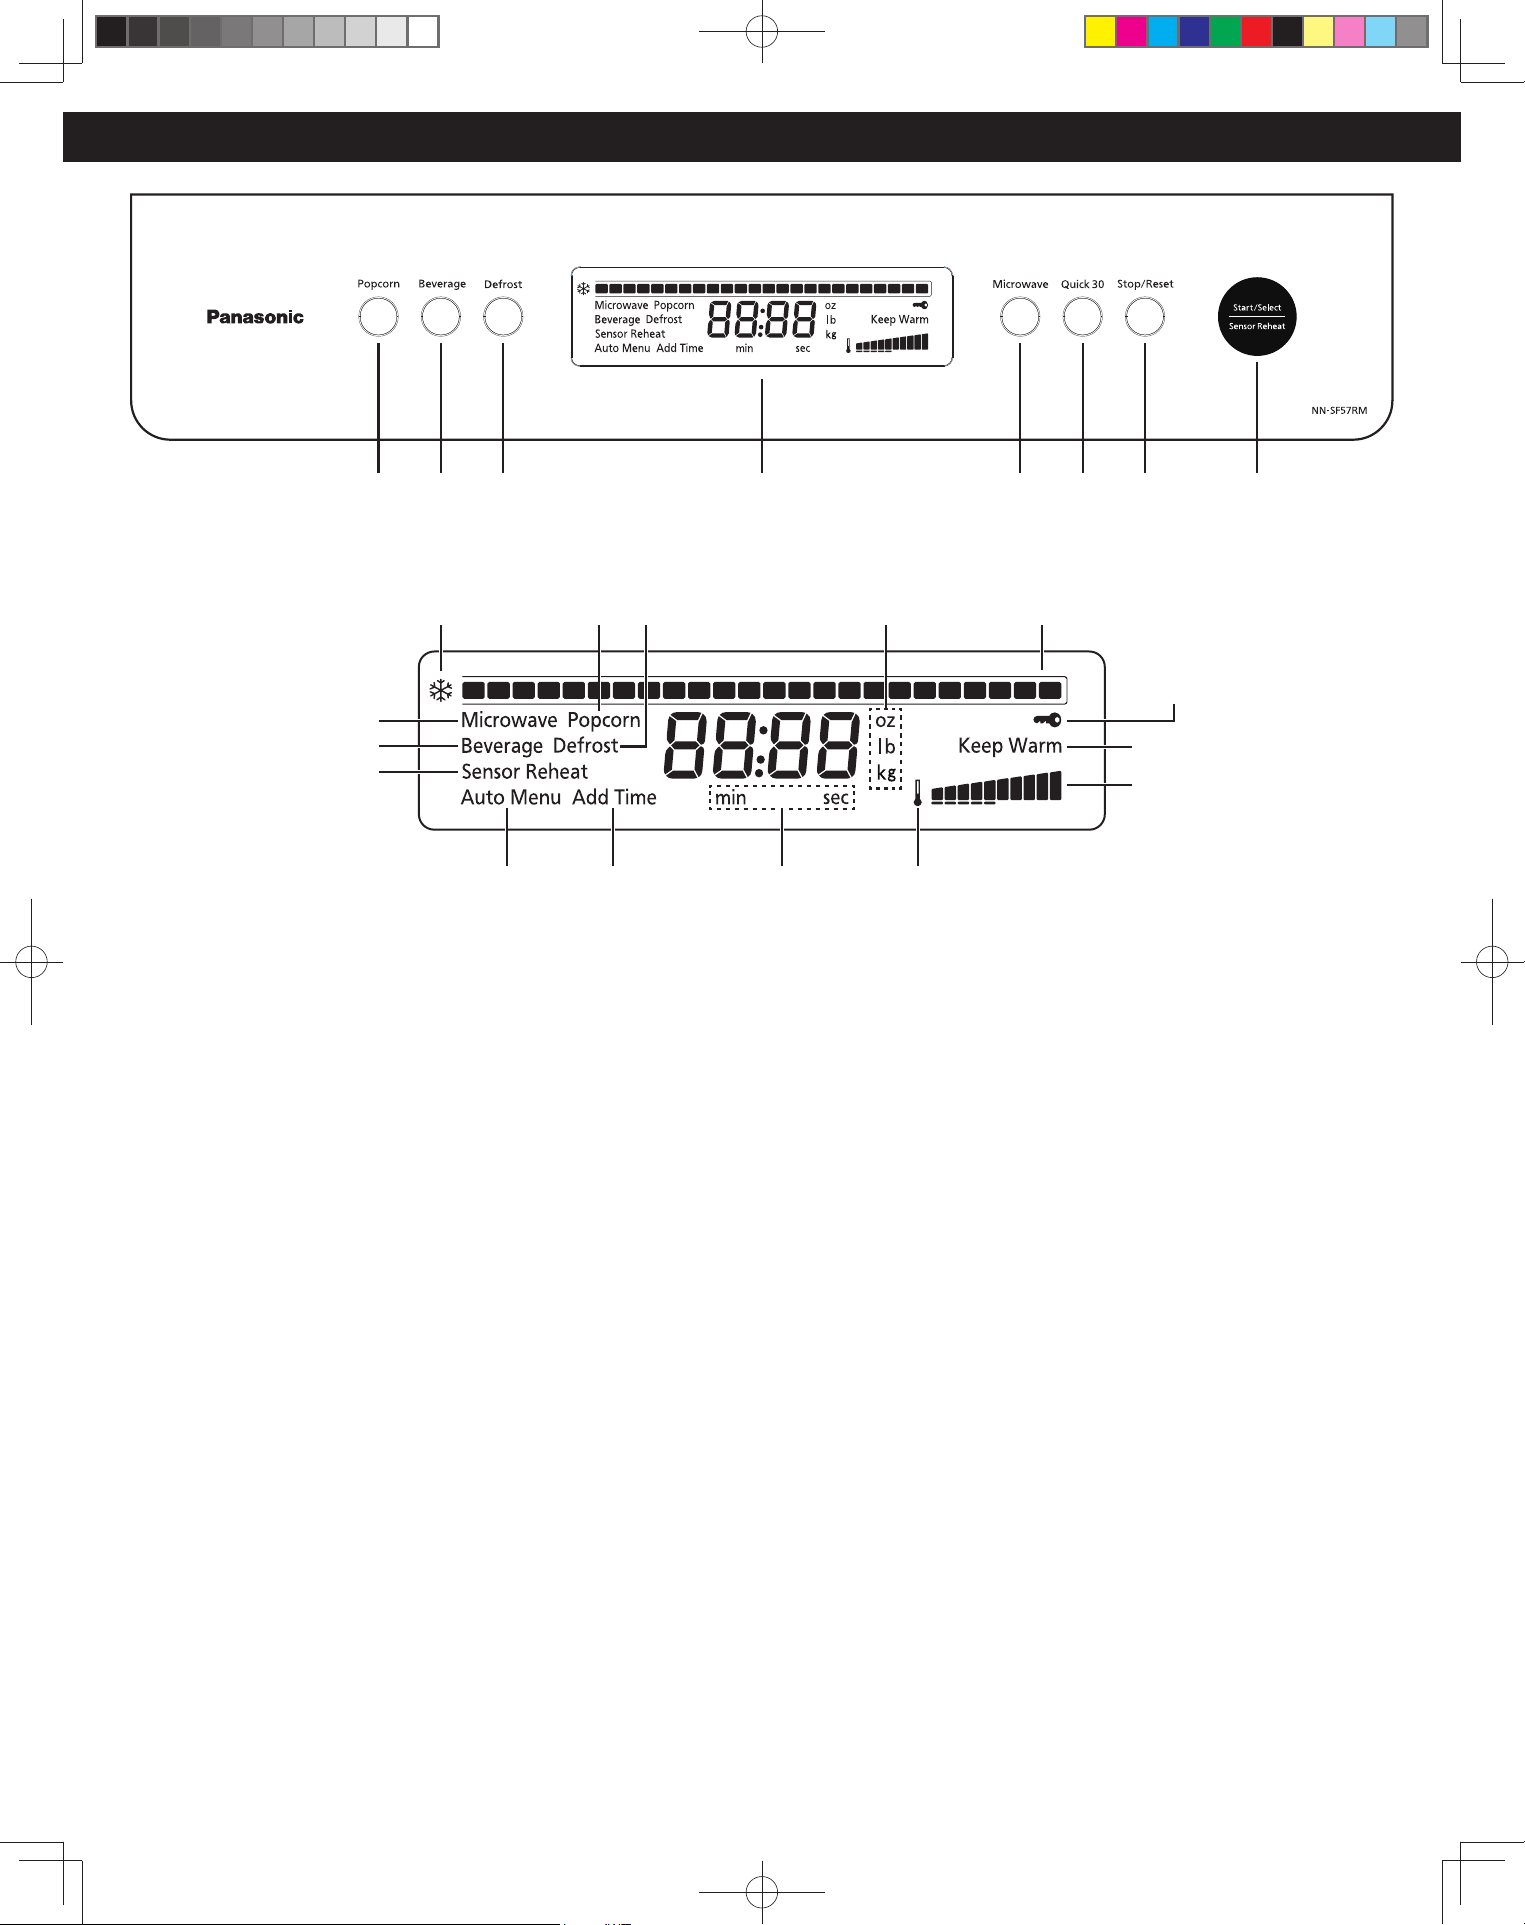
q Display Window
Mode
A: Microwave
B: Popcorn
C: Beverage
D: Defrost
E: Sensor Reheat
F: Auto Menu
G: Add time
H: Keep Warm
w Popcorn Pad (See page 18)
e Beverage Pad (See page 19)
r Defrost Pad (See page 17)
t Microwave Pad (See page 14-15)
y Quick 30 Pad (See page 16)
u Stop/Reset Pad
Before cooking: One press clears all your
instructions.
During cooking:
One press temporarily
stops the cooking process. Another tap
cancels all your instructions, and time of day
or colon appears in the display window.
i Dial
The dial has 4 functions. (see details on next
page)
Beep Sound:
When a pad is pressed correctly, a beep will be
heard. If a pad is pressed and no beep is heard, the
unit did not or cannot accept the instruction. At the
end of any complete program, the oven will beep 5
times.
NOTE:
1. If no operation after cooking program setting,
6 minutes later, the oven will automatically cancel
the cooking program. The display will return to clock
or colon display.
2. The oven will enter stand-by mode after the
last operation has completed. When in stand-by
mode, the brightness of the display and dial will be
reduced.
3. When in stand-by mode, it is necessary to open
and close the oven door before operating the oven.
NOTE:
The illustration is for reference only.
F
E
C
B
A
D
G
Weight
Temperature
1. Microwave level
2. Temperature setting
3. More/less setting
H
Status Bar
Defrost Mode
Time
(Minute/Second)
qrewtyui
F0003DB70AP_EN.indd 10F0003DB70AP_EN.indd 10 2026/3/2 16:26:122026/3/2 16:26:12
11
Dial Feature
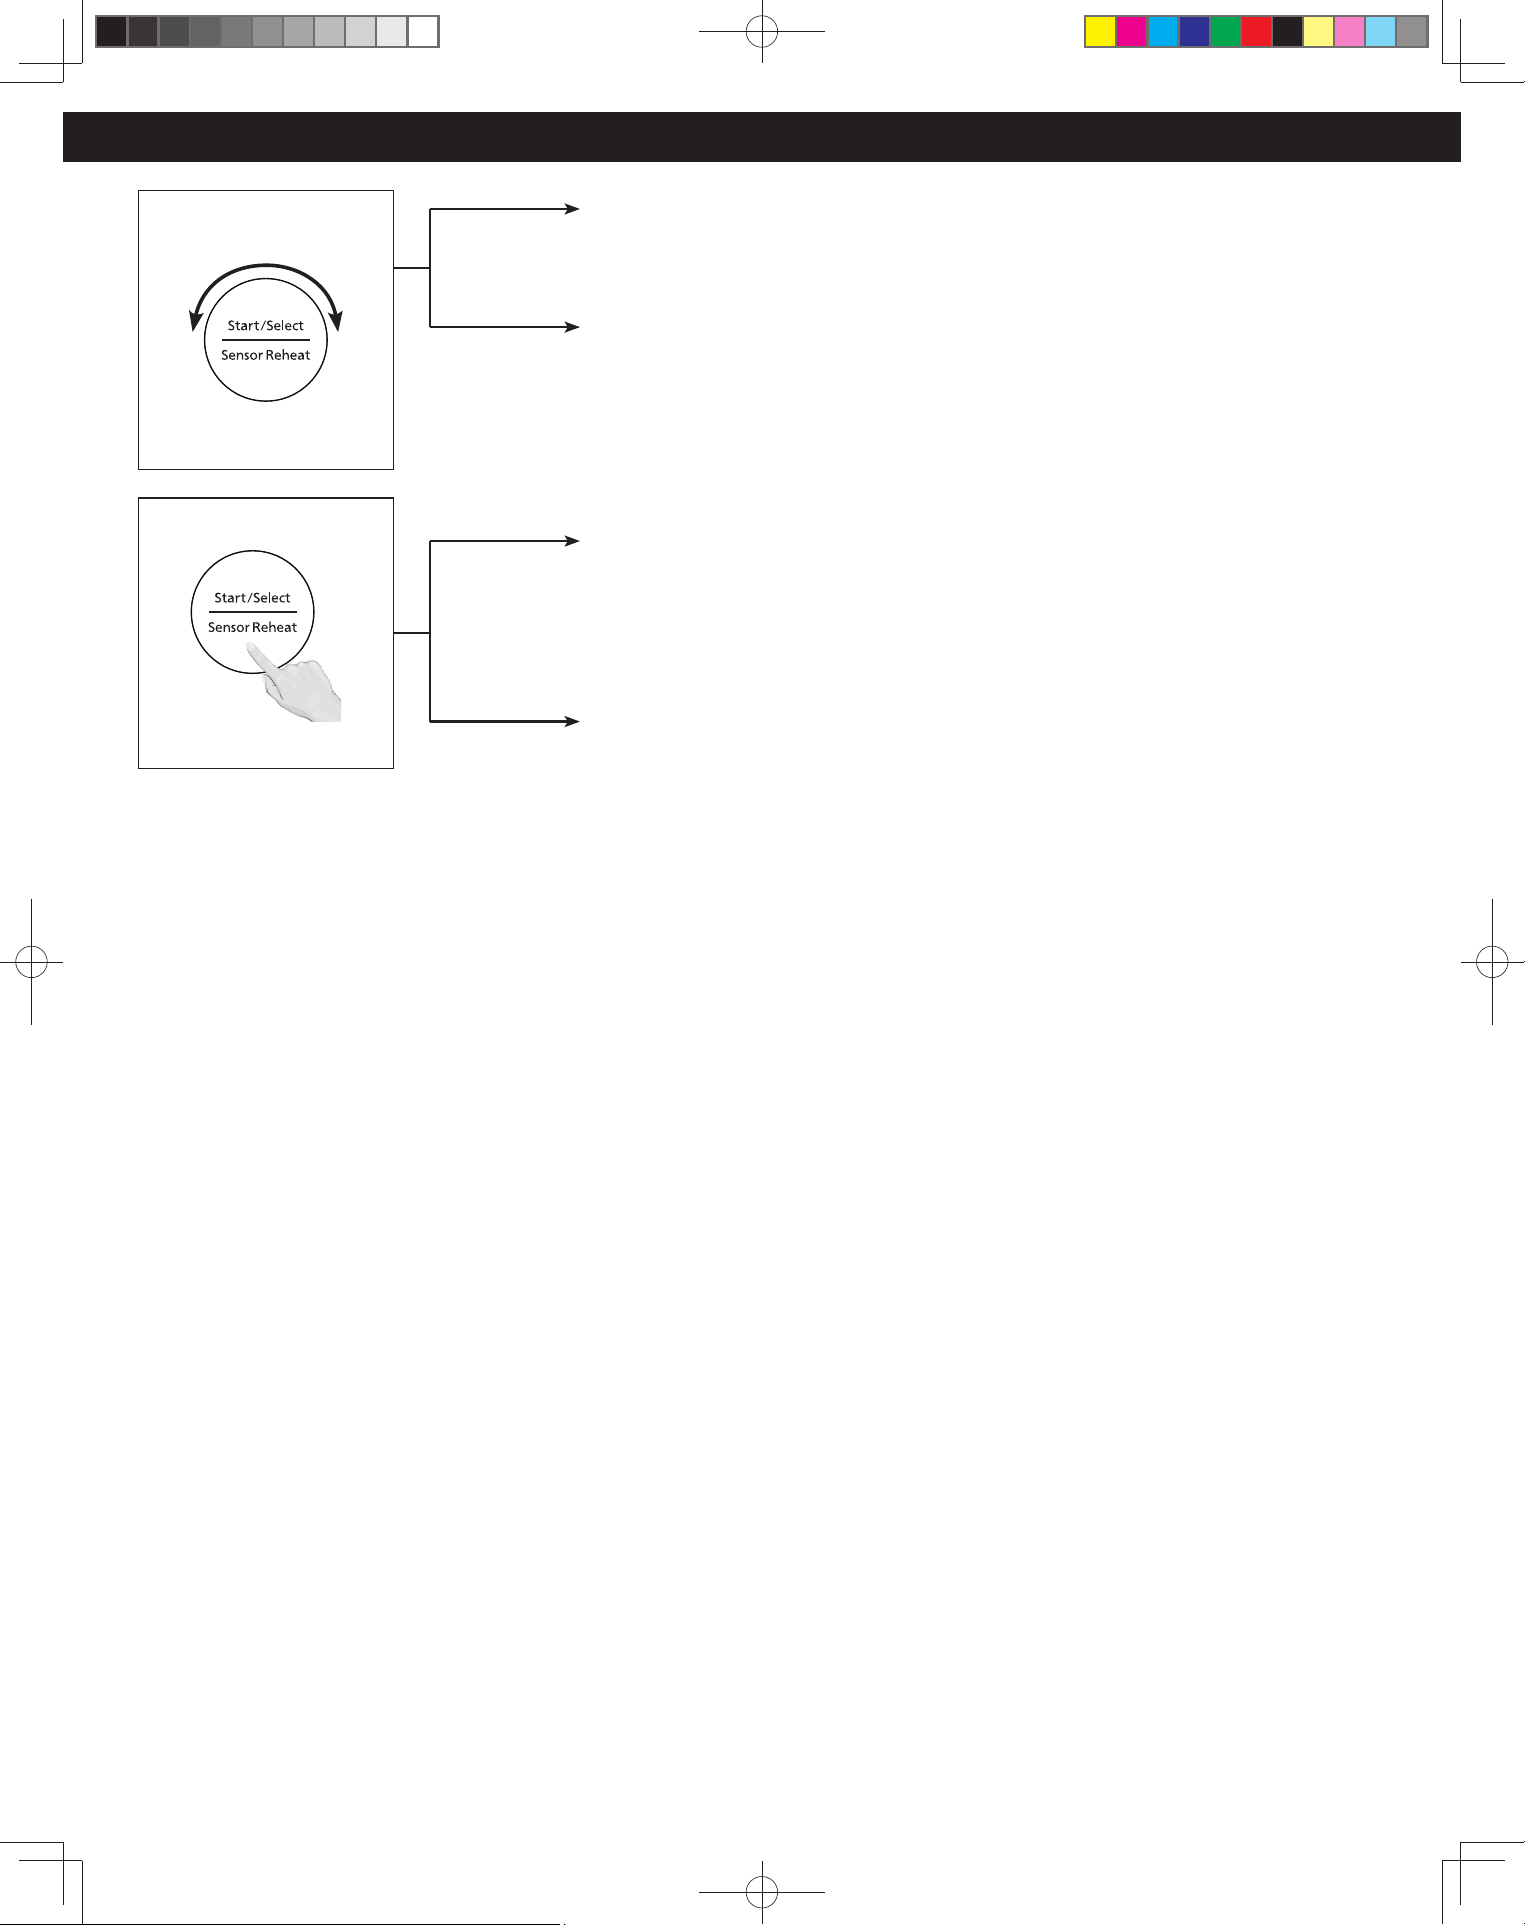
q Time/Menu/Weight Selection
Select the time, sensor cook menu or weight (for Popcorn) by turning the Dial.
w Temperature and More/Less Selection
* (Optional) Fine-tune your dish after pressing Start. Change the setting to achieve
the perfect outcome within 14 seconds.
Default setting is Medium (Standard) when rst plugged in.
e Start/Select (Confirmation)
Press the Dial to start operating the oven or confirm the setting. If during cooking
the door is opened or Stop/Reset is pressed once, Start has to be pressed again to
continue cooking.
r Sensor Reheat (One Push Reheating)
When colon or clock mode is displayed, press the Dial for quick start reheating meals
(page 13).
F0003DB70AP_EN.indd 11F0003DB70AP_EN.indd 11 2026/3/2 16:26:122026/3/2 16:26:12
12
Operation
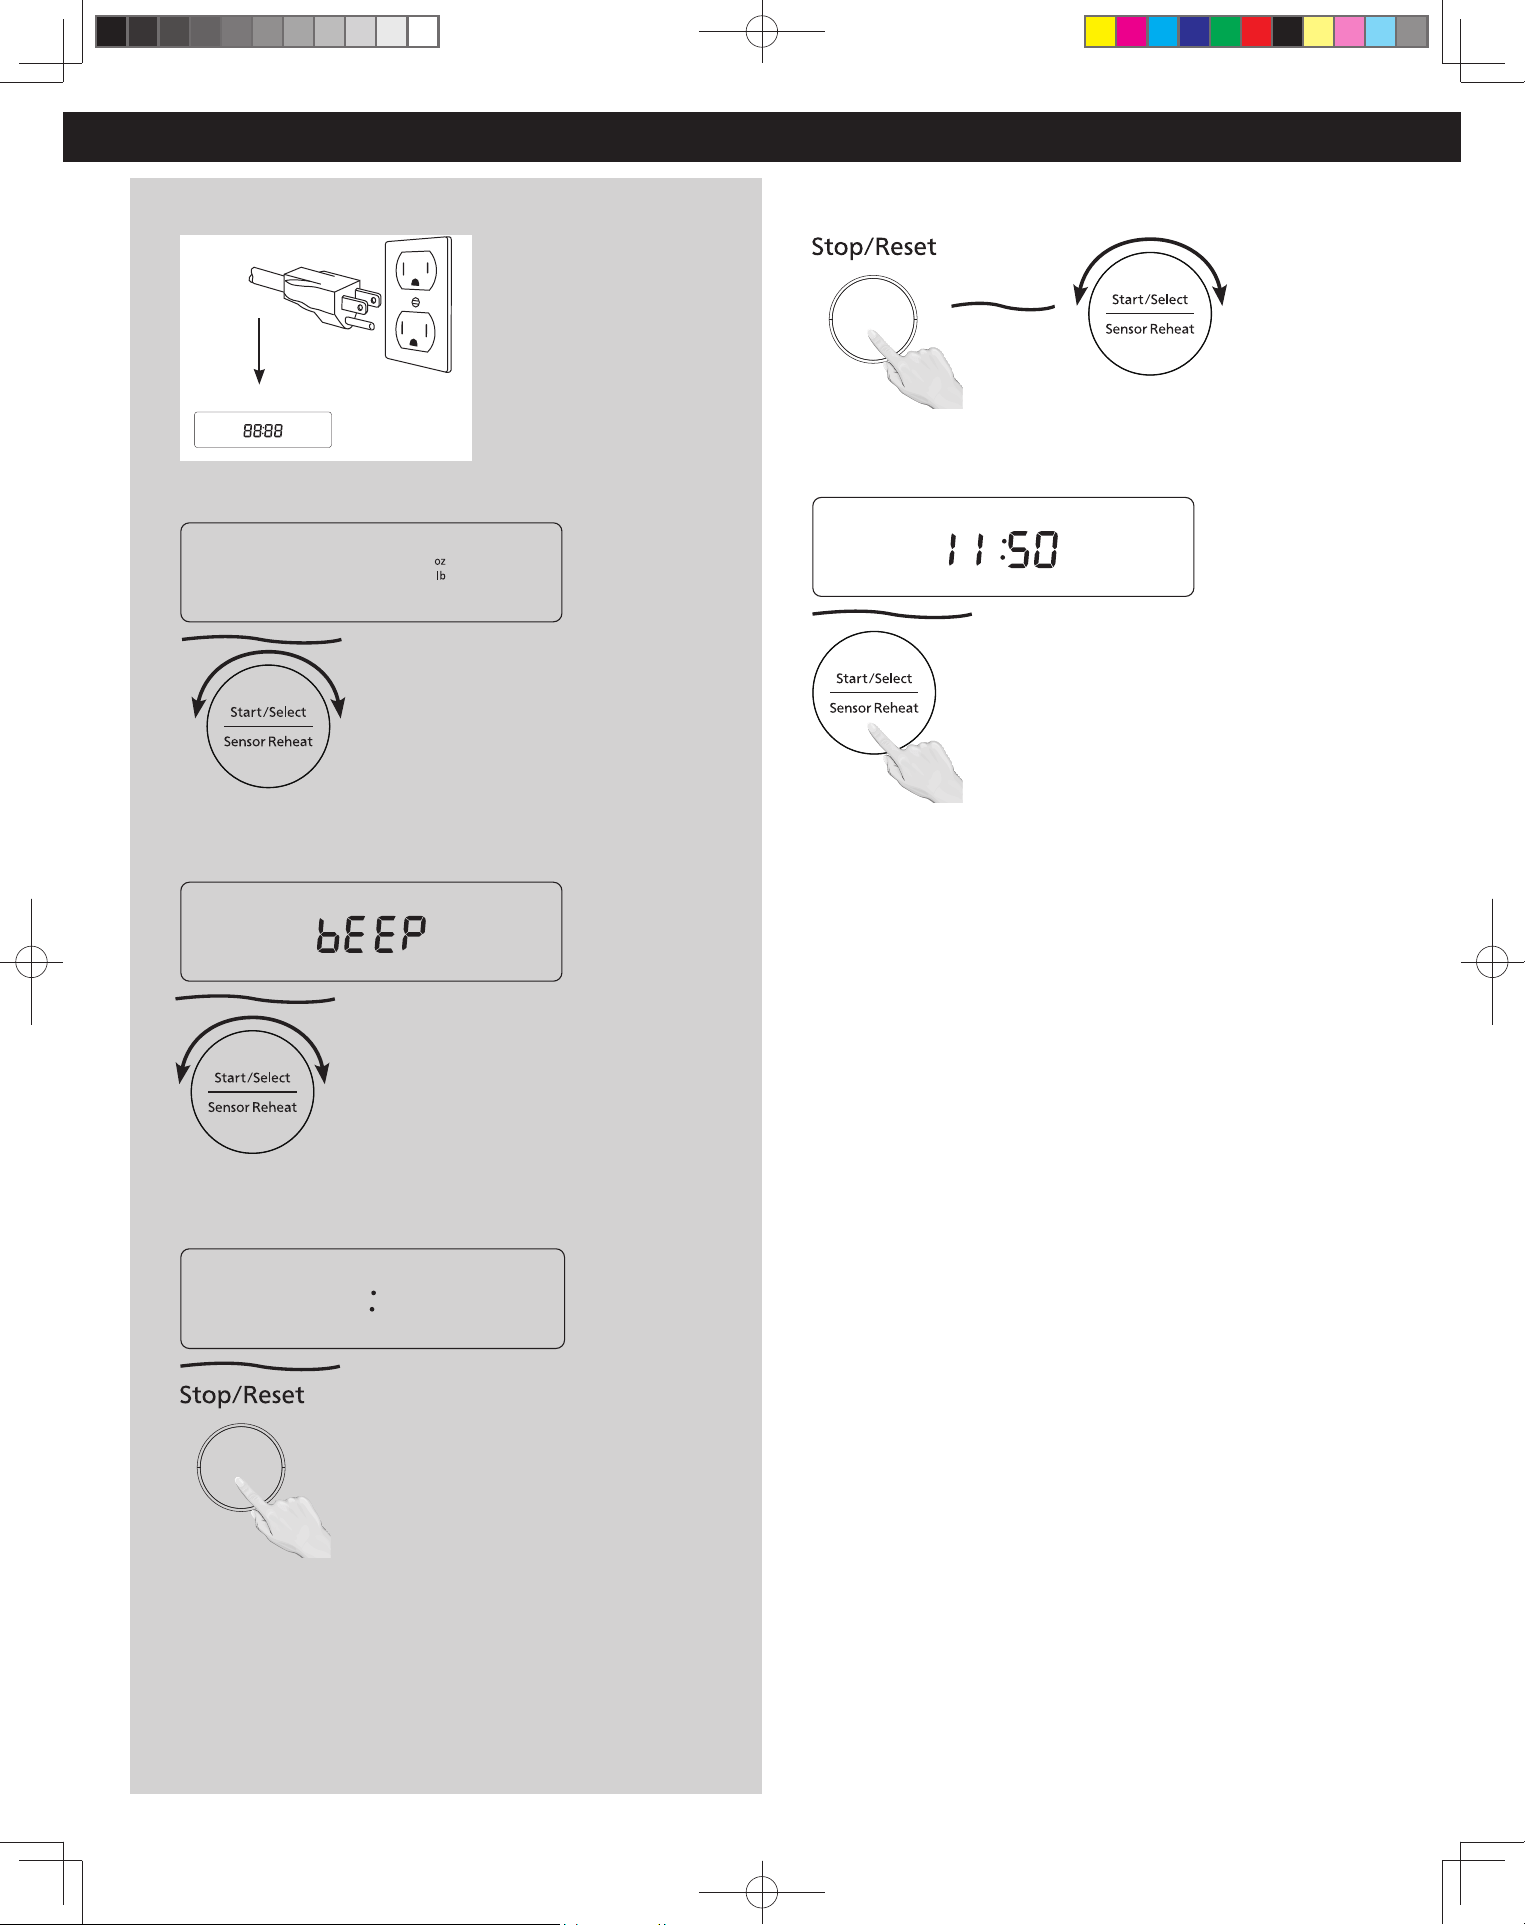
Using the Microwave for the First Time
1
Display Window
Plug into a properly grounded electrical outlet.
2
oz/lb
oz/lb
k
g
Press Start once, then using the Dial to cycle between the weight
system, Imperial (oz/lb) or Metric (kg).
3
off
off
on
on
Press Start once, then using the Dial to cycle between the Beep
on or Beep off.
4
Press Stop/Reset to confirm; a colon (:) will appear in the display
window.
NOTE:
1.These choices can be selected only when you plug-in the oven.
2.Some features of this product remember your preferences (e.g.,
weight unit, buzzer on/off). Once configured, these settings are
saved so that you don’t have to change them each time. They will
remain stored even if the oven is unplugged.
Setting the Clock
1
When the oven is NOT cooking, hold Stop/Reset for 3 seconds; the
colon will blink. Enter time of day using the Dial.
2
Press Start to finish setting and the colon (:) will stop blinking.
NOTES:
1. To reset the clock, repeat steps.
2. The clock will retain the time of day as long as the oven is
plugged in and electricity is supplied.
3. The clock is a 12-hour display.
4. Oven will not operate while colon (:) is flashing.
F0003DB70AP_EN.indd 12F0003DB70AP_EN.indd 12 2026/3/2 16:26:122026/3/2 16:26:12
13
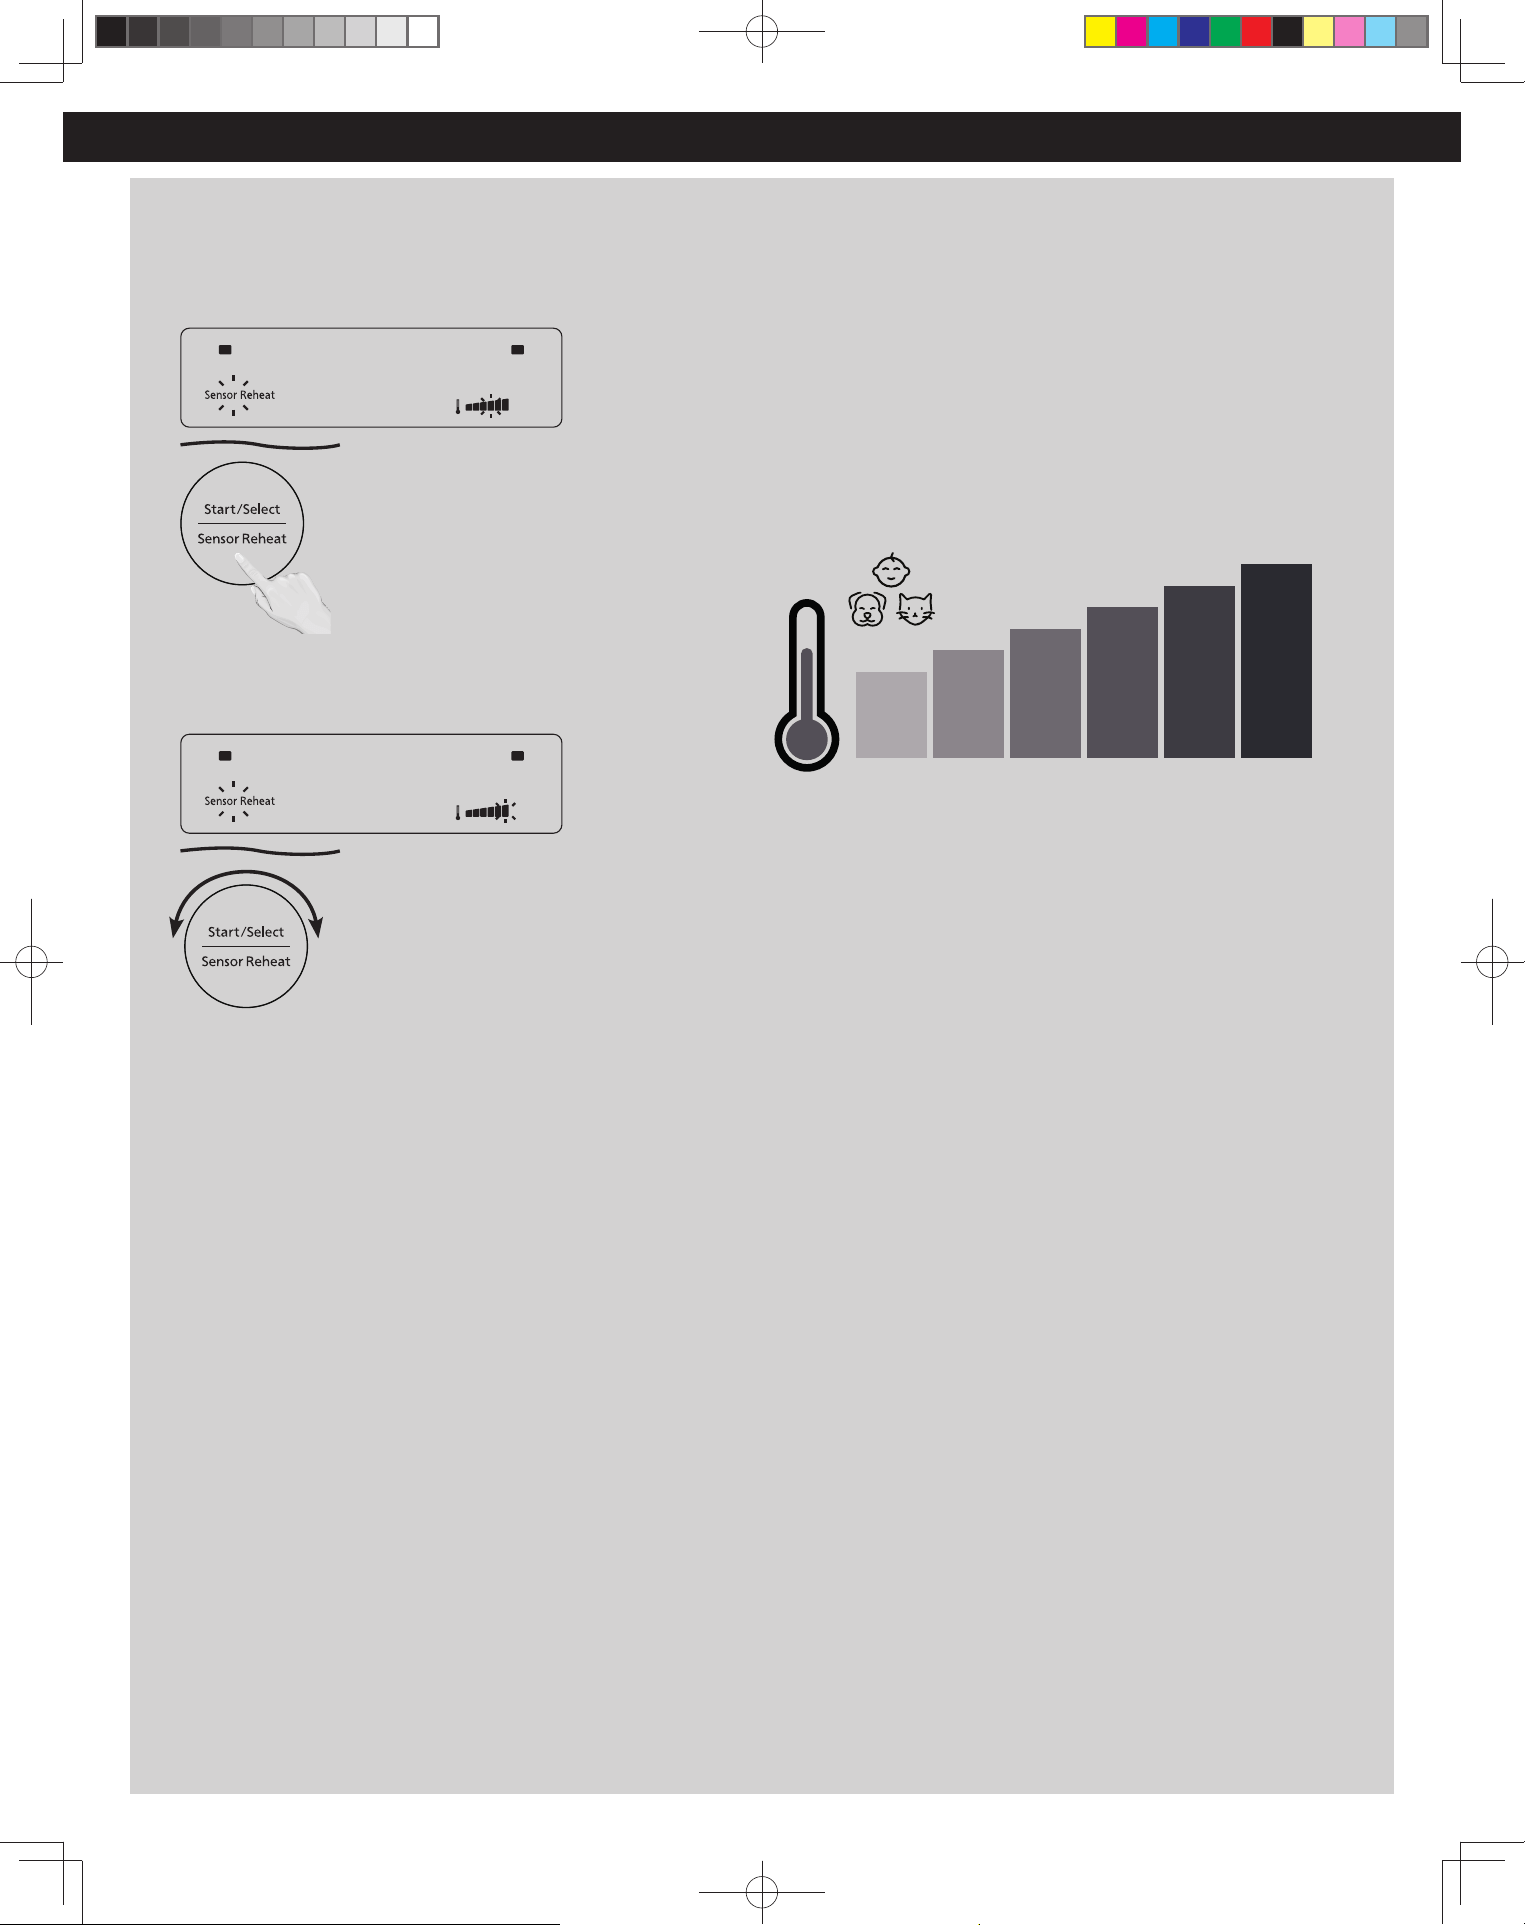
Sensor Reheat
(For One push reheat without setting time or wattage.
The Genius® 2.0 Sensor will automatically detect the food
temperature.)
(Example: To reheat food on High.)
1
Place food in a microwave safe container at the center of cavity,
press the Dial to start, and it will begin reheating automatically.
2
After pressing Start, you can adjust the Temperature (level) from
Medium (Standard) within 14 seconds.
To Increase: Rotate the dial clockwise.
To Decrease: Rotate the dial counterclockwise.
The 6 available settings are:
Lowest → Low → Medium-Low → Medium → Medium-High →
High
(Adjust only if needed.)
1. The door should not be opened until the end of cooking. Always stir
and check the temperature before serving. For larger items, let stand
for 2–3 minutes.
2. After having used the Sensor Reheat feature a few times, you may
decide you would prefer your food reheated to a different degree
– that is why you would utilize the Temperature and More/Less
selection.
3. Always place food at the center of the cavity within the weight range
2 – 35 oz.
(55 g - 1000g).
4. Do not cover food with lid, paper towel, plastic wrap or any other
materials. Sensor will not be able to see food temperature. However,
use plastic wrap when heating soup to prevent splatters.
5. For even reheating, ensure food is no thicker than 1.2 in ( 3 cm).
DO NOT USE SENSOR REHEAT:
1. To reheat frozen high-oil, high-salt, thick, and cheese-heavy foods, use
manual power and time for these foods.
2. To reheat large or dense vegetable pieces like baked potatoes, use
manual power and time for these foods.
3. For raw or uncooked foods.
4. If oven cavity is warm.
5. For beverages or popcorn, use the specific buttons instead.
Temperature Setting Tips:
After started reheating, adjust the temperature by turning the
dial as you wish.
LOWLOWEST HIGHMEDIUM
Default
Baby Food
Pet Food
Whole Chicken: Due to its size and density, “High” setting is
recommended.
Lasagna: Due to its size and density, “High” setting is
recommended.
Operation (continued)
F0003DB70AP_EN.indd 13F0003DB70AP_EN.indd 13 2026/3/2 16:26:122026/3/2 16:26:12
14
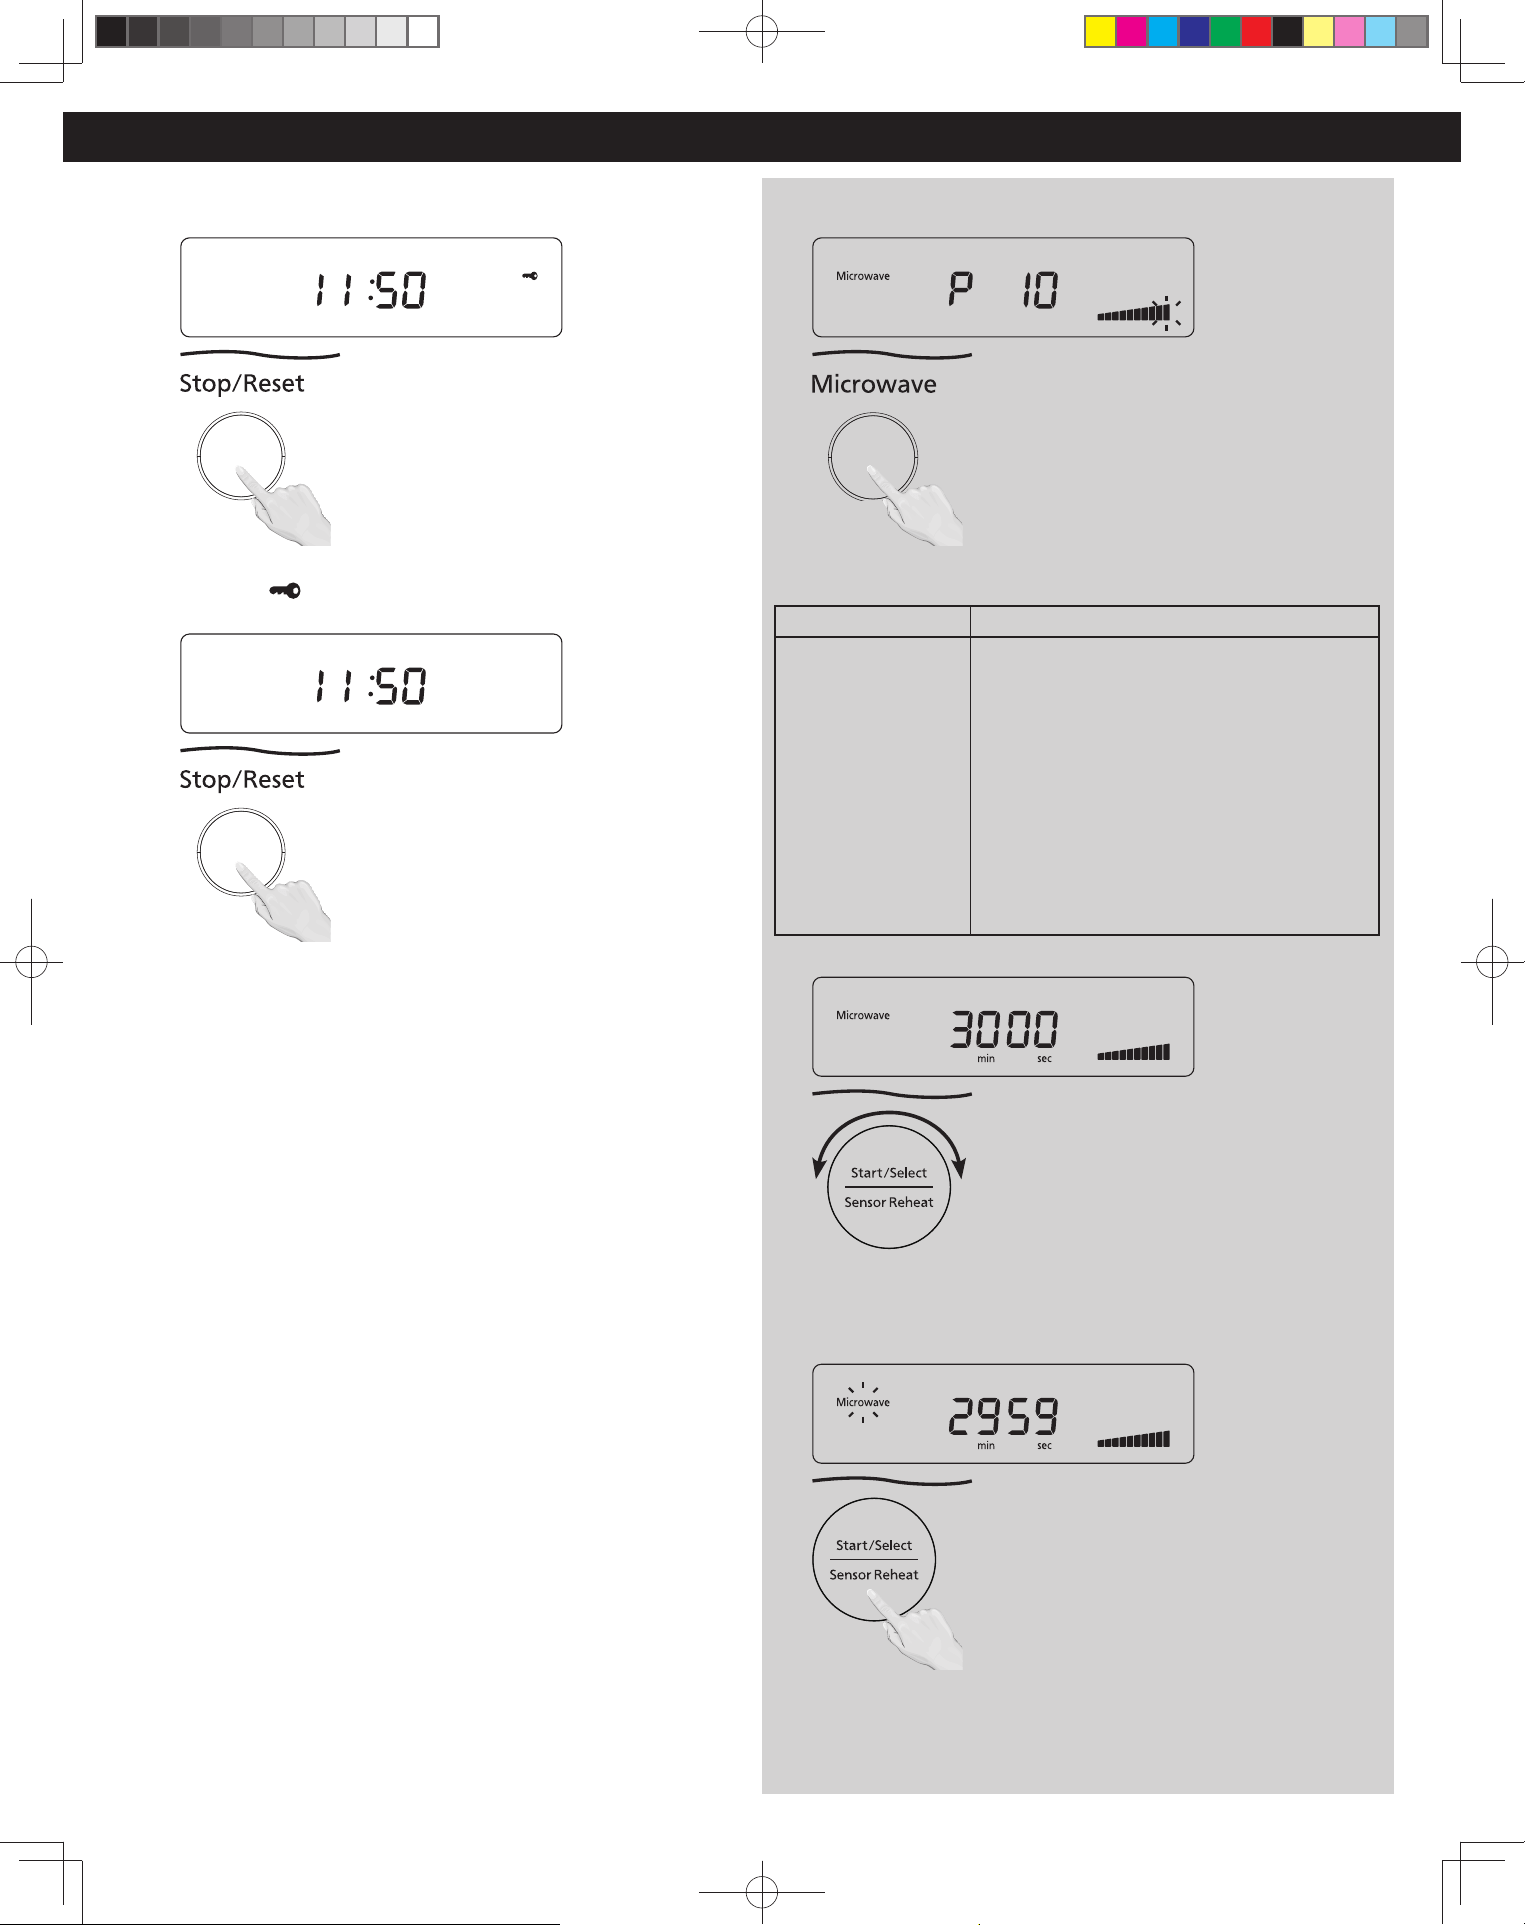
Setting the Child Safety Lock
1
When the time of day appears in the display, press Stop/Reset
three times; “ ” will appear in the display.
2
Press Stop/Reset three times; the display will return to the time of
the day and Child Safety Lock will be cancelled.
NOTES:
1. This feature prevents the electronic operation of the oven until
cancelled. It does not lock the door.
2. To set or cancel Child Safety Lock, Stop/Reset pad must be
pressed 3 times within 10 seconds. A minimum time interval of
3 seconds is required between switches.
3. You can set Child Safety Lock feature when the display shows a
colon or time of day.
Operation (continued)
Cooking
1
Press Microwave pad until the desired power level appears in the
display. P10 is the highest and P1 is the lowest.
Press Power Level
once
twice
3 times
4 times
5 times
6 times
7 times
8 times
9 times
10 times
11 times
P10 (HIGH)
P9
P8
P7 (MED-HIGH)
P6 (MEDIUM)
P5
P4
P3 (MED-LOW)
P2
P1 (LOW)
KEEP WARM
2
Set cooking time using the Dial. P10 (HIGH) and KEEP WARM have
max. cooking time of 30 minutes. For other power levels, the max.
time is 1 hour and 30 minutes.
3
Press Start; the cooking will start and the time will count down in the
display. At the end of cooking, five beeps will sound.
F0003DB70AP_EN.indd 14F0003DB70AP_EN.indd 14 2026/3/2 16:26:122026/3/2 16:26:12
15
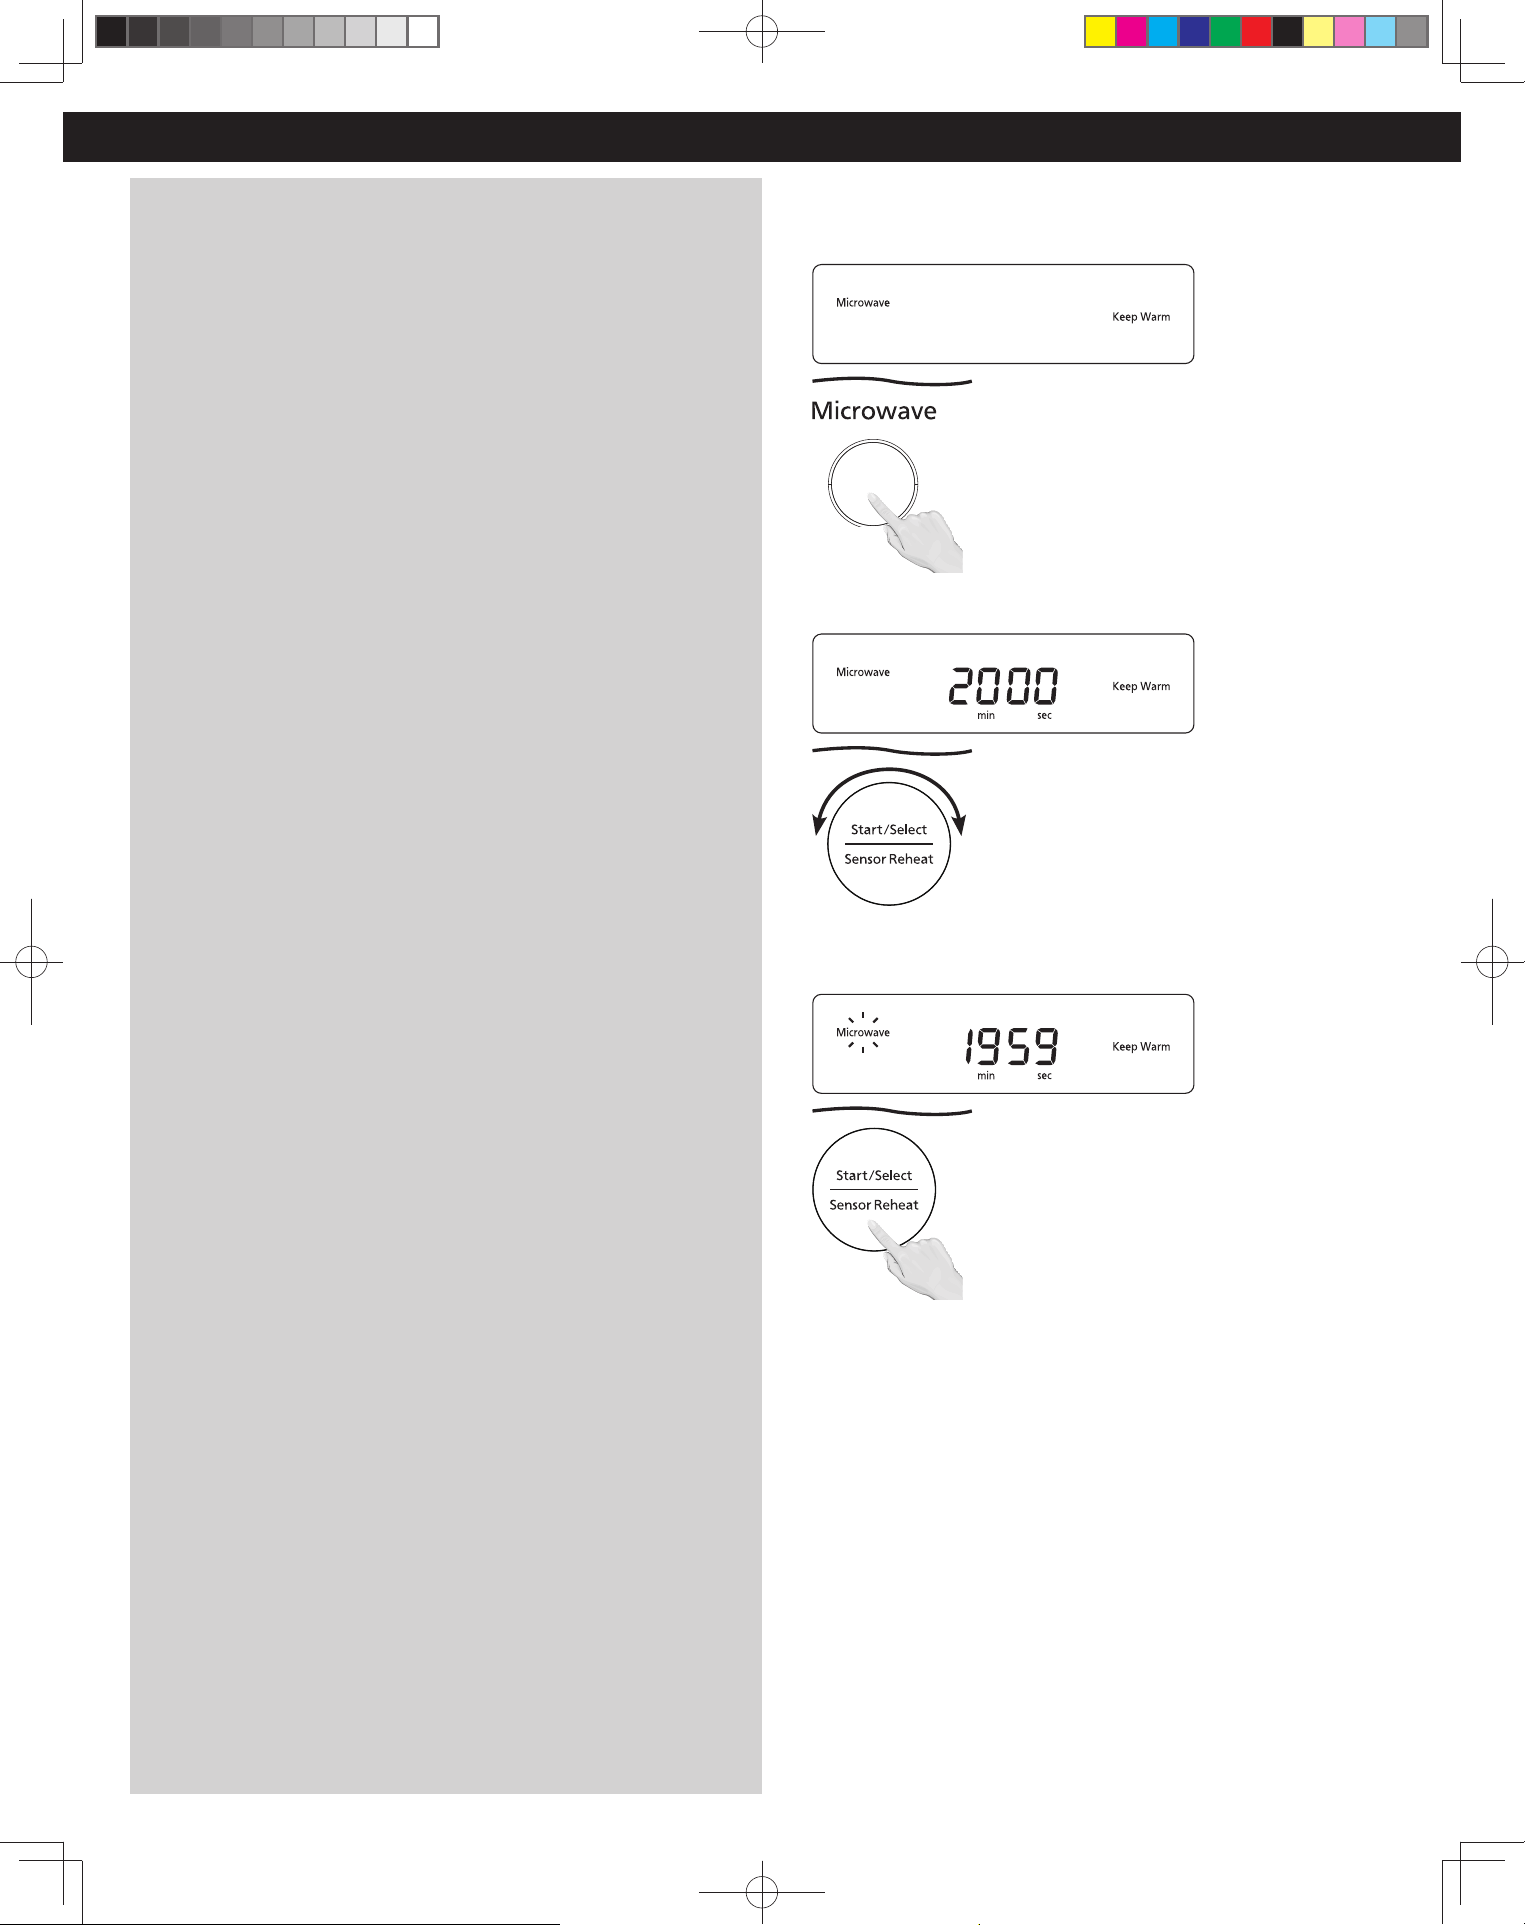
Keep Warm
(Will keep food warm for up to 30 minutes after cooking)
1
Press Microwave pad 11 times to select KEEP WARM.
2
Set warming time using the Dial (up to 30 minutes). Set 20
minutes cooking for an example.
3
Press Start; the cooking will start and the time will count down in the
display. At the end of cooking, five beeps will sound.
NOTES:
1. Do not attempt to use microwave only with any metal
container in the oven.
2. Do not place food directly onto the base of the oven.
Place in a microwaveable or glass dish. Foods reheated or
cooked by microwave only should be covered with a lid or
pierced cling film, unless otherwise stated.
3. For reheating, use P10 (HIGH) for liquids, P7 (MED-HIGH) for most
foods, and P6 (MEDIUM) for dense foods.
4. For defrosting, use P3 (MED-LOW).
DO NOT OVERCOOK:
This oven requires less time to cook than older units. Overcooking
will cause food to dry out and may cause a fire. A microwave oven’s
cooking power tells you the amount of microwave power available
for cooking.
Caution:
DO NOT defrost food at a high power setting. Doing so can
cause energy concentration at a focused point, which can lead to
arcing and damage to the oven. For precise defrosting of small
portions, use the “Defrost” function on page 17.
Operation (continued)
F0003DB70AP_EN.indd 15F0003DB70AP_EN.indd 15 2026/3/2 16:26:132026/3/2 16:26:13
16
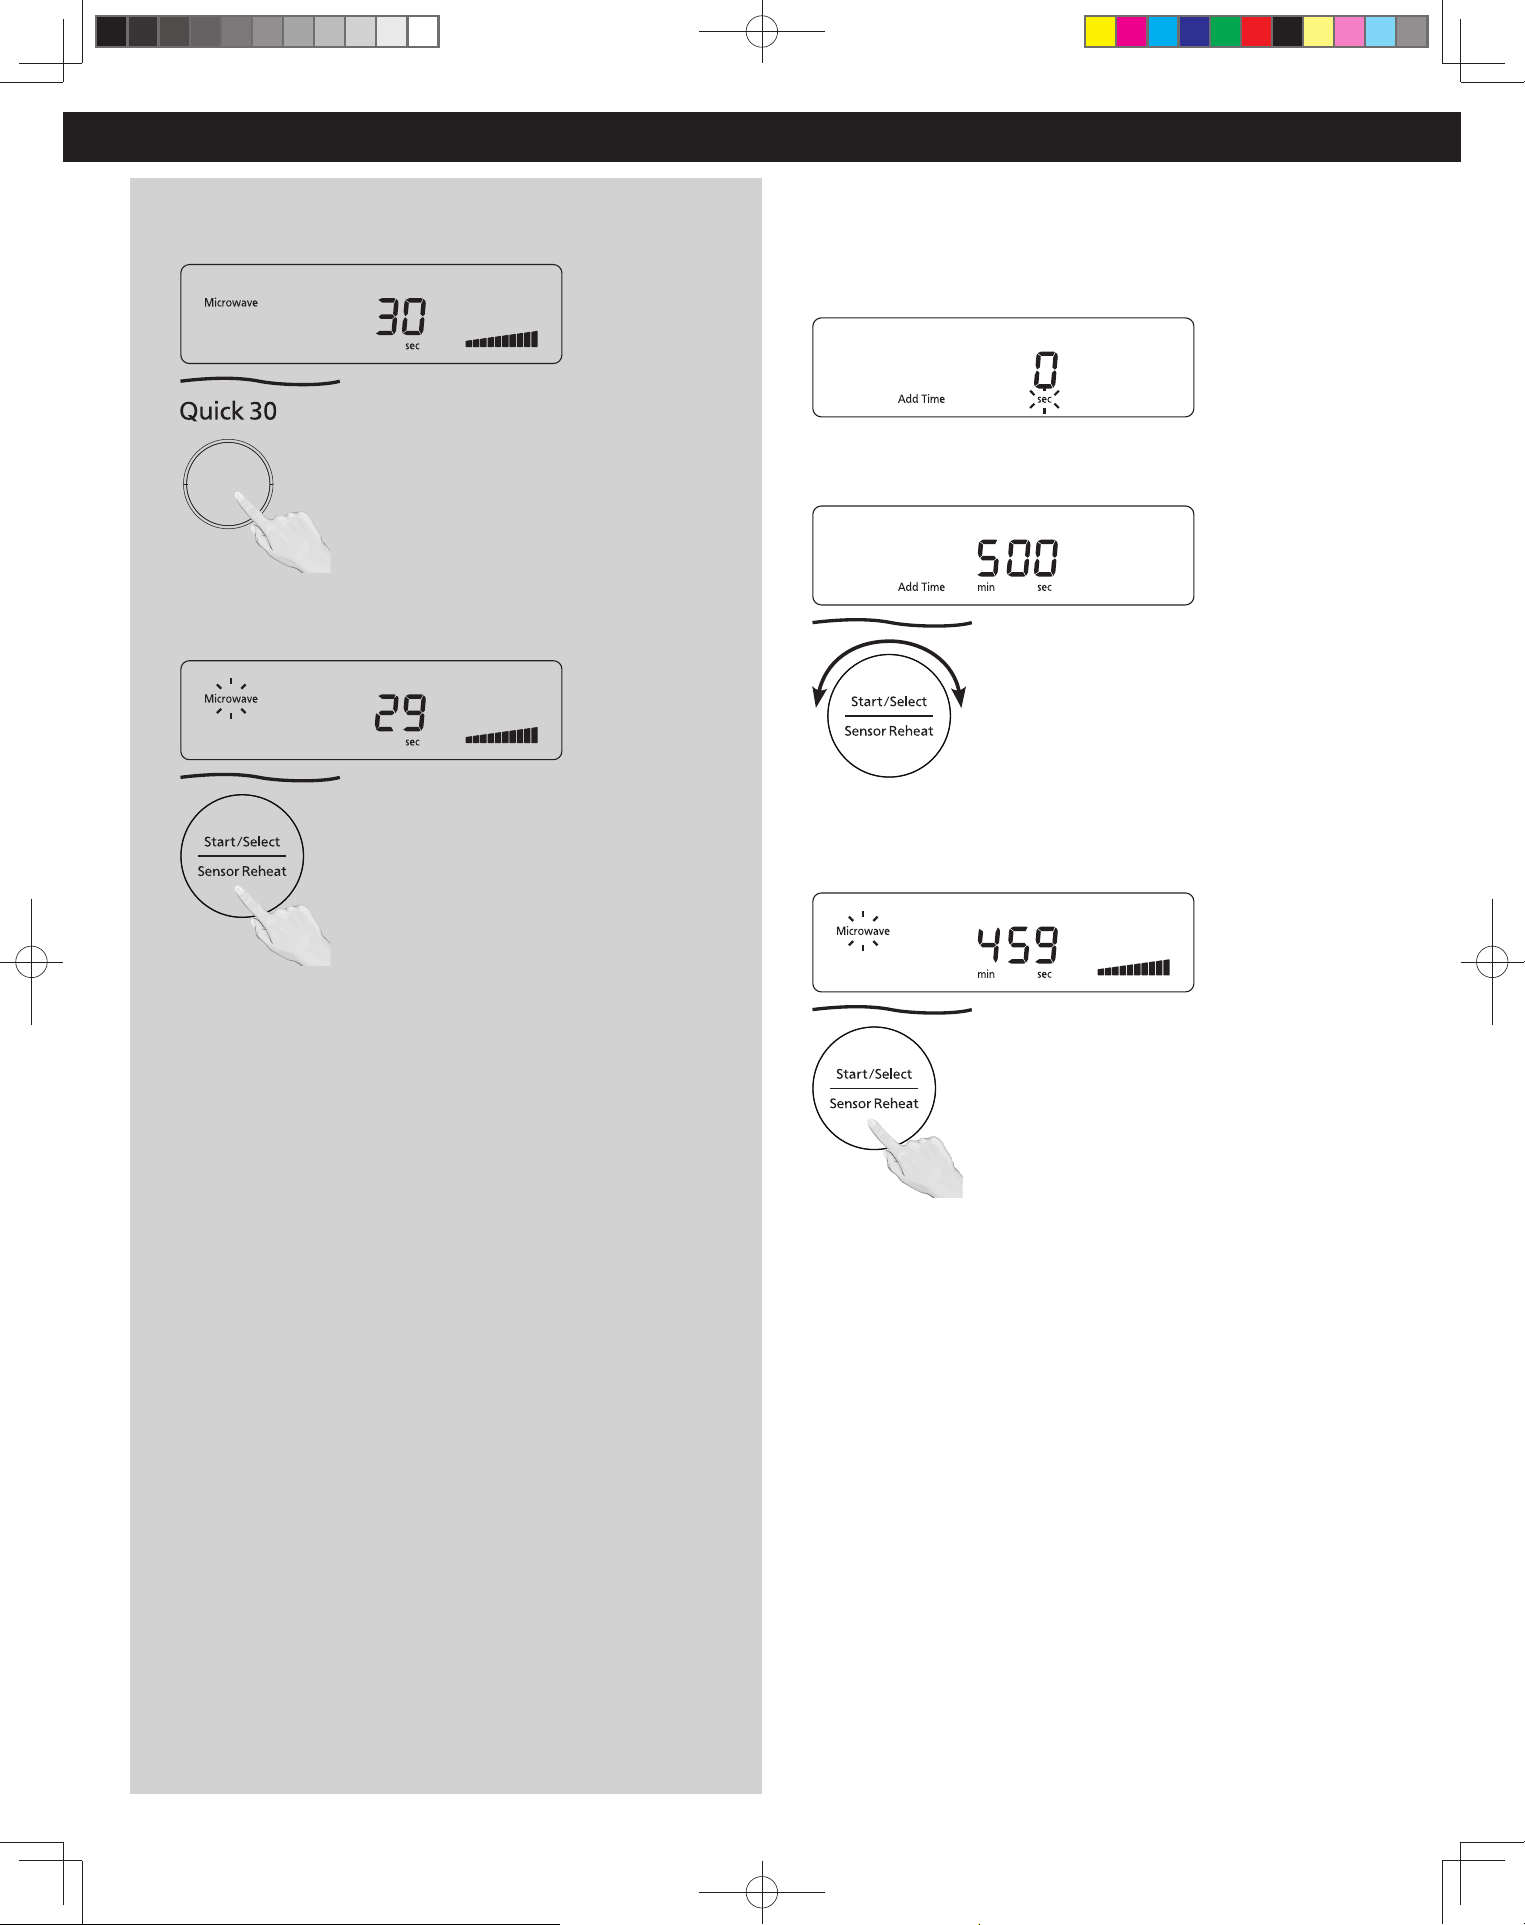
Quick 30
(Set or add cooking time in 30 seconds increments)
1
Press Quick 30 until the desired cooking time (up to
5 minutes) appears in the display. Power Level is pre-set at P10.
2
Press Start; the cooking will start and the time will count down in
the display. At the end of cooking, five beeps will sound.
NOTES:
1. This function is only available for Microwave, Keep Warm. If
desired, you can use other power levels. Select desired power
level before pressing Quick 30.
2. After setting the time by Quick 30 pad, you cannot use the
Dial.
3. Quick 30 pad can also be used to add more time during
manual cooking.
Operation (continued)
Add Time
(This feature allows you to add cooking time at the end of previ-
ous cook. )
(Example: Add 5 minutes on P10)
1
After cooking, add more time with the same power of previous
cooking.
2
Add cooking time by turning the Dial. Maximum cooking time:
P10 and KEEP WARM up to 30 minutes; other powers up to 1 hour
30 minutes.
3
Press Start. Time will be added. The time in the display window
will count down.
NOTES:
1. This function is only available for Microwave, Keep Warm.
2. The Add Time function will be cancelled if you do not perform
any operation for 1minute after cooking.
3. The power level is the same as the previous cook.
F0003DB70AP_EN.indd 16F0003DB70AP_EN.indd 16 2026/3/2 16:26:132026/3/2 16:26:13
17
Operation (continued)
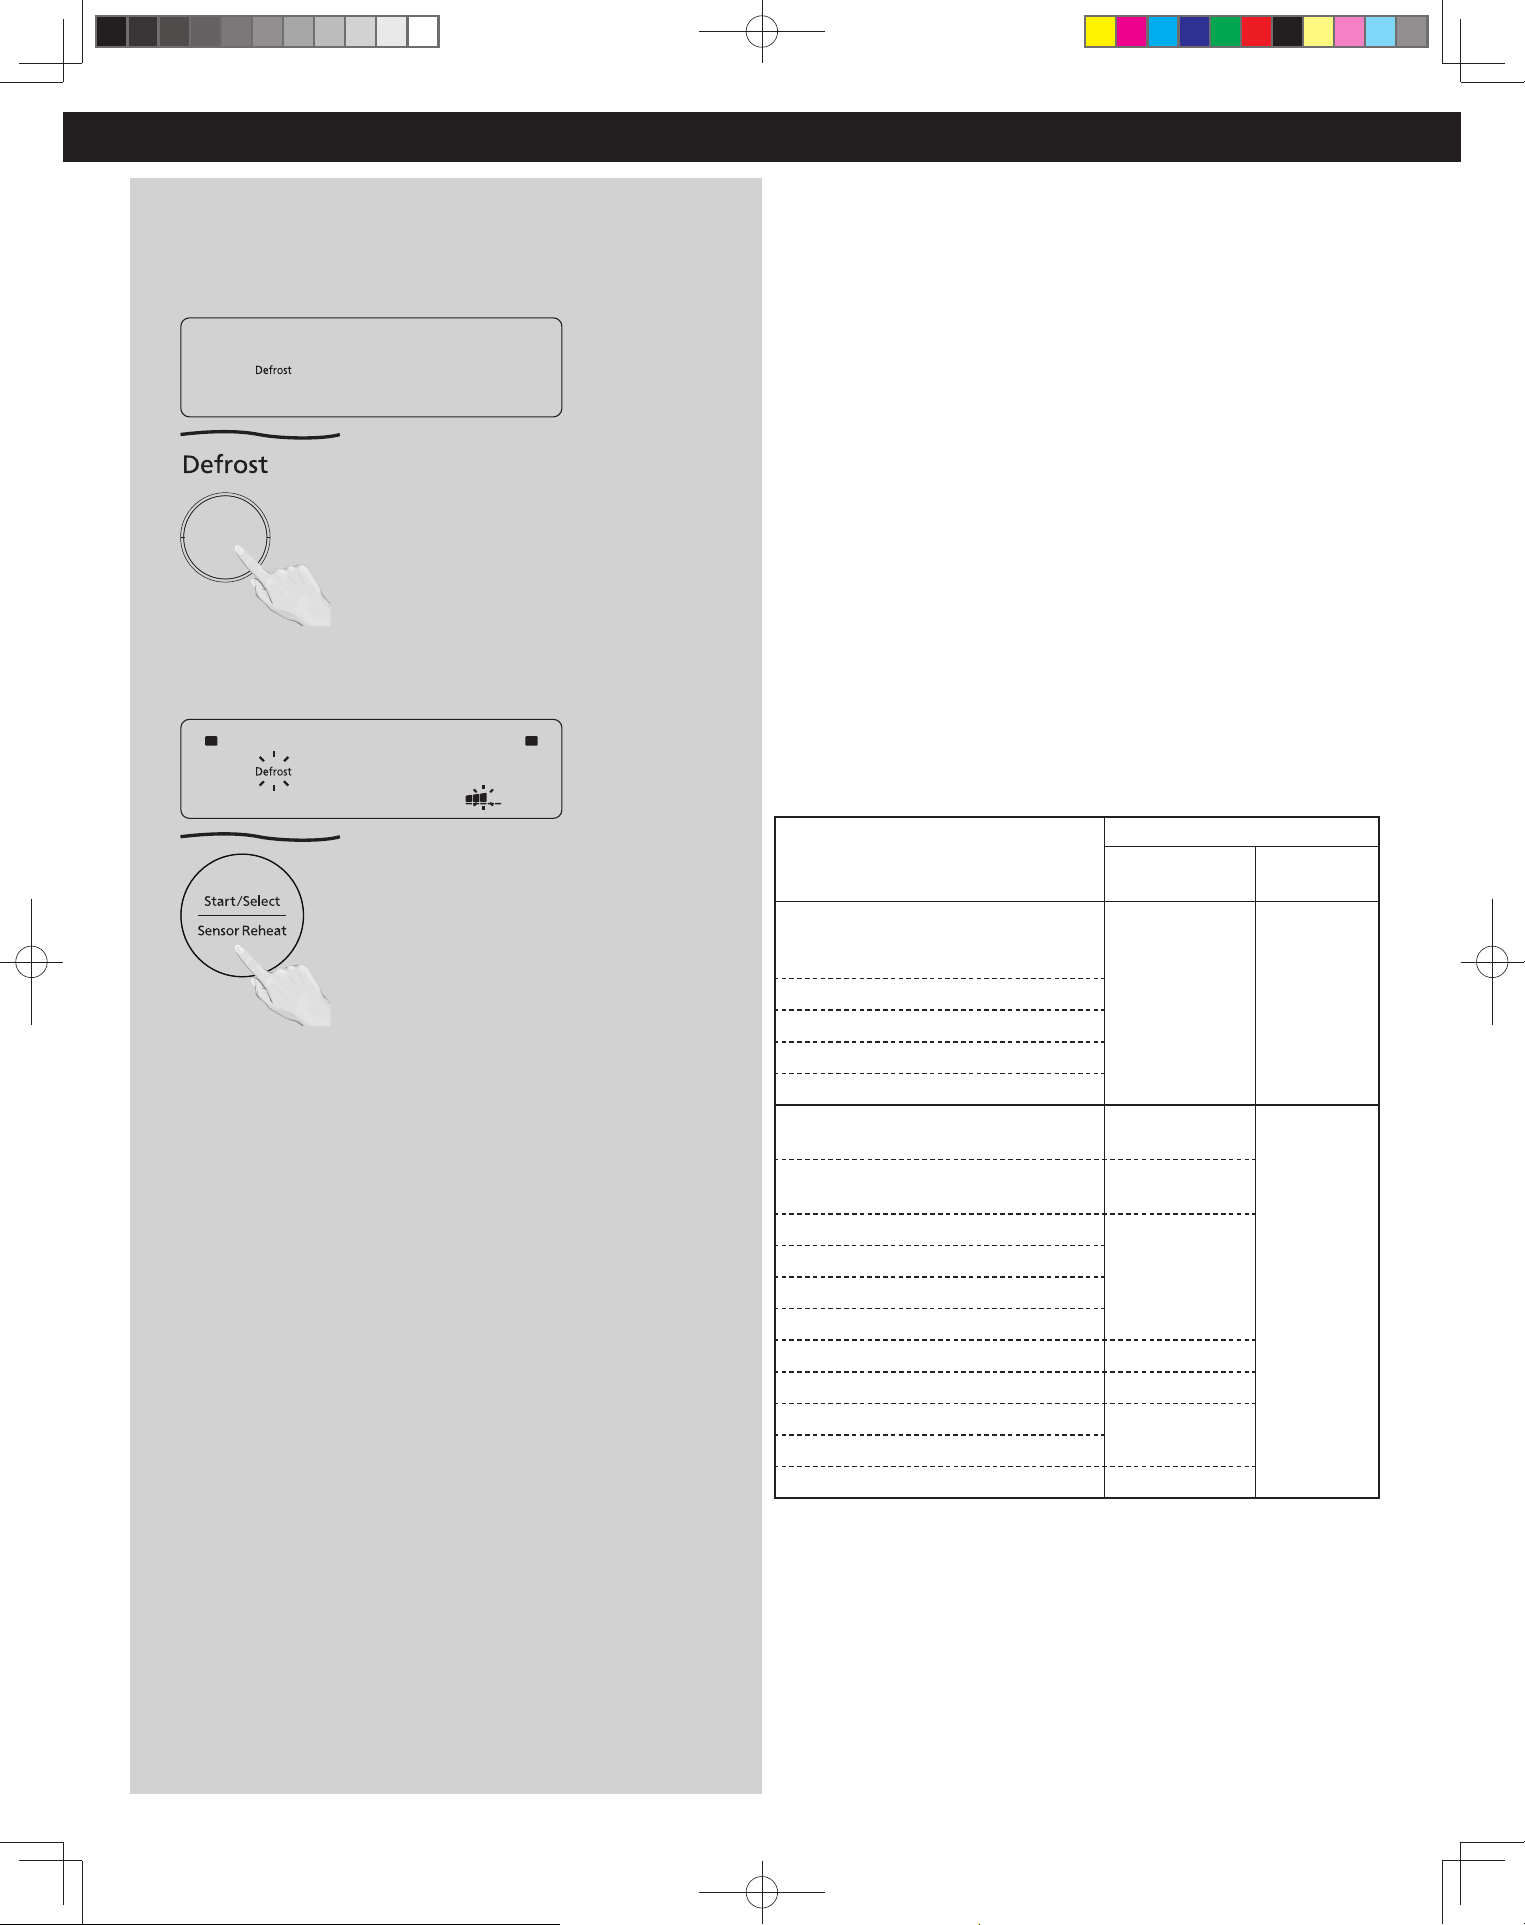
Defrost (Automatic)
Simply press the pad to defrost frozen food. It works
automatically without any settings.
[Example: Defrost food on Medium (Standard)]
1
This feature allows you to defrost foods such as meat cuts, poultry
and seafood, simply by pressing Defrost.
2
Press Start. Defrosting will start.
After pressing Start, you can adjust the temperature (level) from
Medium (Standard) within 14 seconds.
To Increase: Rotate the dial clockwise.
To Decrease: Rotate the dial counterclockwise.
The 5 available settings are:
Low → Medium-Low → Medium → Medium-High → High
(Less-) (Less) (Standard) (More) (More+)
(Adjust only if needed.)
NOTE:
1. The frozen defrost mark indicates that frozen food is being
defrosted.
2. The thickness of the meat must not exceed 1.2 in (3 cm).
3. Recommended portion size for defrosted meat is 4 – 35 oz. (110
g - 1000g).
Defrosting Tips & Techniques
Preparation For Freezing:
1. Freeze meats, poultry, and fish in packages with only one or two layers
of food. Place wax paper between layers.
2. Package in heavy-duty plastic wrap, bags (labeled “For Freezer”), or
freezer paper.
3. Remove as much air as possible.
4. Seal securely, date, and label.
To Defrost:
1. Remove wrapper. This helps moisture to evaporate. Juices from food can
get hot and cook the food.
2. It is not suitable to defrost meat joints and big pieces. For large
quantities , please use P3 manual power and time.
3. Set food in microwave safe dish. DO NOT COVER.
After Defrosting:
1. Large items may be frozen in the center. Defrosting will complete during
rest time.
2. Let rest, covered, following rest time directions in the chart below.
3. Rinse foods indicated in the chart.
4. Items which have been layered should be rinsed separately or have a
longer rest time.
FOOD
AFTER DEFROSTING
Rest Time
Rinse
(cold water)
Fish and Seafood
Crabmeat
5 mins YES
Fish Steaks
Fish Fillets
Sea Scallops
Whole sh
Meat
Ground Meat
10 mins
NO
Roasts 30 mins in refrig.
Chops/Steak
5 mins
Ribs/T-bone
Stew Meat
Liver (thinly sliced)
Bacon (sliced) ----
Cutlets 5 mins
Pieces
10 mins
Cornish hens
Turkey Breast 20 mins
in refrig.
F0003DB70AP_EN.indd 17F0003DB70AP_EN.indd 17 2026/3/2 16:26:132026/3/2 16:26:13
18
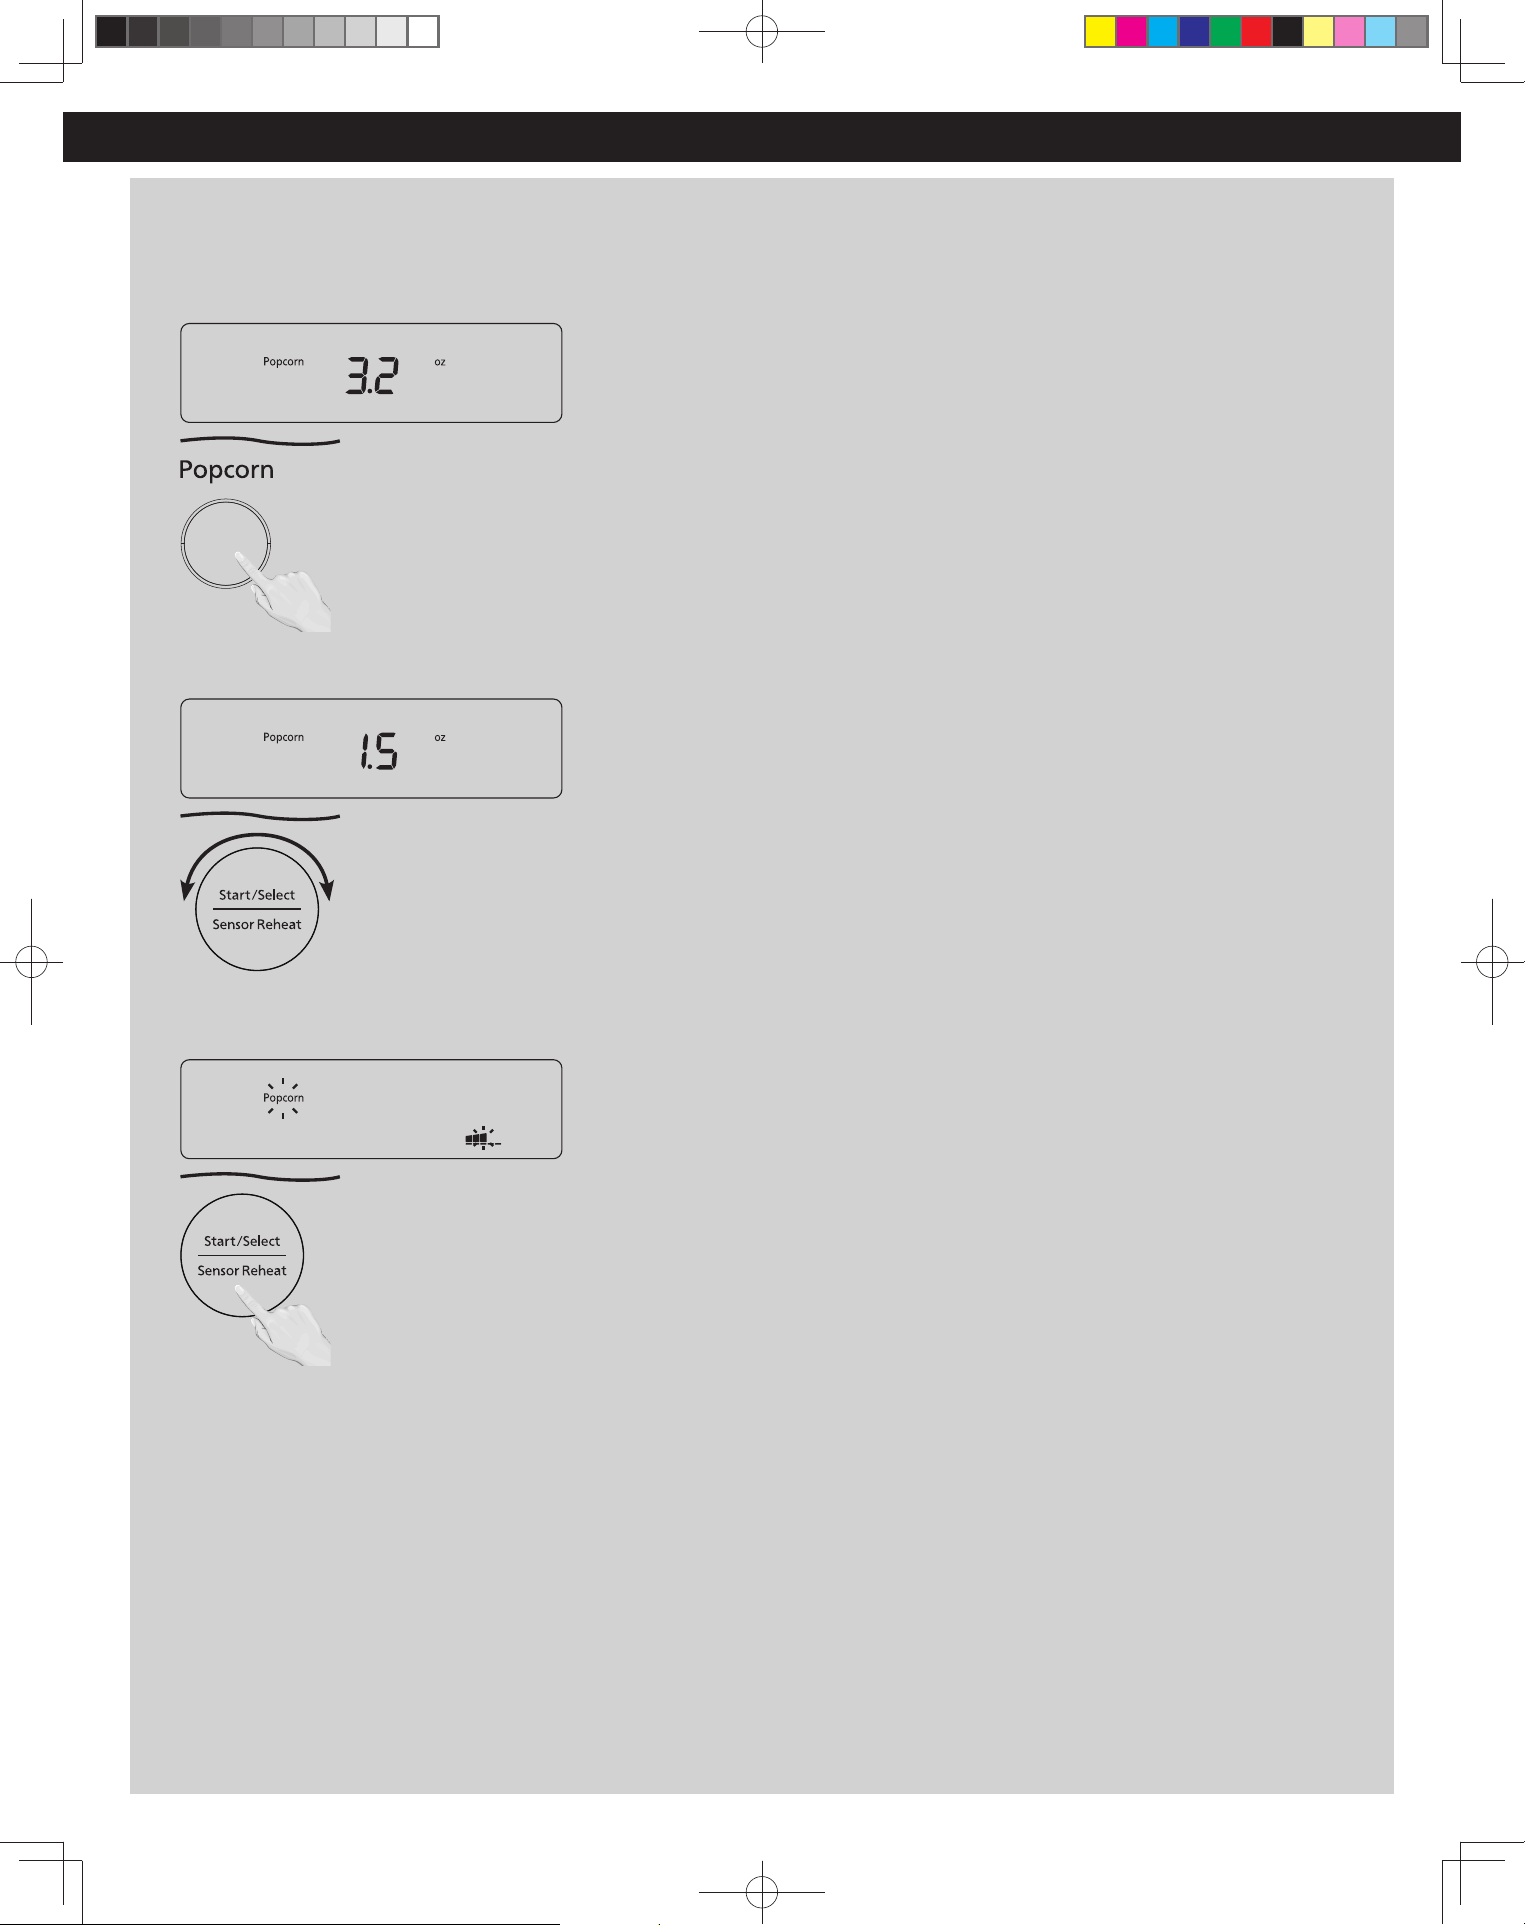
Popcorn
[Example: Pop 1.5 oz. (42
g
) of popcorn on Medium
(Standard)]
1
Press Popcorn once.
2
Use the dial to select from the following weight options: 3.2 oz.
(91 g), 2.75 oz. (78 g), or 1.5 oz. (42 g).
3
Press Start; After pressing Start, you can adjust temperature
(level) from Medium (Standard) within 14 seconds.
To Increase: Rotate the dial clockwise.
To Decrease: Rotate the dial counterclockwise.
The 5 available settings are:
Low → Medium-Low → Medium → Medium-High→ High
(Less-) (Less) (Standard) (More) (More+)
(Adjust only if needed.)
Operation (continued)
NOTES:
1. Pop one bag at a time.
2. Place bag in oven according to manufacturers’ directions.
3. Start with popcorn at room temperature.
4. Allow popped corn to sit unopened for a few minutes.
5. Open bag carefully to prevent burns, because steam will
escape.
6. Do not reheat unpopped kernels or reuse bag.
7. If popcorn is of a different weight than listed, follow
instructions on popcorn package.
8. Never leave the oven unattended.
9. If popping slows to 2 to 3 seconds between pops, stop
oven. Overcooking can burn popcorn or cause fire.
10. When popping multiple bags one right after the other, the
cooking time may vary slightly. This does not affect the
popcorn results.
F0003DB70AP_EN.indd 18F0003DB70AP_EN.indd 18 2026/3/2 16:26:132026/3/2 16:26:13
19
Operation (continued)
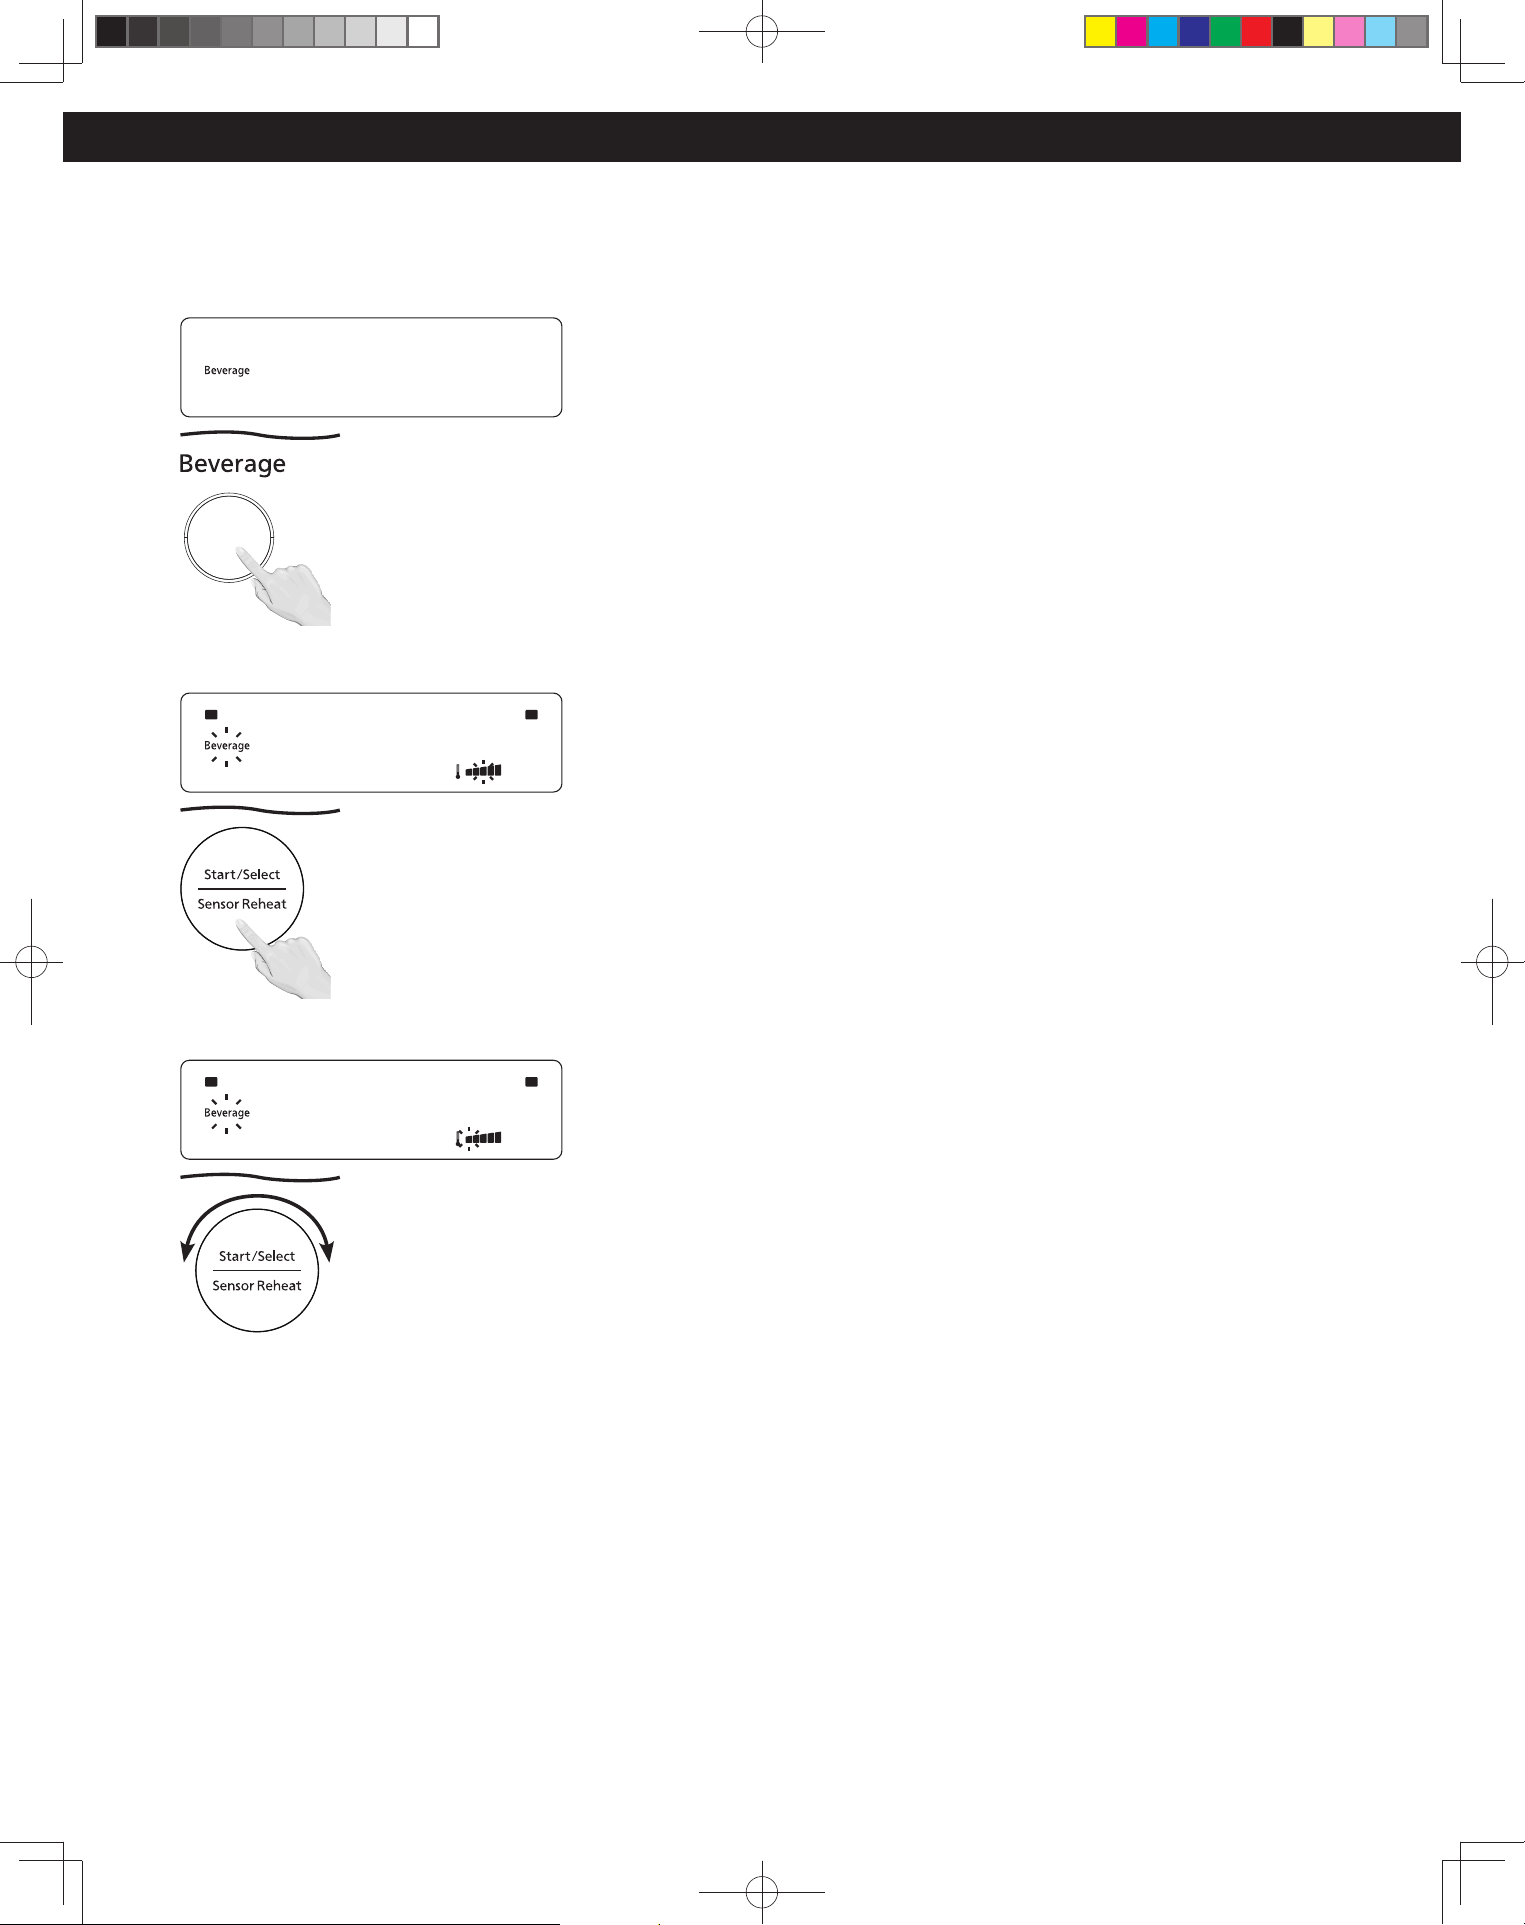
Beverage
(Simply press the pad to reheat beverage. It works
automatically without any settings.)
[Example: To reheat 1 cup of beverage on Low (Less-)]
1
Press Beverage once.
2
Press Start.
3
After pressing Start, you can adjust the temperature (level) from
Medium (Standard) within 14 seconds.
To Increase: Rotate the dial clockwise.
To Decrease: Rotate the dial counterclockwise.
The 5 available settings are:
Low → Medium-Low → Medium → Medium-High → High
(Less-) (Less) (Standard) (More) (More+)
(Adjust only if needed.)
NOTES:
1. It is suitable for reheating one cup of milk, coffee, etc. but not
suitable for alcohol.
2. Use a microwave safe cup. To prevent overflow, do not fill the
cup more than 80% with liquid for reheating. DO NOT COVER.
3. Overheated liquid can erupt if not mixed with air. Always stir
and check the temperature before serving.
4. The internal food temperature may differ from the set
temperature (level). But under-reheating is better than over-
reheating. Please add more time manually or utilize the
Temperature and More/Less selection after pressing Start.
Overheating will cause an increased risk of scalding, or water
eruption. Refer to page 4, item 19.
5. For even reheating, reheat only one cup of beverage at a time.
F0003DB70AP_EN.indd 19F0003DB70AP_EN.indd 19 2026/3/2 16:26:132026/3/2 16:26:13
20
Sensor Cook
Sensor Cook includes reheating breaded type foods, one
bowl cooking and other auto cook menus. Please refer next
page for auto menu numbers
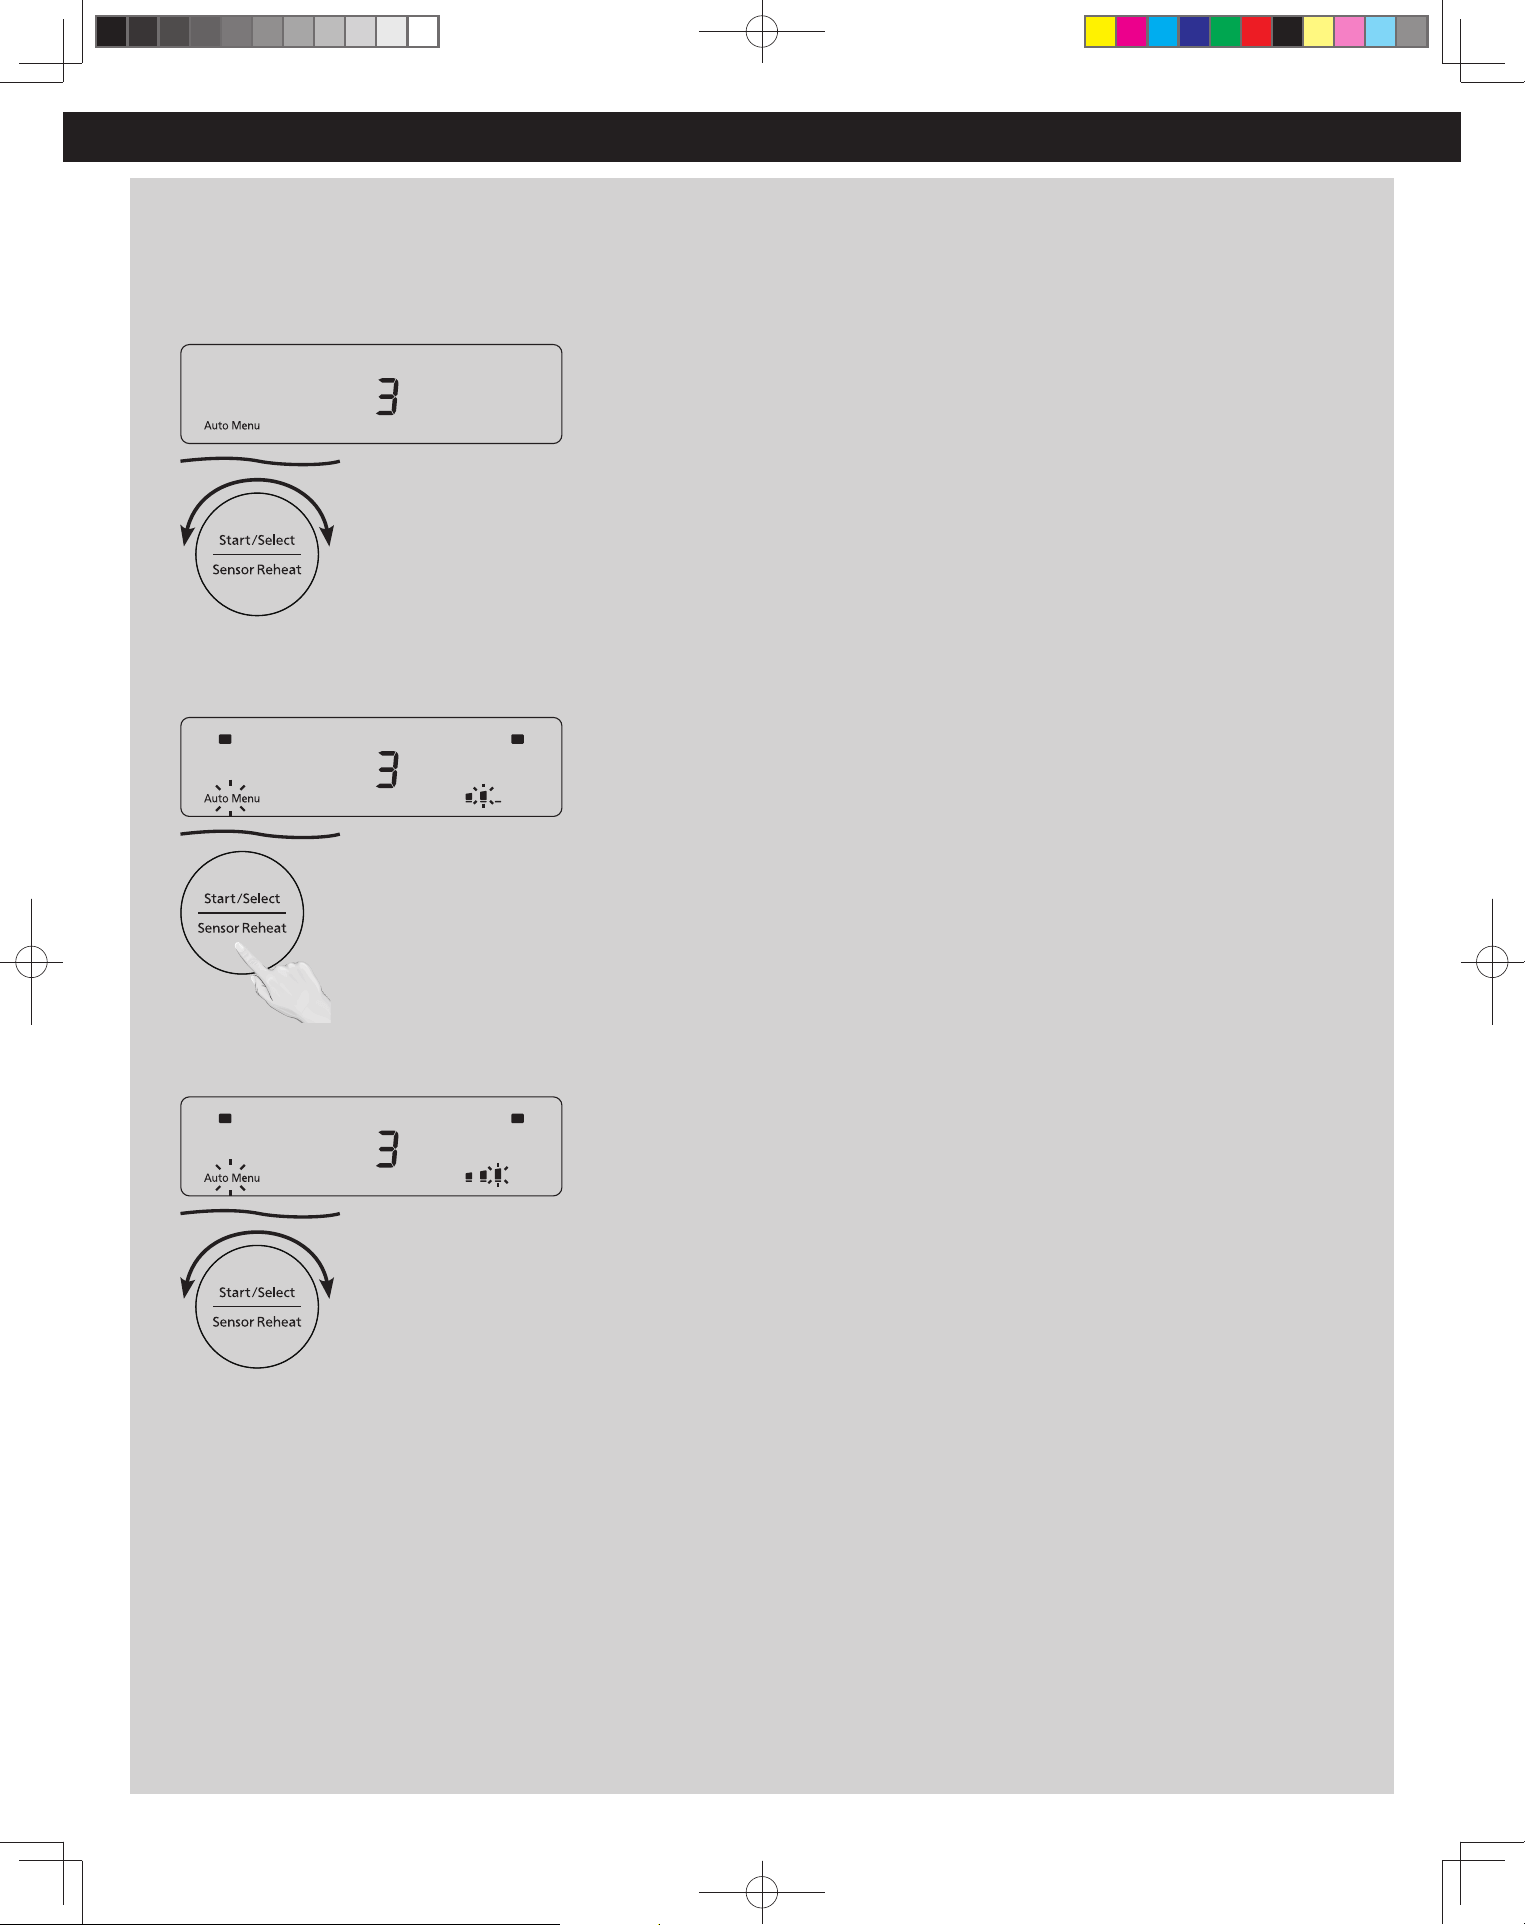
[Example: Set Sensor Cook Menu NO.3 on High (More)]
1
Turn the dial until the number corresponding to the desired food
appears in the display (see chart on the next page).
2
Press Start.
3
After pressing Start, you can adjust the temperature (level) from
Medium (Standard) within 14 seconds.
To Increase: Rotate the dial clockwise.
To Decrease: Rotate the dial counterclockwise.
The 3 available settings are:
Low → Medium → High
(Less) (Standard) (More)
(Adjust only if needed.)
Operation (continued)
What is one bowl recipe?
One bowl cooking is easy way to cook spaghetti, mac’n’cheese or
soup in the oven. You have 3 steps to do.
1. Put all ingredients in one glass bowl.
2. Seal with plastic wrap.
3. Put the bowl in the microwave oven and set one bowl cooking
menu. (No.2-No.7)
The Genius® 2.0 Sensor will monitor food for you for perfect result!
NOTES:
1. To reheat breaded type food, using Sensor Cook Menu NO.1 is
the best choice.
2. Do not open door before cooking is complete. Always stir and
check the temperature before serving.
3. After having used the Sensor Cook feature a few times, you
may decide you would prefer your food cooked to a different
doneness – that is why you would utilize the Temperature and
More/Less selection pad.
4.
Automatic features are provided for your convenience. If results
are not suitable to your individual preference, or if serving size
is other than what is listed on page 21, please refer to manual
cooking on page 14.
For the best results with One Bowl Cooking powered by The
Genius® 2.0 Sensor , follow these recommendations:
BEFORE Cooking:
1. The room temperature surrounding the oven should be below
95 °F (35 °C).
2. Food weight should not exceed the weight range on next page.
3. Be sure the flat table, the outside of the cooking containers and
the inside of the microwave oven are dry before placing food
in the oven. Residual beads of moisture turning into steam can
mislead the sensor.
4. Cover food with plastic wrap for one bowl cooking (No.2-No.7)
and Oatmeal. Paper towel or silicon lid are not suitable as it will
affect the sensor performance.
AFTER Cooking:
All foods should have a rest time.
F0003DB70AP_EN.indd 20F0003DB70AP_EN.indd 20 2026/3/2 16:26:132026/3/2 16:26:13
21
Operation (continued)
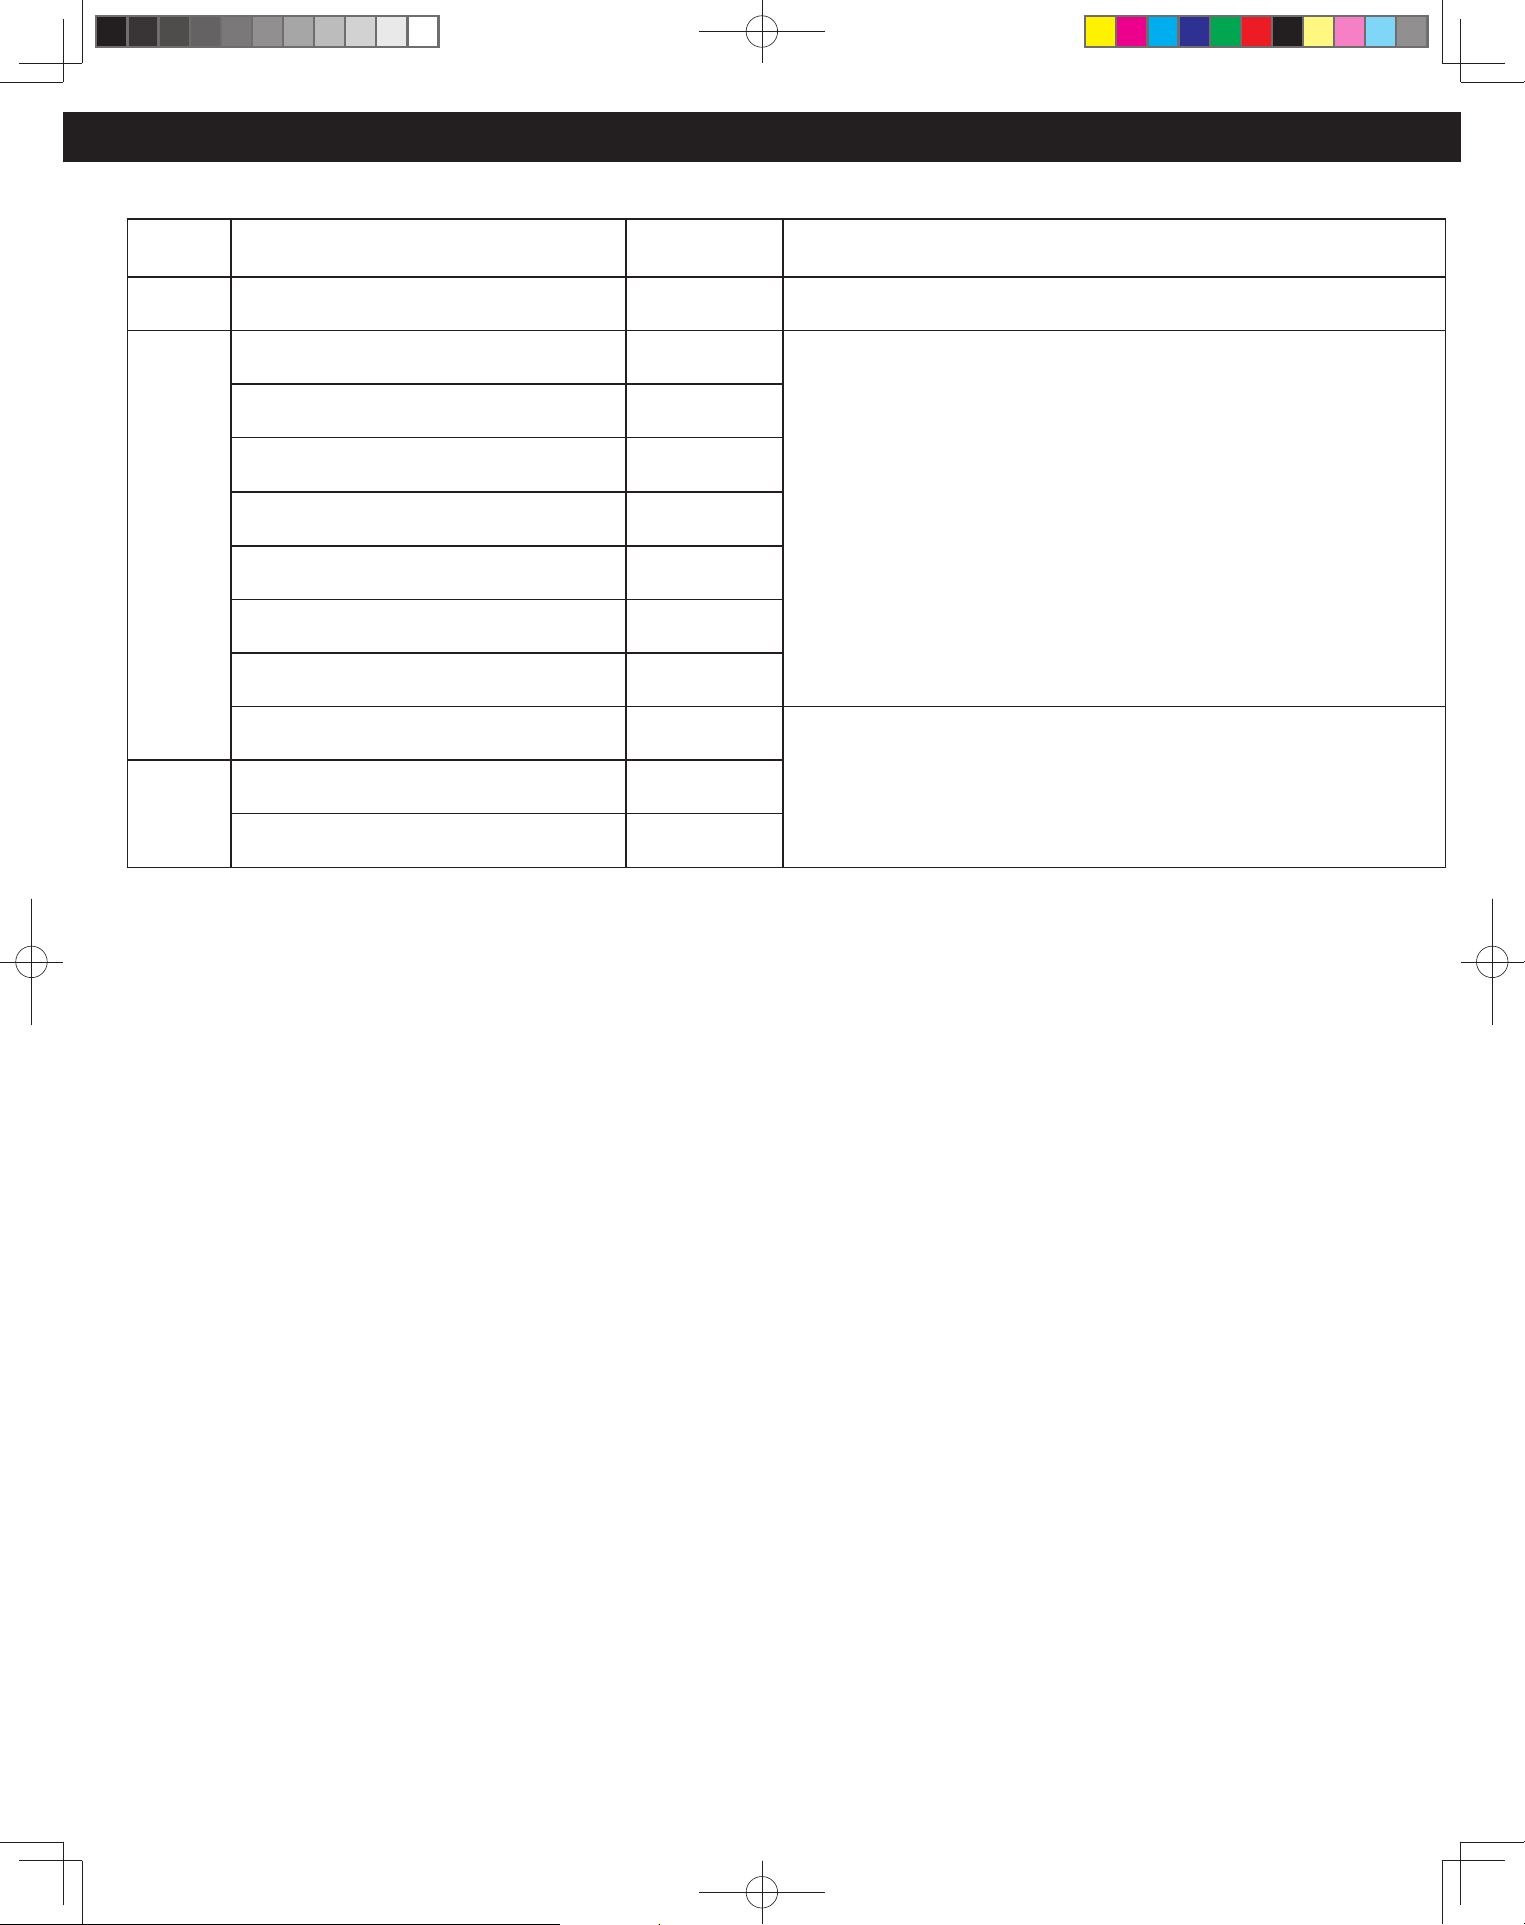
Sensor Cook Chart
See the chart below for Sensor Cook categories.
Category Programs
Serving/
Weight
Recommended Container and Hints
Reheat
1. Pizza, Mexican Foods, Sandwiches
4 – 8 oz.
(110 – 225 g)
microwave safe dish
Cook
2. One Bowl Spaghetti
1 serv. – 4 servs.
2.5 qt (approx. 10 in) microwave-safe bowl.
Cover with plastic wrap. Paper towel or silicon lid are not suitable as it will
affect the sensor performance.
3. One Bowl Pasta Sauce
1 serv. – 4 servs.
4. One Bowl Mac’n’Cheese
1 serv. – 4 servs.
5. One Bowl Soup
1 serv. – 4 servs.
6. One Bowl Chilli
1 serv. – 4 servs.
7. One Bowl Stew
1 serv. – 4 servs.
8. Oatmeal
½ – 1 cup
(50 – 100 g)
9. Potato
8 – 40 oz.
(225 – 1100 g)
microwave safe dish
Melt
10. Butter
2 – 16 oz.
(55 – 450 g)
11. Chocolate
2 – 16 oz.
(55 – 450 g)
1. Pizza, Mexican Foods, Sandwiches
For reheating breaded type foods such as chilled, purchased pizza,
Mexican foods such as tacos or burritos and sandwiches within the
weight range 4 - 8 oz.(110 - 225g). Remove all packaging and place
food in a microwave-safe dish. Select Program 1 and press Start to
cook.
2. One Bowl Spaghetti (Bolognese)
Ingredients (4 servs)
12 oz. (340 g) Spaghetti
4 oz. (110 g) Half medium onion, chopped
8 oz. (225 g) Ground beef
1 clove Garlic, chopped
8 oz. (225 g) Canned chopped tomatoes
2 cups (480 ml) Water
4 tbsp (60 ml) Olive oil
1 tsp (5 g) Salt
4 tbsp (60 g) Tomato Paste
Directions:
1. Stir water and oil together in a large 2.5 qt (approx. 10 in)
microwave-safe bowl.
2. Break the spaghetti in half and put into the bowl. Gently stir
to coat the pasta,ensure that the noodles are fully covered with
water.
3. Add in all the remaining ingredients except salt and tomato
paste.
4. Cover tightly with plastic wrap.
5. Place bowl into the microwave oven, turn dial to select Program
2 and press Start to cook.
6. After cooking, add salt and tomato paste. Stir well and enjoy.
Note:
The ingredients listed are for 4 servings. Feel free to adjust the
amounts proportionally depending on your needs.
3. One Bowl Pasta Sauce (Meat Sauce)
Ingredients (4 servs)
4 oz. (110 g) Half medium onion, chopped
16 oz. (450 g) Ground beef
1 clove Garlic, chopped
1 tbsp (10 g) Flour
14 oz. (390 g) Canned chopped tomatoes
4 tbsp (60 g) Tomato Paste
1 tbsp (15 g) Salt
Pepper (to taste)
Directions:
1. Place the Ground beef in a heatproof glass bowl approximately
2.5 qt (approx. 10 in) and coat it with flour and break apart meat
with a spatula.
2. Stir in all the remaining ingredients.
3. Cover tightly with plastic wrap.
4. Place bowl into the microwave oven, turn dial and select
Program 3 and press Start to cook.
5. After cooking, stir well and enjoy with noodles.
Note:
The ingredients listed are for 4 servings. Feel free to adjust the
amounts proportionally depending on your needs.
4. One Bowl Mac’n’Cheese (HOMEMADE)
Ingredients (3 servs)
7.25 oz. (206 g) Macaroni
3 tbsp (45 g) Butter
1½ cup (360 ml) Water
1 cup (240 ml) Milk
7 oz. (195 g) Shredded Cheddar Cheese
2 tbsp (20 g) Flour
Salt and Pepper (to taste)
F0003DB70AP_EN.indd 21F0003DB70AP_EN.indd 21 2026/3/2 16:26:132026/3/2 16:26:13
22
Operation (Continued)
Directions:
1. Cut the butter into cubes and put them into a large 2.5 qt
(approx. 10 in) microwave-safe bowl.
2. Add in Macaroni and water. Gently stir to coat.
3. Cover tightly with plastic wrap.
4. Put into the microwave oven, turn dial to select Program 4 and
press Start to cook.
5. Drain macaroni.
6. Add milk, shredded cheese, flour, salt and pepper to cooked
macaroni and mix well.
7. Cover tightly with plastic wrap.
8. Place bowl into the microwave oven, select Manual MW P5 and
press Start to cook for five minutes.
9. After cooking, stir well and enjoy.
For Boxed Mac & Cheese follow steps 1 through 3 in the homemade
recipe. Put into the microwave oven, turn dial to select Program 4
and press Start to cook. After cooking, drain macaroni and stir in
milk and cheese powder.
Note:
The ingredients listed are for 3 servings. Feel free to adjust the
amounts proportionally depending on your needs.
5. One Bowl Soup (Chicken Noodle soup)
Ingredients (3 servs)
2 oz. (55 g) Onion, diced
2 oz. (55 g) Celery, diced
2 oz. (55 g) Carrot, sliced
8 oz. (225 g) Chicken breast, cubbed
2 oz. (55 g) Noodles
2 cups (480 ml) Chicken Stock
Salt and Pepper (to taste)
Dried Basil (to taste)
Dried Oregano (to taste)
Directions:
1. Put all ingredients together – except basil and oregano–in a large
2.5 qt (approx. 10 in) microwave-safe bowl.
2. Cover tightly with plastic wrap.
3. Place bowl into microwave oven, turn dial to select Program 5
and press Start to cook.
4. After cooking, add basil and oregano. Stir well and enjoy.
Note:
The ingredients listed are for 3 servings. Feel free to adjust the
amounts proportionally depending on your needs.
6. One Bowl Chilli
Ingredients (3 servs)
4 oz. (110 g) Half medium onion, chopped
8 oz. (225 g) Ground beef
15 oz. (420 g) Canned red kidney beans (drained)
14 oz. (390 g) Canned chopped tomatoes
2 tbsp (30 g) Tomato Paste
1 tbsp (10 g) Flour
1 tsp (5 g) Chili powder
1 tsp (5 g) Cumin
Salt and Pepper (to taste)
Directions:
1. Place the ground beef in a large 2.5 qt (approx. 10 in) microwave
safe bowl and coat with flour.
2. Break up ground beef with spatula.
3. Add the rest of the ingredients to ground beef mixture, stir well.
4. Cover tightly with plastic wrap.
5. Place bowl into the microwave oven, turn dial to select Program
6 and press Start to cook.
6. After cooking, stir well and enjoy.
Note:
The ingredients listed for chilli are for 3 servings. Feel free to adjust
the amounts proportionally depending on your needs.
7. One Bowl Stew
Ingredients (2 servs)
8 oz. (225 g) Beef
4 oz. (110 g) Half medium onion, chopped
4 oz. (110 g) 2 Medium carrot
5 oz. (140 g) Medium potato
1 cup (240 ml) Beef broth (Cold)
2 tbsp (30 g) Tomato Paste
2 tbsp (20 g) Flour
1 tsp (5 g) Salt
Black pepper (to taste)
Directions:
1. Cut carrot into 1/4-inch pieces. Cut potato and beef into cubes.
2. Put beef and flour to a large micro-wave safe bowl and combine
well.
3. Add in the rest ingredients in the bowl and stir well.
4. Cover tightly with plastic wrap.
5. Place bowl into the microwave oven, turn dial to select
Program 7 and press Start to cook.
6. After cooking, caution to the hot steam.
Tips:
This function is suitable for tender beef cuts and is not
recommended for tougher ones, such as beef shank.
8. Oatmeal
Place oatmeal in a microwave safe serving bowl, Cover tightly with
plastic wrap. Follow manufacturers’ directions for preparation.
Select Program 8 and press Start to cook.
9. Potato
Pierce each potato with a fork 6 times spacing around surface.
Place in the center of the oven, at least 1 inch (2.5 cm) apart. Do
not cover. Select Program 9 and press Start to cook. Let stand 5
minutes to complete cooking.
10. Butter
Remove wrapper, cut butter into 1 inch (2.5 cm) cube, and place
into a microwave safe dish. Leave uncovered wrap, and put in the
center of the oven. Select Program 10 and press Start to melt.
After melting, stir until completely melted. If food needs more
time to melt or weight exceeds range, melt using Micro power P3.
11. Chocolate
Remove wrapper, separate chocolate into small pieces, and place
into a microwave safe dish. Leave uncovered, and put the dish in
the center of the oven. Select Program 11 and press Start to melt.
After melting, stir until completely melted. If food needs more
time to melt or weight exceeds range, melt using Micro power P3.
Note:
1.This function works best for melting baking chocolate.
2. Chocolate holds its shape even when softened.
Operation (continued)
F0003DB70AP_EN.indd 22F0003DB70AP_EN.indd 22 2026/3/2 16:26:132026/3/2 16:26:13
23
Microwave shortcuts
Food Power
Time
(in mins.)
Directions
To separate refrigerated Bacon,
16 oz. (450
g
)
P10 ½ Remove wrapper and place in microwave safe dish. After
reheating, use a plastic spatula to separate slices.
To soften refrigerated Butter,
1 stick, 4 oz. (110
g
)
To melt refrigerated Butter,
1 stick, 4 oz. (110
g
)
P3
P5
1
1½ – 2
Remove wrapper and place butter in a microwave safe dish
covered with lid or vented plastic wrap.
To melt Chocolate, 1 square,
1 oz. (28
g
)
To melt Chocolate,
½ cup (125 ml) chips
P3
P5
1 – 1½
1 – 1½
Remove wrapper and place chocolate in a microwave safe
dish. After melting, stir until completely melted.
NOTE: Chocolate holds its shape even when softened.
To toast Coconut, ½ cup (125 ml) P10 1 Place in a microwave safe dish. Stir every 30 seconds.
To soften Cream Cheese,
8 oz. (225
g
)
P3 1 – 1½ Remove wrapper and place in a microwave safe bowl.
To brown Ground Beef,
16 oz. (450
g
)
P10 4 – 5 Crumble into a microwave safe colander set into another
dish. Cover with plastic wrap. Stir twice. Drain grease.
To cook Vegetables,
Fresh 8 oz. (225
g
)
Frozen 10 oz. (280
g
)
Canned 15 oz. (420
g
)
P7
P7
P7
4 – 5
6 – 7
3½ – 4
All pieces should be the same size. Wash thoroughly, add 1
tbsp of water per ½ cup (125 ml) of vegetables, and cover
with lid or vented plastic wrap. Do not salt/butter until
after cooking.
Wash thoroughly, add 1 tbsp of water per ½ cup (125 ml)
of vegetables, and cover with lid or vented plastic wrap.
Do not salt/butter until after cooking. (Not suitable for
vegetables in butter or sauce.)
Empty contents into microwave safe serving bowl. Cover
with lid or vented plastic wrap.
To cook baked Potato,
6 – 8 oz. each (165 – 225
g
)
1 piece
2 pieces
P8
P8
4 – 5
6 – 7
Pierce each potato with a fork 6 times spacing around
surface. Place potato or potatoes on a plate at least 1 in (2.5
cm) apart. Do not cover. Let stand 5 minutes to complete
cooking.
To steam Hand Towel P10 ½ Soak in water, then wring out excess. Place on a microwave
safe dish.
Heat. Present immediately.
To soften Ice Cream,
½ gallon (2 L)
P3 1 – 1½ Check often to prevent melting.
Cup of liquid
To boil water, broth, etc.
1 cup (240 ml)
2 cups (480 ml)
P10
P10
1½ – 2
2½ – 3
Overheated liquids can erupt if not stirred. Do not
heat liquids in microwave oven without stirring before
reheating.
Cup of liquid
To warm Beverage,
1 cup (240 ml)
2 cups (480 ml)
P7
P7
1½ – 2
2½ – 3
To roast Nuts, 1½ cups (340
g
) P10 3 – 4 Spread nuts into a 9-inch (23 cm) microwave safe pie plate.
Stir occasionally.
To toast Sesame Seeds,
¼ cup (55
g
)
P10 2 – 2½ Place in a small microwave safe bowl. Stir twice.
F0003DB70AP_EN.indd 23F0003DB70AP_EN.indd 23 2026/3/2 16:26:132026/3/2 16:26:13
24
Food Power
Time
(in mins.)
Directions
To skin Tomatoes, (one at a time) P10 ½ Place tomato into a microwave safe bowl containing
boiling water. Rinse and peel. Repeat for each tomato.
To remove Cooking Odours P10 5 Combine 1 to 1½ cups (240 – 375 ml) water with the juice
and peel of one lemon in a 2 quart microwave safe bowl.
After water nishes boiling, wipe interior of oven with a
cloth. You can also use a Combo of several whole cloves
and ¼ cup of vinegar with 1 cup of water.
Microwave shortcuts (continued)
Defrosting Chart
Food
Defrosting Time
at P3
Method Rest Time
Meat
Beef/Lamb/Pork joint
18 oz. (500
g
)
8 – 9 mins Place in a suitable dish or on an upturned saucer or use a
microwave safe rack. Turn once. .
30 mins
Minced beef 18 oz. (500
g
) 6 mins 30 secs Place in a suitable dish. Break up and turn once.
5 mins
Chops 16 oz. (450
g
) 6 – 7 mins Place in a suitable dish in a single layer. Turn once.
5 mins
Sausages 16 oz. (450
g
) 6 mins Place in a suitable dish in a single layer. Turn twice.
5 mins
Bacon slices 18 oz. (500
g
) 4 – 6 mins Place in a suitable dish. Turn and separate twice.
3 mins
Stewing steak 16 oz. (450
g
) 6 mins Place in a suitable dish. Break up frequently.
5 mins
Whole chicken 18 oz. (500
g
) 6 – 8 mins Place in a suitable dish on an upturned saucer or use a
microwave safe rack. Turn once.
10 mins
Chicken portions 16 oz. (450
g
) 5 – 7 mins Place in a suitable dish in a single layer. Turn once.
10 mins
Fish
Whole 12 oz. (340
g
) 7 – 9 mins Place in a suitable dish. Turn once. .
5 mins
Fillets/Steak
16 oz. (450
g
)
5 – 6 mins Place in a suitable dish. Turn once.
5 mins
Prawns 16 oz. (450
g
) 5 – 7 mins Place in a suitable dish. Stir halfway during defrosting.
5 mins
General
Bread sliced 14 oz. (390
g
) 4 mins Place on a plate. Separate and rearrange during
defrosting.
5 mins
Slice of bread 2 oz. (55
g
) 20 secs – 30 secs Place on a plate. 1 – 2 mins
Pastry 18 oz. (500
g
) 4 mins Place on a plate. Turn halfway. 5 – 10 mins
Soft fruit 16 oz. (450
g
) 5 – 6 mins Place in a suitable dish. Stir once during defrosting. 2 mins
F0003DB70AP_EN.indd 24F0003DB70AP_EN.indd 24 2026/3/2 16:26:132026/3/2 16:26:13
25
Reheating Chart
The times given in the charts below are a guideline only, and will vary depending on starting temperature, dish size etc.
Food Weight/ Quantity Power Level
Time to Select
(approx)
Instructions/Guidelines
Canned beans, pasta
Baked beans 8 oz. (225
g
) P10 2 mins Place in a micro-safe bowl on base.
Cover.
16 oz. (450
g
) P10 3 mins
Baked beans & sausages/burgers 16 oz. (450
g
) P10 3 – 4 mins
Broad beans 11 oz. (310
g
) P10 2 mins
Butter beans 8 oz. (225
g
) P10 1 min 30 secs
Canned meat
Hot dogs (drained) 16 oz. (450
g
) P10 2 – 3 mins Place in a micro-safe bowl on base.
Cover.
Stewed steak 16 oz. (450
g
) P10 3 – 4 mins
Canned soups
Cream of mushroom 16 oz. (450
g
) P10 3 – 4 mins Place in a micro-safe bowl on base.
Cover. Stir halfway.
Minestrone 16 oz. (450
g
) P10 2 mins 30 secs
Canned vegetables - Drain where appropriate
Carrots, whole 12 oz. (340
g
) P10 2 mins Place in a micro-safe bowl on base.
Cover. Stir halfway.
Carrots, baby 11 oz. (310
g
) P10 2 mins
Peas, mushy 12 oz. (340
g
) P10 2 mins
Peas, garden 12 oz. (340
g
) P10 2 mins – 2 mins 30
secs
Place in a micro-safe bowl on base.
Cover.
Sweetcorn 8 oz. (225
g
) P10 1 min 30 secs Place in a micro-safe bowl on base.
Cover. Stir halfway.
12 oz. (340
g
) P10 2 – 3 mins
Tomatoes, whole 14 oz. (390
g
) P10 3 mins 30 secs Place in a micro-safe bowl on base.
Cover.
Pastry products – precooked – N.B. Pastries reheated by microwave will have a soft base.
Quiche 16 oz. (450
g
) P10 4 – 5 mins Place in micro-safe dish on base. Do
not cover.
Xmas mince pies 4 oz. (110
g
) P10 10 – 20 secs Place in micro-safe dish on base. Do
not cover.
Pastries/slices 5 oz. (140
g
) P10 1 min 30 secs Place in glass dish on base.
Plated meals – homemade – chilled
Child size 1 P10 2 – 3 mins Place on a micro-safe plate on base.
Cover.
Adult size 1 P10 4 – 5 mins
Puddings and desserts- Transfer puddings to a micro-safe/heatproof dish
Bread and butter pudding
(chilled)
18 oz. (500
g
) P10 3 – 4 mins Place on base. Do not cover.
Apple pie (chilled) 18 oz. (500
g
) P10 3 – 4 mins Place in micro-safe dish on base.
Do not cover
Custard (chilled) 1¼ cups (300 ml) P10 2 mins – 2 mins
30 secs
Place in large jug. Stir during
reheating.
F0003DB70AP_EN.indd 25F0003DB70AP_EN.indd 25 2026/3/2 16:26:132026/3/2 16:26:13
26
Cooking Chart
Food Weight/ Quantity Power Level
Time to Select
(approx)
Instructions/Guidelines
Bacon – from raw
Slices 12 oz. (340
g
) P10 4 – 6 mins or 1 min
per slice
Place on micro-safe rack or plate on
base and cover with kitchen towel to
minimise splatter.
Steaks 8 oz. (225
g
) P10 4 – 5 mins Place on micro-safe rack or plate on
base. Cover.
Beans & pulses – should be pre-soaked (except lentils)
Black eyed beans 8 oz. (225
g
) P10 then P3 10 mins
25 – 30 mins
Use 2½ cups (600 ml) boiling water in
a large bowl. Cover.
Chick peas 8 oz. (225
g
) P10 then P3 10 mins
45 mins
Lentils 8 oz. (225
g
) P5 10 – 15 mins
Red kidney beans 8 oz. (225
g
) P10 then P3 15 mins
35 – 40 mins
Beef - Joints from raw – Caution: Hot fat! Remove dish with care.
Mince 18 oz. (500
g
) P10 then P5 5 mins
5 mins
Place in micro-safe dish with stock
and seasonings on base. Stir halfway.
Cover.
Chicken from raw – Caution: Hot Fat! Remove oven accessories with care.
Breasts, boneless 26 oz. (730
g
) P5 14 – 16 mins Place on micro-safe rack or plate on
base. Cover.
Drumsticks 28 oz. (780
g
) P5 14 – 16 mins
Eggs – Scrambled
Egg 1 P10 30 secs Add 1 tbsp (15 ml) of milk for each
egg used. Beat eggs, milk and knob of
butter together. Cook for 1st cooking
time then stir.
Cook for 2nd cooking time then stand
for 1 minute.
P10 30 secs
Eggs 2 P10 50 secs
P10 40 secs
Eggs 3 P10 1 min 20 secs
P10 40 secs
Fish – Fresh from raw
Fillets 10 oz. (280
g
) P10 3 – 4 mins Place in micro-safe dish. Add 2 tbsp
(30 ml) of liquid. Cover.
Steaks 8 oz. (225
g
) P10 3 – 4 mins
Whole 11 oz. (310
g
) P10 3 – 4 mins
Lamb – from raw – Caution: Hot Fat! Remove accessory with care.
Chops, cutlets 11 oz. (310
g
) P5 4 – 6 mins Place in micro-safe dish or rack on
base. Cover.
Chops, loin 20 oz. (560
g
) P5 5 – 7 mins Place in micro-safe dish or rack on
base. Cover.
Stewing lamb 16 oz. (450
g
) P10 then P4 10 mins
40 mins
Place in micro-safe dish with stock
and vegetables on base. Stir halfway.
Cover.
Pasta - Place in a large 3 litre microwave safe bowl.
Twists 8 oz. (225
g
) P10 8 – 10 mins Use 1 litre boiling water. Add 1 tbsp
(15 ml) oil. Cover. Stir halfway.
Macaroni 8 oz. (225
g
) P10 10 – 12 mins
Spaghetti / tagliatelle 8 oz. (225
g
) P10 8 – 10 mins Use 1½ litres boiling water. Add 1 tbsp
(15 ml) oil. Cover. Stir halfway.
Pasta shells - i.e. conchiglie 8 oz. (225
g
) P10 10 – 12 mins
F0003DB70AP_EN.indd 26F0003DB70AP_EN.indd 26 2026/3/2 16:26:132026/3/2 16:26:13
27
Food Weight/ Quantity Power Level
Time to Select
(approx)
Instructions/Guidelines
Pizza – fresh chilled – N.B. Remove all packaging. Pizzas will have a soft base if cooked by microwave only.
Deep pan, ham 14 oz. (390
g
) P10 4 – 6 mins Place on micro-safe plate on base. Do
not cover.
Pork – from raw – Caution: Hot Fat! Remove oven accessories with care.
Joints
-
P5 15 – 18 mins
per 16 oz. (450
g
)
Place on upturned saucer in micro-
safe dish on base. Turn joint over
halfway during cooking. Drain o fat
during cooking.
Ham covered with water
-
P10 then P5 15 mins
25 – 30 mins per 16
oz. (450
g
)
Place in large casserole dish with lid
and cover with water.
Fresh vegetables – place in shallow micro-safe dish
Broad beans 16 oz. (450
g
) P10 5 – 6 mins
Add 6 tbsp (90 ml) water. Cover.
Beetroot 16 oz. (450
g
) P5 12 – 15 mins
Brussel sprouts 16 oz. (450
g
) P10 8 – 9 mins
Cabbage – sliced 16 oz. (450
g
) P10 8 – 10 mins
Carrots – sliced 16 oz. (450
g
) P10 8 – 10 mins
Brocolli 16 oz. (450
g
) P10 9 – 11 mins
Courgettes 16 oz. (450
g
) P10 5 mins
Corn on the cob 16 oz. (450
g
) P10 6 – 7 mins
Leeks – sliced 16 oz. (450
g
) P10 7 – 8 mins
Mushrooms 16 oz. (450
g
) P10 5 mins
Spinach 16 oz. (450
g
) P10 6 mins
Swede - cubed 16 oz. (450
g
) P10 8 – 12 mins
Frozen vegetables - place in shallow micro-safe dish.
Beans 16 oz. (450
g
) P10 8 – 9 mins
Add 2 tbsp (30 ml) water. Cover.
Beans – green 16 oz. (450
g
) P10 8 – 9 mins
Brocolli 16 oz. (450
g
) P10 8 – 9 mins
Brussels sprouts 16 oz. (450
g
) P10 9 – 10 mins
Cabbage – shredded 16 oz. (450
g
) P10 7 – 8 mins
Carrots – sliced 16 oz. (450
g
) P10 8 – 9 mins
Cauliflower 16 oz. (450
g
) P10 9 – 10 mins
Peas 16 oz. (450
g
) P10 7 – 8 mins
Sweetcorn 16 oz. (450
g
) P10 7 – 8 mins
Cooking Chart (continued)
F0003DB70AP_EN.indd 27F0003DB70AP_EN.indd 27 2026/3/2 16:26:132026/3/2 16:26:13
28
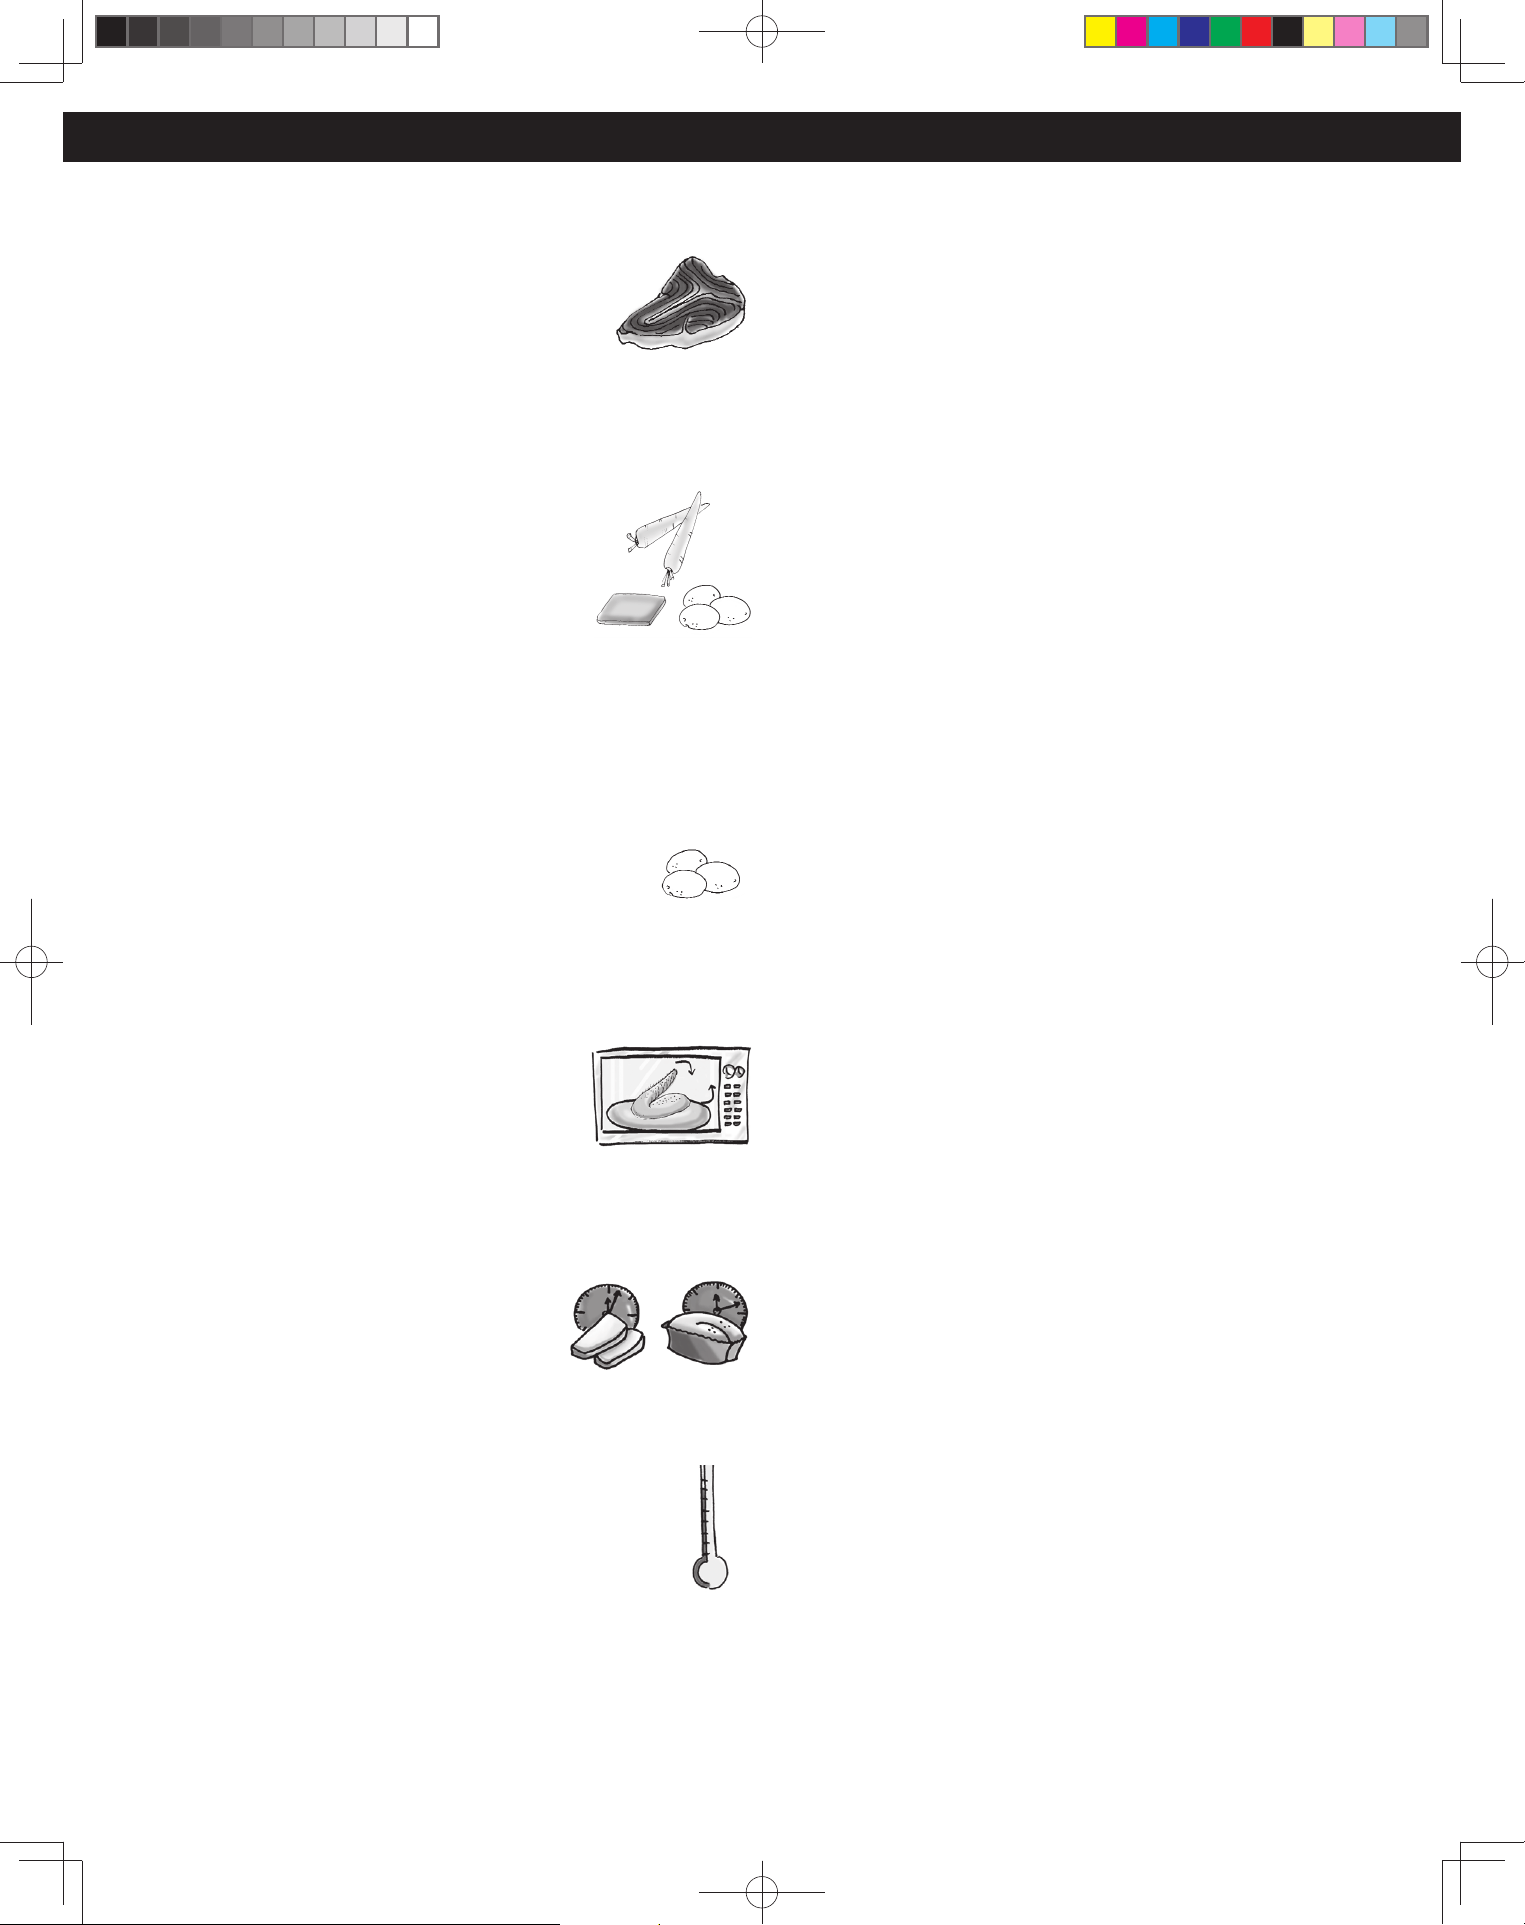
Food Characteristics
Bone and Fat
Both bone and fat affect cooking. Bones may cause
irregular cooking. Meat next to the tips of bones may
overcook while meat positioned under a large bone,
such as a ham bone, may be undercooked. Large
amounts of fat absorb microwave energy and the meat
next to these areas may overcook.
Density
Porous, airy foods such as breads, cakes or rolls take
less time to cook than heavy, dense foods such as
potatoes and roasts. When reheating donuts or other
foods with different centers be very careful. Certain
foods have centers made with sugar, water, or fat and
these centers attract microwaves (for example, jelly
donuts). When a jelly donut is reheated, the jelly can
become extremely hot while the exterior remains
warm to the touch. This could result in a burn if the food is not allowed to
cool properly in the center.
Quantity
Two potatoes take longer to cook than one potato. As the
quantity of the food decreases so does the cooking time.
Overcooking will cause the moisture content in the food
to decrease and a fire could result. Never leave microwave
unattended while in use.
Shape
Uniform sizes heat more evenly. The thin end of a
drumstick will cook more quickly than the meaty end.
To compensate for irregular shapes, place thin parts
toward the center of the dish and thick pieces toward
the edge.
Size
Thin pieces cook more quickly than thick pieces.
Starting Temperature
Foods that are at room temperature take less time to cook than
if they are chilled, refrigerated or frozen.
Cooking Techniques
Piercing
Foods with skins or membranes must be pierced, scored or have a strip of
skin peeled before cooking to allow steam to escape. Pierce clams, oysters,
chicken livers, whole potatoes and whole vegetables. Whole apples or
new potatoes should have a 1-inch (2.5 cm) strip of skin peeled before
cooking. Score sausages and frankfurters. Do not Cook/Reheat whole eggs,
with or without the shell. Steam buildup in whole eggs may cause them to
explode, and possibly damage the oven or cause injury. Reheating SLICED
hard-boiled eggs and cooking SCRAMBLED eggs is safe.
Browning
Foods will not have the same brown appearance as conventionally cooked
foods or those foods which are cooked utilizing a browning feature. Meats
and poultry may be coated with browning sauce, Worcestershire sauce,
barbecue sauce or shake-on browning sauce. To use, combine browning
sauce with melted butter or margarine and brush on before cooking. For
quick breads or muffins, brown sugar can be used in the recipe in place of
granulated sugar, or the surface can be sprinkled with dark spices before
baking.
Spacing
Individual foods, such as baked potatoes, cupcakes and appetizers, will
cook more evenly if placed in the oven equal distances apart. When
possible, arrange foods in a circular pattern.
Covering
As with conventional cooking, moisture evaporates during microwave
cooking. Casserole lids or plastic wrap are used for a tighter seal. When
using plastic wrap, vent the plastic wrap by folding back part of the plastic
wrap from the edge of the dish to allow steam to escape. Loosen or
remove plastic wrap as recipe directs for standing time. When removing
plastic wrap covers, as well as any glass lids, be careful to remove them
away from you to avoid steam burns. Various degrees of moisture
retention are also obtained by using wax paper or paper towels.
Cooking Time
Cooking times will vary because of food shape variations, starting
temperature, and regional preferences. Always cook food for the minimum
cooking time given in a recipe and check for doneness. If the food is
undercooked, continue cooking. It is easier to add time to an undercooked
product. Once the food is overcooked, nothing can be done.
Food Characteristics and Cooking Techniques
F0003DB70AP_EN.indd 28F0003DB70AP_EN.indd 28 2026/3/2 16:26:132026/3/2 16:26:13
29
Stirring
Stirring is usually necessary during microwave cooking. Always bring
the cooked outside edges toward the center and the less cooked center
portions toward the outside of the dish.
Rearranging
Rearrange small items such as chicken pieces, shrimp, hamburger patties
or pork chops. Rearrange pieces from the edge to the center and pieces
from the center to the edge of the dish.
Turning
It is not possible to stir some foods to distribute the heat evenly. At times,
microwave energy will concentrate in one area of the food. To help ensure
even cooking, these foods need to be turned. Turn over large foods, such
as roasts or turkeys, halfway through cooking.
Standing Time
Most foods will continue to cook by conduction after the microwave oven
is turned off. After cooking meat, the internal temperature will rise 5 °F to
15 °F (3 °C to 8 °C), if allowed to stand, tented with foil, for 10 to 15 minutes.
Casseroles and vegetables need a shorter amount of standing time, but
this standing time is necessary to allow foods to complete cooking to the
center without overcooking on the edges.
Test for Doneness
The same tests for doneness used in conventional cooking may be used
for microwave cooking. Meat is done when fork-tender or splits at fibers.
Chicken is done when juices are clear yellow and drumstick moves freely.
Fish is done when it flakes and is opaque. Cake is done when a toothpick or
cake tester is inserted and comes out clean.
Check foods to see that they are cooked to the United States Department of
Agriculture’s recommended temperatures.
To test for doneness, insert a meat thermometer in a thick or dense area
away from fat or bone. NEVER leave the thermometer in the food during
cooking, unless it is approved for microwave oven use.
Cook all food to these minimum internal temperatures as measured
with a food thermometer before removing food from oven. For
reasons of personal preference, you may choose to cook food at
higher temperatures.
Product
Minimum Internal
Temperature & Standing Time
Beef, Pork, Veal & Lamb
Steaks, chops, roasts
145 °F (63 °C) and allow to rest
for at least 3 minutes
Ground meats 160 °F (71 °C)
Ham, fresh or smoked
(uncooked)
145 °F (63 °C) and allow to rest
for at least 3 min.
Fully Cooked Ham
(to reheat)
Reheat cooked hams
packaged in USDA-inspected
plants to 140 °F (60 °C); all oth-
ers to 165 °F (74 °C).
All Poultry (breasts, whole
bird, legs, thighs, and wings,
ground poultry, and stuffing)
165 °F (74 °C)
Eggs 160 °F (71 °C)
Fish & Shellfish 145 °F (63 °C)
Leftovers 165 °F (74 °C)
Casseroles 165 °F (74 °C)
Food Characteristics and Cooking Techniques (continued)
F0003DB70AP_EN.indd 29F0003DB70AP_EN.indd 29 2026/3/2 16:26:132026/3/2 16:26:13
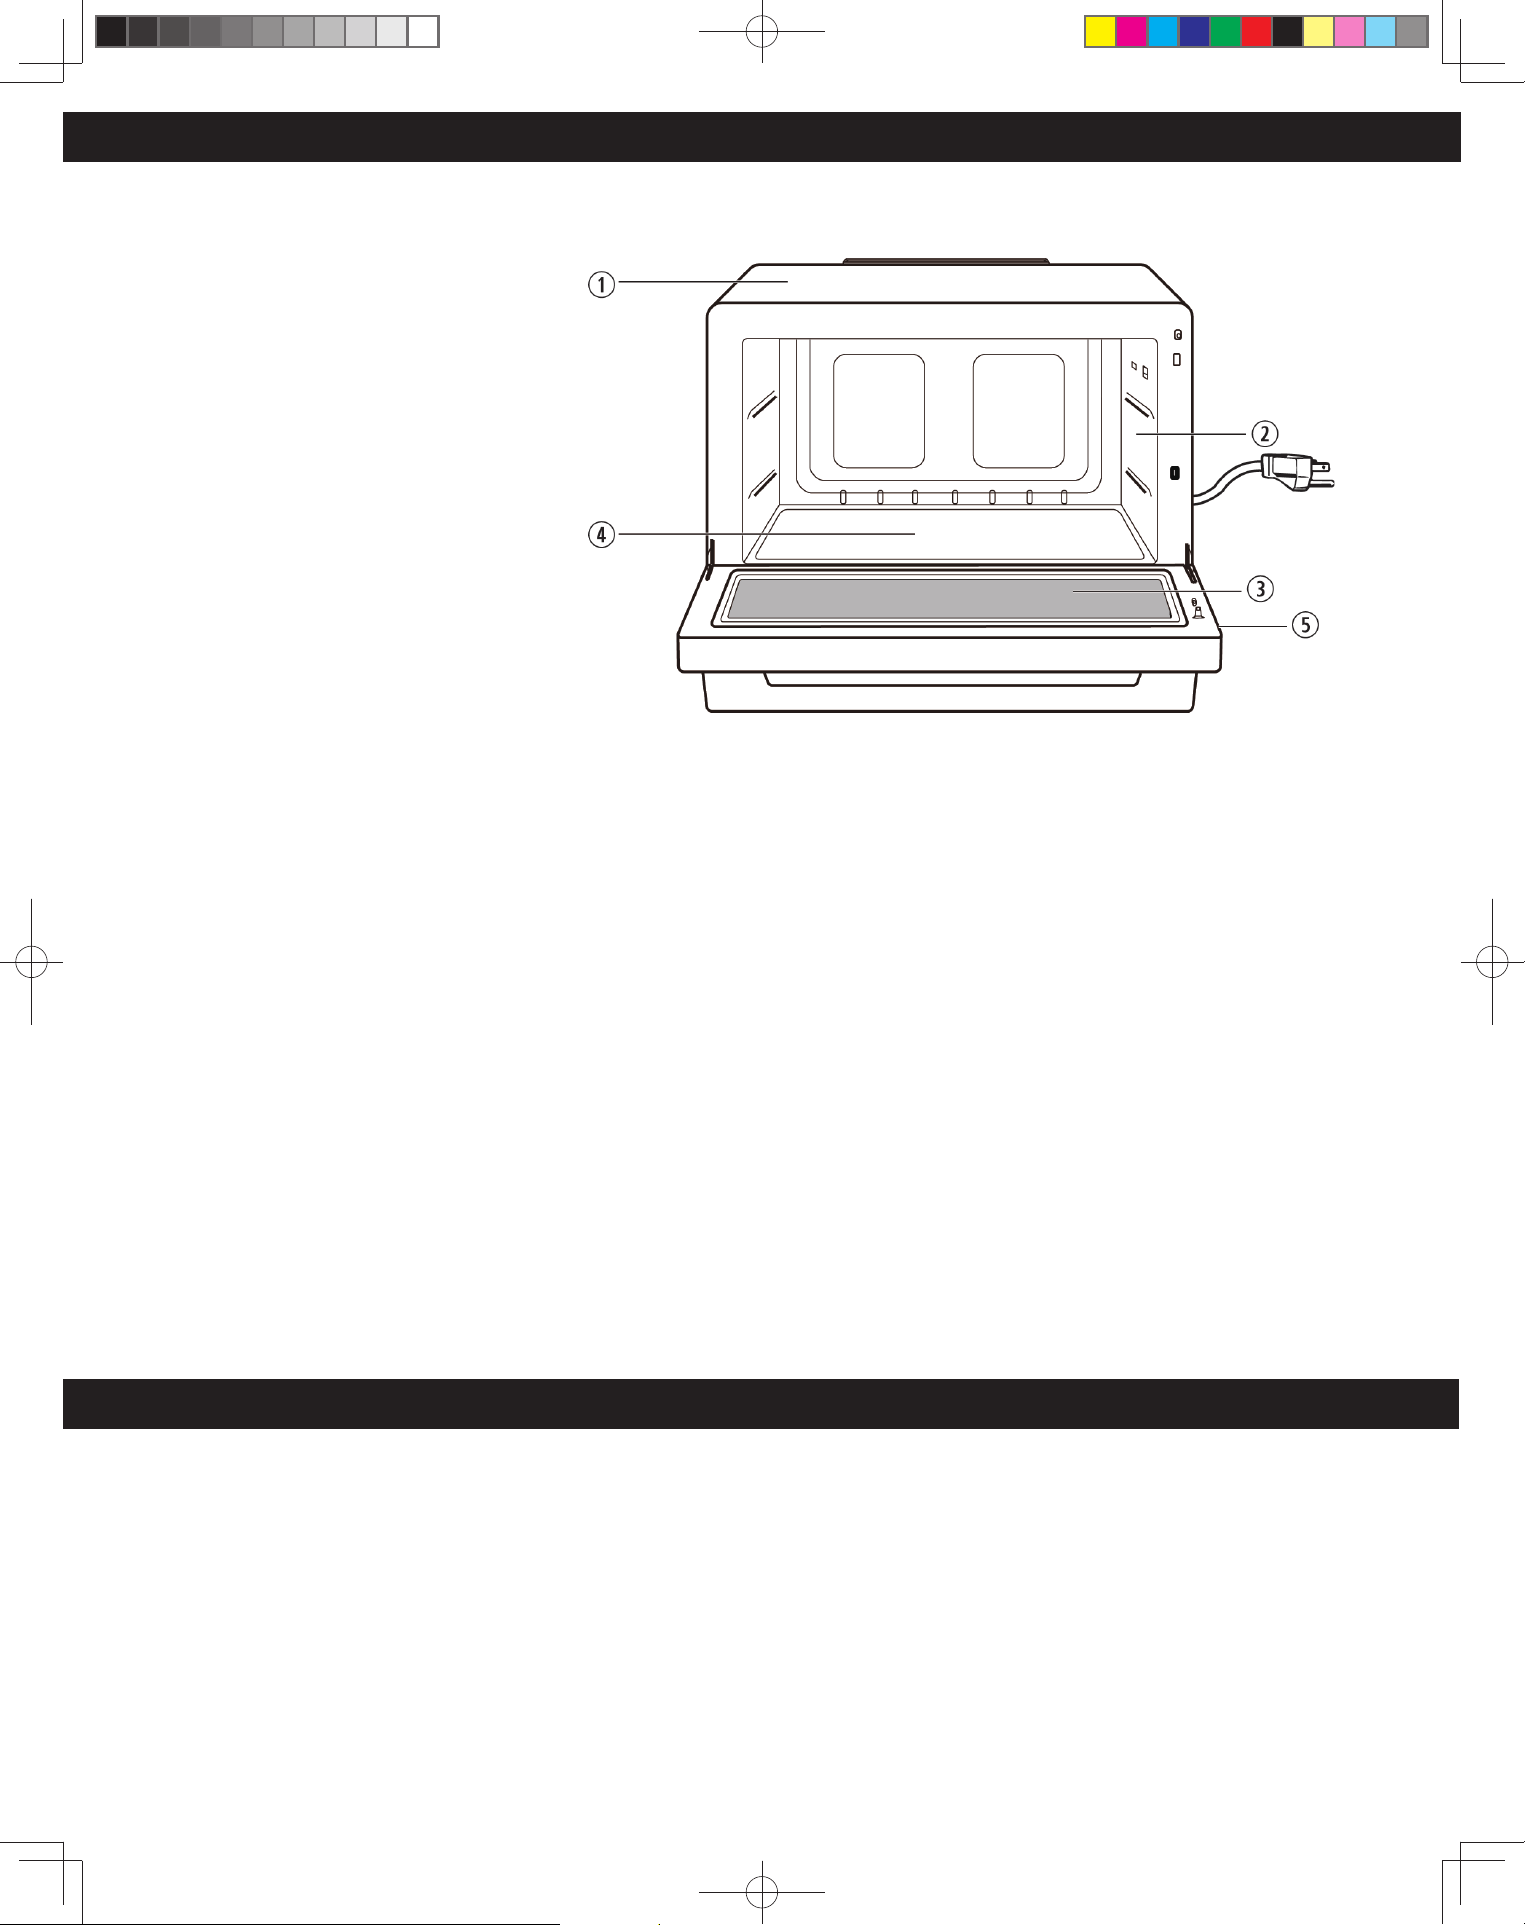
30
Care and Cleaning of Your Microwave Oven
Please see below and the following page
for particular cleaning instructions for
each section of the oven.
BEFORE CLEANING: Unplug oven at wall
outlet. If outlet is inaccessible, leave oven
door open while cleaning.
AFTER CLEANING: Press the Stop/Reset
Pad to clear the Display.
1. Outside oven surfaces: Clean with a
damp cloth. To prevent damage to the
operating parts inside the oven, water
should not be allowed to seep into
ventilation openings.
2. Inside the Oven: Wipe with a damp
cloth after using. Mild detergent may
be used if needed. Do not use harsh
detergents or abrasives.
3. Oven Door: Wipe with a soft dry cloth
when steam accumulates inside or
around the outside of the oven door.
During cooking, especially under high
humidity conditions, steam is given
off from the food. (Some steam will
condense on cooler surfaces, such as the oven door. This is normal.)
4. Flat Table: Always clean the flat table after cooling down with a mild detergent and wipe to dry.
5. Control Panel: Do not allow the Control Panel to become wet. Clean with a soft, damp cloth. Do not use detergents, abrasives or
spray on cleaners on the Control Panel. After cleaning tap Stop/Reset pad to clear display window.
AS WITH ANY COOKING APPLIANCE, MICROWAVE OVENS REQUIRE THE SAME LEVEL OF CARE TO PREVENT OVERHEATING OR
DAMAGE. IT IS IMPORTANT TO KEEP THE OVEN CLEAN AND DRY. FOOD RESIDUE AND CONDENSATION MAY CAUSE
RUSTING OR ARCING AND DAMAGE TO THE OVEN. AFTER USE, WIPE DRY ALL SURFACES,
INCLUDING VENT OPENINGS, OVEN SEAMS, AND UNDER FLAT TABLE.
Purchase Parts, Accessories and Instruction Books online for all Panasonic Products by visiting our Web Site at:
shop.panasonic.com/support
Parts Available to Order
Instructions/Operating Manual (this book) .....................................................F0003DB70AP
Shop Accessories
NOTE:
The illustration is for reference only.
F0003DB70AP_EN.indd 30F0003DB70AP_EN.indd 30 2026/3/2 16:26:132026/3/2 16:26:13
31
Before Requesting Service
See below before calling for service, as most problems can easily be remedied by following these simple solutions:
Problem Solution
The oven causes TV
interference.
Some radio, TV, Wi-Fi, cordless telephone, baby monitor, blue tooth or
other wireless equipment interference might occur when you cook with the
microwave oven. This interference is similar to the interference caused by small
appliances such as mixers, vacuums, blow dryers, etc. It does not indicate a
problem with your oven.
Steam accumulates
on oven door and
warm air comes from
the oven vents.
During cooking, steam and warm air are given off from the food. Most of the
steam and warm air are removed from the oven by the air which circulates in the
oven cavity. However, some steam will condense on cooler surfaces such as the
oven door. This is normal. After use, the oven should be wiped dry (see page 30).
Oven will not turn on.
The oven is not plugged in securely or needs to be reset; remove plug from
outlet, wait ten seconds and re-insert.
Main circuit breaker or main fuse is tripped; reset main circuit breaker or replace
main fuse.
There is a problem with the outlet; plug another appliance into the outlet to
check if it is working.
Oven will not start
cooking.
The door is not completely closed; close the oven door securely.
Start was not pressed after programming; press Start.
Another program is already entered into the oven; press Stop/Reset to cancel
the previous program and enter new program.
The program is not correct; program again according to the Owner’s Manual.
Stop/Reset has been pressed accidentally; program oven again.
“
” rotates in the
display window.
The fan is operating to cool the electric components. It will disappear after the
fan stops.
The “
” appears in
the display.
The CHILD SAFETY LOCK was activated by pressing Stop/Reset three times;
Deactivate CHILD SAFETY LOCK by pressing Stop/Reset three times.
The oven stops
cooking and nothing
appears in the display
windows.
The oven’s power supply has failed; please contact an authorized Service Center
(see next page).
F0003DB70AP_EN.indd 31F0003DB70AP_EN.indd 31 2026/3/2 16:26:132026/3/2 16:26:13
32
Limited Warranty (Only for U.S.A.)
Panasonic Products Limited Warranty
Limited Warranty Coverage (For USA Only)
If your product does not work properly because of a defect in materials or
workmanship, Panasonic Consumer Electronics Corporation (referred to as
“the warrantor”) will, for the length of the period indicated on the chart below,
which starts with the date of product receipt (“warranty period”), at its option
either (a) repair your product with new or refurbished parts, (b) replace it with
a new or a refurbished equivalent value product, or (c) refund your purchase
price. The decision to repair, replace or refund will be made by the warrantor.
Product or Part Name Labor Parts
ALL PARTS (EXCEPT MAGNETRON TUBE) 1 yr. 1 yr.
MAGNETRON TUBE 1 yr. 5 yrs.
During the “Labor” warranty period there will be no charge for labor. During
the “Parts” warranty period, there will be no charge for parts.
This warranty only applies to products purchased and serviced in the United
States. This warranty is extended only to the original purchaser of a new
product which was not sold “as is”.
Mail-In Service – Online Repair Request
Online Repair Request
To submit a new repair request, and for quick repair status visit our Web
Site at: http://shop.panasonic.com/support
When shipping the unit, carefully pack and send it in the original (or supplied)
carton. Include a letter detailing the complaint along with the bill of sales and
provide a daytime phone number where you can be reached. A valid
registered receipt is required under the Limited Warranty.
When shipping Lithium Ion batteries please visit our web site at
http://shop.panasonic.com/support as Panasonic is committed to
providing the most up to date information.
IF REPAIR IS NEEDED DURING THE WARRANTY PERIOD, THE
PURCHASER WILL BE REQUIRED TO FURNISH A SALES
RECEIPT/PROOF OF PURCHASE INDICATING DATE OF PURCHASE,
AMOUNT PAID AND PLACE OF PURCHASE. CUSTOMER WILL BE
CHARGED FOR THE REPAIR OF ANY UNIT RECEIVED WITHOUT SUCH
PROOF OF PURCHASE.
Limited Warranty Limits And Exclusions
This warranty ONLY COVERS failures due to defects in materials or
workmanship, and DOES NOT COVER glass, plastic parts, temperature
probes (if included) and normal wear and tear or cosmetic damage. The
warranty ALSO DOES NOT COVER damages which occurred in shipment,
or failures which are caused by products not supplied by the warrantor, or
failures which result from accidents, misuse, abuse, neglect, bug infestation,
mishandling, misapplication, alteration, faulty installation, set-up
adjustments, maladjustment of consumer controls, improper maintenance,
power line surge, lightning damage, modification, or commercial use (such
as in a hotel, office, restaurant, or other business), rental use of the product,
service by anyone other than a Factory Service center or other Authorized
Servicer, or damage that is attributable to acts of God.
THERE ARE NO EXPRESS WARRANTIES EXCEPT AS LISTED UNDER
“LIMITED WARRANTY COVERAGE”.
THE WARRANTOR IS NOT LIABLE FOR INCIDENTAL OR
CONSEQUENTIAL DAMAGES RESULTING FROM THE USE OF THIS
PRODUCT, OR ARISING OUT OF ANY BREACH OF THIS WARRANTY.
(As examples, this excludes damages for lost time, travel to and from the
servicer, loss of or damage to media or images, data or other memory or
recorded content. The items listed are not exclusive, but for illustration only.)
ALL EXPRESS AND IMPLIED WARRANTIES, INCLUDING THE
WARRANTY OF MERCHANTABILITY, ARE LIMITED TO THE PERIOD
OF THE LIMITED WARRANTY.
Some states do not allow the exclusion or limitation of incidental or
consequential damages, or limitations on how long an implied warranty lasts,
so the exclusions may not apply to you.
This warranty gives you specific legal rights and you may also have other
rights which vary from state to state. If a problem with this product develops
during or after the warranty period, you may contact your dealer or Service
Center. If the problem is not handled to your satisfaction, then write to:
Panasonic Corporation of North America
Consumer Affairs Department
Two Riverfront Plaza
Newark NJ 07102-5490
PARTS AND SERVICE, WHICH ARE NOT COVERED BY THIS LIMITED
WARRANTY, ARE YOUR RESPONSIBILITY.
Product registration is not mandatory. Failure to complete the form
does not affect the consumer' s warranty rights.
As of January 4, 2026
Shop
Accessories!
ĨŽƌĂůůLJŽƵƌWĂŶĂƐŽŶŝĐŐĞĂƌ
'ŽƚŽ
ŚƚƚƉƐŚŽƉƉĂŶĂƐŽŶŝĐƐƵƉƉŽƌƚ
'ĞƚĞǀĞƌLJƚŚŝŶŐLJŽƵŶĞĞĚƚŽŐĞƚƚŚĞŵŽƐƚŽƵƚŽĨ
LJŽƵƌWĂŶĂƐŽŶŝĐƉƌŽĚƵĐƚƐ
ĐĐĞƐƐŽƌŝĞƐΘWĂƌƚƐĨŽƌLJŽƵƌĂŵĞƌĂWŚŽŶĞ
sƉƌŽĚƵĐƚƐdsŽŵƉƵƚĞƌƐΘEĞƚǁŽƌŬŝŶŐ
WĞƌƐŽŶĂůĂƌĞ,ŽŵĞƉƉůŝĂŶĐĞƐ,ĞĂĚƉŚŽŶĞƐ
ĂƚƚĞƌŝĞƐĂĐŬƵƉŚĂƌŐĞƌƐΘŵŽƌĞ
ƵƐƚŽŵĞƌ^ĞƌǀŝĐĞƐŝƌĞĐƚŽƌLJ
&ŽƌWƌŽĚƵĐƚ/ŶĨŽƌŵĂƚŝŽŶKƉĞƌĂƚŝŶŐƐƐŝƐƚĂŶĐĞ
WĂƌƚƐKǁŶĞƌƐDĂŶƵĂůƐĞĂůĞƌĂŶĚ^ĞƌǀŝĐĞŝŶĨŽ
ŐŽƚŽ
ŚƚƚƉƐŚŽƉƉĂŶĂƐŽŶŝĐƐƵƉƉŽƌƚ
&ŽƌƚŚĞŚĞĂƌŝŶŐŽƌƐƉĞĞĐŚŝŵƉĂŝƌĞĚ
ddzϭͲϴϱϱͲϰϵϳͲϮϬϱϲ
F0003DB70AP_EN.indd 32F0003DB70AP_EN.indd 32 2026/3/2 16:26:132026/3/2 16:26:13
33
Specifications
Power Source .........................................................................................................................................................................................................................120 V~, 60 Hz
Power Consumption .................................................................................................................................................................................................................8 A, 950 W
Cooking Power* ............................................................................................................................................................................................................................... 1,200 W
Outside Dimensions (W x H x D) ...................................................................................................................................................... 18
1
⁄2” x 13
3
⁄4” x 15
3
⁄8”(**17
3
⁄16”)
(470 mm x 350 mm x 390(**436) mm)
Oven Cavity Dimensions (W x H x D) ..................................................................................................................................................................15
3
⁄16” x 8
1
⁄4” x 13
7
⁄16”
(385 mm x 210 mm x 341 mm)
Operating Frequency ................................................................................................................................................................................................................ 2,450 MHz
Net Weight ......................................................................................................................................................................................................Approx. 27.1 lbs. (12.3 kg)
*IEC Test procedure Specifications subject to change without notice.
** 390 mm is the dimension without handle.
436 mm is the dimension with handle.
The serial number of this product may be found on the back side of the oven. You should note the model number
and the serial number of this oven in the space provided and retain this book as a permanent record of your
purchase for future reference.
Model No. ______________________________
Serial No. ______________________________
Date of Purchase ________________________
Scan this code for product registration
User’s Record
F0003DB70AP_EN.indd 33F0003DB70AP_EN.indd 33 2026/3/2 16:26:132026/3/2 16:26:13

Panasonic Consumer Electronics Company,
Division of Panasonic Corporation of North America
Two Riverfront Plaza
Newark, New Jersey 07102
Website : http://shop.panasonic.com/support
F0003DB70AP_EN.indd 34F0003DB70AP_EN.indd 34 2026/3/2 16:26:132026/3/2 16:26:13
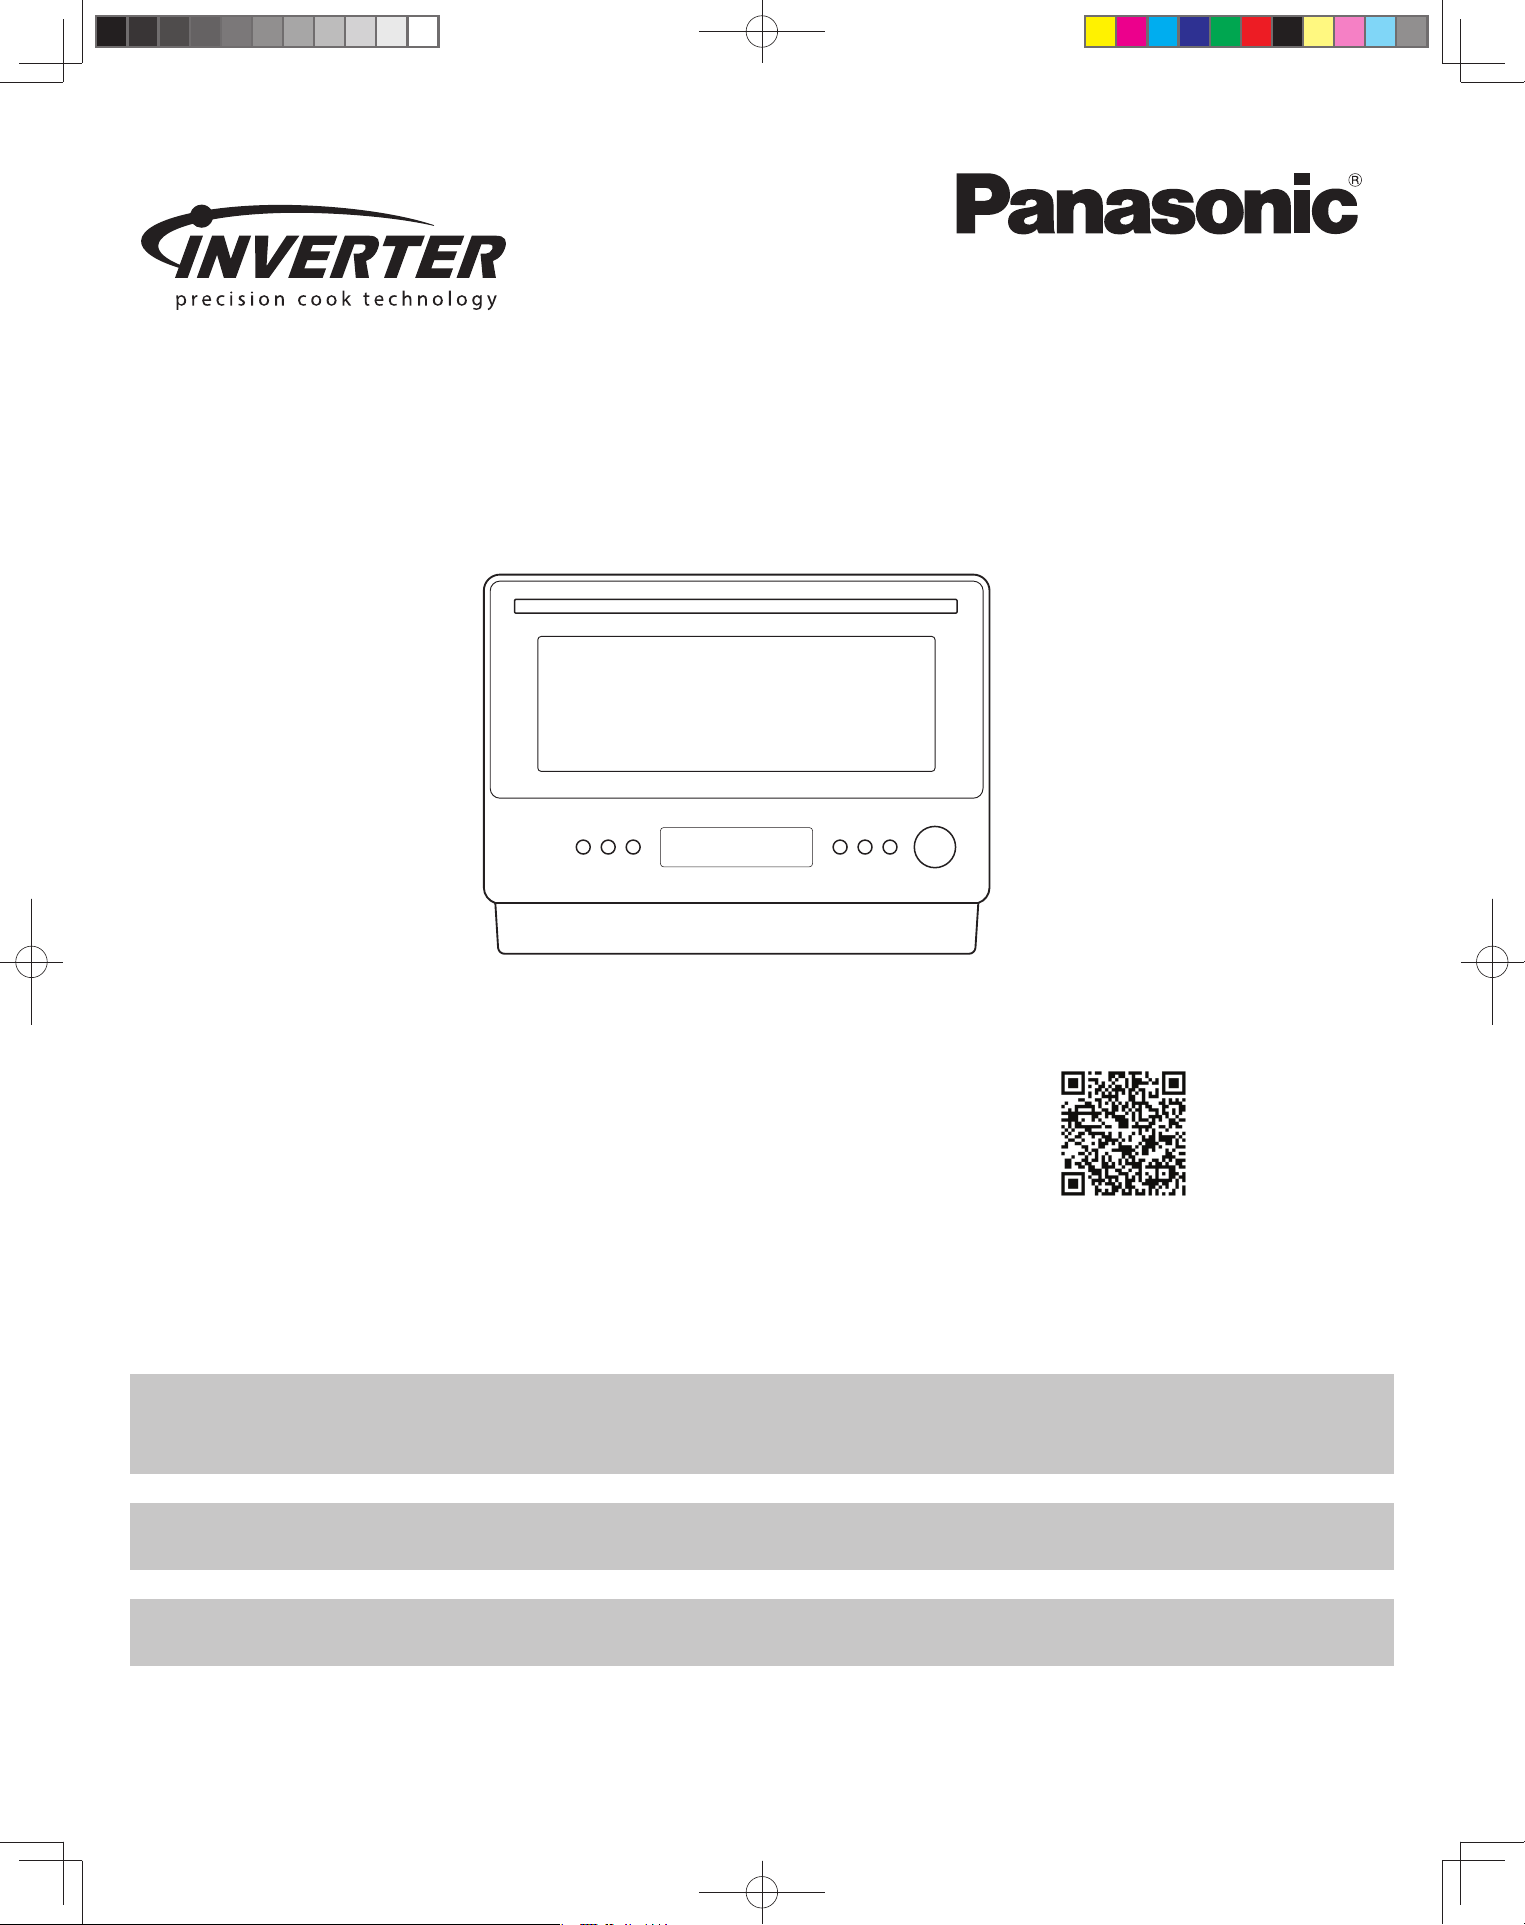
Manual del usuario
Horno de microondas
Solo para uso doméstico
Modelo No.
NN-SF57RM
LEA ESTAS INSTRUCCIONES CUIDADOSAMENTE ANTES DE USAR ESTE PRODUCTO Y
GUARDE ESTE MANUAL PARA USARLO EN EL FUTURO.
Si necesita registrar su producto o cualquier otro tipo de asistencia, contáctenos a través de la web en:
http://shop.panasonic.com/support (Solo los Estados Unidos)
Para la referencia de seguridad del horno de microondas visite la página web de la FDA en:
http://www.fda.gov/radiation-emittingproducts/resourcesforyouradiationemittingproducts/ucm252762.htm
Para obtener instrucciones en español, por favor visite la página web en:
http://shop.panasonic.com/support
F0003DB70AP
PA0326-0
Impreso en China
© Panasonic Corporation 2026
Escanee este código para registrar el producto
NN-SF57RM
F0003DB70AP_ES.indd 1F0003DB70AP_ES.indd 1 2026/3/3 16:22:372026/3/3 16:22:37
2
CONTENIDOS
Información de Seguridad
INSTRUCCIONES IMPORTANTES DE SEGURIDAD ........................................................................................................................ 3-5
Instrucciones de Instalación y Para La Conexión a Tierra ......................................................................................................... 5-6
Preparación de Alimentos ................................................................................................................................................................... 6-7
Ubicación de Los Controles .................................................................................................................................................................... 9
Panel de control ........................................................................................................................................................................................10
Función de dial ..........................................................................................................................................................................................11
Funcionamiento
Uso del Microondas por Primera Vez .................................................................................................................................................12
Ajustar el Reloj ...........................................................................................................................................................................................12
Recalentar por Sensor .............................................................................................................................................................................13
Configuración del Bloqueo de Seguridad para Niños .................................................................................................................14
Cocción .........................................................................................................................................................................................................14
Mantener caliente ....................................................................................................................................................................................15
30 Seg Automático ...................................................................................................................................................................................16
Tiempo Adicional ......................................................................................................................................................................................16
Descongelación automática .................................................................................................................................................................17
Consejos y Técnicas de Descongelado .............................................................................................................................................17
Palomitas .....................................................................................................................................................................................................18
Bebidas .........................................................................................................................................................................................................19
Cocción por Sensor (Sensor Cook) .....................................................................................................................................................20
Tabla de Cocción por Sensor ......................................................................................................................................................... 21-22
Atajos de microondas ...................................................................................................................................................................... 23-24
Tabla de descongelación .......................................................................................................................................................................24
Tabla de recalentamiento ......................................................................................................................................................................25
Tabla de cocción ................................................................................................................................................................................ 26-27
Características de los Alimentos y Técnicas de Cocción ...................................................................................................... 28-29
Mantenimiento
Limpieza y Mantenimiento de su Horno de Microondas ...........................................................................................................30
Comprar Accesorios .................................................................................................................................................................................30
Antes de Solicitar Reparaciones ..........................................................................................................................................................31
Limited Warranty (Only for U.S.A.) ......................................................................................................................................................32
Información general
Guía de Utensilios de Cocina .................................................................................................................................................................. 8
Especi caciones ........................................................................................................................................................................................33
Registro del Usuario .................................................................................................................................................................................33
F0003DB70AP_ES.indd 2F0003DB70AP_ES.indd 2 2026/3/3 16:22:372026/3/3 16:22:37
3
INSTRUCCIONES IMPORTANTES DE SEGURIDAD
Su seguridad y la seguridad de los demás son muy importantes.
Hemos suministrado mensajes importantes de seguridad en este manual y en su electrodoméstico. Siempre lea y
cumpla con todos los mensajes de seguridad.
Este es el símbolo de alerta de seguridad. Se usa para alertar sobre posibles peligros que pueden causarle heridas o la
muerte, a usted y a otras personas.
Todos los mensajes de seguridad seguirán el símbolo de alerta de seguridad y la palabra “PELIGRO”, “ADVERTENCIA” o
“PRECAUCIÓN”. Estas palabras significan:
No seguir las instrucciones de inmediato puede ocasionarle lesiones graves o la muerte.
No seguir las instrucciones puede ocasionarle lesiones graves o la muerte.
Puede quedar expuesto a una situación de posible peligro que, si no se evita, puede causarle
lesiones menores o moderadas.
Todos los mensajes de seguridad le indicarán cuál es el posible peligro, le dirán cómo reducir la probabilidad de lesiones y qué puede
suceder si no se siguen las instrucciones.
PELIGRO
ADVERTENCIA
PRECAUCIÓN
PRECAUCIONES PARA EVITAR POSIBLE EXPOSICIÓN
EXCESIVA A LA ENERGÍA DEL MICROONDAS
(a) NO intente poner en funcionamiento este horno con la puerta
abierta, ya que el funcionamiento del mismo con la puerta
abierta puede provocar una exposición dañina a la energía
de microondas. Es importante que no anule ni fuerce los
dispositivos de seguridad.
(b) NO coloque objetos entre la parte frontal del horno y la
puerta, ni permita que se acumule tierra o residuos del líquido
limpiador sobre la superficie de sellado.
(c)
NO ponga en funcionamiento el horno si se encuentra dañado.
Es fundamental que la puerta del horno cierre correctamente y
que ninguna de las siguientes partes se encuentre dañada:
(1) la puerta (doblada),
(2) las bisagras y las trabas (rotas o flojas),
(3) el sellado de las puertas o las superficies de sellado.
(d) Solo permita que personal de mantenimiento calificado
repare o arregle el horno.
Gracias por comprar un horno de microondas Panasonic
Su horno de microondas es un electrodoméstico para cocinar y usted debe tener tanto cuidado como con la cocina u otro
electrodoméstico para cocinar. Cuando utilice este aparato electrodoméstico, siga las instrucciones de seguridad básicas, incluso las que
figuran a continuación:
Para disminuir el riesgo de quemaduras, descargas eléctricas, incendios,
lesiones a personas o excesiva exposición a energía de microondas
1. Lea todas las instrucciones antes de utilizar este electrodoméstico.
2. Lea y siga las “PRECAUCIONES PARA EVITAR POSIBLE EXPOSICIÓN EXCESIVA A LA ENERGÍA DE MICROONDAS” específicas que
aparecen arriba.
3. Este electrodoméstico debe tener conexión a tierra. Solo conéctelo a un toma corriente con una adecuada conexión a tierra. Vea las
“INSTRUCCIONES PARA LA CONEXIÓN A TIERRA” en la página 5.
4. Como con cualquier otro artefacto de cocina, NO deje de supervisar el horno mientras lo este utilizando.
5. Instale o ubique este electrodoméstico solo en conformidad con las instrucciones de instalación de la página 5.
6. NO cubra ni bloquee ninguna abertura de este aparato.
7. NO guarde este aparato en el exterior. NO utilice este producto cerca del agua (por ejemplo: cerca de un fregadero, en un sótano
húmedo o cerca de una piscina o ubicación similar).
8. Utilice este aparato solo para su uso previsto, según se describe en este manual. NO utilice productos químicos corrosivos, vapores
o productos no alimenticios en este aparato. Este tipo de horno ha sido diseñado específicamente para calentar o cocinar alimentos.
No ha sido diseñado para uso industrial o en laboratorios. El uso de químicos corrosivos, ya sea para calentarlos o limpiar, danara el
electrodomestico y podra provocar escapes de radiacion.
9. Al limpiar la superficie de las uniones de la puerta y el horno cuando se cierra la puerta, utilice sólo jabones o detergentes suaves y
no abrasivos y aplíquelos con una esponja o paño suave.
ADVERTENCIA
F0003DB70AP_ES.indd 3F0003DB70AP_ES.indd 3 2026/3/3 16:22:372026/3/3 16:22:37
4
10. NO deje que los niños utilicen este electrodoméstico, a menos que los supervise un adulto. NO asuma que un niño puede cocinar
cualquier cosa porque dominó una habilidad de cocción.
11.
EL CONTENIDO CALIENTE PUEDE PROVOCAR QUEMADURAS GRAVES. NO PERMITA A LOS NIÑOS USAR EL MICROONDAS. Tenga cuidado
cuando retire el contenido caliente.
12. NO ponga en funcionamiento este aparato si tiene algún cable o enchufe dañado, si no funciona correctamente o si se dañó o se cayó.
13. NO sumerja el cable ni el enchufe en agua.
14. Evite el contacto del cable con superficies calientes.
15. NO permita que el cable cuelgue del borde de una mesa o mostrador.
16. Solo el personal de mantenimiento calificado podrá reparar este aparato. Comuníquese con el centro de servicio técnico autorizado
más cercano para su control, reparación o ajuste.
17. Algunos productos como los huevos enteros, con o sin cáscara, botellas de cuello angosto y los recipientes sellados (por ejemplo,
frascos de vidrio cerrados), pueden explotar y por lo tanto no deben calentarse en este horno.
18. Para reducir el riesgo de incendio en la cavidad del horno:
(a) NO cocine demasiado los alimentos. Observe cuidadosamente el aparato cuando coloque papel, plástico u otros materiales
inflamables dentro del horno para facilitar la cocción.
(b) Retire las tiras de alambre de las bolsas de papel o plástico antes de colocar las mismas en el horno.
(c) Si se prende fuego el material dentro del horno, mantenga la puerta cerrada, apague el horno y desconecte el cable de
alimentación desde el fusible o desde el panel interruptor.
(d) NO utilice la cavidad para almacenar cosas. NO deje productos de papel, utensilios de cocina o alimentos dentro de la
cavidad cuando no se encuentre en uso.
19.
Líquidos calentados en exceso: Los liquidos como el agua, el cafe o el te pueden recalentarse mas que el punto de ebullicion y no mostrar evidencias
(o signos) de ebullicion. No siempre se observan las burbujas cuando retira el recipiente del horno de microondas.ESTO PUEDE HACER QUE, AL TOCAR
EL RECIPIENTE O INTRODUCIR UN UTENSILIO EN EL LÍQUIDO MUY CALIENTE, ÉSTE SE DESBORDE. Para reducir el riesgo de lesiones en las personas:
(a) REVUELVA EL LÍQUIDO ANTES Y A LA MITAD DEL PROCESO DE CALENTADO.
(b) NO
caliente agua y aceite, o grasas, juntos. La película de aceite atrapará el vapor y podrá causar una erupción violenta.
(c) NO utilice recipientes con lados rectos y cuello angosto.
(d) Después de calentar algo, deje el recipiente en el microondas durante un corto lapso de tiempo antes de retirarlo.
20. NO cocine directamente en la base plana. Se puede romper y causar lesiones o daños al horno.
21. NO coloque ningún objeto encima del microondas. Colocar objetos encima puede afectar al funcionamiento y la fiabilidad del
aparato.
CONSERVE ESTAS INSTRUCCIONES
Para el uso apropiado del horno, lea las precauciones restantes de seguridad e instrucciones de funcionamiento.
INSTRUCCIONES IMPORTANTES DE SEGURIDAD (continuación)
F0003DB70AP_ES.indd 4F0003DB70AP_ES.indd 4 2026/3/3 16:22:372026/3/3 16:22:37
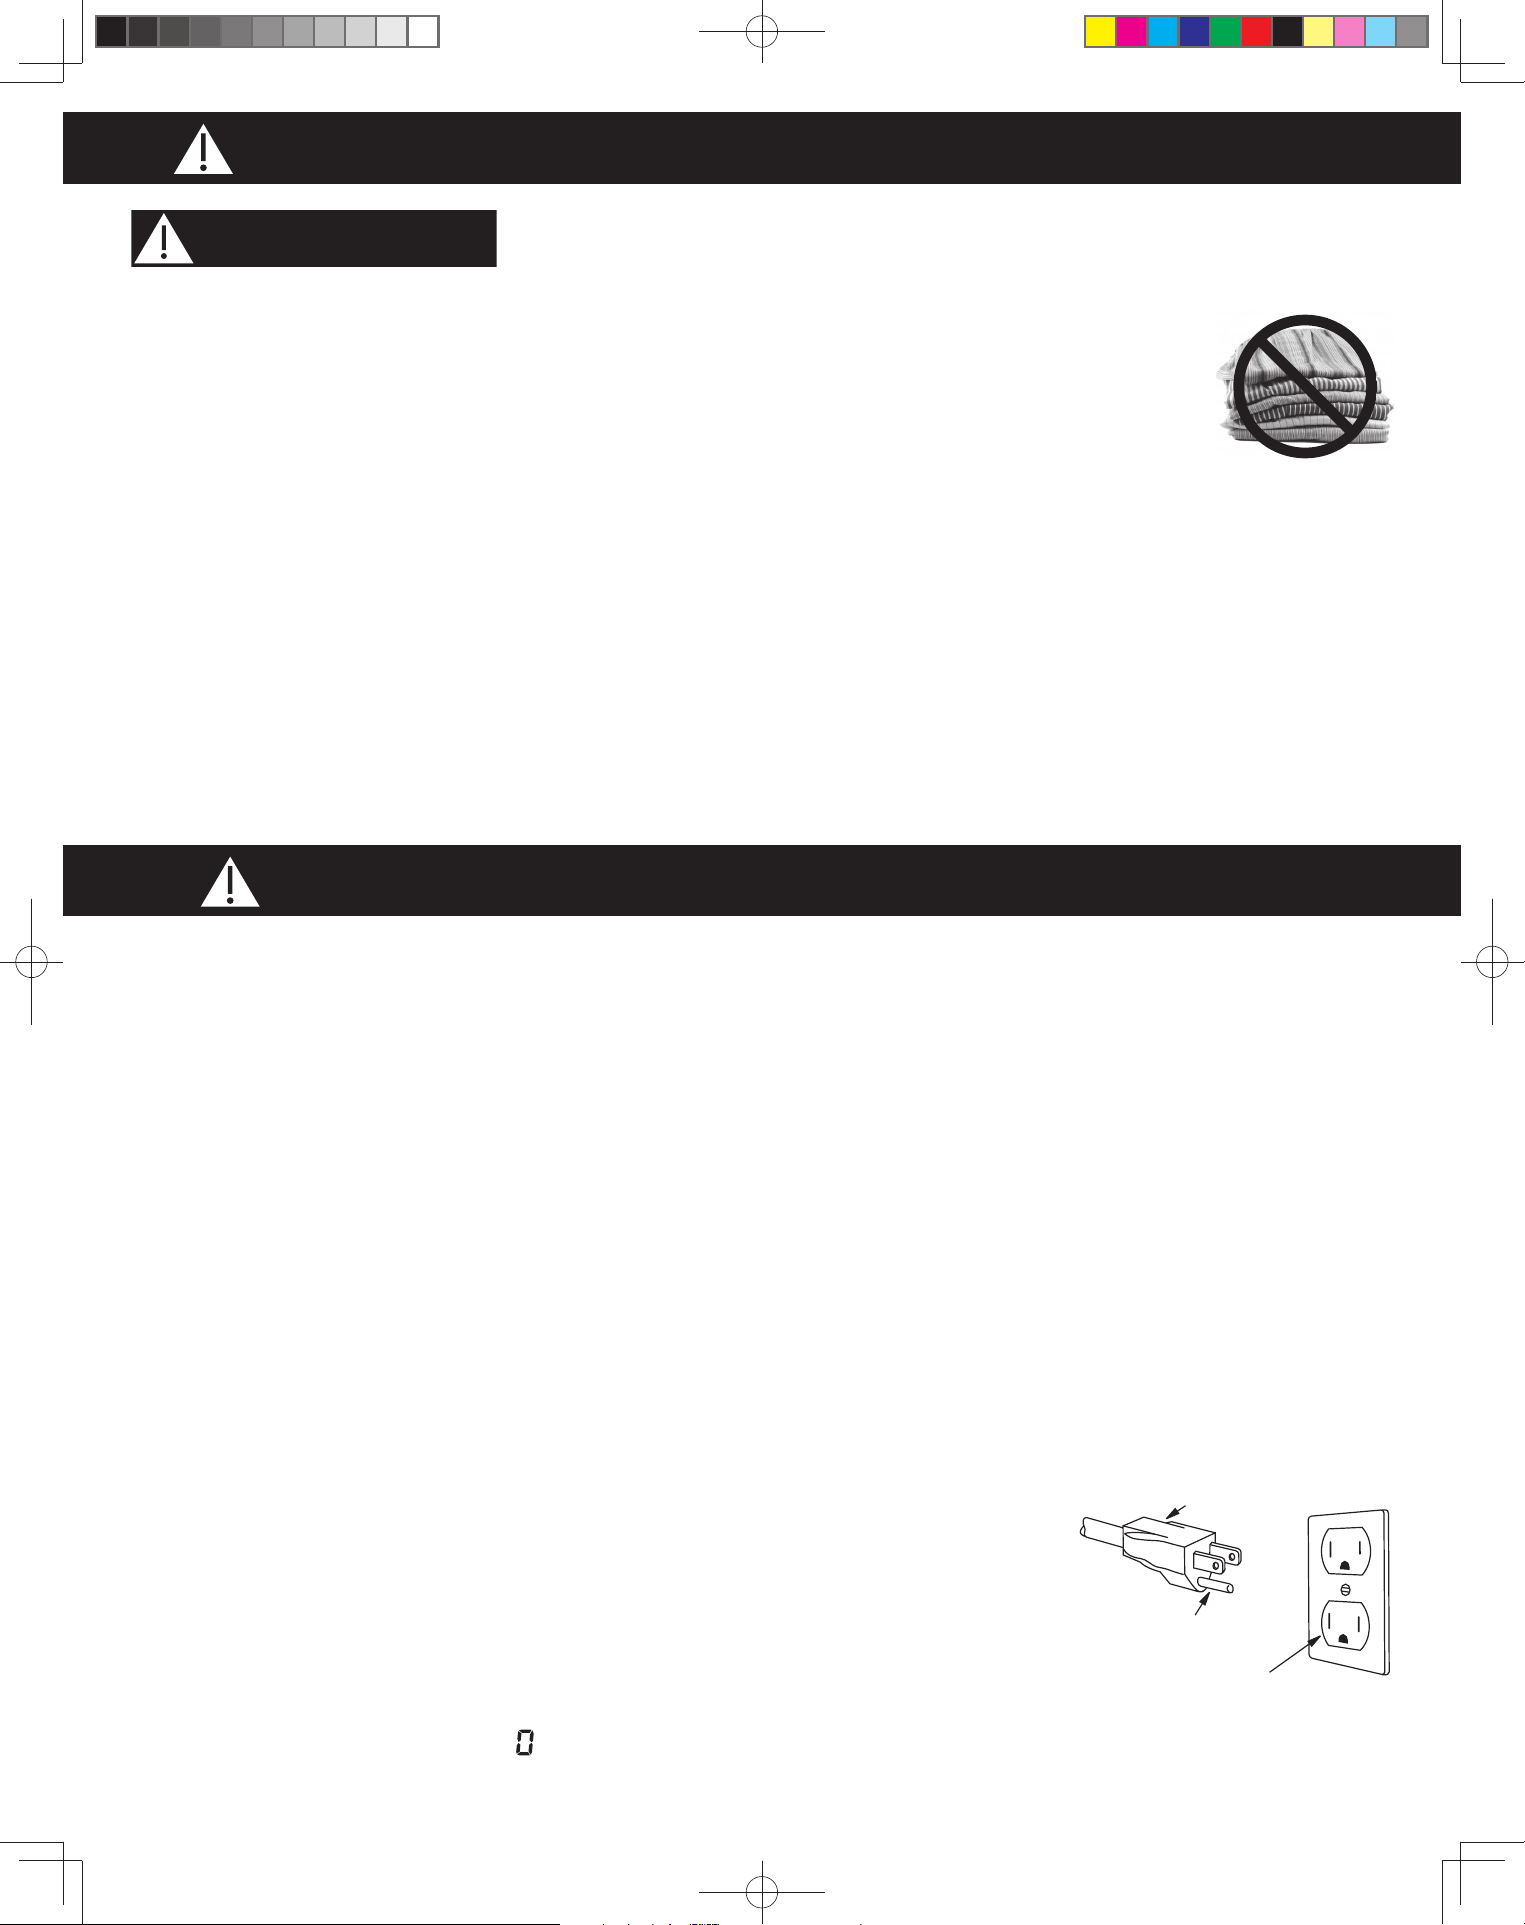
5
PARA EVITAR EL RIESGO DE DESCARGAS:
NO retire el panel exterior del horno. Solo una persona de
mantenimiento calificada podrá reparar el horno.
PARA REDUCIR EL RIESGO DE EXPOSICIÓN A LA ENERGÍA DEL
MICROONDAS:
NO apriete, arregle o repare la puerta, el marco del panel de control, los
interruptores de dispositivos de seguridad, ni ninguna otra parte del
horno. Puede causar perdidas en el microondas.
PARA EVITAR EL RIESGO DE ARCOS ELÉCTRICOS O INCENDIOS:
1. NO opere el horno de microondas vacío, ni cocine porciones pequeñas
de alimentos sin supervisión, ni utilice recipientes de metal. Al usar
el horno de microondas sin agua o alimentos, o cocinar una porción
demasiado pequeña, su energía no puede ser absorbida y se reflejará de
manera continua a través de la cavidad. Esto ocasionará la formación de
arcos eléctricos y daños a la cavidad del horno u otros componentes, lo
que podría derivar en un peligro de incendio.
2. NO guarde material inflamable junto al horno, ni arriba ni dentro de él.
3.
NO seque ropa, periódicos u otros
materiales en el horno, ni use periódicos o
bolsas de papel para cocinar.
4. NO golpee ni pegue en el panel de control.
Pueden causarse daños a los controles.
5. NO use productos de papel reciclado a menos
que el producto de papel tenga una etiqueta
que indique que es seguro para su uso en horno de microondas.
Los productos de papel reciclado pueden contener impurezas que
pueden provocar chispas.
PARA EVITAR EL RIESGO DE QUEMADURAS:
Siempre se deberán usar AGARRADERAS para quitar elementos
del horno. El calor se transfiere de los alimentos CALIENTES al
recipiente de cocción y del recipiente a la base plana. La base plana
también puede estar muy CALIENTE después de sacar el recipiente
de cocción del horno.
INSTRUCCIONES IMPORTANTES DE SEGURIDAD (continuación)
Instrucciones de Instalación y Para La Conexión a Tierra
Examine su horno
Desembale el horno, quite todo el material de embalaje y examine el
horno para ver si tiene daños, como abolladuras, trabas de puertas
rotas o roturas en la puerta. Notifique de inmediato al distribuidor si
existen daños en el horno. NO instalar si el horno está dañado.
Ubicación del horno
1. El horno debe colocarse en una superficie plana, estable, a más
de 91.6 cm (36 pulgadas) de altura de desde el suelo. Coloque la superficie
frontal de la puerta a 7.6 cm (3 pulgadas) o más allá del borde superior del
mostrador para evitar que se voltee por accidente el horno de microondas
mientras lo esté usando. Para su operación apropiada, el horno debe tener
suficiente flujo de aire. Deje 15 cm (6 pulgadas) de espacio en la parte
superior del horno, 10 cm (4 pulgadas) en la parte posterior y 5 cm
(2 pulgadas) en ambos lados. Si un lado del horno se coloca al ras
de la pared, el otro lado o la parte superior no deben
bloquearse. No quite los pies.
(a) NO bloquee las entradas y salidas de aire. Si se bloquean durante su
funcionamiento, el horno puede recalentarse y danarse.
(b) NO coloque el horno cerca de una superficie caliente y húmeda,
como una cocina de gas o eléctrica, fregadero o lavavajillas.
(c) NO ponga en funcionamiento el horno cuando haya excesiva
humedad ambiente.
2. Este horno fue manufacturado para el uso domestico
únicamente. No fue probado para usarse en ningún tipo de
vehículo terrestre, marítimo o de uso comercial.
Funcionamiento del motor del ventilador
Luego de utilizar el horno, el ventilador puede girar para enfriar los
componentes eléctricos, y se muestra un “ ” giratorio en la pantalla
indicadora.
Puede retirar la comida del horno mientras el ventilador está
funcionando. Se recomienda mantener el horno enchufado hasta
que el motor del ventilador se detenga por completo.
Instalación
NO bloquee las entradas y salidas de aire. Si se bloquean durante su
funcionamiento, el horno puede recalentarse. Si el horno se recalienta,
un dispositivo de seguridad térmica apagará el horno. El horno
permanecerá sin funcionar hasta que se haya enfriado.
ADVERTENCIA: EL USO INCORRECTO DEL ENCHUFE A TIERRA
PUEDE REPRESENTAR UN RIESGO DE DESCARGA ELÉCTRICA.
Consulte con un electricista calificado o con el personal de mantenimiento si no
comprende alguna de las instrucciones de conexión a tierra, o si tiene alguna
duda en cuanto a la conexión a tierra correcta del aparato. Si necesita utilizar
un cable alargador, utilice solo uno con tres hilos que cuente con un enchufe
a tierra para tres puntas, polarizado, y un toma corriente con tres ranuras que
acepte el enchufe del aparato. La clasificación marcada del cable alargador
debe ser igual o mayor a la clasificación eléctrica del electrodoméstico.
Instrucciones para la conexión a tierra
ESTE ELECTRODOMÉSTICO DEBE TENER CONEXIÓN A TIERRA.
En caso de producirse un
cortocircuito eléctrico, la
conexión a tierra reduce el riesgo
de una descarga eléctrica ya que
proporciona un cable de escape
para la corriente eléctrica. Este
aparato se encuentra equipado
con un cable con conexión a
tierra y un enchufe a tierra.
Enchufe de 3 clavijas
Enchufe a tierra
Receptáculo para 3 clavijas
Precauciones de seguridad
ADVERTENCIA
F0003DB70AP_ES.indd 5F0003DB70AP_ES.indd 5 2026/3/3 16:22:372026/3/3 16:22:37
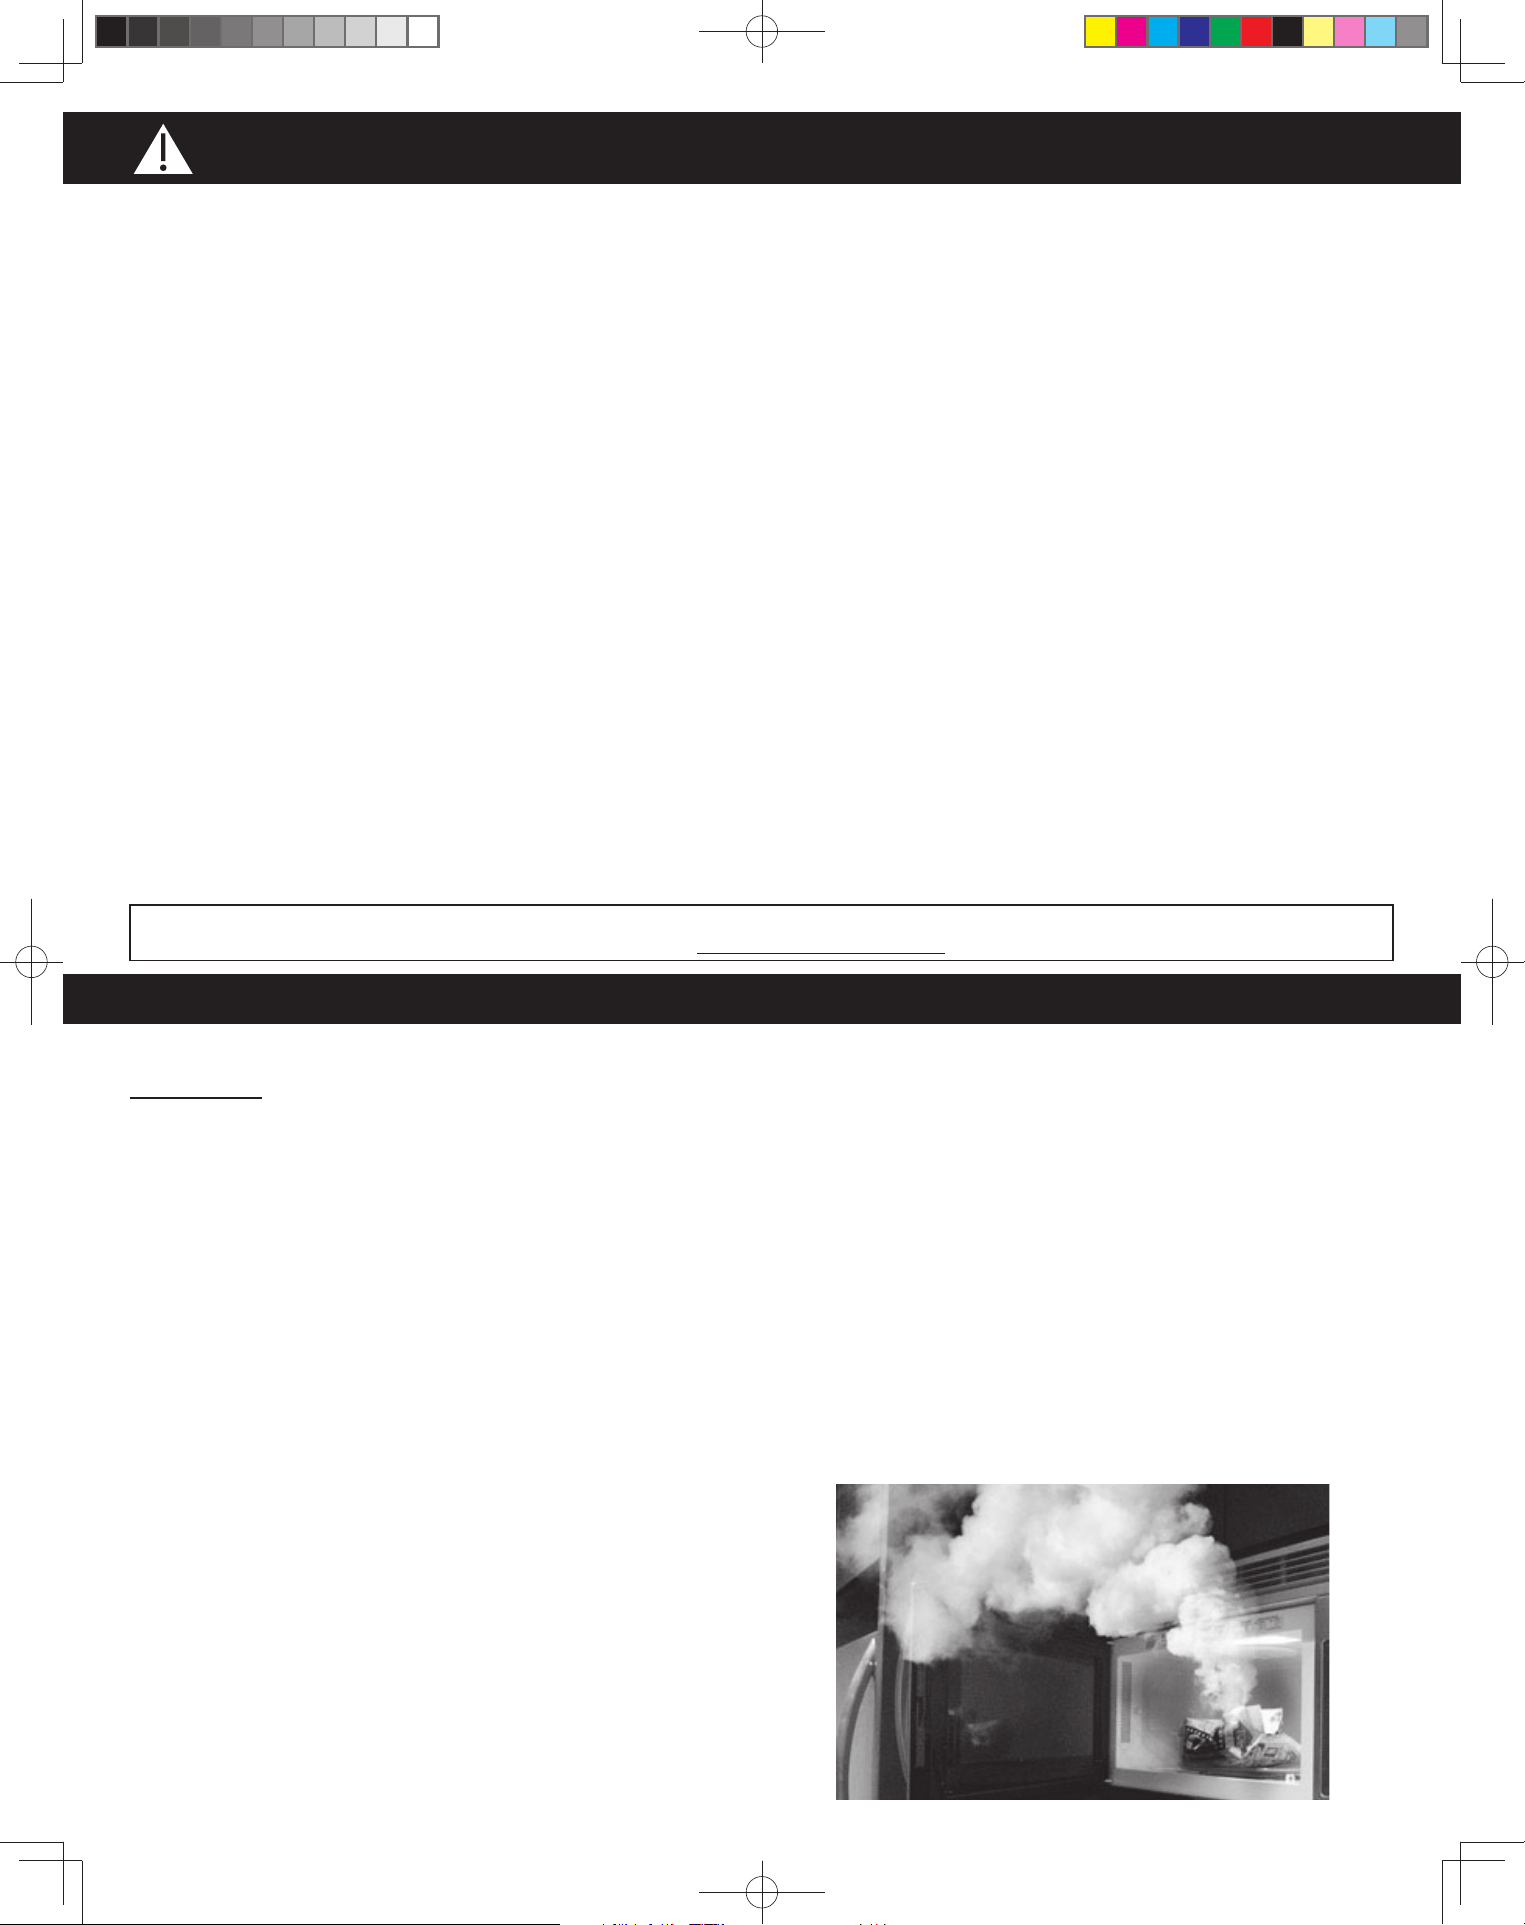
6
El enchufe debe conectarse en un toma corriente correctamente
instalado y que tenga conexión a tierra.
• Conecte en un toma corriente para tres clavijas
correctamente instalado y con conexión a tierra.
• NO quite la clavija a tierra.
• NO use un adaptador.
Alimentación
1. El microondas trae un cable de alimentación corto para reducir
el riesgo de enredarse o tropezar con un cable más largo.
2. Se encuentran disponibles juegos de cable más largos o cables
alargadores y se pueden utilizar si se tiene cuidado en su uso. NO
permita que el cable cuelgue del borde de una mesa o mostrador.
3. Si utiliza un cable largo o cable alargador,
(1)
la clasificación eléctrica marcada del juego del cable o del
cable alargador debe ser por lo menos igual a la clasificación
eléctrica del aparato,
(2)
el cable alargador debe ser un cable con descarga a tierra
con tres hilos y
(3)
el cable alargador debe estar dispuesto de manera tal que no
se pliegue sobre la superficie del mostrador o de una mesa en
donde un niño pueda tirarlo o tropezar involuntariamente.
Requisitos de cableado
Debe ponerse en funcionamiento el horno en un CIRCUITO
SEPARADO. Ningún otro aparato compartirá el circuito con el horno
de microondas. Si así fuera, el fusible de circuito del ramal puede
explotar o puede saltar el disyuntor. El horno se enchufará en un
TOMA CORRIENTE A TIERRA de al menos 20 A, 120 V, 60 Hz. Donde
se encuentre un toma corriente para dos clavijas estándar, será
obligación y responsabilidad personal del consumidor reemplazarlo
por un toma corriente para tres clavijas correctamente conectado
a tierra. El VOLTAJE utilizado debe ser el mismo especificado en
este horno de microondas (120 V, 60 Hz). El uso de voltaje mas alto
es peligroso y puede causar incendios o danos al horno. El uso de
voltaje mas bajo puede provocar una coccion lenta. Panasonic NO
asume responsabilidad por danos que resulten del uso del horno con
voltajes que no sean los especificados.
TV/RADIO/INTERFERENCIAS EQUIPOS INALÁMBRICOS
Este producto ha sido evaluado y cumple con los limites para Hornos
de Microondas, segun la Parte 18 de las normas de la FCC. Este
producto puede emitir energia de radio frecuencia, lo que podria
producir interferencia en radios, TVs, monitor de bebe, telefono
inalambrico, Bluetooth, router inalambrico o equipos similares, lo
que se puede confirmar apagando este producto y volviendolo a
encender. Si esta presente, se alienta al usuario a tratar de corregirlo
tomando una o mas de las siguientes medidas:
(1) Aumente la distancia de separacion entre el horno microondas y
otro producto que recibe la interferencia.
(2) Si es posible, utilice una antena receptora correctamente
instalado y/o reorientar la antena receptora de la otra receptora
product la interferencia.
(3) Enchufe el horno de microondas a una toma diferente de la otra
producto que recibe la interferencia.
(4) Limpia la puerta y las superficies de sellado del horno. (Vea
Cuidado y Limpieza de su horno de microondas)
Instrucciones de Instalación y Para La Conexión a Tierra (continuación)
Preparación de Alimentos
Siga estas precauciones de seguridad cuando cocine en su horno.
IMPORTANTE
La cocción correcta depende de la potencia, configuración
de tiempo y cantidad de alimentos. Si usa una porción más
pequeña que la recomendada pero la cocina en el momento
para la porción recomendada, puede producirse un incendio.
1) PREPARADO DE CONSERVAS CASERAS/ESTERILIZACIÓN/
DESHIDRATAR ALIMENTOS/PEQUEÑAS CANTIDADES DE ALIMENTOS
• NO use el horno para preparar conservas caseras. Su horno no puede
mantener los alimentos a la temperatura adecuada de preparado de
conservas. Los alimentos pueden contaminarse y echarse a perder.
• NO use el horno de microondas para esterilizar objetos
(mamaderas, etc.). Es difícil mantener el horno a la temperatura
elevada necesaria para la esterilización.
• NO deshidrate carnes, hierbas, frutas o verduras en el horno. Las
cantidades pequeñas de alimentos o alimentos con poco contenido de
humedad pueden secarse, quemarse o prenderse fuego si se recalientan.
• NO prepare porciones demasiado pequeñas a alta potencia.
Esto puede generar concentración de energía en un punto fijo,
que puede generar arcos eléctricos y dañar su horno. Seleccione
un ajuste de potencia de cocción menor al preparar porciones
pequeñas.
2) PALOMITAS DE MAÍZ
Las palomitas de maíz pueden prepararse en un recipiente para
palomitas de maíz especial para microondas. También hay
disponibles palomitas de maíz para microondas que se preparan
en su propio paquete. Siga las indicaciones del fabricante de
palomitas de maíz y use una marca adecuada para la potencia de
cocción de su horno de microondas.
PRECAUCIÓN: Cuando use palomitas de maíz para microondas
preempacadas, puede seguir las instrucciones recomendadas en
el paquete o usar la tecla Palomitas de maíz (consulte la página
18). De lo contrario, las palomitas de maíz tal vez no se cocinen
correctamente o pueden causar un incendio. Siempre controle el
horno cuando esté preparando palomitas de maíz. Deje enfriar la
bolsa de palomitas de maíz antes de abrirla, y siempre abra la bolsa
lejos de su rostro y cuerpo para evitar quemarse con el vapor.
Si tiene preguntas o inquietudes sobre algún problema relacionado con su información personal, comuníquese con la Oficina de Ética y
Cumplimiento de Panasonic Corporation of North America en [email protected].
F0003DB70AP_ES.indd 6F0003DB70AP_ES.indd 6 2026/3/3 16:22:372026/3/3 16:22:37
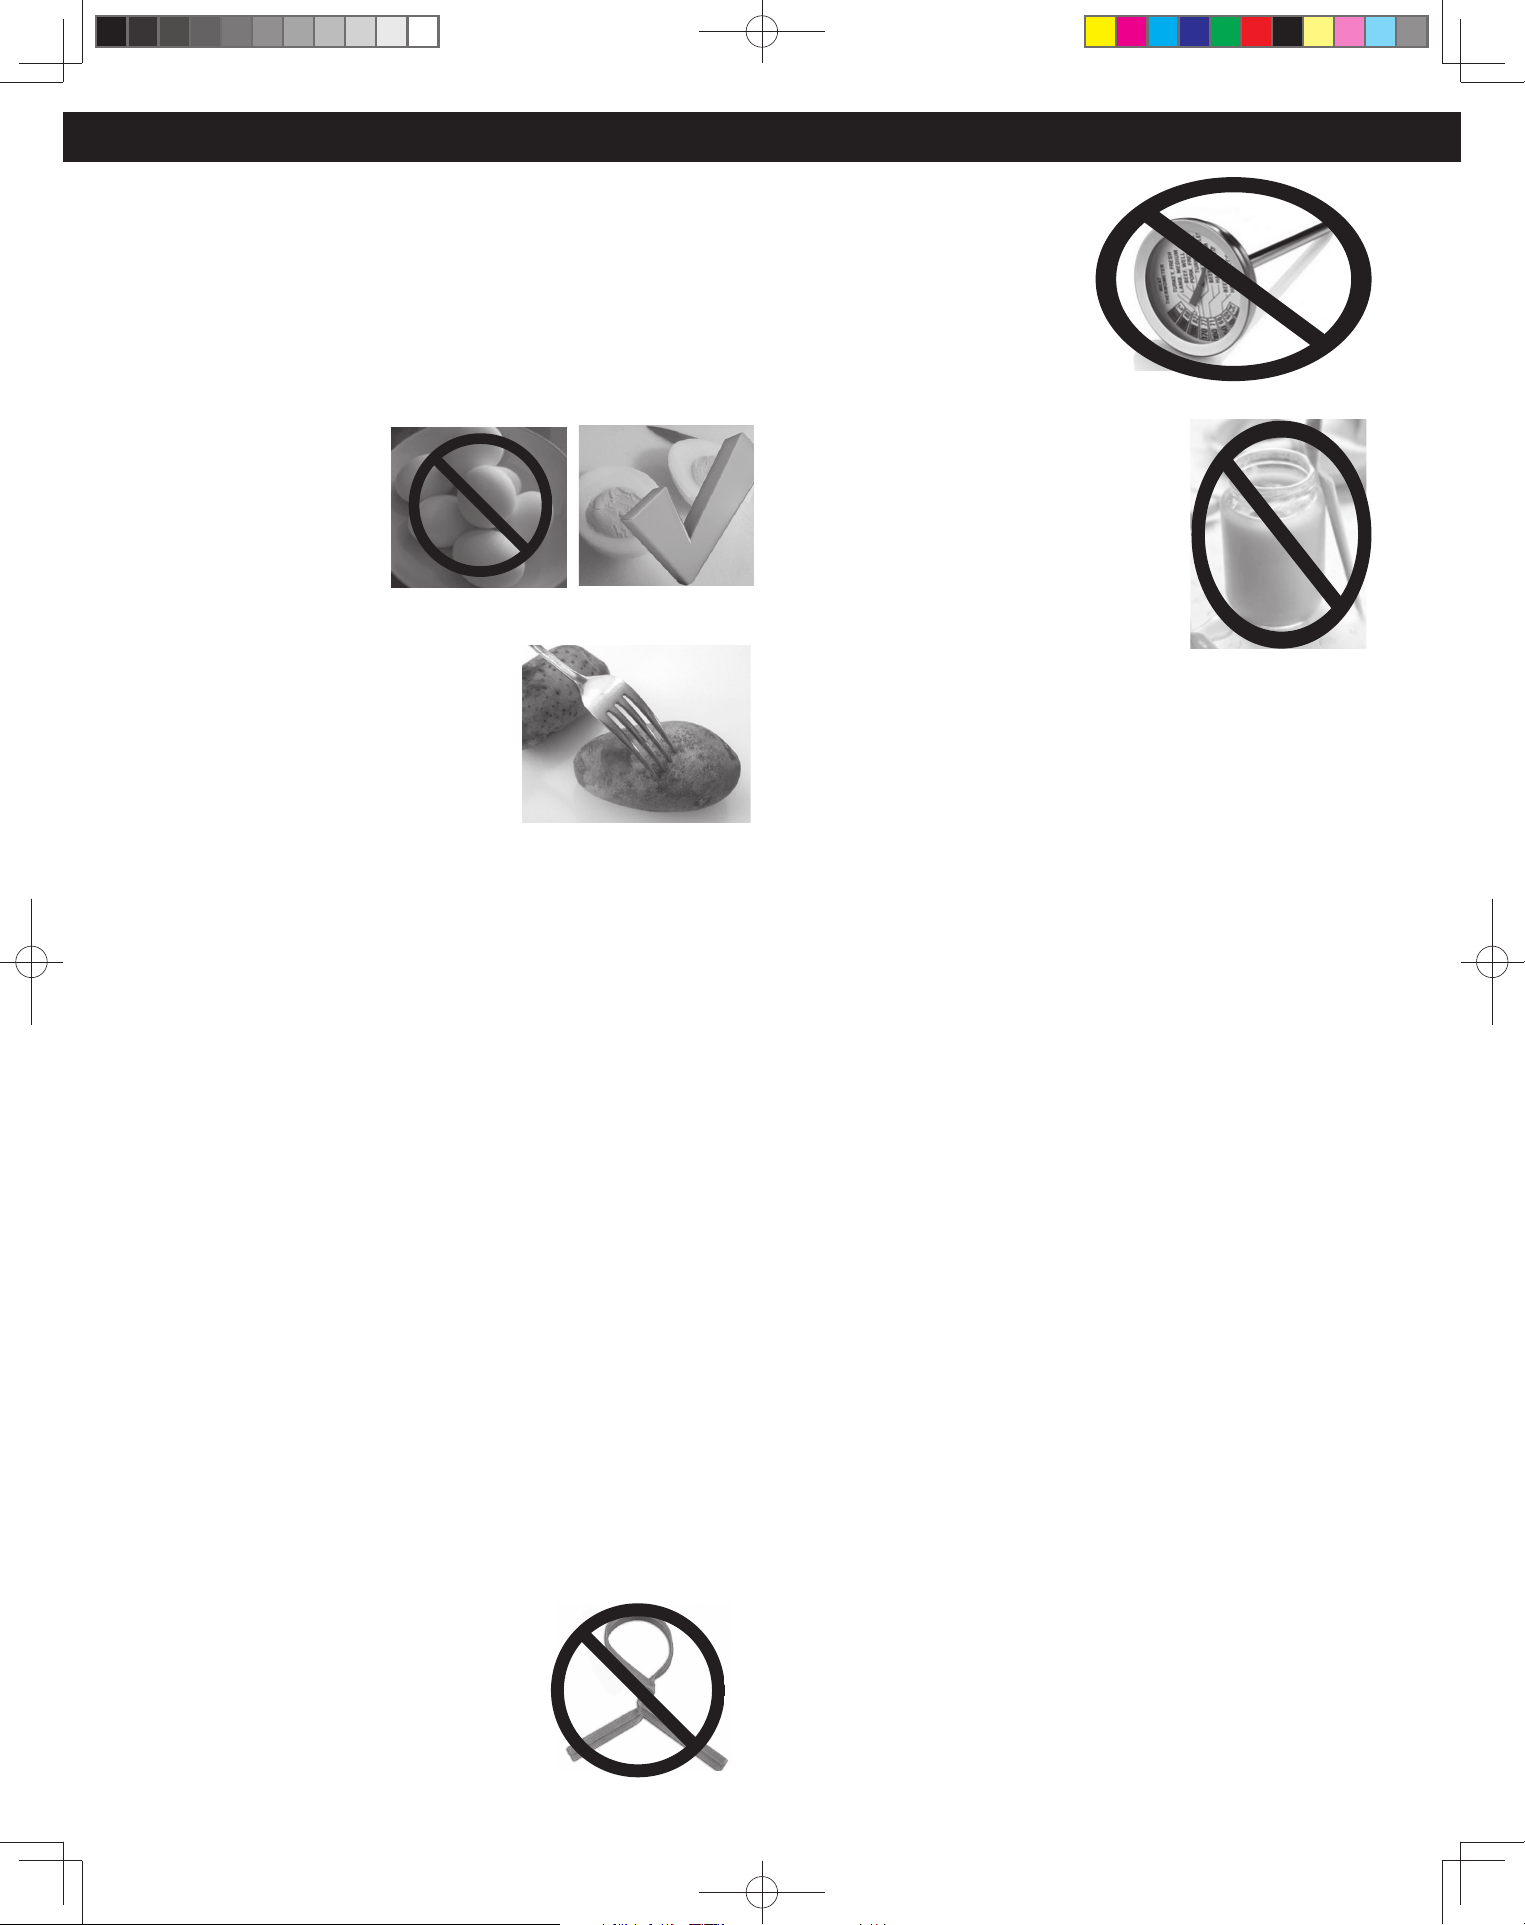
7
3) FRITURAS CON GRASA
• NO fria con grasa en su horno de microondas. Los aceites de cocina
pueden explotar en llamas y causar danos al horno y pueden provocar
quemaduras Es posible que los utensilios para microondas no soporten
la temperatura del aceite caliente y se pueden romper o derretir.
4) ALIMENTOS CON PIEL NO POROSA
• NO COCINAR/RECALENTAR HUEVOS ENTEROS, CON O SIN CÁSCARA.
La acumulación de vapor
en los huevos enteros
puede hacerlos explotar
y posiblemente dañe el
horno o cause lesiones.
Recalentar huevos duros
EN RODAJAS y cocinar
huevos REVUELTOS es seguro.
• Las papas, manzanas, la calabaza
entera y las salchichas son algunos
ejemplos de alimentos con piel no
porosa. Estos tipos de alimentos pueden
perforarse antes de la coccion en
microondas para evitar que exploten.
PRECAUCIÓN:
Cocinar papas viejas
o secas puede causar incendios.
5) BASE PLANA / CONTENEDORES DE COCCIÓN
• Los utensilios para cocinar se calientan durante la coccion en microondas.
El calor se transfiere de los alimentos CALIENTES al recipiente y a la base
plana. Use soportes para lo caliente, cuando saque los utensilios del horno
o cuando quite tapas o cubiertas de envoltura de plastico de los utensilios
de cocina, para evitar quemaduras.
• La base plana se calienta durante la cocción. Debe dejarse enfriar
antes de manipularla, o antes de colocar productos de papel, como
platos de papel o bolsas de palomitas de maiz para microondas en el
horno para su coccion en microondas.
• Los platos con borde metálico no se deberán usar, ya que puede
producirse un arco eléctrico.
6) TOALLAS DE PAPEL/PAÑOS
• NO use toallas de papel o paños que contengan fibra sintética
tejida en ellos. La fibra sintética puede prender fuego la toalla.
Use toallas de papel bajo supervisión.
7) PLATOS PARA DORAR/BOLSAS DE COCCIÓN EN HORNO
• Los platos para dorar o parrillas estan disenadas para coccion
en microondas unicamente. Siempre siga las instrucciones del
fabricante. NO precaliente un plato para dorar mas de seis minutos.
• Si se usa bolsa de coccion en horno para la coccion en microondas,
prepare segun las indicaciones del paquete. NO use una tira de alambre
para cerrar la bolsa. En cambio, use tiras de
plastico, cuerda de algodon, o una tira cortada
del extremo abierto de la bolsa.
8) TERMÓMETROS
• NO use un termómetro de
carnes convencional en su
horno. Puede producirse
un arco eléctrico. Hay
disponibles termómetros
seguros para microondas,
para carnes y dulces.
9) ALIMENTOS Y FÓRMULA PARA BEBÉS
• NO caliente alimentos o fórmula para
bebés en el horno de microondas.
El frasco de vidrio o la superficie de
los alimentos pueden parecer tibios
mientras que el interior puede estar tan
caliente que le queme la boca y esófago
al bebé.
10) RECALENTAR PRODUCTOS DE PASTELERÍA
• Cuando recaliente productos de pastelería, verifique las
temperaturas de cualquier relleno antes de comer. Algunos
alimentos tienen relleno, que se calienta más rápido y puede ser
extremadamente caliente, mientras que la superficie sigue tibia
al tacto (por ejemplo, donas con jalea).
11) PAUTAS GENERALES DE USO DEL HORNO
• NO use el horno para ningún fin excepto para preparar
alimentos.
• Para evitar lesiones, no permita que nadie se incline, cuelgue,
siente o coloque objetos pesados en la puerta abierta del
aparato. Se pueden producir lesiones graves.
Preparación de Alimentos (continuación)
F0003DB70AP_ES.indd 7F0003DB70AP_ES.indd 7 2026/3/3 16:22:372026/3/3 16:22:37
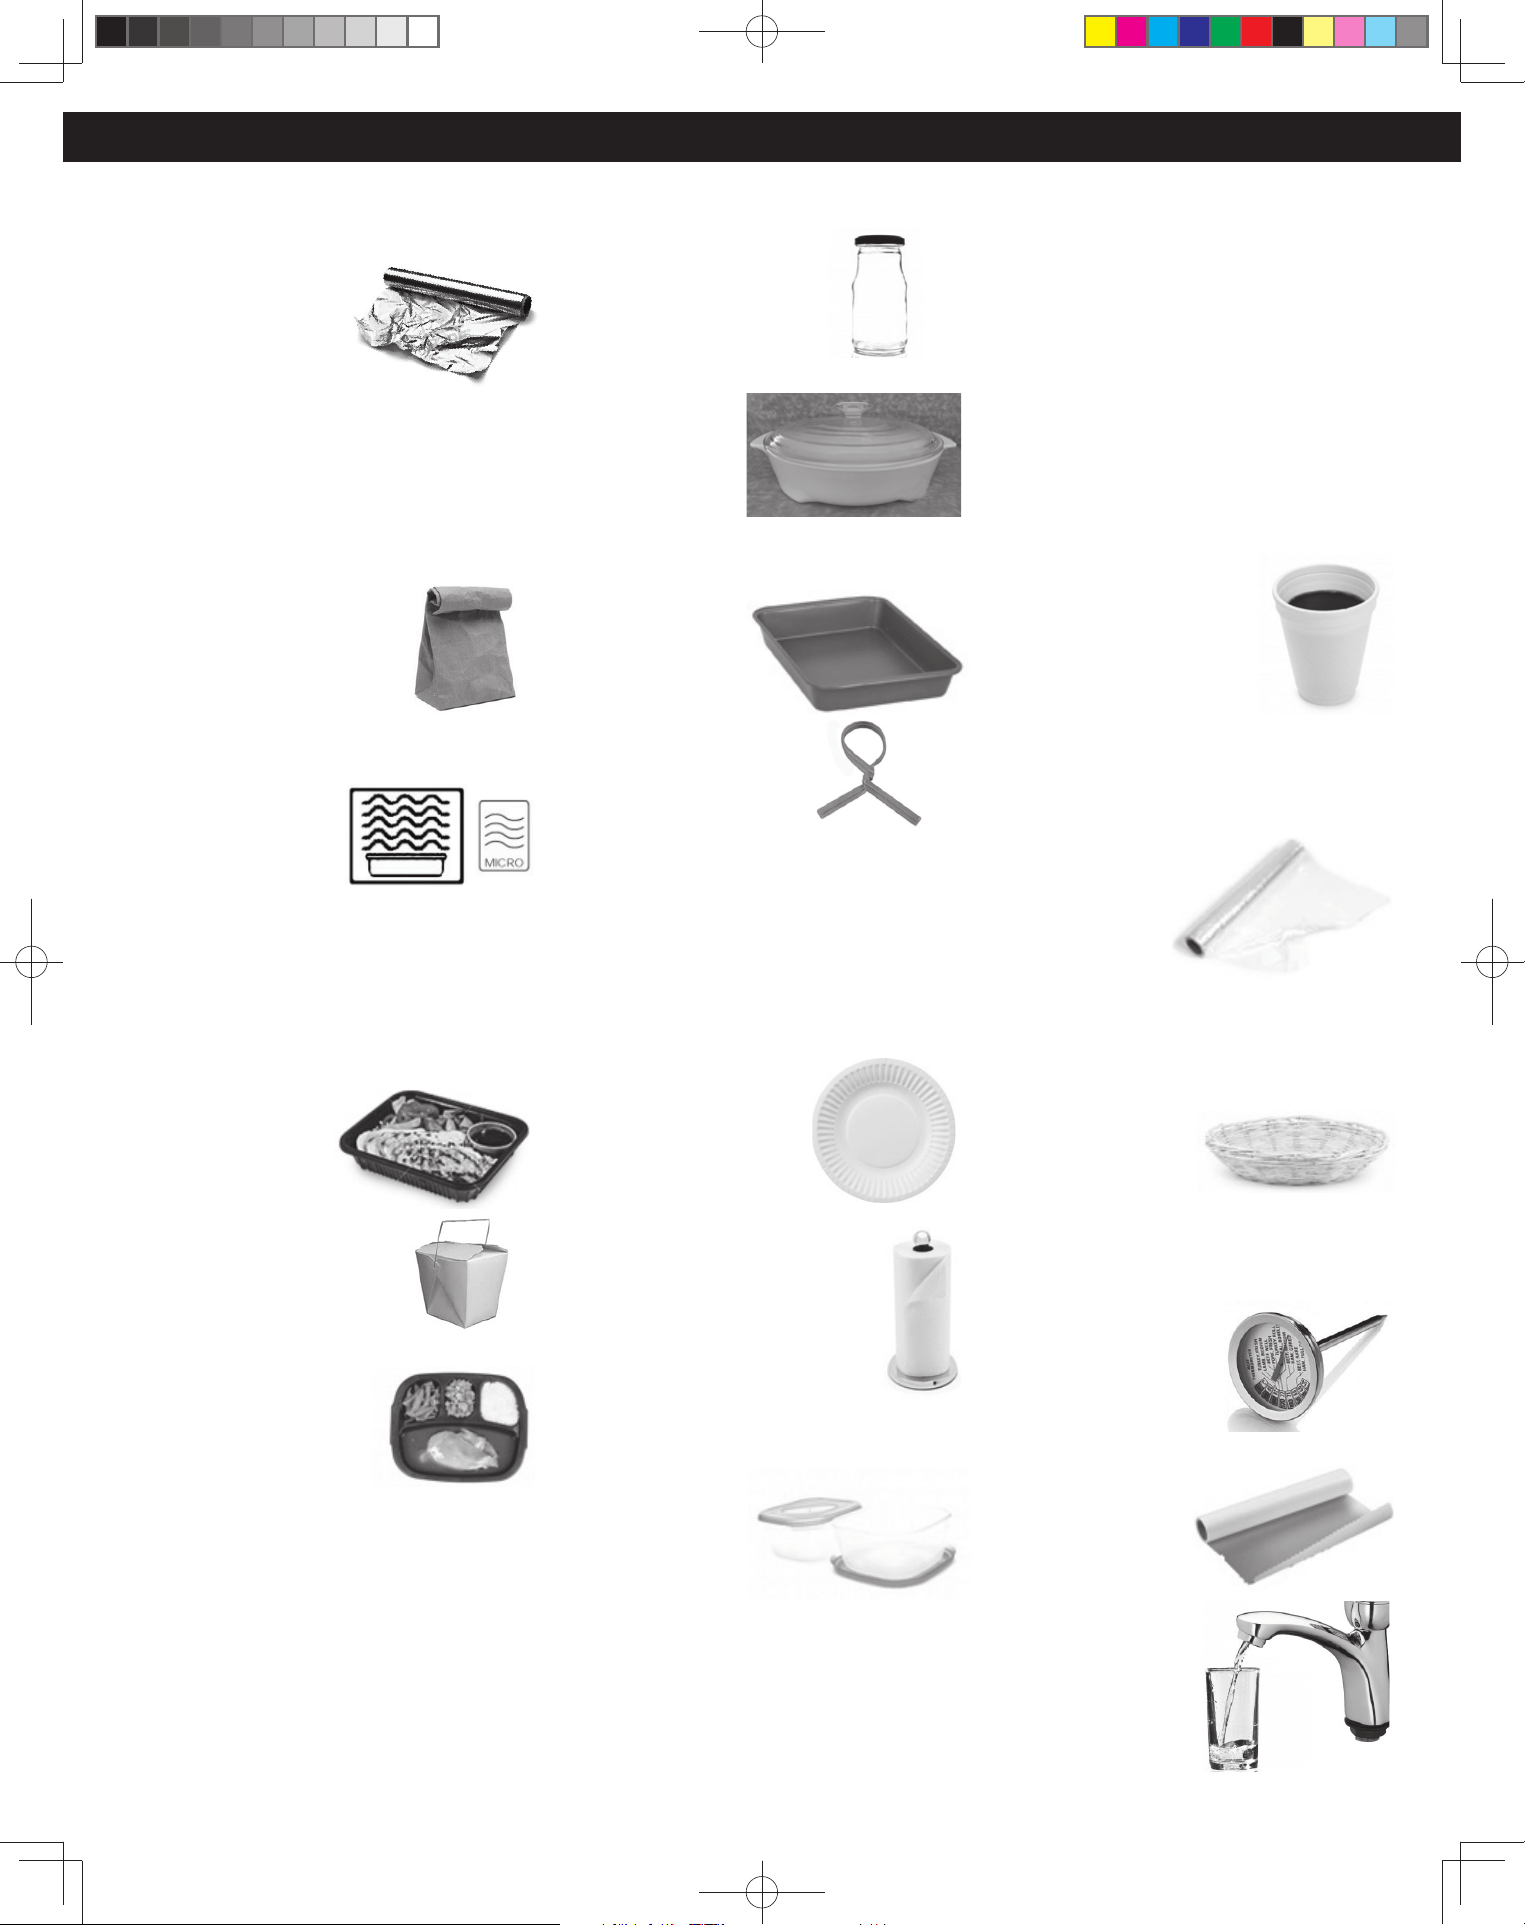
8
Papel de aluminio
No se recomienda su uso.
Se puede producir un arco
eléctrico si el papel está
demasiado cerca de la
pared del horno o la puerta,
y puede danar el horno.
Plato para dorar
Sí. Solo use platos para dorar diseñados para
cocción en microondas. Verifique la información del
plato para dorar, para ver las instrucciones/tabla de
calentamiento. No precaliente más de seis minutos.
Bolsas de papel marrón
No. Pueden causar un incendio
en el horno.
Seguro para microondas
Si. Si tiene etiqueta de Seguro para microondas,
verifique las indicaciones del fabricante para
el uso para calentar en
microondas. Cierta vajilla
puede indicar en el
reverso “Seguro para uso
en horno de microondas”.
Vajilla
Sin etiqueta, use la PRUEBA DEL RECIPIENTE a
continuacion.
Platos de cartón de poliéster descartables
Sí. Algunos alimentos congelados están envasados
en estos platos. También
se pueden comprar
en algunas tiendas de
comestibles.
Cartones de locales de
comida rápida con asa de metal
No. El asa de metal puede causar
un arco eléctrico.
Bandejas de comidas congeladas
Si son para microondas, si. Si
contiene metal, no.
Frascos de vidrio
No. La mayoría de los frascos de
vidrio no son resistentes al calor.
Horno resistente al calor.
Cristalería/Cerámica
Sí, pero solo para
cocción y dorado
en microondas.
(Ver la PRUEBA
DEL RECIPIENTE a
continuacion).
Fuentes de horno de metal
No. El metal puede
provocar arco electrico y
danar el horno.
Tiras de metal
No. Pueden causar arco
electrico, que puede provocar
un incendio en el horno.
Bolsa de cocción en horno
Si. Siga las indicaciones del fabricante. Cierre la bolsa con la
tira de nylon suministrada, un corte de tira del extremo de la
bolsa o un trozo de cuerda de algodon. No cierre con la tira
de metal. Haga seis cortes de media pulgada cerca del cierre.
Tazas y platos de papel
Si. Uselos para calentar alimentos cocidos, y para
cocinar alimentos que requieran corto tiempo de
coccion, como los perros calientes.
No coloque tazas de papel
en el microondas, pueden
recalentarse y prenderse fuego.
Toallas y servilletas
Si, solo toallas/servilletas de papel.
Uselas para calentar bocadillos y
sandwiches, solo si tienen la etiqueta
de Seguro para uso en microondas.
NO utilice toallas de papel reciclado.
Papel de pergamino
Sí. Úselo como cubierta para evitar
salpicaduras.
Vajilla de plástico
Sí, con precaución.
Deberá tener la etiqueta
“Adecuado para calentar
en microondas”.
Verifique las instrucciones de los fabricantes de
Seguridad para microondas, para ver los usos
recomendados. Algunos recipientes de plastico
seguros para microondas no son adecuados para
cocinar alimentos con alto contenido de grasa
o de azucar. El calor de los alimentos calientes
puede causar deformaciones.
Plástico, melamina
No. Este material absorbe la energía del
microondas. ¡Los platos se CALIENTAN!
Tazas de espuma de plástico
Si, con precaucion. La espuma
de plastico se derretira si
los alimentos llegan a una
temperatura alta. Use a
corto plazo solamente para
recalentar alimentos a una baja
temperatura para servirlos.
No coloque tazas de papel en el microondas,
pueden recalentarse y prenderse fuego.
Envoltorio plástico
Sí. Use para cubrir
alimentos durante la
cocción para retener
la humedad y evitar
salpicaduras.
Deberá tener la
etiqueta “Adecuado
para calentar en microondas”. Verifique las
indicaciones del paquete.
Paja, mimbre, madera
Si, solo a corto plazo.
Use solamente para
recalentar a corto
plazo alimentos a una
baja temperatura para
servirlos. La madera puede secarse, romperse o
quebrarse.
Termómetros
Solo los termómetros
seguros para microondas
podrán usarse, NO los
convencionales.
Papel encerado
Sí. Use como
cubierta para evitar
salpicaduras y
conservar la humedad.
Guía de Utensilios de Cocina
PRUEBA DEL RECIPIENTE
PARA EVALUAR SI UN RECIPIENTE ES SEGURO PARA SU USO EN HORNO DE MICROONDAS: Llene una taza segura para
microondas con agua fria y coloquela en el horno de microondas junto con el recipiente vacio a evaluar; caliente un (1)
minuto a P10 (ALTA). Si el recipiente es seguro para uso en horno de microondas (transparente a energia de microondas),
el recipiente vacio debera permanecer frio y el agua debera estar caliente. Si el recipiente esta caliente, absorbio algo de la
energia del microondas, y NO se debe usar. Esta prueba no se puede usar para recipientes de plastico.
Esta sección responde a la pregunta “¿Qué puedo usar en el microondas?”
F0003DB70AP_ES.indd 8F0003DB70AP_ES.indd 8 2026/3/3 16:22:372026/3/3 16:22:37
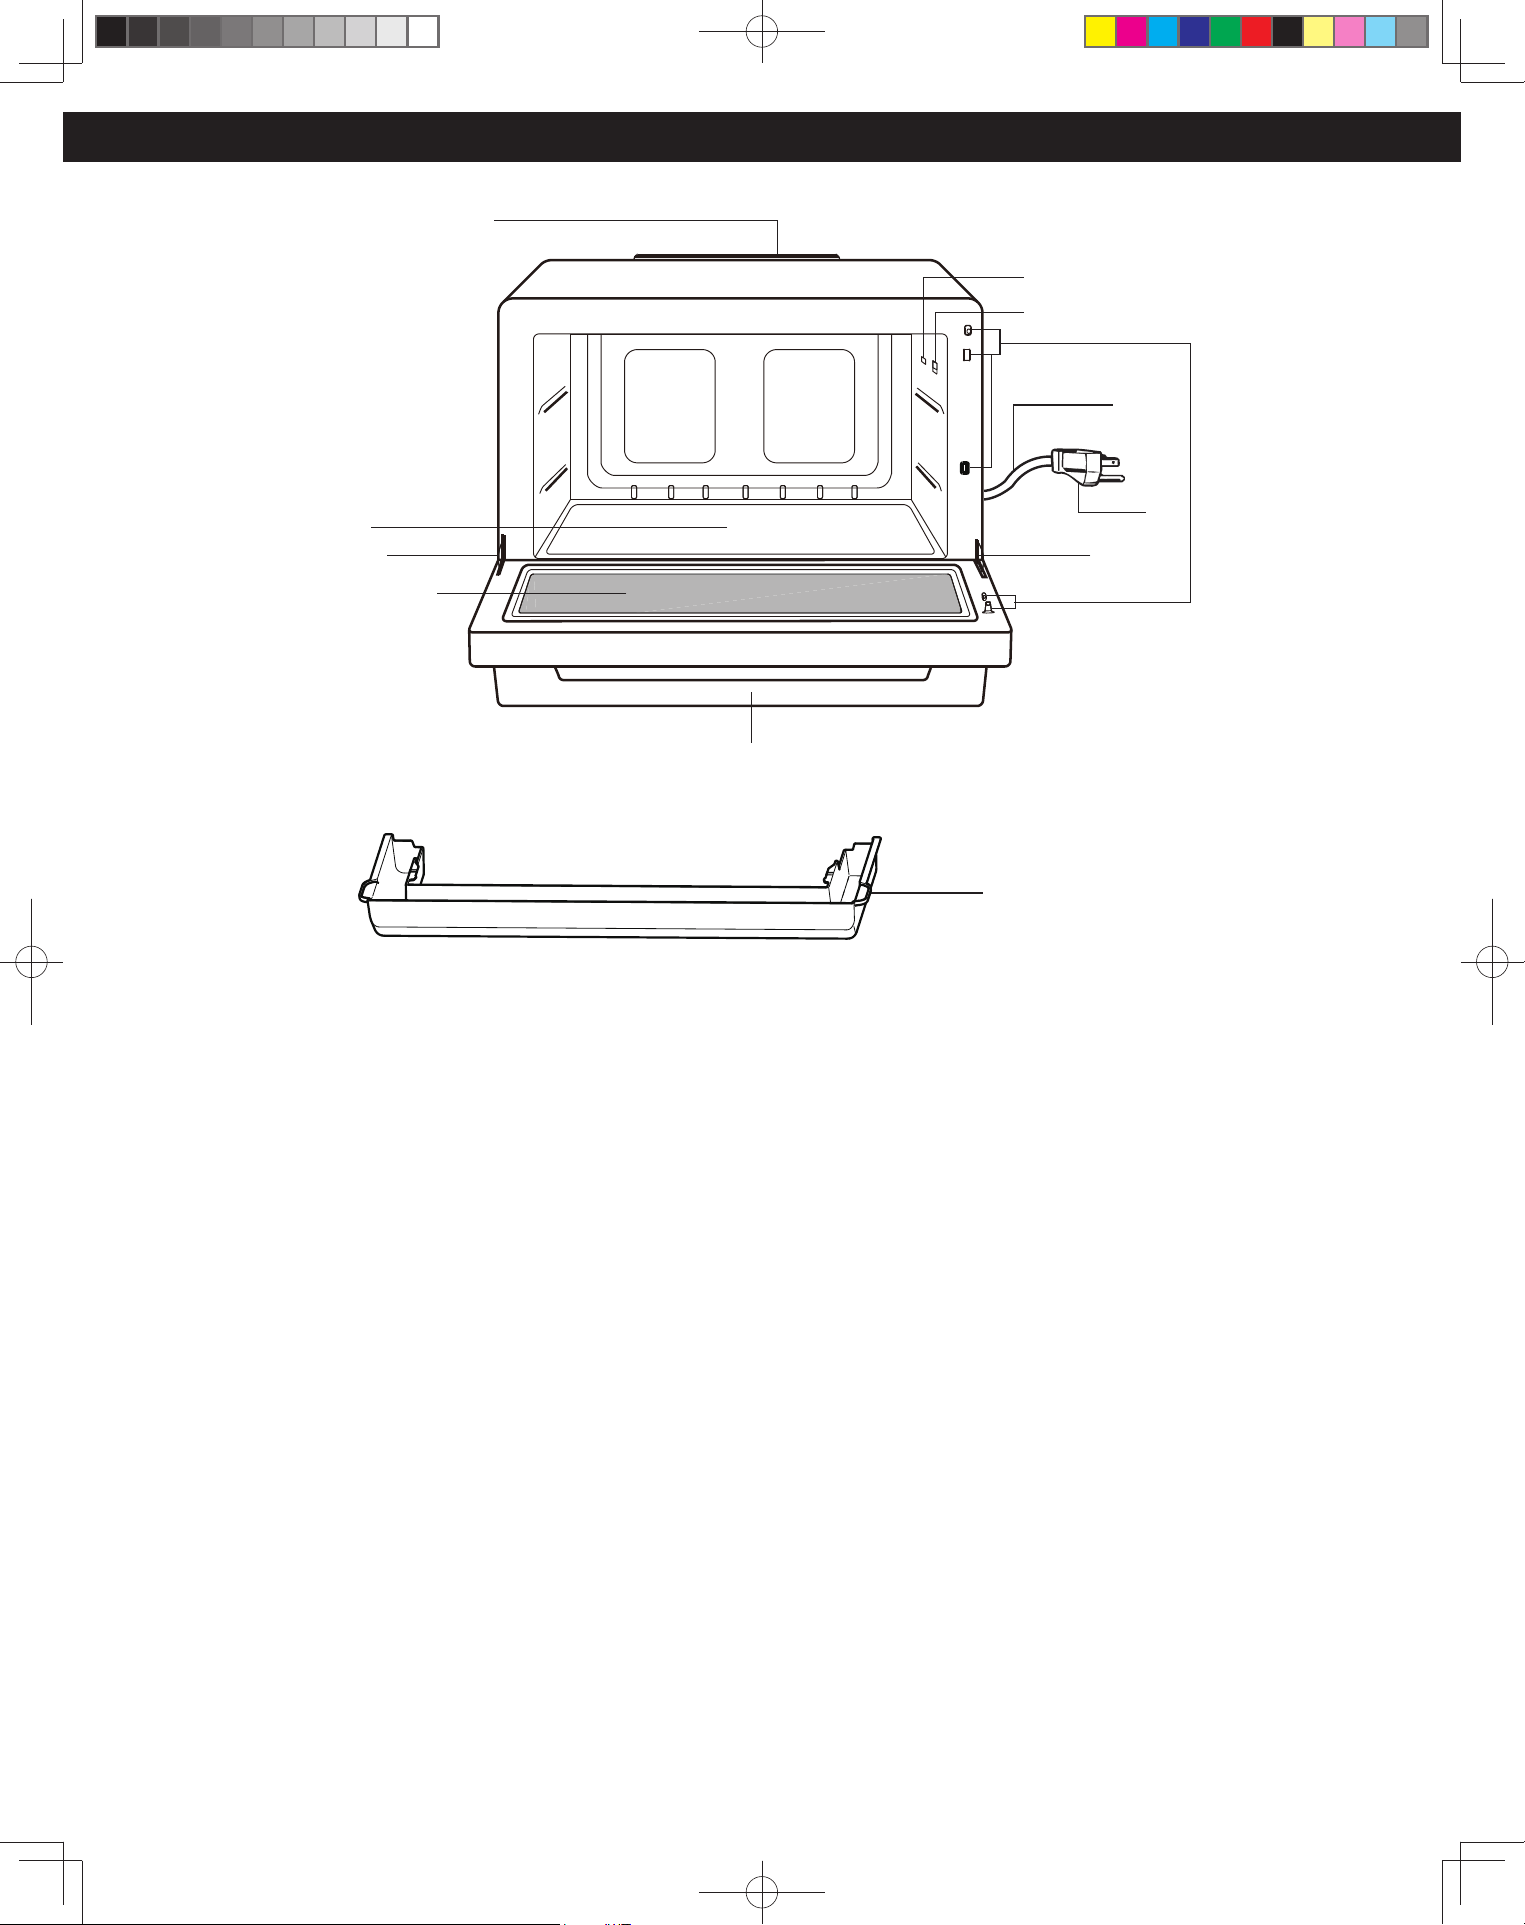
9
Ubicación de los controles
q Manija de la puerta
Tire de la manija hacia afuera para abrir. Cuando
abra la puerta del horno durante la cocción, esta
se detiene temporalmente sin borrar los ajustes
programados. La cocción se reanuda una vez
que la puerta se cierra y se presiona el Dial. La
lámpara del horno se ilumina tan pronto se abre
la puerta.
w Ventana del horno
e Sistema de puerta de cierre suave
r Salida de aire de escape
t Luz del horno
La luz del horno se encenderá mientras esté
cocinando y también cuando se abra la puerta.
y Base plana
Si la base plana está caliente, espere a que se
enfríe antes de limpiarla. No coloque alimentos
directamente sobre la base plana. Colóquelos en
un recipiente o bandeja recipiente especial para
hornos de microondas.
u Bisagras de la puerta
Para prevenir lesiones al abrir o cerrar la puerta,
mantenga los dedos alejados de las bisagras.
i Cable de suministro eléctrico
o Enchufe de suministro eléctrico
a Sensor IR
s Cubierta decorativa
Esta cubierta es decorativa. Si se ensucia, para
limpiarla solo enjuáguela con agua limpia. No la
lave en el lavavajillas.
NOTA:
La ilustración es solo para fines de referencia.
r
y
o
i
u
u
q
w
e
t
a
s
F0003DB70AP_ES.indd 9F0003DB70AP_ES.indd 9 2026/3/3 16:22:382026/3/3 16:22:38
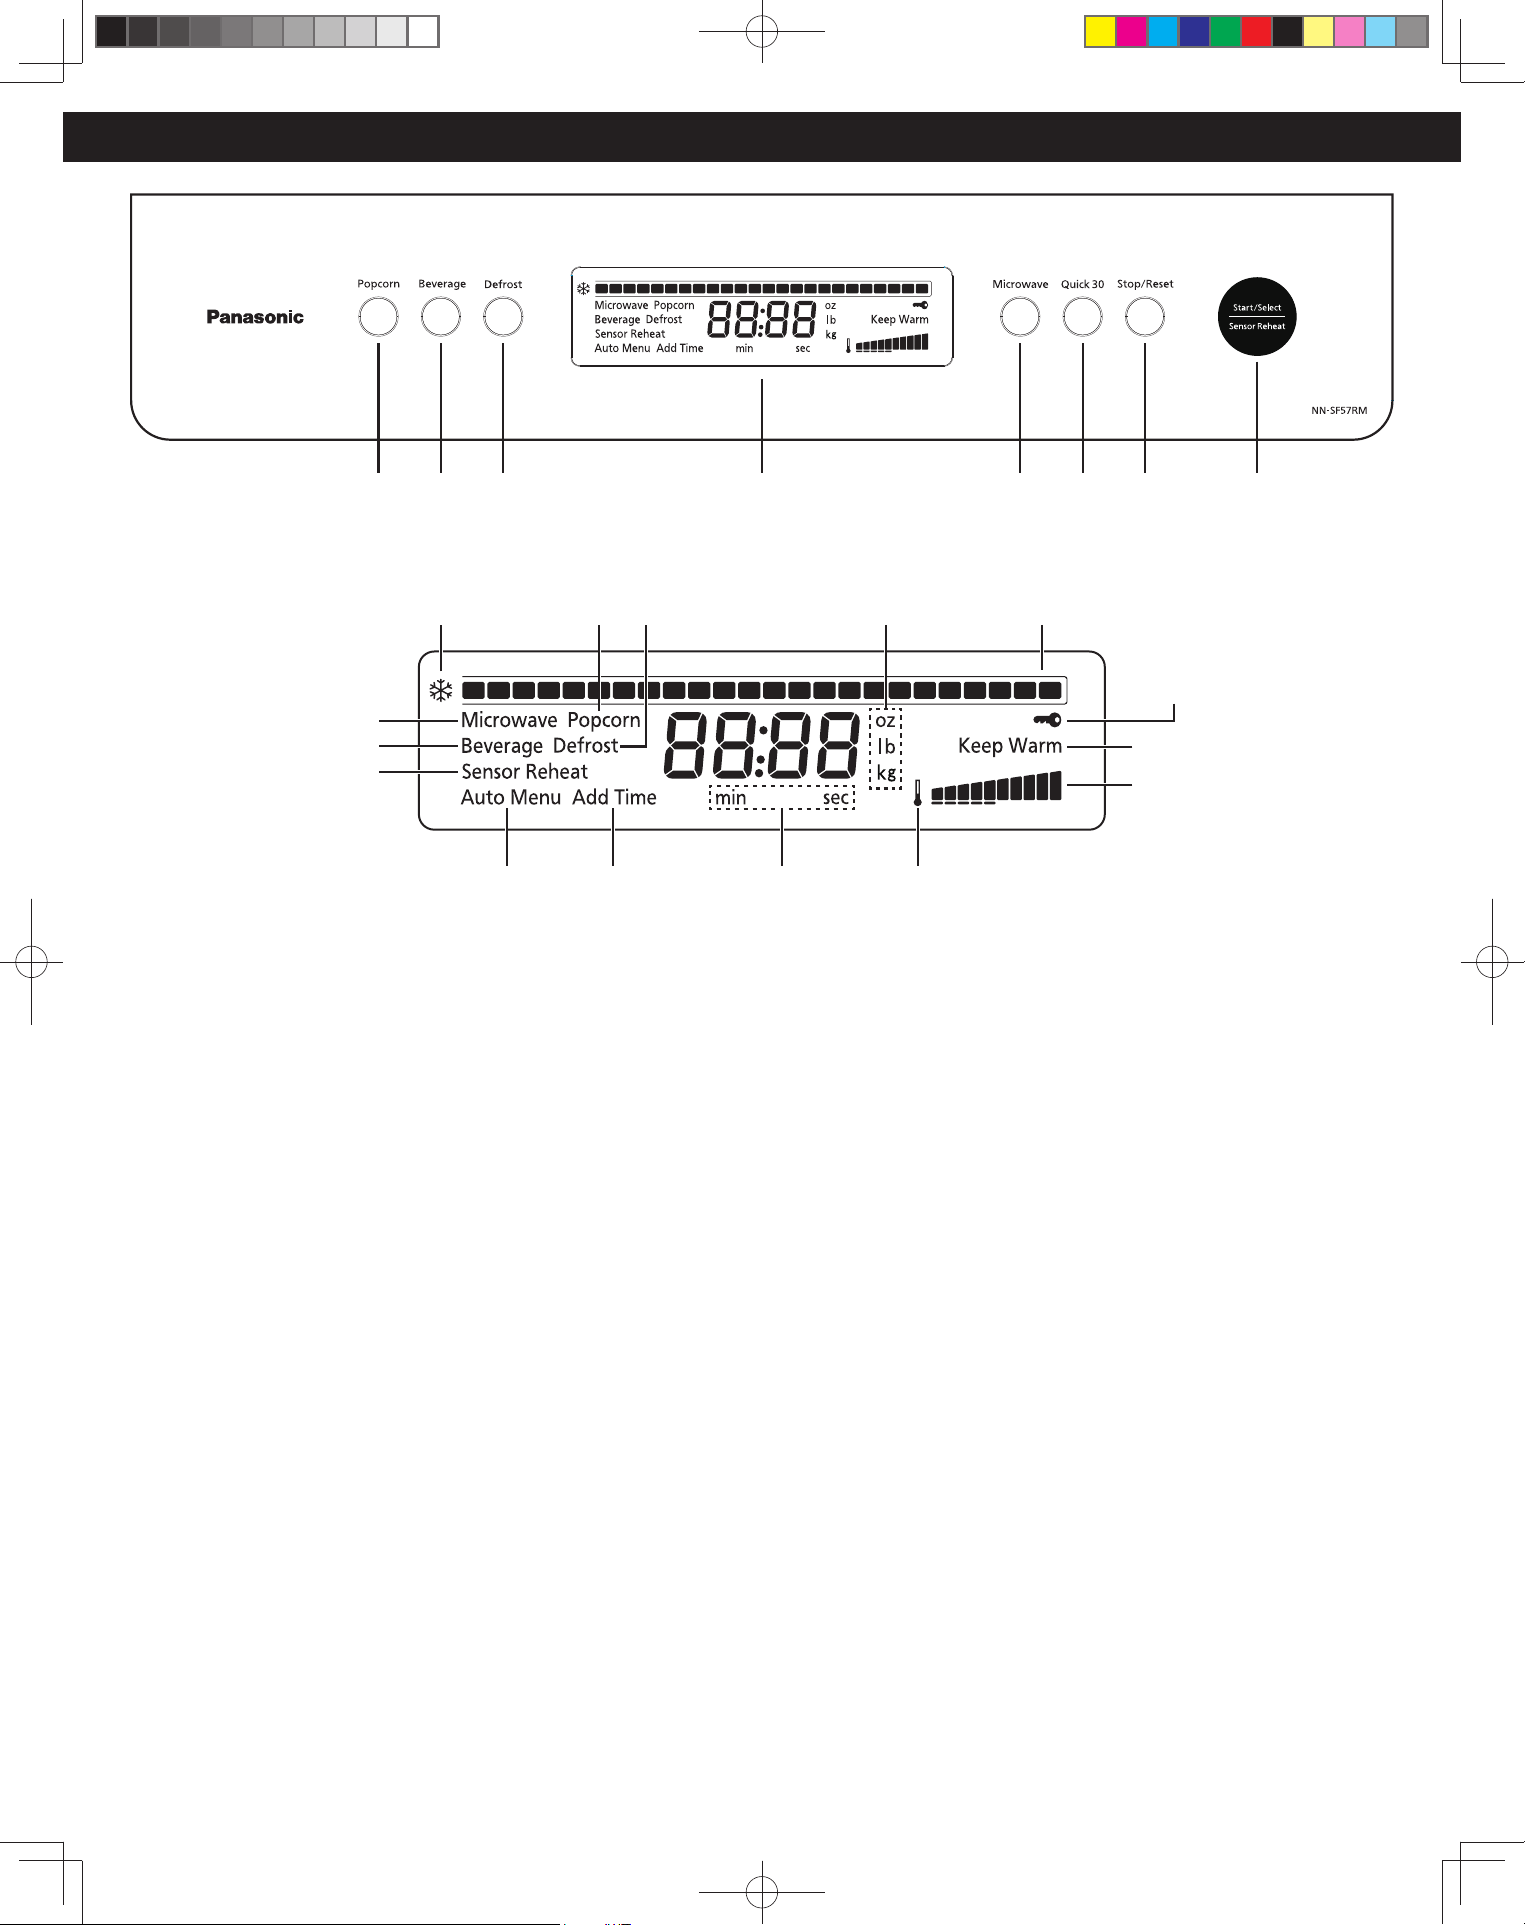
10
Ajuste de bloqueo de
seguridad para niños
Panel de Control
q Pantalla indicadora
Modo
A: Microondas
B: Palomitas
C: Bebidas
D: Descongelación
E: Recalentar por Sensor
F: Menú Automático
G: Tiempo Adicional
H: Mantener caliente
w Tecla de Palomitas (Ver página 18)
e Tecla de Bebidas (Ver página 19)
r Tecla de Descongelar (Ver página 17)
t Tecla de Microondas (Ver página 14-15)
y Tecla de 30 Seg Automático (Ver página 16)
u Tecla para Pausa/Cancelar
Antes de cocinar: Un toque borra todas sus
instrucciones.
Durante la cocción:
Un toque detiene
temporalmente el proceso de cocción. Otro
toque cancela todas sus instrucciones y la
hora del día aparece en la pantalla indicadora.
i Dial
El dial tiene 4 funciones. (Ver detalles en la página
siguiente)
Sonido de pitido:
Cuando se presiona una tecla correctamente, sonará un
pitido. Si se presiona la tecla y no se oye ningún pitido,
la unidad no aceptó o no puede aceptar la instrucción.
Al final de cualquier programa completado, el horno
emitirá un pitido 5 veces.
NOTA:
1. Si una operación ha sido fijada sin apretar Comenzar,
después de 6 minutos el horno automáticamente
cancelará la operación. La pantalla indicadora
regresará al modo de reloj o dos puntos.
2. Luego de que se haya completado la última
operación, el horno quedará en modo de espera.
Cuando está en modo de espera, se reduce el brillo
de la pantalla y el dial.
3. Para usar el horno cuando está en modo de espera,
se debe abrir y cerrar la puerta.
NOTA:
La ilustración es solo para fines de referencia.
F
E
C
B
A
D
G
Peso
Temperatura
1. Nivel de microondas
2. Ajuste de temperatura
3. Ajuste Más/Menos
H
Barra de estado
Modo de descongelación
Tiempo
(Minuto/Segundo)
qrewtyui
F0003DB70AP_ES.indd 10F0003DB70AP_ES.indd 10 2026/3/3 16:22:382026/3/3 16:22:38
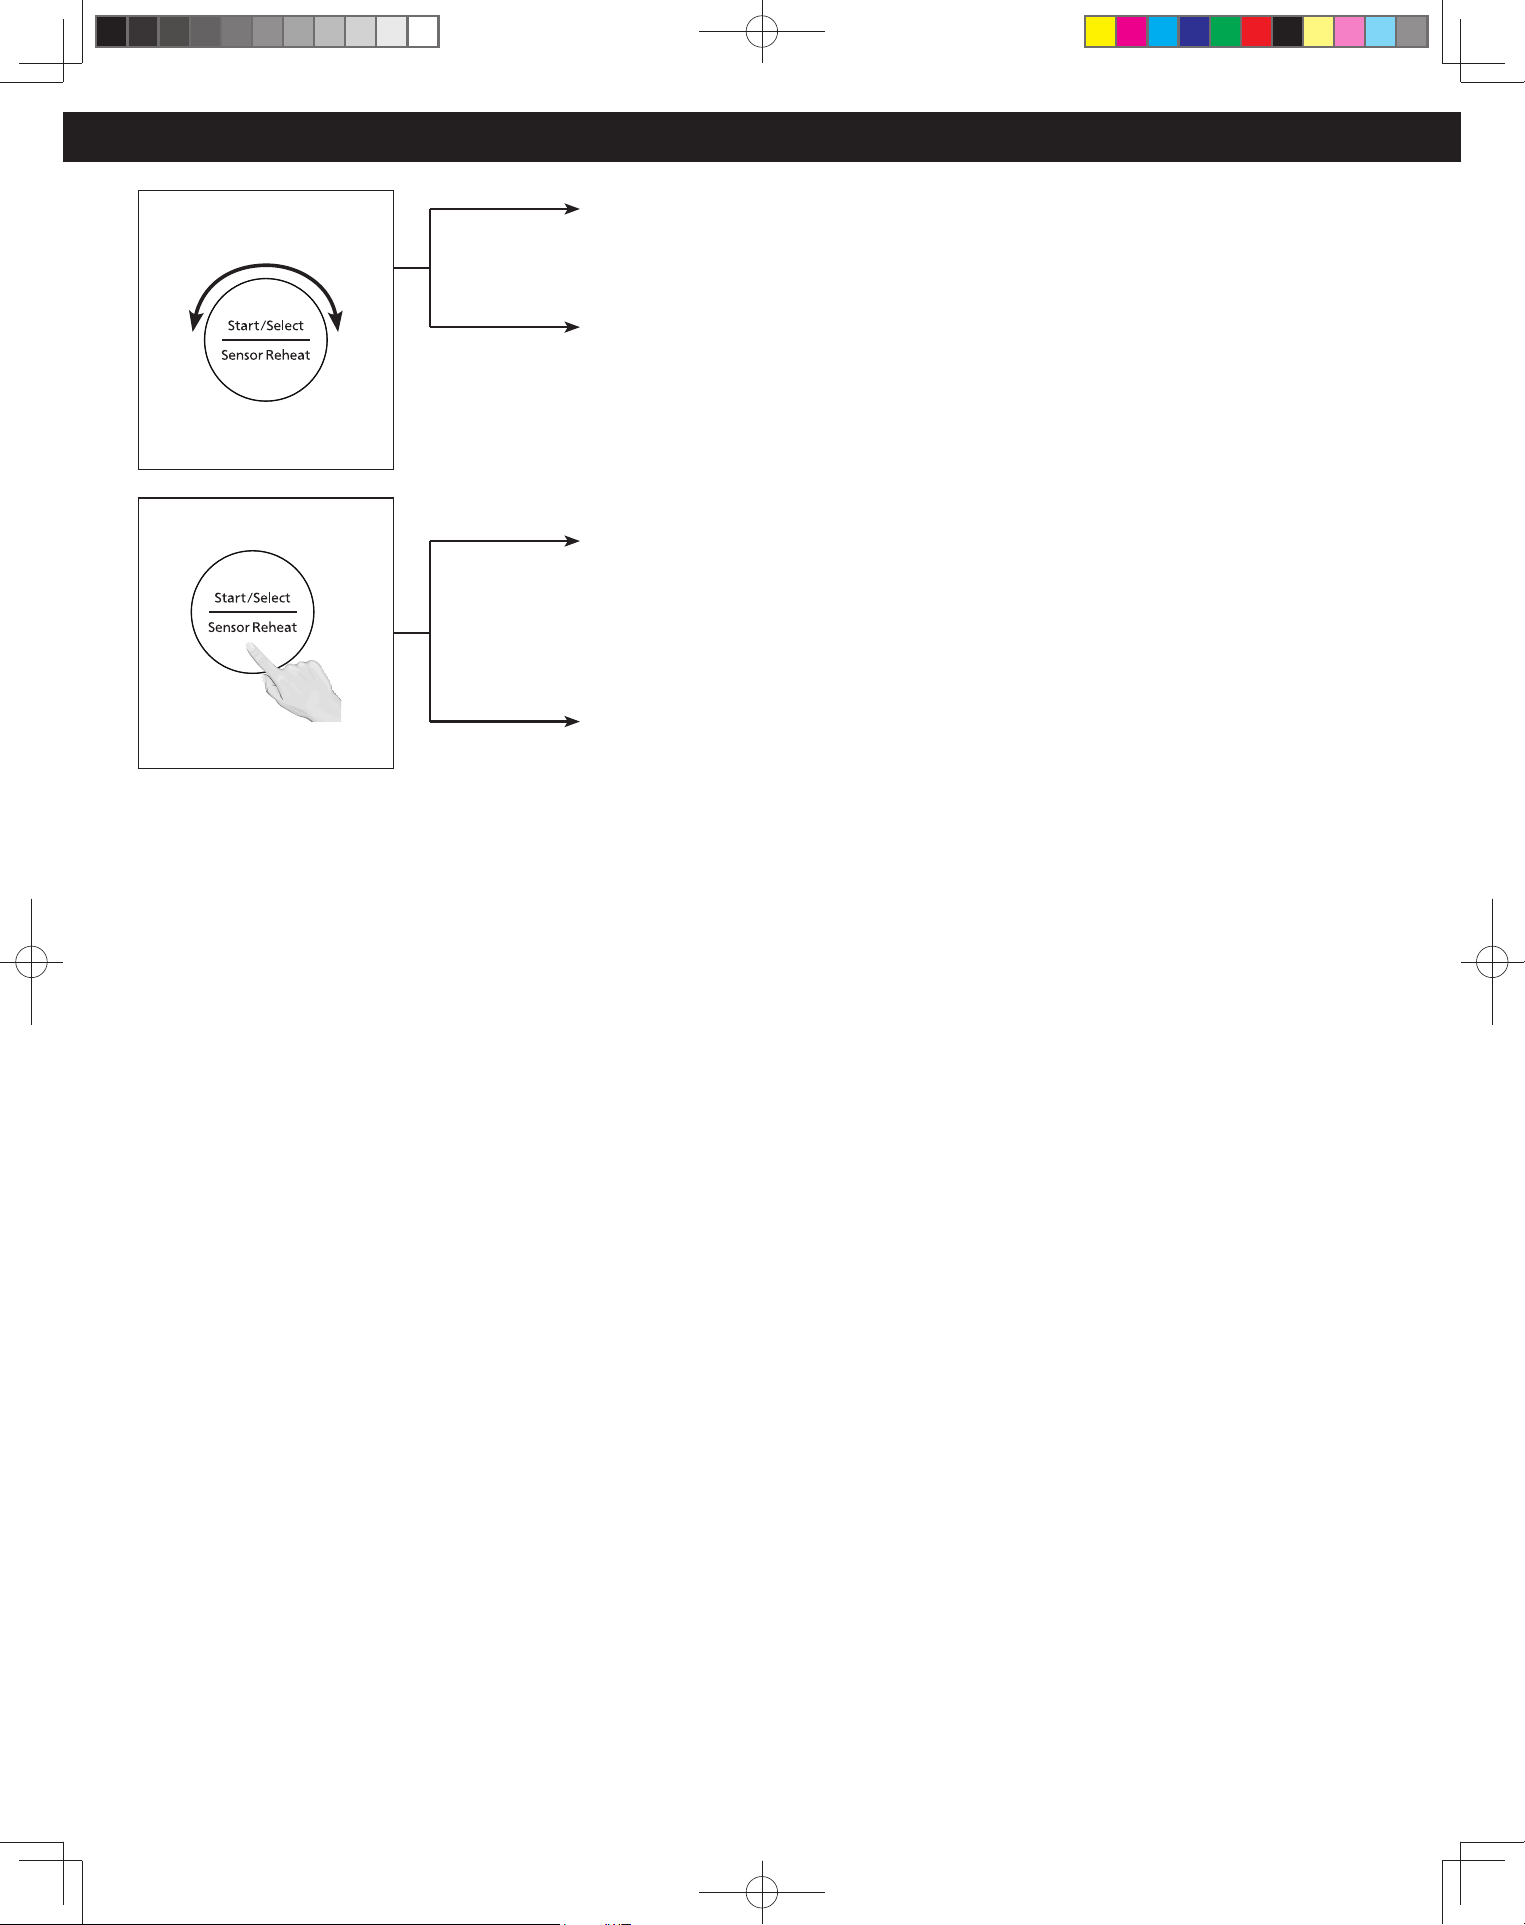
11
Función de dial
q Selección de Tiempo/Menú/Peso
Seleccione el tiempo, el menú de cocción por sensor o el peso (para palomitas) girando
el Dial.
w Selección de Temperatura y Más/Menos
* (Opcional) Ajuste su plato después de presionar Encender (Start).
Cambie el ajuste para obtener el resultado perfecto en los siguientes 14 segundos.
Al conectarlo por primera vez, el ajuste predeterminado es Medio (Estándar).
e Encender/Seleccionar (Confirmación)
Presionar el Dial para comenzar a operar el horno o con rmar el ajuste. Si durante
la cocción, se abre la puerta o se presiona Pausa/Cancelar (Stop/Reset) una vez,
Encender debe ser presionado nuevamente para continuar cocinando.
r Recalentamiento por sensor (Una pulsación de recalentamiento)
Cuando se muestre el modo de dos puntos o el modo de reloj, presione el Dial para
iniciar rápidamente el recalentamiento de comidas (página 13).
F0003DB70AP_ES.indd 11F0003DB70AP_ES.indd 11 2026/3/3 16:22:382026/3/3 16:22:38
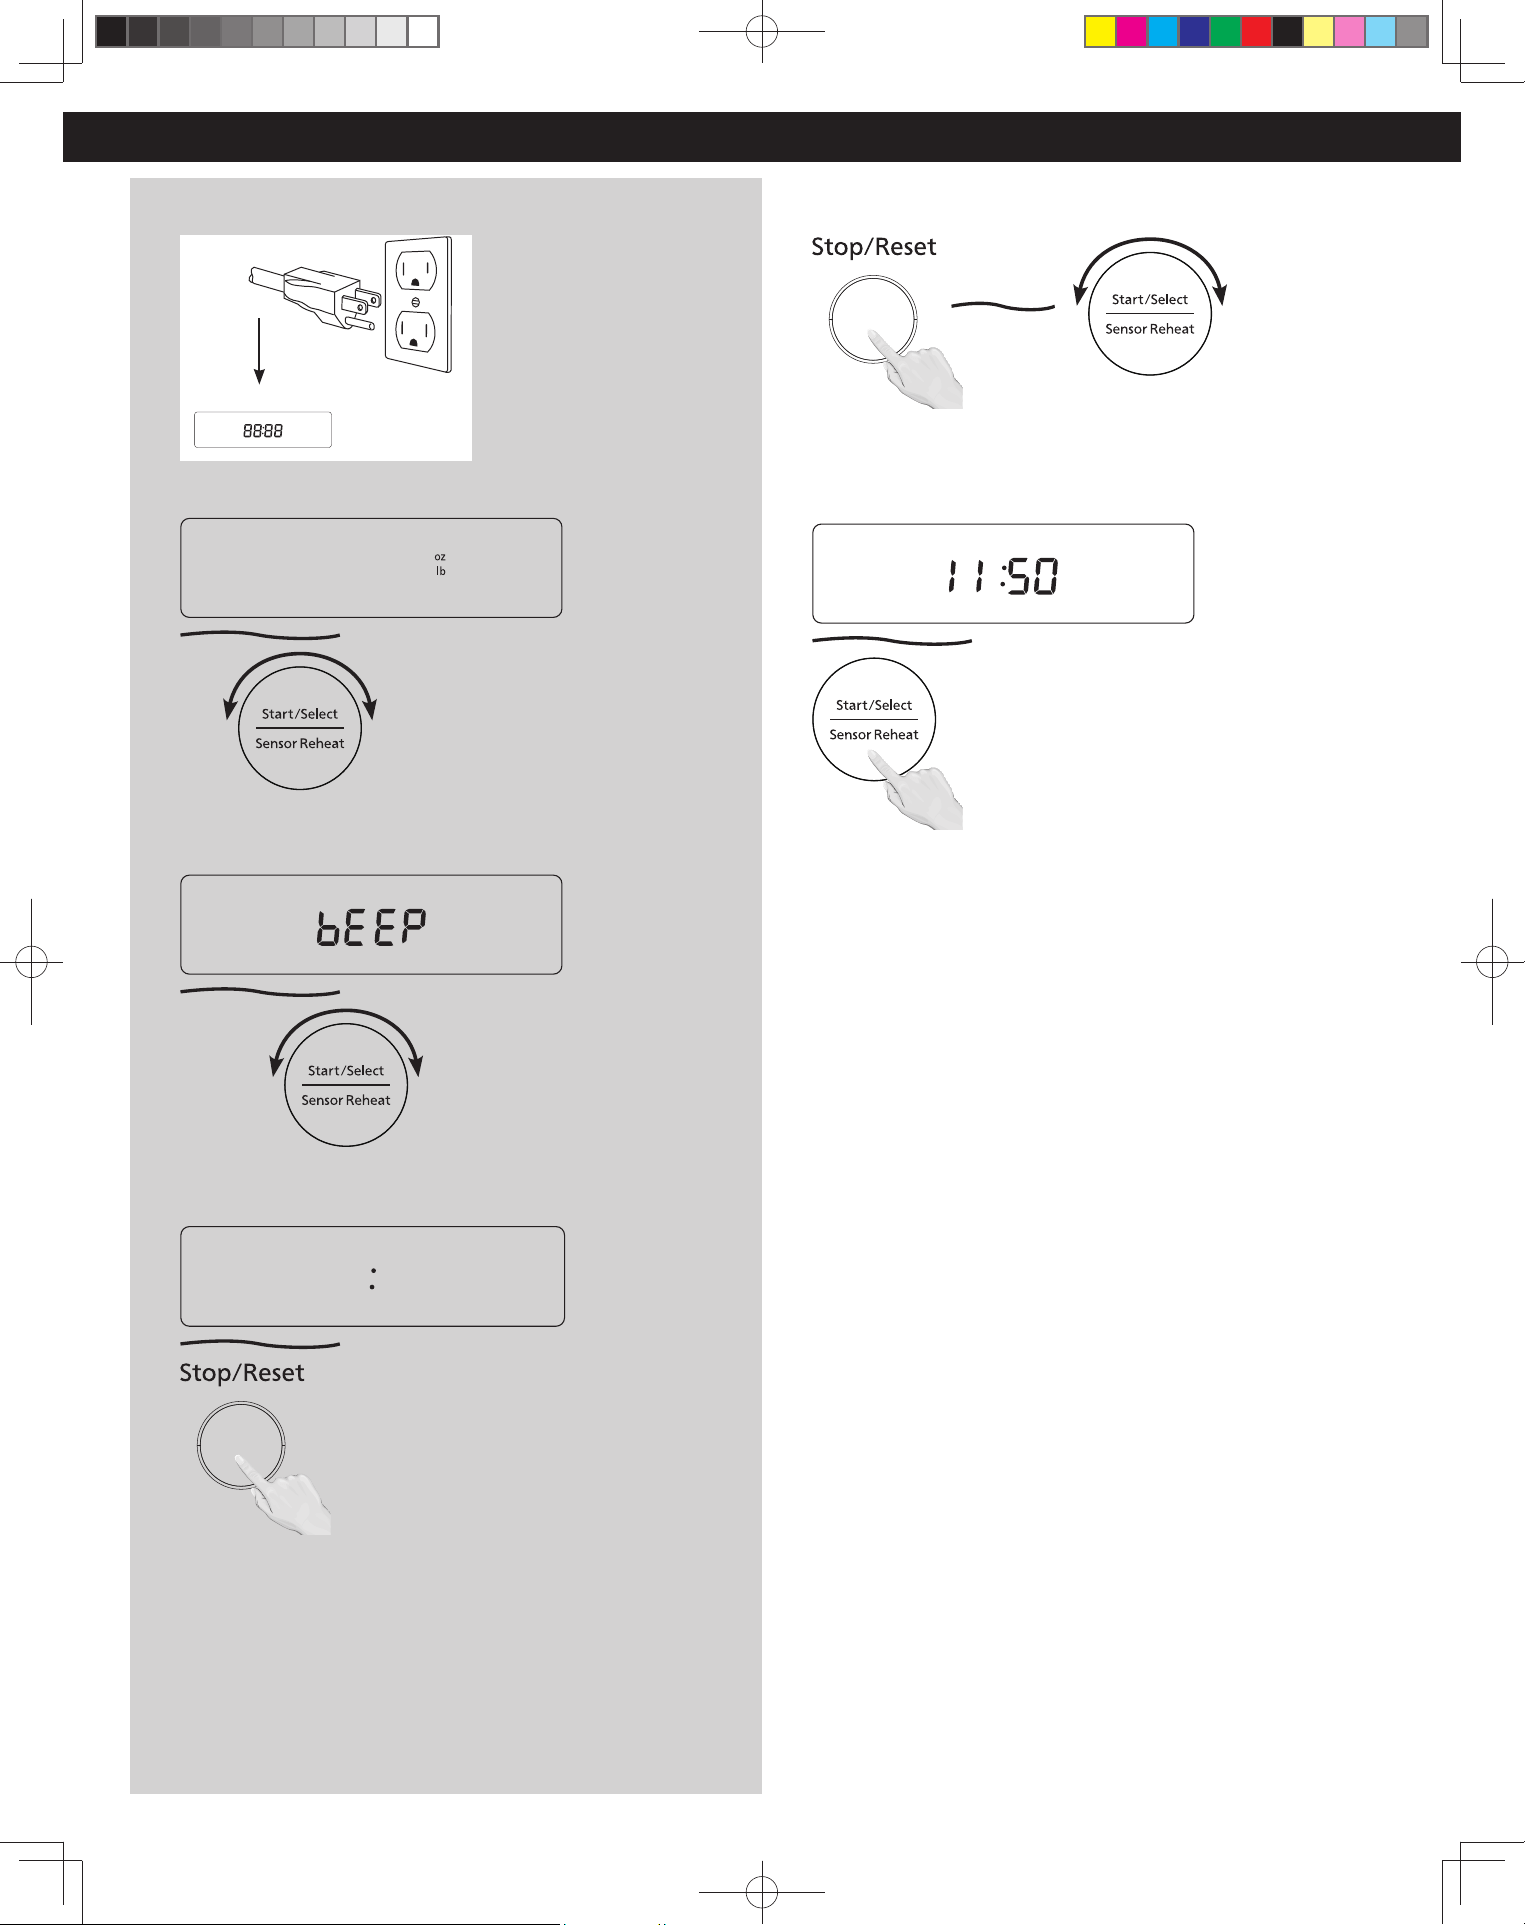
12
Funcionamiento
Uso del microondas por primera vez
1
Pantalla indicadora
Enchufe a un tomacorriente eléctrico correctamente conectado a tierra.
2
oz/lb
kg
Presione Encender (Start) una vez y luego use el Dial para cambiar
entre el sistema de peso imperial (oz/lb) y el métrico (kg).
3
apagado
encendido
Presione Encender (Start) una vez, luego use el Dial para cambiar
entre Pitido encendido o Pitido apagado.
4
Presione Pausa/Cancelar (Stop/Reset) para confirmar; aparecerá
el signo de dos puntos (:) en la pantalla indicadora.
NOTA:
1. Estas opciones pueden seleccionarse solo cuando el horno está
enchufado.
2. Sus preferencias de algunas funciones de este producto quedan
en la memoria (por ejemplo, unidad de medida de peso y
zumbador activado o desactivado). Una vez configurados, estos
ajustes se guardan de modo que no tenga que cambiarlos
siempre. Permanecen guardados incluso al desenchufar el horno.
Ajustar el Reloj
1
Con el horno SIN cocinar, mantenga presionado la tecla para
Pausa/Cancelar (Stop/Reset) durante 3 segundos; los dos puntos
parpadearán. Ingrese la hora del día usando el Dial.
2
Presione Encender (Start) para finalizar la configuración; los dos
puntos (:) dejarán de parpadear.
NOTAS:
1. Para reiniciar el reloj repita los pasos.
2. El reloj conservará la hora del día mientras el horno siga
enchufado y con suministro de electricidad.
3. La hora se muestra en formato de 12 horas.
4. El horno no funcionará mientras siga parpadeando el signo de
dos puntos (:).
F0003DB70AP_ES.indd 12F0003DB70AP_ES.indd 12 2026/3/3 16:22:382026/3/3 16:22:38
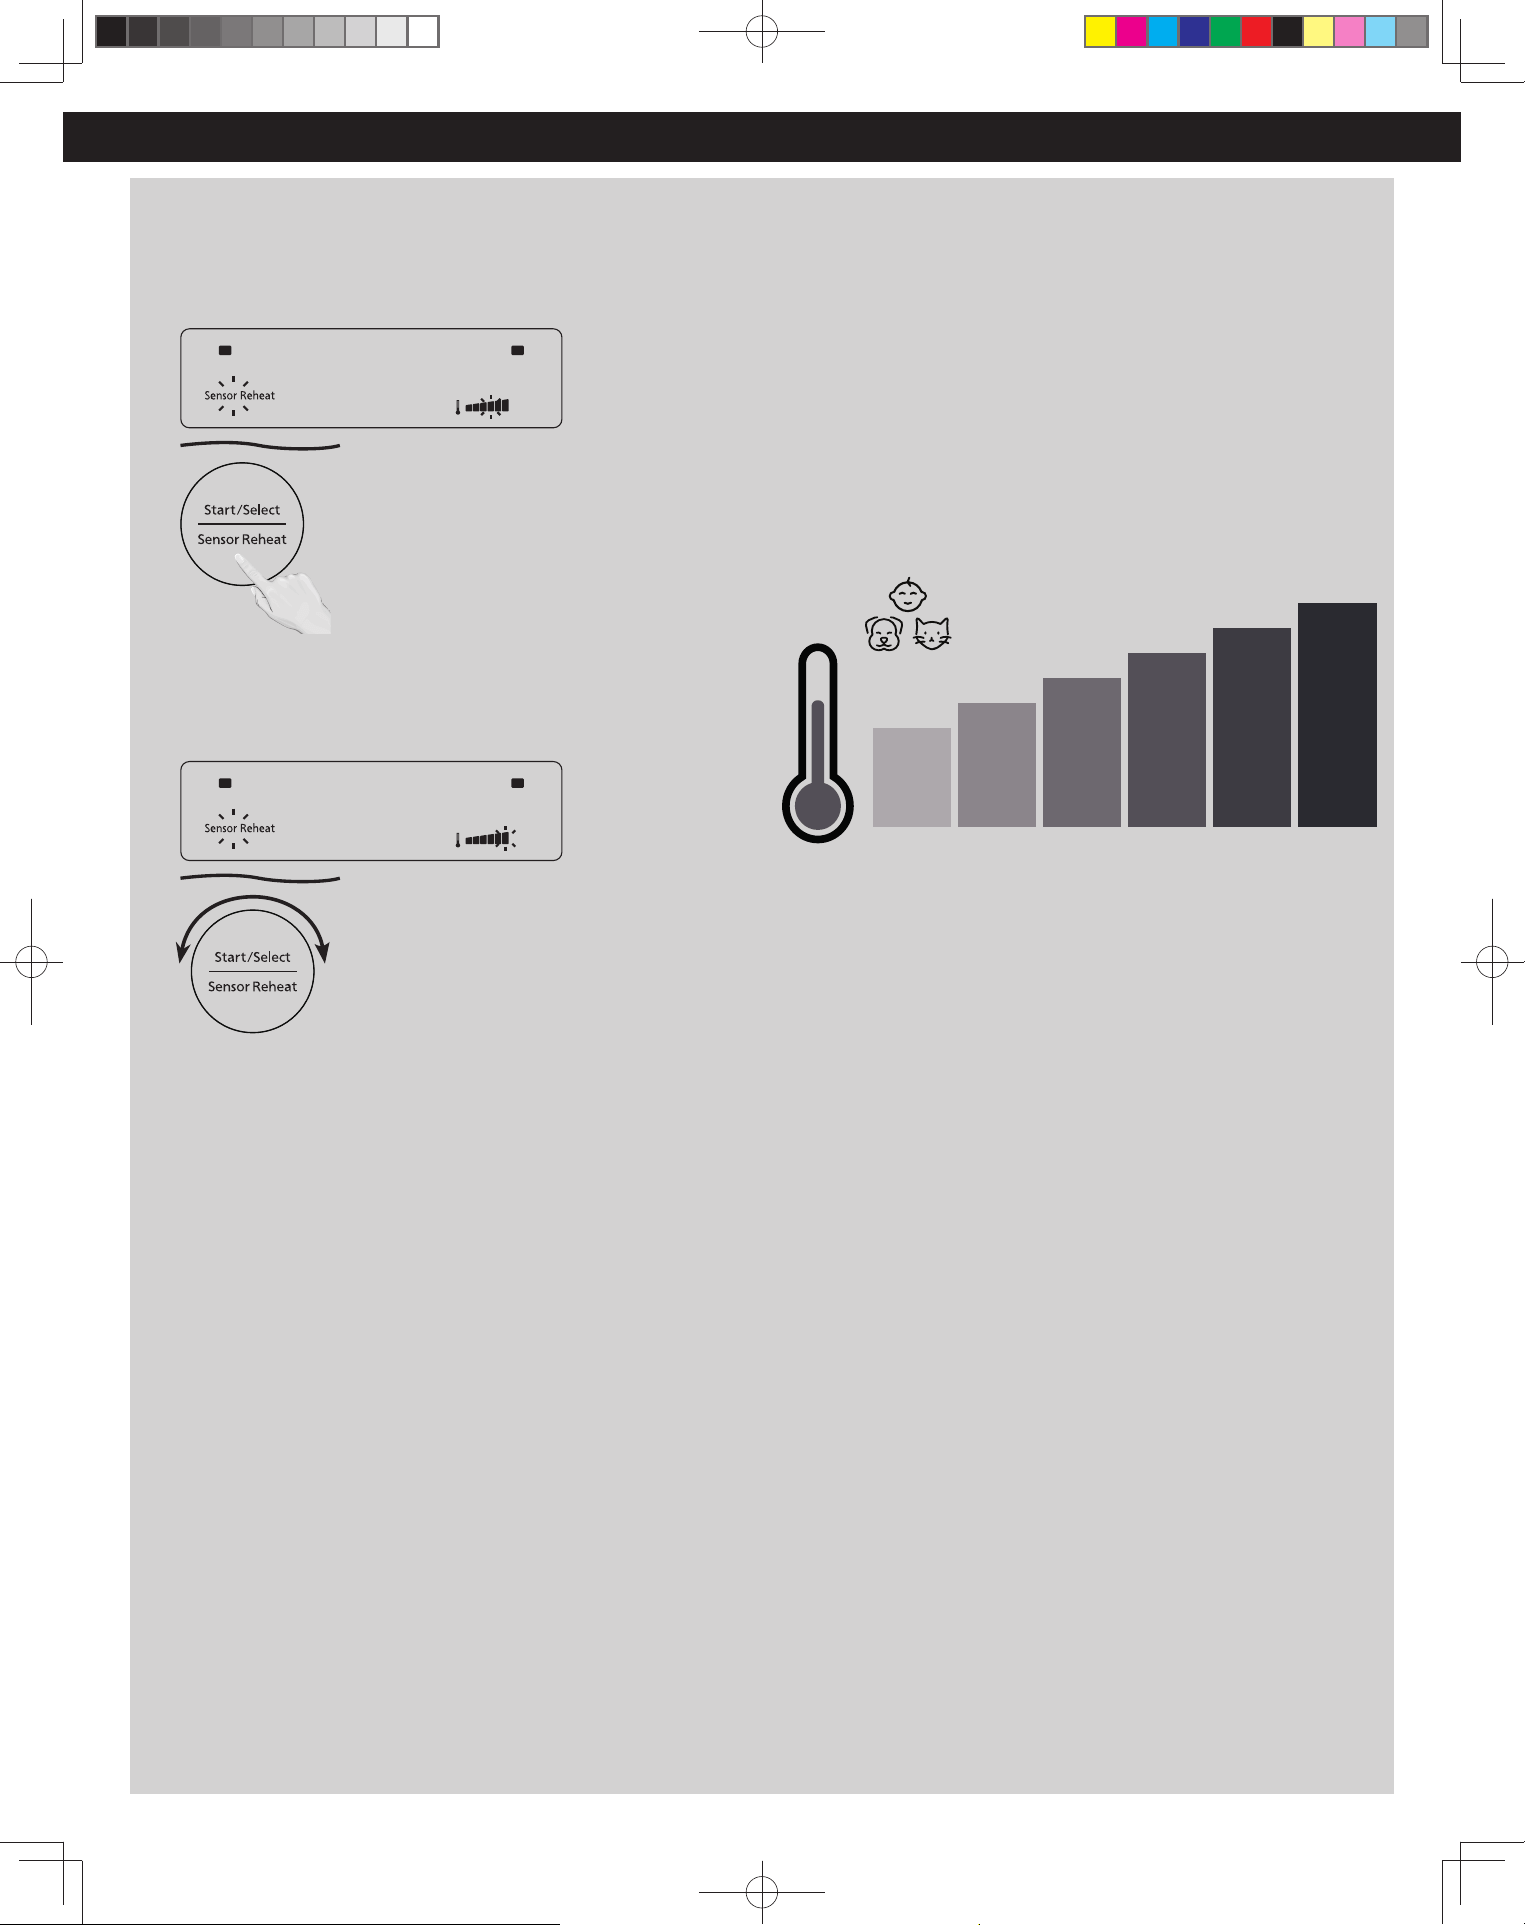
13
Recalentar por Sensor
(Recalentamiento con una sola pulsación sin ajustar el
tiempo ni la potencia. El sensor Genius® 2.0 detectará
automáticamente la temperatura de los alimentos)
(Ejemplo: Para recalentar la comida a alta potencia).
1
Coloque los alimentos en un recipiente apto para microondas
en el centro del horno, presione el Dial para iniciar y el horno
comenzará a calentar automáticamente.
2
Después de presionar Encender (Start), puede ajustar la
temperatura (nivel) del nivel Medio (Estándar) predeterminado
dentro de los siguientes 14 segundos.
Para aumentar: Gire el dial hacia la derecha.
Para disminuir: Gire el dial a la izquierda.
Las 6 configuraciones disponibles son:
Más bajo → Bajo → Medio-Bajo → Medio → Medio-Alto → Alto
(Ajuste solo si es necesario).
NOTAS:
1. La puerta no debe abrirse hasta que termine la cocción. Siempre
revuelva y revise la temperatura antes de servir. Deje reposar de 2 a 3
minutos los alimentos grandes.
2. Después de usar la función Recalentar por Sensor algunas veces,
puede decidir que preferiría sus alimentos recalentados a diferentes
niveles, por eso utilizaría la selección de Temperatura (Temperature) y
Más/Menos (More/Less).
3. Coloque siempre los alimento en el centro del horno dentro del rango
de peso de 55 g a 1000 g (2 - 35 oz.).
4. No cubra los alimentos con tapas, toallas de papel, envoltura plástica
ni ningún otro material. El sensor no podrá detectar la temperatura de
los alimentos. Sin embargo, utilice envoltura plástica al calentar sopas
para evitar salpicaduras.
5. Para un recalentado uniforme, asegúrese de que los alimentos no
tengan más de 3 cm (1.2 pulgadas) de grosor.
NO USE RECALENTAR POR SENSOR:
1. Para recalentar comidas congeladas muy grasosas, saladas, espesas
y con mucho queso, seleccione la potencia y el tiempo de forma
manual.
2. Para recalentar trozos de verduras grandes o densos, como papas
asadas. Use tiempo y potencia manual para estos alimentos.
3. Para alimentos crudos o sin cocinar.
4. Si está tibia la cavidad del horno.
5. Para bebidas o palomitas (utilice los botones específicos para ello).
Consejos para ajustar la temperatura:
Una vez iniciado el recalentamiento, ajuste la temperatura
girando el dial según desee.
Pollo entero: Debido a su tamaño y densidad, se recomienda usar
el ajuste "Alto".
Lasaña: Debido a su tamaño y densidad, se recomienda usar el
ajuste "Alto".
Funcionamiento (continuación)
BAJO
M
íNIMO
ALTOMEDIO
Por defecto
Comida para bebés
Comida para mascotas
F0003DB70AP_ES.indd 13F0003DB70AP_ES.indd 13 2026/3/3 16:22:382026/3/3 16:22:38
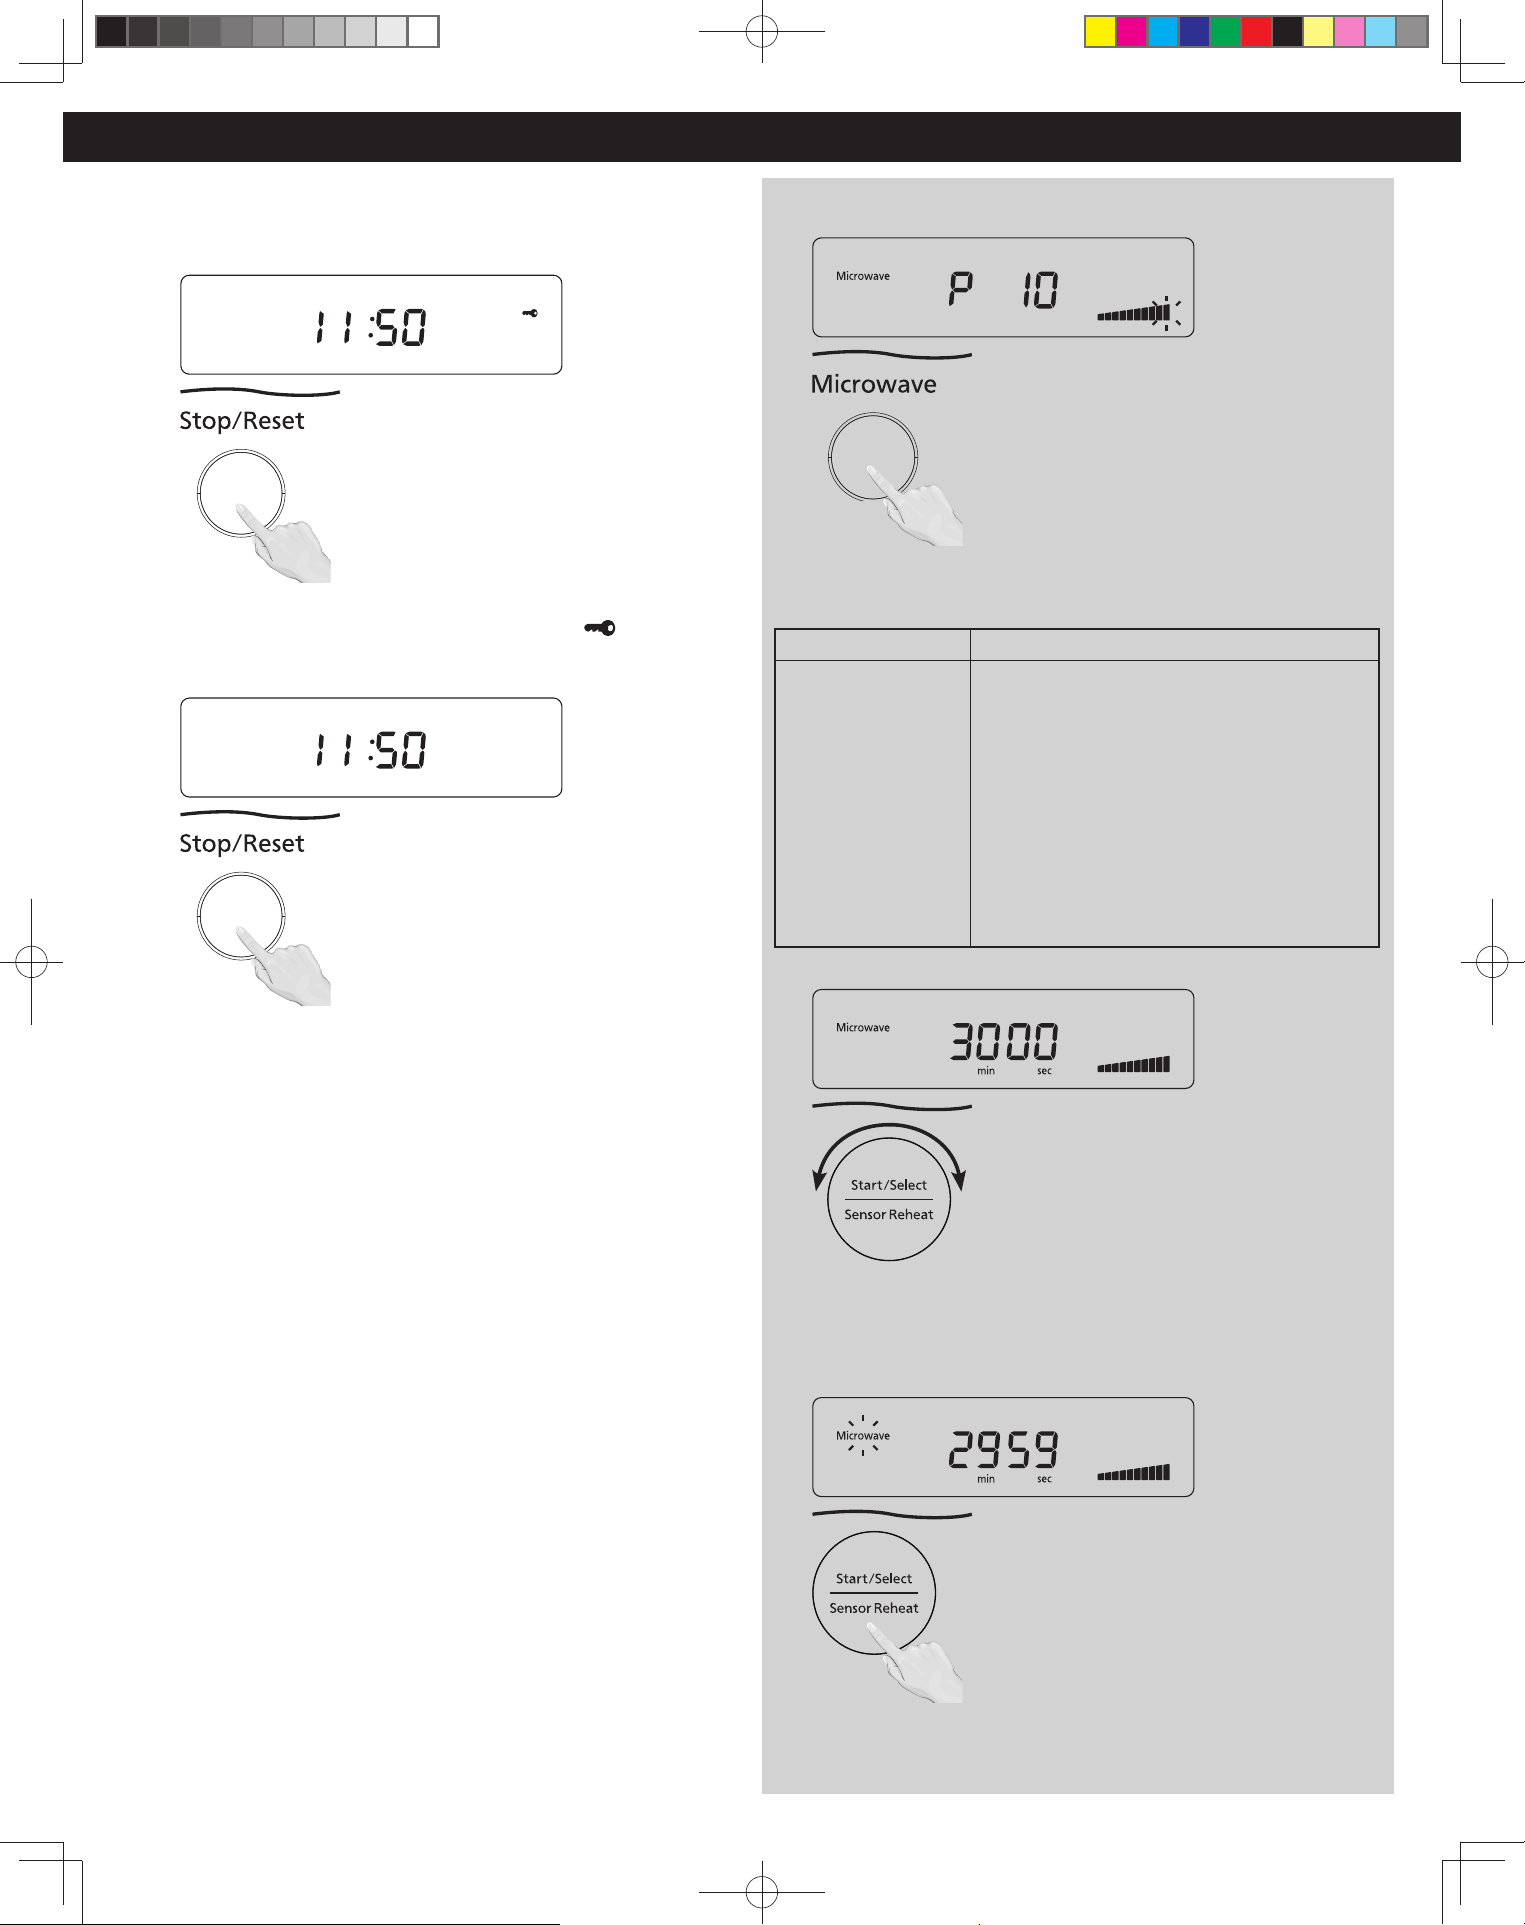
14
Configuración del Bloqueo de seguridad
para niños
1
Cuando aparezca la hora del día en la pantalla, presionar tres
veces Pausa/Cancelar (Stop/Reset); aparecerá “ ” en la
pantalla.
2
Presione Pausa/Cancelar (Stop/Reset) tres veces; la pantalla
volverá a la hora del día y se cancelará el Bloqueo de seguridad
para niños.
NOTAS:
1. Esta función evita que el horno funcione electrónicamente
hasta que se cancela. No asegura la puerta.
2. Para ajustar o cancelar el Bloqueo de seguridad para niños,
debe presionarse 3 veces dentro de 10 segundos la tecla para
Pausa/Cancelar (Stop/Reset). Se requiere un intervalo de
tiempo mínimo de 3 segundos entre cada conmutación.
3. Se puede configurar la función de “Bloqueo de seguridad para
niños” cuando la visualización muestra dos puntos o la hora
del día.
Funcionamiento (continuación)
Cocción
1
Presione la tecla Microondas (Microwave) hasta que aparezca el
nivel de potencia deseado en la pantalla. P10 es el más alto y P1 es
el más bajo.
Presione Nivel de potencia
una vez
dos veces
3 veces
4 veces
5 veces
6 veces
7 veces
8 veces
9 veces
10 veces
11 veces
P10 (ALTO)
P9
P8
P7 (MEDIO-ALTO)
P6 (MEDIO)
P5
P4
P3 (MEDIO-BAJO)
P2
P1 (BAJO)
MANTENER CALIENTE
2
Ingrese el tiempo de cocción usando el Dial. P10 (ALTO) y
MANTENER CALIENTE tienen un tiempo máximo de cocción de 30
minutos. Para otros niveles de potencia, el tiempo máximo es 1
hora y 30 minutos.
3
Presione Encender (Start); comenzará la cocción y el tiempo
comenzará con el conteo regresivo, que aparecerá en pantalla. Al
finalizar la cocción sonarán cinco pitidos.
F0003DB70AP_ES.indd 14F0003DB70AP_ES.indd 14 2026/3/3 16:22:382026/3/3 16:22:38
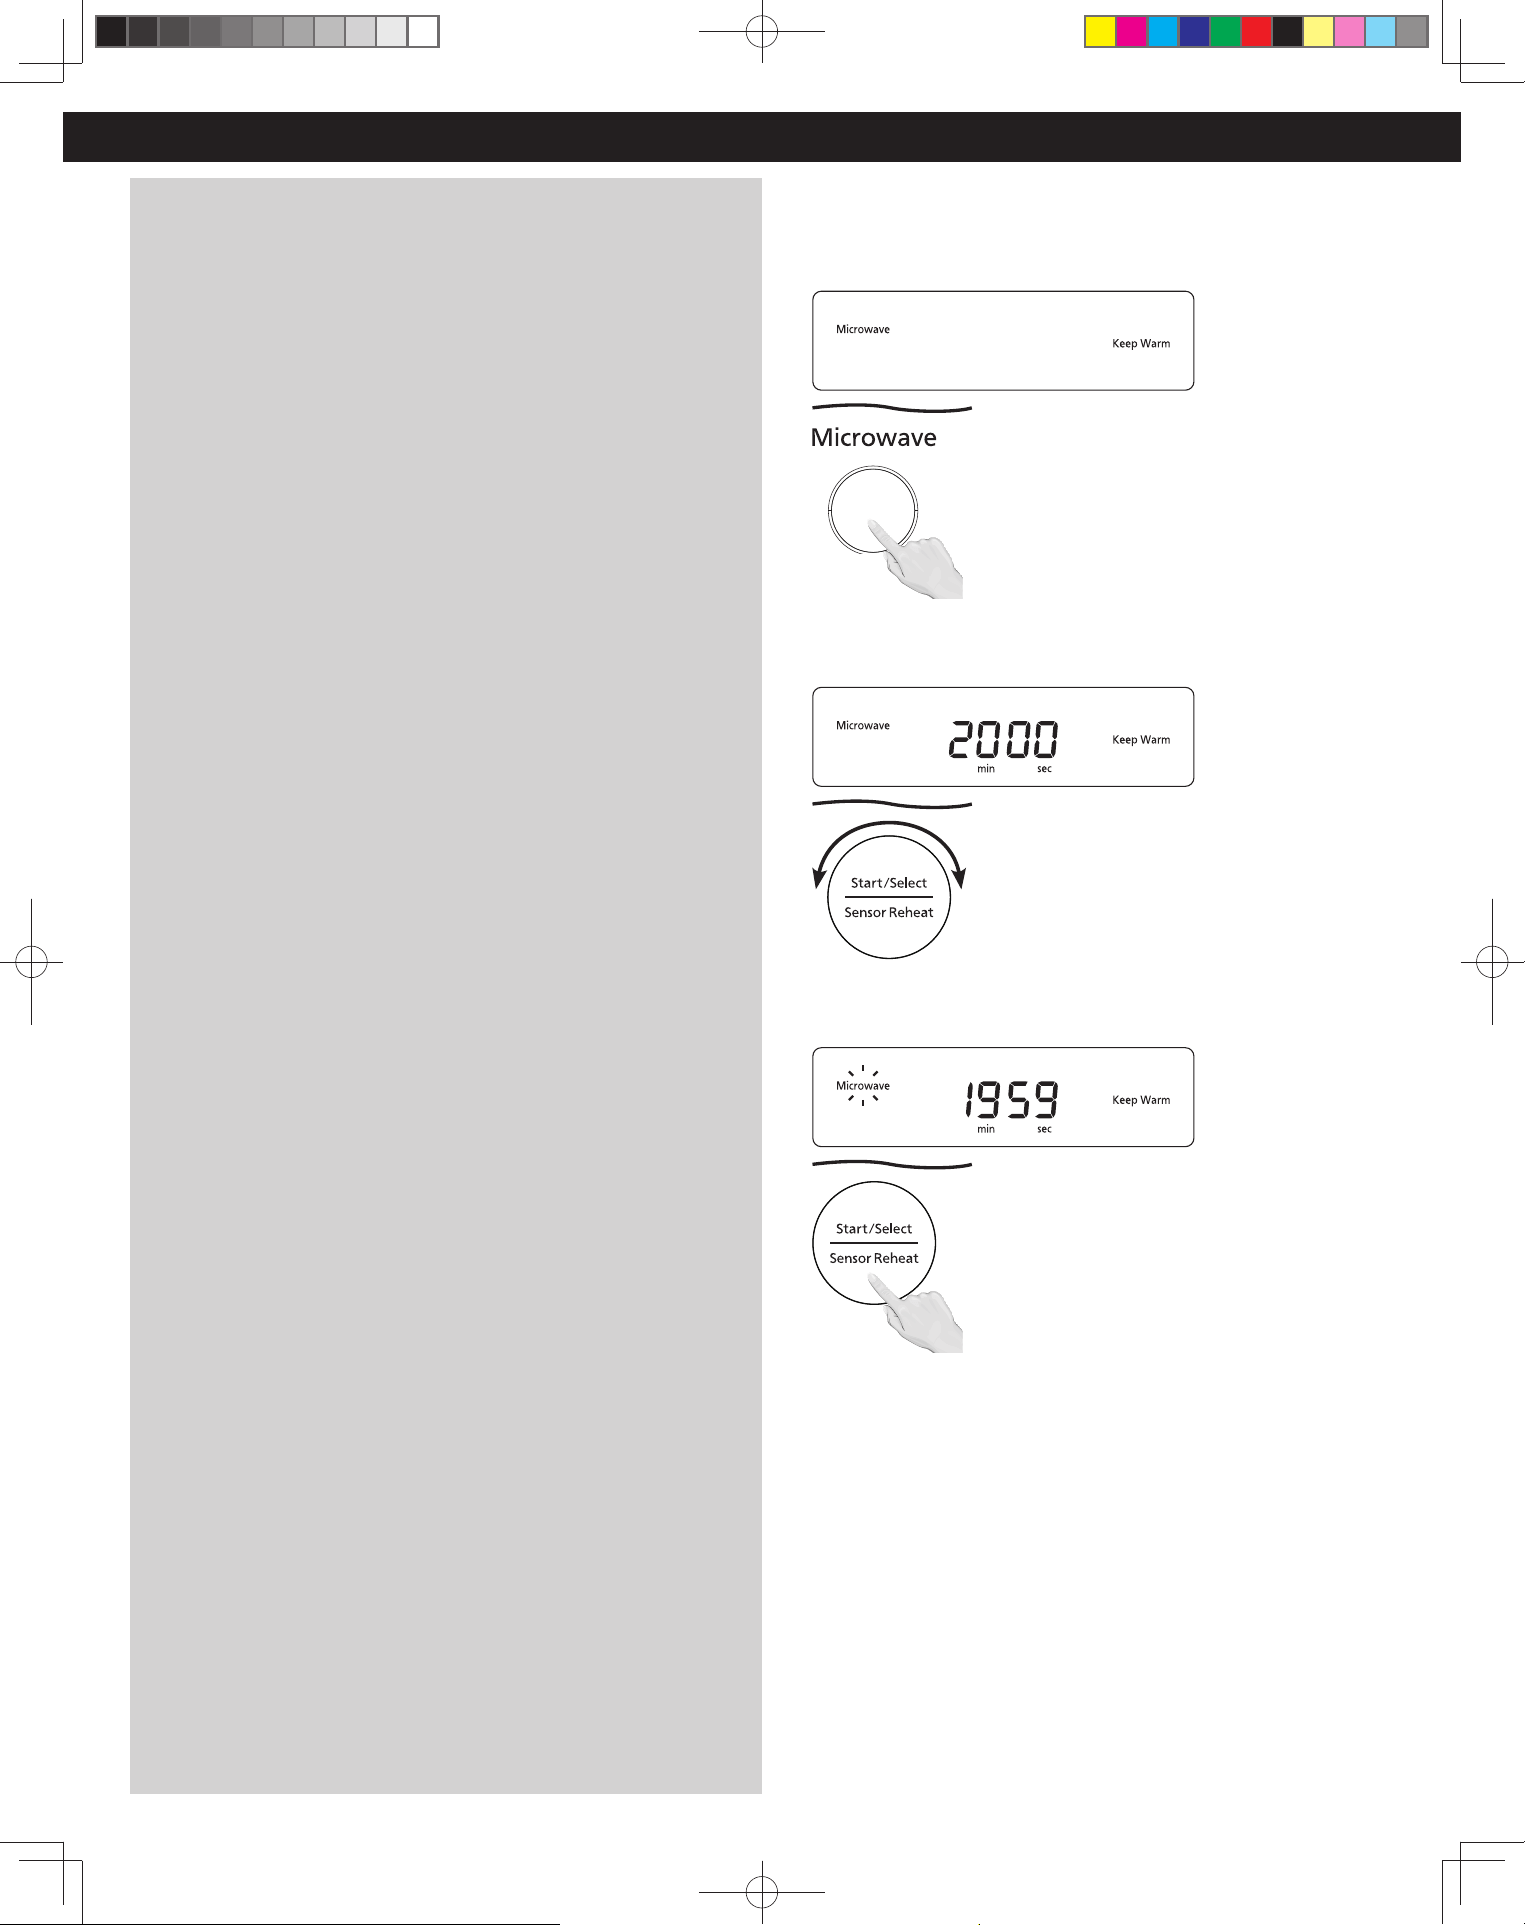
15
Mantener Caliente
(Mantendrá caliente la comida por hasta 30 minutos luego de
la cocción)
1
Presione la tecla Microondas (Microwave) 11 veces para
seleccionar MANTENER CALIENTE.
2
Ajuste el tiempo de calentamiento usando Dial (hasta 30
minutos). Seleccione 20 minutos de cocción, por ejemplo.
3
Presione Encender (Start); comenzará la cocción y el tiempo
comenzará con el conteo regresivo, que aparecerá en pantalla. Al
finalizar la cocción sonarán cinco pitidos.
NOTAS:
1. No intente usar el microondas con solo un recipiente metálico
en el horno.
2. No coloque alimentos directamente en la base del horno.
Colóquelos en un plato de vidrio o apto para microondas. A
menos que se indique lo contrario, los alimentos recalentados
o cocinados con microondas solo deben cubrirse con una tapa
o película adherente perforada.
3. Para recalentar, use P10 (ALTO) para líquidos, P7 (MEDIO-ALTO)
para la mayoría de los alimentos, y P6 (MEDIO) para alimentos
densos.
4. Para descongelar, use P3 (MEDIA BAJA).
NO COCINE DE MÁS:
Este horno requiere de menos tiempo de cocción que las
unidades antiguas. Si cocina de más, los alimentos se secarán y
pueden causar un incendio. La potencia de cocción de un horno
de microondas le indica la cantidad de potencia de microondas
disponible para la cocción.
Precaución:
NO descongele la comida a un ajuste de potencia alta. Hacerlo
puede generar concentración de energía en un punto fijo,
que puede generar arcos eléctricos y dañar su horno. Para
descongelar porciones pequeñas con precisión, use la función
“Descongelación (Defrost)” que se explica en la página 17.
Funcionamiento (continuación)
F0003DB70AP_ES.indd 15F0003DB70AP_ES.indd 15 2026/3/3 16:22:382026/3/3 16:22:38
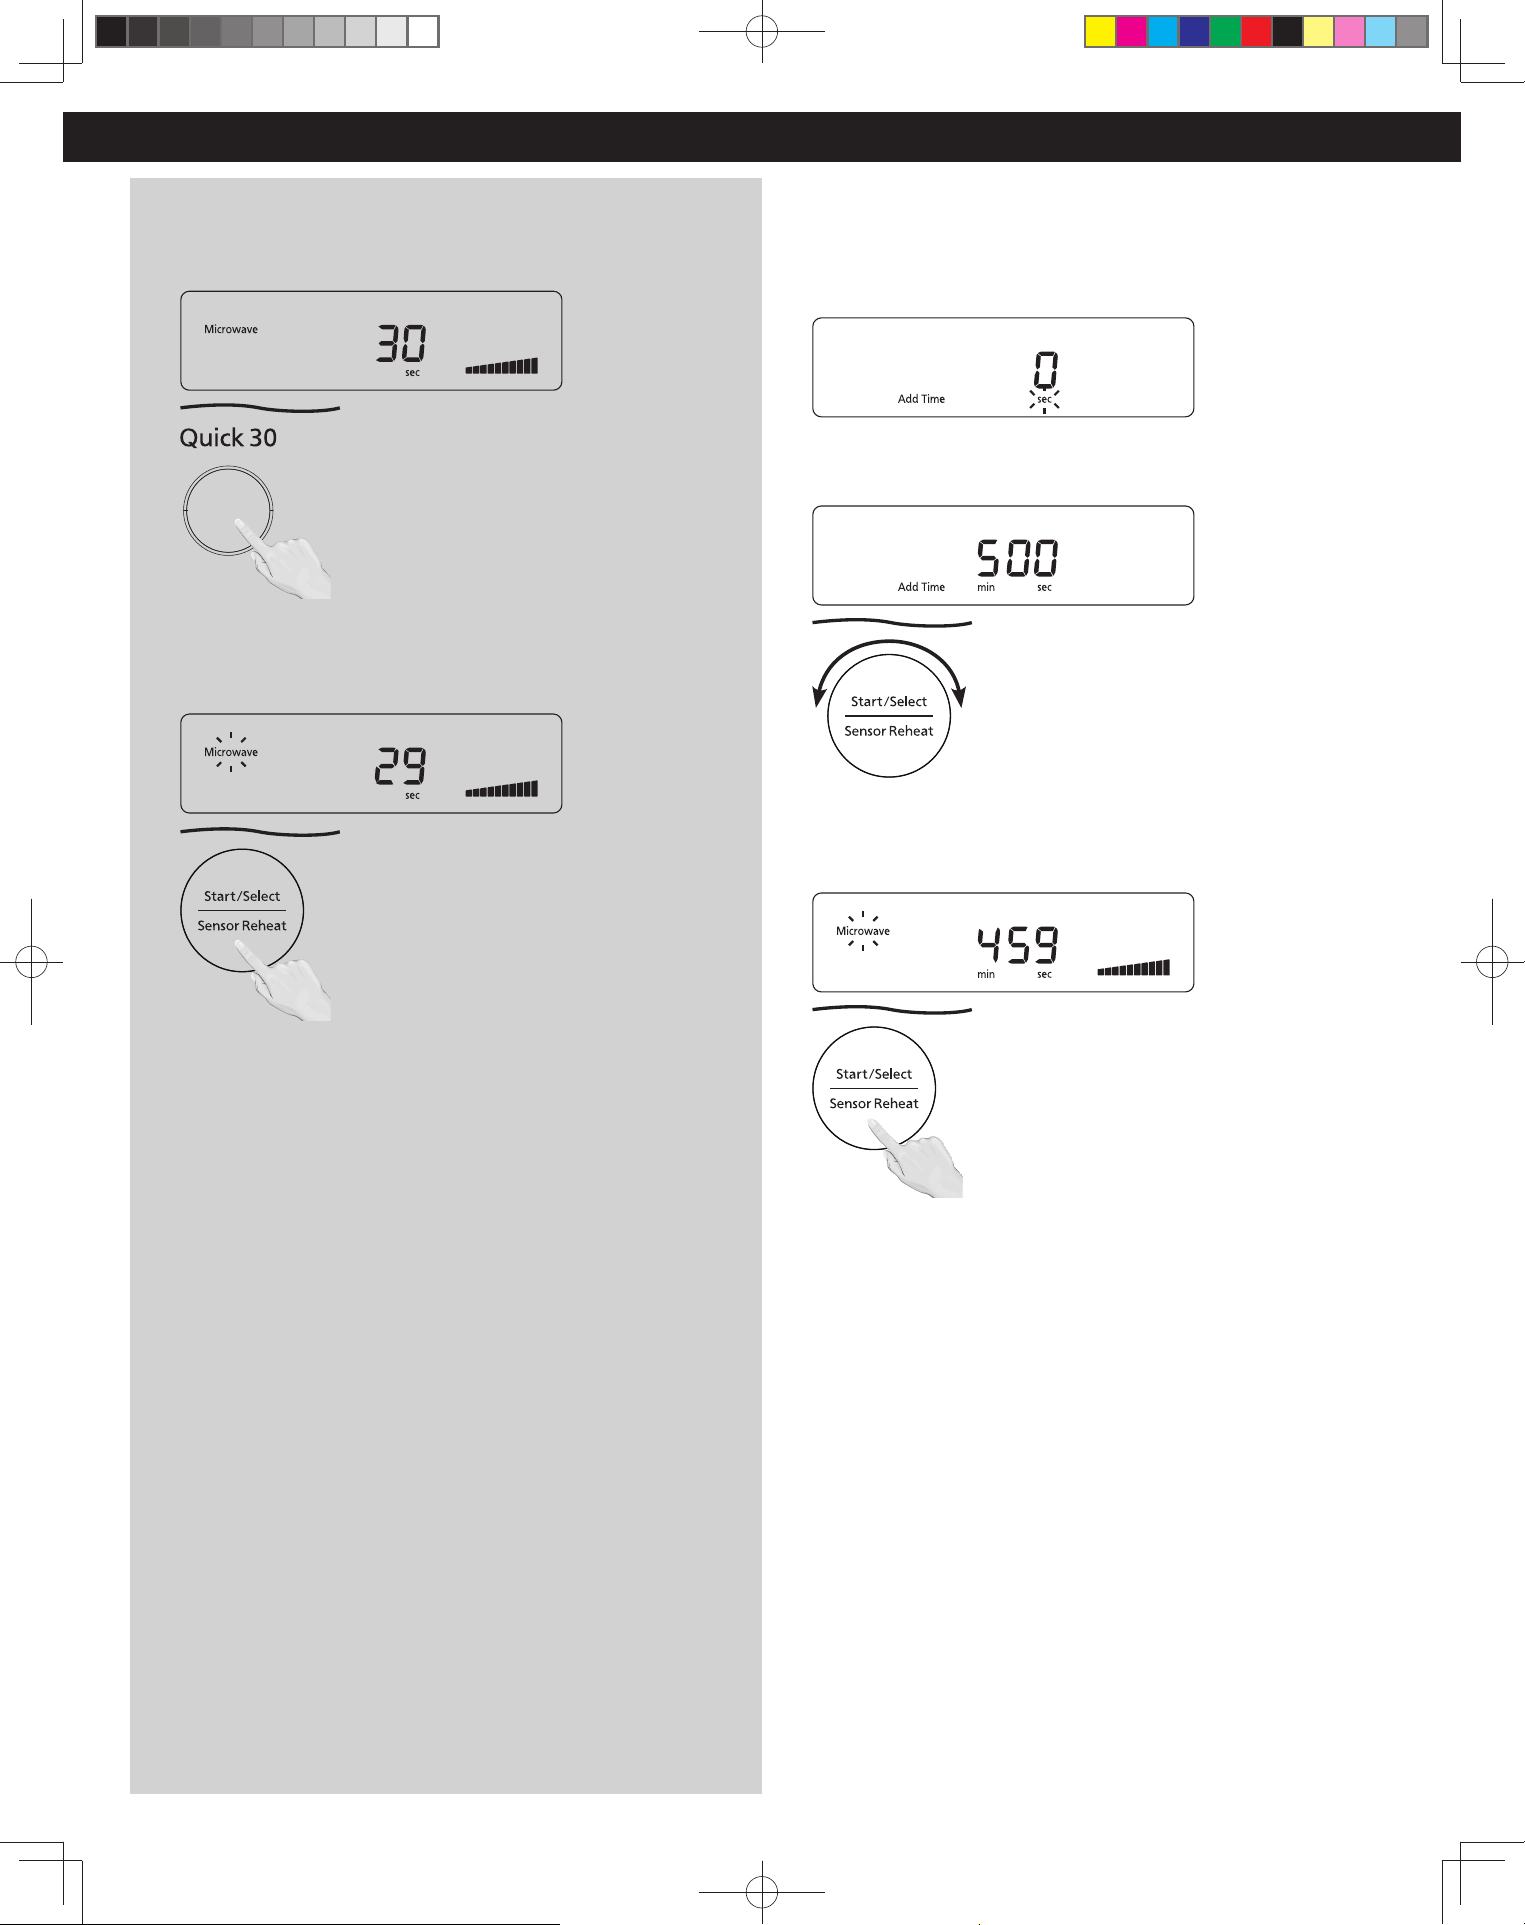
16
30 Seg Automático
(Establecer o agregar tiempo de cocción por incrementos de
30 segundos)
1
Presione 30 Seg Automático (Quick 30) hasta que aparezca el
tiempo de cocción deseado (hasta 5 minutos) en pantalla. El nivel
de potencia está predeterminado en P10.
2
Presione Encender (Start); comenzará la cocción y el tiempo
comenzará con el conteo regresivo, que aparecerá en pantalla. Al
finalizar la cocción sonarán cinco pitidos.
NOTAS:
1. Esta función solo está disponible para Microondas y Mantener
caliente. Si lo desea puede usar otra niveles de potencia.
Seleccione el nivel de potencia deseada antes de presionar 30
Seg Automático (Quick 30).
2. Luego de ajustar el tiempo mediante el tecla 30 Seg
Automático (Quick 30), no podrá usar el Dial.
3. La tecla de 30 Seg Automático (Quick 30) también puede
usarse para agregar más tiempo durante la cocción manual.
Funcionamiento (continuación)
Tiempo Adicional
Esta función le permite agregar tiempo de cocción al nal de
la cocción anterior. )
(Ejemplo: Añada 5 minutos en P10)
1
Después de cocinar, agregue más tiempo con la misma potencia
que en la cocción anterior.
2
Seleccione el tiempo de cocción girando el Dial. Tiempo de
cocción máximo: P10 y MANTENER CALIENTE (KEEP WARM) hasta
30 minutos; otras potencias hasta 1 hora y 30 minutos.
3
Presione Encender (Start). El tiempo se agregará. El tiempo en la
pantalla indicadora transcurrirá en forma regresiva.
NOTAS:
1. Esta función solo está disponible para Microondas y Mantener
caliente.
2. La función Tiempo Adicional (Add Time) se cancelará si no
realiza ninguna operación durante 1 minuto después de la
cocción.
3. El nivel de potencia es el mismo que el del ciclo de cocción
anterior.
F0003DB70AP_ES.indd 16F0003DB70AP_ES.indd 16 2026/3/3 16:22:382026/3/3 16:22:38
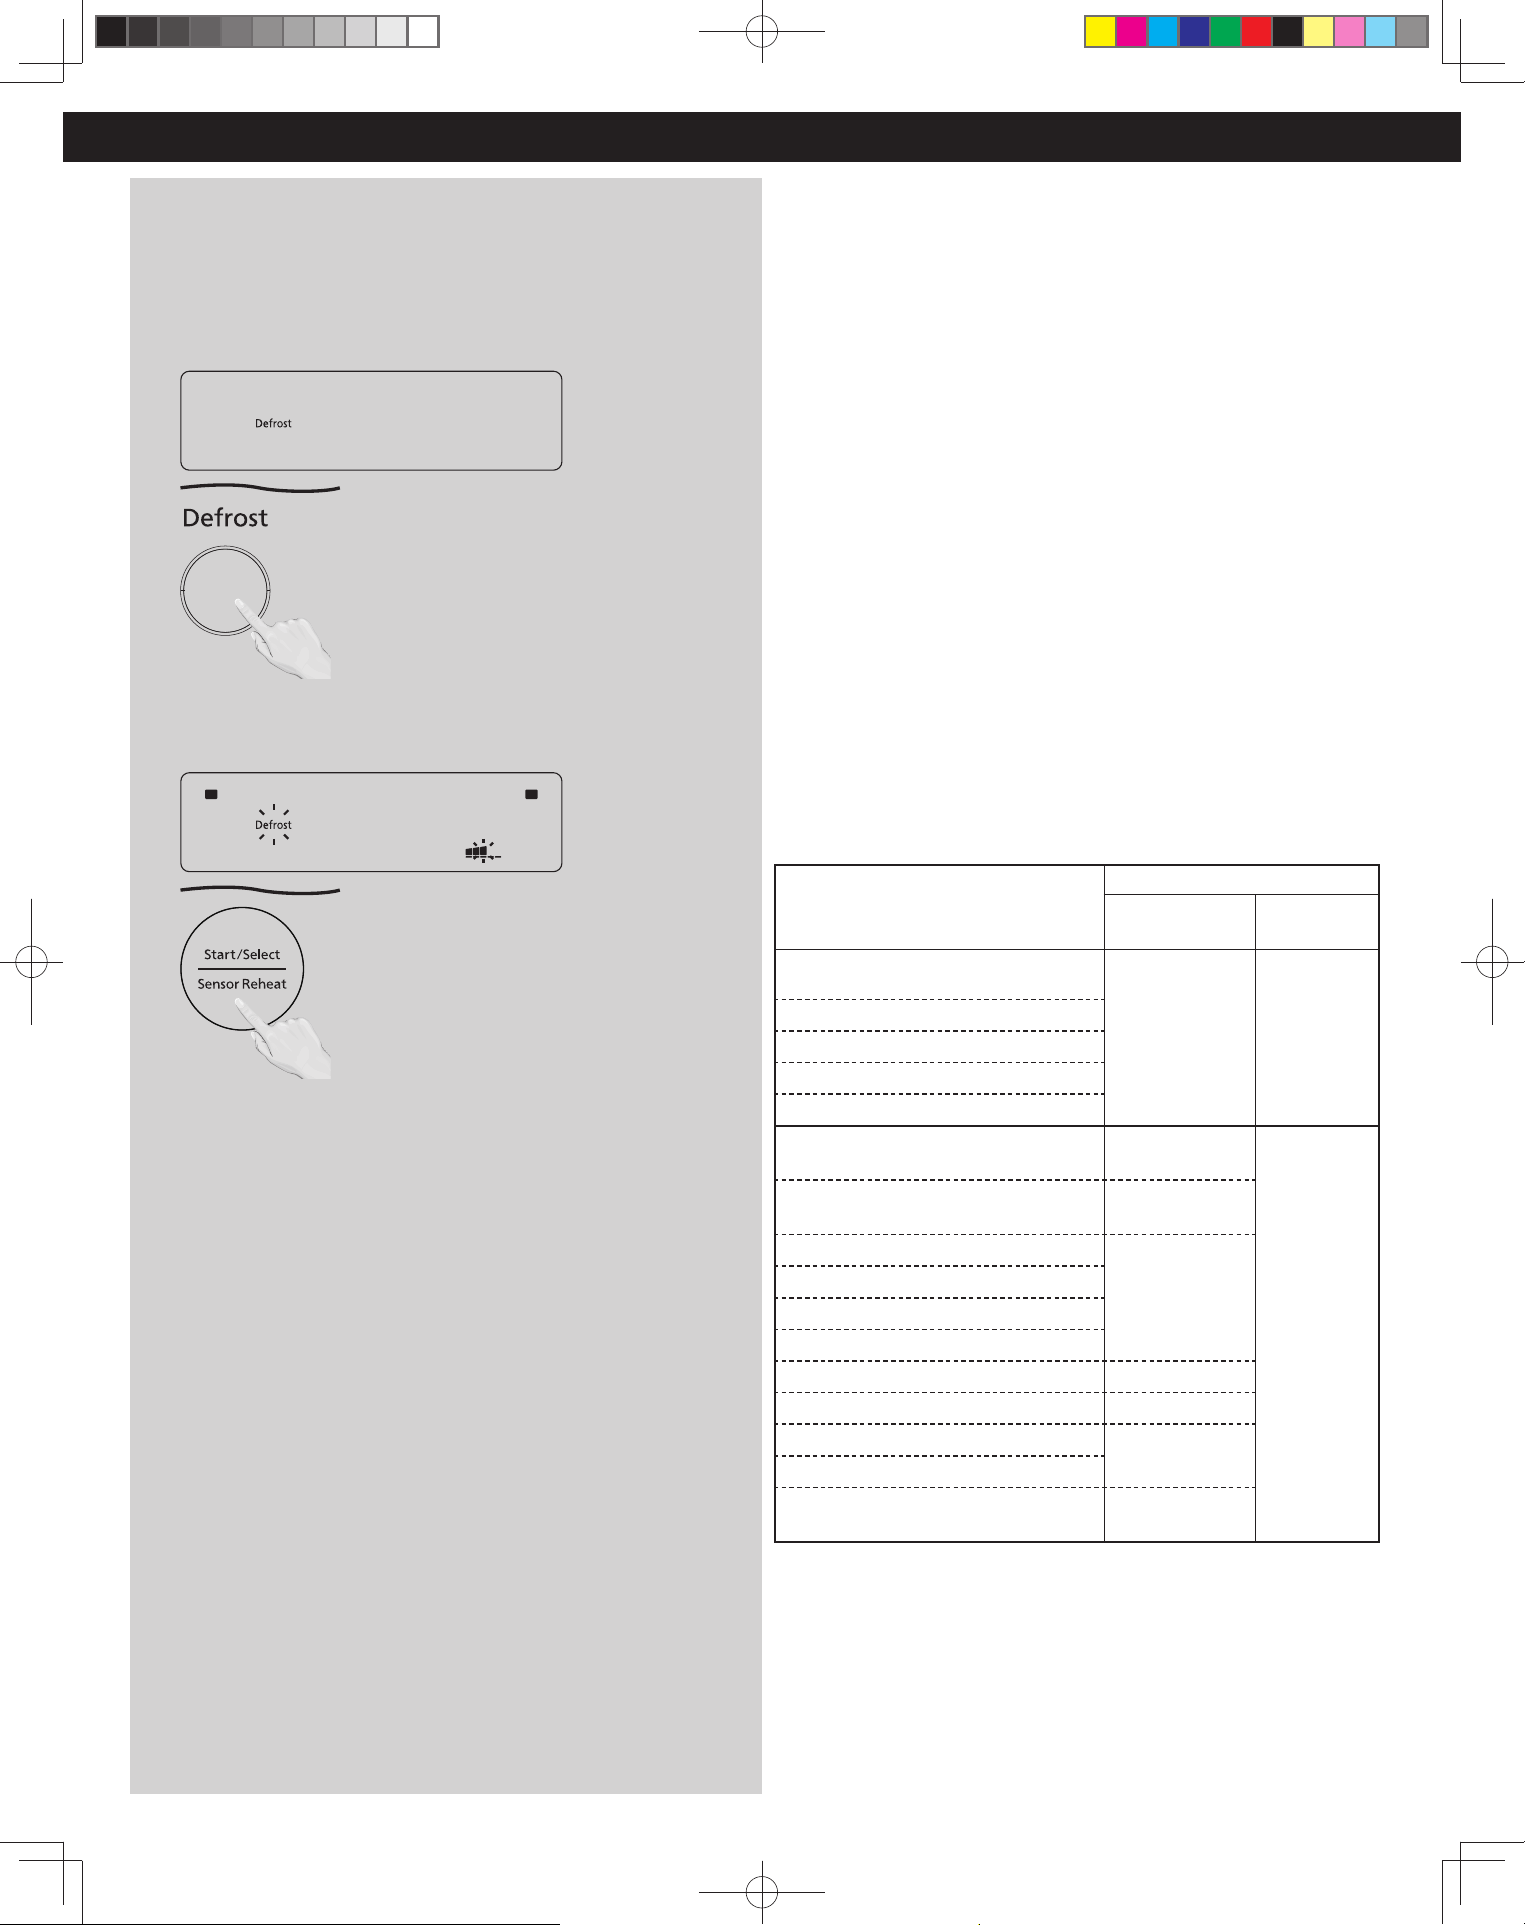
17
Funcionamiento (continuación)
Descongelación automática
Solamente presione el botón para descongelar alimentos
congelados. Funciona automáticamente sin necesidad de
configuración.
[Ejemplo: Para descongelar alimentos a potencia medio
(Estándar)]
1
Esta función le permite descongelar alimentos como carne, aves y
mariscos con solo presionar Descongelación (Defrost).
2
Presione Encender (Start). El descongelamiento se iniciará.
Después de presionar Encender (Start), puede ajustar la
temperatura (nivel) desde Medio (Estándar) dentro de los
siguientes 14 segundos.
Para aumentar: Gire el dial hacia la derecha.
Para disminuir: Gire el dial a la izquierda.
Las 5 configuraciones disponibles son:
Bajo → Medio-Bajo → Medio → Medio-Alto → Alto
(Menos-) (Menos) (Estándar) (Más) (Más+)
(Ajuste solo si es necesario).
NOTAS:
1. El indicador de descongelado señala que el alimento
congelado se está descongelando.
2. El grosor de la carne no debe superar los 3 cm (1.2 pulgadas).
3.
La porción recomendada de carne descongelada es de 110 g a
1000 g (4 - 35 oz.).
Consejos y Técnicas de Descongelado
Preparación para congelar:
1. Congele carnes, aves y pescados en paquetes con solo una o dos
capas de alimentos. Coloque papel encerado entre las capas.
2. Empaquete en envoltorios de plástico resistentes, bolsas (“Para
congelador”) o papel para congelador.
3. Quite la mayor cantidad de aire posible.
4. Selle bien, firme y etiquete.
Para descongelar:
1. Quite el envoltorio. Esto ayuda a evaporar la humedad. Los jugos de
los alimentos pueden calentarse y cocinar los alimentos.
2. No es apto para descongelar piezas de carne enteras o grandes. Para
grandes cantidades, utilice la potencia y el tiempo manuales P3.
3. Coloque los alimentos en un plato seguro para microondas. NO
CUBRA.
Después de descongelar:
1. Los elementos grandes pueden estar congelados en el centro. La
descongelación se completará durante el Tiempo de reposo.
2. Déjelos reposar tapados, siguiendo las instrucciones de tiempo de
reposo en la tabla que se muestra más adelante.
3. Enjuague los alimentos indicados en la tabla.
4. Los elementos dispuestos en capas deben enjuagarse por separado o
tener un mayor tiempo de reposo.
ALIMENTOS
DESPUÉS DE DESCONGELAR
Tiempo de
reposo
Enjuagar
(agua fría)
Pescados y mariscos
Cangrejo
5 min Sí
Medallones de pescado
Filetes de pescado
Vieiras
Pescado entero
Carne
Carne molida
10 min
NO
Asados
30 min en
refrigerador.
Chuletas/bistec
5 min
Costillas/T-bone
Carne de estofado
Hígado (rodajas nas)
Tocino (en rodajas) ----
Chuletas 5 min
Piezas
10 min
Gallina de Cornualles
Pechuga de pavo
20 min en
refrigerador.
F0003DB70AP_ES.indd 17F0003DB70AP_ES.indd 17 2026/3/3 16:22:382026/3/3 16:22:38
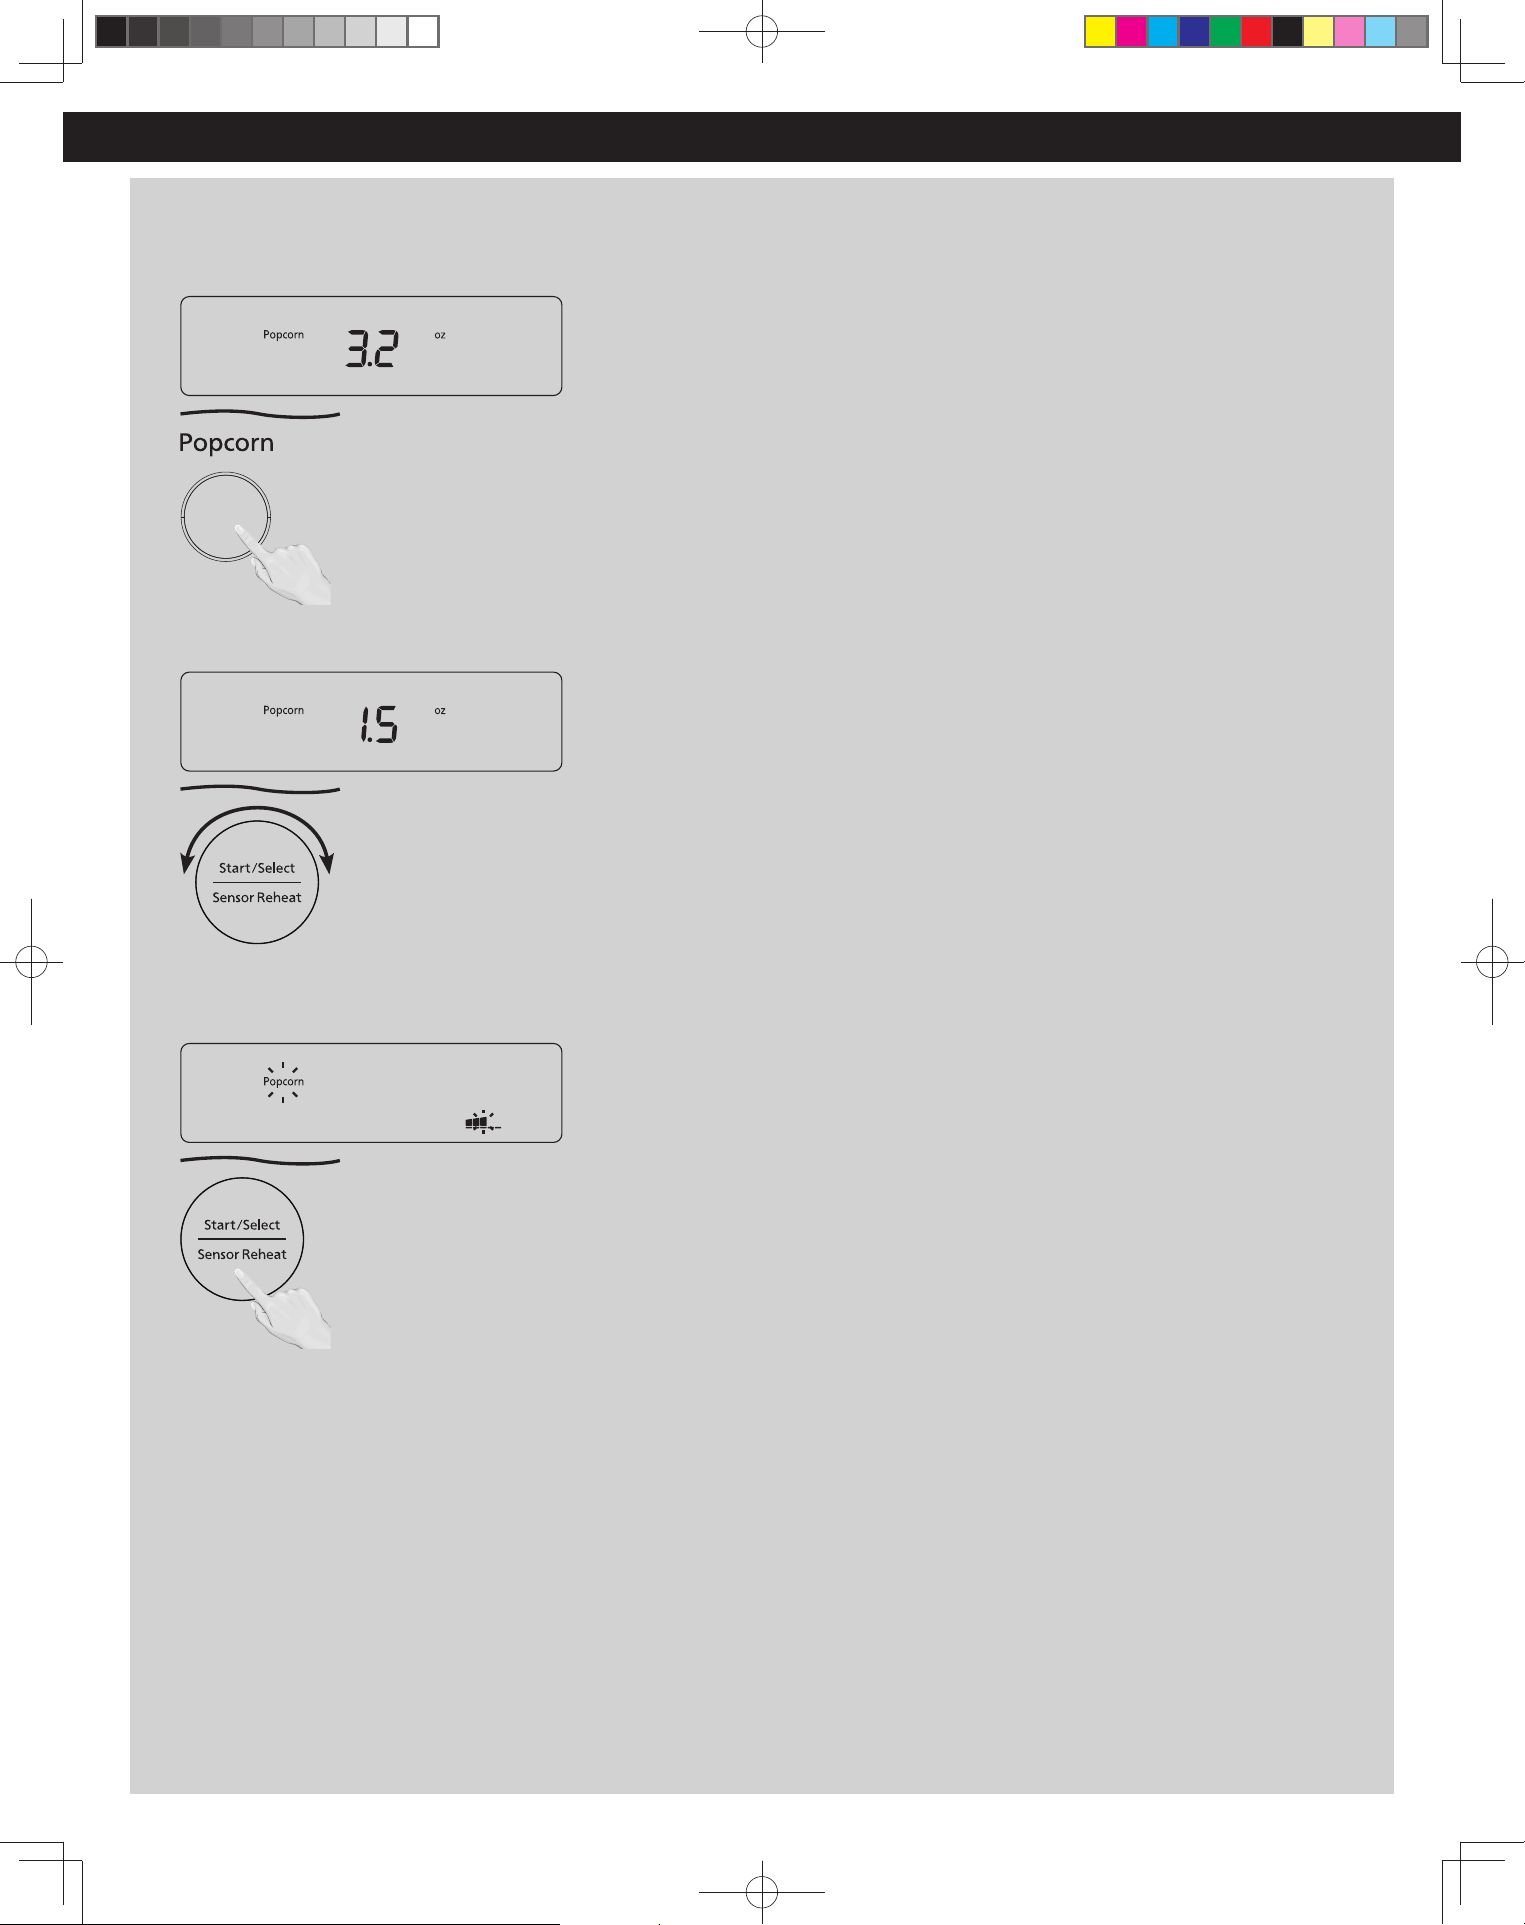
18
Palomitas
[Ejemplo: Prepara 42 g (1,5 oz.) de palomitas en Medio
(Estándar)]
1
Presione Palomitas (Popcorn) una vez.
2
Utilice el dial para seleccionar entre las siguientes opciones de
peso: 91 g (3,2 oz.), 78 g (2,75 oz.) o 42 g (1,5 oz.).
3
Después de presionar Encender (Start), puede ajustar la
temperatura (nivel) desde Medio (Estándar) dentro de los
siguientes 14 segundos.
Para aumentar: Gire el dial hacia la derecha.
Para disminuir: Gire el dial a la izquierda.
Las 5 configuraciones disponibles son:
Bajo → Medio-Bajo → Medio → Medio-Alto → Alto
(Menos-) (Menos) (Estándar) (Más) (Más+)
(Ajuste solo si es necesario).
Funcionamiento (continuación)
NOTAS:
1. Cocine una bolsa por vez.
2. Coloque la bolsa en el horno según las indicaciones del
fabricante.
3. Comience con las palomitas a temperatura ambiente.
4. Deje reposar las palomitas cocidas sin abrir durante unos
minutos.
5. Abra la bolsa con cuidado para evitar quemaduras, porque
puede salir vapor.
6. No recaliente granos no cocidos ni reutilice la bolsa.
7. Si las palomitas son de un peso diferente al indicado, siga las
instrucciones del paquete de las palomitas.
8. Controle siempre el horno.
9. Si las explosiones disminuyen a un lapso entre 2 y 3
segundos entre cada explosión, detenga el horno. La
sobrecocción puede quemar las palomitas o causar
incendios.
10. Cuando se cocinen múltiples bolsas una detrás de otra, el
tiempo de cocción puede variar levemente. Esto no afecta los
resultados de la cocción de palomitas.
F0003DB70AP_ES.indd 18F0003DB70AP_ES.indd 18 2026/3/3 16:22:382026/3/3 16:22:38
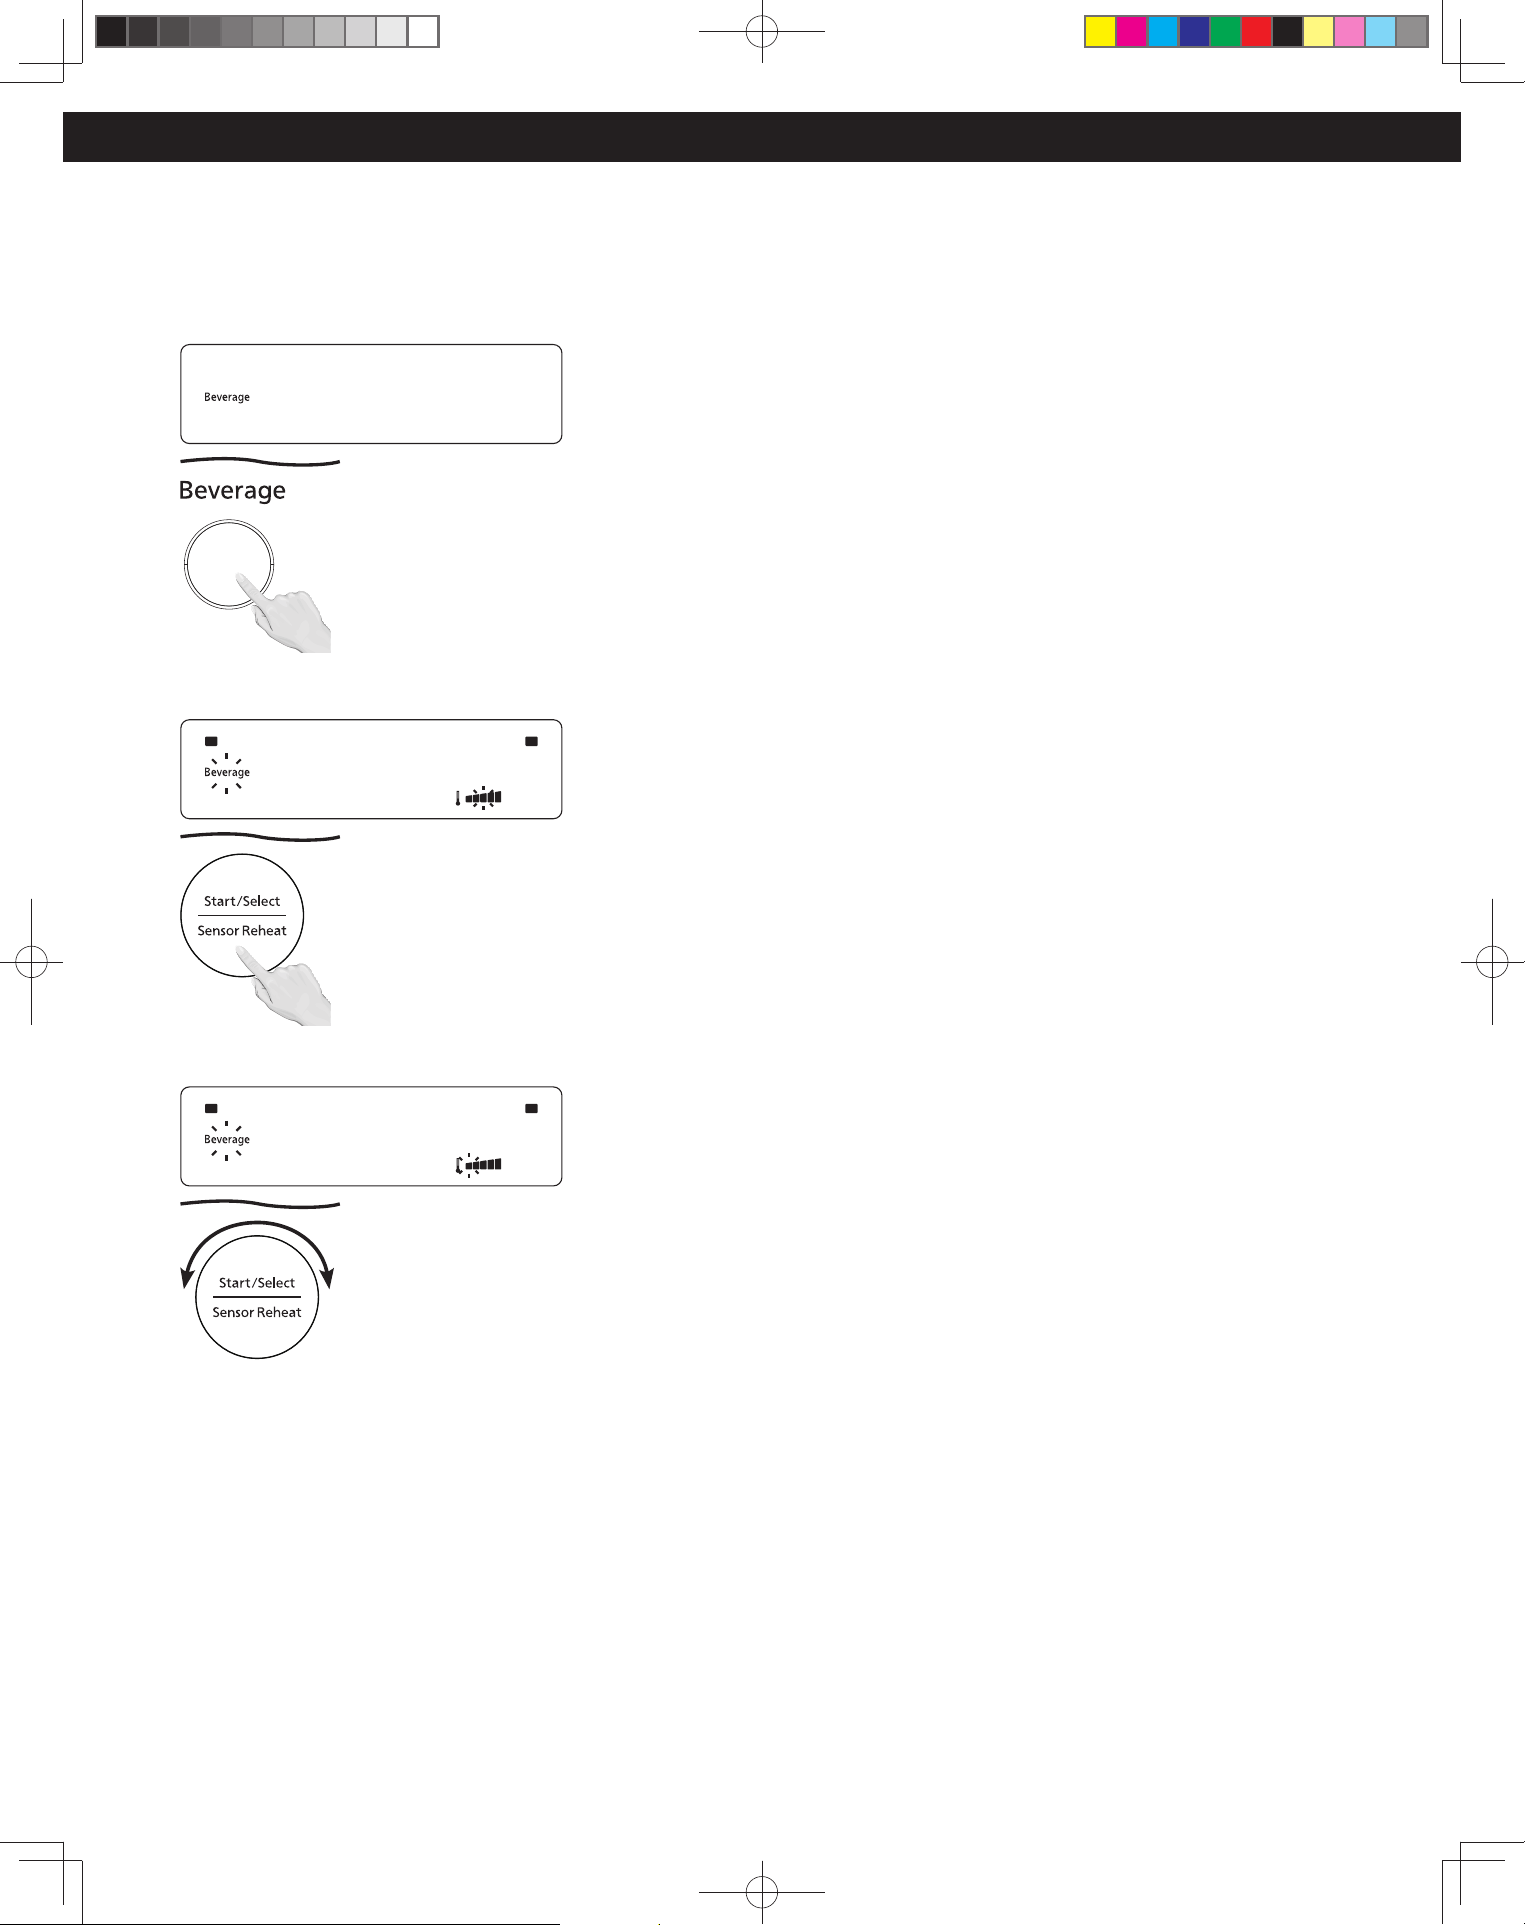
19
Funcionamiento (continuación)
Bebidas
(Simplemente presione el botón para recalentar la bebida.
Funciona automáticamente sin ninguna configuración).
[Ejemplo: Para recalentar una bebida de 1 taza en Bajo
(Menos-)]
1
Presione la tecla Bebida (Beverage) una vez.
2
Presione Encender (Start).
3
Después de presionar Encender (Start), puede ajustar la
temperatura (nivel) desde Medio (Estándar) dentro de los
siguientes 14 segundos.
Para aumentar: Gire el dial hacia la derecha.
Para disminuir: Gire el dial a la izquierda.
Las 5 configuraciones disponibles son:
Bajo → Medio-Bajo → Medio → Medio-Alto → Alto
(Menos-) (Menos) (Estándar) (Más) (Más+)
(Ajuste solo si es necesario).
NOTAS:
1. Es apto para recalentar una taza de leche, café, etc., pero no
para alcohol.
2. Utilice una taza adecuada para microondas. Para evitar que se
derrame, no llene la taza más del 80% con líquido. NO CUBRA.
3. El líquido sobrecalentado puede eruptar si no se mezcla con
aire. Siempre revuelva y revise la temperatura antes de servir.
4. La temperatura interna de los alimentos puede diferir de
la temperatura (nivel) establecida. Pero un recalentado
insuficiente es mejor que uno excesivo. Añada más
tiempo manualmente o utilice la selección Temperatura
(Temperature) y más/menos (More/Less) después de
presionar Encender (Start). El sobrecalentamiento provocará
un aumento en el riesgo de escaldaduras, o erupción del agua.
Consulte la página 4, punto 19.
5. Para un recalentado uniforme, recaliente solo una taza de
bebida a la vez.
F0003DB70AP_ES.indd 19F0003DB70AP_ES.indd 19 2026/3/3 16:22:382026/3/3 16:22:38
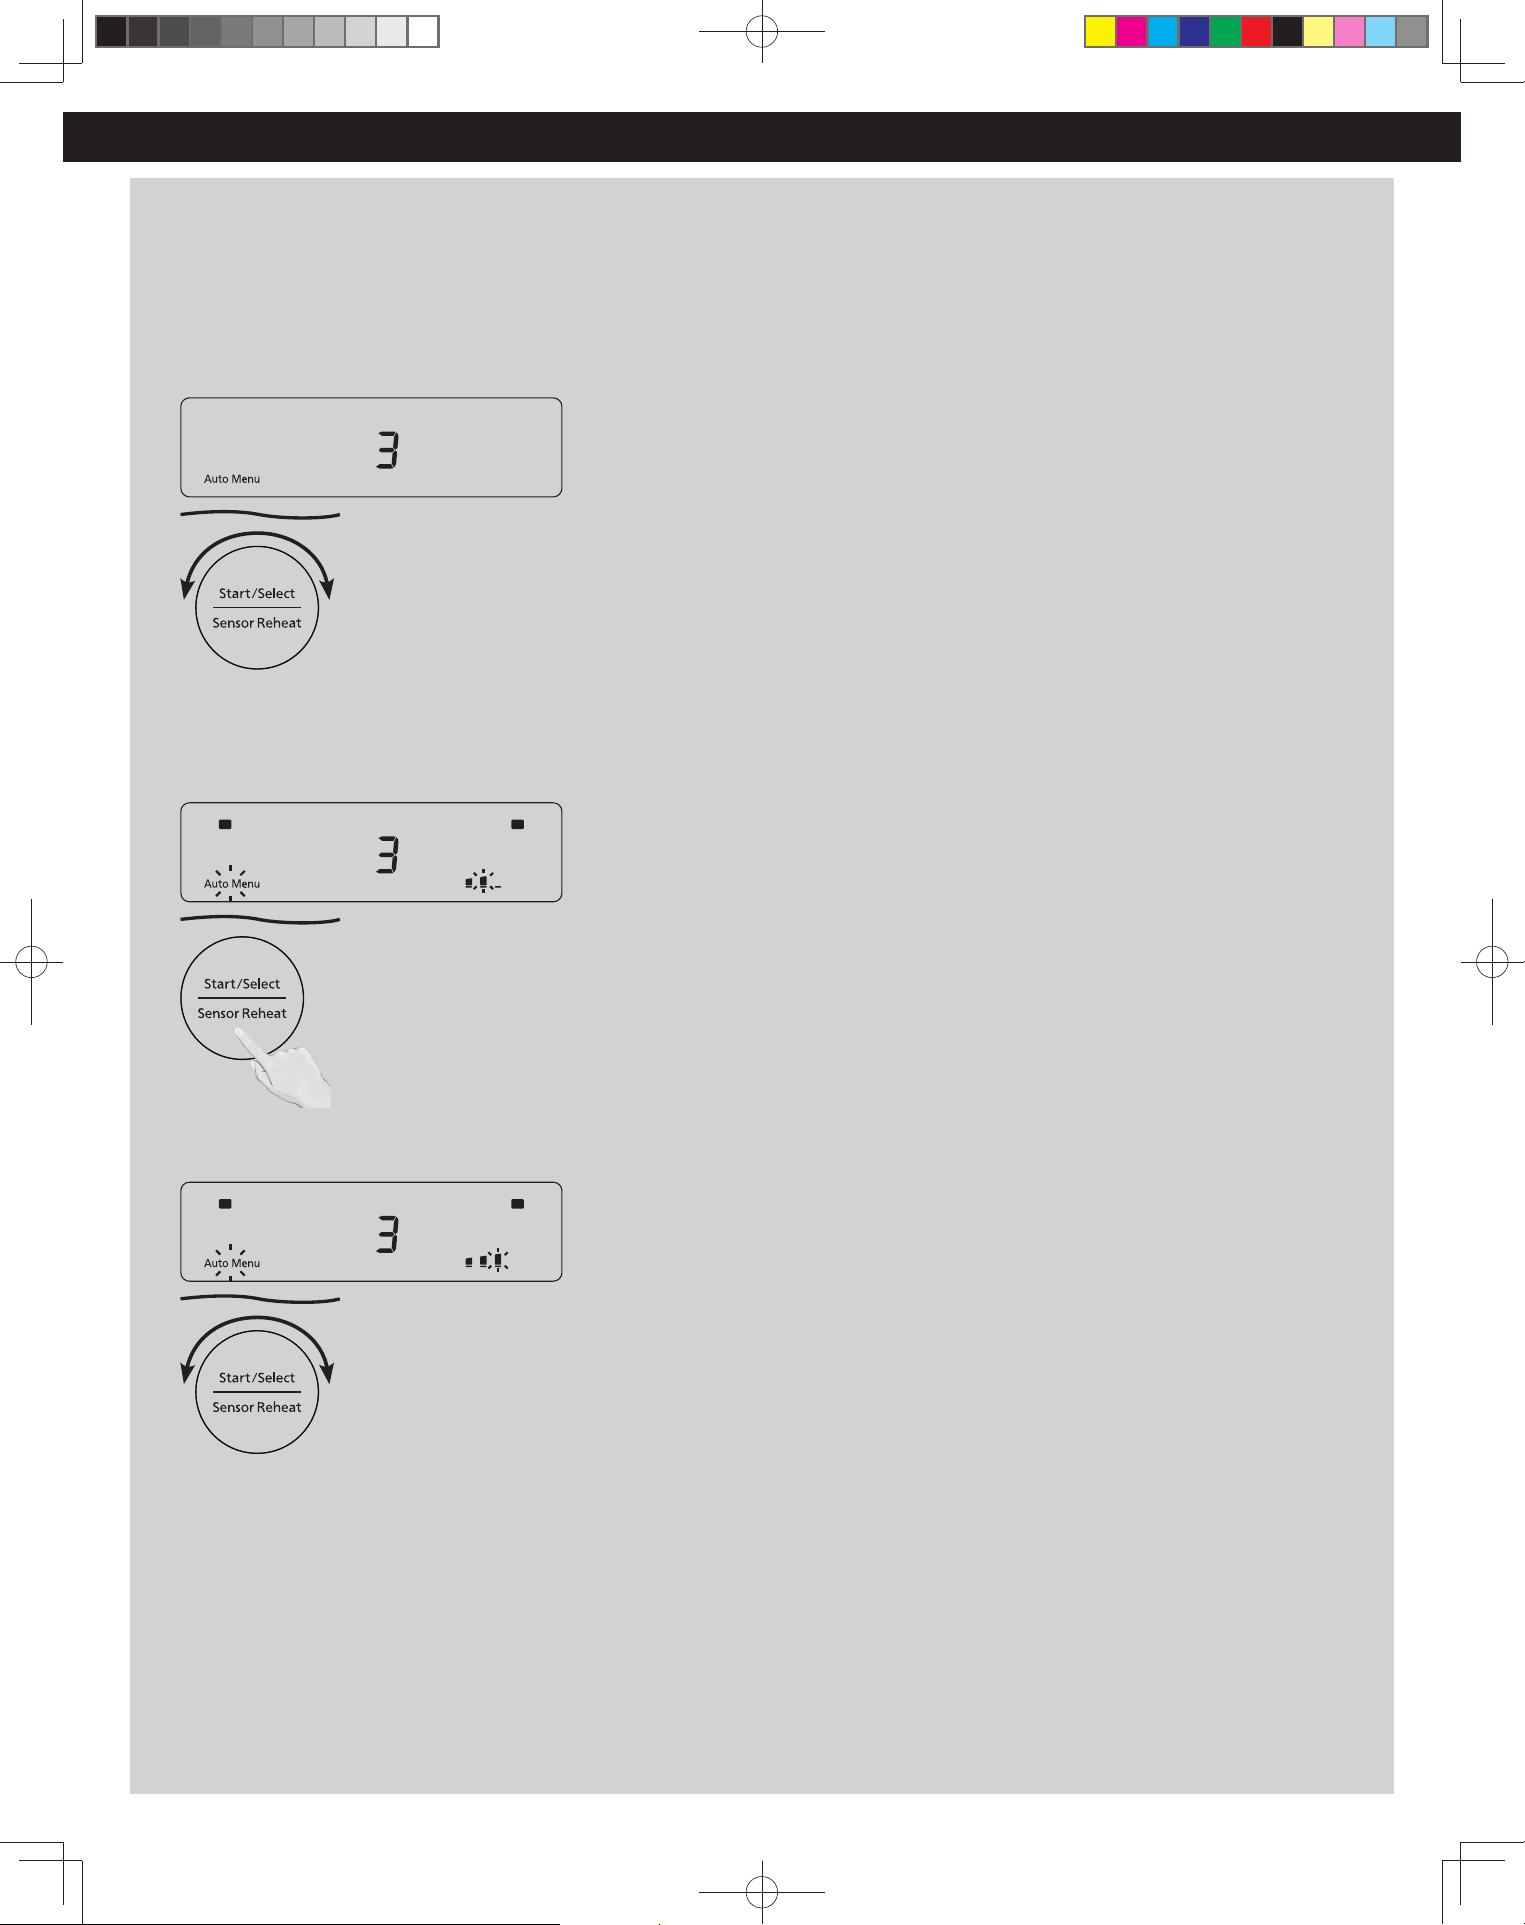
20
Cocción por Sensor (Sensor Cook)
Cocción por Sensor incluye recalentar alimentos de pan,
cocción en un tazón y otros menús de cocción automática.
Consulte la siguiente página para ver los números del menú
automático.
[Ejemplo: Para ajustar el menú n.° 3 de cocción por sensor en
Alto (Más)]
1
Voltee el Dial hasta que el número correspondiente al alimento
deseado aparezca en la pantalla (consulte la tabla de la página
siguiente).
2
Presione Encender (Start).
3
Después de presionar Encender (Start), puede ajustar la
temperatura (nivel) desde Medio (Estándar) dentro de los
siguientes 14 segundos.
Para aumentar: Gire el dial hacia la derecha.
Para disminuir: Gire el dial a la izquierda.
Los 3 niveles de calor en orden:
Bajo → Medio → Alto
(Menos) (Estándar) (Más)
(Ajustar solo si es necesario).
Funcionamiento (continuación)
¿Qué es una receta de un solo tazón?
La cocción en un solo tazón es una forma fácil de preparar
espagueti, macarrones con queso o sopa en un microondas. Se
deben seguir 3 pasos.
1. Coloque todos los ingredientes en un bol de vidrio.
2. Selle con envoltura plástica.
3. Coloque el tazón en el microondas y seleccione el menú de
cocción de un tazón. (N.º 2 al 7)
¡El sensor Genius 2.0® revisará los alimentos para obtener un
resultado perfecto!
NOTAS:
1. Para recalentar alimentos de pan, la mejor opción es utilizar el
Menú Sensor N.º 1.
2. La puerta no debe abrirse hasta que termine la cocción. Siempre
revuelva y revise la temperatura antes de servir.
3. Después de usar la función Recalentar por Sensor algunas
veces, puede decidir que preferiría sus alimentos cocinados a
diferentes términos, por eso utilizaría las teclas de selección de
Temperatura (Temperature) y Más/Menos (More/Less).
4.
Funciones automáticas se han proporcionado para su
conveniencia. Si los resultados no son convenientes para su
preferencia individual o el tamaño del servicio es distinto al
listado en la página 21, por favor refiérase al manual de cocinar en
la página 14.
Para obtener los mejores resultados con la función de cocción
de un tazón con la tecnología de sensor Genius® 2.0, siga estas
recomendaciones:
ANTES de cocinar:
1. La temperatura ambiente que rodea el horno debe estar por
debajo de los 35 °C (95 °F).
2. El peso de los alimentos debe exceder el rango de peso indicado
en la siguiente página.
3. Asegúrese de que la base plana, la parte exterior de los
recipientes de cocción y la parte interior del horno de
microondas estén secos antes de colocar alimentos en el horno.
Las gotas residuales de humedad que se convierten en vapor
pueden engañar al sensor.
4. Cubra los alimentos con envoltura plástica para la cocción de un
tazón (n.° 2 al 7) y para la avena. Las toallas de papel o las tapas
de silicona no son adecuadas, ya que afectarán al desempeño
del sensor.
DESPUÉS de cocinar:
Todos los alimentos deben tener un tiempo de reposo.
F0003DB70AP_ES.indd 20F0003DB70AP_ES.indd 20 2026/3/3 16:22:382026/3/3 16:22:38
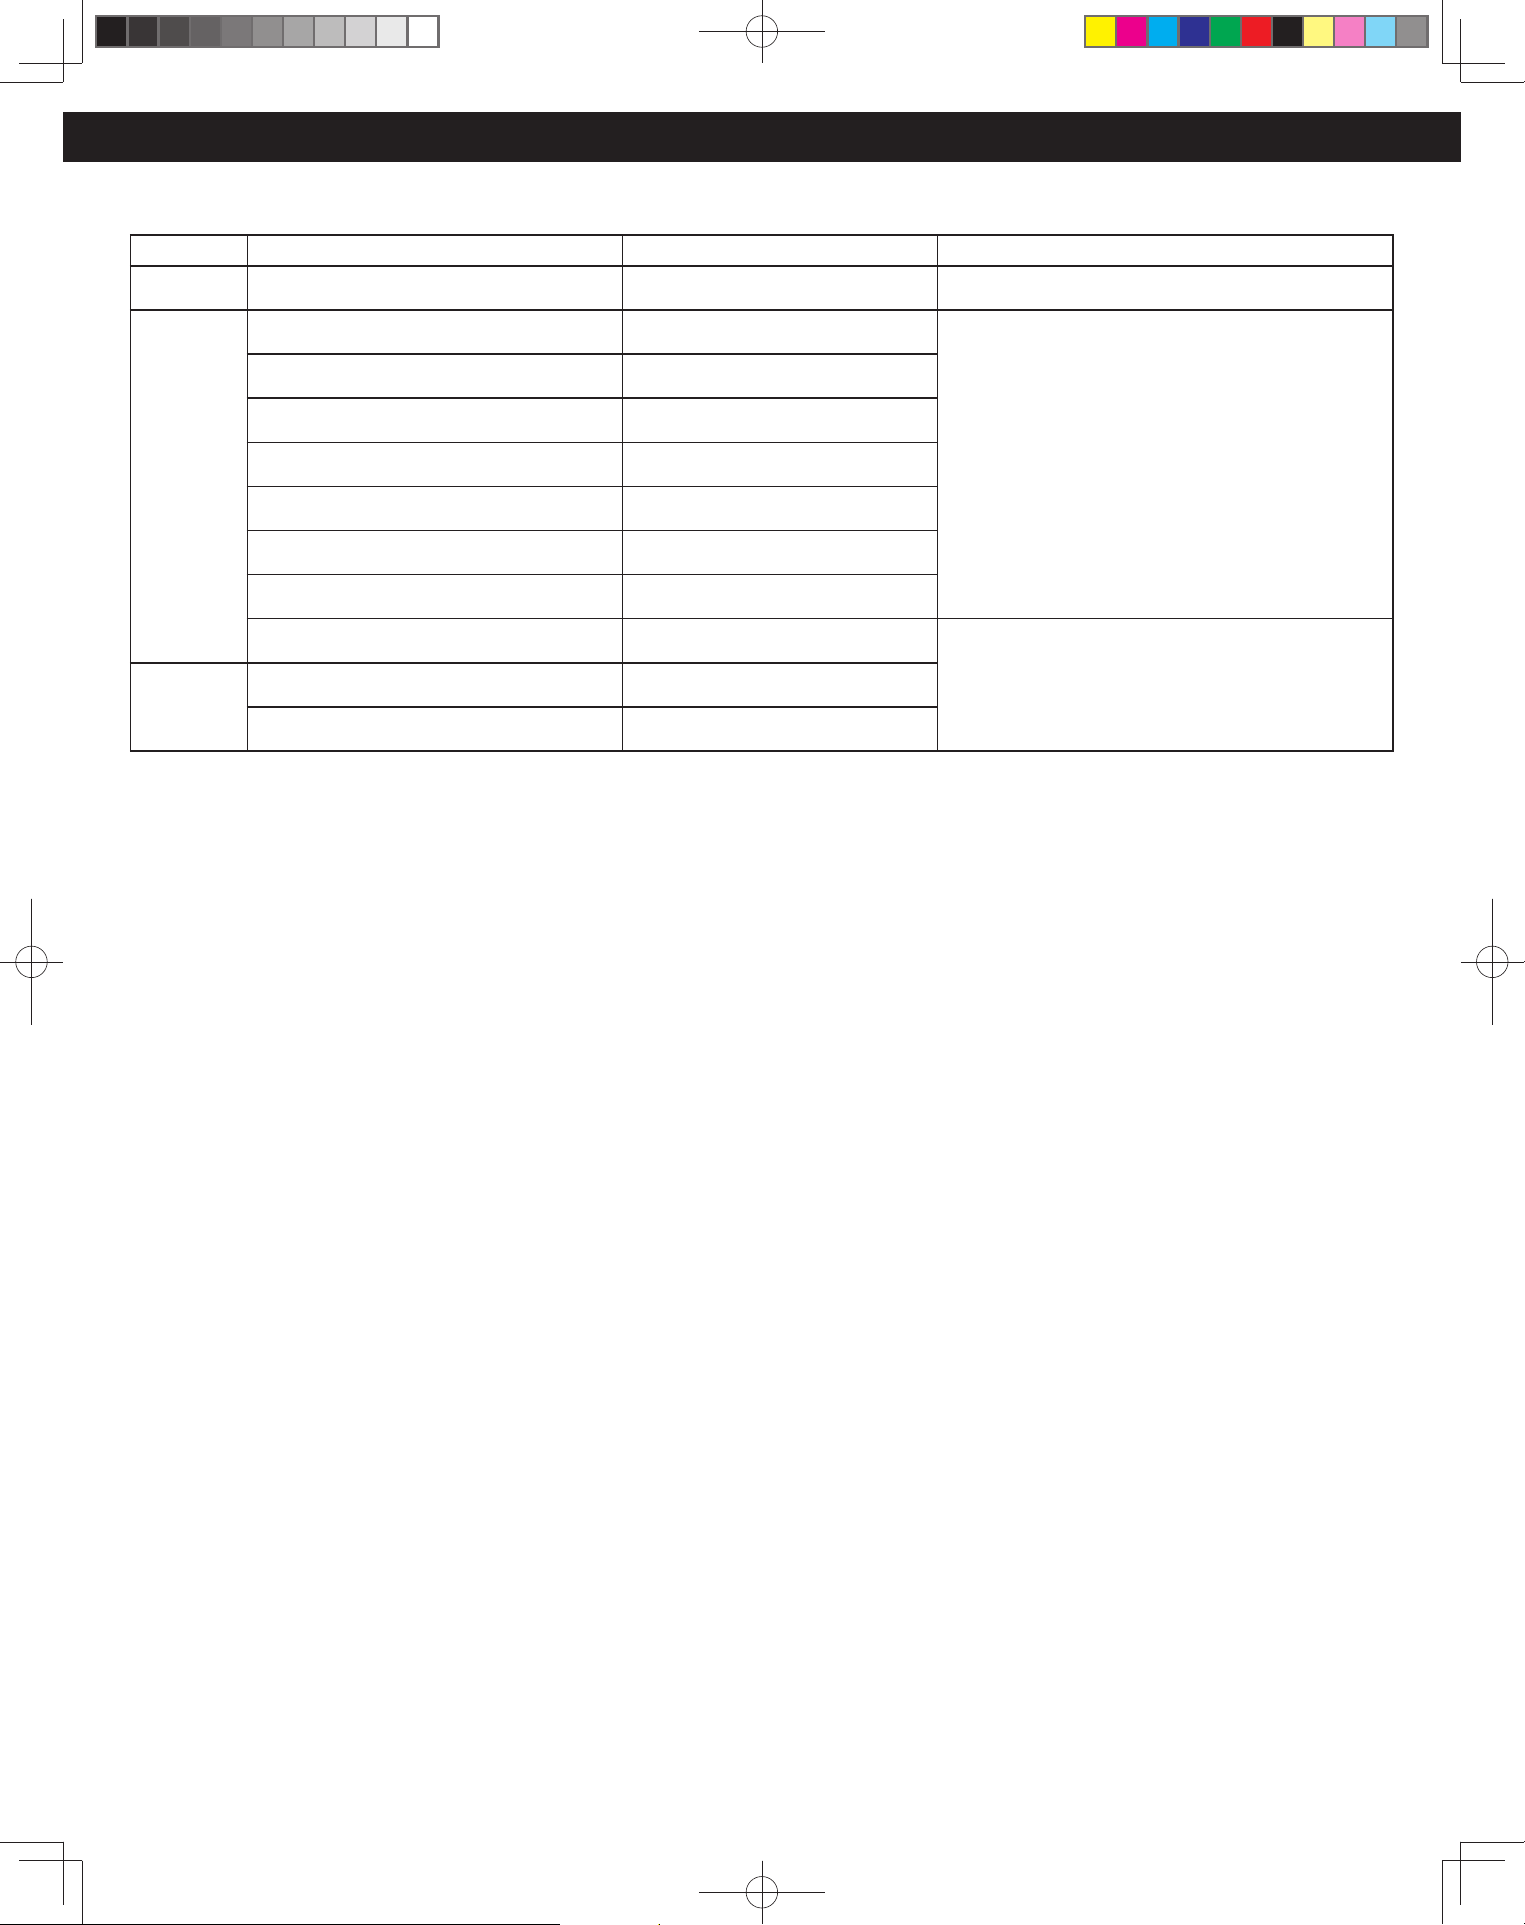
21
Funcionamiento (continuación)
Tabla de Cocción por Sensor
Vea la tabla a continuación para las categorías de Cocción por Sensor.
Categoría Programas Porción/Peso Recipiente recomendado y sugerencias
Recalentar 1. Pizza, comida mexicana, sándwiches
110 – 225 g (4 – 8 oz.) Plato apto para microondas
Cocinar
2. Espagueti en un tazón
1 porción – 4 porciones
Tazón apto para microondas de aproximadamente
10 pulgadas (2,5 cuartos).
Cubra con envoltura plástica. Las toallas de papel
o las tapas de silicona no son adecuadas, ya que
afectarán al desempeño del sensor.
3. Salsa para pasta en un tazón
1 porción – 4 porciones
4. Macarrones con queso en un tazón
1 porción – 4 porciones
5. Sopa en un tazón
1 porción – 4 porciones
6. Chili en un tazón
1 porción – 4 porciones
7. Guiso en un tazón
1 porción – 4 porciones
8. Avena
50 – 100 g (½ – 1 taza)
9. Papas
225 – 1100 g (8 – 40 oz.)
Plato apto para microondas
Derretir
10. Mantequilla
55 – 450 g (2 – 16 oz.)
11. Chocolate
55 – 450 g (2 – 16 oz.)
1. Pizza, comida mexicana, sándwiches
Para recalentar alimentos de pan, como pizzas frías compradas,
comida mexicana y sándwiches con un peso entre 110 - 225
g
(4 - 8 oz.), retire todo el embalaje y coloque el alimento en un plato
apto para microondas. Seleccione Programa 1 y presione Encender
(Start) para cocinar.
2. Espagueti (a la boloñesa) en un tazón
Ingredientes (4 porciones)
340
g
(12 oz.) Espagueti
110
g
(4 oz.) Media cebolla mediana, picada
225
g
(8 oz.) Carne molida
1 diente Ajo, picado
225
g
(8 oz.) Tomates picados enlatados
480 ml (2 taza) Agua
60 ml (4 cdas.) Aceite de oliva
5
g
(1 cdta.) Sal
60
g
(4 cdas.) Pasta de tomate
Instrucciones:
1. Mezcle el agua y el aceite en un tazón grande apto para
microondas de aproximadamente 10 pulgadas (2,5 cuartos).
2. Rompa los espaguetis por la mitad y colóquelos en el tazón.
Revuelva suavemente para cubrir la pasta, asegurándose de
que los fideos queden completamente cubiertos de agua.
3. Añada todos los ingredientes restantes excepto la sal y la pasta
de tomate.
4. Cubra sellando bien con envoltura plástica.
5. Coloque el tazón en el horno microondas, gire el dial para
seleccionar el Programa 2 y luego presione Encender (Start) para
cocinar.
6. Luego de cocinar, añada la sal y la pasta de tomate. Revuelva
bien y disfrute.
Nota:
Los ingredientes listados son para 4 porciones. Puede ajustar las
cantidades proporcionalmente según sus necesidades.
3. Salsa para pasta en un tazón (salsa de carne)
Ingredientes (4 porciones)
110
g
(4 oz.) Media cebolla mediana, picada
450
g
(16 oz.) Carne molida
1 diente Ajo, picado
10
g
(1 cda.) Harina
390
g
(14 oz.) Tomates picados enlatados
60
g
(4 cdas.) Pasta de tomate
15
g
(1 cda.) Sal
Pimienta (al gusto)
Instrucciones:
1. Coloque la carne molida en un tazón de vidrio resistente al calor
de aproximadamente 10 pulgadas (2,5 cuartos) y recúbralo con
harina, luego, desmenuce la carne con una espátula.
2. Revuelva todos los ingredientes restantes.
3. Cubra sellando bien con envoltura plástica.
4. Coloque el tazón en el horno microondas, gire el dial para
seleccionar el Programa 3 y luego presione Encender (Start)
para cocinar.
5. Después de cocinar, revuelva bien y sirva con fideos.
Nota:
Los ingredientes listados son para 4 porciones. Puede ajustar las
cantidades proporcionalmente según sus necesidades.
4. Un tazón de macarrones con queso (casero)
Ingredientes (3 porciones)
206
g
(7,25 oz.) Macarrones
45
g
(3 cdas.) Mantequilla
360 ml (1½ tazas) Agua
240 ml (1 taza) Leche
195
g
(7 oz.) Queso cheddar rallado
20
g
(2 cdas.) Harina
Sal y pimienta (al gusto)
F0003DB70AP_ES.indd 21F0003DB70AP_ES.indd 21 2026/3/3 16:22:382026/3/3 16:22:38
22
Funcionamiento (continuación)
Instrucciones:
1. Corte la mantequilla en cubos y colóquela en un tazón grande
apto para microondas de aproximadamente 10 pulgadas (2,5
cuartos).
2. Agregue los macarrones y el agua. Revuelva suavemente para
recubrirlos.
3. Cubra sellando bien con envoltura plástica.
4. Coloque el tazón en el horno microondas, gire el dial para
seleccionar el Programa 4 y luego presione Encender (Start)
para cocinar.
5. Escurra los macarrones.
6. Añada la leche, el queso rallado, la harina, la sal y la pimienta a
los macarrones cocidos y mezcle bien.
7. Cubra sellando bien con envoltura plástica.
8. Coloque el tazón en el microondas, seleccione Microondas
Manual P5 y presione Encender (Start) para cocinar durante 5
minutos.
9. Luego de cocinar, revuelva bien y disfrute.
Para cocinar macarrones con queso de caja, siga los pasos 1 a 3
de la receta casera. Coloque el tazón en el horno microondas, gire
el dial para seleccionar el Programa 4 y luego presione Encender
(Start) para cocinar. Luego de cocinar, drene los macarrones e
incorpore la leche y el polvo de queso.
Nota:
Los ingredientes enumerados son para 3 porciones. Puede ajustar
las cantidades proporcionalmente según sus necesidades.
5. Sopa en un tazón (fideos con pollo)
Ingredientes (3 porciones)
55
g
(2 oz.) Cebolla picada
55
g
(2 oz.) Apio picado
55
g
(2 oz.) Zanahorias en julianas
225
g
(8 oz.) Pechuga de pollo en cubos
55
g
(2 oz.) Fideos
480 ml (2 tazas ) Caldo de pollo
Sal y pimienta (al gusto)
Albahaca seca (al gusto)
Orégano seco (al gusto)
Instrucciones:
1. Coloque todos los ingredientes, excepto la albahaca y el
orégano, en un tazón grande apto para microondas de
aproximadamente 10 pulgadas (2,5 cuartos).
2. Cubra sellando bien con envoltura plástica.
3. Coloque el tazón en el horno microondas, gire el dial para
seleccionar el Programa 5 y presione Encender (Start) para
cocinar.
4. Luego de cocinar, añada la albahaca y el orégano. Revuelva
bien y disfrute.
Nota:
Los ingredientes enumerados son para 3 porciones. Puede ajustar
las cantidades proporcionalmente según sus necesidades.
6. Chili en un tazón
Ingredientes (3 porciones)
110
g
(4 oz.) Media cebolla mediana, picada
225
g
(8 oz.) Carne molida
420
g
(15 oz.) Frijoles rojos enlatados (escurridos)
390
g
(14 oz.) Tomates picados enlatados
30
g
(2 cdas.) Cátsup
10
g
(1 cda.) Harina
5
g
(1 cdta.) Chile en polvo
5
g
(1 cdta.) Comino (al gusto)
Al gusto Sal y pimienta
Instrucciones:
1. Coloque la carne molida en un tazón grande apto para
microondas de aproximadamente 10 pulgadas (2,5 cuartos) y
recubra con harina.
2. Desmenuce la carne molida con una espátula.
3. Añada el resto de los ingredientes a la mezcla de carne molida y
revuelva bien.
4. Cubra sellando bien con envoltura plástica.
5. Coloque el tazón en el horno microondas, gire el dial para
seleccionar el Programa 6 y luego presione Encender (Start)
para cocinar.
6. Luego de cocinar, revuelva bien y disfrute.
Nota:
Los ingredientes listados para chilli son para 3 porciones. Puede
ajustar las cantidades proporcionalmente según sus necesidades.
7. Guiso en un tazón
Ingredientes (2 porciones)
225
g
(8 oz.) Carne
110
g
(4 oz.) Media cebolla mediana, picada
110
g
(4 oz.) 2 zanahorias medianas
140
g
(5 oz.) Papa mediana
240 ml (1 taza) Consomé de res (frío)
30
g
(2 cdas.) Pasta de tomate
20
g
(2 cdas.) Harina
5
g
(1 cdtas.) Sal
Al gusto Pimienta negra molida (al gusto)
Instrucciones:
1. Corte las zanahorias en trozos de 1/4 de pulgada. Corte la papa
y la carne en cubos.
2. Coloque la carne y la harina en un tazón grande apto para
microondas y mezcle bien.
3. Añada el resto de los ingredientes al tazón y revuelva bien.
4. Cubra sellando bien con envoltura plástica.
5. Coloque el tazón en el horno microondas, gire el dial para
seleccionar el Programa 7 y luego presione Encender (Start)
para cocinar.
6. Después de cocinar, tenga cuidado con el vapor caliente.
Consejos:
Esta función es adecuada para cortes de carne tierna, y no se
recomienda para cortes más duros, como la pierna de res.
8. Avena
Coloque la avena en un bol apto para microondas y cúbrala bien
con envoltura plástica. Siga las instrucciones del fabricante para la
preparación. Seleccione el Programa 8 y presione Encender (Start)
para cocinar.
9. Papas
Perfore cada papa con un tenedor 6 veces alrededor de toda la
superficie. Colóquelas en el centro del horno, con una separación
de al menos 2,5 cm (1 pulgada). No cubra. Seleccione el Programa 9
y presione Encender (Start) para cocinar. Déjelo reposar 5 minutos
para completar la cocción.
10. Mantequilla
Quite el envoltorio, corte la mantequilla en cubos de 2,5 cm (1
pulgada) y coloque en un plato apto para microondas. Déjela
descubierta y colóquela en el centro del horno. Seleccione el
Programa 10 y presione Encender (Start) para derretir. Después
de derretir, revuelva hasta que esté completamente fundido. Si la
comida necesita más tiempo para derretirse o el peso excede el
rango, derrita usando Micro potencia P3.
11. Chocolate
Quite el envoltorio, separe el chocolate en piezas pequeñas y
coloque en un plato apto para microondas. Déjelo descubierto y
coloque el plato en el centro del horno. Seleccione el Programa
11 y presione Encender (Start) para derretir. Después de derretir,
revuelva hasta que esté completamente fundido. Si la comida
necesita más tiempo para derretirse o el peso excede el rango,
derrita usando Micro potencia P3.
Notas:
1. Esta función funciona mejor para derretir chocolate para hornear.
2. El chocolate mantiene su forma aún al ser ablandado.
Funcionamiento (continuación)
F0003DB70AP_ES.indd 22F0003DB70AP_ES.indd 22 2026/3/3 16:22:382026/3/3 16:22:38
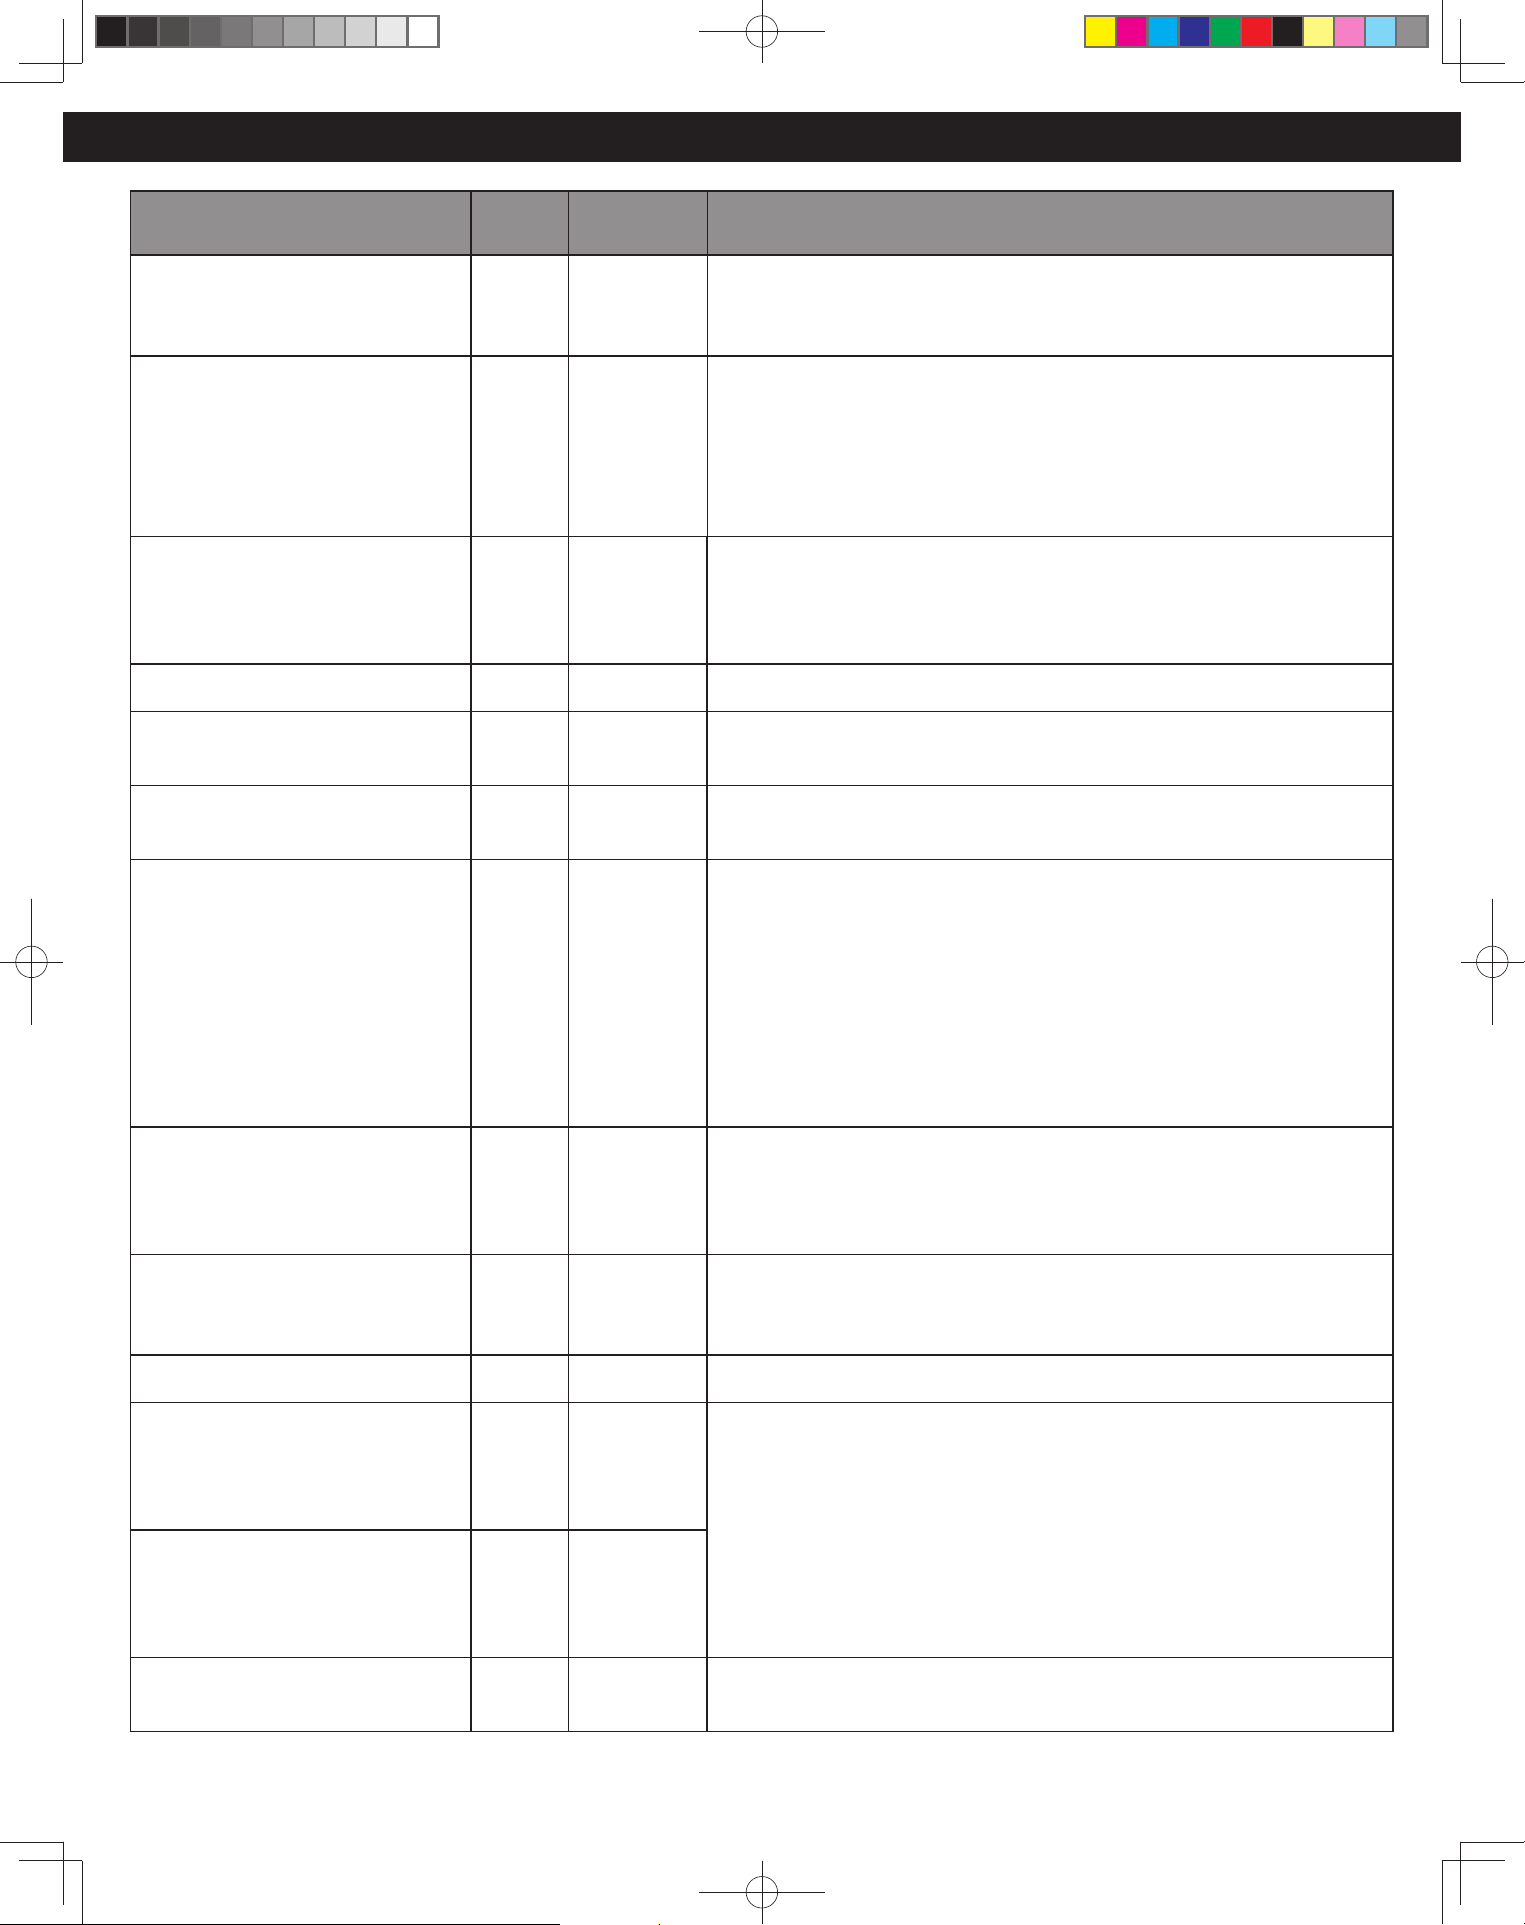
23
Atajos de microondas
Alimentos Potencia
Tiempo
(en minutos)
Indicaciones
Para separar tocino refrigerado,
450
g
(16 oz.)
P10 ½
Retire la envoltura y colóquela en un plato apto para microondas.
Después de recalentar, use una espátula de plástico para separar las
rodajas.
Para ablandar la mantequilla
refrigerada,
1 barra, 110
g
(4 oz.)
Para derretir la mantequilla
refrigerada,
1 barra, 110
g
(4 oz.)
P3
P5
1
1½ – 2
Retire la envoltura y coloque la mantequilla en un plato apto para
microondas cubierto con tapa o envoltura plástica perforada.
Para derretir chocolate, 1 cuadro,
28
g
(1 oz.)
Para derretir chocolate,
125 ml (½ taza) de chispas
P3
P5
1 – 1½
1 – 1½
Retire la envoltura y coloque el chocolate en un plato apto para
microondas. Luego de calentar, revuelva hasta que se derrita por
completo.
NOTA: El chocolate mantiene su forma aún al ser ablandado.
Para tostar coco, 125 ml (½ taza) P10 1 Coloque en un plato apto para microondas. Revuelva cada 30 segundos.
Para suavizar queso crema,
225
g
(8 oz.)
P3 1 – 1½ Retire la envoltura y coloque en un bol apto para microondas.
Para dorar carne molida,
450
g
(16 oz.)
P10 4 – 5 Desmenuce en un colador apto para microondas y colóquelo en otro
plato. Cubra con envoltura plástica. Revuelva dos veces. Escurra la grasa.
Para cocinar vegetales,
Frescos 225
g
(8 oz.)
Congelados 280
g
(10 oz.)
Enlatados 420
g
(15 oz.)
P7
P7
P7
4 – 5
6 – 7
3½ – 4
Todos los trozos deben ser del mismo tamaño. Lave bien, agregue 15 ml
(1 cucharada) de agua por cada 125 ml (½ taza) de vegetales y cúbralos
con una tapa o una envoltura de plástico perforada. No agregue sal o
mantequilla hasta después de cocinar.
Lave bien, agregue 15 ml (1 cucharada) de agua por cada 125 ml (½taza)
de vegetales y cúbralos con una tapa o una envoltura de plástico
perforada. No agregue sal o mantequilla hasta después de cocinar. (No
se recomienda para los vegetales en mantequilla o salsa.)
Vacíe el contenido en el bol apto para microondas. Cubra con una tapa
o envoltura plástica perforada.
Para cocinar papa horneada,
165 – 225
g
c/u (6 – 8 oz.)
1 pieza
2 piezas
P8
P8
4 – 5
6 – 7
Perfore cada papa con un tenedor 6 veces alrededor de toda la
super cie. Coloque las papas en un plato con una separación de al
menos 2,5 cm (1 pulgada). No cubra. Déjelo reposar 5 minutos para
completar la cocción.
Para vaporizar la toalla de mano P10 ½ Remoje en agua, luego escurra el exceso. Coloque en un plato apto
para microondas.
Caliente. Sirva inmediatamente.
Para suavizar helado, 2 L (½ galón) P3 1 – 1½ Veri que con frecuencia para evitar que se derrita.
Taza de líquido
Para hervir agua, caldo, etc.
240 ml (1 taza)
480 ml (2 tazas)
P10
P10
1½ – 2
2½ – 3
Los líquidos sobrecalentados pueden eruptar si no se revuelven. No
caliente líquidos en el microondas sin removerlos primero.
Taza de líquido
Para calentar una bebida,
1 taza, 240 ml
2 tazas, 480 ml
P7
P7
1½ – 2
2½ – 3
Para tostar frutos secos,
340
g
(1½ tazas)
P10 3 – 4 Extienda los frutos secos en un molde apto para microondas de
23 cm (9 pulgadas). Revuelva ocasionalmente.
F0003DB70AP_ES.indd 23F0003DB70AP_ES.indd 23 2026/3/3 16:22:382026/3/3 16:22:38
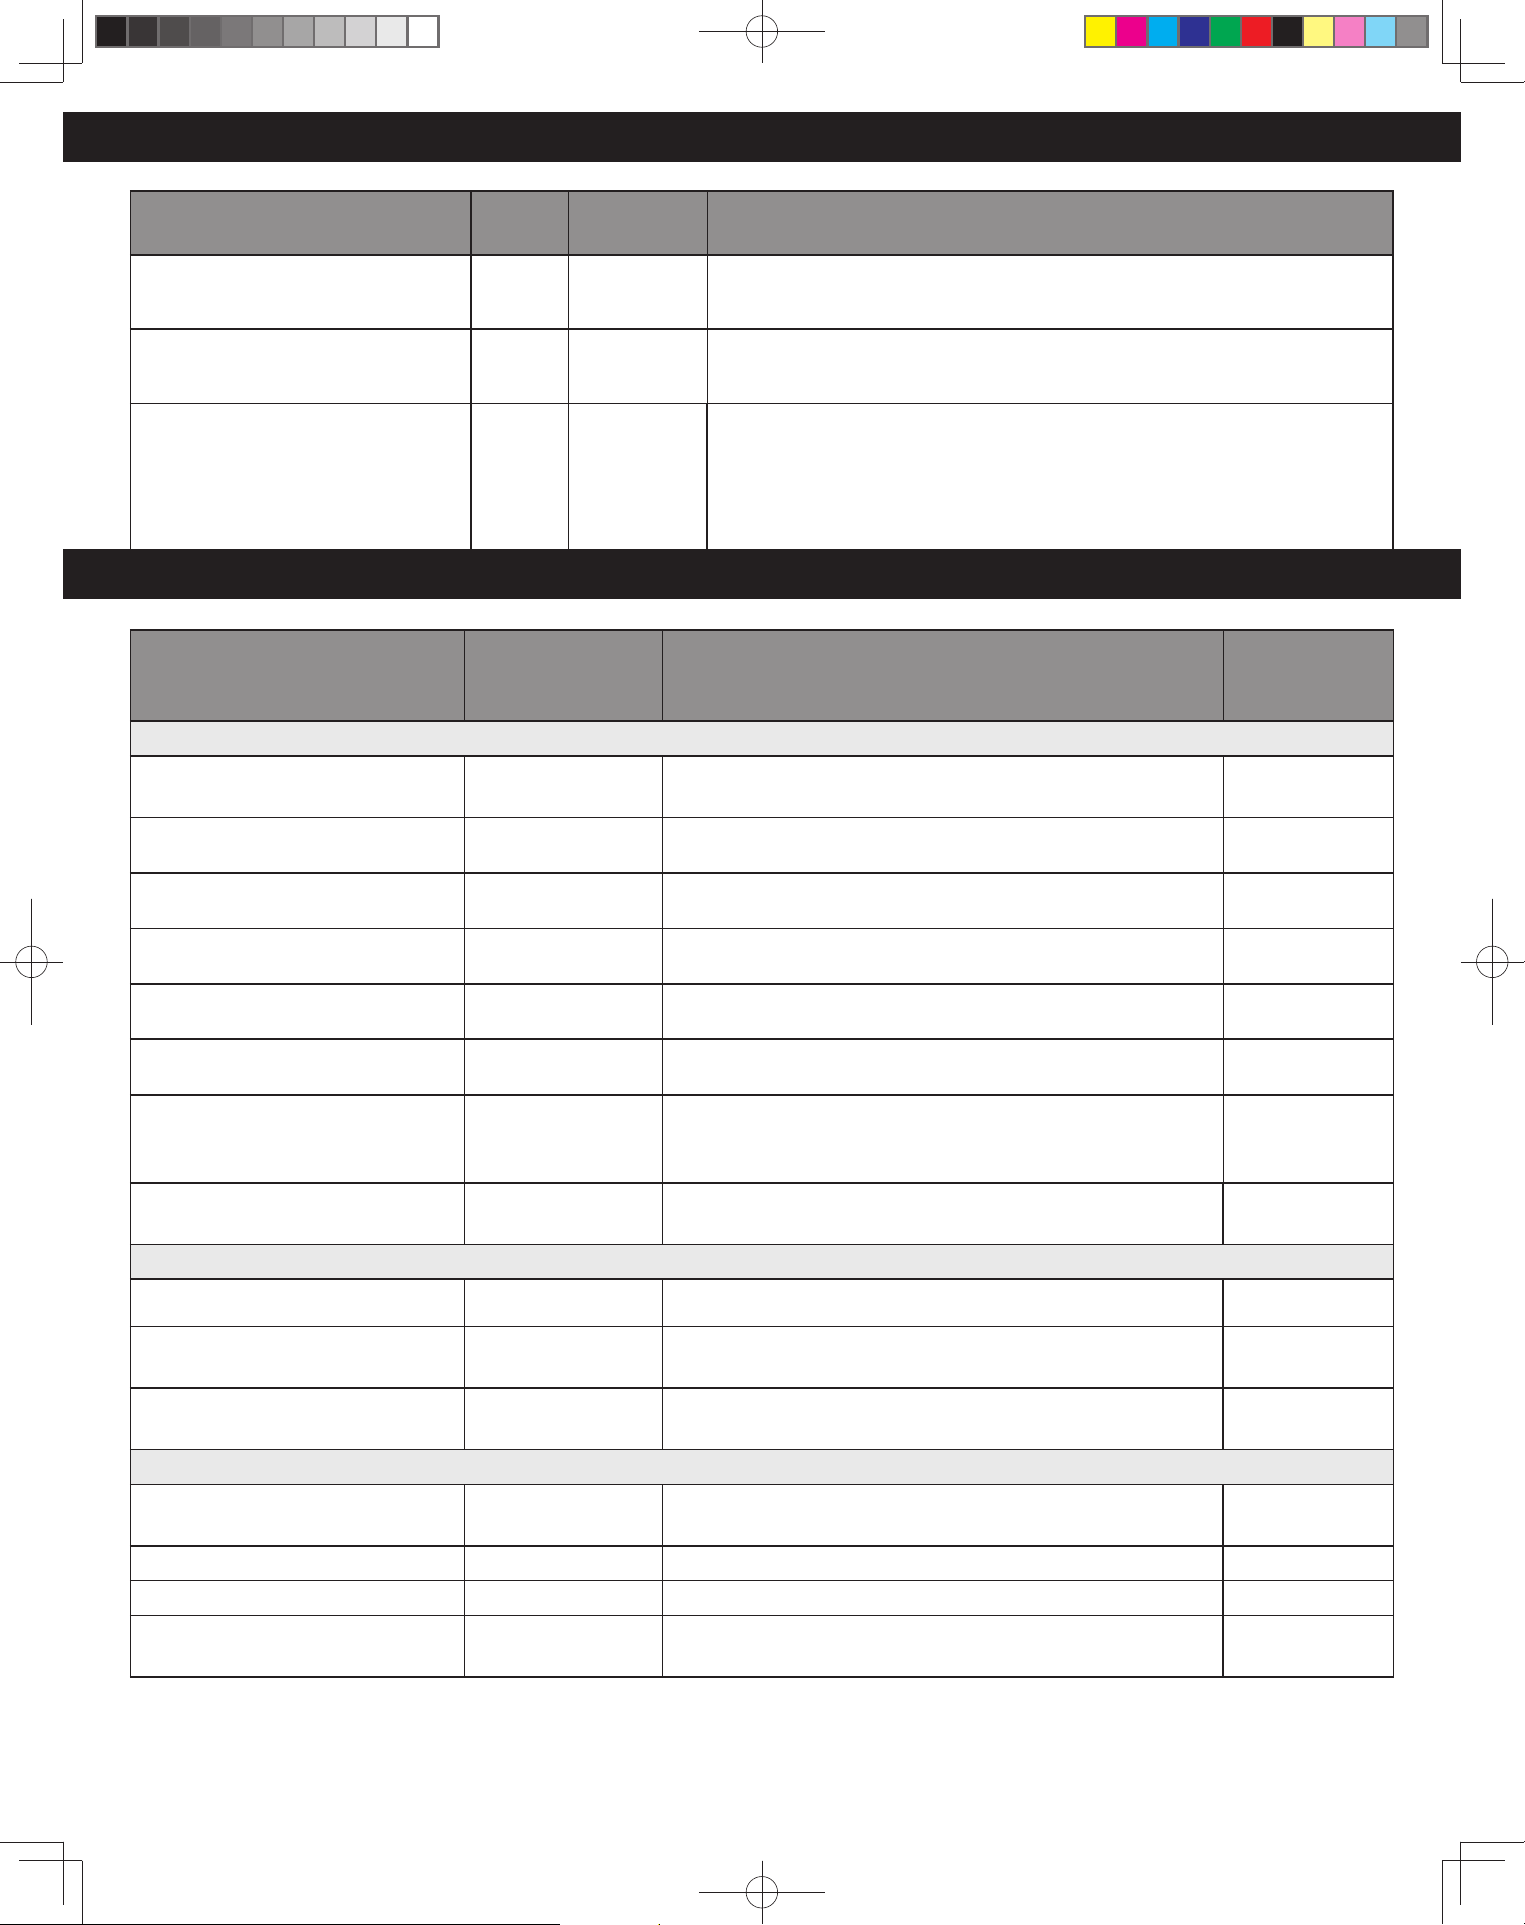
24
Alimentos Potencia
Tiempo
(en minutos)
Indicaciones
Para tostar semillas de ajonjolí,
55
g
(¼ taza)
P10 2 – 2½ Coloque en un bol pequeño apto para microondas. Revuelva dos veces.
Para pelar tomates, (uno a la vez) P10 ½ Coloque el tomate en un bol apto para microondas que contenga agua
hirviendo. Enjuague y pele. Repita para cada tomate.
Para quitar el olor a comida P10 5 Combine 240 – 375 ml (1 a 1½ tazas) de agua con el jugo y piel de un
limón en un bol de 2 cuartos apto para microondas. Después de que
el agua termine de hervir, limpie el interior del horno con un paño.
También puede usar un Combo de varios dientes enteros de ajo y
¼taza de vinagre con 1 taza de agua.
Atajos de microondas (continuación)
Tabla de descongelación
Alimentos
Tiempo de
descongelación
en P3
Método
Tiempo de
reposo
Carne
Trozo de res/cordero/cerdo
500
g
(18 oz.)
8 – 9 min Coloque en un plato adecuado o en una bandeja al revés
o use una rejilla apta microondas.
30 min
Bife picado 500
g
(18 oz.) 6 min 30 s Coloque en un plato adecuado. Divida y voltee una vez.
5 min
Costillas 450
g
(16 oz.) 6 – 7 min Coloque en un plato adecuado en una sola capa.
5 min
Salchichas 450
g
(16 oz.) 6 min Coloque en un plato adecuado en una sola capa.
5 min
Lonchas de tocino 500
g
(18 oz.) 4 – 6 min Coloque en un plato adecuado.
3 min
Bife guisado 450
g
(16 oz.) 6 min Coloque en un plato adecuado. Dividir frecuentemente.
5 min
Pollo entero 500
g
(18 oz.) 6 – 8 min Coloque en un plato adecuado sobre una bandeja dada
vuelta o use una rejilla apta microondas. Voltee una vez.
Cubra.
10 min
Porciones de pollo 450
g
(16 oz.) 5 – 7 min Coloque en un plato adecuado en una sola capa.
10 min
Pescado
Entero 335
g
(12 oz.) 7 – 9 min Coloque en un plato adecuado.
5 min
Filetes/Bistec 450
g
(16 oz.) 5 – 6 min Coloque en un plato adecuado.
5 min
Camarones 450
g
(16 oz.) 5 – 7 min Coloque en un plato adecuado. Revuelva a la mitad del
tiempo durante la descongelación.
5 min
General
Pan rebanado 390
g
(14 oz.) 4 min Coloque en un plato. Separe y reacomode durante la
descongelación.
5 min
Rebanada de pan 55
g
(2 oz.) 20 – 30 s Coloque en un plato. 1 – 2 min
Hojaldre 500
g
(18 oz.) 4 min Coloque en un plato. Voltee a la mitad del tiempo. 5 – 10 min
Frutas blandas 450
g
(16 oz.) 5 – 6 min Coloque en un plato adecuado. Voltee una vez durante la
descongelación.
2 min
F0003DB70AP_ES.indd 24F0003DB70AP_ES.indd 24 2026/3/3 16:22:382026/3/3 16:22:38
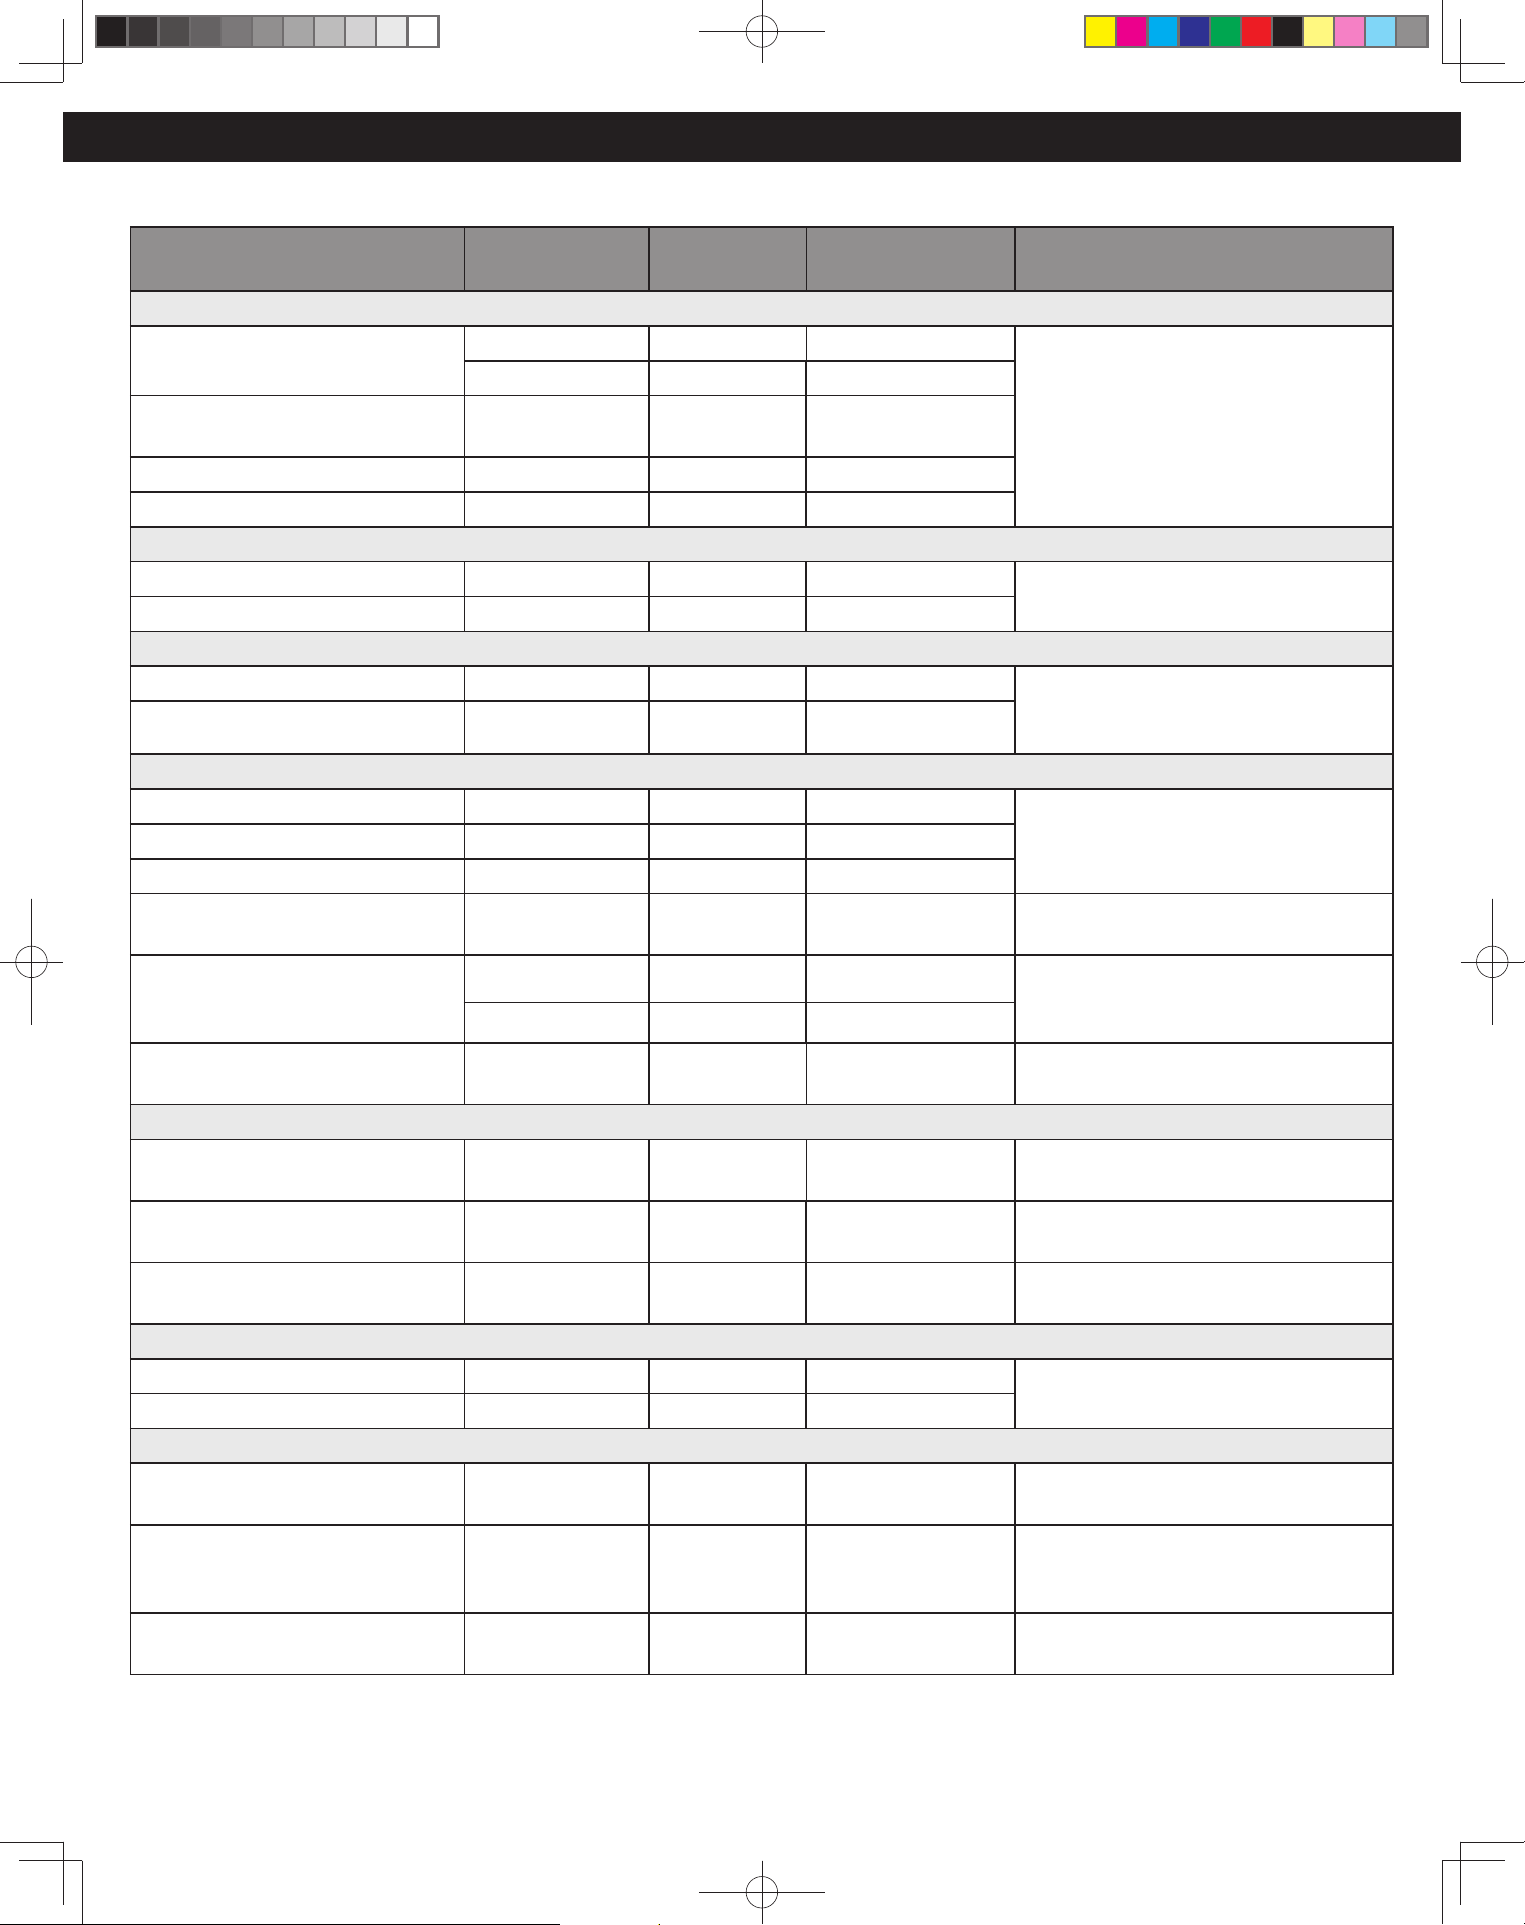
25
Tabla de recalentamiento
Los tiempos dados en las tablas siguientes son una guía solamente y variarán según la temperatura de inicio, el tamaño del plato, etcétera.
Alimentos Peso/Cantidad
Nivel de
potencia
Tiempo de
selección (aprox.)
Instrucciones/Pautas
Frijoles enlatados, pasta
Frijoles horneados 225
g
(8 oz.) P10 2 min Coloque en un bol apto para
microondas sobre la base. Cubra.
450
g
(16 oz.) P10 3 min
Frijoles entomatados y
salchichas/hamburguesas
450
g
(16 oz.) P10 3 – 4 min
Habas 310
g
(11 oz.) P10 2 min
Habas de lima 225
g
(8 oz.) P10 1 min 30 s
Carne enlatada
Hot dogs (escurridos) 450
g
(16 oz.) P10 2 – 3 min Coloque en un bol apto para
microondas sobre la base. Cubra.
Bistec guisado 450
g
(16 oz.) P10 3 – 4 min
Sopas enlatadas
Crema de champiñones 450
g
(16 oz.) P10 3 – 4 min Coloque en un bol apto para
microondas sobre la base. Cubra.
Revuelva a la mitad del tiempo.
Minestrone 450
g
(16 oz.) P10 2 min 30 s
Vegetales enlatados – Escurrir cuando corresponda
Zanahorias, enteras 340
g
(12 oz.) P10 2 min Coloque en un bol apto para
microondas sobre la base. Cubra.
Revuelva a la mitad del tiempo.
Zanahorias, baby 310
g
(11 oz.) P10 2 min
Chícharos, blandos 340
g
(12 oz.) P10 2 min
Chícharos, jardín 340
g
(12 oz.) P10 2 min – 2 min 30 s Coloque en un bol apto para
microondas sobre la base. Cubra.
Maíz 225
g
(8 oz.) P10 1 min 30 s Coloque en un bol apto para
microondas sobre la base. Cubra.
Revuelva a la mitad del tiempo.
340
g
(12 oz.) P10 2 – 3 min
Tomates, enteros 390
g
(14 oz.) P10 3 min 30 s Coloque en un bol apto para
microondas sobre la base. Cubra.
Productos de hojaldre – precocidos – Nota: los hojaldres recalentados en microondas tendrán una base suave.
Quiche 450
g
(16 oz.) P10 4 – 5 min Coloque en un plato apto para
microondas sobre la base. No cubra.
Pasteles de picadillo de fruta
navideños
110
g
(4 oz.) P10 10 – 20 s Coloque en un plato apto para
microondas sobre la base. No cubra.
Hojaldres/rebanadas 140
g
(5 oz.) P10 1 min 30 s Coloque en un plato de vidrio sobre la
base.
Carnes al plato, caseras, frías
Tamaño para niños 1 P10 2 – 3 min Coloque en un plato apto para
microondas sobre la base. Cubra.
Tamaño para adultos 1 P10 4 – 5 min
Budines y postres: Pasar los budines al plato apto para microondas/resistente al calor
Budín de pan y mantequilla (frío) 500
g
(18 oz.) P10 3 – 4 min Coloque sobre la base. No cubra.
Pay de manzanas (frío) 500
g
(18 oz.) P10 3 – 4 min Coloque en un plato apto para
microondas sobre la base.
No cubra.
Natilla (fría) 300 ml (1¼ tazas) P10 2 min – 2 min 30 s Coloque en una jarra grande. Revuelva
durante el recalentamiento.
F0003DB70AP_ES.indd 25F0003DB70AP_ES.indd 25 2026/3/3 16:22:382026/3/3 16:22:38
26
Tabla de cocción
Alimentos Peso/Cantidad
Nivel de
potencia
Tiempo de
selección (aprox.)
Instrucciones/Pautas
Tocino – crudo
Lonchas 340
g
(12 oz.) P10 4 – 6 min o 1 min
por loncha
Coloque en una rejilla o plato aptos
para microondas sobre la base y
cubra con una toalla de cocina para
minimizar las salpicaduras.
Bistecs 225
g
(8 oz.) P10 4 – 5 min Coloque en una rejilla o plato aptos
para microondas sobre la base. Cubra.
Frijoles y legumbres: debe remojarse previamente (excepto las lentejas)
Frijoles negros 225
g
(8 oz.) P10 y luego
P3
10 min
25 – 30 min
Use 600 ml (2½ tazas) de agua
hirviendo en un bol grande. Cubra.
Garbanzos 225
g
(8 oz.) P10 y luego
P3
10 min
45 min
Lentejas 225
g
(8 oz.) P5 10 – 15 min
Frijoles rojos 225
g
(8 oz.) P10 y luego
P3
15 min
35 – 40 min
Carne – trozos crudos. Precaución: ¡Grasa caliente! Retire el plato con cuidado.
Carne picada 500
g
(18 oz.) P10 y luego
P5
5 min
5 min
Coloque en un plato apto para
microondas con el consomé y los
condimentos sobre la base. Revuelva
a la mitad del tiempo. Cubra.
Pollo crudo. Precaución: ¡Grasa Caliente! Retire los accesorios del horno con cuidado.
Pechugas, deshuesadas 730
g
(26 oz.) P5 14 – 16 min Coloque en una rejilla o plato aptos
para microondas sobre la base. Cubra.
Piernas de pollo 780
g
(28 oz.) P5 14 – 16 min
Huevos – Revueltos
Huevo 1 P10 30 s Agregue 1 cucharada de leche por
cada huevo usado. Bata los huevos,
la leche y la porción de mantequilla
juntos. Cocine la primera cocción,
luego revuelva.
Cocine la segunda cocción, luego deje
reposar 1 minuto.
P10 30 s
Huevos 2 P10 50 s
P10 40 s
Huevos 3 P10 1 min 20 s
P10 40 s
Pescado – crudo y fresco
Filetes 280
g
(10 oz.) P10 3 – 4 min Coloque en un plato apto para
microondas. Agregar 30 ml (2 cdas.)
de líquido. Cubra.
Bistecs 225
g
(8 oz.) P10 3 – 4 min
Entero 310
g
(11 oz.) P10 3 – 4 min
Cordero, crudo. Precaución: ¡Grasa Caliente! Retire el accesorio con cuidado.
Costillas, chuletas 310
g
(11 oz.) P5 4 – 6 min Coloque en un plato o rejilla aptos
para microondas sobre la base. Cubra.
Chuletas, lomo 560
g
(20 oz.) P5 5 – 7 min Coloque en un plato o rejilla aptos
para microondas sobre la base. Cubra.
Cordero guisado 450
g
(16 oz.) P10 y luego
P4
10 min
40 min
Coloque en un plato apto para
microondas con el consomé y las
verduras sobre la base. Revuelva a la
mitad del tiempo. Cubra.
F0003DB70AP_ES.indd 26F0003DB70AP_ES.indd 26 2026/3/3 16:22:382026/3/3 16:22:38
27
Alimentos Peso/Cantidad
Nivel de
potencia
Tiempo de
selección (aprox.)
Instrucciones/Pautas
Pasta: coloque en un bol grande de 3 litros apto para microondas.
Moños 225
g
(8 oz.) P10 8 – 10 min Use 1 litro de agua hirviendo. Agregar
15 ml (1 cda.) de aceite. Cubra.
Revuelva a la mitad del tiempo.
Macarrones 225
g
(8 oz.) P10 10 – 12 min
Espaguetis/tallarines 225
g
(8 oz.) P10 8 – 10 min Use 1½ litros de agua hirviendo.
Agregar 15 ml (1 cda.) de aceite.
Cubra. Revuelva a la mitad del tiempo.
Conchas de pasta, por ej.
conchiglie
225
g
(8 oz.) P10 10 – 12 min
Pizza – fresca y fría. Nota: Quitar todo el envoltorio. Las pizzas tendrán una base suave si se las cocina solo en el microondas.
Jamón en bandeja profunda 390
g
(14 oz.) P10 4 – 6 min Coloque en un plato apto para
microondas sobre la base. No cubra.
Cerdo crudo. Precaución: ¡Grasa Caliente! Retire los accesorios del horno con cuidado.
Trozos de carne - P5 15 – 18 min
por cada 450
g
(16 oz.)
Coloque en un platillo volteado apto
para microondas sobre la base. Voltee
el trozo a la mitad del tiempo de
cocción. Escurra la grasa durante la
cocción.
Jamón - P10 y luego
P5
15 min
25 – 30 min por
cada 450
g
(16 oz.)
Coloque en una cacerola grande con
tapa y cubra con agua.
Vegetales frescos: coloque en un plato poco profundo apto para microondas
Habas 450
g
(16 oz.) P10 5 – 6 min
Agregar 90 ml (6 cdas.) de agua.
Cubra.
Remolacha 450
g
(16 oz.) P5 12 – 15 min
Coles de Bruselas 450
g
(16 oz.) P10 8 – 9 min
Col – picada 450
g
(16 oz.) P10 8 – 10 min
Zanahorias – picadas 450
g
(16 oz.) P10 8 – 10 min
Brócoli 450
g
(16 oz.) P10 9 – 11 min
Calabacitas 450
g
(16 oz.) P10 5 min
Maíz en mazorca 450
g
(16 oz.) P10 6 – 7 min
Puerros – picados 450
g
(16 oz.) P10 7 – 8 min
Champiñones 450
g
(16 oz.) P10 5 min
Espinaca 450
g
(16 oz.) P10 6 min
Colinabo - en cubos 450
g
(16 oz.) P10 8 – 12 min
Vegetales congelados: coloque en un plato poco profundo apto para microondas.
Frijoles 450
g
(16 oz.) P10 8 – 9 min
Agregar 30 ml (2 cdas.) de agua.
Cubra.
Frijoles – verdes 450
g
(16 oz.) P10 8 – 9 min
Brócoli 450
g
(16 oz.) P10 8 – 9 min
Coles de Bruselas 450
g
(16 oz.) P10 9 – 10 min
Repollo – picado 450
g
(16 oz.) P10 7 – 8 min
Zanahorias – picadas 450
g
(16 oz.) P10 8 – 9 min
Coliflor 450
g
(16 oz.) P10 9 – 10 min
Chícharos 450
g
(16 oz.) P10 7 – 8 min
Maíz 450
g
(16 oz.) P10 7 – 8 min
Tabla de cocción (continuación)
F0003DB70AP_ES.indd 27F0003DB70AP_ES.indd 27 2026/3/3 16:22:382026/3/3 16:22:38
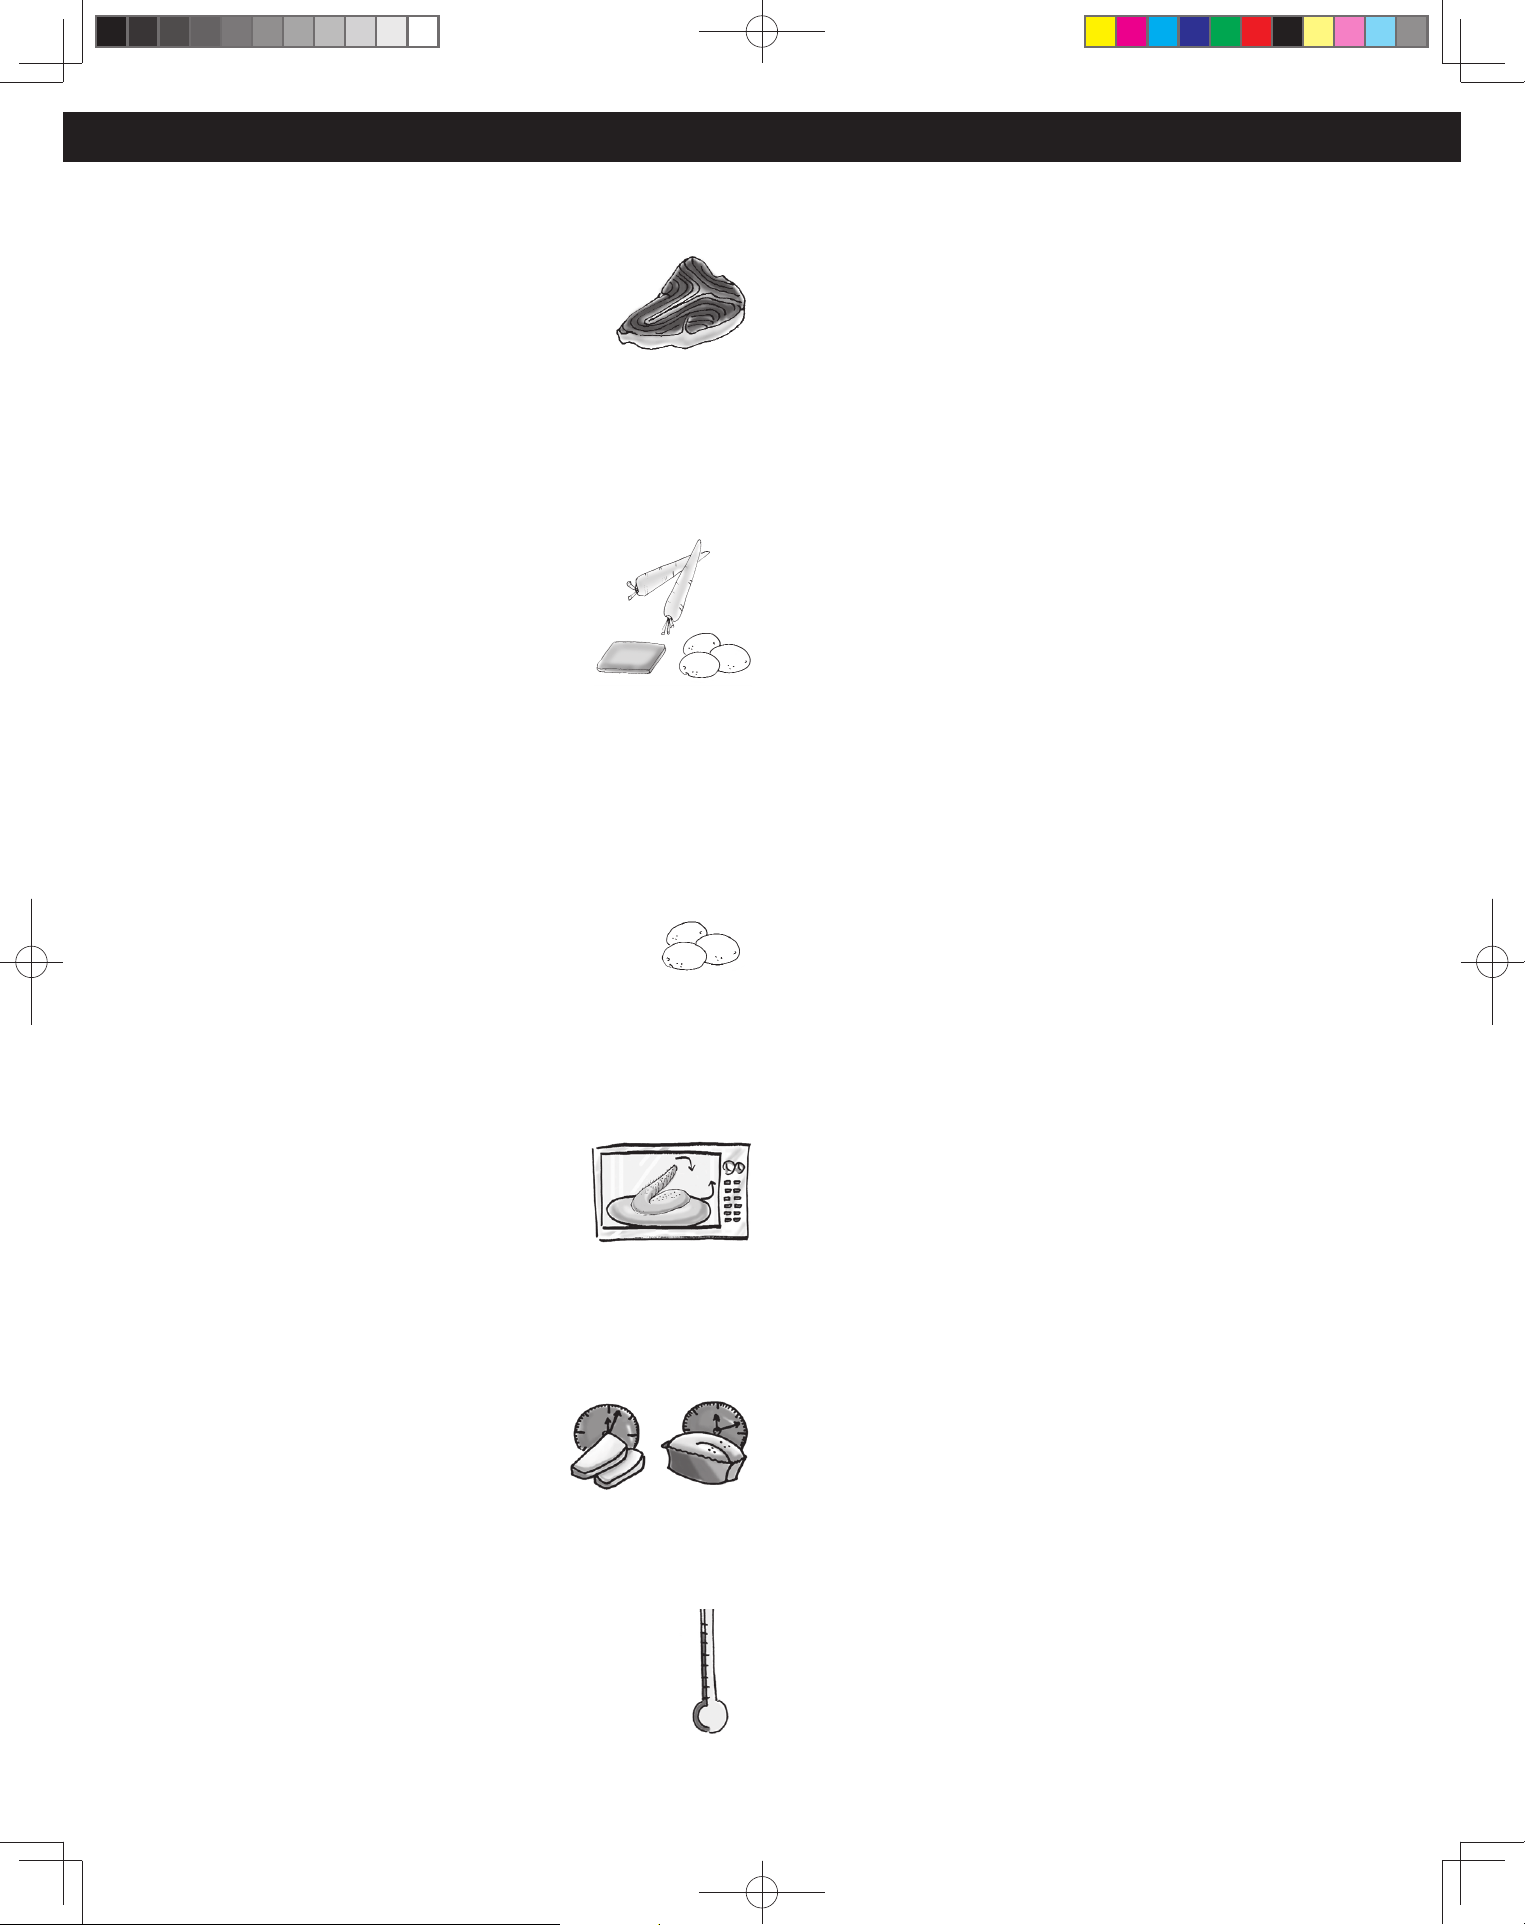
28
Características de los alimentos
Hueso y grasa
Tanto el hueso como la grasa afectan la cocción. Los
huesos pueden causar cocción irregular. La carne junto
a las puntas de los huesos se pueden cocinar en exceso
mientras que la carne posicionada debajo de un hueso
grande, como el hueso de jamón, puede no cocinarse lo
suficiente. Las grandes cantidades de grasa absorben la
energía del microondas y la carne junto a estas áreas puede cocinarse en
exceso.
Densidad
Los alimentos porosos y aireados como panes,
pasteles o rollos tardan menos tiempo en cocinarse
que los alimentos pesados y densos como papas y
asados. Cuando recaliente donas u otros alimentos
con centros diferentes, tenga mucho cuidado. Ciertos
alimentos tienen centros hechos con azúcar, agua,
o grasa y estos centros atraen las microondas (por
ejemplo, las donas con jalea). Cuando se calienta una
dona con jalea, la jalea puede calentarse extremadamente mientras el
exterior sigue tibio al tacto. Esto puede causar quemaduras si el alimento
no se deja enfriar correctamente en el centro.
Cantidad
Dos papas tardan más en cocinarse que una sola. A medida
que disminuye la cantidad de alimento, también lo hace el
tiempo de cocción. La coccion excesiva puede causar que
el contenido de humedad en los alimentos disminuya y se
puede provocar un incendio. Controle siempre el microondas
mientras esté en uso.
Forma
Los tamaños uniformes se calientan en forma más
pareja. El extremo delgado de un palillo se cocinará
más rápido que el extremo carnoso. Para compensar
las formas irregulares, coloque las partes más
delgadas hacia el centro del plato y las gruesas hacia
el borde.
Tamaño
Las piezas delgadas se cocinan más rápidamente
que las gruesas.
Temperatura de inicio
Los alimentos a temperatura ambiente tardan menos en
cocinarse que los alimentos que están fríos, congelados o
refrigerados.
Técnicas de cocción
Perforación
Los alimentos con pieles o membranas deben perforarse, cortarse o se debe
quitar una tira de piel antes de cocinar para poder permitir que escape el
vapor. Perfore almejas, ostras, hígado de pollo, papas enteras y vegetales
enteros. A las manzanas enteras o papas nuevas se les debe pelar una tira
de cáscara de 2,5 cm (1 pulgada) antes de cocinar. Corte las salchichas
comunes y las tipo alemanas. No cocinar/recalentar huevos enteros, con o
sin cáscara. La acumulación de vapor en los huevos enteros puede hacerlos
explotar y posiblemente dañe el horno o cause lesiones. Recalentar huevos
duros EN RODAJAS y cocinar huevos REVUELTOS es seguro.
Dorado
Los alimentos no tendrán la misma apariencia dorada de los alimentos
cocinados en forma convencional o los alimentos cocinados utilizando
una función de dorado. Las carnes y aves pueden recubrirse con salsa
para dorar, salsa Worcestershire, salsa barbacoa o salsa para dorar batida.
Para usar, mezcle la salsa para dorar con margarina o manteca derretida y
coloque con un pincel antes de cocinar. Para muffins o panes rápidos, se
puede usar azúcar negra en la receta en lugar de azúcar granulada o se
puede espolvorear la superficie con condimentos oscuros antes de hornear.
Espaciado
Los alimentos individuales, como las papas asadas, las magdalenas y
aperitivos, se cocinarán de manera más pareja, si se colocan en el horno
a la misma distancia unos de otros. Cuando sea posible, disponga los
alimentos en forma circular.
Cubierta
Como en el caso de la cocción convencional, la humedad se evapora
durante la cocción con microondas. Para un mejor sellado, utilice tapas para
cazuelas o envoltorios plásticos. Cuando use envoltorio de plástico, ventile el
envoltorio replegando una parte del envoltorio desde el borde del plato para
permitir que escape el vapor. Afloje o quite el envoltorio de plástico como
indica la receta durante el tiempo de reposo. Cuando quite las cubiertas del
envoltorio de plástico y las tapas de vidrio, procure quitarlas lejos de usted
para evitar quemarse con el vapor. Se obtienen también diversos grados de
retención de humedad usando papel encerado o toallas de papel.
Tiempo de cocción
Los tiempos de cocción varían según las diferentes formas de los alimentos, la
temperatura de inicio y las preferencias regionales. Siempre cocine alimentos
el tiempo mínimo de cocción que se indique en una receta y verifique el punto
de cocción. Si el alimento no está totalmente cocido, prosiga la cocción. Es
más fácil agregar tiempo de cocción a un producto a medio cocinar. Una vez
que los alimentos estan sobrecocinados, nada se puede hacer.
Características de los Alimentos y Técnicas de Cocción
F0003DB70AP_ES.indd 28F0003DB70AP_ES.indd 28 2026/3/3 16:22:382026/3/3 16:22:38
29
Revolver
En general es necesario revolver durante la cocción en microondas.
Siempre lleve los bordes externos cocidos hacia el centro y las partes
centrales menos cocidas hacia la parte externa del plato.
Reacomodar
Reacomode elementos pequeños como trozos de pollo, crustáceos,
hamburguesas o chuletas de cerdo. Reacomode las piezas desde el borde
hacia el centro y otras del centro hacia los bordes del plato.
Girar
No es posible revolver algunos tipos de alimentos para distribuir
uniformemente el calor. En ocasiones, la energía del microondas se
concentrará en un área de los alimentos. Para asegurar una cocción
uniforme, hay que girar estos alimentos. Gire alimentos grandes, como
asados o pavo, en la mitad del proceso de cocción.
Tiempo de reposo
La mayoría de los alimentos sigue cocinándose por conducción después de
apagar el horno de microondas. Después de cocinar carne, la temperatura
interna aumentará de 3 °C a 8 °C (5 °F a 15 °F), si se deja reposar, cubierta
con aluminio, 10 a 15 minutos. Las cazuelas y vegetales necesitan menos
cantidad de tiempo de reposo, pero este tiempo es necesario para que los
alimentos completen la cocción del centro sin cocinar excesivamente los
bordes.
Prueba del punto de cocción
Las mismas pruebas para el punto de cocción usadas en la cocción
convencional pueden usarse para cocción en microondas. La carne está
cocida cuando está tierna o se deshace en fibras. El pollo está cocido
cuando el jugo es amarillo transparente y el palillo se mueve libremente. El
pescado está cocido cuando se desmenuza y está opaco. El pastel está listo
cuando se inserta un palillo o probador de pasteles y sale limpio.
Verifique los alimentos para ver si se cocinan según las temperaturas
recomendadas por el Departamento de Agricultura de los Estados Unidos.
Para probar el punto de cocción inserte un termómetro de carnes en un
área gruesa o densa lejos de la grasa o hueso. NUNCA deje el termómetro
en los alimentos durante la cocción a menos que esté aprobado para uso
en horno de microondas.
Cocine todos los alimentos con base en estas temperaturas internas
mínimas, según las mediciones con un termómetro para alimentos antes
de quitar los alimentos del horno. Por razones de preferencia personal
puede optar por cocinar los alimentos a temperaturas más altas.
Producto
Temperatura interna mínima y
tiempo de reposo
Bistecs de res, puerco, ternera y
cordero chuletas, asados
63 °C (145 °F) y dejar reposar
por al menos 3 minutos
Carnes molidas 71 °C (160 °F)
Jamón, fresco o ahumado
(sin cocinar)
63 °C (145 °F) y dejar reposar
por al menos 3 min.
Jamón completamente coci-
nado
(para recalentar)
Vuelva a calentar los jamo-
nes cocidos empacados en
plantas inspeccionadas por la
USDA a 60 °C (140 °F); el resto
a 74 °C (165 °F).
Todas las aves (pechugas, ave
completa, piernas, muslos y
alitas, carne de ave triturada y
relleno)
74 °C (165 °F)
Huevos 71 °C (160 °F)
Peces y mariscos 63 °C (145 °F)
Restos 74 °C (165 °F)
Cazuelas 74 °C (165 °F)
Características de los Alimentos y Técnicas de Cocción (continuación)
F0003DB70AP_ES.indd 29F0003DB70AP_ES.indd 29 2026/3/3 16:22:382026/3/3 16:22:38
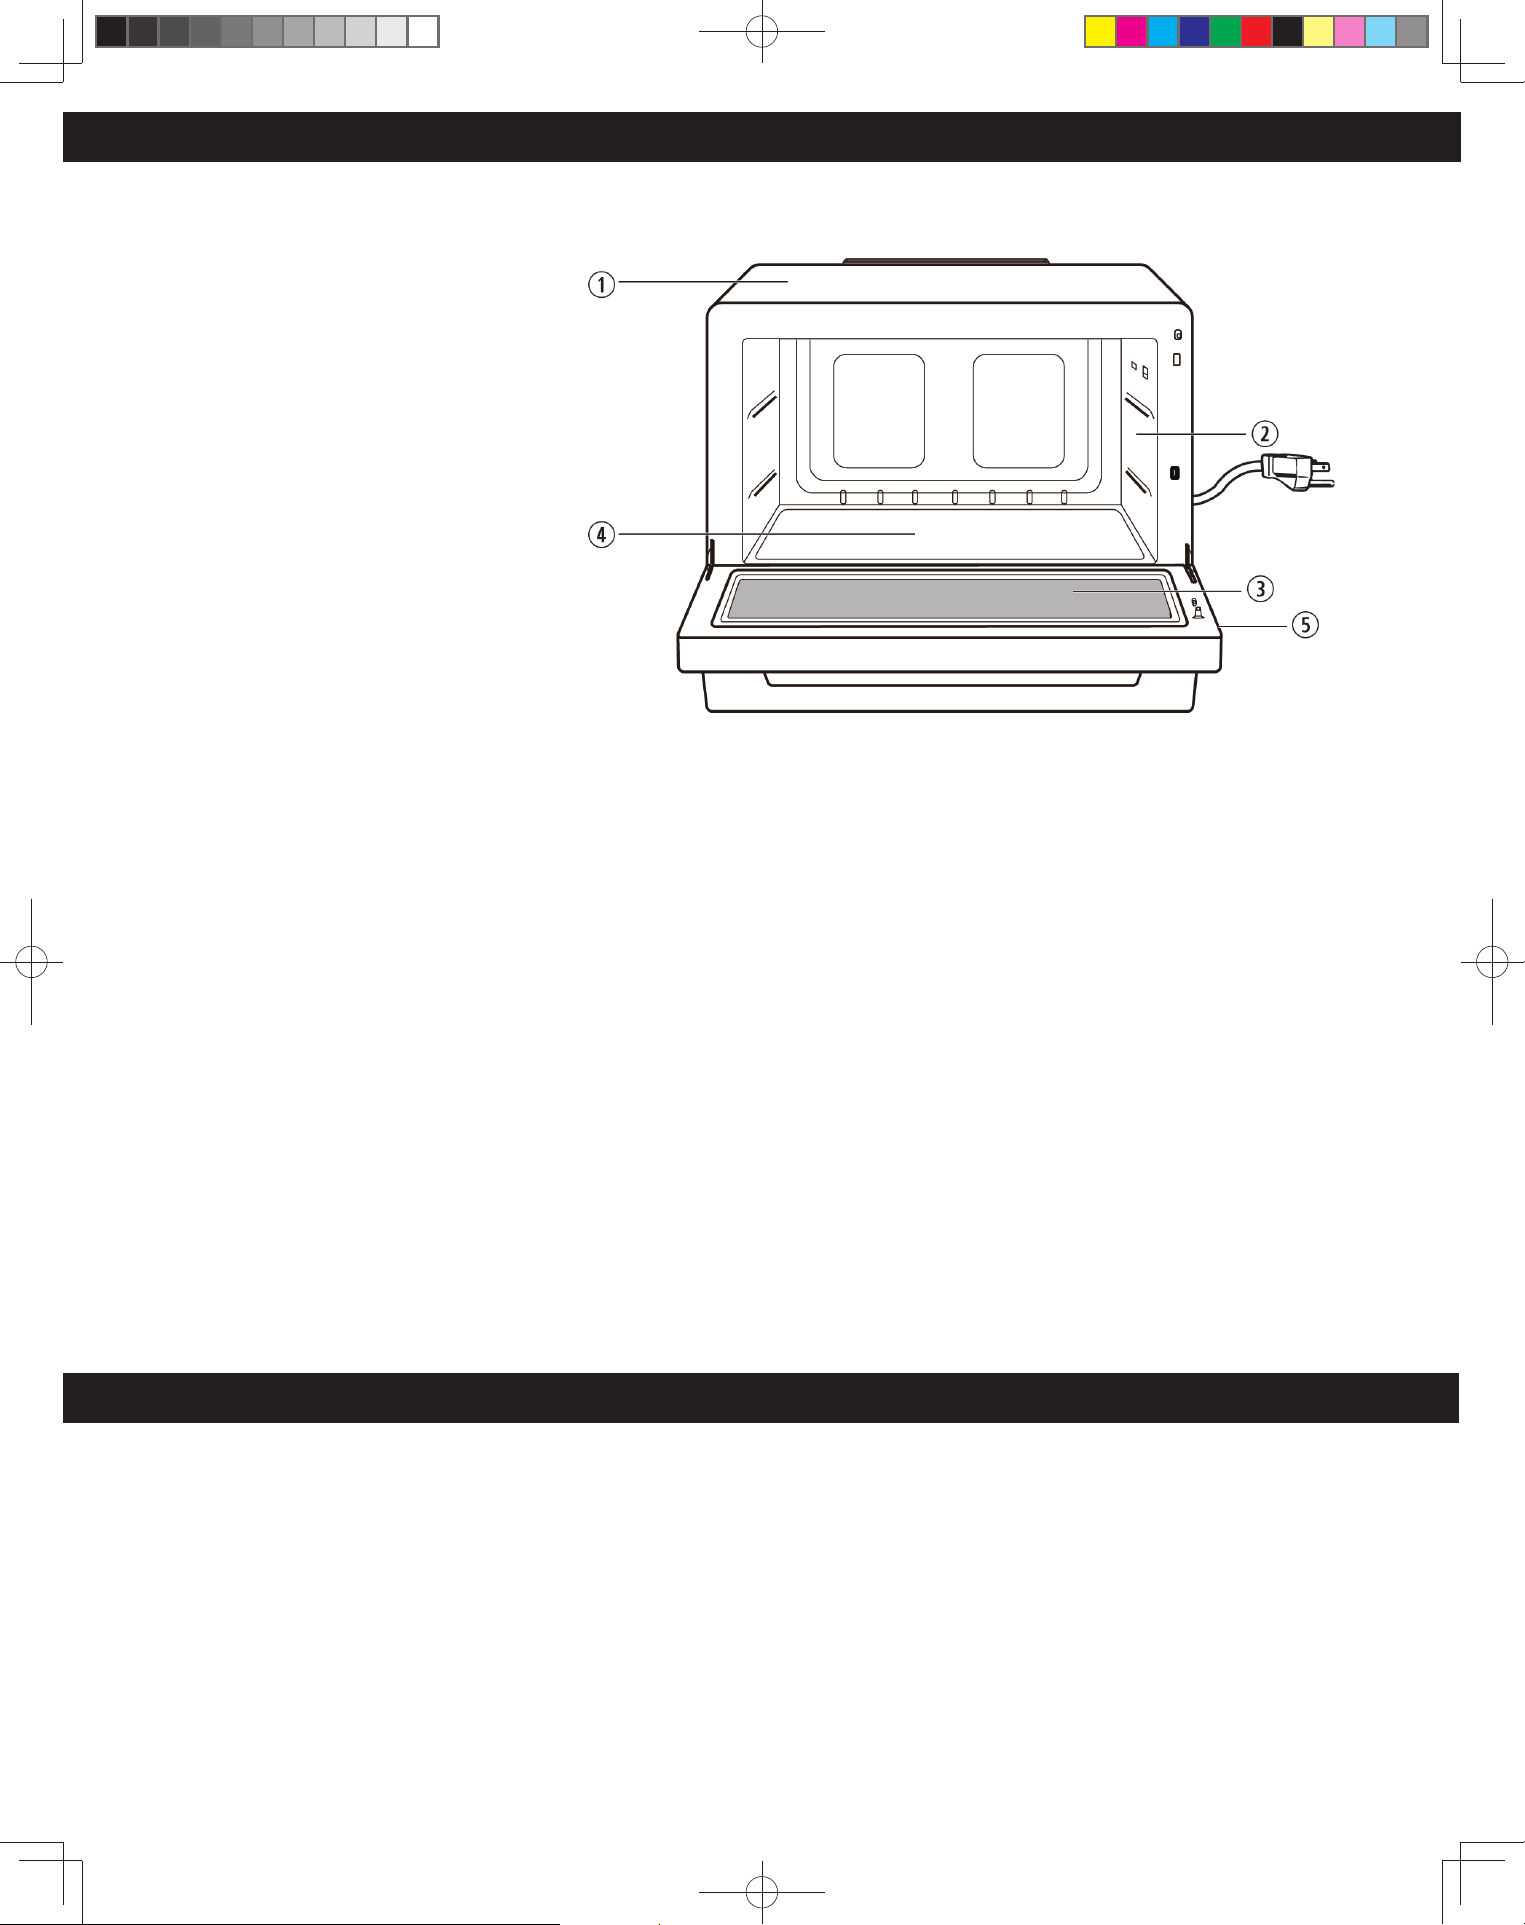
30
Limpieza y Mantenimiento de su Horno de Microondas
Vea a continuación y en la página
siguiente las instrucciones específicas de
limpieza para cada sección del horno.
ANTES DE LIMPIAR: Desenchufe el horno
del tomacorriente de pared. Si no puede
acceder al tomacorriente, deje abierta la
puerta del horno mientras limpia.
DESPUÉS DE LIMPIAR: Presione la tecla para
Pausa/Cancelar (Stop/Reset) para borrar la
pantalla.
1. Superficies externas del horno: Limpie
con un paño húmedo. Para evitar
danos en las piezas de funcionamiento
internas del horno, no deje que se filtre
agua por las aberturas de ventilacion.
2. Dentro del horno: Limpie con un paño
húmedo después de usar. Se puede usar
un detergente suave si es necesario. No
use detergentes fuertes o abrasivos.
3. Puerta del horno: Limpie con un pano
seco suave cuando se acumule vapor
dentro o alrededor de la parte externa
de la puerta del horno. Durante la
coccion, en especial bajo condiciones de alta humedad, los alimentos emanan vapor. (Cierto vapor se condensara en superficies mas
frescas, como la puerta del horno. Esto es normal).
4. Base plana: Siempre limpie la base plana luego de que se enfríe con un detergente suave y seque con un paño.
5. Panel de control: No permita que el panel de control se humedezca. Límpielo con un paño suave y húmedo. No utilice detergentes,
abrasivos o limpiadores en espray en el panel de control. Al limpiar el panel de control, deje la puerta del horno abierta para
evitar encenderlo accidentalmente. Luego de limpiarlo, presione la tecla para Pausa/Cancelar (Stop/Reset) para borrar la pantalla
indicadora.
AL IGUAL QUE CON CUALQUIER APARATO DE COCCIÓN, LOS HORNOS DE MICROONDAS REQUIEREN DEL MISMO NIVEL DE
CUIDADO PARA EVITAR SU RECALENTAMIENTO O DAÑO. ES IMPORTANTE MANTENER LIMPIO Y SECO EL HORNO. LOS RESIDUOS
DE ALIMENTOS Y LA CONDENSACIÓN PUEDEN CAUSAR OXIDACIÓN O ARCOS ELÉCTRICOS Y DAÑOS AL HORNO. DESPUÉS DE
USAR, LIMPIE Y SEQUE TODAS LAS SUPERFICIES, INCLUSO LAS ABERTURAS DE VENTILACIÓN, LAS UNIONES Y DEBAJO DE LA
BASE PLANA.
Compra piezas, Accesorios e Libros de instrucciones en línea de todos los productos Panasonic visite nuestro sitio web en:
shop.panasonic.com/support
Partes disponibles para pedir
Manual del usuario (este libro) ..............................................................................F0003DB70AP
Comprar Accesorios
NOTA:
La ilustración es sólo para referencia.
F0003DB70AP_ES.indd 30F0003DB70AP_ES.indd 30 2026/3/3 16:22:382026/3/3 16:22:38
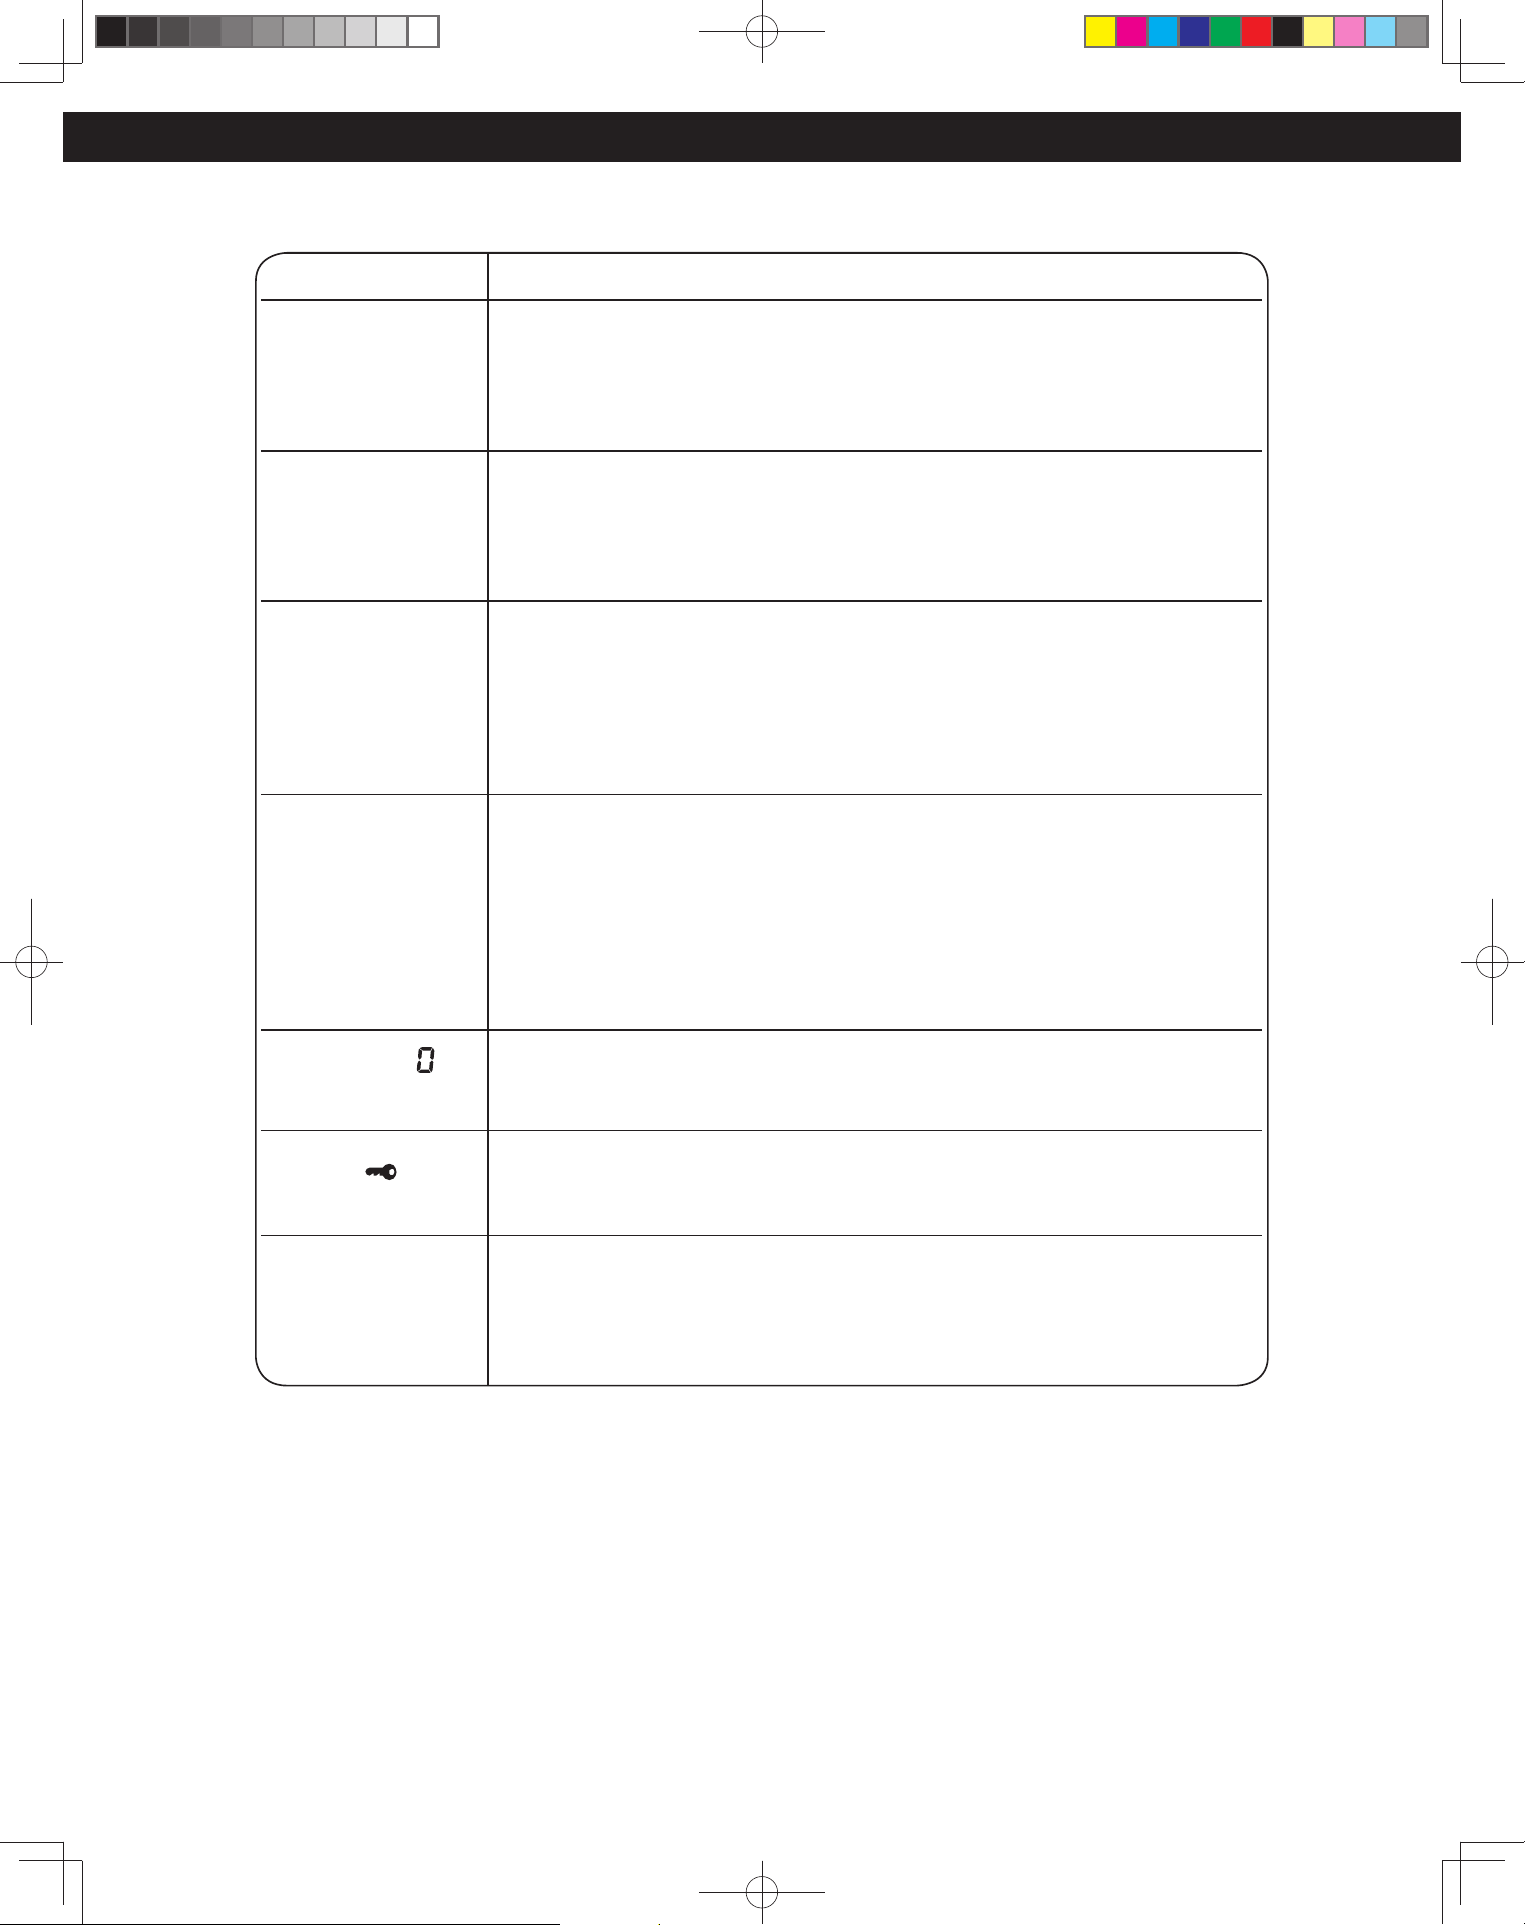
31
Antes de Solicitar Reparaciones
Consulte a continuación antes de llamar a reparaciones, ya que la mayoría de los problemas se pueden resolver fácilmente
siguiendo estas simples soluciones:
Problema Solución
El horno causa
interferencia con el
televisor.
Es posible que haya interferencia de radio, TV, Wi-Fi, teléfono inalámbrico,
monitor de bebés, Bluetooth u otros equipos inalámbricos cuando cocina con
el horno microondas. Esta interferencia es similar a la causada por los pequeños
electrodomésticos como batidoras, aspiradoras, secadores de cabello, etc. No
indica un problema con su horno.
El vapor se acumula
en la puerta del horno
y sale aire cálido de
las ventilaciones del
horno.
Durante la cocción, los alimentos emanan aire cálido y vapor. El aire que circula
en la cavidad del horno remueve la mayor parte del vapor y aire cálido del horno.
No obstante, cierto vapor se condensara en superficies mas frescas, como la
puerta del horno. Esto es normal. Despues del uso se debe limpiar y secar el
horno (ver página 30).
El horno no enciende.
El horno no está enchufado correctamente o se debe reiniciar; quite el enchufe
del tomacorriente, espere diez segundos y vuelva a insertarlo.
Se desconectó el disyuntor principal o el fusible principal; reinicie el disyuntor
principal o reemplace el fusible principal.
Hay un problema con el tomacorriente; enchufe otro aparato en el tomacorriente
para verificar si funciona.
El horno no empieza
a cocinar.
La puerta no está bien cerrada; cierre la puerta del horno correctamente.
No se oprimió Encender (Start) después de la programación; oprima Encender (Start).
Ya se ingresó otro programa en el horno. Oprima Pausa/Cancelar (Stop/Reset)
para cancelar el programa anterior e ingresar el nuevo.
El programa no es el correcto, programe otra vez según las Manual del Usuario.
Se oprimió accidentalmente Pausa/Cancelar (Stop/Reset) ; programe el horno
otra vez.
Se muestra un “
”
giratorio en la pantalla
indicadora.
El ventilador está funcionando para enfriar los componentes eléctricos.
Desaparecerá cuando el ventilador se detenga.
Aparece “
” en la
pantalla.
Al oprimir Pausa/Cancelar (Stop/Reset) tres veces se activo el BLOQUEO DE
SEGURIDAD
PARA NINOS; Desactivelo oprimiendo tres veces Pausa/Cancelar (Stop/Reset).
El horno deja de
cocinar.
La alimentacion del horno fallo; contacte a un Centro de servicio tecnico
autorizado (ver la página siguiente).
F0003DB70AP_ES.indd 31F0003DB70AP_ES.indd 31 2026/3/3 16:22:382026/3/3 16:22:38
32
Limited Warranty (Only for U.S.A.)
y( y )
Panasonic Products Limited Warranty
Limited Warranty Coverage (For USA Only)
If your product does not work properly because of a defect in materials or
workmanship, Panasonic Consumer Electronics Corporation (referred to as
“the warrantor”) will, for the length of the period indicated on the chart below,
which starts with the date of product receipt (“warranty period”), at its option
either (a) repair your product with new or refurbished parts, (b) replace it with
a new or a refurbished equivalent value product, or (c) refund your purchase
price. The decision to repair, replace or refund will be made by the warrantor.
Product or Part Name Labor Parts
ALL PARTS (EXCEPT MAGNETRON TUBE) 1 yr. 1 yr.
MAGNETRON TUBE 1 yr. 5 yrs.
During the “Labor” warranty period there will be no charge for labor. During
the “Parts” warranty period, there will be no charge for parts.
This warranty only applies to products purchased and serviced in the United
States. This warranty is extended only to the original purchaser of a new
product which was not sold “as is”.
Mail-In Service – Online Repair Request
Online Repair Request
To submit a new repair request, and for quick repair status visit our Web
Site at: http://shop.panasonic.com/support
When shipping the unit, carefully pack and send it in the original (or supplied)
carton. Include a letter detailing the complaint along with the bill of sales and
provide a daytime phone number where you can be reached. A valid
registered receipt is required under the Limited Warranty.
When shipping Lithium Ion batteries please visit our web site at
http://shop.panasonic.com/support as Panasonic is committed to
providing the most up to date information.
IF REPAIR IS NEEDED DURING THE WARRANTY PERIOD, THE
PURCHASER WILL BE REQUIRED TO FURNISH A SALES
RECEIPT/PROOF OF PURCHASE INDICATING DATE OF PURCHASE,
AMOUNT PAID AND PLACE OF PURCHASE. CUSTOMER WILL BE
CHARGED FOR THE REPAIR OF ANY UNIT RECEIVED WITHOUT SUCH
PROOF OF PURCHASE.
Limited Warranty Limits And Exclusions
This warranty ONLY COVERS failures due to defects in materials or
workmanship, and DOES NOT COVER glass, plastic parts, temperature
probes (if included) and normal wear and tear or cosmetic damage. The
warranty ALSO DOES NOT COVER damages which occurred in shipment,
or failures which are caused by products not supplied by the warrantor, or
failures which result from accidents, misuse, abuse, neglect, bug infestation,
mishandling, misapplication, alteration, faulty installation, set-up
adjustments, maladjustment of consumer controls, improper maintenance,
power line surge, lightning damage, modification, or commercial use (such
as in a hotel, office, restaurant, or other business), rental use of the product,
service by anyone other than a Factory Service center or other Authorized
Servicer, or damage that is attributable to acts of God.
THERE ARE NO EXPRESS WARRANTIES EXCEPT AS LISTED UNDER
“LIMITED WARRANTY COVERAGE”.
THE WARRANTOR IS NOT LIABLE FOR INCIDENTAL OR
CONSEQUENTIAL DAMAGES RESULTING FROM THE USE OF THIS
PRODUCT, OR ARISING OUT OF ANY BREACH OF THIS WARRANTY.
(As examples, this excludes damages for lost time, travel to and from the
servicer, loss of or damage to media or images, data or other memory or
recorded content. The items listed are not exclusive, but for illustration only.)
ALL EXPRESS AND IMPLIED WARRANTIES, INCLUDING THE
WARRANTY OF MERCHANTABILITY, ARE LIMITED TO THE PERIOD
OF THE LIMITED WARRANTY.
Some states do not allow the exclusion or limitation of incidental or
consequential damages, or limitations on how long an implied warranty lasts,
so the exclusions may not apply to you.
This warranty gives you specific legal rights and you may also have other
rights which vary from state to state. If a problem with this product develops
during or after the warranty period, you may contact your dealer or Service
Center. If the problem is not handled to your satisfaction, then write to:
Panasonic Corporation of North America
Consumer Affairs Department
Two Riverfront Plaza
Newark NJ 07102-5490
PARTS AND SERVICE, WHICH ARE NOT COVERED BY THIS LIMITED
WARRANTY, ARE YOUR RESPONSIBILITY.
Product registration is not mandatory. Failure to complete the form
does not affect the consumer' s warranty rights.
As of January 4, 2026
Shop
Accessories!
ĨŽƌĂůůLJŽƵƌWĂŶĂƐŽŶŝĐŐĞĂƌ
'ŽƚŽ
ŚƚƚƉƐŚŽƉƉĂŶĂƐŽŶŝĐƐƵƉƉŽƌƚ
'ĞƚĞǀĞƌLJƚŚŝŶŐLJŽƵŶĞĞĚƚŽŐĞƚƚŚĞŵŽƐƚŽƵƚŽĨ
LJŽƵƌWĂŶĂƐŽŶŝĐƉƌŽĚƵĐƚƐ
ĐĐĞƐƐŽƌŝĞƐΘWĂƌƚƐĨŽƌLJŽƵƌĂŵĞƌĂWŚŽŶĞ
sƉƌŽĚƵĐƚƐdsŽŵƉƵƚĞƌƐΘEĞƚǁŽƌŬŝŶŐ
WĞƌƐŽŶĂůĂƌĞ,ŽŵĞƉƉůŝĂŶĐĞƐ,ĞĂĚƉŚŽŶĞƐ
ĂƚƚĞƌŝĞƐĂĐŬƵƉŚĂƌŐĞƌƐΘŵŽƌĞ
ƵƐƚŽŵĞƌ^ĞƌǀŝĐĞƐŝƌĞĐƚŽƌLJ
&ŽƌWƌŽĚƵĐƚ/ŶĨŽƌŵĂƚŝŽŶKƉĞƌĂƚŝŶŐƐƐŝƐƚĂŶĐĞ
WĂƌƚƐKǁŶĞƌƐDĂŶƵĂůƐĞĂůĞƌĂŶĚ^ĞƌǀŝĐĞŝŶĨŽ
ŐŽƚŽ
ŚƚƚƉƐŚŽƉƉĂŶĂƐŽŶŝĐƐƵƉƉŽƌƚ
&ŽƌƚŚĞŚĞĂƌŝŶŐŽƌƐƉĞĞĐŚŝŵƉĂŝƌĞĚ
ddzϭͲϴϱϱͲϰϵϳͲϮϬϱϲ
F0003DB70AP_ES.indd 32F0003DB70AP_ES.indd 32 2026/3/3 16:22:382026/3/3 16:22:38
33
Especificaciones
Alimentacion ..........................................................................................................................................................................................................................120 V~, 60 Hz
Consumo de energía ..........................................................................................................................................................................................................8 Amps 950 W
Potencia de cocción * .................................................................................................................................................................................................................... 1 200 W
Dimensiones externas (Ancho x Altura x Profundidad) ............................................................................................470 mm x 350 mm x 390(**436) mm
(18
1
⁄2” x 13
3
⁄4” x 15
3
⁄8”(**17
3
⁄16”) )
Dimensiones de cavidad del horno (Ancho x Altura x Profundidad) .................................................................................385 mm x 210 mm x 341 mm
(15
3
⁄16” x 8
1
⁄4” x 13
7
⁄16”)
Frecuencia de funcionamiento ............................................................................................................................................................................................. 2 450 MHz
Peso neto ............................................................................................................................................................................................................Aprox. 12,3 kg (27,1 lbs.)
* Procedimiento de prueba de IEC Las especificaciones del estan sujetas a cambios sin previo aviso.
** 390 mm es la dimensión sin asa.
436 mm es la dimensión con asa.
El número de serie de este producto se encuentra en la parte posterior del horno. Debe anotar el número de modelo
y de serie de este horno en el espacio provisto, y conservar este libro como un registro permanente de su compra
para referencias futuras.
Modelo No. ______________________________
No. de serie _____________________________
Fecha de compra ________________________
Registro del Usuario
Escanee este código para registrar el producto
F0003DB70AP_ES.indd 33F0003DB70AP_ES.indd 33 2026/3/3 16:22:392026/3/3 16:22:39

Panasonic Consumer Electronics Company,
Division of Panasonic Corporation of North America
Two Riverfront Plaza
Newark, New Jersey 07102
Sitio web: http://shop.panasonic.com/support
F0003DB70AP_ES.indd 34F0003DB70AP_ES.indd 34 2026/3/3 16:22:392026/3/3 16:22:39