
DXAELJ16
LITHIUM AUTOMOTIVE JUMP STARTER WITH USB POWER BANK
ARRANCADOR DE LITIO PARA AUTOMÓVILES CON BANCO DE
ENERGÍA USB
INSTRUCTION MANUAL
MANUAL DE INSTRUCCIONES
If you have questions or comments, contact us.
Si tiene dudas o comentarios, contáctenos.
1-888-394-3392
BC
RD022124

English
2
ADVERTENCIA: Lea todas las instrucciones antes de utilizar
el producto. No seguir todas las instrucciones que aparecen a
continuación pueden provocar descargas eléctricas, incendios
y/o lesiones graves.
ADVERTENCIA: Este producto o su cable de alimentación contiene
plomo, una sustancia química reconocida por el Estado de California
como causante de cáncer, defectos de nacimiento u otros problemas
reproductivos. Lávese las manos después de utilizarlo. Para más
información, visite www.P65Warnings.ca.gov
WARNING: Read all instructions before operating product.
Failure to follow all instructions listed below may result in electric
shock, fire and/or serious injury.
WARNING: This product or its power cord contains lead, a chemical
known to the State of California to cause cancer and birth defect or
other reproductive harm. Wash hands after handling. For more
information go to www.P65Warnings.ca.gov
English
3
Definitions: Safety Guidelines
The definitions below describe the level of severity for each signal
word. Please read the manual and pay attention to these symbols.
DANGER: Indicates an imminently hazardous situation which,
if not avoided, will result in death or serious injury.
WARNING: Indicates a potentially hazardous situation which,
if not avoided, could result in death or serious injury.
CAUTION: Indicates a potentially hazardous situation which,
if not avoided, may result in injury.
NOTICE: Indicates a practice not related to personal injury
which, if not avoided, may result in property damage.
IF YOU HAVE ANY QUESTIONS OR COMMENTS ABOUT THIS
DEWALT TOOL, CALL US TOLL FREE AT: 1-888-394-3392.
Lithium Automotive Jump Starter with
USB Power Bank
The DXAELJ16 1600A Jump Starter and 3.1A USB Ports is a DeWALT
jump starter that features a USB-A & USB-C charging ports.
Important Safety
Instructions
1. Keep these instructions.
2. Heed all warnings.
3. Follow all instructions.
4. Avoid dangerous environments. Don’t use this unit in damp or wet
locations; or in the rain or snow.
5. Clean only with a dry cloth.
6. Keep children away from the work area. Keep this unit away from
children. This is not a toy!
7. Store indoors. When not in use, this unit should be stored indoors
in a dry and high or locked-up place – out of the reach of children.
8. Stay alert. Use common sense. Do not operate this equipment
when you are tired or impaired.
9. Only use attachments/accessories specified by the manufacturer.
The use of any accessory or attachment not recommended for
use with this appliance could be hazardous.
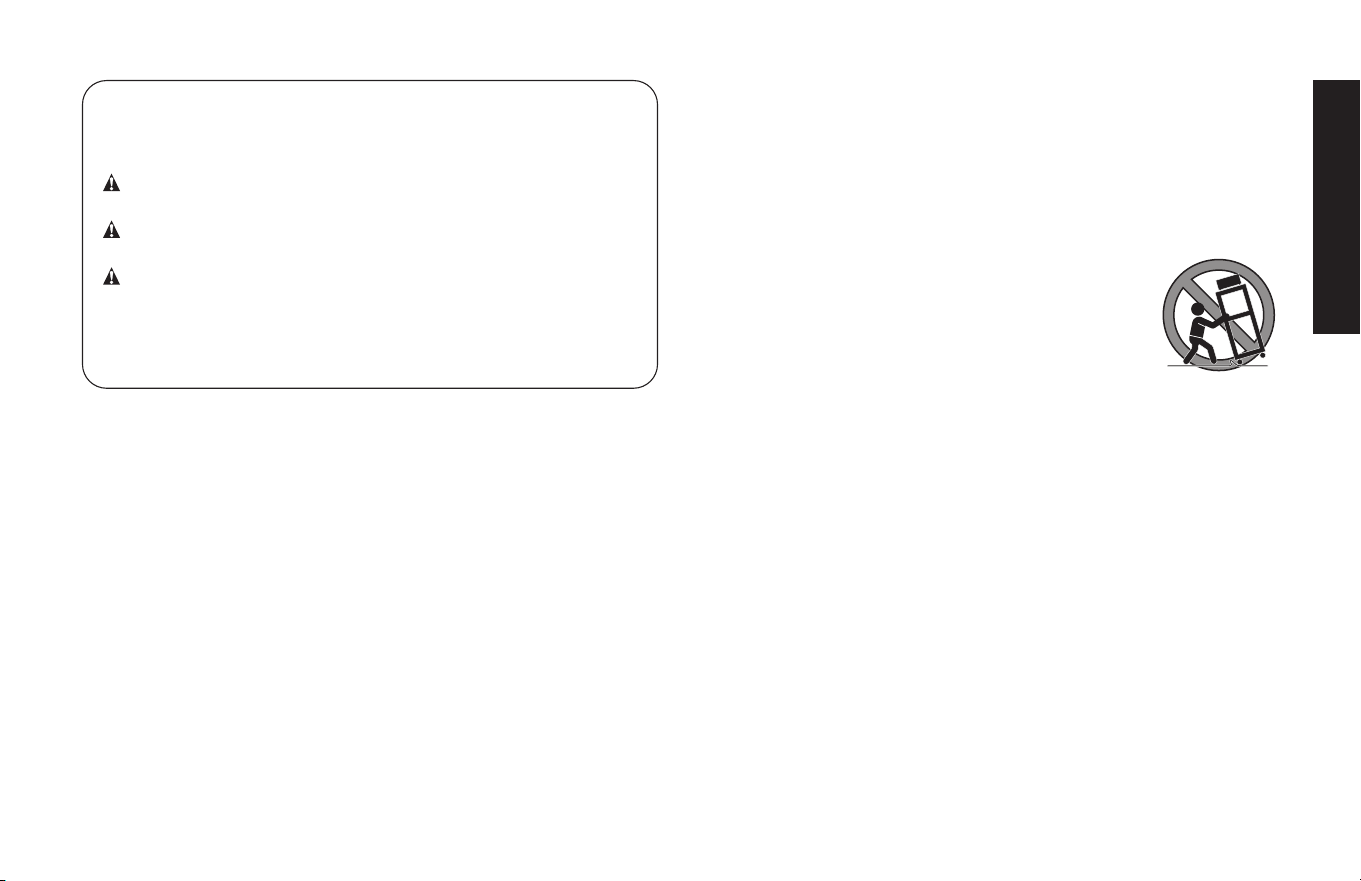
10. Use only on a flat, level surface. If a cart is used,
use caution when moving the cart/apparatus
combination to avoid injury from tip-over.
11. To reduce risk of electric shock, disconnect
the unit from any power source before
attempting maintenance or cleaning. Turning off controls without
disconnecting will not reduce this risk.
12. Check for damaged parts. Do not use if damaged in any way.
13. Do not disassemble the unit. Opening the unit may result in a risk
of electric shock or fire, and will void warranty.
14. Unit shall not be exposed to dripping or splashing and no objects
filled with liquids, shall be placed on the unit.
15. Do not operate this unit near flammable liquids or in gaseous or
explosive atmospheres.
16. This unit employs parts (switches, relays, etc.) that produce arcs
or sparks. Therefore, if used in a garage or enclosed area, the
unit MUST be placed not less than 18 inches above the floor.
NOTE: This equipment has been tested and found to comply with
the limits for a Class B digital device, pursuant to Part 15 of the FCC
Rules. These limits are designed to provide reasonable protection
against harmful interference in a residential installation. This equipment
generates, uses and can radiate radio frequency energy and, if not
installed and used in accordance with the instructions, may cause

English
4
harmful interference to radio communications. However, there is no
guarantee that interference will not occur in a particular installation. If
this equipment does cause harmful interference to radio or television
reception, which can be determined by turning the equipment off and
on, the user is encouraged to try to correct the interference by one or
more of the following measures:
• Reorient or relocate the receiving antenna.
• Increase the separation between the equipment and the
receiver.
• Connect the equipment into an outlet on a circuit different
from that to which the receiver is connected.
• Consult the dealer or an experienced radio/TV technician
for help.
NOTICE: Per FCC Part 15, changes or modifications to this equipment
not expressly approved by DEWALT could void your authority to operate
this equipment.
READ ALL INSTRUCTIONS
GENERAL SAFETY WARNINGS AND INSTRUCTIONS
WARNING – To reduce the risk of fire, electric shock:
• The Smart Cables Controller and Smart Cables Port are
always “live”! NEVER insert fingers into the sockets or attempt to
disassemble the unit.
• Do not put the unit in water or other liquid. Do not place or store
this unit where it can fall or be pulled into water. Do not expose it
to rain, snow or use when wet.
• Charge indoors only.
• Use only the USB charging cable supplied by the manufacturer
to recharge.
SPECIFIC SAFETY INSTRUCTIONS FOR LITHIUM BATTERIES
WARNING – To reduce the risk of fire, electric shock,
burst hazard, or injury to persons or property: Lithium batteries
are small, compact and ideal for providing long-lasting power to this
unit. However, they must be used and charged properly. Improper
use can result in serious injury, fire, or death.
• Lithium batteries can explode in the presence of a source of
ignition. Do not use the product in the presence of an
open flame.
• Do not place this lithium battery powered unit in fire or apply heat
to it.
• Do not subject this lithium battery powered unit to strong impacts
or shocks. The battery in this unit contains safety and protection
devices which, if damaged, may cause the battery to generate
heat, rupture or ignite.
• Do not expose this lithium battery powered unit to water or salt
water, or allow the battery to get wet.
• Avoid storing this lithium battery powered unit in the basement,
bathroom or other areas of the house that are or may become
wet or humid or where moisture may concentrate.
• Do not leave this lithium battery powered unit in direct sunlight,
or use or store the unit inside cars in hot weather. Doing so may
cause the battery to generate heat, rupture, or ignite. Using the
battery in this manner may also result in a loss of performance
and a shortened life expectancy.
• Never charge this unit near heat or flammable objects.
• NEVER THROW WATER ON A BURNING LITHIUM BATTERY!
If a lithium battery does catch on fire, it will burn even more violently
if it comes in contact with water or even moisture in the air. A fire
extinguisher must be used.
Battery Charging and Capacity
This unit is delivered in a partially charged state – you must fully
charge it before using it for the first time.

English
5
When stored in room temperature with a full charge, lithium batteries
will begin to discharge from the time they are manufactured,
even when unused. Deep discharges also decrease their capacity.
Battery life can be extended by the following:
• Charge battery to full capacity before storage.
• Store this unit at the temperature ranges of 5°C and 20°C (41°F
and 68°F).
• Never fully discharge the battery.
• Charge after each use.
• Always charge at least once every 3-6 months if not in frequent
use to prevent over-discharge.
Transportation of Lithium Batteries
• Always check all applicable local, national, and international
regulations before transporting a unit containing a lithium battery.
• Transporting an end-of-life, damaged, or recalled battery may, in
certain cases, be specifically limited or prohibited.
INSTRUCTIONS PERTAINING TO THE 12V DC/USB CHARGING
ADAPTER
CAUTION – To avoid the risk of property damage:
• The 12 Volt DC charging adapter must only be connected to
batteries with a nominal output voltage of 12 volts. The unit will
not operate from a 6 volt battery and will sustain permanent
damage if connected to a 24 volt battery.
• Always connect the 12 volt DC/USB charging adapter to the 12
volt DC power source before plugging any devices into it.
• NEVER connect the 12V DC/USB charging adapter to a
positive grounded vehicle.
Specific Safety Instructions for Jump
Starters
WARNING – Burst hazard: Do not use the unit for charging dry-cell
batteries that are commonly used with home appliances. These
batteries may burst and cause injury to persons and damage property.
Use the unit for boosting a lead-acid battery only. It is not intended to
supply power to a low-voltage electrical system other than in a starter-
motor application.
WARNING: To reduce the risk of electric shock, never immerse this
unit in water or any other liquid, or use when wet.
WARNING – Risk of explosive gases:
• Working in the vicinity of a lead acid battery is dangerous. Batteries
generate explosive gases during normal battery operation. For this
reason, it is of the utmost importance that each time before using
the jump-starter you read this manual and follow instructions exactly.
• To reduce the risk of battery explosion, follow these instructions and
those published by the battery manufacturer and manufacturer of
any equipment you intend to use in the vicinity of the battery. Review
cautionary markings on these products and on the engine.
WARNING – To reduce the risk of fire:
• Do not operate near flammable materials, dust, fumes or gases.
• Do not expose to extreme heat or flames.
CAUTION – To reduce the risk of injury or property damage:
• NEVER ATTEMPT TO JUMP-START OR CHARGE A FROZEN
BATTERY.
• Make sure the cord is located so that it will not be stepped on, tripped
over or otherwise subjected to damage or stress.
• Do not leave the unit unattended while in use.
• Pull by the plug rather than the cord when disconnecting the USB
Charging Cable.

English
6
• Vehicles that have on-board computerized systems may be damaged
if vehicle battery is jump-started. Before jump-starting, read the
vehicle’s owner’s manual to confirm that external-starting assistance
is suitable.
• When working with lead acid batteries, always make sure immediate
assistance is available in case of accident or emergency.
• Always have protective eyewear when using this product: contact with
battery acid may cause blindness and/or severe burns. Be aware of
first aid procedures in case of accidental contact with battery acid.
• Have plenty of fresh water and soap nearby in case battery acid
contacts skin.
• Never smoke or allow a spark or flame in vicinity of vehicle battery,
engine or power station.
• Stay clear of fan blades, belts, pulleys, and other parts that can
cause injury to persons.
• Remove personal metal items such as rings, bracelets,
necklaces and watches when working with a lead acid battery. A
lead acid battery can produce a short circuit current high enough to
weld a ring, or similar metal object, to skin, causing a severe burn.
• Do not wear vinyl clothing when jump-starting a vehicle. Friction can
cause dangerous static-electrical sparks.
• Do not wear loose clothing or jewelry. They can be caught in
moving parts. Rubber gloves and substantial, non-skid footwear are
recommended when working outdoors. Wear protective hair covering
to contain long hair.
• Be extra careful to avoid dropping a metal tool onto the battery. It
might spark or short-circuit the battery or another electrical part and
could cause an explosion.
• Jump-start procedures should only be performed in a safe, dry,
well-ventilated area.
• Always store battery clamps when not in use. Never touch battery
clamps together.
• Make sure to connect the clamps with correct polarity.
• Do not expose battery to fire or intense heat since it may explode.
Before disposing of the battery, protect exposed terminals with
heavy-duty electrical tape to prevent shorting (shorting can result
in injury or fire).
• Place this unit as far away from the battery as cables permit.
• Never allow battery acid to come in contact with this unit.
• Do not operate this unit in a closed area or restrict ventilation in any
way.
• This system is designed to be used only on vehicles with a 12 volt DC
battery system. Do not connect to a 6 volt or 24 volt battery system.
• Excessive engine cranking can damage a vehicle’s starter motor. If
the engine fails to start after the recommended number of attempts,
discontinue jump-start procedures and look for other problems that
may need to be corrected.
• Do not use this jump starter on a watercraft. It is not qualified for
marine applications.
INSTRUCTIONS PERTAINING TO THE USB PORTS
IMPORTANT:
Some household USB-powered electronics will
not operate with the USB ports provided with this unit and
its charging adapters. Check the manual of the corresponding
electronic devices (including phones, tablets, etc.) to confirm that they
can be used with one of these USB ports and which USB port to use
(Type A or Type C).
• The USB ports do not support data communication. They
only provide power to an external USB powered device, as follows:
– 5V DC/3.1A maximum using the Type A and Type C USB ports on
the unit;
– 5V DC/2A using the USB ports on the AC/USB or DC/USB
Charging Adapters).
Make sure the rating of equipment plugged into the USB port does
not exceed the amperage stated.

English
7
• Always connect the appropriate charging adapter to either the
120V AC or 12V DC power source before plugging any devices into
it.
• Do not attach USB hubs allowing connection of multiple personal
electronic devices to any of the USB ports on the charging adapters.
• Do not insert foreign objects into any of the USB Ports.
FIRST AID
When working with lead acid batteries, always make sure immediate
assistance is available in case of accident or emergency.
Always have protective eyewear when using this product: contact
with battery acid may cause blindness and/or severe burns. Be
aware of first aid procedures in case of accidental contact with
battery acid.
• Have plenty of fresh water and soap nearby in case battery acid
contacts skin.
• Remove personal metal items such as rings, bracelets, necklaces
and watches when working with a lead acid battery. A lead acid
battery can produce a short circuit current high enough to weld a
ring, or similar metal object, to skin causing a severe burn.
• Stay clear of fan blades, belts, pulleys, and other parts that can
cause injury to persons.
• Be extra cautious to avoid dropping a metal tool onto the battery.
It might spark or short-circuit the battery or another electrical part,
and that may cause an explosion.
• Never smoke or allow a spark or flame in vicinity of vehicle battery,
engine or battery charger.
•
SKIN: If battery acid contacts skin or clothing, wash
immediately with soap and water for at least 10 minutes. If
redness, pain, or irritation occurs, seek immediate medical
attention.
•
EYES: If battery acid comes in contact with eyes, flush eyes
immediately, for a minimum of 15 minutes and seek immediate
medical attention.
SAVE THESE
INSTRUCTIONS
FOR FUTURE USE

English
8
WARNING – To reduce the risk of injury: Follow these
instructions and those published by the battery manufacturer and
manufacturer of any equipment you intend to use with this unit.
Review cautionary markings on these products and on engine.
INTRODUCTION
Congratulations on purchasing your new Lithium Jump-Starter /
Power Bank. Read this Instruction Manual and follow the instructions
carefully before using this unit.
IMPORTANT NOTES:
• Several factors can affect a jump-starter’s ability to boost a
vehicle’s battery, including, but not limited to the size of the battery,
the temperature (hot or cold), whether the battery is damaged or
defective, and whether the jump-starter itself is fully charged.
• The jump-starter requires a minimum voltage to detect the
correct connection before it will begin to boost. If the vehicle battery
voltage is below approximately 2 volts, it may not be able to detect
connection and may not be able to start the vehicle. While this low
battery voltage is rare it may occur under extreme conditions.
English
9
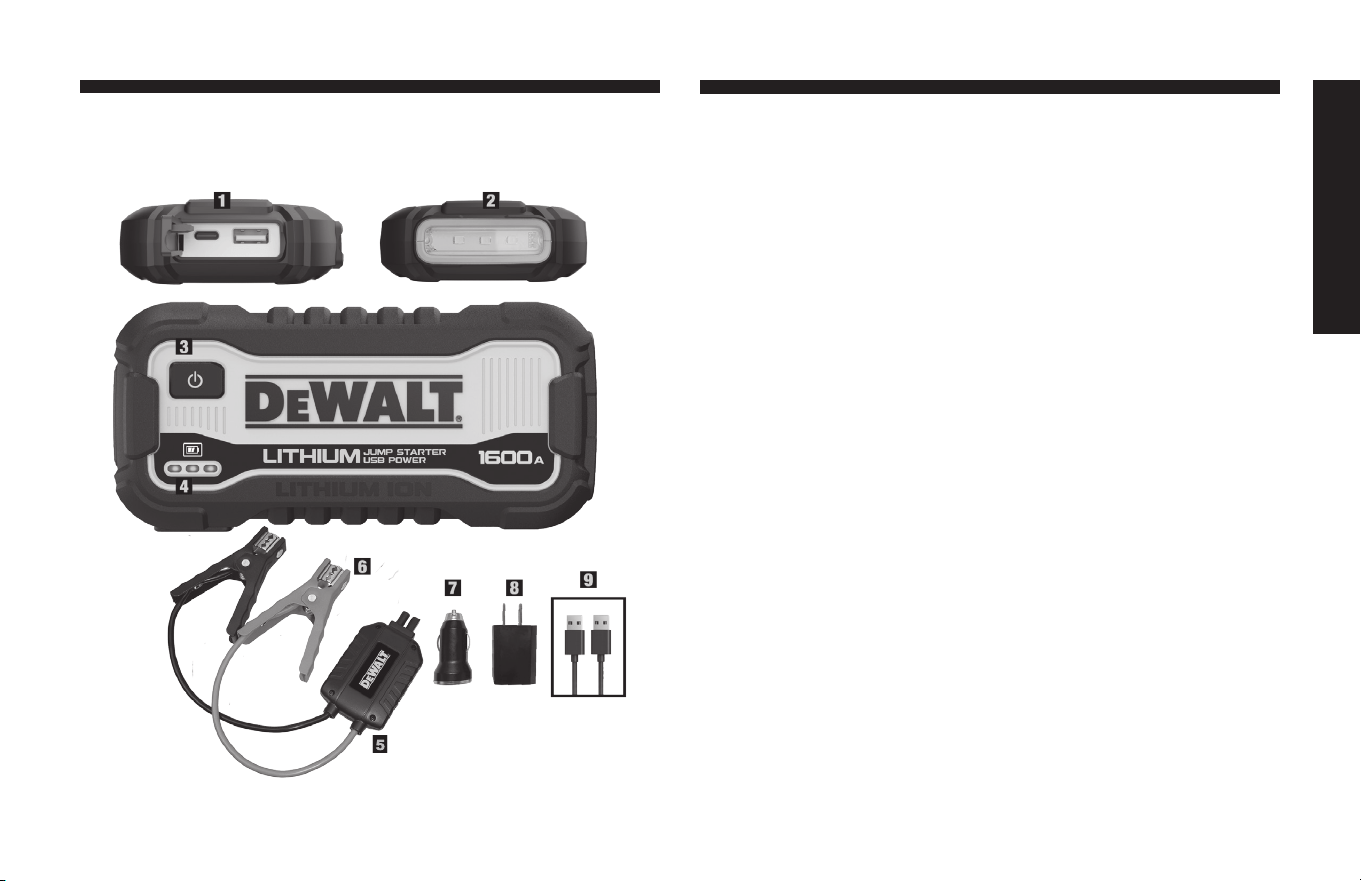
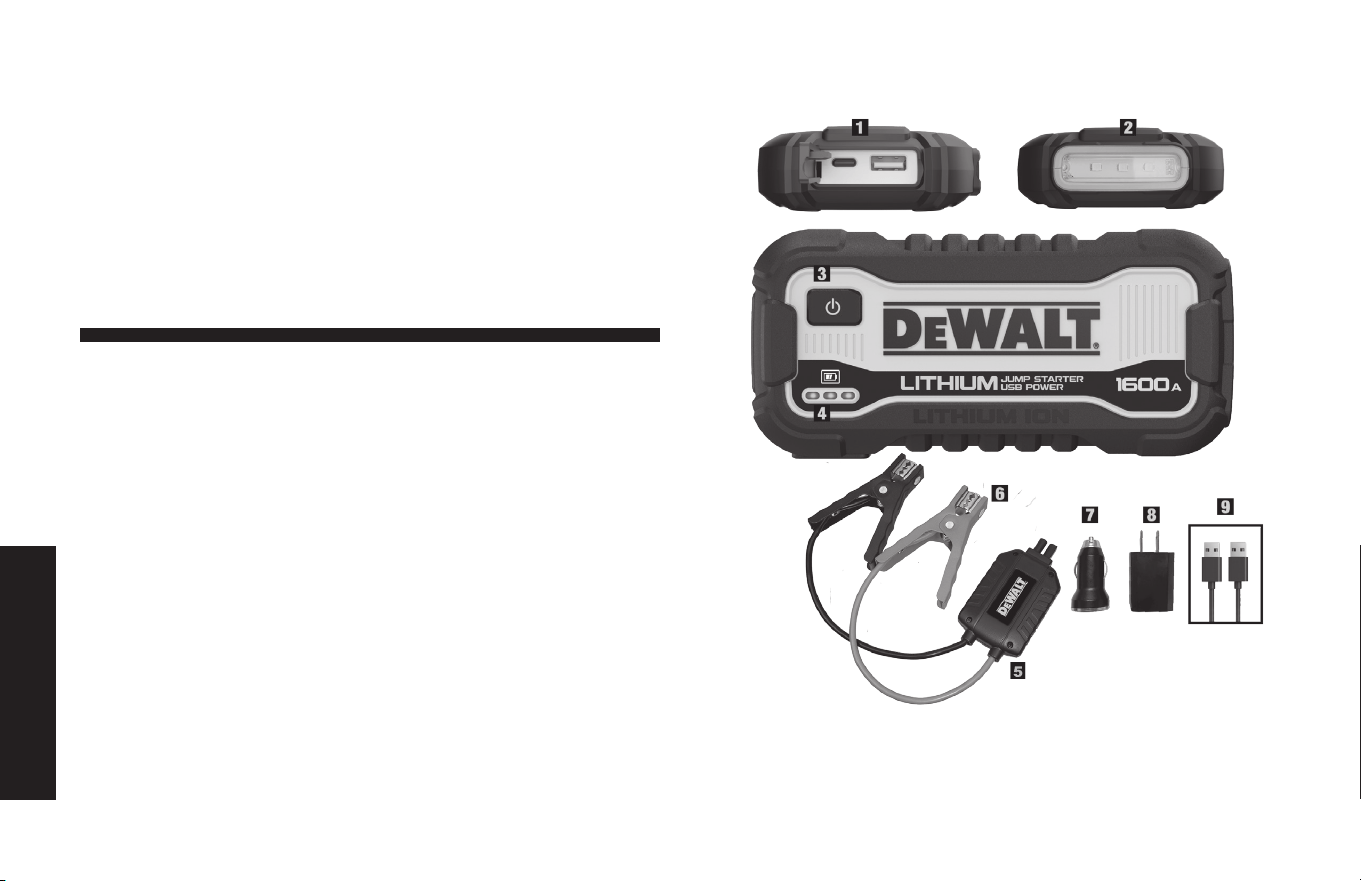
5
1. USB-A and USB-C Power
Ports
2. 200 Lumen LED Light
3. Power Button
4. LED Status Indicators
5. Smart Cables Controller
6. Metal Battery Clamps
7. DC Charger
8. AC Charger
9. USB Charging Cable
FEATURES

English
10
Viewing Battery Status
The Battery Status LED Indicators indicate the battery charge level
as follows:
• If the battery charge level is at full capacity, all three Battery
Status LED Indicators light.
• If the battery is at partial charged, two Battery Status LED
Indicators light.
• If the battery is nearly empty, only one Battery Status LED
Indicator lights. The unit should be charged at this time.
• If the battery is completely empty, only one Battery Status LED
Indicator flashes. The unit MUST be charged at this time or the
unit’s built-in low voltage protection will activate and the unit will
automatically shut down.
CHARGING / RECHARGING
T
his unit is shipped in a partially charged state. Charge the unit after
purchase, before first use, and after each subsequent use until all
three blue Battery Status LED Indicators light when the Power Button
is pressed (with the adapter unplugged from the unit).
IMPORTANT: When the unit is not in use, we recommend that the
battery is charged at least every 3 to 6 months. Failure to keep the
battery charged will cause permanent damage and result in poor
performance.
NOTES:
• When the Type A USB port is in use in the charging process, the
Type C port will have no output. Pressing the Power Button
during the charging process will only control the LED Light.
• When the unit battery is fully charged, the charging process will
terminate and the unit will automatically shut down.
• A 2A USB is required in order to recharge the unit (2A AC and
DC charging adapters included).
• During the charging process, the unit will stop charging if the
battery of the unit is overheated due to extensive use or
recharging. The charging process will automatically resume
after a cool down period.
CHARGING/RECHARGING USING THE 120 VOLT AC/USB
CHARGING ADAPTER
IMPORTANT: Always connect the 120V AC/USB Charging Adapter
to the 120 Volt AC power source (using the USB Charging Cable)
BEFORE connecting it to the unit.
1. Make sure the Power Button is turned off (the Battery Status LED
Indicators are not lit).
2. Insert one end of the USB Charging Cable into the 120V AC/USB
Charging Adapter.
3. Insert the 120V AC/USB Charging Adapter into a standard 120
volt AC wall outlet or a functioning 120 volt AC power source.
4. Lift up the protective cover of the USB ports. Insert the other end
of the USB Charging Cable into the unit’s Type A USB port.
5. The blue Battery Status LED Indicators will gradually light up (left to
right) to indicate the unit is charging.
6. Charge for approximately 6 hours or until the unit automatically
shuts down.
7. Unplug the 120V AC/USB Charging Adapter from the 120 volt AC
power source, then disconnect the USB Charging Cable from the
120V AC/USB Charging Adapter, and then from the unit’s Type A
USB port.
8. Press the Power Button to turn the unit on. When all three blue
Battery Status LED Indicators light, the unit battery is fully charged.
9. Store the 120V AC/USB Charging Adapter and USB Charging
Cable in a safe place.

English
11
CHARGING/RECHARGING USING THE 12V DC/USB
CHARGING ADAPTER
IMPORTANT: Always connect the 12V DC/USB Charging Adapter
to the 12 volt DC power source (using the USB Charging Cable)
BEFORE connecting it to the unit.
1. Make sure the Power Button is turned off (the Battery Status LED
Indicators are not lit).
2. Insert one end of the USB Charging Cable into the 12V DC/USB
Charging Adapter.
3. Insert the 12V DC/USB Charging Adapter into a vehicle’s 12 volt
DC accessory outlet or other functioning 12V DC power source.
The LED indicator on the 12V DC/USB Charging Adapter will
light green when it is properly plugged into the 12 volt DC power
source.
Note:
Some vehicles require that the ignition be switched to the
accessory outlet position in order to power the accessory outlet.
4. Lift up the protective cover of the USB ports. Insert the other end
of the USB Charging Cable into the unit’s Type A USB port.
5. The blue Battery Status LED Indicators will gradually light up (left
to right) to indicate the unit is charging.
6. Charge until the unit automatically shuts down. Unplug the 12V
DC/USB Charging Adapter from the 12 volt DC power source,
then disconnect the USB Charging Cable from the 12V DC/USB
Charging Adapter, and then from the unit’s Type A USB port.
7. Press the Power Button to turn the unit on. When all three blue
Battery Status LED Indicators light, the unit battery is fully charged.
8. Store the 12V DC/USB Charging Adapter and USB Charging
Cable in a safe place.
CHARGING/RECHARGING USING THE USB CHARGING
CABLE AND A DEVICE WITH A USB POWER PORT (NOT
SUPPLIED)
IMPORTANT: Always connect the USB Charging Cable to the
external device’s USB power port BEFORE connecting it to the unit.
A 2A USB power source is required in order to recharge the unit.
1. Make sure the Power Button is turned off (the Battery Status LED
Indicators are not lit).
2. Insert one end of the USB Charging Cable into an external
device’s functional USB power port.
3. Lift up the protective cover of the USB ports. Insert the other end
of the USB Charging Cable into the unit’s Type A USB port.
4. When the unit is properly connected, the blue Battery Status LED
Indicators will gradually light up (left to right) to indicate the unit is
charging.
5. Charge until the unit automatically shuts down.
6. Disconnect the USB charging cable from the device’s USB power
port and the unit.
7. Press the Power Button to turn the unit on. When all three blue
Battery Status LED Indicators light, the unit battery is fully charged.
8. When charging is complete, store the USB Charging Cable in safe
place.
OPERATING INSTRUCTIONS
JUMP-STARTING USING THE SMART CABLES
Battery Clamp Connection Precautions
• Connect and disconnect the battery clamps only after unplugging
the power source.
• Make sure the engine is not running when connecting or
disconnecting the battery clamps.

English
12
• Never allow clamps to touch each other.
• Attach clamps to battery and chassis as indicated in the section
“Connecting the Jump-Starter Using the Included Battery Clamps”.
CONNECTING THE JUMP-STARTER USING THE INCLUDED
BATTERY CLAMPS
1. Position the Smart Cables Controller to reduce risk of damage by
the car hood, doors, or moving engine parts.
2. Stay clear of fan blades, belts, pulleys, and other parts that can
cause injury to persons.
3. Check polarity of battery posts. The positive (POS, P, +) battery
post usually has larger diameter than the negative (NEG, N, –)
post.
4. Connect the Smart Cables Connector to the Smart Cables Port.
Be especially careful, since both the Connector and Controller
are “live.”
5. Connect the positive (RED) clamp from the jump-starter to the
positive (POS, P, +) ungrounded battery post. Connect the
negative (BLACK) clamp to the negative (NEG, N, –) battery post,
the vehicle chassis or engine block away from the battery. Do not
connect the clamp to the carburetor, fuel lines or sheet-metal body
parts. Connect to a heavy gauge metal part of the frame or engine
block.
Note: If the battery clamps are incorrectly connected with regard
to polarity, the Bi-Color Jump-Starter Status Indicator on the
Smart Cables Controller will light red until the clamps are
disconnected. Remove the clamps and then reconnect them
with the correct polarity.
6. When disconnecting the jump-starter, first remove the negative
BLACK (–) clamp from the negative battery post or the vehicle
chassis, and then remove the positive RED (+) clamp from the
positive battery post. Disconnect the double barrel connector of
the Smart Cables Controller from the Smart Cables Port of unit.
Store the Smart Cables Controller in a safe place.
Procedure
Take the following steps, observing all cautions and warnings in the
“Important Safety Instructions” section at the front of this manual.
1. Turn off vehicle ignition and all accessories (radio, A/C, lights,
connected cell phone chargers, etc.). Place vehicle in “park” and
set the emergency brake.
2. Make sure all the unit functions are turned off (the Battery Status
LED Indicators are not lit) and the USB Charging Cable is NOT
connected.
3. Lift up the protective cover of the unit’s Smart Cables Port. Insert
the double-barrel Smart Cables Connector into the Smart Cables
Port on the unit.
4. Set up the unit as described in the “Connecting the Jump-starter
Using Included Battery Clamps” section, observing all warnings
and cautions in the “Important Safety Instructions” section.
5. When the unit is properly connected, the Bi-Color Status Indicator
on the Smart Cables Controller will light green.
6. Turn on the ignition and crank the engine in 5-6 second bursts
until the engine starts.
7. When the process is completed, disconnect the jump-starter. First
remove the negative BLACK (–) clamp from vehicle chassis, and
then remove the positive RED (+) clamp from the positive battery
post. Disconnect the double barrel Smart Cables Connector from
the Smart Cables Port.
8. Store the Smart Cables Controller in a safe place.
9. Recharge the unit fully.

English
13
IMPORTANT NOTES:
If the battery clamps are incorrectly connected with regard to polarity,
the Bi-Color LED Status Indictor will light red until the clamps are
disconnected. Remove the clamps and then reconnect them with
correct polarity.
If the voltage of the unit’s internal lithium battery is low and has
insufficient output power, the Bi-Color LED Status Indicator will light
red. Disconnect the unit and fully charge following the directions in
the “Charging / Recharging” section.
If the Smart Cables Controller is overheated, the Bi-Color LED
Status Indictor will light red. Disconnect the Battery Clamps and
allow the unit to cool down for a period before resuming any
operation.
If the cranking current and/or time period exceeds the unit’s
parameters, the Bi-Color LED Status Indictor will flash red for
50 seconds (a cooling down period) before lighting green again
(resuming normal operation).
CAUTION – To avoid the risk of property damage:
• If the vehicle doesn’t start after the first attempt, allow a resting/
cooling period of 4 to 5 minutes before making a second attempt.
If a second attempt doesn’t start the vehicle, discontinue use and
look for other problems that need to be corrected. The battery may
be damaged.
• NEVER attempt to use the unit to start a vehicle while it is in
charging mode.
• Using the jump-starter without a car battery installed in the vehicle
will damage the vehicle’s electrical system.
IMPORTANT: Always turn the unit off when not in use. Recharge this
unit fully after each use.
CAUTION – TO REDUCE THE RISK OF PROPERTY DAMAGE:
• Vehicles that have on-board computerized systems may be damaged
if vehicle battery is jump-started. Before jump-starting this type of
vehicle, read the vehicle manual to confirm that external-starting
assistance is advised.
• Excessive engine cranking can damage the vehicle‘s starter motor. If
the engine fails to start after the recommended number of attempts,
discontinue jump-start procedure and look for other problems that
need to be corrected.
• If vehicle fails to start, turn off the ignition, disconnect the jump-start
system’s leads and contact a qualified technician to investigate why
the engine did not start.
OPERATING THE TYPE C USB PORT, TYPE
A USB PORT, AND LED LIGHT
The Type C Port, Type A USB Port and LED Light are located on
opposite sides of the unit. They are all controlled by the Power
Button (on the front of the unit). Refer to the “Features” section to
locate.
1. Press the Power Button on the unit once. The Type C Port and
USB port are both ready to use.
2. Lift up the protective cover of the Type C and Type A USB ports.
Plug the USB-powered device into the appropriate USB power
port and operate normally.
3. Press the Power Button a second time. The Area Light will turn on
(and the USB Ports remain active).
4. Press the Power Button a third time to turn off both functions.
Periodically check the unit’s battery status. When the battery level is
nearly empty (only one blue Battery Status LED Indicator lights), the
unit must be recharged or the unit’s built-in low voltage protection
will activate briefly before automatic shut down occurs.

English
14
Make sure all the unit functions are turn off when the unit is being
recharged or stored.
TYPE C PORT AND TYPE A USB PORT FAULT CONDITIONS
When the Type C and/or Type A USB Ports are in use, the unit will
monitor for the following fault conditions (on both Ports):
• If a Low Battery Voltage Fault occurs, only one Battery Status
LED Indicator flashes for 30 seconds before automatic shut down
occur.
• If an Overload Fault or a Short-circuit occurs, the unit will
automatically shut down immediately.
• If the battery of the unit overheats or is too cold, the
output of the USB ports automatically shut down immediately. The
Battery Status LED indicators light for one minute before the unit
automatically shuts down.
In any of these cases, disconnect the USB-powered device
immediately.
– Make sure the unit does not need to be recharged.
– Allow the unit to cool down for several minutes before attempting
to use the USB Ports again.
– If a fault occurs again, make sure that the total draw of all USB
devices plugged into the USB Ports does not exceed 3.1A (5V).
– If an individual USB device is within specifications and the fault
occurs, have the USB device checked for malfunction and do not
continue to use it with these USB Ports.
Notes:
This unit’s USB Ports do not support data communication. They only
provide power to external USB-powered devices. The USB Ports provide a
total of 3.1A (5V).
Some USB-powered household electronics may not operate with this USB
port. Check the manual of the corresponding electronic device (including a cell
phone, tablet, etc.) to confirm that it can be used with this type of USB port.
OPERATING THE 120V AC/USB CHARGING
ADAPTER’S USB PORT
Plug the 120V AC/USB Charging Adapter into a (powered) standard
North American 120 volt 60Hz outlet. Simply plug a USB device into
the USB outlet and operate normally.
WARNING – To reduce the risk of injury or property damage:
Always plug the 120V AC/USB charging adapter to the standard
North American 120 volt 60Hz outlet before plugging any devices
into it.
OPERATING THE 12V DC/USB CHARGING
ADAPTER’S USB PORT
Plug the 12V DC/USB Charging Adapter into a vehicle’s 12 volt DC
accessory outlet or other functioning 12 volt DC power source. The
LED indicator on the 12V DC/USB Charging Adapter LED Indicator
will light green to show that it is properly connected. Simply plug a
USB device into the USB outlet and operate normally.
Note: Some vehicles require that the ignition be switched to the
accessory outlet position in order to power the accessory outlet.
Care and Maintenance
WARNING: To reduce the risk of injury, turn the unit off and
disconnect it from any power source before installing and removing
accessories, before adjusting or when performing maintenance. An
accidental start-up can cause injury.
Never submerge this unit in water. Dirt and grease may be removed
from the exterior of the unit using a cloth or soft non-metallic brush.
Never let any liquid get inside the unit; never immerse any part of the
unit into a liquid.
WARNING: Shock hazard. Disconnect the 120V AC/USB charging
adapter before cleaning.

English
15
Except for the fuse in the 12V DC/USB Charging Adapter, there are no
user-replaceable parts. Periodically inspect the condition of adapters,
connectors and wires. Do not use if damaged in any way.
THE INTERNAL BATTERY
All batteries lose energy from self-discharge over time and more rapidly
at higher temperatures. When the unit is not in use, we recommend
that the battery is charged at least every 3-6 months.
BATTERY REPLACEMENT
The battery should last the service life of the unit. Service life is
dependent on a number of factors including but not limited to the
number of recharge cycles, and proper care and maintenance of the
battery by the end user. Contact manufacturer for any information you
may need.
SAFE BATTERY DISPOSAL
Contains a lithium battery, which must be disposed of
properly. Recycling is required. Failure to comply with
local, state and federal regulations can result in fines, or
imprisonment.
Please recycle.
WARNING – To reduce the risk of serious injury or property
damage:
• Do not dispose of the battery in fire as this may result in an explosion.
• Before disposing of the battery, protect exposed terminals with
heavy-duty electrical tape to prevent shorting (shorting can result
in injury or fire).
• Do not expose battery to fire or intense heat as it may explode.
12 VOLT DC/USB ADAPTER PLUG FUSE REPLACEMENT
(OPTIONAL ACCESSORY)
The fuse in the plug end of the 12 Volt DC/USB Adapter protects the
adapter’s charging circuit. If the built-in 120 Volt AC Charger operates,
but the DC charging adapter does not, then this fuse may be opened
(blown).
To replace the fuse:
1. Unscrew the end cap of the DC plug (counterclockwise).
2. Remove spring center contact and fuse.
END CAP
CENTER
CONTACT
2A FUSE
3. Check fuse with a continuity checker.
4. If blown, locate a replacement 2 amp fuse.
5. Replace the fuse, spring, contact and end cap.
6. Screw end cap clockwise until it is finger tight –
DO NOT OVER-TIGHTEN.
7. Test for proper operation of the 12 volt DC
charging adapter.
English
16
Troubleshooting
Problem Possible Solution
Unit will not charge Check that all the unit functions are
all turned off.
Check that the USB Charging Cable
is properly connected to either the
12V DC/USB charging adapter or the
120V AC/USB charging adapter, and
to the unit.
Check the connection to the AC or
DC power source. Make sure there is
good contact.
Confirm that there is functioning AC
or DC current.
Confirm that the unit is plugged into
a 2A USB power source.
Check the plug fuse in the 12V DC/
USB Charging Adapter. Replace the
fuse following the instructions in this
manual, if necessary.
The unit may have shut down to
protect the battery from overheating
after a long period of operation
or charging. Unplug the charging
adapter from the power source and
disconnect the USB charging cable
from the unit. Allow the unit to cool
down for a period before resuming
charging.
Problem Possible Solution
Unit fails to jump-start Check that all the unit functions are
all turned off.
Make sure a proper polarity cable
connection has been established and
the Bi-Color Booster Status Indicator
on the Smart Cables Controller lights
green.
The unit may be in over-current /
over-time protection. Remove the
clamps and restart after a cooling
down period of approximately 30
minutes.
The unit may be overheated due to
the excessive engine cranking. Make
sure all the unit functions are turned
off and allow the unit to cool down
before resuming operation.
The vehicle battery may in fault
condition and cannot accept starting
assistance. The manufacturer
recommends taking it to a certified
automotive service center for
evaluation.
Check that the unit has a full charge.
Recharge the unit if necessary.

English
17
Problem Possible Solution
The Type C Port and/
or Type A USB port will
not operate
Make sure the Power Button has
been pressed to turn the USB ports
on.
If a fault condition exists in either
of the USB Ports, the unit will
automatically shut down. Refer to the
“Type C Port and Type A USB Port
Fault Conditions” section and remedy
any faults.
Make sure that the total draw of all
USB devices plugged into the USB
Ports do not exceed 3.1A (5V).
Some USB-powered household
electronics will not operate with these
USB charging/power ports. Check
the manual of the corresponding
electronic device to confirm that it
can be used with this type of USB
charging/power port.
Check that the unit has a full charge.
Recharge the unit if necessary.
The 120V AC/USB
Charging Adapter’s
USB port will not
operate
Make sure you have live AC power to
the outlet the 120V AC/USB Charging
Adapter is plugged into.
Make sure the rating of equipment
plugged into the charging adapter’s
USB port does not exceed 2A
continuous.
Problem Possible Solution
The 120V AC/USB
Charging Adapter’s
USB port will not
operate (Cont)
Some household USB-powered
electronics will not operate with this
USB port. Check the manual of the
corresponding electronic device to
confirm that it can be used with this
type of USB port.
The 12V DC/USB
Charging Adapter’s
USB port will not
operate /
12V DC/USB Charging
Adapter LED Indicator
does not come on
Check the connection to the 12 volt
DC power source. Make sure there is
good contact.
Confirm there is functioning DC
current.
Check the plug fuse in the 12V DC/
USB charging adapter. Replace the
fuse following the instructions in this
manual, if necessary.
Make sure the rating of equipment
plugged into the charging adapter’s
USB port does not exceed 2A
continuous.
Some household USB-powered
electronics will not operate with this
USB port. Check the manual of the
corresponding electronic device to
confirm that it can be used with this
type of USB port.
English
18
Problem Possible Solution
LED Area Light does
not come on
Make sure the Power Button has
been pressed twice to turn the LED
Light on.
Check that the unit has a full charge.
Recharge the unit if necessary.
Accessories
WARNING: Since accessories other than those offered by
DeWALT have not been tested with this product, the use of such
accessories with this unit could be hazardous. To reduce the risk of
injury, only DeWALT recommended accessories should be used with
this product.
If you need assistance regarding accessories, please contact the
manufacturer at 1-888-394-3392 or CustomerService@dewalt12volt.
com.
Technical Assistance
For Customer Service or Technical Assistance, contact the manufacturer
at 1-888-394-3392 or [email protected].
One-Year Limited Manufacturer’s
Warranty
The manufacturer, Baccus Global LLC, warrants this product against
defects in materials and workmanship for a period of ONE (1) YEAR
commencing from the date of retail purchase by the original end-user
purchaser or from the date of delivery of the good, whichever occurs
later (“Warranty Period”).
If there is a defect and a valid claim is received by the manufacturer
within the Warranty Period, the defective product can be replaced
in the following ways: (1) Return the product to the manufacturer for
replacement. Proof of purchase may be required by manufacturer. (2)
Return the product to the retailer where product was purchased for an
exchange (provided that the store is a participating retailer). Returns
to retailer should be made within the time period of the retailer’s return
policy for exchanges only. Proof of purchase may be required. Please
check with the retailer for their specific return policy regarding returns
that are beyond the time set for exchanges.
This manufacturer’s warranty does not apply to accessories, bulbs, fuses
and batteries; defects resulting from normal wear and tear, accidents;
damages sustained during shipping; alterations; unauthorized use;
neglect, misuse, abuse; and failure to follow instructions for care and
maintenance for the product.
This manufacturer’s warranty gives you, the original retail purchaser,
specific legal rights and you may have other rights which vary from
state to state or province to province. This product is not intended for
commercial use. To register your product with the manufacturer, please
visit www.BaccusGlobal.com.
The photos in this manual may differ from the actual unit.
English
19
Specifications
Jump-Starter / USB Power Bank (Certified to ANSI/CAN/
UL STD. 2743)
Output: *1600 Amp Max.
Input: 5V DC, 2A
USB Ports: 5V DC, 3.1A max.
Battery Capacity: Lithium polymer, 11.1V DC
LED Light: 3 white LEDs
Charging Temperature: 32°F to 104°F (0°C to 40°C)
Operating Temperature: –4°F to 104°F (–20°C to 40°C)
12V DC/USB Charging Adapter (Conforms to UL STD.
2089)
Input: 12V DC, 1.1A
Output: 5V DC, 2A
Fuse: 2A
120V AC/USB Charging Adapter (Conforms to UL STD.
62368-1)
Input: 120V AC, 60Hz, 13.3W
Output: 5V DC, 2A
Imported by Baccus Global, LLC,
225 NE Mizner Blvd., Suite 301
Boca Raton, FL 33432
www.dewalt12volt.com 1-888-394-3392
Made in China
Copyright © 2024 Baccus Global, LLC.
D
eWALT
®
and the DeWALT Logo are trademarks of the DeWALT
Industrial Tool Co., or an affiliate thereof and are used under license.
The yellow/black color scheme is a trademark for D
eWALT power
tools & accessories.
*1600 Peak Amps: Tested and verified by Intertek. Conforms to UL 2743.
www.dewalt12volt.com
RD022724

Español
20
Definiciones: Normas de seguridad
Las siguientes definiciones describen el nivel de gravedad de
cada palabra de señal. Lea el manual y preste atención a estos
símbolos.
PELIGRO: Indica una situación de peligro inminente que, si
no se evita, provocará la muerte o lesiones graves.
ADVERTENCIA: Indica una situación de peligro potencial
que, si no se evita, podría provocar la muerte o lesiones
graves.
ATENCIÓN: Indica una situación de peligro potencial que, si
no se evita, posiblemente provocaría lesiones.
AVISO: Se refiere a una práctica no relacionada a lesiones
corporales que de no evitarse puede resultar en daños a la
propiedad.
SI TIENE ALGUNA DUDA O ALGÚN COMENTARIO SOBRE ÉSTA
HERRAMIENTA D
eWALT, LLÁMENOS AL NÚMERO GRATUITO:
1-888-394-3392.
Arrancador de litio para automóviles con
banco de energía USB
El arrancador DXAELJ16 1600A y puertos USB 3.1A es un arrancador
DeWALT que cuenta con puertos de carga USB-A y USB-C.

Español
21
Instrucciones
importantes sobre
seguridad
1. Conserve estas instrucciones.
2. Preste atención a todas las advertencias.
3. Obedezca todas las advertencias.
4. Evite las condiciones ambientales peligrosas. No utilice artefactos
en zonas húmedas o mojadas. No utilice artefactos bajo la lluvia.
5. Limpie únicamente con un trapo seco.
6. Mantenga a los niños lejos del área de trabajo. Mantenga esta
unidad alejada de los niños. Esto no es un juguete!
7. Guarde en el interior . Cuando no los utilice, los artefactos deben
guardarse bajo techo, en un lugar seco, alto o bajo llave, lejos
del alcance de los niños.
8. Manténgase alerta. Use el sentido común. No opere este equipo
si está cansado o con impedimentos.
9. Utilice únicamente los aditamentos y accesorios especificados
por el fabricante. El uso de cualquier accesorio o dispositivo no
recomendados para su uso con este aparato puede resultar
peligroso.
10. Utilice únicamente sobre una superficie plana y
nivelada. Cuando use un carrito, tenga cuidado
al mover la combinación de carro/aparato para
evitar daños por vuelco.
11. Para reducir el riesgo de descarga eléctrica,
desconecte la unidad de la toma de corriente
antes de mantenimiento o limpieza. Apagar los controles sin
desconectar no reducirá este riesgo.
12. Compruebe si hay piezas dañadas. No utilice esta unidad si
está dañada de alguna manera.
13. No desmonte la unidad. Abrir la unidad puede resultar en un
riesgo de descarga eléctrica o incendio, y anulará la garantía.
14. La unidad no se debe exponer a goteos o salpicaduras y no
se deben colocar objetos llenos de líquidos sobre la unidad.
15. No opere esta unidad cerca de líquidos inflamables o en
atmósferas gaseosas o explosivas.
16. Esta unidad emplea partes (interruptores, relés, etc.) que
producen arcos o chispas. Por lo tanto, si se usa en un garaje
o área cerrada, la unidad DEBE colocarse a no menos de 18
pulgadas sobre el piso.
NOTA: Este equipo ha sido probado y se ha encontrado que cumple
con los límites establecidos para dispositivos digitales Clase B, en
conformidad con la Parte 15 del Reglamento de la FCC. Estos límites
están diseñados para ofrecer un nivel razonable de protección contra la
interferencia dañina en instalaciones residenciales. Este equipo genera,
utiliza y puede emitir energía de radiofrecuencia y, si no se instala y
utiliza de acuerdo a las instrucciones proporcionadas, puede producir
una interferencia dañina para la comunicación radial. Sin embargo,
no existen garantías de que no ocurra interferencia alguna en una
instalación en particular. Si este equipo produce interferencia dañina
para su recepción de radio o televisión, lo que puede ser determinado
al apagar y volver a encender el equipo, se pide al usuario que corrija
la interferencia implementando una o más de las siguientes medidas:
• Cambie la orientación o el lugar donde está ubicada la antena
receptora.
• Aumente el espacio que separa al equipo del receptor.
• Conecte el equipo a una toma de corriente que esté en un
circuito diferente al circuito al que está conectado el receptor.
• Consulte con el concesionario o con un técnico de radio y
televisión experimentado que pueda ayudarle.

Español
22
AVISO: De acuerdo con la FCC Parte 15, los cambios o modificaciones
a este equipo que no sean expresamente aprobados por DeWALT
podrían invalidar su autoridad para operar este equipo.
LEE TODAS LAS INSTRUCCIONES
ADVERTENCIAS E INSTRUCCIONES GENERALES
DE SEGURIDAD
ADVERTENCIA – Para reducir el riesgo de incendio,
descarga eléctrica:
• El controlador de cables inteligentes y el puerto de cables
inteligentes están siempre “vivos”. NUNCA introduzca los dedos
en las tomas de corriente ni intente desmontar la unidad.
• No introduzca la unidad en agua u otro líquido. No coloque o
almacene esta unidad donde pueda caerse o ser arrastrada por
el agua. No lo exponga a la lluvia, la nieve o lo utilice cuando
esté mojado.
• Cárguelo sólo en interiores.
• Utilice únicamente el cable de carga USB suministrado por el
fabricante para la recarga.
INSTRUCCIONES DE SEGURIDAD ESPECÍFICAS PARA
BATERÍAS DE LITIO
ADVERTENCIA – Para reducir el riesgo de incendio,
descarga eléctrica, peligro de explosión o lesiones a
personas o propiedades:
LLas baterías de litio son pequeñas, compactas e ideales
para proporcionar energía de larga duración a esta unidad. Sin embargo, deben usarse y cargarse
correctamente. El uso inadecuado puede provocar lesiones graves, incendios o la muerte.
• Las baterías de litio pueden explotar en presencia de una
fuente de ignición. No utilice el producto en presencia de una
llama abierta.
• No coloque esta unidad alimentada por batería de litio en el
fuego ni le aplique calor.
• No someta esta unidad alimentada por batería de litio a
fuertes impactos o golpes. La batería de esta unidad contiene
dispositivos de seguridad y protección que, si se dañan, pueden
provocar que la batería genere calor, se rompa o se encienda.
• No exponga esta unidad alimentada por batería de litio al agua
o al agua salada, ni permita que la batería se moje.
• Evite almacenar esta unidad alimentada por batería de
litio en la base, el baño u otras áreas de la casa que estén o
puedan estar mojadas o húmedas o donde la humedad pueda
concentrarse.
• No deje esta unidad alimentada por batería de litio expuesta a
la luz solar directa, ni la use o almacene dentro de automóviles
en climas cálidos. Si lo hace, la batería podría generar calor,
romperse o encenderse. El uso de la batería de esta manera
también puede provocar una pérdida de rendimiento y una
esperanza de vida más corta.
• Nunca cargue esta unidad cerca del calor o de objetos
inflamables.
• ¡NUNCA ECHE AGUA SOBRE UNA BATERÍA DE LITIO
ARDIENTE! Si una batería de litio se incendia, se quemará aún
más violentamente si entra en contacto con agua o incluso con
la humedad del aire. Se debe utilizar un extintor de incendios.
Carga y capacidad de la batería
Esta unidad se entrega parcialmente cargada; debe cargarla
completamente antes de usarla por primera vez.
Cuando se almacenan a temperatura ambiente con una carga
completa, las baterías de litio comenzarán a descargarse desde
el momento en que se fabrican, incluso cuando no se usan. Las
descargas profundas también disminuyen su capacidad.

Español
23
La vida útil de la batería se puede extender de la siguiente
manera:
• Cargue la batería a su máxima capacidad antes de guardarla.
• Almacene esta unidad a temperaturas entre 5 °C y 20 °C (41 °F
y 68 °F).
• Nunca descargue la batería por completo.
• Cargue después de cada uso.
• Cargue siempre al menos una vez cada 3 a 6 meses si no lo usa
con frecuencia para evitar una descarga excesiva.
Transporte de Baterías de Litio
• Compruebe siempre todas las normativas locales, nacionales
e internacionales aplicables antes de transportar una unidad que
contenga una batería de litio.
• El transporte de una batería al final de su vida útil, dañada
o retirada del mercado puede, en ciertos casos, estar
específicamente limitado o prohibido.
INSTRUCCIONES RELATIVAS AL ADAPTADOR DE CARGA DE
12V CC/USB
PRECAUCIÓN – Para evitar el riesgo de daños materiales:
• El adaptador de carga de 12 voltios CC solo debe conectarse
a baterías con un voltaje de salida nominal de 12 voltios. La
unidad no funcionará con una batería de 6 voltios y sufrirá daños
permanentes si se conecta a una batería de 24 voltios.
• Conecte siempre el adaptador de carga de CC/USB de 12
voltios a la fuente de alimentación de CC de 12 voltios antes de
conectar cualquier dispositivo.
• NUNCA conecte el adaptador de carga de 12 V CC/USB a un
vehículo con conexión a tierra positiva.
Instrucciones de seguridad específicas
para arrancadores
ADVERTENCIA – Peligro de explosión: no utilice la unidad para
cargar baterías de celda seca que se usan comúnmente con
electrodomésticos. Estas baterías pueden explotar y causar lesiones
a las personas y daños a la propiedad. Use la unidad para reforzar
una batería de plomo-ácido únicamente. No está diseñado para
suministrar energía a un sistema eléctrico de bajo voltaje que no sea
una aplicación de motor de arranque.
ADVERTENCIA: Para reducir el riesgo de descarga eléctrica, nunca
sumerja esta unidad en agua ni en ningún otro líquido, ni la use cuando
esté mojada.
ADVERTENCIA – Riesgo de gases explosivos:
• Trabajar cerca de una batería de plomo ácido es peligroso. Las
baterías generan gases explosivos durante el funcionamiento normal
de la batería. Por esta razón, es de suma importancia que cada vez
que utilice el arrancador, lea este manual y siga las instrucciones al
pie de la letra.
• Para reducir el riesgo de explosión de la batería, siga estas
instrucciones y las publicadas por el fabricante de la batería y el
fabricante de cualquier equipo que pretenda utilizar cerca de la
batería. Revise las marcas de precaución en estos productos y en
el motor.
ADVERTENCIA – Para reducir el riesgo de incendio:
• No opere cerca de materiales, polvo, humos o gases inflamables.
• No exponer a calor extremo o llamas.
PRECAUCIÓN – Para reducir el riesgo de lesiones o daños a la
propiedad:
• NUNCA INTENTE ARRANCAR O CARGAR UNA BATERÍA
CONGELADA.
• Asegúrese de que el cable está situado de forma que no se pise, se
tropiece o sufra cualquier otro tipo de daño o tensión.

Español
24
• No deje la unidad desatendida mientras esté en uso.
• Tire del enchufe y no del cable cuando desconecte el cable de
carga USB.
• Los vehículos que tienen sistemas computarizados a bordo pueden
dañarse si se arranca la batería del vehículo. Antes de arrancar con
puente, lea el manual del propietario del vehículo para confirmar que
la asistencia de arranque externa es adecuada.
• Cuando trabaje con baterías de plomo-ácido, asegúrese siempre de
contar con asistencia inmediata en caso de accidente o emergencia.
• Siempre use gafas protectoras cuando use este producto: el contacto
con el ácido de la batería puede causar ceguera y/o quemaduras
graves. Tenga en cuenta los procedimientos de primeros auxilios en
caso de contacto accidental con el ácido de la batería.
• Tenga a mano abundante agua fresca y jabón en caso de que el
ácido de la batería entre en contacto con la piel.
• Nunca fume ni permita que haya chispas o llamas cerca de la batería,
el motor o la central eléctrica del vehículo.
• Manténgase alejado de las aspas, correas, poleas y otras partes del
ventilador que puedan causar lesiones a las personas.
• Quítese los artículos personales de metal como anillos, pulseras,
collares y relojes cuando trabaje con una batería de plomo ácido. A
La batería de plomo-ácido puede producir una corriente de cortocircuito
lo suficientemente alta como para soldar un anillo u objeto metálico
similar a la piel y causar una quemadura grave.
• No use ropa de vinilo cuando arranque un vehículo. La fricción puede
causar peligrosas chispas de electricidad estática.
• No use ropa suelta o joyas. Pueden quedar atrapados en las piezas
móviles. Se recomiendan guantes de goma y calzado resistente
y antideslizante cuando se trabaja al aire libre. Use una cubierta
protectora para el cabello para contener el cabello largo.
• Tenga mucho cuidado para evitar dejar caer una herramienta de
metal sobre la batería. Podría provocar una chispa o provocar un
cortocircuito en la batería u otra parte eléctrica y provocar una
explosión.
• Los procedimientos de arranque puente solo deben realizarse en un
área segura, seca y bien ventilada.
• Guarde siempre las pinzas de la batería cuando no las utilice. Nunca
toque las abrazaderas de la batería.
• Asegúrese de conectar las pinzas con la polaridad correcta.
• No exponga la batería al fuego o al calor intenso ya que puede
explotar. Antes de desechar la batería, proteja los terminales
expuestos con cinta aislante resistente para evitar cortocircuitos (los
cortocircuitos pueden provocar lesiones o incendios).
• Coloque esta unidad tan lejos de la batería como lo permitan los
cables.
• Nunca permita que el ácido de la batería entre en contacto con
esta unidad.
• No opere esta unidad en un área cerrada ni restrinja la ventilación
de ninguna manera.
• Este sistema está diseñado para usarse solo en vehículos con un
sistema de batería de CC de 12 voltios. No conecte a un sistema
de batería de 6 voltios o 24 voltios.
• El arranque excesivo del motor puede dañar el motor de arranque
de un vehículo. Si el motor no arranca después de la cantidad
recomendada de intentos, interrumpa los procedimientos de
arranque y busque otros problemas que deban corregirse.
• No utilice este arrancador de batería en una embarcación. No está
calificado para aplicaciones marinas.

Español
25
INSTRUCCIONES RELATIVAS A LA PUERTOS USB
IMPORTANTE:
Algunos dispositivos electrónicos domésticos
alimentados por USB no funcionarán con los puertos USB
provistos con esta unidad y sus adaptadores de carga.
Consulte el manual de los dispositivos electrónicos correspondientes (incluidos teléfonos, tabletas,
etc.) para confirmar que se pueden usar con uno de estos puertos USB y qué puerto USB usar
(Tipo A o Tipo C).
• Los puertos USB no admiten la comunicación de datos.
Solo proporcionan energía a un dispositivo externo alimentado por
USB, de la siguiente manera:
– 5V DC/3.1A máximo usando los puertos USB Tipo A y Tipo C en la unidad;
– 5V DC/2A usando los puertos USB en los adaptadores de carga AC/USB o DC/USB).
Asegúrese de que la potencia del equipo conectado al puerto USB no supere el amperaje
indicado.
• Conecte siempre el adaptador de carga adecuado a la fuente de
alimentación de 120 V CA o 12 V CC antes de enchufar cualquier
dispositivo en él.
• No conecte concentradores USB que permitan la conexión de
múltiples dispositivos electrónicos personales a ninguno de los
puertos USB de los adaptadores de carga.
• No introduzca objetos extraños en ninguno de los puertos USB.
PRIMEROS AUXILIOS
Cuando trabaje con baterías de plomo-ácido, asegúrese siempre de disponer
de asistencia inmediata en caso de accidente o emergencia.
Lleve siempre gafas de protección cuando utilice este producto: el contacto
con el ácido de la batería puede causar ceguera y/o quemaduras graves.
Conozca los procedimientos de primeros auxilios en caso de contacto
accidental con el ácido de la batería.
• Tenga a mano abundante agua fresca y jabón en caso de que el
ácido de la batería entre en contacto con la piel.
• Quítese los artículos personales de metal como anillos, pulseras,
collares y relojes cuando trabaje con una batería de plomo ácido.
Una batería de plomo ácido puede producir una corriente de
cortocircuito lo suficientemente alta como para soldar un anillo u
objeto metálico similar a la piel y causar una quemadura grave.
• Manténgase alejado de las aspas, correas, poleas y otras partes
del ventilador que puedan causar lesiones a las personas.
• Tenga mucho cuidado para evitar dejar caer una herramienta
de metal sobre la batería. Podría provocar una chispa o provocar
un cortocircuito en la batería u otra parte eléctrica, y eso podría
provocar una explosión.
• Nunca fume ni permita chispas o llamas cerca de la batería del
vehículo, el motor o el cargador de batería.
•
PIEL: Si el ácido de la batería entra en contacto con la piel
o la ropa, lávese inmediatamente con agua y jabón durante
al menos 10 minutos. Si se produce enrojecimiento, dolor o
irritación, busque atención médica inmediata.
•
OJOS: Si el ácido de la batería entra en contacto con los
ojos, enjuague los ojos inmediatamente, durante un mínimo de 15
minutos y busque atención médica de inmediato.
GUARDA ESTAS
INSTRUCCIONES
PARA USO FUTURO
ADVERTENCIA – Para reducir el riesgo de lesiones.: Siga
estas instrucciones y las publicadas por el fabricante de la batería y el
fabricante de cualquier equipo que desee utilizar con esta unidad. Revise
las marcas de precaución en estos productos y en el motor.
INTRODUCCIÓN
Felicitaciones por comprar su nuevo Arrancador/Banco de energía
de litio. Lea este manual de instrucciones y siga las instrucciones
cuidadosamente antes de usar esta unidad.
NOTAS IMPORTANTES:
Español
26
• Varios factores pueden afectar la capacidad de un arrancador para
impulsar la batería de un vehículo, incluidos, entre otros, el tamaño
de la batería, la temperatura (caliente o fría), si la batería está dañada
o defectuosa y si el arrancador en sí está completamente cargado.
• El arrancador requiere un voltaje mínimo para detectar la conexión
correcta antes de que comience a aumentar. Si el voltaje de la
batería del vehículo es inferior a aproximadamente 2 voltios, es
posible que no pueda detectar la conexión y que no pueda arrancar
el vehículo. Si bien este bajo voltaje de la batería es raro, puede
ocurrir en condiciones extremas.
1. Puertos de alimentación
USB-A y USB-C
2. Luz LED de 200 lúmenes
3. Botón de encendido
4. Indicadores LED de estado
5. Controlador inteligente Jump
Start
6. Abrazaderas de batería de
metal
7. Cargador de CC
8. Cargador de CA
9. Cable de carga USB
5
CARACTERISTICAS

Español
27
Visualización del estado de la
batería
Los indicadores LED de estado de la batería indican el nivel de
carga de la batería de la siguiente manera:
• Si el nivel de carga de la batería está al máximo de su
capacidad, se iluminan los tres indicadores LED de estado de
la batería.
• Si la batería tiene una carga parcial, se encienden dos
indicadores LED de estado de la batería.
• Si la batería está casi descargada, solo se enciende un indicador
LED de estado de la batería. La unidad debe cargarse en este
momento.
• Si la batería está completamente descargada, solo parpadea un
indicador LED de estado de la batería. La unidad DEBE cargarse
en este momento o la protección de bajo voltaje incorporada de
la unidad se activará y la unidad se apagará automáticamente..
CARGANDO / RECARGANDO
Esta unidad se envía en un estado parcialmente cargado. Cargue la unidad después de la compra,
antes del primer uso y después de cada uso subsiguiente hasta que los tres indicadores LED
azules de estado de la batería se enciendan cuando se presione el botón de encendido (con el
adaptador desenchufado de la unidad).
IMPORTANTE:
Cuando la unidad no está en uso, recomendamos que la batería se
cargue al menos cada 3 a 6 meses. Si no se mantiene la batería cargada, se producirán daños
permanentes y se producirá un rendimiento deficiente.
NOTAS:
• Cuando el puerto USB Tipo A está en uso en el proceso de
carga, el puerto Tipo C no tendrá salida. Presionar el botón de
encendido durante el proceso de carga solo controlará la luz
LED.
• Cuando la batería de la unidad esté completamente cargada,
el proceso de carga terminará y la unidad se apagará
automáticamente.
• Se requiere un USB 2A para recargar la unidad (se incluyen
adaptadores de carga de CA y CC de 2A).
• Durante el proceso de carga, la unidad dejará de cargar si
la batería de la unidad se sobrecalienta debido a un uso
prolongado o recarga. El proceso de carga se reanudará
automáticamente después de un período de enfriamiento.
CARGA/RECARGA CON EL ADAPTADOR DE CARGA USB/CA
DE 120 VOLTIOS
IMPORTANTE: Siempre conecte el adaptador de carga USB/CA de
120 V a la fuente de alimentación de CA de 120 voltios (usando el
cable de carga USB) ANTES de conectarlo a la unidad.
1. Asegúrese de que el botón de encendido esté apagado (los
indicadores LED de estado de la batería no están encendidos).
2. Inserte un extremo del cable de carga USB en el adaptador de
carga USB/CA de 120 V.
3. Inserte el adaptador de carga USB/CA de 120 V en un
tomacorriente de pared estándar de 120 voltios CA o en una
fuente de alimentación de 120 voltios CA que funcione.
4. Levante la cubierta protectora de los puertos USB. Inserte el otro
extremo del cable de carga USB en el puerto USB tipo A de la
unidad.
5. Los indicadores LED azules del estado de la batería se
iluminarán gradualmente (de izquierda a derecha) para indicar
que la unidad se está cargando.
6. Cargue durante aproximadamente 6 horas o hasta que la unidad
se apague automáticamente.
7. Desenchufe el adaptador de carga USB/CA de 120 V de la
fuente de alimentación de CA de 120 voltios, luego desconecte

Español
28
el cable de carga USB del adaptador de carga USB/CA de 120
V y luego del puerto USB tipo A de la unidad.
8. Presione el botón de encendido para encender la unidad.
Cuando los tres indicadores LED azules de estado de la batería
se encienden, la batería de la unidad está completamente
cargada.
9. Guarde el adaptador de carga USB/CA de 120 V y el cable de
carga USB en un lugar seguro.
CARGA/RECARGA MEDIANTE EL ADAPTADOR DE CARGA
USB/CC DE 12 V
IMPORTANTE: Siempre conecte el adaptador de carga USB/CC
de 12 V a la fuente de alimentación de CC de 12 voltios (usando el
cable de carga USB) ANTES de conectarlo a la unidad.
1. Asegúrese de que el botón de encendido esté apagado (los
indicadores LED de estado de la batería no están encendidos).
2. Inserte un extremo del cable de carga USB en el adaptador de
carga USB/CC de 12 V.
3. Inserte el adaptador de carga de 12 V CC/USB en el
tomacorriente para accesorios de 12 V CC de un vehículo
u otra fuente de alimentación de 12 V CC que funcione. El
indicador LED del adaptador de carga de 12 V CC/USB se
iluminará en verde cuando esté conectado correctamente a la
fuente de alimentación de 12 voltios CC.
Nota:
Algunos vehículos requieren que el encendido se cambie a
la posición de salida de accesorios para alimentar la salida de
accesorios.
4. Levante la cubierta protectora de los puertos USB. Inserte el otro
extremo del cable de carga USB en el puerto USB tipo A de la
unidad.
5. Los indicadores LED azules del estado de la batería se iluminarán
gradualmente (de izquierda a derecha) para indicar que la unidad
se está cargando.
6. Cargue hasta que la unidad se apague automáticamente.
Desconecte el adaptador de carga USB/CC de 12 V de la fuente
de alimentación de CC de 12 voltios, luego desconecte el cable
de carga USB del adaptador de carga USB/CC de 12 V y luego
del puerto USB tipo A de la unidad.
7. Presione el botón de encendido para encender la unidad. Cuando
los tres indicadores LED azules de estado de la batería se
encienden, la batería de la unidad está completamente cargada.
8. Guarde el adaptador de carga USB/CC de 12 V y el cable de
carga USB en un lugar seguro.
CARGA/RECARGA MEDIANTE EL CABLE DE CARGA USB Y
UN DISPOSITIVO CON PUERTO DE ALIMENTACIÓN USB (NO
SUMINISTRADO)
IMPORTANTE: Conecte siempre el cable de carga USB al puerto
de alimentación USB del dispositivo externo ANTES de conectarlo a
la unidad. Se necesita una fuente de alimentación USB de 2A para
recargar la unidad.
1. Asegúrese de que el botón de encendido está apagado (los
indicadores LED de estado de la batería no están encendidos).
2. Inserte un extremo del cable de carga USB en el puerto de
alimentación USB funcional de un dispositivo externo.
3. Levante la cubierta protectora de los puertos USB. Inserte el otro
extremo del cable de carga USB en el puerto USB tipo A de la
unidad.
4. Cuando la unidad esté correctamente conectada, los indicadores
LED azules del estado de la batería se iluminarán gradualmente
(de izquierda a derecha) para indicar que la unidad se está
cargando.
5. Cargue hasta que la unidad se apague automáticamente.
6. Desconecte el cable de carga USB del puerto de alimentación
USB del dispositivo y de la unidad.

Español
29
7. Pulse el botón de encendido para encender la unidad. Cuando
se enciendan los tres indicadores LED azules de estado de la
batería, la batería de la unidad estará completamente cargada.
8. Cuando la carga esté completa, guarda el cable de carga USB en
un lugar seguro.
INSTRUCCIONES DE OPERACIÓN
ARRANQUE RÁPIDO UTILIZANDO LOS SMART CABLES
Precauciones de conexión de abrazadera de batería
• Conecte y desconecte las pinzas de la batería solo después de
desconectar la fuente de alimentación.
• Asegúrese de que el motor no esté en marcha cuando conecte
o desconecte las pinzas de la batería.
• Nunca permita que las abrazaderas se toquen entre sí.
• Fije las abrazaderas a la batería y al chasis como se indica en
la sección “Conexión del arrancador con las abrazaderas de
batería incluidas”.
CONEXIÓN DEL ARRANCADOR AUXILIAR CON LAS
ABRAZADERAS DE BATERÍA INCLUIDAS
1. Coloque el controlador Smart Cables para reducir el riesgo
de daños por el capó del automóvil, las puertas o las piezas
móviles del motor.
2. Manténgase alejado de las aspas, correas, poleas y otras partes
del ventilador que puedan causar lesiones a las personas.
3. Compruebe la polaridad de los postes de la batería. El borne
positivo (POS, P, +) de la batería suele tener un diámetro mayor
que el borne negativo (NEG, N, –).
4. Conecte el conector de Smart Cables al puerto de Smart
Cables. Tenga especial cuidado, ya que tanto el conector como
el controlador están “vivos”.
5. Conecte la pinza positiva (ROJA) del arrancador al borne positivo
(POS, P, +) de la batería sin conexión a tierra. Conecte la pinza
negativa (NEGRA) al borne negativo (NEG, N, –) de la batería, el
chasis del vehículo o el bloque del motor lejos de la batería. No
conecte la abrazadera al carburador, a las líneas de combustible
o a partes de la carrocería de chapa. Conéctelo a una parte de
metal de gran calibre del bastidor o del bloque del motor.
Nota: Si las pinzas de la batería están conectadas
incorrectamente con respecto a la polaridad, el indicador de
estado del arrancador bicolor en el controlador de Smart
Cables se iluminará en rojo hasta que se desconecten las
pinzas. Retire las abrazaderas y luego vuelva a conectarlas
con la polaridad correcta.
6. Al desconectar el arrancador, primero retire la abrazadera NEGRA
negativa (–) del borne negativo de la batería o del chasis del
vehículo y luego retire la abrazadera ROJA positiva (+) del borne
positivo de la batería. Desconecte el conector de doble cilindro del
controlador Smart Cables del puerto Smart Cables de la unidad.
Guarde el controlador Smart Cables en un lugar seguro.
Procedimiento
Tome los siguientes pasos, observando todas las precauciones y
advertencias en la sección “Instrucciones de seguridad importantes”
al principio de este manual.
1. Apague el encendido del vehículo y todos los accesorios (radio,
aire acondicionado, luces, cargadores de teléfonos celulares
conectados, etc.). Coloque el vehículo en “estacionamiento” y
ponga el freno de emergencia.

Español
30
2. Asegúrese de que todas las funciones de la unidad estén
apagadas (los indicadores LED de estado de la batería no estén
encendidos) y que el cable de carga USB NO esté conectado.
3. Levante la cubierta protectora del puerto Smart Cables de la
unidad. Inserte el conector Smart Cables de doble cilindro en el
puerto Smart Cables de la unidad.
4. Configure la unidad como se describe en la sección “Conexión
del arrancador con abrazaderas de batería incluidas”,
observando todas las advertencias y precauciones en la sección
“Instrucciones de seguridad importantes”.
5. Cuando la unidad esté correctamente conectada, el indicador
de estado bicolor del controlador Smart Cables se iluminará en
verde.
6. Encienda el encendido y arranque el motor en ráfagas de 5 a 6
segundos hasta que el motor arranque.
7. Cuando se complete el proceso, desconecte el arrancador.
Primero retire la abrazadera NEGRA negativa (–) del chasis del
vehículo y luego retire la abrazadera ROJA positiva (+) del borne
positivo de la batería. Desconecte el conector Smart Cables de
doble cilindro del puerto Smart Cables.
8. Guarde el controlador Smart Cables en un lugar seguro.
9. Recargue la unidad por completo.
NOTAS IMPORTANTES:
Si las pinzas de la batería están conectadas incorrectamente con
respecto a la polaridad, el indicador de estado LED bicolor se
iluminará en rojo hasta que se desconecten las pinzas. Retire las
abrazaderas y luego vuelva a conectarlas con la polaridad correcta.
Si el voltaje de la batería de litio interna de la unidad es bajo y
tiene una potencia de salida insuficiente, el indicador de estado
LED bicolor se iluminará en rojo. Desconecte la unidad y cárguela
completamente siguiendo las instrucciones de la sección “Carga/
Recarga”.
Si el controlador de Smart Cables se sobrecalienta, el indicador de
estado LED bicolor se iluminará en rojo. Desconecte las pinzas de
la batería y deje que la unidad se enfríe durante un tiempo antes de
reanudar cualquier operación.
Si la corriente de arranque y/o el período de tiempo excede los
parámetros de la unidad, el indicador de estado LED bicolor
parpadeará en rojo durante 50 segundos (un período de
enfriamiento) antes de volver a encenderse en verde (reanudando el
funcionamiento normal).
PRECAUCIÓN – Para evitar el riesgo de daños materiales:
• Si el vehículo no arranca después del primer intento, permita
un período de descanso/enfriamiento de 4 a 5 minutos antes
de hacer un segundo intento. Si un segundo intento no enciende
el vehículo, deje de usarlo y busque otros problemas que deban
corregirse. La batería puede estar dañada.
• NUNCA intente usar la unidad para arrancar un vehículo mientras
está en modo de carga.
• El uso del arrancador auxiliar sin una batería de automóvil
instalada en el vehículo dañará el sistema eléctrico del vehículo.
IMPORTANTE: Siempre apague la unidad cuando no esté en uso.
Recargue esta unidad por completo después de cada uso.
PRECAUCIÓN – PARA REDUCIR EL RIESGO DE DAÑOS A LA
PROPIEDAD:
• Los vehículos que tienen sistemas computarizados a bordo pueden
dañarse si se arranca la batería del vehículo. Antes de arrancar este
tipo de vehículo, lea el manual del vehículo para confirmar que se
recomienda la asistencia externa para el arranque.
• El arranque excesivo del motor puede dañar el motor de arranque del
vehículo. Si el motor no arranca después de la cantidad recomendada

Español
31
de intentos, interrumpa el procedimiento de arranque y busque otros
problemas que deban corregirse.
• Si el vehículo no arranca, apague el encendido, desconecte los
cables del sistema de arranque auxiliar y comuníquese con un técnico
calificado para investigar por qué el motor no arrancó.
FUNCIONAMIENTO DEL PUERTO USB
TIPO C, PUERTO USB TIPO A Y LUZ LED
El puerto tipo C, el puerto USB tipo A y la luz LED están ubicados
en lados opuestos de la unidad. Todos están controlados por el
botón de encendido (en la parte frontal de la unidad). Consulte la
sección “Características” para localizar.
1. Pulse el botón de encendido de la unidad una vez. El puerto tipo
C y el puerto USB están listos para usar.
2. Levante la cubierta protectora de los puertos USB Tipo C y Tipo
A. Enchufe el dispositivo alimentado por USB en el puerto de
alimentación USB apropiado y opere normalmente.
3. Presione el botón de encendido por segunda vez. La luz de área
se encenderá (y los puertos USB permanecerán activos).
4. Presione el botón de encendido por tercera vez para apagar
ambas funciones.
Verifique periódicamente el estado de la batería de la unidad.
Cuando el nivel de la batería está casi vacío (solo se enciende
un indicador LED azul de estado de la batería), la unidad debe
recargarse o la protección de bajo voltaje incorporada de la unidad
se activará brevemente antes de que ocurra el apagado automático.
Asegúrese de que todas las funciones de la unidad estén apagadas
cuando la unidad se esté recargando o almacenando.
CONDICIONES DE FALLA DEL PUERTO TIPO C Y DEL
PUERTO USB TIPO A
Cuando los puertos USB tipo C y/o tipo A están en uso, la
unidad monitoreará las siguientes condiciones de falla (en ambos
puertos):
• Si ocurre una falla de voltaje de batería baja, solo un
indicador LED de estado de la batería parpadea durante 30
segundos antes de que ocurra el apagado automático.
• Si ocurre una falla de sobrecarga o un cortocircuito, la
unidad se apagará automáticamente de inmediato..
• Si la batería de la unidad se sobrecalienta o está
demasiado fría, la salida de los puertos USB se apagará
automáticamente de inmediato. Los indicadores LED de estado de
la batería se encienden durante un minuto antes de que la unidad
se apague automáticamente.
En cualquiera de estos casos, desconecte inmediatamente el
dispositivo alimentado por USB.
– Asegúrese de que no sea necesario recargar la unidad.
– Permita que la unidad se enfríe durante varios minutos antes de
intentar usar los puertos USB nuevamente.
– Si vuelve a ocurrir una falla, asegúrese de que el consumo total
de todos los dispositivos USB conectados a los puertos USB no
supere los 3,1 A (5 V).
– Si un dispositivo USB individual está dentro de las
especificaciones y se produce la falla, haga revisar el dispositivo
USB para ver si funciona mal y no continúe usándolo con estos
puertos USB.
Notas:
Los puertos USB de esta unidad no admiten la comunicación de datos.
Solo proporcionan energía a dispositivos externos alimentados por USB. Los
puertos USB proporcionan un total de 3,1 A (5 V).
Es posible que algunos dispositivos electrónicos domésticos alimentados por
USB no funcionen con este puerto USB. Consulte el manual del dispositivo
electrónico correspondiente (incluido un teléfono celular, tableta, etc.) para
confirmar que se puede usar con este tipo de puerto USB.
Español
32
FUNCIONAMIENTO DEL PUERTO USB DEL
ADAPTADOR DE CARGA USB/CA DE 120 V
Enchufe el adaptador de carga USB/CA de 120 V en un
tomacorriente estándar norteamericano (con corriente) de 120 voltios
y 60 Hz. Simplemente conecte un dispositivo USB a la salida USB y
opere normalmente. No utilice esta unidad si está dañada de alguna
manera.
ADVERTENCIA – Para reducir el riesgo de lesiones o daños
a la propiedad: Siempre conecte el adaptador de carga de 120 V
CA/USB al tomacorriente estándar de América del Norte de 120
voltios y 60 Hz antes de conectar cualquier dispositivo.
FUNCIONAMIENTO DEL PUERTO USB DEL
ADAPTADOR DE CARGA USB/CC DE 12 V
Enchufe el adaptador de carga de 12 V CC/USB en el
tomacorriente para accesorios de 12 voltios CC de un vehículo
u otra fuente de alimentación de 12 voltios CC que funcione.
El indicador LED del adaptador de carga USB/CC de 12 V se
iluminará en verde para mostrar que está correctamente conectado.
Simplemente conecte un dispositivo USB a la salida USB y opere
normalmente.
Nota: Algunos vehículos requieren que la ignición se cambie a
la posición de salida de accesorios para encender la salida de
accesorios.
Cuidado y mantenimiento
ADVERTENCIA: Para reducir el riesgo de lesiones, apague la
unidad y desconéctela de cualquier fuente de alimentación antes de
instalar y quitar accesorios, antes de realizar ajustes o realizar tareas
de mantenimiento. Una puesta en marcha accidental puede causar
lesiones.
Nunca sumerja esta unidad en agua. La suciedad y la grasa se pueden
quitar del exterior de la unidad con un paño o un cepillo suave no
metálico. Nunca permita que entre líquido dentro de la unidad; nunca
sumerja ninguna parte de la unidad en un líquido.
ADVERTENCIA: Peligro de choque. Desconecte el adaptador de
carga de 120 V CA/USB antes de limpiar.
Excepto por el fusible del adaptador de carga de 12 V CC/USB, no
hay piezas reemplazables por el usuario. Inspeccione periódicamente
el estado de los adaptadores, conectores y cables.
LA BATERÍA INTERNA
Todas las baterías pierden energía por autodescarga con el tiempo
y más rápidamente a temperaturas más altas. Cuando la unidad no
está en uso, recomendamos que la batería se cargue al menos cada
3-6 meses.
CAMBIO DE BATERÍA
The battery should last the service life of the unit. Service life is
dependent on a number of factors including but not limited to the
number of recharge cycles, and proper care and maintenance of the
battery by the end user. Contact manufacturer for any information you
may need.
ELIMINACIÓN SEGURA DE LA BATERÍA
Contiene una batería de litio, que debe desecharse
correctamente. Se requiere reciclar. El incumplimiento de
las regulaciones locales, estatales y federales puede
resultar en multas o encarcelamiento.
Por favor recicla.
ADVERTENCIA – Para reducir el riesgo de lesiones graves o
daños a la propiedad:
• No arroje la batería al fuego, ya que podría provocar una explosión.
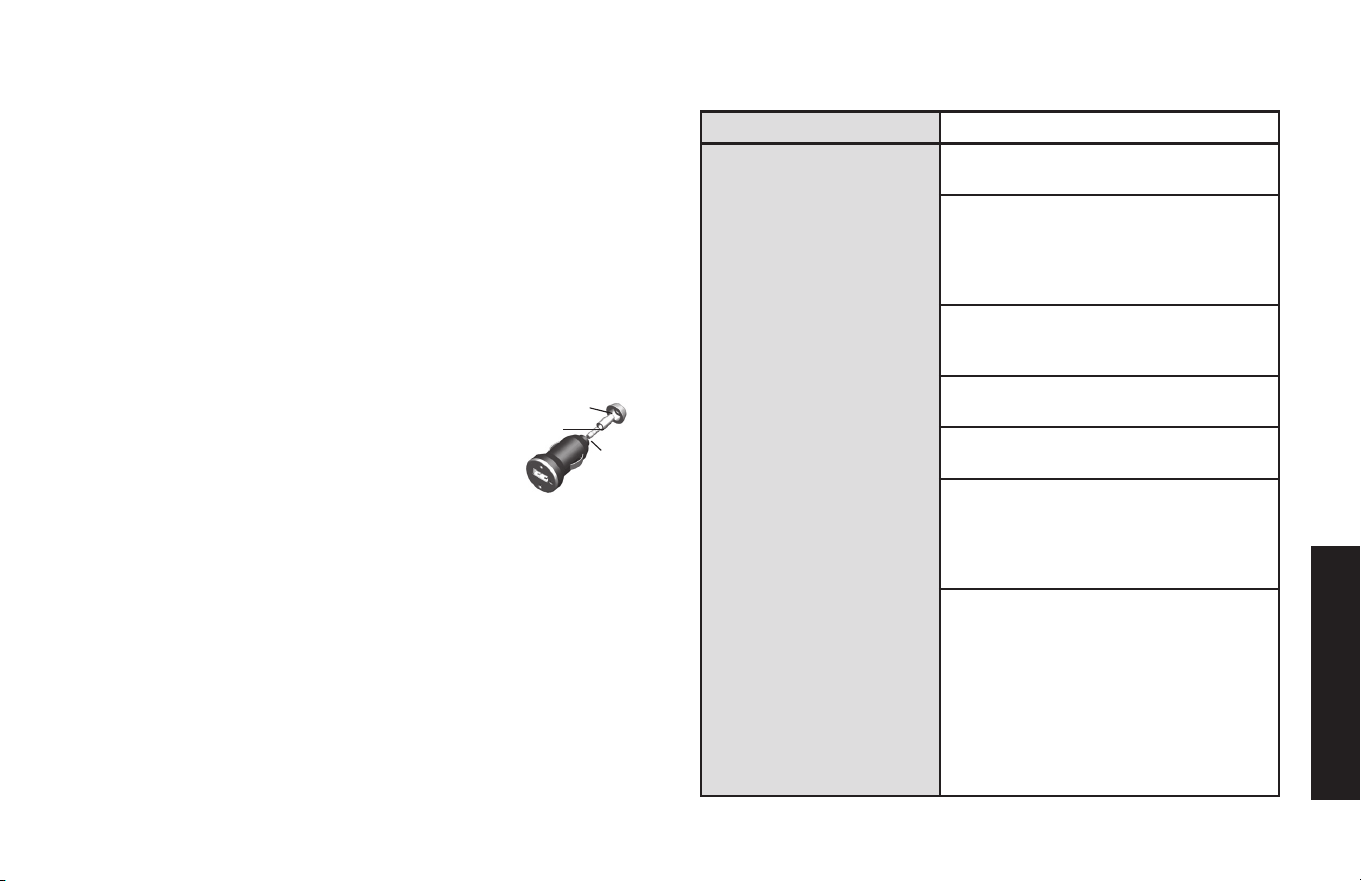
Español
33
• Antes de desechar la batería, proteja los terminales expuestos con
cinta aislante resistente para evitar cortocircuitos (los cortocircuitos
pueden provocar lesiones o incendios).
• No exponga la batería al fuego o al calor intenso, ya que puede
explotar.
REEMPLAZO DEL FUSIBLE DEL ENCHUFE DEL ADAPTADOR
DE CC/USB DE 12 VOLTIOS (ACCESORIO OPCIONAL)
El fusible en el extremo del enchufe del adaptador de CC/USB de 12
voltios protege el circuito de carga del adaptador. Si el cargador de CA
de 120 voltios incorporado funciona, pero el adaptador de carga de CC
no, entonces este fusible puede estar abierto (quemado).
Para reemplazar el fusible:
1. Desenrosque la tapa del extremo del enchufe de CC (en sentido
contrario a las agujas del reloj).
2. Retire el contacto del centro del resorte y el
fusible.
3. Verifique el fusible con un comprobador de
continuidad.
4. Si está fundido, busque un reemplazo de 2
amperios.
5. Vuelva a colocar el fusible, el resorte, el contacto y la tapa del
extremo.
6. Atornille la tapa del extremo en el sentido de las agujas del reloj
hasta que quede apretada con los dedos.
NO APRIETE DEMASIADO.
7. Pruebe el funcionamiento correcto del adaptador de carga de CC
de 12 voltios.
Solución de problemas
Problema Posible solución
La unidad no se carga Compruebe que todas las funciones
de la unidad están apagadas.
Compruebe que el cable de carga
USB está correctamente conectado
al adaptador de carga de 12V DC/
USB o al adaptador de carga de
120V AC/USB, y a la unidad.
Compruebe la conexión a la fuente de
alimentación de CA o CC. Asegúrese
de que hay un buen contacto.
Confirme que hay corriente alterna o
continua en funcionamiento.
Confirm that the unit is plugged into
a 2A USB power source.
Compruebe el fusible del enchufe en
el adaptador de carga de 12 V CC/
USB. Reemplace el fusible siguiendo
las instrucciones de este manual, si
es necesario.
Es posible que la unidad se haya
apagado para proteger la batería del
sobrecalentamiento después de un
largo período de funcionamiento o
carga. Desenchufe el adaptador de
carga de la fuente de alimentación y
desconecte el cable de carga USB
de la unidad. Deje que la unidad se
enfríe durante un tiempo antes de
reanudar la carga.
FIN DE LA TAPA
CONTACTO
CENTRAL
FUSIBLE
2A
Español
34
Problema Posible solución
La unidad no
proporciona un
arranque
Compruebe que todas las funciones
de la unidad estén apagadas.
Asegúrese de que se ha establecido
una conexión de cable con la
polaridad adecuada y que el
indicador de estado del amplificador
bicolor del controlador de los cables
inteligentes se ilumina en verde.
La unidad puede estar en protección
contra sobrecorriente/tiempo
excesivo. Retire las abrazaderas y
reinicie después de un período de
enfriamiento de aproximadamente 30
minutos.
La unidad puede sobrecalentarse
debido al arranque excesivo del
motor. Asegúrese de que todas
las funciones de la unidad estén
apagadas y permita que la unidad
se enfríe antes de reanudar la
operación.
La batería del vehículo puede fallar y
no aceptar la asistencia de arranque.
El fabricante recomienda llevarlo a
un centro de servicio automotriz
certificado para su evaluación.
Compruebe que la unidad tiene una
carga completa. Recargue la unidad
si es necesario.
Problema Posible solución
El puerto tipo C y/o el
puerto USB tipo A no
funcionarán
Asegúrese de que se haya
presionado el botón de encendido
para encender los puertos USB.
Si existe una condición de falla en
cualquiera de los puertos USB, la
unidad se apagará automáticamente.
Consulte la sección “Condiciones de
falla del puerto tipo C y del puerto
USB tipo A” y resuelva cualquier falla.
Asegúrese de que el consumo
total de todos los dispositivos USB
conectados a los puertos USB no
supere los 3,1 A (5 V).
Algunos dispositivos electrónicos
domésticos alimentados por USB
no funcionarán con estos puertos de
carga/alimentación USB. Consulte
el manual del dispositivo electrónico
correspondiente para confirmar que
se puede utilizar con este tipo de
puerto de carga/alimentación USB.
Compruebe que la unidad tiene una
carga completa. Recargue la unidad
si es necesario.

Español
35
Problema Posible solución
El puerto USB del
adaptador de carga
USB/CA de 120 V no
funciona
Asegúrese de tener alimentación de
CA activa en el tomacorriente en el
que está enchufado el adaptador de
carga de CA/USB de 120 V.
Asegúrese de que la clasificación del
equipo conectado al puerto USB del
adaptador de carga no supere los 2 A
continuos.
Algunos dispositivos electrónicos
domésticos alimentados por USB no
funcionarán con este puerto USB.
Consulte el manual del dispositivo
electrónico correspondiente para
confirmar que se puede utilizar con
este tipo de puerto USB..
Problema Posible solución
El puerto USB del
adaptador de carga
USB/CC de 12 V no
funciona/
El indicador LED del
adaptador de carga
USB/CC de 12 V no se
enciende
Compruebe la conexión a la fuente
de alimentación de CC de 12 voltios.
Asegúrate de que haya un buen
contacto.
Confirme que hay corriente continua
en funcionamiento.
Compruebe el fusible del enchufe en
el adaptador de carga de 12 V CC/
USB. Reemplace el fusible siguiendo
las instrucciones de este manual, si
es necesario.
Asegúrese de que la clasificación del
equipo conectado al puerto USB del
adaptador de carga no supere los 2 A
continuos.
Algunos dispositivos electrónicos
domésticos alimentados por USB no
funcionarán con este puerto USB.
Consulta el manual del dispositivo
electrónico correspondiente para
confirmar que se puede utilizar con
este tipo de puerto USB.
La luz de área LED no
se enciende
Asegúrese de que el botón de
encendido se haya presionado dos
veces para encender la luz LED.
Compruebe que la unidad tiene una
carga completa. Recargue la unidad
si es necesario.

Español
36
Accesorios
ADVERTENCIA: Debido a que no se han probado accesorios
con este producto que no sean los ofrecidos por DeWALT, el uso
de dichos accesorios con esta unidad podría ser peligroso. Para
reducir el riesgo de lesiones, solo deben usarse con este producto
los accesorios recomendados por DeWALT.
Asistencia técnica
Para servicio al cliente o asistencia técnica, comuníquese con el
fabricante al 1-888-394-3392 o [email protected].
Garantía Limitada Del Fabricante
De Un Año
El fabricante, Baccus Global LLC, ofrece garantía por este producto
contra defectos de materiales y de mano de obra por un período de
UN (1) AÑO a partir de la fecha de compra minorista por parte del
comprador que sea el usuario final original o desde la fecha de entrega
del bien, cualquiera que sea la fecha que ocurra más tarde (“Período
de Garantía”).
Cuando haya un defecto y el fabricante reciba un reclamo válido dentro
del Período de Garantía, el producto defectuoso se podrá reemplazar
de las siguientes maneras: (1) Devolviendo el producto al fabricante para
reemplazarlo. Es posible que el fabricante solicite un comprobante de
compra. (2) Devolviendo el producto al minorista donde se compró para
un cambio (siempre que la tienda sea una tienda minorista participante).
Las devoluciones al minorista deben realizarse dentro del período
de tiempo de la política de devolución del minorista para cambios
únicamente. Es posible que se requiera prueba de compra. Consulte
con el minorista su política de devolución específica con respecto a
las devoluciones que superan el tiempo establecido para los cambios.
Esta garantía del fabricante no se aplicará a accesorios, bombillas,
fusibles y baterías; a defectos resultantes del desgaste normal, a
accidentes; a daños sufridos durante el envío; a alteraciones; a uso no
autorizado; a negligencia, al mal uso, al abuso; y al incumplimiento de
las instrucciones de cuidado y mantenimiento del producto.
Esta garantía del fabricante le otorga a usted, el comprador minorista
original, derechos legales específicos y usted puede tener otros
derechos que pueden variar de un estado a otro o de una provincia a
otra. Este producto no está diseñado para uso comercial. Para registrar
su producto con el fabricante, visite www.BaccusGlobal.com.
Las fotos de este manual pueden diferir de la unidad real.
Español
37
Especificaciones
Arrancador / Banco de energía USB (certificado según
ANSI/CAN/UL STD. 2743)
Salidad: *1600 Amp Max.
Entrada: 5V CC, 2A
Puertos USB: 5V CC, 3.1A max.
Capacidad de la batería: Polímero de litio, 11.1V CC
Luz LED: 3 LED blancos
Temperatura de carga: 32°F to 104°F (0°C to 40°C)
Temperatura de funcionamiento: –4°F to 104°F (–20°C to 40°C)
Adaptador de carga de 12 V CC/USB (Conforme a la
norma UL STD. 2089)
Entrada: 12V CC, 1.1A
Salida: 5V CC, 2A
Fusible: 2A
Adaptador de carga de CA/USB de 120 V (cumple con UL
STD. 62368-1)
Entrada: 120V CA, 60Hz, 13.3W
Salida: 5V CC, 2A
Fabricado e importado por Baccus Global LLC,
225 NE Mizner Blvd., Suite 301
Boca Raton, FL 33432
www.dewalt12volt.com 1-888-394-3392
Hecho en China
Derechos Reservados © 2024 Baccus Global, LLC.
D
eWALT
®
y el logotipo son marcas comerciales de DeWALT el
D
eWALT Industrial Tool Co., o una filial de la misma y se utilizan
bajo licencia. El esquema de color amarillo y negro es una marca
comerciale de herramientas y accesorios de D
eWALT.
*1600 amperios pico: Probado y verificado por Intertek. Cumple con UL 2743.
www.dewalt12volt.com
RD022724