CAR1415
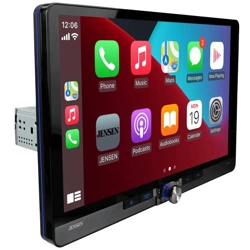
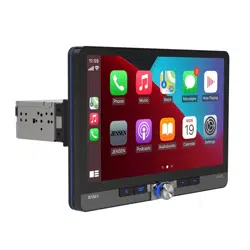
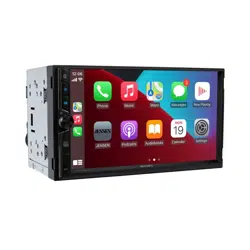
Media Receiver with Android Auto™ and Apple CarPlay
®
featuring a 14" digital
TFT
Display
INSTALLATION &
OWNER’S MANUAL

1
This is a safety feature to prevent driver distraction. In-dash video functions
will only operate when vehicle is in Park and the parking brake is engaged. It
is illegal in most jurisdictions for the driver to view video while the vehicle is
in motion.
Safety Notes
The SAFETY NOTICE is reminder to drive responsibly and safely while using your mobile phone device, or any apps that are
compatible with this unit.
It is highly recommended that your Jensen unit is installed by a professional installer or an authorized dealer.
This product is only for use in vehicles with 12VDC negative ground only.
To prevent damage or injury:
•
Make sure to ground the unit securely to the vehicle chassis ground.
•
Do not remove the top or bottom covers of the unit.
•
Do not install the unit in a spot exposed to direct sunlight, excessive heat or the possibility of water splashing.
•
Do not subject the unit to excessive shock.
•
When replacing a fuse, only use a new one with the correct rating. Using a fuse with the wrong rating may cause the unit
to malfunction.
•
To prevent short circuits when replacing a fuse, disconnect the wiring harness first.
•
Use only the provided hardware and wire harness.
•
If you experience problems during installation, consult your nearest Jensen dealer.
•
If the unit malfunctions, reset the unit as described. If the problem still persists, consult your nearest Jenses dealer or
call technical assistance @ 1-888-921-4088.
•
To clean the monitor, wipe only with a dry silicone cloth or other soft cloth. Do not use a stiff cloth or solvents such as
paint thinner and alcohol, as these can scratch the surface of the panel and/or remove the printing.
•
When the temperature of the unit falls (as in winter), the liquid crystal inside the screen will become darker than usual.
Normal brightness will return after the unit is in use for a while.
•
When extending the ignition, battery or ground wiring, make sure to use automotive-grade wiring with an a minimum
AWG 16 or more to prevent voltage drops.
•
Do not touch the liquid crystal fluid if the LCD is damaged or broken. The liquid crystal fluid may be hazardous to your
health or fatal. If the liquid crystal fluid from the LCD contacts your body or clothing, wash it off with soap immediately.
Copyright Notes
The Bluetooth
®
word mark and logos are owned by the Bluetooth SIG, Inc.
Use of the Apple CarPlay logo means that a verhicle user interface meets Apple performance standards. Apple is not
responsible for the operation of this vehicle or its compliance with safety and regulatory standards. Please note that use of
this product with iPhone, iPod or iPad may affect wireless performance. Apple CarPlay is a trademark of Apple Inc. "Made
for iPod" and "Made for iPhone" mean that an electronic accessory has been designed to connect specifically to iPod or
iPhone, respectively, and has been certified by the developer to meet Apple performance standards. iPhone and iPod are
trademarks of Apple, Inc., registered in the U.S. and other countries.
Availability of Android Auto™ may vary depending upon your country and phone model. Please visit android.com/auto for
more information. Android, Android Auto, Google and other marks are trademarks of Google Inc.
SiriusXM and all related marks and logos are trademarks of Sirius XM Radio, Inc. All rights reserved.
Other trademarks and trade names are those of their respective owners.

CAR1415
2
Table of Contents
Pag
Driver Orientation Settings . . . . . . . . . . . . . . . . . . . . . . . 20
e
Warning Statement . . . . . . . . . . . . . . . . . . . . . . . . . . . . . . . . . . . . . . . . . . . . .
3
FCC Compliance. . . . . . . . . . . . . . . . . . . . . . . . . . . . . . . . . . . . . . . . . . . . . . . .
4
Preparation/Mounting . . . . . . . . . . . . . . . . . . . . . . . . . . . . . . . . . . . . .
5
Screen Rotation . . . . . . . . . . . . . . . . . . . . . . . . . . . . . . . . . .
6
Wiring Diagram . . . . . . . . . . . . . . . . . . . . . . . . . . . . . . . . . .
7
Control Locations. . . . . . . . . . . . . . . . . . . . . . . . . . . . . . . . . . . . . . . .
8
General Operation . . . . . . . . . . . . . . . . . . . . . . . . . . . . . . . . .
9-10
Screen
Operation . . . . . . . . . . . . . . . . . . . . . . . . . . . . . . . . . . 11-13
Audio Operation . . . . . . . . . . . . . . . . . . . . . . . . . . . . . . . . . 14
AM/FM Tuner Operation . . . . . . . . . . . . . . . . . . . . . . . . . . . . . . . . . . . . . . . . .
15
USB Operation . . . . . . . . . .. . . . . . . . . . . . . . . . . . . . . . . . . . . . . . . . . . . . . . . .
16
Media Compatibility . . . . . . . . . . . . . . . . . . . . . . . . . . . . . . . . . . . . . . . . . . . . .
17
Bluetooth Operation . . . . . . . . . . . . . . . . . . . . . . . . . . . . . . . . . . . . . . . . .
18-19
Apple CarPlay . . . . . . . . . . . . . . . . . . . . . . . . . . . . . . . . .. . . . . . . . . 21-22
Android Auto . . . . . . . . . . . . . . . . . . . . . . . . . . . . . . . . . . . . . . . . . . . . 23-24
SiriusXM
®
Auxiliary Inputs/Front & Rear Camera Operation . . . . . . . . . . . . . . . . . . 25
SWC Input Operation . . . . . . . . . . . . . . . . . . . . . . . . . . . . . . . . . . . . . 26
Satellite Radio Operation . . . . . . . . . . . . . . . . . . . . . . . . . . . . . . . . .
27-32
iDatalink Operation . . . . . . . . . . . . . . . . . . . . . . . . . . . . . . . . . . . . . . . 33-37
Specifications . . . . . . . . . . . . . . . . . . . . . . . . . . . . . . . . . . . . . . . . . . 42
Warranty . . . . . . . . . . . . . . . . . . . . . . . . . . . . . . . . . . . . . . . . . . . . . 43
Metra Operation . . . . . . . . . . . . . . . . . . . . . . . . . . . . . . . . . . . . . . . . 38-40
Trouble shooting . . . . . . . . . . . . . . . . . . . . . . . . . . . . . . . . . . . . . . . . 41

CAR1415
3
WARNING
Upon installation of this monitor/media player (“unit”) into a vehicle, the driver of
the vehicle must not operate this unit by watching videos or playing video games
while driving. Failure to follow this instruction could lead to driver distraction
which could result in serious injury or death to the vehicle’s occupants or persons
outside the vehicle and/or property damage.
Several states prohibit the installation of monitors/media players if the screen is
visible from the driver’s seat. If you reside in a jurisdiction which has enacted
such a law, this unit must not be installed so that the screen is visible from the
driver’s seat. When installing this unit in the front console/dashboard, the unit
must be positioned so that it is facing the front passenger seat only. Failure
to follow this instruction could lead to driver distraction which could result in
serious injury or death to the vehicle’s occupants or persons outside the vehicle
and/or property damage.
This unit is designed so that it may be operated only when the vehicle is in “Park”
and the parking brake is fully engaged. To this end, this unit includes a parking
brake lock-out feature which prohibits the unit from operating if the vehicle is not
in “Park” and/or the parking brake is not fully engaged. When installing this unit,
the installer must connect the parking brake detect wire to the parking brake
mechanism in order to make the parking brake lock-out feature operable. DO
NOT simply ground the parking brake detect wire to a metal portion of the vehicle.
Failure to properly install the parking brake lock-out feature could lead to driver
distraction which could result in serious injury or death to the driver’s occupants
or persons outside the vehicle and/or property damage.
Once the parking brake lock-out feature is installed, the owner/user must not
attempt to disrupt/neutralize the parking brake lock-out feature by (a) partially
engaging the parking brake and/or (b) purchasing/using any device or unit
designed to send necessary brake signals to the unit. Failure to follow these
instructions could lead to driver distraction which could result in serious injury
or death to the driver’s occupants or persons outside the vehicle and/or property
damage.
When operating this unit, keep the unit’s volume level low enough so that the
vehicle’s occupants can hear traffic-related sounds such as police and emergency
vehicles. Failure to follow this instruction could lead to driver distraction which
could result in serious injury or death to the vehicle’s occupants or persons
outside the vehicle and/or property damage.

CAR1415
4
FCC
Compliance
This device complies with Part 15 of the FCC Rules. Operation is subject to the following two conditions:
(1)
this device may not cause harmful interference, and
(2)
this device must accept any interference received, including interference that may cause undesired
operation.
Warning:
Changes or modifications to this unit not expressly approved by the party responsible for
compliance could void the user’s authority to operate the equipment.
This equipment complies with FCC radiation exposure limits set forth for an uncontrolled environment.
This equipment should be installed and operated with a minimum distance of 20cm between the radiator &
your body.
This transmitter must not be co-located or operating in conjunction with any other antenna or transmitter.
Note: This equipment has been tested and found to comply with the limits for a Class B digital device,
pursuant to Part 15 of the FCC Rules. These limits are designed to provide reasonable protection against
harmful interference in a residential installation. This equipment generates, uses and can radiate radio
frequency energy and, if not installed and used in accordance with the instructions, may cause harmful
interference to radio communications. However, there is no guarantee that interference will not occur in a
particular installation. If this equipment does cause harmful interference to radio or television reception,
which can be determined by turning the equipment off and on, the user is encouraged to try to correct the
interference by one or more of the following measures:
•
Reorient or relocate the receiving antenna.
•
Increase the separation between the equipment and receiver.
•
Connect the equipment into an outlet on a circuit different from that to which the receiver is connected.
•
Consult the dealer or an experienced radio/TV technician for help.
CAR1415
5
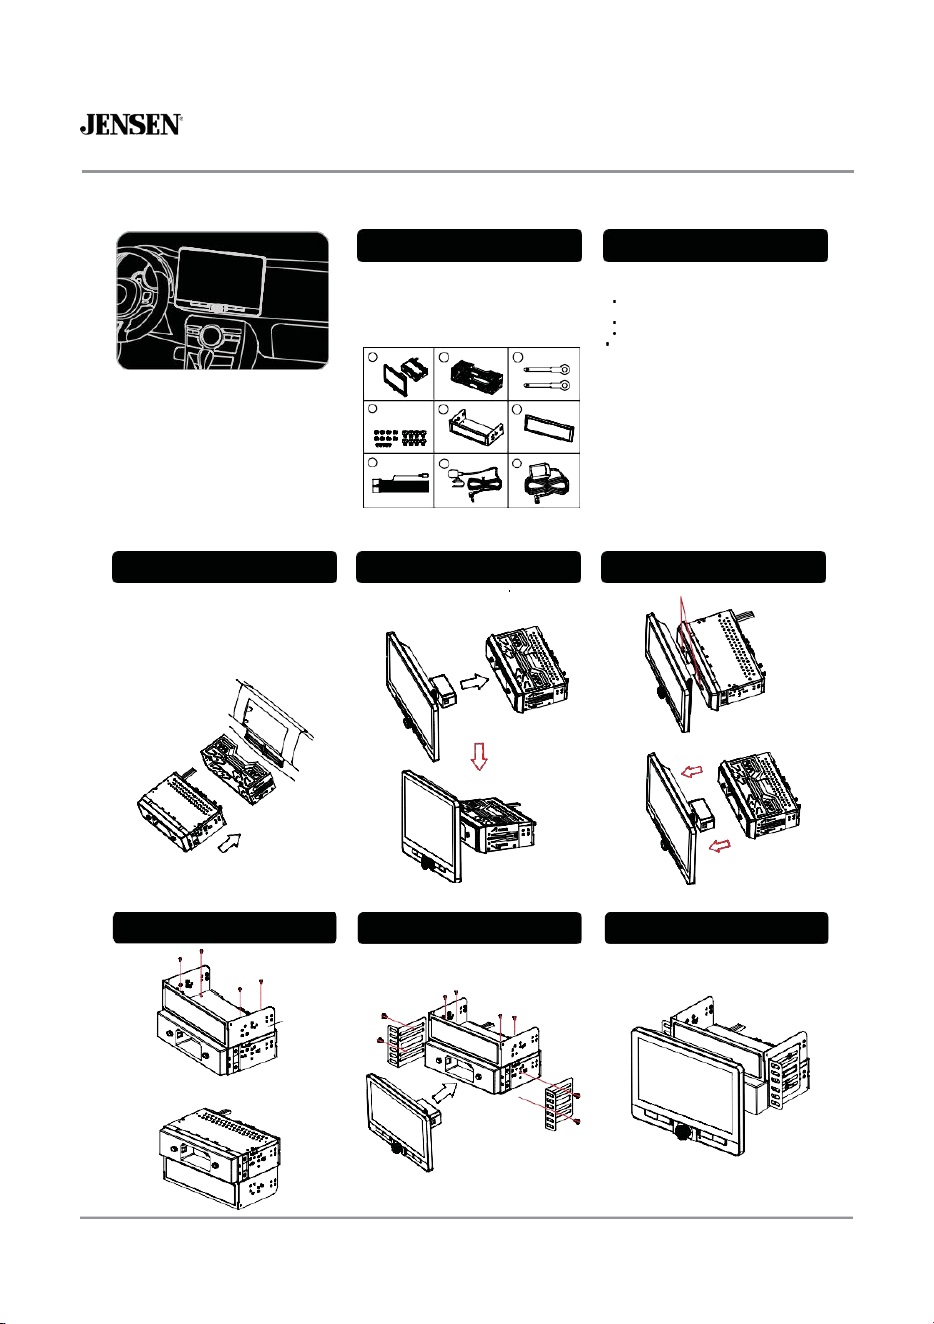
Preparing for Installation
Installation
Preparation
Package Contents Before You Begin
Installation Guide
1.
Main Unit
2.
Mounting Sleeve for 1 DIN
3.
Release Keys
4.
Screw Kit
5.
Chassis sleeve for 2 DIN install
6.
Trim Ring
7.
Wiring Harness
8.Microphone
9.
GPS Antenna (for CarPlay
and Android Auto only)
Before You Begin
•
Consult a qualified technician for instructions.
We always recommend professional installation.
•
Disconnect the negative battery terminal.
•
Remove trim ring from unit (if installed).
•
Insert the removal keys, and remove the mounting sleeve
from the receiver.
Note: Most vehicles require an installation kit, wiring
harness and/or antenna adapter (all sold separately)
to properly install the head unit in the vehicle.
Step #1 Step #2
Install Mounting Sleeve and Trim Ring
Connecting the LCD to the Chassis
Removing the LCD from the Chassis
1)
Install the mounting sleeve into a dash kit (sold separately) or dash
opening, bending the tabs to secure the mounting sleeve.
2)
Connect the wiring harness, microphone and antenna to the chassis
of the radio.
3)
Snap trim ring into place making sure the notched area is on the
bottom.
4)
Slide the receiver into the mounting sleeve to secure.
To connect the LCD to the unit, carefully push the LCD
connector into the receiver's chassis until you hear a click
as shown below.
1.
Hold down the two relea se buttons
2.
Gently pull th e display p anel forward
Step #1
Step #2
Step #3
Installing the 2-DIN Chassis Sleeve
Install Mounting Side Brackets
Installation Complete
Attach the 2-DIN chassis sleeve using (4) M2.5*4 screws
Mounting brac kets shown be low or option al
vehicle mo unting kit are not included
2-DIN Chassis Sleeve
A
Install the 2-DIN mounting chassis sleeve to the top of the
OR
chassis (shown above) or to the bottom of the chassis (shown below).
B
Install the mounting brackets to the c hassis of the
radio or to th e 2-DIN chas sis s leeve d epending on
choice of m ounting option as s hown in Ste p #1 to the left.
1
2
3
4
MountingScrewfor2DIN BracketM2.5*45PCS
FlatHeadScrewM5*6 8pcs
RoundHeadScrewM5*68pcs
5
6
7
8
9
CAR1415
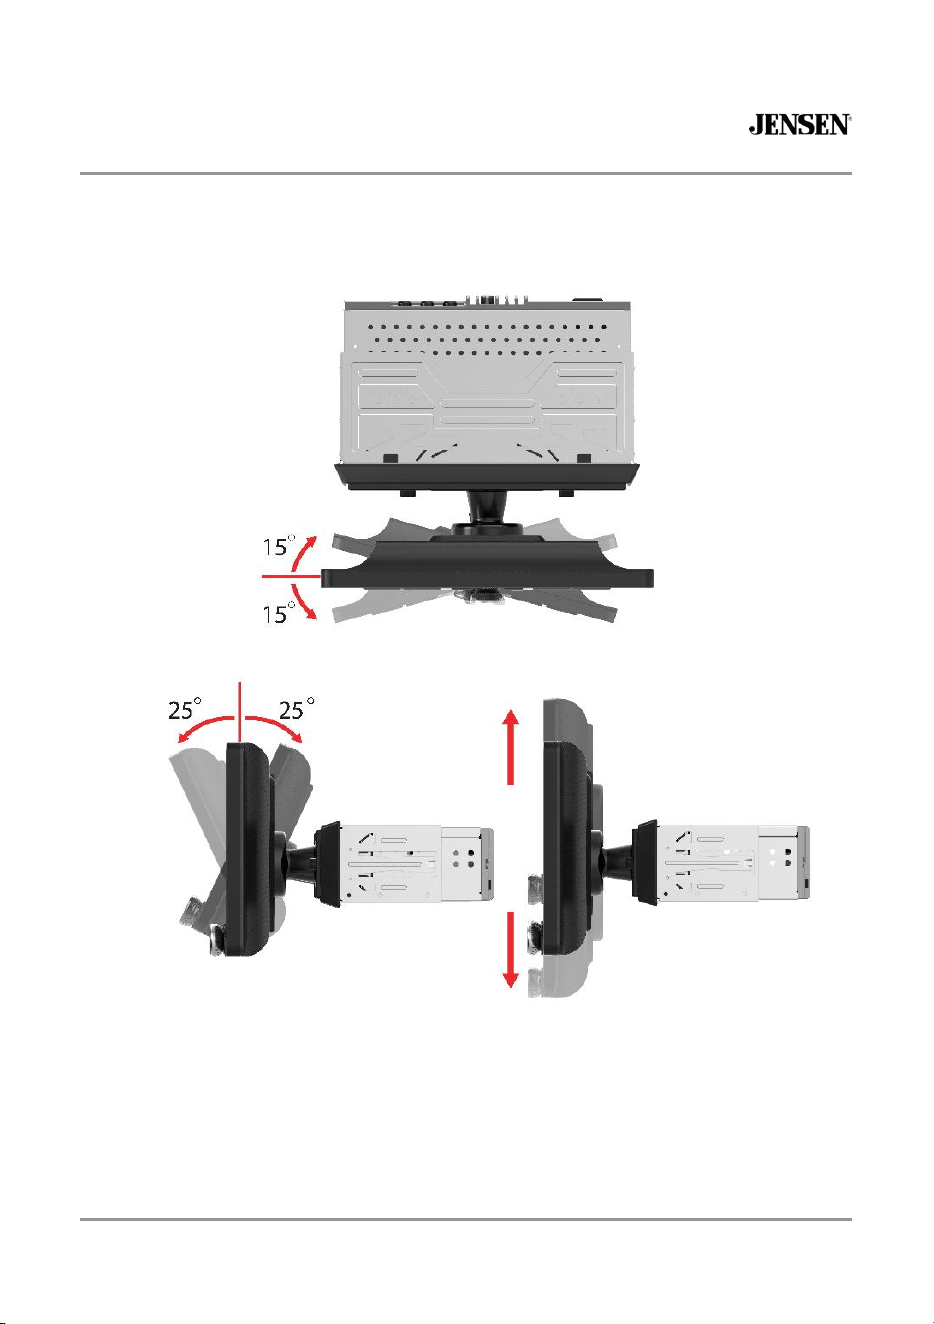
6
Screen Rotation
CAR1415
7
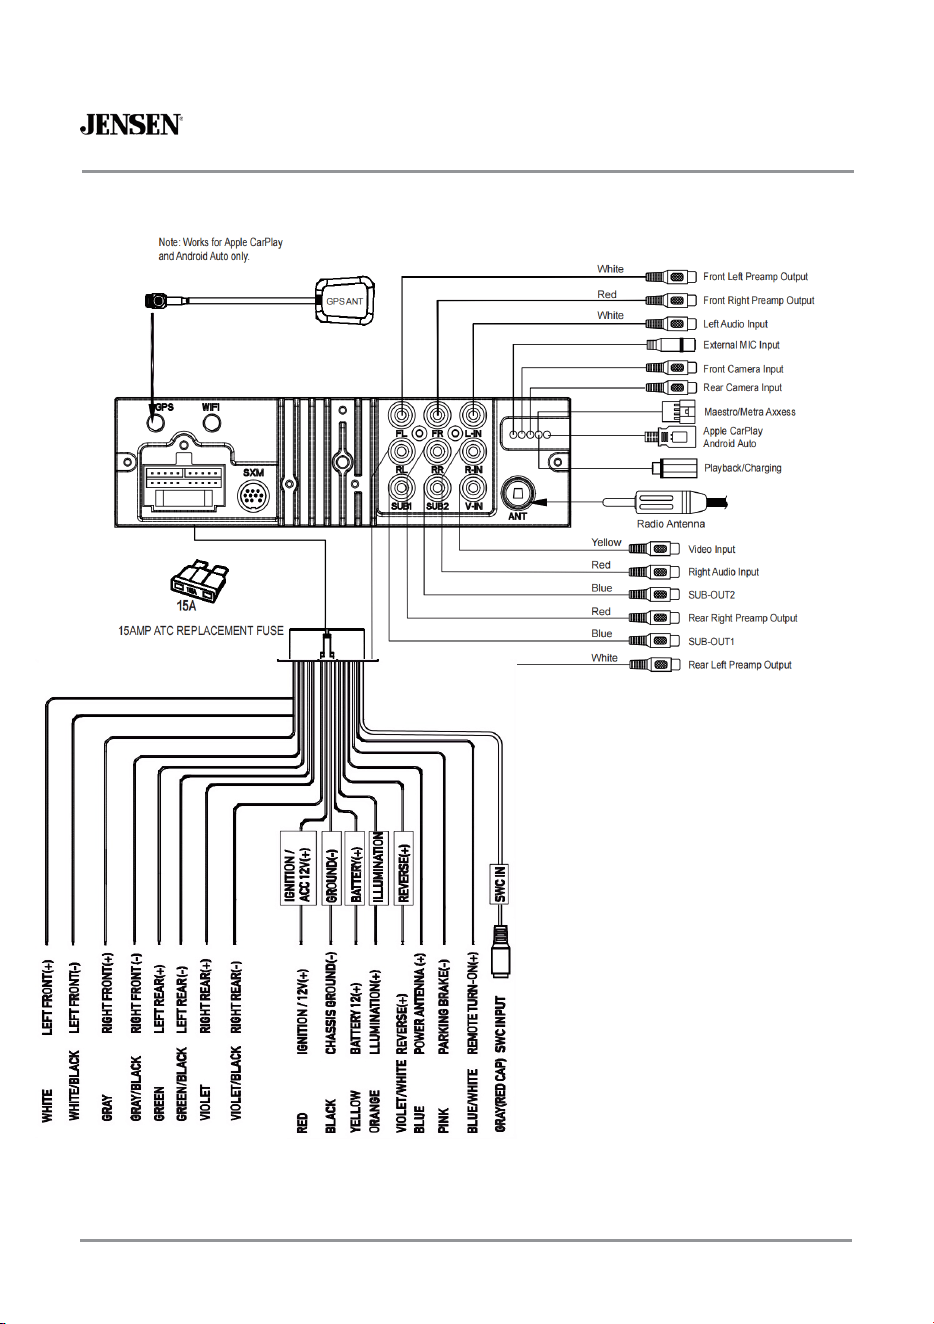
Wiring Diagram - Inputs/Outputs
Note:
When replacing a fuse, make sure to use the correct type and amperage. Using an incorrect fuse could cause
damage. The unit uses (1) 15 amp ATC mini style fuse located on the power connector.
Rear camera input
A rear view camera (not included) can be used with the Camera input.
CAR1415
8
1
3
4
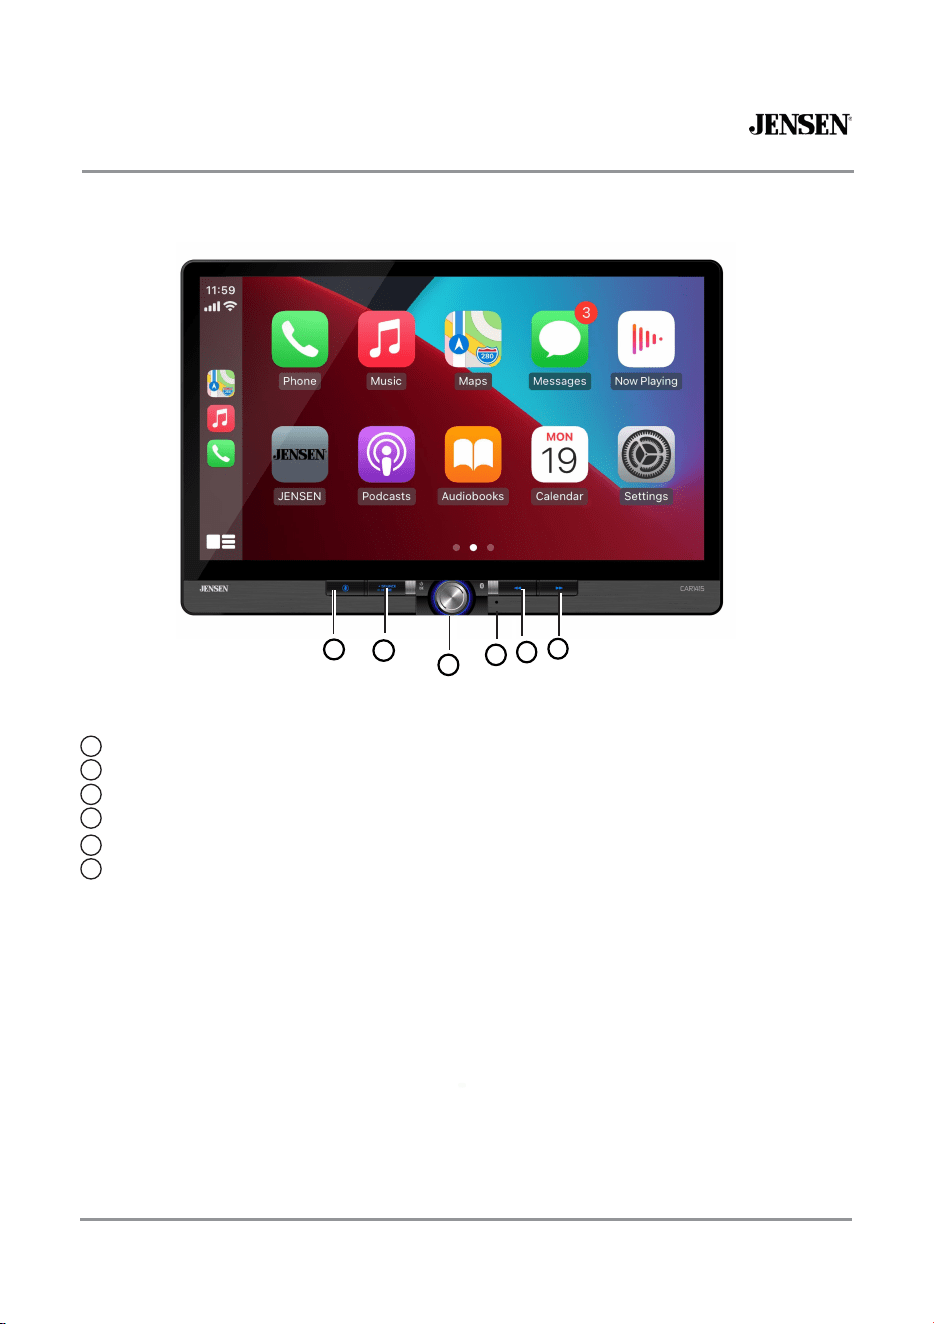
Control Locations
Voice Activation Button
Source/Home
Power/Volume/Mute
Reset
Previous Button
Next Butto
The radio display features the following functions and displays:
n
1
2
3
4
5
6
2
5
6

CAR1415
9
General
Operation
Power On/Off
Volume
Mute
Mode
Main
Menu
Momentarily press to turn the unit on. Press and hold to tur
A/V In
USB
n
the unit off.
Rotate the volume knob to increase or decrease the volume level.
Momentarily press
MUTE
to silence the audio. Momentarily press
MUTE
again to return to the previously selected volume. Rotating
the volume knob while the volume is muted will also cancel the
mute function.
Press SOURCE to step through the following modes of operation:
Radio/SiriusXM/BT Phone/BT Audio/Apple CarPlay/Android
Auto/USB/ Camera/EQ/AV/Settings.
Note
: Modes of operation can also be accessed by selecting the
corresponding icon from the main menu.
Press the icon at the top left corner of the screen to display
the OSD main menu. Press the Radio/SiriusXM/BT Phone/BT
Audio/Apple
CarPlay/Android Auto/USB/Camera/EQ/AV/Settings icons to select
the desired source.
Connect external devices to the rear RCA Type A/V Input.
Connect a USB flash drive to the rear USB Input.
To resolve abnormal operation or if the unit is inoperable, press the
RESET button located on the front panel as shown in the Control
default settings
Locations section. The unit will reset the main processor to the
.
Note:
Use the tip of a pen to access the reset button and restore
the factory default software settings.
Reset
CAR1415
10
General
Operation
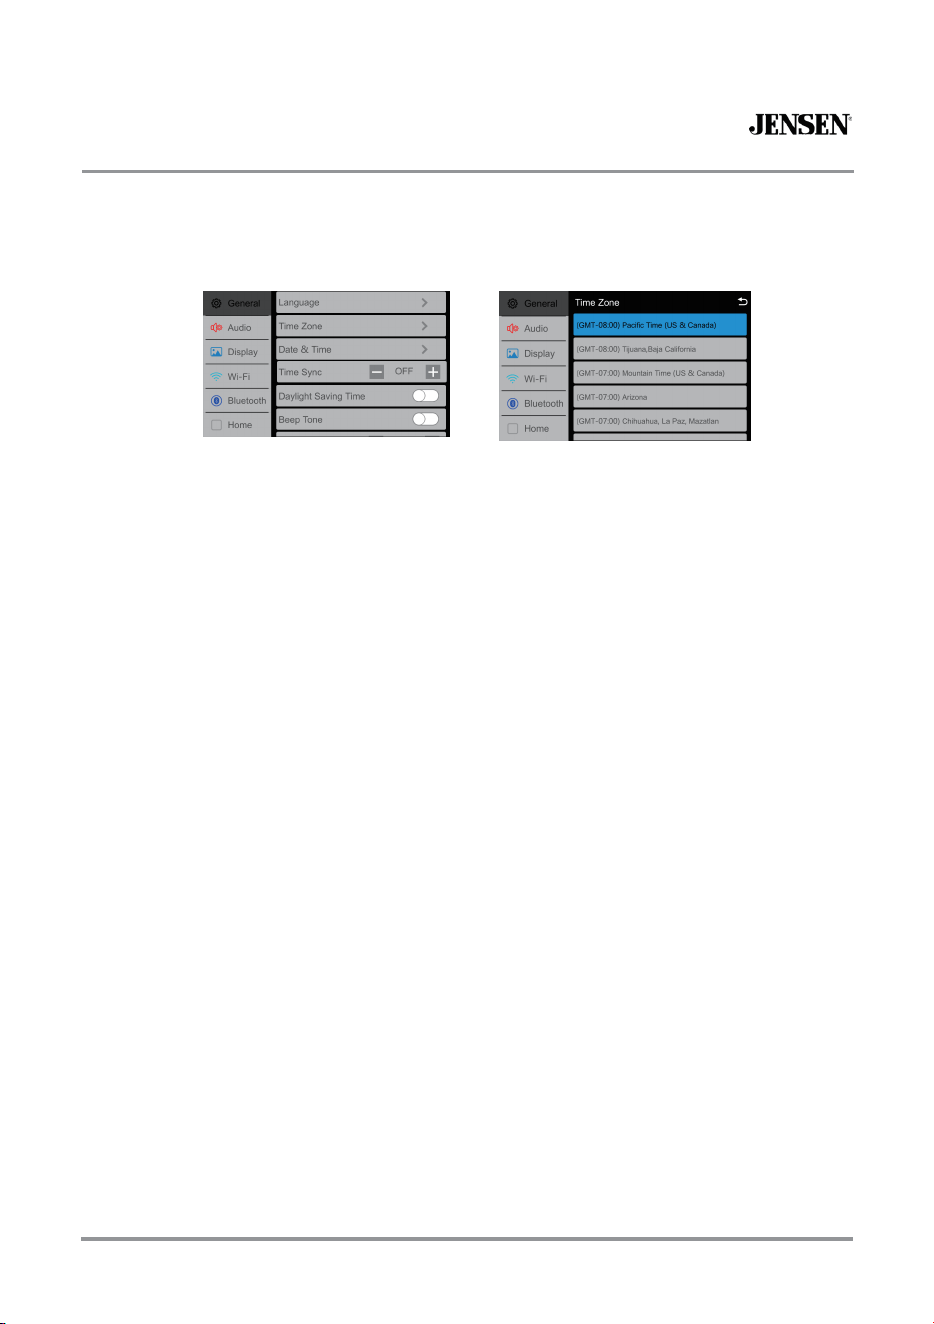
From the Main Menu screen,select Setup to access the Settings menu and select from eight
categories represented by the icons on the left of the screen: General, Audio, Display, Wifi,Bluetooth
, Camera, Region and Version. Select the category, and adjust any of the available
options using the touch screen.
General:
•
Time Zone:
•
Language: Select between English and Spanish.
Select desired time zone.
•
Date & Time:
Adjust the day, month, year, hour, minute and format.
•
Power Off Delay:
Select 1 second, 2 second, 3 seconds or Off
•
Beep Tone:
Turn On or Off
•
Daylight Savings Time: Turn On or Off.
.
.
•
Factory Default: Reset the unit to factory default settings.
•
Balance/Fader -
•
Right Hand Drive: Turn On or Off. When the item is off, it is left hand drive mode, and when
the item is On, it is right hand drive mode. Default setting is Off (left hand drive mode)
Select to adjust balance/fader settings.
•
Subwoofer - Turn the Subwoofer Control On/Off.
•
Subwoofer Level
•
Subwoofer Frequency- Select subwoofer frequency.
- Select subwoofer 0-14 (7 is default).
•
EQ - Select to adjust EQ settings.
•
Loudness - Select to turn Loudness feature On or Off.
•
Default Volume -
Select adjust default volume settings.
•
Gray Level & Brightness
•
Illumination Control -
•
Source Level - Select to adjust source level settings.
Select to turn Illumination Control On or Off.
- Adjust Gray Level & Brightness settings for Day and Night.
Camera:
Turn Front and Rear Camera On/Off, reverse Camera Views, turn Parking Assistance
On/Off, adjust Parking Assistance settings and adjust the Rear View Delay.
Radio: Adjust the Region, and turn TA and AF On/Off.
Version: View version information.
•
LED
- Select a color for the LED button lights.
•
LED Animation - Select to turn LED Animation On or Off
Bluetooth: Turn Bluetooth, Auto Connect and Auto Answer On/Off, view Device Name and clear
•
Wallpaper
- Select from three wallpaper options.
WiFi: Turn WiFi On/Off, Reset Password or view Device List.
Phone Book Names and Numbers.
Factory Default-Reset Bluetooth Settings or Reboot System.(Including SiriusXM data reset)
Audio:
Dispaly:
•
Ambient- Select to adjust ambient light's brightness and color.

CAR1415
11
Screen Operation
Click on Display in the Settings menu to control screen brightness, button light brigh
tness/color, and ambient light brightness/color.
On this interface, you can control the gray level/brightness of sreen during the day/night.
●Gray Level Day: to adjust the gray level of screen during the day. There are a total of 20
levels (from level 1 to level 20, the gray level gradually increases).
●Gray Level Night: to adjust the gray level of screen at night. There are a total of 20
levels (from level 1 to level 20, the gray level gradually increases).
●Day Brightness: to adjust the brightness of screen during the day. There are a total of 10
levels (from level 1 to level 10, the brightness gradually increases).
●Night Brightness: to adjust the brightness of screen at night. There are a total of 10
levels (from level 1 to level 10, the brightness gradually increases).
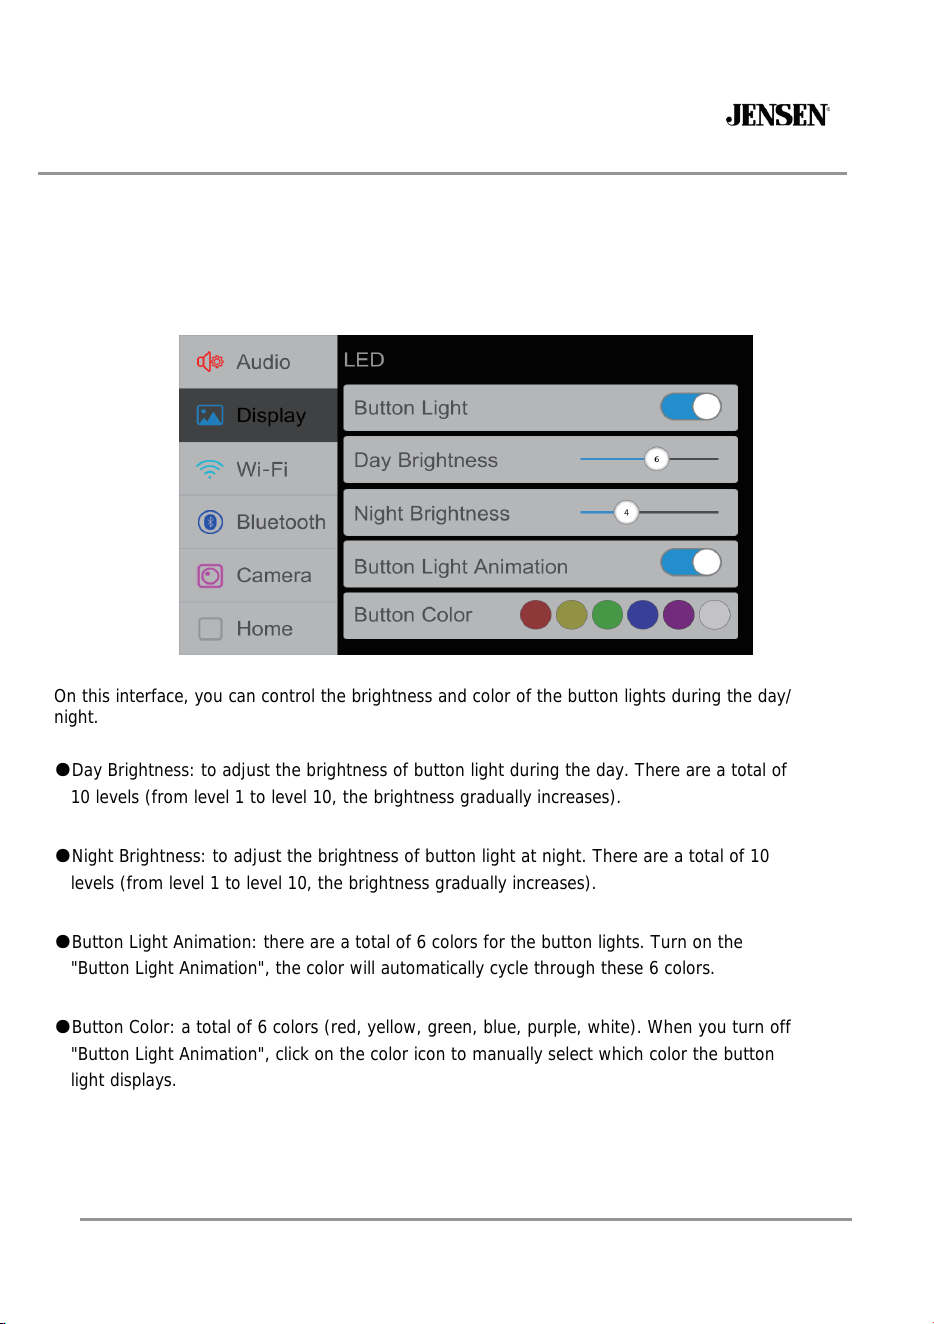
On this interface, you can control the brightness and color of the button lights during the day/
night.
●Day Brightness: to adjust the brightness of button light during the day. There are a total of
10 levels (from level 1 to level 10, the brightness gradually increases).
●Night Brightness: to adjust the brightness of button light at night. There are a total of 10
levels (from level 1 to level 10, the brightness gradually increases).
●Button Light Animation: there are a total of 6 colors for the button lights. Turn on the
"Button Light Animation", the color will automatically cycle through these 6 colors.
●Button Color: a total of 6 colors (red, yellow, green, blue, purple, white). When you turn off
"Button Light Animation", click on the color icon to manually select which color the button
light displays.
CAR1415
12
Screen Operation
Click on Display in the Settings menu to control screen brightness, button light brigh
tness/color, and ambient light brightness/color.
CAR1415
13
Screen Operation
Click on Display in the Settings menu to control screen brightness, button light brigh
tness/color, and ambient light brightness/color.
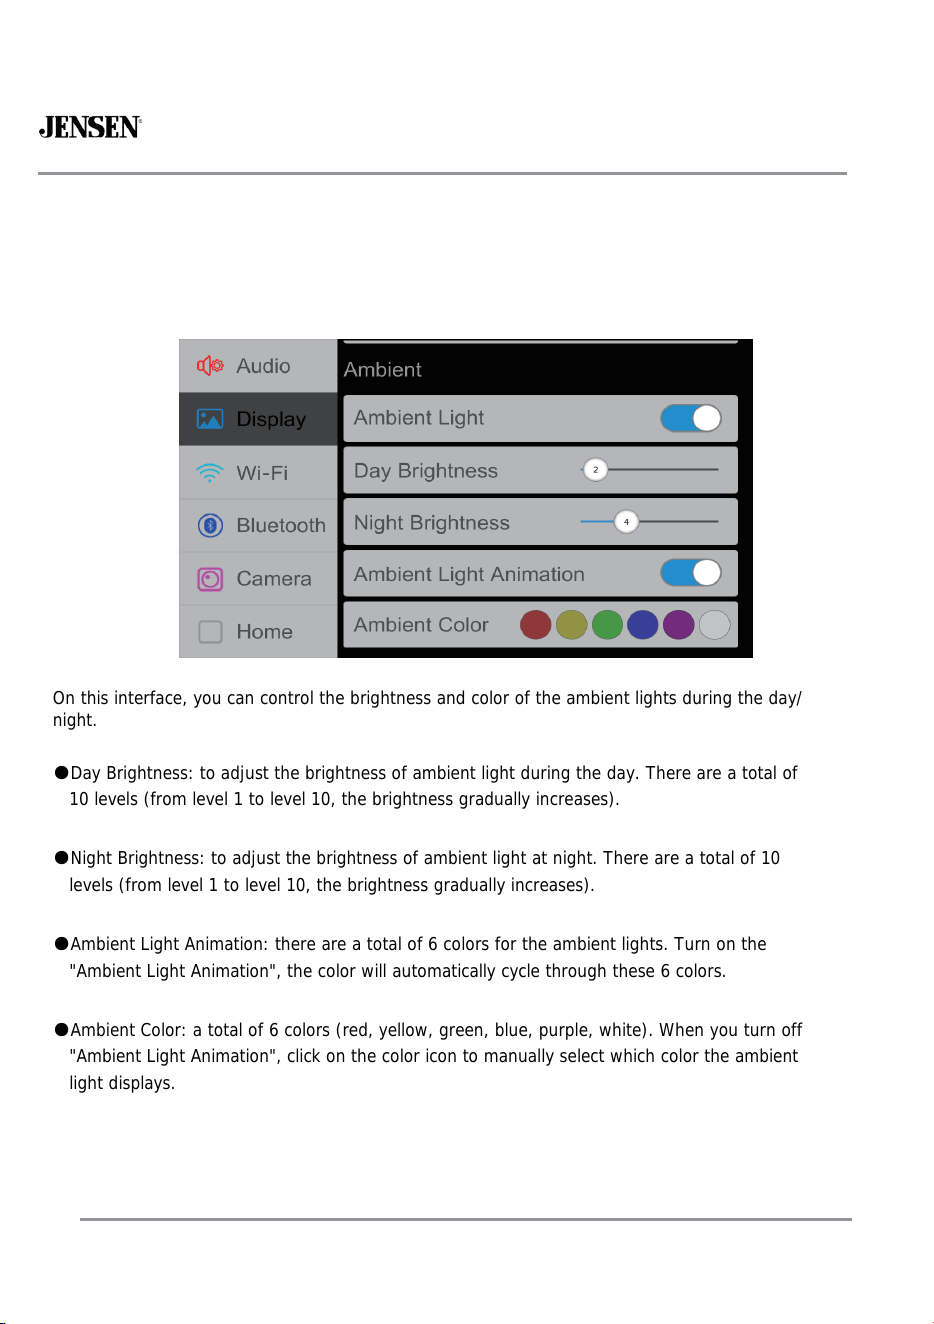
On this interface, you can control the brightness and color of the ambient lights during the day/
night.
●Day Brightness: to adjust the brightness of ambient light during the day. There are a total of
10 levels (from level 1 to level 10, the brightness gradually increases).
●Night Brightness: to adjust the brightness of ambient light at night. There are a total of 10
levels (from level 1 to level 10, the brightness gradually increases).
●Ambient Light Animation: there are a total of 6 colors for the ambient lights. Turn on the
"Ambient Light Animation", the color will automatically cycle through these 6 colors.
●Ambient Color: a total of 6 colors (red, yellow, green, blue, purple, white). When you turn off
"Ambient Light Animation", click on the color icon to manually select which color the ambient
light displays.
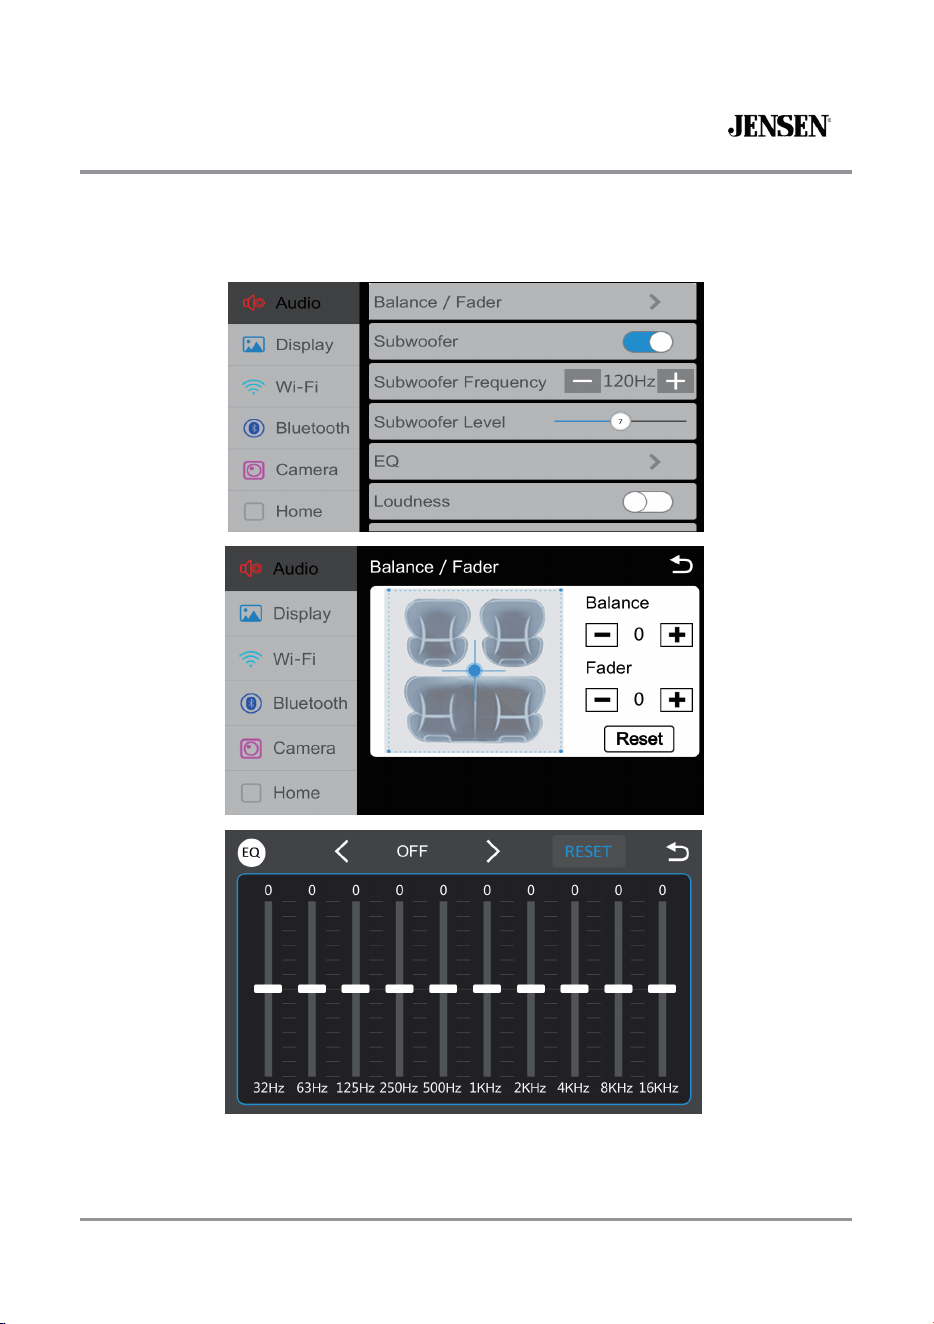
Press the AUDIO icon on the main menu screen to enter the audio settings menu.
Audio
Operatio
CAR1415
14
n
CAR1415
15
10
2
3
1
4
5
6
7
8
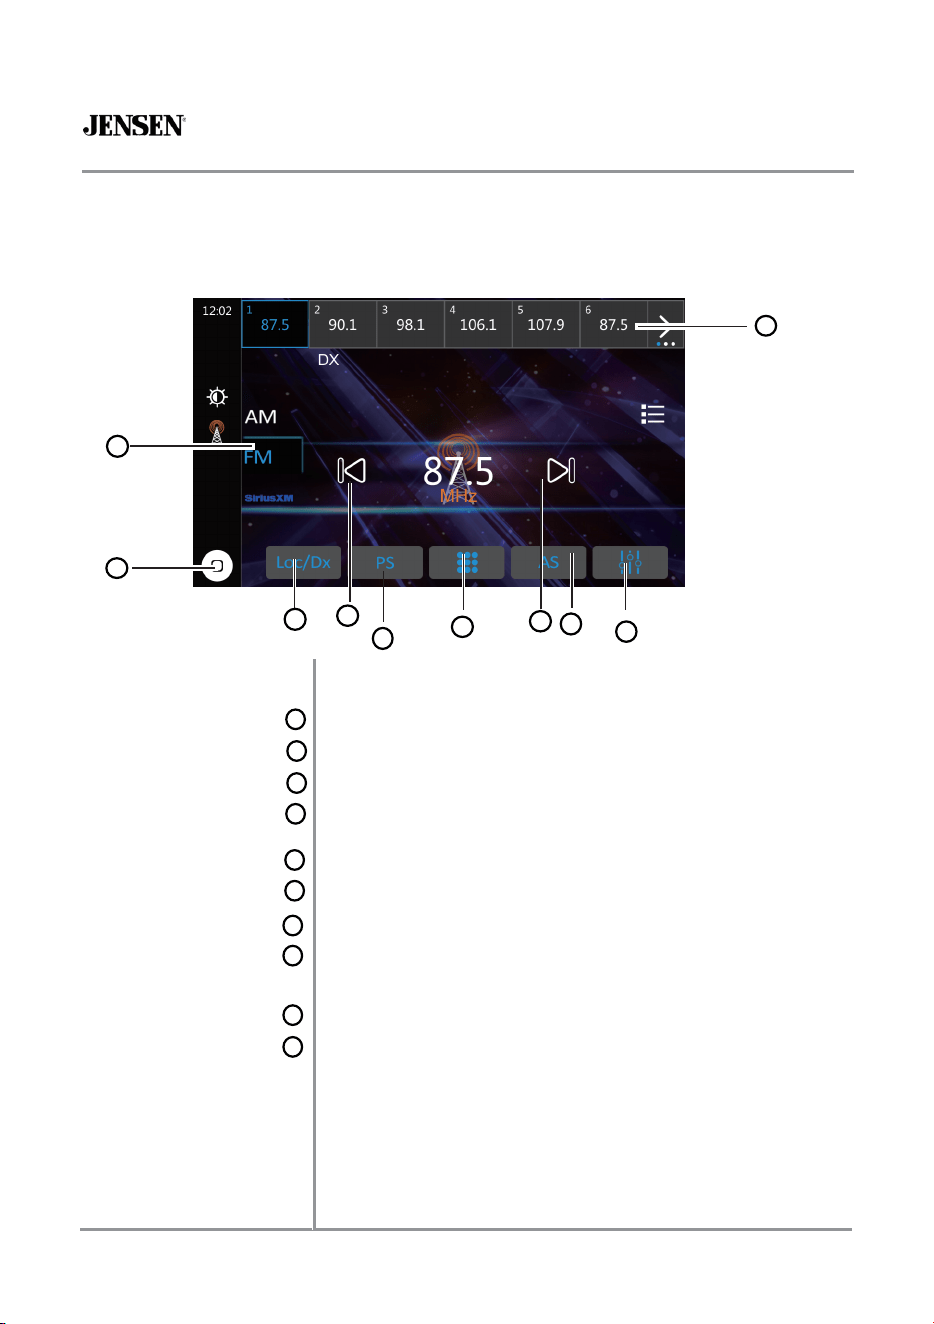
AM/FM Tuner Operation
Radio
Operation
Main Menu
Keypad
Band
1
2
Local / Distance
3
4
Preset Scan
Seek Tune Down
5
6
From the main menu, touch Radio Icon to select AM/FM tune
Seek Tune Up
7
Automatically Store
8
r
mode.
Press to return to Main Menu screen.
Press to step through three FM and two AM bands.
Press to toggle between local or distance tuning.
llPress to scan through a tuna
play them for 3 seconds each
b
.
le presets in the current band and
Press to automaticall
Press to automatically tune to a lower frequency.
Press to display the keypad.
Press to automatically tune to a higher frequency.
y search and store the six strongest station
in the current band. A total of 18 FM and 12 AM stations can
stored
b
s
e
.
To store a station as a preset i
Press to access and adjust audio settings.
n the current band, tune to the
desired station, then press and hold the desired preset number
to store. Press any preset button to recall and begin playback of
that station. (Hold this button down for a few seconds and it will
switch between AS and PS)
Audio Settings
9
Preset Stations
10
9
CAR1415
16
2
5
1
3
7
8
4
9
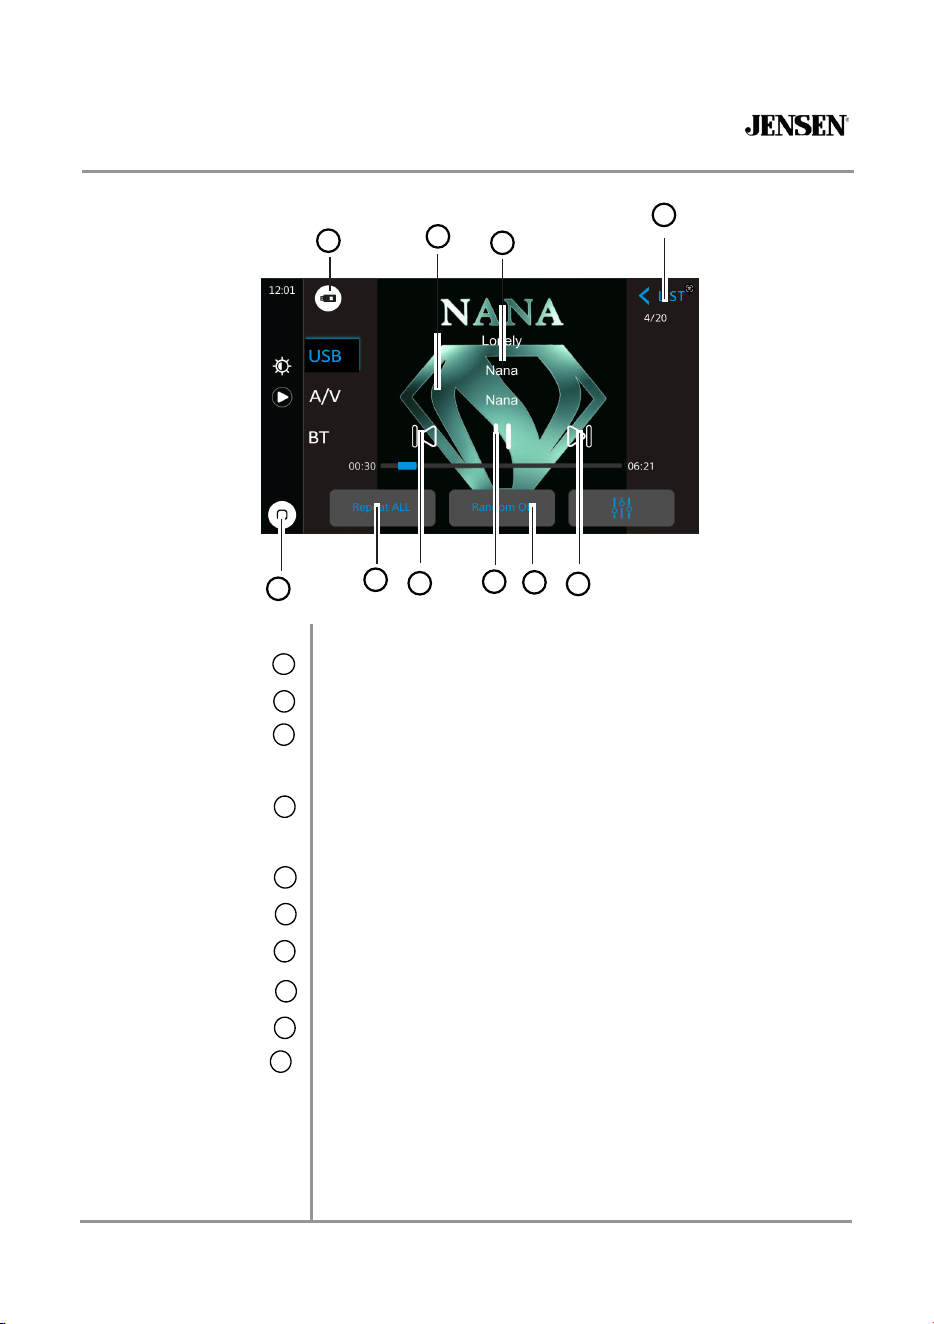
USB Operation
USB
Main Menu
1
Current Mode Indicator
2
Repeat
3
Random
4
List
5
ID3 Tag Display Area
6
Track Down
7
Play/Pause
8
Track Up
9
Album Art
10
From the main menu, touch the USB icon on the main screen.
Press to return to Main Menu screen.
Displays source currently playing.
Press to repeat current track and adjust to repeat all tracks in
the current folder. Press again to exit repeat mode.
Press to shuffle all tacks in the current folder and again to
shuffle all tracks. Press again to exit random mode.
Press to enter the list.
Press to see the ID3 information of current song.
Press to return to the beginning of the current track.
Press to pause or resume playback.
Press to skip ahead to the next song.
Press to see the album art information of current song.
6
10

CAR1415
17
Media
Compatibility
Media
Compatibility
Playback Order
Compatible
Recording
Formats
Notes
The following types of files are not compatible:
•
MP3 PRO format, MP3 playlists
•
RMP format
•
AAC, protected AAC, M4A format
MP3 playback sequence begins in the root folder of the USB device. Any
empty folders or folders that do not include MP3 files are skipped.
ISO9660 standards:
•
Maximum nested folder depth is 8 (including the root folder).
•
Valid characters for folder/file names are letters A-Z (all caps),
numbers 0-9, and “_” (underscore). Some characters may not be
displayed correctly, depending on the character type.
•
This device can play back files in Joliet and other standards that
conform to ISO9660. MP3 written in the formats other than the above
may not play and/or their file names or folder names may not be
displayed properly.
Some files may not play or be displayed correctly, depending on sampling
rates and bit rates.
For best results, use the following settings when ripping MP3 files:
128kbps or higher constant bit rate
44.1
kHz or higher sampling frequency

CAR1415
18
2 3 4
5
7
1
6
Bluetooth Operation
Before using Bluetooth
Pairing a New Device
Connect
Bluetooth Phone
Before you can use a Bluetooth device to make hands-free calls
or stream audio, it must be authenticated. This is also referred to
as "pairing" a device.
The unit broadcasts the pairing signal constantly when no devices
are currently connected. Complete the pairing sequence from
your Bluetooth device. Refer to the owner's manual for your
device for more details. The device name is "CAR1415". The unit
can be in any mode of operation when pairing is performed. On
certain phones, pairing may need to be done more than once.
The head unit will automatically connect to the last connected
device when the connect feature is set to Auto connect On. If the
connect feature is set to Auto Connect Off, the head unit will not
automatically connect to any device.
From the main menu, touch the Bluetooth on the screen.
Bluetooth icon will appear anytime a Bluetooth device is connected.
Press to return to Main Menu screen.
Press to display the keypad.
Press to display contact list.
Press to display the recent call list.
Press to display the device list.
Press to connect a call.
Use the Phone Keypad to enter a phone number.
Main Menu
1
Keypad
2
Contact
3
History
4
Device
5
Call
6
Phone
Keypad
7
CAR1415
19
8
9
10
11
15
12
13
14
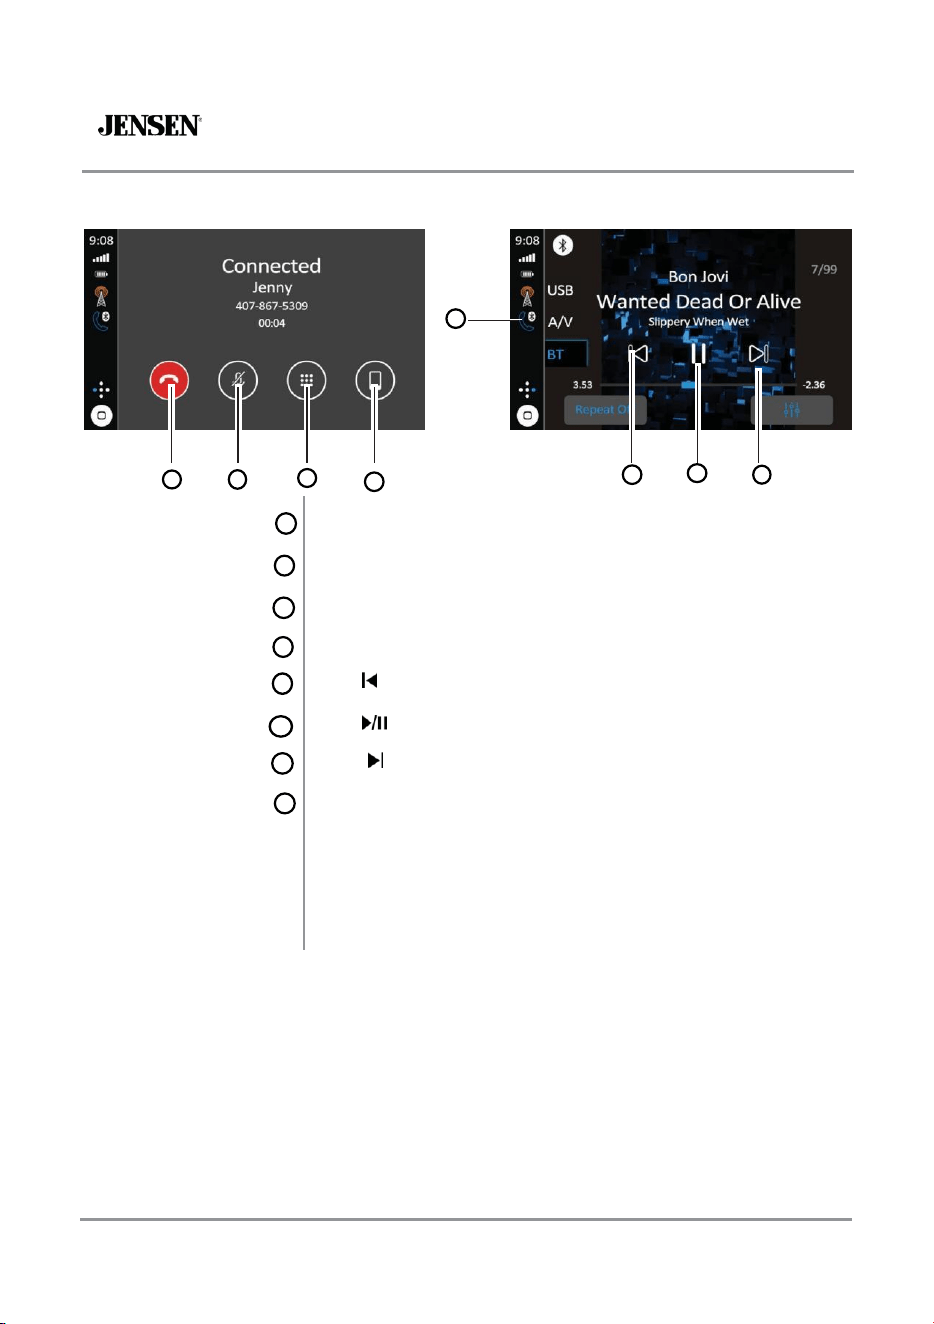
Bluetooth Operation
End Call 8
Phone Keypad
Microphone
9
10
Pres
Press to end a call in progress or reject an incoming call.
Press to turn the Microphone voice On or Off.
Press to enter a phone number.
Press to transfer audio between the unit and mobile phone
Audio Transfer 11
Track Down 12
Play / Pause 13
Track Up
14
Bluetooth P h o n e 15
.
s icon to return to the beginning of the current track.
Press icon to pause or resume playback.
Touch icon to skip ahead to the next song.
Press to switch to Bluetooth phone.
CAR1415
21
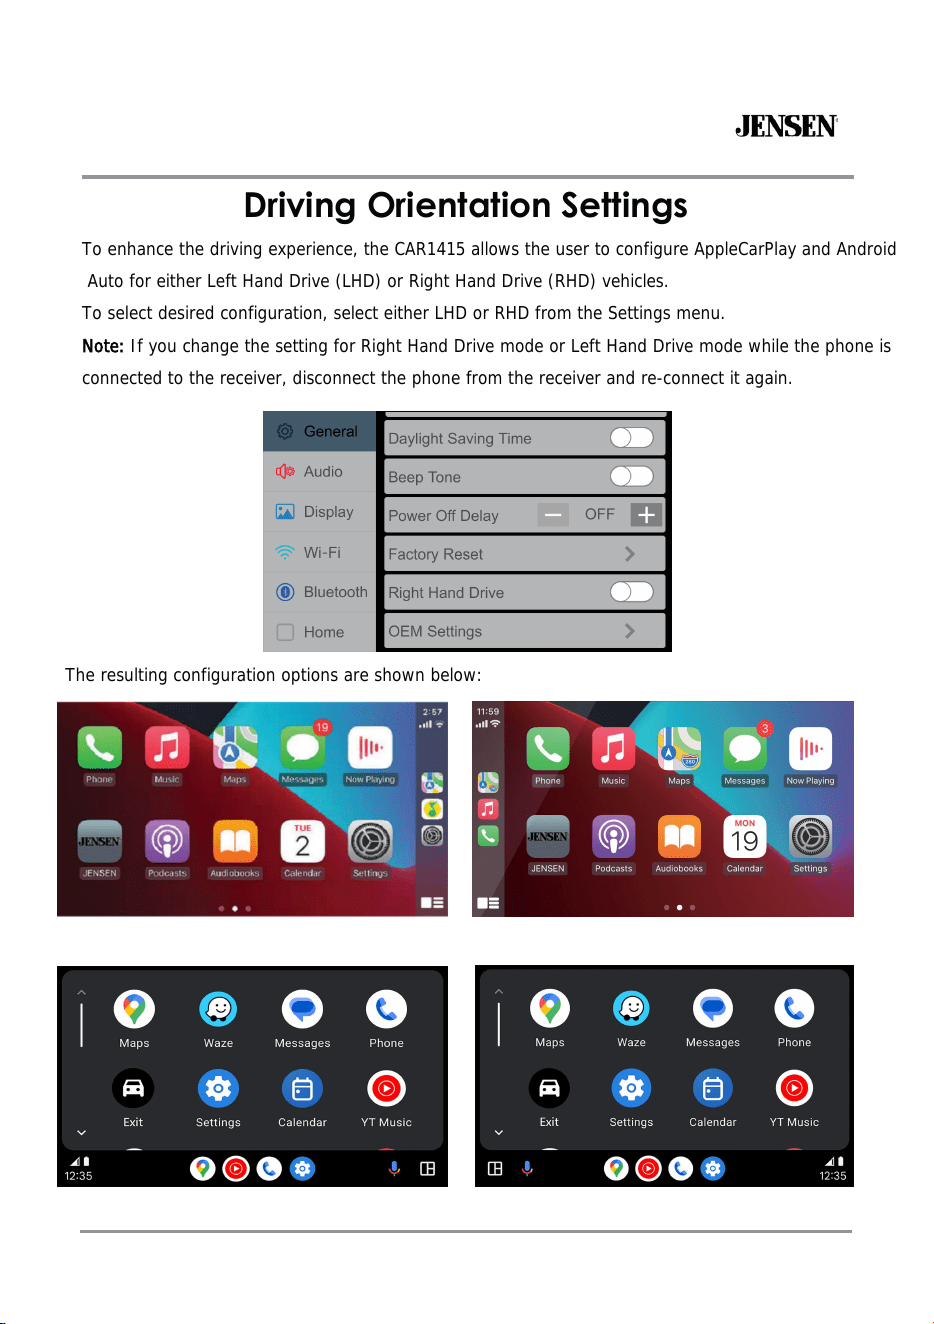
Driving Orientation Settings
To enhance the driving experience, the CAR1415 allows the user to configure AppleCarPlay and Android
Auto for either Left Hand Drive (LHD) or Right Hand Drive (RHD) vehicles.
To select desired configuration, select either LHD or RHD from the Settings menu.
Note: If you change the setting for Right Hand Drive mode or Left Hand Drive mode while the phone is
connected to the receiver, disconnect the phone from the receiver and re-connect it again.
Apple CarPlay - Right Hand Drive
Android Auto -
Right Hand
DriveAndroid Auto -
Left Hand
Drive
Apple CarPlay - Left Hand Drive
The resulting configuration options are shown below:
CAR1415
21
Apple CarPlay
®
Operation
Siri) music, navigation, phone and messaging apps - significantly reducing drive
Apple CarPlay is a smart interface for iPhone, allowing you to voice-control (via
r
distraction.
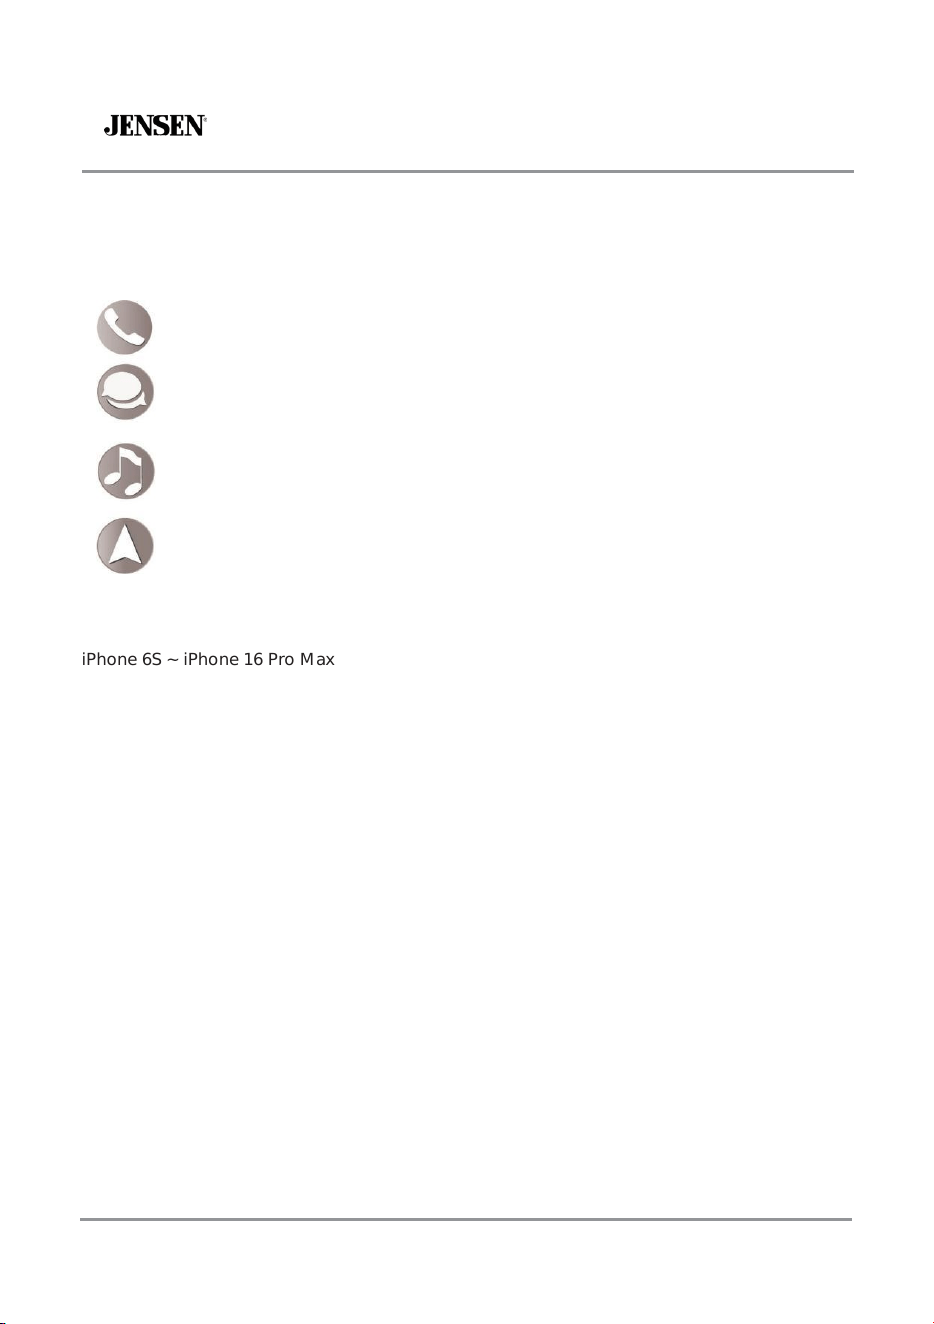
Phone - Use Siri to make calls, return missed calls, listen to voicemail
messages, and view the caller ID on the receiver’s screen.
Messages - Ask Siri to send, read, and reply to text messages. This hands
free operation minimizes distraction and allows you to keep hands on the
wheel and eyes on the road.
Music - Access music by artist, song, playlist, and more through the
receiver’s touchscreen or via Siri. The receiver will mirror the iPhone screen
with artist and track information.
Maps - Use Siri to request turn-by-turn directions – search by address or
points of interest. Apple Maps will be mirrored on the screen, including
traffic information and estimated time to destination.
Compatible
Devices
Note:
Made for iPhone models:
Starting Apple CarPlay
Wireless CarPlay Connection Descriotion.
1.
Enter the main UI and click BT Phone to enter the Bluetooth interface;
2.
Click Refresh to search nearby Bluetooth, click Pair to match Bluetooth;
3.
Open the iPhone WLAN to connect to the car, after the connection is successful, the Apple
CarPlay icon in the device list will appear, and the Apple CarPlay connection is successful;
4.
Enter the Apple CarPlay interface, click the functions of Phone/ Music/Map/Information/etc.
Note: For safety reasons, Apple CarPlay features are limited while driving and will
vary with each Apple CarPlay-enabled app. Available functions are determined by each
individual app provider. For more information, visit www.apple.com/ios/carplay.
Certain iPhone functions may be illegal while driving in your location. Be sure to
familiarize yourself with local and state laws regarding mobile devices. When in
doubt, stop and park your vehicle before using any devices.
iPhone 6S ~ iPhone 16 Pro Max
CAR1415
22
Apple CarPlay
®
Operation
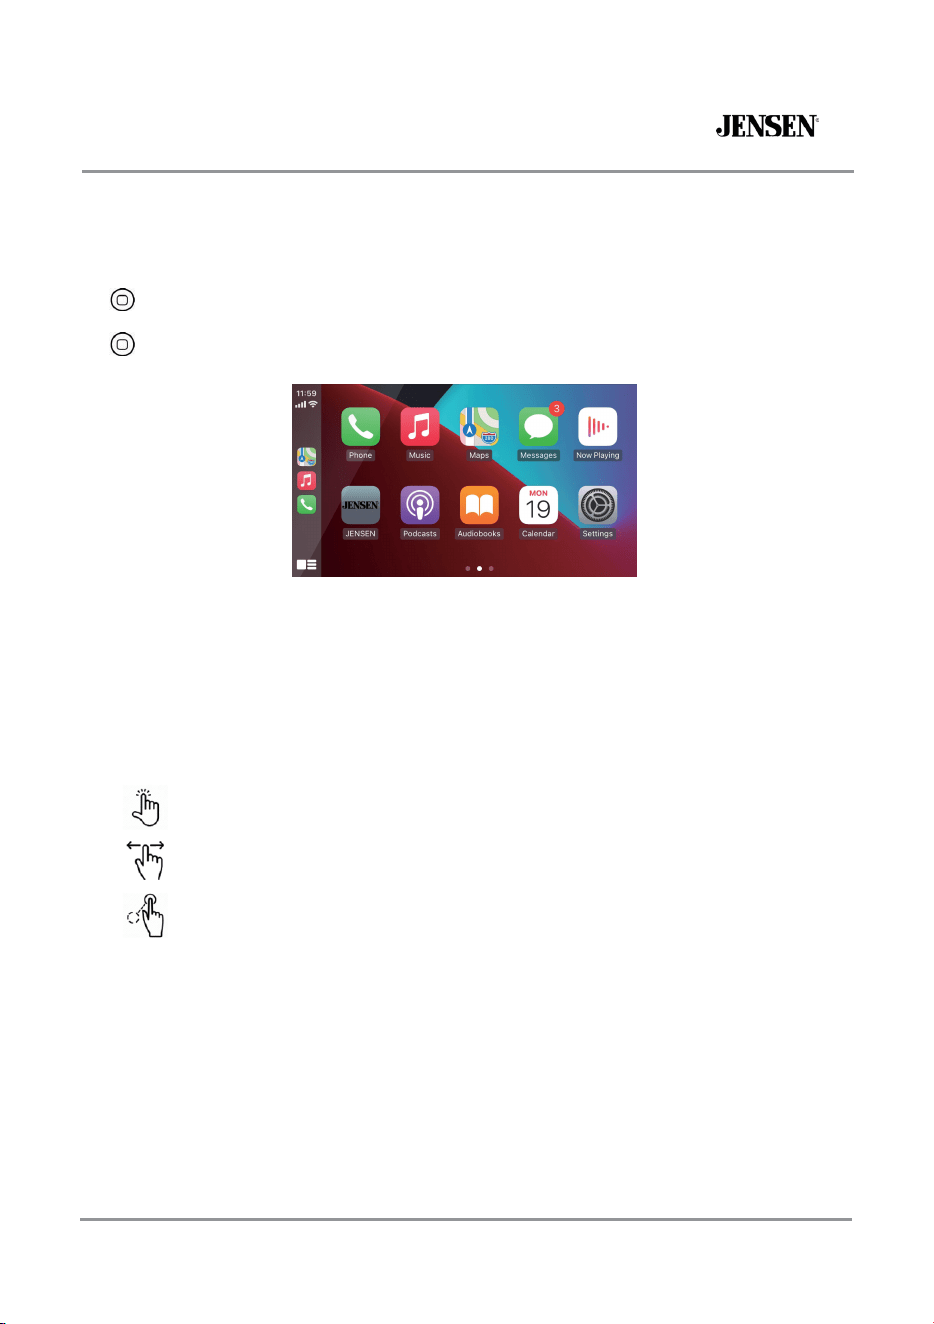
When the Apple CarPlay menu is displayed, the home button in the lower left corner
work just like the home button on your iPhone.
Press and hold it to summon Siri and begin your voice commands.
At any time during Apple CarPlay operation, you can press this button
momentarily to return to the main Apple CarPlay menu screen.
Press any Application button on the main Apple CarPlay menu to access that operation
directly. The toolbar on the left side of the screen displays the time, signal strength
and shortcuts to the most popular applications - Phone, Music and Navigation - so
they can be accessed quickly and easily without returning to the main menu.
Controlling Apple CarPlay
The following basic controls will operate many standard Apple CarPlay features.
Touch - Briefly press the desired option.
Swipe - Briefly swipe in the desired direction.
Drag - Press, hold and drag to the desired location.
Exiting Apple CarPlay
Disconnecting your iPhone will automatically exit Apple CarPlay mode. To exit Apple
CarPlay mode while your phone is still connected, press the Power/Volume knob
momentarily, and the unit's main menu will be displayed.

CAR1415
23
Android Auto™ Operation
Android Auto brings the most useful apps to your phone screen or your compatible car
display, in a format that makes it easy for you to keep your main focus on driving. You
can control things like navigation and maps, calls and text messages, and music.
Google
Assistant
With your Google Assistant on Android Auto, you can keep your eyes on the road and
your hands on the wheel while using your voice to help you with your day. Simply
say, “Ok Google,” or in compatible cars, long press the voice control button on your
steering wheel.
Navigation
Get real-time traffic alerts to avoid hazards, speed traps, and find the fastest route. Or
take a break and find a bite along the way.
Calls & Messages
Your Google Assistant lets you stay connected while you’re driving. Your Assistant can
help you call phone numbers from your contacts, chat with your favorite apps, read
your messages aloud and text back, keeping your hands on the wheel.
Compatible
Devices
Android Auto requires the Android Auto app from Google Play installed on an Android
smartphone running Android Lollipop 5.0 or higher.
Warning:
Certain uses of the smartphone may not be legal while driving in your jurisdiction,
so you must be aware of and obey any such restrictions. If in doubt as to a particular
function, only perform it while the car is parked. No feature should be used unless it is
safe to do so under the driving conditions you are experiencing.
Starting Android Auto
Wireless Android Auto Connection Descriotion.
1.
Enter the main UI and click BT Phone to enter the Bluetooth interface;
2.
Click Refresh to search nearby Bluetooth, You'd better turn on your Phone's WLAN
before you connect to Bluetooth, otherwise the connection will fail;
3.
Click Pair to match Bluetooth, then there will be a notification to select settings and
select your mobile Phone, and the Android Auto connection is successful;
4.
Enter the Android Auto interface, click the functions of Phone/ Music/Map/
Information/etc.
Note: When the device for Android Auto is connected to this unit, the device is also
connected via Bluetooth at the same time. If five devices are already paired, the
message confirming whether to delete the registered device is displayed. If you want to
delete the device, touch [Agree]. If you want to delete other device, touch [BT Settings]
and delete the devices manually.
Note: If Android Auto is turned on during a call on a cellular phone other than the
Android Auto compatible device, the Bluetooth connection will switch to the Android
Auto compatible device after the call.
CAR1415
24
1 2
3 4 5 6
Android Auto™ Operation
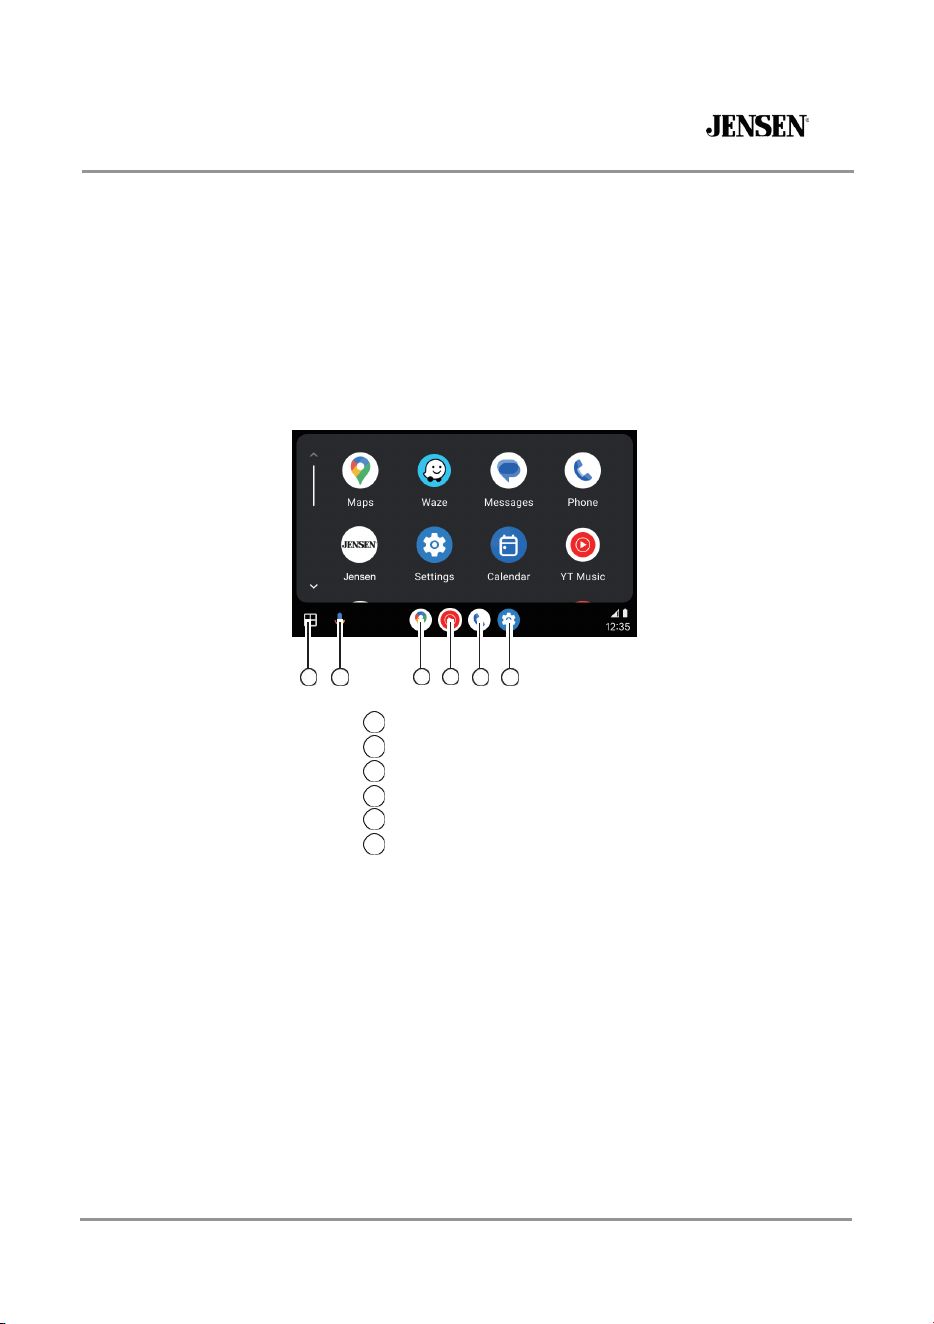
Using Android Auto
The Android Auto home screen displays personalized information, like time to your
destination, reminders, recent calls incoming messages, the song you're listening to,
and Google Now cards.
When the Android Auto menu is displayed, you can say "OK Google" or select the
microphone in the upper right corner to talk to Google.
Recent Apps
Google Assistant
Google Maps
YouTube
Phone
Settings
Exiting Android Auto
To exit Android Auto, press the Exit button. Disconnecting your Android phone will
automatically exit Android Auto mode.
1
2
3
4
5
6
CAR1415
A/V
I
25
N
Rear RCA Input
Connect an optional audio/video source into the RCA (rear) input.
Adjust volume on the external audio source as needed (if connected
to the headphone output of the device).
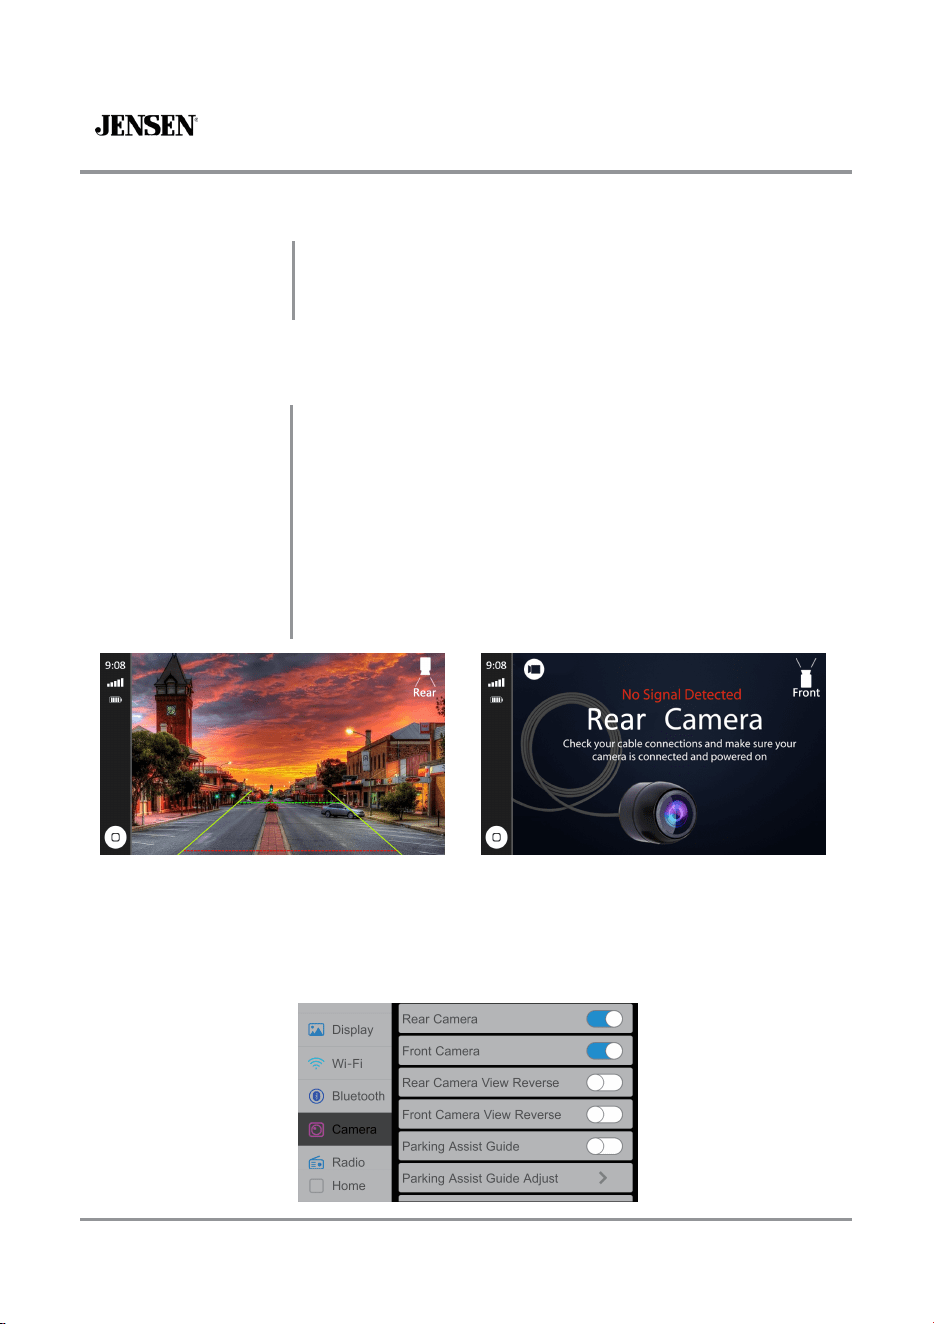
Front and Rear Camera Operation - (Optional)
Using the Cameras
Auto
Selection
Connect an optional camera to the front or rear Camera Input. Refer
to the wiring diagram for details.
The unit will automatically select camera mode when connected to
the reverse lamp circuitry.
Touch the CAMERA icon on the Main Menu (when enabled) to select
camera mode. Touch the top left area of the screen to return to the
Main Menu to turn this feature off.
Note
: The manual mode is for dedicated cameras that are connected
to the 12VDC+ ignition wire and are always on while driving, it is not
meant for cameras that are connected to the vehicle's reverse light.
Adjusting Front and Rear Camera Screen Image
If your front or rear cameras appear to have a reversed image on the radio’s display, go into the
Camera section in the Settings menu to reverse the image of the camera. To do this, toggle the "Rear
Camera View Reverse" or "Front Camera View Reverse" function to correct the viewing angle of the
camera(s).
CAR1415
26
SWC Input Operation
The built-in SWC Interface is compatible with PAC steering wheel control modules.
The PAC SWI-RC is recommended. A third-party adapter must be used in order for the
CAR1415 to be compatible with any steering wheel controls. The following controls are
available for most vehicles.
1. Preset Up/Down 4. Seek/Track Down (-) 7. Volume Down (-) 10. BT End
2.
Mode
5.
Mute
8.
Band
3. Seek/Track Up (+) 6. Volume Up (+) 9. BT Talk
Note: Not all OE steering wheel functions may be supported by the CAR1415.
PAC SWI-RC Installation Hints
1.
Set "Radio Select Switch". Set the SWI-RC to position 7 - "Pioneer/Other/Sony".
2.
To program, use the Pioneer/Sony/Other radio function mapping order for Jensen units.
3.
When programming the SWI-RC, if a function is not supported (or not desired), then the
function MUST be skipped as per the PAC SWI-RC instructions.
4.
The SWC function MUST be programmed in the correct order per the PAC SWI-RC radio
function mapping order instructions.
Function
Order
Function
Mapping
SWI-RC (3.3VDC Reference)
Center Pin (Ring)
Voltage
(Function Select)
Tip Pin Voltage
1 Preset Up/Down L 0.0V 1.54/1.81
2 Mode H 3.3V 0.6
3 Seek + / Track + H 3.3v 1.54
4 Seek - / Track - H 3.3v 1.81
5 Mute H 3.3v 1.01
6 Volume + H 3.3v 2.07
7 Volume
-
H 3.3v 2.32
8
Band
H 3.3v 2.73
9 BT Talk L 0.0V 0.60
10 BT End L 0.0V 1.01
CAR1415
27
SiriusXM
®
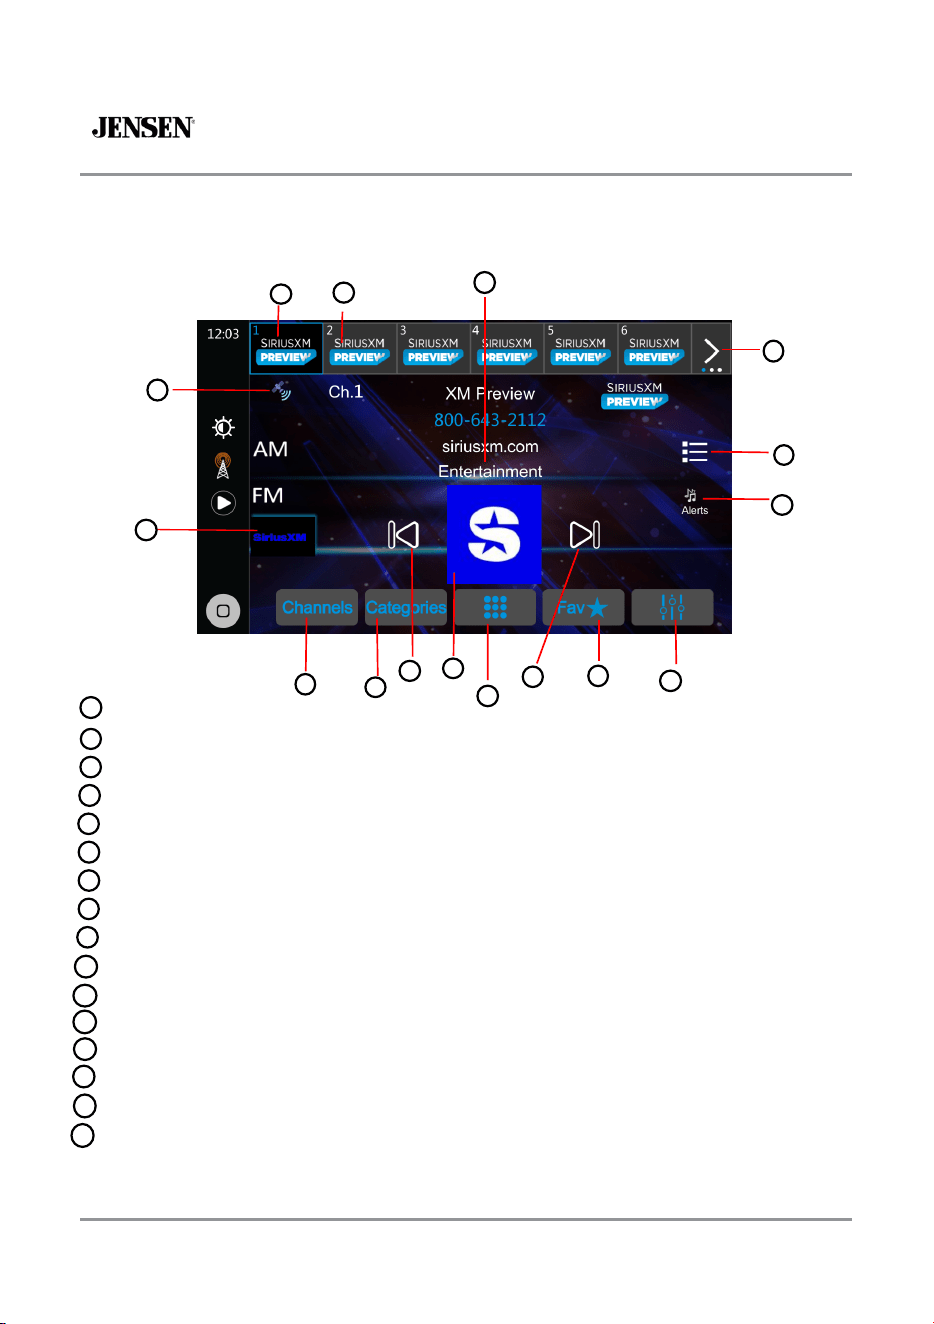
Satellite Radio Operation
From the main menu,touch the SXM icon on the main screen.
1
2
3
4
5
6
7
8
9
10
11
12
13
14
Band Selector
Satellite Strength
BAND Presets 1~6
Channel Info
File Information
Quick Select Bands
Additional Options
Favorites Alert
Direct Equalizer
Favorites Manager
Next
Direct Channel Entry
Channel / Album Artwork
Previous
Category Manager
15
16
Channel Manager
1
2
3
4
6
5
15
9
8
7
14
13
12
11
10
16
CAR1415
2
28
6
SiriusXM
®
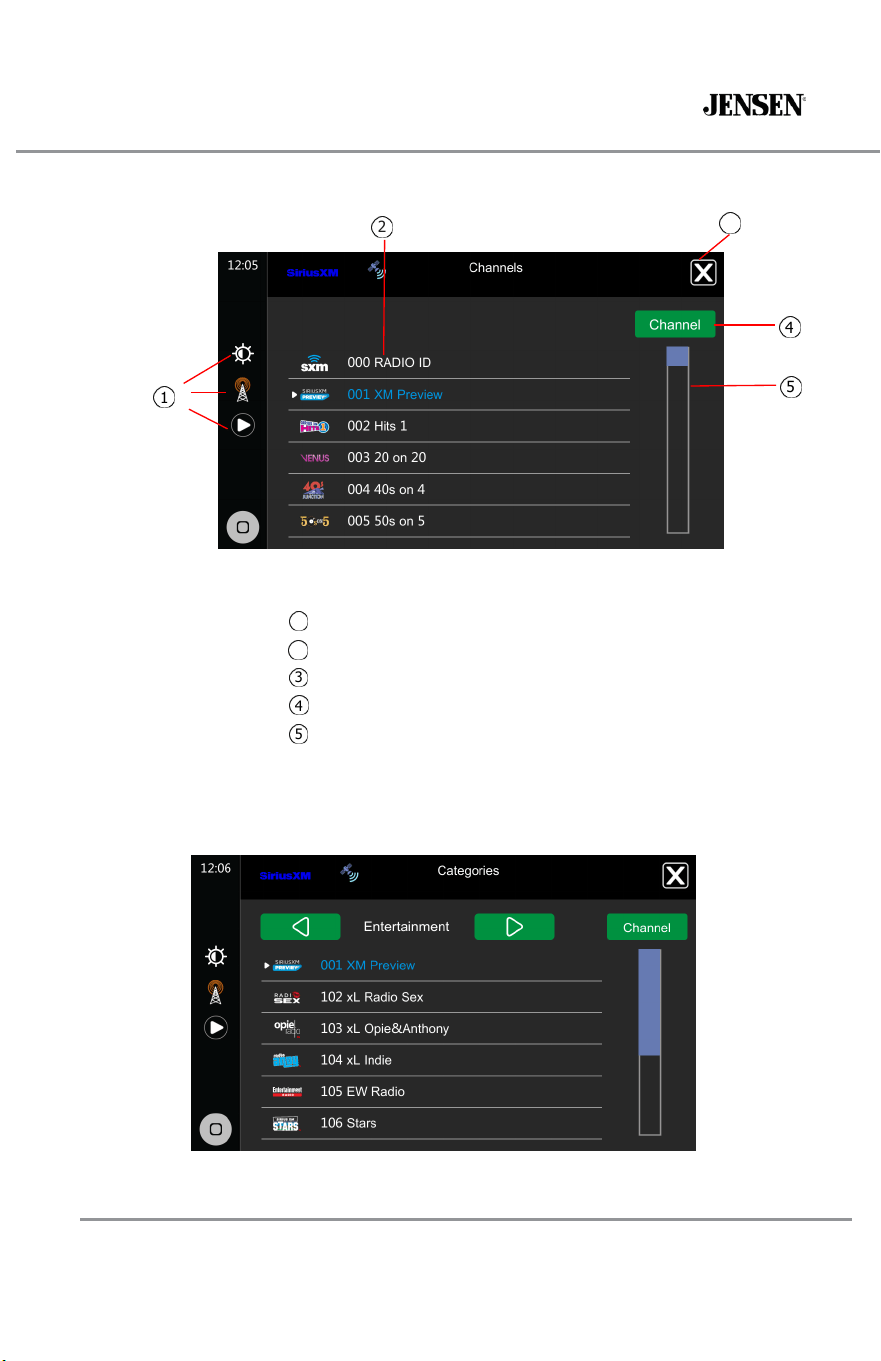
Radio Operation - Part 1
Category Manager
Quick Select Sources
1
Press for any of Top 3 Sources in use
Channel List
2
Channel Information
Media Player
3
Press to return to SXM mode
Info Selection
4
Channel | Artist | Song | Info
Page Scrolling
5
Drag up or down for quick page scrolling
Channel Manager
2
3
4
5
1
29
Press
here to
select
SiriusXM
®
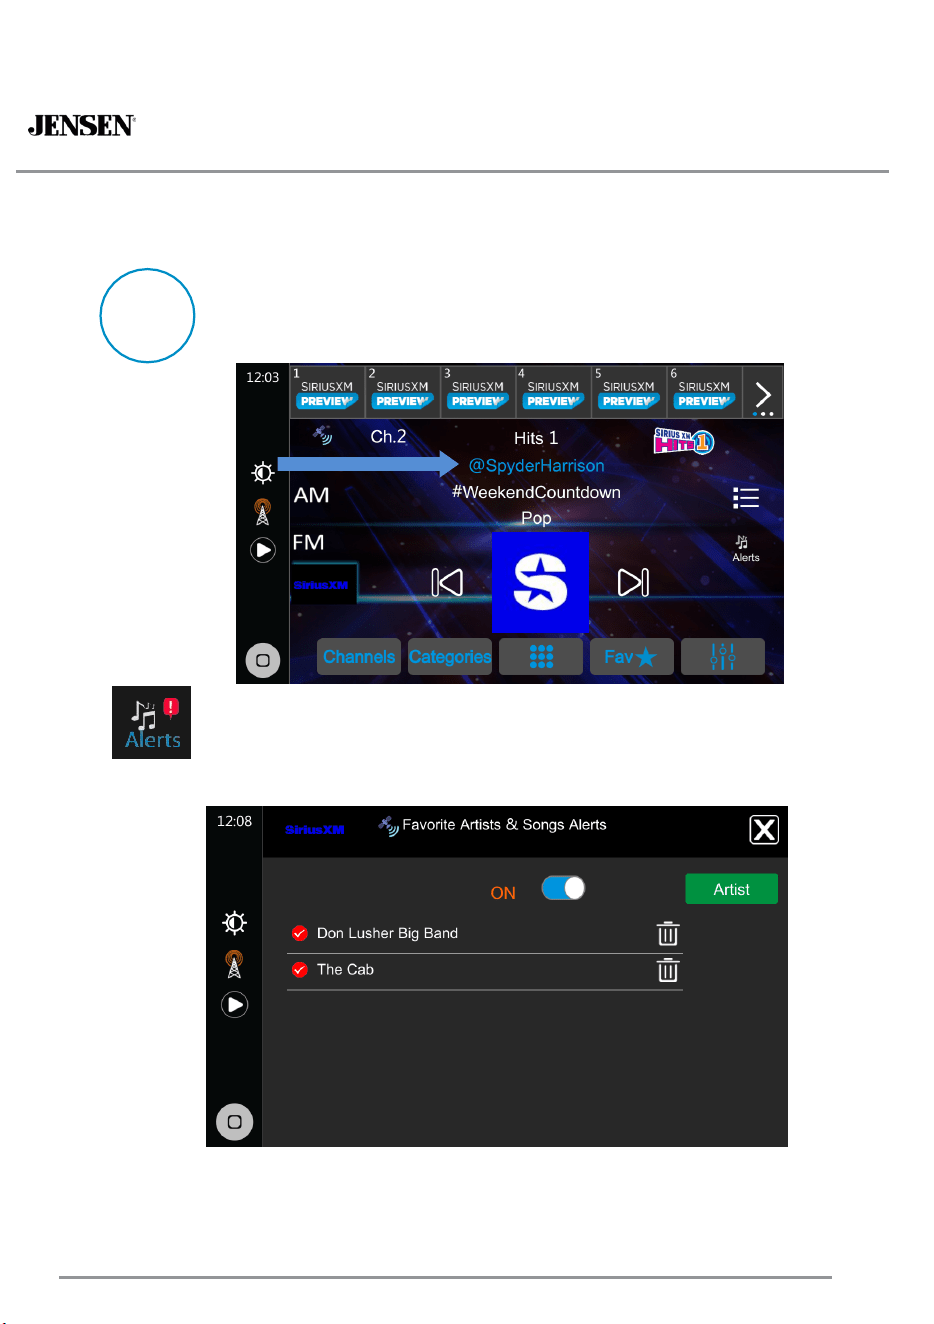
Radio Operation - Part 2
Favorite Selection
Alert is active when a Favorite Song or Artist is available
Favorites Manager
CAR1415
CAR1415
30
SiriusXM
®
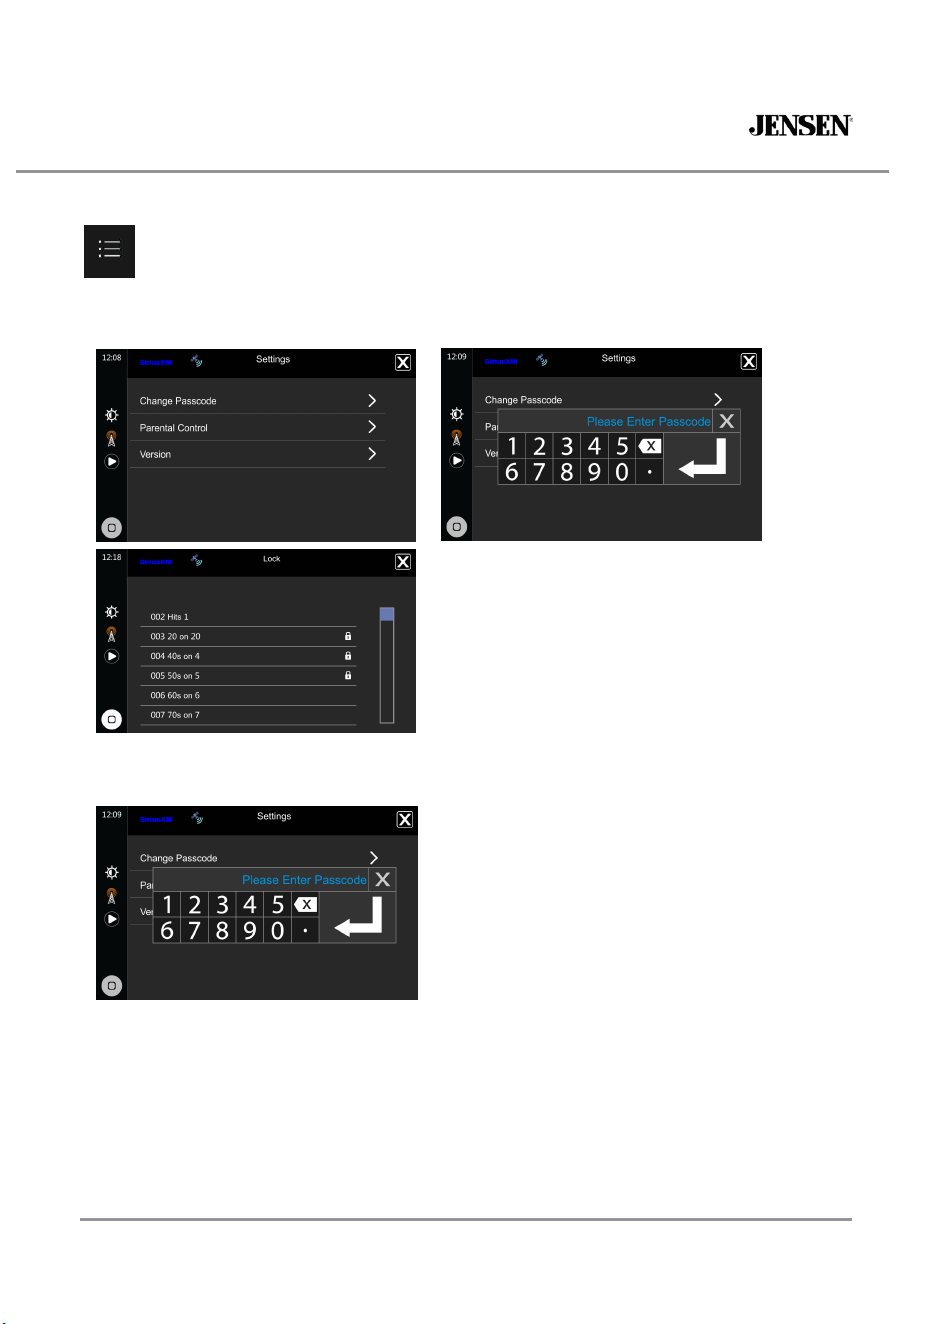
Parental Control
Settings Menu
1. On the SirusXM menu touch Parental Control. The Enter password Screen appears.
2. Enter your 4-digit password. The following screen appears:
Lock / Unlock Screen
3. Touch to Station lock, touch lock icon to unlock, the icon will disappear. Channel is unlocked.
The Change Password option allows you to change the password from the default or current custom
password to another password.
NOTE:The default password is 0 0 0 0.
To Change password:
1. Enter into Settings menu. Go to SXM to change password.
2. Enter your 4-digit password and press the OK icon.
3. Enter the new 4-digit password and press the OK icon. The new password is set.
CAR1415
SiriusXM
®
Radio Advisory Message
31
s
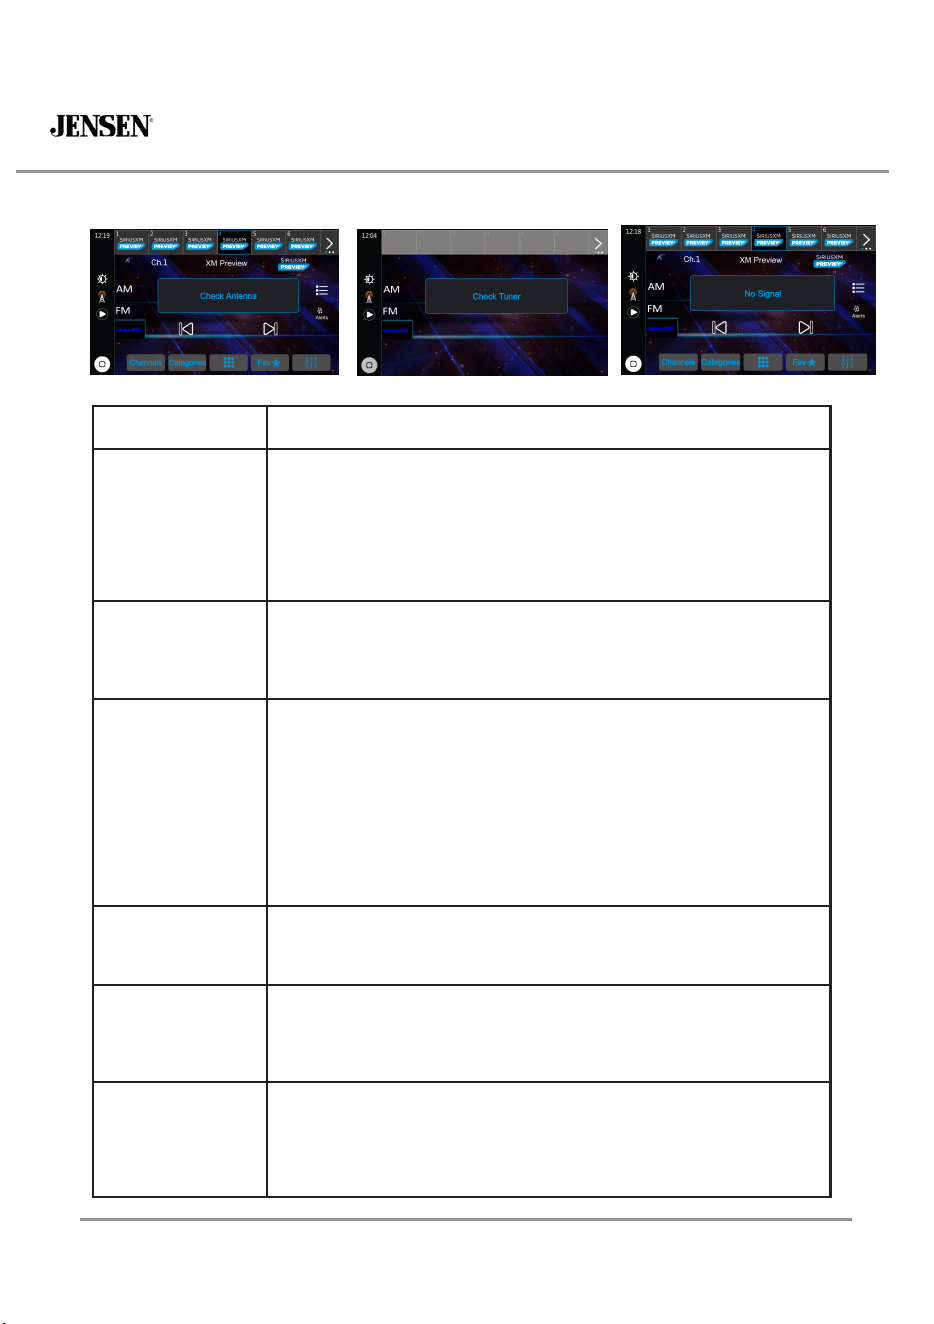
SiriusXM
Advisory Message
Recommendation
Check Antenna
1. The radio has detected a fault with the SiriusXM antenna. The
antenna cable may be either disconnected or damage.
2. Verify that the antenna cable is connected to the SiriusXM Connect
Vehicle Tuner.
3. Inspect the antenna cable for damage and kinks. Replace the
antenna if the cable is damaged.
4. SiriusXM products are available at your local car audio retailer or
online at www.shop.siriusxm.com.
Check Tuner
1. The radio is having difficulty communicating with the SiriusXM
Connect Vehicle Tuner. The tuner may be disconnected or
damaged.
2. Verify that the SiriusXM Connect Vehicle Tuner cable is securely
connected to the radio
No Signal
1. The SiriusXM Connect Vehicle Tuner is having difficulty receiving
the SiriusXM satellite signal.
2. Verify that your vehicle is outdoors with a clear view of the sky.
3. Verify that the SiriusXM magnetic mount antenna is mounted on a
metal surface on the outside of the vehicle.
4. Move the SiriusXM antenna away from any obstructions.
5. Inspect the antenna cable for damages and kinks.
6. Consult the SiriusXM Connect Vehicle tuner installation manual for
more information on antenna installation. Replace the antenna if the
cable is damaged. SiriusXM products are available at your local car
audio retailer or online at www.shop.siriusxm.com.
Subscription
Updated
This channel is not included in your SiriusXM
®
subscription plan. In the
USA, visit www.siriusxm.com or call 1-866-635-2349 if you have questions
about your subscription. In Canada, visit www.siriusxm.ca or call 1-888-
539-7474 if you have questions about your subscription.
Channel Unavailable
The channel that you have requested is not a valid SiriusXM channel or
the channel that you were listening to is no longer available. You may
also see this message briefly when first connecting a new SiriusXM
Connect Vehicle tuner. Visit www.siriusxm.com for more information
about the SiriusXM channel lineup.
Channel
Unsubscribed
The channel that you have requested is not included in your SiriusXM
subscription package or is no longer included in your SiriusXM
subscription package. In the USA, visit www.siriusxm.com or call 1-866-
635-2349 if you have questions about your subscription. In Canada, visit
www.siriusxm.ca or call 1-888-539-7474 if you have questions about
your subscription.

CAR1415
Channel Locke
32
d
The channel that you have requested is locked by the radio’s Parental
Control feature. Refer to the SiriusXM
®
Satellite Radio Operation section
for more information on the Mature Channel Lock feature and how to
access.

CAR1415
33
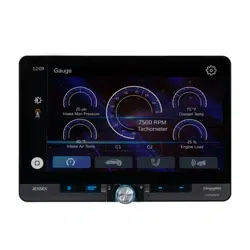
iDatalink Operation
Summary
You can access the satellite radio source provided for the vehicle. The vehicle
information and many OEM systems such as steering wheel controls, warning
chimes,driver safety systems, and etc. can be displayed on this product by connecting
the optional iDatalink adaptor. lt is also possible to add visual screens such as
gauges,vehicle information, climate control, and parking assist. However, an extra
interface module is required to access these features.
NOTE
Since the type of module varies depending on the vehicle model, search for your
vehicle via the following URL to determine which features are available for each
module. Remember to select the correct radio model for accurate results.
https://www.idatalinkmaestro.com/en
Important
For details about vehicle models that are compatible with the iDatalink adaptor,
refer to the information on our website.
After installing the iDatalink adaptor, be sure to check that it operates properly.
Functions and displays vary depending on the vehicle model. For details on the
functions available for each model, refer to the information on our website.
For troubleshooting information about iDatalink functions, visit the following
website:
https://www.idatalinkmaestro.com/en/support/faq
Limitations
The data is transmitted to this product from your vehicle system via the connected
iDatalink adaptor. Therefore, the actual data contents displayed on your product
may differ from the contents on the screen described in this manual.
When information on your vehicle or on the devices in your vehicle is sent from
the iDatalink Maestro module, a screen notifying you of such information may
pop up.
TIP
The operating buttons, text information, etc. overlaid on the camera view screen may
not appear immediately after turning on the ignition switch.

CAR1415
34
iDatalink Operation
Activating iDatalink Maestro
Before using and/or connecting the iDatalink Maestro adaptor,you will need to first
flash the Maestro RR module with the appropriate vehicle and head unit firmware.
1.Find the Maestro serial number(The last 7 digits of 16 Arabic numerals) of this
product.
2.Access the following website and follow the on-screen instructions to configure the
desired firmware.
https://www.idatalinkmaestro.com/en
NOTE
When the serial number input is required, input the device number of this product.
3.lnstall the vehicle/head unit-specific firmware on your iDatalink Maestro module.
4.Connect this product to the iDatalink Maestro and install this product to the vehicle.
The iDatalink function will be active.
NOTES
For details on installing the firmware, refer to iDatalink Maestro website.
For details on connecting this product to iDatalink Maestro, refer to the Installation
Manual.
You can also check the device number (serial number) on the [Setting>About>
Idata SN] screen of this product.
Starting procedure
1.Connect the iDatalink Maestro adaptor to this product.
For details, refer to the lnstallation Manual.
2.Touch on home screen.
NOTE
The iDatalink function is available only when the input signal is received by the
iDatalink Maestro adaptor.
CAR1415
35
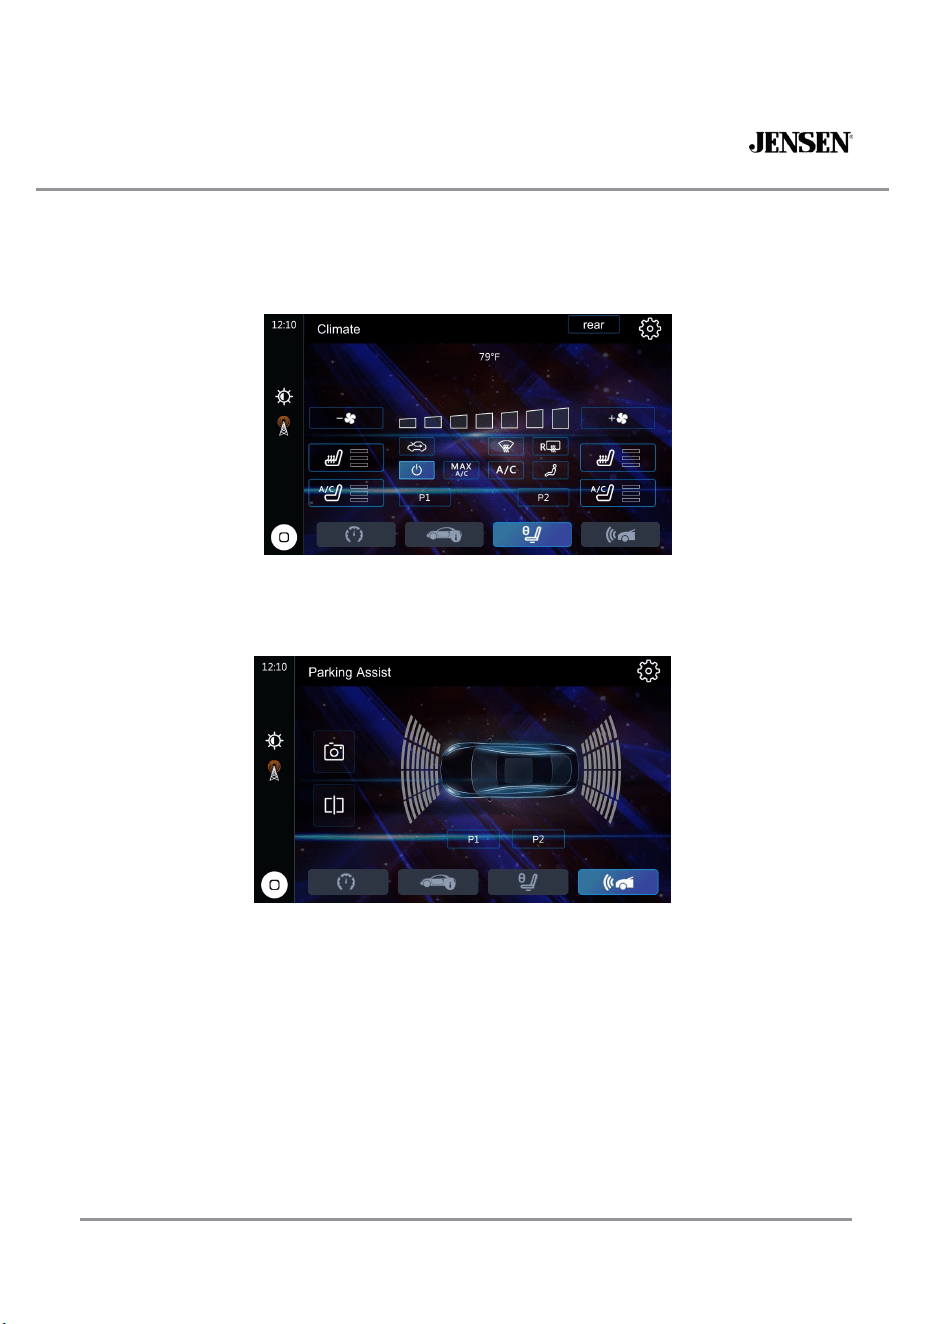
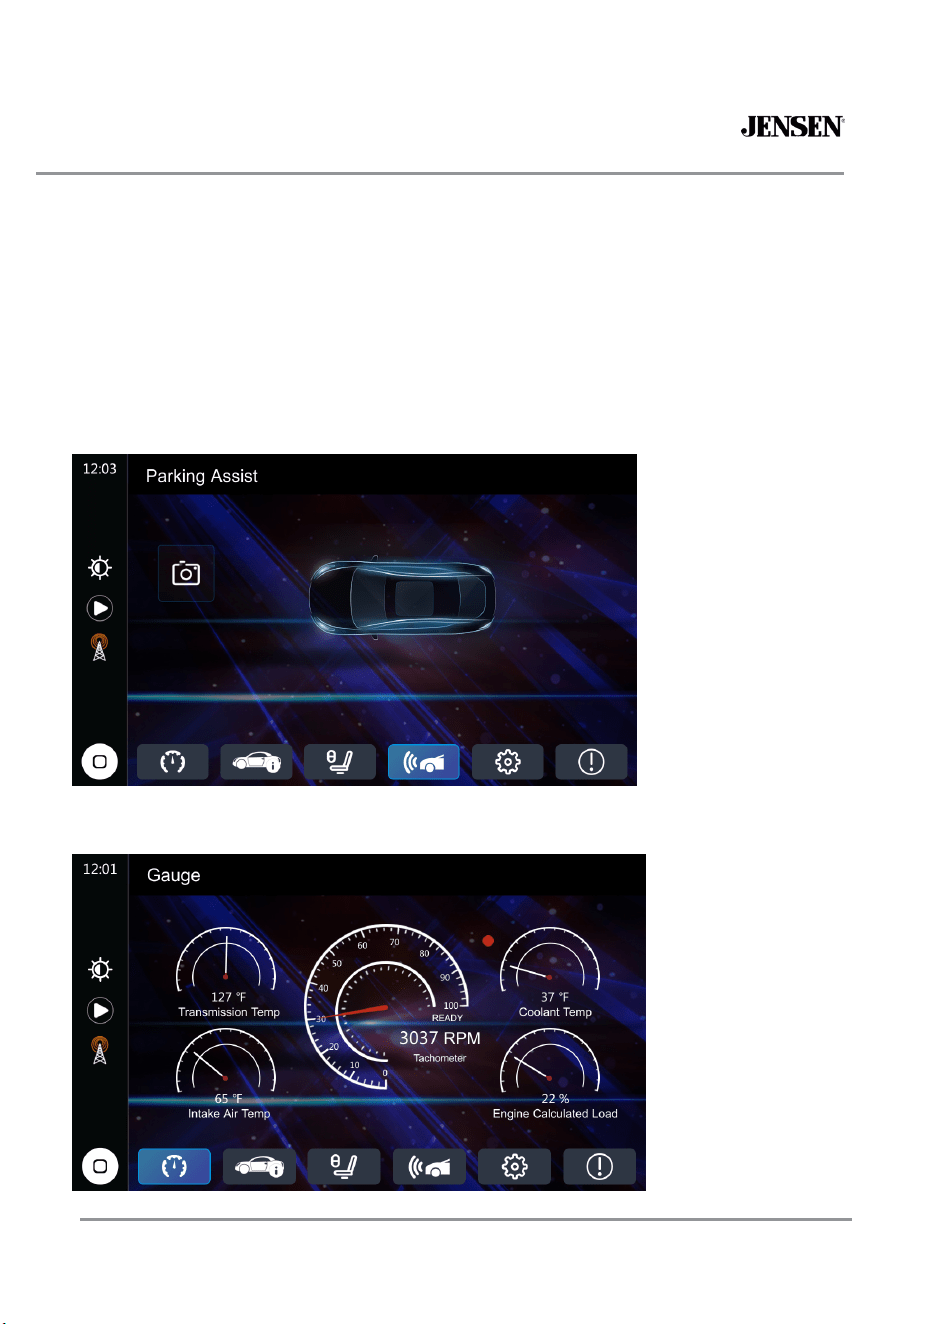
iDatalink Operation
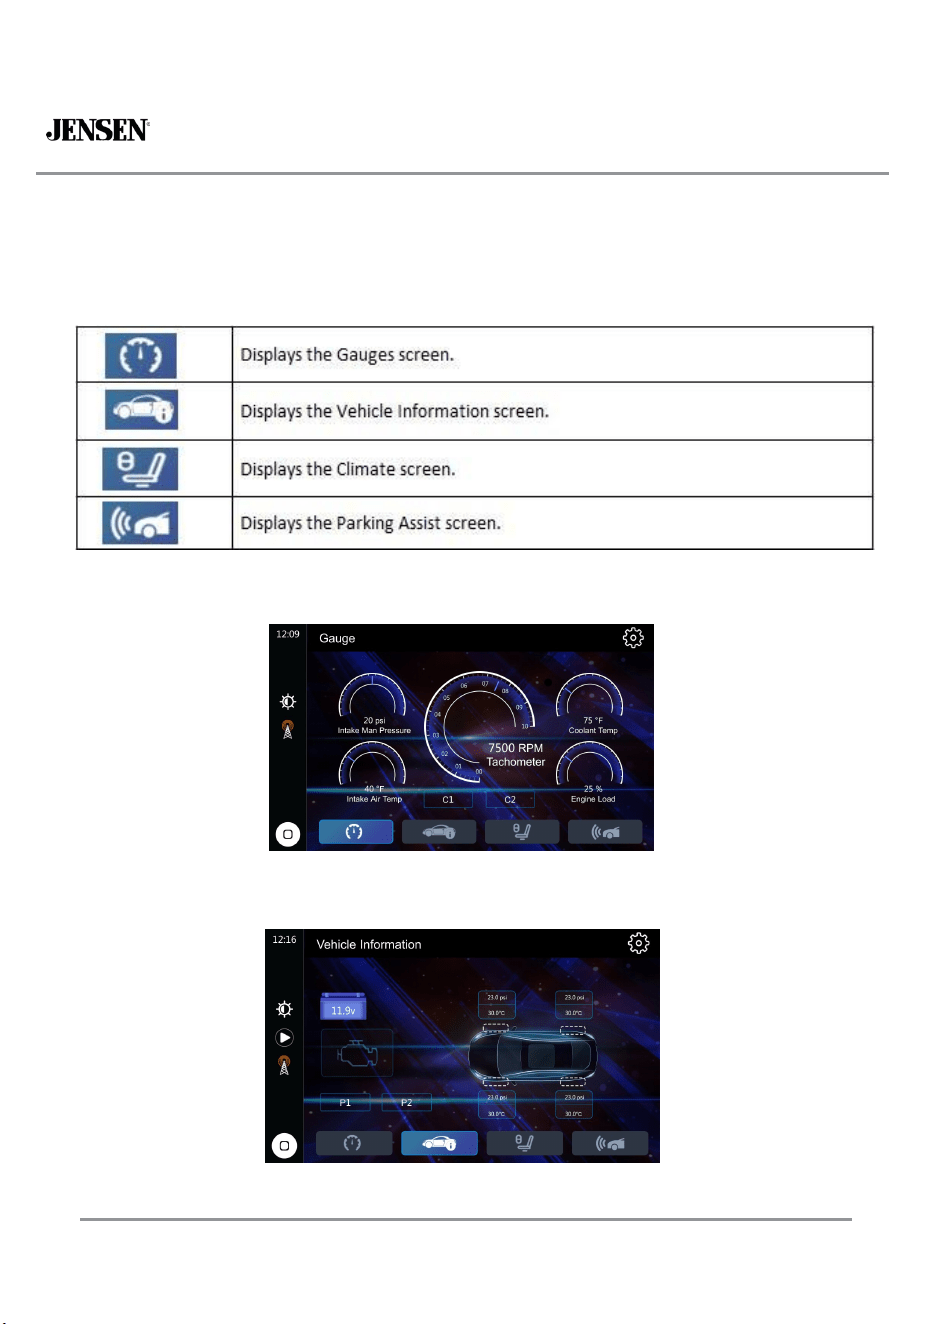
You can check and use the following screens after selecting[Car Features] in the
starting procedure.Touch one of the icons on the bottom of the screen to switch a
feature.
Gauges screen
Vehicle lnformation screen
CAR1415
36
iDatalink Operation
Climate screen
Parking Assist screen
Displaying obstacle detection information
CAUTION
This function is intended solely to assist the driver's vision. lt does not detect all
dangers and obstacles and is not a substitute for your attentiveness, judgement, and
care while parking your vehicle.
NOTE
This function is only available for vehicles equipped with a parking sensor system.

CAR1415
37
iDatalink Operation
iDatalink settings
1 Touch Upper right corner icon.
The upper right corner of all four interfaces ( Gauges screen, Vehicle Information screen
, Climate screen, Parking Assist screen) should have a setting button,
which can be clicked to perform corresponding display or function settings.
CAR1415
38
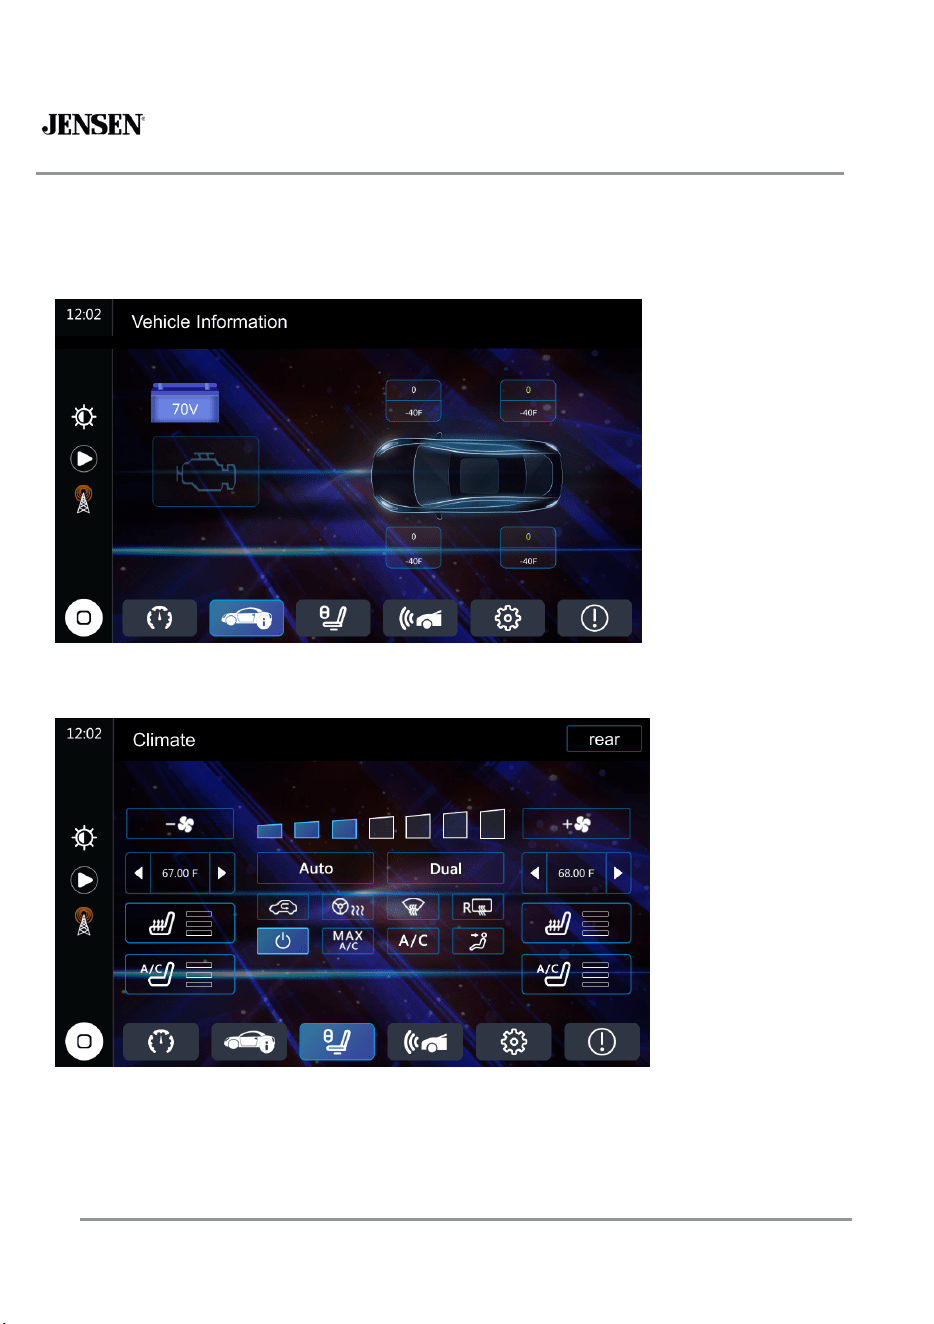
Metra Operation
This Jensen receiver connects with a compatible Metra programmable interface
(optional, purchased separately*), allowing the unit to display OEM features and
functions such as Vehicle Info, Gauge, Vehicle Information, Climate, Parking Assist,
Customizations. The functions that are displayed are dependent on what is available on
your specific vehicle.
Parking Assist
Gauge
CAR1415
39
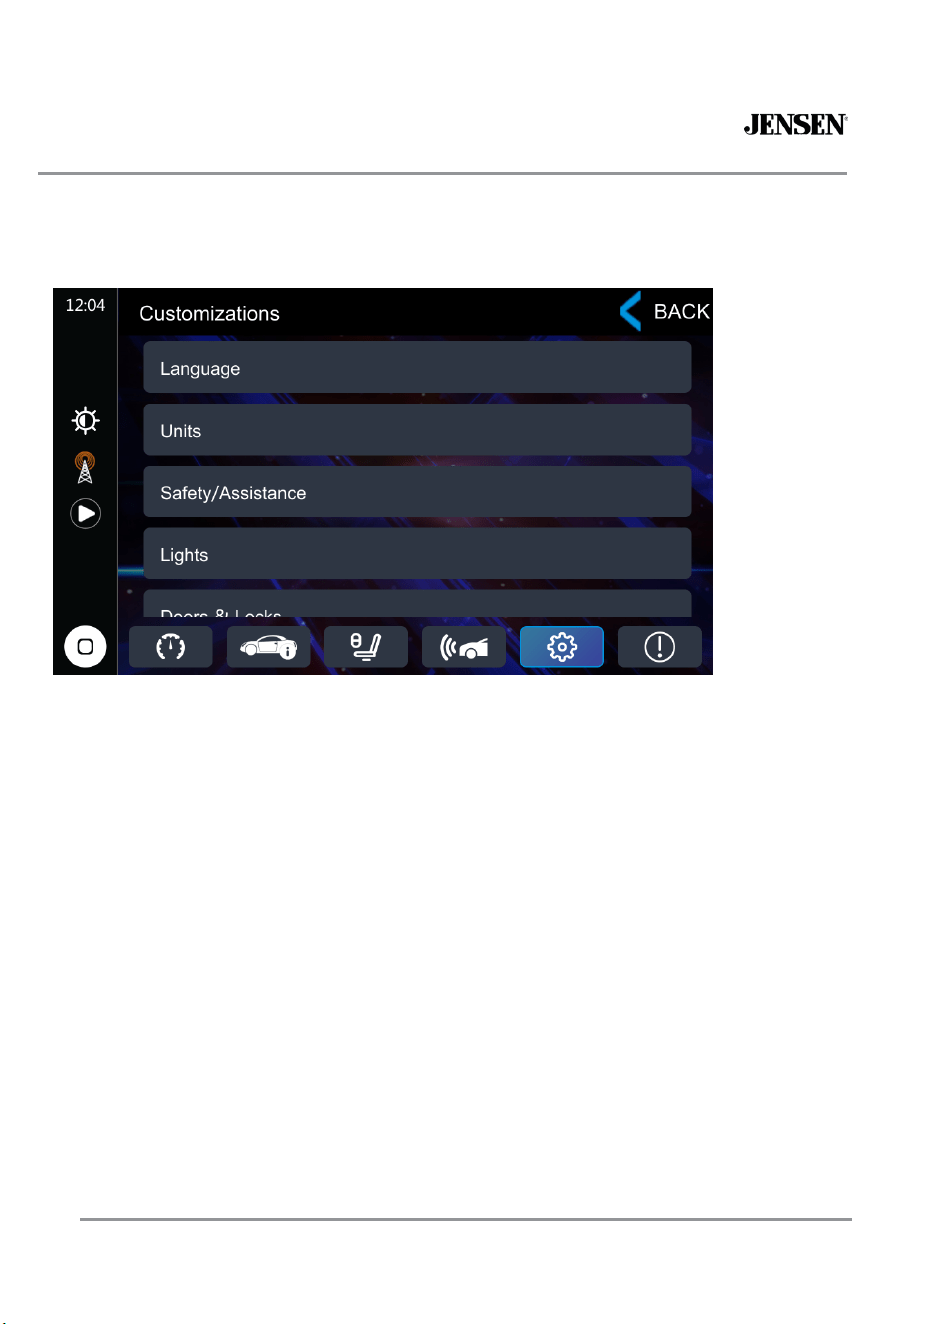
Metra Operation
Vehicle Information
Climate
CAR1415
40
Metra Operation
Customizations
CAR1415
41
Troubleshooting
General
Problem
Cause Action
Unit will not turn on
(no power)
Yellow wire not connected or incorrect
voltage Red wire not connected or incorrect
voltage
Check connections for proper voltage (11~16VDC)
Black wire not connected Check connection to ground
Fuse blown
Replace fuse(s)
Unit has power
(but no sound)
Speaker wires not connected Check connections at speakers
One or more speaker wires touching each
other or touching chassis ground
Insulate all bare speaker wires from each other and
chassis ground
Unit blows fuse(s)
Yellow or red wire touching chassis ground Check for pinched wire
Speaker wires touching chassis ground Check for pinched wire
Incorrect fuse rating Use fuses with correct rating
Unit has audio
(but no video)
Parking brake safety circuit not connected
Parking brake not applied
Check connections at parking brake
Apply parking brake as described on page 26
IR remote does not work
Dead battery Replace battery
For Your Records
Please keep your original sales receipt and be prepared to provide this receipt
in the event you require service, as your original receipt is considered the best
proof of purchase and indicates the date you purchased your Jensen product.
Dealer Name
Dealer Phone
Purchase Date
Register Your Product Register your product online at www.jensenmobile.com.
Firmware Upgrades
If a product or software update becomes available, you may find these updates on our website under
your product model number.
Please go to www.jensenmobile.com to check for new updates.
Updates can be completed with a user supplied USB drive, typically 8GB or 16GB in size from one of the
below recommended manufacturers:
●SanDisk, Kingston, PNY, Samsung, Corsair or Verbatim.
●These are
readily available online or at most retail locations that sell electronics.
The drive needs to support USB 2.0 or faster transfer speeds. Older version USB 1.0 is not compatible 。
Format the drive using the FAT32 file system.
42
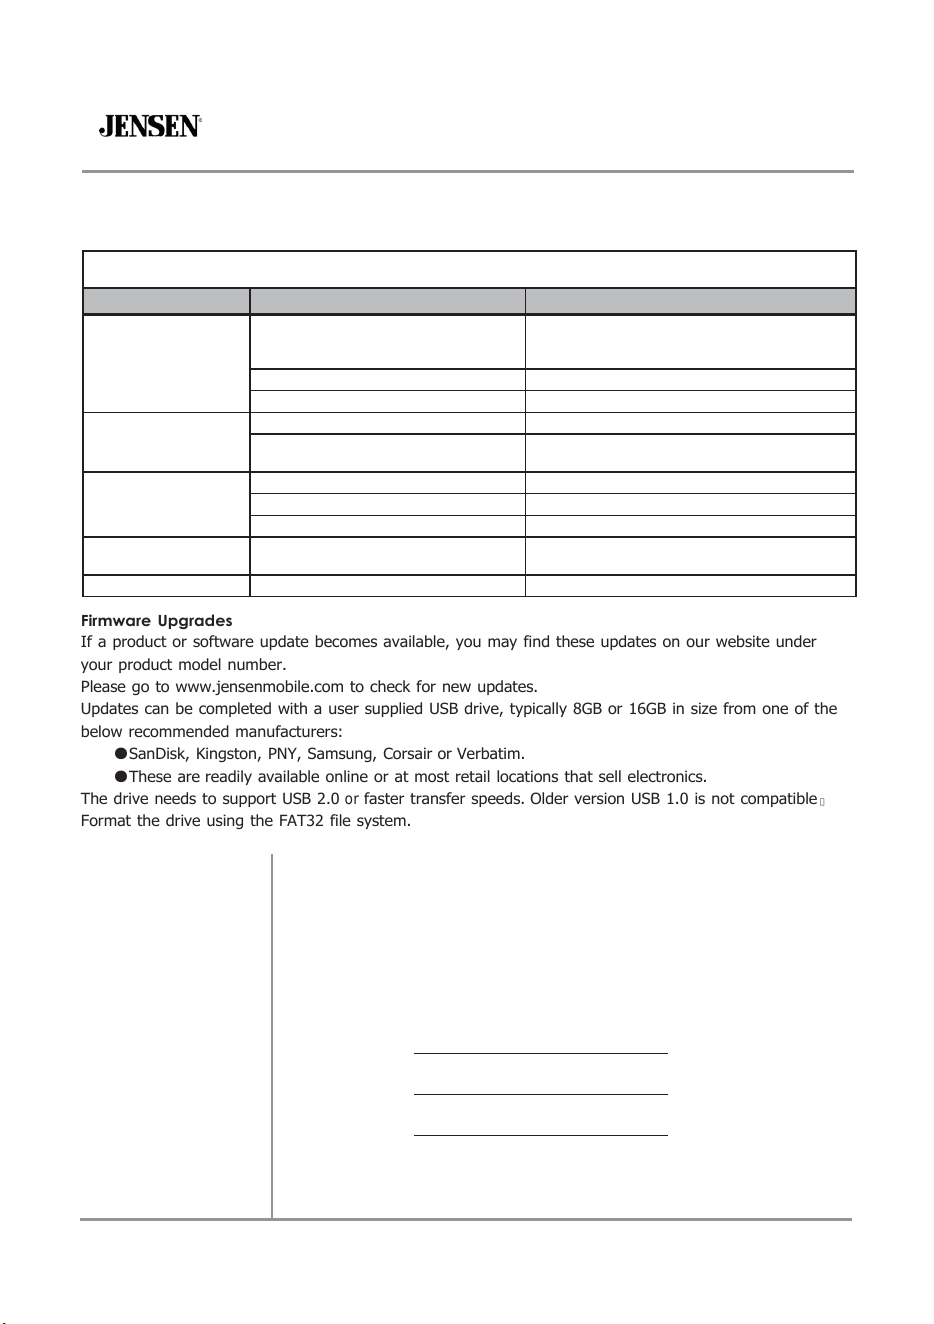
Specifications
FM Tuner
AM
Tuner
Rear USB
Tuning range: 87.5MHz-107.9MHz
Usable sensitivity:
USB port s: 1. USB-C: for Charging and Playback
50dB quieting sensitivity: 20dBf
Stereo separation @ 1kHz: 38dB
Frequency response: 30Hz-13kHz
Tuning range: 530kHz-1710kHz
Usable sensitivity:
24uV
Frequency response: 30Hz-2.3kHz
Compatibility:
High Speed USB 2.0
USB Class:
Mass storage class (There
are t
wo
;
General
10dBf
Resolution:
1366 (H) x 768 (V)
Brightness (cd/m
2
): 500
Contrast ratio: 500:1
Pixels: 1,152,000
Speaker output impedance:
4 ohms
Line output voltage: 4
2. USB-A: only for AA/CP with charging
but no playback)
Panel size: 14” diagonal measurement View
angle (up/down/left/right): 50/70/70/70
volt RMS
CEA-2006 Power Standard Specifications
(reference: 14.4VDC +/- 0.2V, 20Hz~20kHz)
Power Output: 16 Watts RMS x 4 channels at 4 ohms and ≤1%THD+N
Signal to Noise Ratio: 80dBA (reference: 1 watt into 4 ohms)
Monitor
Line output impedance: 200 ohms
Chassis dimensions: 7" X 4.1" X 2" (W x D x H)
Design and specifications subject to change without notice.

CAR1415
43
Limited Three Year* Warranty
What to do?
1.
Before you call for service, check the
troubleshooting guide in your owner’s manual. A
slight adjustment of any custom controls may save
you a service call.
2.
If you require service during the warranty
period, you must carefully pack the product
(preferably in the original package) and ship it by
prepaid transportation with a copy of the original
receipt from the retailer to an authorized service
center.
3.
Please describe your problem in writing and
include your name, a return UPS shipping address
(P.O. Box not acceptable), and a daytime phone
number with your shipment.
4.
For more information and for the location of the
nearest authorized service center please contact
us by one of the following methods
This warranty gives you specific legal rights. You
may also have other rights which vary from state
to state.
Namsung America Inc warrants this product to
the original purchaser to be free from defects in
material and workmanship for a period of three
year (or five years*) from the date of the original
purchase.
Namsung America Inc agrees, at our option,
during the warranty period, to repair any defect in
material or workmanship or to furnish an equal
new, renewed or comparable product (whichever
is deemed necessary) in exchange without
charges, subject to verification of the defect or
malfunction and proof of the date of purchase.
Subsequent replacement products are warranted
for the balance of the original warranty period.
Who is covered?
This warranty is extended to the
original retail purchaser for products purchased
from an authorized JENSEN dealer and used in
the U.S.A.
What is covered? This warranty covers all
defects in material and workmanship in this
product. The following are not covered: software,
installation/removal costs, damage resulting
from accident, misuse, abuse, neglect, product
modification, improper installation, incorrect
line voltage, unauthorized repair or failure to
follow instructions supplied with the product, or
damage occurring during return shipment of the
product. Specific license conditions and copyright
notices for the software can be found via www.
jensenmobile.com.
Warranty
Coverage
*Limited 3 -year warranty. (Proof of purchase
required)
Extend your warranty from 3 years to 5 years when
you register online at www.jensenmobile.com.
:
•
Call us toll-free at (888) 921-4088
(Monday-Friday, 9:00 a.m. to 5:00 p.m. EST)
•
E-mail us at cs@jensenmobile.com
Exclusion of Certain Damages:
This warranty
is exclusive and in lieu of any and all other
warranties, expressed or implied, including
without limitation the implied warranties of
merchantability and fitness for a particular
purpose and any obligation, liability, right, claim or
remedy in contract or tort, whether or not arising
from the company’s negligence, actual or imputed.
No person or representative is authorized to
assume for the company any other liability in
connection with the sale of this product. In no
event shall the company be liable for indirect,
incidental or consequential damages.

Customer Support
1-888-921-4088
(Monday-Friday, 9AM-5PM EST)
Visit https://www.jensenmobile.com
Designed and Engineered in USA
All rights reserved. No part of this publication may be
reproduced, distributed, or transmitted in any form or
by any means, including photocopying, recording, or
other electronic or mechanical methods, without th
Namsung America Inc.
©2025 Namsung America Inc
.All rights reserved.
e
prior written permission of NAMSUNG AMERICA INC.
NSC0823-V01