TABLE OF CONTENTS
IMPORTANT SAFETY INSTRUCTIONS 3
PRODUCT DIAGRAM
INSTALLATION INSTRUCTION
6
S
Before Using Your Beverage coole
7
r
To Install Stainless Steel Handl
7
e
To Install Your Beverage coole
8
r
OPERATION INSTRUCTION
8
S
Control
10
s
Storag
10
e
Door Loc
11
k
Wired
11
Shelves
CARE & MAINTENANC
11
E
Cleaning Your Beverage coole
12
r
Power Failur
12
e
Vacation Tim
12
e
Moving Your Beverage coole
12
r
Energy Saving Tip
13
s
TROUBLESHOOTING GUID
13
E 14-15
WARRANTY TERMS 16
REVERSING THE DOOR
6
3
IMPORTANT SAFETY INSTRUCTIONS
Your safety and the safety of others are ver y important.
This Beverage cooler complies with the applicable safety requirements and is safe for daily use.
However, basic safety precautions should always be followed when usin g an electric al appli ance,
to reduce the risk of fire, electric shock, and personal injury.
.
Plug into its own indivi dual electrical outlet with a voltage rating that matches the rating
label on the cooler (115/120V AC only, 60Hz, 10A) . Use receptacle
s that cannot be
turned off by a switch or pull chain. Make sure that the plug is fully inserted into the
receptacle.
.
Plug into a grounded 3-prong outlet. Do not under any circumstances cut or remove the
third ground prong from the power cord supplied.
.
To protect against electr ic shock, do not i mmerse the Beverage cooler, plug or cord in
water or other liquids.
.
Never unplug the cooler by pulling the power cord. To disconnect the Beverage cooler,
always grip the plug firmly and pul
l straight out from the wall outlet.
.
Repair or replace immediately all pow e r cords that have become frayed or otherwise
damaged. Do not use a cord that shows cracks or abrasion damage along its length or at
either end.
.
Do not connect or disconnect the electric plug when your hands are wet. Do not operate
the cooler with wet hands, while standing on a wet surface or while standing in water.
.
Unplug the Beverage cooler or disconnect power before cleaning or servic ing. Failure to
do so can result in electrical shock or death.
.
When moving the Beverage cooler, be careful not to roll over or damage the power cord.
.
Never clean Beverage cooler parts with flamm able fluids. These fumes ca n create a fire
hazard or explosion. And do not store or use gasoline or other flamma ble vapor and
liquids in the vicinity of this or any other appliance. The fumes can create a fire hazard
or explosion.
.
Do not attempt to repair or replace any part of your Beverage cooler unless it is
specifically recommended in this manual. All other servicing should be referred to a
qualified technician.
.
An empty Beverage cooler can be dangerous to children. Remove any latches, l ids, lock s,
and/or doors from unused or discarded Beverage coolers to prevent child entrapment
and suffocation. Never allow children to operate, play with or crawl inside this Beverage
cooler.

4
FLAMMABLE REFRIGERANT GAS
DANGER - Ris k of fire or explosio n. Flammable refrigerant use d.
DO NOT use mechanical devices to defrost refrigerator. DO NOT puncture refrig erant
tubing.
DANGER - Risk of fire or explosion. Flammable refrigerant used. To be repaired only by tra ined
service personnel. DO NOT puncture refrigerant tubing.
CAUTION - Risk of fire or explosion. Flammab le refrigerant used. Consult repair manual / owner’s
guide before attempting to service this product. All safety precauti
ons must be followed.
CAUTION - Risk of fire or explosion. Dispose of property in accordance with federal or local
regulations. Flammable refrigerant used.
CAUTION - Risk of fire or explosion due to puncture of refrigerant tubing. Fo llow handli ng
instructions carefully. Flammable refrigerant used.
CAUTION - To prevent a child from being entrapped, keep out of reach of children and not in the
vicinity of the cooler.
.
Do not use this beverage cooler for othe r than its intended purpose.
.
Move this beverage cooler by 2 people. Failure to do so can result in injury.
.
Place this beverage cooler in a well-venti lated area with temperatures above 15°C (60°F)
and below 32°C (90 °F).
.
To ensure proper ventilation f or your beverage cooler, the front of the cooler must be
completel y unobstructed.
.
This beverage cooler must be install e d in an area away from wind, rain, water spray or
drips.
.
The beverage coole r should no t be located next to ovens, grills or other sources of high
heat.
.
Do not kink or pinch the power supply cord of beverage cooler.
.
It is important for the beverage cooler to be leveled in order to work properly. You may
need to make several adjustments to level it.
.
This beverage cooler is designed for storing and cooling . Do not store
perishable
food or medical products inside the cooler.
.
When disposing of refrige ration beverage coolers, special handling is often required. It is
the consumer’s responsibility to comply with federal and lo cal regulati ons when
disposing of this product.
.
WARNING: Risk of child entrapment and suffocation. Before you throw away this or an
old cooler, remove the door. Leave the shelves in place, so that children may not easily
climb i nside.
beverages
1.This appliance is not intended for use by persons (including children) with reduced
physical, sensory or mental capabilities, or lack of experience and knowledge, unless
they have been given supervision or instruction concerning use of the appliance by a
person responsible for their safety.
2. Children should be supervised to ensure that they do not play with the appliance.
3. This appliance can be used by children aged from 8 years and above and persons
with reduced phy
sical, sensory or mental capabilities or lack of experience and
knowledge if they have been given supervision or instruction concerning use of the
appliance in a safe way and understand the hazards involved. Children shall not play
with the appliance. Cleaning and user maintenance shall not be made by children
without supervision.
4. If the supply cord is damaged, it must be replaced by the manufacturer, its service
agent or similarly qualified persons in order to avoid a h
azard.
5. To avoid a hazard due to instability of the appliance, it must be fixed in accordance
with the instructions.
6. When positioning t he appliance, ensure the supply cord is not trapped or damaged.
7. Do not locate multiple portable socket-outlets or portable power supplies at the rear
of the appliance.
8. Keep ventilation openings, in the appliance enclosure or in the built-in structure,
clear of obstruction.
9. Do not use mechanical devices or other means to acceler
ate the defrosting process,
other than those recommended by the manufacturer.
10. Do not damage the refrigerant circuit.
11. Do not use electrical appliances inside the drink storage compartments of the
appliance, unless they are of the type recommended by the manufacturer.
12. Do not store explosive substances such as aerosol cans with a flammable
propellant in this appliance.
13. This appliance is intended t o be used in household and similar applications such
as
– staf
f kitchen areas in shops, offices and other working environments;
– farm houses and by clients in hotels, motels and other residential type environments;
– bed and breakfast type environments;
– catering and similar non-retail applications.
14. To avoid contamination of drink, please respect the following instructions:
– Opening the door for long periods can cause a significant increase of the
temperature in the compartments of the appliance.
– Clean r egularly surfac
es that can come in contact with drink and accessible drainage
systems.
– Clean water tanks if they have not been used for 48 h, flush the water system
connected to a water supply if water has not been drawn for 5 days.
– If the refrigerating appliance is left empty for long periods, switch off, defrost, clean,
dry, and leave the door open to prevent mould developing within the appliance.
5
WARNING:Risk of fire / flammable materials
The coolant circuit of this unit contains the refrigerant lsobutane (R600a),a natural gas that-is
flammable and of high environmental compatibility. Make sure no parts of the coolant circuit
get damaged-during transport and installation of the appliance.
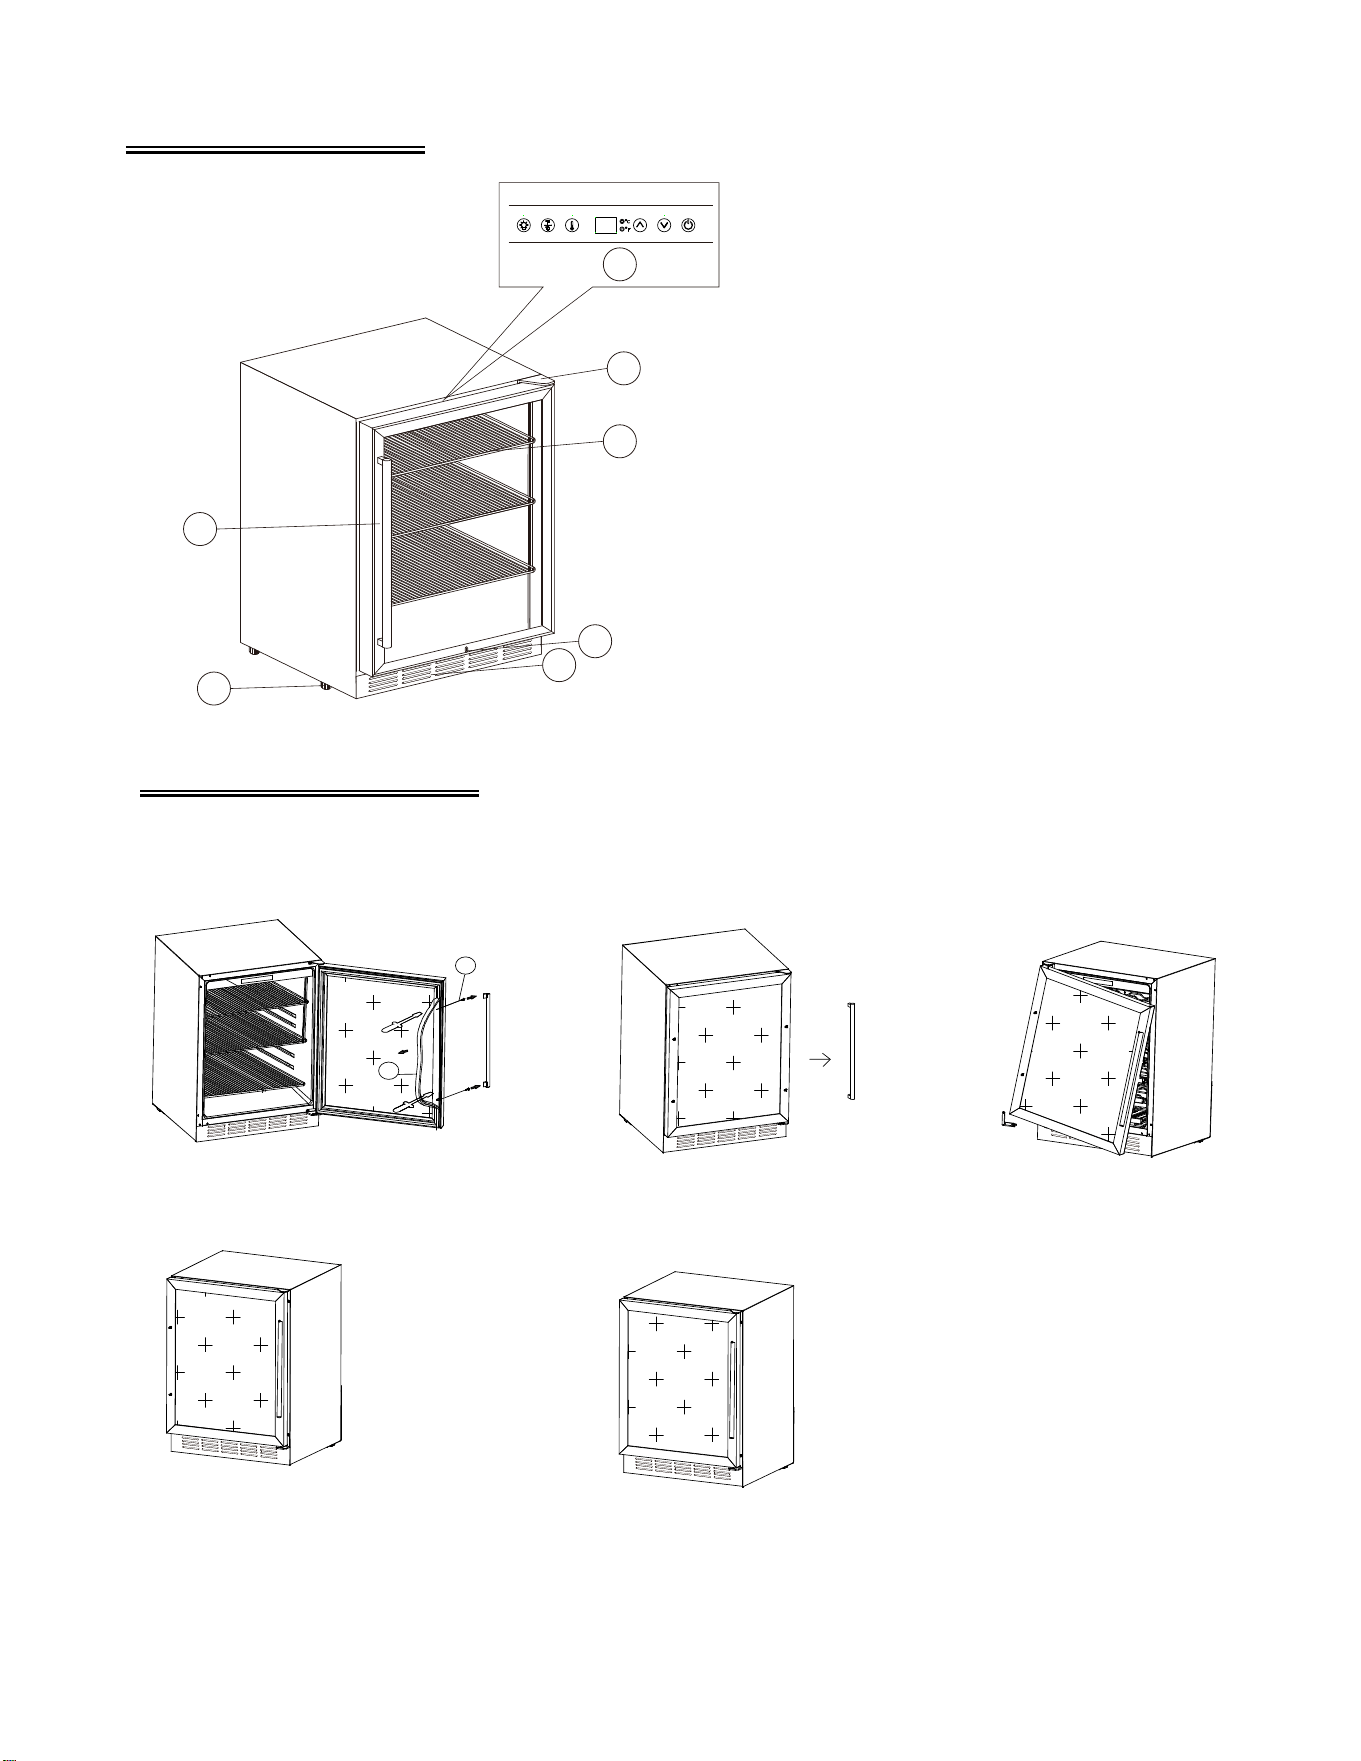
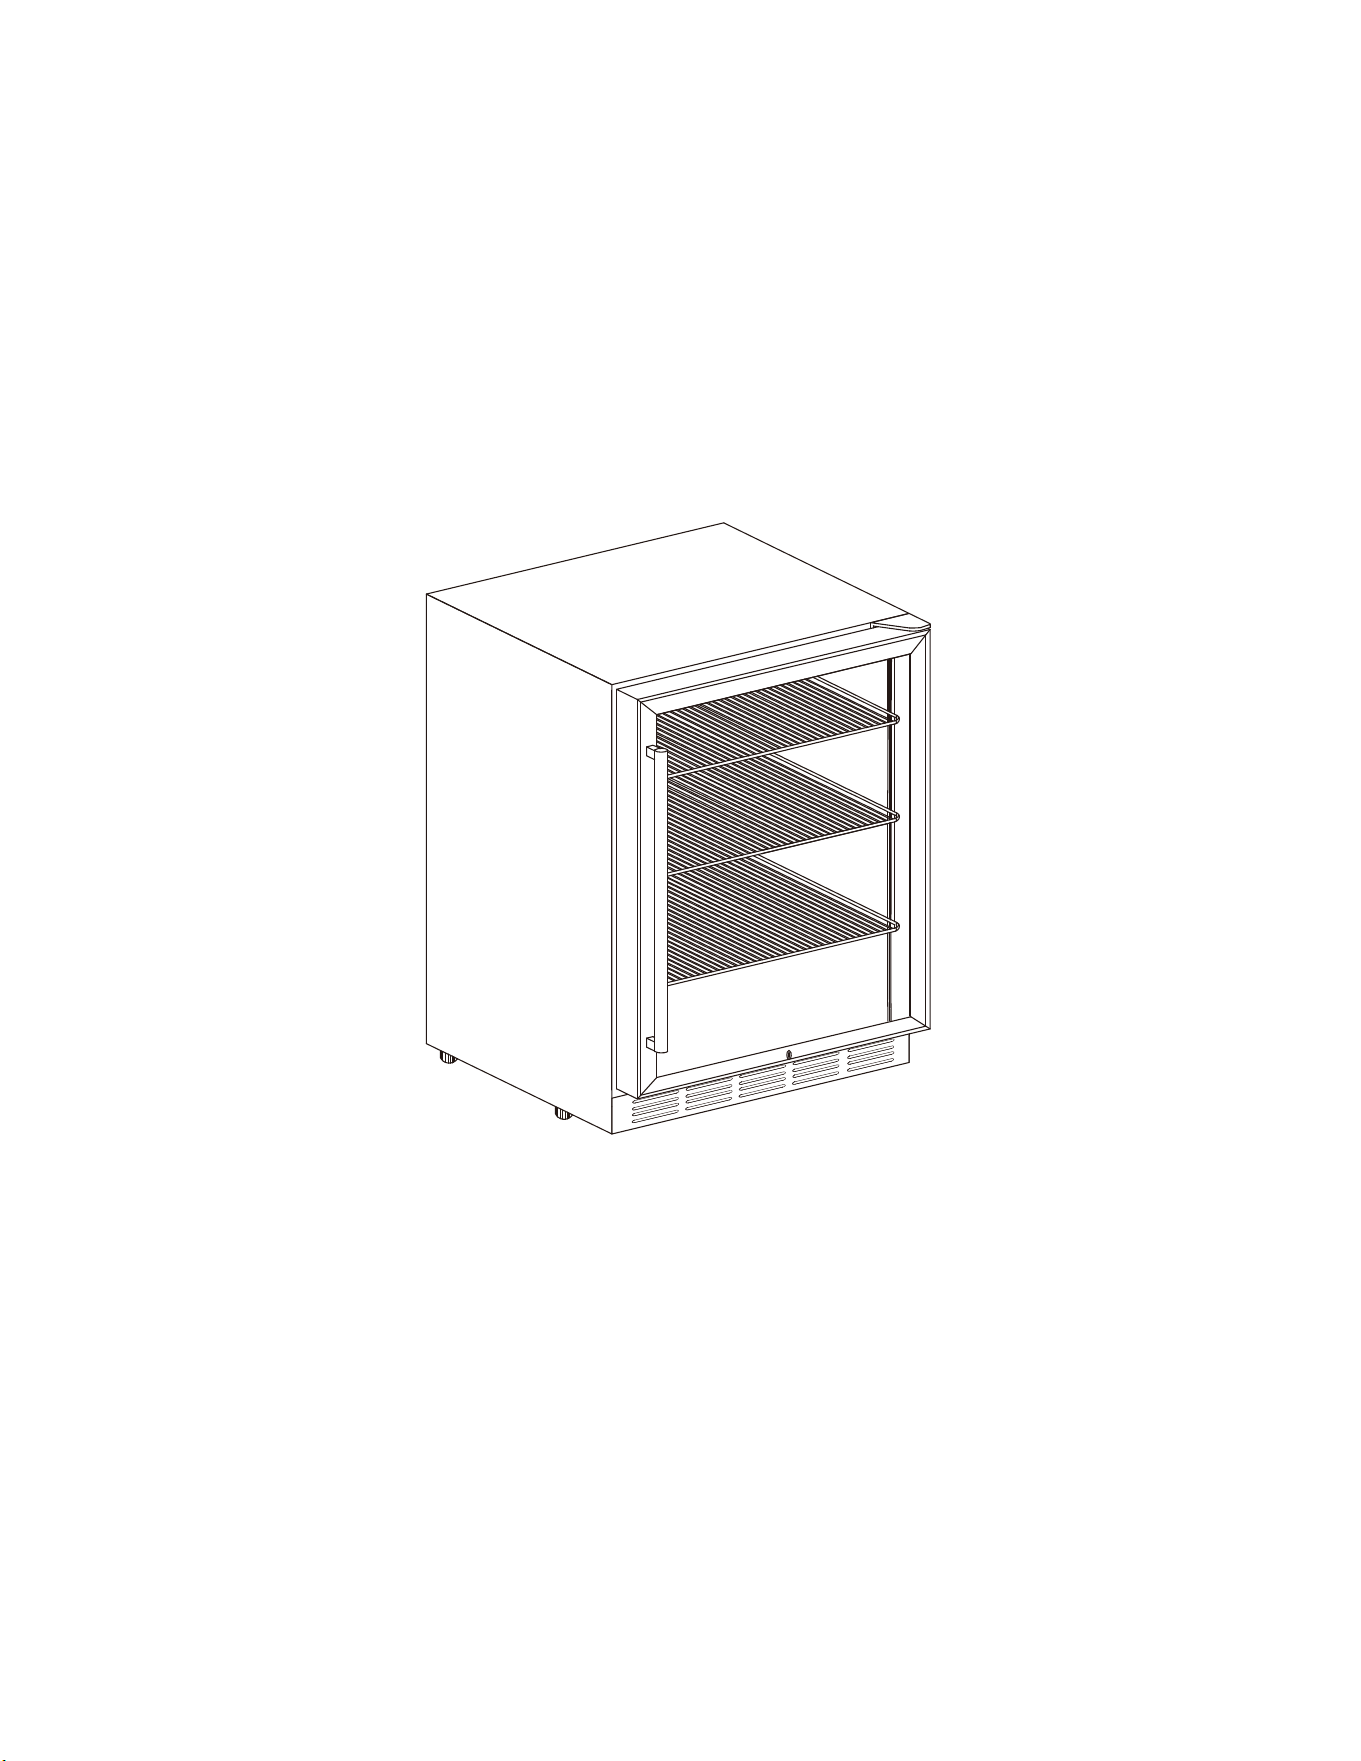
PRODUCT DIAGRA
6
M
1 Control Panel
5
Top Hinge2
Shelves
6
Glass Door with Handle
3
Exhaust Window
7
Lock4
Leveling Legs
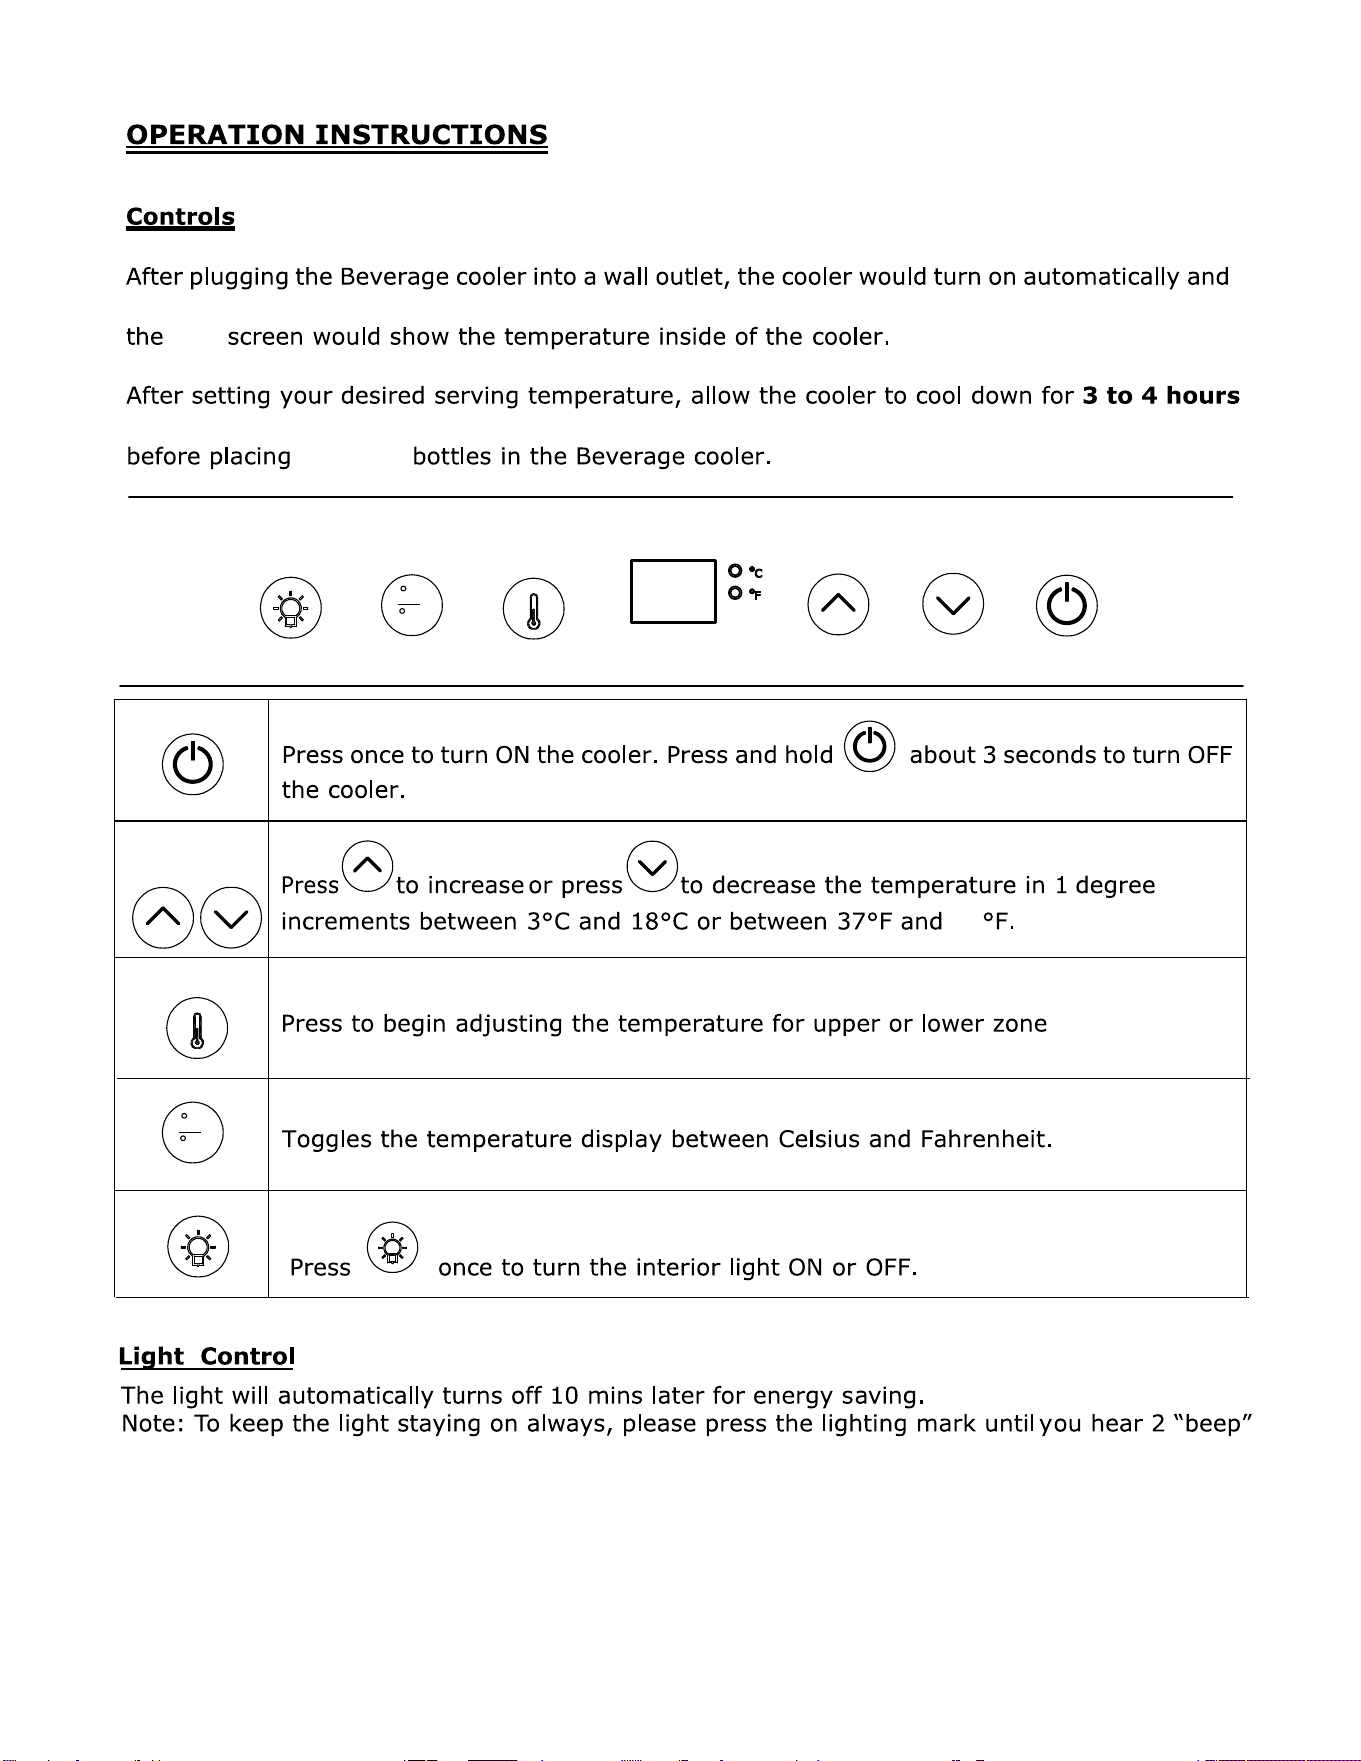
LIGHT
UP
DOWN ON/OFF
TEMPERATURE LOCK
1
3
4
5
6
7
2
2
1
REVERSING THE DOOR
The door is reversible. The default way to open the door is from the left, lf you need to reverse
the door,follow these diagrams:
Step 1:Remove the door handle.
Step 2:Remove the plug from the door frame
at the door handle position, and reinstall the
door handle.
Step 3:Remove the door hinge.
Step 4:Reinstall the door hinge. Step 5:Reinstall the plug in the door frame
at the door handle position. Done.
Note: If you encounter any problems during the installation process, please contact us through
the manual home page contact information, customer service staff will provide you with assistance.

INSTALLATION INSTRUCTION
7
S
Before Using Your Beverage cooler
-
Remove the exterior and interior packaging.
-
Check to make sure you have all o f the following parts:
o
3 wired Shelves
o
2 Keys
o
Stainless Steel Handle
o
Instruction Manual
o
2 Extra Screws f or Installing Handle
-
IMPORTANT: Before connecting this Beve rage cooler to a power source, l e t it stand upright
for approximately 24 hours. T hi s will reduce the possibi lity of a malfunction in the cooling
system from handling during transportation.
-
Clean the interior surface with lukewarm water using a soft cloth.
-
Install the handle on the left side of the door.
To Install Stainless Steel Handle
1)
Pull away the door gasket in the area where the handle is to be installed, as Illustration #1.
The gasket is easily removed by hand, no tools are necessary.
2)
Align the handle with the pre-installed screws on the door frame. Tighten the screws with a
screwdriver until the handles secure tightly against the door frame, as Illustrat ion #2. (Do NOT
over tighten as this
will cause damage to the handle assem bly).
3)
Replace the door gasket to its original position.
Note: This Beverage cooler includes stainless steel handles that are not required to operate this
Beverage cooler. If you choose not to use the handle supplied, simply follow step 1 to access the
pre-installed screws and remove them and then place 2 decorative plugs (NOT included) into the
two holes separately. Co ntinue on to step 3 to replace the door gasket to its original positi
on.
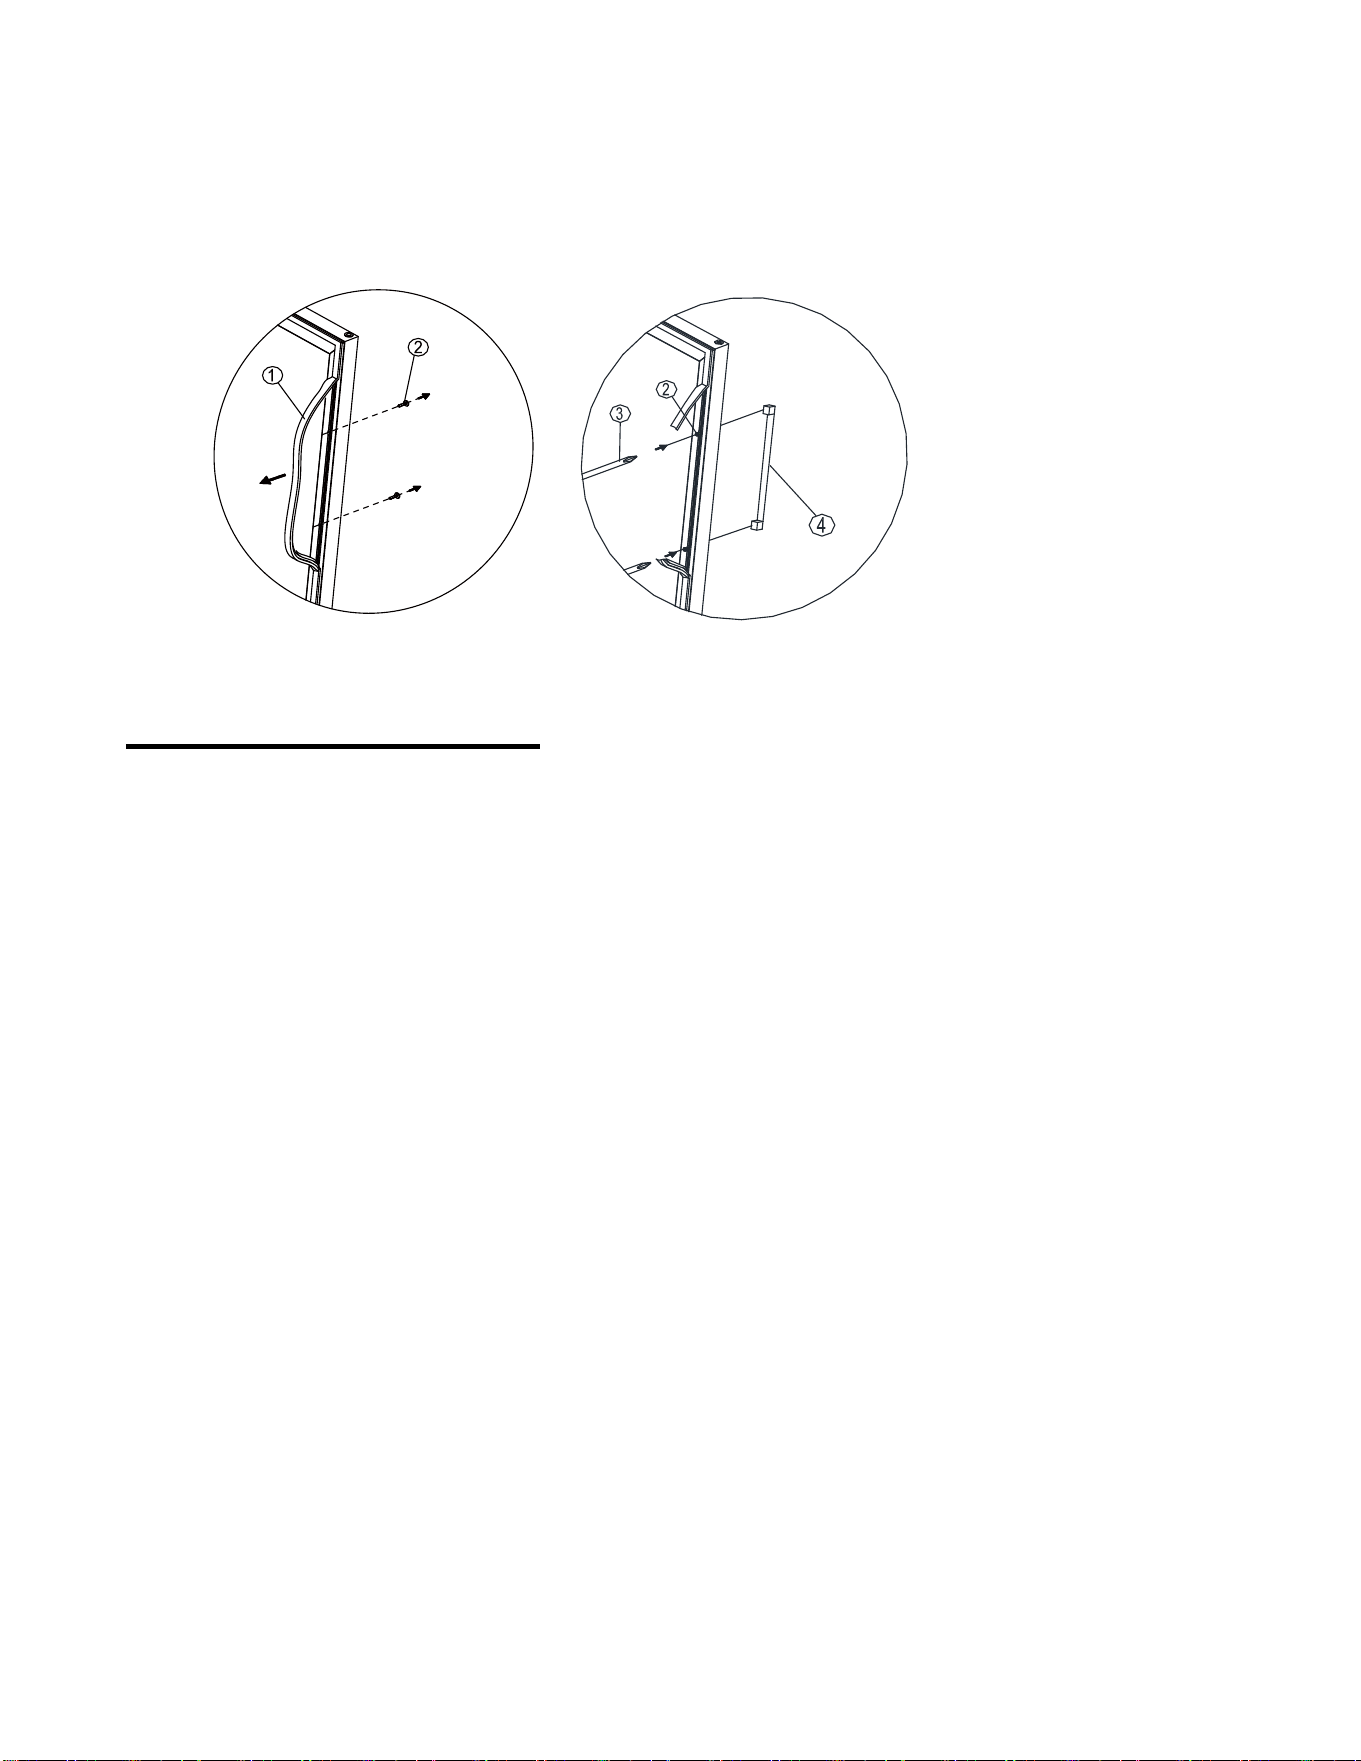
Illustration #
8
1 Illustration #2
1
Gasket
2
Screw
3
Screw Driver
4
Handle
To Install Your Beverage cooler
-
This Beverage cooler is designed for freestanding or built-in (fully recessed) installation.
-
Place your Beverage cooler on a soli d and level floor that is strong enough to support it when
it is fully loaded. This will ensure a vibration-free and nois e -free operat i on. Adjust the le veling
legs in and out to stabilize the cooler horizontally. If the legs are not properly adjusted, the
cooler may be unstable and result in excess noise or vibration.
-
Locate the Beverage cooler away from direct sunlight and sources of heat (stove, heater,
radiator, etc.). Direct sunlight may affect the acrylic coating and heat sources may increase
electrical consumption. Extremely cold ambient temperatures may also cause the cooler not
to perform properly.
-
It is not advisable to install this cooler in moist areas or directly adjacent to a kitchen sink, as
moisture could cause premature corrosion to the components of your new cool e r.
-
It is recommended you install the Beverage cooler in a place with temperatures above 60°F
(15°C) and below 90°F (32°C), and humidity is under 60%. If the ambient temperature is
above or below recommended temperatures, the performance of the cooler may be affe cted.
Placing your cooler in extremely cold or hot conditions may cause interior temp e ratures to

fluctuate, and the temperature range of 3ºC-18ºC (37ºF-65ºF) may not be reached
9
.
-
Connect the Beverage cooler to an excl usive, properly grounded, standard electrical supply
(115 V AC only, 60 Hz), in accordance with the National Electrical Code and local codes and
ordinances. Any questions concerning powe r and/or groundin g should be directed toward a
certified electrician or an authorized products service center.
Warning
: Improper use of the grounded plug can result in the risk of electrical shock. If the
power cord is damaged, have it replaced by an authorized service center.
.
The Beverage cooler should alway s be plugged into its own individual electrical outlet
which has a voltage rating that matches the rating label on the Beverage cool e r. This
provides the best performance and also prevents overloading house wiring circuits that
could cause a fi re hazard from overheated.
.
Do not under any circumstances cut or remove the third ground prong from the power
cord supplied.
.
Do not use an extension cord or adapter plug. However, if you must use an extension
cord, it is absolutely necessary that it be a UL-list e d, 3-wire grounding type Beverage
cooler extension cor d having a grounding type plug and outlet and that the electrical
rating of the cord is 10 amperes (minimum) and 120 volts.
.
Do not use a cord that shows cracks or abrasion damage along its lengt h or at either end.
.
If the Beve rage coole r is going to be used in an area that is prone to power
surges/outages, it is suggested that you use a power surge protector. The surge
protector that you select must have a surge block high enough to protect the Beverage
cooler it is connected to. Dam ages due to power surges are no t considered a
manufacturer covered defect and will void your prod uct warranty.
10
F
C
LIGHT
UP
DOWN
ON/OFF
TEMPERATURE LOCK
F
C
65
cans and
LED
Storag
11
e
Many cans and bottles may differ in size and dimensions. As such the actual num ber of bottles
you may be able to store may vary.
Door Lock
This cooler can be secured with a lock and key. The keys are located inside the plastic bag that
contains the Instruction Manual. Insert the key into the lock and turn it clockwise to l ock the
door, making sure the metal pin is engaged completely. To unlock the door, do the reverse.
Remove the key and put it in a secure loca tion.
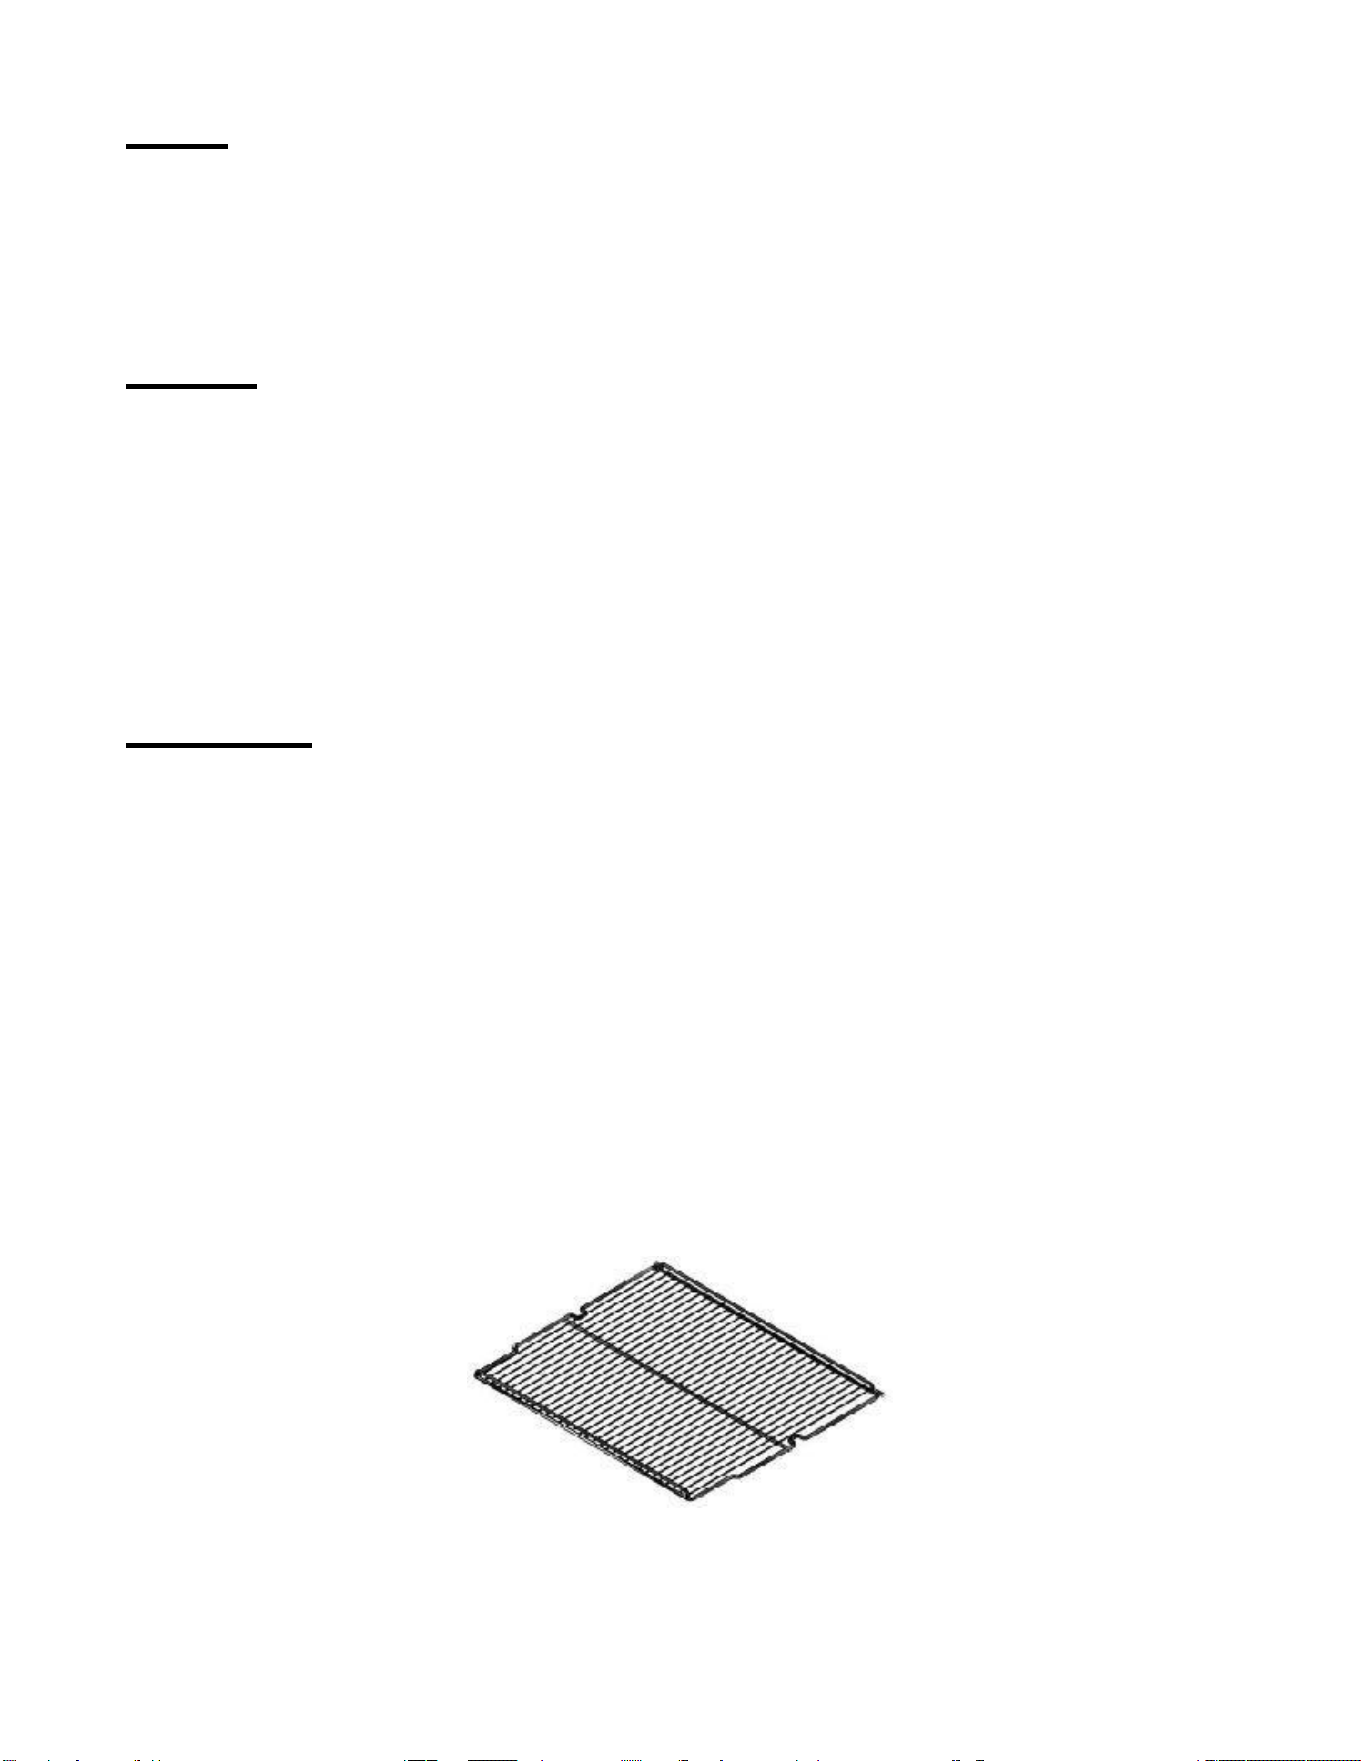
Wired Shelves
The appliance is equipped with three wired shelves. You can remove the shelf by lift up and pull
it out smoothly.
To prevent damaging the door gasket, make sure to have the door all the way opened when
pulling the bottom shelf out of the rail compartment.
For easy access to the storage content, you can pull the shelf approximately 30% out of the
rail compartment, however this unit was designed with a stopper on each side of the shelf
track to preve nt bottles from falling.

CARE & MAINTENANC
12
E
Cleaning Your Beverage cooler
IMPORTANT: Always unplug the cooler before cleaning or performing maintenance. Never use
harsh cleansers or scouring pads to clean any part of the cooler.
Turn off the power, unplug the Beverage cooler, and remove all items including shelves.
Wash the inside surfaces with warm water and baking soda solution. The solution should
be about 2 tablespoons of baking soda to a quart of water.
Wash the shelves with a mild detergent solution.
Wring excess water out of the sponge or cloth when cleaning the area near the controls,
or any electrical parts.
Wash the outside cabinet with warm water and a mild liquid detergent. Rinse well and
wipe dry with a clean soft cloth. Do not use steel wool or steel brush to rub the stainless
steel, which will contaminate the stainless steel with steel particles and rusting may
occur.
Power failure
Most power failures are corrected within a few hours and should not affect the temperature of
your Beverage cooler. If the power is off for an extended period of time, proper steps should be
taken to protect your contents.
Vacation Time
Leave the Beverage cooler operating during vacations of less than three weeks. For periods
longer than this, turn the Beverage cooler off and leave the door slightly ajar to prevent odor
from building inside the Beverage cooler.
Moving Your Beverage coole
13
r
Remove all items (bottles) from the cooler;
Securely tape down any loose items, such as shelves, inside the cooler.
Turn the adjustable leg up to the base to avoid damage.
Tape the door shut.
Ensure that the Beverage cooler stays securely in the upright position during transportation.
Protect the outside of the Beverage cooler with a blanket or a similar item.
Energy saving tips
-
The cooler should be located in the coolest area of the room away from heat sources or direct
sunlight.
-
Ensure that the cooler is adequately ventilated. Never cover air vents.
-
Only open the cooler door for as long as necessary. Frequent opening of the door will affect
internal temperature.
14
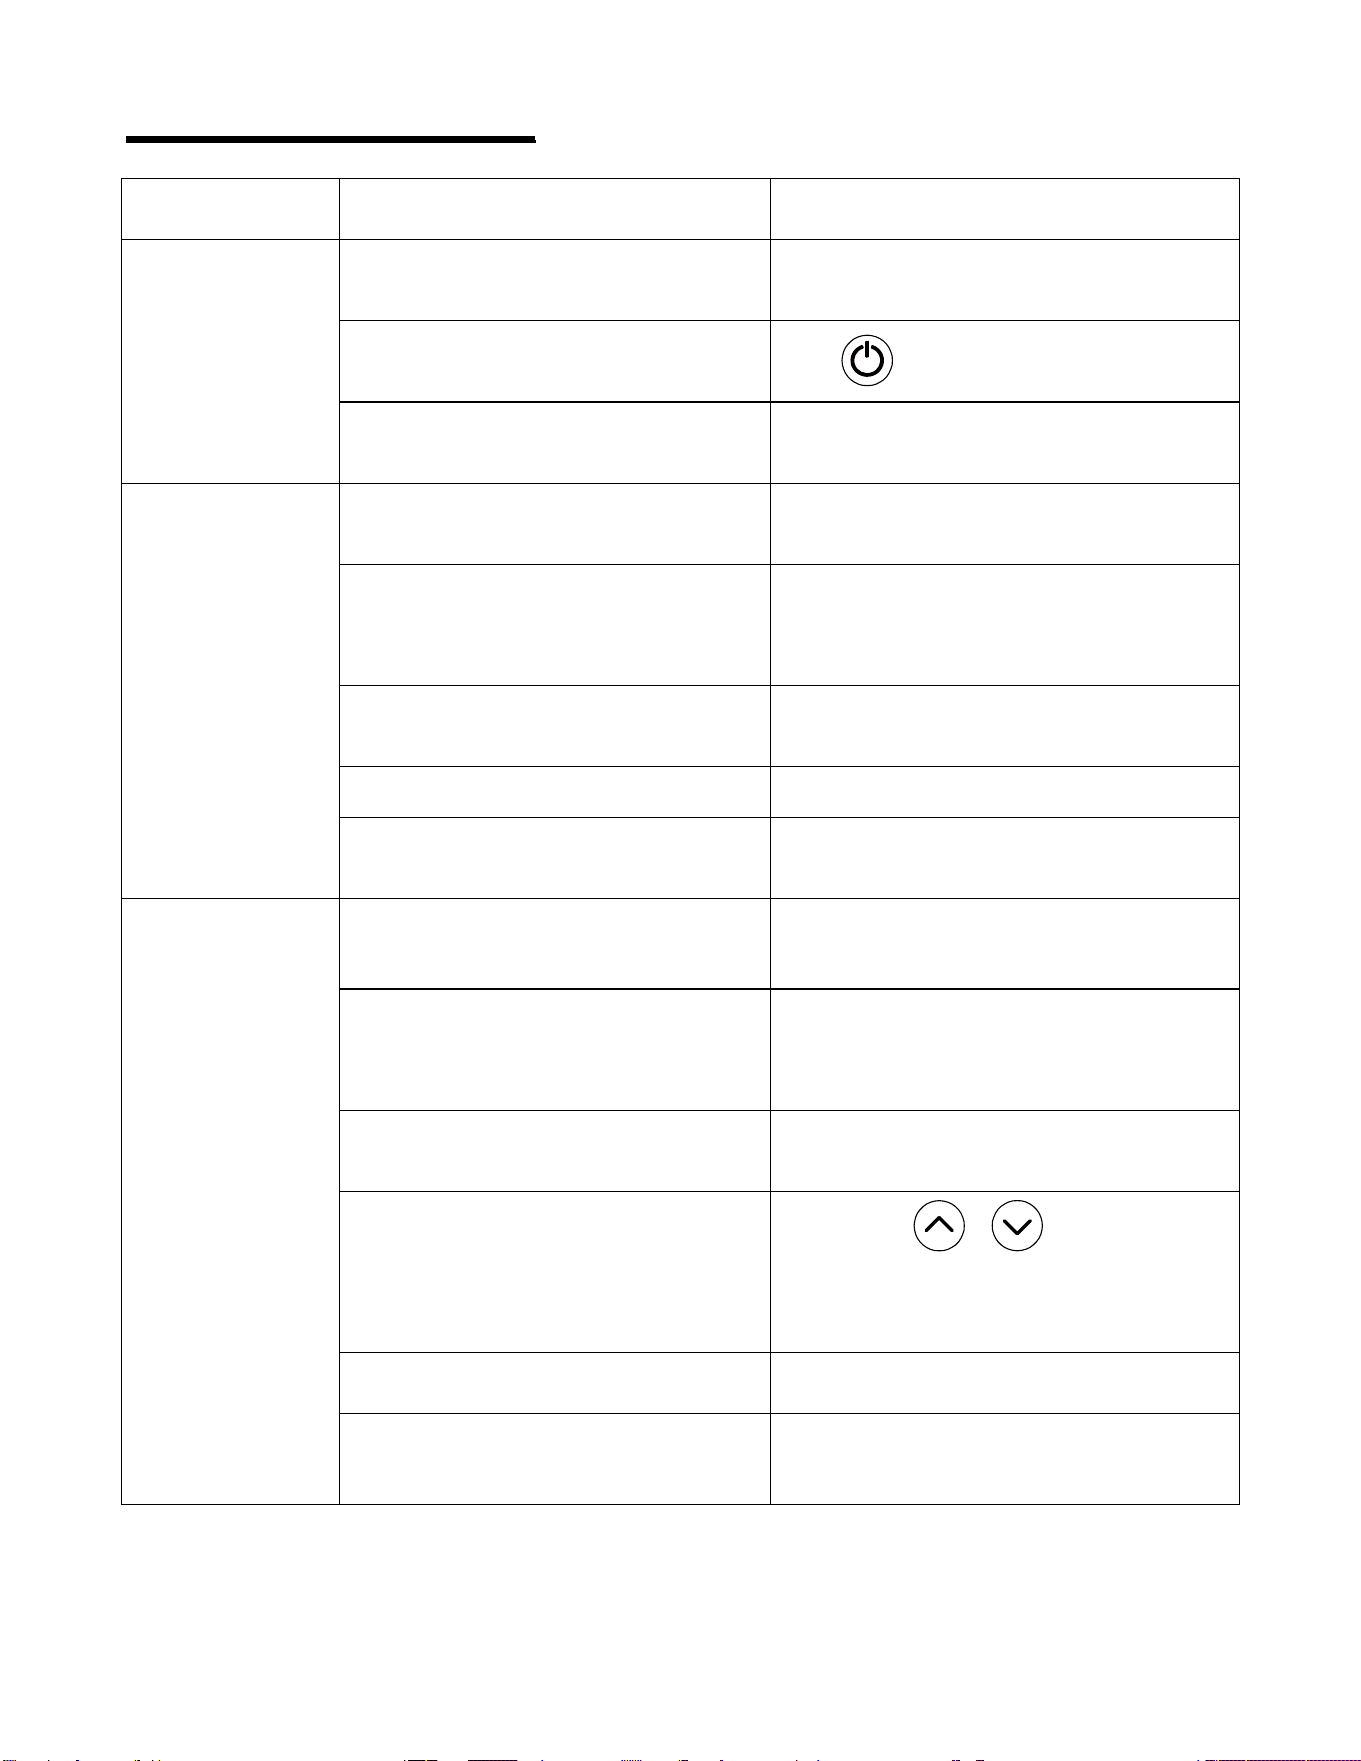
TROUBLESHOOTING GUIDE
PROBLEM POSSIBLE CAUSE SOLUTION
The Beverage
cooler does not
run.
The Beverage cooler may not be
plugged in, or plug may be loose.
Ensure the Beverage cooler has been
plugged in properly.
The Beverage cooler is turned off.
Press to turn on the cooler.
House fuse blown or tripped circuit
breaker.
Check/replace fuse. Reset circuit
breaker.
The Beverage
cooler is not
cold enough.
External environment may require a
higher setting.
Set a colder setting. Allow several hours
for t
he temperature to stabilize.
The Beverage cooler has recently
been disconnected for a period of
time.
It takes 3-4 hours for the Beverage
cooler to cool down completely.
Prolonged or frequent door
openings.
Open the door less often.
The door i s not closed completely. Close the door properly.
The door gasket does not seal
properly.
Check the door gasket. Clean or change
gasket if necessary.
The compressor
turns on and off
frequently.
The room temperature i s hotter than
norma
l.
It
’
s normal for the Beverage cooler to
work harder under these conditions.
A large amount of contents has been
added to the cooler.
A large amount of contents cause the
Beverage cooler to run more until the
desired temperature is reached.
Prolonged or frequent door
openings.
Open the door less often.
The temperature has not been set
correctly.
Press either or to check
the set temperature, a nd set the
temperature properly.
The door i s not closed completely. Close the door properl
y.
The door gasket does not seal
properly.
Check the door gasket. Clean or change
gasket if necessary.
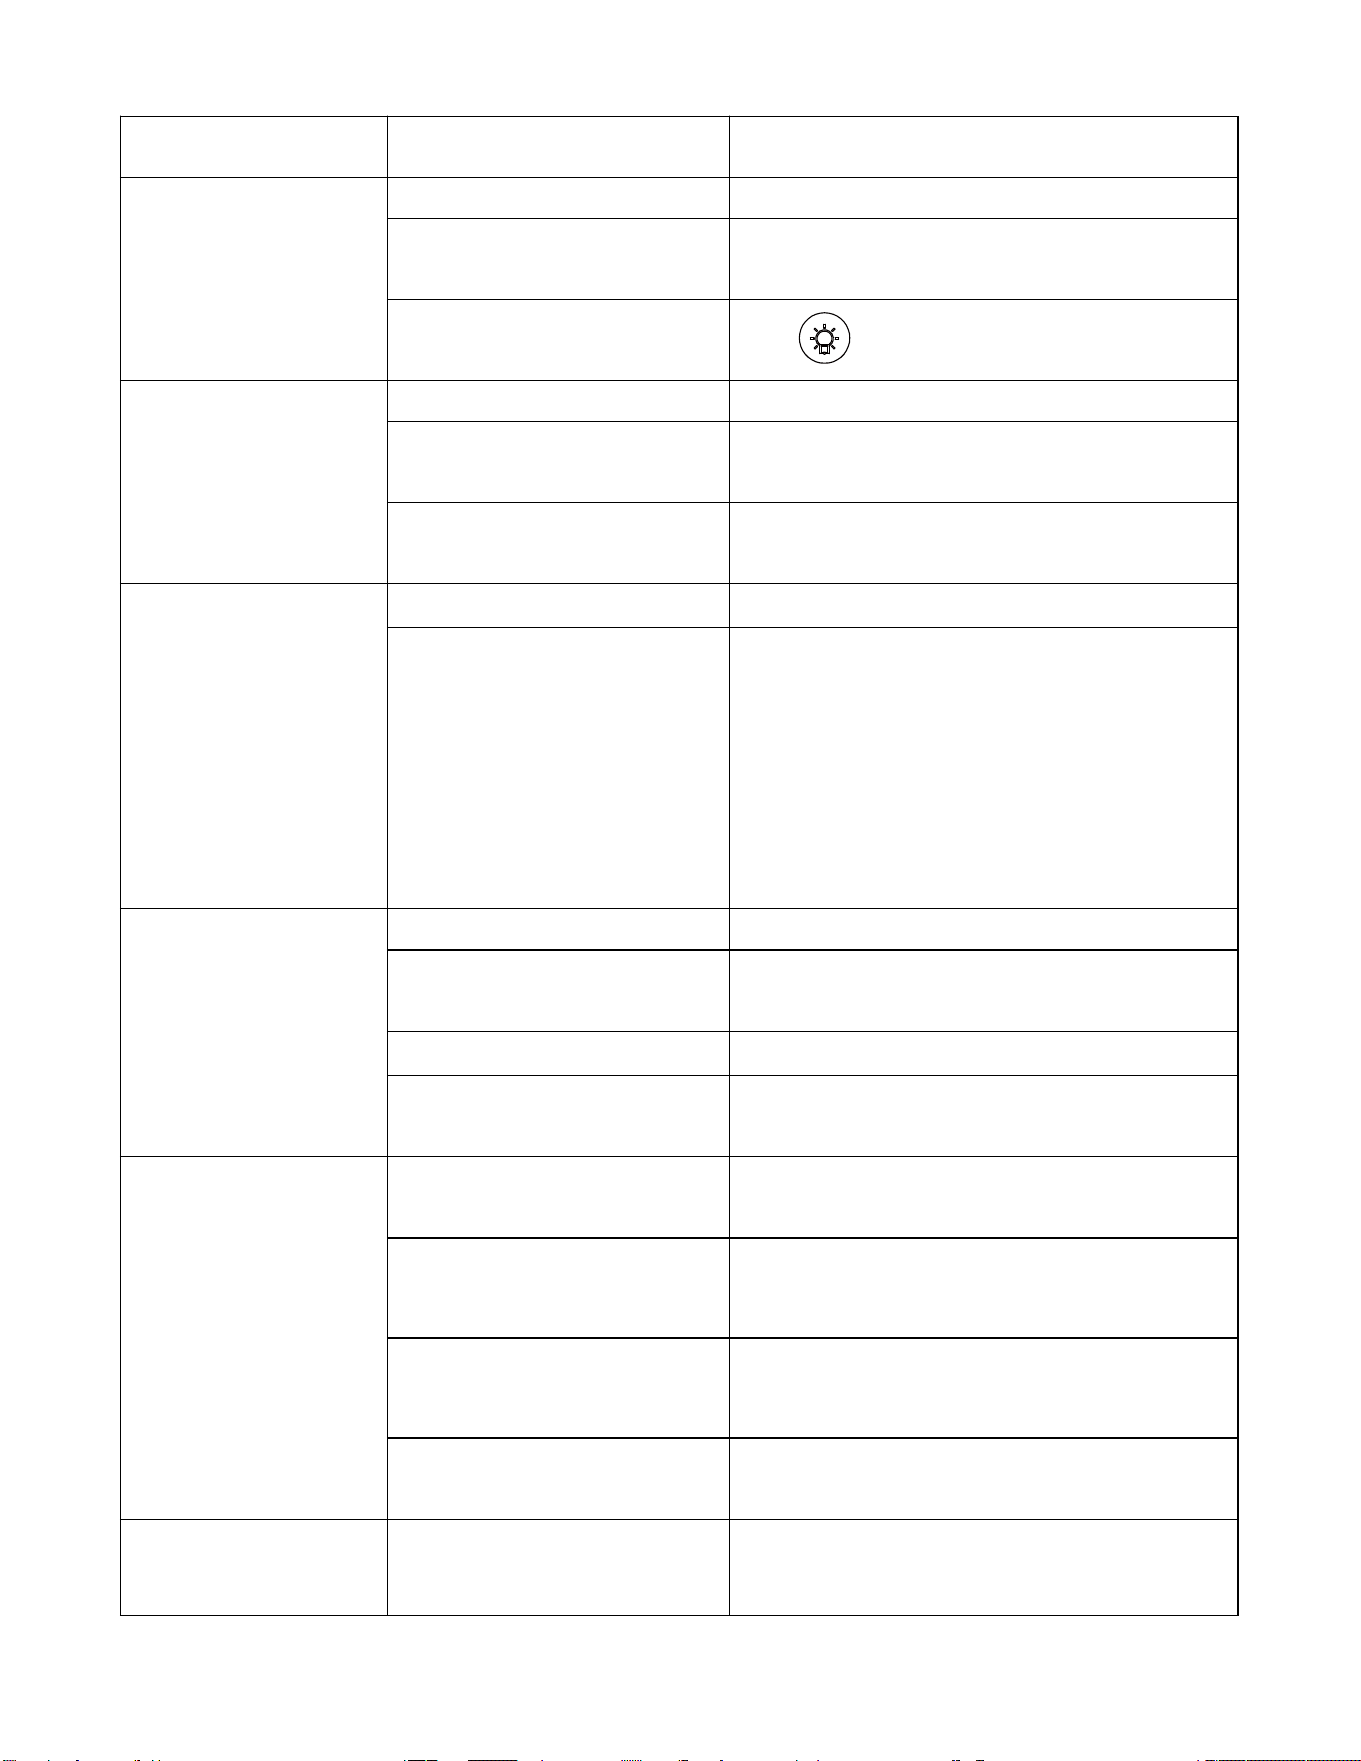
PROBLE
15
M POSSIBL E CAUSE SOLUTION
The light does not
work.
Not plugged in. Plug the cooler in.
The circuit breaker tripped
or a blown fuse.
Check the breaker and/or fuses.
The light button is
“
OFF
”
.
Press to turn the light ON.
Vibrations.
The cooler is not leveled. Check to assure that the cooler i s level.
The bottles are vibrating.
Make sure the bottles don
’
t touch each
others.
There is an object under the
cooler.
Remove the object under the cooler.
The cooler seems to
make too much
noise.
The cooler is not level. Level the cooler.
Normal noise from the flow
of the refrigerant
The rattling noise may come from the flow
of the refrigerant, which is normal. As each
cycle ends, you may hear gurgling sounds
caused by the flow of refrigerant in your
cooler. Contraction and expansion of the
inside walls may cause popping and
crackling noise
s.
The door will not
close properly.
The cooler is not level. Level the cooler.
The door was reversed and
not properly installed.
Re-install the door properly.
The gasket is dirty. Clean the door gasket.
The shelves are out of
position.
Place the shelves properly.
Moisture build up on
interior or
exterior of the
Beverage cooler.
This is normal during high
humidity periods.
Lower the room humidity.
This is normal in high
temperature environment.
Move the cooler to a cooler pla
ce, and avoid
heat and sunlight.
Prolonged or frequent door
openings.
Open the door less often.
The door does not seal
completely.
Check door gaskets for proper seal.
Error Code:
E1-E2-E3-E4-E7-E8
A sensor has failed. Contact the customer service

16
Warranty Terms
Warranty Period
1. Customers are entitled to replacement or free repair service in case of quality defect(s) found
in the product within 15 days upon receipt of the product.
2. Customers are entitled to free repair service for any product proven defective in material or
workmanship that results in product failure during normal consumer usage and conditions
within the valid warranty period, which is 12 months counting from the date of selling.
However, warranty period varies by product component and country of purchase. Please contact
our after-sales service team via for detailed warranty information.
Warranty Exclusions
1. Products subjected to unauthorized repair, misuse, collision, neglect, mishandling, soaking,
accident, and unauthorized alteration.
2. Products subjected to improper use or whose labels or security tags have been torn off or
altered.
3. Products whose warranty has expired.
4. Products damaged due to force majeure, such as fire, flood, lightening, etc.
Warranty Claim Procedure
1. If failure or any problem occurs to your product after purchase, please contact us,
or you can always contact our customer service through email at
2. Our customer service will guide you through the whole service procedure regarding any
product issue or problem you have encountered.
We reserve the right to reexamine damaged or returned products.
Contact Card