Mobile Music Sequencer Owner’s Manual 1
• Copying of the commercially available music sequence data and/or digital audio files is strictly
prohibited except for your personal use.
• The software and this owner’s manual are exclusive copyrights of Yamaha Corporation.
• Copying of the software or reproduction of this manual in whole or in part by any means is expressly
forbidden without the written consent of the manufacturer.
• Yamaha makes no representations or warranties with regard to the use of the software and
documentation and cannot be held responsible for the results of the use of this manual and the
software.
• The screen displays as illustrated in this Owner’s Manual are for instructional purposes, and may
appear somewhat different from the screens which appear on your devicer.
• Apple, iPad, iPhone, iPod touch and iTunes are trademarks of Apple Inc., registered in the U.S. and
other countries.
• The company names and product names in this Owner’s Manual are the trademarks or registered
trademarks of their respective companies.
© 2013 Yamaha Corporation. All rights reserved.
Introduction
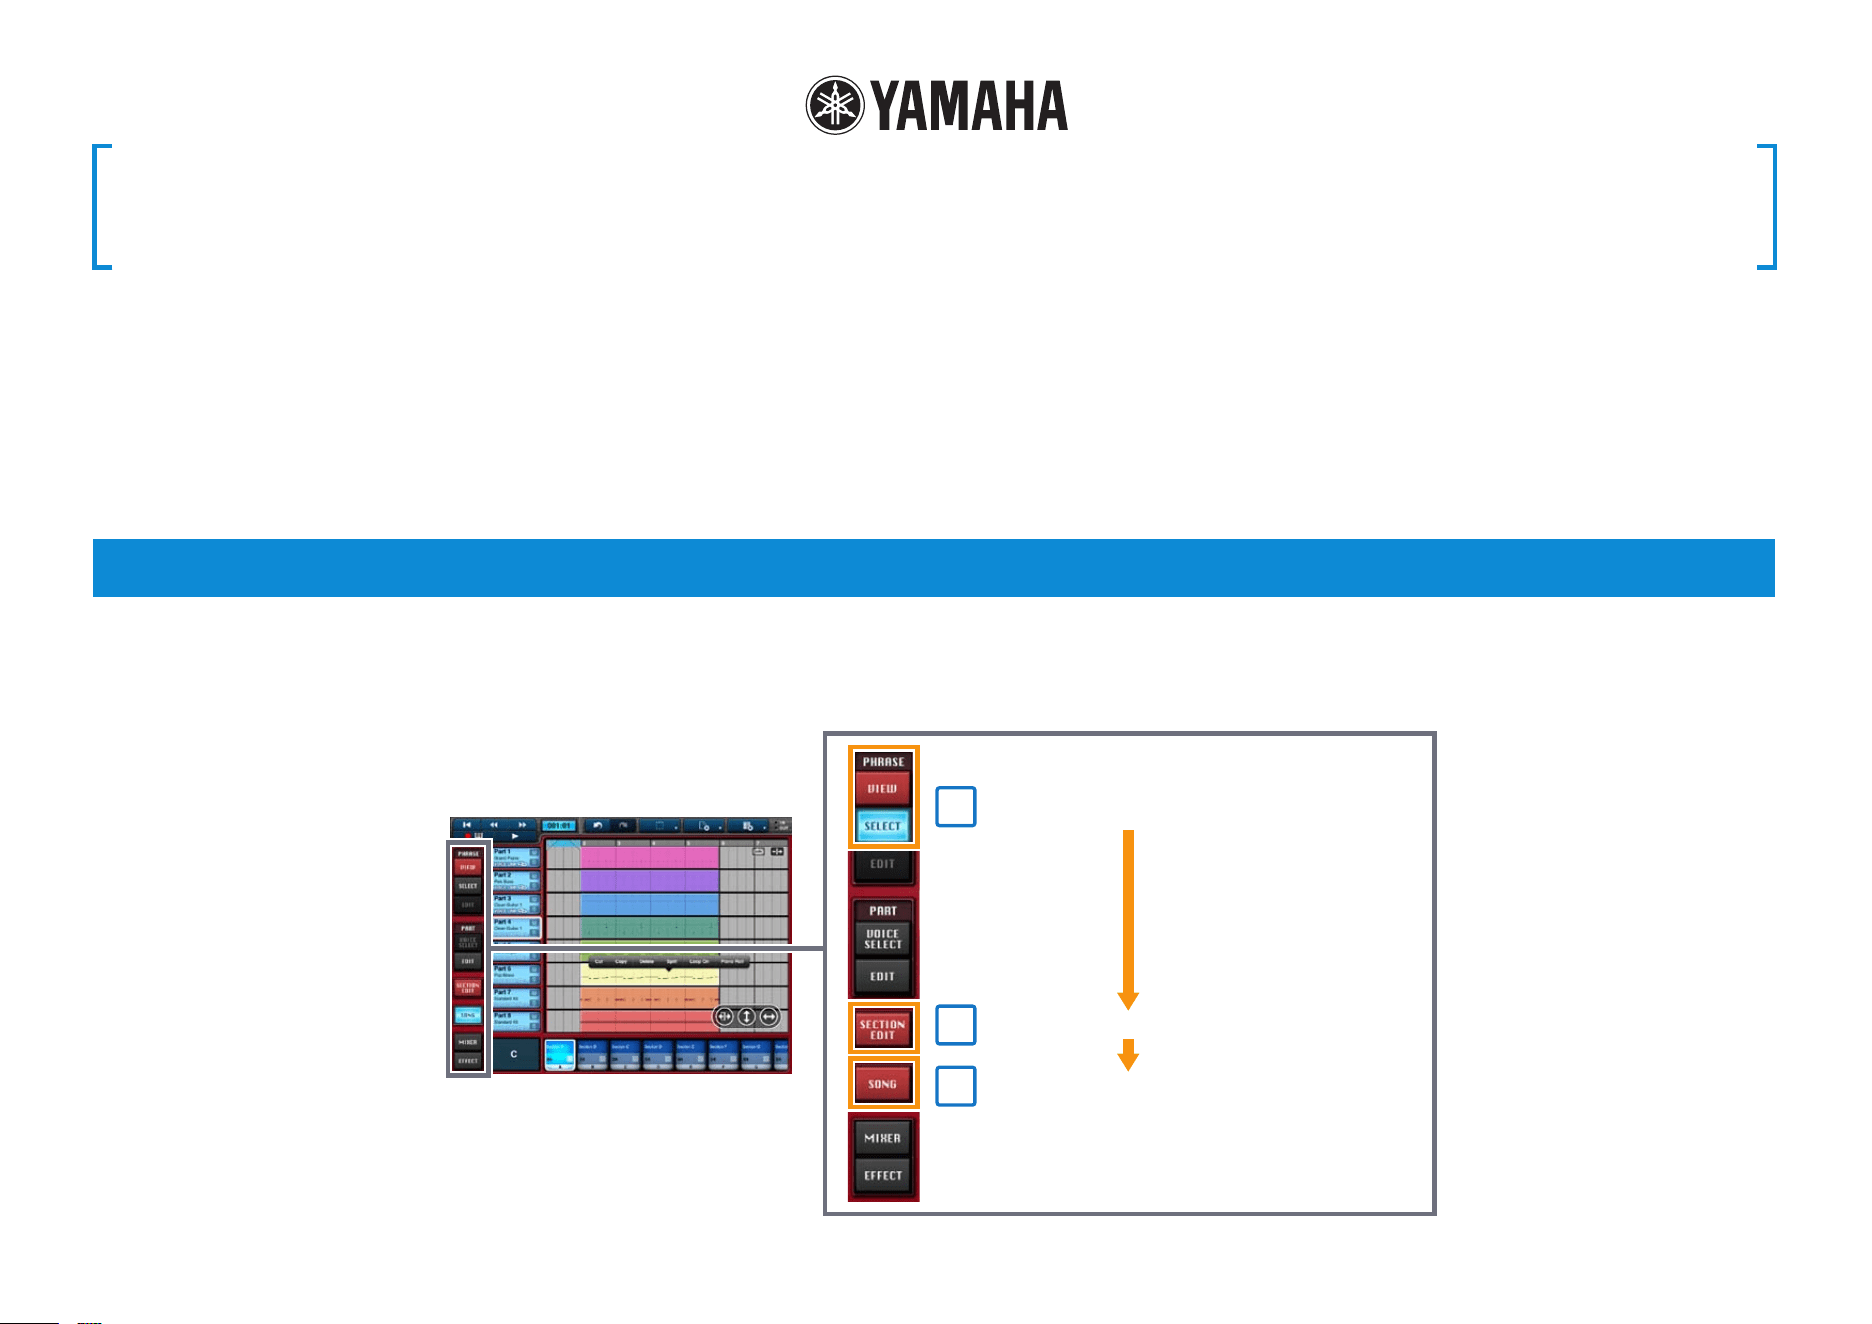
Coming with a wide range of phrases built-in, Mobile Music Sequencer can be used to create songs by arranging these phrases and entering chord sequences. Mobile
Music Sequencer can actually create music in many different ways, but this manual will cover the standard approach, which comprises the following three steps.
1
2
3
Mobile Music Sequencer Owner’s Manual
Build sections by arranging phrases
Add chord sequences to the sections
Expand the sections to build songs
Mobile Music Sequencer Owner’s Manual 2
Building Sections by Arranging Phrases
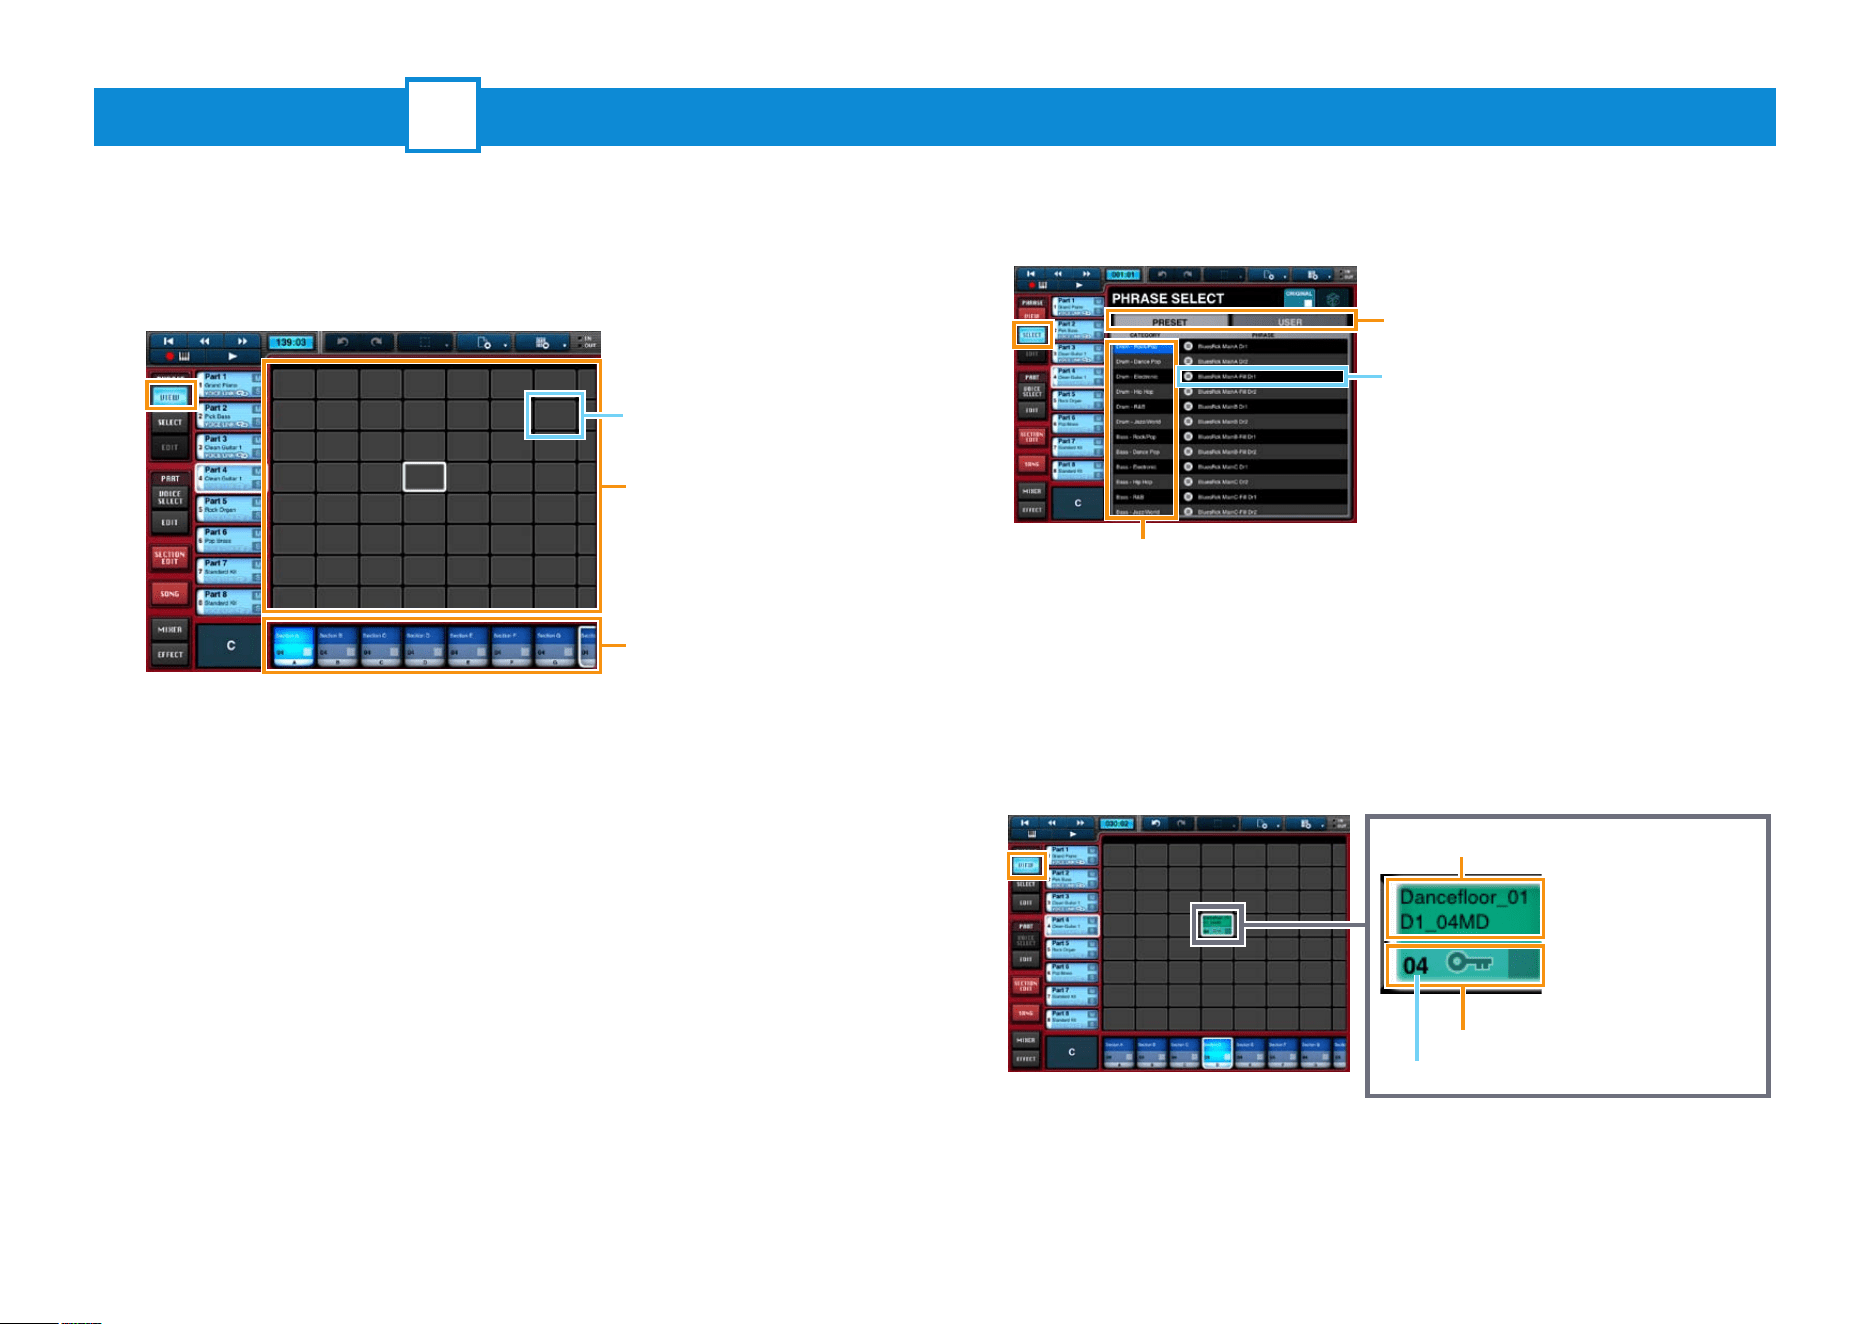
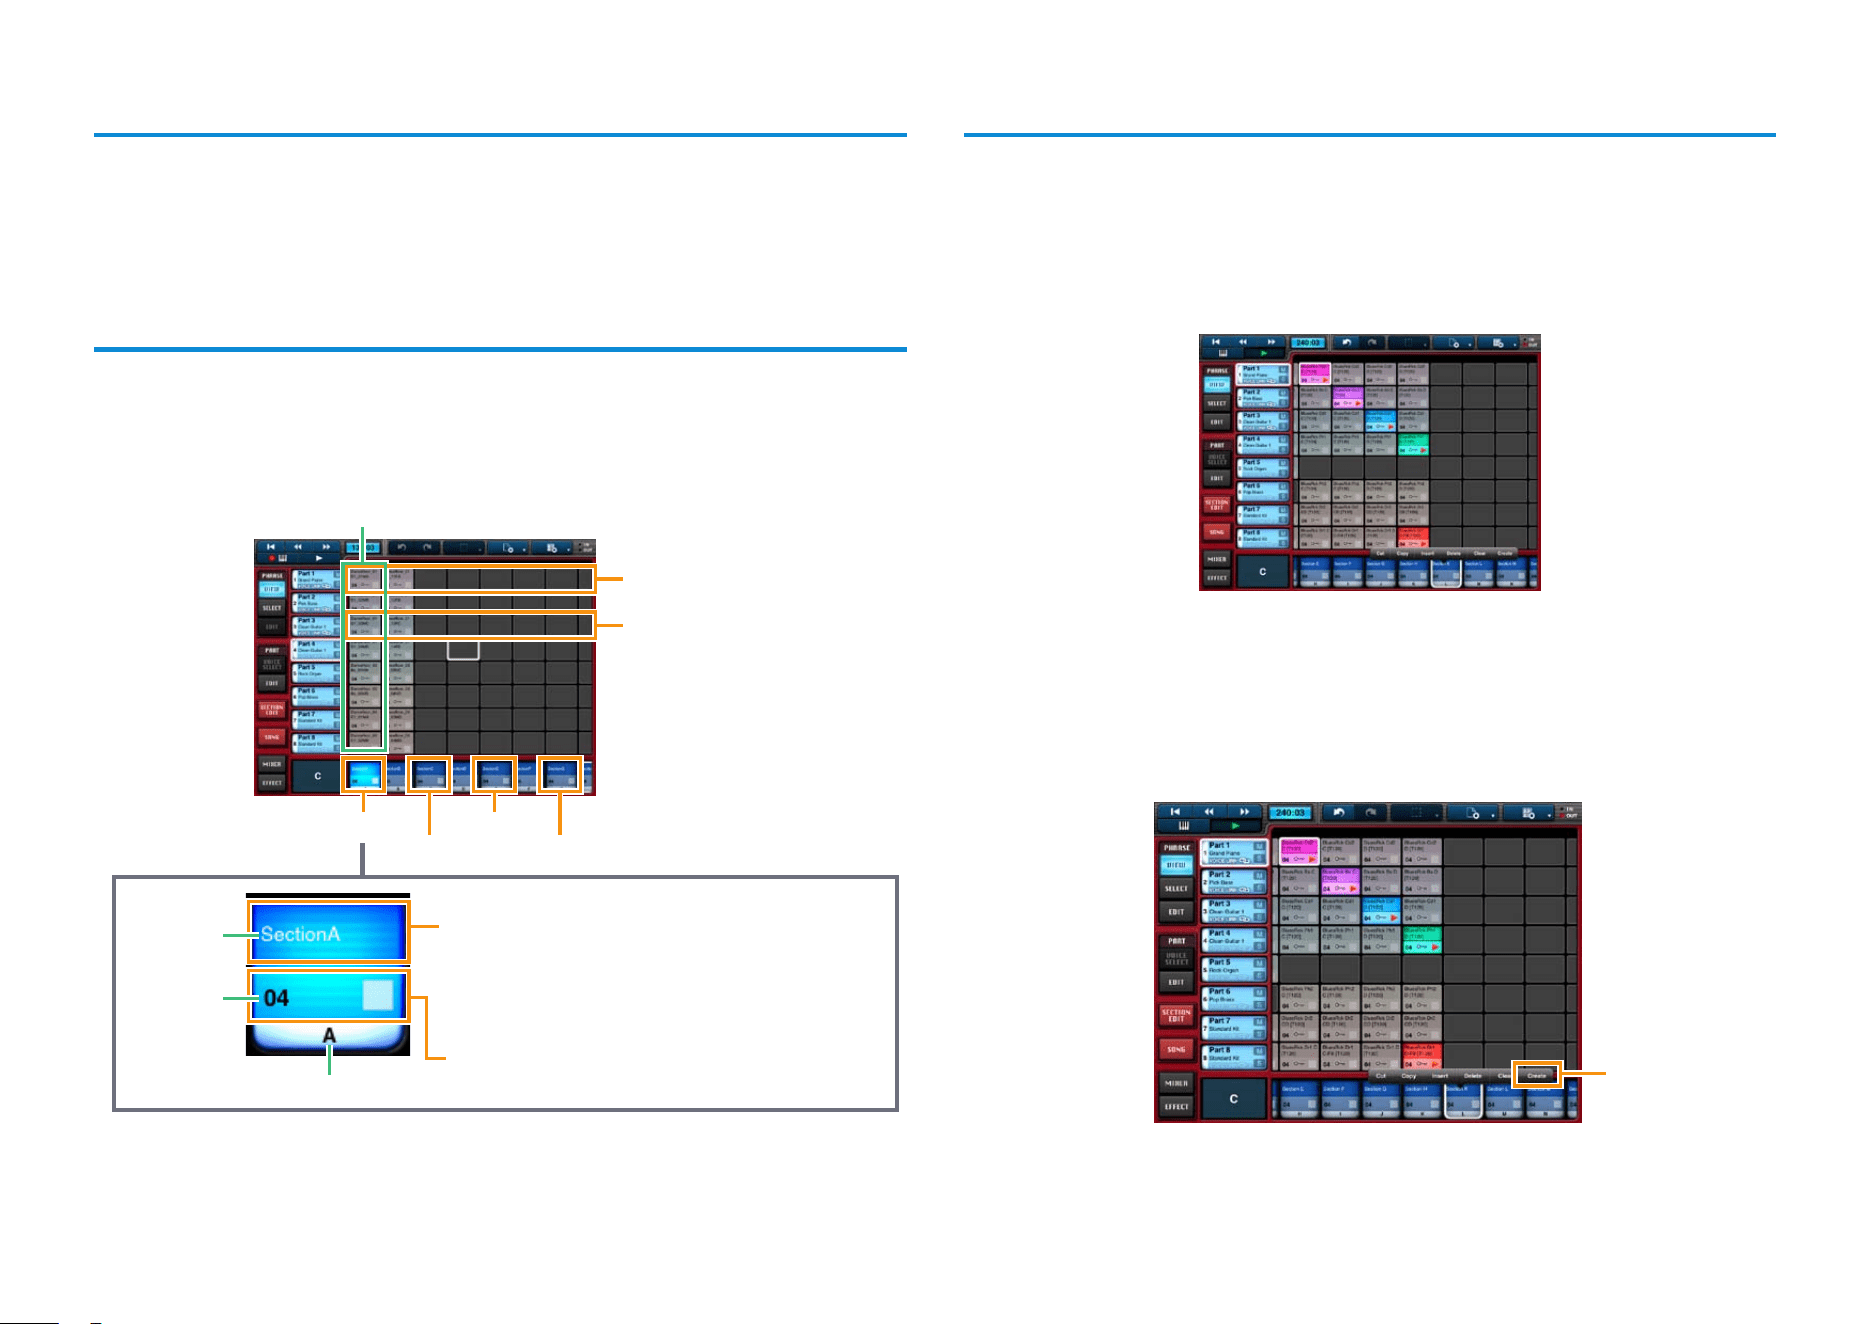
1. Tap [VIEW] from the PHRASE menu to open the Phrase
Viewer.
Phrases are arranged by placing them in cells in the Phrase Area. Each one
contains a small section of a performance on one particular instrument (or
voice).
2. Tap the Phrase Area cell in which you wish to place a
phrase.
3. Tap [SELECT] from the PHRASE menu.
4. Tap a phrase in the PHRASE SELECT pane to select it.
PRESET: Tap to display the app’s preset (i.e., built-in) phrases.
USER: Tap to display phrases that you have edited and saved.
CATEGORY: Tap to list the phrases based on instrument and music
category.
5. Tap [VIEW] from the PHRASE menu.
The phrase you selected will now be visible in the Phrase Viewer.
Length in measures
Phrase name:
Tap to play the phrase.
Tap here to cut, copy,
delete, or save.
[Piano Roll] will also
be displayed for User
phrases, allowing you
to open the Piano Roll
Editor.
Repeat Steps 2 through 5 to arrange phrases as needed.
1
Phrase Viewer
Cell
Phrase Area
Sections
PRESET, USER
Phrases play when tapped so that you
can preview them while selecting.
CATEGORY
Mobile Music Sequencer Owner’s Manual 3
Phrase voices
Each phrase in Mobile Music Sequencer has its own voice assignment. In order to
have phrases play with their assigned voices, be sure to turn on Voice Link for the
part in question. For details on this function, refer to Editing Parts.
Phrase arrangement tips
It generally makes sense for phrases containing similar voices (such as drums) to
be arranged in the same row. Columns represent sections such as the intro or fills,
which you can freely assign. For example, all of the phrases you would like to use
in the intro section should normally be arranged in the corresponding column.
Drum phrases
Bass phrases
Phrases for the intro
Intro
Section number
Main
Fill Ending
Section
name
Section
length in
measures
Section button
Tap to bring up a menu for copying or clearing the
section. If you cut or copy a section, [Paste] will then
be displayed when you tap a different section button,
allowing you to paste the content of the cut or copied
section.
Tap to play all of the section’s phrases together.
Tap once again to stop playback of the phrases.
NOTE
You can change the arrangement of sections in the Phrase Viewer by touching a section button and
then sliding.
Recommended approach for building sections
1. Arrange all of the phrases you would like to use in the
Phrase Viewer.
2. Play multiple phrases together to see which ones sound
good together.
3. Select an empty section by tapping its section button.
4. Tap the section button for that section once again to display
[Cut], [Copy], and other buttons.
5. Tap [Create].
Tap here.
NOTE
Steps 3 through 5 can be performed as one action by double-tapping the section button for an empty
section.
Mobile Music Sequencer Owner’s Manual 4
The section selected in Step 3 will be built from the phrases combined in Step 2.
Creating phrases
If you cannot find the phrase you need in the Phrase Select pane, you can easily
create it as described below.
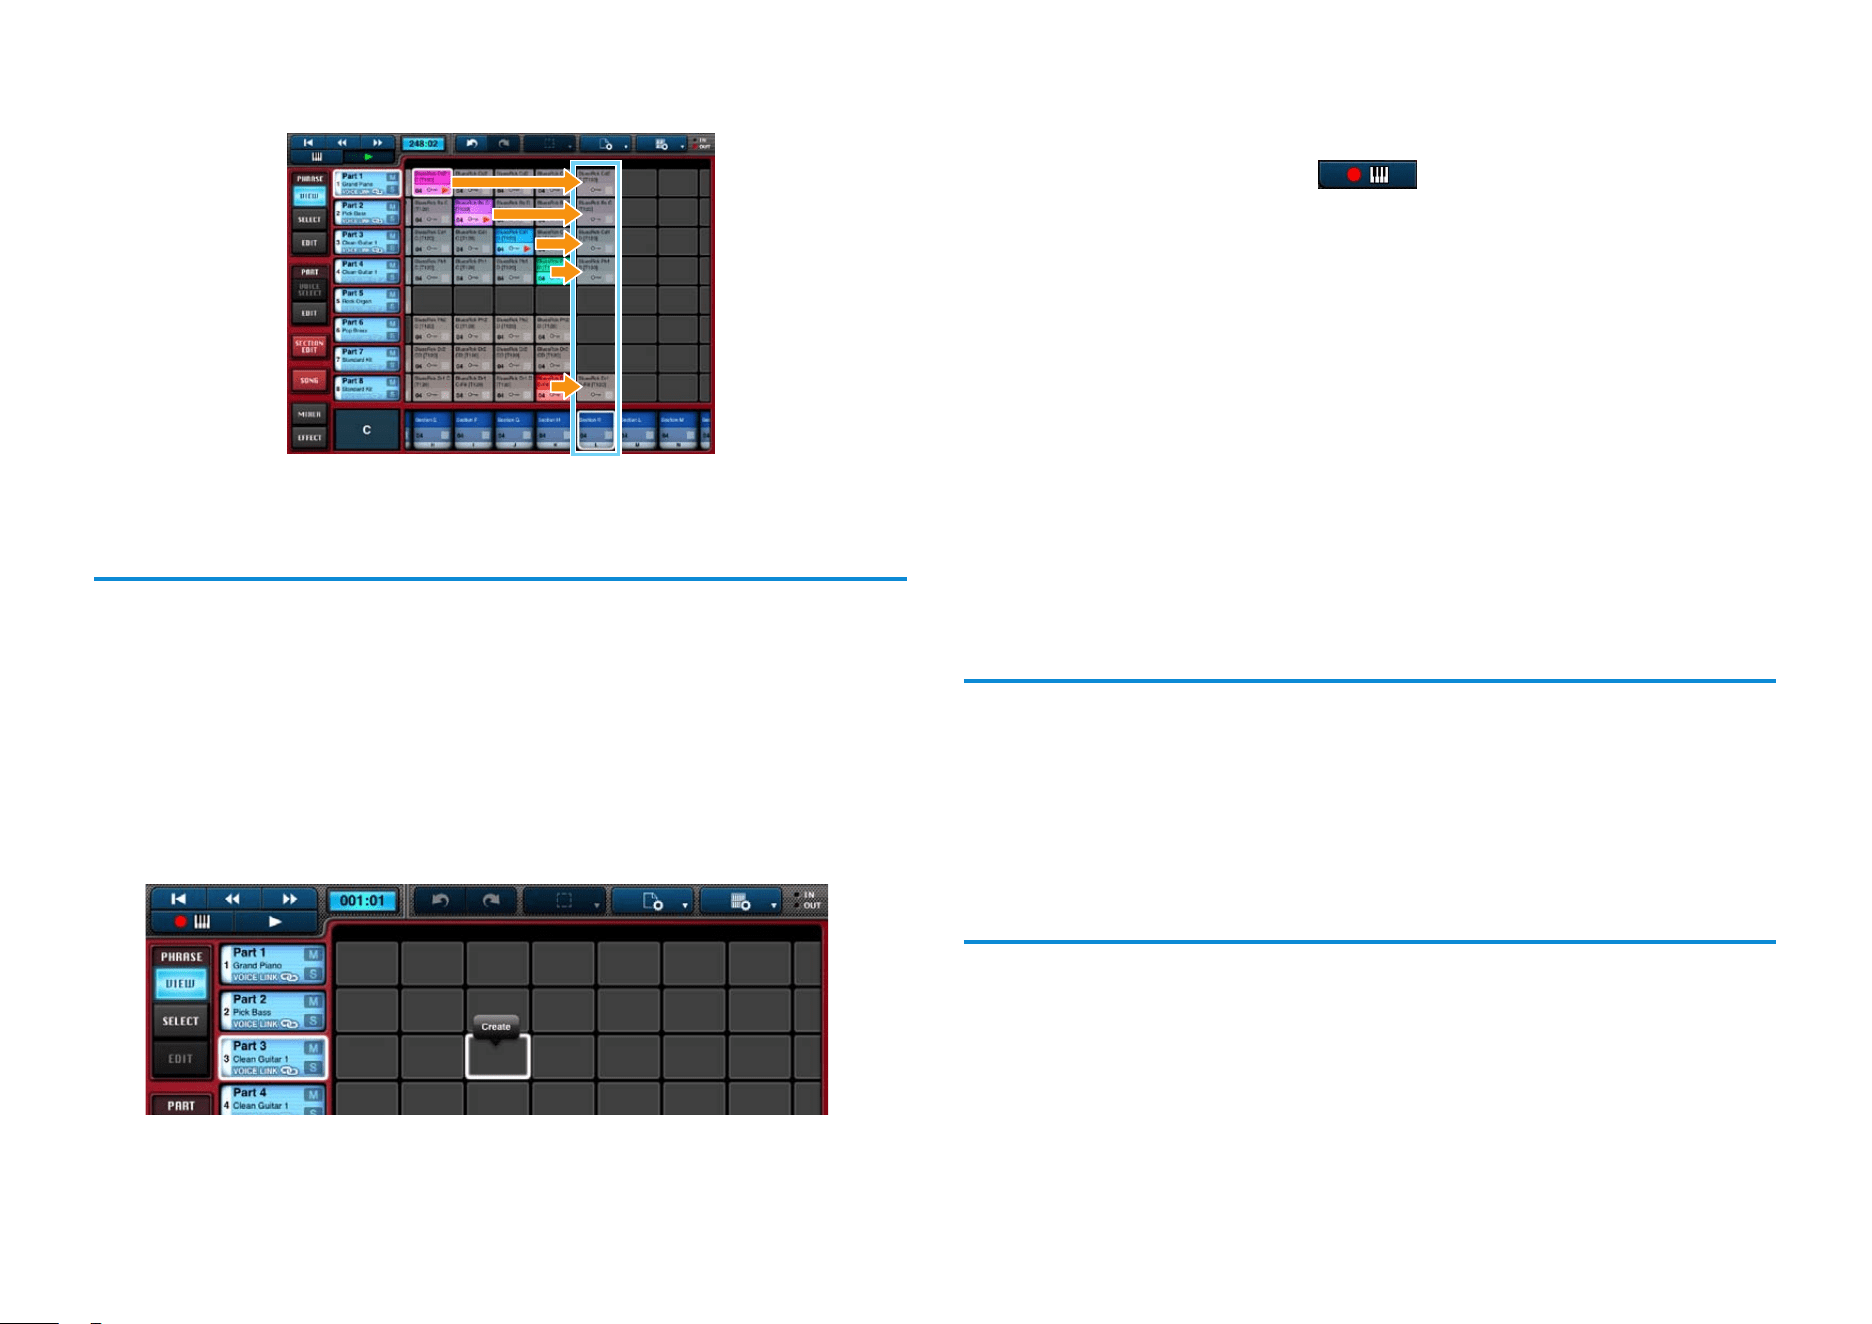
1. Tap [VIEW] from the PHRASE menu.
2. In the Phrase Area, select the cell to be assigned the phrase
by tapping it.
3. Tap the selected cell.
Tap [Create] in the menu that appears.
4. Add notes and other performance data to the phrase.
The Piano Roll Editor will be displayed, allowing you to add notes one by
one. If necessary, you can tap in the top-left corner to open the
Keyboard Screen. On that screen, you can record notes directly into the
phrase as you play.
We recommend that you create phrases based on only one chord. Once
created, however, you can set different chords for the phrases to play within
a song. For details on how to do so, refer to Adding Chord Sequences to
Sections.
NOTE
For more details on the Piano Roll Editor and the Keyboard screen, refer to the corresponding
sections below.
5. When you have nished adding notes and other
performance data, tap [EXIT].
The phrase you created will now be visible in the Phrase Viewer.
Editing phrases
Phrases from the Phrase Viewer can be edited at any time. For details, refer to
Editing Phrases.
NOTE
MIDI events and certain other parameters cannot be edited for Preset phrases or for User phrases
created by saving Preset phrases.
Editing voices
After adding phrases to a part, you can change or modify its voice. For details,
refer to Editing Parts.
Mobile Music Sequencer Owner’s Manual 5
Adding Chord Sequences to Sections
2
In Mobile Music Sequencer, chords can be set at any of a section’s beat positions
as follows.
1. In the Phrase Viewer, select a section to edit by tapping its
section button.
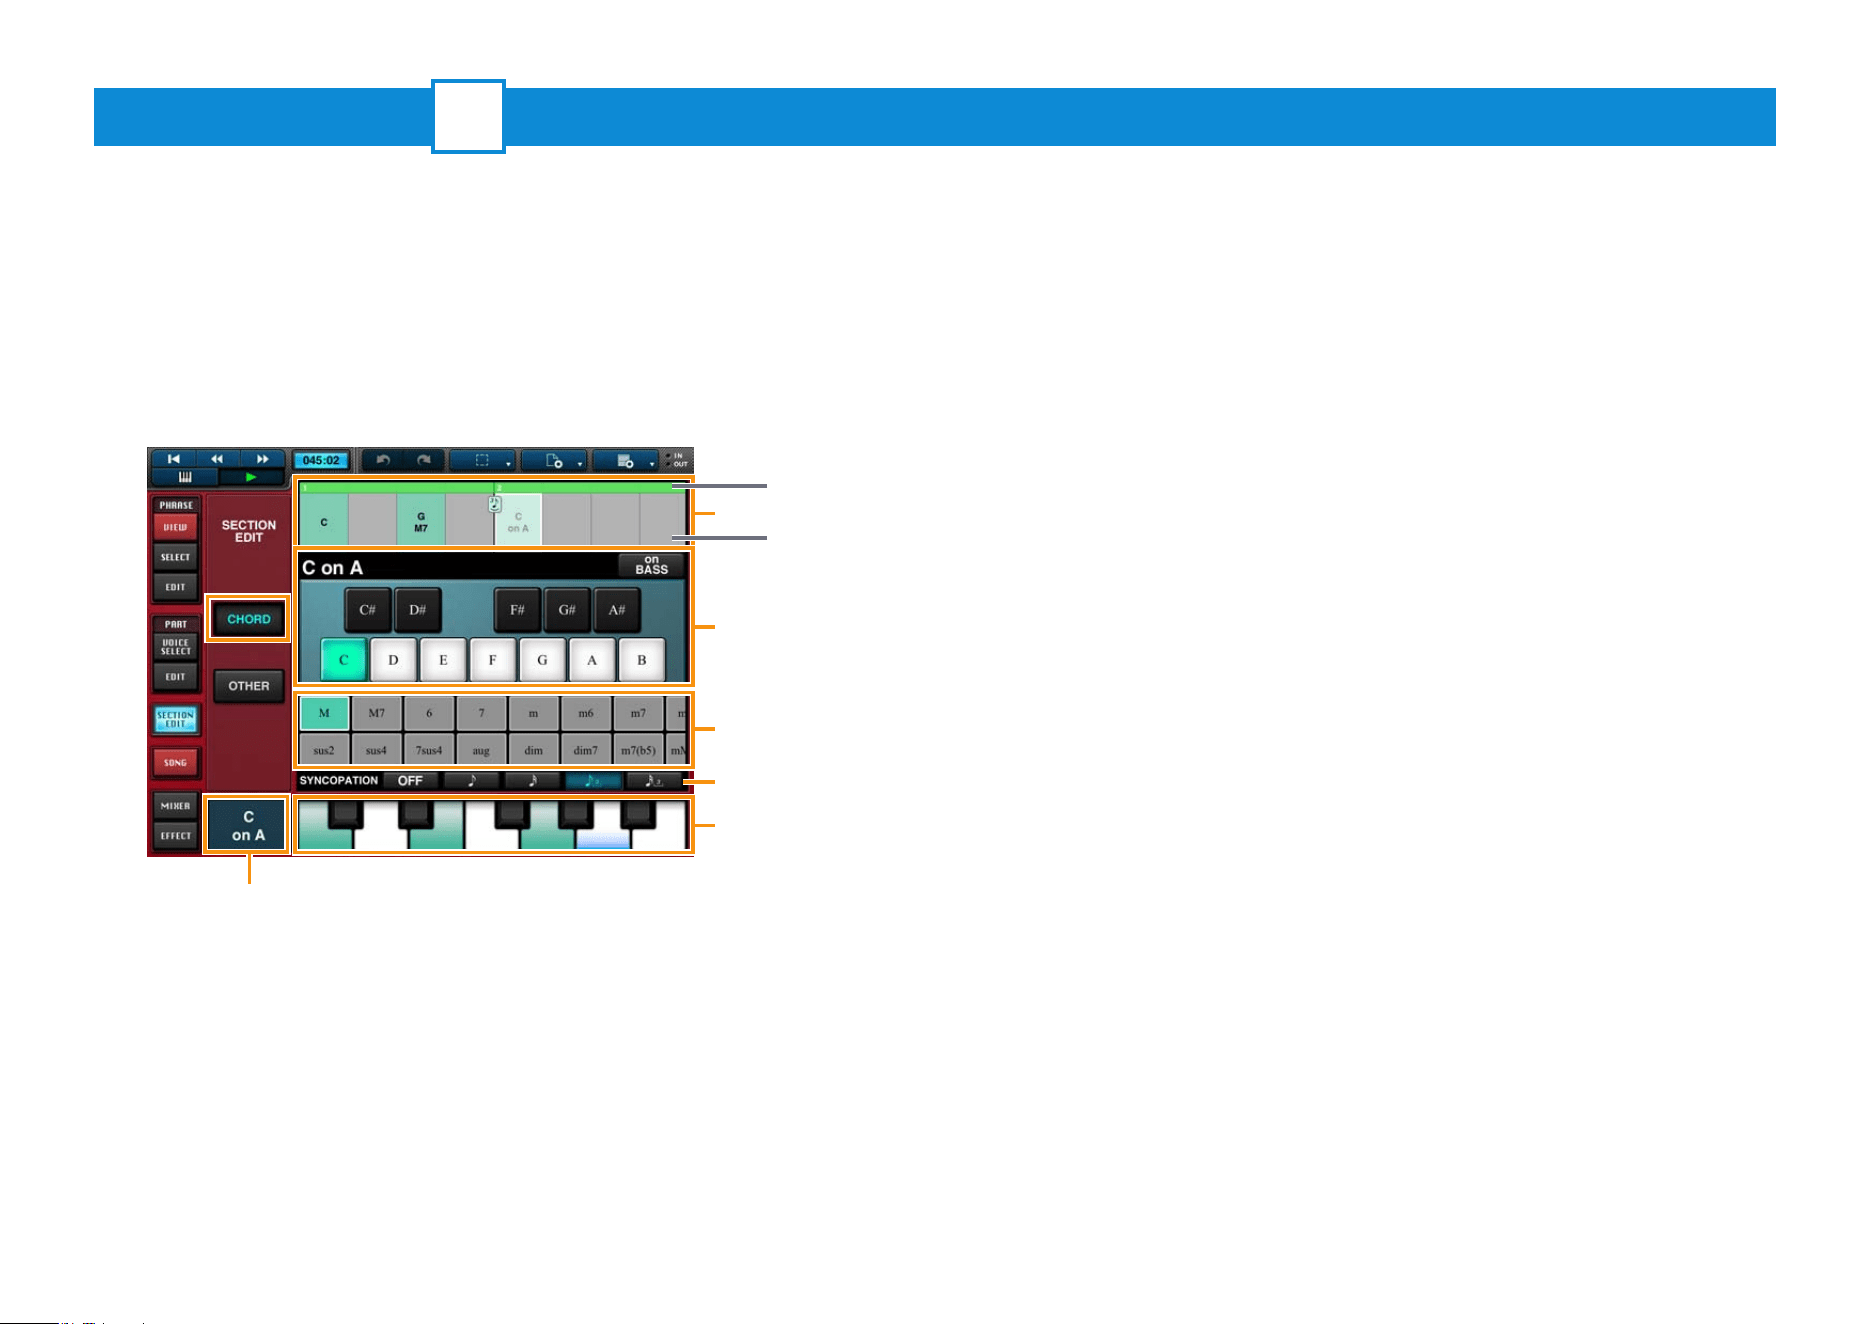
2. Tap [SECTION EDIT] to open the Section Editor.
3. Tap [CHORD] from the SECTION EDIT menu.
1
2
3
5
4
4-1. Add a chord change:
In Area 1, tap the beat where you want the chord to change.
In Area 2, tap the desired root of the chord, and then enter the chord type
using Area 3 or the keyboard in Area 5.
The chord change will now be added.
The notes that make up the selected chord will be shown in green on the
keyboard in Area 5.
When a section is playing, the Chord Indicator will show the current chord.
4-2. Add an on-bass note:
Using the On-bass function, you can set a specific bass root note to be used
when playing phrases.
Accordingly, this function only affects bass-category Preset phrases or User
phrases whose chord type has been set to Bass.
If, for example, you set A as the on-bass note for a C chord, the Chord
Indicator will display “C on A”, and the relevant phrases will play the note A.
In Area 1, tap the beat where you want to add an on-bass note.
In Area 2, tap [on BASS] and select an on-bass note or tap the
corresponding key in Area 5.
The on-bass note will now be added. To remove an on-bass note, tap [on
BASS] and then tap the selected on-bass note once again.
On-bass notes will be shown in blue on the keyboard in Area 5.
When a section is playing, the Chord Indicator will show the on-bass setting.
4-3. Add syncopation:
In Area 1, tap the beat where you want to add syncopation.
In Area 4, select a syncopation type.
Syncopation will now be added. To remove syncopation, tap [OFF].
Syncopation settings will be displayed in the corresponding measure in Area
1.
Measures
Beats
Chord Indicator
Mobile Music Sequencer Owner’s Manual 6
The following settings can also be made in the Section Editor.
Setting the section name and length in measures
1. In the Phrase Viewer, select a section to edit by tapping its
section button.
2. Tap [SECTION EDIT] to open the Section Editor.
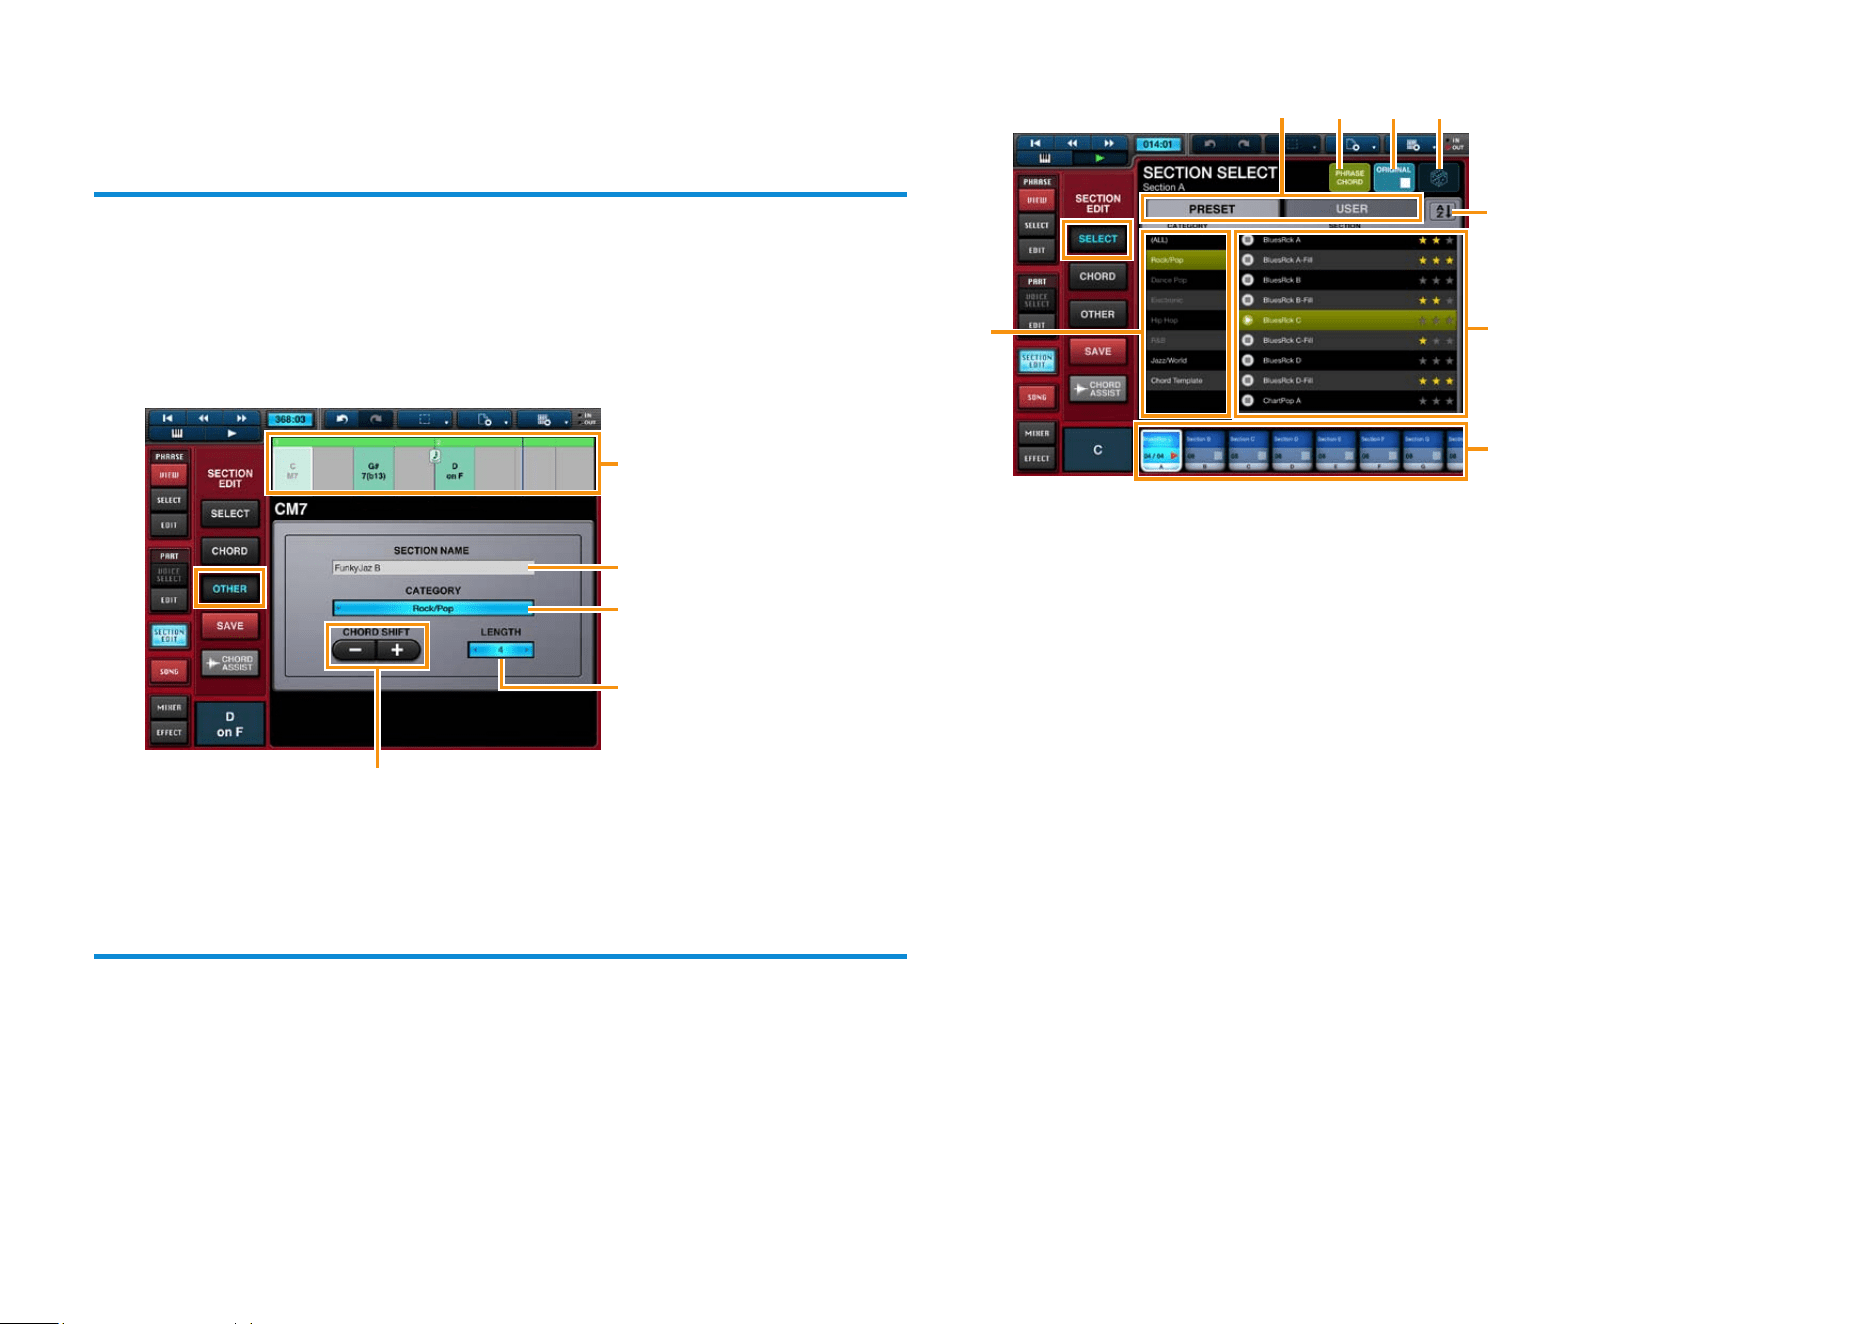
3. Tap [OTHER].
Tap to transpose the chord’s root note or on-base
note. Your new setting will be shown in Area
1
.
1
Selecting sections from presets
Using the procedure described below, you can create sections by loading presets
or previously saved data.
1. Tap [SELECT] in the Section Editor.
Tap to bring up the keyboard
and then enter a name for the
section.
Tap to set the length of the
section in measures.
Tap to set the section
category.
3
2
4
8 5 6 7
1
2. In Area 1, select the section into which you wish to load
data by tapping it.
3. In Area 3, select the section you wish to load by tapping it.
The following numbered areas and buttons can be used when selecting
sections.
2 You can select a section category in this area.
3 Tap the star symbols (
«
) here to rate individual sections.
4 Use this button to list the sections in Area 3 in alphabetical order or
based on their ratings.
5 You can use this button to indicate whether phrases only, chords only, or
both phrases and chords should be loaded with sections.
6 Tap this button to return to the condition before Step 3.
7 You can tap this button to load a random section from Area 3.
8 Tap to choose the type of section to display in Area 3.
PRESET: Area 3 will display Preset sections.
USER: Area 3 will display the sections that you have saved.
4. If necessary, tap [SAVE] to save the selected section with a
name and category.
To select sections saved in this way, set the display to User in Area 8.
Mobile Music Sequencer Owner’s Manual 7
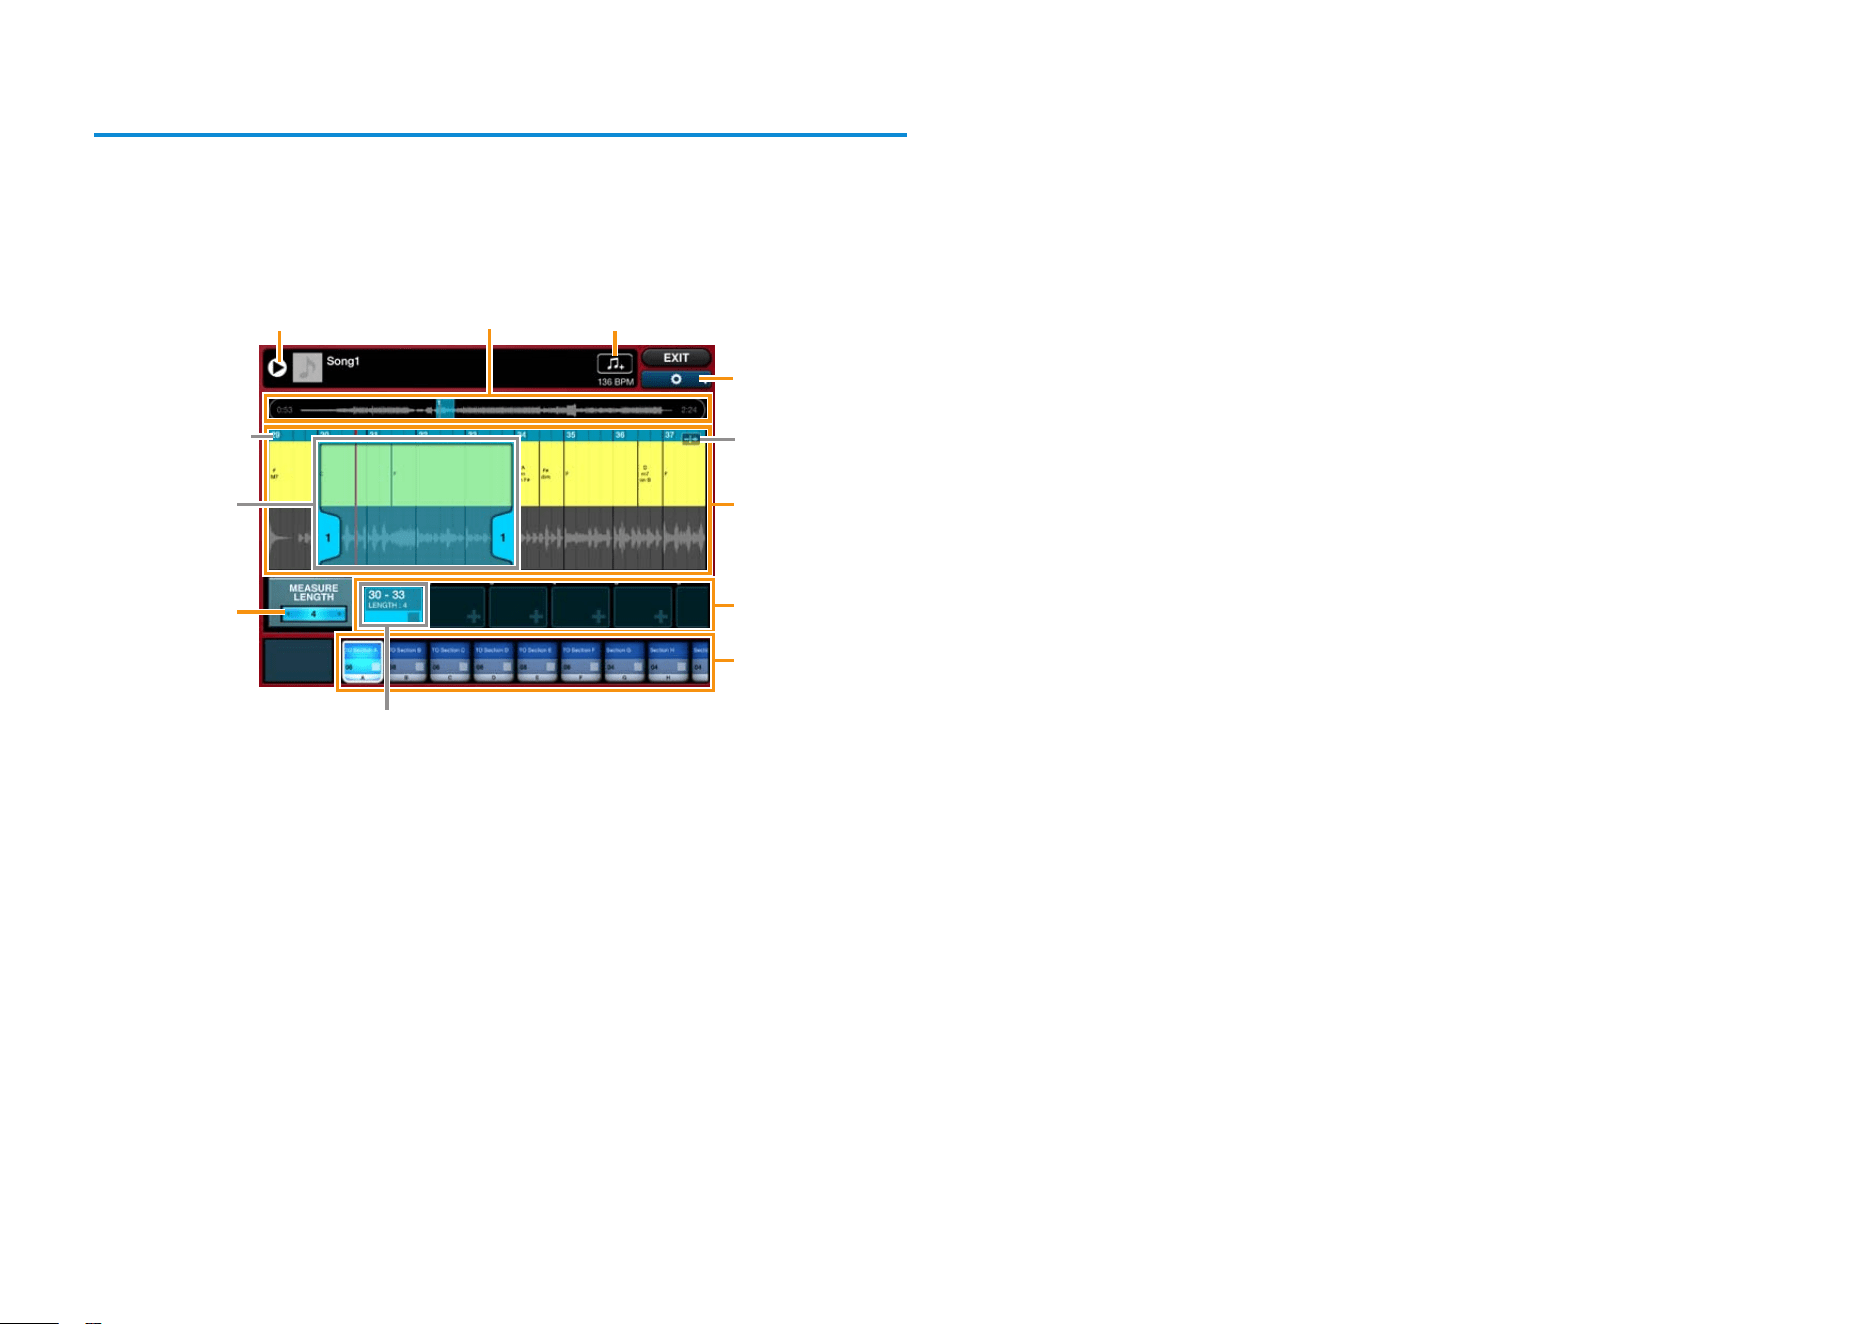
Importing chord sequences into sections from audio data
Using the procedure described below, you can import chord sequences from
audio data in the Music app on your iPhone or iPad.
1. Tap [CHORD ASSIST] in the Section Editor to open the
screen shown below.
4
6
9
2 13
8
7
Measures
Chord set
5
)
If necessary, tap 9 to make the following settings.
AUDIO VOLUME: Adjust the volume of the audio data.
AUDIO TEMPO: Double or halve the tempo of the audio data.
BEAT SHIFT: Adjust the positions of beats and measures relative to the
audio data.
PROJECT TEMPO: Adjust the tempo of the current project.
2. Tap 1 to display the Music app’s audio list screen.
3. Select audio data as follows.
3-1. Within the list of audio data, tap the one from which you wish to
import chords.
Mobile Music Sequencer will automatically start to play and analyze the data.
NOTE
• If you turn off [REANALYZE] at the bottom-left of the audio list screen, audio data that has
been analyzed already will not be re-analyzed when you tap it again.
• Depending on the type of audio data selected, it may not be possible to analyze chords
accurately.
3-2. Tap [Select] to close the audio list screen.
4. Import the chord sequence from the selected audio data as
follows.
4-1. While playing the audio data using 3, tap 2 to indicate the
approximate location of the chord sequence you wish to import.
Tap ) if you would like the playback position from 2 to be displayed in Area 4.
NOTE
You can also stop playback by tapping 3.
4-2. In Area 7, tap the chord set into which you wish to import the
chord sequence.
When you do so, the measure corresponding to the position set in Step 4-1
and the chord sequence will be displayed in Area 4. In addition, the chord-
set selection range will be displayed as Area 5.
4-3. Adjust the chord-set selection range 5 as appropriate.
To move the selection range: Touch Area 5 and then slide it left or right.
To change the number of measures in the selection range: Touch a
numbered tab in Area 5 and slide it left or right; alternatively, change the
setting in 6.
5. Copy and paste the chord sequence from the chord set into
a section.
To copy the chord sequence: In Area 7, tap the top of the chord set you
wish to copy from, and then tap [Copy] in the menu displayed.
To paste the chord sequence: In Area 8, tap the top of the section you
wish to paste into, and then tap [Paste] in the menu displayed.
NOTE
You can also copy and paste a chord sequence by dragging the chord set and dropping it
onto a section.
6. Tap [EXIT] at the top-right of the screen to return to the
Section Editor.
In the Section Editor, tap [CHORD] to review or edit the imported chord
sequence.
If necessary, tap [SAVE] to save the selected section. Sections saved in this
way can be accessed by setting the Section Select area to User.
Mobile Music Sequencer Owner’s Manual 8
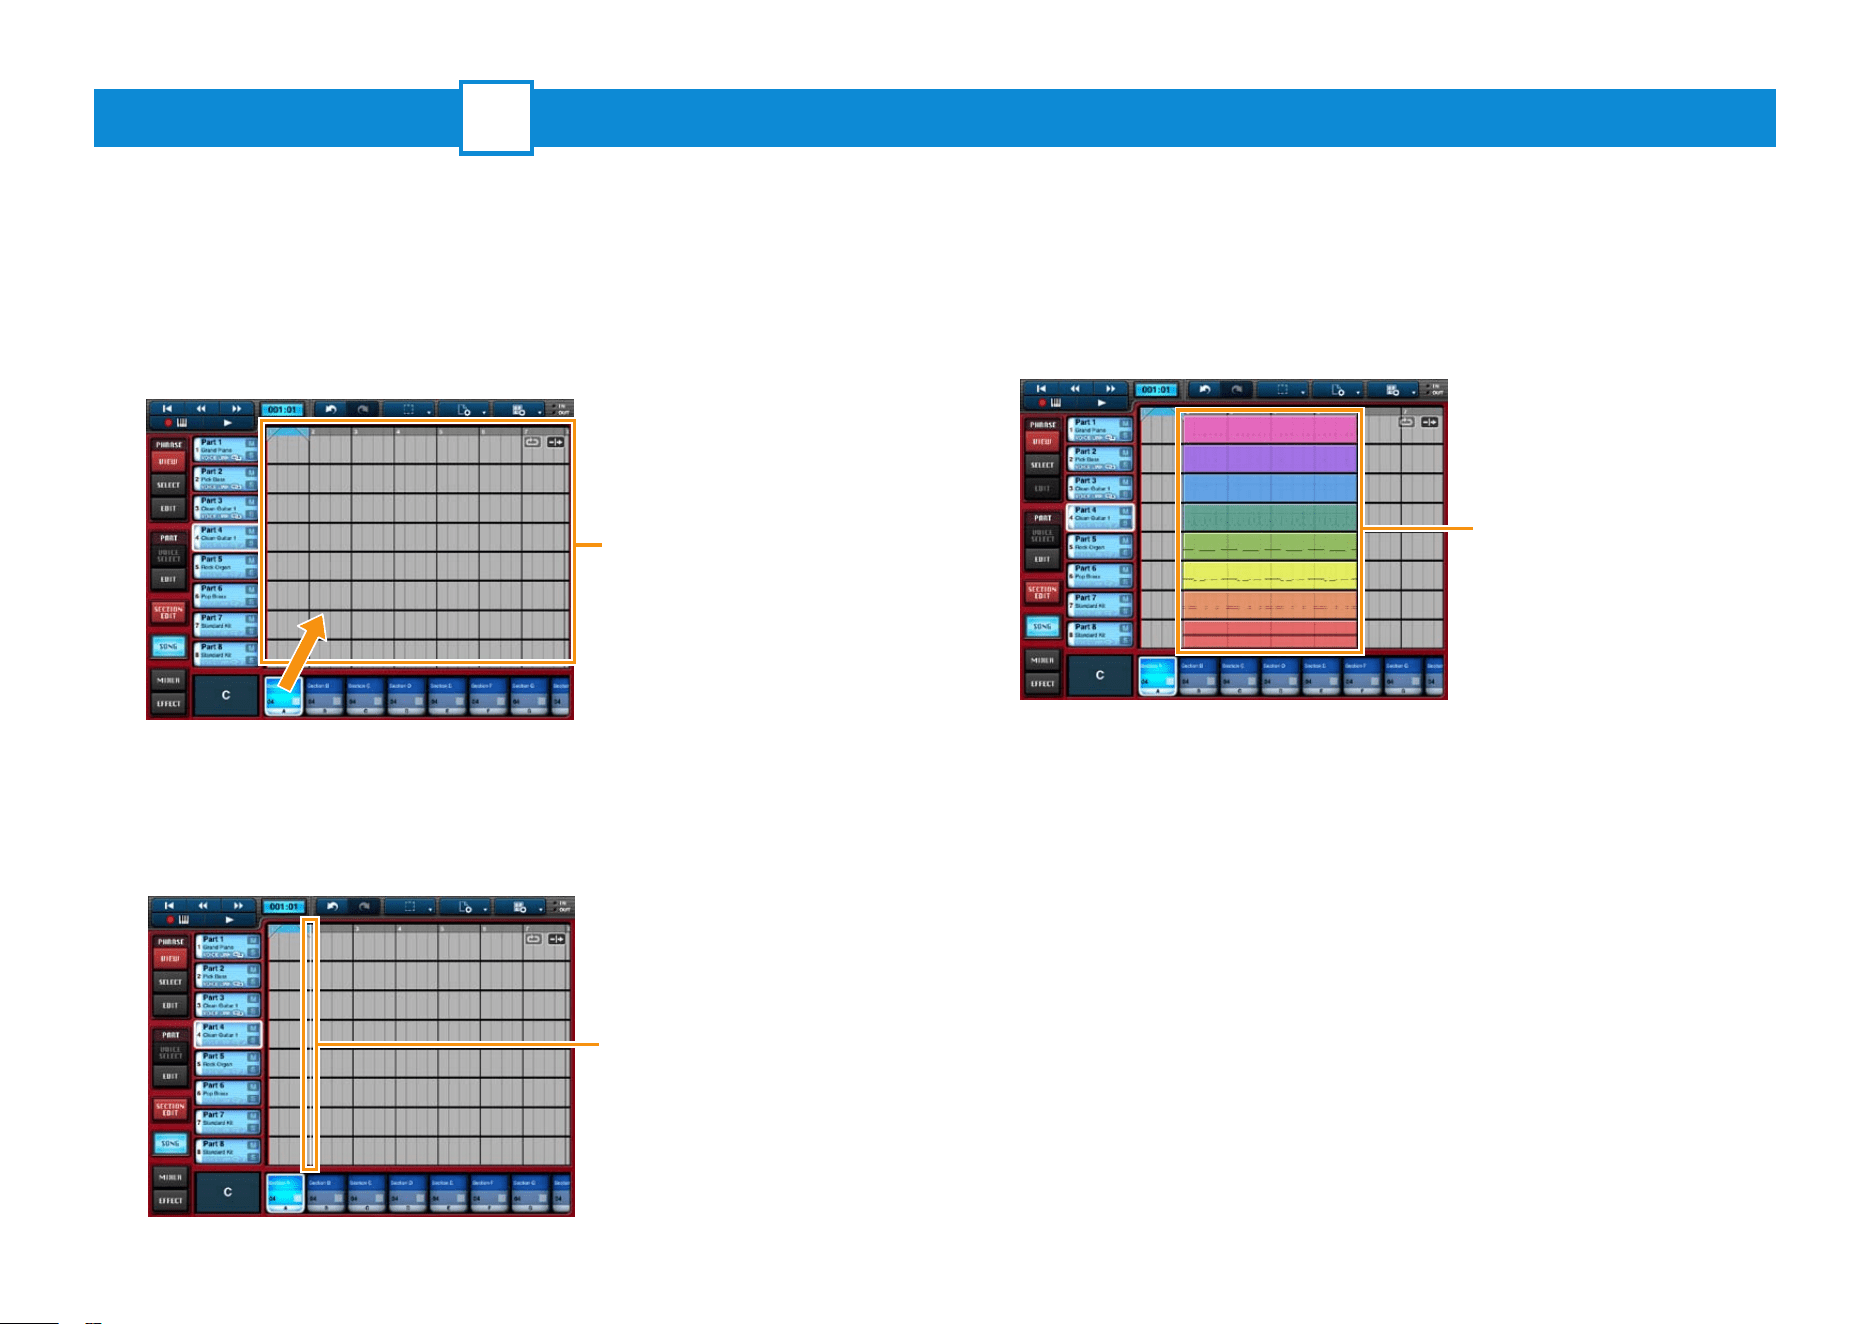
Expanding Sections to Build Songs
3
In Mobile Music Sequencer, you can build a song as follows by expanding
sections based on the phrases they contain.
1. Tap [SONG] to open the Song Editor.
2. Touch the section button for the section you wish to expand
into the song, and slide the section into the Song Area.
3. Move the section to the measure at which you wish it to
start (shown by the white playhead), and then release your
nger from the screen.
All of the section’s phrases will now be expanded into the song.
NOTE
• In addition to the above-described procedure, you can also copy sections and individual phrases
in the Phrase Viewer and paste them into the Song Editor.
• If SECTION CHAIN PLAY from Project settings is turned on, you will need to select whether to
expand only the selected section or that section together with all sections between it and the next
empty sections to the left and right.
You can edit your song at any time. For details, refer to Editing Songs.
You can also mix your song and adjust the effects. For details, refer to Mixing &
Adjusting Effects.
Song Area
Touch and slide
Release your nger
Phrases expanded to form
song blocks
Blocks are created by expanding
phrases according to the length
of the section and its chord
sequence.
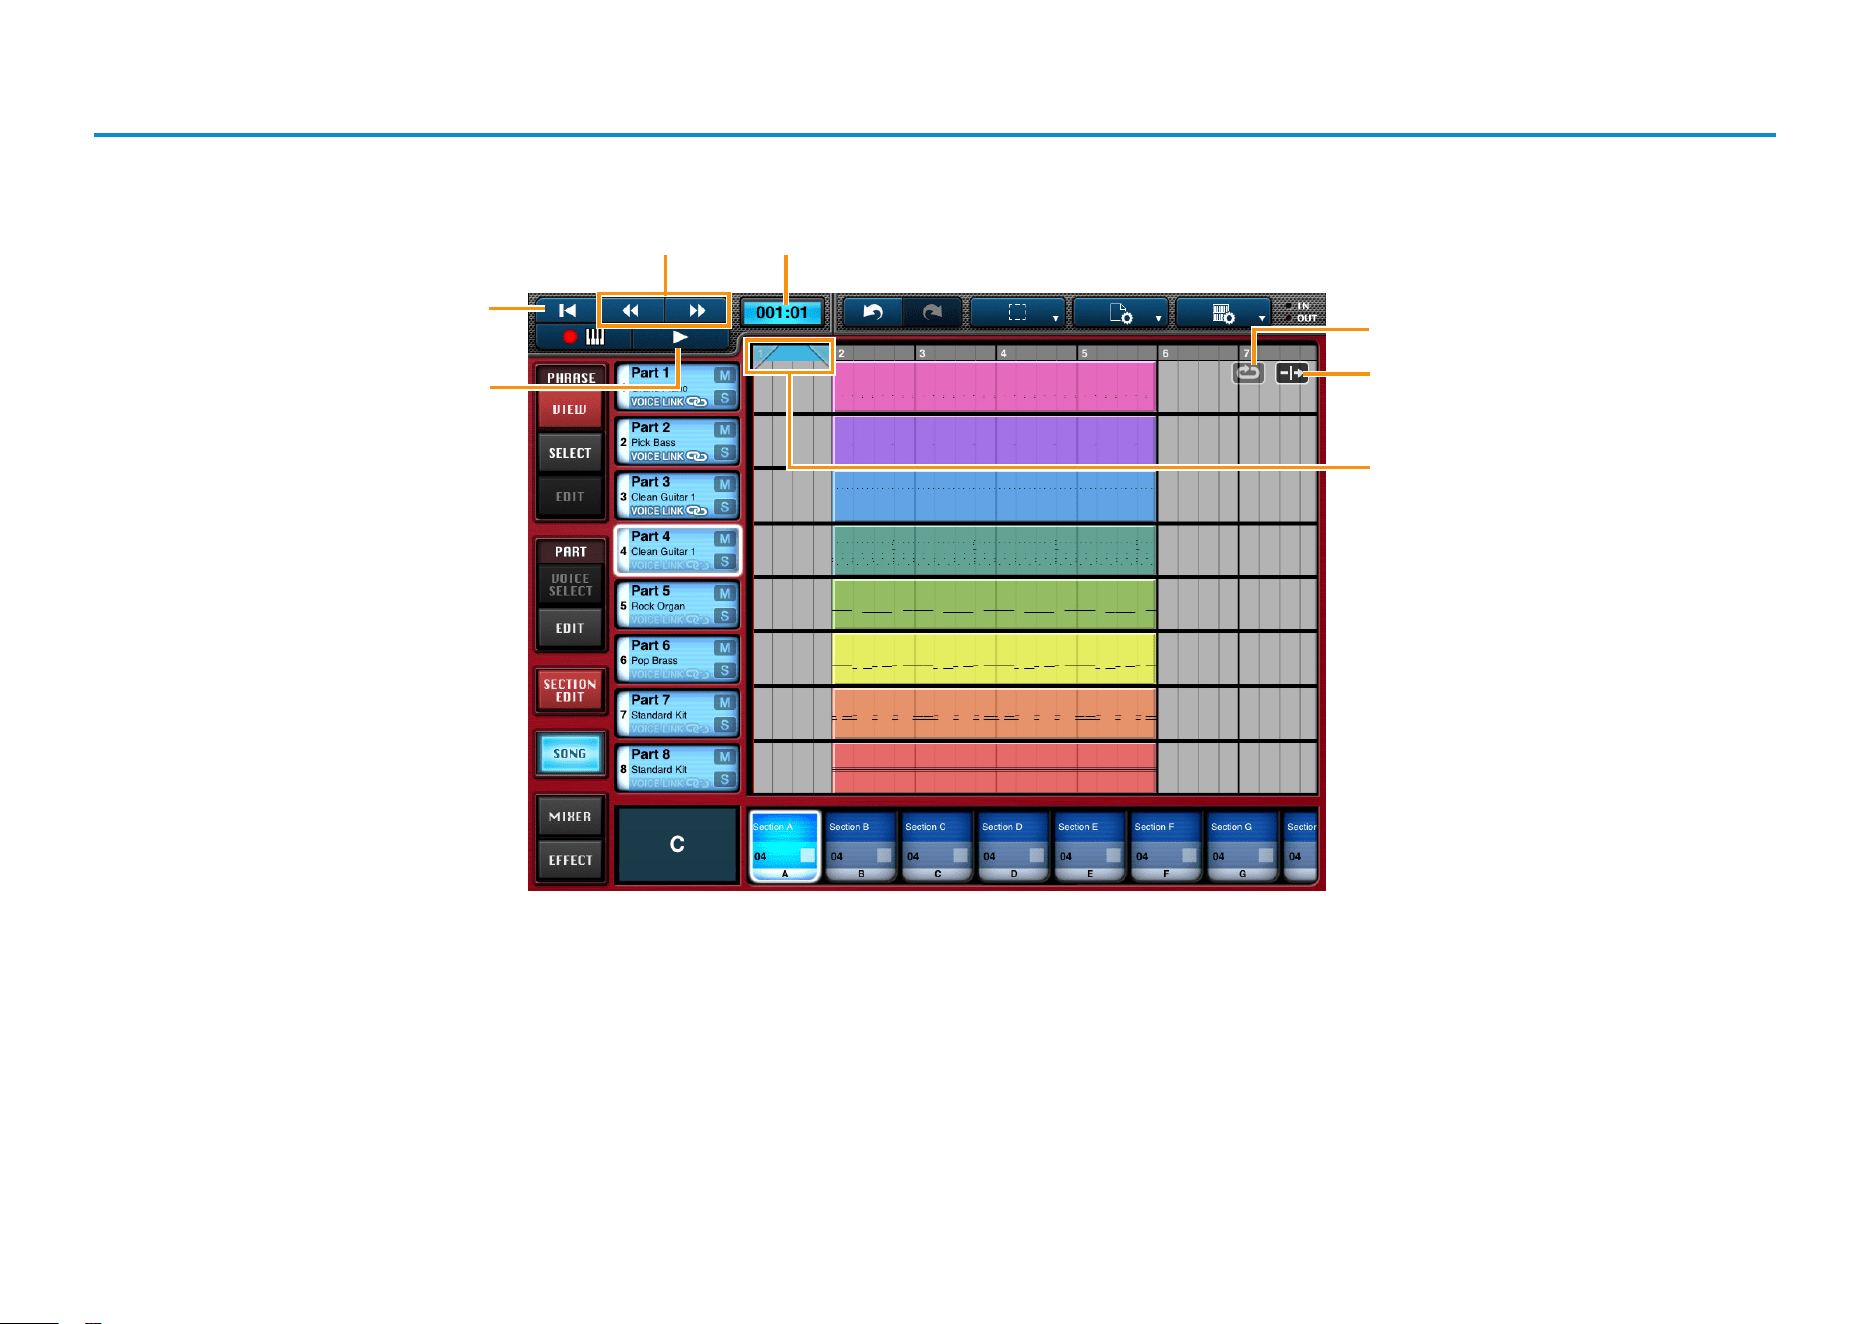
Mobile Music Sequencer Owner’s Manual 9
Song playback controls and indicators
Tap to move the playhead to the start
of the song.
Tap to start playback of the current
song. Tap while playing to stop the
song.
Tap to move the playhead forwards or
backwards in steps of one measure.
Shows the playback position
in terms of measures and beats.
Tap to have playback loop within the
Loop Area.
Tap to have the screen scroll to follow
the playhead.
Loop Area
Slide the triangle on the left to set the
loop start point. Slide the triangle on
the right to set the loop end point.
Mobile Music Sequencer Owner’s Manual 10
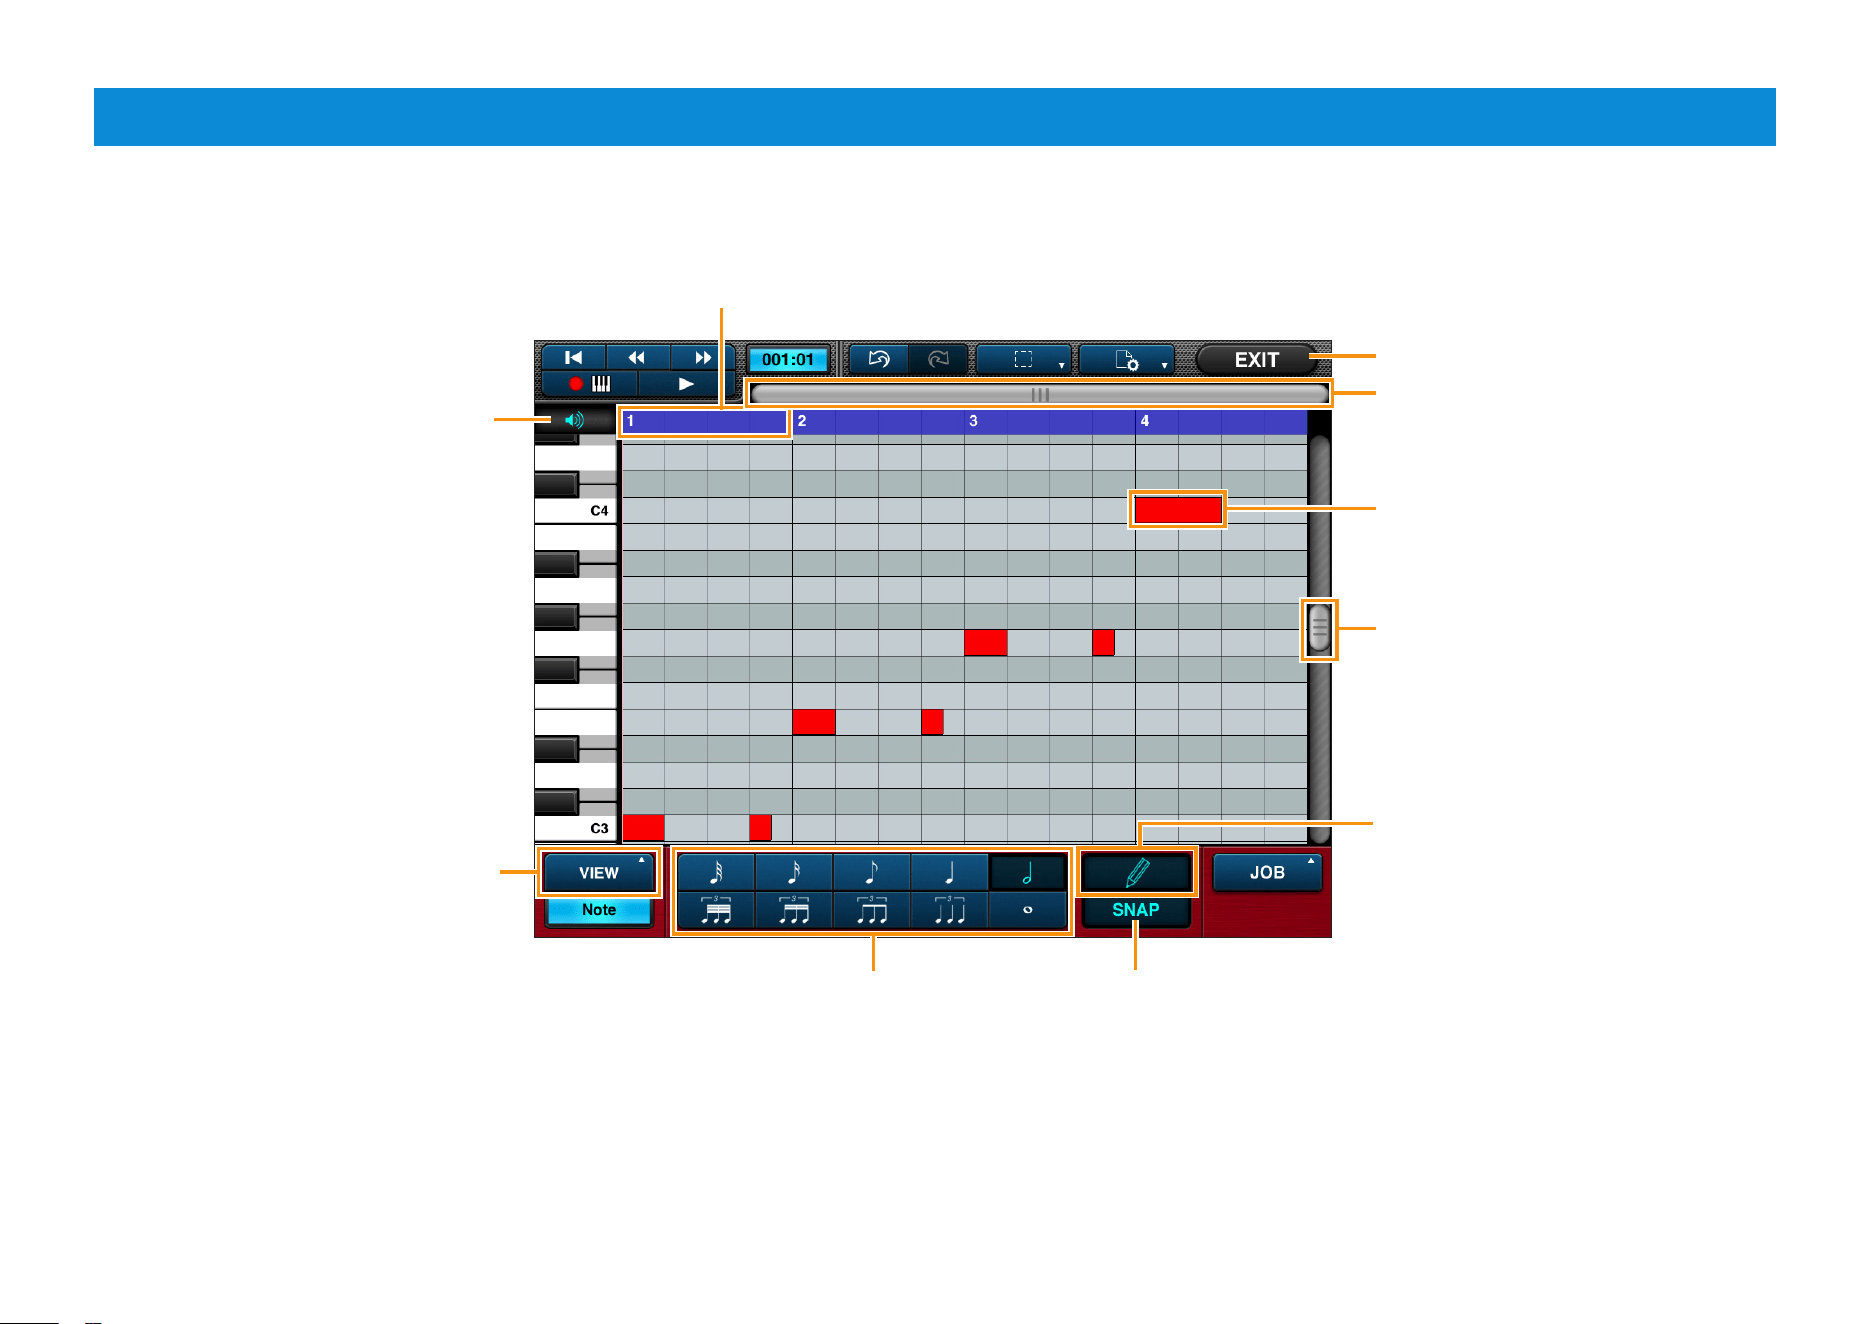
Piano Roll Editor
Using the Piano Roll Editor, you can edit individual notes from phrases or song blocks.
In addition, you can tap a cell to add a new note at that position and pitch.
NOTE
You can also listen to voices and make selections
with Voice Link turned on.
By turning this on, you can check the
sound when tapping a cell to add a new
note.
Measure
Tap to activate performance-data mode
for viewing and editing velocity, pitch
bend, or control change messages.
Tap to return to the previous screen.
Use this scroll bar to move along the
length of the phrase or block.
A note from the phrase or block.
The length of the rectangle
corresponds to the length of the note.
Use this scroll bar to move along the
length of the keyboard.
Turn on to allow editing.
Turn on to have notes snap into place (i.e., quantized)
when positioned. (Specifically, the start of the note will
be moved to the nearest vertical line.)
Length of newly added notes
Mobile Music Sequencer Owner’s Manual 11
Adding notes and Changing velocities
Adding notes
1. Ensure that is turned on (tap if necessary).
2. Ensure that the note length is set as required at the bottom
of the screen.
3. Tap the screen at the desired pitch position (vertical) and
playback position (horizontal).
A rectangular note of the selected length will be added at the tapped position.
NOTE
A newly added note can be tapped once again to delete it.
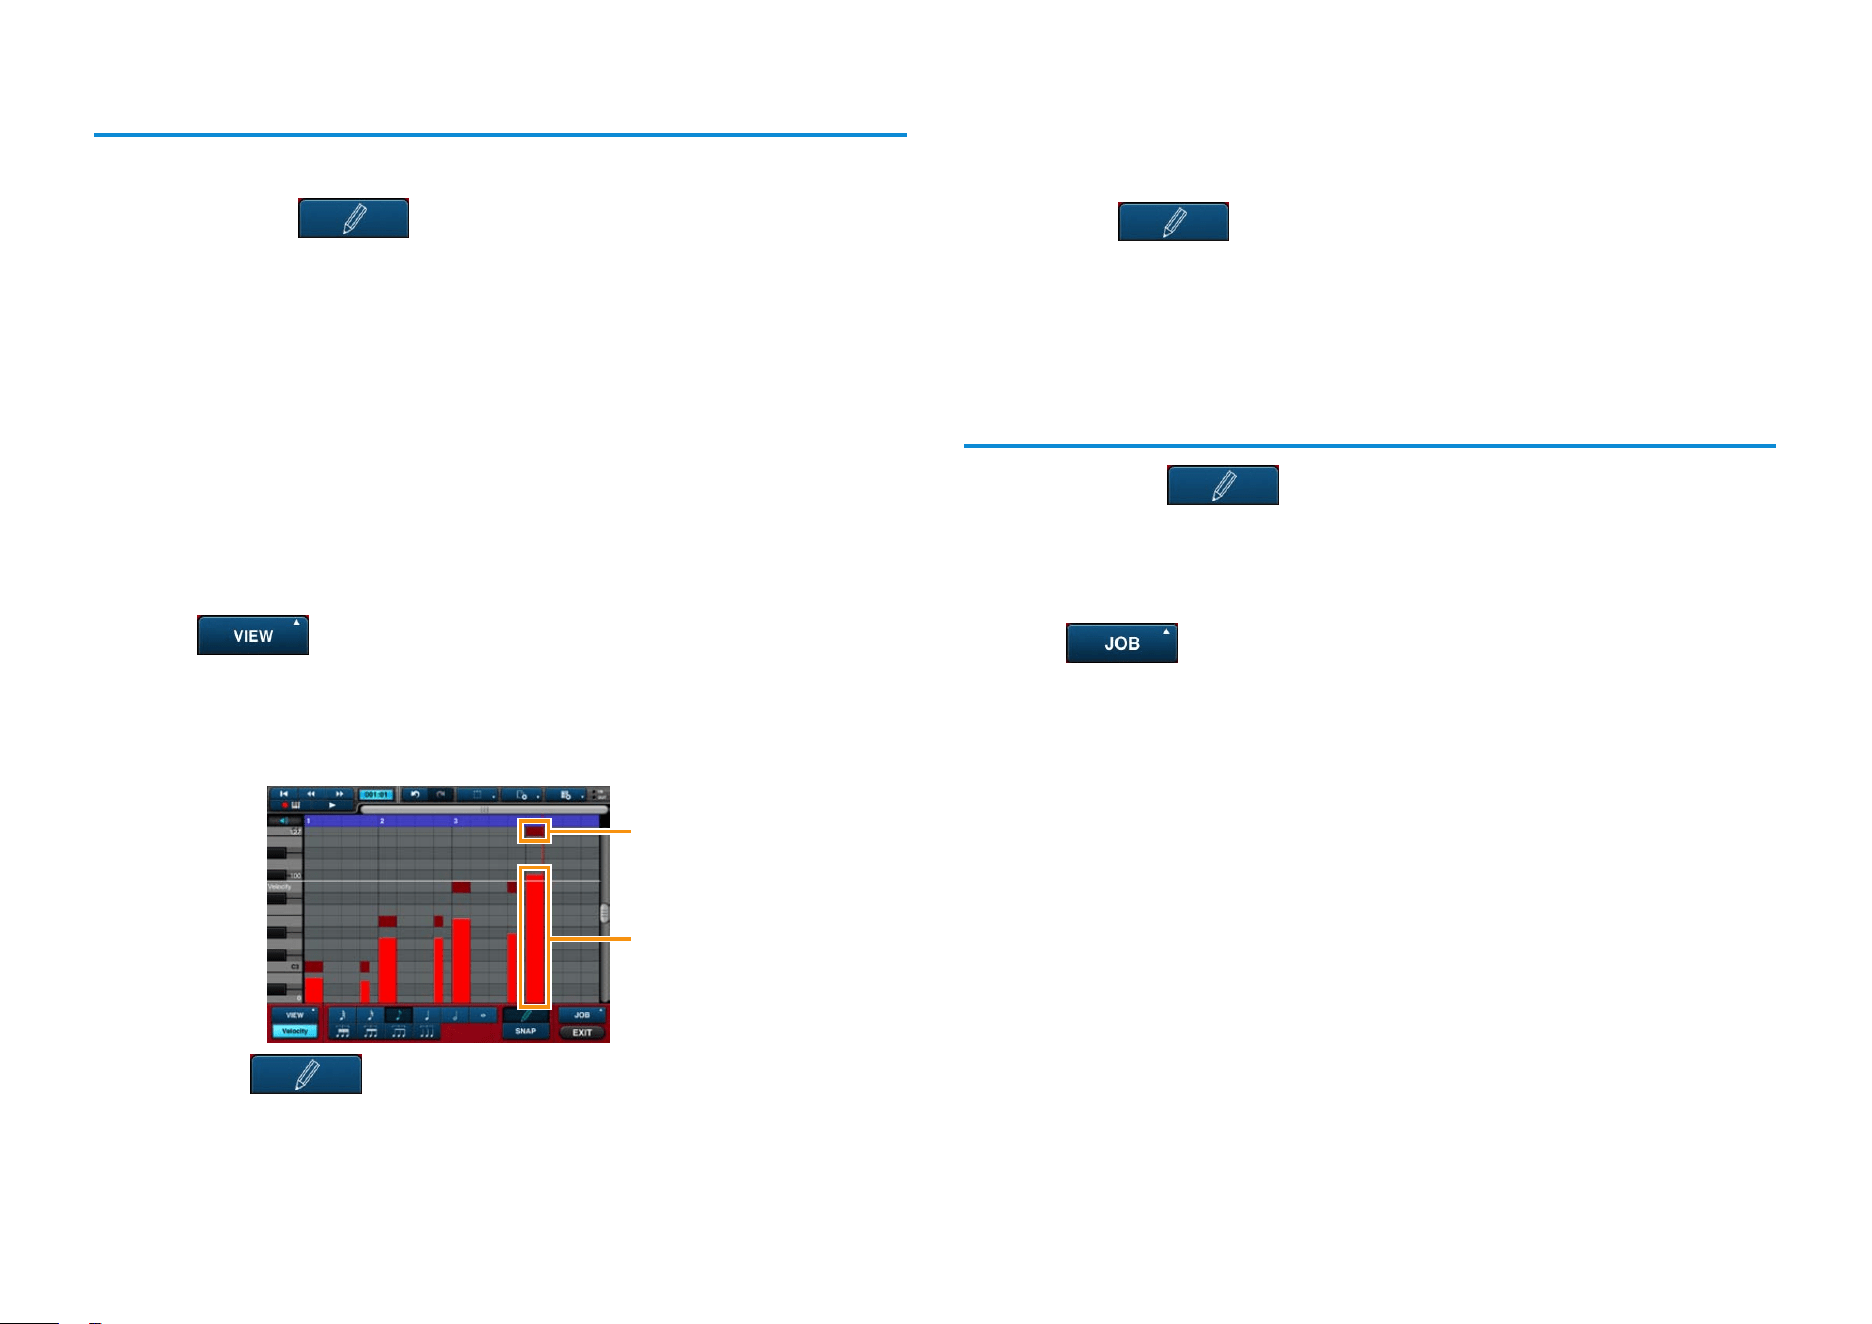
Changing velocities
1. Tap to activate performance data mode.
2. Select [Velocity] from the list displayed.
The velocities of the notes in the phrase or block will be displayed. The taller
the bar, the greater the velocity.
Note
Velocity
3. Turn off .
4. Select the note whose velocity you wish to edit by tapping
it.
The velocity for the just the selected note will be displayed.
5. Turn on .
6. Touch and slide the velocity to change it.
Batch editing velocity, gate time, note shift, and
quantize data
1. Ensure that is turned off (tap if necessary).
2. Select the notes that you wish to edit.
NOTE
For details on selecting multiple notes, refer to Selecting notes.
3. Tap .
4. Select an action from the window displayed and set the
corresponding parameters.
5. Tap [APPLY] to modify the notes selected in Step 2 above
based on the parameters you have set.
The notes’ performance data will now be modified.
Mobile Music Sequencer Owner’s Manual 12
Adding pitch-bend or control-change data
1. Turn on .
2. Select [Pitch Bend] or [Control Change] from the list
displayed.
3. Turn on
.
4. Enter the pitch-bend or control-change data by sliding your
nger in the corresponding area.
Editing pitch-bend or control-change data
You can easily cut, copy, paste, and delete pitch-bend and control-change data
as follows.
1. Turn on .
2. Select [Pitch Bend] or [Control Change] from the list
displayed.
3. Turn off
.
4. Touch one end of the area to be edited and then slide to the
other end.
5. Tap the selected area and then cut, copy, or delete its data
using the buttons displayed.
Cutting, copying, deleting, moving, and stretching notes
1. Ensure that is turned off (tap if necessary).
2. Select the notes that you wish to edit.
NOTE
• For details on selecting multiple notes, refer to Selecting notes.
• To select a range of notes, touch one end of the area to be edited and then slide to the other
end.
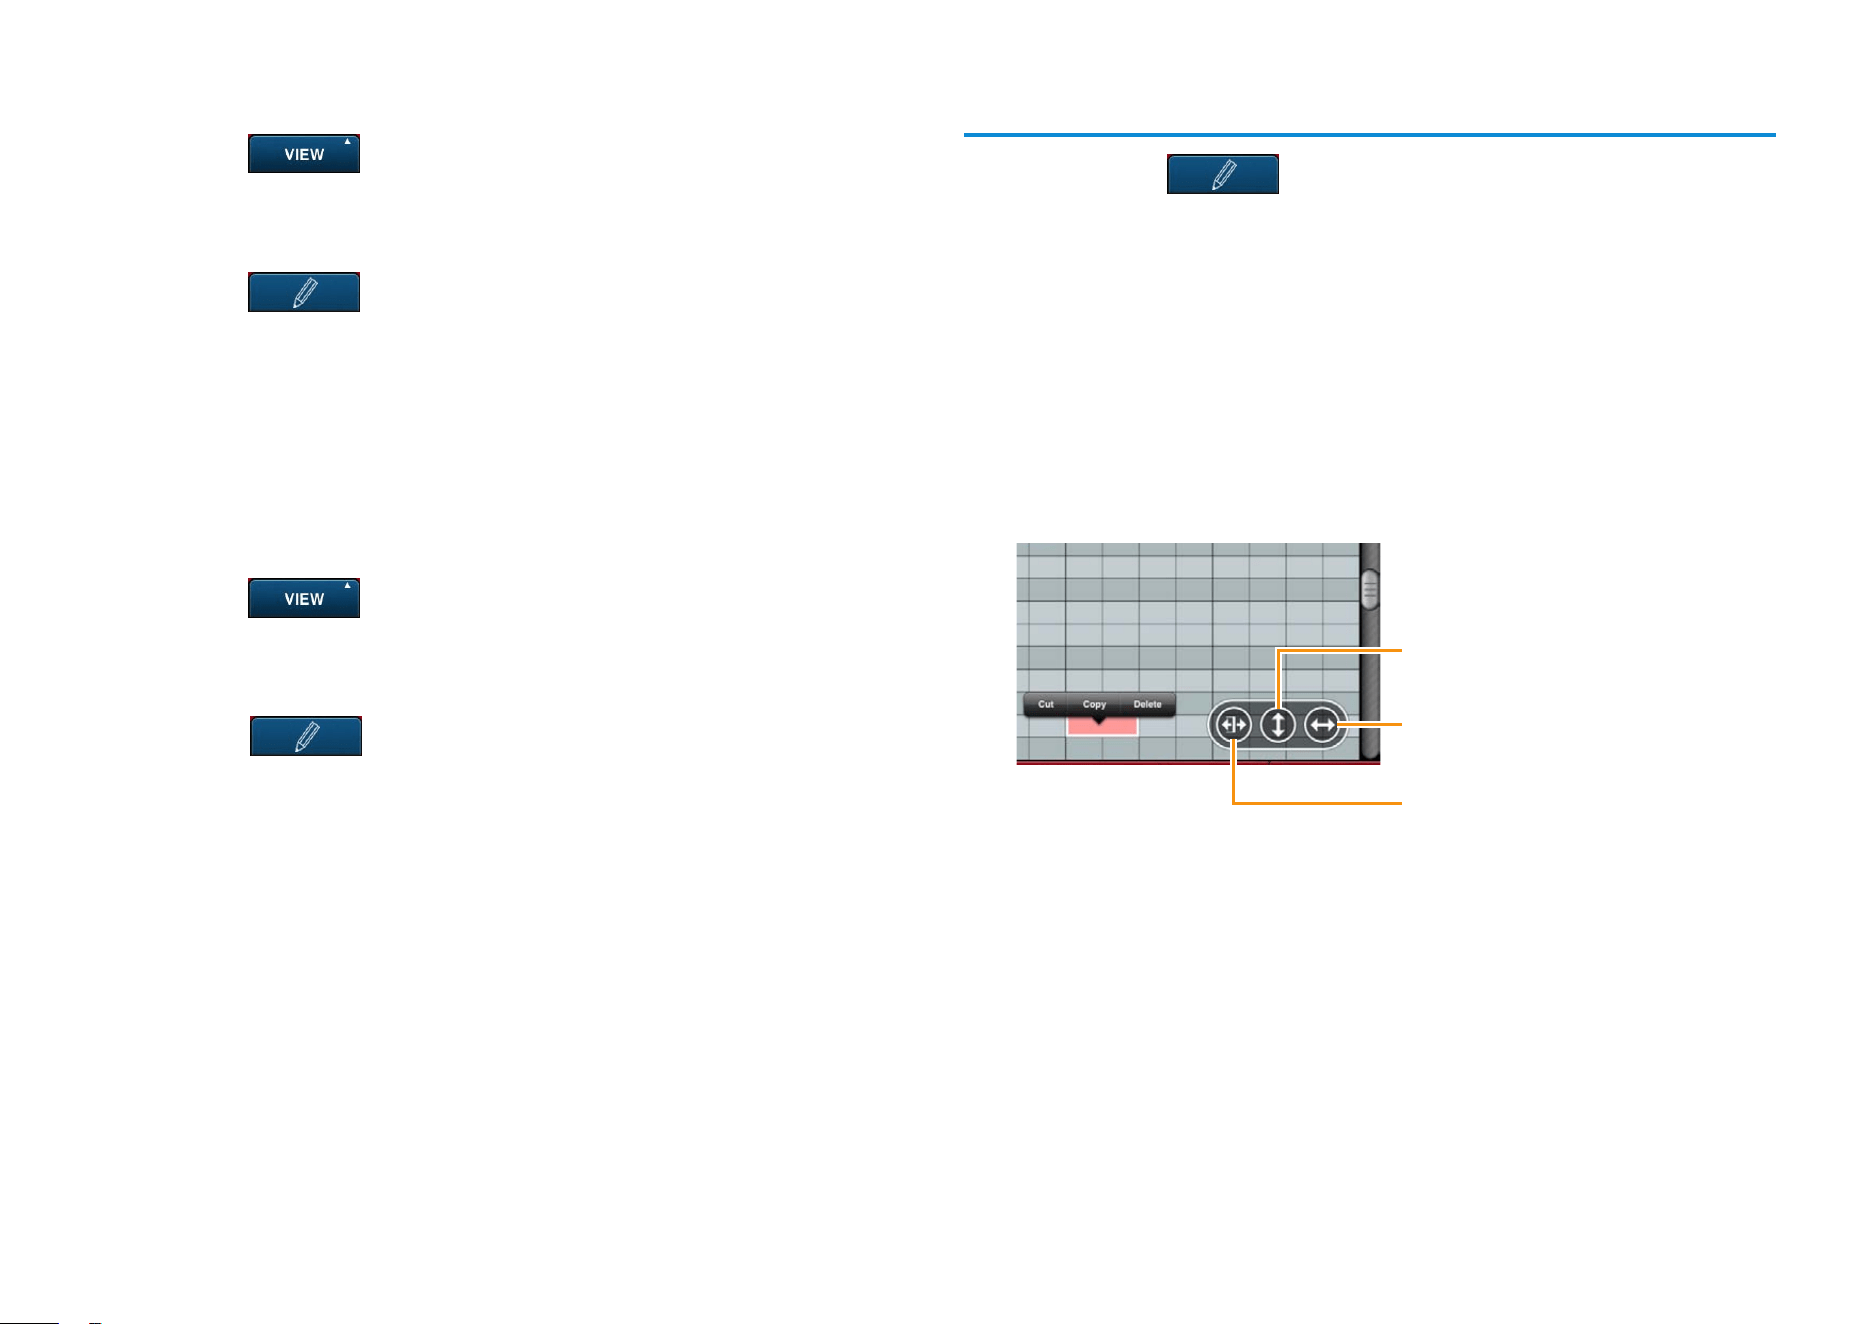
3. Tap a selected note to bring up the edit menu.
To cut or copy the selected notes, tap [Cut] or [Copy] in the menu and then
tap the location at which the notes are to be pasted. Alternatively, you can
tap [Delete] to permanently delete the selected notes.
Tap in order to slide the selected
notes to new pitches.
Tap in order to slide the selected
notes to new playback positions.
Tap in order to slide the selected
notes to new lengths.
Mobile Music Sequencer Owner’s Manual 13
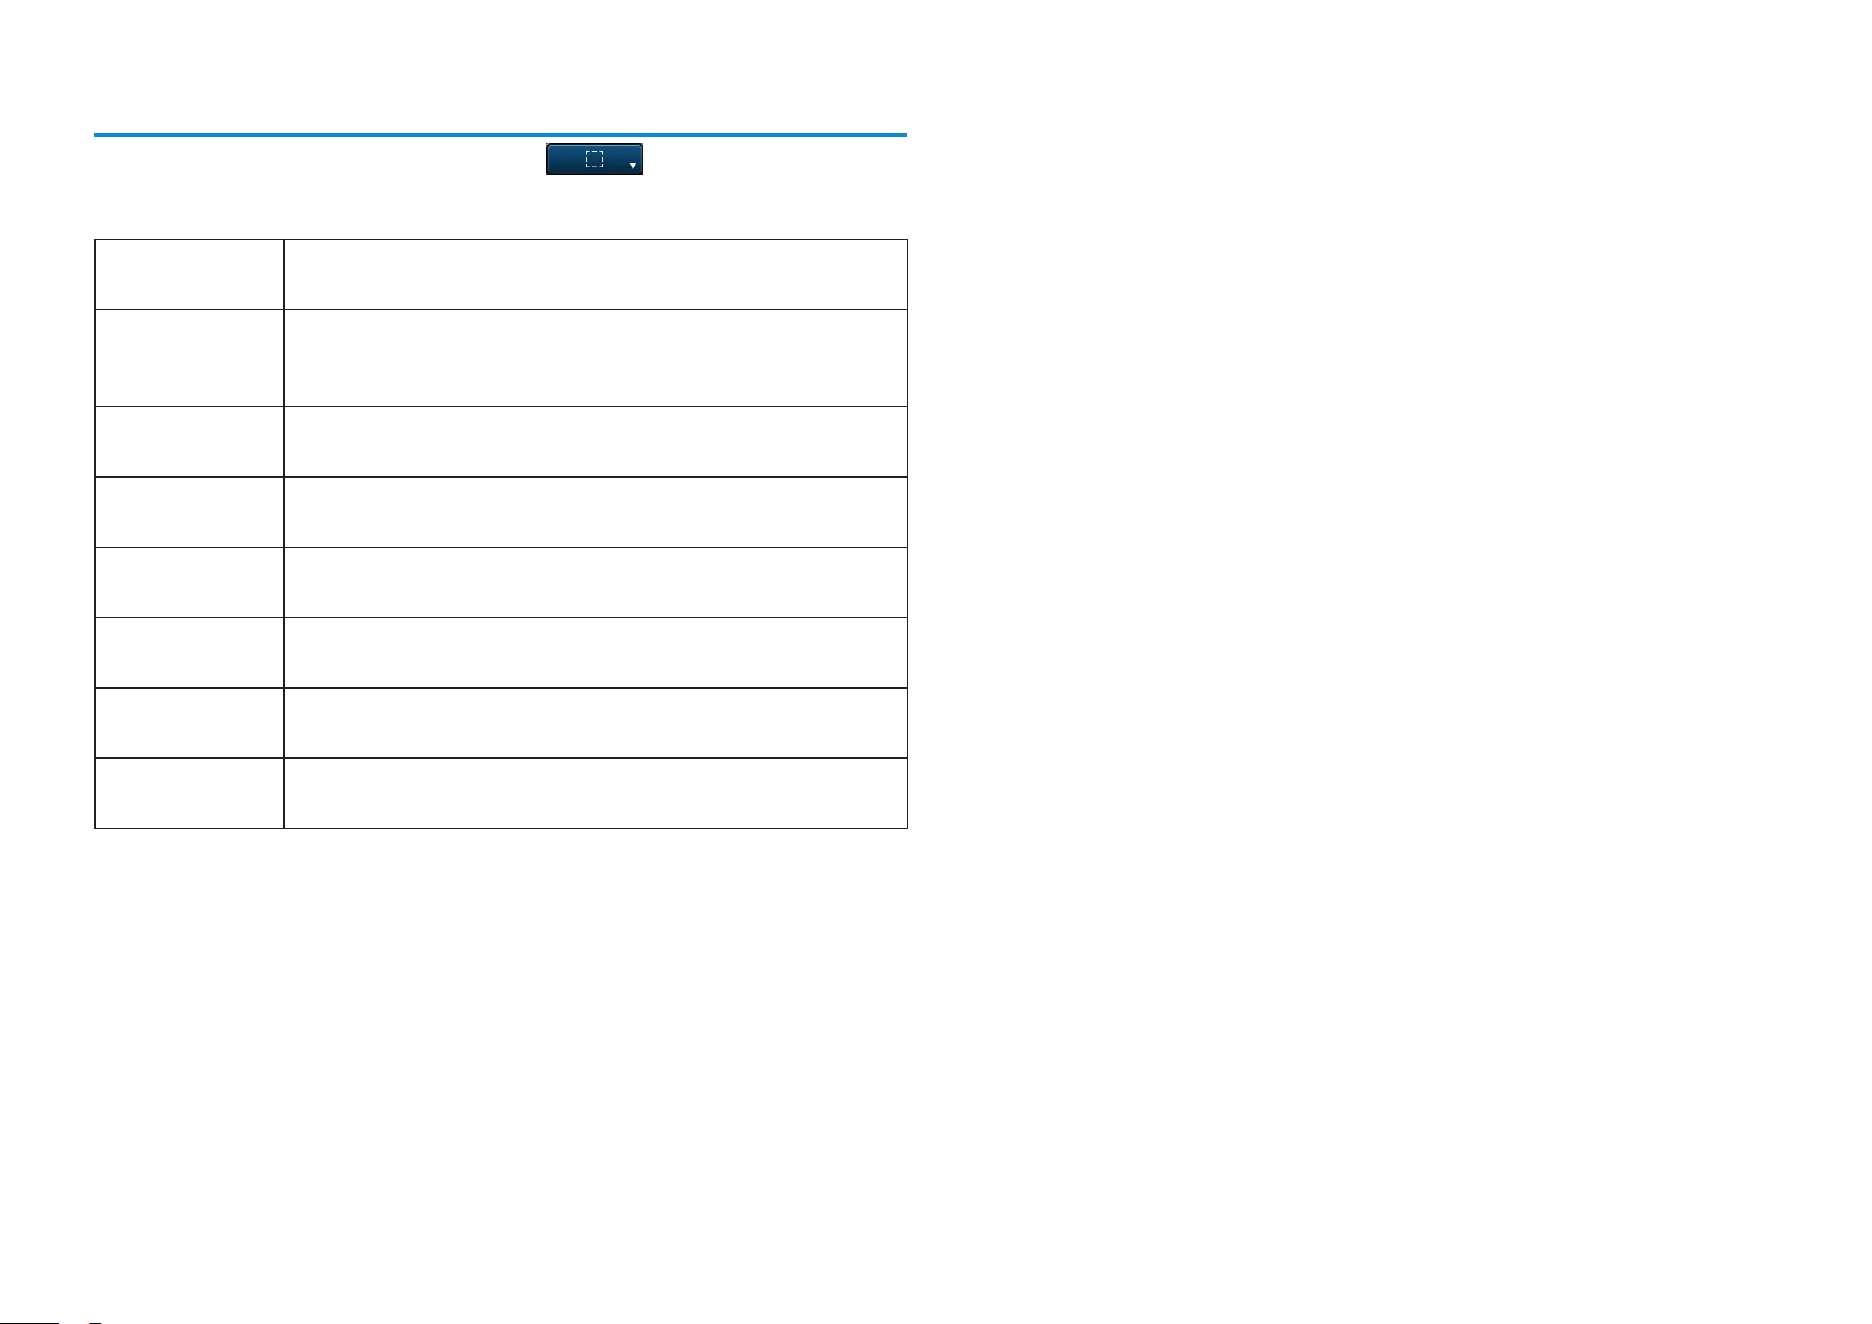
Selecting notes
To select multiple notes at the same time, tap and choose the required
selection mode.
SINGLE This mode lets you select a single note. Selecting a new
note cancels the previous selection.
ADDITIONAL This mode lets you select multiple notes. Selecting a new
note adds it to the previous selection. Tapping any of the
currently unselected area cancels the entire selection.
NOTE In this mode, you can select all notes at the same pitch as
the one tapped.
TO START In this mode, you can select all notes from the one tapped to
the start of the phrase or block.
TO END In this mode, you can select all notes from the one tapped to
the end of the phrase or block.
INVERT Choose this mode to select all currently unselected notes
and cancel the previous selection.
ALL Choose this mode to select all of the notes in the phrase or
block.
NONE Choose this mode to deselect all of the notes in the phrase
or block.
Mobile Music Sequencer Owner’s Manual 14
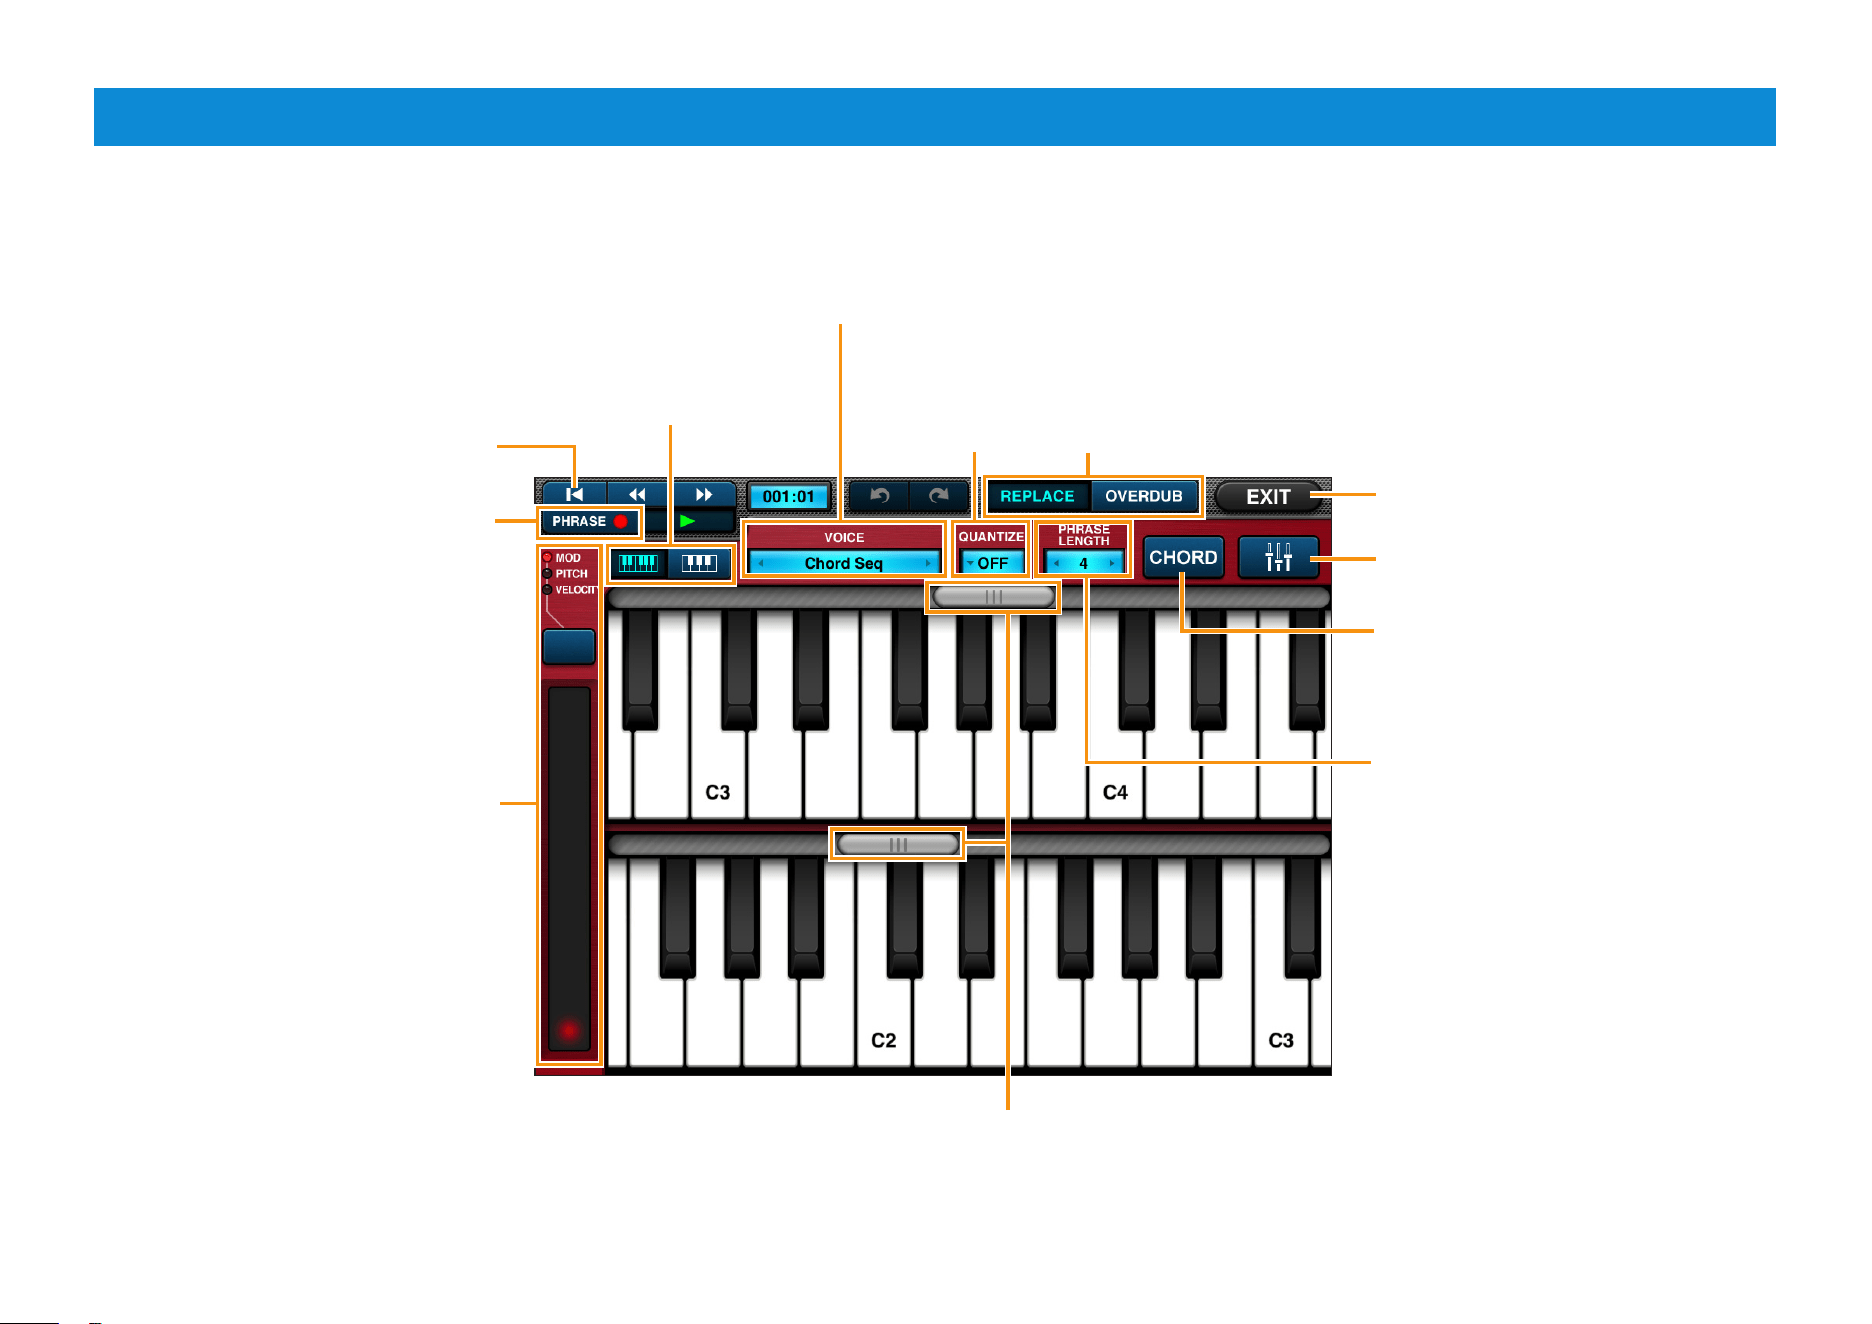
Keyboard Screen
Using the Keyboard screen, you can use the on-screen keyboards to add notes directly into phrases or song blocks.
Tap to bring up the voice list. You can then tap a voice from the list to select it.
When Voice Link is turned on, you can select phrase and song voices; when turned off,
you can select part voices.
Use the button at the top of the slider to
select its function.
MOD: The slider will function as a
modulation wheel.
PITCH: The slider will function as a pitch
bend wheel.
VELOCITY: The slider can be dragged
to set a velocity range for the notes
played.
Tap to turn on recording (i.e., direct
input of notes). Tap once again to stop
recording.
Tap to move the record position to the
start of the phrase or block.
Tap to change the size of the
on-screen keyboards.
Use these scroll bars to move along the
length of the keyboards.
Tap to set the
quantization
mode.
REPLACE: Existing notes in the phrase or block will be deleted
when new ones are recorded.
OVERDUB: Recorded notes will be added to those already in
the phrase or block.
Tap to return to the previous screen.
Tap to toggle between the on-screen
keyboards and control-change input
mode.
Active only when recording into a
phrase, Chord can be tapped to
specify the phrase’s chord root and
type.
Active only when recording into a
phrase, this value sets the length of the
phrase.

Mobile Music Sequencer Owner’s Manual 15
Editing Phrases
Any phrase from the Phrase Viewer can be edited using the Loop Remix Editor,
Source Chord Editor, Phrase Voice Setup Editor, and Other Setting Editor as
follows.
1. Tap [VIEW] from the PHRASE menu to open the Phrase
Viewer.
2. In the Phrase Viewer, tap a phrase to select it for editing.
3. Tap [EDIT] from the PHRASE menu.
4. Tap the required editor in the PHRASE EDIT menu.
5. Tap [SAVE] to save any changes you have made to the
phrase.
REMIX
The Loop Remix Editor can be opened by tapping [REMIX] in Step 4 above.
1
5
4
2 3 6 7
1 Area 1 contains two different remix types. If, for example, the same measure
in Area 4 is selected for both, that measure will be affected by both REMIX 1
and REMIX 2.
2 Area 2 is used to select the remix mode.
3 In Area 3, you can select a variation for the remix mode from Area 2
4 Use Area 4 to set the measures to be remixed. You can also tap [ALL ON]
to remix all measures or [ALL OFF] to clear the current selection.
5 Area 5 is used to select a remix type. The bar below the type number
corresponds to one measure, and the lines show the remix points within
the measure. By changing the type, therefore, you can remix the phrase at
different points.
1. Select either REMIX 1 or REMIX 2 in Area 1.
2. Select from NORMAL, BREAK, ROLL, and FILL remix modes in
Area 2.
3. Tap a number to select a variation in Area 3.
The phrase will be remixed based on the selected mode and variation, and the
remixed phrase will be played.
You can tap [ORIGINAL] in Area 6 to restore the phrase to its original condition
before remixing. In addition, you can tap the [DICE] in Area 7 to randomize the
variation selected in Area 3.
Mobile Music Sequencer Owner’s Manual 16
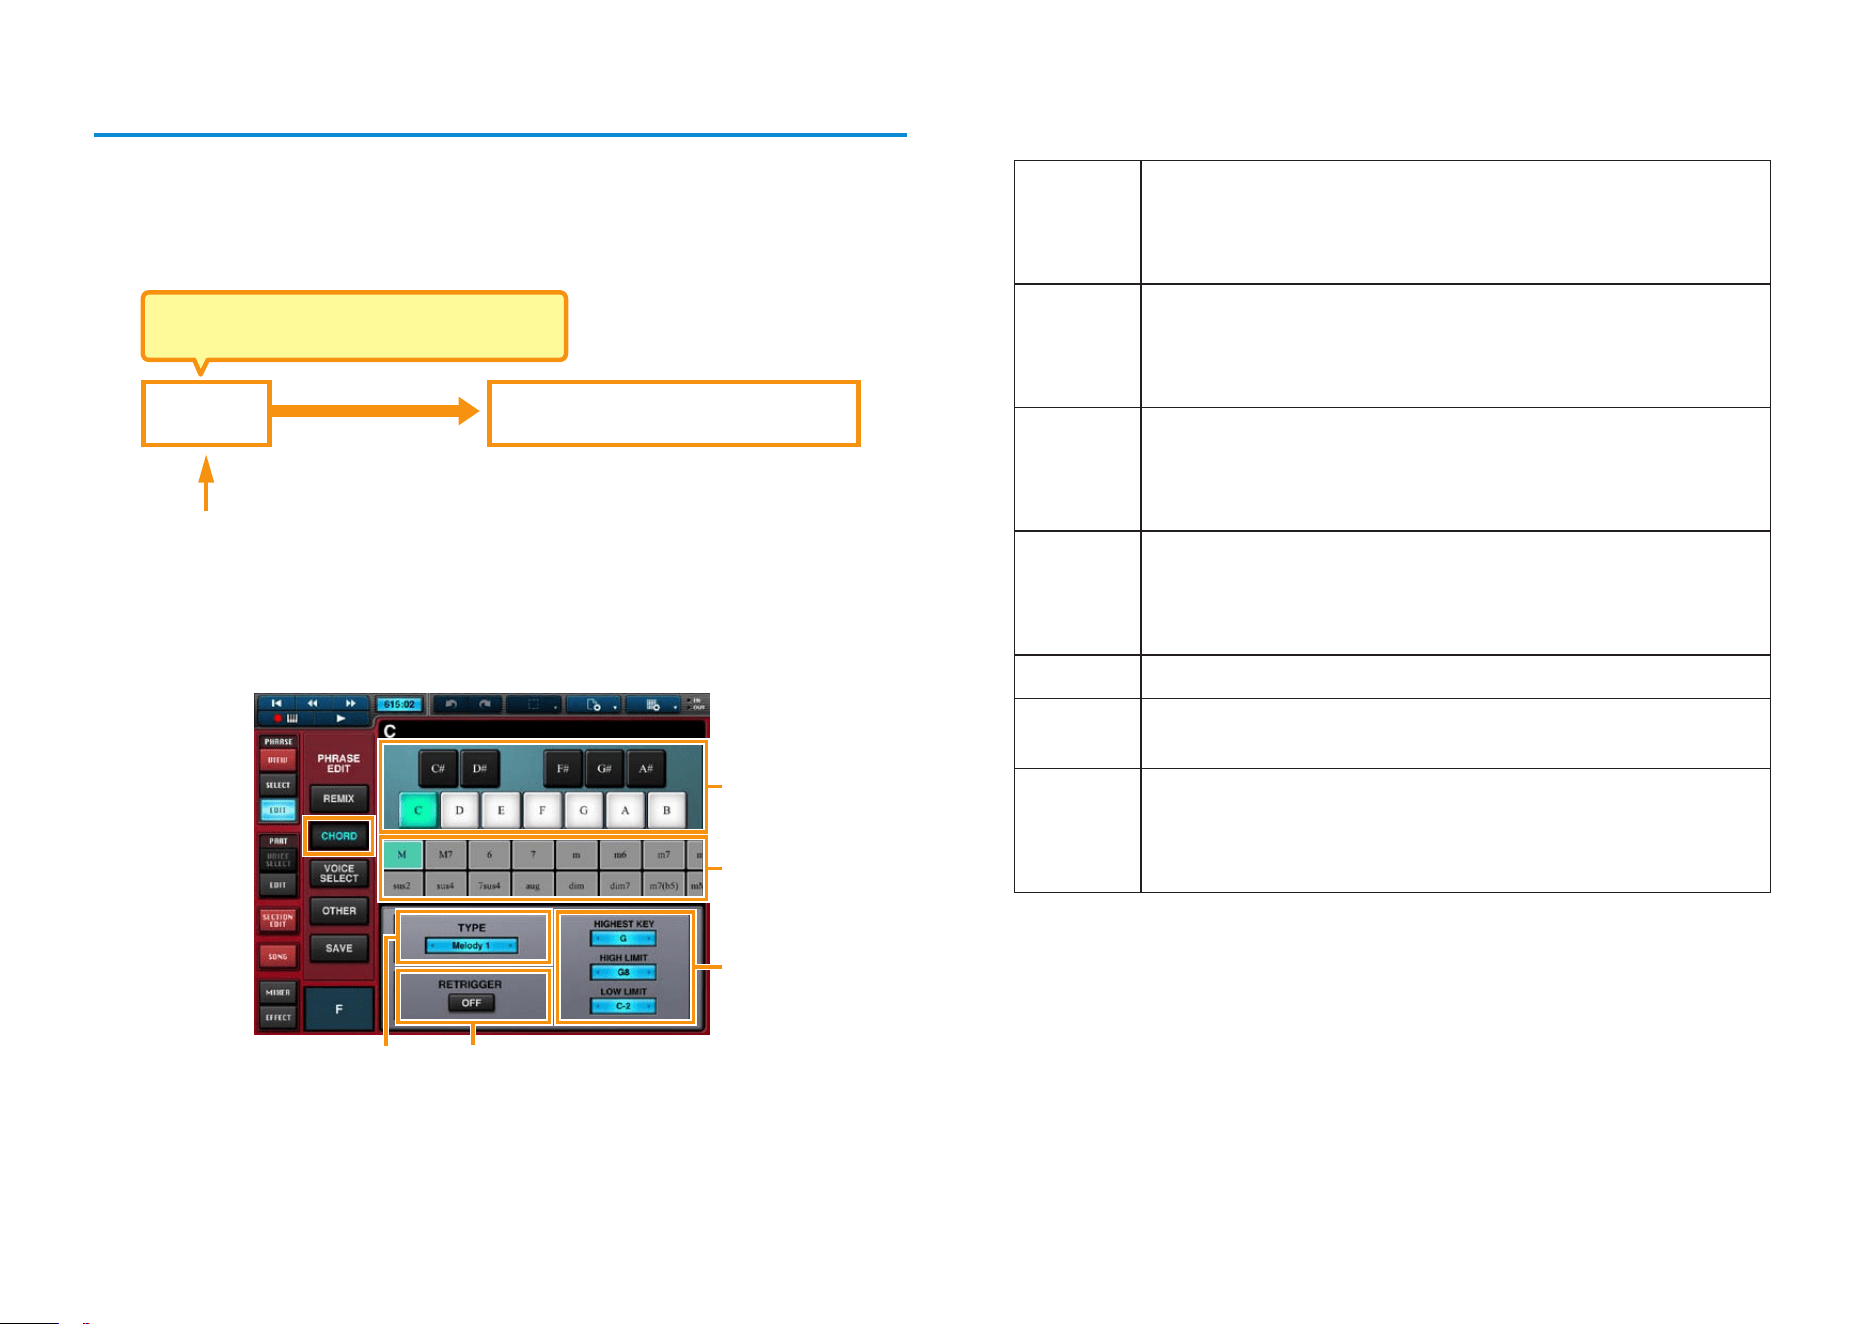
CHORD
When playing phrases, Mobile Music Sequencer ensures that they follow the
chord changes set for the corresponding section. In order to do this, it needs
to know each phrase’s original chord root and type. This information can be set
using the Source Chord Editor.
Chord change
Phrase based on the new chordPhrase
Chord set for the section
Phrase’s original chord root and type
NOTE
The original chord root and type of preset phrases cannot be edited.
The Source Chord Editor can be opened by tapping [CHORD] in Step 4 above.
5
1
2
4
3
1 Area 1 is used to set the chord root.
2 Area 2 is used to set the chord type, and it can be scrolled horizontally.
3 In Area 3, you can set one of the following chord-change types for the
phrase.
Melody1 This type limits the effect of chord changes, making it ideal
for melodic phrases. In specific terms, the phrase will be
converted or transposed based on the chord types and roots
set for the section.
Melody2 As above, this type also limits the effect of chord changes
and is ideal for melodic phrases. In response to chord
changes, Mobile Music Sequencer shifts the phrase’s notes
as little as possible for smoother chord progressions.
Chord1 This type significantly changes the phrase, making it ideal
for backing tracks. In specific terms, the phrase will be
converted or transposed based on the chord types and roots
set for the section.
Chord2 As above, this type also significantly changes the phrase
and is ideal for backing tracks. In response to chord
changes, Mobile Music Sequencer shifts the phrase’s notes
as little as possible for smoother chord progressions.
Bass This type is ideal for bass phrases.
Bypass When this type is selected, the phrase is unaffected by chord
changes. As such, it is perfect for drum phrases.
Para This type causes the entire phrase to be transposed based
on the new chord’s root note, but the chord type is ignored.
As such, it is suitable for phrases that already include chord
changes.
4 HIGHEST KEY from Area 4 is used to set the highest possible root note.
If set to G, for example, chords with a root note higher than G would be
transposed down an octave.
HIGH LIMIT and LOW LIMIT define the range in which the phrase will be
played. Any notes outside this range will be moved into it by transposing up
or down accordingly in octave steps.
5 Area 5 is used to specify whether the phrase should be retriggered (i.e.,
started again from the beginning) in response to chord changes.
Mobile Music Sequencer Owner’s Manual 17
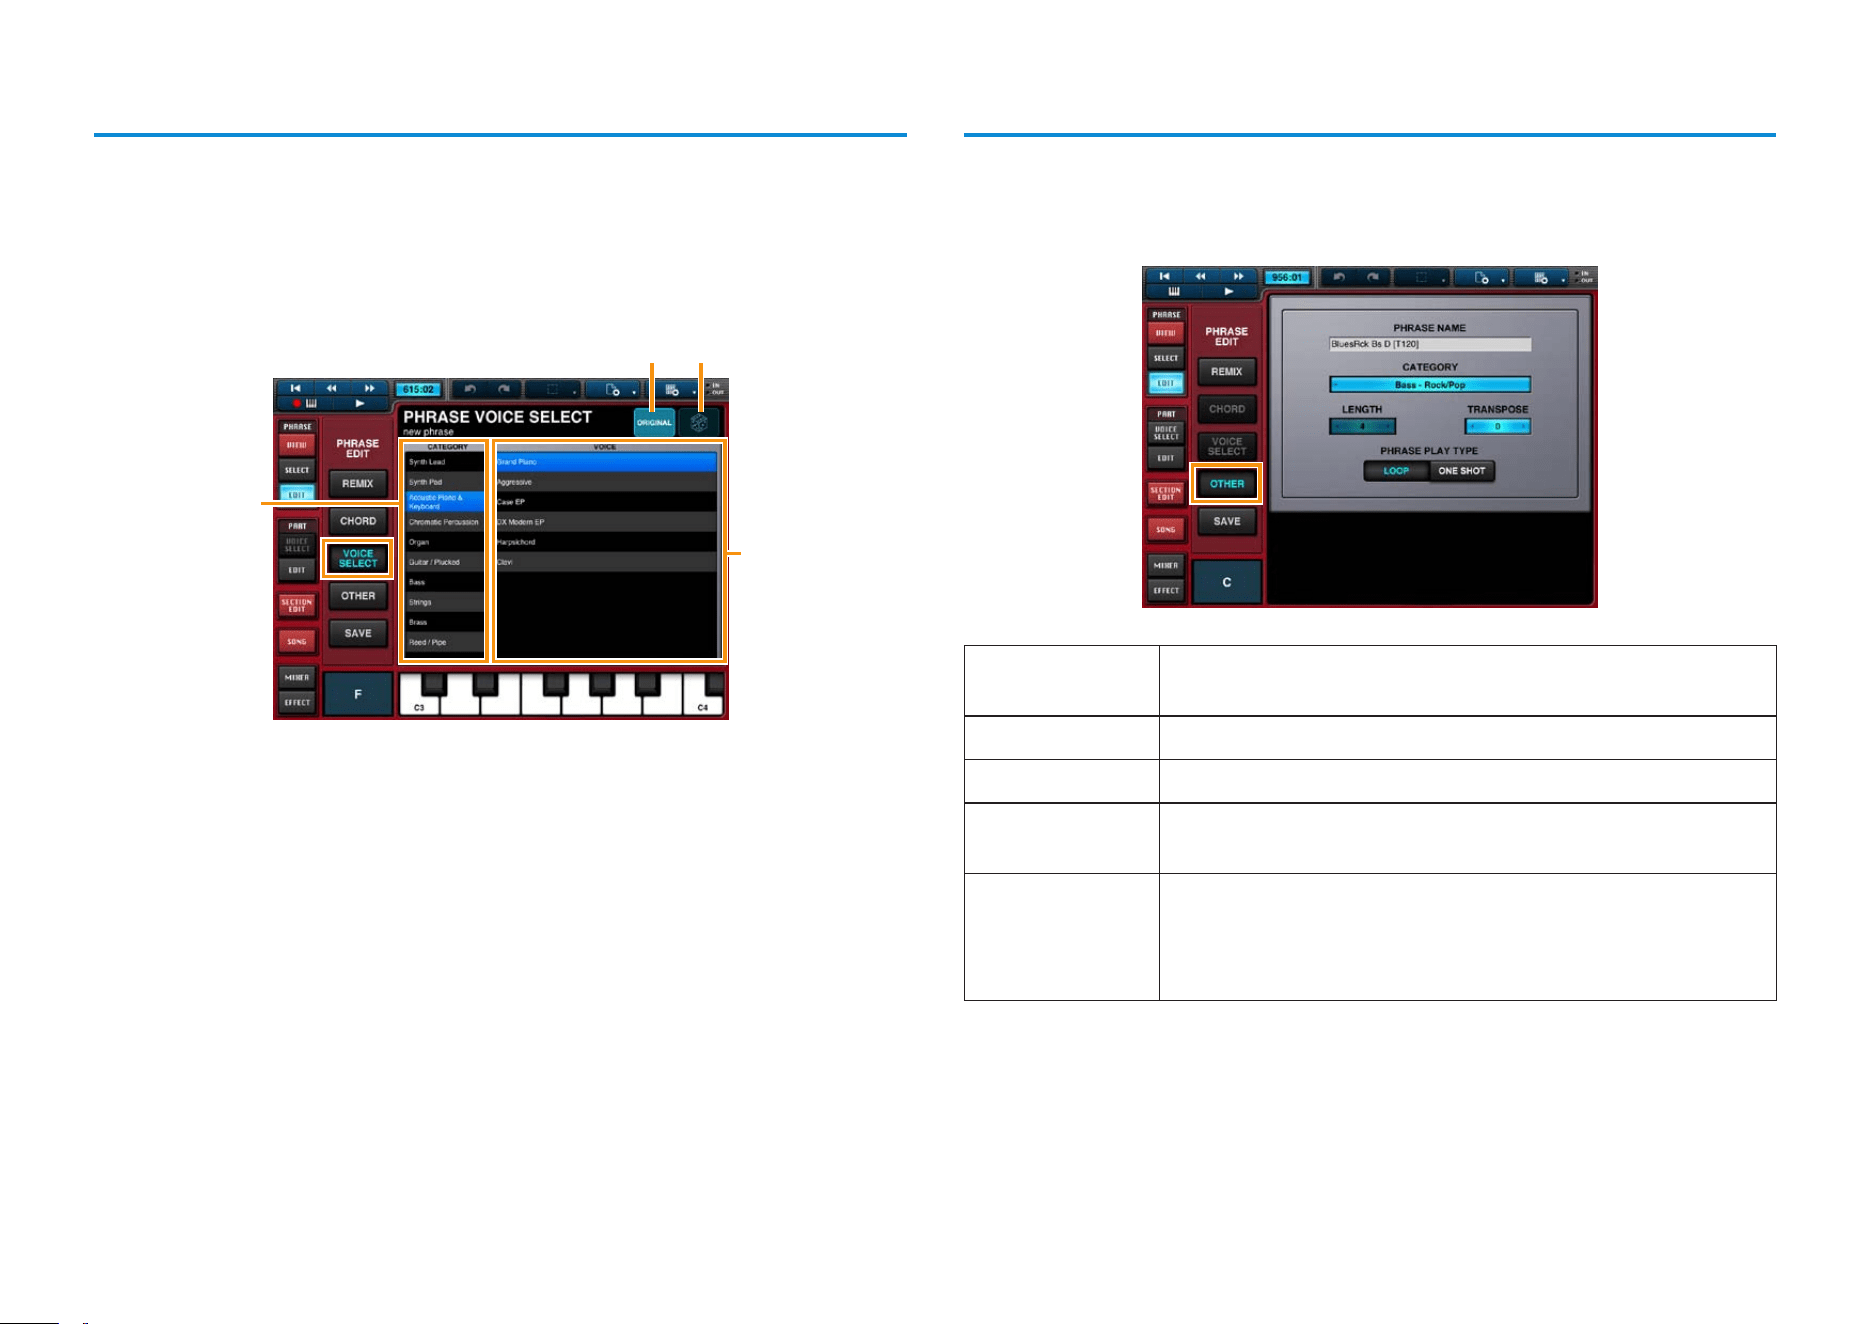
VOICE SELECT
The Phrase Voice Select Editor is used to select a voice for the phrase.
It can be opened by tapping [VOICE SELECT] in Step 4 above.
NOTE
[VOICE SELECT] cannot be tapped to open the Phrase Voice Select Editor when Voice Link is turned
off.
2
1
3 4
Area 1 is used to select the voice category; Area 2 the desired voice.
Area 3 is used to restore the original voice.
Area 4 is used to randomize the voice selection in Area 2.
OTHER
The Other Setting Editor is used to set a name and category for the phrase.
It can be opened by tapping [OTHER] in Step 4 above.
PHRASE NAME Tap in the name field to bring up the keyboard and then
enter a name for the phrase.
CATEGORY Use this to select a category for the phrase.
LENGTH Use this value to set the length of the phrase in measures.
TRANSPOSE If you need to transpose the phrase, you can set the
required number of semitones here.
PHRASE PLAY LOOP: The phrase will start again from the beginning after
it has played to the end.
ONE SHOT: The phrase plays once to the end and then
stops.
Mobile Music Sequencer Owner’s Manual 18
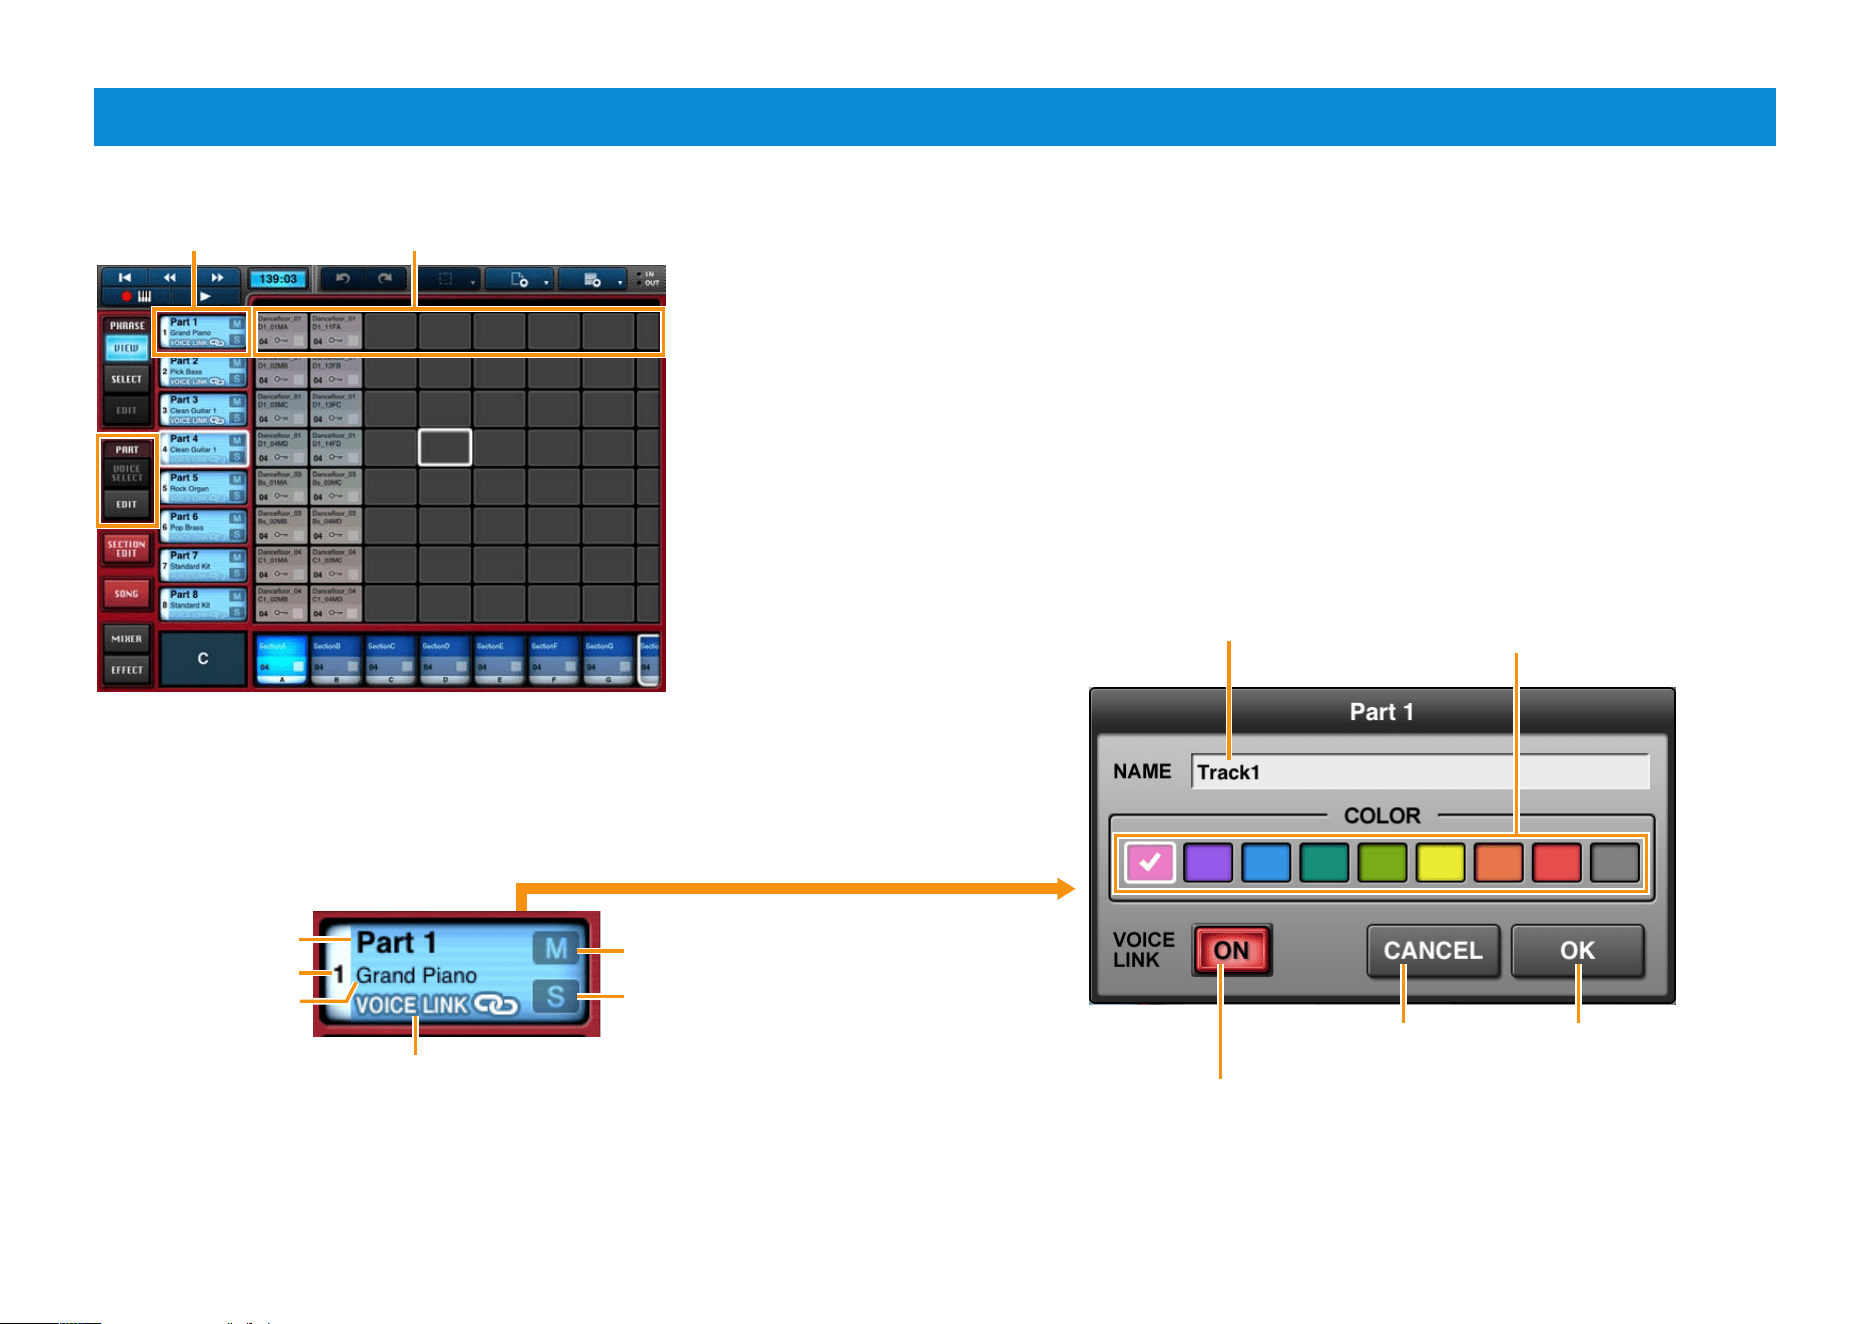
Editing Parts
From the PART menu, you can make settings that affect all phrases and blocks in specific parts.
Part 1
Part name
VOICE LINK
Voice set
for the part.
Part number
Phrases in Part 1
Part button
Tap to mute the part.
Tap to bring up the keyboard
and then enter a name for the
part.
Here, you can select a color
for the part’s phrases and
blocks.
Tap to solo the part.
Tap to close the
window and apply
your changes.
Tap to close the
window without
making any changes.
When turned on, the part’s phrases will use the voices set in
the Phrase Voice Setup Editor, which can be accessed from
the Phrase Edit menu.
Double-tap the part button
to open the Part window.
VOICE LINK indicator
This indicator is displayed as shown when Voice Link
is turned on.
After selecting a part, tap to bring
up a menu for copying, clearing,
or editing the part.
NOTE
You can change the arrangement of
parts by touching a part button and
then sliding.
Edit window
The Edit window for a part can be opened as follows.
1. Select the part you wish to edit by tapping its part
button.
2. Tap the part button once again to display the
[Edit] button.
3. Tap the [Edit] button.
Mobile Music Sequencer Owner’s Manual 19
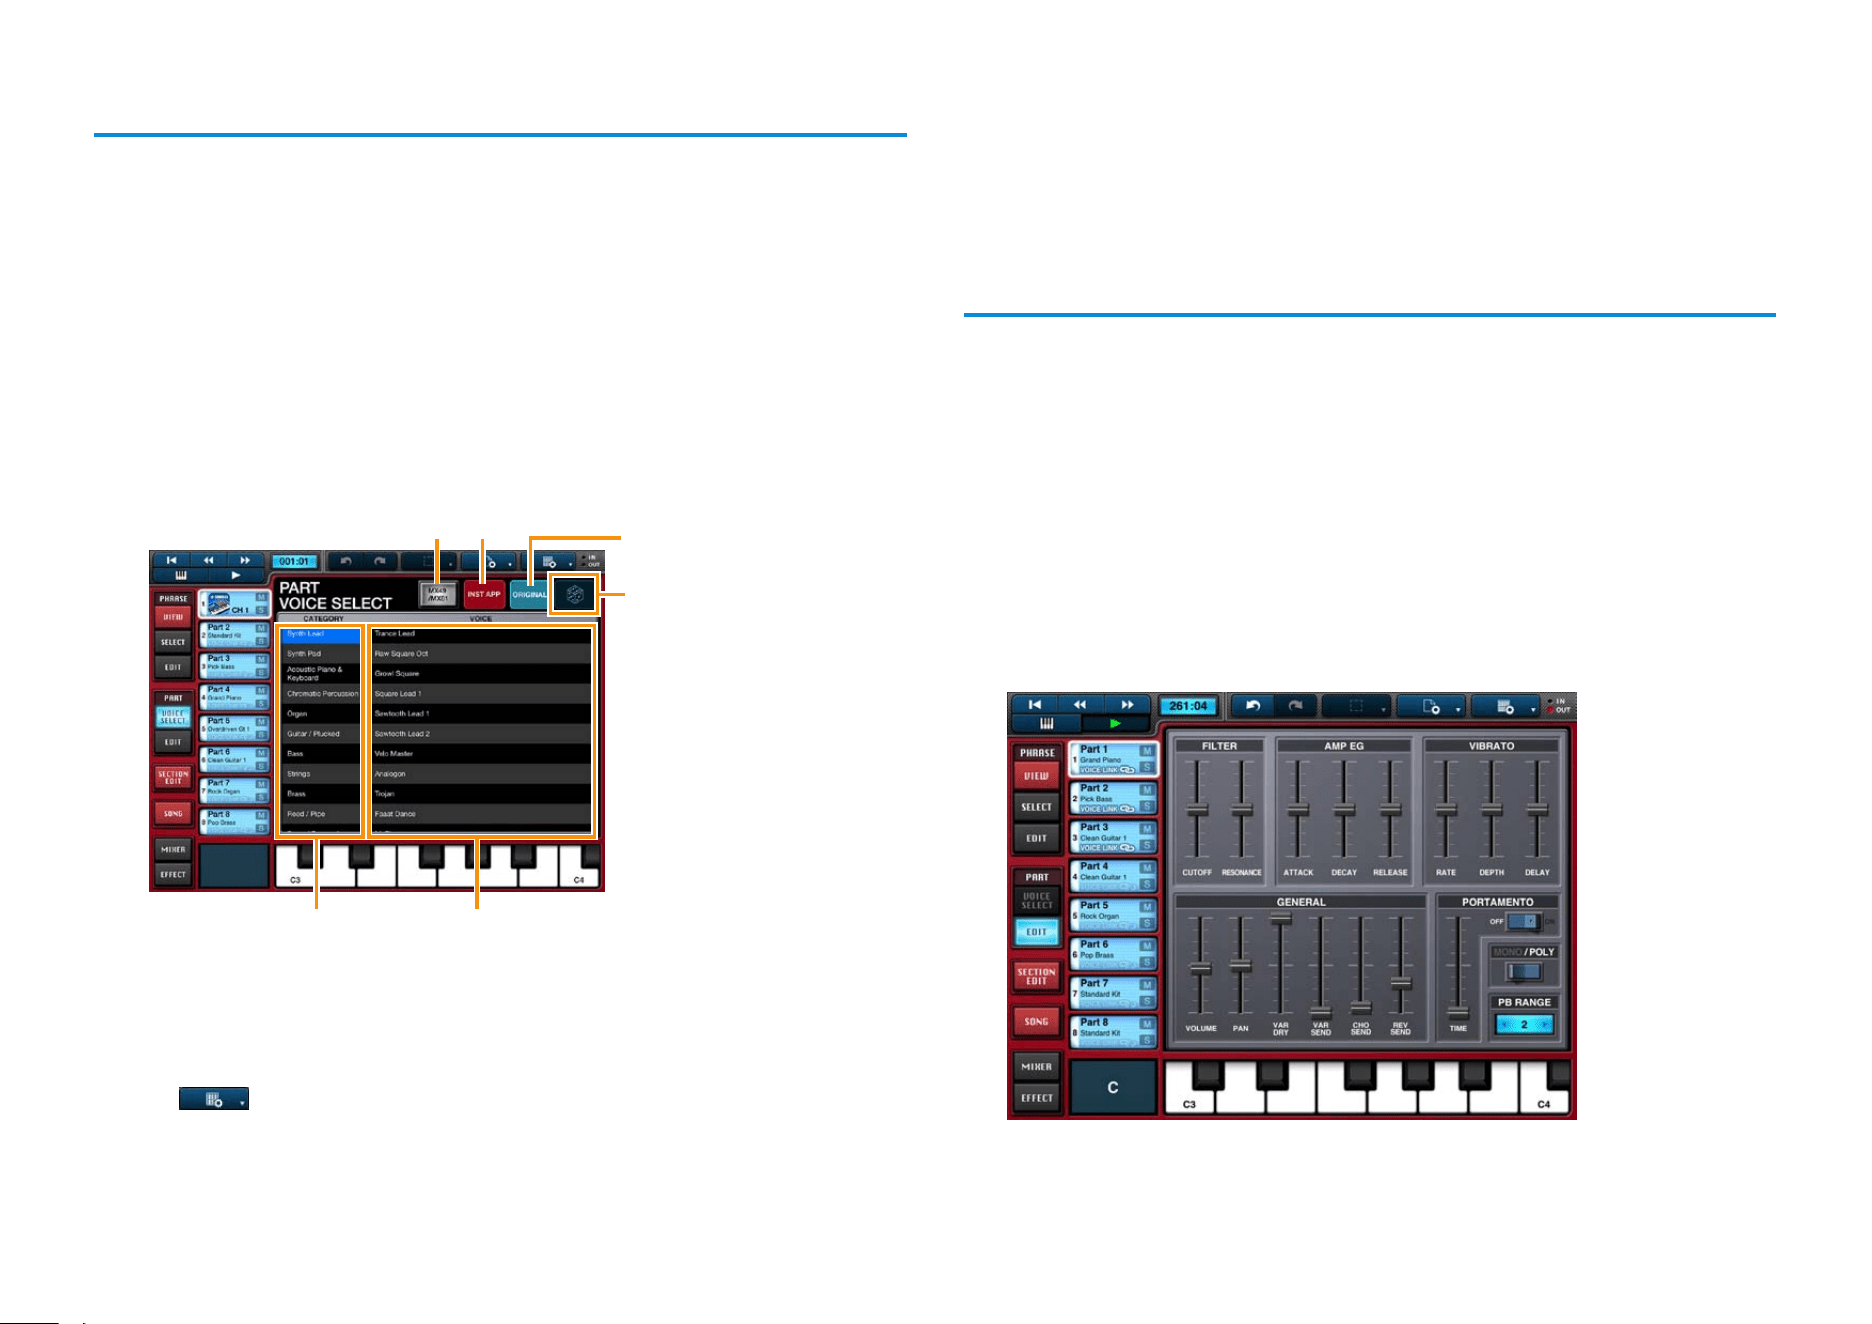
Setting a part’s voice
1. Tap the part button for the part whose voice you wish to set.
2. Tap [VOICE SELECT] from the PART menu.
NOTE
[VOICE SELECT] will be deactivated if VOICE LINK is turned on for the part in question. This
function can be turned off in the Part window, which is displayed by double-tapping the part
button.
3. In the Part Voice Select Editor, select the desired voice
category and voice.
The part will now play with the newly selected voice.
Voice categories Voices in the selected category
Part Voice Select Editor
Tap to randomize the
voice selection.
Tap to restore the
original voice.
1 2
1 Tap to display a list of categories and voices for the assigned instrument.
When you select one of the listed voices, Mobile Music Sequencer will send
the corresponding program change message to the connected instrument.
NOTE
Tap , [SYSTEM], [MIDI PORT], and then [HARDWARE] to assign an instrument to this
button.
2 Tap to display a list of other tone generator apps supporting Inter-App
Audio. If you select a tone generator app from the list by tapping it, it will be
assigned to the part button and its icon will be displayed there. By double
tapping an icon displayed in this way, you can open the corresponding tone
generator app and edit its settings.
Editing a part’s voice
1. Tap the part button for the part whose voice you wish to
edit.
2. Tap [EDIT] from the PART menu.
3. Edit the voice using the controllers on the Part Voice Editor.
The effect of your changes will be much more apparent if you play a phrase
from the part or block while editing.
The part will now play with the edited voice.
Part Voice Editor
Mobile Music Sequencer Owner’s Manual 20
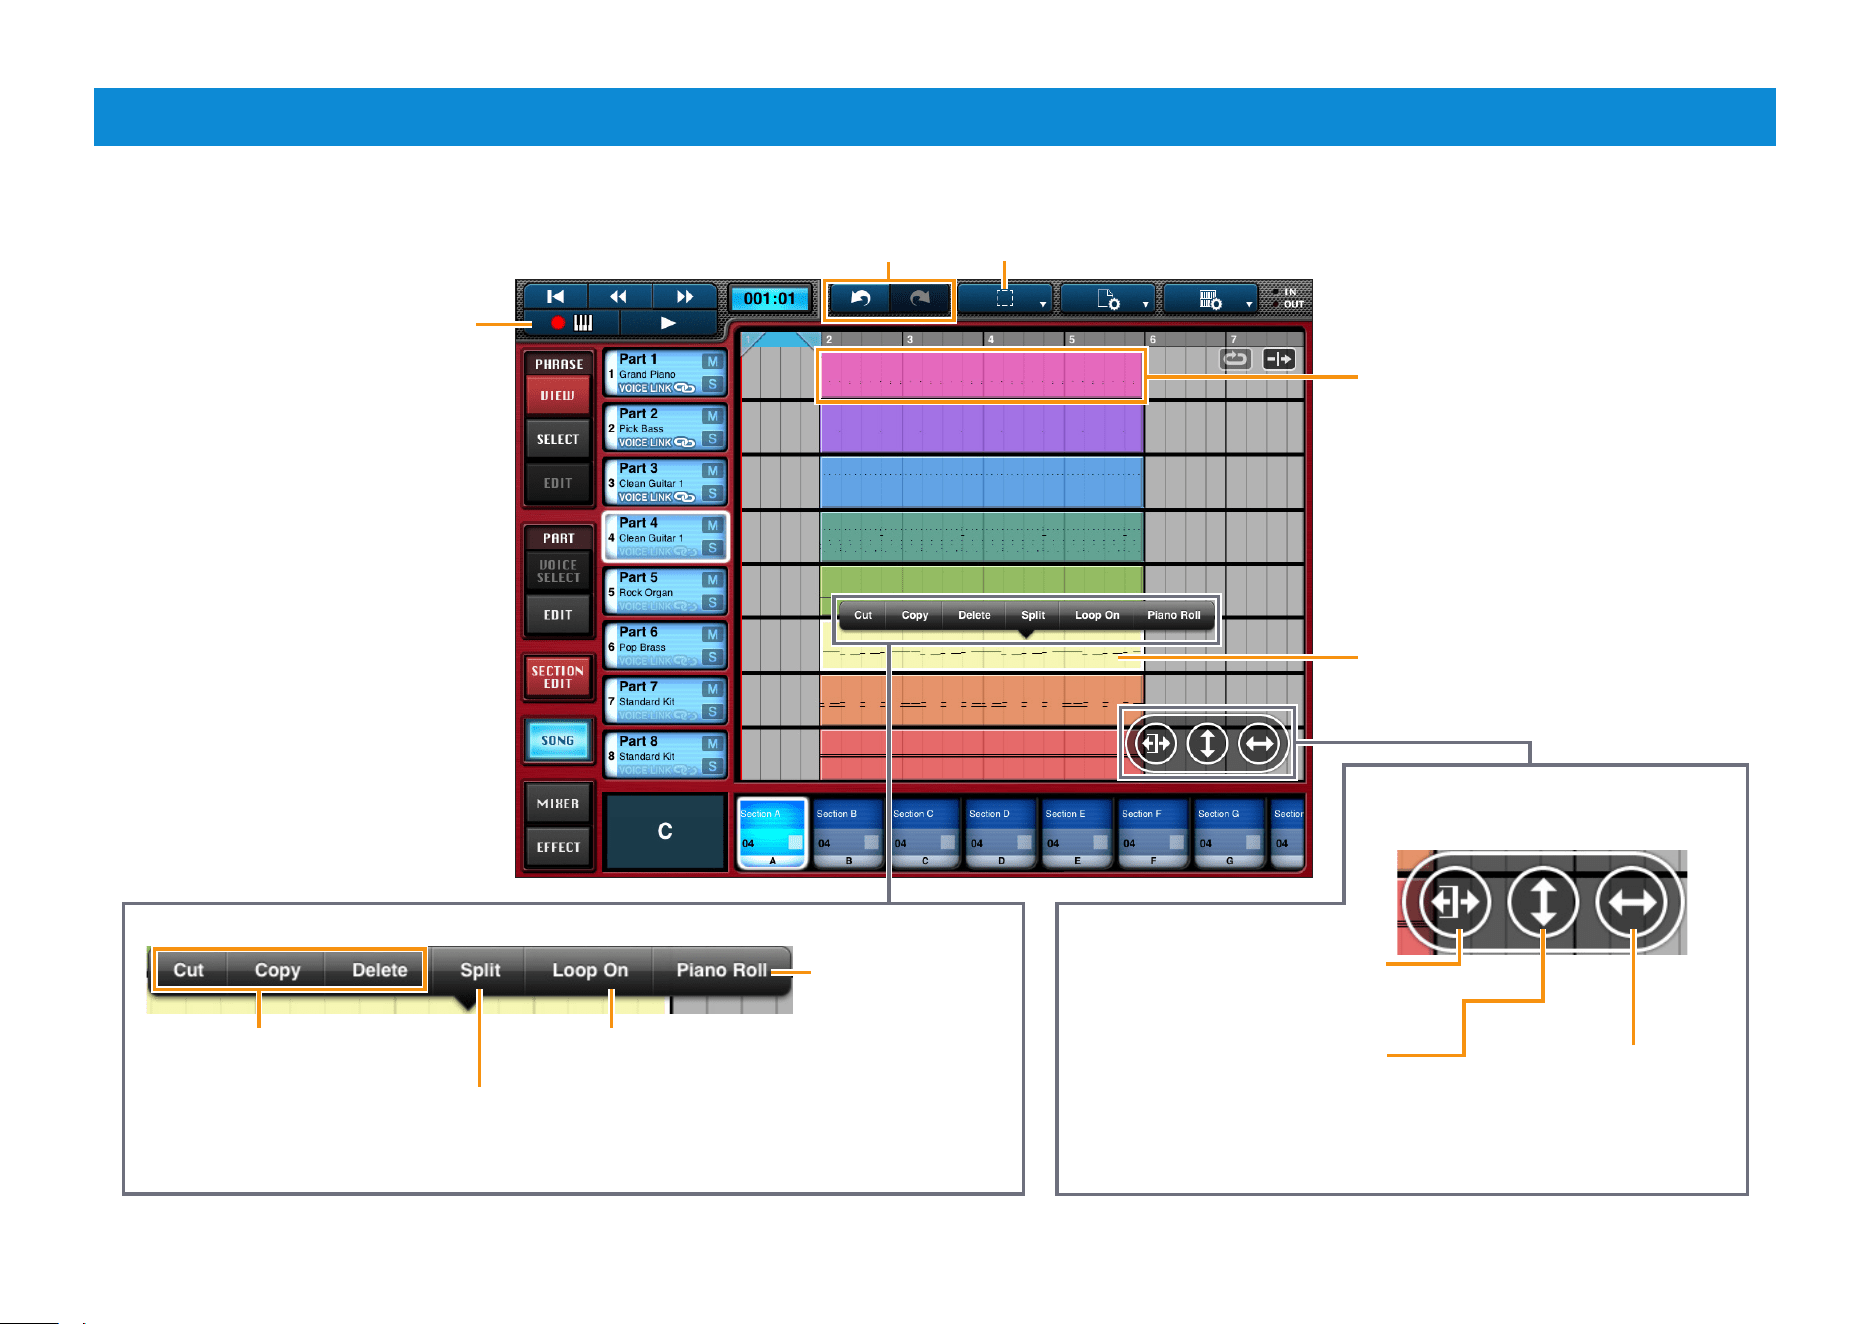
Editing Songs
Tap to open the Keyboard screen
and record directly into the selected
block.
When lit, you can tap these buttons
to undo or redo your last edit.
Used to set the block selection method.
SINGLE: Only the most-recently tapped block will be selected.
ADDITIONAL: All tapped blocks will be selected.
Block (of song data)
Tap the blocks that you wish to edit.
Double-tap a block to bring up the edit menu.
Tap to cut, copy, or delete
the selected blocks.
When enabled, the selected blocks
will loop during song playback.
Tap to edit the
selected blocks on
the Piano Roll Editor.
This menu is displayed whenever one or
more blocks have been selected.
Tap in order to touch and slide the
selected blocks to new lengths.
Tap in order to touch and slide
the selected blocks up or down to
different parts.
Tap in order to touch and
slide the selected blocks to
different playback positions
within their current parts.
Tap to split the selected blocks. When you do so, a line will appear on the blocks in question.
Slide the line left or right to the desired split point. If multiple blocks from the same track have
been selected, [Combine] will be displayed instead of the [Split] button, allowing you to combine
them into a single block.
Mobile Music Sequencer Owner’s Manual 21
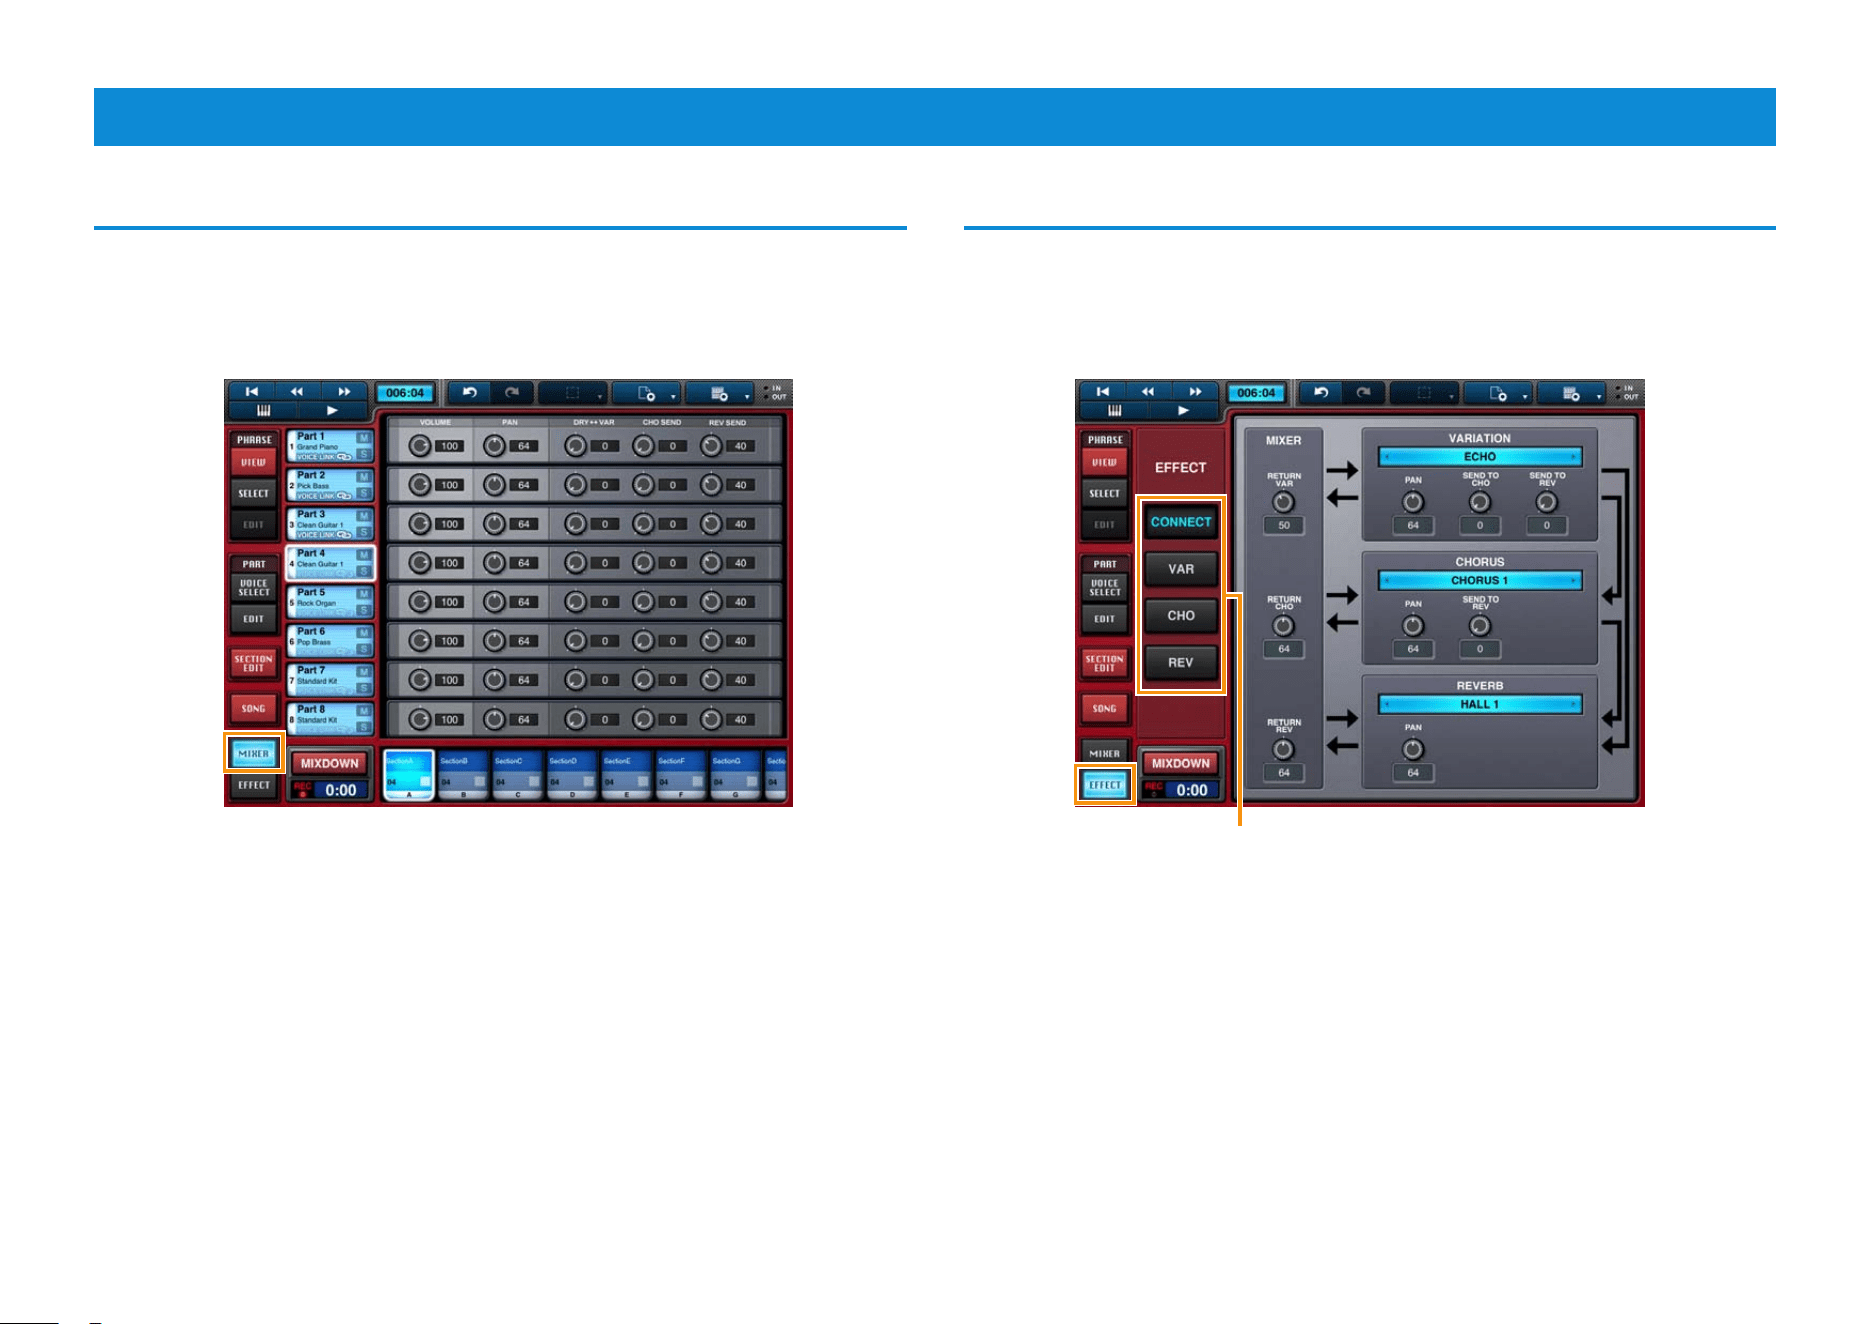
Mixing & Adjusting Effects
Mixing
Tap [MIXER] to open the Mixer screen.
Here, you can adjust the volume, pan, and effect send levels for each part.
Mixer screen
Adjusting effects
Tap [EFFECT] to open the Effects screen. Here, you can configure a variation
effect, the reverb, and the chorus.
Effect screen
Tap these buttons to display the Effect Connection Layout,
the Variation Effect Editor, the Chorus Editor, or the Reverb
Editor.
Mobile Music Sequencer Owner’s Manual 22
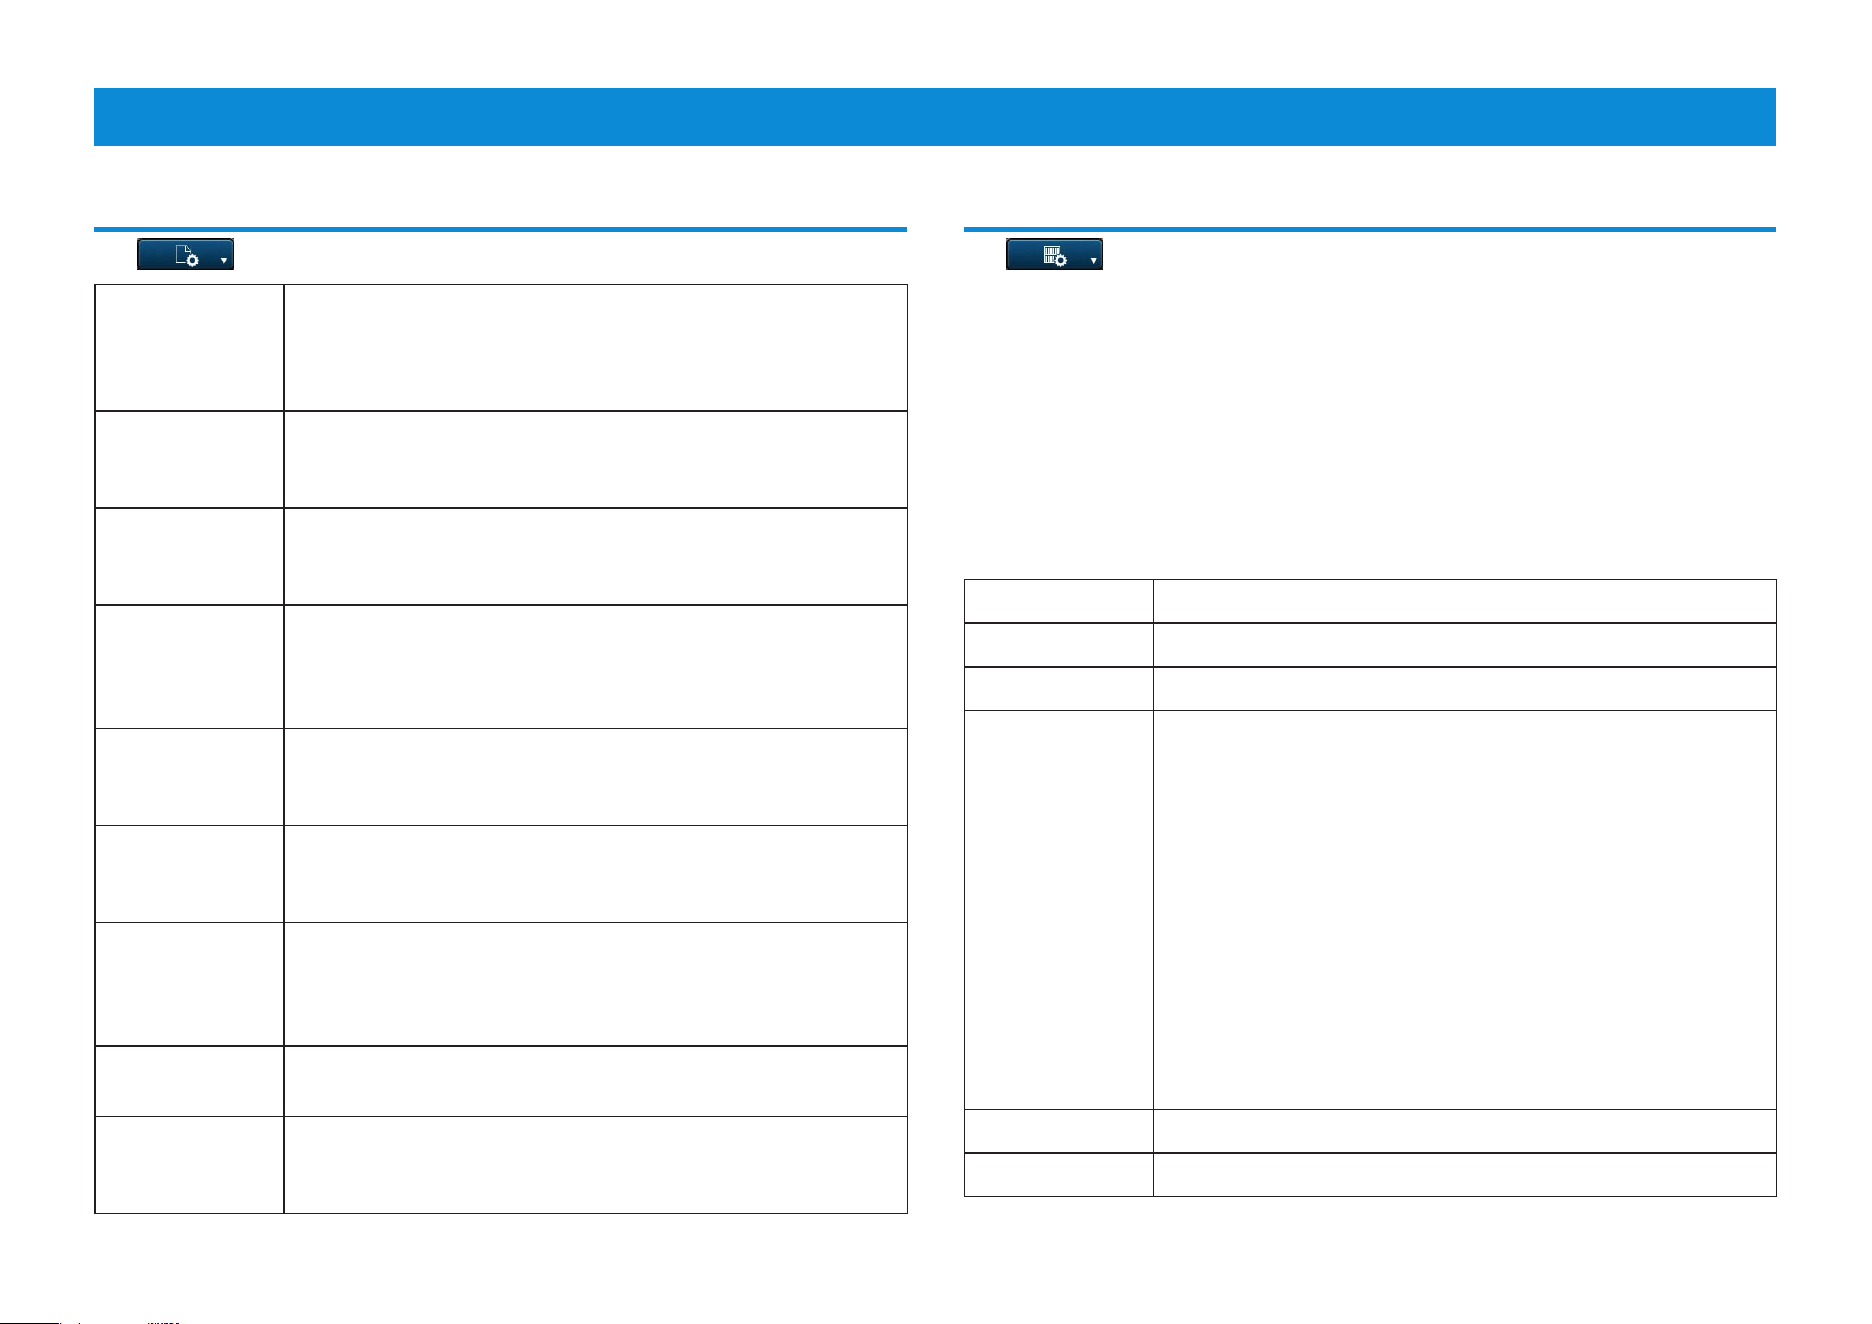
Settings
Project settings (affecting songs and phrases)
Tap to display the setting screen. Tap once again to close the screen.
TEMPO This sets the playback tempo for the song and phrases. Tap
the arrows at each end or slide to the left or right in order to
change the tempo setting.
You can also use [TAP] to tap the desired tempo.
MASTER
VOLUME
Use this to set Mobile Music Sequencer’s overall volume.
Tap the arrows at each end or slide to the left or right in
order to change the master volume setting.
NOTE SHIFT Use this to adjust the coarse tuning of Mobile Music
Sequencer in semitone units. Tap the arrows at each end or
slide to the left or right in order to change the setting.
SECTION
CHAIN PLAY
Turn on this setting to have all sections play automatically in
order from the left during section playback, starting with the
one played first. In such a case, playback will stop at any
section that contains no phrases.
TUNE Use this to adjust the fine tuning of Mobile Music Sequencer.
Tap the arrows at each end or slide to the left or right in
order to change the setting.
SONG LENGTH Tap the arrows at each end or slide to the left or right in
order to change the length of the song in units of one
measure.
SONG SNAP
GRID
Use to set the quantization unit to be applied when moving
blocks within the Song Area. For example, if you set Song
Snap Grid to
♪, the blocks will be quantized to eighth note
positions.
DEFAULT
VIEW
Use to specify whether the Phrase Viewer or Song Editor is
to open when a file is loaded.
TIME
SIGNATURE
Use to set the number of beats per measure in the Song
Area. For example, if you set 3/4, each measure will have
three beats.
App settings
Tap to display the setting screen. Tap once again to close the screen.
Tap [FILE] to open the File screen and manage your files. The screen contains
a list of all of the files that you can work with, and this can be toggled between
[PRESET] and [USER].
If you have activated iCloud, a Cloud button will be displayed at the right of
User files. Individual files can be uploaded and synchronized by turning on the
corresponding Cloud button. Turning off a Cloud button cancels synchronization,
and the corresponding file will be stored on the current device only.
NOTE
Preset files cannot be overwritten, renamed, or deleted.
The User list contains the project files that you have created.
NEW Tap to create a new Mobile Music Sequencer project.
LOAD Tap to load the selected file.
SAVE Tap to save your data as a Mobile Music Sequencer project.
EXPORT Tap to convert the selected file to SMF format.
When you do so, Mobile Music Sequencer will display a
window for synthesizer selection. Following this, you can tap
either [SECTION] or [SONG] to insert the most appropriate
MIDI Program Change messages for each device into the
SMF.
SECTION: All sections from the leftmost section containing
a phrase to the first section containing no phrases will be
exported in order as a single file.
SONG: The com
plete song will be exported.
NOTE
• Exported files will not be displayed in the file lists.
• You can store exported files on your computer using File Sharing in
iTunes.
RENAME Tap to bring up the keyboard and rename the selected file.
DELETE Tap to delete the selected file.

Mobile Music Sequencer Owner’s Manual 23
AUDIO LIBRARY
1
^
2
3
4
5
6
7
8
9
) ! @ # $ %
1 Shows the list of recorded sound data in your iPad.
2 Shows the list of sound data files which have been downloaded from
SoundCloud.
3 Shows the list of recorded sound data files which have been uploaded to
SoundCloud.
4 Shows the list of your favorite sound data files.
5 Shows all the uploaded sound data files for which Sharing has been set to
“public.”
6 Sound data list displaying available data files for selection.
7 For connecting to SoundCloud.
8 Shows the available recording capacity.
9 Calls up the waveform of the currently selected sound data.
) Plays back the sound data files selected in the list. When playing back sound
data directly from SoundCloud, the playback sound is output only from the
iPad.
! When the Library window is displaying the data les of Local: Opens
the SoundCloud Upload window.
When the Library window is displaying the data les of SoundCloud:
Downloads the selected file.
@ When the Library window is displaying the data les of Local: Copies
the sound data selected in the list to the Clipboard. The sound data can be
copied to other iPhone/iPad applications via the Clipboard.
When the Library window is displaying the data les of SoundCloud:
Registers the currently selected sound data to Your Favorites or cancels the
registration.
# Deletes the selected sound data file.
$ Updates the window. The sound data list on the SoundCloud is updated to
the latest settings.
% Calls up the information related to the currently selected sound data. If your
original data is selected, you can edit the information with the keyboard.
^ Closes the Library window.
MIXDOWN Tap to display a [MIXDOWN] button and recording timer
in the Chord Indicator area. Tap once again to hide the
recording timer.
Tap to start recording Mobile Music Sequencer’s
output in audio format. Tap once again to stop
recording. You can record for up to 30 minutes.
Tap to turn on synchronization if you would like
recording to begin automatically when you press
[
R
] (Play button) on the Song Editor or Phrase
Viewer.
AUDIO
LIBRARY
Tap to open the AUDIO LIBRARY. Here, you can manage
the audio files that you have recorded using Mobile Music
Sequencer and upload them to SoundCloud.
Mobile Music Sequencer Owner’s Manual 24
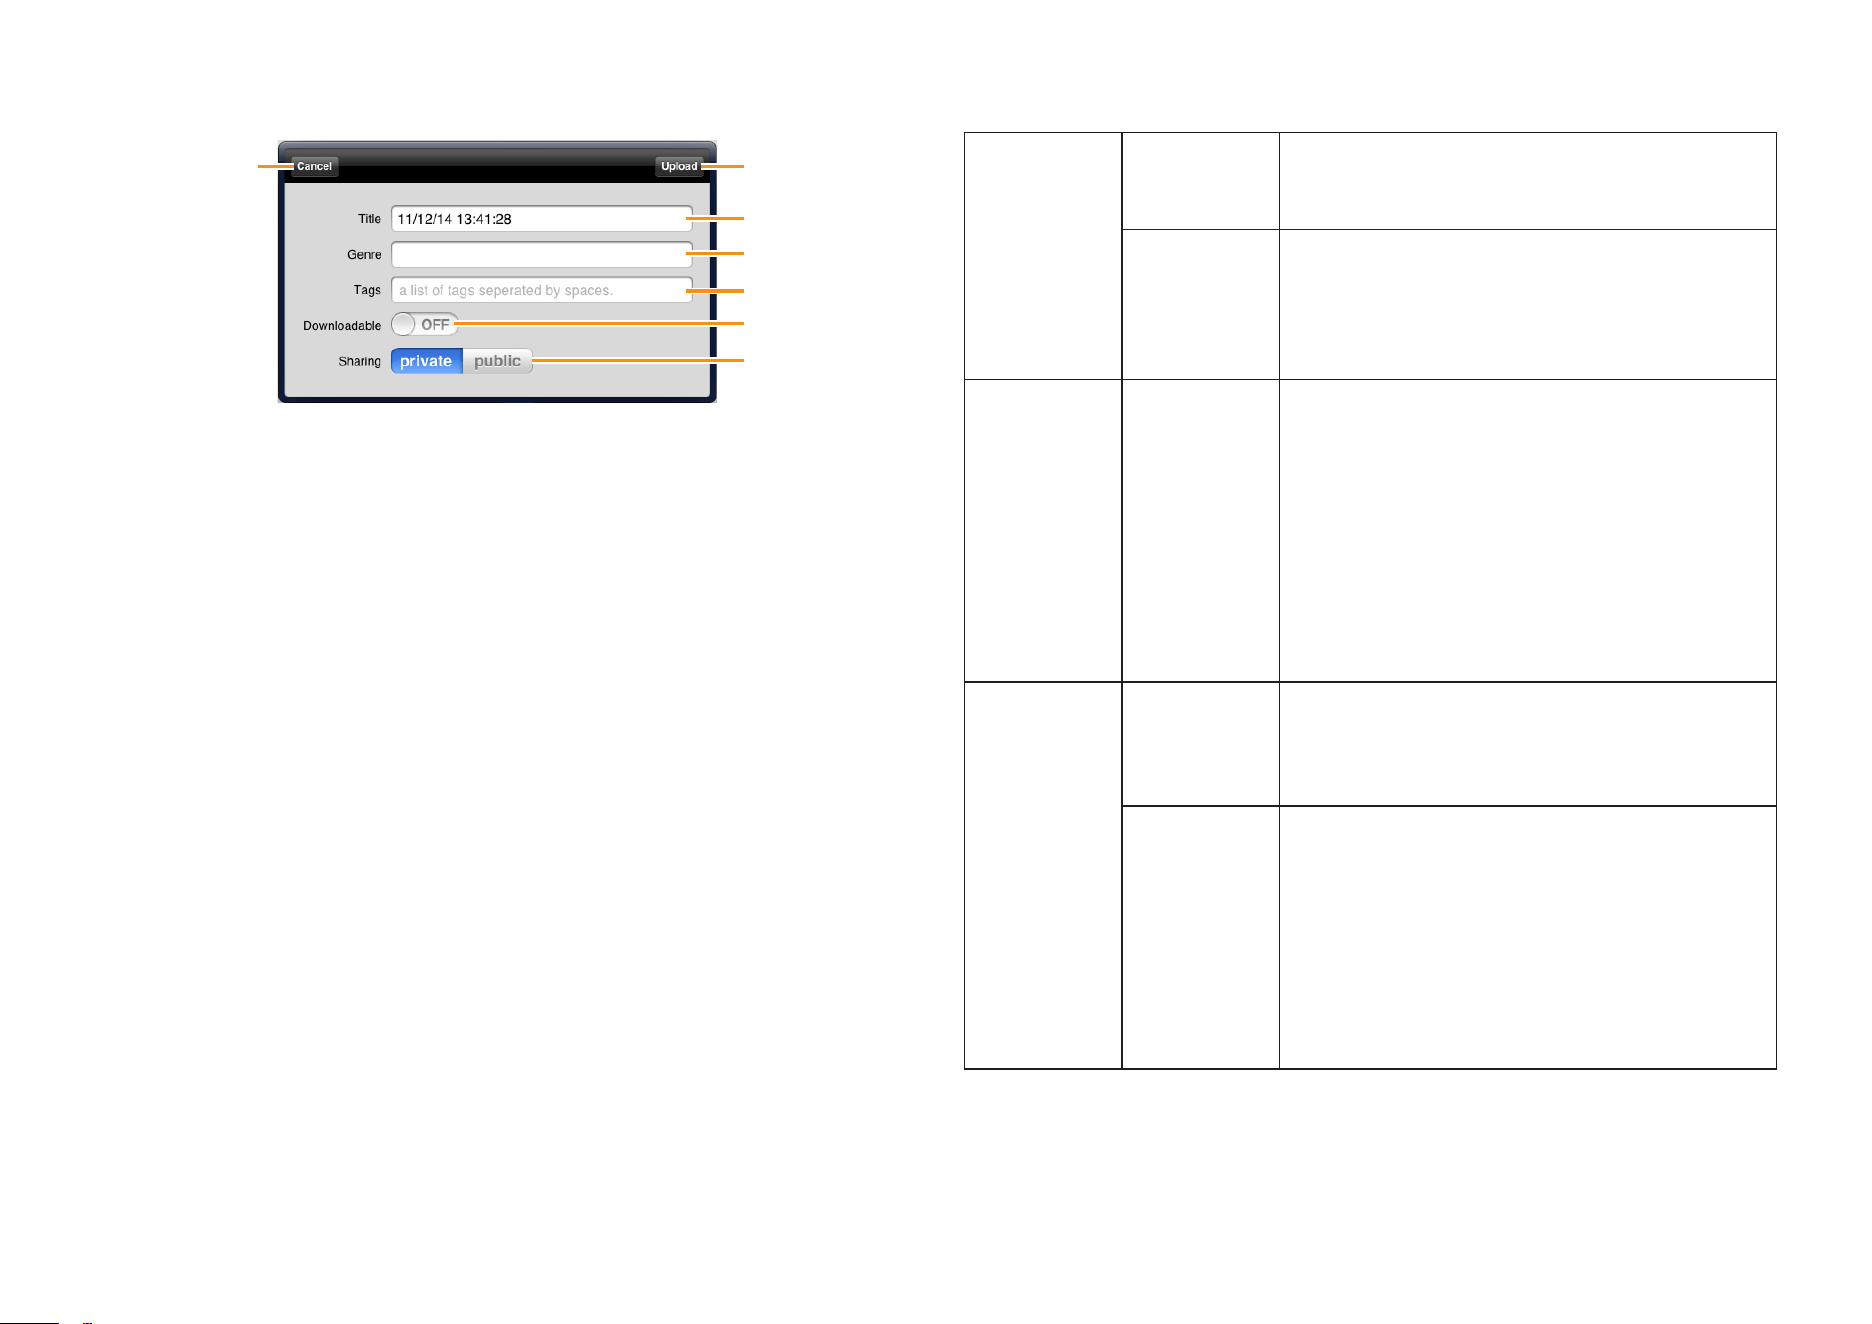
SoundCloud Upload window
1
2
3
4
5
6
7
1 Uploads the current sound data to SoundCloud.
2 For entering a title or name for the sound data with the keyboard.
3 For entering the musical genre or type of sound data with the keyboard.
4 For entering identifying tags to the sound data with the keyboard.
5 When this is set to “ON,” you can download sound data from SoundCloud.
6 Setting this to “public” allows you to share the sound data on SoundCloud
with other users. Setting this to “private” allows you to keep the sound data
on SoundCloud from being accessed by other users.
7 Closes the window.
NOTE
To use SoundCloud, access the following URL, then register your name.
http://soundcloud.com/
IMPORTANT
Copying of commercially available music sequence data and/or digital audio les is
strictly prohibited except for your personal use. Never upload such data to SoundCloud.
Yamaha makes no representations or warranties with regard to the use of the software and
documentation and cannot be held responsible for the results of the use of this manual and
the software.
Tap [SYSTEM] followed by [GENERAL] to make the following settings.
SOUND SOUND Turn off to stop Mobile Music Sequencer
producing any sound. Normally Sound should
be turned on.
BACK-
GROUND
PLAY
When turned on, you will still be able to hear
Mobile Music Sequencer when it is running in
the background. When turned off, playback will
be halted as soon as the app is moved to the
background.
iCloud iCloud When turned on, your User phases and User
projects stored using the File screen can be
uploaded to and downloaded from iCloud.
Your iPad will need to be configured as follows
in order to use iCloud.
1. Press the Home button to close this app.
2. Go to Settings.
3. Tap iCloud.
4. Sign in to your account using your Apple ID.
5. Turn on Documents & Data.
RECORDING
REC TEMPO Use this to set the recording tempo as a
percentage of the playback tempo. For
example, if you set a value of 50%, recording
will take place at half the speed of playback.
PHRASE
REC TYPE
Use this to set the recording method for User
phrases.
NORMAL: When a phrase plays to the
end while recording, it will loop back to the
beginning and recording will continue.
ONE LOOP: When a phrase plays to the
end while recording, it will loop back to the
beginning, recording will end, and playback will
continue.
Mobile Music Sequencer Owner’s Manual 25
OPERATION KNOB Use this to set an operation mode for knobs.
ROTARY: Knobs will follow your finger as you
swipe clockwise or counter-clockwise.
LINEAR: Knobs will turn clockwise as you
swipe upwards and vice-versa.
FADER Use this to set an operation mode for faders.
JUMP: The fader will jump to the position at
which it is tapped.
CATCH: The fader will move only when you
swipe it upwards or downwards
MIDI SYNC CLOCK Turn on to have Mobile Music Sequencer send
Timing Clock (F8) messages.
SYNC AUTO: When MIDI clock continuously comes
from an external MIDI device, Mobile Music
Sequencer is synchronized to the external
MIDI clock. When no MIDI clock continuously
comes from an external MIDI device, the App is
synchronized to the internal MIDI clock.
INTERNAL: Playback is synchronized to the
internal clock.
Tap [SYSTEM] followed by [MIDI PORT] to make the following settings.
MIDI PORT I/O Tap to display a list of ports for connected MIDI devices. An
[INPUT] and [OUTPUT] button are provided for each, and
they can be used to turn on and off the connection to the
input and output ports.
WIRELESS Tap to display a list of devices that Mobile Music Sequencer
can connect to via wireless Network MIDI
HARDWARE Tap to display a list of connected synthesizers. Program
change messages can be sent to the selected synthesizer
from the Part Voice Select Editor.
NOTE
• This setting does not change automatically when devices are
connected.
• For details on the Part Voice Select Editor, refer to Setting a part’s voice
from Editing Parts.
Tap [SYSTEM] followed by [METRONOME] to make the following settings.
METRONOME VOLUME Use to set the metronome volume.
BEAT Use to set the beats on which the
metronome will sound.
REC
PRECOUNT
Sets the number of precount beats
before recording is started by tapping
the Record button.
CLICK MODE Use to set whether or not the metronome is to play
automatically.
REC: When turned on, the metronome will be activated
automatically during recording.
PLAY: When turned on, the metronome will be activated
automatically during playback.
Tap [SYSTEM] followed by [OTHER] to make the following settings.
MANUAL Tap to open this manual.
All Sound Off Tap to silence the connected devices and Mobile Music
Sequencer’s parts by sending an All Sound Off MIDI
message.
Tap [SHOP] to open the Shop screen and purchase phrases, voices.
Play button Tap to listen to a preview.
Buy button Tap to purchase.
Restore
Purchases
Tap to restore previously purchased content to Purchased
status.
Normally, this would be used when you change devices or
reinstall Mobile Music Sequencer.

Mobile Music Sequencer Owner’s Manual 26
SoundCloud API cocoa wrapper
Apache License 2.0.
Copyright 2009 Ullrich Schäfer, Gernot Poetsch for SoundCloud Ltd.
This product includes software developed by Ullrich Schäfer and Gernot Poetsch on behalf of SoundCloud
Ltd.
SoundCloud Cocoa UI Toolkit
Apache License 2.0.
Copyright 2009-2012 nxtbgthng GmbH and SoundCloud Ltd.
This product includes software developed by nxtbgthng GmbH on behalf of SoundCloud Ltd.
OAuth2Client
BSD License
Copyright © 2010, nxtbgthng
All rights reserved.
Redistribution and use in source and binary forms, with or without modification, are permitted provided that
the following conditions are met:
• Redistributions of source code must retain the above copyright notice, this list of conditions and the
following disclaimer.
• Redistributions in binary form must reproduce the above copyright notice, this list of conditions and the
following disclaimer in the documentation and/or other materials provided with the distribution.
• Neither the name of nxtbgthng nor the names of its contributors may be used to endorse or promote
products derived from this software without specific prior written permission.
THIS SOFTWARE IS PROVIDED BY THE COPYRIGHT HOLDERS AND CONTRIBUTORS “AS IS” AND ANY
EXPRESS OR IMPLIED WARRANTIES, INCLUDING, BUT NOT LIMITED TO, THE IMPLIED WARRANTIES
OF MERCHANTABILITY AND FITNESS FOR A PARTICULAR PURPOSE ARE DISCLAIMED. IN NO
EVENT SHALL BE LIABLE FOR ANY DIRECT, INDIRECT, INCIDENTAL, SPECIAL, EXEMPLARY, OR
CONSEQUENTIAL DAMAGES (INCLUDING, BUT NOT LIMITED TO, PROCUREMENT OF SUBSTITUTE
GOODS OR SERVICES; LOSS OF USE, DATA, OR PROFITS; OR BUSINESS INTERRUPTION) HOWEVER
CAUSED AND ON ANY THEORY OF LIABILITY, WHETHER IN CONTRACT, STRICT LIABILITY, OR
TORT (INCLUDING NEGLIGENCE OR OTHERWISE) ARISING IN ANY WAY OUT OF THE USE OF THIS
SOFTWARE, EVEN IF ADVISED OF THE POSSIBILITY OF SUCH DAMAGE.
OHAttributedLabel
Copyright © 2010 Olivier Halligon
Permission is hereby granted, free of charge, to any person obtaining a copy of this software and
associated documentation files (the “Software”), to deal in the Software without restriction, including
without limitation the rights to use, copy, modify, merge, publish, distribute, sublicense, and/or sell copies
of the Software, and to permit persons to whom the Software is furnished to do so, subject to the following
conditions:
The above copyright notice and this permission notice shall be included in all copies or substantial portions
of the Software.
THE SOFTWARE IS PROVIDED “AS IS”, WITHOUT WARRANTY OF ANY KIND, EXPRESS OR IMPLIED,
INCLUDING BUT NOT LIMITED TO THE WARRANTIES OF MERCHANTABILITY, FITNESS FOR A
PARTICULAR PURPOSE AND NONINFRINGEMENT. IN NO EVENT SHALL THE AUTHORS OR
COPYRIGHT HOLDERS BE LIABLE FOR ANY CLAIM, DAMAGES OR OTHER LIABILITY, WHETHER IN AN
ACTION OF CONTRACT, TORT OR OTHERWISE, ARISING FROM, OUT OF OR IN CONNECTION WITH
THE SOFTWARE OR THE USE OR OTHER DEALINGS IN THE SOFTWARE.
Created by Olivier Halligon (AliSoftware) on 20 Jul. 2010.
Any comment or suggestion welcome. Please contact me before using this class in your projects.
Referencing this project in your AboutBox/Credits is appreciated.
JSONKit
JSONKit is dual licensed under either the terms of the BSD License, or alternatively under the terms of the
Apache License, Version 2.0.
Copyright © 2011, John Engelhart.
Apache License
Version 2.0, January 2004
http://www.apache.org/licenses/
TERMS AND CONDITIONS FOR USE, REPRODUCTION, AND DISTRIBUTION
1. Definitions.
“License” shall mean the terms and conditions for use, reproduction, and distribution as defined by
Sections 1 through 9 of this document.
“Licensor” shall mean the copyright owner or entity authorized by the copyright owner that is granting the
License.
“Legal Entity” shall mean the union of the acting entity and all other entities that control, are controlled by, or
are under common control with that entity. For the purposes of this definition, “control” means (i) the power,
direct or indirect, to cause the direction or management of such entity, whether by contract or otherwise, or
(ii) ownership of fifty percent (50%) or more of the outstanding shares, or (iii) beneficial ownership of such
entity.

Mobile Music Sequencer Owner’s Manual 27
“You” (or “Your”) shall mean an individual or Legal Entity exercising permissions granted by this License.
“Source” form shall mean the preferred form for making modifications, including but not limited to software
source code, documentation source, and configuration files.
“Object” form shall mean any form resulting from mechanical transformation or translation of a Source form,
including but not limited to compiled object code, generated documentation, and conversions to other
media types.
“Work” shall mean the work of authorship, whether in Source or Object form, made available under the
License, as indicated by a copyright notice that is included in or attached to the work (an example is
provided in the Appendix below).
“Derivative Works” shall mean any work, whether in Source or Object form, that is based on (or derived
from) the Work and for which the editorial revisions, annotations, elaborations, or other modifications
represent, as a whole, an original work of authorship. For the purposes of this License, Derivative Works
shall not include works that remain separable from, or merely link (or bind by name) to the interfaces of, the
Work and Derivative Works thereof.
“Contribution” shall mean any work of authorship, including the original version of the Work and any
modifications or additions to that Work or Derivative Works thereof, that is intentionally submitted to Licensor
for inclusion in the Work by the copyright owner or by an individual or Legal Entity authorized to submit on
behalf of the copyright owner. For the purposes of this definition, “submitted” means any form of electronic,
verbal, or written communication sent to the Licensor or its representatives, including but not limited to
communication on electronic mailing lists, source code control systems, and issue tracking systems that
are managed by, or on behalf of, the Licensor for the purpose of discussing and improving the Work, but
excluding communication that is conspicuously marked or otherwise designated in writing by the copyright
owner as “Not a Contribution.”
“Contributor” shall mean Licensor and any individual or Legal Entity on behalf of whom a Contribution has
been received by Licensor and subsequently incorporated within the Work.
2. Grant of Copyright License.
Subject to the terms and conditions of this License, each Contributor hereby grants to You a perpetual,
worldwide, non-exclusive, no-charge, royalty-free, irrevocable copyright license to reproduce, prepare
Derivative Works of, publicly display, publicly perform, sublicense, and distribute the Work and such
Derivative Works in Source or Object form.
3. Grant of Patent License.
Subject to the terms and conditions of this License, each Contributor hereby grants to You a perpetual,
worldwide, non-exclusive, no-charge, royalty-free, irrevocable (except as stated in this section) patent
license to make, have made, use, offer to sell, sell, import, and otherwise transfer the Work, where such
license applies only to those patent claims licensable by such Contributor that are necessarily infringed
by their Contribution(s) alone or by combination of their Contribution(s) with the Work to which such
Contribution(s) was submitted. If You institute patent litigation against any entity (including a cross-claim or
counterclaim in a lawsuit) alleging that the Work or a Contribution incorporated within the Work constitutes
direct or contributory patent infringement, then any patent licenses granted to You under this License for
that Work shall terminate as of the date such litigation is filed.
4. Redistribution.
You may reproduce and distribute copies of the Work or Derivative Works thereof in any medium, with or
without modifications, and in Source or Object form, provided that You meet the following conditions:
(a) You must give any other recipients of the Work or Derivative Works a copy of this License; and
(b) You must cause any modified files to carry prominent notices stating that You changed the files; and
(c) You must retain, in the Source form of any Derivative Works that You distribute, all copyright, patent,
trademark, and attribution notices from the Source form of the Work, excluding those notices that do
not pertain to any part of the Derivative Works; and
(d) If the Work includes a “NOTICE” text file as part of its distribution, then any Derivative Works that
You distribute must include a readable copy of the attribution notices contained within such NOTICE
file, excluding those notices that do not pertain to any part of the Derivative Works, in at least one
of the following places: within a NOTICE text file distributed as part of the Derivative Works; within
the Source form or documentation, if provided along with the Derivative Works; or, within a display
generated by the Derivative Works, if and wherever such third-party notices normally appear. The
contents of the NOTICE file are for informational purposes only and do not modify the License. You
may add Your own attribution notices within Derivative Works that You distribute, alongside or as
an addendum to the NOTICE text from the Work, provided that such additional attribution notices
cannot be construed as modifying the License.
You may add Your own copyright statement to Your modifications and may provide additional or different
license terms and conditions for use, reproduction, or distribution of Your modifications, or for any such
Derivative Works as a whole, provided Your use, reproduction, and distribution of the Work otherwise
complies with the conditions stated in this License.
5. Submission of Contributions.
Unless You explicitly state otherwise, any Contribution intentionally submitted for inclusion in the Work by
You to the Licensor shall be under the terms and conditions of this License, without any additional terms or
conditions. Notwithstanding the above, nothing herein shall supersede or modify the terms of any separate
license agreement you may have executed with Licensor regarding such Contributions.
6. Trademarks.
This License does not grant permission to use the trade names, trademarks, service marks, or product
names of the Licensor, except as required for reasonable and customary use in describing the origin of the
Work and reproducing the content of the NOTICE file.
7. Disclaimer of Warranty.
Unless required by applicable law or agreed to in writing, Licensor provides the Work (and each Contributor
provides its Contributions) on an “AS IS” BASIS, WITHOUT WARRANTIES OR CONDITIONS OF ANY
KIND, either express or implied, including, without limitation, any warranties or conditions of TITLE, NON-
INFRINGEMENT, MERCHANTABILITY, or FITNESS FOR A PARTICULAR PURPOSE. You are solely
responsible for determining the appropriateness of using or redistributing the Work and assume any risks
associated with Your exercise of permissions under this License.
8. Limitation of Liability.
In no event and under no legal theory, whether in tort (including negligence), contract, or otherwise, unless
required by applicable law (such as deliberate and grossly negligent acts) or agreed to in writing, shall any
Contributor be liable to You for damages, including any direct, indirect, special, incidental, or consequential
damages of any character arising as a result of this License or out of the use or inability to use the Work
(including but not limited to damages for loss of goodwill, work stoppage, computer failure or malfunction,
or any and all other commercial damages or losses), even if such Contributor has been advised of the
possibility of such damages.

Mobile Music Sequencer Owner’s Manual 28
9. Accepting Warranty or Additional Liability.
While redistributing the Work or Derivative Works thereof, You may choose to offer, and charge a fee for,
acceptance of support, warranty, indemnity, or other liability obligations and/or rights consistent with this
License. However, in accepting such obligations, You may act only on Your own behalf and on Your sole
responsibility, not on behalf of any other Contributor, and only if You agree to indemnify, defend, and hold
each Contributor harmless for any liability incurred by, or claims asserted against, such Contributor by
reason of your accepting any such warranty or additional liability.
END OF TERMS AND CONDITIONS
APPENDIX: How to apply the Apache License to your work.
To apply the Apache License to your work, attach the following boilerplate notice, with the fields enclosed
by brackets “[]” replaced with your own identifying information. (Don’t include the brackets!) The text should
be enclosed in the appropriate comment syntax for the file format. We also recommend that a file or class
name and description of purpose be included on the same “printed page” as the copyright notice for easier
identification within third-party archives.
Copyright [yyyy] [name of copyright owner]
Licensed under the Apache License, Version 2.0 (the “License”); you may not use this file except in
compliance with the License.
You may obtain a copy of the License at
http://www.apache.org/licenses/LICENSE-2.0
Unless required by applicable law or agreed to in writing, software distributed under the License is
distributed on an “AS IS” BASIS, WITHOUT WARRANTIES OR CONDITIONS OF ANY KIND, either express
or implied.
See the License for the specific language governing permissions and limitations under the License.
C.S.G., DMI Development Division
© 2013 Yamaha Corporation
312MW-E0