
EN
MULTI-COOKER AND FRYER
Translation of the original manual
SFR 9400WH
SFR 9400WH
A
4,8L -MAX MIN-1,7L
8
9
1
0
11
2
3
4
5
6
1
7
12
13
B
2
3
1
4
5
6
C
Function
°
9
2
3
4
5
7
6
8
10
1
12
11
13

- 1 -
04/2025
2025, .
EN
Multi-cooker and fryer
User’smanual
Important safety instructions
READ CAREFULLY AND STORE FOR FUTURE USE.
• This appliance must not be used by children 0 to 8 years
of age. This appliance may be used by children 8 years
old and older when under continuous supervision. This
appliance may be used by persons with physical, sensory
or mental impairments or by persons with insufficient
experience and knowledge, if they are properly supervised
or have been informed about how to use the appliance in
asafe manner and understand the potential dangers.
• Cleaning and maintenance performed by the user must
not be performed by unsupervised children.
• Children must not play with the appliance.
• Keep the appliance and its power cord out of reach of
children younger than 8 years of age.
• In the event that the power cord is damaged, have it
repaired at aprofessional service centre to prevent causing
adangerous situation. It is forbidden to use the appliance if
it has adamaged power cord.
• The appliance must be located in astable position with the
handles positioned in such away as to prevent spilling hot
liquids.
• The surfaces of the appliance that come into contact with
food must always be cleaned according to the instructions
in this user’smanual.
- 2 -
04/2025
2025, .
• This appliance is not designed to be controlled using
aprogrammed device, external timer switch or remote
control.
• This appliance is designed for domestic use and similar
locations such as:
– kitchens in stores; offices and other workplaces;
– in agriculture;
– for guests of hotels, motels and other similar locations;
– in bed and breakfast establishments
• Make sure that no water or any other liquid splashes
on the power plug or the power socket, and that the hot
steam emitted from the appliance is also kept away. If this,
nevertheless, occurs, disengage the circuit breaker of the
power socket and then carefully dry the power socket and
the power plug before further use.
• The surfaces of the appliance that come into contact with
food must always be cleaned according to the instructions
in this user’smanual.
Warning:
Incorrect use may lead to injuries.
• The surface of the heating element retains residual heat
after use.
CAUTION: Hot surface!
The temperature of accessible surfaces may be
higher if the appliance is in operation. The appliance
may remain hot even after being switched off. Before
cleaning, maintenance or other manipulation, make
sure that the appliance is completely cooled down.
. . . . . . . . . . . . . . . . . . . . . . . . . . . . . . . . . . . . . . . . . . . . . . . . . . . . . . . . . . . . . . . . . . . . . . . . . . . . . . . . . . . . . . . . . . . . . . . . . . . . . . . . . . . . . . . . . . . . . . . . . . . . . . . . . . . . . . . . . . . .
- 3 -
04/2025
2025, .
Electrical safety
• Before connecting this appliance to apower socket, make sure that the voltage stated on its rating label corresponds to the voltage in your power
socket.
• Connect the appliance only to aproperly grounded socket. Do not use an extension cord.
• Do not connect and disconnect the power cord to and from the power socket with wet hands.
• Ensure that the power plug contacts do not come into contact with water or moisture.
• Do not disconnect the appliance from the power socket by pulling on the power cord. This could damage the power cord or the power socket.
Disconnect the cord from the power socket by gently pulling the plug of the power cord.
• Do not place heavy items on the power cord. Make sure the power cord does not hang over the edge of atable and that it is not touching ahot
surface or sharp objects.
• To avoid the danger of injury by electrical shock, do not repair the appliance yourself or make any adjustments to it. Have all repairs or adjustments
of the appliance performed at an authorised service centre. Tampering with the appliance during the warranty period may void the warranty.
• To prevent the risk of injury by electrical shock, never submerge the cooker unit, the power cord or the power plug in water or any other liquid.
• Always turn off the appliance and disconnect it from the power socket when you have finished using it.
Correct use of the appliance
• Do not use the appliance for apurpose other than that for which it is designed.
• This appliance is designed for use in indoor areas only. Never use it in an outdoor or industrial environment.
• This appliance must be used only in accordance with the instructions contained in this user‘smanual.
• Only use the appliance with the original accessories that came with it.
Attention:
Using non-original accessories may result in adangerous situation arising.
• Do not use the appliance for indoor heating purposes!
• Always turn off and disconnect the appliance from the mains power socket when not using it, before cleaning, maintenance or moving it. Never
move the appliance during operation.
• Do not use the appliance when it is not functioning correctly or after it has fallen on the floor, been submerged in water or is damaged in any other
way. Hand it over to an authorised service centre for inspection or repair.
• Do not connect the appliance to apower socket or turn it on without the removable pot being located inside appliance.
• Do not use the appliance with an empty removable cooking pot.
• Never place any items in the area between the inside of the cooker unit and the base of the removable pot.
• It is forbidden to modify the surface of the appliance in any way, e.g. using self-adhesive wallpaper, foil, etc.
Warning:
Do not pour water or place any food into the cooker unit. Food and water are put only into the removable cooking pot.
Installation location of the appliance
• Only use the appliance on an even, dry, clean, stable surface and heat resistant surface.
• Do not use the appliance near flammable materials such as curtains, kitchen towels, etc.
• Do not place the appliance on the edge of atable, on adrainboard, on unstable, inclining or uneven surfaces, on an electric or gas stove and other
sources of heat, or in their vicinity.
• To ensure sufficient air circulation during operation, there must be aclearance of at least 15 cm on all sides of the appliance. Do not place any items
on to the appliance and do not cover the ventilation openings.
• Do not place the appliance in the vicinity of items, surfaces or under items that may become damaged, for example walls, kitchen cabinets,
cupboards, paintings, curtains. The escaping steam could damage them.
Handling the removable cooking pot
• Only use the removable cooking pot supplied with this cooker. Never use adifferent cooking pot.
• Do not use acracked, dented or otherwise damaged cooking pot. Adamaged cooking pot must be replaced with anew pot of the original type.
• Never use the cooking pot separately without the cooker unit, for preparing food on an electric, gas, induction stove or on an open fire.
• Before inserting the removable cooking pot into the cooker unit, check that the outer surface of the pot and the inner area of the cooker unit are
completely clean and dry. There must be no dried on food residues, etc. on the outer surface of the cooking pot or on the heating element of the
cooker unit. Otherwise, there is arisk of amalfunction or damage to the cooker.
• Before connecting the cooker to apower socket, make sure that the removable cooking pot is properly seated in the cooker unit, that it is filled with
water and food, and that the lid is correctly positioned on the cooking pot. Do not overfill the cooking pot.
Safety during use
• During operation, there needs to be sufficient area for air circulation above the cooker and around it. Do not cover the pot.
• While cooking, do not touch places where hot steam is being released as this may cause burns or scalding.
• Do not leave any kitchen utensils (e.g. mixing and serving spoon) inside the removable cooking pot when using the keep warm function.
• Be very careful when lifting the lid, always removing it away from yourself.

- 4 -
04/2025
2025, .
• When opening the lid, ensure that the water drips only into the removable pot. Water must never drip into the cooker unit.
• Make sure that no water or any other liquid splashes on the power plug, cable socket or the power socket, and that the hot steam emitted from the
appliance is also kept away. If this, nevertheless, occurs, disengage the circuit breaker of the power socket and then carefully dry the power socket,
the power plug and cable socket before further use.
After cooking
• Before removing the pot, grate rack and before cleaning, always allow the cooker to fully cool down.
• When the lid is hot, do not place it on heat sensitive surfaces.
Handling the appliance and its parts
• When you have finished using the appliance, always handle it in such away as not to touch its outer surface or other parts that may still be hot as
aresult of residual heat.
• Do not touch the hot surfaces of the appliance. After turning off and disconnecting the appliance from the power socket, use the cut-outs in the base
of the appliance to lift and carry it.
• It is necessary to pay exceptional care when moving the frying basket or rack when it is filled with hot food.
Safety during maintenance
• Allow the appliance to always fully cool down before cleaning it.
• Regularly clean the appliance after each use according to the instructions in chapter Maintenance and cleaning. Do not perform any maintenance
on the appliance apart from the maintenance procedure described in chapter Maintenance and cleaning.
• The outer body of the appliance is not intended to be washed in adishwasher.
• Never wash the appliance under running water or submerge it in water or another liquid.
• To prevent scratching the non-stick surface of the cooking pot when cleaning it, always use wooden, silicone or plastic utensils.
• If the lid and the removable cooking pot are hot, do not submerge them in cold water or wash them under acurrent of running cold water. The
sudden change in temperature could result in their damage.
. . . . . . . . . . . . . . . . . . . . . . . . . . . . . . . . . . . . . . . . . . . . . . . . . . . . . . . . . . . . . . . . . . . . . . . . . . . . . . . . . . . . . . . . . . . . . . . . . . . . . . . . . . . . . . . . . . . . . . . . . . . . . . . . . . . . . . . . . . . .

- 5 -
04/2025
2025, .
• Thank you for purchasing our SENCOR product; we hope you will be
satisfied with it.
• Prior to using this appliance, please read the user’smanual
thoroughly, even in cases where owners have previously familiarised
themselves with using similar types of appliances. Only use the
appliance in the manner described in this user’smanual. Keep the
manual for future reference.
• It is recommended to keep the original shipping carton, packing
material, receipt and confirmation of the extent of the seller’sliability
or warranty certificate at least for the duration of the legal right of
defective performance or quality guarantee. When transporting the
appliance, we recommend packaging it again in the original box
provided by the manufacturer.
. . . . . . . . . . . . . . . . . . . . . . . . . . . . . . . . . . . . . . . . . . . . . . . . . . . . . . . . . . . . . . . . . . . .
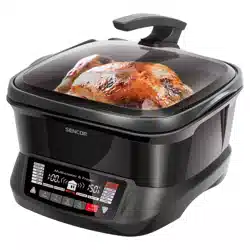
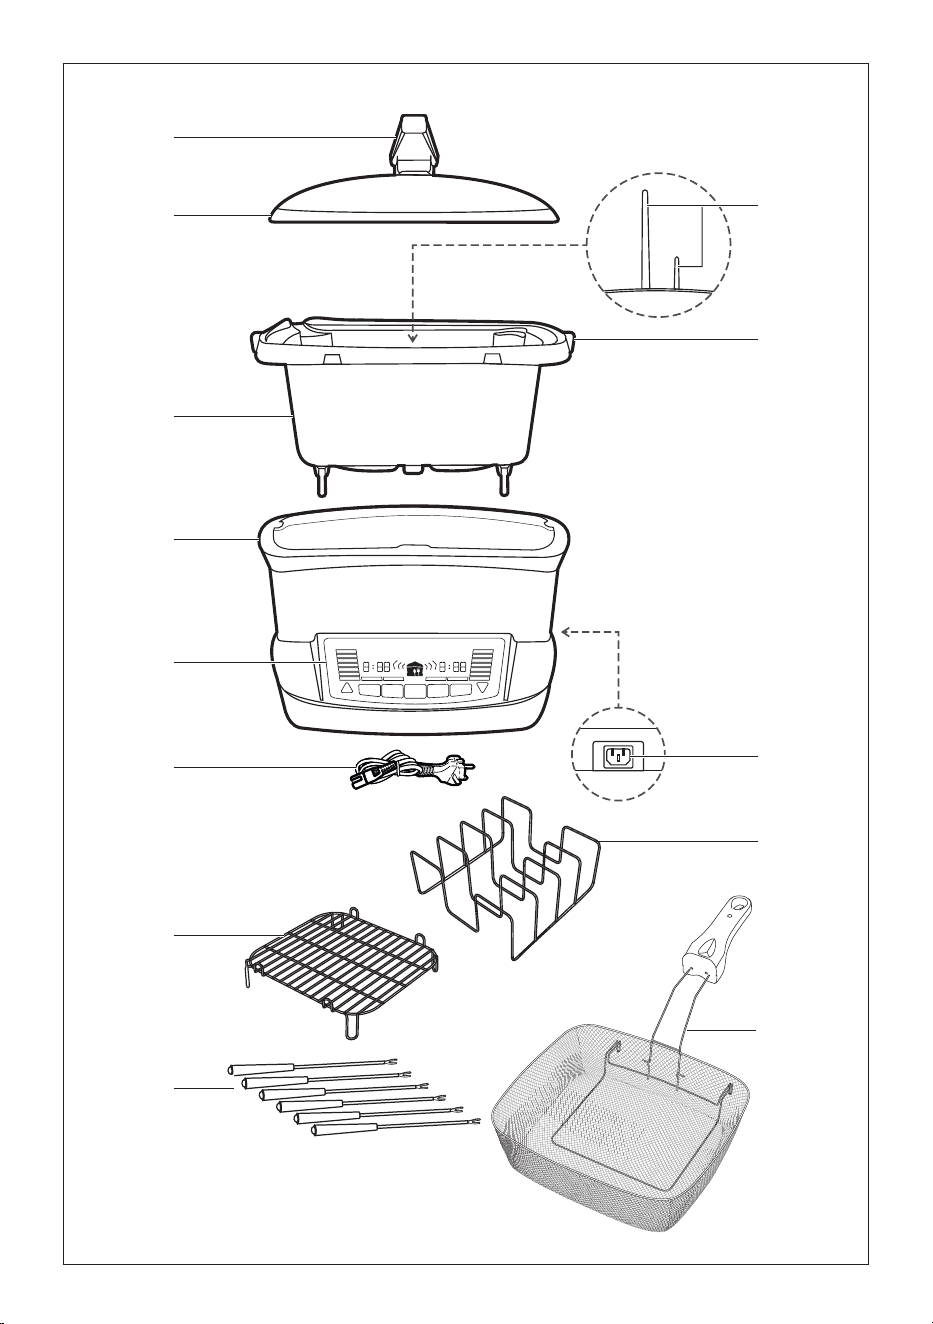
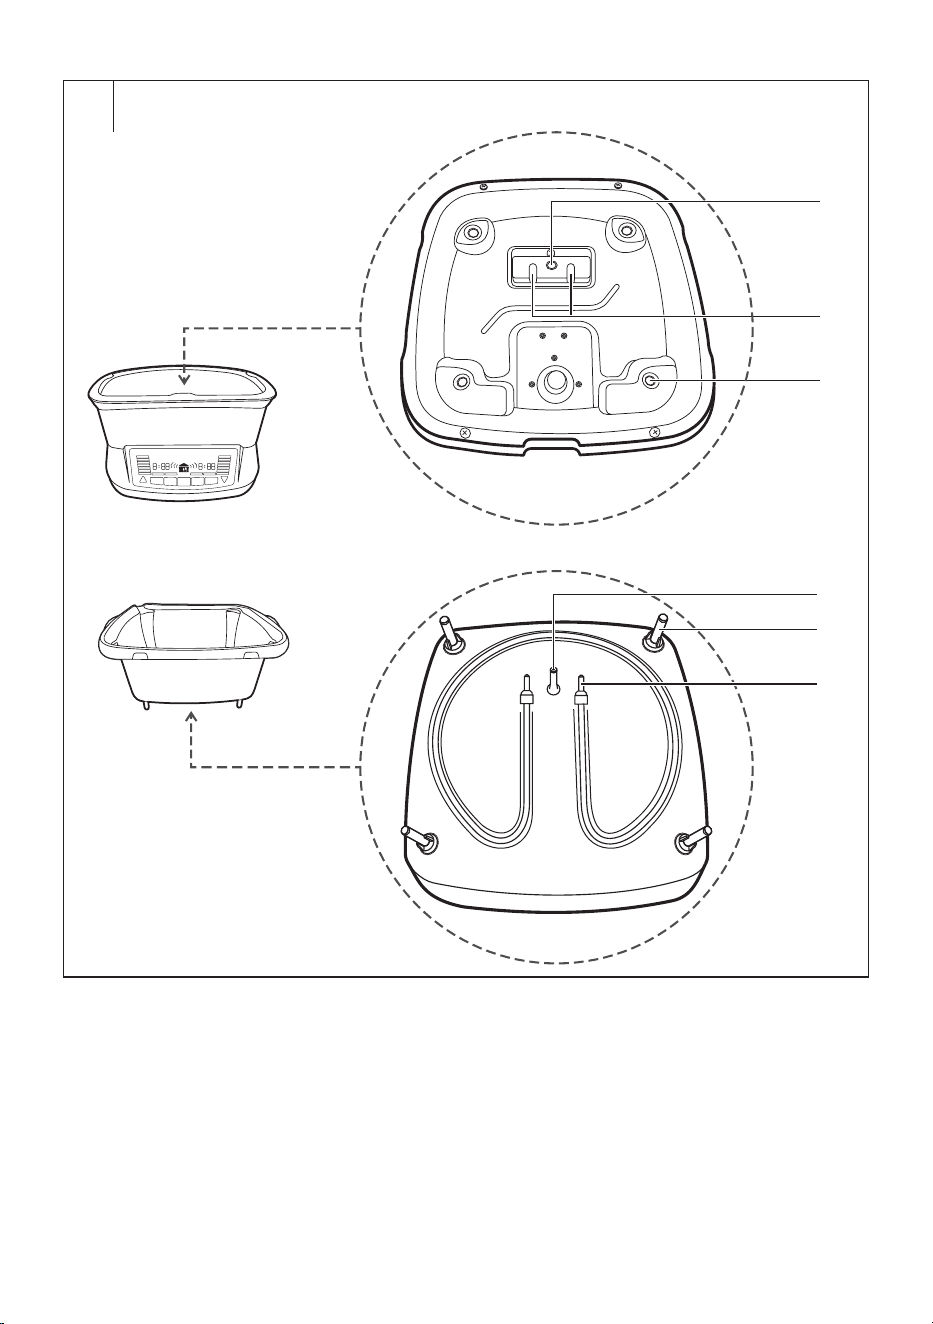
DESCRIPTION OF THE APPLIANCE
A1 Lid handle
A2 Glass lid with gasket
A3 Pot
8-litre capacity, made from an
aluminium alloy with anon-
stick inner surface.
A4 Multi-cooker unit
The multi-cooker unit has
cut-outs on both sides that are
used for carrying.
A5 Control panel with display
A6 Power cord
A7 Minimum and maximum level
marks
A8 Pot handles
A9 Multi-cooker unit power
socket (rear of the unit)
A10 Frying grate
A11 Fondue forks
Used for forking various foods
that are subsequently dipped
in fondue or for taking food
directly out of the fondue.
A12 Sous-vide rack
A13 Frying basket
. . . . . . . . . . . . . . . . . . . . . . . . . . . . . . . . . . . . . . . . . . . . . . . . . . . . . . . . . . . . . . . . . . . .
B1 Pot pin hole
B2 Pot contact holes
B3 Pot feet holes
B4 Pin
B5 Feet
B6 Contacts
. . . . . . . . . . . . . . . . . . . . . . . . . . . . . . . . . . . . . . . . . . . . . . . . . . . . . . . . . . . . . . . . . . . .
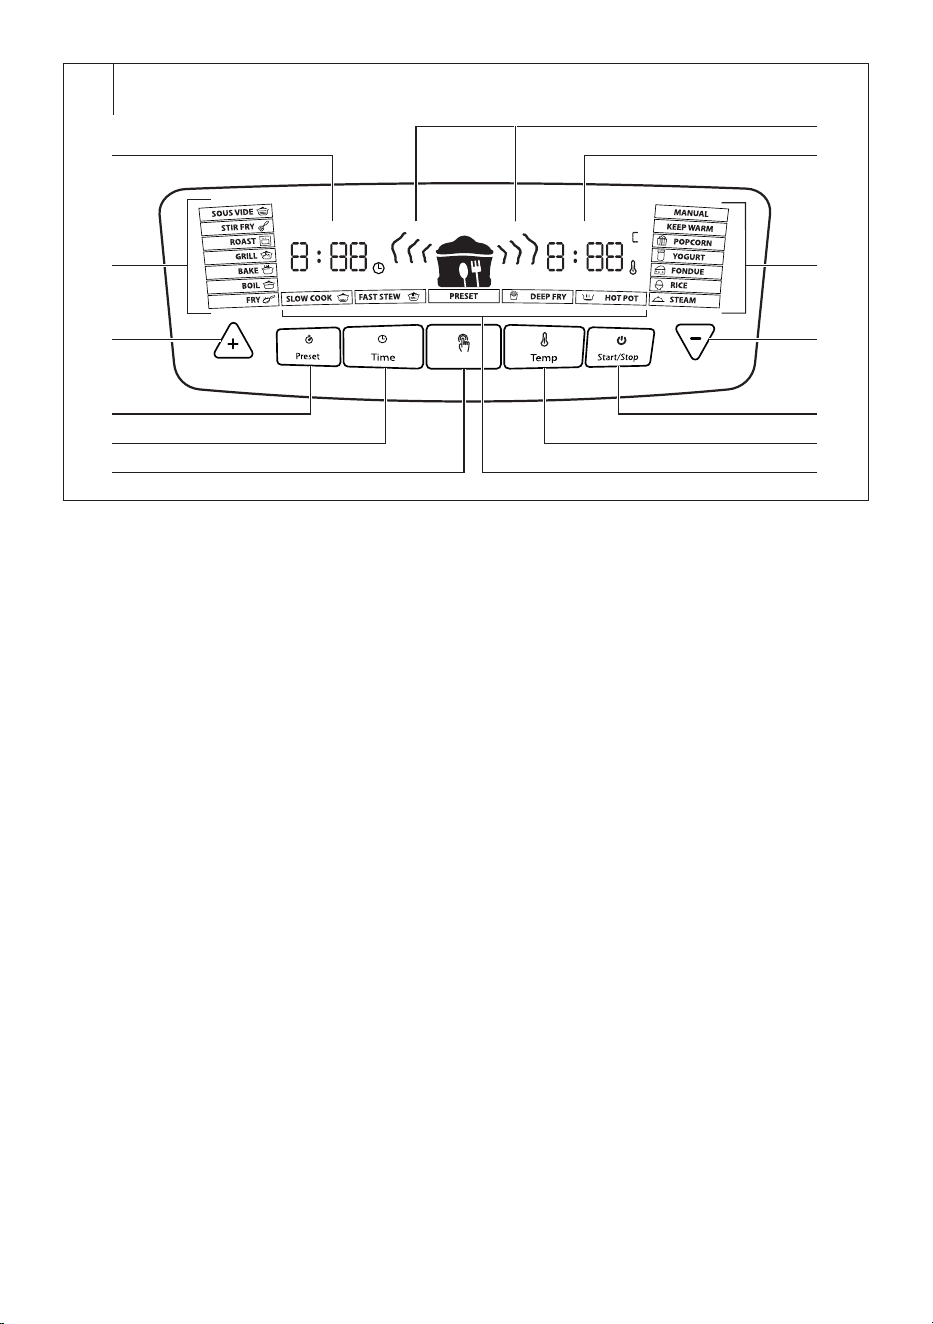
C1 Time indicator
C2 Left program menu
C3 Plus (+) button
Serves to increase the time
or temperature value and to
scroll through the cooking
programs.
C4 Preset button
Serves to activate the delayed
cooking function.
C5 TIME button
Serves to set the cooking time
in the range from 0:01 – 9:59.
C6 FUNCTION button
Serves to set the
preprogrammed cooking
programs
C7 On/Off cooking process
indicators
When no cooking process
is running, the symbols
are permanently shown. If
acooking process is running,
the symbols gradually load
up from the smallest to the
largest.
C8 Temperature indicator
C9 Right program menu
C10 Minus (–) button
Serves to lower the time or
temperature value and to
scroll through the cooking
programs.
C11 Start/Stop button
Serves to start and stop the
cooking process
C12 TEMP button (temperature)
Enables the setting of the
cooking temperature in the
range from 40 to 240°Cin
10°Cincrements.
C13 Centre program menu
. . . . . . . . . . . . . . . . . . . . . . . . . . . . . . . . . . . . . . . . . . . . . . . . . . . . . . . . . . . . . . . . . . . .
INTENDED USE OF THE MULTI-COOKER AND
FRYER
• The multi-cooker and fryer is designed for cooking awide range of
meals for which, under normal circumstances, it would be necessary
to use various other appliances and pots. The multi-cooker enables,
for example, cooking, baking, grilling, stir frying, stewing, steam
cooking, roasting and deep frying.
• The multi-cooker can be used either in automatic mode by selecting
one of 18 preset programs without having to perform any other
settings or in manual mode where the cooking time and temperature
can be set based on your needs and experience.
• The multi-cooker has other functions such as adelayed start and an
automatic or adjustable keep warm function.
. . . . . . . . . . . . . . . . . . . . . . . . . . . . . . . . . . . . . . . . . . . . . . . . . . . . . . . . . . . . . . . . . . . .
BEFORE FIRST USE
• Before using it for the first time, wash the cooking pot A3, lid A2, and
accessories A10 to A13 using ahot detergent solution. Then rinse
all these parts with clean water and dry them thoroughly with afine
wiping cloth.
• Also clean out the inner and outer parts of the multi-cooker unit A4
using alightly dampened wiping cloth and then wipe it dry. Never
submerge the multi-cooker unit in water or any other liquid!
• We recommend running the air fryer empty for approximately
30minutes at 200 °C. During this time, you may notice a slight
amount of smoke or a faint odour. This is a normal occurrence and will
disappear with use.
. . . . . . . . . . . . . . . . . . . . . . . . . . . . . . . . . . . . . . . . . . . . . . . . . . . . . . . . . . . . . . . . . . . .
OPERATION
PREPARING INGREDIENTS AND COOKING TIPS
• Select the amount of food for cooking so that it does not exceed
the maximum capacity of the cooking pot. Always pour asufficient
amount of water under the food, otherwise due to the lack of water the
multi-cooker could overheat before the cooking process is completed.
• When preparing whole pieces of meat, pour asufficient amount of
water underneath it. Always trim away excess fat from the meat.
Thoroughly cook all meat, fish and seafood.
• You can also place frozen meat into the cooking pot, however you
must add approximately 0.2 litres of water or stock to it in order to
create athermal inter-layer between the meat and the cooking pot
to protect the cooking pot against damage by asudden change in
temperature. At the same time, keep in mind that the cooking time will
be several hours longer.
• As arule, cut food into equal-sized pieces to ensure that it cooks
evenly.
• Vegetables such as carrots, onions, turnips, etc. take longer to cook
than meat, therefore cut them into sufficiently small pieces.
• Allow frozen vegetables to defrost and add them in the last half hour to
hour of cooking. This will ensure that the vegetables retain their colour
and structure. At the same time, the ingredients in the multi-cooker will
not be cooled down excessively.
• Searing meat and frying vegetables in advance separately on
apan will remove apart of the fat from the meat and improve the
appearance and flavour of both meat and vegetables.
• Milk products such as for example cream, sour cream or yoghurt as
well as pasta tend to shrink and disintegrate during the slow cooking
process, therefore add them at the end.
• Never cook legumes (e.g. dry beans or lentils) in the multi-cooker,
always first soak them for about ten hours in water.
EN
Multi-cooker and fryer
User'smanual
- 6 -
04/2025
2025, .
• Fats such as oils, butter, lard do not need to be used at all, especially if
you wish to adhere to ahealthy diet. If you cannot be without fat, then
2-3 tablespoons of oil based on the number of portions that you are
cooking will be sufficient.
• During the cooking process, lift the lid as little as possible because
each time the lid is lifted, heat escapes and liquids are evaporated. If
you lift the lid frequently or put it aside when cooking for an extended
period of time, it is necessary to take into consideration that the meal
may not be fully cooked and that it may be necessary to extend the
cooking time by manually adjusting the time and/or temperature.
• If the food intended for deep frying is damp, then dry it first. Always
season food with spices only after deep frying and do not apply the
spices above the cooking pot or during the course of deep frying.
• If you wish to deep fry coated/battered food, ensure that it is evenly
coated/battered and that any excess breadcrumbs are tapped off
because loose breadcrumbs spoil the quality of the frying medium.
• Certain types of food, such as doughnuts, can be deep fried directly in
the cooking pot containing the frying medium without using the frying
basket (not included).
• If you wish to deep fry frozen food, first remove any excess ice from it
since it could cause the oil to boil over.
. . . . . . . . . . . . . . . . . . . . . . . . . . . . . . . . . . . . . . . . . . . . . . . . . . . . . . . . . . . . . . . . . . . .
ASSEMBLY
• Take the cooking pot out of the multi-cooker unit and fill it with
ingredients based on the intended food type. Always respect the
marks A7 (MIN/MAX) inside the cooking pot. The total amount of
ingredients together with water must not exceed the 4/5 mark of
the cooking pot. When preparing meals, which increase in volume
during the cooking process, do not fill the cooking pot to more than
3/5. However, the volume of the food must reach at least 1/5 of the
capacity of the cooking pot.
• For deep frying, only use oils and shortening fats that are explicitly
marked as „non-frothing“ and suitable for deep frying. This information
is provided on the packaging or label.
Warning:
Never cut food directly inside the cooking pot A3.
Never place food directly in the multi-cooker unit A4.
When frying, never combine various types of
shortening fats or oils together.
• Clean the top edge of the cooking pot and any other parts, which have
been soiled while the cooking pot was being filled.
• Prior to inserting the cooking pot into the multi-cooker unit, check that
its inner part is clean and free of any food residues.
• Insert the cooking pot into the multi-cooker so that the pin B4, feet
B5 and contacts B6 slide into their respective holes B1-B3 inside the
metal plate inside the multi-cooker unit.
Warning:
Always ensure that the cooking pot is correctly
positioned inside the multi-cooker unit. Never
attempt to turn on the multi-cooker if the cooking pot
is incorrectly positioned!
. . . . . . . . . . . . . . . . . . . . . . . . . . . . . . . . . . . . . . . . . . . . . . . . . . . . . . . . . . . . . . . . . . . .
OPERATING LOCATION OF THE MULTI-COOKER
• Place the multi-cooker on an even, dry, clean and most importantly
stable and heat-resistant surface. In the event that you wish to use the
multi-cooker on aheat sensitive countertop, place acutting board or
asimilar heat resistant material underneath it.
• If you wish to place the multi-cooker on acooktop underneath arange
hood, ensure that the cooktop is turned off.
• There must be no items or surfaces in the near vicinity of the multi-
cooker that may be damaged by the escaping steam, e.g. walls,
kitchen cabinets, cupboards, paintings, curtains, etc.
• Position the multi-cooker in such away that children cannot reach it
and that nobody can brush against it, pull it down or knock it over.
. . . . . . . . . . . . . . . . . . . . . . . . . . . . . . . . . . . . . . . . . . . . . . . . . . . . . . . . . . . . . . . . . . . .
TURNING ON
• Insert the end plug on the power cord into the socket on the multi-
cooker and the power cord plug into apower socket. Abeep will be
made, the display will be lit for 1 second and then it will turn off and the
multi-cooker will switch to the power saving mode.
• Pressing any button will light up the display and the multi-cooker will
switch to the stand-by mode, which means that it is ready for use. The
display is lit and the individual cooking programs are shown.
• Set the multi-cooker to stand-by mode also by pressing button C11
(Start/Stop) at any time while the multi-cooker is running.
• In the event that no settings are made within 1 minute, the multi-
cooker will again switch to the energy saving mode.
Note:
When used for the first time, aslight odour caused by
the burning in of the new product may be emitted. This is
completely normal and will disappear after the appliance
has been used afew times. Before first use, you can,
therefore, pour two cups of water into the non-stick pot and
start the STEAM (steam cooking) mode. Repeat the process
if necessary.
. . . . . . . . . . . . . . . . . . . . . . . . . . . . . . . . . . . . . . . . . . . . . . . . . . . . . . . . . . . . . . . . . . . .
- 7 -
04/2025
2025, .
AUTOMATIC COOKING USING PRESET PROGRAMS
• The multi-cooker and fryer has smart cooking programs. Each of them has its predefined cooking time and temperature to enable you to easily
achieve the best possible results.
Programme overview:
Programme Description
Default
value of
time
Temperature
Option to
adjust time
Temperature Note
Sous vide
Cooking in a vacuum using a water bath
and vacuum bags. The programme
is particularly suitable for meat, fish,
vegetables and fruit. When using the
program, use the grill provided.
01:00 50°C 01:00–9:59 40–99°C
For the recommended time
and temperature for sous vide
cooking, see the table “Sous
vide cooking method” below.
Stir Fry
Fry the ingredients in a small amount
of very hot oil, stirring constantly.
The programme is suitable for meat
and fish, to which side dishes such
as noodles or rice can be added (e.g.
Chinese noodles, Indian dishes, etc.).
0:10 240°C 0:05–0:20 140–240°C
Roast
Roasting. Use the program to sear, fry
or roast meat, vegetables, poultry, etc.
Ideal for creating a crispy crust.
01:00 240°C 0:10–1:00 120–240°C
Grill
The programme is suitable for grilling,
for example, slices of pickled chicken or
other food. When using the program,
use the grill provided.
0:30 240°C 0:10–1:00 150–240°C
Bake
Baking. The programme is suitable for
preparing cakes, cupcakes, cookies
and other sweet dishes, as well as
roasting meat, fish and vegetables as
in the oven.
0:30 180°C 0:10–2:00 140–180°C
Boil
The programme corresponds to
classic cooking in a pot and is
suitable for cooking pasta, potatoes,
rice, vegetables, soups and sauces,
dumplings, etc.
0:25 150°C 0:15–1:00 100–240°C
Fry
Frying food partially immersed in the
frying medium.
Suitable, for example, for frying
schnitzels.
0:20 200°C 0:01–1:00 120–240°C
Slowcook
Slow cooking of ingredients. Just chop
the ingredients, put them in the pot
(fill to 4.5 l – i.e. to the top), stir, cover,
adjust the time and start cooking.
06:00
P1-90°C
P2-95°C
P3-100°C
0:30–6:00 not possible
3 kg of pork is cooked at
95°C for 2,5–3 h until tender,
4 h until falling apart.
During the cooking process,
we recommend checking the
water regularly and topping it
up if necessary.
Fast stew
Fast stewing. Programme is ideal to
stew meat, liver, fishes and vegetables.
You can prepare juicy dishes similarly
as in a pressure cooker.
01:00 120°C 0:01–2:00 120–200°C
After 15–20 minutes, the
vegetables are cooked to the
bite, after 30–35 minutes
they are cooked until tender.
During cooking, we
recommend checking
regularly and, if necessary,
adding water.
Deepfry
Deep frying foods completely
immersed in the frying medium.
Suitable, for example, for frying potato
pancakes, lángos, breaded chicken
pieces, etc.
0:40 210°C 0:20–2:00 180–210°C
- 8 -
04/2025
2025, .
Programme Description
Default
value of
time
Temperature
Option to
adjust time
Temperature Note
Hotpot
Cooking soup directly on the dining
table. At the same time, as the soup
is gradually removed to the plates,
the ingredients are added to the soup,
which is simmered again and then
served. Ingredients can be thinly sliced
meats, leafy greens, mushrooms, egg
dumplings, tofu, seafood, etc. Ideal
to cook through the newly added
ingredients.
01:00 220°C 0:30–9:59 120–240°C
Steam
Steam cooking. The programme can
also be used toheat cold or frozen food.
0:15 220°C 0:10–1:00 100–220°C
We recommend cooking
soft vegetables (200g) such
as broccoli, green beans,
asparagus, leeks, zucchini,
etc. for approximately
10minutes.
Harder vegetables (200 g),
such as carrots or pumpkins,
are recommended to cook for
20 minutes.
Rice
Cooking regular or pre-cooked rice.
Rinse the rice thoroughly under running
water. We recommend 2 cups of water
for 1 cup of rice.
N/A 100°C not possible not possible
It is necessary to check the
rice regularly. The appliance
is not equipped with an
automatic shut-off function.
Fondue
Cooking chocolate, cheese or meat
sauce or toppings.
02:00 60°C 0:30–4:00 40–70°C
Yogurt
Preparing homemade yoghurts. Use
boiled or pasteurised milk and yoghurt
culture. The yoghurt culture can be
either commercial unflavored yoghurt,
previously made yoghurt, powdered
yoghurt mix available in supermarkets,
or yoghurt culture from health food
stores.
04:00 40°C 0:30–9:59 not possible
For 1 l of milk, we recommend
one commercial unflavoured
white yoghurt (150 g).
Popcorn
Preparing popcorn. Pour a tablespoon
of oil in the pot and pour in 80–100 g of
dried corn kernels. Cover with a lid and
let the kernels pop.
0:08 240°C 0:01–0:15 200–240°C
It is necessary to watch
the preparation. Once the
popping time has increased
to 2–3 seconds, stop the
programme immediately and
remove the pot.
Sous vide cooking method
Ingredients
Thickness
(in cm)
Temperature
(in °C)
Cooking time
Minimum Maximal
Flank steak, pork belly
2.5 56.5 or higher 8 h 24 h
Whole pork tenderloin
57 or higher 90 min 6 h
Cutlets, roasts, schnitzels
2.5 56.5 or higher 2–4 h 6–8 h
5 56.5 or higher 4–6 h 8–10 h
Knee with bone
65–75 7 h 48 h
Boneless chicken breasts
2.5 63.5 or higher 1 h 2–4 h
Duck breasts
2.5 63.5 or higher 90 min 4–6 h
Boneless chicken leg
2.5 74–80 2 h 4–6 h
Tuna, halibut, sea bass, salmon, trout,
mackerel
1.25–2.5 52 or higher 20 min 30 min
2.5–5 52 or higher 30 min 40 min
Carrots, parsnips, potatoes, turnips, celery,
beets
Up to 2.5 84 1–2 h 4 h
2.5–5 84 2.5 h 4 h
Asparagus, broccoli, corn, cauliflower,
eggplant, onions, green beans, fennel,
squash, fresh peas
Up to 2.5 84 30 min 1.5 h
- 9 -
04/2025
2025, .
Selecting aprogram
• The programs from the left, centre and right menu can be selected in
three ways:
– Using button C6 (function): Each time the button is pressed,
programs are cycled through in an anticlockwise direction, i.e. from
left to right.
– Using button C3 (plus) in the stand-by mode: Each time the button
is pressed, programs are cycled through in an anticlockwise
direction, i.e. from left to right
– Using button C10 (minus) in the stand-by mode: Each time the
button is pressed, programs are cycled through in aclockwise
direction, i.e. from right to left.
Pressing any of the above described buttons is accompanied
by ashort beep, flashing of the selected program and the preset
cooking values are shown on the display.
Starting, stopping and finishing aprogram
• Start the cooking process by pressing button C11 (Start/Stop). The
selected cooking program will flash, indicators C7 will start loading
and the preset time will start to countdown.
• You can pause the cooking process at any time by pressing button
C11 (Start/Stop).
• When the multi-cooker finishes cooking, it will beep 3× and,
depending on the selected program or setting, either switch to the
keep warm mode or the energy saving mode, i.e. the display will turn
off. In this way the automatic cooking function is finished.
ADJUSTING THE COOKING PROGRAMS
• On most programs, it is possible to adjust some or all of the preset
cooking parameters based on your needs and experience. Adjustable
parameters are listed in the program overview table.
• Adjustable parameters can be adjusted both before and during the
cooking process. The cooking parameters can be adjusted at any time
by pressing button C11 (Start/Stop).
• After adjusting the parameters, start the cooking process by pressing
button C11 (Start/Stop). The cooking process will run in the same way
as with automatic cooking.
Adjusting time
• Select aprogram that enables the adjustment of time and press
button C5 (Time). When the button C5 is pressed for the first time, the
minutes will start flashing, when pressed again the hours will start
flashing. Using buttons C3 (plus) or C10 (minus), adjust the value as
required.
• When adjusting minutes, the value will change by 1 minute each time
the button is pressed. Hold down the button to change the time in 10
minute increments.
Adjusting temperature
• Select aprogram that enables the adjustment of temperature and
press button C12 (Temp). Using buttons C3 (plus) or C10 (minus),
adjust the value as required.
MANUAL COOKING
• The multi-cooker also enables cooking parameters to be custom
set based on recipes, amounts of ingredients and your personal
preferences. You can set the cooking temperature and time, see the
program overview table.
• Select the Manual program. The default time of 01:00 and
temperature of 240 °Cwill be shown.
• Adjust the cooking parameters according to the procedure in the
previous chapter ADJUSTING THE COOKING PROGRAMS.
• After setting the parameters, start the cooking process by pressing
button C11 (Start/Stop). The cooking process will run in the same way
as with automatic cooking.
DELAYED COOKING FUNCTION
• The delayed cooking function enables you to start cooking only after
your preset time has elapsed. The minimum delay time is 30 minutes
and the maximum delay time is 24 hours.
• Delayed cooking is only available for the following programs: SOUS
VIDE, BAKE, BOIL, SLOW COOK, FAST STEW, HOT POT, STEAM
and RICE.
• Select acooking program and press button C4 (Preset). The text
PRESET and the time indicator will start flashing. The default value is
1 hour. Press button C5 (Time) and then using buttons C3/C10 (+/-)
change the value in the range from 0:01 to 9:59.
• Press button C11 (Start/Stop) to start the countdown. The text PRESET
will be lit. As soon as the set time elapses, the multi-cooker will
automatically start the cooking process.
KEEP WARM FUNCTION
• The keep warm function serves to keep food warm at the preset
temperature of 80°C.
• The keep warm function will be started automatically at the end of
the following programs: BOIL, SLOW COOK, FAST STEW, STEAM
andRICE. It can also be started manually by selecting the KEEP
WARM program using button C6 (Function) or buttons C3/C10 (+/-).
• The default time value of the automatically or manually selected
keep warm function is 2:00 hours. The value can be changed in the
range from 0:30 to 9:59 by pressing button C5 (Time) and setting
the required values using buttons C3/C10 (+/-). Apreset temperature
value cannot be changed.
• Press button C11 (Start/Stop) to start the function. The symbols C7 will
start loading and the countdown will be started. The function can be
stopped prematurely at any time by pressing button C11 (Start/Stop).
• As soon as set time elapses, abeep is made and the multi-cooker will
turn off automatically.
OVERHEATING PROTECTION
• The multi-cooker is equipped with an overheating protection fuse.
When there is no more water or juice inside the cooking pot and
the temperature inside rises too high, the multi-cooker will turn off
automatically. In such acase, pull out the power plug and allow the
multi-cooker to cool down. Then you can put it into operation again.
TURNING OFF THE MULTI-COOKER
• To turn the multi-cooker completely off, disconnect the power
cord from the power socket and allow it to cool down completely.
After it cools down, clean it according to chapter CLEANING AND
MAINTENANCE and store it in asuitable location.
. . . . . . . . . . . . . . . . . . . . . . . . . . . . . . . . . . . . . . . . . . . . . . . . . . . . . . . . . . . . . . . . . . . .
CLEANING AND MAINTENANCE
Attention:
Prior to any cleaning or maintenance, always
unplug the multi-cooker from the power grid.
Before removing the lid and taking out the cooking
pot, always allow the multi-cooker to cool down
completely.
Attention:
The multi-cooker unit and its power cord are not
intended for washing in adishwasher.
Do not spray these parts with water or any other
liquid or submerge them in water or any another
liquid.
• Wash the removable cooking pot, the lid and any accessories that
were used in hot water with detergent, rinse and dry thoroughly with
afine wiping cloth.
• If the lid is excessively dirty, carefully take off the rubber gasket seal
and thoroughly clean, wash and dry the lid and gasket seal. Do not
forget to put the gasket seal back on to the lid.
• Also clean out the outer parts of the multi-cooker unit using alightly
dampened wiping cloth and then wipe it dry. Wipe the inner part into
the of the multi-cooker unit using paper towels, tougher soils can be
cleaned using asoft sponge and then wipe it dry.
• If you wish to remove baked on food remains from the cooking
pot, then first allow it to soak for 20-30 minutes in hot water with
detergent. The food remains can then be easily removed using asoft
kitchen brush.
- 10 -
04/2025
2025, .
Attention:
Never use chemicals, cookware scrubbers, steel
wool, or abrasive cleaning agents to clean the outer
surface of the multi-cooker unit or the cooking pot,
as they could damage the multi-cooker unit or the
cooking pot.
STORAGE
• Before storing it, the multi-cooker must be completely cool, turned off
and disconnected from the power supply, clean and dry.
• Place the accessories into the cooking pot and place the cooking pot
into the multi-cooker unit. Put the lid on the cooking pot.
• Then store the multi-cooker in aclean, dry place out of reach of
children.
Attention:
Keep the stored multi-cooker away from extreme
temperatures, direct sunlight and excessive humidity
and do not store it in an overly dusty environment.
Do not place anything on to the multi-cooker.
. . . . . . . . . . . . . . . . . . . . . . . . . . . . . . . . . . . . . . . . . . . . . . . . . . . . . . . . . . . . . . . . . . . .
TECHNICAL SPECIFICATIONS
Rated voltage range ........................................................................ 220−240 VAC
Rated frequency ..........................................................................................50–60 Hz
Rated power input ...........................................................................................1,800 W
Volume of the frying pot .........................................................................................4.8 l
Dimensions (height × width × depth) ...........300 mm × 345 mm × 340 mm
Weight .........................................................................................................................4 kg
Changes to text and technical parameters are reserved.
. . . . . . . . . . . . . . . . . . . . . . . . . . . . . . . . . . . . . . . . . . . . . . . . . . . . . . . . . . . . . . . . . . . .
INSTRUCTIONS AND INFORMATION REGARDING
THE DISPOSAL OF USED PACKAGING MATERIALS
Dispose of used packaging material at asite designated for waste in your
municipality.
DISPOSAL OF USED ELECTRICAL AND ELECTRONIC
EQUIPMENT
This symbol on products or original documents means that
used electric or electronic products must not be added to
ordinary municipal waste. For proper disposal, renewal and
recycling, hand these products over to determined collection
points. Alternatively, in some European Union states or other
European countries you may return your appliances to the
local retailer when buying an equivalent new appliance.
Correct disposal of this product helps save valuable natural
resources and prevents potential negative effects on the environment and
human health, which could result from improper waste disposal. Ask your
local authorities or collection facility for more details.
In accordance with national regulations penalties may be imposed for the
incorrect disposal of this type of waste.
For business entities in European Union states
If you want to dispose of electric or electronic devices, ask your retailer or
supplier for the necessary information.
Disposal in other countries outside the European Union.
This symbol is valid in the European Union. If you wish to dispose of this
product, request the necessary information about the correct disposal
method from the local council or from your retailer.
This product meets all the basic requirements of EU directives
related to it.

www.sencor.com
info@sencor.cz