www.tylrhome.com
PROFESSIONAL
PROFESSIONAL SERIES
TYL-PZ0705
INSTRUCTIONS
MANUAL
PIZZA OVEN
360° rotatable pizza stoNe for even cooking
15" GAS-POWERED


1
TABLE OF CONTENTS
IMPORTANT SAFEGUARDS ................................................... 2
PARTS AND FEATURES .......................................................... 4
Accessories ...................................................................................... 4
ASSEMBLING YOUR PIZZA OVEN ......................................... 5
Checking for Gas Leaks ................................................................... 7
OPERATING YOUR PIZZA OVEN ........................................... 8
Lighting the Burner .......................................................................... 8
Using the Pizza Oven ....................................................................... 8
HELPFUL TIPS FOR MAKING PIZZA ..................................... 9
CLEANING AND MAINTENANCE ......................................... 10
Cleaning the Pizza Stone ............................................................... 10
Storage .......................................................................................... 11
TROUBLESHOOTING ............................................................ 12
WARRANTY TERMS AND CONDITIONS ............................. 14

2
IMPORTANT SAFEGUARDS
When using this appliance, basic safety precautions should
always be followed to reduce the risk of fire, electric shock, or
injury, including the following:
• Do not repair or replace any part of the oven unless
specifically recommended in this manual. All other service
should be referred to a qualified technician.
• Children should not be left alone or unattended in an area
where the oven is being used. Do not allow children to sit,
stand or play around the oven at any time.
• Ensure the gas hose is not tangled and comes away from the
oven. Do not pass the hose under the oven.
• Never let clothing or other flammables come in contact with
or too close to any burner or hot surface until it has cooled.
• For personal safety, wear proper apparel. Loose fittings
garments or sleeves should never be worn while using the
oven. Some synthetic fabrics are highly flammable and
should not be worn while cooking.
• Do not look directly into the mouth of the oven when lighting,
as flames may escape during the initial lighting process.
• If the flames have been extinguished, switch off the gas
supply immediately for at least 5 minutes before relighting.
• Do not leave the oven unattended while lit.

3
• When using the oven, do not touch the exterior, pizza stone
or immediate surroundings as these areas become extremely
hot and could cause burns.
• Do not use the oven to cook extremely fatty meats or other
ingredients which increase flare-up.
• When using your oven, protective heat-resistant gloves
should be always worn to avoid burns.
• Keep the area surroundings the oven free from combustible
material including fluids, trash, and vapors such as gasoline
or lighter fluid.
• Do not obstruct the flow of combustion and ventilation air.
• For outdoor use only. Never use the oven in extremely windy
conditions.
• The temperature under the oven is high. Do not place the
oven on a table with flammable table clothes, plastic, or any
other inflammable materials.
SAVE THESE INSTRUCTIONS.
FOR OUTDOOR USE ONLY.
4
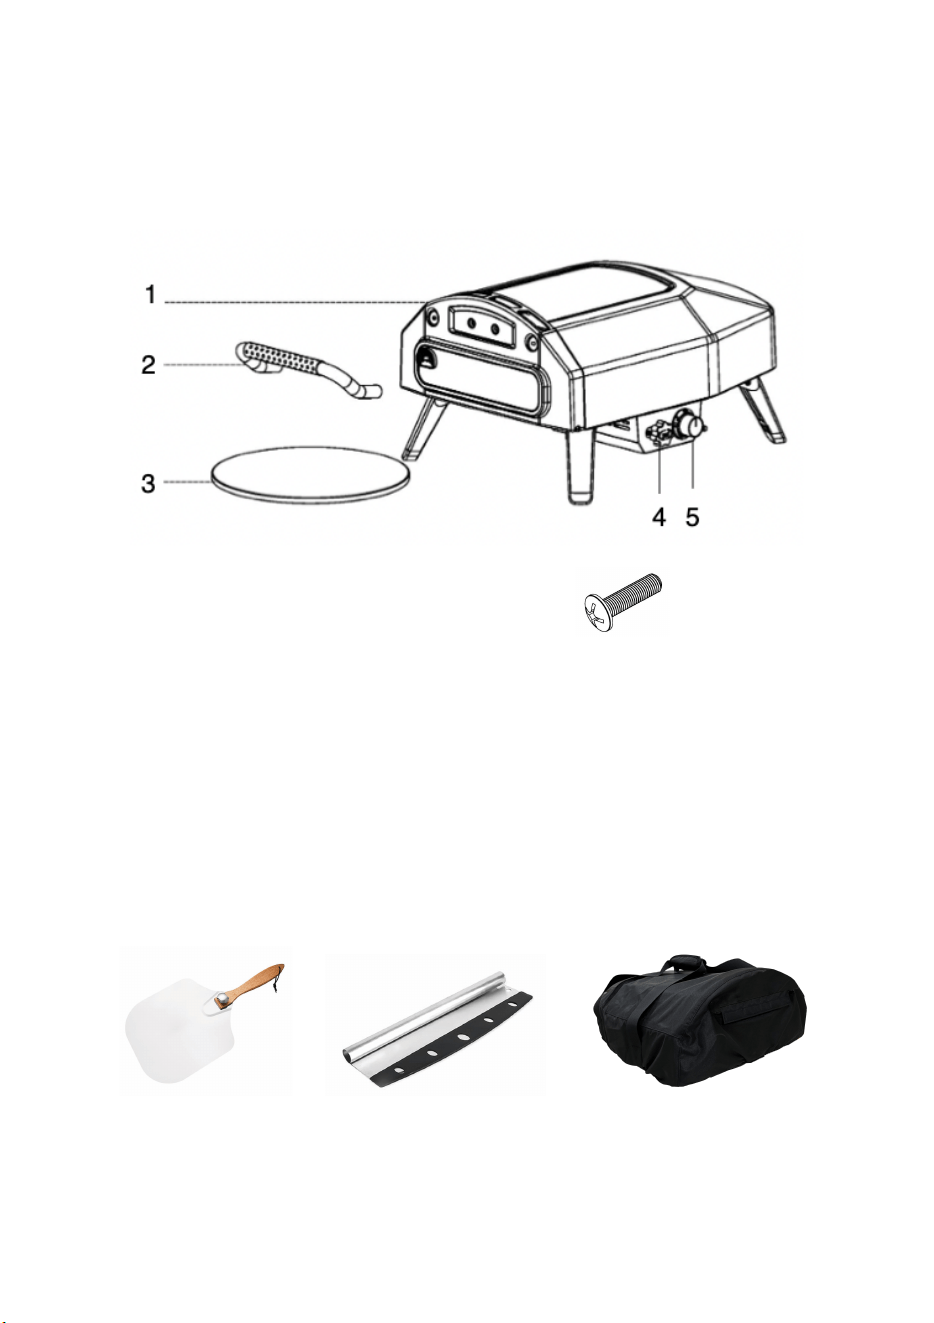
PARTS AND FEATURES
1 Oven body
2 Handle
3 Pizza stone
4 360° rotation knob
5 Gas control knob
6 Fixing screws for handle (2 pcs.)
Accessories
6
Pizza peel
Pizza cutter
Carrying bag
5
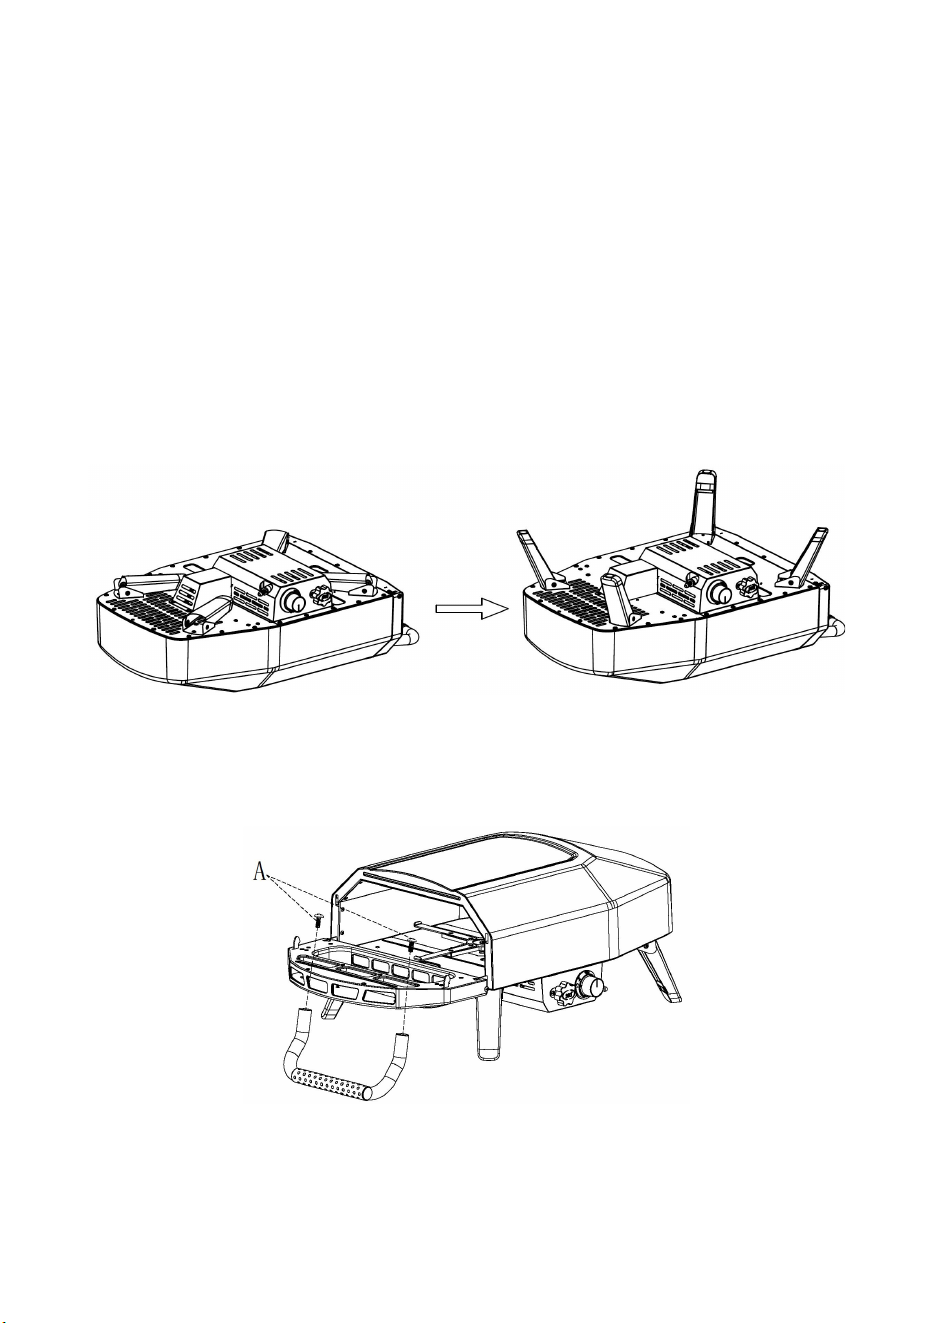
ASSEMBLING YOUR PIZZA OVEN
Before assembly, installation or operation, make sure all parts
are present. If any part is missing or damaged, do not attempt
to assemble, install or operate the product. Contact customer
service for replacement parts.
1. Unfold the legs.
2. Install the handle.
6
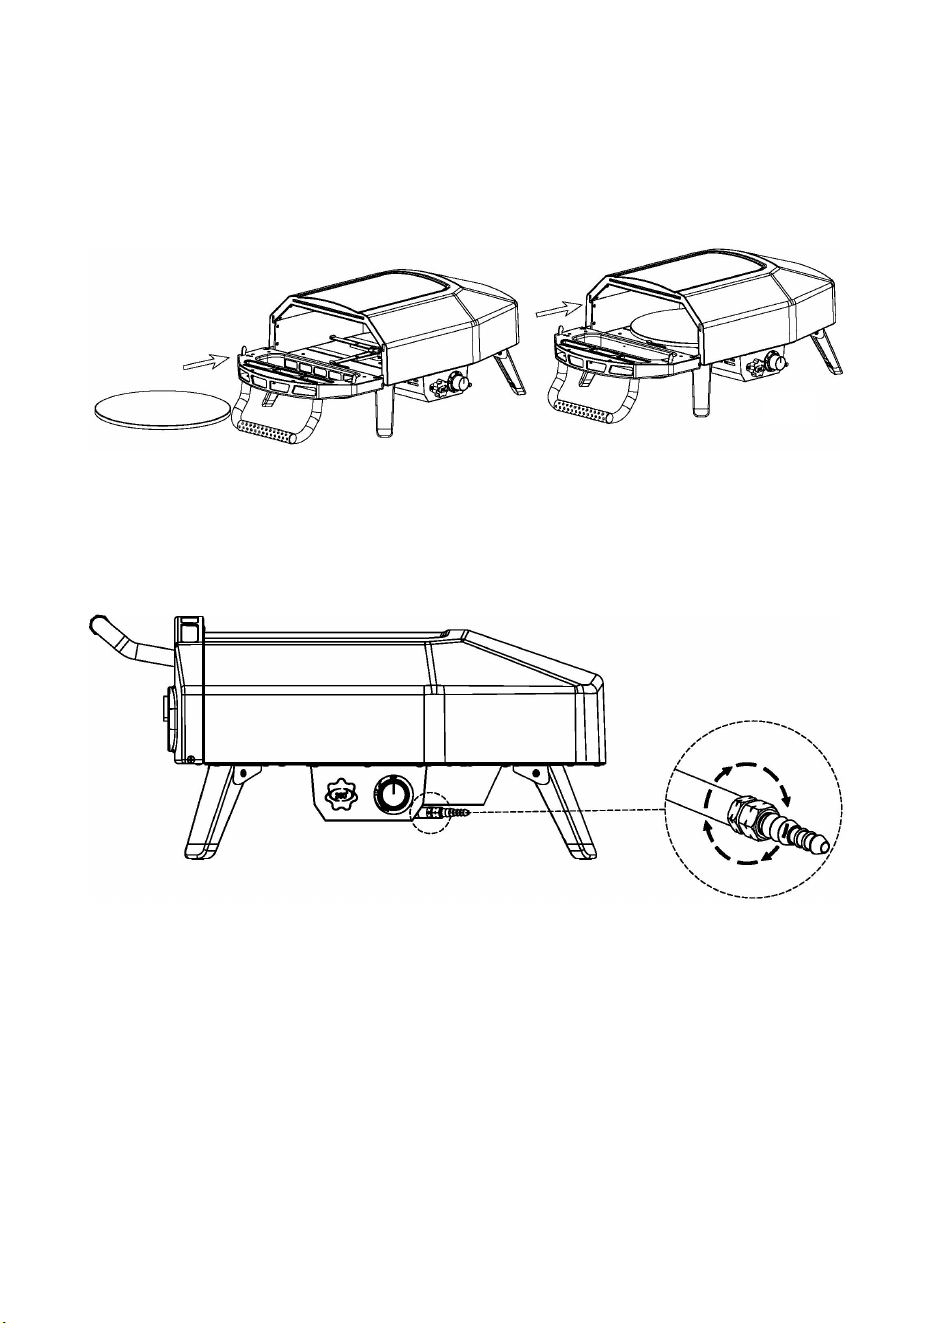
3. Insert the pizza stone into the oven, and set upon the metal
holder.
4. Connect a gas hose to a propane or LPG gas nozzle.

7
5. Connect the hose with regulator to the propane or LPG gas tank,
following the instructions for your regulator accordingly.
Checking for Gas Leaks
Before each use, check all gas connections for leaks. If
the smell of gas is detected at any time, immediately stop using
the pizza oven and check the entire system for leaks.
1. Make sure the pizza oven gas control knob is in the OFF
position.
2. Open the gas tank valve.
3. Apply soapy water to all connections between the pizza oven
and the gas tank. Bubbles will appear where a leak is
present.
4. If leak is present, immediately switch off the gas supply and
check the gas fittings. If bubbles continue, switch off the gas
and contact customer service. Never use the oven that has
failed a leak test.

8
OPERATING YOUR PIZZA OVEN
Lighting the Burner
1. Make sure the gas control knob is in the OFF position before
turning the gas tank valve on.
2. Push the gas control knob in and slowly turn counter-
clockwise as you allow gas to flow into the oven, until you
hear a click and the burner ignites. Hold in for another 5
seconds after ignition, then release.
Using the Pizza Oven
1. Close the oven door and allow the pizza stone to preheat to
desired temperature. We suggest to use the gas control
knob to set flame output to the maximum when preheating.
2. Once preheated, open the oven door and use the pizza peel
to place the pizza on the pizza stone inside the oven.
NOTE: Dust your pizza peel with flour or cornmeal to prevent
sticking when transferring pizzas to and from the stone.
3. Cook pizza to desired doneness. Use the 360° rotation knob
to turn the pizza stone and help cook the pizza evenly.

9
4. When pizza is done, use the pizza peel to carefully remove
the pizza from the oven.
5. Turn the gas control knob to OFF and close the gas tank
valve.
HELPFUL TIPS FOR MAKING PIZZA
1. Use dough and pizza peel at room temperature. Cold dough
will spring back on itself; warm dough will stretch too much
and tear. Stretching pizza on warm peel will also cause the
dough to sweat and stick.
2. Flour your hands and your working surface before stretching
your pizza. Additionally, flour the pizza peel to prevent
stretched pizza from sticking.
3. Keep your toppings light, and do not allow toppings to rest
on the dough for too long to prevent sauce from seeping
through.
4. For faster heat up, close the oven door while preheating the
pizza oven; leave the door open while pizza is cooking.
5. Rotate your pizza every 20-30 seconds using the 360°
rotation knob for an even bake on your crusts and toppings.
6. Allow some time in between cooking pizzas. This gives you
time to properly preheat the pizza oven and prepare next
pizza to be cooked.

10
CLEANING AND MAINTENANCE
To clean the pizza oven interior, run the oven at maximum setting
to burn off excess food. Once cool, wipe the inside with clean
paper towels or soft cloth.
To clean the exterior, use a soft damp cloth. Do not use abrasive
cleaning products.
Cleaning the Pizza Stone
1. Allow your pizza stone to cool completely before cleaning it.
2. Scrape away any debris or crusted-on bits with bench
scraper or spatula.
3. If there are more stubborn bits that need loosening, quickly
wipe the surface with a damp cloth. DO NOT use soap or any
cleaning solution.
4. Use a pizza stone brush or a scouring pad to scrub all
remaining crumbs and debris off, then wipe clean with a
slightly damp cloth.
5. Let the pizza stone air dry completely before using again.

11
Storage
Store the pizza oven out of direct sunlight and indoors where
possible. Do not expose to harsh weather conditions such as
snow, heavy rain and strong wind.
When not using for an extended period of time, store the pizza
oven safely with the provided carrying cover. Wait for the oven
to cool completely before moving.

12
TROUBLESHOOTING
Problem
Possible Solutions
Burner will not
light.
• Ensure that your gas tank is not empty.
• Clear any debris from the regulator and gas
tank connections, then reattach the
regulator.
• Review the lighting steps on page 8.
Low flame.
• Ensure that your gas tank is not empty.
• Turn off gas control knob, wait 30 seconds
and light oven. If flames are still low, turn
off gas control knob, close gas tank valve
and disconnect regulator. Reconnect
regulator again and perform a leak test.
Open gas tank valve, wait 30 seconds then
light oven again.
Flame suddenly
goes out.
• If flames go out while lighting the burner,
wait 5 minutes before relighting.
Review the lighting steps on page 8. After
ignition, continue to push in the control
knob for 20 seconds, then release
• If the oven is being used in the wind, turn
front of oven away from the wind.
Oven running too
hot.
• Use the gas control knob to reduce the
burner’s flame output.

13
Oven makes a
roaring sound.
• Turn off the oven. Wait for 5 minutes, then
relight.
Oven flares up.
• Clean oven interior.
• Adjust gas control knob to lower setting.
• Trim excess fats from food before cooking.

14
WARRANTY TERMS AND CONDITIONS
ONE-YEAR LIMITED WARRANTY ON PARTS AND LABOR
TYLR provides a warranty to the original purchaser of this product
against defects in materials and workmanship for one year. If a
product covered by this warranty is determined to be defective within
the warranty period, TYLR will repair or replace the defective part with
a new or remanufactured part free of charge subject to terms and
conditions stated herein.
To obtain warranty service, proof of purchase in the form of a sales
invoice or copy thereof is required to show that a product is within the
warranty period. If any one of the documents cannot be produced,
corresponding fees for labor and replacement parts will be charged.
Parts and Labor
There will be no charge for parts and labor during the warranty period.
Replacement parts or units may be new or recertified and are upon
TYLR’s option and sole discretion. Replacement parts and units are
warranted for the remaining portion of the original warranty. Our
decision on all questions relating to complaints as a result of defects,
either workmanship or materials, shall be conclusive and you shall
agree to abide by such decision. Any unit or defective part that have
been replaced shall become TYLR’s property. After the lapse of this
warranty, a charge will be made on all labor and replacement of parts.

15
Types of Services
Defective Products must be sent to any TYLR service center to obtain
warranty service. TYLR is neither responsible for transportation costs
to the service center nor TYLR will cover return shipping to the
customer. Product returns to TYLR service centers must utilize either
the original carton box and shipping material or packaging that affords
an equal degree of protection.
For home service, the transportation fee of TYLR service personnel
will be charged to the customer, depending on the location. Our
service personnel reserve all rights to refuse to attend to any
equipment installed in an inaccessible location or any other hazardous
situation.
LIMITATIONS AND EXCLUSIONS
TYLR one-year limited warranty only covers defects in materials and
workmanship; however, this warranty does not cover the following:
1. Damage resulting from accidents, transport, misuse, abuse,
alteration, tampering, or failure of the purchaser to follow normal
operating procedures outlined in the user's manual.
2. Damage caused by negligence and poor maintenance.
3. Defects or damage due to spillage of food/liquids or improper
usage of electrical supply or electrical circuit, major fluctuations in
voltage, exposure to rain or moisture, wrong fuel or oil used.
4. Damage, losses, and defects as a result of fire, flood, or other Acts
of God.
5. Normal wear-and-tear, corrosion, rusting, or stains.

16
6. Defects & damage arising from improper testing, operation, usage
of the wrong component, demonstration, maintenance,
installation, adjustment, or any alteration or modification of any
kind.
7. Scratches & damage to the outer surface areas and externally
exposed parts that are due to normal customer use.
8. General maintenance & routine servicing.
9. Claims for damaged/missing parts after 7 days from the date of
purchase.
10. If any part or parts of the unit are replaced with a part or parts not
supplied or approved by us, or if the unit has been dismantled or
repaired by any person other than a TYLR authorized technician.
11. Any equipment/product which has its serial number removed or
made illegible/tampered with.
12. If the warranty card is altered, defaced, or erased in any manner
whatsoever.
13. If the unit is used for purposes other than household use, such as
commercial use.
The one (1) year warranty covers the igniter and gas control knob.
However, this warranty does not cover parts (i.e. stone, exterior
casing, accessories, burners) that are subject to wear and tear, rust,
stains, corrosion, and improper use.
This one-year limited warranty does not cover Products sold “AS IS”,
“FACTORY RECTIFIED”, or by a non-authorized reseller.

17
THERE ARE NO EXPRESS WARRANTIES OTHER THAN THOSE
LISTED OR DESCRIBED ABOVE. ANY IMPLIED WARRANTIES,
INCLUDING ANY IMPLIED WARRANTY OF MERCHANTABILITY AND
FITNESS FOR A PARTICULAR PURPOSE, SHALL BE LIMITED IN
DURATION TO THE PERIOD OF TIME SET FORTH ABOVE. TYLR’S
TOTAL LIABILITY FOR ANY AND ALL LOSSES AND DAMAGES
RESULTING FROM ANY CAUSE WHATSOEVER INCLUDING TYLR’S
NEGLIGENCE, ALLEGED DAMAGE, OR DEFECTIVE GOODS,
WHETHER SUCH DEFECTS ARE DISCOVERABLE OR LATENT,
SHALL IN NO EVENT EXCEED THE PURCHASE PRICE OF THE
PRODUCT. TYLR SHALL NOT BE RESPONSIBLE FOR LOSS OF
USE, COMMERCIAL LOSS, LOST REVENUE OR LOST PROFITS, OR
OTHER INCIDENTAL OR CONSEQUENTIAL DAMAGES. THIS
WARRANTY IS SUBJECT TO CHANGE WITHOUT NOTICE.
IMPORTANT: Please present sales invoice as proof of purchase
whenever you require our service during the warranty period.
www.tylrhome.com
