USER GUIDE
20KG ELITE CLEAN
EXTRA-LARGE TOP-LOADER WASHING MACHINE

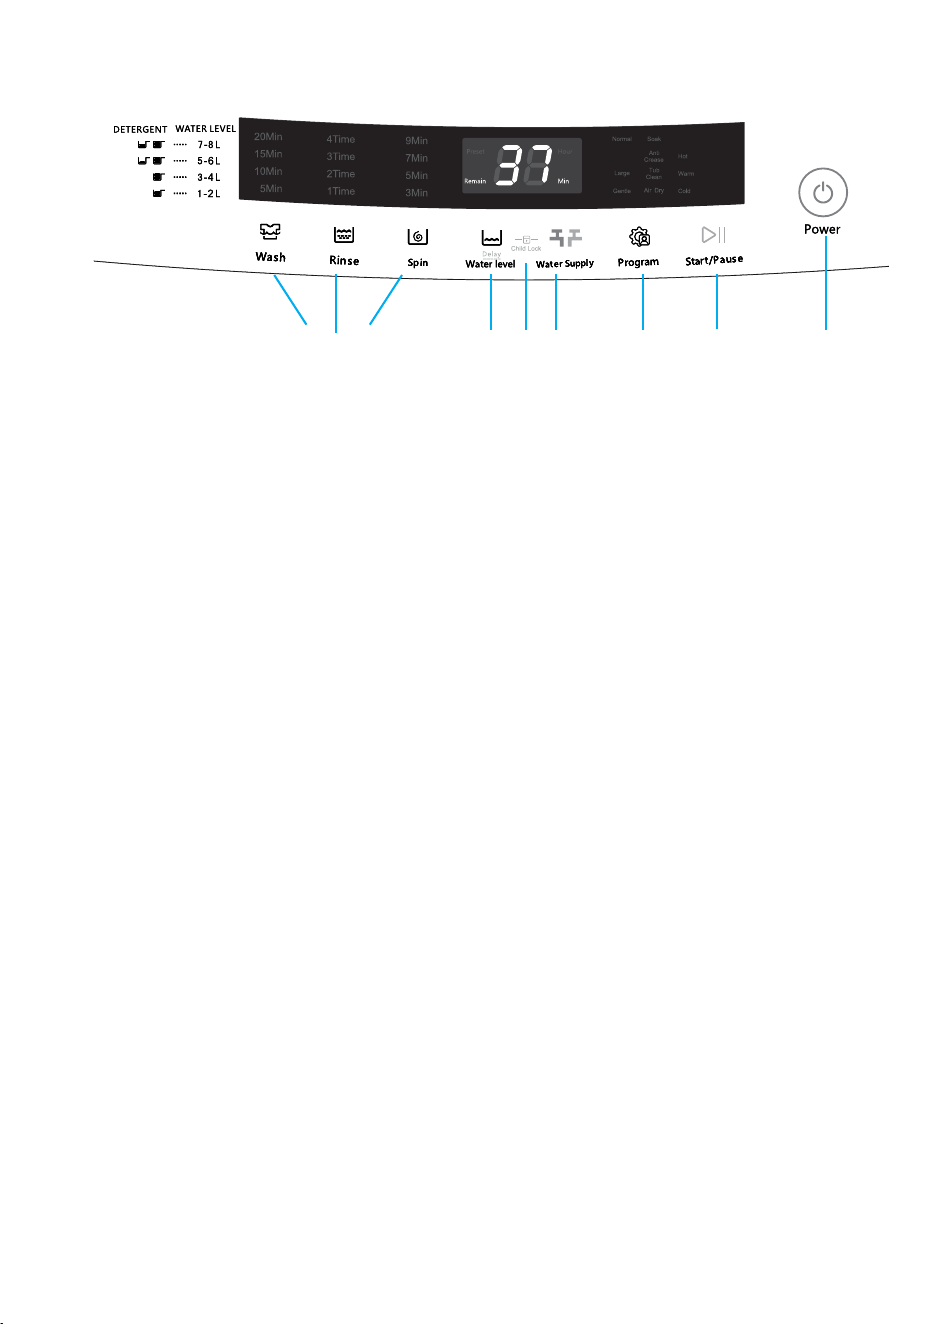
1 - “POWER” BUTTON
• Press this button for 2 seconds to turn the power ON or OFF. Press START/PAUSE within 10
minutes or it will turn off automatically.
• When the washing cycle is complete, the washing machine will automatically switch OFF.
2 - “START/PAUSE” BUTTON
• Press this button to start the operation.
• During operation, press this button to pause a program temporarily, then press it again to
resume the program.
3 - ”PROGRAM” BUTTON
• Select the appropriate function according to the type of clothes and the degree of stains.
4 - “WATER LEVEL” BUTTON
• Select the desired water level based on your laundry load. Options range from 1.2L to 7.8L
or it may be indicated by a specic wash program that has been selected.
5 - “WATER SUPPLY” BUTTON
• Press this button to select the water temperature.
6 - “WASH, RINSE, & SPIN” BUTTONS
• Select one of these three options to customise your wash program by adjusting the number of
wash cycles, rinse cycles, or spin cycles according to your preference.
7 - “CHILD-LOCK” FEATURE
• This function is to prevent accidental operation of the appliance by children.
• The Child-Lock function will activate an alarm if the washing machine is opened.
• To turn the Child-Lock function ON or OFF, press the “Water Level” button, and press and
hold down the “Preset” button simultaneously.
8 - “DELAY END” FEATURE
• The Delay End Function is activated by pressing the Water Level button for at least 20
seconds until the number on the digital display indicates the desired end time.
For example, 5 = an end time of 5 hours from now.
WARNING:
Hot water only: Hot water can result in better cleaning efciency but is not suitable for all
clothing items. Please follow the instructions on the garment label.
DESCRIPTION OF FUNCTIONAL PROGRAMS
1. Preparation for washing:
• Open the lid and add clothes to the tub.
• Open the detergent compartment, add detergent and fabric softener, then close the
detergent compartment.
• Make sure that the tap for the Water Inlet Hose is turned on.
2. Press the “Power” button to switch the power ON.
3. Press the “program” button to select the desired program.
4. Press the “Water Supply” button and select the water temperature; cold, warm or hot
water.
5. Press the "Wash", "Rinse", and "Spin” buttons to adjust the washing time, spin-dry
speed, and rinse time respectively.
6. Press the “Start/Pause” button to start washing.
7. When operation is complete:
• The display will indicate "END".
• Open the lid to take out the clothes.
• Unplug the power plug and turn off the tap.
CONGRATULATIONS ON PURCHASING A BENNETT READ
®
20KG ELITE CLEAN WASHING MACHINE.
WARRANTY
Your BENNETT READ
®
20KG ELITE CLEAN WASHING MACHINE comes with a 3 year
warranty. We stand behind it with a knowledgeable, dedicated Customer Care
department, so should you ever have a problem, you'll receive fast, considerate
assistance (see contact details at the end of the warranty section on page 21).
Please read this user guide carefully before using your
BENNETT READ
®
20KG ELITE CLEAN WASHING MACHINE.
KEEP THIS USER GUIDE FOR FUTURE REFERENCE.
FOR HOME USE ONLY, NOT FOR COMMERCIAL USE.
NOTE: Images of the product are for illustrative purposes and may vary according to model.
1 - “POWER” BUTTON
• Press this button for 2 seconds to turn the power ON or OFF. Press START/PAUSE within 10
minutes or it will turn off automatically.
• When the washing cycle is complete, the washing machine will automatically switch OFF.
2 - “START/PAUSE” BUTTON
• Press this button to start the operation.
• During operation, press this button to pause a program temporarily, then press it again to
resume the program.
3 - ”PROGRAM” BUTTON
• Select the appropriate function according to the type of clothes and the degree of stains.
4 - “WATER LEVEL” BUTTON
• Select the desired water level based on your laundry load. Options range from 1.2L to 7.8L
or it may be indicated by a specic wash program that has been selected.
5 - “WATER SUPPLY” BUTTON
• Press this button to select the water temperature.
6 - “WASH, RINSE, & SPIN” BUTTONS
• Select one of these three options to customise your wash program by adjusting the number of
wash cycles, rinse cycles, or spin cycles according to your preference.
7 - “CHILD-LOCK” FEATURE
• This function is to prevent accidental operation of the appliance by children.
• The Child-Lock function will activate an alarm if the washing machine is opened.
• To turn the Child-Lock function ON or OFF, press the “Water Level” button, and press and
hold down the “Preset” button simultaneously.
8 - “DELAY END” FEATURE
• The Delay End Function is activated by pressing the Water Level button for at least 20
seconds until the number on the digital display indicates the desired end time.
For example, 5 = an end time of 5 hours from now.
WARNING:
Hot water only: Hot water can result in better cleaning efciency but is not suitable for all
clothing items. Please follow the instructions on the garment label.
DESCRIPTION OF FUNCTIONAL PROGRAMS
1. Preparation for washing:
• Open the lid and add clothes to the tub.
• Open the detergent compartment, add detergent and fabric softener, then close the
detergent compartment.
• Make sure that the tap for the Water Inlet Hose is turned on.
2. Press the “Power” button to switch the power ON.
3. Press the “program” button to select the desired program.
4. Press the “Water Supply” button and select the water temperature; cold, warm or hot
water.
5. Press the "Wash", "Rinse", and "Spin” buttons to adjust the washing time, spin-dry
speed, and rinse time respectively.
6. Press the “Start/Pause” button to start washing.
7. When operation is complete:
• The display will indicate "END".
• Open the lid to take out the clothes.
• Unplug the power plug and turn off the tap.
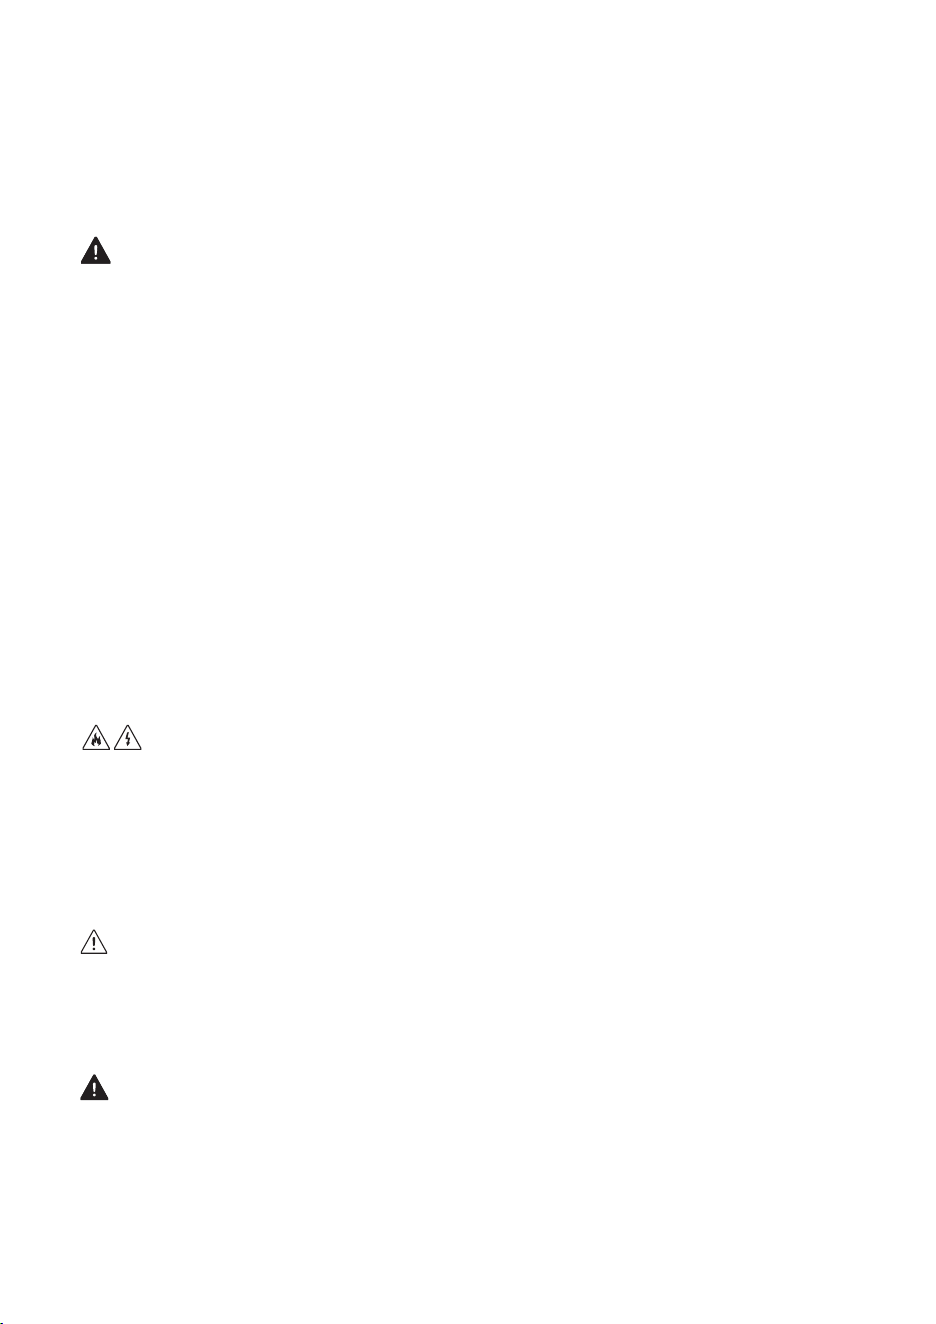
ICON TYPE MEANING
WARNING Serious injury or death risk
RISK OF ELECTRIC SHOCK
Dangerous voltage risk
FIRE
Warning: Risk of re/ammable materials
CAUTION
Injury or property damage risk
IMPORTANT/NOTE
Operating the system correctly
Hot surface
Read the instructions
1

CONTENTS
SAFETY PRECAUTIONS................................................................................... 3 - 5
PRODUCT OVERVIEW.............................................................................. 5 - 6
INSTALLATION INSTRUCTIONS............................................................................. 7 - 12
SAFETY PRECAUTIONS BEFORE WASHING.......................................................13
FUNCTIONAL DESCRIPTION OF CONTROL PANEL.............................................14
DESCRIPTION OF FUNCTIONAL PROGRAMS............................................................15
DETERGENT & WATER QUANTITY...............................................................................15
MAINTENANCE & SERVICING.......................................................16 - 17
TROUBLESHOOTING GUIDELINES.........................................................................18 - 19
SPECIFICATIONS TABLE......................................................................... 20
WARRANTY AND AFTER-SALES SERVICE............................................................... 21
1 - “POWER” BUTTON
• Press this button for 2 seconds to turn the power ON or OFF. Press START/PAUSE within 10
minutes or it will turn off automatically.
• When the washing cycle is complete, the washing machine will automatically switch OFF.
2 - “START/PAUSE” BUTTON
• Press this button to start the operation.
• During operation, press this button to pause a program temporarily, then press it again to
resume the program.
3 - ”PROGRAM” BUTTON
• Select the appropriate function according to the type of clothes and the degree of stains.
4 - “WATER LEVEL” BUTTON
• Select the desired water level based on your laundry load. Options range from 1.2L to 7.8L
or it may be indicated by a specic wash program that has been selected.
5 - “WATER SUPPLY” BUTTON
• Press this button to select the water temperature.
6 - “WASH, RINSE, & SPIN” BUTTONS
• Select one of these three options to customise your wash program by adjusting the number of
wash cycles, rinse cycles, or spin cycles according to your preference.
7 - “CHILD-LOCK” FEATURE
• This function is to prevent accidental operation of the appliance by children.
• The Child-Lock function will activate an alarm if the washing machine is opened.
• To turn the Child-Lock function ON or OFF, press the “Water Level” button, and press and
hold down the “Preset” button simultaneously.
8 - “DELAY END” FEATURE
• The Delay End Function is activated by pressing the Water Level button for at least 20
seconds until the number on the digital display indicates the desired end time.
For example, 5 = an end time of 5 hours from now.
WARNING:
Hot water only: Hot water can result in better cleaning efciency but is not suitable for all
clothing items. Please follow the instructions on the garment label.
DESCRIPTION OF FUNCTIONAL PROGRAMS
1. Preparation for washing:
• Open the lid and add clothes to the tub.
• Open the detergent compartment, add detergent and fabric softener, then close the
detergent compartment.
• Make sure that the tap for the Water Inlet Hose is turned on.
2. Press the “Power” button to switch the power ON.
3. Press the “program” button to select the desired program.
4. Press the “Water Supply” button and select the water temperature; cold, warm or hot
water.
5. Press the "Wash", "Rinse", and "Spin” buttons to adjust the washing time, spin-dry
speed, and rinse time respectively.
6. Press the “Start/Pause” button to start washing.
7. When operation is complete:
• The display will indicate "END".
• Open the lid to take out the clothes.
• Unplug the power plug and turn off the tap.
2

3
SAFETY PRECAUTIONS
When using any electrical appliance, basic safety precautions should always be followed, including the
following:
• Read this User Guide carefully before use and save it for future reference. If the appliance is re-sold, pass
the User Guide on to the new owner.
• Use the appliance only as described in this User Guide. Incorrect operation, improper use, or any other
use not recommended by the manufacturer may cause re, electric shock, or injury to persons.
• This appliance is intended for household use only.
• Always ensure that the voltage on the rating label corresponds to the mains voltage in your home.
• Only connect the appliance to a power socket that has been correctly installed by a qualied electrician,
and is functioning properly.
• Do not operate the unit with a damaged power cord or plug, after a malfunction, or if the unit has been
dropped or is damaged in any manner. Take damaged appliances to an authorised Bennett Read/Tevo
Service Centre for examination.
• Check the power cord and plug regularly for any damage. If the cord or the plug is damaged, it must be
repaired by an authorised Bennett Read/Tevo Service Centre Technician to avoid an electrical hazard.
• Always uncoil the power cord and ensure that it is fully extended before plugging it in and powering on
the appliance.
• Plug the appliance directly into a nearby power socket so that the plug can be easily removed in case of
an emergency.
• A short cord is provided to reduce the hazards resulting from becoming entangled in, or tripping over a
longer cord.
• Do not let the cord hang over the edge of a table or counter. Ensure that the cord is not in a position
where it can be pulled on inadvertently.
• Keep the appliance, the power cord, and the plug away from hot surfaces, naked ames, direct sunlight,
and sharp edges.
• Do not damage, bend, stretch, or twist the power cord; do not place heavy objects on the power cord or
clamp the power cord.
• To unplug, grip the plug to remove it from the wall socket. Never pull on the power cord to disconnect the
plug.
• Do not handle the power plug with wet hands.
• After use, unplug the power plug for maintenance or cleaning.
• Children should be supervised to ensure that they do not play with the appliance.
• This appliance may be used by children aged 8 years and above and persons with reduced physical,
sensory, or mental capabilities or a lack of experience and knowledge ONLY IF they have been given
supervision or instruction concerning the use of the appliance in a safe way and understand the hazards
involved. Children shall not play with the appliance. Cleaning and user maintenance shall not be carried
out by children without supervision.
• Any lters and/or lint traps must be cleaned frequently.
• Lint must not be allowed to accumulate around the appliance (not applicable for appliances intended to
be vented to the exterior of the building).
• Use only in an area with adequate ventilation and away from excessive heat or open ames.
• Items that have been soiled with substances such as cooking oil, acetone, alcohol, petrol, kerosene, spot
removers, turpentine, waxes, and wax removers should be washed in hot water with an extra amount of
detergent before being placed in this appliance.
• Detergents, fabric softeners, and similar products must only be used as specied by the manufacturer.
• Remove any and all objects from clothing pockets before washing the garments.
• Fill steam generators only with liquids specied by the manufacturer.
• The appliance is not to be used if industrial chemicals have been used for cleaning.
• Fabrics that contain vegetable or cooking oil, or have been contaminated by hair-care products should
rst be washed in hot water with extra detergent.
• The openings and vents must not be obstructed in any way by carpets, furniture, etc.
• The appliance must not be installed in such a way that the full opening of the appliance lid is restricted.
• WARNING: The appliance must not be connected to an external switching device, such as a timer, or
connected to a circuit that is regularly switched on and off by a utility.
• Children younger than 3 years should be kept away from the appliance unless continuously supervised.
IMPORTANT SAFEGUARDS
• During use, please pay attention to the safety precautions, and use common sense to operate
cautiously. Bennett Read/Tevo cannot be held responsible for any loss caused by improper use.
WARNING!
• This product belongs to Class I appliances. Please pay attention to electricity safety when using:
1. This machine uses a single-phase, two-pole grounded power outlet. The outlet must be reliably
grounded, and the grounding terminal should not be connected to gas pipelines, water pipes, or
other utilities.
2. Ensure that the cross-sectional area of the power supply system wires can meet the normal electrical
load requirements.
3. Ensure that a dedicated socket is used for this appliance. The socket must be installed by a certied
electrician and must be able to carry more than 10A of current.
4. Do not connect the ground wire with the live wire, or the neutral wire as this may cause an electric
shock hazard.
5. Unplug the power plug from the socket to ensure safety in the event of any malfunction.
• Only use the original parts and accessories provided by the manufacturer.
• If the appliance can no longer be used, please cut off the power cord and remove the lid hook device.
• Waste electrical appliances must be disposed of at a designated disposal centre.
• Always check garment wash labels to ensure that clothing is suitable for this appliance.
• Do not use this appliance in the vicinity of dust hazards (such as coal seam or rock powder).
• Do not lean against the appliance lid. Do not climb or sit on the appliance.
• The ambient temperature around the appliance should not be lower than 5°C or higher than 35°C.
DANGER OF FIRE OR ELECTRIC SHOCK
• Keep the appliance indoors in a cool, dry area.
• Do not expose the control panel or electrical parts to any type of liquid or moisture.
• Install and secure the Drain pipe before use, making sure that the outlet is not blocked.
• Do not spill water directly on the washing machine control panel.
• Do not place the washing machine in a wet or damp environment.
RISK OF BURNS DUE TO HIGH TEMPERATURE
• When washing at high temperatures, the lid glass will get hot. Do not touch the lid glass.
• If the lid needs to be opened during high temperature washing, please wait until the temperature drops
to a safe level and the lid has been automatically unlocked.
RISK OF PERSONAL INJURY
• Always dispose of all packaging materials responsibly and keep them away from children to avoid
choking or other hazards.
• Children are not allowed to operate or climb onto the washing machine to play.
• When the washing machine is not in use, close the appliance lid properly to prevent children from
entering the tub.
RISK OF DAMAGE TO APPLIANCE
• Do not place heavy objects on top of the washing machine.
• Two people are required to move this appliance.
• Do not allow non-professionals to repair or modify the machine.
RISK OF DAMAGE TO CLOTHING
• Do not wash waterproof clothes, such as raincoats, down products, sleeping bags, etc.
• Only machine-washable clothes may be washed in this appliance. If in doubt, please follow the
washing guide on the clothes.
RISK OF EXPLOSION
• Do not wash clothes stained with kerosene, gasoline, diluent, or other ammable materials.
• Do not operate the appliance if there are gas leaks.
• When the power plug is pulled out, the lid lock can be opened even if there is a high water level in the
tub. Always check the water level in the tub before opening the lid. If the water level is high, do not
open the lid.
1 - “POWER” BUTTON
• Press this button for 2 seconds to turn the power ON or OFF. Press START/PAUSE within 10
minutes or it will turn off automatically.
• When the washing cycle is complete, the washing machine will automatically switch OFF.
2 - “START/PAUSE” BUTTON
• Press this button to start the operation.
• During operation, press this button to pause a program temporarily, then press it again to
resume the program.
3 - ”PROGRAM” BUTTON
• Select the appropriate function according to the type of clothes and the degree of stains.
4 - “WATER LEVEL” BUTTON
• Select the desired water level based on your laundry load. Options range from 1.2L to 7.8L
or it may be indicated by a specic wash program that has been selected.
5 - “WATER SUPPLY” BUTTON
• Press this button to select the water temperature.
6 - “WASH, RINSE, & SPIN” BUTTONS
• Select one of these three options to customise your wash program by adjusting the number of
wash cycles, rinse cycles, or spin cycles according to your preference.
7 - “CHILD-LOCK” FEATURE
• This function is to prevent accidental operation of the appliance by children.
• The Child-Lock function will activate an alarm if the washing machine is opened.
• To turn the Child-Lock function ON or OFF, press the “Water Level” button, and press and
hold down the “Preset” button simultaneously.
8 - “DELAY END” FEATURE
• The Delay End Function is activated by pressing the Water Level button for at least 20
seconds until the number on the digital display indicates the desired end time.
For example, 5 = an end time of 5 hours from now.
WARNING:
Hot water only: Hot water can result in better cleaning efciency but is not suitable for all
clothing items. Please follow the instructions on the garment label.
DESCRIPTION OF FUNCTIONAL PROGRAMS
1. Preparation for washing:
• Open the lid and add clothes to the tub.
• Open the detergent compartment, add detergent and fabric softener, then close the
detergent compartment.
• Make sure that the tap for the Water Inlet Hose is turned on.
2. Press the “Power” button to switch the power ON.
3. Press the “program” button to select the desired program.
4. Press the “Water Supply” button and select the water temperature; cold, warm or hot
water.
5. Press the "Wash", "Rinse", and "Spin” buttons to adjust the washing time, spin-dry
speed, and rinse time respectively.
6. Press the “Start/Pause” button to start washing.
7. When operation is complete:
• The display will indicate "END".
• Open the lid to take out the clothes.
• Unplug the power plug and turn off the tap.
4
SAFETY PRECAUTIONS
When using any electrical appliance, basic safety precautions should always be followed, including the
following:
• Read this User Guide carefully before use and save it for future reference. If the appliance is re-sold, pass
the User Guide on to the new owner.
• Use the appliance only as described in this User Guide. Incorrect operation, improper use, or any other
use not recommended by the manufacturer may cause re, electric shock, or injury to persons.
• This appliance is intended for household use only.
• Always ensure that the voltage on the rating label corresponds to the mains voltage in your home.
• Only connect the appliance to a power socket that has been correctly installed by a qualied electrician,
and is functioning properly.
• Do not operate the unit with a damaged power cord or plug, after a malfunction, or if the unit has been
dropped or is damaged in any manner. Take damaged appliances to an authorised Bennett Read/Tevo
Service Centre for examination.
• Check the power cord and plug regularly for any damage. If the cord or the plug is damaged, it must be
repaired by an authorised Bennett Read/Tevo Service Centre Technician to avoid an electrical hazard.
• Always uncoil the power cord and ensure that it is fully extended before plugging it in and powering on
the appliance.
• Plug the appliance directly into a nearby power socket so that the plug can be easily removed in case of
an emergency.
• A short cord is provided to reduce the hazards resulting from becoming entangled in, or tripping over a
longer cord.
• Do not let the cord hang over the edge of a table or counter. Ensure that the cord is not in a position
where it can be pulled on inadvertently.
• Keep the appliance, the power cord, and the plug away from hot surfaces, naked ames, direct sunlight,
and sharp edges.
• Do not damage, bend, stretch, or twist the power cord; do not place heavy objects on the power cord or
clamp the power cord.
• To unplug, grip the plug to remove it from the wall socket. Never pull on the power cord to disconnect the
plug.
• Do not handle the power plug with wet hands.
• After use, unplug the power plug for maintenance or cleaning.
• Children should be supervised to ensure that they do not play with the appliance.
• This appliance may be used by children aged 8 years and above and persons with reduced physical,
sensory, or mental capabilities or a lack of experience and knowledge ONLY IF they have been given
supervision or instruction concerning the use of the appliance in a safe way and understand the hazards
involved. Children shall not play with the appliance. Cleaning and user maintenance shall not be carried
out by children without supervision.
• Any lters and/or lint traps must be cleaned frequently.
• Lint must not be allowed to accumulate around the appliance (not applicable for appliances intended to
be vented to the exterior of the building).
• Use only in an area with adequate ventilation and away from excessive heat or open ames.
• Items that have been soiled with substances such as cooking oil, acetone, alcohol, petrol, kerosene, spot
removers, turpentine, waxes, and wax removers should be washed in hot water with an extra amount of
detergent before being placed in this appliance.
• Detergents, fabric softeners, and similar products must only be used as specied by the manufacturer.
• Remove any and all objects from clothing pockets before washing the garments.
• Fill steam generators only with liquids specied by the manufacturer.
• The appliance is not to be used if industrial chemicals have been used for cleaning.
• Fabrics that contain vegetable or cooking oil, or have been contaminated by hair-care products should
rst be washed in hot water with extra detergent.
• The openings and vents must not be obstructed in any way by carpets, furniture, etc.
• The appliance must not be installed in such a way that the full opening of the appliance lid is restricted.
• WARNING: The appliance must not be connected to an external switching device, such as a timer, or
connected to a circuit that is regularly switched on and off by a utility.
• Children younger than 3 years should be kept away from the appliance unless continuously supervised.
IMPORTANT SAFEGUARDS
• During use, please pay attention to the safety precautions, and use common sense to operate
cautiously. Bennett Read/Tevo cannot be held responsible for any loss caused by improper use.
WARNING!
• This product belongs to Class I appliances. Please pay attention to electricity safety when using:
1. This machine uses a single-phase, two-pole grounded power outlet. The outlet must be reliably
grounded, and the grounding terminal should not be connected to gas pipelines, water pipes, or
other utilities.
2. Ensure that the cross-sectional area of the power supply system wires can meet the normal electrical
load requirements.
3. Ensure that a dedicated socket is used for this appliance. The socket must be installed by a certied
electrician and must be able to carry more than 10A of current.
4. Do not connect the ground wire with the live wire, or the neutral wire as this may cause an electric
shock hazard.
5. Unplug the power plug from the socket to ensure safety in the event of any malfunction.
• Only use the original parts and accessories provided by the manufacturer.
• If the appliance can no longer be used, please cut off the power cord and remove the lid hook device.
• Waste electrical appliances must be disposed of at a designated disposal centre.
• Always check garment wash labels to ensure that clothing is suitable for this appliance.
• Do not use this appliance in the vicinity of dust hazards (such as coal seam or rock powder).
• Do not lean against the appliance lid. Do not climb or sit on the appliance.
• The ambient temperature around the appliance should not be lower than 5°C or higher than 35°C.
DANGER OF FIRE OR ELECTRIC SHOCK
• Keep the appliance indoors in a cool, dry area.
• Do not expose the control panel or electrical parts to any type of liquid or moisture.
• Install and secure the Drain pipe before use, making sure that the outlet is not blocked.
• Do not spill water directly on the washing machine control panel.
• Do not place the washing machine in a wet or damp environment.
RISK OF BURNS DUE TO HIGH TEMPERATURE
• When washing at high temperatures, the lid glass will get hot. Do not touch the lid glass.
• If the lid needs to be opened during high temperature washing, please wait until the temperature drops
to a safe level and the lid has been automatically unlocked.
RISK OF PERSONAL INJURY
• Always dispose of all packaging materials responsibly and keep them away from children to avoid
choking or other hazards.
• Children are not allowed to operate or climb onto the washing machine to play.
• When the washing machine is not in use, close the appliance lid properly to prevent children from
entering the tub.
RISK OF DAMAGE TO APPLIANCE
• Do not place heavy objects on top of the washing machine.
• Two people are required to move this appliance.
• Do not allow non-professionals to repair or modify the machine.
RISK OF DAMAGE TO CLOTHING
• Do not wash waterproof clothes, such as raincoats, down products, sleeping bags, etc.
• Only machine-washable clothes may be washed in this appliance. If in doubt, please follow the
washing guide on the clothes.
RISK OF EXPLOSION
• Do not wash clothes stained with kerosene, gasoline, diluent, or other ammable materials.
• Do not operate the appliance if there are gas leaks.
• When the power plug is pulled out, the lid lock can be opened even if there is a high water level in the
tub. Always check the water level in the tub before opening the lid. If the water level is high, do not
open the lid.
1 - “POWER” BUTTON
• Press this button for 2 seconds to turn the power ON or OFF. Press START/PAUSE within 10
minutes or it will turn off automatically.
• When the washing cycle is complete, the washing machine will automatically switch OFF.
2 - “START/PAUSE” BUTTON
• Press this button to start the operation.
• During operation, press this button to pause a program temporarily, then press it again to
resume the program.
3 - ”PROGRAM” BUTTON
• Select the appropriate function according to the type of clothes and the degree of stains.
4 - “WATER LEVEL” BUTTON
• Select the desired water level based on your laundry load. Options range from 1.2L to 7.8L
or it may be indicated by a specic wash program that has been selected.
5 - “WATER SUPPLY” BUTTON
• Press this button to select the water temperature.
6 - “WASH, RINSE, & SPIN” BUTTONS
• Select one of these three options to customise your wash program by adjusting the number of
wash cycles, rinse cycles, or spin cycles according to your preference.
7 - “CHILD-LOCK” FEATURE
• This function is to prevent accidental operation of the appliance by children.
• The Child-Lock function will activate an alarm if the washing machine is opened.
• To turn the Child-Lock function ON or OFF, press the “Water Level” button, and press and
hold down the “Preset” button simultaneously.
8 - “DELAY END” FEATURE
• The Delay End Function is activated by pressing the Water Level button for at least 20
seconds until the number on the digital display indicates the desired end time.
For example, 5 = an end time of 5 hours from now.
WARNING:
Hot water only: Hot water can result in better cleaning efciency but is not suitable for all
clothing items. Please follow the instructions on the garment label.
DESCRIPTION OF FUNCTIONAL PROGRAMS
1. Preparation for washing:
• Open the lid and add clothes to the tub.
• Open the detergent compartment, add detergent and fabric softener, then close the
detergent compartment.
• Make sure that the tap for the Water Inlet Hose is turned on.
2. Press the “Power” button to switch the power ON.
3. Press the “program” button to select the desired program.
4. Press the “Water Supply” button and select the water temperature; cold, warm or hot
water.
5. Press the "Wash", "Rinse", and "Spin” buttons to adjust the washing time, spin-dry
speed, and rinse time respectively.
6. Press the “Start/Pause” button to start washing.
7. When operation is complete:
• The display will indicate "END".
• Open the lid to take out the clothes.
• Unplug the power plug and turn off the tap.

5
PRODUCT OVERVIEW
2PC Water Inlet
Hoses
Spring Clamp
Drain Pipe
SAFETY PRECAUTIONS
When using any electrical appliance, basic safety precautions should always be followed, including the
following:
• Read this User Guide carefully before use and save it for future reference. If the appliance is re-sold, pass
the User Guide on to the new owner.
• Use the appliance only as described in this User Guide. Incorrect operation, improper use, or any other
use not recommended by the manufacturer may cause re, electric shock, or injury to persons.
• This appliance is intended for household use only.
• Always ensure that the voltage on the rating label corresponds to the mains voltage in your home.
• Only connect the appliance to a power socket that has been correctly installed by a qualied electrician,
and is functioning properly.
• Do not operate the unit with a damaged power cord or plug, after a malfunction, or if the unit has been
dropped or is damaged in any manner. Take damaged appliances to an authorised Bennett Read/Tevo
Service Centre for examination.
• Check the power cord and plug regularly for any damage. If the cord or the plug is damaged, it must be
repaired by an authorised Bennett Read/Tevo Service Centre Technician to avoid an electrical hazard.
• Always uncoil the power cord and ensure that it is fully extended before plugging it in and powering on
the appliance.
• Plug the appliance directly into a nearby power socket so that the plug can be easily removed in case of
an emergency.
• A short cord is provided to reduce the hazards resulting from becoming entangled in, or tripping over a
longer cord.
• Do not let the cord hang over the edge of a table or counter. Ensure that the cord is not in a position
where it can be pulled on inadvertently.
• Keep the appliance, the power cord, and the plug away from hot surfaces, naked ames, direct sunlight,
and sharp edges.
• Do not damage, bend, stretch, or twist the power cord; do not place heavy objects on the power cord or
clamp the power cord.
• To unplug, grip the plug to remove it from the wall socket. Never pull on the power cord to disconnect the
plug.
• Do not handle the power plug with wet hands.
• After use, unplug the power plug for maintenance or cleaning.
• Children should be supervised to ensure that they do not play with the appliance.
• This appliance may be used by children aged 8 years and above and persons with reduced physical,
sensory, or mental capabilities or a lack of experience and knowledge ONLY IF they have been given
supervision or instruction concerning the use of the appliance in a safe way and understand the hazards
involved. Children shall not play with the appliance. Cleaning and user maintenance shall not be carried
out by children without supervision.
• Any lters and/or lint traps must be cleaned frequently.
• Lint must not be allowed to accumulate around the appliance (not applicable for appliances intended to
be vented to the exterior of the building).
• Use only in an area with adequate ventilation and away from excessive heat or open ames.
• Items that have been soiled with substances such as cooking oil, acetone, alcohol, petrol, kerosene, spot
removers, turpentine, waxes, and wax removers should be washed in hot water with an extra amount of
detergent before being placed in this appliance.
• Detergents, fabric softeners, and similar products must only be used as specied by the manufacturer.
• Remove any and all objects from clothing pockets before washing the garments.
• Fill steam generators only with liquids specied by the manufacturer.
• The appliance is not to be used if industrial chemicals have been used for cleaning.
• Fabrics that contain vegetable or cooking oil, or have been contaminated by hair-care products should
rst be washed in hot water with extra detergent.
• The openings and vents must not be obstructed in any way by carpets, furniture, etc.
• The appliance must not be installed in such a way that the full opening of the appliance lid is restricted.
• WARNING: The appliance must not be connected to an external switching device, such as a timer, or
connected to a circuit that is regularly switched on and off by a utility.
• Children younger than 3 years should be kept away from the appliance unless continuously supervised.
IMPORTANT SAFEGUARDS
• During use, please pay attention to the safety precautions, and use common sense to operate
cautiously. Bennett Read/Tevo cannot be held responsible for any loss caused by improper use.
WARNING!
• This product belongs to Class I appliances. Please pay attention to electricity safety when using:
1. This machine uses a single-phase, two-pole grounded power outlet. The outlet must be reliably
grounded, and the grounding terminal should not be connected to gas pipelines, water pipes, or
other utilities.
2. Ensure that the cross-sectional area of the power supply system wires can meet the normal electrical
load requirements.
3. Ensure that a dedicated socket is used for this appliance. The socket must be installed by a certied
electrician and must be able to carry more than 10A of current.
4. Do not connect the ground wire with the live wire, or the neutral wire as this may cause an electric
shock hazard.
5. Unplug the power plug from the socket to ensure safety in the event of any malfunction.
• Only use the original parts and accessories provided by the manufacturer.
• If the appliance can no longer be used, please cut off the power cord and remove the lid hook device.
• Waste electrical appliances must be disposed of at a designated disposal centre.
• Always check garment wash labels to ensure that clothing is suitable for this appliance.
• Do not use this appliance in the vicinity of dust hazards (such as coal seam or rock powder).
• Do not lean against the appliance lid. Do not climb or sit on the appliance.
• The ambient temperature around the appliance should not be lower than 5°C or higher than 35°C.
DANGER OF FIRE OR ELECTRIC SHOCK
• Keep the appliance indoors in a cool, dry area.
• Do not expose the control panel or electrical parts to any type of liquid or moisture.
• Install and secure the Drain pipe before use, making sure that the outlet is not blocked.
• Do not spill water directly on the washing machine control panel.
• Do not place the washing machine in a wet or damp environment.
RISK OF BURNS DUE TO HIGH TEMPERATURE
• When washing at high temperatures, the lid glass will get hot. Do not touch the lid glass.
• If the lid needs to be opened during high temperature washing, please wait until the temperature drops
to a safe level and the lid has been automatically unlocked.
RISK OF PERSONAL INJURY
• Always dispose of all packaging materials responsibly and keep them away from children to avoid
choking or other hazards.
• Children are not allowed to operate or climb onto the washing machine to play.
• When the washing machine is not in use, close the appliance lid properly to prevent children from
entering the tub.
RISK OF DAMAGE TO APPLIANCE
• Do not place heavy objects on top of the washing machine.
• Two people are required to move this appliance.
• Do not allow non-professionals to repair or modify the machine.
RISK OF DAMAGE TO CLOTHING
• Do not wash waterproof clothes, such as raincoats, down products, sleeping bags, etc.
• Only machine-washable clothes may be washed in this appliance. If in doubt, please follow the
washing guide on the clothes.
RISK OF EXPLOSION
• Do not wash clothes stained with kerosene, gasoline, diluent, or other ammable materials.
• Do not operate the appliance if there are gas leaks.
• When the power plug is pulled out, the lid lock can be opened even if there is a high water level in the
tub. Always check the water level in the tub before opening the lid. If the water level is high, do not
open the lid.
Base Plate
User Guide
USER
GUIDE
1 - “POWER” BUTTON
• Press this button for 2 seconds to turn the power ON or OFF. Press START/PAUSE within 10
minutes or it will turn off automatically.
• When the washing cycle is complete, the washing machine will automatically switch OFF.
2 - “START/PAUSE” BUTTON
• Press this button to start the operation.
• During operation, press this button to pause a program temporarily, then press it again to
resume the program.
3 - ”PROGRAM” BUTTON
• Select the appropriate function according to the type of clothes and the degree of stains.
4 - “WATER LEVEL” BUTTON
• Select the desired water level based on your laundry load. Options range from 1.2L to 7.8L
or it may be indicated by a specic wash program that has been selected.
5 - “WATER SUPPLY” BUTTON
• Press this button to select the water temperature.
6 - “WASH, RINSE, & SPIN” BUTTONS
• Select one of these three options to customise your wash program by adjusting the number of
wash cycles, rinse cycles, or spin cycles according to your preference.
7 - “CHILD-LOCK” FEATURE
• This function is to prevent accidental operation of the appliance by children.
• The Child-Lock function will activate an alarm if the washing machine is opened.
• To turn the Child-Lock function ON or OFF, press the “Water Level” button, and press and
hold down the “Preset” button simultaneously.
8 - “DELAY END” FEATURE
• The Delay End Function is activated by pressing the Water Level button for at least 20
seconds until the number on the digital display indicates the desired end time.
For example, 5 = an end time of 5 hours from now.
WARNING:
Hot water only: Hot water can result in better cleaning efciency but is not suitable for all
clothing items. Please follow the instructions on the garment label.
DESCRIPTION OF FUNCTIONAL PROGRAMS
1. Preparation for washing:
• Open the lid and add clothes to the tub.
• Open the detergent compartment, add detergent and fabric softener, then close the
detergent compartment.
• Make sure that the tap for the Water Inlet Hose is turned on.
2. Press the “Power” button to switch the power ON.
3. Press the “program” button to select the desired program.
4. Press the “Water Supply” button and select the water temperature; cold, warm or hot
water.
5. Press the "Wash", "Rinse", and "Spin” buttons to adjust the washing time, spin-dry
speed, and rinse time respectively.
6. Press the “Start/Pause” button to start washing.
7. When operation is complete:
• The display will indicate "END".
• Open the lid to take out the clothes.
• Unplug the power plug and turn off the tap.
6
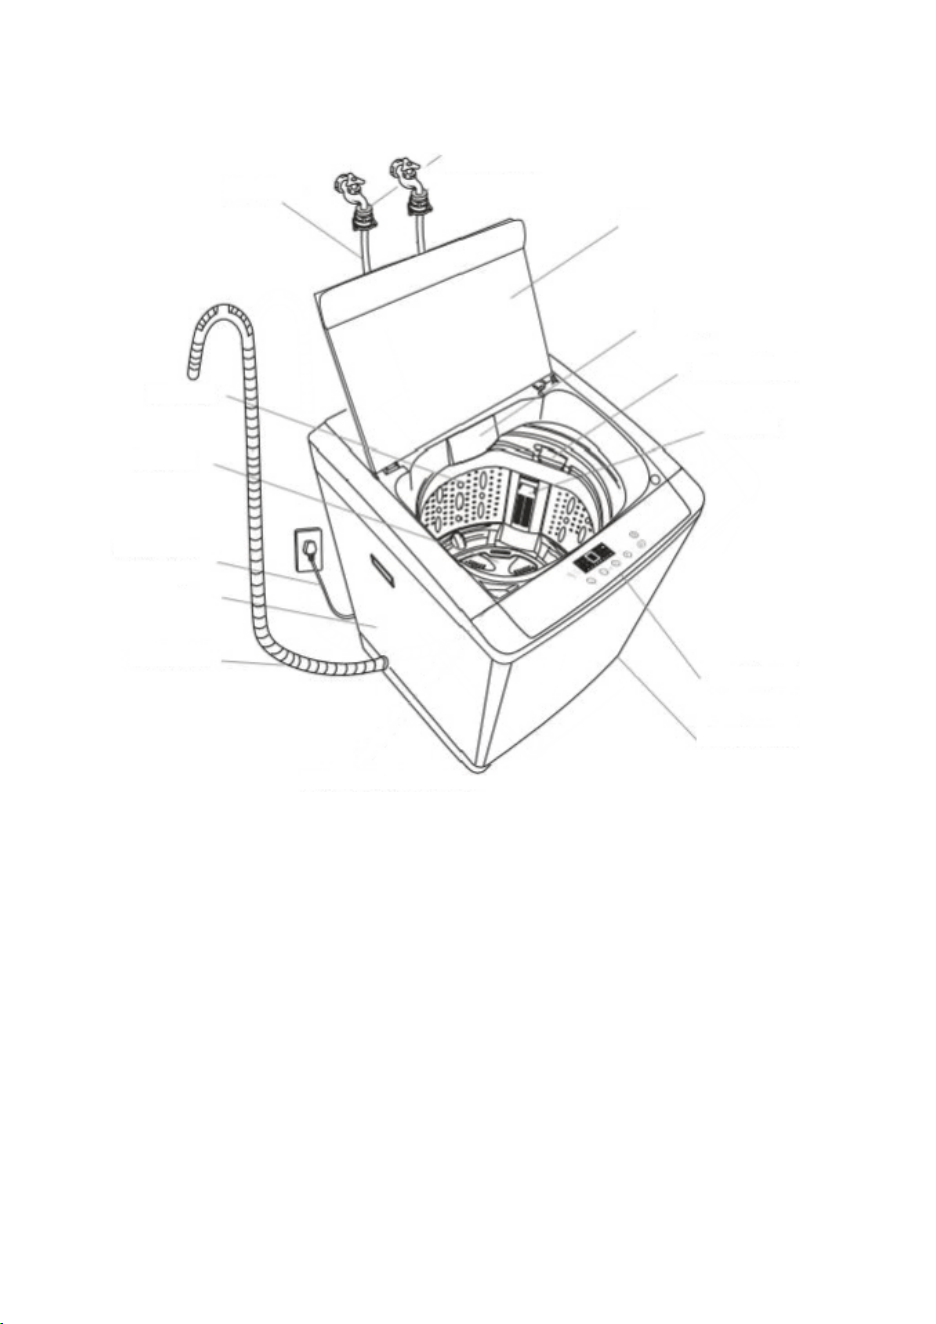
PRODUCT OVERVIEW
1
2
3
4
5
6
7
8
9
10
11
12
13
14
NOTES:
• Due to the performance test at the factory, some water may ow from the appliance when
washing clothes for the rst time. This is a normal occurrence.
• After using the appliance, please pull out the power plug and turn off the tap to prevent
unexpected ooding or re.
Images are for instructional purposes only and may not reect the exact appearance of the product.
1. Lid
2. Detergent Compartment
3. Softener Dispenser
4. Lint Filter
5. Balance Ring
6. Control Panel
7. Adjustable Feet
8. Drainage Hose
9. Exterior
10. Power Cord
11. Pulsator
12. Tub
13. Inlet Hose
14. Fixed Socket
1 - “POWER” BUTTON
• Press this button for 2 seconds to turn the power ON or OFF. Press START/PAUSE within 10
minutes or it will turn off automatically.
• When the washing cycle is complete, the washing machine will automatically switch OFF.
2 - “START/PAUSE” BUTTON
• Press this button to start the operation.
• During operation, press this button to pause a program temporarily, then press it again to
resume the program.
3 - ”PROGRAM” BUTTON
• Select the appropriate function according to the type of clothes and the degree of stains.
4 - “WATER LEVEL” BUTTON
• Select the desired water level based on your laundry load. Options range from 1.2L to 7.8L
or it may be indicated by a specic wash program that has been selected.
5 - “WATER SUPPLY” BUTTON
• Press this button to select the water temperature.
6 - “WASH, RINSE, & SPIN” BUTTONS
• Select one of these three options to customise your wash program by adjusting the number of
wash cycles, rinse cycles, or spin cycles according to your preference.
7 - “CHILD-LOCK” FEATURE
• This function is to prevent accidental operation of the appliance by children.
• The Child-Lock function will activate an alarm if the washing machine is opened.
• To turn the Child-Lock function ON or OFF, press the “Water Level” button, and press and
hold down the “Preset” button simultaneously.
8 - “DELAY END” FEATURE
• The Delay End Function is activated by pressing the Water Level button for at least 20
seconds until the number on the digital display indicates the desired end time.
For example, 5 = an end time of 5 hours from now.
WARNING:
Hot water only: Hot water can result in better cleaning efciency but is not suitable for all
clothing items. Please follow the instructions on the garment label.
DESCRIPTION OF FUNCTIONAL PROGRAMS
1. Preparation for washing:
• Open the lid and add clothes to the tub.
• Open the detergent compartment, add detergent and fabric softener, then close the
detergent compartment.
• Make sure that the tap for the Water Inlet Hose is turned on.
2. Press the “Power” button to switch the power ON.
3. Press the “program” button to select the desired program.
4. Press the “Water Supply” button and select the water temperature; cold, warm or hot
water.
5. Press the "Wash", "Rinse", and "Spin” buttons to adjust the washing time, spin-dry
speed, and rinse time respectively.
6. Press the “Start/Pause” button to start washing.
7. When operation is complete:
• The display will indicate "END".
• Open the lid to take out the clothes.
• Unplug the power plug and turn off the tap.
7
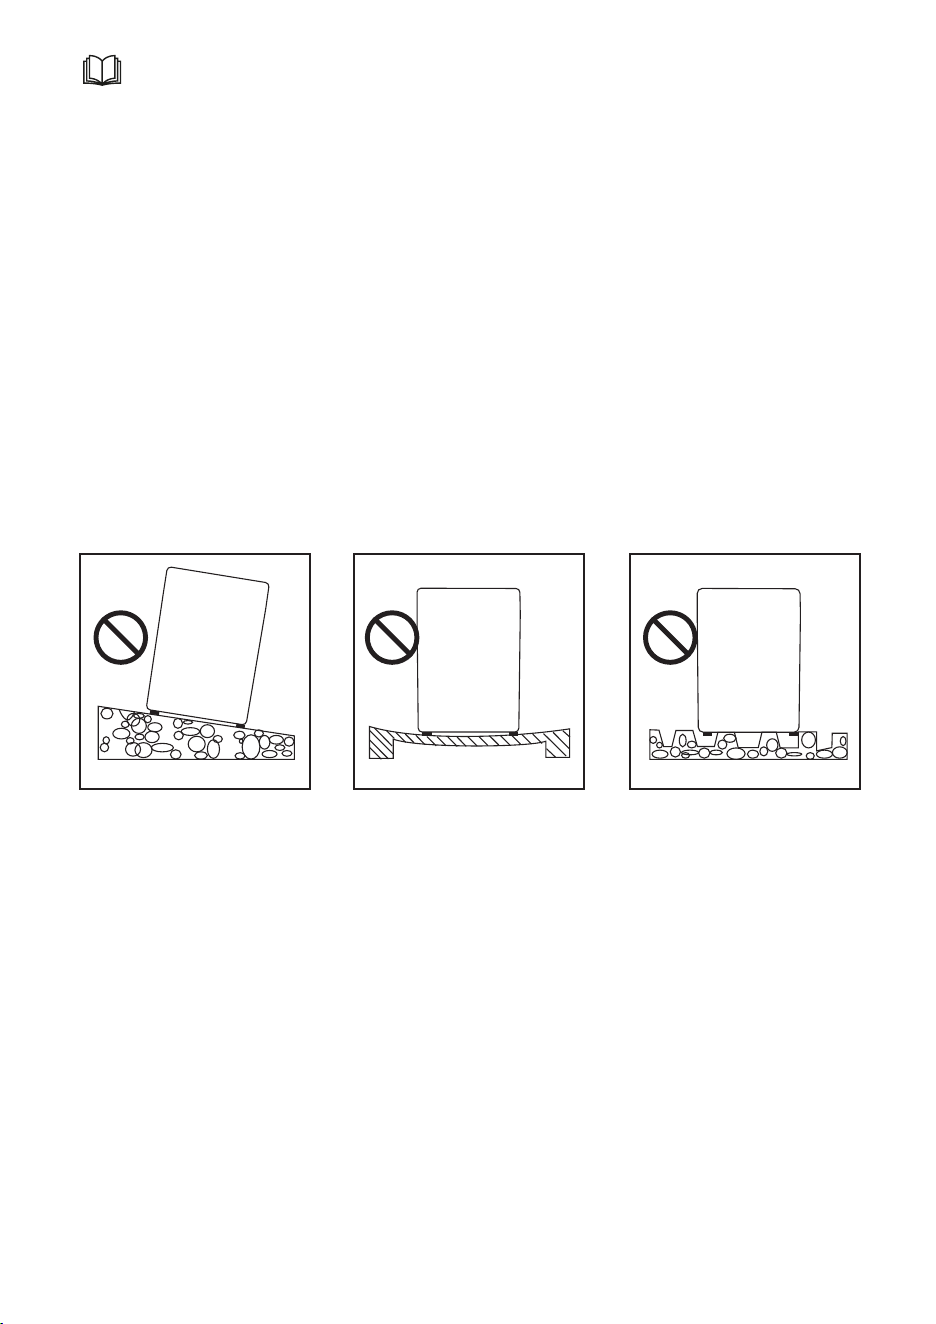
BEFORE INSTALLATION
• Check that the appliance has not been damaged during transportation. If damaged, do not
switch on the appliance. Return it to the retailer with its complete packaging.
• The appliance should be installed in a dry, well-ventilated area out of direct sunlight. Do not
install in areas with damp, steam, and/or water (such as bathrooms, etc.).
• Do not use stoves, gas appliances, etc. near the appliance.
• Do not install the appliance in a dusty area to avoid blocking the appliance’s air ducts.
• Remove all the packaging and place the appliance on a solid, at surface with access to a
Drain and power outlet.
• During installation, adjust the feet to level the appliance. Do not use any other materials to
level the appliance.
• Install the appliance at least 5cm away from furniture or walls on the back and sides.
• Do not install in areas below 0 °C. Do not install or place the washing machine outdoors.
• Do not install on carpeted or wooden oors.
• Do not install in any area infested with pests or insects that may cause damage to the
appliance. The warranty does not cover any damage caused by pests.
• All packaging from the base and tub support needs to be removed,
Do not install on an angled
or tilted surface. Install on a
level surface.
Do not install on an unstable
surface. Install on a solid,
secure surface.
Do not install on an uneven
surface. Install on a at,
secure surface.
1 - “POWER” BUTTON
• Press this button for 2 seconds to turn the power ON or OFF. Press START/PAUSE within 10
minutes or it will turn off automatically.
• When the washing cycle is complete, the washing machine will automatically switch OFF.
2 - “START/PAUSE” BUTTON
• Press this button to start the operation.
• During operation, press this button to pause a program temporarily, then press it again to
resume the program.
3 - ”PROGRAM” BUTTON
• Select the appropriate function according to the type of clothes and the degree of stains.
4 - “WATER LEVEL” BUTTON
• Select the desired water level based on your laundry load. Options range from 1.2L to 7.8L
or it may be indicated by a specic wash program that has been selected.
5 - “WATER SUPPLY” BUTTON
• Press this button to select the water temperature.
6 - “WASH, RINSE, & SPIN” BUTTONS
• Select one of these three options to customise your wash program by adjusting the number of
wash cycles, rinse cycles, or spin cycles according to your preference.
7 - “CHILD-LOCK” FEATURE
• This function is to prevent accidental operation of the appliance by children.
• The Child-Lock function will activate an alarm if the washing machine is opened.
• To turn the Child-Lock function ON or OFF, press the “Water Level” button, and press and
hold down the “Preset” button simultaneously.
8 - “DELAY END” FEATURE
• The Delay End Function is activated by pressing the Water Level button for at least 20
seconds until the number on the digital display indicates the desired end time.
For example, 5 = an end time of 5 hours from now.
WARNING:
Hot water only: Hot water can result in better cleaning efciency but is not suitable for all
clothing items. Please follow the instructions on the garment label.
DESCRIPTION OF FUNCTIONAL PROGRAMS
1. Preparation for washing:
• Open the lid and add clothes to the tub.
• Open the detergent compartment, add detergent and fabric softener, then close the
detergent compartment.
• Make sure that the tap for the Water Inlet Hose is turned on.
2. Press the “Power” button to switch the power ON.
3. Press the “program” button to select the desired program.
4. Press the “Water Supply” button and select the water temperature; cold, warm or hot
water.
5. Press the "Wash", "Rinse", and "Spin” buttons to adjust the washing time, spin-dry
speed, and rinse time respectively.
6. Press the “Start/Pause” button to start washing.
7. When operation is complete:
• The display will indicate "END".
• Open the lid to take out the clothes.
• Unplug the power plug and turn off the tap.
8
Fig. 1
CONNECTING THE POWER SUPPLY
• The appliance must be installed in an area where it can easily connect to an electrical outlet.
• Connect the appliance power cord to a grounded electrical outlet.
• This appliance has a grounding line (a conductor with a grounding plug to reduce the
danger of electric shock in case of a failure). The grounding plug must be inserted into an
appropriate electrical power outlet.
• Do not connect the electrical plug to a power strip or power strip bar.
• Do not use the power cord if it is damaged, contact a Bennett Read/Tevo Service Centre for
repairs.
• After use, always unplug the power plug and turn off the tap.
• If the washing machine is moved during ambient temperatures of 0°C or below, allow it to
reach room temperature before use.
• If the washing machine smokes or emits a peculiar smell, unplug it from the electrical outlet
and contact a Bennett Read/Tevo Service Centre.
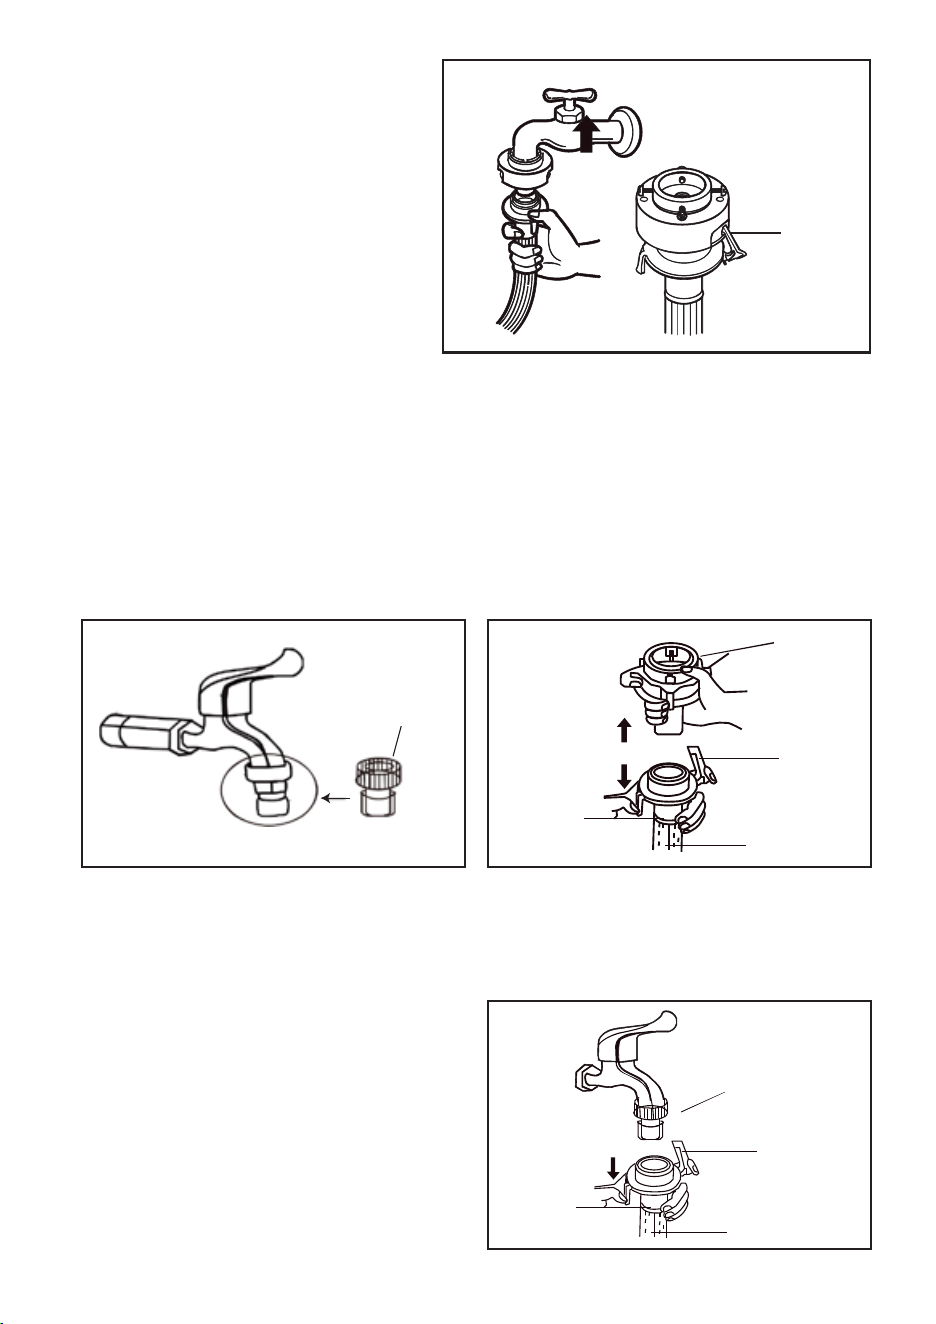
CONNECTING THE WATER SUPPLY
• The water supply pressure must be
between 50kPa and 85kPa.
• Tighten the Water Inlet Hose rmly by
hand. Do not overtighten the Water
Inlet Hose.
• Turn on the tap to check the
Connectors for any water leakage.
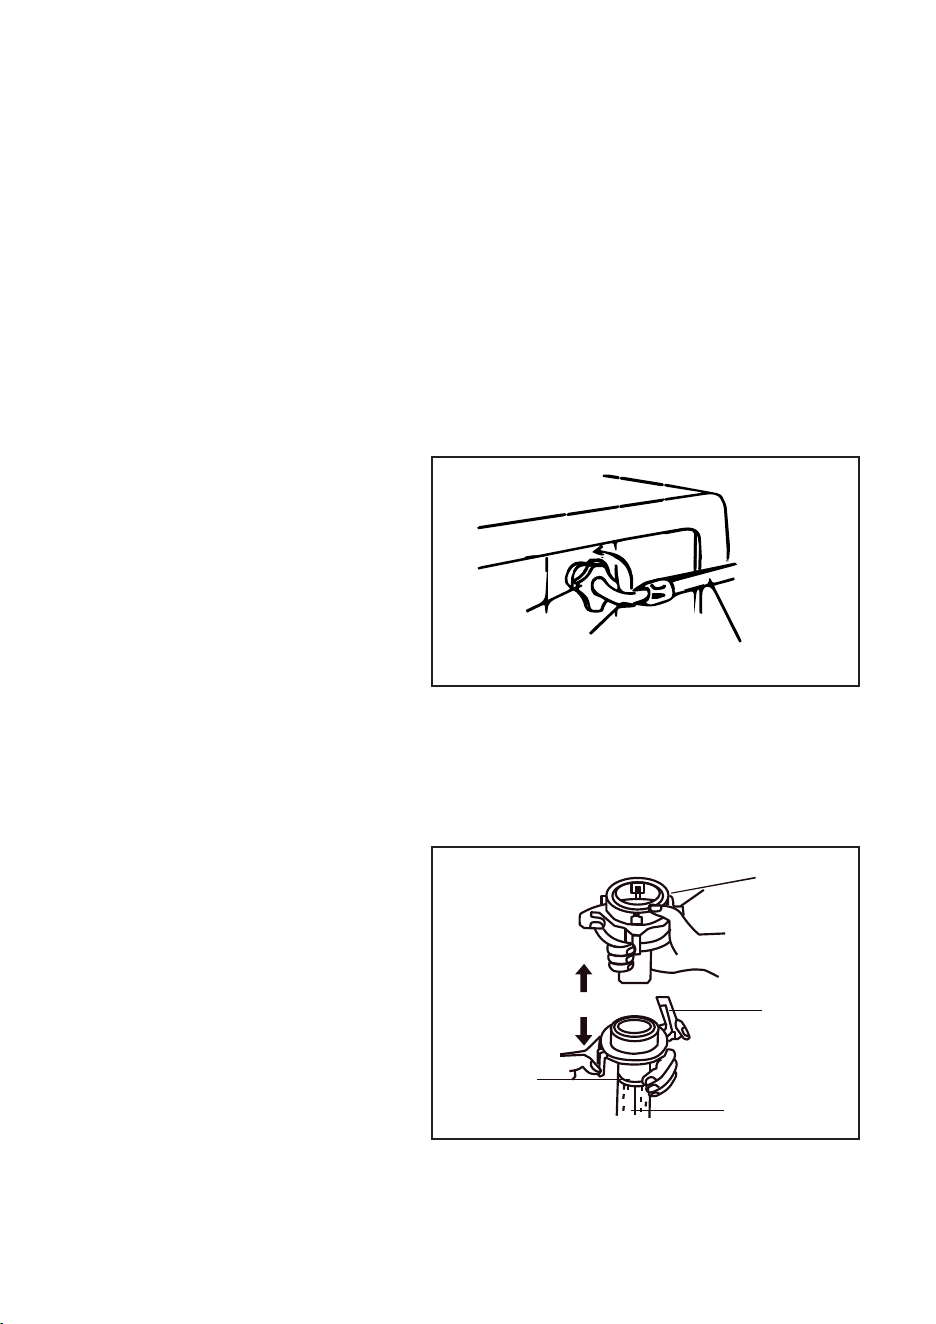
CONNECTING THE WATER INLET
HOSE TO THE TAP
1. Hold the Connector with one hand,
press the retaining ring with the other
hand, and pull it down to separate the
Connector from the Water Inlet Hose.
• Make sure that the Water Inlet Hose is not warped or damaged.
• Check the Water Inlet Hose regularly for wear and replace it if necessary.
• Only use the new Water Inlet Hose assembly that comes with this appliance. Do not use any
other hose.
Screw
Cap
Elbow Water Inlet Hose
Connector
Retaining
Ring
Water Inlet
Hose
Retaining
Ring
1 - “POWER” BUTTON
• Press this button for 2 seconds to turn the power ON or OFF. Press START/PAUSE within 10
minutes or it will turn off automatically.
• When the washing cycle is complete, the washing machine will automatically switch OFF.
2 - “START/PAUSE” BUTTON
• Press this button to start the operation.
• During operation, press this button to pause a program temporarily, then press it again to
resume the program.
3 - ”PROGRAM” BUTTON
• Select the appropriate function according to the type of clothes and the degree of stains.
4 - “WATER LEVEL” BUTTON
• Select the desired water level based on your laundry load. Options range from 1.2L to 7.8L
or it may be indicated by a specic wash program that has been selected.
5 - “WATER SUPPLY” BUTTON
• Press this button to select the water temperature.
6 - “WASH, RINSE, & SPIN” BUTTONS
• Select one of these three options to customise your wash program by adjusting the number of
wash cycles, rinse cycles, or spin cycles according to your preference.
7 - “CHILD-LOCK” FEATURE
• This function is to prevent accidental operation of the appliance by children.
• The Child-Lock function will activate an alarm if the washing machine is opened.
• To turn the Child-Lock function ON or OFF, press the “Water Level” button, and press and
hold down the “Preset” button simultaneously.
8 - “DELAY END” FEATURE
• The Delay End Function is activated by pressing the Water Level button for at least 20
seconds until the number on the digital display indicates the desired end time.
For example, 5 = an end time of 5 hours from now.
WARNING:
Hot water only: Hot water can result in better cleaning efciency but is not suitable for all
clothing items. Please follow the instructions on the garment label.
DESCRIPTION OF FUNCTIONAL PROGRAMS
1. Preparation for washing:
• Open the lid and add clothes to the tub.
• Open the detergent compartment, add detergent and fabric softener, then close the
detergent compartment.
• Make sure that the tap for the Water Inlet Hose is turned on.
2. Press the “Power” button to switch the power ON.
3. Press the “program” button to select the desired program.
4. Press the “Water Supply” button and select the water temperature; cold, warm or hot
water.
5. Press the "Wash", "Rinse", and "Spin” buttons to adjust the washing time, spin-dry
speed, and rinse time respectively.
6. Press the “Start/Pause” button to start washing.
7. When operation is complete:
• The display will indicate "END".
• Open the lid to take out the clothes.
• Unplug the power plug and turn off the tap.
9
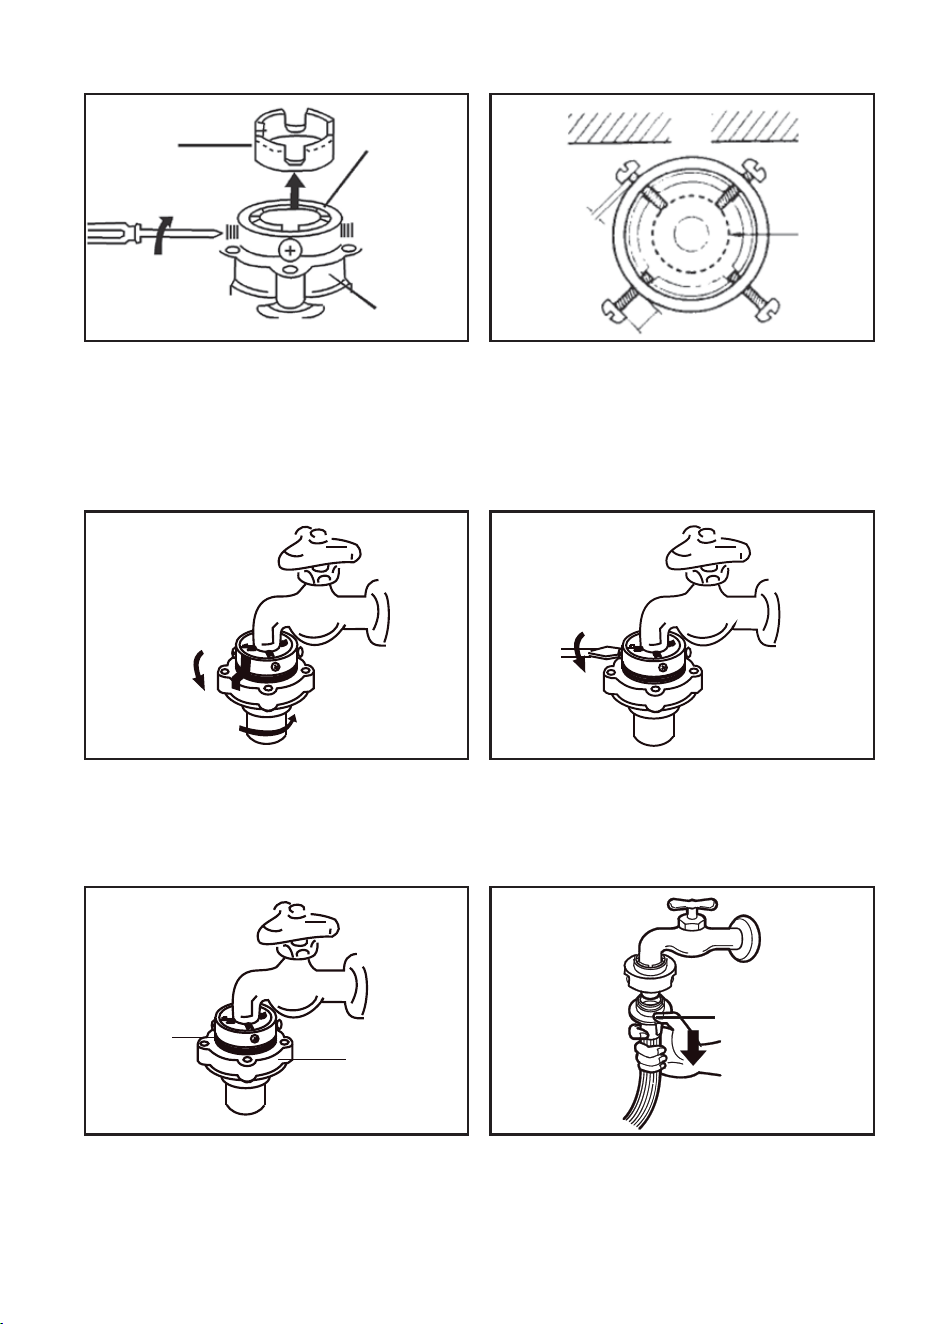
2. Loosen the four mounting screws on the
upper part of the Connector, and rotate the
lower part of the Connector to leave enough
distance (equal to the height of 3 threads) for
installing the screws between the upper part
and the lower part of the Connector.
CONNECTING THE WATER INLET HOSE TO THE TAP (cont.)
3. Adjust the four screws of the Connector
evenly so that the two screws near the wall
are fully in contact with the exterior of the tap
rst.
4. Hold the upper part of the Connector
against the mouth of the tap so that the seal
ring in the Connector is fully in contact with the
tap (do not remove the seal ring).
5. Rotate the two screws opposite the wall so
that they are in contact with the tap, and
secure them tightly with a screwdriver.
Plastic
Conduit
Upper Part
of Connector
Lower Part
of Connector
Wall
Tap
Use a Standard
Tap/Faucet
Gap to be
less than
3mm
Connector
Retaining Ring
Fig. 4 Fig. 5
6. Tightly screw the lower part of the
Connector to avoid leaking. When secure, the
gap between the lower and upper part of the
Connector must be less than 3mm.
7. To remove the Water Inlet Hose, press the
Retaining Ring of the water supply hose.
Fig. 6 Fig. 7
Fig. 2 Fig. 3
1 - “POWER” BUTTON
• Press this button for 2 seconds to turn the power ON or OFF. Press START/PAUSE within 10
minutes or it will turn off automatically.
• When the washing cycle is complete, the washing machine will automatically switch OFF.
2 - “START/PAUSE” BUTTON
• Press this button to start the operation.
• During operation, press this button to pause a program temporarily, then press it again to
resume the program.
3 - ”PROGRAM” BUTTON
• Select the appropriate function according to the type of clothes and the degree of stains.
4 - “WATER LEVEL” BUTTON
• Select the desired water level based on your laundry load. Options range from 1.2L to 7.8L
or it may be indicated by a specic wash program that has been selected.
5 - “WATER SUPPLY” BUTTON
• Press this button to select the water temperature.
6 - “WASH, RINSE, & SPIN” BUTTONS
• Select one of these three options to customise your wash program by adjusting the number of
wash cycles, rinse cycles, or spin cycles according to your preference.
7 - “CHILD-LOCK” FEATURE
• This function is to prevent accidental operation of the appliance by children.
• The Child-Lock function will activate an alarm if the washing machine is opened.
• To turn the Child-Lock function ON or OFF, press the “Water Level” button, and press and
hold down the “Preset” button simultaneously.
8 - “DELAY END” FEATURE
• The Delay End Function is activated by pressing the Water Level button for at least 20
seconds until the number on the digital display indicates the desired end time.
For example, 5 = an end time of 5 hours from now.
WARNING:
Hot water only: Hot water can result in better cleaning efciency but is not suitable for all
clothing items. Please follow the instructions on the garment label.
DESCRIPTION OF FUNCTIONAL PROGRAMS
1. Preparation for washing:
• Open the lid and add clothes to the tub.
• Open the detergent compartment, add detergent and fabric softener, then close the
detergent compartment.
• Make sure that the tap for the Water Inlet Hose is turned on.
2. Press the “Power” button to switch the power ON.
3. Press the “program” button to select the desired program.
4. Press the “Water Supply” button and select the water temperature; cold, warm or hot
water.
5. Press the "Wash", "Rinse", and "Spin” buttons to adjust the washing time, spin-dry
speed, and rinse time respectively.
6. Press the “Start/Pause” button to start washing.
7. When operation is complete:
• The display will indicate "END".
• Open the lid to take out the clothes.
• Unplug the power plug and turn off the tap.
10
• Check that the lower part of the Connector and the Water Inlet Hose are rmly secured.
• Tightly secure the Water Inlet Hose Connector and the Inlet Valve Connector. Slowly turn on
the tap to check for water leakage.
• If water leaks from the connection, turn off the tap and assemble them again. (Water may
leak from the connection if the upper part of the Connector is not assembled correctly, or if
the upper part and the lower part of the Connector are not screwed on tightly).
• Check the connections from time to time to make sure that they are still secure.
CONNECTING TO A NON-STANDARD TAP
Fig. 8
8. To reconnect the Water Inlet Hose,
make sure the Retaining Ring is
attached to the Connector.
1. Replace the original Connector with the
supplied Standard Connector (Fig.1).
2. Hold the Connector with one hand, press
the Retaining Ring with the other hand and
pull it down to separate the Connector from
the Water Inlet Hose (Fig.2).
Attach the
Retaining
Ring
Fig. 2Fig. 1
Connector
Standard Connector
Standard
Connector
Retaining
Ring
Retaining
Ring
Retaining
Ring
Water Inlet
Hose
Water Inlet Hose
Retaining
Ring
3. Press both sides of the Retaining Ring and
pull it down to insert the Water Inlet Hose
directly into the Standard Connector (Fig.3).
Fig. 3
1 - “POWER” BUTTON
• Press this button for 2 seconds to turn the power ON or OFF. Press START/PAUSE within 10
minutes or it will turn off automatically.
• When the washing cycle is complete, the washing machine will automatically switch OFF.
2 - “START/PAUSE” BUTTON
• Press this button to start the operation.
• During operation, press this button to pause a program temporarily, then press it again to
resume the program.
3 - ”PROGRAM” BUTTON
• Select the appropriate function according to the type of clothes and the degree of stains.
4 - “WATER LEVEL” BUTTON
• Select the desired water level based on your laundry load. Options range from 1.2L to 7.8L
or it may be indicated by a specic wash program that has been selected.
5 - “WATER SUPPLY” BUTTON
• Press this button to select the water temperature.
6 - “WASH, RINSE, & SPIN” BUTTONS
• Select one of these three options to customise your wash program by adjusting the number of
wash cycles, rinse cycles, or spin cycles according to your preference.
7 - “CHILD-LOCK” FEATURE
• This function is to prevent accidental operation of the appliance by children.
• The Child-Lock function will activate an alarm if the washing machine is opened.
• To turn the Child-Lock function ON or OFF, press the “Water Level” button, and press and
hold down the “Preset” button simultaneously.
8 - “DELAY END” FEATURE
• The Delay End Function is activated by pressing the Water Level button for at least 20
seconds until the number on the digital display indicates the desired end time.
For example, 5 = an end time of 5 hours from now.
WARNING:
Hot water only: Hot water can result in better cleaning efciency but is not suitable for all
clothing items. Please follow the instructions on the garment label.
DESCRIPTION OF FUNCTIONAL PROGRAMS
1. Preparation for washing:
• Open the lid and add clothes to the tub.
• Open the detergent compartment, add detergent and fabric softener, then close the
detergent compartment.
• Make sure that the tap for the Water Inlet Hose is turned on.
2. Press the “Power” button to switch the power ON.
3. Press the “program” button to select the desired program.
4. Press the “Water Supply” button and select the water temperature; cold, warm or hot
water.
5. Press the "Wash", "Rinse", and "Spin” buttons to adjust the washing time, spin-dry
speed, and rinse time respectively.
6. Press the “Start/Pause” button to start washing.
7. When operation is complete:
• The display will indicate "END".
• Open the lid to take out the clothes.
• Unplug the power plug and turn off the tap.

11
RISK OF DAMAGE TO APPLIANCE
• This appliance is designed for home use only. Do not use it on ships, motor vehicles,
aeroplanes, etc.
• If the appliance will not be used for extended periods, turn off the tap and disconnect the
power plug.
• When the appliance is not being used, use the Child-Lock function to prevent children from
being trapped inside the washing machine.
• Packaging materials (such as lms and foams) can be dangerous to children and may cause
suffocation! Keep all packaging material out of the reach of children.
Sealing
Gasket
CONNECTING TO A THREADED TAP
1. Follow these steps if your tap has a
threaded connection, as shown in Fig. 1
above.
2. Ensure that the Sealing Gasket in the
Water Inlet Hose Connector is properly
installed (Fig.2).
Fig. 2Fig. 1
3. Align the Water Inlet Hose Connector with
the tap and tighten the nut on the Water Inlet
Hose (Fig. 3).
Fig. 3
1 - “POWER” BUTTON
• Press this button for 2 seconds to turn the power ON or OFF. Press START/PAUSE within 10
minutes or it will turn off automatically.
• When the washing cycle is complete, the washing machine will automatically switch OFF.
2 - “START/PAUSE” BUTTON
• Press this button to start the operation.
• During operation, press this button to pause a program temporarily, then press it again to
resume the program.
3 - ”PROGRAM” BUTTON
• Select the appropriate function according to the type of clothes and the degree of stains.
4 - “WATER LEVEL” BUTTON
• Select the desired water level based on your laundry load. Options range from 1.2L to 7.8L
or it may be indicated by a specic wash program that has been selected.
5 - “WATER SUPPLY” BUTTON
• Press this button to select the water temperature.
6 - “WASH, RINSE, & SPIN” BUTTONS
• Select one of these three options to customise your wash program by adjusting the number of
wash cycles, rinse cycles, or spin cycles according to your preference.
7 - “CHILD-LOCK” FEATURE
• This function is to prevent accidental operation of the appliance by children.
• The Child-Lock function will activate an alarm if the washing machine is opened.
• To turn the Child-Lock function ON or OFF, press the “Water Level” button, and press and
hold down the “Preset” button simultaneously.
8 - “DELAY END” FEATURE
• The Delay End Function is activated by pressing the Water Level button for at least 20
seconds until the number on the digital display indicates the desired end time.
For example, 5 = an end time of 5 hours from now.
WARNING:
Hot water only: Hot water can result in better cleaning efciency but is not suitable for all
clothing items. Please follow the instructions on the garment label.
DESCRIPTION OF FUNCTIONAL PROGRAMS
1. Preparation for washing:
• Open the lid and add clothes to the tub.
• Open the detergent compartment, add detergent and fabric softener, then close the
detergent compartment.
• Make sure that the tap for the Water Inlet Hose is turned on.
2. Press the “Power” button to switch the power ON.
3. Press the “program” button to select the desired program.
4. Press the “Water Supply” button and select the water temperature; cold, warm or hot
water.
5. Press the "Wash", "Rinse", and "Spin” buttons to adjust the washing time, spin-dry
speed, and rinse time respectively.
6. Press the “Start/Pause” button to start washing.
7. When operation is complete:
• The display will indicate "END".
• Open the lid to take out the clothes.
• Unplug the power plug and turn off the tap.
12
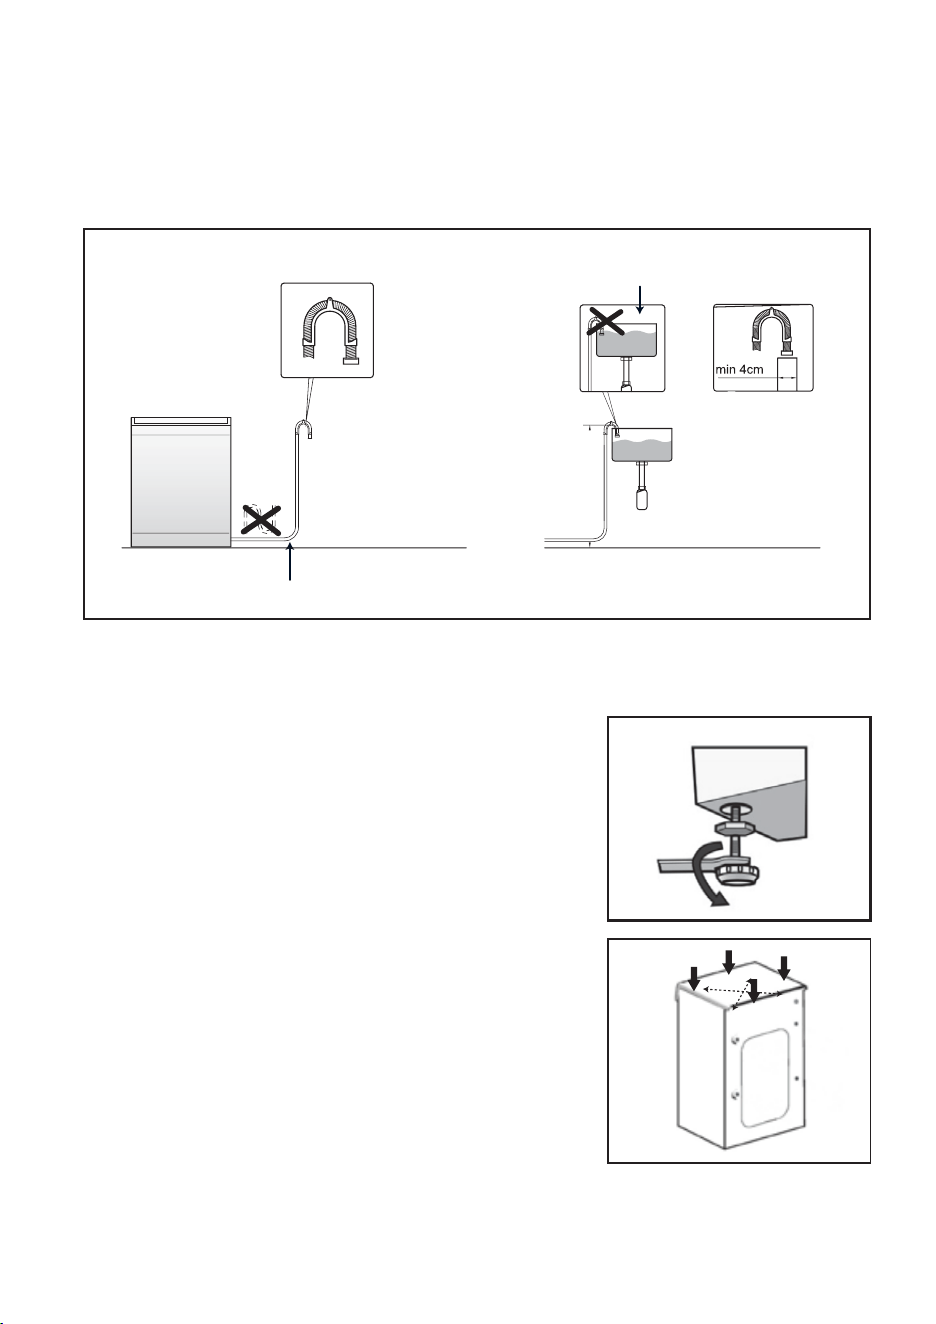
• Adjust the level of the appliance to avoid excessive noise
and vibrations. Install the appliance on a hard, level
oor (the corner of a room is preferred).
• Adjust the Adjustable Feet so that the appliance is level
and stable on the oor (Fig.1). Make sure that all four
adjustable feet are in contact with the oor rmly.
Preferably use a a spirit level to check that the appliance
is completely horizontal. Do not insert objects such as
wood under the Adjustable Feet.
• Check stability by pressing the top of the appliance on
diagonally opposite corners to ensure the machine does
not rock back and forth (Fig.2). Check on both
diagonals. Adjust the feet until there is no rocking
movement.
• When the appliance is completely level, tighten the
locknuts on the Adjustable Feet.
INSTALLING THE DRAIN HOSE
HORIZONTAL ADJUSTMENT
Fig.1
Fig. 2
1 - “POWER” BUTTON
• Press this button for 2 seconds to turn the power ON or OFF. Press START/PAUSE within 10
minutes or it will turn off automatically.
• When the washing cycle is complete, the washing machine will automatically switch OFF.
2 - “START/PAUSE” BUTTON
• Press this button to start the operation.
• During operation, press this button to pause a program temporarily, then press it again to
resume the program.
3 - ”PROGRAM” BUTTON
• Select the appropriate function according to the type of clothes and the degree of stains.
4 - “WATER LEVEL” BUTTON
• Select the desired water level based on your laundry load. Options range from 1.2L to 7.8L
or it may be indicated by a specic wash program that has been selected.
5 - “WATER SUPPLY” BUTTON
• Press this button to select the water temperature.
6 - “WASH, RINSE, & SPIN” BUTTONS
• Select one of these three options to customise your wash program by adjusting the number of
wash cycles, rinse cycles, or spin cycles according to your preference.
7 - “CHILD-LOCK” FEATURE
• This function is to prevent accidental operation of the appliance by children.
• The Child-Lock function will activate an alarm if the washing machine is opened.
• To turn the Child-Lock function ON or OFF, press the “Water Level” button, and press and
hold down the “Preset” button simultaneously.
• To ensure normal operations of the appliance, the inner diameter of the Drain pipe into which
the Drain Hose will be inserted must be a minimum of 4cm.
• The height of the outlet of the Drain Hose must be within a certain range. For specic data,
please refer to the gure below.
The Drain Hose must not be bent
The end the Drain Hose cannot
be immersed in water
Min
1.2m
height
8 - “DELAY END” FEATURE
• The Delay End Function is activated by pressing the Water Level button for at least 20
seconds until the number on the digital display indicates the desired end time.
For example, 5 = an end time of 5 hours from now.
WARNING:
Hot water only: Hot water can result in better cleaning efciency but is not suitable for all
clothing items. Please follow the instructions on the garment label.
DESCRIPTION OF FUNCTIONAL PROGRAMS
1. Preparation for washing:
• Open the lid and add clothes to the tub.
• Open the detergent compartment, add detergent and fabric softener, then close the
detergent compartment.
• Make sure that the tap for the Water Inlet Hose is turned on.
2. Press the “Power” button to switch the power ON.
3. Press the “program” button to select the desired program.
4. Press the “Water Supply” button and select the water temperature; cold, warm or hot
water.
5. Press the "Wash", "Rinse", and "Spin” buttons to adjust the washing time, spin-dry
speed, and rinse time respectively.
6. Press the “Start/Pause” button to start washing.
7. When operation is complete:
• The display will indicate "END".
• Open the lid to take out the clothes.
• Unplug the power plug and turn off the tap.

13
• Be sure to wash according to the care labels of clothes.
• Do not place non-machine washable clothing in this appliance.
• For safer and more effective washing, group types of garments per washing cycle.
• Dark clothing must be washed separately from light and white clothing.
• Dyed clothing and cotton velvet clothing must be washed separately to avoid staining other
garments.
• Water temperature, spin speed and programs vary with clothing types.
• If possible, do not wash very dirty clothes with moderately dirty clothes.
• Clothing with a high amount of cotton uff should be washed separately to avoid the cotton
uff attaching to other garments.
• Turn clothing inside out if it has buttons or accessories that may be damaged during washing.
• Remove all objects from clothing pockets before washing.
• Remove excessive dirt from clothes before washing.
• Place delicate clothing into a laundry bag before washing.
• Wash clothes with oil stains separately.
• Clothes that fade easily should be washed separately.
SAFETY PRECAUTIONS BEFORE WASHING
1 - “POWER” BUTTON
• Press this button for 2 seconds to turn the power ON or OFF. Press START/PAUSE within 10
minutes or it will turn off automatically.
• When the washing cycle is complete, the washing machine will automatically switch OFF.
2 - “START/PAUSE” BUTTON
• Press this button to start the operation.
• During operation, press this button to pause a program temporarily, then press it again to
resume the program.
3 - ”PROGRAM” BUTTON
• Select the appropriate function according to the type of clothes and the degree of stains.
4 - “WATER LEVEL” BUTTON
• Select the desired water level based on your laundry load. Options range from 1.2L to 7.8L
or it may be indicated by a specic wash program that has been selected.
5 - “WATER SUPPLY” BUTTON
• Press this button to select the water temperature.
6 - “WASH, RINSE, & SPIN” BUTTONS
• Select one of these three options to customise your wash program by adjusting the number of
wash cycles, rinse cycles, or spin cycles according to your preference.
7 - “CHILD-LOCK” FEATURE
• This function is to prevent accidental operation of the appliance by children.
• The Child-Lock function will activate an alarm if the washing machine is opened.
• To turn the Child-Lock function ON or OFF, press the “Water Level” button, and press and
hold down the “Preset” button simultaneously.
8 - “DELAY END” FEATURE
• The Delay End Function is activated by pressing the Water Level button for at least 20
seconds until the number on the digital display indicates the desired end time.
For example, 5 = an end time of 5 hours from now.
WARNING:
Hot water only: Hot water can result in better cleaning efciency but is not suitable for all
clothing items. Please follow the instructions on the garment label.
DESCRIPTION OF FUNCTIONAL PROGRAMS
1. Preparation for washing:
• Open the lid and add clothes to the tub.
• Open the detergent compartment, add detergent and fabric softener, then close the
detergent compartment.
• Make sure that the tap for the Water Inlet Hose is turned on.
2. Press the “Power” button to switch the power ON.
3. Press the “program” button to select the desired program.
4. Press the “Water Supply” button and select the water temperature; cold, warm or hot
water.
5. Press the "Wash", "Rinse", and "Spin” buttons to adjust the washing time, spin-dry
speed, and rinse time respectively.
6. Press the “Start/Pause” button to start washing.
7. When operation is complete:
• The display will indicate "END".
• Open the lid to take out the clothes.
• Unplug the power plug and turn off the tap.
14
Quick
Wash
12374 56
1 - “POWER” BUTTON
• Press this button for 2 seconds to turn the power ON or OFF. Press START/PAUSE within 10
minutes or it will turn off automatically.
• When the washing cycle is complete, the washing machine will automatically switch OFF.
2 - “START/PAUSE” BUTTON
• Press this button to start the operation.
• During operation, press this button to pause a program temporarily, then press it again to
resume the program.
3 - ”PROGRAM” BUTTON
• Select the appropriate function according to the type of clothes and the degree of stains.
4 - “WATER LEVEL” BUTTON
• Select the desired water level based on your laundry load. Options range from 1.2L to 7.8L
or it may be indicated by a specic wash program that has been selected.
5 - “WATER SUPPLY” BUTTON
• Press this button to select the water temperature.
6 - “WASH, RINSE, & SPIN” BUTTONS
• Select one of these three options to customise your wash program by adjusting the number of
wash cycles, rinse cycles, or spin cycles according to your preference.
7 - “CHILD-LOCK” FEATURE
• This function is to prevent accidental operation of the appliance by children.
• The Child-Lock function will activate an alarm if the washing machine is opened.
• To turn the Child-Lock function ON or OFF, press the “Water Level” button, and press and
hold down the “Preset” button simultaneously.
CONTROL PANEL
8 - “DELAY END” FEATURE
• The Delay End Function is activated by pressing the Water Level button for at least 20
seconds until the number on the digital display indicates the desired end time.
For example, 5 = an end time of 5 hours from now.
WARNING:
Hot water only: Hot water can result in better cleaning efciency but is not suitable for all
clothing items. Please follow the instructions on the garment label.
DESCRIPTION OF FUNCTIONAL PROGRAMS
1. Preparation for washing:
• Open the lid and add clothes to the tub.
• Open the detergent compartment, add detergent and fabric softener, then close the
detergent compartment.
• Make sure that the tap for the Water Inlet Hose is turned on.
2. Press the “Power” button to switch the power ON.
3. Press the “program” button to select the desired program.
4. Press the “Water Supply” button and select the water temperature; cold, warm or hot
water.
5. Press the "Wash", "Rinse", and "Spin” buttons to adjust the washing time, spin-dry
speed, and rinse time respectively.
6. Press the “Start/Pause” button to start washing.
7. When operation is complete:
• The display will indicate "END".
• Open the lid to take out the clothes.
• Unplug the power plug and turn off the tap.

15
1 - “POWER” BUTTON
• Press this button for 2 seconds to turn the power ON or OFF. Press START/PAUSE within 10
minutes or it will turn off automatically.
• When the washing cycle is complete, the washing machine will automatically switch OFF.
2 - “START/PAUSE” BUTTON
• Press this button to start the operation.
• During operation, press this button to pause a program temporarily, then press it again to
resume the program.
3 - ”PROGRAM” BUTTON
• Select the appropriate function according to the type of clothes and the degree of stains.
4 - “WATER LEVEL” BUTTON
• Select the desired water level based on your laundry load. Options range from 1.2L to 7.8L
or it may be indicated by a specic wash program that has been selected.
5 - “WATER SUPPLY” BUTTON
• Press this button to select the water temperature.
6 - “WASH, RINSE, & SPIN” BUTTONS
• Select one of these three options to customise your wash program by adjusting the number of
wash cycles, rinse cycles, or spin cycles according to your preference.
7 - “CHILD-LOCK” FEATURE
• This function is to prevent accidental operation of the appliance by children.
• The Child-Lock function will activate an alarm if the washing machine is opened.
• To turn the Child-Lock function ON or OFF, press the “Water Level” button, and press and
hold down the “Preset” button simultaneously.
8 - “DELAY END” FEATURE
• The Delay End Function is activated by pressing the Water Level button for at least 20
seconds until the number on the digital display indicates the desired end time.
For example, 5 = an end time of 5 hours from now.
WARNING:
Hot water only: Hot water can result in better cleaning efciency but is not suitable for all
clothing items. Please follow the instructions on the garment label.
DESCRIPTION OF FUNCTIONAL PROGRAMS
1. Preparation for washing:
• Open the lid and add clothes to the tub.
• Open the detergent compartment, add detergent and fabric softener, then close the
detergent compartment.
• Make sure that the tap for the Water Inlet Hose is turned on.
2. Press the “Power” button to switch the power ON.
3. Press the “program” button to select the desired program.
4. Press the “Water Supply” button and select the water temperature; cold, warm or hot
water.
5. Press the "Wash", "Rinse", and "Spin” buttons to adjust the washing time, spin-dry
speed, and rinse time respectively.
6. Press the “Start/Pause” button to start washing.
7. When operation is complete:
• The display will indicate "END".
• Open the lid to take out the clothes.
• Unplug the power plug and turn off the tap.

16
NOTES:
1. The rst parameter of water temperature is the default parameter at startup. You can
select other parameters manually.
2. The running time may be different for each wash due to the machine compensating for
differing water pressure, drainage conditions, clothing material, clothing weight,
and/or water temperature.
3. If a washing cycle is interrupted by a power failure, the washing machine will continue
from where it left off when the power resumes.
• Perform light maintenance at regular intervals. Good servicing practices may extend the
service life of the washing machine.
WARNING! BEFORE SERVICING, ALWAYS DISCONNECT THE POWER PLUG.
APPLIANCE BODY
Keep the body of the washing machine clean by wiping it with a clean, soft cloth. For
tough dirt, wipe the body with a clean, damp cloth and mild soap.
• Do not spray water directly on the body.
• Do not wipe the body with harsh chemicals such as putty-powder, diluting agents,
gasoline, and alcohol.
• Do not use abrasive cleaning materials, such as wire brushes, that will damage the
surface of the appliance.
CLEANING THE LINT FILTER
• Clean the Lint Filter after every wash.
• Ensure the Lint Filter is pulled out according to the direction of the arrow.
• Remove the Lint Filter, open it, and wash it with warm, soapy water. Dry it
thoroughly, close it, and place it back into the machine according to the direction
of the arrow.
MAINTENANCE & SERVICING
1 - “POWER” BUTTON
• Press this button for 2 seconds to turn the power ON or OFF. Press START/PAUSE within 10
minutes or it will turn off automatically.
• When the washing cycle is complete, the washing machine will automatically switch OFF.
2 - “START/PAUSE” BUTTON
• Press this button to start the operation.
• During operation, press this button to pause a program temporarily, then press it again to
resume the program.
3 - ”PROGRAM” BUTTON
• Select the appropriate function according to the type of clothes and the degree of stains.
4 - “WATER LEVEL” BUTTON
• Select the desired water level based on your laundry load. Options range from 1.2L to 7.8L
or it may be indicated by a specic wash program that has been selected.
5 - “WATER SUPPLY” BUTTON
• Press this button to select the water temperature.
6 - “WASH, RINSE, & SPIN” BUTTONS
• Select one of these three options to customise your wash program by adjusting the number of
wash cycles, rinse cycles, or spin cycles according to your preference.
7 - “CHILD-LOCK” FEATURE
• This function is to prevent accidental operation of the appliance by children.
• The Child-Lock function will activate an alarm if the washing machine is opened.
• To turn the Child-Lock function ON or OFF, press the “Water Level” button, and press and
hold down the “Preset” button simultaneously.
DETERGENT & WATER QUANTITY
CLOTHES WEIGHT WATER LEVEL LIQUID DETERGENT POWER DETERGENT
>6 Kg High
Medium
Minimum
Low
110ml
90ml
50ml
70ml
110g
90g
50g
70g
4 - 6 Kg
2 - 6 Kg
0 - 2 Kg
8 - “DELAY END” FEATURE
• The Delay End Function is activated by pressing the Water Level button for at least 20
seconds until the number on the digital display indicates the desired end time.
For example, 5 = an end time of 5 hours from now.
WARNING:
Hot water only: Hot water can result in better cleaning efciency but is not suitable for all
clothing items. Please follow the instructions on the garment label.
DESCRIPTION OF FUNCTIONAL PROGRAMS
1. Preparation for washing:
• Open the lid and add clothes to the tub.
• Open the detergent compartment, add detergent and fabric softener, then close the
detergent compartment.
• Make sure that the tap for the Water Inlet Hose is turned on.
2. Press the “Power” button to switch the power ON.
3. Press the “program” button to select the desired program.
4. Press the “Water Supply” button and select the water temperature; cold, warm or hot
water.
5. Press the "Wash", "Rinse", and "Spin” buttons to adjust the washing time, spin-dry
speed, and rinse time respectively.
6. Press the “Start/Pause” button to start washing.
7. When operation is complete:
• The display will indicate "END".
• Open the lid to take out the clothes.
• Unplug the power plug and turn off the tap.
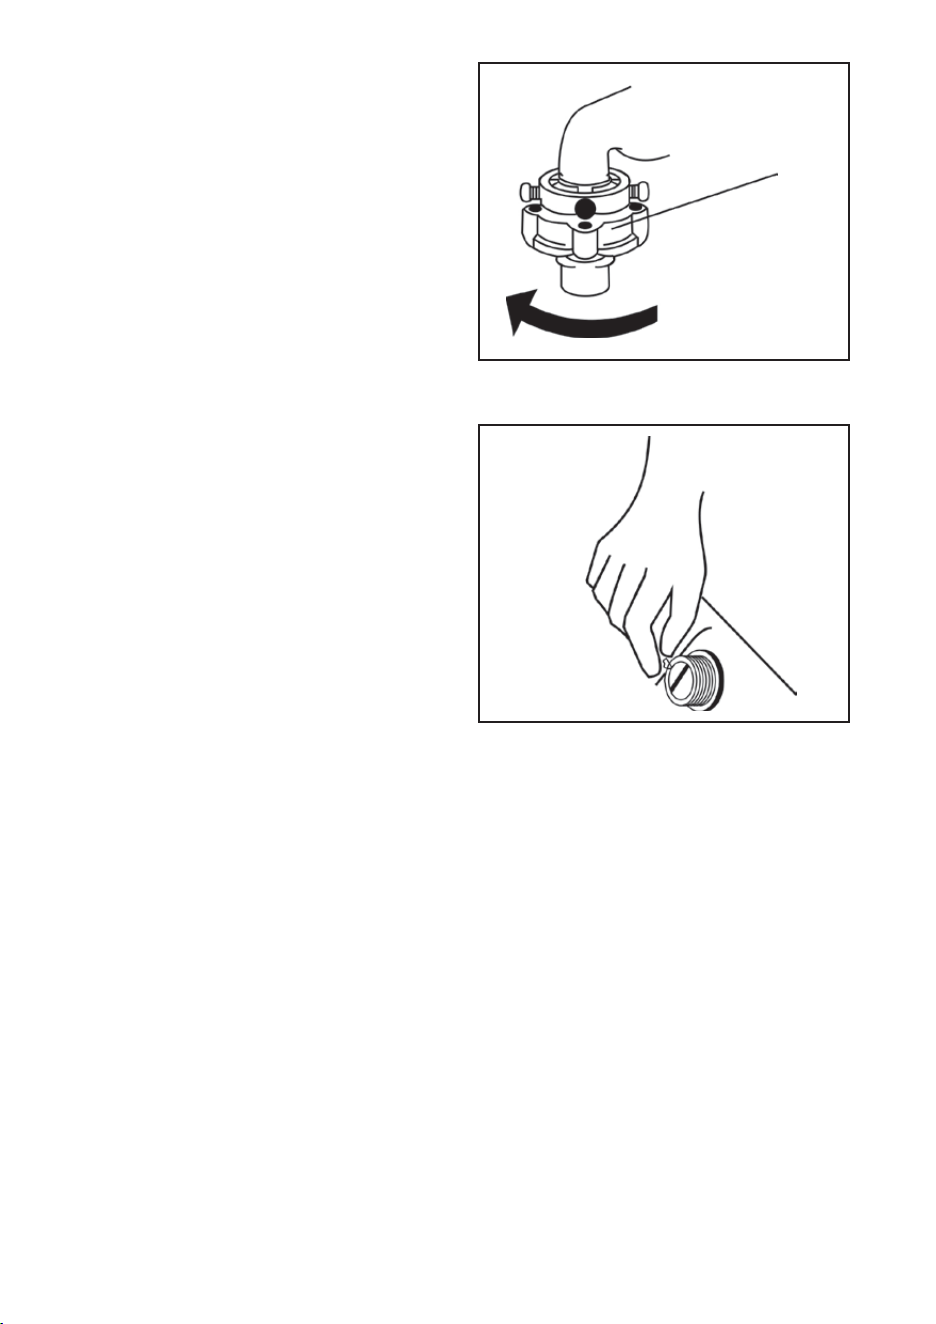
17
CLEANING THE CONNECTOR
It is recommended to clean the Connector
once every six months.
1. Remove the Water Inlet Hose from the
Connector.
2. Unscrew the Fastener in the direction of
the arrow (Fig.1).
3. Rinse the interior of the Fastener with
water.
4. Re-install the clean Fastener to the
Connector and re-attach the Connector
to the Water Inlet Hose.
Fastener
Inlet Valve
Fig.1
CLEANING THE INLET VALVE
It is recommended to clean the Inlet Valve
once every six months.
1. Disconnect the Water Inlet Hose from
the washing machine.
2. Remove the lter screen from the Inlet
Valve.
3. Clean the lter screen thoroughly with a
toothbrush, then install it back into the
Inlet Valve.
4. Reconnect the Water Inlet Hose.
Fig.2
1 - “POWER” BUTTON
• Press this button for 2 seconds to turn the power ON or OFF. Press START/PAUSE within 10
minutes or it will turn off automatically.
• When the washing cycle is complete, the washing machine will automatically switch OFF.
2 - “START/PAUSE” BUTTON
• Press this button to start the operation.
• During operation, press this button to pause a program temporarily, then press it again to
resume the program.
3 - ”PROGRAM” BUTTON
• Select the appropriate function according to the type of clothes and the degree of stains.
4 - “WATER LEVEL” BUTTON
• Select the desired water level based on your laundry load. Options range from 1.2L to 7.8L
or it may be indicated by a specic wash program that has been selected.
5 - “WATER SUPPLY” BUTTON
• Press this button to select the water temperature.
6 - “WASH, RINSE, & SPIN” BUTTONS
• Select one of these three options to customise your wash program by adjusting the number of
wash cycles, rinse cycles, or spin cycles according to your preference.
7 - “CHILD-LOCK” FEATURE
• This function is to prevent accidental operation of the appliance by children.
• The Child-Lock function will activate an alarm if the washing machine is opened.
• To turn the Child-Lock function ON or OFF, press the “Water Level” button, and press and
hold down the “Preset” button simultaneously.
8 - “DELAY END” FEATURE
• The Delay End Function is activated by pressing the Water Level button for at least 20
seconds until the number on the digital display indicates the desired end time.
For example, 5 = an end time of 5 hours from now.
WARNING:
Hot water only: Hot water can result in better cleaning efciency but is not suitable for all
clothing items. Please follow the instructions on the garment label.
DESCRIPTION OF FUNCTIONAL PROGRAMS
1. Preparation for washing:
• Open the lid and add clothes to the tub.
• Open the detergent compartment, add detergent and fabric softener, then close the
detergent compartment.
• Make sure that the tap for the Water Inlet Hose is turned on.
2. Press the “Power” button to switch the power ON.
3. Press the “program” button to select the desired program.
4. Press the “Water Supply” button and select the water temperature; cold, warm or hot
water.
5. Press the "Wash", "Rinse", and "Spin” buttons to adjust the washing time, spin-dry
speed, and rinse time respectively.
6. Press the “Start/Pause” button to start washing.
7. When operation is complete:
• The display will indicate "END".
• Open the lid to take out the clothes.
• Unplug the power plug and turn off the tap.
18
TROUBLESHOOTING
PROBLEM
CHECK POINTS SOLUTION
The appliance
will not start.
Abnormal spin
Power Supply
An error code is displayed and the Power Supply can’t be turned off. Turn off the tap
and disconnect the power plug. Contact a Bennett Read/Tevo Sevice Centre.
Drain the washing machine. If an error code is displayed, turn off the tap and
disconnect the power plug. Contact a Bennett Read/Tevo Sevice Centre.
Overowing
Water
Is the “Power” button or “Start/Pause”
button pressed?
Is the plug of the power cord pulled out?
Is there a power failure?
Has the earth leakage tripped on your DB?
Press the “Power” button or “Start/
Pause” button.
Insert the plug of the power cord.
Wait for electrical power to resume.
Reset your earth leakage on your DB.
Is the washing machine seated rmly?
Are there too few clothes in the drum?
Are the locknuts for the adjustable feet
properly tightened?
Add more clothing.
Screw locknuts tightly.
Water fault
Is the tap turned off?
Is there a water outage, or is the water
pressure too low?
Is the Water Inlet Hose frozen or
blocked?
Is the Water Inlet Hose or the Inlet Valve
blocked?
Turn on the tap.
Wait for the water supply or water
pressure to return to normal.
Unfreeze the water hose with warm water.
Remove any foreign objects from the
water hose.
Take the lter screens out from the Water
Inlet Hose and the Inlet Valve and clean
them thoroughly.
After 50 minutes with no water, an alarm
will sound.
Drainage fault
Is the Drain Hose positioned too high?
Is the Drain Hose frozen?
Is the Drain Hose blocked by foreign
objects?
Is the Drain blocked by foreign objects?
Ensure the Drain Hose height is below
1.2m.
Unfreeze the Drain Hose with warm water.
Remove any foreign objects from the Drain
Hose.
Remove any foreign objects from the Foor
Drain.
After 50 minutes with a blocked Drain, an
alarm will sound.
1 - “POWER” BUTTON
• Press this button for 2 seconds to turn the power ON or OFF. Press START/PAUSE within 10
minutes or it will turn off automatically.
• When the washing cycle is complete, the washing machine will automatically switch OFF.
2 - “START/PAUSE” BUTTON
• Press this button to start the operation.
• During operation, press this button to pause a program temporarily, then press it again to
resume the program.
3 - ”PROGRAM” BUTTON
• Select the appropriate function according to the type of clothes and the degree of stains.
4 - “WATER LEVEL” BUTTON
• Select the desired water level based on your laundry load. Options range from 1.2L to 7.8L
or it may be indicated by a specic wash program that has been selected.
5 - “WATER SUPPLY” BUTTON
• Press this button to select the water temperature.
6 - “WASH, RINSE, & SPIN” BUTTONS
• Select one of these three options to customise your wash program by adjusting the number of
wash cycles, rinse cycles, or spin cycles according to your preference.
7 - “CHILD-LOCK” FEATURE
• This function is to prevent accidental operation of the appliance by children.
• The Child-Lock function will activate an alarm if the washing machine is opened.
• To turn the Child-Lock function ON or OFF, press the “Water Level” button, and press and
hold down the “Preset” button simultaneously.
8 - “DELAY END” FEATURE
• The Delay End Function is activated by pressing the Water Level button for at least 20
seconds until the number on the digital display indicates the desired end time.
For example, 5 = an end time of 5 hours from now.
WARNING:
Hot water only: Hot water can result in better cleaning efciency but is not suitable for all
clothing items. Please follow the instructions on the garment label.
DESCRIPTION OF FUNCTIONAL PROGRAMS
1. Preparation for washing:
• Open the lid and add clothes to the tub.
• Open the detergent compartment, add detergent and fabric softener, then close the
detergent compartment.
• Make sure that the tap for the Water Inlet Hose is turned on.
2. Press the “Power” button to switch the power ON.
3. Press the “program” button to select the desired program.
4. Press the “Water Supply” button and select the water temperature; cold, warm or hot
water.
5. Press the "Wash", "Rinse", and "Spin” buttons to adjust the washing time, spin-dry
speed, and rinse time respectively.
6. Press the “Start/Pause” button to start washing.
7. When operation is complete:
• The display will indicate "END".
• Open the lid to take out the clothes.
• Unplug the power plug and turn off the tap.
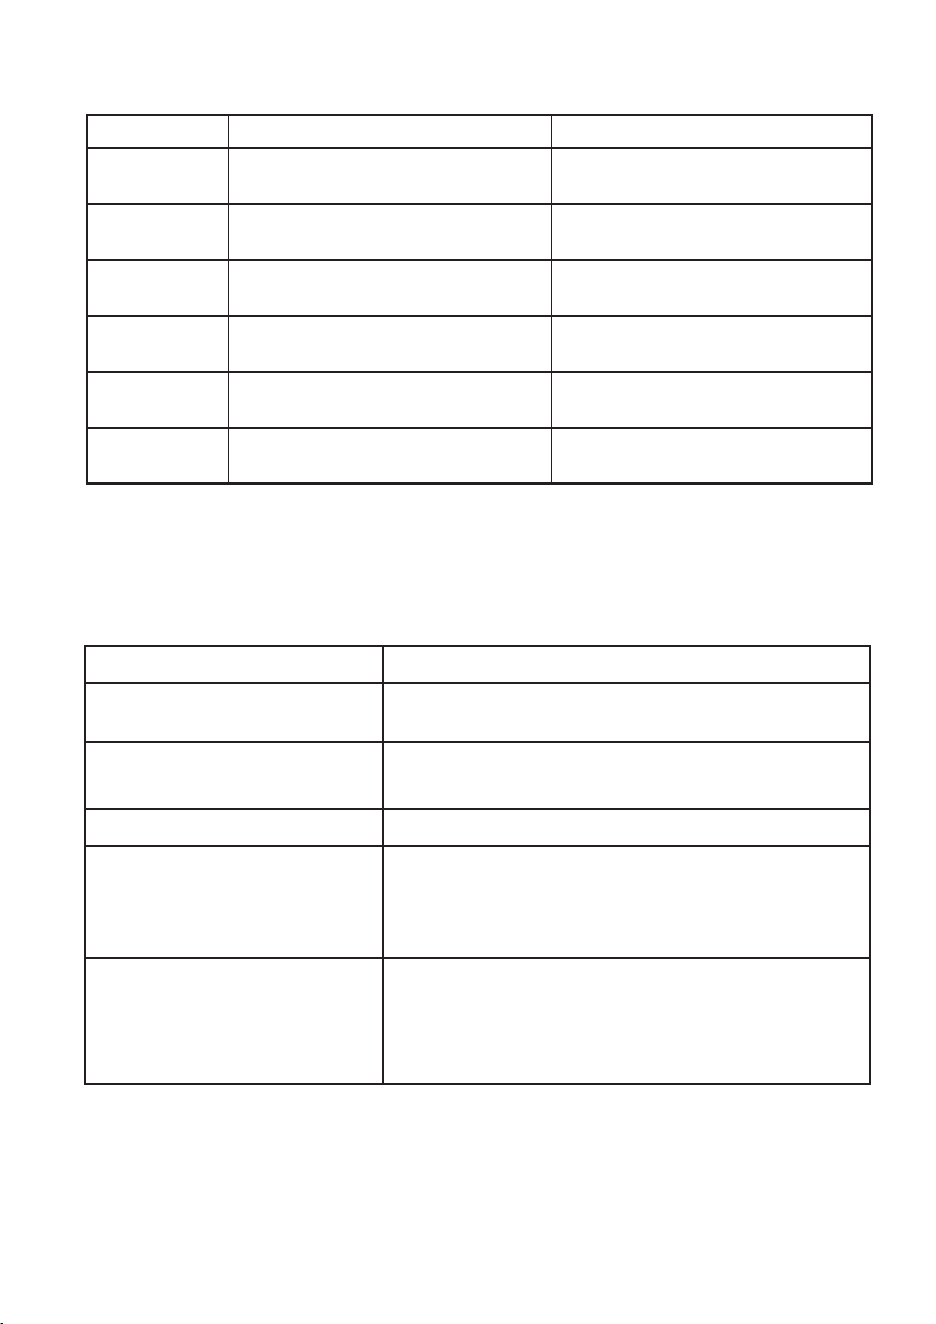
19
TROUBLESHOOTING
ERROR
PROBLEM SOLUTION
E0
E1
The washing machine is lled with water
for more than 50 minutes.
Open the lid of the washing machine.
Machine is not draining. Ensure the Drain Hose is not blocked
or bent.
E2
Load Imbalance. Arrange the laundry evenly and
symmetrically, then close the lid.
E3
The lid of the washing machine is open. Close lid of the washing machine properly.
E4
E6
Abnormal water sensor
Open the lid after setting the Child Lock
function.
Contact a Bennett Read/Tevo Sevice Centre.
Close the lid properly.
In the case of other faults, please contact a Bennett Read/Tevo Service Centre for
professional maintenance. See contact details on page 21.
THE FOLLOWING CONDITIONS DO NOT REPRESENT FAULTS
SYMPTOM
EXPLANATION
There is a peculiar smell.
Because rubber parts are used in the washing machine,
there can be a rubber smell when the machine is new.
Water inow during running of
programs.
If the water level decreases, the washing machine
automatically replenishes water.
Drainage during washing. Is too much high-foam detergent added?
Variation of remaining time.
If the clothes are off-center during spinning, the spin time
will increase appropriately.
If the water pressure is too low, the inow time will
increase appropriately.
Abnormal sound during spinning.
Is the power cord touching the appliance body?
Have the shipping bolts been removed?
Are there any foreign objects such as hairpins or coins in
the tub?
1 - “POWER” BUTTON
• Press this button for 2 seconds to turn the power ON or OFF. Press START/PAUSE within 10
minutes or it will turn off automatically.
• When the washing cycle is complete, the washing machine will automatically switch OFF.
2 - “START/PAUSE” BUTTON
• Press this button to start the operation.
• During operation, press this button to pause a program temporarily, then press it again to
resume the program.
3 - ”PROGRAM” BUTTON
• Select the appropriate function according to the type of clothes and the degree of stains.
4 - “WATER LEVEL” BUTTON
• Select the desired water level based on your laundry load. Options range from 1.2L to 7.8L
or it may be indicated by a specic wash program that has been selected.
5 - “WATER SUPPLY” BUTTON
• Press this button to select the water temperature.
6 - “WASH, RINSE, & SPIN” BUTTONS
• Select one of these three options to customise your wash program by adjusting the number of
wash cycles, rinse cycles, or spin cycles according to your preference.
7 - “CHILD-LOCK” FEATURE
• This function is to prevent accidental operation of the appliance by children.
• The Child-Lock function will activate an alarm if the washing machine is opened.
• To turn the Child-Lock function ON or OFF, press the “Water Level” button, and press and
hold down the “Preset” button simultaneously.
8 - “DELAY END” FEATURE
• The Delay End Function is activated by pressing the Water Level button for at least 20
seconds until the number on the digital display indicates the desired end time.
For example, 5 = an end time of 5 hours from now.
WARNING:
Hot water only: Hot water can result in better cleaning efciency but is not suitable for all
clothing items. Please follow the instructions on the garment label.
DESCRIPTION OF FUNCTIONAL PROGRAMS
1. Preparation for washing:
• Open the lid and add clothes to the tub.
• Open the detergent compartment, add detergent and fabric softener, then close the
detergent compartment.
• Make sure that the tap for the Water Inlet Hose is turned on.
2. Press the “Power” button to switch the power ON.
3. Press the “program” button to select the desired program.
4. Press the “Water Supply” button and select the water temperature; cold, warm or hot
water.
5. Press the "Wash", "Rinse", and "Spin” buttons to adjust the washing time, spin-dry
speed, and rinse time respectively.
6. Press the “Start/Pause” button to start washing.
7. When operation is complete:
• The display will indicate "END".
• Open the lid to take out the clothes.
• Unplug the power plug and turn off the tap.

20
• 20Kg Family-sized Capacity
• Delay End
• Soft-close Lid
• 8 Wash programs
• Tempered Glass Lid
• Sleek, modern design
• Built-in Memory*
SPECIFICATIONS TABLE
PRODUCT FEATURES
Rated washing capacity 20.0kg
Model BR20TL1
220 - 240V~ 50HzRated voltage
500WRated washing power
0.03 - 0.85MPaWater pressure
685 × 700 × 1095mmOverall dimensions
*Cycle will automatically resume, from where it left off after a power failure.
1 - “POWER” BUTTON
• Press this button for 2 seconds to turn the power ON or OFF. Press START/PAUSE within 10
minutes or it will turn off automatically.
• When the washing cycle is complete, the washing machine will automatically switch OFF.
2 - “START/PAUSE” BUTTON
• Press this button to start the operation.
• During operation, press this button to pause a program temporarily, then press it again to
resume the program.
3 - ”PROGRAM” BUTTON
• Select the appropriate function according to the type of clothes and the degree of stains.
4 - “WATER LEVEL” BUTTON
• Select the desired water level based on your laundry load. Options range from 1.2L to 7.8L
or it may be indicated by a specic wash program that has been selected.
5 - “WATER SUPPLY” BUTTON
• Press this button to select the water temperature.
6 - “WASH, RINSE, & SPIN” BUTTONS
• Select one of these three options to customise your wash program by adjusting the number of
wash cycles, rinse cycles, or spin cycles according to your preference.
7 - “CHILD-LOCK” FEATURE
• This function is to prevent accidental operation of the appliance by children.
• The Child-Lock function will activate an alarm if the washing machine is opened.
• To turn the Child-Lock function ON or OFF, press the “Water Level” button, and press and
hold down the “Preset” button simultaneously.
8 - “DELAY END” FEATURE
• The Delay End Function is activated by pressing the Water Level button for at least 20
seconds until the number on the digital display indicates the desired end time.
For example, 5 = an end time of 5 hours from now.
WARNING:
Hot water only: Hot water can result in better cleaning efciency but is not suitable for all
clothing items. Please follow the instructions on the garment label.
DESCRIPTION OF FUNCTIONAL PROGRAMS
1. Preparation for washing:
• Open the lid and add clothes to the tub.
• Open the detergent compartment, add detergent and fabric softener, then close the
detergent compartment.
• Make sure that the tap for the Water Inlet Hose is turned on.
2. Press the “Power” button to switch the power ON.
3. Press the “program” button to select the desired program.
4. Press the “Water Supply” button and select the water temperature; cold, warm or hot
water.
5. Press the "Wash", "Rinse", and "Spin” buttons to adjust the washing time, spin-dry
speed, and rinse time respectively.
6. Press the “Start/Pause” button to start washing.
7. When operation is complete:
• The display will indicate "END".
• Open the lid to take out the clothes.
• Unplug the power plug and turn off the tap.

21
ENVIRONMENTALLY FRIENDLY DISPOSAL
Do not dispose of electrical appliances with general municipal waste.
Hazardous substances can leak and contaminate the groundwater, affecting
the food chain and ultimately damaging the environment and your health.
Contact your local municipality for information on safe disposal in your area.
WARRANTY
Your BENNETT READ
®
20KG ELITE CLEAN is covered against manufacture faults for a period
of 3 years. Bennett Read
®
/Tevo undertakes to repair or replace this product at no charge if
found to be defective due to a manufacturing fault during the warranty period. This warranty
excludes damage caused by, but not limited to, misuse, neglect, accidental damage,
commercial use, incorrect installation, or unauthorised repair. Bennett Read/Tevo is not liable
for incidental or consequential damages of any nature associated with the use of this product.
Liability will not exceed the purchase price of this product.
PLEASE KEEP YOUR RECEIPT TO VERIFY YOUR WARRANTY.
This warranty applies to product used for personal or domestic use only, and specically
excludes any malfunction or defect arising from commercial use.
WARRANTY, SERVICE AND REPLACEMENT PART ENQUIRIES CAN BE MADE BY
CONTACTING:
TEVO (PTY) LTD
Johannesburg (012) 740 5000
Durban (031) 570 5900
Cape Town (021) 380 0039
Customer Service Help Line: 0861 77 88 88
www.bennettread.co.za / www.tevo.co.za
SPECIFICATIONS
Model: BR20TL1
220 - 240V~ 50Hz
500W
1 - “POWER” BUTTON
• Press this button for 2 seconds to turn the power ON or OFF. Press START/PAUSE within 10
minutes or it will turn off automatically.
• When the washing cycle is complete, the washing machine will automatically switch OFF.
2 - “START/PAUSE” BUTTON
• Press this button to start the operation.
• During operation, press this button to pause a program temporarily, then press it again to
resume the program.
3 - ”PROGRAM” BUTTON
• Select the appropriate function according to the type of clothes and the degree of stains.
4 - “WATER LEVEL” BUTTON
• Select the desired water level based on your laundry load. Options range from 1.2L to 7.8L
or it may be indicated by a specic wash program that has been selected.
5 - “WATER SUPPLY” BUTTON
• Press this button to select the water temperature.
6 - “WASH, RINSE, & SPIN” BUTTONS
• Select one of these three options to customise your wash program by adjusting the number of
wash cycles, rinse cycles, or spin cycles according to your preference.
7 - “CHILD-LOCK” FEATURE
• This function is to prevent accidental operation of the appliance by children.
• The Child-Lock function will activate an alarm if the washing machine is opened.
• To turn the Child-Lock function ON or OFF, press the “Water Level” button, and press and
hold down the “Preset” button simultaneously.
8 - “DELAY END” FEATURE
• The Delay End Function is activated by pressing the Water Level button for at least 20
seconds until the number on the digital display indicates the desired end time.
For example, 5 = an end time of 5 hours from now.
WARNING:
Hot water only: Hot water can result in better cleaning efciency but is not suitable for all
clothing items. Please follow the instructions on the garment label.
DESCRIPTION OF FUNCTIONAL PROGRAMS
1. Preparation for washing:
• Open the lid and add clothes to the tub.
• Open the detergent compartment, add detergent and fabric softener, then close the
detergent compartment.
• Make sure that the tap for the Water Inlet Hose is turned on.
2. Press the “Power” button to switch the power ON.
3. Press the “program” button to select the desired program.
4. Press the “Water Supply” button and select the water temperature; cold, warm or hot
water.
5. Press the "Wash", "Rinse", and "Spin” buttons to adjust the washing time, spin-dry
speed, and rinse time respectively.
6. Press the “Start/Pause” button to start washing.
7. When operation is complete:
• The display will indicate "END".
• Open the lid to take out the clothes.
• Unplug the power plug and turn off the tap.

®
EVERYDAY EXCEPTIONAL
Brought to you by:
www.tevo.co.za
info@tevo.co.za
0861 77 88 88
1 - “POWER” BUTTON
• Press this button for 2 seconds to turn the power ON or OFF. Press START/PAUSE within 10
minutes or it will turn off automatically.
• When the washing cycle is complete, the washing machine will automatically switch OFF.
2 - “START/PAUSE” BUTTON
• Press this button to start the operation.
• During operation, press this button to pause a program temporarily, then press it again to
resume the program.
3 - ”PROGRAM” BUTTON
• Select the appropriate function according to the type of clothes and the degree of stains.
4 - “WATER LEVEL” BUTTON
• Select the desired water level based on your laundry load. Options range from 1.2L to 7.8L
or it may be indicated by a specic wash program that has been selected.
5 - “WATER SUPPLY” BUTTON
• Press this button to select the water temperature.
6 - “WASH, RINSE, & SPIN” BUTTONS
• Select one of these three options to customise your wash program by adjusting the number of
wash cycles, rinse cycles, or spin cycles according to your preference.
7 - “CHILD-LOCK” FEATURE
• This function is to prevent accidental operation of the appliance by children.
• The Child-Lock function will activate an alarm if the washing machine is opened.
• To turn the Child-Lock function ON or OFF, press the “Water Level” button, and press and
hold down the “Preset” button simultaneously.
8 - “DELAY END” FEATURE
• The Delay End Function is activated by pressing the Water Level button for at least 20
seconds until the number on the digital display indicates the desired end time.
For example, 5 = an end time of 5 hours from now.
WARNING:
Hot water only: Hot water can result in better cleaning efciency but is not suitable for all
clothing items. Please follow the instructions on the garment label.
DESCRIPTION OF FUNCTIONAL PROGRAMS
1. Preparation for washing:
• Open the lid and add clothes to the tub.
• Open the detergent compartment, add detergent and fabric softener, then close the
detergent compartment.
• Make sure that the tap for the Water Inlet Hose is turned on.
2. Press the “Power” button to switch the power ON.
3. Press the “program” button to select the desired program.
4. Press the “Water Supply” button and select the water temperature; cold, warm or hot
water.
5. Press the "Wash", "Rinse", and "Spin” buttons to adjust the washing time, spin-dry
speed, and rinse time respectively.
6. Press the “Start/Pause” button to start washing.
7. When operation is complete:
• The display will indicate "END".
• Open the lid to take out the clothes.
• Unplug the power plug and turn off the tap.
