W11761076A
STAND BLENDERS
5KSB2072A
PRODUCT GUIDE
2
PARTS AND FEATURES
3
4
5
6
7
1
2
O
n
/
O
f
f
S
m
o
o
t
h
i
e
I
c
e
C
r
u
s
h
C
l
e
a
n
1
8
5
0
M
a
x
m
l
1
7
5
0
1
2
5
0
1
0
0
0
7
5
0
5
0
0
2
5
0
1
5
0
0
m
l
2
0
0
0
M
a
x
1
7
5
0
1
5
0
0
1
2
5
0
1
0
0
0
7
5
0
5
0
0
2
5
0
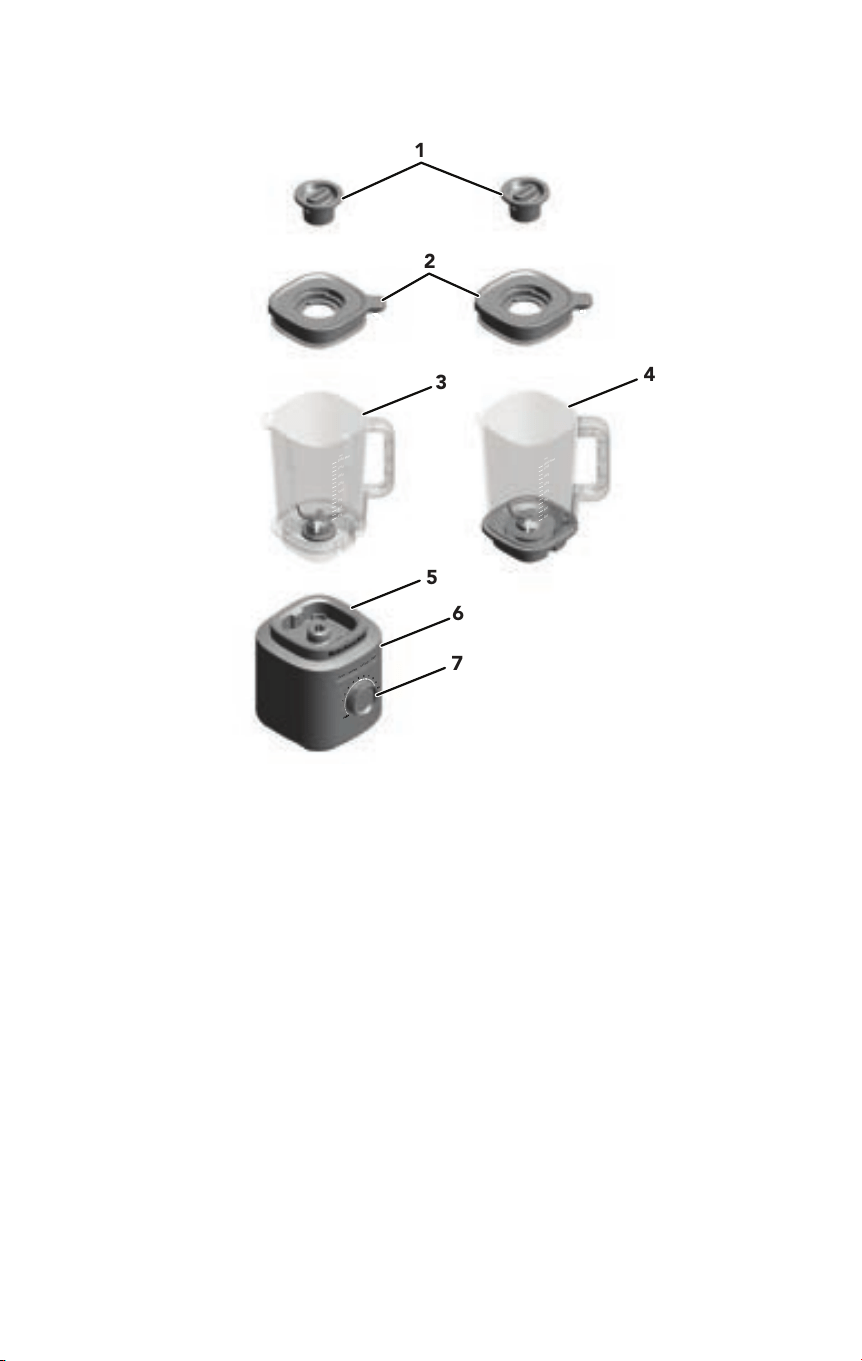
1. Lid Centre Cap
2. Lid
3. Jar (68 oz/2 L capacity)
4. Glass Jar
*
(62 oz/1.85 L capacity)
5. Base
6. Function Buttons On/Off, Smoothie, Ice
Crush, Clean
7. Precision Control Knob
*Only available Glass Jar model as an accessory 5KSBJA71.
EN
3
PRODUCT SAFETY
Your safety and the safety of others are very important.
We have provided many important safety messages in this manual and on your
appliance. Always read and obey all safety messages.
This is the safety alert symbol.
This symbol alerts you to potential hazards that can kill or hurt you
and others.
All safety messages will follow the safety alert symbol and either
the word “DANGER” or “WARNING.” These words mean:
DANGER
You can be killed or seriously injured
if you don't immediately follow
instructions.
WARNING
You can be killed or seriously injured
if you don’t follow instructions.
All safety messages will tell you what the potential hazard is, tell you how to reduce
the chance of injury, and tell you what can happen if the instructions are not
followed.
IMPORTANT SAFEGUARDS
When using electrical appliances, basic safety precautions
should always be followed, including the following:
1. Read all instructions. Misuse of appliance may result in
personal injury.
2. To protect against risk of electrical shock, do not put Stand
Blender Base in water or other liquid.
3. Appliances can be used by persons with reduced physical,
sensory or mental capabilities or lack of experience and
knowledge if they have been given supervision or instruction
concerning use of the appliance in a safe way and understand
the hazards involved.
4. This appliance shall not be used by children. Keep the
appliance and its cord out of reach of children.
5. This appliance is not intended for use by persons (including
children) with reduced physical, sensory or mental capabilities,
or lack of experience and knowledge, unless they have been
given supervision or instruction concerning use of the
appliance by a person responsible for their safety.

4
6. Turn the appliance off (On/Off), then unplug from the outlet
when not in use, before assembling or disassembling parts and
before cleaning. To unplug, grasp the plug and pull from the
outlet. Never pull from the power cord.
7. Avoid contacting moving parts.
8. Do not operate any appliance with a damaged cord or plug, or
after the appliance malfunctions, or is dropped or damaged in
any manner. Return appliance to the nearest Authorised
Service Facility for examination, repair, or electrical or
mechanical adjustment.
9. Do not use the appliance outdoors.
10. Do not let cord hang over edge of table or counter.
11. Keep hands and utensils out of container while blending to
reduce the risk of severe injury to persons or damage to the
Blender. A scraper may be used but must be used only when
the Blender is not running.
12. Blades are sharp. Handle carefully.
13. Be careful if hot liquid is poured into the Blender as it can be
ejected out of the appliance due to sudden steaming.
14. If the supply cord is damaged, it must be replaced by
KitchenAid, its service agent or similarly qualified persons in
order to avoid a hazard.
15. Always operate Blender with cover in place.
16. Never leave the appliance unattended while it is in operation.
17. When blending hot liquids or ingredients, Lid Centre Cap shall
remain in place over the lid opening. Always start on lowest
speed and slowly ramp to desired speed when blending hot
liquids or ingredients.
18. The use of attachments or accessories, including canning jars,
not recommended or sold by KitchenAid may cause fire,
electrical shock or injury.
19. Allow the appliance to cool completely before putting on or
taking off parts, and before cleaning the appliance.

EN
5
20. This appliance is intended to be used in household and similar
applications such as:
� staff kitchen areas in shops, offices and other working
environments;
� farmhouses;
� by clients in hotels, motels and other residential type
environments;
� bed and breakfast type environments.
SAVE THESE INSTRUCTIONS
For complete details on product information, instructions and
videos, including Guarantee information, visit
www.kitchenaid.com.au or www.KitchenAid.co.nz.
1700 PEAK POWER
DISCLAIMER: Laboratory measurement of peak input wattage, not the operational power at
the blade; UL rated at 1200 watts.
ELECTRICAL REQUIREMENTS
Voltage: 220-240 V~
Frequency: 50-60 Hz
NOTE: This Blender is equipped with a polarised plug (one blade is wider than the other). To
reduce the risk of electrical shock, this plug will fit in a polarised outlet only one way.
If the plug does not fit fully in the outlet, reverse the plug. If it still does not fit, contact a
qualified electrician. Do not modify the plug in any way.

6
GETTING STARTED
BLENDER FUNCTION GUIDE
This Blender offers precise control with 10 variable speeds and a Pulse function, allowing you
to customise your blending for any recipe. Convenient pre-programmed settings include
Smoothie, Ice Crush, and Clean. The Precision Control Knob also houses the Pulse function,
giving you even more flexibility. Since different recipes may require specific speeds for optimal
results, we encourage you to experiment and discover the perfect setting for your favourite
blends.
SETTING DESCRIPTION
BLENDING TIME
(MINUTES:
SECONDS)
SUGGESTED
ITEMS TO BLEND
Pulse
Allows precise
control of the
duration and
frequency of
blending.
Manual
Salsa, crumb
topping, chopped
nuts, fruits or
vegetables & more.
Variable Speed
(1–10)
Manual speeds offer
ultimate control of
the Blender.
3:00
Fruits, soups,
sauces, doughs,
vegetables, butters,
nuts, dips, frozen
desserts, purées.
Ice Crush
The Blender runs at
optimal speed to
crush ice.
00:30
To crush and chop
ice without adding
any liquid
ingredients.
Smoothie
The Blender will
operate at the high
speed to make
purées of items or
ingredients.
00:45
Fruits, vegetables,
ice cream and
yoghurt into thick
smoothie, blended
drinks and
milkshakes, etc.
Clean
Quick pulses of
power and high
speeds work to
clean the Blender
Jar.
00:15
Half of the Jar filled
with warm water and
1-2 drops of dish
soap.
PRODUCT USAGE
PREPARING THE BLENDER FOR USE
Before using your Blender for the first time, wipe clean Blender Base with a warm damp cloth.
Dry with a soft cloth. Wash Blender Jar, Lid, and Lid Centre Cap in warm, sudsy water (see
“Care and Cleaning” section). Rinse parts and wipe dry. Be sure the countertop beneath the
Blender and surrounding areas are dry and clean.
IMPORTANT: When moving your Blender, always support/lift from the Blender Base. The
Base will become disengaged from Jar if carried by Blender Jar or Blender Jar handle only.
EN
7
USING THE BLENDER
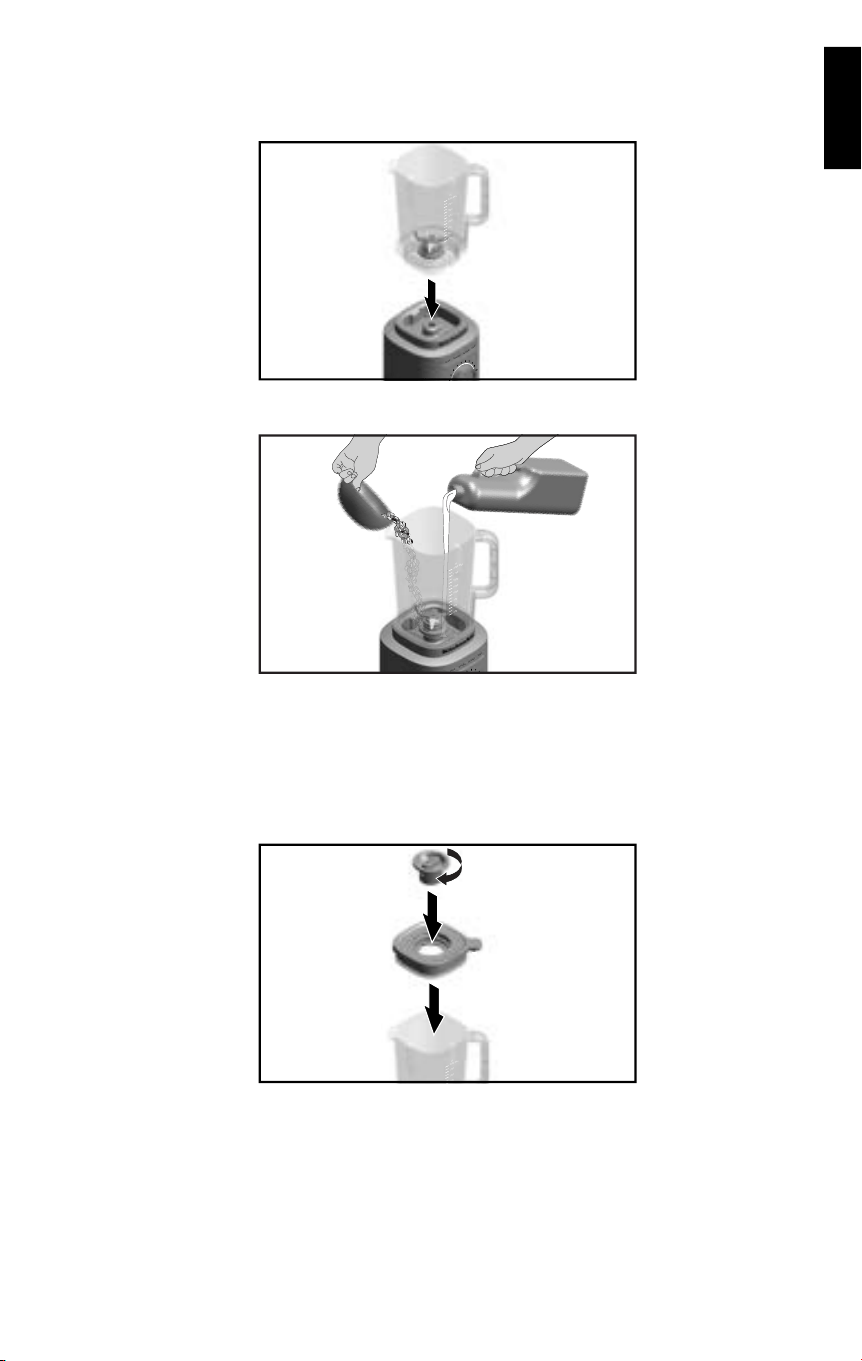
1. Place the Blender Jar by always using the front right side of the handle towards the
Precision Control Knob. Make sure that it is fully seated in the Base.
O
n
/
O
f
f
S
m
o
o
t
h
i
e
I
c
e
C
r
u
s
h
C
l
e
a
n
m
l
2
0
0
0
M
a
x
1
7
5
0
1
5
0
0
1
2
5
0
1
0
0
0
7
5
0
5
0
0
2
5
0
2. Place the ingredients into Jar. Add liquids first, then soft foods, then leafy greens, and ice
or frozen items last.
O
n
/
O
f
f
S
m
o
o
t
h
i
e
I
c
e
C
r
u
s
h
C
l
e
a
n
m
l
2
0
0
0
M
a
x
1
7
5
0
1
5
0
0
1
2
5
0
1
0
0
0
7
5
0
5
0
0
2
5
0
NOTE: Do not fill Blender Jar past the top-most measurement mark. Only place 40 oz
maximum of hot liquid in Jar.
3. Secure the lid firmly, ensuring the extended portion of the lid is positioned over the handle,
as shown in the image and twist the Lid Centre Cap onto the Lid to lock it in place before
blending.
Before operating the Blender, make sure the Jar is properly positioned on the Blender
Base. Then, plug the Blender into a earthed outlet.
m
l
2
0
0
0
M
a
x
1
7
5
0
1
5
0
0
1
2
5
0
1
0
0
0
8
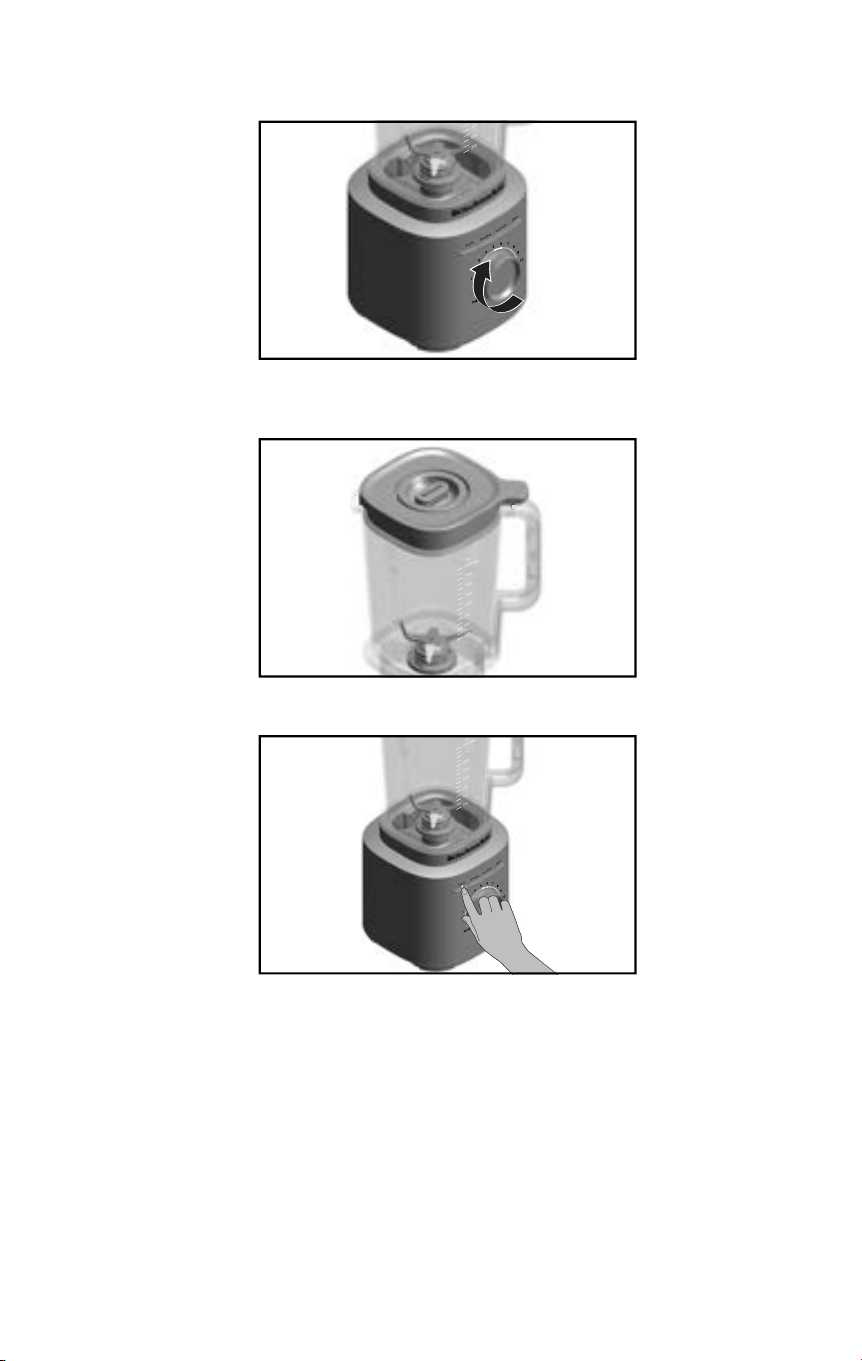
4.
Press the On/Off button and from there either select one of the preset functions or rotate
the Precision Control Knob clockwise for variable speed. To use the Pulse function simply
turn the Precision Control Knob counterclockwise.
O
n
/
O
f
f
S
m
o
o
t
h
i
e
I
c
e
C
r
u
s
h
C
l
e
a
n
1
0
0
0
7
5
0
5
0
0
2
5
0
5. When blending hot liquids or ingredients, place the Lid securely on the Jar and lock the Lid
Centre Cap in place. It is recommended to operate only on speed 1 while blending hot
liquid or food.
m
l
2
0
0
0
M
a
x
1
7
5
0
1
5
0
0
1
2
5
0
1
0
0
0
7
5
0
5
0
0
2
5
0
6. When finished, turn the Blender off by pressing the On/Off button. Unplug the Blender
before removing the Blender Jar.
O
n
/
O
f
f
S
m
o
o
t
h
i
e
I
c
e
C
r
u
s
h
C
l
e
a
n
m
l
2
0
0
0
M
a
x
1
7
5
0
1
5
0
0
1
2
5
0
1
0
0
0
7
5
0
5
0
0
2
5
0
IMPORTANT: Allow the Blender to fully stop before removing the Lid, Blender Jar, or pouring
out your blended ingredients.
EN
9
USING PULSE
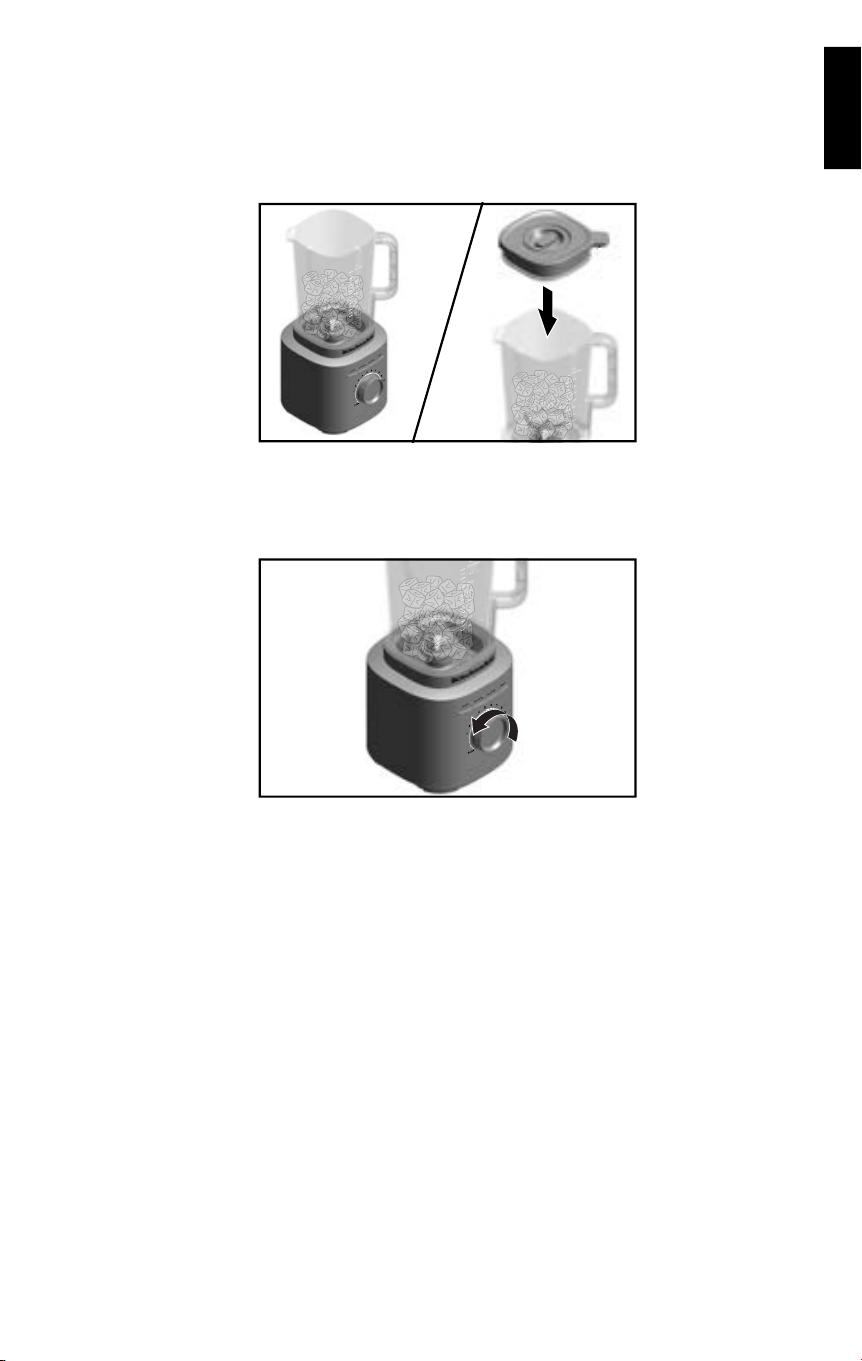
The Blender offers a Pulse function. When turning the Precision Control Knob to Pulse, it
allows you to manually control short bursts of high speed blending.
1. Place ingredients or ice cubes into the Blender Jar. Secure the lid firmly, ensuring the
extended portion of the lid is positioned over the handle, as shown in the image with Lid
Centre Cap on Blender Jar.
O
n
/
O
f
f
S
m
o
o
t
h
i
e
I
c
e
C
r
u
s
h
C
l
e
a
n
m
l
2
0
0
0
M
a
x
1
7
5
0
1
5
0
0
1
2
5
0
1
0
0
0
7
5
0
5
0
0
2
5
0
m
l
2
0
0
0
M
a
x
1
7
5
0
1
5
0
0
1
2
5
0
1
0
0
0
7
5
0
5
0
0
2
5
0
2. Turn and hold the Precision Control Knob from (•) to Pulse function. Use the Pulse function
for ice crushing. This provides maximum blending power. Control the blending duration by
holding the Precision Control Knob in the Pulse position. Release the Precision Control
Knob to (•) to stop the Blender. See the "Blender Function Guide" section for further
details.
O
n
/
O
f
f
S
m
o
o
t
h
i
e
I
c
e
C
r
u
s
h
C
l
e
a
n
m
l
2
0
0
0
M
a
x
1
7
5
0
1
5
0
0
1
2
5
0
1
0
0
0
7
5
0
5
0
0
2
5
0
NOTE: For variable speeds (from 1 to 10), the Blender will stop automatically after 3 minutes
of run time. For preset recipe programs, the Blender will automatically stop blending once the
cycle is complete.
NOTE: The Precision Control Knob should be turned to (•) position when use preset function.
During the preset function operation, turning the Precision Control Knob can change the preset
function to manual control.
TIP : Use half of standard ice cube tray or 7-8 standard ice cubes at a time for blending. The
Ice Crush function has been Optimised to crush and chop ice without adding any liquid
ingredients.
CARE AND CLEANING
IMPORTANT: Allow the appliance to cool completely before putting on or taking off parts, and
before cleaning the appliance.
CLEANING THE BLENDER AND ACCESSORIES
Clean the Blender and accessories thoroughly after every use.
NOTE: To avoid damaging the Blender, do not immerse the Blender Base or cord in water. To
avoid scratching the Blender, do not use abrasive cleansers or scouring pads.
10
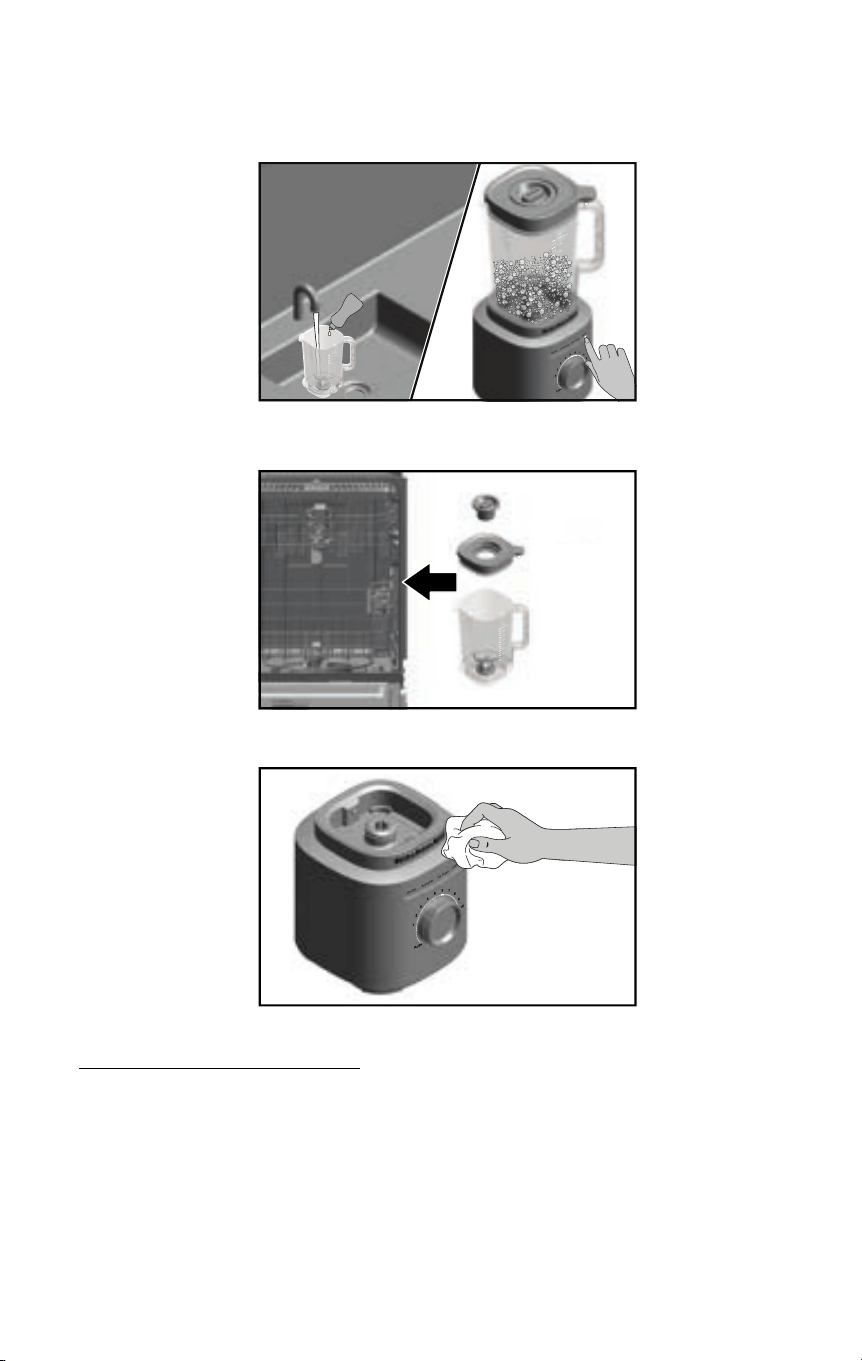
1. Remove any remaining contents from the Jar. Fill half of the Jar with warm water, and add
1 or 2 drops of dish-washing liquid. Place the Blender Jar on the Base. Make sure the
Blender Jar is fully seated in the Base. Secure the Lid on the Jar, press the Clean function,
and run the Blender for 15 seconds cleaning. Remove the Blender Jar, empty contents
and rinse with warm water.
m
l
2
0
0
0
M
a
x
1
7
5
0
1
5
0
0
1
2
5
0
1
0
0
0
7
5
0
5
0
0
2
5
0
O
n
/
O
f
f
S
m
o
o
t
h
i
e
I
c
e
C
r
u
s
h
C
l
e
a
n
m
l
2
0
0
0
M
a
x
1
7
5
0
1
5
0
0
1
2
5
0
1
0
0
0
7
5
0
5
0
0
2
5
0
2. The Lid, Jar Assembly, Lid Centre Cap can be cleaned in the top rack of a dishwasher.
NOTE: For best results, store the Jar without the Lid to air out any odours.
1
8
5
0
M
a
x
m
l
1
7
5
0
1
2
5
0
1
0
0
0
7
5
0
5
0
0
2
5
0
1
5
0
0
m
l
2
0
0
0
M
a
x
1
7
5
0
1
5
0
0
1
2
5
0
1
0
0
0
7
5
0
5
0
0
2
5
0
3. To clean the Blender Base and cord: Unplug the Blender before cleaning. Wipe clean the
Base and the cord with a warm, damp cloth and dry with a soft cloth.
O
n
/
O
f
f
S
m
o
o
t
h
i
e
I
c
e
C
r
u
s
h
C
l
e
a
n
FOR DETAILED INFORMATION ON OPERATING AND CLEANING THE BLENDER
Visit www.kitchenaid.com/quickstart for additional instructions with videos, inspiring recipes,
and tips on how to clean your Blender. For additional instructions refer online Product Guide,
videos, inspiring recipes, guarantee information and tips on how to clean and operate your
Blender.
EN
11
TROUBLESHOOTING
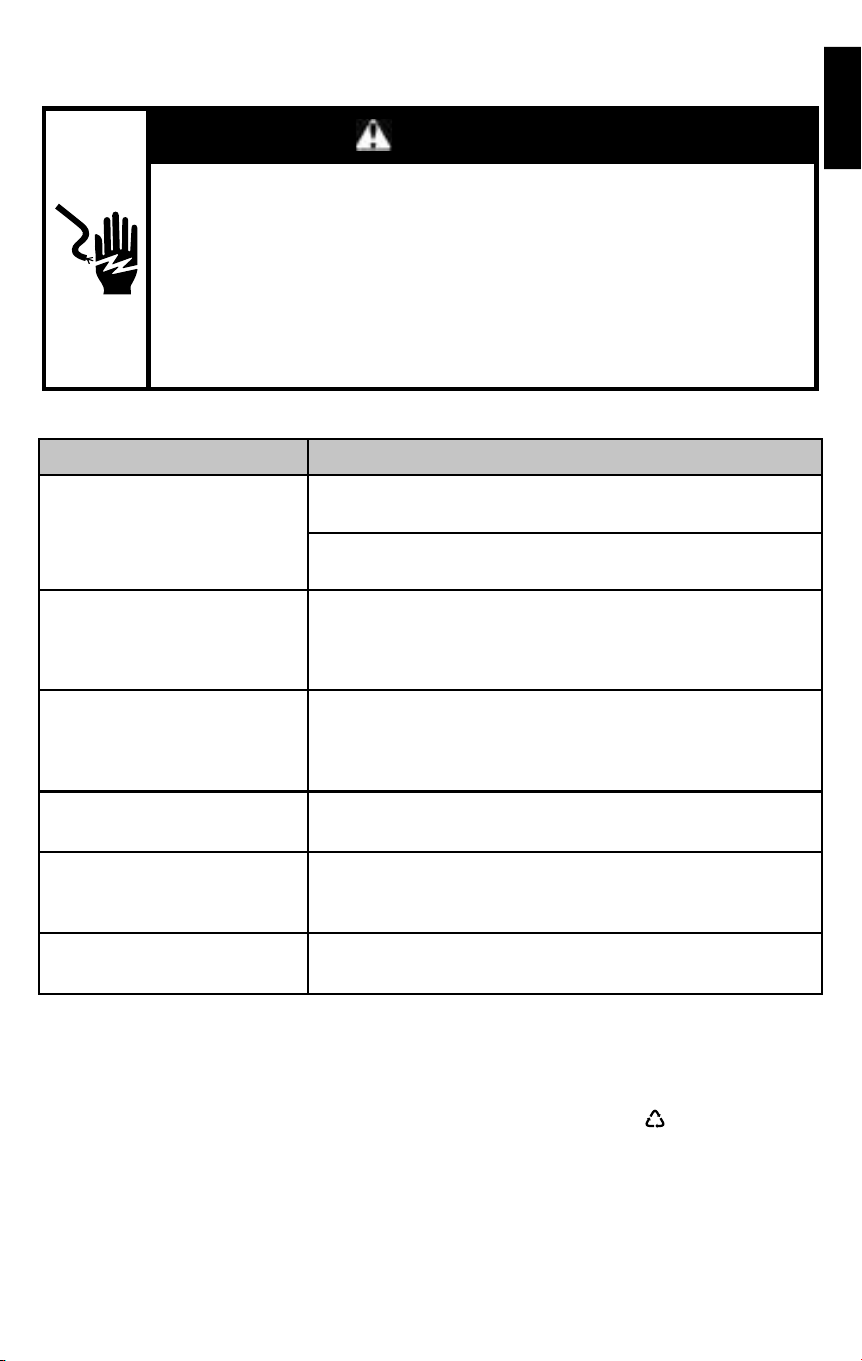
WARNING
Electrical Shock Hazard
Plug into an earthed outlet.
Do not remove earth prong.
Do not use an adapter.
Do not use an extension cord.
Failure to follow these instructions can result in death, fire, or
electrical shock.
If your Blender malfunctions or fails to operate
PROBLEM SOLUTION
If Blender fails to start
Check if the Blender is securely plugged into a earthed
3 prong outlet.
If you have a circuit breaker box, make sure the circuit is
closed.
Blender shuts off during
operation after running
continuously for 3 minutes.
If the Blender has shut off automatically after running for
3 minutes, reset the knob to (•) to continue with normal
operation. The Blender has an auto-shutoff feature as a
safety precaution.
Blender shuts off during
operation before the
automatic 3 minutes shutoff.
If the Blender has been operating in back-to-back cycles
under a heavy load, turn off and unplug the machine and
allow it to cool completely. If the Blender still does not work
after cooling down, please call the service 800 number.
If ingredients are stuck or not
blending
Unplug the Blender. Remove the Jar and use a spatula to
rearrange ingredients in the Jar.
If Blender stops while
blending and the white LED
ring flashes rapidly
An error is detected in the Blender. Contact an authorised
service centre for assistance. Please see the "Terms of
KitchenAid Guarantee" sections.
If the white LED ring is off
10 minutes of no activity will make the Blender go into
sleep mode. To wake up the Blender, press (On/Off) button.
ELECTRICAL EQUIPMENT WASTE DISPOSAL
DISPOSAL OF PACKING MATERIAL
The packing material is recyclable and is marked with the recycle symbol . The various parts
of the packing must therefore be disposed of responsibly and in full compliance with local
authority regulations governing waste disposal.

12
RECYCLING THE PRODUCT
� By ensuring this product is disposed of correctly, you will help prevent potential negative
consequences for the environment and human health, which could otherwise be caused by
inappropriate waste handling of this product.
� The symbol
on the product or on the accompanying documentation indicates that it
should not be treated as domestic waste but must be taken to an appropriate collection
centre for the recycling of electrical and electronic equipment.
For more detailed information about treatment, recovery and recycling of this product, please
contact your local city office, your household waste disposal service or the shop where you
purchased the product.
CUSTOMER SERVICE
In Australia:
For any questions, or to find the nearest Authorised KitchenAid Service Centre, please find our
contact details below.
NOTE: All service should be handled locally by an Authorised KitchenAid Service Centre.
Toll free number: 1-800-990-990
Address Australia:
KitchenAid Australia Pty Ltd
6-8 Billbrooke Close
Cameron Park NSW 2285, Australia
Phone: 1-800-990-990
Email: [email protected]
In New Zealand:
Website: www.KitchenAid.co.nz
Email: [email protected]
Phone: 0800 881 200
In other countries:
For all product related questions and after-sales matters, please contact your dealer to obtain
the name of the nearest Authorised KitchenAid Service/Customer Centre.
For complete details on product information, instructions and videos, including Guarantee
information, visit our website at: www.KitchenAid.com.au.
©2025 All rights reserved.

NOTES

NOTES

NOTES

©2025 All rights reserved.
W11761076A
05/25

