
V1.9 1024
Installation + User Manual
OCIG905B
Designed to Enhance
EST. �98�
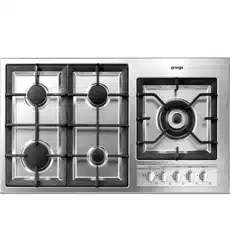
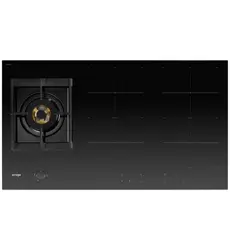
Hybrid Cooktop
90cm
omegaappliances.com.au

02User Manual OCIG905B
Contents
03
04
08
�4
16
25
26
28
31
33
34
Welcome
Safety Information
Installation Instructions
Your Hybrid Cooktop
Operating Instructions
Cooking Guidelines
Care & Maintenance
Troubleshooting
Technical Specifications
Purchase Details
Warranty Information

03User Manual
Congratulations on purchasing your new Hybrid Cooktop.
Omega appliances are proudly owned and distributed within Australia by
Residentia Group Pty Ltd.
Please refer to the warranty chapter at the rear of this manual for information
regarding your product’s parts and labour warranty, or visit us online at:
→ residentiagroup.com.au
Here at Residentia Group, we are customer obsessed and our Support Team are there
to ensure you get the most out of your appliance. Should you want to learn more about
your unit, and importantly, taking care of the appliance, our Support Team are here to
help. You can use our online Support Centre at any time by visiting:
→ support.residentiagroup.com.au
Or you can contact us by dialling: 1300 11 HELP (4357)
It is important that you read through the following user manual thoroughly, in order to
familiarise yourself with the installation and operation requirements of your appliance,
and to ensure optimum performance.
Again, thank you for choosing an Omega appliance and we look forward to being of
service to you.
Kind Regards,
The Residentia Team
Residentia Group
Office 165 Barkly Avenue Burnley
Victoria Australia 3121
ACN 70 600 546 656
Online residentia.group
omegaappliances.com.au
Post PO BOX 5177 Burnley
Victoria Australia 3121
Phone 1300 11 4357
Email support@residentia.group
Welcome
Customer Care
At Residentia Group, we strongly encourage the use of authentic spare parts to guarantee the best results.
When contacting our spare parts team through �300 �� HELP, or by emailing parts@residentiagroup.com.au,
ensure that you have the model and serial numbers on hand, which are found on your appliances’ rating plate.

04User Manual OCIG905B
Important Safety Instructions
This cooktop must only be installed by a suitably licensed and
qualified installer in accordance with the instructions provided.
Incorrect installation may result in bodily harm, damage to
property, and void the product’s warranty.
• This appliance is intended for domestic use only, and must
only be used for food preparation.
• Do not use this appliance for anything other than its
intended purpose. Other uses are not recommended,
and may cause fire, electric shock or personal injury.
• The use of attachments is not recommended by the
appliance manufacturer and distributor as they may prove
hazardous, or cause damage to your appliance.
• Ensure you remove all the packaging, taking care to discard
waste responsibly.
• Under absolutely no circumstances should you install
or use a damaged appliance.
• Always move the appliance carefully.
• The appliance must always be installed by an authorised
technician or similarly qualified person. Please note that
the manufacturer is not held responsible for any damage
caused by defective placement or installation done by an
unauthorised personnel.
• To arrange an authorised technician please contact our
friendly support team at 1300 11 HELP (4357).
• The manufacturer is not responsible if incorrect installation
or use causes injuries and damages.
• Before installing and using your appliance, carefully read the
supplied instructions. Always keep the instructions with you
for future reference.
Health Hazard
• This appliance complies with electromagnetic safety
standards.
Electrical Shock Hazard
• WARNING: Before any procedures, it is important to check
that the appliance is disconnect from the electrical mains.
•
CAUTION: The appliance must be earthed.
• Ensure the data on the cooktop’s rating label agrees
with the power supply. If not, contact an electrician.
• Always use a correctly installed shockproof socket.
Do not use any multi-plug adapters or extension cables.
• Connect the mains plug to the mains socket only at the
end of the installation. Make sure that there is access to
the mains plug after the installation. Do not connect the
appliance plug with a power connection board.
• Do not pull the mains cable to disconnect the appliance.
Instead pull the plug portion fo the mains cable.
• Never touch the mains cable or plug with wet hands,
nor should you touch the oven with wet hands or feet.
•
WARNING: If the supply cord is damaged, it must be
replaced by the manufacturer or its service agent.
•
WARNING: All electrical work must be done in accordance
with local and national electrical codes as applicable and
should be undertaken by licensed and qualified persons only.
Failure to follow these instructions can result in death, fire or
electrical shock.
• Do not cook on a broken or cracked cooktop. If the
cooktop surface is break or crack, switch the appliance off
immediately at the mains power supply (wall switch) and
contact a qualified technician.
• Switch the cooktop off at the wall before cleaning
or maintenance.
• Failure to follow this advice may result in electrical shock
or death.
During use
• This product is designed to cook food inside ordinary homes
and for non-professional purposes. It should not be used for
any other purpose.
• After using the appliance, make sure that all controls are in
“CLOSED” or “OFF” position.
• If you use an electrical socket close to this appliance, take
care that the cables of the appliances you are using are far
away from the hot parts of this appliance.
Safety Information

05User Manual
Safety Information
Children's Safety
• Adults and children must not operate the appliance without
supervision if they do not have the physical or mental ability,
or if they lack the knowledge and experience required to
operate the appliance correctly.
• Never allow children to play with the appliance. Do not allow
children to go near the cooktop while it is operating without
supervision, children must always keep a safe distance from
the appliance at all times.
• Under absolutely no circumstances should cleaning and
user maintenance be carried out by children.
• This appliance can be used by children aged from 8 years
and above and persons with reduced physical, sensory or
mental capabilities or lack of experience and knowledge if
they have been given supervision or instruction concerning
use of the appliance in a safe way and understand the
hazards involved.
• The appliance and its accessible parts become hot during
use. Care should be taken to avoid touching heating
elements or placing objects by the cooktop, especially while
it is in operation, as it may be dangerous.
• If the burners are in operation for a prolonged period of time,
the space between them can also become hot.
• The exposed parts of this appliance heat up during cooking
and remain hot for some time even after it is switched off.
Keep children well away until the appliance has cooled down.
During Use
• Please follow the manufacturer’s instructions when using
certain cookware. Aluminium foil and plastic containers can
melt and stick on hot burners.
• This product is designed to cook food inside ordinary homes
and for non-professional purposes. It should not be used for
any other purpose.
• After using the appliance, make sure that all controls are in
“CLOSED” or “OFF” position.
• If you use an electrical socket close to this appliance, take
care that the cables of the appliances you are using are far
away from the hot parts of this appliance.
• Never operate the cooktop when there is nothing on top. Do
not heat empty pots or pans, as this will damage the pan’s
base. Do not allow saucepans to boil dry, in particular enamel
and aluminium saucepans.
• The base of the cookware used for the cooktop must be
clean, dry and flat, as uneven surfaces can affect the cooking
process or damage the burners’ surface.
• Metallic objects such as knives, forks, spoons and lids should
not be placed on the cooktop as they can get hot.
• Do not use a roasting dish that is so large it has to be heated
using two burners, as this will cause too much heat to
accumulate, damaging your appliance.
• Before cooking, always ensure thar burner bodies and trivets
are properly located on the cooktop (i.e. correctly assembled
and positioned).
•
WARNING: Do not use or store flammable materials in
the appliance storage drawer (if applicable) or near this
appliance. Never leave or store flammable objects on or
near the cooktop. It is suggested to store cooking oils in a
cupboard away from the appliance.
• Overheated oil or fat can ignite very quickly. Never leave fat
or oil to cook unattended. Should the oil ignite, do not try and
put it out by pouring water on it. Cover the pan immediately
with a lid or plate, and switch off the cooktop. Let the
cookware to cool down on the cooktop before removing.
• Be careful with food that is prepared using drinks with
a high alcohol content, such as wine, rum or cognac.
Alcohol evaporates at high temperatures, and in some
circumstances the alcoholic vapors can catch fire. Only use
small quantities of drinks with a high alcohol content.
• Prolonged and intensive use of the appliance may call for
additional ventilation, for example the opening of a window,
or increasing the power level of your rangehood.
Hot Surface Hazard
• During use, accessible parts of this appliance will become
hot enough to cause burns.
• Do not let your body, clothing or any item other than suitable
cookware contact the ceramic glass until the surface is cool.
• Metallic objects such as knives, forks, spoons and lids should
not be placed on the hob surface since they can get hot
• Children less than 8 years of age shall be kept away unless
continuously supervised.
• Handles of saucepans may be hot to touch. Check saucepan
handles do not overhang other cooking zones that are on.
Keep handles out of reach of children.
• Failure to follow this advice could result in burns and scalds.

06User Manual OCIG905B
Installation
• Installation of the appliance and its connection to the gas
and electrical mains must only be carried out by an qualified
authorised technician.
• Before any procedure, it is important to check that the
appliance is disconnected from the electrical mains. The
Manufacturer declines all responsibility for any damage
arising from installation in breach of the regulations in
force or from failure to comply with the accident prevention
regulations.
• It is risky to modify or attempt to modify the characteristics
of this product.
• After removing the appliance from the packaging, make sure
that it is undamaged and that the electrical lead is in perfect
condition. Otherwise, contact your dealer before putting the
appliance into operation.
• The Manufacturer declines all responsibility in case of failure
to comply with the accident prevention regulations.
• Make sure that air is able to circulate freely around the
appliance. Poor ventilation produced a shortage of oxygen
• Make sure that the appliance is supplied with the type of
gas indicated on the relative sticker next to the mains gas
connection pipe.
• Use of a gas cooking appliance produces heat and moisture
in the room in which it is installed. Ensure that the room
is well ventilated by keeping the air intakes open and in
good working order or by installing an extractor hood with
discharge pipe.
• If the appliance is used intensively for a long time the
effectiveness of the ventilation will have to be increased, for
example by opening a window or increasing the power of any
electric extractor fan.
•
WARNING: This appliance is not suitable to install and
operate with aftermarket lids or covers.
Cut Hazard
• The razor-sharp blade of a cooktop scraper is exposed when
the safety cover is retracted. Use with extreme care and
always store safely and out of reach of children.
• Failure to use caution could result in injury or cuts.
Important safety instructions
• Never leave the appliance unattended when in use. Boilover
causes smoking and greasy spillovers that may ignite.
• Never use your appliance as a work or storage surface.
• Never leave any objects or utensils on the appliance.
• Never use your appliance for warming or heating the room.
• After use, always turn off the cooking zones and the cooktop
as described in this manual (i.e. by using the touch controls).
• Do not allow children to play with the appliance or sit, stand,
or climb on it.
• Do not store items of interest to children in cabinets above
the appliance. Children climbing on the cooktop could be
seriously injured.
• Do not leave children alone or unattended in the area where
the appliance is in use.
• Children or persons with a disability which limits their
ability to use the appliance should have a responsible and
competent person to instruct them in its use. The instructor
should be satisfied that they can use the appliance without
danger to themselves or their surroundings.
• Do not repair or replace any part of the appliance unless
specifically recommended in the manual. All other servicing
should be done by a qualified technician.
• Do not use a steam cleaner to clean your cooktop.
• Do not place or drop heavy objects on your cooktop.
• Do not stand on your cooktop.
• Do not use pans with jagged edges or drag pans across the
glass surface as this can scratch the glass.
• Do not use scourers or any other harsh abrasive cleaning
agents to clean your cooktop, as these can scratch the
ceramic glass.
• If the supply cord is damaged, it must be replaced by the
manufacturer, its service agent or similarly qualified persons
in order to avoid a hazard.
• This appliance is intended to be used in a domestic
household environment only! Commercial use of any kind is
not covered under the manufacturer's warranty!
•
WARNING: Do not modify this appliance.
Safety Information
07User Manual
Safety Information
• WARNING: The appliance and its accessible parts become
hot during use.
• Care should be taken to avoid touching heating elements.
• WARNING: Unattended cooking on a hob with fat or oil can
be dangerous and may result in fire. NEVER try to extinguish
a fire with water, but switch off the appliance and then cover
flame e.g. with a lid or a fire blanket.
• WARNING: Danger of fire: do not store items on the cooking
surfaces.
• WARNING: If the surface is cracked, switch off the appliance
to avoid the possibility of electric shock, for hob surfaces of
glass-ceramic or similar material which protect live parts.
• A steam cleaner is not to be used.
• The appliance is not intended to be operated by means of an
external timer or separate remote-control system.
• CAUTION: The cooking process has to be supervised.
A short term cooking process has to be supervised
continuously.
• Power cord can’t accessible after installation.
•
WARNING: Incorrect repairs are dangerous. Repairs may
only be carried out by an authorised service technician or a
similarly qualified individual.
•
WARNING: Never replace a damaged power cable yourself.
Power cables must only be replaced by an authorised service
technician or a similarly qualified individual. Carefully switch
off the circuit breaker in the fuse box if the appliance appears
faulty, and contact our friendly after sales support team for
further instructions.
•
WARNING: In order to avoid a fire, this appliance must be
regularly cleaned to avoid any potential fat or oil build-up.
•
WARNING: Do not spray aerosols in the vicinity of this
appliance while it is in operation.
• Do not use harsh or abrasive cleaners or sharp metal
scrapers to clean the cooktop surface, as these tools may
scratch the surface which can result in tarnishing the
cooktop finish, or the glass (if relevant) shattering.
•
WARNING: Do not use steam cleaners.
•
WARNING: Do not use this appliance as a space heater.
• If the hob surface is made of toughened ceramic glass:
if the surface cracks, switch off the appliance to avoid the
possibility of electric shock or further damage, and contact
our after sales support team for guidance.
• Ensure that this product is disposed of correctly, to prevent
any possible damage to the environment and to human
health which might otherwise be caused if the appliance
were to be disposed of incorrectly.
• This product may not be treated as normal household waste.
It should be taken to a collection point for the recycling of
electrical and electronic goods.
• As this appliance requires a specialist waste disposal, for
further information regarding the treatment, recovery and
recycling of this product please contact your local council,
your household waste disposal service or the store of
purchase.
• To disassemble and remove the appliance, perform the
installation instructions in reverse order. Always perform
disassembly with two people to avoid risk of injuries.
Installation and disassembly must always be carried out
by either an authorised service technician, or a similarly
qualified person.
• Materials used for packaging the appliance include those
that are environmentally friendly and are 100% recyclable.
Environmentally materials have been marked and can be
identified with the appropriate symbol.
• Always wear appropriate clothing when cooking, such
as non-flammable clothes that cover
torso, legs and feet.
• The symbol on the product indicates
that it may not be treated as normal
household waste, instead it should
be taken to a collection point for
the recycling of electrical and
electronic goods.
• By ensuring that this appliance is
disposed of correctly, you will help to
prevent any possibledamage to our
environment and to human health,
which might otherwise be caused if it were disposed of in the
wrong way.
• This appliance requires specialist waste disposal. For further
information regarding the treatment, recovery and recycling
of this product please contact your local council, your
household waste disposal service, or the shop where you
purchased the appliance.
• For further questions please contact our support team
at 1300 11 4357 or visit support.residentiagroup.com.au

08User Manual OCIG905B
Technician Instructions
CAUTION: This appliance must only be installed and used
in rooms with permanent ventilation to local standards.
Installation of the appliance and its connection to the gas
and electrical mains must only be carried out by an qualified
authorised technician.
Before any procedure, it is important to check that the
appliance is disconnected from the electrical mains. The
Manufacturer declines all responsibility for any damage arising
from installation in breach of the regulations in force or from
failure to comply with the accident prevention regulations.
Location Recommendations
CAUTION: This appliance must only be installed and used
in rooms with permanent ventilation to local standards.
To ensure the proper operation of the gas appliance, it is
essential that the required air for gas combustion can naturally
flow into the room. The intake of air should occur through
openings in the exterior walls, and these openings must possess
an unobstructed cross-section of not less than 2m³/h for each
kilowatt of power (refer to the total power in kilowatts on the
appliance rating label).
Construct the opening in a manner that prevents obstruction
from inside or outside, and avoid placing it close to the floor. It
is advisable to position the opening on the side opposite to the
discharge of flue gases. In cases where providing these openings
within the room of appliance installation is impractical, the
necessary air may be drawn from an adjacent room under the
following conditions:
• The adjacent room is not a bedroom or a hazardous
environment.
• The adjacent room has proper ventilation.
• There are openings for ventilation between the room where
the appliance is installed and the adjacent room.
Discharge of flue gases
Gas cooking appliances are required to expel their flue gases
either through rangehoods connected directly to flues or to the
outdoors. If it is not possible to install a rangehood, an electric
fan must be installed on the exterior wall or window of the room.
It is essential to ensure that the ventilation opening can be
proportionally increased based on the delivery rate of the fan.
For kitchen applications, the electric fan's delivery rate must
guarantee an hourly air exchange of 3-5 times its volume.
In both instances, it is strictly prohibited to use flues that are
already in use by other appliances for the purpose of discharging
flue gases.
Operating with Natural Gas
Your appliance is designed to run both LPG and natural gas.
Conversion for use of LPG and substitute natural gases must
only be undertaken by a qualified person. Despite your appliance
having been set-up for use with natural gas, it can be converted
for use with LPG.
Gas Supply Connection
The gas connection must adhere to local standards. During
installation, incorporate a safety tap at the end of the pipeline.
The appliance is dispatched from the factory having undergone
testing and preset for the specified gas type, as indicated on the
plate located inside the bottom guard near the gas connection
pipe. Ensure that the gas supplied to the appliance matches the
type specified on the plate. If not, refer to the instructions in the
"Adapting to Different Types of Gas" section.
For optimal efficiency and minimal consumption, verify that the
gas supply pressure aligns with the values specified. If the gas
used differs or varies, a suitable pressure regulator must be
installed on the supply pipeline.
Attach the union at the end of the gas train, complete with a
GJ1/2" threaded nut. Insert the gasket between the components
as illustrated, ensuring compliance with local standards.
Assemble the parts without excessive force, orient the union as
needed, and then securely tighten all components.
Gas System Connection Guidelines
Connect the appliance to the gas system using a rigid metal
pipe and regulation unions or employ a stainless steel hose that
complies with local standards. If using metal hoses, ensure they
are positioned to avoid contact with mobile parts and prevent
any crushing, especially when combining the hob with an oven.
The gas intake connection of the appliance features a "male
thread." When making the connection, be cautious not to apply
any stresses to the appliance.
WARNING: After completing the installation, always check
the absolute tightness of all unions using a soapy solution.
Avoid using an open flame for this check.
Installation Instructions

09User Manual
Adapting to Different Gas Types
To accommodate various gas types, follow these steps for
changing the nozzles:
• Remove the cooktop trivets standee.
• Take off the burner caps and flame caps from the burners.
• Utilise a size 7 socket wrench to unscrew and remove
the existing nozzles. Replace them with the nozzles
corresponding to the type of gas to be used (refer to the
table for guidance).
• Reassemble the parts by reversing the operations described
above.
• Replace the setting data (located close to the mains gas
connection) with the information for the new type of gas.
If the gas pressure differs from the specified value (or is
variable), install a suitable piped gas pressure regulator
complying with the standard on the supply pipeline.
Setting the Minimum Flame Level
To set the minimum flame level, follow these steps:
• Light the burner as previously described.
• Turn the tap to the minimum flame position.
• Remove the control knobs.
• For LPG to NG:
Use a thin blade screwdriver to turn the by-pass screw located
above the left of the gas valve shaft, as shown on the right
Turn the by-pass screw clockwise to the end completely.
Turn it anti-clockwise: 1/2 turn for the Triple Flame burner, 3/4
turn for the Large Rapid burner, 1/2 turn for the Medium Semi-
rapid Burner, and 3/8 turn for the Auxiliary burner.
For NG to LPG:
Use a thin blade screwdriver to turn the by-pass screw located
above the left of the gas valve shaft, as shown on the right.
Turn the by-pass screw clockwise to the end.
• Finally, check that the burner does not go out when the tap is
turned quickly from the maximum to the minimum position.
Electrical Shock Hazard
• Disconnect the appliance from the mains electricity supply
before carrying out any work or maintenance on it.
• Connection to a good earth wiring system is essential
and mandatory.
• Means for disconnection must be incorporated in the fixed
wiring in accordance with the wiring rules.
• Alterations to the domestic wiring system must only be
made by a qualified electrician.
• Failure to follow this advice may result in electrical shock
or death.
Cut Hazard
• Take care - panel edges are sharp.
• Failure to use caution could result in injury or cuts.
Important safety instructions
• Read these instructions carefully before installing or using
this appliance.
• No combustible material or products should be placed on
this appliance at any time.
• Please make this information available to the person
responsible for installing the appliance as it could reduce
your installation costs.
• In order to avoid a hazard, this appliance must be installed
according to these instructions for installation.
• This appliance is to be properly installed and earthed only by
a suitably qualified person.
• This appliance should be connected to a circuit which
incorporates an isolating switch providing full disconnection
from the power supply.
• WARNING: Use only hob guards designed by the
manufacturer of the cooking appliance or indicated by the
manufacturer of the appliance in the instructions for use as
suitable or hob guards incorporated in the appliance. The
use of inappropriate guards can cause accidents.
• Failure to install the appliance correctly could invalidate any
warranty or liability claims.
• Regarding the details of installation in this section.
Installation Instructions

10User Manual OCIG905B
Nominal Test Point Pressures:
Natural Gas = 1.00kPa LPG = 2.75kPa
For further technical information regarding your cooktop,
please see the chapter ‘Technical Specifications’ found
between pages 13 and 19, and your cooktop’s rating label.
Testing the Gas Supply
Check the manometer zero point is correct. Then connect the
manometer to the cooktop pressure point. This is located on
the regulator.
Turn on the gas supply and electricity and try to ignite the gas.
Note that it will take additional time to light the gas for the first
time as air needs to be purged from the pipes.
Following this, with the appliance operating, carefully check the
outlet pressure:
• First with all burners of operating at maximum, followed by
operating. the smallest burner at minimum.
• Under these conditions the outlet pressure should not vary
from the nominal outlet pressure of 1.00kPa by more than
0.20kPa.
If the regulator appears to not be performing satisfactorily, then
check the following points:
• If the outlet pressure is consistently too low then the inlet
pressure may be too low and adjustment of an upstream
regulator may be needed, or an upstream regulator or valve
with insufficient flow capacity may be present in the gas
supply line.
• If this is suspected then it may be necessary to repeat the
checks whilst measuring both the inlet and outlet pressure
to determine if the inlet pressure is in the range 1.13 – 5kPa.
• Check that the regulator has been fitted to the gas supply
line in the correct orientation, the arrow on the base of the
body indicates the direction of gas flow.
Once these checks have been completed, if the regulator still
fails to perform in a satisfactory manner it should be replaced.
LPG Conversion
Your cooktop has been set up for natural gas usage, however
a conversion kit is included with the product for universal LPG
usage. The conversion kit contains the appropriate injectors, a
brass test point and an LPG sticker.
• To ensure proper operation, the gas pressure of this
appliance must be verified to be 2.75 kPa. The test point is
located at the Auxiliary burner injector, as shown below.
Please follow the procedure below if a conversion to suit
UNIVERSAL LPG is required:
• Disconnect the appliance from the power supply.
• Ignite the Semi-Rapid burner and set it to the high flame
position. Ensure all other burners are turned off.
• Zero the manometer, then connect flexible tubing securely
over the Auxiliary burner injector. Hold the tubing firmly
in place.
• Press in the corresponding burner control knob and turn
it to the high flame position to measure the gas pressure.
• If the gas pressure reads 2.75 kPa, reassemble the burner
and perform final checks according to these instructions.
• If the pressure is not 2.75 kPa, disconnect the appliance
and inspect, adjust, or replace the LPG cylinder regulators
as needed, following the guidelines in AS/NZS 5601.
Installation Instructions
11User Manual
Preparing the Cut-Out
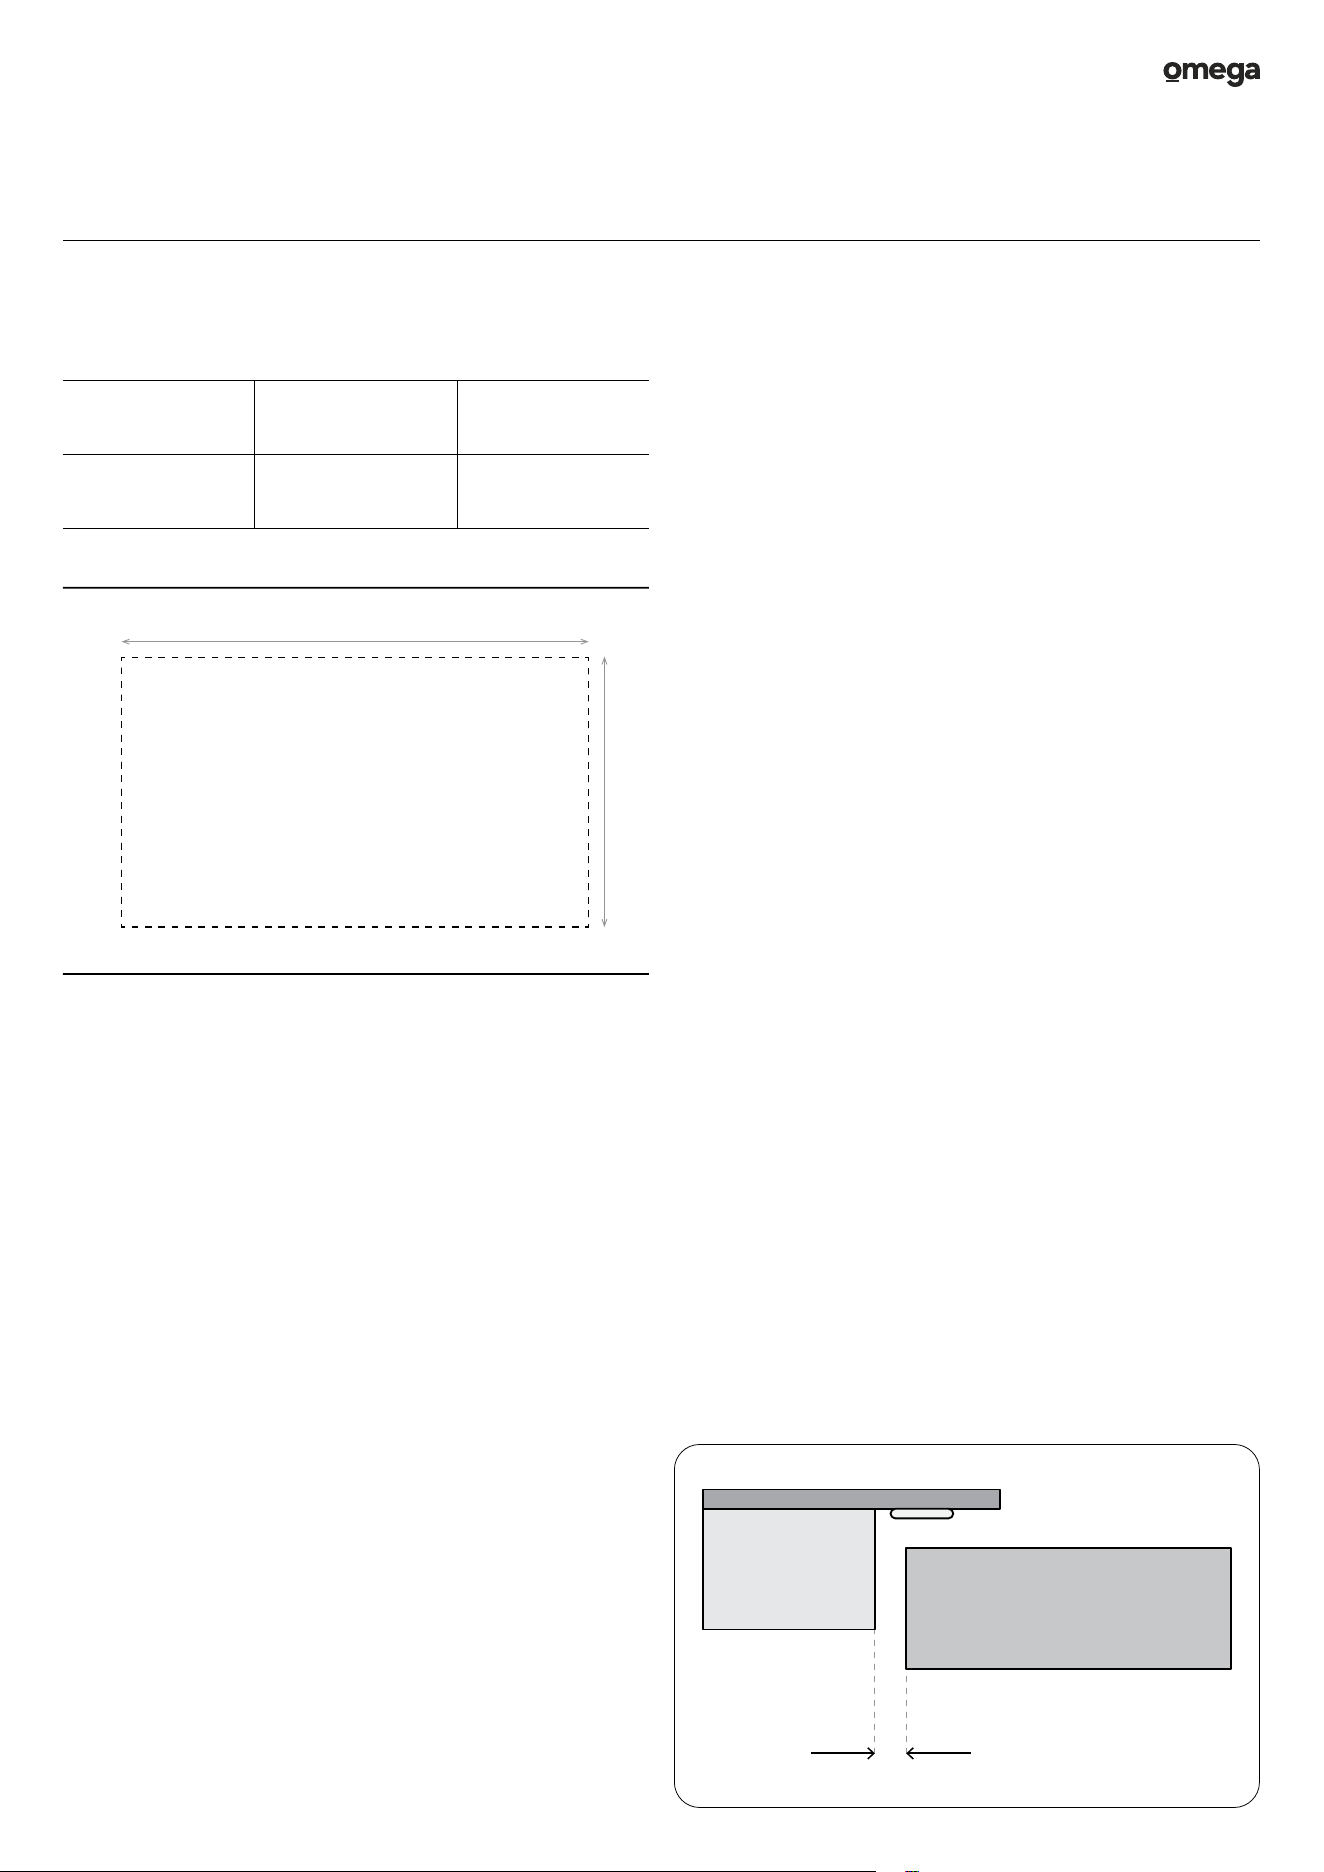
Cut-Out Dimensions for Hybrid Cooktop:
Model Width (W) Depth (D)
OCIG905B 870mm 490mm
W
D
• The bench cut-out should be made as per the cutout
dimensions shown above.
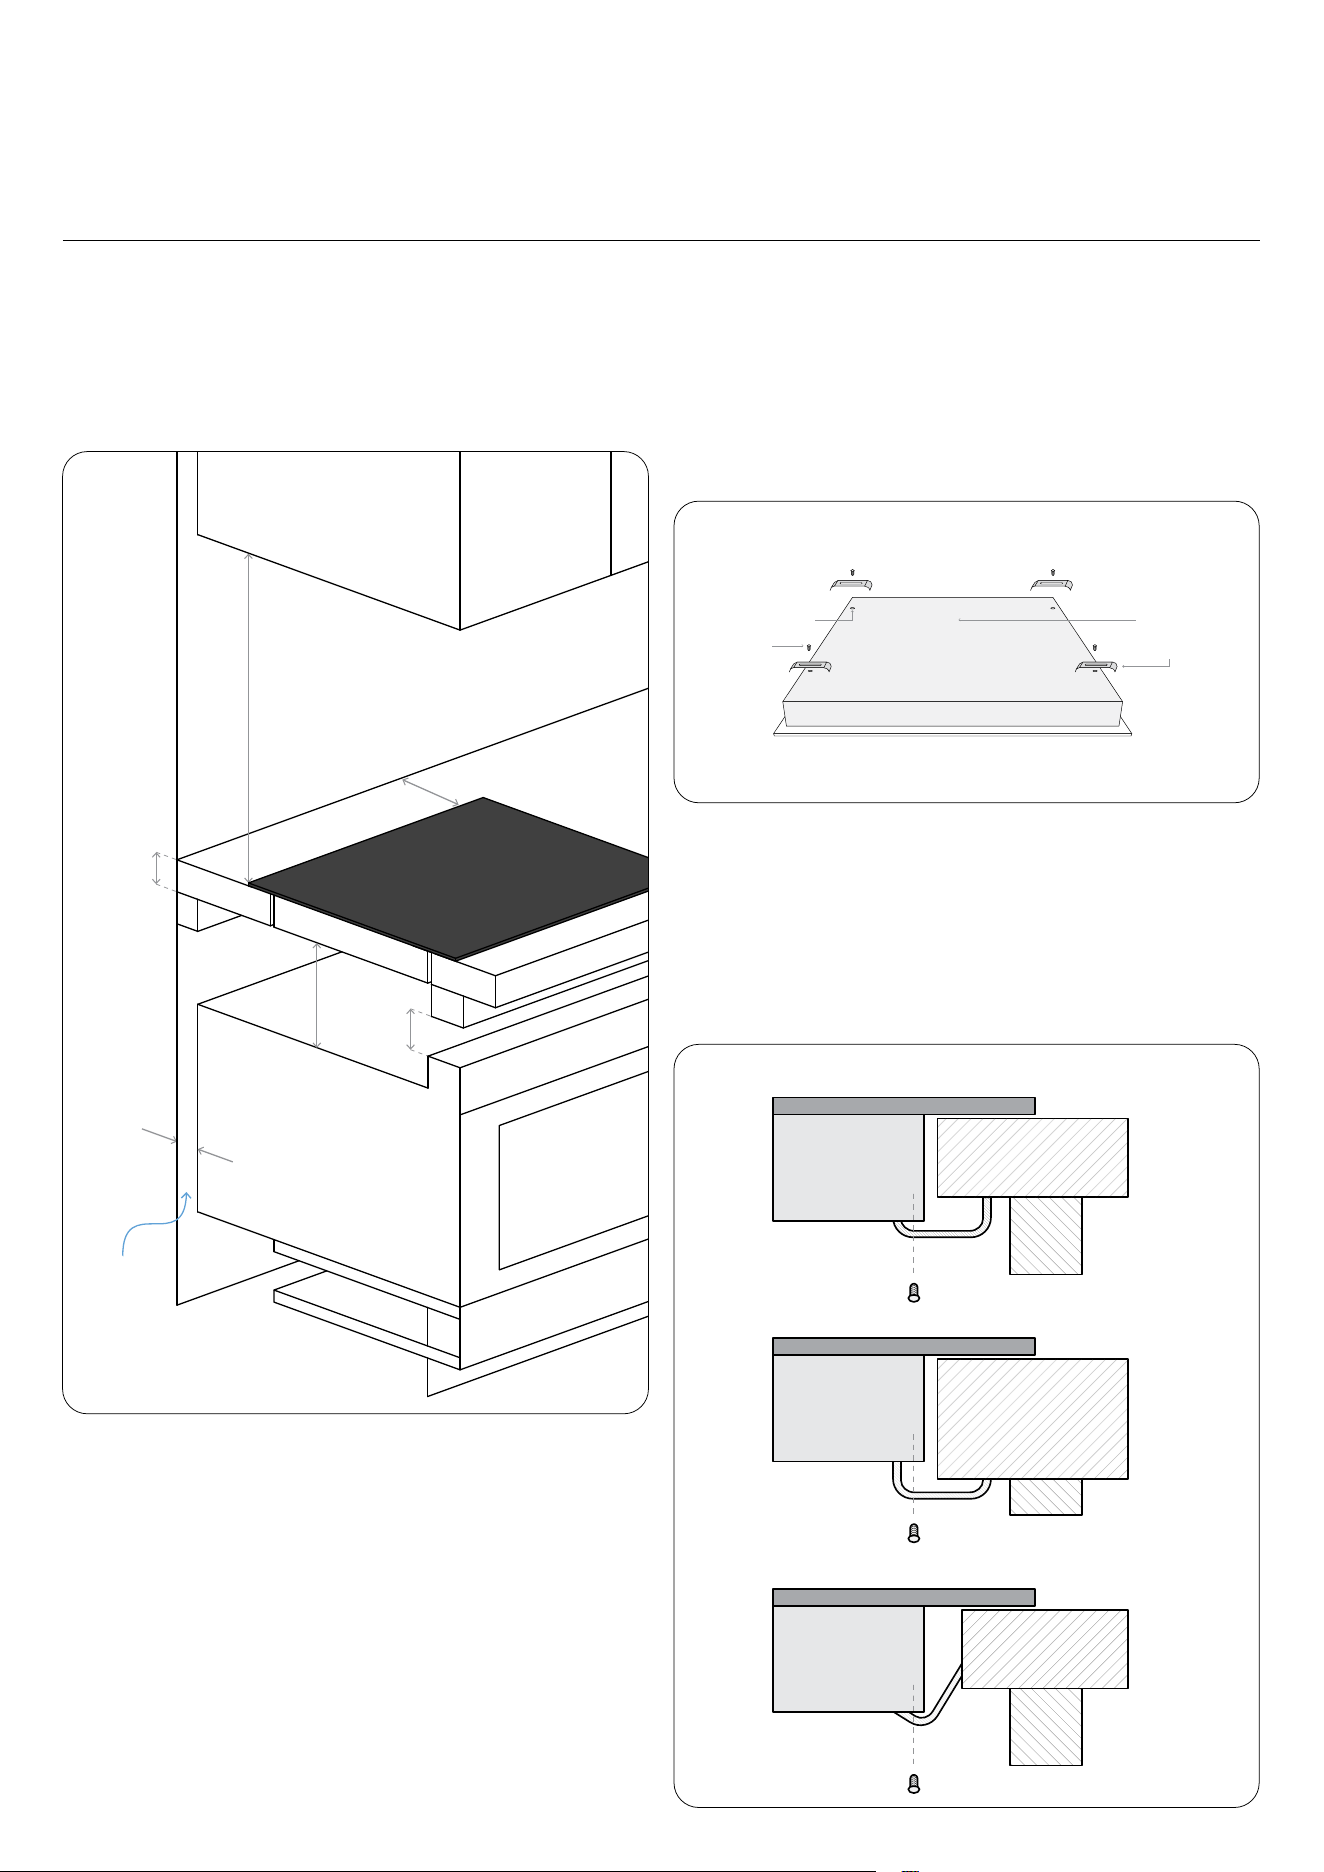
• For the purpose of installation and use, a minimum of 50mm
space shall be preserved around the hole.
• Be sure the thickness of the work surface is at least 30mm.
Please select heat-resistant work surface material to avoid
larger deformation caused by the heat radiation from the
hotplate.
•
WARNING: The work surface material must use the
impregnated wood or other insulation material.
• This ceramic can be connected only to a supply with system
impedance no more than 0.427 ohm. In case necessary,
please consult your supply authority for system impedance
information.
• Appliance clearances: 600mm to from the top of the nearest
burner overhead, 150mm from the periphery of the nearest
burner to side, 150mm from the periphery of the nearest
burner to back walls.
Installation Procedure
• Under all circumstances, make sure the cooktop is well
ventilated and the air inlet and outlet are not blocked.
Ensure the cooktop is in good working state.
• A barrier must be installed to prevent accidental contact
with the cooktop base, where the base of the cooktop is
accessible from below (i.e. Inside a cupboard, etc.).
• A minimum clearance of 50mm must be maintained
between the base and the barrier. This barrier may be made
of any non-combustible, rigid material.
• Ensure that the power supply cable is not accessible through
cupboard doors or drawers.
• Ensure that there is adequate flow of air from outside the
cabinetry to the base of the cooktop.
• The isolating switch is easily accessible by the customer.
•
WARNING: Do not use any kind of silicon sealant to seal the
appliance against the benchtop. This will make it difficult
to remove the appliance, which must be accessible for the
service agent to perform any necessary repairs in the future.
• Clamps and screws are supplied with your cooktop.
Fit the pull down clamps supplied to ensure that the cooktop
cannot move after installation. Refer to the diagram shown
below, and the relevant instructions.
• The safety distance between the sides of the cooktop and
the inner surfaces of the worktop should be at least 3mm.
• Where a hose assembly is used and the cooktop is in the
installed position, the hose assembly shall be suitable for
connection to a fixed consumer piping outlet located at
a point of 800–850mm above the floor and in the region
outside the width of the appliance to a distance of 250mm.
The point of connection to consumer piping must be
accessible after the appliance has been installed.
Installation Instructions
seal
min. 3mm
12User Manual OCIG905B
Ensuring Adequate Ventilation
*NOTE: Please refer to your rangehood’s user manual for the
exact minimum clearances from the top of the cooktop surface
to your rangehood.
The measurements in the diagram above is in millimetres (mm).
IMPORTANT: Regarding adjacent walls, cupboards and
protection for combustible materials: Always ensure that the
appliance is installed in accordance with AS/NZS 5601.1 with
regard to clearances to combustible surfaces and materials,
and clearances to rangehoods and exhaust fans.
Applying the Fixing Brackets
The unit should be placed on a stable, smooth surface (such
as the packaging). Do not apply force onto any controls if they
protrude from the cooktop. Fix the cooktopon the work surface
by screwing in the four brackets on the bottom of cooktop after
installation (see diagram below).
Applying the Fixing Brackets
IMPORTANT: When applying the brackets, ensure you adjust
the brackets’ position to suit your particular work surface’s
thickness. Under no circumstances are the brackets to touch
with the inner surfaces of the worktop after installation (see
diagrams below).
5
min. 50
min. 50
Air Intake
*See note
min. 30
min. 20
Screw
Screw-hole
Base
Bracket
↓ TABLE
BRACKET
↓ HOB
↓ TABLE
BRACKET
↓ HOB
↓ TABLE
BRACKET
↓ HOB
Note: The diagrams in this user manual are for explanatory purposes only.
Your appliance and parts may appear differently.
Installation Instructions
13User Manual
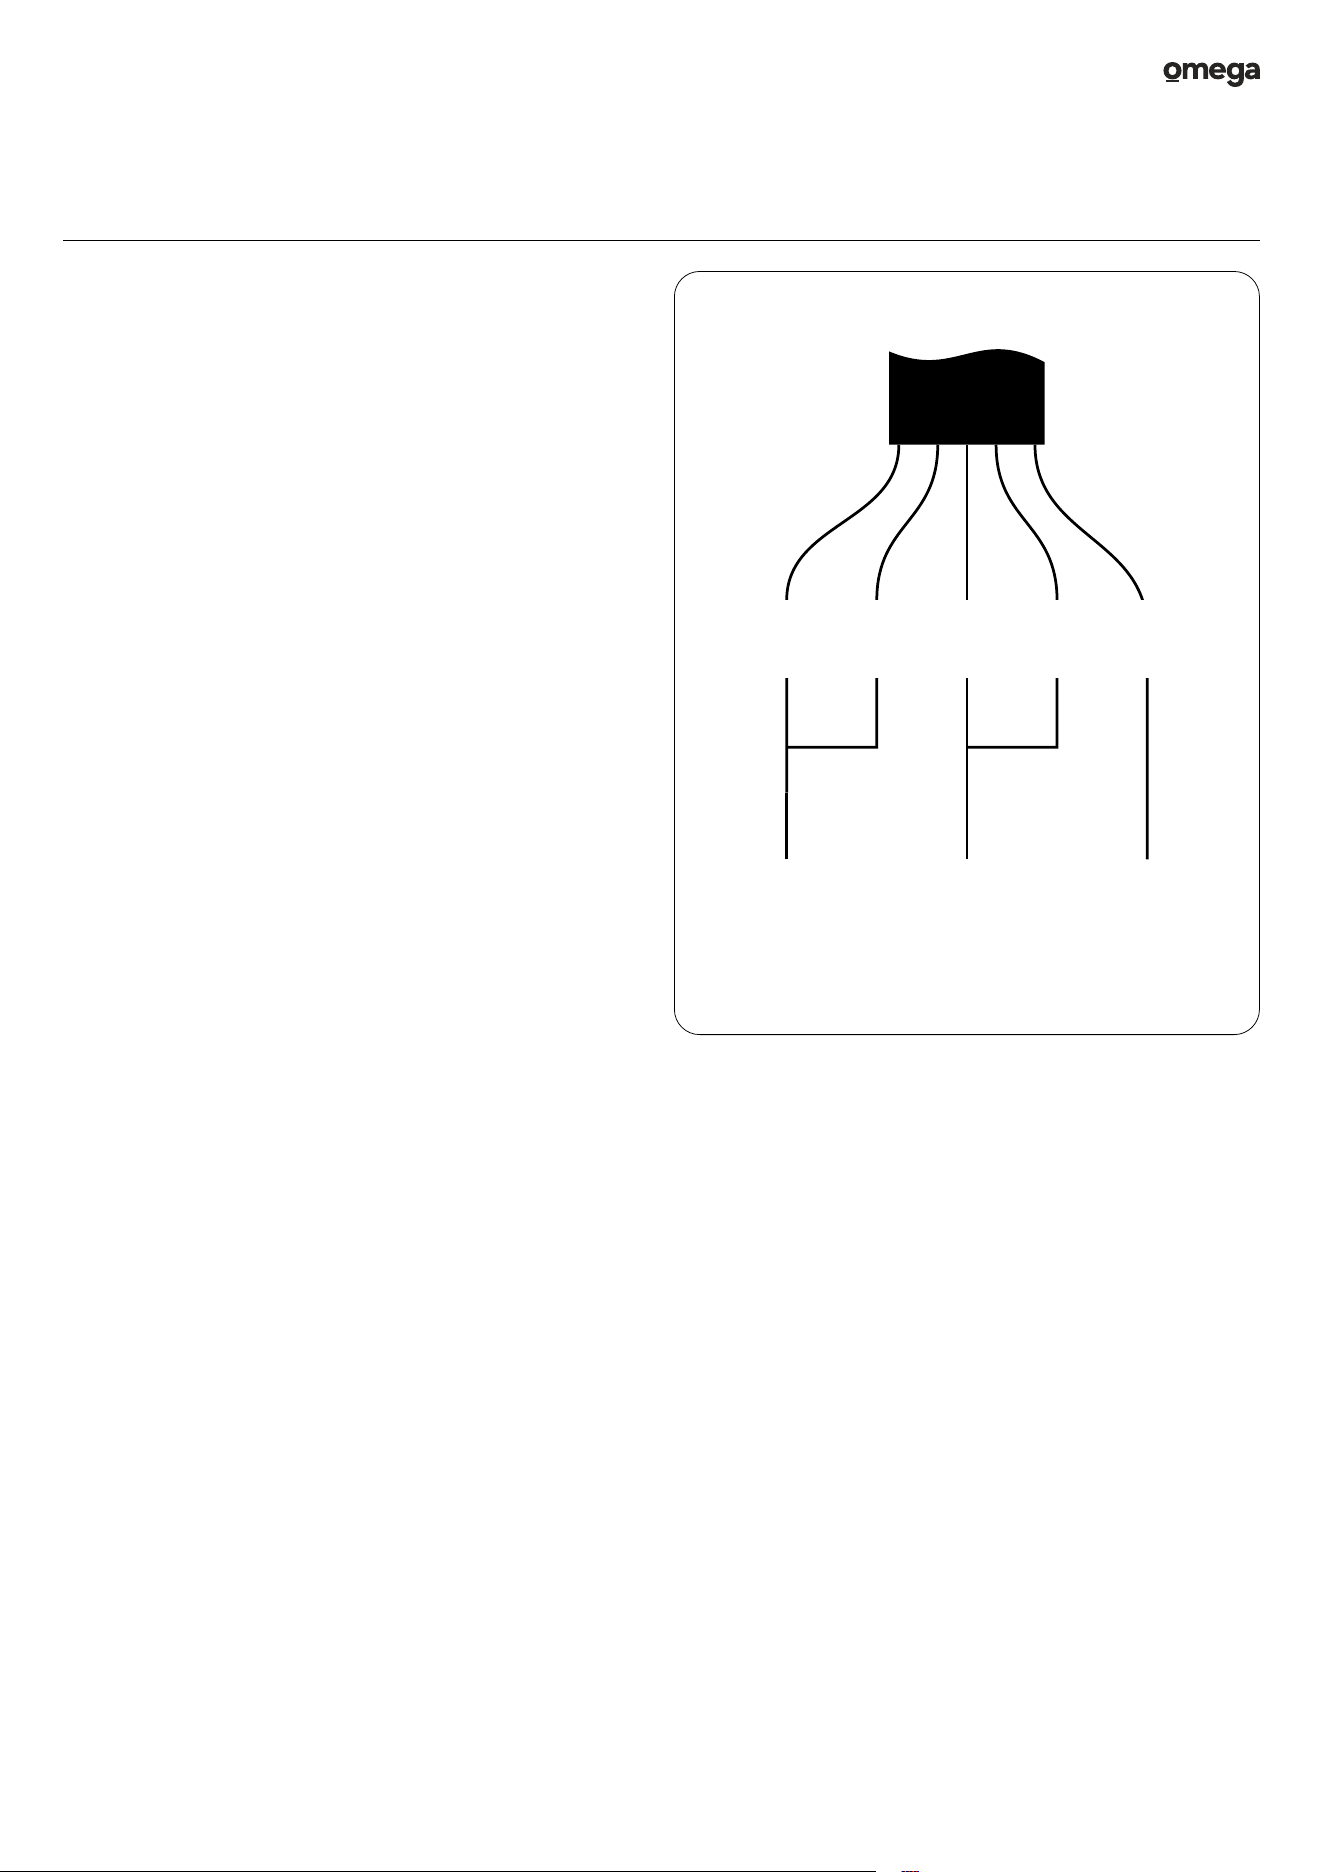
Electrical Connection
The power supply should be connected in compliance with the
relevant standard, or a single-pole circuit breaker.
Please refer to the method of connection shown below relevant
to your cooktop model.
• If the cable is damaged or needs replacing, this should be
done by an after-sales technician using the proper tools, so
as to avoid any accidents.
• If the appliance is being connected directly to the mains
supply, an omnipolar circuit breaker must be installed with a
minimum gap of 3mm between the contacts.
• The installer must ensure that the correct electrical
connection has been made and that it complies with safety
regulations.
• The cable must not be bent or compressed.
• The cable must be checked regularly and only replaced by a
proper qualified person.
Installation Instructions
L N
L–N: 220–240V~
PE
L2 N1L1 N2 PE
14User Manual OCIG905B
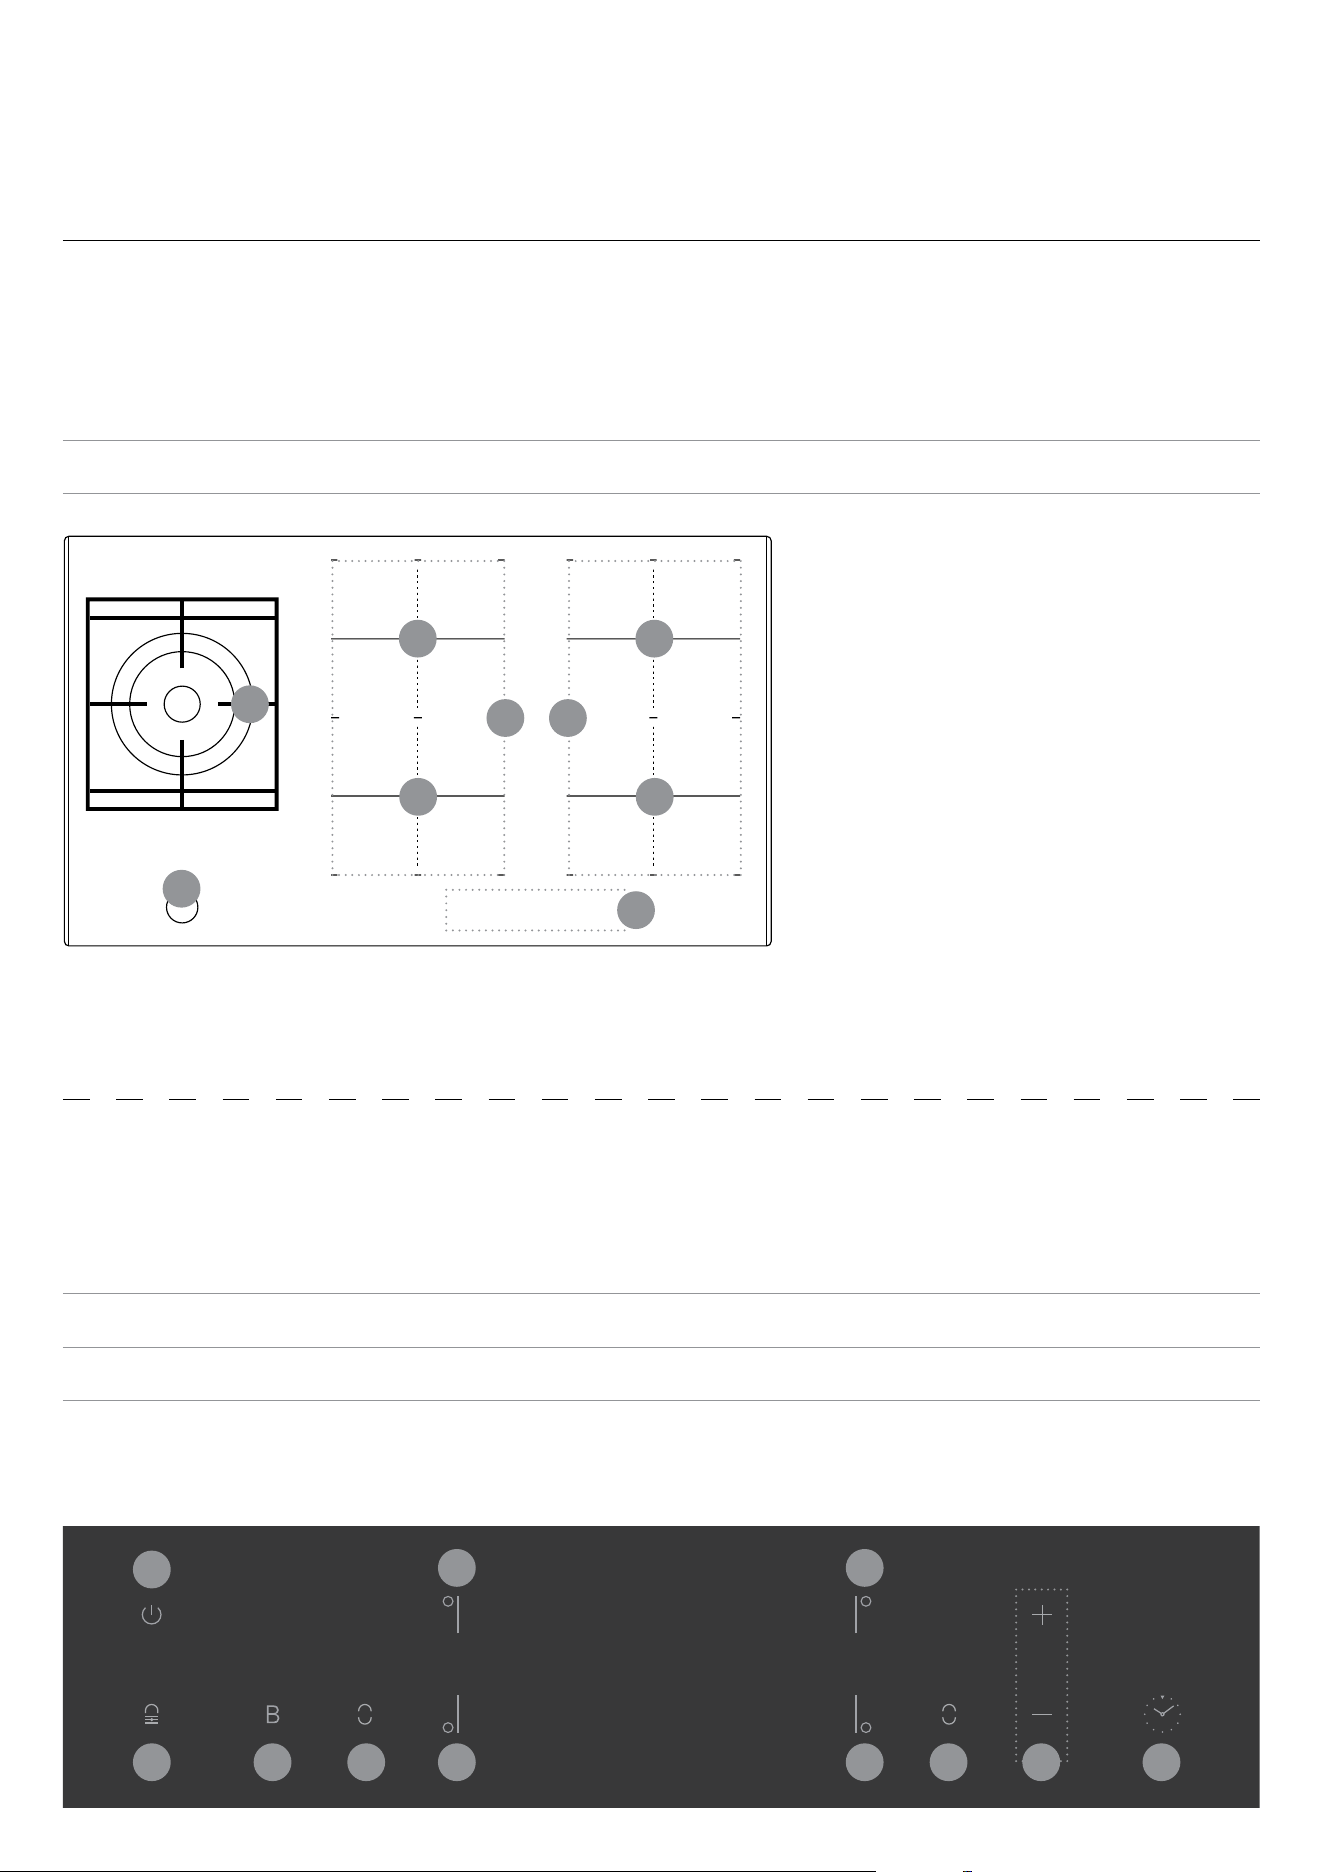
Control Panel
Key
A. Power Button D. FlexZone Selector F. Adjustment Controls
B. Child Lock Button E. Zone Selector G. Timer Selector
C. Power Boost Button*
* Note: Power Boost is only available for the front left cooking zone.
Overview
Key
A. Knob Control C. 220×200mm Zone (Max. 1800 / 2100W) E. Touch Control Panel
B. Wok Burner D. 220×400mm FlexZone (Max. 3000 / 3600W)
A
B C D GDE
E
E
E
F
Your Hybrid Cooktop
D D
B
E
A
C C
C C
15User Manual
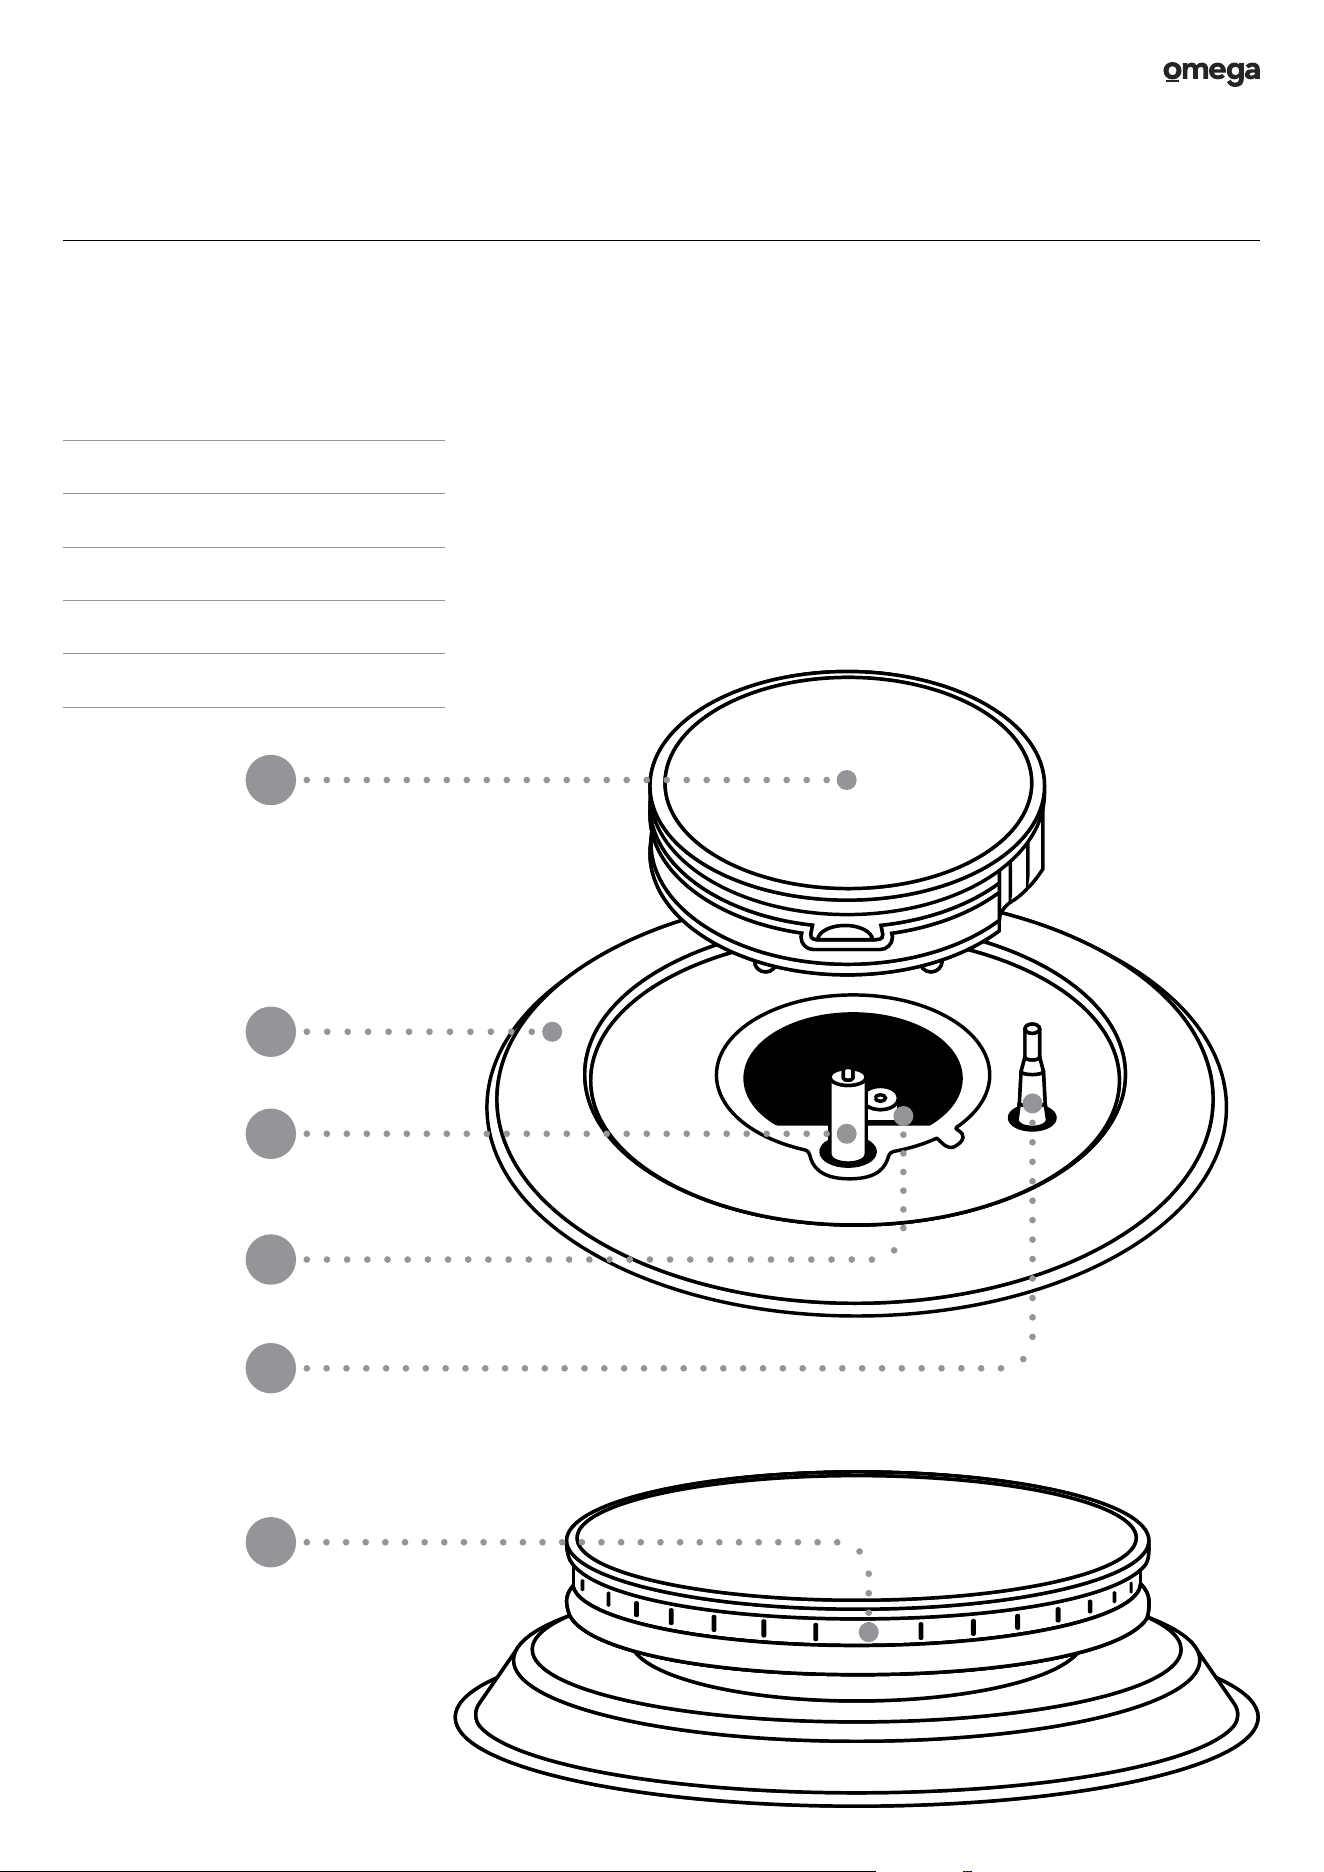
Wok Burner Overview
Key
A. Burner Cap
B. Burner Skirt
C. Ignition Spark Plug
D. Injector Jet
E. Flame Sensor
F. Flame Ports
Your Hybrid Cooktop
A
B
C
D
E
F
16User Manual OCIG905B
Introducing Induction Cooking
This innovative and efficient cooking method is designed to offer
safety, advanced functionality, and cost-effectiveness.
Induction cooking operates using electromagnetic vibrations
that generate heat directly within the pan, rather than heating
the glass surface indirectly. The glass surface only heats up as a
consequence of the pan's heat transfer.
Please refer to this manual for comprehensive guidance on using
and maximising the benefits of your induction cooker.
Before using the Hybrid Cooktop
• Read this user manual carefully, taking special note
of the ‘Safety Information’ chapter in particular.
• Ensure you remove any protective film that may still
be on your cooktop surface after unpacking.
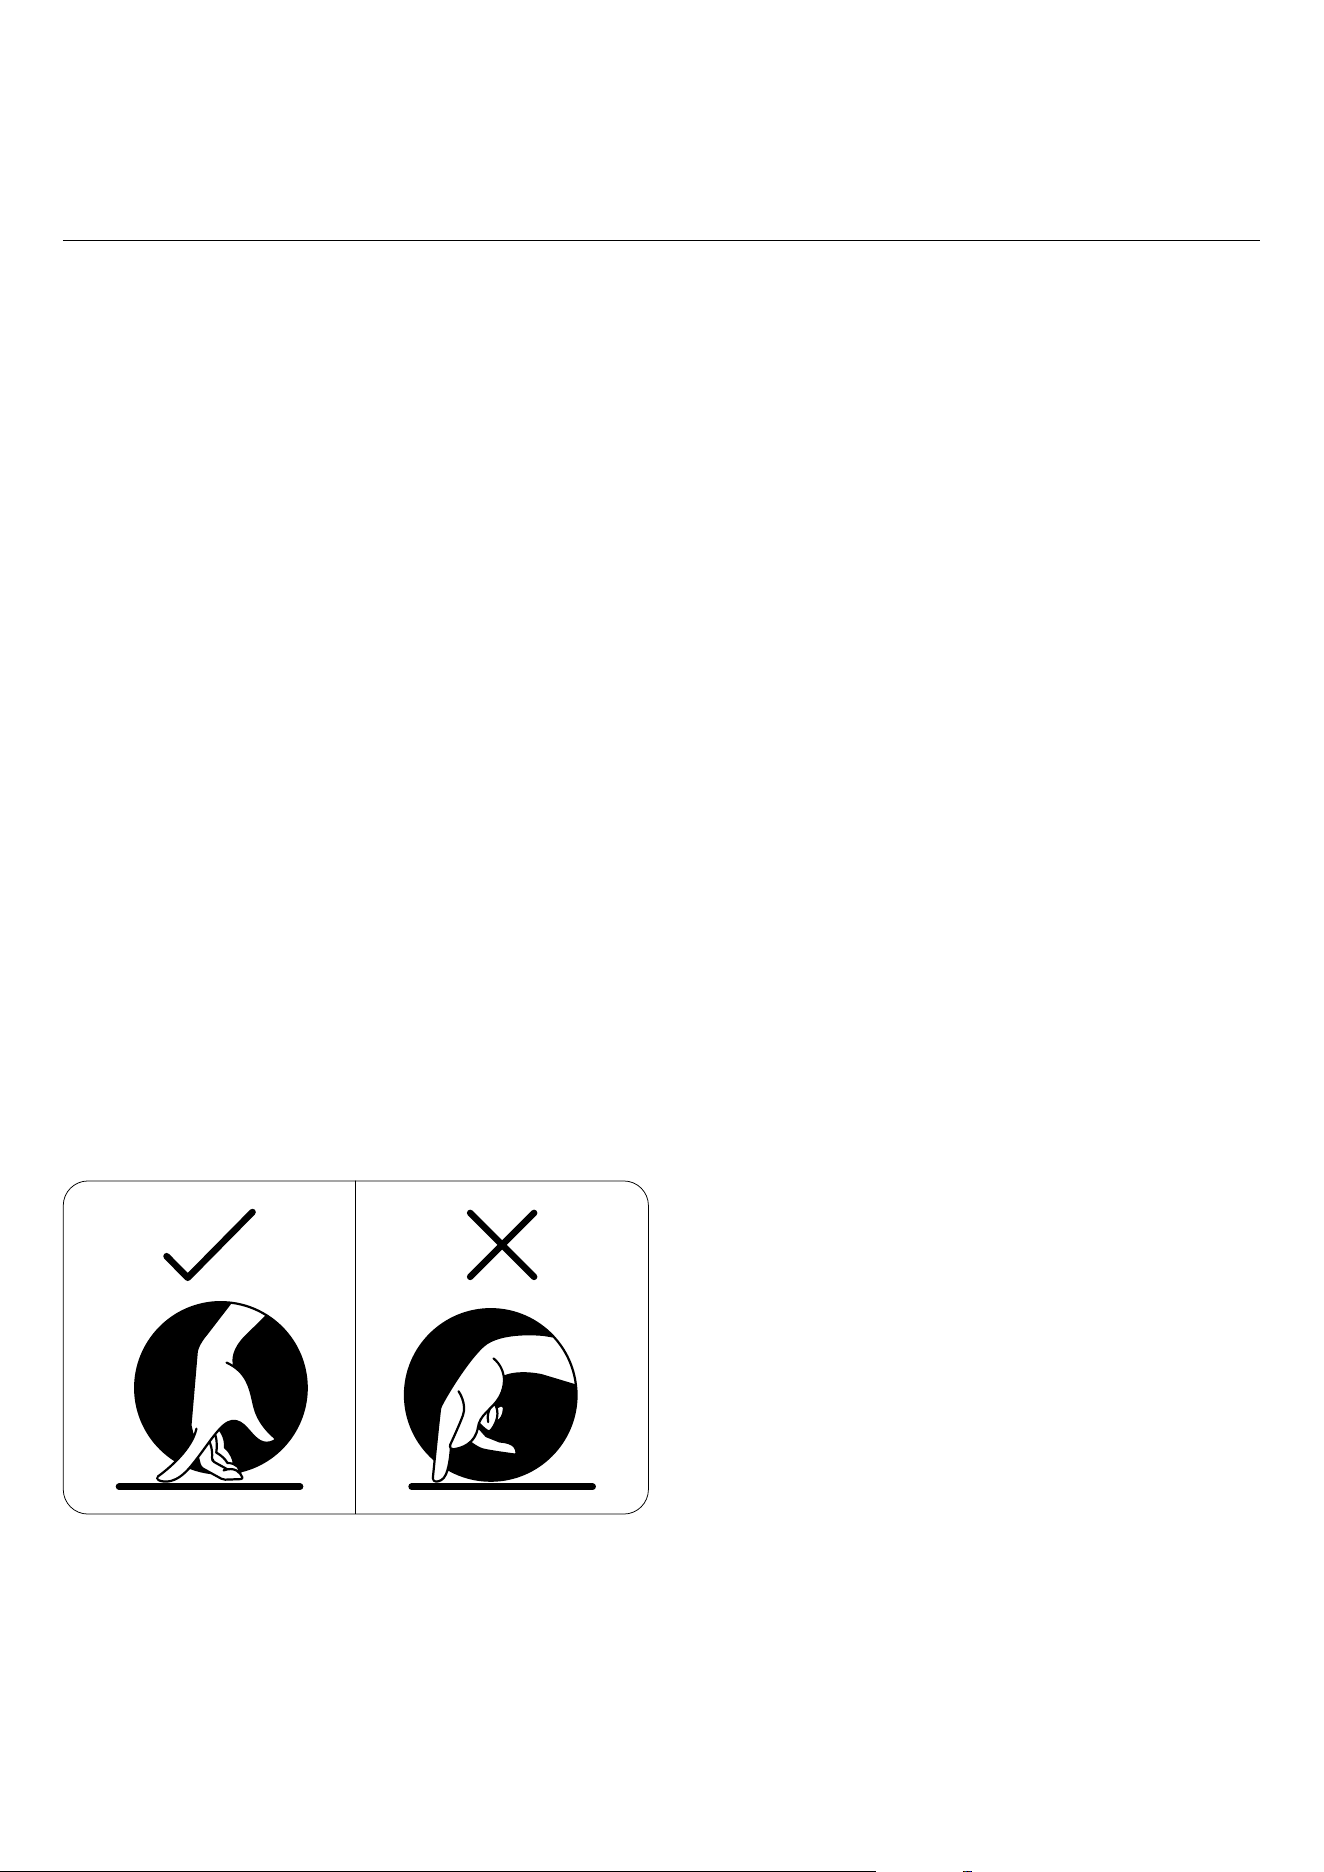
• The controls respond to touch, so you don’t need any
pressure. Use the pad of your finger, not the tip.
• You will hear a beep each time a touch is registered.
• Make sure the controls are always clean, dry, and that there is
no object (e.g. a utensil or a cloth) on top. Even a thin film of
water or food particles may make the controls unresponsive
and difficult to operate.
Choice of Burner
Below is a cookware size guide to use on your cooktop’s zones:
• Ø160mm Zone
Cookware Size: Ø 120mm
• Ø180mm Zone
Cookware Size: Ø 140mm
• Ø210mm Zone
Cookware Size: Ø 160mm
• 220×200mm Independent Zone
Cookware Size: Ø 160mm
• 220×400mm FlexZone
Cookware Size: Ø 280mm
• Wok Burner: For quick heating with large cookware.
Cookware Size: Ø 200mm – Ø 240mm.
Verifying Induction Compatibility
To determine if your cookware is compatible with induction
cooking, you can perform a magnet test. Simply bring a magnet
close to the base of the pan. If the magnet is attracted to the pan,
it indicates that the pan is suitable for induction use.
In the event that you don’t have a magnet available, you can
follow these steps:
1. Fill the pan you wish to test with some water.
2. Proceed to start cooking as instructed in the ‘Cooking with
Your Hybrid Cooktop’ section.
3. If the indicator specified in the manual does not flash on
the display and the water begins to heat up, it confirms the
suitability of the pan for induction.
Please note that cookware composed solely of materials
such as pure stainless steel, aluminum, or copper without a
magnetic base, along with glass, wood, porcelain, ceramic, and
earthenware, are not compatible with induction cooking.
Operating Instructions
17User Manual
Operating Instructions
Choosing the Right Induction Cookware
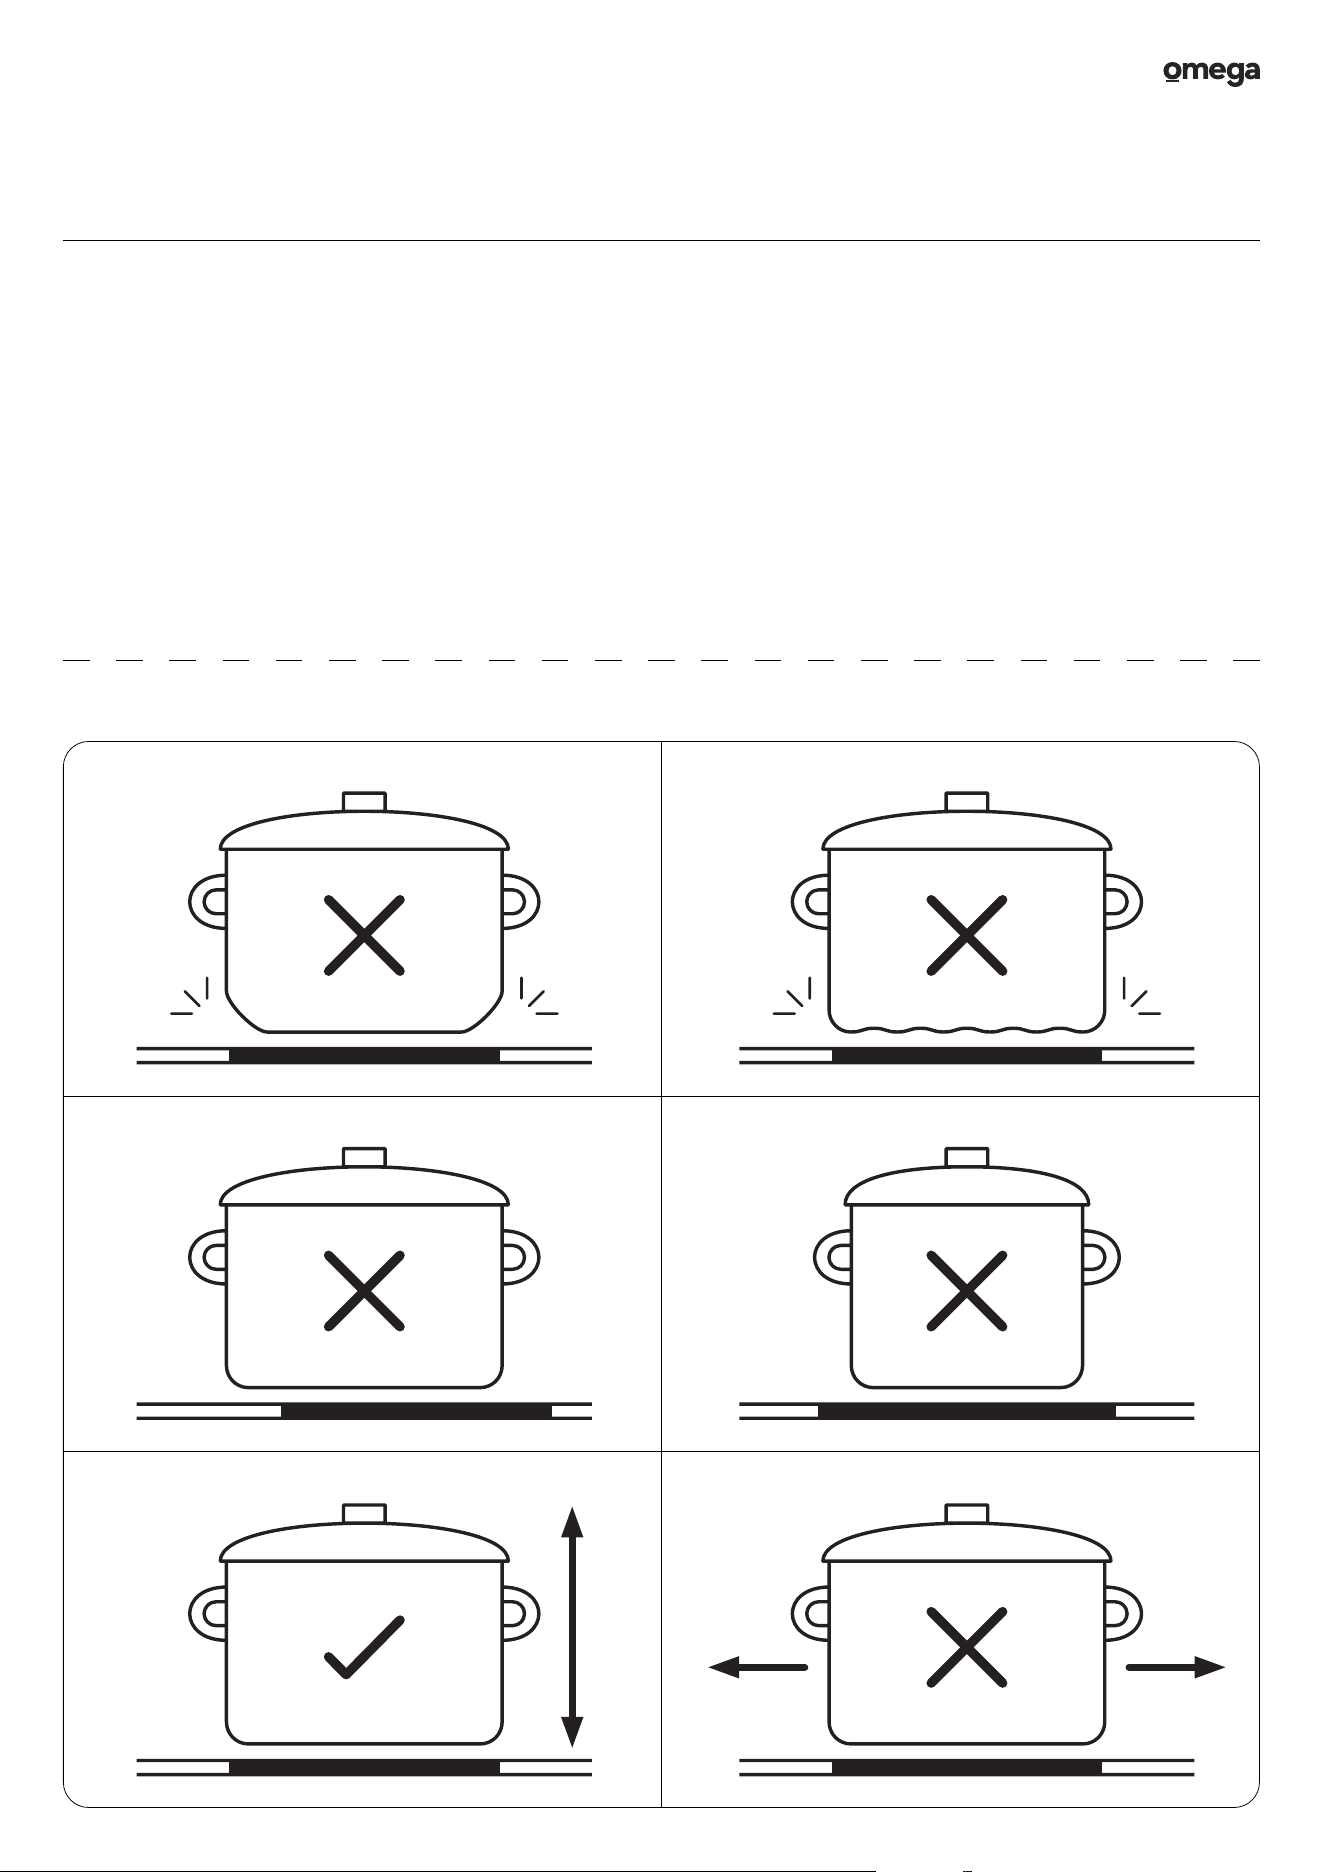
• Do not use cookware with jagged edges, coarse or uneven
surfaces, chipped bottoms or a curved base.
• Make sure that the base of your pan is smooth, sits flat
against the glass, and is the same size as the cooking zone.
Always center your pan on the cooking zone.
• For best practice, gently lift cookware off the glass—avoid
sliding them, as the bottom of your cookware may scratch
the surface.
• The FlexZone can not only use griddle plates, you can
also utilise larger cookware specially designed for that
specific area.
• For certain types of induction cookware with incomplete
ferromagnetic bases. If the cookware's bottom material
includes aluminum, it may result in a reduced ferromagnetic
area. Consequently, this could lead to the cookware not
reaching adequate heat levels or even being undetectable
during operation.
18User Manual OCIG905B
Choosing the Right Wok Burner Cookware
Many common woks, pots and pans, such as those made from
aluminium, ceramic, cast-iron and stainless steel may be used
on your cooktop.
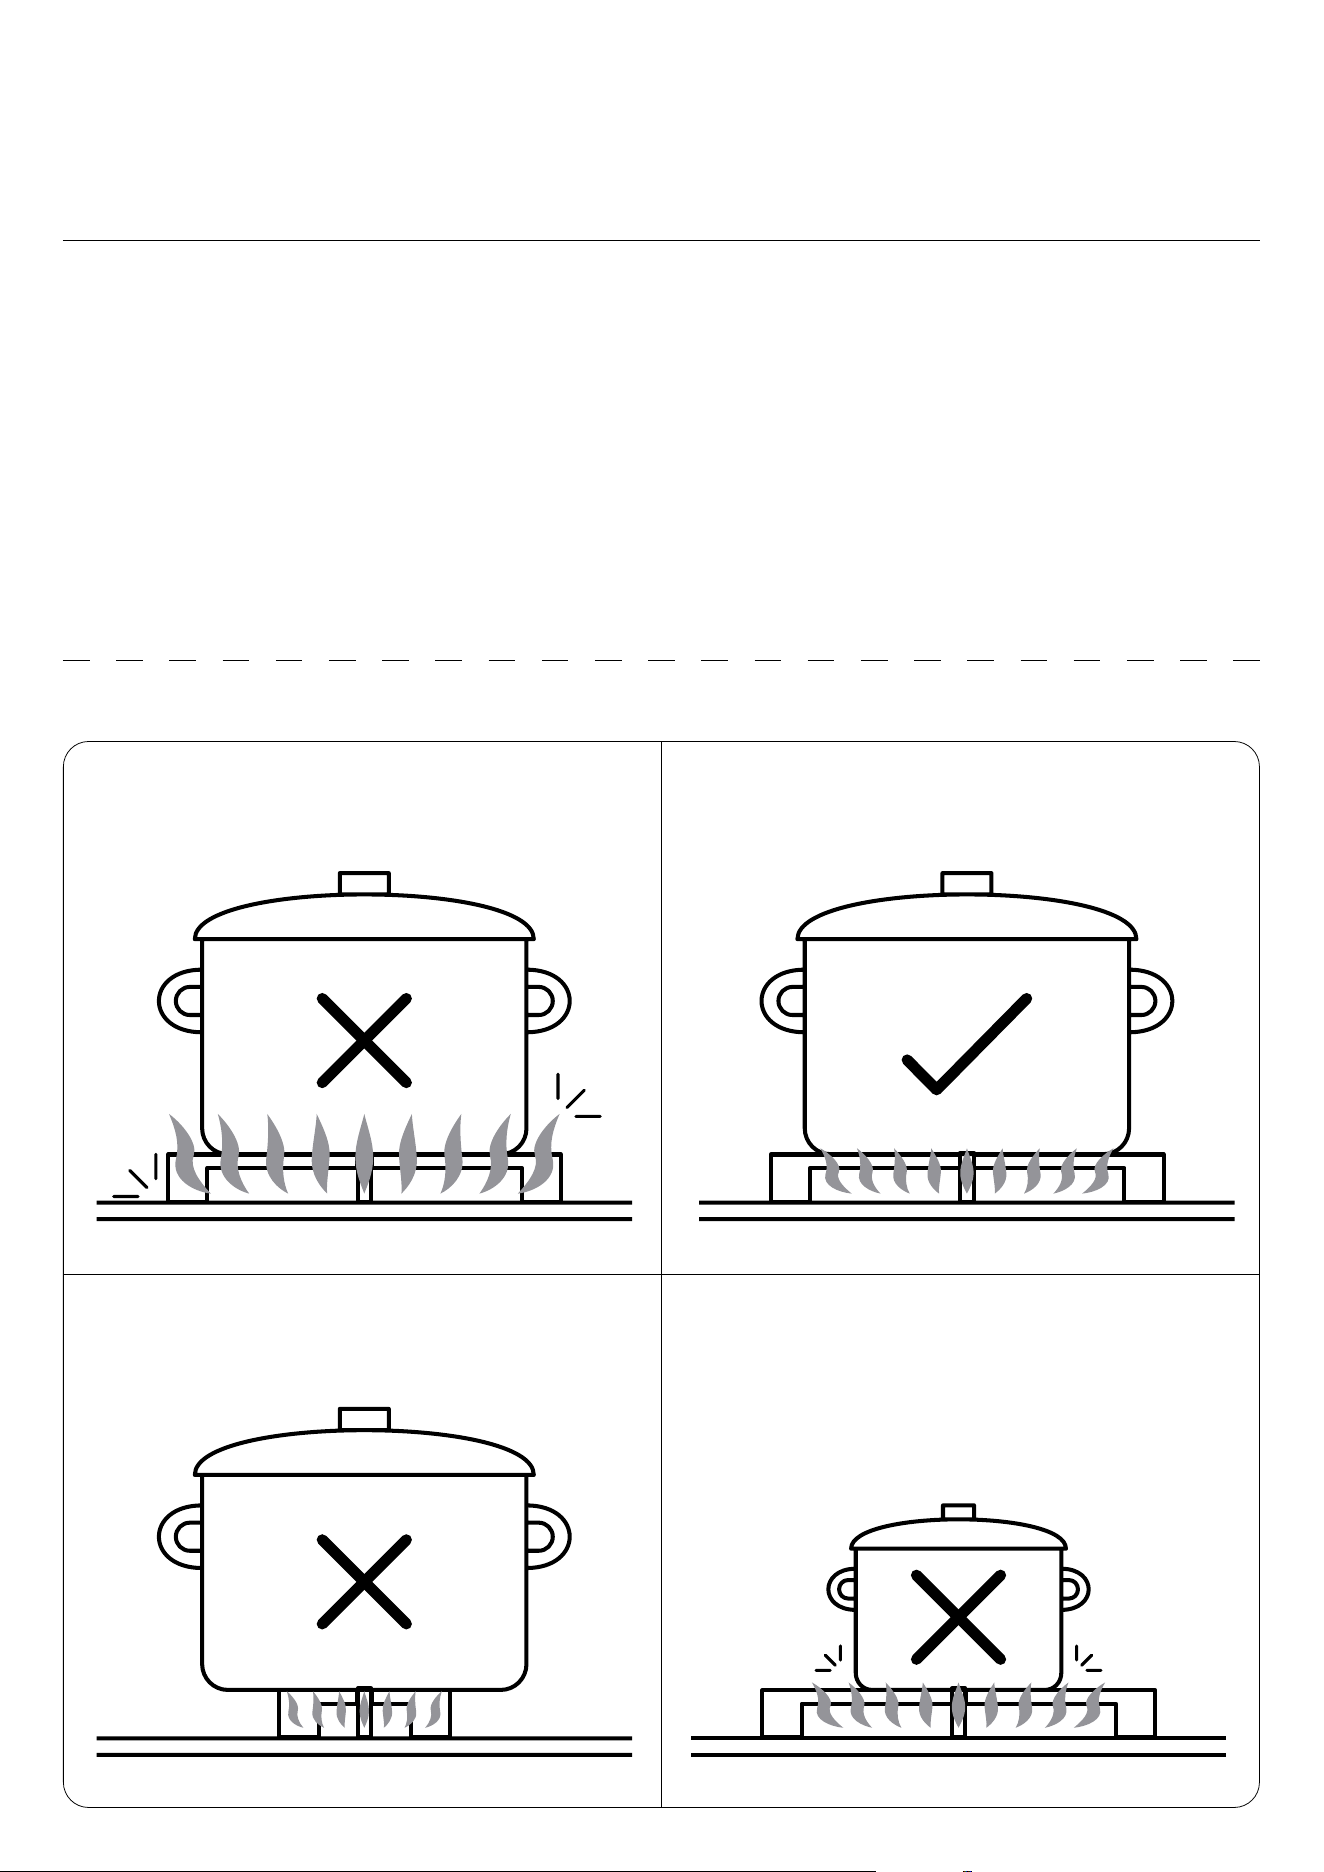
Ensure that the pots or pans are steady and have flat bases to
avoid dangerous spill-over of hot liquids and wasted energy.
Do not use cookware with jagged edges, coarse or uneven
surfaces, chipped bottoms or a curved base.
Make sure that the base of your cookware is smooth, sits flat
against the trivets, and is the same size as the chosen burner,
and always centre your pan on the cooking zone.
For best practice, gently lift cookware off the trivets—avoid
sliding them, as the bottom of your cookware, and the trivets’
surface may become scratched.
Operating Instructions
19User Manual
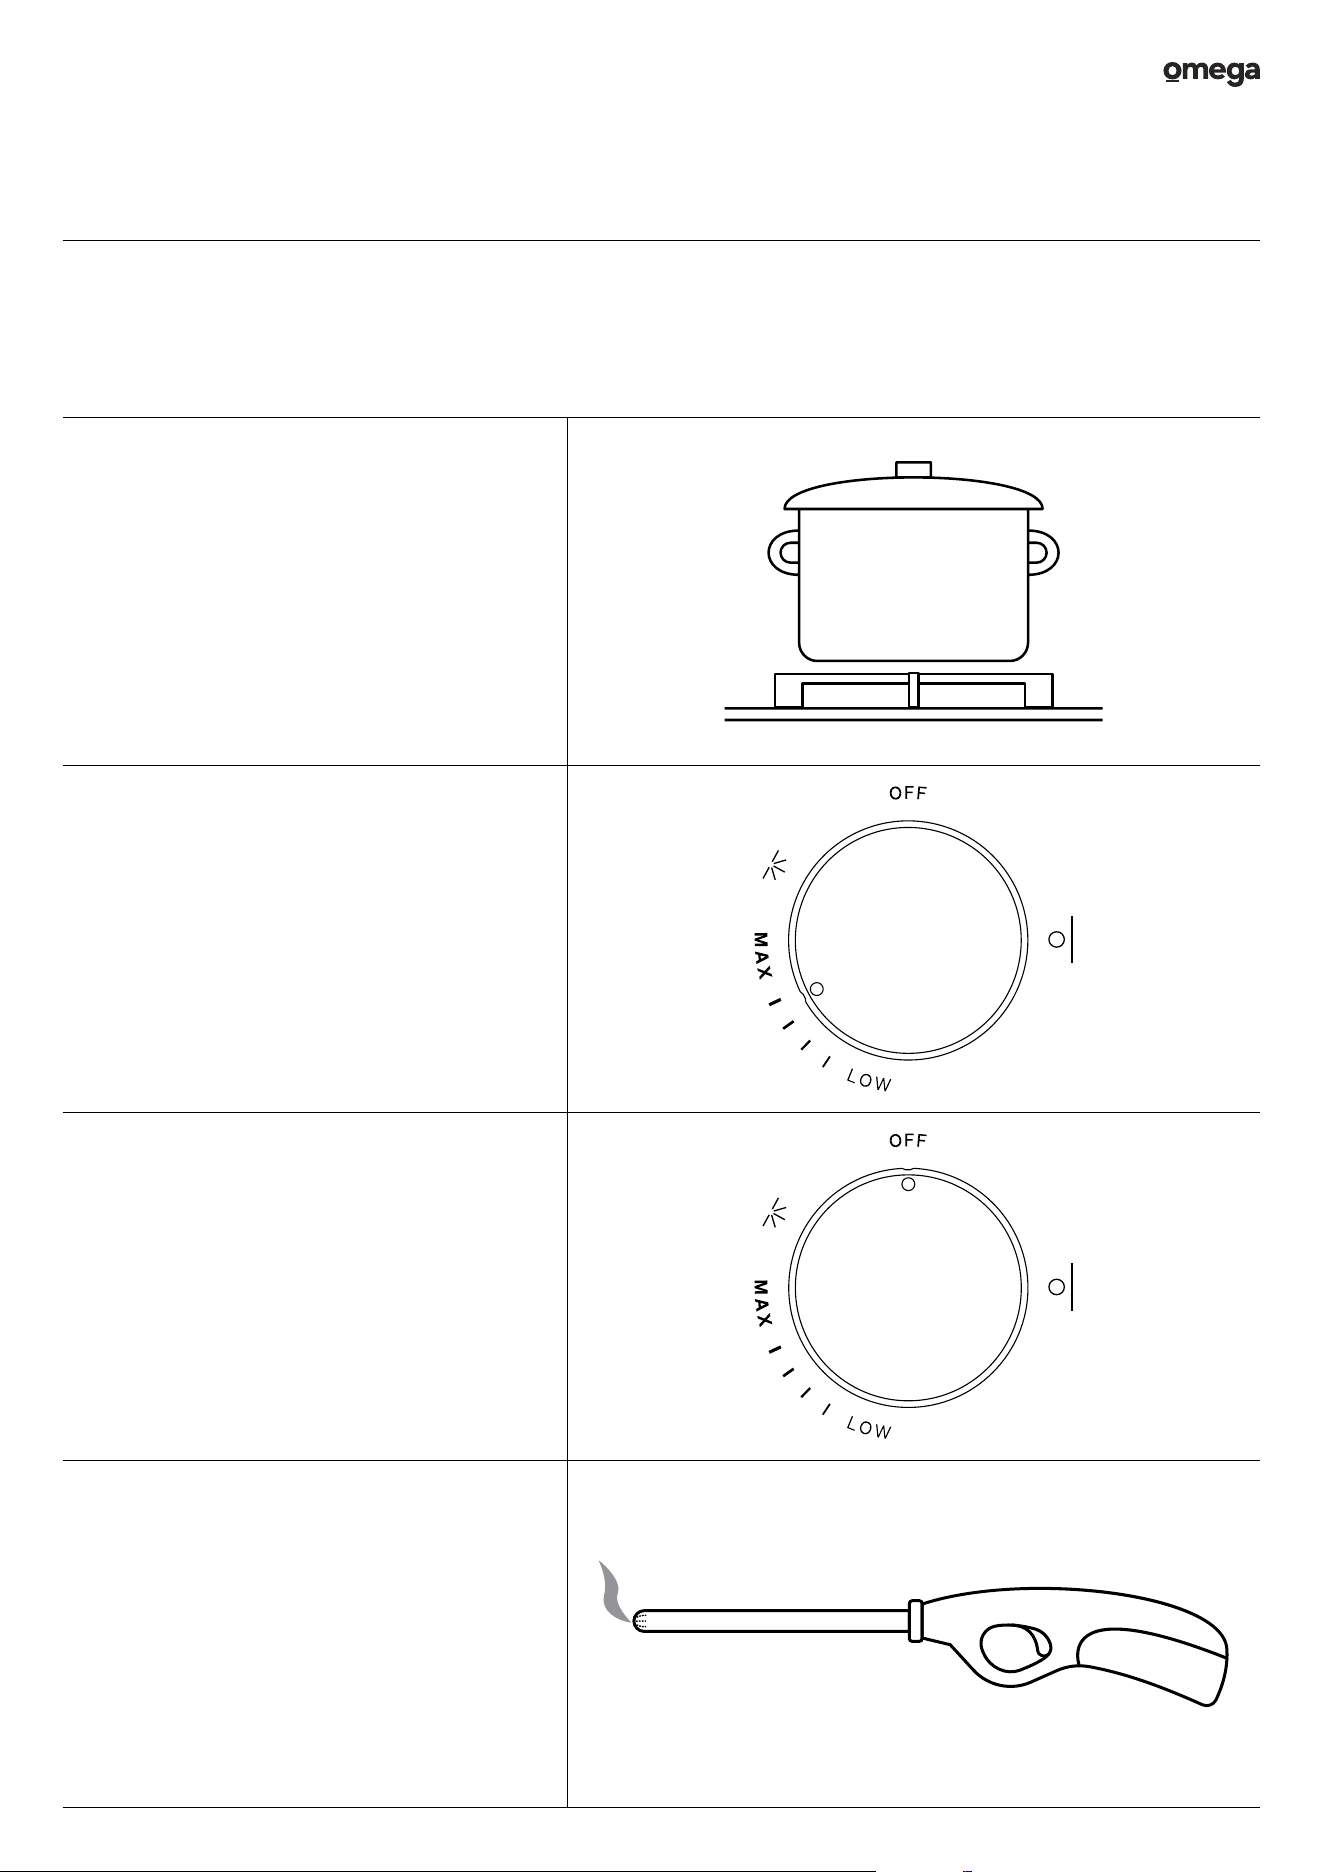
Place a suitable pan on the burner you wish to use,
following page 18’s cookware guide.
Make sure that the bottom of the pan and the
surface of the cooktop are clean and dry, and that
there are no cracks or oil build-up present.
To begin cooking, press down for approximately 5
seconds, and the flames will then emit.
Note that the heat level must be set within the
‘LOW’ to ‘MAX’ settings.
When you have finished cooking, turn the control
knob clockwise towards the ‘OFF’ position, and
once the flames from the burner have dispersed,
simply let go.
Note that the burner will be hot for some time, so
caution should be always be exercised even after
cooking is over.
Your cooktop has been fitted with an electric ignition.
When the cooktop has been connected and the
power is on, pressing any knob will release sparks to
all burners, instantly.
However, in the absence of electrical power,
for example a local power outage, you can carry out
the ignition directly to the burner with a hand-held
ignition source, such as a lighter.
Using the Gas Wok Burner
Operating Instructions
20User Manual OCIG905B
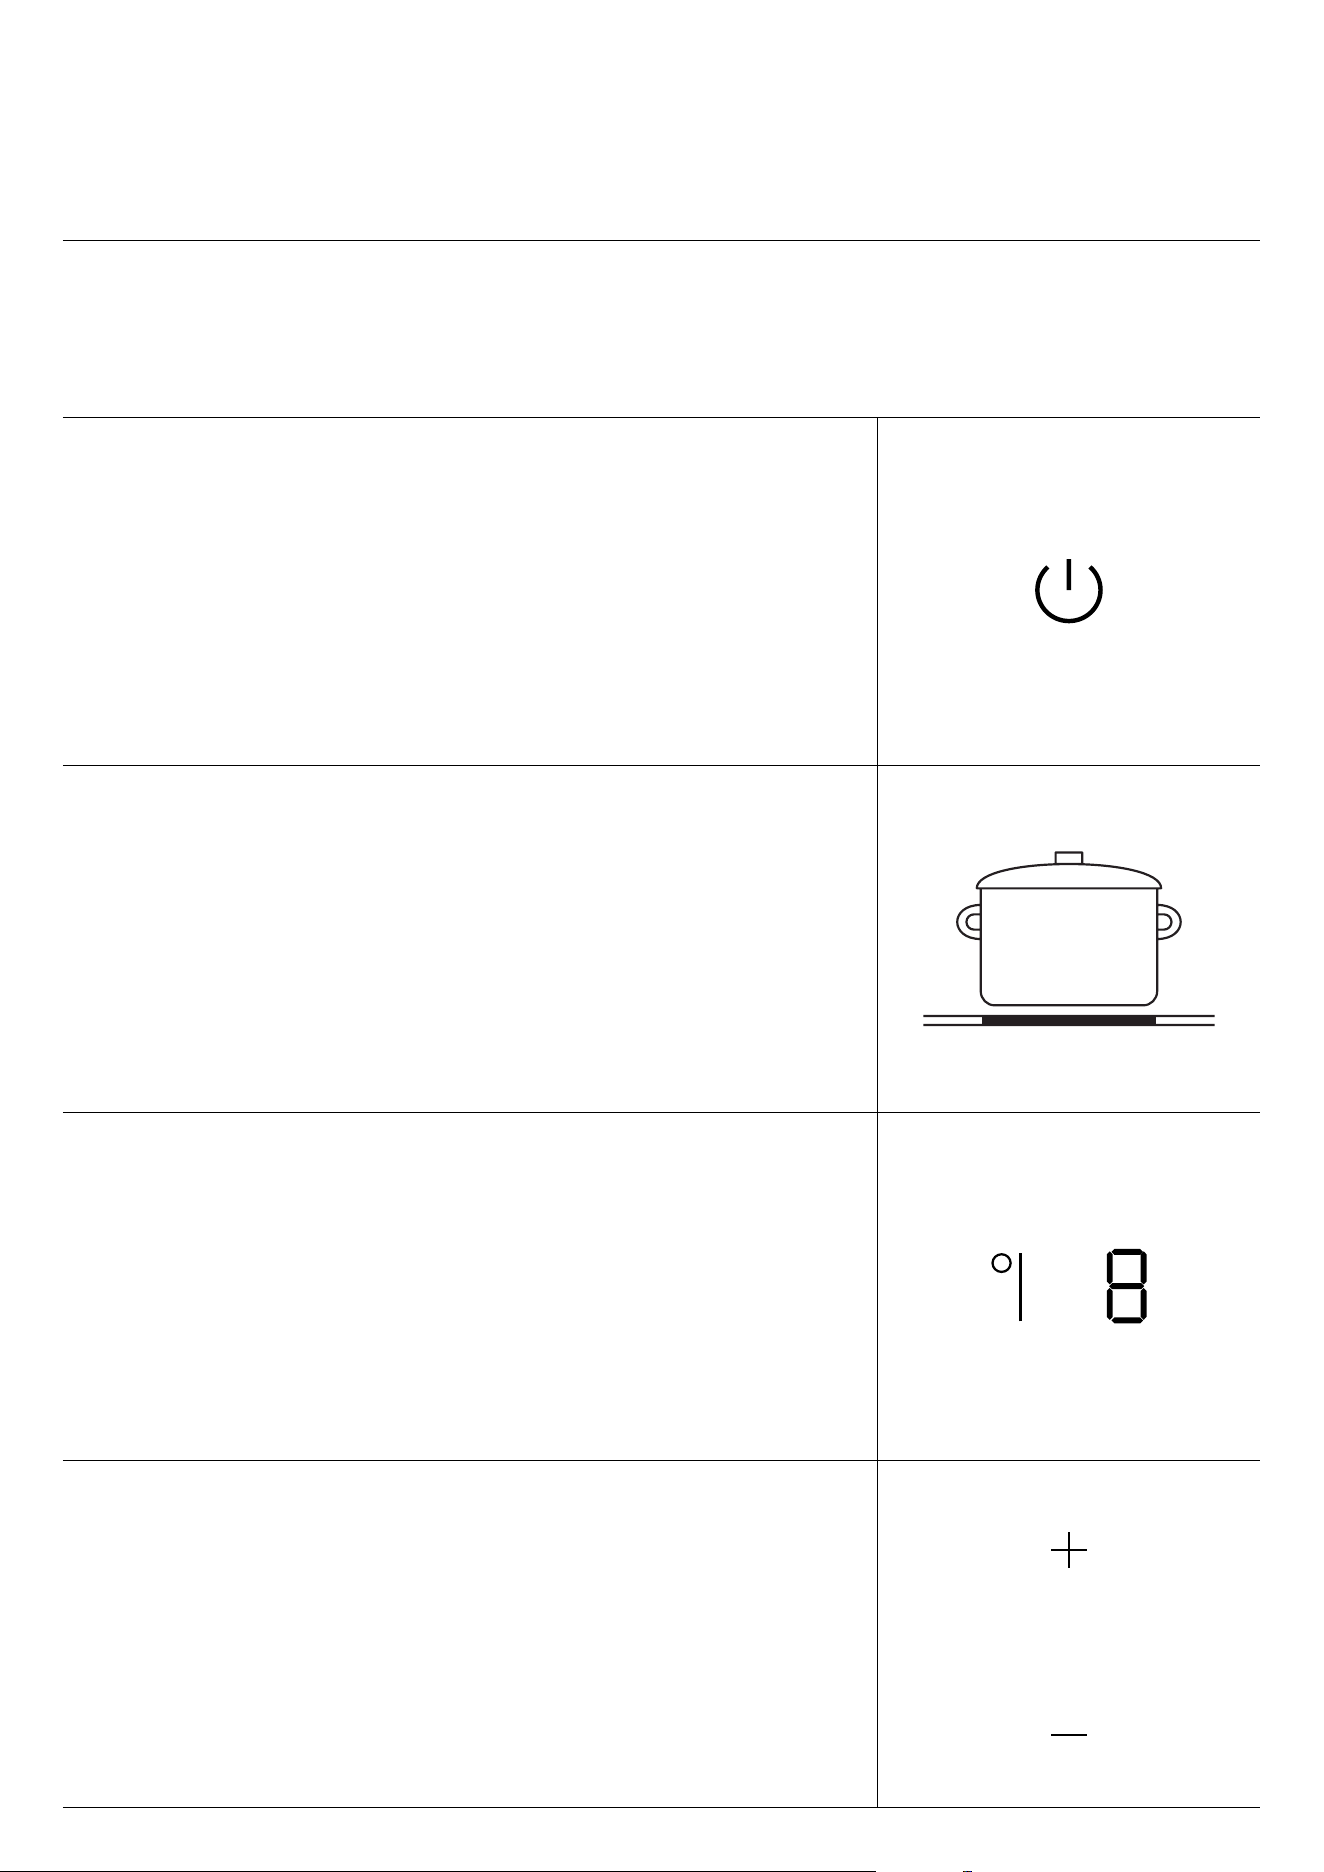
1. Power On
Activate the cooktop by pressing the Power button. Upon activation, a single beep
will sound, and all indicators will briefly display "–" for 1 second before turning off.
This indicates that the cooktop has entered standby mode.
2. Preparing the Cooking Surface
Place an induction compatible pan or pot on the desired cooking zone following
page 17’s cookware guide.. Please ensure both the bottom of the pan and the
cooktop's surface are clean and dry for optimal cooking performance.
3. Selecting the Cooking Zone
Simply touch the Zone Selector button beside the desired cooking zone.
Subsequently, an indicator adjacent to the selected key will start flashing.
4. Selecting the Cooking Zone & Heat Setting
Touch the Adjustment Controls "–" & "+" corresponding to your desired power level.
Note:
• If you do not adjust the heat setting within 1 minute of selecting the cooking zone,
the cooktop will automatically switch off. In such cases, you will need to restart
the process from step 1.
• You have the flexibility to modify the power level at any point during cooking.
Getting Started with the Induction Zones
Operating Instructions
21User Manual
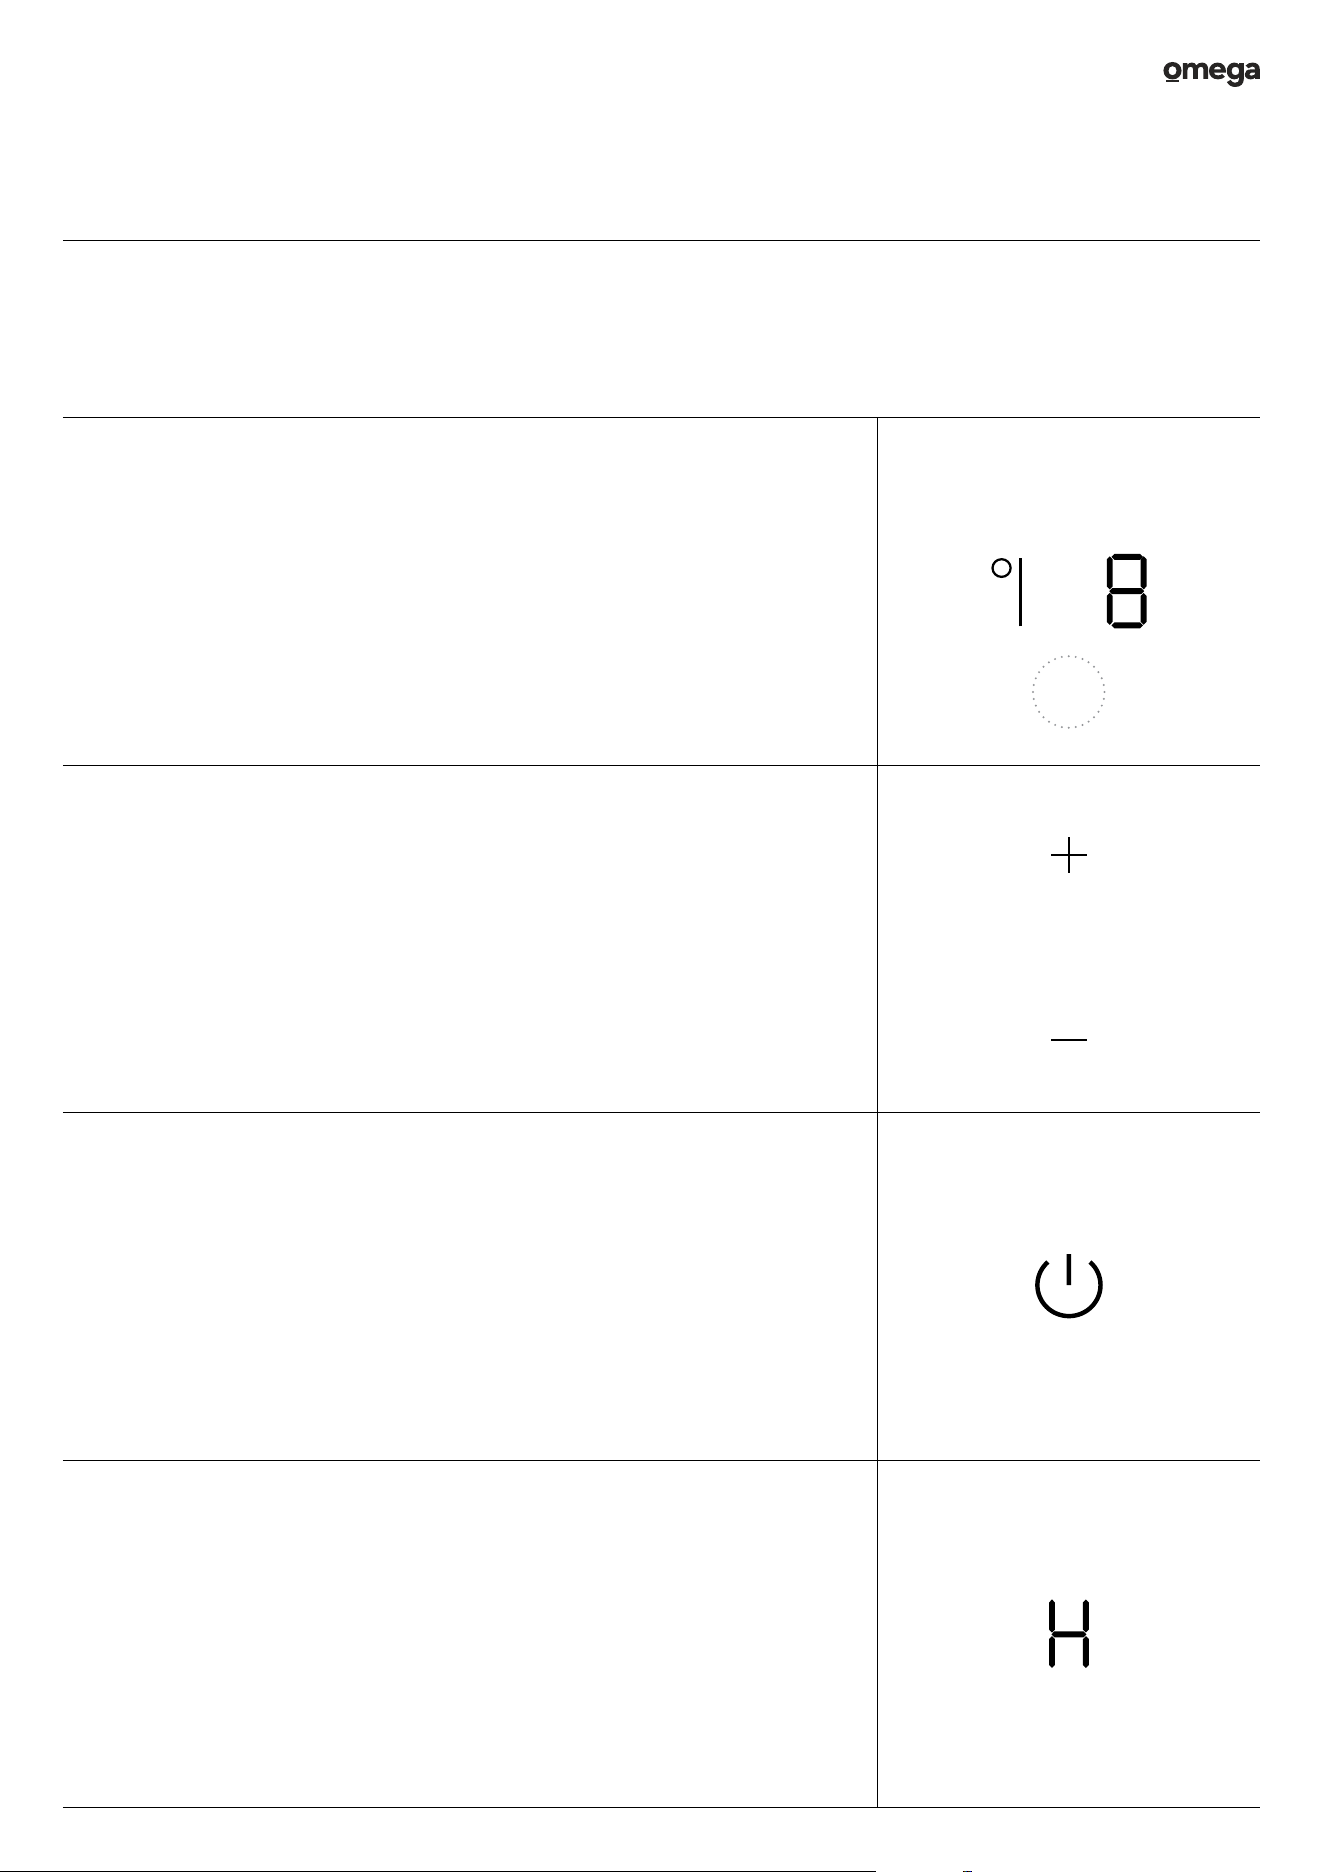
1. Selecting the Cooking Zone
Simply touch the Zone Selector button beside the desired cooking zone.
Subsequently, an indicator adjacent to the selected key will start flashing.
2. Switching Off Individual Cooking Zones
Touch the Adjustment Control "–" down to "0" on the control for the specific cooking
zone. Ensure that the display indicates "0" to confirm the cooking zone has been
turned off.
3. Turning Off the Entire Cooktop
To shut down the entire cooktop, touch the Power button control.
4. Caution: Hot Surfaces
After cooking, "H" may display, indicating that the cooking zone is too hot to touch.
This symbol will disappear once the surface has cooled to a safe temperature.
Additionally, it can serve as an energy-saving feature; you can use the residual heat
to further heat other pans or continue cooking without additional power usage.
When Finished Cooking with the Induction Zones
Operating Instructions
22User Manual OCIG905B
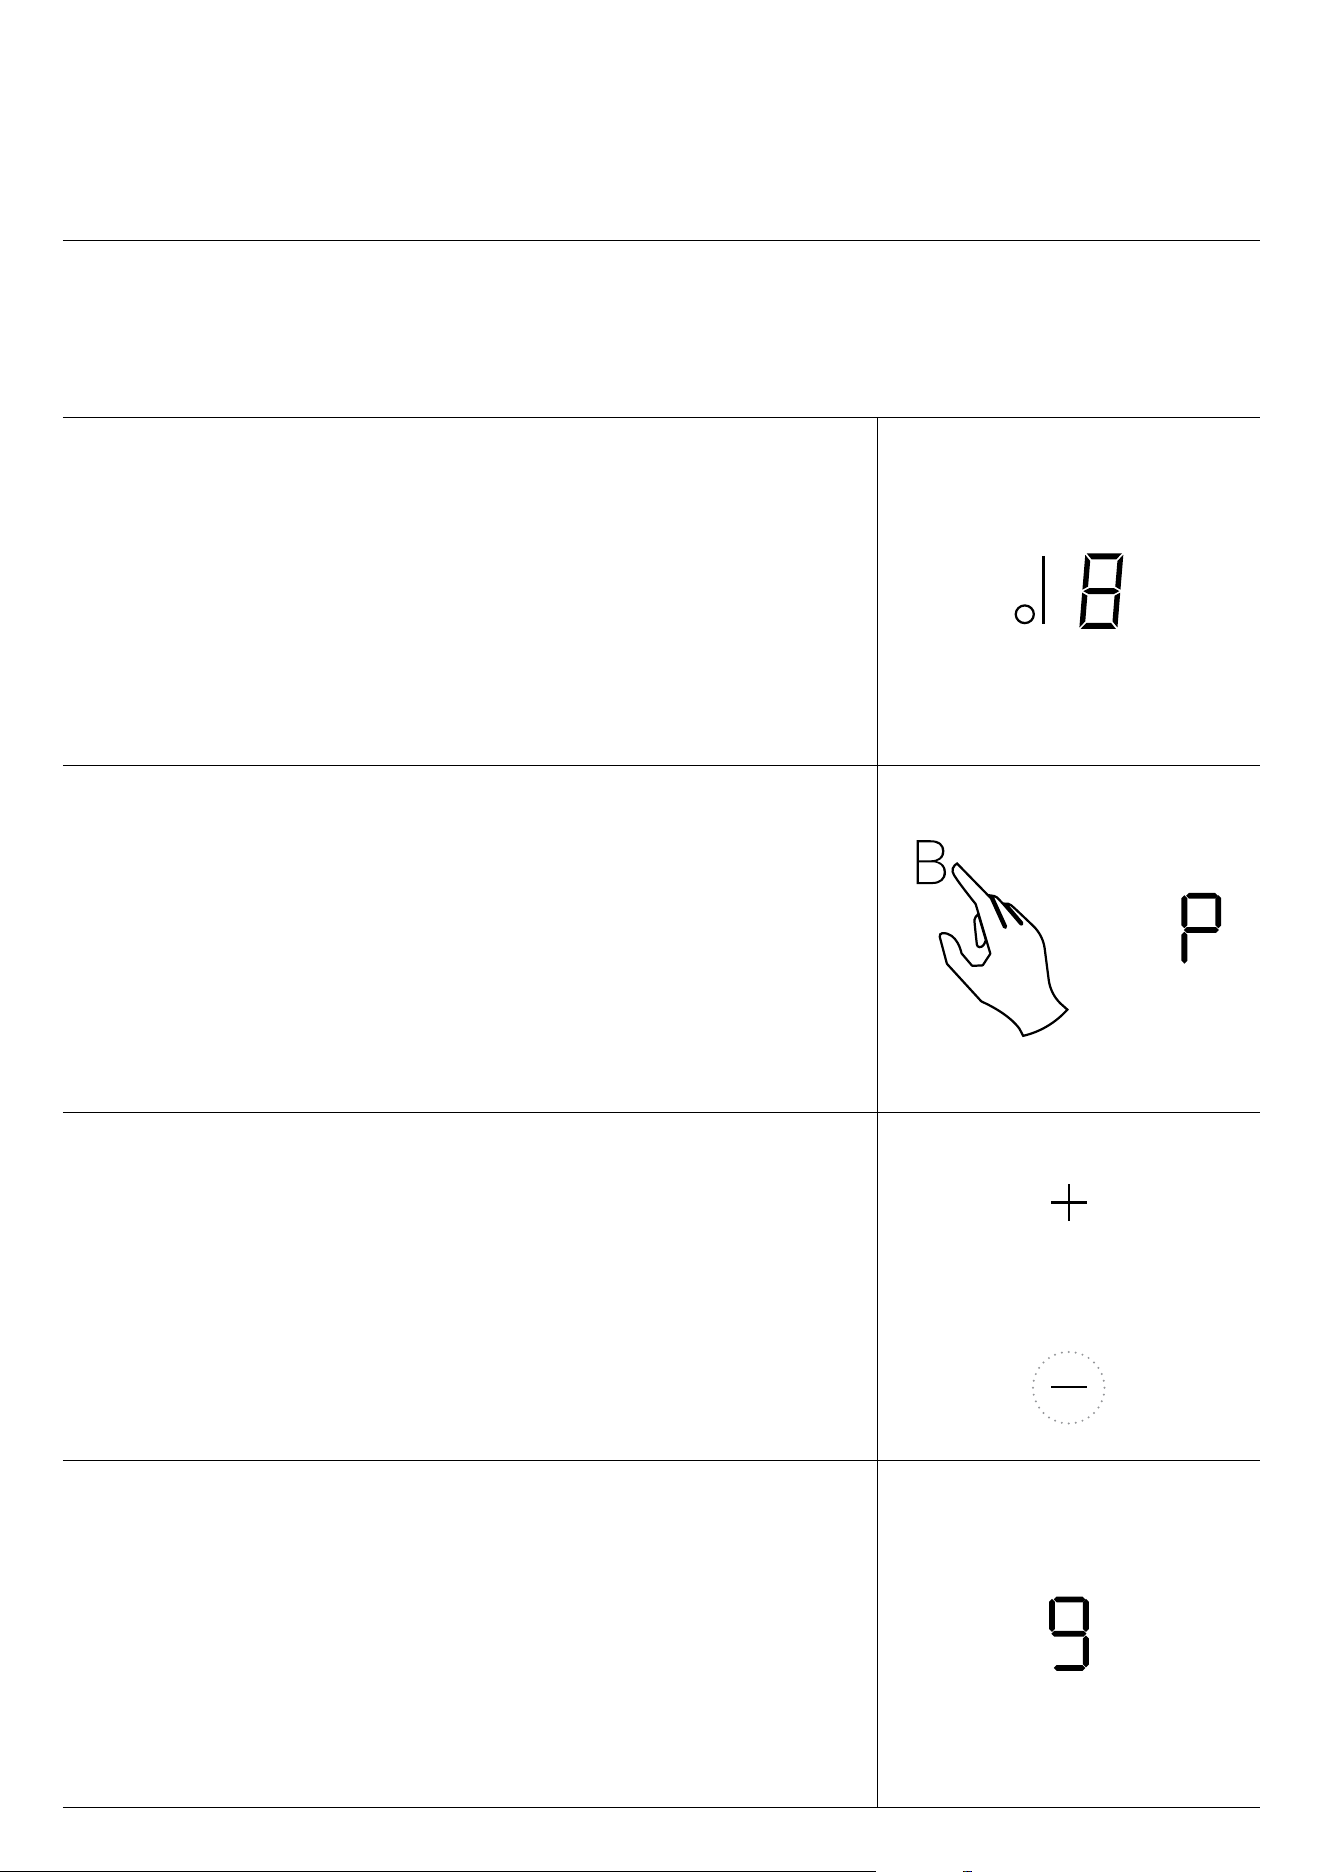
1. Selecting the Cooking Zone
Touch the Zone Selector button next to the cooking zone featuring the boost
function (front left cooking zone).
2. Activating Boost Function
Then press and hold the Power Boost button key (B) until the power level display
shows “P”.
3. Cancelling the Boost Function
Touch the Zone Selector button next to the cooking zone featuring the boost
function (front left cooking zone). Then touch the Adjustment Controls "–" and
choose the desired power level.
Note:
The Boost function operates for a maximum of 5 minutes.
Afterward, the zone will automatically revert to level 9.
Utilising the Power Boost Function
For the Induction Zones
Operating Instructions

23User Manual
Using the Timer Function
The Timer function can be used in two ways, either as a minute
minder (kitchen timer), or as a way to automatically turn off
cooking zones after a set period of time. The timer can be set up
to 99 minutes.
Using the Timer as a Minute Minder
NOTE: You can set the minute minder either before or after
adjusting the cooking zone power settings.
• Ensure the cooktop is powered on and the zone selection
key is inactive (no blinking ‘–‘ indication).
• Touch the Timer Selector button. “00” will appear on the
timer display and the first digit will be blinking.
• Adjust time for the first digit by touching the Adjustment
Controls.
• Touch the Timer Selector again to set the time and second
digital will be blinking.
• Adjust time for the second digit by touching the Adjustment
Controls.
• Touch the Timer Selector again to set the time.
• Once the time is set, the countdown will start immediately,
and the display will indicate the remaining time.
• When the set time elapses, an alert will sound for
30 seconds, and the timer indicator will display “- -”.
Residual Heat Warning
When the cooktop has been operating for some time, there will
be some residual heat. The letter “H” appears to warn you to
keep away from it.
Using the timer to power off one
or more cooking zones
• Select the desired heating zone by touching its Zone
Selector button.
• Touch the Timer Selector. “00” will appear on the timer
display and the first digit will be blinking.
• Adjust time for the first digit by touching the Adjustment
Controls.
• Touch the Timer Selector again to set the time and second
digital will be blinking.
• Adjust time for the second digit by touching the Timer
Adjustment Controls.
• Touch the Timer Adjustment Controls again to set the time.
• Once the time is set, the countdown starts immediately,
showing the remaining time on the display. A red dot on the
power level indication signifies the selected zone.
• When the cooking timer reaches zero, the corresponding
zone will turn off automatically.
NOTE: Other cooking zones will keep operating if they are
turned on previously.
Using the timer to power off multiple
cooking zones
• If setting timers for multiple zones, the relevant cooking
zones will display red dots, indicating the activated timers.
The timer display will show the minimum set timer, and the
corresponding zone's dot will blink.
• Upon expiration of a zone's timer, that specific zone will
switch off. The display will then show the new minimum
timer, and the dot of the corresponding zone will flash.
Canceling the Timer:
• Select the heating zone for which you want to cancel the
timer.
• Touch the timer control; the indicator will flash.
• Press the “–” control until the timer shows “00” to cancel the
timer for the selected zone.
Operating Instructions

24User Manual OCIG905B
Using the FlexZones
• This function allows the FlexZone cooking areas to be used
as a single large zone or as two independent zones, adapting
to diverse cooking requirements.
• Comprised of two distinct inductors that can be controlled
separately, activating only the area covered by the cookware
for efficient heating.
• Proper centering of the cookware ensures accurate
detection and even heat distribution.
• It is not recommended to use several zones outside of the
FlexZones at the same time for a single pan.
•
NOTE: The minimum diameter of cookware is 280mm
Using the FlexZone as an single large zone:
• Activate FlexZone Function:
Press the FlexZone Selector button relevant to where you
want to merge the bridge area into a single large zone.
• An alert will sound, indicating the cooktop has entered
FlexZone selection, and the corresponding indicator will
display flashing.
• Set the desired power level by pressing the Power Level
Adjustment Controls.
Cancel Flexible Zone Function
• Touch any of the Zone Selector buttons that are in use to
deactivate the FlexZone function.
For example, if the left FlexZone is in use, press the front left
Zone Selector button.
• The power settings will operate as usual for a standard
cooking area.
• As Two Independent Zones:
Using the FlexZone as two independent zones
To utilise the FlexZone as two separate cooking zones with
varying power settings:
• Touch the individual Zone Selector button for the cooking
zone desired.
• Set the desired power level by pressing the Power Level
Adjustment Controls.
Using the Child Lock Function
To prevent unintended use, such as accidental activation by
children, you can activate the Child Lock feature. When locked,
all controls, except the Power button, will be disabled.
To lock the controls
Touch the Child Lock button ( ). The timer indicator will display
“Lo”.
To unlock the controls
• Ensure the cooktop is powered on.
• Press and hold the Child Lock button
( ) for 3 seconds.
• You can now resume using your cooktop.
NOTE: While the cooktop is in lock mode, all controls, except
the Power button, are disabled. In case of an emergency, you can
always turn the cooktop off using the Power button. However,
remember to unlock the cooktop before further operation.
The Auto-off Safety Feature
The cooktop includes a safety feature called auto-off safety.
This activates when a cooking zone is left unintentionally on.
Default shutdown times are outlined in the table below:
Power Level Default Operating Time
1 8
2 8
3 8
4 4
5 4
6 4
7 2
8 2
9 2
Operating Instructions

25User Manual
Cooking Guidelines
WARNING: Frying Caution
Be cautious when frying, especially with the Wok Burner or
Boost mode, as oil and fats heat up rapidly. At extremely high
temperatures, there's a risk of spontaneous ignition, posing a
serious fire hazard.
Cooking Tips
• Reduce the power setting when food reaches boiling point.
• Use a lid to shorten cooking times and conserve energy by
trapping heat.
• Minimise liquid or fat for quicker cooking.
• Initiate cooking at a high setting and lower it once the food is
heated through.
Simmering and Rice Cooking
• Simmering, at around 85˚C, occurs below boiling, preserving
flavours without overcooking. Ideal for soups, stews, egg-
based, and flour-thickened sauces.
• Some tasks, like cooking rice, might require a higher
setting than the lowest to ensure proper cooking within the
recommended time.
Searing Steak
To cook juicy, flavourful steaks:
• Allow the meat to reach room temperature for 20 minutes
before cooking.
• Preheat a heavy-based frying pan.
• Brush both sides of the steak with oil, then lower it into the
hot pan with a drizzle of oil.
• Turn the steak once during cooking, judging doneness by
firmness. Cooking times vary based on thickness.
• Rest the steak on a warm plate for a few minutes before
serving to enhance tenderness.
Stir-Frying Steps
• Choose a induction compatible flat-based wok or a large
frying pan if using the induction zones.
• Prepare all ingredients and equipment beforehand for quick
stir-frying. Cook in smaller batches for larger quantities.
• Briefly preheat the pan and add two tablespoons of oil.
• Cook any meat first, set it aside, and keep warm.
• Stir-fry vegetables until hot but still crisp, then reduce the
heat, return the meat, and add the sauce.
• Gently stir to ensure even heating.
• Serve promptly.
Recommended Heat Settings
Power Level Suitability
1–2
• Delicate warming for small amounts
of food
• Melting chocolate, butter, and foods
that burn quickly
• Gentle simmering
• Slow warming
3–4
• Reheating
• Rapid simmering
• Cooking rice
5–6 • Pancakes
7–8
• Sauteing
• Cooking pasta
9 + Power Boost
• Stir-frying
• Searing
• Bringing soup to the boil
• Boiling water

26User Manual OCIG905B
Before Cleaning
• Read this user manual carefully, taking special note of the
‘Safety Information’ chapter in particular.
• Prior to cleaning ensure that the cooktop is both turned off,
and has been given the chance to properly cool down.
Wok Trivet & Cooktop Burner
• Trivets and burners can be lifted up and removed for
cleaning. See page 15 for a guide to burner assembly.
• Persistent stains may require some rubbing with a nylon
scourer or creamed powder cleansers. Household enamel
cleaners are available, follow the manufacturer’s instructions
in their use. Harsh abrasive cleaners, powder cleaners, steel
wool or wax polishes should not be used.
• Always thoroughly dry burners after cleaning or spillage.
When cleaning them, ensure that all the flame ports are free
of any blockage. If necessary, you can use a toothpick or
brush to clear ports.
• The outer surface of the burner caps have a polished finish;
extra care needs to be taken to avoid scratching during
cleaning. In instances of heavy soiling, it may be necessary
to apply a non-abrasive cleaning compound and rub with a
cloth until the soiling is removed.
Ignition Spark Plug & Flame Sensor
Gently clean both with a damp cloth to avoid lighting difficulties.
Ensure that they are dry before use.
Burner Injector Jet
Ensure the injector remains free of any foreign material.
If necessary, use a thin piece of wire to clear the orifice.
Cooktop Surface
CAUTION: In some cases it is helpful to clean up and
remove spillages immediately, while the hob is still hot.
This is especially the case for sugary foods such as jam,
or melted plastics and foil; all of which can damage the
hob if left. If cleaning while the cooktop is hot, exercise caution
and wear protective clothing.
Glass Surface
• The cooktop’s surface material is made of toughened
glass, manufactured to the highest possible standards
for both safety and reliability. However, it must always be
remembered that as it is glass, it may break, so always take
care of it. To clean the glass surface, use a soft cloth or
sponge with detergent and warm water.
•
WARNING: If the surface of the cooktop becomes cracked,
switch off the appliance immediately to avoid the possibility
of electric shock. A cracked cooktop is considered a serious
fault, and if it occurs you should contact our After Sales
Support Team immediately.
Routine maintenance
• Have the condition and efficiency of the gas pipe and the
pressure regulator (if installed) checked periodically. If
anomalies are found, do not repairs but have the faulty part
replaced.
• To ensure good performance and safety, the gas regulator
taps must be greased periodically.
•
WARNING: Periodic lubrication of the taps must only
be carried out by qualified personel, who must also be
contacted if the appliance malfunctions.
Service and Spare Parts
• Prior to shipment from the factory, our appliance undergoes
thorough testing and calibration by skilled specialists
to ensure optimal performance. Any required repairs or
adjustments thereafter should be conducted with utmost
care and attention.
• We highly recommend reaching out to the Dealer from
whom you purchased the appliance or contacting our
nearest Service Centre. Please provide details of the issue,
including the equipment model (Mod.), product number
(Prod. No.), and serial number (Ser. No.), all of which can
be found on the manual cover plate. Always insist on using
genuine spare parts for any replacements.
Care & Maintenance

27User Manual
Care & Maintenance
Care and Cleaning Guide
Marks, Blemishes or Spots Solution Warning
Everyday soiling on glass (fingerprints,
marks, stains left by food or non-sugary
spillovers on the glass).
1. Switch the power to the cooktop off.
2. Apply a cooktop cleaner while the
glass is still warm (but not hot!)
3. Rinse and wipe dry with a clean cloth
or paper towel.
4. Switch the power to the cooktop
back on.
• When the power to the cooktop is
switched off, there will be no ‘hot
surface’ indication but the cooking
zone may still be hot! Take extreme
care.
• Heavy-duty scourers, some nylon
scourers and harsh/abrasive cleaning
agents may scratch the glass. Always
read the label to check if your cleaner
or scourer is suitable.
• Never leave cleaning residue on the
cooktop as it may stain the glass.
Boilovers, melts, and hot sugary
spills on the cooktop glass.
1. Remove these immediately with a
fish slice, palette knife or razor blade
scraper suitable for ceramic glass
cooktops, but beware of hot cooking
zone surfaces:
2. Switch the power to the cooktop off at
the wall.
3. Hold the blade or utensil at a 30° angle
and scrape the soiling or spill to a cool
area of the cooktop.
4. Clean the soiling or spill up with a dish
cloth or paper towel.
5. Follow steps 2 to 4 for ‘Everyday
soiling on glass’ above.
• Remove stains left by melts and
sugary food or spillovers as soon
as possible. If left to cool on the
glass, they may be difficult to remove
or even permanently damage the
glass surface.
•
WARNING: Cut hazard
When the safety cover is retracted,
the blade in a scraper is razor-sharp.
Use with extreme care and always
store safely and out of reach of
children.
Spillovers on the touch controls. 1. Switch the power to the cooktop off.
2. Soak up the spill
3. Wipe the touch control area with a
clean damp sponge or cloth.
4. Wipe the area completely dry with a
paper towel.
5. Switch the power to the cooktop
back on.
The cooktop may beep and turn itself
off, and the touch controls may not
function while there is liquid on them.
Make sure you wipe the touch control
area dry before turning the cooktop
back on.

28User Manual OCIG905B
For Minor Faults
Problem Possible Cause Solution
The cooktop cannot be powered on.
No power is going to the cooktop.
Ensure the cooktop is connected to the
power, and is switched on.
Check if there is a power outage in your
home or area. If the problem persists
contact our Support Team for guidance.
The touch controls won’t respond,
or are difficult to operate.
The controls may be locked
Deactivate the Child Lock function.
See page 24.
There may be a slight film of water on
the controls.
Gently clean and dry the controls
You may be using the tip of your finger
as opposed to the pad when touching
controls.
Make sure to use the pad of your finger
rather than the tip.
The ceramic glass is being scratched.
Rough-edged cookware may have been
used on the cooktop.
Use cookware with flat and smooth
bases. Please refer to pages 17–18 for
further instructions regarding cookware.
Unsuitable cleaning products such as an
abrasive scourer may have been used on
the cooktop.
See Care & Maintenance on pages 26–27.
Some of my cookware makes crackling or
clicking noises.
This may be caused by the construction
of your cookware (Layers of different
metals vibrating differently).
This is normal for cookware and does not
indicate a fault.
The cooktop makes a low humming noise
when used on a high heat setting.
This is caused by the technology of
induction cooking.
This is normal, but the noise should
quieten down or disappear completely
when you decrease the heat setting.
Fan noise coming from the cooktop.
A cooling fan built into your induction
cooktop has come on to prevent the
electronics from overheating. It may
continue to run even after you’ve turned
the cooktop off.
This is normal and needs no action.
Do not switch the power to the induction
cooktop off at the wall while the fan is
running.
Troubleshooting

29User Manual
For Minor Faults
Problem Possible Cause Solution
One of the burners is not lighting up,
even though the sparker appears to
be working normally.
The knob may not have been pushed down
long enough to deactivate the burner’s
flame safeguard.
Repeat the lighting procedure,
however this time hold the knob down
for 5 seconds or longer.
A gas supply valve may be shut off. Turn on the appliance’s gas supply.
You may have accidentally turned a
different knob that does not correspond
to the burner you want.
Carefully ensure that the knob
you are turning corresponds to
the burner you want to light.
A port blockage in the burner’s ignition
area may have occurred, likely due to
irregular cleaning.
Ensure that the ports in each
of the burner’s ignition areas
is clean and dry.
It's possible the ignition spark plug may
be wet or dirty.
Gently clean and dry the ignition spark
plugs before resuming.
When holding down a control knob,
no spark is being emitted.
The cooktop’s electricity supply is
disconnected or has been turned off.
A local power outage can also affect the
cooktop’s functioning.
Ensure the cooktop is connected to the
power, and that the power has been
switched on.
Check if there is a power outage in your
home or area.
It's possible the ignition spark plug may
be wet or dirty.
Gently clean and dry the ignition spark
plugs before resuming.
Flames emitted from the burner are
uneven, or tending to lift.
The flame ports may be blocked or wet. Carefully clean and then dry the ports.
A burner cap may be incorrectly fitted. Ensure the components are well fitted.
Flames from the burner are not staying
lit after the knob has been released.
The knob may not have been pushed down
long enough to deactivate the burner’s
flame safeguard.
Repeat the lighting procedure, however
this time hold the knob down for 5 seconds
or longer.
The knob may not have been set between
the valid power levels, 1–9.
In order for the burner to stay lit, the knob
must be set between levels 1–9.
There may be dirt or spillage covering the
flame safeguard sensor.
Carefully clean and dry the flame
safeguard sensor before resuming.
The cookware is not heating up well,
and cooking is happening too slowly.
An incompatible piece of cookware
may have been used.
Please refer to pages 17–18 for further
instructions regarding cookware.
The cooktop surface, surrounding
benchtop, or the cooktop control
knobs have started overheating.
An incompatible piece of cookware
may have been used.
Please refer to pages 17–18 for further
instructions regarding cookware.
The cookware may not be placed
on the burner and trivets properly.
Ensure that the cookware is centred
correctly on the burner and trivet.
Troubleshooting

30User Manual OCIG905B
For Minor Faults
Problem Possible Cause Solution
Pans do not become hot and appears in
the display.
The induction zones cannot detect the
pan because it may not suitable for
induction cooking.
Use cookware suitable for induction
cooking. Please refer to pages 17 for
further instructions regarding cookware.
The induction zones cannot detect
the pan because it is too small for the
cooking zone or not properly centered
on it.
Centre the pan and make sure
that its base matches the size of
the cooking zone.
The cooktop or a cooking zone has turned
itself off unexpectedly, a tone sounds
and an error code is displayed (typically
alternating with one or two digits in the
cooking timer display).
Technical fault.
Please note down the fault code, switch
the power to the cooktop off at the wall,
and contact our After Sales Support
by calling 1300 11 4357 or by emailing
suppor[email protected].
Troubleshooting
For Serious Faults
• Some minor faults can be fixed by referring to the table in
this section, however if an emergency or serious fault occurs,
immediately power off the cooktop and disconnect the
power from the source.
• If a serious fault occurs, DO NOT attempt any repairs
yourself, instead wait for a service agent to do so.
• For assistance or to organise an authorised service agent
contact our After Sales Support by calling 1300 11 4357,
or by emailing support@residentiagroup.com.au.
•
NOTE: If a service agent is asked to attend whilst the product
is under warranty and finds that the problem is not the result
of an appliance fault, then you may be liable for the cost of
the call out charge.
• The appliance must be accessible for the service agent to
perform any necessary repair. If your appliance is installed in
such a way that a service agent is concerned that damage
will be caused to the appliance or your kitchen, then they will
not complete a repair.
• Please refer to the Warranty Information to learn more.
Cooktop Fault Codes & Solutions
Fault Code Possible Cause Solution
E2 / E3
Abnormal supply voltage.
Please inspect whether power supply is
normal. Power on after the power supply
is normal.
E4 / E5
Temperature sensor failure.
Contact our After Sales Support by
calling 1300 11 4357 or by emailing
suppor[email protected].
E6 / E9
Bad induction cooktop heat radiation.
Please restart after the induction cooktop
cools down.
E7 / E8
Temperature sensor of the IGBT failure.
Contact our After Sales Support by
calling 1300 11 4357 or by emailing
suppor[email protected].

31User Manual
Technical Specifications
Model Number OCIG905B
Cooktop Finish Black DiaCeram® Ceramic Glass
Burner Type Brass Burner
Cooking Zones 4
Trivet Material Cast Iron
Rated Voltage 220–240V~
Rated Frequency 50–60Hz
Induction Cooktop Power 7200 W
Wok Burner Output
NG: 19.7 MJ/h (Injector 2.00 mm) ULPG: 15.5 MJ/h (Injector 1.10 mm)
220×200mm Cooking Zone Output (×4) 1800 / 2100 W
Gas Intake Connection G1/2"
Gas Compatibility Natural Gas & LPG
Power Connection 30 Amp, Hardwired
Auto-off Safety 120 Minutes
Power Cord Length 150 cm
Product Weight (Net / Gross) 19.3 kg / 22 kg
Dimensions (W × D × H) 900 × 520 × 105 mm
Cut-Out Dimensions (W × D) 870 × 490 mm
Height Dimensions Bench top surface to the top of the pan support: 101 mm
Specifications Chart: OCIG905B

32User Manual OCIG905B
Notes

33User Manual
Attach your receipt to this page
For future reference, please record the following information which can be found
on the rating plate and the date of purchase which can be found on your sales invoice.
Store Details
Store Name
Address
Telephone | Purchase Date
Product Details
Model No.
Serial No.
Purchase Details

34User Manual OCIG905B
WARRANTY TERMS AND CONDITIONS
HYBRID COOKTOPS
This document sets out the terms and conditions of the product
warranties for Residentia Group Appliances. It is an important
document. Please keep it with your proof of purchase documents
in a safe place for future reference should you require service
for your Appliance.
1. In this warranty
(a) ‘acceptable quality’ as referred to in clause 10 of this warranty
has the same meaning referred to in the ACL;
(b) ‘ACL’ means Trade Practices Amendment (Australian
Consumer Law) Act (No.2) 2010;
(c) ‘Appliance’ means any Residentia Group product
purchased by you accompanied by this document;
(d) ‘ASR’ means Residentia Group authorised service
representative;
(e) ‘Residentia Group’ means Residentia Group Pty Ltd
of 165 Barkly Ave, Burnley VIC 3121, ACN 70 600 546 656 in
respect of Appliances purchased in Australia;
(f ) ‘major failure’ as referred to in clause 10 of this warranty
has the same meaning referred to in the ACL and includes
a situation when an Appliance cannot be repaired or it is
uneconomic for Residentia Group, at its discretion, to repair
an Appliance during the Warranty Period;
(g) ‘Warranty Period’ means:
(i) where the Appliance is used for personal, domestic
or household use (i.e. normal single family use)
as set out in the instruction manual, the Appliance
is warranted against manufacturing defects for
36 months, following the date of original purchase
of the Appliance;
(h) ‘you’ means the purchaser of the Appliance not having
purchased the Appliance for re-sale, and ‘your’ has a
corresponding meaning.
2. This warranty only applies to Appliances purchased and
used in Australia and is in addition to (and does not exclude,
restrict, or modify in any way) any non-excludable statutory
warranties in Australia.
3. During the Warranty Period Residentia Group or its ASR
will, at no extra charge if your Appliance is readily accessible
for service, without special equipment and subject to these
terms and conditions, repair or replace any parts which it
considers to be defective. Residentia Group or its ASR may
use remanufactured parts to repair your Appliance. You
agree that any replaced Appliances or parts become the
property of Residentia Group. This warranty does not apply
to light globes, batteries, seals, filters or similar perishable
parts.
4. Parts and Appliances not supplied by Residentia Group
are not covered by this warranty.
Warranty Information

35User Manual
5. You will bear the cost of transportation, travel and delivery of
the Appliance to and from Residentia Group or its ASR. If you
reside outside of the service area, you will bear the cost of:
(a) travel of an authorised representative;
(b) transportation and delivery of the Appliance to and from
Residentia Group or its ASR, in all instances, unless the
Appliance is transported by Residentia Group or its ASR,
the Appliance is transported at the owner’s cost and risk
while in transit to and from Residentia Group or its ASR.
6. Proof of purchase is required before you can make a claim
under this warranty.
7. You may not make a claim under this warranty unless
the defect claimed is due to faulty or defective parts or
workmanship. Residentia Group is not liable in the following
situations (which are not exhaustive):
(a) the Appliance is damaged by:
(i) accident
(ii) misuse or abuse, including failure to properly
maintain or service
(iii) normal wear and tear
(iv) power surges, electrical storm damage or incorrect
power supply
(v) incomplete or improper installation
(vi) incorrect, improper or inappropriate operation
(vii) insect or vermin infestation
(viii) failure to comply with any additional instructions
supplied with the Appliance;
(b) the Appliance is modified without authority from Residentia
Group in writing;
(c) the Appliance’s serial number or warranty seal has been
removed or defaced;
(d) the Appliance was serviced or repaired by anyone other than
Residentia Group, an authorised repairer or ASR.
8. This warranty, the contract to which it relates and the
relationship between you and Residentia Group are governed
by the law applicable where the Appliance was purchased.
9. To the extent permitted by law, Residentia Group excludes
all warranties and liabilities (other than as contained in this
document) including liability for any loss or damage whether
direct or indirect arising from your purchase, use or non use
of the Appliance.
10. For Appliances and services provided by Residentia
Group in Australia, the Appliances come with a guarantee
by Residentia Group that cannot be excluded under the
Australian Consumer Law. You are entitled to a replacement
or refund for a major failure and for compensation for any
other reasonably foreseeable loss or damage. You are also
entitled to have the Appliance repaired or replaced if the
Appliance fails to be of acceptable quality and the failure
does not amount to a major failure. The benefits to you
given by this warranty are in addition to your other rights
and remedies under a law in relation to the Appliances or
services to which the warranty relates.
11. At all times during the Warranty Period, Residentia Group
shall, at its discretion, determine whether repair, replacement
or refund will apply if an Appliance has a valid warranty claim
applicable to it.
12. Missing parts are not covered by warranty. Residentia Group
reserves the right to assess each request for missing parts
in a case by case basis. Any parts that are not reported
missing in the first week after purchase will not provide free
of charge.
13. To enquire about claiming under this warranty, please follow
these steps:
(a) carefully check the operating instructions, user manual and
the terms of this warranty;
(b) have the model and serial number of the Appliance available;
(c) have the proof of purchase (e.g. an invoice) available;
(d) telephone the numbers shown below.
14. You accept that if you make a warranty claim, Residentia
Group and its ASR may exchange information in relation
to you, in order to enable Residentia Group to meet its
obligations under this warranty.
—
IMPORTANT
Before calling for service, please ensure
the steps in point 13 have been followed.
CONTACT SERVICE
�300 �� HELP (4357)
support@residentiagroup.com.au
Our goods come with guarantees that cannot be excluded under the Australian Consumer Law.
You are entitled to a replacement or refund for a major failure and for compensation for any other
reasonably foreseeable loss or damage. You are also entitled to have the goods repaired or replaced
if the goods fail to be of acceptable quality and the failure does not amount to a major failure.
The Australian Consumer Law requires
the inclusion of the following statement
with this warranty:
Warranty Information

Omega is proudly owned, designed and engineered
in Australia by Residentia Group Pty. Ltd.
@residentia.group
www.residentia.group
EST. 1981
Designed to Enhance