
Write the model and serial
numbers here:
Model # _________________
Serial # _________________
You can find them on a label on
the side trim or on the front of the
(lower) oven behind the oven door.
OWNER’S MANUAL
WALL OVEN
Built-In Electric
49-2003952 Rev. 1 05-26
GE is a trademark of the General Electric Company. Manufactured under trademark license.
Wall Oven
7000 and 9000 Series
ENGLISH / FRANÇAIS /
ESPAÑOL
SAFETY INFORMATION ..........3
USING THE APPLIANCE
Wi-Fi Connectivity ....................6
Voice Controls .........................7
Appliance Display ......................8
Settings .............................10
Sabbath ............................. 11
Oven Door Camera .................... 11
Oven Racks ..........................12
Aluminum Foil and Oven Liners .........13
Cookware Guidelines ..................13
Cooking Modes .......................14
Probe ...............................18
Cooking Guide .......................19
Air Fry Cooking Guide ................ 20
Roasting Guide .......................21
Dehydrating Guide ....................22
CARE AND CLEANING
Cleaning The Oven - Exterior ...........23
Cleaning The Oven - Interior .......... 24
Probe ...............................25
Oven Racks ..........................25
Oven Light .......................... 26
Oven Door ...........................27
TROUBLESHOOTING TIPS ......28
LIMITED WARRANTY .......... 30
ACCESSORIES ...................31
CONSUMER SUPPORT ..........32

THANK YOU FOR MAKING GE APPLIANCES A PART OF YOUR HOME.
Whether you grew up with GE Appliances, or this is your first, we’re happy to have you in the family.
We take pride in the craftsmanship, innovation and design that goes into every GE Appliances
product, and we think you will too. Among other things, registration of your appliance ensures that we
can deliver important product information and warranty details when you need them.
Register your GE appliance now online. Helpful websites and phone numbers are available in the
Consumer Support section of this Owner’s Manual. You may also mail in the pre-printed registration
card included in the packing material.
49-2003952 Rev. 0 3
READ AND SAVE THESE INSTRUCTIONS
IMPORTANT SAFETY INFORMATION
READ ALL INSTRUCTIONS BEFORE USING THE APPLIANCE
SAFETY INFORMATION
WARNING
GENERAL SAFETY INSTRUCTIONS
Ŷ 8VHWKLVDSSOLDQFHRQO\IRULWVLQWHQGHGSXUSRVHDV
described in the Owner’s Manual.
Ŷ +DYH\RXUDSSOLDQFHLQVWDOOHGDQGSURSHUO\
grounded by a qualified installer in accordance with
the provided installation instructions.
Ŷ $Q\DGMXVWPHQWUHSDLURUVHUYLFHQRWVSHFLILFDOO\
recommended in the Owner’s Manual should be
performed ONLY by a qualified appliance installer or
service technician.
Ŷ %HIRUHSHUIRUPLQJDQ\VHUYLFHXQSOXJWKHDSSOLDQFH
or disconnect the power supply at the household
distribution panel by removing the fuse or switching
off the circuit breaker.
Ŷ %HVXUHDOOSDFNLQJPDWHULDOVDUHUHPRYHGIURPWKH
appliance before operating to prevent ignition of
these materials.
Ŷ $YRLGVFUDWFKLQJRULPSDFWLQJJODVVGRRUV
cooktops, or control panels. Doing so may lead to
glass breakage.
Ŷ 'RQRWFRRNRQDSURGXFWZLWKEURNHQJODVV6KRFN
fire, or cuts may occur.
Ŷ 'RQRWOHDYHFKLOGUHQDORQHRUXQDWWHQGHGLQDQ
area where an appliance is in use. They should
never be allowed to climb, sit or stand on any part
of the appliance.
Ŷ
CAUTION
Do not store items of interest
to children in cabinets above or on top of the
appliance - children climbing on the oven to reach
LWHPVFRXOGEHVHULRXVO\LQMXUHG
Ŷ 1HYHUXVH\RXUDSSOLDQFHIRUZDUPLQJRUKHDWLQJ
the room.
Ŷ 'RQRWDOORZDQ\RQHWRFOLPEVWDQGRUKDQJRQWKH
oven door, drawer, or cooktop. They could damage
WKHDSSOLDQFHRUWLSLWRYHUFDXVLQJVHYHUHLQMXU\RU
death.
Ŷ 8VHRQO\GU\SRWKROGHUV²PRLVWRUGDPSSRWKROGHUV
on hot surfaces may result in burns from steam.
Do not let pot holders touch surface units or oven
heating elements. Do not use a towel or other bulky
cloth in place of pot holders.
Ŷ 'RQRWWRXFKWKHEXUQHUVJULGGOHVRQVRPH
PRGHOVJUDWHVRQVRPHPRGHOVWKHFRRNWRSRU
oven heating elements, or the interior surface of
the oven. These surfaces may remain hot enough
to burn for an extended period of time following
cooking, even though they no longer appear to be on
or hot.
Ŷ 'XULQJDQGDIWHUXVHGRQRWWRXFKRUOHWFORWKLQJRU
other flammable materials contact any interior area of
the oven; allow sufficient time for cooling first. Other
surfaces of the appliance may become hot enough to
cause burns. Potentially hot surfaces include burners
RUKHDWLQJHOHPHQWVJUDWHVRQVRPHPRGHOV
cooktop surface, oven vent openings, surfaces near
the openings, crevices around the oven door, metal
trim parts above the door, any backguard, or shelves
located above cooking surface.
Ŷ 'RQRWKHDWXQRSHQHGIRRGFRQWDLQHUV3UHVVXUH
could build up and the container could burst, causing
DQLQMXU\
Ŷ &RRNIRRGWKRURXJKO\WRKHOSSURWHFWDJDLQVW
foodborne illness. Minimum safe food temperature
UHFRPPHQGDWLRQVDUHSURYLGHGE\WKH86'$
DQG)'$8VHDIRRGWKHUPRPHWHUWRWDNHIRRG
temperatures and check several locations.
Ŷ .HHSWKHYHQWLODWRUKRRGDQGJUHDVHILOWHUVFOHDQWR
maintain good venting and to avoid grease fires. Turn
the ventilator OFF in case of a fire. The blower if in
operation, could spread the flames.
WARNING
KEEP FLAMMABLE MATERIALS AWAY FROM THE OVEN
Failure to do so may result in fire or personal injury.
Ŷ 'RQRWVWRUHRUXVHIODPPDEOHPDWHULDOVLQDQRYHQ
or near the cooktop, including paper, plastic, pot
holders, linens, wall coverings, curtains, drapes and
gasoline or other flammable vapors and liquids.
Ŷ 1HYHUZHDUORRVHILWWLQJRUKDQJLQJJDUPHQWVZKLOH
using the appliance. These garments may ignite if
they contact hot surfaces causing severe burns.
Ŷ 'RQRWOHWFRRNLQJJUHDVHRURWKHUIODPPDEOH
materials accumulate in or near the appliance.
Grease in the oven or on the cooktop may ignite.
Ŷ 'RQRWVWRUHDQ\IODPPDEOHPDWHULDOVRU
temperature sensitive items inside of or on the
appliance.
Ŷ &OHDQYHQWLODWLQJKRRGVIUHTXHQWO\*UHDVHVKRXOG
not be allowed to accumulate on the hood or filter.
Ŷ 2QVRPHPRGHOV5HPRWH2SHUDWLRQ±7KLV
appliance is configurable to allow remote operation
at any time.
WARNING
Read all safety instructions before using the product. Failure to follow these instructions may
UHVXOWLQILUHHOHFWULFDOVKRFNVHULRXVLQMXU\RUGHDWK
4 49-2003952 Rev. 0
SAFETY INFORMATION
READ AND SAVE THESE INSTRUCTIONS
IMPORTANT SAFETY INFORMATION
READ ALL INSTRUCTIONS BEFORE USING THE APPLIANCE
WARNING
KEEP FLAMMABLE MATERIALS AWAY FROM THE APPLIANCE
Failure to do so may result in fire or personal injury.
Ŷ 'RQRWVWRUHRUXVHIODPPDEOHPDWHULDOVLQDQRYHQ
or near the cooktop, including paper, plastic, pot
holders, linens, wall coverings, curtains, drapes and
gasoline or other flammable vapors and liquids.
Ŷ 1HYHUZHDUORRVHILWWLQJRUKDQJLQJJDUPHQWVZKLOH
using the appliance. These garments may ignite if
they contact hot surfaces causing severe burns.
Ŷ 'RQRWOHWFRRNLQJJUHDVHRURWKHUIODPPDEOH
materials accumulate in or near the appliance.
Grease in the oven or on the cooktop may ignite.
Ŷ Do not store any flammable materials or temperature
sensitive items inside of or on the appliance.
Ŷ Clean ventilating hoods frequently. Grease should not
be allowed to accumulate on the hood or filter.
Ŷ 2QVRPHPRGHOVRemote Operation±7KLV
appliance is configurable to allow remote operation at
any time.
WARNING
IN THE EVENT OF A FIRE, TAKE THE FOLLOWING
STEPS TO PREVENT INJURY AND FIRE SPREADING
Ŷ 'RQRWXVHZDWHURQJUHDVHILUHV1HYHUSLFNXS
a flaming pan. Turn the controls off. Smother a
flaming pan on a surface unit by covering the pan
completely with a well-fitting lid, cookie sheet or flat
WUD\8VHDPXOWLSXUSRVHGU\FKHPLFDORUIRDPW\SH
fire extinguisher.
Ŷ ,IWKHUHLVDILUHLQWKHRYHQGXULQJEDNLQJVPRWKHU
the fire by closing the oven door and turning the
oven off or by using a multi-purpose dry chemical or
foam-type fire extinguisher.
Ŷ 2QVRPHPRGHOV,IWKHUHLVDILUHLQWKHRYHQ
during self-clean, turn the oven off and wait for
the fire to go out. Do not force the door open.
,QWURGXFWLRQRIIUHVKDLUDWVHOIFOHDQWHPSHUDWXUHV
may lead to a burst of flame from the oven. Failure
to follow this instruction may result in severe burns.
WARNING
OVEN SAFETY INSTRUCTIONS
Ŷ 6WDQGDZD\IURPWKHDSSOLDQFHZKHQRSHQLQJWKH
oven door. Hot air or steam which escapes can
cause burns to hands, face and/or eyes.
Ŷ 'RQRWXVHWKHRYHQLIDKHDWLQJHOHPHQWGHYHORSV
a glowing spot during use or shows other signs
of damage. A glowing spot indicates the heating
element may fail and present a potential burn, fire,
or shock hazard. Turn the oven off immediately and
have the heating element replaced by a qualified
service technician.
Ŷ .HHSWKHRYHQYHQWXQREVWUXFWHG
Ŷ 1HYHUSODFHFRRNLQJXWHQVLOVSL]]DRUEDNLQJ
stones, or any type of foil or liner on the oven floor.
These items can trap heat or melt, resulting in
damage to the product and risk of shock, smoke or
fire.
Ŷ 3ODFHRYHQUDFNVLQGHVLUHGORFDWLRQZKLOHRYHQLV
FRRO,IUDFNPXVWEHPRYHGZKLOHRYHQLVKRWEH
careful to avoid touching hot surfaces and do not let
pot holder contact hot heating element in oven.
Ŷ 'RQRWOHDYHLWHPVVXFKDVSDSHUFRRNLQJXWHQVLOV
RUIRRGLQWKHRYHQZKHQQRWLQXVH,WHPVVWRUHGLQ
an oven can ignite.
Ŷ 'RQRWOHDYHLWHPVRQWKHFRRNWRSQHDUWKHRYHQ
YHQW,WHPVPD\RYHUKHDWUHVXOWLQJLQDULVNRIILUHRU
burns.
Ŷ 1HYHUEURLOZLWKWKHGRRURSHQ
Ŷ .HHSWKHRYHQIUHHIURPJUHDVHEXLOGXS*UHDVHLQ
the oven may ignite.
Ŷ :KHQXVLQJFRRNLQJRUURDVWLQJEDJVLQWKHRYHQ
follow the manufacturer’s directions.
Ŷ SHOCK OR BURN HAZARD:%HIRUHUHSODFLQJ
oven light bulb, disconnect the electrical power to
the appliance at the main fuse or circuit breaker
panel. Failure to do so may result in electric shock
or burn.
Ŷ
CAUTION
BURN HAZARD: The glass cover
and bulb should be removed when cool. Touching
hot glass with bare hands or a damp cloth can
cause burns.
Ŷ 'RQRWXVHDQ\W\SHRIIRLORUOLQHUWRFRYHUWKH
oven bottom or anywhere in the oven, except as
described in the Owner’s Manual. Oven liners can
trap heat or melt, resulting in damage to the product
and risk of shock, smoke or fire.
49-2003952 Rev. 0 5
SAFETY INFORMATION
READ AND SAVE THESE INSTRUCTIONS
IMPORTANT SAFETY INFORMATION
READ ALL INSTRUCTIONS BEFORE USING THE APPLIANCE
PROPER DISPOSAL OF YOUR APPLIANCE
Dispose of or recycle your appliance in accordance with Federal and Local Regulations. Contact your local
authorities for the environmentally safe disposal or recycling of your appliance.
REGULATORY INFORMATION
FCC/IC Compliance Statement:
7KLVGHYLFHFRPSOLHVZLWK3DUWRIWKH)&&5XOHV2SHUDWLRQLVVXEMHFWWRWKHIROORZLQJFRQGLWLRQV
1. This device may not cause harmful interference, and
7KLVGHYLFHPXVWDFFHSWDQLQWHUIHUHQFHUHFHLYHGLQFOXGLQJLQWHUIHUHQFHWKDWPD\FDXVHXQGHVLUHGRSHUDWLRQ
NOTICE: Changes or modifications to this unit not expressly approved by the manufacturer could void the use's
authority to operate the equipment.
How to Remove Protective Shipping Film and Packaging Tape
Carefully grasp a corner of the protective shipping film
with your fingers and slowly peel it from the appliance
surface. Do not use any sharp items to remove the film.
Remove all of the film before using the appliance for the
first time.
To assure no damage is done to the finish of the product,
the safest way to remove the adhesive from packaging
tape on new appliances is an application of a household
liquid dishwashing detergent. Apply with a soft cloth and
allow to soak.
NOTE: All protective packing must be removed from all
SDUWV,WFDQQRWEHUHPRYHGLILWLVEDNHGRQ
Consider recycling options for your appliance packaging
material.
WARNING
RQVRPHPRGHOV7KLVRYHQPD\EHHTXLSSHGZLWKDPLFURSKRQHWRDOORZIRUYRLFHFRQWURORI
your oven's operations. Enabling use of the microphone will cause it to be capable of listening for certain voice
FRPPDQGVWRDFWLYDWHDQGRSHUDWHWKHRYHQDWDOOWLPHV,WLVSRVVLEOHIRUEDFNJURXQGRUHQYLURQPHQWDOQRLVH
to mimic words or sounds that this appliance recognizes as an instruction, and the unit may activate or initiate
a feature or cooking mode as a result, even when the unit is unattended and no activation of the feature or
cooking mode was desired. Never store flammable or temperature-sensitive items inside of the appliance.
6 49-2003952 Rev. 0
USING THE APPLIANCE: Wi-Fi Connectivity
Wi-Fi Connectivity (on some models)
Your appliance is designed to provide you with two-
way communication between your appliance and smart
GHYLFHV,QDGGLWLRQWKLVDSSOLDQFHPD\UHTXLUHD
software update to enable all features on initial setup.
%\XVLQJWKH6PDUW+4
TM
mobile app, you will be able to
FRQQHFWWRDYDULHW\RIIHDWXUHVLQFOXGLQJEXWQRWOLPLWHG
to using your appliance as a smart speaker with Amazon
Alexa) and using your smartphone or tablet*. Visit your
DSSVWRUHDQGGRZQORDG6PDUW+4RUXVHWKH45FRGH
EHORZ
To connect your appliance to Wi-Fi, follow the prompts
on the appliances controls display. For the best
H[SHULHQFHSULRUWREHJLQQLQJ
Ɣ'RZQORDGWKH6PDUW+4DSSDQGVLJQLQRUFUHDWHDQ
account.
NOTE: New users must verify their email address to
complete the sign in process.
Ɣ+DYH\RXUKRPH:L)LQHWZRUNSDVVZRUGDYDLODEOH
,ID0$&,'LVUHTXLUHGWRFRQQHFW\RXUDSSOLDQFHWR
Wi-Fi see the Settings section for details. You can also
reference the connected appliance information label
typically located inside the door of the oven or drawer.
,WZLOODOVRFRQWDLQWKH$SSOLDQFH1HWZRUN1DPHDQG
Password, should it be needed.
2QFH\RXUDSSOLDQFHLVFRQQHFWHGODXQFKWKH6PDUW+4
app and tap on your appliance to explore. Apply all
software upgrades if prompted to ensure your appliance
has the latest features.
NOTE: Make sure to keep the Wi-Fi function turned
on so that you can control your appliance from your
6PDUW+4DSS
,I\RXKDYHLVVXHVZLWKWKHFRQQHFWLRQSURFHVVSOHDVH
FDOODQGDVNIRUDVVLVWDQFHZLWKZLUHOHVV
connectivity.
* Compatible Apple or Android devices and home Wi-Fi
network required.
Turning Off the Wi-Fi
,I\RXKDYHD5HPRWH(QDEOHRU:L)L&RQQHFWEXWWRQ
press and hold the button for 3 seconds to fully
GLVFRQQHFWIURPWKH:L)L,I\RXGRQRWKDYHDEXWWRQ
on your controls, navigate to Settings and disconnect or
forget network to fully disconnect from the Wi-Fi. NOTE:
<RXZLOOKDYHWRUHFRQQHFW\RXU6PDUW+4DSSWR\RXU
appliance if you would like to control your appliance from
\RXUSKRQHDJDLQ1RWHWKDWZKHQWKH:,)LLVWXUQHGRII
the oven Wi-Fi board is not broadcasting.
Available Features
Follow all in-app instructions for proper operation of the
appliance when using connected features.
Remote Oven Control:
7RHQDEOH6PDUW+4FRQWURORIWKHRYHQZKLOH:L)LLV
active, ensure the feature is on by checking the remote
enable setting in Settings.
Voice to Activate:
You have the power to control your oven operation with
MXVW\RXUYRLFH6HHWKH9RLFH&RQWUROVHFWLRQIRUPRUH
details on how to use this feature.
NOTE: Some cooking functions and features are not
available until after you Wi-Fi connect your new oven
to your local home wireless network. Please follow the
instructions above to connect. This provides capability to
XVH6PDUW+4DSSIXQFWLRQVDQGHQVXUHVWKDWWKHRYHQ
has the latest software.
Contains FCC:
UPD ID:
PT. NO.
Contains IC:
MAC ID:
Connected Appliance Information

49-2003952 Rev. 0 7
7RXVHDQ\YRLFHFRQWUROFRPPDQGVHQVXUH\RXURYHQLVFRQQHFWHGWR:L)LFRQQHFWHGWRWKH6PDUW+4DSSRYHQ
remote enable is turned on and your oven control is unlocked.
,QVWUXFWLRQVIRUFRQQHFWLQJ\RXURYHQFDQEHIRXQGLQWKH6PDUW+4$SSRQ\RXUSKRQHRUXQGHU6HWWLQJVRQ\RXU
oven control.
Smart Speaker Control / Voice Assistant
Control
,I\RXURYHQGRHVQRWKDYHDPLFURSKRQH\RXFDQVWLOO
use your voice to turn on an oven and oven timers or
turn off an oven. Make sure that your oven is connected
WR:L)LWKH6PDUW+4$SSDQGDQ$PD]RQ$OH[DVPDUW
speaker. Ensure your oven and your smart speaker are
connected to Wi-Fi, your oven remote enable is turned
on and your oven control is unlocked. Also ensure that
your smart speaker is within close distance to your oven
so it hears your commands.
Microphone Control (on some models)
,I\RXURYHQKDVPLFURSKRQHVYRLFHFRQWUROKDV
enhanced capabilities and can also be used with some
RIWKHDSSVRQWKHFRQWUROLQDGGLWLRQWRWXUQLQJRQRU
off the oven. Ensure your oven is connected to Wi-Fi,
FRQQHFWHGWRWKH6PDUW+4DSSRYHQUHPRWHHQDEOHLV
turned on and your oven control is unlocked.
Your unit arrives with the microphone muted. You must
unmute the microphone to make it available.
7RXQPXWHWKHPLFURSKRQHSXOOGRZQWKH4XLFN6HWWLQJ
Shade and press the to unmute. A voice activation
waiver will be required the first time you unmute the
microphone. The waiver will not be needed to unmute
the microphone afterwards.
When the oven is connected to Wi-Fi and the
microphone is muted, indicators that the microphone is
PXWHGDQGWXUQHGRIIZLOODSSHDULQWKH4XLFN6HWWLQJV
6KDGHDQGLQWKH6WDWXV%DUDUHD
To use voice activation when the microphone is not
PXWHGVD\WKHZDNHZRUGV³+H\+4´SDXVHEULHIO\DQG
wait for the activation screen to appear. Then speak
your command clearly. Note that pausing after saying
³+H\+4´DQGZDLWLQJIRUWKHDFWLYDWLRQVFUHHQWRDSSHDU
will help ensure that your command is heard fully and
correctly.
&RPPRQPLFURSKRQHYRLFHFRPPDQGVLQFOXGH
Oven Controls
Ɣ Set the upper oven to air fry at 400 degrees.
Ɣ7XUQRQWKHORZHURYHQ
Ɣ7XUQRIIWKHXSSHURYHQ
Ɣ&RRNIRUKRXULQWKHXSSHURYHQ
Timers
Ɣ6HWDWLPHUIRUKRXUDQGPLQXWHVIRUFDVVHUROHV
Shopping List
Ɣ$GGEDQDQDVWRP\VKRSSLQJOLVW
Ɣ5HPRYHFRIIHHIURPP\VKRSSLQJOLVW
NOTE: 7KHVKRSSLQJOLVWLVDYDLODEOHRQWKH6PDUW+4
App and can be exported into some shopping apps.
Voice to Open Oven Door (on some
models)
,I\RXURYHQLVHTXLSSHGZLWKDSXVKWRRSHQRYHQGRRU
voice to open capability allows you to open your oven
door handsfree! Please ensure your oven is connected
WR:L)LWKH6PDUW+4$SS\RXURYHQUHPRWHHQDEOHLV
turned on, your oven control is unlocked, and an Amazon
Alexa smart speaker is active or the oven microphone
RQVRPHPRGHOVLVXQPXWHG
Voice Controls
USING THE APPLIANCE: Voice Controls
8 49-2003952 Rev. 0
Appliance Display
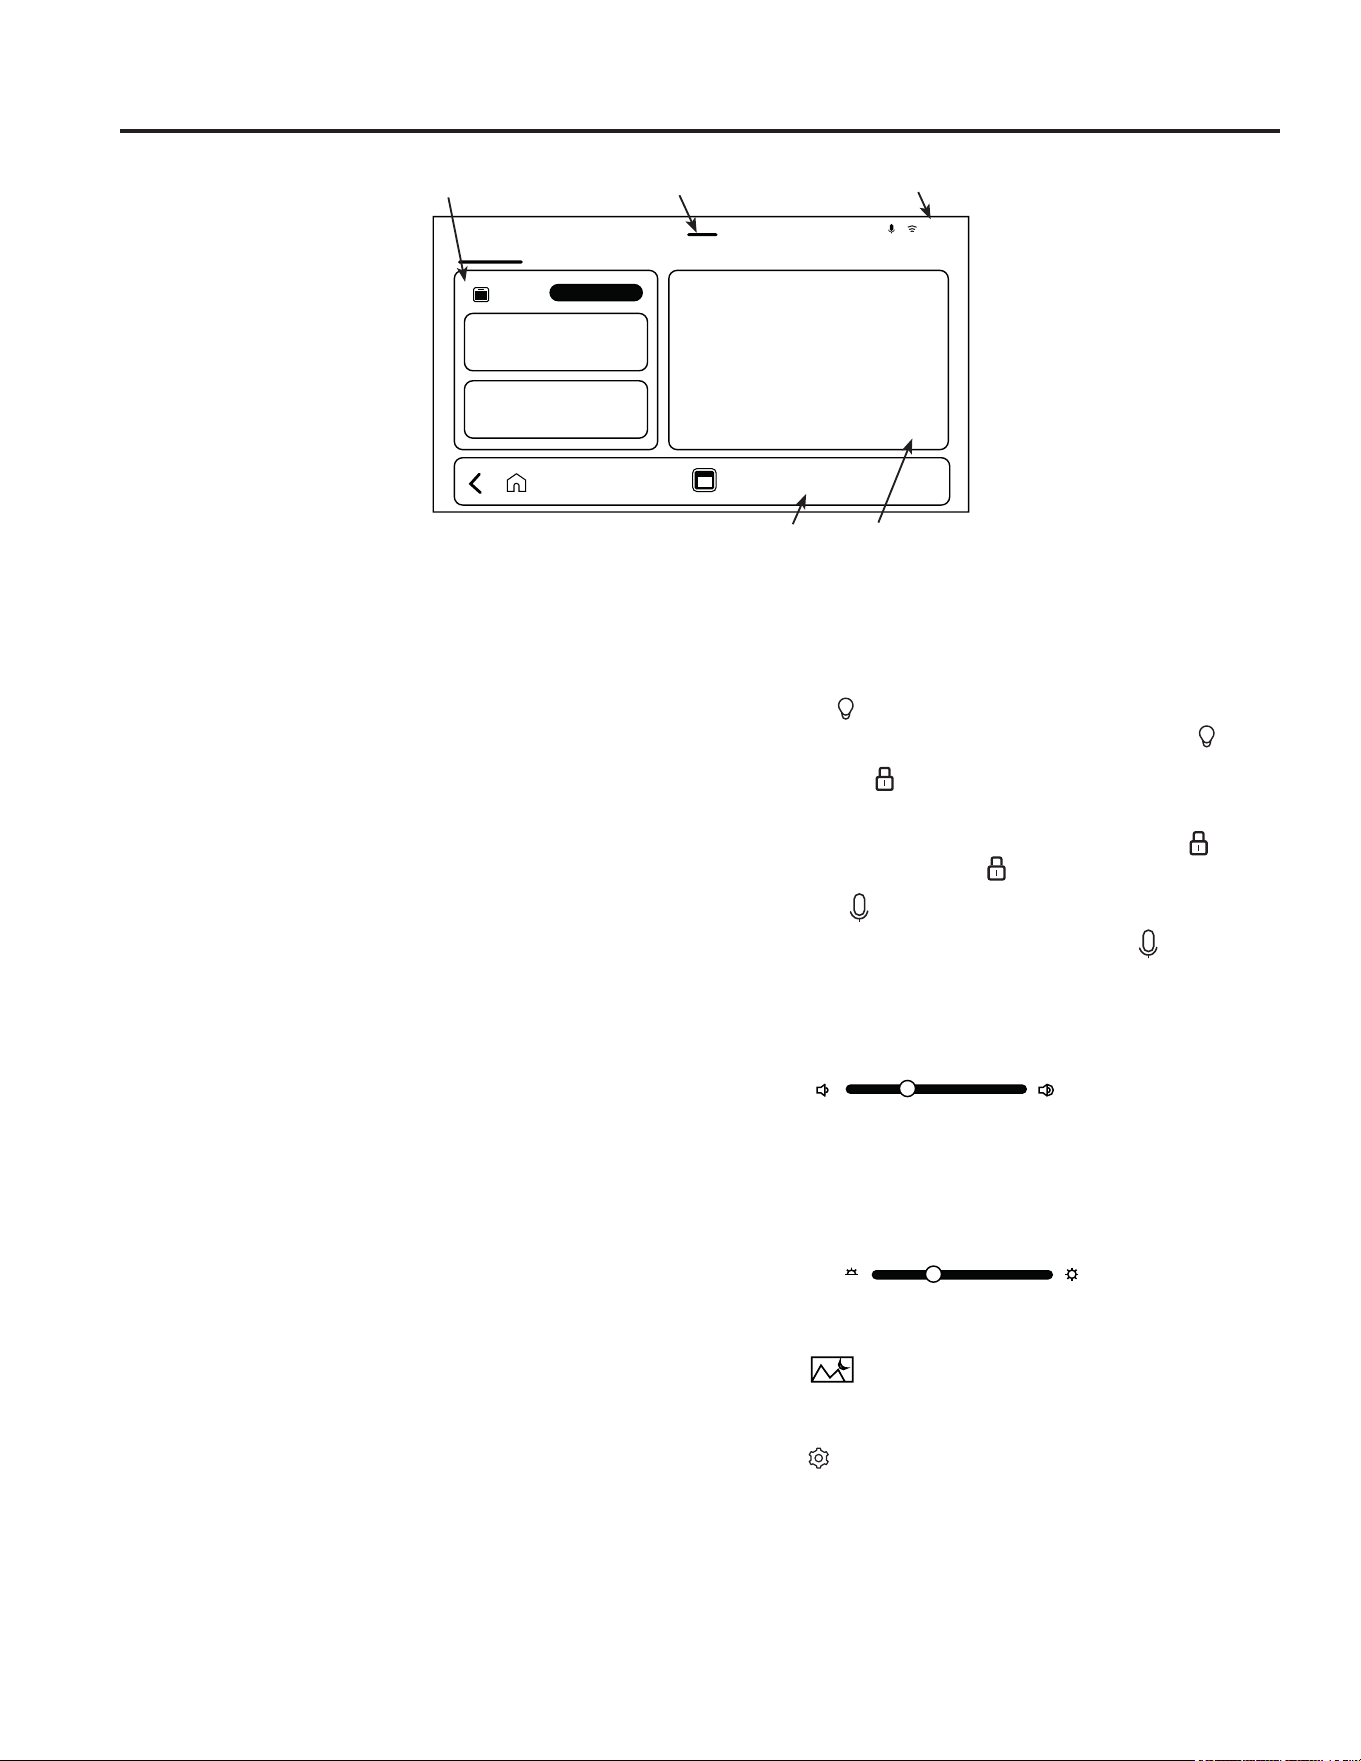
HOME SCREEN
1 - Oven Control
Located on the far left of the Oven Display Home
Screen. Make sure to swipe all the way over to the left if
it is not displayed when the Oven Display wakes up.
Upper Oven and Lower Oven (on double wall oven
models)
When using a double wall oven, you can use different
cooking modes in each oven. First select the oven to use
then select the cooking mode desired.
NOTE: When using a single oven, there will not be an
oven selection.
Cooking Mode Selection Screen
Select your cooking preference in this area. You can
select between traditional oven modes or precision oven
modes. See the Cooking Modes section for more details
on the different traditional and precision cooking modes
available.
Make sure to connect your oven so that you can
download new precision cooking modes as they are
available.
2 - Quick Settings Shade
Swipe this menu down to access oven lights, control
ORFNPLFURSKRQHRQVRPHPRGHOVVSHDNHUVGLVSOD\
brightness, Ambient menu layout, alerts, and settings.
Oven Light
To turn on or off the oven cavity lights, press the .
Lock Controls
Select this option to lock the oven control from any
undesired screen selections. To lock, press the
button. Press and hold the button to unlock.
Microphone (on some models)
To unmute or mute microphone, press the ,QGLFDWRUV
that the microphone is muted and turned off will appear
LQWKH4XLFN6HWWLQJV6KDGHDQGLQWKH6WDWXV%DUDUHD
7KHPLFURSKRQHPXVWEHXQPXWHGWRXVHWKH6PDUW+4
Assistant.
Speaker
8VHWKHVOLGHUEDUWRDGMXVWWKHYROXPHWRWKHGHVLUHG
setting for playing videos and music when available.
This does not affect the volume of alerts or touch tones.
See the Settings Section for more information on how to
DGMXVWWKRVHYROXPHV
Brightness
8VHWKHVOLGHUEDUWRDGMXVWVFUHHQEULJKWQHVVWRGHVLUHG
setting.
Ambient
Press the Ambient button to go directly to the Ambient
screen.
Settings
Press the Settings button to access the Settings Menu.
See the Settings section for a full list of what is available.
USING THE APPLIANCE: Appliance Display
My Oven
Oven
Meal Planning Stay Informed Tools
1:59 PM
1
2
3
45

49-2003952 Rev. 0
Appliance Display
USING THE APPLIANCE: Appliance Display
3 - Status Bar
The upper right hand corner, displays active alerts,
PLFURSKRQHVWDWXVRQVRPHPRGHOV:L)LVWDWXVDQG
WLPH8VHWKLVDVDTXLFNUHIHUHQFHZKHQXVLQJWKH
oven.
4 - Navigation Bar
Back Arrow
This takes you back one screen until you reach the
Home screen.
Home Button
Takes you directly to the Home Screen with the Oven
Control section viewable.
Oven button / Oven buttons
This takes you to the oven screen showing what is
UXQQLQJLIWKHRYHQLVEHLQJXVHG,IWKHRYHQVHOHFWHG
is not being used, it will take you to the mode selection
screen for the oven selected.
Activity Bar
Located at the bottom of the Appliance Display, this
indicates that the oven is currently turned on. This
bar does not display when the oven is turned off. This
feature only displays when oven is turned on.
5 - Apps
Connect your oven to capture the full functionality of the
apps on your control. Some apps can only be used if
your oven is connected to Wi-Fi. Example apps include
weather and kitchen timer.
Swipe to the right to access more apps as well as the
6PDUW+4DVVLVWDQWRQPLFURSKRQHFDSDEOHPRGHOV
only) and Oven Tips information.
Timers
The timer app works as a countdown timer. You can set
a new timer or select an existing timer.
Select Add a Timer or Timer, set the timer duration
KRXUVPLQXWHVVHFRQGVQDPHWKHWLPHULI\RXZDQWWR
reuse it, then start the timer. Once a timer is started, the
timer name cannot be changed.
Multiple timers can be set and reused independently or
at the same time.
,IPRUHWKDQWZRWLPHUVDUHVHWDWWKHVDPHWLPHWKHWZR
most recently set timers will display in the Apps section.
To view all active timers and all timers previously set,
select the timer app to access the list and swipe to view
active timers, reuse a timer or delete a timer.
The Appliance Display will notify you when a timer is
complete.
HOME SCREEN (Cont.)

10 49-2003952 Rev. 0
Settings
Set Clock
7KLVIHDWXUHRQO\DYDLODEOHZKHQQRWFRQQHFWHGDOORZV
you to set the clock and specifies how the time of day
ZLOOEHGLVSOD\HG2SWLRQVDUHIRUDVWDQGDUGKRXU
FORFNZLWK$0DQG30VHOHFWLRQVRUKRXUPLOLWDU\WLPH
display.
Sounds & Alerts
This setting screen allows you to change the volume, the
end of cycle alert, and turn on or off the touch sound.
Display & Appearance
This screen shows the options for brightness and Energy
saver.
Appliance Settings
Ŷ TEMPERATURE UNITS: The oven is set to
Fahrenheit, however, in this setting the cooking unit
can be changed to Celsius.
Ŷ ADJUST OVEN TEMPERATURE: $GMXVW2YHQ
Temperature allows the oven temperature to be
DGMXVWHGXSWR)KRWWHURUGRZQWR)FRROHU
8VHWKLVIHDWXUHLI\RXEHOLHYH\RXURYHQWHPSHUDWXUH
is too hot or cold and wish to change it. For double
ovens, the upper and lower oven temperatures are
DGMXVWHGVHSDUDWHO\'RQRWXVHWKHUPRPHWHUV
such as those found in grocery stores, to check
the temperature setting of your oven. These
WKHUPRPHWHUVPD\YDU\±GHJUHHV
Ŷ AUTO RECIPE CONVERSION: Auto Recipe
Conversion can be turned on in order to automatically
reduce the programmed cooking temperature for
&RQYHFWLRQ%DNHRU&RQYHFWLRQ%DNH0XOWL1RWHWKDW
this will only reduce the cooking temperature, not the
baking time.
Ŷ 12 HOUR SHUT OFF: :KHQWKH+RXU6KXW2II
option is turned on, it will automatically shut off the
RYHQDIWHUKRXUVRIFRQWLQXRXVXVH
Ŷ OVEN LIGHT TIMEOUT: Turn this feature on to have
the oven light turn off automatically after cooking is
completed and the oven turned off.
SmartHQ Account
$OORZV\RXWRORJLQWR\RXU6PDUW+4DFFRXQWRQ\RXU
oven. This feature also helps with connecting your oven
WR\RXU6PDUW+4$FFRXQW
Wi-Fi
Allows you connect to or forget your Wi-Fi network.
Remote Enable
Turn this feature on to control your oven remotely via
app, via microphone, or voice commands once your
oven is connected.
Ambient Mode
Allows you to configure the ambient screen.
Voice & Microphone (on some models)
The oven must be connected to WiFi and the
PLFURSKRQHWXUQHGRQWRXVHWKH6PDUW+4$VVLVWDQW
System
This screen allows you to clear your saved user data and
VKRZVWKHFXUUHQWVRIWZDUHYHUVLRQVDQGWKH0$&,'
USING THE APPLIANCE: Settings

49-2003952 Rev. 0 11
USING THE APPLIANCE: Settings / Oven Door Camera
Oven Door Camera (on some models)
The Oven Door CameraDOORZVIRUUHPRWHYLHZLQJRIWKHFHQWHURIWKHRYHQFDYLW\XVLQJWKH6PDUW+4DSS5HIHUWR
the Connectivity section. From the app's home page, select your oven, then tap on the camera icon to start the camera
stream to your smart device. The oven lights will illuminate while the camera is streaming. The camera stream will stop if
the oven door is opened, and is not allowed during certain modes such as Self Clean. Turn off camera streaming in the
app to resume normal oven light operation.
Soils on the oven door glass and oven cavity light cover may cause an unclear oven camera image. Refer to Care and
Cleaning section for door glass cleaning instructions. For best results, clean door glass immediately after spillage once
the oven has cooled.
For double oven models with an oven door camera, the oven camera is only on the upper oven.
Settings
Sabbath Mode
<RXUUDQJHRIIHUVD6DEEDWKPRGHWKDWFRPSOLHVZLWKVWDQGDUGVVHWIRUWKE\2UWKRGR[8QLRQWKH&HQWUDO5DEELQLFDO
&RQJUHVVDQG+DODFKD7HFKLVFHUWLILHGWRWKHKLJKHVWKDODFKDVWDQGDUGV,QWKLVPRGHWKHRYHQOLJKWVZLOOEH
turned off for the duration of use and oven tones will be disabled.
NOTE: Ensure the oven clock is accurate before entering the mode. For proper Sabbath operation, the mode must
be started within 1-hour window before sunset.
Using the Sabbath Mode
Navigate to the Settings menu and select Sabbath.
Select the desired Sabbath Mode or Holiday Mode
combination from the options provided and press Start.
The display will indicate which Sabbath or Holiday mode
is operating.
Options with Holiday and Sabbath with automatically
transition between the functions based on the initial time
entered within the 1-hour window before sunset.
)RU6DEEDWK:DUPRSWLRQVOHVVWKDQKRXUVWKH
appliance will complete the Sabbath Warm function and
WUDQVLWLRQWR6DEEDWK,GOHIRUWKHUHPLQGHURIWKHKRXU
period. The oven lights will remain turned off, oven tones
will remain disabled, oven heating will be disabled, and
the display will show the oven idle.
Sabbath Mode Power Outage
,IDSRZHURXWDJHRFFXUVGXULQJWKHXVHRI6DEEDWK
Warm or Holiday modes, the appliance will return
to Sabbath Warm for the remainder of the chosen
VFKHGXOH,IWKHRXWDJHRFFXUVGXULQJ6DEEDWK,GOHWKH
DSSOLDQFHZLOOUHWXUQWR6DEEDWK,GOHIRUWKHUHPDLQGHURI
the chosen schedule.
Sabbath Warm Temperature
8VHWKH6HWWLQJVRSWLRQ6DEEDWK:DUPHUWRLQFUHDVHWKH
Sabbath Warm energy if the oven is operating cooler
WKDQGHVLUHGRULI\RXURYHQLVRSHUDWLQJRQYROWDJH
Go to Appliance Settings, select Sabbath Warm
Temperature.
49-2003952 Rev. 0
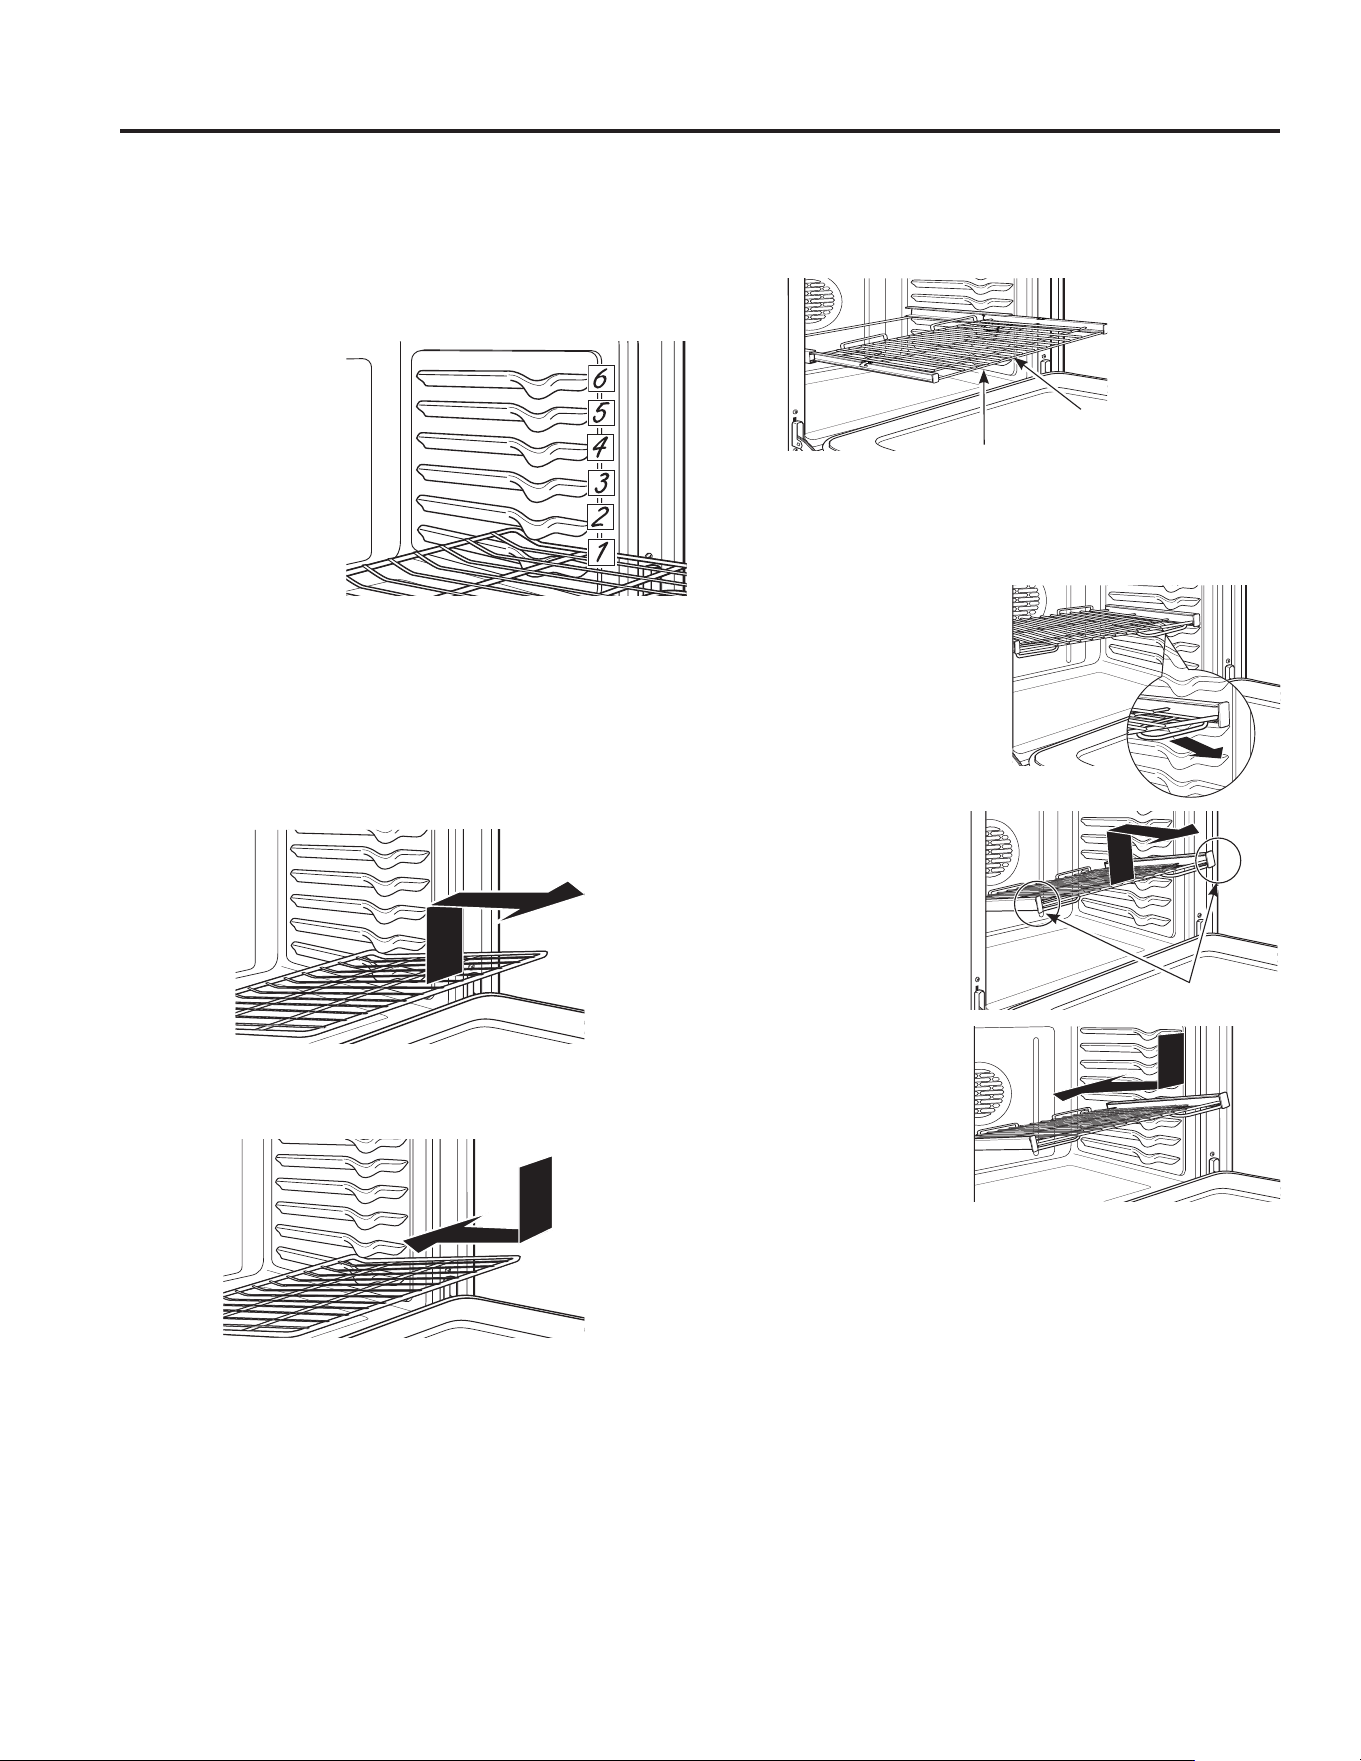
Your oven has six rack positions. Recommended rack
positions for various types of foods are provided in the
&RRNLQJ*XLGH$GMXVWLQJUDFNSRVLWLRQLVRQHZD\WR
impact cooking results. For example, if you would prefer
darker tops on cakes, muffins, or cookies, try moving
IRRGRQHUDFNSRVLWLRQKLJKHU,I\RXILQGIRRGVDUHWRR
brown on top try moving them down next time.
When baking with
multiple pans and on
multiple racks, ensure
there is sufficient
space between pans
to allow air to flow.
Your Oven may have
extension racks and/or
traditional flat racks.
To avoid possible burns, place the racks in the desired
position before you turn the oven on.
Flat Racks
When placing and removing cookware, pull the rack out
WRWKHEXPSVWRSSRVLWLRQRQWKHUDFNVXSSRUW
To remove a rack, pull it toward you, tilt the front end up
and pull it out.
7RUHSODFHSODFHWKHFXUYHGHQGRIWKHUDFNVWRSORFNV
onto the oven supports, tilt up the front of the rack and
push the rack in.
Racks may become difficult to slide, especially after
a self-clean. Put some vegetable oil on a soft cloth or
paper towel and rub onto the left and right edges.
Extension Racks (on some models)
Always pull the rack out by its upper front rail to its fully
open position, when placing or removing cookware.
Extension racks cannot be used in the top rack position.
,IH[WHQVLRQUDFNVDUHGLIILFXOWWRH[WHQGOXEULFDWHWKH
racks per the Care and Cleaning section of this manual.
To Remove An Extension Rack:
1. Make sure the rack is
pushed all the way into the
oven so that side paddles
on the rack disengage from
the oven support.
6OLGHWKHUDFNWRZDUG\RX
WRWKHEXPSVWRSSRVLWLRQ
on the rack support.
3. Firmly grasp both
sides of the rack
frame and the sliding
rack, tilt the front end
up and pull it out.
To Replace An
Extension Rack:
1. Firmly grasp both sides
of the rack frame and
the sliding rack.
3ODFHWKHFXUYHGHQG
RIWKHUDFNVWRS
locks) onto the oven
supports, tilt up the
front of the rack and push it in as far as it will go.
,IH[WHQVLRQUDFNVDUHGLIILFXOWWRUHSODFHRUUHPRYHSXW
some vegetable oil on a soft cloth or paper towel and
wipe the oven rack supports. Do not wipe oil on the rack
slides.
Oven Racks
8SSHU)URQW
Rail
Fully Open Position
Grasp here
USING THE APPLIANCE: Oven Racks
NOTE: 8VLQJRWKHUFRRNLQJRLOVOLNHSHDQXWRLO3DP
®
or other lubricant sprays, can cause a discoloring or a rust
like color residue on the racks and cavity sides. To clean this residue, use a soap and water or a vinegar and water
solution. Rinse with clean water and dry with a soft cloth.

49-2003952 Rev. 0 13
USING THE APPLIANCE:
Aluminum Foil and Oven Liners / Cookware Guidelines
CAUTION
Do not use any type of foil or oven liner to cover the oven bottom. These items can trap heat
or melt, resulting in damage to the product and risk of shock, smoke or fire. Damage from improper use of
these items is not covered by the product warranty.
Foil may be used to catch spills by placing a sheet on a lower rack, several inches below the food. Do not use more
IRLOWKDQQHFHVVDU\DQGQHYHUHQWLUHO\FRYHUDQRYHQUDFNZLWKDOXPLQXPIRLO.HHSIRLODWOHDVW´IURPRYHQZDOOV
to prevent poor heat circulation.
Aluminum Foil and Oven Liners
Cookware Guidelines
The material, finish, and size of cookware affect baking
performance.
Dark, coated and dull pans absorb heat more readily
than light, shiny pans. Pans that absorb heat more
readily can result in a browner, crisper, and thicker crust.
,IXVLQJGDUNDQGFRDWHGFRRNZDUHFKHFNIRRGHDUOLHU
WKDQPLQLPXPFRRNWLPH,IXQGHVLUDEOHUHVXOWVDUH
obtained with this type of cookware consider reducing
RYHQWHPSHUDWXUHE\)QH[WWLPH
Shiny pans can produce more evenly cooked baked
goods such as cakes and cookies.
Glass and ceramic pans heat slowly but retain heat well.
These types of pans work well for dishes such as pies
and custards.
Air insulated pans heat slowly and can reduce bottom
browning.
.HHSFRRNZDUHFOHDQWRSURPRWHHYHQKHDWLQJ
Cookware used in broil modes and air fry must be broil-
safe.

14 49-2003952 Rev. 0
Cooking Modes
Your new oven has a variety of cooking modes to help you get the best results. These modes are described below.
Refer to the Cooking Guide section for recommendations for specific foods, and check out the cooking options menu
on the appliance display for cooking tips and other recommendations while setting an oven mode. Remember, your
new oven may perform differently than the oven it is replacing.
Baking and Roasting Modes
Select a mode for baking and roasting based on the
type and quantity of food you are preparing. When
preparing baked goods such as cakes, cookies, and
pastries always preheat the oven first. Follow recipe
UHFRPPHQGDWLRQVIRUIRRGSODFHPHQW,IQRJXLGHOLQHV
are provided, center food in the oven.
Bake
The traditional bake mode is intended for single rack
cooking. This mode uses heat primarily from the lower
element but also from the upper element to cook food.
To use this mode press Bake, enter a temperature, and
then press Start. Preheating is generally recommended
when using this mode.
Convection Bake (on some models/ovens)
7KH&RQYHFWLRQ%DNHPRGHLVLQWHQGHGIRUVLQJOHUDFN
cooking. This mode uses heat from the lower element
and also the upper and rear elements, along with air
movement to enhance evenness. Your oven is equipped
with Auto Recipe Conversion, so it is not necessary to
convert the temperature when using this mode. To use
this mode press Convection Bake, enter a temperature,
and then press Start. Preheating is generally
recommended when using this mode.
Convection Bake Multi Rack (on some
models/ovens)
7KH&RQYHFWLRQ%DNH0XOWL5DFNPRGHLVLQWHQGHG
for baking on multiple racks at the same time. This
mode uses heat primarily from the rear element but
also heat from the upper and lower elements, along
with air movement from the convection fan to enhance
cooking evenness. Your oven is equipped with Auto
Recipe Conversion, so it is not necessary to convert the
WHPSHUDWXUHZKHQXVLQJWKLVPRGH%DNLQJWLPHPLJKW
be slightly longer for multiple racks than what would
be expected for a single rack. To use this mode press
Convection Bake Multi Rack, enter a temperature, and
then press Start. Always preheat when using this mode.
Convection Roast (on some models/ovens)
The Convection Roast mode is intended for roasting
meats and vegetables on a single rack. This mode uses
heat from the lower, upper, and rear elements along with
air movement to improve browning and reduce cooking
WLPH ,W LVQRW QHFHVVDU\ WR FRQYHUW WHPSHUDWXUH &KHFN
food earlier than the recipe suggested time when using
this mode, or use the probe. To use this mode press
Convection Roast, enter a temperature, and then press
Start,WLVQRWQHFHVVDU\WRSUHKHDWZKHQXVLQJWKLVPRGH
Slow Roast (on some models/ovens)
The Slow Roast mode is a special, no-preheat roasting
mode that uses pulses of heat to brown the exterior of
foods while also providing gentle cooking for a more
uniform interior doneness. The Slow Roast mode is
intended for single rack cooking only. Expect foods
WKDW\RXZRXOGW\SLFDOO\FRRNLQ7UDGLWLRQDO%DNHRU
Convection Roast to take longer to cook when cooking
LQ6ORZ5RDVW8VLQJWKHSUREHWRPRQLWRUFRRNLQJLV
recommended. Additional guidelines for using this mode
can be found in the Cooking Guide Section. To use this
mode press Slow Roast, enter a temperature, and then
press Start.
Broiling Modes
Always broil with the door closed. The broil element
in this oven is very powerful. Monitor food closely
ZKLOHEURLOLQJ8VHFDXWLRQZKHQEURLOLQJRQXSSHUUDFN
positions as placing food closer to the broil element
increases smoking, spattering, and the possibility
of fats igniting. Broiling on rack position 6 is not
recommended.
7U\EURLOLQJIRRGVWKDW\RXZRXOGQRUPDOO\JULOO$GMXVW
UDFNSRVLWLRQVWRDGMXVWWKHLQWHQVLW\RIWKHKHDWWRWKH
food. Place foods closer to the broil element when a
seared surface and rare interior is desired. Thicker foods
and foods that need to be cooked through should be
broiled on a rack position farther from the broiler or by
XVLQJ7UDGLWLRQDO%URLO/RRU&RQYHFWLRQ%URLO/R)RU
best performance, center food below the broil heating
element.
Broil
7KH7UDGLWLRQDO%URLO+LJKPRGHXVHVLQWHQVHKHDWIURP
WKHXSSHUHOHPHQWWRVHDUIRRGV8VH%URLO+LJKIRU
thinner cuts of meat and/or foods you prefer less done
on the interior. To use this mode press Broil, then select
High or Low depending on the amount of searing and
the internal temperature that is preferred, and then press
Start,WLVQRWQHFHVVDU\WRSUHKHDWZKHQXVLQJWKLV
mode.
Convection Broil (on some models/ovens)
7KH&RQYHFWLRQ%URLO+LJKPRGHXVHVLQWHQVHKHDWIURP
the upper element along with air movement for improved
searing and browning. To use this mode press Convection
Broil, then select High or Low depending on the amount of
searing and the internal temperature that is preferred, and
then press Start. For best results preheat 5 minutes when
using this mode.
USING THE APPLIANCE: Cooking Modes

49-2003952 Rev. 0 15
USING THE APPLIANCE: Cooking Modes
Cooking Modes (Cont.)
Air Fry
(on some models/ovens)
The Air Fry mode is a special, no-preheat convection
cooking mode designed to produce foods with a crispier
exterior than traditional oven cooking. The Air Fry mode
is intended for single rack cooking only. Select Air Fry,
then input the desired set temperature and press Start.
7KHWHPSHUDWXUHFDQEHVHWEHWZHHQ)DQG)
Preheating is not recommended for this mode. Follow
traditional oven recipe or package guidelines for set
WHPSHUDWXUHVDQGFRRNWLPHVDGMXVWFRRNWLPHWRDFKLHYH
your desired crispness. Additional guidelines for using this
mode can be found in the Cooking Guide.
Proof
3URRIPRGHLVGHVLJQHGIRUULVLQJIHUPHQWLQJDQG
proofing) bread doughs. Select Proof and then press
Start.&RYHUGRXJKZHOOWRSUHYHQWGU\LQJRXW%UHDGZLOO
rise more rapidly than at room temperature.
Warm
Warm mode is designed to keep hot foods hot for up
to 3 hours. To use this mode, select Warm and then
press Start. Cover foods that need to remain moist and
do not cover foods that should be crisp. Preheating is
not required. Do not use warm to heat cold food other
WKDQFULVSLQJFUDFNHUVFKLSVRUGU\FHUHDO,WLVDOVR
recommended that food not be kept warm for more than
KRXUV
Precision Cooking
(on some models/
ovens)
Precision Cooking is a guided cooking experience
designed to give you the best outcome from your oven
for specific foods. When you select a food through the
Precision Cooking Menu, the recommended oven settings
for that food are automatically selected and additional
information is provided to help you get the best result.
Additional cycles will be available through software
updates. Connect your oven to have access to these
updates. See the Wi-Fi Connect section for details on
how to connect your oven.
16 49-2003952 Rev. 0
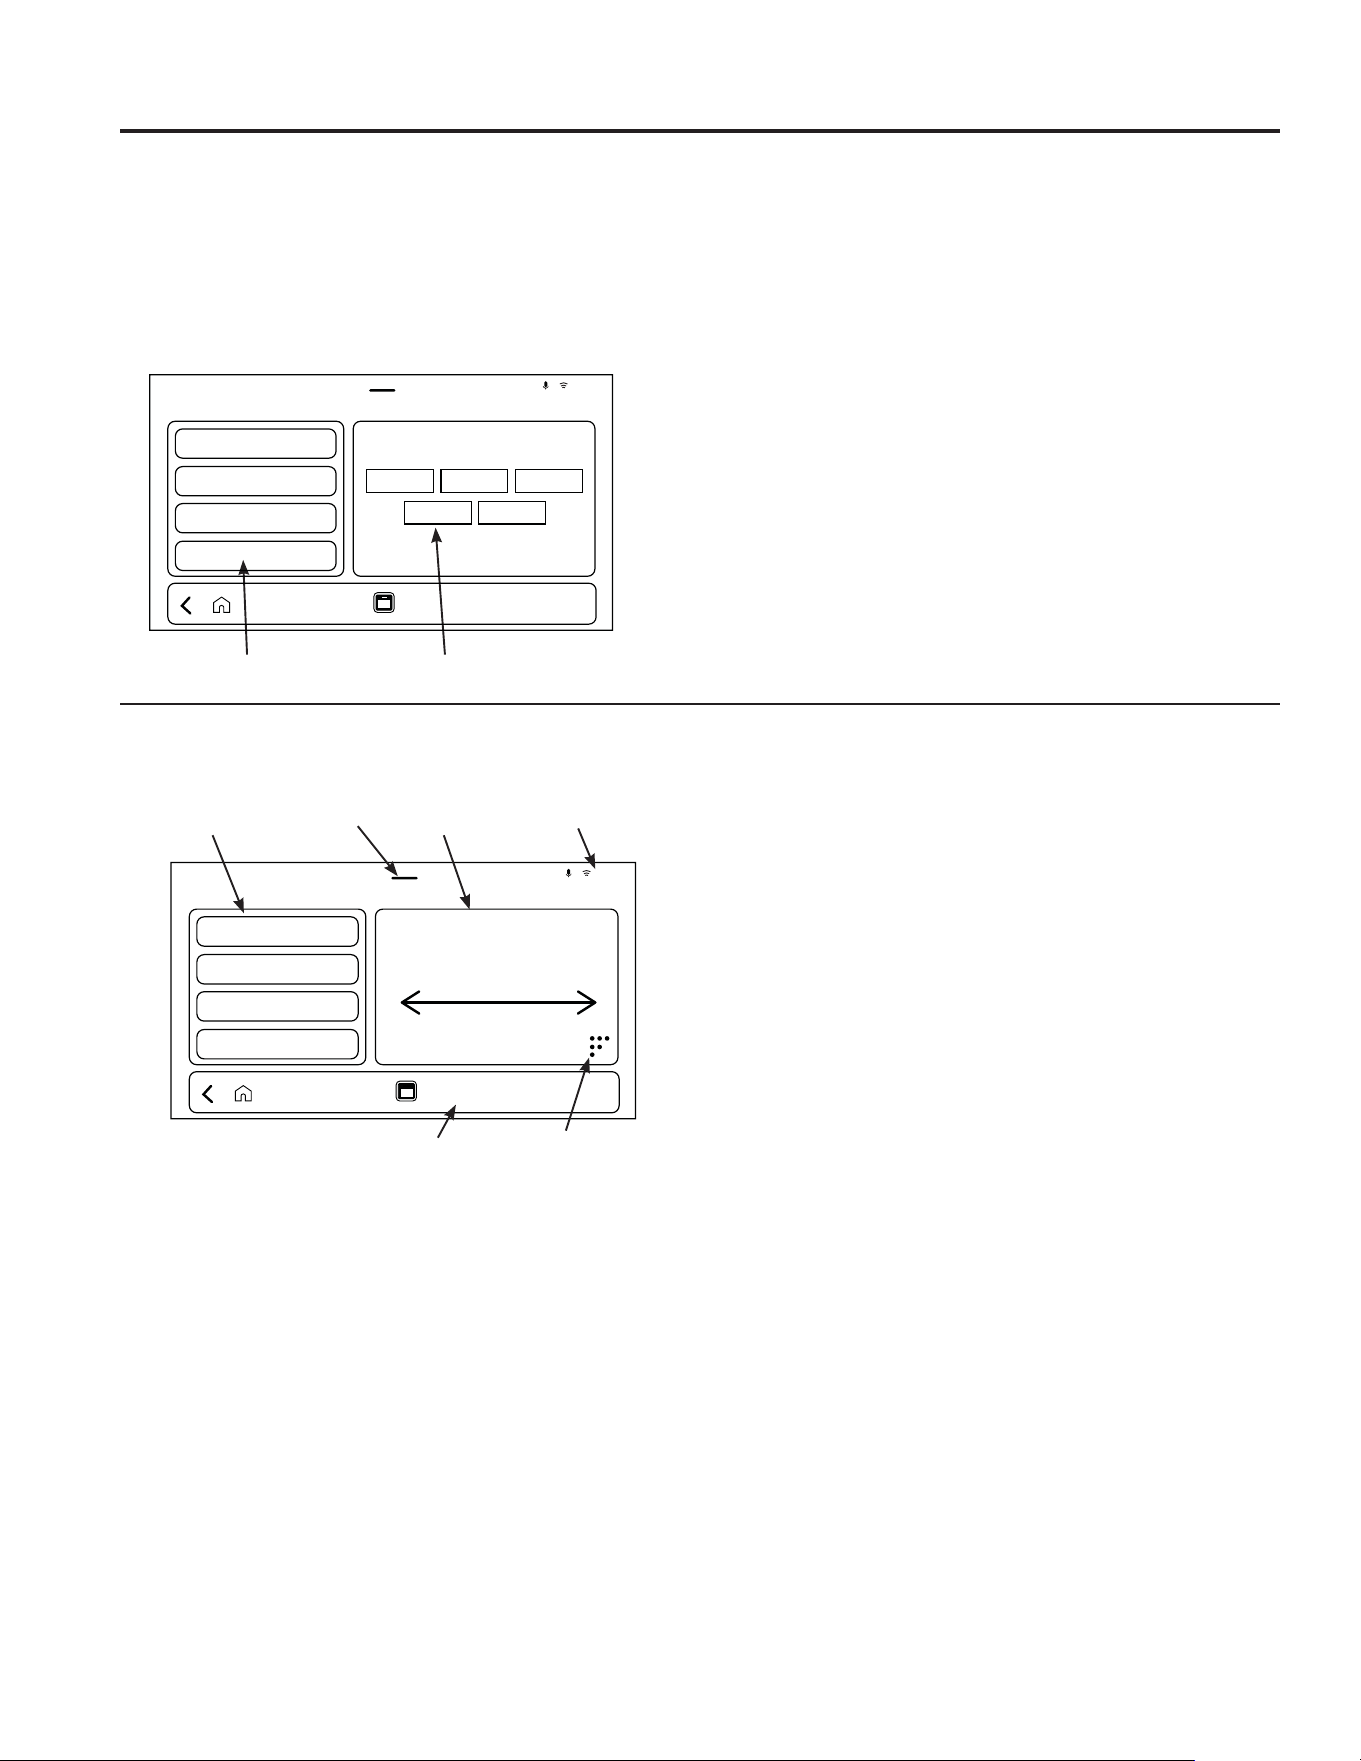
Once you select a Traditional Cooking mode or Precision Cooking mode, Cooking Options will show up on the left
part of the screen and information about selections will show up on the right side of the screen.
1. COOKING OPTIONS
A cooking option will only be displayed if it is available
RUUHTXLUHGIRUWKHFRRNLQJPRGHVHOHFWHG,IDFRRNLQJ
option is not displayed for a selected cooking mode, then
it is not available to use or is not required.
Note that any cooking options displayed for a cooking
mode will have default selections but confirm that the
default settings and selections match your desired inputs
VXFKDVVHWWHPSHUDWXUHFRRNWLPHVL]HRUW\SHDQG
RXWFRPHGRQHQHVV7KLVLVHVSHFLDOO\LPSRUWDQWZKHQ
using Precision Cooking modes.
Make sure to scroll up and down to view all the Cooking
Options available for a selected cooking mode.
Temperature
When selecting an oven set temperature, preset
temperatures are shown and can be selected by scrolling
horizontally and selecting the desired temperature.
The option to set a custom cooking temperature is
available by using the number pad.
Not all Precision Cooking modes require you to set a
cooking temperature.
Timer
,IWKHFRRNLQJPRGHVHOHFWHGVXSSRUWVDFRRNLQJWLPHU
this option allows you to set a countdown cooking timer
that can be set to turn off or not turn off the cooking
mode when the timer is complete.
Some Precision Cooking modes have a timer
DXWRPDWLFDOO\VHWIRUWKHP,QWKHVHFDVHVWKH7LPHU
RSWLRQGRHVQRWGLVSOD\,QVWHDGWKHWLPHUFRXQWGRZQ
starts after Start is pressed. This timer will not turn off
the oven when the timer is complete.
Probe
This option displays if the oven probe can be used with a
Traditional oven mode. See the Probe section for details
on using the oven probe.
Some Precision Cooking modes require using the oven
probe provided with the oven. For these cycles, probe
placement instructions are provided but the probe set
temperature is determined by the precision cooking
mode selected.
Cooking Modes (Cont.)
USING THE APPLIANCE: Cooking Modes
Cooking Mode
Start
1:59 PM
1. Cooking
Options
4XLFN6HWWLQJ
Shade
1DYLJDWLRQ%DU
6WDWXV%DU
Number Pad
,QIRUPDWLRQ
or Selections
3.
Setting a Cooking Mode
From the Home Screen, select the oven when using a
double oven. Then select the Traditional Cooking mode
or Precision Cooking.
,I\RXVHOHFW3UHFLVLRQ&RRNLQJFDWHJRULHVZLOOVKRZXS
on the left part of the screen and food options will show
up on the right.
1. Categories: Food items are grouped into Categories.
Scroll up and down to see all Categories. Select a
Category to see all food options within a Category on
the right side of the screen.
Foods: Scroll left and right to see all food options
within a Category. Select a food on the right side of
the screen to begin cooking.
Additional categories and food options will be
available through software updates. Connect your
oven to have access to these updates. See the Wi-Fi
Connectivity section for details on how to connect
your oven.
1. Categories )RRGV
Precision Cooking
1:59 PM

49-2003952 Rev. 0 17
Cooking Modes (Cont.)
Setting a Cooking Mode (Cont.)
1. COOKING OPTIONS (cont.)
Cooking Tips
This option provides helpful information tailored to the
cooking mode selected. This may include tips about how
to prepare food for cooking, how cookware can impact
cooking results, or how to help prevent messes in the
oven cavity.
Rack & Cookware
For some Precision Cooking modes, this option gives
rack location and cookware suggestions tailored to what
mode is selected.
Number of Racks
)RUVRPH3UHFLVLRQ&RRNLQJPRGHVEDNHGJRRGVVXFK
as Cookies for example), this provides cooking options
IRUFRRNLQJRQRQHUDFNRUPXOWLSOHUDFNV,IWKLVRSWLRQ
is not displayed, the expectation is that you are cooking
on a single rack.
Doneness
)RUVRPH3UHFLVLRQ&RRNLQJPRGHVVXFKDVVWHDNV
or bacon), this option requires you to choose a desired
doneness for the food selected. Some Foods with
Doneness options require the probe while others rely on
cooking time. When a Doneness option is selected the
probe target or cooking time, as well as the oven cooking
conditions, update based on the food selection made.
Size
)RUVRPH3UHFLVLRQ&RRNLQJPRGHVVXFKDVVDOPRQ
this option requires you to pick from a list of selections
to tailor cooking conditions and cook time based on the
selections made.
Type
)RUVRPH3UHFLVLRQ&RRNLQJPRGHVVXFKDVEDFRQ
this option requires you to pick from a list of selections
VXFKDVWKLFNUHJXODURUFHQWHUFXWIRUEDFRQWR
tailor cooking conditions and cook time based on the
selections made.
2. INFORMATION OR SELECTIONS
The content in this area varies according to the active
option selected on the left. Make sure to swipe left and
right in this area to see all the relevant content. There
may be cookware recommendations or additional tips to
reference.
3. START
Review cooking option settings, your selections and
SODFHRYHQUDFNVVEHIRUHSUHVVLQJStart.
3.
USING THE APPLIANCE: Cooking Modes

18 49-2003952 Rev. 0
Probe (on some models)
,QWHUQDOIRRGWHPSHUDWXUHLVIUHTXHQWO\XVHGDVDQLQGLFDWRURIGRQHQHVVHVSHFLDOO\IRUURDVWVDQGSRXOWU\7KH3UREH
mode monitors the internal food temperature and turns the oven off when the internal food temperature reaches the
programmed temperature.
WARNING
Consuming undercooked food can result in foodborne illness. Use probe according to
the following instructions to ensure all portions of the food reach minimum safe cooking temperatures.
Minimum safe food temperature recommendations are provided by the USDA and FDA.
Always check the temperature at multiple locations in the food with a food thermometer after cooking to
ensure that all portions of the food have reached the minimum safe internal temperature for that food.
Proper Probe Placement
After preparing the meat and placing it on the cooking
pan follow these instructions for proper probe placement.
Ŷ ,QVHUWWKHSUREHLQWRWKHIRRGVRWKDWWKHWLSRIWKH
probe will rest in the center of the thickest part of
the food. For best performance the probe should
EHIXOO\LQVHUWHGLQWRWKHIRRG,IWKHSUREHLVQRW
located properly, it may not accurately measure the
temperature of the coolest portion of the food. Some
foods, particularly small items, are not well suited for
cooking with the probe due to their shape or size.
Ŷ 7KHSUREHVKRXOGQRWWRXFKERQHIDWRUJULVWOH
Ŷ )RUZKROHSRXOWU\LQVHUWWKHSUREHLQWRWKHWKLFNHVW
part of the breast.
Ŷ )RUERQHOHVVURDVWVLQVHUWWKHSUREHLQWRWKHFHQWHU
of the roast.
Ŷ )RUERQHLQKDPRUODPELQVHUWWKHSUREHLQWRWKH
FHQWHURIWKHORZHVWODUJHPXVFOHRUMRLQW
Ŷ )RUFDVVHUROHVRUGLVKHVVXFKDVPHDWORDILQVHUWWKH
probe into the center of the dish.
Ŷ )RUILVKLQVHUWWKHSUREHIURPMXVWDERYHWKHJLOOLQWR
the meatiest area, parallel to the backbone.
Probe Usage
To use the probe
,QVHUWWKHSUREHLQWRWKHIRRGVHH3URSHU3UREH
Placement).
3ODFHWKHIRRGLQWKHRYHQDQGFRQQHFWWKHSUREH
LQWRWKHSUREHRXWOHWLQWKHRYHQVNOTE: The
probe cannot be used during broil, convection broil,
dehydrate, warm, proof.
3. Select the desired cooking mode and temperature.
,IWKHFRRNLQJPRGHVXSSRUWVXVHZLWKDSUREHWKH
probe setting screen will be displayed. Enter the
desired internal food temperature and press Start.
7KHSUREHWHPSHUDWXUHFDQEHVHWEHWZHHQ)DQG
)
NOTE:,ISUHKHDWLQJLVGHVLUHGFRPSOHWHWKLVVWHS
ahead of step 1.
7UDGLWLRQDOFRRNLQJPRGHVH[FOXGHV6ORZ5RDVWHQG
the mode when the probe temperature is reached and
Precision Cooking modes and Slow Roast do not.
Probe Care Guidelines
NOTE: some double oven models have a probe in the
upper oven only.
Ŷ 8VHRISUREHVRWKHUWKDQWKHRQHSURYLGHGZLWKWKLV
product may result in damage to the probe.
Ŷ 8VHWKHKDQGOHVRIWKHSUREHDQGSOXJZKHQLQVHUWLQJ
and removing them from the meat and outlet.
Ŷ 7RDYRLGGDPDJLQJ\RXUSUREHGRQRWXVHWRQJVWR
pull on the cable when removing it.
Ŷ 7RDYRLGEUHDNLQJWKHSUREHPDNHVXUHIRRGLV
completely defrosted before inserting the probe.
Ŷ 7RSUHYHQWSRVVLEOHEXUQVGRQRWXQSOXJWKHSUREH
from the outlet until the oven has cooled.
Ŷ 1HYHUOHDYHWKHSUREHLQVLGHWKHRYHQGXULQJDVHOIRU
steam clean cycle.
Ŷ 'RQRWVWRUHWKHSUREHLQWKHRYHQ
USING THE APPLIANCE: Probe
49-2003952 Rev. 0
USING THE APPLIANCE: Cooking Guide
Cooking Guide
FOOD TYPE
RECOMMENDED
MODE(S)
RECOMMENDED
RACK POSITION(S) ADDITIONAL SUGGESTIONS
Baked Goods
Layer cakes, sheet cakes, bundt
cakes, muffins, quick breads on a
Single Rack
7UDGLWLRQDO%DNH H[WRUIODW 8VHVKLQ\FRRNZDUH
Layer cakes* on Multiple Racks &RQYHFWLRQ%DNH0XOWL
1 ext. and 4 flat or
DQGIODW
(QVXUHDGHTXDWHDLUIORZVHHLOOXVWUDWLRQEHORZ
8VHVKLQ\FRRNZDUH
&KLIIRQFDNHVDQJHOIRRG 7UDGLWLRQDO%DNH 1 8VHVKLQ\FRRNZDUH
Cookies, biscuits, scones on a
Single Rack
7UDGLWLRQDO%DNH H[WRUIODW 8VHVKLQ\FRRNZDUH
Cookies, biscuits, scones on
Multiple Racks
&RQYHFWLRQ%DNH0XOWL
1 ext. and 4 flat or
1 ext., 3 & 5 flat
(QVXUHDGHTXDWHDLUIORZ8VHVKLQ\FRRNZDUH
Beef & Pork
Hamburgers %URLO+L 5
8VHDEURLOSDQPRYHIRRGGRZQIRUPRUHGRQHQHVVOHVVVHDULQJ
Watch food closely when broiling. For best performance, center
food below the broil heating element.
Steaks & Chops %URLO+L 5
8VHDEURLOSDQPRYHIRRGGRZQIRUPRUHGRQHQHVVOHVVVHDULQJ
Watch food closely when broiling. For best performance, center
food below the broil heating element.
Roasts
7UDGLWLRQDO%DNH
Convection Roast
Slow Roast
RU
Leave uncovered, use a low sided pan such as a broil pan.
Preheating is not necessary.
Poultry
Whole chicken
7UDGLWLRQDO%DNH
Convection Roast
Slow Roast
RUH[W
RUIODW
8VHDORZVLGHGSDQVXFKDVDEURLOSDQ
Preheating is not necessary.
%RQHLQFKLFNHQEUHDVWVOHJV
thighs
%URLO/R
Convection Roast
Slow Roast
H[WRUIODW
%URLOVNLQVLGHGRZQILUVW:DWFKIRRGFORVHO\ZKHQEURLOLQJ)RU
best performance when broiling, center food below the broil
heating element.
%RQHOHVVFKLFNHQEUHDVWV
%URLO/R
7UDGLWLRQDO%DNH
H[WRUIODW
Move food down for more doneness/less searing and up for
greater searing/browning when broiling. For best performance
when broiling, center food below the broil heating element.
Whole turkey
7UDGLWLRQDO%DNH
Convection Roast
RU
8VHDORZVLGHGSDQVXFKDVDEURLOSDQ
Preheating is not necessary.
7XUNH\%UHDVW
7UDGLWLRQDO%DNH
Convection Roast
RU
8VHDORZVLGHGSDQVXFKDVDEURLOSDQ
Preheating is not necessary.
Fish
%URLO/R
WKLFNRUOHVV
!LQFK
Watch food closely when broiling. For best performance, center
food below the broil heating element.
Slow Roast 3
Casseroles
&RQYHFWLRQ%DNH
7UDGLWLRQDO%DNH
H[WRUIODW
Frozen Convenience Foods
Pizza on a single rack
&RQYHFWLRQ%DNH
7UDGLWLRQDO%DNH
H[WRUIODW 8VHVKLQ\FRRNZDUH
Pizza on multiple racks &RQYHFWLRQ%DNH0XOWL 1 ext. and 4 flat
Stagger pizzas so that they are not placed directly over each other
ZKHQFRRNLQJRQWKHUDFN8VHVKLQ\FRRNZDUH
Potato products, chicken nuggets,
appetizers on single racks
7UDGLWLRQDO%DNH
3 ext. or 4 flat
8VHVKLQ\FRRNZDUHZKHQXVLQJWUDGLWLRQDOEDNH
Air Fry 8VHGDUNFRRNZDUHRUFRRNLHVKHHWZKHQXVLQJ$LU)U\
Potato products, chicken nuggets,
appetizers on multiple racks
&RQYHFWLRQ%DNH0XOWL 1 ext. and 4 flat
8VHVKLQ\FRRNZDUH6ZLWFKIRRGORFDWLRQSDUWLDOO\WKURXJKFRRNLQJ
for more even cooking results.
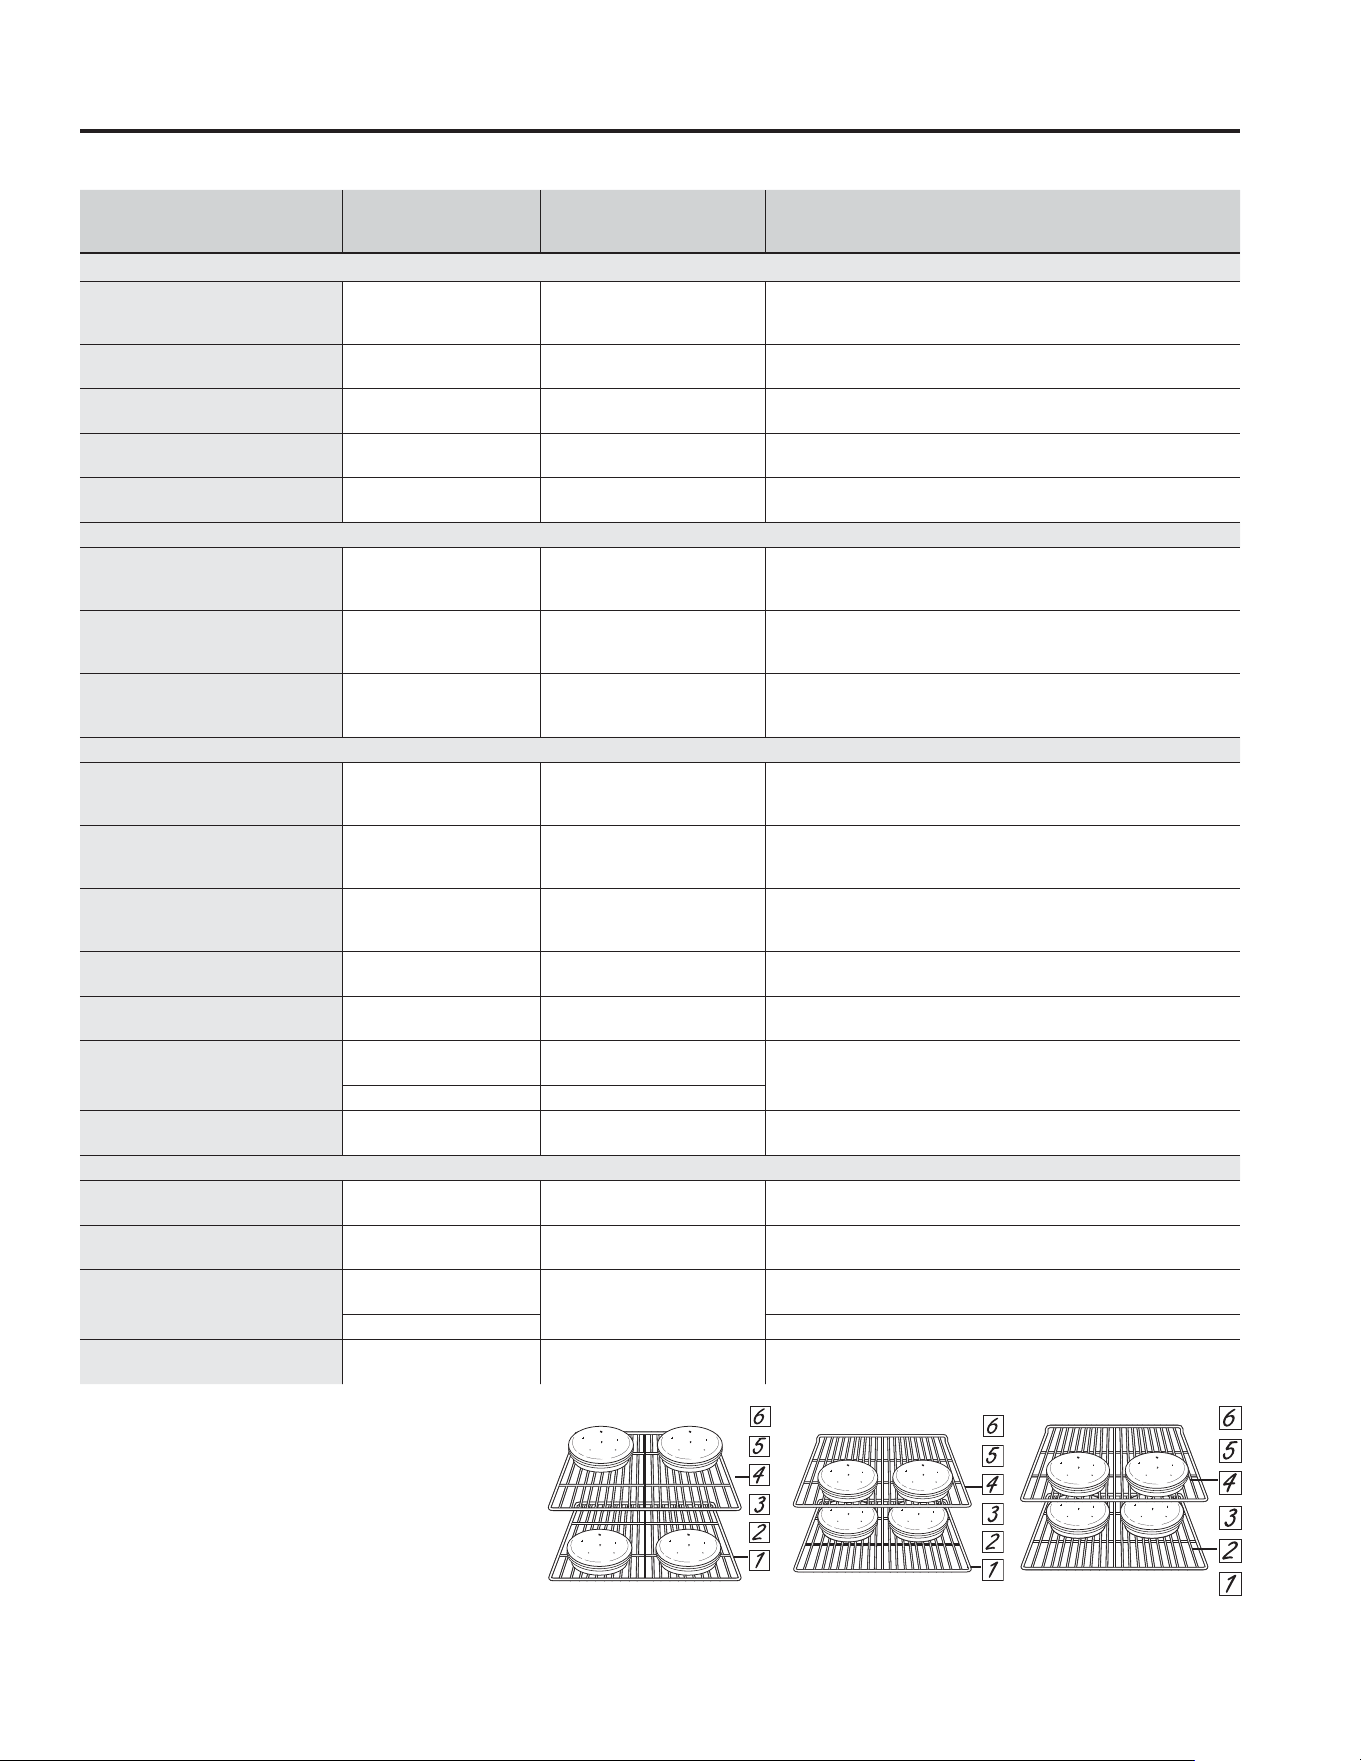
The table below provides some guidelines for typical cooking modes. For Precision modes, recommendations for rack
positions, etc. will be shown as part of the step-by-step instruction on the display.
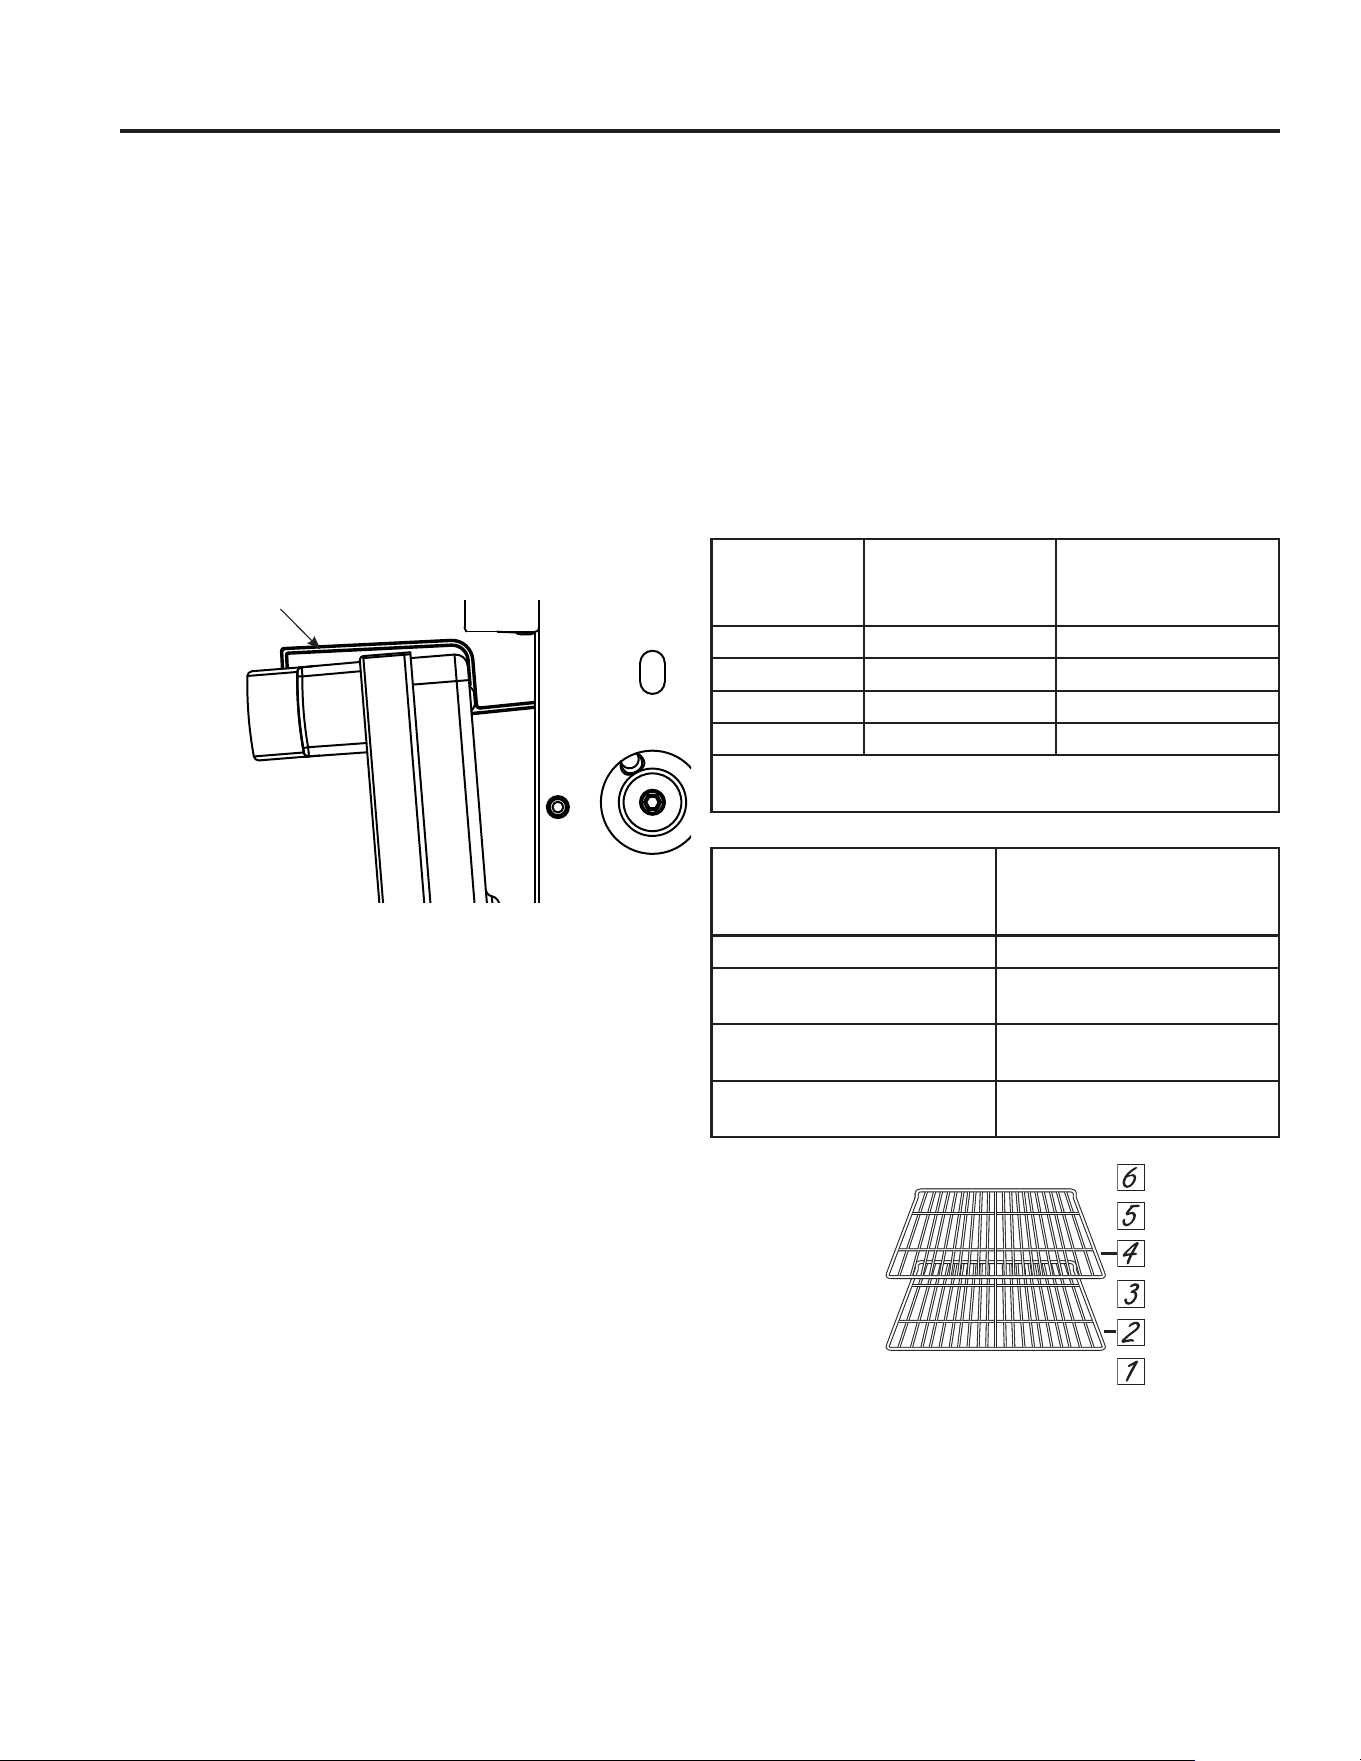
When baking or convection baking four cake layers in a
´FRQYHFWLRQFDYLW\RUFRQYHFWLRQEDNLQJLQD´FDYLW\
at a time, use racks 1 extension and 4 flat. Place pans
as shown so that one pan is not directly above another.
:KHQEDNLQJIRXUFDNHOD\HUVXVLQJIODWUDFNVLQD´RU
´WKHUPDOFDYLW\DWDWLPHXVHUDFNVIODW3ODFH
pans as shown so that one pan is not directly above
another.
Minimum safe food temperature recommendations
DUHSURYLGHGE\WKH86'$DQG)'$8VHDIRRG
thermometer to take food temperatures and check
several locations.
30" Convection Ovens &RQYHFWLRQ2YHQV DQG
Thermal Ovens
49-2003952 Rev. 0
Cooking Guide
AIR FRY COOKING GUIDE
Air Fry is a special, no-preheat, cooking mode that
is designed to produce foods with a crispier exterior
than traditional oven cooking. Select Air Fry, then
input the desired set temperature and press Start. The
WHPSHUDWXUH FDQ EH VHW EHWZHHQ ) DQG )
Air Fry Cookware Guidelines
• Only use broil safe cookware when using Air Fry mode.
• A dark sheet pan is recommended. A dark pan
promotes better browning and crisping.
• Oven baking baskets and baking grids can also be
used. A sheet pan should be placed on the rack below
the foods to catch any drippings when using a baking
basket.
General Tips for Air Fry Mode
• The Air Fry mode is designed for cooking on a single
rack.
• The Air Fry mode is designed to be used without
preheating.
5DFN SRVLWLRQ LV UHFRPPHQGHG IRU PRVW IRRGV,I
foods are browning too rapidly try using a lower rack
position.
• Foods may cook faster than expected if the oven is
already hot when food is placed in the oven.
• When air frying foods with sauce, it is recommended to
apply the sauce at the end of cooking.
,I IRRGV DUH EURZQLQJ WRR TXLFNO\ WU\ D ORZHU UDFN
position or lower oven set temperature.
• For packaged foods, use traditional oven cooking
instructions for set temperature and expected cook
time.
,W LV QRW QHFHVVDU\ WR IOLS RU VWLU IRRG GXULQJ FRRNLQJ
• Arrange food in a single layer on the pan, do not
overload the pan. For best results food should not
overlap.
• Cook food thoroughly to help protect against
foodborne illness. Minimum safe food temperature
UHFRPPHQGDWLRQV DUH SURYLGHG E\ WKH 86'$ DQG )'$
8VH D IRRG WKHUPRPHWHU WR WDNH IRRG WHPSHUDWXUHV DQG
check several locations.
FOOD TYPE
RECOMMENDED
RACK POSITION(S)
RECOMMENDED
SET TEMPERATURES (F)
RECOMMENDED
COOK TIME (MIN) NOTES
Fresh boneless fish or
poultry pieces, breaded such
as nuggets, tenders, fillets
3 extension 375-400 15-30
8VHU ORZHU VHW WHPSHUDWXUHV IRU ODUJHU SLHFHV
8VH VKLQ\ FRRNZDUH
Fresh bone in
chicken wings
3 extension 375-400
Salt wings or coat in a dry rub, if using sauce
apply after cooking or toward the end of cooking
Fresh bone in chicken
drumsticks or thighs
3 extension 375-400 30-55 8VHU ORZHU VHW WHPSHUDWXUHV IRU ODUJHU SLHFHV
Fresh French fries,
WKLQ ò LQFK
3 extension 15-30
Parchment paper is recommended when
preparing fresh French fries. For crispier fries,
toss fries in corn starch or rice flour before
cooking.
Fresh French fries,
WKLFN ! ò LQFK
3 extension 375-400
Parchment paper is recommended when
preparing fresh French fries. For crispier fries,
toss fries in corn starch or rice flour before
cooking.
Frozen packaged
foods
3 extension
8VH WUDGLWLRQDO RYHQQRW $LU )U\ FRRNLQJ LQVWUXFWLRQV DV D JXLGHOLQH IRU VHW WHPSHUDWXUH DQG FRRN WLPH$GGLWLRQDO
FRRN WLPH EH\RQG UHFRPPHQGHG SDFNDJH WLPH PD\ EH UHTXLUHG IRU VRPH IRRGV ,I RYHQ LV KRW ZKHQ VWDUWLQJ IRRG
may cook faster than the minimum package time.
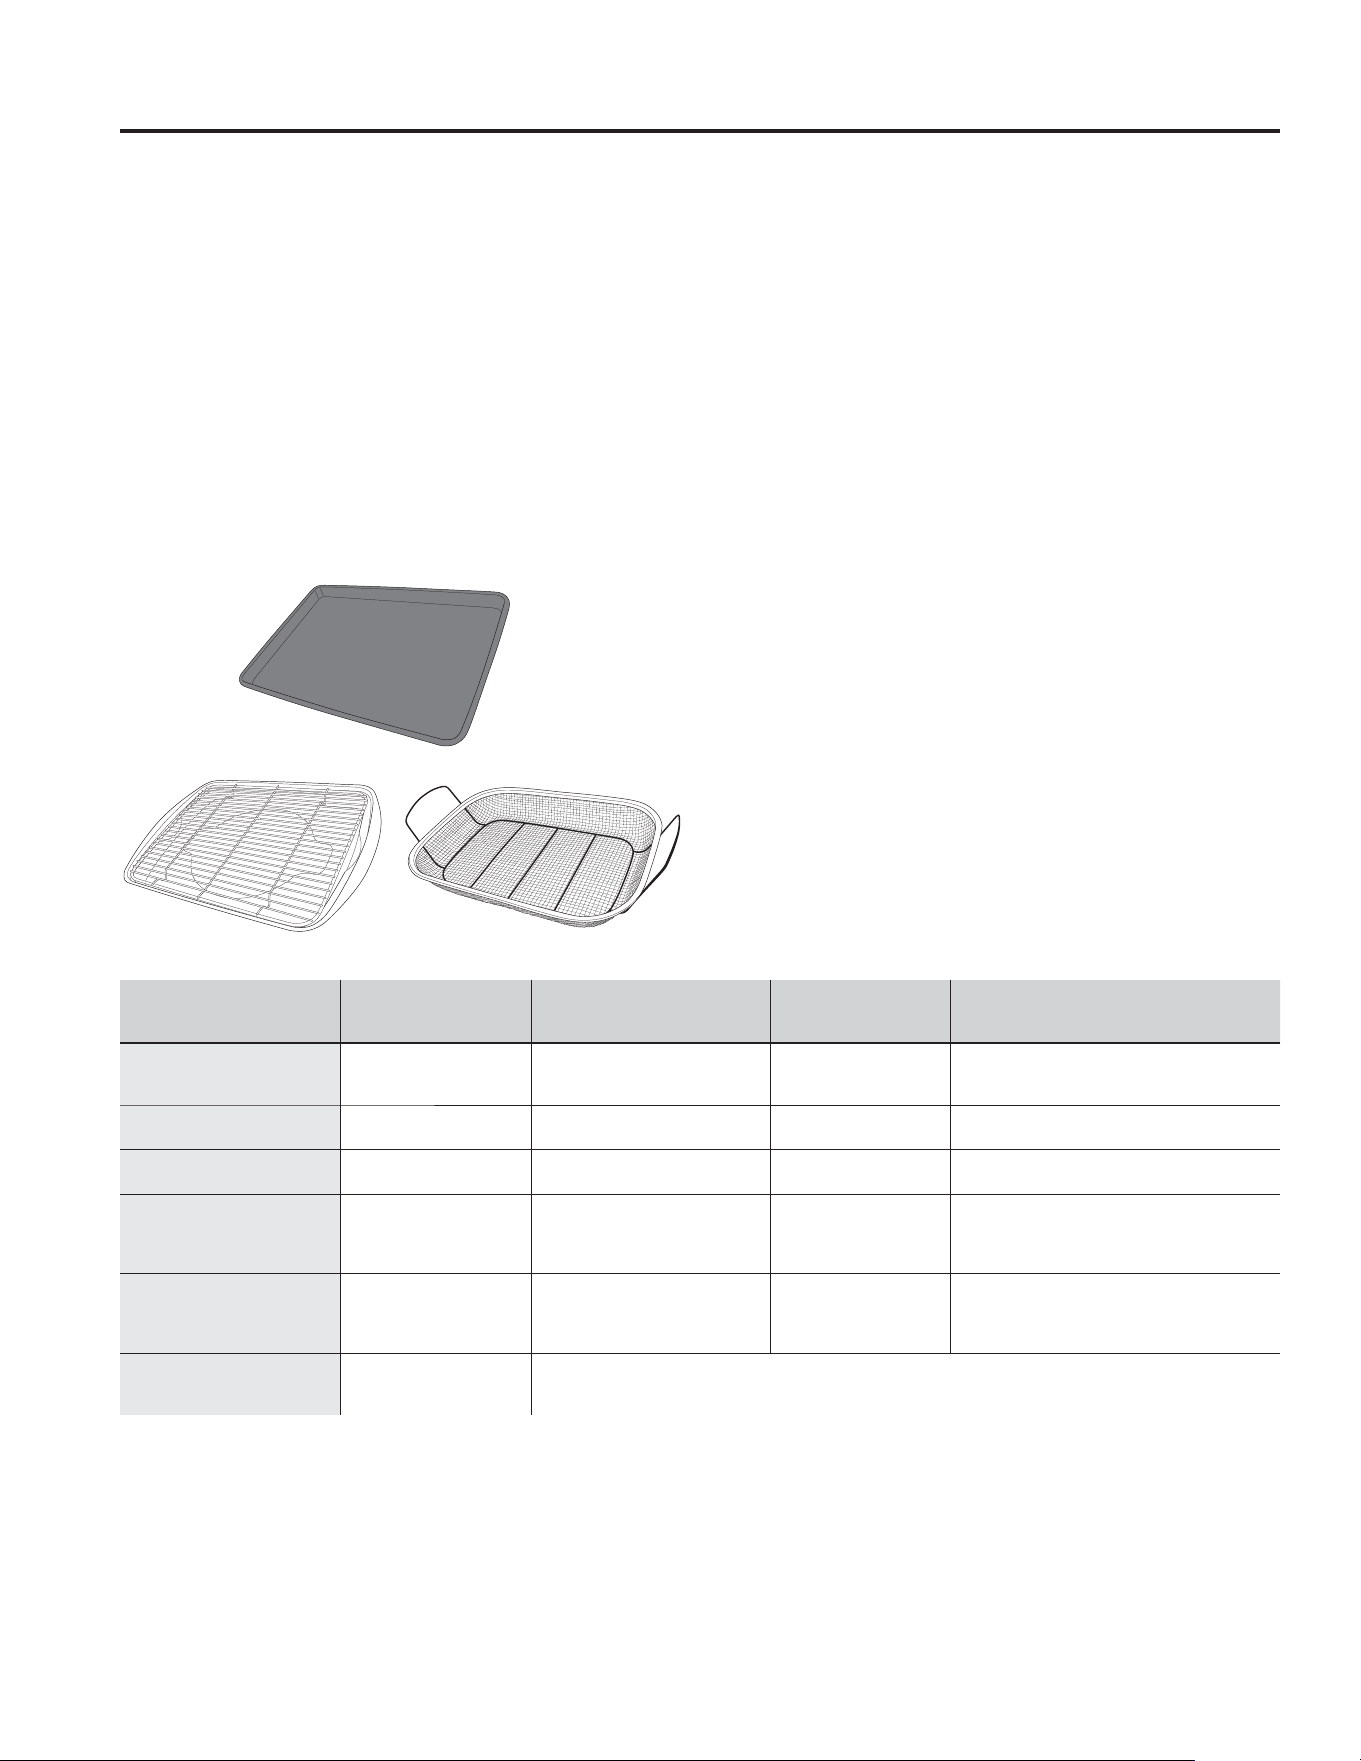
Primary recommended cookware
Alternate cookware options
USING THE APPLIANCE: Roasting Guide
49-2003952 Rev. 0
USING THE APPLIANCE: Cooking Guide
ROASTING GUIDE
Your new oven has two Cooking Modes designed
VSHFLILFDOO\IRU5RDVWLQJ6ORZ5RDVWDQG&RQYHFWLRQ
Roast.
Slow Roast uses pulses of heat and air movement from
the convection fan to brown the exterior of foods while
also providing gentle cooking for a more uniform interior
doneness relative to Convection Roast. Slow Roast
FDQEHVHWEHWZHHQ)DQG)6ORZ5RDVWLV
designed to be used without preheating.
Convection Roast uses air movement from the
convection fan to brown the surface of foods more
UDSLGO\WKDQ7UDGLWLRQDO%DNH&RQYHFWLRQ5RDVWFDQEH
VHWEHWZHHQ)DQG)7KH&RQYHFWLRQ5RDVW
mode includes a preheat, but for most foods preheating
is not necessary.
Roasting Cookware Guidelines
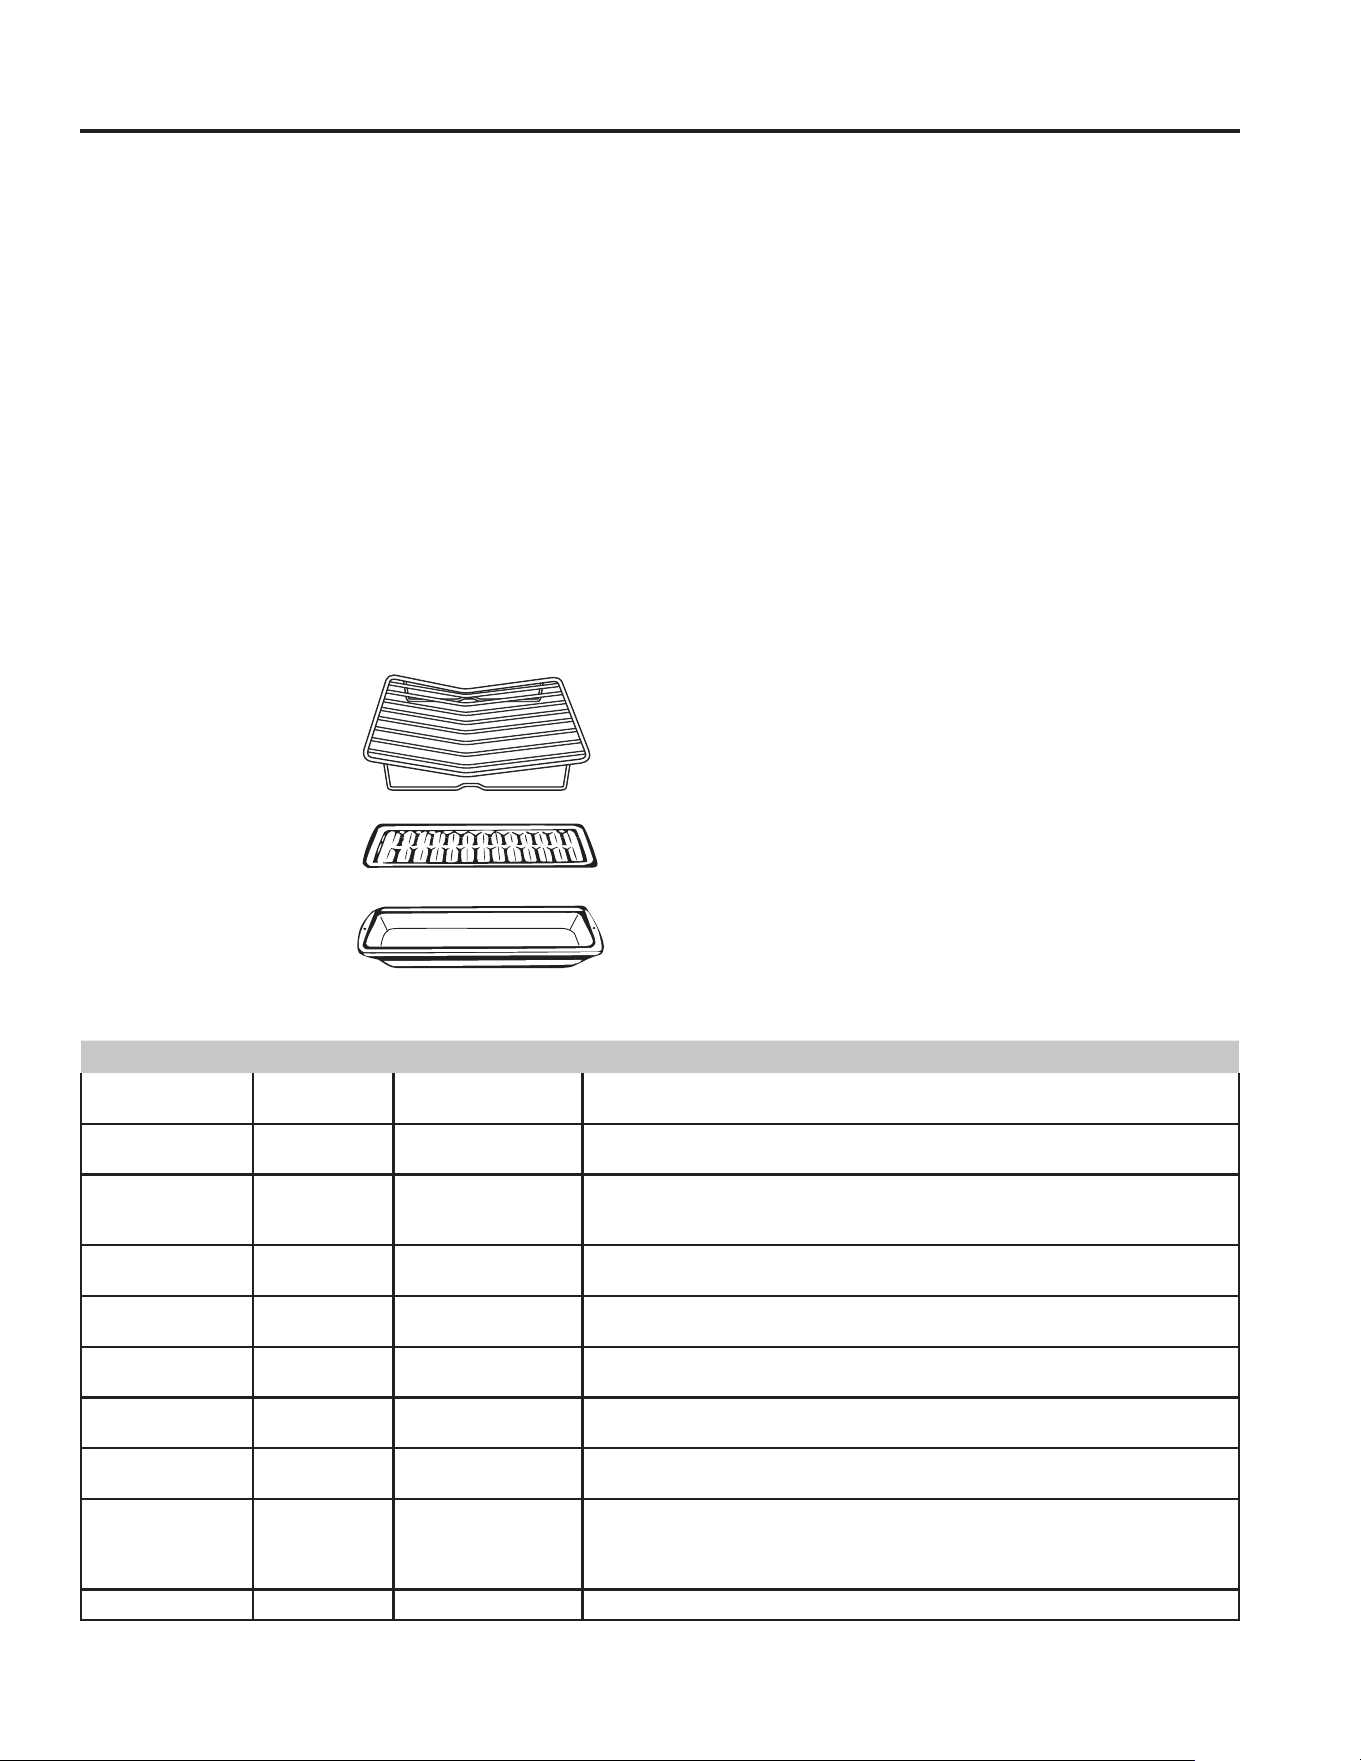
5RDVWLQJ3DQZLWK
or without rack)
• Sheet Pan
%URLO3DQZLWKRU
without grid)
General Tips for Roasting
• Roasting modes should only be used for single rack
cooking.
• Position the rack so that the food is centered in the
oven, or for more top browning on thin foods, place the
food closer to the broil heater
• Slow Roast: Expect foods that you would typically
FRRNLQ7UDGLWLRQDO%DNHWRWDNHWLPHVORQJHUWR
cook.
• Convection Roast: Check foods earlier than package
or recipe time.
8VLQJWKHSUREHWRPRQLWRUFRRNLQJRIODUJHFXWVRI
meat is recommended. See the Probe section for more
information on using the probe.
,QJHQHUDONHHSIRRGVXQFRYHUHGZKLOHURDVWLQJWR
DOORZIRRGWREURZQ,IIRRGLVEURZQLQJWRRTXLFNO\EXW
needs more time to cook through, cover food with foil
or a lid.
,WLVQRWQHFHVVDU\WRIOLSRUVWLUIRRGVZKHQURDVWLQJ
• Foods such as roasted vegetables will brown better
and cook faster if they are not crowded in the pan.
• For cooking activities where food is covered such as
EUDLVLQJRUVORZFRRNLQJXVH7UDGLWLRQDO%DNHPRGH
rather than a roast mode.
• Cook food thoroughly to help protect against
foodborne illness. Minimum safe food temperature
UHFRPPHQGDWLRQVDUHSURYLGHGE\WKH86'$DQG)'$
8VHDIRRGWKHUPRPHWHUWRWDNHIRRGWHPSHUDWXUHVDQG
check several locations
Cooking GuideCooking Guide
Grid
%URLOHU3DQ
Roasting Rack
Recommended Oven Set Temperatures for Roasting
Food Slow Roast Convection Roast Additional Suggestions
%HHI/DPERU3RUN
Roasts
) )
8VH3UHFLVLRQ&RRNLQJIRUDJXLGHGFRRNLQJH[SHULHQFHDQGFXVWRPVHWWLQJVIRU
%HHI7HQGHUORLQDQG3ULPH5LERQVRPHPRGHOV
%HHI/DPERU3RUN
Steaks or Chops
) )
8VH3UHFLVLRQ&RRNLQJIRUDJXLGHGFRRNLQJH[SHULHQFHDQGFXVWRPVHWWLQJVIRU
%HHI6WHDNV
Chicken breasts,
legs, and thighs
VNLQRQ
) )
Skin-on chicken is recommended for roasting because skinless chicken can
develop a leathery surface
Chicken, whole ) )
8VH3UHFLVLRQ&RRNLQJIRUDJXLGHGFRRNLQJH[SHULHQFHDQGFXVWRPVHWWLQJVIRU
Whole Chicken
Fish ) )
8VH3UHFLVLRQ&RRNLQJIRUDJXLGHGFRRNLQJH[SHULHQFHDQGFXVWRPVHWWLQJVIRU
Salmon Fillets
Potatoes, Cut
Not
recommended
)
8VH3UHFLVLRQ&RRNLQJIRUDJXLGHGFRRNLQJH[SHULHQFHDQGFXVWRPVHWWLQJVIRU
Cut Potatoes
Potatoes, Whole
Not
recommended
)
8VH3UHFLVLRQ&RRNLQJIRUDJXLGHGFRRNLQJH[SHULHQFHDQGFXVWRPVHWWLQJVIRU
Whole Potatoes
Turkey, whole
Not
recommended
)
8VH3UHFLVLRQ&RRNLQJIRUDJXLGHGFRRNLQJH[SHULHQFHDQGFXVWRPVHWWLQJVIRU
Whole Turkey
Vegetables, cut or
small
) )
Vegetables such as onions, garlic, eggplant and root vegetables can be slow
URDVWHGDWORZHUWHPSHUDWXUHV8VHKLJKHUWHPSHUDWXUHVIRU6ORZ5RDVWLQJ
YHJHWDEOHVVXFKDVPXVKURRPVDQGFDXOLIORZHU8VH3UHFLVLRQ&RRNLQJIRUD
guided cooking experience and custom settings for some Roasted Vegetables
Vegetables, large ) ) Cut whole squash in half and roast cut side down
See the Cooking Guide for additional details and rack position recommendations for specific foods.
8VHWKHSUREHWRPRQLWRUFRRNLQJRIODUJHFXWVRIPHDWWRKHOSGHWHUPLQHZKHQIRRGLVGRQH
49-2003952 Rev. 0
Cooking GuideCooking Guide
DEHYDRATING GUIDE (upper oven only on double oven models)
Dehydrate is a special convection mode that is designed
for dehydrating foods such as fruits, vegetables or herbs,
DQGPDNLQJIUXLWOHDWKHUVRUMHUNLHV7KHGHK\GUDWHPRGH
uses airflow and low heat to remove moisture from
foods. The door must be partially open when running the
GHK\GUDWHPRGH8VHWKHGRRUVSDFHUSURYLGHGZLWK\RXU
oven to prop the door open to the appropriate position
as shown below. Once the door prop is in place, select
Dehydrate, then input the desired set temperature and
press Start7KHWHPSHUDWXUHFDQEHVHWEHWZHHQ)
DQG):KHQWKHGHK\GUDWHPRGHLVUXQQLQJ
hour shut-off is automatically disabled.
Ŷ&RQVXOWRQOLQHDQGERRNUHIHUHQFHVIRUGHWDLOHG
information on how to safely and properly dehydrate
foods.
Ŷ'HK\GUDWLQJDWWRRKLJKRIDWHPSHUDWXUHFDQSUHYHQW
the interior of foods from sufficiently drying.
Ŷ'HK\GUDWLQJDWWRRORZRIDWHPSHUDWXUHRUWRRVORZO\
can allow microorganisms to grow resulting in spoilage
or food borne illness.
Ŷ'RQRWRQO\UHO\RQH[WHULRUDSSHDUDQFHRUWH[WXUH
check food interior to ensure that foods are sufficiently
dried.
Ŷ'HK\GUDWLQJWLPHVDUHLPSDFWHGE\WKHLQLWLDOFRQGLWLRQ
of the food, ambient humidity, temperature setting,
quantity of food, etc. Thinner, smaller pieces of foods
will dehydrate more quickly than thicker or larger
pieces.
Ŷ)RUEHVWSHUIRUPDQFHZKHQXVLQJWKHGHK\GUDWHPRGH
use grids or racks with small spacing that allow air to
reach food from all sides. These can be placed directly
on your oven rack. Parchment paper or silicone
baking mats can be used for dehydrating purees.
Ŷ,WLVQRUPDOWRVHHPRLVWXUHRQWKHLQWHULRURYHQ
surfaces when dehydrating.
Ŷ6RPHIRRGVEHQHILWIURPDSUHWUHDWPHQW
Ŷ5HPRYHH[FHVVPRLVWXUHIURPWKHH[WHULRURIIRRGV
prior to dehydrating.
Ŷ3LHUFHFKHFNRUFXWIRRGVVXFKDVEOXHEHUULHV
cranberries or grapes prior to dehydrating.
Ŷ3HULRGLFDOO\EORWPHDWVWRUHPRYHH[FHVVIDWGXULQJ
dehydrating.
Ŷ'HK\GUDWLQJPRUHWKDQUDFNVDWDWLPHLVQRW
recommended.
Food Type
Recommended
Set Temperature
(°F)
Expected Drying
Time (hours)
Fruits 130-140 4 - 36
Herbs 105-115
Meat/Jerky* 145-165
Vegetables
0HDWVKRXOGEHKHDWHGWR)EHIRUHGHK\GUDWLQJ
See fsis.usda.gov for more information
Number of Oven Racks
Used During Dehydrate
Mode
Rack Positions in Your
Oven
1 rack IODWRUH[WHQVLRQUDFN
UDFNV H[WHQVLRQUDFNDQGIODW
rack)
3 racks IODWUDFNH[WHQVLRQ
UDFNDQGIODWUDFN
4 racks IODWUDFNIODWUDFN
IODWUDFNDQGIODWUDFN
Door Spacer to
be used when
dehydrating
USING THE APPLIANCE: Dehydrating Guide

49-2003952 Rev. 0
%HVXUHHOHFWULFDOSRZHULVRIIDQGDOOVXUIDFHVDUHFRROEHIRUHFOHDQLQJDQ\SDUWRIWKHUDQJH
Control Panel
7RORFNWKHFRQWUROVUHIHUHQFHWKH4XLFN6HWWLQJV6KDGH
information in the Appliance Display Settings section.
,W¶VDJRRGLGHDWRZLSHWKHFRQWUROSDQHODIWHUHDFKXVH
Clean with mild soap and water or vinegar and water,
rinse with clean water and polish dry with a soft cloth.
Do not use abrasive cleansers, strong liquid cleansers,
plastic scouring pads or oven cleaners on the control
SDQHO²WKH\ZLOOGDPDJHWKHILQLVK
NOTE: 'RQRWXVHVKDUSSRLQW\REMHFWVWRFOHDQ
microphone holes.
Oven Exterior
Do not use oven cleaners, abrasive cleansers, strong
liquid cleansers, steel wool, plastic scouring pads, or
cleaning powders on the exterior of the oven. Clean with
a mild soap and water or vinegar and water solution.
Rinse with clean water and dry with a soft cloth. When
cleaning surfaces, make sure that they are at room
temperature and not in direct sunlight.
,IVWDLQRQWKHGRRUYHQWWULPLVSHUVLVWHQWXVHDPLOG
abrasive cleaner and a sponge-scrubber for best results.
6SLOODJHRIPDULQDGHVIUXLWMXLFHVWRPDWRVDXFHVDQG
basting liquids containing acids may cause discoloration
and should be wiped up immediately. Let hot surfaces
cool, then clean and rinse.
Cleaning The Oven - Exterior
Painted Surfaces and Black Stainless Steel (on some models)
Painted surfaces may include the door and trim around
the control panel. Clean these with soap and water or a
vinegar and water solution.
Do not use commercial oven cleaners, cleaning
powders, steel wool or harsh abrasives on any painted
VXUIDFHLQFOXGLQJ%ODFN6WDLQOHVV6WHHO
Stainless Steel - Excluding Black Stainless Steel (on some models)
Do not use a steel wool pad; it will scratch the surface.
To clean the stainless steel surface, use warm sudsy
water or a stainless steel cleaner or polish. Always wipe
the surface in the direction of the grain. Follow the cleaner
instructions for cleaning the stainless steel surface.
Cleaners with oxalic acid will remove surface rust, tarnish
DQGVPDOOEOHPLVKHV8VHRQO\DOLTXLGFOHDQVHUIUHHRIJULW
and rub in the direction of the brush lines with a damp, soft
sponge.
To inquire about purchasing cleaning products including
stainless steel appliance cleaner or polish, see the
Accessories and Consumer Support sections at the end of
this manual.
USING THE APPLIANCE: Cleaning the Oven -Exterior

49-2003952 Rev. 0
Cleaning The Oven - Interior
The interior of your new oven can be cleaned manually or by using Steam Clean or Self Clean modes.
6SLOODJHRIPDULQDGHVIUXLWMXLFHVWRPDWRVDXFHVDQGEDVWLQJOLTXLGVFRQWDLQLQJDFLGVPD\FDXVHGLVFRORUDWLRQDQG
should be wiped up immediately. Let hot surfaces cool, then clean and rinse.
IMPORTANT:)RURYHQVZLWKDFDPHUDLQWKHGRRU,IGRRUJODVVLVQRWFOHDQFDPHUDLPDJHFODULW\PD\EHDIIHFWHG
Please follow directions below to properly clean the door glass.
Manual Cleaning
'RQRWXVHRYHQFOHDQHUVXQOHVVFHUWLILHGIRUVHOIFOHDQLQJRYHQVWURQJOLTXLGFOHDQVHUVRUVFRXULQJSDGVRQWKH
interior of the oven. Clean with a mild soap and water, or vinegar and water solution. Rinse with clean water and dry
with a soft cloth. When cleaning surfaces, make sure that they are at room temperature.
Steam Clean Mode
Steam Clean is designed to sufficiently heat the water
added to the bottom, allowing in to reach a temperature
that causes steam to condense on food soils. This process
softens the residues, making them easier to remove.
The oven should be cool before beginning a Steam Clean
cycle. This allows for safe wiping of grease and soils form
the oven bottom beforehand. Additionally, it prevents the
risk of thermal shock and enamel cracking that could
result from pouring cold water onto the hot oven surface.
Pour one cup of water into the bottom of the oven. Close
the door. Select Steam Clean and press Start to the
right of the screen. You should not open the door during
the 30-minute steam clean as this will decrease the
steam clean performance. Wipe out any excess water
and any remaining soil. NOTE: Water in the bottom of
the oven may be hot right after finishing the cycle.
Self Clean Mode
5HDG6HOI&OHDQLQJ2YHQ6DIHW\,QVWUXFWLRQVDWWKH
beginning of this manual before using Self Clean Mode.
Self clean uses very high temperatures to clean the oven
interior. The oven door will lock when using this feature.
%HIRUHRSHUDWLQJWKHVHOIFOHDQF\FOHZLSHXSJUHDVH
and soils from the oven. Remove all items from the oven
RWKHUWKDQHQDPHOHGGDUNFRORUUDFNV6KLQ\RUVLOYHU
racks, the meat probe, and any cookware or other items
should all be removed from the oven before initiating a
VHOIFOHDQF\FOH&ORVHWKHGRRU,IXVLQJDGRXEOHRYHQ
select which oven you would like to clean. Select Self
Clean. Choose a 3, 4, or 5 hour cycle, and select Start.
For heavily soiled ovens, the maximum 5 hour clean time
LVUHFRPPHQGHG,I\RXZLVKWRXVHWKHGHIDXOWWLPHSUHVV
Start immediately after selecting Self Clean. The oven
will show that the door has locked and display the amount
of time remaining in the cycle. Press Cancel if you wish
to stop the cycle. The oven will turn off automatically when
the self clean cycle is complete. The door will stay locked
until the oven has cooled down. After the oven has cooled
down wipe any ash out of the oven.
We recommend venting your kitchen with an open
window or using a ventilation fan or hood during the first
self-clean cycle.
Soil on the front frame of the oven and outside the
gasket on the door will need to be cleaned by hand.
Clean these areas with hot water, soap-filled steel wool
pads or cleaners such as Soft Scrub
®
. Rinse well with
clean water and dry.
Do not clean the gasket. The fiberglass material of
WKHRYHQGRRUJDVNHWFDQQRWZLWKVWDQGDEUDVLRQ,WLV
HVVHQWLDOIRUWKHJDVNHWWRUHPDLQLQWDFW,I\RXQRWLFHLW
becoming worn or frayed, replace it.
Make sure the oven light bulb cover is in place and the
oven light is off. When using the Self Clean Mode in a
double oven, only the upper or lower oven can utilize
the cycle at one time. Additionally, no other mode may
be started in the alternate oven cavity while self clean is
in progress.
IMPORTANT: The health of some birds is extremely
sensitive to the fumes given off during the self-cleaning cycle
of any range. Move birds to another well-ventilated room.
USING THE APPLIANCE: &OHDQLQJWKH2YHQ,QWHULRU
49-2003952 Rev. 0
USING THE APPLIANCE: &OHDQLQJWKH2YHQ,QWHULRU
Cleaning The Oven - Interior
Probe
The temperature probe may be cleaned with soap and
water or a soap-filled scouring pad. Cool the temperature
probe before cleaning. Scour stubborn spots with a soap-
filled scouring pad, rinse and dry.
To order additional temperature probes see the
Accessories and Consumer Support sections at the end of
this manual.
Ŷ Do not immerse the temperature probe in water.
Ŷ Do not store the temperature probe in the oven.
Ŷ Do not leave the
temperature probe
inside the oven
during a self or
steam clean cycle.
Oven Racks
,IWKHUDFNVWKDWZHUHSURYLGHGZLWK\RXURYHQDUHGDUN
enameled racks, not shiny, they may remain in the oven
during the self-cleaning cycle without being damaged.
To manually clean racks, use warm, soapy water. Make
sure not to wash the rack slides on an extension rack.
,IUDFNVEHFRPHPRUHGLIILFXOWWRUHPRYHIURPWKHRYHQ
put some vegetable oil on a soft cloth or paper towel and
rub onto the oven rack supports. Do not wipe the oil on
an extension rack slide.
NOTE: 8VLQJRWKHUFRRNLQJRLOVOLNHSHDQXWRLO3DP
®
or
other lubricant sprays, can cause a discoloring or a rust
like color residue on the racks and cavity sides. To clean
this residue, use a soap and water or a vinegar and
water solution. Rinse with clean water and dry with a soft
cloth.
Periodically, the oven racks may need to be lubricated
using the lubricant shipped with your oven. To order
additional lubricant, see accessories section of this
manual.
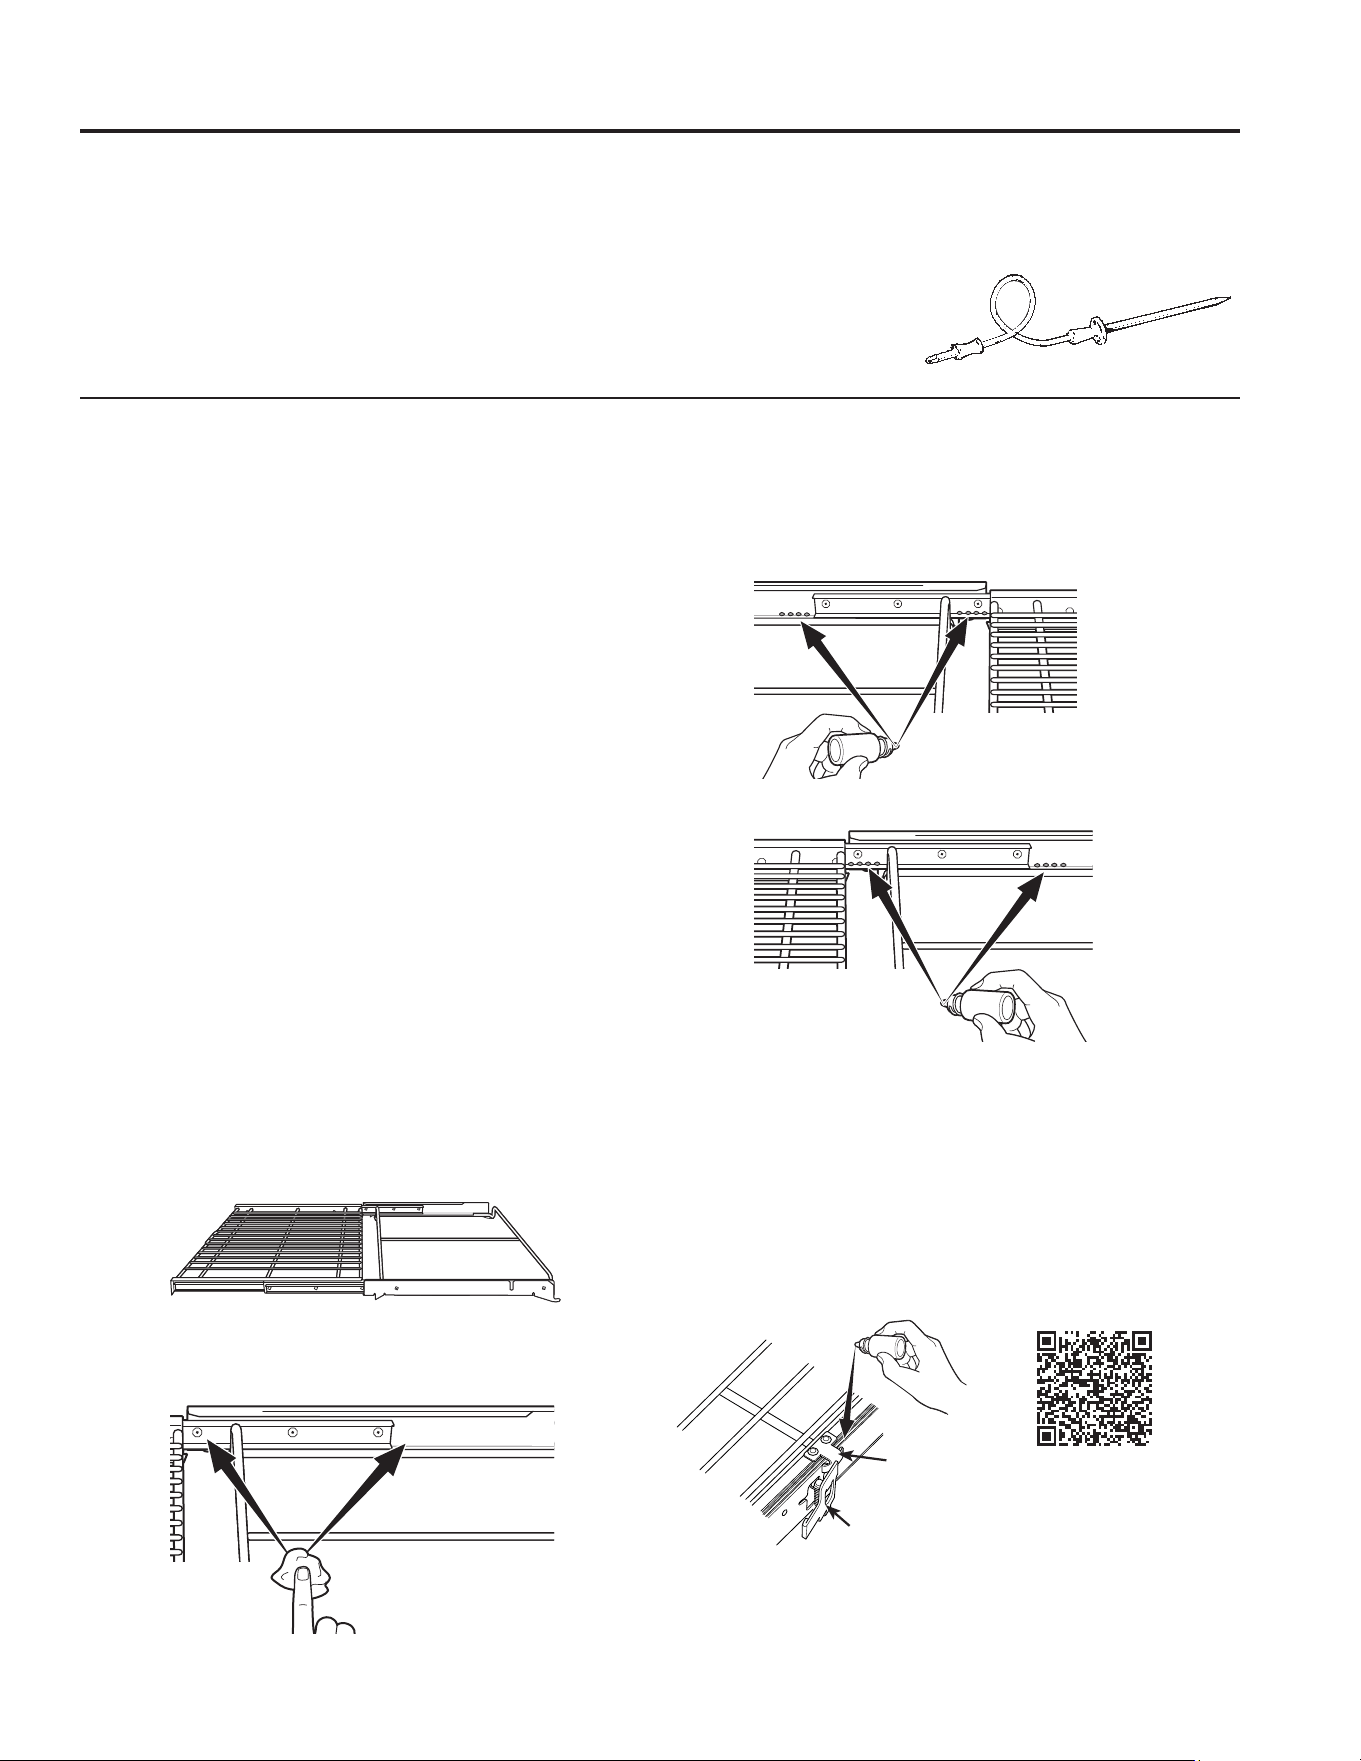
Using the oven:
1. Remove rack from the oven. See the Extension Oven
Racks section.
)XOO\H[WHQGWKHUDFNRQDWDEOHRUFRXQWHUWRS
Newspaper may be placed underneath the rack for
easy cleanup.
,IWKHUHLVGHEULVLQWKHVOLGHWUDFNVZLSHLWDZD\XVLQJ
a paper towel. NOTE: Any lubricant wiped away must
be replaced.
4. Shake the lubricant before opening it. Starting with
OHIWVOLGHPHFKDQLVPRIWKHUDFNSODFHIRXUVPDOO
GURSVRIOXEULFDQWRQWKHWZRERWWRPWUDFNVRIWKH
slide close to the bearing carriers.
5. Repeat for the right slide mechanism of the rack.
6. Open and close the rack several times to distribute
the lubricant.
7. Replace the cap on the lubricant and shake it again.
Turn the rack over and repeat steps 3, 4, 5 and 6.
)RUUDFNVXSSRUWVPROGHGLQWRWKHRYHQFDYLW\ZDOO
only.)
Also, for optimal sliding performance be sure to add a
couple of drops of lubricant on the bracket and paddle
VSULQJVKRZQEHORZ
8. Close the rack, turn rack right-side-up and place in
the oven. See the Extension Oven Racks section.
5HSHDWDERYHVWHSVIRUHDFKUDFN
Rack right-
side-up
Right
side
Left
side
Rack right-side-up
KWWSVSURGXFWVJHDSSOLDQFHV
com/appliance/gea-support-
VHDUFKFRQWHQW"FRQWHQW,G
%UDFNHW
Paddle Spring

49-2003952 Rev. 0
WARNING
SHOCK OR BURN HAZARD:%HIRUHUHSODFLQJRYHQOLJKWEXOEGLVFRQQHFWWKHHOHFWULFDOSRZHUWRWKH
oven at the main fuse or circuit breaker panel. Failure to do so may result in electric shock or burn.
CAUTION
BURN HAZARD: The glass cover and bulb should be removed when cool. Touching hot glass with
bare hands or a damp cloth can cause burns.
Oven Light
1. Disconnect power at the main fuse or circuit breaker
panel.
5HPRYHRYHQUDFNV
3. Slide a flat blade screwdriver or butter knife between
the metal housing and the glass light cover.
NOTE: on some models there is a metal clip visibly
holding the glass. The tool needs inserted between
the metal housing and the clip holding the glass.
4. Support the glass light cover with two fingers to prevent
the cover from falling to the bottom of the oven.
5. Gently twist the screwdriver blade or butter knife to
ORRVHQWKHJODVVOLJKWFRYHU%HFDUHIXOQRWWRFKLS
the oven coating.
6. Remove the glass light cover.
7. Remove the bulb by firmly grasping and sliding the
bulb straight out until the two prongs have cleared
the ceramic holder.
8. Do not touch the glass of the new replacement bulb
ZLWK\RXUILQJHUV,WZLOOFDXVHWKHEXOEWRIDLOZKHQLW
lights. Grasp the replacement bulb with a clean towel
or facial tissue with the prongs facing down. Align
the two prongs in the ceramic holder, pressing gently
until the bulb is securely in the ceramic socket.
6OLGHWKHSURWHFWLYHOHQVLQWRWKHKROGHUDQGSXVK
until the clips snap into the housing.
10. Reconnect power.
CARE AND CLEANING: Oven Light
49-2003952 Rev. 0
Oven Door
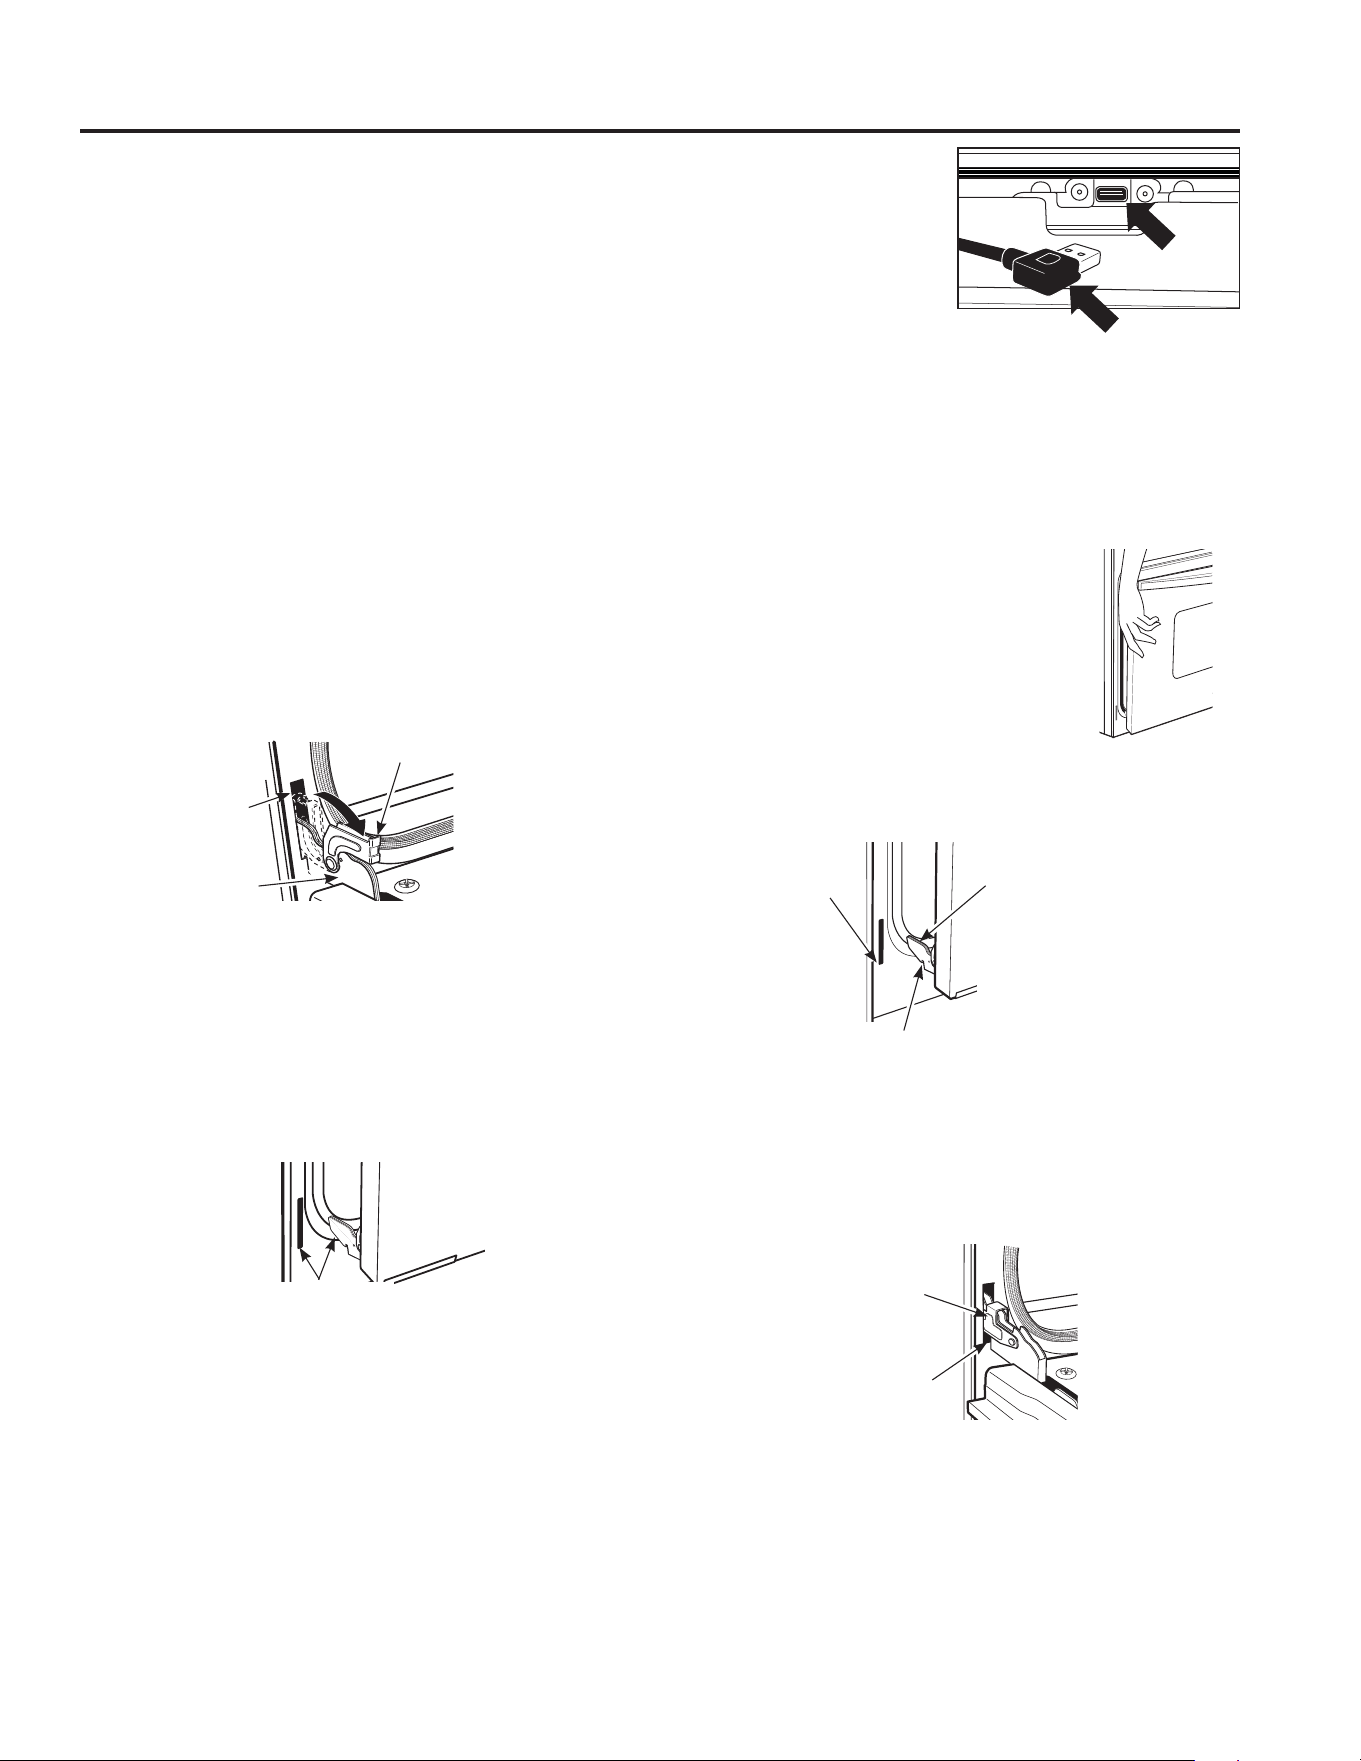
Removing the Oven Door (on some
models)
NOTE: Door removal is not a requirement for installation
of the product but is an added convenience.
To remove the door:
1. Open the oven door as far as it will go.
3XVKERWKKLQJHORFNVGRZQWRZDUGWKHGRRUIUDPHWR
the unlocked position. This may require a flat-blade
screwdriver. DO NOT LIFT THE DOOR BY THE
HANDLE!
3. Place hands on both sides of the door and close the
RYHQGRRUWRWKHUHPRYDOSRVLWLRQDSSUR[LPDWHO\
´±´>FP±FP@IURPWKHFORVHGSRVLWLRQ
4. Lift the door up and out until the hinge arms clear the
slots. NOTE:7KHRYHQGRRULVYHU\KHDY\%HVXUH
you have a firm grip before lifting the oven door off
WKHKLQJHV8VHFDXWLRQRQFHWKHGRRULVUHPRYHG
Do not lay the door on its handle. This could cause
dents or scratches.
Replacing the Oven Door
NOTE: The oven door is heavy. You may need help
lifting the door high enough to slide it into the hinge slots.
Do not lift the door by the handle.
1. Lift the oven door by grasping each
side.
:LWKWKHGRRUDWWKHVDPHDQJOHDV
WKHUHPRYDOSRVLWLRQDSSUR[LPDWHO\
´±´>FP±FP@IURPWKHFORVHG
position), seat the notch of the hinge
arm into the bottom edge of the hinge
slot. The notch of the hinge arm must
be fully seated into the bottom of the
slot.
)XOO\RSHQWKHGRRU,IWKHGRRUZLOOQRWIXOO\RSHQWKH
indentation is not seated correctly in the bottom edge
of the slot.
4. Push the hinge locks up against the front frame of the
oven cavity, to the locked position.
5. Close the oven door.
Hinge in
Locked
Position
Notch of Hinge
Securely Fitted
,QWR%RWWRPRI
Hinge Slot
%RWWRP
Edge of
Slot
Hinge
Arm
Hinge Notch
Hinge
Slot
Hinge
Arm
+LQJH8QORFNHG
Position
Hinge Clears Slot
7KHGRRULVYHU\KHDY\%HFDUHIXOZKHQUHPRYLQJDQGOLIWLQJWKHGRRU'RQRWOLIWGRRUE\
the handle.
On ovens with a camera: %HIRUHUHPRYLQJWKHGRRUGLVFRQQHFWWKHFDPHUDKDUQHVVE\
unhooking the connector that is snapped into the bottom of the door.
IMPORTANT:,IGRRUJODVVRURYHQFDYLW\OLJKWFRYHUDUHQRWFOHDQFDPHUDLPDJHFODULW\
may be affected. Please follow directions below to properly clean the door glass. For
best results, clean door glass and oven light cover immediately after spillage once the
oven has cooled.
CARE AND CLEANING: Oven Door
Camera
Port
Camera Cable

49-2003952 Rev. 0
Save time and money! Review the charts on the following pages before you call for service. Check out self-help
YLGHRVDQG)$4DWbodewell.com/faqs.
Problem Possible Cause What To Do
My new oven doesn't
cook like my old one.
Is something wrong
with the temperature
settings?
Your new oven has a different cooking system from
your old oven and therefore may cook differently
than your old oven.
For the first few uses, follow your recipe times and
WHPSHUDWXUHVFDUHIXOO\,I\RXVWLOOWKLQN\RXUQHZRYHQ
LVWRRKRWRUWRRFROG\RXFDQDGMXVWWKHWHPSHUDWXUH
yourself to meet your specific cooking preference.
6HHWKH6SHFLDO)HDWXUHV6HFWLRQWRDGMXVWWKH
oven temperature. NOTE:7KLVDGMXVWPHQWDIIHFWV
7UDGLWLRQDO%DNH&RQYHFWLRQ%DNHDQG&RQYHFWLRQ
%DNH0XOWLWHPSHUDWXUHVLWZLOOQRWDIIHFW&RQYHFWLRQ
5RDVW7UDGLWLRQDO%URLO&RQYHFWLRQ%URLORU&OHDQ
Food does not bake
properly
Oven controls improperly set. See the Cooking Modes section.
Rack position is incorrect or rack is not level. See the Cooking Modes section and Cooking Guide.
,QFRUUHFWFRRNZDUHRUFRRNZDUHRILPSURSHUVL]H
being used.
See the Cookware section.
2YHQWHPSHUDWXUHQHHGVDGMXVWPHQW See the Cooking option under the Settings section.
,QJUHGLHQWVXEVWLWXWLRQ Substituting ingredients can change the recipe
outcome.
Food does not broil
properly
Oven controls improperly set. Make sure you select the appropriate broil mode.
,PSURSHUUDFNSRVLWLRQEHLQJXVHG See the Cooking Guide for rack location suggestions.
Food being cooked in a hot pan. Make sure cookware is cool
Cookware not suited for broiling. 8VHDSDQVSHFLILFDOO\GHVLJQHGIRUEURLOLQJ
Aluminum foil used on the broiling pan and
grid has not been fitted properly and slit as
recommended.
,IXVLQJDOXPLQXPIRLOFRQIRUPWRSDQVOLWV
,QVRPHDUHDVWKHSRZHUYROWDJHPD\EHORZ Preheat the broil element for 10 minutes.
Oven temperature too
hot or too cold
2YHQWHPSHUDWXUHQHHGVDGMXVWPHQW See the Cooking option under the Settings section.
Oven does not work or
appears not to work
A fuse in your home may be blown or the circuit
breaker tripped.
Replace the fuse or reset the circuit breaker.
Oven controls improperly set. 6HHWKH8VLQJWKH$SSOLDQFHDQG6HWWLQJD&RRNLQJ
Mode sections.
Oven is in Sabbath Mode Verify, that the oven is not in Sabbath Mode. See the
Sabbath option under the Settings section.
“Crackling” or
“popping” sound
This is the sound of the metal heating and cooling
during both the cooking and cleaning functions.
This is normal.
Why is my range making
a "clicking" noise when
using my oven?
Your range has been designed to maintain a tighter
control over your oven's temperature. You may
hear your oven's heating elements "click" on and
off more frequently than in older ovens to achieve
better results during cooking and cleaning cycles.
This is normal.
Clock and timer do not
work
A fuse in your home may be blown or the circuit
breaker tripped.
Replace the fuse or reset the circuit breaker.
Oven light does not
work
Light bulb is loose or defective. Tighten or replace bulb.
Oven will not self-clean The temperature is too high to set a self-clean
operation.
Allow the oven to cool and reset the controls.
Oven controls improperly set. See the Cleaning the Oven section.
Excessive smoking
during clean cycle
Excessive soil or grease. Press Cancel to stop the cycle. Open the windows
to rid the room of smoke. Wait until the door unlocks.
Wipe up the excess soil and reset the clean cycle.
Excessive smoking during
broiling
Food too close to burner element. Lower the rack position of the food.
Troubleshooting tips ... %HIRUH\RXFDOOIRUVHUYLFH
TROUBLESHOOTING TIPS

49-2003952 Rev. 0
TROUBLESHOOTING TIPS
Problem Possible Cause What To Do
Oven door will not open
after a clean cycle
Oven too hot. Allow the oven to cool below locking temperature.
Oven not clean after a
clean cycle
Oven controls improperly set. See the Cleaning the Oven section.
Oven was heavily soiled. Clean up heavy spillovers before starting the clean
cycle. Heavily soiled ovens may need to self-clean
again or for a longer period of time.
“F— and a number or
letter” are displayed on
LCD screen
You have a function error code. Press Dismiss on the LCD screen. Allow the oven to
cool for one hour. Put the oven back into operation.
,IWKHIXQFWLRQFRGHUHSHDWV Disconnect all power to the oven for at least 30 seconds
DQGWKHQUHFRQQHFWSRZHU,IWKHIXQFWLRQHUURUFRGH
repeats, call for service.
LCD (Touch Screen) is not
functioning properly
A fuse in your home may be blown or the circuit
breaker tripped.
Replace the fuse or reset the circuit breaker.
Oven controls improperly set. See the Cooking Modes or Settings section to ensure
proper use. Ensure unit is updated to the most recent
software update.
LCD screen is locked. 8QORFNWKHVFUHHQE\SUHVVLQJWKHUnlockLFRQ,IWKLV
does not correct the issue, cycle power at the circuit
breaker and ensure unit is updated to the most recent
software update.
Touch Screen is not responding properly. Place your entire hand on the touch screen for 5
seconds then remove it to reset the touch screen
sensitivity.
LCD is faulty. Cycle power at the circuit breaker and ensure unit is
XSGDWHGWRWKHPRVWUHFHQWVRIWZDUHXSGDWH,ILVVXH
persists, call service to assess the issue.
Power outage, clock
resets
Power outage or surge 5HVHWWKHFORFN,IWKHRYHQZDVLQXVH\RXPXVWUHVHW
it by pressing Cancel, setting the clock and resetting
any cooking function.
“Burning” or “oily” odor
emitting from the vent
This is normal in a new oven and will disappear in
time.
To speed the process, set a self-clean cycle for a
minimum of 3 hours. See the Cleaning the Oven
section.
Strong odor An odor from the insulation around the inside of the
oven is normal for the first few times the oven is used.
This is temporary and will go away after several uses or
a self-clean cycle.
Fan noise A cooling fan may automatically turn on. This is normal. The cooling fan will turn on to cool
LQWHUQDOSDUWV,WPD\UXQIRUXSWRKRXUVDIWHUWKH
oven is turned off.
My oven door glass
appears to be "tinted" or
have a "rainbow" color. Is
this defective?
No. The inner oven glass is coated with a heat barrier
to reflect the heat back into the oven to prevent heat
loss and keep the outer door cool while baking.
7KLVLVQRUPDO8QGHUFHUWDLQOLJKWRUDQJOHV\RXPD\
see this tint or rainbow color.
Sometimes the oven takes
longer to preheat to the
same temperature
Cookware or food in oven
The cookware or food in the oven will cause the oven to take
longer to preheat. Remove items to reduce preheat time.
Number of racks in oven Adding more racks to the oven will cause the oven to
take longer to preheat. Remove some racks.
Different cooking modes The different cooking modes use different preheat
methods to heat the oven for the specific cooking
PRGH6RPHPRGHVZLOOWDNHORQJHUWKDQRWKHUVLH
convection bake multi).
Oven will not work
remotely
Router issues, no wireless signal, etc. For assistance with oven wireless network connectivity,
SOHDVHFDOO
Oven is not connected.
Oven camera image is not
clear
Oven door glass is dirty Follow directions in Cleaning the Oven section to
properly clean oven door glass.
No image on oven camera
app
Camera cable unplugged Check to make sure camera cable is plugged into
bottom of door.
Troubleshooting tips ... %HIRUH\RXFDOOIRUVHUYLFH
30 49-2003952 Rev. 0
Staple your receipt here. Proof of the original purchase
date is needed to obtain service under the warranty.
LIMITED WARRANTY
GE Appliances Electric Oven Limited Warranty
All warranty service for your appliance is provided exclusively by GE Appliances, a Haier company’s Factory Service Centers, or by a
VHUYLFHWHFKQLFLDQDXWKRUL]HGE\*($SSOLDQFHVWRSURYLGHZDUUDQW\VHUYLFHIRU\RXUDSSOLDQFH7RVFKHGXOHVHUYLFHZLWKLQWKH86$YLVLW
us at Bodewell.com/schedule-repair-serviceRUFDOO%2'(:(//
,Q&DQDGDYLVLWGEAppliances.ca, monogram.ca, or call 800.561.3344. Please have your serial number and your
model number available when calling for service. Service that has not been scheduled or otherwise arranged for by GE Appliances will
not be covered under this warranty, including any parts and/or services provided.
Servicing your appliance may require the use of the onboard data port for diagnostics. This gives a GE Appliances factory service
technician the ability to quickly diagnose any issues with your appliance and helps GE Appliances improve its products by providing GE
$SSOLDQFHVZLWKLQIRUPDWLRQRQ\RXUDSSOLDQFH,I\RXGRQRWZDQW\RXUDSSOLDQFHGDWDWREHVHQWWR*($SSOLDQFHVSOHDVHDGYLVH\RXU
technician not to submit the data to GE Appliances at the time of service.
What GE Appliances will not cover:
Ŷ Service trips to your home to teach you how to use the
product.
Ŷ ,PSURSHULQVWDOODWLRQGHOLYHU\RUPDLQWHQDQFH
Ŷ )DLOXUHRIWKHSURGXFWLILWLVDEXVHGPLVXVHGPRGLILHG
or used for other than the intended purpose or used
commercially.
Ŷ 5HSODFHPHQWRIKRXVHIXVHVRUUHVHWWLQJRIFLUFXLWEUHDNHUV
Ŷ 'DPDJHWRWKHSURGXFWFDXVHGE\DFFLGHQWILUHIORRGVRU
acts of God.
Ŷ ,QFLGHQWDORUFRQVHTXHQWLDOGDPDJHFDXVHGE\SRVVLEOH
defects with this appliance.
Ŷ 'DPDJHFDXVHGDIWHUGHOLYHU\
Ŷ 3URGXFWQRWDFFHVVLEOHWRSURYLGHUHTXLUHGVHUYLFH
Ŷ 6HUYLFHWRUHSDLURUUHSODFHOLJKWEXOEVH[FHSWIRU
LED lamps.
Ŷ 'DPDJHWRILQLVKVXFKDVVXUIDFHUXVWWDUQLVKRUVPDOO
blemishes not reported within 48 hours of delivery.
EXCLUSION OF IMPLIED WARRANTIES
Your sole and exclusive remedy is product repair as provided in this Limited Warranty. Any implied warranties, including the implied
warranties of merchantability or fitness for a particular purpose, are limited to one year or the shortest period allowed by law.
For the period of GE Appliances will replace
One year
From the date of the
original purchase
Any part of the oven which fails due to a defect in materials or workmanship. During this limited one-
year warranty, GE Appliances will provide, free of charge, all labor and in-home service to replace
the defective part.
Two years
From the date of the
original purchase of any
Monogram brand oven
Any part of the oven which fails due to a defect in materials or workmanship. During this limited two-
year warranty, GE Appliances will provide, free of charge, all labor and in-home service to replace
the defective part.
For US Customers: This limited warranty is extended to the
original purchaser and any succeeding owner for products
SXUFKDVHGIRUKRPHXVHZLWKLQWKH86$,IWKHSURGXFW
is located in an area where service by a GE Appliances
Authorized Servicer is not available, you may be responsible
for a trip charge or you may be required to bring the product to
DQ$XWKRUL]HG*($SSOLDQFHV6HUYLFHORFDWLRQIRUVHUYLFH,Q
Alaska, the limited warranty excludes the cost of shipping or
service calls to your home.
Some states do not allow the exclusion or limitation of
incidental or consequential damages. This limited warranty
gives you specific legal rights, and you may also have other
rights which vary from state to state. To know what your legal
rights are, consult your local or state consumer affairs office or
your state’s Attorney General.
Warrantor: GE Appliances, a Haier company
/RXLVYLOOH.<
IN CANADA (INCLUDING THE PROVINCE OF QUÉBEC):
This limited warranty is extended to the original purchaser
and any succeeding owner for products purchased in Canada
LQFOXGLQJ4XpEHFIRUKRPHXVHZLWKLQ&DQDGDLQFOXGLQJ
4XpEHF,IWKHSURGXFWLVORFDWHGLQDQDUHDZKHUHVHUYLFHE\
a GE Appliances Authorized Servicer is not available, you may
be responsible for a trip charge or you may be required to bring
the product to an Authorized GE Appliances Service location.
6RPHSURYLQFHVLQFOXGLQJ4XpEHFGRQRWDOORZWKHH[FOXVLRQ
or limitation of incidental or consequential damages. This
limited warranty gives you specific legal rights, and you may
also have other rights which vary from province to province
LQFOXGLQJ4XpEHF7RNQRZZKDW\RXUOHJDOULJKWVDUHFRQVXOW
your local or provincial consumer affairs office.
FOR QUÉBEC CONSUMERS ONLY - NOTICE ON THE
WARRANTY OF AVAILABILITY OF SPARE PARTS,
REPAIR SERVICES AND INFORMATION NECESSARY FOR
REPAIR OR MAINTENANCE (S. 39 OF THE CONSUMER
PROTECTION ACT): Please be advised that MC Commercial
,QF³0&&RPPHUFLDO´GRHVQRWJXDUDQWHHZLWKLQWKH
PHDQLQJRIVHFWLRQRIWKH&RQVXPHU3URWHFWLRQ$FW&4/5
F3DQGVHFWLRQVWRRIWKH5HJXODWLRQ
respecting the application of the Consumer Protection
$FW&4/5F3UWKHDYDLODELOLW\RIUHSODFHPHQW
parts, repair services, or the information necessary for the
maintenance or repair of goods manufactured, imported,
advertised, or sold by MC Commercial.
3OHDVHQRWHWKDW0&&RPPHUFLDO,QFFRQWLQXHVWRRIIHUWKH
manufacturer’s limited warranty as stated in the Owner’s
0DQXDORU4XLFN*XLGHDQGWKDWWKLVOLPLWHGZDUUDQW\LV
distinct from the statutory warranty of availability provided for
XQGHUVHFWLRQRIWKH&RQVXPHU3URWHFWLRQ$FW
Warrantor: MC Commercial Inc.,
Burlington, ON, L7L 6B2
EXTENDED WARRANTIES: Purchase a GE Appliances
extended warranty and learn about special discounts that are
available while your warranty is still in effect. You can purchase
it online anytime at
bodewellcareplan.com
or call 866-884-5646 during normal business hours. GE
Appliances Service will still be there after your warranty
H[SLUHV,Q&DQDGDFRQWDFW\RXUORFDOH[WHQGHGZDUUDQW\
provider.

49-2003952 Rev. 0 31
ACCESSORIES
Looking For Something More?
GE Appliances offers a variety of accessories to
improve your cooking and maintenance experiences!
Refer to the Consumer Support page for phone numbers
and website information.
7KHIROORZLQJSURGXFWVDQGPRUHDUHDYDLODEOH
Accessories
Accessories
6PDOO%URLOHU3DQô´[ó´[ò³
/DUJH%URLOHU3DQô´[ó´[ò³
;/%URLOHU3DQ´[ó´[³
Parts
Oven racks
Oven elements
Light bulbs
Probe
Cleaning Supplies
Stainless Steel Wipes
Stainless Steel Appliance Cleaner
Lubricant
7KHODUJHEURLOHUSDQGRHVQRWILWLQ´´UDQJHV
7KH;/EURLOHUSDQGRHVQRWILWLQ´ZDOORYHQV´GURSLQV
RU´´UDQJHV
49-2003952 Rev. 0
3ULQWHGLQWKH8QLWHG6WDWHV
Consumer Support
CONSUMER SUPPORT
In the United States±9LVLWXVDWGEAppliances.comRUFDOO
In Canada±9LVLWXVDWGEAppliances.ca RUFDOO
Find owner support information on our website:
• Information
• Register the Appliance
• Schedule Service through Bodewell
• Purchase Parts, Accessories or Extended Warranties
• Connect your Appliance ±
If you are not satisfied with the service you receive, contact us on our website with all the details including your phone
QXPEHURUZULWHWR
In the United States -*HQHUDO0DQDJHU&XVWRPHU5HODWLRQV_*($SSOLDQFHV_$SSOLDQFH3DUN_/RXLVYLOOH.<
In Canada -
Director, Customer Relations
|
0&&RPPHUFLDO,QF
|
%XUORDN'U6XLWH_%XUOLQJWRQ21//%
GEAppliances.com GEAppliances.ca

49-2003952 Rev. 1 05-26
Four encastré
Séries 7000 et 9000
FOUR ENCASTRÉ
Électrique
MANUEL DE
L'UTILISATEUR
Inscrivez ici les numéros
de modèle et de série:
Nº de modèle ____________
Nº de série ______________
Vous trouverez ces numéros
sur une étiquette située sur la
garniture latérale ou à l'intérieur
de la porte du four (four inférieur).
GE est une marque de commerce de General Electric Company. Fabriqué sous licence d'utilisation de marque de commerce.
SÉCURITÉ .........................3
UTILISATION DU FOUR
Connectivité Wi-Fi ....................6
Commande vocale .....................7
Affichage de l’appareil .................8
Réglages ............................10
Sabbat .............................. 11
Caméra de la porte du four ............11
Grilles de four ........................12
Papier d'aluminium et protections
pour four ............................13
Directives relatives aux ustensiles
de cuisson ...........................13
Modes de cuisson .....................14
Sonde thermique .....................18
Guide de cuisson .....................19
Guide de friture à convection ......... 20
Guide de rôtissage ...................21
Guide de déshydratation ..............22
ENTRETIEN ET NETTOYAGE
Nettoyage du four– Extérieur ..........23
Nettoyage du four– Intérieur .......... 24
Sonde thermique .....................25
Portes françaises .................... 26
Lampe du four ...................... 26
Porte du four .........................27
CONSEILS DE DÉPANNAGE ....28
GARANTIE LIMITÉE ............ 30
ACCESSOIRES ...................31
SERVICE À LA CLIENTÈLE .....32
FRANÇAIS

2 49-2003952 Rev. 0
MERCI DE PERMETTRE À ÉLECTROMÉNAGERS GE DE FAIRE PARTIE
DE VOTRE FOYER.
Que vous ayez grandi avec des électroménagers GE ou qu'il s'agisse de votre premier appareil GE,
nous sommes heureux de vous avoir dans la famille.
Nous sommes fiers du savoir-faire, de l'innovation et du design qui font partie intégrante de tous les
électroménagers GE que nous fabriquons, et nous pensons que vous le serez aussi. À cet égard,
l'enregistrement de votre appareil nous assure que nous pourrons vous fournir des informations
importantes sur votre appareil et des détails sur sa garantie si vous en avez besoin.
Enregistrez votre électroménager GE en ligne dès maintenant. Des sites Web et des numéros
de téléphone utiles sont disponibles dans la section « Service à la clientèle » de ce manuel de
l'utilisateur. Vous pouvez également envoyer par courrier la carte d'enregistrement préimprimée
qui se trouve dans l'emballage de votre appareil.
49-2003952 Rev. 0 3
LISEZ ET CONSERVEZ CES INSTRUCTIONS
CONSIGNES DE SÉCURITÉ IMPORTANTES
LISEZ TOUTES LES INSTRUCTIONS AVANT D'UTILISER L'APPAREIL
SÉCURITÉ
AVERTISSEMENT
CONSIGNES GÉNÉRALES DE SÉCURITÉ
Ŷ8WLOLVH]FHWpOHFWURPpQDJHUXQLTXHPHQWDX[ILQV
mentionnées dans ce manuel d’utilisation.
Ŷ/¶LQVWDOODWLRQHWODPLVHjODWHUUHGRLYHQWrWUHUpDOLVpHVSDU
un installateur qualifié en conformité avec les instructions
d’installation fournies.
Ŷ7RXWUpJODJHUpSDUDWLRQRXHQWUHWLHQTXLQ¶HVWSDV
spécifiquement recommandé dans le manuel d’utilisation
GRLWrWUHHIIHFWXp81,48(0(17SDUXQLQVWDOODWHXU
d’électroménagers ou un technicien d’entretien qualifiés.
Ŷ$YDQWG¶HIIHFWXHUTXHOTXHUpSDUDWLRQFRXSH]O¶DOLPHQWDWLRQ
électrique au panneau de distribution électrique du domicile
en retirant le fusible ou en désarmant le disjoncteur
Ŷ$VVXUH]YRXVTXHWRXWOHPDWpULHOG¶HPEDOODJHHVWUHWLUpGH
la cuisinière avant l’utilisation afin de prévenir l’inflammation
de ce matériel.
ŶeYLWH]GHUD\HURXGHKHXUWHUOHVSRUWHVGHYHUUHOHVWDEOHV
de cuisson ou les panneaux de commande. Cela pourrait
causer le bris du verre.
Ŷ1HFXLVH]SDVG¶DOLPHQWVVXUXQSURGXLWGRQWOHYHUUHHVW
brisé. Cela poserait un risque de décharge électrique,
d’incendie ou de coupure.
Ŷ1HODLVVH]SDVOHVHQIDQWVVDQVVXUYHLOODQFH/HVHQIDQWV
QHGRLYHQWSDVrWUHODLVVpVVHXOVQLVDQVVXUYHLOODQFHGDQV
OD]RQHG¶XWLOLVDWLRQGHODSSDUHLO,OVQHGRLYHQWMDPDLV
grimper, s’asseoir ou se tenir debout sur l'appareil.
Ŷ
ATTENTION
1HUDQJH]SDVOHVREMHWVGLQWpUrW
pour les enfants dans des armoires au-dessus d'un four,
les enfants grimpant sur le four pour atteindre des objets
SRXUUDLHQWrWUHJUDYHPHQWEOHVVpV
Ŷ1¶XWLOLVH]MDPDLVFHWpOHFWURPpQDJHUSRXUUpFKDXIIHURX
chauffer la pièce.
Ŷ1HODLVVH]SHUVRQQHJULPSHUVHWHQLUGHERXWRXVDFFURFKHU
à la porte du four, au tiroir ou à la table de cuisson.
Cela pourrait endommager l'appareil ou le renverser et
provoquer des blessures graves, voire mortelles.
Ŷ8WLOLVH]XQLTXHPHQWGHVPLWDLQHVGHIRXUVqFKHVOHFRQWDFW
de mitaines humides ou mouillées sur des surfaces très
chaudes peut causer des brûlures par la vapeur. Ne
laissez pas les mitaines ou maniques isolantes toucher les
éléments chauffants chauds. N’utilisez pas une serviette ou
autre linge de grande taille à la place d’une poignée ou de
mitaines.
Ŷ1HWRXFKH]SDVOHVEUOHXUVOHVSODTXHVGHFXLVVRQ
(certains modèles), les grilles (certains modèles), la table
de cuisson ou les éléments chauffants du four, ni la surface
intérieure du four. Ces surfaces peuvent rester assez
chaudes pour causer des brûlures, et ce, durant une longue
SpULRGHDSUqVODFXLVVRQPrPHVLHOOHVQHVHPEOHQWSOXV
rWUHDOOXPpHVRXFKDXGHV
Ŷ3HQGDQWHWDSUqVO¶XWLOLVDWLRQQHWRXFKH]SDVO¶LQWpULHXUGX
IRXUHWQHODLVVH]SDVGHVYrWHPHQWVRXG¶DXWUHVPDWLqUHV
inflammables entrer en contact avec une zone de l’intérieur
du four; laissez d’abord suffisamment de temps pour
refroidir. D’autres surfaces de l’électroménager peuvent
devenir suffisamment chaudes pour causer des brûlures.
/HVVXUIDFHVSRWHQWLHOOHPHQWFKDXGHVFRPSUHQQHQWOHV
brûleurs ou les éléments chauffants, les grilles (certains
modèles), la surface de la table de cuisson, les orifices
des évents du four, les surfaces proches des ouvertures,
les interstices autour de la porte du four, les pièces de
garniture métalliques au-dessus de la porte, les dosserets
ou les étagères situées au-dessus de la surface de cuisson.
Ŷ1HFKDXIIH]SDVGHVFRQWHQDQWVGDOLPHQWVQRQRXYHUWV
/¶DXJPHQWDWLRQGHODSUHVVLRQSHXWIDLUHpFODWHUOH
contenant et causer des blessures.
Ŷ&XLVH]OHVDOLPHQWVjIRQGSRXUYRXVSUpPXQLUFRQWUH
OHVPDODGLHVG¶RULJLQHDOLPHQWDLUH/HVUHFRPPDQGDWLRQV
relatives à la température alimentaire minimale et
VpFXULWDLUHVRQWIRXUQLHVSDUO86'$HWOD)'$8WLOLVH]XQ
thermomètre pour aliments et vérifiez à plusieurs endroits.
ŶGardez la hotte du ventilateur et les filtres à graisse propres
afin de maintenir une bonne ventilation et prévenir les feux
GHJUDLVVHe7(,*1(=OHYHQWLODWHXUHQFDVGLQFHQGLH/D
soufflante en marche peut propager les flammes.
AVERTISSEMENT
9HXLOOH]OLUHWRXWHVOHVFRQVLJQHVDYDQWG¶XWLOLVHUFHSURGXLW/HQRQUHVSHFWGHFHVLQVWUXFWLRQV
pourrait entraîner un incendie, un choc électrique, une blessure grave voire la mort.
AVERTISSEMENT
GARDER LES MATÉRIAUX INFLAMMABLES À L’ÉCART DE LA TABLE
DE CUISSON Le non-respect de ces instructions pourrait entraîner un incendie ou une blessure.
Ŷ $EVWHQH]YRXVGHUDQJHURXG¶XWLOLVHUGHVPDWpULDX[
inflammables dans ou à proximité du four, y compris
du papier, du plastique, des poignées, des nappes, des
UHYrWHPHQWVPXUDX[GHVULGHDX[GHVVWRUHVDLQVLTXHGH
l’essence ou d’autres vapeurs ou liquides inflammables.
Ŷ 1HSRUWH]MDPDLVGHYrWHPHQWVDPSOHVRXSHQGDQWV
ORUVGHO¶XWLOLVDWLRQGHO¶pOHFWURPpQDJHU&HVYrWHPHQWV
pourraient s’enflammer s’ils entrent en contact avec des
surfaces chaudes, ce qui pourrait entraîner des brûlures
graves.
Ŷ 1HODLVVH]SDVODJUDLVVHGHFXLVVRQRXG¶DXWUHVPDWLqUHV
inflammables s’accumuler dans ou à proximité du four.
Ces matières pourraient prendre feu.
Ŷ 1HUDQJH]SDVGHVPDWLqUHVLQIODPPDEOHVRXGHVDUWLFOHV
sensibles à la température à l’intérieur de l’électroménager.
Ŷ 1HWWR\H]IUpTXHPPHQWOHVKRWWHVGHYHQWLODWLRQ1HODLVVH]
pas la graisse s’accumuler sur la hotte ou le filtre.
Ŷ (Sur certains modèles)
Fonctionnement à distance
- Cet appareil est configurable pour permettre un
fonctionnement à distance à tout moment.
4 49-2003952 Rev. 0
SÉCURITÉ
LISEZ ET CONSERVEZ CES INSTRUCTIONS
CONSIGNES DE SÉCURITÉ IMPORTANTES
LISEZ TOUTES LES INSTRUCTIONS AVANT D'UTILISER L'APPAREIL
AVERTISSEMENT
EN CAS D'INCENDIE, PRENEZ LES MESURES SUIVANTES POUR
ÉVITER LES BLESSURES ET LA PROPAGATION DU FEU
Ŷ 1HYHUVH]SDVGHDXVXUXQIHXGHJUDLVVH1HSUHQH]
MDPDLVXQHFDVVHUROHHQIODPPHV0HWWH]OHVFRPPDQGHV
jODSRVLWLRQG¶DUUrW2))eWRXIIH]XQHFDVVHUROHHQ
flammes sur un brûleur de surface en la recouvrant
complètement avec un couvercle bien ajusté, une tôle à
ELVFXLWVRXXQSODWHDXSODW8WLOLVH]XQH[WLQFWHXUjPRXVVH
ou à poudre chimique multi-usages.
Ŷ 6LXQIHXVHGpFODUHGDQVOHIRXUSHQGDQWODFXLVVRQ
étouffez-le en fermant la porte du four et en éteignant le
IRXU2))RXHQXWLOLVDQWXQH[WLQFWHXUjSRXGUHVqFKHRX
à mousse.
Ŷ 6XUFHUWDLQVPRGqOHV6LXQIHXVHGpFODUHGDQVOHIRXU
pendant l’autonettoyage, éteignez le four et attendez
que le feu s’éteigne. Ne forcez pas l’ouverture de la
SRUWH/¶LQWURGXFWLRQG¶DLUIUDLVjGHVWHPSpUDWXUHV
d’autonettoyage peut provoquer un jaillissement de
IODPPHVGDQVOHIRXU/¶RPLVVLRQG¶REVHUYHUFHWWH
instruction peut occasionner des brûlures graves.
AVERTISSEMENT
CONSIGNES DE SÉCURITÉ DU FOUR
Ŷ 7HQH]YRXVjO¶pFDUWORUVTXHYRXVRXYUH]ODSRUWHGXIRXU
/DYDSHXURXO¶DLUFKDXGVTXLV¶pFKDSSHQWSHXYHQWEUOHU
les mains, la figure et/ou les yeux.
Ŷ 6LO¶pOpPHQWFKDXIIDQWGDQVO¶DSSDUHLOGpYHORSSHXQH
tache incandescente ou montre d’autres signes de
GRPPDJHVQ¶XWLOLVH]SDVFHWWH]RQHGHO¶DSSDUHLO8QH
tache incandescente indique que l'élément peut tomber en
panne et présenter un risque de brûlure, d'incendie ou de
GpFKDUJHpOHFWULTXHeWHLJQH]LPPpGLDWHPHQWODSSDUHLO
et faites remplacer l'élément chauffant par un technicien
qualifié.
Ŷ 1HEORTXH]SDVOHVpYHQWVGXIRXU
Ŷ 1HSODFH]MDPDLVGXVWHQVLOHVGHSLHUUHVjSL]]DRX
de cuisson, ou tout type de papier aluminium ou de
UHYrWHPHQWVXUOHSODQFKHUGXIRXU&HVDUWLFOHVSHXYHQW
emprisonner la chaleur ou fondre, endommageant le
produit et causant un risque de décharge électrique,
d'enfumage ou d'incendie.
Ŷ /HIRXUGRLWrWUHUHIURLGLDYDQWGHSODFHUOHVJULOOHVGXIRXU
DX[HPSODFHPHQWVGpVLUpV6LODJULOOHGRLWrWUHGpSODFpH
alors que le four est chaud, veillez à ne pas toucher les
surfaces chaudes et ne laissez pas la mitaine isolante
entrer en contact avec l’élément chauffant du four.
Ŷ 1HODLVVH]SDVGHVDUWLFOHVWHOVTXHGXSDSLHUGHV
ustensiles de cuisson ou des aliments dans le four lorsqu’il
Q¶HVWSDVXWLOLVp/HVDUWLFOHVUDQJpVGDQVOHIRXUSHXYHQW
s’enflammer.
Ŷ 1HODLVVH]SDVGHVDUWLFOHVVXUODWDEOHGHFXLVVRQSUqVGH
O¶pYHQWGXIRXU/HVDUWLFOHVSHXYHQWVXUFKDXIIHUHWSRVHU
un risque d’incendie ou de brûlure.
Ŷ 1HJULOOH]MDPDLVDYHFODSRUWHRXYHUWH
Ŷ *DUGH]OHIRXUH[HPSWG¶DFFXPXODWLRQGHJUDLVVH/D
graisse dans le four peut prendre feu.
Ŷ /RUVTXHYRXVXWLOLVH]GHVVDFVGHFXLVVRQRXGHU{WLVVHULH
dans le four, suivez les directives du fabricant.
Ŷ RISQUE DE DÉCHARGE ÉLECTRIQUE OU DE
BRÛLURE : $YDQWGHUHSODFHUO¶DPSRXOHGXIRXUFRXSH]
l’alimentation électrique du four au fusible principal ou
DXSDQQHDXGXGLVMRQFWHXU/¶RPLVVLRQGHSUHQGUHFHWWH
précaution peut occasionner une décharge électrique ou
une brûlure.
Ŷ
ATTENTION
RISQUE DE BRÛLURE :$WWHQGH]TXH
le couvercle de verre et l’ampoule soient refroidis avant de
OHVUHWLUHU7RXFKHUGXYHUUHFKDXGDYHFOHVPDLQVQXHVRX
un linge humide peut causer des brûlures.
Ŷ1XWLOLVH]DXFXQW\SHGHSDSLHUDOXPLQLXPRXGHUHYrWHPHQW
pour couvrir le fond du four ou n'importe où dans le four, sauf
WHOTXHGpFULWGDQVOHPDQXHOG¶XWLOLVDWLRQ/HVGRXEOXUHVGH
four peuvent emprisonner la chaleur ou fondre, endommageant
le produit et causant un risque de choc électrique, d'enfumage
ou d'incendie.
AVERTISSEMENT
CONSIGNES DE SÉCURITÉ DU FOUR AUTONETTOYANT
(Sur certains modèles)
/DIRQFWLRQG¶DXWRQHWWR\DJHpOqYHODWHPSpUDWXUHGXIRXUjGHVGHJUpVVXIILVDQWVSRXUEUOHUFRPSOqWHPHQWOHVVDOLVVXUHV
alimentaires dans le four. Suivez les instructions suivantes pour un fonctionnement sûr.
Ŷ 1HWRXFKH]SDVOHVVXUIDFHVGXIRXUSHQGDQWOHSURFHVVXV
d’autonettoyage. Gardez les enfants à l’écart du four
SHQGDQWO¶DXWRQHWWR\DJH/¶RPLVVLRQGREVHUYHUFHV
instructions peut occasionner des brûlures.
Ŷ $YDQWGXWLOLVHUOHF\FOHGDXWRQHWWR\DJHUHWLUH]OHV
casseroles, les grilles de four en métal brillant, tout papier
d'aluminium et tout autre ustensile du four. Seules les
JULOOHVGHIRXUUHYrWXHVGHSRUFHODLQHGHFRXOHXUIRQFpH
SHXYHQWrWUHODLVVpHVGDQVOHIRXU/HQRQUHVSHFWGH
cette consigne peut endommager ces articles et le four, et
présenter un risque de brûlure ou d'incendie.
49-2003952 Rev. 0 5
SÉCURITÉ
LISEZ ET CONSERVEZ CES INSTRUCTIONS
CONSIGNES DE SÉCURITÉ IMPORTANTES
LISEZ TOUTES LES INSTRUCTIONS AVANT D'UTILISER L'APPAREIL
AVERTISSEMENT
CONSIGNES DE SÉCURITÉ DU FOUR AUTONETTOYANT
(Sur certains modèles) (suite)
Ŷ $YDQWG¶XWLOLVHUOHF\FOHG¶DXWRQHWWR\DJHHVVX\H]OD
JUDLVVHHWOHVVDOLVVXUHVDOLPHQWDLUHVGDQVOHIRXU8QH
quantité excessive de graisse peut s’enflammer et causer
des dommages par la fumée.
Ŷ 6LOHPRGHG¶DXWRQHWWR\DJHQHIRQFWLRQQHSDVELHQ
éteignez le four et débranchez l’alimentation électrique.
Faites réparer l’appareil par un technicien qualifié.
Ŷ 1¶XWLOLVH]SDVGHQHWWR\DQWVSRXUOHIRXU$XFXQQHWWR\DQW
SRXUIRXUFRPPHUFLDORXUHYrWHPHQWGHSURWHFWLRQSRXU
IRXUGHTXHOTXHVRUWHTXHFHVRLWQHGRLWrWUHXWLOLVpGDQV
RXDXWRXUGXQHSDUWLHGXIRXUjPRLQVGrWUHFHUWLILpSRXU
une utilisation dans un four autonettoyant.
Ŷ 1HQHWWR\H]SDVOHVMRLQWVG¶pWDQFKpLWpGHSRUWH&HVMRLQWV
sont essentiels pour garantir l’étanchéité. Veillez à ne pas
frotter, endommager ou déplacer les joints.
Ŷ IMPORTANT: &HUWDLQVRLVHDX[VRQWH[WUrPHPHQW
sensibles aux vapeurs dégagées durant le cycle
G¶DXWRQHWWR\DJHGHQ¶LPSRUWHTXHOOHFXLVLQLqUH3ODFH]OHV
oiseaux dans une autre pièce, bien ventilée.
MISE AU REBUT ADÉQUATE DE VOTRE ÉLECTROMÉNAGER
Veuillez jeter ou recycler votre électroménager conformément aux règlements fédéraux ou locaux. Communiquez
avec les instances locales pour en savoir plus sur la mise au rebut ou le recyclage de votre électroménager.
Comment retirer le film protecteur d’expédition et le ruban adhésif d’emballage
Saisissez délicatement un coin du film protecteur d’expédition
avec vos doigts et le décoller lentement de la surface de
l’appareil. N’utilisez pas d’objets pointus pour retirer le film.
Retirez complètement le film avant d’utiliser l’appareil pour la
première fois.
3RXUDVVXUHUQHSDVHQGRPPDJHUODILQLWLRQGXSURGXLWOD
façon la plus sûre pour enlever le ruban adhésif de l’emballage
sur les nouveaux appareils consiste à appliquer un détergent à
vaisselle liquide à l’aide d’un chiffon doux et à laisser tremper.
REMARQUE : 7RXVOHVHPEDOODJHVGHSURWHFWLRQGRLYHQWrWUH
retirés de toutes les pièces. Cela sera impossible une fois
cuits.
Considérez les options de recyclage des matériaux
d’emballage de votre électroménager.
INFORMATION RÉGLEMENTAIRE
Déclaration de conformité FCC/IC :
&HWDSSDUHLOHVWFRQIRUPHjODSDUWLHGHVUqJOHVGHOD)&&/¶XWLOLVDWLRQGHFHWpTXLSHPHQWHVWDVVXMHWWLHDX[GHX[
conditions suivantes :
1. Cet appareil ne doit pas causer de brouillage préjudiciable; et
2. Cet appareil doit accepter tout brouillage qu’il reçoit, y compris celui pouvant entraîner un fonctionnement indésirable.
AVIS : 7RXWFKDQJHPHQWRXWRXWHPRGLILFDWLRQDSSRUWpjFHWWHXQLWpTXLQ¶DSDVpWpH[SUHVVpPHQWDSSURXYpSDUOHIDEULFDQW
pourrait annuler l’autorisation de l’utilisateur d’utiliser cet équipement.
AVERTISSEMENT
(Sur certains modèles) &HIRXUSHXWrWUHpTXLSpG¶XQPLFURSKRQHDILQGHSHUPHWWUHOHFRQWU{OH
YRFDOGHVIRQFWLRQVGHYRWUHIRXU/¶DFWLYDWLRQGXPLFURSKRQHOXLSHUPHWWUDG¶pFRXWHUHQWRXWWHPSVFHUWDLQVPRWVFOpVSRXU
DFWLYHUHWIDLUHIRQFWLRQQHUOHIRXU,OHVWSRVVLEOHTXHGHVEUXLWVGHIRQGRXGHVVRQVDPELDQWVLPLWHQWGHVPRWVRXGHVVRQV
que cet appareil reconnaît comme une commande, et l’appareil pourrait alors s’activer ou lancer une fonction ou un mode de
FXLVVRQPrPHVLO¶DSSDUHLOHVWODLVVpVDQVVXUYHLOODQFHHWTX¶DXFXQHDFWLYDWLRQGHODIRQFWLRQRXGXPRGHGHFXLVVRQQ¶pWDLW
souhaitée. Ne rangez jamais de matières inflammables ou d’articles sensibles à la chaleur à l’intérieur de l’appareil.
6 49-2003952 Rev. 0
Connectivité Wi-Fi (Sur certains modèles)
Votre appareil est conçu pour vous offrir une communication
bidirectionnelle entre votre appareil et des appareils
intelligents. De plus, cet appareil peut nécessiter une mise
à jour logicielle afin d’activer toutes les fonctions lors de
la configuration initiale. En utilisant l’application mobile
SmartHQ™, vous pourrez accéder à diverses fonctions (y
compris, sans s’y limiter, l’utilisation de votre appareil comme
KDXWSDUOHXULQWHOOLJHQWDYHF$PD]RQ$OH[DHWXWLOLVHUYRWUH
téléphone intelligent ou votre tablette*. Visitez votre boutique
d’applications et téléchargez Smart HQ ou utilisez le code QR
ci-dessous :
3RXUFRQQHFWHUYRWUHDSSDUHLODX:L)LVXLYH]OHVLQVWUXFWLRQV
DIILFKpHVVXUO¶pFUDQGHFRPPDQGHGHO¶DSSDUHLO3RXUXQH
expérience optimale, avant de commencer :
Ɣ7pOpFKDUJH]O¶DSSOLFDWLRQ6PDUW+4HWRXYUH]XQHVHVVLRQRX
créez un compte.
REMARQUE : /HVQRXYHDX[XWLOLVDWHXUVGRLYHQWYpULILHUOHXU
adresse courriel pour terminer le processus de connexion.
$\H]jSRUWpHGHPDLQOHPRWGHSDVVHGHYRWUHUpVHDX:L)L
GRPHVWLTXH6LXQLGHQWLILDQW0$&HVWUHTXLVSRXUFRQQHFWHU
YRWUHDSSDUHLODX:L)LFRQVXOWH]ODVHFWLRQ3DUDPqWUHVSRXU
plus de détails. Vous pouvez également consulter l’étiquette
d’information sur l’appareil connecté, généralement située
à l’intérieur de la porte du four ou du tiroir. Elle contiendra
pJDOHPHQWOHQRPGXUpVHDXGHO¶DSSDUHLO$SSOLDQFH1HWZRUN
Name) et le mot de passe, au besoin.
8QHIRLVYRWUHDSSDUHLOFRQQHFWpODQFH]O¶DSSOLFDWLRQ6PDUW+4
HWWRXFKH]YRWUHDSSDUHLOSRXUH[SORUHU$SSOLTXH]WRXWHVOHV
mises à jour logicielles si cela vous est demandé afin de vous
assurer que votre appareil dispose des fonctionnalités les plus
récentes.
NOTA : $VVXUH]YRXVGHJDUGHUODIRQFWLRQ:L)LDFWLYpHDILQ
de pouvoir contrôler votre appareil à partir de l’application
SmartHQ.
Si vous éprouvez des difficultés lors du processus de
connexion, veuillez composer le 800.220.6899 et demander de
l’aide pour la connectivité sans fil.
$SSDUHLOV$SSOHRX$QGURLGFRPSDWLEOHVHWUpVHDX:L)L
domestique requis.
Désactivation du Wi-Fi
Si vous avez un bouton Remote Enable (accès à distance
activé) ou Wi-Fi Connect (connexion Wi-Fi), appuyez sur le
bouton et maintenez-le enfoncé pendant 3 secondes pour
vous déconnecter complètement du Wi-Fi. Si vous n’avez
SDVGHERXWRQVXUYRVFRPPDQGHVDFFpGH]j3DUDPqWUHV
et sélectionnez « déconnecter » ou « oublier le réseau » pour
vous déconnecter complètement du Wi-Fi. NOTA : Vous devrez
reconnecter l’application SmartHQ à votre appareil si vous
souhaitez à nouveau contrôler votre appareil à partir de votre
téléphone. Notez que lorsque le Wi-Fi est désactivé, la carte
Wi-Fi du four ne diffuse pas de signal.
Fonctionnalités disponibles
Suivez toutes les instructions affichées dans l’application pour
assurer le bon fonctionnement de l’appareil lors de l’utilisation
des fonctionnalités connectées.
Contrôle du four à distance :
3RXUDFWLYHUOHFRQWU{OHGXIRXUYLD6PDUW+4ORUVTXHOH:L)L
est actif, assurez-vous que la fonction est activée en vérifiant
le paramètre remote enable (accès à distance) dans Settings
(paramètres).
Activation vocale :
Vous avez la possibilité de contrôler le fonctionnement de
votre four simplement avec votre voix. Consultez la section
Commande vocale pour plus de détails sur l’utilisation de cette
fonction.
REMARQUE : certaines fonctions et caractéristiques de
cuisson ne seront pas accessibles tant que vous n’aurez
pas connecté votre nouveau four au réseau sans fil (Wi-Fi)
de votre domicile. Veuillez suivre les instructions ci-dessus
pour effectuer la connexion. Cela vous permettra d’utiliser les
fonctions de l’application SmartHQ et d’assurer que le four
dispose de la version la plus récente du logiciel.
Contains FCC:
UPD ID:
PT. NO.
Contains IC:
MAC ID:
Connected Appliance Information
UTILISATION DU FOUR : Connectivité Wi-Fi

49-2003952 Rev. 0 7
Commande vocale
UTILISATION DU FOUR : Commande vocale
3RXUXWLOLVHUWRXWHFRPPDQGHYRFDOHDVVXUH]YRXVTXHYRWUHIRXUHVWFRQQHFWpDX:L)LFRQQHFWpjO¶DSSOLFDWLRQ6PDUW+4TXH
la fonction remote enable (contrôle à distance) du four est activée et que le panneau de commande du four est déverrouillé.
/HVLQVWUXFWLRQVSRXUFRQQHFWHUYRWUHIRXUVHWURXYHQWGDQVO¶DSSOLFDWLRQ6PDUW+4VXUYRWUHWpOpSKRQHRXVRXV6HWWLQJV
(paramètres) sur le panneau de commande du four.
Contrôle par haut-parleur intelligent /
Assistant vocal
Si votre four n’est pas doté d’un microphone, vous pouvez
WRXWGHPrPHXWLOLVHUYRWUHYRL[SRXUDOOXPHUOHIRXUUpJOHU
OHVPLQXWHULHVGXIRXURXpWHLQGUHOHIRXU$VVXUH]YRXVTXH
votre four est connecté au Wi-Fi, à l’application SmartHQ et
jXQKDXWSDUOHXULQWHOOLJHQW$PD]RQ$OH[D9HLOOH]jFHTXH
votre four et votre haut-parleur intelligent soient connectés
au Wi-Fi, que la fonction remote enable (contrôle à distance)
du four soit activée et que le panneau de commande du four
VRLWGpYHUURXLOOp$VVXUH]YRXVpJDOHPHQWTXHYRWUHKDXW
parleur intelligent se trouve à proximité du four afin qu’il puisse
entendre vos commandes.
Contrôle par microphone (sur certains
modèles)
Si votre four est équipé de microphones, le contrôle vocal offre
GHVIRQFWLRQQDOLWpVDPpOLRUpHVHWSHXWpJDOHPHQWrWUHXWLOLVp
avec certaines applications (sur le panneau de commande),
HQSOXVG¶DOOXPHURXG¶pWHLQGUHOHIRXU$VVXUH]YRXVTXHYRWUH
four est connecté au Wi-Fi, connecté à l’application SmartHQ,
que la fonction remote enable (contrôle à distance) du four
est activée et que le panneau de commande du four est
déverrouillé.
Votre appareil arrive avec le microphone en mode sourdine.
Vous devez réactiver le microphone pour le rendre disponible.
3RXUUpDFWLYHUOHPLFURSKRQHIDLWHVJOLVVHUOHYROHWGHV
paramètres rapides vers le bas et appuyez sur l’icône du
microphone
SRXUGpVDFWLYHUODVRXUGLQH8QHUHQRQFLDWLRQj
l’activation vocale sera requise lors de la première réactivation
du microphone. Si vous remettez le microphone en sourdine,
la renonciation ne sera pas requise lors de la prochaine
réactivation.
/RUVTXHOHIRXUHVWFRQQHFWpDX:L)LHWTXHOHPLFURSKRQHHVW
en mode sourdine, des indicateurs signalant que le microphone
est en sourdine et désactivé apparaîtront dans le volet des
paramètres rapides et dans la barre d’état.
3RXUXWLOLVHUO¶DFWLYDWLRQYRFDOHORUVTXHOHPLFURSKRQHQ¶HVW
pas en mode sourdine, dites les mots d’activation « Hey HQ
», faites une courte pause et attendez que l’écran d’activation
apparaisse. Ensuite, énoncez clairement votre commande.
Veuillez noter qu’une pause après avoir dit « Hey HQ » et
l’attente de l’apparition de l’écran d’activation aideront à
garantir que votre commande soit entendue complètement et
correctement.
Exemples courants de commandes vocales au microphone :
Commandes du four
Ɣ5pJOHUOHIRXUVXSpULHXUjDLUIU\IULWHXVHjDLUj
degrés.
Ɣ$OOXPHUOHIRXULQIpULHXU
ƔeWHLQGUHOHIRXUVXSpULHXU
Ɣ&XLUHSHQGDQWKHXUHGDQVOHIRXUVXSpULHXU
Minuteries
Ɣ5pJOHUXQHPLQXWHULHGHKHXUHHWPLQXWHVSRXUOHV
casserole
Liste d’achats
Ɣ$MRXWHUGHVEDQDQHVjPDOLVWHG¶DFKDWV
Ɣ5HWLUHUOHFDIpGHPDOLVWHG¶DFKDWV
REMARQUE :/DOLVWHG¶DFKDWVHVWGLVSRQLEOHGDQV
O¶DSSOLFDWLRQ6PDUW+4HWSHXWrWUHH[SRUWpHYHUVFHUWDLQHV
applications d’achats.
Commande vocale pour ouvrir la porte du
four (sur certains modèles)
Si votre four est équipé d’une porte à ouverture par pression, la
fonction de commande vocale pour ouvrir la porte vous permet
d’ouvrir la porte du four sans les mains! Veuillez vous assurer
que votre four est connecté au Wi-Fi, à l’application SmartHQ,
que la fonction remote enable (contrôle à distance) du four est
activée, que le panneau de commande du four est déverrouillé
HWTX¶XQKDXWSDUOHXULQWHOOLJHQW$PD]RQ$OH[DHVWDFWLIRXTXH
le microphone du four (sur certains modèles) est réactivé.
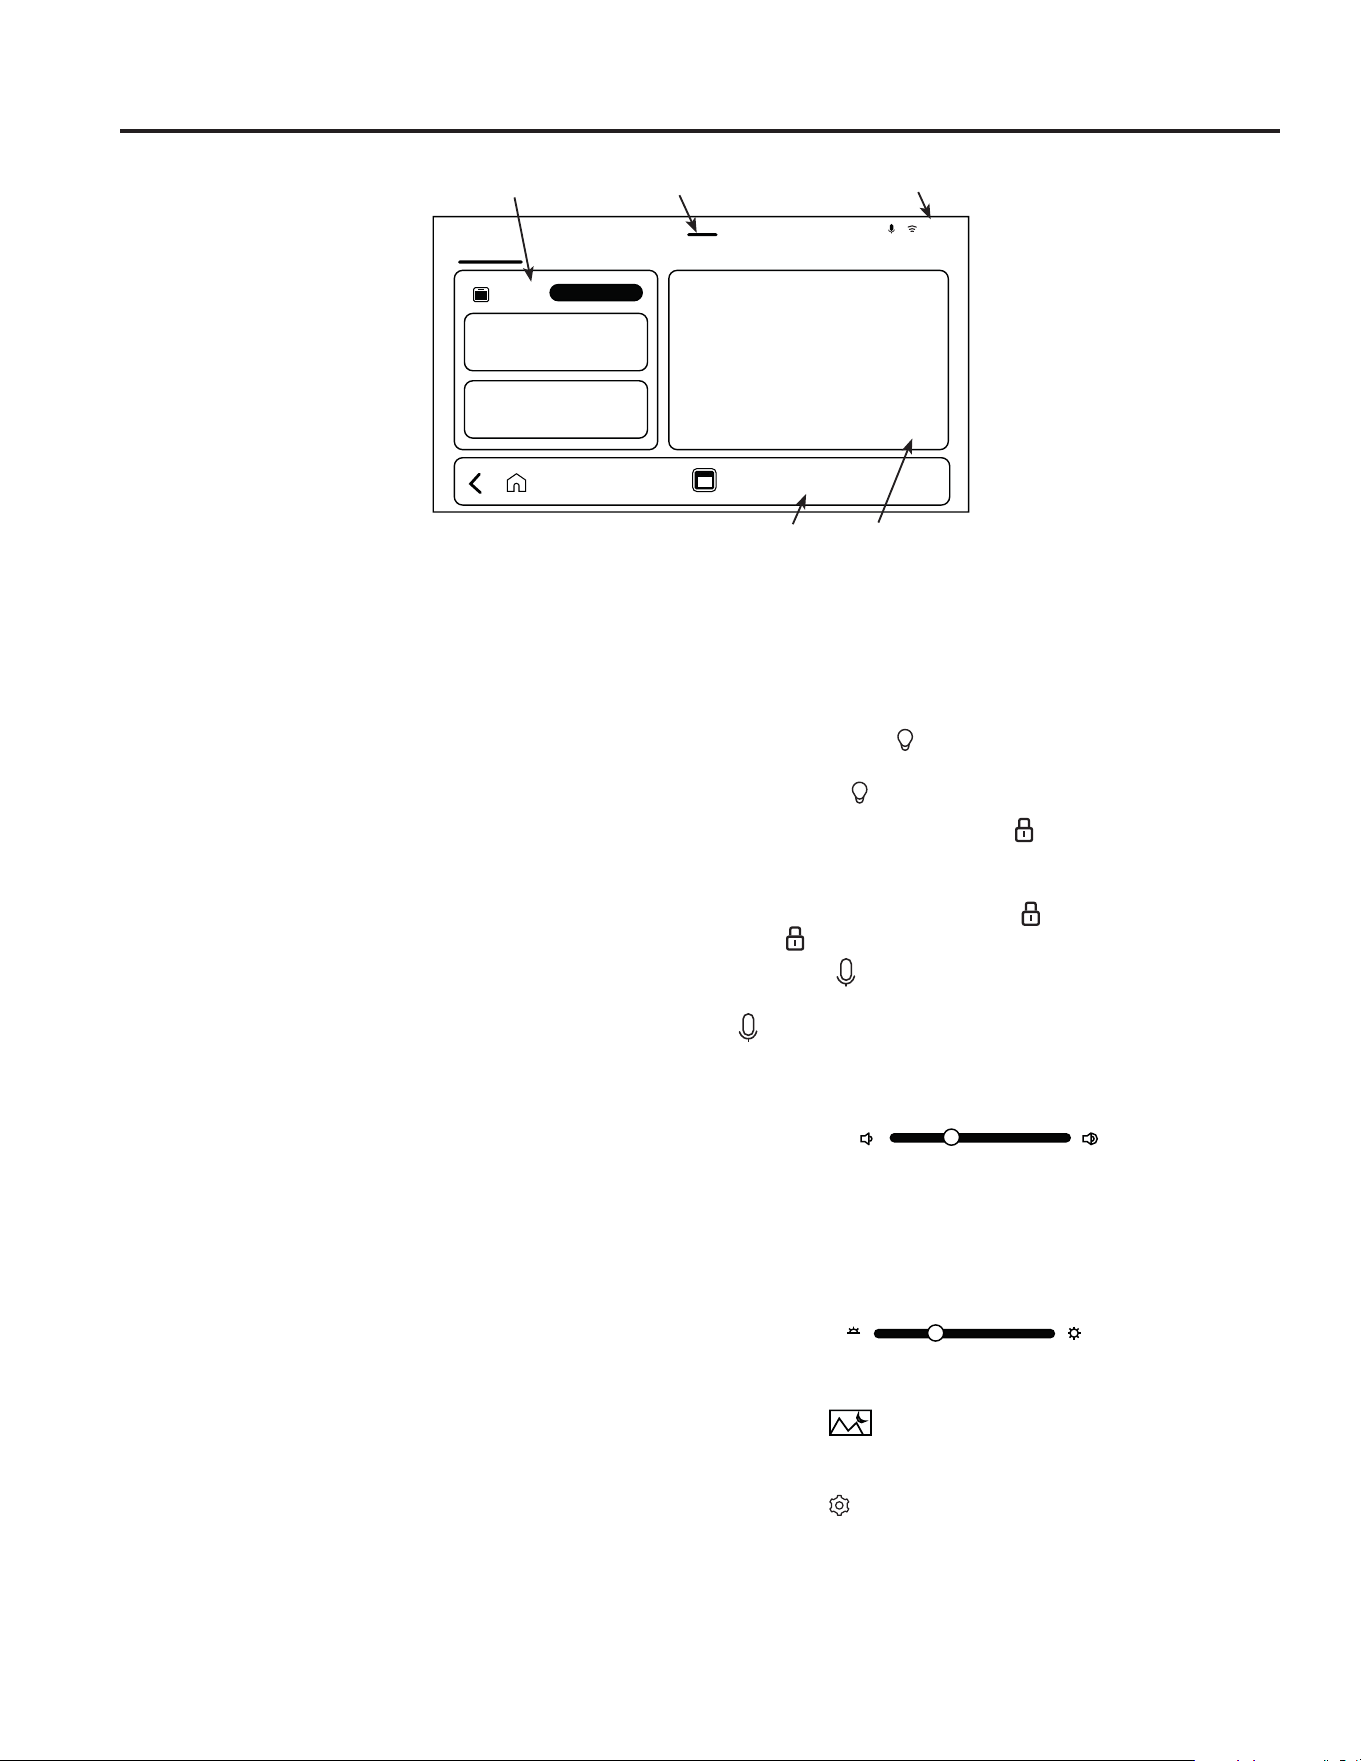
8 49-2003952 Rev. 0
Affichage de l’appareil
ÉCRAN D’ACCUEIL
1 - Commande du four
Située complètement à gauche de l’écran d’accueil de
O¶DIILFKDJHGXIRXU$VVXUH]YRXVGHIDLUHJOLVVHUFRPSOqWHPHQW
vers la gauche si elle n’apparaît pas lorsque l’affichage du four
s’active.
Four supérieur et four inférieur (sur les modèles de four
mural double)
/RUVTXHYRXVXWLOLVH]XQIRXUPXUDOGRXEOHYRXVSRXYH]
sélectionner différents modes de cuisson dans chaque four.
Sélectionnez d’abord le four à utiliser, puis sélectionnez le
mode de cuisson désiré.
REMARQUE : /RUVTXHYRXVXWLOLVH]XQIRXUVLPSOHLOQ¶\DXUD
pas de sélection de four.
Écran de sélection du mode de cuisson
Sélectionnez votre préférence de cuisson dans cette zone.
Vous pouvez choisir entre les modes de cuisson traditionnels
RXOHVPRGHVGHFXLVVRQGHSUpFLVLRQ9R\H]ODVHFWLRQ0RGHV
de cuisson pour plus de détails sur les différents modes de
cuisson traditionnelle et de cuisson de précision offerts.
$VVXUH]YRXVGHFRQQHFWHUYRWUHIRXUDILQGHSRXYRLU
télécharger de nouveaux modes de cuisson de précision dès
qu’ils sont disponibles.
2 - Volet des réglages rapides
Faites glisser ce menu vers le bas pour accéder à l’éclairage
du four, au verrouillage des commandes, au microphone
(sur certains modèles), aux haut-parleurs, à la luminosité de
O¶DIILFKDJHjODGLVSRVLWLRQGXPHQX$PELHQWDX[DOHUWHVHW
aux réglages.
Éclairage du four
3RXUDOOXPHURXpWHLQGUHOHVOXPLqUHVGHODFDYLWpGXIRXU
appuyez sur le
.
Verrouillage des commandes
Sélectionnez cette option pour verrouiller la commande du four
DILQG¶HPSrFKHUWRXWHVpOHFWLRQQRQGpVLUpHjO¶pFUDQ3RXU
verrouiller, appuyez sur le bouton
$SSX\H]HWPDLQWHQH]OH
bouton
enfoncé pour déverrouiller.
Microphone
(sur certains modèles)
3RXUUpDFWLYHURXFRXSHUOHVRQGXPLFURSKRQHDSSX\H]VXU
le
. Des indicateurs signalant que le microphone est coupé
et désactivé s’afficheront dans le panneau de réglages rapides
HWGDQVODEDUUHG¶pWDW/HPLFURSKRQHGRLWrWUHUpDFWLYpSRXU
utiliser l’assistant SmartHQ.
Haut-parleur
8WLOLVH]ODEDUUHGHGpILOHPHQWSRXUUpJOHUOHYROXPHDXQLYHDX
souhaité pour la lecture des vidéos et de la musique, lorsque
disponible.
Cela n’affecte pas le volume des alertes ni des tonalités
tactiles. Consultez la section Settings (paramètres) pour plus
d’information sur l’ajustement de ces volumes.
Luminosité
8WLOLVH]ODEDUUHGHGpILOHPHQWSRXUUpJOHUODOXPLQRVLWpGH
l’écran selon vos préférences.
Ambiance
$SSX\H]VXUOHERXWRQAmbient pour accéder directement à
O¶pFUDQ$PELHQW
Paramètres
$SSX\H]VXUOHERXWRQSettings pour accéder au menu
Settings (paramètres). Consultez la section Settings
(paramètres) pour la liste complète des options disponibles.
UTILISATION DU FOUR :$IILFKDJHGHO¶DSSDUHLO
My Oven
Oven
Meal Planning Stay Informed Tools
1:59 PM
1
2
3
45

49-2003952 Rev. 0 9
Affichage de l’appareil
UTILISATION DU FOUR :$IILFKDJHGHO¶DSSDUHLO
ÉCRAN D’ACCUEIL(suite)
3 - Barre d’état
Dans le coin supérieur droit, affiche les alertes actives, l’état
du microphone (sur certains modèles), l’état du Wi-Fi et
O¶KHXUH8WLOLVH]FHWWHEDUUHFRPPHUpIpUHQFHUDSLGHORUVGH
l’utilisation du four.
4 - Barre de navigation
Flèche de retour
Vous ramène à l’écran précédent jusqu’à ce que vous
atteigniez l’écran d’accueil.
Bouton Accueil
Vous amène directement à l’écran d’accueil où la section
2YHQ&RQWUROFRPPDQGHGXIRXUHVWYLVLEOH
Bouton Oven / boutons Oven
Vous amène à l’écran du four affichant ce qui est en cours
si le four est utilisé. Si le four sélectionné n’est pas en cours
d’utilisation, vous serez dirigé vers l’écran de sélection du
mode pour le four choisi.
Barre d’activité
Situé au bas de l’affichage de l’appareil, cette barre indique
que le four est actuellement allumé. Elle ne s’affiche pas
lorsque le four est éteint. Cette fonction s’affiche uniquement
lorsque le four est allumé.
5 - Applications
Connectez votre four pour profiter de toutes les fonctionnalités
des applications sur votre panneau de commande. Certaines
DSSOLFDWLRQVQHSHXYHQWrWUHXWLOLVpHVTXHVLYRWUHIRXUHVW
FRQQHFWpDX:L)L3DUPLOHVDSSOLFDWLRQVRIIHUWHVRQUHWURXYH
la météo et le minuteur de cuisine.
Faites glisser vers la droite pour accéder à d’autres
applications ainsi qu’à l’assistant SmartHQ (sur les modèles
GRWpVG¶XQPLFURSKRQHVHXOHPHQWHWjO¶LQIRUPDWLRQ2YHQ
7LSVFRQVHLOVSRXUOHIRXU
Minuteries
/¶DSSOLFDWLRQGHPLQXWHULHIRQFWLRQQHFRPPHXQPLQXWHXU
à rebours. Vous pouvez régler une nouvelle minuterie ou
sélectionner une minuterie existante.
Sélectionnez « Add a Timer » (Ajouter une minuterie)
ou « Timer » (Minuterie), réglez la durée de la minuterie
en heures:minutes:secondes, nommez la minuterie si vous
VRXKDLWH]ODUpXWLOLVHUSXLVGpPDUUH]ODPLQXWHULH8QHIRLVOD
minuterie démarrée, il n’est plus possible de modifier son nom.
3OXVLHXUVPLQXWHULHVSHXYHQWrWUHUpJOpHVHWUpXWLOLVpHV
indépendamment ou simultanément.
6LSOXVGHGHX[PLQXWHULHVVRQWUpJOpHVHQPrPHWHPSVOHV
deux minuteries les plus récemment programmées s’afficheront
GDQVODVHFWLRQ©$SSVª$SSOLFDWLRQV
3RXUDIILFKHUWRXWHVOHVPLQXWHULHVDFWLYHVHWWRXWHVOHV
minuteries précédemment réglées, sélectionnez l’application de
minuterie pour accéder à la liste et faites glisser pour voir les
minuteries actives, réutiliser une minuterie ou supprimer une
minuterie.
/¶DIILFKDJHGHO¶DSSDUHLOYRXVDYLVHUDORUVTXHODPLQXWHULHVHUD
terminée.

10 49-2003952 Rev. 0
Set Clock (réglage de l'horloge)
Cette fonction (pas disponible lorsque non connecté) sert à
régler l'horloge et à spécifier la façon dont sera affichée l'heure
GXMRXU9RXVSRXYH]VpOHFWLRQQHUOHPRGHKHXUHVDYHF$0
HW30RXOHPRGHKHXUHV
Sons et alertes
Cet écran de réglages vous permet de modifier le volume,
l’alerte de fin de cycle et d’activer ou désactiver le son tactile.
Affichage et apparence
Cet écran affiche les options de luminosité et Energy saver
(économie d’énergie).
Paramètres de l’appareil
Ŷ UNITÉS DE TEMPÉRATURE : /HIRXUHVWUpJOpSRXU
afficher les degrés Fahrenheit, mais dans ce réglage, vous
pouvez le changer aux degrés Celsius.
Ŷ AJUSTER LA TEMPÉRATURE DU FOUR: /DIRQFWLRQ
$GMXVW2YHQ7HPSHUDWXUHSHUPHWG¶DMXVWHUODWHPSpUDWXUH
du four jusqu’à 35 °F (19,4 °C) plus chaude ou 35 °F
&SOXVIURLGH8WLOLVH]FHWWHIRQFWLRQVLYRXVFUR\H]
que la température de votre four est trop chaude ou trop
IURLGHHWVRXKDLWH]ODPRGLILHU3RXUOHVIRXUVGRXEOHVOHV
températures des fours supérieur et inférieur s’ajustent
VpSDUpPHQW1(3$6XWLOLVHUGHWKHUPRPqWUHVFRPPH
ceux vendus en épicerie, pour vérifier le réglage de la
température de votre four. Ces thermomètres peuvent varier
de 20 à 40 degrés.
Ŷ CONVERSION AUTOMATIQUE DE RECETTE: /RSWLRQ
$XWR5HFLSH&RQYHUVLRQFRQYHUVLRQDXWRPDWLTXHGH
UHFHWWHSHXWrWUHDFWLYpHSRXUDXWRPDWLTXHPHQWUpGXLUHOD
température de cuisson programmée pour la cuisson
à convection ou la cuisson à convection multiple. Veuillez
noter que cela ne réduit que la température de cuisson, pas
la durée de la cuisson.
Ŷ ARRÊT AUTOMATIQUE APRÈS 12 HEURES : /RUVTXH
ORSWLRQ+RXU6KXW2IIDUUrWDSUqVKHXUHVHVW
activée, le four s'éteindra automatiquement après 12 heures
d'utilisation continue.
Ŷ ARRÊT AUTOMATIQUE DE LA LUMIÈRE DU FOUR :
$FWLYH]FHWWHIRQFWLRQSRXUTXHODOXPLqUHGXIRXUV¶pWHLJQH
DXWRPDWLTXHPHQWDSUqVODFXLVVRQHWO¶DUUrWGXIRXU
SmartHQ Account
3HUPHWGHYRXVFRQQHFWHUjYRWUHFRPSWH6PDUW+4VXUYRWUH
four. Cette fonction facilite également la connexion de votre
four à votre compte SmartHQ.
Wi-Fi
3HUPHWGHYRXVFRQQHFWHUjYRWUHUpVHDX:L)LRXGH
l’oublier.
Remote Enable (activation à distance)
$FWLYH]FHWWHIRQFWLRQSRXUFRQWU{OHUYRWUHIRXUjGLVWDQFH
via l’application, le microphone ou des commandes
vocales, une fois votre four connecté.
Ambient Mode (mode ambiant)
3HUPHWGHFRQILJXUHUO¶pFUDQDPELDQW
Voice & Microphone (voix et
microphone) (sur certains modèles)
/HIRXUGRLWrWUHFRQQHFWpDX:L)LHWOHPLFURSKRQHGRLW
rWUHDFWLYpSRXUXWLOLVHUO¶DVVLVWDQW6PDUW+4
Système
Cet écran vous permet d’effacer vos données utilisateur
enregistrées et affiche la versions actuelle du logiciel
DLQVLTXHOH0$&,'LGHQWLILDQW0$&
Settings (Paramètres)
UTILISATION DU FOUR :6HWWLQJV3DUDPqWUHV

49-2003952 Rev. 0 11
UTILISATION DU FOUR : Sabbat / Caméra de la porte du four
Caméra de la porte du four (Sur certains modèles)
/DFDPpUDGHODSRUWHGXIRXUSHUPHWG¶REVHUYHUjGLVWDQFHOHFHQWUHGHODFDYLWpGXIRXUYLDO¶DSSOLFDWLRQ6PDUW+49R\H]ODVHFWLRQ
Connectivité. Depuis la page d’accueil de l’application, sélectionnez votre four, puis tapez l’icône de caméra pour démarrer le filmage
HQFRQWLQXGHYRWUHpOHFWURPpQDJHULQWHOOLJHQW/HVODPSHVGXIRXUV¶DOOXPHQWORUVTXHODFDPpUDILOPH/HILOPDJHV¶DUUrWHVLODSRUWH
du four s’ouvre et il n’est pas disponible lors de certains modes tels l’autonettoyage (Self Clean). Désactivez le filmage de la caméra
dans l’application pour retrouver l’éclairage normal du four.
/HVVDOHWpVVXUODYLWUHGHODSRUWHGXIRXUHWOHFRXYHUFOHGHO¶pFODLUDJHGHODFDYLWpSHXYHQWQXLUHjODFODUWpGHO¶LPDJHGHODFDPpUD
GXIRXU&RQVXOWH]ODVHFWLRQ(QWUHWLHQHWQHWWR\DJHSRXUOHVLQVWUXFWLRQVGHQHWWR\DJHGHODYLWUHGHODSRUWH3RXUGHPHLOOHXUV
résultats, nettoyez la vitre de la porte immédiatement après un dégât, une fois que le four a refroidi.
3RXUOHVPRGqOHVjGRXEOHIRXUGRWpVG¶XQHFDPpUDGHSRUWHGHIRXUODFDPpUDGXIRXUVHWURXYHXQLTXHPHQWVXUOHIRXUVXSpULHXU
Settings (Paramètres)
Sabbat
9RWUHFXLVLQLqUHRIIUHXQPRGHVDEEDWLTXHFRQIRUPHDX[QRUPHVpWDEOLHVSDU2UWKRGR[8QLRQOH&HQWUDO5DEELQLFDO&RQJUHVVHW
+DODFKD7HFKHWHVWFHUWLILpHjVHORQOHVSOXVKDXWVVWDQGDUGVKDODFKLTXHV'DQVFHPRGHOHVOXPLqUHVGXIRXUVHURQWpWHLQWHV
pendant toute la durée d’utilisation et les signaux sonores du four seront désactivés.
REMARQUE : $VVXUH]YRXVTXHO¶KRUORJHGXIRXUHVWH[DFWHDYDQWG¶DFWLYHUOHPRGH3RXUXQIRQFWLRQQHPHQWFRQIRUPHDX
VDEEDWOHPRGHGRLWrWUHODQFpGDQVODIHQrWUHG¶XQHKHXUHSUpFpGDQWOHFRXFKHUGXVROHLO
Utilisation du mode sabbatique
$FFpGH]DXPHQXSettings (paramètres) et sélectionnez
Sabbath (sabbatique).
6pOHFWLRQQH]ODFRPELQDLVRQVRXKDLWpHGH6DEEDWK0RGH
PRGHVDEEDWLTXHRX+ROLGD\0RGHPRGHIrWHSDUPL
les options proposées et appuyez sur Start (démarrer).
/¶DIILFKDJHLQGLTXHUDTXHOPRGHVDEEDWLTXHRXIrWHHVWHQ
cours d’utilisation.
/HVRSWLRQVFRPSUHQDQW+ROLGD\IrWHHW6DEEDWKVDEEDWLTXH
passeront automatiquement d’une fonction à l’autre selon
O¶KHXUHLQLWLDOHHQWUpHGDQVODIHQrWUHG¶XQHKHXUHDYDQWOH
coucher du soleil.
3RXUOHVRSWLRQVGHPDLQWLHQDXFKDXG6DEEDWKLQIpULHXUHV
à 24 heures, l’appareil terminera la fonction Sabbath Warm
(réchauffement sabbatique) puis passera en mode Sabbath
,GOHYHLOOHVDEEDWLTXHSRXUOHUHVWHGHODSpULRGHGH
KHXUHV/HVOXPLqUHVGXIRXUUHVWHURQWpWHLQWHVOHVVLJQDX[
sonores du four resteront désactivés, le chauffage du four sera
désactivé et l’affichage indiquera que le four est en veille.
Panne de courant en mode sabbatique
Si une panne de courant survient pendant l’utilisation des
modes Sabbath Warm (réchauffement sabbatique) ou Holiday
IrWHO¶DSSDUHLOUHYLHQGUDj6DEEDWK:DUPUpFKDXIIHPHQW
sabbatique) pour le reste de l’horaire choisi. Si la panne
VXUYLHQWSHQGDQW6DEEDWK,GOHYHLOOHVDEEDWLTXHO¶DSSDUHLO
UHYLHQGUDj6DEEDWK,GOHYHLOOHVDEEDWLTXHSRXUOHUHVWHGH
l’horaire choisi.
Température de maintien au chaud en mode
sabbat
8WLOLVH]O¶RSWLRQ6HWWLQJV6DEEDWK:DUPHUUpFKDXIIHXU
sabbatique) pour augmenter la température de Sabbath
Warm (réchauffement sabbatique) si le four fonctionne à
une température inférieure à celle désirée ou si votre four
IRQFWLRQQHjYROWV$FFpGH]jAppliance Settings
(Réglages), sélectionnez Sabbath Warm Temperature
(Température de maintien au chaud en mode sabbat).
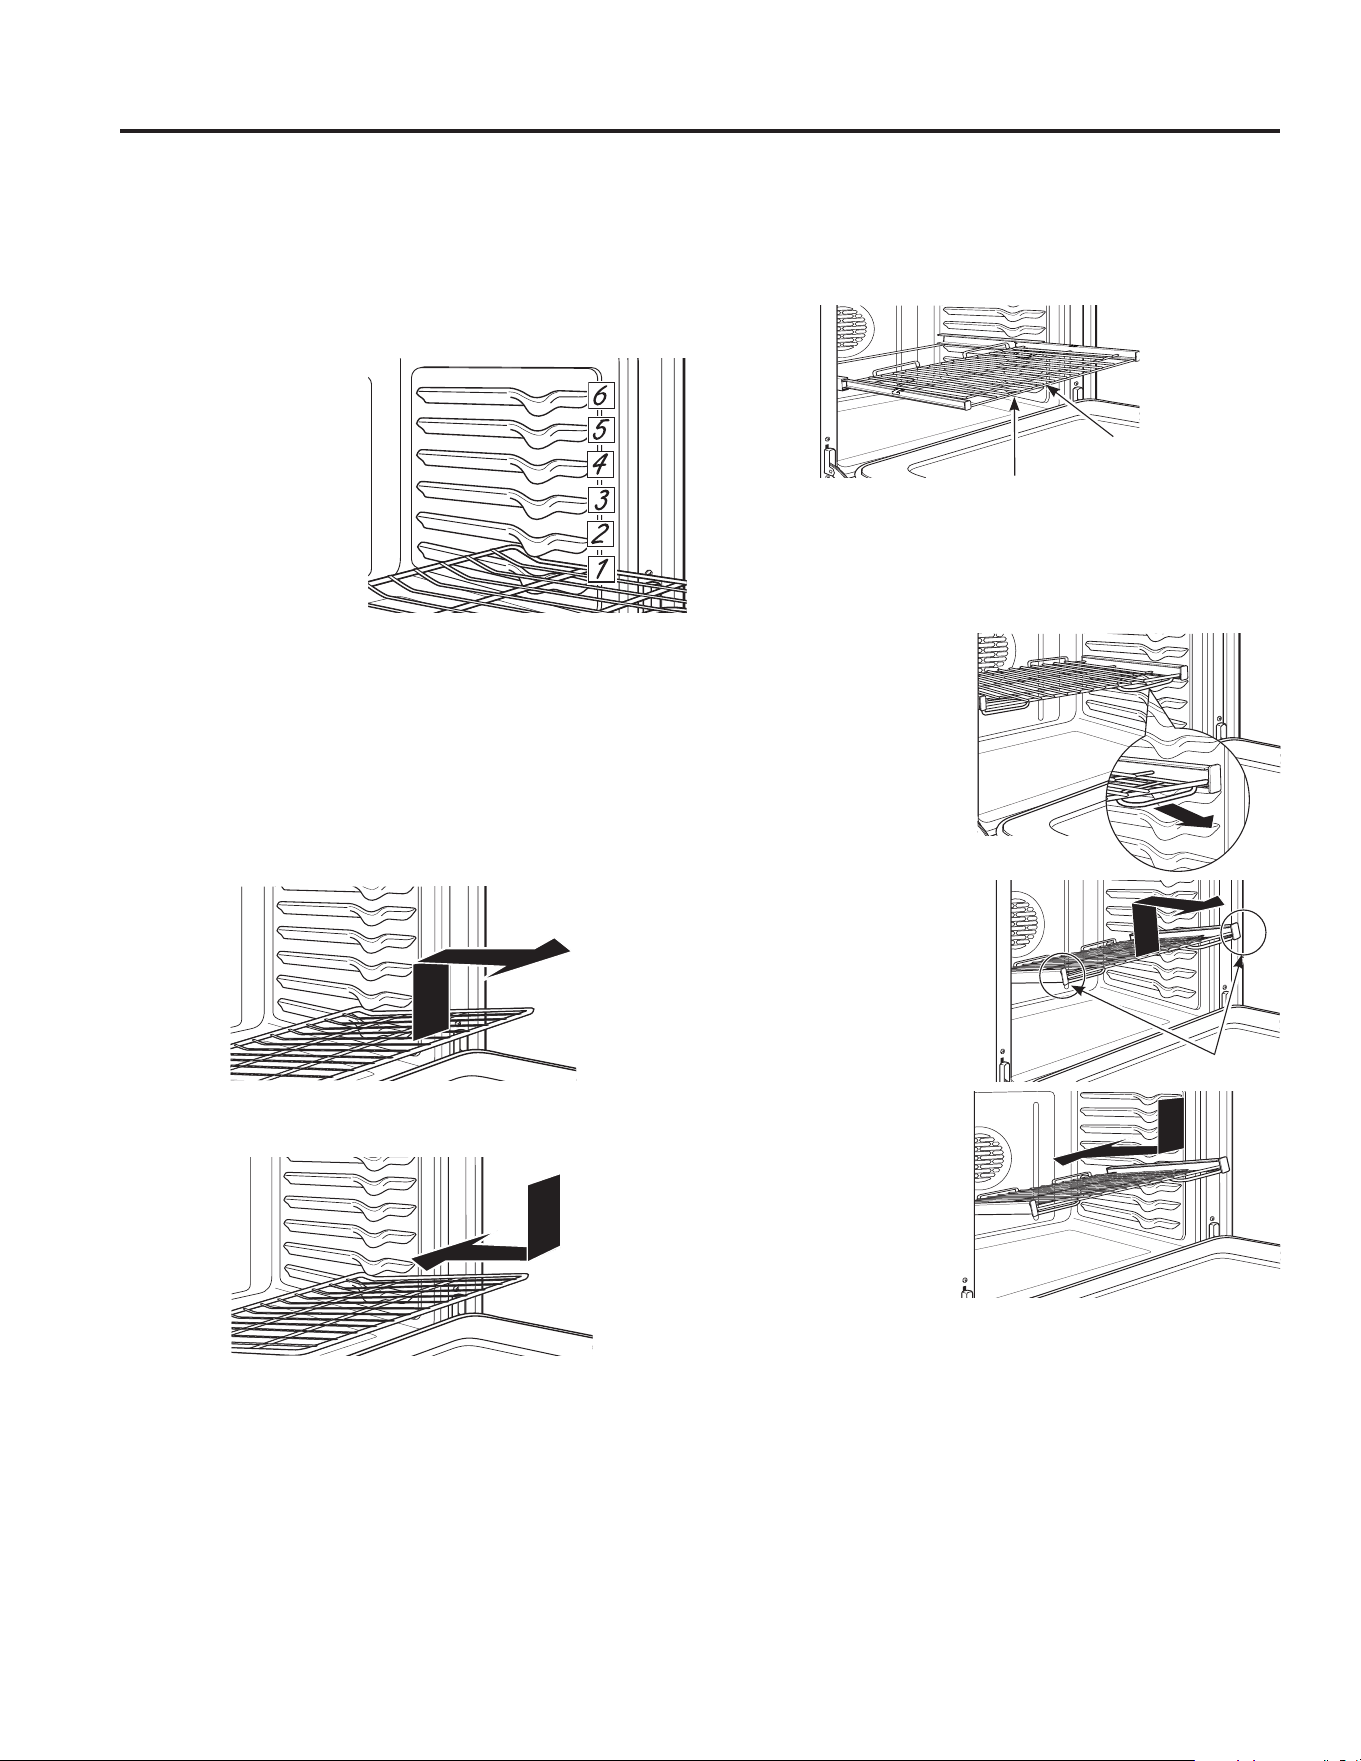
12 49-2003952 Rev. 0
9RWUHIRXUSRVVqGHVL[SRVLWLRQVGHJULOOH/H*XLGHGHFXLVVRQ
contient des recommandations quant à la position des grilles à
XWLOLVHUHQIRQFWLRQGHVW\SHVGDOLPHQWVjFXLUH/HUpJODJHGH
la position de la grille est une façon d'optimiser le rendement
GHODFXLVVRQ3DUH[HPSOHVLYRXVSUpIpUH]TXHYRVJkWHDX[
vos muffins ou vos biscuits soient très brunis, placez la grille à
un cran supérieur. Si vos aliments brunissent trop, placez votre
grille à un cran inférieur la prochaine fois.
/RUVGHODFXLVVRQDYHFGH
nombreuses casseroles
et de nombreuses grilles,
assurez-vous que l'espace
entre les casseroles est
suffisant pour favoriser une
bonne
circulation d'air.
9RWUHIRXUSHXWrWUHPXQL
de grilles coulissantes
et/ou de grilles plates
traditionnelles.
3RXUpYLWHUOHVEUOXUHVSODFH]ODRXOHVJULOOHVj
l'emplacement désiré avant d'allumer le four.
Grilles plates
/RUVTXHYRXVPHWWH]GHVXVWHQVLOHVGHFXLVVRQGDQVOHIRXURX
OHVHQUHWLUH]WLUH]OHVJULOOHVMXVTXjODEXWpHGDUUrWGXVXSSRUW
de grille.
3RXUUHWLUHUXQHJULOOHWLUH]ODYHUVYRXVVRXOHYH]HQODYDQW
et sortez-la.
3RXUUHPHWWUHXQHJULOOHHQSODFHSODFH]VRQF{WpUHFRXUEp
FUDQVGDUUrWVXUOHVXSSRUWVRXOHYH]HQODYDQWHWSRXVVH]OD
à l'intérieur.
/HVJULOOHVSHXYHQWrWUHGLIILFLOHVjIDLUHJOLVVHUSDUWLFXOLqUHPHQW
DSUqVXQDXWRQHWWR\DJH$SSOLTXH]GHOKXLOHYpJpWDOHVXUXQ
chiffon doux ou un essuie-tout, puis enduisez d'huile les côtés
droit et gauche de la grille.
Grilles coulissantes (Sur certains modèles)
/RUVTXHYRXVPHWWH]GHVXVWHQVLOHVGHFXLVVRQGDQVOHIRXU
ou les en retirez, tirez toujours la grille à la position d'extension
PD[LPDOHHQXWLOLVDQWODEDUUHVXSpULHXUHDYDQW/HVJULOOHV
FRXOLVVDQWHVQHSHXYHQWrWUHXWLOLVpHVjODSRVLWLRQGH
grille supérieure.
Si les grilles extensibles sont difficiles à étendre, lubrifiez-
les conformément à la section Entretien et nettoyage de ce
manuel.
Pour retirer une grille coulissante :
$VVXUH]YRXVTXHOD
grille est complètement
enfoncée dans le four,
de façon à ce que les
leviers latéraux du cadre
de la grille puissent se
désenclencher du support
du four.
7LUH]ODJULOOHMXVTXjOD
EXWpHGDUUrWGXVXSSRUW
de grille.
7HQH]IHUPHPHQWOHVGHX[
côtés du cadre de la grille
et la grille coulissante,
soulevez son extrémité
avant et sortez-la du four.
Pour remettre en place
une grille coulissante :
7HQH]IHUPHPHQWOHV
deux côtés du cadre
de la grille et la grille
coulissante.
3ODFH]OH[WUpPLWp
arrondie de la grille
FUDQVGDUUrWVXU
les supports du four,
soulevez son extrémité
avant et poussez la
grille aussi loin que
possible.
Si les grilles extensibles sont difficiles à replacer ou à retirer,
appliquez de l’huile végétale sur un chiffon doux ou un essuie-
tout et essuyez les supports de grille du four. N'enduisez pas
d'huile les glissières de la grille.
Grilles de four
Rail avant
supérieur
Extension complète
7HQH]LFL
UTILISATION DU FOUR : Grilles de four
REMARQUE : /¶XWLOLVDWLRQG¶DXWUHVKXLOHVGHFXLVVRQFRPPHO¶KXLOHG¶DUDFKLGH3DP
®
ou d’autres aérosols lubrifiants, peut
entraîner une décoloration ou la formation d’un résidu de couleur semblable à de la rouille sur les grilles et les parois de la cavité.
3RXUQHWWR\HUFHUpVLGXXWLOLVH]GXVDYRQHWGHOHDXRXXQHVROXWLRQGHYLQDLJUHHWGHDX5LQFH]jOHDXFODLUHHWDVVpFKH]DYHF
un chiffon doux et propre.

49-2003952 Rev. 0 13
UTILISATION DU FOUR :3DSLHUGDOXPLQLXP'LUHFWLYHVUHODWLYHVDX[XVWHQVLOHVGHFXLVVRQ
Papier d'aluminium et protections pour four
Directives relatives aux ustensiles de cuisson
ATTENTION
Ne recouvrez pas la sole du four de papier d'aluminium ni de protection pour four d'aucune sorte.
Ils sont susceptibles de retenir la chaleur ou de fondre, ce qui pourrait endommager le produit ou provoquer un choc
électrique, de la fumée ou un incendie. Les dommages résultant d'une utilisation inappropriée de ces articles ne sont pas
couverts par la garantie du produit.
2QSHXWXWLOLVHUGXSDSLHUGDOXPLQLXPSRXUUHFXHLOOLUOHVpFODERXVVXUHVHQSRVDQWXQHIHXLOOHVXUXQHJULOOHLQIpULHXUHTXHOTXHV
centimètres sous les aliments. N'utilisez pas plus de papier qu'il n'en faut et ne couvrez jamais entièrement une grille de four
DYHFGXSDSLHUGDOXPLQLXP3ODFH]OHSDSLHUGDOXPLQLXPjDXPRLQVSRFPGHVSDURLVGXIRXUDILQGpYLWHUXQH
mauvaise circulation de la chaleur.
/HPDWpULHOOHILQLHWODWDLOOHGHOXVWHQVLOHGHFXLVVRQRQW
une incidence sur le rendement de la cuisson.
/HVFDVVHUROHVIRQFpHVUHFRXYHUWHVGXQHQGXLWHWPDWHV
absorbent plus de chaleur que les casseroles minces et
EULOODQWHV/HVFDVVHUROHVTXLDEVRUEHQWSOXVIDFLOHPHQWOD
chaleur produisent des croûtes brunes, croustillantes et plus
épaisses. Si vous utilisez des ustensiles de cuisson foncés
et recouverts d'un enduit, vérifiez la cuisson avant le temps
prescrit dans la recette. Si vous obtenez de mauvais résultats
avec ce type d'ustensile de cuisson, réduisez la température
du four de 25 °F (14 °C) la prochaine fois.
/HVFDVVHUROHVOXVWUpHVSHUPHWWHQWGHFXLUHXQLIRUPpPHQW
les aliments, comme les gâteaux et les biscuits.
/HVFDVVHUROHVHQYHUUHRXHQFpUDPLTXHVHUpFKDXIIHQW
lentement, mais conservent la chaleur plus longtemps.
Ces types d'ustensiles de cuisson conviennent parfaitement
aux tartes et croustades.
/HVXVWHQVLOHVGHFXLVVRQLVROpVVHUpFKDXIIHQWOHQWHPHQW
et peuvent réduire le brunissement des aliments.
Gardez les ustensiles de cuisson propre pour favoriser
une cuisson uniforme.
/HVXVWHQVLOHVGHFXLVVRQXWLOLVpVDYHFOHVPRGHVGHJULOHWGH
IULWXUHjFRQYHFWLRQGRLYHQWrWUHDSSURXYpVjFHWHIIHW

14 49-2003952 Rev. 0
Modes de cuisson
Votre nouveau four offre une variété de modes de cuisson pour vous aider à obtenir les meilleurs résultats. Ces modes sont décrits
ci-dessous. Reportez-vous à la section « Guide de cuisson » pour obtenir des recommandations spécifiques à chaque type d’aliments,
et consultez le menu des options de cuisson sur l’affichage de l’appareil pour des conseils de cuisson et d’autres recommandations lors
du réglage d’un mode de cuisson. N’oubliez pas que votre nouveau four peut fonctionner différemment de celui qu’il remplace.
Modes de cuisson et de rôtissage
Sélectionnez un mode de cuisson et de rôtissage selon le type et la
TXDQWLWpG¶DOLPHQWVTXHYRXVSUpSDUH]/RUVTXHYRXVSUpSDUH]GHV
produits de boulangerie tels que gâteaux, biscuits , et pâtisseries
préchauffez toujours le four d’abord. Suivez les recommandations
de la recette pour la position des aliments. En l’absence de
recommandations, centrez les aliments dans le centre du four.
Bake (cuisson)
/HPRGHGHFXLVVRQWUDGLWLRQQHOOHHVWGHVWLQpjODFXLVVRQVXU
une seule grille. Ce mode de cuisson utilise essentiellement
la chaleur produite par l'élément inférieur, mais également
celle générée par l'élément supérieur, pour cuire les aliments.
3RXUXWLOLVHUFHPRGHSUHVVH]Bake, entrez une température,
puis pressez Start/HSUpFKDXIIDJHHVWJpQpUDOHPHQW
recommandé lors de l'utilisation de ce mode.
Cuisson par convection (sur certains
modèles/four)
/HPRGHGHFXLVVRQSDUFRQYHFWLRQHVWFRQoXSRXUXQHFXLVVRQ
sur un seule grille. Ce mode utilise la chaleur de l’élément
inférieur ainsi que des éléments supérieur et arrière, en plus du
mouvement d’air pour améliorer l’uniformité. Votre four est équipé
GHODIRQFWLRQGHFRQYHUVLRQGHUHFHWWHDXWRPDWLTXH$XWR5HFLSH
Conversion) de sorte qu’il n’est pas nécessaire de convertir
ODWHPSpUDWXUHORUVTXHYRXVXWLOLVH]FHPRGH3RXUXWLOLVHUFH
PRGHDSSX\H]VXU&RQYHFWLRQ%DNHFXLVVRQSDUFRQYHFWLRQ
entrez une température, puis pressez Start/HSUpFKDXIIDJHHVW
généralement recommandé quand on utilise ce mode.
Cuisson par convection sur plusieurs grilles
(sur certains modèles/four)
/HPRGHGHFXLVVRQSDUFRQYHFWLRQVXUSOXVLHXUVJULOOHV
&RQYHFWLRQ%DNH0XOWL5DFNHVWGHVWLQpjXQHFXLVVRQ
simultanée sur plusieurs grilles. Ce mode utilise surtout la
chaleur de l’élément arrière mais aussi celle des éléments
VXSpULHXUHWLQIpULHXUGHPrPHTX¶XQPRXYHPHQWG¶DLUGX
ventilateur de convection afin d’améliorer l’uniformité de la
cuisson. Votre four est équipé de la fonction de conversion de
UHFHWWHDXWRPDWLTXH$XWR5HFLSH&RQYHUVLRQGHVRUWHTX¶LOQ¶HVW
pas nécessaire de convertir la température lorsque vous utilisez
FHPRGH/¶XWLOLVDWLRQGHSOXVLHXUVJULOOHVSOXW{WTX¶XQHVHXOHSHXW
OpJqUHPHQWSURORQJHUOHWHPSVGHFXLVVRQ3RXUXWLOLVHUFHPRGH
pressez Convection Bake Multi Rack (cuisson par convection
sur plusieurs grilles), entrez une température, puis pressez
Start3UpFKDXIIH]WRXMRXUVOHIRXUORUVTXHYRXVXWLOLVH]FHPRGH
Rôtissage par convection (sur certains
modèles/four)
/HPRGH&RQYHFWLRQ5RDVWU{WLVVDJHSDUFRQYHFWLRQHVWFRQoX
pour rôtir des viandes et des légumes sur une seule grille.
Ce mode utilise la chaleur des éléments inférieur, supérieur
et arrière, ainsi que le mouvement de l’air, afin d’améliorer
OH EUXQLVVDJH HW GH UpGXLUH OH WHPSV GH FXLVVRQ ,O Q¶HVW SDV
nécessaire de convertir la température. Vérifiez les aliments
SOXVW{WTXHFHTXHODUHFHWWHVXJJqUHRXXWLOLVH]ODVRQGH3RXU
utiliser ce mode, pressez Convection Roast (rôtissage par
convection), entrez une température, puis pressez Start /H
préchauffage n’est pas nécessaire avec ce mode.
Slow Roast (rôtissage lent) (sur certains
modèles/fours)
/H PRGH GH U{WLVVDJH OHQW 6ORZ 5RDVW HVW XQ PRGH GH
rôtissage spécial, sans préchauffage, qui utilise des impulsions
de chaleur pour dorer l’extérieur des aliments tout en assurant
une cuisson douce pour une cuisson intérieure plus uniforme.
/H PRGH GH U{WLVVDJH OHQW HVW FRQoX XQLTXHPHQW SRXU OD
FXLVVRQVXUXQHVHXOHJULOOH3UpYR\H]TXHOHVDOLPHQWVTXHYRXV
cuisineriez habituellement avec le mode cuisson traditionnelle
7UDGLWLRQDO%DNHRXU{WLVVDJHjFRQYHFWLRQ&RQYHFWLRQ5RDVW
SUHQGURQWSOXVGHWHPSVjFXLUHDYHFOHPRGHU{WLVVDJHOHQW,O
est recommandé d’utiliser la sonde alimentaire pour surveiller la
cuisson. Des directives supplémentaires pour l’utilisation de ce
PRGHVHWURXYHQWGDQVODVHFWLRQ*XLGHGHFXLVVRQ3RXUXWLOLVHU
ce mode, appuyez sur Slow Roast, entrez une température,
puis appuyez sur Start.
Modes de grillage (Broil)
Grillez toujours avec la porte fermée. /¶pOpPHQWGHJULOODJH
de ce four est très puissant. Surveillez les aliments étroitement
ORUVTXHYRXVOHVJULOOH]8VH]GHSUXGHQFHORUVGXJULOODJH
sur les positions de grille supérieures car approcher les
aliments de l'élément de grillage augmente la fumée, les
pFODERXVVHPHQWVHWODSRVVLELOLWpG¶HQIODPPHUODJUDLVVH/H
grillage sur la position de grille 6 n’est pas recommandée.
Commencez par des aliments que vous avez l’habitude de
griller. Réglez les positions de grille pour ajuster l’intensité de
ODFKDOHXUVXUO¶DOLPHQW3ODFH]O¶DOLPHQWSOXVSUqVGHO¶pOpPHQW
de grillage lorsqu’une surface plus grillée ou un intérieur plus
FXLWHVWVRXKDLWp/HVDOLPHQWVSOXVpSDLVHWFHX[TX¶LOIDXW
bien cuire de part en part doivent se rôtir sur une position de
grille plus éloignée de l’élément de grillage, ou il faut utiliser
OHVPRGHV7UDGLWLRQDO%URLO/RRX&RQYHFWLRQ%URLO/R3RXUXQ
meilleur résultat, centrez l’aliment en dessous de l’élément de
grillage.
Broil (gril)
/HPRGHGHJULOODJHKDXWHWHPSpUDWXUHXWLOLVHXQHFKDOHXU
intense de l’élément supérieur pour brunir les aliments.
8WLOLVH]%URLO+LJKSRXUOHVFRXSHVGHYLDQGHSOXVPLQFHVHW
ou les aliments que vous préférez moins cuits à l’intérieur.
3RXUXWLOLVHUFHPRGHSUHVVH]Broil (gril), puis sélectionnez
High (élevé) ou Low (faible) selon le niveau de saisie et
la température interne souhaités. puis pressez Start/H
préchauffage n’est pas nécessaire avec ce mode.
Grillage par convection haute température
(sur certains modèles/four)
Ce mode Convection Broil High utilise la chaleur intense de
l’élément supérieur accompagnée d’un mouvement direct de l’air
vers le bas depuis le haut du four pour améliorer la saisie et le
EUXQLVVDJH3RXUXWLOLVHUFHPRGHSUHVVH]Convection Broil,
SXLVVpOHFWLRQQH]+LJKpOHYpRX/RZIDLEOHVHORQODTXDQWLWpGH
saisie et la température interne souhaitées, puis pressez Start.
3RXUOHVPHLOOHXUVUpVXOWDWVSUpFKDXIIH]OHIRXUGXUDQWPLQXWHV
lorsque vous utilisant ce mode.
UTILISATION DU FOUR :0RGHVGHFXLVVRQ

49-2003952 Rev. 0 15
UTILISATION DU FOUR : 0RGHVGHFXLVVRQ
Modes de cuisson (suite)
Friture à convection (sur certains modèles/
four)
/DIULWXUHjDLUFKDXG$LU)U\HVWXQPRGHGHFXLVVRQSDU
convection spécial, sans préchauffage, conçu pour donner aux
aliments un surface extérieure plus croustillante par rapport
jODFXLVVRQDXIRXUWUDGLWLRQQHOOH/HPRGH$LU)U\HVWFRQoX
pour une cuisson sur un seule grille. Sélectionnez Air Fry,
entrez la température désirée et pressez Start. Vous pouvez
UpJOHUODWHPSpUDWXUHHQWUH)HW)/HSUpFKDXIIDJH
n’est pas recommandé pour ce mode. Suivez la recette pour
four traditionnelle ou les instructions de l’emballage pour choisir
les températures et les temps de cuisson; ajustez le temps
de cuisson pour obtenir la croustillance désirée. Des conseils
supplémentaires pour ce mode figurent dans le guide de cuisson.
Proof (fermentation)
/HPRGH3URRIIHUPHQWDWLRQHVWFRQoXSRXUIDLUHOHYHU
(fermenter) les pâtes à pain. Sélectionnez Proof (fermentation),
puis appuyez sur Start. Couvrez bien la pâte pour éviter qu'elle
QHVqFKH/HSDLQOqYHUDSOXVUDSLGHPHQWTXjWHPSpUDWXUH
ambiante.
Maintien au chaud
/HPRGH:DUPPDLQWLHQDXFKDXGHVWGHVWLQpjFRQVHUYHUOD
température des aliments cuits pendant une durée maximale
GHKHXUHV3RXUXWLOLVHUFHPRGHVpOHFWLRQQH]Warm (tenue
au chaud), puis appuyez sur Start (démarrer). Recouvrez les
aliments qu’il faut maintenir humides sauf ceux que l’on souhaite
FURXVWLOODQWV/HSUpFKDXIIDJHQ¶HVWSDVQpFHVVDLUH1¶XWLOLVH]
pas Warm pour réchauffer les aliments froids à l’exception
GHVFUDTXHOLQVGHVFURXVWLOOHVHWGHVFpUpDOHVVqFKHV2Q
recommande aussi de ne pas garder les aliments au chaud
durant plus de 2 heures.
Precision Cooking (cuisson de précision)
(sur certains modèles/four)
/DFXLVVRQGHSUpFLVLRQHVWXQHH[SpULHQFHGHFXLVVRQJXLGpH
conçue pour vous offrir les meilleurs résultats de votre four
SRXUGHVDOLPHQWVVSpFLILTXHV/RUVTXHYRXVVpOHFWLRQQH]
XQDOLPHQWGDQVOHPHQX3UHFLVLRQ&RRNLQJOHVUpJODJHV
recommandés du four pour cet aliment sont automatiquement
choisis et des renseignements supplémentaires vous sont
fournis afin de vous aider à obtenir le meilleur résultat possible.
Des programmes supplémentaires seront disponibles via des
mises à jour logicielles. Connectez votre four pour avoir accès
à ces mises à jour. Consultez la section sur la connexion au
Wi-Fi pour plus de détails sur la façon de connecter votre four.
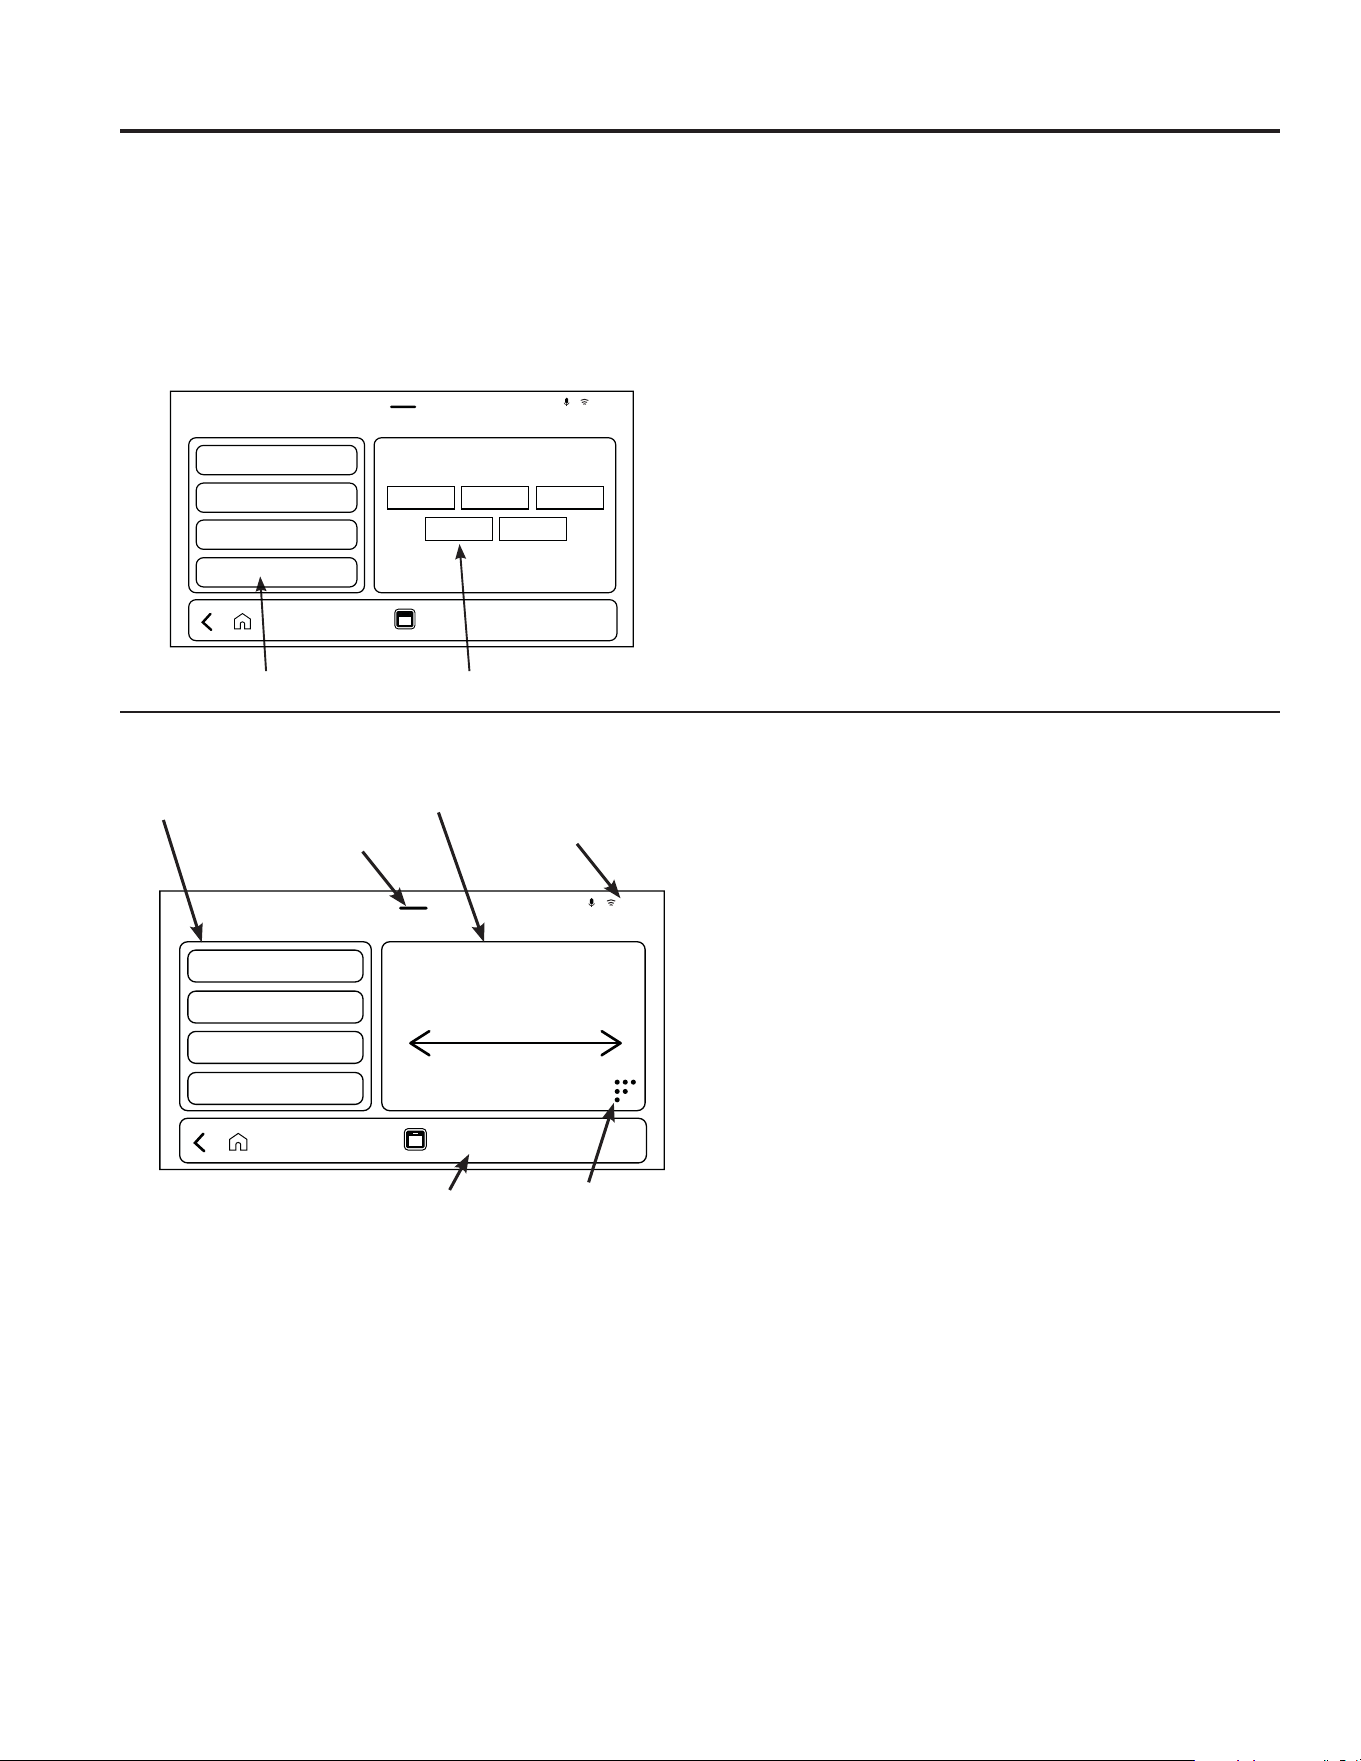
16 49-2003952 Rev. 0
8QHIRLVTXHYRXVVpOHFWLRQQH]XQPRGHGHFXLVVRQWUDGLWLRQQHORXXQPRGH3UHFLVLRQ&RRNLQJOHVRSWLRQVGHFXLVVRQV¶DIILFKHQW
sur la partie gauche de l’écran et les informations concernant vos sélections s’affichent sur la partie droite de l’écran.
1. OPTIONS DE CUISSON
8QHRSWLRQGHFXLVVRQQHV¶DIILFKHTXHVLHOOHHVWGLVSRQLEOH
ou requise pour le mode de cuisson sélectionné. Si une
option de cuisson n’est pas affichée pour un mode de cuisson
sélectionné, cela signifie qu’elle n’est pas disponible ou qu’elle
n’est pas requise.
Notez que toute option de cuisson affichée pour un mode de
cuisson aura des sélections par défaut, mais assurez-vous
que les réglages et sélections par défaut correspondent à vos
entrées souhaitées (comme la température réglée, la durée de
cuisson, la taille ou le type) et au résultat attendu (degré de
cuisson). Ceci est particulièrement important lors de l’utilisation
des modes de cuisson de précision.
$VVXUH]YRXVGHIDLUHGpILOHUYHUVOHKDXWHWYHUVOHEDVSRXU
voir toutes les options de cuisson disponibles pour un mode de
cuisson sélectionné.
Température
/RUVTXHYRXVVpOHFWLRQQH]XQHWHPSpUDWXUHGHFRQVLJQHGX
four, des températures prédéfinies sont affichées et peuvent
rWUHVpOHFWLRQQpHVHQIDLVDQWGpILOHUKRUL]RQWDOHPHQWHWHQ
choisissant la température désirée.
/¶RSWLRQSHUPHWWDQWGHUpJOHUXQHWHPSpUDWXUHGHFXLVVRQ
personnalisée est disponible à l’aide du clavier numérique.
7RXVOHVPRGHVGHFXLVVRQGHSUpFLVLRQQHQpFHVVLWHQWSDV
que vous régliez une température de cuisson.
Minuterie
Si le mode de cuisson sélectionné prend en charge une
minuterie de cuisson, cette option vous permet de régler une
PLQXWHULHGHFRPSWHjUHERXUVTXLSHXWrWUHSURJUDPPpHSRXU
éteindre ou non le mode de cuisson à la fin du temps écoulé.
Certains modes de cuisson de précision ont une minuterie qui
VHUqJOHDXWRPDWLTXHPHQW'DQVFHVFDVO¶RSWLRQ0LQXWHULHQH
s’affiche pas. Dans ce cas, le compte à rebours de la minuterie
commence après avoir appuyé sur Start. Cette minuterie
n’éteindra pas le four à la fin du temps écoulé.
Sonde
&HWWHRSWLRQV¶DIILFKHVLODVRQGHGXIRXUSHXWrWUHXWLOLVpHDYHF
un mode de cuisson traditionnel. Consultez la section Sonde
pour plus de détails sur l’utilisation de la sonde du four.
Certains modes de cuisson de précision exigent l’utilisation
GHODVRQGHGHIRXUIRXUQLHDYHFOHIRXU3RXUFHVF\FOHVGHV
instructions de placement de la sonde sont fournies, mais la
température de consigne de la sonde est déterminée par le
PRGHGHFXLVVRQ3UHFLVLRQVpOHFWLRQQp
Modes de cuisson (suite)
UTILISATION DU FOUR :0RGHVGHFXLVVRQ
Cooking Mode
Start
1:59 PM
2SWLRQVGHFXLVVRQ
Réglage rapide
de la teinte
Barre de navigation
Barre d’état
Clavier numérique
,QIRUPDWLRQVRXVpOHFWLRQV
3.
Réglage d’un mode de cuisson
À partir de l’écran d’accueil, sélectionnez le four lorsque vous
utilisez un four double. Sélectionnez ensuite le mode de
Traditional Cooking (cuisson traditionnelle) ou Precision
Cooking (cuisson de précision).
6LYRXVVpOHFWLRQQH]3UHFLVLRQ&RRNLQJFXLVVRQGHSUpFLVLRQ
les catégories s’afficheront sur la partie gauche de l’écran et
les options d’aliments s’afficheront sur la partie droite.
1. Catégories : /HVDOLPHQWVVRQWUHJURXSpVHQFDWpJRULHV
Faites défiler vers le haut ou vers le bas pour voir toutes les
catégories. Sélectionnez une catégorie pour afficher toutes
les options d’aliments de cette catégorie sur le côté droit de
l’écran.
2. Aliments : Faites défiler vers la gauche ou la droite
pour voir toutes les options d’aliments d’une catégorie.
Sélectionnez un aliment sur le côté droit de l’écran pour
commencer la cuisson.
D’autres catégories et options d’aliments seront offertes
lors de mises à jour logicielles. Connectez votre four pour
avoir accès à ces mises à jour. Consultez la section Wi-Fi
Connectivity (connectivité Wi-Fi) pour savoir comment
connecter votre four..
1. Catégories $OLPHQWV
Precision Cooking
1:59 PM

49-2003952 Rev. 0 17
Modes de cuisson (suite)
Réglage d’un mode de cuisson
1. OPTIONS DE CUISSON (suite)
Conseils de cuisson
Cette option fournit des renseignements utiles adaptés au
mode de cuisson sélectionné. Cela peut inclure des conseils
sur la préparation des aliments, l’influence des ustensiles de
cuisson sur les résultats ou des astuces pour éviter les dégâts
dans la cavité du four.
Grille et ustensiles de cuisson
3RXUFHUWDLQVPRGHV3UHFLVLRQFHWWHRSWLRQGRQQHGHV
suggestions sur l’emplacement de la grille et les ustensiles de
cuisson à utiliser selon le mode sélectionné.
Nombre de grilles
3RXUFHUWDLQVPRGHV3UHFLVLRQSDUH[HPSOHOHVSURGXLWVGH
boulangerie comme les biscuits), cette option propose des
choix de cuisson sur une seule grille ou sur plusieurs grilles. Si
cette option n’est pas affichée, il est prévu que vous cuisiniez
sur une seule grille.
Degré de cuisson
3RXUFHUWDLQVPRGHV3UHFLVLRQFRPPHOHVVWHDNVRXOH
bacon), cette option exige que vous choisissiez le degré de
cuisson désiré pour l’aliment sélectionné. Certains aliments
avec des options de degré de cuisson nécessitent la sonde,
tandis que d’autres se basent sur la durée de cuisson.
/RUVTX¶XQGHJUpGHFXLVVRQHVWVpOHFWLRQQpODFLEOHGHOD
sonde ou la durée de cuisson, ainsi que les conditions de
cuisson du four, sont ajustées selon l’aliment choisi.
Taille
3RXUFHUWDLQVPRGHV3UHFLVLRQFRPPHOHVDXPRQFHWWH
option exige que vous choisissiez parmi une liste de sélections
afin d’adapter les conditions de cuisson et la durée en fonction
des choix effectués.
Type
3RXUFHUWDLQVPRGHV3UHFLVLRQFRPPHOHEDFRQFHWWHRSWLRQ
exige que vous choisissiez parmi une liste de sélections (par
exemple, épais, régulier ou coupe centrale pour le bacon) afin
d’adapter les conditions de cuisson et la durée en fonction des
choix effectués.
2. INFORMATIONS OU SÉLECTIONS
/HFRQWHQXGHFHWWH]RQHYDULHVHORQO¶RSWLRQDFWLYH
VpOHFWLRQQpHjJDXFKH$VVXUH]YRXVGHIDLUHJOLVVHUYHUVOD
gauche et la droite dans cette zone pour voir tout le contenu
SHUWLQHQW,OSHXW\DYRLUGHVUHFRPPDQGDWLRQVG¶XVWHQVLOHVGH
cuisson ou des conseils supplémentaires à consulter.
3. DÉMARRER
Vérifiez les réglages des options de cuisson, vos sélections
et placez la ou les grilles du four avant d’appuyer sur Start
(démarrer).
UTILISATION DU FOUR : 0RGHVGHFXLVVRQ

18 49-2003952 Rev. 0
Sonde thermique (sur certains modèles)
/DWHPSpUDWXUHLQWHUQHGHO¶DOLPHQWHVWIUpTXHPPHQWXWLOLVpHFRPPHLQGLFDWHXUGHFXLVVRQDGpTXDWHHQSDUWLFXOLHUSRXUOHV
U{WLVHWODYRODLOOH/DVRQGHPHVXUHODWHPSpUDWXUHLQWHUQHGHVDOLPHQWVHWpWHLQWOHIRXUORUVTXHFHOXLFLDWWHLQWODWHPSpUDWXUH
programmée.
AVERTISSEMENT
Consommer des aliments insuffisamment cuits peut entraîner une maladie d'origine
alimentaire. Utilisez la sonde thermique en suivant les instructions suivantes pour vous assurer que toutes les
parties de l'aliment atteignent une température de cuisson sécuritaire minimale. Les recommandations concernant
la température minimale sécuritaire des aliments sont fournies par le USDA et la FDA.
Vérifiez toujours la température à plusieurs endroits dans l'aliment à l'aide d'un thermomètre pour aliment afin de
vous assurer que toutes les portions de l'aliment ont atteint la température interne souhaitée.
Positionnement de la sonde thermique
$SUqVDYRLUSUpSDUpODYLDQGHHWODYRLUSODFpHVXU
l'ustensile de cuisson, suivez ces consignes pour placer
la sonde correctement.
Ŷ ,QVpUH]ODVRQGHGDQVODOLPHQWGHPDQLqUHjFHTXH
sa pointe soit positionnée au centre de la partie la plus
pSDLVVHGHODOLPHQW3RXUGHVSHUIRUPDQFHVRSWLPDOHV
ODVRQGHGRLWrWUHHQWLqUHPHQWLQVpUpHGDQVODQRXUULWXUH
Si la sonde n'est pas placée correctement, elle pourrait ne
pas mesurer avec précision la température de la partie la
plus froide de l'aliment. Certains aliments, en particulier les
aliments de faibles dimensions, ne sont pas bien adaptés
pour la cuisson avec la sonde en raison de leur forme ou
de leur taille.
Ŷ /DVRQGHQHGRLWWRXFKHUQLRVQLJUDVQLFDUWLODJH
Ŷ 3RXUXQHYRODLOOHHQWLqUHLQVpUH]ODVRQGHGDQVODSDUWLH
la plus épaisse de la poitrine.
Ŷ 3RXUXQU{WLGpVRVVpLQVpUH]ODVRQGHGDQVOHFHQWUH
du rôti.
Ŷ 3RXUXQMDPERQRXGHODJQHDXDYHFRVLQVpUH]ODVRQGH
au centre du grand muscle ou de l'articulation la plus
basse.
Ŷ 3RXUXQPHWVHQFRFRWWHFRPPHOHSDLQGHYLDQGHLQVpUH]
la sonde dans le centre de l'aliment.
Ŷ 3RXUOHSRLVVRQLQVpUH]ODVRQGHMXVWHDXGHVVXVGHOD
branchie et dans la partie la plus charnue, parallèlement
à la colonne vertébrale.
Utilisation de la sonde thermique
Utilisation de la sonde:
,QVpUH]ODVRQGHGDQVODOLPHQWUHSRUWH]YRXVjODVHFWLRQ
©3RVLWLRQQHPHQWGHODVRQGHWKHUPLTXHª
3ODFH]ODOLPHQWGDQVOHIRXUHWEUDQFKH]ODVRQGHGDQV
sa prise à l'intérieur du ou des fours. REMARQUE :/D
VRQGHQHSHXWSDVrWUHXWLOLVpHSHQGDQWOHVPRGHVEURLO
(griller), convection broil (griller par convection), dehydrate
GpVK\GUDWHUZDUPUpFKDXIIHUSURRIOHYpH
3. Sélectionnez le mode et la température de cuisson désirés.
Si le mode de cuisson prend en charge l’utilisation d’une
VRQGHODIHQrWUHGHUpJODJHGHODVRQGHDSSDUDvWUD(QWUH]
le température d’aliment désirée et pressez Start. Vous
pouvez régler la température de la sonde entre 100°F et
200°F.
REMARQUE : Si vous souhaitez préchauffer, effectuez
cette étape avant l’étape 1.
/HVPRGHVGHFXLVVRQWUDGLWLRQQHOVjO¶H[FHSWLRQGH6ORZ
Roast) mettent fin au mode lorsque la température de la
sonde est atteinte, tandis que les modes de cuisson de
précision et la cuisson lente n’en disposent pas.
Consignes d'entretien de la sonde
thermique
REMARQUE : Certains modèles à deux fours sont munis
d’une sonde dans le four supérieur seulement.
Ŷ /¶XWLOLVDWLRQGHVRQGHVGLIIpUHQWHVGHFHOOHIRXUQLHDYHFFH
produit risque d’endommager la sonde.
Ŷ 8WLOLVH]OHVSRLJQpHVGHODVRQGHHWGHODILFKHORUVTXH
vous les insérez dans la viande/la prise ou les en retirez.
Ŷ 1HUHWLUH]SDVODVRQGHGHODOLPHQWRXGHODSULVHHQWLUDQW
sur son câble au moyen d'une pince. Vous risqueriez de
l'endommager.
Ŷ 3RXUpYLWHUGHFDVVHUODVRQGHDVVXUH]YRXVTXHODOLPHQW
est complètement décongelé avant d'insérer la sonde.
Ŷ 3RXUpYLWHUOHVEUOXUHVQHGpEUDQFKH]SDVODVRQGH
de la prise avant que le four n'ait refroidi.
Ŷ 1HODLVVH]MDPDLVODVRQGHjOLQWpULHXUGXIRXUSHQGDQW
l'autonettoyage ou le nettoyage à la vapeur.
Ŷ 1HUDQJH]SDVODVRQGHGDQVOHIRXU
UTILISATION DU FOUR : Sonde thermique
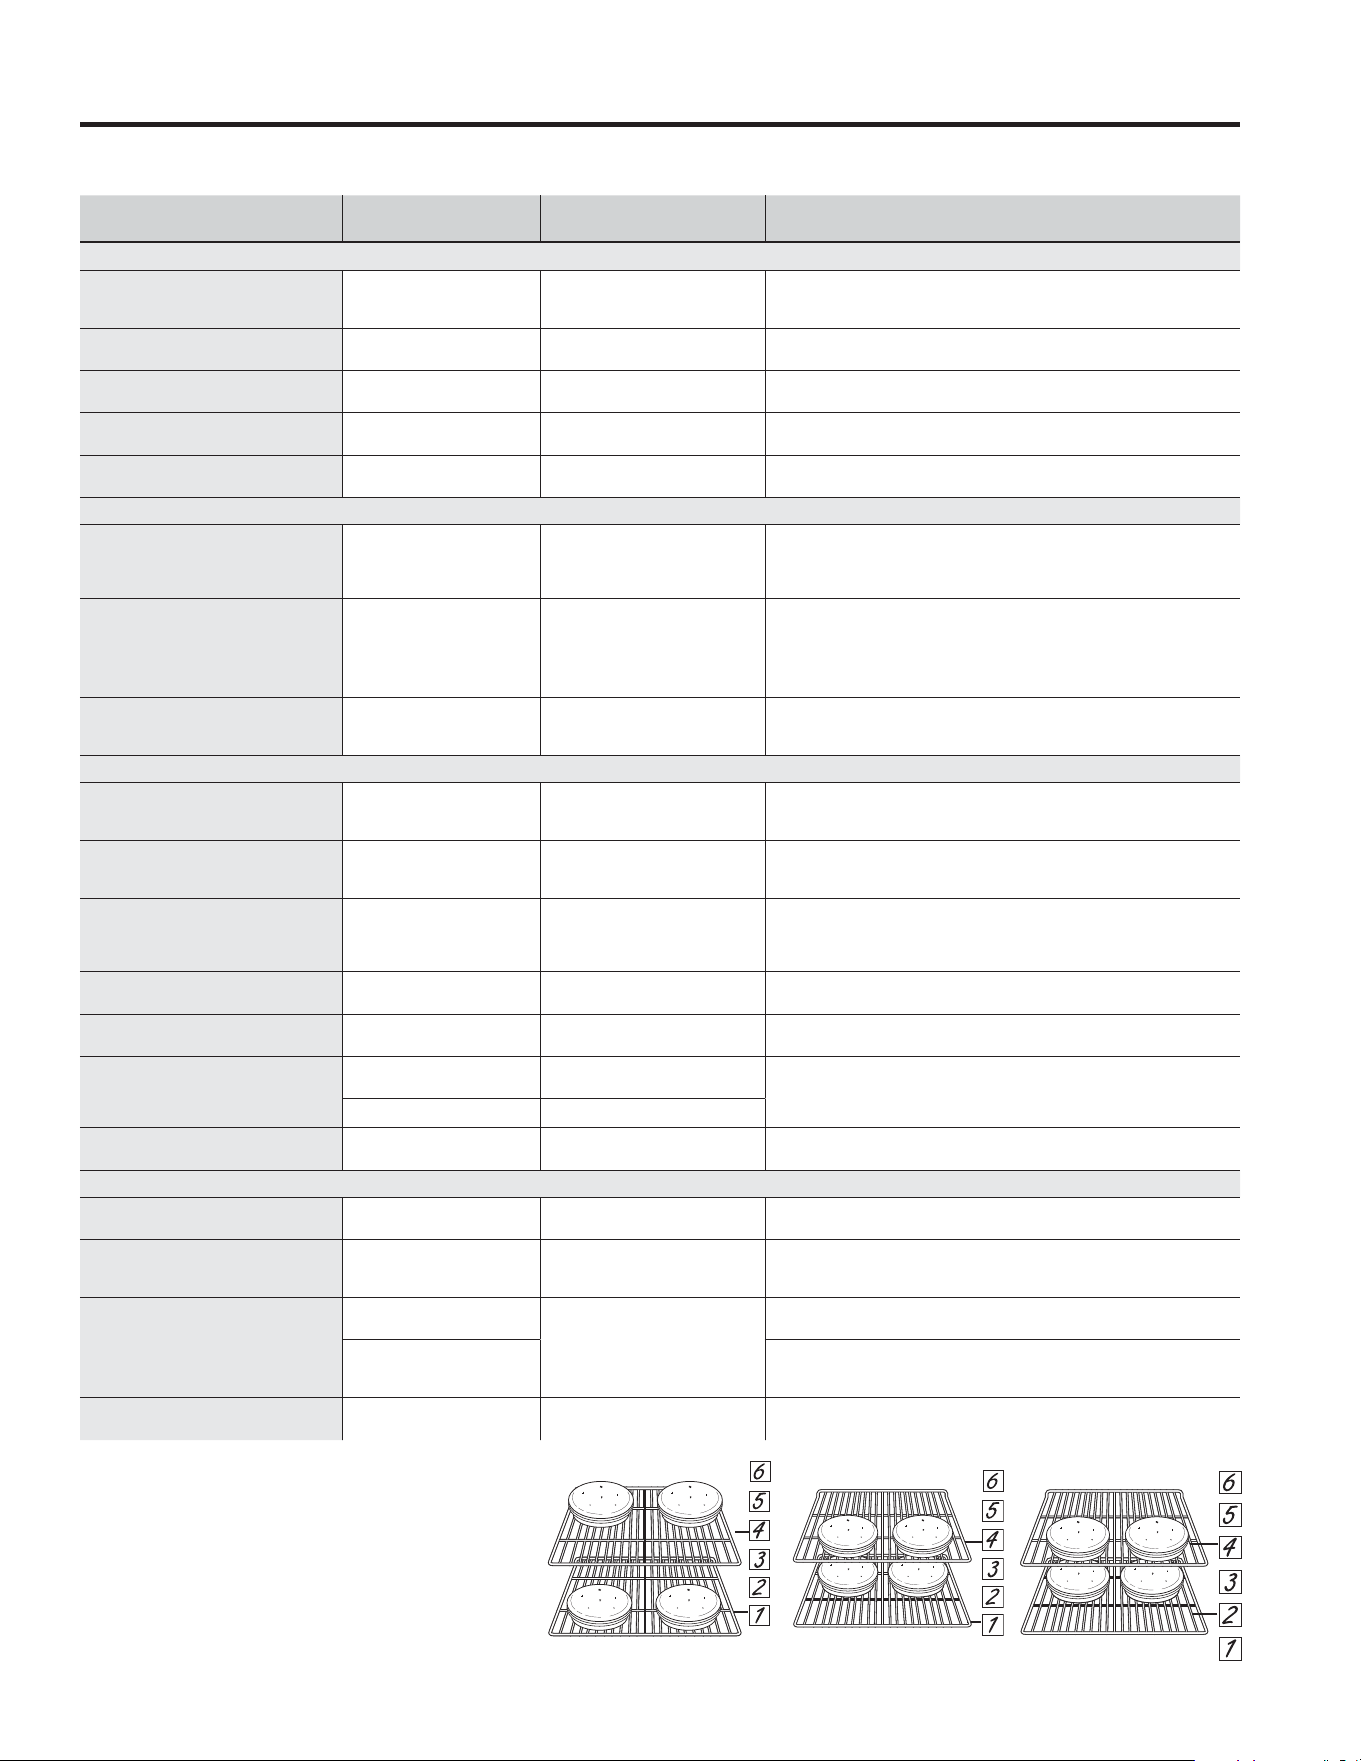
49-2003952 Rev. 0 19
Guide de cuisson
TYPE D'ALIMENT
MODES DE CUISSON
RECOMMANDÉS
POSITIONS DE GRILLE
RECOMMANDÉES SUGGESTIONS ADDITIONNELLES
Produits de boulangerie et pâtisseries
Gâteaux à étages, gâteaux plats,
gâteaux Bundt, muffins, pains à
préparation rapide sur une seule grille
Cuisson traditionnelle
2 ext. ou 3 plat 8WLOLVH]XQXVWHQVLOHGHFXLVVRQDXILQLEULOODQW
Gâteaux à étages* sur plusieurs grilles
Cuisson à convection
avec plusieurs grilles
1 ext. et 4 plat ou
2 et 4 plat
$VVXUH]XQHFLUFXODWLRQGDLUDGpTXDWH
8WLOLVH]XQXVWHQVLOHGHFXLVVRQDXILQLEULOODQW
Gâteaux des anges Cuisson traditionnelle 1 8WLOLVH]XQXVWHQVLOHGHFXLVVRQDXILQLEULOODQW
Biscuits, pains cuits en galettes sur une
seule grille
Cuisson traditionnelle
2 ext. ou 3 plat 8WLOLVH]XQXVWHQVLOHGHFXLVVRQDXILQLEULOODQW
Biscuits, pains cuits en galettes sur
plusieurs grilles
Cuisson à convection
avec plusieurs grilles
1 ext. et 4 plat ou
$VVXUH]XQHFLUFXODWLRQGDLUDGpTXDWH
8WLOLVH]XQXVWHQVLOHGHFXLVVRQDXILQLEULOODQW
Bœuf et porc
Galettes de bœuf haché Gril élevé 5
8WLOLVH]XQHOqFKHIULWHDEDLVVH]OHVDOLPHQWVGDQVOHIRXUSRXUXQHFXLVVRQ
plus en profondeur/moins grillée. Vérifiez fréquemment les aliments lorsque
YRXVXWLOLVH]ODFXLVVRQDXJULO3RXUGHPHLOOHXUVUpVXOWDWVSODFH]ODOLPHQWDX
centre du four, sous l'élément de gril.
%LIWHFNVHWF{WHOHWWHV Gril élevé 5
8WLOLVH]XQHOqFKHIULWHDEDLVVH]OHVDOLPHQWVGDQVOHIRXUSRXUXQHFXLVVRQ
plus en profondeur/moins grillée. Vérifiez fréquemment les aliments lorsque
YRXVXWLOLVH]ODFXLVVRQDXJULO3RXUGHPHLOOHXUVUpVXOWDWVSODFH]ODOLPHQWDX
centre du four, sous l'élément de gril.
Rôtis
Cuisson traditionnelle
Rôtissage à convection
Rôtissage lent
1 ou 2
Ne couvrez pas; utilisez un ustensile moins profond, comme une lèchefrite.
/HSUpFKDXIIDJHQHVWSDVQpFHVVDLUH
Volaille
3RXOHWHQWLHU
Cuisson traditionnelle
Rôtissage à convection
Rôtissage lent
1 ou 2 ext.
2 ou 3 plat
8WLOLVH]XQXVWHQVLOHGHFXLVVRQSHXSURIRQGFRPPHXQHOqFKHIULWH/H
préchauffage n'est pas nécessaire.
3RLWULQHVGHSRXOHWDYHFRVFXLVVHV
pilons
Gril bas
Rôtissage à convection
Rôtissage lent
2 ext. ou 3 plat
Grillez d'abord avec la peau vers le bas. Vérifiez fréquemment les aliments
ORUVTXHYRXVXWLOLVH]ODFXLVVRQDXJULO3RXUGHPHLOOHXUHVSHUIRUPDQFHVORUV
de la cuisson au gril, centrez les aliments sous l'élément chauffant du gril.
3RLWULQHVGHSRXOHWGpVRVVpHV
Gril bas
Cuisson traditionnelle
2 ext. ou 3 plat
$EDLVVH]OHVDOLPHQWVGDQVOHIRXUSRXUXQHFXLVVRQSOXVHQSURIRQGHXU
moins grillée, et disposez-les plus haut dans le four pour les griller et les
EUXQLUGDYDQWDJH3RXUGHPHLOOHXUHVSHUIRUPDQFHVORUVGHODFXLVVRQDXJULO
centrez les aliments sous l'élément chauffant du gril.
Dinde entière
Cuisson traditionnelle
Rôtissage à convection
1 ou 2
8WLOLVH]XQXVWHQVLOHGHFXLVVRQSHXSURIRQGFRPPHXQHOqFKHIULWH/H
préchauffage n'est pas nécessaire.
3RLWULQHGHGLQGH
Cuisson traditionnelle
Rôtissage à convection
1 ou 2
8WLOLVH]XQXVWHQVLOHGHFXLVVRQSHXSURIRQGFRPPHXQHOqFKHIULWH/H
préchauffage n'est pas nécessaire.
Poisson
Gril bas
5 (épaisseur de 1/2 po/1 cm ou moins)
4 (épaisseur > 1/2 po/1 cm)
Vérifiez fréquemment les aliments lorsque vous utilisez la cuisson au gril.
3RXUGHPHLOOHXUVUpVXOWDWVSODFH]ODOLPHQWDXFHQWUHGXIRXUVRXVOpOpPHQW
de gril.
Rôtissage lent 3
Mets mijotés
Cuisson traditionnelle
Rôtissage à convection
2 ext. ou 3 plat
Aliments préparés surgelés
3L]]DVXUXQHVHXOHJULOOH
Cuisson à convection
Cuisson traditionnelle
2 ext. ou 3 plat 8WLOLVH]XQXVWHQVLOHGHFXLVVRQDXILQLEULOODQW
3L]]DVVXUSOXVLHXUVJULOOHV
Cuisson à convection
avec plusieurs grilles
1 ext. y 4 plat
Escalonez les pizzas de façon à ce qu’elles ne soient pas placées
GLUHFWHPHQWO¶XQHDXGHVVXVGHO¶DXWUHORUVGHODFXLVVRQVXUODJULOOH8WLOLVH]
un ustensile de cuisson au fini brillant.
3URGXLWVGHSRPPHVGH
terre, croquettes de poulet,
hors-d'œuvre sur une seule grille
Cuisson traditionnelle
3 ext. ou 4 plat
8WLOLVH]GHVXVWHQVLOHVGHFXLVLQHDXILQLEULOODQWORUVTXHYRXVXWLOLVH]OD
cuisson traditionnel
Friture à convection
8WLOLVH]GHVXVWHQVLOHVGHFXLVVRQIRQFpVRXXQHSODTXHjELVFXLWVORUVTXH
YRXVXWLOLVH]OHPRGH$LU)U\IULWXUHjFRQYHFWLRQ
3URGXLWVGHSRPPHVGHWHUUH
croquettes
de poulet, hors-d'œuvre
sur plusieurs grilles
Cuisson à convection
avec plusieurs grilles
1 ext. y 4 plat
8WLOLVH]XQXVWHQVLOHGHFXLVVRQDXILQLEULOODQW'pSODFH]OpJqUHPHQWOHV
aliments pendant la cuisson pour garantir une cuisson uniforme.
/HWDEOHDXFLGHVVRXVIRXUQLWFHUWDLQHVOLJQHVGLUHFWULFHVSRXUOHVPRGHVGHFXLVVRQKDELWXHOV3RXUOHVPRGHV3UHFLVLRQPRGH
3UpFLVLRQOHVUHFRPPDQGDWLRQVFRQFHUQDQWOHVSRVLWLRQVGHVJULOOHVHWFV¶DIILFKHURQWGDQVOHVLQVWUXFWLRQVpWDSHSDUpWDSHjO¶pFUDQ
3RXUFXLUHRXFXLUHSDUFRQYHFWLRQTXDWUHpWDJHVGHJkWHDXGDQV
une cavité à convection de 30 po (76,2 cm) ou pour cuire par
convection dans une cavité de 27 po (68,6 cm) à la fois, utilisez
OHVJULOOHVH[WHQVLRQHWSODW3ODFH]OHVPRXOHVFRPPHLOOXVWUp
afin qu’aucun moule ne soit directement au-dessus d’un autre.
3RXUFXLUHTXDWUHpWDJHVGHJkWHDXjO¶DLGHGHJULOOHVSODWHV
dans une cavité de 30 po (76,2 cm) ou de 27 po (68,6 cm) cavité
WKHUPLTXHjODIRLVXWLOLVH]OHVJULOOHVHWSODW3ODFH]OHV
moules comme illustré afin qu’aucun moule ne soit directement
au-dessus d’un autre.
/HVUHFRPPDQGDWLRQVPLQLPDOHVGHWHPSpUDWXUHVpFXULWDLUH
GHVDOLPHQWVVRQWIRXUQLHVSDUO¶86'$HWOD)'$8WLOLVH]XQ
thermomètre alimentaire pour mesurer la température des
aliments et vérifiez à plusieurs endroits.
Fours à convection
de 30 po
Fours à convection
de 27 po
27 po et 30 po
Fours thermiques
UTILISATION DU FOUR : Guide de cuisson
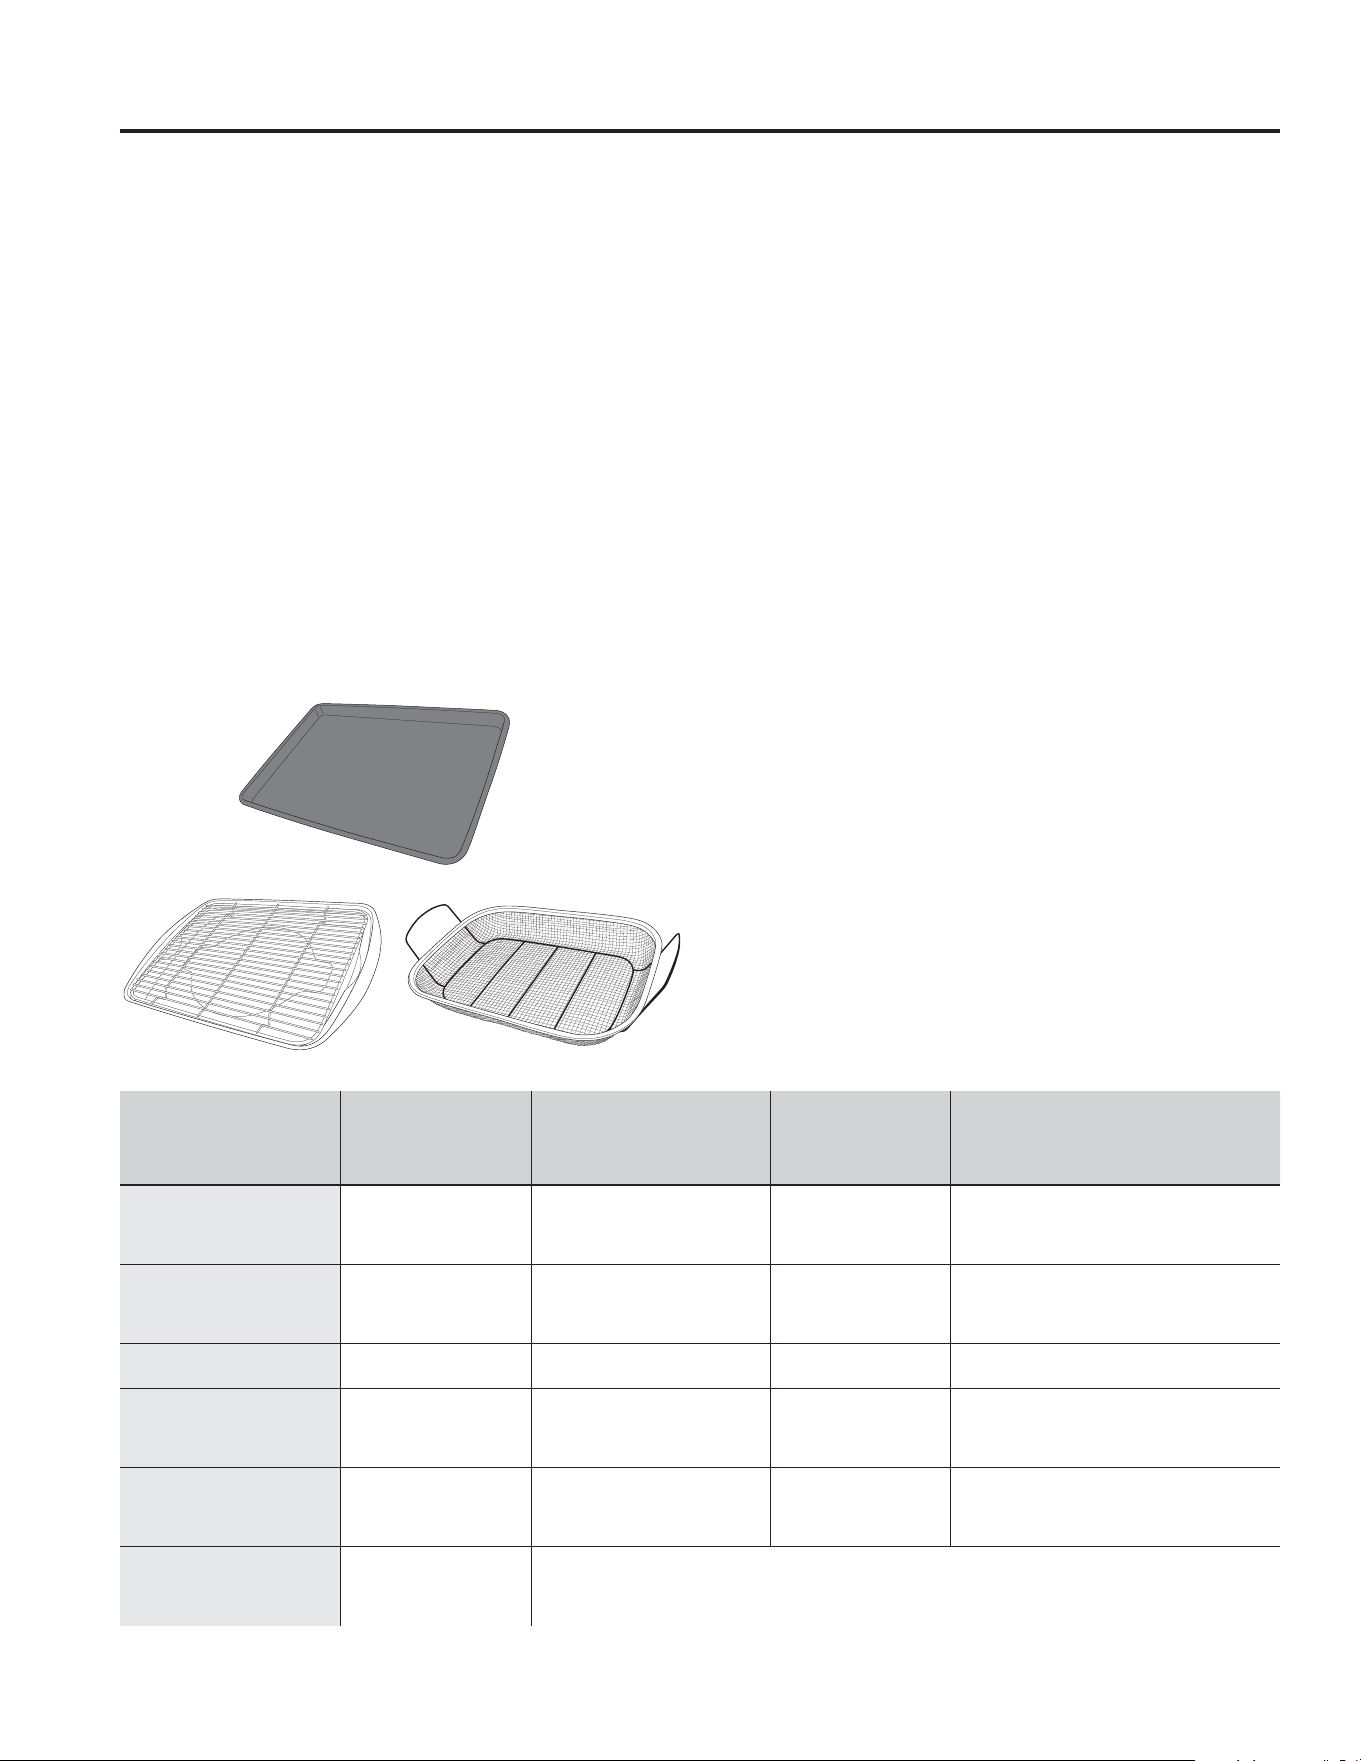
20 49-2003952 Rev. 0
Guide de cuisson
Guide de friture à convection
/HPRGHGHIULWXUHjFRQYHFWLRQHVWXQPRGHGHFXLVVRQ
à convection sans préchauffage conçu pour obtenir un
extérieur plus croustillant que la cuisson au four traditionnelle.
Sélectionnez Air Fry (Friture à convection) puis sélectionnez
la température de réglage désirée et appuyez sur Start (mise
en marche)/DWHPSpUDWXUHSHXWrWUHUpJOpHHQWUH)HW
500 °F.
Directives pour les ustensiles de friture à
convection
8WLOLVH]VHXOHPHQWGHVXVWHQVLOHVGHFXLVVRQDSSURXYpVSRXU
le gril lorsque vous utilisez le mode de friture à convection.
/¶XWLOLVDWLRQG¶XQHSODTXHjSkWLVVHULHIRQFpHHVW
UHFRPPDQGpH8QHSODTXHIRQFpHSHUPHWWUDG¶REWHQLUXQ
meilleur brunissage et plus de croustillance.
• Des paniers de cuisson et des grilles de cuisson au four
SHXYHQWpJDOHPHQWrWUHXWLOLVpVPDLVXQHSODTXHGHFXLVVRQ
GRLWrWUHSODFpHVXUODJULOOHVLWXpHVRXVOHVDOLPHQWVSRXU
récupérer les gouttes provenant de la cuisson des aliments.
Conseils généraux pour le mode de friture à
convection (Air Fry)
/HPRGHGHIULWXUHjFRQYHFWLRQHVWFRQoXSRXUXQHFXLVVRQ
sur une seule grille
/HPRGHGHIULWXUHjFRQYHFWLRQ$LU)U\HVWFRQoXSRXUrWUH
utilisé sans préchauffage.
/DSRVLWLRQGHODJULOOHHVWUHFRPPDQGpHSRXUODSOXSDUWGHV
aliments. Si les aliments brunissent trop rapidement, essayez
d’utiliser la position inférieure de la grille.
/HVDOLPHQWVSHXYHQWFXLUHSOXVUDSLGHPHQWTXHSUpYXVLOH
four est déjà chaud lorsque vous insérerez des aliments dans
le four.
/RUVTXHYRXVIDLWHVIULUHGHVDOLPHQWVjFRQYHFWLRQDYHFGHOD
sauce, il est recommandé de badigeonner la sauce à la fin de
la cuisson.
• Si les aliments brunissent trop rapidement, essayez la
position inférieure de la grille ou abaissez le réglage de
température.
3RXUOHVDOLPHQWVHPEDOOpVVXLYH]OHVLQVWUXFWLRQVGHFXLVVRQ
au four traditionnel pour régler la température et la durée de
cuisson prévues.
,OQ¶HVWSDVQpFHVVDLUHGHUHWRXUQHURXGHUHPXHUOHVDOLPHQWV
pendant la cuisson.
• Disposez les aliments en une seule couche sur la plaque
VDQVWRXWHIRLVODVXUFKDUJHU3RXUGHPHLOOHXUVUpVXOWDWVOHV
aliments ne doivent pas se chevaucher.
• Faites bien cuire les aliments pour aider à prévenir les
PDODGLHVG¶RULJLQHDOLPHQWDLUH/HVUHFRPPDQGDWLRQVGH
température minimale sécuritaire pour les aliments sont
IRXUQLHVSDUOH86'$HWOD)'$8WLOLVH]XQWKHUPRPqWUH
alimentaire pour mesurer la température des aliments et
vérifiez à plusieurs endroits.
ALIMENTS
POSITION
DE GRILLE
RECOMMANDÉE
RÉGLAGES DE
TEMPÉRATURE
RECOMMANDÉES (°F)
DURÉE DE
CUISSON
RECOMMANDÉE
(MIN.) REMARQUES
3RLVVRQIUDLVVDQVDUrWHVRX
morceaux de volaille, panés
comme des pépites, filets,
bâtonnets
Coulissante 3 375 à 400 15 à 30
8WLOLVH]OHVUpJODJHVGHWHPSpUDWXUHOHVSOXV
EDVSRXUOHVSOXVJURVPRUFHDX[8WLOLVH]GHV
ustensiles de cuisson brillants
$LOHVGHSRXOHWVIUDvFKHV
avec os
Coulissante 3 375 à 400 25 à 40
Salez les ailes ou enrobez-les d’épices à
frotter sèches. Si vous utilisez de la sauce,
badigeonnez-la après la cuisson ou juste avant
la fin.
$LOHVRXFXLVVHVGHSRXOHW
fraîches avec os
Coulissante 3 375 à 400 30 à 55
8WLOLVH]OHVUpJODJHVGHWHPSpUDWXUHOHVSOXVEDV
pour les plus gros morceaux
Frites fraîches minces
(< 1/2 po)
Coulissante 3 400 à 425 15 à 30
Du papier parchemin est recommandé pour la
SUpSDUDWLRQGHIULWHVIUDvFKHV3RXUGHVIULWHV
plus croustillantes, secouez-les dans de la fécule
de maïs ou de farine de riz avant la cuisson.
Frites fraîches épaisses
(> 1/2 po)
Coulissante 3 375 à 400 20 à 35
Du papier parchemin est recommandé pour la
SUpSDUDWLRQGHIULWHVIUDvFKHV3RXUGHVIULWHV
plus croustillantes, secouez-les dans de la fécule
de maïs ou de farine de riz avant la cuisson.
$OLPHQWVFRQJHOpVHPEDOOpV Coulissante 3
Respectez les instructions de cuisson au four traditionnel (pas le mode de friture à convection) comme guide
SRXUUpJOHUODWHPSpUDWXUHHWODGXUpHGHFXLVVRQ8QHGXUpHGHFXLVVRQSOXVORQJXHTXHFHOOHUHFRPPDQGpHVXU
O¶HPEDOODJHSHXWrWUHQpFHVVDLUHSRXUFHUWDLQVDOLPHQWV6LOHIRXUHVWGpMjFKDXGORUVTXHYRXVFRPPDQGH]OD
cuisson, les aliments peuvent cuire plus rapidement que la durée minimum indiquée sur l’emballage.
3ULQFLSDOXVWHQVLOHGHFXLVVRQUHFRPPDQGp
$XWUHVRSWLRQVGXVWHQVLOHVGHFXLVVRQ
UTILISATION DU FOUR : Guide de friture à convection
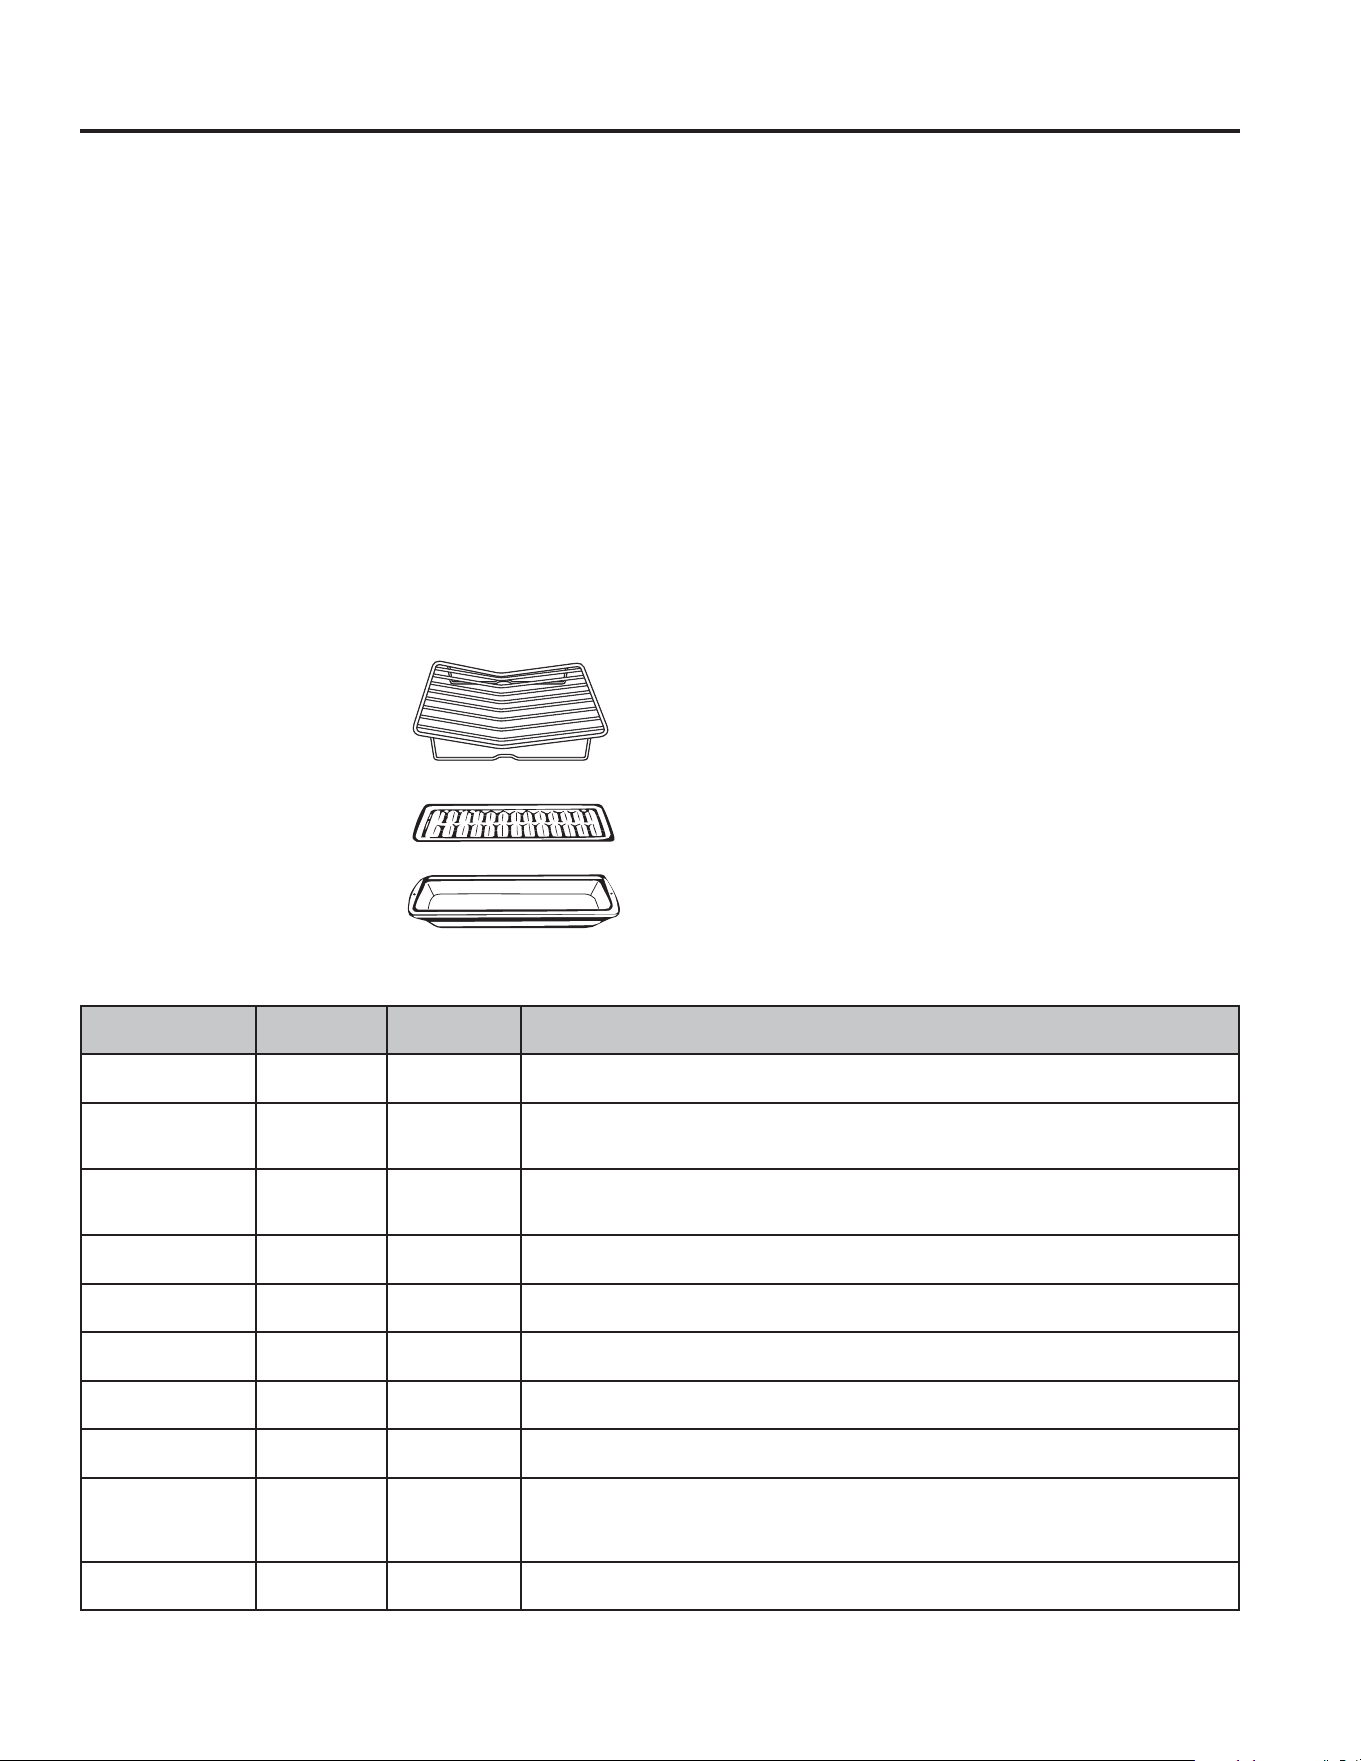
49-2003952 Rev. 0 21
UTILISATION DU FOUR : Guide de rôtissage
Guide de cuisson
GUIDE DE RÔTISSAGE
Votre nouveau four offre deux modes de cuisson conçus
VSpFLDOHPHQWSRXUOHU{WLVVDJH6ORZ5RDVWU{WLVVDJHOHQWHW
Convection Roast (rôtissage par convection).
/HPRGH6ORZ5RDVWXWLOLVHGHVLPSXOVLRQVGHFKDOHXUHW
le mouvement d’air du ventilateur de convection pour dorer
l’extérieur des aliments tout en assurant une cuisson douce
pour une cuisson interne plus uniforme par rapport au mode
&RQYHFWLRQ5RDVW/HPRGH6ORZ5RDVWSHXWrWUHUpJOpHQWUH
)&HW)&6ORZ5RDVWHVWFRQoXSRXU
rWUHXWLOLVpVDQVSUpFKDXIIDJH
/HPRGH&RQYHFWLRQ5RDVWXWLOLVHOHPRXYHPHQWG¶DLUGX
ventilateur de convection pour dorer la surface des aliments
SOXVUDSLGHPHQWTXHOHPRGH7UDGLWLRQDO%DNHFXLVVRQ
WUDGLWLRQQHOOH&RQYHFWLRQ5RDVWSHXWrWUHUpJOpHQWUH
)&HW)&/HPRGH&RQYHFWLRQ5RDVW
inclut un préchauffage, mais pour la plupart des aliments, le
préchauffage n’est pas nécessaire.
Directives sur les ustensiles de cuisson
pour le rôtissage
3ODWjU{WLUDYHFRXVDQVJULOOH
3ODTXHGHFXLVVRQ
3ODWjJULOOHUDYHFRXVDQVJULOOH
Conseils généraux pour le rôtissage
/HVPRGHVGHU{WLVVDJHGRLYHQWrWUHXWLOLVpVXQLTXHPHQWSRXU
la cuisson sur une seule grille.
3ODFH]ODJULOOHGHIDoRQjFHTXHOHVDOLPHQWVVRLHQWFHQWUpV
dans le four, ou pour un brunissement supérieur accru sur les
aliments minces, placez-les plus près de l’élément de grillage.
• Slow Roast :3UpYR\H]TXHOHVDOLPHQWVTXHYRXVFXLVLQHULH]
QRUPDOHPHQWHQPRGH7UDGLWLRQDO%DNHSUHQGURQWjIRLV
plus de temps à cuire.
• Convection Roast : Vérifiez les aliments plus tôt que le
temps indiqué sur l’emballage ou dans la recette.
,OHVWUHFRPPDQGpG¶XWLOLVHUODVRQGHDOLPHQWDLUHSRXU
surveiller la cuisson des grosses pièces de viande. Consultez
la section Sonde pour plus d’informations sur l’utilisation de la
sonde.
• En général, laissez les aliments découverts pendant le
rôtissage pour permettre le brunissement. Si les aliments
brunissent trop rapidement mais nécessitent plus de temps
de cuisson, couvrez-les de papier d’aluminium ou d’un
couvercle.
,OQ¶HVWSDVQpFHVVDLUHGHUHWRXUQHURXGHUHPXHUOHVDOLPHQWV
lors du rôtissage.
/HVDOLPHQWVFRPPHOHVOpJXPHVU{WLVEUXQLURQWPLHX[HW
cuiront plus rapidement s’ils ne sont pas entassés dans le
plat.
3RXUOHVFXLVVRQVROHVDOLPHQWVVRQWFRXYHUWVFRPPHOH
EUDLVDJHRXODFXLVVRQOHQWHXWLOLVH]OHPRGH7UDGLWLRQDO%DNH
(cuisson traditionnelle) plutôt qu’un mode de rôtissage.
• Faites toujours bien cuire les aliments pour aider à prévenir
OHVPDODGLHVG¶RULJLQHDOLPHQWDLUH/HVWHPSpUDWXUHV
minimales sécuritaires recommandées sont fournies par
O¶86'$HWOD)'$8WLOLVH]XQWKHUPRPqWUHDOLPHQWDLUHSRXU
vérifier la température des aliments à plusieurs endroits.
7{OHSHUIRUpH
/qFKHIULWH
Grille de rôtissage
Températures recommandées du four pour le rôtissage
Aliment Slow Roast
Convection
Roast
Suggestions supplémentaires
Rôtis de bœuf,
d’agneau ou de porc
250-325 °F
(121-163 °C)
350-425 °F
(177-218 °C)
8WLOLVH]3UHFLVLRQ&RRNLQJFXLVVRQGHSUpFLVLRQSRXUXQHH[SpULHQFHJXLGpHHWGHV
réglages personnalisés pour le filet de bœuf et la côte de bœuf (sur certains modèles)
%LIWHFNVRX
côtelettes de bœuf,
d’agneau ou de porc
250-325 °F
(121-163 °C)
350-425 °F
(177-218 °C)
8WLOLVH]3UHFLVLRQ&RRNLQJSRXUXQHH[SpULHQFHJXLGpHHWGHVUpJODJHVSHUVRQQDOLVpV
SRXUOHVELIWHFNVGHE°XI
3RLWULQHVSLORQVHW
cuisses de poulet
(avec peau)
275-350 °F
(135-177 °C)
325-375 °F
(163-191 °C)
/HSRXOHWDYHFSHDXHVWUHFRPPDQGpSRXUOHU{WLVVDJHFDUOHSRXOHWVDQVSHDXSHXW
devenir coriace
3RXOHWHQWLHU
300-350 °F
(149-177 °C)
350-400 °F
(177-204 °C)
8WLOLVH]3UHFLVLRQ&RRNLQJSRXUXQHH[SpULHQFHJXLGpHHWGHVUpJODJHVSHUVRQQDOLVpV
pour le poulet entier
3RLVVRQ
200-250 °F
(93-121 °C)
400-425 °F
(204-218 °C)
8WLOLVH]3UHFLVLRQ&RRNLQJSRXUXQHH[SpULHQFHJXLGpHHWGHVUpJODJHVSHUVRQQDOLVpV
pour les filets de saumon
3RPPHVGHWHUUH
coupées
Non
recommandé
400-450 °F
(204-232 °C)
8WLOLVH]3UHFLVLRQ&RRNLQJSRXUXQHH[SpULHQFHJXLGpHHWGHVUpJODJHVSHUVRQQDOLVpV
pour les pommes de terre coupées
3RPPHVGHWHUUH
entières
Non
recommandé
400-450 °F
(204-232 °C)
8WLOLVH]3UHFLVLRQ&RRNLQJSRXUXQHH[SpULHQFHJXLGpHHWGHVUpJODJHVSHUVRQQDOLVpV
pour les pommes de terre entières
Dinde entière
Non
recommandé
300-350 °F
(149-177 °C)
8WLOLVH]3UHFLVLRQ&RRNLQJSRXUXQHH[SpULHQFHJXLGpHHWGHVUpJODJHVSHUVRQQDOLVpV
pour la dinde entière
/pJXPHVFRXSpV
ou petits
255-350 °F
(124-177 °C)
400-450 °F
(204-232 °C)
/HVOpJXPHVFRPPHOHVRLJQRQVO¶DLOO¶DXEHUJLQHHWOHVOpJXPHVUDFLQHVSHXYHQWrWUHU{WLV
OHQWHPHQWjEDVVHWHPSpUDWXUH8WLOLVH]GHVWHPSpUDWXUHVSOXVpOHYpHVSRXUOHU{WLVVDJH
OHQWGHOpJXPHVFRPPHOHVFKDPSLJQRQVHWOHFKRXIOHXU8WLOLVH]3UHFLVLRQ&RRNLQJSRXU
une expérience guidée et des réglages personnalisés pour certains légumes rôtis
/pJXPHVJURV
275-325 °F
(135-163 °C)
350-400 °F
(177-204 °C)
Coupez la courge entière en deux et faites-la rôtir côté coupé vers le bas
Consultez le Guide de cuisson pour plus de détails et des recommandations sur la position des grilles selon les aliments.
8WLOLVH]ODVRQGHDOLPHQWDLUHSRXUVXUYHLOOHUODFXLVVRQGHVJURVVHVSLqFHVGHYLDQGHDILQGHGpWHUPLQHUTXDQGOHVDOLPHQWV
VRQWSUrWV
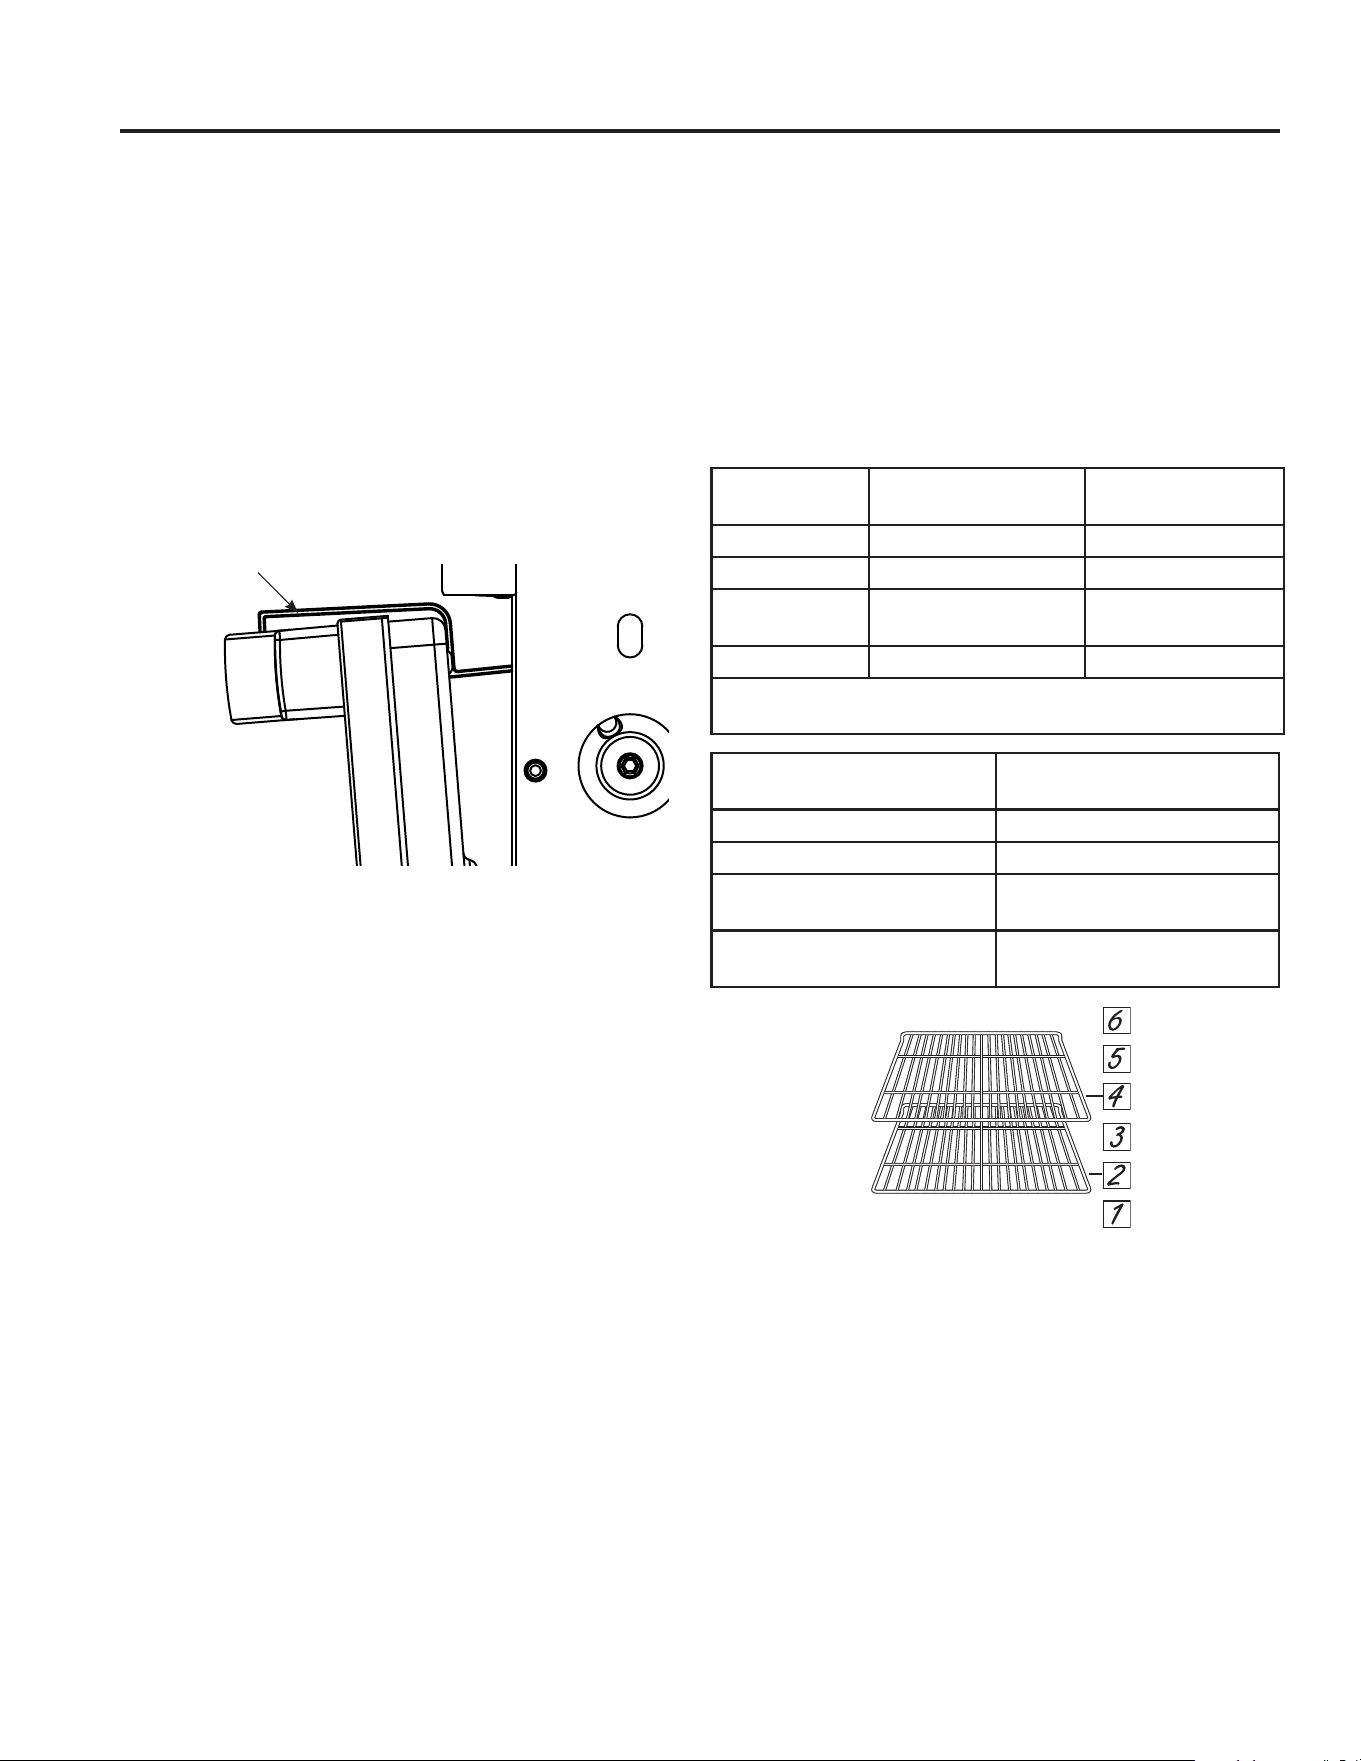
22 49-2003952 Rev. 0
Guide de déshydratation (four supérieur seulement, modèles à deux fours)
Dehydrate est un mode de convection spécial conçu pour
déshydrater des aliments tels que fruits, légumes ou herbes, et
SUpSDUHUGHVSkWHVGHIUXLWVGpVK\GUDWpVRXGHVFKDUTXLV/H
mode Dehydrate utilise un flux d’air et une chaleur basse pour
UHWLUHUO¶KXPLGLWpGHVDOLPHQWV/DSRUWHGRLWrWUHSDUWLHOOHPHQW
RXYHUWHORUVTXHOHPRGH+\GUDWHHVWHQPDUFKH8WLOLVH]
l’espaceur de porte fourni avec votre four pour maintenir la
porte ouverte dans la position appropriée illustrée ci-dessous.
8QHIRLVO¶HVSDFHXUHQSODFHVpOHFWLRQQH]Dehydrate, entrez
la température désirée et pressez Start. Vous pouvez régler la
WHPSpUDWXUHHQWUH)HW)/RUVTXHOHPRGH'HK\GUDWH
HVWHQPDUFKHODIRQFWLRQG¶DUUrWDXWRPDWLTXHDXERXWGH
heures est désactivée.
Ŷ&RQVXOWH]GHVOLYUHVHWGHVUHVVRXUFHVHQOLJQHSRXUODIDoRQ
appropriée et sûre de déshydrater des aliments.
Ŷ'pVK\GUDWHUjXQHWHPSpUDWXUHWURSpOHYpHSHXWHPSrFKHU
l’intérieur des aliments de sécher suffisamment.
Ŷ'pVK\GUDWHUjXQHWHPSpUDWXUHWURSEDVVHRXWURSOHQWHPHQW
peut favoriser la croissance de micro-organismes et mener à
du gaspillage ou des maladies d’origine alimentaire.
Ŷ1HYRXVILH]SDVjO¶DVSHFWRXODWH[WXUHH[WpULHXUVYpULILH]
l’intérieur des aliments pour vous assurer qu’ils sont
suffisamment secs.
Ŷ/HGXUpHGHODGpVK\GUDWDWLRQYDULHVHORQODFRQGLWLRQLQLWLDOH
et la quantité de l’aliment, l’humidité ambiante, le réglage de
la température, etc. Des morceaux d’aliment plus petits et
plus minces vont se déshydrater plus rapidement.
Ŷ3RXUOHVPHLOOHXUVUpVXOWDWVGDQVOHPRGHGHGpVK\GUDWDWLRQ
utilisez des grilles de petites dimensions pour permettre à
l’air d’atteindre les aliments par tous les côtés. Ces grilles
SRXUURQWVHSODFHUGLUHFWHPHQWVXUODJULOOHGXIRXU3RXU
déshydrater des purées, vous pouvez utiliser du papier
sulfurisé ou des toiles de cuisson en silicone.
Ŷ,OHVWQRUPDOG¶DSHUFHYRLUGHO¶KXPLGLWpVXUO¶LQWpULHXUGHV
surfaces du four lors de la déshydratation.
Ŷ&HUWDLQVDOLPHQWVSURILWHURQWG¶XQSUpWUDLWHPHQW
Ŷ5HWLUH]O¶KXPLGLWpH[FpGHQWDLUHGHO¶H[WpULHXUGHVDOLPHQWV
avant la déshydratation.
Ŷ3HUFH]YpULILH]RXFRXSH]GHVDOLPHQWVWHOVTXHEOHXHWV
canneberges ou raisons avant la déshydratation.
Ŷ6pFKH]SpULRGLTXHPHQWOHVYLDQGHVSRXUUHWLUHUO¶H[FqVGH
gras pendant la déshydratation.
Ŷ'pVK\GUDWHUSOXVGHJULOOHVjODIRLVQ¶HVWSDVUHFRPPDQGp
Type d’aliment
Température
recommandée (°F)
Temps de séchage
prévu (heures)
Fruits 130-140 4 - 36
Herbes 105-115 2 - 18
Viande/
Charqui*
145-165 4 - 12
/pJXPHV 125-130 3 - 24
/DYLDQGHGRLWrWUHFKDXIIpHj)DYDQWODGpVK\GUDWDWLRQ
Consultez le site fsis.usda.gov pour plus d’informations.
Nombre de grilles durant la
déshydratation
Positions de grille dans le
four
1 grille 3 (plates ou extensions)
2 grille 2 (extensions) et 4 (plates)
3 grille 2 (plates), 3 (extensions)
et 5 (plates)
4 grille 2 (plates), 3 (plates), 4
(plates) et 5 (plates)
Espaceur de porte
à utiliser en cours
de déshydratation.
Guide de cuisson (sur certains modèles)
UTILISATION DU FOUR : Guide de déshydratation

49-2003952 Rev. 0 23
ENTRETIEN ET NETTOYAGE : Nettoyage du four – Extérieur
Nettoyage du four – Extérieur
$VVXUH]YRXVTXHWRXVOHVERXWRQVVRQWHQSRVLWLRQGDUUrWHWTXHWRXWHVOHVVXUIDFHVVRQWIURLGHVDYDQWGHQHWWR\HUODFXLVLQLqUH
Tableau de commande
3RXUYHUURXLOOHUOHVFRPPDQGHVFRQVXOWH]OHVUHQVHLJQHPHQWV
VXUOHYROHWGHVUpJODJHVUDSLGHV4XLFN6HWWLQJV6KDGH
GDQVODVHFWLRQ5pJODJHVG¶DIILFKDJHGHO¶DSSDUHLO$SSOLDQFH
'LVSOD\6HWWLQJV,OHVWUHFRPPDQGpGHQHWWR\HUOHWDEOHDXGH
commande après chaque utilisation. Nettoyez-le avec du savon
doux et de l'eau ou un mélange de vinaigre et d'eau, rincez-le
à l'eau claire et séchez-le avec un chiffon doux pour le polir.
N'utilisez pas de nettoyant abrasif, de nettoyant liquide fort, de
tampon à récurer en plastique ou de nettoyant pour four sur le
WDEOHDXGHFRPPDQGH,OVHQGRPPDJHUDLHQWVRQUHYrWHPHQW
REMARQUE : 1(3$6XWLOLVHUG¶REMHWVSRLQWXVRXWUDQFKDQWV
pour nettoyer les orifices du microphone.
Surfaces extérieures du four
N'utilisez pas de nettoyant pour four, de nettoyant abrasif, de
nettoyant liquide fort, de laine d'acier, de tampon à récurer
en plastique ou de poudre à récurer pour nettoyer l'extérieur
GXIRXU8WLOLVH]XQVDYRQGRX[HWGHOHDXRXXQHVROXWLRQ
de vinaigre et d'eau. Rincez à l'eau claire et asséchez avec
XQFKLIIRQGRX[HWSURSUH/RUVGXQHWWR\DJHGHVVXUIDFHV
assurez-vous qu'elles sont à la température ambiante et
qu'elles ne sont pas exposées aux rayons directs du soleil.
Si une tache persiste sur les garnitures des évents, utilisez un
nettoyant abrasif doux et le côté grattoir d'une éponge pour de
meilleurs résultats.
/HVpFODERXVVXUHVGHPDULQDGHMXVGHIUXLWVDXFHWRPDWH
et jus de cuisson contiennent des éléments acides qui
SHXYHQWFDXVHUXQHGpFRORUDWLRQ(OOHVGRLYHQWGRQFrWUH
LPPpGLDWHPHQWHVVX\pHV/DLVVH]OHVVXUIDFHVFKDXGHV
refroidir, plus nettoyez-les et rincez-les.
Surfaces peintes et de couleur noire en acier inoxydable (certains modèles)
/HVVXUIDFHVSHLQWHVSHXYHQWLQFOXUHODSRUWHHWODJDUQLWXUH
entourant le tableau de commande. Nettoyez-les avec de l'eau
et du savon ou avec une solution d'eau et de vinaigre.
N'utilisez pas de nettoyant commercial pour four, de poudre
nettoyante, de laine d'acier ou d'abrasif fort sur les surfaces
peintes, y compris l'acier inoxydable noir.
Acier inoxydable (à l'exception de l'acier inoxydable noir) (certains modèles)
N'utilisez pas de tampon en laine d'acier; il raierait la surface.
3RXUQHWWR\HUODVXUIDFHHQDFLHULQR[\GDEOHXWLOLVH]GHOHDX
tiède savonneuse ou un produit de nettoyage ou à polir pour
acier inoxydable. Essuyez toujours la surface dans le sens
du grain. Suivez les instructions du nettoyant pour surface en
acier inoxydable.
/HVQHWWR\DQWVFRQWHQDQWGHODFLGHR[DOLTXHSHUPHWWHQW
d'éliminer la rouille, le ternissement et les petits défauts de la
VXUIDFHGXIRXU8WLOLVH]XQLTXHPHQWOHVQHWWR\DQWVOLTXLGHV
sans granule et frottez dans le sens du grain avec une éponge
douce et humide.
3RXUHQVDYRLUGDYDQWDJHVXUODFKDWGHSURGXLWVGHQHWWR\DJH
y compris les nettoyants pour appareils électroménagers en
acier inoxydable ou les produits de polissage, consultez les
VHFWLRQV©$FFHVVRLUHVªHW©6HUYLFHjODFOLHQWqOHªjODILQ
de ce manuel.

24 49-2003952 Rev. 0
Nettoyage du four – Intérieur
/LQWpULHXUGHYRWUHQRXYHDXIRXUSHXWrWUHQHWWR\pjODPDLQRXHQXWLOLVDQWOHVIRQFWLRQVGHQHWWR\DJHjODYDSHXURXGDXWRQHWWR\DJH
/HVpFODERXVVXUHVGHPDULQDGHMXVGHIUXLWVDXFHWRPDWHHWMXVGHFXLVVRQFRQWLHQQHQWGHVpOpPHQWVDFLGHVTXLSHXYHQWFDXVHU
XQHGpFRORUDWLRQ(OOHVGRLYHQWGRQFrWUHLPPpGLDWHPHQWHVVX\pHV/DLVVH]OHVVXUIDFHVFKDXGHVUHIURLGLUSOXVQHWWR\H]OHV
et rincez-les.
IMPORTANT: 3RXUOHVIRXUVDYHFFDPpUDGHIRXULQWpJUpHjODSRUWHVLOHYHUUHGHODSRUWHQ¶HVWSDVSURSUHODFODUWpGHO¶LPDJH
GHODFDPpUDSHXWrWUHDIIHFWpH9HXLOOH]VXLYUHOHVLQVWUXFWLRQVFLGHVVRXVSRXUQHWWR\HUFRUUHFWHPHQWOHYHUUHGHODSRUWH
Nettoyage manuel
N'utilisez pas de nettoyant pour four (sauf si certifié pour four à autonettoyage), de nettoyant liquide fort ou de tampon à récurer
jOLQWpULHXUGXIRXU8WLOLVH]XQVDYRQGRX[HWGHOHDXRXXQHVROXWLRQGHYLQDLJUHHWGHDX5LQFH]jOHDXFODLUHHWDVVpFKH]DYHF
XQFKLIIRQGRX[HWSURSUH$VVXUH]YRXVTXHOHVVXUIDFHVVRQWjODWHPSpUDWXUHDPELDQWHDYDQWGHOHVQHWWR\HU
Nettoyage à la vapeur
/DIRQFWLRQ6WHDP&OHDQQHWWR\DJHjODYDSHXUHVWFRQoXH
pour chauffer suffisamment l’eau ajoutée au fond afin qu’elle
atteigne une température permettant à la vapeur de se
condenser sur les saletés alimentaires. Ce processus ramollit
les résidus, ce qui facilite leur élimination.
/HIRXUGRLWrWUHIURLGDYDQWGHFRPPHQFHUXQF\FOH6WHDP
Clean (nettoyage à la vapeur). Cela permet d’essuyer en toute
sécurité les graisses et saletés au fond du four au préalable.
De plus, cela prévient le risque de choc thermique et de
fissuration de l’émail pouvant résulter du versement d’eau
froide sur une surface de four chaude.
Versez une tasse d’eau (250 ml) dans le fond du four. Fermez
la porte. Sélectionnez Steam Clean (nettoyage à la vapeur),
et appuyez sur Start (démarrer) à droite de l’écran. Vous
ne devez pas ouvrir la porte pendant les 30 minutes du
cycle Steam Clean (nettoyage à la vapeur), car cela réduira
l’efficacité du nettoyage. Essuyez tout excès d’eau et toute
saleté restante. NOTE :/¶HDXDXIRQGGXIRXUSHXWrWUHFKDXGH
immédiatement après la fin du cycle.
Autonettoyage
/LVH]OHVLQVWUXFWLRQVUHODWLYHVjO¶DXWRQHWWR\DJHGXIRXUDX
début de ce manuel avant d’utiliser la fonction Self Clean
DXWRQHWWR\DJH/DIRQFWLRQVHOIFOHDQXWLOLVHGHVWHPSpUDWXUHV
WUqVpOHYpHVSRXUQHWWR\HUO¶LQWpULHXUGXIRXU/DSRUWHGXIRXU
VHYHUURXLOOHORUVTXHFHWWHIRQFWLRQHVWDFWLYpH$YDQWGHODQFHU
le cycle d’autonettoyage, essuyez la graisse et les saletés
dans le four. Retirez tous les articles du four, à l’exception
GHVJULOOHVpPDLOOpHVGHFRXOHXUIRQFpH/HVJULOOHVEULOODQWHV
ou argentées, la sonde thermique, ainsi que tout ustensile
GHFXLVVRQRXDXWUHDUWLFOHGRLYHQWrWUHUHWLUpVGXIRXUDYDQW
de lancer le cycle d’autonettoyage. Fermez la porte. Si vous
utilisez un four double, sélectionnez le four que vous souhaitez
nettoyer. Sélectionnez Self Clean (autonettoyage). Choisissez
un cycle de 3, 4 ou 5 heures, puis sélectionnez Start (mise
en marche)3RXUOHVIRXUVWUqVVDOHVLOHVWUHFRPPDQGp
d’utiliser la durée maximale de 5 heures. Si vous souhaitez
utiliser la durée par défaut, appuyez sur Start (mise en
marche) immédiatement après avoir sélectionné Self Clean
(autonettoyage)/HIRXULQGLTXHUDTXHODSRUWHHVWYHUURXLOOpH
HWDIILFKHUDOHWHPSVUHVWDQWGXF\FOH$SSX\H]VXUCancel
(annuler)VLYRXVVRXKDLWH]DUUrWHUOHF\FOH/HIRXUV¶pWHLQGUD
automatiquement lorsque le cycle d’autonettoyage sera
WHUPLQp/DSRUWHGHPHXUHUDYHUURXLOOpHMXVTX¶jFHTXHOHIRXU
DLWUHIURLGL/RUVTXHOHIRXUDUHIURLGLHVVX\H]ODFHQGUHTXLVH
sera formée dans le four.
Nous vous recommandons d'aérer votre cuisine en ouvrant
XQHIHQrWUHRXHQXWLOLVDQWXQYHQWLODWHXURXXQHKRWWHORUVGX
premier autonettoyage.
/DVDOHWpVXUOHFDGUHDYDQWGXIRXUDLQVLTXjOH[WpULHXUGX
MRLQWGHODSRUWHGRLWrWUHQHWWR\pHjODPDLQ1HWWR\H]FHV
zones avec de l'eau chaude et des tampons en laine d'acier
imbibés de savon ou des nettoyants tels que Soft Scrub
0'
.
Rincez bien avec de l'eau propre et séchez.
1HQHWWR\H]SDVOHMRLQW/HPDWpULDXHQILEUHGHYHUUHGXMRLQW
GHODSRUWHGXIRXUQHUpVLVWHSDVjODEUDVLRQ,OHVWHVVHQWLHO
que le joint reste intact. Si vous constatez que le joint est usé
ou endommagé, remplacez-le.
$VVXUH]YRXVTXHOHFRXYUHDPSRXOHHVWHQSODFHHWTXHOD
ODPSHHVWpWHLQWH/HPRGHGDXWRQHWWR\DJHGDQVXQIRXU
GRXEOHQHSHXWSDVrWUHXWLOLVpVLPXOWDQpPHQWGDQVOHVGHX[
IRXUV'HSOXVDXFXQDXWUHPRGHQHSHXWrWUHGpPDUUpGDQV
l'autre cavité du four pendant l'autonettoyage de l'un des deux
fours.
IMPORTANT :&HUWDLQVRLVHDX[VRQWH[WUrPHPHQWVHQVLEOHV
aux fumées dégagées pendant l'autonettoyage d'un four.
Déplacez-les dans une autre pièce bien aérée.
ENTRETIEN ET NETTOYAGE : 1HWWR\DJHGXIRXU±,QWpULHXU
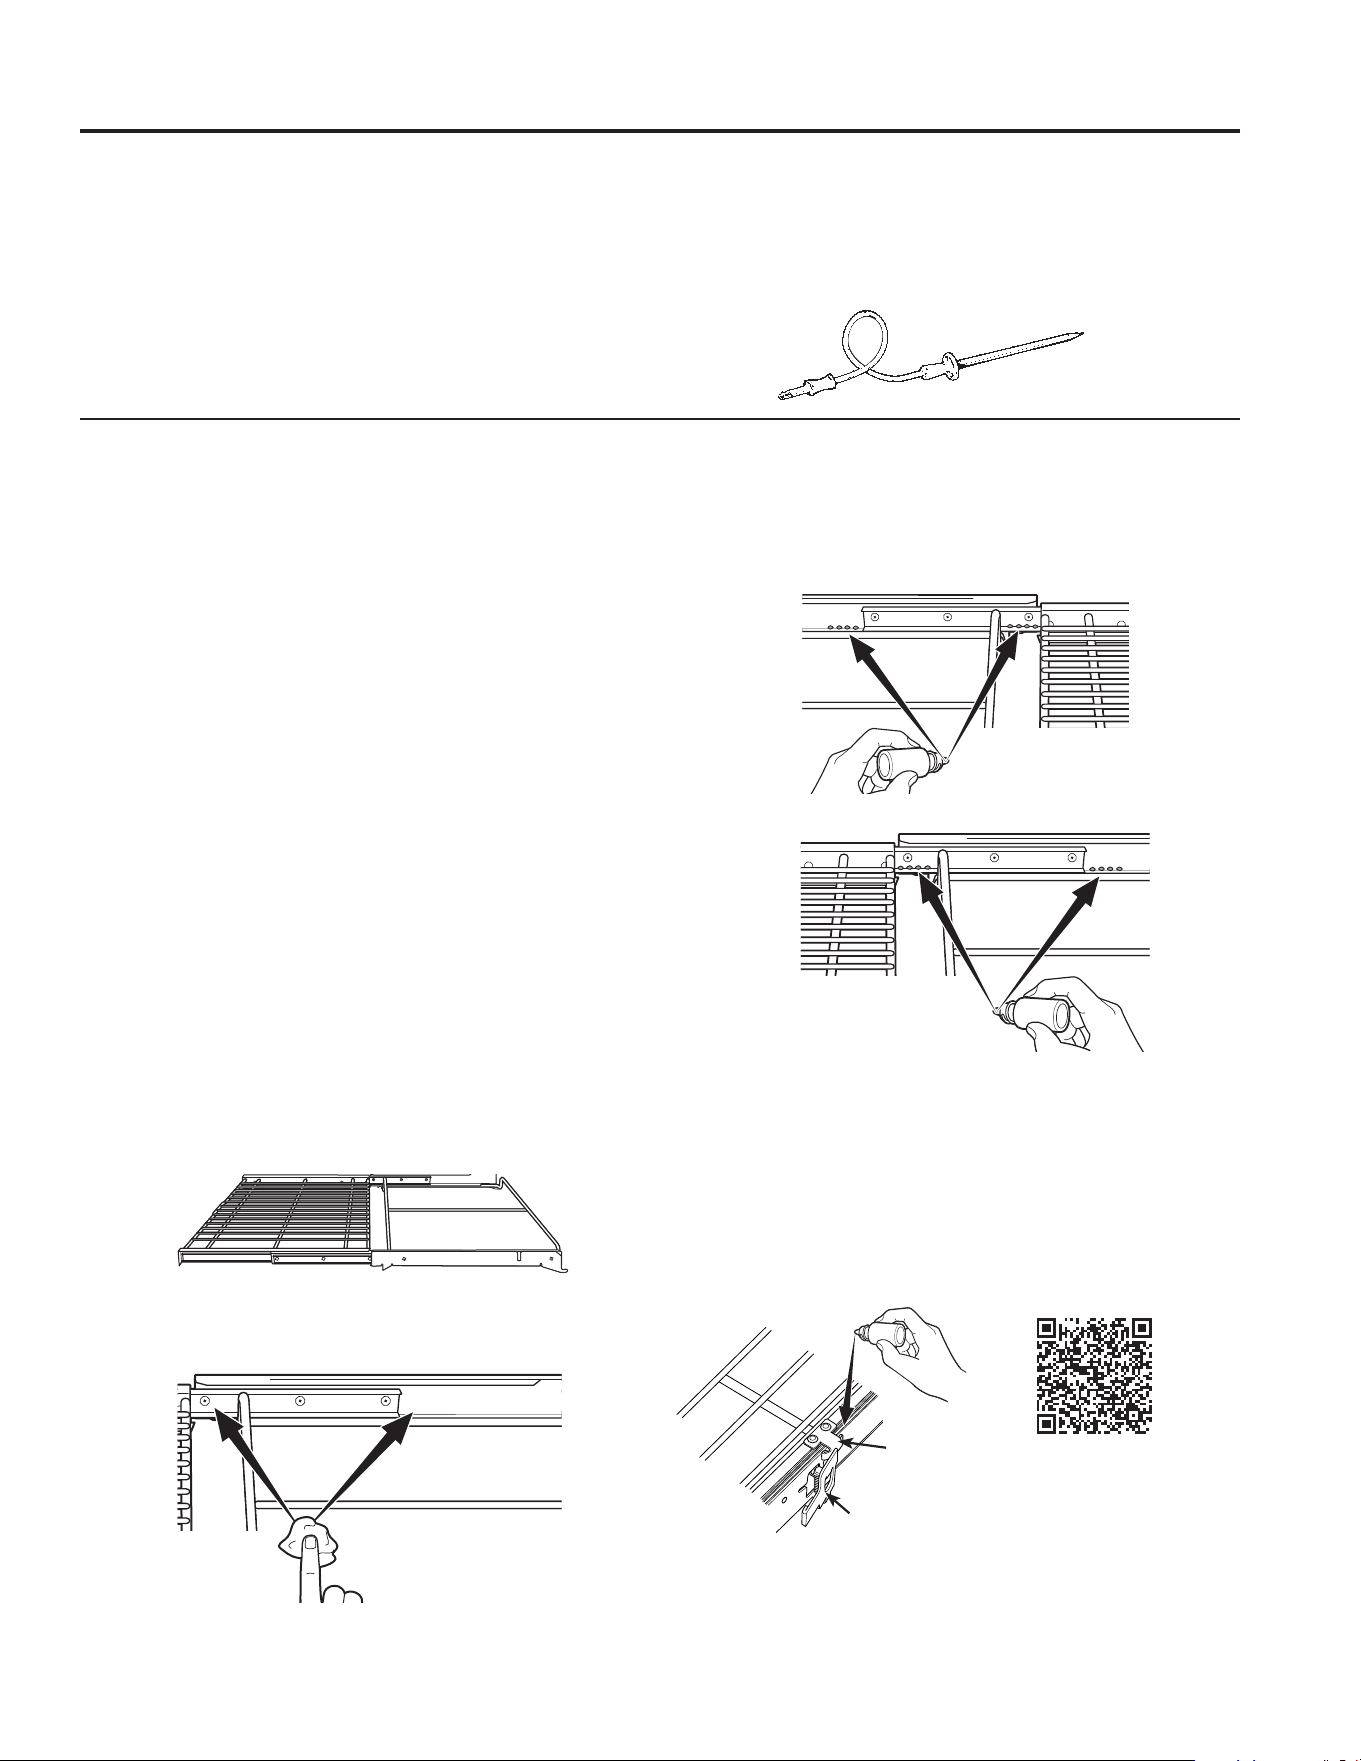
49-2003952 Rev. 0 25
UTILISATION DU FOUR : 1HWWR\DJHGXIRXU±,QWpULHXU
Nettoyage du four – Intérieur
Probe (Sonde thermique)
/DVRQGHWKHUPLTXHSHXWrWUHQHWWR\pHDYHFGHOHDX
savonneuse ou un tampon à récurer imbibé de savon.
/DLVVH]ODVRQGHWKHUPLTXHUHIURLGLUDYDQWGHODODYHU
Frottez les taches rebelles avec un tampon à récurer imbibé
de savon, rincez et séchez.
3RXUFRPPDQGHUGHVVRQGHVWKHUPLTXHVDGGLWLRQQHOOHV
UHSRUWH]YRXVDX[VHFWLRQV©$FFHVVRLUHVªHW©6HUYLFH
à la clientèle » à la fin de ce manuel.
Ŷ 1LPPHUJH]SDVODVRQGHWKHUPLTXHGDQVOHDX
Ŷ Ne rangez pas la sonde thermique dans le four.
Ŷ Ne laissez jamais la sonde thermique à l'intérieur du four
pendant l'autonettoyage ou le nettoyage à la vapeur.
GRILLES DE FOUR
Si les grilles fournies avec votre four sont des grilles émaillées
foncées, non brillantes, elles peuvent rester dans le four
SHQGDQWOHF\FOHG¶DXWRQHWWR\DJHVDQVrWUHHQGRPPDJpHV
3RXUQHWWR\HUOHVJULOOHVPDQXHOOHPHQWXWLOLVH]GHO¶HDXFKDXGH
VDYRQQHXVH$VVXUH]YRXVGHQHSDVODYHUOHVJOLVVLqUHVG¶XQH
grille extensible.
Si les grilles deviennent plus difficiles à retirer du four, mettez
un peu d’huile végétale sur un chiffon doux ou un essuie-tout
HWIURWWH]OHVVXSSRUWVGHJULOOHGXIRXU1(3$6DSSOLTXHU
l’huile sur la glissière d’une grille extensible.
REMARQUE :/¶XWLOLVDWLRQG¶DXWUHVKXLOHVGHFXLVVRQFRPPH
O¶KXLOHG¶DUDFKLGH3DP
®
ou d’autres aérosols lubrifiants peut
entraîner une décoloration ou un résidu de couleur rouille sur
OHVJULOOHVHWOHVSDURLVGHODFDYLWp3RXUQHWWR\HUFHUpVLGX
utilisez une solution d’eau et de savon ou de vinaigre et d’eau.
Rincez à l’eau claire et séchez avec un chiffon doux.
3pULRGLTXHPHQWLOSHXWrWUHQpFHVVDLUHGHOXEULILHUOHVJULOOHV
GXIRXUjO¶DLGHGXOXEULILDQWIRXUQLDYHFYRWUHIRXU3RXU
commander du lubrifiant supplémentaire, consultez la section
accessoires de ce manuel.
Utilisation du four :
1. Retirez la grille du four. Voir la section Grilles de four
extensibles.
2. Dépliez totalement la grille sur la table ou le plan de travail.
Nous vous recommandons de placer du papier journal
sous la grille pour faciliter le nettoyage.
3. Si vous constatez la présence de résidus sur les barres
coulissantes, éliminez-les à l’aide d’une serviette en papier.
REMARQUE :7RXWOXEULILDQWHVVX\pGRLWrWUHUpDSSOLTXp
4. Secouez le lubrifiant avant de l’ouvrir. En commençant par le
mécanisme coulissant gauche de la grille, appliquez quatre
(4) goutelettes de lubrifiant sur les deux (2) chenilles du
mécanisme coulissant à proximité des porte-roulements.
)DLWHVGHPrPHSRXUOHPpFDQLVPHFRXOLVVDQWGURLW
2XYUH]HWIHUPH]ODJULOOHSOXVLHXUVIRLVSRXUpWDOHUOH
lubrifiant.
7. Replacez le bouchon du lubrifiant et secouez-le à nouveau.
5HWRXUQH]ODJULOOHHWUpSpWH]OHVpWDSHVHW3RXU
les supports de grille moulés uniquement dans la paroi de la
cavité du four.)
De plus, pour une performance de glissement optimale,
assurez-vous d’ajouter quelques gouttes de lubrifiant sur
OHVXSSRUWEUDFNHWHWOHUHVVRUWjSDOHWWHSDGGOHVSULQJ
illustrés ci-dessous :
8. Fermez la grille, placez la grille avec le côté droit à la
verticale et introduisez-la dans le four. Voir la section Grilles
de cuisson extensibles.
9. Répétez les étapes ci-dessus pour chaque grille.
Côté
gauche
Côté droit de la
grille vers le haut
Côté droit
de la grille
vers le haut
Côté
droit
https://products.geappliances.
com/appliance/gea-support-
VHDUFKFRQWHQW"FRQWHQW,G
Support
Ressort à palette

26 49-2003952 Rev. 0
Lampe du four
AVERTISSEMENT
RISQUE DE CHOC ÉLECTRIQUE OU D'INCENDIE :$YDQWGHUHPSODFHUODPSRXOHFRXSH]
ODOLPHQWDWLRQGXIRXUDXQLYHDXGXWDEOHDXGHGLVWULEXWLRQGLVMRQFWHXUVRXIXVLEOHV/HQRQUHVSHFWGH
cette consigne peut entraîner un choc électrique ou des brûlures.
ATTENTION
RISQUE DE BRÛLURE :/DPSRXOHHWOHFRXYUHDPSRXOHHQYHUUHGRLYHQWrWUHUHWLUpVORUVTXLOVVRQWIURLGV
7RXFKHUOHYHUUHFKDXGjPDLQQXHRXDYHFXQFKLIIRQKXPLGHSHXWFDXVHUGHVEUOXUHV
1. Coupez le courant au niveau du tableau de distribution
(fusible ou disjoncteur).
2. Retirez les grilles du four.
3. Faites glisser un tournevis à lame plate ou un couteau à
beurre entre le boîtier métallique et le couvercle en verre
de l'ampoule. REMARQUE : Sur certains modèles, il y a
une attache métallique qui maintient visiblement le verre.
/RXWLOGRLWrWUHLQVpUpHQWUHOHERvWLHUPpWDOOLTXHHWODWWDFKH
retenant le verre.
4. Soutenez le couvercle en verre de l'ampoule avec
deux doigts pour éviter que le couvercle ne tombe
au fond du four.
7RXUQH]GRXFHPHQWODODPHGXWRXUQHYLVRXGXFRXWHDXj
beurre pour desserrer le couvercle en verre de l'ampoule.
9HLOOH]jQHSDVpEUpFKHUOHUHYrWHPHQWGXIRXU
6. Retirez le couvercle de l'ampoule.
7. Retirez l'ampoule en la saisissant fermement et en la
faisant glisser vers l'extérieur jusqu'à ce que les deux
broches se soient dégagées de la douille en céramique.
8. Ne touchez pas le verre de la nouvelle ampoule de
remplacement avec vos doigts. Cela entraînera des
GRPPDJHVjODPSRXOHSRXYDQWOHPSrFKHUGHVDOOXPHU
Saisissez l'ampoule de remplacement avec une serviette
propre ou un mouchoir en papier avec les broches vers le
EDV$OLJQH]OHVGHX[EURFKHVGDQVODGRXLOOHHQFpUDPLTXH
en appuyant doucement jusqu'à ce que l'ampoule soit bien
en place dans la douille.
9. Faites glisser le couvercle de protection dans le support
et poussez jusqu'à ce que les fixations s'enclenchent
dans le boîtier.
10. Rebranchez l'alimentation.
ENTRETIEN ET NETTOYAGE : /DPSHGX)RXU
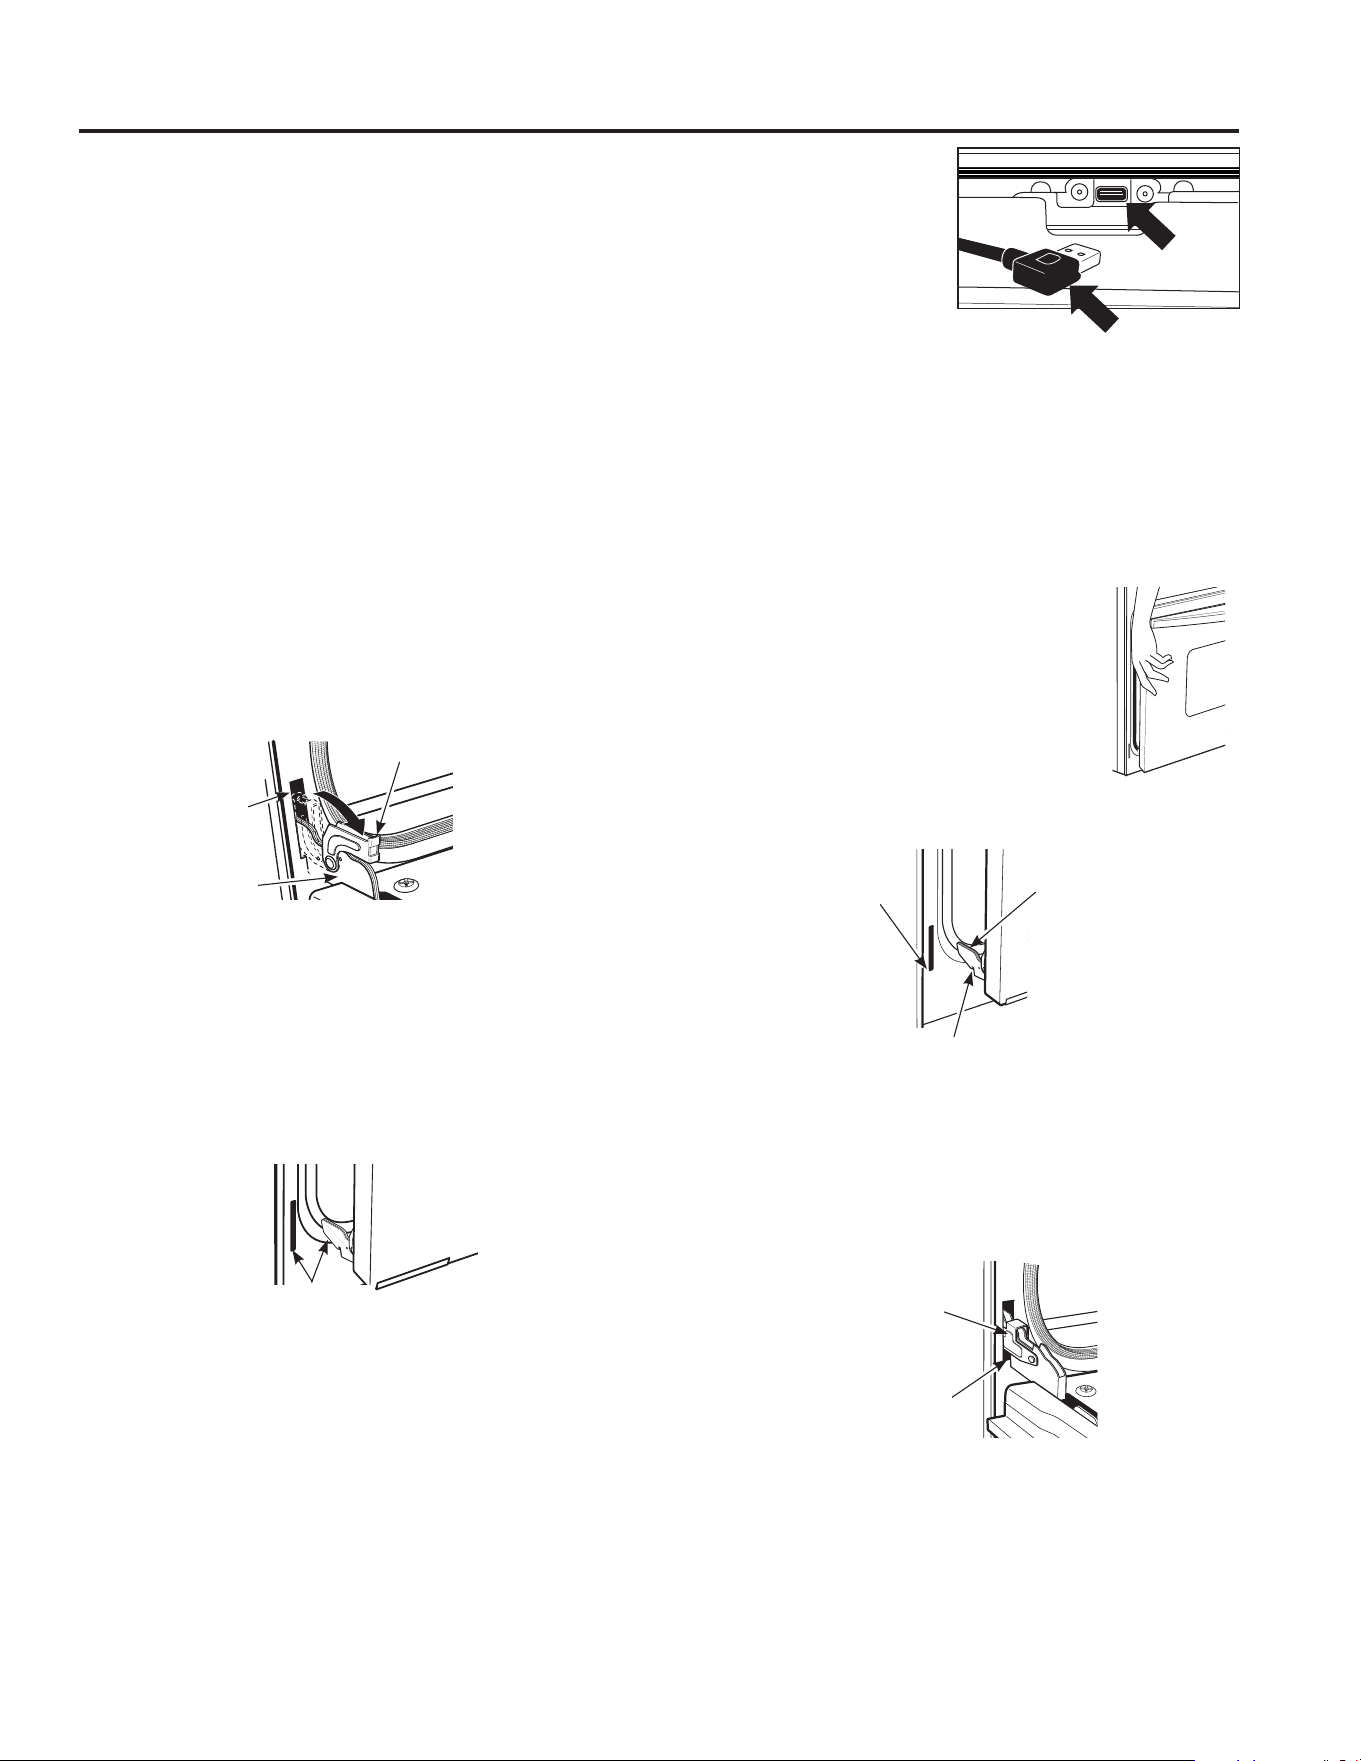
49-2003952 Rev. 0 27
ENTRETIEN ET NETTOYAGE : 3RUWHGX)RXU
Porte du four
Retrait de la porte du four (sur certains
modèles)
REMARQUE : /HUHWUDLWGHODSRUWHQ¶HVWSDVUHTXLVSRXU
l’installation du produit mais il peut la faciliter.
Pour retirer la porte :
2XYUH]ODSRUWHGXIRXUDXVVLORLQTX¶HOOHOHSRXUUD
3RXVVH]OHVYHUURXVGHFKDUQLqUHYHUVOHEDVHWOHFDGUHGH
SRUWHMXVTX¶jODSRVLWLRQGHGpYHUURXLOODJH8QWRXUQHYLVj
lame plate peut s’avérer nécessaire. NE SOULEVEZ PAS
LA PORTE PAR LA POIGNÉE!
3ODFH]OHVPDLQVGHVGHX[F{WpVGHODSRUWHHWIHUPH]OD
porte du four jusqu’à la position de retrait (environ 1 à 2 po
[2,5 cm à 5,1 cm] depuis la position fermée).
4. Soulevez la porte verticalement puis vers l’extérieur
jusqu’à ce que les bras des charnières sortent des fentes.
REMARQUE : /DSRUWHGXIRXUHVWWUqVORXUGH$VVXUH]
vous d’avoir une prise solide avant de soulever la porte
KRUVGHVFKDUQLqUHV8VH]GHSUXGHQFHXQHIRLVODSRUWH
retirée. Ne déposez pas la porte sur sa poignée. Cela
pourrait causer des bosses ou des rayures.
Remise en place de la porte du four
REMARQUE :/DSRUWHGXIRXUHVWWUqVORXUGH'HO¶DLGHSHXW
s’avérer nécessaire pour soulever la porte suffisamment haut
pour la glisser dans les fentes de charnière. Ne soulevez pas
la porte par la poignée.
1. Soulevez la porte du four en l’agrippant de
chaque côté.
$YHFODSRUWHGDQVOHPrPHDQJOHTXHSRXU
la position de retrait (environ 1 à 2 po [2,5
cm à 5,1 cm] depuis la position fermée),
rentrez l’encoche du bras de charnière dans
le bord inférieur de la fente de charnière.
/¶HQFRFKHGXEUDVGHFKDUQLqUHGRLWrWUH
complètement insérée dans le bas
de la fente.
2XYUH]ODSRUWHFRPSOqWHPHQW6LODSRUWHQ¶HVWSDV
totalement ouverte, l’encoche ne reposera pas à fond sur le
bord inférieur de la fente.
3RXVVH]OHVYHUURXVGHFKDUQLqUHYHUVOHKDXWFRQWUHOH
cadre frontal de la cavité du four, jusqu’à la position de
verrouillage.
5. Fermez la porte du four.
Charnière
en position
verrouillée
Encoche de
charnière rentrée
solidement dans
le bas de la fente
de charnière
Bord
inférieur
de la
fente
Bras de
charnière
Encoche de charnière
Fente de
charnière
Bras de
charnière
3RVLWLRQDYHF
charnière déverrouillée
/DFKDUQLqUHVRUW
de la fente
/DSRUWHHVWWUqVORXUGH6R\H]SUXGHQWORUVTXHYRXVHQOHYH]RXVRXOHYH]ODSRUWH1HVRXOHYH]
pas la porte par la poignée.
Sur les fours avec une caméra: $YDQWGHUHWLUHUODSRUWHGpFRQQHFWH]OHIDLVFHDXGHILOVGHOD
caméra en débranchant le connecteur inséré dans le bas de la porte.
IMPORTANT: Si la vitre de la porte ou le couvercle de la lampe du four ne sont pas propres, la
FODUWpGHO¶LPDJHGHODFDPpUDSHXWrWUHDIIHFWpH9HXLOOH]VXLYUHOHVLQVWUXFWLRQVFLGHVVRXVSRXU
QHWWR\HUFRUUHFWHPHQWODYLWUHGHODSRUWH3RXUGHPHLOOHXUVUpVXOWDWVQHWWR\H]ODYLWUHGHODSRUWH
et le couvercle de la lampe du four immédiatement après un renversement, une fois que le four a
refroidi.
3RUWGHFDPpUD
Câble de caméra

28 49-2003952 Rev. 0
eFRQRPLVH]WHPSVHWDUJHQW&RQVXOWH]OHVWDEOHDX[GHVSDJHVVXLYDQWHVDYDQWGHIDLUHDSSHODXVHUYLFH9LVLRQQH]GHVYLGpRV
G¶DXWRDVVLVWDQFHHWOD)$4jbodewell.com/faqs.
Problème Causes possibles Solutions
Mon nouveau four ne cuit
pas les aliments comme
mon ancien four. Y a-t-il un
problème avec le réglage de
la température?
Votre nouveau four est doté d'un système de cuisson différent
de celui de votre ancien four; par conséquent, il peut cuire les
aliments différemment.
3RXUODSUHPLqUHXWLOLVDWLRQUHVSHFWH]OHVWHPSVHWOHV
températures indiqués dans votre recette. Si vous pensez
toujours que votre four chauffe trop ou ne chauffe pas assez,
YRXVSRXYH]DMXVWHUODWHPSpUDWXUHYRXVPrPH&RQVXOWH]
ORSWLRQ©&RRNLQJFXLVVRQªGDQVODVHFWLRQ©5pJODJHVª
pour régler la température du four. REMARQUE : Ce réglage
affecte les températures de la cuisson traditionnelle, de la
cuisson à convection et de la cuisson à convection multiple;
il n'affectera pas le rôtissage à convection, la cuisson au gril
traditionnelle, la cuisson au gril à convection
ou le nettoyage.
Les aliments ne cuisent pas
correctement
/HVFRPPDQGHVGXIRXUVRQWPDOUpJOpHV 5HSRUWH]YRXVjODVHFWLRQ©0RGHVGHFXLVVRQª
/DJULOOHQDSDVpWpSODFpHVXUODERQQHSRVLWLRQ
dans le four ou n'est pas de niveau.
5HSRUWH]YRXVjODVHFWLRQ©0RGHVGHFXLVVRQªHWDX*XLGH
de cuisson.
8VWHQVLOHGHFXLVVRQLQDSSURSULpRXGHGLPHQVLRQV
inadéquates.
5HSRUWH]YRXVjODVHFWLRQ©8VWHQVLOHVGHFXLVVRQª
/DWHPSpUDWXUHGXIRXUGRLWrWUHDMXVWpH 5HSRUWH]YRXVjORSWLRQ©&RRNLQJFXLVVRQªGDQV
la section « Réglages ».
Substitution d'ingrédients /DVXEVWLWXWLRQGLQJUpGLHQWVSHXWPRGLILHUOHUpVXOWDW
Les aliments ne grillent pas
correctement
/HVFRPPDQGHVGXIRXUVRQWPDOUpJOpHV $VVXUH]YRXVGHVpOHFWLRQQHUOHPRGHGHFXLVVRQ
au gril approprié.
3RVLWLRQGHJULOOHLQDSSURSULpH Consultez le Guide de cuisson pour des suggestions sur la
position des grilles.
/HVDOLPHQWVVRQWFXLWVGDQVXQXVWHQVLOHFKDXG $VVXUH]YRXVTXHOXVWHQVLOHGHFXLVVRQHVWIURLG
8QXVWHQVLOHGHFXLVVRQLQDSSURSULpSRXUOHJULO
est utilisé.
8WLOLVH]XQXVWHQVLOHGHFXLVVRQFRQoXSRXUOHJULO
/HSDSLHUGDOXPLQLXPXWLOLVpGDQVODOqFKHIULWHRXVXUODJULOOH
n'est pas installé selon les recommandations.
Si vous utilisez du papier d'aluminium, pratiquez des ouvertures
vis-à-vis des ouvertures de la lèchefrite.
Dans certaines régions, la tension électrique
SHXWrWUHEDVVH
3UpFKDXIIH]OpOpPHQWGHJULOSHQGDQWPLQXWHV
Température du four trop
chaude ou trop froide
/DWHPSpUDWXUHGXIRXUGRLWrWUHDMXVWpH 5HSRUWH]YRXVjORSWLRQ©&RRNLQJFXLVVRQªGDQV
la section « Réglages ».
Le four ne fonctionne pas, ou
semble ne pas fonctionner
8QIXVLEOHGHYRWUHGRPLFLOHSHXWrWUHJULOOp
ou le disjoncteur s'est déclenché.
Remplacez le fusible ou réenclenchez le disjoncteur.
/HVFRPPDQGHVGXIRXUVRQWPDOUpJOpHV &RQVXOWH]OHVVHFWLRQV©8WLOLVDWLRQGHO¶DSSDUHLOªHW©5pJODJH
d’un mode de cuisson ».
/HIRXUHVWHQPRGHVDEEDW $VVXUH]YRXVTXHOHIRXUQHVWSDVHQPRGHVDEEDW5HSRUWH]
vous à l'option « Sabbath (sabbat) » dans
la section « Réglages ».
Bruits de crépitement
ou de craquement
Ces sons proviennent du métal qui chauffe et refroidit pendant
les fonctions de cuisson et d'autonettoyage.
Cela est normal.
Pourquoi ma cuisinière émet-
elle un cliquetis lorsque
j'utilise le four?
Votre four a été conçu pour maintenir avec précision sa
température. Vous pourriez entendre les éléments chauffants
de votre four « cliquer » plus souvent que dans les anciens
modèles afin d’obtenir de meilleurs résultats pendant les
cycles de cuisson et de nettoyage.
Cela est normal.
L'horloge et la minuterie ne
fonctionnent pas
8QIXVLEOHGHYRWUHGRPLFLOHSHXWrWUHJULOOp
ou le disjoncteur s'est déclenché.
Remplacez le fusible ou réenclenchez le disjoncteur.
La lampe du four ne
fonctionne pas
/DPSRXOHHVWPDOVHUUpHRXHOOHHVWJULOOpH Resserrez ou remplacez l'ampoule.
L'autonettoyage ne fonctionne
pas
/DWHPSpUDWXUHGXIRXUHVWWURSpOHYpHSRXUSURJUDPPHU
l'autonettoyage.
/DLVVH]OHIRXUUHIURLGLUHWUHSURJUDPPH]OH
/HVFRPPDQGHVGXIRXUVRQWPDOUpJOpHV Reportez-vous à la section sur le nettoyage du four.
Fumée excessive pendant
l'autonettoyage
Saleté ou graisse excessive. $SSX\H]VXUCancelSRXUDUUrWHUOHF\FOH2XYUH]OHVIHQrWUHV
SRXUpOLPLQHUODIXPpHGDQVODSLqFH$WWHQGH]TXHODSRUWHVH
déverrouille. Essuyez les saletés excédentaires et réinitialisez le
cycle de nettoyage.
Conseils de dépannage... $YDQWGHFRQWDFWHUOHVHUYLFHGHGpSDQQDJH
CONSEILS DE DÉPANNAGE

49-2003952 Rev. 0 29
Problème Causes possibles Solutions
Fumée excessive en mode de
cuisson au gril
/HVDOLPHQWVVRQWWURSSUqVGHOpOpPHQW $EDLVVH]ODJULOOHGDQVOHIRXU
La porte du four ne s'ouvre
pas après l'autonettoyage
Four trop chaud. /DLVVH]ODWHPSpUDWXUHGXIRXUUHGHVFHQGUHHQGHVVRXV
de la température de verrouillage.
Le four n'est pas propre après
l'autonettoyage
/HVFRPPDQGHVGXIRXUVRQWPDOUpJOpHV Reportez-vous à la section sur le nettoyage du four.
/HIRXUpWDLWWUqVVDOH Nettoyez les éclaboussures importantes avant de lancer
ODXWRQHWWR\DJH/HVIRXUVWUqVVDOHVSHXYHQWQpFHVVLWHU
un second autonettoyage ou un autonettoyage plus long.
« F– » suivi d'un chiffre ou
d'une lettre sont affichés sur
l'écran ACL
,OVDJLWGXQFRGHGHUUHXUGHIRQFWLRQ $SSX\H]VXUDismissHIIDFHUVXUOpFUDQ$&//DLVVH]
le four refroidir pendant une heure. Rallumez le four.
Si le code de fonction réapparaît. Coupez l'alimentation du four pendant au moins 30 secondes,
puis rétablissez-la. Si le code d'erreur de fonction réapparaît,
contactez un service de réparation.
L'afficheur à cristaux liquide
(ACL) ne fonctionne pas
correctement
8QIXVLEOHGHYRWUHGRPLFLOHSHXWrWUHJULOOpRXOHGLVMRQFWHXU
s'est déclenché.
Remplacez le fusible ou réenclenchez le disjoncteur.
/HVFRPPDQGHVGXIRXUVRQWPDOUpJOpHV &RQVXOWH]ODVHFWLRQ©0RGHVGHFXLVVRQªRX©5pJODJHVª
SRXUDVVXUHUODERQQHXWLOLVDWLRQ$VVXUH]YRXVTXHOHORJLFLHOGH
l'appareil a été mis à jour
à la plus récente version.
/pFUDQ$&/HVWYHUURXLOOp Déverrouillez l'écran en appuyant sur Unlock (déverrouiller).
Si cela ne corrige pas le problème, coupez et rétablissez
l'alimentation au disjoncteur et assurez-vous que le logiciel de
l'appareil a été mis à jour à la plus récente version.
/¶pFUDQWDFWLOHQHUpSRQGSDVFRUUHFWHPHQW 3ODFH]WRXWHYRWUHPDLQVXUO¶pFUDQWDFWLOHSHQGDQWVHFRQGHV
puis retirez-la pour réinitialiser la sensibilité de l’écran tactile.
/pFUDQ$&/HVWGpIHFWXHX[ Coupez et rétablissez l'alimentation au disjoncteur et assurez-
vous que le logiciel de l'appareil a été mis à jour
à la plus récente version. Si le problème persiste, appelez le
service à la clientèle pour faire évaluer le problème.
Panne de courant,
réinitialisation de l'horloge
Coupure de courant ou surtension. Remettez l'horloge à l'heure. Si le four était en cours d'utilisation,
vous devez le reprogrammer en appuyant sur la touche Cancel
(annuler), en remettant l'horloge à l'heure et en reprogrammant la
fonction de cuisson choisie.
Odeur de « brûlé » ou d'huile
provenant de l'évent
Cela est normal pour un nouveau four et disparaît avec le
temps.
3RXUDFFpOpUHUFHSURFHVVXVSURJUDPPH]XQDXWRQHWWR\DJHGDX
moins 3 heures. Reportez-vous à la section sur le nettoyage du
four.
Forte odeur ,OHVWQRUPDOTXXQHRGHXUVHGpJDJHGHOLVRODQWGHOLQWpULHXU
du four pendant les premières utilisations du four.
Ceci est temporaire et cessera avec le temps ou après
un cycle d'autonettoyage.
Bruit de ventilateur 8QYHQWLODWHXUGHUHIURLGLVVHPHQWSHXWDXWRPDWLTXHPHQWVH
mettre en marche.
&HODHVWQRUPDO/HYHQWLODWHXUGHUHIURLGLVVHPHQWVHPHWWUDHQ
marche pour refroidir les composants internes.
,OSHXWIRQFWLRQQHUMXVTXjKDSUqVODUUrWGXIRXU
La vitre de ma porte de four
semble teintée ou présente
un arc-en-ciel. Est-elle
défectueuse?
1RQ/HYHUUHLQWpULHXUGHODSRUWHGXIRXUHVWUHYrWXGXQH
barrière thermique qui réfléchit la chaleur dans le four pour
prévenir la perte de chaleur et pour garder l'extérieur de la
porte froide pendant la cuisson.
Cela est normal. Dans certaines conditions d'éclairage
et selon l'angle de vue, il est possible de percevoir une teinte ou
les couleurs de l'arc-en-ciel.
Il arrive que le four prenne
plus de temps à préchauffer
pour atteindre la même
température
8VWHQVLOHGHFXLVVRQRXDOLPHQWGDQVOHIRXU /XVWHQVLOHGHFXLVVRQRXOHVDOLPHQWVSODFpVGDQVOHIRXU
prolongent le préchauffage. Retirez les aliments pour diminuer le
temps de préchauffage.
Nombre de grilles dans le four. /DMRXWGHJULOOHVGDQVOHIRXUSURORQJHOHWHPSVGHSUpFKDXIIDJH
Retirez quelques grilles.
0RGHVGHFXLVVRQGLYHUV /HVGLIIpUHQWVPRGHVGHFXLVVRQXWLOLVHQWGLIIpUHQWHVPpWKRGHVGH
préchauffage pour chauffer le four. Certains modes de cuisson
prendront plus de temps que d'autres (ex. : cuisson à convection
multiple).
Le four ne fonctionne pas à
distance
3UREOqPHVGHURXWHXUSDVGHVLJQDOVDQVILOHWF 3RXUREWHQLUGHODLGHVXUODFRQQHFWLYLWpUpVHDXVDQVILO
du four, veuillez appeler le 1-800-220-6899.
/HIRXUQHVWSDVFRQQHFWp
L’image de la caméra n’est
pas claire
/DYLWUHGHODSRUWHGXIRXUHVWVDOH Suivez les instructions de la section Nettoyage du four pour la
nettoyer correctement.
Aucune image sur
l’application de la caméra
/HFkEOHGHODFDPpUDHVWGpEUDQFKp $VVXUH]YRXVTXHOHFkEOHGHFDPpUDHVWEUDQFKpGDQVOHEDV
de la porte.
Conseils de dépannage... $YDQWGHFRQWDFWHUOHVHUYLFHGHGpSDQQDJH
CONSEILS DE DÉPANNAGE
30 49-2003952 Rev. 0
Garantie limitée du four électrique GE Appliances
GARANTIE LIMITÉE
$JUDIH]YRWUHIDFWXUHLFL8QHSUHXYHGHODGDWHGDFKDWGRULJLQH
est requise pour obtenir des services sous garantie.
7RXWHVOHVUpSDUDWLRQVVRXVJDUDQWLHVRQWHIIHFWXpHVSDUQRV&HQWUHVGHUpSDUDWLRQRXSDUQRVUpSDUDWHXUVDJUppV&XVWRPHU&DUH
®
3RXU
faire la demande d'une réparation en ligne, visitez Bodewell.com/schedule-repair-service, ou appelez 833-4BODEWELL
(833-426-3393). $X&DQDGDYHXLOOH]YLVLWHUelectromenagersge.ca/soutien-apres-vente.
Veuillez avoir les numéros de série et de modèle
de votre appareil à portée de main lorsque vous appelez pour obtenir un service.
/¶HQWUHWLHQGHYRWUHDSSDUHLOSRXUUDLWQpFHVVLWHUO¶XWLOLVDWLRQG¶XQDFFqVDX[GRQQpHVHPEDUTXpHVSRXUOHGLDJQRVWLF&HODSHUPHWDX
WHFKQLFLHQGHO¶DWHOLHUGHUpSDUDWLRQ*($SSOLDQFHVGHGLDJQRVWLTXHUUDSLGHPHQWWRXWHGpIDLOODQFHGHYRWUHpOHFWURPpQDJHUHWj*(
$SSOLDQFHVG¶DPpOLRUHUODTXDOLWpGHVHVSURGXLWV6LYRXVQHVRXKDLWH]SDVWUDQVPHWWUHOHVGRQQpHVGHYRWUHDSSDUHLOj*($SSOLDQFHV
veuillez aviser votre technicien de s’en abstenir au moment de la visite de service.
Ce que GE Appliances ne couvre pas :
Ŷ /¶HQYRLG¶XQWHFKQLFLHQFKH]YRXVSRXUYRXVPRQWUHUFRPPHQW
utiliser le produit.
Ŷ 8QHLQVWDOODWLRQXQHOLYUDLVRQRXXQHQWUHWLHQLQDGpTXDWV
Ŷ 8QHSDQQHGXSURGXLWVXLWHjXQHXWLOLVDWLRQDEXVLYHRX
inadéquate, une modification, un usage autre que celui auquel il
a été destiné ou un usage commercial.
Ŷ /HUHPSODFHPHQWGHVIXVLEOHVGHYRWUHUpVLGHQFHRXOH
réenclenchement des disjoncteurs.
Ŷ /HVGRPPDJHVDXSURGXLWFDXVpVSDUXQDFFLGHQWXQLQFHQGLH
une inondation ou une catastrophe naturelle.
Ŷ 'RPPDJHVDFFLGHQWHOVRXFRQVpFXWLIVFDXVpVSDUGpYHQWXHOV
défauts de cet appareil.
Ŷ /HVGRPPDJHVVXUYHQXVDSUqVODOLYUDLVRQ
Ŷ /HVHUYLFHV¶LOHVWLPSRVVLEOHG¶DYRLUDFFqVDXSURGXLW
Ŷ /HVHUYLFHSRXUUpSDUHURXUHPSODFHUOHVDPSRXOHVj
O¶H[FHSWLRQGHVODPSHV'(/
Ŷ /HVGRPPDJHVDXILQLWHOVTXHODURXLOOHGHVXUIDFHOH
ternissement ou les petites imperfections qui ne sont pas
rapportés dans les 48 heures suivant la livraison.
EXCLUSION DES GARANTIES IMPLICITES
9RWUHVHXOHWXQLTXHUHFRXUVHVWODUpSDUDWLRQGXSURGXLWVHORQOHVGLVSRVLWLRQVGHODSUpVHQWHJDUDQWLHOLPLWpH7RXWHVJDUDQWLHV
implicites, y compris les garanties implicites de qualité marchande et d’adéquation à un usage spécifique, sont limitées à un an
ou à la plus courte période permise par la loi.
Durant une période de GE Appliances remplacera
Un an
depuis la date d’achat
d’origine
Toute pièce défectueuse en raison d'un vice de matière ou de fabrication. Durant cette garantie
limitée d’un an*($SSOLDQFHVassumera tous les frais de main-d'œuvre et de service à domicile
afférents au remplacement de la pièce défectueuse.
Deux ans
depuis la date d’achat
d’origine de four de
PDUTXH0RQRJUDP
Toute pièce défectueuse en raison d'un vice de matière ou de fabrication. Durant cette garantie
limitée de deux ans*($SSOLDQFHVassumera tous les frais de main-d'œuvre et de service à
domicile afférents au remplacement de la pièce défectueuse.
POUR LES CLIENTS DES ÉTATS-UNIS : Cette garantie
limitée est offerte à l’acheteur initial et à tout propriétaire
VXEVpTXHQWG¶XQSURGXLWDFKHWpDX[eWDWV8QLVjGHVILQV
d’usage domestique. Si le produit est situé dans une localité où
un réparateur autorisé GE n’est pas disponible, vous pourriez
encourir des frais de déplacement ou devoir acheminer le
produit à un réparateur autorisé GE pour faire réparer l’appareil.
(Q$ODVNDFHWWHJDUDQWLHOLPLWpHH[FOXWOHVIUDLVG¶H[SpGLWLRQHW
les visites de service à votre domicile.
&HUWDLQVeWDWVRXSURYLQFHVQHSHUPHWWHQWSDVO¶H[FOXVLRQ
ou la restriction des dommages accessoires ou indirects.
Certains droits particuliers vous sont dévolus en vertu de la
présente garantie et peuvent s’accompagner d’autres droits
TXLYDULHQWVHORQYRWUHOLHXGHUpVLGHQFH3RXUFRQQDvWUHOD
nature exacte de vos droits, consultez l’organisme de protection
du consommateur de votre région, ou encore le bureau du
SURFXUHXUJpQpUDOGHO¶eWDW
Garant : GE Appliances, a Haier company,
/RXLVYLOOH.<
AU CANADA (INCLUANT LA PROVINCE DE QUÉBEC) :
Cette garantie limitée s’étend à l’acheteur initial et à tous les
propriétaires ultérieurs pour les produits achetés au Canada,
y compris au Québec, et qui sont destinés à un usage
GRPHVWLTXHDX&DQDGD\FRPSULVDX4XpEHF7RXWHIRLVVLOH
produit se trouve dans une région où un réparateur agréé GE
$SSOLDQFHVQ¶HVWSDVGLVSRQLEOHYRXVSRXUULH]rWUHWHQXGH
payer des frais de déplacement ou de vous rendre dans un
FHQWUHGHVHUYLFHDJUpp*($SSOLDQFHV&HUWDLQVWHUULWRLUHV
comme le Québec, interdisent l’exclusion ou la restriction des
dommages collatéraux ou indirects. Cette garantie limitée vous
confère des droits légaux spécifiques ; vous pouvez également
bénéficier d’autres droits qui varient d’une province à l’autre,
\FRPSULVDX4XpEHF3RXUHQVDYRLUSOXVVXUYRVGURLWV
légaux, adressez-vous à votre bureau régional ou provincial de
protection des consommateurs.
À L’INTENTION DES CONSOMMATEURS QUÉBÉCOIS
UNIQUEMENT - AVIS SUR LA GARANTIE DE
DISPONIBILITÉ DES PIÈCES DE RECHANGE, DES
SERVICES DE RÉPARATION ET DES RENSEIGNEMENTS
NÉCESSAIRES À LA RÉPARATION OU À L’ENTRETIEN
(ART. 39 DE LA LOI SUR LA PROTECTION DU
CONSOMMATEUR): 9HXLOOH]QRWHUTXH0&&RPPHUFLDO,QF
©0&&RPPHUFLDOªQHJDUDQWLWSDVDXVHQVGHO¶DUWLFOH
GHOD/RLVXUODSURWHFWLRQGXFRQVRPPDWHXU5/54F3
et des articles 79.18 à 79.20 du Règlement d’application de
OD/RLVXUODSURWHFWLRQGXFRQVRPPDWHXU5/54F3
r. 3, la disponibilité des pièces de rechange, des services de
réparation ou des renseignements nécessaires à l’entretien
ou à la réparation des biens fabriqués, importés, annoncés ou
YHQGXVSDU0&&RPPHUFLDO
9HXLOOH]QRWHUTXH0&&RPPHUFLDO,QFFRQWLQXHG¶RIIULUOD
garantie limitée du fabricant, telle qu’énoncée dans le manuel
du propriétaire ou le guide rapide. Cette garantie limitée diffère
de la garantie légale de disponibilité énoncée à l’article 39 de
OD/RLVXUODSURWHFWLRQGXFRQVRPPDWHXU
Garant : MC Commercial Inc., Burlington, ON, L7L 6B2
PROLONGATION DE GARANTIE :$FKHWH]XQFRQWUDW
G¶HQWUHWLHQ*($SSOLDQFHVHWLQIRUPH]YRXVGHVUDEDLVVSpFLDX[
en vigueur pendant toute la durée de votre garantie. Vous
pouvez vous le procurer en tout temps sur
electromenagersge.ca/achat-dune-garantie-prolongee
ou en composant le 866-884-5646 durant les heures normales
GHEXUHDX/HVHUYLFHDSUqVYHQWH*($SSOLDQFHVVHUDWRXMRXUV
disponible après l’expiration de votre garantie.

49-2003952 Rev. 0 31
ACCESSOIRES
Vous manquez de quelque chose?
Électroménagers GE propose une panoplie d'accessoires
qui permettent d'améliorer votre expérience de cuisson
et de nettoyage!
Reportez-vous à la page du service à la clientèle pour obtenir
les numéros de téléphone et des informations sur le site Web.
/HVSURGXLWVVXLYDQWVHWGDXWUHVVRQWRIIHUWV
Accessoires
Accessoires
3HWLWHOqFKHIULWHô[ó[òSR[[FP
*UDQGHOqFKHIULWHô[ó[òSR[[FP
7UqVJUDQGHOqFKHIULWH[ó[óSR[[FP
Pièces
Grilles de four
eOpPHQWVGHIRXU
$PSRXOHV
Sonde thermique
Fournitures de nettoyage
/LQJHWWHVSRXUDFLHULQR[\GDEOH
Nettoyant pour appareil en acier inoxydable
/XEULILDQWjEDVH
/DJUDQGHOqFKHIULWHQHFRQYLHQWSDVDX[FXLVLQLqUHVGHSRSRFPFP
/DWUqVJUDQGHOqFKHIULWHQHFRQYLHQWSDVDX[IRXUVHQFDVWUpVGHSRFP
aux cuisinières encastrables de 27 po (68,6 cm) ou aux cuisinières de 20 po (50,8 cm)
ou 24 po (61 cm).
32 49-2003952 Rev. 0
Service à la clientèle
SERVICE À LA CLIENTÈLE
Aux États-Unis – Visitez-nous à GEAppliances.com ou composez le 800.626.2005
Au Canada – Visitez-nous à GEAppliances.ca ou composez le 877.994.5366
7URXYH]GHVUHQVHLJQHPHQWVSRXUOHVSURSULpWDLUHVVXUQRWUHVLWH:HE:
• Information
• Enregistrez l’appareil
• Planifiez un service
• Achetez des pièces, accessoires ou garanties prolongées
• Connectez votre appareil – 800.220.6899
6LYRXVQ¶rWHVSDVVDWLVIDLWGXVHUYLFHFRQWDFWH]QRXVVXUQRWUHVLWH:HEHQLQFOXDQWWRXVOHVGpWDLOVDLQVLTXHYRWUH
numéro de téléphone, ou écrivez à :
Aux États-Unis -*HQHUDO0DQDJHU&XVWRPHU5HODWLRQV_*($SSOLDQFHV_$SSOLDQFH3DUN_/RXLVYLOOH.<
Au Canada -
Director, Customer Relations
_
0&&RPPHUFLDO,QF
_
%XUORDN'U6XLWH_%XUOLQJWRQ21//%
GEAppliances.com GEAppliances.ca

MANUAL DEL
PROPIETARIO
Escriba los números de modelo y de
serie aquí:
Nº de Modelo ____________
Nº de Serie ______________
Los podrá encontrar en una etiqueta en
el borde lateral o en el frente del horno
(inferior) detrás de la puerta del horno.
HORNO DE PARED
Eléctrico Empotrado
49-2003952 Rev. 1 05-26
GE es una marca registrada de General Electric Company. Fabricado bajo licencia de marca.
Serie 7000 y 9000
INFORMACIÓN DE SEGURIDAD ... 3
USO DEL ELECTRODOMÉSTICO
Conectividad Wi-Fi ........................ 6
Control por Voz ........................... 7
Pantalla de Inicio .......................... 8
Settings (Configuraciones) ..................10
Modo Sabático ............................11
Cámara de la Puerta del Horno . . . . . . . . . . . . . . 11
Estantes del Horno .........................12
Papel de Aluminio y Cobertores del Horno ....13
Guía para Utensilios de Cocina ..............13
Modos de Cocción .........................14
Probe (Sonda) .............................18
Guías de Cocción ..........................19
Modo de Cocción para Freír con Aire .......20
Guía de Rostizado .........................21
Guía de Deshidratación .................... 22
CUIDADO Y LIMPIEZA
Cuidado y limpieza - Exterior ............... 23
Cuidado y limpieza - Interior ............... 24
Probe (Sonda) ............................ 25
Puertas De Horno Francesas ............... 25
Luz del Horno ............................ 26
Puerta del Horno ......................... 27
CONSEJOS PARA LA
SOLUCIÓN DE PROBLEMAS ... 28
GARANTÍA LIMITADA ............ 30
ACCESORIOS .......................31
SOPORTE PARA
EL CONSUMIDOR
................. 32
ESPAÑOL

2 49-2003952 Rev. 0
GRACIAS POR HACER QUE GE APPLIANCES SEA PARTE DE SU HOGAR.
Ya sea que haya crecido usando GE Appliances, o que ésta es su primera vez, nos complace
tenerlo en la familia.
Sentimos orgullo por el nivel de arte, innovación y diseño de cada uno de los electrodomésticos de
GE Appliances, y creemos que usted también. Entre otras cosas, el registro de su electrodoméstico
asegura que podamos entregarle información importante del producto y detalles de la garantía
cuando los necesite.
Registre su electrodoméstico GE ahora a través de Internet. Sitios Web y números telefónicos útiles
están disponibles en la sección de Soporte para el Consumidor de este Manual del Propietario.
También puede enviar una carta en la tarjeta de inscripción preimpresa que se incluye con
el material embalado.
49-2003952 Rev. 0 3
LEA Y GUARDE ESTAS INSTRUCCIONES
INFORMACIÓN IMPORTANTE DE SEGURIDAD
LEA TODAS LAS INSTRUCCIONES ANTES DE USAR ESTE ELECTRODOMÉSTICO
INFORMACIÓN DE SEGURIDAD
ADVERTENCIA
INSTRUCCIONES GENERALES DE SEGURIDAD
Ŷ 8VHHVWHDSDUDWRVyORFRQHOREMHWLYRSDUDHOTXHIXH
creado, como se describe en este Manual del Propietario.
Ŷ 6ROLFLWHTXHXQLQVWDODGRUFDOLILFDGRLQVWDOHVXHVWXID\
que esté adecuadamente conectada a tierra, de acuerdo
con las instrucciones de instalación provistas.
Ŷ &XDOTXLHUDMXVWHUHSDUDFLyQRVHUYLFLRWpFQLFRQR
recomendado específicamente en este manual deberá
ser realizado SOLO por un instalador o técnico del
servicio con calificación en estufas.
Ŷ $QWHVGHUHDOL]DUFXDOTXLHUFODVHGHUHSDUDFLyQ
desenchufe la cocina o desconecte el suministro eléctrico
desde el panel de distribución doméstico quitando el
fusible o desconectando el interruptor de circuitos.
Ŷ $VHJ~UHVHGHTXHWRGRVORVPDWHULDOHVGHHPEDODMHVHDQ
retirados de la estufa antes de su uso, a fin de evitar que
los mismos se incendien.
Ŷ (YLWHUD\RQHVRLPSDFWRVVREUHODVSXHUWDVGHYLGULR
placas de cocción o paneles de control. Hacer esto podrá
producir la rotura de vidrios.
Ŷ 1RFRFLQHVREUHXQSURGXFWRFRQXQYLGULRURWR6H
podrán producir descargas, incendios o cortes.
Ŷ 1RGHMHDORVQLxRVVRORVRVLQDWHQFLyQHQXQiUHD
GRQGHXQDSDUDWRHVWpHQXVR1XQFDGHEHSHUPLWLUVH
que se suban, sienten o paren en cualquier parte de este
aparato.
Ŷ
PRECAUCIÓN
1RJXDUGHtWHPVGHLQWHUpV
para los niños en los gabinetes que están sobre o en la
parte superior de una estufa; si los niños trepan sobre la
estufa para alcanzar estos artículos podrán sufrir lesiones
graves.
Ŷ 1XQFDXVHHOHOHFWURGRPpVWLFRSDUDFDOHQWDUR
calefaccionar la habitación.
Ŷ 1RSHUPLWDTXHQDGLHVHWUHSHVHSDUHRFXHOJXHGH
la puerta del horno, del cajón o la placa de cocción. Se
podrá dañar la estufa o provocar su caída, ocasionando
lesiones graves o la muerte.
Ŷ 6yORXVHDJDUUDGHUDVVHFDVODVDJDUUDGHUDVK~PHGDV
o mojadas colocadas en superficies calientes pueden
SURYRFDUTXHPDGXUDVGHYDSRU1RSHUPLWDTXHODV
agarraderas tengan contacto con las unidades de la
superficie ni con los elementos para calentar del horno.
1RXWLOLFHWRDOODVXRWUDVWHODVJUXHVDVHQOXJDUGHXQD
agarradera.
Ŷ 1RWRTXHORVTXHPDGRUHVSODQFKDVHQDOJXQRV
PRGHORVSDUULOODVHQDOJXQRVPRGHORVODVXSHUILFLH
de cocción o los elementos calefactores del horno, ni
la superficie interior del horno. Estas superficies podrán
permanecer lo suficientemente caliente como para
quemar durante un período de tiempo prolongado luego
de la cocción, incluso aunque ya no parezcan estar
encendidas o calientes.
Ŷ 'XUDQWH\GHVSXpVGHOXVRQRWRTXHQLSHUPLWDTXHWHODV
u otros materiales inflamables toquen cualquier área
interior del horno; espere a que haya pasado un tiempo
suficiente hasta que se enfríen. Otras superficies del
electrodoméstico se podrán calentar lo suficiente como
para ocasionar lesiones. Las superficies potencialmente
calientes incluyen quemadores o elementos calefactores,
SDUULOODVHQDOJXQRVPRGHORVVXSHUILFLHGHFRFFLyQ
aberturas de la ventilación del horno, superficies
cercanas a las aberturas, grietas alrededor de la puerta
del horno, partes con marcos metálicos por encima de la
puerta, cualquier protección trasera, o repisas ubicadas
encima de una superficie de cocción.
Ŷ 1RFDOLHQWHUHFLSLHQWHVFHUUDGRVGHDOLPHQWRV3RGUtD
haber una acumulación de presión en el recipiente y éste
podría explotar, provocando lesiones.
Ŷ &RFLQHODFRPLGDFRPSOHWDPHQWHSDUDHYLWDUTXHVH
SURGX]FDQHQIHUPHGDGHVDSDUWLUGHODFRPLGD86'$
\)'$EULQGDQODVUHFRPHQGDFLRQHVGHWHPSHUDWXUD
PtQLPDSDUDXQDFRPLGDVHJXUD8WLOLFHXQWHUPyPHWUR
para tomar la temperatura de la comida y haga controles
en diferentes ubicaciones.
Ŷ 0DQWHQJDOLPSLDODFDPSDQDGHOYHQWLODGRU\ORVILOWURV
de grasa, con el fin de conservar una buena ventilación
y de evitar incendios con grasa. En caso de incendio,
apague el ventilador. Si el extractor se encuentra en
funcionamiento, podrá esparcir las llamas.
ADVERTENCIA
/HDWRGDVODVLQVWUXFFLRQHVGHVHJXULGDGDQWHVGHXWLOL]DUHVWHSURGXFWR1RVHJXLUHVWDV
instrucciones puede generar un incendio, una descarga eléctrica, lesiones corporales o la muerte.
ADVERTENCIA
MANTENGA LOS MATERIALES INFLAMABLES ALEJADOS DE LA ESTUFA
Si esto no se cumple, se podrán sufrir lesiones personales graves o incendios.
Ŷ 1RDOPDFHQHRXWLOLFHPDWHULDOHVLQIODPDEOHVGHQWURGH
un horno o cerca de la estufa, tales como papel, plástico,
agarraderas, telas, recubrimientos de pared, cortinas y
gasolina u otros vapores y líquidos inflamables.
Ŷ 1XQFDXVHYHVWLPHQWDVKROJDGDVRDPSOLDVPLHQWUDVXWLOLFH
el aparato. Estas vestimentas pueden prenderse fuego si
entran en contacto con superficies calientes, provocando
quemaduras graves.
Ŷ 1RSHUPLWDTXHODJUDVDGHODFRFFLyQXRWURVPDWHULDOHV
inflamables se acumulen dentro de la estufa o en su
cercanía. La grasa dentro del horno o sobre la estufa puede
encenderse.
Ŷ 1RJXDUGHPDWHULDOHVLQIODPDEOHVQLtWHPVVHQVLEOHVDOD
temperatura dentro del electrodoméstico.
Ŷ /LPSLHODVFDPSDQDVGHYHQWLODFLyQGHIRUPDIUHFXHQWH1R
se debe permitir la acumulación de grasa en la campana o
el filtro.
Ŷ (QDOJXQRVPRGHORV)XQFLRQDPLHQWR5HPRWR(VWH
electrodoméstico permite su configuración para permitir un
funcionamiento remoto en cualquier momento.

4 49-2003952 Rev. 0
LEA Y GUARDE ESTAS INSTRUCCIONES
INFORMACIÓN DE SEGURIDAD
INFORMACIÓN IMPORTANTE DE SEGURIDAD
LEA TODAS LAS INSTRUCCIONES ANTES DE USAR ESTE ELECTRODOMÉSTICO
ADVERTENCIA
EN CASO DE INCENDIO, SIGA LOS SIGUIENTES PASOS
PARA EVITAR LA PROPAGACIÓN DEL FUEGO
Ŷ 1RXWLOLFHDJXDHQLQFHQGLRVGHJUDVD1XQFDOHYDQWH
una sartén en llamas. Apague los controles. Apague
una sartén en llamas sobre una unidad de superficie
cubriendo la sartén por completo con una tapa que
ajuste bien, una plancha para galletas o una bandeja
SODQD8WLOLFHXQTXtPLFRVHFRPXOWLXVRRXQH[WLQWRUGH
incendios de espuma.
Ŷ 6LKD\XQLQFHQGLRHQHOKRUQRGXUDQWHHOKRUQHDGR
apáguelo cerrando la puerta del horno y apagando el
control o usando un químico seco multiuso o un extintor
de incendios de espuma.
Ŷ 6LKD\XQLQFHQGLRHQHOKRUQRGXUDQWHODDXWROLPSLH]D
apague el horno y espere a que el incendio se consuma.
1RDEUDODSXHUWDGHOKRUQRDODIXHU]D El ingreso de aire
IUHVFRDWHPSHUDWXUDVGHDXWROLPSLH]DSXHGHSURYRFDU
XQDH[SORVLyQGHOODPDVGHVGHHOKRUQR1RVHJXLUHVWD
instrucción puede provocar quemaduras graves.
ADVERTENCIA
INSTRUCCIONES DE SEGURIDAD DEL HORNO
Ŷ 0DQWpQJDVHDOHMDGRGHOKRUQRDODEULUODSXHUWDGHO
mismo. El aire caliente o el vapor que sale puede causar
quemaduras en las manos, rostro y/u ojos.
Ŷ 1RXVHHOKRUQRVLXQHOHPHQWRGHFDOHQWDPLHQWRJHQHUD
un punto brillante durante el uso o aparecen otros signos
GHGDxRV8QSXQWREULOODQWHLQGLFDTXHHOHOHPHQWRSDUD
calentar puede fallar y generar una posible quemadura,
incendio o descarga eléctrica. Apague el horno de
inmediato y solicite a un técnico calificado del servicio
que reemplace el elemento para calentar.
Ŷ 0DQWHQJDGHVREVWUXLGDODYHQWLODFLyQGHOKRUQR
Ŷ 1XQFDFRORTXHORVXWHQVLOLRVGHFRFLQDSLHGUDVSDUD
pizza u horneado o cualquier otro tipo de aluminio o
cobertor en la base del horno. Estos ítems pueden
atrapar el calor o derretirse, ocasionando daños sobre el
producto y el riesgo de descargas, humo o incendios.
Ŷ &RORTXHORVHVWDQWHVGHOKRUQRHQODXELFDFLyQGHVHDGD
mientras éste se encuentra frío. Si es necesario mover el
estante mientras el horno está caliente, tenga cuidado de
evitar tocar superficies calientes y evite que el mango de
la olla tenga contacto con el elemento calentador en el
horno.
Ŷ 1RGHMHSURGXFWRVWDOHVFRPRSDSHOXWHQVLOLRVGHFRFLQD
ni comida en el horno cuando éste no se encuentre en
uso. Los artículos guardados en el horno se pueden
incendiar.
Ŷ 1RGHMHDUWtFXORVVREUHODVXSHUILFLHGHFRFFLyQ
cerca de la ventilación del horno. Los ítems se
podrán sobrecalentar, y existe el riesgo de incendio o
quemaduras.
Ŷ 1XQFDDVHFRQODSXHUWDDELHUWD
Ŷ 0DQWHQJDHOKRUQROLEUHGHDFXPXODFLyQGHJUDVD/D
grasa del horno se puede incendiar.
Ŷ $OXVDUODVEROVDVSDUDFRFLQDURGRUDUHQHOKRUQRVLJD
las instrucciones del fabricante.
Ŷ PELIGRO DE DESCARGA O QUEMADURAS: Antes
de reemplazar la bombilla de luz del horno, desconecte
la conexión eléctrica del horno desde el fusible principal
o desde el panel del disyuntor. Si esto no se cumple, se
podrá producir una descarga eléctrica o un incendio.
Ŷ
PRECAUCIÓN
RIESGO DE INCENDIO: La
tapa de vidrio y la bombilla de luz se deberán retirar
cuando estén frías. Tocar el vidrio caliente sin protección
en las manos o con una tela húmeda podrá ocasionar
quemaduras.
Ŷ 1RXVHQLQJ~QWLSRGHDOXPLQLRRFREHUWRUSDUDFXEULU
el fondo del horno o cualquier parte del horno, excepto
como se describe en este manual. Los cobertores de
horno pueden atrapar el calor o derretirse, ocasionando
daños sobre el producto y el riesgo de descargas, humo
o incendios.
ADVERTENCIA
INSTRUCCIONES DE SEGURIDAD DEL HORNO CON LIMPIEZA
AUTOMÁTICA (en algunos modelos)
La función de limpieza automática usa el horno en temperaturas lo suficientemente altas como para consumir la suciedad de
comida que haya dentro del horno. Para un funcionamiento seguro, siga estas instrucciones.
Ŷ 1RWRTXHODVVXSHUILFLHVGHOKRUQRGXUDQWHHOFLFORGH
limpieza automática. Mantenga a los niños alejados del
horno durante la limpieza automática. Si no se siguen
estas instrucciones, se podrán producir quemaduras.
Ŷ $QWHVGHXWLOL]DUHOFLFORGHOLPSLH]DDXWRPiWLFDUHWLUH
las ollas, estantes de metal brillante del horno y otros
utensilios que haya en el horno. Sólo se pueden dejar
dentro del horno los estantes para horno de color
RVFXURFRQUHYHVWLPLHQWRGHSRUFHODQD1RKDFHUHVWR
podrá ocasionar daños sobre estos ítems y el horno, y
presentar una posible quemadura o riesgo de incendio.
Ŷ $QWHVGHXWLOL]DUHOFLFORGHOLPSLH]DDXWRPiWLFDOLPSLH
ODJUDVD\UHVWRVGHFRPLGDTXHKD\DHQHOKRUQR8QD
cantidad excesiva de grasa se puede incendiar, lo cual
puede producir daños con humo en su hogar.
Ŷ 6LHOPRGRGHOLPSLH]DDXWRPiWLFDIXQFLRQDGHIRUPD
incorrecta, apague el horno y desconecte el suministro de
corriente. Solicite el servicio de un técnico calificado.
49-2003952 Rev. 0 5
LEA Y GUARDE ESTAS INSTRUCCIONES
INFORMACIÓN DE SEGURIDAD
INFORMACIÓN IMPORTANTE DE SEGURIDAD
LEA TODAS LAS INSTRUCCIONES ANTES DE USAR ESTE ELECTRODOMÉSTICO
ADVERTENCIA
INSTRUCCIONES DE SEGURIDAD DEL HORNO CON LIMPIEZA
AUTOMÁTICA (en algunos modelos) (Cont.)
Ŷ 1RXVHOLPSLDGRUHVSDUDKRUQR1RVHGHEHUiXVDU
limpiadores comerciales para horno ni revestimientos
de protección para hornos de ningún tipo en o alrededor
de cualquier parte del horno, a menos que cuente
con certificación para uso en un horno con limpieza
automática.
Ŷ 1ROLPSLHODMXQWDGHODSXHUWD/DMXQWDGHODSXHUWDHV
esencial para un buen sellado. Se debe tener cuidado de
no frotar, dañar ni mover la junta.
Ŷ IMPORTANTE: La salud de algunas aves es
extremadamente sensible a los humos emitidos durante
el ciclo de limpieza automática de cualquier estufa.
Coloque las aves en otra habitación bien ventilada.
FORMA ADECUADA DE DESCARTAR SU ELECTRODOMÉSTICO
'HVFDUWHRUHFLFOHVXHOHFWURGRPpVWLFRGHDFXHUGRFRQODV5HJXODFLRQHV)HGHUDOHV\/RFDOHV&RPXQtTXHVHFRQODV
autoridades locales para descartar o reciclar su electrodoméstico de forma ambientalmente segura.
Cómo Retirar la Película Protectora de Envío y la Cinta de Embalaje
Con cuidado tome un extremo de la película protectora
de envío con los dedos y lentamente retire la misma de la
VXSHUILFLHGHOHOHFWURGRPpVWLFR1RXWLOLFHQLQJ~QSURGXFWR
filoso para retirar la película. Retire toda la película antes de
usar el electrodoméstico por primera vez.
Para asegurar que no haya daños sobre el acabado del
producto, la forma más segura de retirar el adhesivo de la cinta
de embalaje en electrodomésticos nuevos es aplicando un
detergente líquido hogareño para lavar platos. Aplique con una
tela suave y deje que se seque.
NOTA: El adhesivo deberá ser eliminado de todas las partes.
1RVHSXHGHUHWLUDUVLVHKRUQHDFRQpVWHGHQWUR
Tenga en cuenta las opciones de reciclaje del material de
embalaje de su electrodoméstico.
INFORMACIÓN REGLAMENTARIA
Declaración de conformidad FCC/IC:
(VWHGLVSRVLWLYRFXPSOHFRQOD3DUWHGHOD1RUPDWLYDGHOD)&&6XIXQFLRQDPLHQWRHVWiVXMHWRDODVGRVFRQGLFLRQHV
VLJXLHQWHV
1. Este dispositivo no deberá causar interferencias nocivas, y
2. Este dispositivo deberá aceptar cualquier interferencia recibida, incluyendo interferencias que puedan generar un
funcionamiento no deseado.
ATENCIÓN (NOTICE): Los cambios o modificaciones realizados en esta unidad que no hayan sido expresamente
aprobados por el fabricante pueden anular la autoridad del usuario para operar el equipo.
ADVERTENCIA
HQDOJXQRVPRGHORVEste horno puede estar equipado con un micrófono para permitir el control
por voz de las operaciones de su horno. Al habilitar el uso del micrófono, este podrá escuchar ciertos comandos de voz para
activar y operar el horno en todo momento. Es posible que ruidos de fondo o ambientales imiten palabras o sonidos que
este electrodoméstico reconozca como una instrucción, y la unidad podría activarse o iniciar una función o modo de cocción
como resultado, incluso cuando la unidad esté desatendida y no se desee la activación de la función o modo de cocción.
1XQFDDOPDFHQHDUWtFXORVLQIODPDEOHVRVHQVLEOHVDODWHPSHUDWXUDHQHOLQWHULRUGHOHOHFWURGRPpVWLFR
6 49-2003952 Rev. 0
Conectividad Wi-Fi (en algunos modelos)
Su electrodoméstico está diseñado para proporcionarle
comunicación bidireccional entre su electrodoméstico y
dispositivos inteligentes. Además, este electrodoméstico
puede requerir una actualización de software para habilitar
todas las funciones durante la configuración inicial. Al utilizar
la aplicación móvil SmartHQ™, usted podrá conectarse a una
YDULHGDGGHIXQFLRQHVLQFOX\HQGRHQWUHRWUDVHOXVRGHVX
electrodoméstico como altavoz inteligente con Amazon Alexa)
y utilizando su teléfono inteligente o tableta*. Visite su tienda
de aplicaciones y descargue Smart HQ o utilice el código QR
TXHDSDUHFHDFRQWLQXDFLyQ
3DUDFRQHFWDUVXHOHFWURGRPpVWLFRD:L)LVLJDODV
indicaciones en la pantalla de controles del electrodoméstico.
3DUDREWHQHUODPHMRUH[SHULHQFLDDQWHVGHFRPHQ]DU
Ɣ'HVFDUJXHODDSOLFDFLyQ6PDUW+46PDUW+4\DFFHGDR
cree una cuenta.
NOTA: Los nuevos usuarios deben verificar su dirección de
correo electrónico para completar el proceso de inicio de
sesión.
7HQJDGLVSRQLEOHODFRQWUDVHxDGHVXUHG:L)LGRPpVWLFD
6LVHUHTXLHUHXQ0$&,'SDUDFRQHFWDUVXHOHFWURGRPpVWLFR
D:L)LFRQVXOWHODVHFFLyQ&RQILJXUDFLyQSDUDREWHQHU
detalles. También puede consultar la etiqueta de información
del electrodoméstico conectado, que normalmente se
encuentra en el interior de la puerta del horno o del cajón.
7DPELpQFRQWHQGUiHO1RPEUHGH5HGGHO(OHFWURGRPpVWLFR\
la Contraseña, en caso de ser necesarios.
8QDYH]TXHVXHOHFWURGRPpVWLFRHVWpFRQHFWDGRLQLFLHOD
aplicación SmartHQ y toque su electrodoméstico para explorar.
Aplique todas las actualizaciones de software si se le solicita
para asegurarse de que su electrodoméstico cuente con las
funciones más recientes.
NOTA: $VHJ~UHVHGHPDQWHQHUDFWLYDGDODIXQFLyQ:L)L
para poder controlar su electrodoméstico desde la aplicación
SmartHQ.
Si tiene problemas con el proceso de conexión, llame al
800.220.6899 y solicite asistencia con la conectividad
inalámbrica.
* Se requiere un dispositivo Apple o Android compatible y una
UHG:L)LGRPpVWLFD
Desactivación del Wi-Fi
6LGLVSRQHGHXQERWyQ5HPRWH(QDEOH+DELOLWDUFRQWURO
UHPRWRR:L)L&RQQHFW&RQH[LyQ:L)LPDQWHQJD
presionado el botón durante 3 segundos para desconectarse
FRPSOHWDPHQWHGHO:L)L6LQRWLHQHXQERWyQHQVXV
controles, diríjase a Configuración y seleccione desconectar
XROYLGDUUHGSDUDGHVFRQHFWDUVHFRPSOHWDPHQWHGHO:L)L
127$'HEHUiYROYHUDFRQHFWDUODDSOLFDFLyQ6PDUW+4D
su electrodoméstico si desea controlar su electrodoméstico
desde su teléfono nuevamente. Tenga en cuenta que cuando
HO:L)LHVWiGHVDFWLYDGRODSODFD:L)LGHOKRUQRQRHVWi
transmitiendo.
Funciones disponibles
Siga todas las instrucciones en la aplicación para el
funcionamiento correcto del electrodoméstico al utilizar
funciones conectadas.
Control remoto del horno:
3DUDKDELOLWDUHOFRQWUROGH6PDUW+46PDUW+4GHOKRUQR
PLHQWUDVHO:L)LHVWiDFWLYRDVHJ~UHVHGHTXHODIXQFLyQ
esté activada verificando la configuración de remote enable
KDELOLWDFLyQUHPRWDHQ&RQILJXUDFLyQ6HWWLQJV
Activación por voz:
8VWHGWLHQHODSRVLELOLGDGGHFRQWURODUHOIXQFLRQDPLHQWRGHVX
horno únicamente con su voz. Consulte la sección Control por
voz para obtener más detalles sobre cómo utilizar esta función.
NOTA: algunas funciones y características de cocción no
estarán disponibles hasta que conecte su horno nuevo al
:L)LGHVXUHGKRJDUHxDORFDOLQDOiPEULFD3RUIDYRUVLJD
las instrucciones anteriores para conectar. Esto brinda la
capacidad de utilizar las funciones de la aplicación SmartHQ y
asegura que el horno cuente con el software más reciente.
Contains FCC:
UPD ID:
PT. NO.
Contains IC:
MAC ID:
Connected Appliance Information
USO DEL ELECTRODOMÉSTICO:&RQHFWLYLGDG:L)L

49-2003952 Rev. 0 7
Control por Voz
USO DEL ELECTRODOMÉSTICO: Control por Voz
3DUDXWLOL]DUFXDOTXLHUFRPDQGRGHFRQWUROSRUYR]DVHJ~UHVHGHTXHVXKRUQRHVWpFRQHFWDGRD:L)LFRQHFWDGRDODDSOLFDFLyQ
6PDUW+4TXHODIXQFLyQRYHQUHPRWHHQDEOHDFFHVRUHPRWRGHOKRUQRHVWpDFWLYDGD\TXHHOFRQWUROGHVXKRUQRHVWp
desbloqueado.
/DVLQVWUXFFLRQHVSDUDFRQHFWDUVXKRUQRVHHQFXHQWUDQHQODDSOLFDFLyQ6PDUW+4GHVXWHOpIRQRRHQ6HWWLQJV&RQILJXUDFLRQHV
en el control de su horno.
Control por altavoz inteligente / Control por
asistente de voz
Si su horno no tiene micrófono, aún puede usar su voz para
encender un horno y los temporizadores del horno o apagar
XQKRUQR$VHJ~UHVHGHTXHVXKRUQRHVWpFRQHFWDGRD:L)L
a la aplicación SmartHQ y a un altavoz inteligente Amazon
Alexa. Asegúrese de que su horno y su altavoz inteligente
HVWpQFRQHFWDGRVD:L)LTXHRYHQUHPRWHHQDEOHDFFHVR
remoto del horno) esté activado y que el control de su horno
esté desbloqueado. Además, asegúrese de que su altavoz
inteligente esté lo suficientemente cerca del horno para que
escuche sus comandos.
Control por micrófono (en algunos
modelos)
Si su horno tiene micrófonos, el control por voz cuenta con
capacidades mejoradas y también puede utilizarse con algunas
GHODVDSOLFDFLRQHVHQHOFRQWURODGHPiVGHHQFHQGHUR
apagar el horno. Asegúrese de que su horno esté conectado a
:L)LFRQHFWDGRDODDSOLFDFLyQ6PDUW+4TXHRYHQUHPRWH
HQDEOHDFFHVRUHPRWRGHOKRUQRHVWpDFWLYDGR\TXHHO
control de su horno esté desbloqueado.
6XXQLGDGOOHJDFRQHOPLFUyIRQRVLOHQFLDGR'HEHDFWLYDUHO
micrófono para que esté disponible.
Para activar el micrófono, deslice hacia abajo la Quick Setting
6KDGHFRUWLQDGHDMXVWHVUiSLGRV\SUHVLRQHHO
para activar
el micrófono. Se requerirá una exención de activación por voz
la primera vez que active el micrófono. Si silencia el micrófono,
la exención no será requerida cuando lo active nuevamente.
&XDQGRHOKRUQRHVWiFRQHFWDGRD:L)L\HOPLFUyIRQRHVWi
silenciado, aparecerán indicadores de que el micrófono está
VLOHQFLDGR\DSDJDGRHQOD4XLFN6HWWLQJV6KDGHFRUWLQDGH
ajustes rápidos) y en el área de la barra de estado.
Para utilizar la activación por voz cuando el micrófono no está
silenciado, diga las palabras de activación “Hey HQ”, haga una
breve pausa y espere a que aparezca la pantalla de activación.
Luego, diga su comando claramente. Tenga en cuenta que
pausar después de decir “Hey HQ” y esperar a que aparezca
la pantalla de activación ayudará a asegurar que su comando
sea escuchado completa y correctamente.
/RVFRPDQGRVGHYR]FRPXQHVSDUDHOPLFUyIRQRLQFOX\HQ
Controles del horno
Ɣ&RQILJXUHHOKRUQRVXSHULRUSDUDDLUIU\IUHtUFRQDLUHD
grados.
Ɣ(QFLHQGDHOKRUQRLQIHULRU
Ɣ$SDJXHHOKRUQRVXSHULRU
Ɣ&RFLQHGXUDQWHKRUDHQHOKRUQRVXSHULRU
Temporizadores
Ɣ&RQILJXUHXQWHPSRUL]DGRUGHKRUD\PLQXWRVSDUD
cazuelas
Lista de compras
Ɣ$JUHJXHSOiWDQRVDPLOLVWDGHFRPSUDV
Ɣ(OLPLQHFDIpGHPLOLVWDGHFRPSUDV
NOTA: La lista de compras está disponible en la aplicación
SmartHQ y puede exportarse a algunas aplicaciones de
compras.
Control por voz para abrir la puerta del
horno (en algunos modelos)
Si su horno está equipado con una puerta push to open
SUHVLRQDUSDUDDEULUODIXQFLyQGHFRQWUROSRUYR]SDUDDEULU
permite abrir la puerta del horno ¡sin usar las manos! Por
IDYRUDVHJ~UHVHGHTXHVXKRUQRHVWpFRQHFWDGRD:L)LDOD
DSOLFDFLyQ6PDUW+4TXHRYHQUHPRWHHQDEOHDFFHVRUHPRWR
del horno) esté activado, que el control de su horno esté
desbloqueado y que un altavoz inteligente Amazon Alexa esté
DFWLYRRTXHHOPLFUyIRQRGHOKRUQRHQDOJXQRVPRGHORVHVWp
activado.
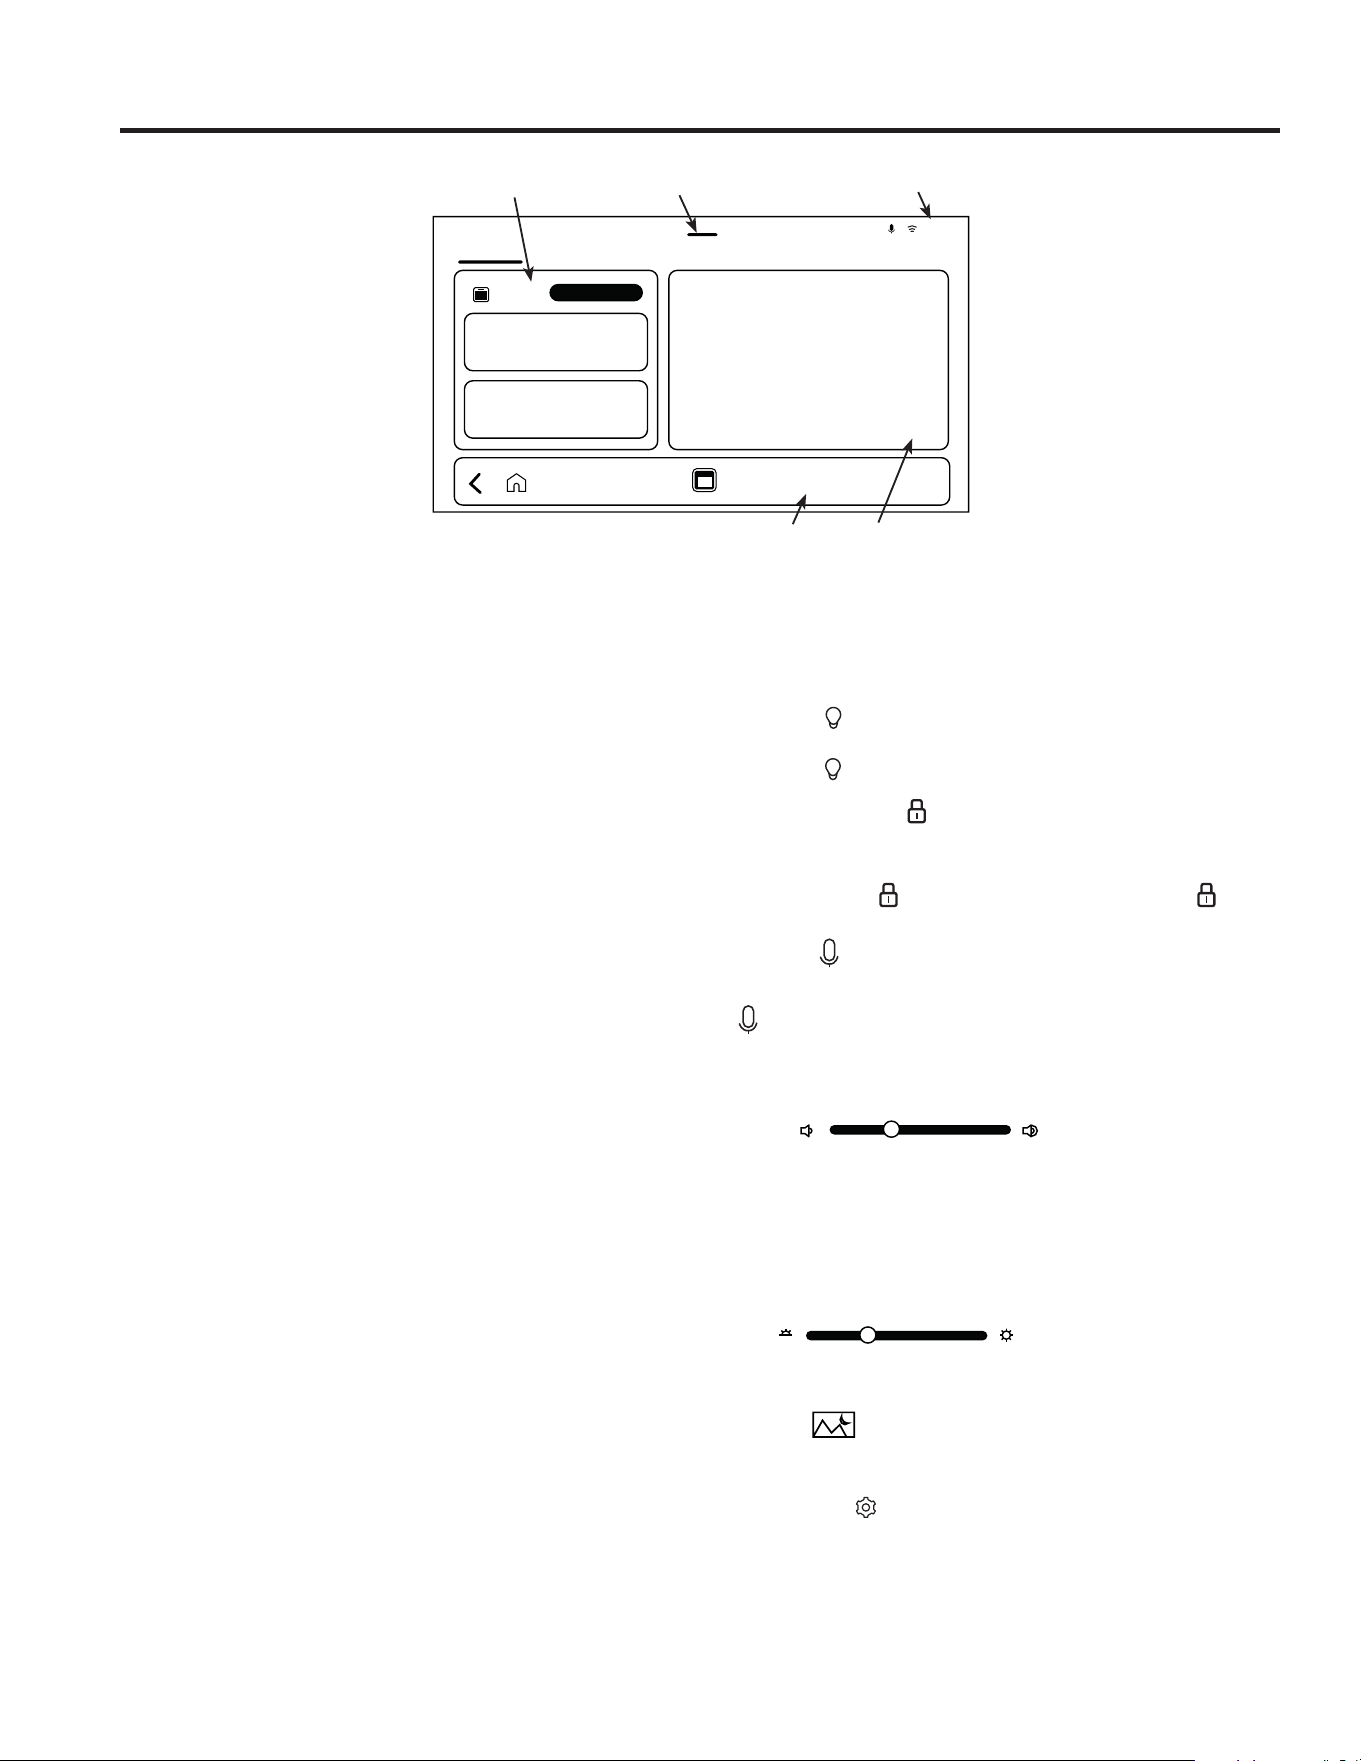
8 49-2003952 Rev. 0
Pantalla del Electrodoméstico
PANTALLA DE INICIO
1 - Control del Horno
8ELFDGRFRPSOHWDPHQWHDODL]TXLHUGDHQOD3DQWDOODGH,QLFLR
del Horno. Asegúrese de deslizar completamente hacia la
izquierda si no se muestra cuando la Pantalla del Horno se
activa.
Horno Superior y Horno Inferior (en modelos de horno
doble empotrado)
Al utilizar un horno de pared doble, usted puede usar
diferentes modos de cocción en cada horno. Primero
seleccione el horno que desea usar y luego seleccione el
modo de cocción deseado.
NOTA: Al utilizar un solo horno, no habrá selección de horno.
Pantalla de Selección de Modo de Cocción
Seleccione su preferencia de cocción en esta área. Puede
seleccionar entre modos tradicionales del horno o modos de
precisión del horno. Consulte la sección de Modos de Cocción
para obtener más detalles sobre los diferentes modos de
cocción tradicionales y de precisión disponibles.
Asegúrese de conectar su horno para que pueda descargar
nuevos modos de cocción de precisión a medida que estén
disponibles.
2 - Menú Rápido de Configuración
'HVOLFHHVWHPHQ~KDFLDDEDMRSDUDDFFHGHUDODVOXFHVGHO
KRUQREORTXHRGHFRQWUROHVPLFUyIRQRHQDOJXQRVPRGHORV
altavoces, brillo de la pantalla, diseño del menú Ambiente,
alertas y configuraciones.
Oven Light
(Luz del Horno)
Para encender o apagar las luces de la cavidad del horno,
presione el
.
Bloquear controles
Seleccione esta opción para bloquear el control del horno y
evitar selecciones no deseadas en la pantalla. Para bloquear,
presione el botón
. Mantenga presionado el botón . para
desbloquear.
Micrófono
(en algunos modelos)
Para activar o desactivar el silencio del micrófono, presione
el
. Los indicadores de que el micrófono está silenciado y
apagado aparecerán en la Sombra de Configuración Rápida
y en el área de la Barra de Estado. El micrófono debe estar
activado para utilizar el Asistente SmartHQ.
Altavoz
8WLOLFHODEDUUDGHVOL]DQWHSDUDDMXVWDUHOYROXPHQDOQLYHO
deseado para reproducir videos y música cuando esté
disponible.
Esto no afecta el volumen de las alertas ni de los tonos
táctiles. Consulte la sección de Configuración para obtener
más información sobre cómo ajustar esos volúmenes.
Brillo
8WLOLFHODEDUUDGHVOL]DQWHSDUDDMXVWDUHOEULOORGHODSDQWDOODDO
nivel deseado.
Ambiente
Presione el botón Ambient (Ambiente) para ir directamente a
ODSDQWDOOD$PELHQW$PELHQWH
Configuración
Presione el botón Settings (Configuración) para acceder
DOPHQ~6HWWLQJV&RQILJXUDFLyQ&RQVXOWHODVHFFLyQGH
Configuración para ver la lista completa de lo que está
disponible.
USO DEL ELECTRODOMÉSTICO: Pantalla del Electrodoméstico
My Oven
Oven
Meal Planning Stay Informed Tools
1:59 PM
1
2
3
45

49-2003952 Rev. 0 9
Pantalla del Electrodoméstico
USO DEL ELECTRODOMÉSTICO: Pantalla del Electrodoméstico
PANTALLA DE INICIO (Cont.)
3 - Barra de estado
En la esquina superior derecha, se muestran las alertas
DFWLYDVHOHVWDGRGHOPLFUyIRQRHQDOJXQRVPRGHORVHO
HVWDGRGH:L)L\ODKRUD8WLOLFHHVWRFRPRUHIHUHQFLDUiSLGD
al usar el horno.
4 - Barra de navegación
Flecha de retroceso
Esto le lleva una pantalla atrás hasta llegar a la pantalla de
inicio.
Botón de inicio
Le lleva directamente a la pantalla de inicio con la sección de
control del horno visible.
Botón de horno / Botones de horno
Esto le lleva a la pantalla del horno mostrando lo que está
en funcionamiento si el horno está en uso. Si el horno
seleccionado no está en uso, le llevará a la pantalla de
selección de modo para el horno seleccionado.
Barra de actividad
8ELFDGRHQODSDUWHLQIHULRUGHOD3DQWDOODGHO
electrodoméstico, indica que el horno está encendido. Esta
barra no se muestra cuando el horno está apagado. Esta
función solo se muestra cuando el horno está encendido.
5 - Aplicaciones
Conecte su horno para aprovechar toda la funcionalidad de
las aplicaciones en su control. Algunas aplicaciones solo
SXHGHQXVDUVHVLVXKRUQRHVWiFRQHFWDGRD:L)L(MHPSORV
de aplicaciones incluyen el clima y el temporizador de cocina.
'HVOLFHKDFLDODGHUHFKDSDUDDFFHGHUDPiVDSOLFDFLRQHV
DVtFRPRDODVLVWHQWH6PDUW+4VRORHQPRGHORVFRQ
micrófono) y a la información de Consejos del horno.
Temporizadores
La aplicación de temporizador funciona como un temporizador
de cuenta regresiva.
Seleccione "Add a TimerAgregar un temporizador),
HVWDEOH]FDODGXUDFLyQGHOWHPSRUL]DGRUHQVHJXQGRVPLQXWRV
horas, asigne un nombre al temporizador si desea reutilizarlo,
OXHJRLQLFLHHOWHPSRUL]DGRU8QDYH]LQLFLDGRXQWHPSRUL]DGRU
no se puede cambiar el nombre del temporizador.
Se pueden configurar y reutilizar varios temporizadores de
forma independiente o al mismo tiempo.
La pantalla del electrodoméstico le notificará cuando un
temporizador haya finalizado.
Si se configuran más de dos temporizadores al mismo tiempo,
los dos temporizadores configurados más recientemente se
mostrarán en la sección Apps.
Para ver todos los temporizadores activos y todos los
temporizadores previamente configurados, seleccione la
aplicación Timer (temporizador) para acceder a la lista y
deslice para ver los temporizadores activos, reutilizar un
temporizador o eliminar un temporizador.
La pantalla del electrodoméstico le notificará cuando un
temporizador haya finalizado.

10 49-2003952 Rev. 0
Settings (Configuraciones)
Set Clock (Configuración del Reloj)
(VWDIXQFLyQVRORGLVSRQLEOHFXDQGRQRHVWiFRQHFWDGROH
permite configurar el reloj y especifica cómo la hora del día
será exhibida. Las opciones para mostrar la hora son el horario
de un reloj estándar de 12 horas con selecciones AM y PM o
de estilo militar de 24 horas.
Sonidos y alertas
Esta pantalla de configuración le permite cambiar el volumen,
la alerta de fin de ciclo y activar o desactivar el sonido táctil.
Pantalla y apariencia
Esta pantalla muestra las opciones de brillo y Ahorro de
energía.
Configuración del Electrodoméstico
Ŷ UNIDADES DE TEMPERATURA: El horno está configurado
en grados Fahrenheit; sin embargo, en esta configuración
la unidad de cocción puede ser cambiada a Celsius.
Ŷ AJUSTAR LA TEMPERATURA DEL HORNO: Esta función
ajusta la temperatura del horno hasta 35 °F más caliente o
KDVWD)PiVIUtD8VHHVWDIXQFLyQVLFRQVLGHUDTXHOD
temperatura de su horno está demasiado caliente o fría y
desea modificarla. Para los modelos con horno doble, las
temperaturas de los hornos superior e inferior se ajustan de
IRUPDVHSDUDGD1RXVHWHUPyPHWURVWDOHVFRPRORVTXH
se encuentran en tiendas, para controlar la configuración
de temperatura del horno. Estos termómetros pueden variar
entre 20 y 40 grados.
Ŷ CONVERSIÓN AUTOMÁTICA DE RECETAS:: La
IXQFLyQ$XWR5HFLSH&RQYHUVLRQ&RQYHUVLyQGH
Receta Automática) puede ser activada a fin de reducir
automáticamente la temperatura de cocción programada
SDUD&RQYHFWLRQ%DNH+RUQHDUSRU&RQYHFFLyQR
&RQYHFWLRQ%DNH0XOWL+RUQHDUSRU&RQYHFFLyQ0~OWLSOH
Observe que esto no reducirá la temperatura de cocción, ni
el tiempo de horneado.
Ŷ APAGADO AUTOMÁTICO A LAS 12 HORAS: Cuando la
RSFLyQGH+RXU6KXW2II$SDJDGR/XHJRGH+RUDV
sea activada, la misma se apagará de forma automática
luego de 12 horas de uso continuo.
Ŷ TIEMPO DE APAGADO DE LA LUZ DEL HORNO:
Active esta función para que la luz del horno se apague
automáticamente después de finalizar la cocción y apagar
el horno.
Cuenta SmarTHQ
Le permite iniciar sesión en su cuenta SmartHQ en su horno.
Esta función también ayuda a conectar su horno a su cuenta
SmartHQ.
Wi-Fi
/HSHUPLWHFRQHFWDUVHRHOLPLQDUVXUHG:L)L
Activación Remota
Active esta función para controlar su horno de forma remota
mediante la aplicación, el micrófono o comandos de voz una
vez que su horno esté conectado.
Modo Ambiente
Le permite configurar la pantalla ambiental.
Voz y Micrófono (en algunos modelos)
El horno debe estar conectado a WiFi y el micrófono
encendido para usar el Smart HQ Assistant.
Sistema
Esta pantalla le permite borrar sus datos de usuario guardados
\PXHVWUDODYHUVLyQVDFWXDOGHOVRIWZDUH\HO,'0$&
USO DEL ELECTRODOMÉSTICO: 6HWWLQJV&RQILJXUDFLRQHV

49-2003952 Rev. 0 11
USO DEL ELECTRODOMÉSTICO: Configuraciones)/ Cámara de la Puerta del Horno
Cámara de la Puerta del Horno (en algunos modelos)
La Cámara de la Puerta del Horno permite la visualización remota del centro de la cavidad del horno utilizando la aplicación
6PDUW+4&RQVXOWHODVHFFLyQ&RQQHFWLYLW\&RQHFWLYLGDG'HVGHODSiJLQDGHLQLFLRGHODDSOLFDFLyQVHOHFFLRQHVXKRUQR\OXHJR
presione sobre el ícono de la cámara para iniciar la visualización de la cámara en su dispositivo inteligente. Las luces del horno se
iluminarán mientras la cámara está realizando la visualización. La visualización de la cámara se detendrá si se abre la puerta del
KRUQR\ODPLVPDQRHVWiSHUPLWLGDGXUDQWHFLHUWRVPRGRVWDOHVFRPR6HOI&OHDQ/LPSLH]D$XWRPiWLFDApague la transmisión de
la cámara desde la aplicación para reiniciar el funcionamiento normal de la luz del horno.
La suciedad en el vidrio de la puerta del horno y en la cubierta de la luz del interior del horno puede causar una imagen poco clara
en la cámara del horno. Consulte la sección de Cuidado y limpieza para obtener instrucciones sobre la limpieza del vidrio de la
puerta. Para obtener los mejores resultados, limpie el vidrio de la puerta inmediatamente después de un derrame, una vez que el
horno se haya enfriado.
Para los modelos de horno doble con cámara en la puerta del horno, la cámara del horno está únicamente en el horno superior.
Settings (Configuraciones)
Modo Sabbath
6XHVWXIDRIUHFHXQPRGR6DEEDWKTXHFXPSOHFRQORVHVWiQGDUHVHVWDEOHFLGRVSRU2UWKRGR[8QLRQHO&HQWUDO5DEELQLFDO
Congress y Halacha Tech, y está 100 % certificado según los estándares halájicos más estrictos. En este modo, las luces del horno
permanecerán apagadas durante el uso y los tonos del horno estarán desactivados.
NOTA:Asegúrese de que el reloj del horno esté ajustado correctamente antes de ingresar al modo. Para un funcionamiento
adecuado durante el Sabbath, el modo debe iniciarse dentro de la ventana de 1 hora antes del atardecer.
Uso del Modo Sabbath
1DYHJXHDOPHQ~Settings (Configuración) y seleccione
Sabbath (Sabbath).
6HOHFFLRQHODFRPELQDFLyQGHVHDGDGH6DEEDWK0RGH0RGR
6DEEDWKR+ROLGD\0RGH0RGR)HVWLYRGHODVRSFLRQHV
proporcionadas y pulse Start (Inicio). La pantalla indicará qué
modo Sabbath o Festivo está en funcionamiento.
/DVRSFLRQHVFRQ+ROLGD\)HVWLYR\6DEEDWK6DEEDWK
cambiarán automáticamente entre las funciones según la hora
inicial ingresada dentro de la ventana de 1 hora antes del
atardecer.
3DUDODVRSFLRQHVGH6DEEDWK:DUP&DOHQWDUHQ6DEEDWK
de menos de 24 horas, el electrodoméstico completará la
IXQFLyQ6DEEDWK:DUP&DOHQWDU6DEEDWK\SDVDUiD6DEEDWK
,GOH5HSRVR6DEEDWKSRUHOUHVWRGHOSHUtRGRGHKRUDV
Las luces del horno permanecerán apagadas, los tonos del
horno seguirán desactivados, la calefacción del horno estará
desactivada y la pantalla mostrará el horno en reposo.
Corte de energía en modo Sabbath
Si ocurre un corte de energía durante el uso de los modos
6DEEDWK:DUP&DOHQWDUHQ6DEEDWKR+ROLGD\)HVWLYR
HOHOHFWURGRPpVWLFRYROYHUiD6DEEDWK:DUP&DOHQWDU
en Sabbath) por el resto del horario seleccionado. Si el
FRUWHRFXUUHGXUDQWH6DEEDWK,GOH5HSRVRHQ6DEEDWKHO
HOHFWURGRPpVWLFRYROYHUiD6DEEDWK,GOH5HSRVRHQ6DEEDWK
por el resto del horario seleccionado.
Sabbath Warm Temperature (Temperatura
de Mantenimiento Sabático)
8WLOLFHODRSFLyQ6HWWLQJV&RQILJXUDFLyQ6DEEDWK:DUPHU
&DOHQWDGRU6DEEDWKSDUDDXPHQWDUODWHPSHUDWXUDGH
6DEEDWK:DUP&DOHQWDU6DEEDWKVLHOKRUQRHVWiIXQFLRQDQGR
a una temperatura inferior a la deseada o si su horno opera
a 208 voltios. Vaya a Appliance Settings (Configuración),
seleccione Sabbath Warm Temperature (Temperatura de
Mantenimiento Sabático).
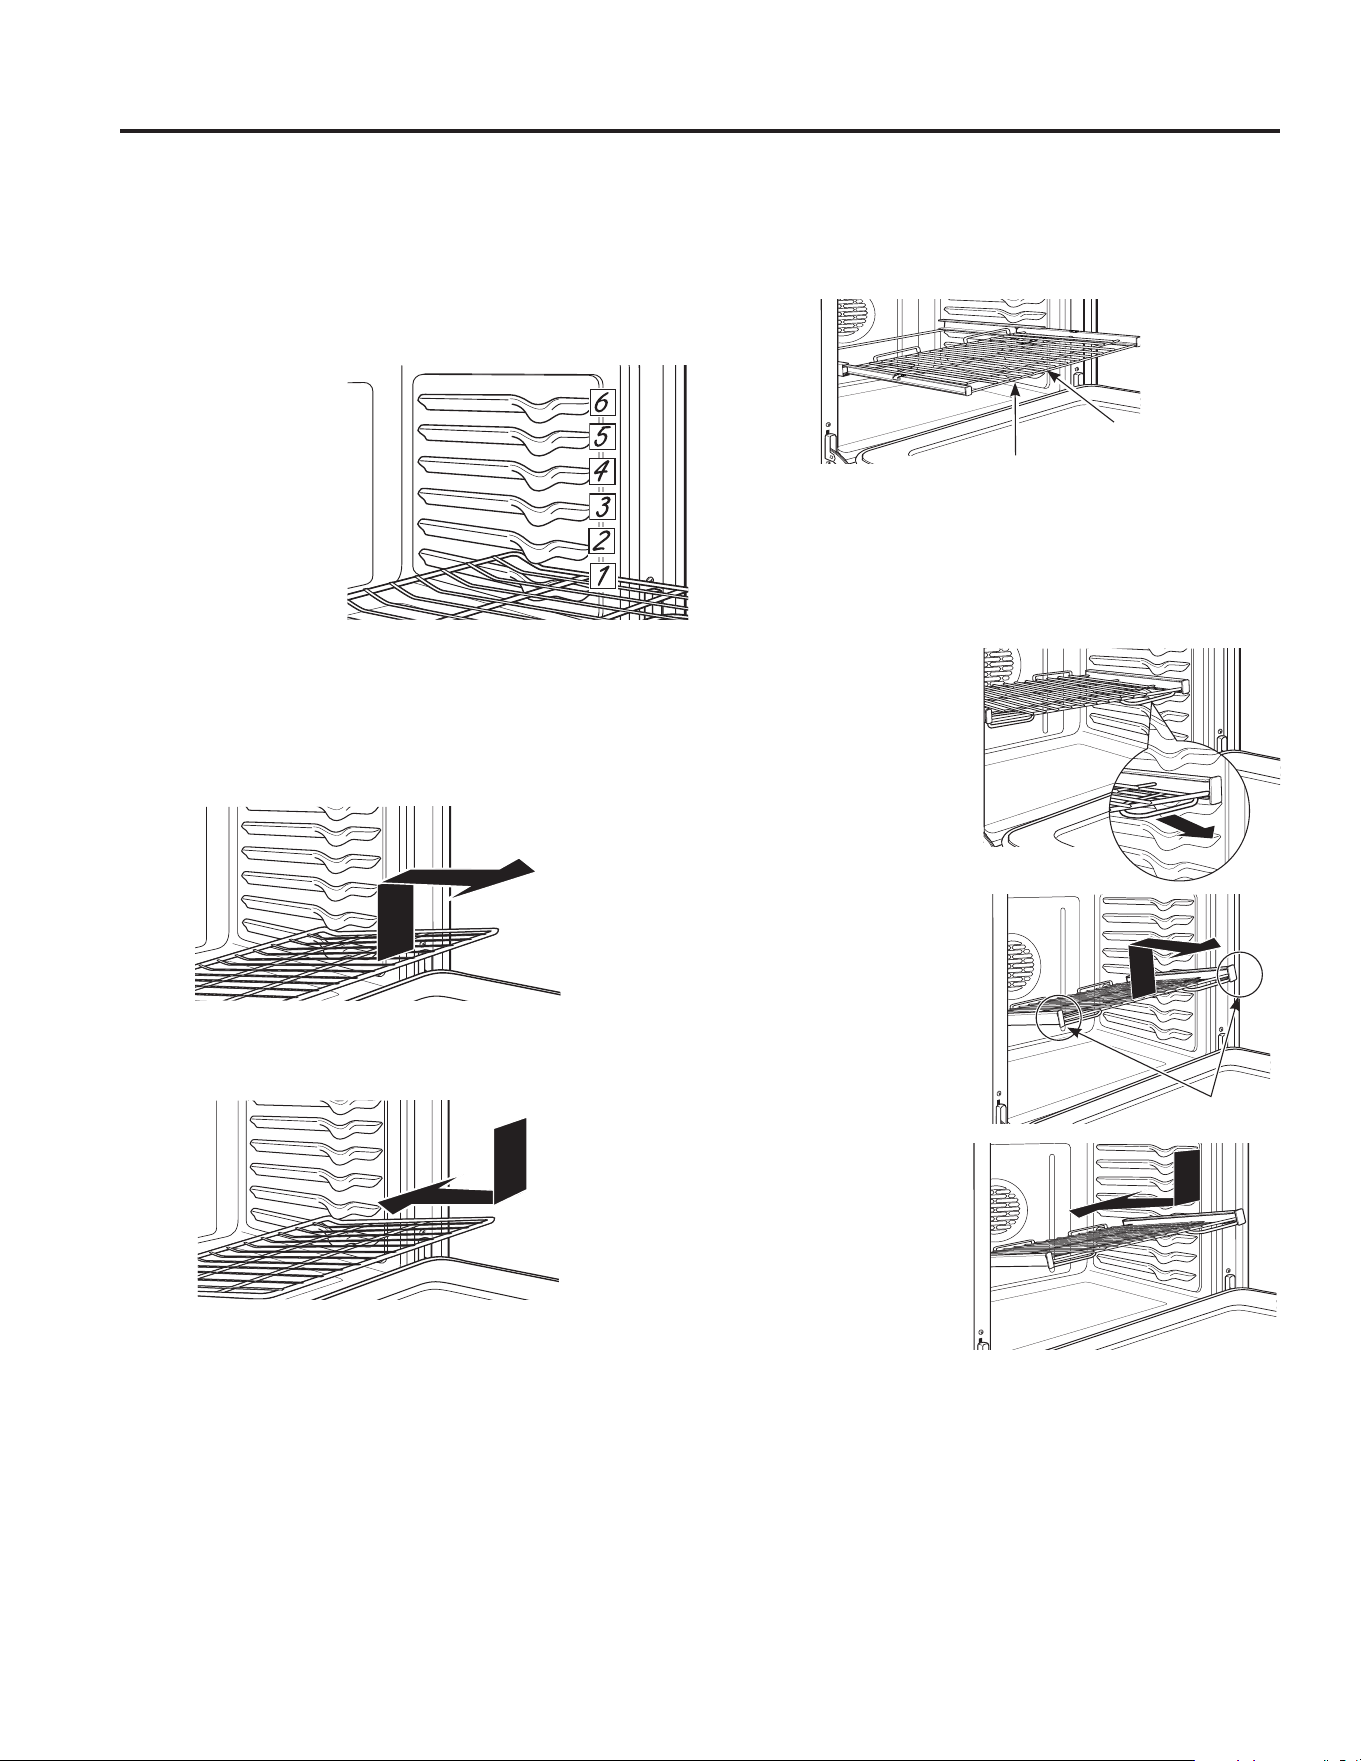
12 49-2003952 Rev. 0
El horno cuenta con seis posiciones de estantes. En la Guía
de Cocción, se brindan recomendaciones de posiciones de
los estantes para diferentes tipos de comidas. Se ajusta un
estante en una dirección para afectar los resultados de cocción.
Por ejemplo, si se prefieren partes superiores más oscuras en
tartas, panecillos o galletas, pruebe moviendo la comida a un
estante que se encuentre una posición más arriba. Si encuentra
que las comidas están demasiado doradas en la parte superior,
pruebe moviendo las mismas más abajo la próxima vez.
Al hornear con múltiples ollas y en múltiples
estantes, asegúrese de que haya suficiente espacio
entre las ollas para que fluya el aire.
Es posible que su horno cuente con estantes
extensibles y/o estantes planos tradicionales.
Para evitar posibles quemaduras, coloque los
estantes en la posición deseada antes de encender
el horno.
Estantes Planos
Al colocar y retirar utensilios de cocina, empuje el estante
KDFLDDIXHUDGHOWRSHSRVLFLyQGHGHWHQFLyQVREUHHOVRSRUWH
del estante.
Para retirar el estante, empuje el mismo hacia usted, incline el
extremo frontal hacia arriba y empuje hacia afuera.
Para hacer un reemplazo, coloque el extremo curvo del
HVWDQWHEORTXHDGRUHVHQORVVRSRUWHVGHOKRUQRLQFOLQHKDFLD
arriba el frente y empuje el estante hacia adentro.
Es posible que resulte difícil deslizar los estantes,
especialmente luego de la limpieza automática. Coloque aceite
vegetal en una tela húmeda o toalla de papel y frote sobre los
extremos izquierdo y derecho.
Estantes Extensibles (en algunos modelos)
Siempre empuje hacia afuera el estante desde el riel frontal
superior hasta la posición de detención en su máxima
extensión, al colocar o retirar utensilios. Los estantes
extensibles no podrán ser usados en la posición del estante
superior.
Si las rejillas extensibles son difíciles de extender, lubríquelas
según la sección de Cuidado y limpieza de este manual.
Para ordenar un lubricante de grafito adicional, lea la sección
de Accesorios de este manual.
Para Retirar un Estante Extensible:
1. Asegúrese de introducir
la parrilla hasta el fondo
del horno, de modo que
las paletas laterales del
armazón de la parrilla
se desenganchen de la
cavidad.
'HVOLFHODSDUULOODKDFLD
usted hasta que llegue al
WRSHSRVLFLyQGHWHQLGD
del soporte de la parrilla.
3. Tome de manera firme
ambos lados de la
estructura del estante y
deslizando este último,
incline el extremo del
frente hacia arriba y
empuje hacia fuera.
Para Reemplazar un
Estante Extensible:
1. Tome firmemente ambos
lados del armazón de
la parrilla y la parrilla
deslizable.
2. Coloque el extremo
curvo del estante en
la posición deseada,
incline el frente hacia
arriba y presione la
parrilla hacia adentro.
Si resulta difícil reemplazar
o retirar los estantes extensibles, coloque un poco de aceite
vegetal en una tela suave o una toalla de papel y limpie los
VRSRUWHVGHORVHVWDQWHVGHOKRUQR1RTXLWHHODFHLWHGH
cocina del espacio de deslizamiento.
Estantes del Horno
Riel frontal
superior
Posición de apertura total
Tomar aquí
USO DEL ELECTRODOMÉSTICO: Estantes del Horno
NOTA: El uso de otros aceites de cocina como aceite de cacahuate, Pam
®
u otros aerosoles lubricantes puede provocar una
descoloración o un residuo de color similar al óxido en los estantes y los laterales de las cavidades. Para limpiar este residuo,
use agua y jabón o una solución de vinagre y agua. Enjuague con agua limpia y seque con una tela seca.

49-2003952 Rev. 0 13
USO DEL ELECTRODOMÉSTICO:3DSHOGH$OXPLQLR\&REHUWRUHVGHO+RUQR8WHQVLOLRV
PRECAUCIÓN
No use ningún tipo de aluminio o cobertor de horno para cubrir el fondo del horno. Estos ítems
pueden atrapar el calor o derretirse, ocasionando daños sobre el producto y el riesgo de descargas, humo o incendios.
Los daños por uso inadecuado de estos ítems no están cubiertos por la garantía del producto.
Se podrá usar aluminio para evitar derrames, colocando una hoja sobre un estante inferior varias pulgadas debajo de la comida.
1RXVHPiVDOXPLQLRTXHHOQHFHVDULR\QXQFDFXEUDWRWDOPHQWHHOHVWDQWHGHXQKRUQRFRQSDSHOGHDOXPLQLR0DQWHQJDHO
aluminio a por lo menos 1 1/2” de las paredes del horno, para evitar una circulación deficiente del calor.
Papel de Aluminio y Cobertores del Horno
Guía para Utensilios de Cocina
Pautas de Uso de Utensilios
El material, el acabado y el tamaño de los utensilios afectan el
horneado.
Las ollas oscuras, revestidas y opacas absorben el calor más
rápidamente que las ollas claras y brillantes. Al usar ollas
que absorben el calor más rápidamente, las comidas podrán
resultar más doradas, crocantes y con una capa más gruesa.
Si utiliza utensilios oscuros y revestidos, controle la comida
antes del tiempo mínimo de cocción. Si se obtienen resultados
no deseados con este tipo de utensilios, considere la
posibilidad de reducir la temperatura del horno en 25º F la
próxima vez.
Las ollas brillantes pueden producir resultados de horneado
más parejos en tortas y galletas.
Las ollas de vidrio y cerámica calientan con lentitud, pero
retienen bien el calor.
Estos tipos de ollas funcionan bien con platos tales como
tartas y postres con natilla.
Las ollas con aislante de aire calientan lentamente y pueden
producir fondos dorados.
Mantenga los utensilios limpios para una cocción más pareja.
El utensilio usado en los modos para asar y freír con aire
deberá ser de uso seguro para asar.

14 49-2003952 Rev. 0
Modos de Cocción
Su nuevo horno posee una variedad de modos de cocción para que pueda obtener los mejores resultados. Estos modos se
describen a continuación. Consulte la sección Guía de cocción para recomendaciones sobre alimentos específicos y revise el menú
de opciones de cocción en la pantalla del electrodoméstico para obtener consejos de cocción y otras recomendaciones al configurar
un modo de horno. Recuerde que es posible que su nuevo horno funcione de manera diferente que aquel que está reemplazando.
Modos de Horneado y Dorado
Seleccione un modo para hornear y dorar basado en el tipo y
cantidad de comida que está preparando. Al preparar comidas
horneadas tales como tartas, galletas y masas, siempre
precaliente el horno primero. Siga las recomendaciones de
la receta sobre la colocación de la comida. Si no se brindan
pautas, centre la comida en el horno.
Hornear
El modo de horneado está pensado para la cocción en un
solo estante. Este modo usa el calor principalmente desde el
elemento inferior, pero también desde el elemento superior
para cocinar la comida. Para usar este modo, presione la
tecla Bake (Hornear), ingrese una temperatura, y luego
presione Start (Iniciar). El precalentamiento generalmente se
recomienda al usar este modo.
Horneado por Convección (en algunos
modelos/hornos)
(OPRGR&RQYHFWLRQ%DNH+RUQHDUSRUFRQYHFFLyQHVWi
destinado a la cocción en una sola rejilla. Este modo utiliza
calor del elemento inferior y también de los elementos superior
y trasero, junto con el movimiento de aire para mejorar
la uniformidad. Su horno está equipado con Auto Recipe
&RQYHUVLRQ&RQYHUVLyQDXWRPiWLFDGHUHFHWDVSRUORTXH
no es necesario convertir la temperatura al utilizar este modo.
Para usar este modo, presione Convection Bake (Hornear por
convección), ingrese una temperatura y luego presione Start
(Inicio). Generalmente se recomienda el precalentamiento al
utilizar este modo.
Honeado por Convección en Estantes
Múltiples (en algunos modelos/hornos)
(OPRGR&RQYHFWLRQ%DNH0XOWL5DFN+RQHDGRSRU
Convección en Estantes Múltiples) está pensado para honear
en múltiples estantes al mismo tiempo. Este modo utiliza el
calor principalmente desde el elemento trasero, pero también
calienta desde los elementos superior e inferior, junto con el
movimiento de aire desde el ventilador por convección para
mejorar una cocción pareja. El horno está equipado con
ODIXQFLyQ$XWR5HFLSH&RQYHUVLRQ&RQYHUVLyQGH5HFHWD
Automática); de modo que no es necesario convertir la
temperatura al usar este modo. Es posible que el tiempo de
horneado sea un poco más prolongado con estantes múltiples,
en comparación con lo que se espera con un solo estante.
Para usar este modo, presione Convection Bake Multi Rack
(Hornear por convección en varias rejillas), ingrese una
temperatura, y luego presione Start (Iniciar). Siempre realice
el precalentamiento al usar este modo.
Dorado por Convección (en algunos
modelos/hornos)
(O PRGR GH $VDGR SRU &RQYHFFLyQ &RQYHFWLRQ 5RDVW HVWi
diseñado para asar carnes y verduras en una sola rejilla. Este
modo utiliza calor de los elementos inferior, superior y trasero
junto con el movimiento de aire para mejorar el dorado y reducir
HOWLHPSRGHFRFFLyQ1RHVQHFHVDULRFRQYHUWLUODWHPSHUDWXUD
Cuando use este modo, o si usa la sonda, controle la comida
antes que el tiempo sugerido en la receta. Para usar este
modo, presione la Convection Roast (Asar por convección),
ingrese una temperatura, y luego presione Start (Iniciar)1RHV
necesario realizar el precalentamiento al usar este modo.
Slow Roast (Asado lento) (en algunos
modelos/hornos)
(OPRGR6ORZ5RDVWDVDGROHQWRHVXQPRGRHVSHFLDO
de asado sin precalentamiento que utiliza pulsos de calor
para dorar el exterior de los alimentos y, al mismo tiempo,
proporciona una cocción suave para lograr un punto de cocción
LQWHULRUPiVXQLIRUPH(OPRGR6ORZ5RDVWDVDGROHQWRHVWi
diseñado únicamente para cocinar en un solo estante. Espere
que los alimentos que normalmente cocinaría en Traditional
%DNHKRUQHDGRWUDGLFLRQDOR&RQYHFWLRQ5RDVWGRUDGRSRU
convección) tarden más en cocinarse cuando utilice Slow Roast
DVDGROHQWR6HUHFRPLHQGDXVDUODVRQGDSDUDDOLPHQWRVSDUD
monitorear la cocción. Puede encontrar pautas adicionales para
el uso de este modo en la Sección Guía de Cocción. Para usar
este modo, presione Slow Roast (asado lento), ingrese una
temperatura y luego presione Start (Inicio).
Modo para Asar
Siempre ase con la puerta cerrada. El elemento para asar en
el horno es muy potente. Monitoree la comida de cerca al asar.
Tenga cuidado al asar en posiciones de estantes superiores,
ya que colocar la comida más cerca del elemento para asar
incrementa el humo, salpicaduras y la posibilidad de que se
incendien las grasas. No se recomienda asar en el estante
de la posición 6.
Intente asar las comidas que normalmente haría a la parrilla.
Ajuste las posiciones de los estantes para ajustar la intensidad
del calor a la comida. Coloque las comidas más cerca del
elemento para asar, cuando se desee una superficie más
cocinada y un interior poco cocido. Las comidas más gruesas
y las comidas cuyo interior debe ser cocinado deberían ser
asadas en un estante en una posición alejada del usado
SDUDDVDURXVDQGRODVIXQFLRQHV7UDGLFLRQDO%URLO/R$VDGR
7UDGLFLRQDO%DMRR&RQYHFWLRQ%URLO/R$VDGRSRU&RQYHFFLyQ
Bajo). Para un mejor rendimiento, centre la comida debajo del
elemento calentador para asar.
Broil (Asar a la parrilla)
(OPRGR%URLO+LJK$VDGR$OWRXVDFDORULQWHQVRGHOHOHPHQWR
VXSHULRUSDUDVRDVDUODVFRPLGDV8VHODIXQFLyQ%URLO+LJK
$VDGR$OWRSDUDFRUWHVPiVGHOJDGRVGHFDUQH\RFRPLGDV
que prefiera que quedan menos cocinadas en su interior.
Para usar este modo presione Broil (Asar), luego seleccione
High (Alto) o Low (Bajo) según la cantidad de sellado y
la temperatura interna que prefiera, y luego presione Start
(Iniciar).1RHVQHFHVDULRUHDOL]DUHOSUHFDOHQWDPLHQWRDOXVDU
este modo.
Asado por Convección Alto (en algunos
modelos/hornos)
(OPRGR&RQYHFWLRQ%URLO+LJK$VDGRSRU&RQYHFFLyQ$OWR
usa calor intenso desde el elemento superior, junto con el
movimiento del aire directamente desde la parte superior del
horno para mejorar la cocción y el dorado. Para usar este
modo presione Convection Broil (Asado por Convección),
OXHJRVHOHFFLRQH+LJK$OWRR/RZ%DMRVHJ~QODFDQWLGDGGH
sellado y la temperatura interna que prefiera, y luego presione
Start (Iniciar). Para obtener mejores resultados, precaliente
durante 5 minutos al usar este modo.
USO DEL ELECTRODOMÉSTICO: Modos de Cocción

49-2003952 Rev. 0 15
USO DEL ELECTRODOMÉSTICO: Modos de Cocción
Modos de Cocción (Cont.)
Fritura con Aire (en algunos modelos/
hornos)
$LU)U\)UHtUFRQ$LUHHVXQPRGRGHFRFFLyQHVSHFLDOSRU
convección sin precalentamiento, diseñado para producir
comidas con un exterior más crocante que en cocciones con
KRUQRVWUDGLFLRQDOHV(OPRGR$LU)U\)UHtUFRQ$LUHIXH
diseñado para la cocción en un solo estante únicamente.
Seleccione Air Fry (Freír con Aire), y luego ingrese la
configuración de temperatura deseada y presione Start
(Iniciar). La temperatura se podrá configurar entre 300°F y
)1RHVQHFHVDULRHOSUHFDOHQWDPLHQWRDOHVWDUHQHVWH
modo. Siga las pautas de la receta para hornos tradicionales o
del paquete en relación a los ajustes de temperatura y tiempos
de cocción; ajuste el tiempo de cocción para lograr la textura
crocante deseada. Se podrán encontrar pautas adicionales
para utilizar este modo en la Guía de Cocción.
Leudar
(OPRGR3URRI/HXGDUHVWiGLVHxDGRSDUDHOHYDUIHUPHQWDU
y leudar) masas de pan. Seleccione Proof (leudar) y luego
presione Start (Inicio). Cubra bien la masa para evitar que se
seque. El pan se elevará más rápidamente que a temperatura
ambiente.
Calentar
(OPRGR:DUP&DOHQWDUHVWiGLVHxDGRSDUDPDQWHQHU
comidas calientes hasta durante 3 horas. Para usar este modo,
seleccione Warm (calentar) y luego presione Start (iniciar).
Cubra las comidas que necesitan mantener la humedad y no
FXEUDDTXHOODVFRPLGDVTXHGHEHUtDQTXHGDUFURFDQWHV1R
VHUHTXLHUHSUHFDOHQWDUODVPLVPDV1RXVHODIXQFLyQ:DUP
&DOHQWDUSDUDFDOHQWDUFRPLGDIUtDH[FHSWRJDOOHWDVFUXMLHQWHV
papas fritas o cereales secos. También se recomienda que la
comida no se mantenga caliente por más de dos horas.
Cocción de Precisión (en algunos modelos/
hornos)
&RFFLyQGHSUHFLVLyQ3UHFLVLRQ&RRNLQJHVXQDH[SHULHQFLD
de cocción guiada diseñada para brindarle el mejor resultado
de su horno para alimentos específicos. Cuando usted
selecciona un alimento a través del menú Cocción de precisión
3UHFLVLRQ&RRNLQJ0HQXVHVHOHFFLRQDQDXWRPiWLFDPHQWH
los ajustes recomendados del horno para ese alimento y se
proporciona información adicional para ayudarle a obtener el
mejor resultado.
Ciclos adicionales estarán disponibles a través de
actualizaciones del software. Conecte su horno para tener
acceso a estas actualizaciones. Para acceder a detalles sobre
FyPRFRQHFWDUVXKRUQRFRQVXOWHODVHFFLyQ:L)L&RQQHFW
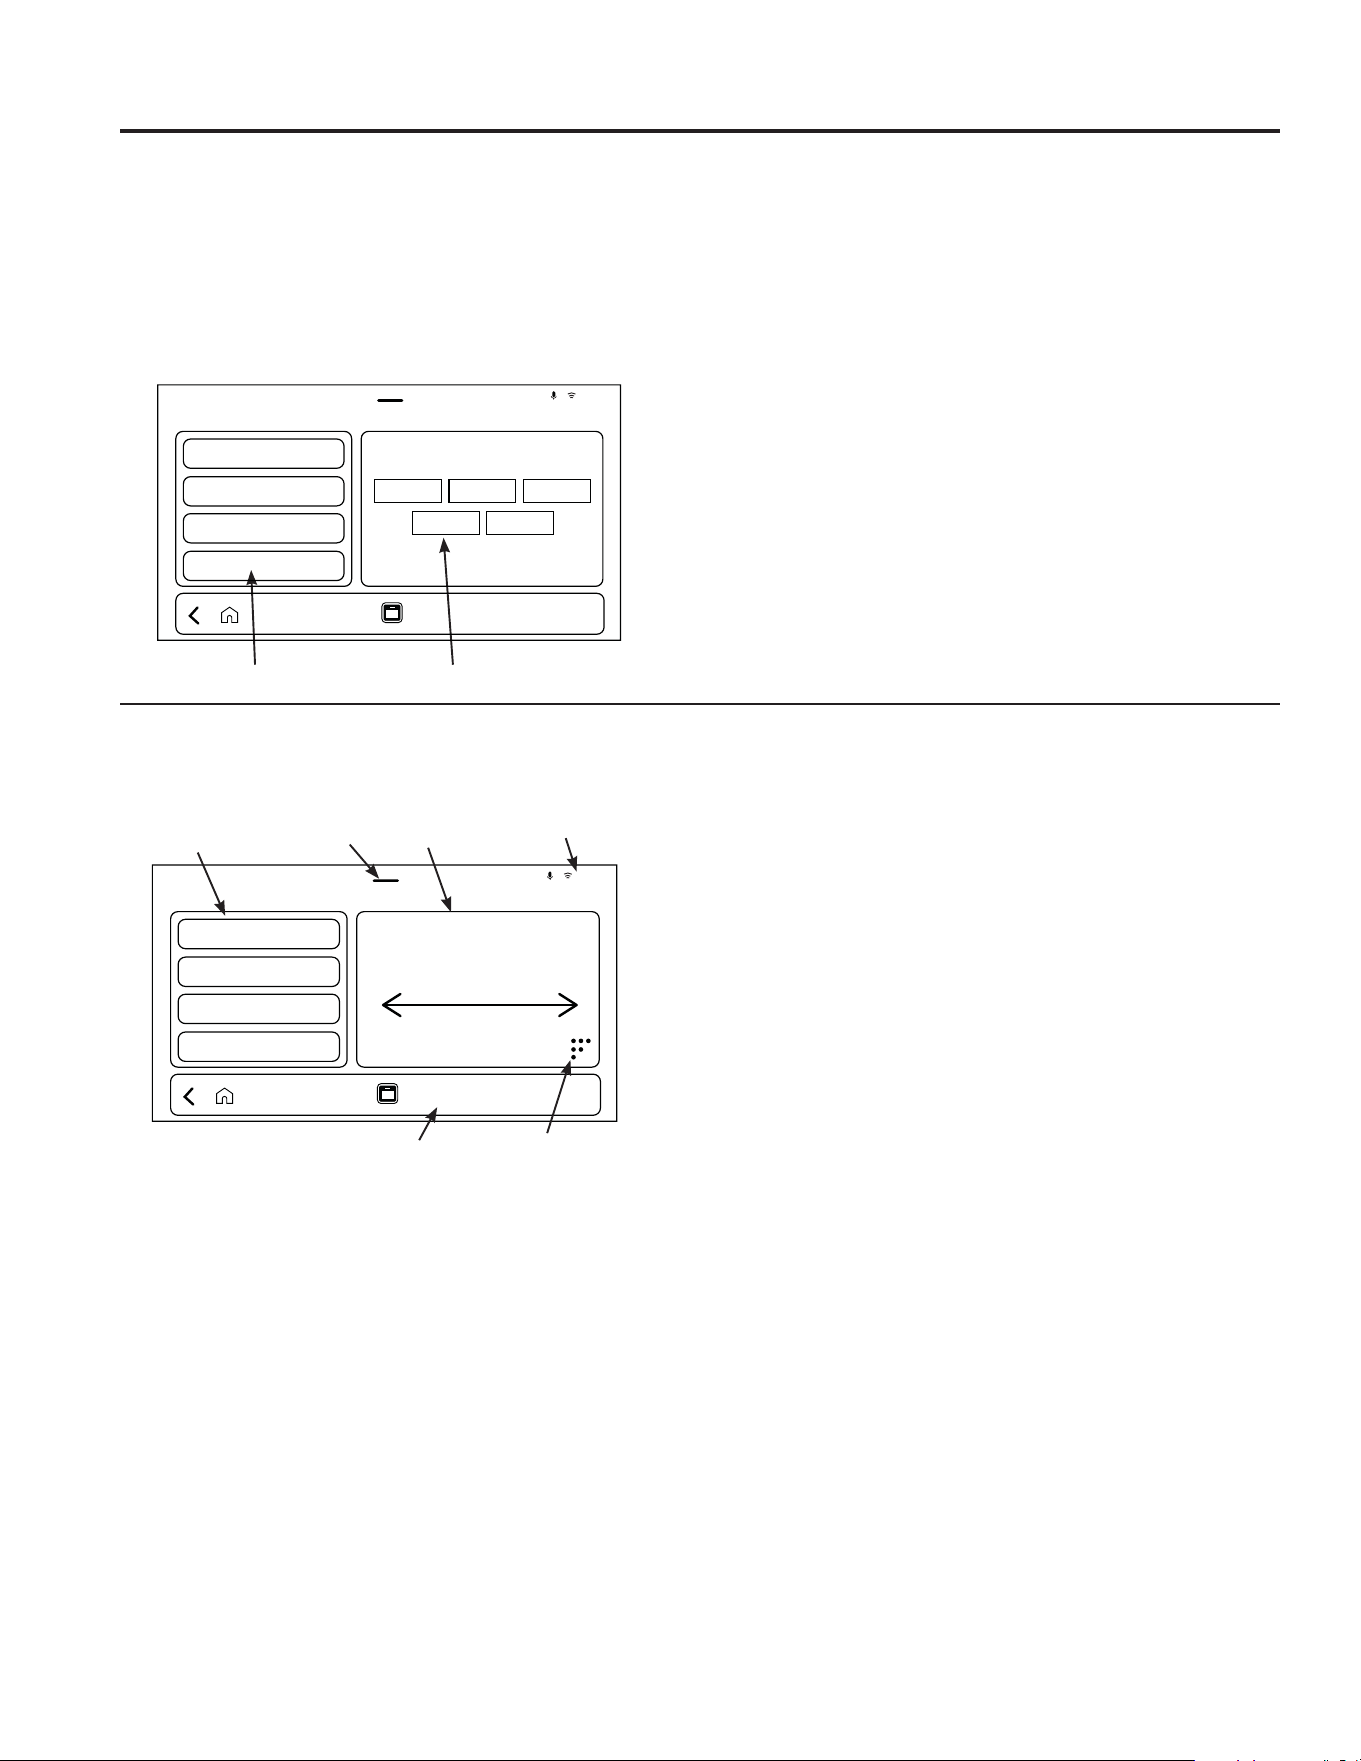
16 49-2003952 Rev. 0
Modos de Cocción (Cont.)
USO DEL ELECTRODOMÉSTICO:0RGRVGH&RFFLyQ8WHQVLOLRV
Configuración de un modo de cocción
'HVGHODSDQWDOODGHLQLFLRVHOHFFLRQHHOKRUQRFXDQGR
utilice un horno doble. Luego seleccione el modo Traditional
&RRNLQJ&RFFLyQWUDGLFLRQDOR3UHFLVLRQ&RRNLQJ&RFFLyQGH
precisión).
6LXVWHGVHOHFFLRQD3UHFLVLRQ&RRNLQJFRFFLyQGHSUHFLVLyQ
las categorías aparecerán en la parte izquierda de la pantalla y
las opciones de comida aparecerán en la parte derecha.
1. Categorías: Los alimentos están agrupados en Categorías.
'HVSOiFHVHKDFLDDUULED\KDFLDDEDMRSDUDYHUWRGDVODV
Categorías. Seleccione una Categoría para ver todas las
opciones de alimentos dentro de una Categoría en el lado
derecho de la pantalla.
2. Alimentos:'HVSOiFHVHKDFLDODL]TXLHUGD\KDFLDOD
derecha para ver todas las opciones de alimentos dentro de
una Categoría. Seleccione un alimento en el lado derecho
de la pantalla para comenzar la cocción.
Categorías y opciones de comida adicionales estarán
disponibles mediante actualizaciones de software. Conecte
su horno para tener acceso a estas actualizaciones.
&RQVXOWHODVHFFLyQGHFRQHFWLYLGDG:L)LSDUDREWHQHU
detalles sobre cómo conectar su horno.
1. Categorías 2. Alimentos
Precision Cooking
1:59 PM
8QDYH]TXHXVWHGVHOHFFLRQHXQPRGRGHFRFFLyQ7UDGLWLRQDO7UDGLFLRQDORXQPRGRGHFRFFLyQ3UHFLVLRQ&RRNLQJ&RFFLyQGH
3UHFLVLyQODV&RRNLQJ2SWLRQV2SFLRQHVGH&RFFLyQDSDUHFHUiQHQODSDUWHL]TXLHUGDGHODSDQWDOOD\ODLQIRUPDFLyQVREUHODV
selecciones aparecerá en el lado derecho de la pantalla.
1. OPCIONES DE COCCIÓN
8QD RSFLyQ GH FRFFLyQ VROR VH PRVWUDUi VL HVWi GLVSRQLEOH R
es necesaria para el modo de cocción seleccionado. Si no
se muestra una opción de cocción para un modo de cocción
seleccionado, entonces no está disponible para su uso o no es
necesaria.
Tenga en cuenta que cualquier opción de cocción que
se muestre para un modo de cocción tendrá selecciones
predeterminadas, pero confirme que la configuración y las
selecciones predeterminadas coincidan con las entradas
TXHXVWHGGHVHDFRPRWHPSHUDWXUDHVWDEOHFLGDWLHPSRGH
FRFFLyQWDPDxRRWLSR\HOUHVXOWDGRHVSHUDGRQLYHOGH
cocción). Esto es especialmente importante al usar los modos
3UHFLVLRQ&RRNLQJFRFFLyQGHSUHFLVLyQ
Asegúrese de desplazarse hacia arriba y hacia abajo para ver
todas las Opciones de cocción disponibles para un modo de
cocción seleccionado.
Temperatura
Al seleccionar una temperatura establecida del horno,
se muestran temperaturas preestablecidas que pueden
seleccionarse desplazándose horizontalmente y seleccionando
la temperatura deseada.
La opción para establecer una temperatura de cocción
personalizada está disponible usando el teclado numérico.
1RWRGRVORVPRGRVGHFRFFLyQGHSUHFLVLyQUHTXLHUHQTXH
usted configure una temperatura de cocción.
Temporizador
Si el modo de cocción seleccionado admite un temporizador
de cocción, esta opción le permite configurar un temporizador
de cuenta regresiva que puede programarse para apagar o no
apagar el modo de cocción cuando el temporizador finaliza.
Algunos modos de cocción de precisión tienen un temporizador
configurado automáticamente. En estos casos, la opción
Temporizador no se muestra. En su lugar, la cuenta regresiva
del temporizador comienza después de presionar Start
(Inicio). Este temporizador no apagará el horno cuando finalice
el tiempo.
Sonda
Esta opción se muestra si la sonda del horno puede usarse
con un modo de horno tradicional. Consulte la sección Sonda
para obtener detalles sobre el uso de la sonda del horno.
Algunos modos de cocción de precisión requieren el uso de la
sonda para horno provista con el horno. Para estos ciclos, se
proporcionan instrucciones de colocación de la sonda, pero la
temperatura establecida de la sonda la determina el modo de
cocción de precisión seleccionado.
Ajuste rápido
de tono
Barra de navegación
Barra de estado
Teclado numérico
2.Información o
selecciones
1. Opciones
de cocción
Cooking Mode
Start
1:59 PM
3.

49-2003952 Rev. 0 17
Modos de Cocción (Cont.)
Configuración de un modo de cocción (cont.)
1. OPCIONES DE COCCIÓN (cont.)
Consejos de cocción
Esta opción proporciona información útil adaptada al modo de
cocción seleccionado. Esto puede incluir consejos sobre cómo
preparar los alimentos para la cocción, cómo el utensilio de
cocina puede afectar los resultados de cocción o cómo ayudar
a evitar derrames en la cavidad del horno.
Parrilla y utensilios de cocina
3DUDDOJXQRVPRGRVGH3UHFLVLRQFRRNLQJFRFFLyQGH
precisión), esta opción brinda sugerencias sobre la ubicación
de la parrilla y los utensilios de cocina adaptadas al modo
seleccionado.
Cantidad de parrillas
3DUDDOJXQRVPRGRVGH3UHFLVLRQFRRNLQJFRFFLyQGH
SUHFLVLyQSURGXFWRVKRUQHDGRVFRPRJDOOHWDVSRUHMHPSOR
esto proporciona opciones de cocción para cocinar en una sola
parrilla o en varias parrillas. Si esta opción no se muestra, se
espera que usted cocine en una sola parrilla.
Nivel de cocción
3DUDDOJXQRVPRGRVGH3UHFLVLRQFRRNLQJFRFFLyQGH
SUHFLVLyQFRPRELVWHFVRWRFLQRHVWDRSFLyQUHTXLHUHTXH
usted elija el nivel de cocción deseado para el alimento
seleccionado. Algunos alimentos con opciones de nivel de
cocción requieren la sonda, mientras que otros dependen del
tiempo de cocción. Cuando se selecciona una opción de nivel
de cocción, el objetivo de la sonda o el tiempo de cocción,
así como las condiciones de cocción del horno, se actualizan
según la selección de alimento realizada.
Tamaño
3DUDDOJXQRVPRGRVGH3UHFLVLRQFRRNLQJFRFFLyQGHSUHFLVLyQ
FRPRVDOPyQHVWDRSFLyQUHTXLHUHTXHXVWHGHOLMDGHXQDOLVWD
de selecciones para adaptar las condiciones de cocción y el
tiempo de cocción según las selecciones realizadas.
Tipo
3DUDDOJXQRVPRGRVGH3UHFLVLRQFRRNLQJFRFFLyQGH
SUHFLVLyQFRPRWRFLQRHVWDRSFLyQUHTXLHUHTXHXVWHGHOLMD
GHXQDOLVWDGHVHOHFFLRQHVFRPRJUXHVRUHJXODURFRUWH
central para tocino) para adaptar las condiciones de cocción y
el tiempo de cocción según las selecciones realizadas.
2. INFORMACIÓN O SELECCIONES
El contenido en esta área varía según la opción activa
seleccionada a la izquierda. Asegúrese de deslizar hacia la
izquierda y la derecha en esta área para ver todo el contenido
relevante. Puede haber recomendaciones de utensilios de
cocina o consejos adicionales para consultar.
3. INICIO
Revise la configuración de las opciones de cocción, sus
selecciones y coloque los estantes del horno antes de
presionar Start (Inicio).
USO DEL ELECTRODOMÉSTICO: Modos de Cocción

18 49-2003952 Rev. 0
Probe (Sonda) (en algunos modelos)
La temperatura interna de la comida con frecuencia se usa como indicador de que está lista, especialmente al dorar o preparar
FDUQHGHDYH(OPRGR3UREH6RQGDPRQLWRUHDODWHPSHUDWXUDLQWHUQDGHODFRPLGD\DSDJDHOKRUQRFXDQGRHVWD~OWLPD
alcanza la temperatura programada.
ADVERTENCIA
El consumo de comida semicruda puede hacer que se contraigan enfermedades producidas
por la comida. Use la sonda de acuerdo con las siguientes instrucciones, a fin de asegurar que todas las partes de la
comida alcancen temperaturas de cocción mínimamente seguras. Las recomendaciones de temperatura mínima segura
para los alimentos son proporcionadas por el USDA y la FDA.
Controle siempre la temperatura en múltiples partes de la comida, utilizando un termómetro de comidas luego de
realizar la cocción, a fin de asegurar que todas las partes de la misma hayan alcanzado una temperatura interna
mínimamente segura en dicha comida.
Ubicación Correcta de la Sonda
Luego de preparar la comida y de colocarla en la olla, siga
estas instrucciones para una ubicación correcta de la sonda.
Ŷ ,QVHUWHODVRQGDHQODFRPLGDGHPRGRTXHODSXQWDGH
la sonda se apoye en el centro de la parte más gruesa de
la comida. Para un mejor rendimiento, la sonda debería
ser completamente insertada en la comida. Si la sonda
no es ubicada correctamente, es posible que no mida con
precisión la temperatura de la parte más fría de la comida.
Algunas comidas, particularmente las más pequeñas, no
son adecuadas para la cocción con el uso de una sonda,
debido a sus formas o tamaños.
Ŷ 1RGHEHUtDWRFDUHOKXHVRODJUDVDQLHOFDUWtODJR
Ŷ 3DUDFRFLQDUXQDYHHQWHUDLQVHUWHODVRQGDHQODSDUWH
más gruesa de la pechuga.
Ŷ 3DUDGRUDUVLQKXHVRVLQVHUWHODVRQGDHQHOFHQWURGHO
dorado.
Ŷ 3DUDFRFLQDUMDPyQRFRUGHURFRQKXHVRVLQVHUWHODVRQGD
en el centro de la articulación o del músculo más bajo y
largo.
Ŷ 3DUDSUHSDUDUFD]XHODVRSODWRVWDOHVFRPRSDVWHOGH
carne, inserte la sonda en el centro del plato.
Ŷ 3DUDFRFLQDUSHVFDGRLQVHUWHODVRQGDMXVWRDUULEDGHOD
agalla en la zona más carnosa paralela a columna.
Uso de la Sonda
Para usar la sonda:
,QVHUWHODVRQGDHQODFRPLGDFRQVXOWHVREUHOD8ELFDFLyQ
Correcta de la Sonda).
2. Coloque la comida en el horno y conecte la sonda en el
tomacorriente correspondiente del o de los hornos. NOTA:
/DVRQGDQRSXHGHXWLOL]DUVHGXUDQWHDVDUEURLODVDU
SRUFRQYHFFLyQFRQYHFWLRQEURLOGHVKLGUDWDUGHK\GUDWH
PDQWHQHUFDOLHQWHZDUPIHUPHQWDUSURRI
3. Seleccione el modo y la temperatura de cocción deseados.
Si el modo de cocción es compatible con el uso de una
sonda, se visualizará la pantalla de configuración de la
sonda. Ingrese la temperatura interna deseada para la
comida y presione Start,QLFLDU/DWHPSHUDWXUDGHOD
sonda se puede configurar entre 100°F y 200°F.
NOTA: Si se desea precalentar, complete este paso antes
del paso 1.
/RVPRGRVGHFRFFLyQWUDGLFLRQDOHVH[FOX\H6ORZ5RDVW
finalizan el modo cuando se alcanza la temperatura de la
sonda y los modos de cocción de precisión y Asado lento
no lo hacen..
Pautas para el Cuidado de la Sonda
NOTA: algunos modelos con horno doble cuentan con una
sonda sólo en el horno superior.
Ŷ 6LVHXVDXQDVRQGDTXHQRVHDODSURYLVWDFRQHVWH
producto, se podrán producir daños sobre la sonda.
Ŷ 8VHODVPDQLMDVGHODVRQGDDOHQFKXIDU\GHVHQFKXIDUOD
misma, luego de insertar o de retirar la sonda de la carne o
del tomacorriente.
Ŷ 3DUDHYLWDUGDxRVVREUHODVRQGDQRXVHDJDUUDGHUDVSDUD
empujar el cable al retirarlo.
Ŷ 3DUDHYLWDUURPSHUODVRQGDDVHJ~UHVHGHTXHOD
comida haya sido completamente descongelada antes de
insertarla.
Ŷ 3DUDHYLWDUSRVLEOHVTXHPDGXUDVQRGHVHQFKXIHODVRQGD
del tomacorriente del horno hasta que este último se haya
enfriado.
Ŷ 1XQFDGHMHODVRQGDGHQWURGHOKRUQRGXUDQWHXQFLFORGH
limpieza automática o de limpieza con vapor.
Ŷ 1RJXDUGHODVRQGDGHQWURGHOKRUQR
USO DEL ELECTRODOMÉSTICO: Probe
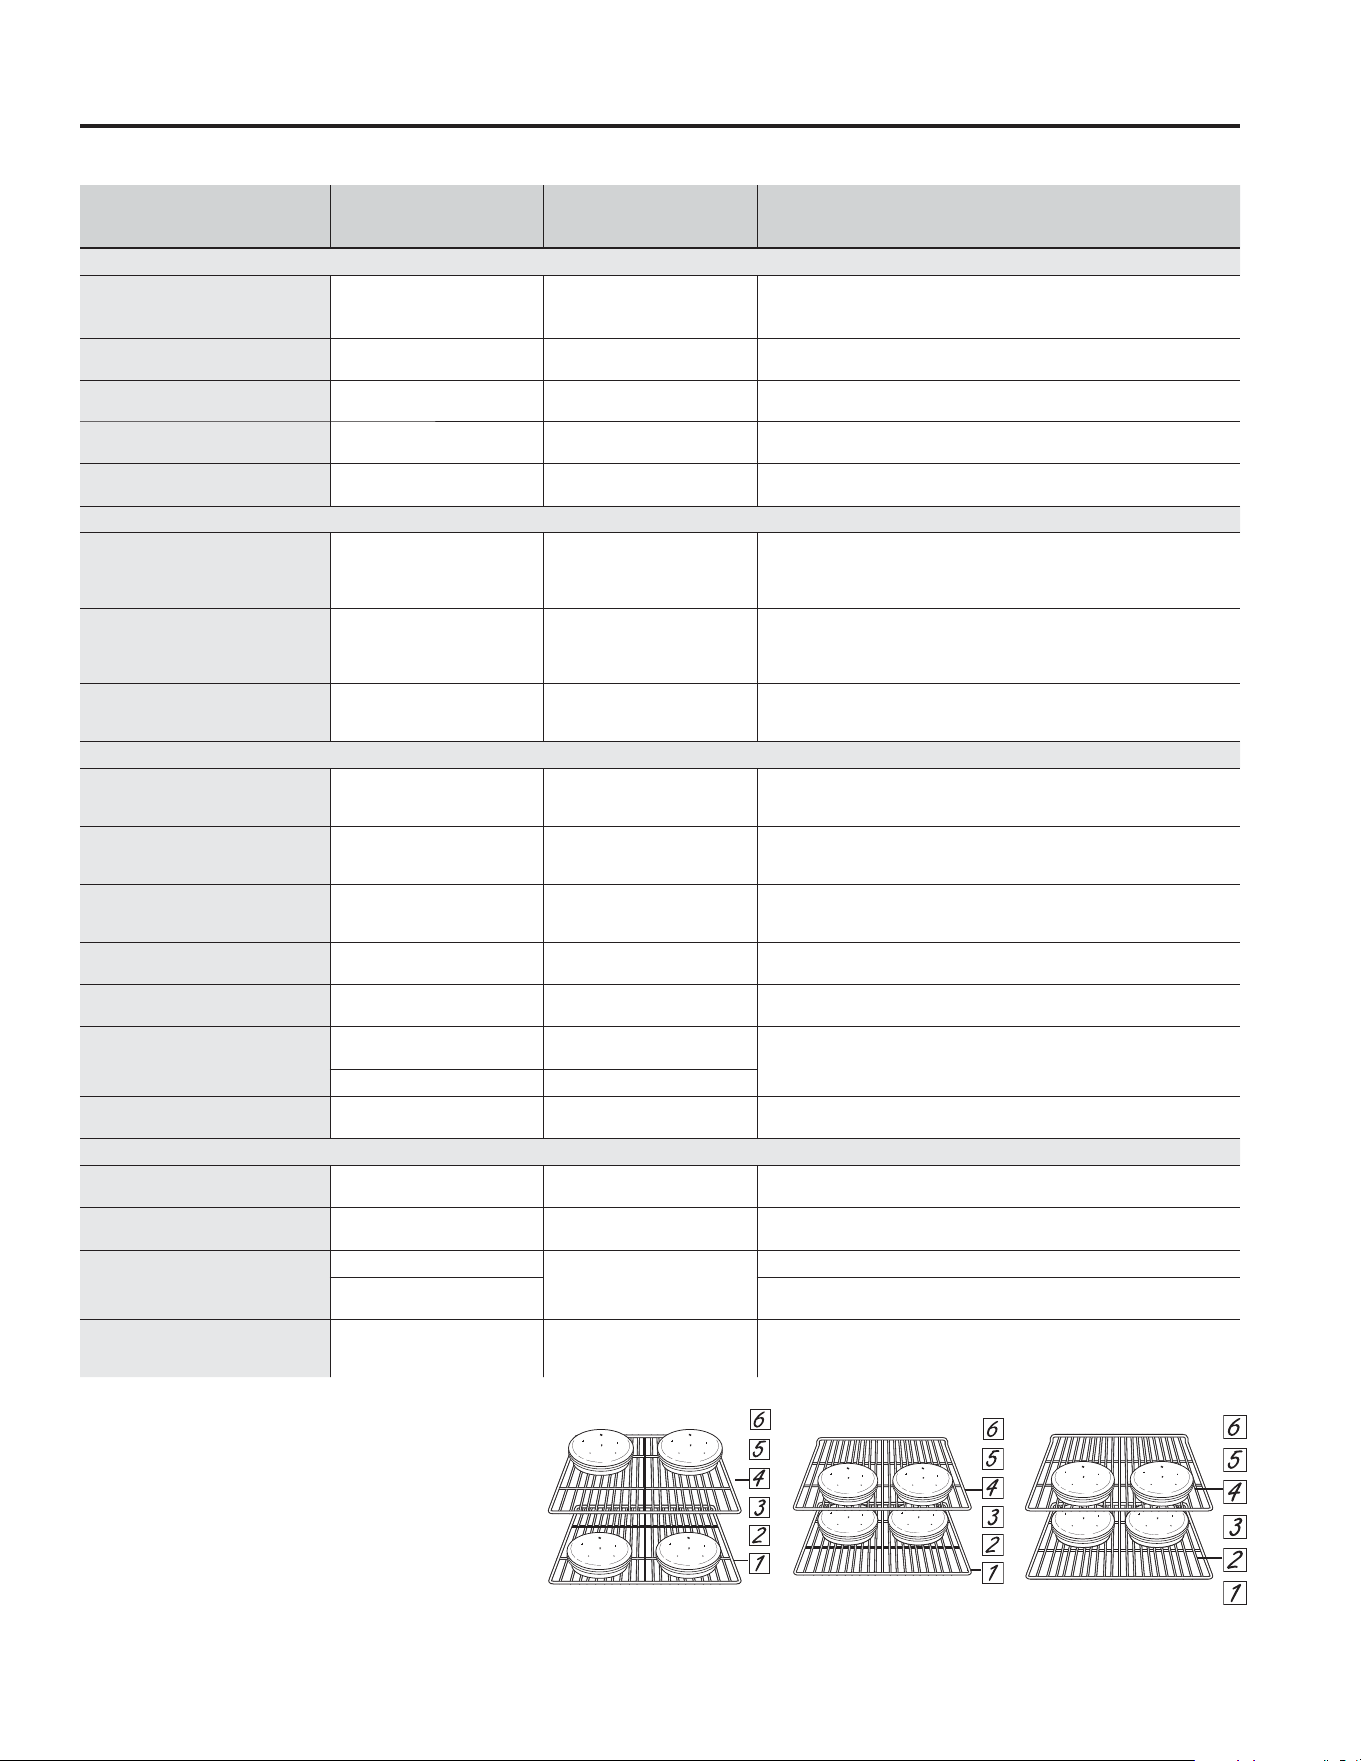
49-2003952 Rev. 0 19
TIPO DE COMIDA
MODO(S)
RECOMENDADO(S)
POSICIÓN(ES)
DE ESTANTES
RECOMENDADA SUGERENCIAS ADICIONALES
Productos Horneados
Tortas con capas, tortas
rectangulares, roscas, panecillos,
pan rápido en un Solo Estante
orneado Tradicional
2 ext. o 3 flat
8VHXWHQVLOLRVEULOODQWHV
Tortas con capas* en Múltiples
Estantes
Horneado por Convección
Múltiple
1 ext. y 4 flat o 2 y 4 flat
$VHJ~UHVHGHTXHKD\DXQIOXMRGHDLUHDGHFXDGRYHULOXVWUDFLyQDEDMR
8VHXWHQVLOLRVEULOODQWHV
7RUWDVGHJUDVDSDVWHOGHiQJHO Horneado Tradicional
1 8VHXWHQVLOLRVEULOODQWHV
Galletas, galletitas, bizcochitos en
un Solo Estante
Horneado Tradicional
2 ext. o 3 flat
8VHXWHQVLOLRVEULOODQWHV
Galletas, galletitas, bizcochitos en
Múltiples Estantes
Horneado por Convección
Múltiple
1 ext. y 4 flat o
1 ext., 3 y 5 flat
Asegúrese de que haya un flujo de aire adecuado.
8VHXWHQVLOLRVEULOODQWHV
Bife y Cerdo
Hamburguesas Asar Alto
5
8VHXQDROODSDUDDVDUPXHYDODFRPLGDKDFLDDEDMRSDUDTXHTXHGH
más preparada y menos soasada. Preste atención a la comida al asarla.
Para un mejor rendimiento, centre la comida debajo del elemento
calentador para asar.
Bifes y Chuletas Asar Alto
5
8VHXQDROODSDUDDVDUPXHYDODFRPLGDKDFLDDEDMRSDUDTXHTXHGH
más preparada y menos soasada. Preste atención a la comida al asarla.
Para un mejor rendimiento, centre la comida debajo del elemento
calentador para asar.
'RUDGRV
Horneado Tradicional
'RUDGRSRU&RQYHFFLyQ
Asado lento
1 o 2
'HMHVLQFXEULUXVHXQDROODFKDWDWDOFRPRXQDROODSDUDDVDU
1RVHUHTXLHUHSUHFDOHQWDUOD
Ave
Pollo entero
Horneado Tradicional
'RUDGRSRU&RQYHFFLyQ
Asado lento
1 o 2 ext.
2 o 3 flat
8VHXQDROODFKDWDWDOFRPRXQDROODSDUDDVDU
1RVHUHTXLHUHSUHFDOHQWDUOD
Pechugas, patas, muslos con
huesos
Asado Bajo
'RUDGRSRU&RQYHFFLyQ
Asado lento
2 ext. o 3 flat
Ase del lado de la piel hacia abajo primero. Preste atención a la comida
al asarla. Para un mejor rendimiento, centre la comida debajo del
elemento calentador para asar.
Pechugas de pollo deshuesadas
Asado Bajo
Horneado Tradicional
2 ext. o 3 flat
Mueva la comida más abajo para que quede más preparada y menos
soasada y más arriba para soasar/ dorar al asar. Para un mejor
rendimiento, centre la comida debajo del elemento calentador para asar.
Pavo entero
Horneado Tradicional
'RUDGRSRU&RQYHFFLyQ
1 o 2
8VDXQDROODFKDWDWDOFRPRXQDROODSDUDDVDU
1RVHUHTXLHUHSUHFDOHQWDUOD
Pechuga de Pavo
Horneado Tradicional
'RUDGRSRU&RQYHFFLyQ
1 o 2
8VHXQDROODFKDWDWDOFRPRXQDROODSDUDDVDU
1RVHUHTXLHUHSUHFDOHQWDUOD
Pescado
Asado por Convección Bajo
PLWDGGHOJURVRURPHQRV
!SXOJDGD
Preste atención a la comida al asarla. Para un mejor rendimiento, centre
la comida debajo del elemento calentador para asar.
Asado Bajo
3
Cazuelas
Horneado por Convección
Horneado Tradicional
2 ext. o 3 flat
Comidas Congeladas a Conveniencia
Pizza en un estante simple
Horneado por Convección
Horneado Tradicional
2 ext. o 3 flat 8VHXWHQVLOLRVEULOODQWHV
Pizza en estantes múltiples
Horneado por Convección
Múltiple
1 ext. y 4 flat
Productos con papa, patitas
de pollo fritas, aperitivos en un
Solo Estante
Horneado Tradicional
3 ext. o 4 flat
8VHXWHQVLOLRVEULOODQWHVDOXVDUHOKRUQHDGRWUDGLFLRQDO
Fritura con Aire
8VHXQXWHQVLOLRRVFXURRXQDEDQGHMDGHJDOOHWDVDOXVDU
$LU)U\)ULWXUDFRQ$LUH
Productos con papa, patitas
de pollo fritas, aperitivos en
Múltiples Estantes
Horneado por Convección
Múltiple
1 ext. o 4 flat
8VHXWHQVLOLRVEULOODQWHV&DPELHODXELFDFLyQGHODFRPLGDSDUFLDOPHQWH
durante la cocción, a fin de obtener resultados de cocción más parejos.
Guía de Cocción
La siguiente tabla brinda algunas pautas para los modos de cocción típicos. Los modos de precisión proporcionarán ubicaciones
de parrilla, recomendaciones e información adicional en la pantalla.
Cuando hornee o utilice la función de horneado por convección
para cuatro capas de pastel en una cavidad de convección
GHƎRXWLOLFHODIXQFLyQGHKRUQHDGRSRUFRQYHFFLyQHQXQD
FDYLGDGGHƎDODYH]XVHODVUHMLOODVH[WHQVLRQ\IODW
Coloque los moldes como se muestra para que un molde no
quede directamente encima de otro.
Cuando hornee cuatro capas de pastel utilizando rejillas planas
HQXQDFDYLGDGGHƎRƎFDYLGDGWpUPLFDDODYH]XVHODV
rejillas 2 y 4 4 flat. Coloque los moldes como se muestra para
que un molde no quede directamente encima de otro.
Las recomendaciones mínimas de temperatura segura para
ORVDOLPHQWRVVRQSURSRUFLRQDGDVSRUHO86'$\OD)'$8WLOLFH
un termómetro para alimentos para medir la temperatura y
verifique en varios puntos.
Hornos de convección
GHƎ
Hornos de convección
GHƎ
Ǝ\Ǝ
Hornos térmicos
USO DEL ELECTRODOMÉSTICO: Guía de Cocción
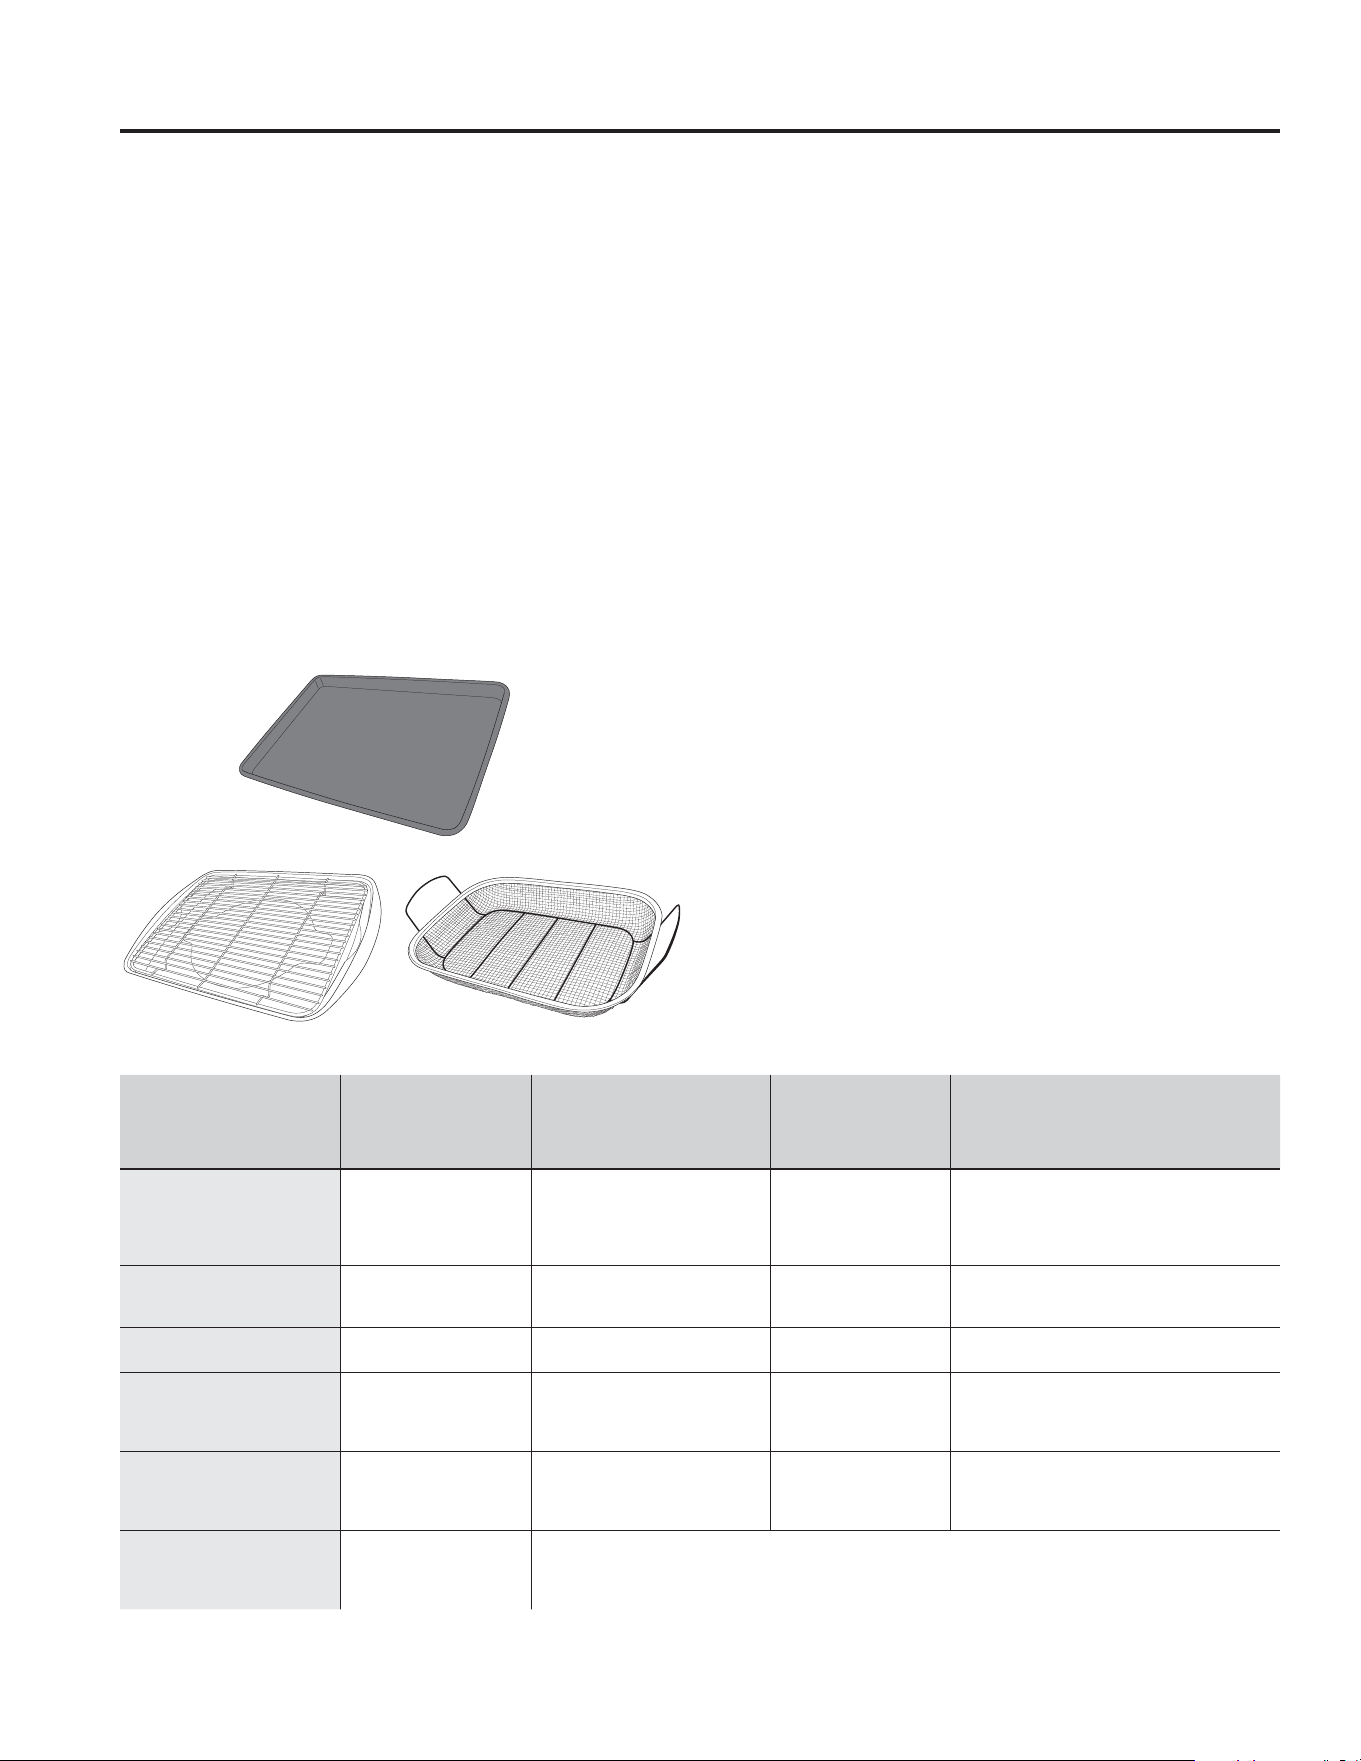
20 49-2003952 Rev. 0
Guía de Cocción
Modo de Cocción para Freír con Aire
$LU )U\ )UHtU FRQ $LUH HV XQ PRGR GH FRFFLyQ HVSHFLDO VLQ
precalentamiento, que fue diseñado para producir comidas
que en su exterior queden más crocantes que en la cocción
HQ KRUQRV WUDGLFLRQDOHV 6HOHFFLRQH $LU )U\ )UHtU FRQ $LUH
y luego ingrese la configuración de temperatura deseada y
SUHVLRQH 6WDUW ,QLFLDU /D WHPSHUDWXUD VH SXHGH FRQILJXUDU
entre 300°F and 500°F.
Pautas del Utensilio para Freír con Aire
8WLOLFH XWHQVLOLRV GH XVR VHJXUR SDUD DVDU DO XWLOL]DU HO PRGR
$LU )U\ )UHtU FRQ $LUH
6H UHFRPLHQGD HO XVR GH XQD EDQGHMD GH OiPLQD RVFXUD 8QD
bandeja oscura promueve un mejor dorado y que la comida
quede más crocante.
• También se podrán usar canastas de horneado en el horno
y rejillas de horneado. Se deberá colocar una bandeja plana
sobre el estante debajo de las comidas, a fin de atrapar
cualquier goteo al usar la canasta de horneado.
Consejos Generales sobre el Modo para
Freír con Aire
(O PRGR $LU )U\ )UHtU FRQ $LUH IXH GLVHxDGR SDUD FRFLQDU HQ
un solo estante.
(O PRGR $LU )U\ )UHtU FRQ $LUH IXH GLVHxDGR SDUD XQ XVR VLQ
pre calentamiento.
• Se recomienda la posición del estante 3 para la mayoría de
las comidas. Si las comidas se están dorando demasiado
rápido, intente usar una posición de estante inferior.
• Las comidas se podrán cocinar más rápido de lo esperado si
el horno ya está caliente cuando se coloca la comida en el
mismo.
• Al freír con aire comidas con salsa, se recomienda aplicar
esta última al final de la cocción.
• Si las comidas se doran demasiado rápido, intente colocar la
misma en un estante que se encuentre en un posición más
baja o en una configuración de temperatura de horno más
baja.
• En el caso de comidas empaquetadas, utilice las
instrucciones de cocción tradicionales para horno en relación
a la configuración de temperatura y tiempos de cocción
esperados.
1R HV QHFHVDULR YROWHDU R UHYROYHU OD FRPLGD GXUDQWH OD
cocción.
8ELTXH OD FRPLGD HQ XQD VROD FDSD VREUH OD EDQGHMD VLQ
sobrecargar la misma. Para obtener los mejores resultados,
los alimentos no deben superponerse.
• Cocine los alimentos completamente para ayudar a proteger
contra enfermedades transmitidas por los alimentos. Las
recomendaciones de temperatura mínima segura para los
DOLPHQWRV VRQ SURSRUFLRQDGDV SRU HO 86'$ \ OD )'$ 8WLOLFH
un termómetro para alimentos para medir la temperatura de
los alimentos y verifique en varios lugares.
TIPO DE COMIDA
POSICIÓN(ES)
DE ESTANTES
RECOMENDADAS
CONFIGURACIÓN
DE TEMPERATURA
RECOMENDADA (°F)
TIEMPO DE
COCCIÓN
RECOMENDADO
(MÍN.) NOTAS
Trozos de pescado
fresco deshuesado o ave,
empanados en forma de
patitas, frituras crocantes,
filetes
Extensión en 3
8VH FRQILJXUDFLRQHV GH WHPSHUDWXUD PiV
EDMDV SDUD SLH]DV PiV JUDQGHV 8VH XWHQVLOLRV
brillantes.
Huesos frescos de alitas
de pollo
Extensión en 3
Sale las alitas o cubra las mismas con un roce
en seco si usará salsa luego de la cocción o
hacia el final de la cocción.
Huesos frescos de patas o
muslos de pollo
Extensión en 3
8VH FRQILJXUDFLRQHV GH WHPSHUDWXUD PiV EDMDV
para piezas más grandes.
Papas fritas frescas y
GHOJDGDV ò SXOJDGD
Extensión en 3
Se recomienda el uso de papel para hornear al
preparar papas fritas frescas. Para frituras más
crocantes, mezcle las papas fritas con almidón
de maíz o harina de arroz antes de la cocción.
Papas fritas frescas y
GHOJDGDV ò SXOJDGD
Extensión en 3
Se recomienda el uso de papel para hornear al
preparar papas fritas frescas. Para frituras más
crocantes, mezcle las papas fritas con almidón
de maíz o harina de arroz antes de la cocción.
Comidas envasadas
congeladas
Extensión en 3
8VH ODV LQVWUXFFLRQHV GH FRFFLyQ SDUD KRUQR WUDGLFLRQDO QR SDUD )UHtU FRQ $LUH FRPR JXtD GH FRQILJXUDFLyQ GH
temperatura y tiempo de cocción. Con algunas comidas, se podrá requerir un tiempo de cocción adicional diferente
al tiempo recomendado en el paquete. Si el horno está caliente al iniciar la cocción, la comida se podrá cocinar
más rápido que el tiempo mínimo que figura en el paquete.
8WHQVLOLR SULQFLSDO UHFRPHQGDGR
Opciones de utensilios alternativos
USO DEL ELECTRODOMÉSTICO: Modo de Cocción para Freír con Aire
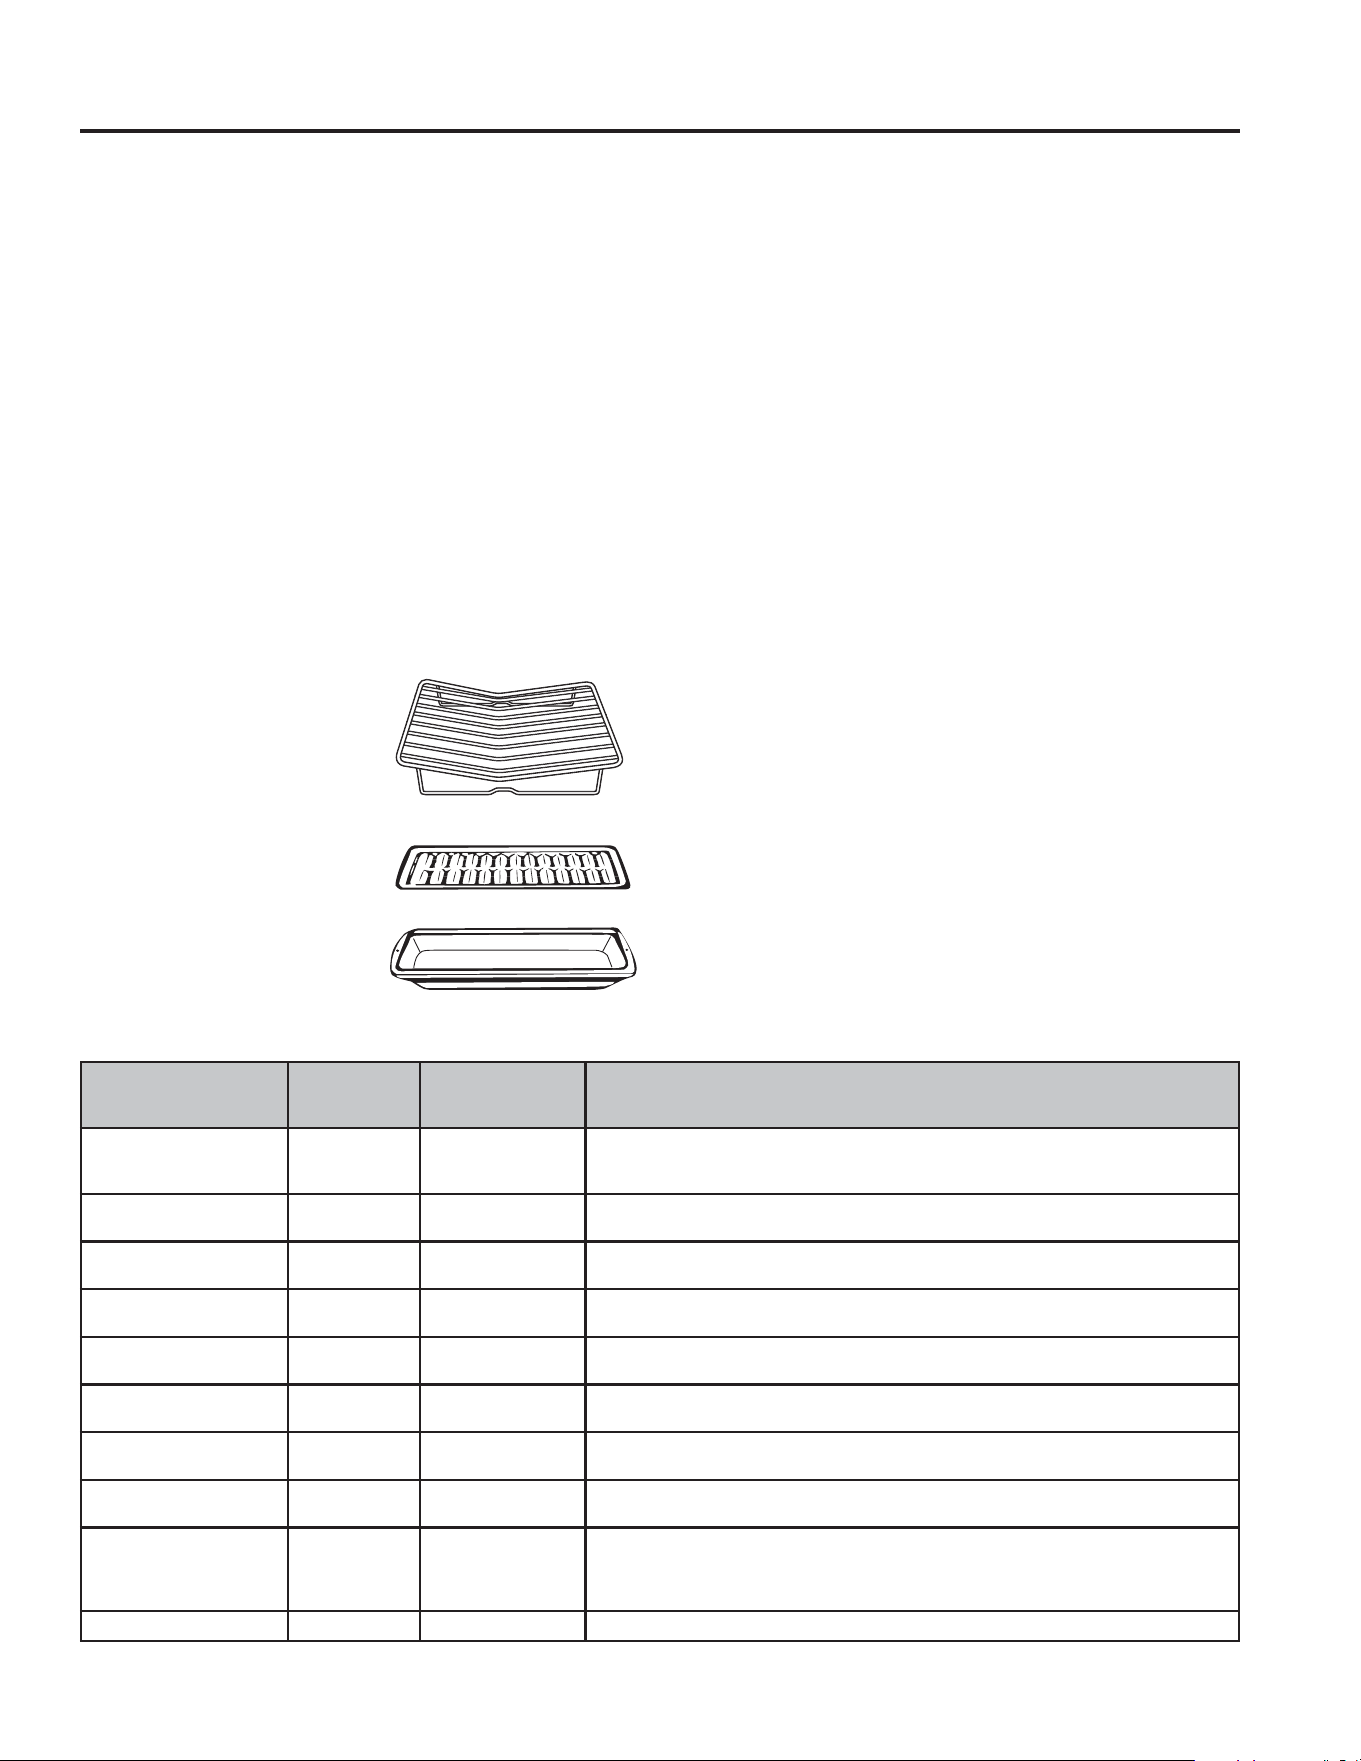
49-2003952 Rev. 0 21
USO DEL ELECTRODOMÉSTICO: Guía ee Rostizado
Guía de Cocción
GUÍA EE ROSTIZADO
Su nuevo horno cuenta con dos modos de cocción diseñados
HVSHFtILFDPHQWHSDUDHOURVWL]DGR6ORZ5RDVWURVWL]DGROHQWR
\&RQYHFWLRQ5RDVWURVWL]DGRSRUFRQYHFFLyQ
6ORZ5RDVWURVWL]DGROHQWRXWLOL]DSXOVRVGHFDORU\
movimiento de aire del ventilador de convección para dorar el
exterior de los alimentos, al mismo tiempo que proporciona una
cocción suave para lograr un término interior más uniforme en
FRPSDUDFLyQFRQ&RQYHFWLRQ5RDVWURVWL]DGRSRUFRQYHFFLyQ
6ORZ5RDVWURVWL]DGROHQWRSXHGHFRQILJXUDUVHHQWUH)\
)6ORZ5RDVWURVWL]DGROHQWRHVWiGLVHxDGRSDUDXVDUVH
sin precalentamiento.
&RQYHFWLRQ5RDVWURVWL]DGRSRUFRQYHFFLyQXWLOL]DHO
movimiento de aire del ventilador de convección para dorar
la superficie de los alimentos más rápidamente que el modo
7UDGLWLRQDO%DNHKRUQHDGRWUDGLFLRQDO&RQYHFWLRQ5RDVW
URVWL]DGRSRUFRQYHFFLyQSXHGHFRQILJXUDUVHHQWUH)\
)(OPRGR&RQYHFWLRQ5RDVWURVWL]DGRSRUFRQYHFFLyQ
incluye un precalentamiento, pero para la mayoría de los
alimentos no es necesario precalentar.
Guía de utensilios para rostizado
%DQGHMDSDUDURVWL]DUFRQR
sin rejilla)
• Bandeja para hornear
%DQGHMDSDUDDVDUFRQRVLQ
parrilla)
Consejos Generales Para el Rostizado
• Los modos de asado solo deben usarse para cocinar en un
solo estante.
• Coloque el estante de modo que los alimentos queden
centrados en el horno, o para lograr un mayor dorado en la
parte superior de alimentos delgados, coloque los alimentos
más cerca del calentador de asar.
• Slow Roast (rostizado lento): Espere que los alimentos
TXH QRUPDOPHQWH FRFLQDUtD HQ 7UDGLWLRQDO %DNH KRUQHDGR
tradicional) tarden entre 1,5 y 2 veces más en cocinarse
cuando.
• Convection Roast (rostizado por convección): Verifique los
alimentos antes del tiempo indicado en el paquete o la receta.
• Se recomienda utilizar la sonda de alimentos para monitorear
la cocción de cortes grandes de carne. Consulte la sección
3UREHVRQGDSDUDREWHQHUPiVLQIRUPDFLyQVREUHHOXVRGH
la sonda.
• En general, mantenga los alimentos destapados durante el
rostizado para permitir que se doren. Si los alimentos se están
dorando demasiado rápido pero necesitan más tiempo de
cocción, cúbralos con papel aluminio o una tapa.
1R HV QHFHVDULR YROWHDU QL UHYROYHU ORV DOLPHQWRV GXUDQWH HO
rostizado.
• Alimentos como los vegetales rostizados se dorarán mejor y se
cocinarán más rápido si no están amontonados en la bandeja.
• Para actividades de cocción en las que los alimentos estén
cubiertos, como el braseado o la cocción lenta, utilice el modo
7UDGLWLRQDO %DNH KRUQHDGR WUDGLFLRQDO HQOXJDUGHXQ PRGR
de rostizado.
• Cocine los alimentos completamente para ayudar a proteger
contra enfermedades transmitidas por alimentos. Las
recomendaciones de temperatura mínima segura para los
DOLPHQWRVVRQ SURSRUFLRQDGDV SRU HO 86'$ \ OD)'$8WLOLFH
un termómetro para alimentos para medir la temperatura y
verifique en varios puntos.
Rejilla
Asadera
Parrilla de rostizado
Temperaturas recomendadas del horno para rostizado
Alimento
Slow Roast
(rostizado
lento)
Convection
Roast (rostizado
por convección)
Sugerencias adicionales
Res, cordero o cerdo,
piezas enteras
) )
8VH3UHFLVLRQ&RRNLQJFRFFLyQSUHFLVDSDUDXQDH[SHULHQFLDJXLDGD\
FRQILJXUDFLRQHVSHUVRQDOL]DGDVSDUDORPRGHUHV\FRVWLOODSULPHHQDOJXQRV
modelos)
Res, cordero o cerdo,
filetes o chuletas
) )
8VH3UHFLVLRQ&RRNLQJFRFFLyQSUHFLVDSDUDXQDH[SHULHQFLDJXLDGD\
configuraciones personalizadas para filetes de res
Pechugas, piernas y
PXVORVGHSROORFRQSLHO
) )
Se recomienda pollo con piel para el rostizado, ya que el pollo sin piel puede
desarrollar una superficie correosa
Pollo entero ) )
8VH3UHFLVLRQ&RRNLQJFRFFLyQSUHFLVDSDUDXQDH[SHULHQFLDJXLDGD\
configuraciones personalizadas para pollo entero
Pescado ) )
8VH3UHFLVLRQ&RRNLQJFRFFLyQSUHFLVDSDUDXQDH[SHULHQFLDJXLDGD\
configuraciones personalizadas para filetes de salmón
Papas, cortadas
1R
recomendado
)
8VH3UHFLVLRQ&RRNLQJFRFFLyQSUHFLVDSDUDXQDH[SHULHQFLDJXLDGD\
configuraciones personalizadas para papas cortadas
Papas, enteras
1R
recomendado
)
8VH3UHFLVLRQ&RRNLQJFRFFLyQSUHFLVDSDUDXQDH[SHULHQFLDJXLDGD\
configuraciones personalizadas para papas enteras
Pavo, entero
1R
recomendado
)
8VH3UHFLVLRQ&RRNLQJFRFFLyQSUHFLVDSDUDXQDH[SHULHQFLDJXLDGD\
configuraciones personalizadas para pavo entero
Vegetales, cortados o
pequeños
) )
Vegetales como cebollas, ajo, berenjena y vegetales de raíz pueden rostizarse lentamente
DWHPSHUDWXUDVPiVEDMDV8VHWHPSHUDWXUDVPiVDOWDVSDUDHOURVWL]DGROHQWRGH
YHJHWDOHVFRPRFKDPSLxRQHV\FROLIORU8VH3UHFLVLRQ&RRNLQJFRFFLyQSUHFLVDSDUDXQD
experiencia guiada y configuraciones personalizadas para algunos vegetales rostizados
Vegetales, grandes ) ) Corte la calabaza entera por la mitad y rostice con el lado cortado hacia abajo
Consulte la Guía de cocción para obtener detalles adicionales y recomendaciones sobre la posición de los estantes para alimentos específicos.
8WLOLFHODVRQGDGHDOLPHQWRVSDUDPRQLWRUHDUODFRFFLyQGHFRUWHVJUDQGHVGHFDUQH\D\XGDUDGHWHUPLQDUFXiQGRHVWiQOLVWRVORVDOLPHQWRV
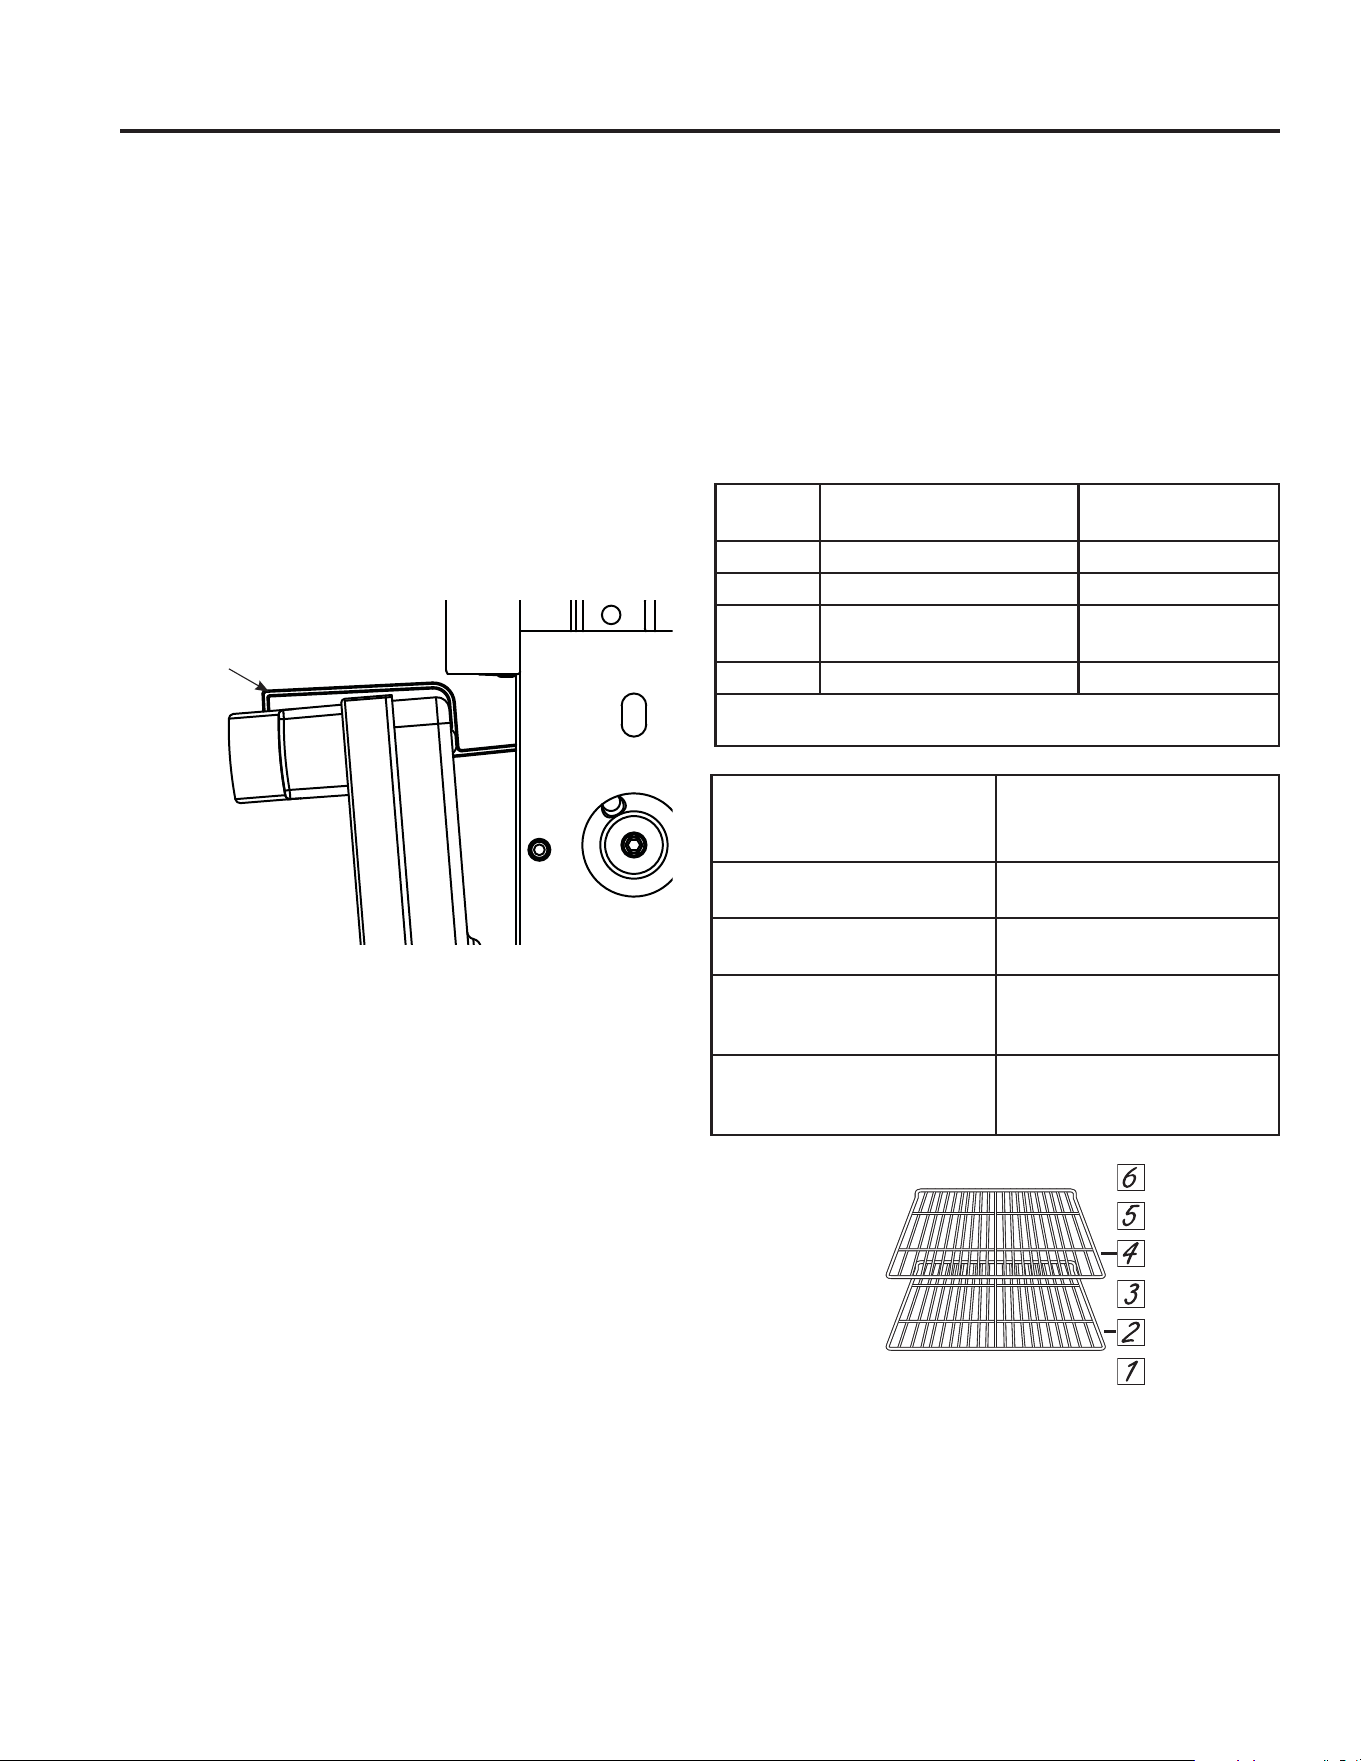
22 49-2003952 Rev. 0
USO DEL ELECTRODOMÉSTICO: Guía de Cocción
Tipo de
Comida
Configuración de tempe-
ratura recomendada (°F)
Tiempo de Secado
Esperado (Horas)
Frutas
Hierbas
Carne/
Charqui*
Verduras
*La carne deberá ser calentada a 165F antes de la deshidratación.
Para más información, visite fsis.usda.gov.
GUÍA DE DESHIDRATACIÓN (horno superior únicamente en modelos con horno doble)
'HK\GUDWH'HVKLGUDWDUHVXQPRGRGHFRQYHFFLyQHVSHFLDO
diseñado para deshidratar comidas tales como frutas,
verduras o hierbas, y cueros de frutas o charquis. El modo de
deshidratación utiliza el flujo de aire y un nivel bajo de calor
para eliminar la humedad de las comidas.
La puerta deberá
estar parcialmente abierta cuando esté activo el modo de
GHVKLGUDWDFLyQ8WLOLFHHOHVSDFLDGRUGHODSXHUWDSURYLVWR
con su horno para ubicar la puerta abierta en la posición
DGHFXDGDFRPRVHPXHVWUDDFRQWLQXDFLyQ8QDYH]TXH
la puerta se encuentre ubicada en su posición, seleccione
'HK\GUDWH'HVKLGUDWDUOXHJRLQJUHVHODFRQILJXUDFLyQGH
WHPSHUDWXUDGHVHDGD\SUHVLRQH6WDUW,QLFLDU/DWHPSHUDWXUD
puede ser configurada entre 105°F y 225°F. Cuando el
modo de deshidratación se encuentre en funcionamiento, el
apagado en 12 horas se deshabilitará de forma automática. La
puerta deberá estar parcialmente abierta cuando el modo de
deshidratación se encuentre activo.
Ŷ3DUDDFFHGHUDLQIRUPDFLyQGHWDOODGDVREUHFyPR
deshidratar comidas de forma segura y adecuada, consulte
referencias a través de Internet y de libros.
Ŷ/DGHVKLGUDWDFLyQHQXQDWHPSHUDWXUDGHPDVLDGRDOWDSRGUi
impedir que el interior de la comida se seque lo suficiente.
Ŷ/DGHVKLGUDWDFLyQHQXQDWHPSHUDWXUDGHPDVLDGREDMD
o demasiado lenta podrá hacer que se desarrollen
microorganismos, produciendo como resultado desechos o
enfermedades provenientes de la comida.
Ŷ1RFRQItHVyORHQHODVSHFWRH[WHULRURODWH[WXUDFRQWUROH
el interior de la comida para asegurar que la misma esté lo
suficientemente seca.
Ŷ/RVWLHPSRVGHGHVKLGUDWDFLyQVHYHQDIHFWDGRVSRUOD
condición en la cual se encuentra inicialmente la comida,
la humedad del ambiente, la configuración de temperatura,
la cantidad de comida, etc. Los trozos más delgados y
pequeños de comida se deshidratarán más rápido que los
trozos más gruesos o grandes.
Ŷ3DUDXQPHMRUUHQGLPLHQWRDOXVDUHOPRGRGH
deshidratación, utilice rejillas o estantes con espaciados
pequeños que permitan que el aire llegue a la comida desde
todos lados. Estos pueden ser colocados directamente sobre
el estante del horno. Se podrán usar apoyafuentes con papel
para hornear o una estera de silicona para deshidratar purés.
Ŷ(VQRUPDOYHUKXPHGDGHQODVVXSHUILFLHVLQWHULRUHVGHO
horno al realizar la deshidratación.
Ŷ$OJXQDVFRPLGDVVHEHQHILFLDQDWUDYpVGHXQWUDWDPLHQWR
previo.
Ŷ5HWLUHHOH[FHVRGHKXPHGDGGHOH[WHULRUGHODVFRPLGDV
antes de realizar la deshidratación.
Ŷ3HUIRUHFRQWUROHRFRUWHFRPLGDVWDOHVFRPRDUiQGDQRV
azules, arándanos rojos o uvas antes de la deshidratación.
Ŷ'HIRUPDSHULyGLFDVHTXHODVFDUQHVSDUDUHWLUDUHOH[FHVR
de grasa durante la deshidratación.
Ŷ1RVHUHFRPLHQGDUHDOL]DUODGHVKLGUDWDFLyQHQPiVGH
estantes al mismo tiempo.
El Espaciador de la
Puerta será utilizado
al deshidratar
Cantidad de Estantes del
Horno Usados Durante el
Modo de Deshidratación.
Posiciones de los
Estantes en su Horno
1 estante HVWDQWHVSODQRVR
extensibles)
2 estantes HVWDQWHVH[WHQVLEOHV\
HVWDQWHVSODQRV
3 estantes HVWDQWHVSODQRV
HVWDQWHVH[WHQVLEOHV\
HVWDQWHVSODQRV
4 estantes HVWDQWHVSODQRV
HVWDQWHVSODQRVHVWDQWHV
SODQRV\HVWDQWHVSODQRV
Guía de Cocción (en algunos modelos)
USO DEL ELECTRODOMÉSTICO:*XtDGH'HVKLGUDWDFLyQ

49-2003952 Rev. 0 23
CUIDADO Y LIMPIEZA:&XLGDGR\OLPSLH]D([WHULRU
Asegúrese de que la corriente eléctrica esté apagada y que todas las superficies estén frías antes de limpiar cualquier parte
de la cocina.
Panel de Control
Para bloquear los controles, consulte la información de
4XLFN6HWWLQJV6KDGH6RPEUDGH&RQILJXUDFLyQ5iSLGDHQ
ODVHFFLyQGH$SSOLDQFH'LVSOD\6HWWLQJV&RQILJXUDFLyQGH
3DQWDOODGHO(OHFWURGRPpVWLFR8QDEXHQDLGHDHVOLPSLDUHO
panel de control luego de cada uso. Limpie con un jabón suave
y agua o vinagre y agua, enjuague con agua limpia y pula
HQVHFRFRQXQDWHODVXDYH1RXVHOLPSLDGRUHVDEUDVLYRV
limpiadores líquidos fuertes, almohadillas para fregar de
plástico ni limpiadores de horno en el panel de control;
dañarán el acabado.
NOTA:1RXWLOLFHREMHWRVDILODGRVRSXQWLDJXGRVSDUDOLPSLDU
los orificios del micrófono.
Exterior del Horno
1RXVHOLPSLDGRUHVGHKRUQROLPSLDGRUHVDEUDVLYRV
limpiadores líquidos fuertes, estropajos de acero, almohadillas
para fregar de plástico, ni polvos limpiadores en el exterior
del horno. Limpie el mismo con agua y jabón o una solución
de vinagre y agua. Enjuague con agua limpia y seque con
una tela seca. Al limpiar supeficies, asegúrese de que estén
a temperatura ambiente y fuera del contacto con la luz
solar. Si las manchas en el borde de la ventana de la puerta
son persistentes, use un limpiador abrasivo suave o una
esponja con estropajo para obtener un mejor resultado. El
derrame de adobo, jugos de fruta, salsas de tomate y líquidos
para humedecer que contengan ácidos pueden ocasionar
GHVFRORUDFLyQ\VHGHEHUiQOLPSLDUGHLQPHGLDWR'HMHTXHODV
superficies calientes se enfríen, y luego limpie y enjuague.
Superficies pintadas y Acero Inoxidable Negro (en algunos modelos)
Las superficies pintadas podrán incluir la puerta y el borde
alrededor del panel de control. Límpielas con jabón y agua o
con una solución de agua y vinagre.
1RXWLOLFHOLPSLDGRUHVGHKRUQRFRPHUFLDOHVSROYRVOLPSLDGRUHV
esponjillas de acero o abrasivos potentes sobre cualquier
superficie pintada, LQFOX\HQGRHO$FHUR,QR[LGDEOH1HJUR
Acero Inoxidable – Excluyendo el Acero Inoxidable Negro (en algunos modelos)
1RXVHYLUXWDVGHDFHURpVWDVGDxDUiQODVXSHUILFLH
Para limpiar la superficie de acero inoxidable, use agua tibia
con jabón o un limpiador o pulidor para acero inoxidable.
Siempre limpie la superficie en la dirección del veteado. Siga
las instrucciones del limpiador para limpiar la superficie de
acero inoxidable.
Los limpiadores con ácido oxálico tales eliminarán el óxido,
GHVOXVWUHV\SHTXHxDVPDQFKDVVREUHODVXSHUILFLH8VHVyOR
un limpiador líquido libre de material abrasivo y frote en la
dirección de las líneas del cepillo con una esponja suave y
húmeda.
Para realizar consultas sobre la adquisición de productos,
incluyendo limpiadores o pulidores para electrodomésticos
de acero inoxidable, consulte las secciones de Accesorios y
Soporte al Consumidor al final de este manual.
Cuidado y limpieza - Exterior

24 49-2003952 Rev. 0
Cuidado y limpieza - Interior
(OLQWHULRUGHVXQXHYRKRUQRSXHGHVHUOLPSLDGRGHIRUPDPDQXDORXWLOL]DQGRORVPRGRV6WHDP&OHDQ/LPSLH]DFRQ9DSRUR
6HOI&OHDQ/LPSLH]D$XWRPiWLFD
El derrame de adobo, jugos de fruta, salsas de tomate y líquidos para humedecer que contengan ácidos pueden ocasionar
descoloración y se deberán limpiar de inmediato. Espere a que las superficies calientes se enfríen, y luego limpie y enjuague.
IMPORTANTE:3DUDORVKRUQRVFRQFiPDUDHQODSXHUWD6LHOYLGULRGHODSXHUWDQRVHHQFXHQWUDOLPSLRODFODULGDGGHOD
imagen de la cámara se podrá ver afectada. Por favor, siga las instrucciones a continuación para realizar la limpieza de la puerta
de vidrio de forma adecuada.
Limpieza Manual
1RXVHOLPSLDGRUHVGHKRUQRDPHQRVTXHHVWpQFHUWLILFDGRVSDUDKRUQRVFRQOLPSLH]DDXWRPiWLFDOLPSLDGRUHVOtTXLGRVIXHUWHV
ni almohadillas para fregar en el interior del horno. Limpie con agua y jabón suave o con una solución de vinagre y agua.
Enjuague con agua limpia y seque con una tela seca. Al limpiar las superficies, asegúrese de que se encuentren a temperatura
ambiente.
Modo de Limpieza con Vapor
Steam Clean está diseñado para calentar suficientemente
el agua añadida en el fondo, permitiendo que alcance una
temperatura que provoca la condensación del vapor sobre
los residuos de alimentos. Este proceso ablanda los residuos,
facilitando su eliminación.
El horno debe estar frío antes de iniciar un ciclo de Steam
Clean. Esto permite limpiar de manera segura la grasa y los
residuos del fondo del horno previamente. Además, previene
el riesgo de choque térmico y agrietamiento del esmalte que
podría resultar de verter agua fría sobre la superficie caliente
del horno.
Vierta una taza de agua en el fondo del horno. Cierre la
puerta. Seleccione Steam Clean (limpieza con vapor) y
presione Start (Inicio)DODGHUHFKDGHODSDQWDOOD1RGHEH
abrir la puerta durante los 30 minutos del ciclo de limpieza a
vapor, ya que esto disminuirá el rendimiento de la limpieza.
Elimine cualquier exceso de agua y los residuos restantes.
NOTA: El agua en el fondo del horno puede estar caliente
inmediatamente después de finalizar el ciclo.
Modo de Limpieza Automática
Lea las instrucciones de seguridad del horno con limpieza
automática, al comienzo de este manual, antes de usar el
PRGR6HOI&OHDQOLPSLH]DDXWRPiWLFD6HOIFOHDQOLPSLH]D
automática) utiliza temperaturas muy altas para limpiar el
interior del horno. La puerta del horno se bloqueará cuando
use esta función. Antes de operar el ciclo de limpieza
automática, limpie la grasa y suciedad del horno. Retire todos
ORVDUWtFXORVGHOKRUQRH[FHSWRORVHVWDQWHVHVPDOWDGRVFRORU
oscuro). Los estantes brillantes o plateados, la sonda para
carne y cualquier utensilio u otros artículos deben ser retirados
del horno antes de iniciar un ciclo de limpieza automática.
Cierre la puerta. Si utiliza un horno doble, seleccione cuál
horno desea limpiar. Seleccione Self Clean (limpieza
automática). Elija un ciclo de 3, 4 o 5 horas y seleccione Start
(Inicio). Para hornos con suciedad excesiva, se recomienda
el tiempo máximo de limpieza de 5 horas. Si desea usar el
tiempo predeterminado, presione Start (Inicio) inmediatamente
después de seleccionar Self Clean (limpieza automática).
El horno mostrará que la puerta está bloqueada y exhibirá
la cantidad de tiempo restante en el ciclo. Presione Cancel
(Cancelar) si desea detener el ciclo. El horno se apagará
automáticamente cuando el ciclo de limpieza automática
finalice. La puerta permanecerá bloqueada hasta que el horno
VHKD\DHQIULDGR8QDYH]TXHHOKRUQRVHKD\DHQIULDGR
limpie cualquier ceniza que haya quedado en el horno.
La suciedad en la estructura frontal del horno y la parte externa
de la junta de la puerta se deberán limpiar de forma manual.
Limpie estas áreas con agua caliente, estropajos de acero con
jabón o limpiadores tales como Soft Scrub
®
. Enjuague bien con
agua caliente y seque.
1ROLPSLHODMXQWD(OPDWHULDOGHILEUDGHYLGULRGHODMXQWDGH
la puerta del horno no resiste la abrasión. Es esencial que la
junta permanezca intacta. Si observa que comienza a gastarse
o deshilacharse, reemplace la misma.
Asegúrese de que el cobertor de la lámpara de luz del horno
se encuentre en su lugar y que la luz del mismo esté apagada.
$OXVDUHOPRGR6HOI&OHDQ/LPSLH]D$XWRPiWLFDHQXQKRUQR
doble, sólo el horno superior o inferior podrán utilizar el ciclo
XQRSRUYH]'HIRUPDDGLFLRQDOQLQJ~QRWURPRGRSRGUiVHU
iniciado en la cavidad del horno alterna mientras el ciclo de
limpieza automática se encuentre en progreso.
IMPORTANTE: Las emanaciones producidas por el ciclo de
autolimpieza de cualquier horno afectan la salud de algunas
aves de manera notoria. Procure llevar sus aves a otra
habitación bien ventilada.
CUIDADO Y LIMPIEZA: /LPSLH]DGHOD&RFLQD,QWHULRU
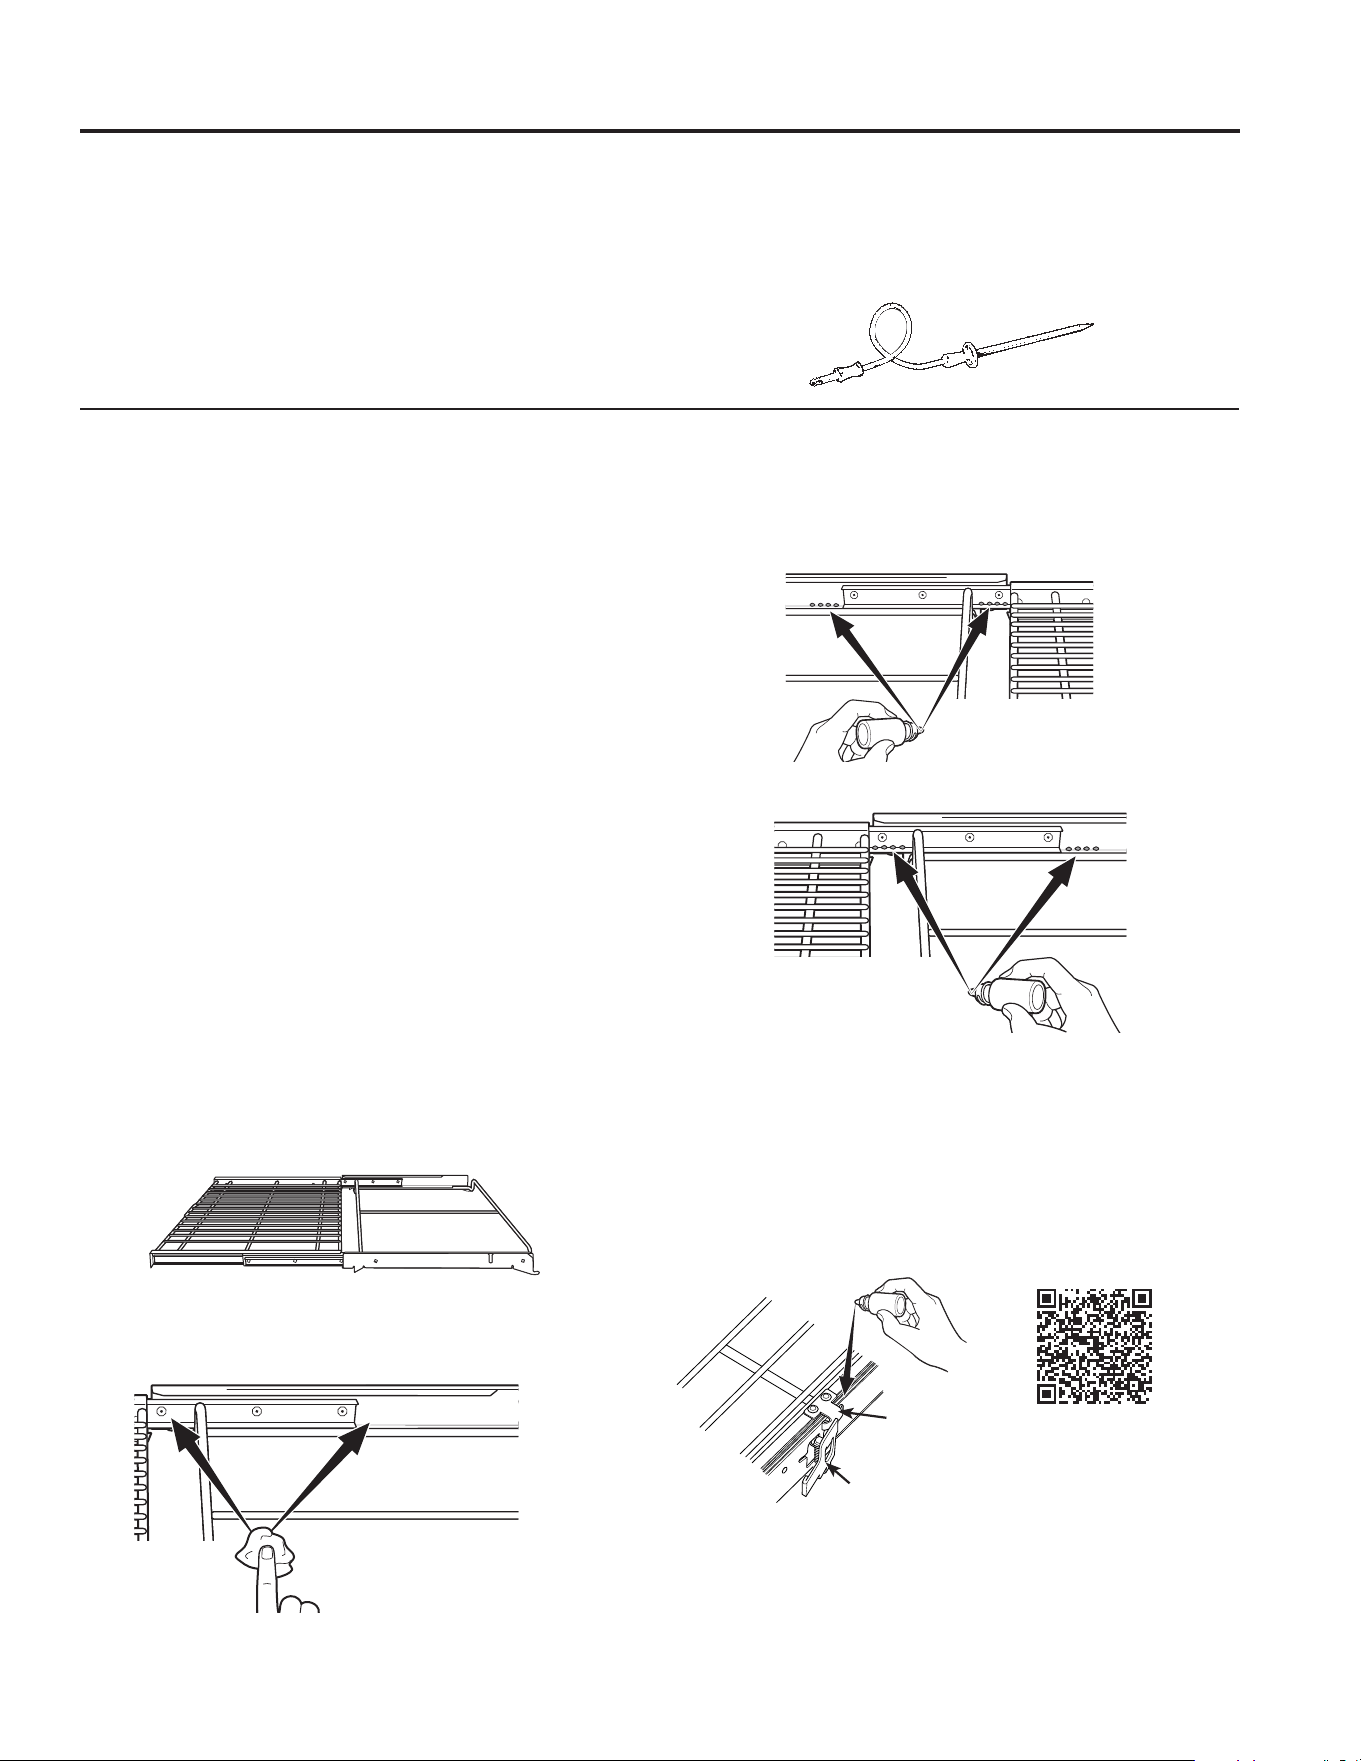
49-2003952 Rev. 0 25
USO DEL ELECTRODOMÉSTICO: &XLGDGR\OLPSLH]D,QWHULRU
Probe (Sonda)
La sonda de temperatura se puede limpiar con agua y jabón
o con una almohadilla de estropajo llena de jabón. Enfríe
la sonda de temperatura antes de su limpieza. Fregue las
manchas difíciles con una almohadilla de estropajo llena de
jabón, enjuague y seque.
Para ordenar más sondas de temperatura, consulte las
secciones de Accesorios y Soporte al Consumidor al final de
este manual.
Ŷ 1RVXPHUMDODVRQGDGHWHPSHUDWXUDHQDJXD
Ŷ 1RJXDUGHODVRQGDGHWHPSHUDWXUDGHQWURGHOKRUQR
Ŷ 1XQFDGHMHODVRQGDGHWHPSHUDWXUDGHQWURGHOKRUQRGXUDQWH
un ciclo de limpieza automática o de limpieza con vapor.
Cuidado y limpieza - Interior
BANDEJAS DEL HORNO
Si las parrillas que se suministraron con su horno son de
esmalte oscuro, no brillantes, pueden permanecer en el horno
durante el ciclo de autolimpieza sin sufrir daños.
Para limpiar manualmente las parrillas, utilice agua tibia y
jabonosa. Asegúrese de no lavar las guías de la parrilla en una
parrilla extensible.
Si las parrillas se vuelven más difíciles de retirar del horno,
aplique un poco de aceite vegetal en un paño suave o una
toalla de papel y frote los soportes de las parrillas del horno.
1RDSOLTXHHODFHLWHHQODJXtDGHODSDUULOODH[WHQVLEOH
NOTA: El uso de otros aceites de cocina como el aceite de
cacahuate, Pam
®
o aerosoles lubricantes similares puede
provocar una descoloración o un residuo de color óxido en las
parrillas y los laterales de la cavidad. Para limpiar este residuo,
utilice una solución de agua y jabón o de agua y vinagre.
Enjuague con agua limpia y seque con un paño suave.
Periódicamente, puede ser necesario lubricar las parrillas del
horno utilizando el lubricante suministrado con su horno. Para
solicitar lubricante adicional, consulte la sección de accesorios
de este manual.
Uso del horno:
1. Quite la bandeja del horno. Ver la sección Bandejas del
Horno de Extensión.
2. Extienda por completo la bandeja sobre una mesa o
mostrador de encimera. Puede colocarse papel de diario
debajo de la bandeja para una limpieza sencilla.
3. Si hay residuos en las guías de deslizamiento, límpielas con
una toalla de papel. NOTA: Todo el lubricante que se haya
eliminado durante la limpieza debe volver a colocarse.
4. Agite el lubricante antes de abrirlo. Comenzando con el
mecanismo de deslizamiento izquierdo de la guía, coloque
FXDWURJRWDVGHOXEULFDQWHVREUHODVGRVJXtDV
traseras cercanas a los cojinetes de apoyo.
5. Repita en el mecanismo del lado derecho de la guía.
6. Abra y cierre la guía varias veces para distribuir el
lubricante.
5HHPSODFHODWDSDGHOOXEULFDQWH\DJtWHODQXHYDPHQWH'p
YXHOWDODEDQGHMD\UHSLWDORVSDVRV\6RORSDUD
soportes de parrilla moldeados en la pared de la cavidad del
horno.)
Además, para un deslizamiento óptimo, asegúrese de
añadir un par de gotas de lubricante en el soporte y el
UHVRUWHGHSDOHWDTXHVHPXHVWUDQDFRQWLQXDFLyQ
8. Cierre la bandeja, gire la bandeja dejando el lado derecho
hacia arriba y colóquela en el horno. Ver la sección Bandejas
del Horno de Extensión.
9. Repita los pasos anteriores para cada bandeja.
Guía lado
derecho arriba
Lado
derecho
Lado
izquierdo
Guía lado
derecho arriba
KWWSVSURGXFWVJHDSSOLDQFHV
FRPDSSOLDQFHJHDVXSSRUW
VHDUFKFRQWHQW"FRQWHQW,G
Soporte
Resorte
de paleta

26 49-2003952 Rev. 0
ADVERTENCIA
PELIGRO DE DESCARGA O QUEMADURAS: Antes de reemplazar la lámpara de luz del horno,
desconecte la conexión eléctrica del horno del fusible principal o del panel del disyuntor. Si esto no se
cumple, se podrá producir una descarga eléctrica o un incendio.
PRECAUCIÓN
RIESGO DE INCENDIO: La tapa de vidrio y la lámpara de luz se deberán retirar cuando estén frías. Tocar
el vidrio caliente sin protección en las manos o con un trapo húmedo puede ocasionar quemaduras.
Luz del Horno
'HVFRQHFWHODFRUULHQWHGHVGHHOIXVLEOHSULQFLSDORHOSDQHO
del disyuntor.
2. Retire los estantes del horno.
'HVOLFHXQGHVWRUQLOODGRUGHSXQWDSODQDRXQFXFKLOORSDUD
untar manteca entre la carcasa metálica y la tapa de luz de
vidrio. NOTA: algunos modelos cuentan con un sujetador
metálico que visiblemente sostiene el vidrio. Es necesario
insertar la herramienta entre la carcasa metálica y el
sujetador que sostiene el vidrio.
4. Apoye la tapa de luz de vidrio con dos dedos para evitar
que se caiga al fondo del horno. Tenga cuidado de no
astillar la cubierta del horno.
'HIRUPDVXDYHJLUHODSXQWDGHOGHVWRUQLOODGRURGHO
cuchillo para untar manteca, a fin de aflojar la tapa de luz
de vidrio. Tenga cuidado de no astillar la cubierta del horno.
6. Retire la tapa de luz de vidrio.
7. Retire la lámpara sosteniendo firmemente y deslizando
la misma hacia afuera, hasta que las dos clavijas hayan
dejado el soporte de cerámica.
1RWRTXHHOYLGULRGHODQXHYDOiPSDUDFRQORVGHGRV(VWR
hará que la lámpara falle al dar luz. Tome la lámpara de
reemplzado con una toalla limpia o un pañuelo de papel
con las clavijas hacia abajo. Aliñe las dos clavijas en el
soporte de cerámica, presionando suavemente hasta que
la lámpara quede asegurada en la ficha de cerámica.
'HVOLFHODVOHQWHVSURWHFWRUDVGHOVRSRUWH\SUHVLRQHKDVWD
que las pinzas queden enganchadas en la caja.
10. Vuelva a conectar la corriente.
CUIDADO Y LIMPIEZA: Luz del Horno
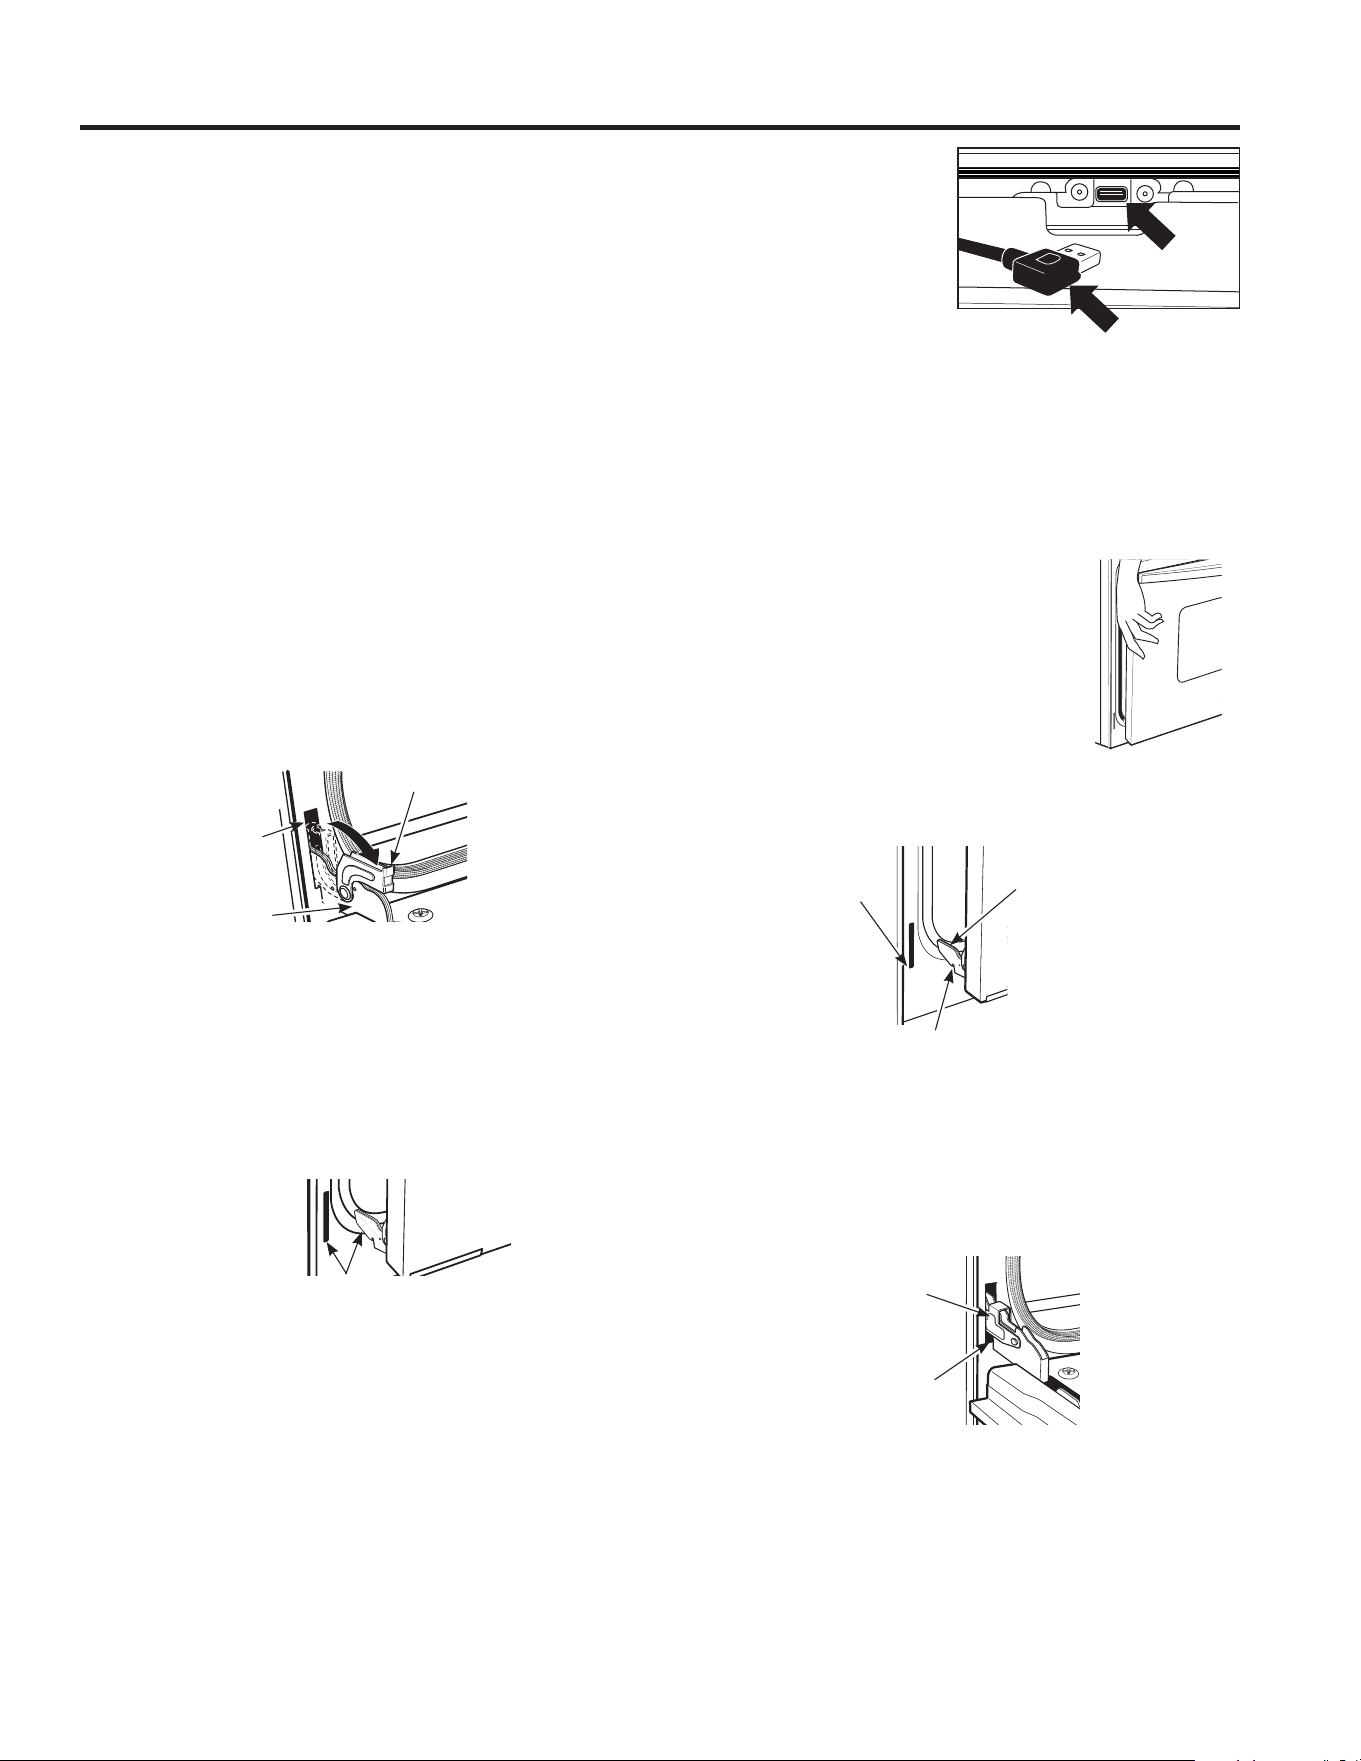
49-2003952 Rev. 0 27
CUIDADO Y LIMPIEZA: Luz del Puerta
Extracción de la puerta del horno (en algunos
modelos)
NOTA: La remoción de la puerta no es un requerimiento de la
instalación del producto, pero es una comodidad adicional.
Para quitar la puerta:
1. Abra la puerta del horno en su totalidad.
2. Presione ambas trabas de la bisagra hacia abajo en
dirección del marco de la puerta hasta destrabarlas. Para
esto puede hacer falta un destornillador de lados planos.
¡NO LEVANTE LA PUERTA DE LA MANIJA!
3. Coloque las manos sobre ambos lados y cierre la puerta
GHOKRUQRKDVWDODSRVLFLyQGHUHPRFLyQDSUR[LPDGDPHQWH
1”–2” [2,5 cm–5,1 cm] de la posición de cierre).
4. Levante la puerta hasta que los brazos de la bisagra hayan
salido de las ranuras. NOTA: La puerta del horno es muy
pesada. Asegúrese de tener un agarre firme antes de
levantar la puerta del horno de sus bisagras. Tenga cuidado
XQDYH]TXHKD\DTXLWDGRODSXHUWD1RGHSRVLWHODSXHUWD
sobre la manija. Esto puede provocar abolladuras o rayones.
Reemplazo de la Puerta del Horno
NOTA: La puerta del horno es pesada. Puede necesitar ayuda
para levantar la puerta lo suficiente como para deslizarla dentro
GHODVUDQXUDVGHODELVDJUD1ROHYDQWHODSXHUWDGHODPDQLMD
1. Levante la puerta del horno tomándola de
ambos lados.
2. Con la puerta en el mismo ángulo de la
SRVLFLyQGHUHPRFLyQDSUR[LPDGDPHQWH
1”–2” [2,5 cm–5,1 cm] desde la posición
de cerrado), introduzca la muesca del
brazo de la bisagra dentro del extremo
inferior de la ranura de la bisagra. La
ranura del brazo de la bisagra debe estar bien colocada en
la parte inferior de la ranura.
3. Abra la puerta por completo. Si la puerta no se abre por
completo, la muesca no está bien colocada en el extremo
inferior de la ranura.
4. Presione las trabas de la bisagra hacia arriba contra el
armazón frontal de la cavidad del horno, hasta alcanzar la
posición de trabado.
5. Cierre la puerta del horno.
Puerta del Horno
Bisagra en
la posición
de trabado
Ranura de la
bisagra bien
colocada en la
parte inferior de
la ranura de la
bisagra
La bisagra sale de la ranura
Ranura
de la
bisagra
Brazo
de la
bisagra
Posición destrabada
de la bisagra
Lado
inferior de
la ranura
Brazo
de la bisagra
Ranura de la bisagra
/DSXHUWDHVPX\SHVDGD7HQJDFXLGDGRDOUHWLUDU\OHYDQWDUODSXHUWD1ROHYDQWHODSXHUWD
usando la manija.
En hornos con cámara:
Antes de retirar la puerta, desconecte el arnés de la cámara
desenganchando el conector que se encuentra calzado sobre la parte inferior de la puerta.
IMPORTANTE6LHOYLGULRGHODSXHUWDRODFXELHUWDGHODOX]GHOKRUQRQRHVWiQOLPSLRVOD
claridad de la imagen de la cámara puede verse afectada. Siga las instrucciones a continuación
para limpiar correctamente el vidrio de la puerta. Para obtener los mejores resultados, limpie el
vidrio de la puerta y la cubierta de la luz del horno inmediatamente después de un derrame, una
vez que el horno se haya enfriado.
Puerto
de cámara
Cable de cámara

28 49-2003952 Rev. 0
¡Ahorre tiempo y dinero! Revise los cuadros en las páginas siguientes antes de llamar al servicio técnico. Consulte videos de
autoayuda y preguntas frecuentes en bodewell.com/faqs.
Problema Causa Posible Qué Hacer
Mi horno nuevo no cocina
como el anterior. ¿Hay
algún problema con
las configuraciones de
temperatura?
Su horno nuevo cuenta con un sistema de cocción
diferente con relación al anterior y, por lo tanto, es posible
que cocine de forma diferente.
En los primeros usos, use los tiempos y temperaturas de su
receta con cuidado. Si aún piensa que su horno nuevo cocina con
demasiado calor o demasiado frío, podrá ajustar el termostato
usted mismo para aplicar su preferencia de cocción específica.
Para ajustar la temperatura del horno, consulte la sección de
Funciones Especiales. NOTA: Este ajuste afecta las temperaturas
GHORVPRGRV7UDGLWLRQDO%DNH+RUQHDGR7UDGLFLRQDO&RQYHFWLRQ
%DNH+RUQHDUSRU&RQYHFFLyQ\&RQYHFWLRQ%DNH0XOWL+RUQHDGR
por Convección Múltiple); éste no afectará los modos Convection
5RDVW'RUDUSRU&RQYHFFLyQ7UDGLWLRQDO%URLO$VDGR7UDGLFLRQDO
&RQYHFWLRQ%URLO$VDUSRU&RQYHFFLyQR&OHDQ/LPSLDU
La comida no se hornea de
forma apropiada
Controles del horno configurados de forma incorrecta. Consulte la sección Modos de Cocción.
La posición del estante es incorrecta o el estante no está
nivelado.
Consulte la sección Modos de Cocción y la Guía de Cocción.
8VRGHXQDFDFHURODLQFRUUHFWDRGHXQDFDFHURODGH
tamaño incorrecto.
&RQVXOWHODVHFFLyQ8WHQVLOLRV
La temperatura del horno debe ser ajustada. &RQVXOWHODRSFLyQ&RRNLQJ&RFFLyQHQODVHFFLyQ6HWWLQJV
&RQILJXUDFLRQHV
Sustitución de ingredientes Sustituir ingredientes puede modificar el resultado de la receta.
La comida no asa de forma
apropiada
Controles del horno configurados de forma incorrecta. Asegúrese de seleccionar el modo correcto para asar.
Se usó una posición incorrecta del estante. Para acceder a sugerencias de ubicación de estantes, consulte la
Guía de Cocción.
Se cocinó comida en una olla caliente. Asegúrese de que el utensilio esté frío
8WHQVLOLRGHFRFLQDLQDGHFXDGRSDUDDVDU 8VHXQDROODHVSHFtILFDPHQWHGLVHxDGDSDUDDVDU
El papel de aluminio usado para la olla y la rejilla para
asar no se ajustó ni cortó de forma apropiada, según lo
recomendado.
Si usará papel de aluminio, deberá usarse conforme con las
aberturas de la olla.
En algunas áreas, es posible que el nivel de corriente
YROWDMHVHDEDMR
Precaliente el elemento para asar durante 10 minutos.
La temperatura del horno
es demasiado caliente o
demasiado fría
La temperatura del horno debe ser ajustada. &RQVXOWHODRSFLyQ&RRNLQJ&RFFLyQHQODVHFFLyQ6HWWLQJV
&RQILJXUDFLRQHV
El horno no funciona o parece
no funcionar
Es posible que un fusible de su hogar se haya quemado
o que el disyuntor se haya desconectado.
Reemplace el fusible o reinicie el disyuntor.
Controles del horno configurados de forma incorrecta. &RQVXOWHODVVHFFLRQHV8VRGHOHOHFWURGRPpVWLFR\&RQILJXUDFLyQ
de un modo de cocción.
(OKRUQRVHHQFXHQWUDHQ6DEEDWK0RGH0RGR6DEiWLFR 9HULILTXHTXHHOKRUQRQRHVWpHQ6DEEDWK0RGH0RGR6DEiWLFR
&RQVXOWHODRSFLyQ6DEEDWK6DEiWLFRHQODVHFFLyQ6HWWLQJV
&RQILJXUDFLRQHV
Sonido de “chisporroteo” o
“traqueo”
Éste es el sonido de metal calentándose o enfriándose
durante las funciones de cocción y limpieza..
Esto es normal.
¿Por qué la estufa hace un
sonido de “clic” cuando uso
el horno?
Su estufa fue diseñada para mantener un control más
ajustado sobre la temperatura del horno. Es posible que
escuche que los elementos calefactores de su horno
hacen un “clic” de encendido y apagado con mayor
frecuencia que en hornos antiguos, a fin de lograr
mejores resultados durante los ciclos de cocción y
limpieza.
Esto es normal.
El reloj y el temporizador no
funcionan
Es posible que un fusible de su hogar se haya quemado
o que el disyuntor se haya desconectado.
Reemplace el fusible o reinicie el disyuntor.
La luz del horno no funciona La lámpara está floja o presenta defectos. Ajuste o reemplace la lámpara.
El modo de limpieza
automática del horno no
funciona
La temperatura del horno es demasiado caliente como
para configurar la limpieza automática.
Espere a que el horno se enfríe y reinicie los controles.
Los controles del horno están configurados de forma
incorrecta.
Consulte la sección de Limpieza del Horno.
Exceso de humo durante un
ciclo de limpieza
Suciedad o grasa excesiva. Presione Cancel (Cancelar) para detener el ciclo. Abra las
ventanas para liberar el humo en la habitación. Espere hasta que la
puerta se destrabe. Limpie el exceso de suciedad y reinicie el ciclo
de limpieza.
Humo excesivo al asar La comida está demasiado cerca del quemador. Baje la posición del estante con comida.
Consejos para la Solución de Problemas... Antes de solicitar el servicio técnico
CONSEJOS PARA LA SOLUCIÓN DE PROBLEMAS

49-2003952 Rev. 0 29
CONSEJOS PARA LA SOLUCIÓN DE PROBLEMAS
Problema Causa Posible Qué Hacer
La puerta del horno no se
abrirá luego de un ciclo de
limpieza
El horno está demasiado caliente. Espere a que el horno se enfríe por debajo de la temperatura de
bloqueo.
El horno no limpia luego de
un ciclo de limpieza
Los controles del horno están configurados de forma
incorrecta.
Consulte la sección de Limpieza del Horno.
El horno estaba demasiado sucio. Limpie derrames excesivos antes de iniciar el ciclo de limpieza. Es
posible que, en hornos con mucha suciedad, sea necesario usar
la limpieza automática nuevamente o usarla durante un período de
tiempo más prolongado.
“F – y un número o letra”
son exhibidos en la pantalla
de LCD
Tiene un código de error de función. Presione Dismiss (Descartar)HQODSDQWDOODGH/&'9XHOYDD
poner el horno en funcionamiento.
Si el código de función se repite. 'HVFRQHFWHWRWDOPHQWHODFRUULHQWHGHODFRFLQDGXUDQWHSRUOR
menos 30 minutos y vuelva a conectar la misma. Si el código de
error de función se repite, llame al servicio técnico.
El LCD no está funcionando
correctamente
Es posible que un fusible de su hogar se haya quemado
o que el disyuntor se haya desconectado.
Reemplace el fusible o reinicie el disyuntor.
Los controles del horno están configurados de forma
incorrecta.
Consulte la sección de Modos de Cocción o Configuraciones para
asegurar un uso correcto. Asegúrese de que la unidad se encuentre
actualizada con el software más reciente.
/DSDQWDOODGH/&'HVWiEORTXHDGD 'HVEORTXHHODSDQWDOODSUHVLRQDQGRHOtFRQRUnlock
(Desbloquear). Si esto no corrige el problema, haga circular
corriente por el disyuntor y asegúrese de que la unidad se
encuentre actualizada con el software más reciente.
La pantalla táctil no responde correctamente Coloque toda su mano sobre la pantalla táctil durante 5 segundos y
luego retírela para restablecer la sensibilidad de la pantalla táctil.
(O/&'HVGHIHFWXRVR Haga circular corriente por el disyuntor y asegúrese de que la
unidad se encuentre actualizada con el software más reciente. Si
el problema persiste, comuníquese con el servicio técnico para
evaluar el mismo.
Corte de corriente, el reloj se
reinicia
Corte o exceso de corriente Reinicie el reloj. Si el horno se encontraba en uso, deberá reiniciar
el mismo presionando la tecla Cancel (Cancelar), configurando el
reloj y reiniciando cualquier función de cocción.
Olor a “quemado” o “aceite”
desde la ventilación
Esto es normal en un horno nuevo y desaparecerá con
el tiempo.
Para acelerar el proceso, configure un ciclo de limpieza automática por
un mínimo de 3 horas. Consulte la sección de Limpieza del Horno.
Olor fuerte
8QRORUHQODDLVODFLyQDOUHGHGRUGHOLQWHULRUGHOKRUQRHV
normal desde las primeras veces en que el horno es usado.
Esto es temporario y desaparecerá luego de varios usos o de un
ciclo de limpieza automática.
Ruido del ventilador Es posible que un ventilador de enfriamiento se active
automáticamente.
Esto es normal. El ventilador de enfriamiento se encenderá para
enfriar las partes internas. Es posible que funcione hasta durante una
hora y media, una vez que el horno se haya apagado.
La puerta de vidrio del horno
parece estar “teñida” o tener
un color “arcoíris”. ¿Es esto
un defecto?
1R(OYLGULRGHOKRUQRLQWHUQRHVWiFXELHUWRFRQXQD
barrera de calor que refleja este último nuevamente hacia
el horno, a fin de evitar la pérdida de calor y de mantener
fría la puerta externa mientras se hornea.
Esto es normal. Bajo ciertas luces y ángulos, es posible que
visualice esta tinta o arcoíris.
A veces el horno tarda más
en precalentarse a la misma
temperatura
8WHQVLOLRRFRPLGDHQHOKRUQR El utensilio o la comida en el horno hará que éste tarde más en
precalentarse. Retire estos artículos para reducir el tiempo de
precalentamiento.
1~PHURGHHVWDQWHVHQHOKRUQR Agregar más estantes al horno hará que éste tarde más en
precalentarse. Retire algunos estantes.
'LIHUHQWHVPRGRVGHFRFFLyQ Los diferentes modos de cocción utilizan diferentes métodos de
precalentamiento para calentar el horno en un modo de cocción
HVSHFtILFR$OJXQRVPRGRVWDUGDUiQPiVTXHRWURVWDOHVFRPR
horneado por convección múltiple).
El horno no funciona en
forma remota
Problemas en el enrutador, no hay señal inalámbrica, etc.
Para solicitar asistencia con la conectividad de red inalámbrica,
FRPXQtTXHVHDO
El horno no está conectado.
La imagen de la cámara del
horno no es clara.
El vidrio de la puerta del horno está sucio. Siga las instrucciones de la sección de Cuidado y Limpieza para
limpiar de forma apropiada el vidrio de la puerta del horno.
No hay ninguna imagen en la
aplicación de la cámara del horno
Cable de la cámara desenchufado Asegúrese de que el cable de la cámara se encuentre enchufado
en la parte inferior de la puerta.
Consejos para la Solución de Problemas... Antes de solicitar el servicio técnico
30 49-2003952 Rev. 0
Garantía Limitada del Horno Eléctrico de GE Appliances
GARANTÍA LIMITADA
Abroche su recibo aquí. Para acceder al servicio técnico de acuerdo con
la garantía deberá contar con la prueba de la fecha original de compra.
Todo el servicio de garantía de su electrodoméstico es provisto exclusivamente por GE Appliances, Centros de Servicio de Fábrica de la
compañía Haier, o por un técnico del servicio autorizado por GE Appliances para brindar el servicio de garantía de su electrodoméstico.
Para
SURJUDPDUHOVHUYLFLRWpFQLFRGHQWURGH((88YLVtWHQRVHQBodewell.com/schedule-repair-service, o llame al 833-4BODEWELL
(Q&DQDGiYLVLWHGEAppliances.ca/en/support/service-request o llame al 800.561.3344. Cuando llame para solicitar el
servicio, tenga los números de serie y modelo disponibles. El servicio técnico que no haya sido programado o de otro modo organizado por
GE Appliances no estará cubierto bajo esta garantía, incluyendo cualquier parte y/o servicios provistos.
Para realizar el servicio técnico de su electrodoméstico, se podrá requerir el uso de datos del puerto de abordaje para su diagnóstico. Esto da
al técnico del servicio de fábrica de GE Appliances la habilidad de diagnosticar de forma rápida cualquier problema con su electrodoméstico,
y de ayudar a GE Appliances a mejorar sus productos al brindarle a GE Appliances la información sobre su electrodoméstico. Si no desea
que los datos de su electrodoméstico sean enviados a GE Appliances, solicitamos que le indique a su técnico no entregar los datos a GE
Appliances en el momento del servicio.
Qué no cubrirá GE Appliances:
Ŷ 9LDMHVGHOWpFQLFRGHOVHUYLFLRDVXKRJDUSDUDHQVHxDUOH
sobre cómo usar el producto.
Ŷ ,QVWDODFLyQHQWUHJDRPDQWHQLPLHQWRLQDGHFXDGRV
Ŷ )DOODVGHOSURGXFWRHQFDVRGHDEXVRPDOXVRPRGLILFDFLyQ
o uso para propósitos diferentes al original o uso comercial.
Ŷ 5HHPSOD]RGHIXVLEOHVGHODFDVDRUHLQLFLRGHGLV\XQWRUHV
Ŷ 'DxRVRFDVLRQDGRVVREUHHOSURGXFWRSRUDFFLGHQWH
incendio, inundaciones o catástrofes naturales.
Ŷ 'DxRVLQFLGHQWDOHVRFRQVHFXHQWHVFDXVDGRVSRUSRVLEOHV
defectos sobre este producto.
Ŷ 'DxRFDXVDGRGHVSXpVGHODHQWUHJD
Ŷ 3URGXFWRQRDFFHVLEOHSDUDEULQGDUHOVHUYLFLRUHTXHULGR
Ŷ 6ROLFLWHHOVHUYLFLRWpFQLFRSDUDUHSDUDURUHHPSOD]DUODV
OiPSDUDVH[FHSWRODVOiPSDUDV/('
Ŷ 'DxRVVREUHHODFDEDGRWDOHVFRPRy[LGRVREUHOD
superficie, deslustres o manchas pequeñas no informadas
dentro de las 48 horas luego de la entrega.
EXCLUSIÓN DE GARANTÍAS IMPLÍCITAS
Su única y exclusiva alternativa es la reparación del producto, como se indica en la Garantía Limitada. Las garantías implícitas,
incluyendo garantías implícitas de comerciabilidad o conveniencia sobre un propósito particular, se limitan a un año o al período más
corto permitido por la ley.
PARA CLIENTES EN EE. UU.: Esta garantía limitada se
extiende al comprador original y a cualquier propietario posterior
de los productos comprados para uso doméstico dentro de
((88
Si el producto está en un área donde no se encuentra
disponible un Proveedor Autorizado del Servicio Técnico de GE
Appliances, usted será responsable por el costo de un viaje o se
podrá requerir que traiga el producto a una ubicación del Servicio
Técnico de GE Appliances autorizado para recibir el servicio.
En
Alaska, la garantía limitada excluye el costo de envío o visitas de
servicio a su domicilio. Algunos estados no permiten la exclusión
o limitación de daños fortuitos o consecuentes. Esta garantía
limitada le otorga derechos legales específicos, y usted también
podría tener otros derechos que varían de estado a estado. Para
conocer cuáles son sus derechos legales, consulte a la oficina de
asuntos del consumidor local o estatal o al Fiscal de su estado.
Garante: GE Appliances, a Haier company
Louisville, KY 40225
EN CANADÁ (INCLUYENDO LA PROVINCIA DE QUÉBEC):
Esta garantía limitada se extiende al comprador original y a
cualquier propietario posterior de los productos adquiridos en
Canadá, incluyendo Québec, para uso doméstico dentro de
Canadá, incluyendo Québec. Si el producto se encuentra en un
área donde no está disponible el servicio de un Proveedor de
Servicio Autorizado de GE Appliances, usted será responsable
por el costo de un viaje o se podrá requerir que lleve el producto a
una ubicación de Servicio Autorizado de GE Appliances.
Algunas provincias, incluyendo Québec, no permiten la exclusión o
limitación de daños fortuitos o consecuentes. Esta garantía limitada
le otorga derechos legales específicos, y usted también podría
tener otros derechos que varían de una provincia a otra, incluyendo
Québec. Para saber cuáles son sus derechos legales, consulte en
la oficina de protección al consumidor local o de su provincia.
SOLO PARA CONSUMIDORES DE QUÉBEC – AVISO
SOBRE LA GARANTÍA DE DISPONIBILIDAD DE PIEZAS DE
REPUESTO, SERVICIOS DE REPARACIÓN E INFORMACIÓN
NECESARIA PARA LA REPARACIÓN O MANTENIMIENTO
(ART. 39 DE LA LEY DE PROTECCIÓN AL CONSUMIDOR):
6HOHLQIRUPDTXH0&&RPPHUFLDO,QF³0&&RPPHUFLDO´QR
garantiza, en el sentido del artículo 39 de la Ley de Protección
DO&RQVXPLGRU&4/5F3\GHORVDUWtFXORVD
del Reglamento relativo a la aplicación de la Ley de Protección
DO&RQVXPLGRU&4/5F3UODGLVSRQLELOLGDGGHSLH]DV
de repuesto, servicios de reparación o la información necesaria
para el mantenimiento o reparación de bienes fabricados,
importados, publicitados o vendidos por MC Commercial.
Tenga en cuenta que MC Commercial Inc. continúa ofreciendo la
garantía limitada del fabricante según lo indicado en el Manual
del Propietario o Guía Rápida, y que esta garantía limitada
es distinta de la garantía legal de disponibilidad prevista en el
artículo 39 de la Ley de Protección al Consumidor.
Garante: MC Commercial Inc., Burlington, ON, L7L 6B2
GARANTÍAS EXTENDIDAS: Adquiera una garantía extendida
de GE Appliances y conozca los descuentos especiales que
están disponibles mientras su garantía aún está vigente. Puede
adquirirla en línea en cualquier momento en
bodewellcareplan.com
RFRPXQLFDUVHDOGXUDQWHHOKRUDULRGHDWHQFLyQ
comercial. El Servicio de GE Appliances seguirá estando
GLVSRQLEOH GHVSXpV GHTXH VX JDUDQWtDFDGXTXH (Q&DQDGi
comuníquese con su proveedor local de garantía extendida.
Por el Período de GE Appliances reemplazará
Un Año
'HVGHODIHFKDGHOD
compra original
Cualquier parteGHOKRUQRTXHIDOOHGHELGRDXQGHIHFWRHQORVPDWHULDOHVRODIDEULFDFLyQ'XUDQWHHVWD
garantía limitada de un año, GE Appliances también proveerá, sin costo, todo el trabajo y el servicio
en el hogar para reemplazar la parte que presente defectos.
Dos Año
'HVGHODIHFKDGHOD
compra original de la
marca Monogram
Cualquier parteGHOKRUQRTXHIDOOHGHELGRDXQGHIHFWRHQORVPDWHULDOHVRODIDEULFDFLyQ'XUDQWH
esta garantía limitada de dos años, GE Appliances también proveerá, sin costo, todo el trabajo y el
servicio en el hogar para reemplazar la parte que presente defectos.

49-2003952 Rev. 0 31
ACCESORIOS
¿Busca Algo Más?
¡GE Appliances ofrece una variedad de accesorios para
mejorar sus experiencias de cocción y mantenimiento!
Para acceder a números telefónicos e información de sitios
Web, consulte la página de Soporte para el Consumidor.
(VWRV\RWURVSURGXFWRVHVWiQGLVSRQLEOHV
Accesorios
Accesorios
2OODSDUD$VDU3HTXHxDô´[ó´[ò³
2OODSDUD$VDU*UDQGHô´[ó´[ò³
2OODSDUD$VDU([WUD*UDQGHô´[ó´[ò³
Piezas
Estantes del horno
Elementos del horno
Lámparas de luz
Sonda
Suministros de Limpieza
Limpiadores de Acero Inoxidable
Limpiador de Electrodomésticos de Acero Inoxidable
Lubricante
*La olla para asar grande no entra en cocinas de 20”/24”.
** La olla XL no entra en hornos de pared de 24”, empotrables de 27”
o cocinas de 20”/24”.
32 49-2003952 Rev. 0
Soporte para el Consumidor
SOPORTE PARA EL CONSUMIDOR
En los Estados Unidos – Visítenos en GEAppliances.com
o llame al
800.626.2005
En Canadá – Visítenos en GEAppliances.ca
o llame al
877.994.5366
Encuentre información de soporte para propietarios en nuestro sitio web:
• Información
• Registre el electrodoméstico
• Programe el servicio a través de Bodewell
• Compre repuestos, accesorios o garantías extendidas
• Conecte su electrodoméstico – 800.220.6899
Si usted no está satisfecho con el servicio, contáctenos en nuestro sitio web con todos los detalles, incluyendo su
número de teléfono, o escriba a:
En los EE. UU. - General Manager, Customer Relations | GE Appliances | Appliance Park | Louisville, KY 40225
En Canadá
'LUHFWRU&XVWRPHU5HODWLRQV
|
MC Commercial Inc.
|
%XUORDN'U6XLWH_%XUOLQJWRQ21//%
GEAppliances.com GEAppliances.ca