Write the model and serial
numbers here:
Model # _________________
Serial # _________________
You can find the rating label on the
side of the air conditioner.
GE is a trademark of the General Electric Company. Manufactured under trademark license.
AIR CONDITIONER
ROOM
49-5001164 Rev. 0 10-25
PWJV08
PWJV10
PWJV12
PWJV14
SAFETY INFORMATION .........3
USING THE AIR CONDITIONER
Controls ..............................5
Remote Control .......................5
CARE AND CLEANING ...........7
INSTALLATION
INSTRUCTIONS ...................8
WIFI SETUP ......................13
TROUBLESHOOTING TIPS ......15
CONSUMER SUPPORT
Warranty ............................17
Consumer Support ....................18
OWNER’S MANUAL &
INSTALLATION
INSTRUCTIONS

2 49-5001164 Rev. 0
THANK YOU FOR MAKING GE APPLIANCES A PART OF YOUR HOME.
Whether you grew up with GE Appliances, or this is your first, we’re happy to have you in the family.
We take pride in the craftsmanship, innovation and design that goes into every GE Appliances
product, and we think you will too. Among other things, registration of your appliance ensures that we
can deliver important product information and warranty details when you need them.
Register your GE appliance now online. Helpful websites and phone numbers are available in the
Consumer Support section of this Owner’s Manual. You may also mail in the pre-printed registration
card included in the packing material.
49-5001164 Rev. 0 3
IMPORTANT SAFETY INFORMATION
READ ALL INSTRUCTIONS BEFORE USING THE APPLIANCE
SAFETY INFORMATION
READ AND SAVE THESE INSTRUCTIONS
WARNING
For your safety, the information in this manual must be followed to minimize the risk of
fire, electric shock or personal injury.
Ŷ8VHWKLVDSSOLDQFHRQO\IRULWVLQWHQGHGSXUSRVHDV
described in this Owner’s Manual.
ŶThis air conditioner must be properly installed in
accordance with the Installation Instructions before it
is used.
ŶNever unplug your air conditioner by pulling on the
power cord. Always grip plug firmly and pull straight
out from the receptacle.
ŶReplace immediately all electric service cords
that have become frayed or otherwise damaged.
A damaged power supply cord must be replaced
with a new power supply cord obtained from the
manufacturer and not repaired. Do not use a cord that
shows cracks or abrasion damage along its length or
at either the plug or connector end.
ŶTurn the unit OFF and unplug your air conditioner
before cleaning.
ŶFor your safety…do not store or use combustible
materials, gasoline or other flammable vapors or
liquids in the vicinity of this or any other appliance.
ŶIf the receptacle does not match the plug, the
receptacle must be changed out by a qualified
electrician.
ŶGEAppliances does not support any servicing of
sealed system components (i.e. refrigerant containing
parts) in the air conditioner.
ŶService of all other components may ONLY be
completed by a qualified technician.
ŶThis appliance is not intended for use by persons
(including children) with reduced physical, sensory
or mental capabilities or lack of experience and
knowledge, unless they have been given supervision
or instruction concerning use of the appliance by a
person responsible for their safety.
ŶChildren should be supervised to ensure that they do
not play with the appliance.
ŶDo not operate your air conditioner in a wet room
such as a bathroom or laundry room.
ŶThe appliance shall be stored so as to prevent
mechanical damage from occurring.
Ŷ'RQRWXVHPHDQVWRDFFHOHUDWHWKHGHIURVWLQJSURFHVV
or to clean, other than those recommended by the
manufacturer.
ŶThe appliance shall be stored in a room without
continuously operating ignition sources (for example:
open flames, an operating gas appliance or an
operating electric heater.
ŶDo not pierce or burn refrigerant tubing. Be aware that
refrigerants may not contain an odor.
ŶKeep ventilation openings clear of obstruction.
ŶWhen handling, installing, and operating the appliance,
care should be taken to avoid damage to the
refrigerant tubing.
ŶDo not drill holes in the unit.
ŶMaintenance, cleaning, and service should only be
performed by technicians properly trained and qualified
in the use of flammable refrigerants.
ŶGEAppliances does not support any servicing of
sealed system components (i.e. refrigerant containing
parts) in the air conditioner.
ŶDispose of air conditioner in accordance with Federal
and Local Regulations. Flammable refrigerants require
special disposal procedures. Contact your local
authorities for the environmentally safe disposal of your
air conditioner.
WARNING
Risk of Fire or Explosion. This unit contains flammable refrigerant.
Additional safety precautions must be followed.
WARNING
USE OF EXTENSION CORDS
RISK OF FIRE. Could cause serious injury or death.
Ŷ'2127XVHDQH[WHQVLRQFRUGZLWKWKLV:LQGRZ$LU
Conditioner.
Ŷ'2127XVHVXUJHSURWHFWRUVRUPXOWLRXWOHWDGDSWRUV
with this Window Air Conditioner.
A2L
4 49-5001164 Rev. 0
SAFETY INFORMATION
IMPORTANT SAFETY INFORMATION
READ ALL INSTRUCTIONS BEFORE USING THE APPLIANCE
HOW TO CONNECT ELECTRICITY
Do not, under any circumstances, cut or remove the
third (ground) prong from the power cord. For personal
safety, this appliance must be properly grounded.
DO NOT use an adapter plug with this appliance.
The power cord of this appliance is equipped with a
3-prong (grounding) plug which mates with a standard
3-prong (grounding) wall outlet to minimize the
possibility of electric shock hazard from this appliance.
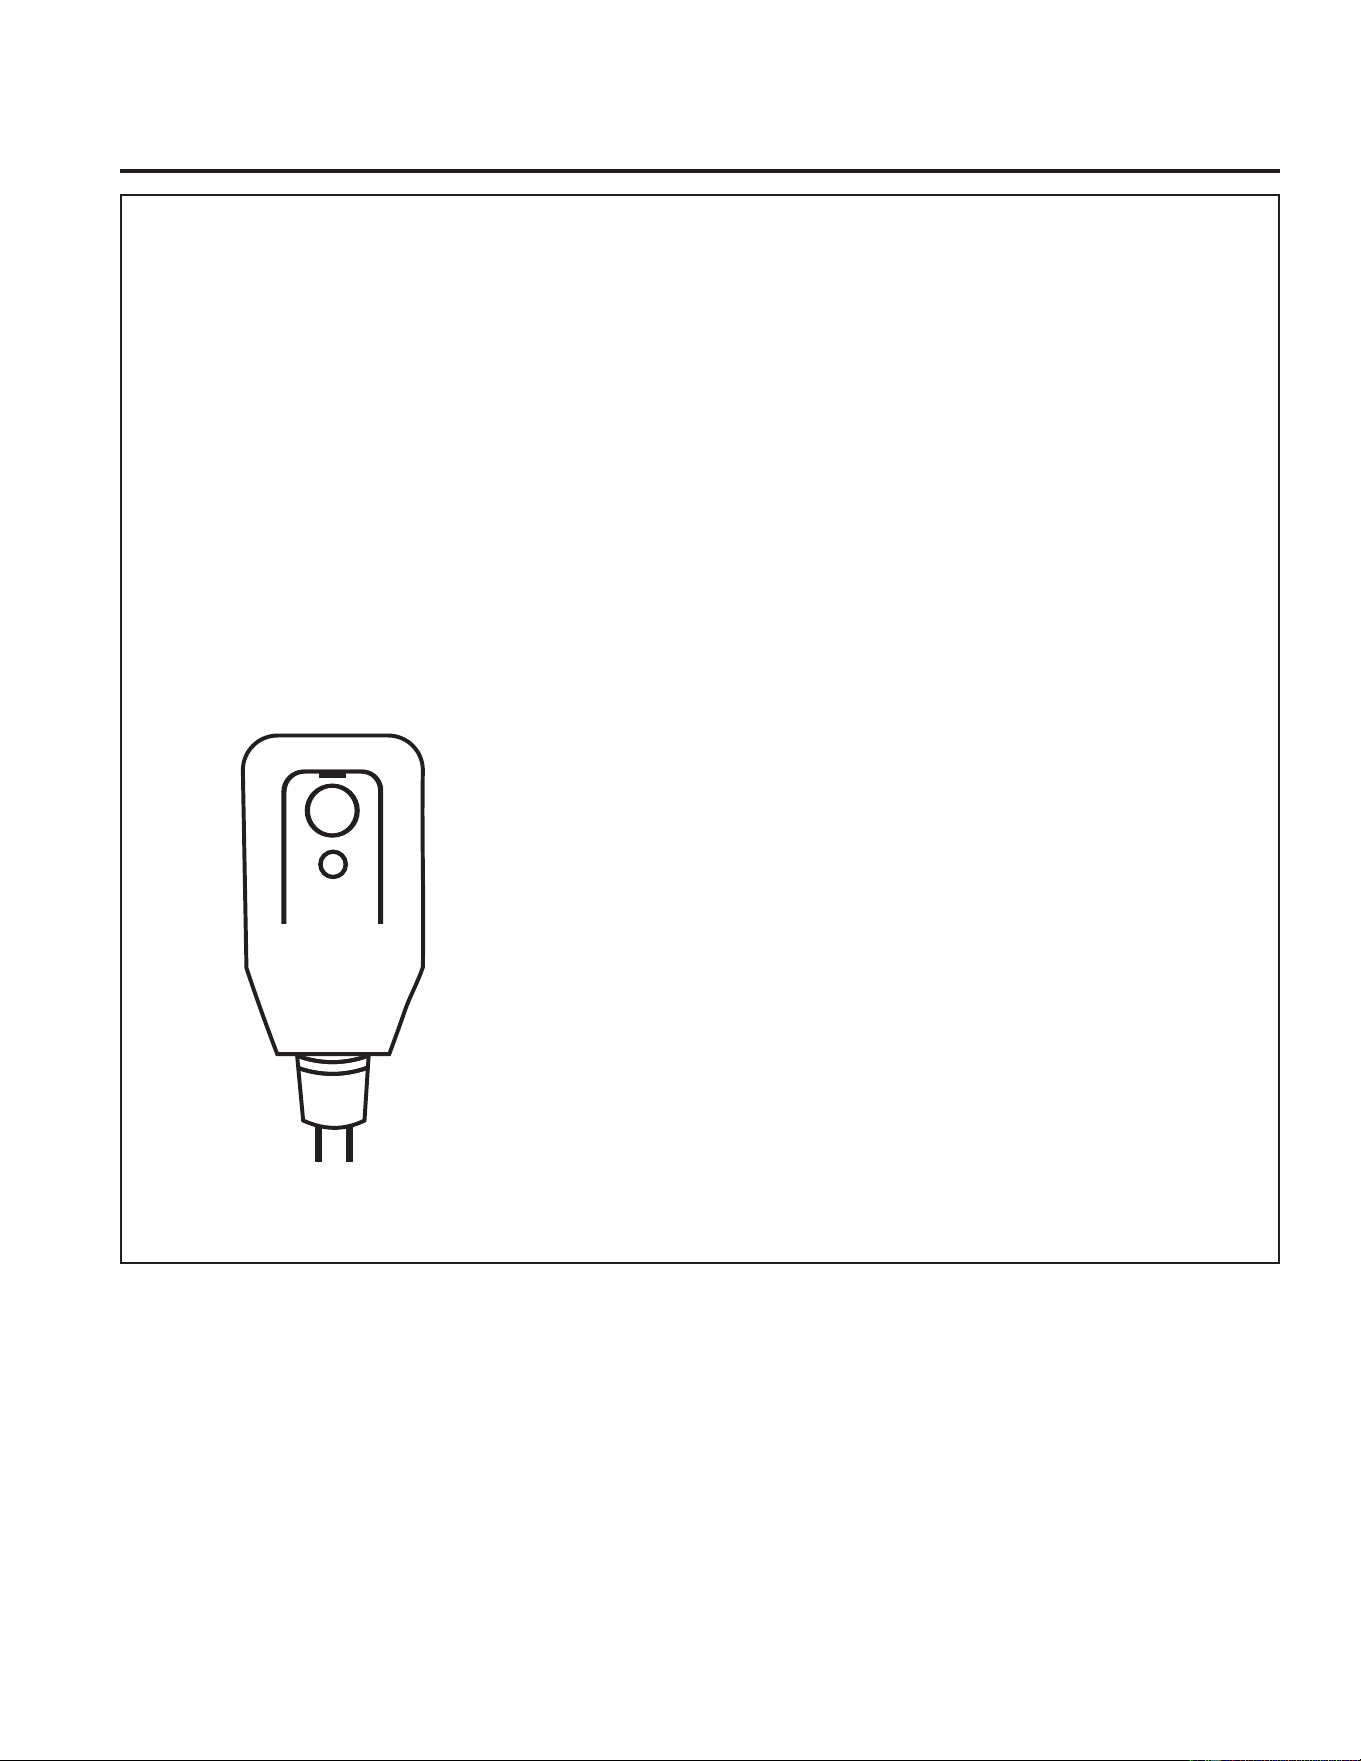
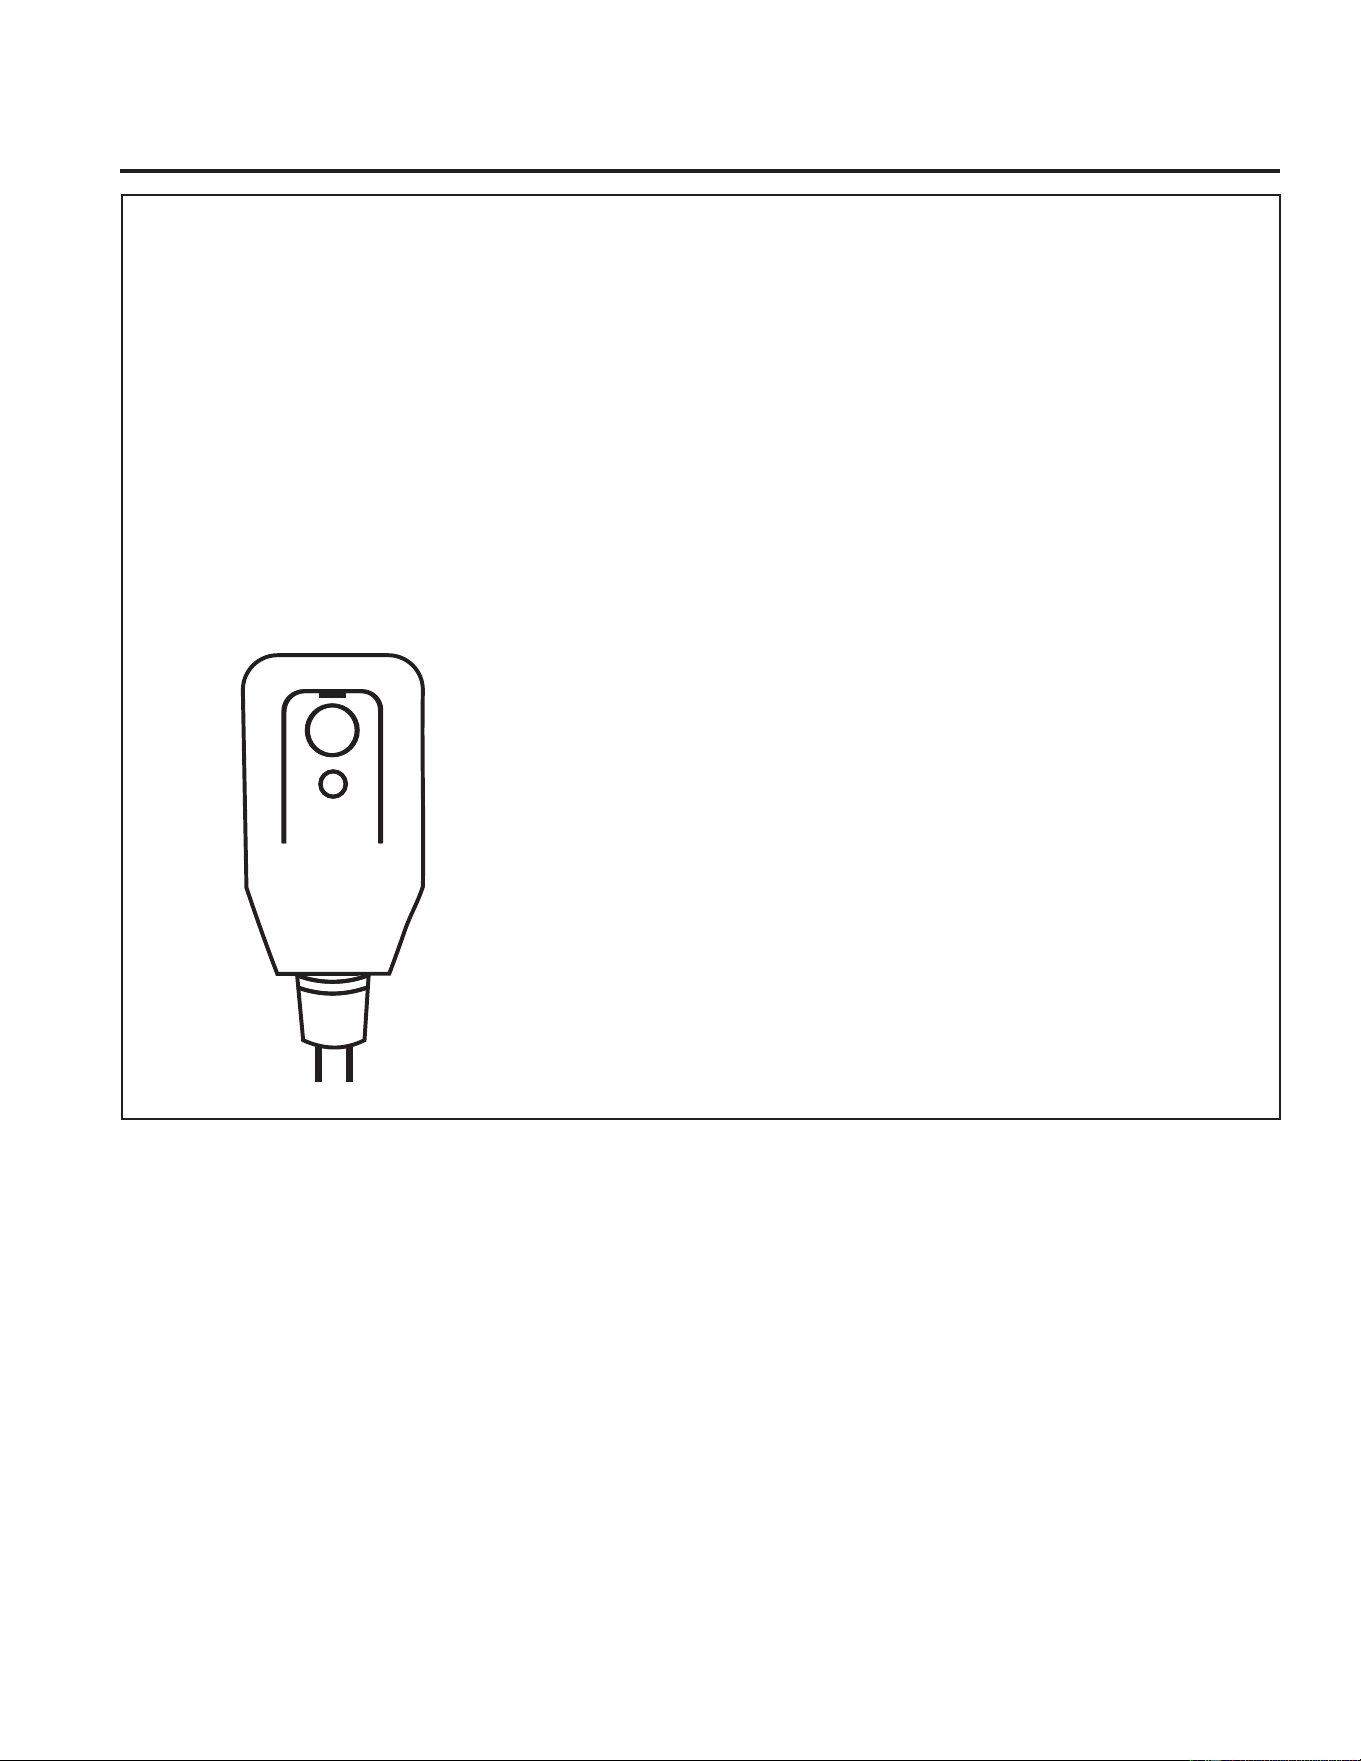
Power cord includes a current interrupter device. A
test and reset button is provided on the plug case. The
device should be tested on a periodic basis by first
pressing the TEST button and then the RESET button
while plugged into the outlet. If the TEST button does
not trip or if the RESET button will not stay engaged,
discontinue use of the air conditioner and contact a
qualified service technician.
Have the wall outlet and circuit checked by a qualified
electrician to make sure the outlet is properly
grounded.
Where a 2-prong wall outlet is encountered, it is
your personal responsibility and obligation to have it
replaced with a properly grounded 3-prong wall outlet.
The air conditioner should always be plugged into its
own individual electrical outlet which has a voltage
rating that matches the rating plate.
This provides the best performance and also prevents
overloading house wiring circuits which could cause a
fire hazard from overheated wires.
See the Installation Instructions, Electrical
Requirements section for specific electrical
connection requirements.
READ AND SAVE THESE INSTRUCTIONS
While plugged in, press
TEST then RESET to
properly safety check.
RESET
TEST
RESET
TEST
49-5001164 Rev. 0 5
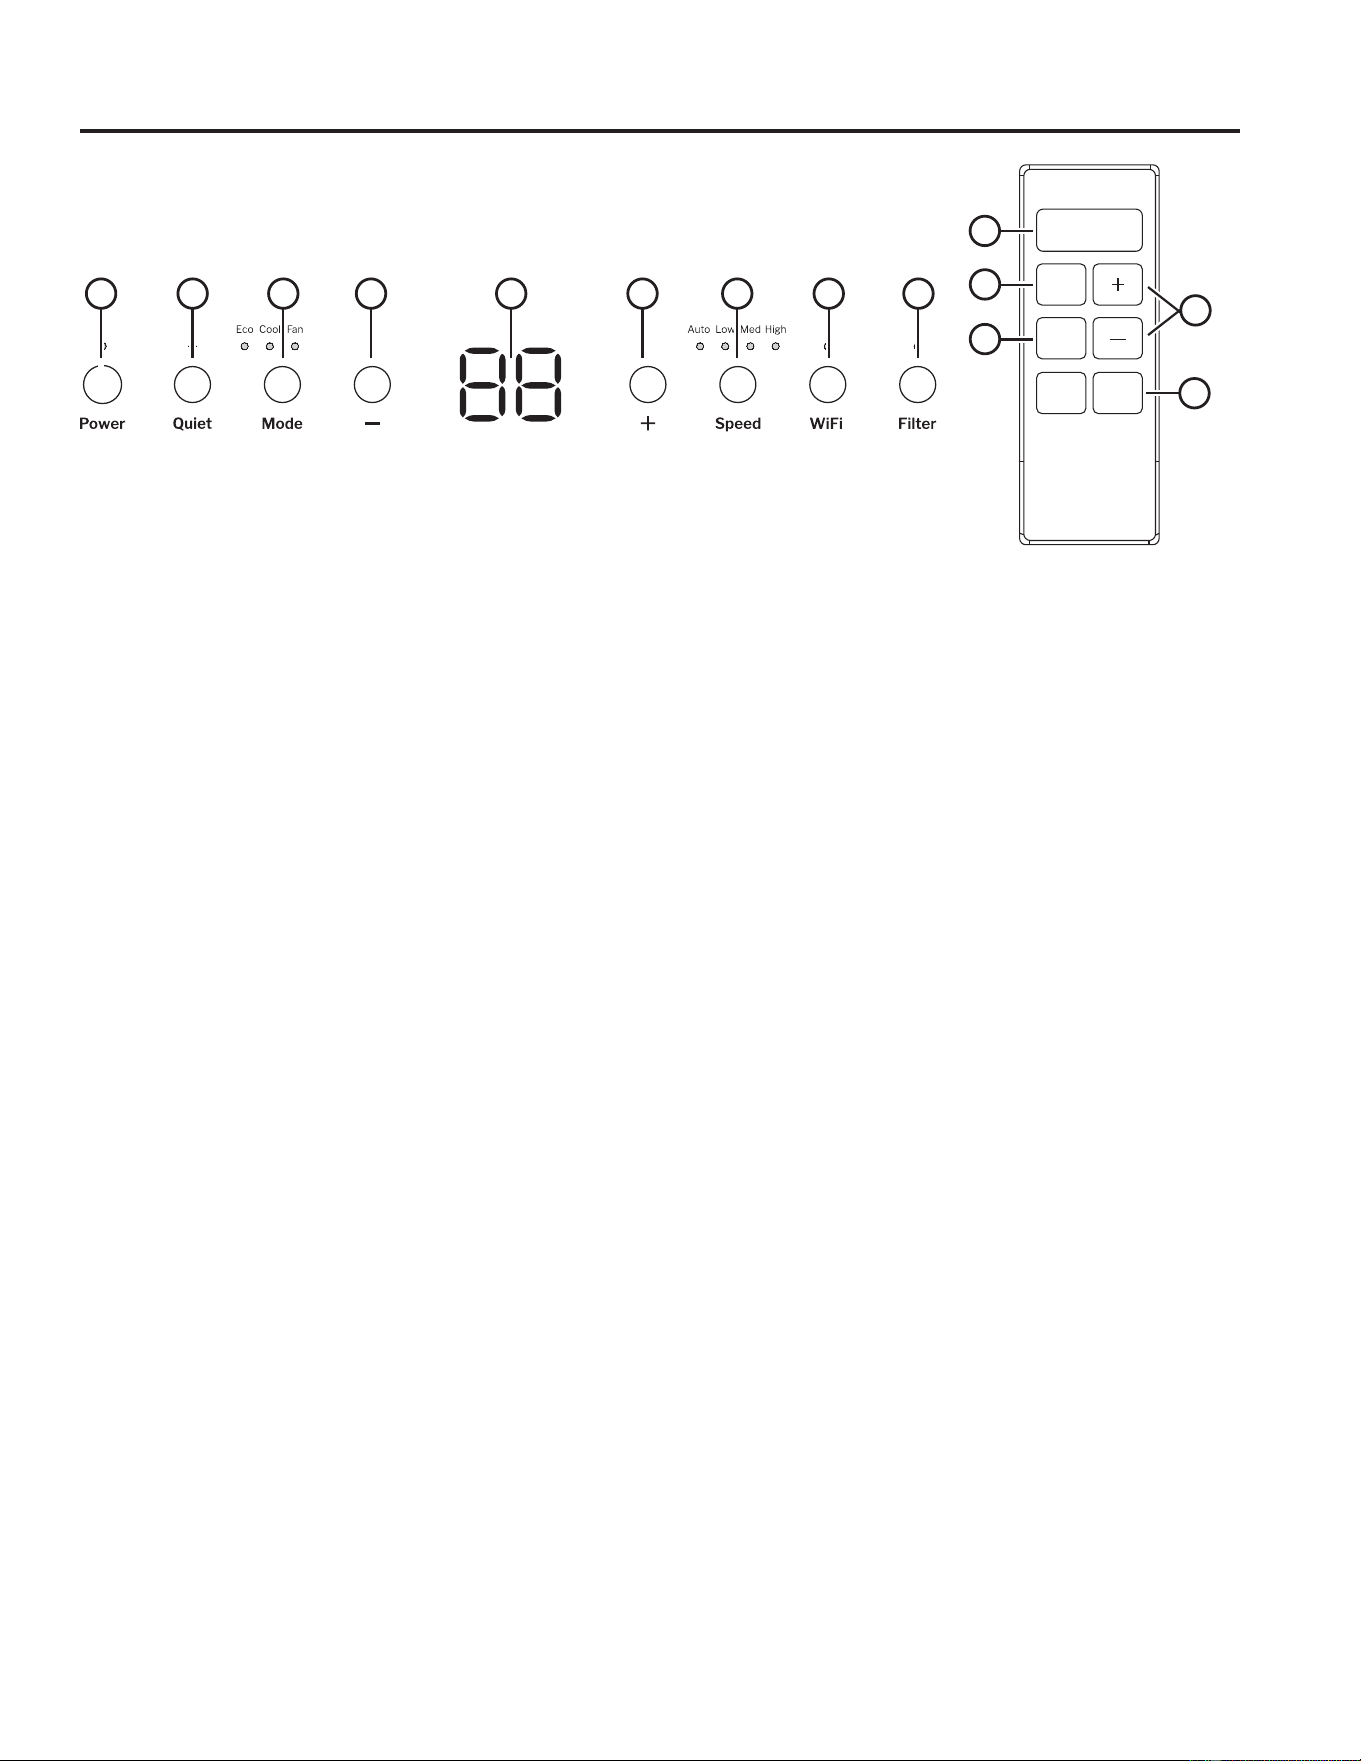
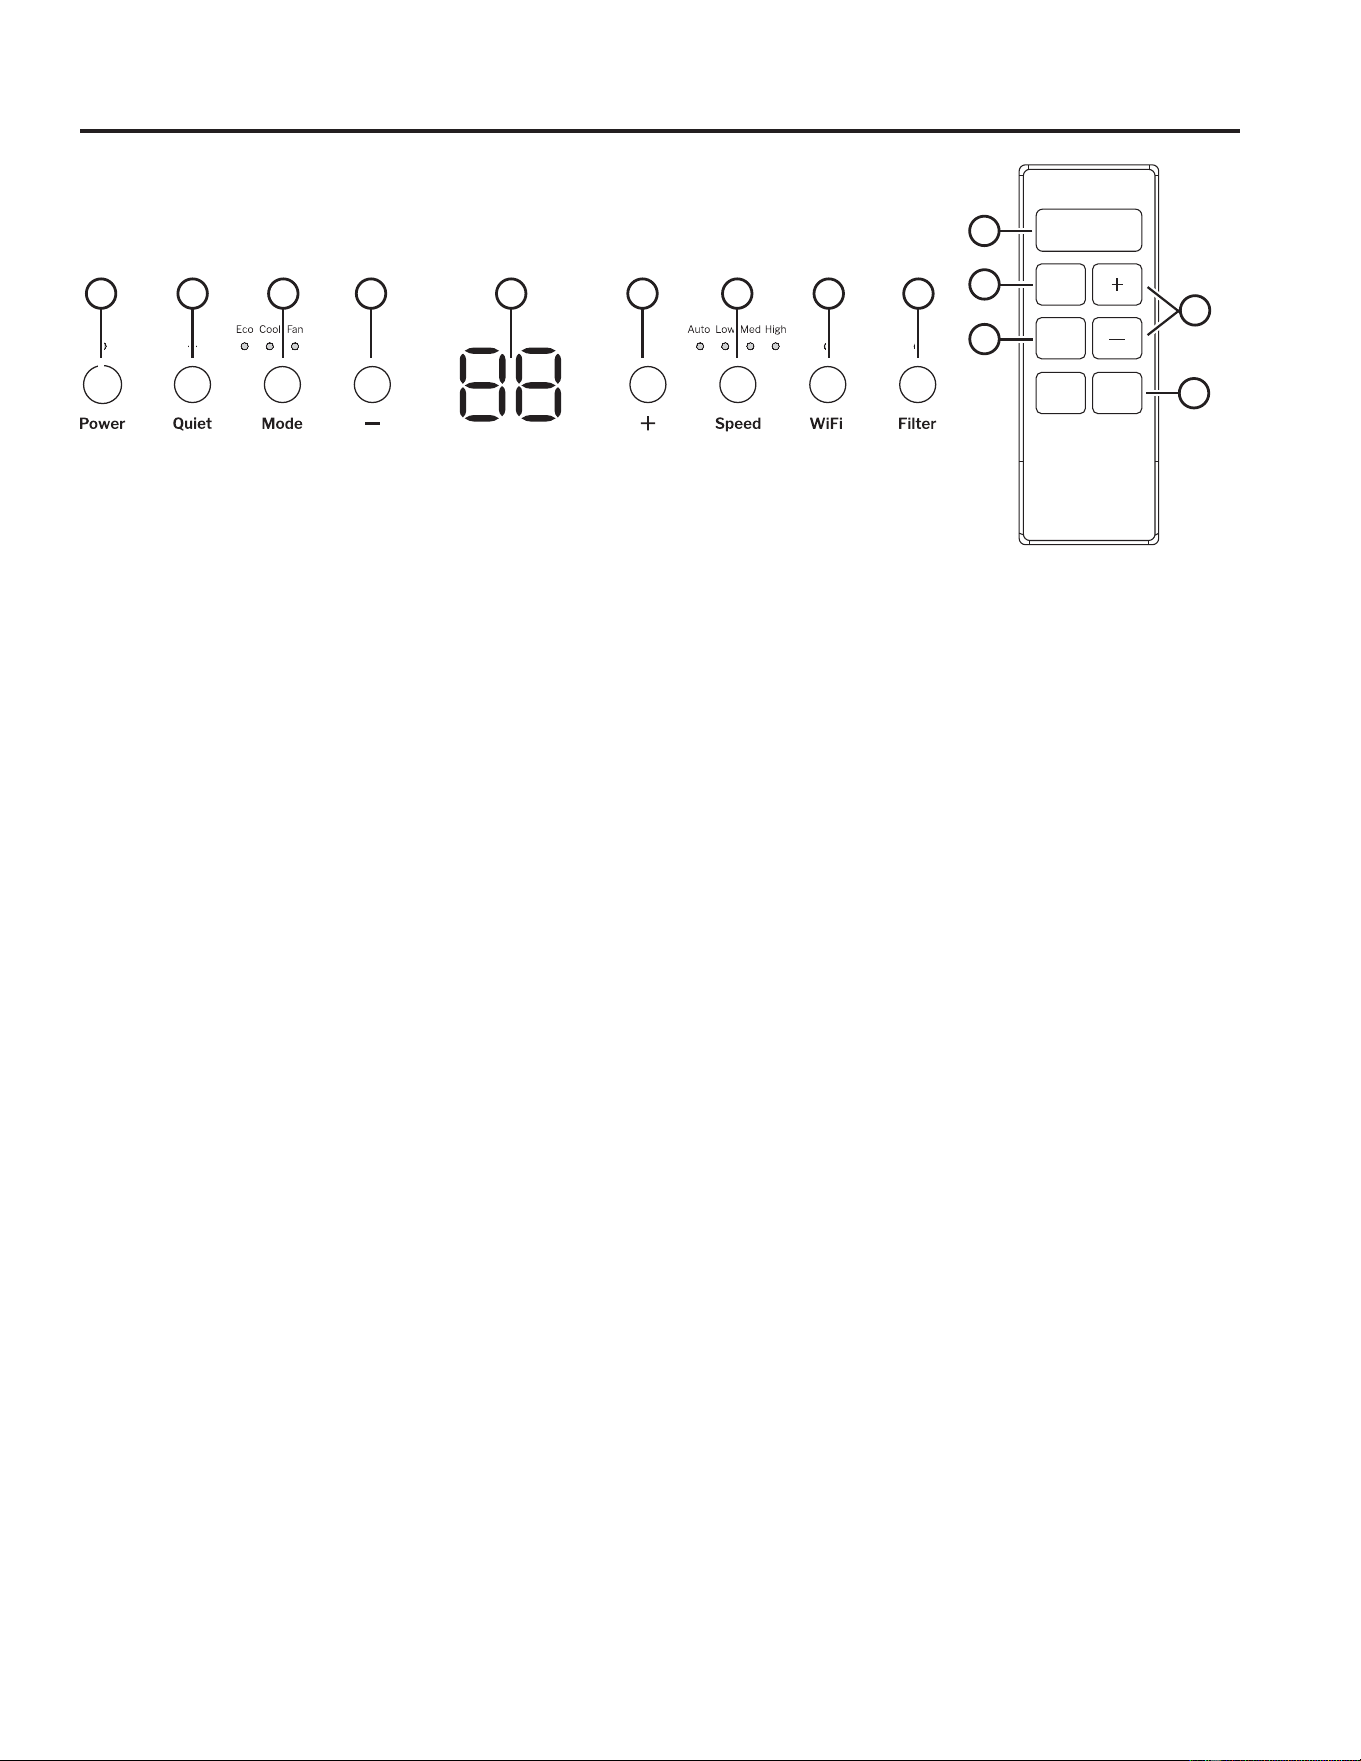
Features and appearance will vary.
Lights beside the touch pads on the air conditioner control panel
indicate the selected settings.
Remote Control
Controls
Power
Speed
Mode
Eco
Delay
1
4
5
6
3
1. Power Pad
Turns air conditioner on and off. When turned on, the
display will show the Set temp.
2. Display
Shows the room temperature in Fan mode. Shows the
Set temperature while setting the temperature in Cool
or ECO modes.
3. Temp and Delay Increase (+) /Decrease (–) pads
8VHWRVHWWHPSHUDWXUHRUGHOD\WLPH7HPSHUDWXUH
can be set in Cool or ECO mode.
4. Mode Pad
8VHWRVHWWKHDLUFRQGLWLRQHUWR Eco, Cool, or Fan
mode.
5. Fan Speed Pad
In Cool or ECO PRGH8VHWRVHWWKHIDQVSHHGWR
Auto, High, Med or Low on the unit.
In Fan PRGH8VHWRVHWWKHIDQVSHHGWR High, Med,
or Low on the unit.
6. Delay
Delay ON—When the air conditioner is off, it can be
set to automatically come on in 1 to 24 hours at its
previous mode and fan settings.
Delay OFF—When the air conditioner is on, it can be
set to automatically turn off in 1 to 24 hours.
How to set:
Press the Delay pad. Each touch of the Increase + /
Decrease – pads will set the timer in 1-hour intervals.
To review the remaining time on the Delay timer,
press the Delay SDG8VHWKH Increase + / Decrease
– pads to set a new time if desired.
To cancel the timer, press Decrease - pad until the
set time is “--”.
7. Quiet Pad
Quiet mode on the unit will set the unit in the lowest
capacity and/or the lowest fan speed to achieve the
best noise performance.
Quiet can be used in ECO and Cool mode.
When set, the Quiet LED will turn on. The Fan Speed
LED will show Auto.
When QuietLVDFWLYHLWFDQEHWXUQHGRႇE\SUHVVLQJ
the Quiet button, pressing the Mode button (on user
interface or remote), or by changing the mode via the
SmartHq app.
8. Filter Reset Pad
This feature automatically notifies you that the air filter
must be cleaned. The indicator light will come on after
250 hours of operation. Clean the air filter (refer to
page 7), place it back in the front panel, and press the
Filter Reset pad. The light will go off.
9 . WiFi Connect Pad
Enables connection of the air conditioner to the home
WiFi. Download App for details at:
GEAppliances.com/connect.
USING THE AIR CONDITIONER
Air Conditioner Controls
5
6
1 23 34 87
Quiet
6 49-5001164 Rev. 0
USING THE AIR CONDITIONER
Using the Air Conditioner
Remote Control
ŶTo ensure proper operation, aim the remote control at
the signal receiver on the air conditioner.
ŶThe remote control signal has a range of up to 20 feet.
ŶMake sure nothing is between the air conditioner and
the remote control that could block the signal.
ŶMake sure batteries are fresh and installed correctly as
indicated on the remote control.
Eco Mode
Controls the fan.
ON—The fan will cycle on and off with the compressor.
This may result in wider variations of room temperature.
NOTE: the fan may continue to run for a short time or
may pulse intermittently after the compressor cycles off
to sample the room air.
OFF—The fan runs all the time, while the compressor
cycles on and off.
Fan Only Mode
8VHWKH)DQ2QO\0RGHDW/RZ0HGRU+LJKIDQVSHHG
to provide air circulation and filtering without cooling.
Since fan-only settings do not provide cooling, a Set
temperature cannot be entered. The room temperature
will appear in the display.
Auto Fan Speed
Set to Auto for the fan speed to automatically set to the
speed needed to provide optimum comfort settings with
the set temperature.
If the room needs more cooling, the fan speed will
automatically increase. If the room needs less cooling,
the fan speed will automatically decrease.
Sleep Mode
Sleep Mode gradually changes the unit settings over an
8-hour period to reduce energy usage while sleeping.
Sleep mode is toggled On or Off by pressing and holding
the Speed Pad for 3 seconds.
The Sleep mode is available only in Cool and Fan only
settings.
Control Panel Lights On/Off Feature
This air conditioner has a control panel lights on/off
feature where its lights will turn off when there is no
activity with the controls for over one minute. To wake up
the controls, press any pad on the controls and the lights
will come on to show the previous settings.
To turn this feature off, press and hold the Filter pad, on
the unit, for 5 seconds. The unit will beep to signal the
successful toggle of the feature on and off.
Cool Mode
8VHWKH&RROPRGHDWLow, Med, High or Auto Fan
6SHHGIRUFRROLQJ8VHWKHTemperature Increase
(+) /Decrease (–) pads to set the desired temperature
between 64°F and 86°F in 1°F increments.
An electronic thermostat is used to maintain the room
temperature. The compressor will cycle on and off and
also change operating speeds to keep the room at
the set level of comfort. Set the thermostat at a lower
number and the indoor air will become cooler. Set the
thermostat at a higher number and the indoor air will
become warmer.
NOTE: If the air conditioner is off and is then turned on
while set to a Cool setting or if turned from a fan setting
to a Cool setting, it may take approximately 3 minutes
for the compressor to start and cooling to begin.
Cooling Descriptions
For Normal Cooling—Select the Cool mode and
High or Med fan with a middle set temperature.
For Maximum Cooling—Select the Cool mode
and High fan with a lower set temperature.
For Quieter and Nighttime Cooling—Select the
Cool mode and Low fan with a middle set temperature.
49-5001164 Rev. 0 7
CARE AND CLEANING
Using the Air Conditioner
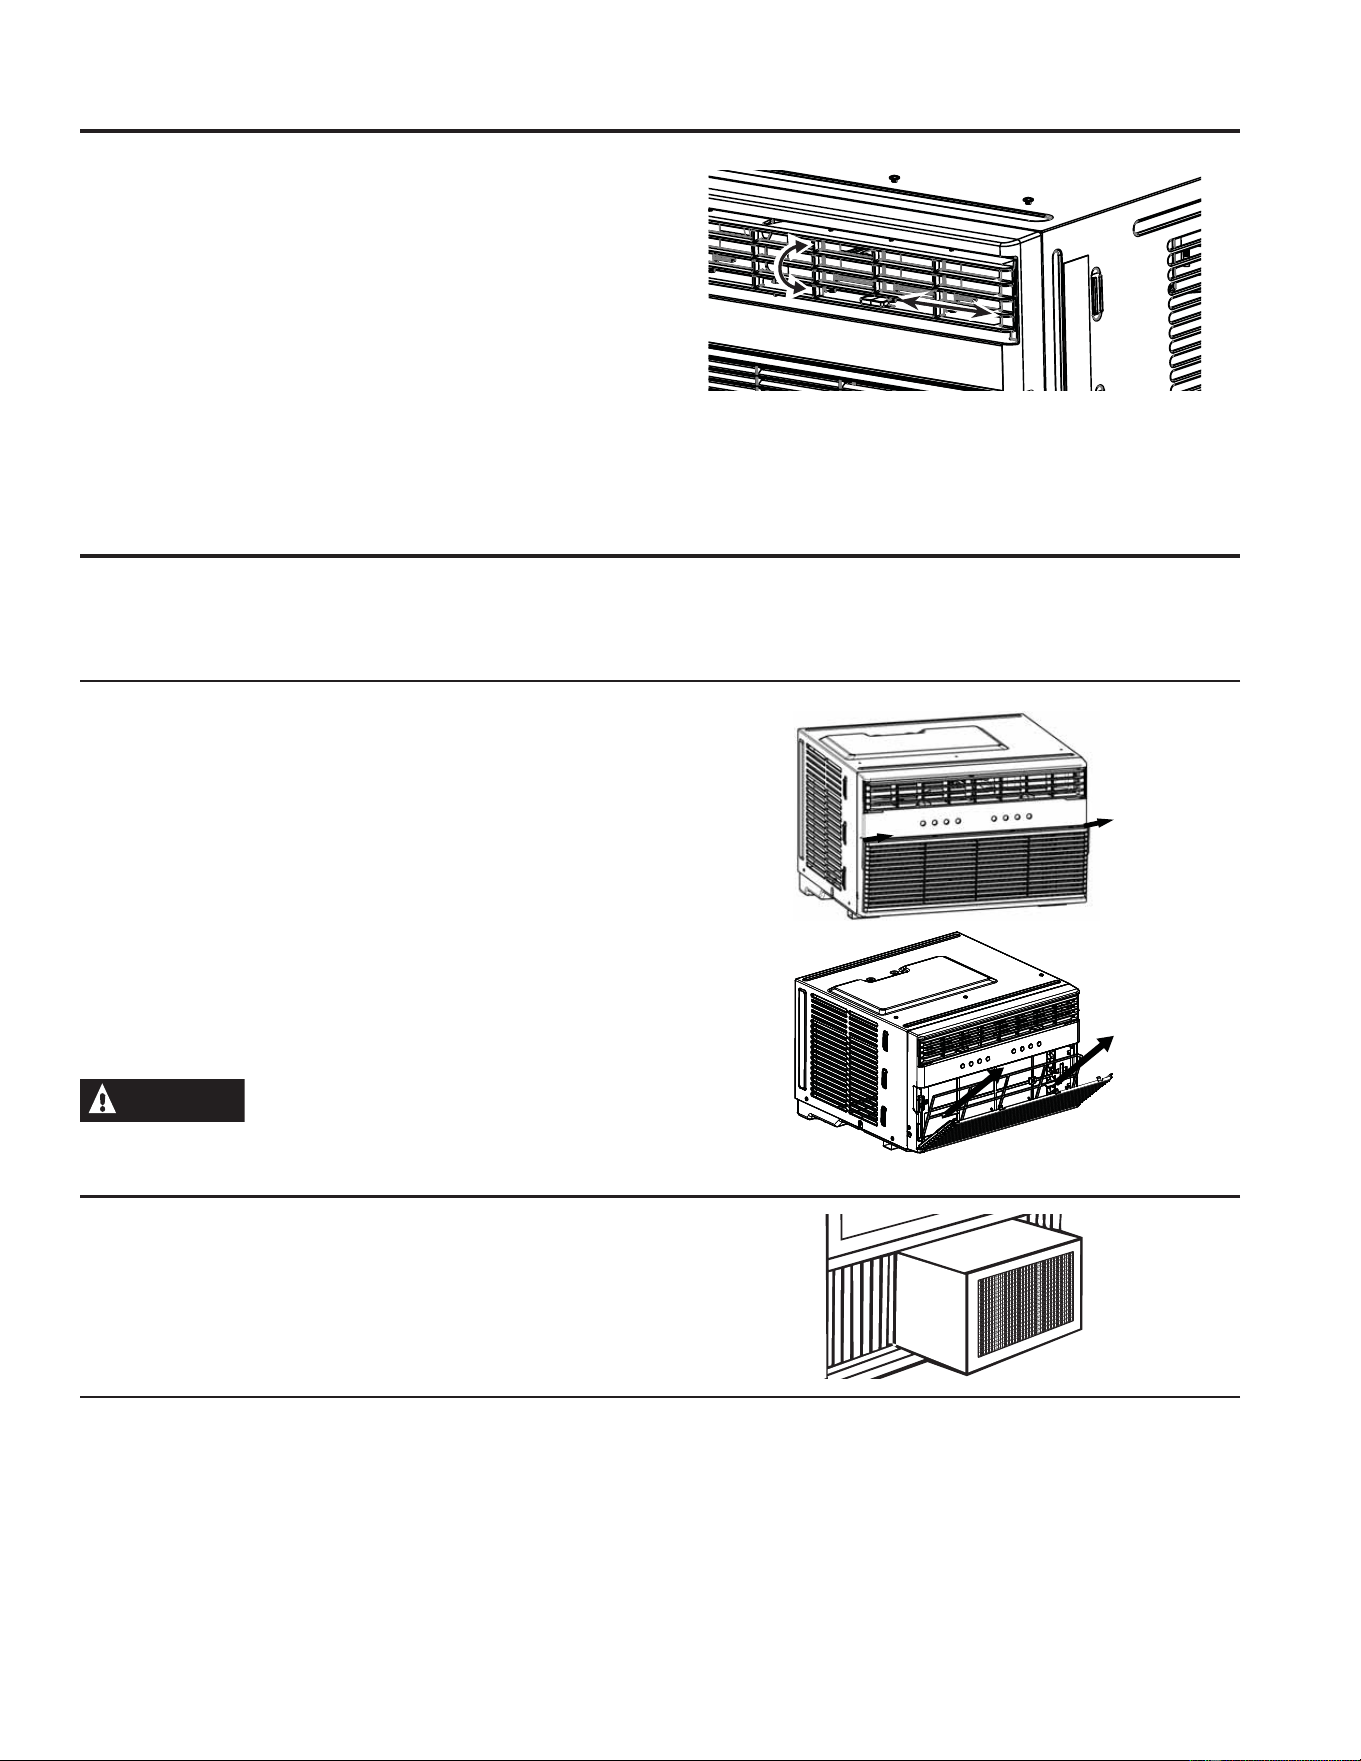
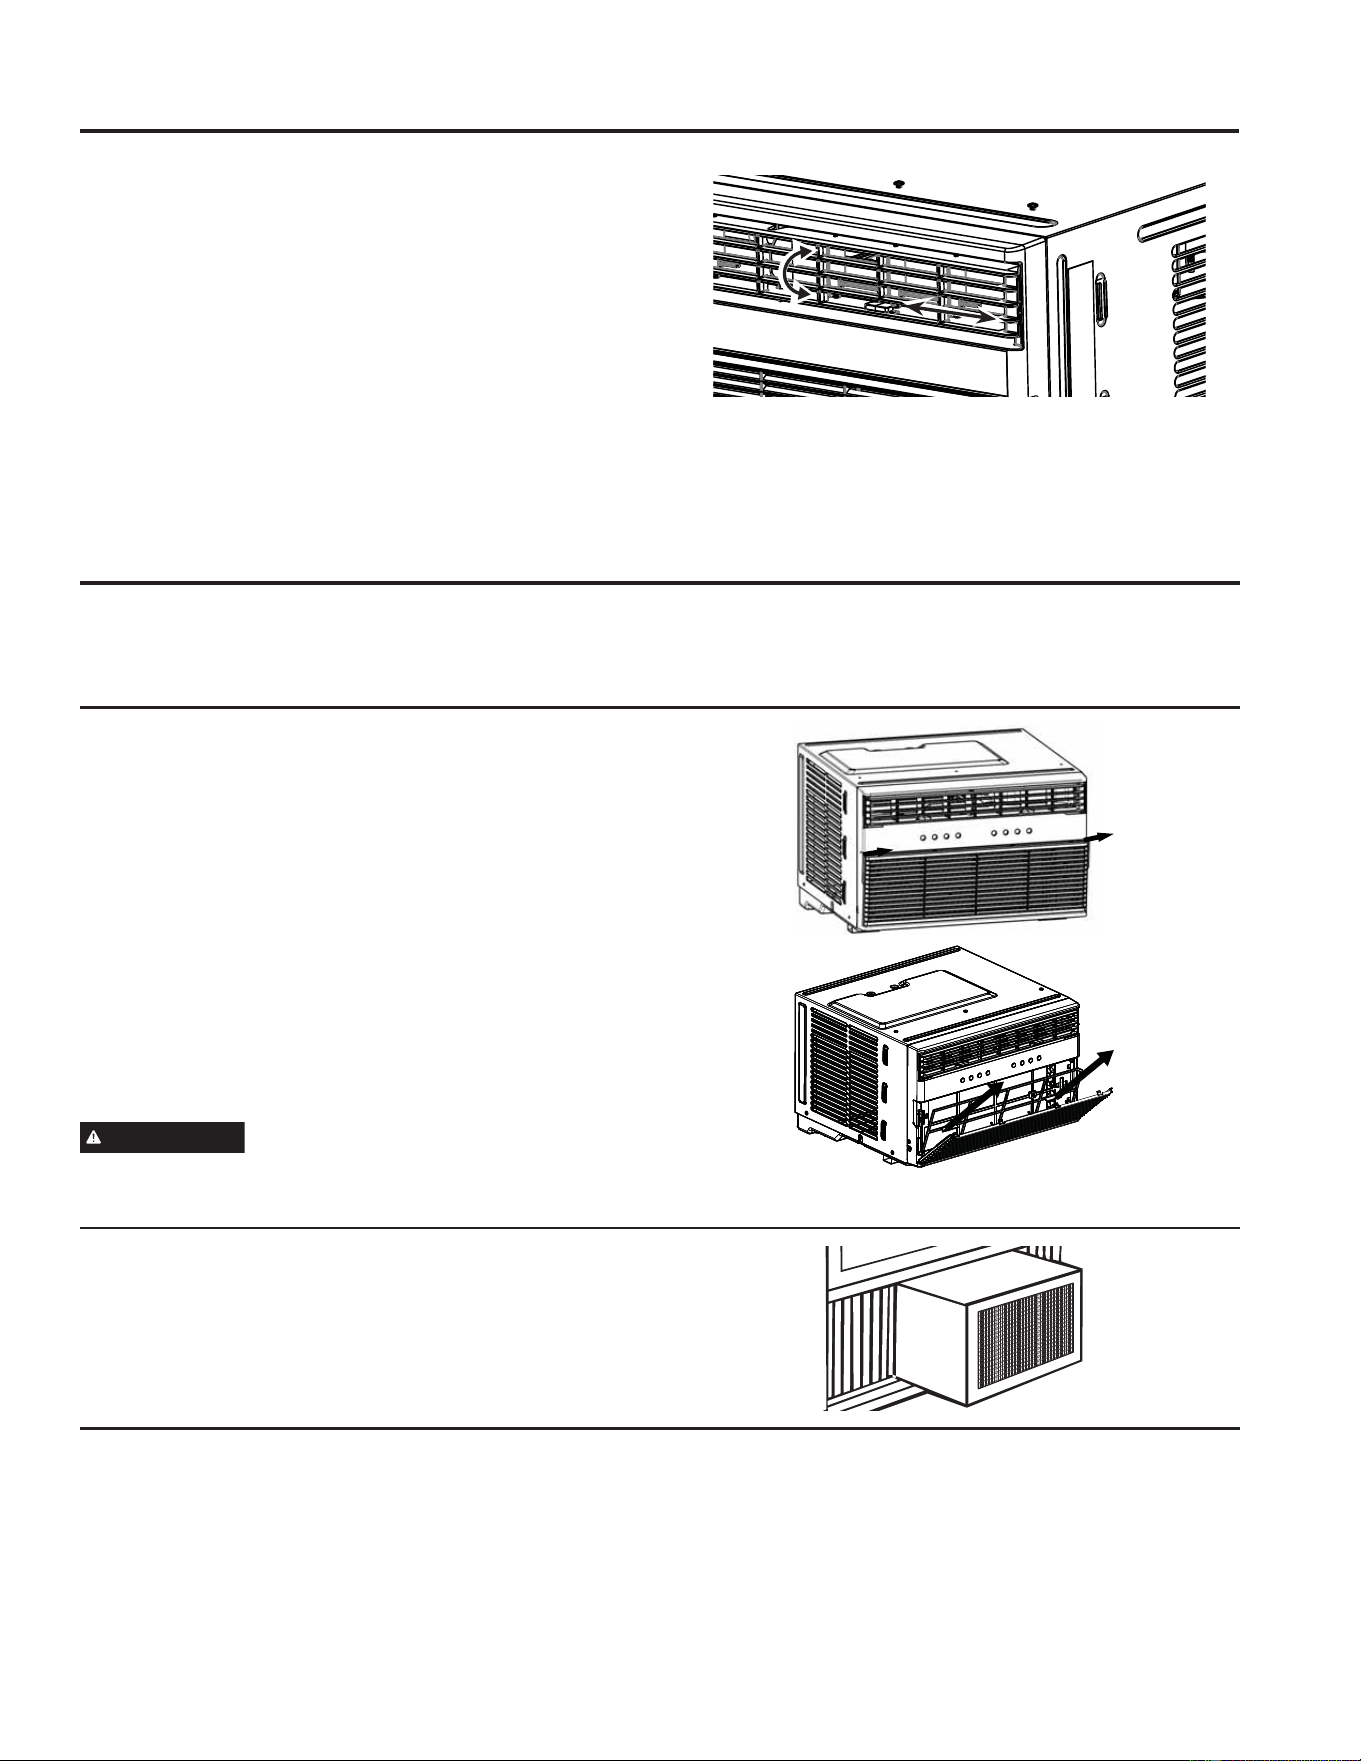
Air Direction
8VHWKHOHYHUWRDGMXVWWKHDLUGLUHFWLRQOHIWDQGULJKW
Push the top or bottom side of the outlet air duct to direct
air up or down.
Care and Cleaning
Grille and Case
Turn the air conditioner off and remove the plug from the
wall outlet before cleaning.
To clean, use water and a mild detergent. Do not use
bleach or abrasives.
Air Filter
The air filter behind the front grille should be checked
and cleaned at least every 30 days or more often if
necessary.
To Clean Air Filter:
1. Open the inlet grille by pulling outward on the tabs at
the upper corners of the inlet grille
2. Hinge the grille out until it is in a 45º position
3. Remove the filter by pulling up and out
4. Clean the filter with warm, soapy water.
– Do not clean the filter in the dishwasher
5. Rinse and let the filter dry fully before replacing it the
reverse way that it was removed
CAUTION
DO NOT operate the air conditioner
without a filter because dirt and lint will clog it and
reduce performance.
Outdoor Coils
The coils on the outdoor side of the air conditioner should
be checked regularly. If they are clogged with dirt or soot,
they may be professionally cleaned.
How to Insert the Batteries in the Remote Control
1. Remove the battery cover by sliding it according to the
arrow direction.
2. Insert new batteries, making sure that the (+) and (–)
of battery are installed correctly.
3. Reattach the cover by sliding it back into position.
NOTES:
8VH³$$$´YROWEDWWHULHV'RQRWXVH
rechargeable batteries.
• Remove the batteries from the remote control if the
system is not going to be used for a long time.
• Do not mix old and new batteries. Do not mix standard
(carbon-zinc) or rechargeable (ni-cad, ni-mh, etc)
batteries.
8 49-5001164 Rev. 0
Installation Instructions
BEFORE YOU BEGIN
Read these instructions completely and carefully.
•
IMPORTANT – Save these
instructions for local inspector’s use.
•
IMPORTANT – Observe all governing
codes and ordinances.
• Note to Installer – Be sure to leave these
instructions with the Consumer.
• Note to Consumer – Keep these instructions for
future reference.
• Skill level – Installation of this appliance requires
basic mechanical skills.
• Completion time – Approximately 1 hour
• We recommend that two people install
this product.
• Proper installation is the responsibility
of the installer.
• Product failure due to improper installation is not
covered under the Warranty.
<RX0867XVHDOOVXSSOLHGSDUWVDQGXVHSURSHU
installation procedures as described in these
instructions when installing this air conditioner.
Questions? Visit our Website at: GEAppliances.com
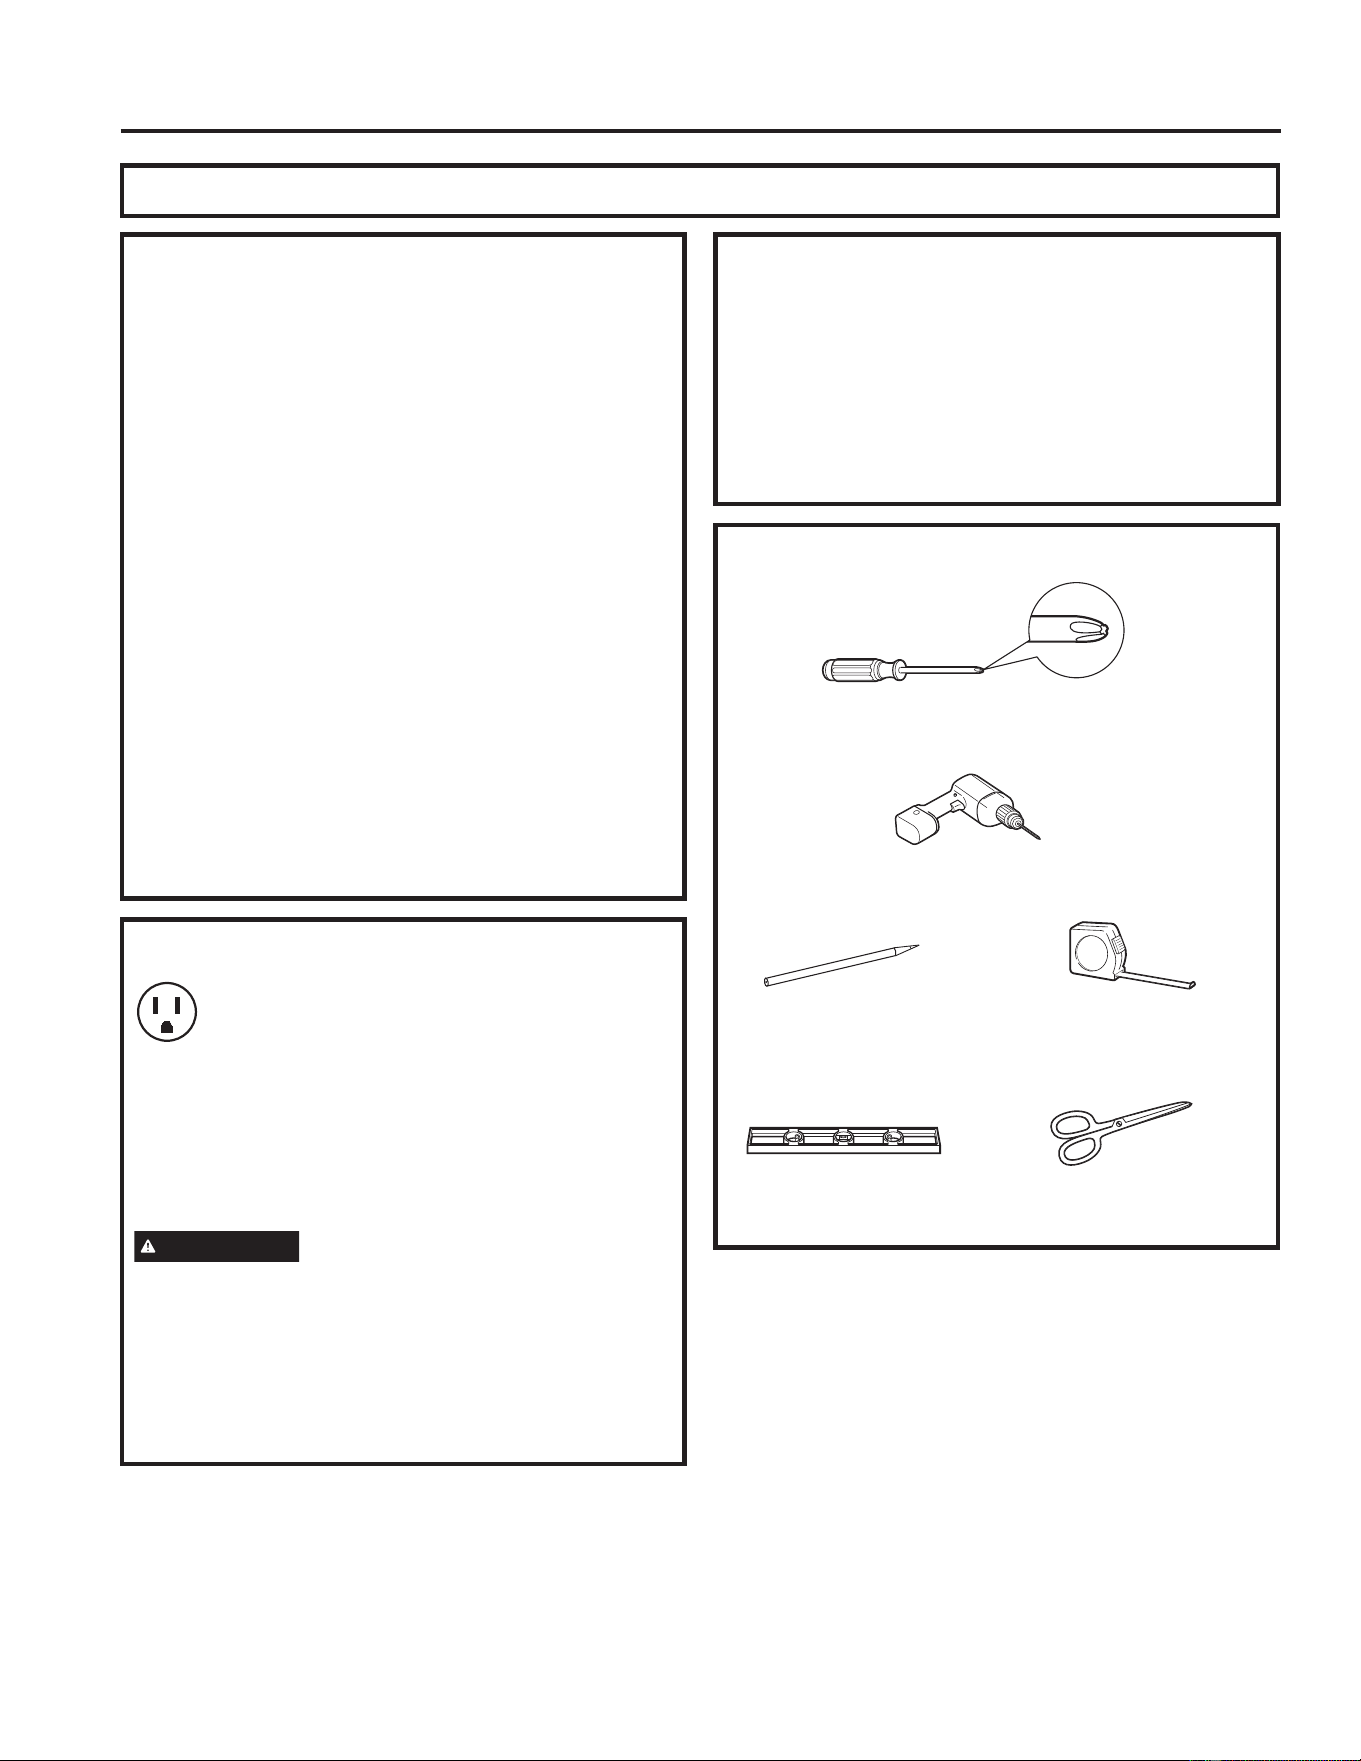
ELECTRICAL REQUIREMENTS
These models require a 115/120-volt AC,
60-Hz grounded outlet protected with a
15-amp time-delay fuse or circuit breaker.
The 3-prong grounding plug minimizes the possibility
of electric shock hazard. If the wall outlet you plan to
use is only a 2-prong outlet, it is your responsibility
to have it replaced with a properly grounded 3-prong
wall outlet.
CAUTION
Do not, under any circumstances, cut or remove the
third (ground) prong from the power cord.
Do not change the plug on the power cord of this air
conditioner.
Aluminum house wiring may present special
problems—consult a qualified electrician.
ELECTRICAL REQUIREMENTS
(cont)
Power cord includes a current interrupter device. A
test and reset button is provided on the plug case.
The device should be tested on a periodic basis
by first pressing the TEST button and then the
RESET button while plugged into the outlet. If the
TEST button does not trip or if the RESET button
will not stay engaged, discontinue use of the air
conditioner and contact a qualified service technician.
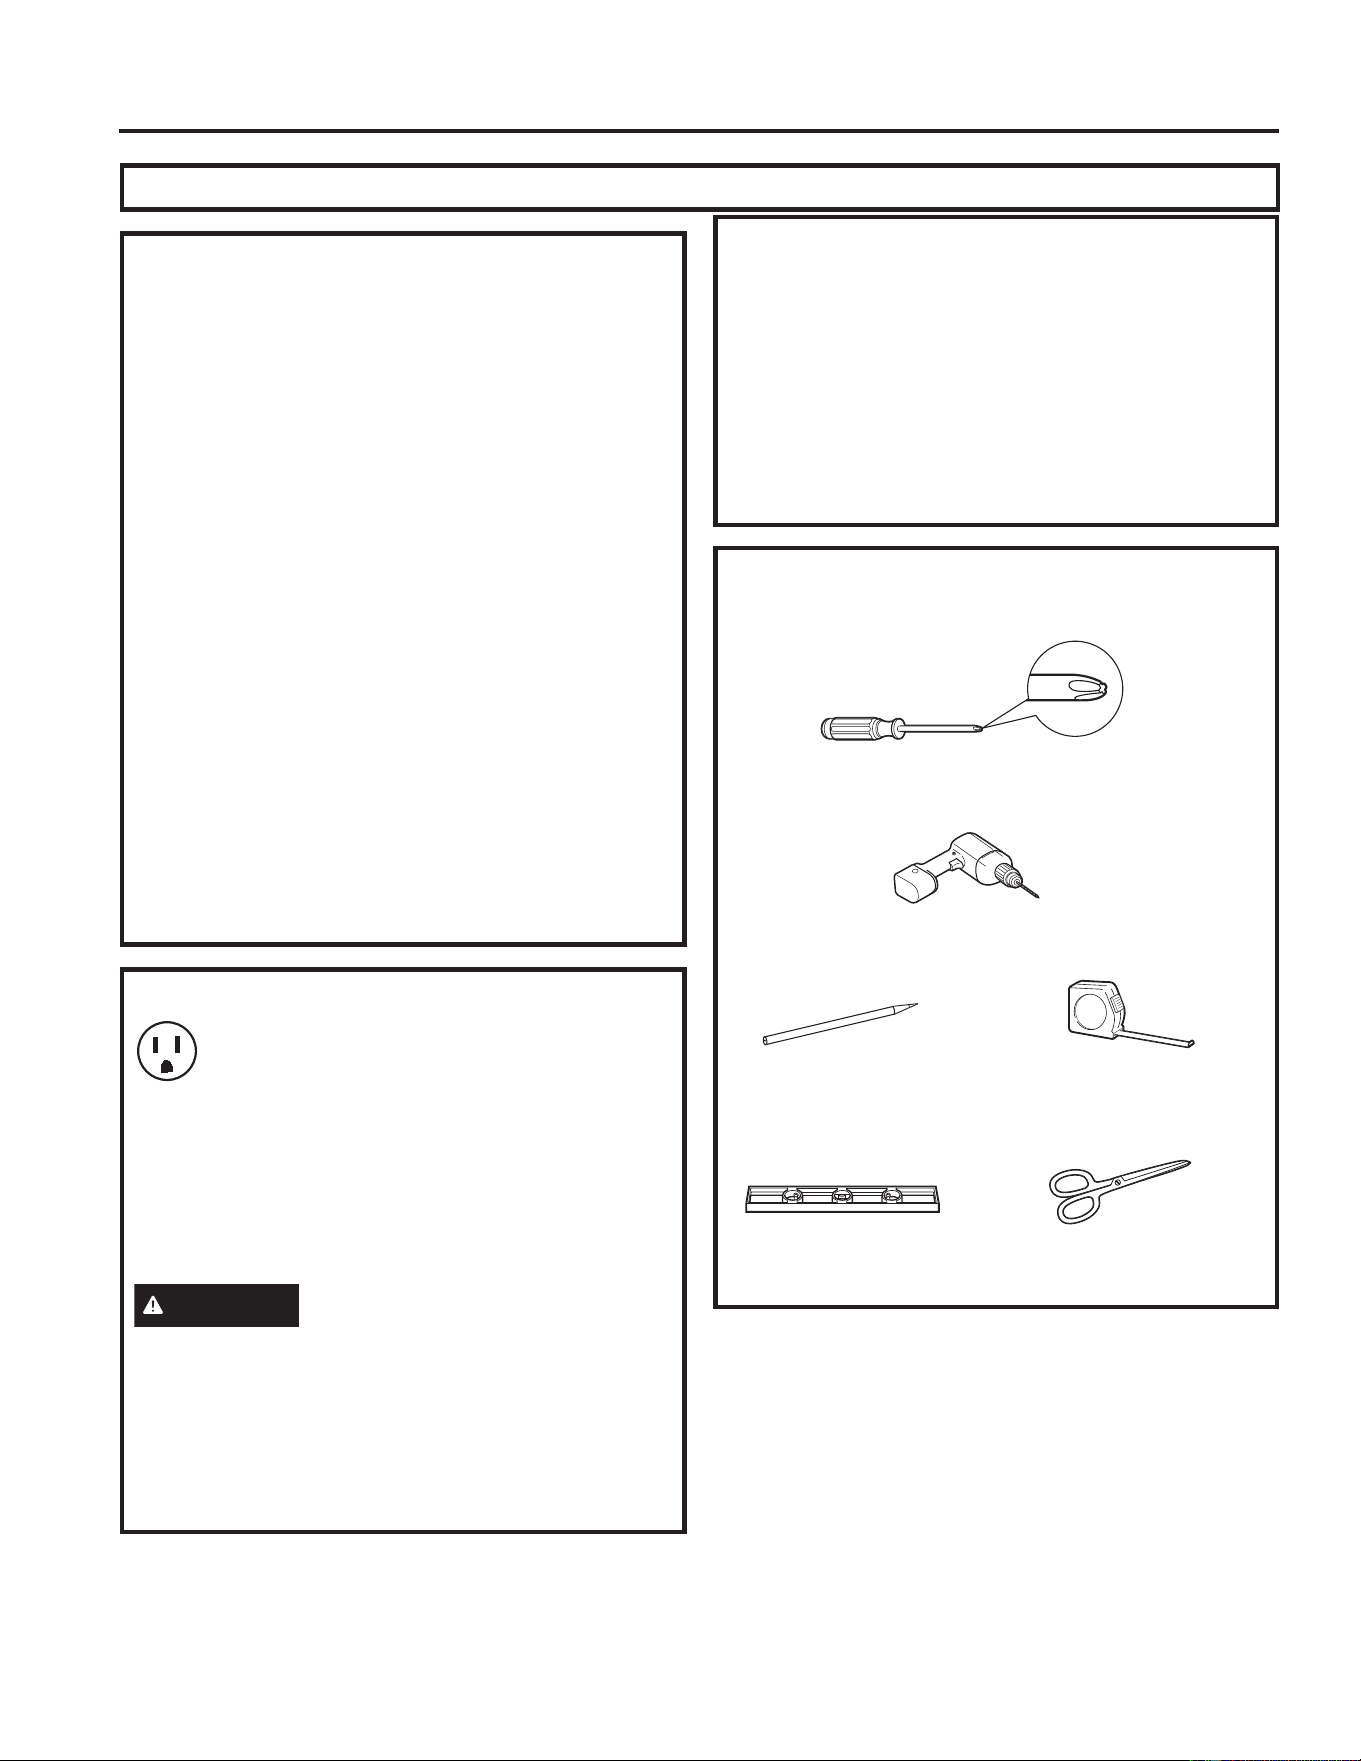
TOOLS YOU WILL NEED
Phillips head screwdriver
Ruler or tape measurePencil
Level
Scissors or knife
'ULOODQG´GULOOELW
INSTALLATION INSTRUCTIONS
49-5001164 Rev. 0 9
INSTALLATION INSTRUCTIONS
Installation Instructions
DELAY
MODE
ON/OFF
SPEED
TEMP/TIME
TEMP/TIME
+
-
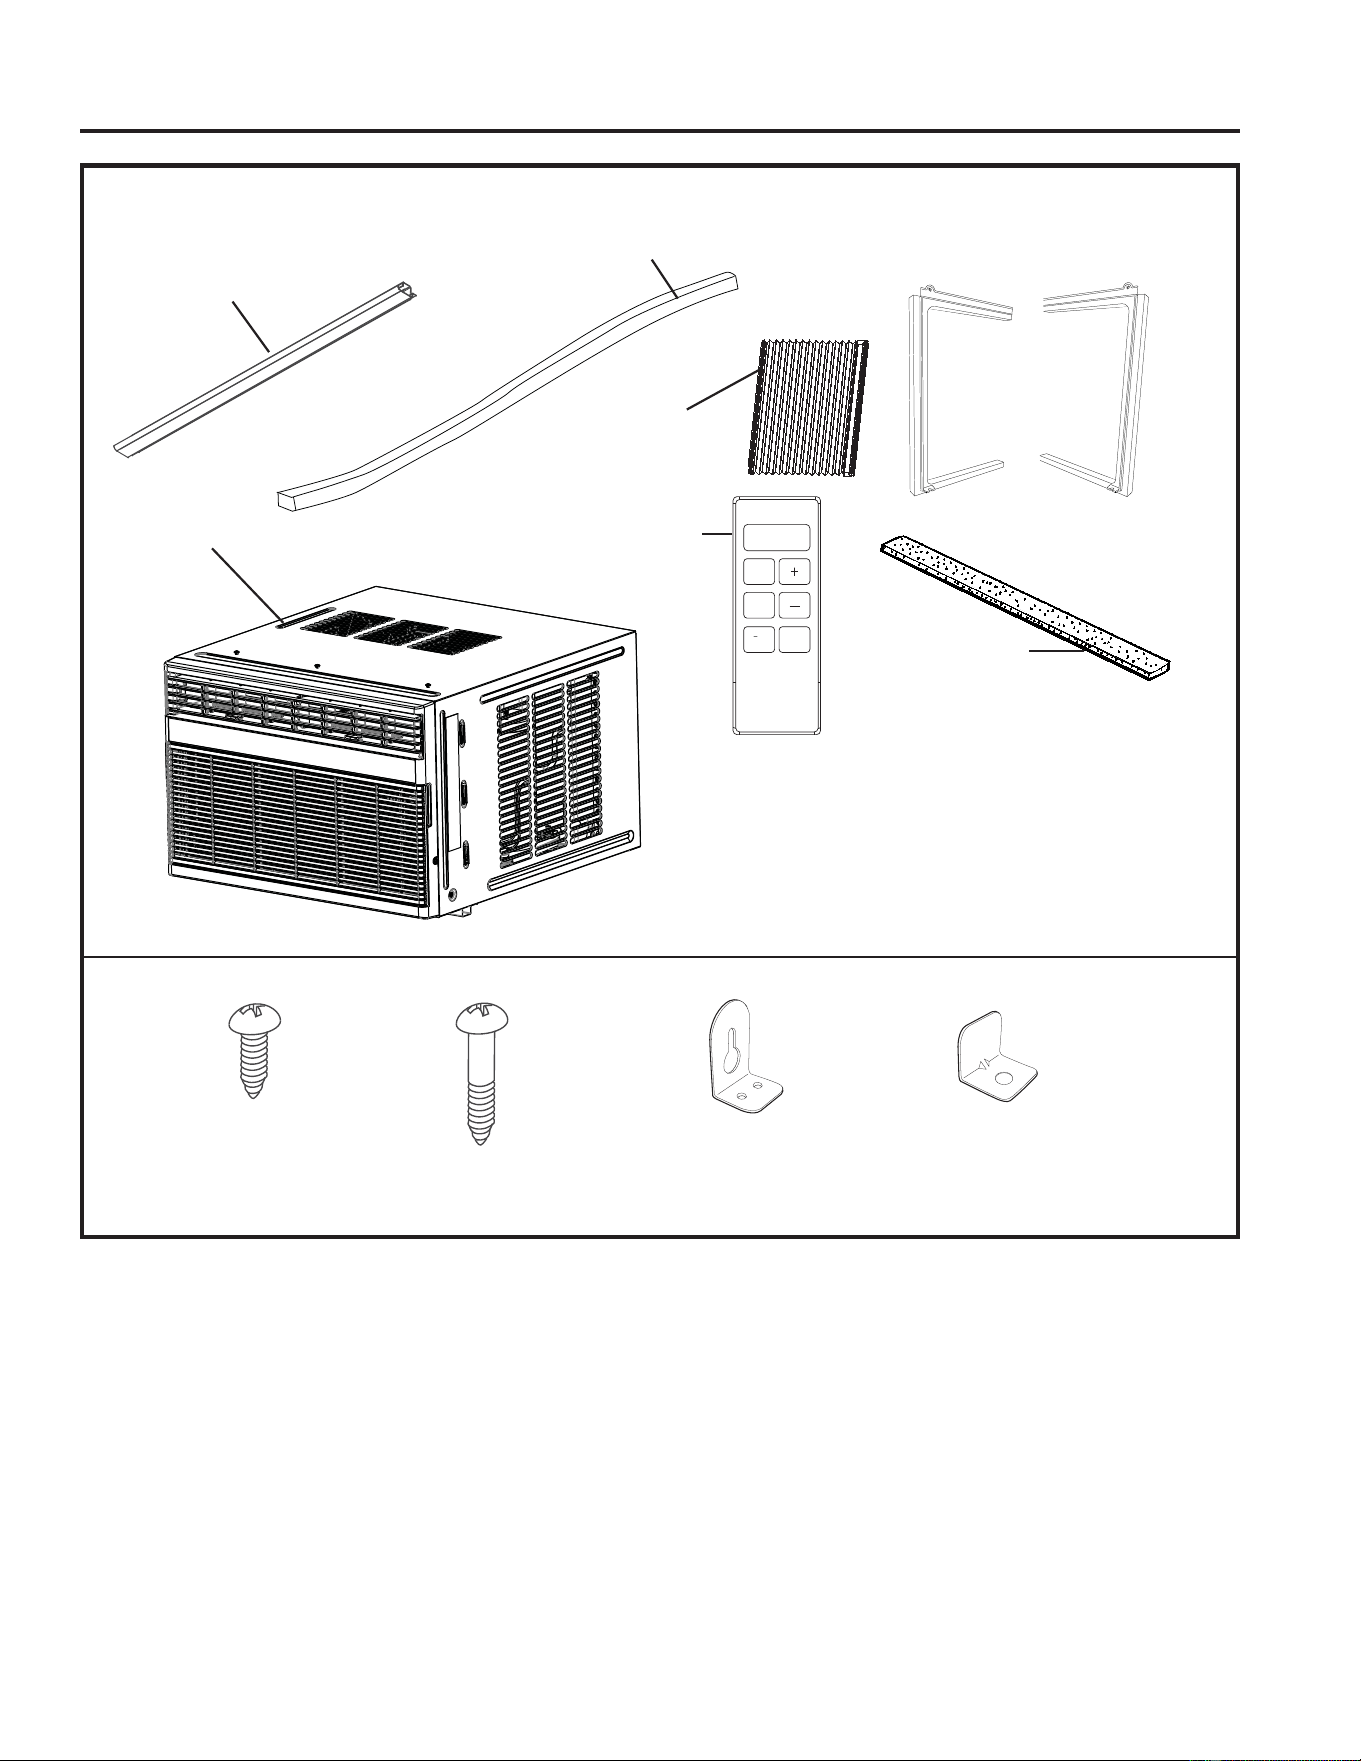
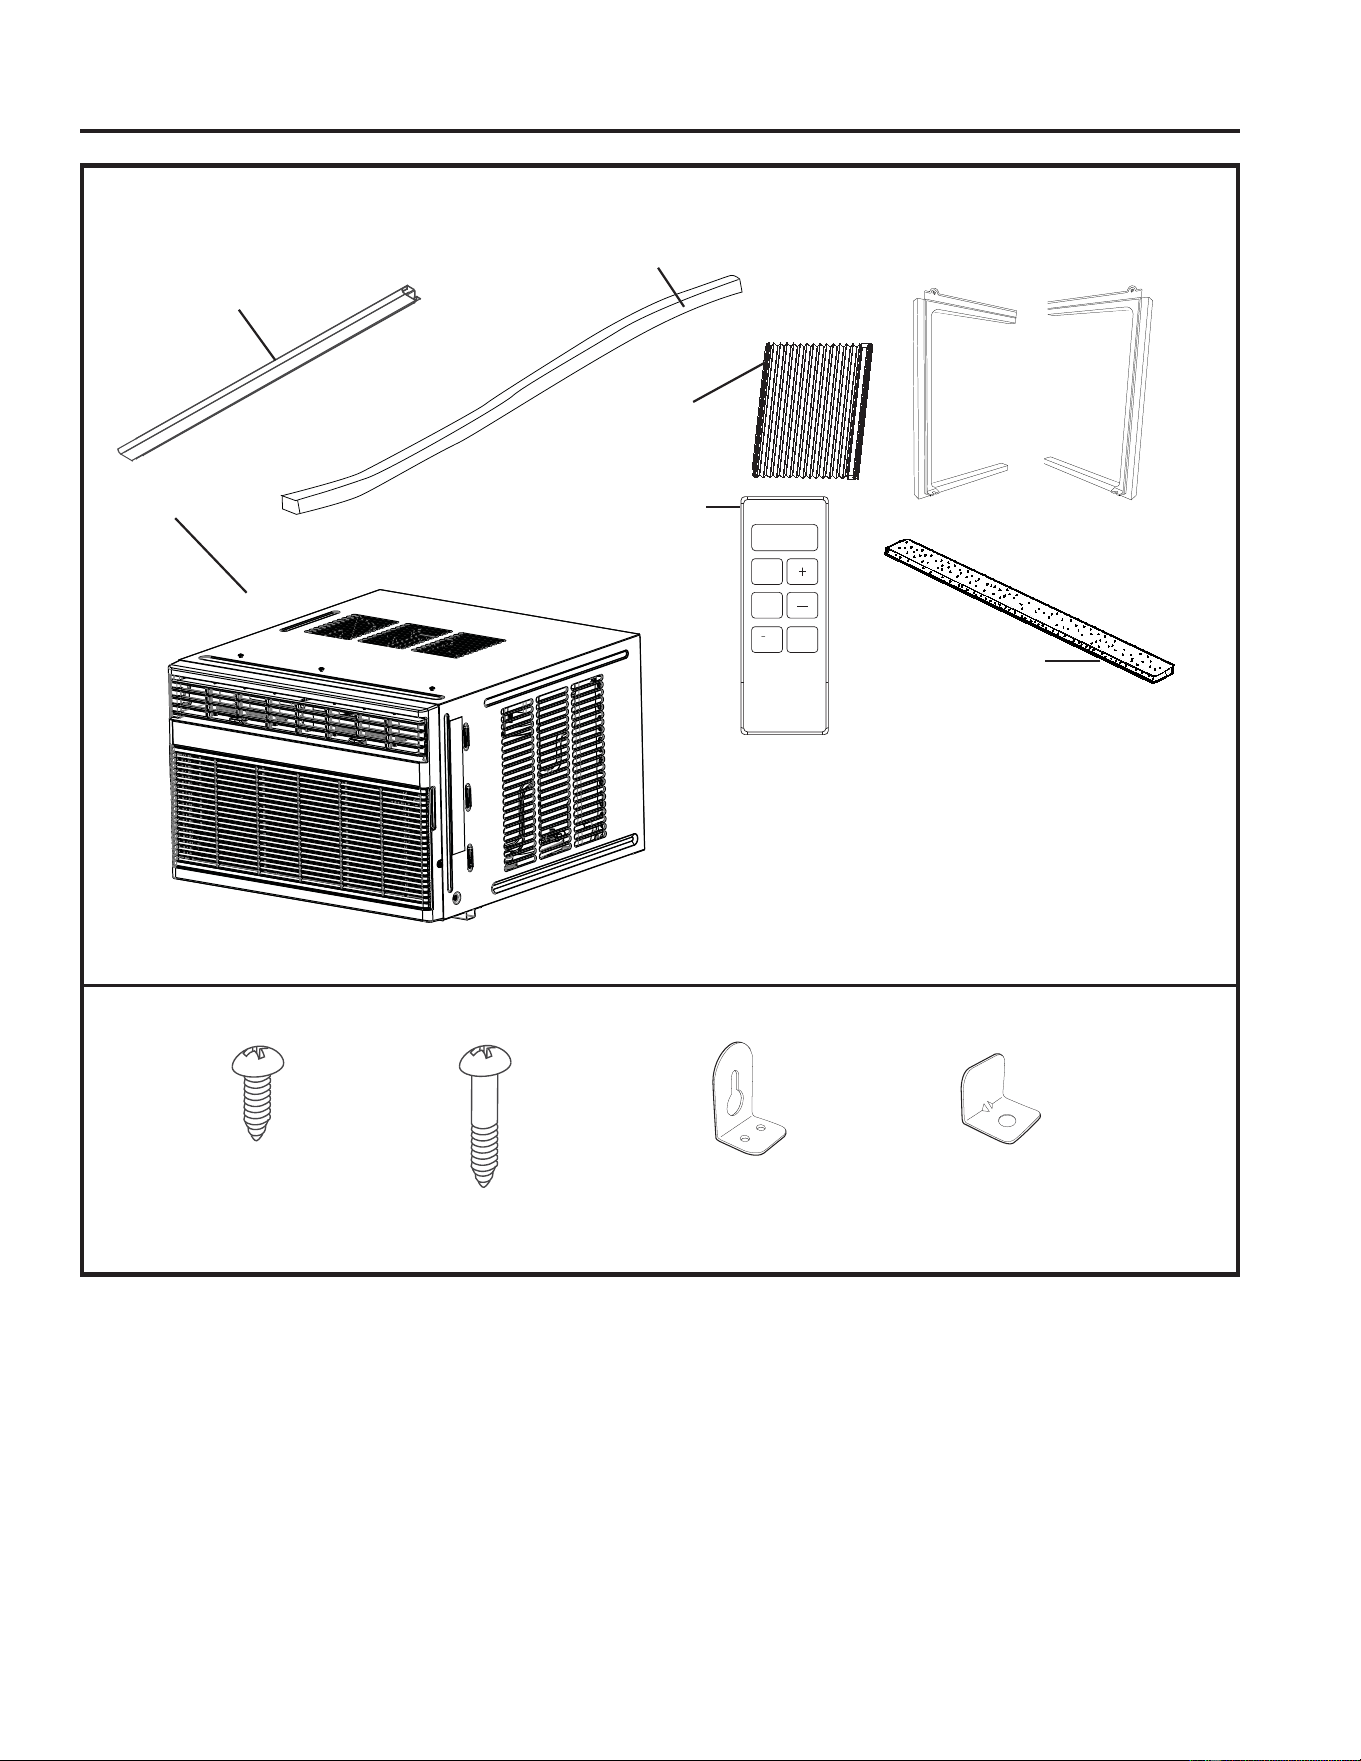
Side Curtain
Frame
Foam top window
gasket
Side
Curtain (2)
Top mounting rail
Air
conditioner
PARTS INCLUDED
(Appearance may vary)
Remote
Control
Bottom Seal and
Side Seals (3)
Left Right
Power
Speed
Mode
Eco
Delay
Quiet
Type B (9)
Window Locking
Bracket (1)
Side Brackets (2)Type A (3)
10 49-5001164 Rev. 0
As a reminder:
- Installing this AC unit should take about 60 minutes.
- We recommend installing this with a partner.
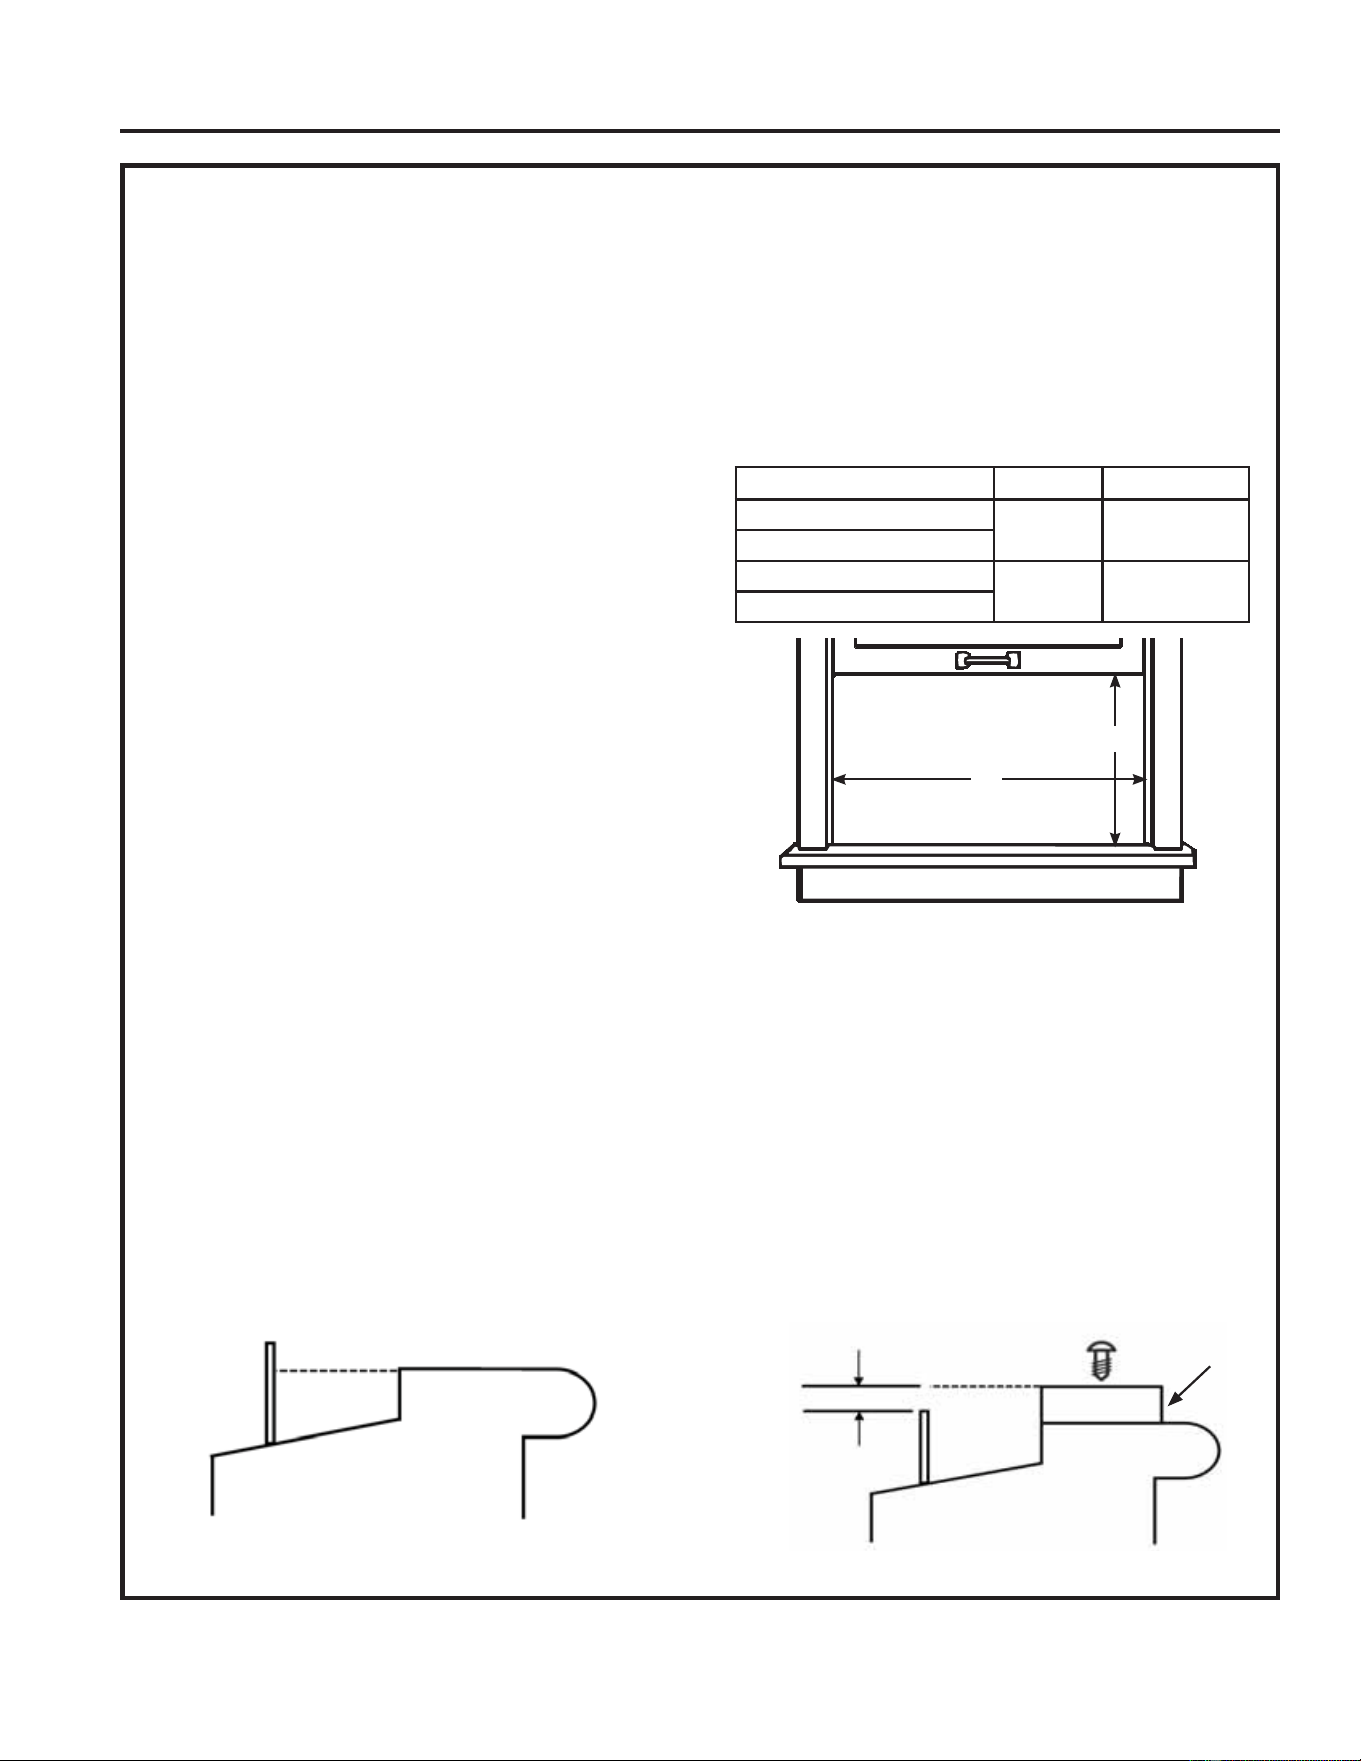
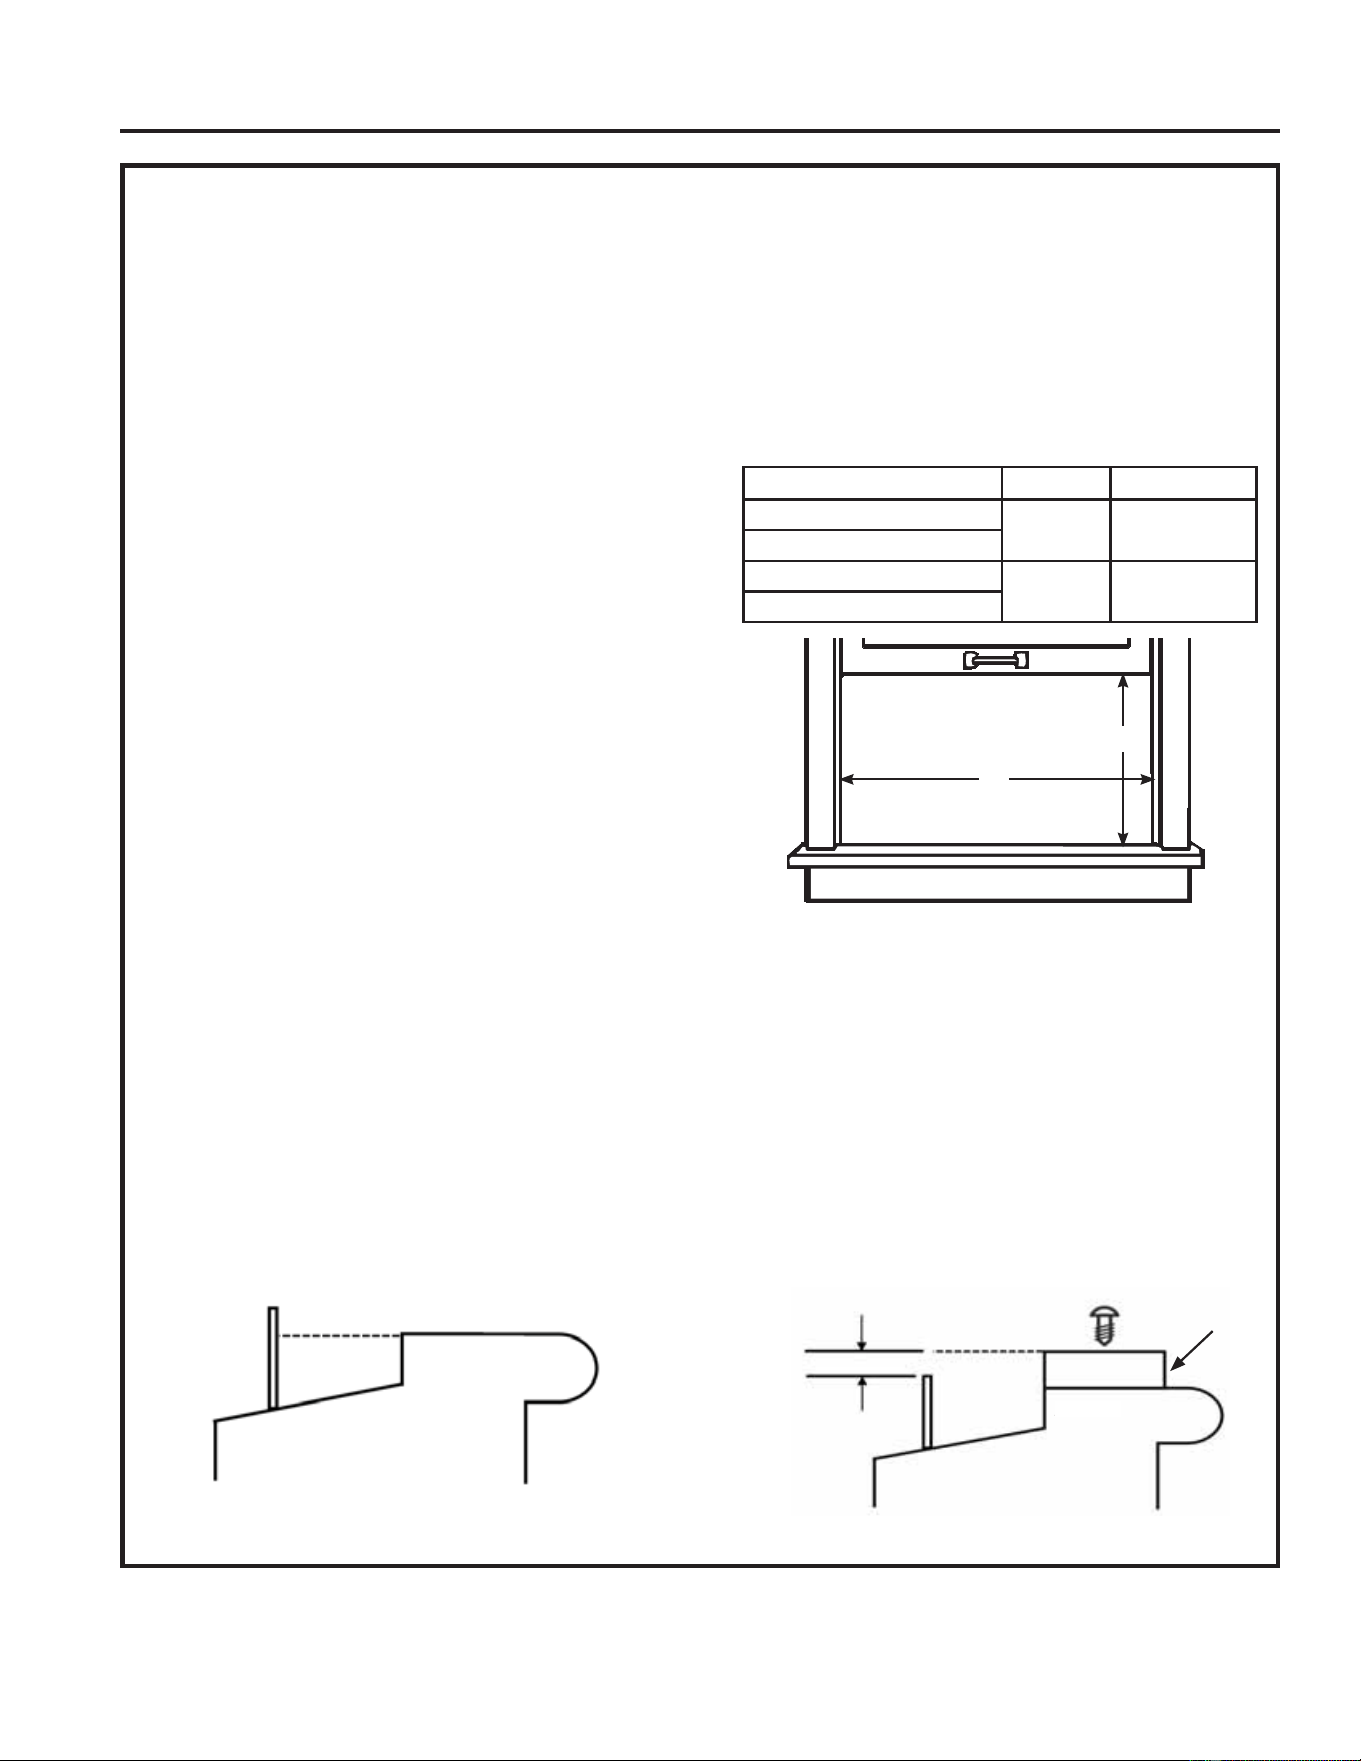
- Make sure the window is within the size constraints below.
- Make sure to have all the tools from the last page.
Window Requirements:
- These instructions are for a standard double-hung,
vertically opening window. You will need to modify
them for other window types.
- The unit can be installed without the side curtain
panels to fit in a narrow window.
- All supporting parts must be secured to firm wood,
masonry, or metal.
- The electrical outlet must be within reach of the
power cord.
- Follow the dimensions in the table and illustration for
your model.
Storm Window Requirements:
Some windows, specifically storm windows, may not allow the air conditioner to tilt toward the outside. This can
prevent the unit from draining properly and operating at peak efficiency. In order to properly tilt your unit to the
outside you may need to attach a piece of wood to the sill prior to installation.
1. Find a piece of wood that is roughly 1 inch wide and runs the length of the entire window.
2QFHLQVWDOOHGWKHWRSRIWKHZRRGVKRXOGEHòLQFKDERYHWKHIUDPHRXWVLGHRIWKHZLQGRZ8VHWKLVWR
determine the height of the wood piece.
8VHPXOWLSOHVFUHZVRUQDLOVWRLQVWDOOWKHSLHFHRIZRRGLQWRWKHVLOO
Installation Instructions
INSTALLATION INSTRUCTIONS
A
(With side curtain panels)
B
Models A B
PWJV08
´PLQ ï»´´
PWJV10
PWJV12
ï»´PLQ ï»´´
PWJV14
Outdoors
Window
Frame
Sill
Indoors
Sill
Outdoors
Sill is now
ò´KLJKHU
than window
frame
Wood
Indoors
Window frame is taller than sill so wood must be added
49-5001164 Rev. 0 11
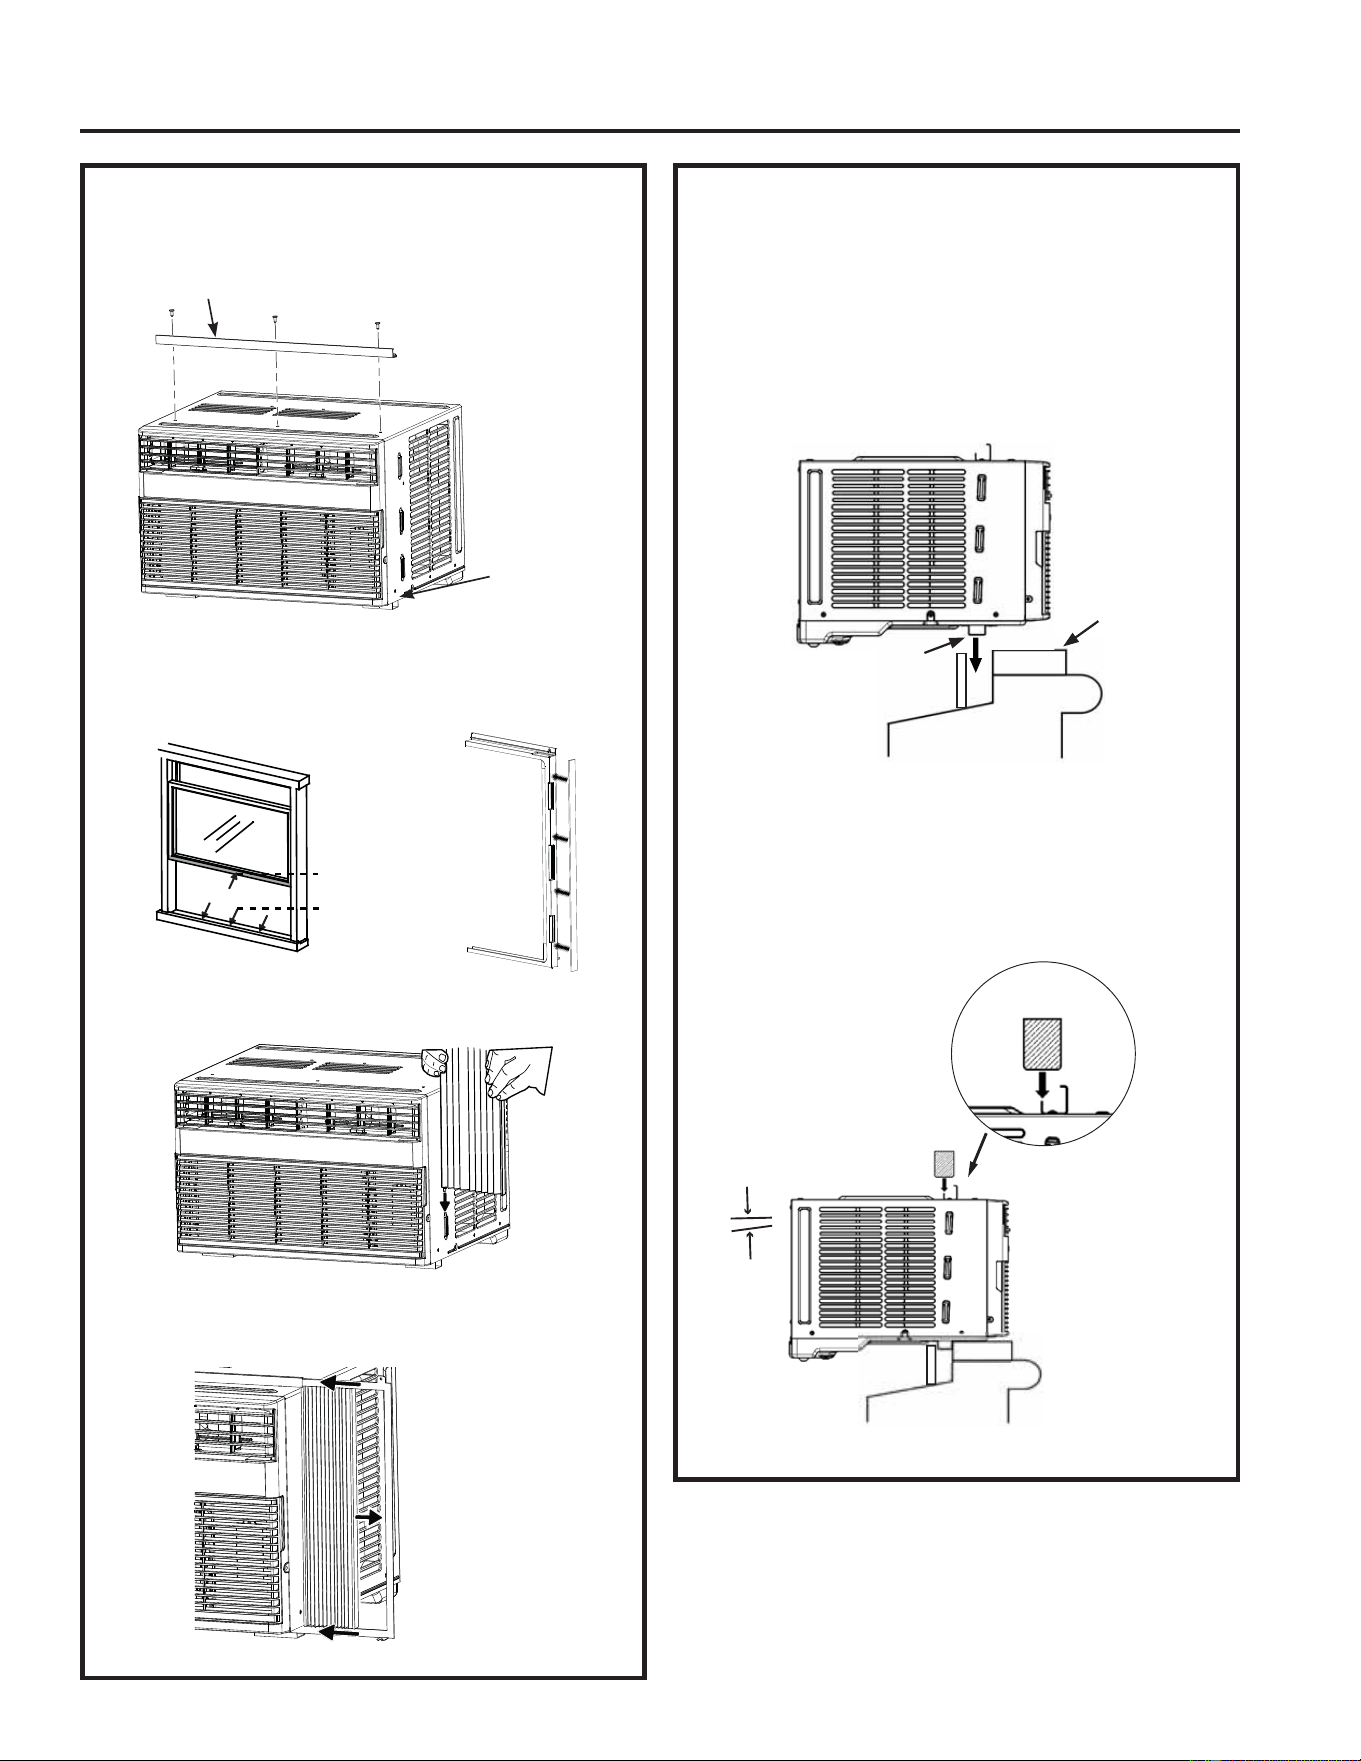
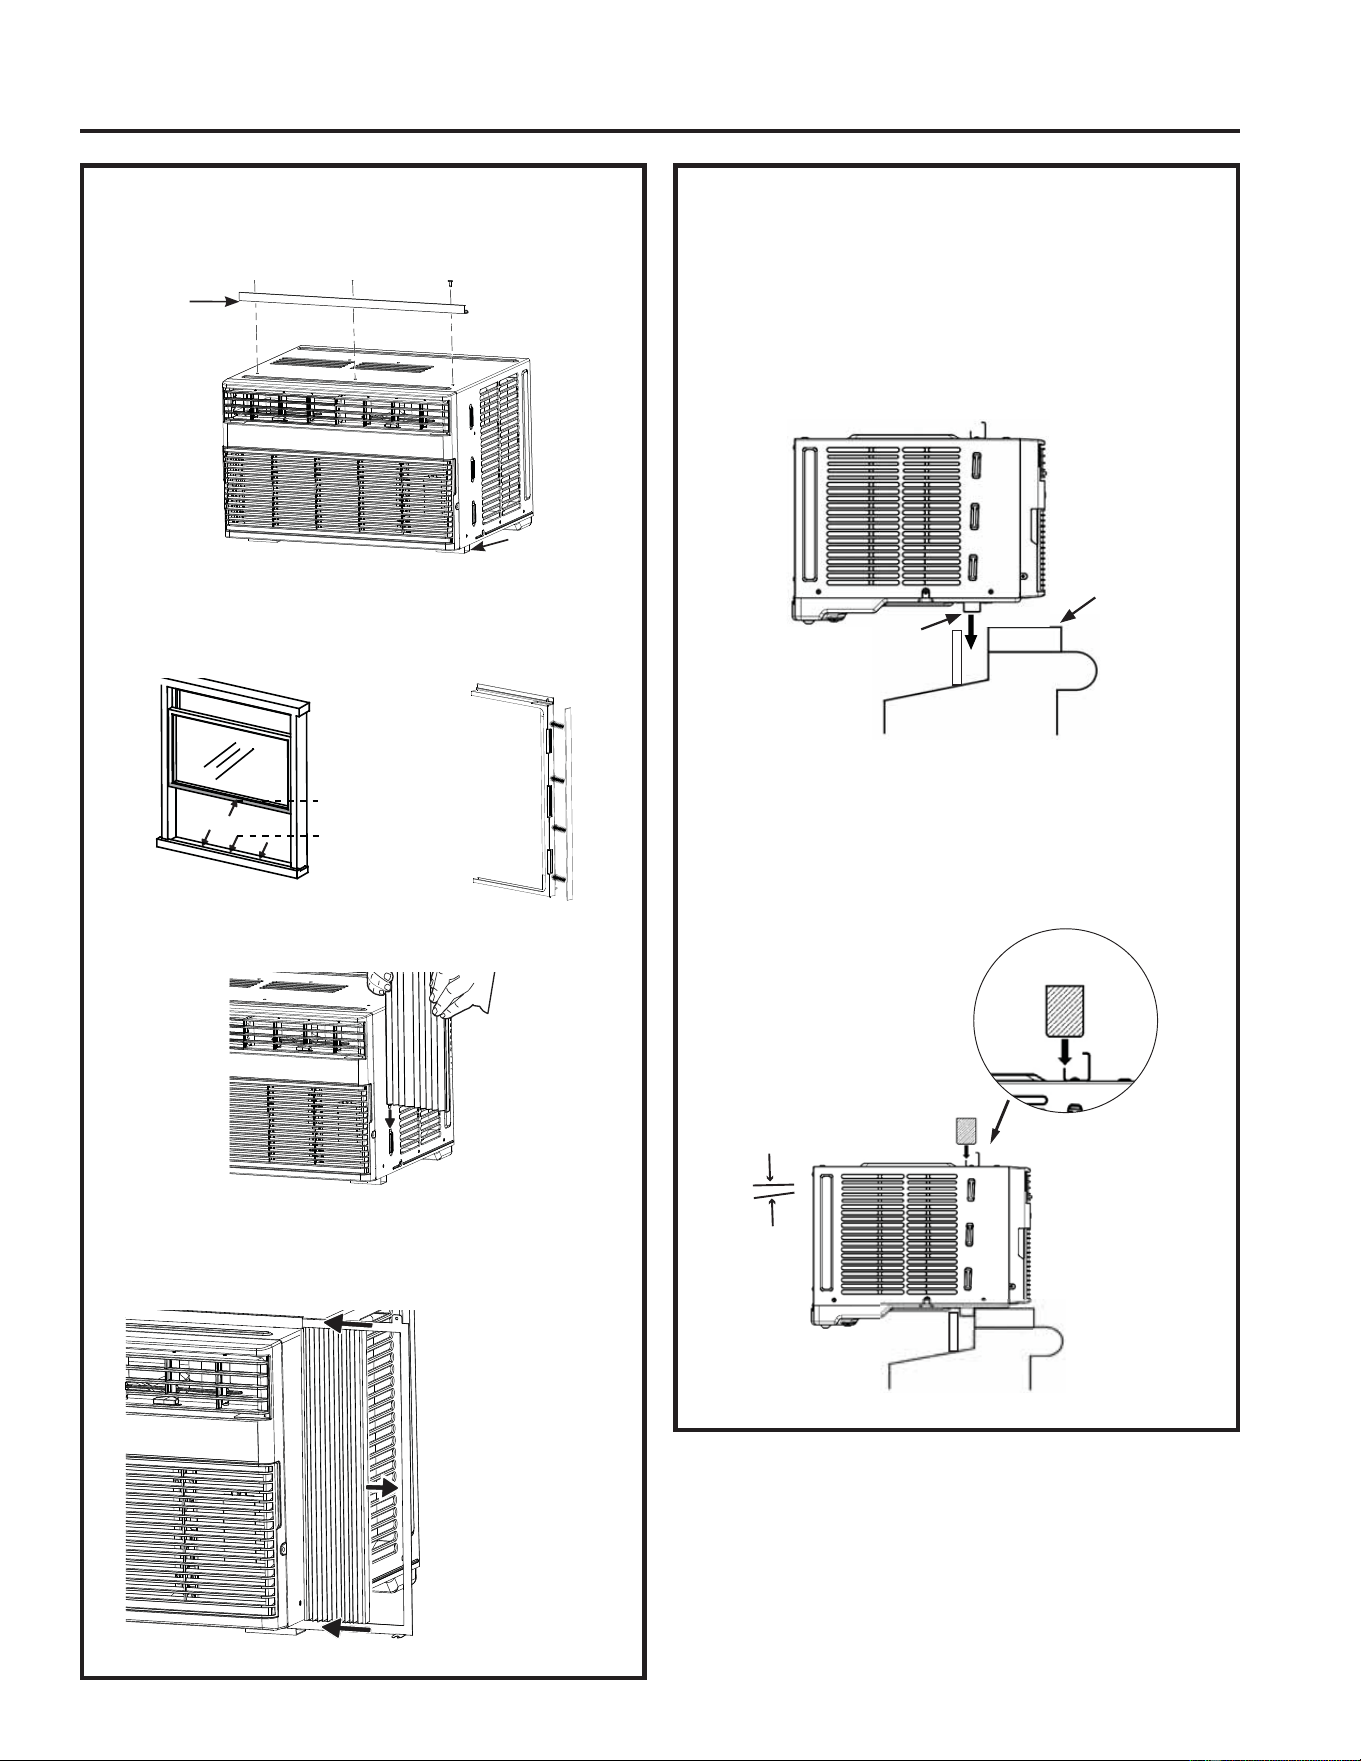
1. Prepare The Air Conditioner
A. Install the top mounting rail with 3 Type A screws
from the outside of the case.
Top Mounting rail
Bottom
mounting
rail
B. Apply the weather seals provided to the top and
bottom of the window along with the outer edge
of the side curtain frame.
Cut and apply
weather strip to
front and edge of
window frame.
Cut and apply
weather strip to
back edge of
the window sill.
C. Slide the side curtain panels into the side panel
rails.
D. Slide left and right side curtain frames into top
and bottom rails. Make sure that side curtains
snap into side of the frames.
Snap curtain
into frame
Installation Instructions
INSTALLATION INSTRUCTIONS
2. Install The Air Conditioner In
The Window
A. Mark the center of the window. With your helper,
set the air conditioner in the window so that is it
centered.
B. Place the air conditioner so that the front edge
of the bottom mounting rail is against the back
edge of the sill.
Outside
Inside
C. Close the window so that the front edge of the
top mounting rail is in front of the window.
• Make sure the air conditioner is tilting slightly to
the outside.
• If there is no tilt, check out the section on storm
windows, that may help.
Exterior
Interior
Aprox
5°
Mounting Rail
Sill
Wood
Block
Sill
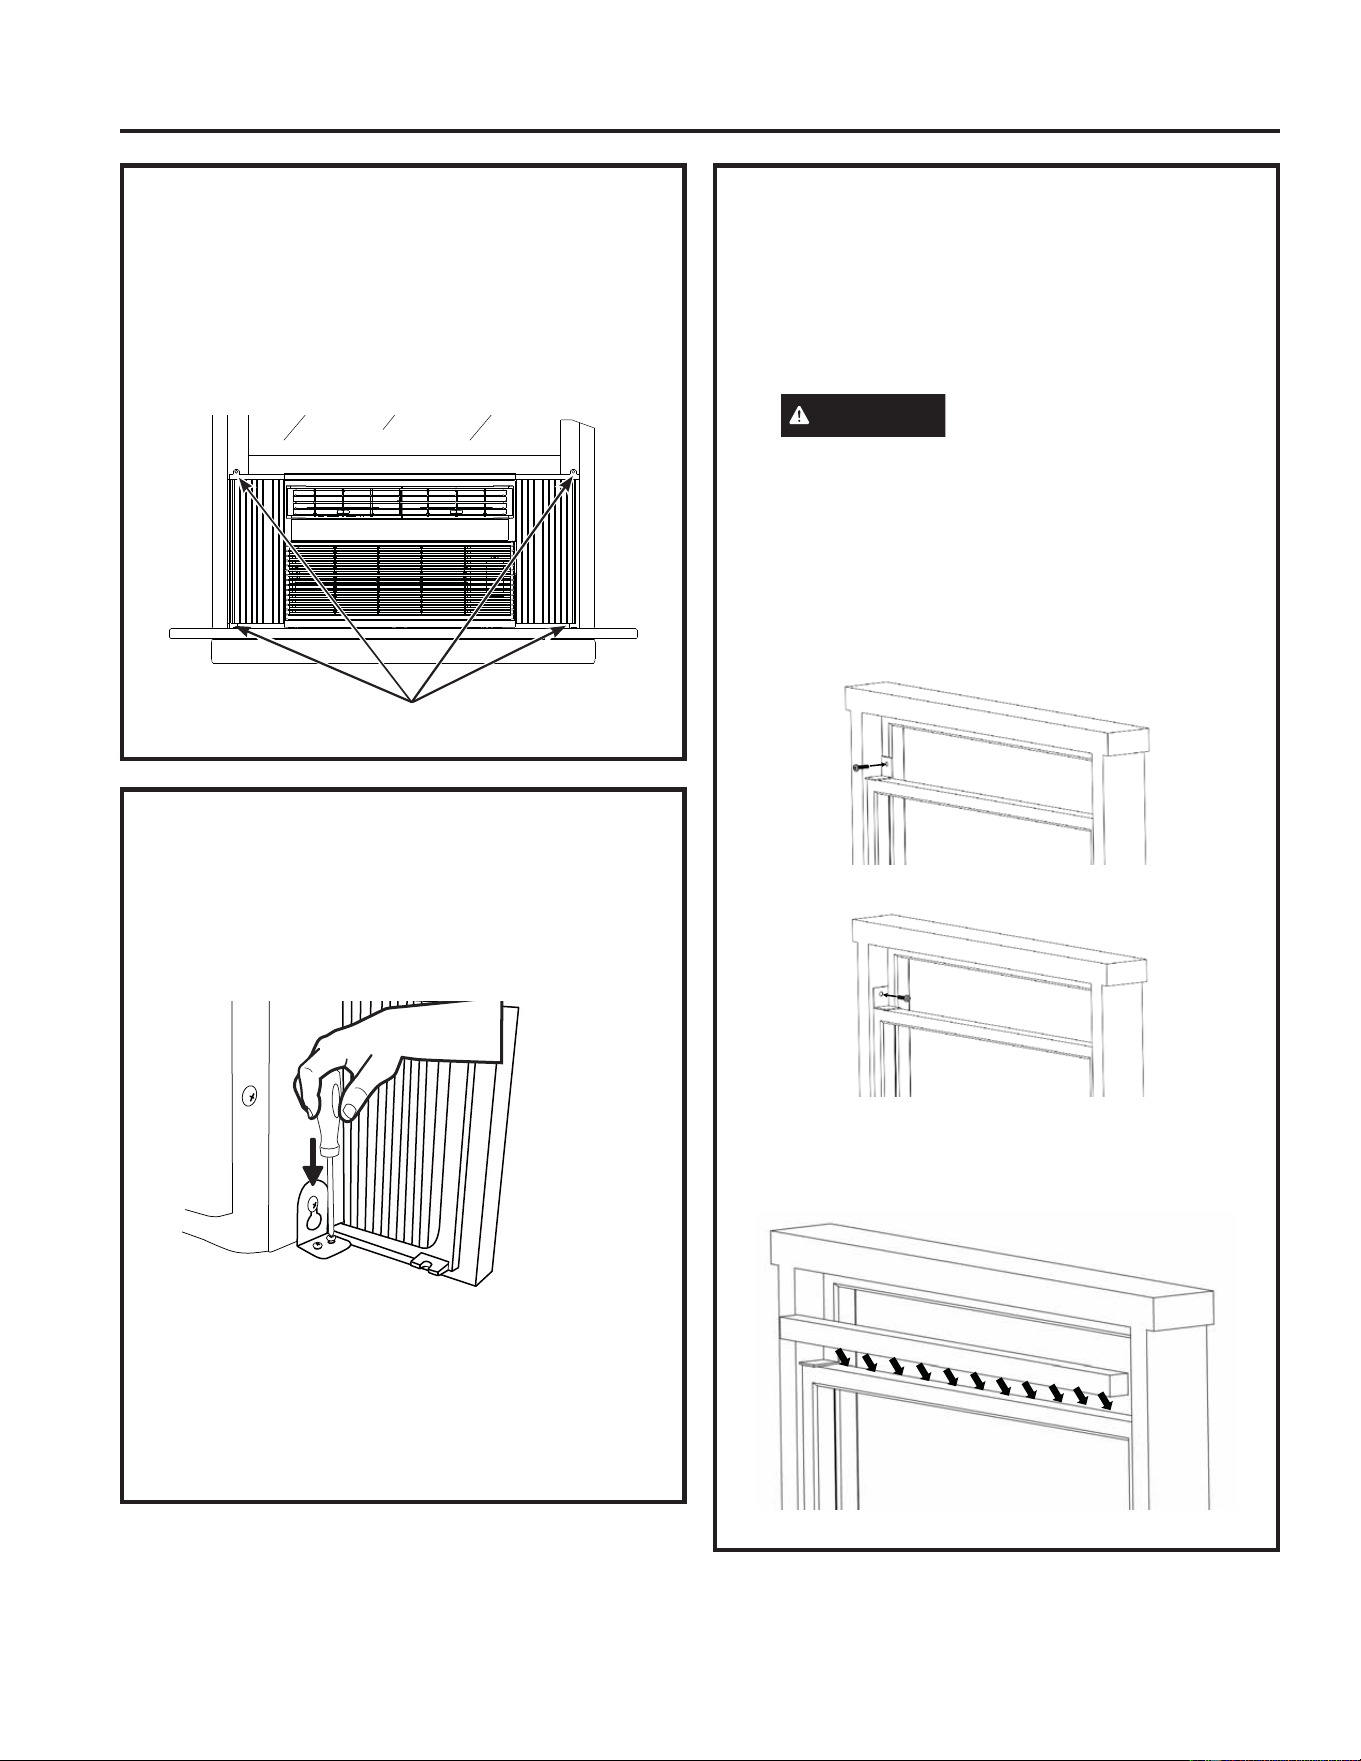
12 49-5001164 Rev. 0
Installation Instructions
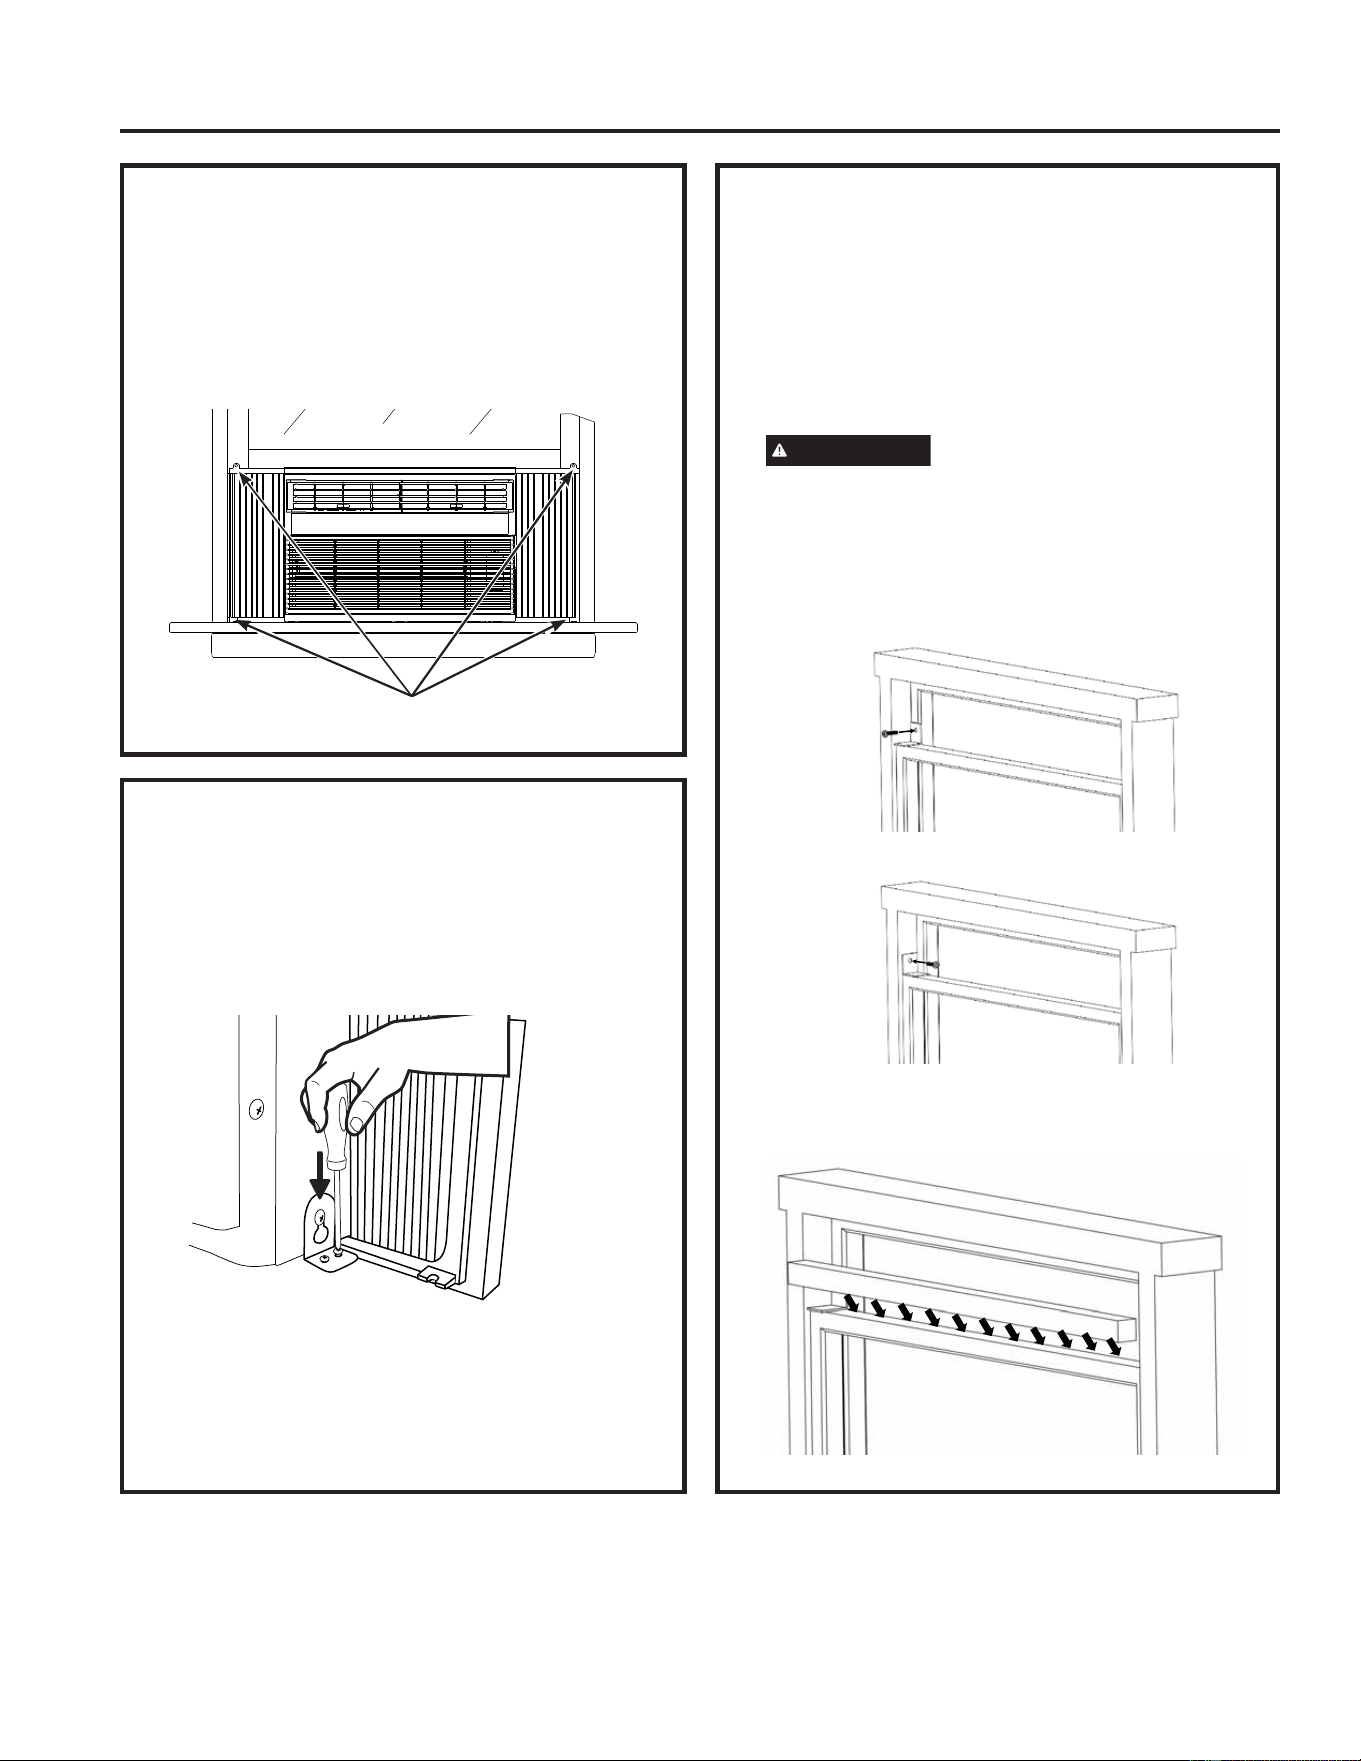
3. Secure Air Conditioner
A. Loosen the screw on the right hand side of the
air conditioner near the bottom.
B. Slide a side bracket over the screw so that the
bracket is resting on the window sill. Tighten the
screw.
C. 8VHD´GULOOELWWRGULOODVWDUWHUKROHLQWRWKH
window sill through the holes in the side bracket.
8VHW\SH%VFUHZVWRDWWDFKWKHVLGHEUDFNHWWR
the window sill.
D. Repeat the side bracket installation on the left
side.
2. Install The Air Conditioner In
The Window
D. Extend the curtain panels until they fill the
window. Mark the location of the holes in each
FRUQHU8VHWKHGULOODQG´GULOOELWWRGULOOSLORW
KROHV8VHW\SH%VFUHZVWRVHFXUHWKHVLGH
panels in place.
Type B screws
4. Install Window Lock Bracket
And Foam Top Window Gasket
A. 8VHWKHUHPDLQLQJ7\SH%VFUHZWRLQVWDOOWKH
window lock bracket above the bottom window.
• For wood windows, the locking bracket should
be attached to the top window.
CAUTION
• For vinyl or other similarly constructed
windows, the locking bracket should be
DWWDFKHGWRWKHVLGHMDPEWRSUHYHQWGDPDJHWR
the window or broken glass.
*See the diagrams below.
B. Cut the foam top window gasket to the window
width.
C. Stuff the foam between the glass and the
window to prevent air and insects from getting
into the room.
Wood
Vinyl
INSTALLATION INSTRUCTIONS
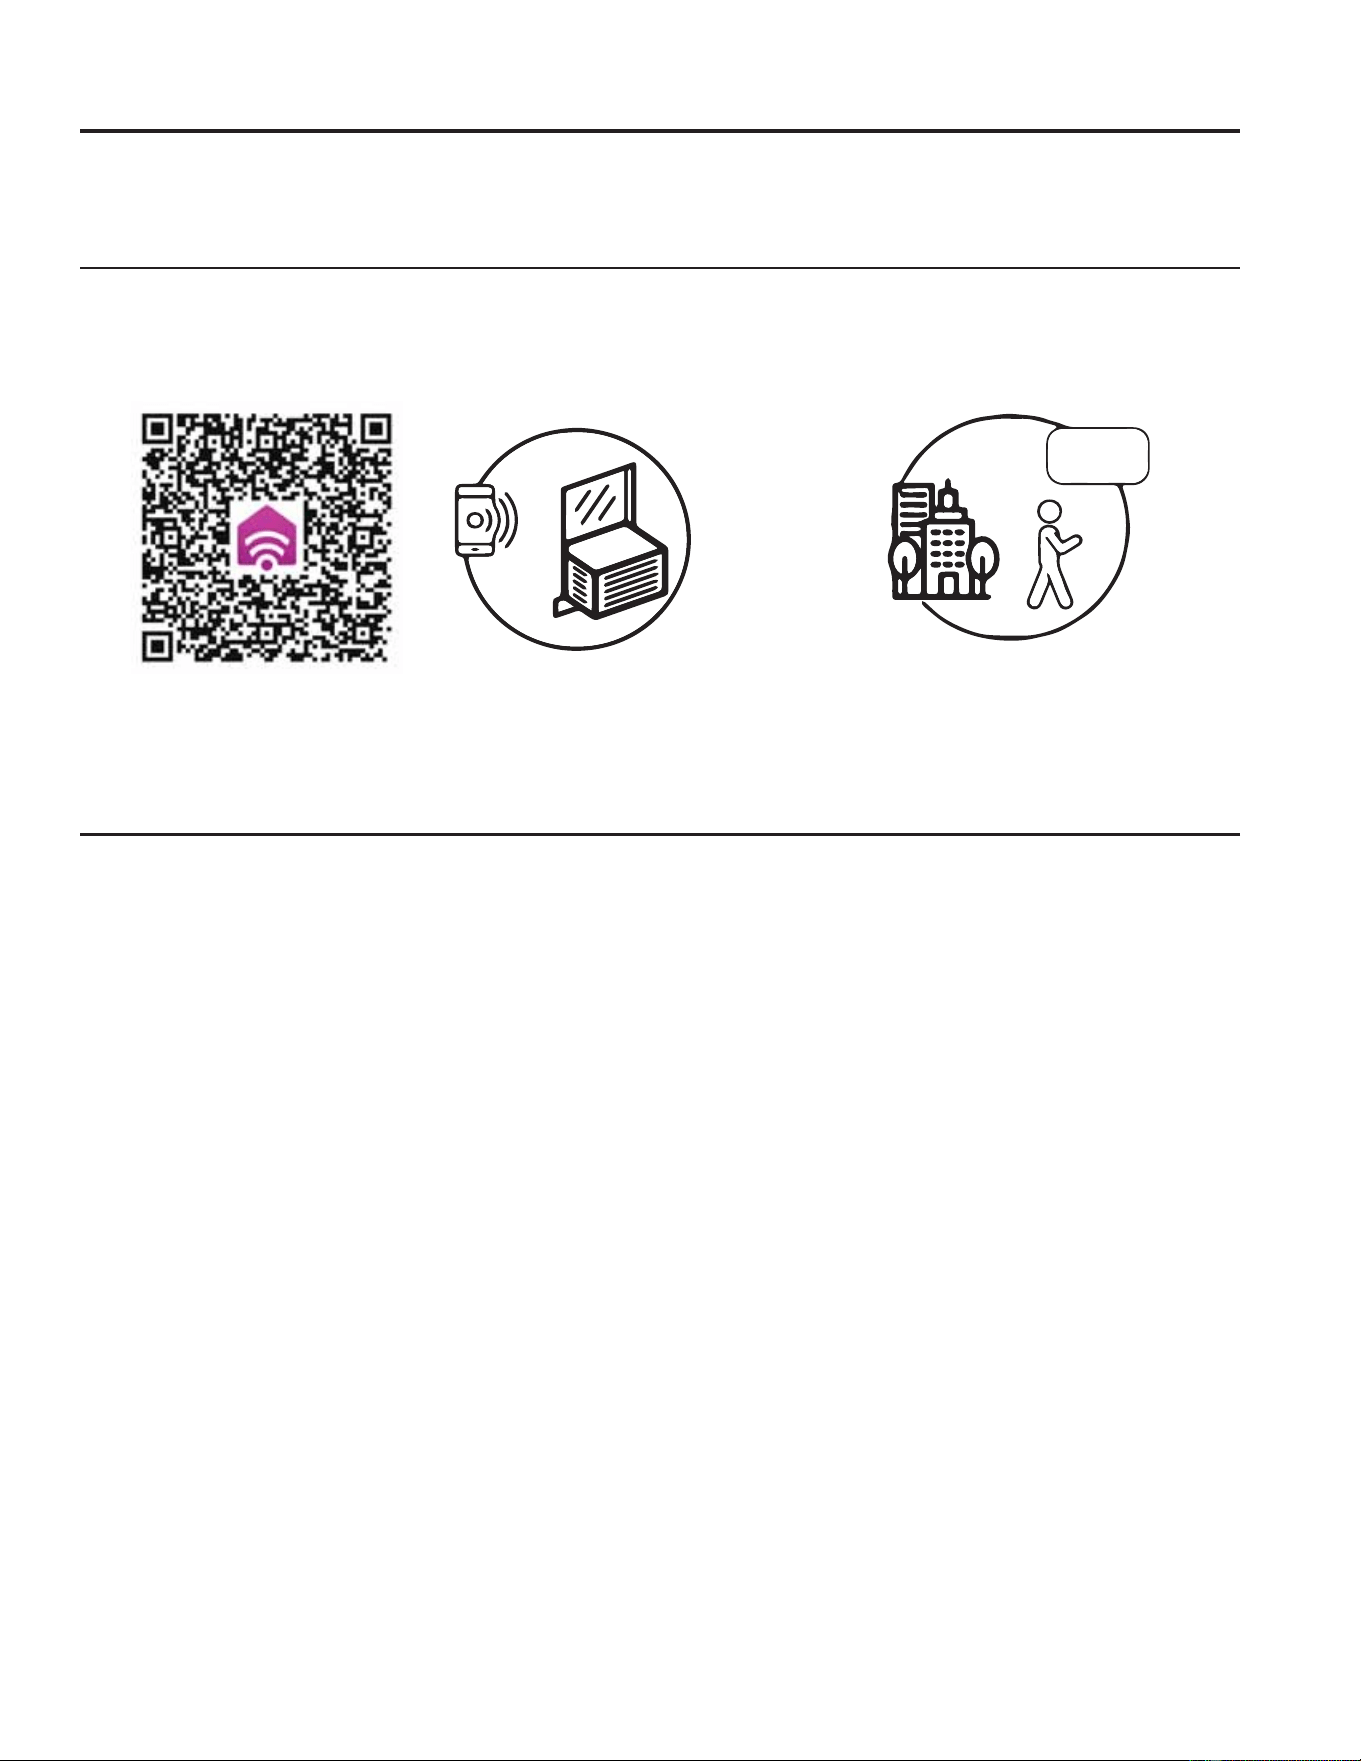
49-5001164 Rev. 0 13
GE Appliances SmartHQ (for customers in the United States)
Your AC is GE Appliances SmartHQ Enabled.
Please visit GEAppliances.com/connect to learn more about
connected appliance features, and to learn what connected appliance apps will work with your smart phone.
WiFi Connectivity:
For assistance with the appliance or the appliance network connectivity, please call 1-800-220-6899.
All connected appliance data is held in strict accordance with the GE Appliances Connected Data Privacy Policy.
Visit geappliances.com/privacy/privacy_policy_connected to view this policy.
Questions about SmartHQ
Get answers you need about setting up WiFi appliances and connecting to your home network in our support articles.
Visit products.geappliances.com/appliance/gea-support-search-content to view wifi connect room air conditioner
support articles.
WIFI SETUP
WiFi Setup
REGULATORY INFORMATION
FCC/IC Compliance Statement:
This device complies with Part 15 of the FCC Rules.
2SHUDWLRQLVVXEMHFWWRWKHIROORZLQJWZRFRQGLWLRQV
1. This device may not cause harmful interference.
2. This device must accept any interference received,
including interference that may cause undesired
operation.
Note that any changes or modifications to the wireless
communication device installed on this air conditioner
that are not expressly approved by the manufacturer
could void the user’s authority to operate the equipment.
This product has Wi-Fi capability and requires
Internet connectivity and a wireless router to enable
interconnection with an Energy Management System,
and/or with other external devices, systems or
applications.
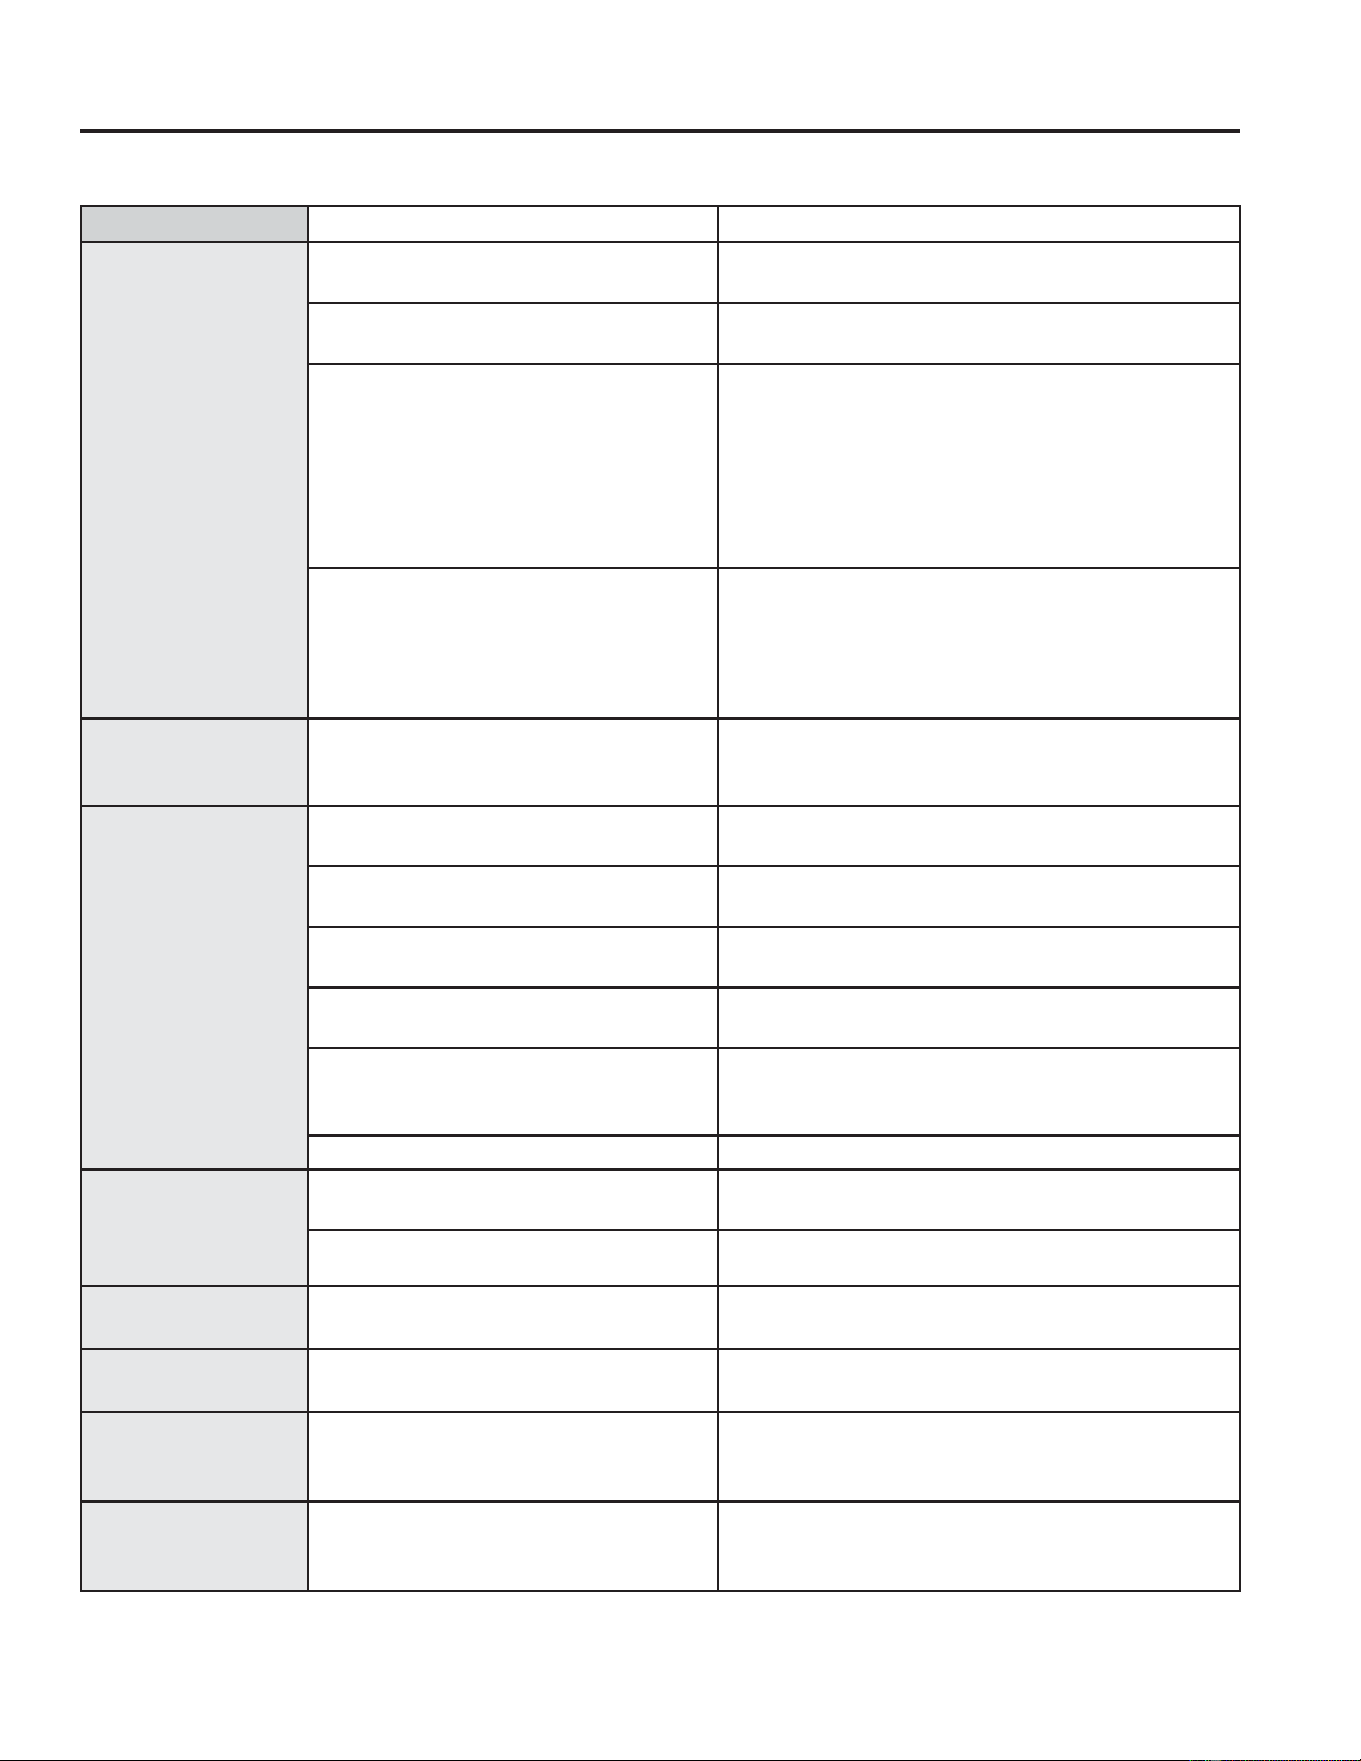
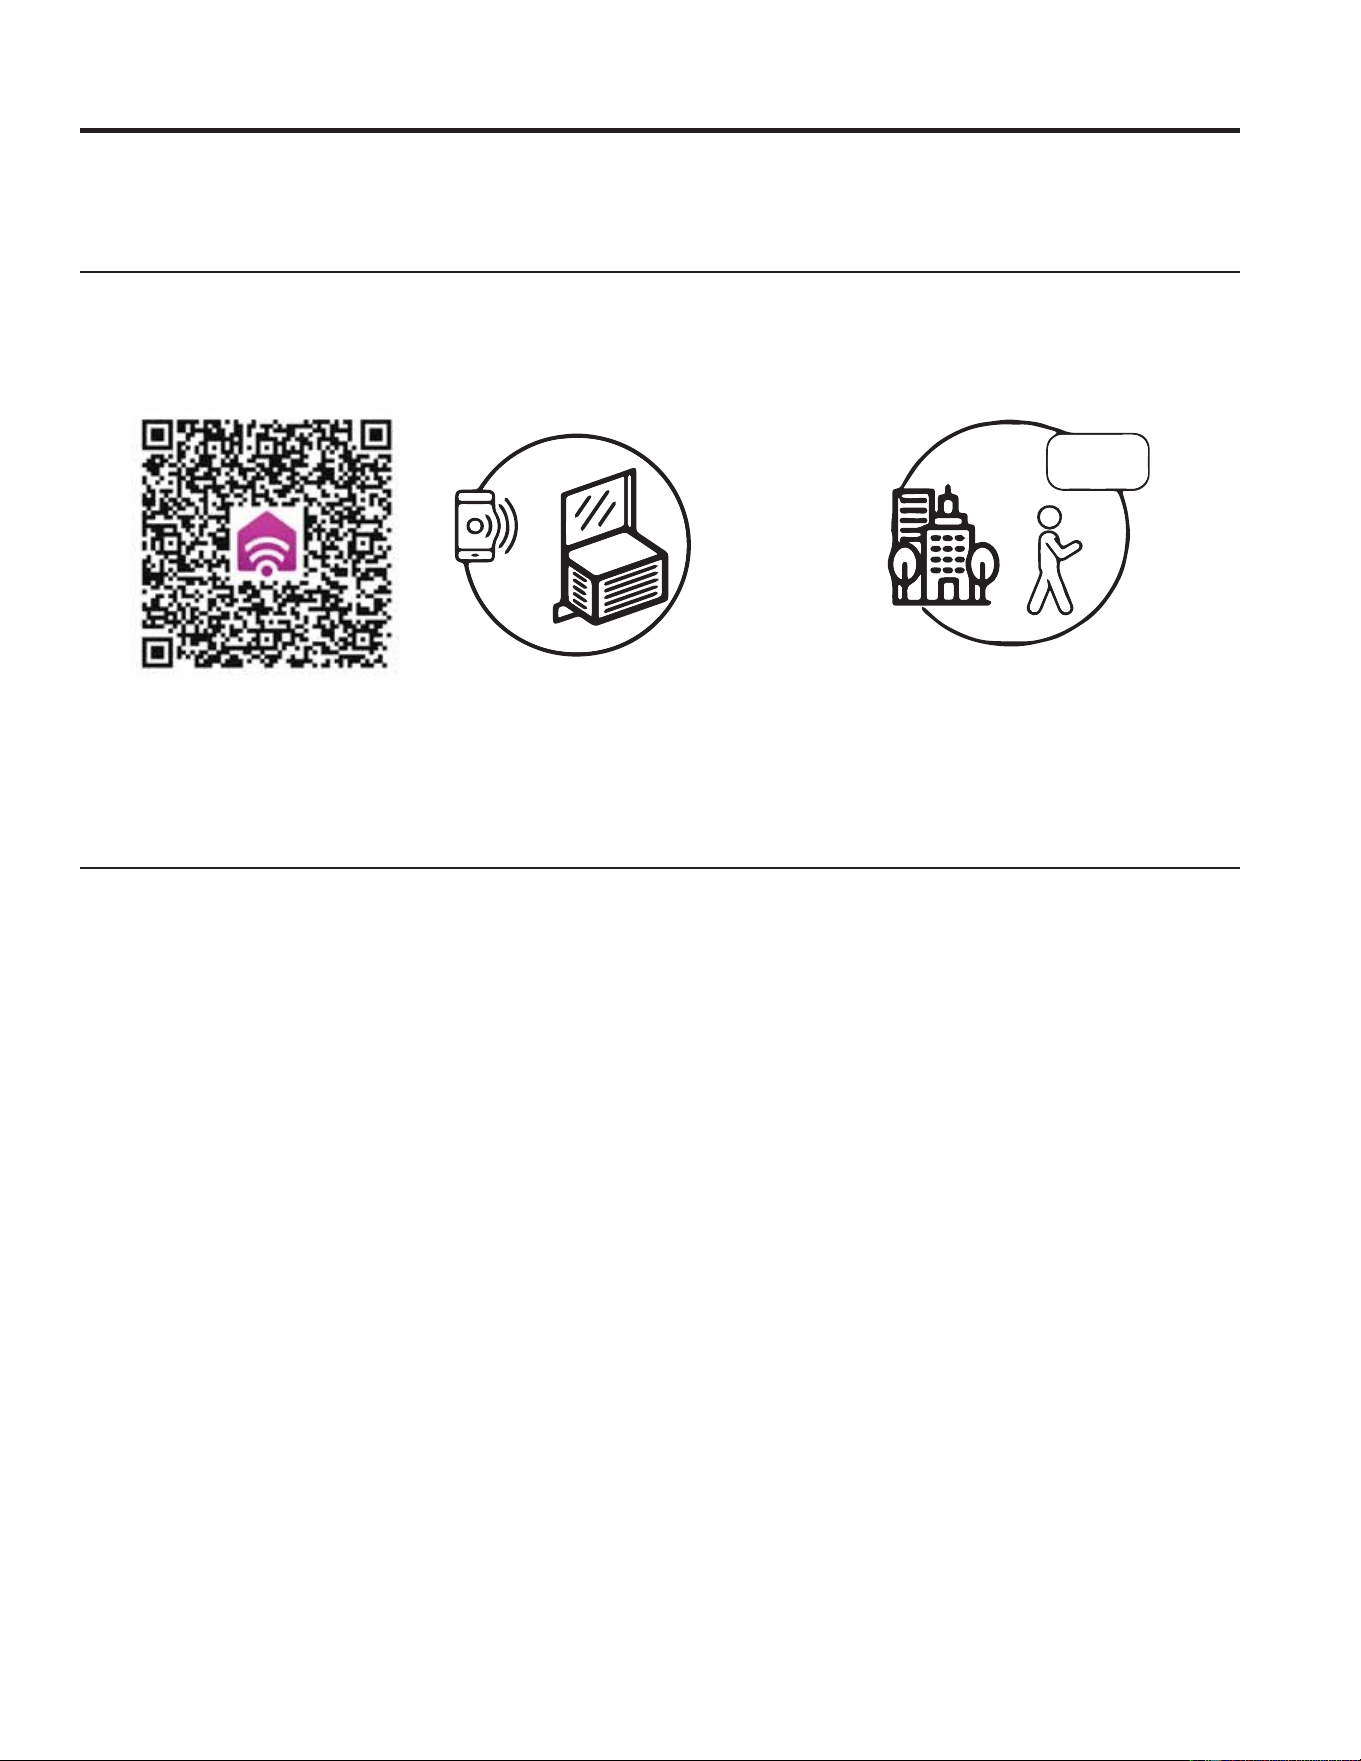
How it Works
8VHWKH45FRGHEHORZWRGRZQORDGWKH6PDUW+4DSSDQG
connect
your room air conditioner to the app.
2QFHFRQQHFWHGXVHWKHDSSWRDGMXVWWKH
air conditioner as desired.
CHANGE TEMP
TO 65

14 49-5001164 Rev. 0
Additional Information
ADDITIONAL INFORMATION
Decommissioning
Before carrying out this procedure, it is essential that the technician is completely familiar with the equipment and all
its detail. It is recommended good practice that all refrigerants are recovered safely. Prior to the task being carried
out, an oil and refrigerant sample shall be taken in case analysis is required prior to re-use of reclaimed refrigerant. It
is essential that electrical power is available before the task is commenced.
a) Become familiar with the equipment and its operation.
b) Isolate system electrically.
c) Before attempting the procedure, ensure that:
• mechanical handling equipment is available, if required, for handling refrigerant cylinders;
• all personal protective equipment is available and being used correctly;
• the recovery process is supervised at all times by a competent person;
• recovery equipment and cylinders conform to the appropriate standards.
d) Pump down refrigerant system, if possible.
e) If a vacuum is not possible, make a manifold so that refrigerant can be removed from various parts of the system.
f) Make sure that cylinder is situated on the scales before recovery takes place.
g) Start the recovery machine and operate in accordance with manufacturer’s instructions.
h) Do not overfill cylinders. (No more than 80 % volume liquid charge).
i) Do not exceed the maximum working pressure of the cylinder, even temporarily.
M:KHQWKHF\OLQGHUVKDYHEHHQILOOHGFRUUHFWO\DQGWKHSURFHVVFRPSOHWHGPDNHVXUHWKDWWKHF\OLQGHUV
and the equipment are removed from site promptly and all isolation valves on the equipment are closed off.
k) Recovered refrigerant shall not be charged into another refrigeration system unless it has been cleaned
and checked.
Labelling
Equipment shall be labelled stating that it has been de-commissioned and emptied of refrigerant. The label shall be
dated and signed. For appliances containing FLAMMABLE REFRIGERANTS, ensure that there are labels on the
equipment stating the equipment contains flammable refrigerant.
Recovery
When removing refrigerant from a system, either for servicing or decommissioning, it is recommended good practice
that all refrigerants are removed safely.When transferring refrigerant into cylinders, ensure that only appropriate
refrigerant recovery cylinders are employed. Ensure that the correct number of cylinders for holding the total system
charge are available. All cylinders to be used are designated for the recovered refrigerant and labelled for that
refrigerant (i.e. special cylinders for the recovery of refrigerant). Cylinders shall be complete with pressure-relief
valve and associated shut-off valves in good working order. Empty recovery cylinders are evacuated and, if possible,
cooled before recovery occurs. The recovery equipment shall be in good working order with a set of instructions
concerning the equipment that is at hand and shall be suitable for the recovery of all appropriate refrigerants
including, when applicable, FLAMMABLE REFRIGERANTS. In addition, a set of calibrated weighing scales shall
be available and in good working order. Hoses shall be complete with leak-free disconnect couplings and in good
condition. Before using the recovery machine, check that it is in satisfactory working order, has been properly
maintained and that any associated electrical components are sealed to prevent ignition in the event of a refrigerant
release. Consult manufacturer if in doubt. The recovered refrigerant shall be returned to the refrigerant supplier in
the correct recovery cylinder, and the relevant waste transfer note arranged. Do not mix refrigerants in recovery units
and especially not in cylinders. If compressors or compressor oils are to be removed, ensure that they have been
evacuated to an acceptable level to make certain that flammable refrigerant does not remain within the lubricant. The
evacuation process shall be carried out prior to returning the compressor to the suppliers. Only electric heating to the
compressor body shall be employed to accelerate this process. When oil is drained from a system, it shall be carried
out safely.
49-5001164 Rev. 0 15
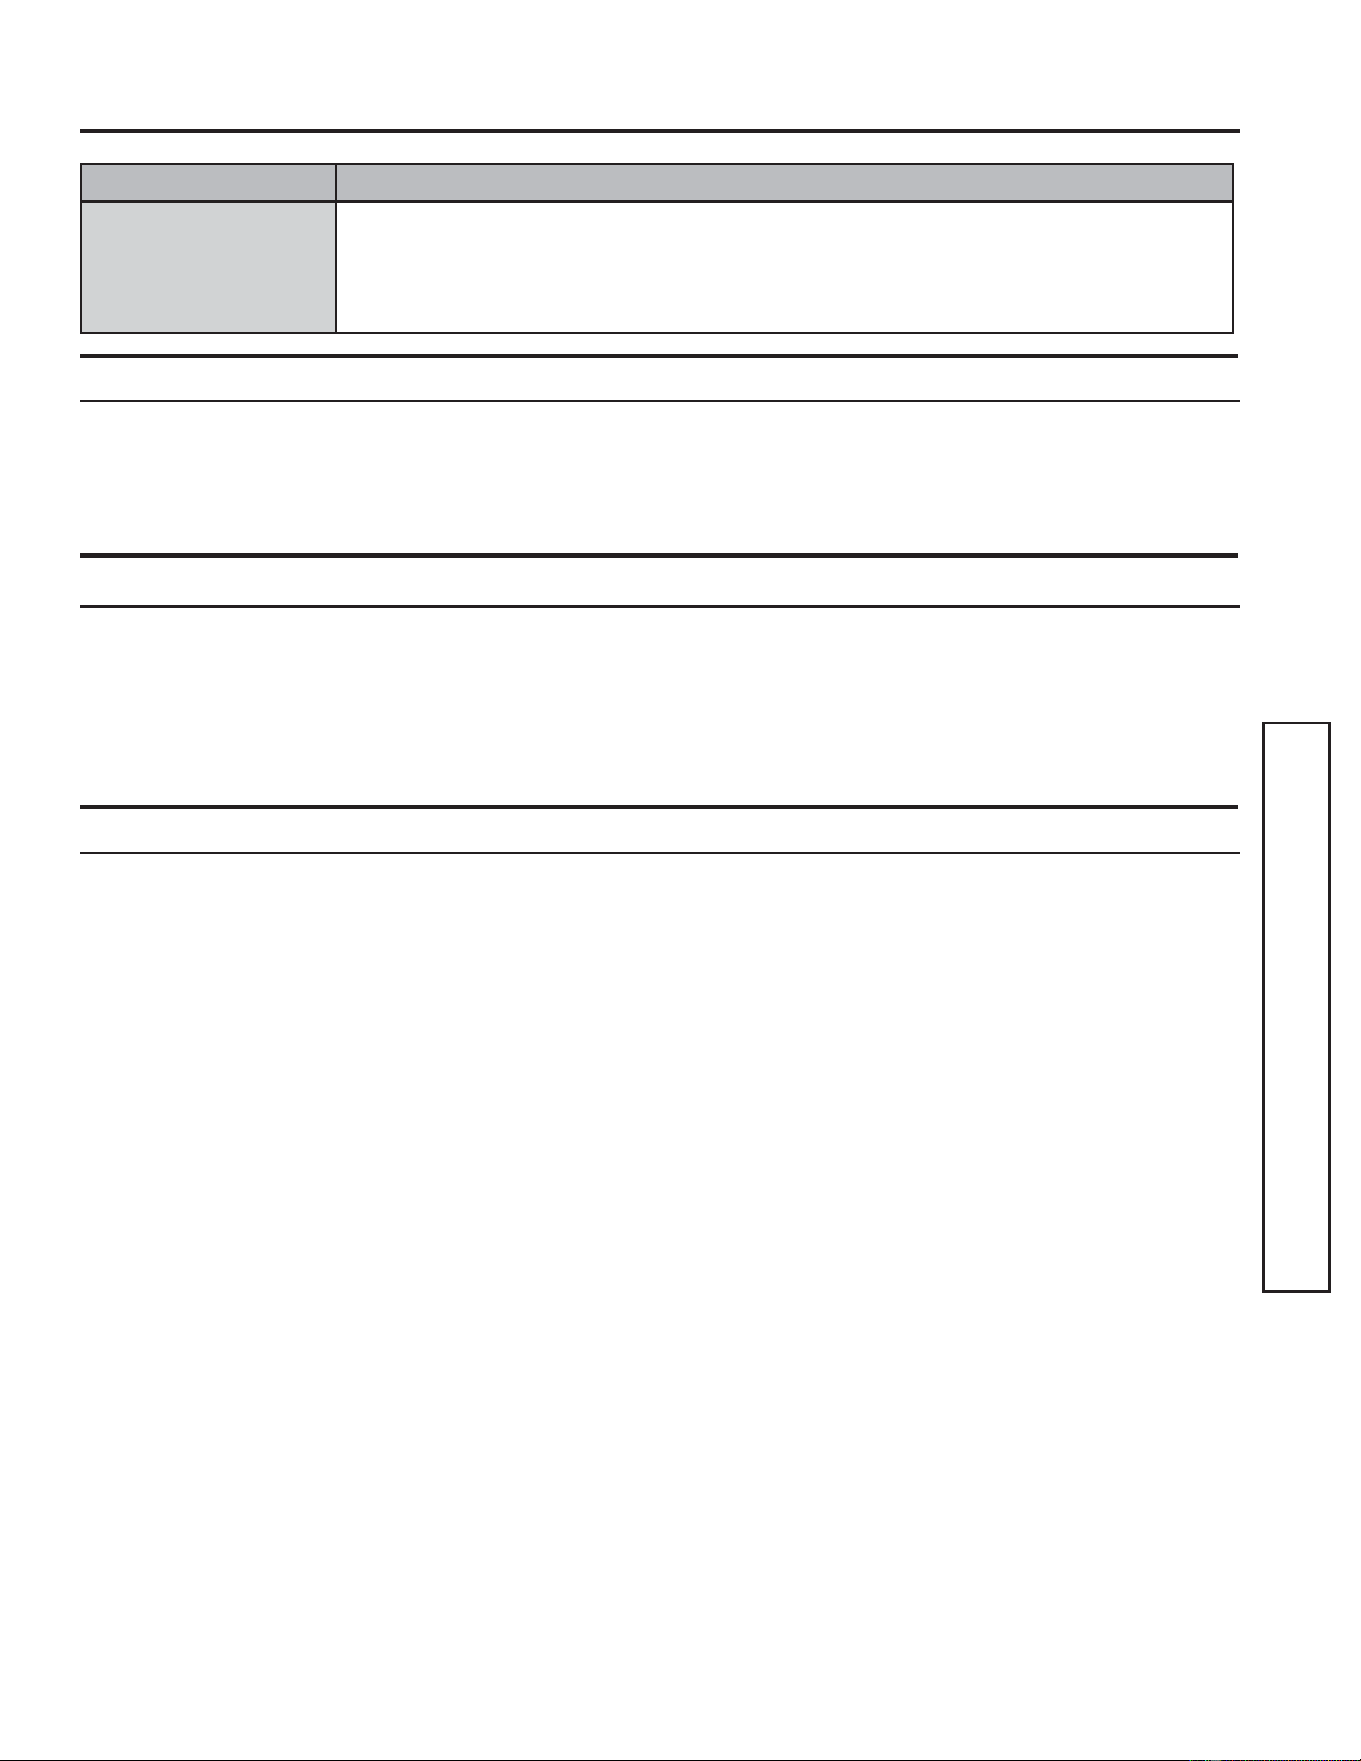
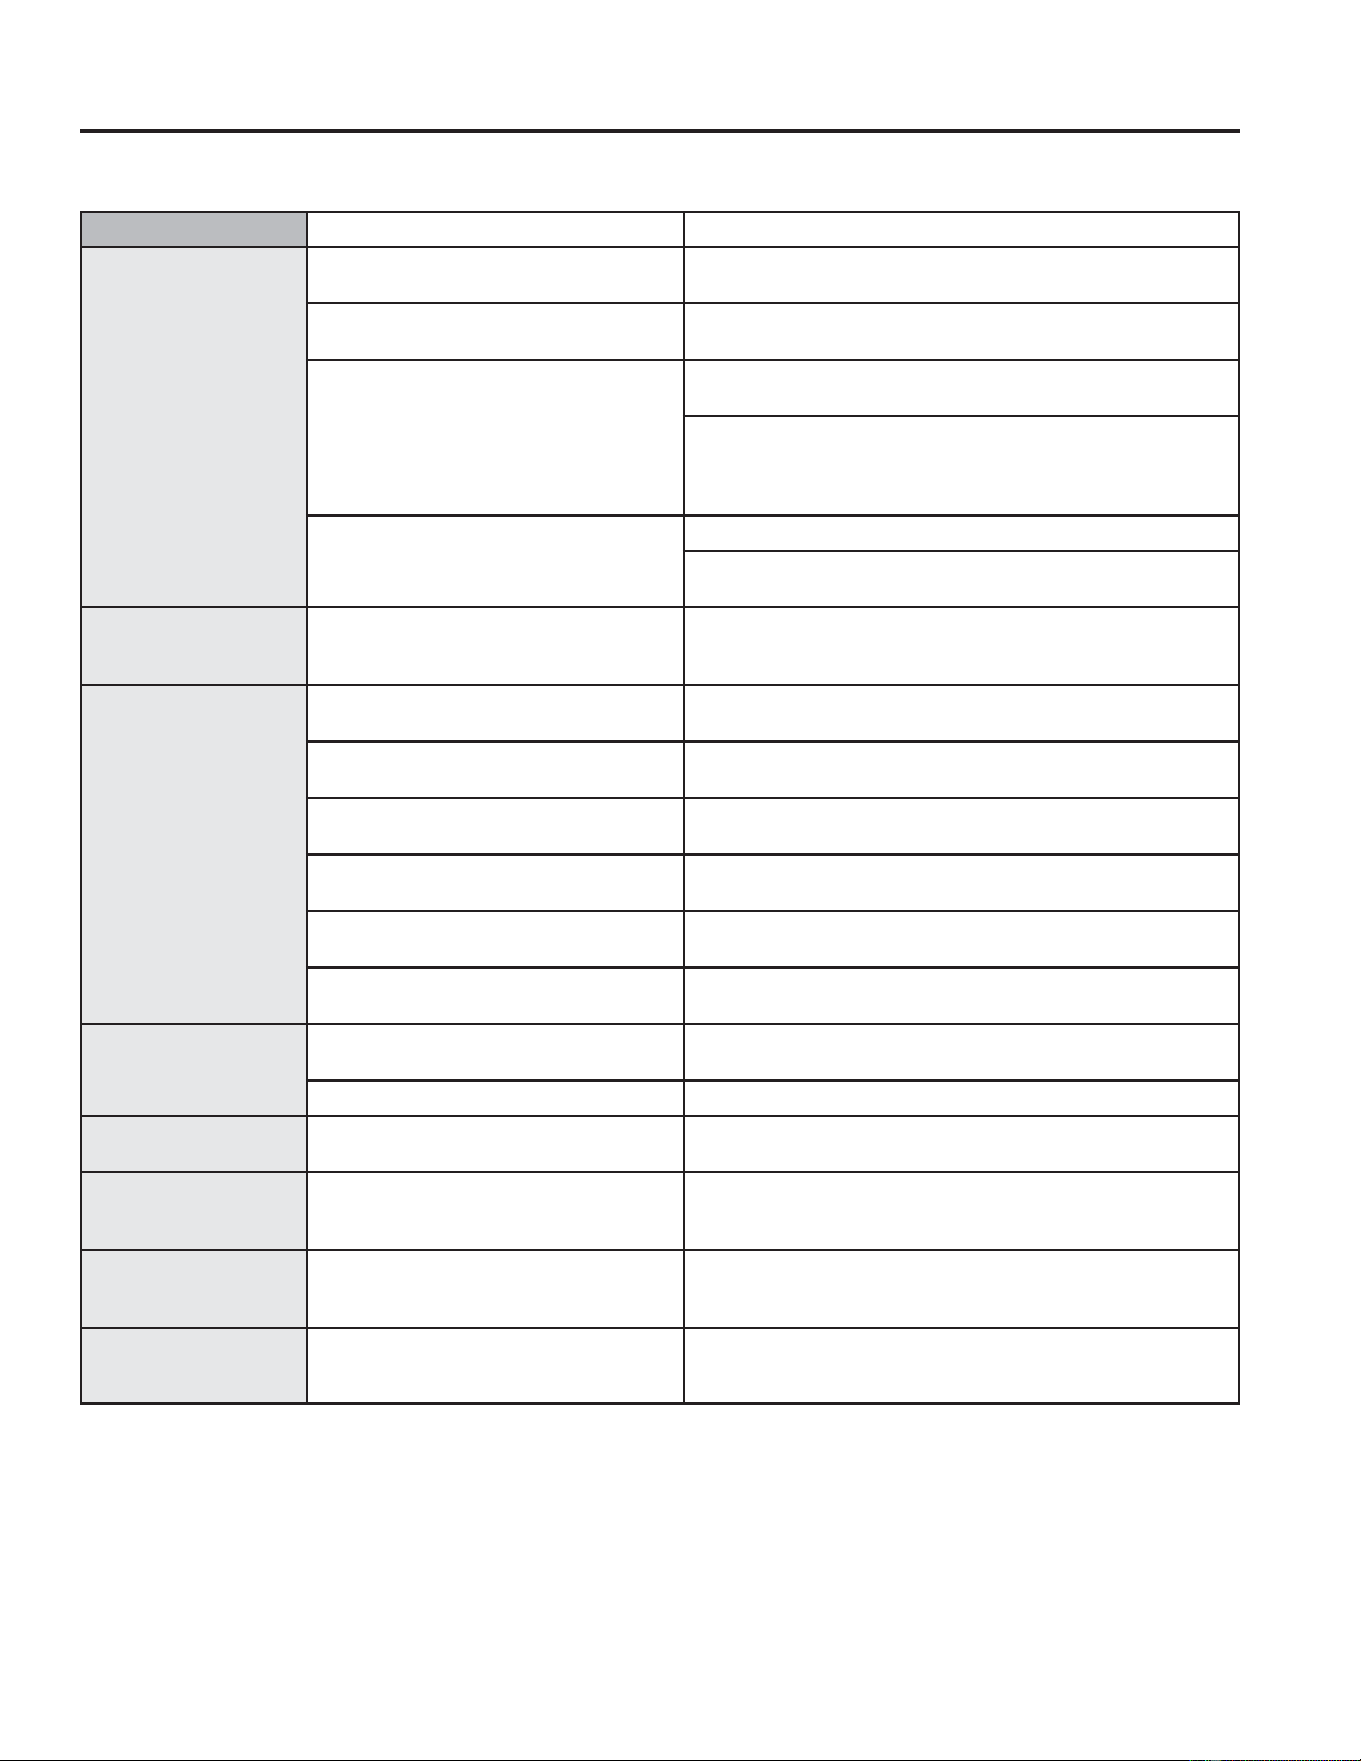
Troubleshooting Tips...Before you call for service
Save time and money! Review the charts on the following pages first and you may not need to call for service.
Problem Possible Cause What To Do
Air conditioner
does not start.
The unit is unplugged. Make sure the air conditioner plug is pushed
completely into the outlet.
The fuse is blown/circuit breaker is
tripped.
Check the house fuse/circuit breaker box and
replace the fuse or reset the breaker.
Power Failure. The unit will automatically restart in the setting
last used after the power is restored.
There is a protective time delay (approximately
3 minutes) to prevent tripping of the compressor
overload. For this reason, the unit may not start
normal cooling for 3 minutes after it is turned back
on.
The current interrupter device is
tripped.
Press RESET button located on the power cord
plug.
If the RESET button will not stay engaged,
discontinue use of the air conditioner and contact
a qualified service technician.
Air conditioner
freezing up
Ice blocks the air flow and stops
the air conditioner from cooling the
room.
Set the mode control to High Fan or High Cool
with the temperature setting as high as it can be
set.
Air conditioner
does not cool as it
should.
Indoor airflow is restricted. Make sure there are not curtains, blinds or
furniture blocking the front of the air conditioner.
The temp control may not be set
properly.
In the Cool mode, press the Decrease pad
The air filter is dirty. Clean the filter at least every 30 days. See
Operating Instructions section.
The room may have been hot. When the air conditioner is first turned on, you
need to allow time for the room to cool down.
Cold air is escaping. Check for open furnace registers and cold air
returns. Set the air conditioner’s vent to the
closed position.
Cooling coils have iced up. See “Air conditioner freezing up´DERYH
The remote control
is not working
The batteries are inserted
incorrectly.
Check the position of the batteries. They should
be inserted in the opposite (+) and (–) direction.
The batteries may be dead. Replace the batteries.
Water drips
outside
Excessively hot, humid weather. This is normal.
Water drips inside The air conditioner is not tilted to
the outside.
For proper disposal, make sure the air conditioner
slants slightly from the case front to the rear.
Water collects in
base pan
Moisture removed from air and
drain into base pan.
This is normal for a short period in areas with little
humidity; normal for a longer period in very humid
areas.
Unit displays an
F25 error code
The outdoor temperature is too
cold for the thermostats to function
properly.
6HHWKHVHFWLRQ³Using the Air Conditioner´
Then power down the unit and restart it.
TROUBLESHOOTING TIPS

16 49-5001164 Rev. 0
TROUBLESHOOTING TIPS
Normal Operating Sounds
Ŷ<RXPD\KHDUDSLQJLQJQRLVHFDXVHGE\ZDWHUEHLQJ
picked up and thrown against the condenser on rainy
days or when the humidity is high. This design feature
helps remove moisture and improve efficiency.
Ŷ<RXPD\KHDUWKHWKHUPRVWDWFOLFNZKHQWKH
compressor cycles on and off.
Ŷ:DWHUZLOOFROOHFWLQWKHEDVHSDQGXULQJKLJKKXPLGLW\
or on rainy days. The water may overflow and drip
from the outdoor side of the unit.
Ŷ7KHIDQPD\UXQHYHQZKHQWKHFRPSUHVVRUGRHVQRW
NOTE: Do not drill hole in the base pan.
Troubleshooting Tips...Before you call for service
Do Not Operate in Freezing Outdoor Conditions
This air conditioner must not be used in ‘COOL’ or ‘ECO’
mode when the outdoor temp is below freezing (32ºF).
Performance of the unit will be reduced when used
outside of these temperatures (depending on the mode)
and may damage the unit.
49-5001164 Rev. 0 17
GE Appliances Limited Warranty
Staple your receipt here. Proof of the original purchase date
is needed to obtain service under the warranty.
EXCLUSION OF IMPLIED WARRANTIES - Your sole and exclusive remedy is product repair as provided in this
Limited Warranty. Any implied warranties, including the implied warranties of merchantability or fitness for a particular
purpose, are limited to one year or the shortest period allowed by law.
For US Customers: This limited warranty is extended to the original purchaser and any succeeding owner for
SURGXFWVSXUFKDVHGIRUKRPHXVHZLWKLQWKH86$,IWKHSURGXFWLVORFDWHGLQDQDUHDZKHUHVHUYLFHE\D*(
Appliances Authorized Servicer is not available, you may be responsible for a trip charge or you may be required to
bring the product to an Authorized GE Appliances Service location for service. In Alaska, the limited warranty excludes
the cost of shipping or service calls to your home.
Some states do not allow the exclusion or limitation of incidental or consequential damages. This limited warranty
gives you specific legal rights, and you may also have other rights which vary from state to state. To know what your
legal rights are, consult your local or state consumer affairs office or your state’s Attorney General.
Warrantor US:
GE Appliances, a Haier company
Louisville, KY 40225
• Customer instruction. This owner’s manual provides
information regarding operating instructions and user
controls.
• Improper installation. If you have an installation
problem, or if the product is of improper capacity,
contact your dealer or installer. You are responsible
for providing adequate electrical connecting facilities.
• Failure of the product resulting from modifications
to the product or due to unreasonable use including
failure to provide reasonable and necessary
maintenance.
• Replacement of house fuses or resetting of circuit
breakers.
• Failure due to corrosion.
• Damage to the product caused by improper power
supply voltage, accident, fire, floods or acts of God.
• Incidental or consequential damage caused by
possible defects with this product.
• Damage caused after delivery.
What Will Not Cover:
For The Period Of: Will Replace:
One Year
From the date of the
original purchase
Replacement, repair, or refund of the original retail price for any product which fails due
to a defect in materials or workmanship. If the unit is exchanged, the replacement unit
is warranted for the remainder of your product’s original one-year warranty period. GE
Appliances will, at its sole discretion, replace the product with a product of the same or
comparable functionality and quality or refund the original retail price.
•
Properly pack your unit. We recommend using the
original carton and packing materials.
• Return the product to the retail location where it was
purchased.
• Include in the package a copy of the sales receipt
or other evidence of date of original purchase. Also
print your name and address and a description of the
defect.
In Order to Make a Warranty Claim During Your Retailer’s Allowable Return Period:
• Locate your sales receipt and make note of the model and serial number.
• Call 800.432.2737 to initiate a warranty claim.
• You will be asked to provide your name, address, receipt information, model and serial number.
• Warranty claims may require electronic or mailed-in evidence of purchase.
In Order to Make a Warranty Claim During the Remainder of the One-Year Warranty:
LIMITED WARRANTY

18 49-5001164 Rev. 0
Consumer Support
CONSUMER SUPPORT
GE Appliances Website
Have a question or need assistance with your appliance? Try the GE Appliances Website 24 hours a day, any day
of the year! You can also shop for more great GE Appliances products and take advantage of all our on-line support
services designed for your convenience. GEAppliances.com
Register Your Appliance
Register your new appliance on-line at your convenience! Timely product registration will allow for enhanced
communication and prompt service under the terms of your warranty, should the need arise. You may also mail in
the pre-printed registration card included in the packing material. GEAppliances.com/register
Parts and Accessories
Individuals qualified to service their own appliances can have parts or accessories sent directly to their homes
(VISA, MasterCard and Discover cards are accepted). Order on-line today 24 hours every day.
GEApplianceparts.com or by phone at 877.959.8688 during normal business hours.
Instructions contained in this manual cover procedures to be performed by any user. Other servicing
generally should be referred to qualified service personnel. Caution must be exercised, since improper
servicing may cause unsafe operation.
Contact Us
If you are not satisfied with the service you receive from GE Appliances, contact us on our Website with all the
details including your phone number, or write to:
General Manager, Customer Relations | GE Appliances, Appliance Park | Louisville, KY 40225
GEAppliances.com/ge/service-and-support/contact.htm
GE es una marca registrada de General Electric Company. Fabricado bajo licencia de marca.
MANUAL DEL
PROPIETARIO Y
INSTRUCCIONES
DE INSTALACIÓN
ACONDICIONADORES DE AIRE
PARA SALA
49-5001164 Rev. 0 10-25
PWJV08
PWJV10
PWJV12
PWJV14
Escriba los números de modelo
y serie aquí:
# de Modelo _____________
# de Serie _______________
Puede encontrar estos números
en una etiqueta en el costado
del acondicionador de aire.
INSTRUCCIONES
DE SEGURIDAD ...................3
USO DEL ACONDICIONADOR
DE AIRE
Controles .............................5
Controle Romoto ......................5
CUIDADO Y LIMPIEZA ...........7
INSTRUCCIONES
DE INSTALACIÓN ................8
CONFIGURACIÓN WIFI .........14
SOLUCIONAR PROBLEMAS ....15
SERVICIO AL CONSUMIDOR
Garantía .............................17
Soporte al Cliente ....................18
2 49-5001164 Rev. 0
GRACIAS POR HACER QUE GE APPLIANCES SEA PARTE DE SU HOGAR.
Ya sea que haya crecido usando GE Appliances, o que ésta es su primera vez, nos complace
tenerlo en la familia.
Sentimos orgullo por el nivel de arte, innovación y diseño de cada uno de los electrodomésticos de
GE Appliances, y creemos que usted también. Entre otras cosas, el registro de su electrodoméstico
asegura que podamos entregarle información importante del producto y detalles de la garantía
cuando los necesite.
Registre su electrodoméstico GE ahora a través de Internet. Sitios Web y números telefónicos útiles
están disponibles en la sección de Soporte para el Consumidor de este Manual del Propietario.
También puede enviar una carta en la tarjeta de inscripción preimpresa que se incluye con
el material embalado.
349-5001164 Rev. 0
Para su seguridad, siga las instrucciones de este manual a fin de minimizar riesgos de
incendio, descargas eléctricas o heridas personales.
Ŷ8VHHVWHHOHFWURGRPpVWLFRVyORSDUDVXSURSyVLWRRULJLQDO
como se describe en el Manual del Propietario.
Ŷ(VWHDFRQGLFLRQDGRUGHDLUHVHGHEHLQVWDODUGHIRUPD
apropiada de acuerdo con las Instrucciones de Instalación
antes de ser usado.
Ŷ1XQFDGHVHQFKXIHVXDFRQGLFLRQDGRUGHDLUHHPSXMDQGR
el cable de corriente. Siempre tome su enchufe de manera
firme y empuje el mismo hacia afuera del receptáculo.
Ŷ5HHPSODFHGHLQPHGLDWRWRGRVORVFDEOHVGHOVHUYLFLR
GHHOHFWULFLGDGSHODGRVRFRQFXDOTXLHUWLSRGHGDxR8Q
cable del servicio de corriente que esté dañado deberá ser
reemplazado por uno nuevo provisto por el fabricante, y
QRGHEHUiVHUUHSDUDGR1RXVHXQFDEOHFRQFRUWDGXUDV
o abrasión sobre su extensión o en cualquiera de sus
enchufes o extremos.
Ŷ&RORTXHODXQLGDGHQ2))$SDJDGR\GHVHQFKXIHHO
acondicionador de aire antes de usar el mismo.
Ŷ3DUDVXVHJXULGDGQRDFXPXOHQLXVHPDWHULDOHV
combustibles, gasolina u otros vapores o líquidos
inflamables cerca de éste u otro electrodoméstico.
Ŷ6LHOUHFHSWiFXORQRFRLQFLGHFRQHOHQFKXIHHOFDPELRGHO
mismo deberá ser realizado por un electricista calificado.
Ŷ*($SSOLDQFHVQREULQGDQLQJ~QVHUYLFLRWpFQLFRGH
FRPSRQHQWHVGHOVLVWHPDVHOODGRHVGHFLUSLH]DVTXH
FRQWHQJDQUHIULJHUDQWHGHODFRQGLFLRQDGRUGHDLUH
Ŷ(OVHUYLFLRWpFQLFRGHOUHVWRGHORVFRPSRQHQWHV6Ï/2
podrá ser completado por un técnico calificado.
Ŷ(VWHHOHFWURGRPpVWLFRQRGHEHUiVHUXVDGRSRUSHUVRQDV
LQFOX\HQGRQLxRVFRQFDSDFLGDGHVItVLFDVVHQVRULDOHV
o mentales reducidas o con falta de experiencia y
conocimiento, a menos que cuenten con supervisión o
instrucción con relación al uso de este electrodoméstico por
parte de una persona responsable de su seguridad.
Ŷ/RVQLxRVGHEHUiQVHUVXSHUYLVDGRVDILQGHDVHJXUDUTXH
no se juegue con el electrodoméstico.
Ŷ1RXWLOLFHVXDFRQGLFLRQDGRUGHDLUHHQXQDKDELWDFLyQ
húmeda tal como un baño o lavadero.
Ŷ(OHOHFWURGRPpVWLFRVHGHEHUiJXDUGDUDILQGHHYLWDUTXH
se produzcan daños mecánicos.
ADVERTENCIA
Ŷ$ILQGHDFHOHUDUHOSURFHVRGHGHVFRQJHODFLyQRSDUD
limpiar, no use ningún método que no sea el recomendado
por el fabricante.
Ŷ(VWHHOHFWURGRPpVWLFRGHEHUiVHUJXDUGDGRHQXQDVDOD
GRQGHQRKD\DIXHQWHVGHHQFHQGLGRFRQWLQXDVSRUHMHPSOR
llamas abiertas, un electrodoméstico que funcione a gas o
XQFDOHIDFWRUTXHIXQFLRQHDHOHFWULFLGDG
Ŷ1RSHUIRUHQLTXHPHHOWXERUHIULJHUDQWH7HQJDSUHVHQWH
que los refrigerantes no deben tener olor.
Ŷ0DQWHQJDODVDEHUWXUDVGHODYHQWLODFLyQOLEUHVGH
obstrucciones.
Ŷ$OPRYHULQVWDODU\RSHUDUHOHOHFWURGRPpVWLFRVHGHEHUi
tener cuidado para evitar dañar la tubería del refrigerante.
Ŷ1RUHDOLFHSHUIRUDFLRQHVHQODXQLGDG
Ŷ(OPDQWHQLPLHQWRODOLPSLH]D\HOVHUYLFLRWpFQLFRVyOR
deberán ser realizados por técnicos adecuadamente
entrenados y calificados en el uso de refrigerantes
inflamables.
Ŷ*($SSOLDQFHVQREULQGDQLQJ~QVHUYLFLRWpFQLFRGH
FRPSRQHQWHVGHOVLVWHPDVHOODGRHVGHFLUSLH]DVTXH
FRQWHQJDQUHIULJHUDQWHGHODFRQGLFLRQDGRUGHDLUH
Ŷ'HVFDUWHHOHOHFWURGRPpVWLFRGHDFXHUGRFRQODV
5HJXODFLRQHV)HGHUDOHV\/RFDOHV/RVUHIULJHUDQWHV
inflamables requieren procedimientos de descarte
específicos. A fin de descartar su acondicionador de aire
de forma ambientalmente segura, comuníquese con las
autoridades locales.
Riesgo de Incendio o Explosión. Esta unidad contiene refrigerante
inflamable. Se deben seguir las precauciones adicionales de seguridad.
ADVERTENCIA
LEA Y GUARDE ESTAS INSTRUCCIONES
INFORMACIÓN IMPORTANTE DE SEGURIDAD
LEA TODAS LAS INSTRUCCIONES ANTES DE USAR
INFORMACIÓN DE SEGURIDAD
ADVERTENCIA
USO DE PROLONGADORE. RIESGO DE INCENDIO.
Podría ocasionar lesiones graves o la muerte.
Ŷ12XVHXQSURORQJDGRUFRQHVWH$FRQGLFLRQDGRUGH$LUHGH
Ventana.
Ŷ12XVHSURWHFWRUHVFRQWUDSLFRVGHFRUULHQWHQL
adaptadores para múltiples tomacorrientes con este
Acondicionador de Aire de Ventana.
A2L
4 49-5001164 Rev. 0
LEA Y GUARDE ESTAS INSTRUCCIONES
INFORMACIÓN IMPORTANTE DE SEGURIDAD
LEA TODAS LAS INSTRUCCIONES ANTES DE USAR
INFORMACIÓN DE SEGURIDAD
CÓMO CONECTAR LA ELECTRICIDAD
1XQFDEDMRQLQJXQDFLUFXQVWDQFLDFRUWHRHOLPLQHHOWHUFHUFDEOH
WLHUUDGHOFDEOHGHFRUULHQWH3DUDVXVHJXULGDGSHUVRQDOHVWH
electrodoméstico debe estar adecuadamente conectado a tierra.
NO use un enchufe adaptador con este electrodoméstico.
El cable de corriente de este electrodoméstico contiene un enchufe
GHFDEOHVFRQH[LyQDWLHUUDTXHVHFRQHFWDDXQWRPDFRUULHQWH
GHSDUHGHVWiQGDUGHFDEOHVFRQH[LyQDWLHUUDSDUDPLQLPL]DUOD
posibilidad de riesgos de descargas eléctricas por parte del mismo.
El cable de corriente incluye un interruptor de corriente. Se brinda
un botón de evaluación y reinicio en la caja del enchufe. El
dispositivo deberá ser evaluado en forma periódica, presionando
primero el botón TEST(YDOXDU\OXHJRRESET5HLQLFLR
mientras se encuentre enchufado al tomacorriente. Si el botón
TEST (YDOXDUQRVHDFWLYDRHOERWyQRESET5HLQLFLRQR
permanece en su posición, deje de usar el acondicionador de aire y
comuníquese con un técnico calificado del servicio.
Contrate a un electricista calificado para que controle el
tomacorriente y el circuito eléctrico para asegurar que el enchufe
esté correctamente conectado a tierra.
En caso de contar con un tomacorriente de pared de 2 cables, es
su responsabilidad y obligación reemplazarlo por un tomacorriente
de pared de 3 cables correctamente conectado a tierra.
El acondicionador de aire debería estar siempre conectado a un
enchufe específico con un índice de voltaje equivalente al que figura
en su etiqueta de características técnicas.
Esto garantiza el mejor funcionamiento y además previene la
sobrecarga de los circuitos del hogar, lo cual podría ocasionar
riesgos de incendio debido al recalentamiento de cables.
Para conocer los requisitos específicos de la conexión eléctrica,
consulte las Instrucciones de Instalación, Requisitos Eléctricos.
RESET
TEST
RESET
TEST
Mientras esté enchufado,
SUHVLRQH7(673UXHED\OXHJR
5(6(75HLQLFLRSDUDUHDOL]DU
FRUUHFWDPHQWHODYHUL¿FDFLyQGH
seguridad.
549-5001164 Rev. 0
Controles
/DVIXQFLRQHV\HODVSHFWRSXHGHQYDULDU
/DVOXFHVDOODGRGHODVWHFODVGHWRTXHHQHOSDQHOGHFRQWUROGHO
acondicionador de aire indicarán los ajustes seleccionados.
Controles
USO DEL ACONDICIONADOR DE AIRE
Control Remoto
1. Tecla de Power (Encendido)
Apaga y prende el acondicionador de aire. Cuando se
enciende, la pantalla mostrará la temperatura establecida.
2. Pantalla
Muestra la temperatura establecida en modo Ventilador.
Muestra la temperatura Definida al configurar la
temperatura en los modos Cool (Frío) o de ECO (Ahorro
de energía).
7HFODVGH7HPS$XPHQWRޔ5HGXFFLyQޕ
8VDGRSDUDDMXVWDUODWHPSHUDWXUDFXDQGRVHHQFXHQWUHHQ
el modo Cool o de ECO.
4. Tecla de MODO
8VDGRSDUDDMXVWDUHODFRQGLFLRQDGRUGHDLUHDOPRGRCool,
Fan (Ventilador) o de ECO.
5. Teclas de Fan Speed (Velocidad del ventilador):
En modo Cool o de ECO.
8VHODVPLVPDVSDUDFRQILJXUDUODYHORFLGDGGHOYHQWLODGRU
en Auto, High (Alto), Med (Medio), o Low (Bajo) en la
unidad.
En modo Teclas de Fan Speed8VHODVPLVPDVSDUD
configurar la velocidad del ventilador en High, Med, o Low
en la unidad.
6. Retraso
Delay ON (Retraso Encendido)—Cuando el acondicionador
de aire se encuentre apagado, se podrá configurar para que
se encienda automáticamente en un período de entre 1 y 24
horas en el modo y configuraciones del ventilador previas.
Delay OFF (Retraso del Apagado)—Cuando el
acondicionador de aire se encuentre encendido, se podrá
configurar automáticamente para que se apague en un
período de entre 1 y 24 horas.
Cómo configurar:
Presione la tecla Delay. Cada vez que se presionen las
teclas , se configurará el temporizador en intervalos de
1 hora.
Para revisar el tiempo restante del temporizador de retraso,
presione la tecla Delay8VHODVWHFODVIncrease + /
'HFUHDVH±,QFUHPHQWDU5HGXFLU para configurar un
nuevo tiempo, si se desea.
Para cancelar el temporizador, presione la tecla 'HFUHDVH
hasta que el tiempo de configuración esté en ³´.
7. Quiet Pad (Tecla del Modo Silencioso)
El modo Quiet (Silencioso) configurará la unidad en la
capacidad más baja y/o en la velocidad más baja del
ventilador para lograr la mayor eficacia en relación al ruido.
El modo Quiet (Silencioso) se puede usar en los modos
ECO (Ecológico), y Cool (Frio). Cuando se configure, la
OX]/('GHQuiet (Silencioso)VHHQFHQGHUi(O/('GH
Fan Speed (Velocidad del Ventilador) mostrará Auto
(Automático). Cuando Quiet (Silencioso) esté activo, se
SRGUiDSDJDUSUHVLRQDQGRHOERWyQQuiet (Silencioso),
presionado el botón Mode (Modo)HQODLQWHUIDFHGH
XVXDULRRGHIRUPDUHPRWDRFDPELDQGRHOPRGRDWUDYpV
de la aplicación SmartHQ.
8. Tecla de Reinicio del Filtro
Esta función automática le notifica que el filtro de aire debe
VHUOLPSLDGR/DOX]LQGLFDGRUDVHHQFHQGHUiOXHJRGH
KRUDVGHIXQFLRQDPLHQWR/LPSLHHOILOWURGHDLUHFRQVXOWHOD
SiJLQDYXHOYDDFRORFDUORHQHOSDQHOIURQWDO\SUHVLRQH
la tecla Filter Reset5HLQLFLRGHO)LOWUR/DOX]VHDSDJDUi
9. WiFI Connect
WiFi Connect le permite la conexión del acondicionador
GHDLUHDO:L)LGHOKRJDU'HVFDUJXHORVGHWDOOHVGHOD
Aplicación en GEAppliances.com/connect.
Controles de aire acondicionado
5
6
1 23 34 87
Power
Speed
Mode
Eco
Delay
1
4
5
6
3
Quiet
6 49-5001164 Rev. 0
USO DEL ACONDICIONADOR DE AIRE
Controles
Control Remoto
Ŷ3DUDDVHJXUDUXQXVRDSURSLDGRDSXQWHHOFRQWUROUHPRWRDO
receptor de señal del acondicionador de aire.
Ŷ/DVHxDOGHOFRQWUROUHPRWRFXHQWDFRQXQDOFDQFHGHKDVWD
SLHV
Ŷ$VHJ~UHVHGHTXHQRKD\DREVWUXFFLRQHVHQWUHHO
acondicionador de aire y el control remoto que pudieran
bloquear la señal.
Ŷ$VHJ~UHVHGHTXHODVSLODVVHDQQXHYDV\TXHHVWpQ
instaladas correctamente, como se indica en el control
remoto.
Eco (Modo de ahorro de energía)
Controla el ventilador.
ON (ENCENDIDO)—El ventilador hará un ciclo de encendido
y apagado con el compresor. Este resulta en variaciones
mayores en la temperatura de la habitación.
NOTA: es posible que el ventilador continúe funcionando
durante un período de tiempo corto o que titile de forma
intermitente cuando el compresor finalice su ciclo para probar
el aire de la sala.
OFF (APAGADO)—El ventilador funciona todo el tiempo,
mientras que el compresor pasa por los ciclos de encendido y
apagado.
Modo de Fan Only (Solo ventilador)
8VH)DQ2QO\0RGH0RGRGH6yOR9HQWLODGRUHQODYHORFLGDG
GHYHQWLODGRU/RZ%DMD0HG0HGLDR+LJK$OWDDILQ
de brindar una circulación de aire y filtrado sin enfriamiento.
'HELGRDTXHODVFRQILJXUDFLRQHVGHVyORYHQWLODGRUQR
brindan enfriamiento, no se podrá ingresar una temperatura
FRQILJXUDGD/DWHPSHUDWXUDGHODPELHQWHDSDUHFHUiHQOD
pantalla.
Velocidad Automática del Ventilador
Configure en Auto (Automática) para que la velocidad del
ventilador se configure de forma automática en la velocidad
necesaria para brindar ajustes de confort óptimos con la
temperatura configurada. Si se necesita más frío en la
habitación, la velocidad del ventilador se incrementará de
forma automática. Si se necesita más frío en la habitación, la
velocidad del ventilador se reducirá de forma automática.
Función de Luces Encendidas/ Apagadas del Panel de Control
Este acondicionador de aire cuenta con una función de panel
de control de luces encendidas/ apagadas, donde dichas
luces se apagarán cuando no haya actividad en los controles
por más de un minuto. Para reactivar los controles, presione
cualquier tecla de los controles y las luces se iluminarán para
mostrar las configuraciones previas.
Para desactivar esta función, mantenga presionada la tecla
FilterVREUHODXQLGDGGXUDQWHVHJXQGRV/DXQLGDGHPLWLUi
un pitido para señalizar que la función fue encendida o
apagada con éxito.
Modo Cool (Frío)
8VHHOPRGRCool a Low, Med, High o Auto Fan Speed
SDUDHQIULDU8VHODVWHFODVGHTemperatura Aumento (+)/
Reducción (–) para ajustar a la temperatura deseada entre
64ºF y 86ºF en incrementos de 1ºF.
Se utiliza un termostato electrónico para mantener la
temperatura ambiente. El compresor se encenderá y apagará
y también cambiará las velocidades de funcionamiento para
mantener la habitación en el nivel establecido de comodidad.
Configure el termostato en un número más bajo y el aire
interior se volverá más frío. Configure el termostato en un
número más alto y el aire interior se calentará.
NOTA: Si el acondicionador de aire está apagado y luego
se enciende mientras se ajusta en la configuración Cool
o si se pasa de una configuración de ventilación a una
configuración de Cool, es posible que al compresor le tome
aproximadamente 3 minutos comenzar y que comience la
refrigeración.
Descripciones de enfriamiento
Para enfriamiento normal—Seleccione el modo Cool y
ventilador High o Med con una temperatura de ajuste media.
Para enfriamiento máximo—Seleccione el modo Cool y
ventilador High con una temperatura de ajuste menor.
Para enfriamiento silencioso y enfriamiento nocturno—
Seleccione el modo Cool y ventilador Low con una
temperatura de ajuste media.
Modo de Inactividad
6OHHS0RGH0RGRGH,QDFWLYLGDGFDPELDJUDGXDOPHQWHODV
configuraciones de la unidad durante un período de 8 horas
para reducir el uso de la energía mientras se duerme.
6HSXHGHDOWHUQDUHQWUH2Q(QFHQGLGR\2II$SDJDGRHQ
6OHHS0RGH0RGRGH,QDFWLYLGDGPDQWHQLHQGRSUHVLRQDGDOD
tecla Speed Pad (Tecla de Velocidad) durante 3 segundos.
6OHHS0RGH0RGRGH,QDFWLYLGDGHVWiGLVSRQLEOHVyORHQODV
FRQILJXUDFLRQHV&RRO)UtR\)DQ9HQWLODGRU
749-5001164 Rev. 0
CUIDADO Y LIMPIEZA
Dirección del Aire
Uso del Acondicionador de Aire
8VHODSDODQFDSDUDDMXVWDUODGLUHFFLyQGHODLUHKDFLDOD
izquierda y la derecha.
Presione el lado superior o inferior del conducto de la salida de
aire para direccionar el aire hacia arriba o abajo.
Cuidado y limpieza
Parrilla y Caja
Apague el acondicionador de aire y retire el enchufe del
tomacorriente antes de limpiar.
3DUDOLPSLDUXVHDJXD\XQGHWHUJHQWHVXDYH1RXVH
blanqueadores ni abrasivos.
Filtro de Aire
El filtro de aire que se encuentra detrás de la rejilla frontal se
GHEHUHYLVDU\OLPSLDUSRUORPHQRVFDGDGtDVRFRQXQD
frecuencia mayor, si fuera necesario.
Para limpiar el filtro de aire:
1. Abra la rejilla de entrada tirando hacia afuera de las
lengüetas ubicadas en las esquinas superiores de la rejilla
de entrada.
2. Gire la rejilla hacia afuera hasta que quede en una posición
de 45°.
3. Retire el filtro tirando hacia arriba y hacia afuera.
/LPSLHHOILOWURFRQDJXDWLELD\MDERQRVD
±1ROLPSLHHOILOWURHQHOODYDYDMLOODV
5. Enjuague y deje secar completamente el filtro antes de
volver a colocarlo, en el sentido inverso al que fue retirado.
PRECAUCIÓN
12XWLOLFHHODFRQGLFLRQDGRUGHDLUH
sin un filtro, ya que la suciedad y las pelusas producirán
atascamientos y reducirán su funcionamiento.
Bobinas Exteriores
/DVERELQDVGHOODGRH[WHULRUGHODFRQGLFLRQDGRUGHDLUH
se deberán controlar de forma regular. Si se encuentran
atascadas con tierra u hollín, deberán ser limpiadas por un
profesional.
Cómo insertar las pilas en el control remoto
1. Retire la cubierta de la pila deslizándola de acuerdo con la
dirección de la flecha.
2. Inserte pilas nuevas cerciorándose de que los polos
SRVLWLYRV\QHJDWLYRV±HVWiQRULHQWDGRVFRUUHFWDPHQWH
3. Coloque la cubierta otra vez deslizándola en su lugar.
NOTAS:
8VHSLODV³$$$´GHYROWLRV1RXVHSLODVUHFDUJDEOHV
• Retire las pilas del control remoto si no va a usar el sistema
por un período prolongado.
1RPH]FOHEDWHUtDVQXHYDV\YLHMDV1RPH]FOHEDWHUtDV
HVWiQGDUFDUERQRFLQFRUHFDUJDEOHVQLFDGQLPKHWF
8 49-5001164 Rev. 0
Instrucciones de instalación
ANTES DE INI CIAR
Lea estas instrucciones completa y cuidadosamente.
•
IMPORTANTE – Guarde estas instrucciones
para uso del inspector local.
•
IMPORTANTE – 2EVHUYHWRGRVORVFyGLJRV\
órdenes de ley.
• Nota al instalador – Asegúrese de dejar estas
instrucciones con el consumidor.
• Nota al consumidor – Conserve estas instrucciones para
referencia futura.
• Nivel de destreza±/DLQVWDODFLyQGHHVWHDSDUDWR
requiere de destrezas mecánicas básicas.
• Tiempo de ejecución – Aprox. 1 hora
• Recomendamos dos personas para la instalación de este
producto.
/DLQVWDODFLyQDSURSLDGDHVODUHVSRQVDELOLGDGGHO
instalador.
/DIDOODGHOSURGXFWRGHELGRDXQDLQVWDODFLyQLQDGHFXDGD
no está cubierta por la garantía.
&XDQGRLQVWDOHHVWHDFRQGLFLRQDGRUGHDLUH'(%(XVDU
todas las piezas suministradas y usar procedimientos
adecuados de instalación.
¿Preguntas? Visite nuestra página en la red en: GEAppliances.com
REQUISITOS ELÉCTRICOS
Algunos modelos requieren tomacorrientes de
YROWLRVGHFRUULHQWHDOWHUQD\+]
conectados a tierra, protegidos con un fusible de
dilatación de tiempo de 15 amperios o un
cortacircuitos.
El enchufe de tres púas con conexión a tierra minimiza la
posibilidad de descargas eléctricas. Si el tomacorriente de
la pared que usted planea usar solamente tiene 2 tomas, es
su responsabilidad hacer que un técnico lo reemplace por
uno de tres tomas con conexión a tierra.
PRECAUCIÓN
%DMRQLQJXQDFLUFXQVWDQFLDFRUWHRUHPXHYDODWHUFHUDS~D
FRQH[LyQDWLHUUDGHOFDEOHHOpFWULFR
1RFDPELHHOHQFKXIHHQHOFDEOHHOpFWULFRGHHVWH
acondicionador de aire.
/RVFDEOHVFDVHURVGHDOXPLQLRSRGUtDQSUHVHQWDU
problemas especiales. Consulte a un técnico electricista
calificado.
REQUISITOS ELÉCTRICOS(CONT)
El cable de alimentación incluye un dispositivo para
interrupción de corriente. Se incluye un botón de prueba
y de reinicio en el dispositivo. El dispositivo debe ponerse
DSUXHEDSHULyGLFDPHQWHSULPHURVHSUHVLRQDHOERWyQ
de TEST SUXHED\OXHJRRESET UHLQLFLRPLHQWUDVVH
encuentra enchufado al tomacorriente. Si el botón TEST no
se dispara o si el botón RESET no queda enganchado, deje
de utilizar el acondicionador de aire y comuníquese con un
técnico calificado.
HERRAMIENTAS QUE NECESITARÁ
8QGHVWRUQLOODGRUGHHVWUHOOD
8QDUHJODRFLQWD
métrica
/iSL]
1LYHO
Tijeras o cuchilla
Taladro y broca de
´
INSTRUCCIONES DE INSTALACIÓN
949-5001164 Rev. 0
PARTES INCLUIDAS
(La apariencia puede variar)
INSTRUCCIONES DE INSTALACIÓN
Instrucciones de instalación
DELAY
MODE
ON/OFF
SPEED
TEMP/TIME
TEMP/TIME
+
-
Junta de gomaespuma
de la parte superior de
la ventana
Cortinas
/DWHUDOHV
Riel de montaje superior
Acondicionador
de aire
Control
Remoto
Sellado Inferior
y Sellados
/DWHUDOHV
Marcos de la
&RUWLQD/DWHUDO
Izquierda
'HUHFKR
7LSR%
Soporte de Cierre de
OD9HQWDQD
6RSRUWHV/DWHUDOHV
7LSR$
Power
Speed
Mode
Eco
Delay
Quiet
49-5001164 Rev. 0
Instrucciones de instalación
INSTRUCCIONES DE INSTALACIÓN
Como recordatorio:
/DLQVWDODFLyQGHHVWDXQLGDGGHDLUHDFRQGLFLRQDGRGHEHUtDWRPDUDSUR[LPDGDPHQWHPLQXWRV
5HFRPHQGDPRVLQVWDODUHVWRFRQXQDFRPSDxDQWH
$VHJ~UHVHGHTXHODYHQWDQDFXPSODFRQODVUHVWULFFLRQHVGHWDPDxRLQGLFDGDVDFRQWLQXDFLyQ
$VHJ~UHVHGHFRQWDUFRQWRGDVODVKHUUDPLHQWDVGHOD~OWLPDSiJLQD
Requisitos de la ventana:
(VWDVLQVWUXFFLRQHVVRQSDUDXQDYHQWDQDHVWiQGDUGH
guillotina doble con apertura vertical. Será necesario
modificarlas para otros tipos de ventanas.
/DXQLGDGSXHGHLQVWDODUVHVLQORVSDQHOHVODWHUDOHVGH
cortina para adaptarse a una ventana angosta
7RGDVODVSLH]DVGHVRSRUWHGHEHQILMDUVHDPDGHUDILUPH
mampostería o metal
/DWRPDHOpFWULFDGHEHHVWDUDODOFDQFHGHOFDEOHGH
alimentación
6LJDODVGLPHQVLRQHVGHODWDEOD\ODLOXVWUDFLyQ
correspondientes a su modelo
Requisitos para ventanas de tormenta:
Algunas ventanas, específicamente las ventanas contra tormentas, pueden no permitir que el acondicionador de aire se
incline hacia el exterior. Esto puede impedir que la unidad drene correctamente y funcione a máxima eficiencia. Para inclinar
correctamente su unidad hacia el exterior, es posible que deba fijar una pieza de madera al alféizar antes de la instalación.
%XVTXHXQDSLH]DGHPDGHUDGHDSUR[LPDGDPHQWHLQSXOJGHDQFKR\TXHFXEUDWRGDODORQJLWXGGHODYHQWDQD
8QDYH]LQVWDODGDODSDUWHVXSHULRUGHODPDGHUDGHEHTXHGDUòLQSXOJSRUHQFLPDGHOPDUFRH[WHULRUGHODYHQWDQD8WLOLFH
esta medida para determinar la altura de la pieza de madera.
8WLOLFHYDULRVWRUQLOORVRFODYRVSDUDLQVWDODUODSLH]DGHPDGHUDHQHODOIpL]DU
.
A
:LWKVLGHFXUWDLQSDQHOV
B
Models A B
3:-9
´PLQ ï»´´
3:-9
PWJV12
ï»´PLQ ï»´´
PWJV14
Exterior
Marco de
la ventana
Alféizar
Alféizar
Interior
A
l
fé
iz
ar
Exterior
El alféizar ahora
HVWiƎPiVDOWR
que el marco de la
ventana
Madera
Interior
El marco de la ventana es más alto que el alféizar, por lo que se debe agregar madera
1149-5001164 Rev. 0
Instrucciones de instalación
1. Prepare el acondicionador de aire
A. Instale el riel de montaje superior con 3 tornillos Tipo
A, desde la parte exterior de la caja.
Riel de
montaje
superior
Riel de
montaje
inferior
B. Aplique los burletes suministrados en la parte superior
e inferior de la ventana, así como en el borde exterior
del marco de la cortina lateral.
Recorte y aplique
la tira de protección
climática al extremo
frontal del marco de
la ventana.
Recorte y aplique
la tira de protección
climática al extremo
inferior del alféizar
de la ventana.
C. 'HVOLFHORVSDQHOHVGHODFRUWLQDODWHUDOHQORVULHOHV
del panel lateral.
D. 'HVOLFHORVPDUFRVGHODVFRUWLQDVODWHUDOHVL]TXLHUGD
y derecha en el riel de montaje superior e inferior.
Asegúrese de que las cortinas laterales coincidan
sobre los costados de los marcos.
Ajustar la cortina
en el marco
INSTRUCCIONES DE INSTALACIÓN
2. Instale el acondicionador de
aire en la ventana
A. Marque el centro de la ventana. Con la ayuda de
otra persona, coloque el acondicionador de aire en la
ventana de modo que quede centrado.
B. Coloque el acondicionador de aire de modo que
el extremo frontal del riel de montaje inferior se
encuentre contra el extremo trasero del alféizar.
Exterior
Interior
C. Cierre la ventana de modo que el borde frontal del riel
de montaje superior quede delante de la ventana.
• Asegúrese de que el acondicionador de aire esté
inclinado ligeramente hacia el exterior.
• Si no hay inclinación, consulte la sección sobre
ventanas de tormenta, eso puede ayudar.
Exterior
Interior
Aprox
5°
Riel de
montaje
%ORTXHGH
madera
Alféizar
Alféizar
12 49-5001164 Rev. 0
Instrucciones de instalación
2. Instale el acondicionador de
aire en la ventana
D. Extienda los paneles de la cortina hasta que llenen
la ventana. Marque la ubicación de los agujeros en
FDGDHVTXLQD8VHHOWDODGUR\XQDEURFDGH´
SDUDWDODGUDUDJXMHURVSLORWR8VHWRUQLOORVWLSR%
para asegurar los paneles laterales en sus lugares
correspondientes.
7LSR%WRUQLOORV
3. Asegure el acondicionador de
aire
A. Afloje el tornillo del lado derecho del acondicionador
de aire, cerca de la parte inferior.
B.
'HVOLFHHOVRSRUWHODWHUDOVREUHHOWRUQLOORGHPRGR
que el soporte esté descansando sobre el alféizar de
la ventana. Ajuste el tornillo.
C. 8VHXQDEURFDGH´SDUDWDODGUDUXQDJXMHURLQLFLDO
en el alféizar de la ventana, a través de los agujeros
GHOVRSRUWHODWHUDO8VHWRUQLOORVWLSR%SDUDXQLUHO
soporte lateral al alféizar de la ventana.
D. Repita la instalación del soporte lateral en el lateral
izquierdo.
4. Instale el soporte de la traba de
la ventana y la junta superior de
gomaespuma de la ventana
A.8WLOLFHHOWRUQLOOR7LSR%UHVWDQWHSDUDLQVWDODUHO
soporte de bloqueo de ventana por encima de la
ventana inferior.
• Para ventanas de madera, el soporte de bloqueo
debe fijarse a la ventana superior.
PRECAUCIÓN
• Para ventanas de vinilo o de construcción similar, el
soporte de bloqueo debe fijarse al marco lateral para
evitar daños a la ventana o rotura de vidrio.
*Consulte los diagramas a continuación.
B.
Corte la junta de espuma superior para ventana al
ancho de la ventana.
C.
Coloque la espuma entre el vidrio y la ventana
para evitar que el aire y los insectos entren en la
habitación.
INSTRUCCIONES DE INSTALACIÓN
Madera
Vinilo
1349-5001164 Rev. 0
Configuración WiFi
GE Appliances SmartHQ (Para clientes en Estados Unidos)
Su acondicionador de aire cuenta con GE SmartHQ Habilitado. Para aprender más sobre las funciones del electrodoméstico
conectado, y para saber qué aplicaciones de electrodomésticos conectados funcionarán con su teléfono inteligente, visite
GEAppliances.com/connect
Conectividad WiFi:
Para solicitar asistencia con relación al electrodoméstico o la conectividad de red del electrodoméstico, comuníquese al
/RVGDWRVGHWRGRVORVHOHFWURGRPpVWLFRVFRQHFWDGRVVRQJXDUGDGRVHQHVWULFWRFXPSOLPLHQWRFRQOD3ROtWLFDGH3ULYDFLGDGGH
'DWRVGH&RQH[LyQGH*($SSOLDQFHV3DUDDFFHGHUDHVWDSROtWLFD
visite GEAppliances.com/privacy/privacy_policy_connected.
CONFIGURACIÓN WIFI
Preguntas acerca de SmartHQ
Acceda a respuestas necesarias sobre la configuración de electrodomésticos con WiFi y la conexión a su red hogareña a través
de nuestros artículos de soporte.
3DUDDFFHGHUDORVDUWtFXORVGHVRSRUWHODFRQH[LyQZLILGHODFRQGLFLRQDGRUGHDLUHSDUDVDODYLVLWHSURGXFWVJHDSSOLDQFHVFRP
DSSOLDQFHJHDVXSSRUWVHDUFKFRQWHQW
INFORMACIÓN REGULATORIA
Declaración de Cumplimiento con FCC/
IC:
1. Este dispositivo no podrá causar interferencias perjudiciales.
2. Este dispositivo debe aceptar cualquier interferencia
recibida, incluidas las interferencias que puedan provocar un
funcionamiento no deseado.
Tenga en cuenta que cualquier cambio o modificación en el
dispositivo de comunicación inalámbrica instalado en este
acondicionador de aire que no esté expresamente aprobado
por el fabricante podría anular la autoridad del usuario para
operar el equipo.
(VWHSURGXFWRWLHQHFDSDFLGDG:L)L\UHTXLHUHFRQHFWLYLGDG
a Internet y un enrutador inalámbrico para permitir la
interconexión con un Sistema de administración de energía y /
o con otros dispositivos, sistemas o aplicaciones externos.
Cómo Funciona
8WLOLFHHOFyGLJR45TXHDSDUHFHDFRQWLQXDFLyQSDUDGHVFDUJDUODDSOLFDFLyQ
SmartHQ y conectar su acondicionador de aire de habitación a la aplicación
.
8QDYH]FRQHFWDGRXVHODDSOLFDFLyQSDUDDMXVWDU
el acondicionador de aire según lo desee.
CHANGE TEMP
TO 65

14 49-5001164 Rev. 0
INFORMACIÓN ADICIONAL
Información Adicional
Desensamble
Antes de realizar este procedimiento, es esencial que el técnico esté completamente familiarizado con el equipamiento y todos
sus detalles. Se recomienda llevar a cabo buenas prácticas de modo que todos los refrigerantes sean recuperados de forma
segura. Antes de que la tarea sea realizada, se deberá toma una muestra del aceite y del refrigerante en caso de que se
requiera un análisis antes de que se vuelva a usar un refrigerante recuperado. Es esencial contar con una conexión eléctrica
antes de que la tarea sea iniciada.
D)DPLOLDUtFHVHFRQHOHTXLSDPLHQWR\VXIXQFLRQDPLHQWR
E$tVOHHOVLVWHPDHOpFWULFR
F$QWHVGHLQWHQWDUHOSURFHGLPLHQWRDVHJ~UHVHGHTXH
• el equipamiento de manejo mecánico esté disponible, si se requiere, para manipular los cilindros del refrigerante;
• todo el equipamiento de protección personal esté disponible y sea usado de forma correcta;
• el proceso de recuperación sea supervisado en todo momento por una persona competente;
• el equipamiento de recuperación y los cilindros cumplan con los estándares apropiados.
G%RPEHHHOVLVWHPDUHIULJHUDQWHGHVHUSRVLEOH
H6LQRHVSRVLEOHDVSLUDUKDJDXQFROHFWRUGHPRGRTXHHOUHIULJHUDQWHVHSXHGDUHWLUDUGHODVGLIHUHQWHVSLH]DVGHOVLVWHPD
I$VHJ~UHVHGHTXHHOFLOLQGURVHHQFXHQWUHVLWXDGRVREUHODVEDODQ]DVDQWHVGHTXHODUHFXSHUDFLyQVHOOHYH
a cabo.
J,QLFLHODPiTXLQDGHUHFXSHUDFLyQ\XWLOLFHODPLVPDGHDFXHUGRFRQODVLQVWUXFFLRQHVGHOIDEULFDQWH
K1RVREUHFDUJXHORVFLOLQGURV1RPiVGHOGHOYROXPHQGHFDUJDOtTXLGD
L1RVXSHUHODSUHVLyQGHIXQFLRQDPLHQWRPi[LPDGHOFLOLQGURLQFOXVRGHIRUPDWHPSRUDULD
M&XDQGRHOFLOLQGURVHKD\DOOHQDGRGHIRUPDFRUUHFWD\HOSURFHVRVHKD\DFRPSOHWDGRDVHJ~UHVHGHTXHORVFLOLQGURV\HO
equipamiento sean retirados del sitio de forma inmediata y que todas las válvulas aisladas del equipamiento se encuentren
cerradas.
N(OUHIULJHUDQWHUHFXSHUDGRQRVHUiFDUJDGRHQRWURVLVWHPDGHUHIULJHUDFLyQDPHQRVTXHVHKD\DOLPSLDGR
y controlado.
Etiqueta
(OHTXLSDPLHQWRGHEHUiFRQWDUFRQXQDHWLTXHWDTXHLQGLTXHTXHIXHGHVHQVDPEODGR\TXHHOUHIULJHUDQWHIXHYDFLDGR/D
etiqueta deberá poseer fecha y firma. En el caso de electrodomésticos que contengan REFRIGERANTES INFLAMABLES,
asegúrese de contar con etiquetas sobre el equipamiento que afirmen que el mismo contiene refrigerante inflamable.
Recuperación
Al retirar el refrigerante de un sistema, ya sea para realizar el servicio técnico o para su desensamble, se recomienda como
una buena práctica que todos los refrigerantes sean retirados de forma segura. Al transferir refrigerante dentro de los cilindros,
asegúrese de que sólo se empleen cilindros de recuperación con el refrigerante apropiado. Asegúrese de contar con el
número correcto de cilindros para almacenar la carga total del sistema. Todos los cilindros que se usarán fueron diseñados
SDUDHOUHIULJHUDQWHUHFXSHUDGR\HWLTXHWDGRVSDUDGLFKRUHIULJHUDQWHHVGHFLUFLOLQGURVHVSHFLDOHVSDUDODUHFXSHUDFLyQGH
UHIULJHUDQWH/RVFLOLQGURVHVWDUiQFRPSOHWRVFRQODYiOYXODGHDOLYLRGHSUHVLyQ\ODVYiOYXODVGHFLHUUHDSURSLDGDVHQXQRUGHQ
GHIXQFLRQDPLHQWRDGHFXDGR/RVFLOLQGURVGHUHFXSHUDFLyQVHUiQHYDFXDGRV\GHVHUSRVLEOHHQIULDGRVDQWHVGHTXHVHUHDOLFH
la recuperación. El equipamiento de recuperación deberá contar con un orden de funcionamiento adecuado con un conjunto
de instrucciones concernientes al equipamiento del cual se dispone, y deberá ser adecuado para la recuperación de todos
ORVUHIULJHUDQWHVDSURSLDGRVLQFOX\HQGRFXDQGRFRUUHVSRQGD5()5,*(5$17(6,1)/$0$%/(6$GHPiVHVWDUiGLVSRQLEOH
XQFRQMXQWRGHEDODQ]DVSDUDSHVDUFDOLEUDGDV\HQXQRUGHQGHIXQFLRQDPLHQWRDGHFXDGR/DVPDQJXHUDVGHEHUiQHVWDU
completas, con acoples de desconexión libres de goteos y en buenas condiciones. Antes de usar la máquina de recuperación,
controle que posee un orden de funcionamiento satisfactorio, que se haya mantenido de forma apropiada y que cualquier
componente eléctrico asociado se encuentre sellado, a fin de evitar incendios en caso de que se produzca la liberación de
refrigerante. En caso de duda, consulte con el fabricante. El refrigerante recuperado se le deberá entregar al proveedor de
refrigerante en el cilindro de recuperación adecuado, y la nota de transferencia de desperdicio relevante deberá estar en orden.
1RPH]FOHUHIULJHUDQWHVHQODVXQLGDGHVGHUHFXSHUDFLyQ\HVSHFLDOPHQWHQRORKDJDHQORVFLOLQGURV6LORVFRPSUHVRUHVRHO
aceite para compresor no son retirados, asegúrese de que se los haya evacuado en un nivel aceptable, a fin de asegurar que
no permanezca refrigerante inflamable dentro del lubricante. El proceso de evacuación deberá ser realizado antes de entregarle
el compresor a los proveedores. Sólo se empleará calefacción eléctrica al cuerpo del compresor para acelerar este proceso.
Cuando se drene el aceite del sistema, se deberá transportar de forma segura.
1549-5001164 Rev. 0
Solucionar problemas
¡Ahorre tiempo y dinero! Primero revise los cuadros que aparecen en las siguientes páginas y es posible que no necesite solicitar
reparaciones.
Problema Causas posibles Qué hacer
El acondicionador de
aire no enciende
El acondicionador de aire está
desconectado
Cerciórese de que el acondicionador de aire está enchufado
totalmente en el tomacorriente.
El fusible se disparó / el cortacircuitos se
disparó
Inspeccione los fusibles / caja de interruptores de la casa y
reemplace cualquier fusible o reajuste el interruptor.
Interrupción en el suministro eléctrico /DXQLGDGVHUHLQLFLDUiDXWRPiWLFDPHQWHFRQODFRQILJXUDFLyQ
utilizada por última vez luego de reestablecer la electricidad.
([LVWHXQUHWUDVRGHWLHPSRSRUSURWHFFLyQGHDSUR[LPDGDPHQWH
PLQXWRVSDUDHYLWDUODGHVFRQH[LyQSRUVREUHFDUJDGHOFRPSUHVRU
Por esta razón, es posible que la unidad no arranque el enfriamiento
o calentamiento normal durante 3 minutos después de encenderlo.
El dispositivo de interrupción de corriente
se ha activado
Presione el botón RESET ubicado en el cable de alimentación.
Si el botón RESET no se mantiene en su lugar, no utilice más el
acondicionador de aire y comuníquese con un técnico calificado.
El acondicionador de
aire se está congelando
El hielo bloquea el flujo de aire hacia el
acondicionador de aire evitando que se
enfríe la habitación
Colo que los controles en Fan (Ventilador solamente) ó High
Cool (Frío Alto) y ajuste el termostato una temperature más alta.
El acondicionador de
aire no enfría como
debería
El flujo de aire está restringido Cerciórese de que no existe ninguna cortina, persiana o mueble
bloqueando el frente del acondicionador de aire.
El control de temperatura no está
ajustado apropiadamente
En el modo Cool (Frío), presione la tecla Reducción –.
El filtro de aire está sucio /LPSLHHOILOWURFDGDGtDVSRUORPHQRV9HUODVHFFLyQGH
Cuidado y limpieza.
La habitación podría haber estado
caliente
Cuando el acondicionador de aire se enciende, usted necesita
darle tiempo para que enfrié la habitación.
El aire frío se está escapando Cerciórese de que los registros de la calefacción no están abiertos
y se encuentran retornando el aire frío.
Las bobinas de enfriamiento se
congelaron
9HU³Acondicionador de aire congelándose´PiVDGHODQWH
El control remoto no
funciona
Las baterías están insertadas
incorrectamente.
,QVSHFFLRQHODSRVLFLyQGHODVEDWHUtDV'HEHQHVWDULQVHUWDGDVHQ
ODSRVLFLyQLQGLFDGD\±
Las baterías están agotadas. Reemplace las baterías.
Hay agua goteando
afuera
Tiempo húmedo y caliente. Esto es normal.
Hay agua goteando
en el interior de la
habitación
El acondicionador de aire no está
inclinado hacia afuera.
Para drenar el agua apropiadamente, cercíorese de que el
acondicionador de aire está inclinado ligeramente desde el frente
hacia atrás.
Se acumula agua en la
bandeja
La humedad removida del aire y se drena
hasta la bandeja.
Esto es normal por un corto período en áreas con poca humedad;
normal por un período de tiempo más postergado en áreas más
húmedas.
La unidad exhibe un
código de error F25
La temperatura exterior es demasiado
fría como para que los termostatos
funcionen correctamente.
&RQVXOWHODVHFFLyQ³8VRGHO$FRQGLFLRQDGRUGH$LUH´/XHJR
apague y reinicie la unidad.
SOLUCIONAR PROBLEMAS

16 49-5001164 Rev. 0
Solucionar problemas
SOLUCIONAR PROBLEMAS
Ŷ4XL]iVHVFXFKHXQVRQLGRPHWiOLFRFDXVDGRSRUHODJXDWRPDGD\WLUDGDFRQWUDHOFRQGHQVDGRUHQORVGtDVOOXYLRVRVRFXDQGR
la humedad es alta. Esta característica de diseño ayuda a remover la humedad y mejora la eficiencia.
Ŷ4XL]iVHVFXFKHTXHHOWHUPRVWDWRKDFHFOLFFXDQGRHOFRPSUHVRUKDFHFLFORHQWUHHQFHQGLGR\DSDJDGR
Ŷ(ODJXDVHDFXPXODHQODEDQGHMDGXUDQWHGtDVOOXYLRVRVRFRQPXFKDKXPHGDG(ODJXDSRGUtDGHUUDPDUVH\JRWHDUGHVGHHO
lado externo de la unidad.
Ŷ(OYHQWLODGRUSRGUtDIXQFLRQDUDXQVLHOFRPSUHVRUQRORKDFH
NOTA: 1RKDJDXQDJXMHURHQODROODGHODEDVH
Sonidos de operación normales
No Utilizar con Condiciones Climáticas Exteriores de Congelación
Este acondicionador de aire no se deberá usar en los modos
³&22/´)UtRR³(&2´(FROyJLFRFXDQGRODWHPSHUDWXUD
H[WHULRUVHDLQIHULRUDOSXQWRGHFRQJHODFLyQ)
El rendimiento de la unidad se reducirá cuando se use fuera
GHHVWDVWHPSHUDWXUDVGHSHQGLHQGRGHOPRGR\HVWRSRGUi
ocasionar daños sobre la misma.
1749-5001164 Rev. 0
Abroche su recibo aquí. Para acceder al servicio técnico de acuerdo
con la garantía deberá contar con la prueba de la fecha original de
compra.
GARANTÍA LIMITADA
Garantía de su acondicionador de aire—garantía limitada de un año.
Abroche su recibo aquí. Para acceder al servicio técnico de acuerdo con la garantía deberá contar con la prueba de la fecha
original de compra.
(;&/86,Ï1'(*$5$17Ë$6,03/Ë&,7$6²6X~QLFD\H[FOXVLYDDOWHUQDWLYDHVODUHSDUDFLyQGHOSURGXFWRFRPRVHLQGLFDHQOD
*DUDQWtD/LPLWDGD/DVJDUDQWtDVLPSOtFLWDVLQFOX\HQGRJDUDQWtDVLPSOtFLWDVGHFRPHUFLDELOLGDGRFRQYHQLHQFLDVREUHXQSURSyVLWR
particular, se limitan a un año o al período más corto permitido por la ley.
3DUD&OLHQWHVGH((88(VWDJDUDQWtDOLPLWDGDVHH[WLHQGHDOFRPSUDGRURULJLQDO\DFXDOTXLHUGXHxRVXEVLJXLHQWHGHSURGXFWRV
FRPSUDGRVSDUDXVRKRJDUHxRGHQWURGH((886LHOSURGXFWRHVWiHQXQiUHDGRQGHQRVHHQFXHQWUDGLVSRQLEOHXQ3URYHHGRU
Autorizado del Servicio Técnico de GE Appliances, usted será responsable por el costo de un viaje o se podrá requerir que traiga
el producto a una ubicación del Servicio Técnico de GE Appliances Autorizado para recibir el servicio. En Alaska, la garantía
limitada excluye el costo de envío o llamadas del servicio técnico a su hogar.
Algunos estados no permiten la exclusión o limitación de daños fortuitos o consecuentes. Esta garantía limitada le da derechos
legales específicos y es posible que tenga otros derechos legales que varían entre un estado y otro. Para conocer cuáles son sus
derechos legales, consulte a la oficina de asuntos del consumidor local o estatal o al Fiscal de su estado.
Garante en EE.UU:
GE Appliances, a Haier company
/RXLVYLOOH.<
Ŷ,QVWUXFFLyQDOFOLHQWH(VWHPDQXDOGHOSURSLHWDULR
brinda información relacionada con instrucciones de
funcionamiento y controles del usuario.
Ŷ,QVWDODFLyQLQDGHFXDGD6LWLHQHXQSUREOHPDGHLQVWDODFLyQ
o el producto no posee la capacidad adecuada, contacte a
VXYHQGHGRUPLQRULVWDRLQVWDODGRU8VWHGHVUHVSRQVDEOHGH
brindar instalaciones de conexión eléctrica adecuadas.
Ŷ)DOODGHOSURGXFWRFRPRUHVXOWDGRGHPRGLILFDFLRQHVVREUH
el mismo o debido a un uso irrazonable, incluyendo la falta
de mantenimiento razonable o necesario.
Ŷ5HHPSOD]RGHIXVLEOHVGHOKRJDURUHLQLFLRGHGLV\XQWRUHV
Ŷ)DOODVFRPRFRQVHFXHQFLDGHFRUURVLyQ
Ŷ'DxRVRFDVLRQDGRVVREUHHOSURGXFWRSRUQLYHOGH
suministro de voltaje inadecuado, accidente, incendio,
inundaciones o catástrofes naturales.
Ŷ'DxRVFRQVHFXHQWHVRLQFLGHQWDOHVFDXVDGRVSRUSRVLEOHV
defectos del producto.
Ŷ'DxRFDXVDGRGHVSXpVGHODHQWUHJD
Qué No Será Cubierto:
Por el Período de: Reemplazaremos:
8Q$xR
'HVGHODIHFKDGHOD
compra original
Reemplazo, reparación o reembolso del costo minorista original de cualquier producto que
falle debido a un defecto en los materiales o la fabricación. Si la unidad es cambiada, la unidad
de reemplazo posee garantía por el resto del período de la garantía original de un año sobre su
producto. GE Appliances reemplazará, a su exclusivo criterio, el producto por otro de la misma o de
una funcionalidad y calidad comparable o hará un reembolso por el precio minorista original.
Ŷ
(PEDOHODXQLGDGFRUUHFWDPHQWH/HUHFRPHQGDPRVXVDUOD
caja de cartón y los materiales de embalaje originales.
ŶEntregue el producto en la ubicación del vendedor minorista
donde fue adquirido.
Ŷ
Incluya en el paquete una copia del receptor de la venta u
otro comprobante de la fecha de compra original. También
escriba su nombre y domicilio y una descripción del defecto.
Para hacer un reclamo de garantía durante el período de devolución permitido de su minorista:
Ŷ8ELTXHVXUHFLERGHYHQWDRULJLQDO\KDJDXQDQRWDGHVXPRGHOR\Q~PHURGHVHULH
Ŷ/ODPHDOSDUDLQLFLDUXQUHFODPRGHJDUDQWtD
Ŷ6HVROLFLWDUiVXQRPEUHGRPLFLOLRIHFKDGHFRPSUD\Q~PHURVGHPRGHOR\VHULH
Ŷ/DVUHFODPDFLRQHVGHJDUDQWtDSXHGHQUHTXHULUHYLGHQFLDGHFRPSUDHOHFWUyQLFDRHQYLDGDSRUFRUUHR
A Fin de Realizar un Reclamo sobre la Garantía Durante el Resto de la Garantía de un Año:

18 49-5001164 Rev. 0
Soporte para el Consumidor
SOPORTE PARA EL CONSUMIDOR
Sitio Web de GE Appliances
¢'HVHDUHDOL]DUXQDFRQVXOWDRQHFHVLWDD\XGDFRQVXHOHFWURGRPpVWLFR"£,QWHQWHDWUDYpVGHO6LWLR:HEGH*($SSOLDQFHVODV
KRUDVGHOGtDFXDOTXLHUGtDGHODxR8VWHGWDPELpQSXHGHFRPSUDUPiVHOHFWURGRPpVWLFRVPDUDYLOORVRVGH*($SSOLDQFHV\
aprovechar todos nuestros servicios de soporte a través de Internet, diseñados para su conveniencia.
GEAppliances.com
Registre su Electrodoméstico
£5HJLVWUHVXHOHFWURGRPpVWLFRQXHYRDWUDYpVGH,QWHUQHWVHJ~QVXFRQYHQLHQFLD8QUHJLVWURSXQWXDOGHVXSURGXFWRSHUPLWLUi
una mejor comunicación y un servicio más puntual de acuerdo con los términos de su garantía, en caso de surgir la necesidad.
También puede enviar una carta en la tarjeta de inscripción preimpresa que se incluye con el material embalado.
GEAppliances.com/register
Piezas y Accesorios
Aquellos individuos calificados para realizar el servicio técnico de sus propios electrodomésticos podrán solicitar el envío de
SLH]DVRDFFHVRULRVGLUHFWDPHQWHDVXVKRJDUHVVHDFHSWDQODVWDUMHWDV9,6$0DVWHU&DUG\'LVFRYHU2UGHQHKR\DWUDYpVGH
Internet durante las 24 horas, todos los días. GEApplianceparts.com o de forma telefónica al 877.959.8688 durante el horario
de atención comercial.
Las instrucciones que figuran en este manual cubren los procedimientos que serán realizados por cualquier usuario.
Otros servicios técnicos generalmente deben ser derivados a personal calificado del servicio. Se deberá tener cuidado,
ya que una reparación indebida podrá hacer que el funcionamiento no sea seguro.
Contáctenos
Si no se encuentra satisfecho con el servicio que recibió de GE Appliances, comuníquese con nosotros a través de nuestro sitio
:HEFRQWRGRVORVGHWDOOHVLQFOX\HQGRVXQ~PHURWHOHIyQLFRRHVFULEDD
*HQHUDO0DQDJHU&XVWRPHU5HODWLRQV_*($SSOLDQFHV$SSOLDQFH3DUN_/RXLVYLOOH.<
*($SSOLDQFHVFRPJHVHUYLFHDQGVXSSRUWFRQWDFWKWP