Instruction Manual
ICE MAKER
Support Email: support@tittla.com
Support Phone: +1(510)228-4672
It is important that you read these instructions carefully and keep them for future
reference. Images are for reference only. Please refer to the actual product for
accuracy.

1
IMPORTANT SAFETY INSTRUCTIONS
When using electrical appliances, basic safety precautions should be followed to
reduce the risk of fire, electric shock, and injury to persons or property.Read all
instructions before operating the machine for the first time.
CAUTION: DO NOT STORE ICE IN THE ICE BIN OVERNIGHT. THIS MACHINE
IS NOT A REFRIGERATOR—THE ICE WILL MELT AND WATER WILL DRAIN
FROM THE UNIT.
1. If connecting to a water supply, caution: use only potable water
2. The machine is intended to be used in household and similar applications such
as:
-staff kitchen areas in shops,offices,and other working environments;
-farmhouses
-by clients in hotels,motels,and other residential type environments;
-Catering industry and similar industries.
3. The machine should be used indoors in a well-ventilated area, free of
obstructions. Ensure at least 50 cm of space around all four sides of the
machine.
4. When using electrical appliances,basic safety precautions should be followed to
reduce the risk of fire,electric shock,and injury to persons or property.Read all
instructions before using any appliance.
5. Do not operate this or any other appliance with a damaged cord.
6. Connect to properly polarized outlets only. No other appliance should be
plugged into the same outlet.Be sure that the plug is fully inserted into the socket.
7. Don't place the machine and power cord near flammable material.Do not cover
the cord. Do not submerge it in water.
8. We do not recommend the use of an extension cord,as it may overheat and
become a risk of fire.
9. Unplug the ice maker before cleaning or making any repairs or servicing.
10.Exercise caution and supervision when the appliance is used near children.
11.Do not use your ice maker outdoors. Avoid direct sunlight and ensure at least 5
inches of clearance between the back and sides of the unit and the wall.
12.Don't use any liquid other than water in the unit to make the ice.
13.Do not clean your ice maker with flammable detergents.The fumes can create a
fire hazard or explosion.
14.Do not tip the machine over.
2
15.If the ice maker is brought indoors from outdoors during the wintertime,give it a
few hours to warm up to room temperature before plugging into the power
source.
16.This unit should be properly grounded for your safety.The power cord is
equipped with a three-prong plug mated with standard three-prong wall outlets
to minimize the possibility of electric shock
17.Plug the appliance into a dedicated and properly grounded wall outlet. In case
of any issues with power or grounding, consult a certified electrician.
18.The foaming materials inside are combustible and must be kept away from fire.
19.Do not unplug the unit by pulling the cord. Always hold the plug itself.
IMPORTANCE:To avoid hazards due to instability,the unit must be placed on an
even and flat surface.
WARNING: This appliance must be grounded.
1)The fuse on the PCB is 15A,if change,must be operated by a
technician.
2)voltage fluctuation can't be exceeded±10%than the rated voltage,or
a Voltage stabilizer is needed.
3)In addition to the method recommended by the manufacturer,
mechanical equipment or other methods must not be used to
accelerate the defrosting process, and the refrigeration system
must not be damaged.
4)The refrigeration system contains high-pressure refrigerant,and the
refrigeration system must not be damaged.Be especially careful
when installing and moving.Installation and maintenance must be
performed by the manufacturer or professional.Scrap must be
disposed of by the designated recycling department.
5)There are heat insulation materials in the appliance,which are
combustible materials,and must be kept away from fire sources.
Repairs must be performed by the manufacturer or professionals.
Scrap must be disposed of by the designated recycling department.
IMPORTANCE: To avoid hazards due to instability,the unit must be placed on an
even and flat surface.
Warning:
Combustible
materials
3
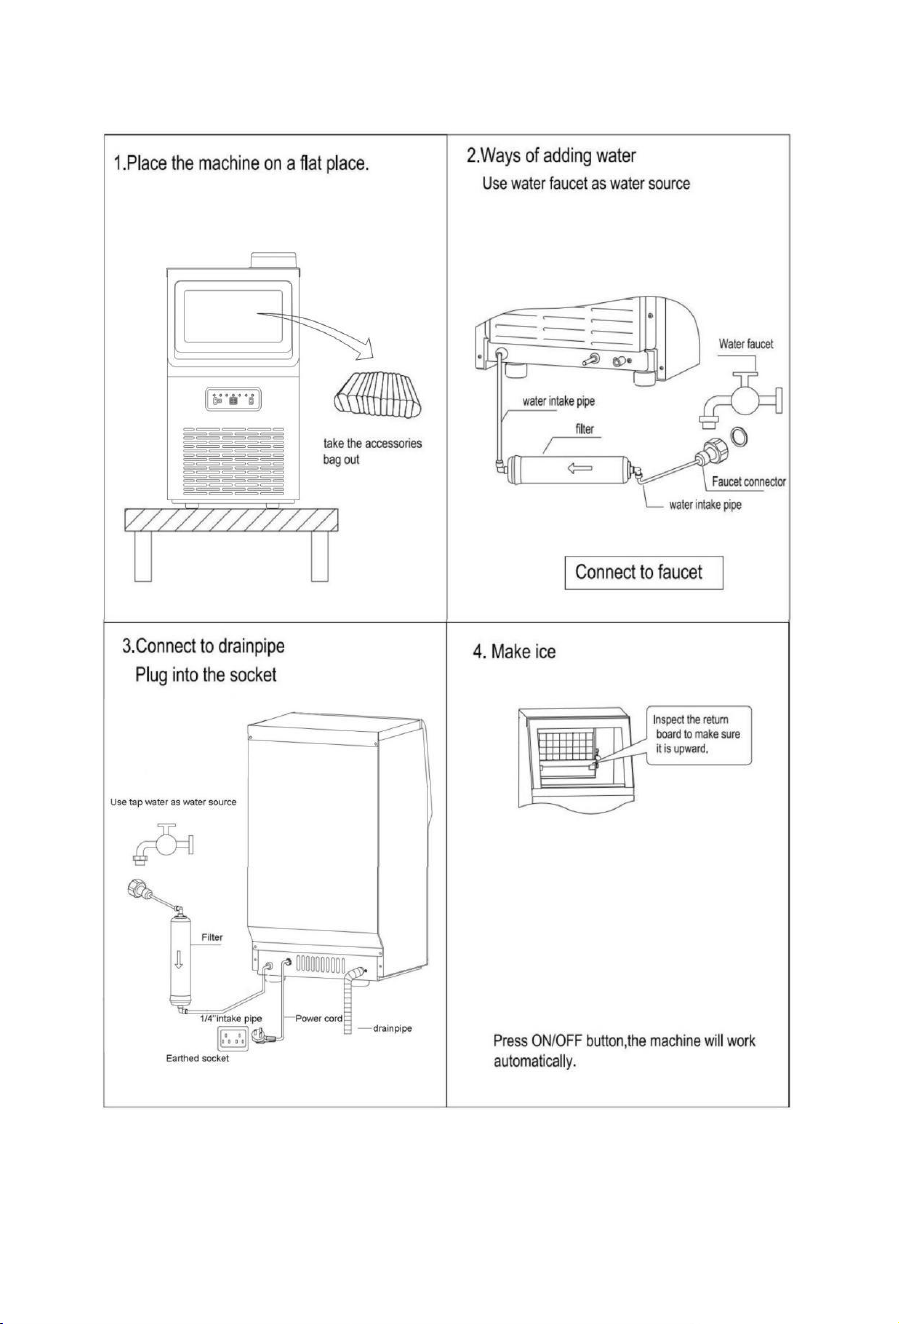
Installation and connection
Note:The installation must be carried out by professionals according to the
instructions.
4
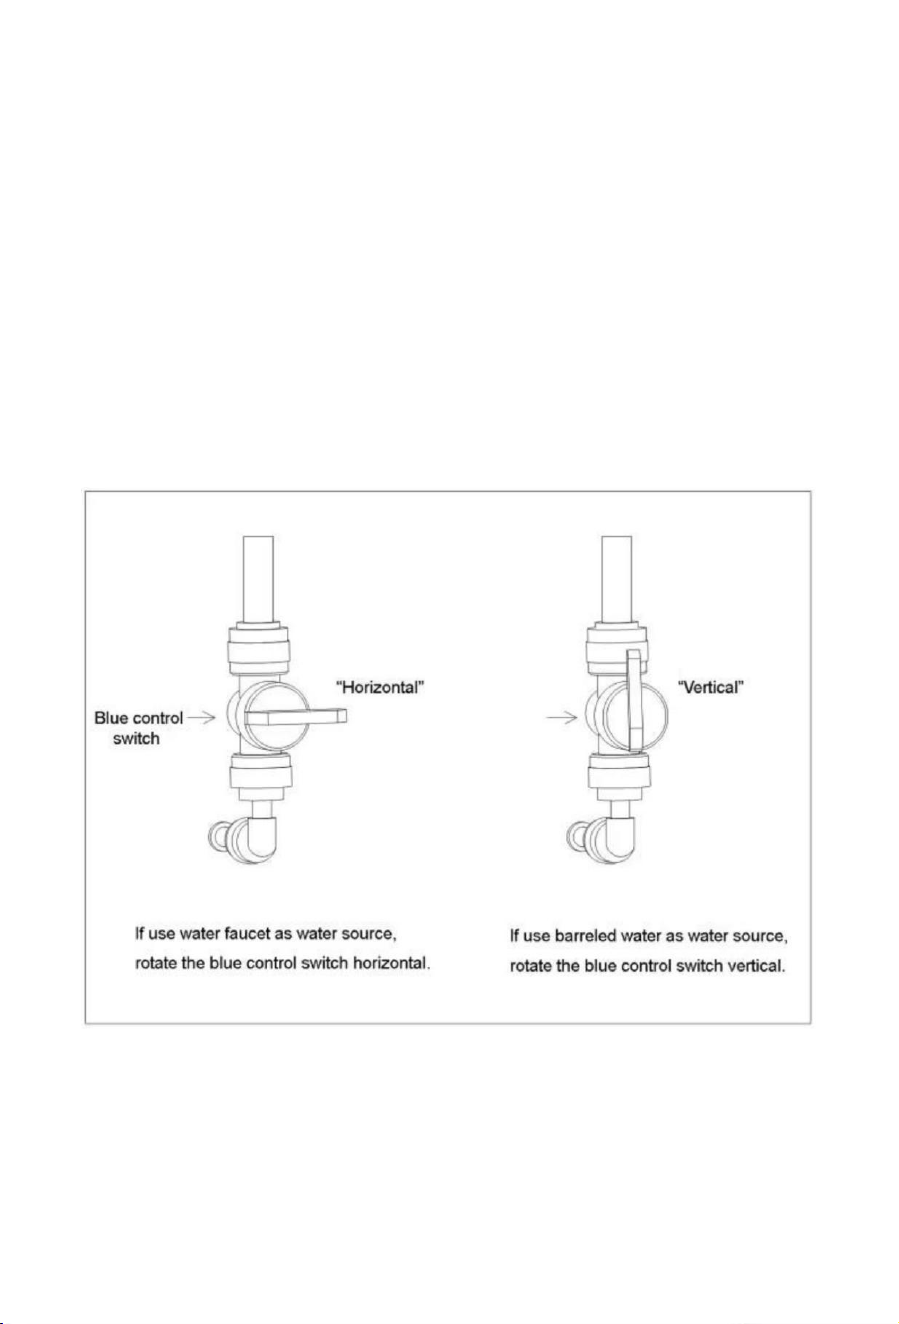
USING BARRELED WATER AS WATER SOURCE
You can use barreled water as water source.Please remember to replenish water
regularly. Also, rotate the blue control switch to the vertical position and turn off the
tap water supply.
1.If you use water faucet as water source, please ensure that the water faucet is
open for continuous water supply. If water runs out, the "add water" indicator will
light on.
2.If you use barreled water as the water source,remember to replenish water
regularly or the "stoppage" indicator will light on.
3.When you use water faucet as water source, please rotate the blue control
switch in the machine horizontal. On the other hand, if you use barreled water as
water source,please rotate the blue control switch vertical.Please refer to the
picture below:
If you have questions,we can send the tutorial video to guide you, please contact:
5
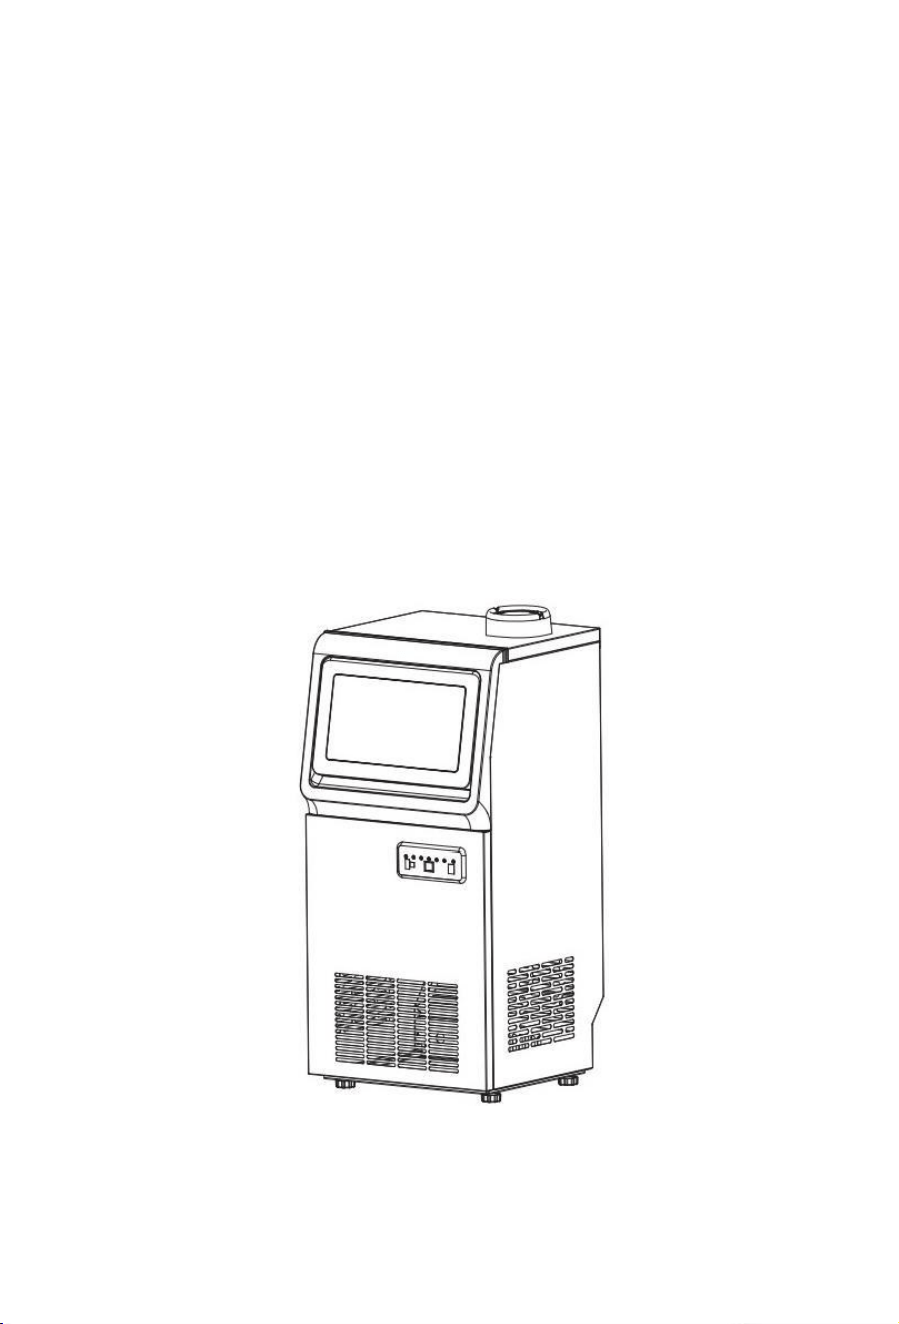
UNPACKING YOUR ICE MAKER
1. Remove all exterior and interior packaging materials.Check whether all of the
following accessories are included. or not.If any parts are missing,please contact
our customer service.After you unpack the machine,we recommend that you
leave it for 24 hours
2. Clean the interior with lukewarm water and a soft cloth, or use the Self-Clean
function.
3. Find a location for your ice maker where it's protected from direct sunlight and
other sources of heat (i.e.stove,furnace,radiator).Place the ice maker on a level
surface.Make sure that there is at least 5 inches of space between the back and
sides of your ice maker and the wall.
4. Allow one hour for the refrigerant to settle before plugging the unit for initial use.
5.The appliance must be positioned where the plug is accessible.
Package Contents
Ice maker machinex1
6
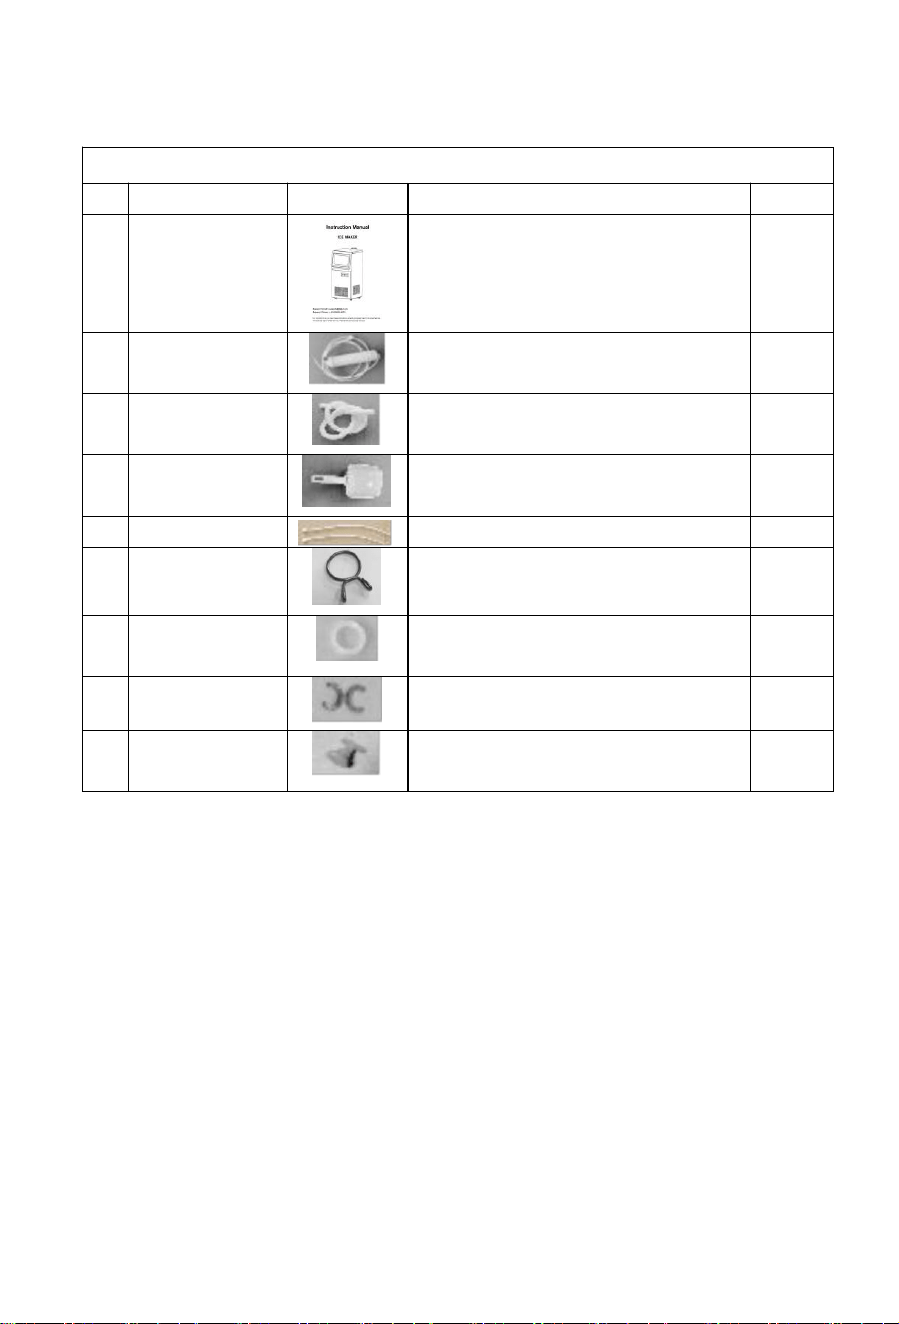
Warm Tips: .Check whether all below accessories are included.
Accessories list
NO
Description
Picture
Usage
QTY
1
Manual
Operation manual
1PC
2
Filter
Filter water
1PC
3
Drainage pipe
Drain
1PC
4
Ice spoon
Take ice cubes
1PC
5
nylon cable ties
Fix pipe if needed
2PCS
6
Hoop
fasten the outlet and the drainage
pipe together if needed
1PC
7
Seal ring
Do put it in the faucet of the intake
pipe.The other one is spare.
2PCS
8
Spare blue clip
Spare blue clip if needed.
2PCS
9
Spare plug
Spare plug which plug the tank if
needed.
1PC
The place of installation
a)The appliance should be placed in a clean place with good ventilation,which
should be kept from sunlight and rain.
b)The machine cannot be placed near any heat source.
c)The ambient temperature should be between 3℃ and 40℃,and there is must be
15cm at least between the four sides of the machine with the wall.
d)The machine should be placed on a flat surface.
e)Do not place anything on top of the appliance.
7
Connect drainage pipe and water intake pipe
Warning:
1)The machine can only connect with drinking water sources,and must meet local
drinking water standards
2)The water pressure must be in 0.1-0.4Mpa,if exceed 0.4Mpa,a pressure
reducing valve must be connected.
3)Drainage:The outlet of the drainage pipe must be lower than the outlet on the
machine
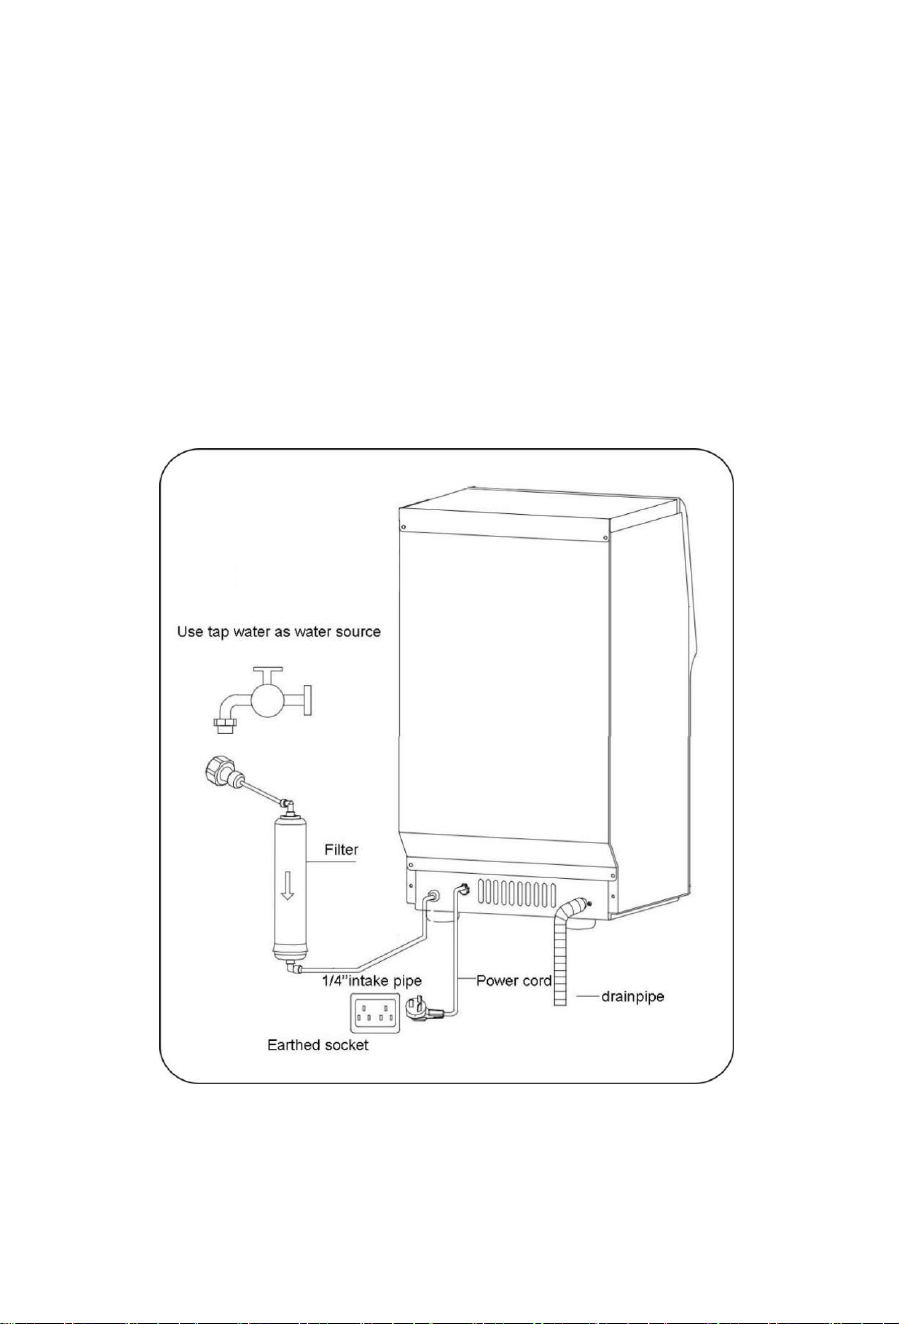
CONNECTING WITH WATER
Please connect your ice maker with other parts by referring the diagram below.
We suggest you change the water filter for about 3 months according to your local
water quality situation.The cleanliness of the ice depends on the water and the
cleaner the water the longer the life of the ice machine will be.If you want to buy
8
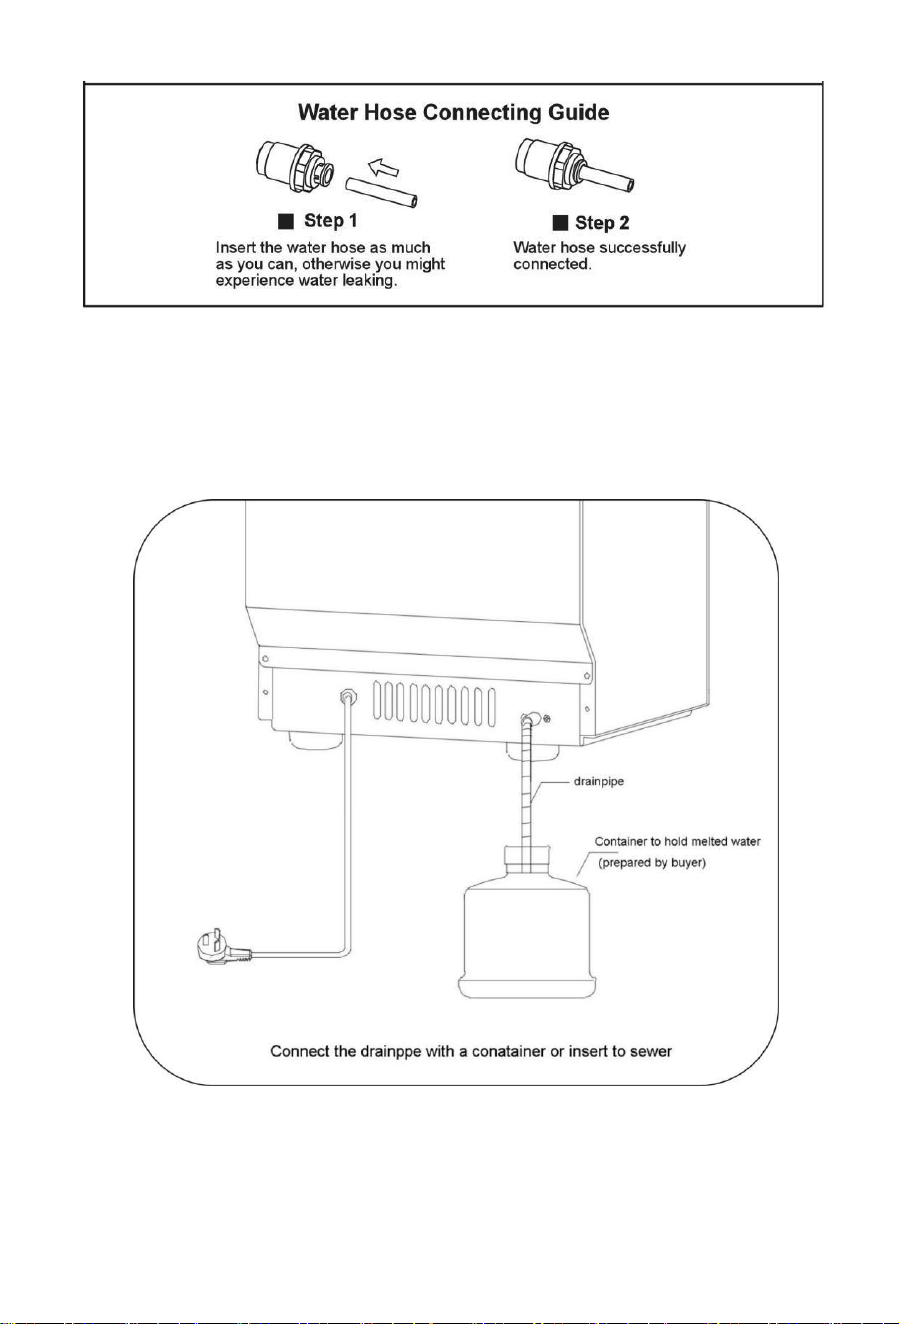
Drain.
Warning:Because the ice in the inner tank will melt,drain pipe must be connected
before using,and insert the drain pipe into a container or into the sewer.
Note:Connect one end of the drain pipe to the machine,and the other end to a
container or sewer.The other port of the drain pipe must be lower than the drain
port of the machine.
If you need a suitable drain pump,you could contact us by email.
Phone Number: +1(510)228-4672

9
MACHINE OPERATIONS
Operation Panel
Ice making operation:
1.Connect the machine to the power and press the"ON/OFF" button.The "ice
making" indicator will light on.
2.Press the ‘+’ or ‘–’ button to set the countdown time for the ice making procedure
(The time range is from 5 minutes to 50 minutes).The machine will enter the ice
making procedure.
3.When the countdown of time is finished,the "melting" indicator will light on.The
ice cubes will come off the freezing panel later.
4.After the ice cubes come off.The machine will enter another loop of ice making
automatically.
Auto Turning On/Off:
1.When the machine is turned off while connected to the power,press the
"Reservation/Clean" button and the "+"/"-"button to set the auto-turning-on time
(in hours).The machine will automatically turn on after the countdown is finished.
2.When the machine is at the middle of ice making, press the
"Reservation/Clean" button and the "+"/"-" button to set the auto-turning-off
time(in hours). The machine will automatically turn off after the countdown is
finished.
Self-cleaning:
1.When the machine is turned off while connected to the power,press the
"Reservation/Clean" button and hold it for a while.The machine will automatically
enter self-clean program.
Notes:
(1)If you change the countdown time during the middle of the ice making
procedure, it will take effect at the next loop.You can long press the "HOT"
button during the ice making to unload the ice cubes ahead of time.
(2)The surrounding environmental temperature will influence the time needed for
ice making.

10
1.Press cleaning button during cleaning mode to make the machine end the
cleaning in advance.
2.Press and hold the “Clean” button for 2 seconds during the ice making to make
the ice cubes drop from the ice mold ahead of time.
Light button:
Press this button to turn off the blue light,press again to turn it on.
Notes:
The surrounding environmental temperature will influence the time needed for ice
making.
Warning:
1.The appliance is used to make ice cubes and store ice temporarily. Please
follow these principles to keep the ice cubes clean:
●Wash your hands before taking out the ice cubes and use the plastic ice scoop
provided to take ice.
●Except ice cubes,please do not put anything else in the machine.
●Clean the storage tank before use.Keep the ice scoop clean and use a neutral
detergent to clean it.Close the door after taking ice to prevent dust.
2.The use of any electrical appliances must follow basic
guidelines,especially:
●A high humidity environment will increase the risk of short circuit or electric
shock.If in doubt,please cut off the power of the machine.
●Please do not pull the power cord directly to turn off the machine.
●Without adult supervision,the ice maker cannot be used alone by children or the
elderly.
CLEANING &MAINTENANCE
Please thoroughly clean your ice maker before initial use.
1)Cleaning of internal and external parts
Note:Unplug the power plug before doing any cleaning or maintenance procedures.
Clean the condenser at least once a year,so that the ice maker can work better.
Do not use alcohol to clean the ice machine, as this may cause the plastic to crack.
a)External
Use a clean soft cloth to wipe the ice machine at least once a week,and then use a
soft cloth with a neutral detergent to remove grease or other impurities.
b)Ice scoop cleaning(weekly)
Dip the ice scoop in a mixture of neutral detergent and water for at least 3 minutes,
then rinse with water.
c)Storage tank cleaning(weekly)

11
Open the ice door and remove all ice cubes.
Use a neutral detergent to clean the inner wall of the tank,and then rinse with
water.
Wipe the inner wall with a cloth and neutral detergent. Rinse with water,and finally
dry the inner surface with another clean cloth.
d)Water pump cleaning(weekly)
The water pump must be cleaned once a week.Before cleaning,unplug the power
plug, then take out the water pump,clean the water inlet of the pump with a small
brush,and
INTERIOR:please use the following Self-Clean function:
1.Add water and vinegar or lemon juice mix(1:1 ratio)
2.Plug in unit,press and hold the CLEAN button for approximately 3 seconds,
then release.The unit will automatically enter Self-clean program.This process
takes about 5- 6 minutes.When the Self-Clean program is finished,unit will
automatically power off.
3.The fan blade will be rotating.This process rinses the inside parts several times.
4.After the Self-Clean program is completed,unplug the power cord and drain out
the water by unplugging the drain cap on the side.Replace drain cap.
5.Add fresh water to the water reservoir,up to the water level mark.
6.Plug the unit and repeat the Self-Clean process by repeating steps 3 to 5.This
will rinse out the vinegar/lemon residue.
7.After draining the water,replace and tighten drain cap.
8.Dry the interior and exterior with a clean,soft cloth.
NOTE:It is strongly recommended to clean the unit before initial use or after the
unit has not been in use for a long period of time.
2)Long-term storage of the ice maker
a)Unplug the power plug to cut off the power supply;
b)Turn off the water supply and remove the water inlet pipe;
c)Remove all ice cubes and drain the water;
d)Wash and dry the inner walls of the storage tank and water tank.
12
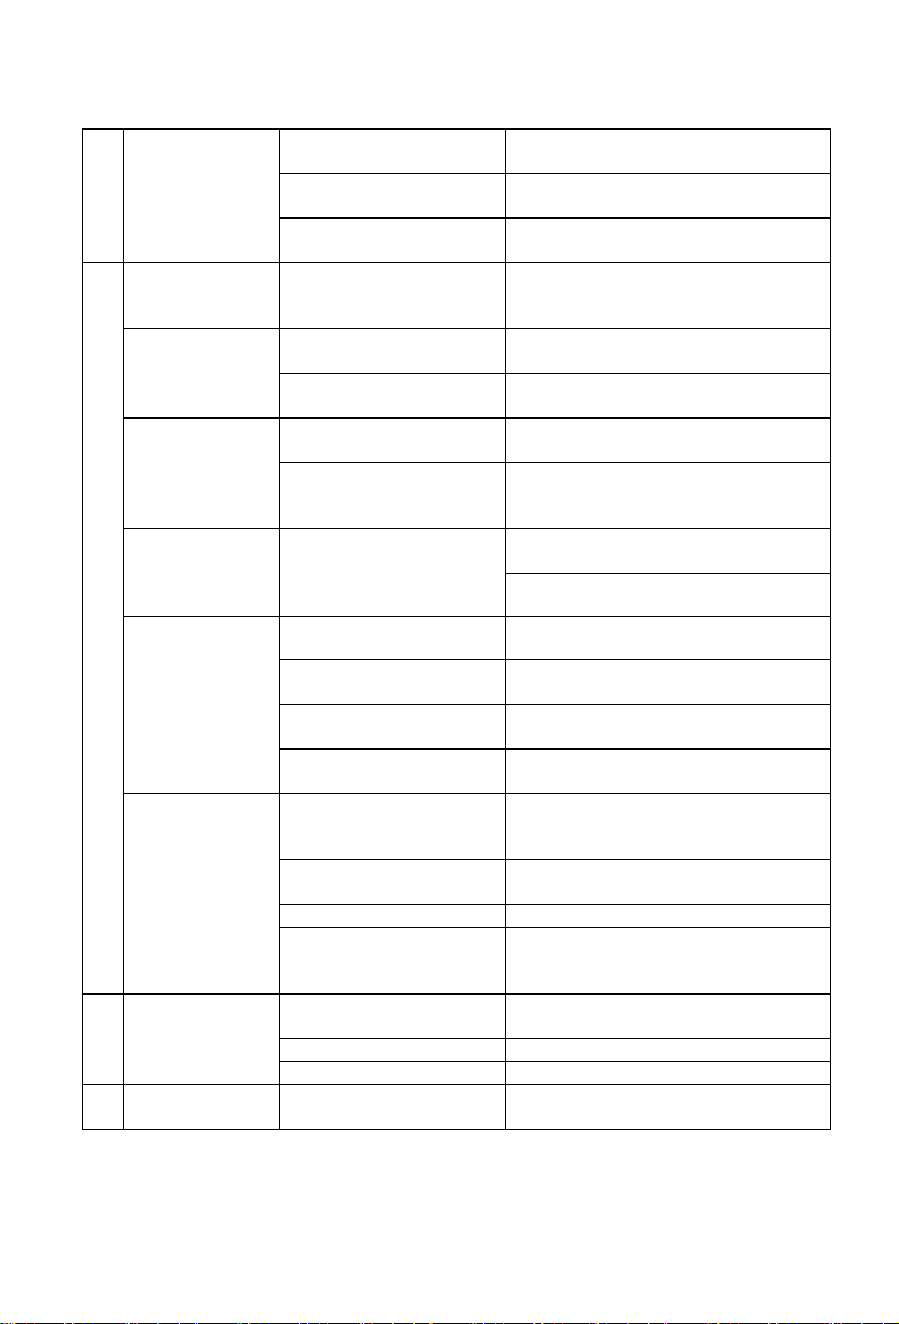
Common malfunction analysis
E1
Ice full indicator is
on, and
proximity switch
didn't react
Evaporator connector
didn't assemble well
Re-install the connector
Proximity switch is not
sensitive
Replace the switch
The connector didn't
return to original position
Take away the ice to make the
connector return to original position
E2
Normal to make
ice
Stop every 4 cycles,and
the process of ice drop
continued for 5 min
Proximity switch is not sensitive,
replace it
No water in the
tank
The water tank is not
plugged
Put the plug back
Use tap water as water
source
Check the water supply
Water slopped
over the tank
Use tap water as water
source
The blue tap didn't rotate to horizontal
Use tap water as water
source
Water pressure is too high, water float
can't work.Adjust the water pressure
or replace by a new one.
Water in the tank
No water or low flow
Pump is badly clogged up, replace or
clean it
The spray pipe is clogged up, clean it
Water flow and
water get cool
Thin ice on the evaporator
Increase the making time through "+"
very solid ice on the
evaporator
Reduce the making time through "-
Some water sprayed to
ice storage tank
Adjust the spray pipe for proper
direction and pressure
The water leak from the
back of water tank
The tank need to be adjusted
Water flows, but it
is not cooling
The main board didn't
supply electricity to
compressor
Replace with a new main board
Compressor didn't work
Check the starter,replace by a new
one if needed
Compressor is very hot
Replace
Compressor work but the
connected copper pipe
didn't get cool
The compressor leak
E3
The fan is not
work
The condenser prob is not
sensitive
Unplug the prob or replace by a new
one
The fan is jammed
Adjust the fan
Fan is broken
Replace by a new fan
E4
Ice full
The connector didn't
return to original position
Take away the ice to make the
connector return to original position
If your ice maker shows E1,E2,E3,E4 code,but you can't solve it,please take a video to
4672
13
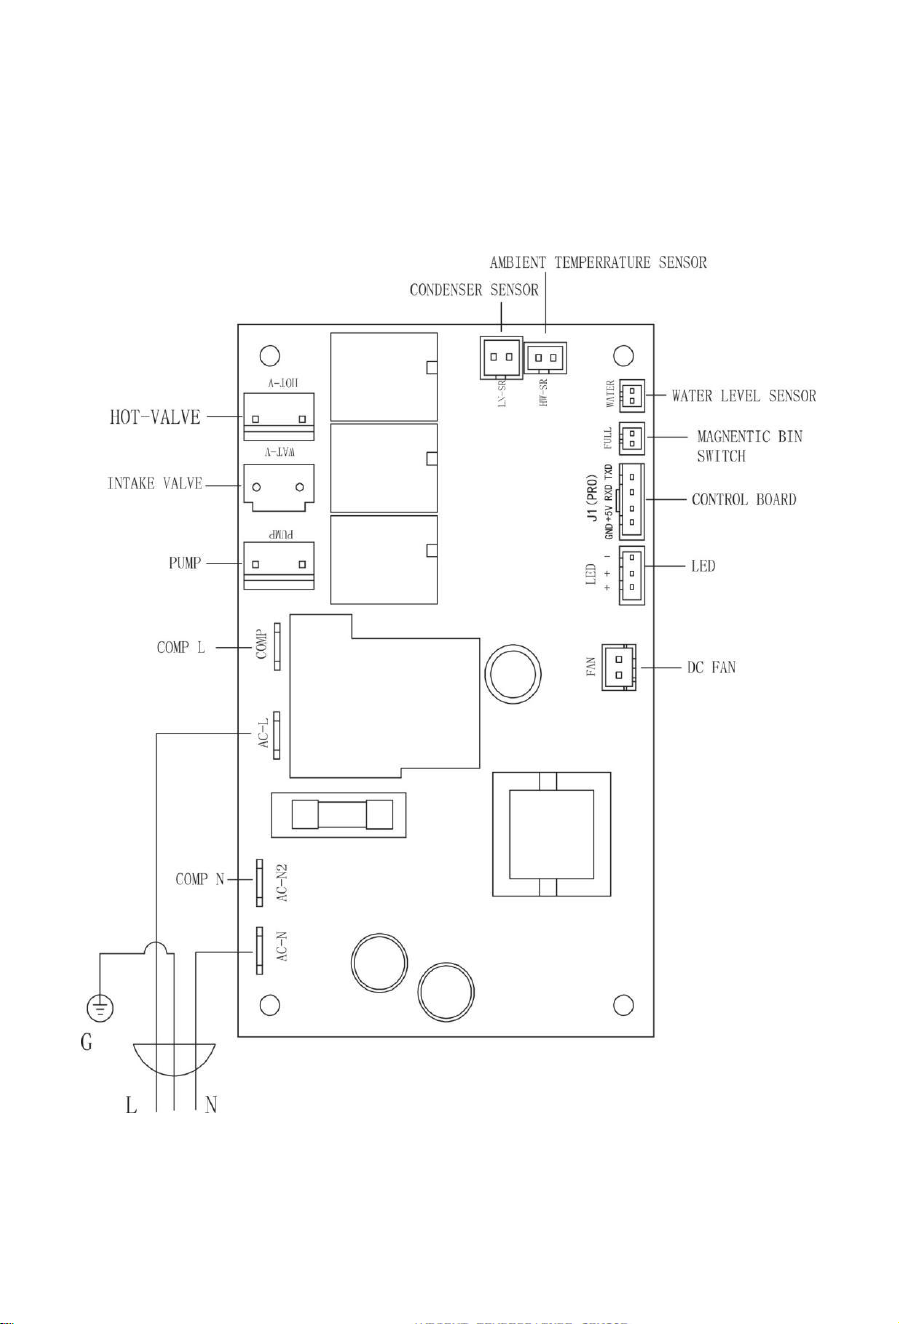
Circuit Diagram
14
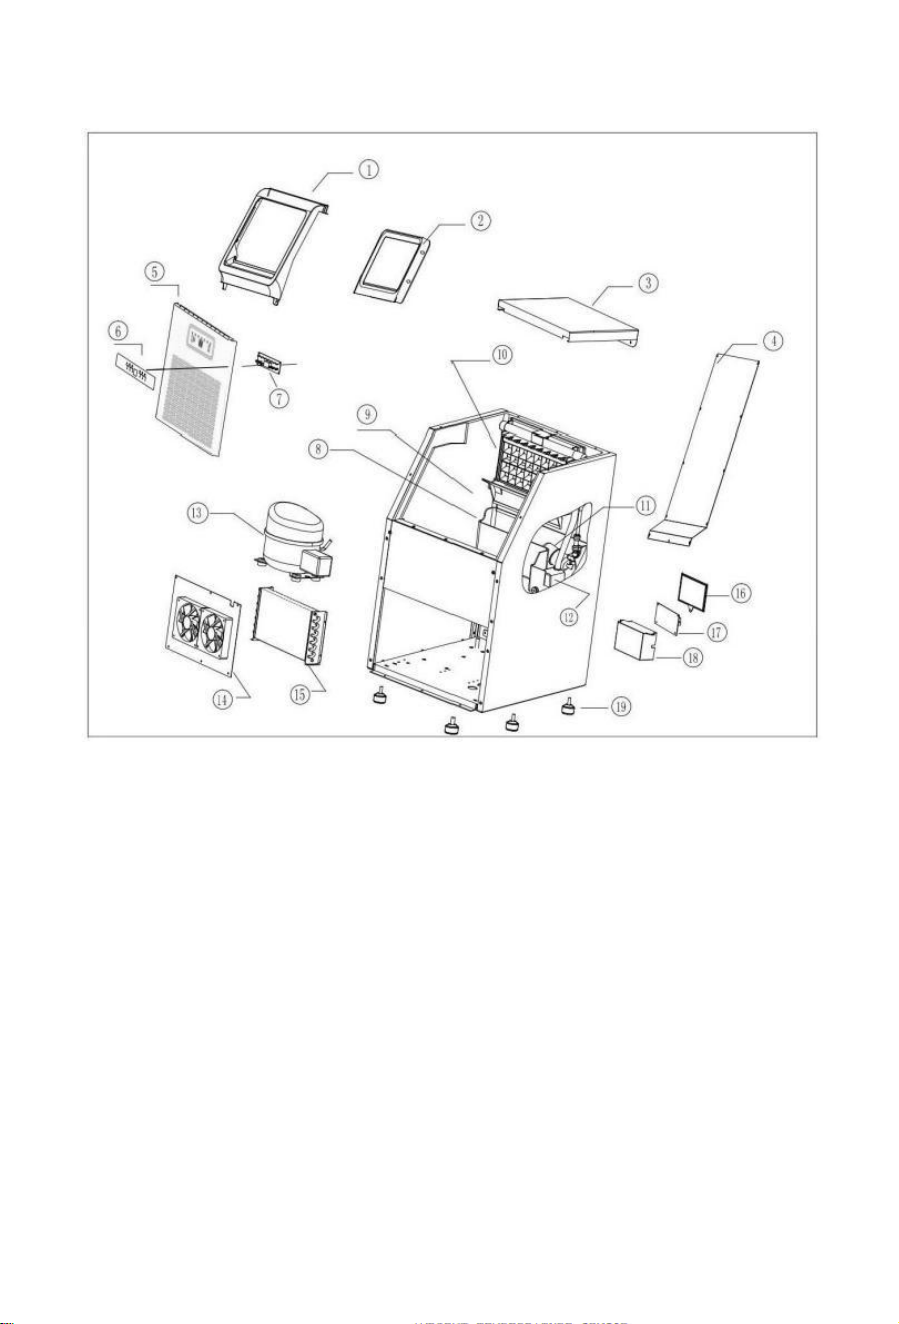
Explosive diagram
1.Door 7.Display board 13.Compressor
2.Door frame 8.Inner tank 14.DC fan
3.Top cover 9.Water tank 15.Condenser
4.Back panel 10.Ice mold 16.Main board
5.Front panel 11.Float 17.Main board box
6.Front plate 12.Pump 18.Rubber feet