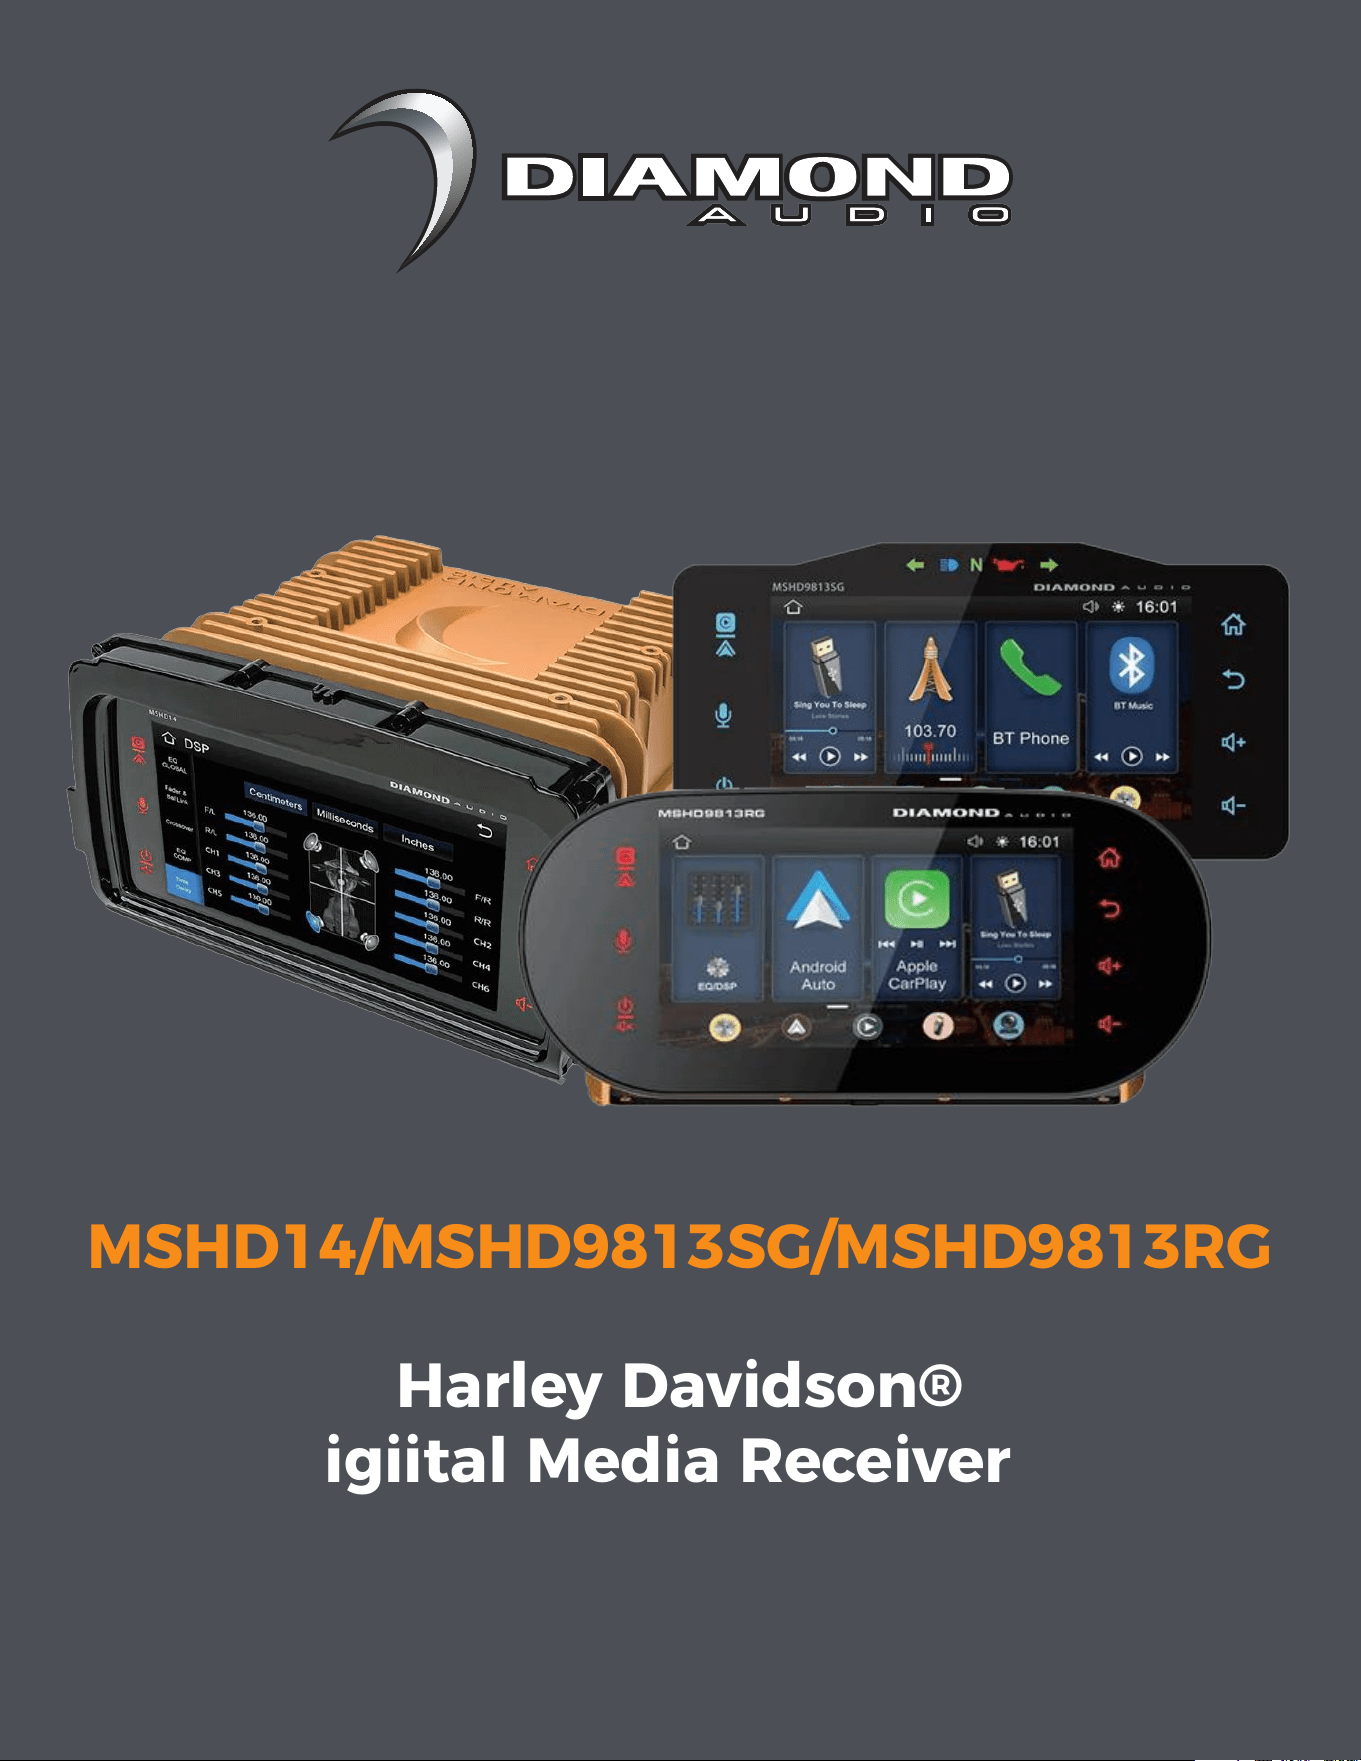
Owners Manual
Harley Davidson®
Digiital Media Receiver
MSHD14/MSHD9813SG/MSHD9813RG

INTRODUCTION
FEATURES
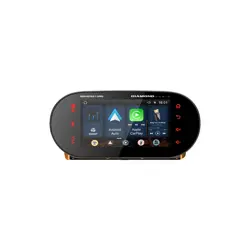
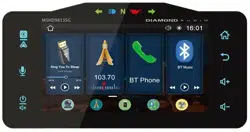
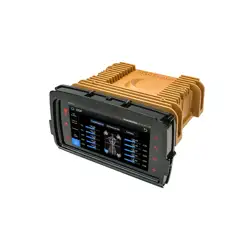
Diamond Audio's MSHD14 is the world’s most advanced Plug N-Play Digital Media
Receiver radio for Harley-Davidson motorcycles. The MSHD14 is also the first media
player to offer iData’s Maestro RR2 module built-in. (MSHD14) Diamond redefines
your ride with unmatched features and cutting-edge technology. You have
purchased the premier media player for your Harley motorcycle with a long list of
innovative features and unmatched musical clarity.
Proudly designed in the USA, this high-end Harley radio is engineered to provide
years of musical enjoyment. Thank you from the team at Diamond Audio for
choosing us for your bike.
10 CHANNEL: CLIP-FREE INDEPENDENT OUTPUTS: EXPERIENCE THE CLEAREST AUDIO
WITH (6) 5V RMS RCA OUTPUTS AND(4) 50X4@2Ω/25X4@4Ω RMS CLIP-FREE OUTPUTS.
WIRELESS APPLE CARPLAY: SEAMLESSLY INTEGRATE YOUR IPHONE WITH THE WIRE-
LESS APPLE CARPLAY FEATURE, PROVIDING YOU WITH EFFORTLESS ACCESS TO MUSIC,
NAVIGATION, AND MORE.
7" ULTRA-BRIGHT, 1000 NIT LCD TOUCHSCREEN: THIS GLOVE-FRIENDLY TOUCHSCREEN
IS DESIGNED FOR VISIBILITY AND EASE OF USE, EVEN UNDER THE BRIGHTEST CONDI-
TIONS.
INTERNAL MAESTRO RR2 CANBUS INTERFACE: AS THE WORLD'S FIRST OF ITS KIND,
THIS INTERFACE ENSURES SEAMLESS INTEGRATION WITH YOUR HARLEY’S SYSTEMS.
6 PROGRAMMABLE AUXILIARY TRIGGERS: CONTROL YOUR LIGHTING, KICKSTANDS, AND
ACCESSORIES THROUGH THE TOUCHSCREEN, TIMERS, TRIGGERS, OR HANDLEBAR
CONTROLS.
VEHICLE DATA SCREENS: MONITOR ESSENTIAL METRICS LIKE SPEED, OIL PRESSURE,
VOLTAGE, AND 0-60 TIME WITH USERSELECTABLE DATA SCREENS.
10CH DSP FEATURES: INCLUDES TIME DELAY, HP/LP/BP CROSSOVERS WITH ADJUST-
ABLE SLOPES, WITH INDEPENDENT CHANNELS THAT CAN BE LINKED OR SEPARATED
FROM FADER CONTROL.
IPX6 WATER RESISTANCE: COMES WITH A WEATHERPROOF TRIM GASKET, ENSURING
DURABILITY IN ALL RIDING CONDITIONS.
MEDIA PLAYER & BLUETOOTH 5.2: SUPPORTS A WIDE RANGE OF MEDIA FORMATS,
INCLUDING MP3, AAC, WMA, AND MORE, WITH BLUETOOTH STREAMING AND
HANDS-FREE CALLING.
USB MEDIA INPUT/CHARGER: EQUIPPED WITH A 2.1A CHARGER TO KEEP YOUR
DEVICES POWERED ON THE GO.
BACKUP CAMERA INPUT: ENHANCE YOUR SAFETY WITH A COMPATIBLE BACKUP
CAMERA INPUT.
BOOM2 COMPATIBLE: DESIGNED TO WORK SEAMLESSLY WITH BOOM2 SYSTEMS.
MULTIPLE PATENTED TECHNOLOGIES: BOASTING NUMEROUS PATENTED FEATURES
AND TECHNOLOGIES, THE MSHD14 SETS A NEW STANDARD IN MOTORCYCLE AUDIO
SYSTEMS.
2
We reserve the right to change the products and specifications at any time without notice.
Images may or may not include optional equipment.

CONTENTS
Weblink Download
4
iData Internal RR2 Programing
4
iData Internal RR2 MPO Programing
6
Radio Receiver Installation
7
Boom Audio Integration
10
Android Auto & Apple Carplay
12
Setup Sirius/XM
13
Setup Bluetooth Line Driver
14
Setup Time Delay
15
Setup Global EQ
16
Setup Compensation EQs
17
Setup Bluetooth Pairing
17
Setup DSP Crossover
18
Setup Balance and Fader
19
Warranty
20
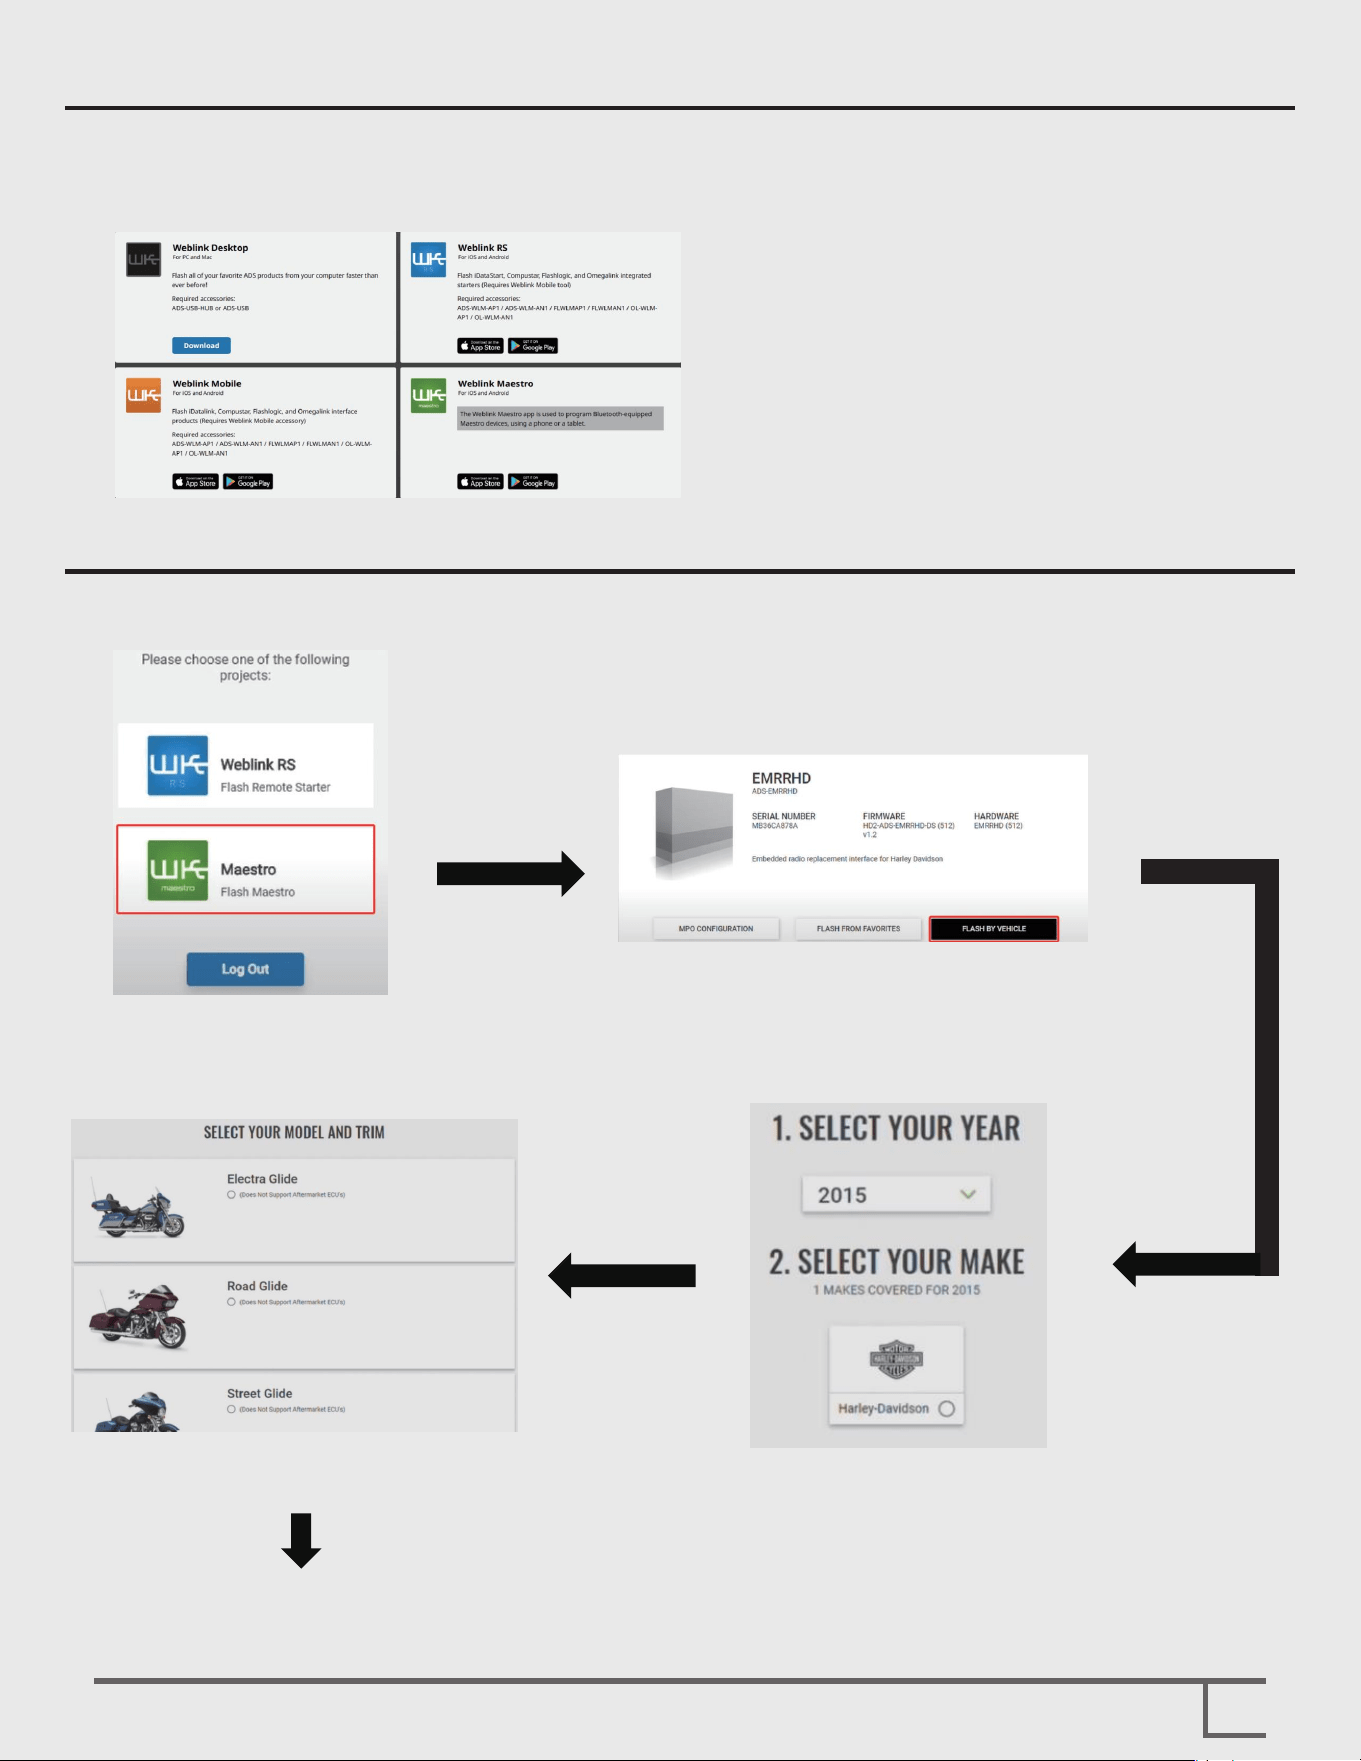
Weblink Download
iData Internal RR2 Programing
Please dowenload Weblink app.
Download link: https://www.weblinkupdater.com/apps
Please follow the steps below to program the internal RR2 of iData.
Step 1-Click the green flash
Maestro button;
Step 4-Select your moderl and trim; Step 3- Select your model year;
Step 2-Click the Green Flash by vehicle;
4
5
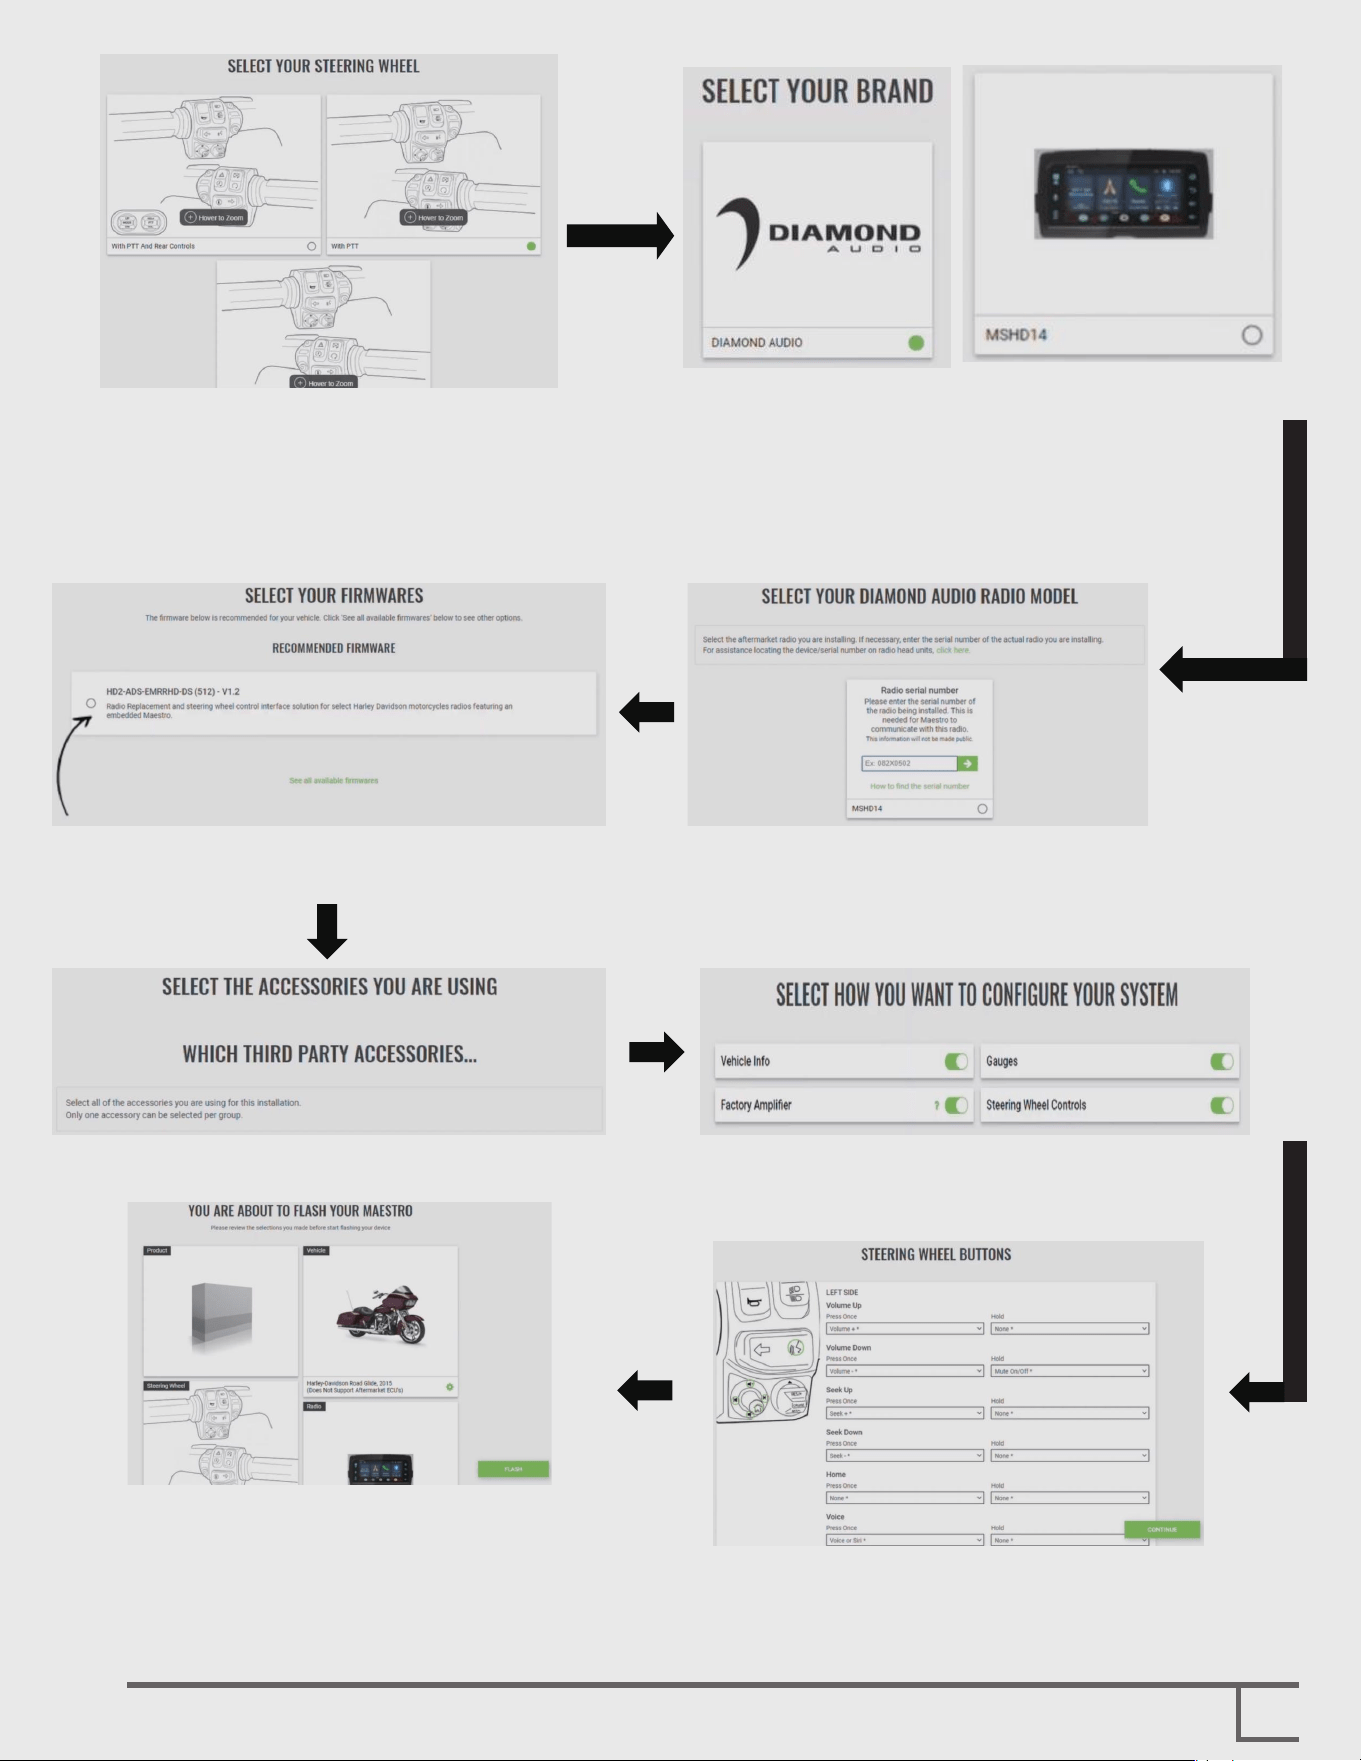
Step 5-Select your steering wheel;
Step 8-Click this button;
Step 9-Click “CONTINUE” twice; Step 10-This is where you configure the
radio function. Click "CONTINUE".
Step 11-On this screen, you can customize
your handlebar when you click "CONTINUE".
Step 12-Now, you are ready to flash your unit.
When the flash is completed,
congratulations! You can install the radio now.
Step 6-Select DIAMOND AUDIO and
MSHD14 radio model;
Step 7-Fill in the serial number at the
bottom of the box or device.
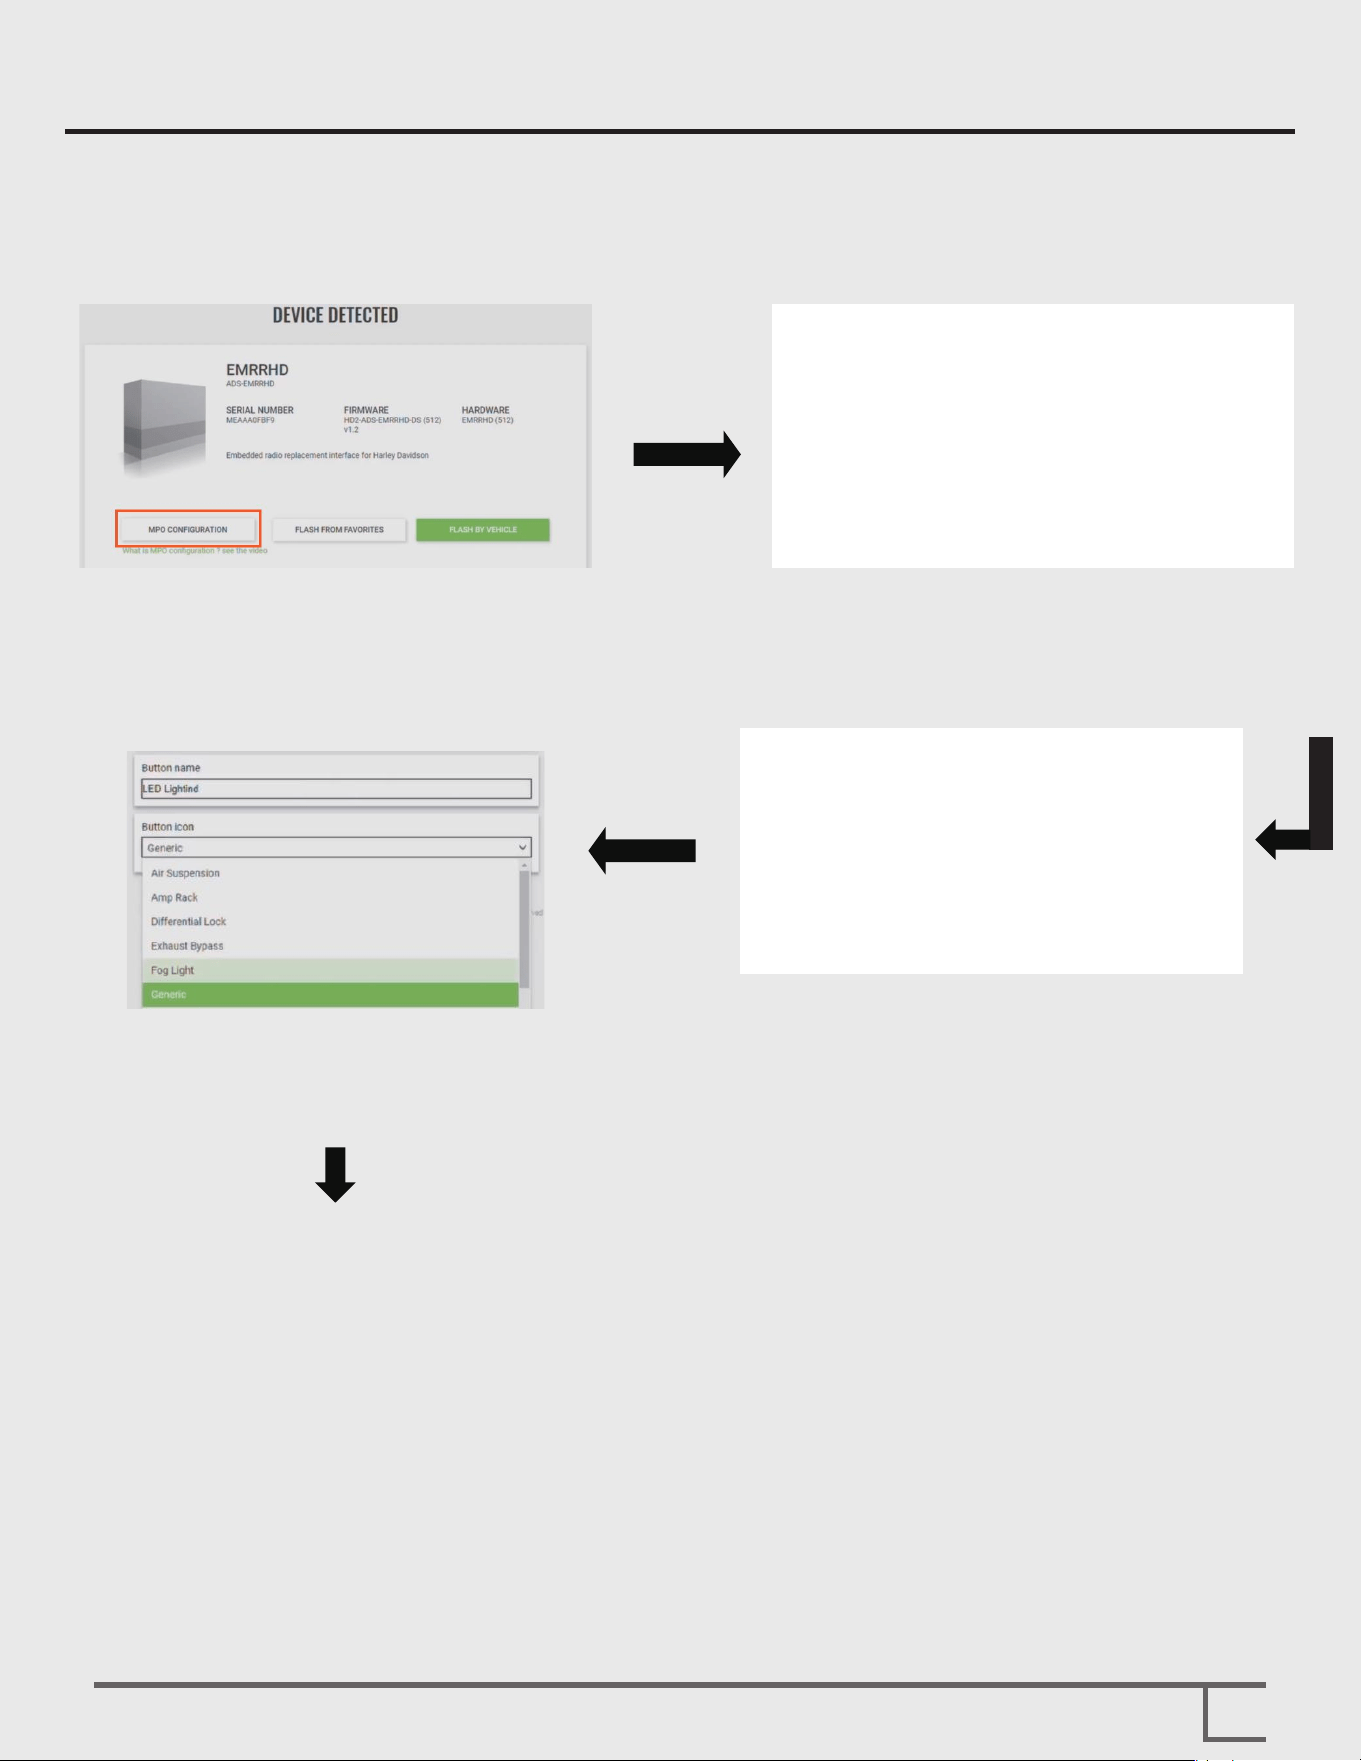
iData Internal RR2 MPO Programing
6
Step 4-Enter the name that will appear
on screen in your receiver;
Next you will assign an icon;
Repeat the same steps to program the rest of your outputs;
You can visit the iData link website and YouTube page for more examples.
Step 2-Click the “Enable” button;
Click toggle for a simple onoff switch.
Step 1-Choose the “MPO CONFIGURATION”
Step 3-Click the trigger signal icon;
Then go down to accessory control
screen button.
In this page, we are discuss how to program the receiver outputs using the Maestro
weblink portal.
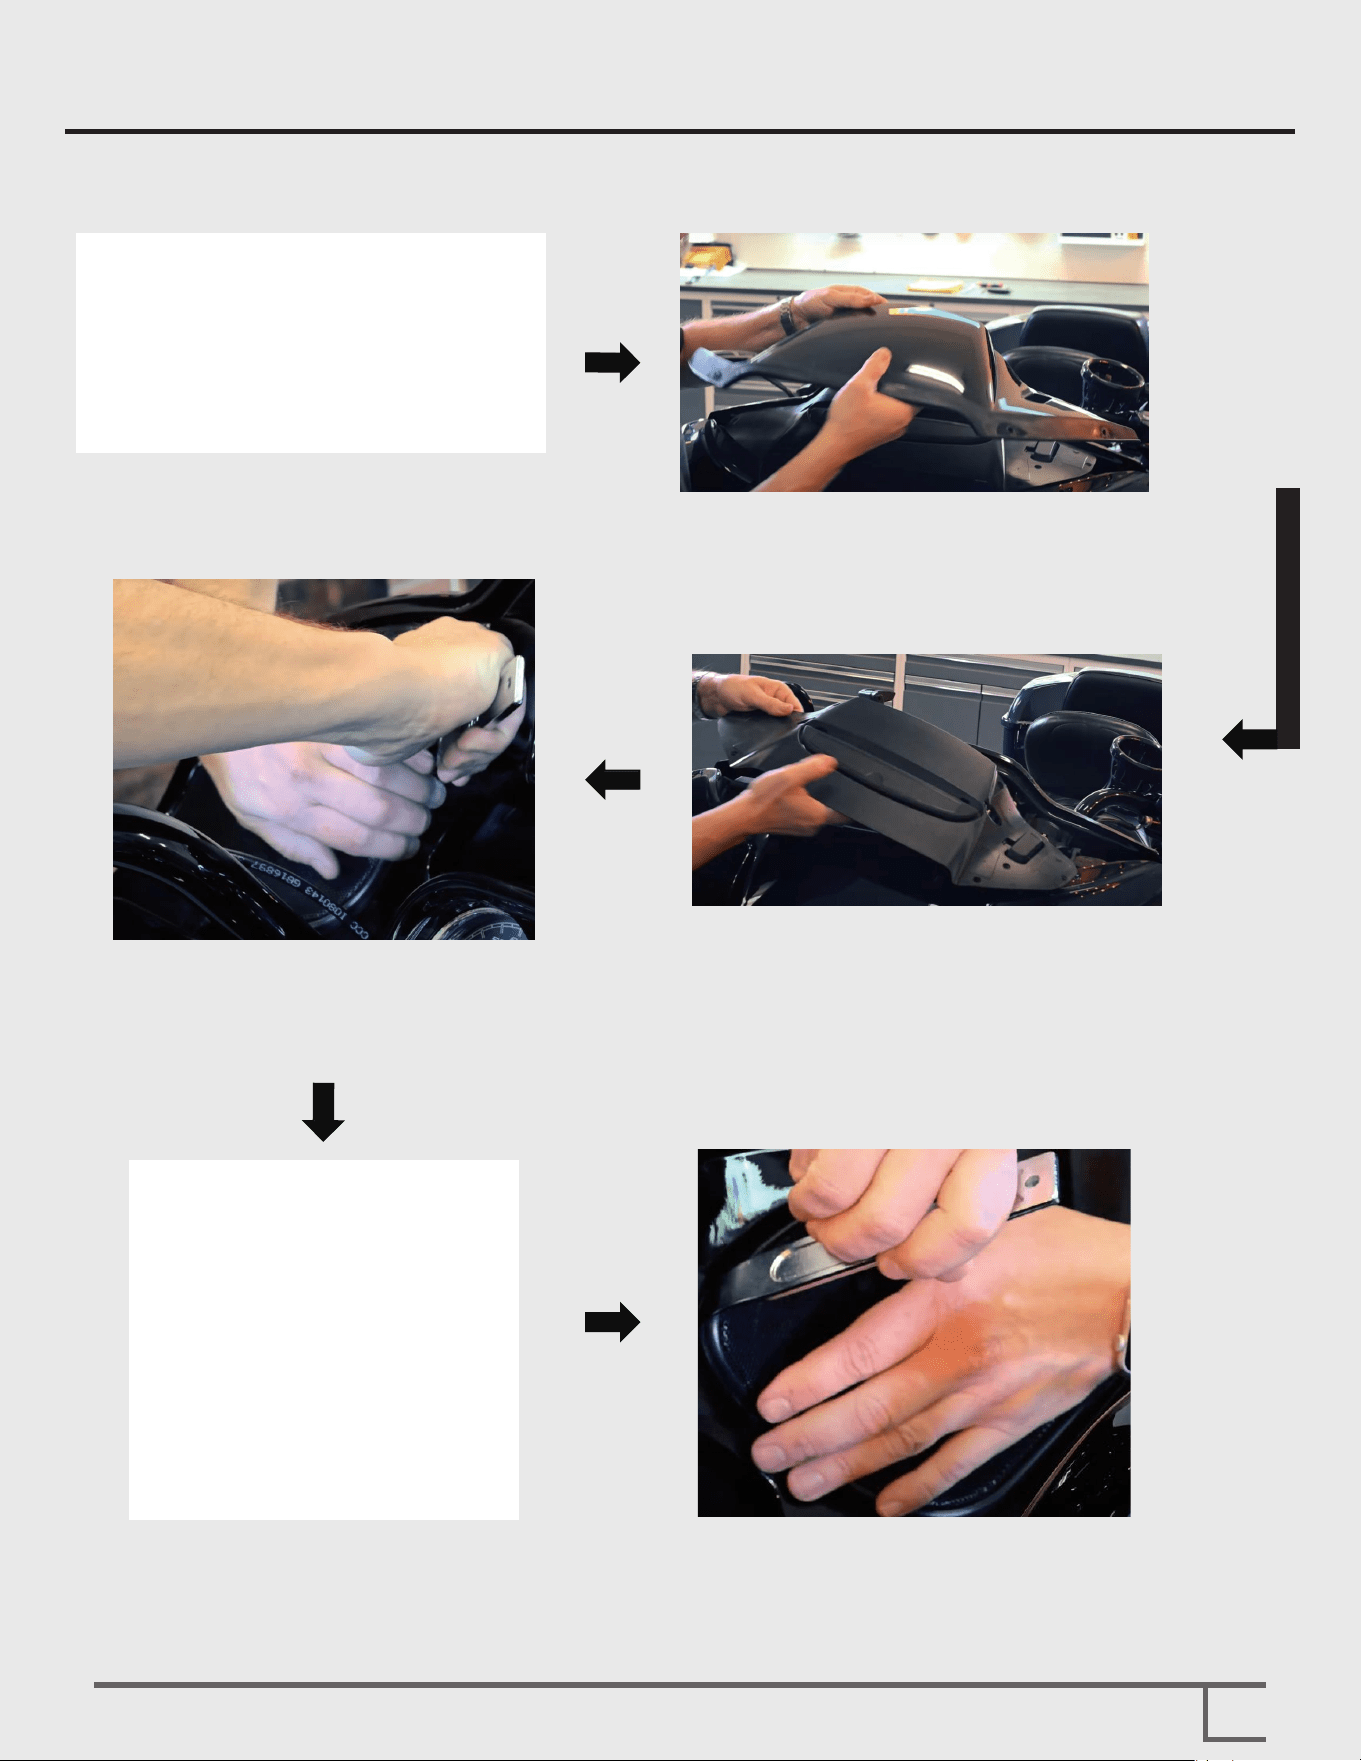
Radio Receiver Installation
7
Step 1-Remove the four screws of the
front windshield.
If your radio features BOOM AUDIO - refer to Boom Audio Integration section before
removing original radio.
Step 2-Remove the protective plate
of the motorcycle.
Step 3-Unfasten and remove the
whole bae.
Step 4-Now we will continue to remove the
grille so that we can access the T25
screws that secure the fairing.
Step 5-Use a panel popper to remove the
top part, and then slide out the
bottom part for disassembly
Step 6-Repeat these steps for the other side.
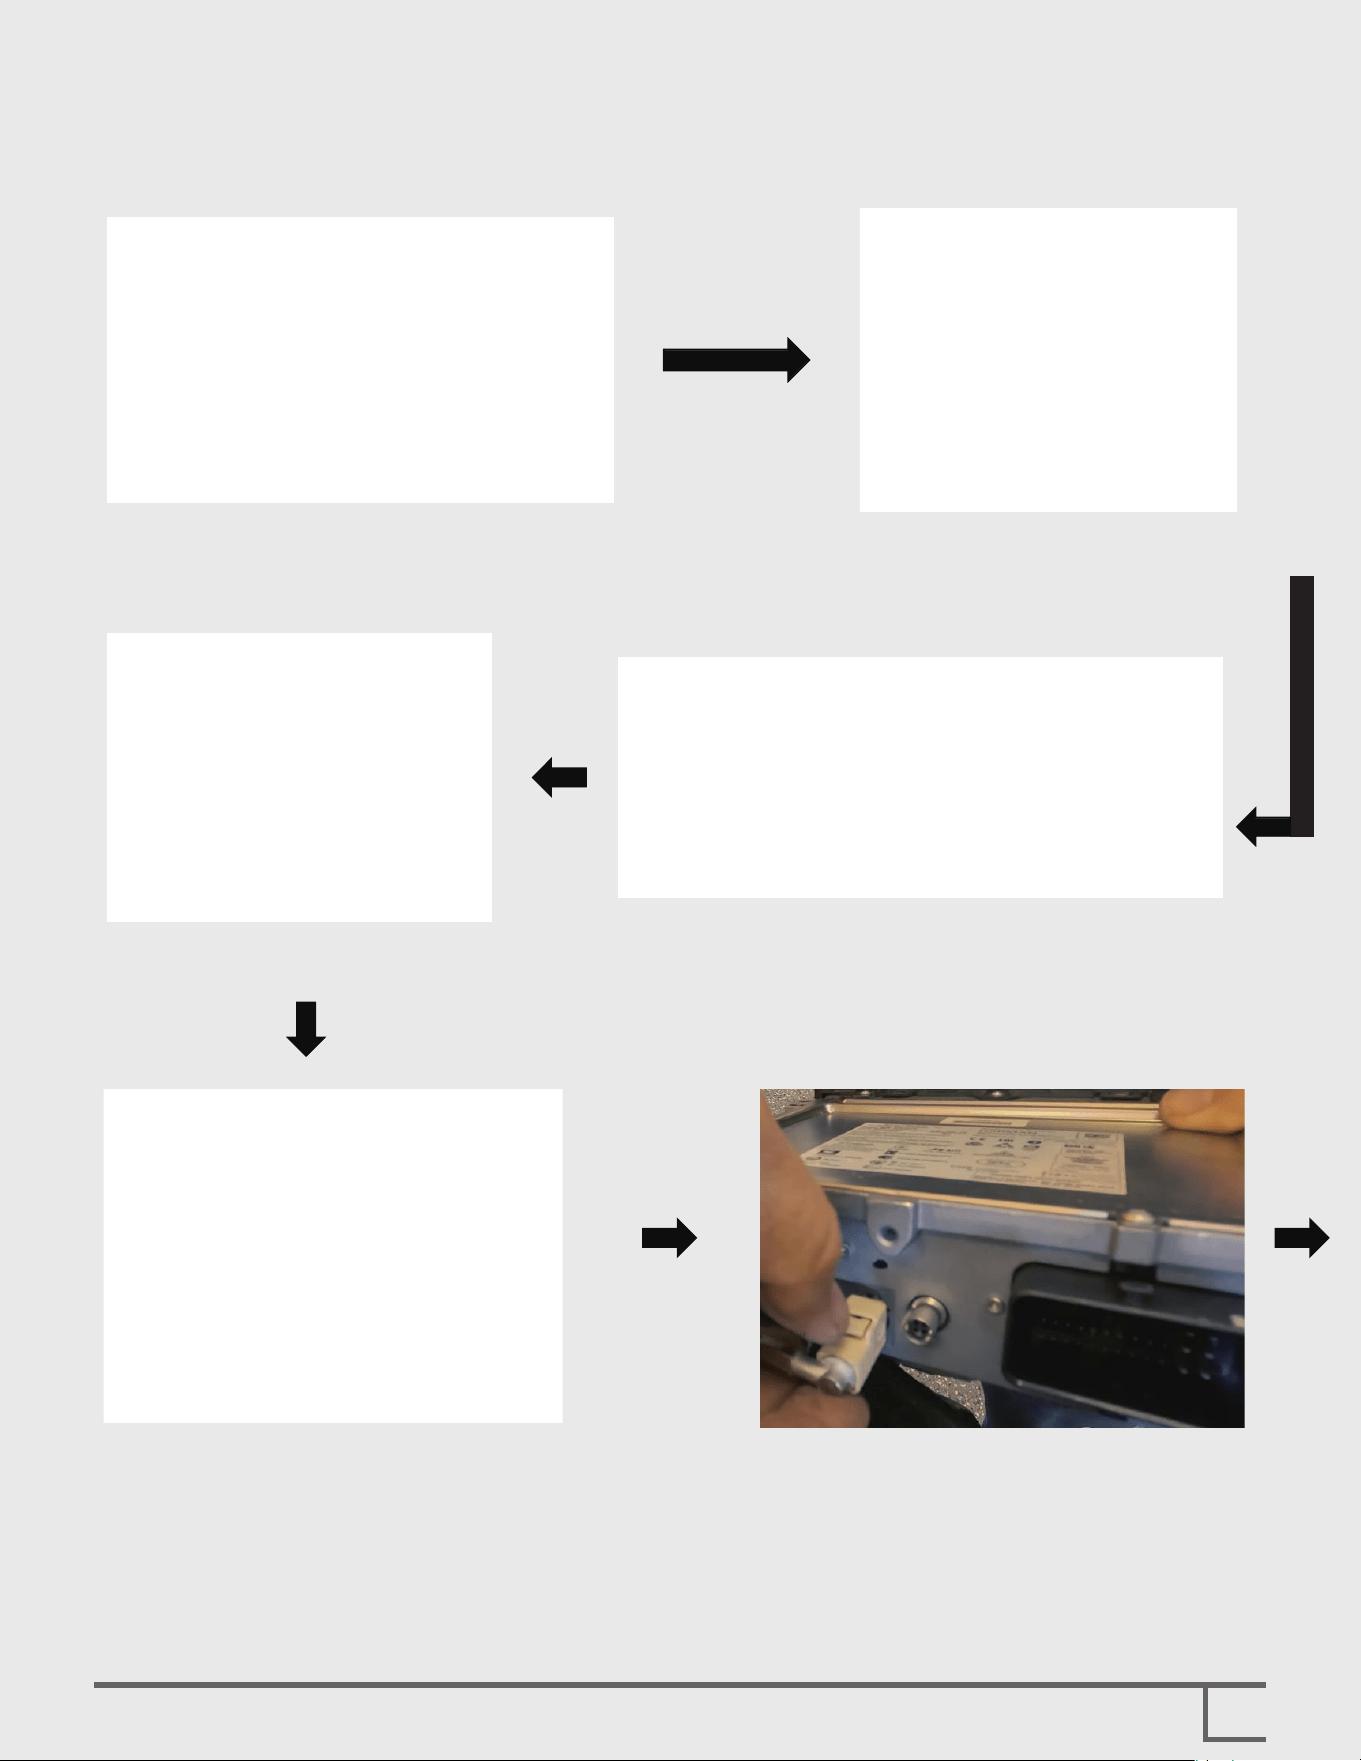
8
Step 7-Remove the bolt located at the
position light on both sides.
Step 10-Remove the four screws that fix
the receiver.
Step 11-Now, we need to remove the factory connector on the back of the radio. There is a
small button on it. First, press the button, then slide it downward until it is unlocked,
and finally pull it out.
Remove the other cable interfaces to take out the radio.
Step 8-Remove the bolt located at the
bottom of the air duct on both
sides.
Step 9-Remove the last two T25 screws. Hold the fairing
steady during the disassembly process to prevent it
from falling off.
9
Step 12-Please stick the gasket(Optional)
on the outer ring of the receiver.
Step 13-Install the radio, program the iData
module BEFORE installation.
Step 14-We suggest testing whether the radio
works properly after installation before
proceeding with the final assembly.
Step 15-Congratulations! The installation is
complete.
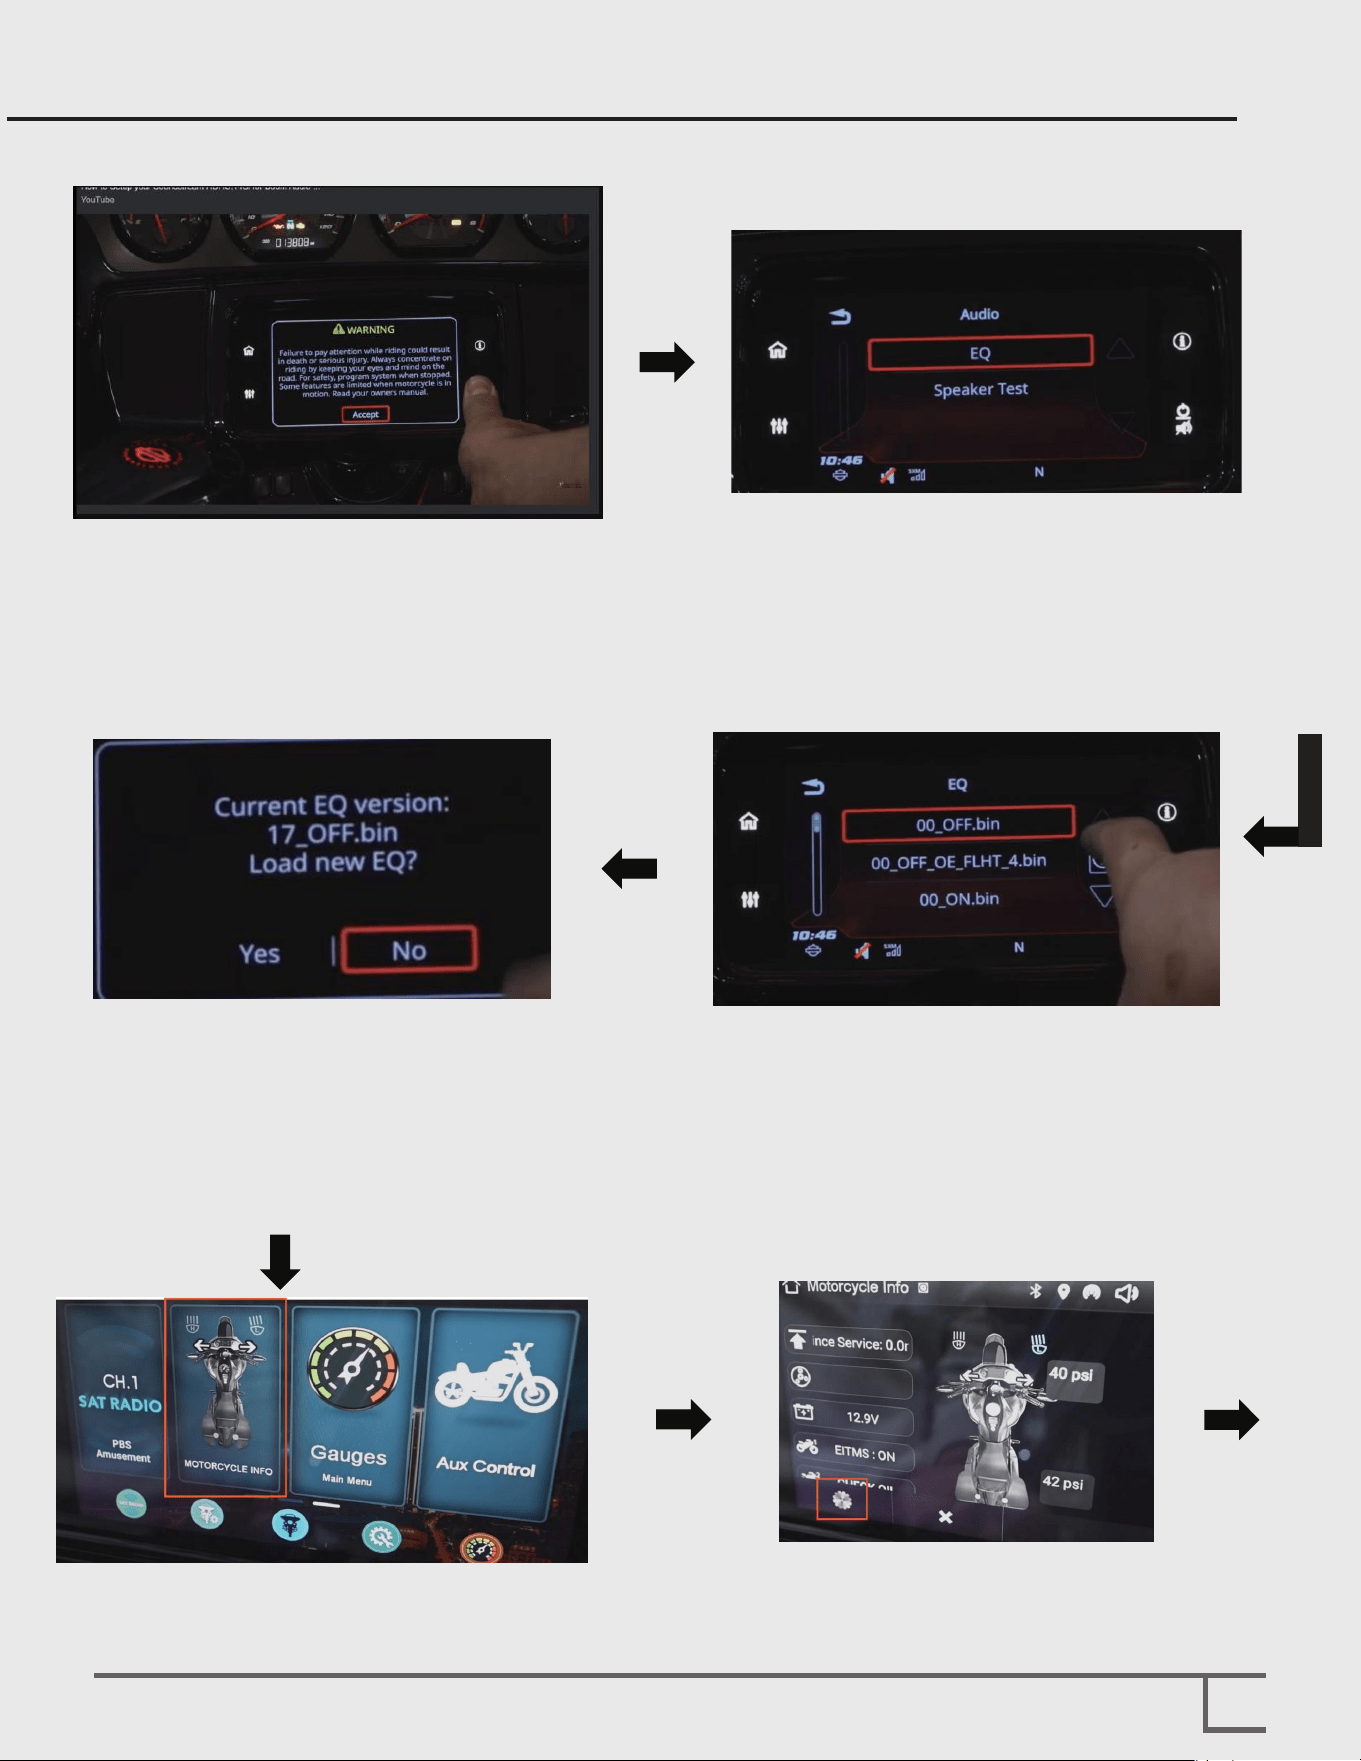
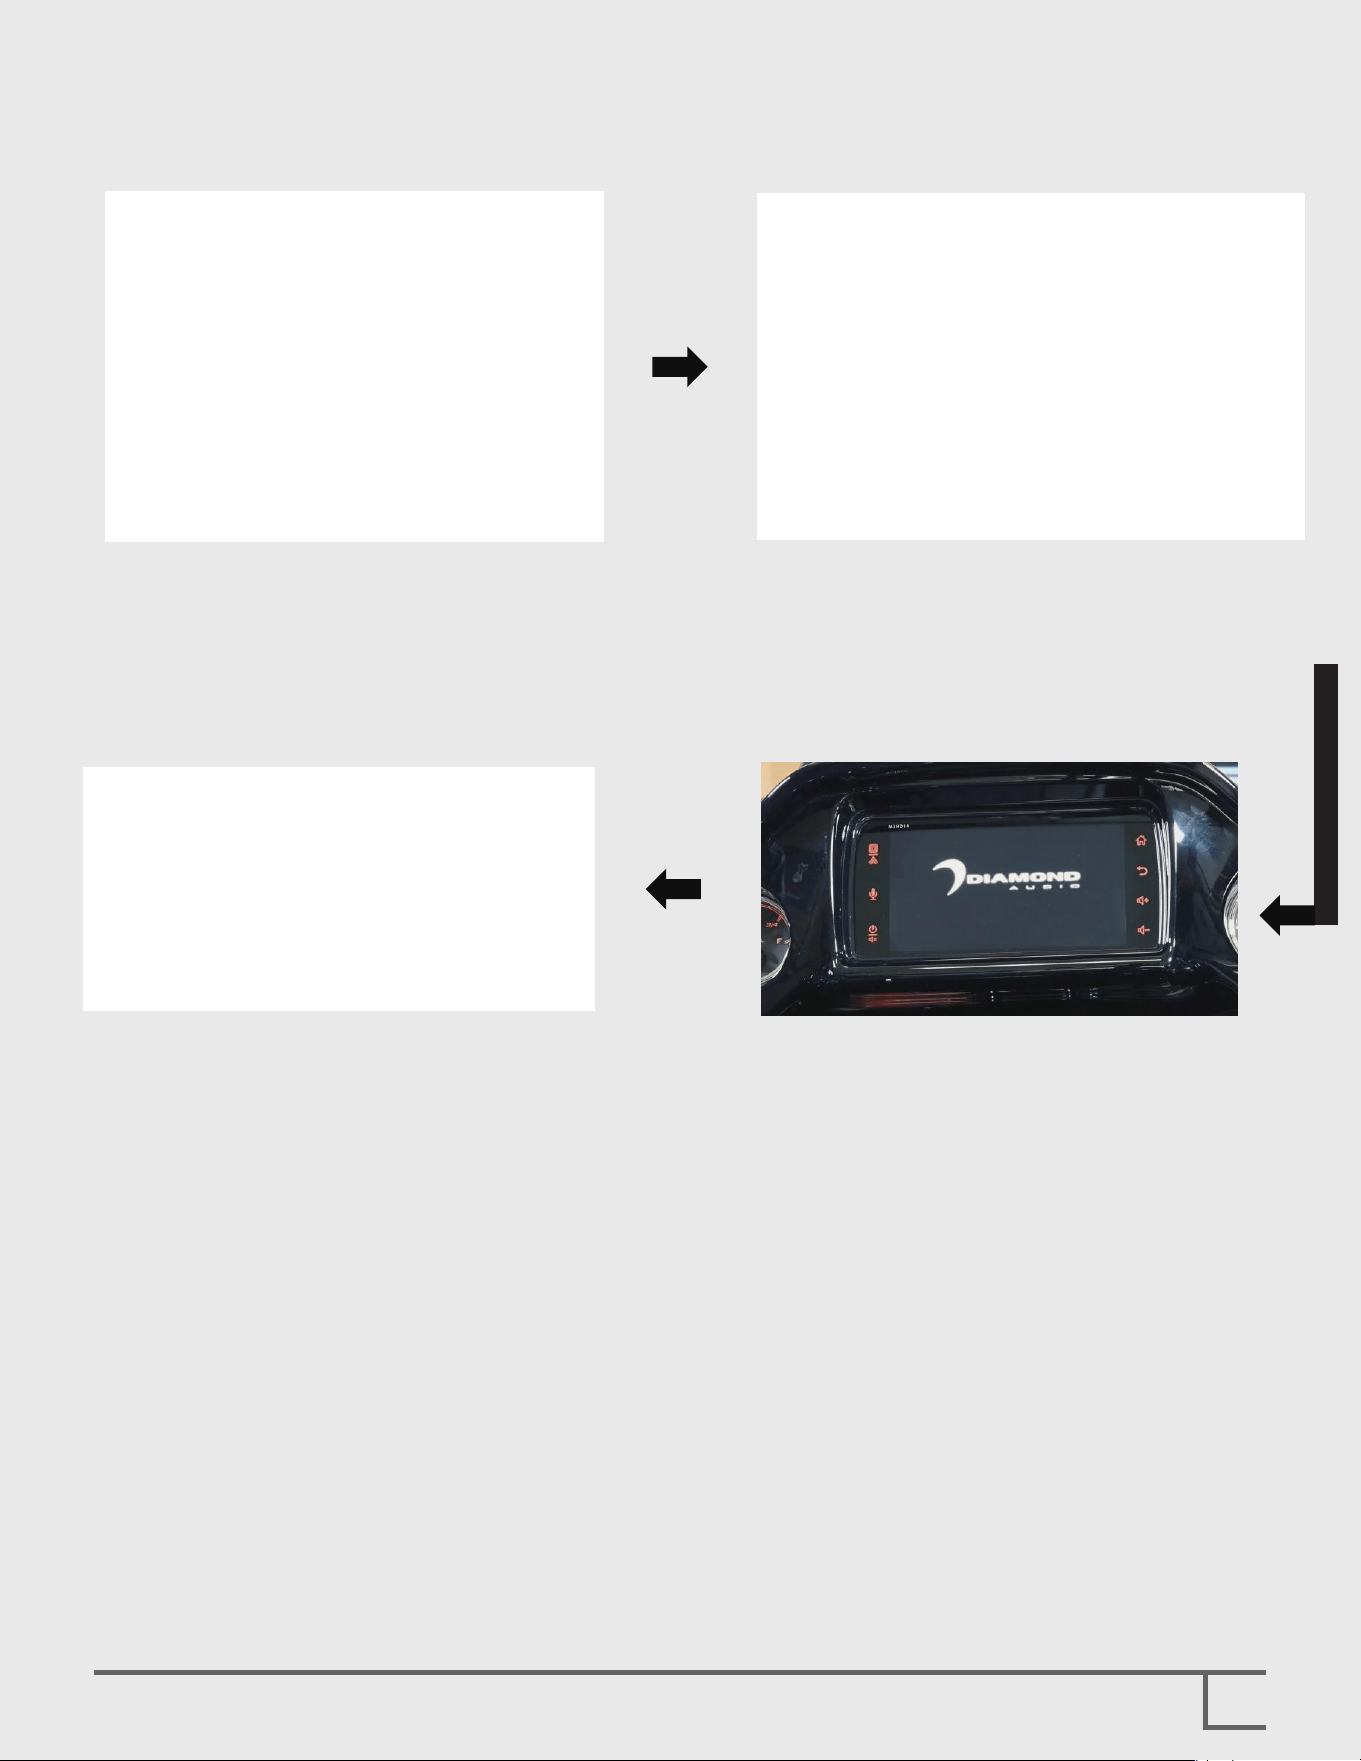
Boom Audio Integration
10
Step 1-For new models from 2019 to
2023, simply press and hold the
power mute button.
Step 3-Push the INFO button.
Step 6-Push the SET UP icon.
Step 4-Click the No button.
Next, you need to record the bin
file number.
Step 5-Select the MOTORCYCLE INFO icon.
Note: Once you have refreshed the radio using the Idata web link upload tool, you can
install the receiver and complete the installation following the steps below.
Step 2-For models from 2014 to 2018, please
push the power mute button.
Click on Audio under the menu, and
then click on EQ.
11
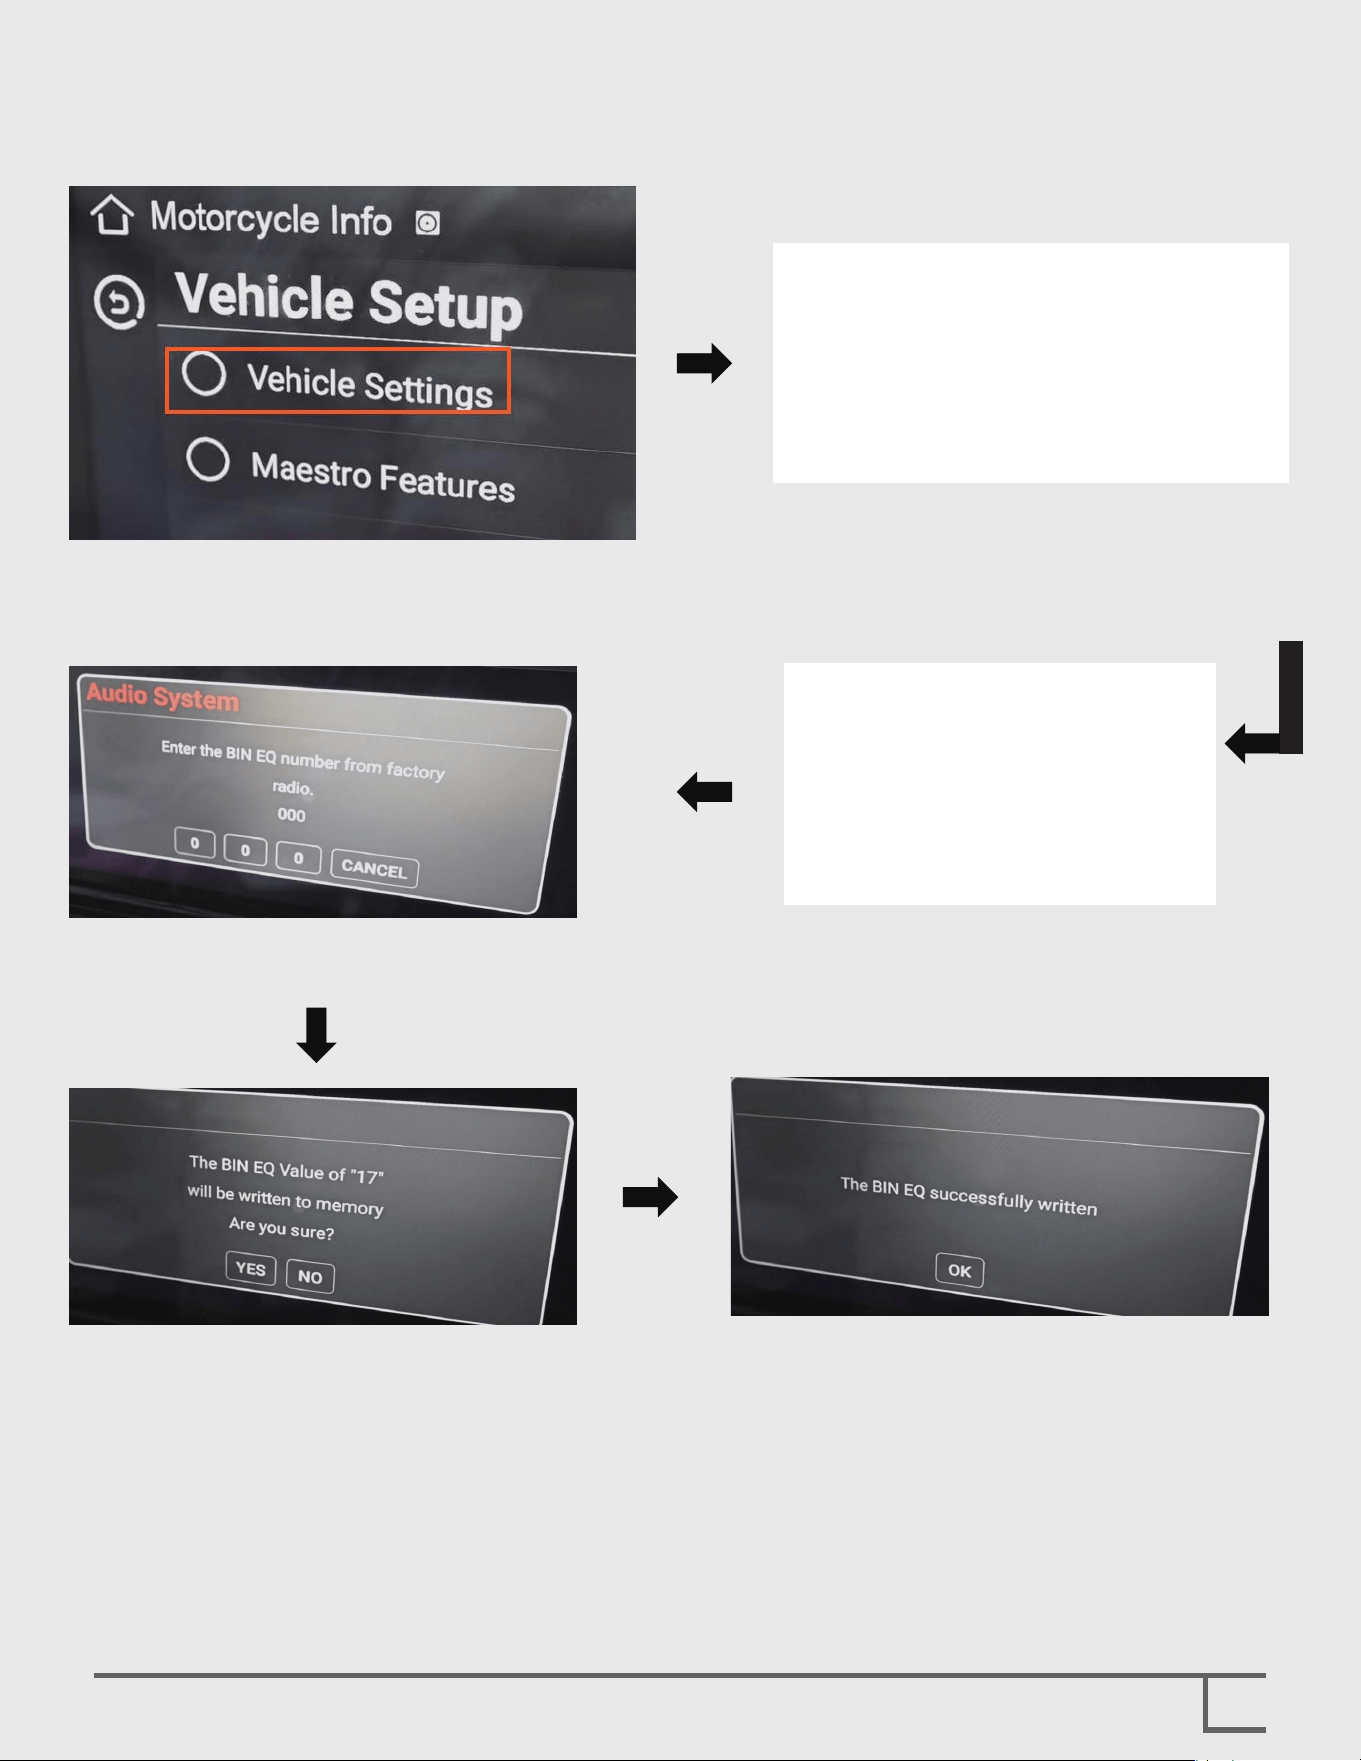
Step 7-Click Vehicle Settings. Step 8-Click Amp Settings.
Step 9-Click Audio System.Step 10-Enter the bin file number of the
original factory radio.
Step 11-Even if you enter the correct bin
file, please click the YES button
after the prompt appears.
NOTE: In the DSP- Fader @ Bal Link menu, turn on the 5V output adjustment to prevent
distortion from the Boom System.
Step 12-Congratulations! Your installation
is complete.

Android Auto & Apple Carplay
12
Step 1-By default, Apple CarPlay is active, while
Android Auto is disabled.
Step 2-Click the Settings button.
Step 3-Turn on the AA wireless function.
Step 4-Android Auto has been successfully added.
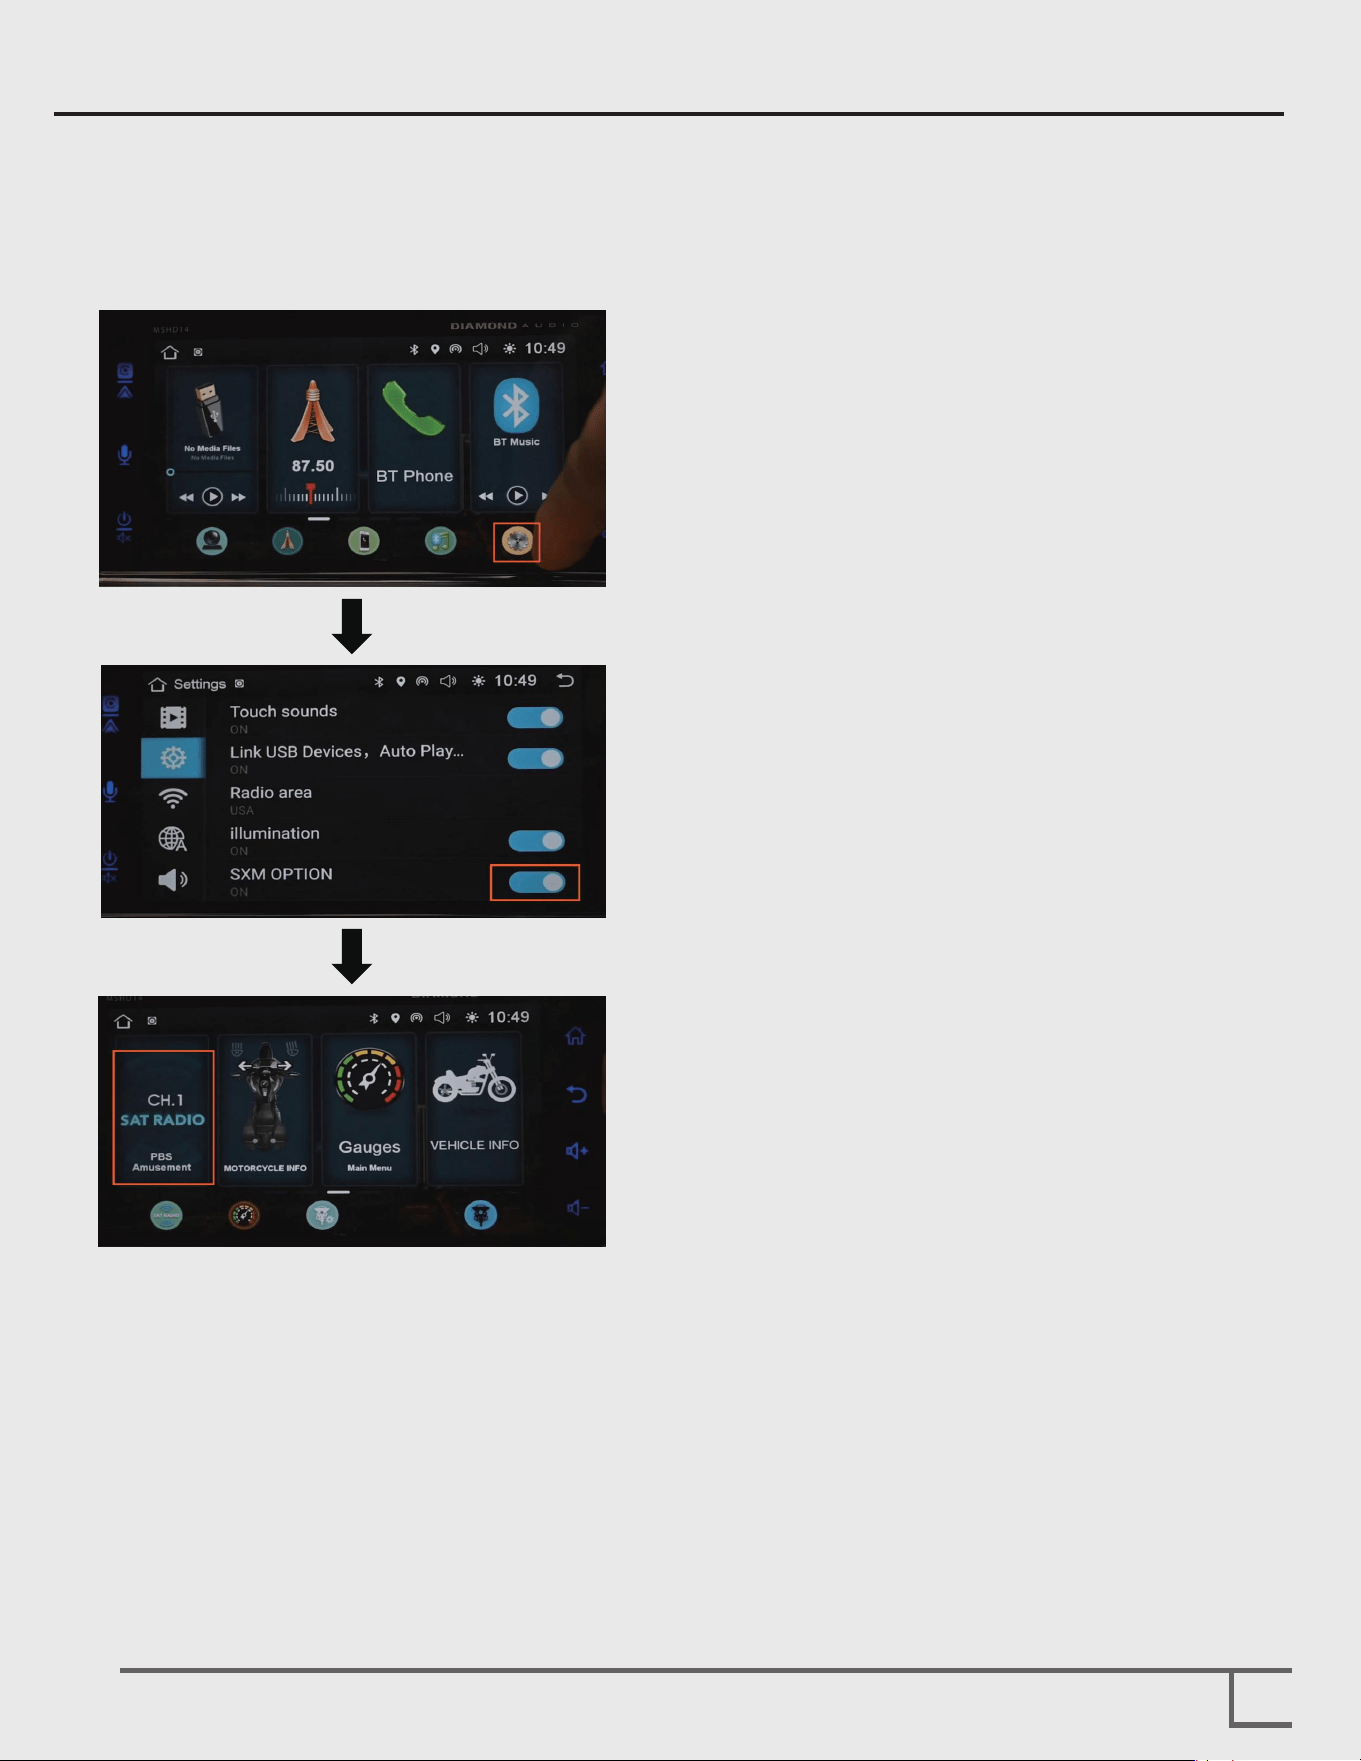
Setup Sirius/XM
13
Follow the steps below to activate satellite radio if you have installed the optional tuner.
Step 1-Click the Settings button.
Step 2-Turn on SXM OPTION.
Step 3-Return to the main menu, and you will
find that the SXM option is already filled
in on the left side of the last page.
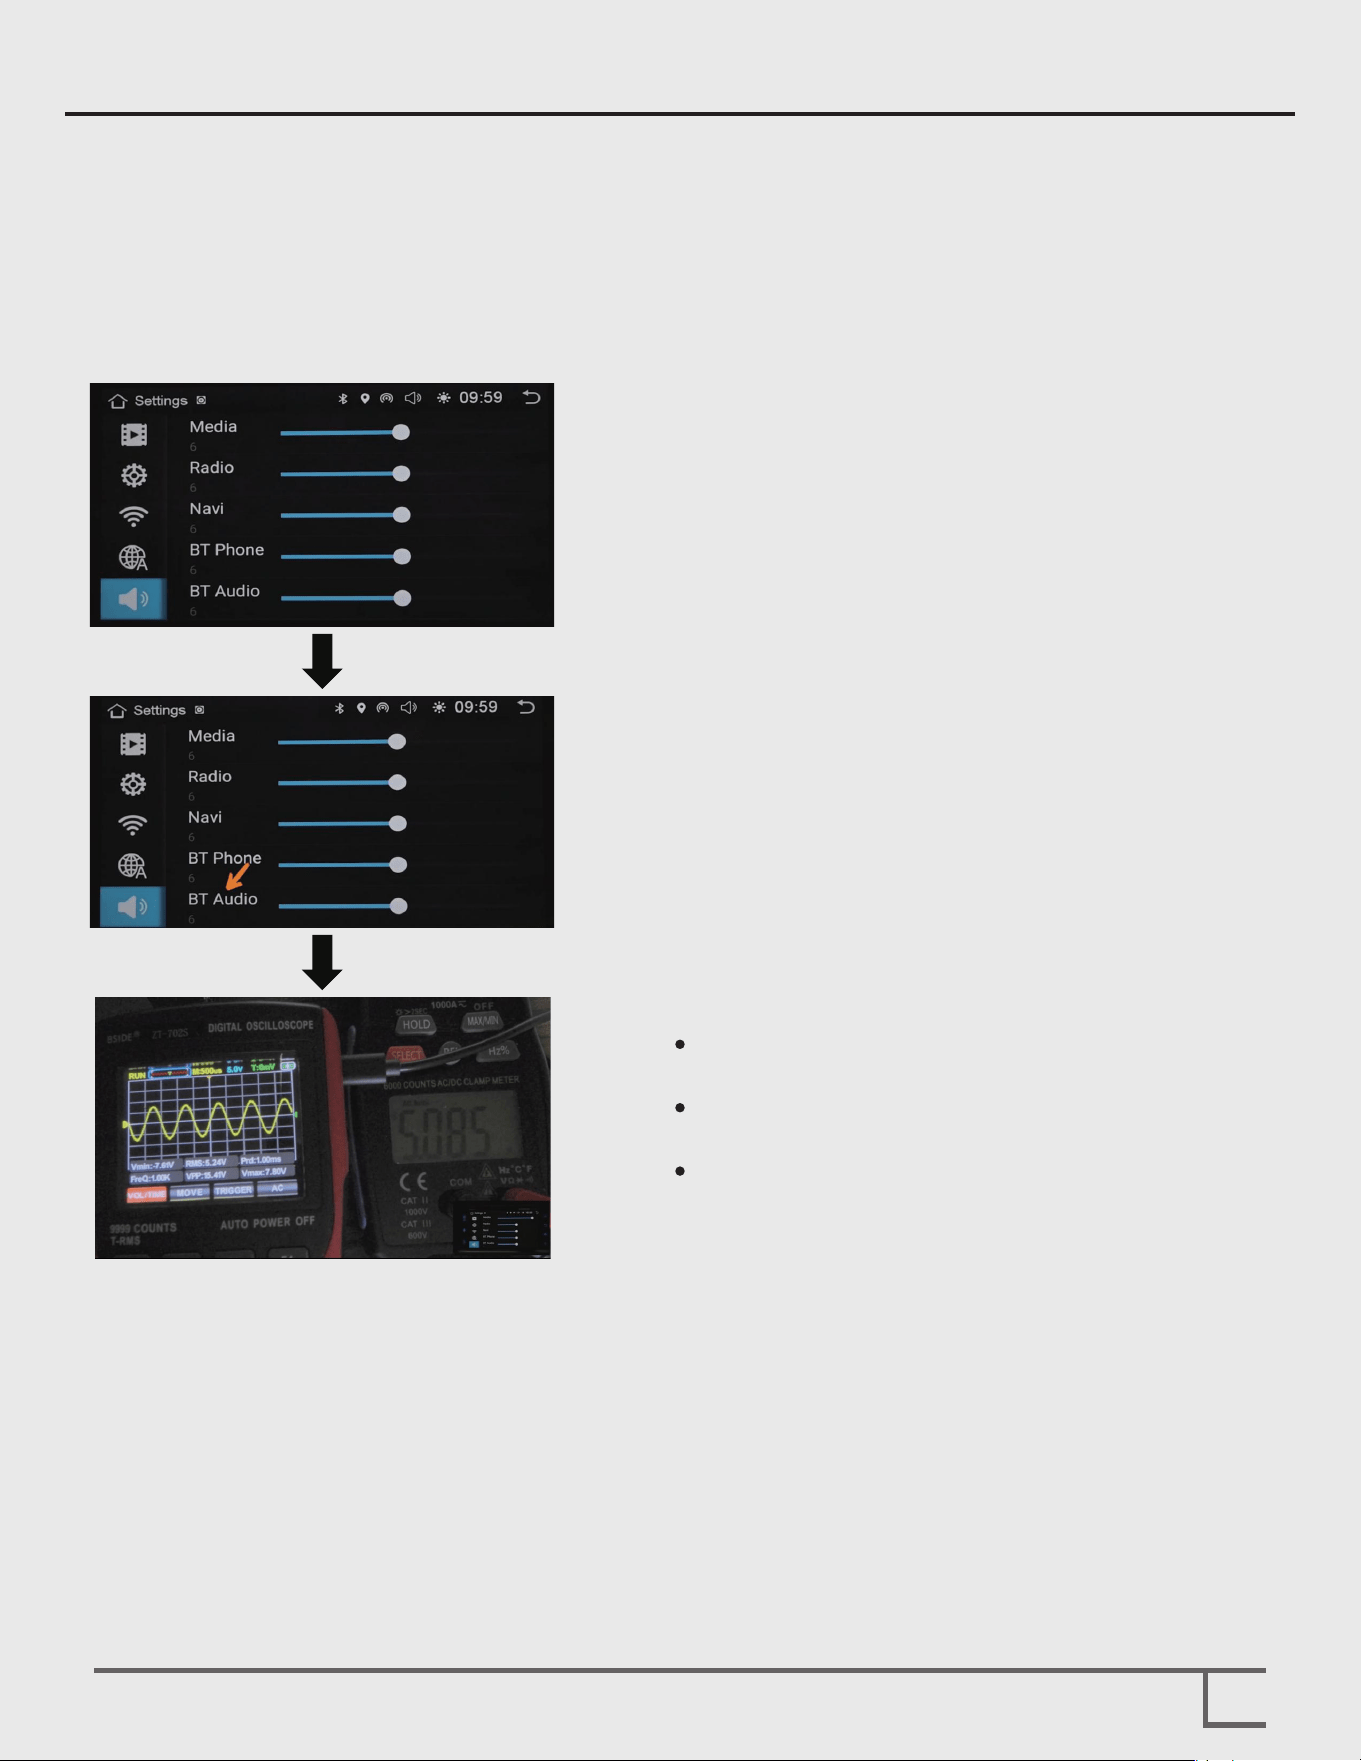
Step 1-Adjust the volume of Android Auto and
Apple CarPlay through the media volume.
Step 2-If you want direct Bluetooth transfer without
Android Auto and Apple CarPlay, adjust
Bluetooth audio separately when
disconnected.
Step 3-
Connect the oscilloscope and multimeter to
the RCA output of the radio.
Let the mobile phone play a 1 kHz test tone
at maximum volume.
Adjust the radio volume until the multimeter
outputs 5 volts.
Setup Bluetooth Line Driver
14
Warning: This step should be carried out without connecting the speaker.
We need to play a 1kHz test tone at 0dB.
Please use the following link to obtain the test audio: https://tinyurl.com/MSHD14TEST
Test conditions: Set the radio volume to 40 and the mobile phone volume to maximum.
Note: The maximum volumes of mobile phones vary. Therefore, we have added a
Bluetooth line driver to the radio. As far as we know, we are the first to put forward
this solution, which can provide a clean and low-distortion environment even when
the signal is boosted.
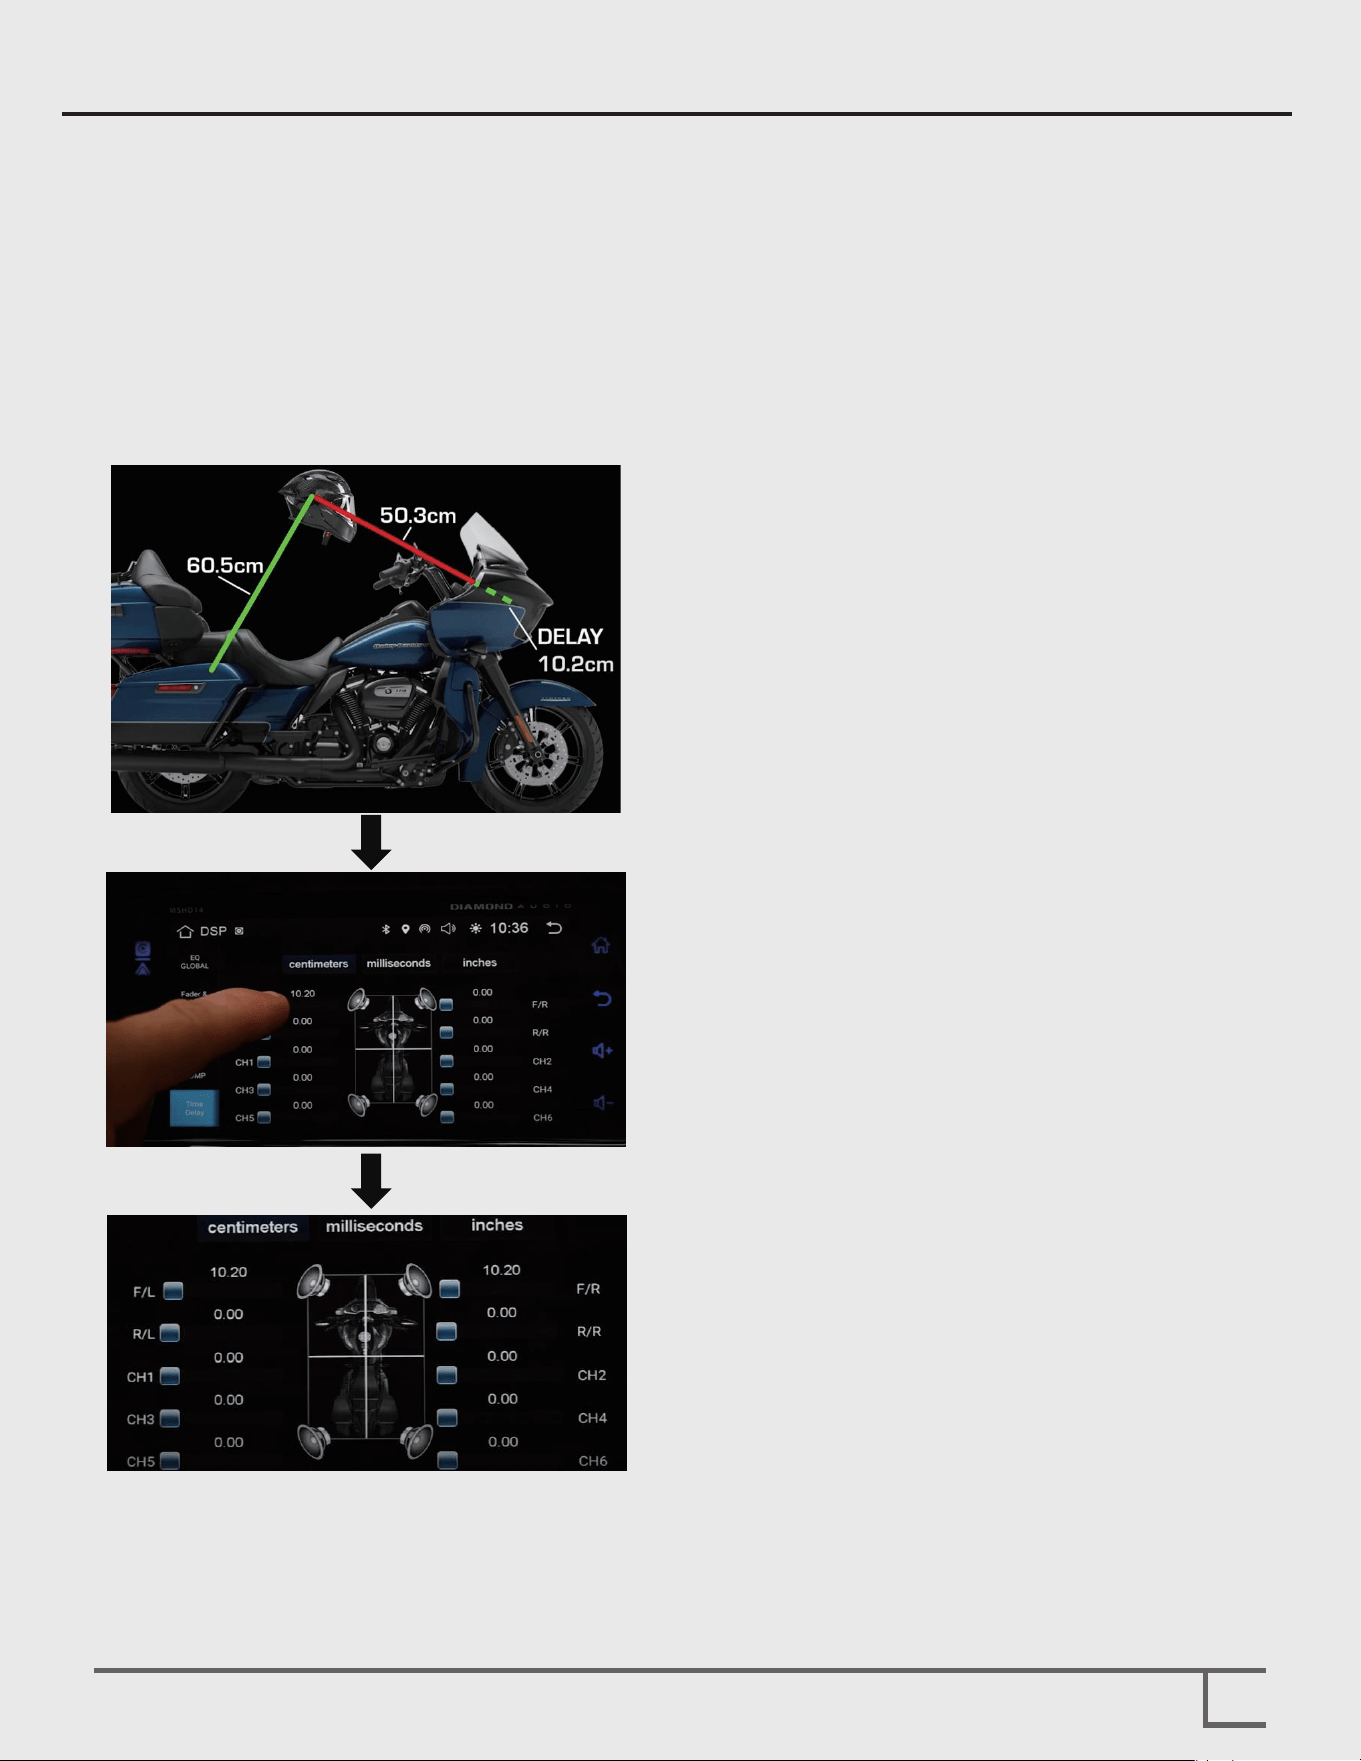
Step 1-After measuring the distance and selecting
the unit, enter the difference value.
Step 2-Ensure that the time delays on both sides
are consistent.
Setup Time Delay
15
Measure from the center of the speaker to the ear of the rider on the same side.
(Note: only one side is necessary)
In a 4 speaker setup, take the largest distance and subtract it from the shortest distance.
We prefer metric measurements as it doesn't need to be converted from a fraction.
Example:
front fairing speaker = 50.3cm
rear lid speaker = 60.5cm
differential (delay needed) = 10.2cm
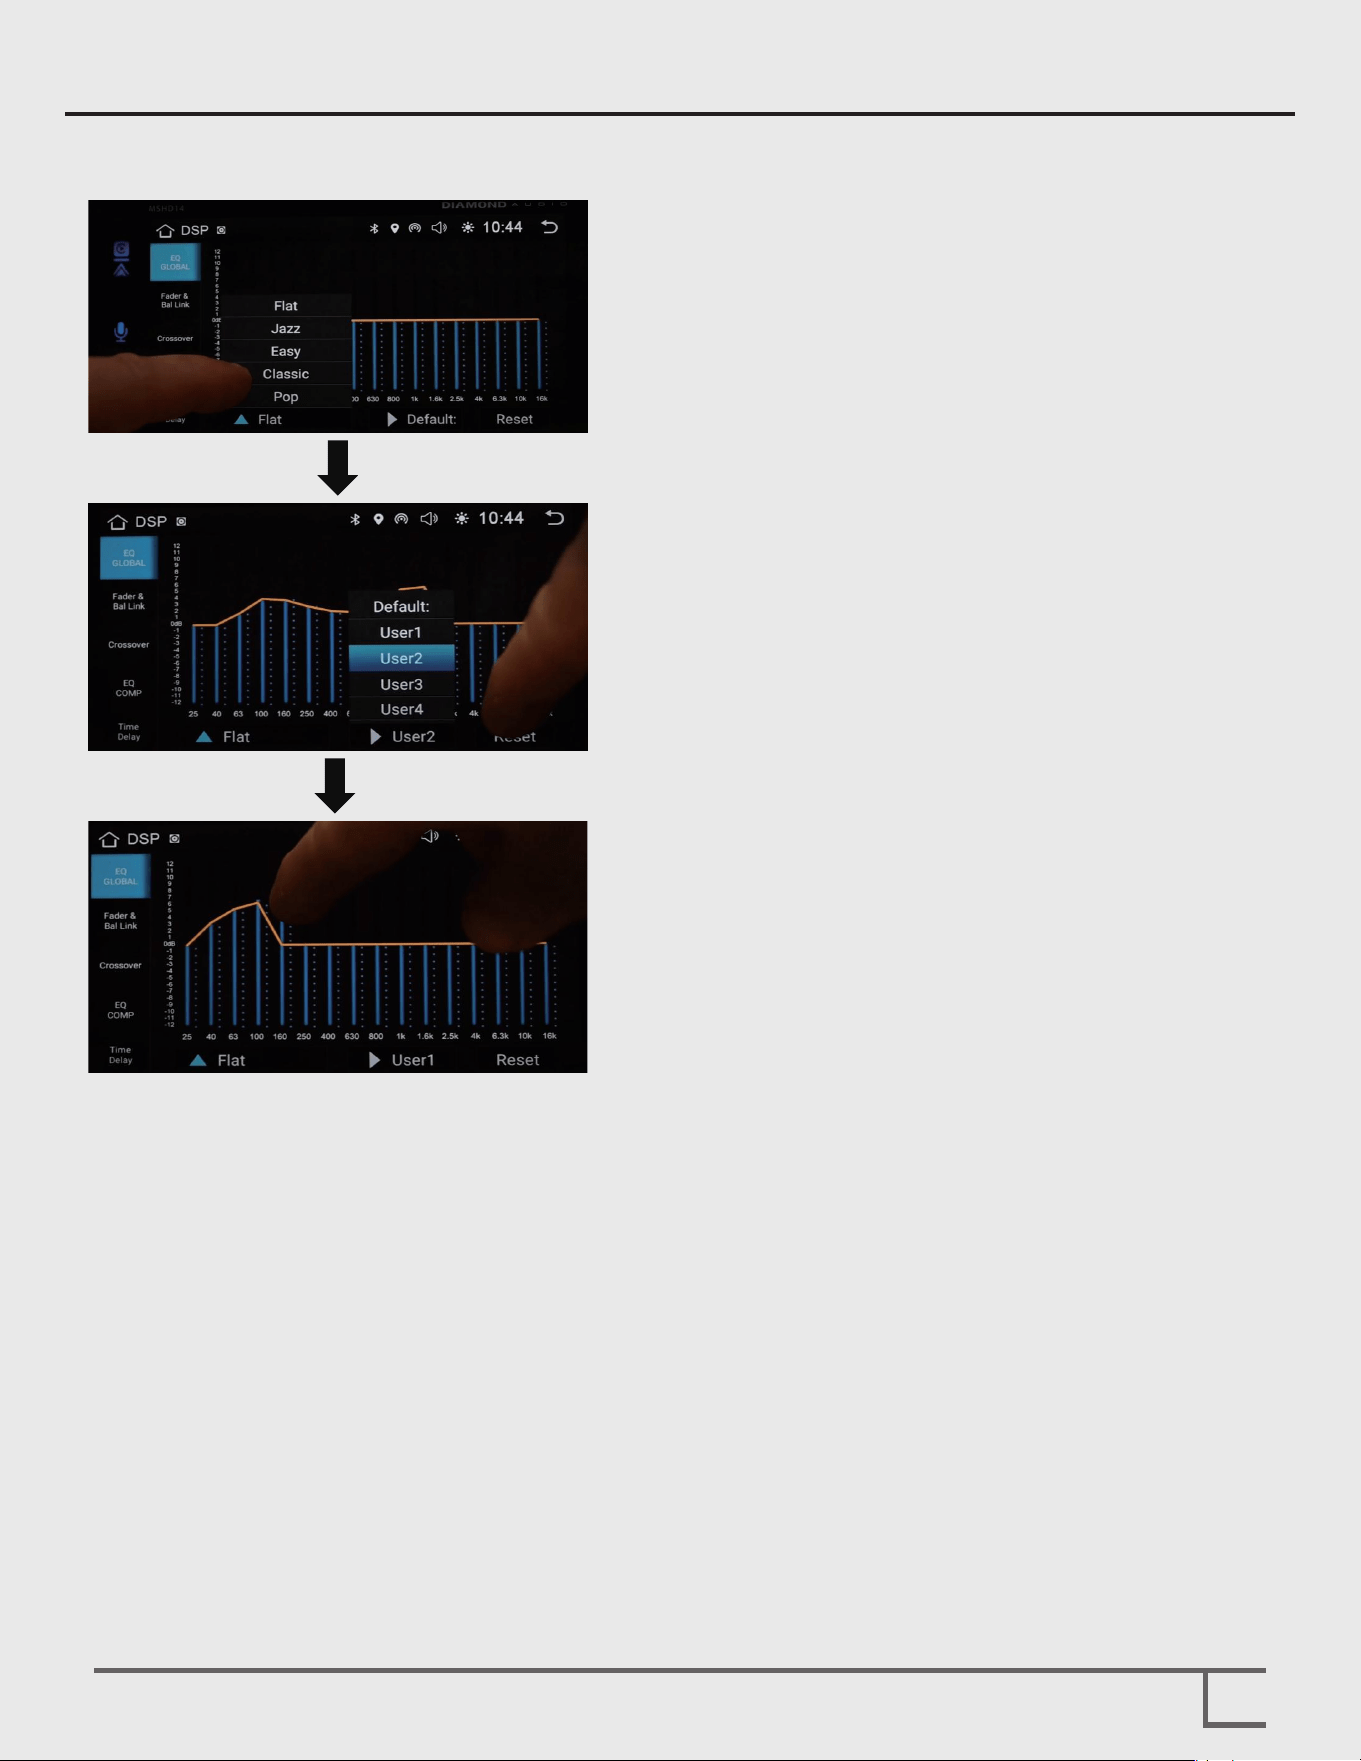
Step 1-We provide a global equalizer that can affect
all 10 channels. We have five simple presets
for your easy access.
Step 2-We also provide four user presets that you
can set according to your preferences.
Step 3-You can easily adjust it just by moving your
fingers on the screen. For more precise
adjustment, use the popup on the left side of
the screen to adjust.
Setup Global EQ
16
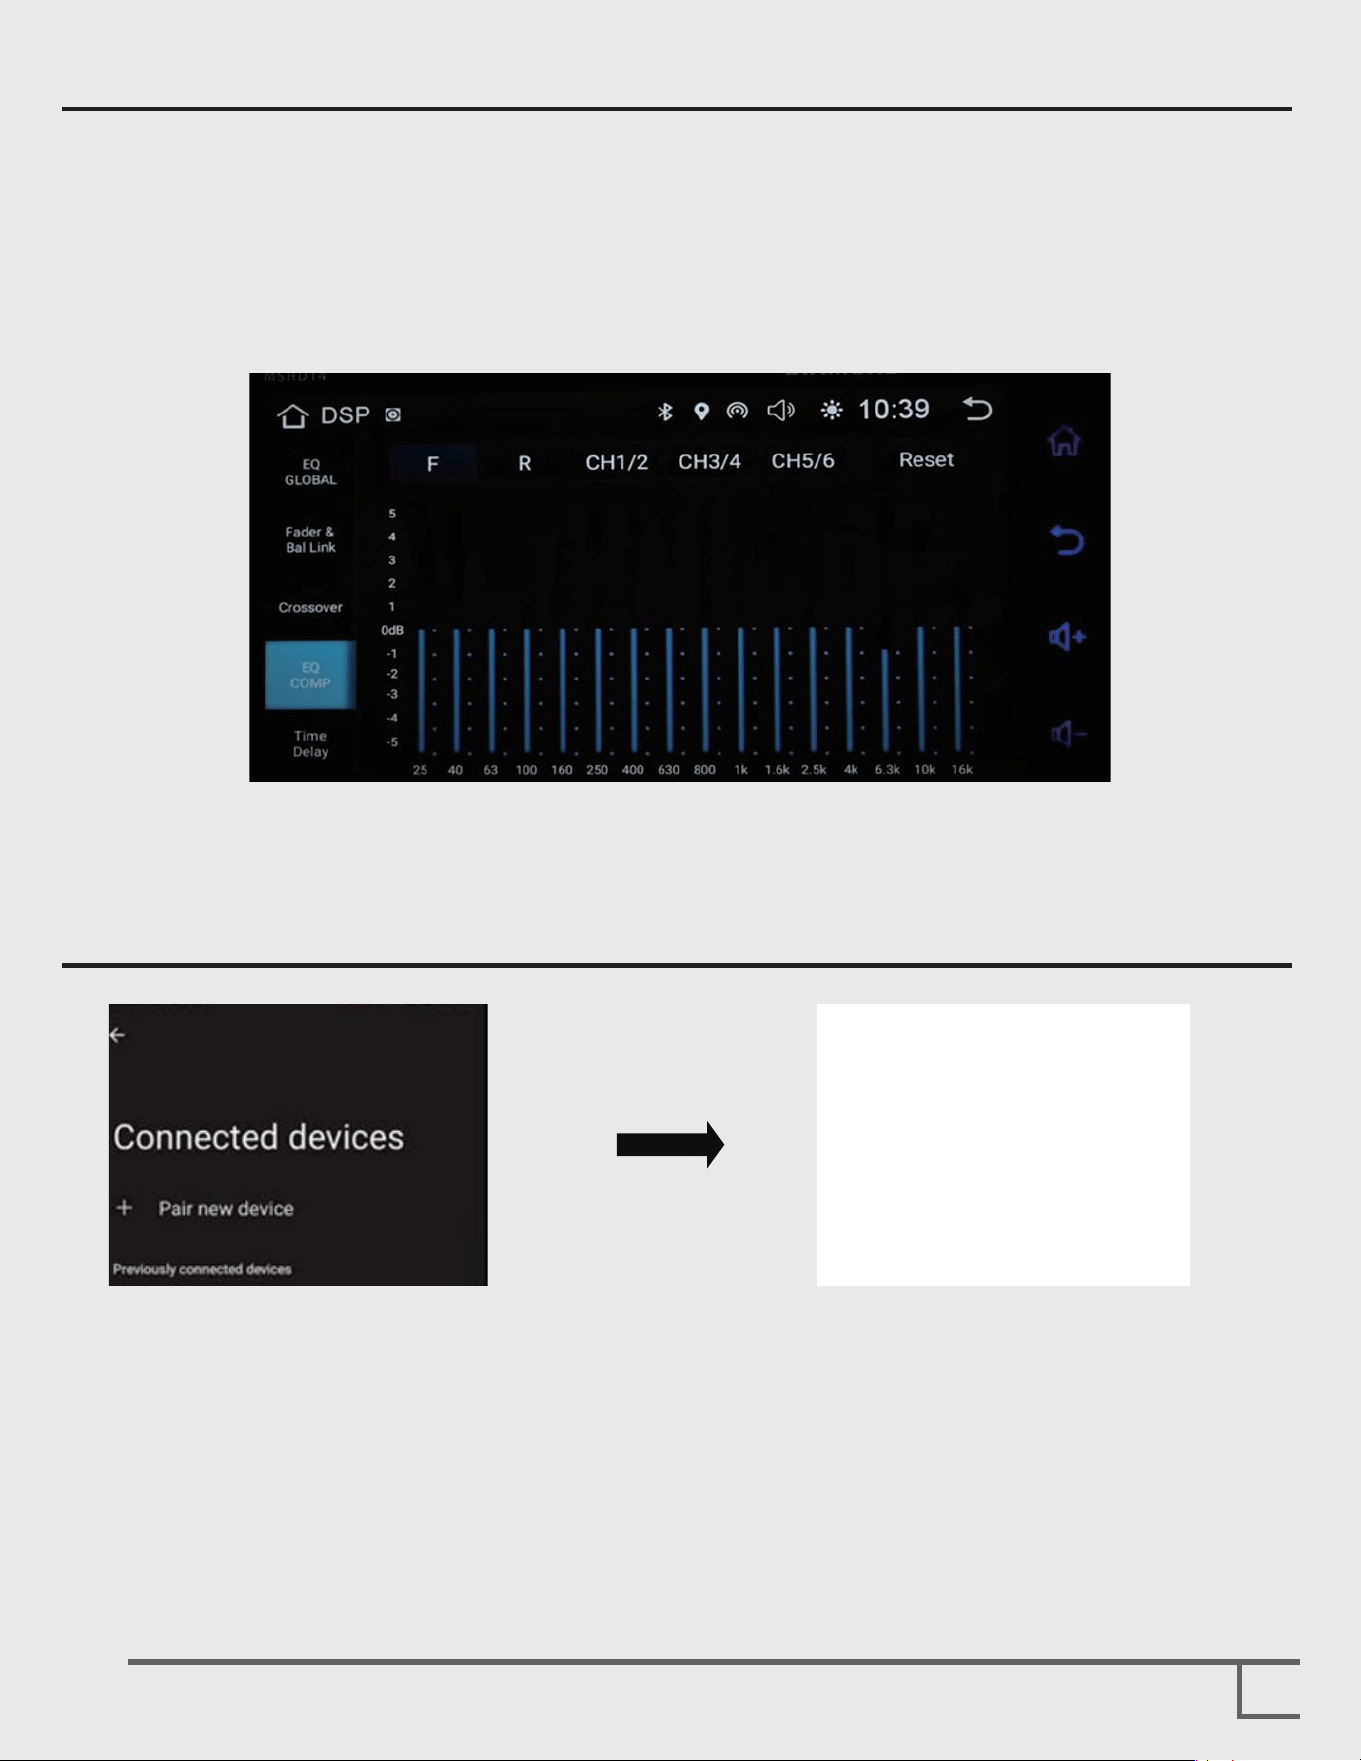
Setup Compensation EQs
Setup Bluetooth Pairing
17
Step 1-Turn on the Bluetooth settings of
your mobile phone and select
Connect to a new device.
Step 2-After the search is finished, you can see the
name of "radio receiver".
Once the connection is successful, you can
use Android Auto and CarPlay applications
normally.
DSP compensation equalizers are equipped with 5 16-band compensation equalizers
for each pair of channels. These equalizers serve to repair abnormalities in system
performance. For instance, if the tweeters are too bright or the midrange speakers
have a dip in a frequency band, these issues can be fixed during the initial setup. The
compensation EQ’s should only need to be adjusted once at initial setup. The global
EQ is for daily “on the fly” adjustments
Simply select the channel you want to adjust and slide the screen to adjust the
values of the equalizer.
Note: The prerequisite is that you have already added Android Auto to the radio screen.
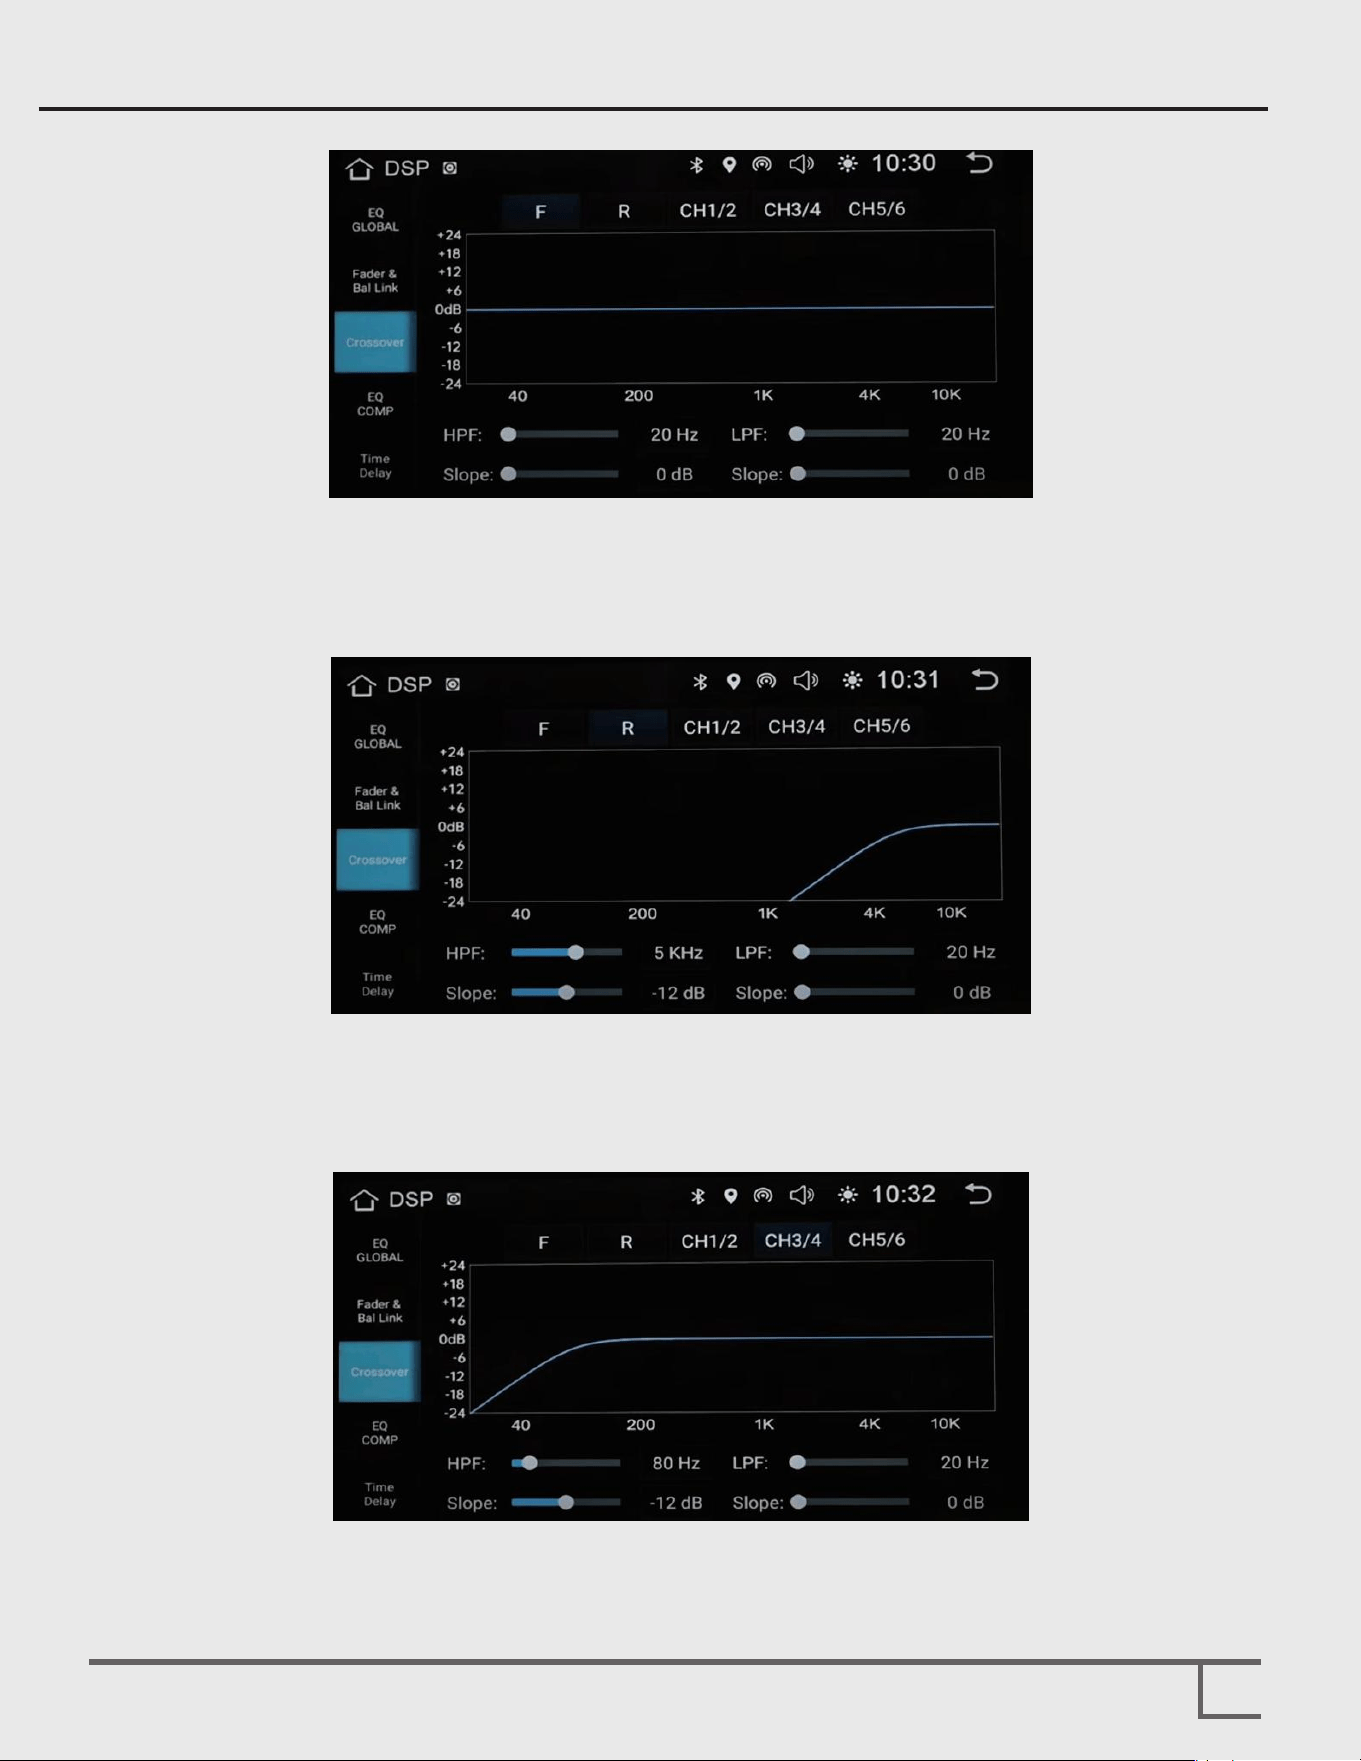
You have five pairs of channels to adjust to adapt to ten output channels.
Each pair can be adjusted to low-pass, high-pass, band-pass, and full-range.
For example, we can set the front power supply output to high-pass, and set the
crossover to 5K with a slope of 12dB to drive the tweeters. After that, we can make the
same settings for the rear speakers.
We've added a mid-bass driver. Using frequencies below 80Hz for the mid-bass driver
would waste eciency, so we set the high-pass crossover to 80Hz with a 12dB slope.
Setup DSP Crossover
18
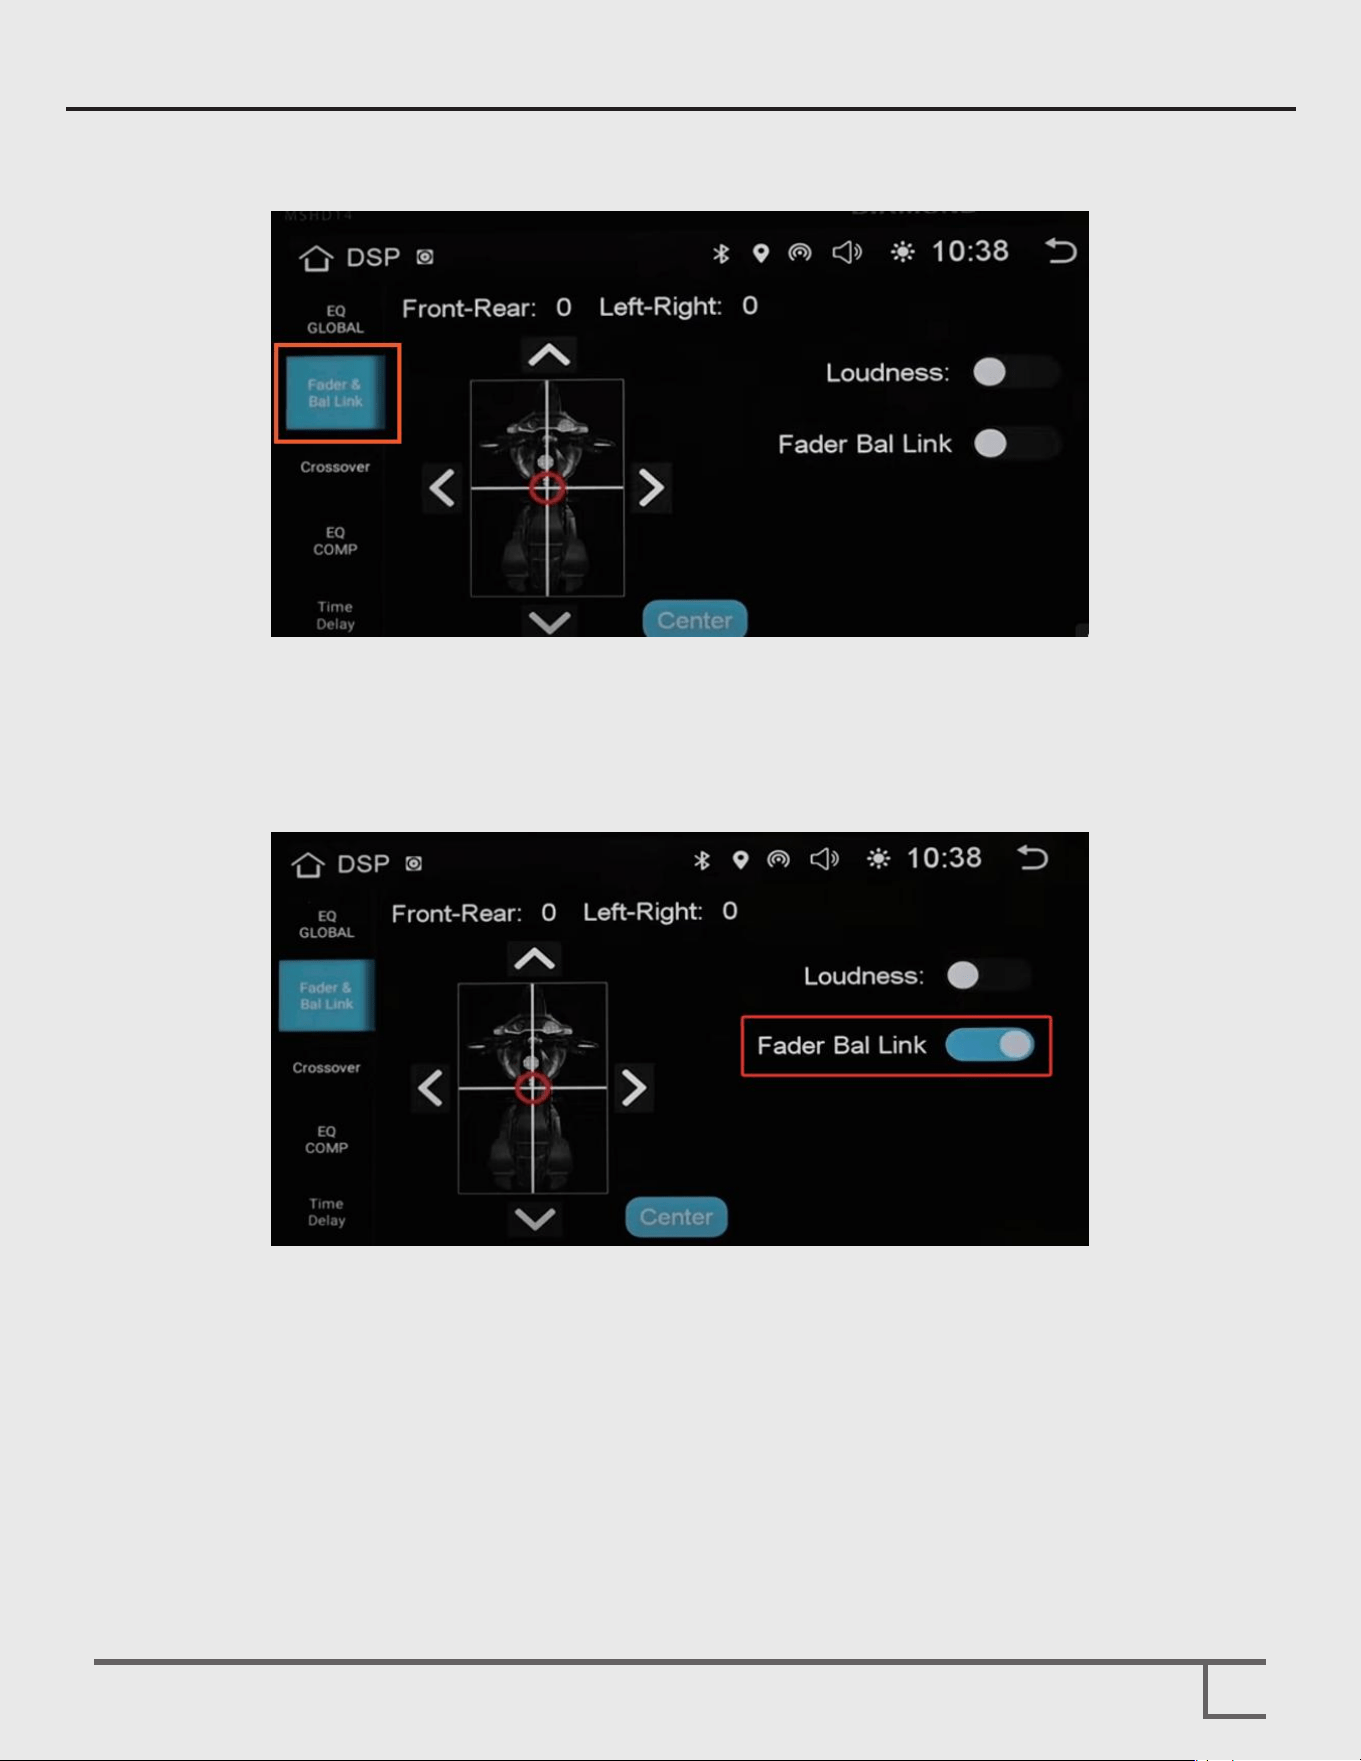
By default, the channel link is turned off, so the fader will not affect the front
and rear active outputs.
If necessary for the fader, these channels can be connected by activating the
fader and balance link buttons in the DSP menu settings.
Setup Balance and Fader
19

Limited Speaker Warranty Statement
How to Obtain Warranty Service
20
We reserve the right to change the products and specifications at any time without notice.
Images may or may not include optional equipment.
Diamond Audio (a division of CV & DA Holdings, Inc.) warrants this product to be free from defects in
material and workmanship for a period of one (1) year from the original date of purchase provided it was
purchased from an authorized DAT retailer within the United States. However, if this product was installed
by the authorized DA retailer, the warranty period will be extended to two (2) years.
THIS WARRANTY IS NOT TRANSFERABLE AND APPLIES ONLY TO THE ORIGINAL PURCHASER OF THIS
PRODUCT IN ITS ORIGINAL INSTALLATION. Original purchaser must reside in the United States and be
able to provide proof of purchase and installation with the sales receipt from the authorized DAT retailer
and completion of online regoistration that sold and installed the product.
Should a manufacturing defect occur during above said warranty period, DA will replace or repair the
defective product with a product of the same or equivalent value and performance.
Damage or failure caused by any of the following is not covered under this warranty policy: negligence,
improper use, abuse, product modification, unauthorized repair attempts, accident, acts of God, misrepre-
sentations by DA retailers, and improper/inadequate packaging during return
shipping.
Warranty is void if serial numbers have been removed, altered or defaced.
In the event a DA product should require service, you should visit the authorized DA retailer you purchased
the product from and they can expedite your claim. All claims must fall into the guidelines listed above
and be accompanied by a copy of the original sales and installation receipt from that authorized DA
retailer.
Product returned for warranty service must be freight-prepaid, properly packaged and clearly marked with
the Return Authorization (RA) number issued by DA. Any product returned to DAT that is improperly
packaged, does not have a RA number clearly marked on the package, or never received a RA number
may be refused upon delivery. DA does not assume responsibility for lost or misdirected product.
Repair or replacement under this warranty is the exclusive remedy of the consumer. DA shall not be liable
for any incidental or consequential damages for breach of any expressed or implied warranty on this
product. Some states do not allow the exclusion or limitation of incidental or consequential damages, or
allow limitations on how long an implied warranty lasts, so the above limitations or exclusions may not
apply to you. This warranty gives you specific legal rights and you may also have other rights that may vary
from state to state.
Customers outside the United States should contact their local sales oce to obtain information on
pricing, exchange unit availability, instructions, service and warranty/non-warranty replacement or repair.
Diamond Audio
3761 South Hill St.
Los Angeles, CA 90717
Tel: 213-261-4161
Fax: 213-947-4767
Web: diamondaudio.com
Facebook.com/diamondaudio
Service/Tech Support:
213-261-4161
Tech Support Email:
©2023 Diamond Audio. All rights reserved.
( a division of CV & DA Holdings, Inc.)