MICROW
AVE OVEN
Use & Care Guide
For questions about features, operation/performance, parts, accessories or service, call:
, or visit our website at www.whirlpool.com/owners
Model
DRAWER
WMBD5024
W11824118A
Horno microondas de cajón
Guía de uso y cuidado
Para consultas sobre características, funcionamiento/rendimiento, piezas, accesorios o servicio, llama al:
, o visita nuestro sitio web en www.whirlpool.com/owners

CONTENT
2
3
6
7
8
9
9
9
9
10
10
10
11
11
12
12
13
13
14
14
CONTROL PANEL
SETTINGS
SETTING THE CLOCK
SETTING THE TIMER
TABLE OF CONTENTS
PARTS AND FEATURES
MICROWAVE OVEN SAFETY
..........................................................................
............................................................
..........................................................................
...............
....................................................
....................................................
............................................................................
......................................................................
.........................................................................
.....................................................................
..............................................................
.................................................................
..........................................
.................................................
..................................................
8
..........................................................
....................................................
....................
......................................
MICROWAVE OVEN COOKING FUNCTIONS
13
..................................................................................
..................................................................
...................................................................
........
.........................................
..................................................................
..................................................... ..........................
......................................................................
.........................................................................
...............................................................................
..............................................................
............................................................................
....................................................................
...............................................................................
.................................................................
............................................................
..............................................................................
......................................................................................
...............................
.................................................
...........
....................................................
.................................................................
.................................................
..........................................................
....................................................
..................................
MUTE FUNCTION
CONTROL LOCK
COOK TIME/POWER
EXPRESS COOKING
COOK
REHEAT
DEFROST
VEGGIES
POPCORN
SOFTEN/MELT
KEEP WARM
STEAM CLEAN
STANDBY MODE
ÍNDICE
2
16
19
20
21
21
22
22
22
23
23
23
24
24
25
25
25
25
26
27
27
28
28
28
21
26
CONTENIDO
SEGURIDAD DEL HORNO MICROONDAS
PARTES Y CARACTERÍSTICAS
PANEL DE CONTROL
CONFIGURACIONES
MODO DE ESPERA
6
.................................... .......................................................
COMBINATION INSTALLATION
19
INSTALACIóN COMBINADA
FUNCIONES DE COCCIÓN DEL HORNO MICROONDAS
AJUSTE DEL RELOJ
AJUSTE DEL CRONÓMETRO
FUNCIÓN DE SILENCIO
CERRADURA PARA NIÑOS
TIEMPO DE COCCIÓN/POTENCIA
COCCIÓN RÁPIDA
COCINAR
DESCONGELAR
RECALENTAR
ABLANDAR
PALOMITAS DE MAÍZ
DERRETIR
FREÍDO AL AIRE
FUNCIONES DE COCCIÓN DEL HORNO
HORNEAR
PARRILLA
LIMPIEZA A VAPOR
ASAR
MANTENER CALIENTE
..........................................................
..................................................................
.....................................................................
..............................................................
POTATOES
2
MICROWAVE OVEN SAFETY
Your safety and the safety of others are very important.
We have provided many important safety messages in this manual and on your appliance. Always read and obey all safety
messages.
This is the safety alert symbol.
This symbol alerts you to potential hazards that can kill or hurt you and others.
All safety messages will follow the safety alert symbol and either the word “DANGER” or “WARNING.” These
words mean:
DANGER
You can be killed or seriously injured if you don't
immediately follow instructions.
WARNING
You can be killed or seriously injured if you don’t follow
instructions.
All safety messages will tell you what the potential hazard is, tell you how to reduce the chance onjury, and tell you what can
happen if the instructions are not followed.
IMPORTANT SAFETY INSTRUCTIONS
When using electrical appliances basic safety precautions should be followed, including the following:
WARNING:
To reduce the risk of burns, electric shock, re, injury to persons, or exposure to excessive microwave energy:
Read all instructions before using the appliance.
Read and follow the specic “PRECAUTIONS TO AVOID
POSSIBLE EXPOSURE TO EXCESSIVE MICROWAVE
ENERGY” found in the PRECAUTIONS TO AVOID
POSSIBLE EXPOSURE TO EXCESSIVE MICROWAVE
ENERGY section.
This appliance must be grounded. Connect
only to properly
grounded outlet. See “GROUNDING INSTRUCTIONS”
section.
Install or locate this appliance only in accordance with the
provided Installation Instructions.
Some products such as whole eggs and sealed containers -
for example, closed glass jars - are able to explode and
should not be heated in this oven.
Use this appliance only for its intended use as described in
the manual. Do not use corrosive chemicals or vapors in
this appliance. This type of oven is specically designed to
heat, cook, or dry food. It is not designed for industrial or
laboratory use.
HOT CONTENTS CAN CAUSE SEVERE BURNS. DO
NOT ALLOW CHILDREN TO USE THE MICROWAVE. Use
caution when removing hot items.
Do not operate this appliance it has a damaged cord or
plug, it is not working properly, or it has been damaged
or dropped.
This appliance should be serviced only by qualied service
personnel. Contact nearest authorized service facility for
examination, repair, or adjustment.
Do not cover or block any openings on the appliance.
Do not store this appliance outdoors. Do not use this
product near water – for example, near a kitchen sink, in a
wet basement, near a swimming pool, or similar locations.
Do not immerse cord or plug in
water.
Keep cord away from heated surfaces.
Do not let cord hang over edge of table or counter.
Do not use replacement parts that have not been
recommended by the manufacturer (e.g. parts made at
home using a 3D printer).
See door surface cleaning instructions in the “Microwave
Oven Maintenance and Care” section.
Liquids, such as water, coee, or tea are able to be
overheated beyond the boiling point without appearing to
be boiling. Visible bubbling or boiling when the container is
removed from the microwave oven is not always present.
THIS COULD RESULT IN VERY HOT LIQUIDS
SUDDENLY BOILING OVER WHEN THE CONTAINER IS
DISTURBED OR A UTENSIL IS INSERTED INTO THE
LIQUID.
Do not operate any heating or cooking appliance beneath
this appliance.
Do not mount unit over or near any portion of a heating or
cooking appliance.
Do not mount over a sink.
Do not store anything directly on top of the appliance
surface when the appliance is in operation.
SAVETHESEINSTRUCTIONS
3
IMPORTANT SAFETY INSTRUCTIONS
When using electrical appliances basic safety precautions should be followed, including the following:
WARNING:
To reduce the risk of burns, electric shock, re, injury to persons, or exposure to excessive microwave energy:
To reduce the risk ore in the oven cavity:
• Do not overcook food. Carefully attend appliance when
paper, plastic, or other combustible materials are placed
inside the oven to facilitate cooking.
• Remove wire twist-ties from paper or plastic bags before
placing bag in oven.
• If materials inside the oven ignite, keep oven door
closed, turn oven o, and disconnect the power cord, or
shut o power at the fuse or circuit breaker panel.
• Do not use the cavity for storage purposes. Do not leave
paper products, cooking utensils, or food in the cavity
when not in use.
Oversized foods or oversized metal utensils should not be
inserted in a microwave/toaster oven as they may create a
re or risk of electric shock.
Do not clean with metal scouring pads. Pieces can burn o
the pad and touch electrical parts involving a risk of electric
shock.
Do not use paper products when appliance is operated in
the toaster mode.
Do not store any materials, other than manufacturer’s
recommended accessories, in this oven when not
in use.
Do not cover racks or any other part of the oven with metal
foil. This will cause overheating of the oven.
SAVETHESEINSTRUCTIONS
PRECAUTIONS TO AVOID POSSIBLE EXPOSURE TO
EXCESSIVE MICROWAVE ENERGY
(a) Do not attempt to operate this oven with the door open since
open-door operation can result in harmful exposure to
microwave energy. It is important not to defeat or tamper with
the safety interlocks.
(b) Do not place any object between the oven front face and the
door or allow soil or cleaner residue to accumulate on sealing
surfaces.
(c) Do not operate the oven it is damaged. It is particularly
important that the oven door close properly and that there is
no damage to the:
(1) Door (bent),
(2) Hinges and latches (broken or loosened),
(3) Door seals and sealing surfaces
(d) The oven should not be adjusted or repaired by anyone
except properly qualied service personnel.
4

MICROWAVE OVEN
MAINTENANCE AND CARE
General Cleaning
IMPORTANT: Before cleaning, make sure all controls are o and
the microwave oven is cool. Always follow label instructions on
cleaning products.
Soap, water, and a soft cloth or sponge are suggested rst, unless
otherwise noted.
STAINLESS STEEL AND BLACK STAINLESS
STEEL (on some models)
NOTE: To avoid damage to stainless steel surfaces, do not use
soap-lled scouring pads, abrasive cleaners, Cooktop Cleaner,
steel-wool pads, gritty washcloths, or abrasive paper towels.
Damage may occur to stainless steel surfaces, even with one-time
or limited use.
Rub in direction of grain to avoid damaging.
Cleaning Method:
Aresh
®
✝
Stainless Steel Cleaners Part Number W10355016
(not included) or aresh
®
Stainless Steel Cleaning Wipes Part
Number W1055049 (not included):
See the Quick Start Guide for ordering information.
Vinegar for hard water spots.
MICROWAVE OVEN DOOR EXTERIOR
Cleaning Method:
Glass cleaner and a soft cloth or sponge: Apply glass cleaner
to soft cloth or sponge, not directly on panel.
Aresh
®
Kitchen Appliance Cleaners Part Number
W10355010 (not included): See “Online Ordering Information”
section from Quick Start Guide to order.
NONSTICK CAVITY COATING (on some models)
To avoid damage to the microwave oven cavity, do not use metal
or sharp utensils or scrapers or any type of abrasiv
e cleanser or
scrubbers.
MICROWAVE OVEN CAVITY
To avoid damage to the microwave oven cavity, do not use
soap-lled scouring pads, abrasive cleaners, steel-wool pads,
gritty washcloths, or some paper towels.
On stainless steel models, rub in direction of grain to avoid
damaging.
The area where the microwave oven door and frame touch when
closed should be kept clean.
Cleaning Method:
Average soil
Mild, nonabrasive soaps and detergents:
Rinse with clean water and dry with soft, lint-free cloth.
Heavy soil
Mild, nonabrasive soaps and detergents:
Heat 1 cup (250 mL) of water for 2 to 5 minutes in microwave
oven. Steam will soften soil. Rinse with clean water and dry
with soft, lint-free cloth.
Odors
Lemon juice or vinegar:
Heat 1 cup (250 mL) of water with 1 tbs (15 mL) of either
lemon juice or vinegar for 2 to 5 minutes in microwave oven.
✝affresh
®
is a registered trademark of Whirlpool, U.S.A.
Microwave Oven Use
Odors and smoke are normal when the microwave oven is used
the rst few times or when it is heavily soiled.
IMPORTANT: The health of some birds is extremely sensitive to
the fumes given o. Exposure to the fumes may result in death to
certain birds. Always move birds to another closed and well
ventilated room.
Safe Use of Aluminum Foil in a Microwave:
1. Small, Smooth Pieces: Use only small, at, new, and smooth
pieces ooil. Avoid wrinkled or crumpled foil.
2. Shielding: Use foil to shield small or thin areas oood to
prevent overcooking. Shape the foil smoothly around the food
without sharp edges.
3. Limited Coverage: Do not cover more than one-quarter of the
food with foil.
4. Keep Away from Walls: Ensure the foil is at least one inch
away from the microwave walls, top, and bottom.
5. No Metal Contact: Avoid contact between the foil and any
other metal parts inside the microwave.
6. Short Durations: Use foil for the shortest possible heating
time, ideally no more than 30 seconds.
7. Monitor Closely: Watch the microwave carefully. If you see
sparks, stop the microwave immediately and remove the foil.
Safe Use of Microwave-Safe Metal Containers:
1. Chec
k for the “Microwave-Safe” Label: Only use metal
containers that are explicitly labeled as microwave-safe by the
manufacturer.
2. Read the Manufacturer’s Instructions: Follow any specic
guidelines provided by the manufacturer.
3. Ensure Smooth, Rounded Edges: Avoid containers with sharp
or irregular edges, dents, or damage.
4. Avoid Contact with Microwave Walls: Keep the container away
from the sides, top, and bottom of the microwave cavity.
5. Do Not Use with Other Metals: Avoid placing metal utensils
inside the container and ensure no metal parts in the
microwave can touch the container.
6. Short Heating Intervals: Heat in shorter intervals and check
frequently.
7. Monitor Closely: Stay near the microwave, especially the rst
few times you use a new container. Stop immediately if you
see sparks.
8. Remove Lids (If Not Microwave-Safe): Remove any
non-microwave-safe lids before microwaving.
9. Be Aware of Longer Heating Times: Metal containers and their
contents may take longer to heat.
5
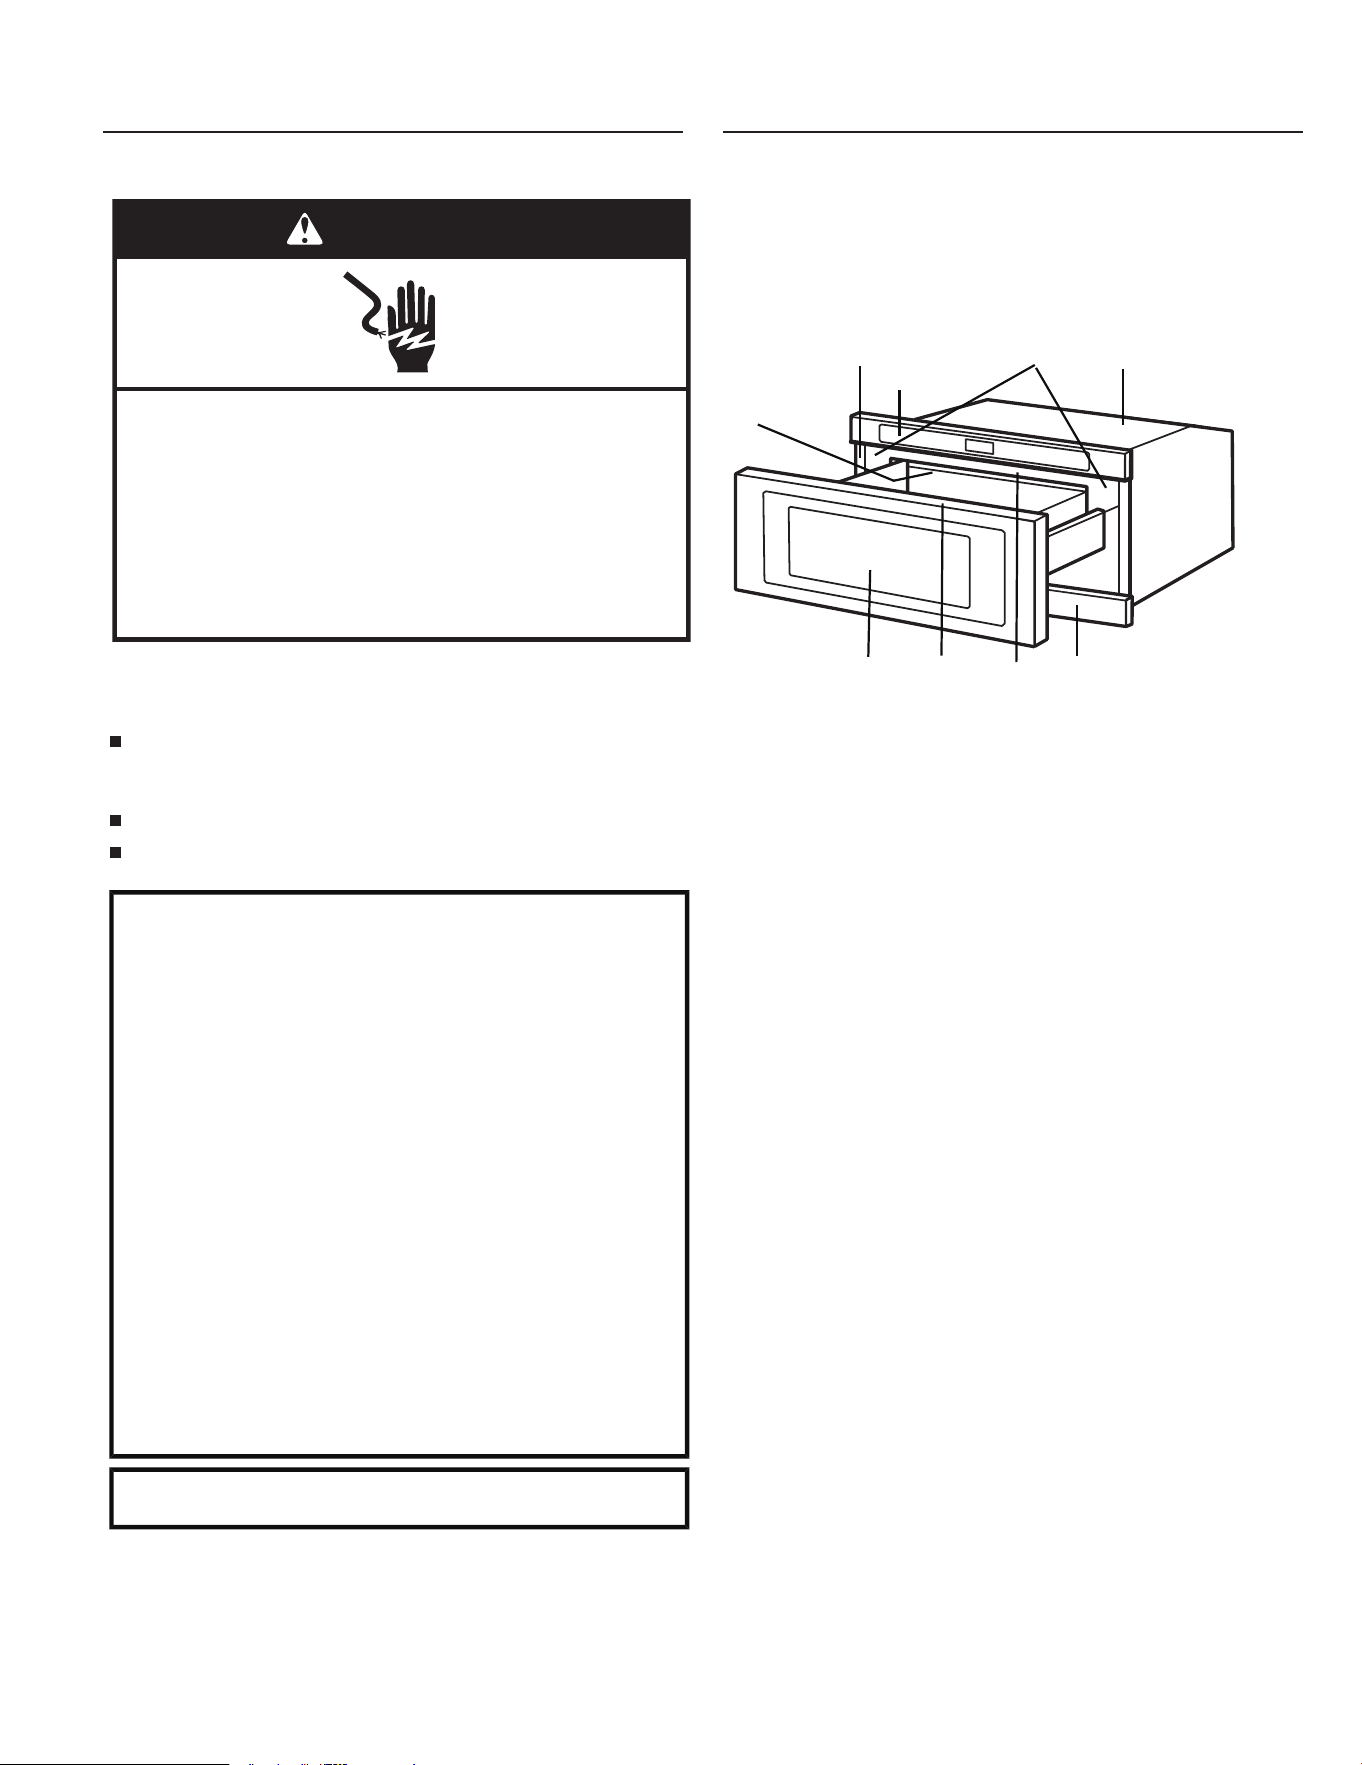
A. Trim
B. Control panel
C. Door lock system
D. Door and window panels
E.
F. Cavity back cover
H.
Cooking guide label
Frame
G. Microwave oven light
(inaccessible – in ceiling)
B
A
C
D
E
F
G
H
Rating label
I
.
I
Electrical Requirements
Observe all governing codes and ordinances.
Required:
A 120 V, 60 Hz, AC-only, 15- or 20-amp electrical supply
with a fuse or circuit breaker.
Recommended:
A time-delay fuse or time-delay circuit breaker.
A separate circuit serving only this microwave oven.
Electrical Shock Hazard
Plug into a grounded 3 prong outlet.
Do not remove ground prong.
Do not use an adapter.
Do not use an extension cord.
Failure to follow these instructions can result in death,
re, or electrical shock.
WARNING
GROUNDING INSTRUCTIONS
For a grounded, cord-connected appliance:
This appliance must be grounded. In the event of a
malfunction or breakdown, grounding will reduce the risk of
electric shock by providing a path oeast resistance for
electric current. This appliance is equipped with a cord having
an equipment-grounding conductor and a grounding plug.
The plug must be plugged into an appropriate outlet that is
properly installed and grounded in accordance with all local
codes and ordinances.
WARNING:
Improper connection of the equipment-
grounding conductor can result in a risk of electric shock.
Check with a qualied electrician or serviceman if you are in
doubt as to whether the appliance is properly grounded. Do
not modify the plug provided with the appliance: it will not t
the outlet, have a proper outlet installed by a qualied
electrician.
Do not use an extension cord. If the power supply cord is too
short, have a qualied electrician or serviceman install an
outlet near the microwave oven.
SAVE THESE INSTRUCTIONS
This device complies with Part 18 of the FCC Rules.
PARTS AND FEATURES
This manual may cover several dierent models. The model you
have purchased may have some or all of the features shown
here. The appearance of your particular model may dier slightly
from the illustrations in this manual.
6
CONTROL PANEL
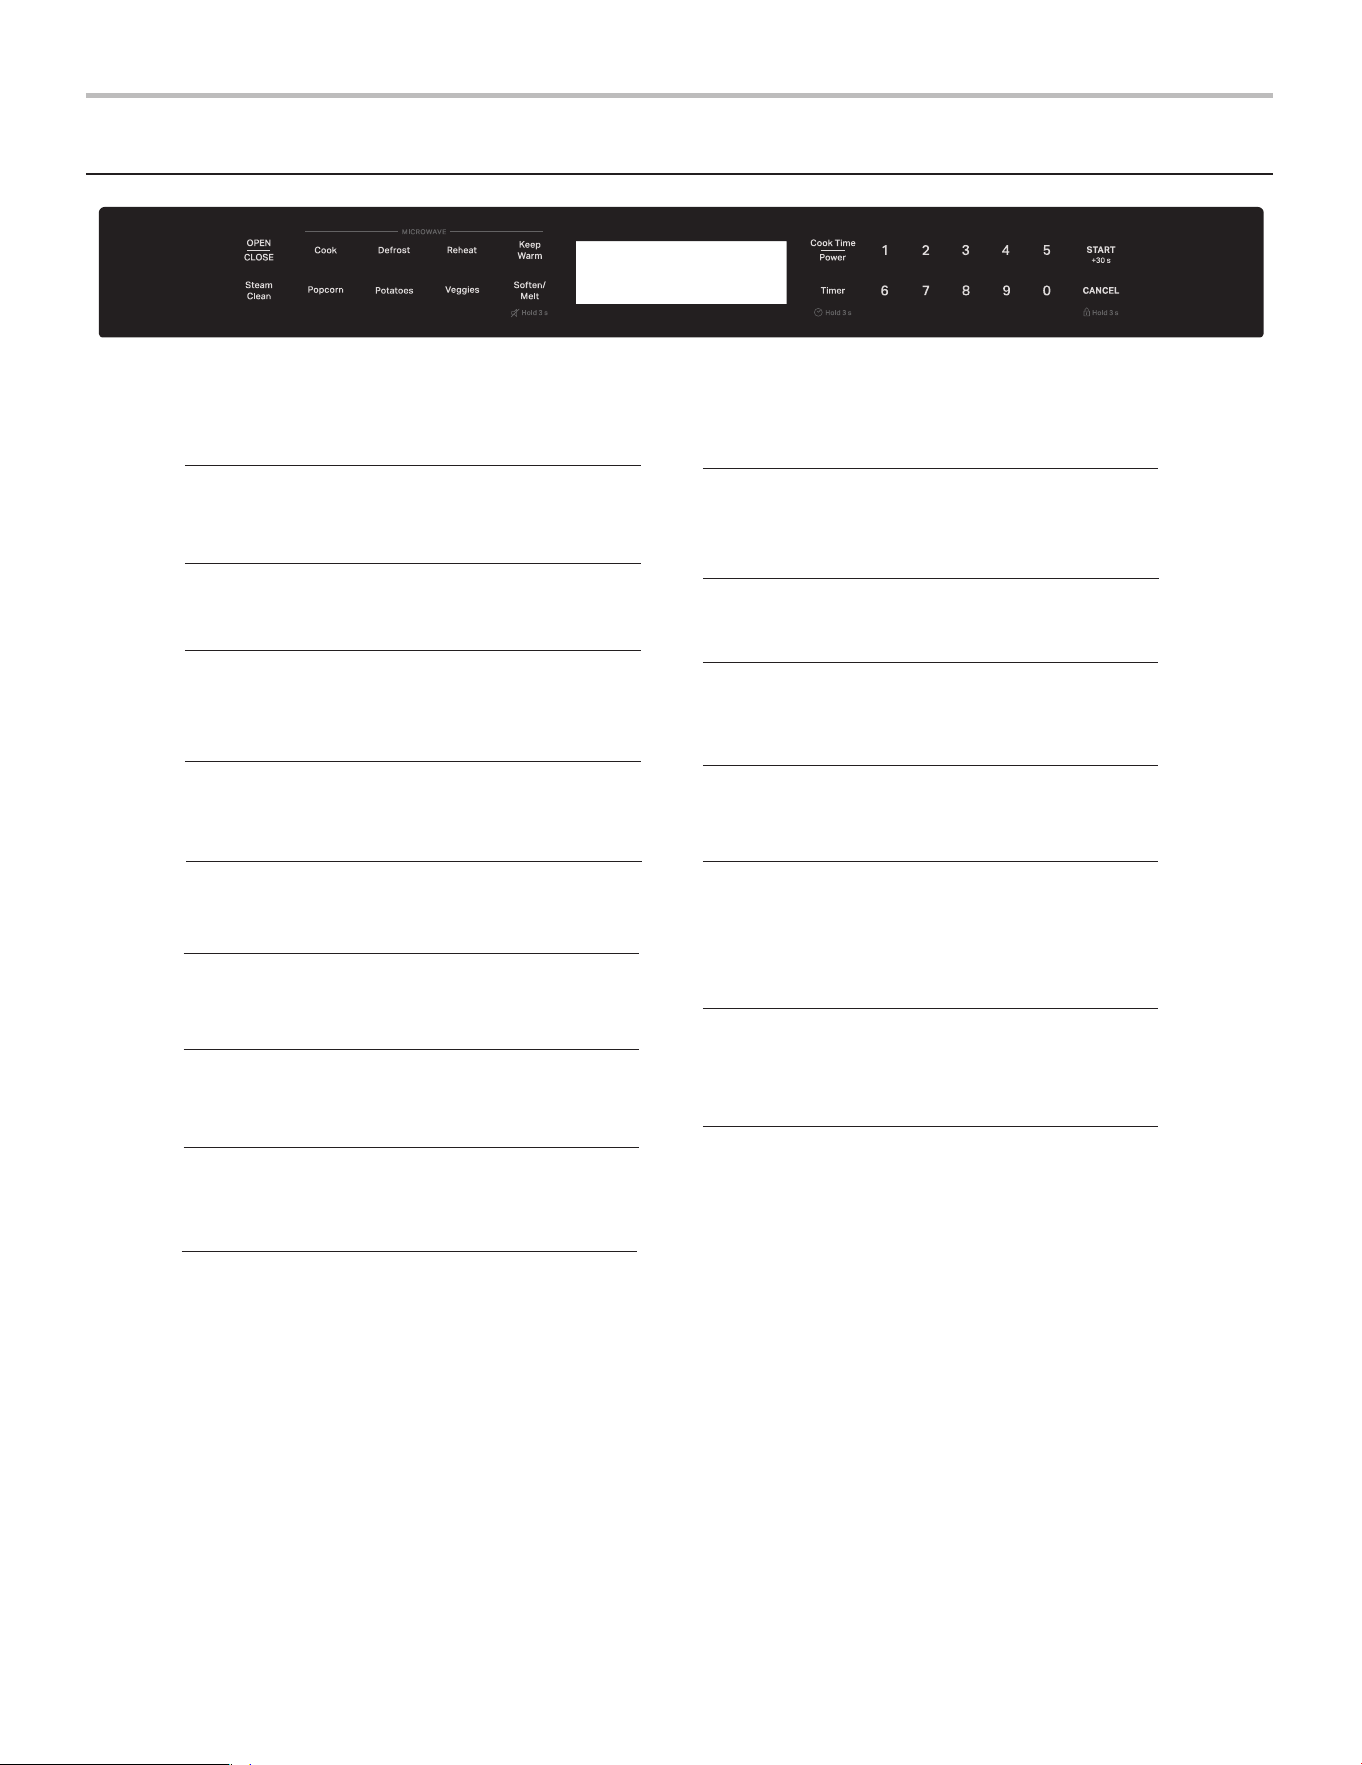
DISPLAY SCREEN
Time, power and indicators are displayed.
COOK
Press to select cooking menus.
DEFROST
Press to defrost food.
REHEAT
Press to select reheating menus.
/MELT
Press and hold for 3 seconds to mute all sounds.
SOFTEN
Press to soften/melt food.
POPCORN
Press to cook popcorn.
COOK TIME/POWER
Press to set microwave cooking program.
NUMBER BUTTONS
Press to set time, food weight or servings.
TIMER
Press once to set kitchen timer function.
Press and hold to set clock time function.
START/+30 s
Press to start a cooking program.
Press to quick start the microwave oven for 30
seconds at full power.
CANCEL
Press once to cancel cooking.
Press and hold for 3 seconds to set control lock.
STEAM CLEAN
Used to set steam clean function.
KEEP WARM
Used to set keeping warm function.
POTATOES
Press to cook potatoes.
VEGGIES
Press to cook veggies.
OPEN/CLOSE
When the Control Lock is deactivated, press the
OPEN/CLOSE button to automatically open or
close the drawer. The drawer can be manually
pushed or pulled to open or close at any time.
CAUTION: The maximum load capacity for the
automatic drawer is 7.7 lbs (3.5 kg). Exceeding this
limit may damage the motor or drive mechanism.
7

SETTINGS
When the oven is plugged in, a "DE" will
sound and all icons light up for 2 seconds.
After 2 seconds, the display screen will show
"12HR" (12 flashing),
(flashing), you can
press TIMER button to select 24- hour or
12-hour clock.
During cooking, if open the oven door, the
program will be paused, then close the door,
press START/+30 s button to resume.
During setting, a "DE" will sound and the
system will return to standby mode if there is
not any operation within 60 seconds.
If there is no operation for 60 seconds in
standby mode, a "DE" will sound, the backlight
will dim, and the system will enter power
saving mode. Pressing any button once and
opening the oven door will exit the power
saving mode.
After cooking ends, the display wi
ll show End
and 3 "DE" will sound. After 1 minute, a
second prompt sound will be emitted, and the
system will emit a prompt sound every 3
minutes. After the fifth prompt is completed,
it will automatically return to standby mode, or
press CANCEL button once or open the
oven door, and the system will return to
standby mode.
During cooking without opening the oven door,
if there is no operation for more than 10
minutes after pausing, the work will
automatically end and return to the standby
interface.
The electronically controlling system of the
microwave oven has the feature of cooling. As
for microwave
cooking mode which cooking
time above 2 minutes, after cooking ends, the
oven fan will work about 3 minutes
automatically to cool the oven for prolonging
the life of the oven.
When the door is opened or during cooking,
the oven light is turned on by default.
When the microwave is in operation, if the
remaining cooking time is less than 6.8 seconds
when adjusting the time by pressing START/
+30 s, the time cannot be modified
After cooking is completed, press START/+30 s
button to immediately start a new cooking.
The parameters for the new cooking will
continue from the previous cooking
parameters, and the cooking time will
default to 30 seconds.
If the oven door is not closed, cooking cannot
be started, and the display screen shows
"DOOR" for 3 s
econds, prompting the user to
close the oven door
STANDBY MODE
When no functions are being used, the
microwave oven will switch to standby mode
and slightly dim the display brightness after
about 1 minutes. Press any button or open
the door, the display will return to normal
lightness.
When the unit is just powered on or returns to
the default mode, it will enter the protection mode.
At this time, the prompt "DOOR" will appear on the
startup screen for three seconds, and you need
to open and close the door once to start the cooking
Do not open the door or press the "CANCEL"button
during the the humidity menu is in operation;
otherwise, the cooking will malfunction and stop
working, returning to the standby screen.
8

SETTING THE CLOCK
The first method:
The second method:
1. When the oven is first plugged in, the display
screen will show "12 HR" (12 flashing), you
can press TIMER button repeatedly to select
24- hour or 12-hour clock.
2. Press START/+30 s button once.
3. Use number buttons to set correct time.
4. Press START/+30 s or TIMER button once to
confirm.
NOTE:
During the clock setting period after power
on, if the clock is not set or if there is not any
operation within 60 seconds, the system
returns to standby, the display screen will
show ":" (not flashing) indicating that the
clock has not been set. If there is not any
operation in 10 seconds on the clock
selection interface,
directly enter the clock
setting interface.
After setting the clock value incorrectly,
press START/+30s button, and the
system will display "00:00" (flashing) and
emit an error prompt sound.
1. In idle state, press TIMER button once.
2. Use number buttons to enter desired time.
The longest time is 90 minutes.
3. Press START/+30 s button to confirm.
NOTE: When the countdown ends, the buzzer will
beep to remind you. During setting or cooking,
you can check the countdown time by pressing
TIMER button, and if CANCEL button is
pressed when the display shows the time, the
function can be cancelled.
To set: Press and hold SOFTEN/MELT button for
3 seconds, the display will show "
". The system
has entered mute mode.
To exit: In mute mode, press and hold SOFTEN/
MELT button for 3 seconds, the "
" will go off.
The system has exited mute mode.
The child proof lock prevents unsupervised
operation by children.
To set: In idle state, press and hold CANCEL
child lock mode and the lock indicator light
will turn on. In the lock state, all buttons are
disabled.
1. In idle state, press Timer button to activate oven.
2. Press and hold TIMER button for 3 seconds.
3. Use number buttons to set the correct time.
4. Press START/+30 s or TIMER button once to
confirm
SETTING THE TIMER
MUTE FUNCTION
CONTROL CLOCK
To exit: In child lock mode, press and hold
CANCEL button for 3 seconds, the lock indicator
will go off. The system has exited child lock mode.
button for 3 seconds, the oven
will auto enter
9
MICROWAVE OVEN COOKING FUNCTIONS
EXPRESS COOKING
Use this feature to program the oven to microwave food at 100% power conveniently. In idle state, press START/+30 s. button once
(Default cooking time is 30 seconds), the oven will start automatically at 100% high power level.
NOTE: The longest cooking time is 90 minutes.
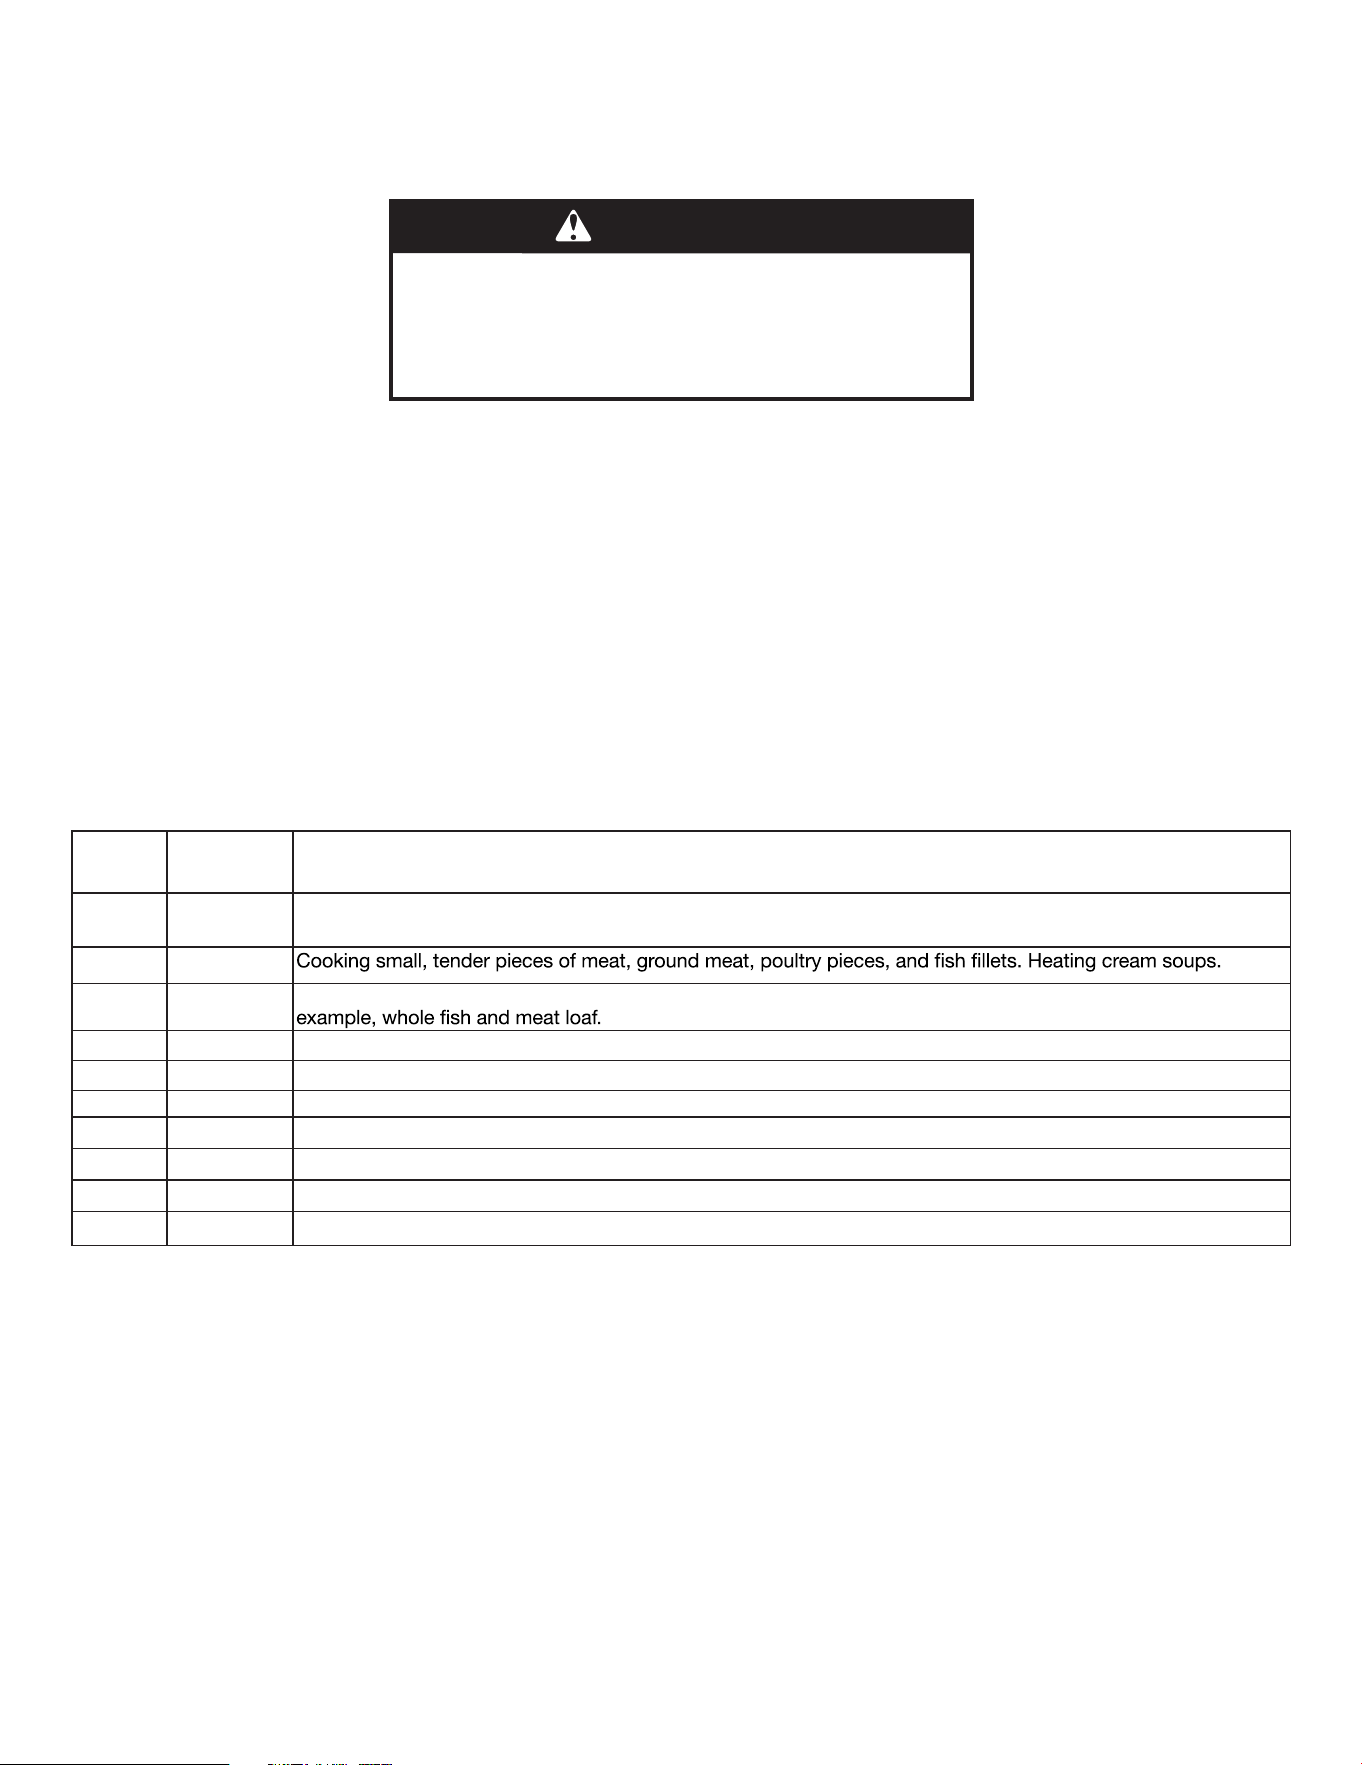
Number Percent/
Name
Use
10 100% Quick heating convenience foods and foods with high water content, such as cooking soups with raw
ingredients, heating beverages, and cooking most vegetables.
9 90%
8 80% Heating rice, pasta, or casseroles. Cooking and heating foods that need a cook power lower than high, for
7 70% Reheating ready-cooked food, single or multiple dishes.
6 60% Cooking sensitive foods such as cheese and egg dishes, pudding, and custards.
5 50% Cooking non-stirrable casseroles, such as lasagna.
4 40% Cooking ham, whole poultry, and pot roasts.
3 30% Simmering stews, melting butter.
2 20% Defrosting, melting chocolate. Heating bread, rolls, and pastries.
1 10% Taking chill out of fruit, Softening butter, cheese,and ice cream.
WARNING
Food Poisoning Hazard
Do not let food sit in oven more than one hour before
or after cooking.
Doing so can result in food poisoning or sickness.
Tips and suggestions:
For a better cooking performance, it is recommended to stir/turn and let the food stand 1 minutes after cooking and reheat.
When cooking foods with high water content (such as potatoes), moisture may form inside the door and oven cavity. After the oven cavity
and door cool down, wipe them o with a dry cloth.
During microwave cooking, press the "Cook Time/Power" button once. The current cooking time will pause (the countdown continues in
the background), and you will enter the time adjustment interface. At this time, press the number keys to set the desired time. The new time
setting will take eect automatically after 5 seconds, or you can press the "START/+30Sec" button to conrm and activate it immediately.
(Note: Time and power level cannot be adjusted if the remaining cooking time is less than 6 seconds.)
In the time setting interface, press the "Cook Time/Power" button once. The "%" indicator will ash, and you will enter the power level
adjustment interface. At this time, press the number keys to set the desired power level. The new power setting will take eect automatically
after 5 seconds, or you can press the "START/+30Sec" button to conrm and activate it immediately.
COOK TIME/POWER
1.While in the Idle State, press Cook Time/Power button once.
2.Use the number pad to enter the desired cooking time. (Maximum time: 90 minutes).
3.Press Cook Time/Power again to adjust the power level. (Default is 100%). Use the number pad to select a power level.
4.Press START / +30 Sec to begin cooking.
10
COOK
1. In idle state, press the Cook button repeatedly to select your food category.
2. Press the START/+30 s button, then use the number buttons to select the food quantity (this step can be skipped for sensor-based
food categories).
3. Press the START/+30 s button to begin.
DEFROST
1. In idle state, press the Defrost button repeatedly to select your food category.
2. Press the START/+30 s button, then use the number buttons to enter the defrost time or food quantity..
3. Press the START/+30 s button to begin.
•
• For optimal results, food should be 0°F (-18°C) or colder when defrosting.
• Unwrap foods and remove lids (from fruit juice) before defrosting.
• Shallow packages will defrost more quickly than deep blocks.
• Separate food pieces as soon as possible during or at the end of the cycle for more even defrosting.
• Foods left outside the freezer for more than 20 minutes or frozen ready-made food should not be defrosted using the Defrost feature
but should be defrosted manually.
•
• Times and cooking powers have been preset for defrosting a number of food types.
• Let stand 5-20 minutes after defrosting.
Item
Food
Category
Display Quantity
Food weight
Instruction
Ounce Gram
1 Bacon BACN 1-6 slices 0.7 oz / slice 20 g / slice
Average thickness: Follow directions on the
package. For best results, place bacon on
a microwave-safe bacon rack.
2 Rice RICE
Senses 0.5- 2.0
cups
3.4 oz - 13.6 oz
(6.8 oz rice / cup)
96 g - 384 g
(192 g rice /cup)
Follow measurements on the package for
ingredient amounts. Place rice and liquid in
a microwave-safe dish. Cover with a loose
after cooking, or until liquid is absorbed.
3
Frozen
Entree
FRZN MEAL Senses 10 - 40 oz 10 - 40 oz 283 - 1134 g
container leaving one of the short sides still
attached. Let stand for 3-5 minutes after
cooking.
4 Oatmeal OAT MEAL Senses 1-4 cups 1.2 oz / serving 35 g / serving
Cover with plastic wrap and vent.
Stir after cooking.
Item Food Category Display Quantity
Food weight
Instruction
Ounce Gram
1 Manual Defrost MDEF Enter time / / Use microwave safe plate
2 Chicken CHKN Enter 0.2-6.6 lb 3.2 - 106 oz 91 - 2994 g Use microwave safe plate
3 Ground Beef BEEF Enter 0.2-6.6 lb 3.2 - 106 oz 91 - 2994 g Use microwave safe plate
11
REHEAT
1. In idle state, press the REHEAT button repeatedly to select your food category.
2. Press the START/+30 s button, then use the number buttons to select the food quantity (this step can be skipped for sensor-based
food categories).
3. Press the START/+30 s button to begin.
Item
Food
Category
Display Quantity
Food weight
Instruction
Ounce Gram
1 Dinner plate MEAL Sense 1 plate 10 - 15 oz 284 - 425 g
Place food on a plate.
Cover with plastic wrap and vent.
Let stand for 3 minutes after reheating.
2 Pizza PIZZ Sense 1-3 slices 3.5 oz / slice 100 g / slice
Place on a paper towel lined microwave-
safe plate.
3 Casserole CASS 1-4 cups 7.8 oz / cup 220 g / cup
Place in a microwave-safe container. Cover
with plastic wrap and vent. Stir and let
stand for 3 minutes after reheating.
4 Soup SOUP Sense 1-4 cups 8.8 oz- 35.2 oz 250 g - 1 kg
Place in a microwave-safe container. Cover
with plastic wrap and vent. Stir and let
stand for 3 minutes after reheating.
5 Beverage BEV 1-4 cups
8 oz - 32 oz
(8 oz / each)
236 g - 944 g
(236 g / cup)
Place in microwave-safe co
ntainer.
Do not cover.
Keep Warm
WARNING
Food Poisoning Hazard
Do not let food sit in oven more than one hour before
or after cooking.
Doing so can result in food poisoning or sickness.
1. In idle state, press KEEP WARM button repeatedly or use number buttons (1~4) to select time.
2. Press START/+30 s button to start.
12
POPCORN
1. Press the Popcorn button once, the display screen shows “POPC”.
2. Press START/+30 s button to start.
Steam Clean
Before starting the cycle:
1. Put 250 mL water into a container (see our recommendations in the below section “Tips and suggestions”).
2. Place the container directly on the middle of the oven bottom.
3. Close the door.
To Start The Cycle:
1. Press the Steam Clean button.
2. Press the START / + 30 s button to start the function.
When The Cycle Is Finished:
1. Press the CANCEL button.
2. Remove the container.
3. Use a soft cloth or a paper towel with mild detergent to clean the interior surfaces.
Tips and suggestions:
For a better cleaning result, it is recommended to use a container with a diameter of 17-20 cm, and a height that is lower than 6.5 cm.
It is recommended to use a container of light plastic material that is suitable for the microwave.
As the container will be hot after the cleaning cycle is completed, it is recommended to use a heat r
esistant glove when removing the
container from the microwave.
For a better cleaning effect and removal of unpleasant odors, add some lemon juice or vinegar to the water.
This automatic cleaning cycle will help you to clean the microwave oven cavity and to remove unpleasant odors.
Quantity
Food weight
Instruction
Ounce
Gram
Sense 3.0 ~
3.5 oz
3.0 ~ 3.5 oz
85 ~99 g
Do not use regular paper bags or glassware.
Follow manufacturer’s instructions when using a microwave popcorn popper.
Listen for popping to slow to one pop every 1 or 2 seconds, and then stop the cycle.
Do not
repop unpopped kernels.
For best results, use fresh bags of popcorn.
Cooking results may vary by brand and fat content. Follow the
instructions provided by the
microwave popcorn manufacturer.
1. Press the Potato button repeatedly to select potato size.
2. Press the START/+30 s button, then use number buttons to select potato quantity.
3. Press the START / + 30 s button to cook.
Potato
Item Food Category Display Quantity
Food Weight Instruction
Ounce Gram
1 Large potatoes LRG 1-4 potatoes 8 - 12 oz / each
227 - 340 g /
each
Pierce each potato several times with a fork.
Place on a paper towel, around ceramic plate
edges, at least 1” (2.5 cm) apart.
Place a single potato to the side of the glass tray.
Place 4 or more potatoes in a spoke pattern (long-
axis of potato pointing toward the center).
Let stand for 5 minutes after cooking.
2 Small potato SML 1-16 potatoes 3 - 5 oz / each
85 - 142 g /
each
Pierce each potato several times with a fork.
Place on a paper towel, around ceramic plate
edges, at least 1” (2.5 cm) apart.
Place 4 or more potatoes in a spoke pattern (long-
axis of potato pointing toward the center).
Let stand for 5 minutes after cooking.
Display
POPC
13
14
SOFTEN/MELT
1. In idle state, press SOFTEN/MELT button repeatedly to select food category.
2. Press START/+30 s button, then use number buttons to select the quantity.
3. Press START/+30 s button to start.
Veggies
1. In idle state, press the Veggies button repeatedly to select food category.
2. Press the START / + 30 s button to cook.
Item Food Category
Quantity
Food weight
Instruction
Ounce Gram
1 Fresh Vegetables Sense 1-4 cups 3.5 oz - 14 oz
(3.5 oz / each)
100 g - 400 g
(100 g / cup)
Place in a microwave-safe container
and add
2-4 tbs water.
Cover with plastic wrap and vent. Stir
and let
stand for 3 minutes after cooking.2 Frozen Vegetables Sense 1-4 cups
3.5 oz - 14 oz
(3.5 oz / each)
100 g - 400 g
(100 g / cup)
Item Food Category Display Quantity Food weight Instruction
Ounce Gram
1 Soften Butter SOF 1
0.5, 1.0, 1.5, 2.0
sticks
2, 4, 6, 8 oz
(4.0 oz / stick)
57, 113, 170, 227 g
(113 g / stick)
Unwrap and place in a
microwave-safe container. Stir
after melting.
2
Soften Cream
Cheese
SOF 2 3, 8 oz 3, 8 oz 85, 227 g
Place in a microwave-safe
container. Stir after melting.
3 Soften Ice Cream SOF 3 16, 32oz 16, 32 oz 454, 907 g
Cut squares into small pieces
or use chips. Place in a
microwave safe container. Stir
after melting.
4 Melt Butter MLT 4
0.5, 1.0, 1.5, 2.0
sticks
2, 4, 6, 8 oz
(4.0 oz / stick)
57, 113, 170, 227 g
(113 g / stick)
Unwrap and place in a
microwave-safe container. Stir
after melting.
5
Melt Chocolate
Chips
MLT 5 4, 8, 12 oz 4, 8, 12 oz 113, 227, 3
40 g
Cut squares into small pieces
or use chips. Place in a
microwave safe container. Stir
after melting.
6 Melt Cheese MLT 6 8, 16 oz 8, 16 oz 227, 454 g
Cut into small pieces and
place in a microwave safe
container. Stir after melting.
Display
FRSH
FRZN