
Tana
360° Rotating
Modular Stroller
Keep these instructions for future reference.
CV452
©2024 Dorel Juvenile Group, Inc. (800) 951-4113 www.maxicosi.com. Styles, colors, and labeling may vary. Made in China.
Distributed by Dorel Juvenile Group, Inc., 2525 State St., Columbus, IN 47201-7494. Dorel Juvenile Canada, 2233 Argentia
Road, Suite 110, Mississauga, ON L5N 2X7. Representante exclusivo en Chile: DOREL JUVENILE CHILE S.A. Av. del Parque
4161, oficina 602 A, Huechuraba, Santiago, Chile - Fono: 56 2 24971500 - www.infanti.cl - www.dorel.cl. Importado y
distribuido en Perú por: COMEXA COMERCIALIZADORA EXTRANJERA S.A. SUCURSAL DEL PERÚ - Los Libertadores 455,
San Isidro, Lima 27, Lima, Perú RUC 20431062870 – Fono: 4413029 – www.infanti.com.pe. En Centro América, Caribe y
Ecuador por: Best Brands Group S.A. – Av. Balboa, Bay Mall Plaza, Planta Baja, local 9, Panamá. - Fono: (507) 300 2884. En
Colombia por: Baby Universe S.A.S. - Vía 40 No. 77-29, Barranquilla, Colombia - Fono: (575) 353 1110 Importador: DJGM,
S.A. DE C.V. Gabriel Mancera No. 1041 Col. Del Valle, Benito Juárez C.P. 03100 México, Ciudad de México R.F.C.
DJG140305GN9 Tel. (55) 67199202 03/24 4358-8521
Learn More
Text 1-812-652-2525
(US and Canada only, carrier fees may apply)
Visit www.maxicosi.com
Call 1-800-544-1108
Email [email protected]

2 3
Introducing
the Maxi-Cosi
Kindred Collection
Our Maxi-Cosi Kindred Collection is inspired by the ancestry, connection, and
inseparable bonds of Family. When you choose to invite us into your home,
you allow us to become a part of your life.
These pieces are more than furniture or baby products—they’re carriers and
keepers of cherished memories and family ties. Their exceptional quality
and craftsmanship mean that the memories they’ll make are countless.
Each Maxi-Cosi Kindred Collection piece is thoughtfully created, reects a
timeless design, features special metals and EcoCare premium, recycled
fabric made from plastic bottles, and is meant to be loved and shared.
The Maxi-Cosi Kindred Collection
Lineage in design.
544
360° Rotation Quick Start Guide
1 2 3 4
QUICK START GUIDE .................................................5
WARNINGS .................................................................. 7
ASSEMBLY ....................................................................11
Parts .........................................................................12
Unfolding the Stroller ........................................ 14
Rear Wheels ......................................................... 15
Front Wheels ........................................................15
Seat ..........................................................................16
Cup Holder ............................................................17
Bumper Bar ........................................................... 17
USE ...................................................................................19
Brake ........................................................................20
Adjusting the Seat ...............................................20
Leg Rest ..................................................................21
Canopy .....................................................................21
Handlebar ...............................................................21
Rotating the Seat ................................................. 22
Removing the Seat ..............................................23
Restraint System ..................................................24
Adjusting the Shoulder Restraints ................ 26
Folding the Stroller .............................................28
Installing an Infant Car Seat ............................31
Removing an Infant Car Seat .........................33
Table of Contents
CARE AND MAINTENANCE ..................................34
Replaceable Parts ............................................... 35
Warranty Information .........................................35
See back cover for contact
information and support.
5

Warnings
9888 98
Read all instructions before assembly and use of product. Keep instructions for future reference.
• NEVER LEAVE CHILD UNATTENDED. ALWAYS keep child in view when in stroller.
• AVOID SERIOUS INJURY from falling or sliding out. ALWAYS use the harness system. Check frequently to make sure it
is secure.
• ALWAYS keep fingers away from moving parts, when folding, unfolding or adjusting stroller to prevent finger entrapment.
• ALWAYS make sure stroller is FULLY OPEN AND LOCKED before using.
• ALWAYS use the brakes when stroller is stopped.
• ALWAYS remove protective material and poly bags and dispose before assembly.
• NEVER put hot liquids in the cup holder.
• NEVER use stroller on stairs or escalators.
Do not use the magnetic chest clip with children who have an implanted electronic medical device. A magnet
is used to help secure the chest clip locking mechanism together which may interfere with proper function of
an implanted electronic medical device. Parents or caregivers who have an implanted electronic device should
keep their device away from the chest clip and consult their doctor and medical device manufacturer for specific
information before using the chest clip. If a parent/caregiver or child has an implanted electronic medical device,
please contact Dorel Juvenile (see page 35) for a replacement (non-magnetic) chest clip free of charge.
IMPLANTED
ELECTRONIC
MEDICAL
DEVICES
• NEVER rollerblade with stroller.
• NEVER allow children to play with or hang onto the stroller.
• NEVER allow children to climb into the stroller unassisted. Stroller may tip over and injure child.
• NEVER place or hang parcels, bags or accessories on the product, handle or canopy. The stroller may become
unstable, or tip over.
• This product may become unstable if package carrying accessories, other than recommended by the manufacturer
are added.
• This product will become unstable if the manufacturer’s recommended loads are exceeded.
• NEVER place more than 2 lbs (0.9 kg) in cup holder.
• NEVER place more than 10 lbs (4.5 kg) in the storage basket. If weight is exceeded, hazardous unstable conditions
may exist.
• STROLLER mode is only for use with children who can sit up unassisted, up to 50 lbs (22.7 kg), and WHEN
SEATED, the midpoint of the child’s head is at or below the top of the stroller seat.
• ONLY use this stroller with ONE child at a time unless manufacturer recommends otherwise.
• Failure to follow the warnings and the instruction manual steps can result in death or serious injury to your child.
WARNING
WARNING

10 11
Assembly
1312
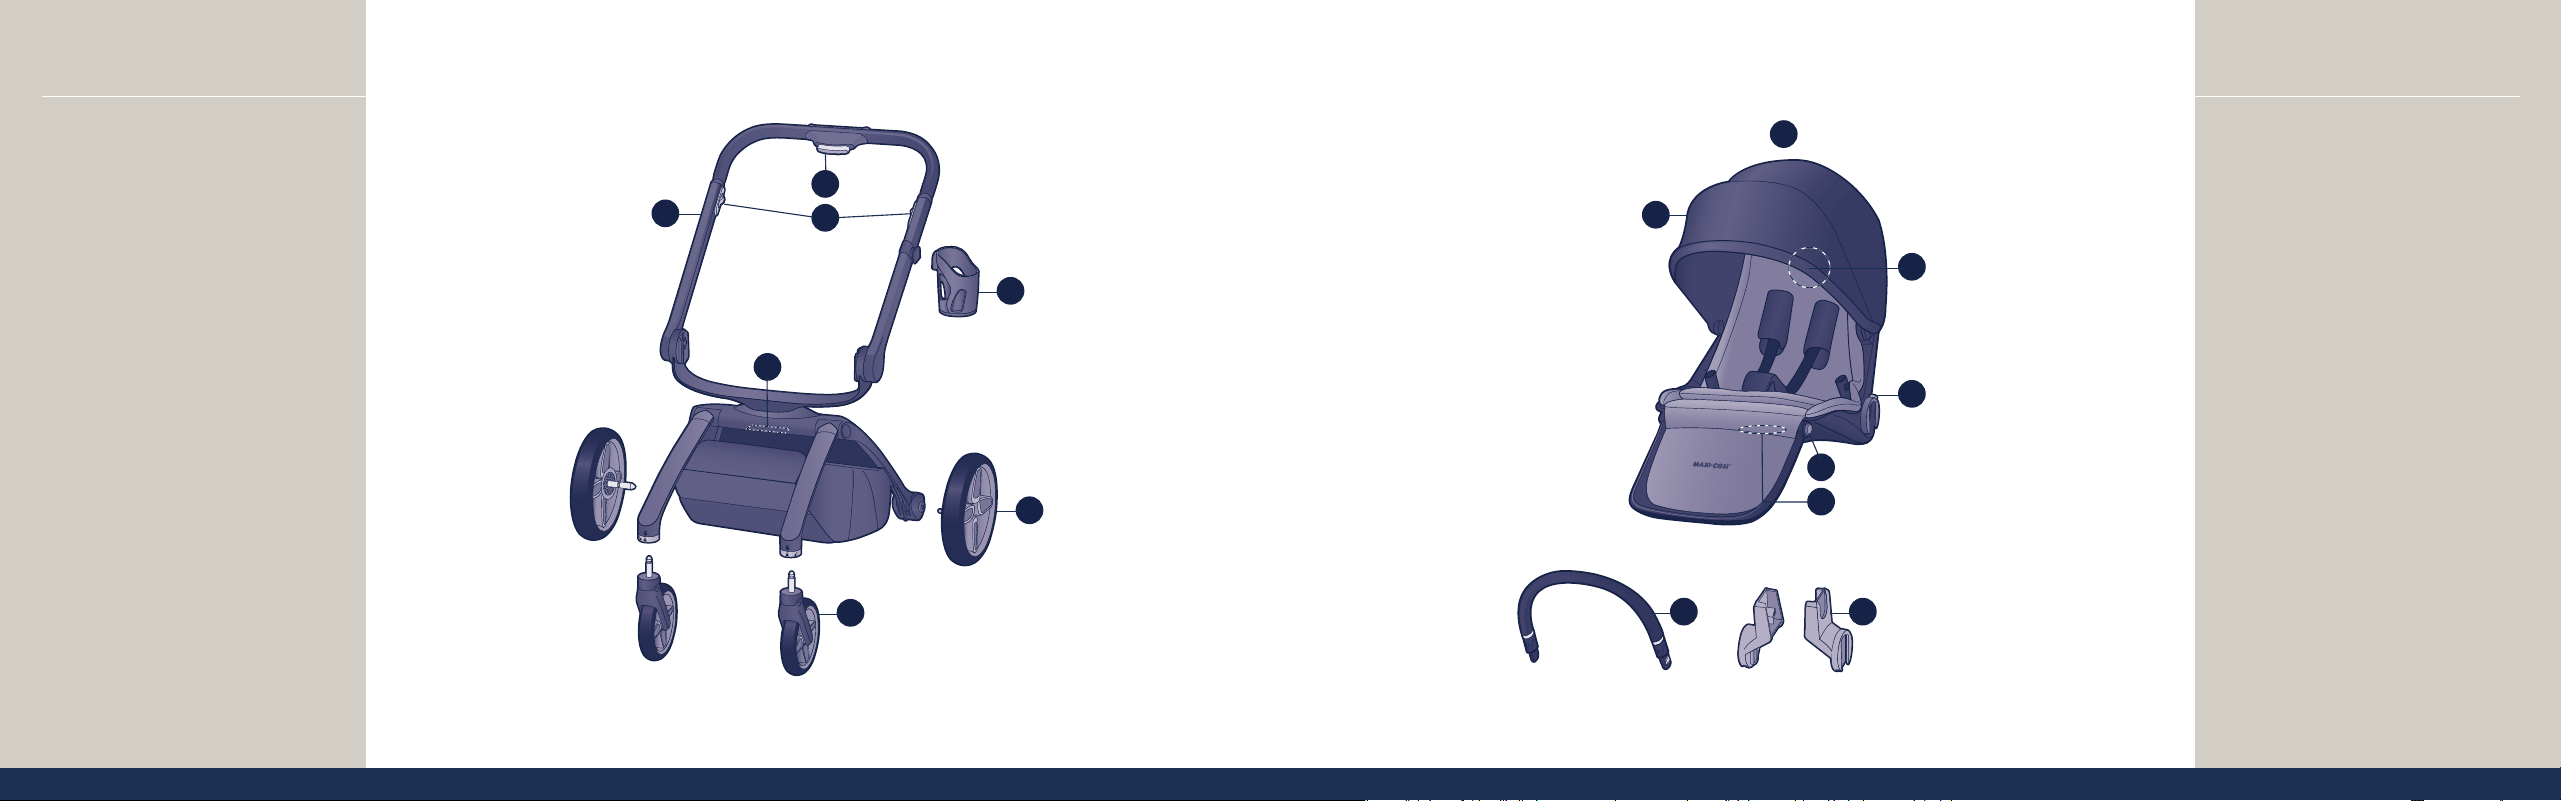
Parts
H Seat
I Canopy
J Seat recline lever
(on back of seat)
K Seat release buttons (2)
L Leg rest adjust buttons (2)
M Carry handle (underneath seat)
N Bumper bar
O Infant car seat adapters (2)
No tools required.
Adult assembly required.
M
I
H
L
N O
K
J
A
C
B
D
E
G
F
Parts
A Stroller frame
B Telescoping handle adjust button
C Frame turn/fold triggers
D Fold
release bar
E Cup holder
F Rear wheels (2)
G Front wheels (2)
1514
Assembly
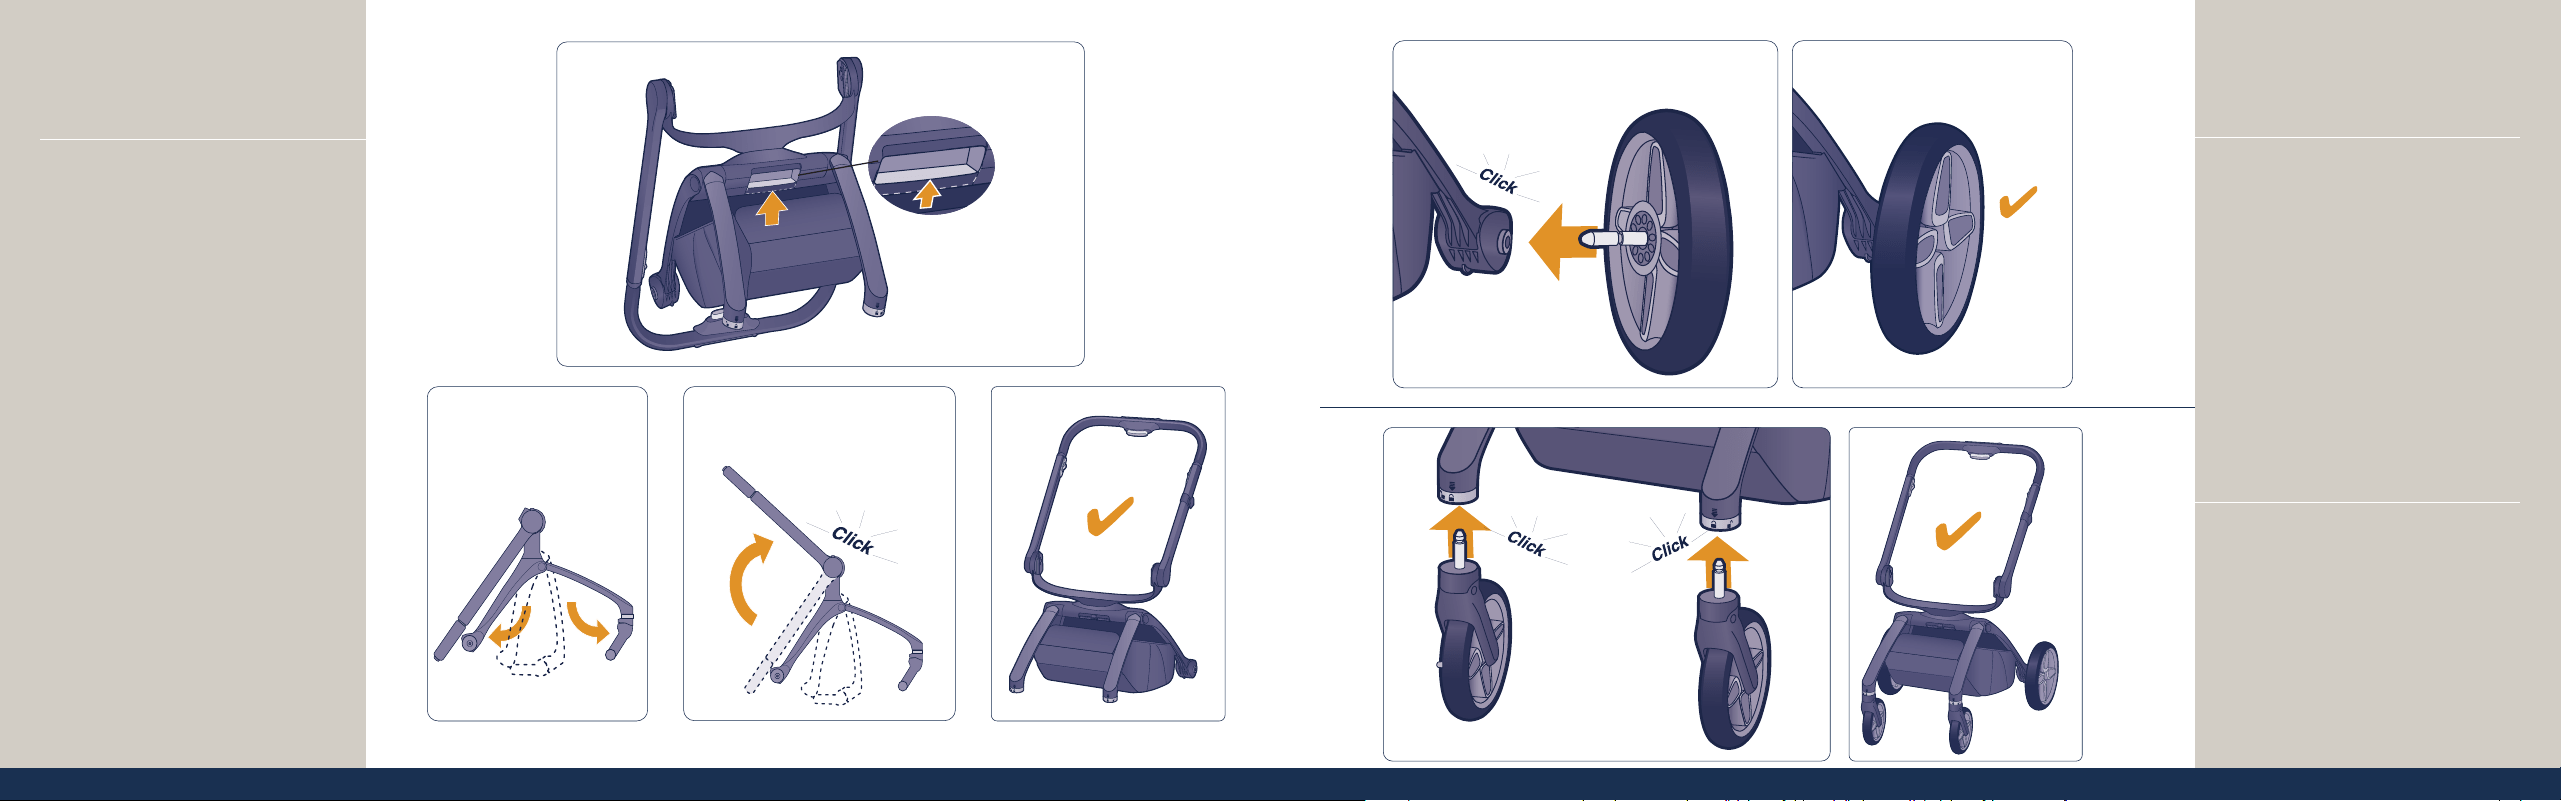
Unfolding the Stroller
Squeeze the fold release bar
under the frame (identied with a
label) and pull the frame to open
the stroller. It will click into place
(Figure 1b).
Then raise the handlebar until it
clicks (Figure 1c).
Assembly
Rear Wheels
Push the rear wheel into the
rear wheel opening until it clicks
(Figure 2a). Repeat with the other
rear wheel. Pull on each wheel to
conrm it is securely attached.
Front Wheels
Push the front wheel into the front
wheel opening until it clicks (Figure
3a). Repeat with the other front
wheel. Pull on each wheel to conrm
it is securely attached.
1b 1c
1a
3a
2b
2a
1716
Assembly
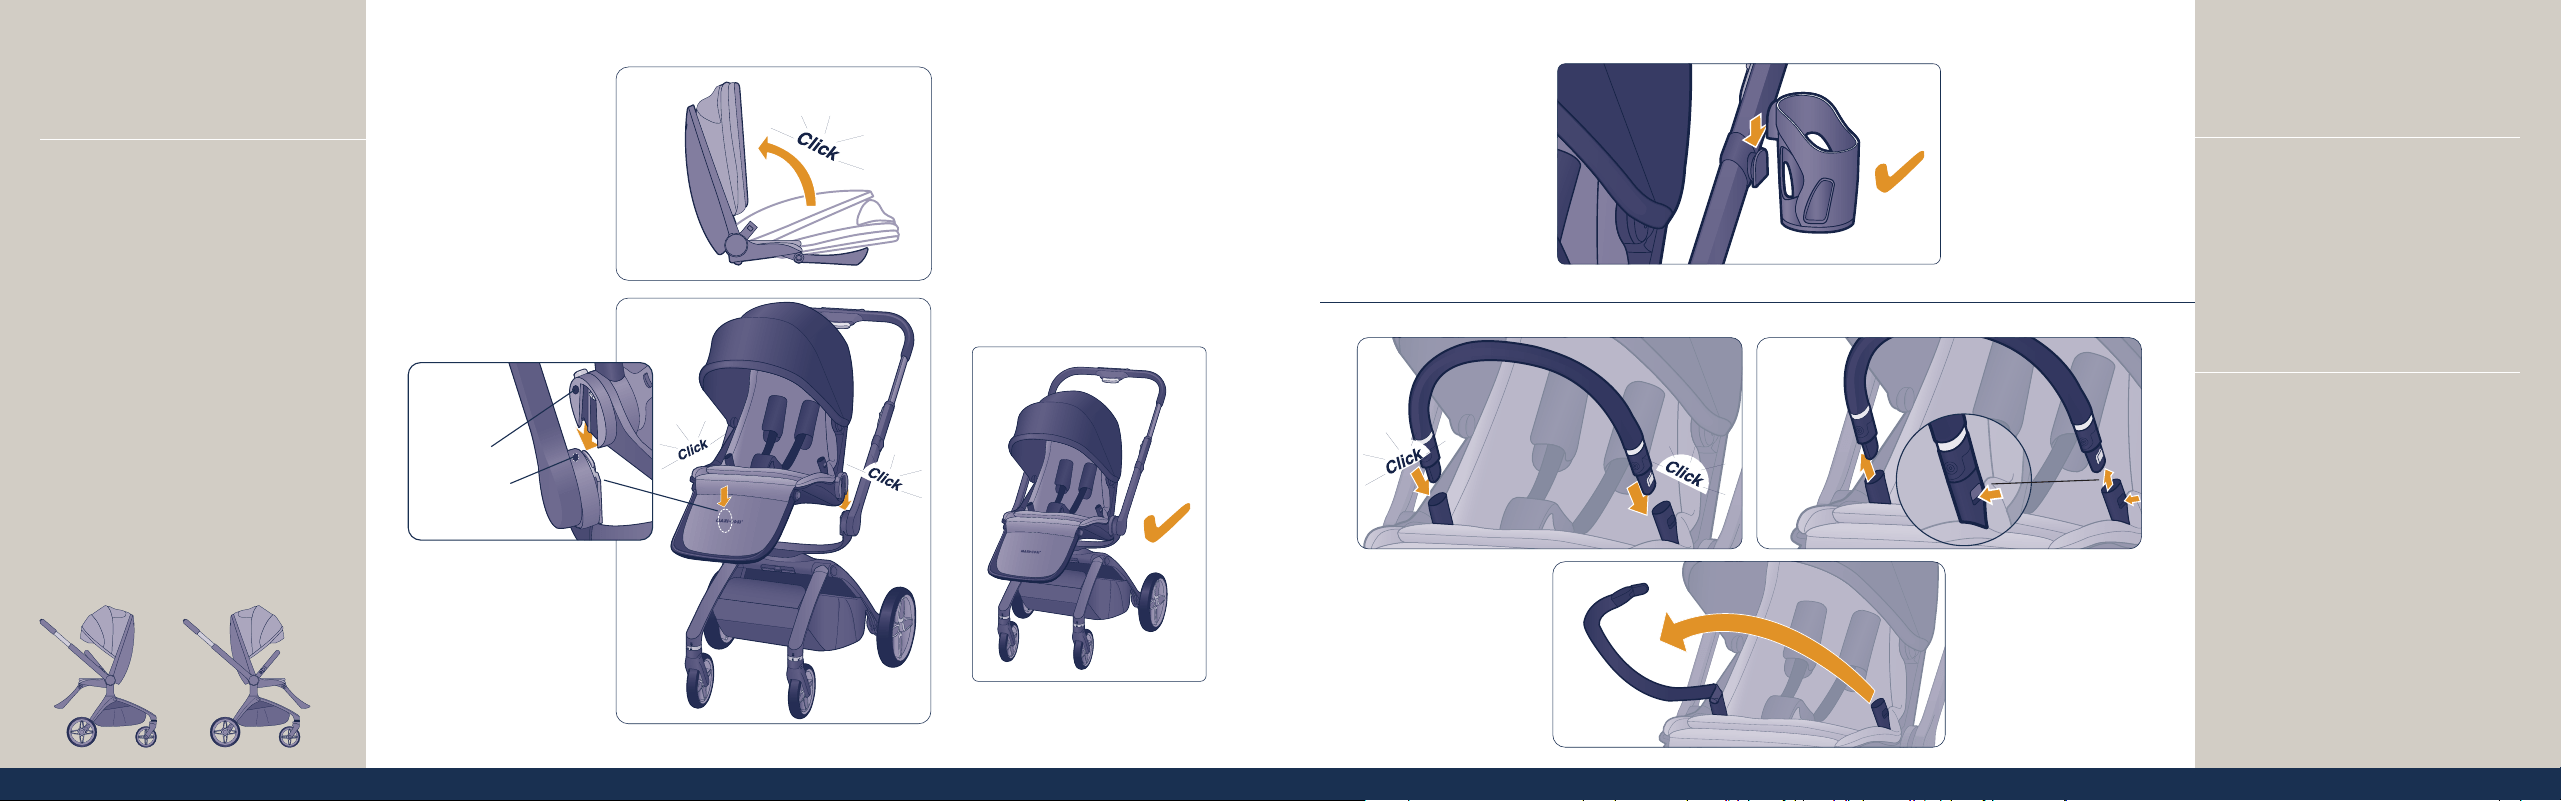
Cup Holder
Align the cup holder with the post
on the side of the stroller frame and
slide it onto the post (Figure 5).
Note: This cup holder swivels to stay
upright even when you rotate the
stroller handle. Cup holder ts up to
a 20-oz. tumbler.
Bumper Bar
Insert the posts of the bumper bar
into the bumper bar mounts until you
hear each side click (Figure 6a). Pull
on each side to conrm it is secure.
The shiny button on the bumper bar
should be facing up.
Note: Always secure your child with
the restraint straps.
To remove the bumper bar, press the
release buttons while lifting it off
(Figure 6b).
Alternatively, you can unlock one
side of the bar and pivot it to the side
to take your child out of the stroller
(Figure 6c).
Assembly
Seat
Pull the seat frame apart to open
(Figure 4a).
Align the seat hub on each side to
the seat mounts on the frame,
matching the colored dots (Figure
4b). Push the seat downward
onto the seat mounts until each
side clicks into place (Figure 4c).
Pull up on the seat to conrm the
seat is securely installed onto
the stroller frame. If it does not
click into place, it is not installed
correctly.
Note: Once installed, the seat can
turn forward or backward.
seat mount
seat hub
Match color on:
4b
4c
4a
6a
6b
6c
5

18 19
Use
2120
Canopy
The canopy has two positions:
extended fully for UPF 50 sun
protection and privacy or closed.
There is also an extendable visor
under the canopy for additional
coverage.
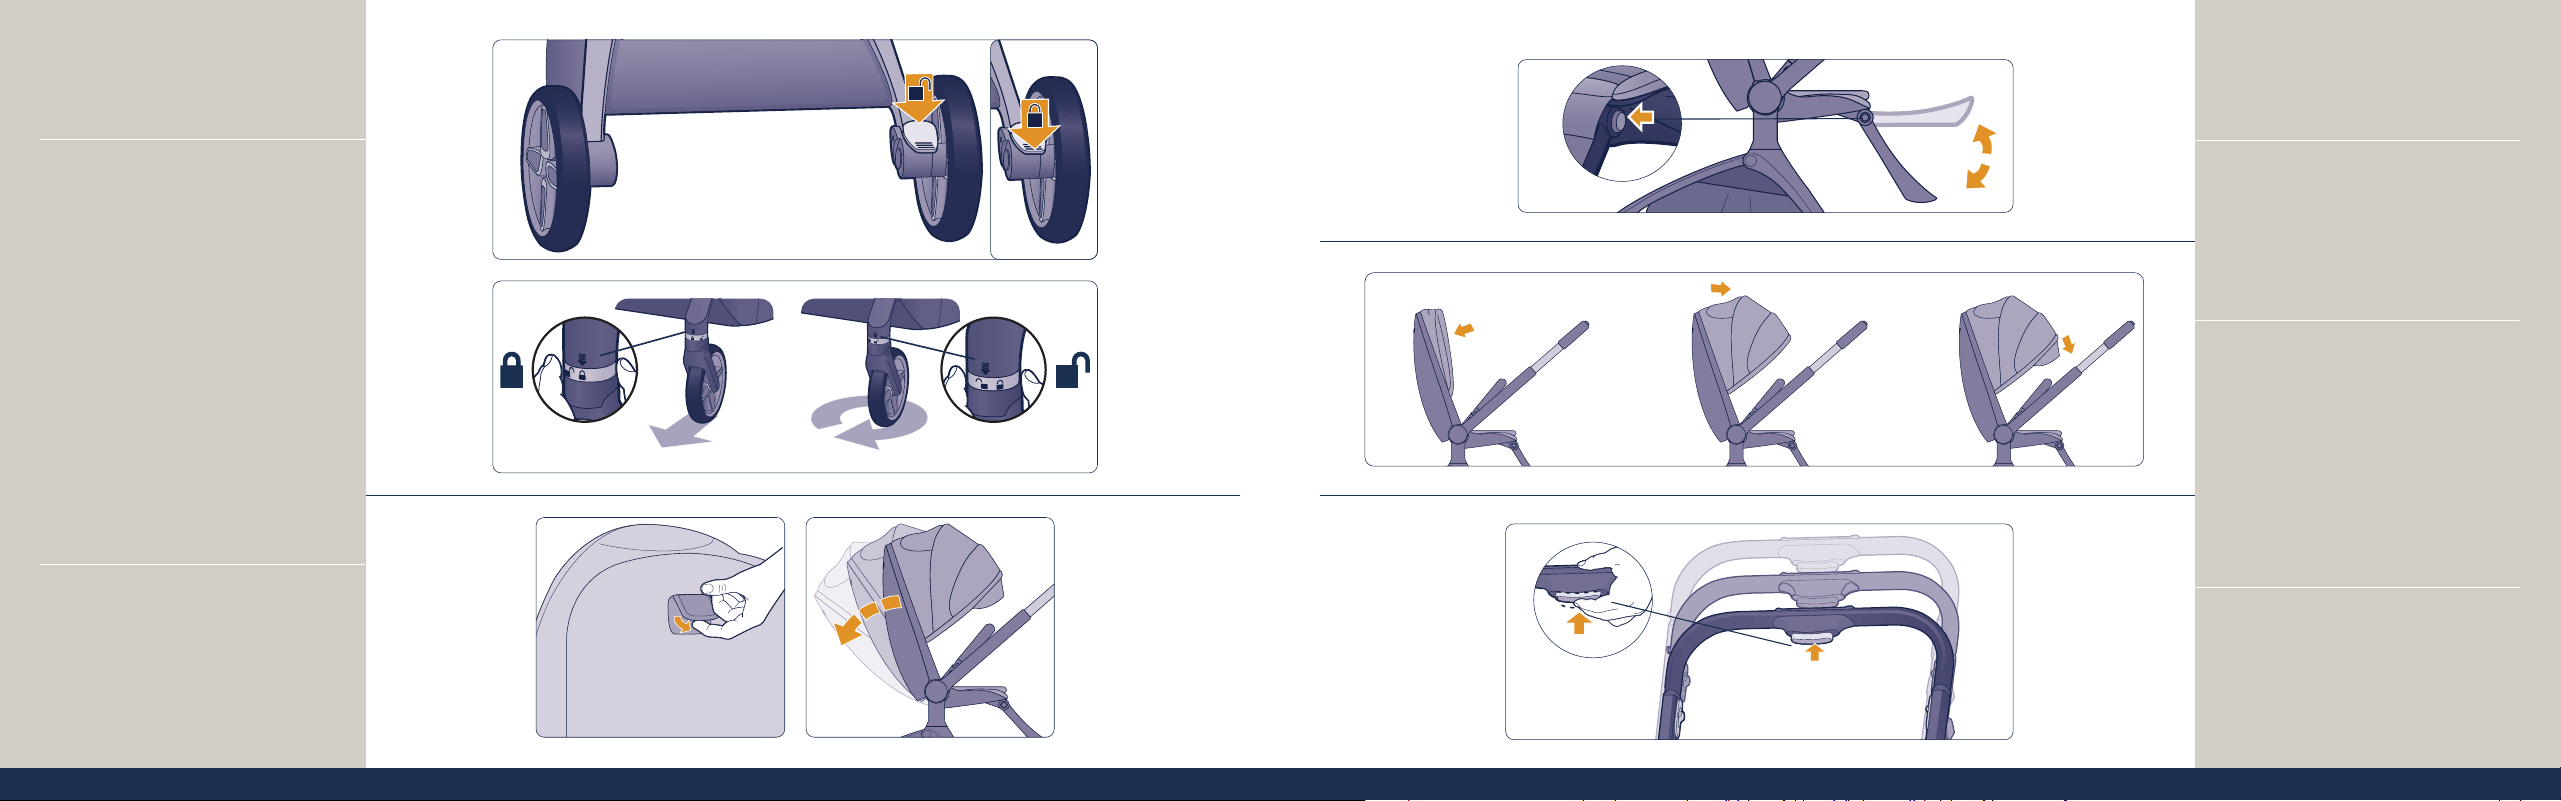
Handlebar
Press the center button on the
handlebar and slide the handlebar to
your desired height. There are three
height positions.
Adjusting the Seat
Pull the seat recline lever located
on the back of the seat (Figure 2a)
to adjust to any of the three recline
positions (Figure 2b).
Leg Rest
Press both leg rest buttons on the
sides of the seat and lift the leg rest
to elevate. The leg rest has two
positions, lowered or elevated.
Use
Brake
The brake is located next to the rear
right wheel (Figure 1a).
To lock the wheels, step on the
bottom section of the brake pedal.
To unlock the wheels, step on the
top section of the brake pedal.
To use the swivel locks, turn the
ring above each front wheel. Align
the locked image with the arrow to
engage the swivel lock; align the
unlocked image with the arrow to
release the swivel lock (Figure 1b).
Use
1b
1a
2a
3
4
5
2b
2322
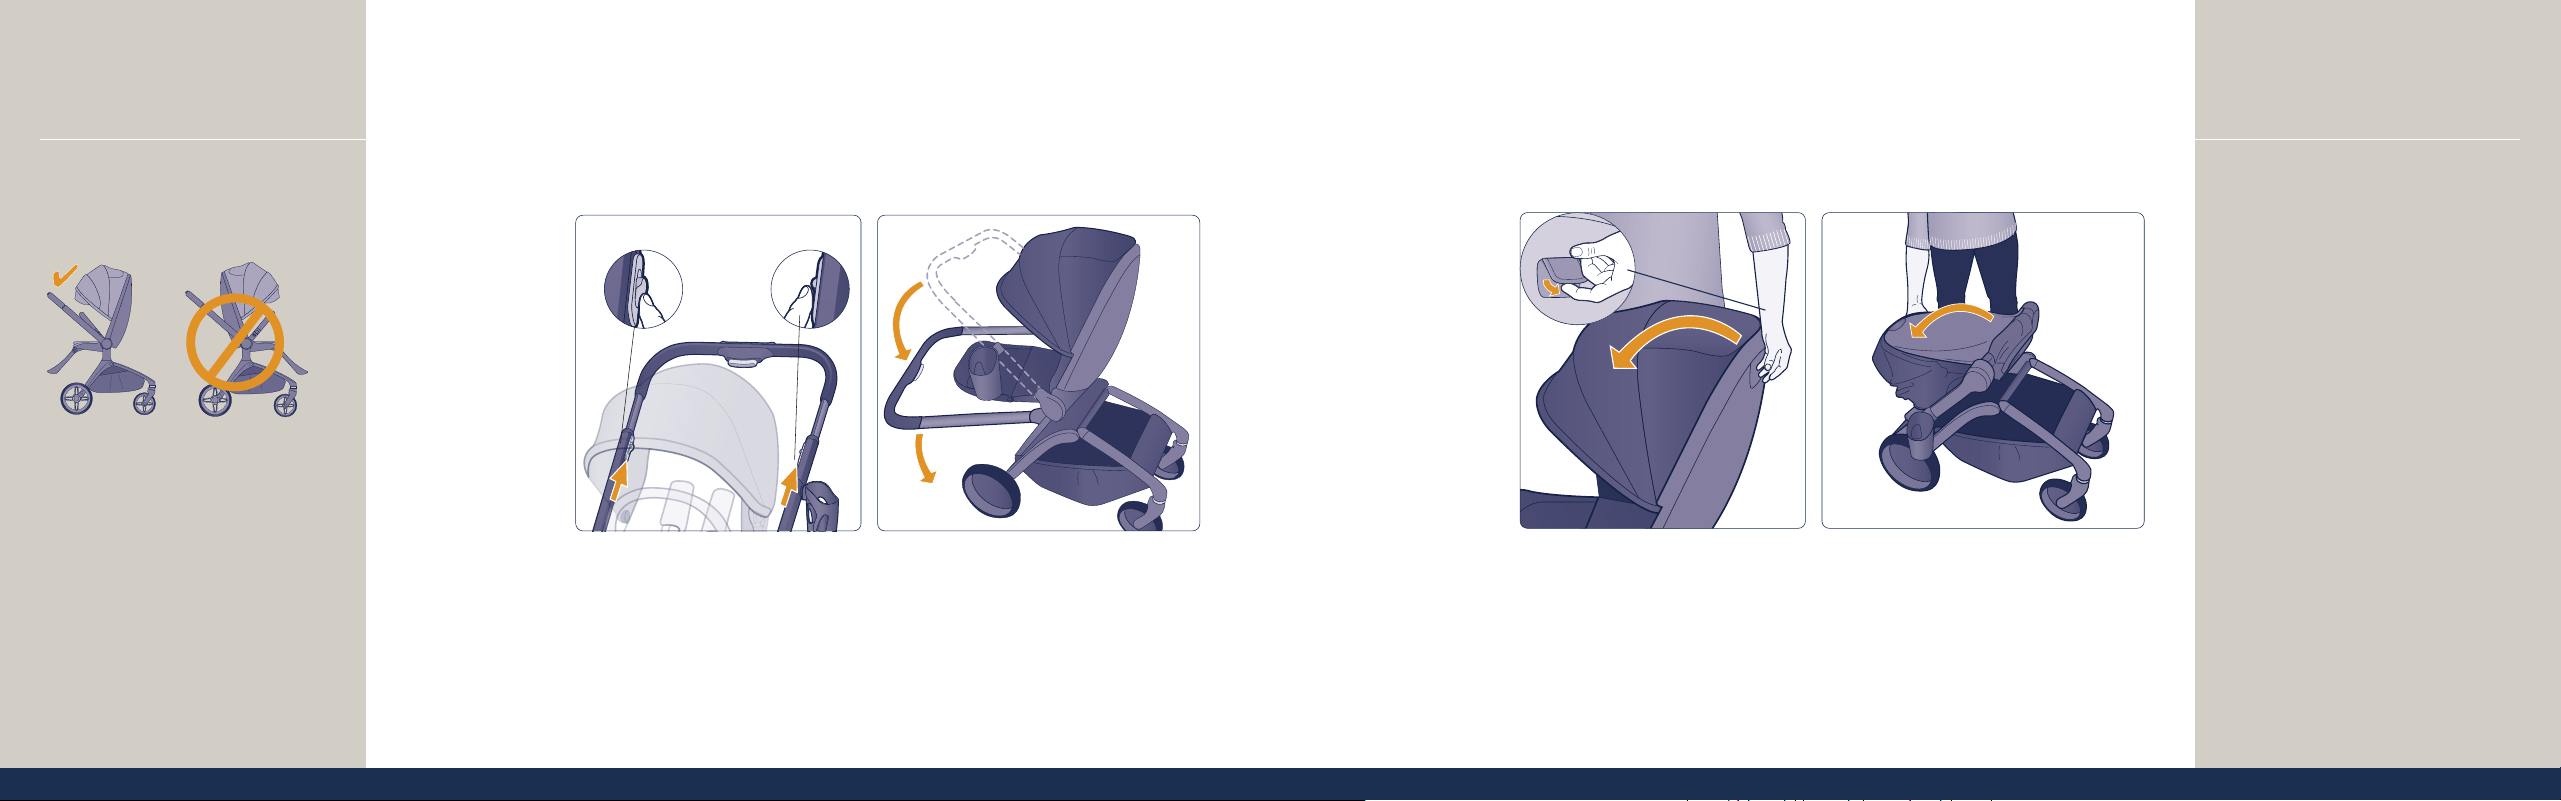
Use
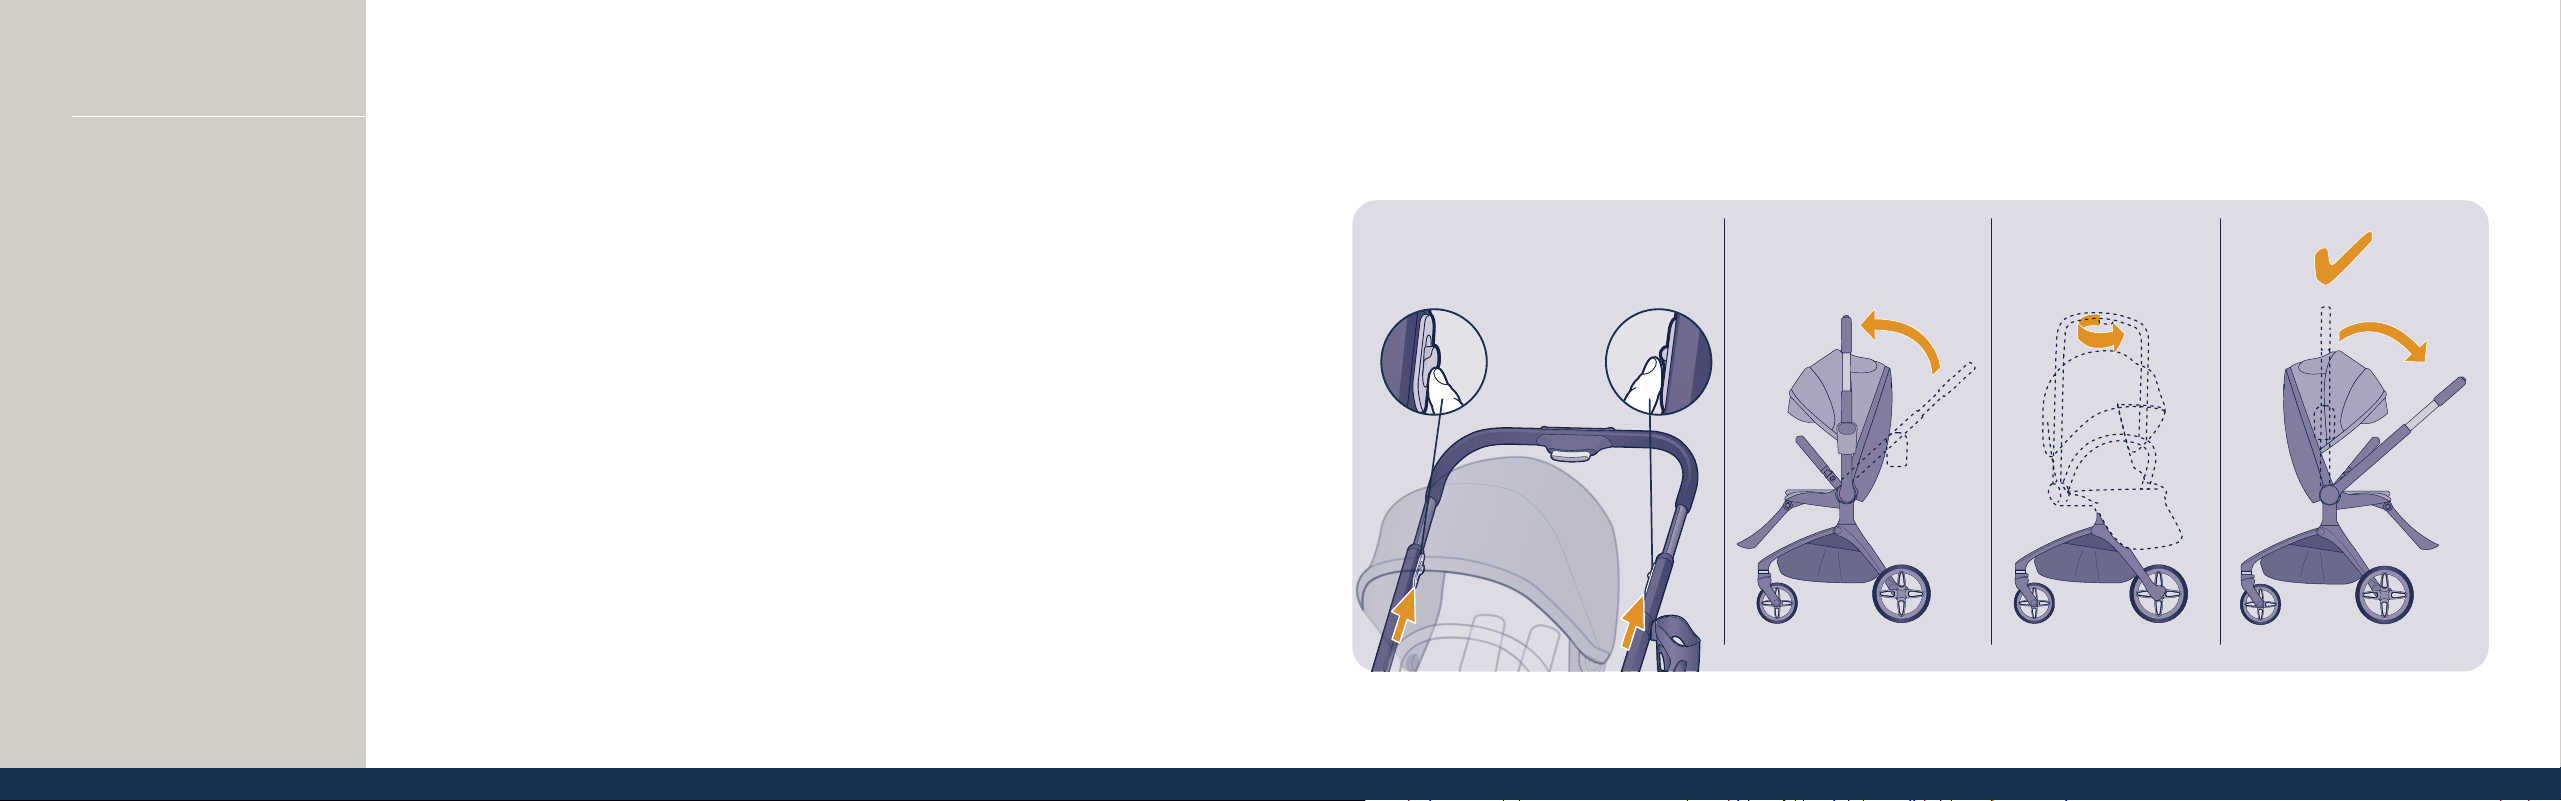
Rotating the Seat
The handlebar does not need to be
fully upright to begin rotating, but it
must be close to upright.
Pull the two triggers on the side of
the frame (Figure 6a) as you push the
handlebar to rotate the stroller seat
to face the other direction.
Once the stroller is facing your
desired direction, pull the handlebar
over the rear wheels to click it into
the locked position.
Note: Engage the brake when
rotating the seat.
Follow the same steps for rotating your
infant car seat or Carriage Accessory.
Removing the Seat
Push the two seat release buttons
down until they click (Figure 7a).
Once both buttons are pushed down,
lift the seat off the frame (Figure 7b).
Use
6a
b c d
seat
release
buttons
7a
7b
2524
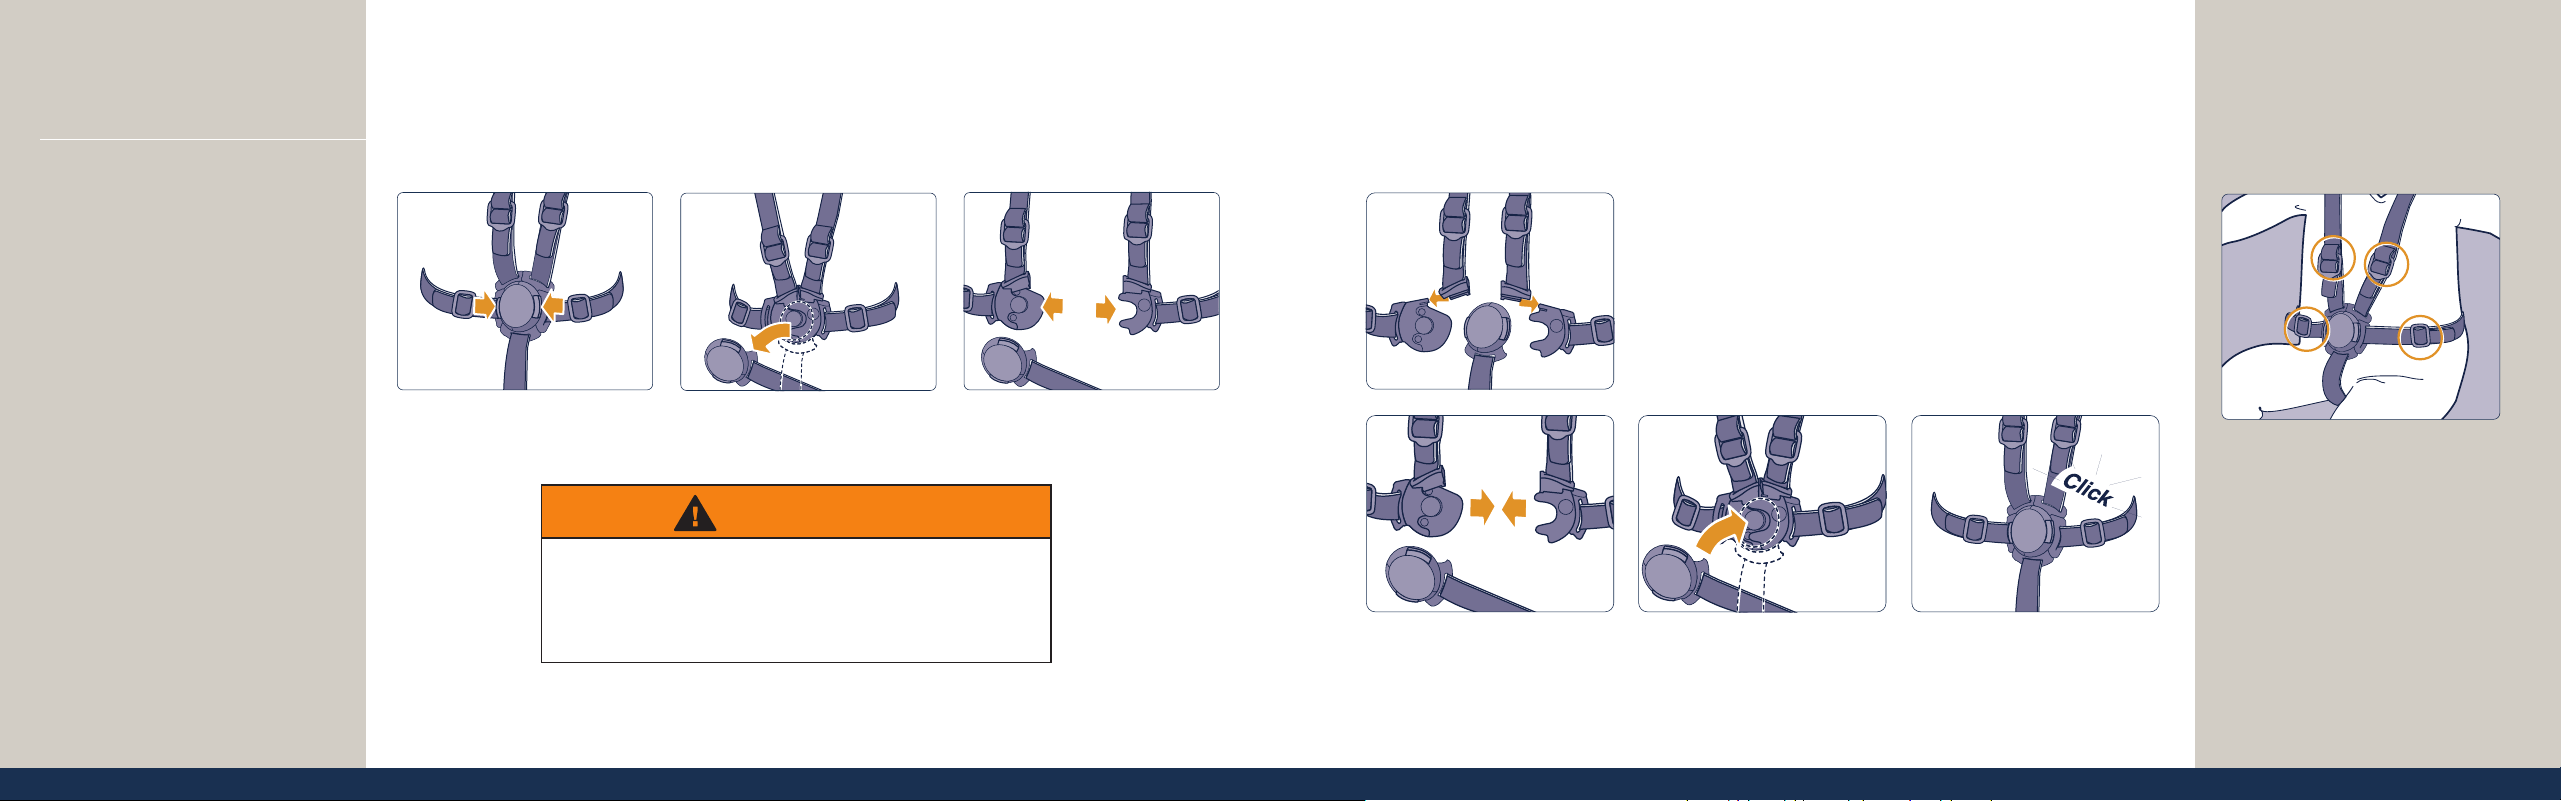
Use
To unbuckle the restraint,
press the side buttons.
The center cover is removed.
Pull the sides apart.
To buckle the restraint: If the shoulder straps
detach, slide each buckle tongue onto the tab
on top of the buckle.
Fit each side together.
Press the center cover
onto the restraint.
Buckled.
8b
8a
Restraint System
Place your child in the seat with the
buckle strap between the child’s legs,
and fasten both buckles.
Adjust the straps (at the four
buckles) to tighten snugly, such
that you can comfortably slide your
nger between the strap and your
child (Figure 8b).
8a continued
• AVOID SERIOUS INJURY from falling or sliding
out. ALWAYS use the harness system. Check
frequently to make sure it is secure.
WARNING
2726
Use
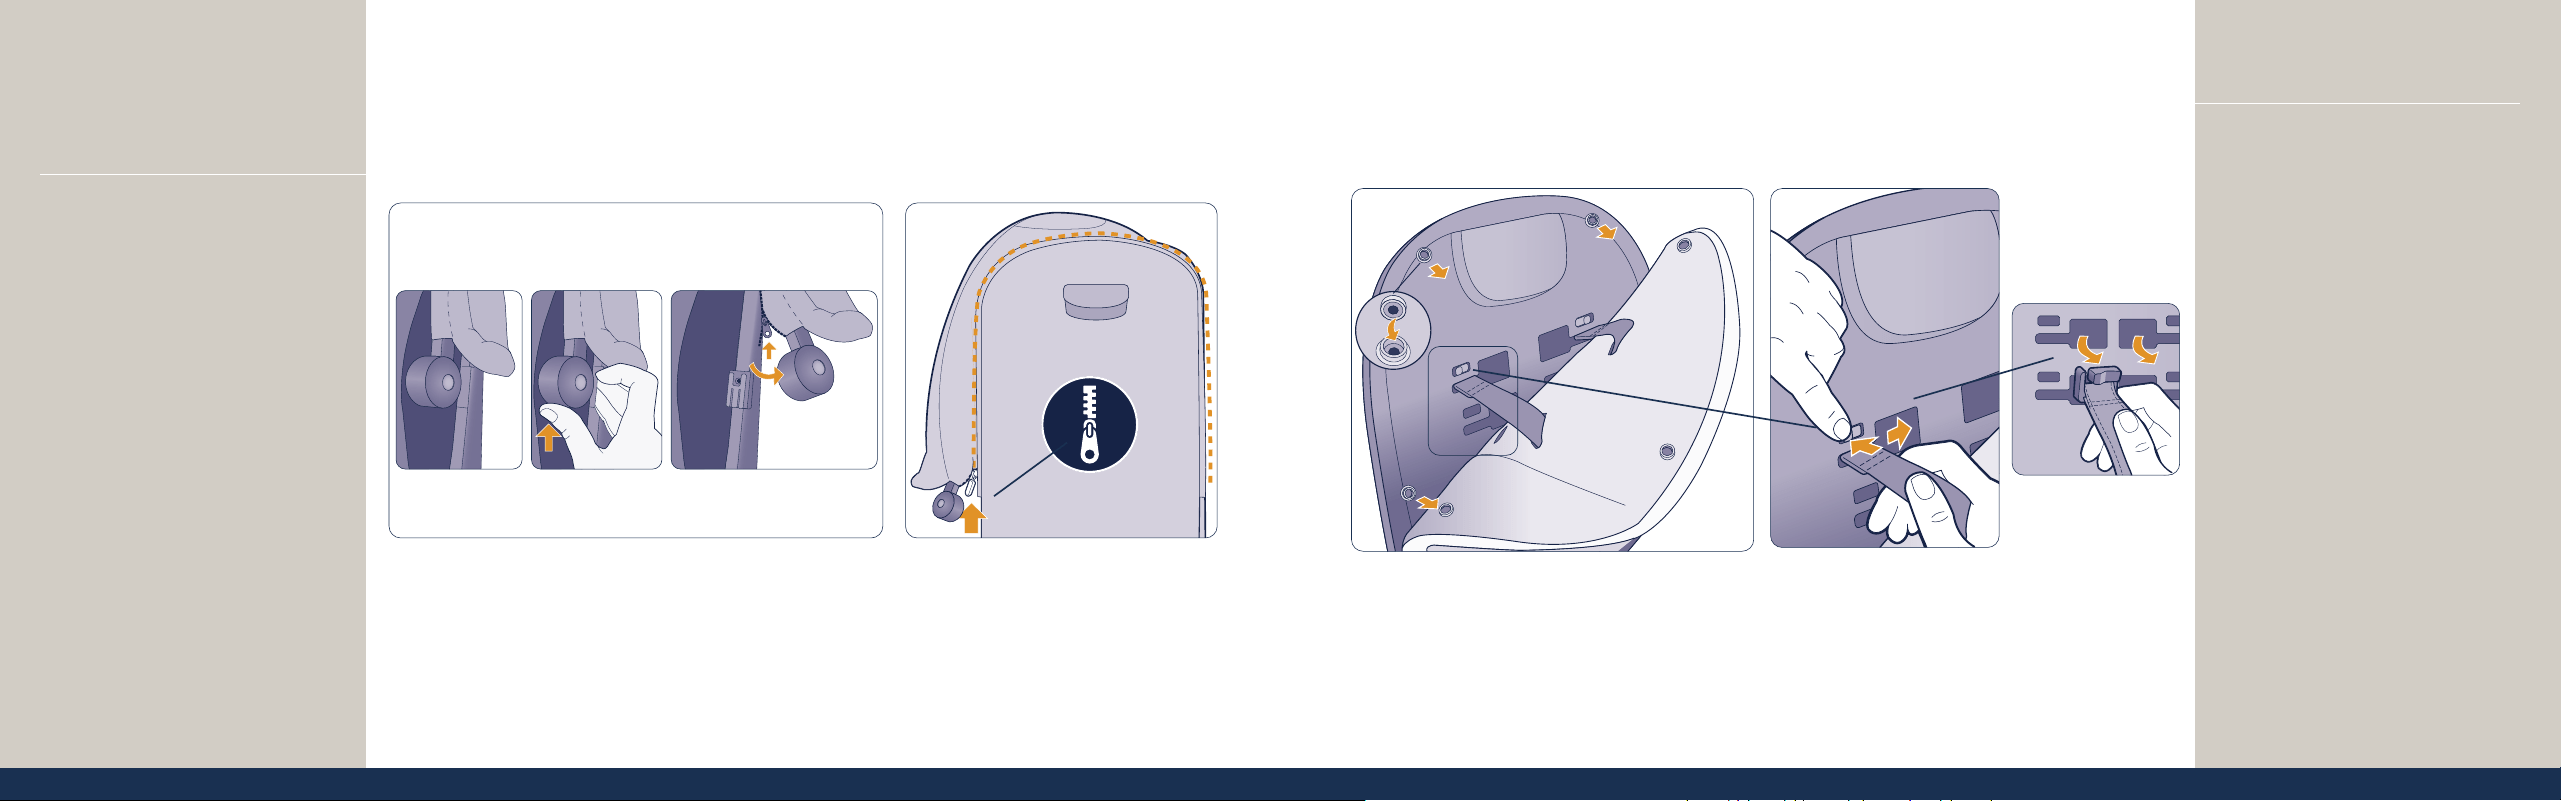
9a 9b
9c
9d
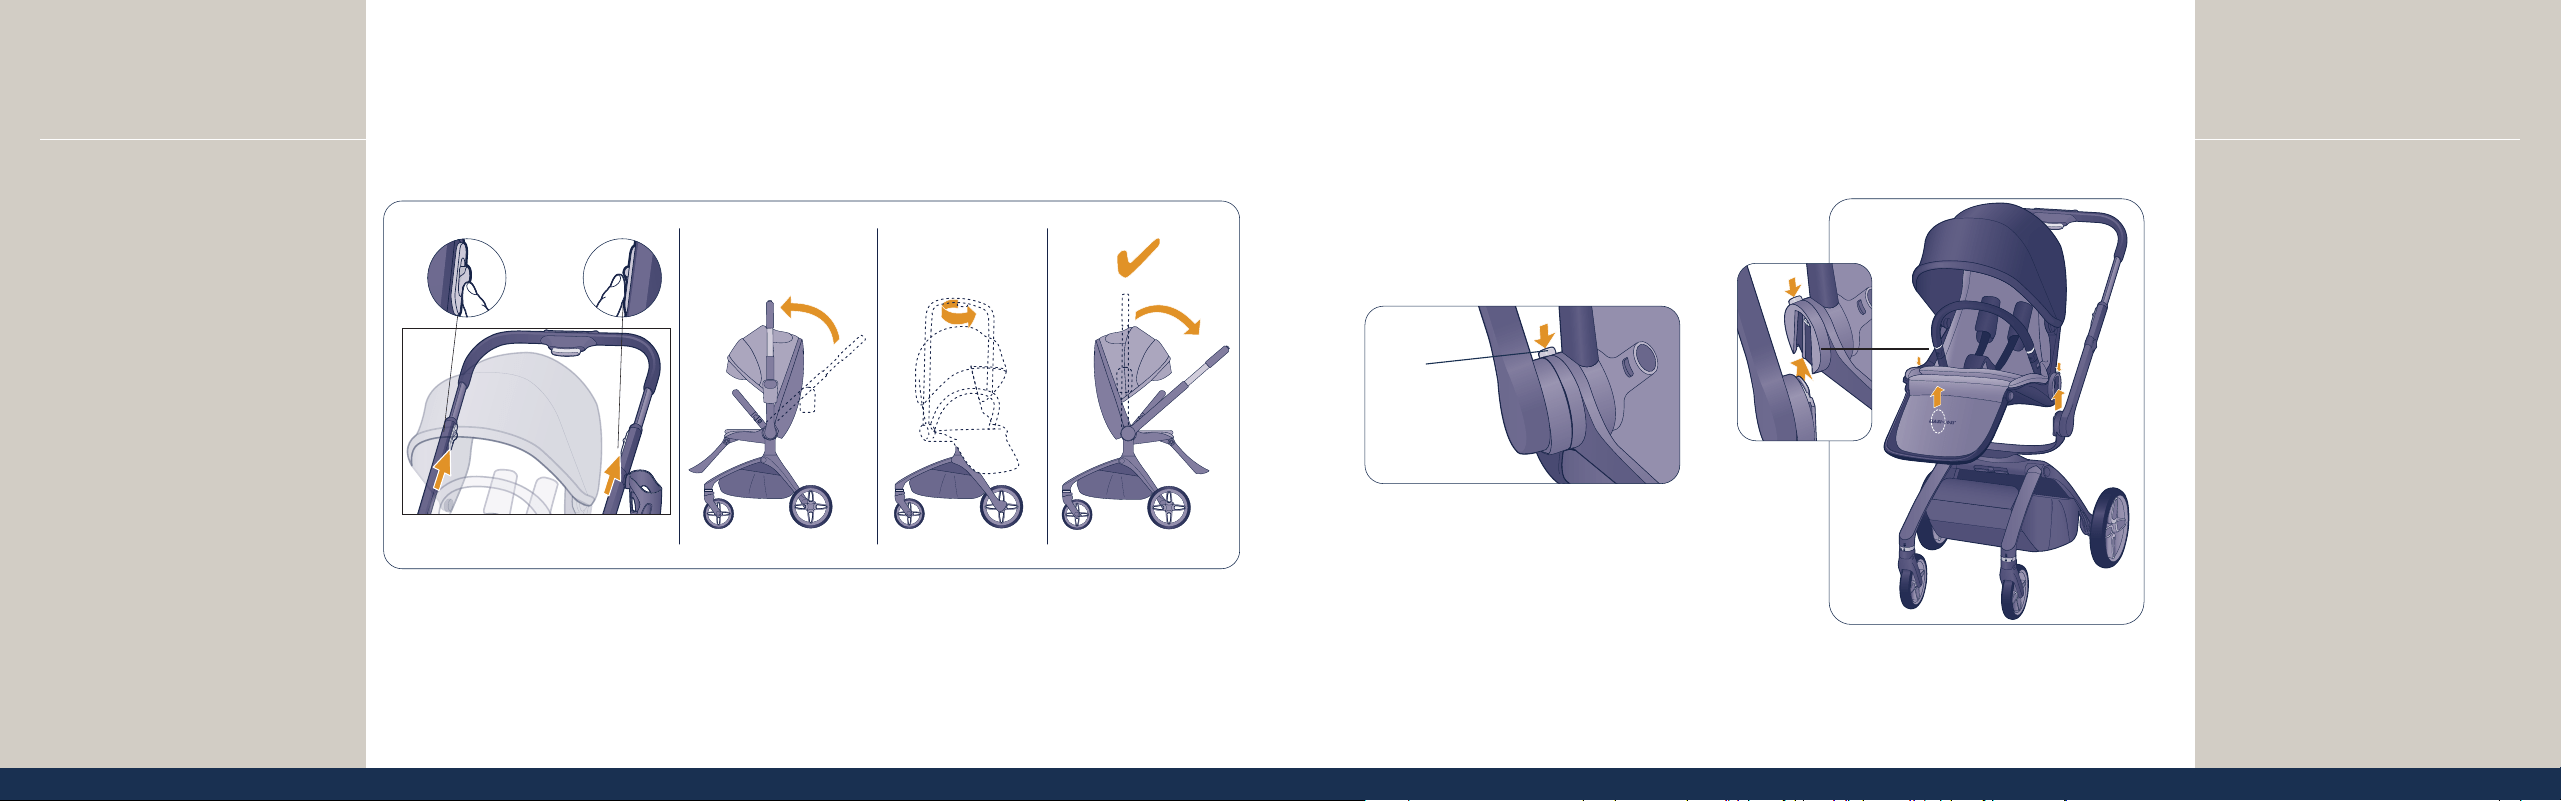
Open the snaps that attach the seat
pad to the frame and pull the seat
pad forward to nd the shoulder
strap adjustments (Figure 9c).
While pushing the black button, slide
the clip out of the slot (Figure 9d). Pull
the strap through the seat pad and
insert. Choose another slot to adjust the
height of the shoulder strap. Rethread
the strap through the corresponding
new slot on the seat pad and insert, and
then slide the clip into the new slot on
the seat. Repeat on the other side.
Note: The waist straps can only be
adjusted by using the buckles (see
Step 8b on page 25).
Use
Adjusting the Shoulder
Restraints
Unhook the canopy from its
posts (Figure 9a) and unzip it
from the frame (Figure 9b).
2928
Use
Folding the Stroller
The cup holder and bumper bar can
remain attached while folding.
Rotate the seat to parent-facing
position (see Step 6 on page 22).
Adjust the handlebar to the lowest
position (see Step 5 on page 21).
Follow these same steps for folding
the stroller without the seat attached.
The Maxi-Cosi logo on the frame
should be right side up.
Pull the triggers
on the side of the
stroller frame
and lower the
handlebar down to
the rear wheels.
Pull the seat
recline lever on
the back of the
seat and push
the seatback
down between
the handlebars.
10a
10b
Use
Folding the Stroller
continued on the next page
3130
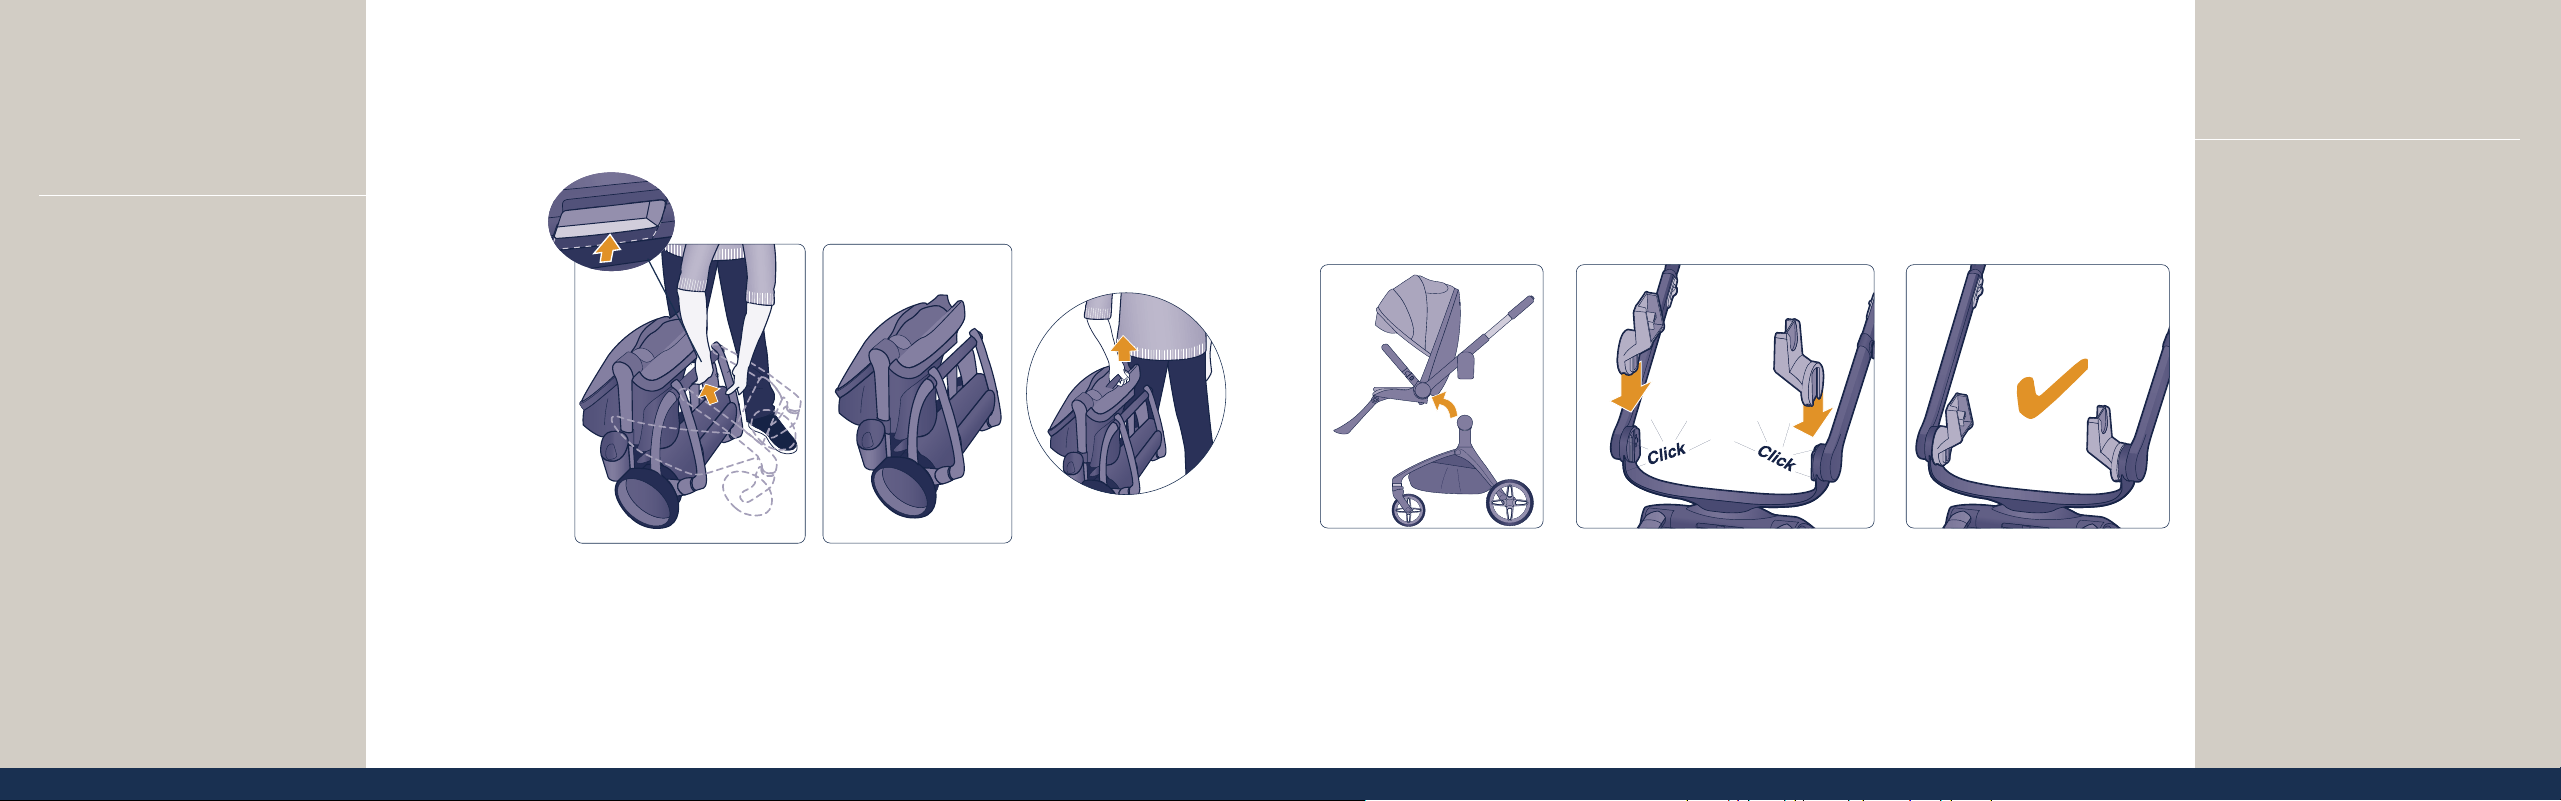
Use
Installing an Infant Car Seat
Remove the stroller seat from
the stroller frame (Figure 11a).
See Step 7 on page 23.
Attach the provided infant car
seat adapters to the stroller
frame, matching the colored dots
(Figure 11b).
continued on the next page
11a 11b 11c
Squeeze the
release lever on
the bottom of the
frame above the
basket to fold the
bottom half of the
stroller. The stroller
will then collapse
into a compact fold.
10c
Note: When the seat is unfolded,
the bumper bar will lay at on
the seat. Raise it up until it clicks.
Use
Folding the Stroller
continued
Use the carry handle
to lift the stroller.
3332
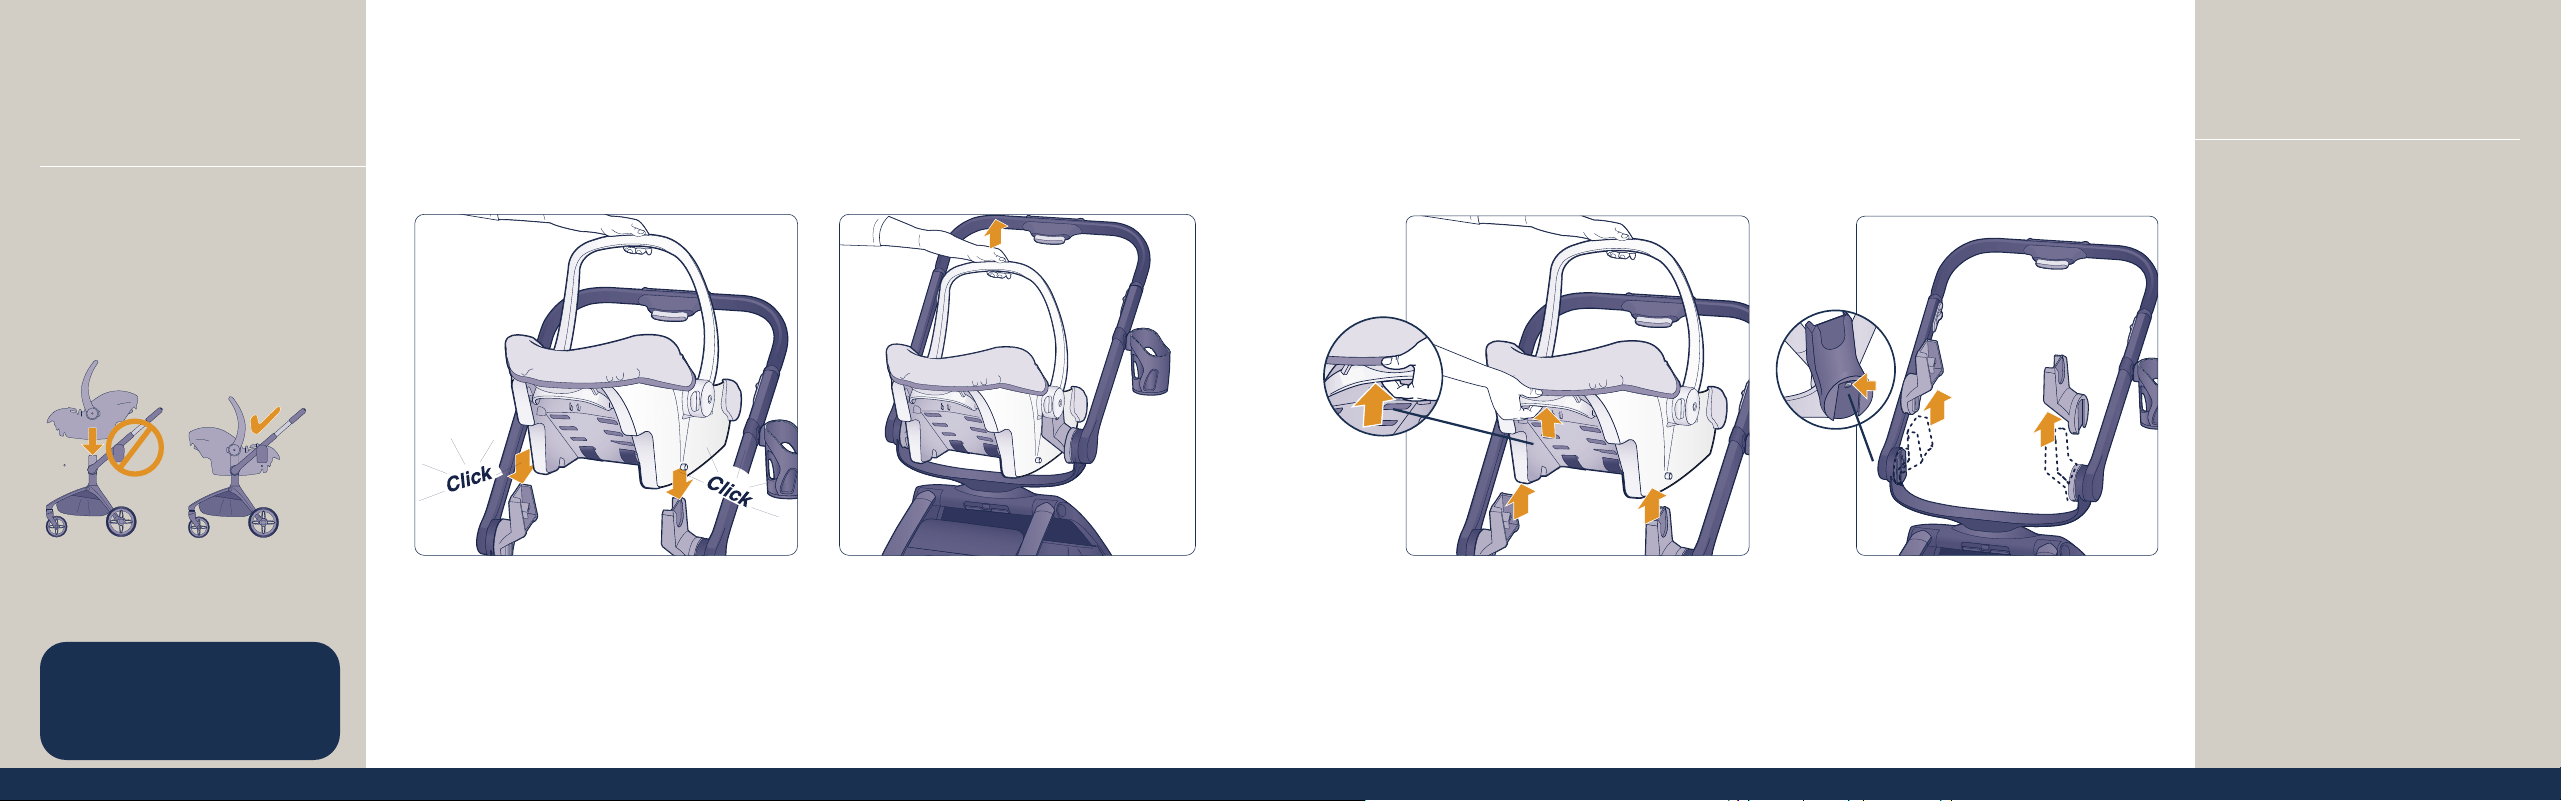
Use
Removing an Infant Car Seat
Pull the release lever on the back of
the car seat and lift the car seat off
(Figure 12a).
Push the buttons on the insides of
the car seat adapters to release the
adapters from the mounts
(Figure 12b).
12b12a11d 11e
Use
Installing an Infant Car Seat
continued
Align the car seat to the adapters
and lower the car seat until both
sides click (Figure 11d). Pull up
on the seat to ensure it is securely
attached (Figure 11e).
The car seat can only be installed in
the parent-facing position.
Once installed on the stroller frame,
the infant car seat can rotate to be
parent-facing or world-facing.
The car seat adapters are
compatible with the Maxi-Cosi
Peri 180° Rotating Infant Car Seat
and all Mico
™
Infant Car Seats.

3534
• Rear wheels
• Front wheels
• Bumper bar
• Cup holder
To order parts, call 1-800-544-1108. Include the model number (CV452), manufacture date (found under the front leg of the frame), and a brief
description of the part.
The seat pad, insert, and harness covers are machine washable with
cold water on gentle cycle. Do not use bleach. Tumble dry on low
heat or line dry. Spot clean only all other parts.
Replaceable Parts
Care and Maintenance
Two-Year Limited Warranty
Dorel Juvenile Group, Inc. warrants to the original purchaser that this product (Tana) is free from material and workmanship defects when used
under normal conditions for a period of two (2) years from the date of purchase. Should the product contain defects in material or workmanship
Dorel Juvenile Group, Inc., will repair or replace the product, at our option, free of charge. Purchaser will be responsible for all costs associated with
packaging and shipping the product to Dorel Juvenile Group Consumer Care Department at the address noted on front page and all other freight
or insurance costs associated with the return. Dorel Juvenile Group will bear the cost of shipping the repaired or replaced product to the purchaser.
Product should be returned in its original package accompanied by a proof of purchase, either a sales receipt or other proof that the product is within
the warranty period. This warranty is void if the owner repairs or modies the product or the product has been damaged as a result of misuse. This
warranty excludes any liability other than that expressly stated previously, including but not limited to, any incidental or inconsequential damages.
SOME STATES DO NOT ALLOW THE EXCLUSION OR LIMITATION OF INCIDENTAL OR CONSEQUENTIAL DAMAGES, SO THE ABOVE
LIMITATION OR EXCLUSION MAY NOT APPLY TO YOU. THIS WARRANTY GIVES YOU SPECIFIC LEGAL RIGHTS, AND YOU MAY ALSO HAVE
OTHER RIGHTS THAT MAY VARY FROM STATE TO STATE.
Care and
Maintenance
35
Scan for instructions on how
to remove and reinstall the
machine-washable parts.
