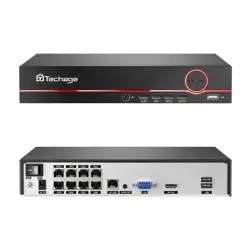
POE NVR
User Manual
www.techage.com
Security Expert for Your Home and Business
XMEye Pro App

1. NVR Installation
1.1 Hard Disk Installation
1.2 Boot & Preview
2. Function Setting
2.1 Login System
2.2 HDD Setup
2.3 General
2.4 Record Setup
2.5 Video Playback
2.6 Video Backup
2.7 Snapshot Configuration
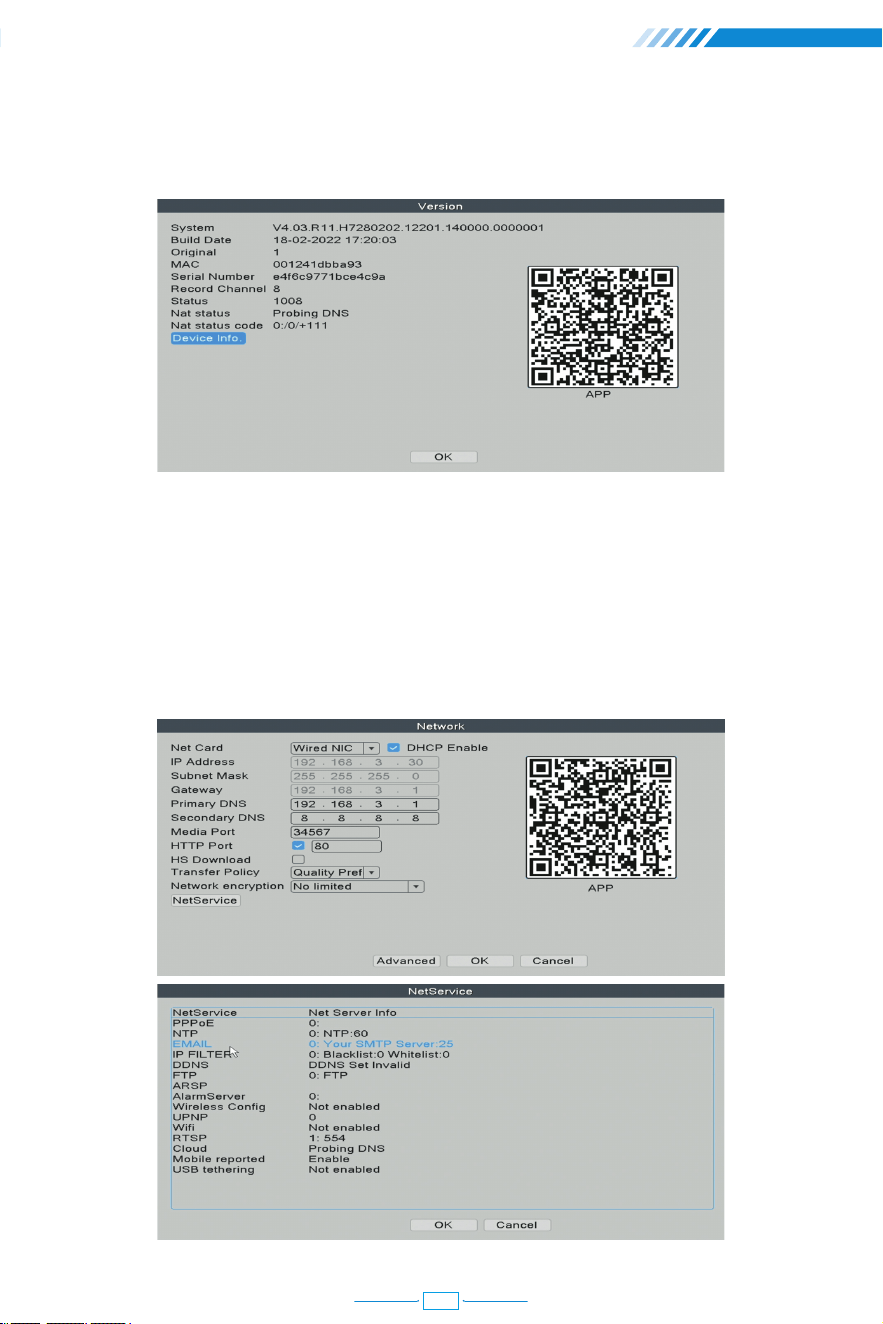
2.8 Network Setup
2.9 Check Nat Status
2.10 Email Setup
2.11 User Management
2.12 Audio Setting
2.13 Alarm
2.13.1 Intelligent Alert Setting
2.13.2 Advanced Setting of Human Detection/Face Detection
2.13.3 Advanced Settings of Vehicle Detection
2.13.4 Advanced Settings of Safe Zone & Line Cross Alarm
2.13.5 Abnormality Settings
2.13.6 Traditional Alarm Setting
5.1 Remote View via Browser
5.2 Remote View via PC Software
5.3 Remote View via Phone App
5. Remote View
4. Add IP Camera
3. Digital Channels Setup
04
04
04
05
05
05
06
07
08
09
10
11
12
12
15
16
16
17
18
20
20
22
23
26
27
28
25
25
24
Table of Contents
Thanks for purchasing our PoE Network Video Recorder Surveillance products. This user
manual is for 4CH/8CH/16CH PoE NVR and PoE cameras system. The firmware and software
for the cameras and NVRs will be updated for better user experience. Please write to us or
visit the store to get the latest user manual.
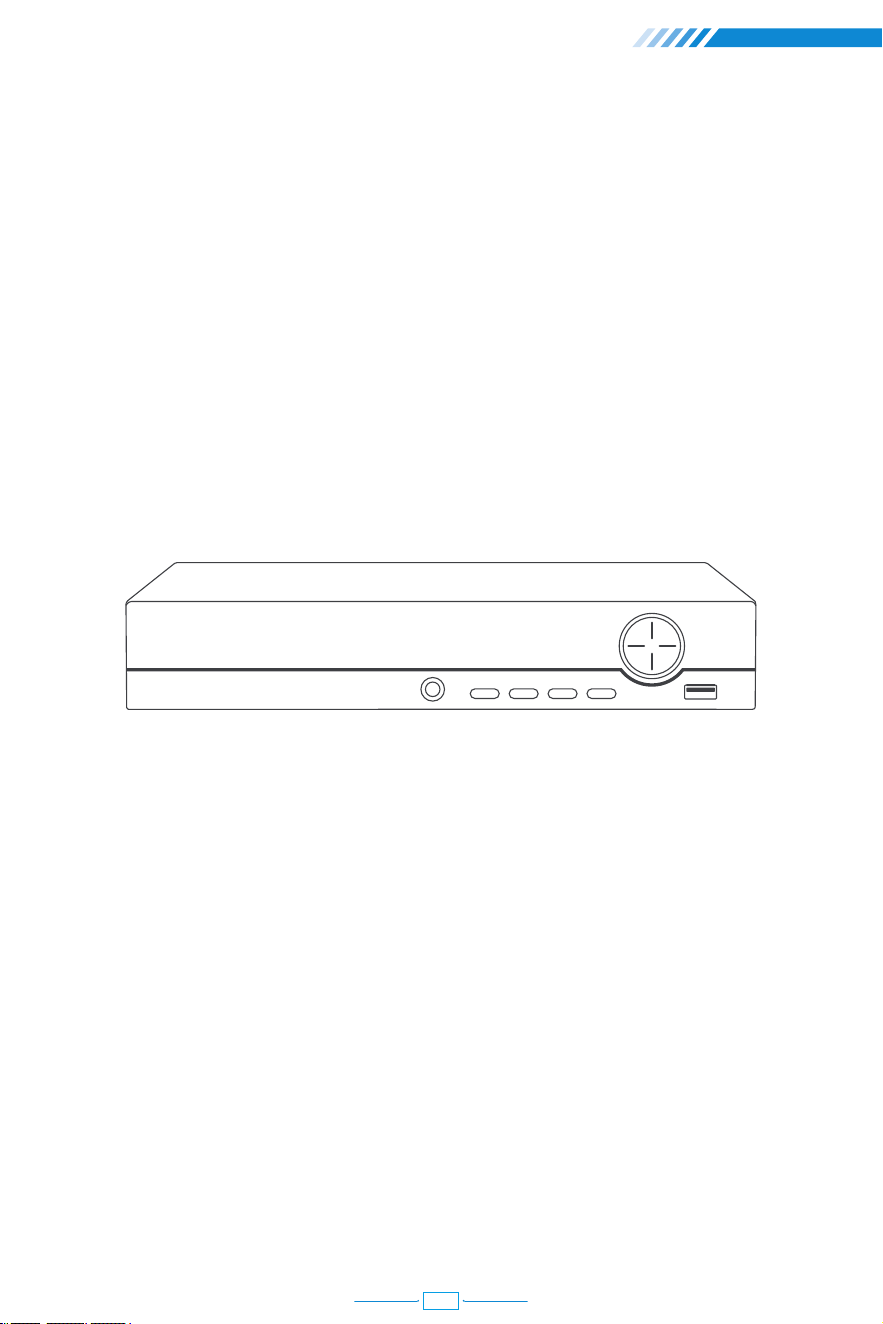
PWR: It will be on when the NVR is plugged in power adapter (DC 48V~52V).
Directions: Choose different options on NVR, left or right, up or down.
USB: For connecting USB mouse to control NVR or USB disk to backup video.
IR: To receive infrared remote control signal.
QUAD: Switch the video display on monitor to 1/4/8/16 channels.
ESC: Leave the current option/window, cancel or back to previous option.
MENU: Enter main menu directly.
ENTER: Enter the options.
QUAD
IR
ESC MENU ENTER
USB
Front of the NVR
NVR Overview
Preface
01
OFFON
DC IN
AUDIO OUT
VGA
HD-PORT
UP LINK
POE8 POE7 POE6 POE5
POE4 POE3 POE2 POE1 USB
Back of the NVR
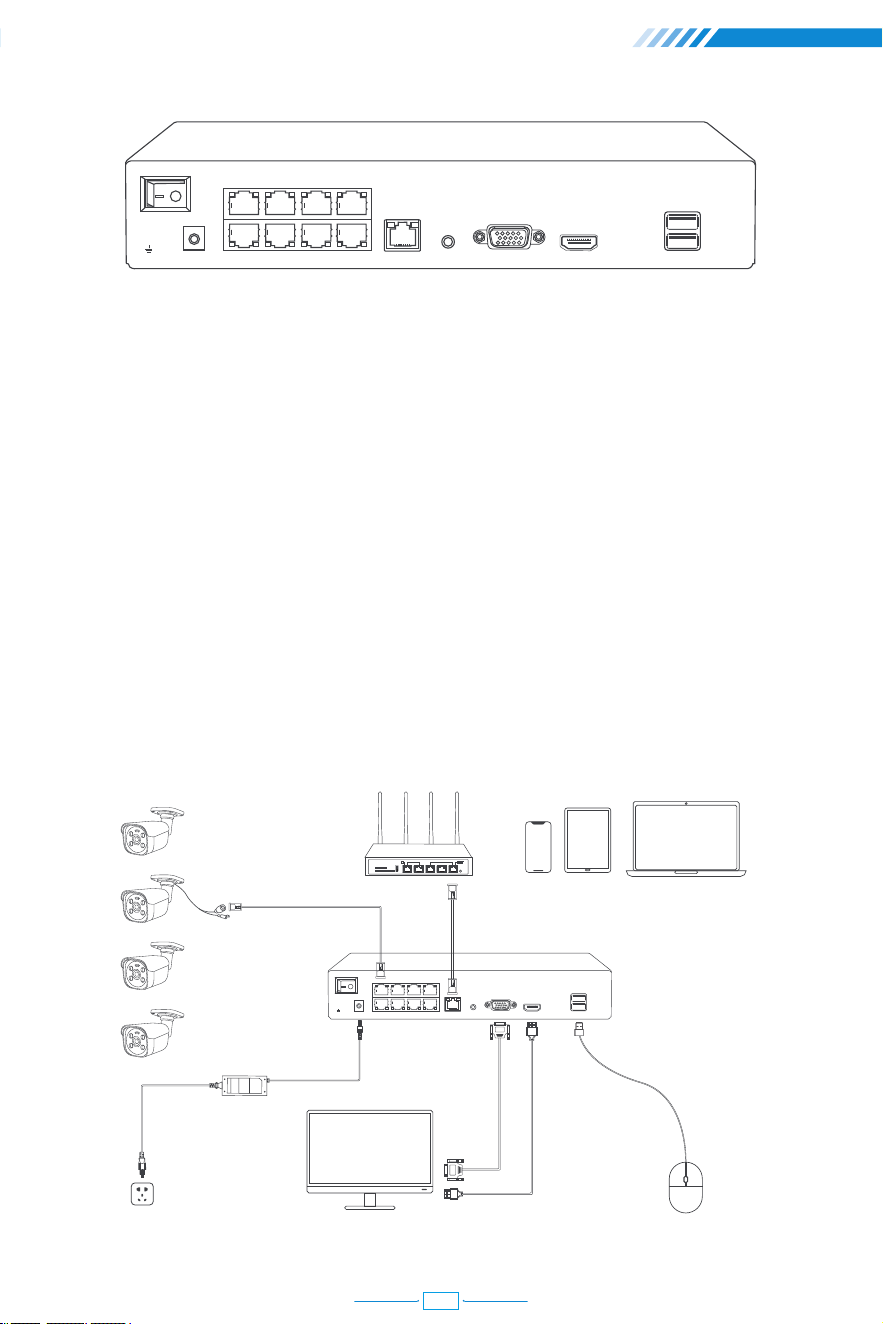
Switch: Turn on/off NVR.
DC IN: For power supply DC 48~52V, the size of the DC plug is 5.5*2.1mm.
PoE 1-8: Ethernet ports for connecting the PoE Cameras.
UP LINK: Ethernet port for connecting to the router.
AUDIO OUT: For connecting speakers to play the recorded audio.
VGA: For connecting the monitor or display with VGA cable.
HD-PORT: For connecting the monitor or display with HDMI cable.
USB: For connecting USB mouse to control NVR or USB disk to backup video.
Wiring and Connection Diagram
OFFON
DC IN
AUDIO OUT
VGA
HD Port
UP LINK
POE1 POE2 POE3 POE4
POE5 POE6 POE7 POE8 USB
Router Display Device for Remote View
PoE IP Camera
Display Device(TV/Monitor with VGA/HD Port)Power Supply
HDMI CableVGA Cable
PoE NVR
Mouse
02

After the wiring and connection as above, the live images should be shown on the
monitor or display. Then you can install the cameras and do the wiring.
When you install the cameras, please make sure to avoid the inaccurate ways of installations.
Wrong Way: The wall will reflect the light from the IR lights to the lens at night if the
camera lens are installed too close to the wall.
Right Way: Adjust the directions of the camera lens and make sure the lens of the camera
are away from the wall.
Wrong Way: There are objects too close to the camera lens. The object will reflect light
from the IR light to the lens.
Right Way: Move the objects away from the camera lens or change the camera's installation
position.
Wrong Way: The wire cables of the camera, like power cable or Ethernet cable are too close
to the camera lens. The cables will reflect light from IR light to the lens.
Right Way: Move the power cable or Ethernet cable away from the camera lens and fix it
on the back of the camera.
Close Wire Cable Reflects
Close Object Reflects
Wrong Viewing Angles
Cameras Installations
03
1 NVR Installation
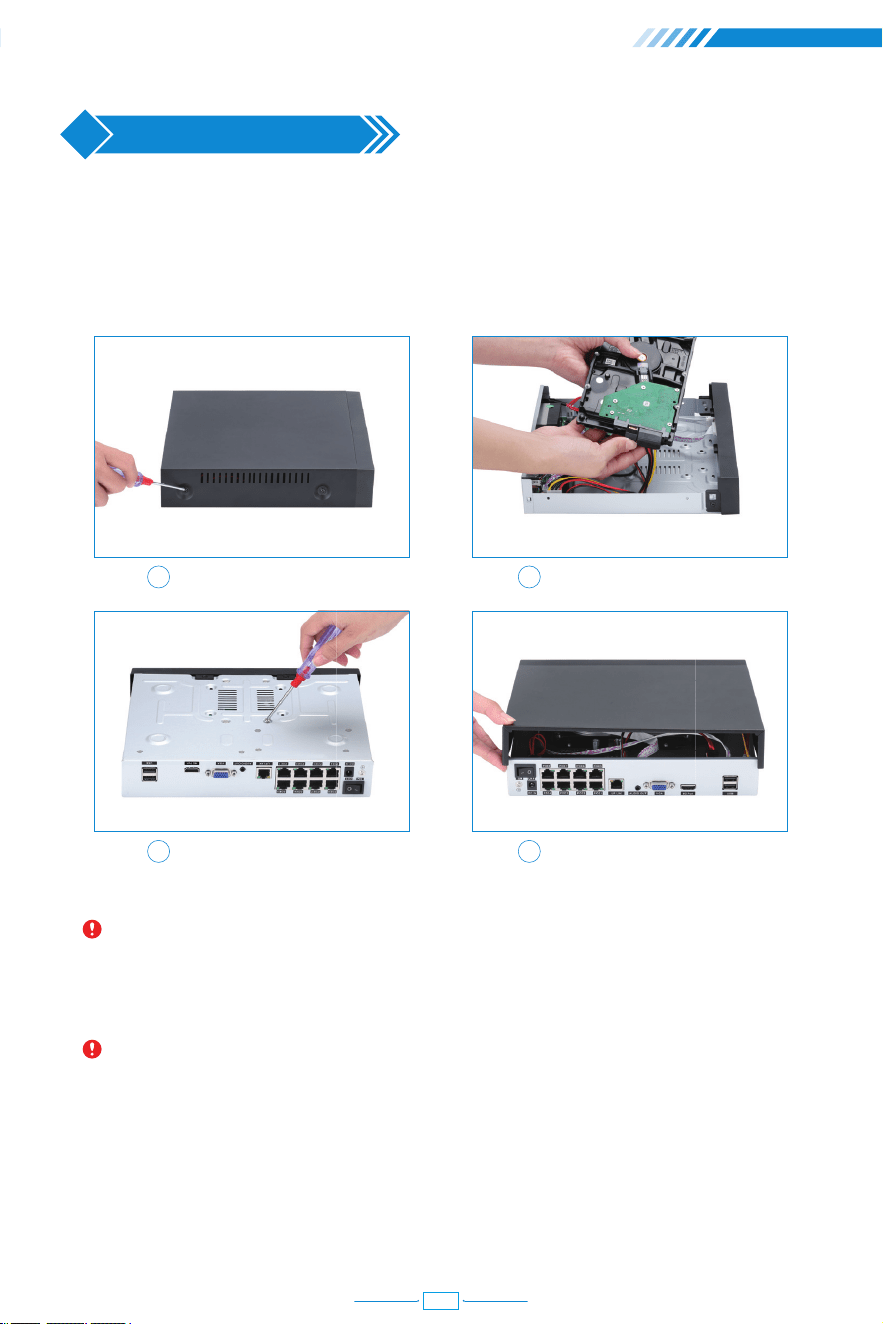
1.1 Hard Disk Installation
Please install the hard disk first. If not, the video recorder can only monitor normally, but
cannot record or playback.
Notice: Please choose a specialized monitoring hard drive disk in order to record
for a longer time. The video recorder supports 3.5" or 2.5" SATA hard disk.
Warning: please make sure the power is off before installation.
1 2
3 4
Remove the case Plug in SATA cable
Screw HDD to the bottom Install the case back
1.2 Boot & Preview
Make sure the power supply matches the requirements of the hard disk video recorder.
After connecting the power, the indicator on the front of the NVR will light on and you
04
will hear a buzzer sound, then the display will boot up and the device will access to the
preview image. After the recovery of the non-normal power failure, the device will
automatically return to the state it was in before the power outage.
2 Function Setting
2.1 Login System
After the normal boot, you have to log in first and the system will provide the corresponding
function according to the user's rights.
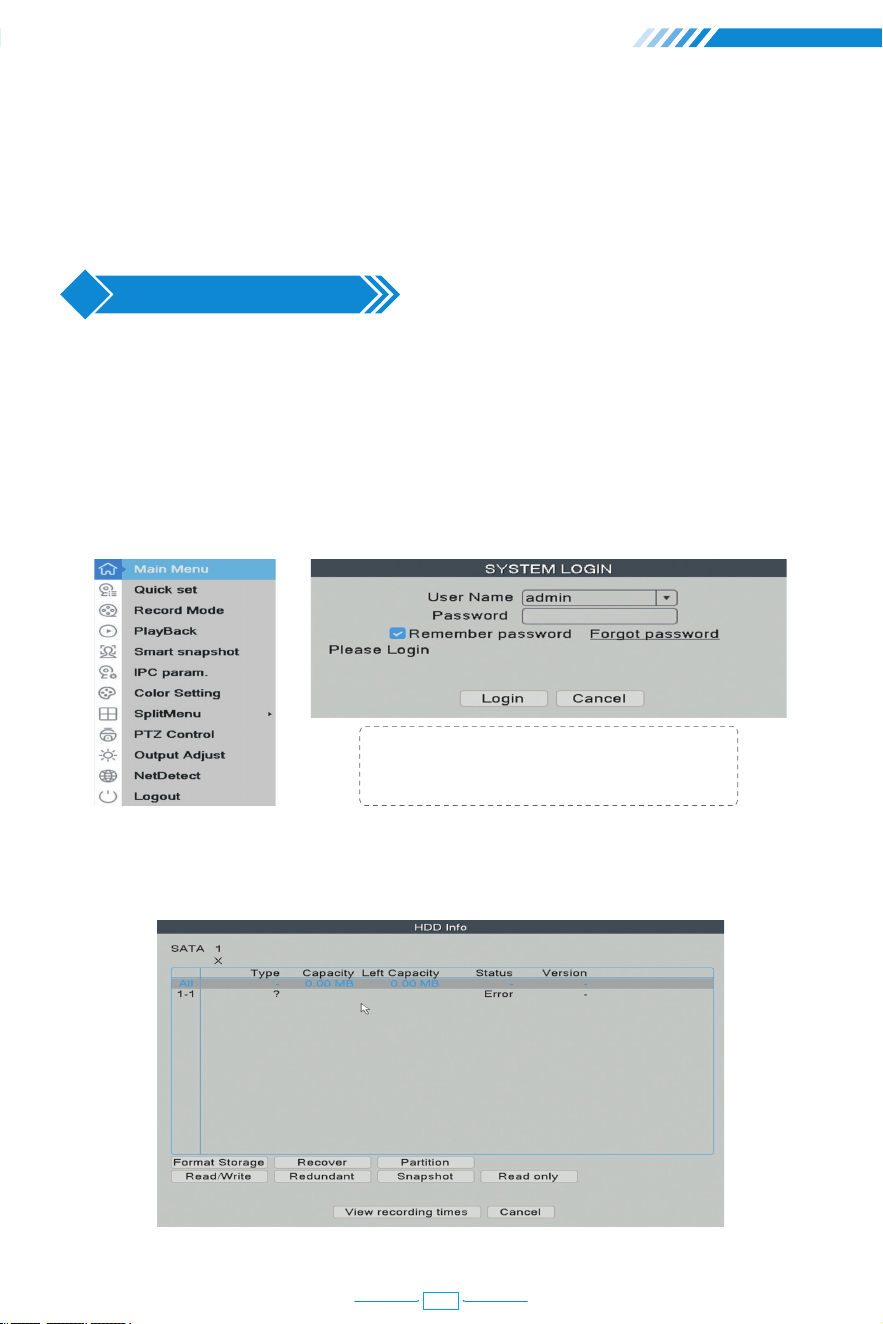
Right click the mouse → 【Main Menu】
2.2 HDD Setup
Right click the mouse→【Main Menu】→【Advanced】→【HDD Info】
User name: admin (default)
Password: Just leave it blank as default.
05
Choosing the Hard Disk, clicking Format Storage, starting to format the HDD.
Notice: Please confirm the hard disk is connected. The hard disk should be formatted
before first use, so that it can record properly. It will automatically overwrite previous
videos when the storage of hard disk is full if you set overwrite.
2.3 General
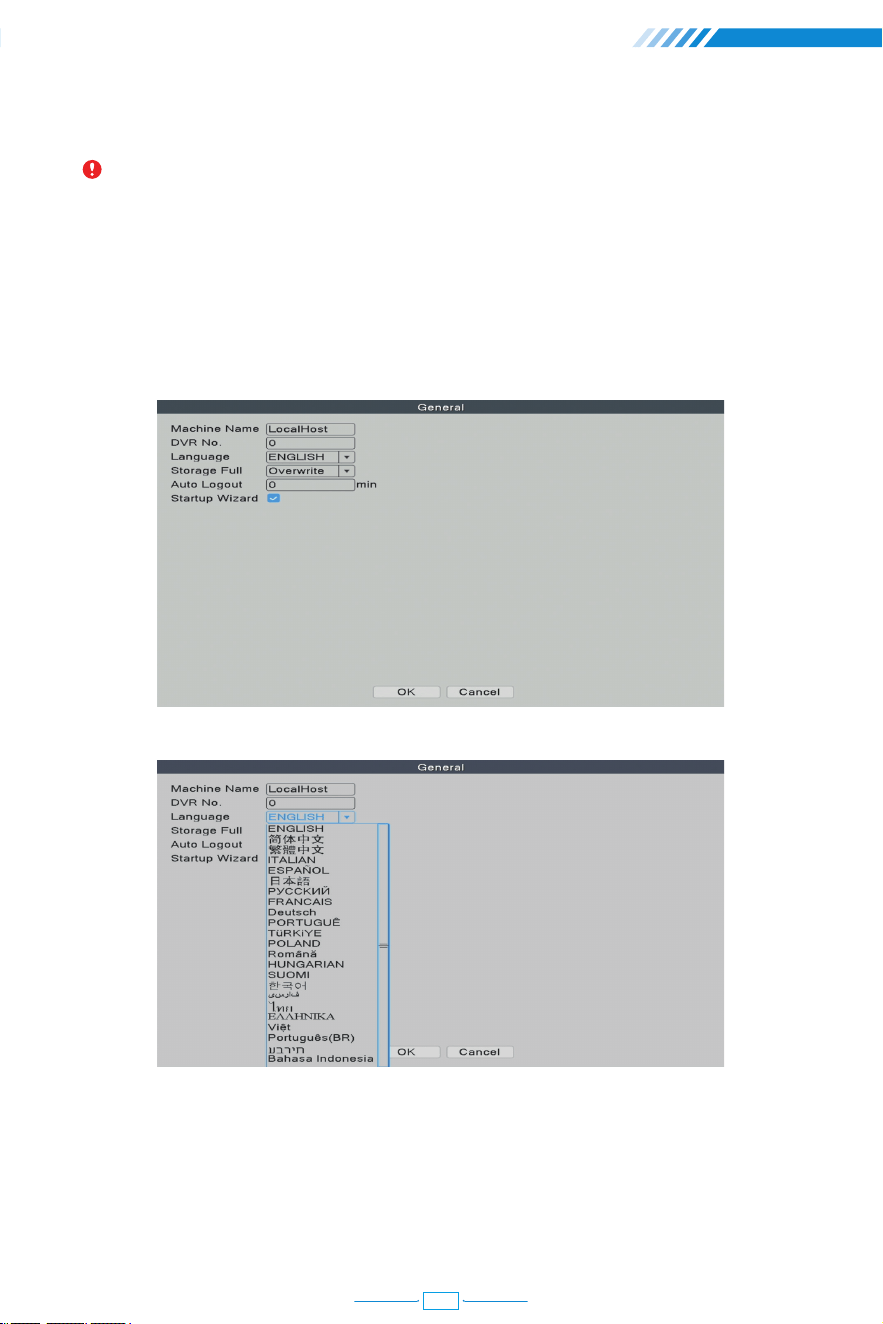
Right click the mouse→【Main Menu】→【System】→【General】
[Language] You can set the system language to the native language.
[Storage Full]
Choose Overwrite: Keep recording video and automatically overwrite the former video
while the storage of HDD is full.
Choose Stop: Stop recording video while the storage of HDD is full.
06
[Auto Logout] You can set up a 0-60 min auto standby. 0 min means you haven't set up the
standby time.
[Startup Wizard] Tick it to get startup wizard when reboot the system (untick it as default).
2.4 Record Setup
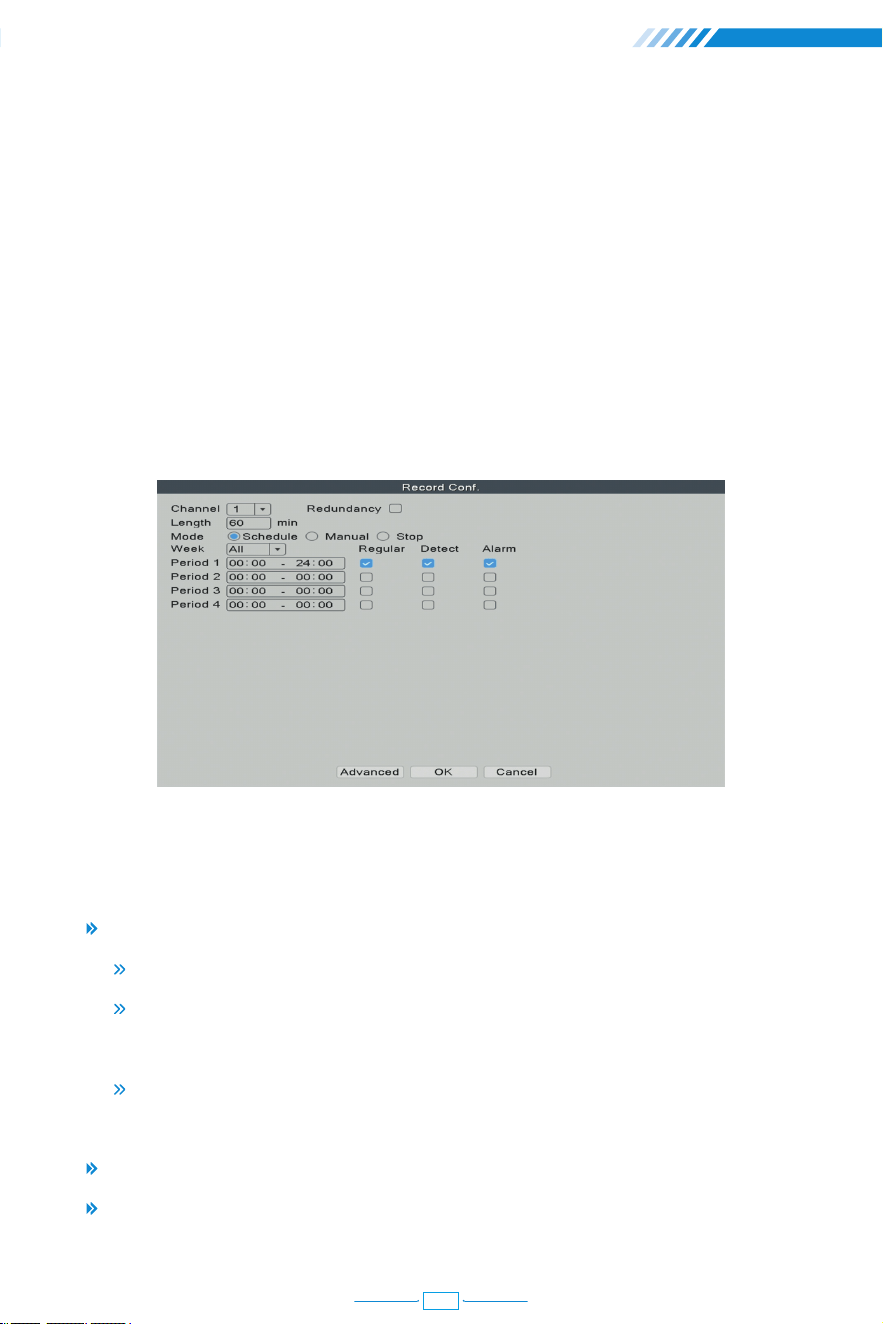
In the Record Configuration, you can set up the record mode for each channel to save space
of the HDD and only record the important videos.
Right click the mouse→【Main Menu】→【Record Conf.】
[Channel] The channel which you want to do settings of record configuration.
[Length] The standard length of each video segment.
[Mode] The way you want to record videos.
Schedule: The selected channel will only record during the chosen time period.
Manual: The selected channel will record 24/7.
Stop: The selected channel will not record any video.
Regular: The system will keep recording during the chosen time period.
Detect: The system will record a video segment when the camera detects
movements during the chosen time period.
Alarm: The system will record a video segment when the camera alarms
during the chosen time period.
07
Notice: If you would like to set the recording mode to "Alarm", please make sure that
you have enabled the alarm function of the corresponding channel.
2.5 Video Playback
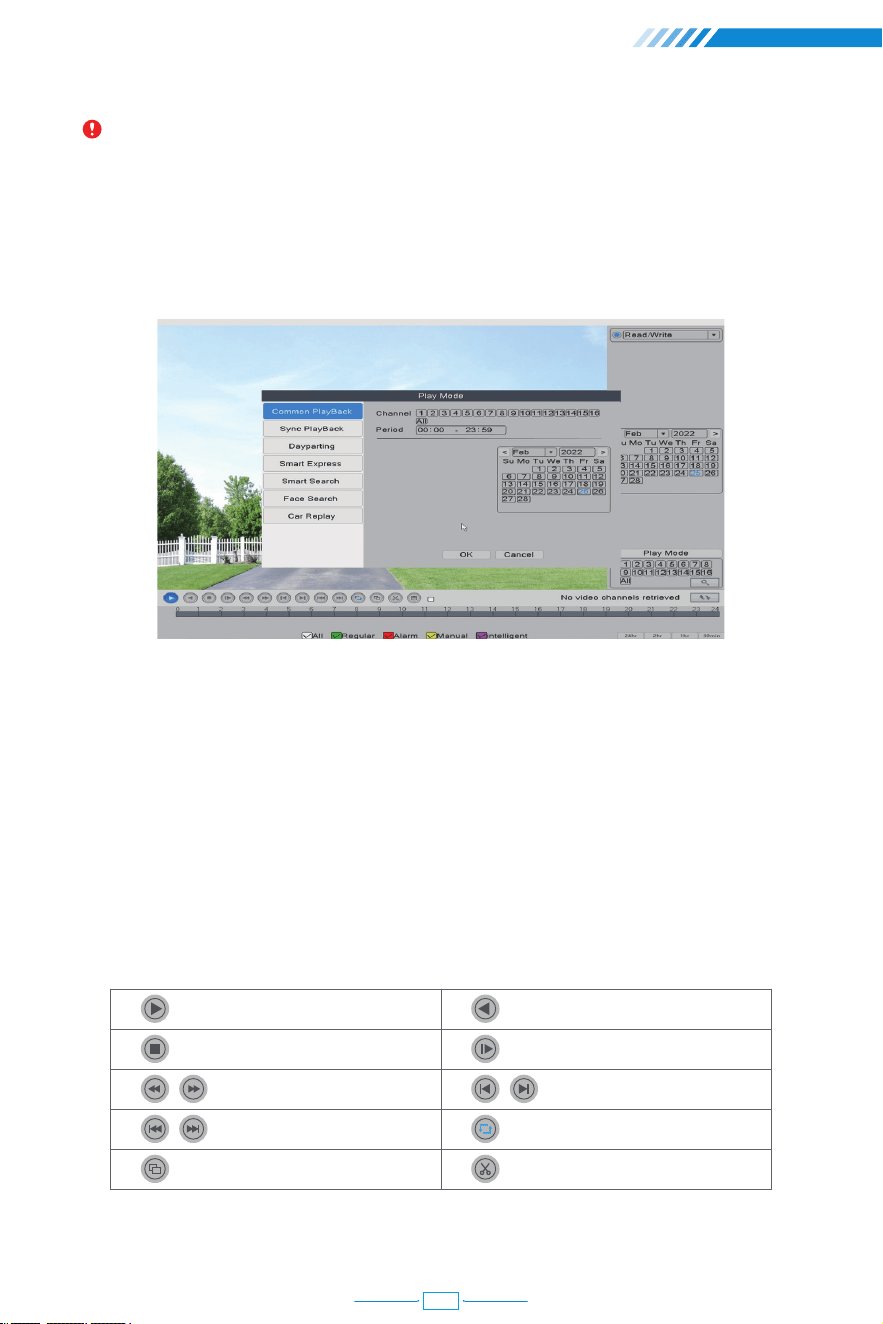
Right click the mouse→【Main Menu】→【PlayBack】
In the "Common Playback", you can playback recorded video according to date, time,
channel and mode.
① Choose Play Mode
② Choose Video Date
③ Playback Channel Option
④ Video Playback Time
⑤ Playback Control Key
Start Playback
Stop Playing
Rewind/Fast-forward
Prev/ Next File
Full Screen
Play Backward
Slow Playback
Prev/Next Frame
Repeat Playback
Start Editing
08
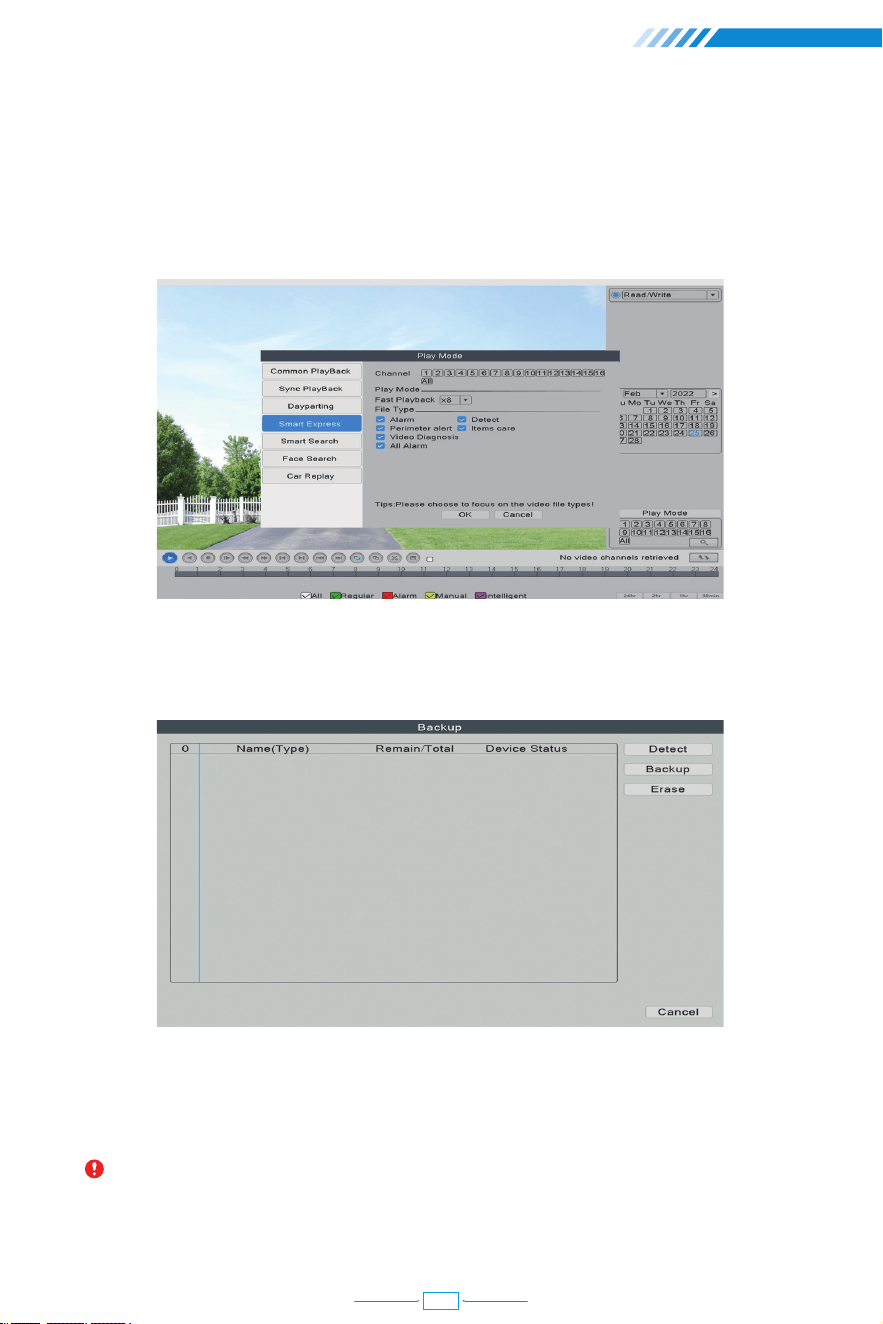
Click the "Smart Express", you can choose different alarm type files for fast playback.
Click the "Smart Search", all recorded videos, which detected motions or humans will be displayed.
Click the "Face Search", all recorded videos, which detected human faces will be displayed.
Click the "Car Replay", all recorded videos, which detected vehicles will be displayed.
2.6 Video Backup
Right click the mouse→【Main Menu】→【System】→【Backup】
Choose 【Video Type】→【Channel】→【Time】, clicking Add button to search video file,
choosing the file in the list, clicking Start button to backup and it will automatically
prompt after backup completed.
Notice: USB disk must be FAT32 format. Please choose AVI format while backup, so
that the backup video could be played on PC directly.
09
2.7 Snapshot Configuration
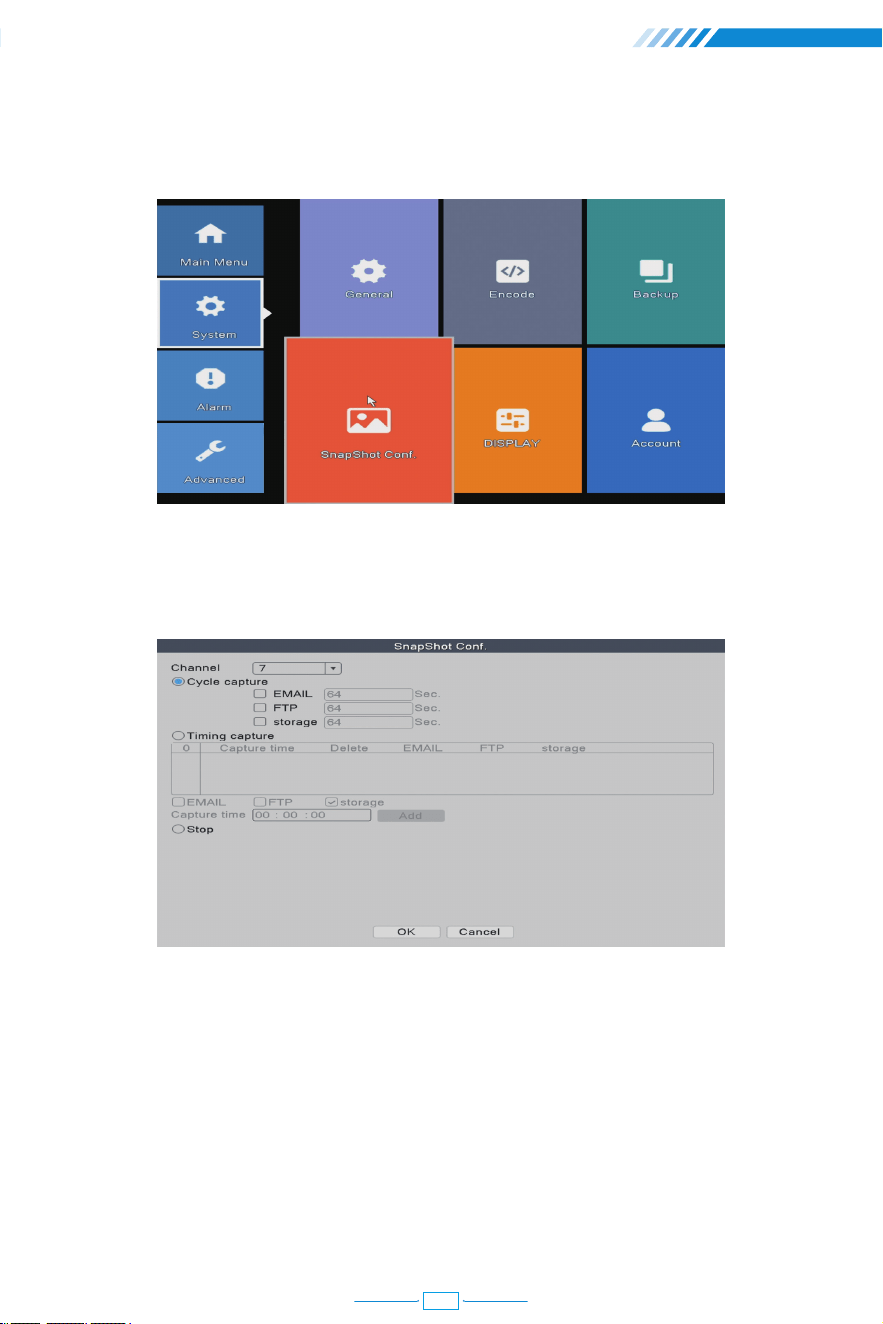
Right click the mouse→【Main Menu】→【System】→【SnapShot Conf.】
[Cycle capture] The camera will take snapshots periodically when you choose Cycle
capture. For example, if the default snapshot period is 64 seconds, it means the camera
will automatically take snapshot every 64 seconds.
[EMAIL] Tick it and the NVR will send the snapshots captured by the cameras to your e-mail
address.
[FTP] Tick it to enable this function. Buyers need to build their own ftp service by themselves.
[storage] Tick it and the NVR will store the snapshots captured by the cameras in the HDD.
10
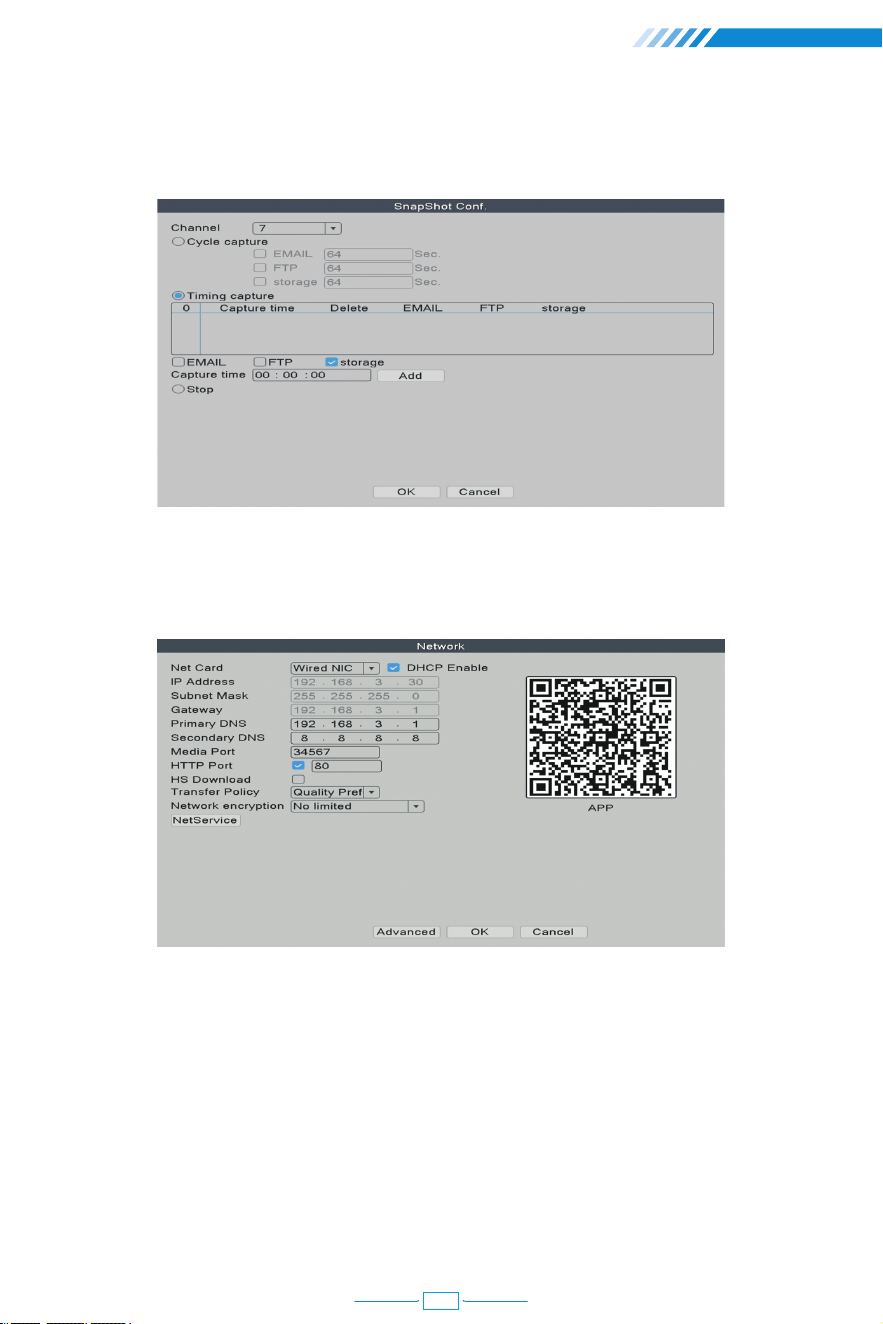
[Timing capture] The camera will take snapshots at the time that you set when you
choose Timing capture.
[DHCP Enable] Tick it to automatically obtain the lP address assigned by the server.
[IP Address] It has to be a unique IP address on the same LAN segment to avoid conflicts
with other equipment in local area.
[HTTP Port] A port number for remote visit, default value is 80.
[NetService] Here you can enable functions like RTSP, FTP, Email and other services.
2.8 Network Setup
Connect NVR to Router→ Right click the mouse→【Main Menu】→【Network】
01
11
2.9 Check Nat Status
Right click the mouse→【Main Menu】→【Advanced】→【Version】
2.10 Email Setup
Right click the mouse→【Main Menu】→【Network】→【NetService】→【EMAIL】
[Serial Number] Device Serial Number for remote view.
[Nat Status] Check the network status, begin a remote monitoring when shows connected.
[Device Info] Edit function like playback preview, face and human detection.
02
12
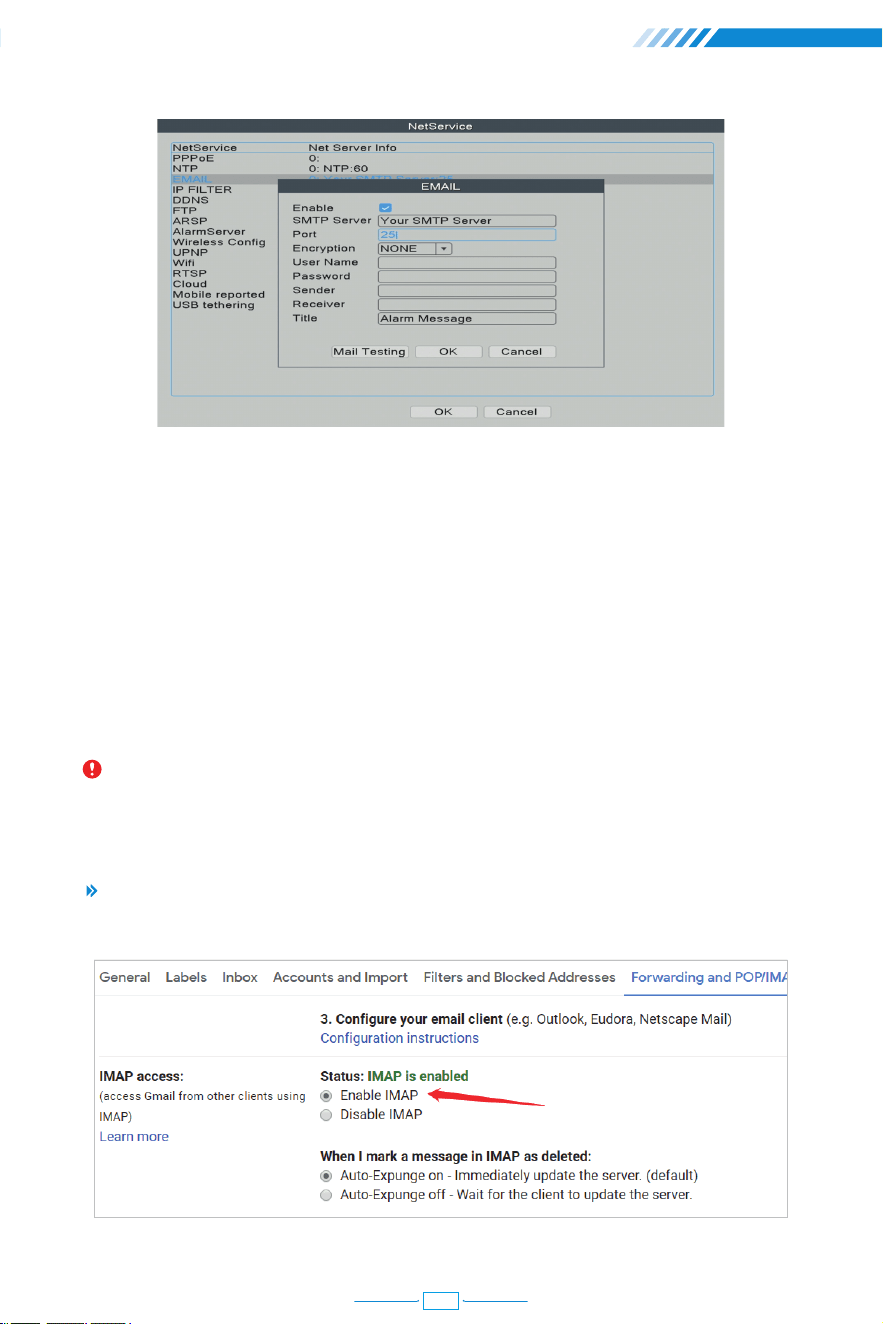
[SMTP Server] Sender's mailbox (for example: gmail / email).
[Port] Sender's mailbox SMTP port.
[Encryption] SSL.
[User Name] Username of the sender's mailbox (must support and open SMTP function).
[Password] Password of the sender's mailbox. Go to get 16-digit app password on your
email setting.
[Receiver] Receiver's mailbox.
[Mail Testing] Click and it will send an email to receiver to test the Email setting.
Notice: Before testing the Email, please confirm the Network has been connected
successfully.
Enable IMAP access of your e-mail.
How To Get 16-Digit App Password
03
13
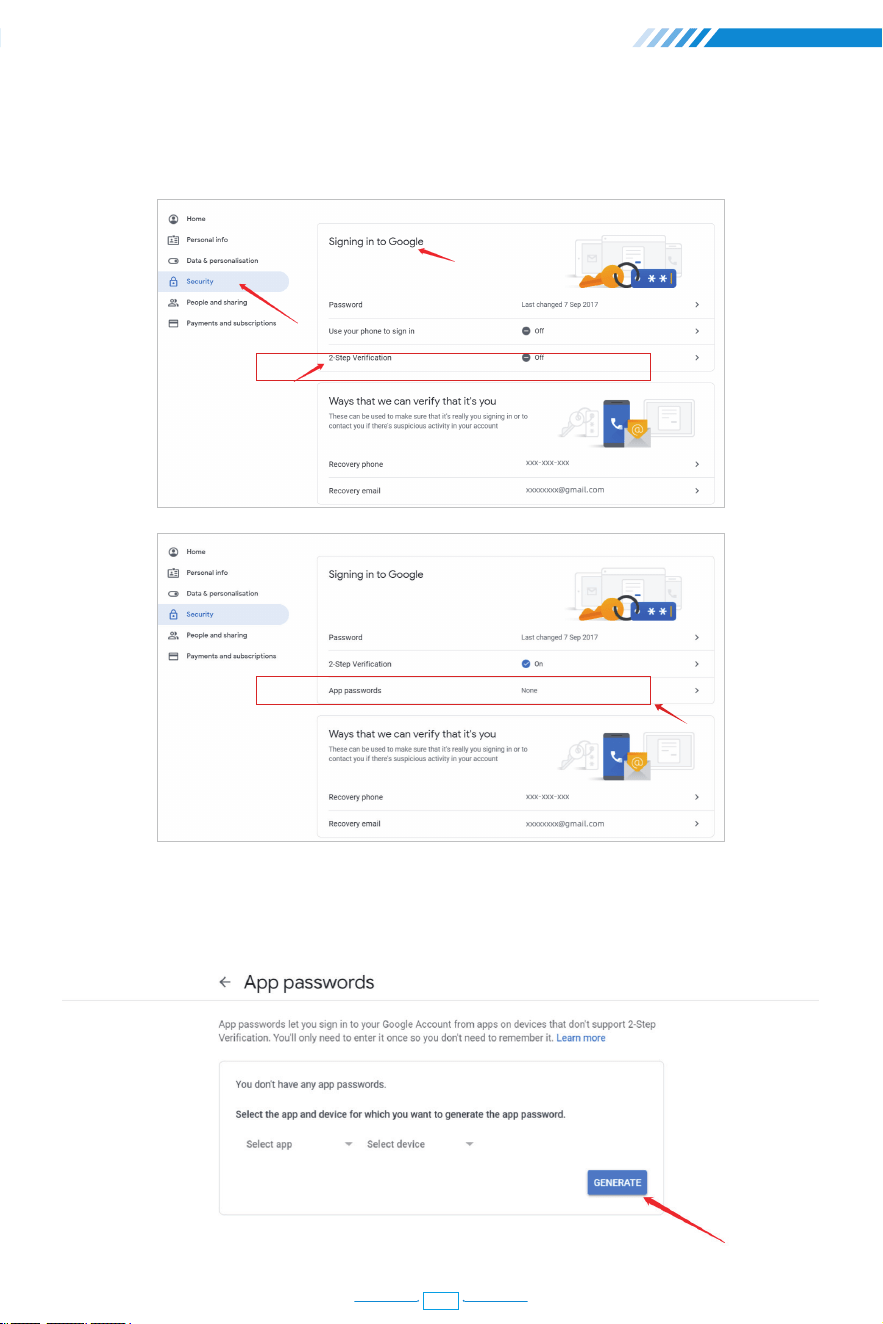
Log in your Google account. In "Security" section, find "Signing in to Google". If the
"2-Step Verification" is off, please enable it.
You will get a 16 digits password that you need to use later to set up your email notice in
NVR system.
04
14
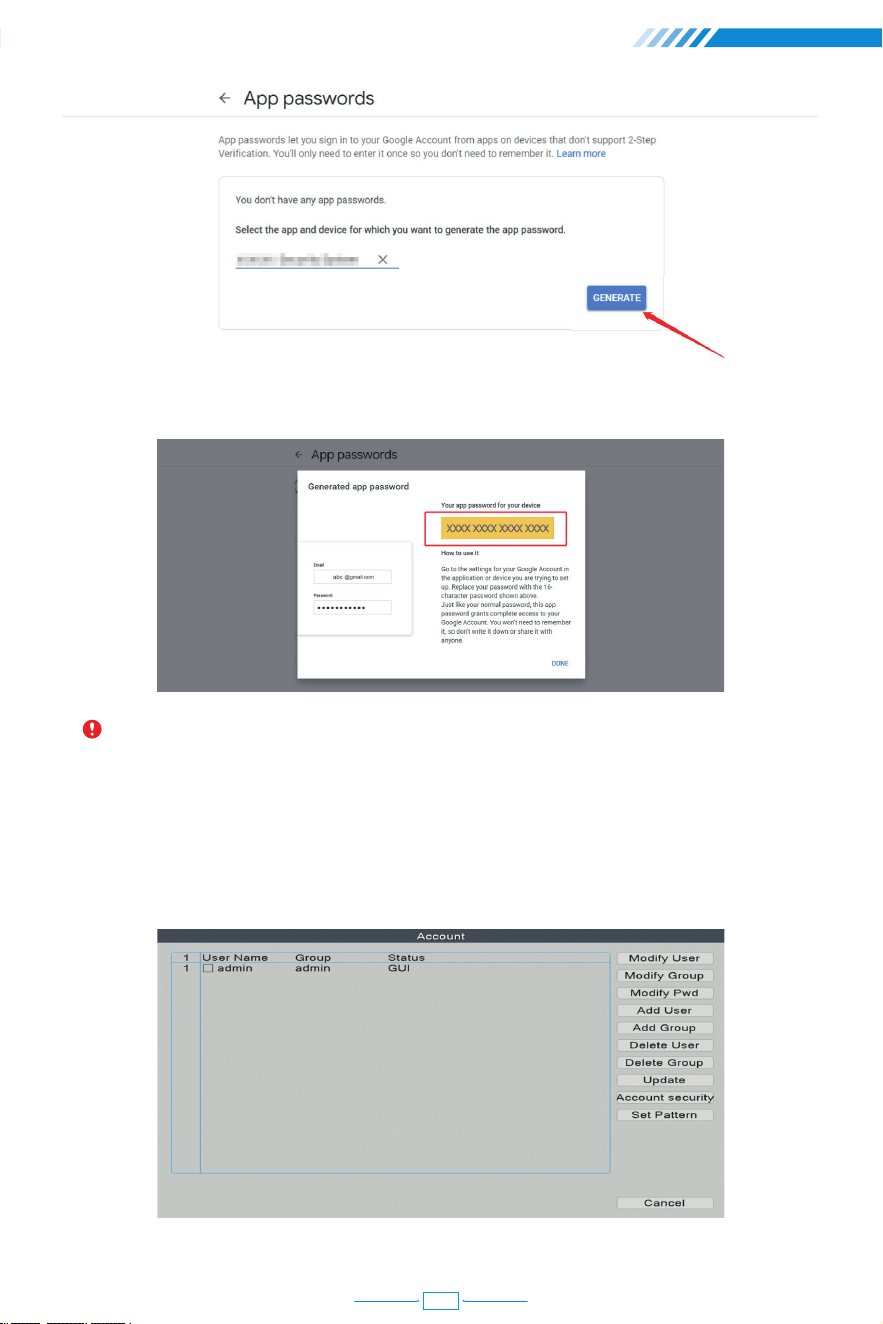
You will get a 16 digits password that you need to use later to set up your e-mail notice in
NVR system.
Notice: You are not able to review the password after you click "DONE" so please
write it down or leave this page open.
2.11 User Management
Right click the mouse→【Main Menu】→【System】→【Account】
05
15
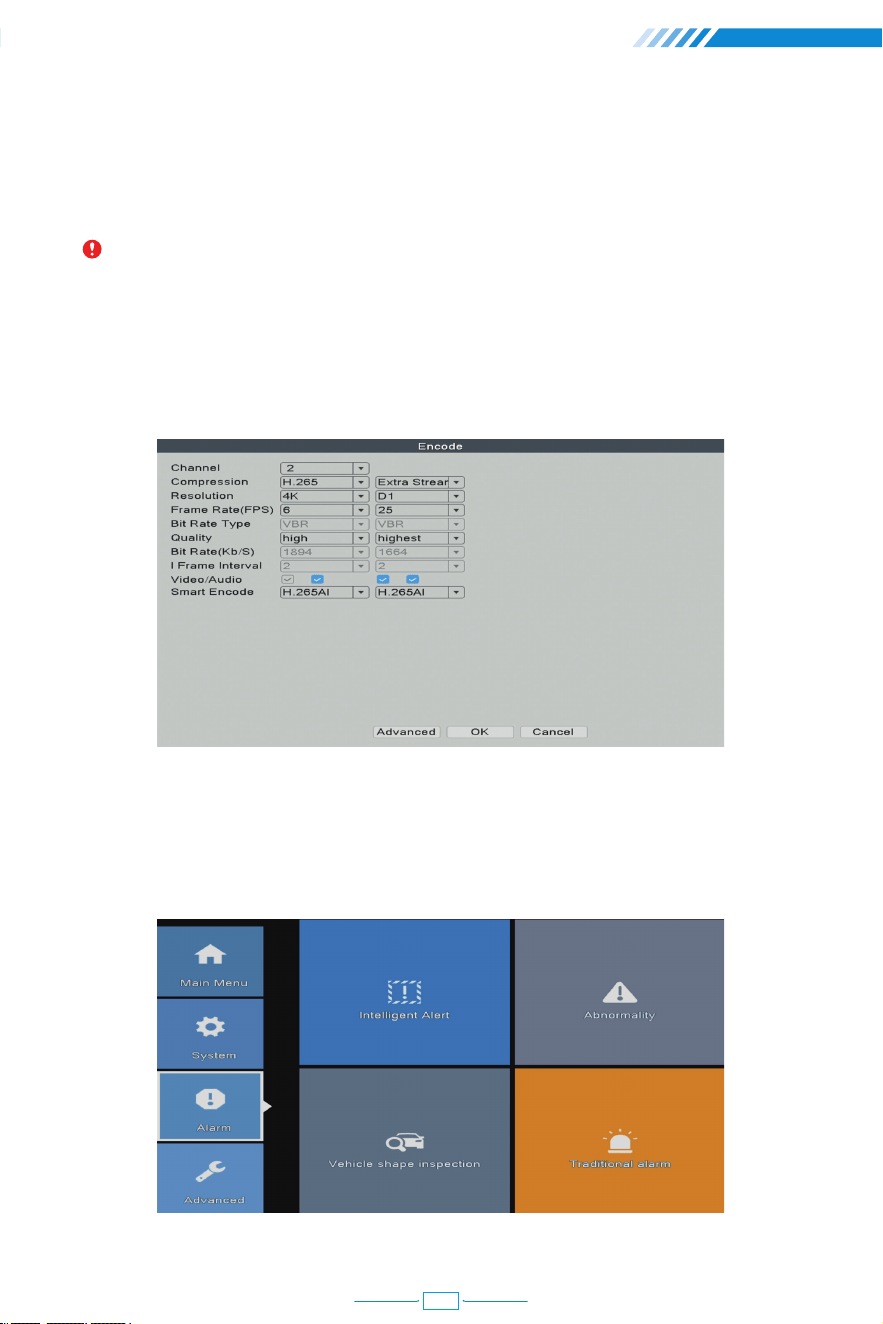
[Modify Pwd] Enter to Modify Password page, and modify password.
[Add User] Add User account and set up the User's permissions. Enter the Add User page
and input the User Name and Password.
[Video/Audio] Tick four blanks to show the file for streaming video and audio.
Right click the mouse→【Main Menu】→【Alarm】
Notice: Password can be setup as number+letter combination, please record your
password in other ways and keep it in a safe place to avoid forgetting.
2.12 Audio Setting
2.13 Alarm
Right click the mouse→【Main Menu】→【System】→【Encode】
06
16
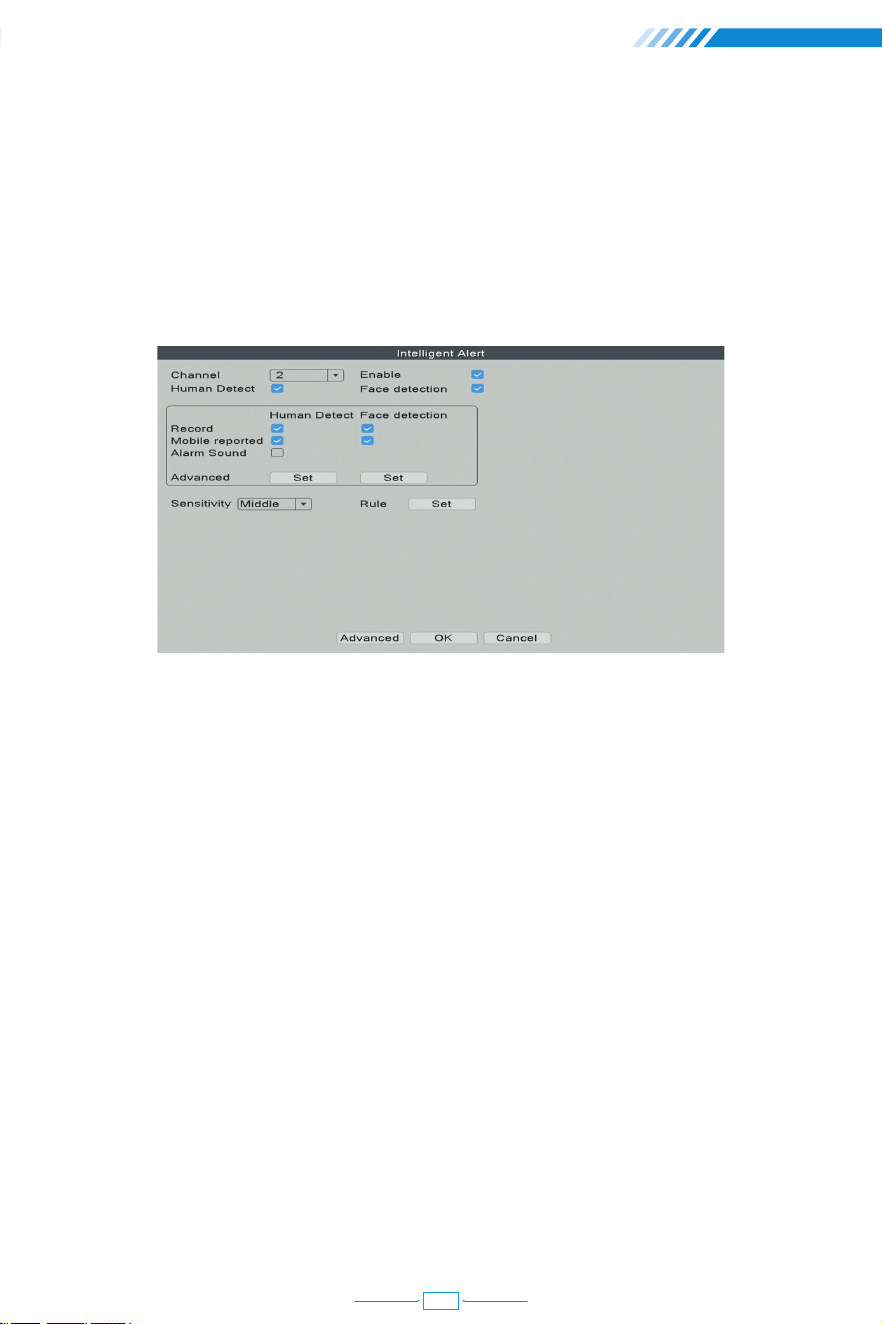
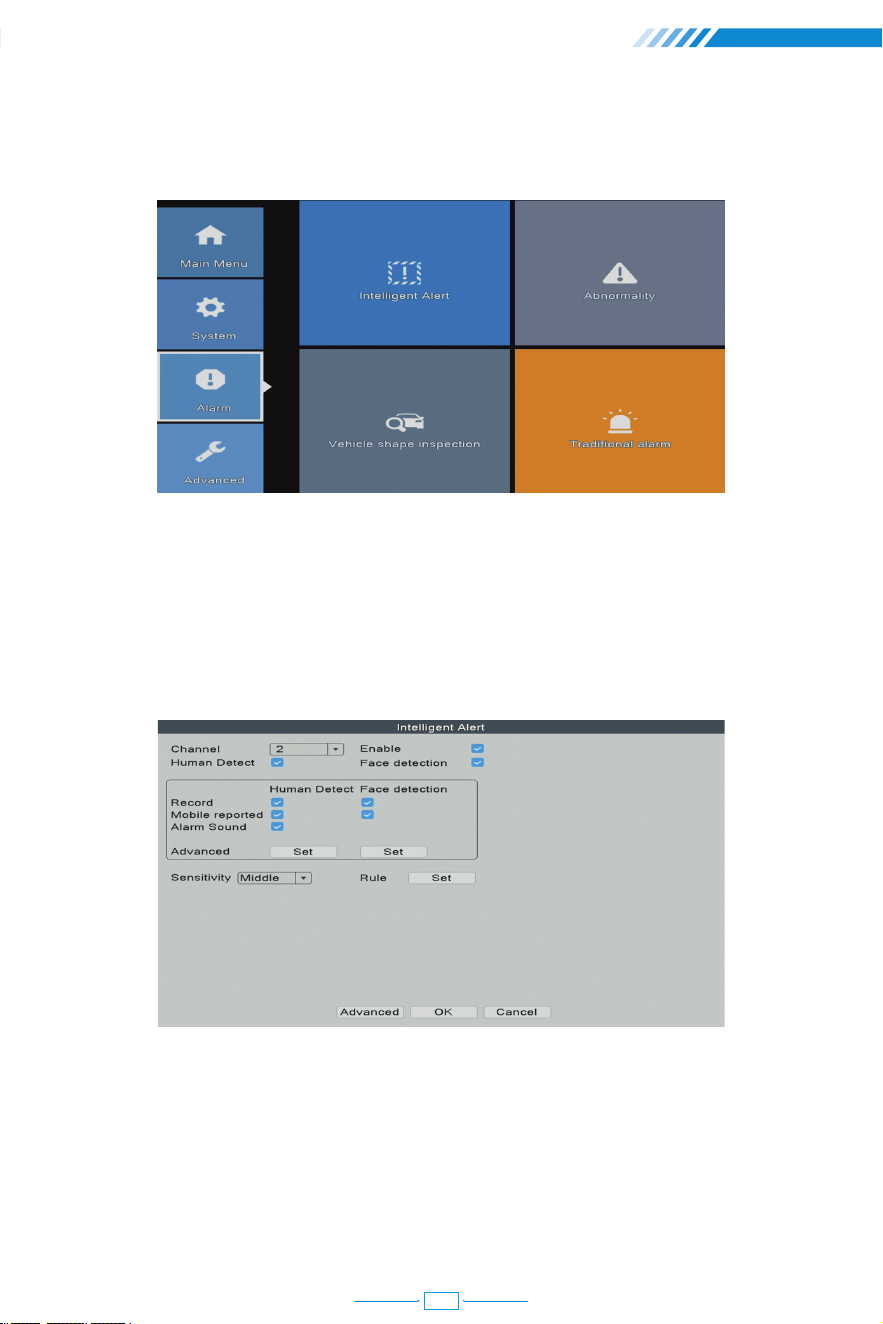
The NVR supports intelligent alerts, such as human detection, face detection, vehicle
detection and traditional alarm. You can set different intelligent alerts if your cameras
also support these functions through the following operations.
2.13.1 Intelligent Alert Setting
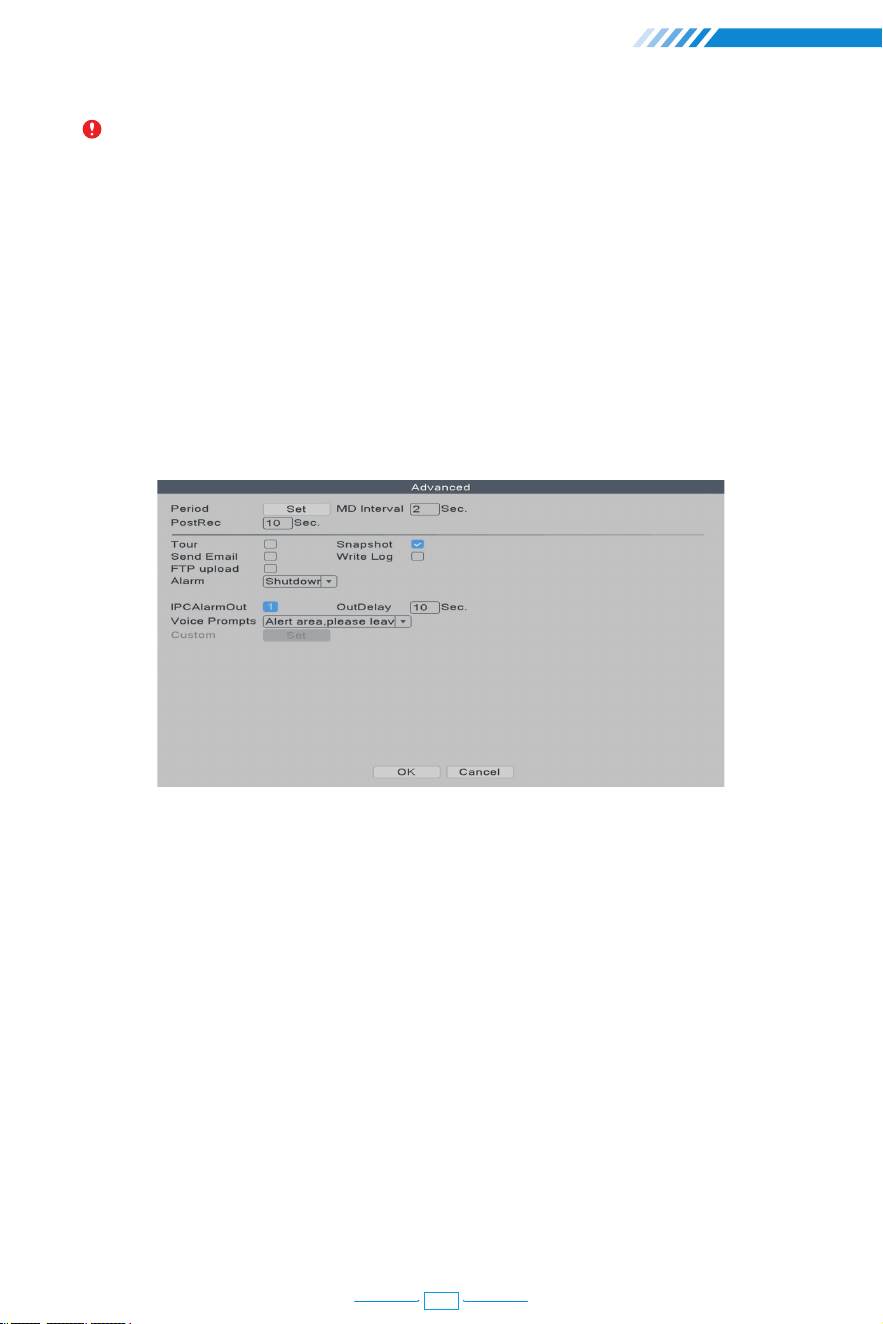
Right click the mouse→【Main Menu】→【Alarm】→【Intelligent Alert】
[Channel] Choose the camera which you want to do alert settings.
[Enable] When it is unticked, the camera will not detect any movements.
[Human Detect] The camera will detect human activities by recognizing humanoid body shape.
[Face detection] The camera will detect human face when this option is ticked on.
[Record] When it is ticked on, the camera will record a video segment when human/face
detected.
[Mobile reported] When it is ticked on, the camera will send alert notifications to your
mobile App when it detects movements or human activities.
[Alarm Sound] When it is ticked on, the camera will make a voice alarm when it detects
movements or human activities.
[Sensitivity] Adjust the detection sensitivity of the camera.
[Rule]Set advanced detection rules like safe zone or line cross alarm.
07
17
Notice: If the "Enable" option is on and the "Human Detect" is off, the camera will
detect all movements, including pets, vehicles, plants, etc. Therefore, we recommend
you to active "Human Detect" to reduce false alerts. It shows that "Human Detect"
function can reduce 98%-99% of the false alerts. If you need to enable this function
please make sure your camera support human/face detection.
2.13.2 Advanced Setting of Human Detection/Face Detection
Right click the mouse→【Main Menu】→【Alarm】→【Intelligent Alert】→【Human Detect】/
【Face detection】→【Advanced】, click Set button.
[Period] The time period of the detection.
[MD Interval] The interval between 2 human motion movements alerts.
[PostRec] To adjust the length of the video after the camera detects abnormal movements.
[Tour] Not applicable.
[Snapshot] When it is ticked on, the camera will take snapshots when it detects abnormal
movements.
[Send Email] When it is ticked on, the camera will send alerts to your e-mail address
when it detects abnormal movements.
[Write Log] When it is ticked on, the NVR will mark down the alarm record. You can review
the records by following this path: Right click the mouse→【Main Menu】→【Advanced】→【Log】.
[FTP upload] Not applicable.
18
[Alarm] Shutdown: It means to turn off all alarm sounds.
Voice Prompts: You can select to turn on different alarm sounds.
[IPC AlarmOut]For setting Blue&Red Alarm Light. Some models of our PoE AI Cameras
are built in Red LED lights and Blue LED lights. When human detected, the red lights and
blue lights will flash alternately to scare off intruders whether day or night.
If your cameras support the function of Red-Blue Light Alarm, and you want to disable
the function, please right click the mouse→【Main Menu】→【Alarm】→【Intelligent Alert】→
【Human detection】 →【Advanced】, click Set button, untick the 【IPCAlarmOut】.
[Voice Prompts] To choose the different alarm sounds for the voice prompts.
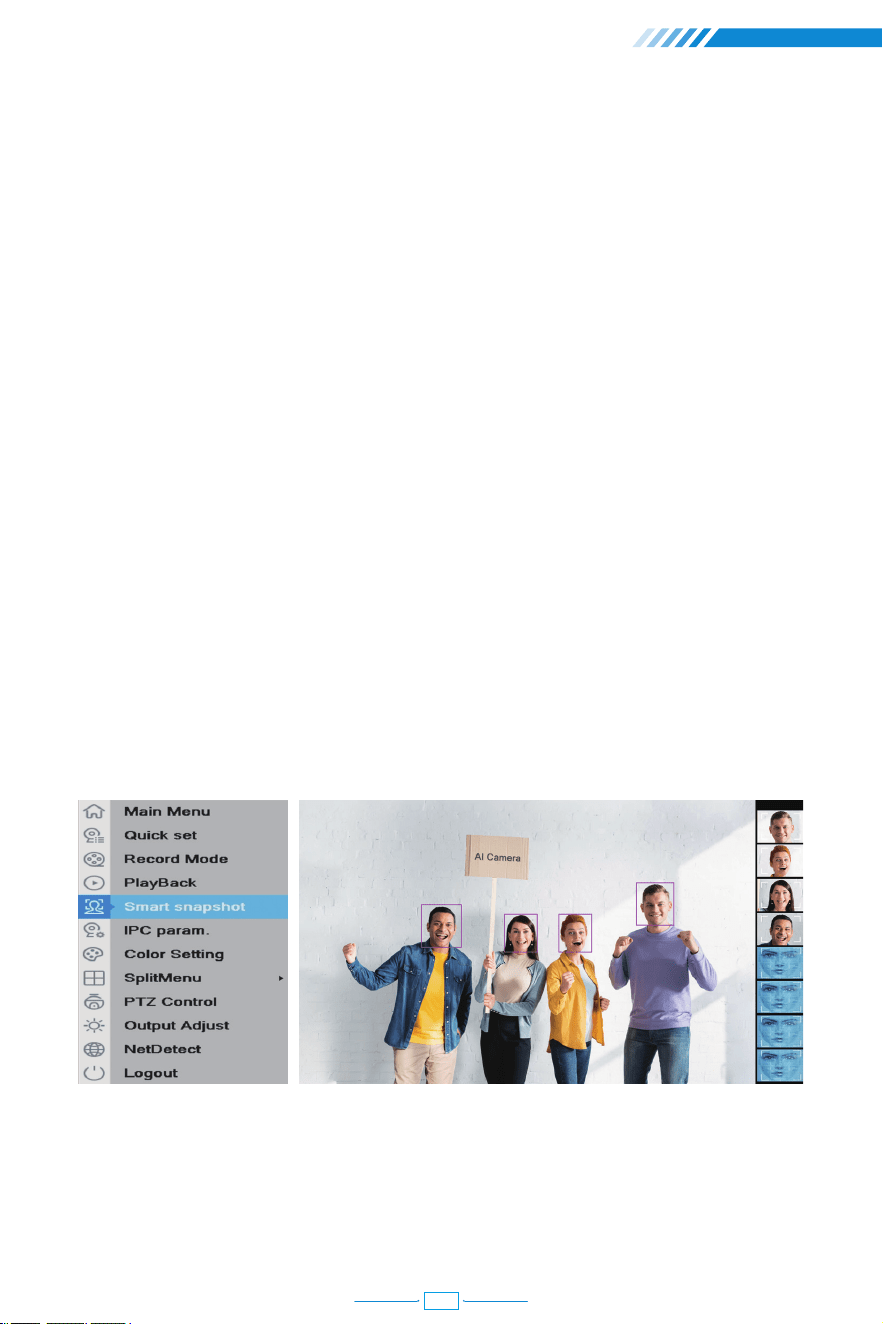
If you have set the function of face detection, on screen of the monitor with live video,
you can view the human faces detected by the cameras. You can easily and quickly get
whether the persons detected by the camera are your friends or intruders. If he is an
intruder, the face detection function can help take some actions as soon as possible to
protect your safety and property.
When the cameras detect human faces, the NVR will show you these faces on the right
side of the screen like the image above.
19
2.13.3 Advanced Settings of Vehicle Detection
Right click the mouse→【Main Menu】→【Alarm】→【Vehicle shape inspection】
2.13.4 Advanced Settings of Safe Zone & Line Cross Alarm
You can set up a safe zone for camera. The camera will only detect or make alarm sound
when there are abnormal activities in the safe zone.
Right click the mouse→【Main Menu】→【Alarm】→【Intelligent Alert】→【Rule Set】
Choose the safe zone shape which you would like to use. In this user manual, we use
rectangle as example.
20
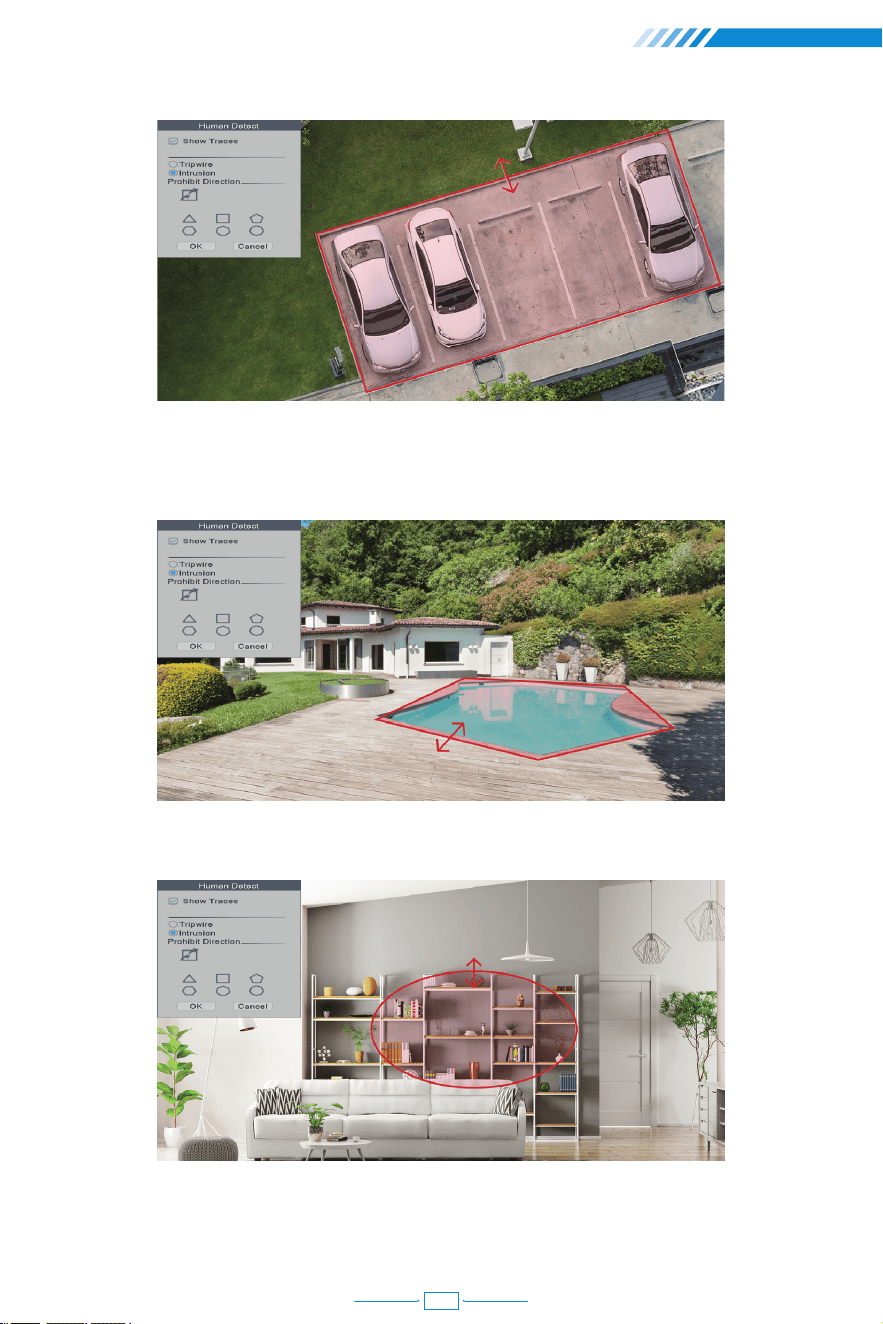
Click & hold the sides of the different patterns then drag the sides to change the shape
and the size of the safe zone.
You can also choose other size such as circle to protect our valuable objects.
21
2.13.5 Abnormality Settings
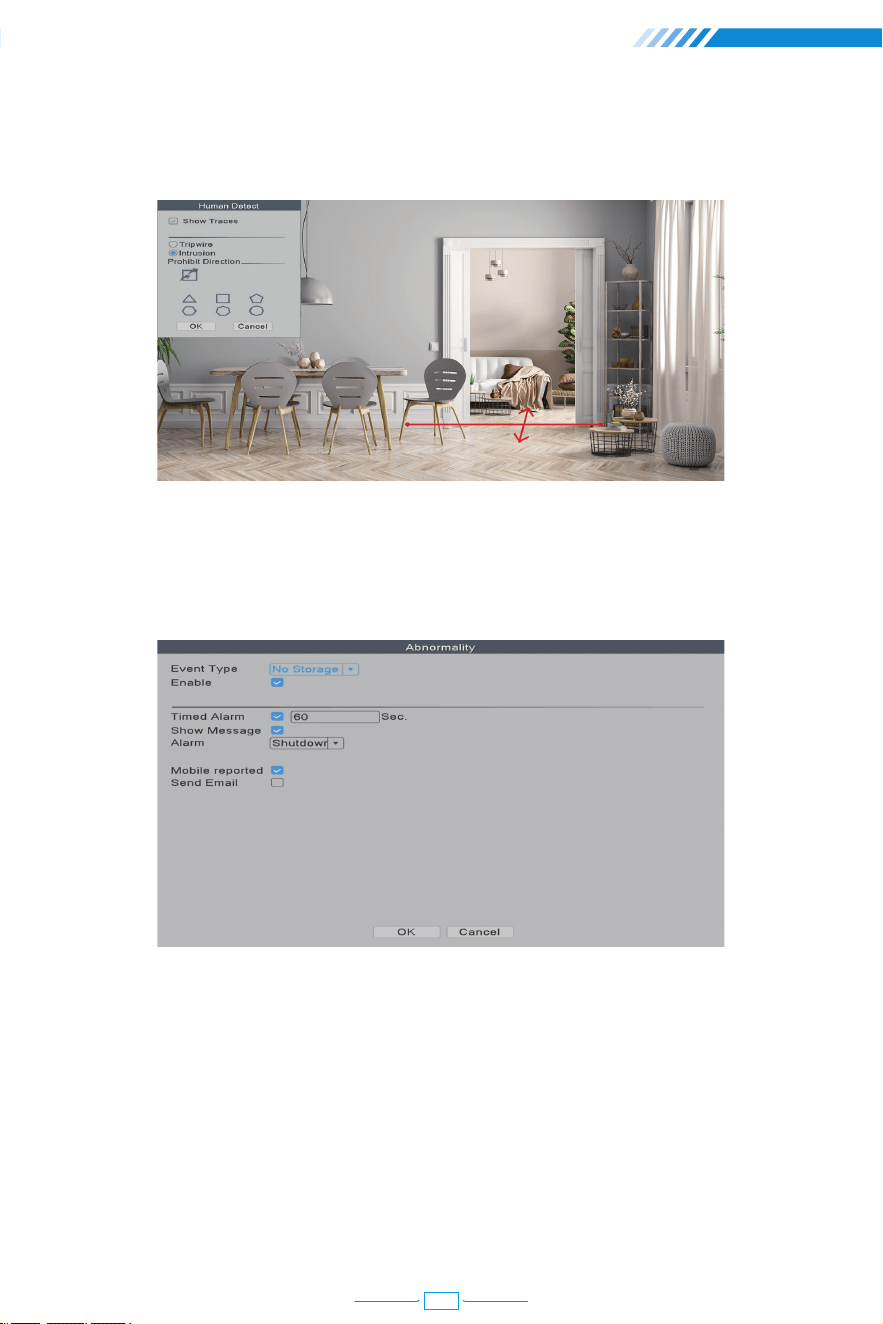
When you choose "Tripwire" in stead of "Intrusion", there will be a line on the screen and
the camera will only detect or make alarm sound when people cross this line.
Right click the mouse→【Main Menu】→【Alarm】→【Abnormality】, in this part, you can set
the alarm for other events.
In the 【Event Type】, there are several options:
[No Storage] The NVR can't detect HDD.
[Storage Device Error] The NVR detects that the HDD is not working correctly.
[Storage No Space] The HDD is full.
[Net Disconnection] The NVR is disconnected to the Internet.
[IP Conflict] There are other devices in the LAN using the same IP address as this NVR.
22
You can also choose different notification types:
[Show Message] The error message will show on the monitor screen.
[Alarm] Shutdown: It means to turn off all alarm sounds.
Voice Prompts: You can select to turn on different alarm sounds.
[Mobile reported] The NVR will send error message to the App.
[Send Email] The NVR will send error message to your e-mail address.
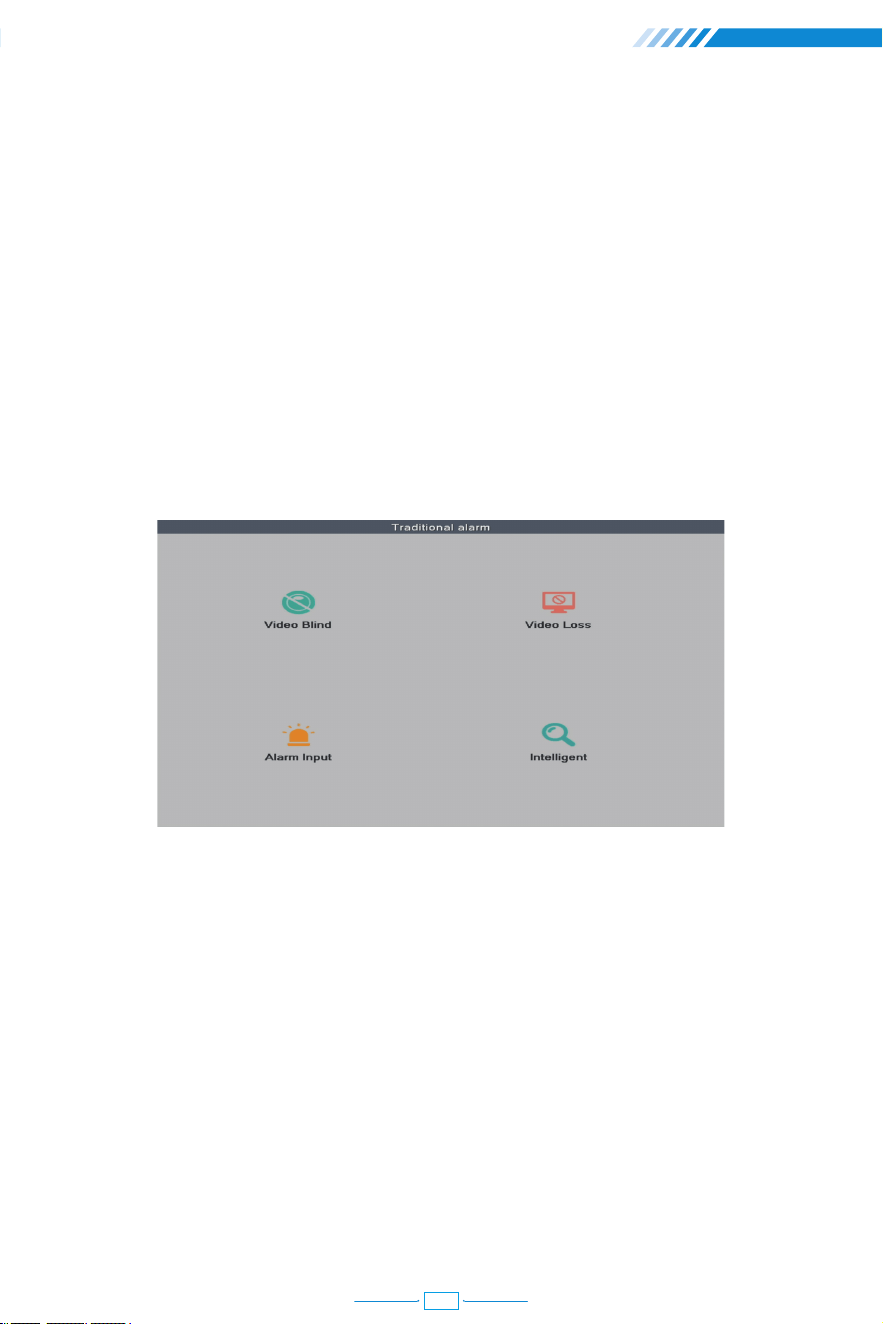
2.13.6 Traditional Alarm Setting
Right click the mouse→【Main Menu】→【Alarm】→【Traditional alarm】, in this part, you
can adjust the settings for other alarm types.
[Video Blind] The camera is covered and blinded.
[Video Loss] The camera loses connection with the NVR.
[Alarm Input] The alarm input from the cameras.
[Intelligent] Not applicable.
23
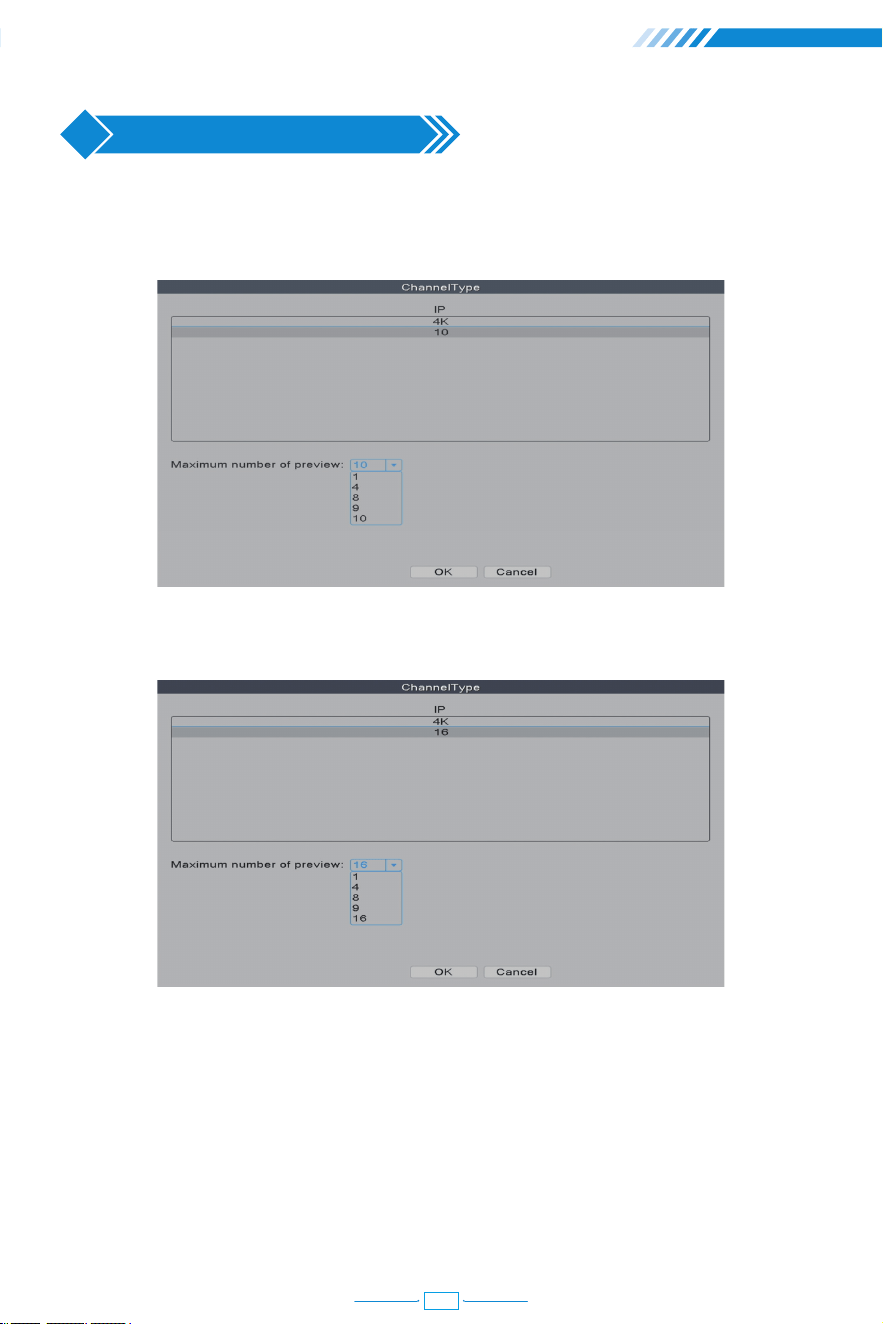
8CH PoE NVR supports to be expanded to 16 channel.
[Maximum number of preview] Number of cameras can be viewed simultaneously.
Right click the mouse→【Main Menu】→【Advanced】→【Digital】→ 【ChannelType】
4CH PoE NVR supports to be expanded to 10 channel.
3 Digital Channel Setup
24
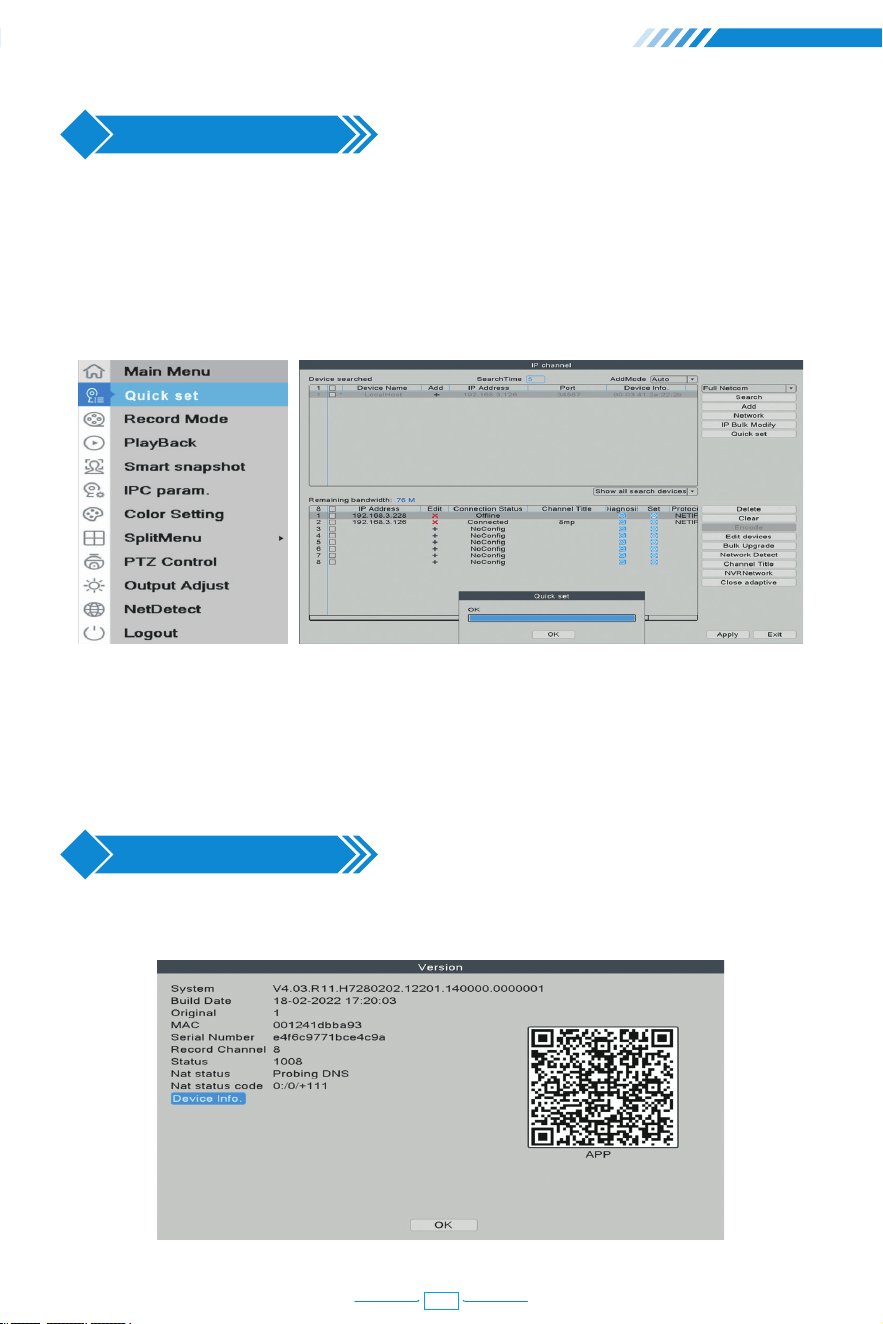
This PoE NVR is expandable and supports Onvif. It means that the recorder is compatible
with all the PoE IP cameras which support Onvif protocol. If you want to connect more
cameras to the recorder, you need to pair the recorder and the cameras first.
Right click the mouse→【Main Menu】→【Quick Set】
Click "Search" and the cameras will be able to be chosen on the upper chart. Click "Add"
then the camera will be paired with the NVR.
[AddMode] Auto and Manual for optional.
4 Add IP Camera
Remote View
Right click the mouse→【Main Menu】→【Advanced】→【Version】
5
25
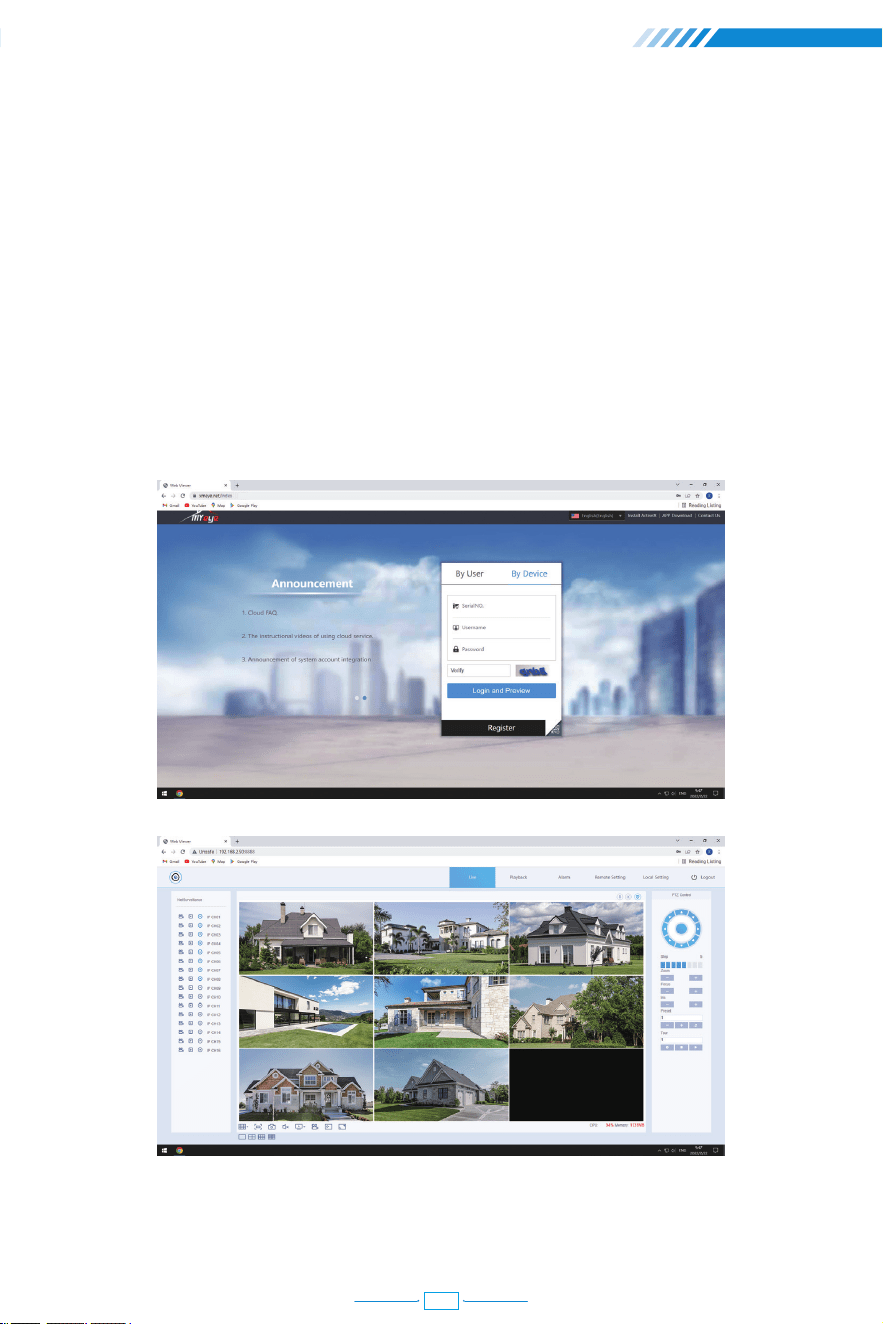
Serial Number: Enter device Serial Number
Username: admin (Default)
Password: Just leave it blank as default (But you need to fill in your own password if you
have changed the password before).
Open the Google Browser, enter website: https://www.xmeye.net, arrive at browsing
page of remote view, choose "By Device". Then enter Serial No., User name, Password
and Verify to realize remote view.
5.1 Remote View via PC
26
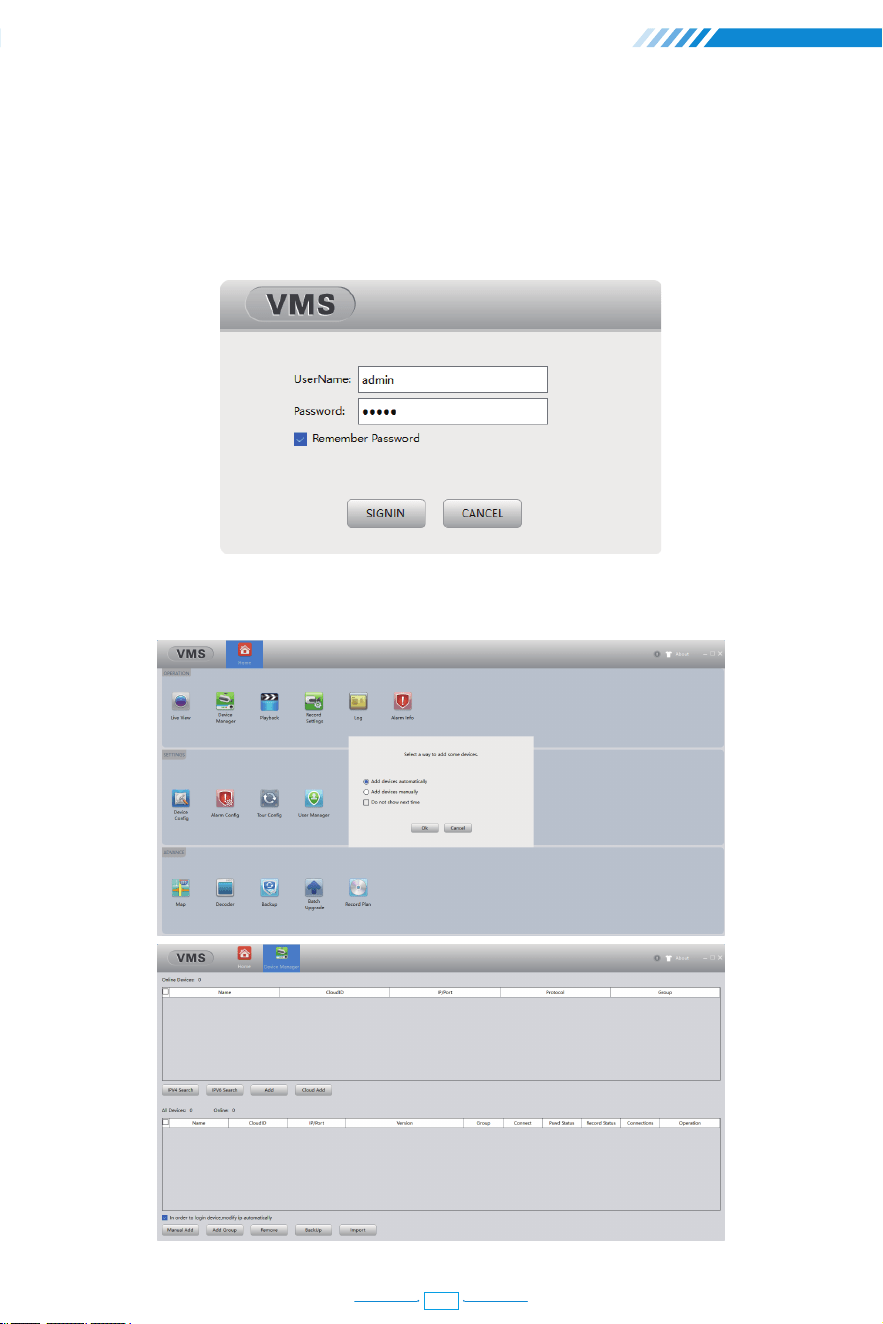
Download Center:
https://www.techage.com/pages/download-for-poe-wired-camera-system
Open VMS PC client software after installation.
Click [Device Manager] and choose [Add devices automatically] to add the device.
5.2 Remote View via PC Client Software
27
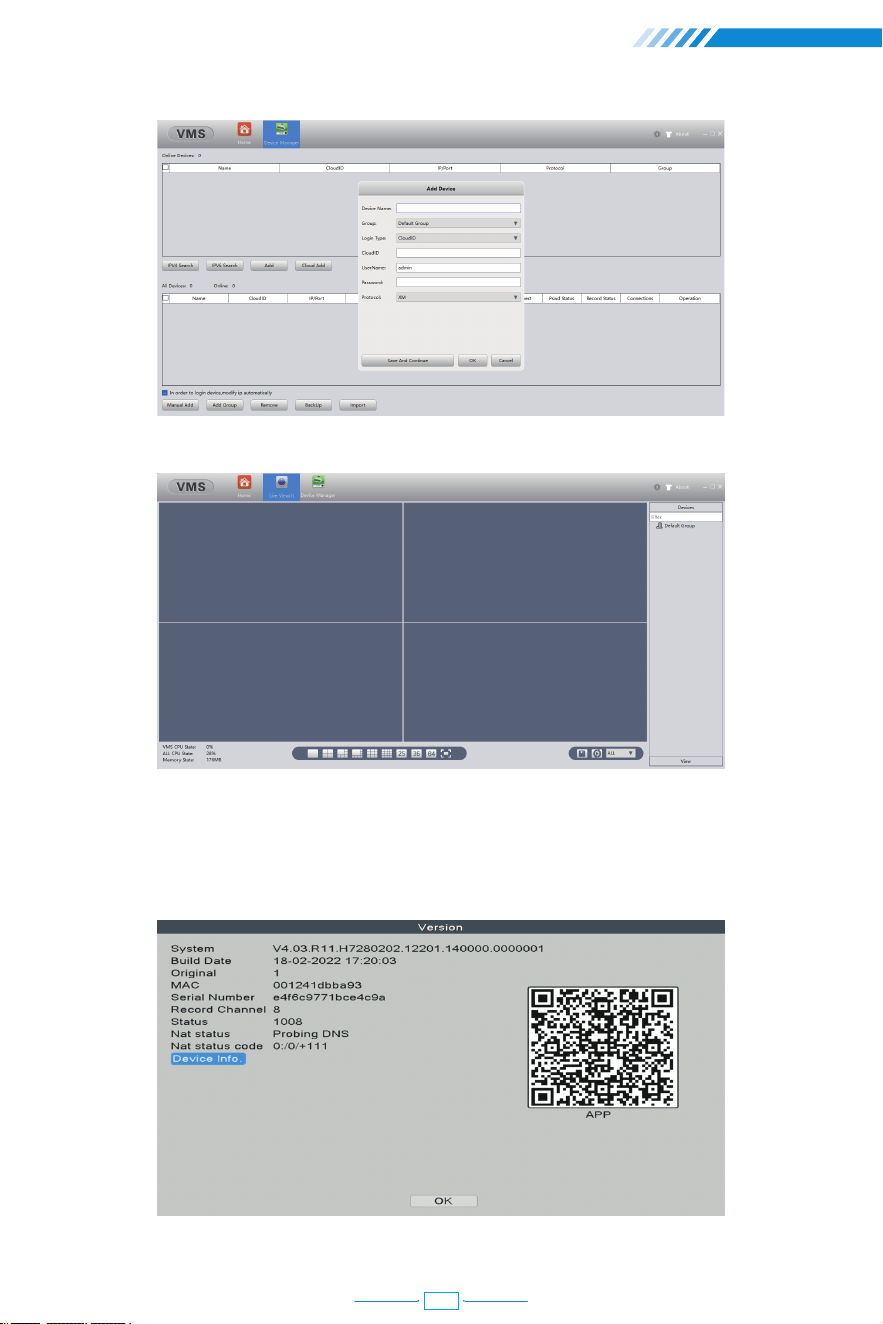
Live view via VMS.
① Install the software: scan the QR code or search XMEye Pro in App store to download.
When turn on NVR for the first time→【Camera Test】→【Time Setup Wizard】→【Network】
5.3 Remote View Via Smart Phone
18
28
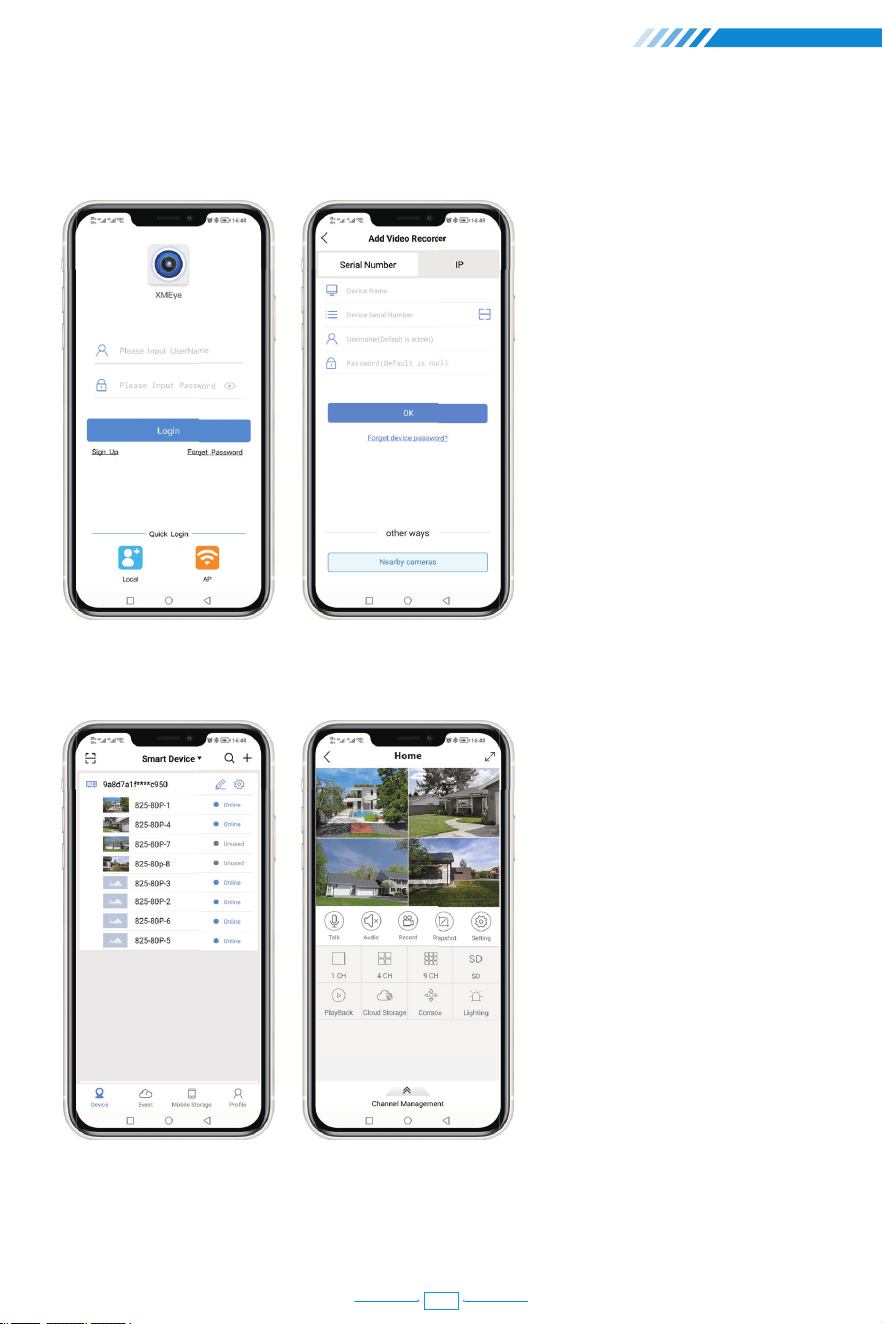
②Install successfully, register user, add device and begin a remote view.
Step 1:
Tap register and input your
Username, Password to
create a new account.
Step 2:
Click "+" to add devices:
input Serial No., username
and password .
Step 3:
After device added, click it
to link the sever.
Step 4:
Connect successfully and
start to view video.
19
29
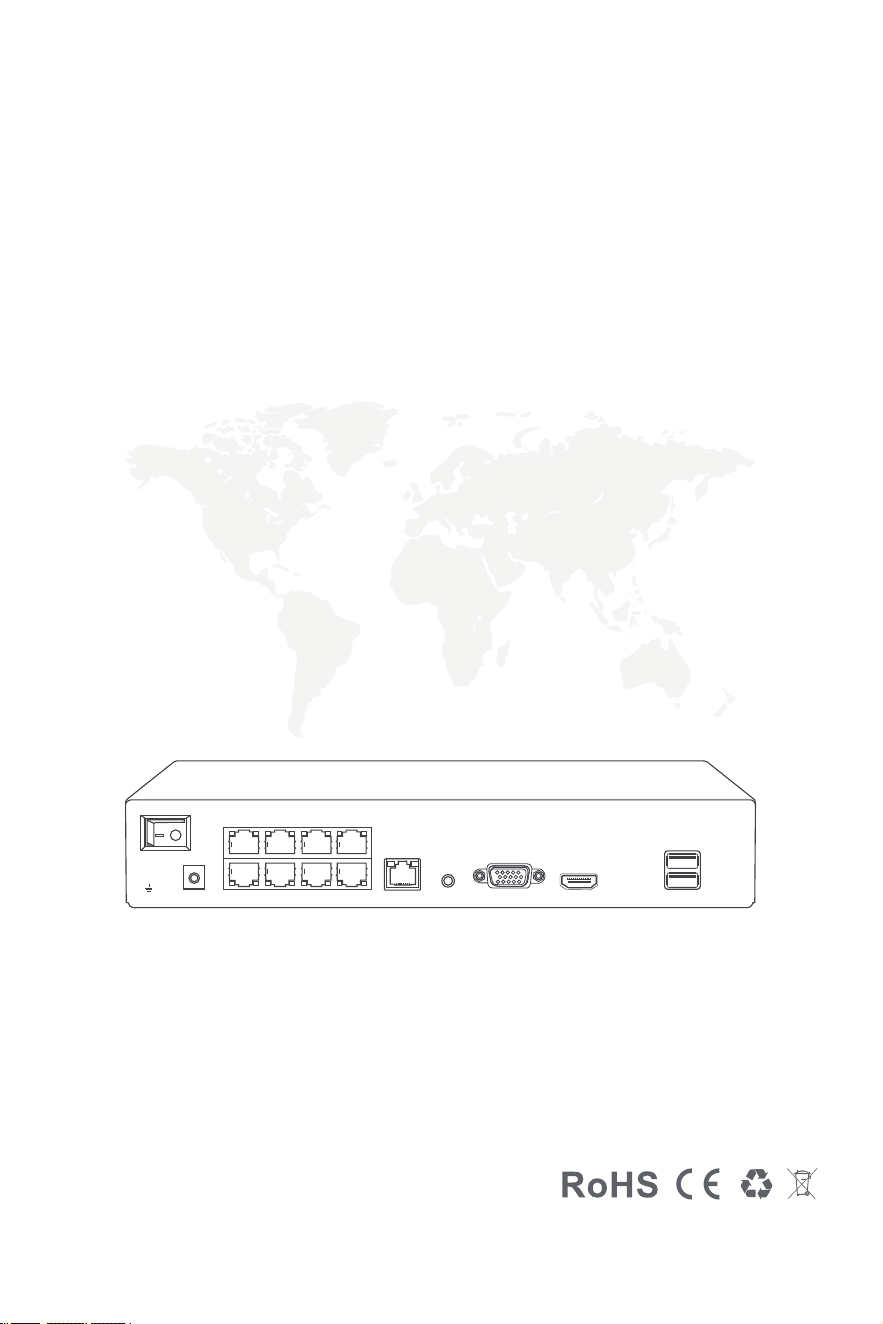
OFFON
DC IN
AUDIO OUT
VGA
HD-PORT
UP LINK
POE8 POE7 POE6 POE5
POE4 POE3 POE2 POE1 USB
All rights reserved. No part of this publication may be reproduced by any means without
written permission from Techage. The information in this publication is believed to be
accurate in all respects.
Techage will not assume responsibility for any consequences resulting from the use
thereof. The information contained herein is subject to change without notice. Revisions
or new editions to this publication may be issued to incorporate such changes.
20

www.techage.com
support@techage.com
V202207
23