
INSTRUCTION MANUAL
EN
STAND MIXER
MANUEL D’UTILISATION
FR
BATTEUR SUR SOCLE
MANUAL DE INSTRUCCIONES
ES
BATIDORA DE PIE
INSTRUCTION MANUAL
EN
STAND MIXER
MANUEL D’UTILISATION
FR
BATTEUR SUR SOCLE
MANUAL DE INSTRUCCIONES
ES
BATIDORA DE PIE
Important information for the user
Informations importantes pour l’utilisateur
Información importante para el usuario
Instructions / Instructions / Instrucciones
Description / Description / Descripción
Use / Usage / Uso
Cleaning and maintenance / Nettoyage et entretien / Limpieza y mantenimiento
Safety instructions / Directives de sécurité / Instrucciones de seguridad
Information / Informations / Información
Advice / Conseil / Recomendaciones
Scan the QR code for quick access to the My Smeg Assistant portal
Scannez le code QR pour un accès rapide au portail My SMEG Assistant
Escanee el código QR para acceder rápidamente al portal My Smeg Assistant

Dear Customer, Thank you for purchasing one of our appliances. Our products are unique because they combine
iconic style with innovative technical solutions. They match perfectly with other products in our range and work
equally well as a standalone design objects in your kitchen. We hope you enjoy using your new appliance!
Cher client, merci beaucoup pour votre achat. Nos produits sont uniques car ils combinent une forte recherche
esthétique avec une conception technique innovante. Ils sont coordonnés avec d‘autres produits de la gamme et
peuvent constituer des éléments de design pour votre cuisine. Nous espérons que vous aimerez utiliser votre nouvel
appareil !
Estimado Cliente, Le agradecemos por haber comprado uno de nuestros aparatos. Nuestros productos son únicos
porque combinan un estilo icónico con soluciones técnicas innovadoras. Combinan perfectamente con otros
productos de nuestra gama y trabajan igual de bien como objetos independientes en su cocina. Le deseamos que
pueda aprovechar plenamente su nuevo electrodoméstico.
SMEG S.p.A.

Model: SMF04 - SMF05 - SMF15
1
2
15
3
5
6
7
9
10
11
13
12
14
8
3
16
4
A
C
D
B

5
EN
IMPORTANT SAFEGUARDS
WARNING: If the instructions contained in this manual are not
followed precisely, a re or explosion may result causing property
damage, personal injury or death.
READ AND SAVE THESE INSTRUCTIONS
Your safety and the safety of others are very important.
We have provided many important safety messages throughout
this manual and on the appliance.
Read all the instructions before using the appliance and always
obey all safety messages.
RECOGNIZE SAFETY INFORMATION
This is the safety alert symbol. This symbol alerts you to potential
hazards that can result in severe personal injury or death.
UNDERSTAND SIGNAL WORDS
A signal word – DANGER, WARNING, or CAUTION – is used
with the safety alert symbol. DANGER denotes the most serious
hazards. It means you could be killed or seriously injured if you
do not immediately follow the instructions. WARNING means
you could be killed or seriously injured if the instructions are not
followed. CAUTION indicates a potentially hazardous situation,
which, if not avoided, could result in minor to moderate injury.
WARNING
• This appliance is intended for household use only.
• Use this appliance only for its intended purpose.
The manufacturer cannot be held liable for damage
caused by improper use of this appliance.
• This appliance complies with current safety regulations.
Improper use can result in personal injury and material
damage.
• Read all the instructions before installing or using the
appliance for the rst time.
• Keep these operating instructions in a safe place and
pass them on to any future user.
• Do not use the appliance for other than intended use.

6
IMPORTANT SAFEGUARDS
The safety messages will inform you of potential hazards, on how to avoid
the risk of injury and what can occur if the instructions are not followed.
IMPORTANT: Observe all codes and ordinances in force.
WARNING: For your safety, the instructions contained in this manual
must be followed to minimize the risk of re or explosion and to prevent
property damage, personal injury or death.
Do not store or use gasoline or other ammable vapors, liquids or materials
near this or any other appliance.
NOTE: This appliance is NOT designed for installation in
manufactured (mobile) homes or in recreational vehicles (RVs).
DO NOT install this appliance outdoors.

7
EN
IMPORTANT SAFEGUARDS
1 Safety
1.1 Essential safety
information
Follow all safety instructions in
order to use the appliance safely:
• Do not touch the plug with wet
hands.
• Make sure that the socket is
always accessible so that the
plug can be removed whenever
necessary.
• Do not immerse the appliance, the
power cord or the plug in water or
any other liquid.
• Do not use the appliance when
the power cord or the plug is
damaged or after the appliance
has been dropped or is damaged
in any way.
• The cord is short to prevent
accidents. Do not use an extension
cord.
• Do not pull on the cord to unplug it
from the power socket.
• Ensure the cord does not come
into contact with sharp edges.
• Portable - Do not let cord hang
over edge of table or counter.
• This appliance is tted with a
ground connection for functional
purposes only.
• If the appliance is faulty, do not
attempt to repair it. Switch off the
appliance, remove the plug from
the power socket and contact
Technical Support.
• If the plug or power cord becomes
damaged, have it replaced only
by the Technical Support service
in order to avoid risks.
• Keep the packaging material
(viscose bags) out of the reach of
children.
• Do not modify the appliance.
• Never try to put out a re or
ames with water: turn off the
appliance, remove the plug from
the power socket and smother
the ames with a re blanket or
another appropriate cover.
• Do not leave the appliance
unattended while it is in operation.
• Do not attempt to defeat any
safety interlock mechanisms.
WARNING
To reduce the risk of re, electrical shock, personal injury,
or damage when using the appliance, follow basic safety
precautions, including the following:

8
IMPORTANT SAFEGUARDS
• Make sure that the bowl is
correctly positioned and locked
onto its base before starting
to use the appliance with its
standard accessories.
• Do not release or remove the
bowl while the appliance is in
operation.
• Do not insert, remove or replace
the standard accessories with the
safety lock disengaged (motor
head lowered).
• Do not remove accessories while
the appliance is in operation.
• Do not touch moving parts while
the appliance is in operation. Keep
hands, hair, clothing, spatulas
and any other objects away from
the mixer’s standard and optional
accessories to avoid personal
injury or damage to the machine.
• Do not exceed maximum capacity
of the bowl.
• Only use original standard and
optional accessories provided by
the manufacturer. The use of non-
original components, standard
and optional accessories could
lead to personal injury or damage
to the appliance.
• Do not place anything on top of
the appliance.
• Do not place the appliance above
or near lit hob burners or electric
rings, inside an oven or near to
other heat sources.
• Make sure there are no foreign
objects inside the appliance.
• Immerse the whisks into the bowl
containing the ingredients before
starting the appliance.
• This manual contains instructions
for cleaning, maintenance and
recommendations from the
manufacturer to the customer.
Any other interventions should
be carried out by an authorized
service center.
• Instructions for cleaning of the
appliance can be found in the
“4 Cleaning and maintenance”
section.
• Remove beaters from mixer
before washing.
• This appliance may not be used
by people (including children)
with reduced physical or mental
capabilities or without sufcient
experience and knowledge unless
they are supervised or instructed
on how to use the appliance by
a person who is responsible for
their safety.
• Children must be supervised at
all times to make sure they do not
play with the appliance.

9
EN
IMPORTANT SAFEGUARDS
1.2 Connecting the appliance
Make sure that the voltage and
frequency of the power supply
correspond to those indicated on
the data plate on the bottom of the
appliance.
If the plug of the appliance is not
compatible with the socket, contact
Technical Assistance service for
replacement.
• Children must never be allowed
to play with this appliance.
• Keep the appliance out of the
reach of children.
• Always unplug the appliance from
the power socket if it is to be left
unattended and before assembly,
disassembly or cleaning.
• Switch off the appliance and
unplug it from the power supply
before changing the accessories
or when close to moving parts
when in use.
• Portable - Turn the appliance OFF,
then unplug from the outlet when
not in use, before assembling or
disassembling parts and before
cleaning. To unplug, grasp the
plug and pull from the outlet.
Never pull from the power cord.
Permanently installed - Make
sure appliance is OFF when not
in use, before putting on or taking
off parts, and before cleaning.
• The use of attachments not
recommended or sold by the
manufacturer may cause re,
electric shock or injury.
1.3 Intended use
Failure to comply with the safety
instructions and failure to read the
instruction manual for the food
processors can lead to the appliance
being used incorrectly and cause
personal injury.
• Do not use the appliance for
purposes other than those for
which it was designed. The mixer
is intended exclusively to mix,
whip, whisk and knead solid and
liquid ingredients to make various
preparations. With the addition of
optional accessories, it is able to
roll out and cut pasta into different
shapes.
• The appliance is not designed to
operate with external timers or
with remote-control systems.
• Use the appliance indoors.
• This appliance is intended for
household use and similar
applications such as:
‐staff kitchen areas in shops,
ofces and other working
environments
‐bed and breakfast facilities /
farm accommodation
‐by guests in hotels, motels
and other types of residential
accommodation.
• Any other use, for example in
restaurants, coffee bars and
coffee shops is considered
improper.
10
IMPORTANT SAFEGUARDS
1.5 Disposal
Electrical appliances must not be
disposed of together with household
waste.
Appliances marked with
this symbol are subject
to European Directive
2012/19/EU.
• All waste electrical and electronic
appliances must be disposed of
separately from domestic waste
and taken to authorized waste
disposal facilities. Disposing of
the used appliance correctly
will help to safeguard the
environment and human health.
For further information regarding
the disposal of used appliances,
please contact your local authority
waste disposal department or the
shop where the appliance was
purchased.
1.4 Manufacturer's liability
The manufacturer declines any
liability for personal injury or
damage to property caused by:
• Use of the appliance other than
the intended use
• Not having read the user manual
• Tampering with any part of the
appliance
• Use of non-original spare parts
• Failure to comply with the safety
instructions
Please keep these
instructions carefully. If the
appliance is passed on to
others, they should also
be given this instruction
booklet.
These instructions can be
downloaded from the Smeg website
“www.smeg.com”.
SAVE THESE INSTRUCTIONS
11
EN
Description
2 Appliance description
(Fig. A and B)
1) Motor head
2) Body
3) Speed selector
4) Head raising/lowering release button
5) Lower attachment for standard
accessories
6) Front attachment hub for optional
accessories
7) Front hub cover
8) Bowl base
9) Bowl**
10) Pouring shield*
11) Dough hook
12) Flat beater
13) Wire whisk
14) Flex edge beater*
15) Identication plate
2.1 Identication plate (Fig. A)
The identication plate (15) bears the
technical data, serial number and brand
name of the appliance. Do not remove the
identication plate for any reason.
2.2 Before rst use
Caution
Plug into a grounded three-pin
socket.
• Do not remove the ground
prong.
• Do not use an adapter.
• Do not use an extension cord.
• Failure to follow these
instructions could result in
death, re, or electrical shock.
• Unpack the appliance carefully and
remove all packaging materials and any
labels and stickers.
• Clean the body and head of the appliance
with a damp cloth.
• Remove the bowl and standard
accessories. Wash and dry them
thoroughly (see section “4 Cleaning and
maintenance”).
Before use, make sure that all the
components are intact.
* Standard only on certain models. Also
available as an optional accessory.
** The bowl design and material may be different
depending on model of mixer
12
Description
2.3 Description of accessories
(Fig. A and B)
Aluminum dough hook (11)
For slowly combining, mixing and kneading
leavened dough-type mixtures, including
bread, pasta, pizza etc.
Aluminum at beater (12)
For combining, mixing, and starting all
mixing procedures.
For preparing cake batters and pastries,
biscuits, icing, etc. and for other, thicker
batters and mixes
Stainless steel wire whisk (13)
For beating, mixing, whisking, whipping
ingredients such as butter, egg whites,
cream etc.
Also ideal for preparing creams, custards,
sauces etc.
Flex edge beater* (14)
Aluminum beater with exible silicone
edges.
Useful for mixing doughs and soft batters.
The silicone edge ensures that ingredients
are scraped off the sides of the bowl
during processing, making them easier to
incorporate and ensuring a perfect texture.
Pouring shield* (10)
For protecting against splattering and to
facilitate the addition of ingredients when in
use. Only suitable for use with the stainless
steel bowl*.
The standard and optional
accessories intended to come
into contact with food are made
of materials that comply with the
provisions of current legislation.
Caution
The spring lift motor head must
always be locked in the horizontal
position when lifting and moving
the mixer or when inserting
optional accessories in the front
section.
* Standard only on certain models. Also
available as an optional accessory.
13
EN
Use
Using the pouring shield* (10)
• Fit the pouring shield onto the
upper rim of the stainless steel
bowl* after having inserted
the bowl into its base, inserted
the accessory into the lower
attachment and after having
lowered the head into the
operating position.
• Fit the pouring shield with the
opening facing outwards so
that ingredients can be added
to the bowl without having to
stop the mixer.
Caution
Remove the pouring shield to
raise or lower the head with
the accessory xed to the lower
attachment.
• Make sure that the speed selector (3) is in
the “0” (OFF) position.
• Insert the plug into the power socket.
• Select the required speed (3) to start
the appliance and begin mixing the
ingredients. See “3.5 Recommended
speeds”.
3 Use
3.1 Using the mixer (Fig. A, B and C)
• Place the mixer on a at, stable and dry
surface.
• Press the release button (4) and lift the
head (1), guiding it with your hand until it
is fully locked.
• Insert the bowl (9) in its base (8). Grasp
the bowl by its handle and turn the bowl
(9) clockwise until it locks into place.
• Select the accessory according to the
type of mixing to be performed.
Caution
Do not operate the mixer with the
accessory without having locked
the bowl in position.
• Insert the accessory into the lower
attachment (5) and push it upwards.
Keep pressing the accessory upwards
and turn it counterclockwise until the pin
locks fully into place (5).
Ensure that the accessory is
correctly locked into place in the
attachment.
• Add the ingredients to the bowl.
• Press the button (4) and lower the head
(1), guiding it with your hand until it is
fully locked.
• Position the pouring shield* (10) on the
bowl, if required, with the opening facing
outwards.
* Standard only on certain models. Also
available as an optional accessory.
14
Use
Caution
• For increased safety, each time
power is disconnected to the
motor, for example by raising
the head or unplugging the
appliance from the socket,
the speed selector rst has to
be placed in the zero position
before the mixer is restarted.
• You should anyway always
move the speed selector to
the “0” (OFF) position before
pressing the button to move the
motor head.
Caution
• Do not touch the accessories
while the appliance is in
operation.
• Do not operate the mixer with
the accessory inserted and the
bowl empty.
It is possible for the motor head
to move slightly when mixing or
kneading dense mixtures or large
quantities. This is normal and
will not affect the operation, long
lifetime or the appliance.
3.2 When nished (Fig. B and D)
• Place the speed selector (3) in the “0”
(OFF) position and remove the plug from
the power socket.
• Remove the pouring shield (10) from the
bowl, if present.
• Press the release button (4) to raise the
head (1), guiding it with your hand until it
is fully locked.
• Push the accessory slightly upwards and
turn it clockwise to release it from the pin.
Remove the accessory from the lower
attachment (5).
• Remove the bowl (9) from its base by
turning it counterclockwise to release it.
15
EN
Use
3.3 Functions
Safety lock system
The appliance is tted with a safety system
that automatically shuts off the appliance
when the motor head is raised.
Smooth Start System
When the appliance is started, the speed
is gradually increased until the set speed
is reached. This prevents damage to the
appliance and accessories and ensures that
ingredients are not ejected from the bowl.
Planetary movement
The mixer accessories move with
a planetary mixing action.
The movement is generated by
the accessory rotating around its
axis in the opposite direction to
the rotary movement of the mixer.
This maximizes coverage of the
entire bowl so that all ingredients
are thoroughly blended
with excellent results for all
preparations.
Hot appliance
Following prolonged use, the
upper part of the motor head
may become hot. This does not,
however, normally indicate a
malfunction.
3.4 General advice
• Never exceed the maximum speed and
capacity indicated in the table in order to
prevent damage to the appliance.
• Turn on the appliance at a low speed
until all the ingredients are mixed, then
increase the speed according to the
required operation.
• When adding ingredients, always pour
them onto the edge of the bowl and not
directly onto the moving accessory.
• Reduce the speed when you add dry or
liquid ingredients to prevent splattering.
Increase the speed again when they
have been mixed.
• Use the pouring shield* on the bowl
for liquid mixtures or when adding dry
ingredients to avoid getting objects in the
vicinity of the stand mixer dirty or being
splashed by liquids or powder.
• Keep the bowl and accessories clean.
Attach them to the appliance only when
they are perfectly dry.
• Clean the head and body of the mixer
carefully using a damp cloth.
* Standard only on certain models. Also
available as an optional accessory.

16
Use
Tips for whisking egg whites
• For the best results, use egg whites at
room temperature.
• Before whisking the egg whites, ensure
that the accessory and bowl are not
damp or greasy and that they have no
egg yolk on them.
• To prevent splattering, gradually increase
the speed up to the recommended speed,
then whisk until you achieve the required
stiffness.
• The stand mixer allows egg whites to be
whisked very quickly. Pay close attention
to the process to avoid over-whisking
the egg whites, which would result in
separation.
Tips for whipping cream
• For the best results, use cold whipping or
double cream straight out of the fridge.
• To prevent splattering, gradually increase
the speed up to the recommended speed,
then whip until you achieve the required
consistency.
• When whipping a liter of liquid cream,
it is advisable to gradually increase the
speed to 7-8 for the rst minute or at
least until the cream begins to thicken.
Then increase the speed to 10 for the
remaining time.
Recommendations for kneading
• Make sure that the proportion of liquids in
doughs is sufcient (at least 55-60% of
the quantity of our, by weight). Doughs
which are too dry and therefore stiff can
overload the motor.
• If the appliance is struggling, switch it
off, divide the dough into two parts and
knead them separately.
Bread/pizza dough and egg pasta dough
• Start the appliance at speed 1 until the
ingredients have been incorporated, then
increase to speed 2.
• To mix the ingredients more effectively,
it is recommended to add the liquid
ingredients to the bowl rst and then
gradually add the solid ingredients.
• Egg pasta, bread, pizza: only knead using
the dough hook. DO NOT use the ex
edge beater*.
Prepared cake batters
• For up to 2.2 lb batter: start the appliance
at a low speed until the ingredients start
to come together, then gradually increase
the speed up to 7 for the remaining time.
• For up to 4.4 lb of batter: start the
appliance at speed 1 until the ingredients
start to come together, then gradually
increase the speed up to 3-4 for the
remaining time.
Pastry
• Cold ingredients should always be
used when making pastry, particularly
short pastes, unless the recipe states
otherwise.
• When preparing cakes, initially beat the
butter at room temperature with sugar,
then add the eggs and lastly the our.
* Standard only on certain models. Also
available as an optional accessory.
17
EN
Use
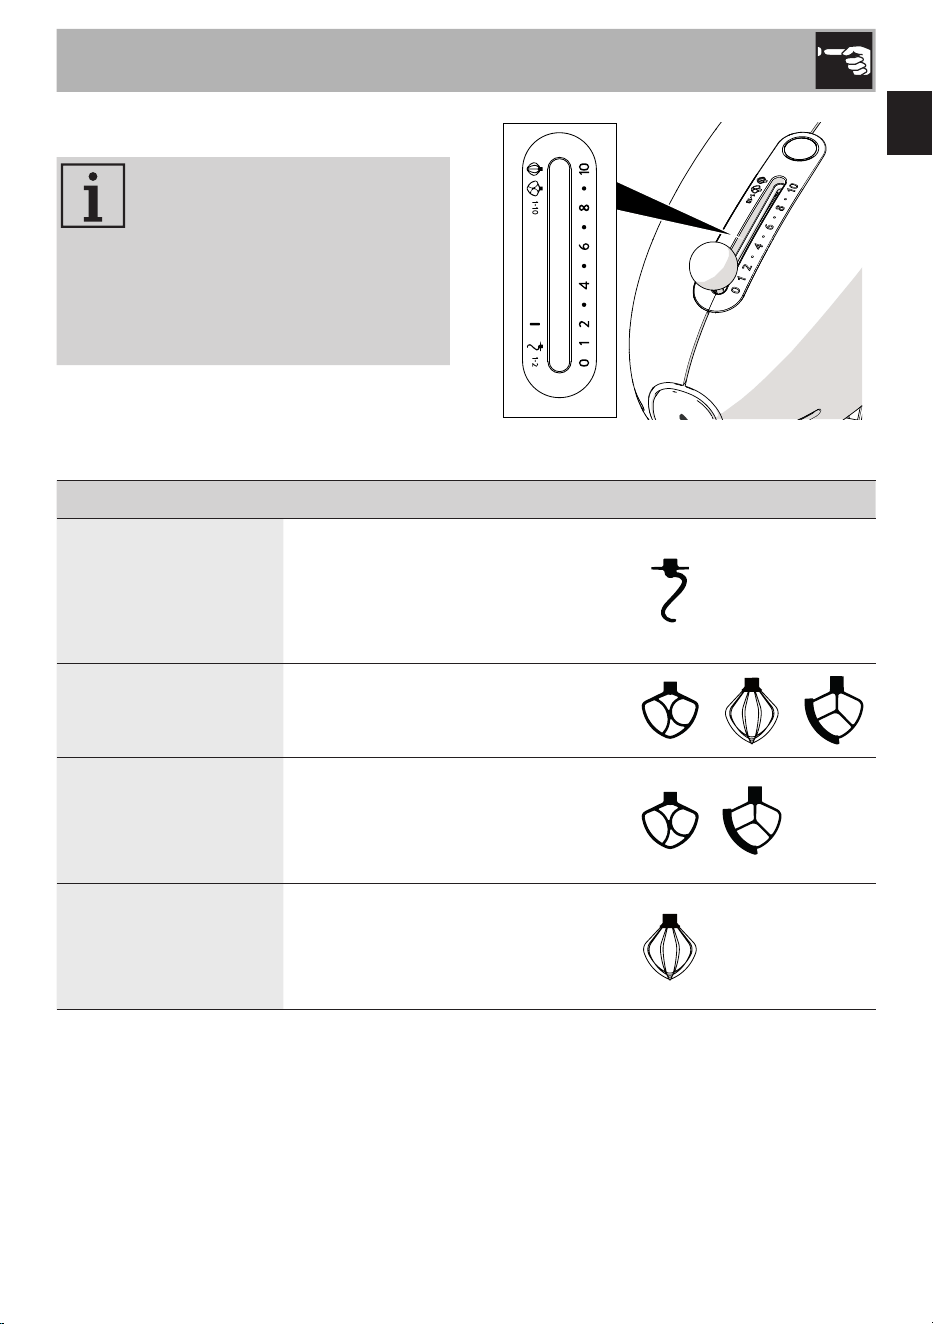
3.5 Recommended speeds
The speed selector (3) indicates
the most appropriate accessory
to use with the selected speed.
The speeds indicated in the table
are approximate and can vary
depending on the recipe and
the interaction of the different
ingredients used.
Speed setting Function Accessory
LOW
1 - 2
COMBINING AND KNEADING
Kneading - preparing leavened
doughs (bread, pizza, egg pasta
etc.), see “Bread/pizza dough and
egg pasta dough”.
LOW
1 - 3
COMBINING
Combining ingredients.
*
MEDIUM
4 - 7
MIXING
Mixing and beating dense batters.
Beating eggs and butter, cake mixes
such as fruitcake.
*
HIGH
8 - 10
WHIPPING AND WHISKING
Whisking light or dense batters.
Whipping cream, egg whites or
sauces.
* Standard only on certain models. Also
available as an optional accessory.
18
Use
Accessories and recommended speeds, maximum capacity for model SMF04
Accessory Preparation Speed Time Min/max capacity
Egg whites 8-10 2-3 min 2 - 12
(1)
Cream 8-10 2-3 min 3.4 oz/33.8 oz
or
*
Prepared cake
batters
1-7 3-4 min
4.4 lb total batter
(max. 2.2 lb our)
Pastry 1-7 3-4 min
5.7 lb total batter
(max. 2.2 lb our)
Bread/
pizza dough
1-2 4 min
4.2 lb total dough
(max. 2.6 lb our/
min. 55% hydration)
Egg pasta
dough
1-2 5-7 min
1.1 lb total batter
(max. 0.7 lb our/
min. 55% hydration)
(1) Average egg size: 1.9-2.2 oz
* Standard only on certain models. Also available as an optional accessory.
The table should be considered a guideline only.
The speed and capacity depend on the accessory used, the quantity of mixture
in the bowl and the ingredients used.
19
EN
Use
Accessories and recommended speeds, maximum capacity for model SMF05/SMF15
Accessory Preparation Speed Time Min/max capacity
Egg whites 8-10 2-3 min 2 - 12
(1)
Cream 8-10 2-3 min 3.4 oz/33.8 oz
or
Prepared cake
batters
1-7 3-4 min
4.4 lb total batter
(max. 2.2 lb our)
Pastry 1-7 3-4 min
6.2 lb total batter
(max. 2.2 lb our)
Bread/
pizza dough
1-2 4 min
4.6 lb total dough
(max. 2.9 lb our/
min. 55% hydration)
Egg pasta
dough
1-2 5-7 min
1.8 lb total batter
(max. 1.1 lb our/
min. 55% hydration)
(1) Average egg size: 1.9-2.2 oz
The table should be considered a guideline only.
The speed and capacity depend on the accessory used, the quantity of mixture
in the bowl and the ingredients used.
20
Cleaning and maintenance
4 Cleaning and maintenance
This manual contains instructions
for cleaning, maintenance and
recommendations from the manufacturer
to the customer. Any other interventions
should be carried out by an authorized
service center.
Before cleaning, ALWAYS remove the
plug from the power supply and allow the
appliance to cool down. Never immerse the
motor base (2) in water or other liquids.
Splattered liquids or batters
should be removed immediately
using a soft, damp, cotton cloth.
Caution
• Do not use steam jets to clean
the appliance.
• Do not use cleaning products
containing chlorine, ammonia,
bleach or alcohol on steel parts
or parts with a metallic nish.
• Do not use harsh or abrasive
detergents (e.g. powder
products or stain removers).
• Do not use rough or abrasive
materials or sharp metal
scrapers.
• Regularly clean the components
and accessories after each use.
• The dough hook, at beater, ex edge
beater*, the pouring shield* and stainless
steel bowl* are dishwasher safe.
• The wire whisk can be hand washed with
a neutral detergent and a soft sponge.
• The glass bowl* can be washed by
hand with warm water and a neutral
detergent or in a dishwasher using a low
temperature (maximum 50° C) program.
• The ring nut at the base of the bowl can
be removed and washed separately by
hand using a neutral detergent and a soft
sponge.
* Standard only on certain models. Also
available as an optional accessory.

21
EN
What to do if...
Problem Cause Solution
The motor does not start.
The motor has overheated.
Disconnect the mixer from
the power supply and allow
the motor cool down.
The plug is not properly
inserted in the power socket.
Insert the plug into the
power socket. Do not use
adapters or extensions.
Check that the house main
breaker is on.
The power cord is defective.
Have the power cord
replaced at an Authorized
Service Center.
No power.
Check that the house main
breaker is on.
The head has been raised
during operation.
The safety lock system has
activated. Move the speed
selector to “0” (OFF), press
and hold down the button
on the rear to release the
head and lower it.
The appliance vibrates.
The mixer is not resting on a
stable surface.
Place the mixer on a at,
stable surface.
The anti-slip rubber feet are
worn.
Have them replaced at an
Authorized Service Center.
The speed has been set too
high or the load is excessive.
Set a lower speed and make
sure the bowl has not been
overlled.
The bowl has not been
correctly locked into its base.
Check that the bowl is
correctly locked into its base.

22
What to do if...
Problem Cause Solution
The accessories hit the
sides of the bowl.
The lower attachment has
come loose over time.
Have the mixer checked and
adjusted at an Authorized
Service Center.
The accessory or the bowl
is not correctly locked into
position.
Move the speed selector to
“0”, press the button on the
rear of the appliance to raise
the head and check that the
accessory is correctly locked
into position in the lower
attachment and the bowl is
correctly locked into position
on the base.
The accessory has difculty
rotating inside the bowl.
The dough mixture is too
thick and is preventing the
accessory from turning.
Add water or another liquid
to loosen the dough mixture.
The bowl is too full.
Remove half the contents
of the bowl and work it
separately.
If the problem has not been resolved or if there is another type of fault, contact
your local technical support center.
For all stand mixer models:
Accessory: Flat Edge Beater.
Ingredients: 1.8 lb our, 1.2 lb water.
(For certication reference only)

The manufacturer reserves the right to make any changes deemed necessary for the improvement of its products
without prior notice. The illustrations and descriptions contained in this manual are therefore not binding and are
merely indicative.
Le fabricant se réserve le droit d’apporter, sans préavis, toutes les modications qu’il jugera utiles pour l’amélioration
de ses produits. Les illustrations et les descriptions gurant dans ce manuel ne sont pas contraignantes et n’ont
qu’une valeur indicative.
El fabricante se reserva el derecho a aportar sin aviso previo todas las modicaciones que considere necesarias para
la mejora de sus propios productos. Las ilustraciones y las descripciones contenidas en este manual no comprometen,
por tanto, al fabricante y tienen un valor meramente indicativo.
