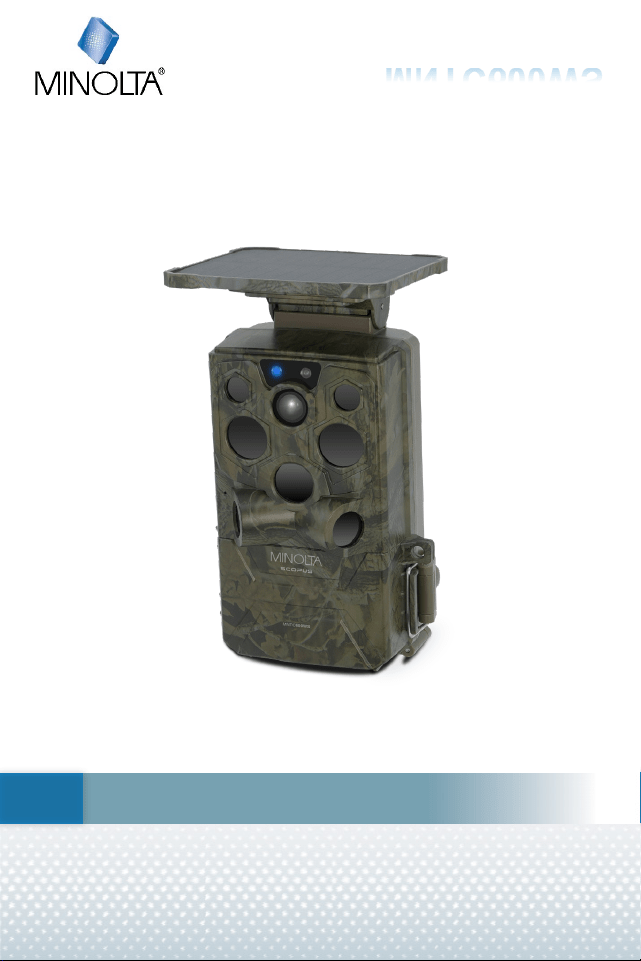
MNTC600WS
User Manual

2
Minolta MNTC600WS
1.0 Introduction ..................................................................................4
1.1 Buttons and Operation Overview ................................................8
1.2 Buttons and Operation Overview Explained ................................9
1.3 Camera Features and Operation ...............................................10
1.4 Opening and Closing the Camera Housing ...............................10
1.5 Installing the Batteries ...............................................................11
1.6 Installing the Memory Card .......................................................12
1.7 Charging the Internal Battery / Solar Panel ...............................13
1.8 Powering the Camera On and Off .............................................14
1.9 Mounting the Camera ................................................................15
1.10 Adjusting the Solar Panel Angle ..............................................16
1.11 Adjusting the Camera Position ................................................17
1.12 Understanding PIR Motion Detection ......................................17
1.13 Using Infrared Night Vision ......................................................18
1.14 Understanding Power Switch Modes ......................................18
1.15 Using Test Mode .....................................................................19
1.16 Capturing a Test Photo or Video .............................................20
1.17 Main Menu Navigation .............................................................21
1.18 Formatting the Memory Card ..................................................21
1.19 Setting Date and Time .............................................................22
1.20 Connecting to a Computer ......................................................23
2.0 Capture Modes ..........................................................................24
2.1 Photo Mode ...............................................................................25
2.2 Video Mode ...............................................................................26
2.3 Photo + Video Mode ..................................................................27
2.4 Using Photo Series Mode ..........................................................28
2.5 Using Time Lapse .....................................................................29
2.6 Using Playback Mode ................................................................30
2.7 Deleting Files .............................................................................31
3.0 Camera Settings ........................................................................32
3.1 Selecting a Recording Mode .....................................................32
3.2 Adjusting Work Time .................................................................33
3.3 Selecting Photo or Video Mode .................................................33
3.4 Adjusting Photo Resolution .......................................................34
3.5 Adjusting Video Resolution .......................................................34
3.6 Adjusting Photo Series ..............................................................35
3.7 Adjusting Video Length .............................................................35
3.8 Turning Audio Recording On or Off ...........................................36
3.9 Adjusting PIR Interval ................................................................36
3.10 Adjusting PIR Sensitivity .........................................................37

3
Minolta MNTC600WS
3.11 Turning Side PIR Sensors On or Off .......................................38
3.12 Adjusting Fill Light Distance ....................................................38
3.13 Turning Camera Name On or Off ............................................39
3.14 Turning Wi-Fi LED On or Off ...................................................39
3.15 Setting Date and Time .............................................................40
3.16 Adjusting Date Format .............................................................40
3.17 Adjusting Time Format ............................................................41
3.18 Turning Date Stamp On or Off ................................................41
3.19 Turning Loop Recording On or Off ..........................................42
3.20 Turning Beep Sound On or Off ................................................42
3.21 Formatting the Memory Card ..................................................43
3.22 Adjusting System Language ....................................................43
3.23 Activating Password Protection ...............................................44
3.24 Performing a Factory Reset ....................................................44
3.25 Viewing Firmware Version .......................................................45
4.0 Wi-Fi and App Connection .........................................................46
4.1 Downloading the App ................................................................46
4.2 Connecting to the App ...............................................................47
4.3 Transferring Photos and Videos ................................................48
5.0 Technical Specifications ............................................................49
5.0 Warranty Information .................................................................51

4
Minolta MNTC600WS
1.0 Introduction
About this Manual
Congratulations on purchasing the Minolta MNTC600WS Trail
Camera!
The contents of this manual are subject to change without notice.
Note that the example screens and product illustrations shown in
this User’s Guide may differ somewhat from the screens and
configuration of the actual camera.
Copyright
This manual contains proprietary information protected by
copyright. All rights are reserved. No part of this manual may be
reproduced by any mechanical, electronic or other means, in any
form, without prior written permission of Elite Brands Inc. ©
2026.
FEDERAL COMMUNICATIONS COMMISSION
INTERFERENCE STATEMENT
This equipment has been tested and found to comply with the
limits for a Class B digital device, pursuant to Part 15 of the FCC
Rules. These limits are designed to provide reasonable
protection against harmful interference in a residential
installation. This equipment generates, uses and can radiate
radio frequency energy and, if not installed and used in
accordance with the instructions, may cause harmful interference
to radio communications. However, there is no guarantee that
interference will not occur in a particular installation. If this
equipment does cause harmful interference to radio or television
reception, which can be determined by turning the equipment off
and on, the user is encouraged to try to correct the interference
by one or more of the following measures:
• Reorient or relocate the receiving antenna.
• Increase the separation between the equipment and
receiver.
• Connect the equipment into an outlet on a circuit different
from that to which the receiver is connected.
• Consult the dealer or an experienced radio/TV technician
for help.

5
Minolta MNTC600WS
CAUTION:
Any changes or modifications not expressly approved by the
party responsible for compliance could void the users authority
to operate the equipment.
This device complies with Part 15 of the FCC Rules. Operation is
subject to the following two conditions:
1. This device may not cause harmful interference and
2. This device must accept any interference received,
including interference that may cause undesired
operation.
RF Exposure Warning
This equipment complies with FCC RF radiation exposure limits
set forth for an uncontrolled environment. This equipment must
be installed and operated in accordance with provided
instructions and must not be co-located or operating in
conjunction with any other antenna or transmitter. End-users and
installers must
be provided with antenna installation instructions and transmitter
operating conditions for satisfying RF exposure compliance.
FCC: SAR standard Value: 1.6 W/Kg, Maximal Measure: 0.4
W/kg
CE Mark Warning
This is a Class B product, in a domestic environment, this
product may cause radio interference, in which case the user
may be required to take adequate measures.

6
Minolta MNTC600WS
Safety and Handling Precautions Camera Information
• Do not disassemble or attempt to service the camera
yourself.
• Do not expose the camera to moisture, or extreme
temperatures.
• Allow the camera to warm up when moving from cold to
warm temperatures.
• Do not touch and put pressure on the camera lens.
• Do not expose the lens to direct sunlight for extended
periods.
• Do not use abrasive chemicals, cleaning solvents or
strong detergents to clean the product. Wipe the product
with a slightly damp soft cloth.
• Do not look directly into the infrared LEDs while they are
operating.
• To prevent you from falling over or resulting in traffic
accident, please do not use the camera while you are
walking, driving or riding a vehicle.
• Please handle the camera strap with care, and never
place the strap around the neck of an infant or child.
Wrapping the strap around a neck may cause suffocation.
• Do not subject the LCD screen to impact.
• To prevent the risk of fire or electric shock, do not expose
this appliance to rain or moisture.

7
Minolta MNTC600WS
Battery Information
• Turn off the camera before installing or removing the
battery.
• Use only the provided batteries or type of battery and
charger that came with your camera. Using other types of
battery or charger may damage the device and invalidate
the warranty.
• Inserting the battery upside down can cause damage to
the product and possibly cause an explosion.
• When the camera is used for an extended period of time,
it is normal for the camera body to feel warm.
• Download all pictures and remove the battery from the
camera if you are going to store the camera for a long
period of time.
• Risk of explosion if battery is replaced by an incorrect
type. Dispose of used batteries according to the
instructions.
• Please keep the batteries out of the reach of children to
prevent from swallowing batteries, which might cause
poisoning.
8
Minolta MNTC600WS
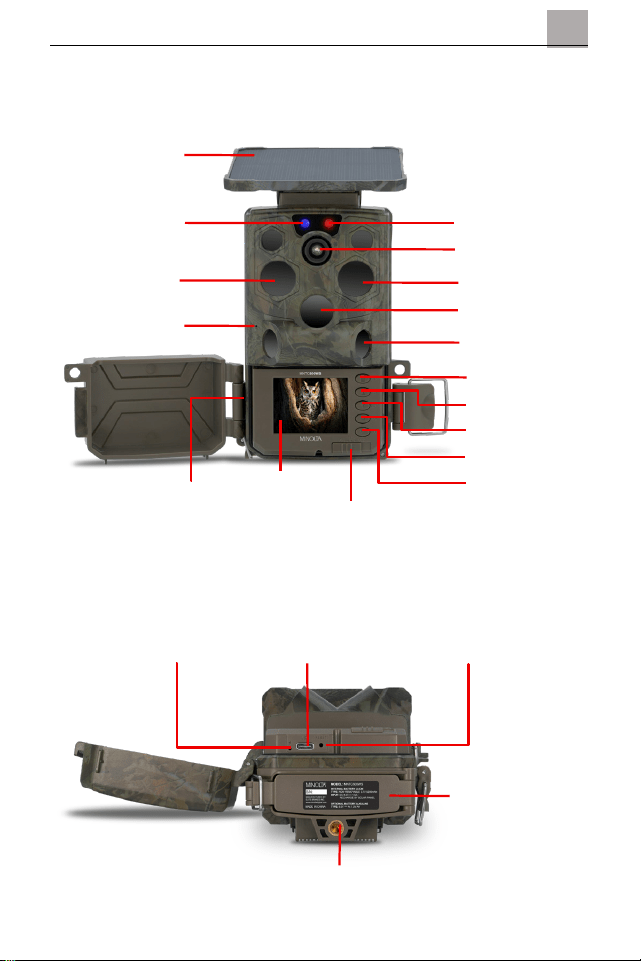
1.1 Buttons and Operation Overview
IR Lights
Lens
Menu Button
Up Button
Side PIR
IR Lights
Microphone
Main PIR
Down Button
Ok Button
Mode Button
Red LED Indicator
Screen
Power Switch
Solar Panel
Speaker
Charging Indicator
Reset Pinhole
USB-C Port
Battery Door
Tripod Socket
Blue LED Indicator

9
Minolta MNTC600WS
1.2 Buttons and Operation Overview Explained
Name Function
Solar Panel
Helps maintain battery life during outdoor use by collecting
sunlight.
Blue LED
Indicator
Indicates when the main PIR sensor is triggered by motion.
Flashes during the monitoring countdown period.
Flashes rapidly while connecting to the smartphone app and
slowly when successfully connected to the smartphone app.
Red LED
Indicator
Indicates when side PIR is triggered by motion.
Lens Captures photos and video recordings.
IR Lights Provide infrared illumination for nighttime recording.
Main PIR Detects motion directly in front of the camera.
Side PIR
Expands motion detection coverage from the sides of the
camera.
Speaker Plays back audio during video playback.
Screen Displays live preview, playback, menus, and camera settings.
Menu Button Opens and exits the settings menu.
Up Button
Navigates upward through menu options, settings, or saved
files.
Down Button
Navigates downward through menu options, settings, or saved
files.
OK Button Confirms menu selections and settings.
Mode Button
Switches between Photo, Video, and Playback preview modes
while in TEST mode.
Power Switch Switches between OFF, TEST, and ON operating modes.
Charging
Indicator
Displays battery charging status while connected to external
power.
USB-C Port
Connects the camera to a power source or compatible
computer.
Reset Pinhole Restarts the camera if the system becomes unresponsive.
Battery Door Provides access to the battery compartment.
Tripod Socket
Allows the camera to be mounted to a compatible tripod or
mounting accessory.

10
Minolta MNTC600WS
1.3 Camera Features and Operation
The Minolta MNTC600WS is designed for outdoor monitoring,
wildlife observation, property surveillance, and remote recording
applications. The camera automatically captures photos or
videos when motion is detected by the PIR motion sensors.
The camera includes infrared night vision LEDs for recording in
low-light and nighttime environments, along with Wi-Fi
connectivity for transferring files and adjusting settings using a
compatible smartphone app.
This manual explains the camera’s operating modes, mounting
options, menu settings, wireless functions, and playback features
to help you get the best performance from your trail camera.
1.4 Opening and Closing the Camera Housing
The MNTC600WS uses a weather-resistant front housing to help
protect the camera from outdoor conditions. Always ensure the
housing is securely closed before placing the camera outdoors.
Properly closing and latching the housing helps maintain the
cameras IP66 weather -resistant protection.
Follow these steps to open and close the camera housing:
1. Locate the Side Latches
Release the locking latches located on the sides of the
camera housing.
2. Open the Front Cover
Carefully pull the front cover open to access the internal
controls, display, battery compartment, and memory card
slot.
3. Verify Access
Make sure the camera is fully open before installing
batteries, inserting a memory card, or adjusting settings.
4. Close the Camera Housing
Close the front cover and secure both side latches before
outdoor use.
11
Minolta MNTC600WS
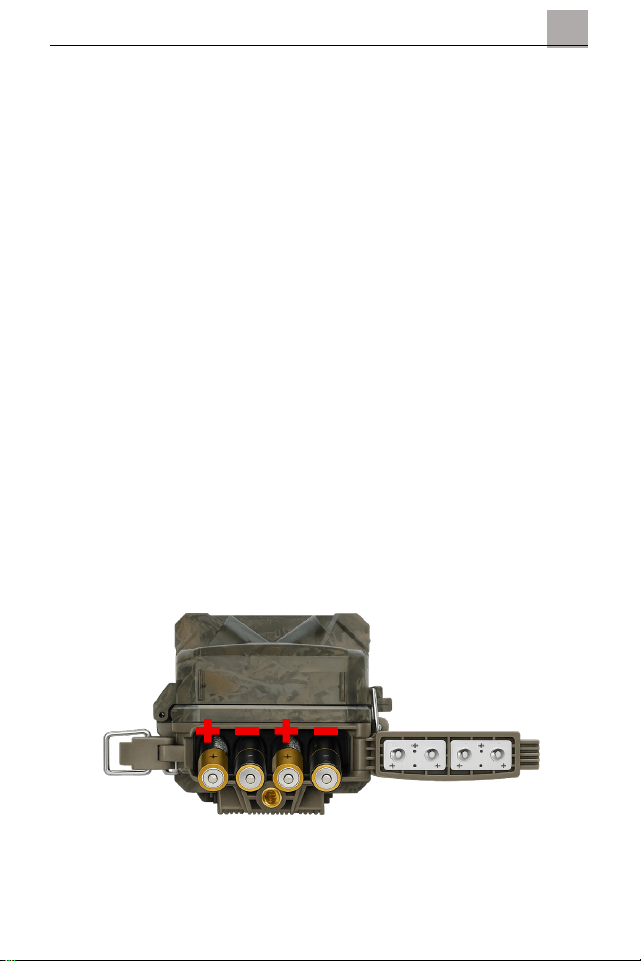
1.5 Installing the Batteries
The MNTC600WS includes a built-in rechargeable battery and
supports AA batteries for portable outdoor operation.
Follow these steps to install the batteries:
1. Open the Battery Door
Open the battery door to access the battery compartment.
2. Insert the Batteries
Install the batteries according to the polarity markings
inside the battery compartment.
3. Verify Installation
Make sure all batteries are installed correctly and seated
securely.
4. Close the Housing
Close and latch the camera housing securely before use.
NOTE:
• Do not mix old and new batteries.
• Do not mix battery types.
• Remove the batteries if the camera will not be used for an
extended period.
12
Minolta MNTC600WS
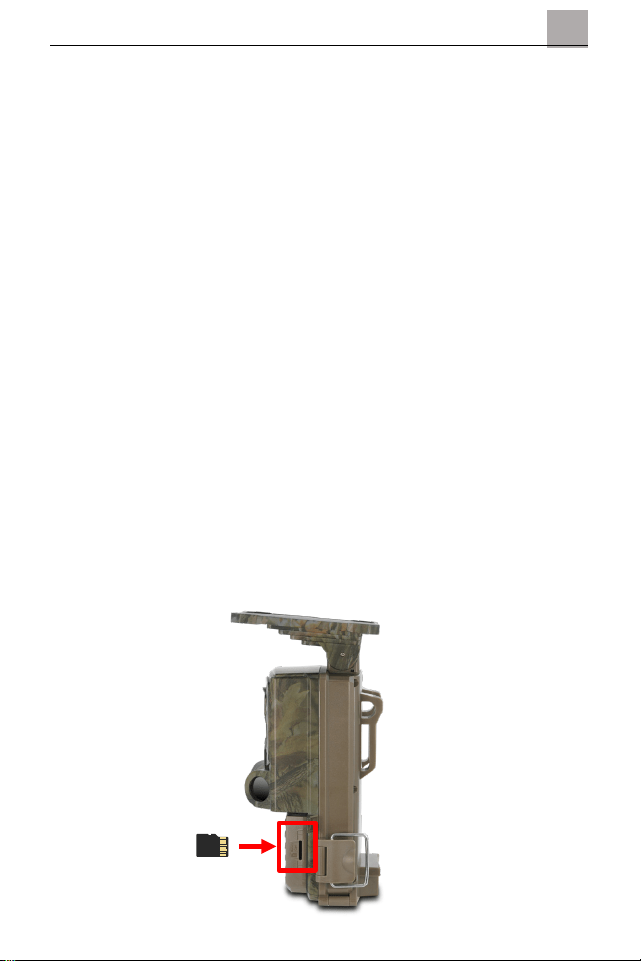
1.6 Installing the Memory Card
The camera requires a memory card to save photos and videos.
Follow these steps to install the memory card:
1. Open the Camera Housing
Open the front housing cover to access the memory card
slot.
2. Align the Memory Card
Hold the memory card so the metal contacts face the
correct direction shown beside the slot.
3. Insert the Memory Card
Gently push the memory card into the slot until it clicks into
place.
4. Verify Installation
The card should remain securely seated inside the slot.
5. Remove the Memory Card
To remove the card, gently press the card inward until it
releases and slides outward.
NOTE:
• Format the memory card before first use.
• Do not remove the memory card while the camera is
capturing photos or recording video.
• Use a Class 10 or higher memory card for best
performance.

13
Minolta MNTC600WS
1.7 Charging the Internal Battery / Solar Panel
The MNTC600WS includes a built-in rechargeable battery and
integrated solar panel to help extend operating time outdoors.
Follow these steps to charge the camera:
1. Locate the USB-C Port
Open the camera housing and locate the USB-C charging
port.
2. Connect the USB Cable
Insert the included USB cable into the USB-C port.
3. Connect to a Power Source
Connect the opposite end of the cable to a compatible
USB power adapter or powered USB port.
4. Allow the Camera to Charge
Leave the camera connected until the battery is fully
charged.
Charging performance may vary depending on weather, sunlight
exposure, power source, and environmental conditions.
14
Minolta MNTC600WS
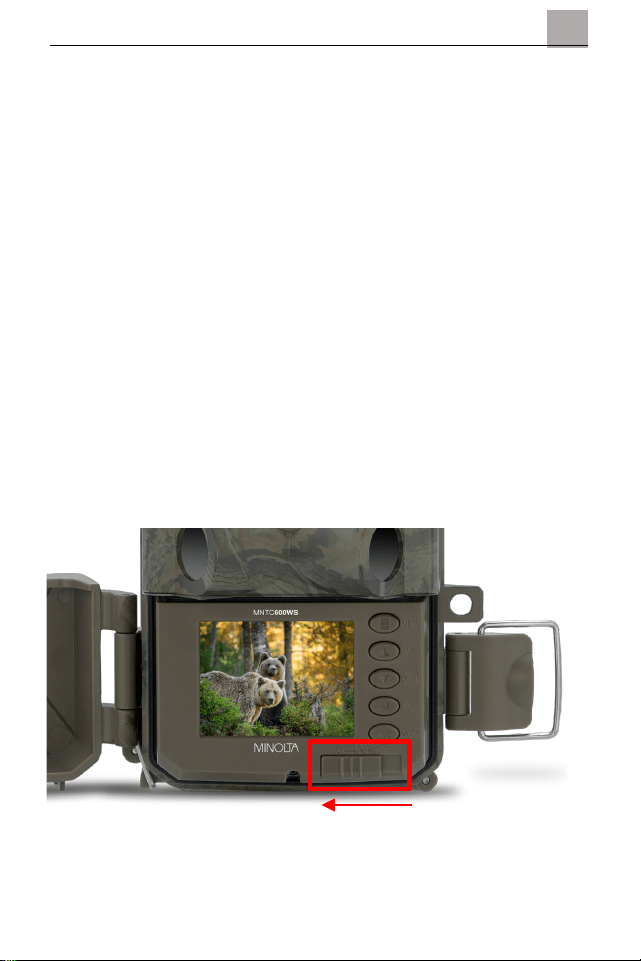
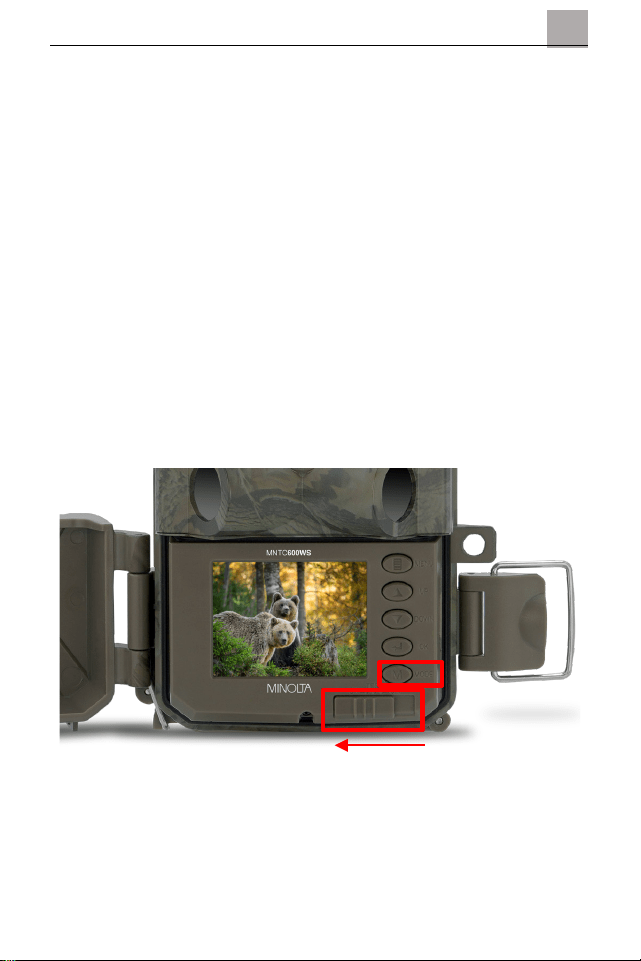
1.8 Powering the Camera On and Off
The POWER switch controls the camera’s operating states,
including TEST mode for setup and ON mode for active
monitoring.
Follow these steps to power the camera on or off:
1. Locate the Power Switch
Open the camera housing and locate the POWER switch.
2. Enter Test Mode
Move the POWER switch to the TEST position to access
the display screen, playback mode, and camera settings.
3. Enter Monitoring Mode
Move the POWER switch to the ON position to activate
motion detection and automatic recording.
4. Turn the Camera Off
Move the POWER switch to the OFF position when the
camera is not in use.
NOTE: Always wait for recording activity to stop before turning
the camera off.
15
Minolta MNTC600WS
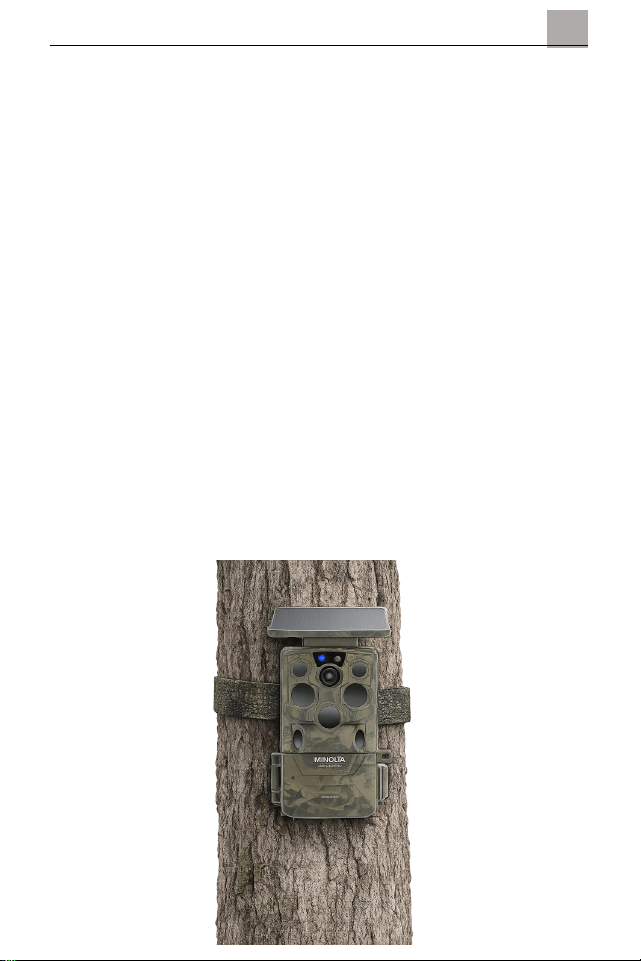
1.9 Mounting the Camera
The MNTC600WS is designed for outdoor placement on trees,
posts, walls, or other stable surfaces.
Follow these steps to mount the camera:
1. Select a Mounting Location
Choose a stable surface with a clear view of the area you
want to monitor.
2. Secure the Camera
Use the included mounting strap or mounting hardware to
secure the camera firmly in place.
3. Adjust the Camera Position
Aim the camera toward the desired monitoring area.
4. Verify the Placement
Make sure branches, tall grass, or other moving objects
are not directly in front of the motion sensors.
NOTE:
• Position the camera approximately 6 inches to 6 feet
above the ground for general wildlife monitoring.
• Avoid aiming the camera directly toward sunlight.
• Moving vegetation or nearby heat sources may trigger
unwanted recordings.
16
Minolta MNTC600WS
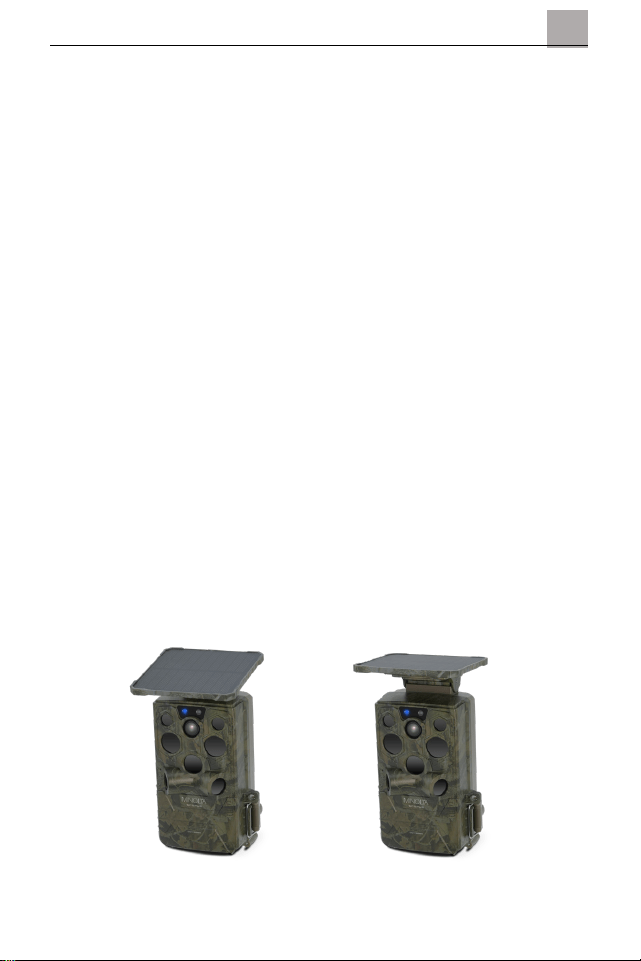
1.10 Adjusting the Solar Panel Angle
The adjustable solar panel helps maintain battery life by
collecting sunlight during outdoor use.
Follow these steps to adjust the solar panel angle:
1. Position the Camera
Mount the camera securely in the desired location.
2. Adjust the Solar Panel
Carefully tilt the solar panel toward direct sunlight.
3. Verify Panel Position
Make sure the panel is not blocked by branches, leaves,
snow, or other objects.
4. Confirm the Adjustment
Check that the solar panel remains securely positioned
after adjustment.
NOTE:
• For best charging performance, position the solar panel
toward direct sunlight.
• Keep the solar panel clean and free from dirt or debris.
• Charging performance may vary depending on weather
and sunlight conditions.

17
Minolta MNTC600WS
1.11 Adjusting the Camera Position
Proper positioning helps improve motion detection accuracy and
recording quality.
Follow these steps to adjust the camera position:
1. Open the Camera Housing
Release the side latches and open the camera housing.
2. Enter Test Mode
Move the POWER switch to the TEST position.
3. Check the Camera View
Use the display screen to confirm the monitoring area.
4. Adjust the Camera Angle
Tilt or reposition the camera until the desired area is
visible.
5. Secure the Camera
Tighten or secure the mounting hardware after
adjustments are complete.
1.12 Understanding PIR Motion Detection
The MNTC600WS uses Passive Infrared (PIR) motion sensors
to detect movement and automatically capture photos or videos.
• Larger moving subjects are easier for the camera to
detect.
• Fast movement may reduce image framing accuracy.
• Extreme weather conditions may affect detection
performance.
• Warm environments may reduce detection sensitivity.
For best results:
• Position the camera facing across a walking path instead
of directly toward it.
• Avoid aiming the camera at moving branches or reflective
surfaces.
• Keep the sensor area clean and unobstructed.

18
Minolta MNTC600WS
1.13 Using Infrared Night Vision
The MNTC600WS includes built-in infrared LEDs for recording in
low-light and nighttime conditions. When the surrounding
environment becomes dark, the camera automatically activates
the infrared LEDs to capture photos and videos in black and
white.
The infrared LEDs may produce a faint red glow during nighttime
operation, and infrared performance may vary depending on
environmental conditions and subject distance.
1.14 Understanding Power Switch Modes
The power switch controls the camera’s primary operating
modes.
• OFF - Turns the camera completely off.
• TEST - Allows access to the display screen, menu system,
playback mode, and camera settings.
• ON - Places the camera into active monitoring mode. The
camera will automatically capture photos or videos when
motion is detected.
NOTE: After moving the POWER switch to the ON position, the
camera may enter a short countdown period before motion
monitoring begins. This allows you time to close the camera
housing and leave the monitoring area before recording starts.

19
Minolta MNTC600WS
1.15 Using Test Mode
Test Mode allows you to adjust camera settings, review
recordings, test placement, and configure the camera before
outdoor use.
While the camera is in TEST mode, you can preview the
monitoring area, adjust settings, manually capture photos or
videos, and review files stored on the memory card.
Follow these steps to enter Test Mode:
1. Open the Camera Housing
Release the side latches and open the camera housing.
2. Move the Power Switch
Set the POWER switch to the TEST position.
3. Wait for the Display to Activate
The camera screen will turn on and display the live view or
menu system.
4. Adjust Settings
Use the camera buttons to navigate menus and configure
settings.
5. Exit Test Mode
Move the POWER switch to the ON position when setup is
complete.

20
Minolta MNTC600WS
1.16 Capturing a Test Photo or Video
Test Mode allows you to manually capture test recordings before
placing the camera outdoors.
Follow these steps to capture a test photo or video:
1. Enter Test Mode
Move the POWER switch to the TEST position.
2. Select the Desired Preview Mode
Use the MODE button to switch between Photo, Video, or
Playback mode.
3. Frame the Monitoring Area
Adjust the camera position while viewing the display
screen.
4. Capture a Test Recording
Press the OK button to capture a photo or begin recording
video. Press the OK button again to stop video recording.
5. Review the Recording
Enter Playback Mode to verify framing, lighting, and
detection coverage.

21
Minolta MNTC600WS
1.17 Main Menu Navigation
The settings menu allows you to configure recording modes,
image quality, motion detection settings, and system
preferences.
Follow these steps to navigate the menu system:
1. Enter Test Mode
Move the POWER switch to the TEST position.
2. Open the Menu
Press the MENU button.
3. Navigate Through Options
Use the UP and DOWN buttons to scroll through settings
and menu options.
4. Change a Setting
Press the OK button to enter a submenu or confirm a
selection.
5. Return to the Previous Menu
Press the MENU button to return to the previous screen.
6. Exit the Menu
Press the MENU button again to exit the settings menu.
1.18 Formatting the Memory Card
Formatting prepares the memory card for use with the camera.
NOTE: Formatting permanently deletes all files stored on the
memory card.
Follow these steps to format the memory card:
1. Enter Test Mode
Move the POWER switch to the TEST position.
2. Open the Menu
Press the MENU button.
3. Select Format
Use the UP or DOWN buttons to highlight Format.
4. Confirm Formatting
Press the OK button and confirm the operation.
5. Wait for Completion
Do not remove the memory card or power off the camera
during formatting.

22
Minolta MNTC600WS
1.19 Setting Date and Time
Setting the correct date and time ensures accurate timestamps
on photos and videos.
Follow these steps to adjust the date and time:
1. Enter Test Mode
Move the POWER switch to the TEST position.
2. Open the Menu
Press the MENU button.
3. Select Date / Time
Use the UP or DOWN buttons to highlight Date / Time.
4. Adjust the Values
Use the UP or DOWN buttons to change the selected
value.
Press the OK button to move between fields.
5. Save the Settings
Press the OK button to confirm the date and time settings.
23
Minolta MNTC600WS
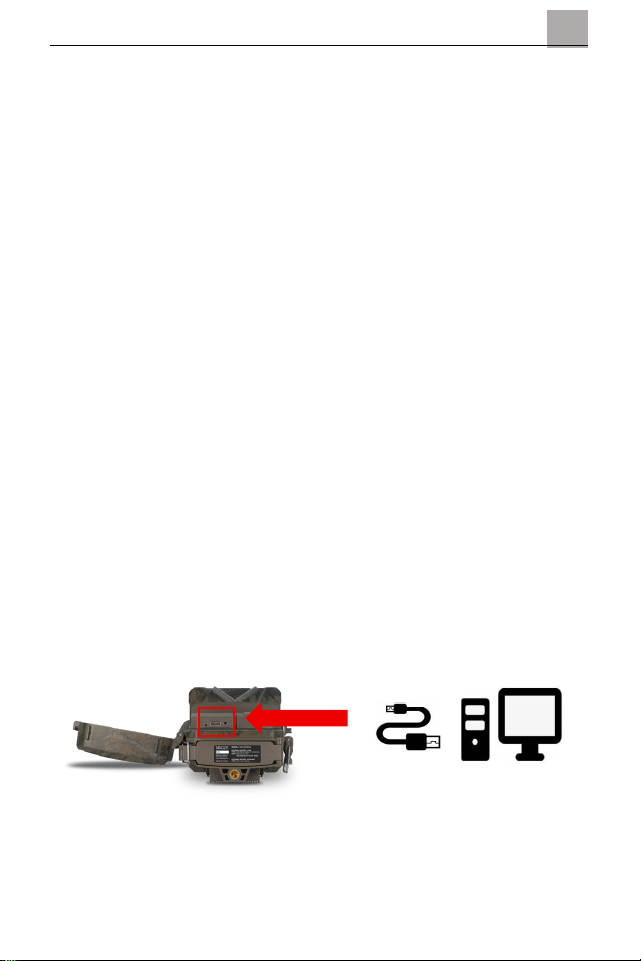
1.20 Connecting to a Computer
The MNTC600WS can connect directly to a compatible computer
for transferring photos and videos stored on the memory card.
Follow these steps to connect the camera to a computer:
1. Enter Test Mode
Move the POWER switch to the TEST position.
2. Connect the USB Cable
Insert the included USB-C cable into the camera and
connect the opposite end to a compatible computer.
3. Wait for Detection
Allow the computer a few moments to recognize the
camera.
4. Open the Camera Storage
Open the detected removable storage device on your
computer to access saved photos and videos.
5. Safely Disconnect the Camera
Eject the storage device from the computer before
disconnecting the USB cable.
NOTE: Keep the camera in TEST mode while connected to a
computer.
24
Minolta MNTC600WS
2.0 Capture Modes
The MNTC600WS supports multiple capture modes for different
outdoor monitoring situations. Depending on the selected mode,
the camera can capture photos, videos, or both when motion is
detected.
In TEST mode, press the MODE button to switch between
Photo, Video, or Playback mode for preview and playback
functions.
Photo, Video, and Photo + Video capture modes are selected
through the camera menu and are used when the POWER
switch is moved to the ON position.
25
Minolta MNTC600WS
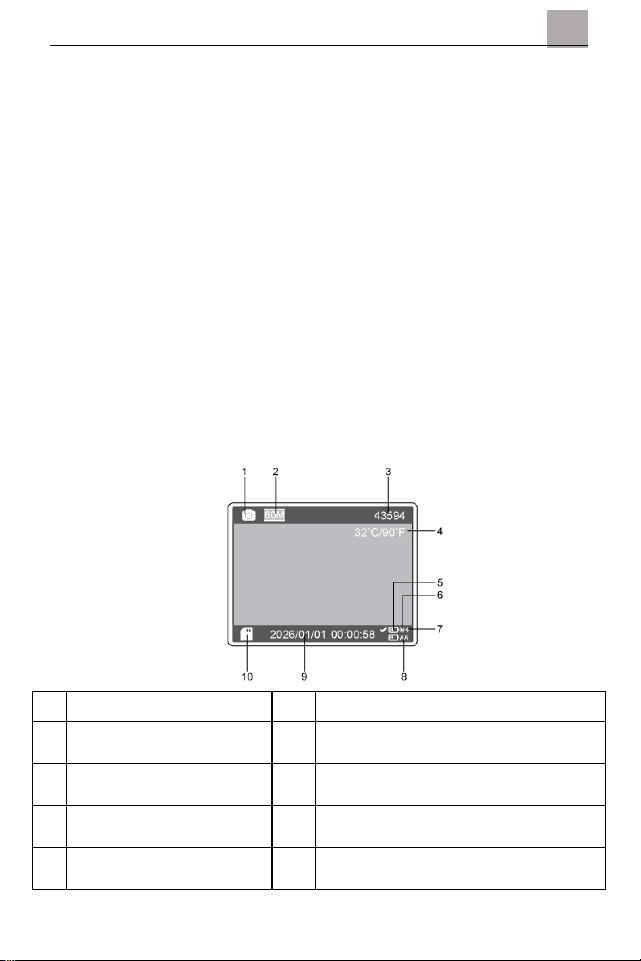
2.1 Photo Mode
Photo Mode captures still images automatically when motion is
detected by the PIR motion sensors. Once Monitoring Mode is
active, the camera captures photos automatically within the
monitored area.
Follow these steps to use Photo Mode:
1. Enter Test Mode
Move the POWER switch to the TEST position.
2. Open the Menu
Press the MENU button.
3. Select Capture Mode
Use the UP or DOWN buttons to highlight Photo or Video.
4. Choose Photo Mode
Press the OK button and select Photo Mode.
5. Exit the Menu
Press the MENU button to return to the live view screen.
6. Activate Monitoring Mode
Move the POWER switch to the ON position.
1 Photo Mode Indicator 6 Solar Battery Charging Indicator
2
Photo Resolution
Indicator
7
Lithium Battery Charging
Indicator
3
Number of Pictures
Available Indicator
8 AA Battery Level Indicator
4
Ambient Temperature
Indicator
9 Date / Time Indicator
5
Lithium Battery Level
Indicator
10 Memory Card Icon
26
Minolta MNTC600WS
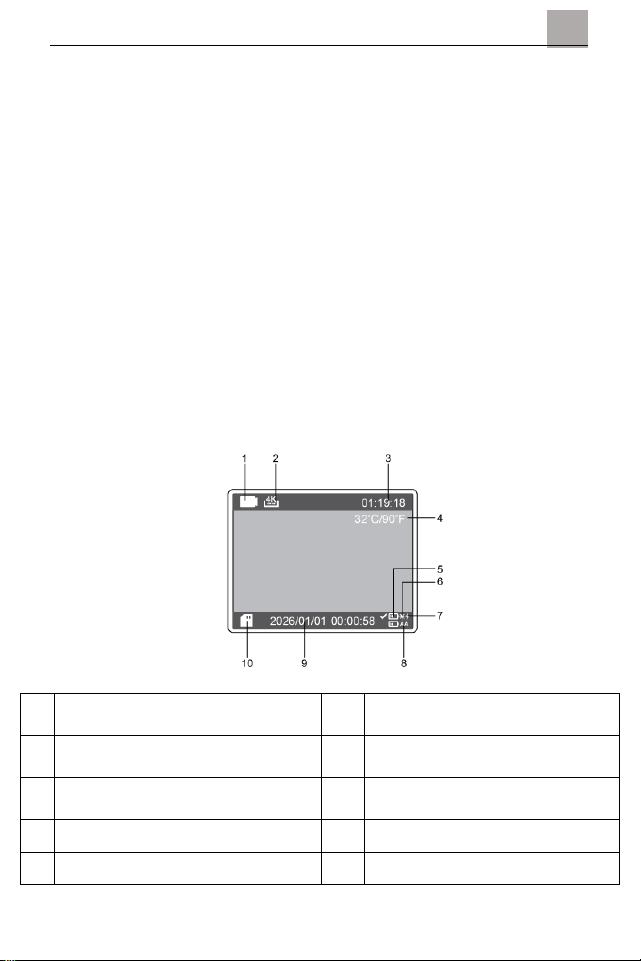
2.2 Video Mode
Video Mode records video clips automatically when motion is
detected. Once Monitoring Mode is active, the camera records
video automatically within the monitored area.
Follow these steps to use Video Mode:
1. Enter Test Mode
Move the POWER switch to the TEST position.
2. Open the Menu
Press the MENU button.
3. Select Capture Mode
Use the UP or DOWN buttons to highlight Photo or Video.
4. Choose Video Mode
Press the OK button and select Video Mode.
5. Exit the Menu
Press the MENU button to return to the live view screen.
6. Activate Monitoring Mode
Move the POWER switch to the ON position.
1 Video Mode Indicator 6
Solar Battery Charging
Indicator
2 Video Resolution Indicator 7
Lithium Battery Charging
Indicator
3
Available Recording Time
Indicator
8 AA Battery Level Indicator
4 Ambient Temperature Indicator 9 Date/Time Indicator
5 Lithium Battery Level Indicator 10 Memory Card Icon

27
Minolta MNTC600WS
2.3 Photo + Video Mode
Photo + Video Mode captures a still image before recording a
video clip after motion is detected. Once Monitoring Mode is
active, the camera captures a photo and then begins recording
video automatically within the monitored area.
Follow these steps to use Photo + Video Mode:
1. Enter Test Mode
Move the POWER switch to the TEST position.
2. Open the Menu
Press the MENU button.
3. Select Capture Mode
Use the UP or DOWN buttons to highlight Photo or Video.
4. Choose Photo + Video Mode
Press the OK button and select Photo + Video Mode.
5. Exit the Menu
Press the MENU button to return to the live view screen.
6. Activate Monitoring Mode
Move the POWER switch to the ON position.

28
Minolta MNTC600WS
2.4 Using Photo Series Mode
Photo Series Mode captures multiple photos in quick succession
after motion is detected. This feature is useful for capturing
fast-moving wildlife or activity and applies to Photo Mode only.
Follow these steps to use Photo Series Mode:
1. Enter Test Mode
Move the POWER switch to the TEST position.
2. Open the Menu
Press the MENU button.
3. Select Photo Series
Use the UP or DOWN buttons to highlight Photo Series.
4. Choose the Number of Photos
Select the desired number of photos captured during each
trigger event.
5. Save the Setting
Press the OK button to confirm the selection.
6. Activate Monitoring Mode
Move the POWER switch to the ON position.

29
Minolta MNTC600WS
2.5 Using Time Lapse
The MNTC600WS supports two Time-Lapse modes that capture
media automatically at set intervals, even when no motion is
detected.
• Time-Lapse Photo captures a series of photos at the
selected interval.
• Time-Lapse Video automatically creates a video using
images captured at the selected interval.
Time-Lapse modes are useful for monitoring long-term activity,
weather changes, construction projects, plant growth, or wildlife
movement patterns.
Follow these steps to use a Time-Lapse mode:
1. Enter Test Mode
Move the POWER switch to the TEST position.
2. Open the Menu
Press the MENU button.
3. Select Mode
Use the UP or DOWN buttons to highlight Mode, then
press the OK button.
4. Choose a Time-Lapse Mode
Select Time-Lapse Photo or Time-Lapse Video.
5. Choose an Interval
Select the desired capture interval.
6. Activate Monitoring Mode
Move the POWER switch to the ON position.

30
Minolta MNTC600WS
2.6 Using Playback Mode
Playback Mode allows you to review photos and videos stored
on the memory card directly on the camera display.
Follow these steps to use Playback Mode:
1. Enter Test Mode
Move the POWER switch to the TEST position.
2. Enter Playback Mode
Press the MODE button until Playback Mode appears.
3. Browse Files
Use the UP or DOWN buttons to view captured photos and
videos.
4. Play a Video
Press the OK button while viewing a video file to begin
playback.
• Press the OK button again to pause playback.
• Press the MODE button to stop playback and return
to Playback Mode.
• Use the UP or DOWN buttons to navigate through
saved files.
5. Exit Playback Mode
Press the MODE button to return to the previous screen.

31
Minolta MNTC600WS
2.7 Deleting Files
The Delete function allows you to remove unwanted photos and
videos from the memory card.
NOTE: Deleted files cannot be recovered.
Follow these steps to delete files:
1. Enter Playback Mode
Open Playback Mode while the camera is in TEST mode.
2. Open the Delete Menu
Press the MENU button.
3. Select a Delete Option
Use the UP or DOWN buttons to highlight Delete Current
File or Delete All Files.
4. Confirm the Selection
Press the OK button to confirm.
5. Delete the File(s)
Select Yes to delete the file or files, then press the OK
button.

32
Minolta MNTC600WS
3.0 Camera Settings
Camera Settings allow you to customize photo capture, video
recording, motion detection behavior, system preferences, and
monitoring functions.
All camera settings can be adjusted while the camera is in TEST
mode.
Follow these steps to access the Camera Settings menu:
1. Enter Test Mode
Move the POWER switch to the TEST position.
2. Open the Menu
Press the MENU button.
3. Navigate Through Settings
Use the UP or DOWN buttons to scroll through available
settings.
4. Select a Setting
Press the OK button to enter or adjust a setting.
5. Save a Setting
Press the OK button to confirm a selection.
6. Exit the Menu
Press the MENU button to exit the settings menu.
3.1 Selecting a Recording Mode
Recording Mode controls how the camera captures media during
operation. Available modes include PIR Detection, Time-lapse
Photo, and Time-lapse Video.
Follow these steps to select a Recording Mode:
1. Enter Test Mode
Move the POWER switch to the TEST position.
2. Open the Menu
Press the MENU button.
3. Select Mode
Use the UP or DOWN buttons to highlight Mode.
4. Choose a Recording Mode
Select PIR Detection, Time-lapse Photo, or Time-lapse
Video.
5. Save the Setting
Press the OK button to confirm the selection.

33
Minolta MNTC600WS
3.2 Adjusting Work Time
Work Time allows the camera to operate only during selected
times of day.
When enabled, the camera captures recordings only during the
configured schedule.
Follow these steps to adjust Work Time:
1. Enter Test Mode
Move the POWER switch to the TEST position.
2. Open the Menu
Press the MENU button.
3. Select Work Time
Use the UP or DOWN buttons to highlight Work Time.
4. Enable Work Time
Select On to enable scheduled operation.
5. Set the Start and End Times
Adjust the desired operating schedule.
6. Save the Setting
Press the OK button to confirm the schedule.
3.3 Selecting Photo or Video Mode
Photo or Video Mode controls whether the camera captures
photos, videos, or both during trigger events.
Follow these steps to select a Photo or Video Mode:
1. Enter Test Mode
Move the POWER switch to the TEST position.
2. Open the Menu
Press the MENU button.
3. Select Photo or Video
Use the UP or DOWN buttons to highlight Photo or Video.
4. Choose a Capture Option
Select Photo, Video, or Photo + Video.
5. Save the Setting
Press the OK button to confirm the selection.

34
Minolta MNTC600WS
3.4 Adjusting Photo Resolution
Photo Resolution controls the image quality and file size of
captured photos.
Higher resolutions provide more image detail but use more
memory card space.
Follow these steps to adjust Photo Resolution:
1. Enter Test Mode
Move the POWER switch to the TEST position.
2. Open the Menu
Press the MENU button.
3. Select Photo Resolution
Use the UP or DOWN buttons to highlight Photo
Resolution.
4. Choose a Resolution
Select the desired image resolution.
5. Save the Setting
Press the OK button to confirm the selection.
3.5 Adjusting Video Resolution
Video Resolution controls the recording quality and file size of
captured videos.
Higher video resolutions provide improved detail but use more
memory card space and battery power.
Follow these steps to adjust Video Resolution:
1. Enter Test Mode
Move the POWER switch to the TEST position.
2. Open the Menu
Press the MENU button.
3. Select Video Resolution
Use the UP or DOWN buttons to highlight Video
Resolution.
4. Choose a Resolution
Select the desired video resolution.
5. Save the Setting
Press the OK button to confirm the selection.

35
Minolta MNTC600WS
3.6 Adjusting Photo Series
Photo Series controls how many photos the camera captures
during a single motion-triggered event.
Photo Series is useful for capturing fast-moving wildlife or activity
and applies to Photo Mode only.
Follow these steps to adjust Photo Series:
1. Enter Test Mode
Move the POWER switch to the TEST position.
2. Open the Menu
Press the MENU button.
3. Select Photo Series
Use the UP or DOWN buttons to highlight Photo Series.
4. Choose the Number of Photos
Select the desired number of photos captured during each
trigger event.
5. Save the Setting
Press the OK button to confirm the selection.
3.7 Adjusting Video Length
Video Length controls how long the camera records after motion
is detected.
Longer recording times capture more activity but use more
memory card space and battery power.
Follow these steps to adjust Video Length:
1. Enter Test Mode
Move the POWER switch to the TEST position.
2. Open the Menu
Press the MENU button.
3. Select Video Length
Use the UP or DOWN buttons to highlight Video Length.
4. Choose a Recording Length
Select the desired video duration.
5. Save the Setting
Press the OK button to confirm the selection.

36
Minolta MNTC600WS
3.8 Turning Audio Recording On or Off
Audio Recording allows the camera to capture sound during
Video Mode and Photo + Video Mode recordings.
Follow these steps to adjust Audio Recording settings:
1. Enter Test Mode
Move the POWER switch to the TEST position.
2. Open the Menu
Press the MENU button.
3. Select Audio Recording
Use the UP or DOWN buttons to highlight Audio
Recording.
4. Choose On or Off
Enable or disable audio recording during video capture.
5. Save the Setting
Press the OK button to confirm the selection.
3.9 Adjusting PIR Interval
PIR Interval controls how long the camera waits before it can
trigger another recording after motion has already been
detected.
Longer intervals help reduce duplicate recordings and conserve
battery life.
Shorter intervals allow the camera to capture activity more
frequently.
Follow these steps to adjust PIR Interval:
1. Enter Test Mode
Move the POWER switch to the TEST position.
2. Open the Menu
Press the MENU button.
3. Select PIR Interval
Use the UP or DOWN buttons to highlight PIR Interval.
4. Choose an Interval
Select the desired delay between trigger events.
5. Save the Setting
Press the OK button to confirm the selection.

37
Minolta MNTC600WS
3.10 Adjusting PIR Sensitivity
PIR Sensitivity controls how responsive the motion sensors are
to movement and temperature changes.
Higher sensitivity settings allow the camera to detect smaller or
more distant movement.
Lower sensitivity settings help reduce unwanted triggers caused
by environmental movement or heat changes.
NOTE: High sensitivity settings may increase false triggers
caused by moving vegetation, sunlight, or weather conditions.
Follow these steps to adjust PIR Sensitivity:
1. Enter Test Mode
Move the POWER switch to the TEST position.
2. Open the Menu
Press the MENU button.
3. Select PIR Sensitivity
Use the UP or DOWN buttons to highlight PIR Sensitivity.
4. Choose a Sensitivity Level
Select the desired sensitivity setting.
5. Save the Setting
Press the OK button to confirm the selection.

38
Minolta MNTC600WS
3.11 Turning Side PIR Sensors On or Off
Side PIR Sensors expand motion detection coverage from the
sides of the camera.
Disabling the side sensors may help reduce unwanted trigger
events in certain environments.
Follow these steps to adjust Side PIR Sensor settings:
1. Enter Test Mode
Move the POWER switch to the TEST position.
2. Open the Menu
Press the MENU button.
3. Select Side PIR Sensors
Use the UP or DOWN buttons to highlight Side PIR
Sensors.
4. Choose On or Off
Enable or disable the side motion sensors.
5. Save the Setting
Press the OK button to confirm the selection.
3.12 Adjusting Fill Light Distance
Fill Light Distance controls the infrared illumination range used
during nighttime recording.
Higher settings may improve nighttime visibility at longer
distances but can increase battery usage.
Follow these steps to adjust Fill Light Distance:
1. Enter Test Mode
Move the POWER switch to the TEST position.
2. Open the Menu
Press the MENU button.
3. Select Fill Light Distance
Use the UP or DOWN buttons to highlight Fill Light
Distance.
4. Choose a Distance Setting
Select Near, Middle, or Far.
5. Save the Setting
Press the OK button to confirm the selection.

39
Minolta MNTC600WS
3.13 Turning Camera Name On or Off
Camera Name adds a custom four-digit identifier to captured
recordings.
This feature may help identify recordings from multiple cameras.
Follow these steps to adjust Camera Name settings:
1. Enter Test Mode
Move the POWER switch to the TEST position.
2. Open the Menu
Press the MENU button.
3. Select Camera Name
Use the UP or DOWN buttons to highlight Camera Name.
4. Enable or Disable Camera Name
Select On or Off.
5. Enter the Camera Number
Adjust the four-digit camera identifier if enabled.
6. Save the Setting
Press the OK button to confirm the selection.
3.14 Turning Wi-Fi LED On or Off
Wi-Fi LED controls the wireless status light used during Wi-Fi
operation.
Follow these steps to adjust Wi-Fi LED settings:
1. Enter Test Mode
Move the POWER switch to the TEST position.
2. Open the Menu
Press the MENU button.
3. Select Wi-Fi LED
Use the UP or DOWN buttons to highlight Wi-Fi LED.
4. Choose On or Off
Enable or disable the Wi-Fi LED light.
5. Save the Setting
Press the OK button to confirm the selection.

40
Minolta MNTC600WS
3.15 Setting Date and Time
Setting the correct date and time ensures accurate timestamps
on photos and videos.
Follow these steps to adjust the date and time:
1. Enter Test Mode
Move the POWER switch to the TEST position.
2. Open the Menu
Press the MENU button.
3. Select Date / Time
Use the UP or DOWN buttons to highlight Date / Time.
4. Adjust the Values
Use the UP or DOWN buttons to change the selected
value. Press the OK button to move between fields.
5. Save the Setting
Press the OK button to confirm the selection.
3.16 Adjusting Date Format
Date Format controls how the camera displays the current date
on menus and recorded files.
Follow these steps to adjust Date Format:
1. Enter Test Mode
Move the POWER switch to the TEST position.
2. Open the Menu
Press the MENU button.
3. Select Date Format
Use the UP or DOWN buttons to highlight Date Format.
4. Choose a Format
Select the desired date display format.
5. Save the Setting
Press the OK button to confirm the selection.

41
Minolta MNTC600WS
3.17 Adjusting Time Format
Time Format controls whether the camera displays time using
12-hour or 24-hour format.
Follow these steps to adjust Time Format:
1. Enter Test Mode
Move the POWER switch to the TEST position.
2. Open the Menu
Press the MENU button.
3. Select Time Format
Use the UP or DOWN buttons to highlight Time Format.
4. Choose a Format
Select the desired time display format.
5. Save the Setting
Press the OK button to confirm the selection.
3.18 Turning Date Stamp On or Off
Date Stamp adds the current date and time directly onto
captured photos or videos.
This feature helps organize recordings and identify when files
were captured.
Follow these steps to adjust Date Stamp settings:
1. Enter Test Mode
Move the POWER switch to the TEST position.
2. Open the Menu
Press the MENU button.
3. Select Date Stamp
Use the UP or DOWN buttons to highlight Date Stamp.
4. Choose a Stamp Option
Enable or disable the date and time stamp.
5. Save the Setting
Press the OK button to confirm the selection.

42
Minolta MNTC600WS
3.19 Turning Loop Recording On or Off
Loop Recording allows the camera to continue recording by
overwriting the oldest files when the memory card becomes full.
This feature helps maintain continuous operation during
long-term monitoring.
Follow these steps to adjust Loop Recording settings:
1. Enter Test Mode
Move the POWER switch to the TEST position.
2. Open the Menu
Press the MENU button.
3. Select Loop Recording
Use the UP or DOWN buttons to highlight Loop Recording.
4. Choose On or Off
Enable or disable Loop Recording.
5. Save the Setting
Press the OK button to confirm the selection.
3.20 Turning Beep Sound On or Off
Beep Sound controls the button beep and menu sound effects
produced by the camera.
Disabling beep sounds may help reduce noise during outdoor
monitoring.
Follow these steps to adjust Beep Sound settings:
1. Enter Test Mode
Move the POWER switch to the TEST position.
2. Open the Menu
Press the MENU button.
3. Select Beep Sound
Use the UP or DOWN buttons to highlight Beep Sound.
4. Choose On or Off
Enable or disable beep sounds.
5. Save the Setting
Press the OK button to confirm the selection.

43
Minolta MNTC600WS
3.21 Formatting the Memory Card
Formatting prepares the memory card for use with the camera.
NOTE: Formatting permanently deletes all files stored on the
memory card.
Follow these steps to format the memory card:
1. Enter Test Mode
Move the POWER switch to the TEST position.
2. Open the Menu
Press the MENU button.
3. Select Format Memory Card
Use the UP or DOWN buttons to highlight Format Memory
Card.
4. Confirm Formatting
Press the OK button and confirm the operation.
5. Wait for Completion
Do not remove the memory card or power off the camera
during formatting.
3.22 Adjusting System Language
Language settings control the display language used by the
camera menus and system messages.
Follow these steps to adjust the language setting:
1. Enter Test Mode
Move the POWER switch to the TEST position.
2. Open the Menu
Press the MENU button.
3. Select Language
Use the UP or DOWN buttons to highlight Language.
4. Choose a Language
Select the desired system language.
5. Save the Setting
Press the OK button to confirm the selection.

44
Minolta MNTC600WS
3.23 Activating Password Protection
Password Protection helps prevent unauthorized access to the
camera and its settings.
Follow these steps to activate Password Protection:
1. Enter Test Mode
Move the POWER switch to the TEST position.
2. Open the Menu
Press the MENU button.
3. Select Password Protection
Use the UP or DOWN buttons to highlight Password
Protection.
4. Create or Enable a Password
Enter the desired password and confirm the setting.
5. Save the Setting
Press the OK button to confirm the password settings.
NOTE: Store the password in a safe location. Forgotten
passwords may prevent access to camera settings.
3.24 Performing a Factory Reset
Factory Reset restores the camera settings to their original
default values.
Follow these steps to perform a factory reset:
1. Enter Test Mode
Move the POWER switch to the TEST position.
2. Open the Menu
Press the MENU button.
3. Select Factory Reset
Use the UP or DOWN buttons to highlight Factory Reset.
4. Confirm the Reset
Press the OK button and confirm the reset operation.
5. Wait for Restart
The camera may restart automatically after the reset is
complete.
NOTE: Factory Reset does not delete files stored on the memory
card unless the card is formatted separately.

45
Minolta MNTC600WS
3.25 Viewing Firmware Version
Firmware Version displays the current software version installed
on the camera.
This information may be useful when checking for firmware
updates or troubleshooting support issues.
Follow these steps to view the firmware version:
1. Enter Test Mode
Move the POWER switch to the TEST position.
2. Open the Menu
Press the MENU button.
3. Select Firmware Version
Use the UP or DOWN buttons to highlight Firmware
Version.
4. View the Firmware Information
The current firmware version will appear on the display
screen.

46
Minolta MNTC600WS
4.0 Wi-Fi and App Connection
The MNTC600WS supports Wi-Fi connectivity for transferring
photos and videos, viewing a live camera preview, and adjusting
camera settings using a compatible smartphone app.
4.1 Downloading the App
The camera includes a built-in QR code for downloading the
compatible smartphone app.
Follow these steps to download the app:
1. Enter Test Mode
Move the POWER switch to the TEST position.
2. Open the Menu
Press the MENU button.
3. Select App QR Code
Use the UP or DOWN buttons to highlight App QR Code.
4. Display the QR Code
Press the OK button to display the QR code on the screen.
5. Scan the QR Code
Use your smartphone camera or QR scanning app to scan
the displayed code.
6. Install the App
Follow the on-screen instructions on your smartphone to
download and install the app.

47
Minolta MNTC600WS
4.2 Connecting to the App
After installing the app, you can connect your smartphone to the
camera using Wi-Fi.
Follow these steps to connect the camera to the app:
1. Enable Wireless Connections on Your Smartphone
Turn on Wi-Fi and Bluetooth on your smartphone.
2. Open the App
Launch the installed app on your smartphone.
3. Add the Camera
Tap Add a Device within the app.
4. Select the Camera
Select the camera from the device list that appears.
5. Complete the Connection
Follow the on-screen instructions in the app to finish
connecting the camera.
NOTE:
• Keep the camera and smartphone within close range
during connection.
• Wi-Fi and Bluetooth must remain enabled on your
smartphone while connecting.

48
Minolta MNTC600WS
4.3 Transferring Photos and Videos
The smartphone app allows you to review and transfer saved
photos and videos from the camera to a compatible mobile
device.
Follow these steps to transfer files:
1. Connect the Camera to the App
Complete the Wi-Fi connection process between the
camera and smartphone.
2. Open the Media Gallery
Use the app to browse saved photos and videos stored on
the camera.
3. Select Files
Choose the desired files for transfer.
4. Download the Files
Follow the on-screen instructions in the app to save files to
your smartphone.
5. Disconnect the App
Close the app or disable Wi-Fi when file transfers are
complete.
49
Minolta MNTC600WS
5.0 Technical Specifications
Model Number Minolta MNTC600WS
Image Sensor CMOS sensor, up to 60 MP (interpolation)
Lens F/ 1.6, f =4mm FOV: 90°
Storage Media Micro SD Memory Card U3 or Above 128GB (Max)
Trigger Speed 0.3s
IR LEDs 850NM / 2pcs with adjustable brightness
PIR Sensitivity High ● Medium ● Low
PIR Sensing
Distance
0 to 20 meters
PIR Angle 120 °
PIR Delay 5s to 1 Hr.
Display Screen 2.0-inch IPS screen
Working Mode
Photo ● Video ● Photo + Video ● Time-Lapse Photo ●
Time-Lapse Video
Photo JPG: 60MP ● 48MP ● 24MP ● 16MP
Video MP4: H.264, 4K 30fps ● 2K 30fps ● 1080P 30fps
Video Length 5sec. to 300 sec. (Adjustable)
Microphone Built-in
Speaker Built-in
Temperature
Detection
Support
Operating Voltage Lithium battery: 3.7V, AA battery: 6V
Wi-Fi Wi-Fi 6, point-to-point connection to your phone
Bluetooth BLE 5.2, Bluetooth remote control for mobile phones

50
Minolta MNTC600WS
Battery Type
Built-in lithium battery 5200mAh, compatible with 4 AA
batteries
Rechargeable
Power
DC 5V/1.5A, USB TYPE-C
Standby Time About 6 months
Language
English ● German ● French ● Spanish ● Italian ●
Russian ● Dutch ● Simplified Chinese ● Japanese ●
Polish
Waterproof Rating IP66
Dimensions 3.7 × 4 × 6.9 in. (including solar panel) ● 15.1 oz.

51
Minolta MNTC600WS
5.0 Warranty Information
Your Minolta product is covered by a limited one-year warranty from the
original date of purchase against defects in materials and workmanship.
At its discretion, Elite Brands Inc. will repair or replace a defective product
covered under this warranty. Proof of purchase is required for warranty
service.
This warranty does not cover:
• Batteries, flash equipment, or accessories not manufactured by
Elite Brands Inc.
• Damage caused by accident, misuse, abuse, impact, sand, dirt,
water, or other liquids.
• Damage resulting from failure to follow operating instructions.
• Products that have been modified or serviced by unauthorized
parties.
This warranty applies only to products distributed in the United States by
Elite Brands Inc. and purchased through authorized dealers. Products
obtained through unauthorized dealers, distributors, or sellers are not
covered.
Except as expressly stated above, Elite Brands Inc. makes no other
warranties, express or implied, including any implied warranties of
merchantability or fitness for a particular purpose. Elite Brands Inc. shall
not be liable for any incidental, consequential, or special damages arising
from the use of this product.
Some states do not allow certain warranty limitations or exclusions, so
these limitations may not apply to you. This warranty gives you specific
legal rights, and you may also have other rights that vary by state.
PRODUCT REGISTRATION
Register your product and view the complete warranty policy at:
www.minoltadigital.com/warranty
Minolta is a registered trademark of JMM Lee Properties, LLC and is used
under license.
SCAN QR
CODE TO
REGISTER
THE
WARRANTY

Minolta is a registered trademark of JMM Lee Properties, LLC
and is used in the United States by Elite Brands Inc. under
license.
40 Wall Street, 61st Floor, New York, NY 10005 USA • Tel: 800-
441-1100 www.minoltadigital.com • www.elitebrands.com
Copyright © 2026 Elite Brands Inc.
If you’re having difficulties with your trail camera, or would like
further assistance, please call our toll-free technical support
hotline at 800-441-1100. Please be sure to have your trail
camera handy when calling.

MNTC600WS

This device complies with part 15 of the FCC Rules. Operation is subject to the following two
conditions: (1) this device may not cause harmful interference, and (2) this device must accept
any interference received, including interference that may cause undesired operation.
Any changes or modifications not expressly approved by the party responsible for compliance
could void the user's authority to operate the equipment.
NOTE: This equipment has been tested and found to comply with the limits for a Class B
digital device, pursuant to Part 15 of the FCC Rules. These limits are designed to provide
reasonable protection against harmful interference in a residential installation. This equipment
generates, uses and can radiate radio frequency energy and, if not installed and used in
accordance with the instructions, may cause harmful interference to radio communications.
However, there is no guarantee that interference will not occur in a particular installation.
If this equipment does cause harmful interference to radio or television reception,
which can be determined by turning the equipment off and on, the user is encouraged to try to
correct the interference by one or more of the following measures:
-- Reorient or relocate the receiving antenna.
-- Increase the separation between the equipment and receiver.
-- Connect the equipment into an outlet on a circuit different
from that to which the receiver is connected.
-- Consult the dealer or an experienced radio/TV technician for help.
The device has been evaluated to meet general RF exposure requirement. The device can be
used in portable exposure condition without restriction