OPERATING INSTRUCTIONS
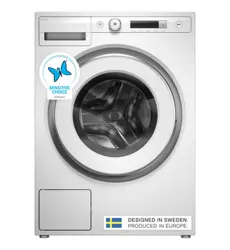
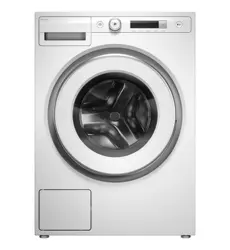
Washing machine
EN
WM86L
W3114CXLW.AU
Carefully read the instructions for use before using the washing machine.

3Introduction ................................................
4Safety precautions .....................................
10
Before using the appliance for the first
time ..............................................................
10Packaging ....................................................
10Transport protection ....................................
11Cleaning .......................................................
11Opening the Door ........................................
12Installation and connection ......................
12Selecting the room .......................................
12Positioning the washing machine ................
16Built-in ..........................................................
17
Moving the washing machine and transport
after installation ............................................
18Connection to water supply .........................
19Installing the drain hose ...............................
20Connecting to the power mains ...................
21ASKO Laundry Care - Hidden helpers .......
22Washing machine description ..................
22Dispenser tray ..............................................
23Initial settings before use ..........................
25
Appliance connection with the ConnectLife
application ...................................................
28Tips before washing ..................................
28Laundry sorting ............................................
28Clothing ........................................................
29Laundry symbols .........................................
30Laundry types ..............................................
30Saving time and energy ...............................
30Economy and efficiency ..............................
30Detergents ...................................................
31Dosing accessories .....................................
31Stains ...........................................................
31Dyeing fabrics ..............................................
33Washing process, step by step (1 – 8) .....
33STEP 1: Sort the laundry ..............................
33STEP 2: Turn on the main switch .................
33
STEP 3: Open the washing machine door
and insert the laundry ..................................
33
STEP 4: Add the detergent and the
conditioner ...................................................
35STEP 5: Choose the program ......................
38STEP 6: Choosing the program settings ......
42STEP 7: Start the wash .................................
44STEP 8: End of program ..............................
45Appliance settings .....................................
45System settings ............................................
49Cleaning and maintenance .......................
49Cleaning the dispenser tray .........................
50Cleaning the filter .........................................
51Cleaning the appliance exterior ...................
51
Cleaning the washing machine interior
against odours .............................................
51If you are using hard water ..........................
52Errors: what to do? ....................................
55Manual opening of washing machine door ..
56Failure display ..............................................
60Service ........................................................
60Before calling a service technician ..............
62Technical information ................................
62Typeface License Notice .............................
63Information for test institute ..........................
65Declaration of conformity .............................
66Table of consumption values ...................
68Option table ................................................
69DISPOSAL ...................................................
Contents
Dear customer,
We thank you for purchasing this quality ASKO product.
We hope it meets all your expectations. Scandinavian design combines pure lines, everyday
functionality, and high quality. These are the key characteristics of all our products, and the reason
why they are highly appreciated across the globe.
We recommend that you read the user manual before using the washing machine for the first time.
The user manual also includes information on how you can help protect the environment.
The following symbols are used throughout the manual and they have the following meanings:
INFORMATION!
Information, advice, tip, or recommendation
WARNING!
Warning – general danger
ELECTRIC SHOCK!
Warning – danger of electric shock
HOT SURFACE!
Warning – danger of hot surface
DANGER OF FIRE!
Warning – Risk of fire / Flammable materials
Original instructions
SAVE THESE INSTRUCTIONS FOR FUTURE REFERENCE!
3
Introduction

General
Please read the instruction manual and save it for future
reference.
• Please, do not use the washing machine without reading and
understanding these instructions or use first.
• This appliance is not intended for use by persons (including
children) with reduced physical, sensory or mental capabilities,
or lack of experience and knowledge, unless they have been
given supervision or instruction concerning use of the appliance
by a person responsible for their safety.
• Failure to observe the instructions for use or inappropriate use
of the washing machine may result in damage to the laundry or
the appliance, or injury to the user. Keep the instruction manual
handy, near the washing machine.
• Instructions for use are available on our website at www.asko.com.
• This appliance is intended to be used in household and similar
applications, such as:
- staff kitchen areas in shops, offices and other working
environments;
- farm houses;
- by clients in hotels, motels and other residential type
environments;
- bed and breakfast type environments.
• This appliance must not be used in:
- areas for communal use in blocks of flats or launderettes.
• Before using the machine, remove all transit bolts. See chapter
Before using the appliance for the first time/ Transport protection.
• Maximum washing capacity in kg (for the Normal program) is
indicated on the rating plate (or in the chapter STEP 5: Choose
the program /Program chart).
4
Safety precautions

Child safety
WARNING!
Do not let children younger than three years to come near the
appliance, unless they are under constant supervision.
Children should be supervised to ensure that they do not play
with the appliance.
Keep the detergent and conditioner out of reach of children.
• Before closing the washing machine door and running the
program, make sure there is nothing except laundry in the drum
(e.g. if a child climbed into the washing machine drum and closed
the door from the inside).
• Activate the Lock (Lock). See chapter System settings.
• The washing machine is made in compliance with all relevant
safety standards.
• This appliance can be used by children aged from 8 years and
above and persons with reduced physical, sensory or mental
capabilities or lack of experience and knowledge if they have
been given supervision or instruction concerning use of the
appliance in a safe way and understand the hazards involved.
• Children shall not play with the appliance.
• Cleaning and user maintenance shall not be made by children
without supervision.
Danger of hot surface
HOT SURFACE!
Warning – danger of hot surface
At higher washing temperatures, the door glass will heat up. Be
careful to avoid burns. Make sure children do not play near the
door glass.
5
Safety precautions

Connection and installation safety
WARNING!
The washing machine may only be used with the supplied
power cord.
ELECTRIC SHOCK!
If the supply cord is damaged, it must be replaced by the
manufacturer, its service agent or similarly qualified persons in
order to avoid a hazard.
WARNING!
Do not connect the washing machine to power mains using an
external switching device such as a programme timer, or connect
it to power mains that is regularly switched on and off by the power
supply provider.
• The appliance has to be connected to the water and power supply
by a trained expert.
• Repairs and maintenance must be carried out by a qualified
professional.
• Do not install the washing machine in a room where the
temperature can drop to below 5°C, as washing machine parts
may be damaged in case of water freezing.
• The ventilation openings in the base of washing machine must
not be obstructed by a carpet.
• After installation, the washing machine should stand still for two
hours before it is connected to the power mains.
• The washing machine may not be connected to the power mains
using an extension cord.
• Do not connect the washing machine to an electrical outlet
intended for an electric shaver or hair dryer.
6
Safety precautions

• To connect the washing machine to water supply, make sure to
use the supplied water supply hose and gaskets. Water pressure
has to be between 0.1-500 kPa (approximately 1–5 kp/cm
2
, 1-5
bar, 10–50 N/cm
2
).
• Always use a new water supply hose to connect the washing
machine to water supply; do not reuse an old water supply hose.
• The end of the water discharge hose should reach into a water
drain line.
• In case of incorrect appliance connection, incorrect use, or
servicing by an unauthorized person, the user shall bear the cost
of any damage.
Safe use
DANGER OF FIRE!
Do not use detergents that contain solvents as this could lead to
release of poisonous gases, damage to the machine, and risk of
fire and explosion.
• Only use detergents intended for the washing machine!
• Only use agents for machine washing and care of laundry. We
shall not be responsible for any damages or discolouration of
gaskets and plastic parts resulting from incorrect use of bleaching
or colouring agents.
• Bleaches that contain chlorine can be replaced with oxygen-based
bleaches. Otherwise, a neutralization cycle should be performed
by running the Normal program at the highest temperature. For
best results, use hydrogen peroxide or oxygen-based detergents.
• Do not use colourants (dyes) or bleaching substances (substances
for discolouration or removal of colourants) as they contain
sulphuric compounds that could cause corrosion.
• Excessive use of products containing chlorine compounds
increases the risk of premature failure of appliance components.
This depends on the concentration of chlorine, exposure time,
and temperature.
7
Safety precautions

• Before the start of the washing cycle, press the door on the
indicated spot until it locks into place. The door cannot be opened
during washing machine operation.
• We recommend removing any impurities from the washing
machine drum before the first wash using the Normal 90°C
program (see Program chart).
• After the washing cycle, close the water tap and pull out the
washing machine plug from the power socket.
• Only use the washing machine for washing laundry, as described
in the instruction manual. The machine is not intended for dry
cleaning.
• No silver ions are released during the washing programme.
• To remove limescale deposits, only use agents with added
anti-corrosion protection. Follow the manufacturer’s instructions.
Finish the descaling process by rinsing several times or by starting
the Drum Cleaning program to remove any residual acids (e.g.
vinegar...).
Overflow guard function
• If the water level in the appliance rises above the normal level,
the water level protection will be activated, which will begin to
pump out the water and close the water supply.
• If the water level does not decrease in 60 seconds, the program
will be interrupted (see chapter Errors: what to do?).
Transporting / storage during the winter
If you transport or store the appliance in vehicles or rooms that are
not heated and where the temperature could drop to below freezing
point, please do the following:
• Clean the drain pump filter. See chapter Cleaning the filter.
• Close the water supply to the washing machine, undo the water
supply hose from the water supply tap, and wait until the water
flows out of the tap and the hose.
8
Safety precautions

• After the drain pump filter is emptied, there can still be a small
amount of water in the machine. This, however, does not affect
the quality and will not damage the appliance.
• If the washing machine is to be transported, transport protection
has to be re-installed (see chapter Transport protection).
9
Safety precautions
Packaging
Remove all packaging. When removing the packaging, make sure not to damage the appliance with
a sharp object.
Please sort the materials in compliance with local waste management recommendations (see chapter
DISPOSAL).
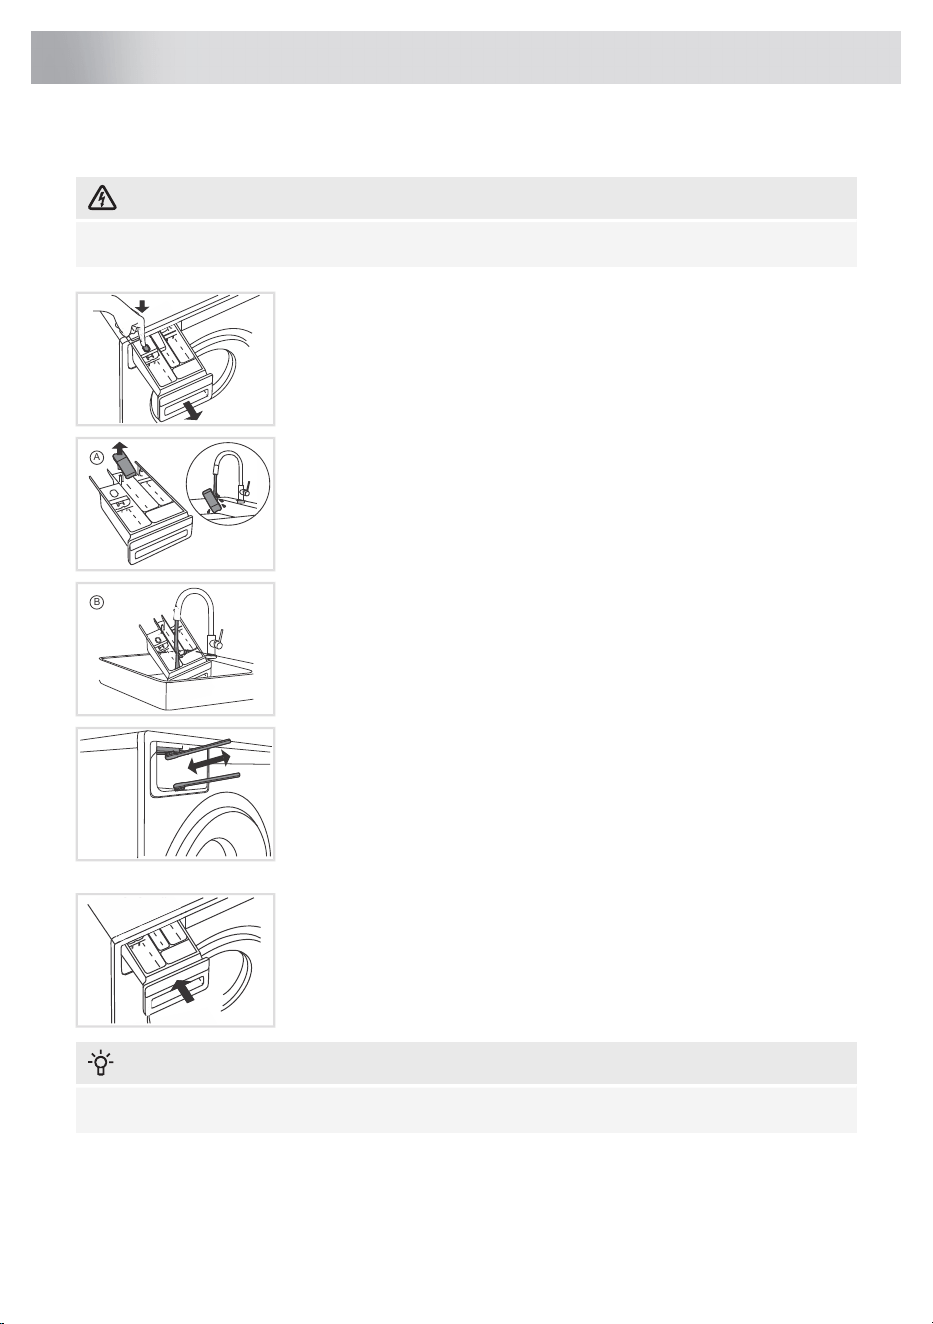
Transport protection
Before using the appliance, remove the three transport bolts and plastic plugs which protect the
appliance during transport.
Loosen and use a spanner no. 15 or 17
(depending on the model) to remove the bolts
as shown in the figures.
To remove the plastic plugs holding the bolts,
squeeze them and (1) then pull them out (2).
1
1
2
Remove the caps from the plastic plugs. Push
the caps into the holes (1), in which the plastic
plugs were located. Save the bolts and plastic
plugs (2) in case you have to move your
washing machine again.
2
1
ID:Article number
Bolt270698
Plastic cap (transport lock)551188
Please order three pieces of each item!
10
Before using the appliance for the first time
INFORMATION!
If you wish to transport the washing machine, reinstall the bolts and plastic caps to lock the
machine. This will prevent any damage to the machine due to vibrations during transport. If you
have lost the transport bolts or plastic caps, replacements can be ordered at your dealer.
Cleaning
Disconnect the washing machine from the
power mains and open the door. Clean the
washing machine drum with a damp cloth and
a mild detergent.
Connect the washing machine to the power
mains, close the washing machine door and
run the self cleaning program. See chapter
STEP 5: Choose the program/Program chart
WARNING!
Do not use any solvents or cleaning agents that could damage the washing machine (please
observe the recommendations and warnings provided by the cleaning agent manufacturers).
Opening the Door
The washing machine door is designed to
open on the right side, with a visual indicator
in the form of a sticker placed on the front of
the door, clearly marking the spot for gripping
and opening.
It can be removed depending on aesthetic
preference.
11
Before using the appliance for the first time

INFORMATION!
Before connecting the washing machine to the power mains, wait for at least 2 hours until it
reaches room temperature.
INFORMATION!
The ventilation openings must not be obstructed by a carpet.
Selecting the room
WARNING!
Do not place the washing machine behind lockable or sliding door, or door with a hinge on the
opposite side of the door hinge of the washing machine. Place it in the room in such a way that
the washing machine door can be freely opened.
INFORMATION!
Floor on which the washing machine is placed must have a concrete base. It should be clean
and dry; otherwise, the washing machine may slide. Also, clean the bottom surface of adjustable
feet.
INFORMATION!
The washing machine must stand level and stable on a solid base.
Positioning the washing machine
The washing machine can be installed as a built-in or a free-standing unit.
INFORMATION!
When installing the washing machine, the wall outlet should be freely accessible.
12
Installation and connection
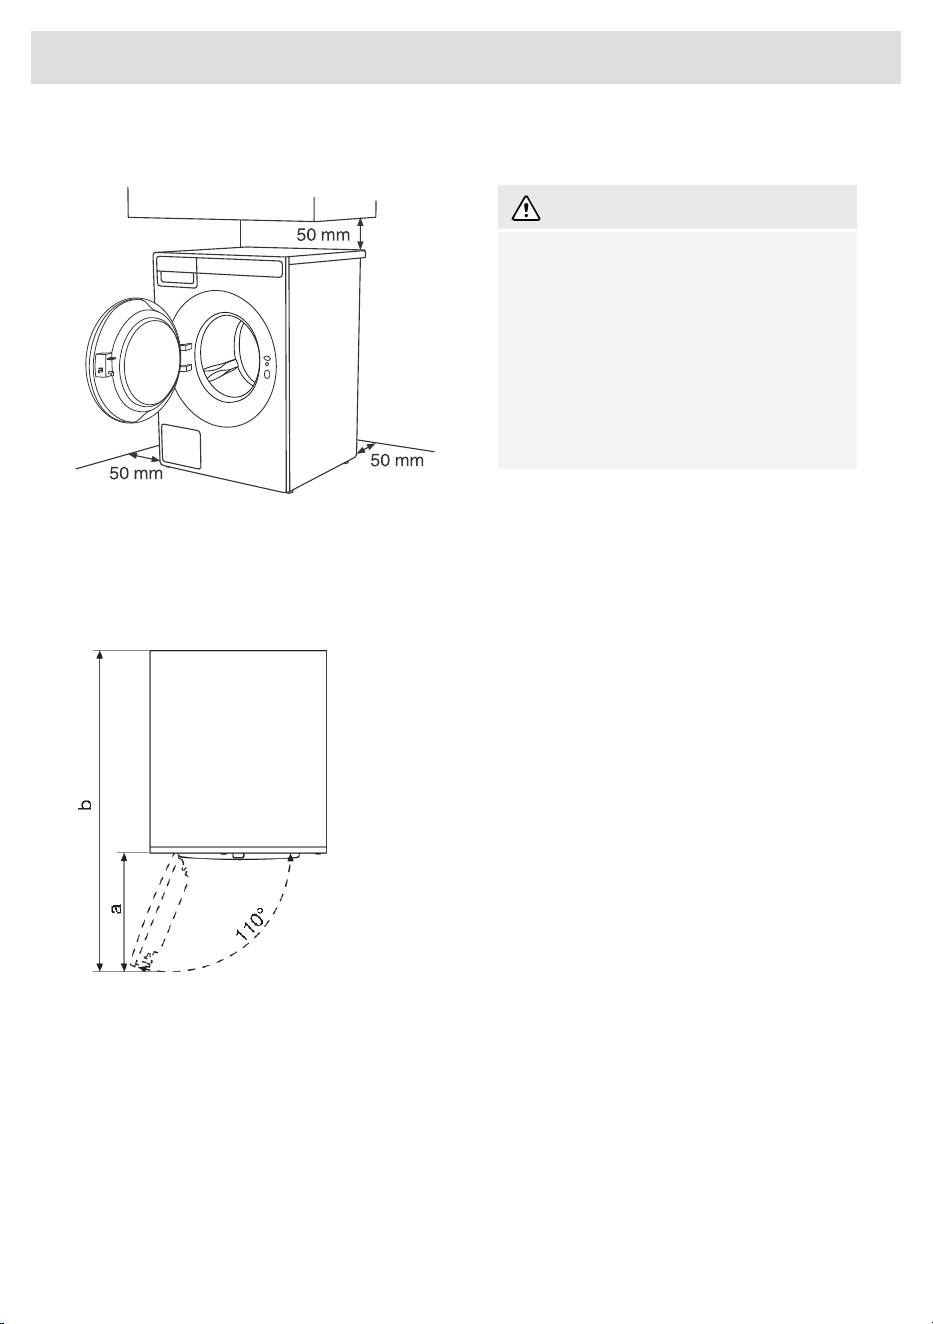
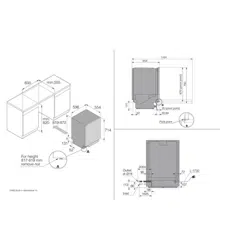
Necessary clearance around the washing machine for best performance
WARNING!
The washing machine may not be in
contact with a wall or adjacent furniture.
For optimum washing machine operation,
we recommend observing the clearances
from the walls as indicated in the figure. In
case of failure to observe the minimum
required clearances, safe and correct
washing machine operation cannot be
ensured. Moreover overheating can also
occur.
For safety reasons, the minimum distance between the back of the appliance and the wall must be
at least 25 mm, and the distance between the appliance and any furniture above it must be at least
40 mm.
Opening the washing machine door (bird's-eye view)
The washing machine door width (a) is 450
mm.
The washing machine depth with the door
open (b) is 1115 mm.
The washing machine door can be opened up
to the angle of 110°.
13
Installation and connection
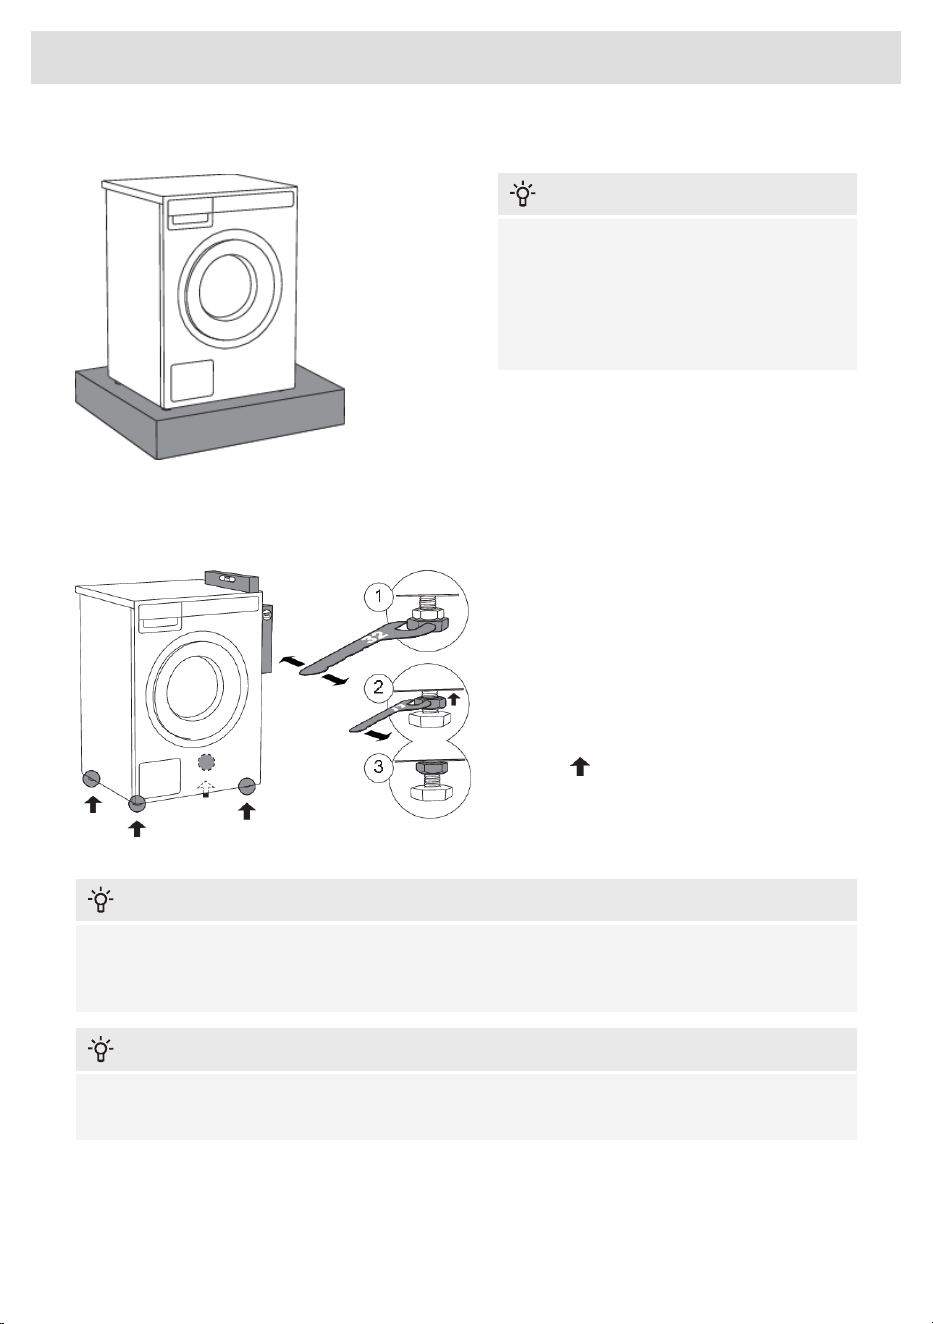
Placement on a pedestal
INFORMATION!
If the appliance is installed on a plinth or a
similar structure, then the appliance must
be fixed to it, to avoid the risk of falling.
ASKO original accessories are available
for this purpose, complete with fixing
instructions.
Adjusting the washing machine feet
Place the washing machine so that it is stable. This will reduce washing machine noise, vibration,
movement etc. to minimum.
1 Level the washing machine in all directions
and traverse direction by rotating the
adjustable feet (using a spanner no.32).
The feet allow levelling by +/- 1 cm.
2 When the appropriate height of feet is set,
use a spanner no.17 to firmly tighten the lock
nuts (counter nuts) towards the bottom of the
machine .
3 Tighten the jam nuts (counter nuts) to the
end position.
INFORMATION!
Incorrect levelling of the washing machine with the adjustable legs may cause vibration, appliance
sliding across the room, and loud operation. Incorrect levelling of the washing machine is not
subject to warranty.
INFORMATION!
Sometimes, unusual or louder noise may appear during appliance operation; these are mostly
the result of improper installation.
14
Installation and connection
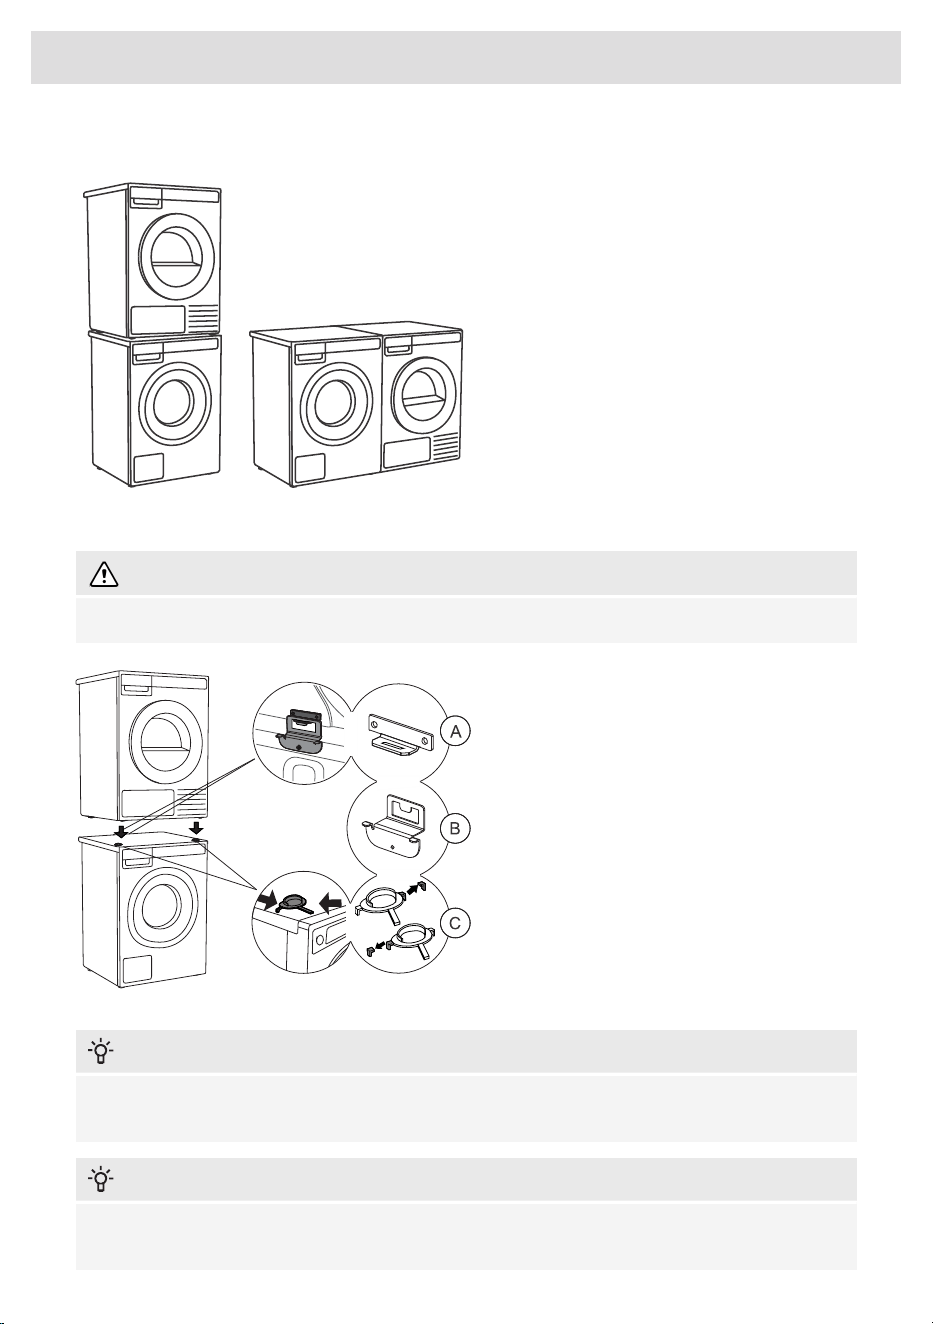
Free-standing appliance
The surface on which the appliance is placed
should be clean and level.
The washing machine and the dryer can be
placed next to each other.
To stack a dryer on top of a washing machine,
use the front feet attachments and the tipping
guard. See the next section below.
Stacking an ASKO dryer on top of an ASKO washing machine
WARNING!
At least two persons are required to install the tumble dryer on top of a washing machine.
To stack a dryer on top of a washing machine,
use the front feet attachments (plastic footrests
(C)) and the tipping guard (A+B), supplied in
the dryer drum.
If the washing machine and dryer are not of
the same dimensions, or if you have installed
an intermediate compartment between the
washing machine and dryer Hidden Helper,
you can purchase a connecting plate intended
for the WM86-TD76 combination from your
dealer or at the repair shop.
INFORMATION!
For detailed instructions on how to install the ASKO tumble dryer on the ASKO washing machine,
refer to the instructions provided with your ASKO tumble dryer.
INFORMATION!
The tipping guard (A+B) corresponds to ASKO washing machines and cannot be installed on
washing machines of other brands.
15
Installation and connection
INFORMATION!
Washing machine on which you wish to install the dryer must be able to bear the weight of the
dryer (see washing machine’s rating plate or technical information).
All ASKO washing machines will bear the weight of the dryer.
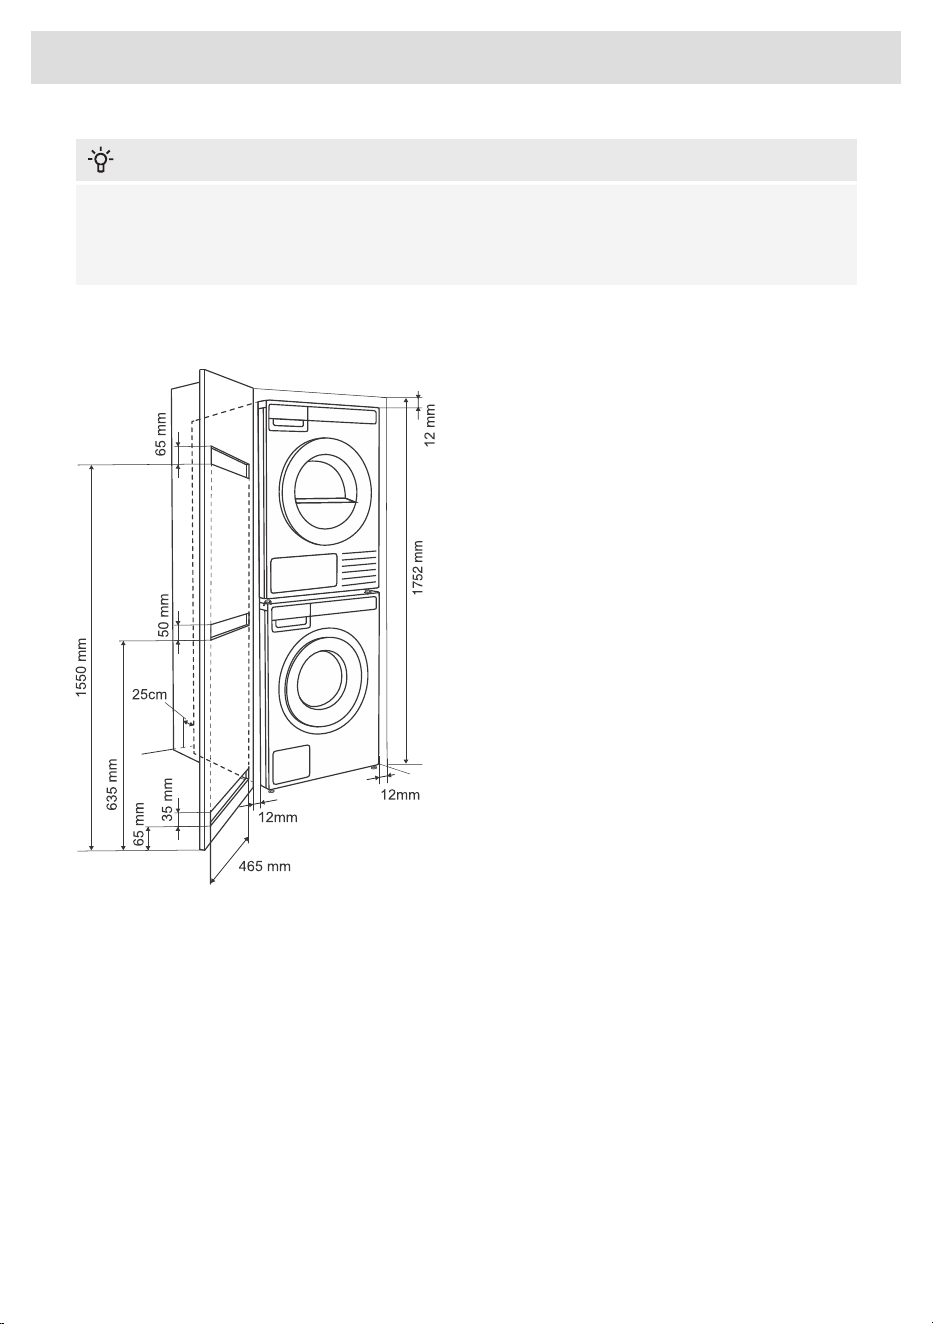
Built-in
Installation in a cabinet
ASKO's front panel controls make it possible
to install the washers and dryers in a cabinet
or closet.
Between the machine and the cabinet or wall,
ensure that there is a minimum distance of 12
mm and a minimum distance of 25 mm
between the rear edge of the top panel of the
machine and the cabinet or wall. To ensure
proper ventilation, a door with grilles is
recommended. Otherwise, there must be
ventilation openings in the door. See figure for
the smallest feasible ventilation openings.
16
Installation and connection
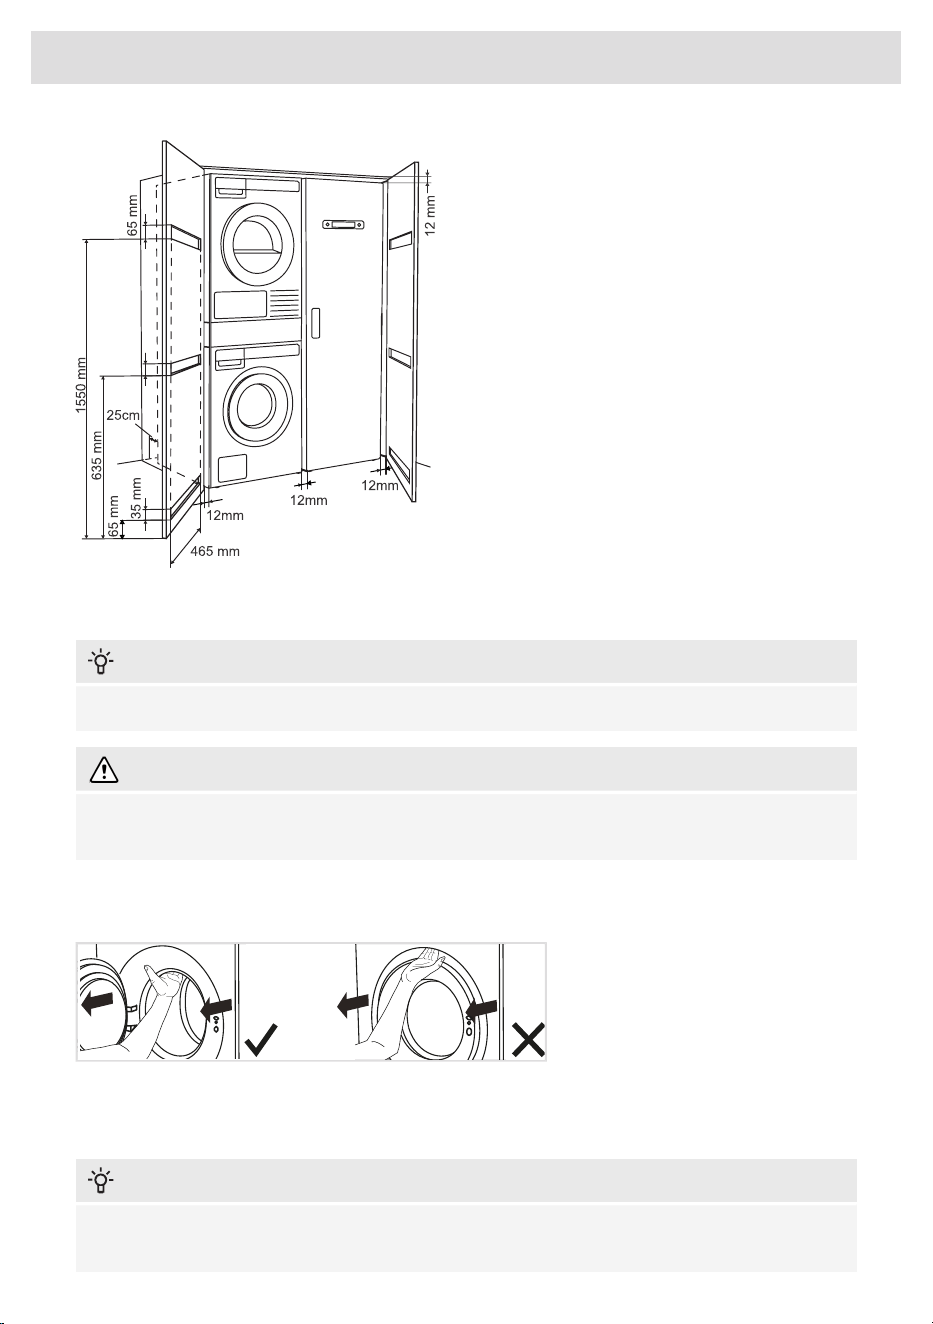
Ventilation Requirements of ASKO
laundry concept or closet installation
Make sure there is clearance between
appliances and cabinet or wall and 25 mm
minimum clearance between the rear edge of
the appliance top panel and the cabinet or
wall.
When closet or cabinet is closed by the door,
we recommend louvered doors, to ensure
proper ventilation.
Otherwise, the door must be fitted with
ventilation gaps. See figure for dimensions of
ventilation openings.
INFORMATION!
Ensure that the washing machine door can be opened without hindrance after installation.
WARNING!
Disregarding of instructions influences on appliance performance and may also result in failure
of the appliance.
Moving the washing machine and transport after installation
If you are moving the washing machine without packaging, open the washing machine door and
pull the appliance by holding the washing assembly, as indicated in the figure.
INFORMATION!
For any further moving of the appliance, use the transport protection (the washing machine drum
has to be blocked). See chapter Transport protection.
17
Installation and connection
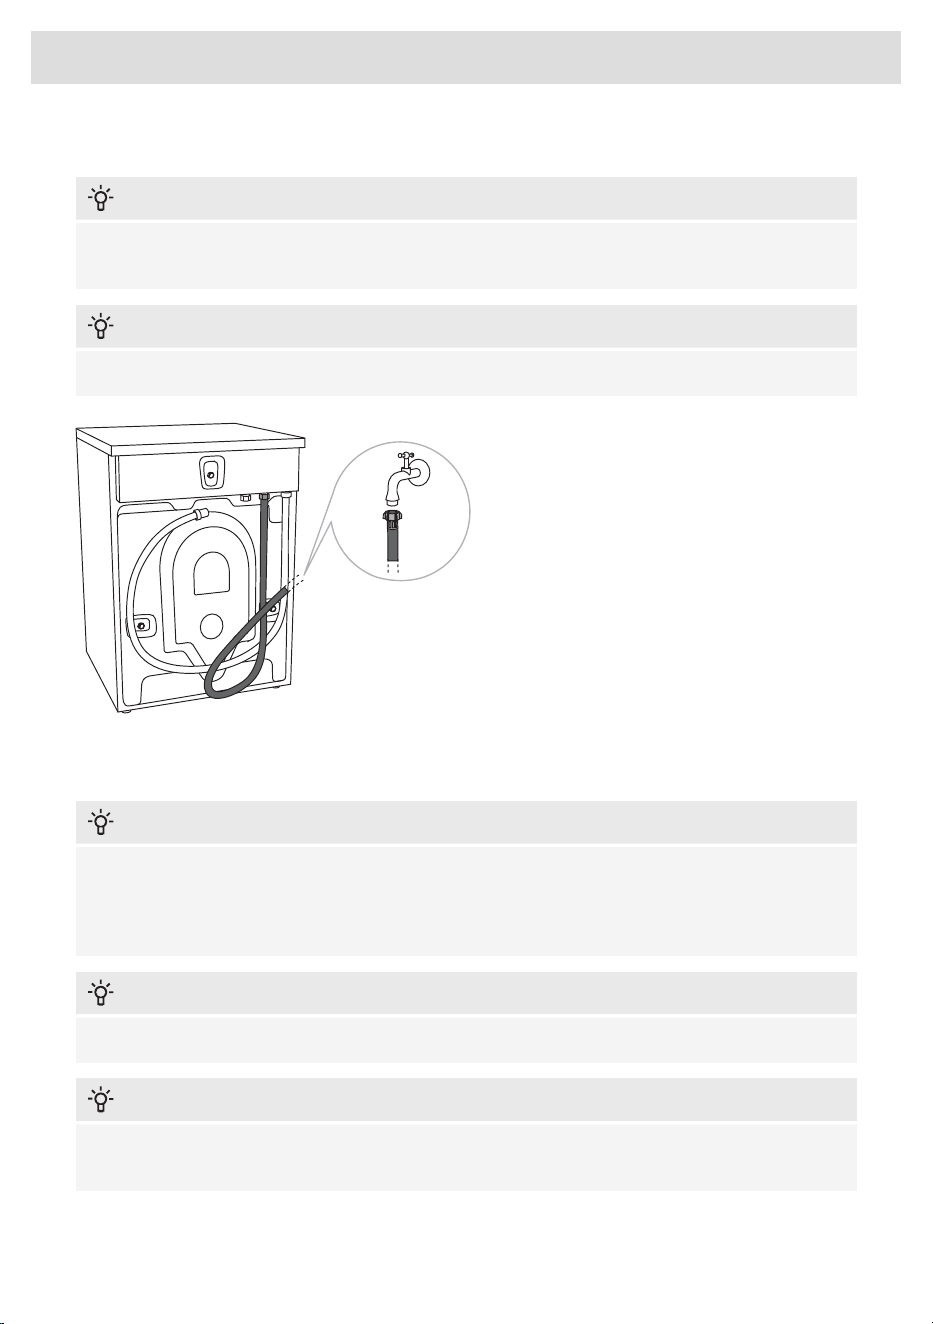
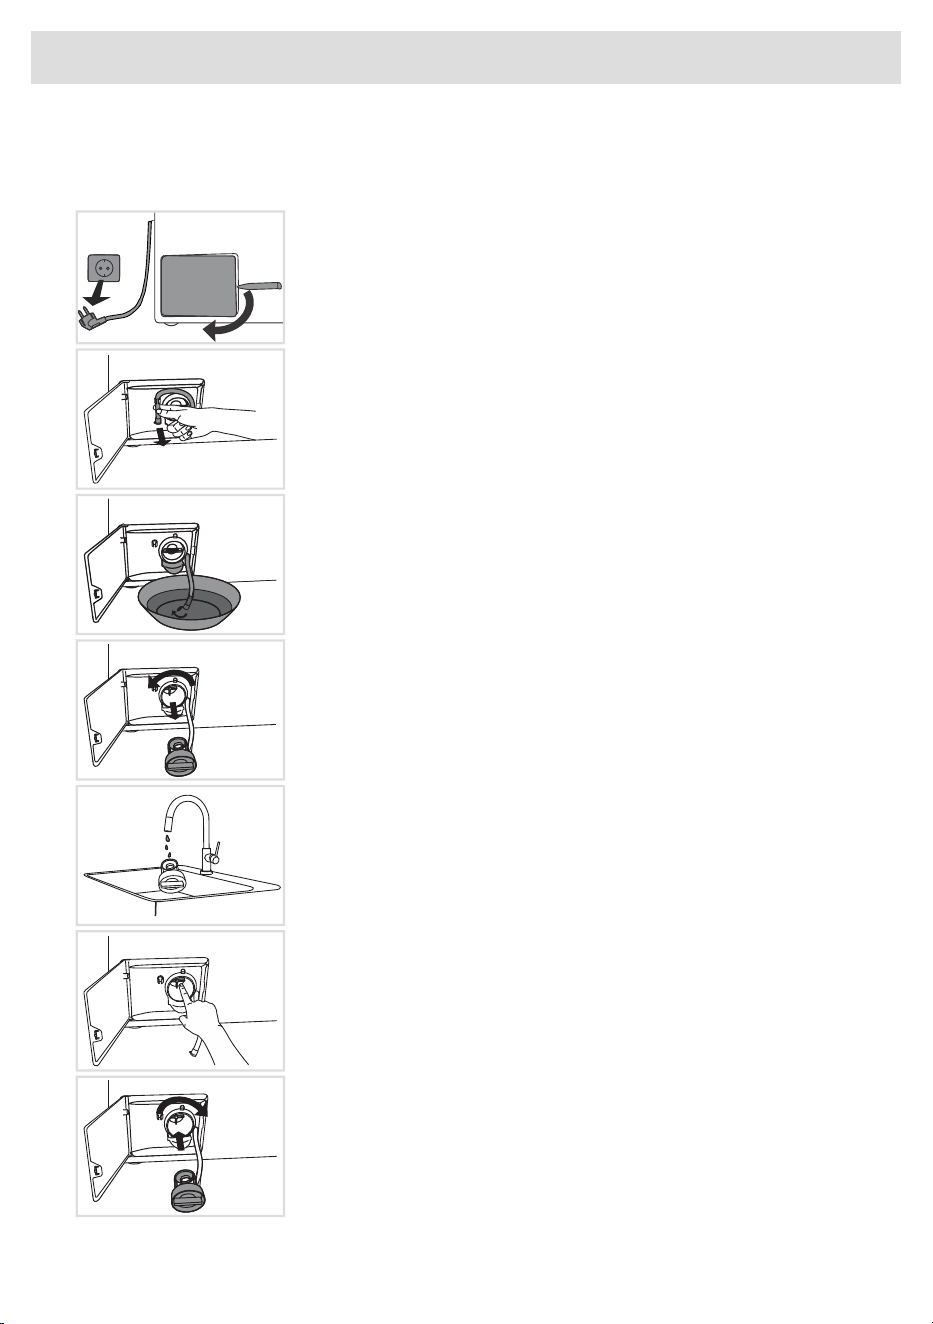
Connection to water supply
INFORMATION!
The water inlet hose is included inside the drum of the washing machine. Before use, it must be
connected to the appliance and the water supply.
INFORMATION!
The machine has to be connected to water supply by an adequately trained person.
STANDARD CONNECTION
Use the water supply hose to connect the
appliance. Water pressure has to be between
0.1-500 kPa (approximately 1–5 kp/cm
2
, 1-5
bar, 10–50 N/cm
2
).
If the hoses are newly installed, we
recommend rinsing them to remove any
impurities. Otherwise, these impurities could
clog the filter in the water connection on the
washing machine and thus cut off the water
supply.
The water intake hose has to be fastened firmly
enough for the hose to have a good seal. After
connecting the hose, the seal must be
checked for any leaks.
INFORMATION!
The washing machine has a sensor that detects water leakage. If there is water on the bottom of
the washing machine, the sensor is activated and trigger a shut-off system to cut the water supply
to the washing machine; washing process is stopped, water supply is shut off, the appliance
engages the pump, and signals an error.
INFORMATION!
Only use the water supply hose supplied with the appliance. Do not use any used or other hoses.
INFORMATION!
If the connection on the supply hose is of different dimensions than the water tap (e.g. 3/4” →
1/2”), use an adapter.
18
Installation and connection
INFORMATION!
When connecting the water supply hose, make sure to connect it in a way that allows adequate
and unobstructed water supply.
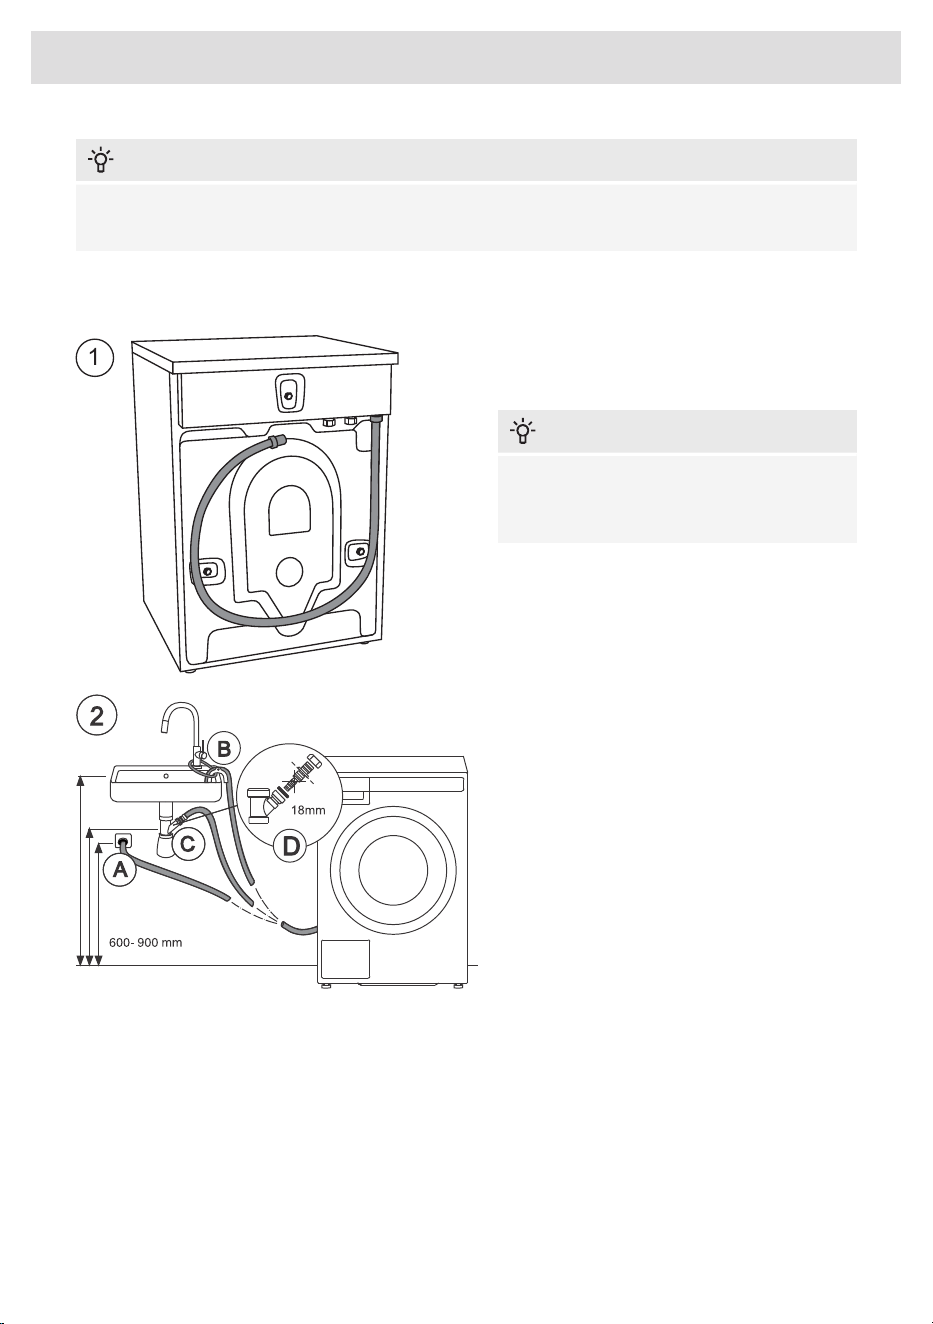
Installing the drain hose
Upon delivery, the washing machine has a
drain hose attached to the back wall (Figure
1), which must be connected to the drain.
1
INFORMATION!
If the drain hose is not correctly attached,
safe and correct washing machine
operation cannot be ensured.
The drain hose can be installed in three ways
(see Figure 2):
1 Into a wall drain with a siphon (A), which
must be properly installed so that it can be
cleaned;
2 Into a sink or bathtub (B). Use a string to
attach the hose through the opening in the
elbow so that it does not slip to the floor;
3 Directly into the sink drain (C). The diameter
of the drain hose must be at least 4 cm. The
internal hose diameter should be at least 18
mm (D).
The end of the drain hose can be no more than 900 mm and at least 600 mm from the ground. The
lower position (60 cm) is always recommended. Make sure the drain hose is not bent.
19
Installation and connection
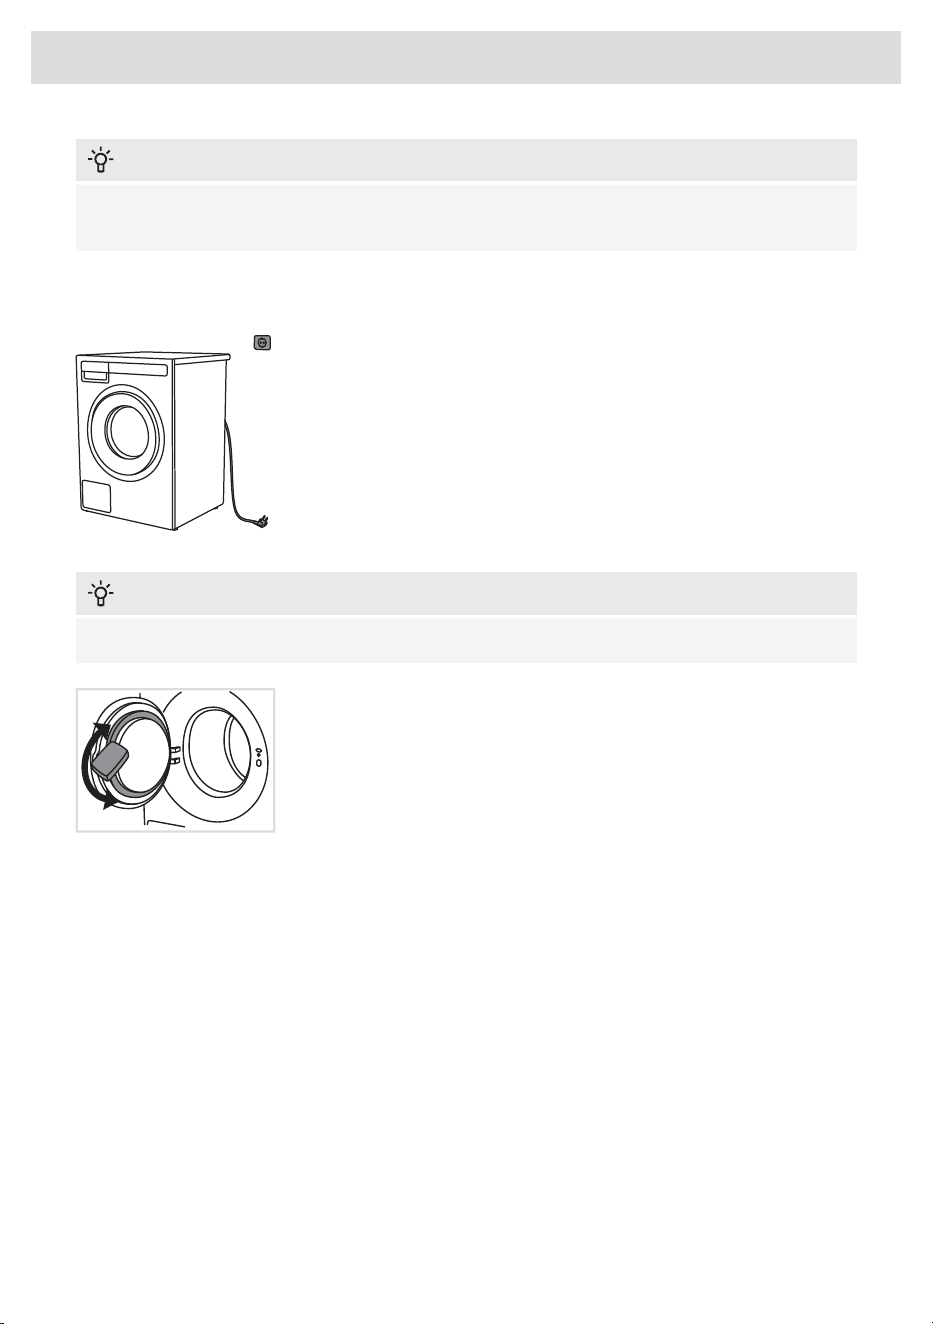
Connecting to the power mains
ELECTRIC SHOCK!
After installation, the washing machine should stand still for two hours before it is connected to
the power mains.
Connect the appliance to an earthed power outlet. After installation, the wall outlet should be freely
accessible. The outlet should be fitted with an earth contact (in compliance with the relevant
regulations).
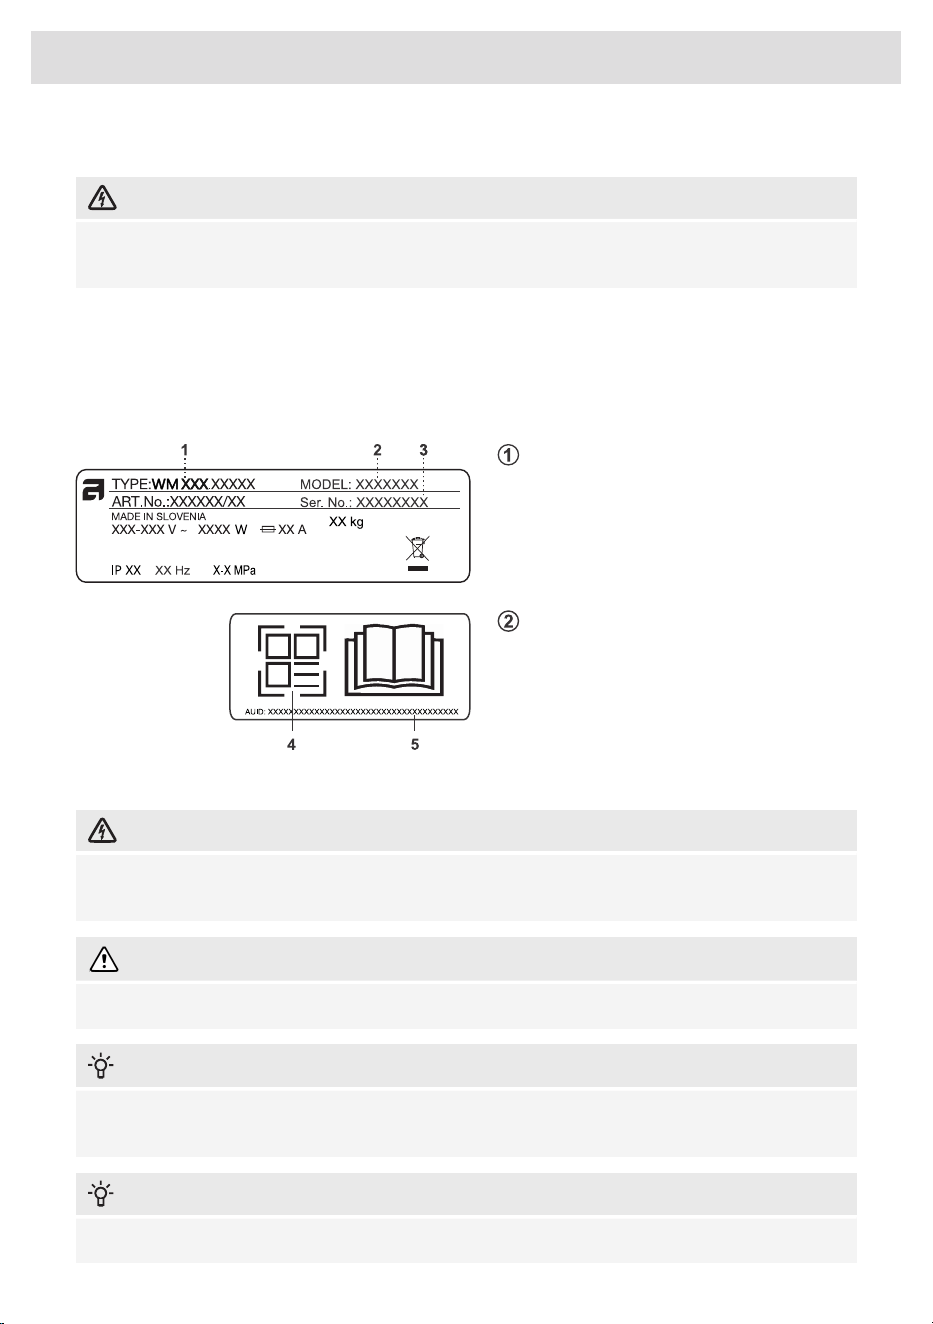
Connection upon delivery
Information about your washing machine is indicated on the rating (type) plate.
1 - Model type
2 - Model
3 - Serial number
4 - QR code
5 - AUID code
Use the type A differential current protection switch.
ELECTRIC SHOCK!
We recommend using overvoltage protection (overvoltage protection) to protect the appliance
in case of a lightning strike.
WARNING!
The washing machine may not be connected to the power mains using an extension cord.
INFORMATION!
Do not connect the washing machine to an electrical outlet intended for an electric shaver or hair
dryer.
INFORMATION!
Repairs and maintenance must be carried out by a qualified professional.
20
Installation and connection
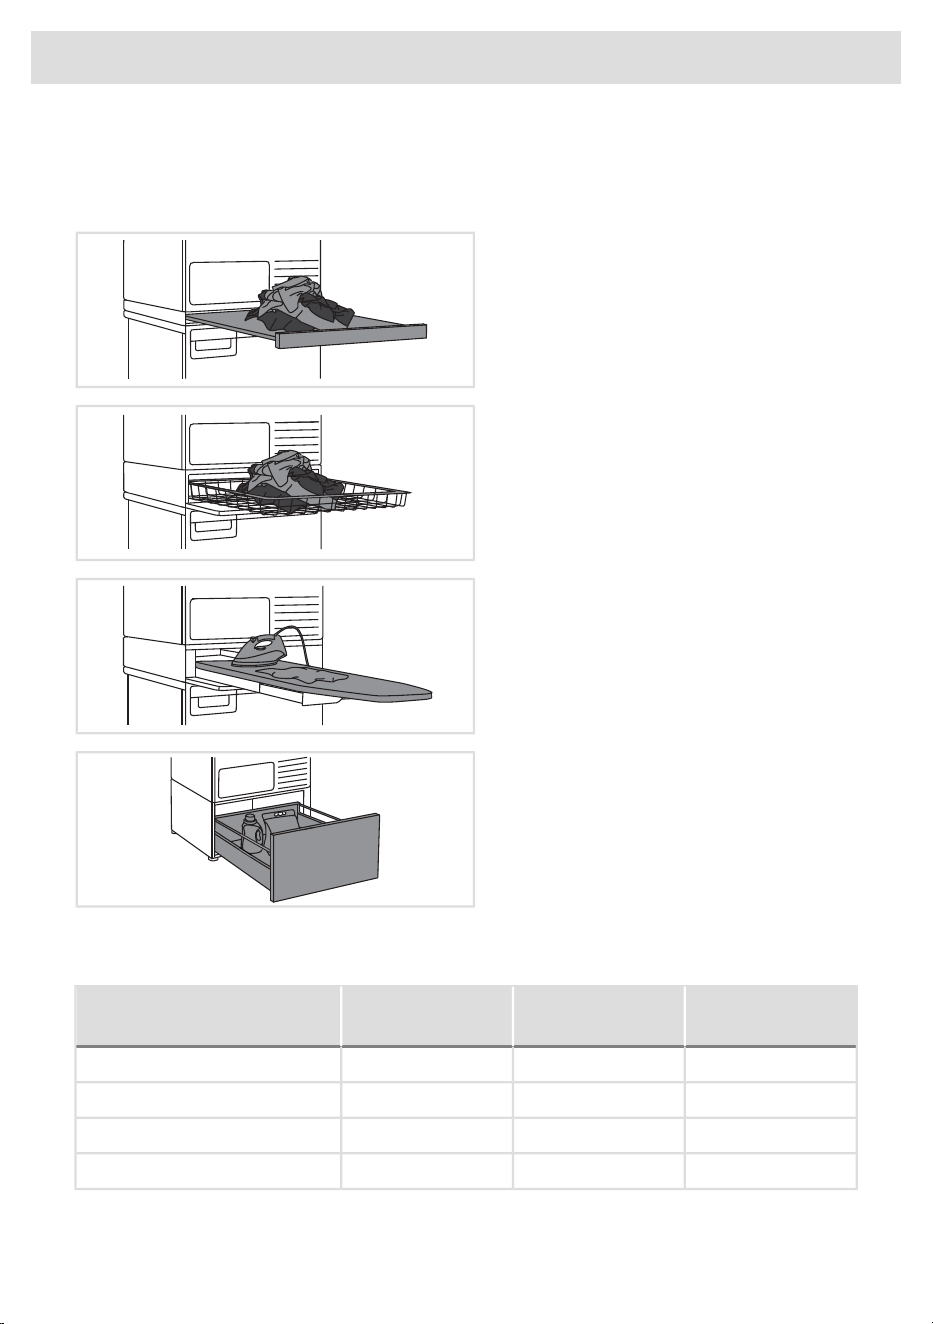
ASKO Laundry Care - Hidden helpers
The Hidden Helper (single shelf, basket, or ironing board) can be installed between the washing
machine and the dryer, or on top of either appliance.
SLIM - Single Shelf
Pull-out shelf. It can be used as an additional
surface when folding clothes and sorting socks
or for storage. It also makes loading and
unloading your laundry much easier. It can be
installed between your washer and dryer.
BASKET
A large pull-out basket that is easily accessible
via a push-pull door opening. Useful for
removing laundry and carrying it to the
wardrobe or workbench for ironing and folding.
IRONING BOARD
The ironing board is a clever solution. It is
always handy when you need to iron your
clothes, and it can be easily, safely and
invisibly stored away when not in use.
A PEDESTAL DRAWER
A useful storage drawer with a height of 30
cm. Ideal for storing your detergent, softener,
coat hangers, pegs, user manuals and other
useful items in the laundry area.
The pedestal drawer is installed under the washing machine or the dryer.
Availability depending on market
Graphite black
ART. No.
Titanium
ART. No.
White
ART. No.
DENOMINATION
HS60G - 746297HS60T - 746296HS60W - 746295SLIM
HB150G - 746300HB150T - 746299HB150W - 746298BASKET
HI150G - 746314HI150T - 746312HI150W - 746311IRONING BOARD
HP320G - 746317HP320T - 746316HP320W - 746315A PEDESTAL DRAWER
21
Installation and connection
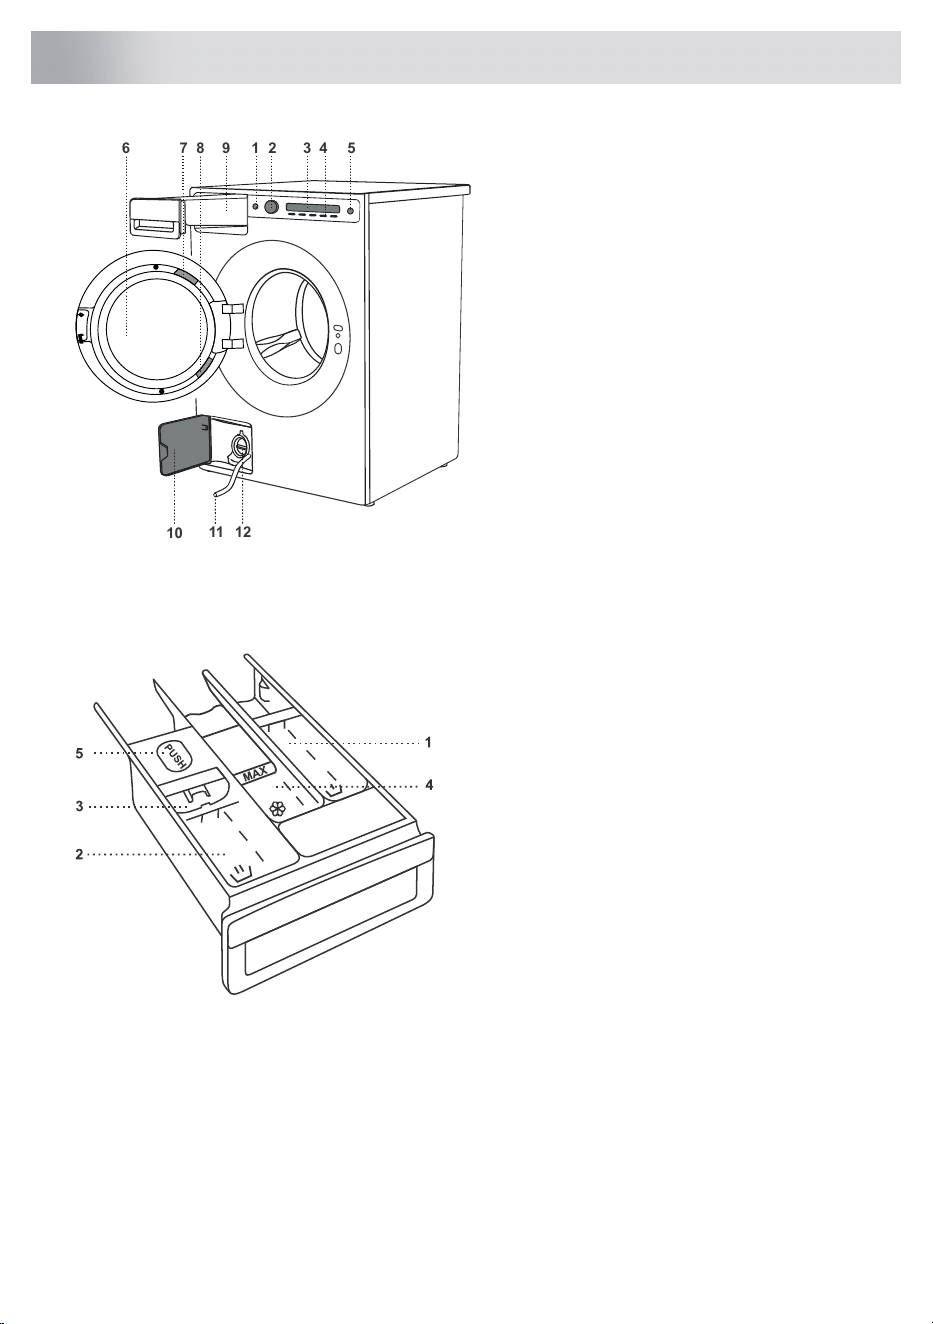
1 2 3 4 5
6
7
8
1211
10
9
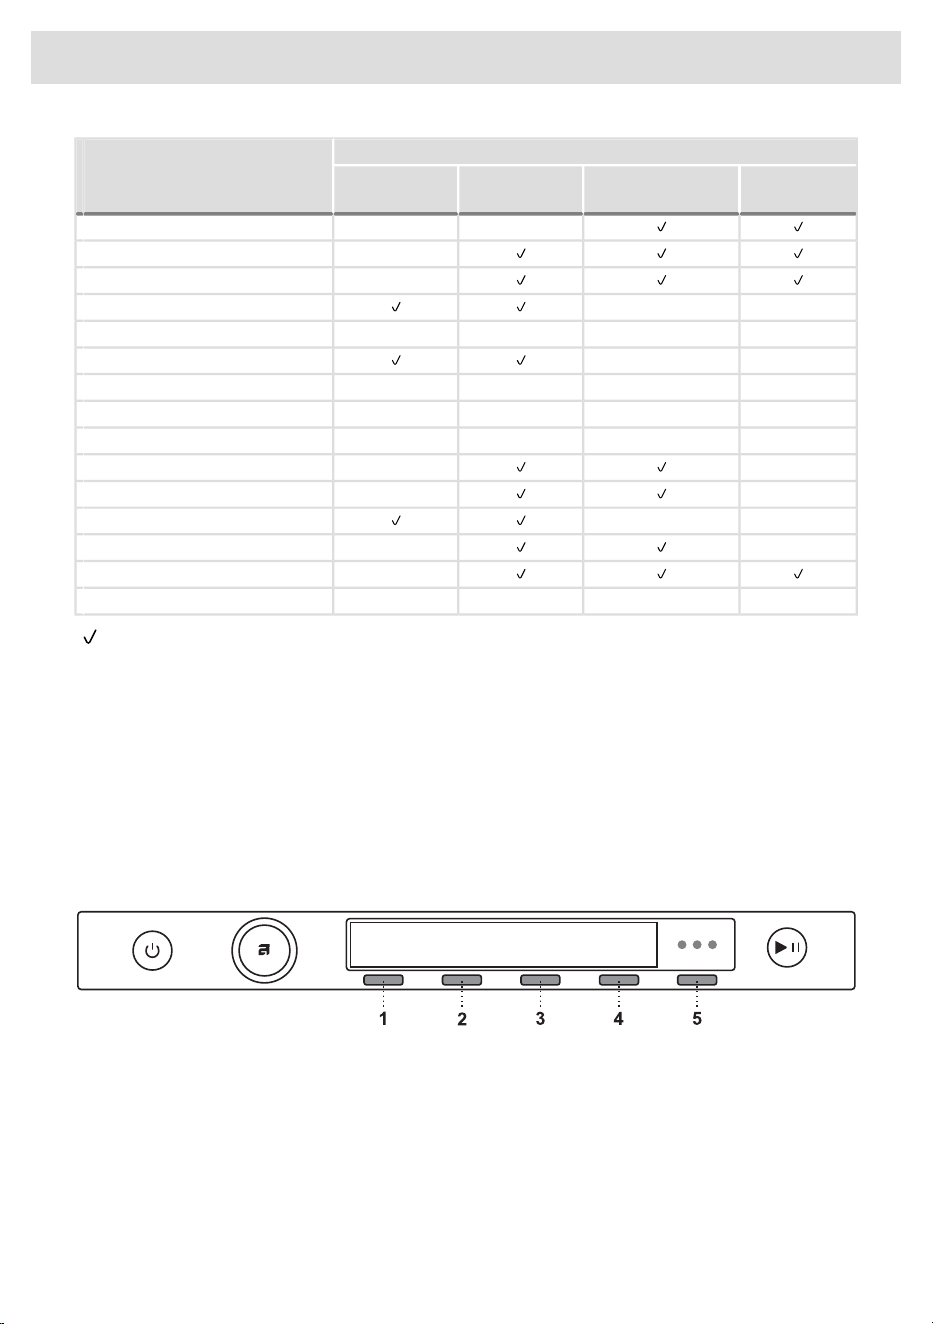
1. Main switch for turning On/Off
2. Program selector knob
3. Display unit
4. Program selector buttons
5. Start/Pause button
6. Washing machine door
7. QR and AUID code
8. Rating plate with information about the
washing machine (on the inside of the
washing machine door)
9. Dispenser tray
10. Drain filter cover
11. Water release hose
12. Drain filter pump (installed behind the
drain pump filter)
Dispenser tray
1. Prewash compartment
2. Compartment for main wash liquid
detergent
Use the foldable barrier (3).
3. Compartment for main wash powder
detergent
Do not use the foldable barrier (3).
4. Softener / conditioner compartment
5. Tab for detergent compartment removal
22
Washing machine description
When the machine is connected (see chapter Installation and connection) and turned on for the first
time, first set the following settings:
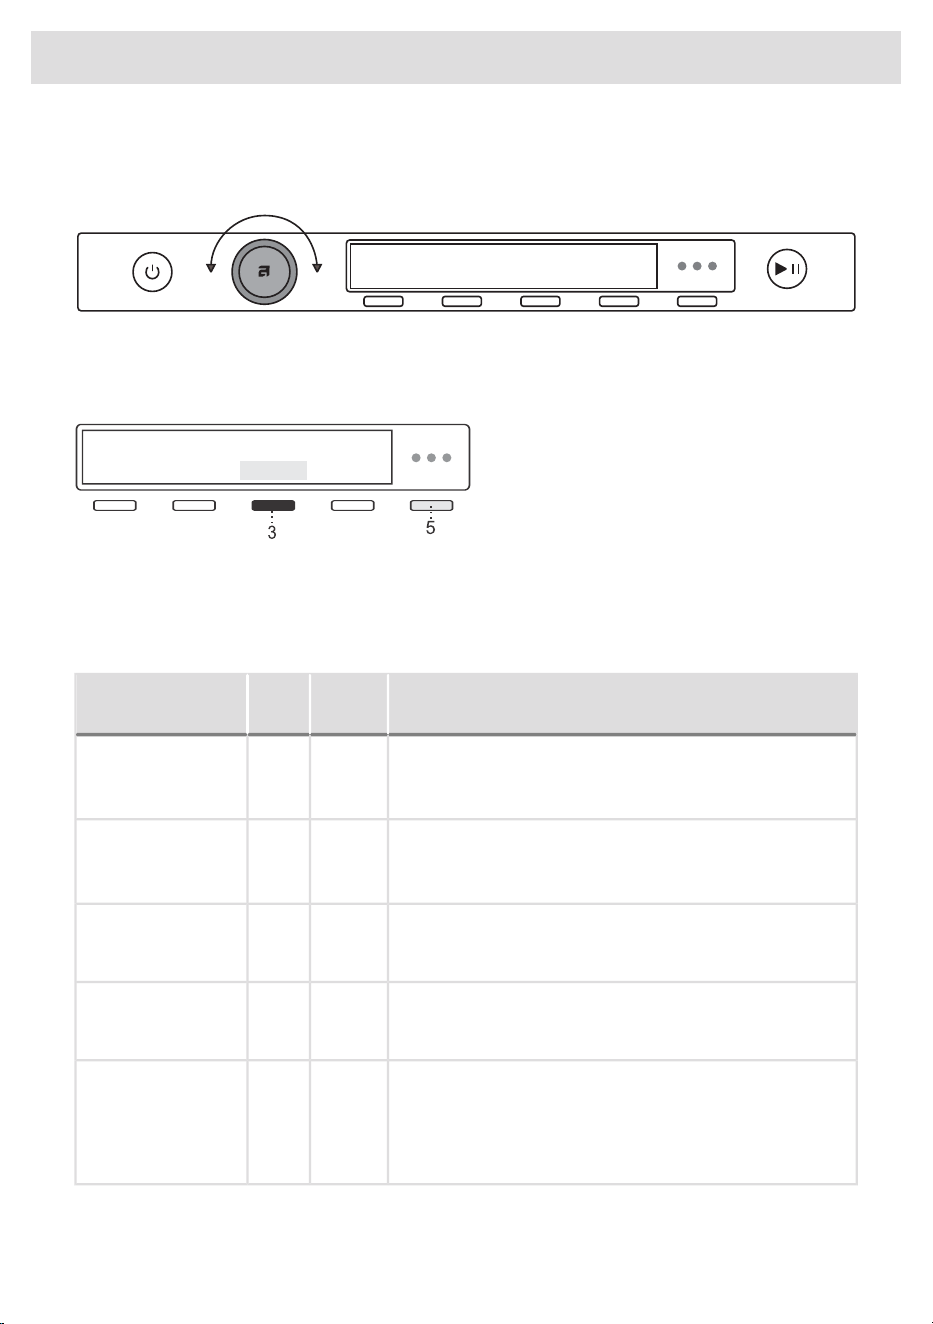
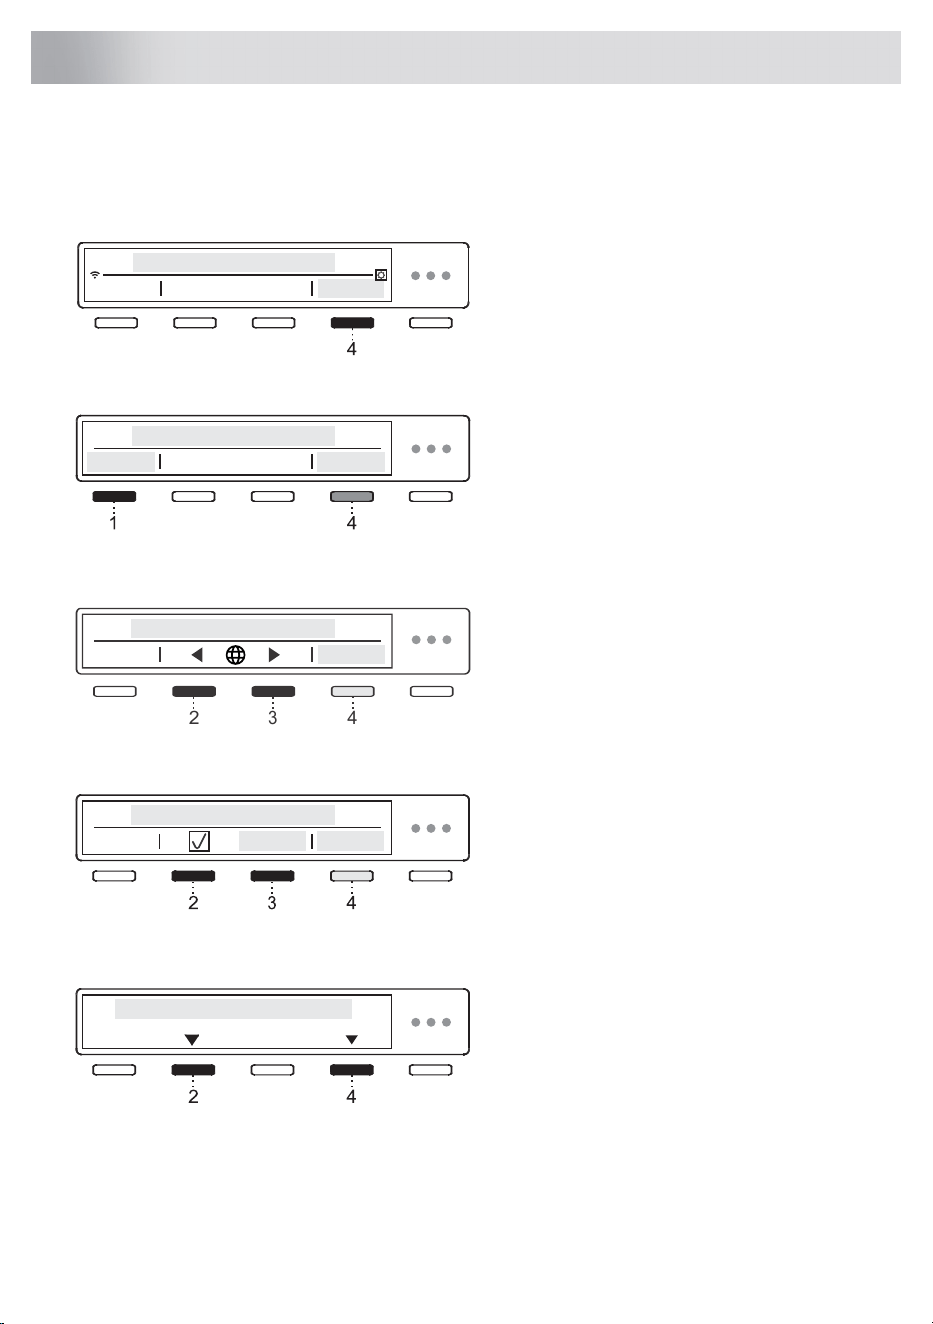
1. Choose language (Language)
Use the buttons 2 and 3 to navigate the list of
languages and select the desired language.
Confirm your selection by pressing 4 Save.
2
3
4
WARNING!
After the language has been selected, the appliance informs you that it is necessary to remove
all transport protection from the appliance. If you have already done so, continue setting up the
appliance by pressing 4 Confirm.
After you have selected the language, rotate the button clockwise and select the setting to set the
units of measurement.
2. Unit settings
Temperature unit
By pressing 1 set the unit of measurement for
temperature:
1
• Celsius °C or
• Fahrenheit °F.
Liquid unit
By pressing 2 set the unit of measurement for
liquids:
2
• Millilitres ml or
• Tablespoons tbsp.
Weight unit
By pressing 3 set the unit of measurement for
weight:
3
• Kilogrammes kg or
• Pounds lbs.
Confirm your selection by pressing 4 Save.
3. Water hardness
By pressing 2 and 3 choose the water
hardness between the following options: Soft
/ Normal / Hard.
1
3
2
23
Initial settings before use
For more information, press 1 Information.
How to determine the hardness of the water:
• use the test strip,
• contact your local water distributor.
Table for water hardness; see chapter System settings/Water hardness.
The amount of detergent also depends on the hardness of water. For details, see the detergent
packaging. Please contact your local water supply company to check the water hardness in your
area.
INFORMATION!
Before the product is dispatched from the factory, every appliance is tested.
As a result, there may be some residual water left in the discharge pump filter. This, however,
does not affect the quality and will not damage the appliance.
4. Wi-Fi settings
You can turn on the Wi-Fi connection by
pressing 3 and confirm your selection by
pressing 4 Save.
If you have turned on the Wi-Fi connection, see setup procedure in the below chapter How to enable
Wi-Fi on the device?.
If you do not want to set the Wi-Fi connection at this time, use the program selector knob to move
forward.
Your washing machine is now set up and ready to use.
24
Initial settings before use
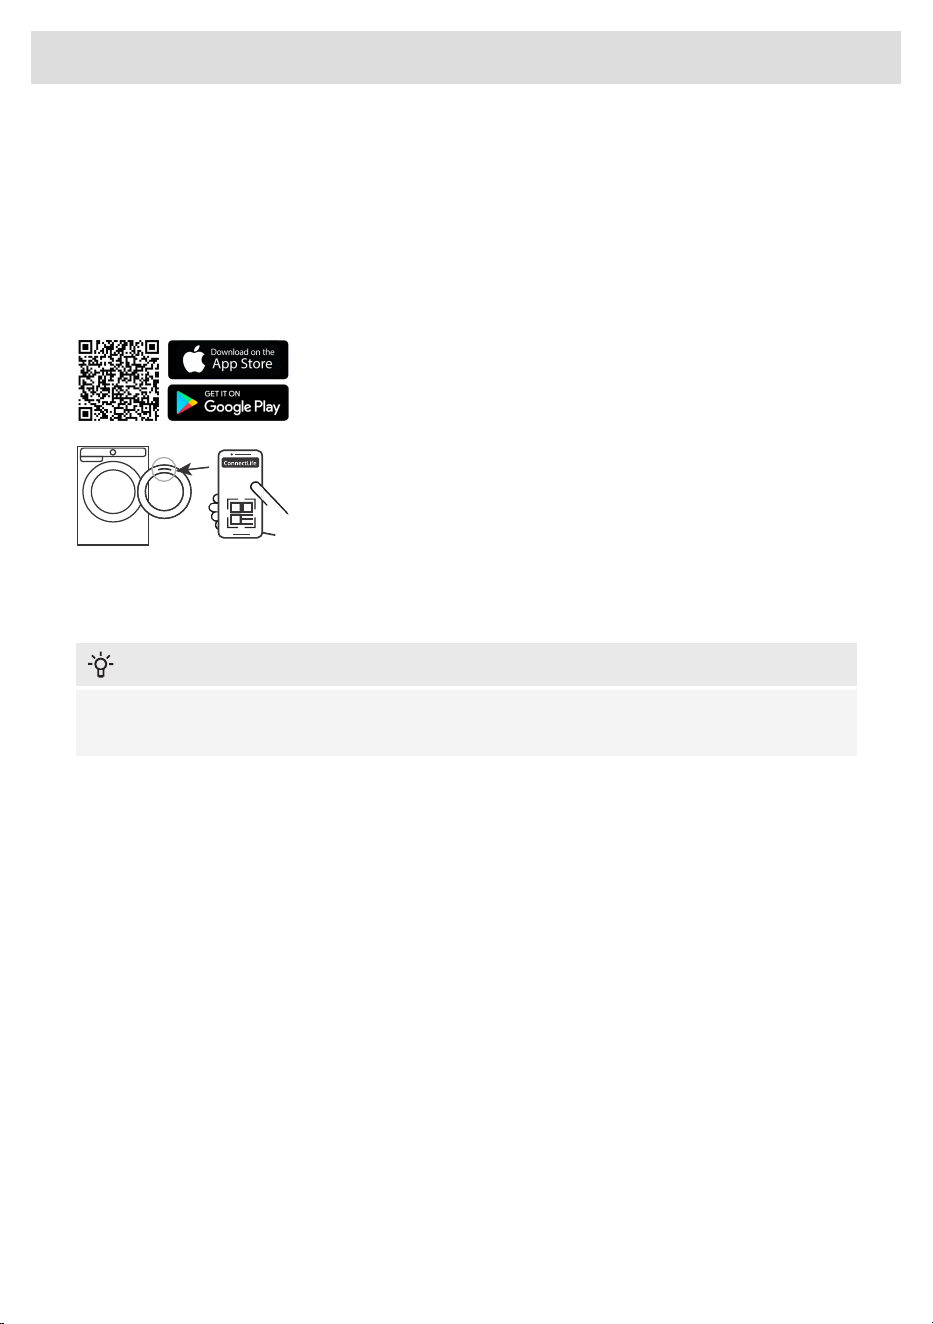
Appliance connection with the ConnectLife application
ConnectLife is an advanced smart home platform that enables seamless connectivity between
people, devices, and services. With the ConnectLife app you can easily monitor and manage your
smart devices, receive notifications directly to your smart device and update software (available
functions depend on your appliance and region).
To connect your smart device to the ConnectLife platform, you need a home Wi-Fi network (2.4 GHz
networks are supported) and a smart device with the app ConnectLife.
STEP 1: Download the ConnectLife app by scanning the included QR
code or searching for it in your favorite app store.
STEP 2: Install the ConnectLife app and create an account.
STEP 3: In the ConnectLife app, go to the »Add device« menu and
select the appropriate type of device. Then scan the QR code (it can
be found on the rating plate of the appliance; you can also enter the
AUID/SN number manually).
STEP 4: The application then guides you through the entire process of
connecting the appliance to your smart device.
After a successful connection, the appliance can be operated remotely via the application.
Useful tips for your smart device
INFORMATION!
The QR code of the device required by the app during the installation process can be found on
the rating plate of the appliance (see chapter: Service).
How to enable Wi-Fi on the device?
1. Turn on the appliance. In the main menu, use the programme selector knob to select System
settings. Confirm your selection by pressing (4) Enter.
2. Rotate the programme selection knob to the right and select Wi-Fi settings. Confirm your selection
by pressing (4) Enter.
3. If the Wi-Fi system is not switched on, turn it on by pressing (3).
4. Use the programme selector knob to select Connection setup, and press (3) Enter. Press (4) Next.
5. If you do not yet have the ConnectLife app installed on your smartphone (or any other smart
device), install it now (scan the QR code on the screen), create your user account and login.
6. In the ConnectLife app, open the add device menu.•
• Follow the instructions in ConnectLife.
- Select the type of appliance.
- Scan the QR code (it can be found on the rating plate of the appliance).
• On the appliance, press (4) Next.
- The 5 minute countdown will begin. During this time, connect the app to the appliance.
• In the ConnectLife app, instructions will guide you through the process of entering the
appropriate data for your appliance to connect to your home network.
25
Initial settings before use

How to enable remote start of the appliance?
In the main menu, rotate the programme selector knob left to select Remote start . To activate, press
the Start/Pause button (the door must be closed) and confirm settings with press on button 4
»Confirm«. The display will show (Remote start/Activated).
The appliance is now ready for remote control through ConnectLife app.
INFORMATION!
Remote start will remain active for the next 24 hours unless cancelled. During this time, the
appliance can enter standby mode and switch off the display. If this happens, the logo will remain
lit, which means that Remote start is still active.
How to add another user or multiple users?
See chapter How to enable Wi-Fi on the device? and observe points 1 and 2.
Use the programme selector knob to select Add device(Add device), and press (3) Enter(Enter). As
a new user, if you do not yet have the ConnectLife app installed, install it on your smart device.
• In the ConnectLife app, go to the Add device menu and follow the instructions.
• On the appliance, press (4) Next.
• The 3 minute countdown will begin. During this time, connect the app to the appliance.-
• You can then complete and confirm the setting in the app.
How to remove the users?
How to remove a user (Remove device)?
See chapter How to enable Wi-Fi on the device? and observe points 1 and 2.
Use the programme selector knob to select Remove device, and press (3) Enter. Press (4) Ok. Follow
the instructions on the appliance screen.
INFORMATION!
This step will remove all active users of the appliance. If you want to operate the appliance
remotely again you will need to repeat the process of adding a user.
Which Wi-Fi router can be used?
Only 2,4 GHz networks are supported. If the ConnectLife app cannot find your local network during
the connection set-up process, check the following:
• your router is operating at the frequency of 2.4 GHz,
• your network is hidden, and
• your signal is strong enough.
Do you have more questions?
26
Initial settings before use

Remotely upgrading the software
When you receive a software update notification, you can choose to update your software from the
app menu in your settings. Upon confirmation, the update is performed, the appliance must be in
standby mode during this time (more on standby mode in chapter Table of consumption values).
Check the software update options in the ConnectLife app.
27
Initial settings before use
This chapter includes several tips on how to prepare the laundry for washing.
Before using the washing machine, carefully remove any solid objects and particles from the textiles
you intend to wash to prevent damage to the appliance or clogging of the pump filter. This includes
(also check all pockets and flaps):
• solid objects (e.g., screws, clips, small stones, hay, etc.),
• food residues (e.g., bones, dried dough, etc.),
• dried particles of construction materials (e.g., mortar, sand, mud, etc.).
WARNING!
The manufacturer assumes no responsibility for malfunctions resulting from failure to follow these
instructions, which may also affect the validity of the warranty. Furthermore, the manufacturer
does not cover service costs in the event of foreign objects in the pump or pump cleaning.
Laundry sorting
Sort the laundry according to:
• how soiled it is,
• colour,
• material,
• permissible washing temperature.
Clothing
• Sort the laundry by type of fabric, colour, soiling, and allowed washing temperature (see Program
chart).
• Wash the laundry that sheds a lot of fibre or lint separately from other laundry.
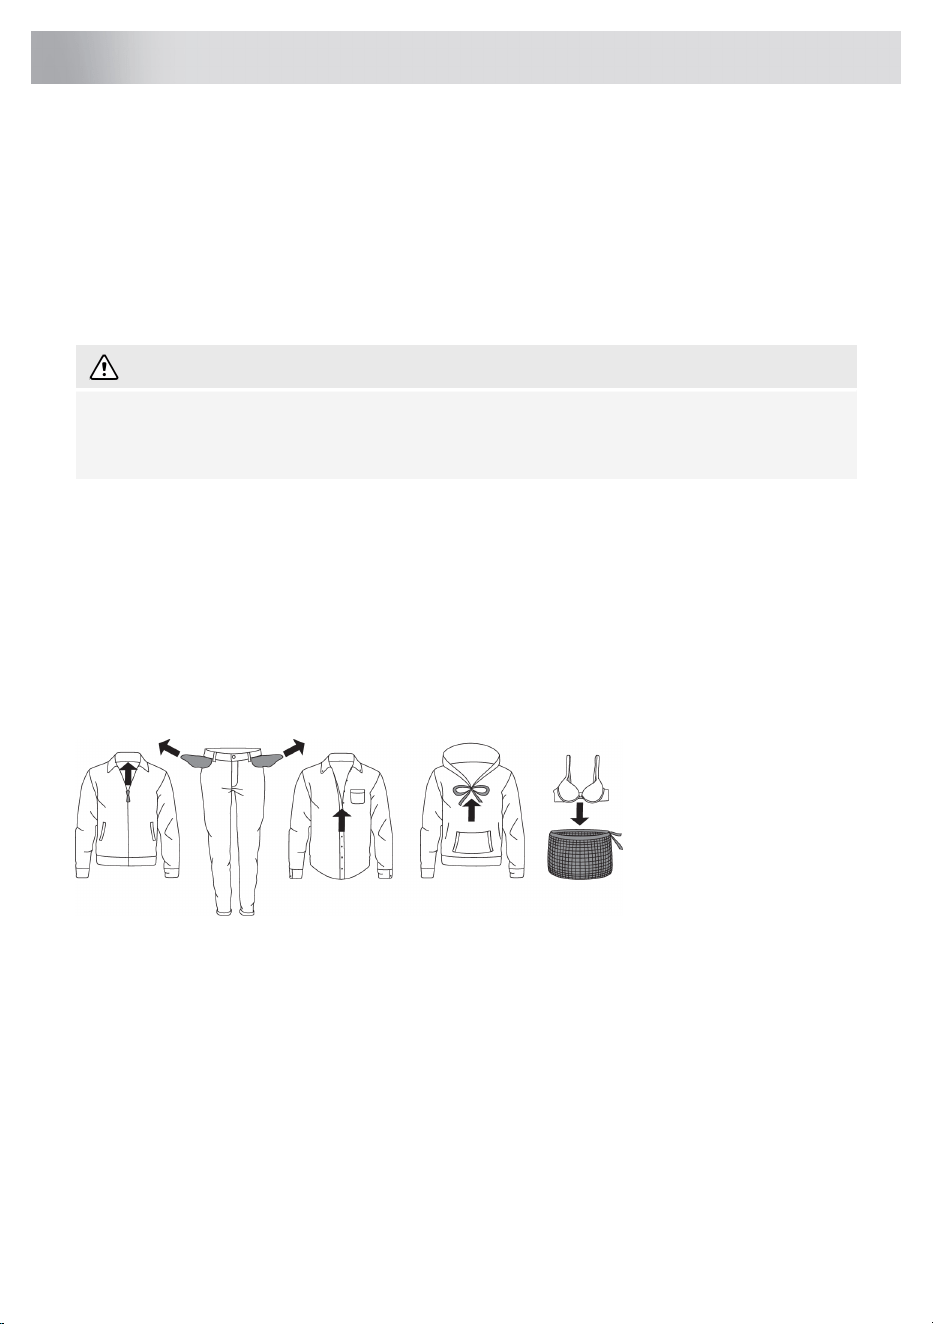
• Empty the pockets. Coins, nails etc. could damage the machine and the fabric.
• Close the buttons and zippers, tie any ribbons, and turn the pockets inside out; remove any
metal clips that could damage the laundry and washing machine interior, or clog the drain.
• Turn delicate items inside out. This will decrease the risk of tear and colour fading.
• Place very sensitive clothes and small items in a special-purpose laundry washing bag.
(The special-purpose laundry bag is available as an optional accessory.)
28
Tips before washing
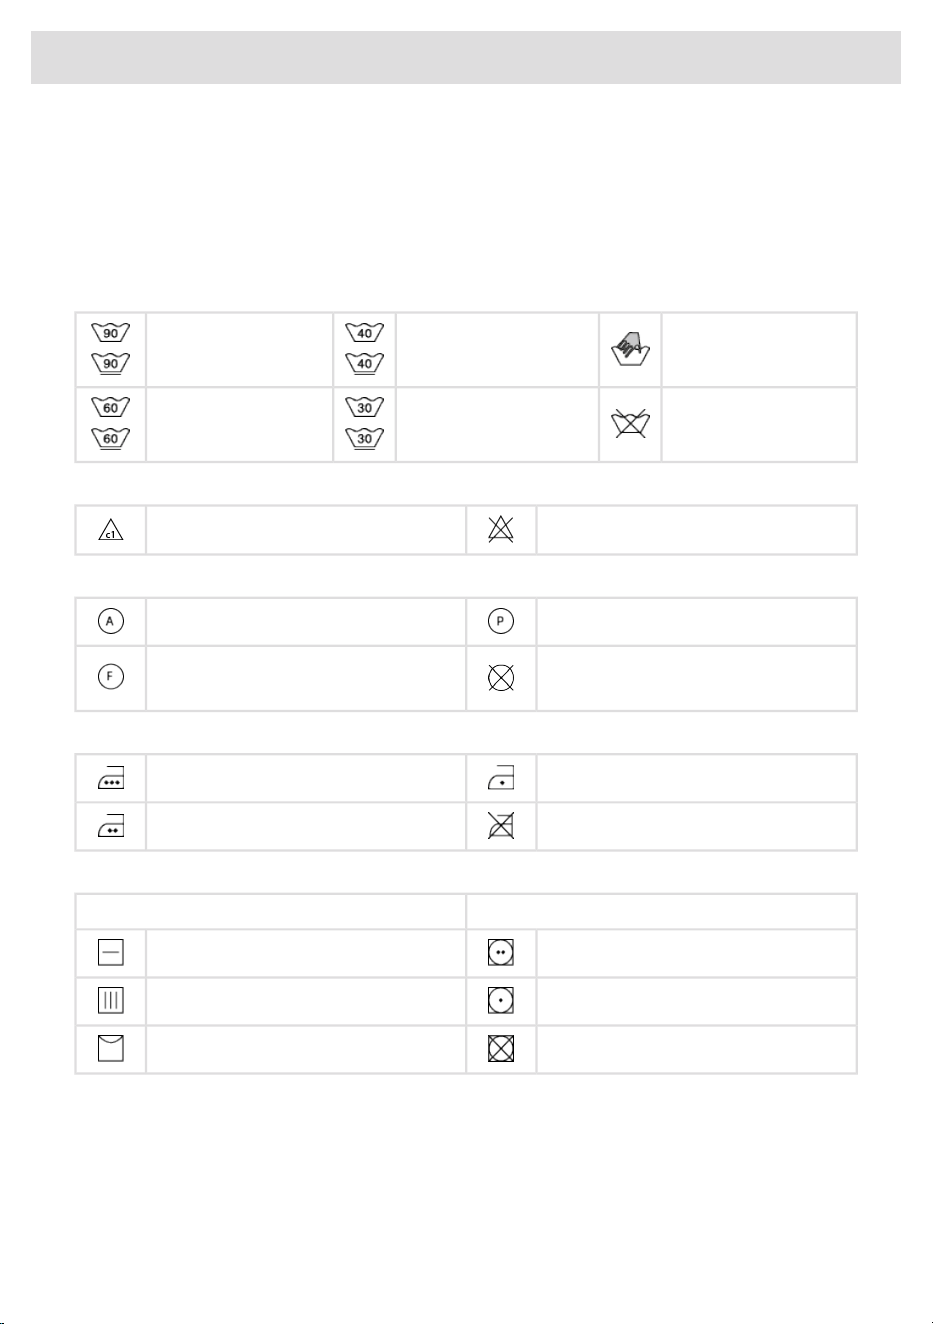
Laundry symbols
Observe the laundry symbols.
Textile maintenance symbols:
Normal wash;
Sensitive laundry
Hand wash only
Max. washing temp.
40°C
Max. washing temp.
cold - 90°C
Do not wash
Max. washing temp.
30°C
Max. washing temp.
60°C
Bleaching
Bleaching not allowedBleaching in cool water
Dry cleaning
Perchloroethylene R11, R113, petroleumDry cleaning with all agents
Dry cleaning not allowed
Dry cleaning in kerosene, pure alcohol,
and R113
Ironing
Hot ironing, max. 110°CHot ironing, max. 200°C
Ironing not allowedHot ironing, max. 150°C
Drying
Tumble dryingNatural drying
Drying at high temperaturesDrying on a flat surface
Drying at low temperaturesDrying without prior spinning
Tumble drying not allowedDrying on a clothes line or a hanger
29
Tips before washing

Laundry types
Dyed cotton
Laundry made of dyed cotton which is to be washed at 40 °C should be first washed at a temperature
of 60 °C to remove the excess dye. If this is not done, there is danger of dye being washed out of
such items. To maintain the colour of the fabric, use bleach-free detergent.
Unbleached linen
Unbleached linen fabrics should be washed at 60 °C with a detergent free of bleach or optical
bleaching agents. Heavily soiled linen laundry may be occasionally washed at higher temperatures,
but do not do this too often as heat could ruin the shine and strength of linen laundry.
Wool
These fabrics are intended for either machine or hand wash. The Wool/Hand Wash program is equally
gentle or even gentler than an actual hand wash.
Wool in particular is sensitive to washing and similar procedures.
When selecting the Wool/Hand wash program use wool detergent and avoid using fabric softener.
If you do not wish to spin your clothes, select a setting without spinning (see chapter STEP 6: Choosing
the program settings). However, most clothes are able to withstand a short spinning period. Top
spinning speed available is 800 rpm.
Viscose and synthetic fibres
Materials made of viscose and some synthetic fibres are highly sensitive, and require a lot of space
in order not to crease. When washing fill the recommended load for the program and choose a
program with spinning speed of no more than 1200 rpm.
INFORMATION!
Viscose and acetates are fragile when wet.
Saving time and energy
Save time by using Speed mode and save power with the Eco (ecological) washing mode (Green
mode).
Economy and efficiency
You can save a lot of energy by not using the programs operating at higher temperatures.
Select the Quick program if you wish to only refresh the laundry or use the Time program. This will
save water and power.
Selecting the maximum spinning speed will reduce power consumption if you dry the clothes in a
dryer or a drying cabinet.
Detergents
INFORMATION!
Detergents carrying the environment protection label are less harmful to the environment.
30
Tips before washing

Only use detergents for machine washing.
When using thick liquid laundry care products, we recommend diluting them with water to prevent
clogging the dispenser tray drain.
Liquid detergents are intended for washing programmes without a prewash cycle.
Only add the detergents in compliance with the recommendations by detergent manufacturers.
Recommended amount of washing detergent at certain loads and water hardness levels are specified
on the detergent packaging.
Dosing accessories
To correctly dose detergents, especially liquid ones, use the accessories provided by the detergent
manufacturer.
Stains
If your clothes are soiled with stubborn stains (blood, eggs, coffee, grass etc.), they should be
appropriately treated before the wash. Then, wash your laundry using the special programs (if your
washing machine has them).
Before using special-purpose stain removers, try using the natural methods that do not harm the
environment on less stubborn stains.
However, prompt action is required! Soak the stain with an absorbent sponge or a paper towel; then,
rinse with cold (lukewarm) water – but never with hot water!
When using bleaches or stain removal agents, there is danger of rust (corrosion) and discolouration.
WARNING!
To protect the environment, we advise against using powerful chemicals.
Do not use any chemical substances or agents; only use the stain removing detergents.
Dyeing fabrics
If you want to dye fabrics in the machine, choose the Normal program with the option to select the
Super rinse function. Choose the temperature according to the dye manufacturer's recommendations.
If you dye mixed fabrics, such as polyester/cotton, choose a low spinning speed.
After dyeing use the Drum Cleaning program. Use the usual amount of detergent.
When using bleaches or stain removal agents, there is danger of rust (corrosion) and discolouration.
WARNING!
To protect the environment, we advise against using powerful chemicals.
If you wash at low temperatures and/or with liquid detergents, there is a risk of developing
microorganisms and an unpleasant odour in the washing machine. Leave the washing machine door
open after each wash to allow the appliance to dry. If you detect an unpleasant odour, run the Drum
Cleaning programme.
31
Tips before washing

To prevent and remove limescale deposits only use agents with added anti-corrosion protection.
Observe the cleaning agent manufacturer's instructions. To remove limescale deposits, we
recommend starting the Drum Cleaning programme. Add spirit vinegar (2 dl).
We recommend avoiding washing very small amounts of laundry as this will lead to excessive use
of energy and poorer washing machine performance.
You can save energy and water by filling up the washing machine to the capacity specified by the
manufacturer for each programme.
32
Tips before washing
STEP 1: Sort the laundry
See chapter Tips before washing.
INFORMATION!
Use a washing net for underwire bras. Empty the pockets. Coins, nails etc. could damage the
machine and the fabric.
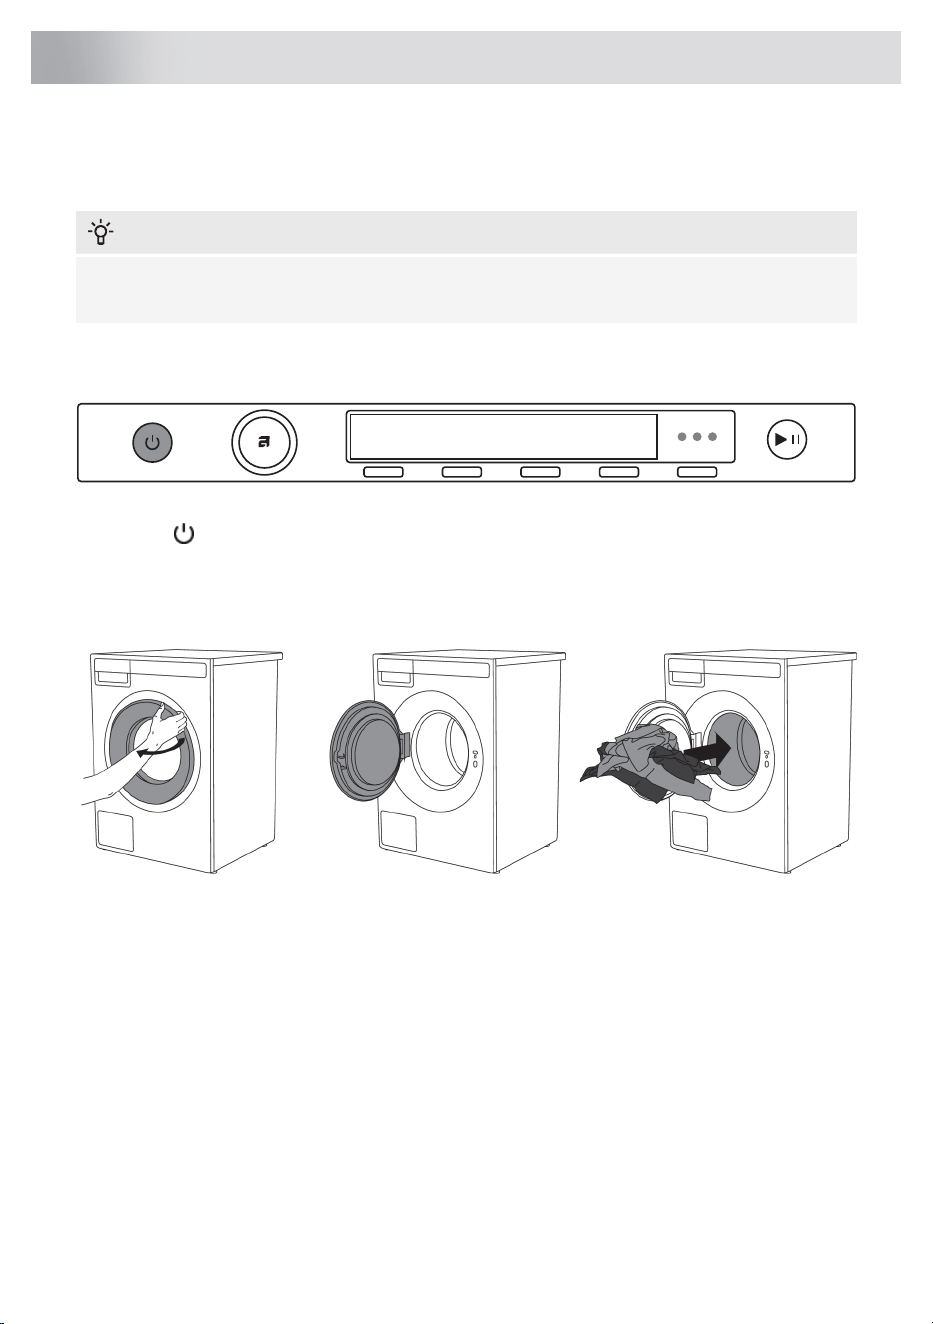
STEP 2: Turn on the main switch
On/Off
Press the on/off button.
STEP 3: Open the washing machine door and insert the laundry
Open the washing machine door by pulling the handle towards you.
Place the laundry into the washing machine drum.
Before doing so, make sure the drum is empty.
Do not overload the drum!
If the washing machine drum is too full, the laundry will not be washed as thoroughly.
STEP 4: Add the detergent and the conditioner
Recommended amount of detergent is usually specified on the detergent packaging. When washing
a smaller amount of laundry, the amount of detergent used can be decreased.
Observe manufacturers' recommendations regarding the type of detergent suitable for certain
temperatures, load size, and water hardness.
33
Washing process, step by step (1 – 8)

Powder detergent
INFORMATION!
We recommend adding the powder detergent immediately before the washing cycle. Otherwise,
make sure the detergent compartment is completely dry before adding the powder detergent,
as otherwise, the powder detergent may cake before the start of the washing process.
Liquid detergent
When using liquid detergent and softeners, follow the detergent manufacturer's recommendations.
When using thick detergents, we always recommend using the laundry balls. In the detergent
compartment, use the separator (3); see figure in the chapter Description of the washing machine
Washing machine description Dispenser tray.
Add the liquid detergent to the compartment for the main wash (1).
Laundry ball or washing bag
If you are using a laundry ball or a washing bag, place it directly into the drum and choose a program
without any prewash.
INFORMATION!
An excessive amount of detergent will not improve washing results. Rather, it will lead to foaming
and increase the environmental impact. We recommend using less detergent. Only increase the
dosage if you are not satisfied with the washing results.
Conditioner
Pour the conditioner into the detergent compartment, into the compartment with the symbol .
Observe the recommendation on the conditioner packaging.
INFORMATION!
Do not fill the conditioner compartment over the max. indication (maximum indicated level).
Otherwise, the conditioner will be added to the washing machine drum too soon, leading to poorer
washing effect.
34
Washing process, step by step (1 – 8)
STEP 5: Choose the program
Choose the program by rotating the Program selector knob in either direction.
Choose the program depending on the type and dirt level of laundry (see chapter Tips before
washing).
Estimated program duration will appear on the display.
With the selected program, you can press key
5 and then key 3 Information to display a brief
description of the program and the maximum
load.
Extra program settings can also be selected for each program. See STEP 6: Choosing the program
settings.
Program chart
Choose between the following programs:
Description
Spin Speed
(rpm)
Capacity
(kg)
Program
Use Normal program to clean normally soiled cotton
laundry.
1400
11
FL
Normal
2)
cold–90°C
The MIX/Synthetic program is adapted for clothing made
of synthetic and mixed fibres or viscose and for easy care
of cotton laundry.
12004
Mix/Synthetics
2)
cold–60°C
Use the white laundry program for normally to heavily soiled
white laundry. Select a lower temperature for less soiled
laundry and a higher temperature for heavily soiled clothes.
1400
5.5
HL
White laundry
cold–90°C
This program is used for washing coloured laundry using
special purpose detergents for coloured laundry. We
recommend turning dark garments inside out.
1200
5.5
HL
Coloured laundry
cold–60°C
Gentle washing program for washing wool, silk, and clothes
that require manual washing. Maximum temperature is
40°C. This programme has a short spinning cycle. Top
spinning speed available is 1200 rpm.
8003
Wool/Hand wash
cold–40°C
Do not use conditioner with this program!
35
Washing process, step by step (1 – 8)

Choose between the following programs:
Description
Spin Speed
(rpm)
Capacity
(kg)
Program
Program for delicate clothing made of synthetic and mixed
fibres, and for simple care of cotton or viscose. It may also
be used for pillows, quilted jackets and similar items, as it
uses a lot of water for the wash. Carefully read the washing
instructions. If the outer layer has a membrane, do not use
a conditioner. Washing temperature can be set up to 40
°C, and spinning speed can be set up to 1000 rpm.
8004
Delicates
cold–40°C
This program is suitable for washing clothing with
membranes, waterproof clothing, and breathable clothing,
requiring simple care. It is suitable for sportswear made of
mixed materials. It combines low temperature with gentle
tumbling.
12004.5
Sportswear
30°C–60°C
Do not use conditioner with this program!
The program is suitable for washing winter jackets, coats
and all outerwear that is heavily soiled.
8004.5
Outerwear
cold–40°C
Use the Time program to set the program time, from 20
minutes to 2 hours. Be sure to choose the time and
temperature appropriate to the degree of soiling of the
laundry.
14002
Time program
cold–60°C
The program allows clothes to be softened and disinfected.
Steam refresh reduces or eliminates the need for ironing.
/2
Steam Refresh
After steam refresh the laundry may be slightly damp or
contain minor traces of water.
A quick program with high efficiency for smaller amounts
of lightly soiled laundry. The program washes with intensive
tumbling and MAX rpm.
14004
Quick PRO
40°C–60°C
The program is suitable for laundry that only needs rinsing,
and for cleaning cloths or mops.
1400
11
FL
Rinse
Use the program when you only wish to spin the laundry.
1400
11
FL
Spinning
If you only wish to pump out the water from the washing
machine, choose the Drain program.
/
Drain
Use the Shirts program for shirts and blouses. This is a very
gentle anti-crease program. The program uses steam at
the end of the program.
10004
Shirts/Blouses
cold–60°C
The program can be used to protect the colour of your dark
clothing or jeans with the selected temperature and spin.
12004.5
Jeans
cold–40°C
Use the Beddings and towels program to wash large items
such as bed linen. The program uses extra water and extra
rinsing.
14006
Bedding/Towels
30°C–90°C
36
Washing process, step by step (1 – 8)
Choose between the following programs:
Description
Spin Speed
(rpm)
Capacity
(kg)
Program
Use this program to wash blankets, coats, vests or jackets.
Place garments in the machine so they don’t touch the
rubber seal or the glass.
12004.5
Down
cold–40°C
Leisurewear and microfibre program. We recommend using
an impregnation agent.
4004.5
Waterproofing
This programme is used for cleaning the drum and
removing the residue of detergent and bacteria. To select
the programme, rotate the program selector knob to the
left or to the right to the Drum clean (Cleaning programme)
position. Other extra functions cannot be selected.
The drum must be empty.Do not add detergent or
softener! You can add some spirit vinegar (approx. 2 dl)
or sodium bicarbonate (1 tablespoon or 15 g) for effective
descaling. We recommend that you use the program at
least once a month.
/
Drum Cleaning
Information for test institutes: During a test in compliance with the applicable standard EN60456,
you must select the maximal possible spin speed.
2)
Full load
FL
Half load
HL
Cold wash
cold
INFORMATION!
In terms of energy and water consumption, programmes that operate at lower temperatures and
last longer are generally the most efficient.
INFORMATION!
Noise and residual moisture content are affected by the spinning rate: the higher the spinning
rate in the spin cycle, the higher the noise and the lower the residual moisture content.
Recommendations for detergents under Regulation (EU) No. 1015/2010
Detergent
Program Special
For delicate
laundry and wool
For coloured
laundryUniversal
Normal
Mix/Synthetics
White laundry
Coloured laundry
Wool/Hand wash
37
Washing process, step by step (1 – 8)
Detergent
Program Special
For delicate
laundry and wool
For coloured
laundryUniversal
Delicates
Sportswear
Outerwear
Time program
Steam Refresh
Quick PRO
Rinse
Spinning
Drain
Shirts/Blouses
Jeans
Bedding/Towels
Down
Waterproofing
Drum Cleaning
Choice of options
STEP 6: Choosing the program settings
Using the program settings, the washing programs can be further adjusted to your wishes.
Some selected program settings will remain stored after the wash is complete and may be changed
subsequently. The following settings are saved: spinning, ADS, washing modes, temperature, extra
rinse, prewash and extra water. Other settings such as: small load, steam disinfection, rinsing and
stopping, anti-creasing, delayed start and manual assist cannot be saved.
Selected program settings will remain stored after the end of the washing cycle and may be changed
subsequently (except for delayed start which is not stored after the wash is complete).
1. Washing mode (Mode)
2. Temperature
3. Spin
4. Dose
5. Extra functions
Choose the program settings before pressing the Start/Pause button.
When a washing program is in progress, program settings cannot be changed.
38
Washing process, step by step (1 – 8)

INFORMATION!
Press and hold the button below the program setting to display information about that program
setting.
INFORMATION!
Some settings may not be available on washing programs.
Following are the programme settings that may be selected using the buttons 1 to 4:
Washing mode (Mode)
The following washing modes are available:
• Default mode
(Basic setting)
• (Eco) Green mode
(Wash that saves energy; lower water consumption).
• Speed mode
(Time-saving wash; shorter washing times, higher water and energy consumption).
In the Normal program, we recommend a half-load.
Temperature
The actual available temperature options, will depend on the selected program.
The following temperatures are available for the selected program:
Cold wash and 20/30/40/50/60/70/80/90 °C.
Spin
The following spinning rates are available for the selected program: max. (rpm) /... / no Drain (max.
rpm = depends on the model).
Default setting is 1400 rpm; it depends on the selected program (spin rate can be changed – reduced
or increased (only in some models)).
The actual available spin speed will depend on the selected washing program.
Manual assist
There are several different ways to dispense detergent:
• Manual dose,
• Manual assist,
With the Manual Assist function, the washing machine will recommend the optimum amount of
detergent according to the selected settings.
Recommended amount of detergent depends on the water hardness, the selected wash program,
and the amount of laundry.
39
Washing process, step by step (1 – 8)

After activating the Manual Assist function, you can select the dirt level of the laundry (3 levels are
available). Once you have selected the dirt level, press button 4 (OK). Then, press the Start button,
and the washing machine will begin calculating the appropriate amount of detergent. The
recommended amount will be displayed on the display.
Left: Concentrated amount of detergent. Right: Non-concentrated amount of detergent. Add the
recommended amount of detergent to the dosing container (in the main wash compartment) and
press the Start button to begin washing.
For more program settings, press the button (5) and then confirm the selection with the (1) More
options button. Turn the knob to select the desired setting. Press the button (3) to confirm the setting.
The following program settings are available:
Small load
The small load function adjusts the use of water and energy to ensure thorough washing while
reducing waste. The small laundry load can be activated to show the correct time if you add up to
2,5 kg of laundry.
Confirm the selection by pressing (3).
Steam desinfection
Steam disinfection is a low temperature disinfection cycle.
Before the start of the main wash, steam is supplied to the washing machine to disinfect your clothes.
Confirm the selection by pressing 3.
Prewash
To use prewash before the main wash, choose the Prewash option. Use of this setting is recommended
for heavily soiled laundry or for laundry with stubborn surface stains.
You can select prewash by pressing 3. Confirm the selection by pressing 4 OK.
Add the prewash detergent into the prewash compartment and the main wash detergent into the
main wash compartment of the detergent compartment (see chapter »DETERGENT
COMPARTMENT«).
High water level
The High Water Level option increases the amount of water used during the main wash and rinsing
phases and is available with certain programmes.
This setting enables more thorough washing and rinsing for heavily soiled laundry, better care of
larger or delicate fabrics, and more effective removal of stains and detergent residues.
Confirm the selection by pressing 3. Confirm the selection by pressing 4 OK.
Super rinse
Choose between turning on or turning off the Super rinse.
The setting helps to ensure that the clothes are rinsed thoroughly without leaving behind any detergent
residue or dirt. This is recommended for persons with highly sensitive skin and/or in areas with very
soft water. The setting allows for double extra rinsing.
Confirm the selection by pressing 3. Confirm the selection by pressing 4 OK.
40
Washing process, step by step (1 – 8)

Rinse and hold
The setting does not include a final spin cycle. If enabled (On), the laundry remains in the final rinse
water after the wash is completed, awaiting your next selected step.
You can resume in the following ways:
Unlock the door: the machine drains the water and stops the program.
Spin and finish: spinning is carried out and the wash is completed.
The purpose of the setting is to prevent the garments from developing a bad smell, as it allows you
to complete the program after several hours when the user determines how to resume and complete
the spin cycle.
Confirm the selection by pressing 3. Confirm the selection by pressing 4 OK.
Anti crease
To prevent creasing, select the Anti-crease function (gentle tumbling). This function is recommended
for delicate laundry.
Confirm the selection by pressing 3. Confirm the selection by pressing 4 OK.
It will be carried out after the washing cycle.
Delay start
Choose the delayed start setting when you wish the washing program to start after a certain period
of time.
You can choose a start delay time from 30 minutes to 6 hours in 30-minute steps, and then from 6
hours to 24 hours in 1-hour steps.
Press the Start/Pause button to start. When the countdown reaches zero, the selected washing
program will start automatically.
If you do not take any action for 5 minutes, the display will turn off.
By pressing the On/Off button you can reactivate it. The display will show the countdown to the start
of the washing cycle.
The display will activate 1 minute before the start of the washing cycle.
After the countdown, washing time will be indicated on the display.
If you want to cancel the delayed start and initiate the washing process immediately, press Skip.
When the Delayed start is already set, it can be cancelled by pressing the Start/Pause button for 3
seconds to return to initial selection.
INFORMATION!
If you have set the delayed start function and you are using liquid detergent, we do not recommend
choosing a programme with a pre-wash cycle.
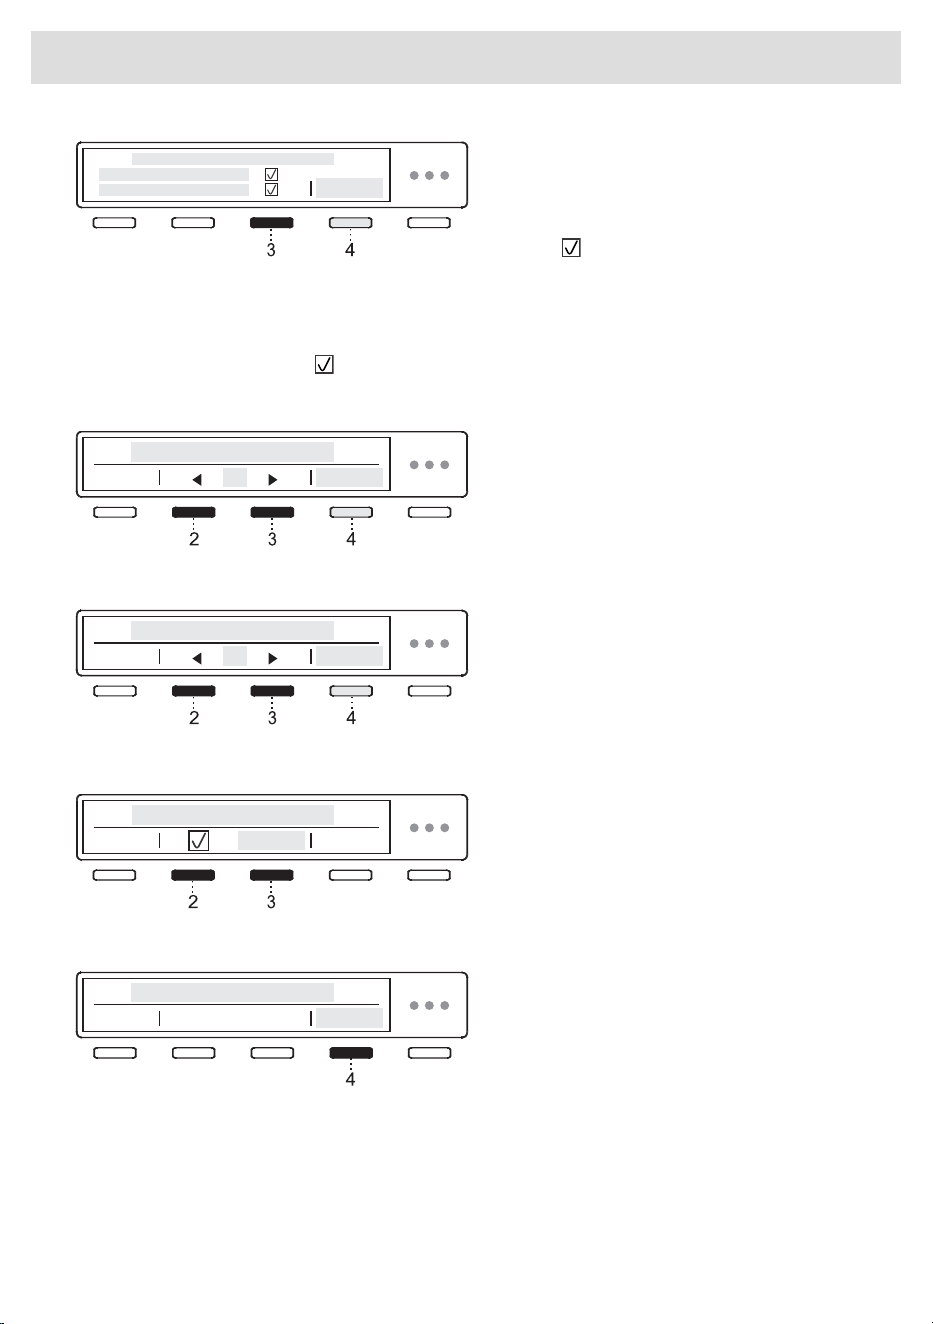
Add to favourite
To add the selected program to your favourites, confirm your selection by pressing 3.
Next to the selected program, the following icon will light up . The program will be stored.
41
Washing process, step by step (1 – 8)
You can store up to 6 favourite programmes.
• Removing a favourite programme
When all 6 slots are taken, it is not possible to set a new programme.
To add a new favourite programme, you need to delete an existing one beforehand.
To remove a favourite program, select the program you want to remove. Select the setting Add
to favourite and confirm the removal of the favourite program by pressing 3 Remove. The program
will be removed.
To select System settings, rotate the program selector knob all the way to the right and confirm the
selection by pressing 4 Enter.
If you do not take any action for 5 minutes, the display will switch to standby mode.
To activate the display, press the On/Off button or open the washing machine door.
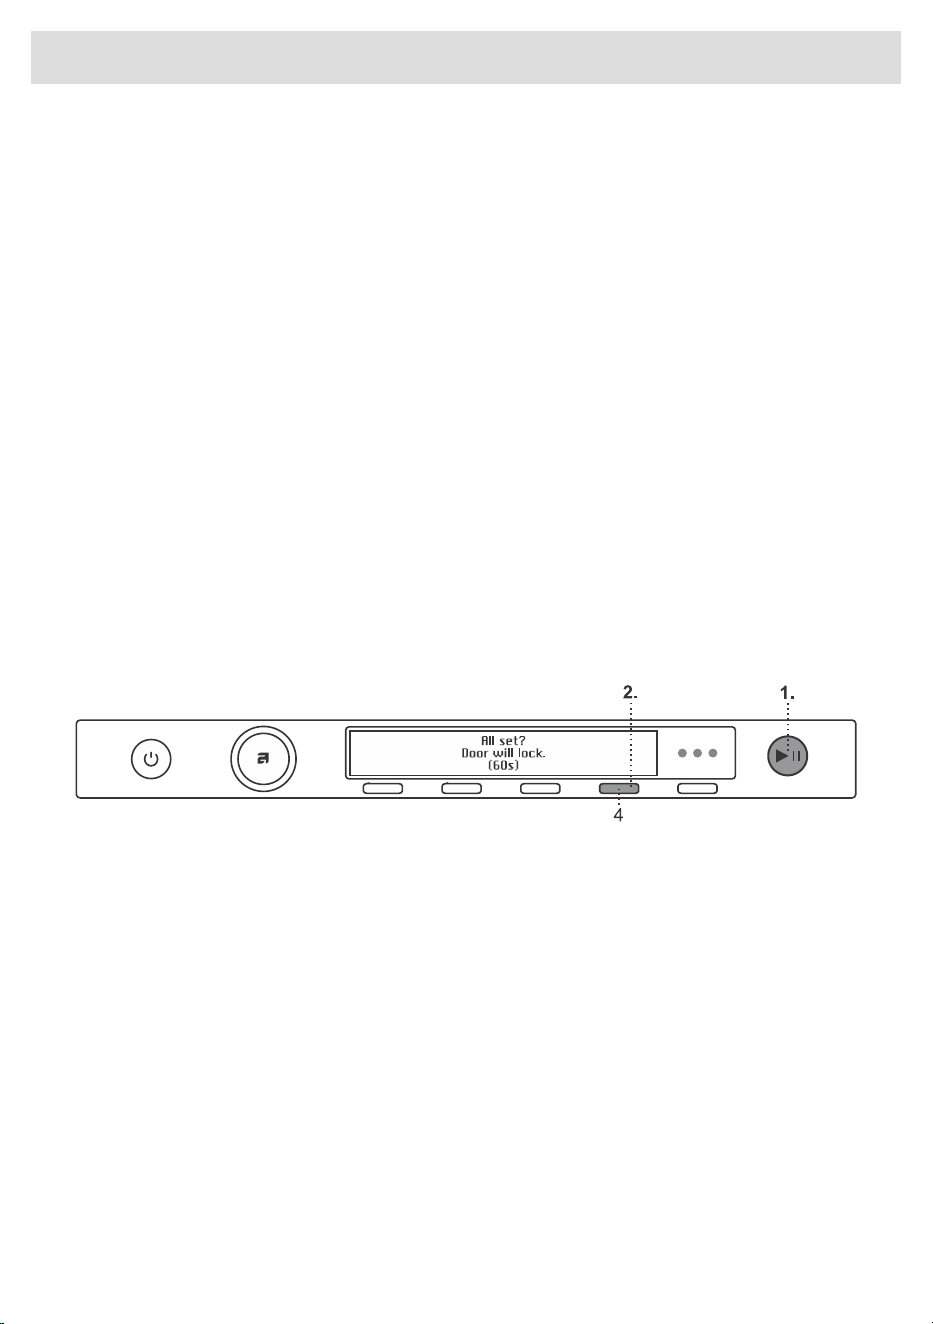
STEP 7: Start the wash
Close the washing machine door.
To start the programme, follow these steps:
1 Press the Start/Pause button.
2 When the message »All set? Door will lock.« appears on the display, press the button (4)
»Confirm« in 60 seconds.
If no confirmation is made within 60 seconds, the start sequence will be cancelled. To start the
programme, press the Start/Pause button again and repeat the confirmation.
By pressing the Start/Pause button, you can start or resume the washing programme and temporarily
pause the programme.
Cancel (press and hold the button for 3 seconds)
Time remaining
Depending on the selected program, anticipated washing time will be displayed in hours and minutes.
Actual washing time will depend on the selected program, load, type of laundry, spin speed etc.
Actual washing time may be longer or shorter than initially displayed.
Remaining time will be updated during the program duration, depending on the actual amount of
laundry and amount of water pumped into the machine. The last remaining time update takes place
before the final spinning cycle.
In case of uneven distribution of laundry, the time on the display will flash and it will not count down.
Once the laundry is evenly redistributed, the washing time will continue and it will stop flashing.
42
Washing process, step by step (1 – 8)

Adding or removing laundry after the start of the program
To add or remove laundry during the progress of a washing program, use the Start/Pause button to
stop the program and then select Add clothes.
The door may be opened when the water is pumped from the machine (but not completely pumped
out). Then, add or remove the laundry. Close the door and resume the program. Press Start/Pause.
The program will resume from the point at which it was interrupted.
If the door cannot be opened, it is possible that the temperature in the machine is too high, and you
won't be able to add the laundry.
Also, if the door cannot be opened, it is possible that the program has been running for too long and
any laundry added at that point would not be efficiently washed.
Pausing, stopping or changing the program
To pause the programme, briefly press the Start/Pause button.
If you wish to continue with the programme, press the Start/Pause button again and confirm your
selection by pressing »Confirm«.
To stop the washing program, press the Start/Pause button and hold it for 3 seconds.
Select Stop program. The program is cancelled and the water is pumped out of the machine if
necessary. Only then can you open the washing machine door. Use the program selector knob to
select a new program, add detergent if necessary, and press Start/Pause.
INFORMATION!
If the temperature in the drum is very high, then cooling procedure starts before program is
canceled.
By pressing On/Off the Washing program can be interrupted.
The washing machine will switch off.
After the appliance is switched back on, press the Start/Pause button to resume the program.
INFORMATION!
Do not open the detergent compartment while the appliance is operating.
INFORMATION!
In some cases the door may be locked although no program is in progress (e.g. in case of an
error). To unlock the door, press the Start/Pause button and hold it for a while.
43
Washing process, step by step (1 – 8)

Cycle counter
Display of the number of cycles performed.
Press and hold key 5 inside the program for 3
seconds.
5
STEP 8: End of program
After the end of the washing program the display will indicate that the program has been successfully
finished.
You can open the door.
If you have additionally selected the Anti crease function, gentle tumbling will continue after the end
of the washing program in order to prevent creasing.
Open the door towards you and remove the laundry from the washing machine.
Make sure the washing machine drum is empty.
If you do not take any action within 5 minutes after the end of the program, the display will switch
off to standby mode in order to save power.
The display will light up again if you press any of the buttons or rotate the program selector knob.
WARNING!
After the washing cycle, close the water tap and pull out the washing machine plug from the
power socket.
44
Washing process, step by step (1 – 8)
System settings
Enter the System settings by rotating the programme selector knob in the main menu all the way to
the right.
Confirm your selection by pressing 4 Enter.
Press the 1 Exit in any setting to return to the main menu.
Certain settings allow a short description to be
displayed by pressing 4 Information.
Then, use the program selector knob to scroll the list of settings that can be changed.
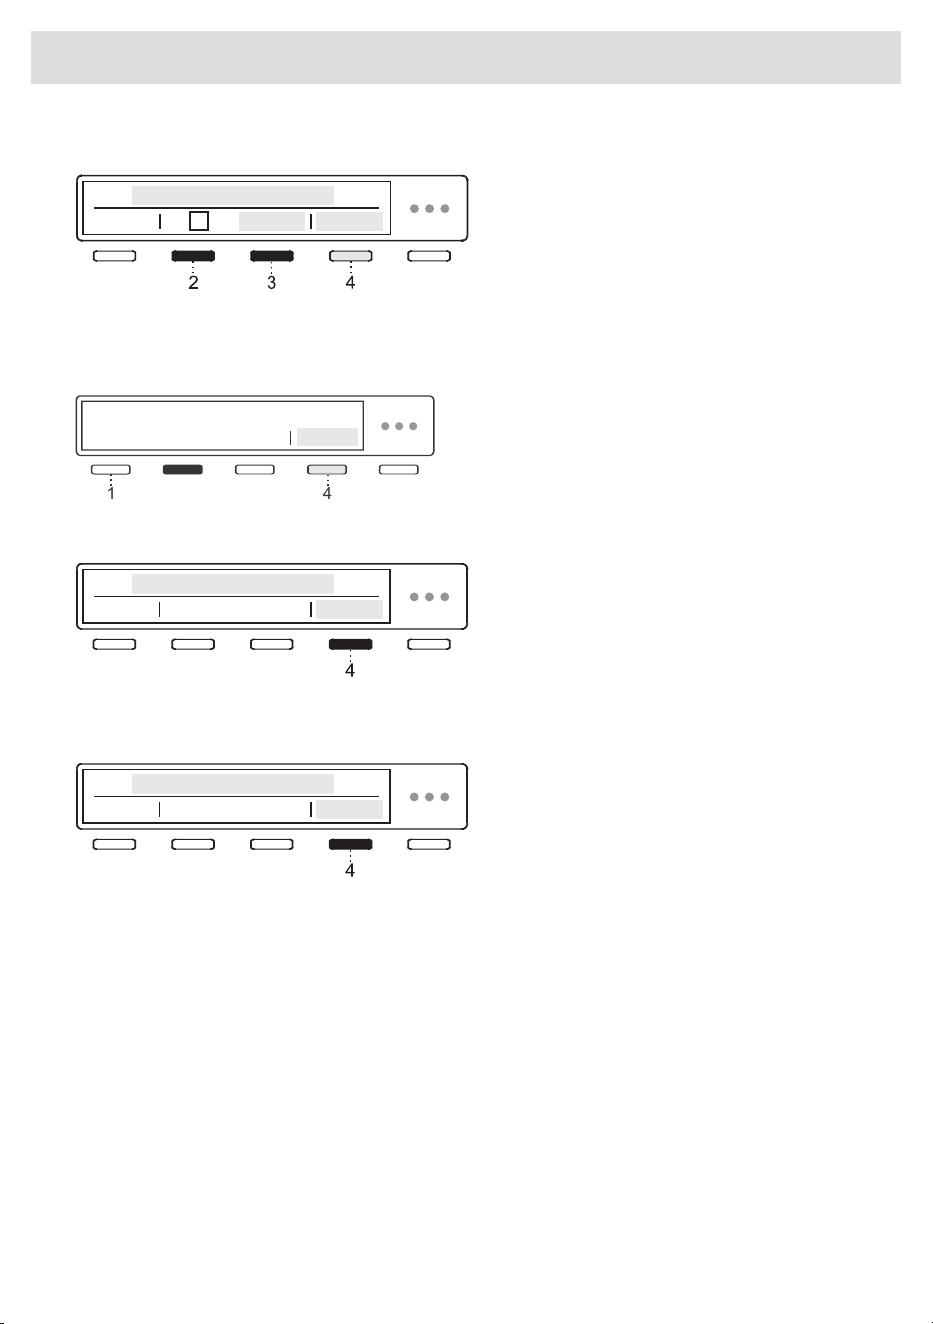
Choose Language
By pressing 2 or 3 you can navigate the list of
languages.
Confirm your selection by pressing 4 Save.
2
3
4
Lock
Use the setting to disable the on-screen
buttons so that children may not inadvertently
trigger or change the cycle.
You can Lock the appliance by pressing 2 or
3. For further information, press 4 Information.
Choose between turning on or turning off the lock.
By pressing 4 Information brief information about the setting will appear on the display unit.
When this option is on, you can activate and
deactivate it by pressing 2 and 4 and hold
them for 3 seconds.
When the lock is activated, no other function
can be selected.
After 1 minute of inactivity on the appliance, the lock will be activated automatically.
Water hardness
Choose water hardness between the following settings: soft / normal / hard.
Confirm the selection by pressing 2 or 3.
45
Appliance settings
Water hardness can be measured with the measuring strip. Check the information on water hardness
with your local water supply company or authority.
Water hardness is determined using the following scales: the German water hardness scale (°dH)
and the French water hardness scale (°fH).
Hardness levelsWater hardness
p.p.m.°fH(°F)m mol/l°dH (°N)
< 150< 15< 1.5< 8.41 – soft
150 - 25015 - 251.5 - 2-58.4 - 142 – normal
> 250> 25> 2.5> 143 – hard
If the water hardness exceeds 50 °dH (89 °fH), we recommend the connection of an external water
softener.
Contact your local water supplier, or measure the water hardness using the supplied test strip, to
check the water hardness in your area.
Unit settings
Temperature unit
By pressing 1 set the unit of measurement for
temperature:
1
• Celsius °C or
• Fahrenheit °F.
Liquid unit
By pressing 2 set the unit of measurement for
liquids:
2
• Millilitres ml or
• Tablespoons tbsp.
Weight unit
By pressing 3 set the unit of measurement for
weight:
3
• Kilogrammes kg or
• Pounds lbs.
Confirm your selection by pressing 4 Save .
Program management
The Main menu includes the entire set of
programs that you can choose using the
Program selector knob.
This setting allows only displaying the selected
program in the Main menu.
Press 4 Enterto display a set of programmes.
46
Appliance settings
Use the program selector knob to choose
between programs. Confirm your selection by
pressing 3. This is how you define the display
of the program in the main menu.
Symbol will appear next to the selected
program.
When you have a set of programmes selected, confirm the change by pressing 4 Save.
If you have not made any changes, press 4 Exit.
Only programs indicated with will appear on the display unit.
Display brightness
You can set the Brightness of the display.
By pressing 2 or 3 you can choose the
brightness of the display from 1 to 5.
Confirm your selection by pressing 4 Save.
Sound volume
By pressing 2 or 3 you may choose the
acoustic signal volume.
During selection, the acoustic signal will be
played with the currently highlighted volume.
Confirm your selection by pressing 4 Save.
Display logotype
By pressing 2 or 3 or you can choose between
switching the logo On/Off.
On = display the logo at switch-on
Off = do not display the logo at switch-on
Wi-Fi settings
For settings, press 4 Enter.
Refer to the setting procedure in the chapter
Before first use How to enable Wi-Fi on the
device?.
To return to "System settings" press 4 Exit.
47
Appliance settings
Shop mode
The appliance simulates the display and
operation of the normal cycle for silent visual
display. Only for stores.
By pressing 2 or 3 you can choose between
turning on or turning off.
For further information, press 4 Information.
The setting allows you to inspect the washing simulation without the machine running.
Errors (Failure read-out)
The last three errors displayed to the user are
displayed in the failure read-out menu.
For more information see chapter Errors: what
to do?.
1
4
Reset program list
By pressing 4 Enter you enter the Reset
program list (Reset program list), which means
that all favourite programmes will be deleted.
Other settings will not be affected.
Confirm the reset by pressing 4 OK.
Factory default settings
By pressing 4 Enter you enter Factory settings,
which means that the settings will return to the
original settings (your own settings and all
favourite programs will be deleted).
Confirm the reset by pressing 4 OK.
48
Appliance settings
Cleaning the dispenser tray
ELECTRIC SHOCK!
Always disconnect the washing machine from the power mains before cleaning.
1 Press the tab to completely remove the detergent compartment from
its housing.
2 Rinse and thoroughly clean the tray. You may also remove the cap
from the plug in the conditioner compartment (A). Clean any residue
from the cap and tube.
A
Clean the detergent compartment (B) interior.
Replace the cap on the plug.
B
3 Use a brush to clean the nozzles on the upper side of the detergent
compartment housing.
After a washing program, nozzles that clean the interior of the dispenser
are automatically switched on (only available in some models).
Use a brush to clean the lower part of the detergent compartment
housing.
4 Replace the detergent compartment into its housing.
Close the detergent compartment!
INFORMATION!
Do not wash the detergent compartment in the dishwasher!
49
Cleaning and maintenance
Cleaning the filter
The washing machine has a filter that will retain smaller objects such as coins, buttons, hair etc.
1 Before cleaning, drain the water from the washing machine using
the Drain program, and disconnect the washing machine from the power
mains.
Open the pump filter cover using appropriate tools (emergency door
opening tool is located on the back side of the dispenser).
2 Release the water drain hose from the holder.
3 Before cleaning the filter, drain the water from the washing machine
by placing the end of the water drain hose over a large shallow container
and opening the cap on the water drain hose.
4 Gradually rotate the filter in the counter-clockwise direction and pull
it out.
5 Clean the filter thoroughly under running water.
6 Remove all objects and impurities from the filter housing and the
impeller.
7 Replace the filter as shown in the figure and fasten it by rotating in
the clockwise direction. For a good seal, the filter seal surface should
be clean.
Reattach the drain hose and close the lid.
50
Cleaning and maintenance
INFORMATION!
We recommend regular cleaning of the pump filter once a month. When washing very fleecy,
very dirty or old laundry, do it more often.
Cleaning the appliance exterior
Clean the appliance exterior and the display unit using a soft damp
cotton cloth and water. Do not use solvents or abrasive cleaners that
could damage the appliance (please observe the recommendations
and warnings provided by the manufacturers of the cleaning agents).
INFORMATION!
Do not clean the machine with a jet of water!
After every wash, wipe the rubber door gasket and remove any objects
that may have become stuck in the gasket to extend its useful life.
Cleaning the washing machine interior against odours
Modern detergents often allow washing clothes at low temperatures. This means that residue may
accumulate in the washing machine, which in turn could cause odours.
To avoid bad odours, we recommend running the Drum Cleaning program once per month . Use a
small amount of powder detergent, without any laundry.
If you are using hard water
If you are washing with hard water (high limescale content), a greyish-white coating may appear on
the washing machine drum. Remove this coating by pouring alcohol vinegar (pickling vinegar) into
the washing machine drum (approx. 2 dl) or sodium bicarbonate (1 tablespoon or 15 g) and select
any program in which the temperature reaches 90 °C or the Drum cleaning program. See chapter
STEP 5: Program chart.
Repeat the process as necessary.
51
Cleaning and maintenance
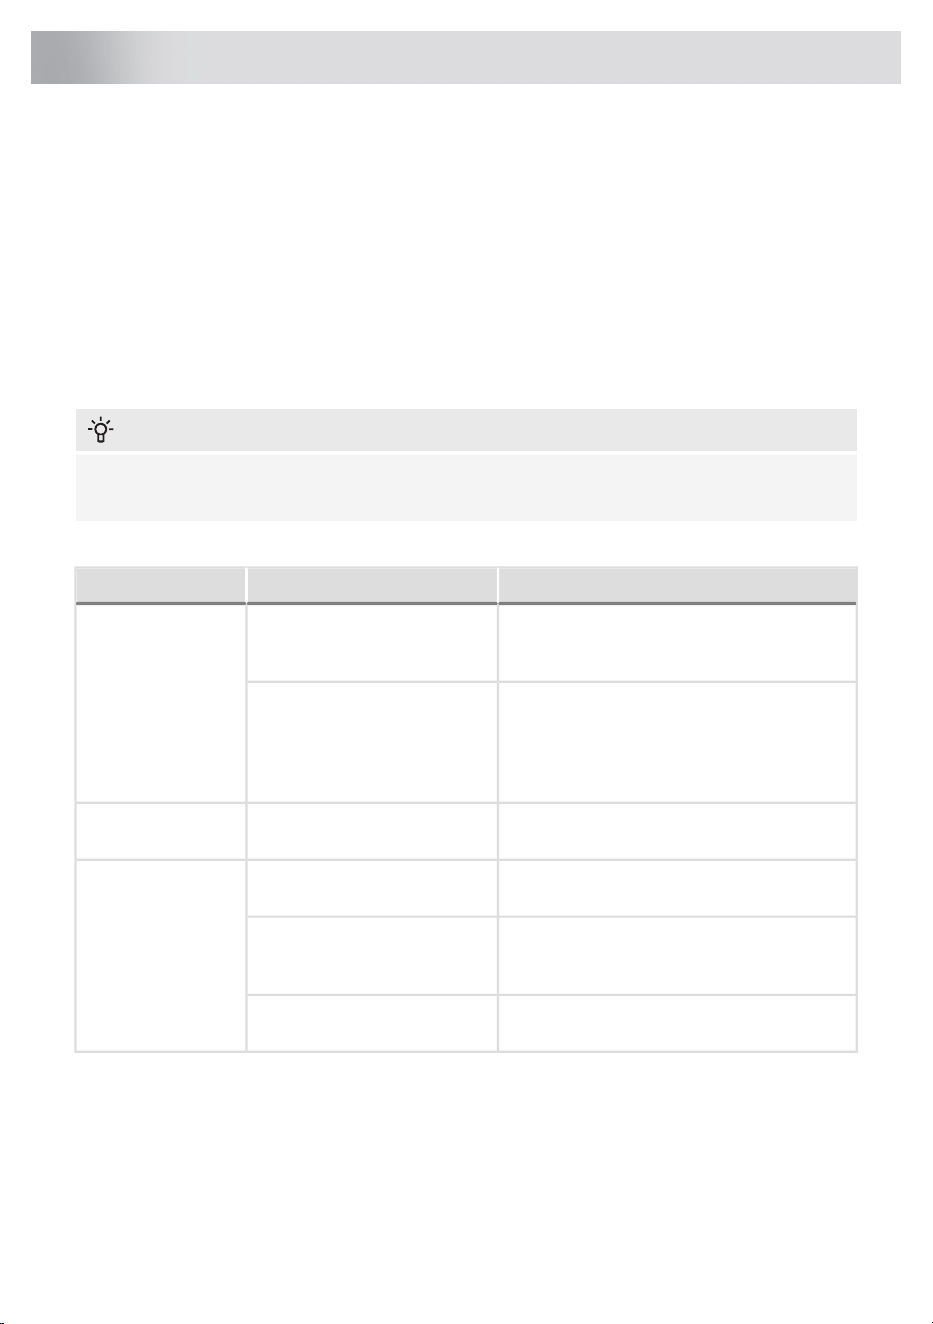
Disturbances from the environment (e.g. the power grid) may result in various error reports (see
table below: Fault/Error). In such case:
• Switch off the appliance, wait for at least 1 minute, switch on the appliance again and repeat
the washing program.
• If the error persists, call an authorized service center.
• Most interferences during operation can be resolved by the user (see table below: Fault/Error).
• Repairs may only be carried out by an adequately trained person.
• Repair or any warranty claim resulting from incorrect connection or use of the washing machine
shall not be covered by the warranty. In such cases, the costs of repair shall be charged to the
user.
INFORMATION!
The warranty does not cover the errors or failures resulting from disturbances from the environment
(lightning strike, power grid failures, natural disasters etc.).
The following lists all the errors that the user can see on the user interface.
What to do?CauseProblem/error
Drain the water using the Drain program or
the Spinning program. See chapter STEP 5/
Program chart.
Water level too high.Washing machine
door does not
open.
Wait for the water temperature to drop and
pump out the water. If you still cannot open
the door, use the emergency door opening
tool (see chapter Errors: what to do?/Manual
opening of washing machine door).
Water temperature in the
washing machine is too high.
Press the OK button to resume the program.Power supply failure.The machine will
not start.
Firmly press on the washing machine door
until you hear two clicks when it is closed.
Washing machine door is not
properly closed.
Washing program
is not in progress.
Check if the plug is connected to the power
outlet and whether there is electric current
(or voltage) in the outlet.
There is no voltage in the
power outlet.
To cancel the delayed start function, press
the OK button for three seconds.
Delayed start function has
been selected.
52
Errors: what to do?

What to do?CauseProblem/error
Program duration can be up to 60% longer
than initially anticipated in the normal
progress.
Low inlet water temperature.Washing time is
longer than
anticipated (the
time is regularly
updated on the
display unit).
Program time is extended due to the need to
redistribute the laundry in the drum.
UKS* (*unbalance system)
stability system engaged due
to unevenly distributed laundry.
Washing machine needs more time because
the power mains voltage is too low.
Low mains voltage.
Program time is extended by the duration of
the power supply failure.
Power supply failure.
Check if the plug is connected to the power
outlet and whether there is electric current
(or voltage) in the outlet.
There is no voltage in the
appliance.
Display does not
light up.
Choose the appropriate language (see
System settings Choose Language ).
You have not selected your
preferred language yet.
The wording on the
display unit is not
in your language.
Loosen and redistribute the laundry and
select the Drain program or the Spinning
program .
A small amount of laundry will
often be unevenly distributed.
Wet laundry
("unbalance" will
appear on display)
Increase the amount of laundry in the
washing machine and restart the program
(see STEP 7/ STEP 7: Start the wash).
Wash the laundry again. When your laundry
is this heavily soiled, add more washing
powder or use a liquid detergent in
combination with a more powerful (longer)
program.
The laundry was very greasy.There are traces of
grease (or grease
rolls) on the
clothes.
Use a detergent that contains bleach.You used bleach-free liquid
detergent or powder detergent
for coloured laundry.
There are still
stains on the
laundry.
Use special stain removers.You selected an unsuitable
program.
Immediately rinse the laundry again.This is not due to poor rinsing
by your washing machine, but
rather due to phosphate-free
detergents which contain
ingredients (zeolites) for water
softening. These ingredients
may be deposited on the
laundry.
There are white
residues of
washing powder on
the laundry.
Use liquid detergents that do not contain
zeolites.
Try removing any residues with a brush.
53
Errors: what to do?

What to do?CauseProblem/error
Clean the net on the water supply hose.Water pressure not high
enough.
There is powder
detergent left in the
main wash
compartment of the
detergent detergent
compartment.
Choose High water level or Extra rinse (see
STEP 6: Choosing the program settings).
Wipe the detergent compartment before
adding the powder detergent.
Some washing powders may
stick strongly to the detergent
compartment if it is empty.
Make sure the plug cap in the softener
compartment of the detergent compartment
is positioned correctly. Clean the plug cap
(see chapter Cleaning and maintenance/
Cleaning the dispenser tray).
Plug cap is not positioned
correctly or it is clogged.
There is
conditioner left in
the conditioner
compartment of the
detergent
compartment.
Check if the filter is clean.Residues of fabric, washing
detergent, and conditioner in
the filter.
Odour in the
washing machine
drum.
Choose the Drum cleaning program (see
STEP 5/ Errors: what to do?).
Development of germs and
bacteria.
Level the feet (see chapter Installation and
connection/ Adjusting the washing machine
feet).
Feet not adjusted correctly.Machine is moving
during operation.
Remove the transport bolts (see chapter
Before using the appliance for the first time/
Transport protection).
Transport bolts not removed.
The washing machine will automatically
decrease the spin speed if vibration is too
strong.
Unevenly distributed laundry
or not enough laundry.
Machine is moving
during spinning.
Increase the amount of laundry in the
washing machine and restart the program
(see: STEP 7: Start the wash).
Make sure the drain pump filter is clean.Drain pump filter is clogged.Noisy (loud) drain
pump
Make sure the filter housing is clean. See
chapter Cleaning and maintenance Cleaning
the filter.
Filter housing and drain pump
impeller are clogged.
54
Errors: what to do?
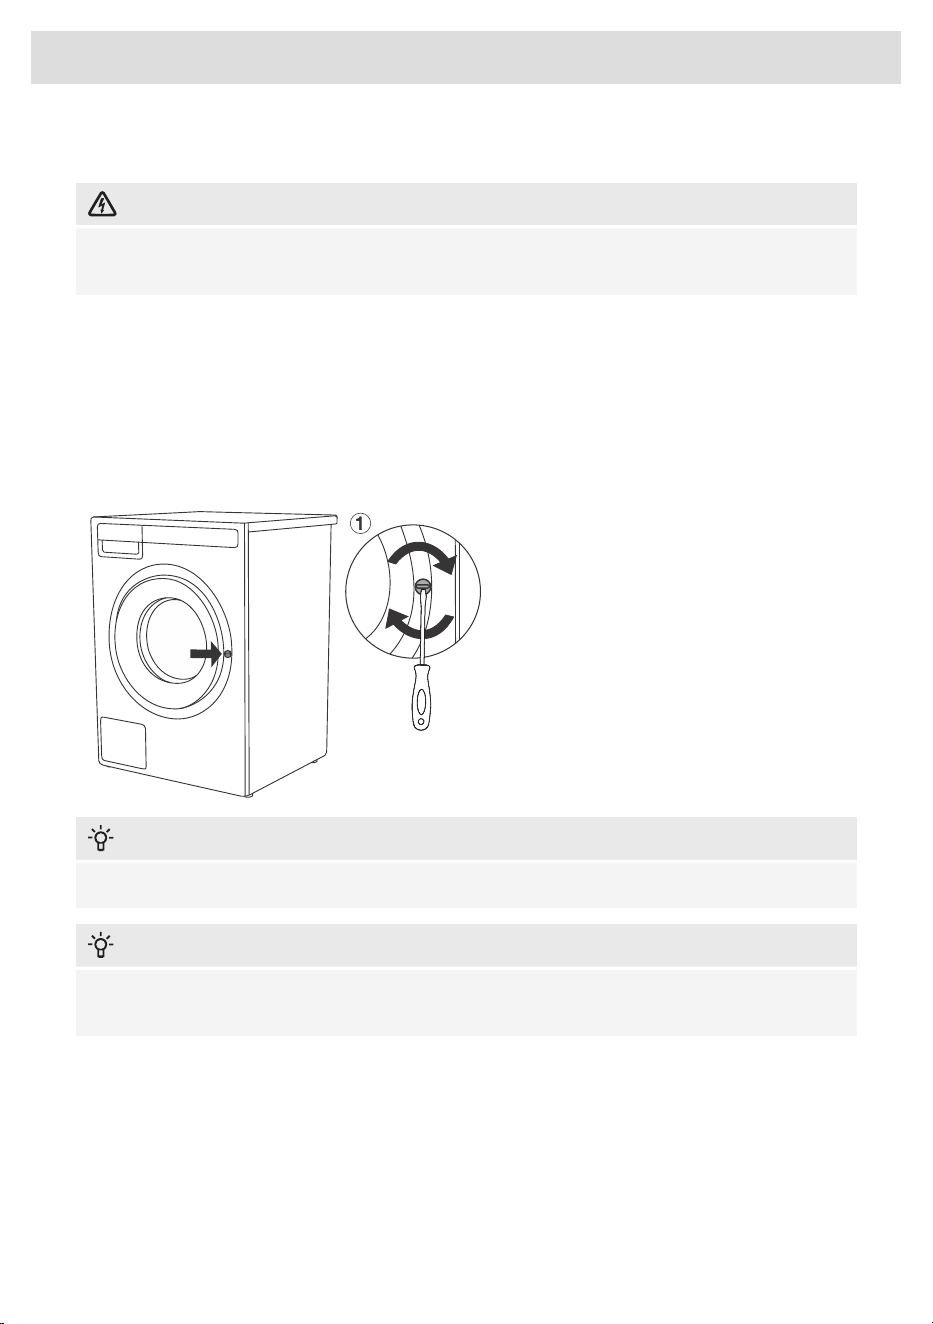
Manual opening of washing machine door
ELECTRIC SHOCK!
Washing machine door may be opened manually if the appliance is not connected to the power
mains and if the water has been pumped out of the machine.
A. Choose the program Spinning or Drain to drain the water from the machine. If this does not work,
water has to be drained from the washing machine drum manually. See chapter Cleaning and
maintenance/ Cleaning the filter.
B. Make sure the main switch is off and that the plug is disconnected from the power outlet.
C. You will need to use a flat-blade screwdriver (1) (the screwdriver is not included). Insert the
flat-blade screwdriver into the emergency door opening hole on the right side of the washing
machine door lock to push the "wheel" inwards and turn it clockwise until the washing machine
door opens. Do not use too much force to open the door with a screwdriver.
INFORMATION!
If the washing machine door still cannot be opened, call a service technician.
INFORMATION!
The door lock is motorised, which may cause noise during locking and unlocking. This is a normal
condition and no cause for concern.
55
Errors: what to do?

Failure display
Press and hold the INFO button (4) to display the error description on the display unit. Switch off the
washing machine and turn it back on.
Errors indicated on the display unit (depending on the model) may include the following:
What to do?Indication on the
display unit and
problem description
Error
Restart the program. If the error reoccurs, call a service
technician.
Incorrect settingsE0
Inlet water too cold. Repeat the washing program.Temperature sensor error.E1
If the appliance reports this error again, call a service technician.
Make sure the washing machine door is closed.Door lock error.E2
Unplug the power cord from the outlet; then, plug the power cord
back into the outlet and switch on the washing machine.
If the error reoccurs, call a service technician.
Check the following:Water filling errorE3
• is the water inlet valve open,
• is the filter on the water inlet hose clean,
• is the water supply hose deformed (clipped, clogged etc.),
• is the pressure in the water mains between 0.1 - 500 kPa
(1–5 bar).
• is the height of the drain hose is at the proper level (see
chapterInstalling the drain hose),
and then press the OK button to resume the program.
If the error reoccurs call a service technician.
Restart the program. If the error reoccurs, call a service
technician.
Water heating errorE6
Check the following:Water draining errorE7
• is the pump filter clean,
• is the drain hose clogged,
• is the drain clogged,
• if the drain hose is placed below the maximum and above
the minimum height (see chapter Installation and connection/
Connecting the water drain hose),
• if you have used too much detergent (a larger amount of
foam may form in the drum),
• and remove any objects and debris from the filter housing
and rotor.
then, press the Exit button again. If the error reoccurs, call a
service technician.
56
Errors: what to do?

What to do?Indication on the
display unit and
problem description
Error
Alert about reduced water flow in the pumping stage. Check how
to clean the pump filter (see chapter Cleaning and maintenance/
Cleaning the filter).
Drain system alertE7.1
Too much detergent may cause excessive foaming in the drum.Excessive amount of
detergent
E7.2
Turn off the washing machine and turn it back on.
Inspect the exterior of the appliance. If you do not observe any
leaks, you can continue to use the washing machine.
Water leak detected in
the washing machine
area
E9
E9.1
Close the water valve and see chapter Installation and
connection/ Connecting the water drain hoseor call a service
center.
Unplug the power cord from the outlet; then, plug the power cord
back into the outlet and switch on the washing machine.
Vent the appliance. Do this by draining and cleaning the washing
machine filter and cleaning the wall-mounted trap.
If the error reoccurs, call a service technician.
Water level sensor errorE10
E10.1
If there is water in the drum that exceeds a certain level, and an
error is reported on the display unit, the washing program will be
interrupted and water will be pumped out of the washing machine.
Restart the programme. If the error reoccurs, call a service
technician.
OverflowE11
If there is water in the drum that exceeds a certain level, and an
error is reported on the display unit, while the washing machine
continues to add water, close the water tap and call a service
technician.
Restart the program. If the error reoccurs, call a service
technician.
Motor error / motor control
error
E12
Imbalance detected. Manually redistribute the laundry (stuck or
tangled laundry) and repeat the washing program. If the error
reoccurs, call a service center.
Unevenly distributed
laundry
E13
Door is closed, but it cannot be locked.Error while locking the
door
E22
E22.1 Switch off the washing machine. Switch it back on and restart
the washing program.
If the error reoccurs, call a service technician.
Door is closed, but it cannot be unlocked. Turn off the washing
machine, then turn it back on. If the error reoccurs, call a service
center.
Error while unlocking the
door
E23
E23.1
To open the door, see chapter STEP 7: Start the wash.
Door lock error. Restart the appliance; if the error reoccurs, call
a service center.
Error while unlocking the
door
E24
57
Errors: what to do?

What to do?Indication on the
display unit and
problem description
Error
Exceeded locking current. Restart the appliance; if the error
reoccurs, call a service center.
Error while locking the
door
E26
Turn off the appliance and turn it back on. If the error reoccurs,
call a service technician.
Communication UI and
PMCU
E36
Error in UI** and PMCU
communication.
Call a service technician.PMCU/UI** software
versions are not
compatible
E37
A prolonged drop of voltage do below 180 V, or voltage in excess
of 260 V was detected, which can affect the washing machine
operation.
Warning from the system
for detecting extended
washing machine voltage
fluctuation – 180 V > U >
260 V
E40
Check the power supply network to which your washing machine
is connected.
The error only affects the option to remotely control (Remote
control) your washing programme. it does not affect the washing
process on other programmes.
Appliance cannot be
connected to the network.
E48
Call a service technician.
Warning - Drum cleaning
program
• clean the dosing container,
• clean the water supply hose, detergent dispenser, and rubber
door gasket,
• clean the pump filter (see chapter Cleaning the filter) and
• run the cleaning program (Drum cleaning) (see chapter
Program chart).
This programme is used for cleaning the drum and removing the
residue of detergent and bacteria. To select the programme,
rotate the program selector knob to the left or to the right to the
Drum clean (Cleaning programme) position. Other extra functions
cannot be selected.
The drum must be empty. Do not add detergent or softener!
You can add some spirit vinegar (approx. 2 dl) or sodium
bicarbonate (1 tablespoon or 15 g) for effective descaling. We
recommend that you use the program at least once a month or
whenever the warning appears.
Wait for the process to finish. If no errors are shown after the
process, a new cycle can be run.
Preparation for unlocking
the door.
** UI = (User Interface)
Unevenly distributed laundry or lumps of laundry in the washing machine drum can cause problems
such as vibration and noisy operation. The washing machine detects such problems and the UKS*
(*stability control system) will be activated.
58
Errors: what to do?

Smaller loads (e.g. one towel, one sweater, one bathrobe etc.) or clothes made of materials with
special geometrical properties are virtually impossible to distribute evenly across the washing
machine drum (slippers, large items etc.). This results in several attempts to redistribute the laundry,
which in turn leads to longer programme duration. In extreme cases of unfavourable conditions, the
programme can be completed without the spinning cycle.
The UKS* (*stability control system) allows stable operation and a longer washing machine useful
life.
If the problems persist despite observing the advice above, call an authorized service technician.
INFORMATION!
Noise and vibration – make sure the appliance is levelled using the adjustable legs and that
the jam nuts are securely tightened.
INFORMATION!
The warranty does not cover consumables, minor deviations in colour, increased noise that results
from appliance age and which does not affect the functionality of the appliance, and aesthetic
defects on components, which do not affect the functionality and safety of the appliance.
INFORMATION!
The warranty does not cover the errors or failures resulting from disturbances from the environment
(lightning strike, power grid failures, natural disasters etc.).
59
Errors: what to do?
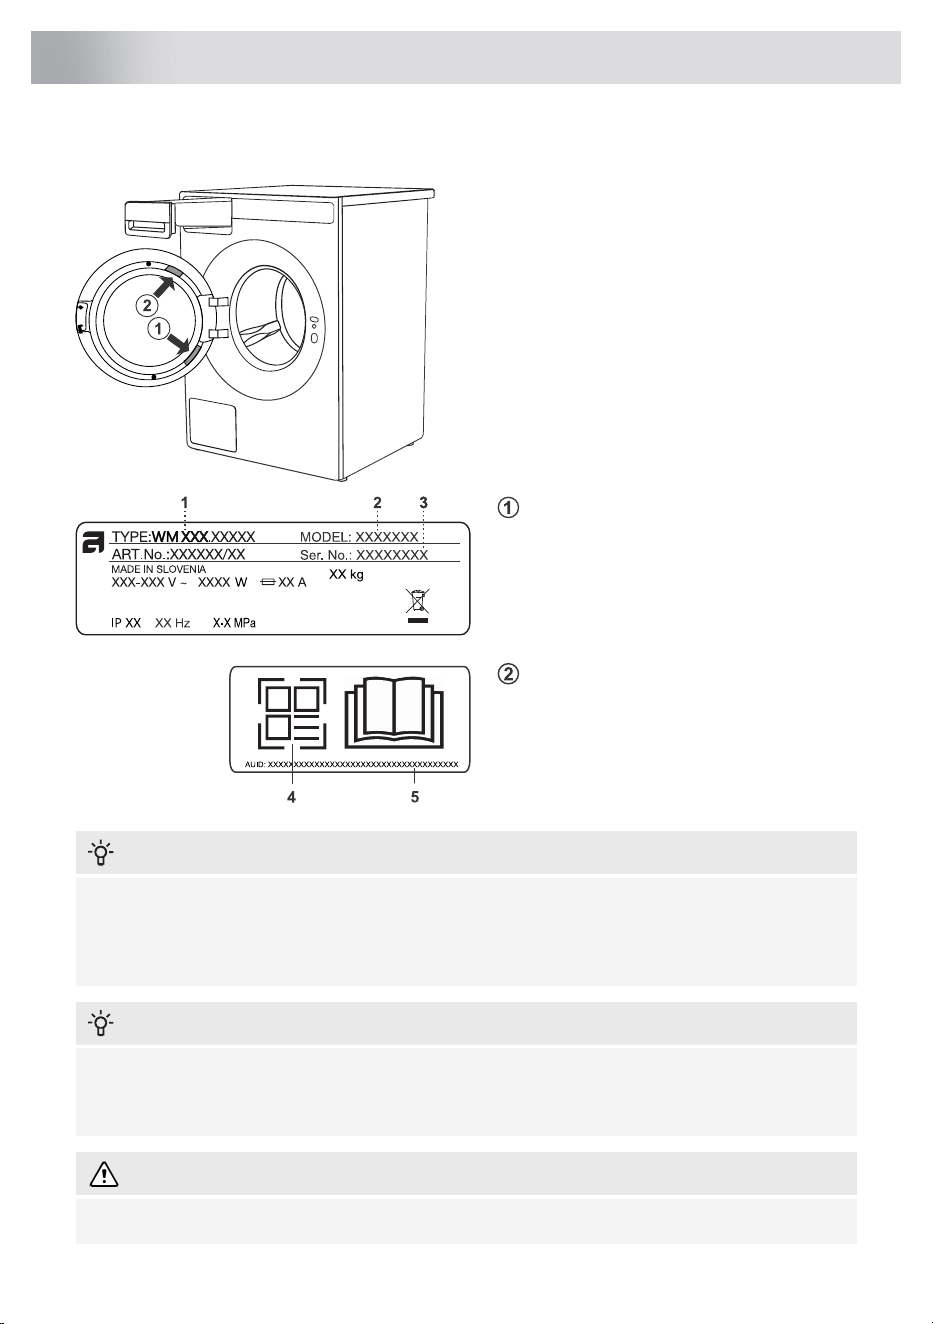
Before calling a service technician
See chapters Cleaning the filter, and Errors:
what to do? and see if you can resolve the
problem yourself.
When you contact a service centre, please
state your model number (2) and type (1) and
the serial number (3) of the washing machine.
Model, type, and serial number are indicated
on the rating (type) plate located on the interior
side of the washing machine door.
The QR and AUID codes are located on the
inside of the washing machine door as well.
1 - Model type
2 - Model
3 - Serial number
4 - QR code
5 - AUID code
INFORMATION!
Report any malfunction to your local call centre or web address; all information can be found in
the enclosed warranty statement. Contact details of your authorised service centre are available
in the warranty statement supplied with the appliance and on the website by scanning the QR
code on the rating plate (see chapter Before calling a service technician).
INFORMATION!
Some simple faults described in the chapter Errors: what to do? can be fixed by the user himself
by taking into account the instructions without risk to their own safety and without affecting the
warranty conditions.
WARNING!
In case of a failure, only use approved spare parts by authorized manufacturers.
60
Service

WARNING!
Repair or any warranty claim resulting from incorrect connection or use of the washing machine
shall not be covered by the warranty. In such cases, the costs of repair shall be charged to the
user.
INFORMATION!
Functional spare parts for the ASKO washing machine you purchased will be available for 15
years. During this time, original spare parts will be available to ensure the correct operation of
your appliance.
A list of spare parts and repair tips in accordance with the current Ecodesign Directive can be
found by scanning the QR code located on the inside of the door of the washing machine.
Or on the following link: https://auid.connectlife.io
61
Service

Technical data
850 mmHeight
595 mmWidth
700 mmDepth
80 lDrum volume
See rating plateRated power
See rating plateHeater power
0,1–500 kPaWater pressure
1–5 kp/cm
2
10–50 N/cm
2
Stainless steelWashing drum and tub material
Hot-dip galvanized and powder coated sheet metal, or
stainless steel sheet (depending on model)
Housing material
1,5 m, reinforced rubber hoseWater connection
1.6 m polypropylene hoseDrain hose
Typeface License Notice
This product includes the Noto Sans font, which is licensed under the SIL Open Font License, Version
1.1.
The full text of the license is available at: https://openfontlicense.org
Noto Sans is an open-source typeface developed by Google, and it may be used, modified, and
redistributed under the terms of the SIL Open Font License.
62
Technical information
Information for test institute
Energy labelling
AS/NZS 2040:2021Australian standard
Normal, 40 °C, 11 kg cottonWashing program
Cold water 20 °CConnection
IEC-60704-2-4Test method for noise measurement
< 0,48 WPower consumption in `off mode` (if applicable)
< 0,48 WPower consumption in `end of cycle mode` (if
applicable)
< 1,00 WIf delay start is available, power consumption in `delay
start`
< 4,64 WPower consumption in `time from end of program until
end of cycle`
Measurements were made at 230 V and
50 Hz
Remarks
Loading procedure for standard test:
Detergent, PBIS and Anti-Sudsing Agent (18ml) must be added via the detergent compartment.
When loading the machine for testing according to AS/NZS 2040:2021 it shall be loaded according
to the table below. Garments are placed on top of each other in layers and the soil swatches should
be placed inside the wash drum in the direction shown in the table, seen from above.
Illustration of loaded Wash Drum for
standard test.
Swatch
placementSwatchesTop
42
41
40
39
Rear1Sheet1.
Right1Undershort2.
Left1T - shirt3.
Right1Pillow case4.
LeftUndershort5.
Front1Undershort6.
Left1Bath towel7.
Right1Bath towel8.
RightPillow case9.
Left2Shirt10.
Center1Sheet11.
Right1T - shirt12.
63
Technical information
Illustration of loaded Wash Drum for
standard test.
Swatch
placementSwatchesTop
42
41
40
39
Right1Pillow case13.
Left1Shirt14.
Left1Undershort15.
Wash cloths (all)16.
Left1Bath towel17.
Center1Tablechloth18.
Right1Bath towel19.
Center1Sheet20.
Rear1Shirt21.
LeftUndershort22.
Center1Undershort23.
Left1T - shirt24.
Left1Bath towel25.
Right1Tablechloth26.
Rear1Pillow case27.
Front1T - shirt28.
Center1Pillow case29.
Handkerchiefs (all)30.
LeftPillow case31.
Center1Shirt32.
Left1Shirt33.
Right1Bath towel34.
Center1Sheet35.
LeftBath towel36.
Center1Pillow case37.
Rear1Undershort38.
Right1Tablechloth39.
Rear1T - shirt40.
Rear1Tablechloth41.
FrontBath towel42.
35Total
64
Technical information

Radio equipment type
HL3215STG(depending on the model)
HLW3215-TG
HLW3215-TG01
Wi-Fi
2.4000 GHz – 2.4835 GHzOperating frequency range
≤10 dBm/MHz (EIRP) (Antenna gain <10 dBi)Maximum output power
Gain: 0 dBiMaximum antenna gain
Bluetooth
2.400 GHz – 2.4835 GHzOperating frequency range
6 dBm (≤ 10 dBm)Carrier output
F1DEmission type
Declaration of conformity
The company declares that the device with the function ConnectLife complies with the essential
requirements and other relevant provisions of Directive 2014/53/EU. The detailed Declaration of
Conformity can be found at the web address https://auid.connectlife.io on the page of your device
among the additional documents.
65
Technical information

Spin speed - default LCD
(rpm)
1
Residual moisture content
(%)
1
Water consumption
(l/cycle)
1
Energy consumption
(kWh/cycle)
1
Programme duration
(h:min)
1
Capacity
(kg)
Temperature
(°C)
Program
1400541450.5703:15
11
FL
20Normalii
140052890.8804:03
11
FL
40Normal*
1400541422.5603:42
11
FL
60Normaliii
120042600.5802:35430Mix/Syntheticsiv
140059260.2300:45230Time programv
1400541513.7903:43
11
FL
90Normalvi
The 20°C program at the rated capacity for this programii
One cotton program at the nominal temperature of 60°C or higher, at the nominal capacity for
this program
iii
One program for textiles other than cotton or a textile blend, at the nominal capacity for this
program
iv
One program for quick washing of lightly soiled laundry, at the nominal capacity for this programv
One program for heavily soiled textiles, at the nominal capacity for this programvi
Due to the influence of water pressure, hardness, and inlet temperature, the type, quantity, and
soiling of the laundry, the detergent used, power supply, and selected functions, the actual
values may differ from the specified values.
1
Full load
FL
* This program is for a normally soiled load at the rated capacity. This consuption data for the
nominated energy labelling programme according to AS/NZS 2040.1 & AS/NZS 2040.2
Consumption data may vary from the given values depending on variations in water pressure, water
hardness, water inlet temperature, room temperature, fluctuations in the electricity, type and volume
of the laundry and any extra options.
Maximum or nominal load applies to laundry prepared pursuant to the IEC 60456 standard.
66
Table of consumption values

Adjustment of the displayed washing time
Advanced technology allows the appliance to sense the amount of laundry and add the required
amount of water during the washing process. Depending on the washing load, washing time can
be longer or shorter and the time displayed will be adjusted accordingly.
Moreover, displayed washing time may change due to differences in inlet water temperature. At low
inlet water temperatures, washing time can be longer; at higher temperatures, it can be shorter.
Unevenly distributed laundry or lumps of laundry in the washing machine drum can cause problems
such as vibration and noisy operation. The appliance can sense such lumps and will try to redistribute
the laundry. Smaller loads (e.g. one towel, one sweater, one bathrobe etc.) or clothes made of
materials with special geometrical properties are virtually impossible to distribute evenly across the
washing machine drum (slippers, large items etc.). This results in several attempts to redistribute
the laundry, which in turn leads to longer program duration.
67
Table of consumption values
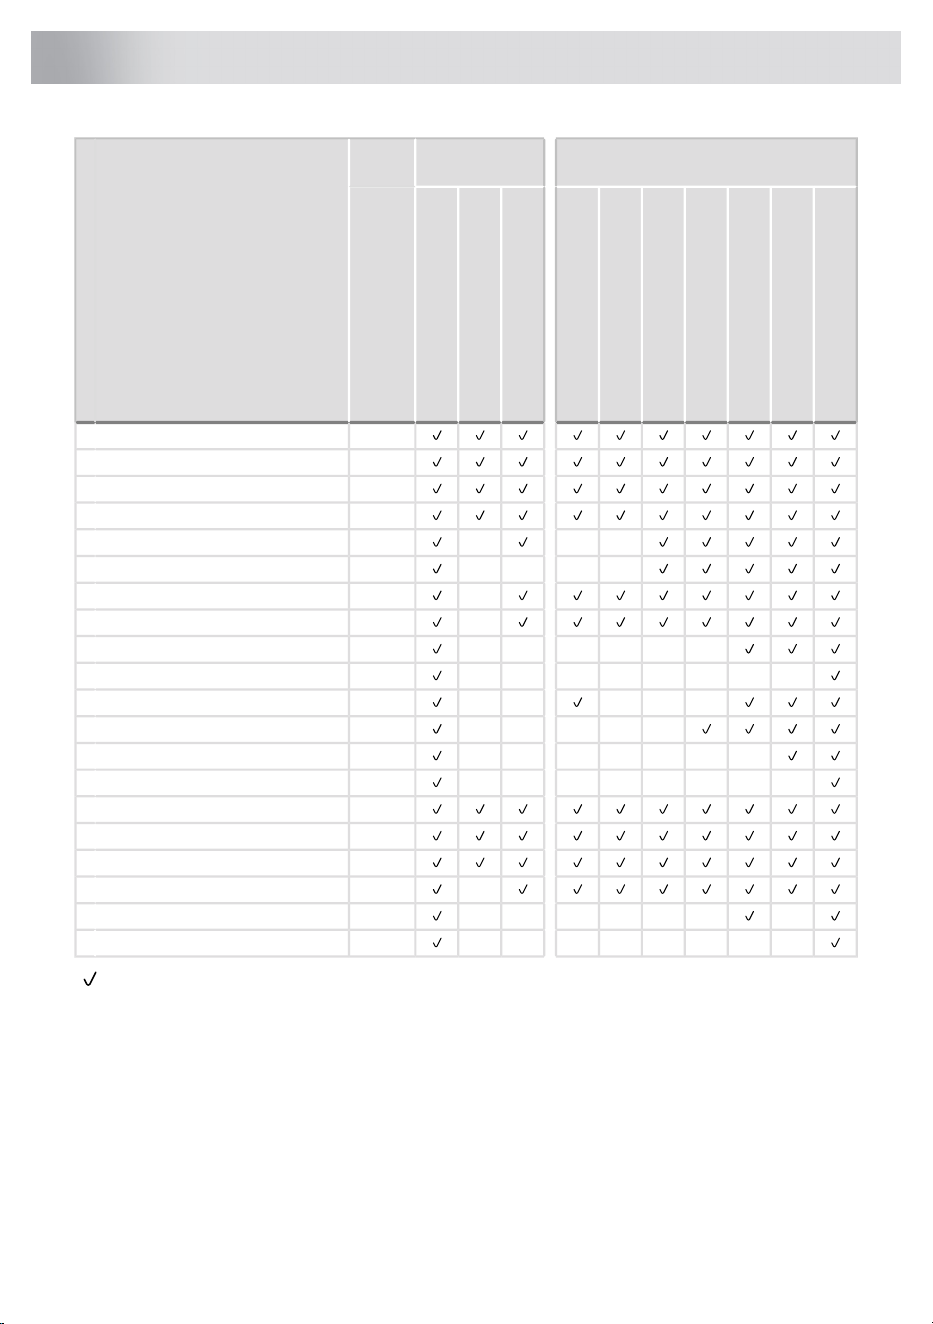
Options
Washing mode
(Mode)
Program
Delay start
Anti-crease
Rinse and hold
High water level
Super Rinse
Prewash
Small load
Speed mode
(Eco) Green mode
Default - Normal
Default (T°C)
40Normal
30Mix/Synthetics
40White laundry
40Coloured laundry
30Wool/Hand wash
40Delicates
40Sportswear
30Outerwear
30Time program
Steam Refresh
40Quick PRO
Rinse
Spinning
Drain
40Shirts/Blouses
40Jeans
40Bedding/Towels
30Down
Waterproofing
Drum Cleaning
Choice of options
Cold wash
cold
68
Option table

Packaging is made of environmentally friendly materials that can be recycled, disposed
of, or destroyed without any hazard to the environment. To this end, packaging materials
are labelled appropriately.
The symbol on the product or its packaging indicates that the product should not be treated as
normal household waste. Take the product to an authorized collection centre for waste electric and
electronic equipment processing.
When disposing of the appliance at the end of its useful life, remove all power cords, and destroy
the door latch and switch to prevent the door from locking or latching (child safety).
Correct disposal of the product will help prevent any negative effects on the environment and
health of people, which could occur in case of incorrect product removal. For detailed information
on removal and processing of the product, please contact the relevant municipal body in charge
of waste management, your waste disposal service, or the store where you bought the product.
69
DISPOSAL

949448
www.asko.com
We reserve the right to make changes.
-a5