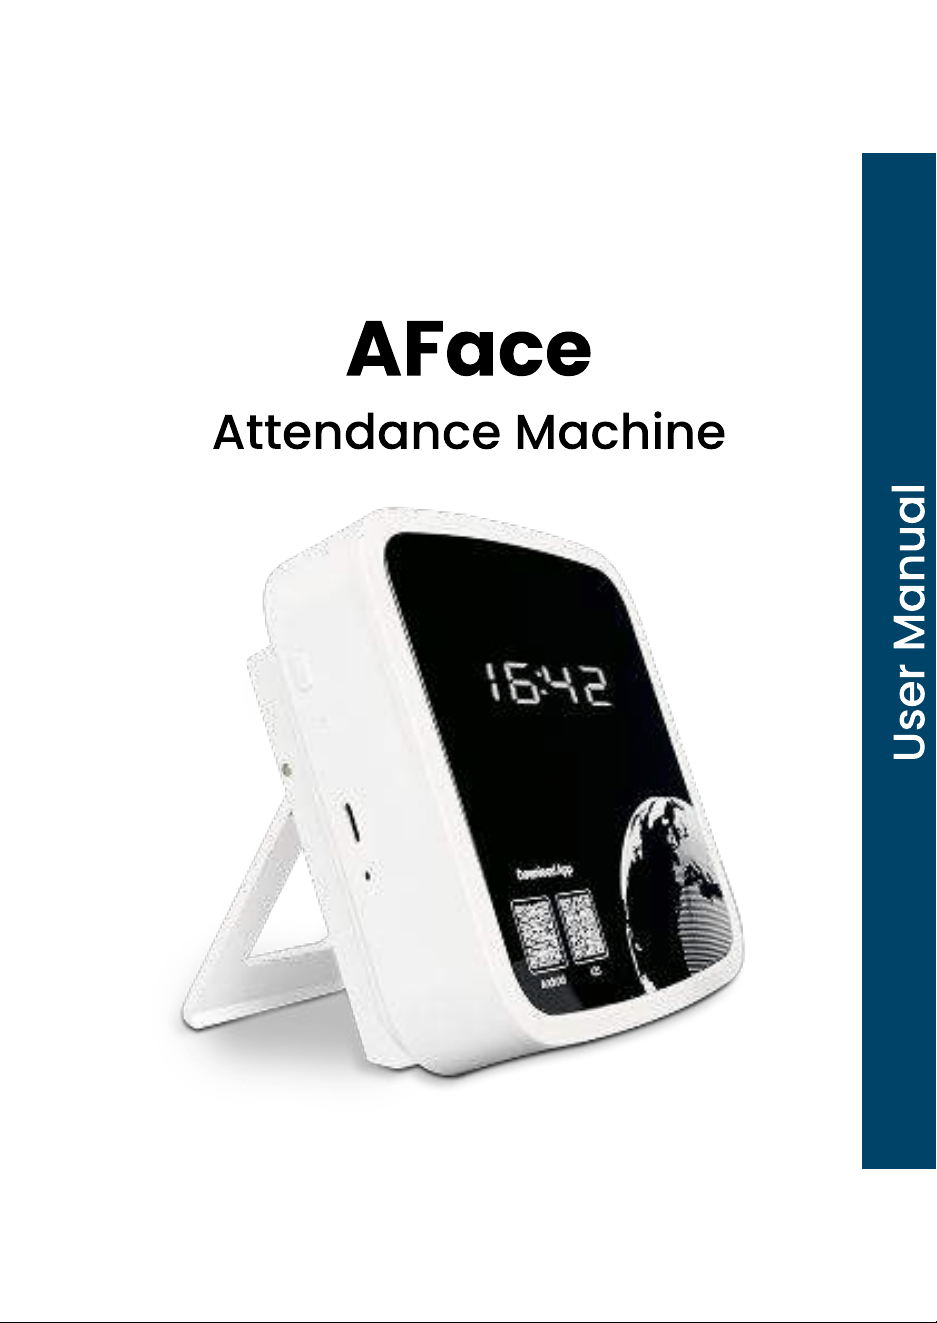
AFac
Attendance Machine
user manual
Attendance Payroll Configuration Notice
Please configure the payroll adjustment rules carefully.
Before use, confirm that they comply with local labor
laws, employment contracts, company policies, and
applicable regulations
These rules are intended for attendance tracking and
payroll reference purposes only and must comply with
applicable local laws and company policies.
Data Privacy Policy
Face recognition data is processed and stored in
accordance with applicable data protection and
privacy regulations.
This system is intended for identification purposes only
and does not share biometric data with unauthorized
third parties.
Users are responsible for ensuring compliance with
local privacy laws and obtaining necessary consent
before using facial recognition features.
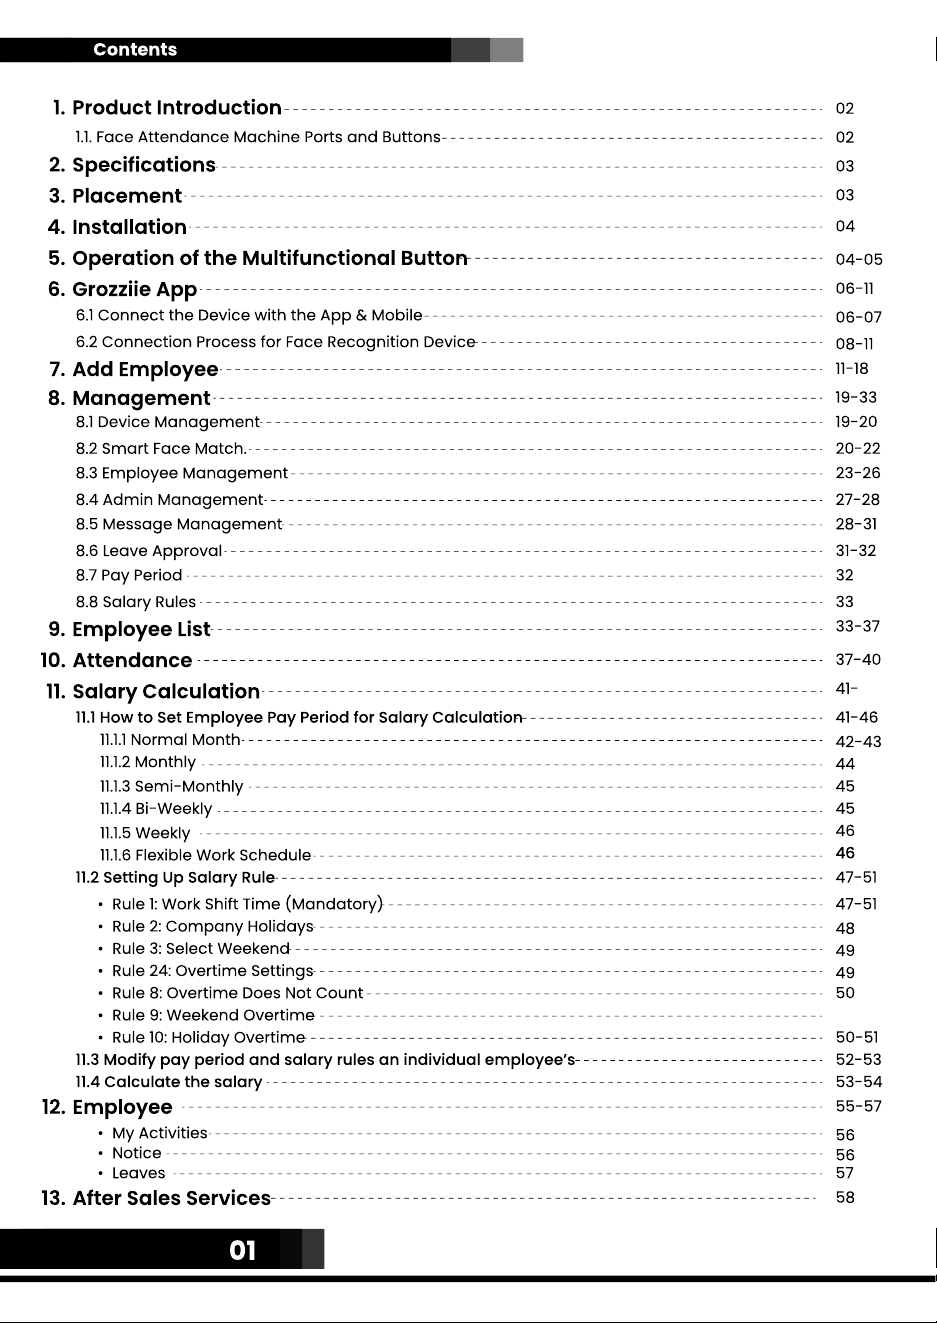
contents
Product Introduction
1.1. Face Attendance Machine Ports and Buttons
Specifications
Placement
Installation
Operation of the Multifunctional Button
Grozziie App
6.1 Connect the Device with the App & Mobile
6.2 Connection Process for Face Recognition Device
Add Employee
Management
8.1 Device Managemen
8.2 Smart Face Match
8.3 Employee Managemen
8.4 Admin Managemen
8.5 Message Managemen
8.6 Leave Approva
8.7 Pay Perio
8.8 Salary Rules
Employee List
Attendance
Salary Calculation
11.1 How to Set Employee Pay Period for Salary Calculation
11.1.1
N
ormal Mont
11.1.2 Monthl
11.1.3 Semi
-
Monthl
11.1.4 Bi
-W
ee
k
l
11.1.5
W
ee
k
l
11.1.6 Fle
x
ible
W
or
k
Schedule
11.2 Setting Up Salary Rule
Rule 1
:
W
or
k
Shift
T
ime
(
Mandatory
Rule 2
:
Company
H
oliday
Rule 3
:
Select
W
ee
k
en
Rule 24
:
O
vertime Setting
Rule 8
:
O
vertime Does
N
ot Coun
Rule
9:
W
ee
k
end
O
vertim
Rule 1
0:
H
oliday
O
vertime
11.3 Modify pay period and salary rules an individual employee’s
11.4 Calculate the salary
Employee
My Activitie
N
otic
Leaves
After Sales Services
01
0
2
0
2
0
3
0
3
0
4
0
4
-0
5
0
6
-
11
0
6
-0
7
0
8
-
11
11
-
18
1
9-
33
1
9-
2
0
2
0-
22
23
-
26
27
-
28
28
-
31
31
-
32
32
33
33
-
37
37
-
4
0
41
-
41
-
46
42
-
43
44
45
45
46
4646
47
-
51
47
-
51
48
4
9
4
9
5
0
5
0-
51
52
-
53
53
-
54
55
-
57
56
56
57
58
o1 Product Introduction
1
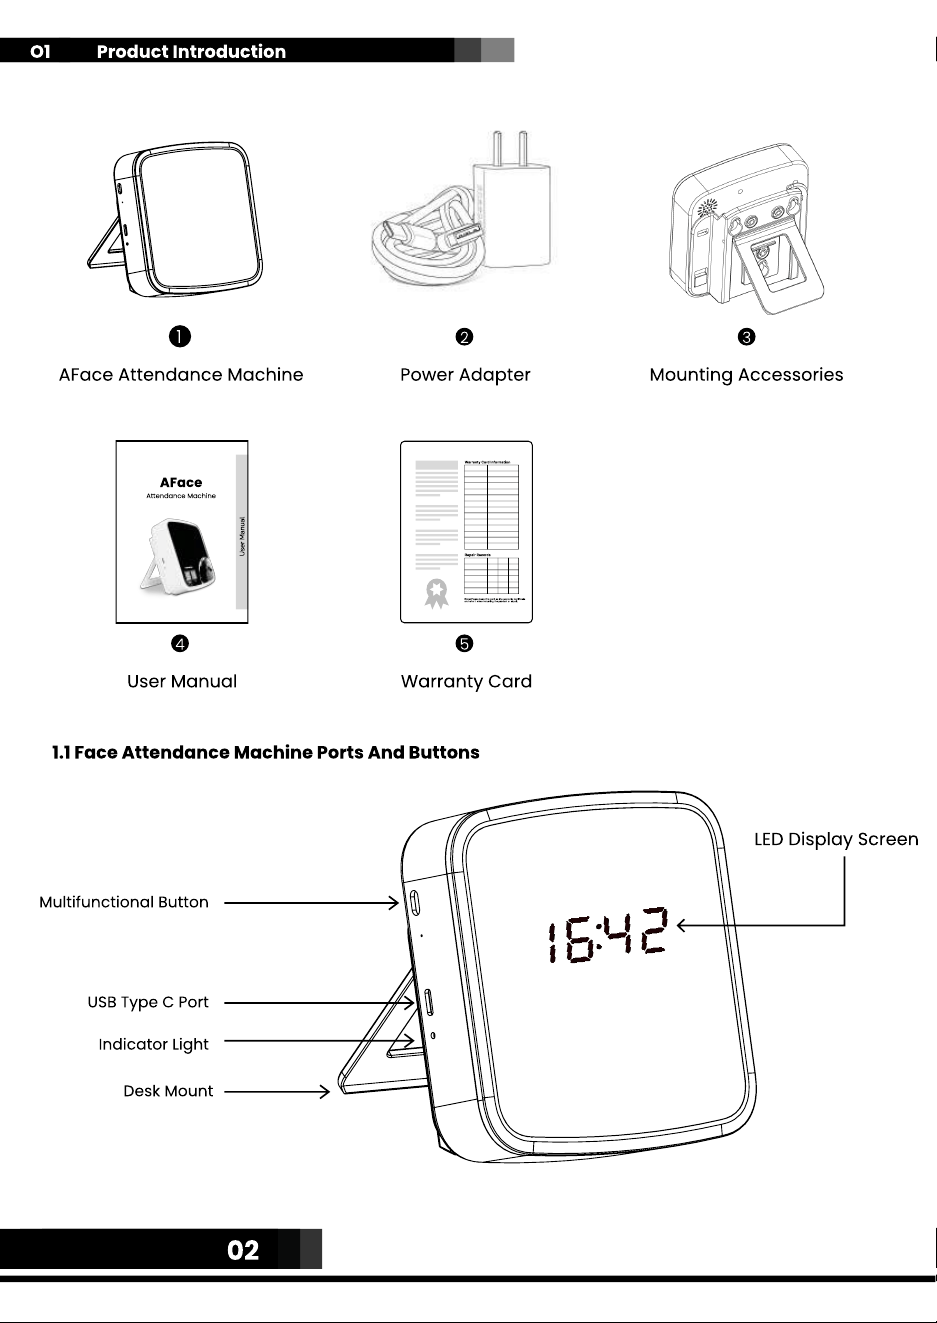
aFace Attendance Machine
aFac
Attendance Machine
2
Power adapter
3
Mounting Accessories
4 5
user manual warranty card
1.1 Face Attendance Machine Ports and buttons
LED Display Screen
Multifunctional Button
USB Type C port
Indicator Light
Desk Mount
02
o2 Specifications
type
model
input/ output Power
Color
Weight
Package(L x W x H)
AFace Attendance Machine
AFace01N
Input: 100V~240V, Output: 5V~1A
White
200 gm
162mm*148mm*63mm
o3 Placement
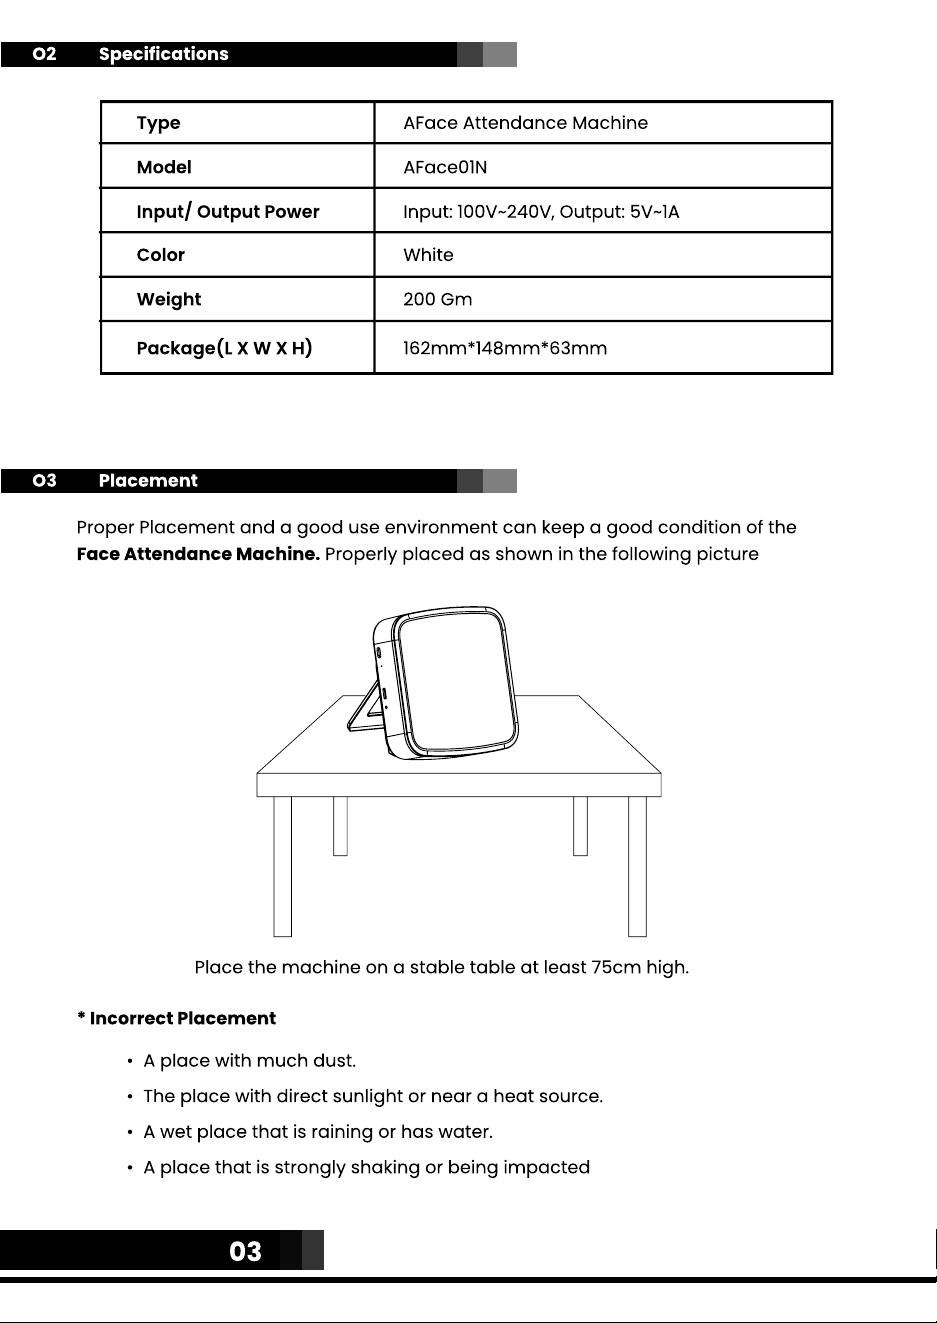
Proper Placement and a good use environment can keep a good condition of the
Face Attendance Machine. Properly placed as shown in the following picture
Place the machine on a stable table at least 75cm high.
* Incorrect Placement
A place with much dust.
The place with direct sunlight or near a heat source.
A wet place that is raining or has water.
A place that is strongly shaking or being impacted
03
o4 Installation
5
.
75
cm
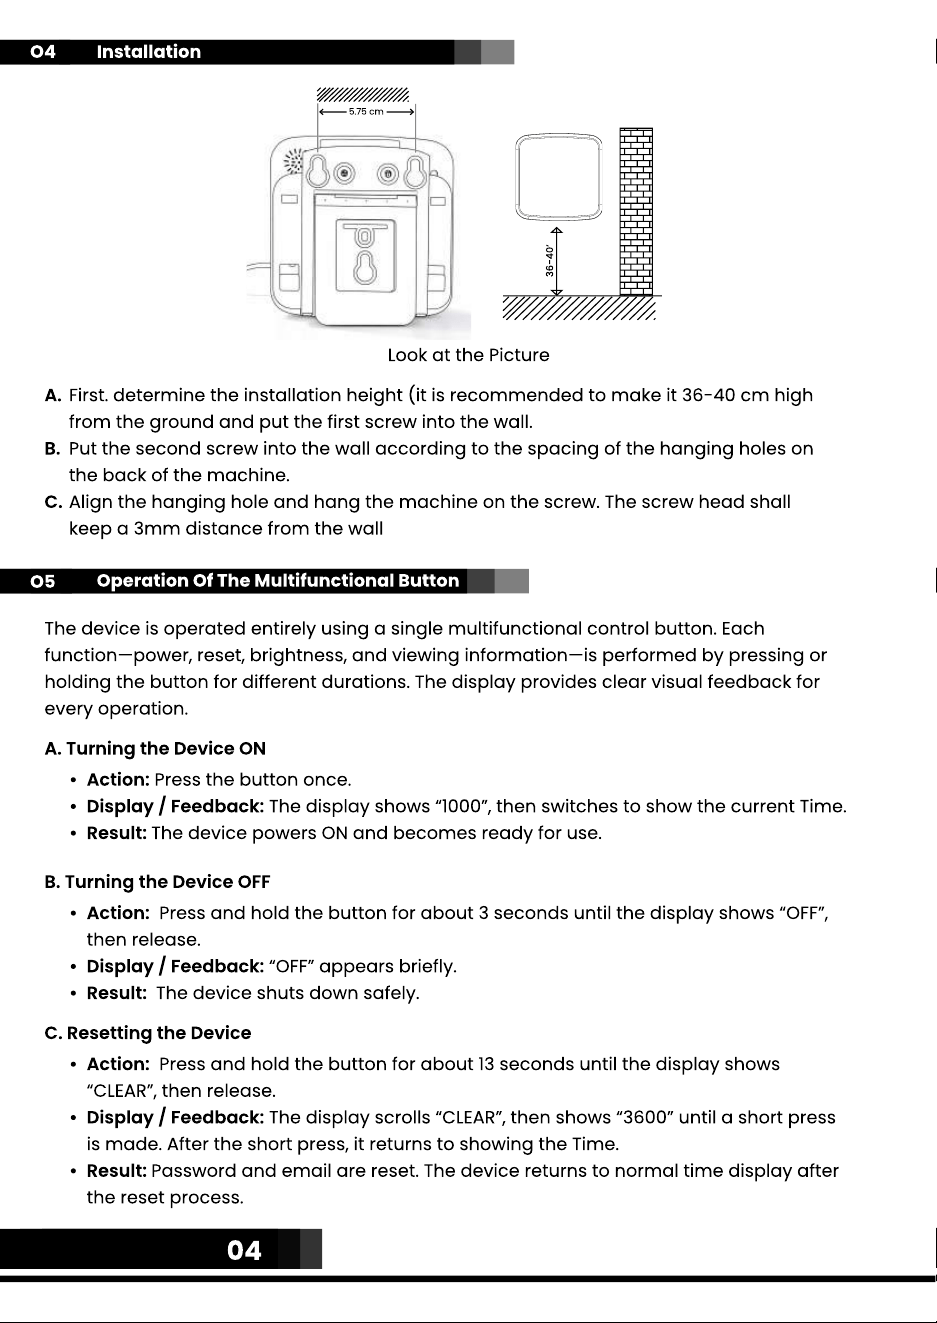
Look at the Picture
A
B
C.
First. determine the installation height (it is recommended to make it 36-40 cm high
from the ground and put the first screw into the wall.
Put the second screw into the wall according to the spacing of the hanging holes on
the back of the machine.
Align the hanging hole and hang the machine on the screw. The screw head shall
keepa 3mm distance from the wall
o5
Operation of the Multifunctional Button
The device is operated entirely using a single multifunctional control button. Each
function—power, reset, brightness, and viewing information—is performed by pressing or
holding the button for different durations. The display provides clear visual feedback for
every operation.
A. Turning the Device ON
Action: Press the button once.
Display / Feedback: The display shows “1000”, then switches to show the current Time.
Result: The device powers ON and becomes ready for use.
B. Turning the Device OFF
Action: Press and hold the button for about 3 seconds until the display shows “OFF”,
then release
Display / Feedback: “OFF” appears briefly
Result: The device shuts down safely.
C. Resetting the Device
Action: Press and hold the button for about 13 seconds until the display shows
“
C
LEA
R
”, then release
Display / Feedback: The display scrolls “
C
LEA
R
”, then shows “3600” until a short press
is made. After the short press, it returns to showing the Time
Result: Password and email are reset. The device returns to normal time display after
the reset process.
04
D. Adjusting Brightness (Short Press)
Action: When the device is ON and showing the time, briefly press and release the button
(less than 1 second)
Display / Feedback: The screen instantly brightens to maximum brightness
Result: The display remains bright for 5 seconds, then automatically dims if no Bluetooth
(BLE) device is connected.
E
.
V
ie
w
ing the
M
A
C
Address (
M
ediu
m
Press)
Action: Press and hold the button for about 1 second (but less than 3 seconds) and then
release
Display / Feedback: The screen shows “ADD”, then begins scrolling the MAC address
Result: If the button is pressed quickly again (less than 1 second) during scrolling, the
display stops and returns to the Time screen.
F
. Auto
ma
ti
c
Brightness
&
B
LE
Beh
av
ior
On BLE Connection: When a phone or BLE device connects, brightness increases to
maximum automatically
On BLE Disconnection: After disconnecting, the display stays bright for 5 seconds and
then dims automatically to save power
During Activity: Whenever the device is actively showing information (e.g., MAC address,
ADD, CLER, CLEAR, 3600), brightness remains at maximum.
Q
ui
ck
F
un
c
tion Su
mma
r
y
F
un
c
tion
H
o
w
to
U
se Dis
play
/
F
eed
back R
esu
l
t
Turn ON Press once “1
000
”
→
Time
D
evice powers ON
Turn O
FF
H
old
~3
sec until
“O
FF”
, then release
“O
FF”
D
evice powers O
FF
R
E
S
ET
H
old
~
1
3
sec until
“CLE
R”
, then release
“CLEA
R”
scrolls
→
“
3
600
”
Password
&
email reset
Increase Brightness
S
hort press (
<
1 sec)
while showing time
D
isplay brightness
Max brightness
;
dims
after 5 sec if no BLE
V
iew MAC Address
H
old
~
1 sec (
<3
sec),
then release
“A
DD
”
→
MAC scrolls
S
hows MAC
;
short press stops
scroll and returns to time
Auto Brightnes
/
BLE
Brightens on BLE connect
;
dims after 5 sec disconnect
Power
-
saving
brightness control
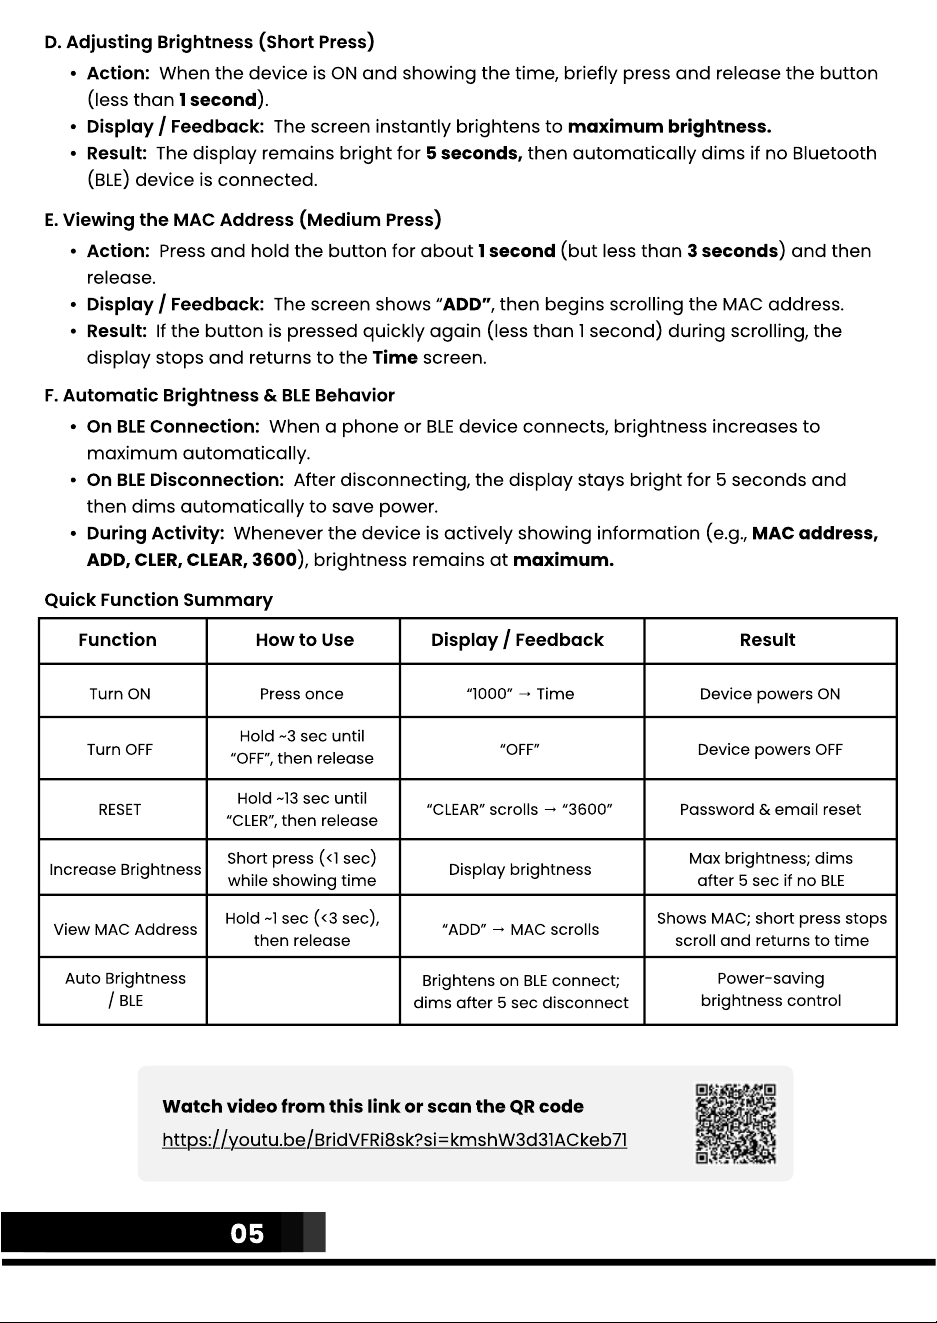
Watch video from this link or scan the QR code
https
://
youtu.be
/
Brid
VFR
i
8
sk
?
si
=
kmshW
3
d
3
1ACkeb
7
1
05
06 Grozziie app
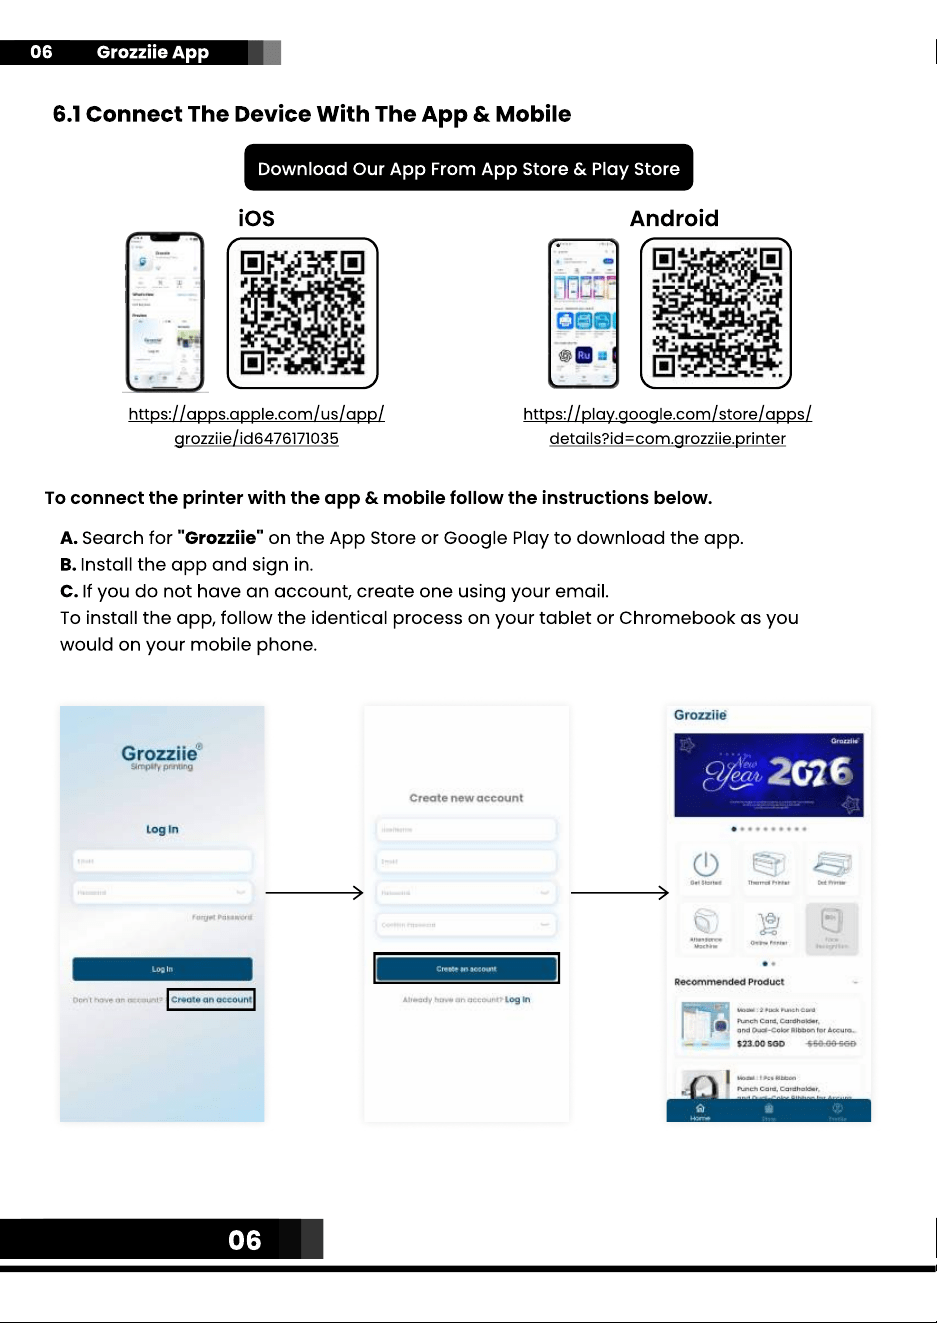
6.1 Connect the Device with the App & Mobile
Download our app from App Store & Play Store
iOS Android
https://apps.apple.com/us/app/
grozziie/id6476171035
https://play.google.com/store/apps/
details?id=com.grozziie.printer
To connect the printer with the app & mobile follow the instructions below.
A. Search for "Grozziie" on the App Store or Google Play to download the app.
B. Install the app and sign in.
C. If you do not have an account, create one using your email.
To install the app, follow the identical process on your tablet or Chromebook as you
would on your mobile phone.
06
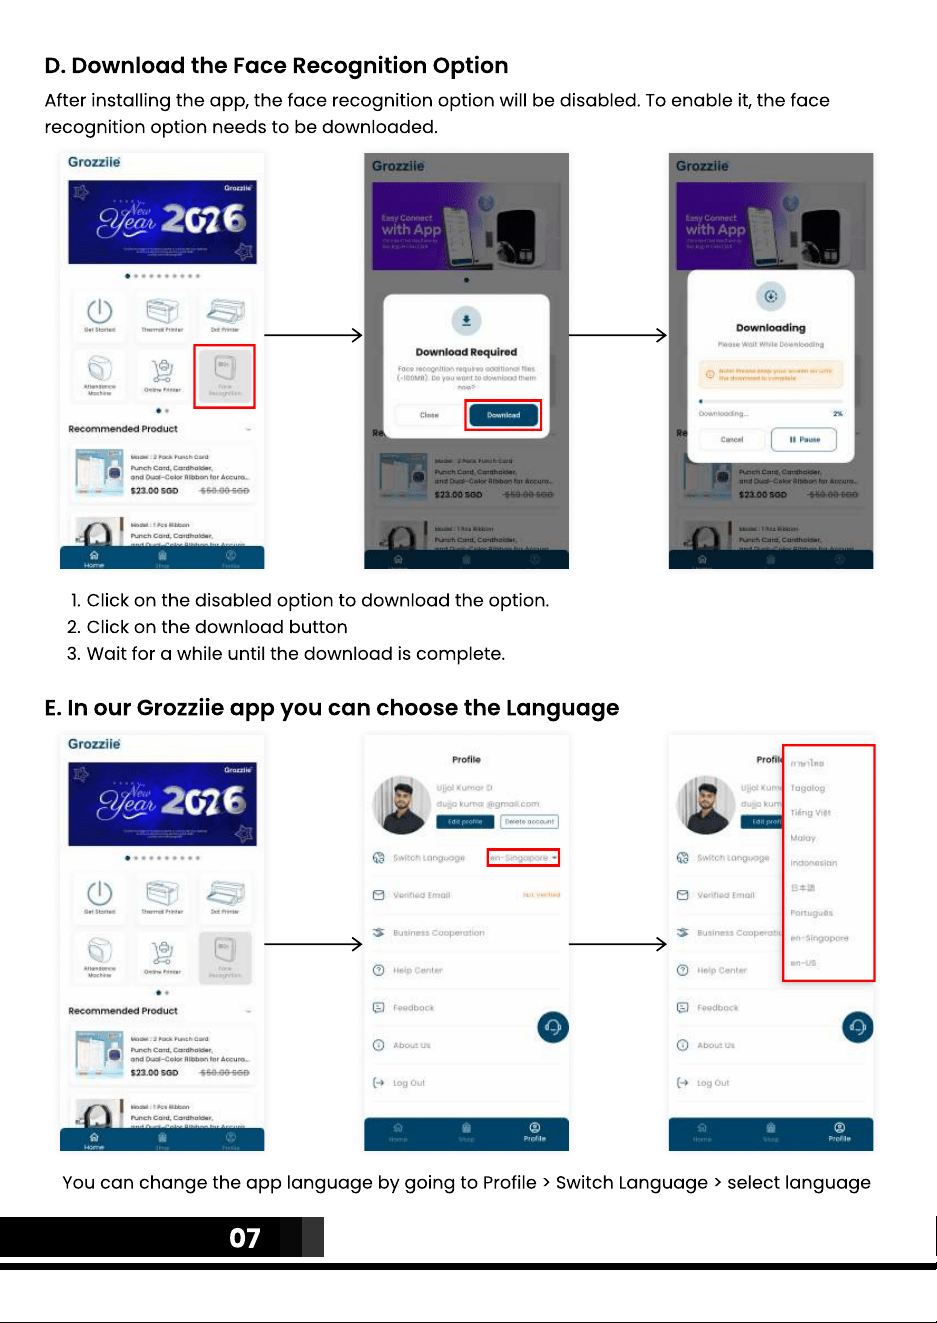
D. Download the Face Recognition Option
After installing the app, the face recognition option will be disabled. To enable it, the face
recognition option needs to be downloaded.
Click on the disabled option to download the option
Click on the download butto
Wait for a while until the download is complete.
E. In our Grozziie app you can choose the Language
You can change the app language by going to Profile > Switch Language > select language
07
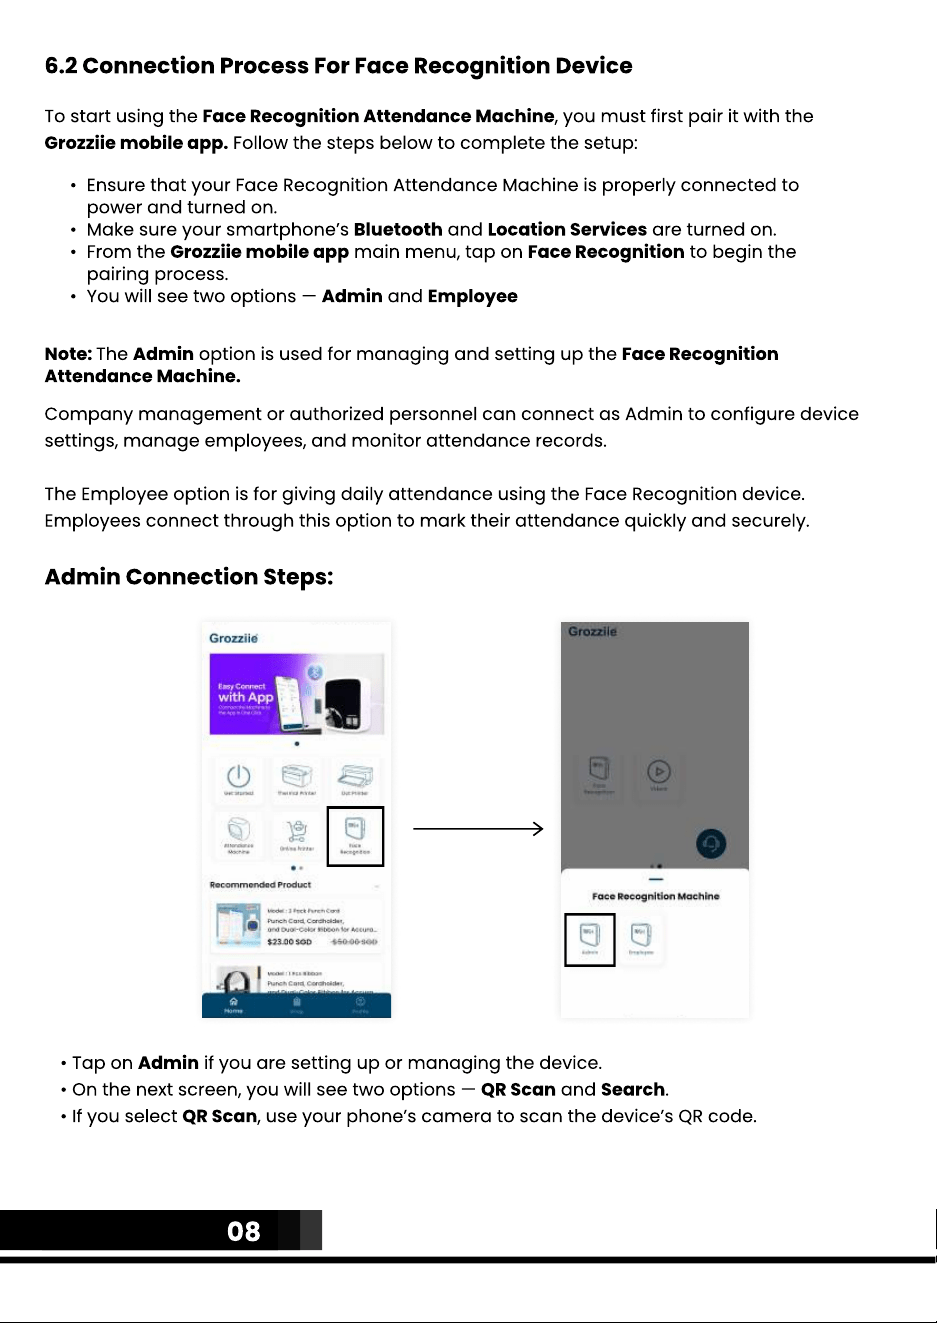
6.2 Connection Process for Face Recognition Device
To start using the Face Recognition Attendance Machine, you must first pair it with the
Grozziie mobile app. Follow the steps below to complete the setup:
Ensure that your Face Recognition Attendance Machine is properly connected to
power and turned on.
Make sure your smartphone’s Bluetooth and Location Services are turned on.
From the Grozziie mobile app main menu, tap on Face Recognition to begin the
pairing process.
You will see two options — Admin and Employee
Note: The Admin option is used for managing and setting up the Face Recognition
Attendance Machine.
Company management or authorized personnel can connect as Admin to configure device
settings, manage employees, and monitor attendance records.
The Employee option is for giving daily attendance using the Face Recognition device.
Employees connect through this option to mark their attendance quickly and securely.
Admin Connection Steps:
•
Tap on Admin if you are setting up or managing the device
•
O
n the ne
x
t screen, you will see two options
—
Q
R
S
can and
S
earch
•
I
f you select
Q
R
S
can, use your phone
’
s camera to scan the device
’
s
Q
R code.
08
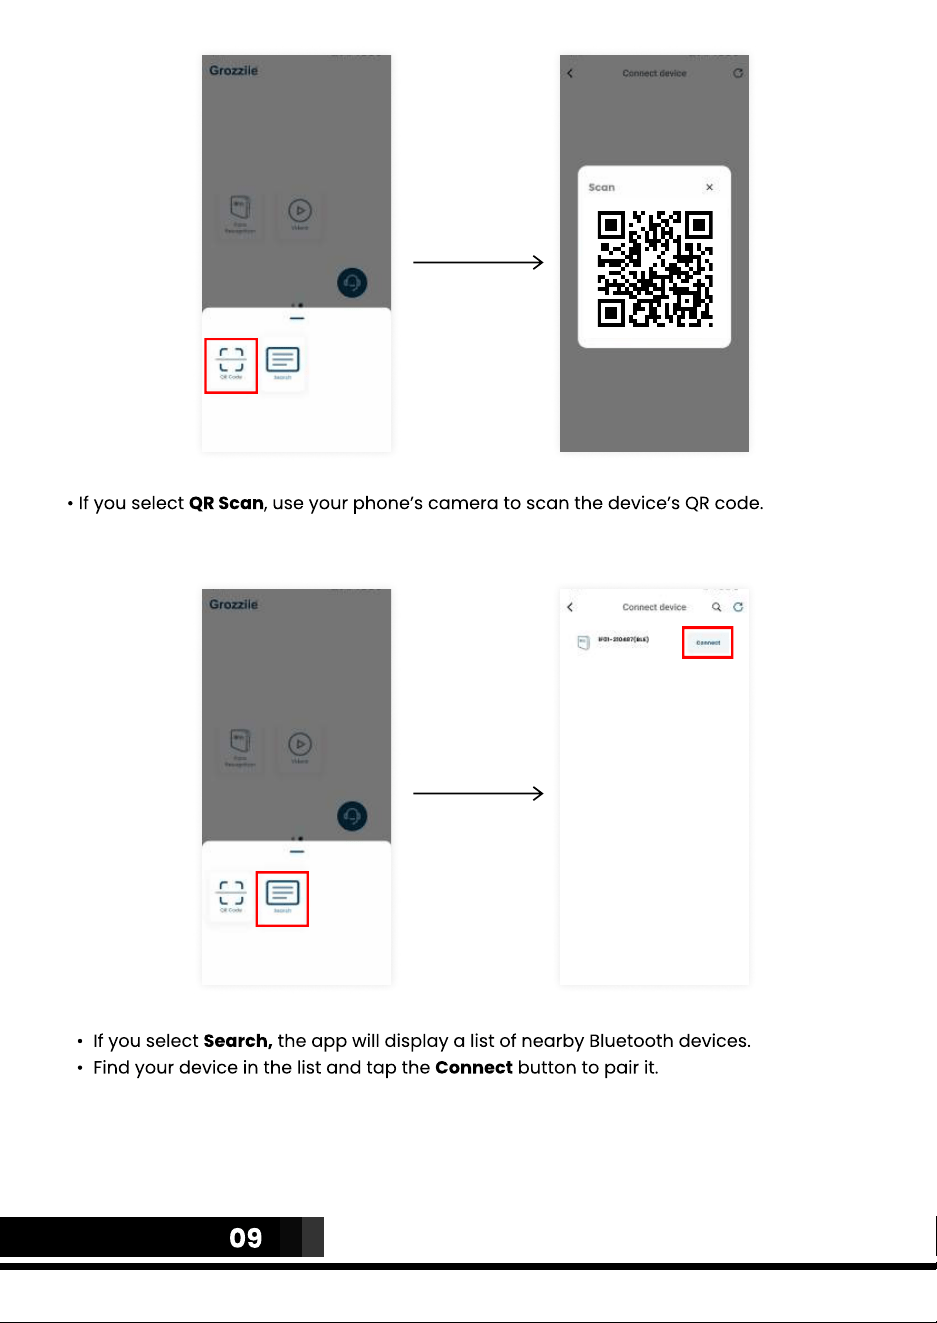
• If you select QR Scan, use your phone’s camera to scan the device’s QR code.
If you select Search, the app will display a list of nearby Bluetooth devices
Find your device in the list and tap the Connect button to pair it.
09
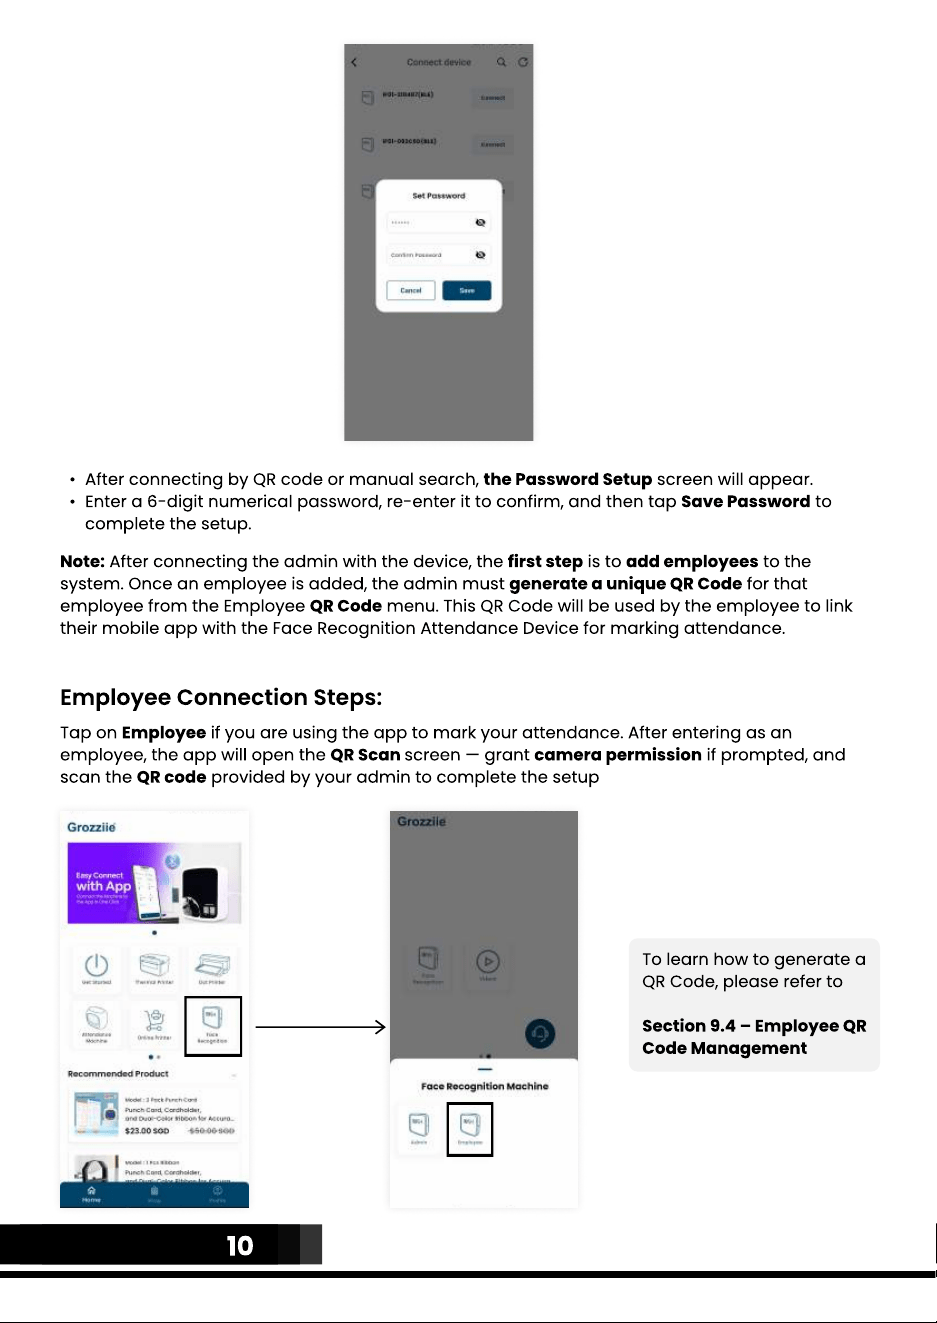
After connecting by QR code or manual search, the Password Setup screen will appear
Enter a 6-digit numerical password, re-enter it to confirm, and then tap Save Password to
complete the setup.
Note: After connecting the admin with the device, the first step is to add employees to the
system. Once an employee is added, the admin must generate a unique QR Code for that
employee from the Employee QR Code menu. This QR Code will be used by the employee to link
their mobile app with the Face Recognition Attendance Device for marking attendance.
Employee Connection Steps:
Tap on Employee if you are using the app to mark your attendance. After entering as an
employee, the app will open the QR Scan screen — grant camera permission if prompted, and
scan the QR code provided by your admin to complete the setup
To learn how to generate a
QR Code, please refer to
Section 9.4 – Employee QR
Code Management
10
07
Once your role is selected, the app will connect to the device.
After successful pairing, the system will automatically sync data, allowing admins to manage
settings and employees to start marking attendance.
This connection ensures that all attendance records are updated in real time and stored
securely within the system.
Watch video from this link or scan the QR code
https://youtu.be/uXiZ2vRodHQ?si=MniblVFBnzpbip0_
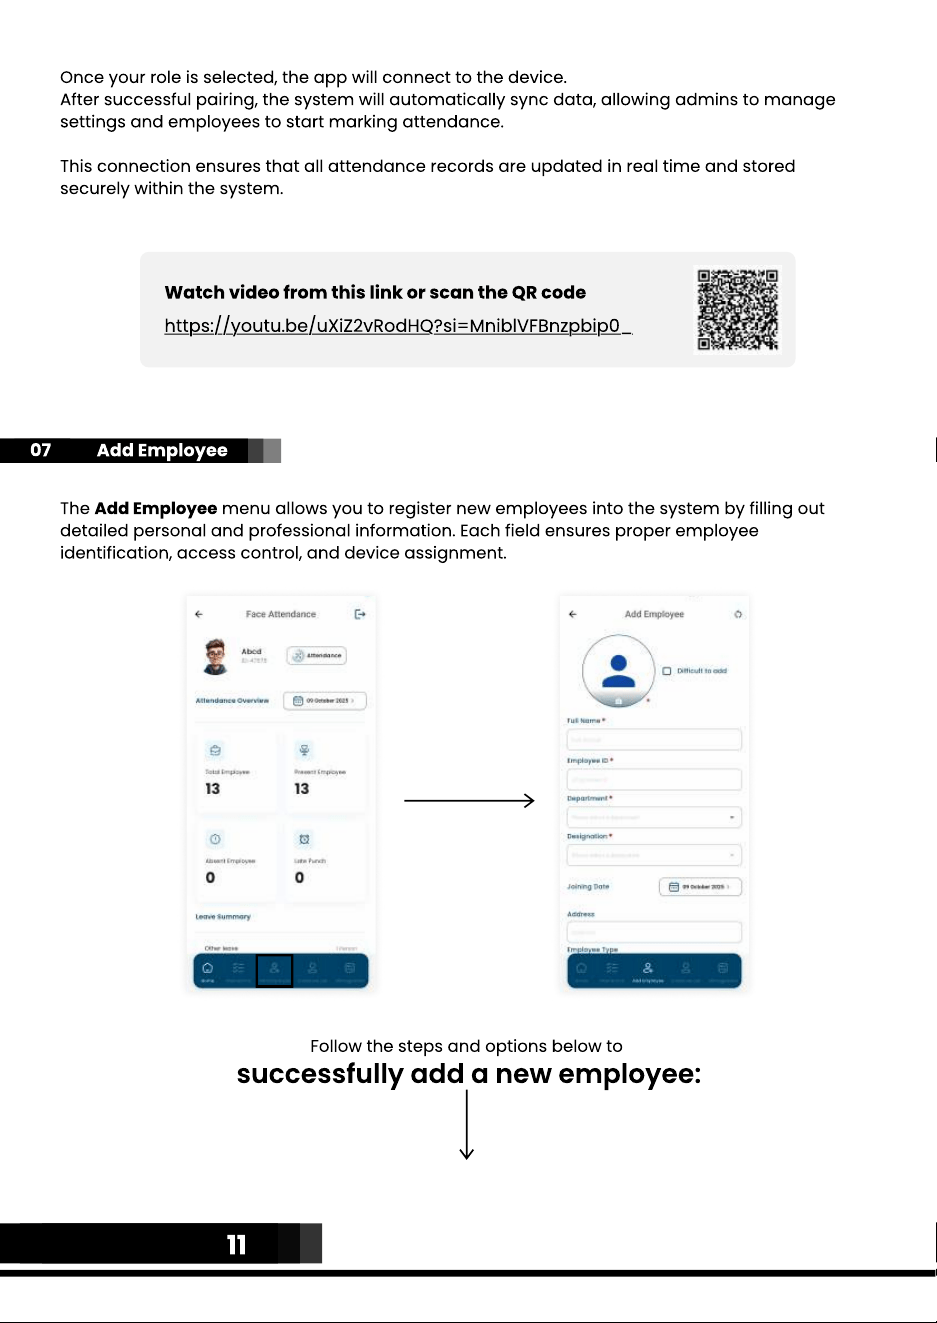
Add Employee
The Add Employee menu allows you to register new employees into the system by filling out
detailed personal and professional information. Each field ensures proper employee
identification, access control, and device assignment.
Follow the steps and options below to
successfully add a new employee:
11
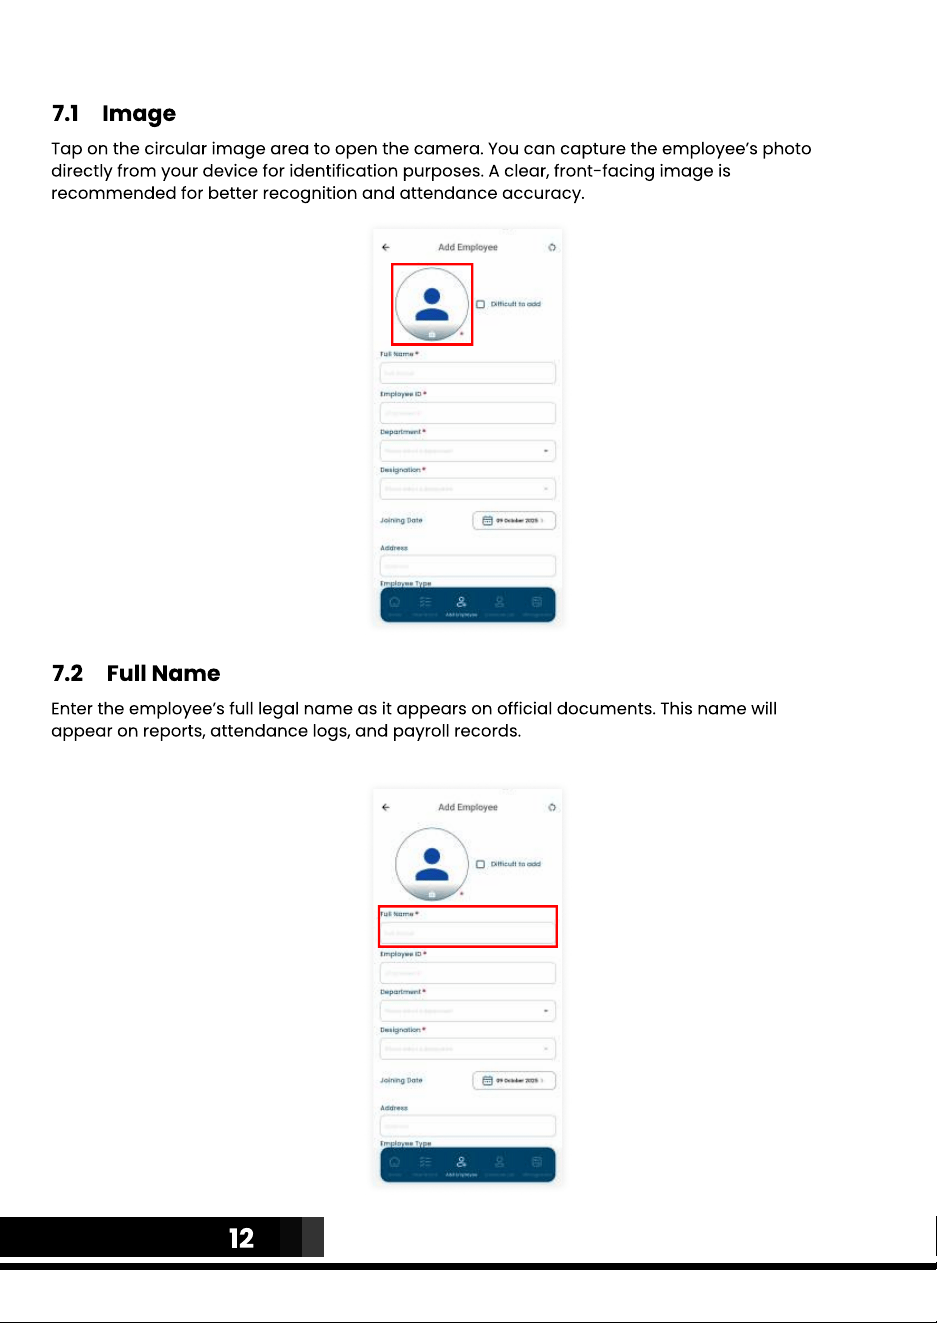
7.1 Image
Tap on the circular image area to open the camera. You can capture the employee’s photo
directly from your device for identification purposes. A clear, front-facing image is
recommended for better recognition and attendance accuracy.
7.2 Full Name
Enter the employee’s full legal name as it appears on official documents. This name will
appear on reports, attendance logs, and payroll records.
12
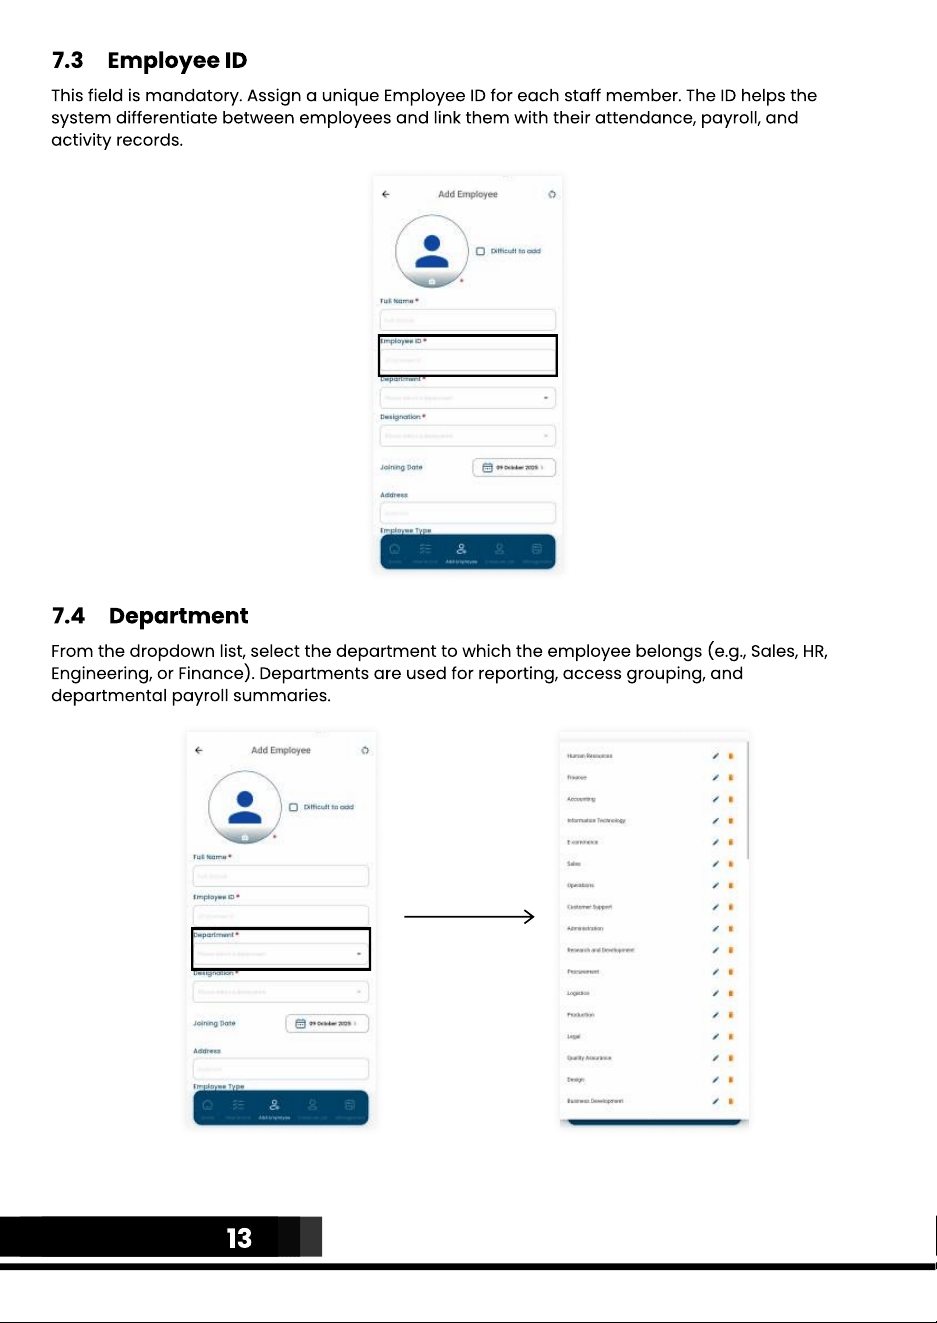
7.3 Employee ID
This field is mandatory. Assign a unique Employee ID for each staff member. The ID helps the
system differentiate between employees and link them with their attendance, payroll, and
activity records.
7.4 Department
From the dropdown list, select the department to which the employee belongs (e.g., Sales, HR,
Engineering, or Finance). Departments are used for reporting, access grouping, and
departmental payroll summaries.
13
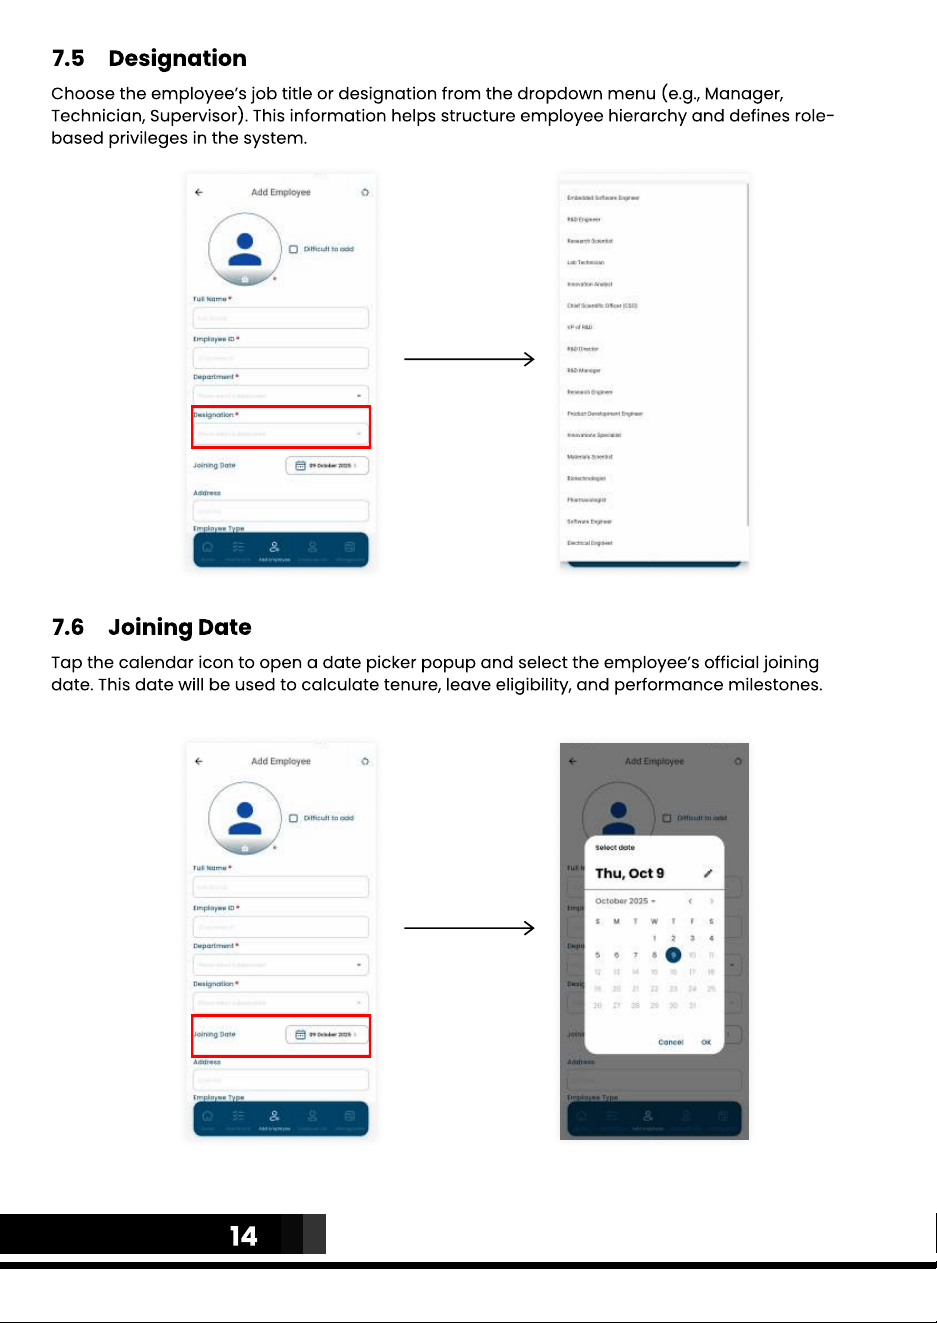
7.5 Designation
Choose the employee’s job title or designation from the dropdown menu (e.g., Manager,
Technician, Supervisor). This information helps structure employee hierarchy and defines role-
based privileges in the system.
7.6 Joining Date
Tap the calendar icon to open a date picker popup and select the employee’s official joining
date. This date will be used to calculate tenure, leave eligibility, and performance milestones.
14
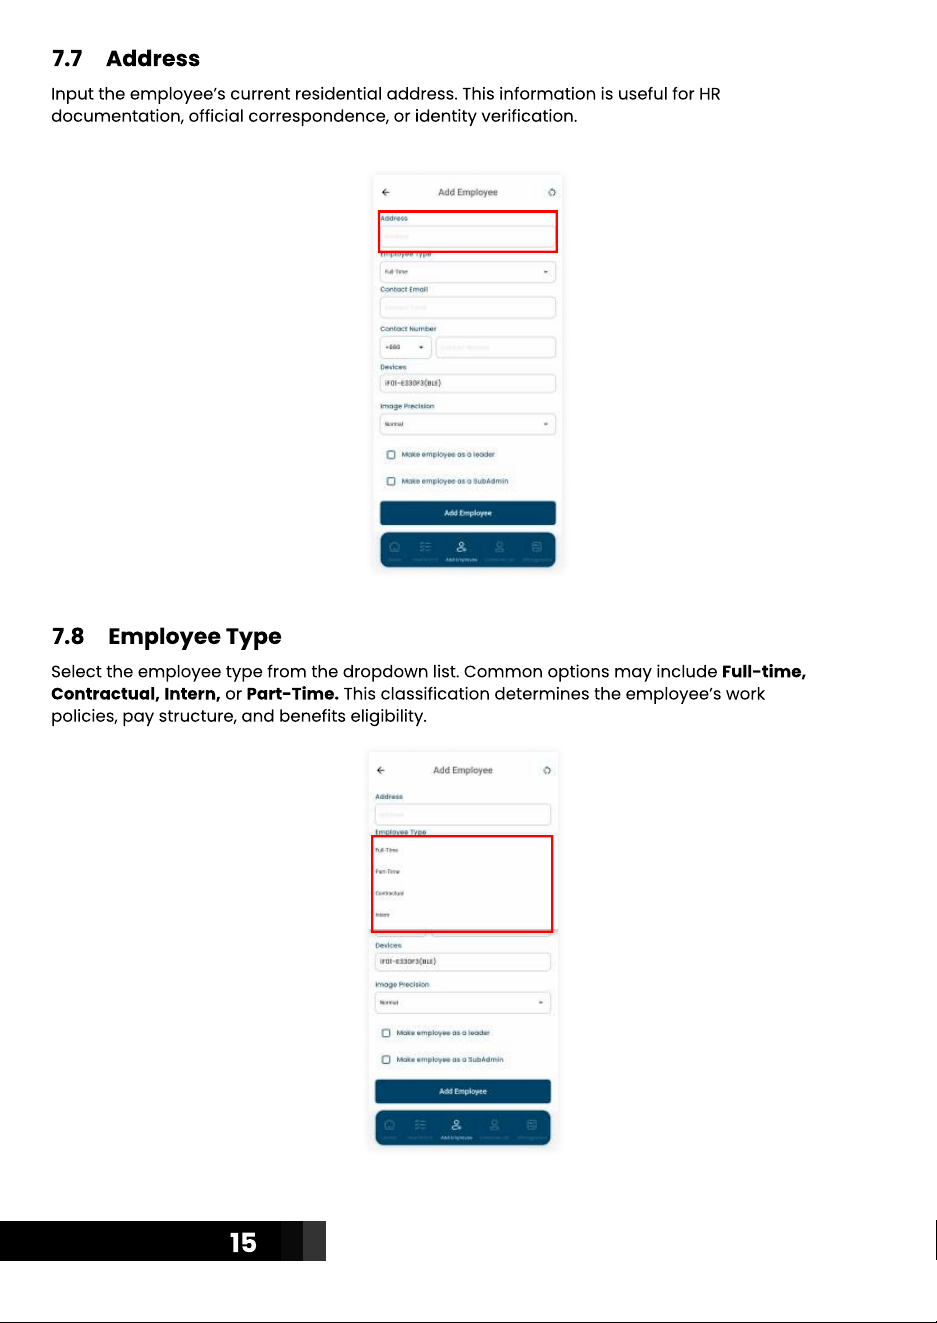
7.7 Address
Input the employee’s current residential address. This information is useful for HR
documentation, official correspondence, or identity verification.
7.8 Employee Type
Select the employee type from the dropdown list. Common options may include Full-time,
Contractual, Intern, or Part-Time. This classification determines the employee’s work
policies, pay structure, and benefits eligibility.
15
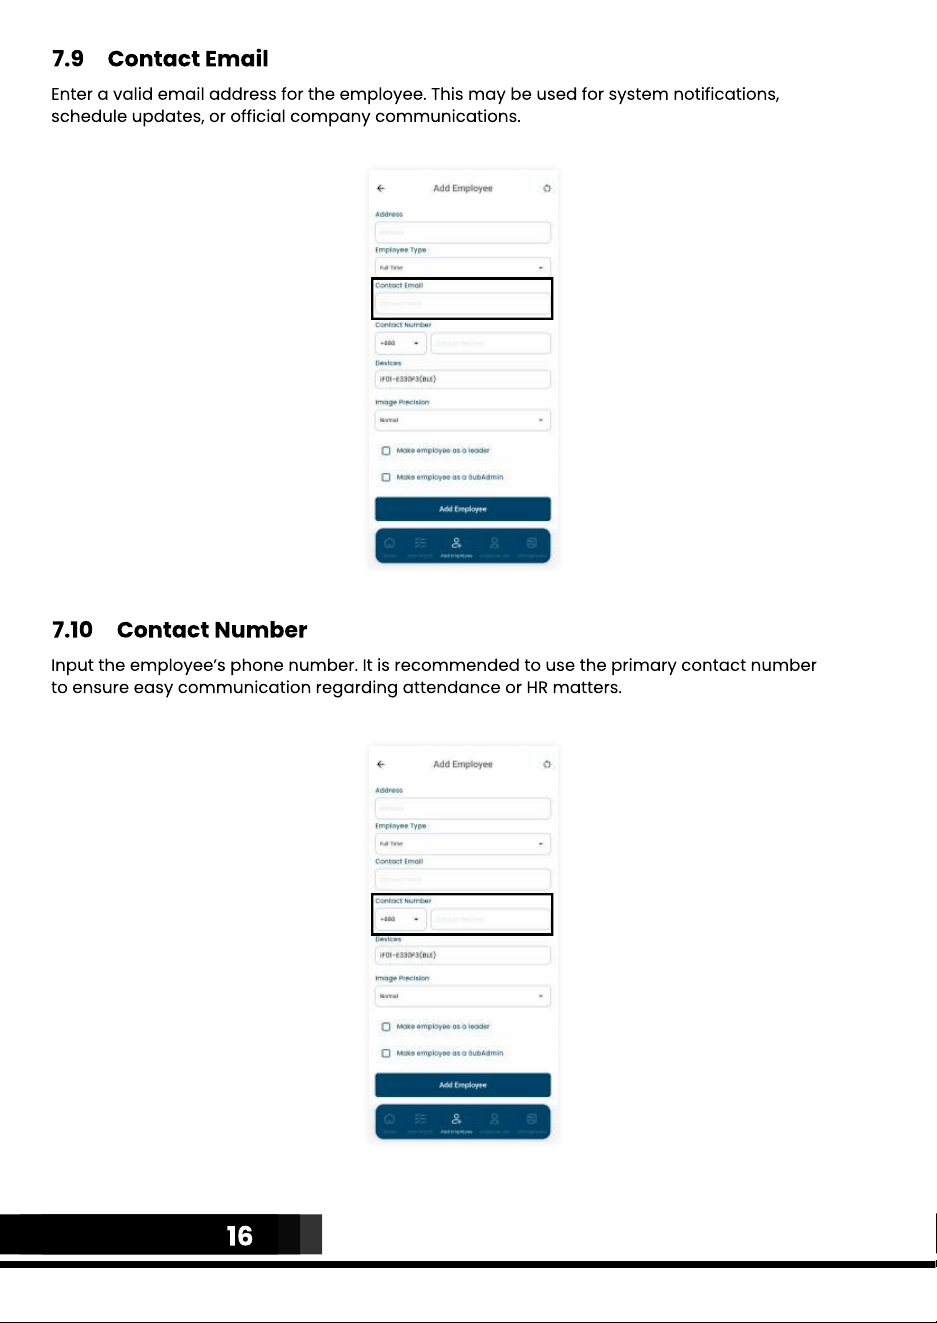
7.9 Contact Email
Enter a valid email address for the employee. This may be used for system notifications,
schedule updates, or official company communications.
7.10 Contact Number
Input the employee’s phone number. It is recommended to use the primary contact number
to ensure easy communication regarding attendance or HR matters.
16
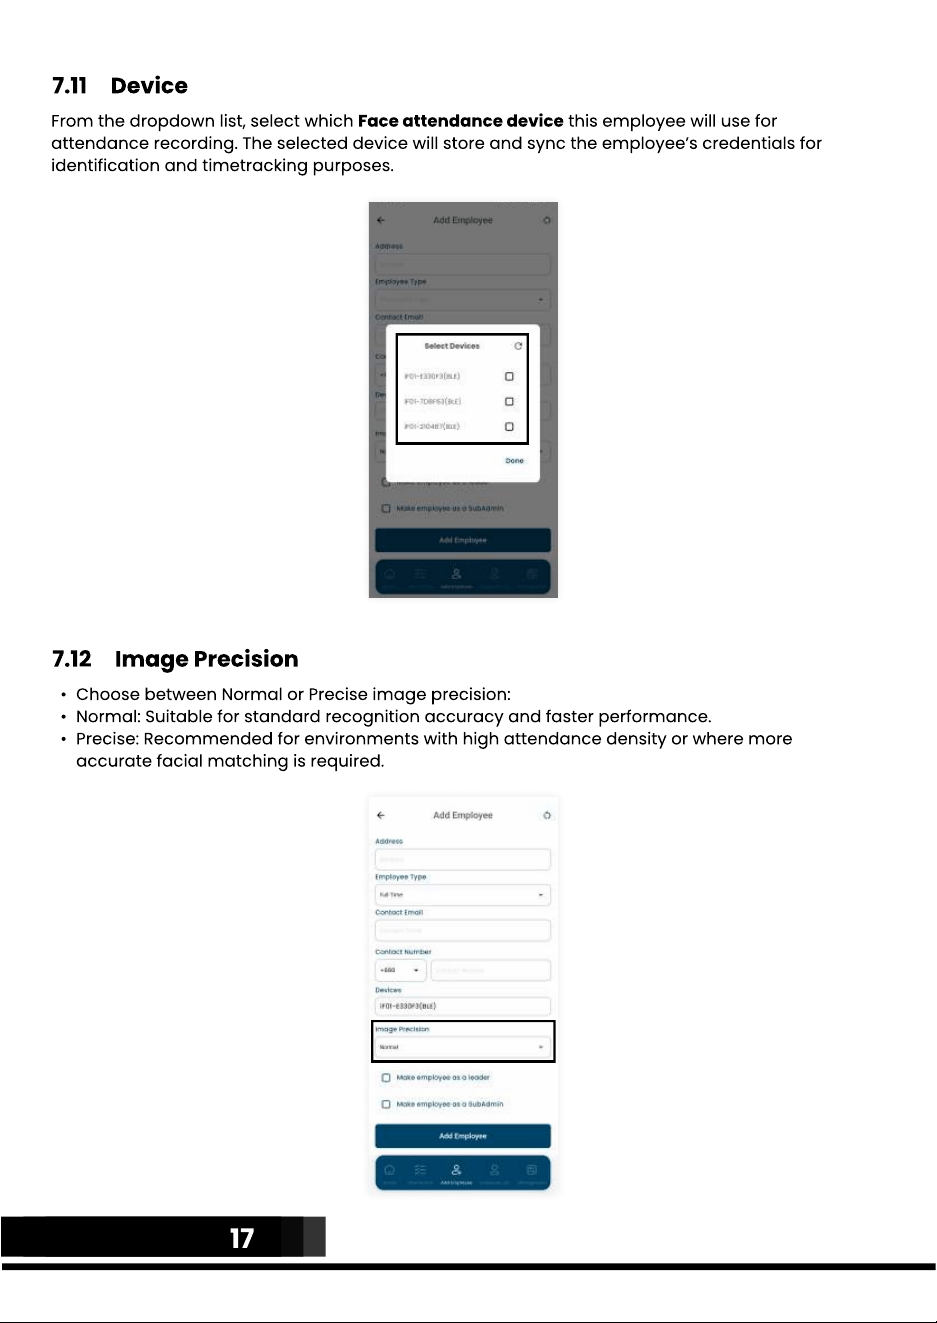
7.11 Device
From the dropdown list, select which Face attendance device this employee will use for
attendance recording. The selected device will store and sync the employee’s credentials for
identification and timetracking purposes.
7.12 Image Precision
Choose between Normal or Precise image precision:
Normal: Suitable for standard recognition accuracy and faster performance.
Precise: Recommended for environments with high attendance density or where more
accurate facial matching is required.
17
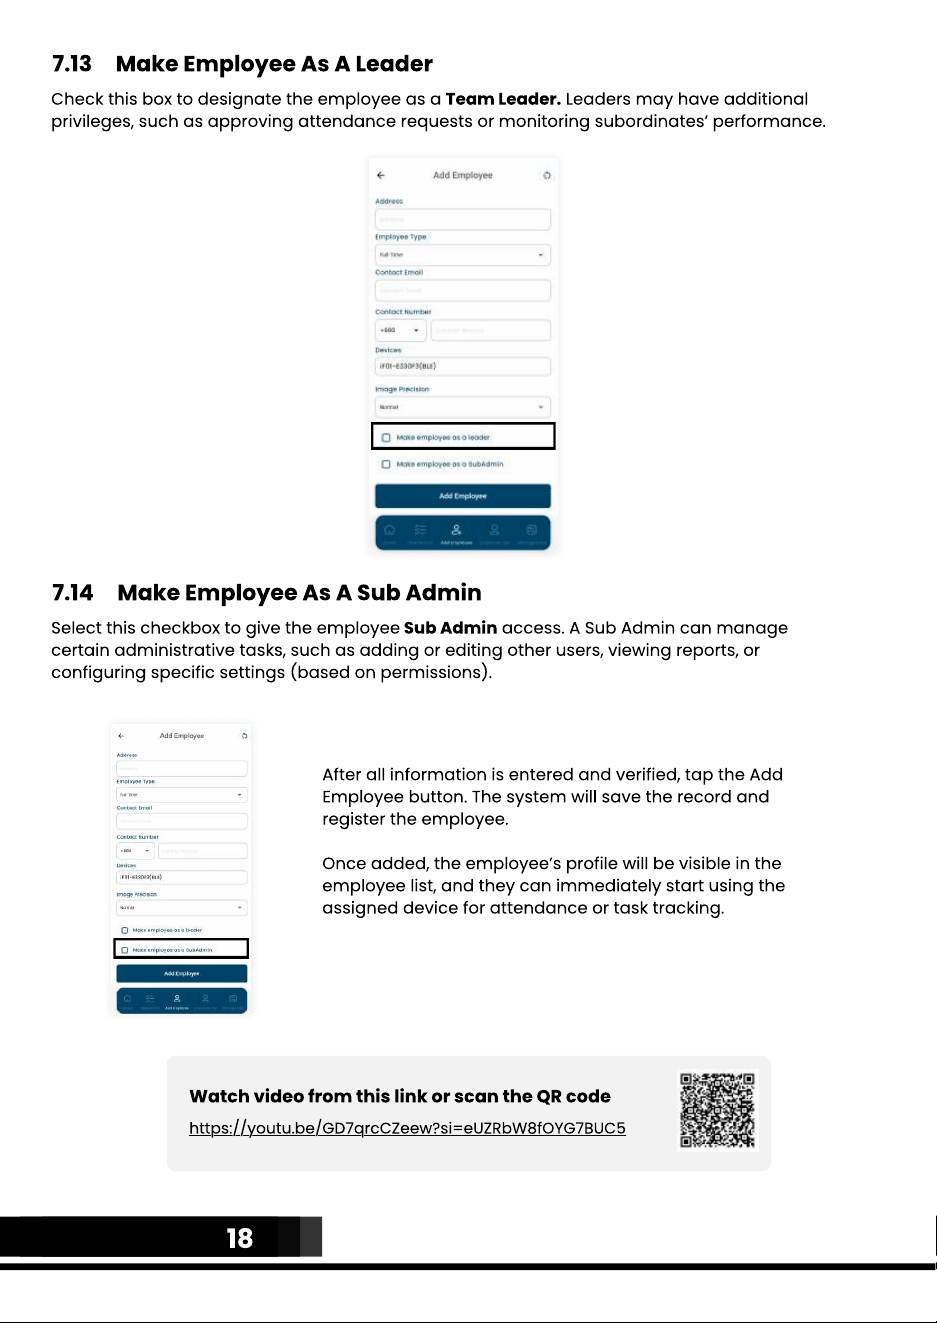
7.13 Make Employee as a Leader
Check this box to designate the employee as a Team Leader. Leaders may have additional
privileges, such as approving attendance requests or monitoring subordinates’ performance.
7.14 Make Employee as a Sub Admin
Select this checkbox to give the employee Sub Admin access. A Sub Admin can manage
certain administrative tasks, such as adding or editing other users, viewing reports, or
configuring specific settings (based on permissions).
After all information is entered and verified, tap the Add
Employee button. The system will save the record and
register the employee.
Once added, the employee’s profile will be visible in the
employee list, and they can immediately start using the
assigned device for attendance or task tracking.
Watch video from this link or scan the QR code
https://youtu.be/GD7qrcCZeew?si=eUZRbW8fOYG7BUC5
18
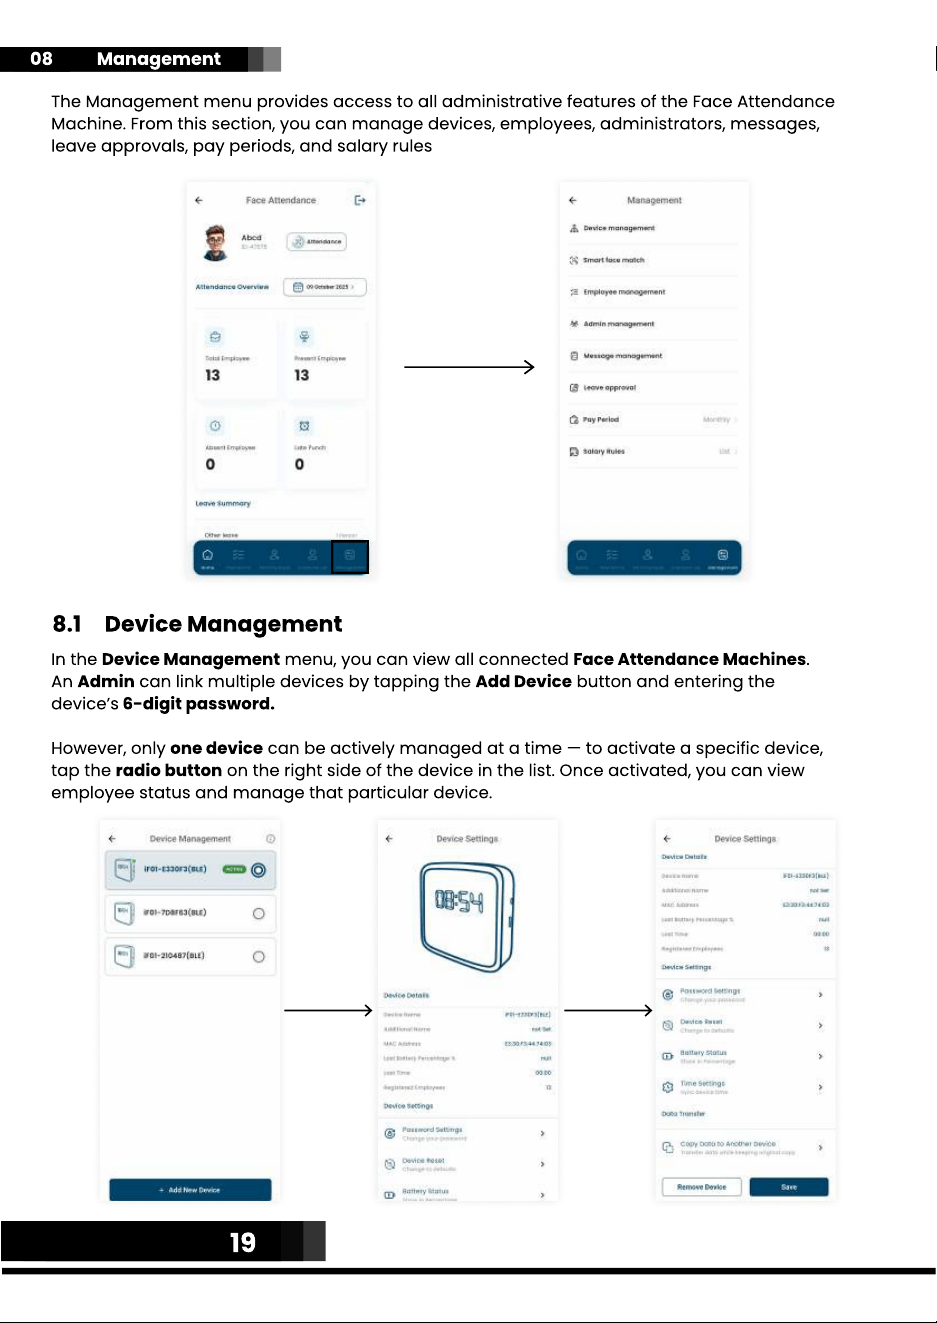
08 Management
The Management menu provides access to all administrative features of the Face Attendance
Machine. From this section, you can manage devices, employees, administrators, messages,
leave approvals, pay periods, and salary rules
8.1 Device Management
In the Device Management menu, you can view all connected Face Attendance Machines.
An Admin can link multiple devices by tapping the Add Device button and entering the
device’s 6-digit password.
However, only one device can be actively managed at a time — to activate a specific device,
tap the radio button on the right side of the device in the list. Once activated, you can view
employee status and manage that particular device.
19
Watch video from this link or scan the QR code
https://youtu.be/uXiZ2vRodHQ?si=MniblVFBnzpbip0_
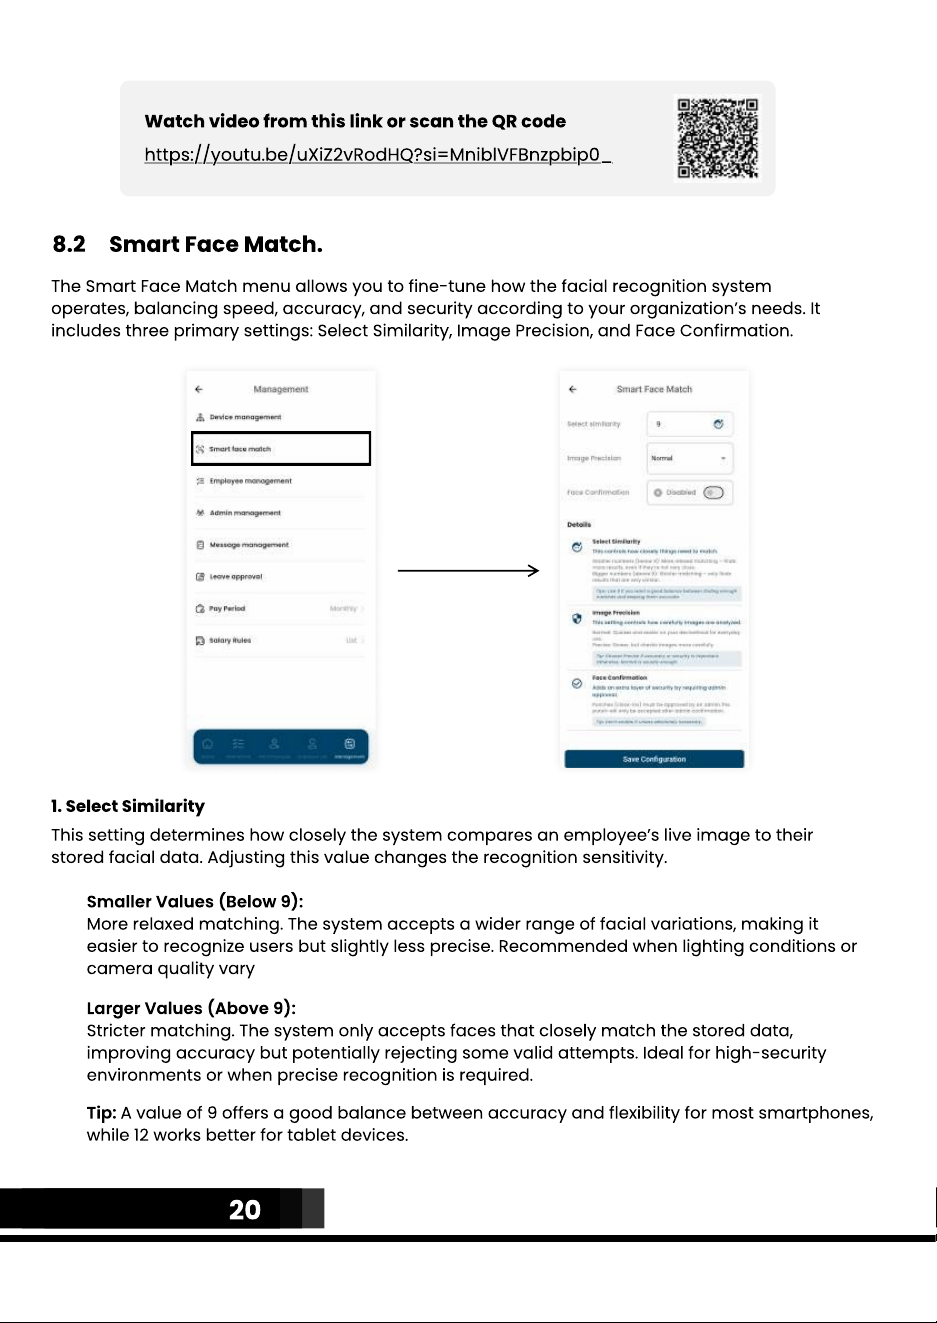
8.2 Smart Face Match.
The Smart Face Match menu allows you to fine-tune how the facial recognition system
operates, balancing speed, accuracy, and security according to your organization’s needs. It
includes three primary settings: Select Similarity, Image Precision, and Face Confirmation.
1. Select Similarity
This setting determines how closely the system compares an employee’s live image to their
stored facial data. Adjusting this value changes the recognition sensitivity.
Smaller Values (Below 9):
More relaxed matching. The system accepts a wider range of facial variations, making it
easier to recognize users but slightly less precise. Recommended when lighting conditions or
camera quality vary
Larger Values (Above 9):
Stricter matching. The system only accepts faces that closely match the stored data,
improving accuracy but potentially rejecting some valid attempts. Ideal for high-security
environments or when precise recognition is required.
Tip:
A value of
9
offers a good balance between accuracy and flexibility for most smartphones,
while
1
2 works better for tablet devices.
20
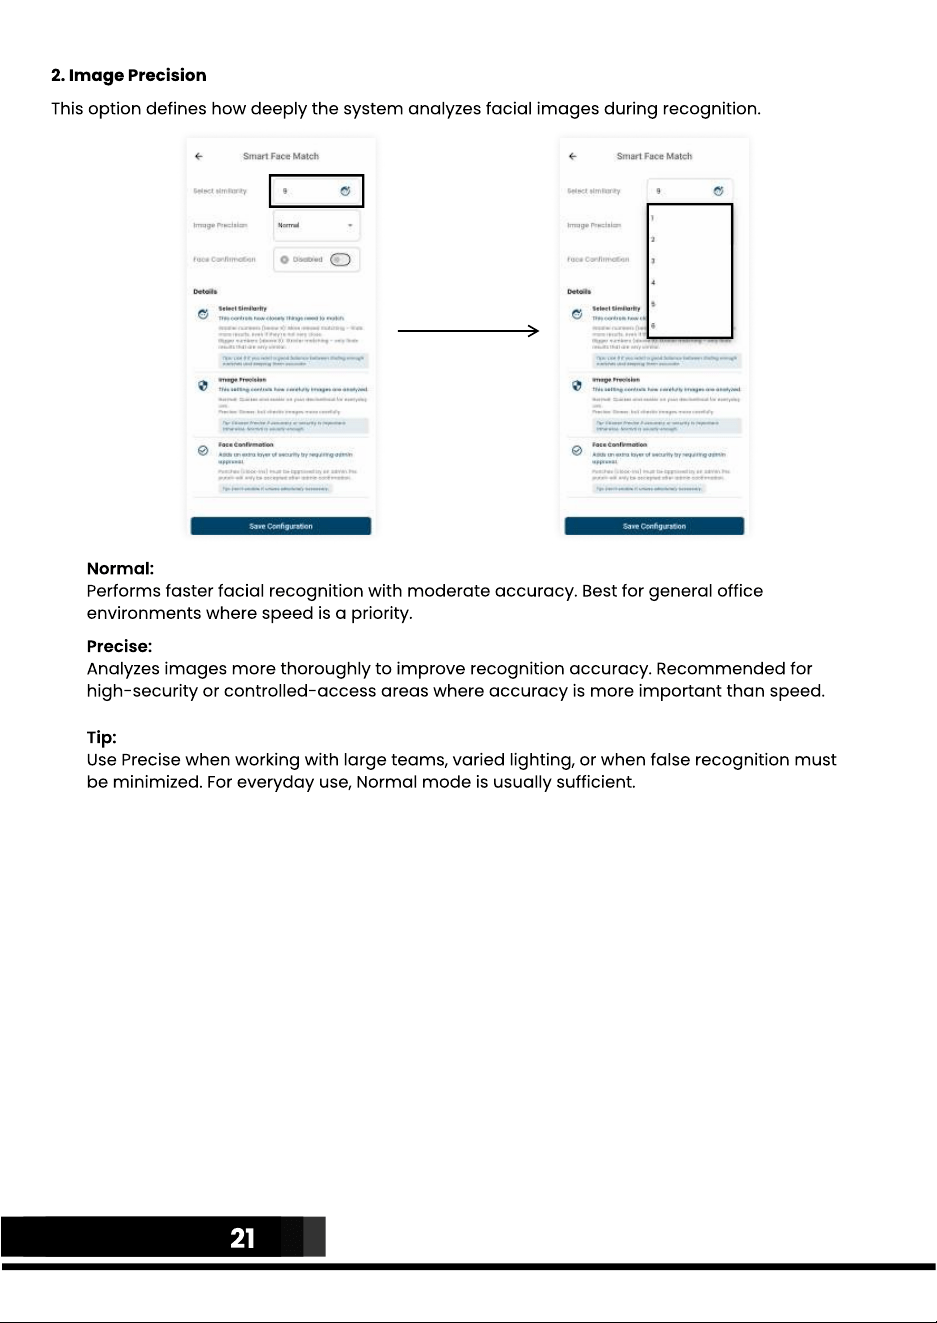
2. Image Precision
This option defines how deeply the system analyzes facial images during recognition.
Normal:
Performs faster facial recognition with moderate accuracy. Best for general office
environments where speed is a priority.
Precise:
Analyzes images more thoroughly to improve recognition accuracy. Recommended for
high-security or controlled-access areas where accuracy is more important than speed.
Tip:
Use Precise when working with large teams, varied lighting, or when false recognition must
be minimized. For everyday use, Normal mode is usually sufficient.
21
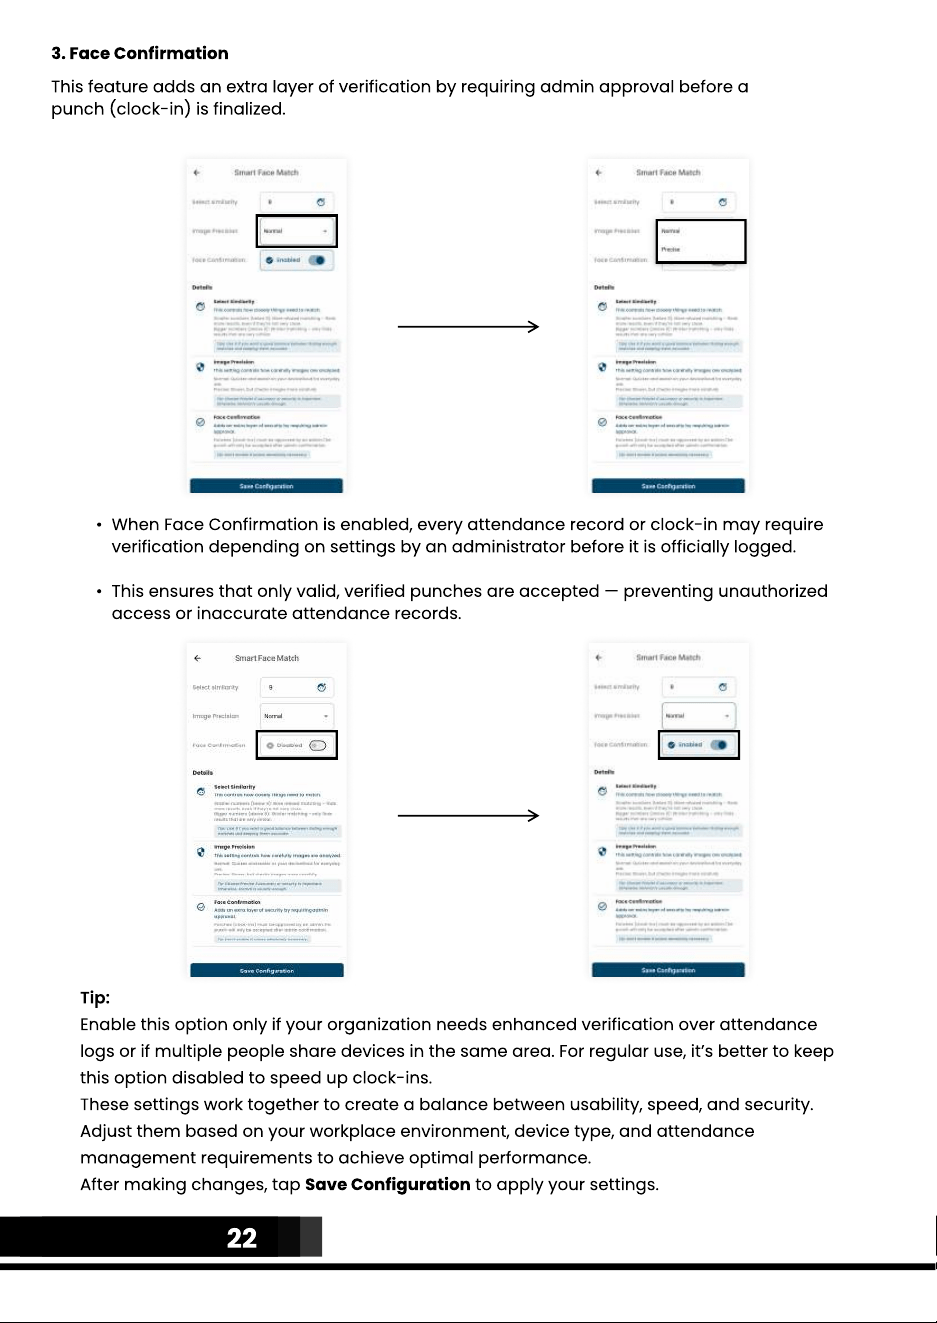
3. Face Confirmation
This feature adds an extra layer of verification by requiring admin approval before a
punch (clock-in) is finalized.
When Face Confirmation is enabled, every attendance record or clock-in may require
verification depending on settings by an administrator before it is officially logged.
This ensures that only valid, verified punches are accepted — preventing unauthorized
access or inaccurate attendance records.
Tip:
Enable this option only if your organization needs enhanced verification over attendance
logs or if multiple people share devices in the same area. For regular use, it’s better to keep
this option disabled to speed up clock-ins.
These settings work together to create a balance between usability, speed, and security.
Adjust them based on your workplace environment, device type, and attendance
management requirements to achieve optimal performance.
After making changes, tap Save Configuration to apply your settings.
22
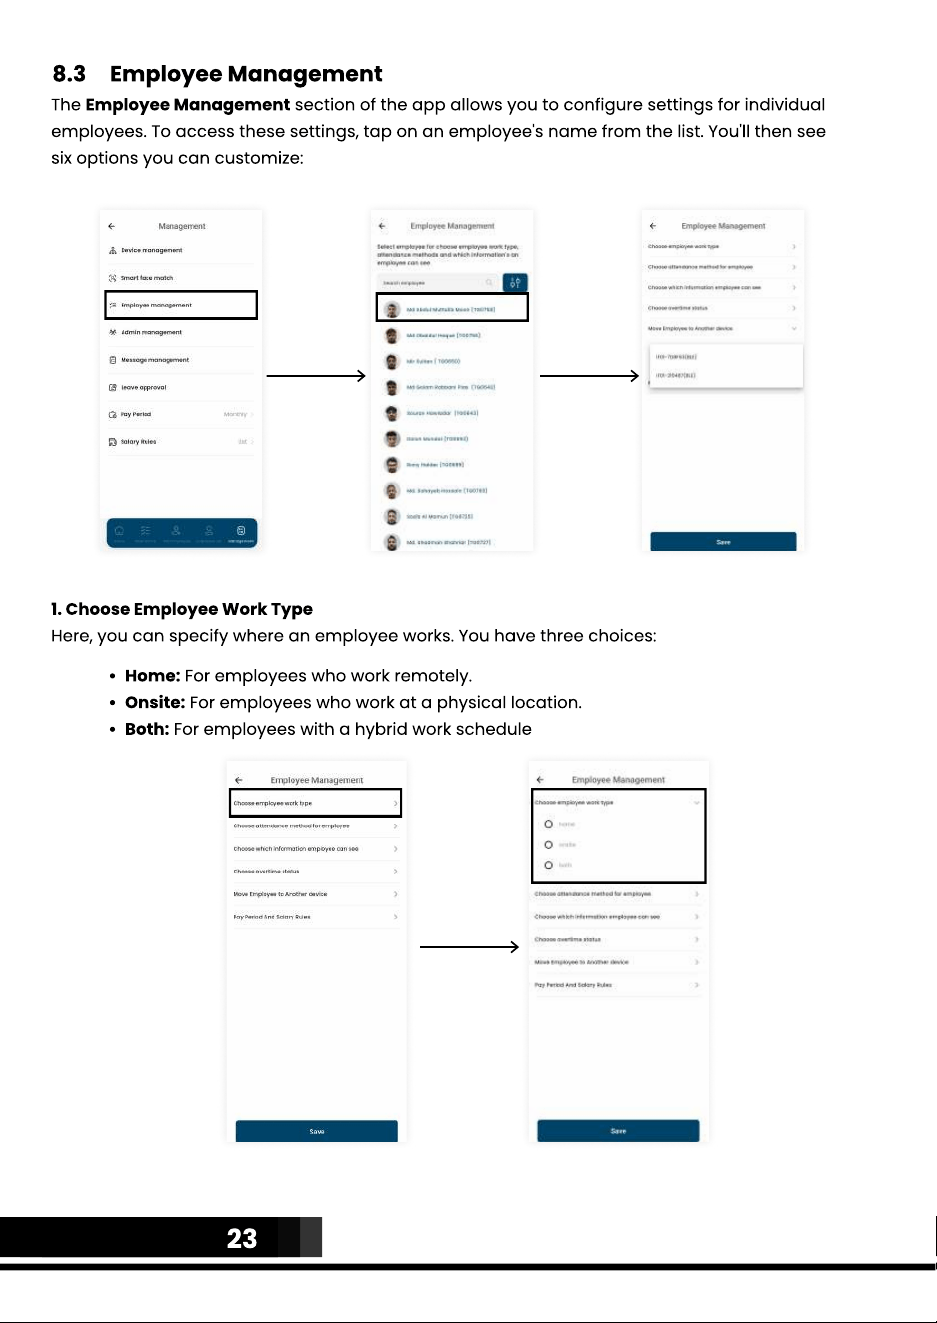
The Employee Management section of the app allows you to configure settings for individual
employees. To access these settings, tap on an employee's name from the list. You'll then see
six options you can customize:
8.3 Employee Management
1. Choose Employee Work Type
Here, you can specify where an employee works. You have three choices:
Home: For employees who work remotely.
Onsite: For employees who work at a physical location.
Both: For employees with a hybrid work schedule
23
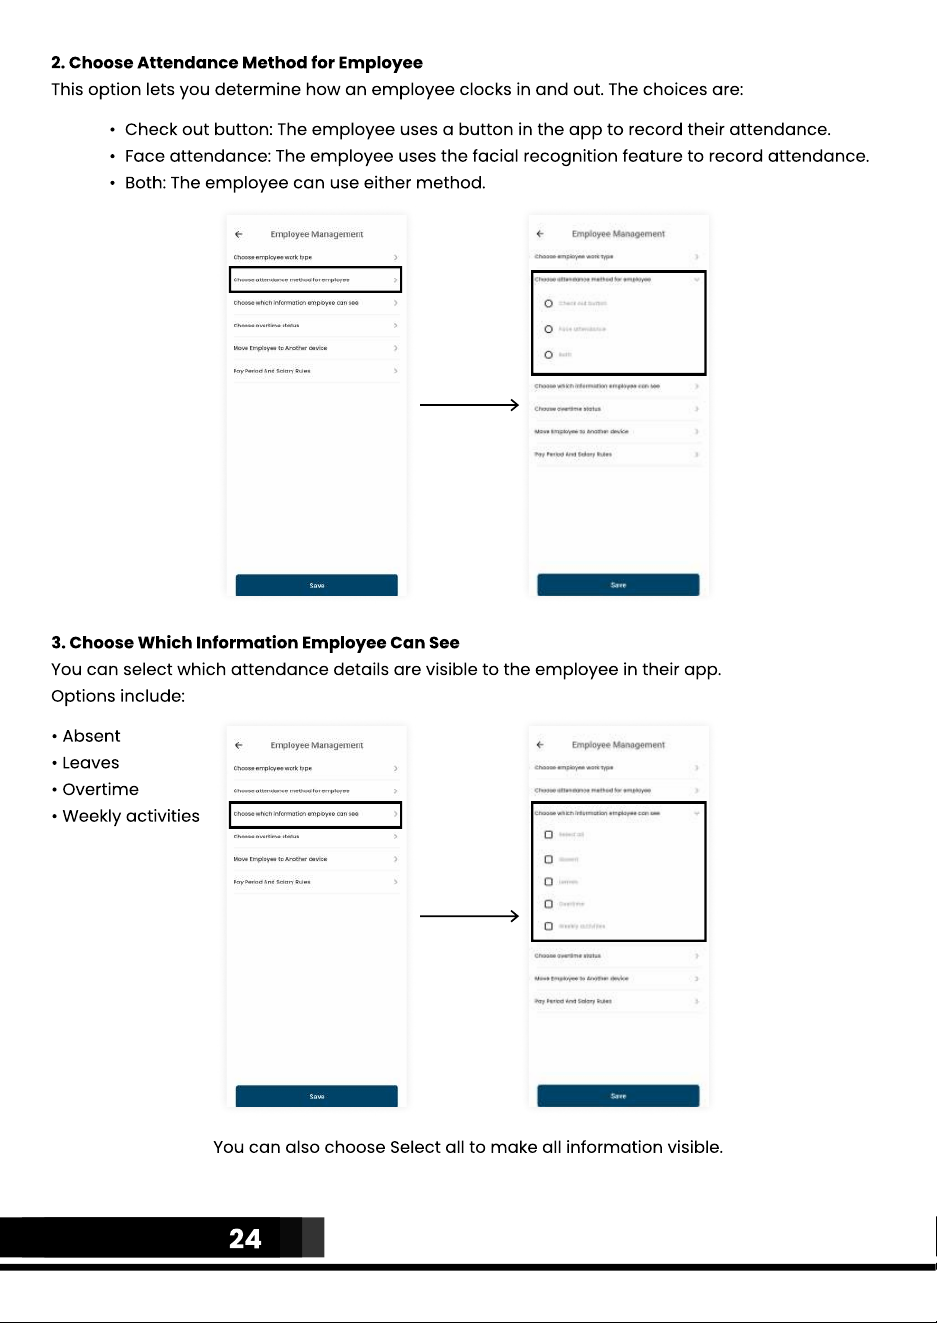
2. Choose Attendance Method for Employee
This option lets you determine how an employee clocks in and out. The choices are:
Check out button: The employee uses a button in the app to record their attendance
Face attendance: The employee uses the facial recognition feature to record attendance
Both: The employee can use either method.
3. Choose Which Information Employee Can See
You can select which attendance details are visible to the employee in their app.
Options include:
• Absent
• Leaves
• Overtime
• Weekly activities
You can also choose Select all to make all information visible.
24
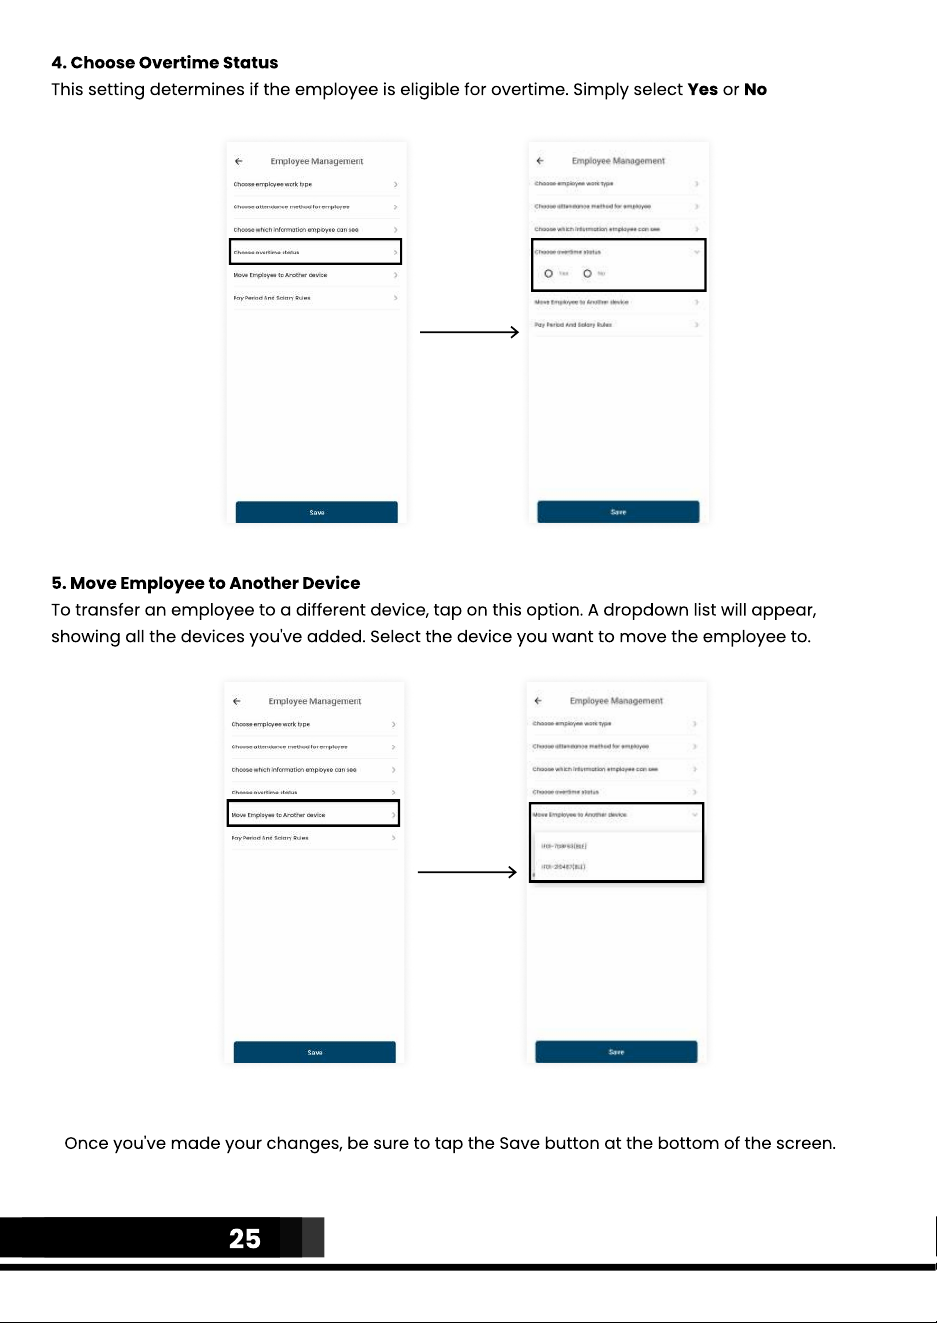
4. Choose Overtime Status
This setting determines if the employee is eligible for overtime. Simply select Yes or No
5. Move Employee to Another Device
To transfer an employee to a different device, tap on this option. A dropdown list will appear,
showing all the devices you've added. Select the device you want to move the employee to.
Once you've made your changes, be sure to tap the Save button at the bottom of the screen.
25
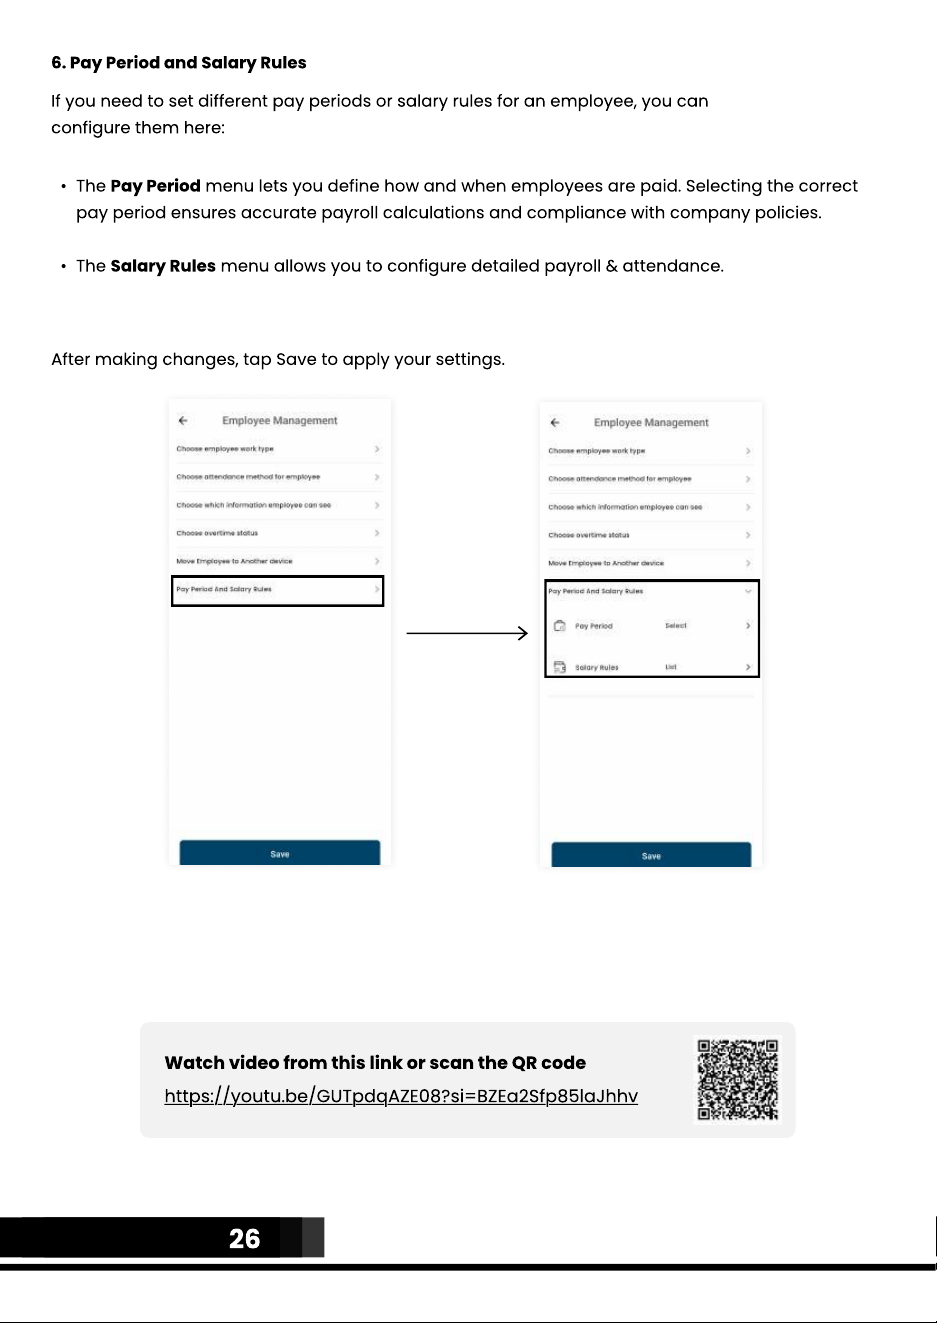
6. Pay Period and Salary Rules
If you need to set different pay periods or salary rules for an employee, you can
configure them here:
The Pay Period menu lets you define how and when employees are paid. Selecting the correct
pay period ensures accurate payroll calculations and compliance with company policies.
The Salary Rules menu allows you to configure detailed payroll & attendance.
After making changes, tap Save to apply your settings.
Watch video from this link or scan the QR code
https://youtu.be/GUTpdqAZE08?si=BZEa2Sfp85laJhhv
26