2
Dear Users:
Thanks for choosing our products. You will enjoy our kind, prompt, and considerate
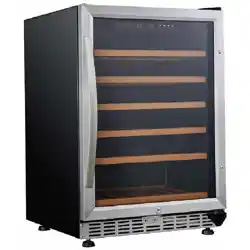
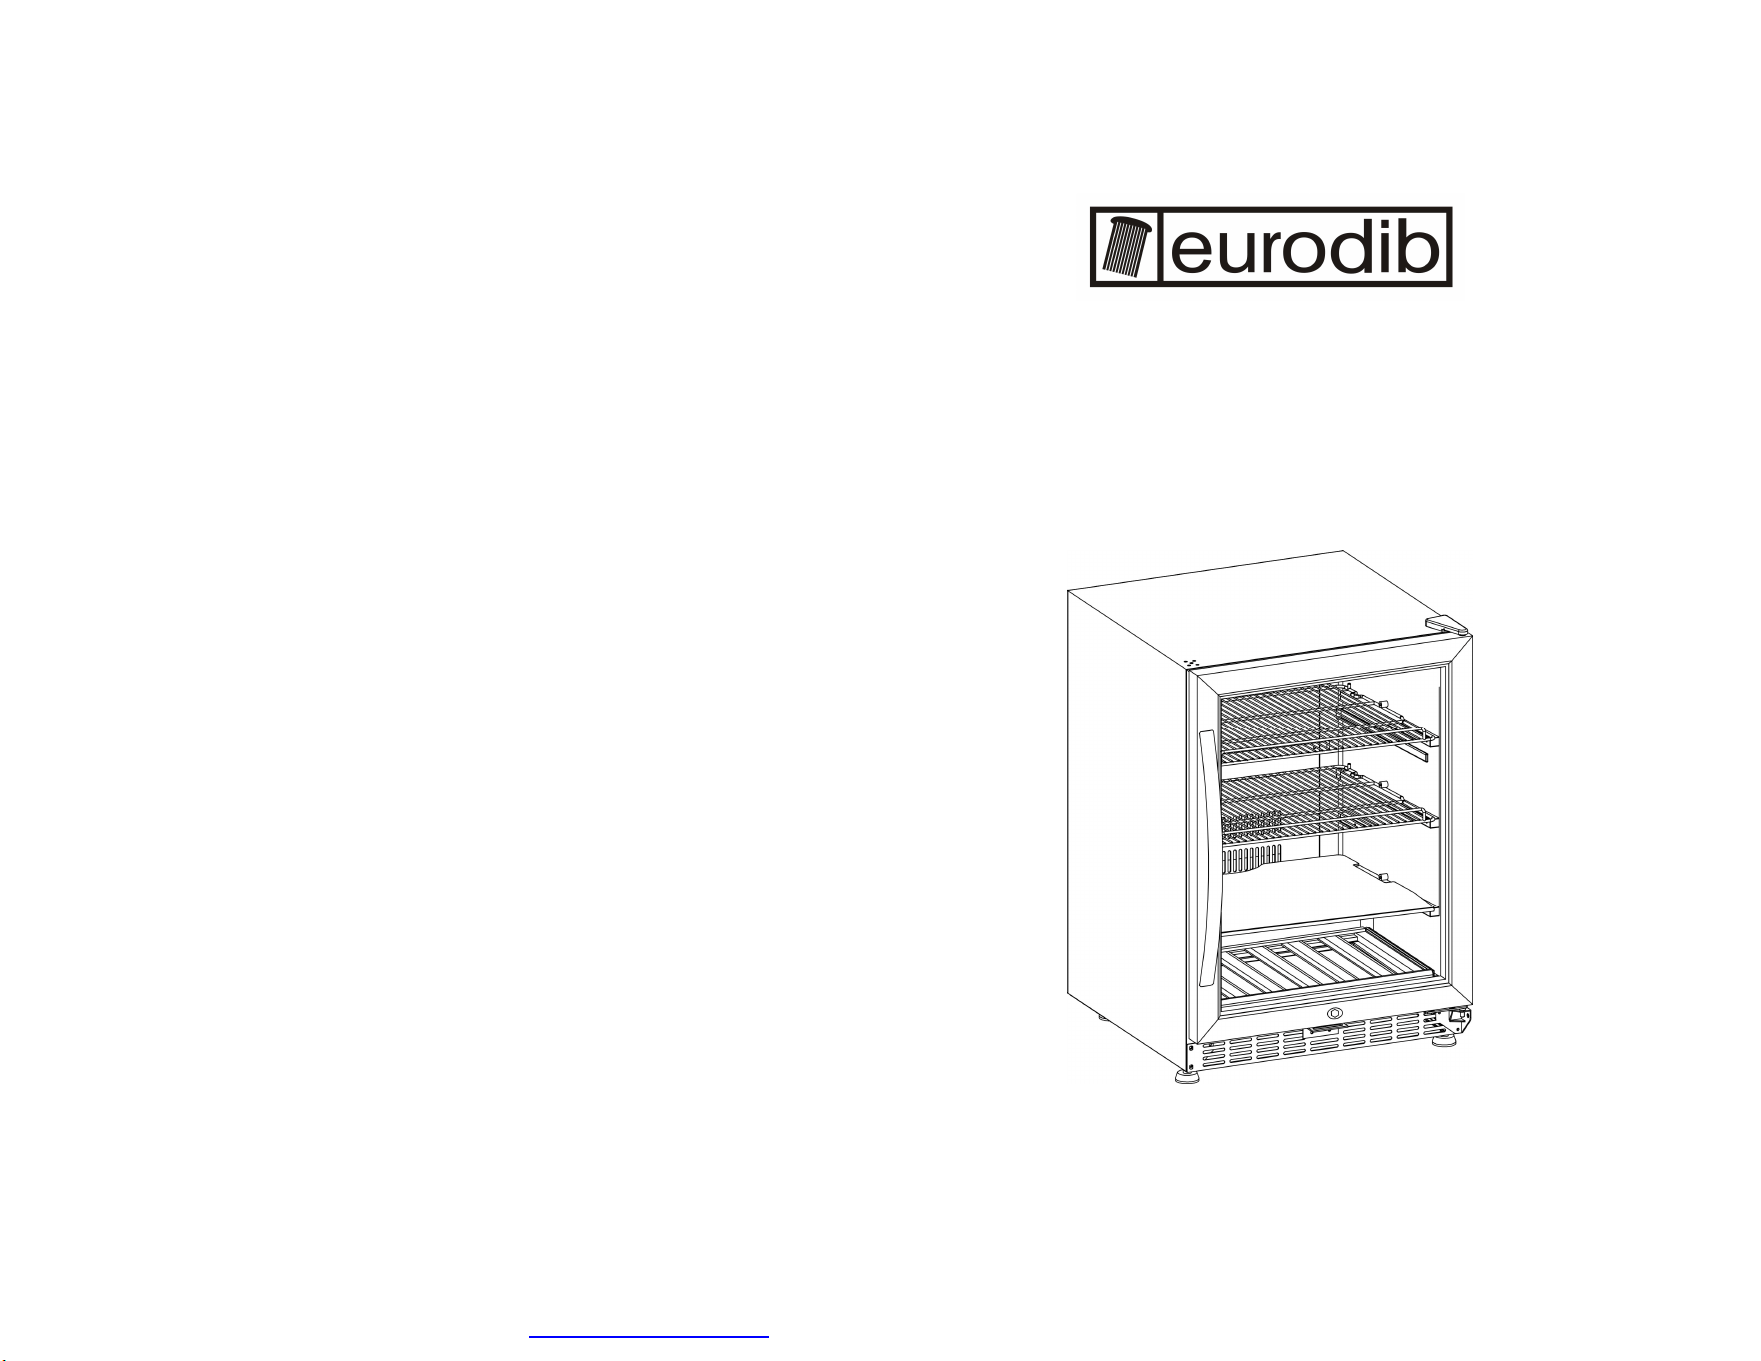
service after you buy our products. The model USF-54BC is serving for keeping both
beverage & wine. This operation manual will be useful to help you know more about our
product and its usage. In order to make it easy for your using, please read this manual
carefully and do as the manual guidance. You will be satisfied with it. In addition, we
sincerely hope that you will enjoy using our beverage coolers.
19
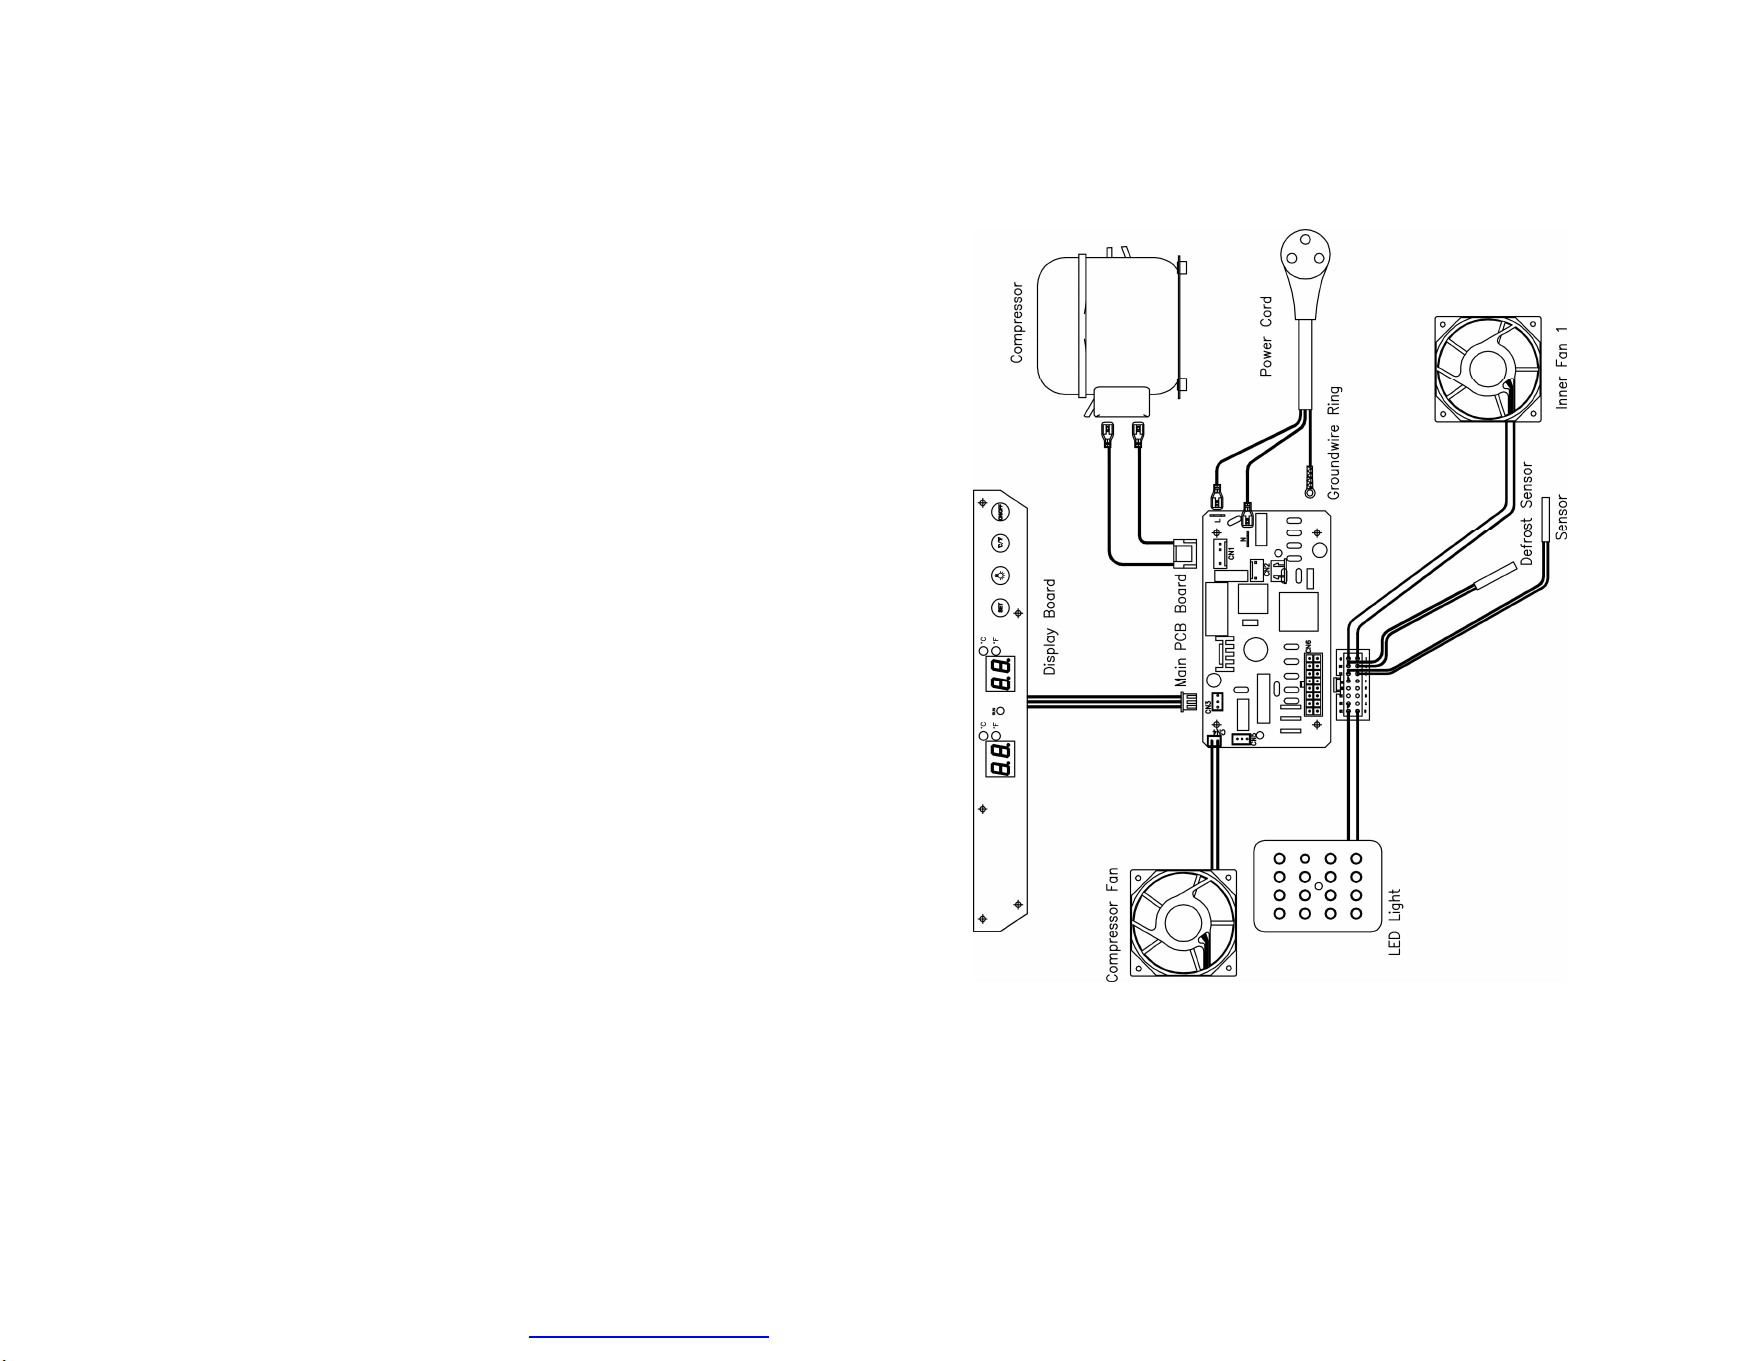
7. Electrical diagram
PDF created with pdfFactory trial version www.pdffactory.com
18
The light button is “OFF”.
Vibrations. Check to ensure that the wine cooler is
on level.
TROUBLESHOOTING GUIDE
PROBLEM POSSIBLE CAUSE
The beverage cooler seems to make too
much noise.
The rattling noise may come from the flow of
the refrigerator, which is normal.
As each cycle ends, you may hear gurgling
sounds caused by the flow of the refrigerator
in your beverage cooler. Contraction and
expansion of the inside walls may cause
popping and crackling noises. The wine
cooler is not on level.
The door will not close properly. The beverage cooler is not on level.
The door was reversed and not properly
installed.
The gasket is dirty.
The shelves are out of position.
Note: The replacement of the LED light must be done by a qualified
technician. First to unscrew the 2 screws on the light cover, then take out
the screw on the LED panel, and replace the LED light of same
specification.
3
TABLE OF CONTENT
Notes ------------------------------------------------------------------------4
Product Structure ---------------------------------------------------------6
Installation ------------------------------------------------------------------7
Operation Instructions----------------------------------------------------9
Care and Maintenance --------------------------------------------------15
Troubles hooting -----------------------------------------------------------17
Electrical diagram ---------------------------------------------------------19
PDF created with pdfFactory trial version www.pdffactory.com
4
1.Important Safety Notes:
~Warnings~
To reduce the risk of fire, electrical shock, or injury when
using your appliance, follow these basic precautions:
l Read all instructions before using the beverage cooler.
l Keep children away from the beverage cooler. Never allow children to operate,
play with, or crawl inside the appliance.
l Never clean appliance parts with flammable fluids. Fumes can create a fire
hazard or explosion.
l While the beverage cooler stops working, please call our after-sale service
department or other related technicians to check and repair. Never do it by
yourself in case of an accident.
l Once the power cord is damaged, find a professional technician or electrician to
change for a new one. Never do it by yourself or continue to use so as to avoid
danger.
l Make sure that the plug is pulled while cleaning, moving, or repairing.
-Keep these instructions-
~Notes~
• In order to avoid damage to the door seal, please make sure the door is totally
opened while pulling out the movable shelves.
• Place the beverage cooler close to the power socket.
• Once the beverage cooler is stored with beverages and wine, please do not move it
again.
• Make sure the beverage cooler is located in proper place in order to avoid easy
access to the compressor in the back.
• Do not start the beverage cooler too frequently. The interval should be at least 5
minutes.
• Before throwing away your old cooler take off the door and leave the shelves in their
original place so that children may not easily climb inside.
• If the beverage cooler is operated with R600a, flammable and explosive articles
should not be put in or near the cabinet to avoid fire or explosions.
17
6. Troubleshooting
You can solve many common beverage cooler problems easily, saving you the
cost of a possible service call. Try the suggestions below to see if you can solve the
problem before calling the service.
TROUBLESHOOTING GUIDE
PROBLEM POSSIBLE CAUSE
Beverage cooler does not operate. Not plugged in.
The appliance is turned OFF.
The circuit breaker tripped or a fuse has
blown.
Beverage cooler is not cold enough. Check the temperature control setting.
The external environment may require a
higher setting.
The door is opened too often.
The door is not completely closed.
The door gasket does not seal properly.
Turn ON and OFF frequently. The room temperature is hotter than normal.
A large amount of contents has been added
to the wine cellar.
The door is opened too often.
The door is not completely closed.
The temperature control is not set correctly.
The door gasket does not seal properly.
The light does not work. Not plugged in.
The circuit breaker tripped or a fuse has
blown.
The bulb has burned out.
PDF created with pdfFactory trial version www.pdffactory.com
16
Ø Power Failure:
• Most power failures are corrected within a few hours and will not affect the
temperature of your appliance if you minimize the frequency of opening the door.
If the power is going to be OFF for a longer period of time, you need to take the
proper steps to protect your contents.
Ø Vacancy Time:
• Long vacancy: If the appliance will not be used for several months, remove all
the items and turn off the appliance. Clean and dry the interior thoroughly so as
to restraint odours and mould. Leave the door slightly open at all time, if
necessary.
Ø Moving your Beverage Cooler:
• Remove all the items.
• Securely tape down all loose items (shelves) inside your appliance.
• Turn the adjustable leg up to the base to avoid damage.
• Make the door shut.
• Be sure the appliance stays secure in upright position during transportation.
Also protect the outside of the appliance with a blanket or any similar item.
Ø Energy Saving Tips:
The beverage cooler should be located in the coolest area of the room, away from heat
producing appliances and out of direct sunlight.
5
• This appliance is not intended for use by persons (including children) with reduced
physical, sensory or mental capabilities, or lack of experience and knowledge, unless
they have been given supervision or instructions on the use of the appliance by a
person responsible for their safety. Children should be supervised to ensure that they
do not play with the appliance.
• If the supply cord is damaged, it must be replaced by the manufacturer, its service
agent, or similarly qualified persons in order to avoid a hazard.
• The instructions shall include the substance of the following: This appliance is
intended to be used in household and similar applications such as:
– Staff kitchen areas in shops, offices, and other working
environments;
– Farm houses, hotel/motel clients, and other residential type
environments;
– Bed and breakfast type environments;
– Catering and similar non-retail applications.
PDF created with pdfFactory trial version www.pdffactory.com
6
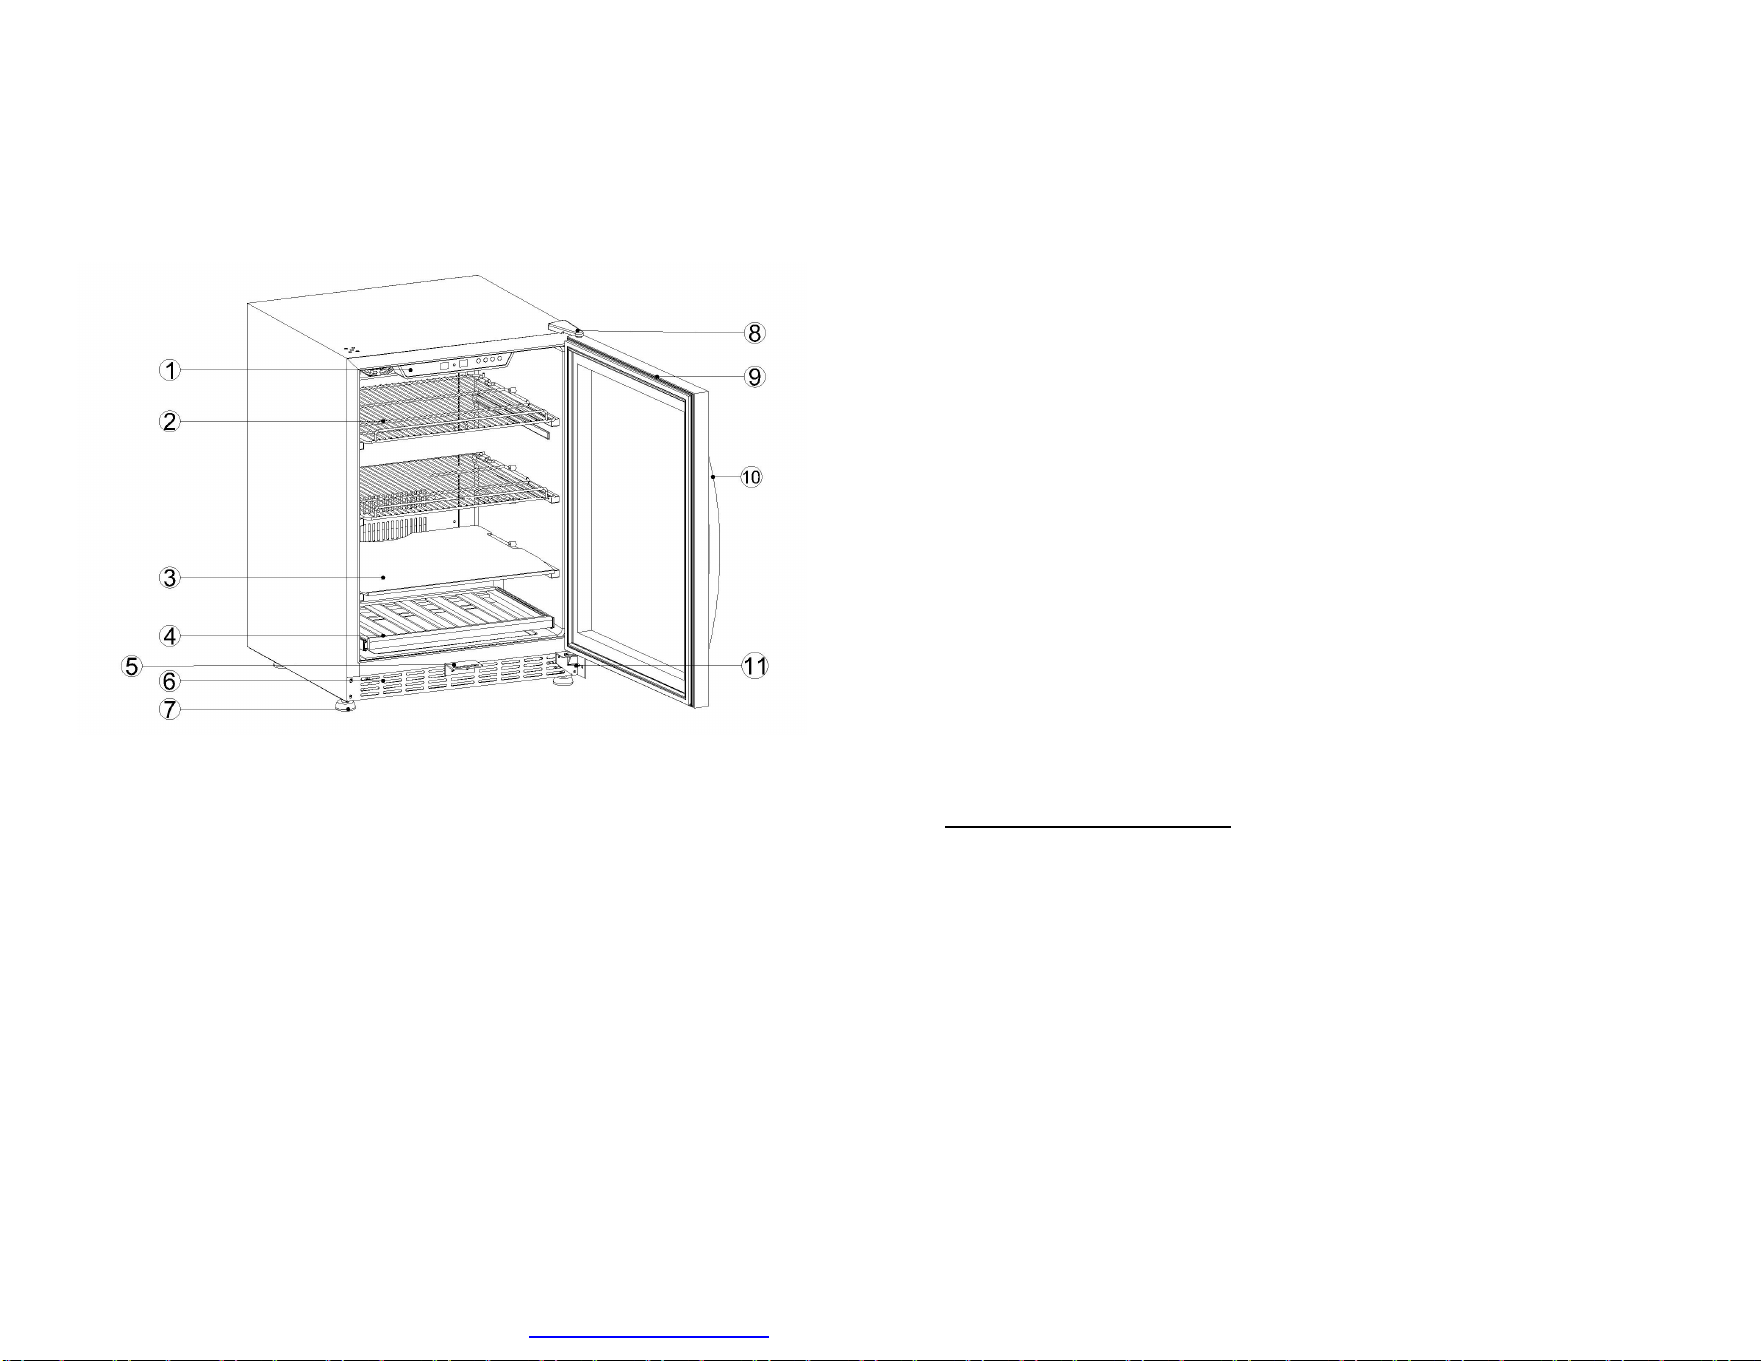
2.Product Structure
(1) USF-54BC:
(1) Control panel (2)Wire shelf (3) Glass shelf
(4) Small beech shelf (5) Lock hook (6) The front vent
(7) Feet (8) Upper hinge (9) Glass door with lock/ gasket
(10) Handle (11) Lower hinge
15
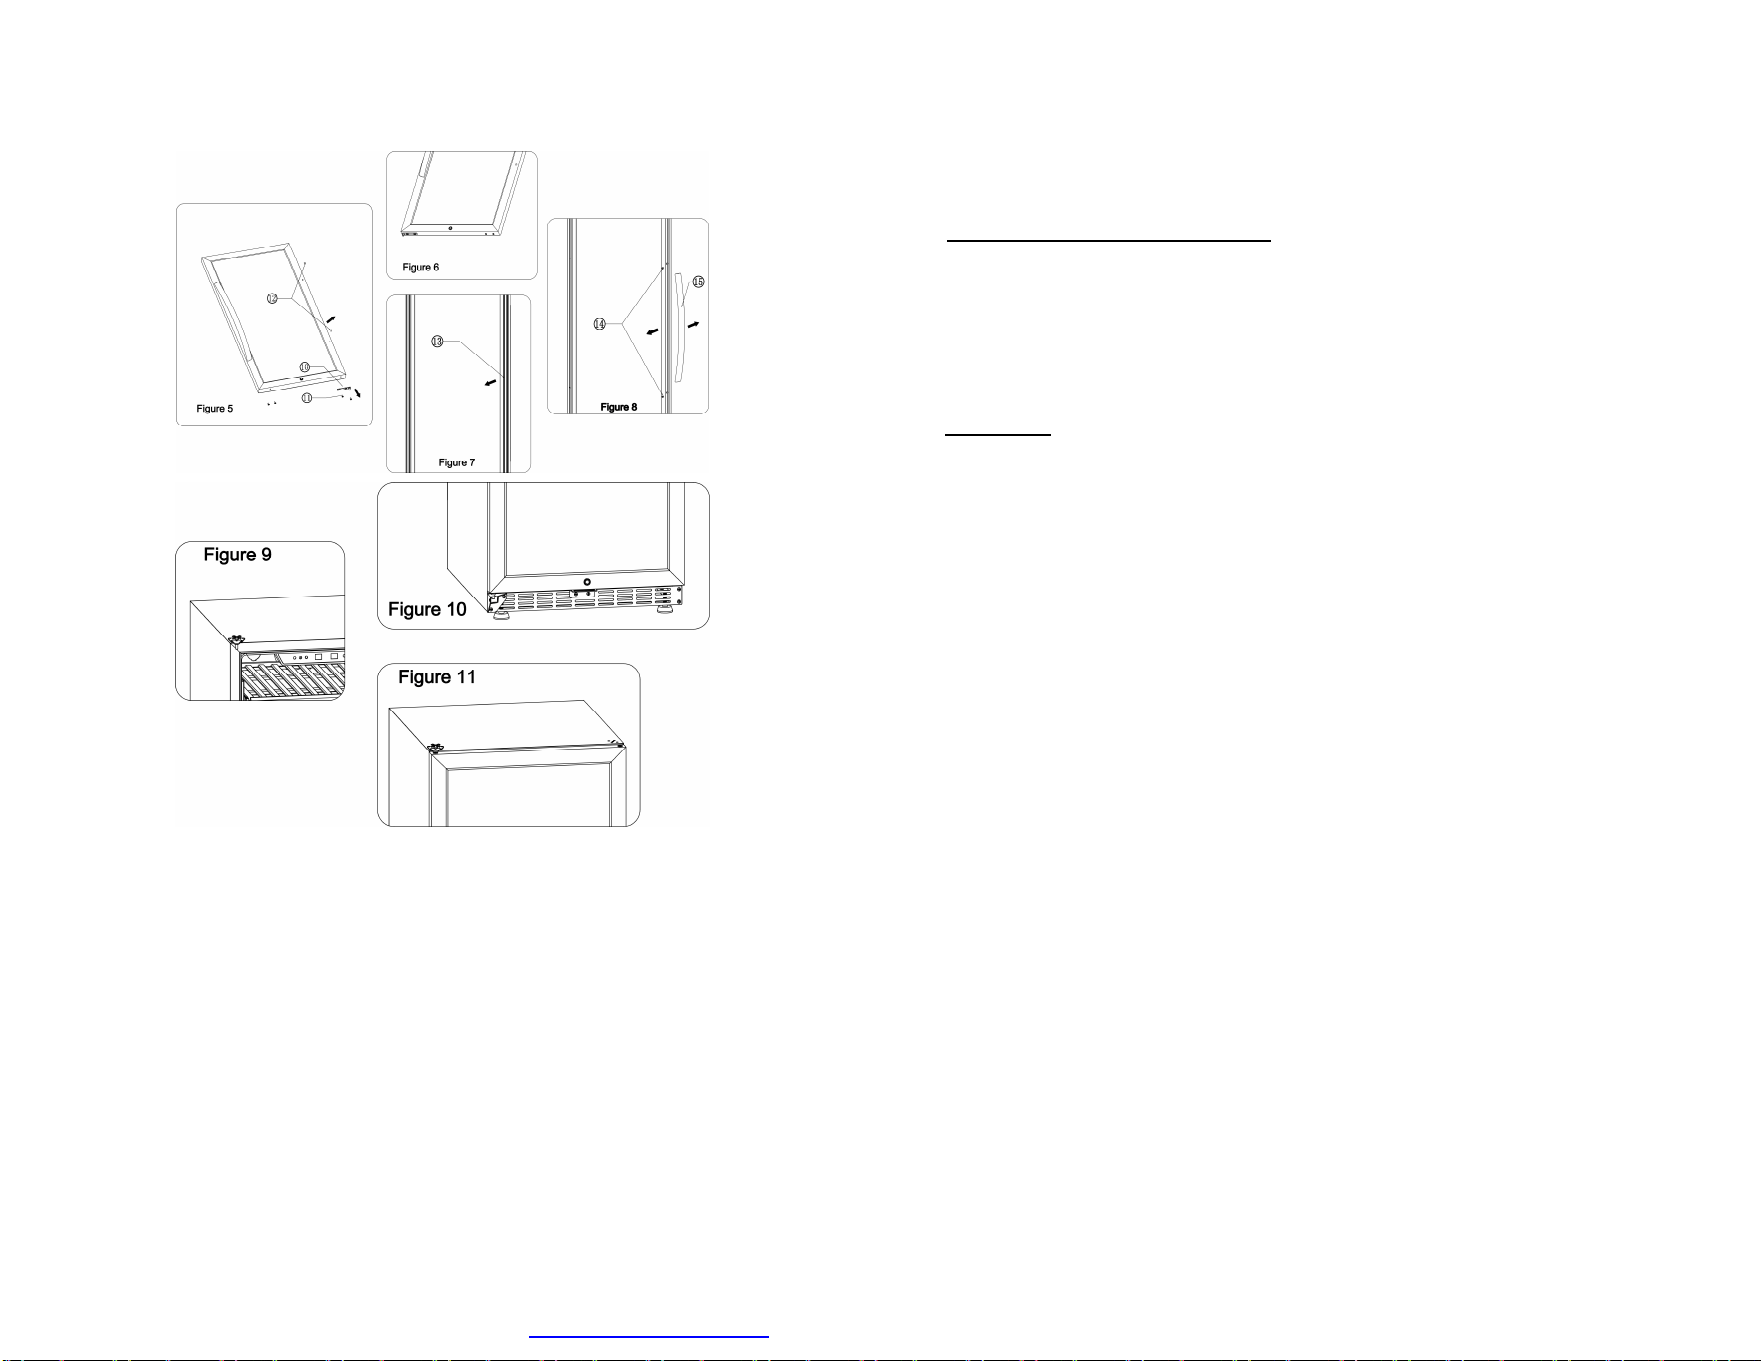
3.Remove the screw of lower door hinge and the left side screw of the front vent (Fig 3);
and then install the lower door hinge at the designated position on the opposite side
(Fig 4).
4.Remove the screw of door handle, then remove the bottom screw of left side of the
door and remove the lower supporter of the door.(Fig 5); Install the lower support of the
door to the opposite side.(Fig 6).
5.Pull open middle section of the door gasket, then it will come out the handle screw
hole.(Fig 7); remove the handle and install it on the opposite side.(Fig 8)
6.Install the upper door hinge to the opposite side and tighten the screws. (Fig 9)
7.Set glass door shaft to aim the shaft of lower door hinge (Fig 10);and then aim the
upper door hinge (Fig 11); adjust the door and the cabinet is aligned and leveled, then
tighten all the lock screws.
You also can call customer service for reversal instructions if it is necessary.
5. Care and Maintenance
Cleaning your Beverage Cooler:
• Wash the inside surfaces with warm water and baking soda solution. The
solution should be about 2 tablespoons of baking soda with a quart of water.
• Wash the shelves with a mild detergent solution.
• Turn off the power, unplug the appliance, and remove all the items including
shelves and racks.
• Wring excess water out of the sponge or cloth when cleaning the area of
controls, or any electrical parts.
• Wash the outside cabinet with warm water and a mild liquid detergent. Rinse
well and wipe dry with a clean soft cloth.
PDF created with pdfFactory trial version www.pdffactory.com
14
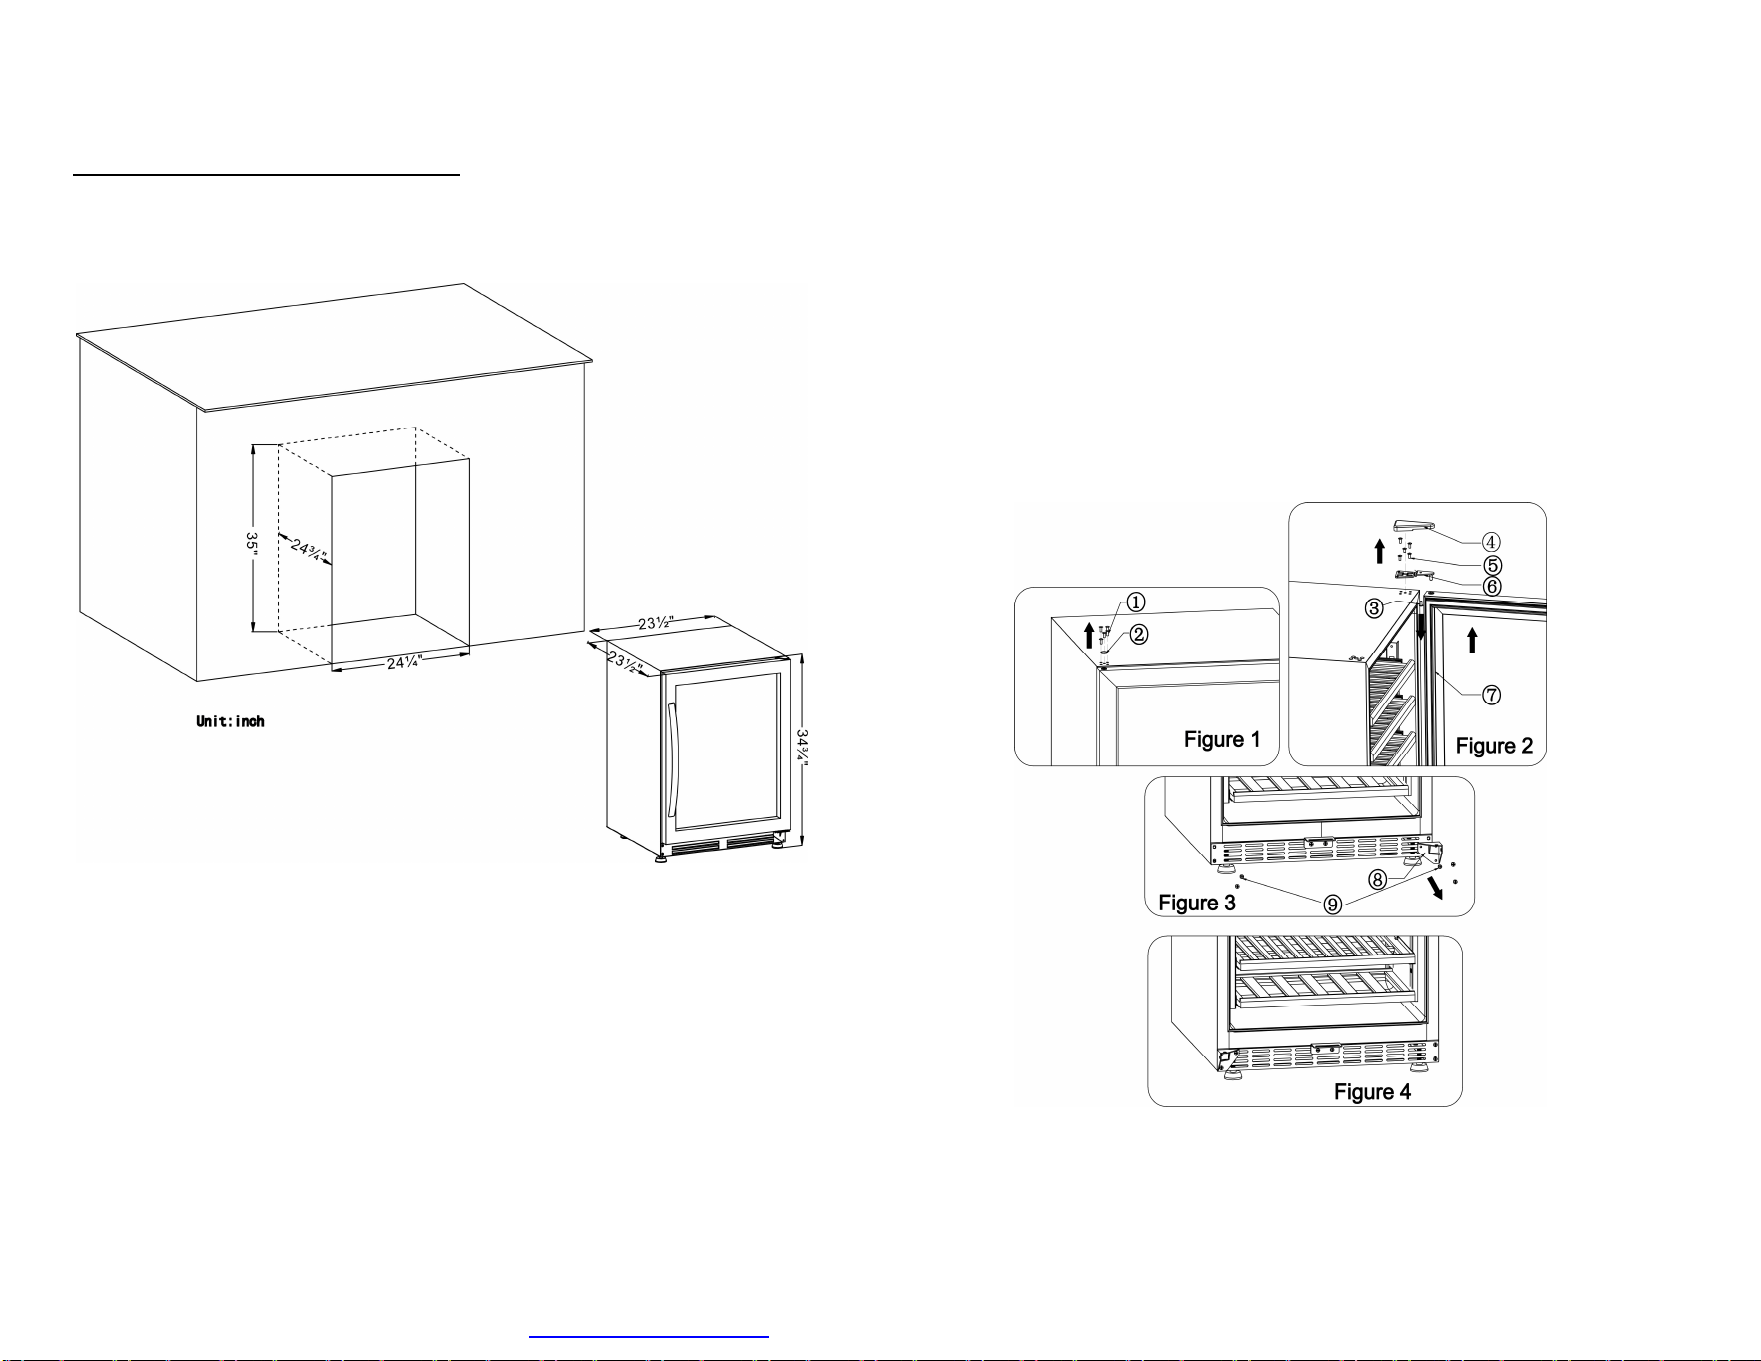
NOTE: All parts removed must be saved to allow the door swing to be reversed
1.Use the sharp tools to pry open the decoration nail on the top of the cabinet and the cap
of door spindle carefully. (Fig 1)
2. Open the door to an angle, unscrew the screw of the door hinges cover , remove the
cover of the upper door hinge; then unscrew all the screws on the upper door hinge. Be
careful to hold the glass door firmly after removing the screw and take off the door.
(Fig 2)
7
3.Installation
Ø Before Using your Beverage Cooler:
• Remove the exterior and interior packing.
• Before connecting the beverage cooler to the power source, let it stand upright for
approximately 2 hours. This will reduce the possibility of a malfunction in the cooling
system from handling during transportation.
• Clean the interior surface with lukewarm water with a soft cloth.
Ø Installation:
• The beverage cooler should be placed independently so as to make sure good heat
dissipation. The back of the wine cooler should be at least 10 cm away from the wall.
• Place your beverage cooler on a floor that is strong enough to support it when it is
fully loaded. To level your beverage cooler, adjust the front levelling leg at the bottom
of the beverage cooler.
• Place the beverage cooler away from direct sunlight and sources of heat (stove,
heater, radiator, etc.). Direct sunlight may affect the acrylic coating and heat sources
may increase electrical consumption. Extreme cold ambient temperatures may also
cause the unit to perform improperly.
• Avoid placing the unit in moist areas.
• Plug in the proper power socket. Make sure that the shape and voltage of the socket
is consistent with the nameplate on the back of the beverage cooler.
PDF created with pdfFactory trial version www.pdffactory.com
8
Installation diagram for the built-in models:
USF-54 series:
13
The cabinet was designed to safely store a maximum number of bottles.
It is kindly advised to layout the beverage and wine bottles evenly.
The best temperature for beverage is 0~10℃;If you storage beverage and wine at the
same time ;the temperature better to set above 5℃
◎ Reversing the door swing of your appliance
The unit is delivered to you with the door opening from the left side (hinge on right
side). The door of this appliance is capable of opening from either the left or right
side . To reverse the door swing of your cooler and open from the right side, please
follow the instructions and diagram as follows.
PDF created with pdfFactory trial version www.pdffactory.com
12
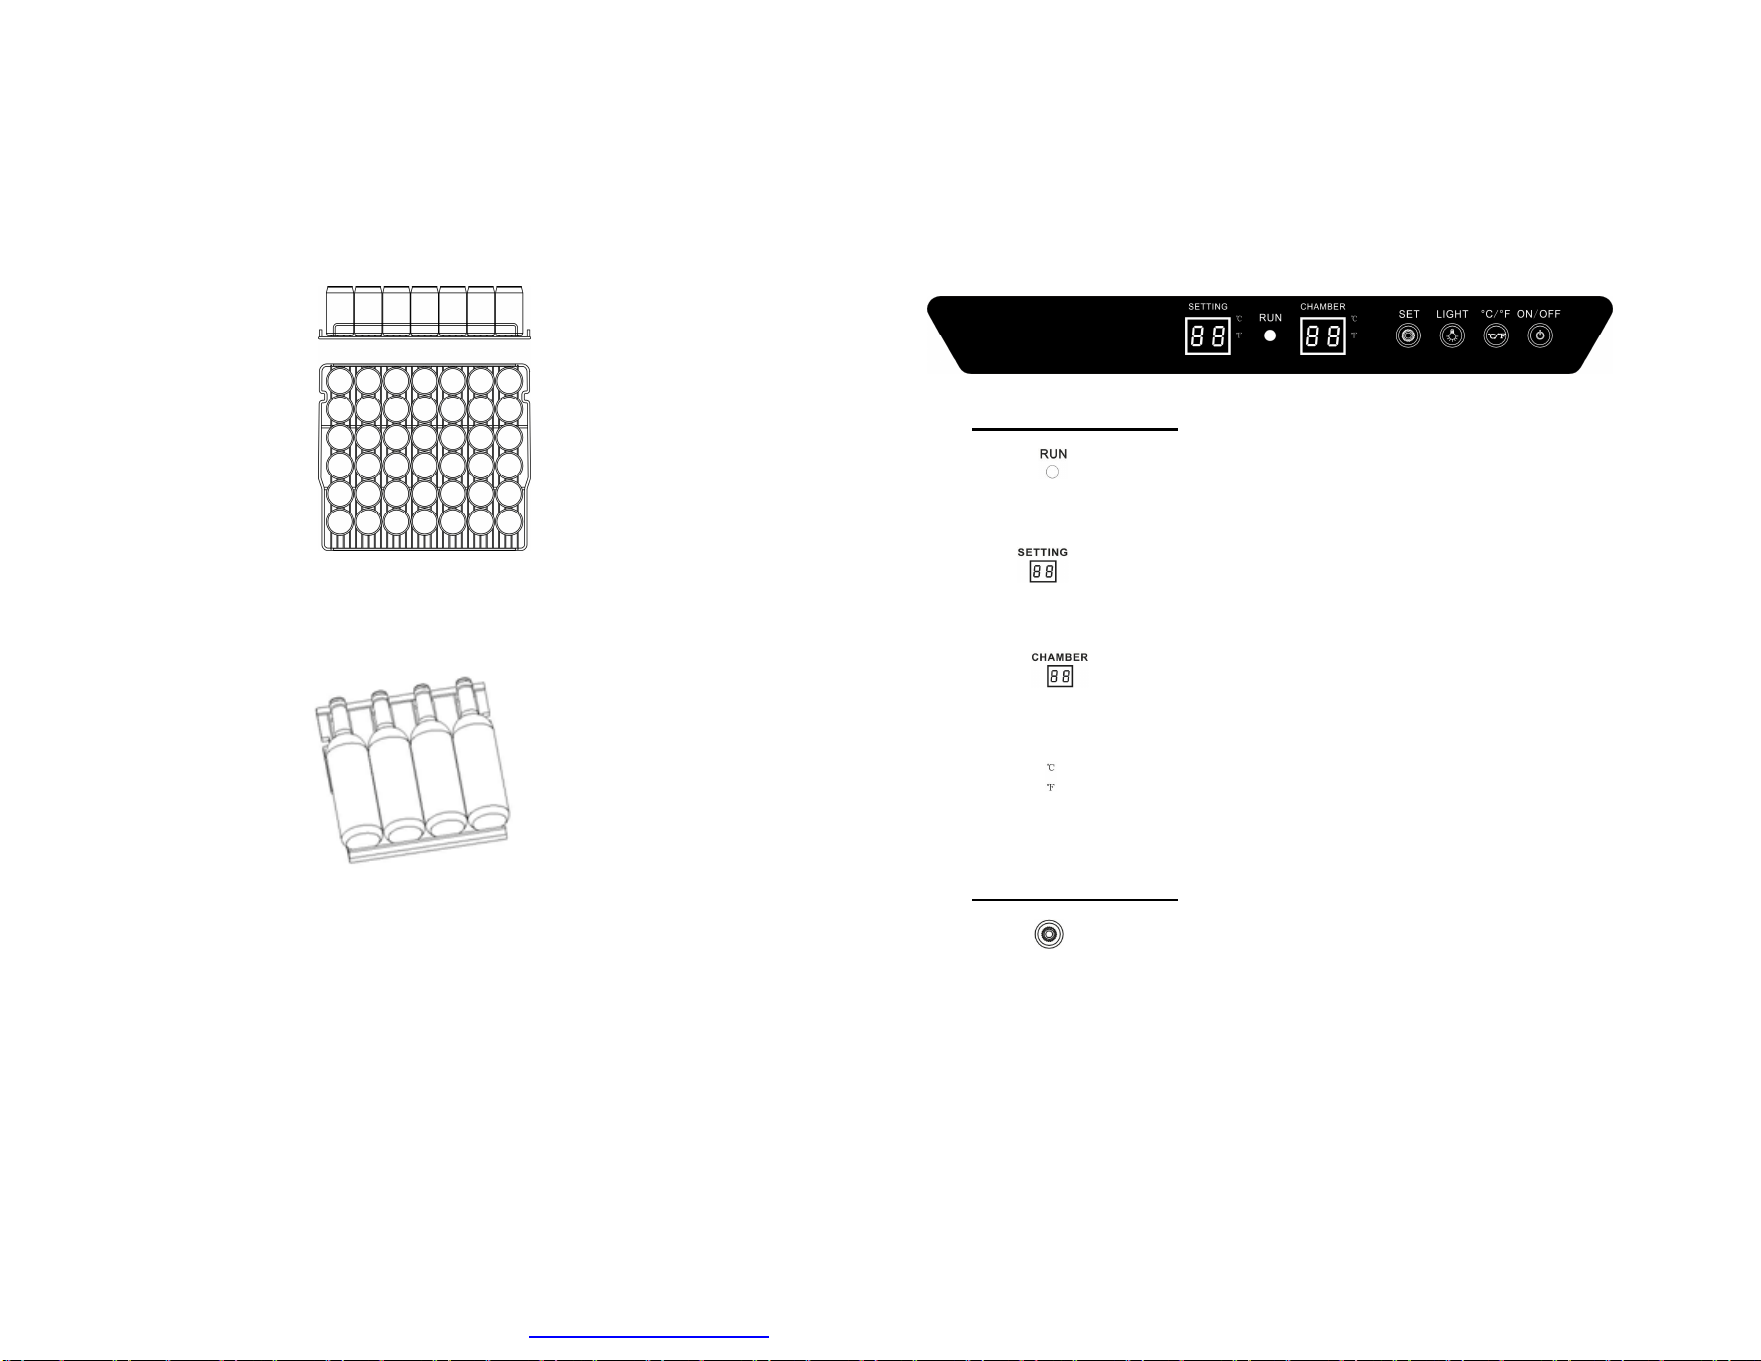
◎ Layout and storage of beverage and wine bottles
·Bottle loading sketch of wire shelf and glass shelf as below.
·Bottle loading sketch of the bottom small beech shelf as below.
9
4.Operation Instructions
Control Panel Below:
◎ Display Windows
· RUN light" ":Indicator light of compressor working. When the compressor is in
operation, the red light is on. When the compressor stops operating, the red light is off.
·SETTING" ":Display of the temperature you setting. The range of temperature
setting is 0℃~10℃ or 32℉~50℉.
·CHAMBER" ":Display of the actual temperature inside the cabinet; The range
is 0℃~37℃ or 32℉~99℉.
· ℃/℉ light" ":When the ℃ light is on, it indicates Celsius temperature; When the
℉ light is on, it indicates Fahrenheit temperature.
◎ Button Operation
• SET Button" ":Temperature setting button; Once you press the button, the
temperature increase 1℃ or 1℉. Temperature setting range is between 0℃~10℃
or 32℉~50℉.
PDF created with pdfFactory trial version www.pdffactory.com
10
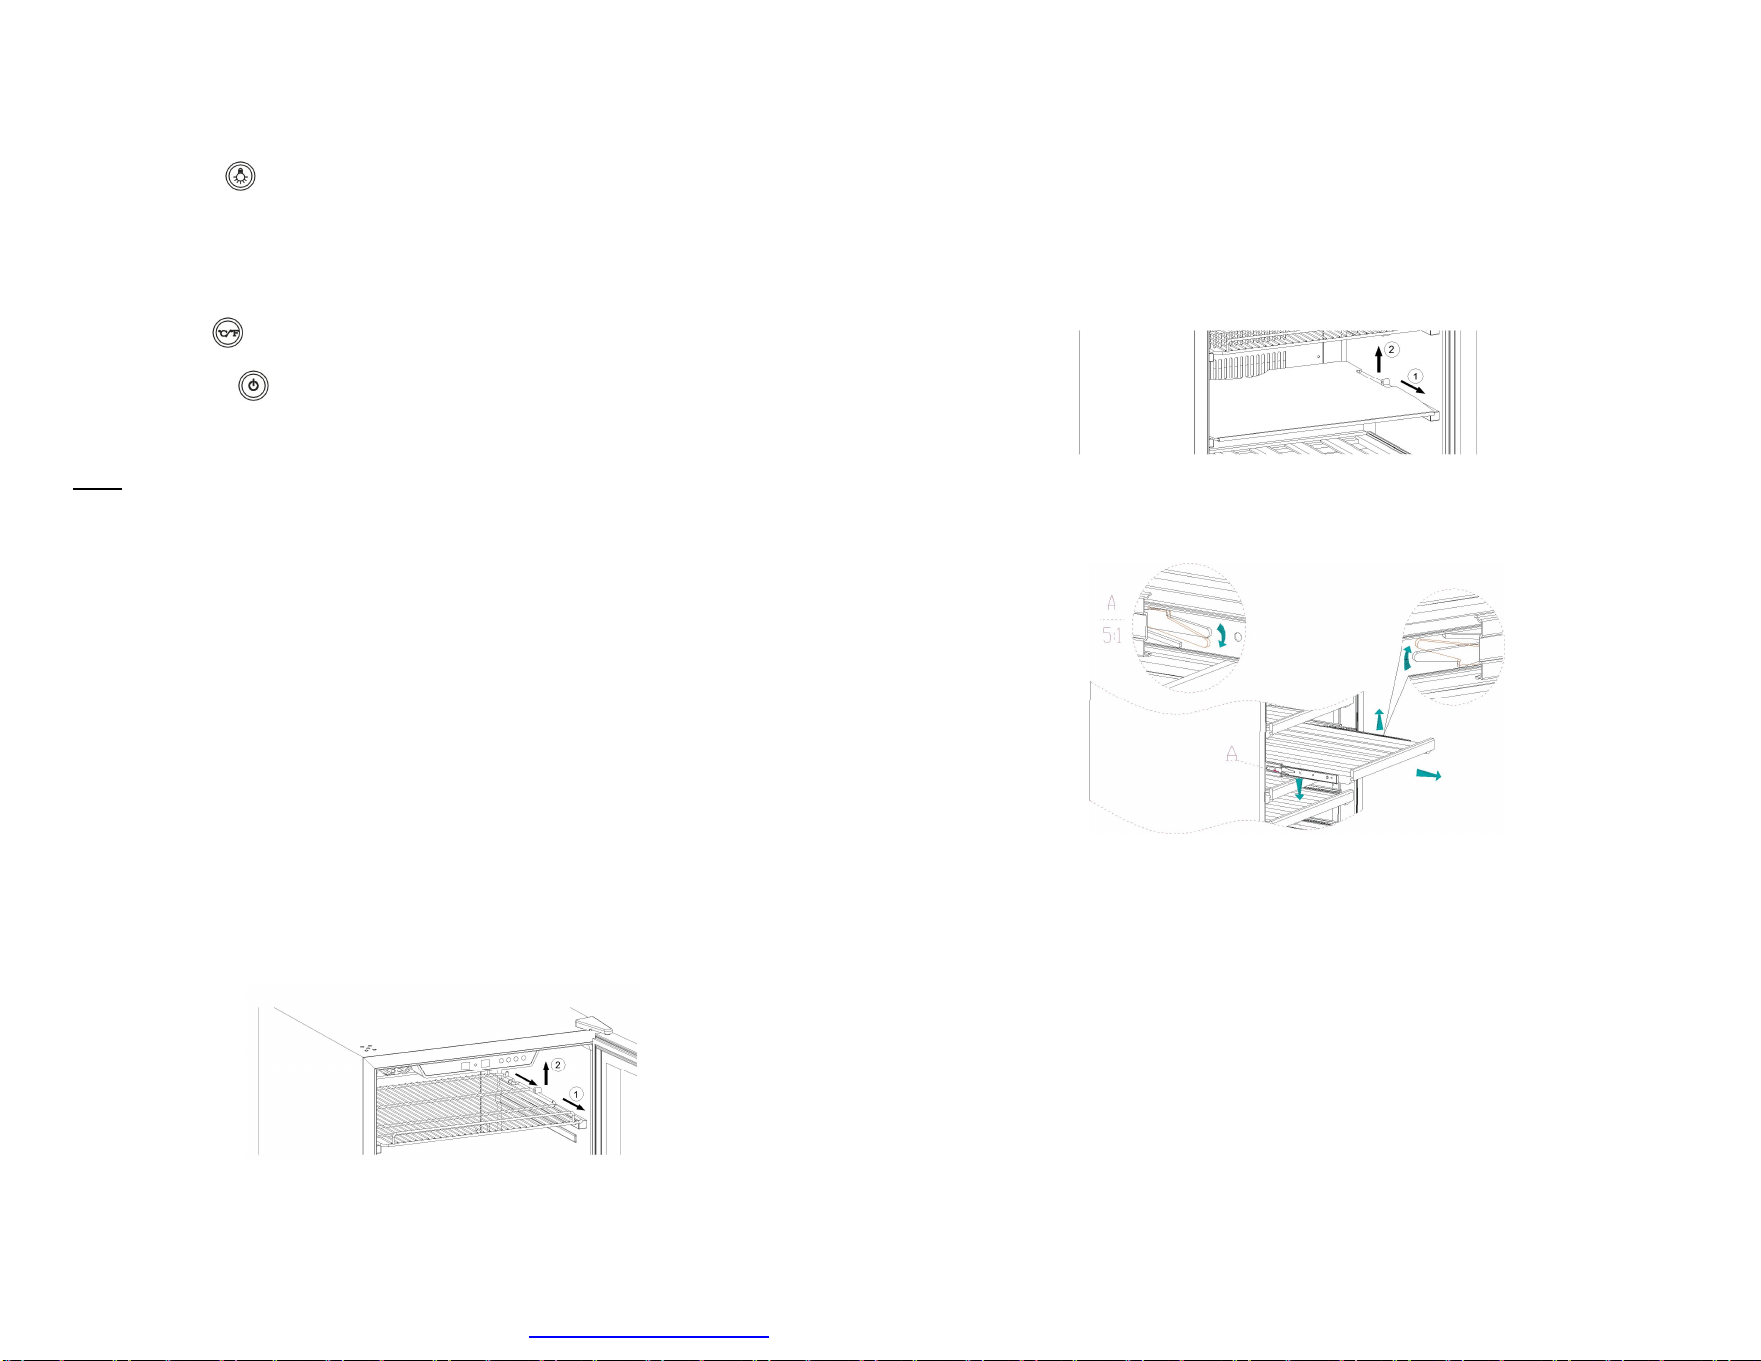
• LIGHT Button" ":Cabinet light control button; Note: Once the light is turned on, it
will automatically off after 10 minutes all out of protecting the beverage and wines
inside.
• ℃/℉ Button" ":Celsius and Fahrenheit conversion button;
• ON/OFF button" ":Power on and off button; Press the button for 3 seconds, it
starts; for press it 3 seconds again, it stops.
Note:
• If the unit is unplugged ,power cut, or turned off ,you must wait 3 to 5 minutes before
restarting the unit.If you attempt to restart before this time delay, the Wine Cellar will not
start.
• When you use the wine cellar for the first time or restart the wine cellar after having
been shut off for a long time, there could be a few degrees variance between the
temperature you select and the one indicated on the LED readout.
This is normal and it is due to the length of the activation time. Once the wine cellar is
running for a few hours everything will be back to normal.
◎ Shelf Change
Pull out or change the wire shelves as shown below:
·Pull out the wire shelf ,make the cove position toward to the pillar at two sides of
the cabinet, then lift up and pull out the wire shelf.
11
Pull out or change the glass shelf as shown below:
·Pull out the glass shelf ,make the cove position toward to the pillar at two sides of
the cabinet, then lift up and pull out the glass shelf.
Do as the following shows if needing to pull out or change the bottom beech shelves.
First, remove all the wine bottles from the shelves and pull the shelf out to the limit. Then
press down the left limit of the sliding rail and, while pressing up the right one, pull the
shelves out at this time. It should be easily pulled out if performing the three steps (press
down the left limit, press up the right one, and pull out) at the same time.
PDF created with pdfFactory trial version www.pdffactory.com