
货号:10220
颗粒数:261
页数:22
尺寸:190mmX125mm
广东宇星科技
Mould King
*This APP supports most of the mainstream Android models on the market, but due to the large number of Android models, different
models of systems and hardware reasons, there may be some models do not supported,specific according to the actual test!
*Diese App unterstützt die meisten gängigen Android-Modelle auf dem Markt. Aufgrund der großen Anzahl von Android-Modellen und
unterschiedlicher System- und Hardwarebedingungen kann es jedoch sein, dass einige Modelle nicht unterstützt werden. Die Kompatibilität
hängt vom tatsächlichen Test ab!
*Cette application prend en charge la plupart des modèles Android populaires sur le marché, mais en raison du grand nombre de modèles
Android, de différents systèmes de modèles et de raisons matérielles, certains modèles peuvent ne pas être pris en charge, selon le test réel !
*Questa app supporta la maggior parte dei modelli Android mainstream sul mercato, ma a causa del grande numero di modelli Android,
diversi modelli di sistemi e motivi hardware, potrebbero esserci alcuni modelli che non sono supportati, specifici secondo il test effettivo!
*Esta aplicación es compatible con la mayoría de los modelos Android principales en el mercado, pero debido al gran número de modelos de
Android, diferentes modelos de sistemas y razones de hardware, puede haber algunos modelos que no son compatibles, específicos según la
prueba real!
*このアプリは市場に出ている主流のAndroidモデルのほとんどをサポートしていますが、Androidモデルの数が非常に多く、システムやハードウェアの違いによ
り、サポートされないモデルが存在する可能性があります。実際のテストによります!
需要苹果iOS 12.0及以上,安卓8.0及以上,鸿蒙OS 2.0及以上版本
Requires iOS 12.0 or above, Android 8.0 or above, and HarmonyOS 2.0 or above.
Erfordert iOS 12.0 oder höher, Android 8.0 oder höher und HarmonyOS 2.0 oder höher.
Nécessite iOS 12.0 ou version ultérieure, Android 8.0 ou version ultérieure, et HarmonyOS 2.0 ou version ultérieure.
Richiede iOS 12.0 o superiore, Android 8.0 o superiore e HarmonyOS 2.0 o superiore.
Requiere iOS 12.0 o superior, Android 8.0 o superior y HarmonyOS 2.0 o superior.
iOS 12.0以上、Android 8.0以上、HarmonyOS 2.0以上が必要です。
此APP支持市场上大多数主流安卓机型。然而,由于安卓机型众多,系统和硬件配置各不相同,部分机型可能无法支持,具体兼容性请根据实际测试为准
!
产品资讯
Product Information
Produktinformation
Information sur le produit
Informazioni sul prodotto
Información del producto
製品情報
积木补件
Brick Replacement Service
Ziegelstein-Ersatzdienst
Service de remplacement de briques
Servizio di sostituzione dei mattoncini
Servicio de reemplazo de ladrillos
ブロック交 換 サービス
防伪查询
Anti-counterfeiting Verification
Echtheitsprüfung
Vérification anti-contrefaçon
Verifica anti-contraffazione
Verificación de autenticidad
防偽確認
电子说明书
Electronic Manual
Elektrisches Handbuch
Manuel électronique
Manuale elettronico
Manual electrónico
電 子 マ ニ ュアル
pertBri
酷砖家
"Bri X pert" ist ein spezielles Kennzeichen von MOULD KING, das die Einzigartigkeit und Originalität des Produkts repräsentiert. Jedes
Bauset mit dem "Bri X pert"-Logo wird persönlich von MOULD KINGs innovativem Team oder von weltklasse Designern, die eng mit
MOULD KING zusammenarbeiten, entworfen oder autorisiert. Dieses Logo ist unser Versprechen an die Verbraucher, sicherzustellen,
dass sie ein einzigartiges und hochwertiges Bauerlebnis genießen können.
"Bri X pert" is a special mark established by MOULD KING, representing the uniqueness and originality of the product. Every building set
with the "Bri X pert" logo is personally designed or authorized by MOULD KING's innovative team or world-class designers who work
closely with MOULD KING. This logo is our commitment to consumers, ensuring that they can enjoy a unique and high-quality building
experience.
"Bri X pert" est une marque spéciale établie par MOULD KING, représentant l'unicité et l'originalité du produit. Chaque ensemble de
construction portant le logo "Bri X pert" est conçu ou autorisé personnellement par l'équipe innovante de MOULD KING ou par des
designers de classe mondiale travaillant étroitement avec MOULD KING. Ce logo est notre engagement envers les consommateurs,
garantissant qu'ils peuvent profiter d'une expérience de construction unique et de haute qualité.
"酷砖家"是宇星模王设立的特殊标识,代表着产品的独特性和原创性。每一款带有"酷砖家"标志的积木套装,都由宇星
的原创团队或者与宇星有密切合作的全球顶尖设计师亲自设计或授权。这个标识是我们对消费者的承诺,确保他们可
以享受到独一无二且高品质的积木拼搭体验。
"Bri X pert" è un marchio speciale stabilito da MOULD KING, che rappresenta l'unicità e l'originalità del prodotto. Ogni set di costruzione
con il logo "Bri X pert" è progettato o autorizzato personalmente dal team innovativo di MOULD KING o da designer di fama mondiale che
lavorano a stretto contatto con MOULD KING. Questo logo è il nostro impegno nei confronti dei consumatori, assicurando che possano
godere di un'esperienza di costruzione unica e di alta qualità.
"Bri X pert" es una marca especial establecida por MOULD KING, representando la unicidad y originalidad del producto. Cada conjunto de
construcción con el logo de "Bri X pert" es diseñado o autorizado personalmente por el equipo innovador de MOULD KING o diseñadores
de clase mundial que trabajan en estrecha colaboración con MOULD KING. Este logo es nuestro compromiso con los consumidores,
asegurando que puedan disfrutar de una experiencia de construcción única y de alta calidad.
「Bri X pert」はMOULD KINGによって設立された特別なマークであり、製品のユニークさとオリジナリティを代表しています。"Bri X pert"ロゴの付いた各
建築セットは、MOULD KINGのイノベーティブチームまたはMOULD KINGと密接に協力する世界クラスのデザイナーによって個人的に設計されたり、認可
されています。このロゴは、消費者に対する私たちの
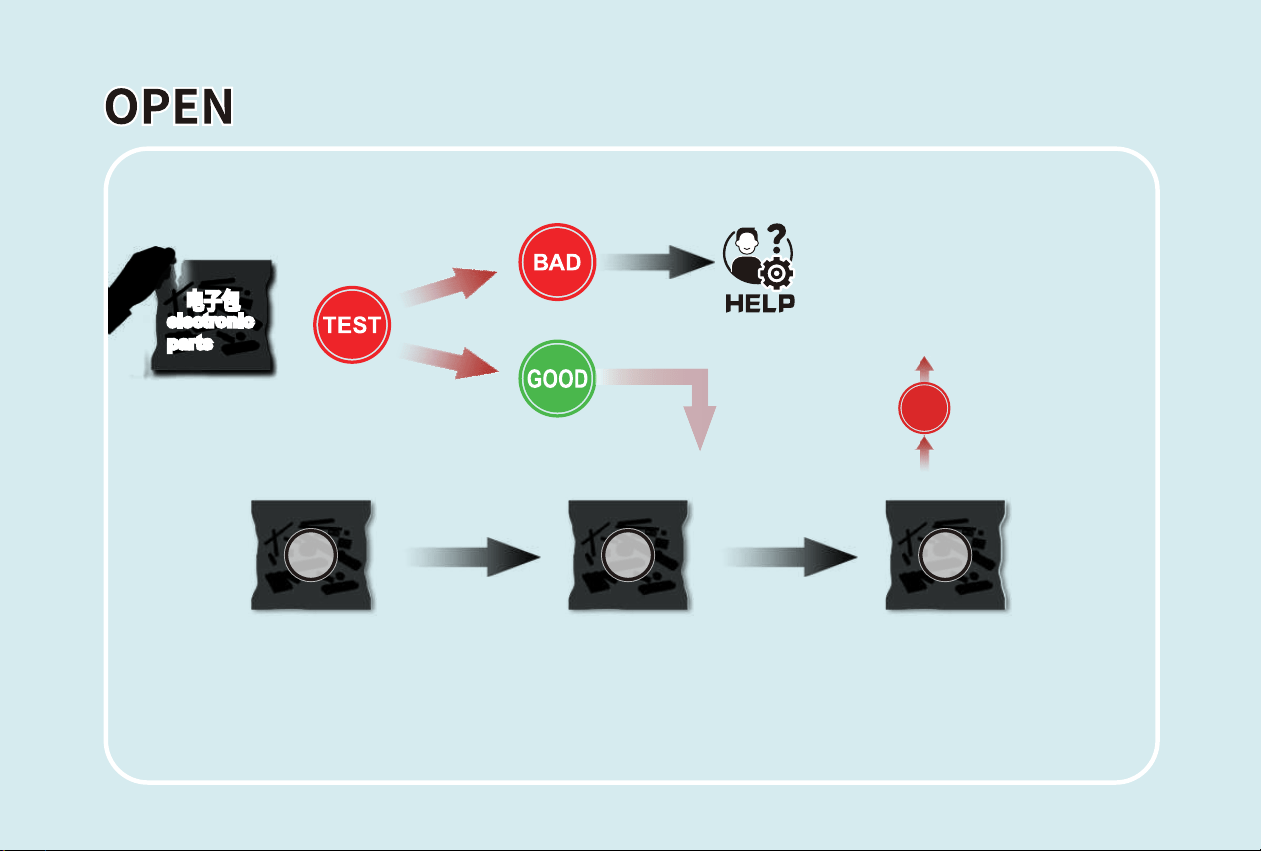
OPEN
电子包
electronic
parts
电子包
electronic
parts
2 31
请向您所购买的店铺商家寻求帮助
Please seek assistance from the store where you purchased the
item.
Bitte wenden Sie sich an den Laden, bei dem Sie den Artikel
gekauft haben.
Veuillez demander de l'aide au magasin où vous avez acheté
l'article.
Si prega di contattare il negozio presso il quale hai acquistato
l'articolo.
Por favor, solicite ayuda en la tienda donde compró el artículo.
購入した店舗の商店に助けを求めてください。
LACK
GET STARTS
1
2
3
6x8
1
4
5
6
7
2x6
2x6
2
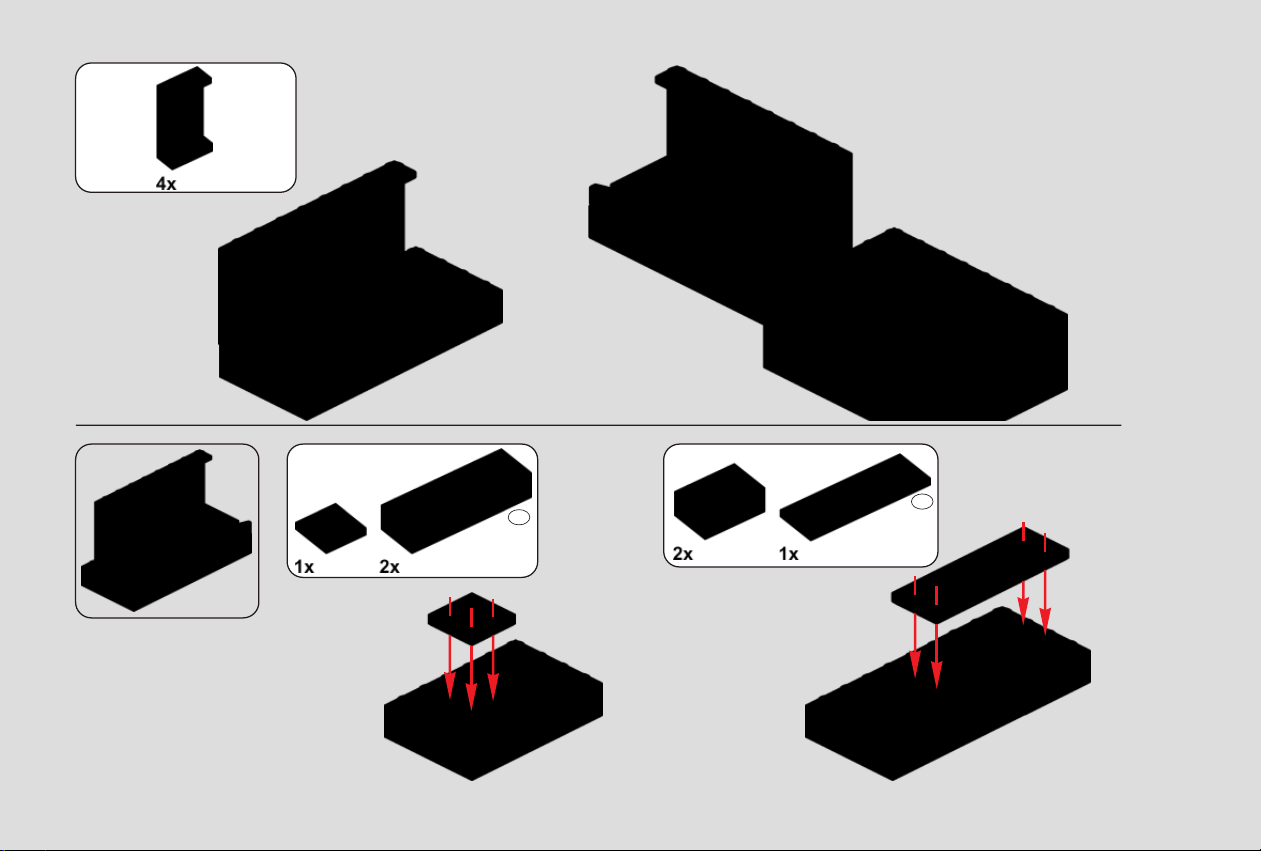
8
9
10
11
2x6
2x6
3
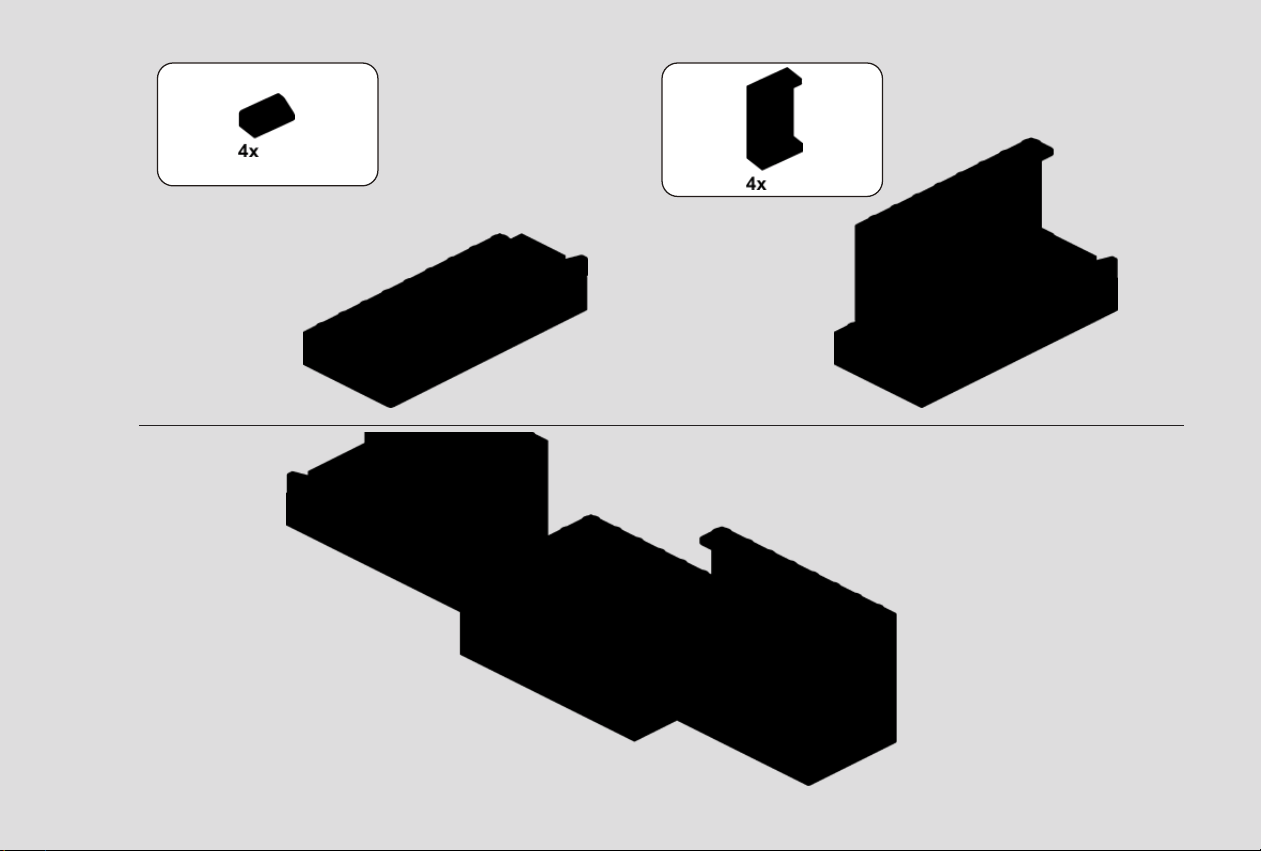
12
13
14
4
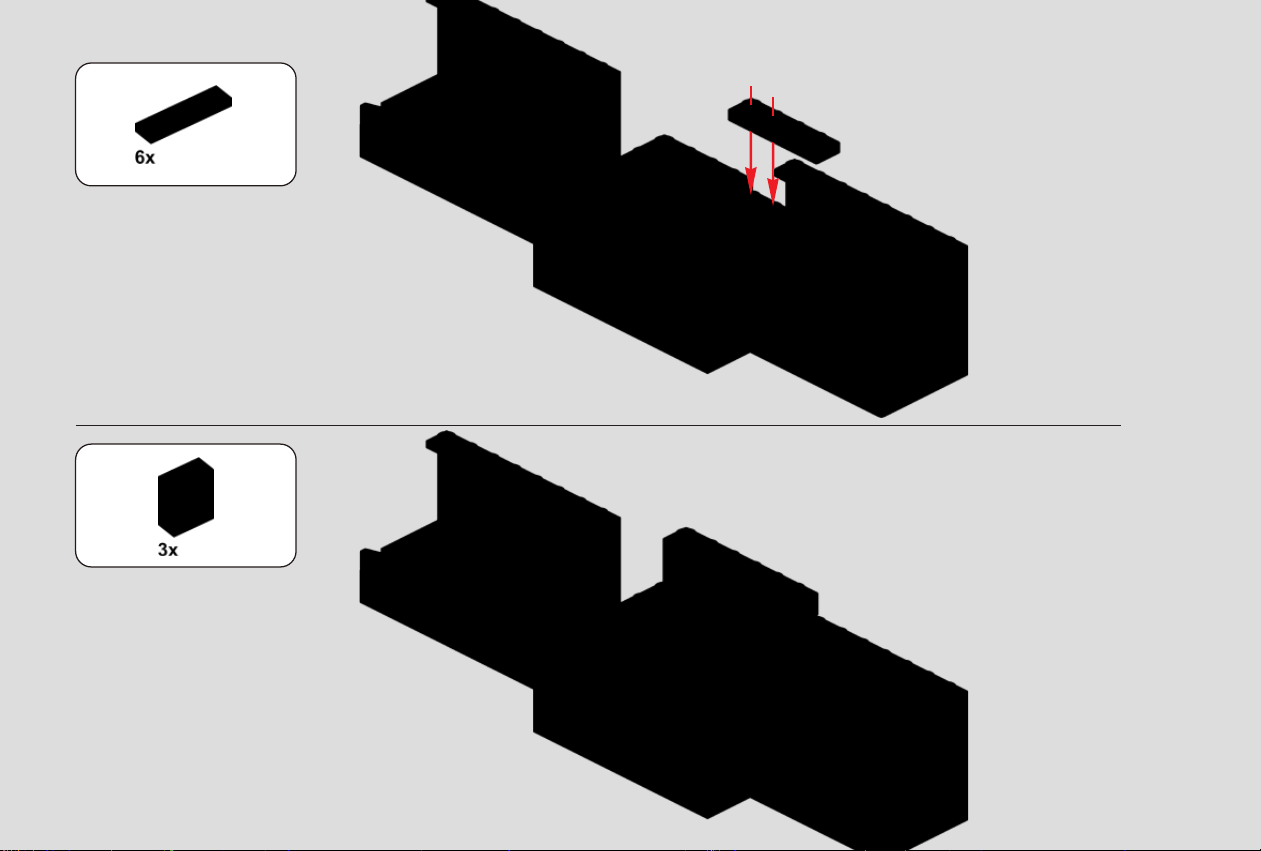
15
16
5
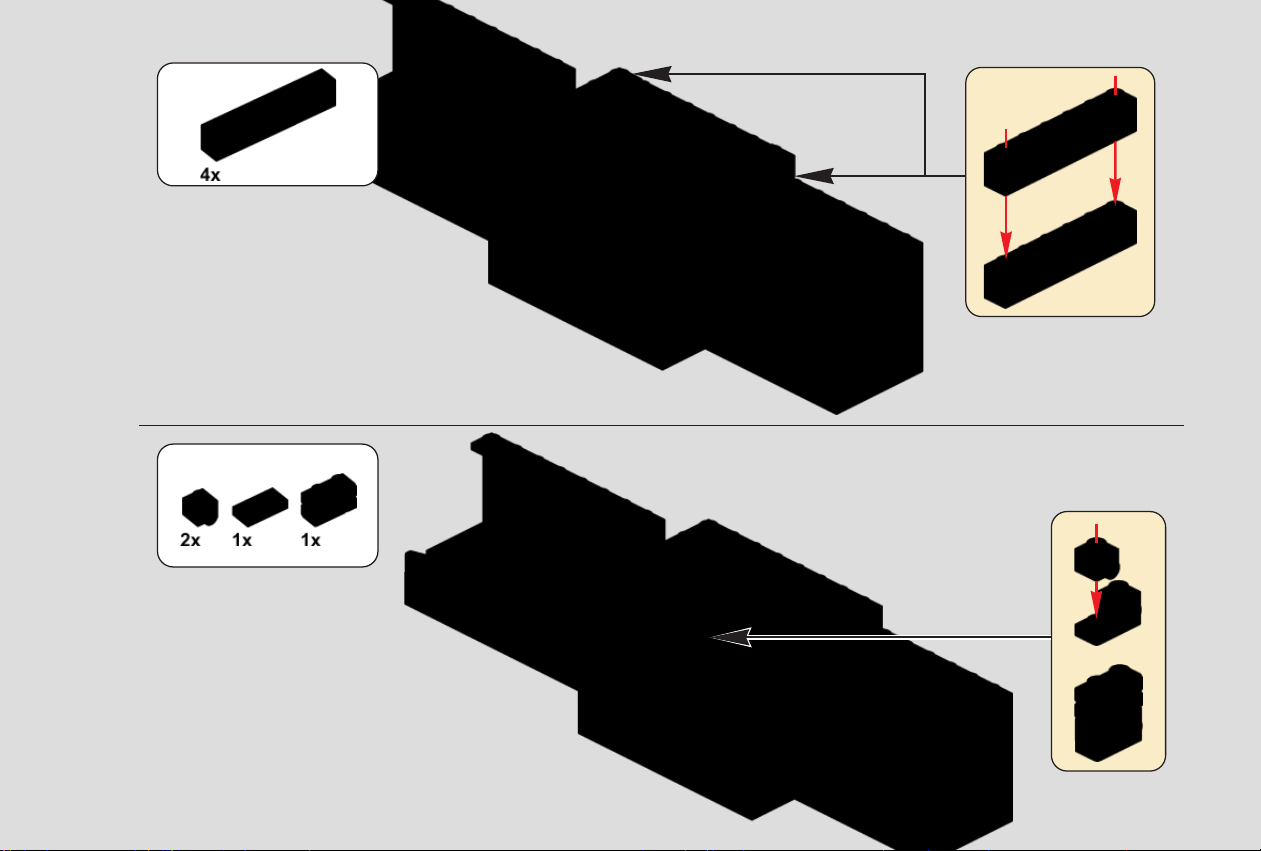
2x
1
2
17
18
6
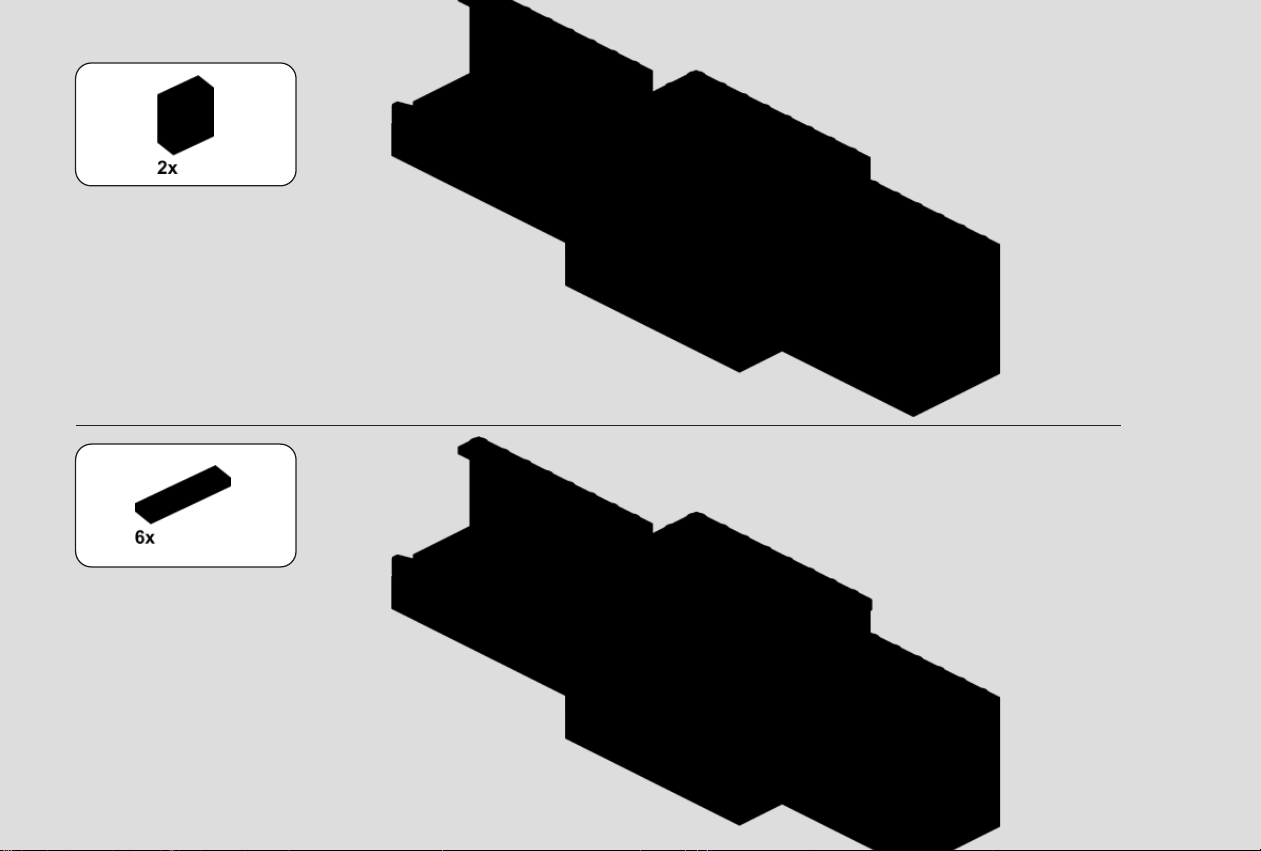
19
20
7
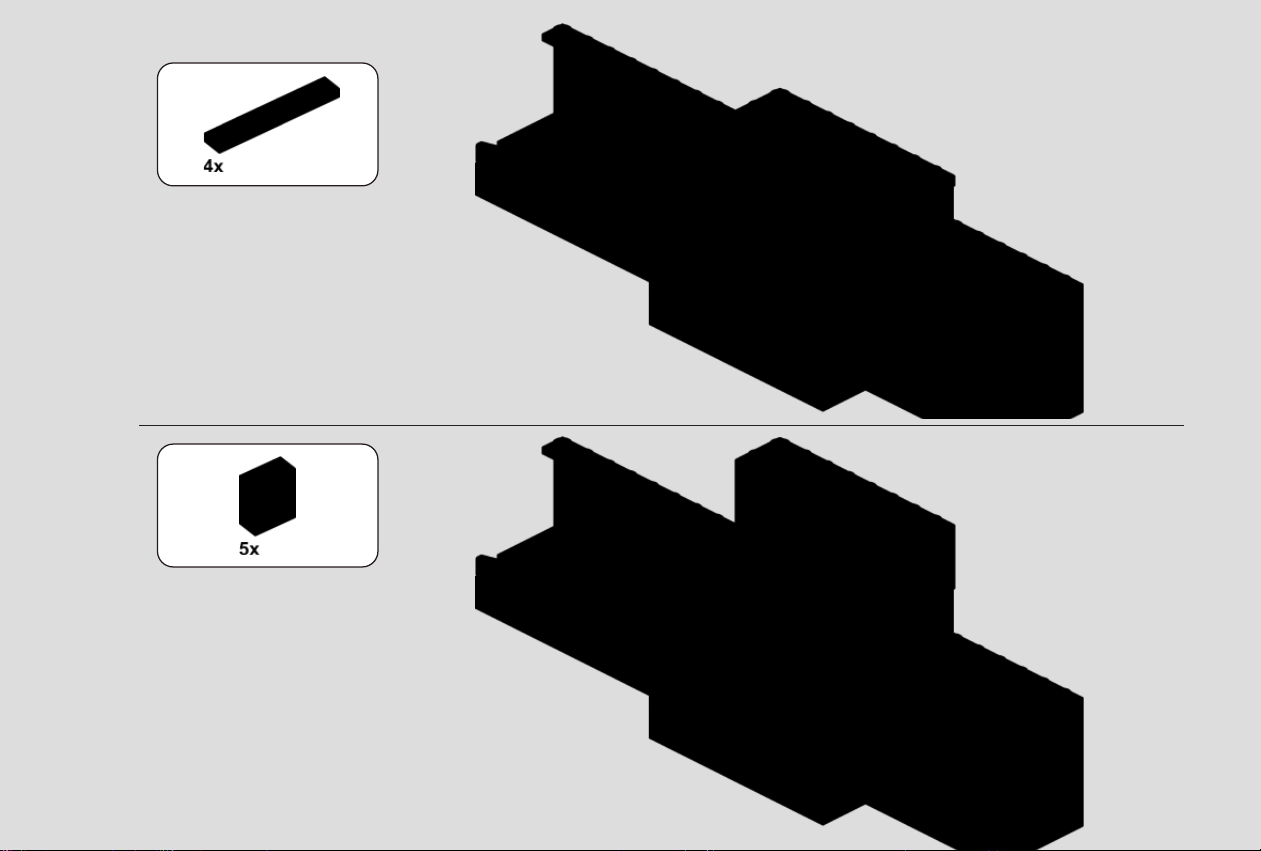
21
22
8
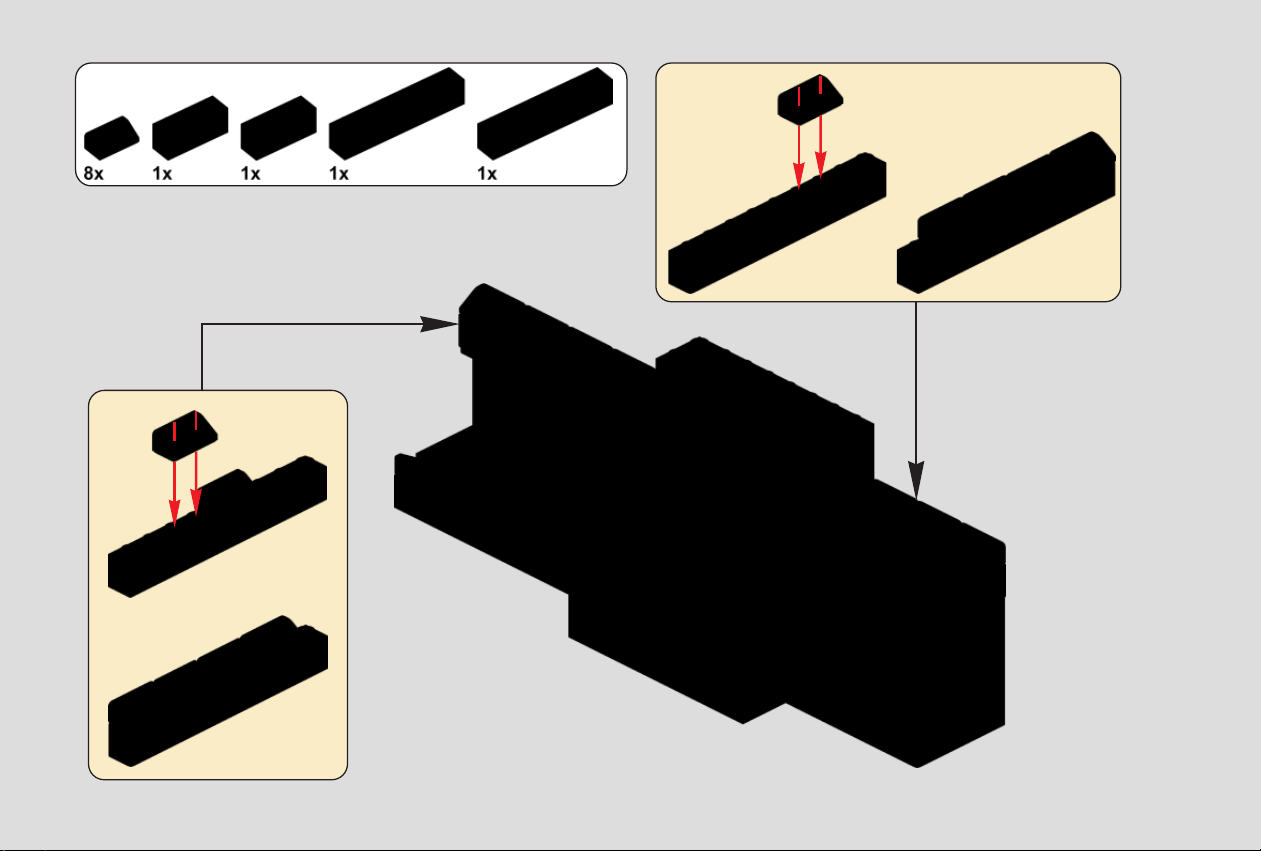
23
1
1
2
2
9
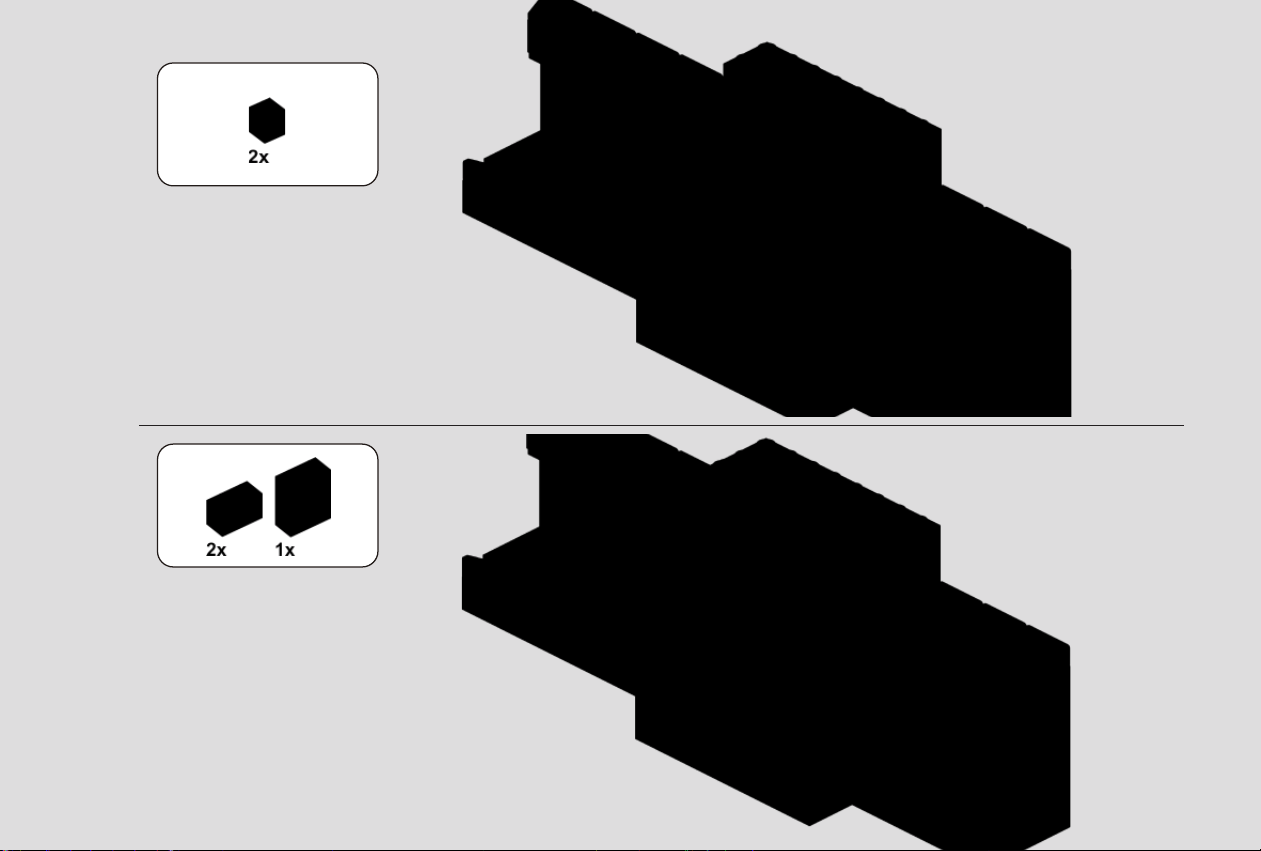
24
25
10
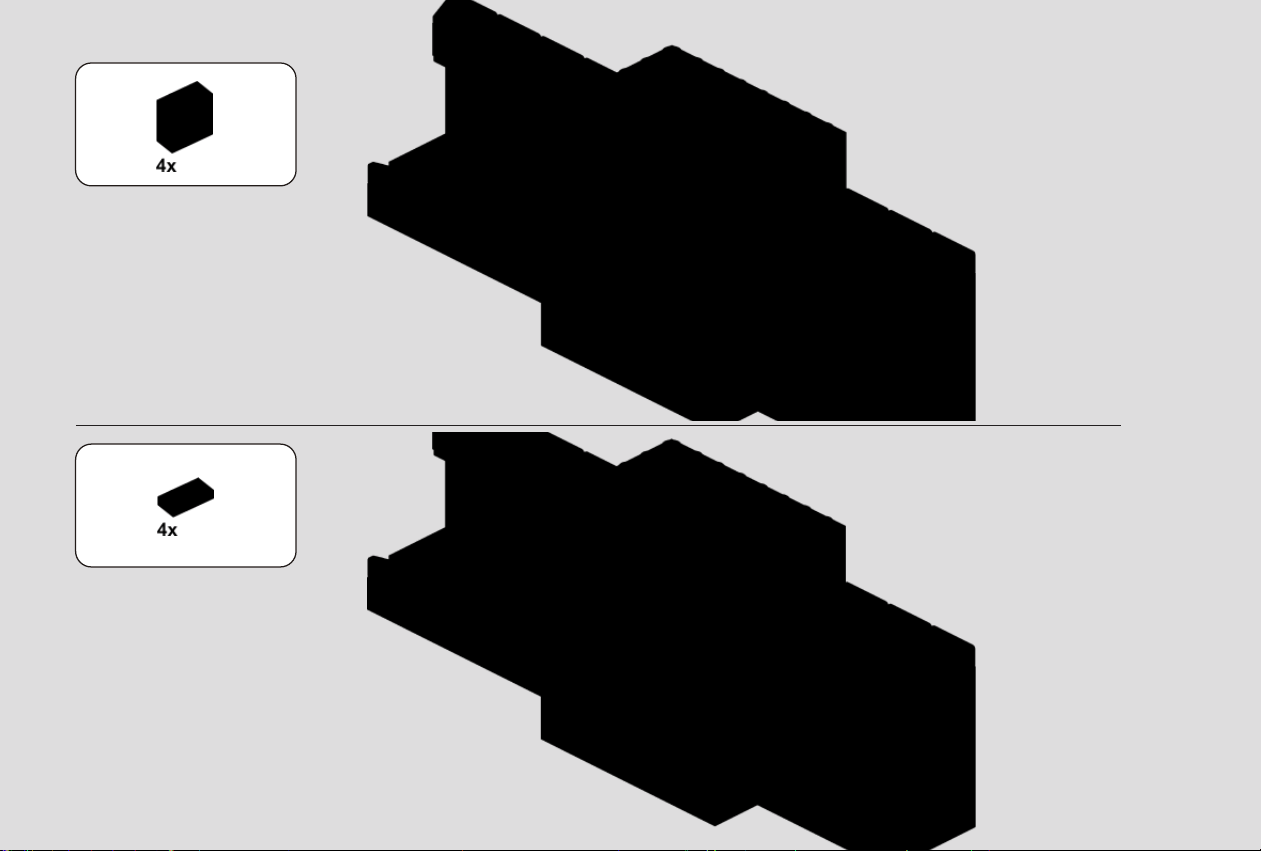
26
27
11
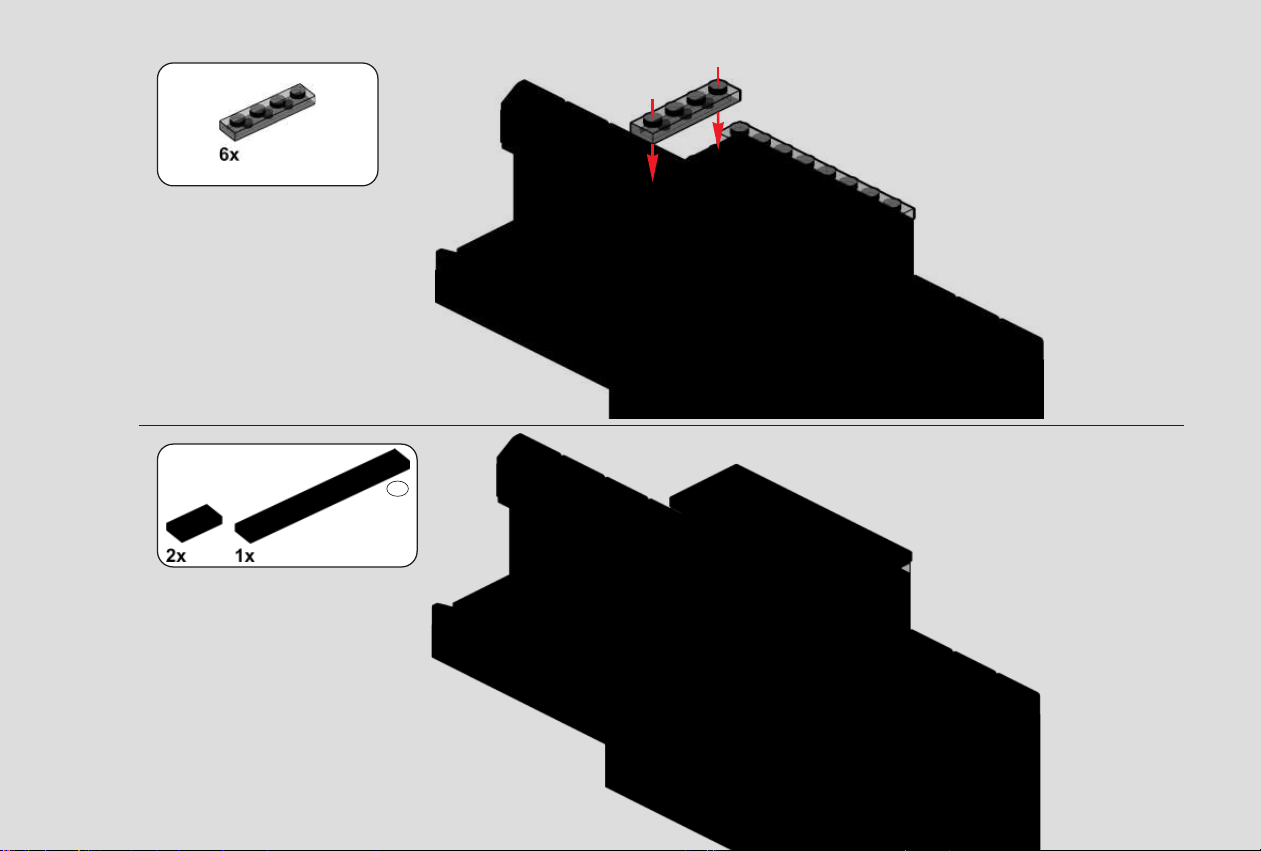
28
29
1x8
12
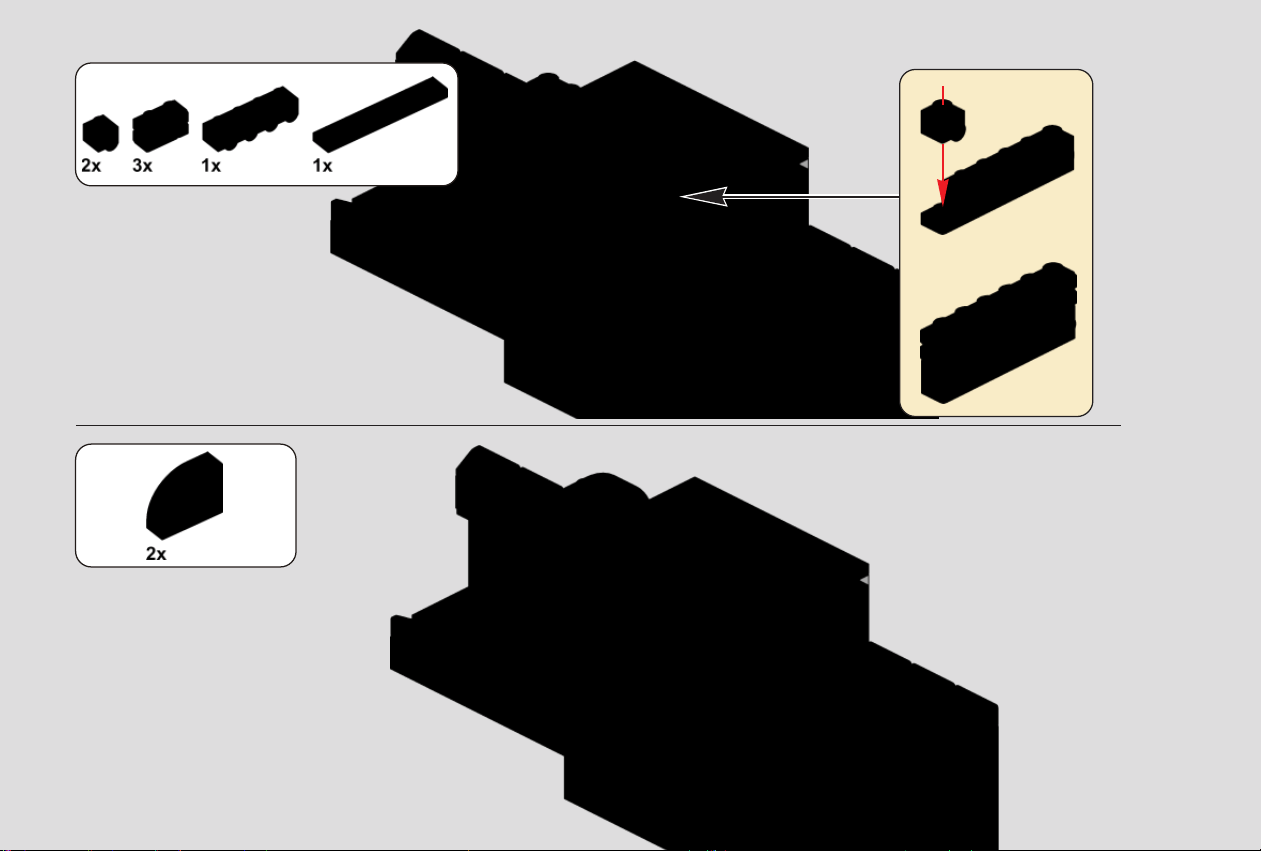
30
31
1
2
13
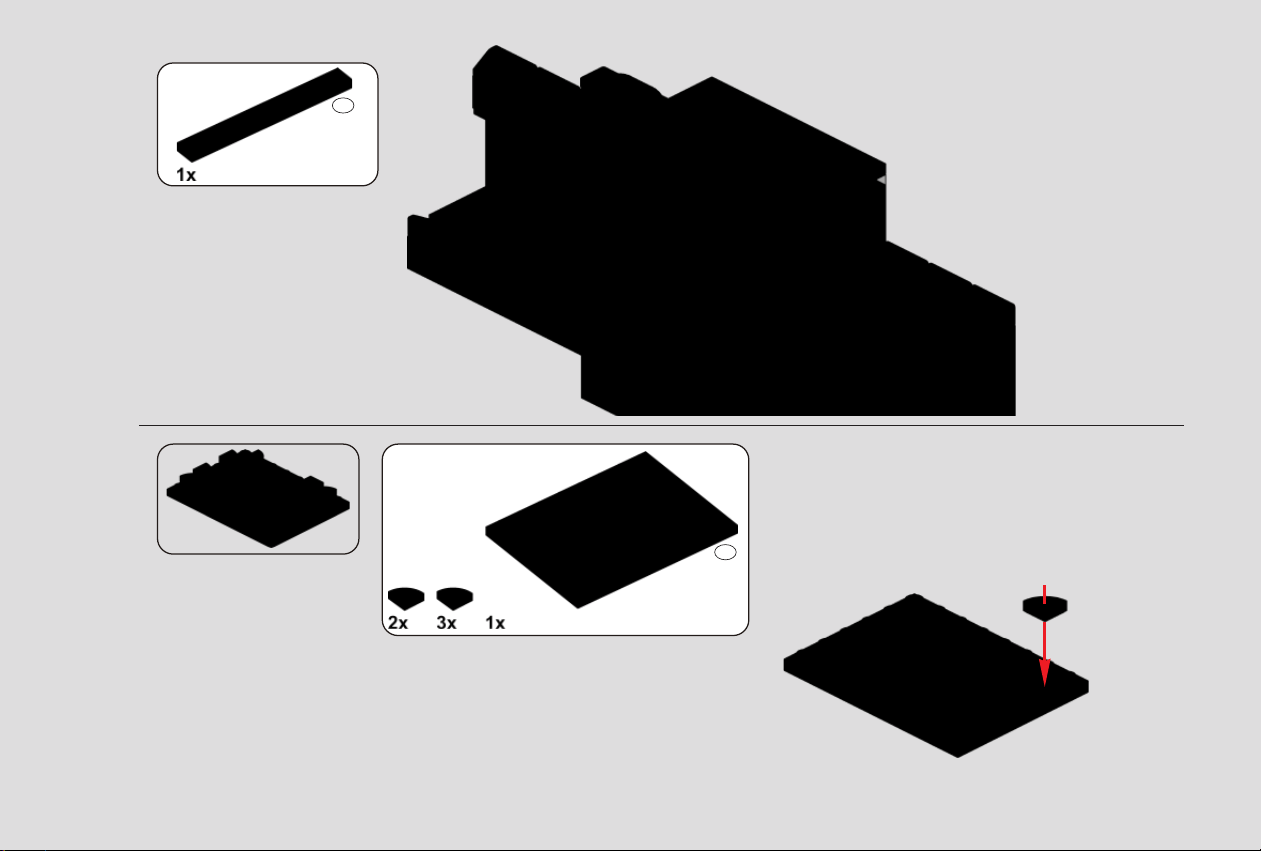
32
33
1x8
6x8
14
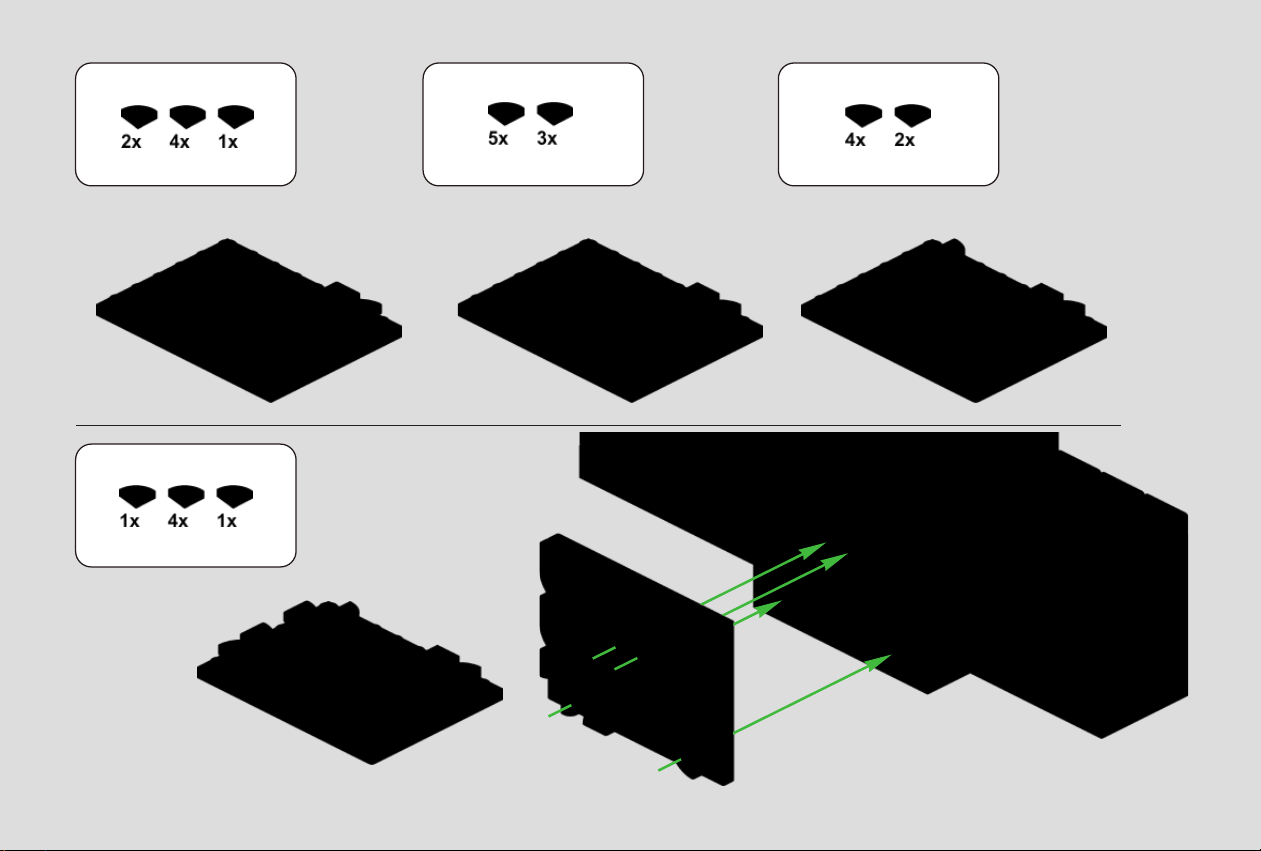
35 36
37
38
34
15
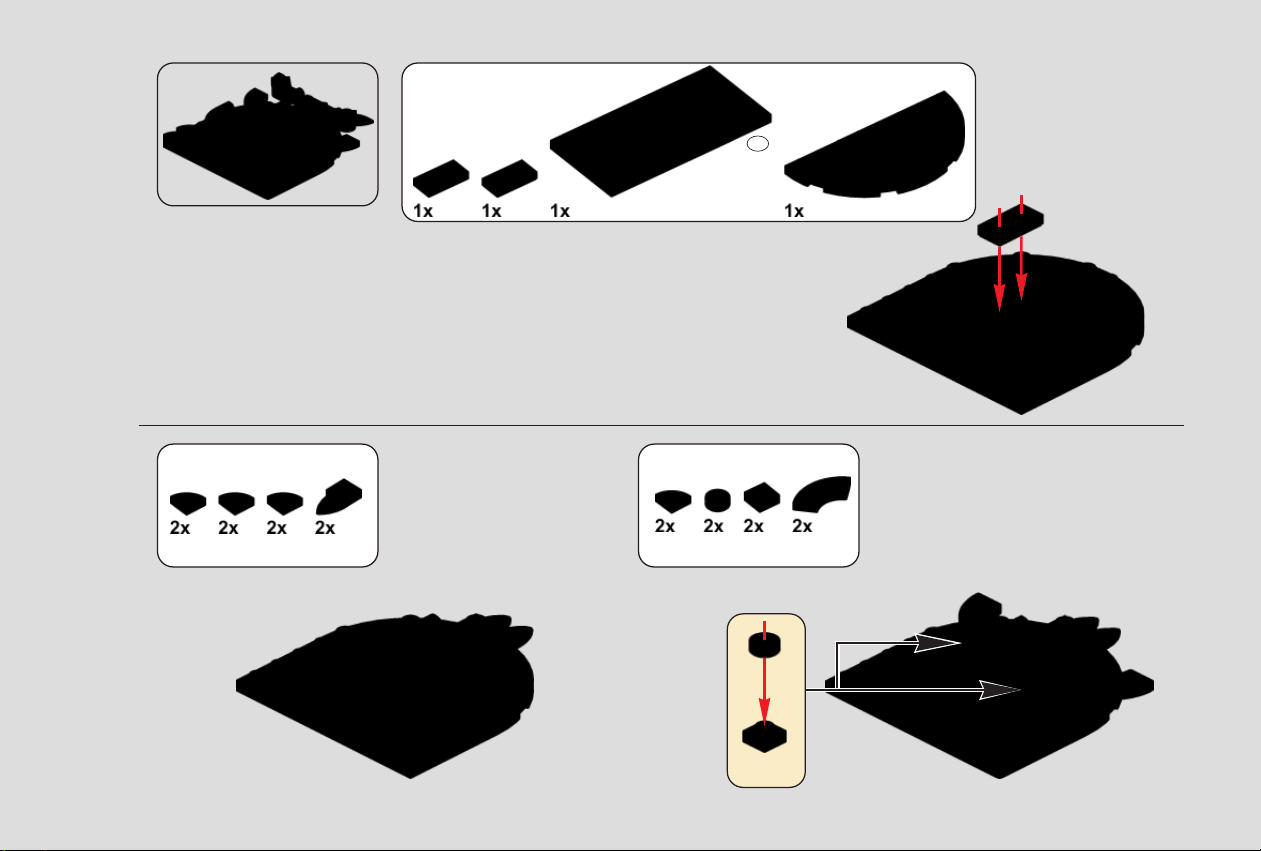
2x
39
40 41
4x8
16
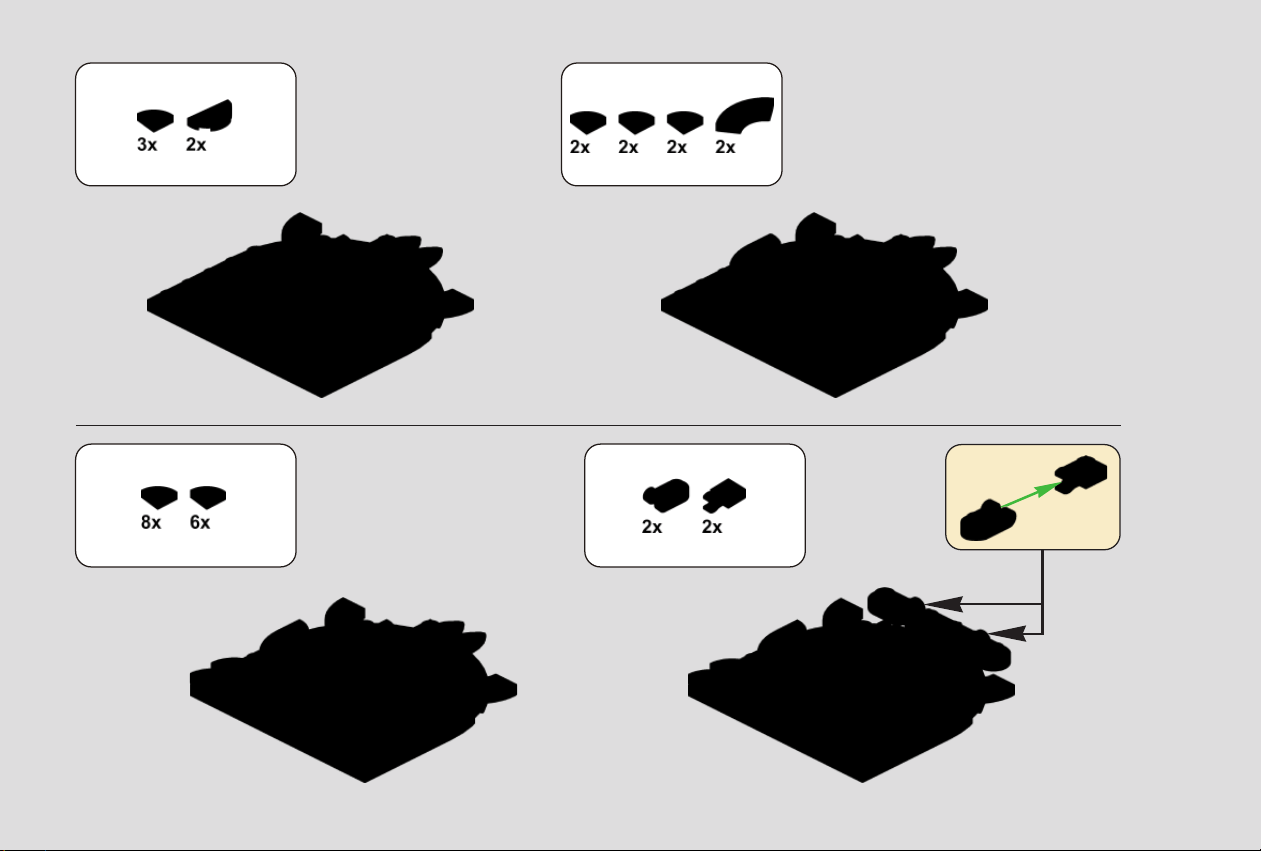
2x
42 43
44 45
117
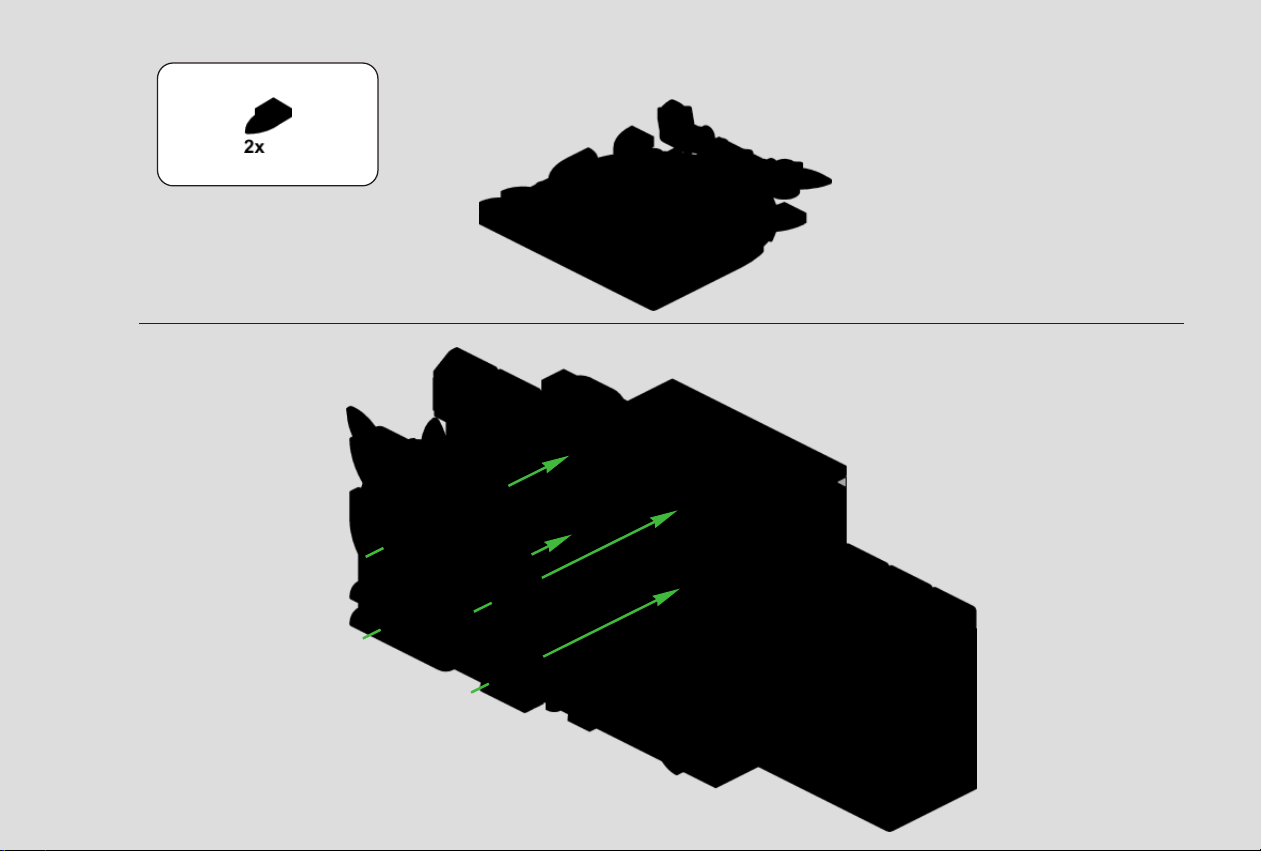
46
47
18
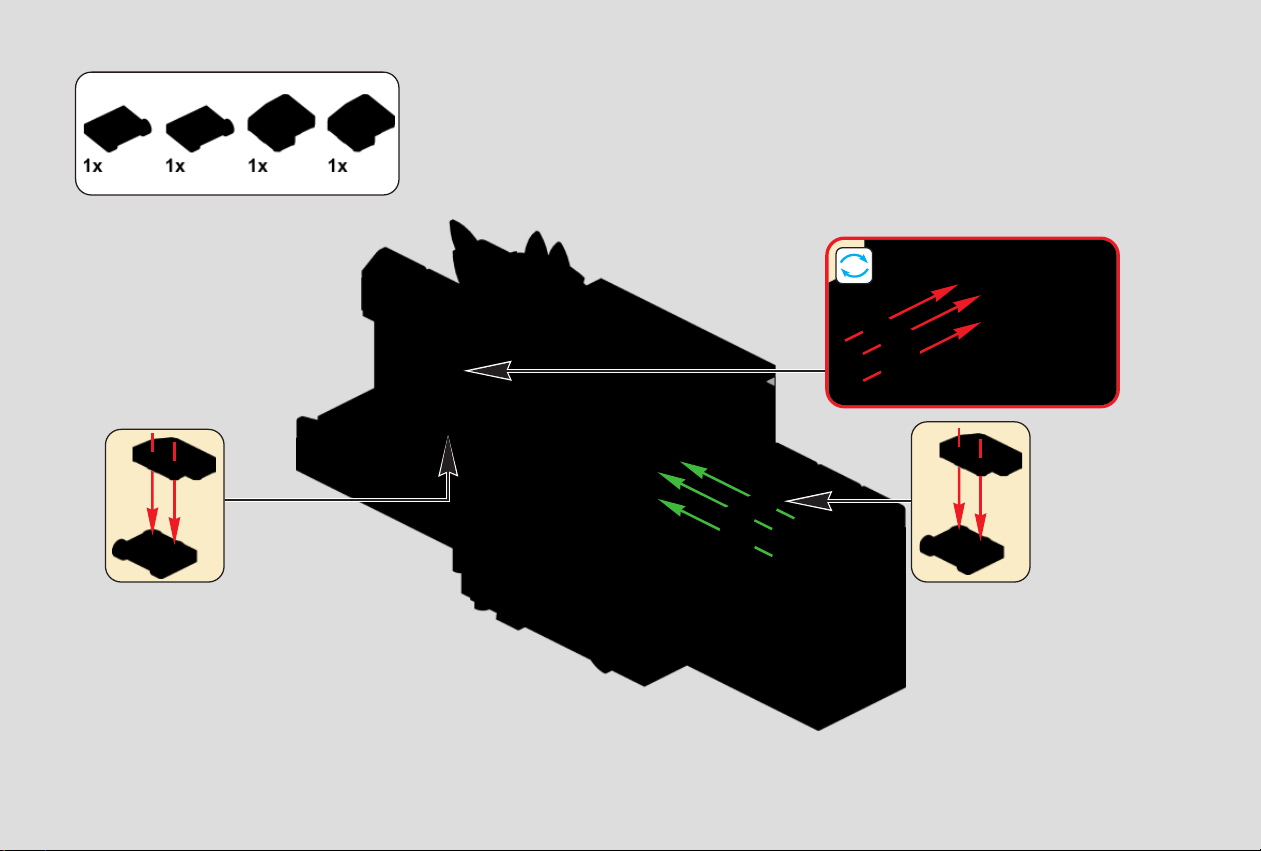
48
19
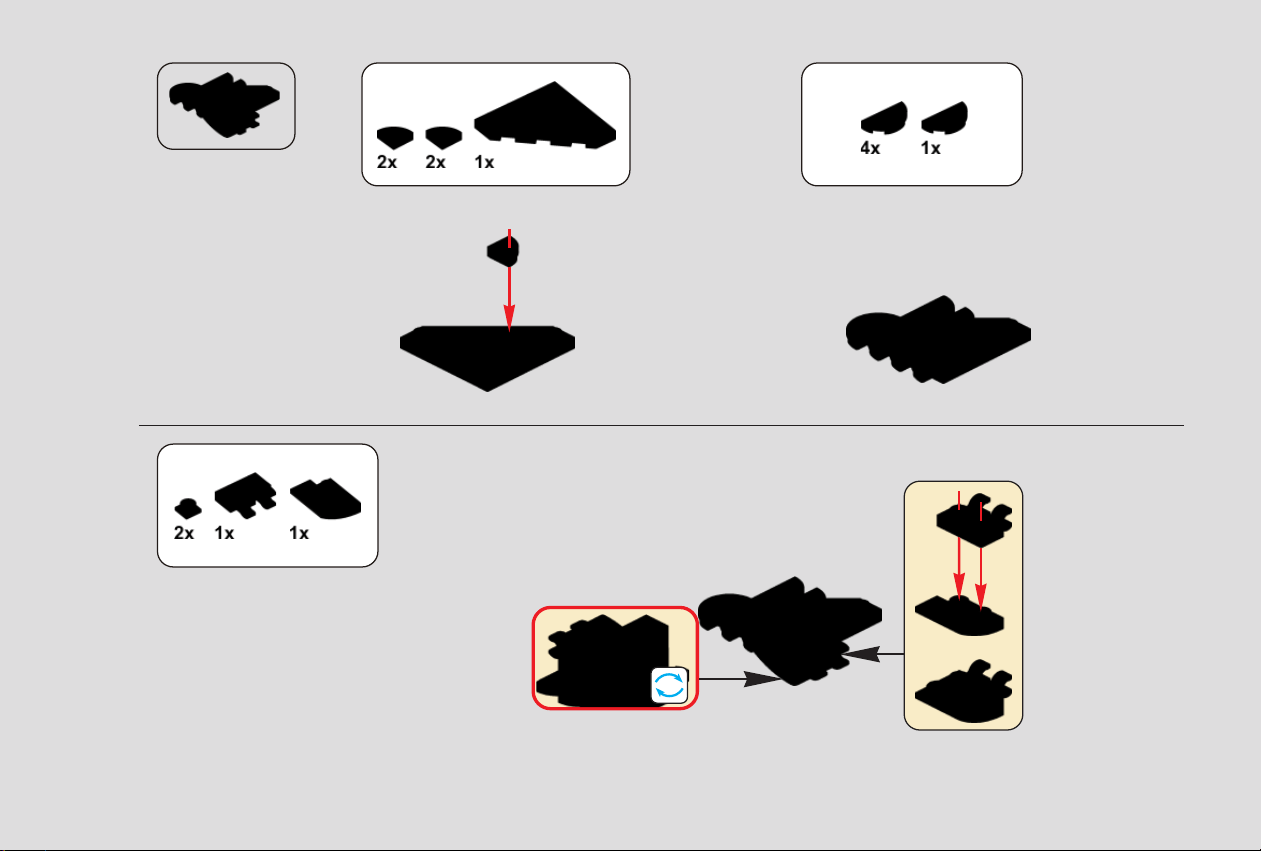
51
49 50
1
2
18
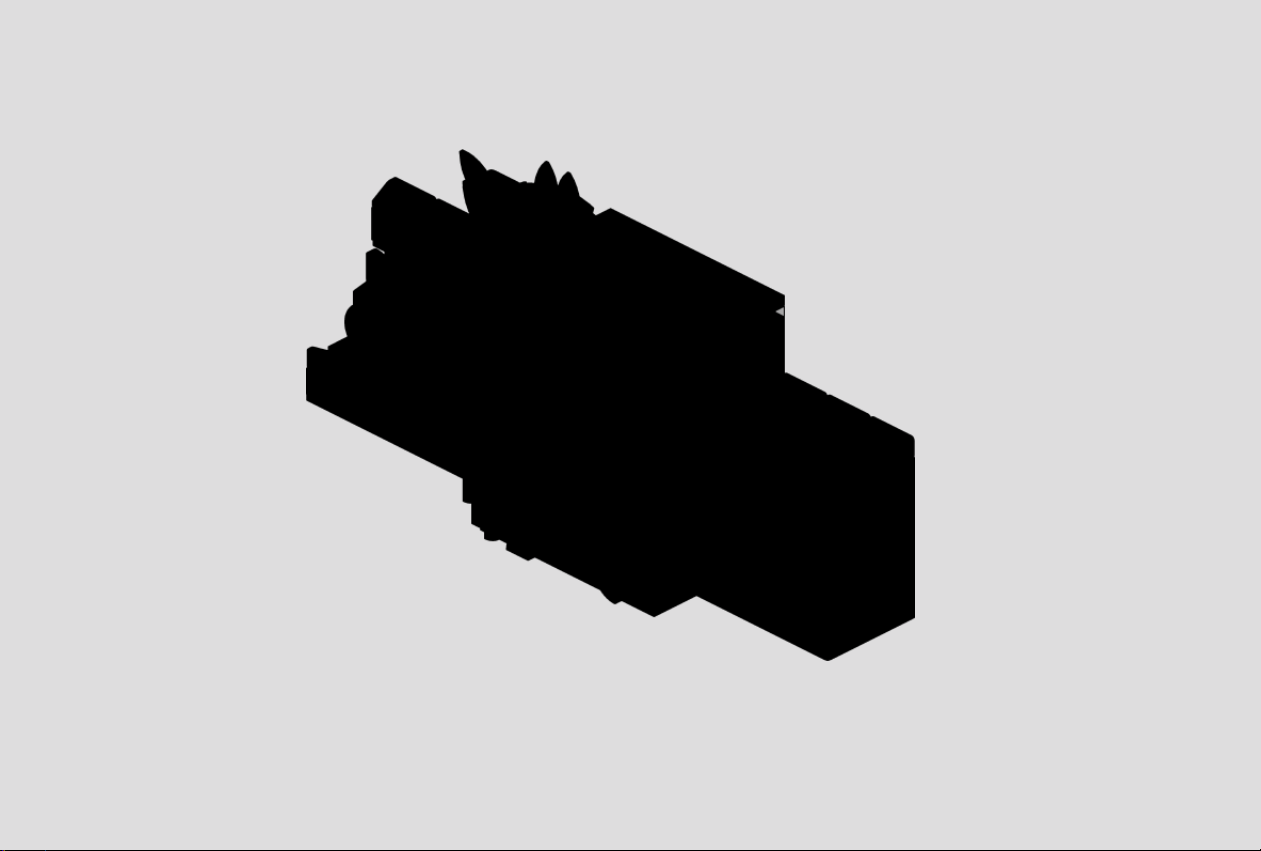
52
19
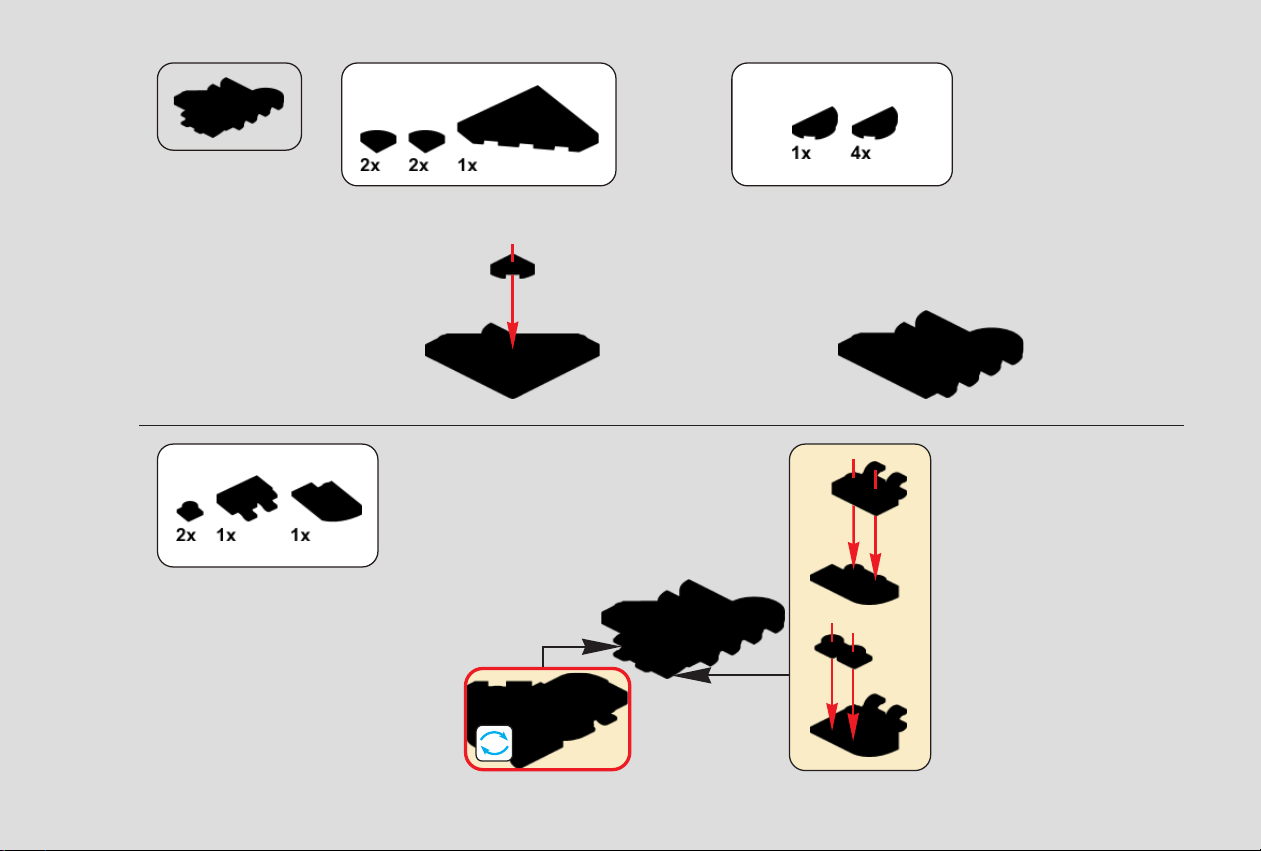
53 54
55
1
2
20
56
21
57
1x 1x
20
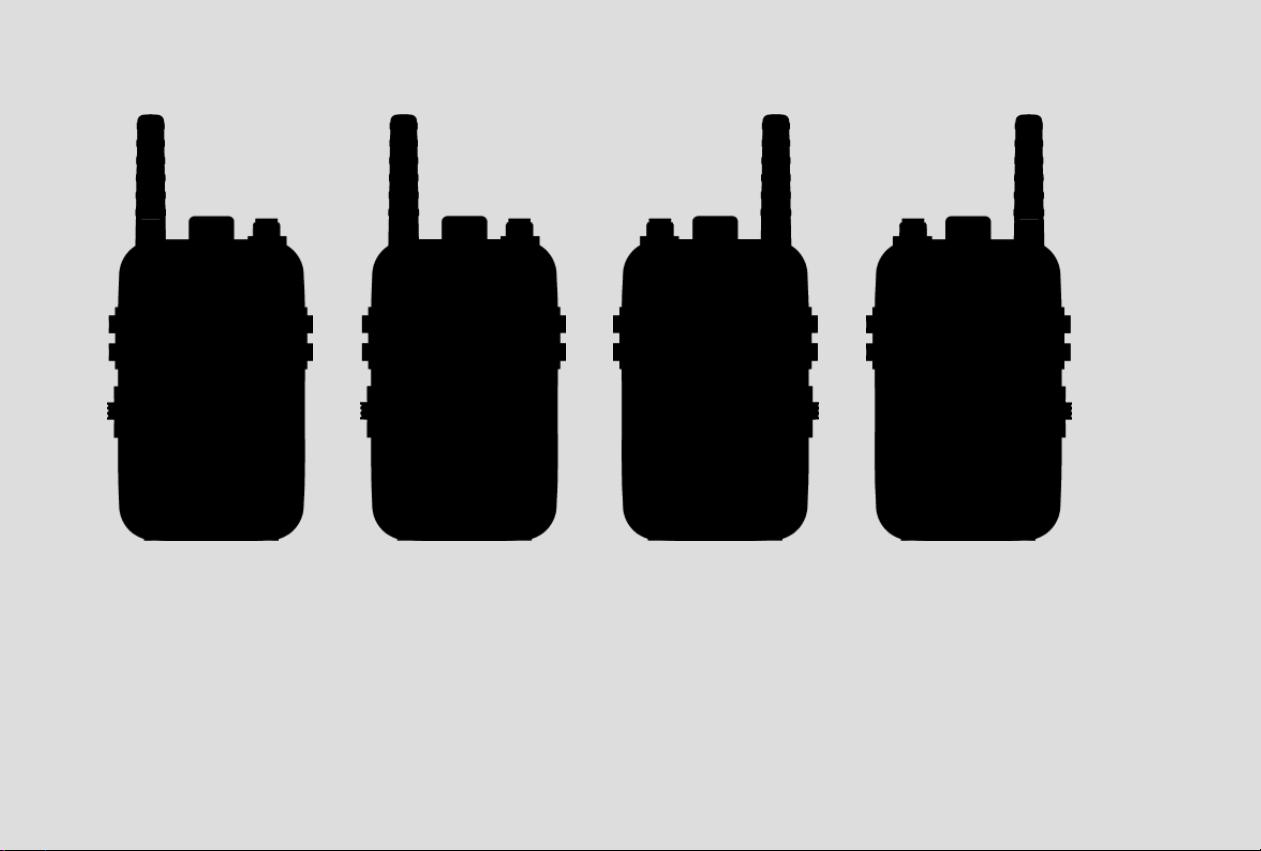
可自行DIY图案
EN:DlYyour own pattern
DE:Eigenes Muster selbst gestalten
FR:Créez votre propre motif
IT:Creailtuo motivo personalizzato
ES:Creatu propio diseño
JA:お好きな図案をDIYできます
58
21
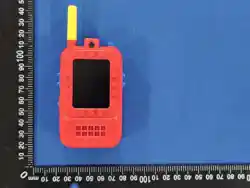
1-模式键/返回键
2-天线
3-摄像头
4-显示屏
5-音量加大/上键
6-音量减少/下键
7-电源开关
8-MIC孔
9-对讲键/确认键
10-Type-C接口
11-充电指示灯
12-挂绳孔
一、外观及功能描述
五、功能描述
按键基本功能操作
1)短按上下键(5)(6)左右移动在主界面选择想要的功能
2)选定功能后,请按确认键/呼叫键(9)进入
3)退出该功能,请按返回键/模式键(1)退出
4)长按“+”键(5),音量加大。长按“-”键(6),音量减小。
6)本机具有以下四种屏幕显示模式,在视频对讲模式下,通过
长按音量+/-键(5)(6)切换
主菜单界面:如下图
1-视频对讲
2-微聊
3-拍照
4-相册
以下为主菜单界面四大功能详解:
A.视频对讲:
1)短按呼叫键/确认键(9)进行呼叫,然后再长按呼叫键(9)等待
对方接听。接听方只需短按呼叫键(9)即可接通
2
3
4
5
6
7
8
9
10
11
112
5)在微聊模式下,选择语音对讲,按住“ ”键(9),进行语音
对讲,本机语音为单向通道传输,只有当讲话方结束松开对
讲按键(9)后,对方才能按住对讲键(9)进行语音发送。
四、开关机功能
1、产品出厂时, 电源拔动开关(7)处于“OFF”位置。
2、将电源开关(7)拔至“ON”,产品自动开机,会出现四宫格
菜单,分别为视频对讲,微聊,拍照,图库。
三、充电指示
1、取用本机配置充电线,连接充电器,电源指示灯(11)
“红色灯”亮,当充满电后,充电指示灯(11)自动熄灭。
2、请使用符合规格的5V/1A充电器,不要边充电边玩耍。
关机状态 开机状态
中文
仅显示对方
图像区域
仅显示本机
图像区域
本机图像区域
本机
图像
区域
对方图像区域
对方
图像
区域
二、家长提示/第一次使用提示
1、本产品含摄像头和内置电池,建议儿童在家长指导下首次使用。
2、首次使用本产品,请先给产品进行充满电。
22
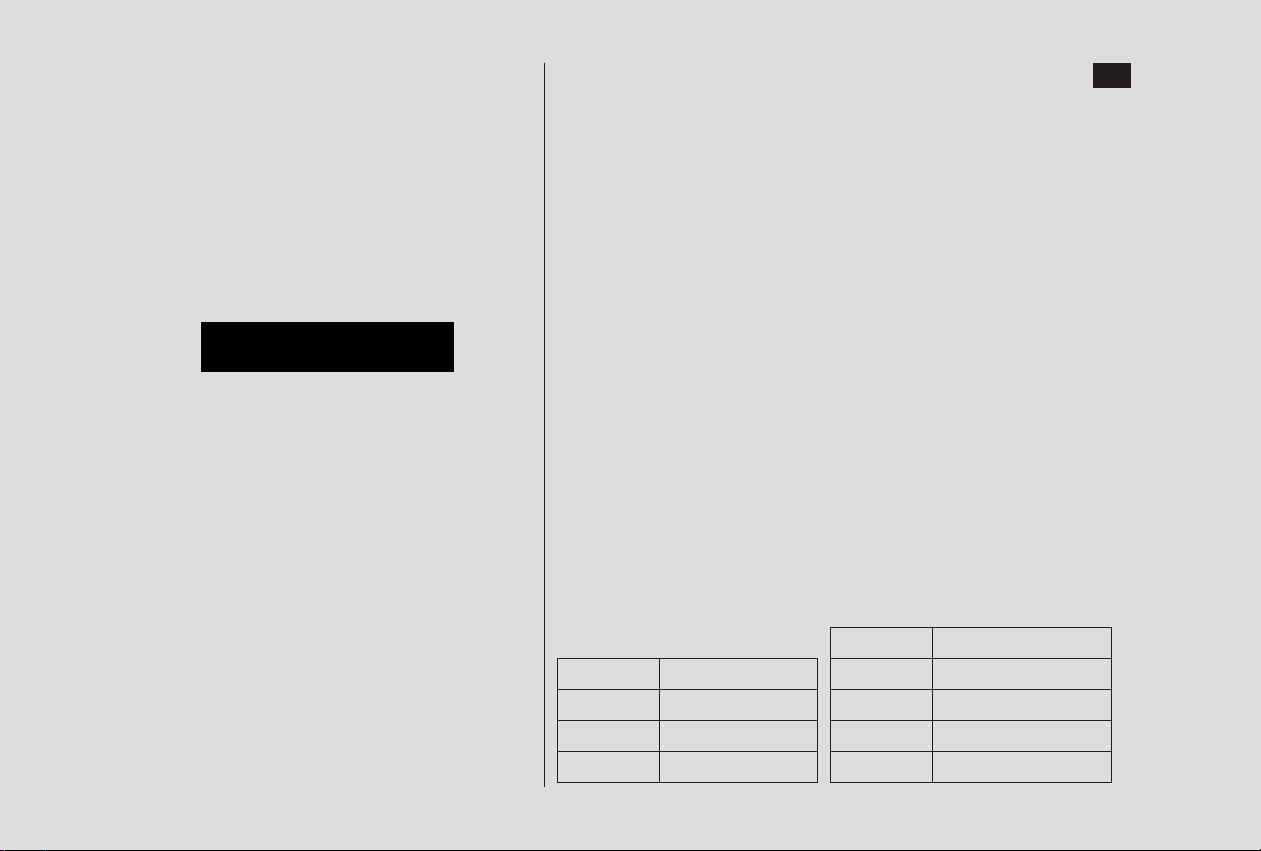
显示屏
CMOS像素
电池容量
语言
2.0 Inch IPS
30W
3.7V 650mAh
中文、英文、德语
USB接口
操作温度
存储温度
电源
产品尺寸
Type-C
-20℃~60℃
-30℃~70℃
5V/1A
124mm*54mm*23mm
2)长按呼叫键(9),进行对讲
3)短按音量+/-(5)(6)增大或减少音量
4)长按音量+/-(5)(6)切换视频窗口显示
5)长按模式键(1),可切换魔音。
(魔音分为四种:原音,孩童,机器人,成人)
6)短按模式键(1),返回主菜单
进入微聊页面后,底部有五个功能可选,
从左到右分别为表情包,语音,音乐,拍照,图片。
按键操作:
1)短按音量+/-(5)(6)切换功能,短按呼叫键(9)确认,
然后通过上下键(5)(6)选择想要的发送的内容,
按确认键(9)发送
2)按模式键(1)返回主菜单
表情包操作
短按音量+/-(5)(6)左右移动选择表情,
按确认键/呼叫键(9)发送
短按音量+/-(5)(6)左右移动选择语音,
长按确认键/呼叫键(9)说话,松开按键发送
音乐操作
语音操作
短按音量+/-(5)(6)左右移动选择音乐,
按确认键/呼叫键(9)发送
拍照操作
进入拍照界面,按确认键/呼叫键(9)拍照并直接发送
图片操作
进入图片界面,短按音量+/-(5)(6)左右移动选择图片,
按确认键/呼叫键(9)发送
六、产品开关机与自动关机功能
本产品开机后就进入工作状态;无论使用与否都会一直处于工作状
态,当产品处于低电状态将自动关机,如停止使用请将拨动开关(7)
至“OFF"状态,如需要重新启动产品,只需要将电源拨动开关(7)
先拨到'OFF",再拨到“ON"就可以正常启动了
七、产品配对与连接方式:
本产品是采用WIFI2.4G发射与连接模式;每一个包装内包含两个对讲机,
且已经完成配对,这两个对讲机不能与其他机器连接使用。
若购买了多套产品,则只能以套为单位一对一的连接,
不能同时多个产品相互连接使用。
八、注意事项:
a,本产品适合户外使用。
b,本机不防水
c,产品室内距离以图像不卡顿为准。
九、产品规格
B.微聊:
C.拍照:
D.相册:
1)进入相册界面,短按音量+/-(5)(6)左右移动选择图片,
按确认键/呼叫键(9)查看图片
2)按模式键/返回键(1)退回主菜单
进入拍照界面,按确认键/呼叫键(9)拍摄
如下图所示:
中文
23
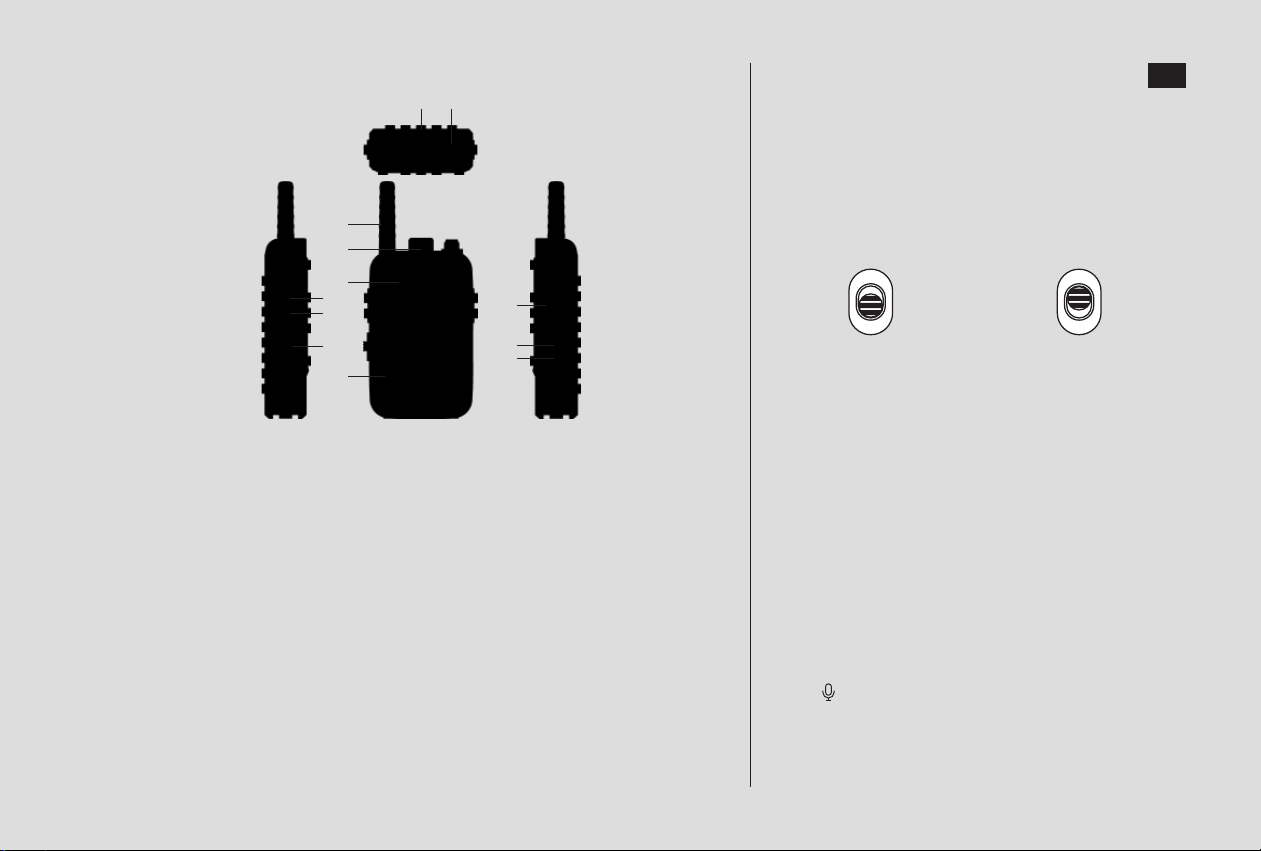
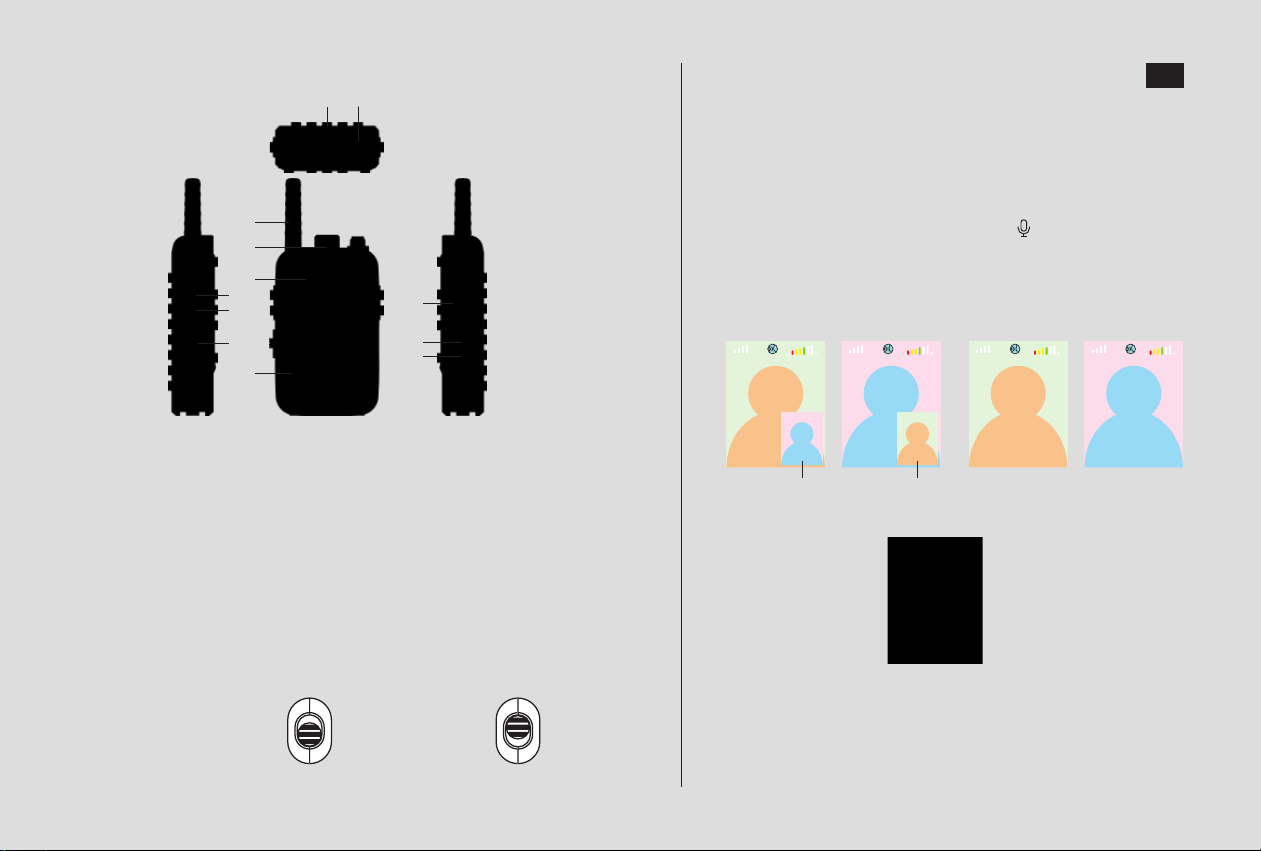
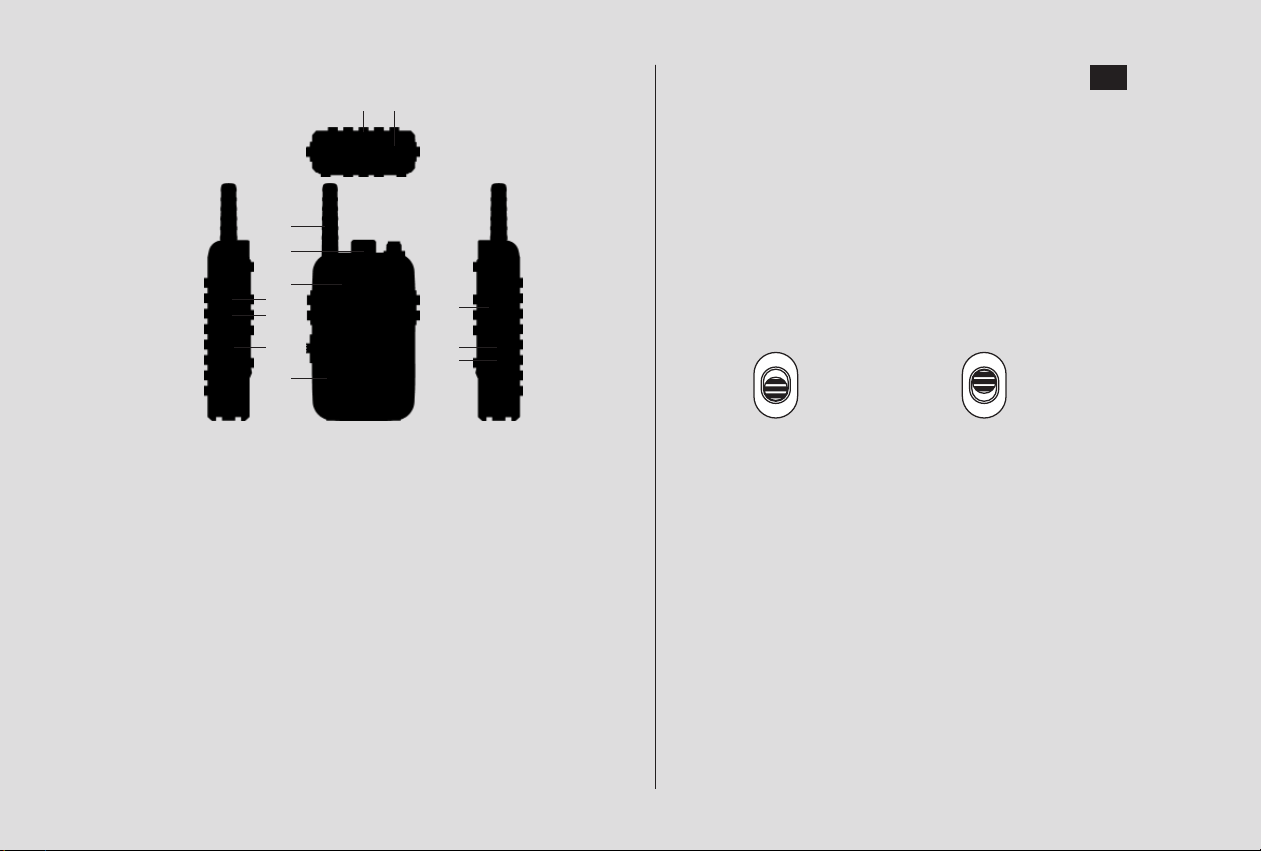
7 - Power Switch
8 - MIC Port
9 - Push-to-Talk Button / Confirm Button
10 - Type-C Port
11 - Charging Indicator Light
12 - Lanyard Hole
1 - Mode Button / Back Button
2 - Antenna
3 - Camera
4 - Display Screen
5 - Volume Up / Up Button
6 - Volume Down / Down Button
I. Appearance and Function Description
II. Parent Notice / First-Time Use Notice
1、This product contains a camera and a built-in battery. Children are
advised to use it for the first time under parental guidance.
2、Before using this product for the first time, please fully charge it first.
III. Charging Instructions
1、Use the supplied charging cable to connect the charger.
The charging indicator (11) lights up red during charging.
When fully charged, the charging indicator (11) turns off automatically.
2、Please use a 5V/1A charger that meets the
specifications. Do not play while charging.
IV. Power On/Off Function
1、When the product leaves the factory, the power
slide switch (7) is in the “OFF” position.
2、Slide the power switch (7) to “ON”. The product will
turn on automatically, and a four-icon menu will
appear: Video Intercom, Chat, Camera, and Gallery.
V. Function Description
Basic Button Operations
1) Short press the Up/Down buttons (5)(6) to move left
or right on the main interface and select the desired
function.
2) After selecting a function, press the Confirm/Call
button (9) to enter it.
3) To exit this function, press the Back/Mode button (1).
4) Press and hold the “+” button (5) to increase the
volume. Press and hold the “-” button (6) to decrease
the volume.
2
3
4
5
6
7
8
9
10
11
112
5) In intercom mode, select voice talkie, press and hold
the “ ” button (9) to speak. The local voice is
transmitted over a one-way channel. Only after the
speaker releases the talk button (9) can the other
party press and hold the talk button (9) to send their
voice.
Power-off state Power-on state
EN
24
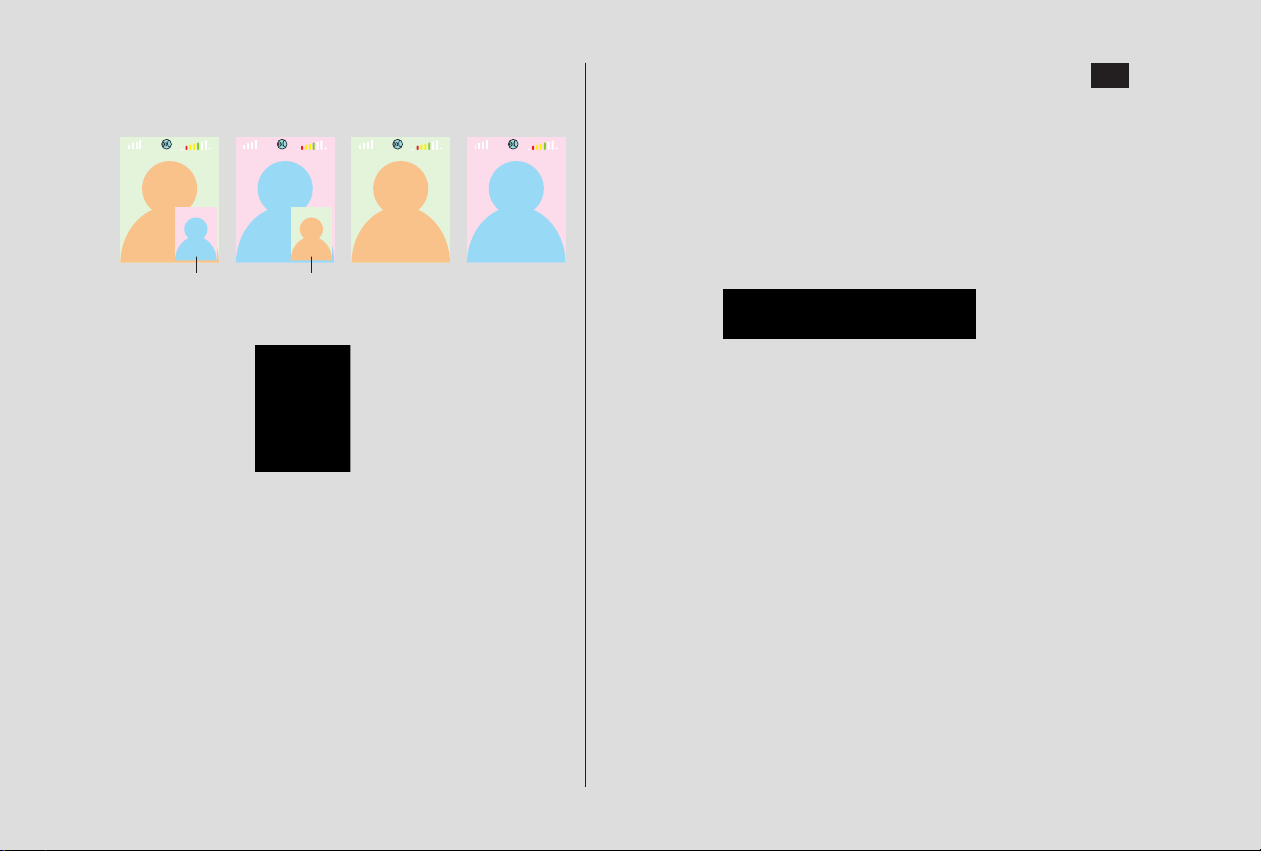
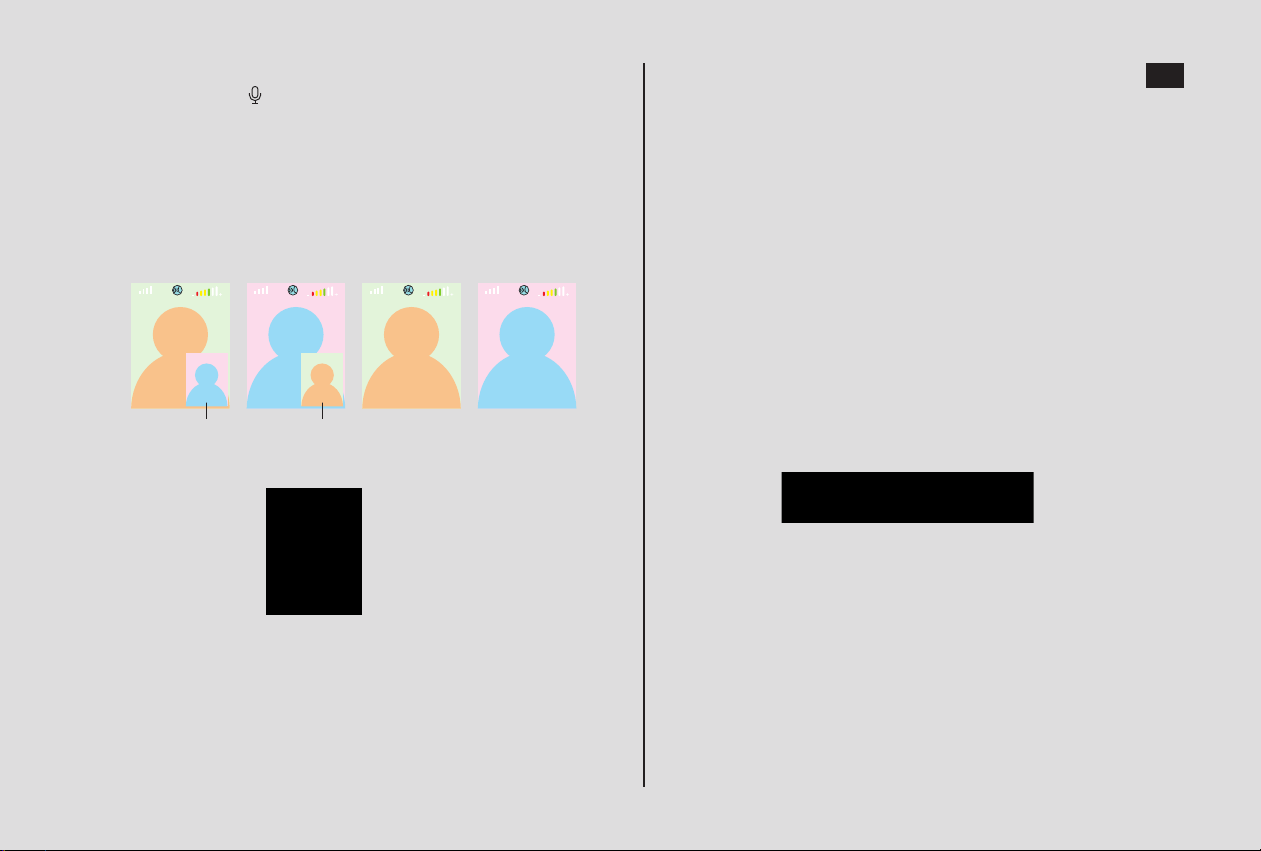
6) This device has the following four screen display modes.
In video intercom mode, press and hold the Volume +/-
buttons (5)(6) to switch between them.
Main Menu Interface: as shown below
1-Video Intercom
2-Chat
3-Camera
4-Album
The following is a detailed explanation of the four
main functions of the main menu interface:
A. Video Intercom:
1) Short press the Call/Confirm button (9) to make a call,
then press and hold the Call button (9) to wait for the
other party to answer. The receiving party only needs to
short press the Call button (9) to connect.
2) Press and hold the Call button (9) to use the intercom
function.
3) Short press Volume +/- (5)(6) to increase or decrease the
volume.
4) Press and hold Volume +/- (5)(6) to switch the video
window display.
5) Press and hold the Mode button (1) to switch voice effects.
(There are four voice effects: Original, Child, Robot, Adult.)
6) Short press the Mode button (1) to return to the main menu.
After entering the chat page, there are five functions available
at the bottom.
From left to right, they are Stickers, Voice, Music, Camera,
and Pictures.
Button operations:
1) Short press Volume +/- (5)(6) to switch functions, short press
the Call button (9) to confirm, then use the Up/Down buttons
(5)(6) to select the content you want to send, and press the
Confirm button (9) to send.
2) Press the Mode button (1) to return to the main menu.
Voice Operation
Short press Volume +/- (5)(6) to move left or right to select a
voice message, press and hold the Confirm/Call button (9) to
speak, and release the button to send.
Sticker Operation
Short press Volume +/- (5)(6) to move left or right to select a
sticker, then press the Confirm/Call button (9) to send.
Music Operation
Short press Volume +/- (5)(6) to move left or right to select music,
then press the Confirm/Call button (9) to send.
Camera Operation
Enter the camera interface, then press the Confirm/Call button (9)
to take a photo and send it directly.
B. Chat:
As shown below:
EN
Local device
image area
Other party’s
image area
Show only the
other party’s
image area
Show only the
local device
image area
Other
party’s
image
area
Local
device
image
area
25
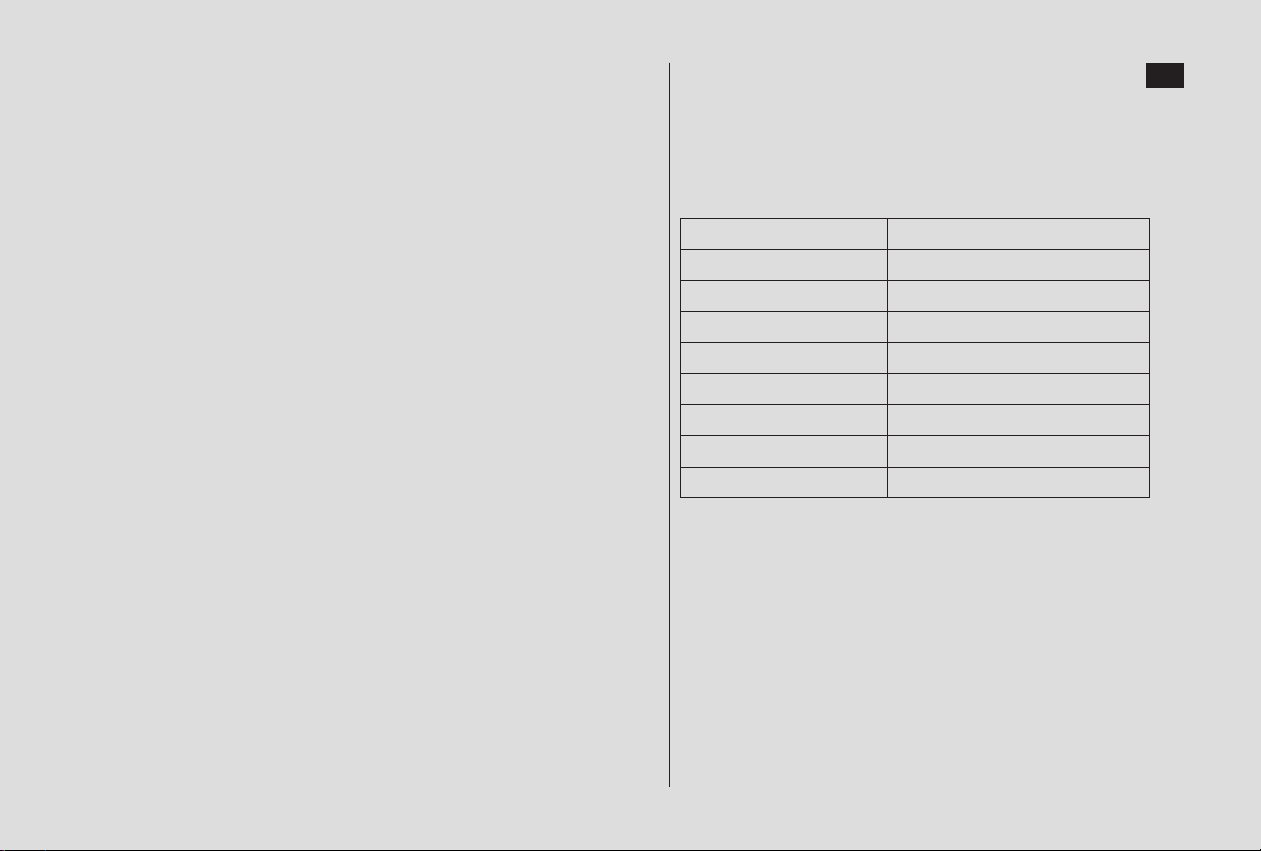
Display
CMOS Resolution
Battery Capacity
Languages
2.0 Inch IPS
0.3 MP
3.7V 650mAh
Chinese / English / German
Power Supply
USB Port
Operating Temperature
Storage Temperature
Product Size
Type-C
-20°C to 60°C
-30°C to 70°C
5V/1A
124mm*54mm*23mm
Picture Operation
Enter the picture interface, short press Volume +/- (5)(6) to
move left or right to select a picture, then press the Confirm/Call
button (9) to send.
VI. Power On/Off and Auto Power-Off Function
After this product is powered on, it enters working mode.
Whether it is being used or not, it will remain in working mode.
When the battery level is low, the product will automatically
shut down. If you stop using it, please move the slide switch (7)
to the “OFF” position. If you need to restart the product, simply
move the power slide switch (7) to “OFF” first, and then to “ON”
again to start it normally.
VII. Product Pairing and Connection Method:
This product uses a WiFi 2.4G transmission and connection
mode. Each package contains two walkie-talkies that have
already been paired. These two walkie-talkies cannot be
connected with other devices. If multiple sets of products are
purchased, they can only be connected one-to-one within each
set, and multiple products cannot be interconnected at the
same time.
VIII. Precautions:
a. This product is suitable for outdoor use.
b. This device is not waterproof.
c. For indoor use, the effective distance depends on whether
the image remains smooth without lag.
IX. Product Specifications
C. Camera:
D. Album:
1) Enter the album interface, short press Volume +/- (5)(6) to
move left or right to select a picture, then press the
Confirm/Call button (9) to view the picture.
2) Press the Mode/Back button (1) to return to the main menu.
Enter the camera interface and press the Confirm/Call button (9)
to take a photo.
EN
26
DE
7 - Ein-/Ausschalter
8 - MIC-Öffnung
9 - Sprechtaste / Bestätigungstaste
10 - Type-C-Anschluss
11 - Ladeanzeige
12 - Öse für Trageschlaufe
1 - Modustaste / Zurück-Taste
2 - Antenne
3 - Kamera
4 - Display
5 - Lauter / Oben-Taste
6 - Leiser / Unten-Taste
I. Beschreibung von Aussehen und Funktionen
II. Hinweise für Eltern / Hinweise zur ersten Verwendung
1、Dieses Produkt enthält eine Kamera und einen eingebauten
Akku. Es wird empfohlen, dass Kinder das Produkt beim
ersten Gebrauch unter Anleitung der Eltern verwenden.
2、Laden Sie das Produkt vor der ersten Verwendung bitte
vollständig auf.
III. Ladehinweise
1、Verwenden Sie das mitgelieferte Ladekabel und schließen Sie es
an ein Ladegerät an. Die Ladeanzeige (11) leuchtet während des
Ladevorgangs rot. Wenn der Akku vollständig
geladen ist, erlischt die Ladeanzeige (11) automatisch.
2、Bitte verwenden Sie ein Ladegerät mit den
Spezifikationen 5V/1A. Nicht während des
Ladevorgangs spielen.
IV. Ein-/Ausschaltfunktion
1、Bei Auslieferung befindet sich der
Stromschiebeschalter (7) in der Position „OFF“.
2、Schieben Sie den Netzschalter (7) auf „ON“.
Das Produkt schaltet sich automatisch ein und
ein Menü mit vier Symbolen erscheint:
Video-Gegensprechen, Chat, Kamera und Galerie.
V. Funktionsbeschreibung
Grundlegende Tastenfunktionen
1) Drücken Sie kurz die Auf-/Ab-Tasten (5)(6), um
sich auf der Hauptoberfläche nach links oder
rechts zu bewegen und die gewünschte Funktion
auszuwählen.
2) Nachdem Sie eine Funktion ausgewählt haben,
drücken Sie die Bestätigungs-/Ruftaste (9), um sie
zu öffnen.
3) Um diese Funktion zu verlassen, drücken Sie die
Zurück-/Modustaste (1).
4) Halten Sie die „+“-Taste (5) gedrückt, um die
Lautstärke zu erhöhen. Halten Sie die „-“-Taste (6)
gedrückt, um die Lautstärke zu verringern.
2
3
4
5
6
7
8
9
10
11
1
12
Ausgeschalteter
Zustand
Eingeschalteter
Zustand
27
DE
6) Dieses Gerät verfügt über die folgenden vier
Bildschirmanzeigemodi. Im Video-Gegensprechmodus
können Sie durch langes Drücken der Lautstärke-+/-
Tasten (5)(6) zwischen ihnen wechseln.
Hauptmenü-Oberfläche: wie unten gezeigt
1-Video-Gegensprechen
2-Chat
3-Foto
4-Album
Nachfolgend finden Sie eine detaillierte Erklärung
der vier Hauptfunktionen der Hauptmenü-Oberfläche:
A. Video-Gegensprechen:
1) Drücken Sie kurz die Ruf-/Bestätigungstaste (9), um einen
Anruf zu starten, und halten Sie dann die Ruftaste (9) gedrückt,
um auf die Annahme durch die andere Seite zu warten. Die
empfangende Seite muss nur kurz die Ruftaste (9)
drücken, um die Verbindung herzustellen.
2) Halten Sie die Ruftaste (9) gedrückt, um die
Gegensprechfunktion zu verwenden.
3) Drücken Sie kurz Lautstärke +/- (5)(6), um die Lautstärke zu
erhöhen oder zu verringern.
4) Halten Sie Lautstärke +/- (5)(6) gedrückt, um die Anzeige des
Videofensters umzuschalten.
5) Halten Sie die Modustaste (1) gedrückt, um den Stimmeffekt
zu wechseln. (Es gibt vier Stimmeffekte: Originalton, Kind,
Roboter, Erwachsener.)
6) Drücken Sie kurz die Modustaste (1), um zum Hauptmenü
zurückzukehren.
Nach dem Aufrufen der Chat-Seite stehen unten fünf Funktionen
zur Auswahl. Von links nach rechts sind dies Sticker, Sprache,
Musik, Foto und Bilder.
Tastenbedienung:
1) Drücken Sie kurz Lautstärke +/- (5)(6), um die Funktionen zu
wechseln, drücken Sie kurz die Ruftaste (9) zur Bestätigung
und verwenden Sie dann die Auf-/Ab-Tasten (5)(6), um den
gewünschten Inhalt auszuwählen. Drücken Sie die
Bestätigungstaste (9), um ihn zu senden.
2) Drücken Sie die Modustaste (1), um zum Hauptmenü
zurückzukehren.
Sticker-Bedienung
Drücken Sie kurz Lautstärke +/- (5)(6), um sich nach links oder
rechts zu bewegen und einen Sticker auszuwählen. Drücken Sie
dann die Bestätigungs-/Ruftaste (9), um ihn zu senden.
B. Chat:
Wie unten dargestellt:
5) Wählen Sie im Gegensprechmodus die Sprachfunktion, halten
Sie die Taste „ “ (9) gedrückt, um zu sprechen. Die eigene
Sprachübertragung erfolgt über einen Einwegkanal. Erst wenn
der Sprecher die Sprechtaste (9) loslässt, kann der andere
Teilnehmer die Sprechtaste (9) gedrückt halten, um seine
Sprachnachricht zu senden.
Bildbereich des
eigenen Geräts
Bildbereich der
Gegenstelle
Nur den
Bildbereich der
Gegenstelle
anzeigen
Nur den
Bildbereich
des eigenen
Geräts anzeigen
Bildbereich der
Gegenstelle
Bildbereich des
eigenen Geräts
28
DE
Display
CMOS-Auflösung
Batteriekapazität
Sprachen
2,0 Zoll IPS
0,3 MP
3,7V 650mAh
Chinesisch, Englisch, Deutsch
Stromversorgung
USB-Anschluss
Betriebstemperatur
Lagertemperatur
Produktgröße
Type-C
-20°C bis 60°C
-30°C bis 70°C
5V/1A
124mm*54mm*23mm
Sprachbedienung
Drücken Sie kurz Lautstärke +/- (5)(6), um sich nach links oder
rechts zu bewegen und eine Sprachnachricht auszuwählen.
Halten Sie die Bestätigungs-/Ruftaste (9) gedrückt, um zu
sprechen, und lassen Sie die Taste los, um zu senden.
Musik-Bedienung
Drücken Sie kurz Lautstärke +/- (5)(6), um sich nach links
oder rechts zu bewegen und Musik auszuwählen. Drücken Sie
dann die Bestätigungs-/Ruftaste (9), um sie zu senden.
Foto-Bedienung
Gehen Sie zur Foto-Oberfläche und drücken Sie die
Bestätigungs-/Ruftaste (9), um ein Foto aufzunehmen und
direkt zu senden.
Bild-Bedienung
Gehen Sie zur Bild-Oberfläche, drücken Sie kurz Lautstärke
+/- (5)(6), um sich nach links oder rechts zu bewegen und ein
Bild auszuwählen, und drücken Sie dann die Bestätigungs-/
Ruftaste (9), um es zu senden.
VI. Ein-/Ausschalten und automatische Abschaltfunktion
Nach dem Einschalten befindet sich dieses Produkt im
Betriebszustand. Unabhängig davon, ob es verwendet wird
oder nicht, bleibt es im Betriebszustand. Wenn der Akkustand
niedrig ist, schaltet sich das Produkt automatisch aus.
Wenn Sie das Produkt nicht mehr verwenden, schieben
Sie bitte den Schalter (7) auf „OFF“. Wenn Sie das Produkt
neu starten möchten, schieben Sie den Netzschalter (7)
einfach zuerst auf „OFF“ und dann wieder auf „ON“, damit
es normal startet.
VII. Produktkopplung und Verbindungsart:
Dieses Produkt verwendet einen WiFi-2.4G-Übertragungs- und
Verbindungsmodus. Jede Verpackung enthält zwei
Walkie-Talkies, die bereits gekoppelt sind. Diese beiden
Walkie-Talkies können nicht mit anderen Geräten verbunden
werden. Wenn mehrere Produktsets gekauft werden, können
sie nur setweise eins zu eins verbunden werden, und mehrere
Produkte können nicht gleichzeitig miteinander verbunden
werden.
VIII. Hinweise:
a, Dieses Produkt ist für den Einsatz im Freien geeignet.
b, Dieses Gerät ist nicht wasserdicht.
c, Im Innenbereich richtet sich die effektive Reichweite danach,
ob das Bild flüssig und ohne Verzögerung angezeigt wird.
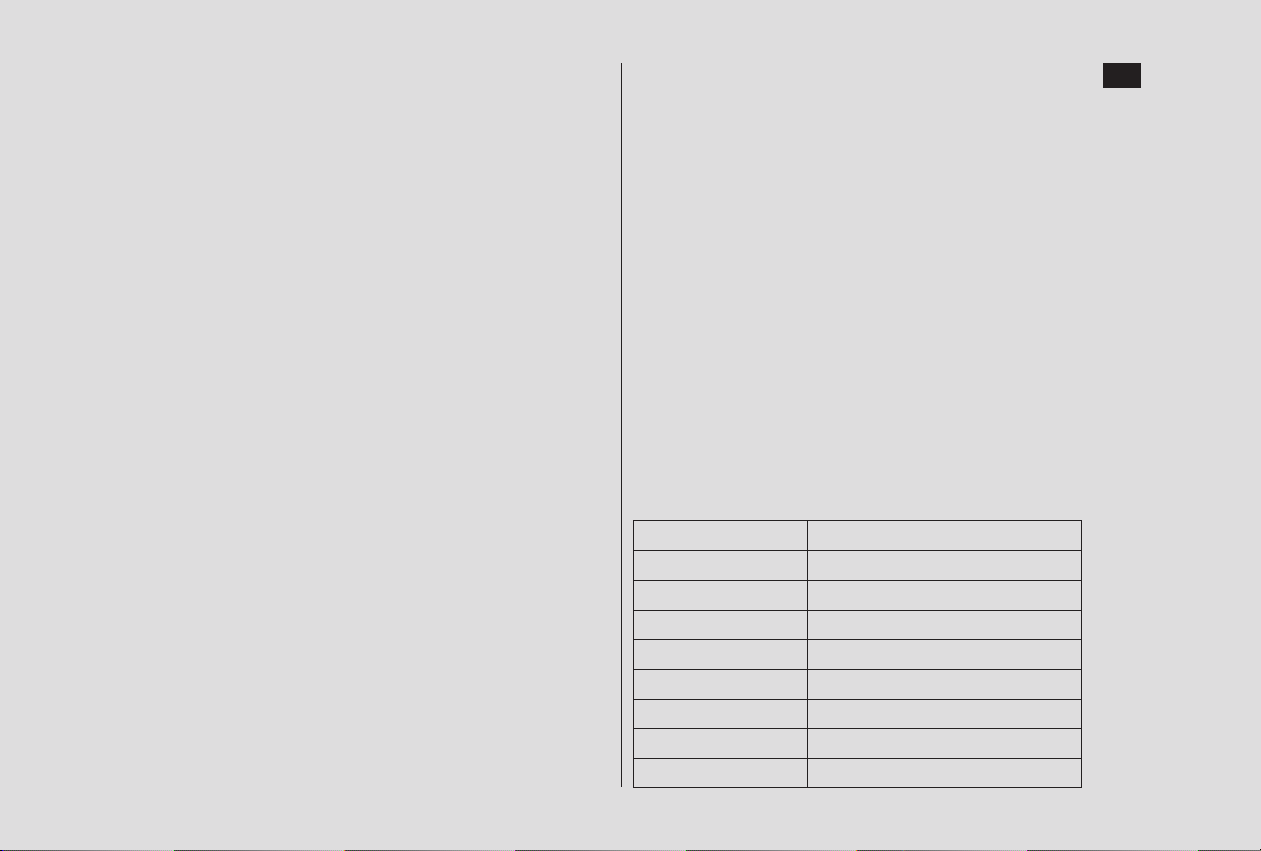
IX. Produktspezifikationen
C. Foto:
D. Album:
1) Gehen Sie zur Album-Oberfläche, drücken Sie kurz
Lautstärke +/- (5)(6), um sich nach links oder rechts zu
bewegen und ein Bild auszuwählen, und drücken Sie dann
die Bestätigungs-/Ruftaste (9), um das Bild anzusehen.
2) Drücken Sie die Modus-/Zurück-Taste (1), um zum
Hauptmenü zurückzukehren.
Gehen Sie zur Foto-Oberfläche und drücken Sie die
Bestätigungs-/Ruftaste (9), um ein Foto aufzunehmen.
29

FCC Warning
This device complies with Part 15 of the FCC Rules.
Operation is subject to the following two conditions:
(1) This device may not cause harmful interference,and
(2) this device must accept any interference received,
including interference that may cause undesired operation.
NOTE 1: This equipment has been tested and found to
comply with the limits for a Class B digital device,
pursuant to part 15 of the FCC Rules. These
limits are designed to provide reasonable
protection against harmful interference in a
residential installation. This equipment generates,
uses and can radiate radio frequency energy and,
if not installed and used in accordance with the
instructions, may cause harmful interference to
radio communications. However, there is no
guarantee that interference will not occur in a
particular installation. If this equipment does
cause harmful interference to radio or television
reception, which can be determined by turning
the equipment off and on, the user is encouraged
to try to correct the interference by one or more
of the following measures:
-Reorient or relocate the receiving antenna.
-Increase the separation between the equipment
and receiver.
-Connect the equipment into an outlet on a circuit
different from that to which the receiver is
connected.
-Consult the dealer or an experienced radio/TV
technician for help.
NOTE 2: Any changes or modifications to this unit not
expressly approved by the party responsible for
compliance could void the user's authority to
operate the equipment.
The device has been evaluated to meet general RF exposure
requirement. The device can be used in portable exposure
condition without restriction.
30