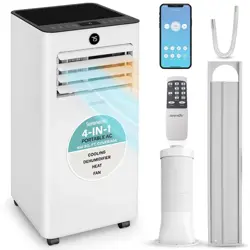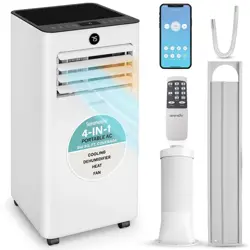
USER MANUAL
Visit Our Website
SCAN ME
serenelifehome.com
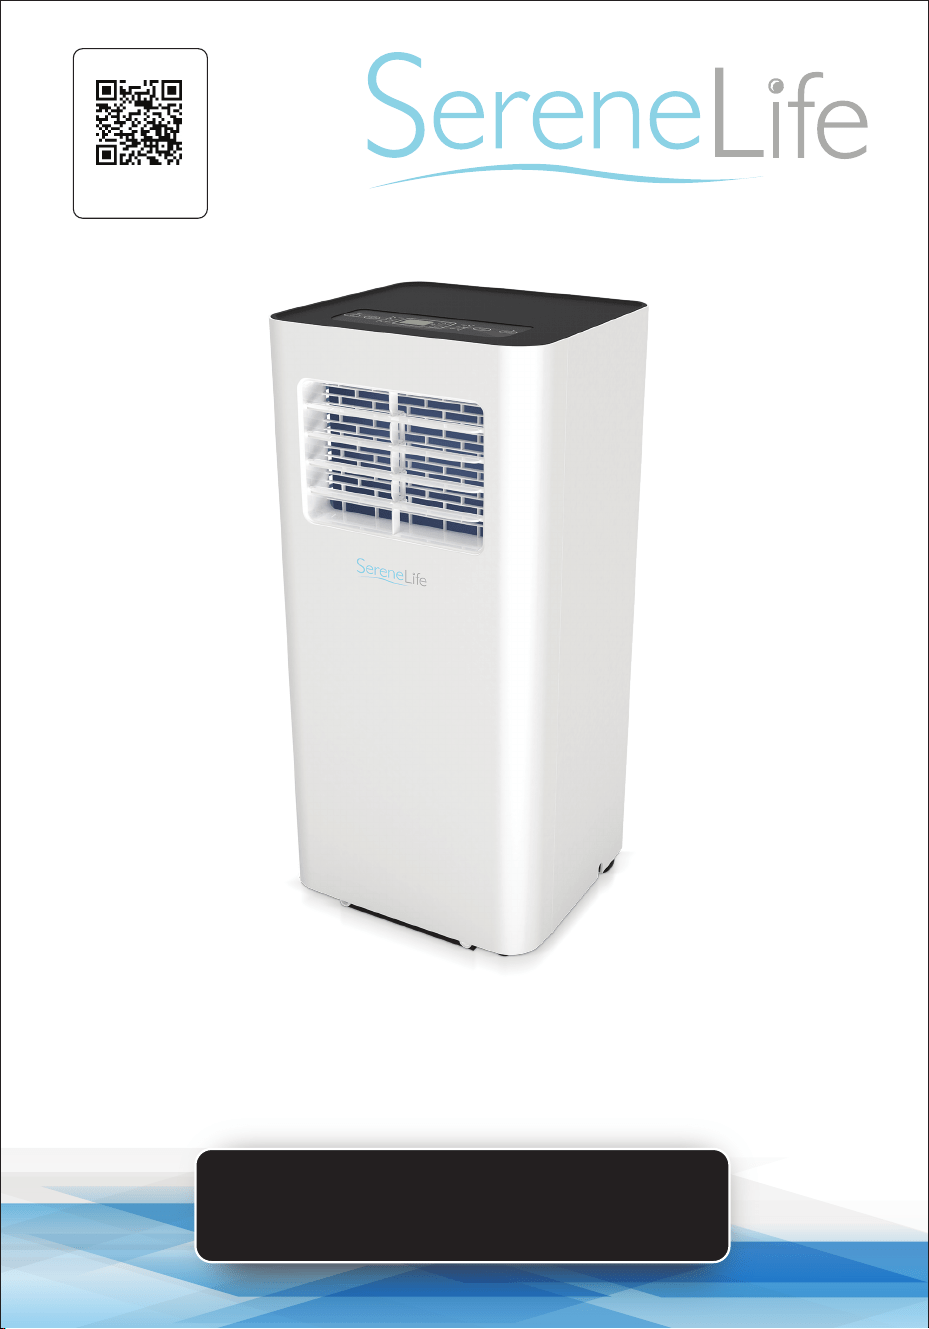
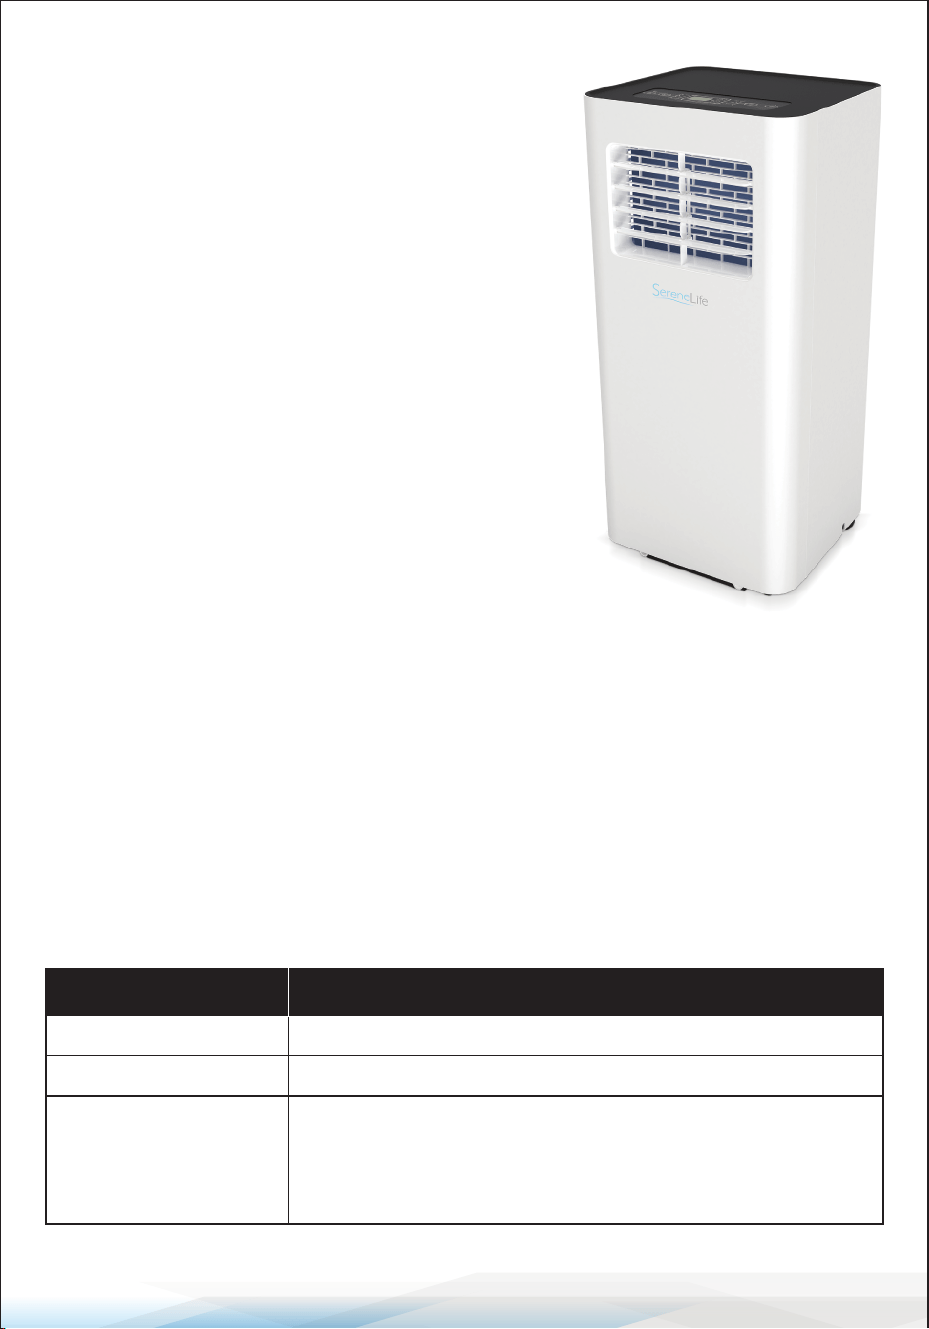
SLPAC805W
Portable Air Conditioner
www.SereneLifeHome.com
2
PLEASE KEEP THIS MANUAL CAREFULLY FOR FUTURE REFERENCE.
FOR HOUSEHOLD USE ONLY.
CONTENT
FEATURES AND TECHNICAL SPECIFICATIONS
IMPORTANT SAFETY TIPS
USER TIPS
PRECAUTION
SAFETY WARNINGS
TIPS
PRODUCT OVERVIEW
MAIN COMPONENTS
CONTROL PANEL AND REMOTE CONTROL
OPERATION
HOW TO OPERATE
TIMER MODE
WIFI OPERATION INSTRUCTION
AMAZON ECHO OPERATION INSTRUCTION
CLEAN AND MAINTENANCE
COMMON FAILURES AND DIAGNOSIS
TROUBLESHOOTING
REGISTER PRODUCT
3
4
7
7
9
12
13
13
14
15
19
20
20
29
35
37
38
39
California Prop 65 Warning
WARNING:
This product contains Acrylonitrile which is known to the state
of California to cause cancer birth defects and other
reproductive harm. Do not ingest.
For more info go to: www.P65warnings.ca.gov

www.SereneLifeHome.com
3
FEATURES:
• Metal Control Box to Prevent from Fire and Exploding
• Rotary Compressor
• Universal Castors for Moving Freely
• Wi function
• Lightweight & Portable A/C Unit
• Compact Freestanding Room Air Conditioner
• (3) Operation Modes: AC Cooling / Dehumidier / Fan
• Hassle-Free, Quick Setup Cooling
• Simple Electric Plug-in Operation
• Convenient Wide-Area Climate Control Room AC Coverage
• Push Button Control Panel with LED Display
• Time, Temperature & Fan Speed Adjustment Settings
• Includes Universal Window Mount AC Exhaust Kit
• Removable & Washable Air Filter Screen
• Modern Style, Sleek Body Housing
• Energy Ecient: Low Power Consumption
• Low Noise Level Motor
• Rolling Wheels for Easy Portability
• Used for Home, Oce, School & Business Rooms
WHAT'S IN THE BOX:
• AC Unit
• Exhaust Hose
• Window Installation Plate
• Remote Control
www.SereneLifeHome.com
4
Technical Specs:
• Power Supply: 115V/60Hz
• Rated Power: 800W
• Refrigerant Type: R410a
• Cooling capacity (ASHRAE): 8,000 Btu/h
• Cooling capacity (DOE): 5,000 Btu/h
• Coverage Area: Cools Rooms up to 300 Square Feet
• Air Flow: 360 Cubic Meters / Hour
• Operating Modes: Cool / Fan / Dry (Dehumidier)
• Moisture Removal / Dehumidier: 1.1 Liters / Hour
• Operating Noise Level: 55 dBA
• Fan Speed Settings: Two Level, Low/High
• Temperature Unit Selectable: °C / °F (Celsius / Fahrenheit)
• Adjustable Timer Settings: Up to 24 Hours
• Construction Material: High Impact Polystyrene (HIPS)
• Battery Operated Remote Control, Requires (2) x ‘AAA’ Batteries, Included
• Power Cable Length: 4.3’ ft.
• Product Dimension (L x W x H): 27.6'' x 12.8'' x 11.6'' -inches
READ ALL INSTRUCTIONS BEFORE USE
Your safety and the safety of others are very important. We have provided many
important safety messages in this manual and on your appliance.
Always read and follow all safety messages.
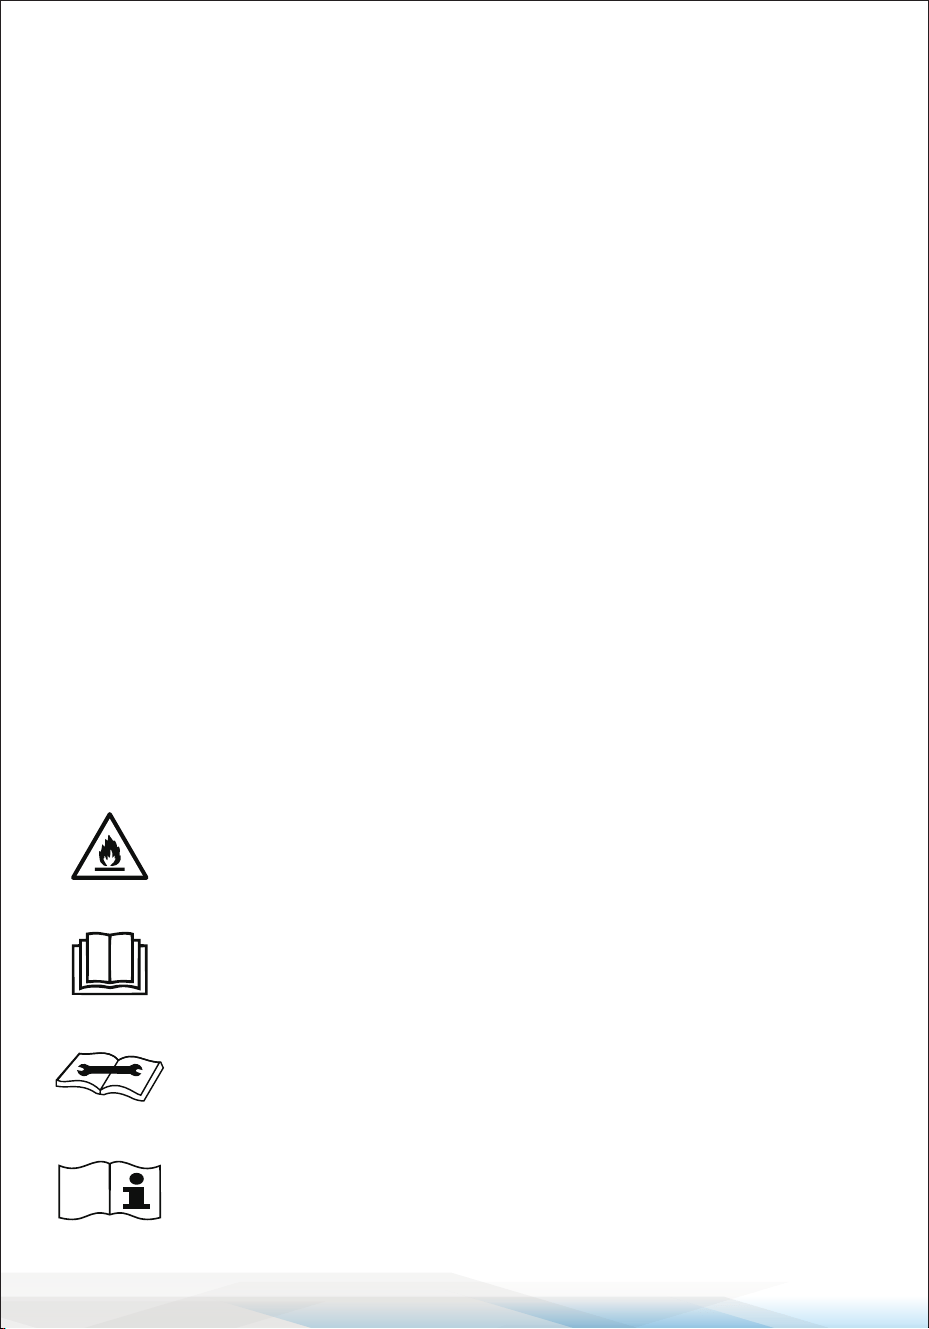
This symbol indicates that this appliance uses a ammable
refrigerant. If the refrigerant leaks and comes into contact with an
external ignition source, there is a risk of re.
This symbol indicates that the operation manual should be read
carefully.
This symbol indicates that service personnel should handle this
equipment with reference to the installation manual.
This symbol indicates that information is available, such as the
operating manual or installation manual.

www.SereneLifeHome.com
5
REFRIGERANT (FOR R32 ONLY)
CAUTION ON FIRE
READ THE MANUAL CAREFULLY BEFORE USING THE APPLIANCE.
R32 refrigerant gas complies with international environmental directives.
Warnings
• Do not use methods to accelerate the defrosting process or cleaning other
than those recommended by the manufacturer.
• The appliance shall be stored in a room without continuously operating ignition
sources (e.g., open ames, operating gas appliances, or operating electric
heaters).
• Do not pierce or burn the appliance.
• Be aware that refrigerants may not contain an odor.
The instructions should contain the following information:
• Piping material, pipe routing, and installation should include protection from
physical damage during operation and service, and comply with national and
local codes and standards, such as ASHRAE 15, IAPMO Uniform Mechanical
Code, ICC International Mechanical Code, or CSA B52.
• All eld joints shall be accessible for inspection prior to being covered or
enclosed.
• The installation of pipework should be kept to a minimum.
• Provisions should be made for expansion and contraction of long runs of piping.
• Protection devices, piping, and ttings should be protected against adverse
environmental eects (e.g., the risk of water collecting and freezing in relief
pipes or the accumulation of dirt and debris).
• The piping in refrigeration systems should be designed and installed to minimize
the likelihood of hydraulic shock damaging the system.
• Steel pipes and components should be protected against corrosion with a
rustproof coating before applying any insulation.
• Flexible pipe elements should be protected against mechanical damage,
excessive stress by torsion, or other forces, and should be checked for
mechanical damage annually.
• Precautions should be taken to avoid excessive vibration or pulsation.

www.SereneLifeHome.com
6
When using the product:
• Keep any required ventilation openings clear of obstructions.
• Servicing should be performed only as recommended by the manufacturer.
Unventilated Area
• An unventilated area where the appliance using ammable refrigerants is
installed should be constructed so that, in case of a refrigerant leak, it will not
stagnate and create a re or explosion hazard.
•
The non-xed appliance should be stored in an area where the size corresponds
to the room area specied for operation.
• The non-xed appliance should be stored in a room without continuously
operating open ames or other potential ignition sources.
•
The manufacturer should specify any other continuously operating sources
known to cause ignition of the refrigerant used.
• The appliance should be stored in a manner that prevents mechanical damage.
• Non-duct connected appliances containing A2L refrigerants with air openings
in the conditioned space may have the body of the appliance installed in open
areas such as false ceilings (not used as return air plenums), as long as the
conditioned air does not directly communicate with the air in the false ceiling.
Qualication of Workers
• All operators or refrigeration circuit maintenance personnel should obtain a
valid certicate issued by an industry-recognized evaluation agency to
demonstrate that they have the qualications to safely handle refrigerants, as
required by the industry-recognized evaluation scope.
•
Perform equipment maintenance and repairs only in accordance with the
methods recommended by the appliance manufacturer.
If another professional is required to assist in maintenance and repairs, it
should be carried out under the supervision of personnel qualied to handle
ammable refrigerants.
www.SereneLifeHome.com
7
USER TIPS
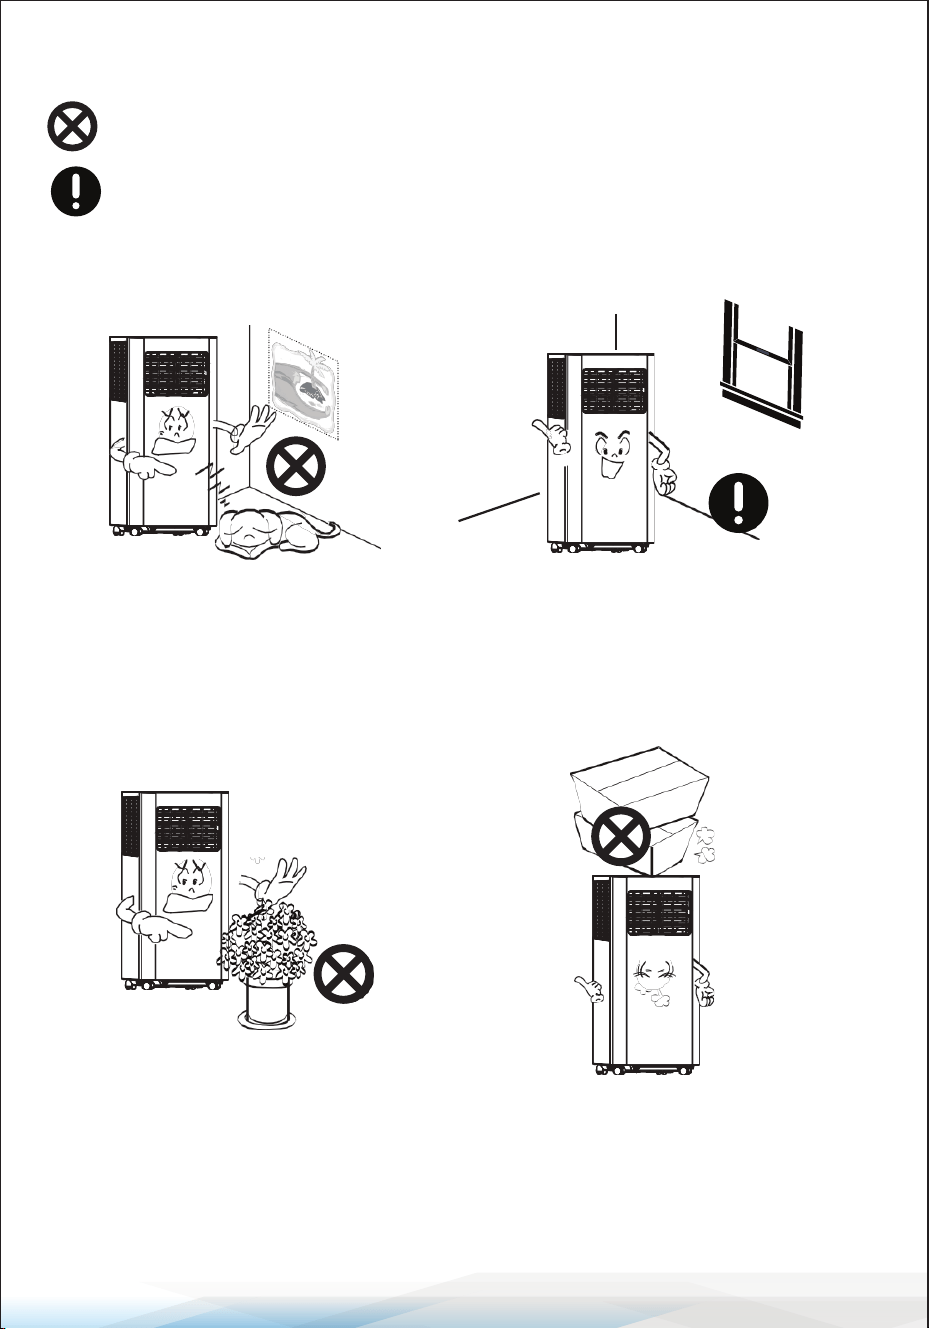
Please avoid such operations, in case of any safety and health risks.
Such instructions are to be followed, for safety and health concerns.
PRECAUTION
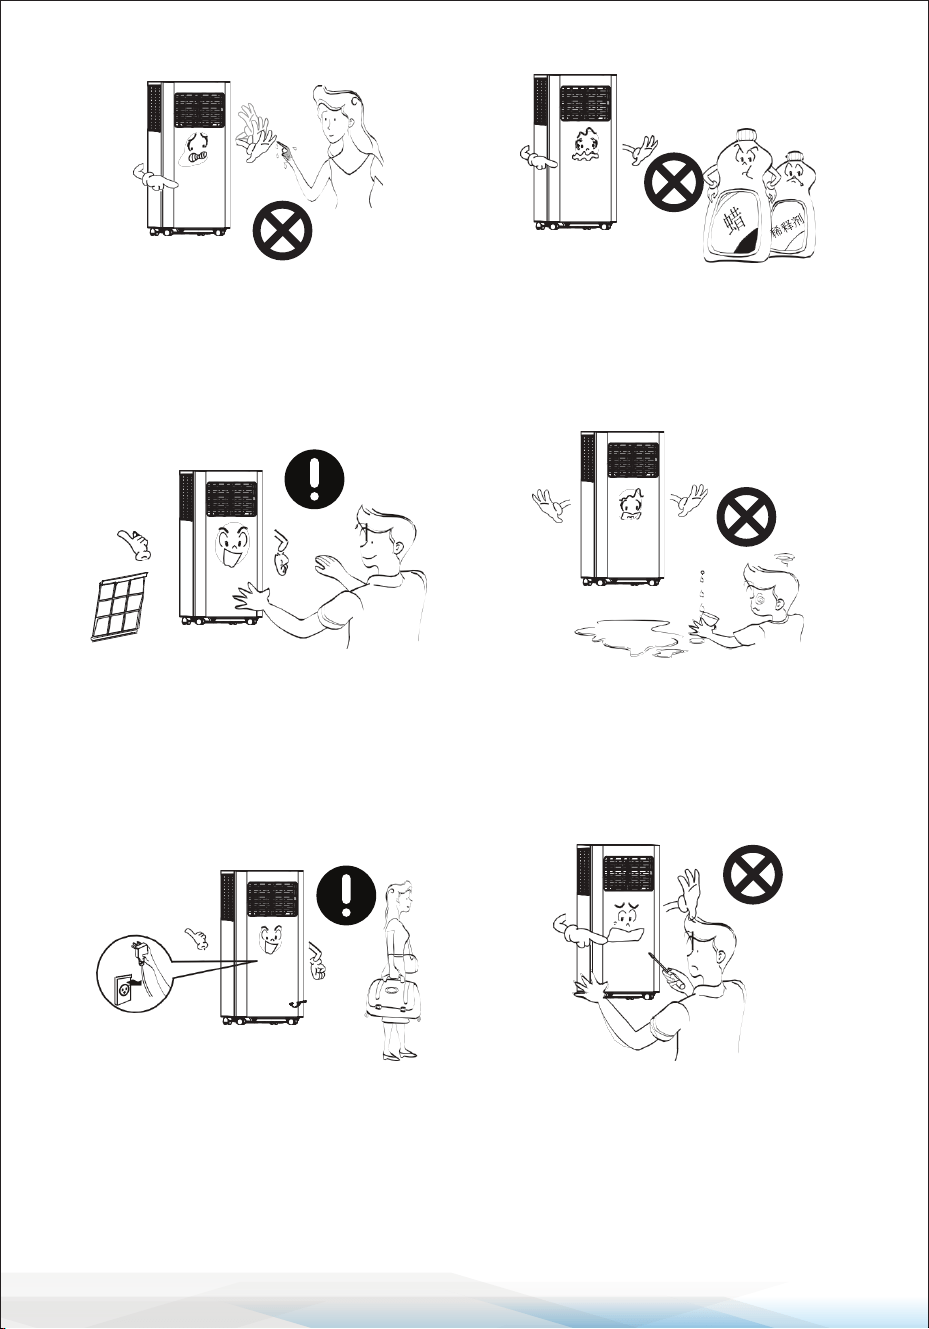
For household use only
For indoor use only;
please place the A/C in a dry
environment.
In case of a blocked air
exchange, never stack any
items around the machine.
To avoid damages, never place
any heavy items on the machine.
www.SereneLifeHome.com
8
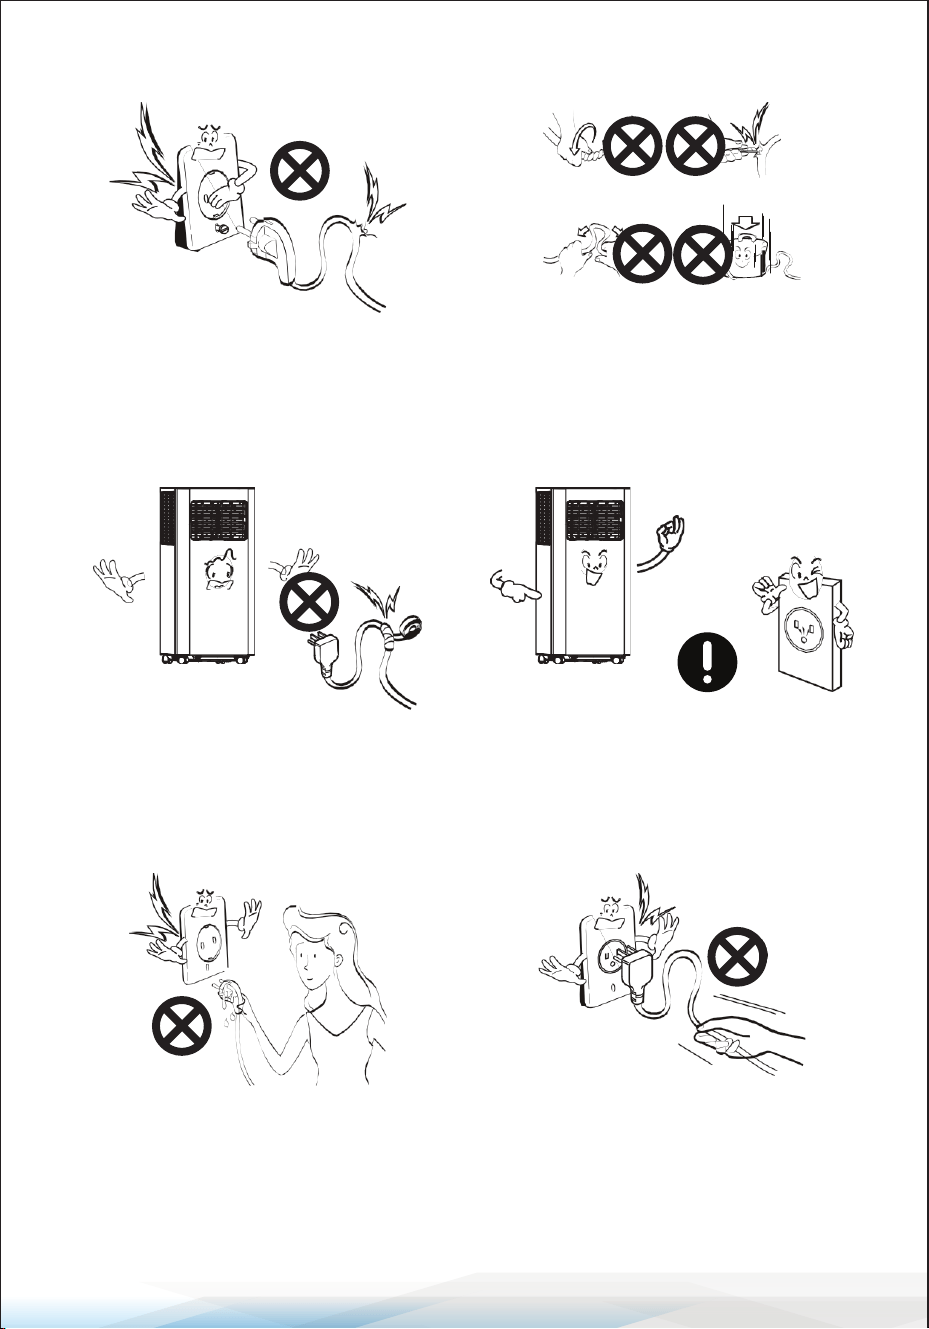
Do not operate the machine
with wet hands or in a humid
environment.
Please wipe the machine with a
soft cloth, instead of wax, diluent
or irritant detergent.
Clean the lter once every two
weeks
For your health, never drink
condensed water discharged
from the machine.
Please unplug the power cord,
if the machine will not be
used for a long time.
Non-professionals are not
allowed to dismantle or repair
the machine.
www.SereneLifeHome.com
9
SAFETY WARNINGS
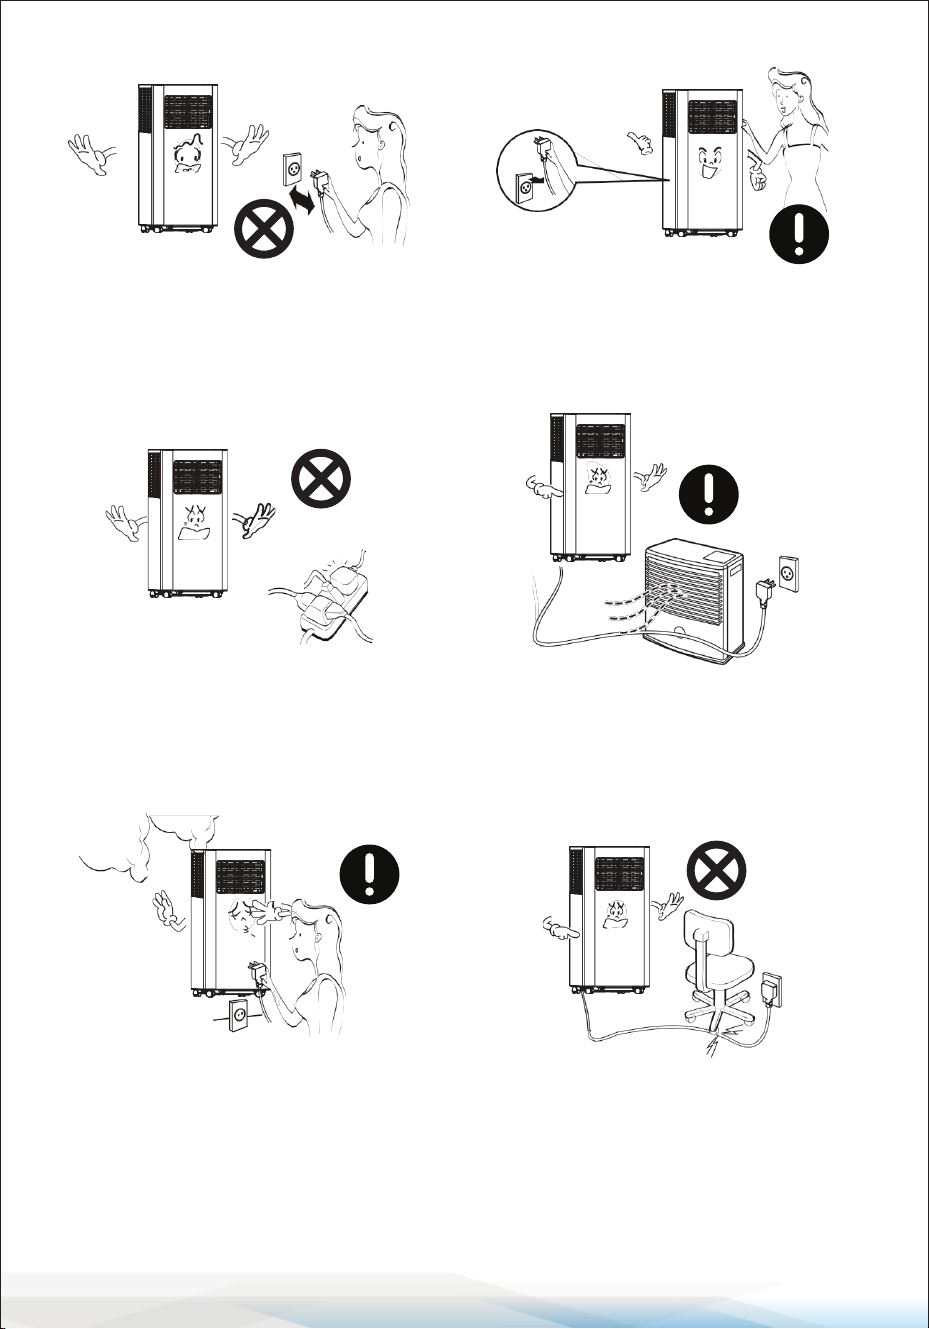
Damaged power cord or plug
shall not be used. Never plug
to a loose socket.
Never damage the power cord, or
use unlicensed power cord. Make
sure voltage is right.
Do not modify or extend the
power cord.
A grounded outlet is suggested
for the machine.
In case of electric shock, never
plug/unplug with wet hands.
To unplug, pull the plug end
instead of wires.
www.SereneLifeHome.com
10
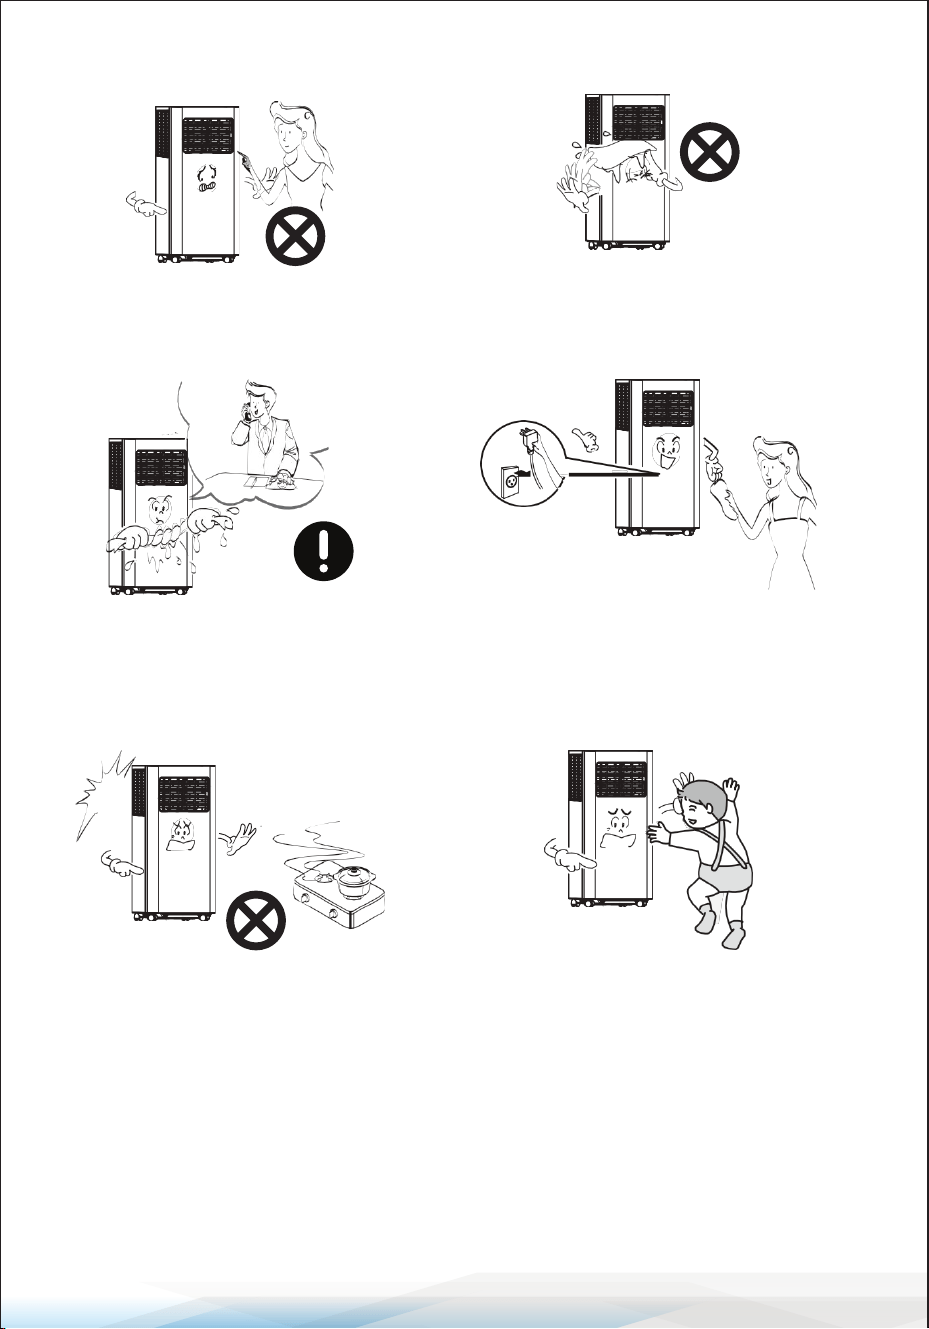
Never control on/o status by
directly plugging/unplugging.
Please turn o the machine
before unplugging.
Never overload the socket. Keep away from heat sources
or direct sunlight exposure.
If there is any actue noise,
smell or smoke, turn o and
unplug for diagnosis.
In case of electric shock, never
damage the power cord by
placing heavy objects on it.
www.SereneLifeHome.com
11
Never insert ngers or any
hard objects into the louver.
Keep electrical parts away from
water.
If water enters, turn o and unplug
in time; and call for check and
repair from a professional.
Please turn o and unplug before
wiping, cleaning or replacing
components.
If gas leakage happens, open the
window for ventilation before
plugging the machine.
The appliance can be used by
children of or above 8 years old and
persons with reduced physical,
sensory or phycological capabilities,
if they have been given supervision
and instruction concerning proper
use and hazards of the appliance.
www.SereneLifeHome.com
12
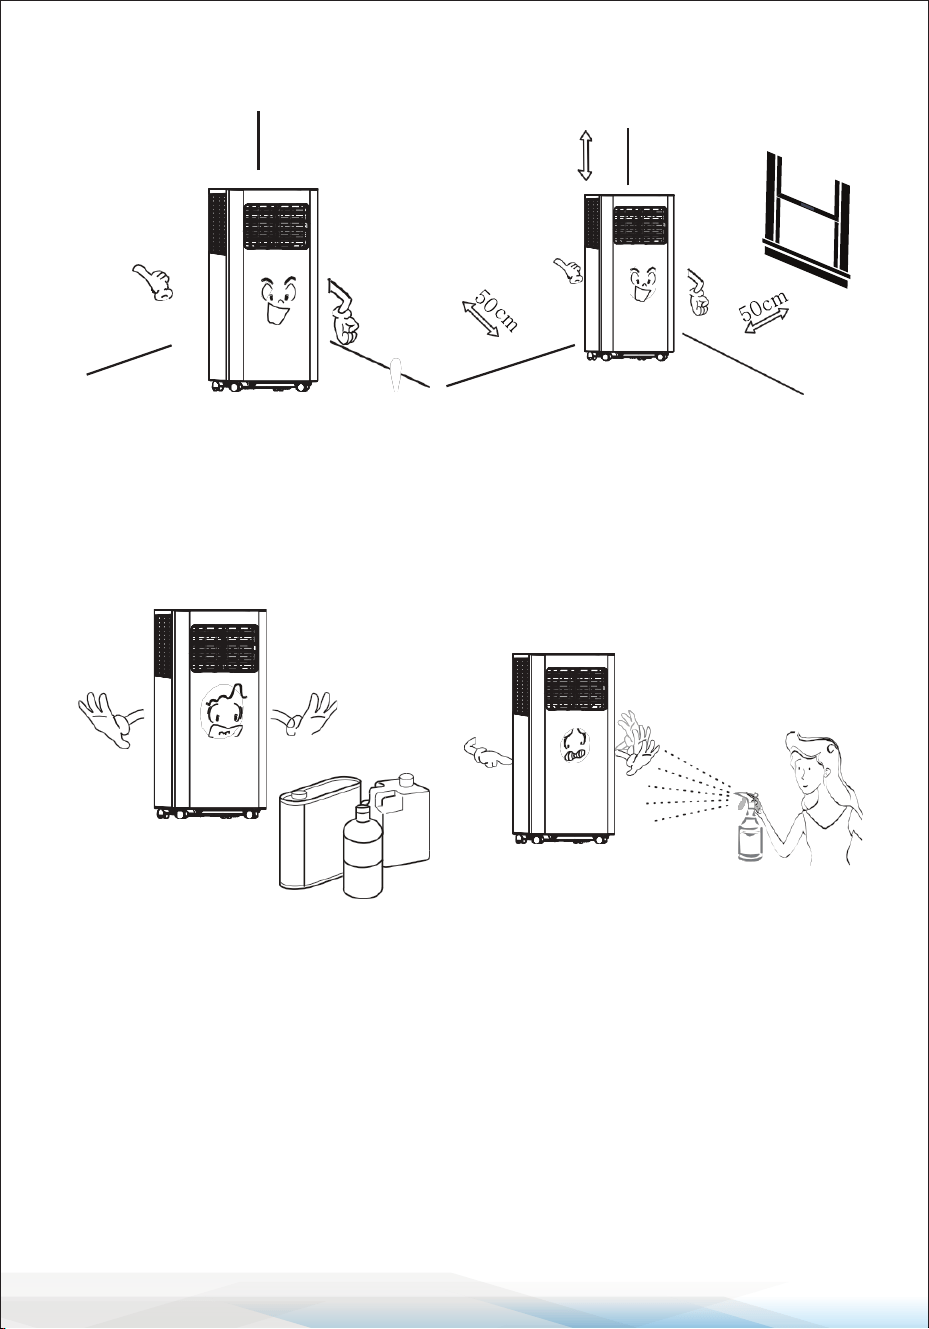
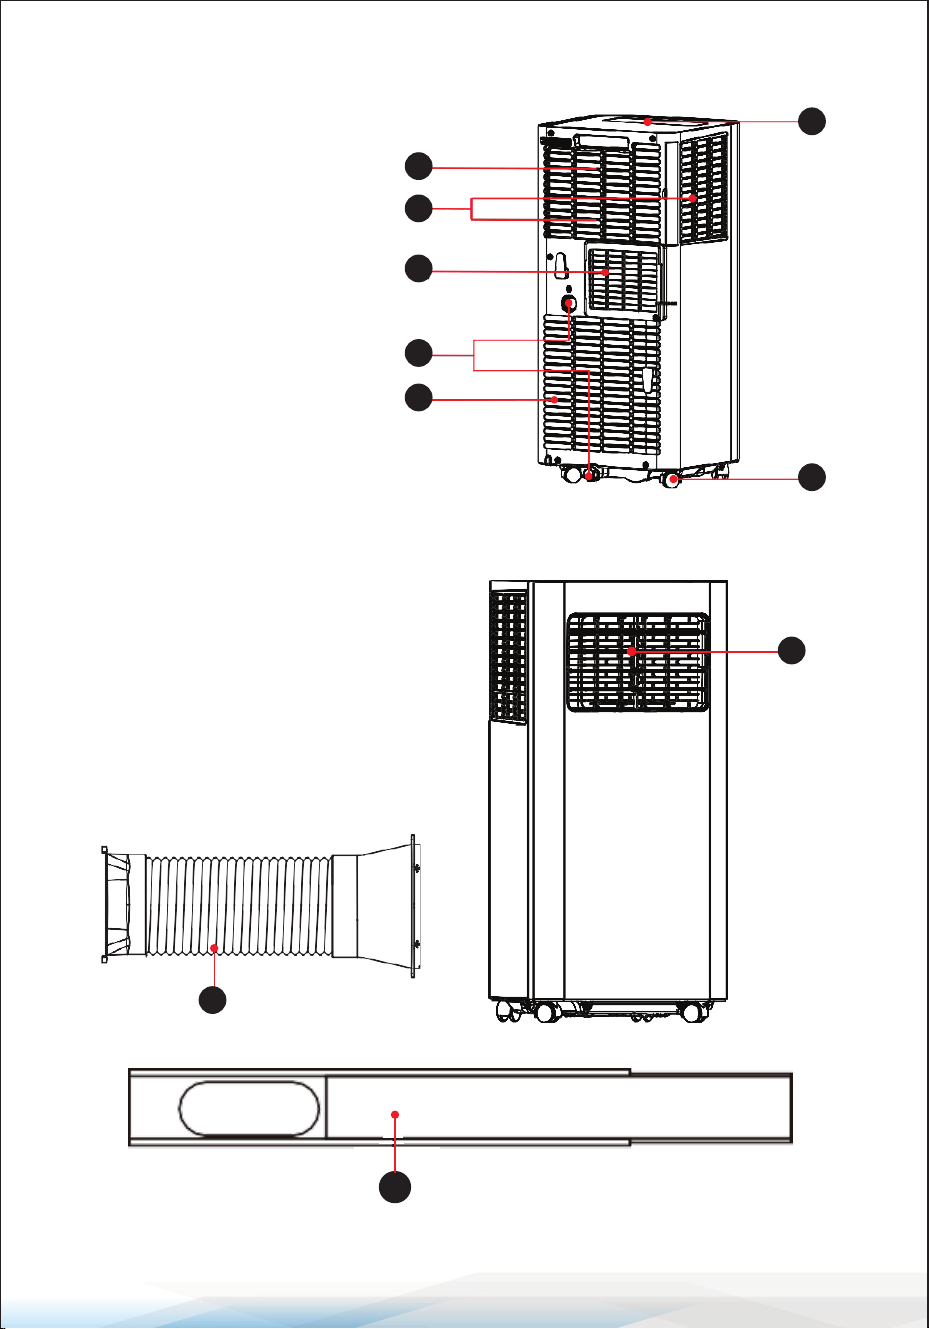
For a proper work of compressor,
place the machine vertically on
an even ground.
For a proper ventilation, keep
the machine at least 50cm from
objects nearby.
Never use the appliance near
gasoline or other ammable
objects.
Keep the appliance from spraying
agent or any solvent,or plastics
may deform and electrical parts
may even be damaged.
50cm
TIPS
www.SereneLifeHome.com
13
PRODUCT OVERVIEW
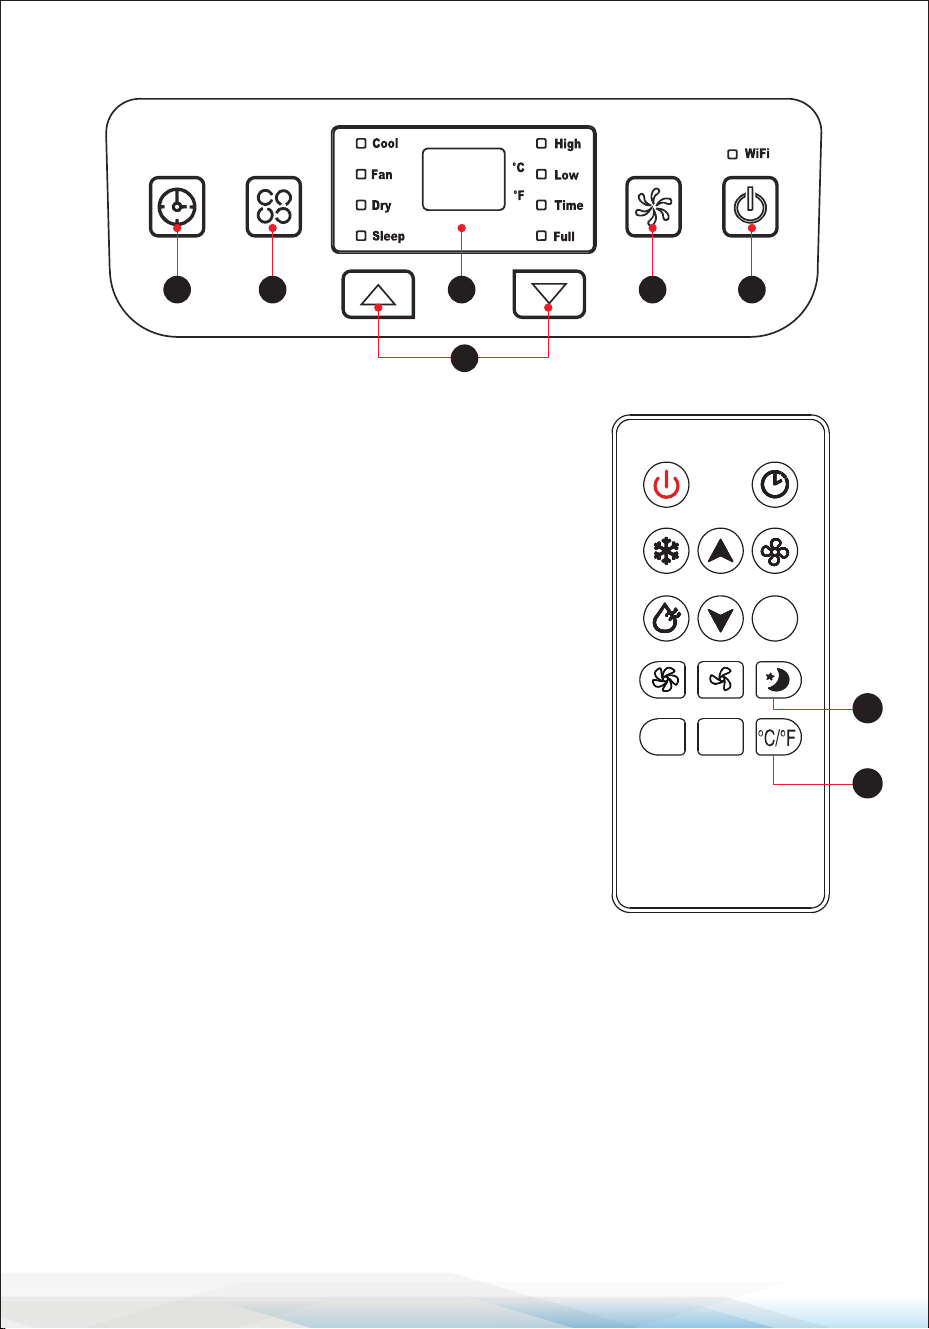
Main Components
1. Handle
2. Air Inlet Grille (Up)
3. Control Panel
4. Casters
5. Louver
6. Air Outlet Grille
7. Drainage Hole
8. Air Inlet Grille (Down)
9. Air Exhaust Duct Assembly
10. Window Sealing Kit
9
3
4
1
2
6
7
8
3
4
5
5
10
9
www.SereneLifeHome.com
14
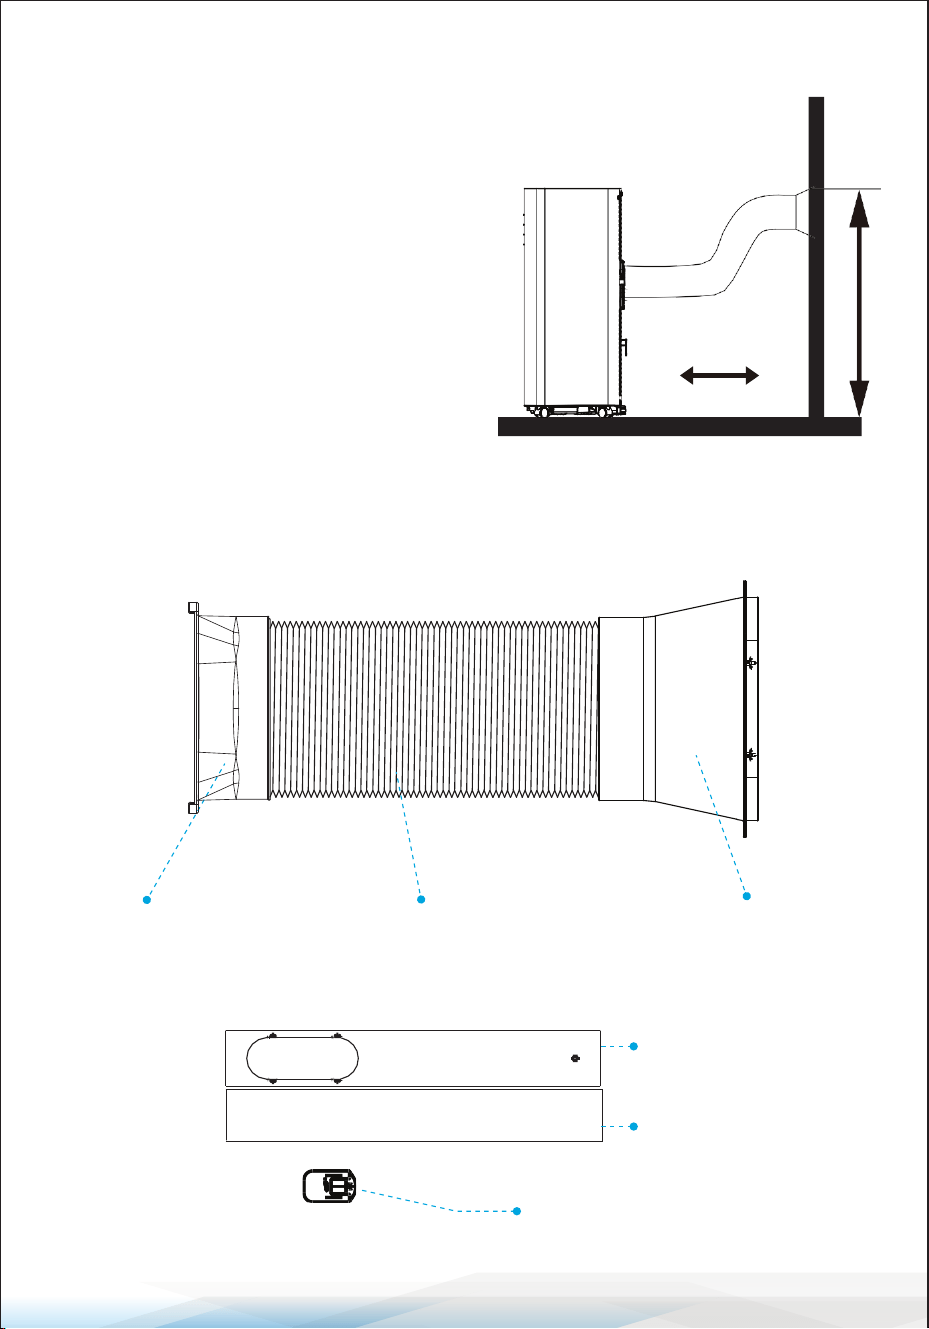
1. Power Button
Press the button to turn the device ON or OFF.
2. Fan Speed Button
Press this button to select either high or low
fan speed.
3. UP/Down Button for Temperature and Timer
• Temperature Adjustment: When in cooling
mode, press these buttons to increase or
decrease the set temperature.
• Timer Setting: When in timer mode, press
these buttons to set the timer for turning the
device on or o.
• Temperature Unit Switch: Press both buttons
simultaneously to toggle between Celsius (°C)
and Fahrenheit (°F).
4. Mode Button
Press this button to switch between dierent
modes: cooling, fan, and dry.
CONTROL PANEL AND REMOTE CONTROL
5. Timer Button
• Standby Mode: Press to set the timer for turning the device on.
• On Mode: Press to set the timer for turning the device o.
6. Temperature and Timer Display
This window shows the current temperature setting or the timer setting.
7. Temperature Switch Button
Use this button to switch the temperature display between Celsius (°C) and
Fahrenheit (°F).
8. Sleep button
Press this button to activate or deactivate the sleep mode.
5 4 6 2 1
10
8
7
www.SereneLifeHome.com
15
OPERATION
Place & Install
Place
• Positioning: Place the machine on a
horizontal oor surface near a window to
ensure proper ventilation.
• Clearance: Maintain at least 50 cm
(approximately 20 inches) of clearance
around the appliance from any nearby
objects for optimal performance and
airow.
Install
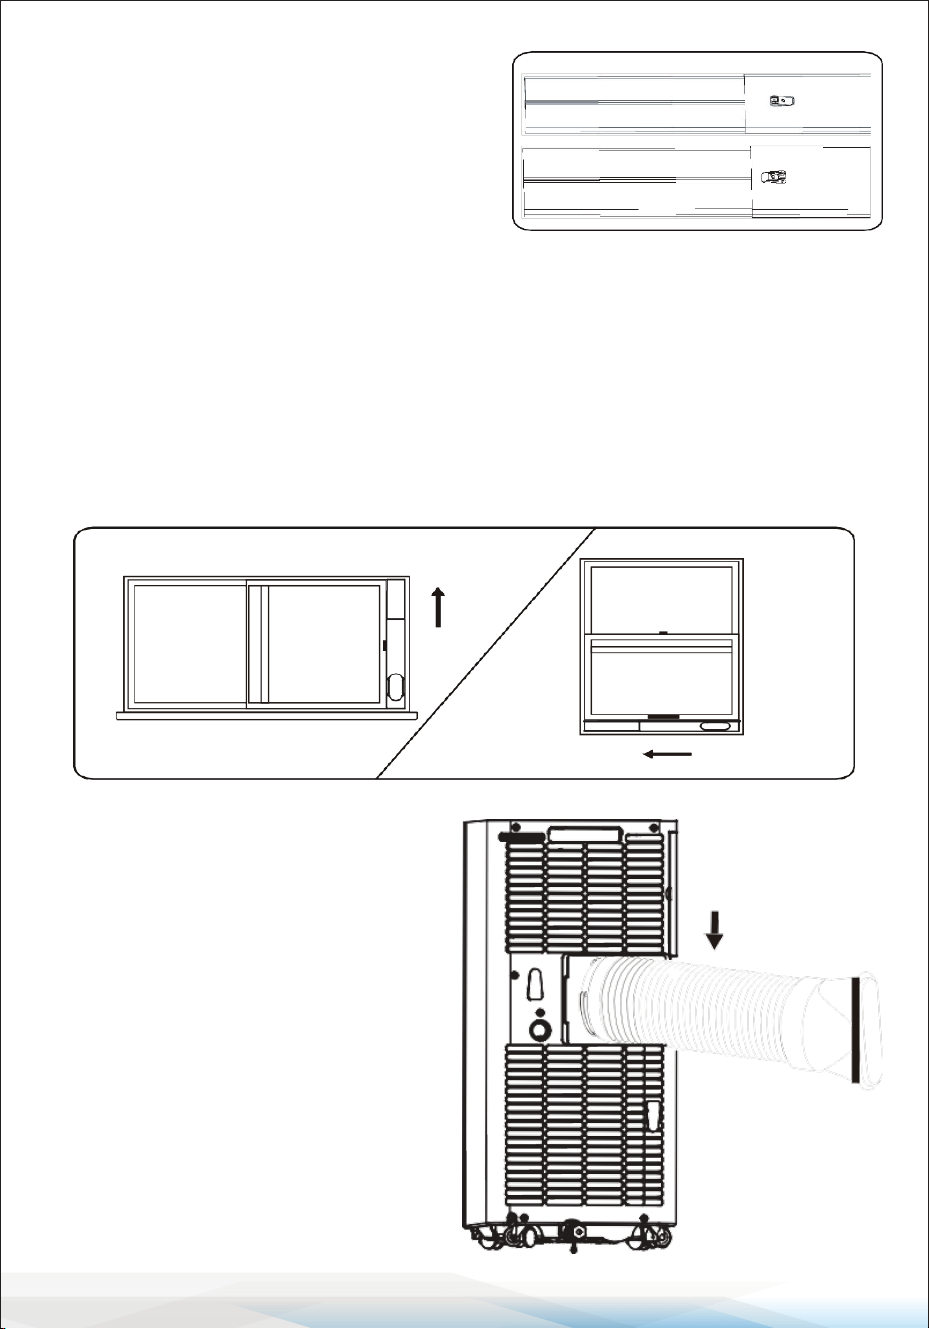
Air Exhaust Duct Assembly
9
Best Install
50cm
90cm
Connector Air exhaust duct Flat nozzle
Clip-xture Type
Plate #1
Plate #2
Clip
www.SereneLifeHome.com
16
Step 1: Adjust the Clip Fixture
1. Measure Window Size: Measure the
dimensions of the window where the
exhaust will be installed.
2. Adjust Plate Length: Adjust the length
of the exhaust plate to match the
measured window size.
3. Lock the Plate: Secure the length of the plate by locking it into place to ensure
it ts the window opening properly.
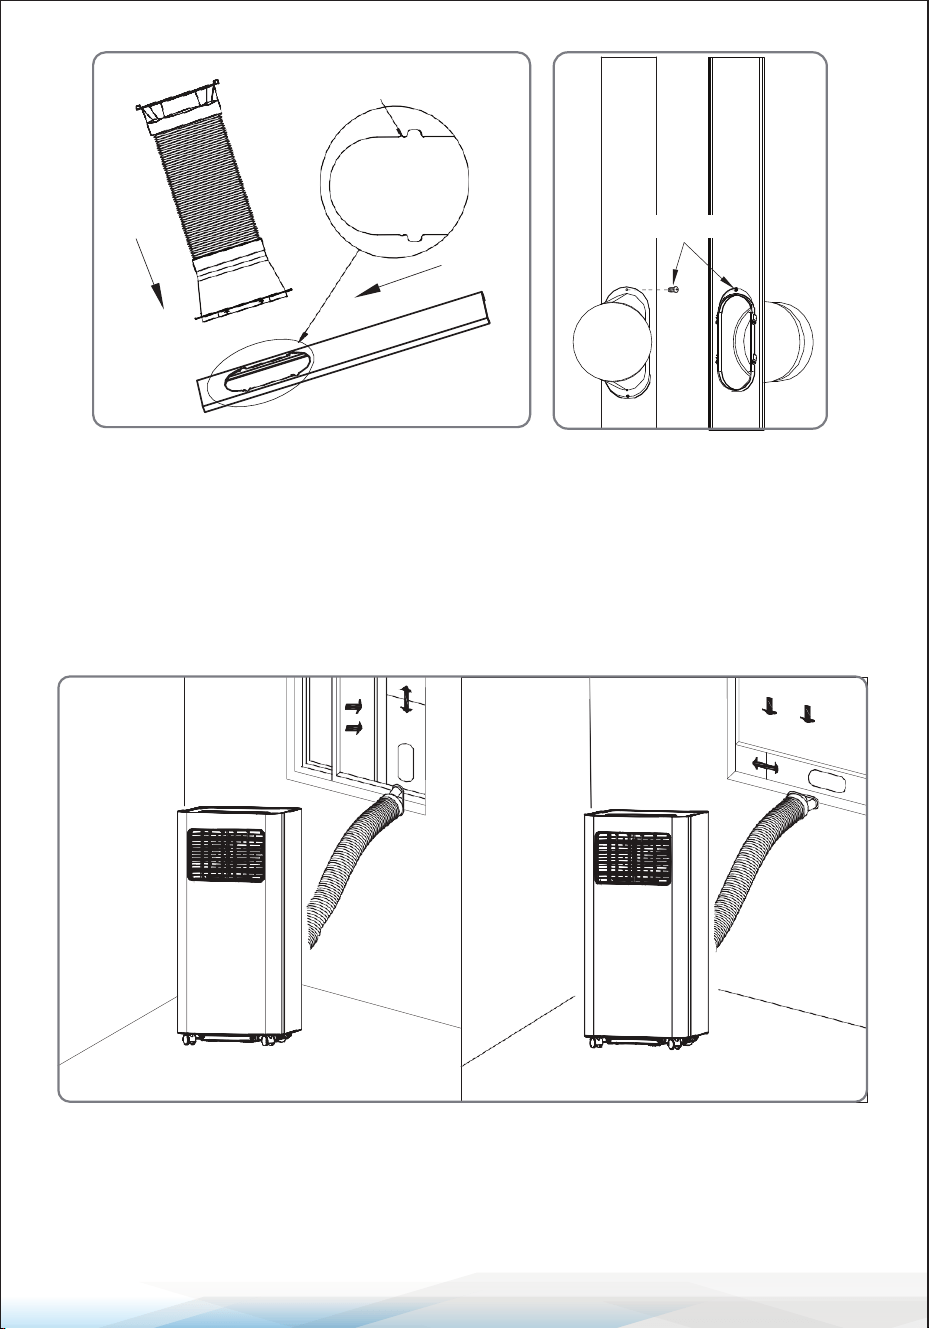
Step 2: Secure the Plate
Fix to Window: Attach the exhaust plate to the window securely, ensuring there
are no gaps or loose ttings.
Step 3: Attach Exhaust Pipe
Connect Pipe: Swirl the exhaust pipe
assembly (exhaust tting end) into the
rear panel outlet by turning it
counterclockwise until it is rmly
connected.
www.SereneLifeHome.com
17
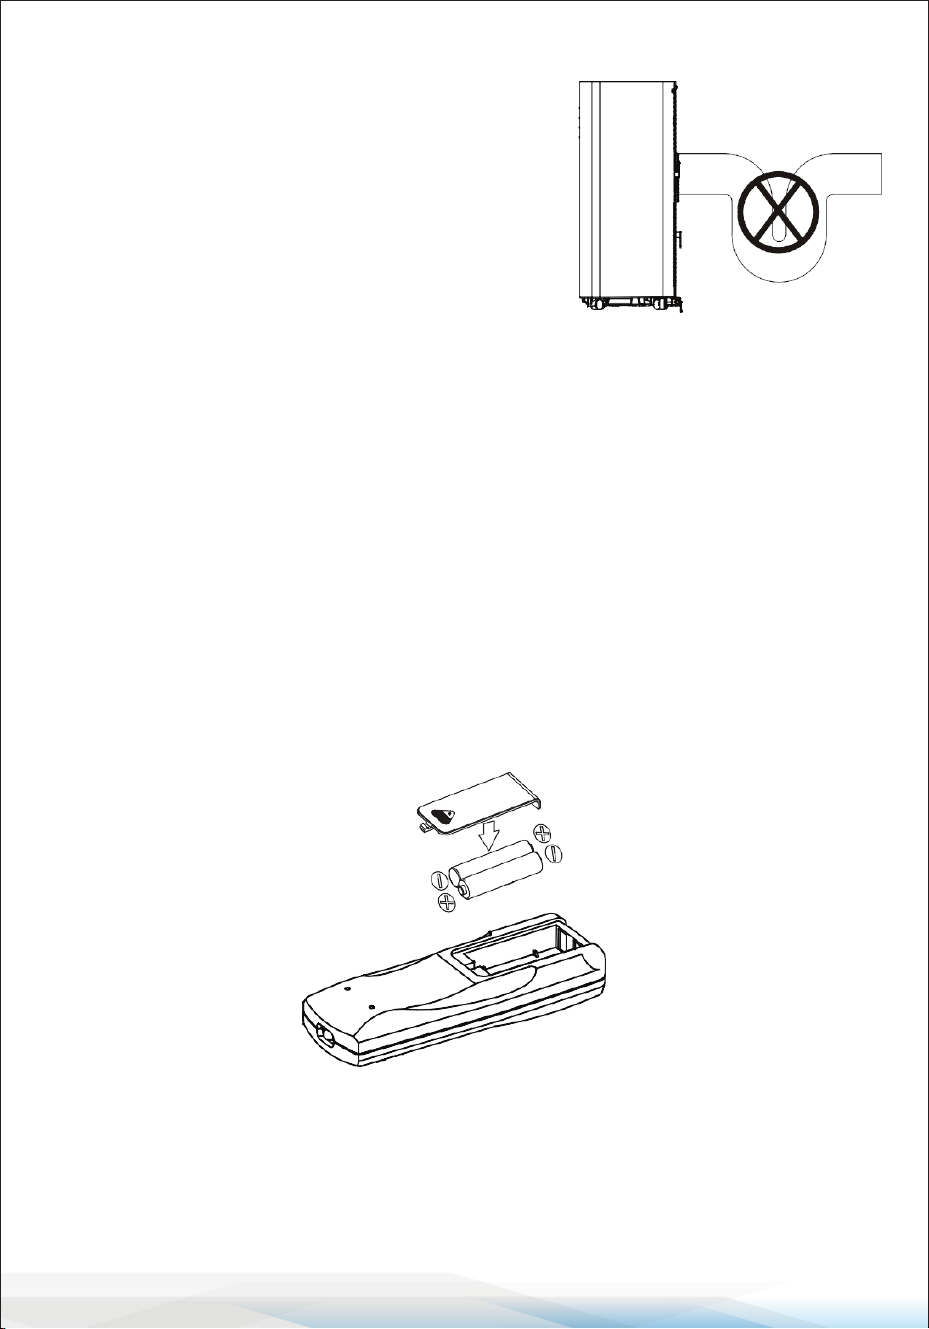
Step 4: Insert Exhaust Pipe
• Insert Pipe: Insert the exhaust pipe assembly (exhaust port end) into the window
seal panel assembly.
• Secure Connection: Screw the exhaust port end of the pipe into the window
seal panel assembly to ensure a secure and airtight connection.
Impression Drawing of Completion
9
screw
little breach
1.Plug in rst
2.Slide to buckle in
www.SereneLifeHome.com
18
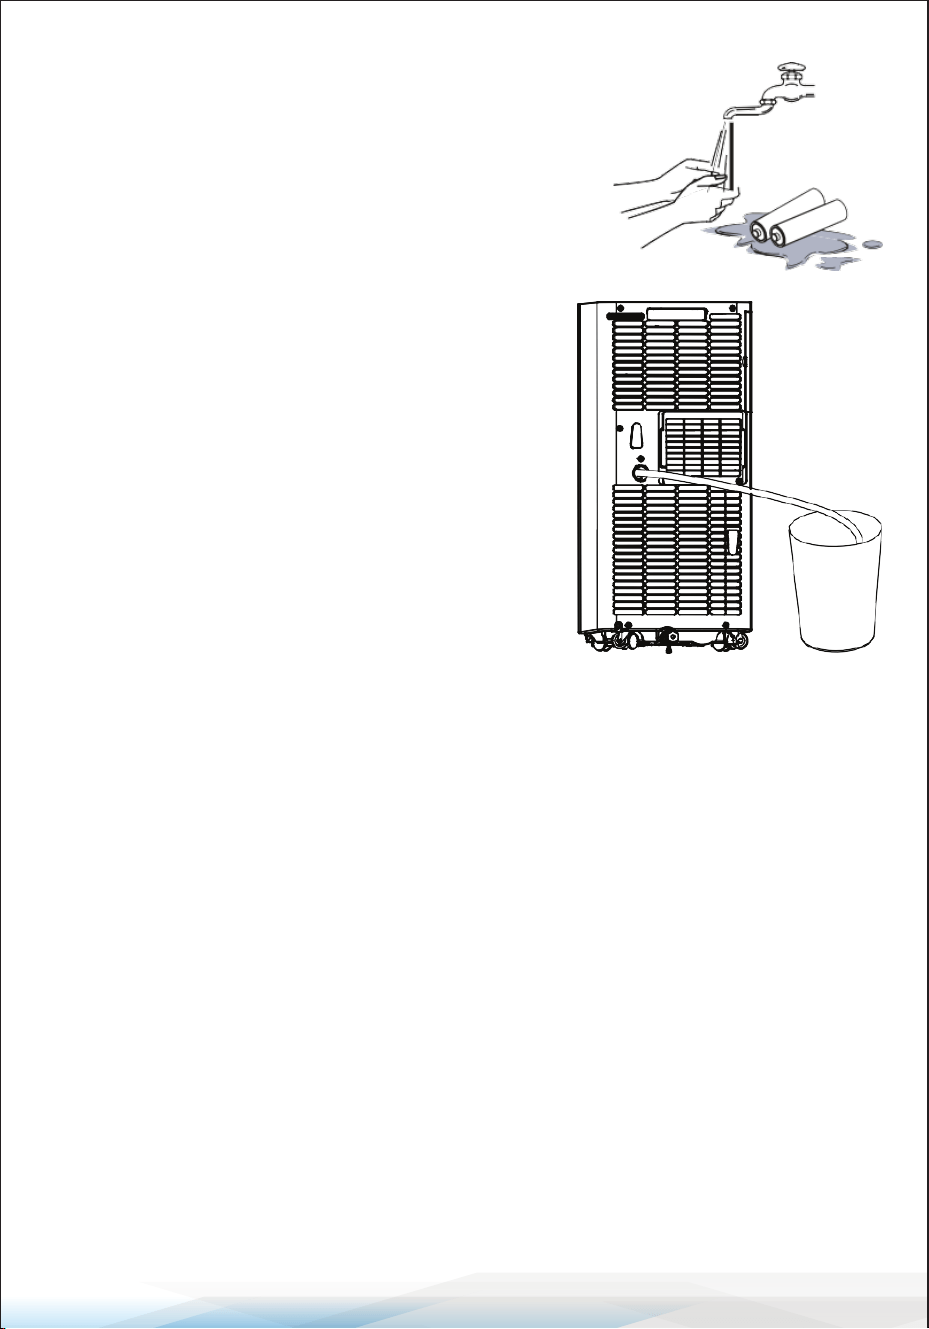
Correct Installation
• Smooth Duct: Ensure the exhaust duct is kept
smooth and free from sharp bends or kinks.
Incorrect installation can negatively impact the
performance of the air conditioner.
• Avoid Bends: Prevent sharp bending in the
exhaust duct to allow for smooth airow.
• Dedicated Duct: Use only the exhaust duct
provided with this model.
Do not replace or lengthen it, as this may cause the appliance to malfunction.
Notice:
The air exhaust duct can stretch up to 1500 mm (approximately 59 inches).
For optimal performance, keep the duct as short as possible to avoid bending.
REMOTE CONTROL
Battery Installation:
Step 1: Slide to open the battery cover on the back of the remote control.
Step 2: Insert 2 new AAA (DC 1.5V) batteries, ensuring correct polarity (+ and -).
Step 3: Fit the batteries in place and close the battery cover.
Warning:
1. Use only AAA DC 1.5V batteries. Do not use rechargeable or other types of
batteries.
2. Replace both batteries simultaneously. Do not mix new and old batteries.
3. Remove the batteries if the appliance will not be used for an extended period.
www.SereneLifeHome.com
19
Safety Notice:
1. Avoid using leaked batteries.
2. Chemicals from batteries can cause burns or other
health hazards. Rinse with clean water if contact
occurs, and seek medical attention if swallowed.
HOW TO OPERATE
Cooling Mode
• Indicator: The cooling indicator will light up.
• Temperature Setting: Adjustable between 60°F
and 86°F.
• Fan Speed: Press the Fan Speed Button to toggle
between low and high fan speeds.
Fan Mode
• Indicator: The fan mode indicator will light up.
• Fan Speed: Press the Fan Speed Button to toggle
between low and high fan speeds.
• Temperature: Cannot be adjusted in this mode.
Dry Mode
• Indicator: The dry mode indicator will light up.
• Drainage: Remove the water plug, insert one end of the pipe into the drainage
hose, and place the other end in a water tank or channel.
• Operation: If ambient temperature is ≥17°C (62°F), the compressor will start.
If ≤15°C (59°F), the compressor will stop. There is a 3-minute delay for compressor
protection.
• Fan Speed: Runs at a xed low speed.
• Temperature: Is xed and cannot be adjusted.
Notes: For best performance in dry mode, remove the air exhaust duct.
Failure to do so may trigger the water full alarm “FL” to buzz.
Heating Mode (Not available for cooling-only models)
• Indicator: The heating indicator will light up.
• Temperature Setting: Adjustable between 16°C and 30°C (60°F and 86°F).
• Fan Speed: Press the Fan Speed Button to toggle between low and high fan
speeds.
9
www.SereneLifeHome.com
20
TIMER MODE
• Standby Mode: Press the Timer button to set the ON time. Use the UP/DOWN
buttons to set a range from 0 to 24 hours. The timer indicator will light up.
• Running Mode: Press the Timer button to set the OFF time. Use the UP/DOWN
buttons to set a range from 0 to 24 hours. The timer indicator will light up.
WIFI OPERATION INSTRUCTION
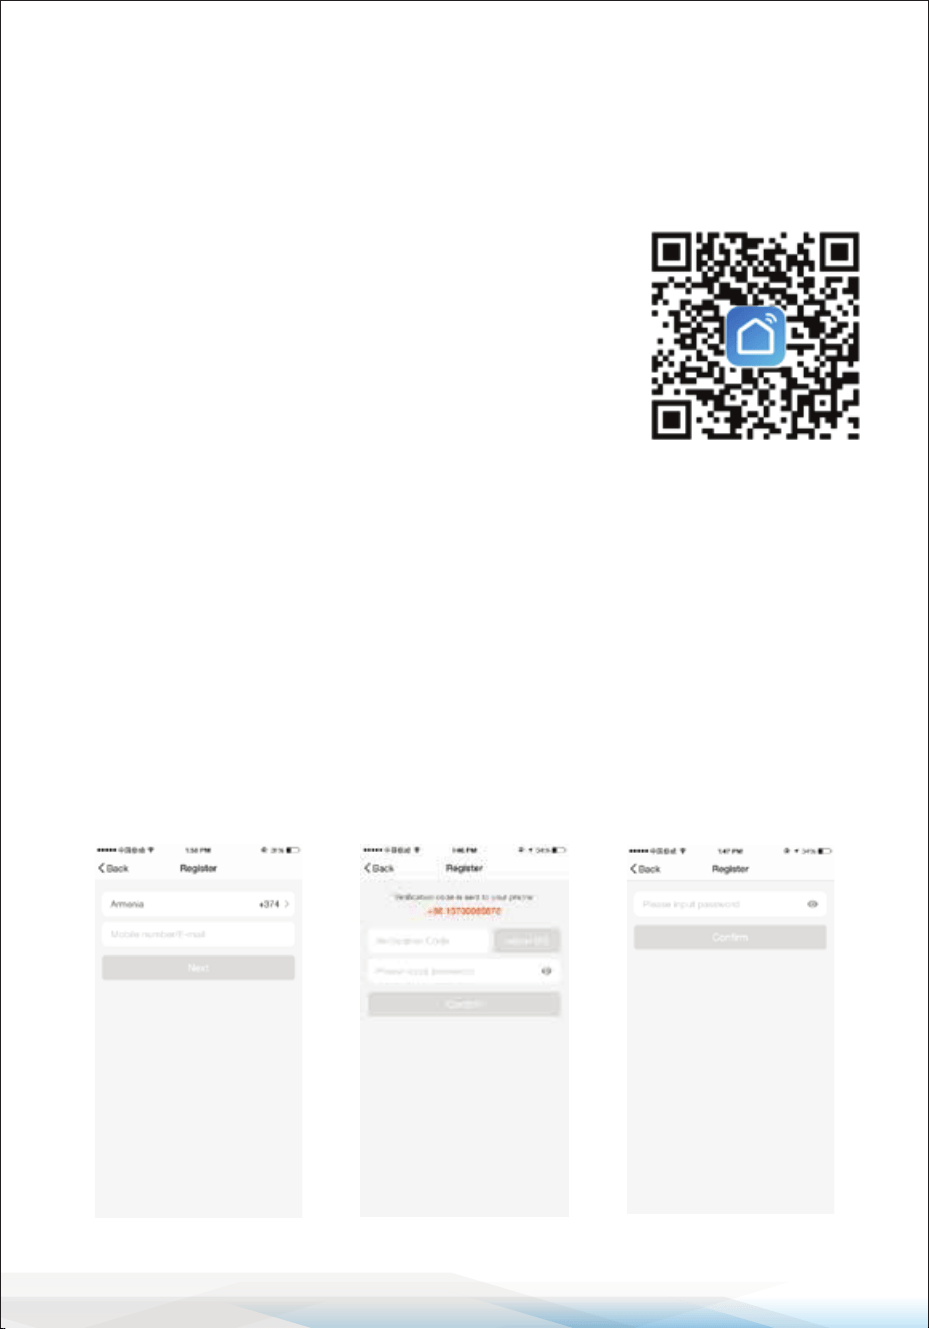
Download and Install the App
Scan QR Code: Use your phone to scan the QR code
below or search “Smart Life” in the application market
to download and install the App.
Registration
1. Register an Account:
• If you don't have an account: Open the App and tap to enter the registration
page.
• Select Country/Area: The system will automatically recognize your country/
area. Alternatively, you can select your country code manually.
• Enter Information: Enter your mobile number or email, then tap “Next.”
(Refer to Picture 1)
• Verication: If you entered a mobile number, a verication code will be sent
via SMS. Enter this code, create a password, and tap "Conrm" to complete
registration. (Refer to Picture 2)
• Email Registration: If using email, enter your password and tap "Conrm" to
complete registration. (Refer to Picture 4)
Picture 1
Picture 2
Picture 3
www.SereneLifeHome.com
21
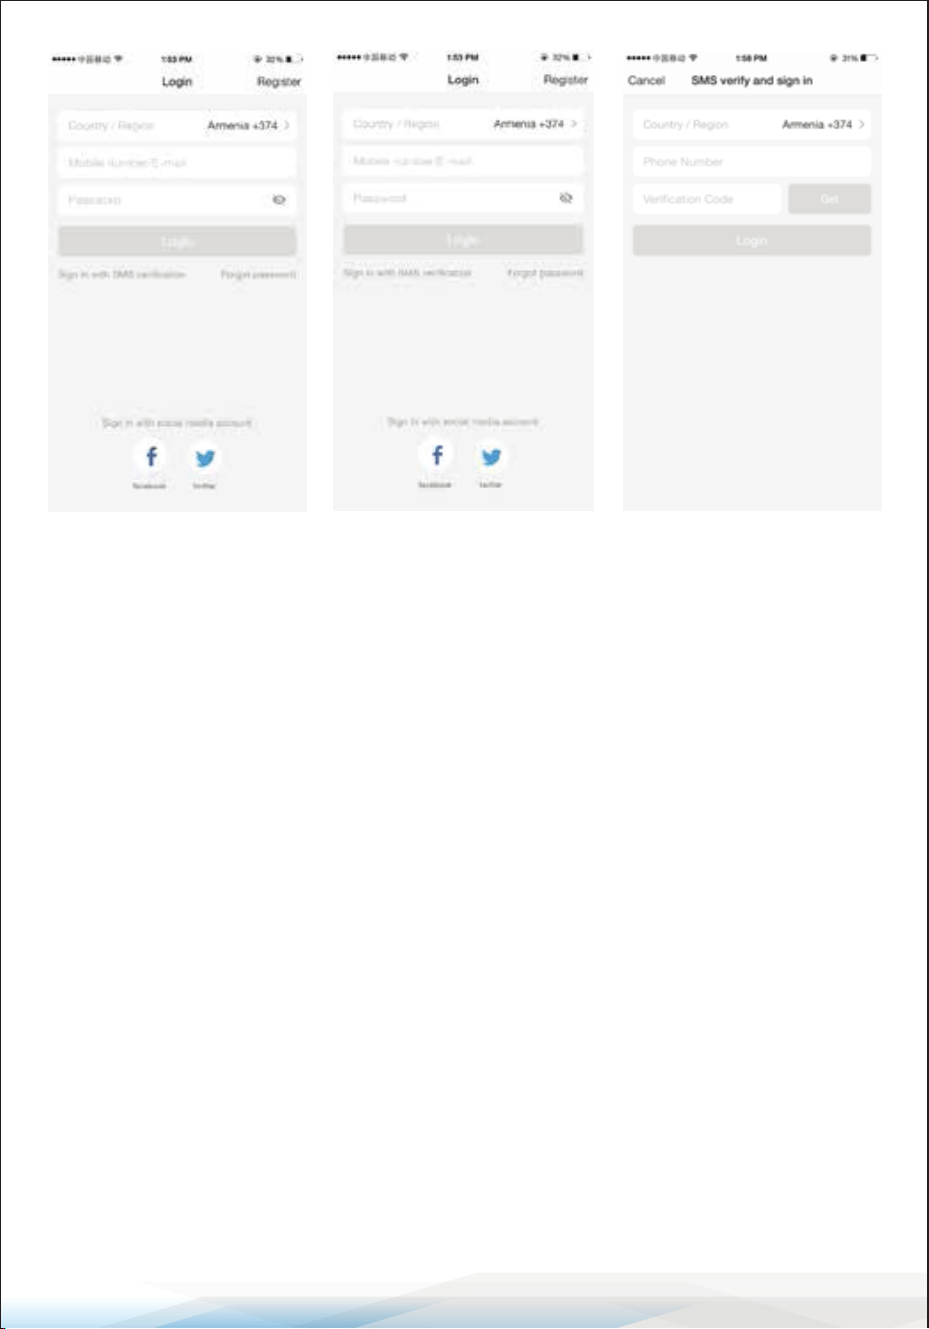
Sign In
Standard Login:
Enter your registered mobile number or email and password to log in.
Social Media Login:
If you have Facebook or Twitter installed, tap the corresponding icons and
authenticate through your social network.
SMS Verication Login:
• Tap “Sign in with SMS verication.” The system will recognize your country/area.
• Enter your mobile number, tap “Get” to receive an SMS verication code, enter
the code, and tap “Login” to access the App.
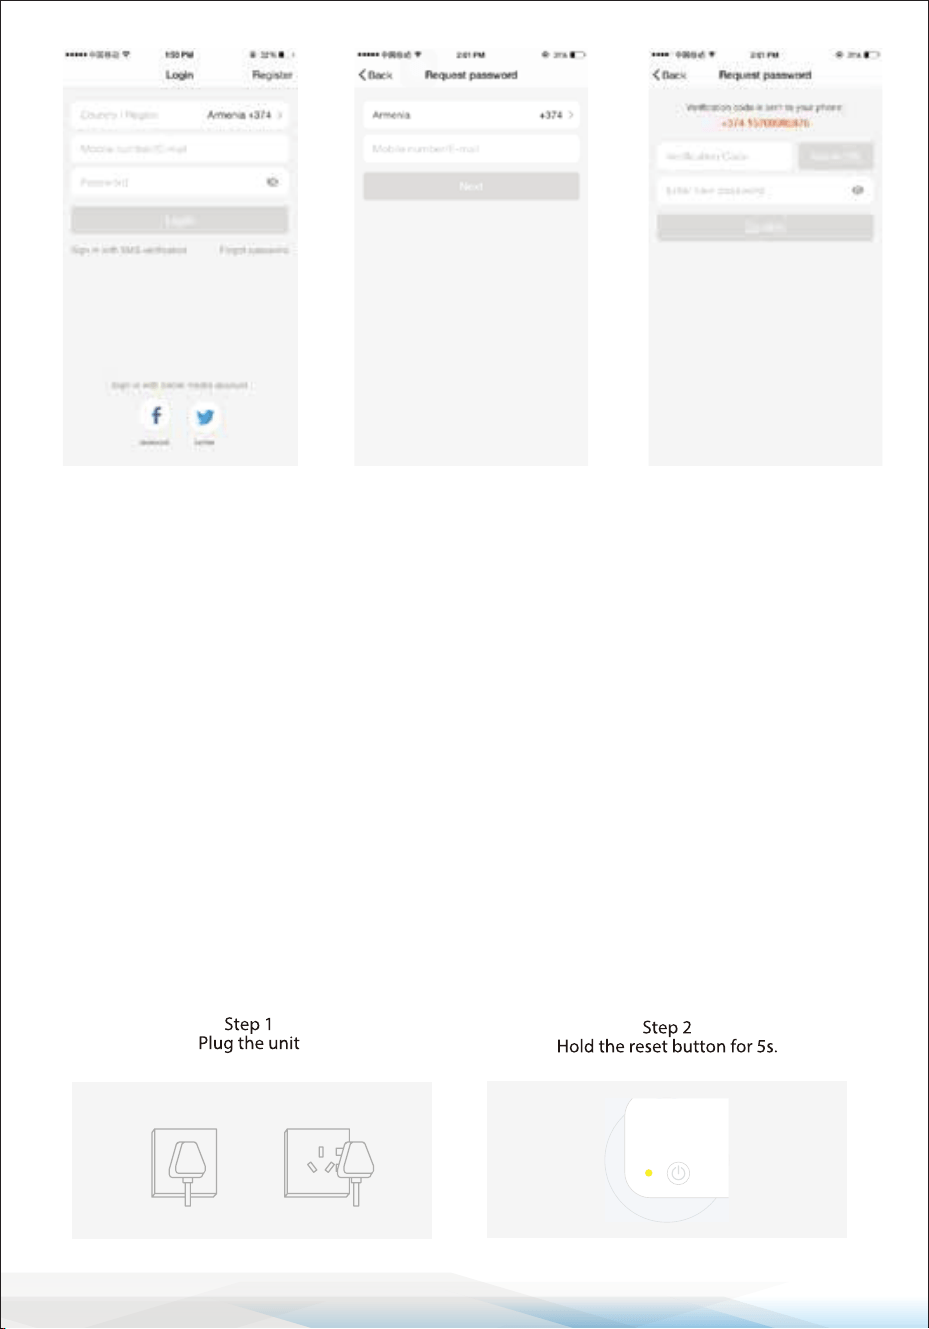
Forgot Password
Reset Password:
• Tap "Forgot password." Select your country code, enter your mobile number or
email, and tap “Next.”
• Enter the verication code sent via SMS or email, create a new password, and tap
"Conrm."
9
www.SereneLifeHome.com
22
Connect Device
1. Preparation: Plug in the Portable Air Conditioner (PAC). Ensure the unit is in
standby mode. Do not turn on the unit until the WiFi connection is established.
2. Enter WiFi Mode: Activate WiFi Connection: Press the SPEED button for 3
seconds to enter WiFi connect mode. (The SPEED button also serves as the reset
button.)
3. App Connection:
• Add Device: Open the App, tap the ‘+’ icon in the upper right corner to enter
the network connection page. (Refer to Picture 4)
• Connection Methods: Choose between Normal mode (default) and AP mode.
Tap the upper right corner to switch between methods if needed.
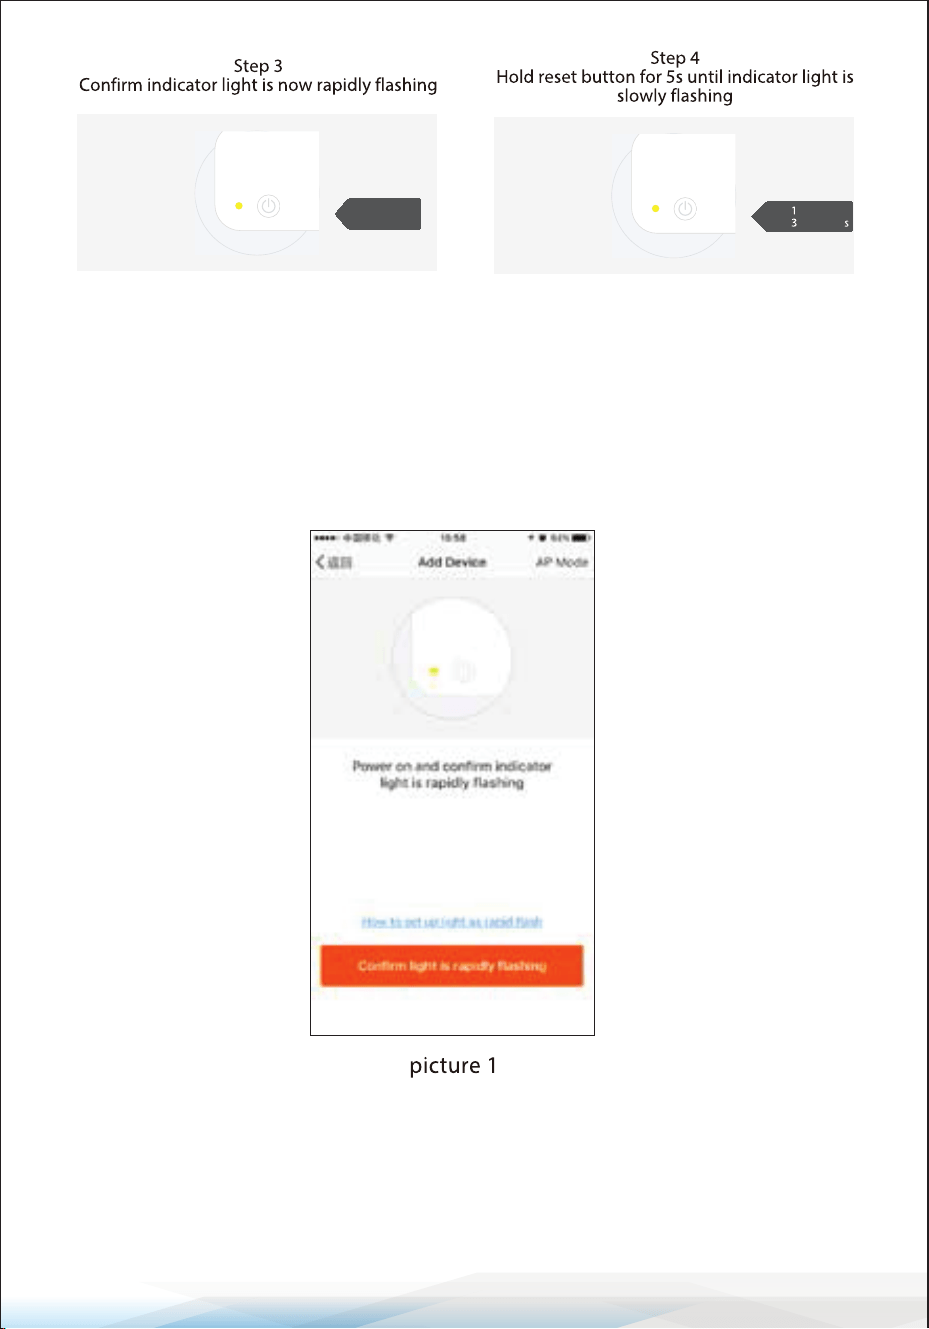
Notes: How to set indicator light as rapid ashing (normal mode) or slowly
ashing (AP mode).
Picture 1 Picture 2 Picture 3
www.SereneLifeHome.com
23
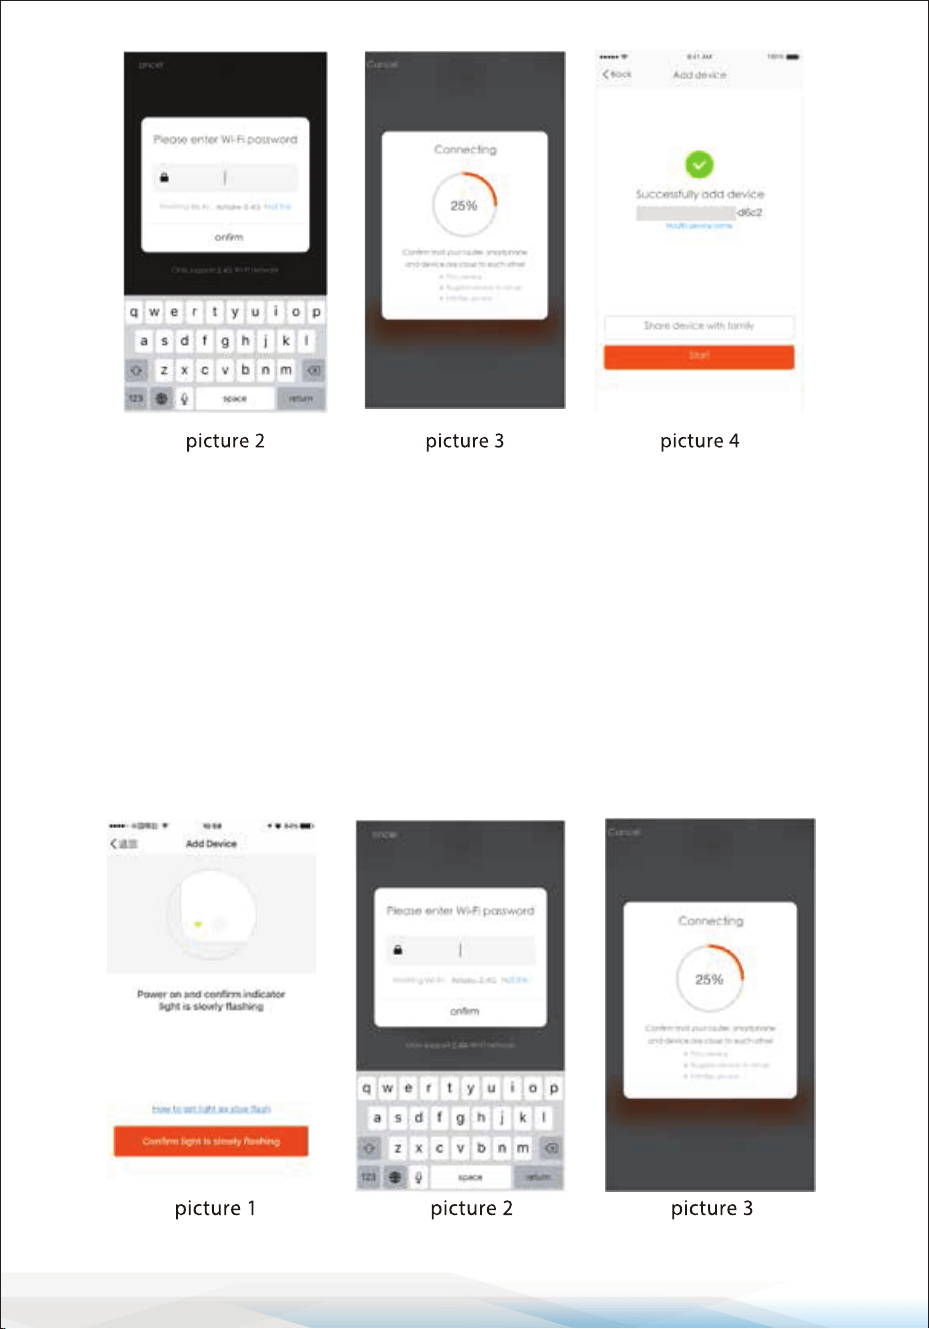
Normal Mode
1. Rapid Flashing: Ensure the device’s indicator light is rapidly ashing (2 times
per second). Tap to proceed to the next step. (Refer to Picture 1)
2. WiFi Selection: Select the WiFi network your device will use, enter the pass
word, and tap “Conrm” to begin network connection. (Refer to Picture 2)
3. Connection Process: Follow the on-screen instructions as shown in Picture 3.
4. Successful Connection: Upon successful connection, the App will display the
connected device as shown in Picture 4.
9
www.SereneLifeHome.com
24
AP Mode
1. Slow Flashing: Ensure the device’s indicator light is slowly ashing (once every
3 seconds). Tap to proceed to the next step.
2. WiFi Selection: Select the WiFi network, enter the password, and tap “Conrm”
to begin the connection process. (Refer to Picture 2)
3. Hotspot Connection: Connect to the hotspot, return to the network connection
page, and complete the process as shown in Picture 3.
4. Successful Connection: The App will display the connected device as shown in
Picture 4.
www.SereneLifeHome.com
25
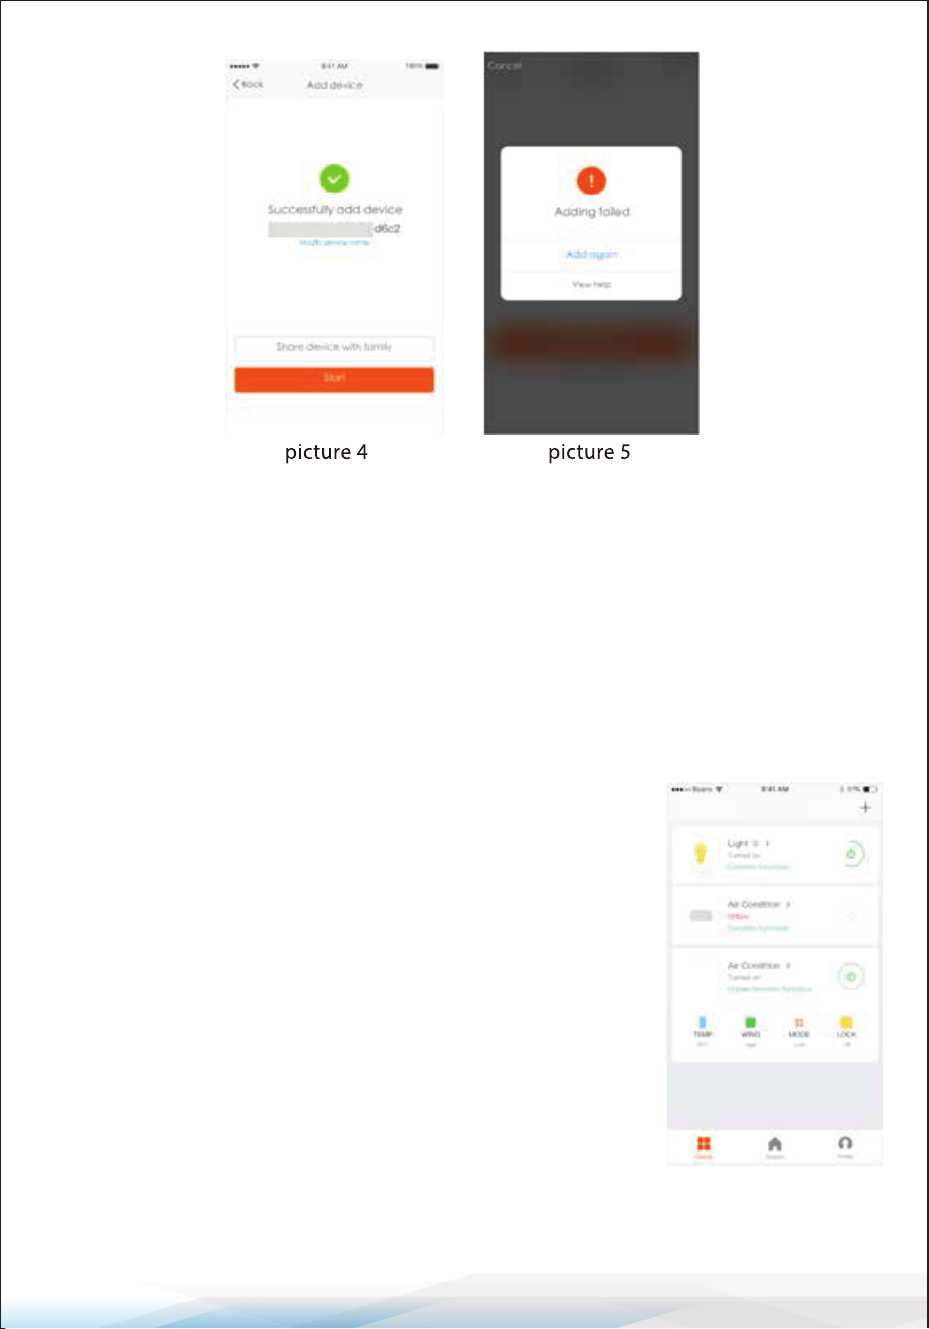
Connecting the Device Troubleshooting:
Failed Connection: If your App interface appears as shown in Picture 5, the network
connection has failed. Retry the connection or consult the help section for further
assistance.
Control Device
1. Access Control Page:
Congured Devices: After successfully conguring your
devices, they will appear on the home page.
Tap the device to access its control page.
Notes:
1. Online Devices: When the device is online, it supports
shortcut operations.
2. Oine Devices: Oine devices will display as “Oine”
and cannot be controlled.
9
www.SereneLifeHome.com
26
Smart Life Scenario
Automated Actions:
• Scenario Setup: Smart Life scenarios allow devices to
perform actions based on various conditions such as:
• Temperature
• Humidity
• Weather
• PM2.5 Levels
• Air Quality
• Sunrise & Sunset Times
• Device Actions (e.g., turn on/o)
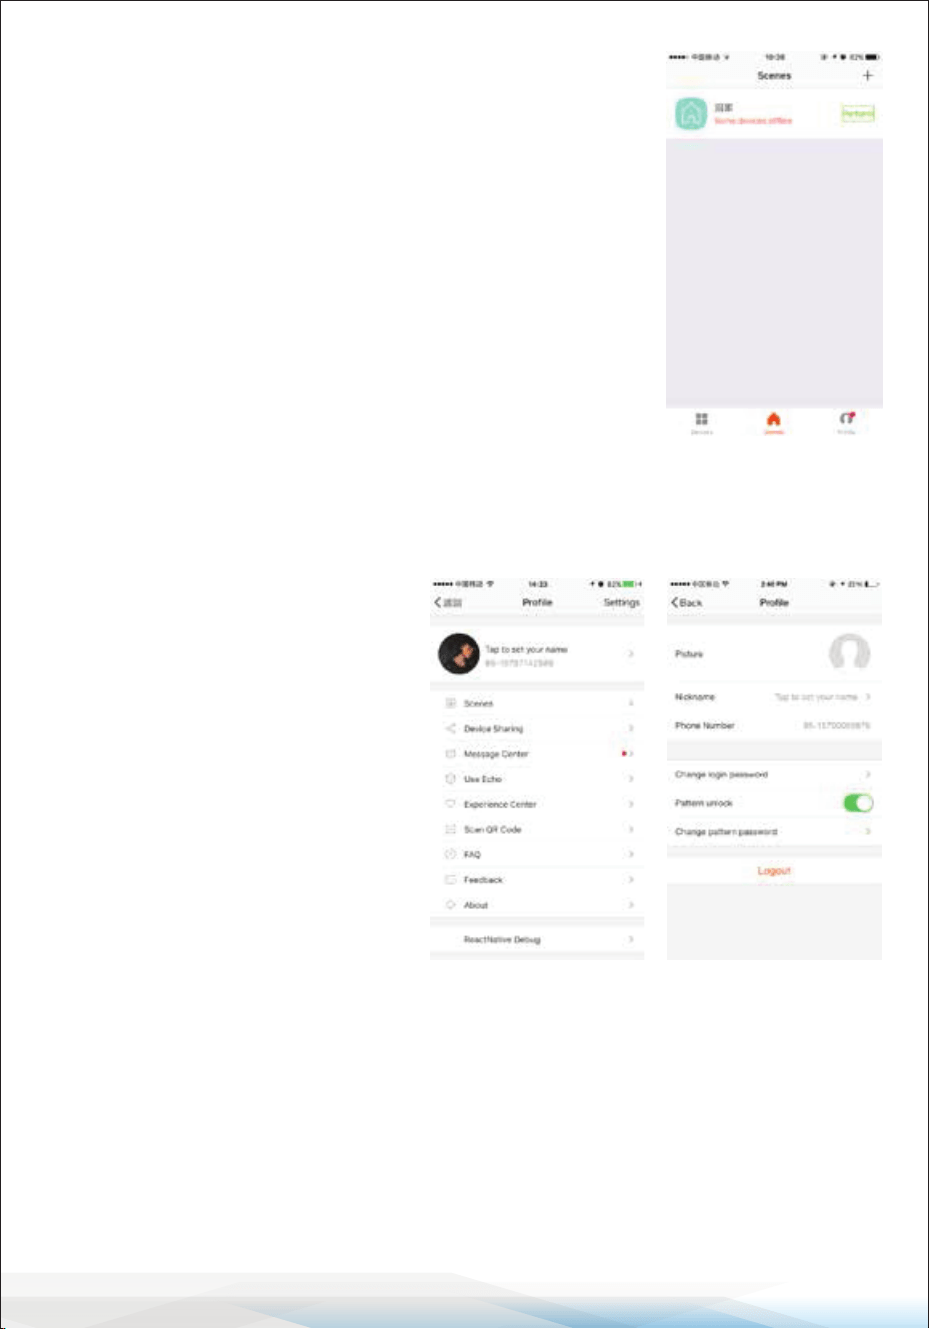
Personal Prole
1. Manage Information:
• Prole Page: This page allows
users to manage personal
information including:
• Personal Information
• Smart Life Scenarios
• Device Sharing
(manage shared devices)
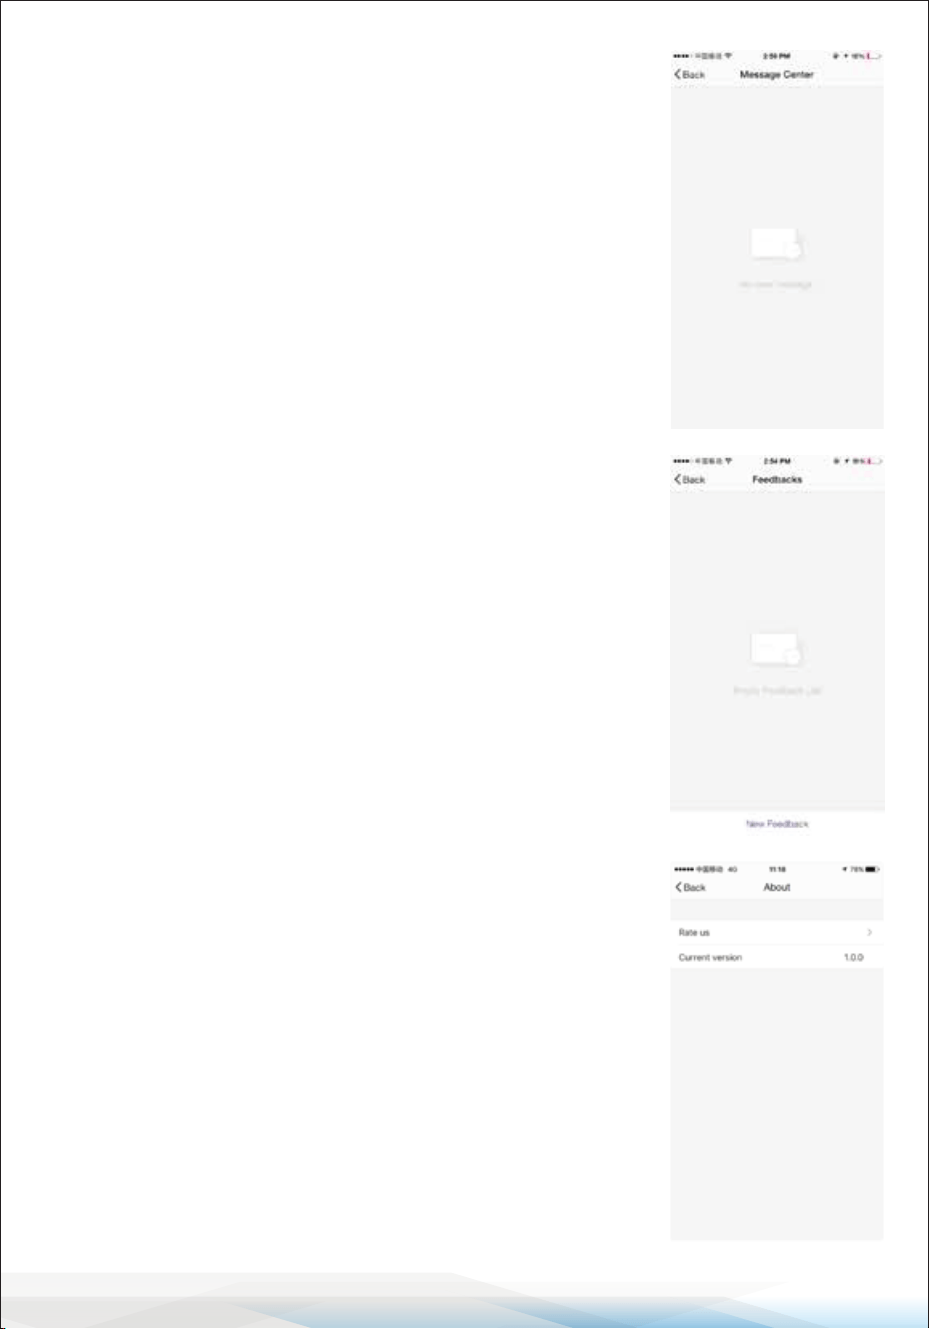
• Message Center
• FAQs
• Feedback Submission
• App Information and Version
www.SereneLifeHome.com
27
Prole Pattern Unlock:
Setup: Tap “Pattern Unlock” to set
your pattern. Once set, you will
need to enter the pattern to use the
App.
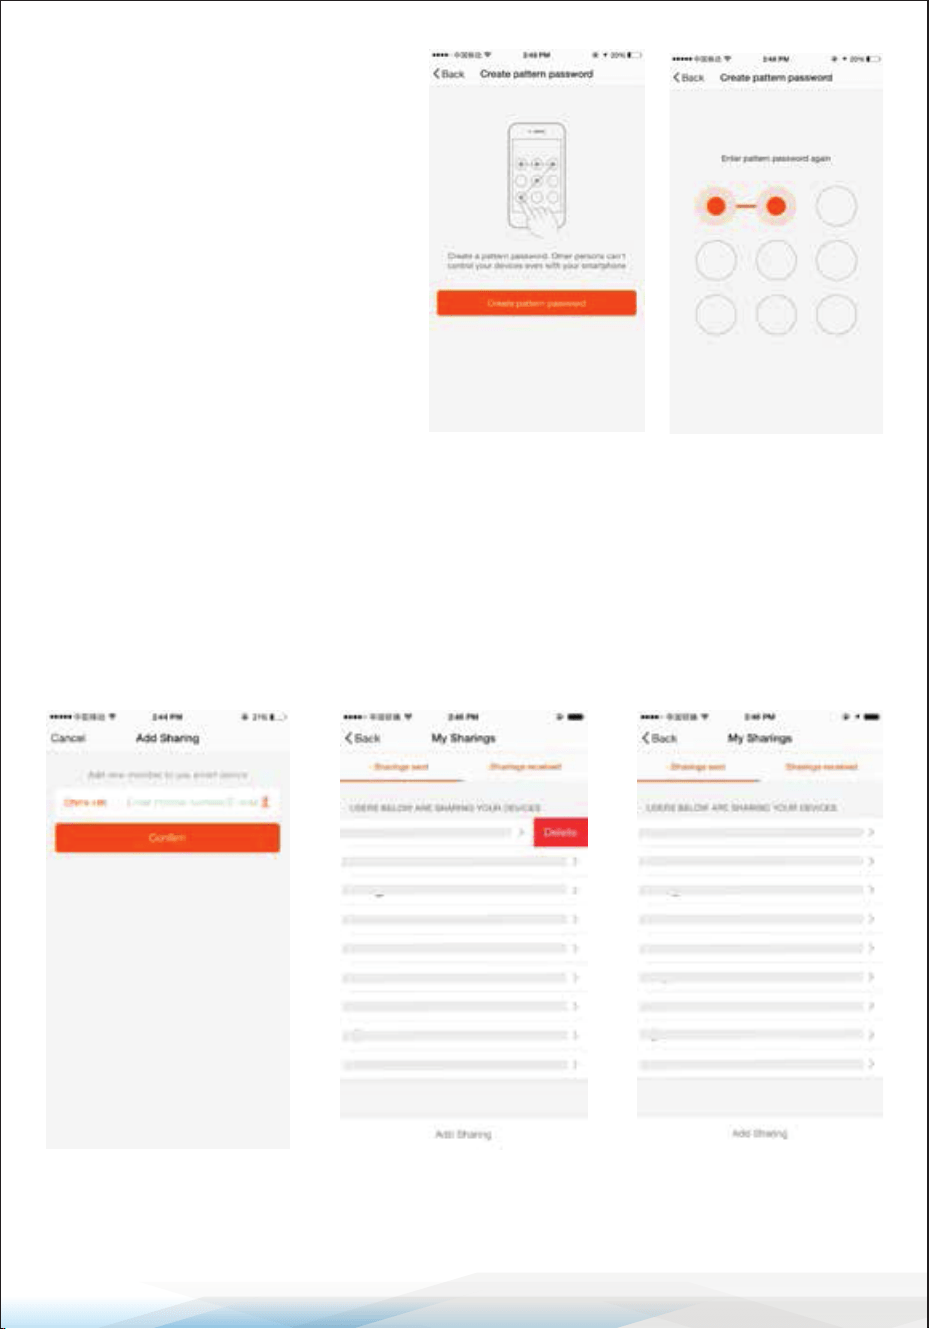
Prole Device Sharing:
Add Sharing: Input a new member’s mobile number to share the device with them.
Manage Sharing: View and manage shared devices, including deleting members
or shared access, by swiping left on the sharing list.
www.SereneLifeHome.com
28
Message Center
Notications:
The message center includes notications about new
devices and new sharing activities.
Feedback
Submit Feedback:
The feedback entry allows users to submit their feedback
directly through the App.
Additional App Information
Rate the App:
Tap on “rate us,” and the App will redirect to the
corresponding App market for you to leave a rating.
App Version: The App version number is displayed in the
“About” section.
Remark:
1. The pictures used in this WiFi section are from the iOS
app interface. The Android version may dier slightly.
2. Product and software updates occur periodically.
The features and interface in this manual are examples
and may change without additional notication.

www.SereneLifeHome.com
29
AMAZON ECHO OPERATION INSTRUCTION
1. What You Need to Get Started
Before using Echo to control your smart devices, ensure the following
conditions are met:
a. Stable Wi-Fi Network: Ensure the network can access Amazon servers.
b. Echo Device: Must have an Echo device (Echo, Echo Tap, or Echo Dot).
c. Amazon Account: You need an Amazon account.
d. Smart Life App: Ensure the Smart Life App is installed and you have an
account.
e. Smart Devices: Your devices should be compatible and added to the
Smart Life App.
2. Add Devices in Smart Life App
You can skip this part if you have already added devices to your Smart Life
account, and the device names are easily recognized.
2.1 Download Smart Life App: Refer to the previous instructions for
downloading the Smart Life App.
2.2 Register a Smart Life Account: Refer to the previous instructions for
registering and signing in.
2.3 Add Device and Rename: Sign in with your Smart Life account, add the device,
then rename it to an easily recognized name like “bedroom air conditioner.”
9
www.SereneLifeHome.com
30
3. Set Up Amazon Echo and Enable Smart Life Skill
You can congure Echo through the web or Alexa app.
Web Conguration Link: Alexa Conguration
http://alexa.amazon.com/spa/index.html
Download Alexa App: Search "Amazon Alexa" in the App Store or Google Play.
3.1 Set Up Echo with Alexa App
If Echo is not set up:
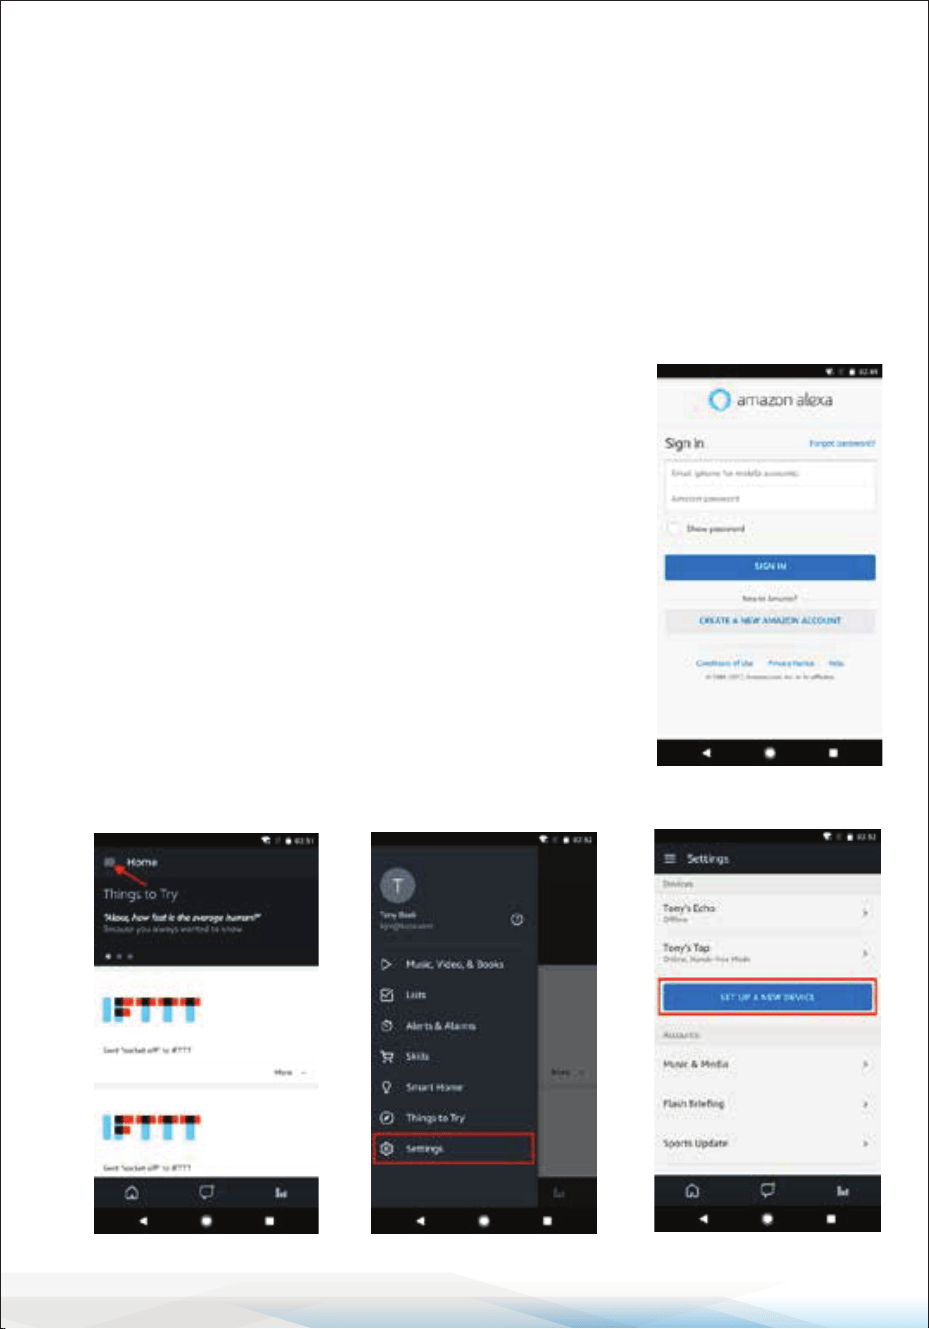
1. Power On Echo: Ensure your Echo device is
plugged in.
2. Open Alexa App: Tap the app icon on your mobile
device.
3. Sign In: Enter your Amazon account and password,
then tap "SIGN IN."
4. Setup Device: Tap the hamburger menu on the top
left corner, select "Settings," then tap
"SET UP A NEW DEVICE."
www.SereneLifeHome.com
31
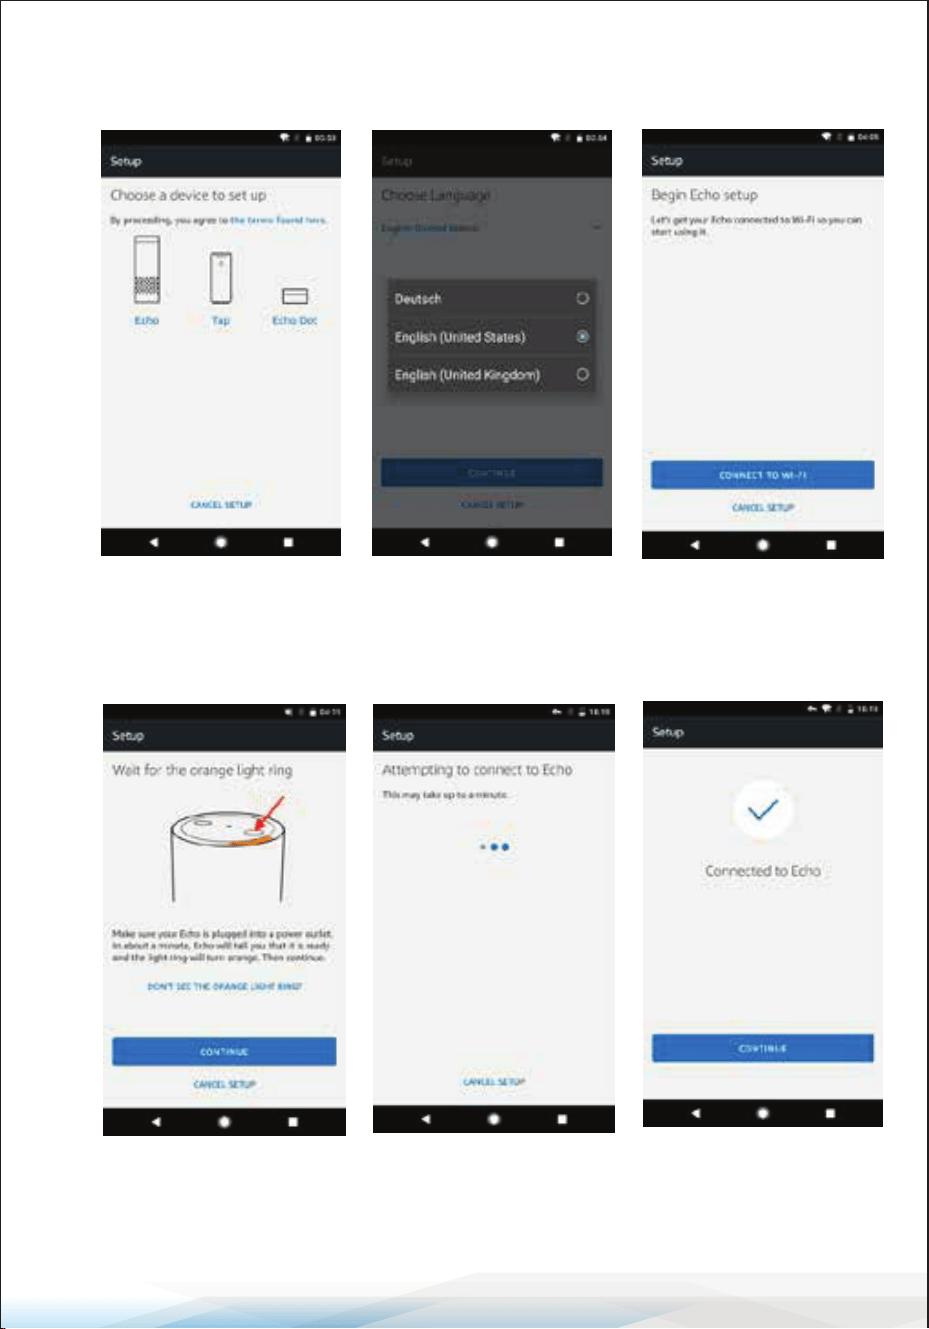
5. Select Model: Choose your Echo model, select the appropriate language,
and tap "CONNECT TO WI-FI."
6. Pair Echo: Press and hold the dot button on the Echo until the orange light
appears. Tap "CONTINUE."
9
www.SereneLifeHome.com
32
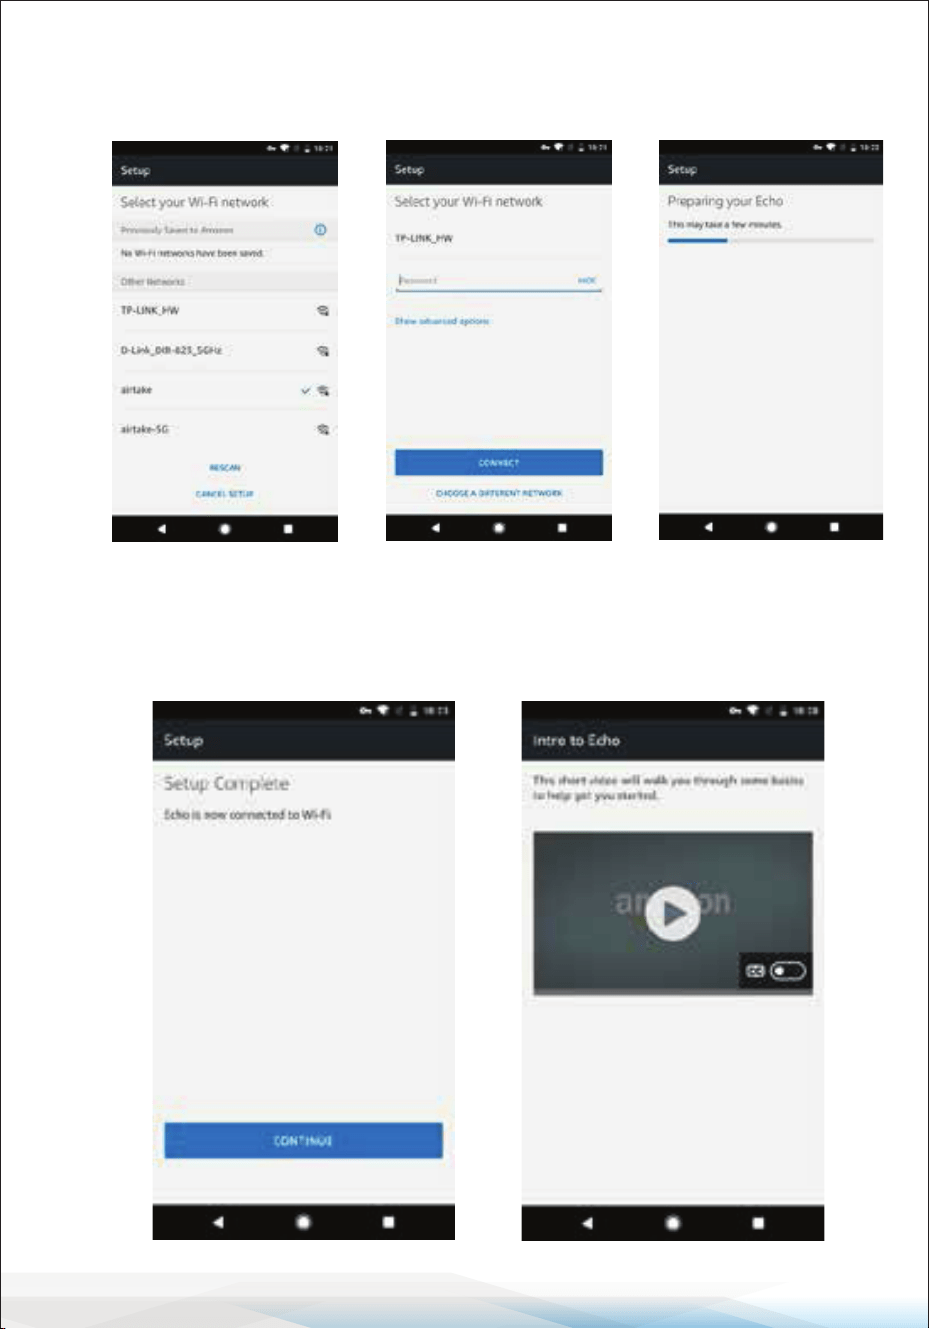
7. WiFi Connection: Select your WiFi network, enter the password, and tap
"CONNECT." Wait for Echo to connect.
8. Complete Setup: Tap "CONTINUE" after connection, watch the introduction
video, and tap "CONTINUE" to nish.
www.SereneLifeHome.com
33
3.2 Link Smart Life Account to Alexa
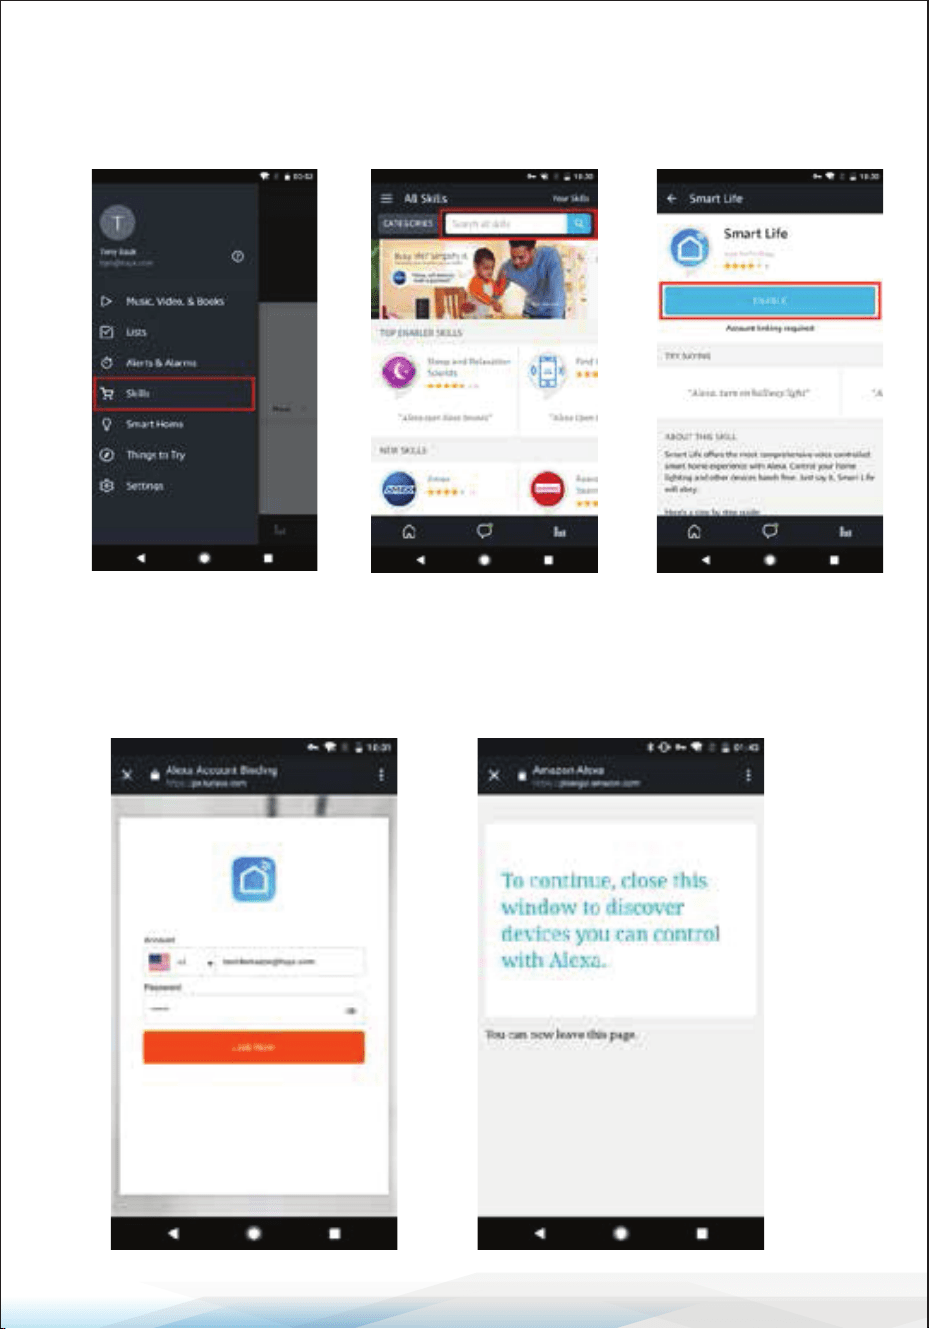
1. Enable Skill: Tap "Skills" in the Alexa app menu, search for "Smart Life,"
select it, and tap "ENABLE."
2. Account Linking: Enter your Smart Life account details (email, password,
and region) and tap "Link Now." The country/region, the account, and the
password must match with the exact content in Step 2.2.
9
www.SereneLifeHome.com
34
4. Control Smart Devices via Echo
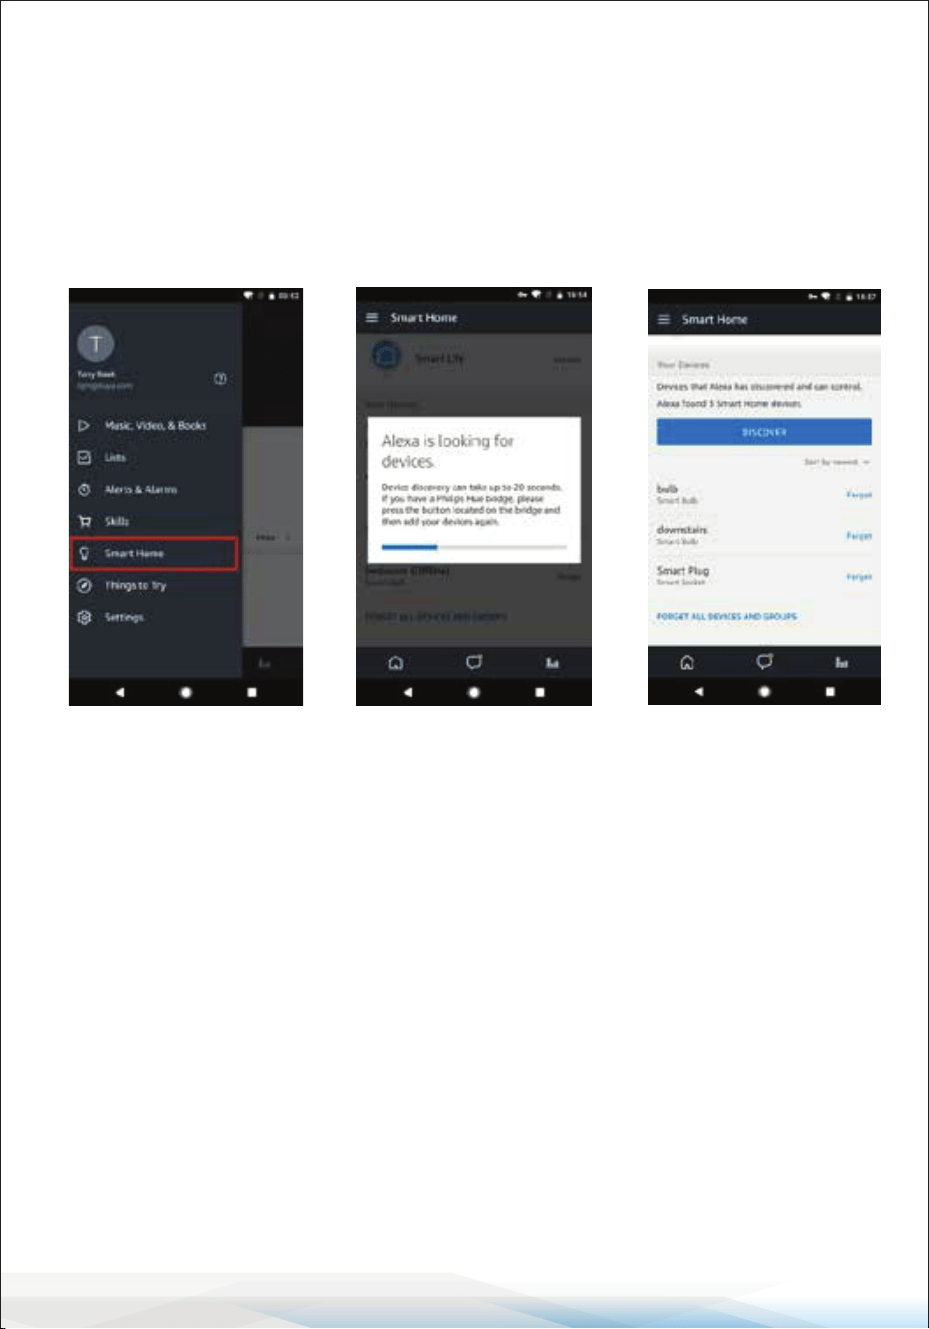
4.1 Discover Devices
• Voice Command: Say "Alexa, discover devices" to allow Echo to nd and
connect to your smart devices.
• Manual Discovery: Alternatively, tap "DISCOVER" in the Alexa app.
Discovered devices will be shown in the list.
Note: Each time you change the device's name on the Smart Life App, Echo must
re-discover it.
4.2 Control Devices by Voice Commands
Use the following commands to control your devices (e.g., bedroom air
conditioner):
• “Alexa, turn on the bedroom air conditioner.”
• “Alexa, set the bedroom air conditioner to 70°F.”
• “Alexa, increase/decrease the temperature.
www.SereneLifeHome.com
35
CLEAN AND MAINTENANCE
Drainage
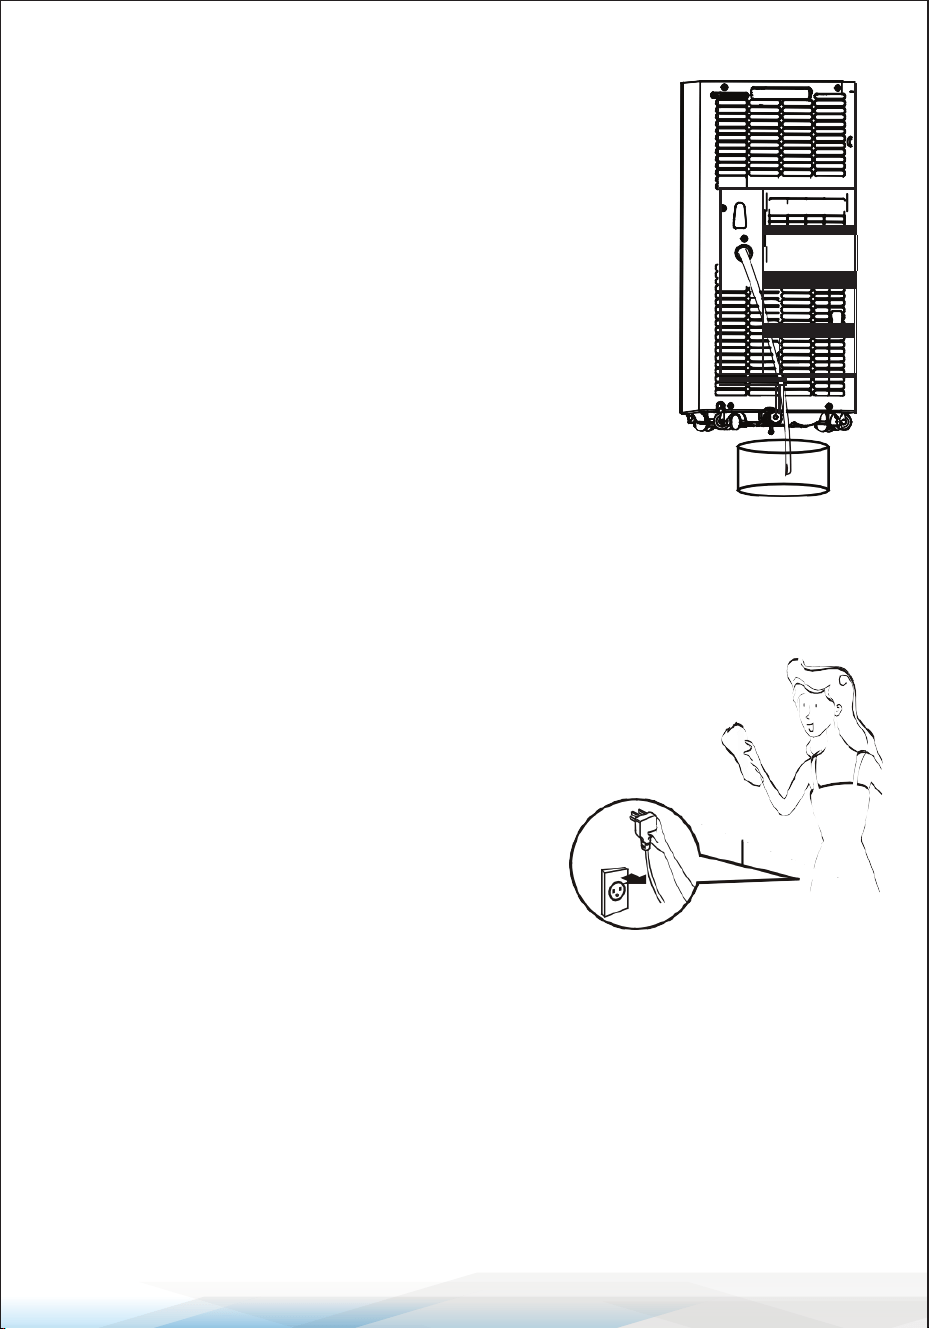
This appliance features a self-evaporating system that
enhances performance and energy eciency by reusing
condensed water to cool the condenser. However, if the
built-in water container becomes full, the appliance will
display "FL" and emit a buzzing sound.
Follow these steps to drain the water:
1. Turn O and Unplug: Ensure the appliance is turned
o and unplugged.
2. Remove Air Exhaust Duct: Detach the air exhaust duct.
3. Move the Appliance: Position the appliance over a
suitable drainage area.
4. Drain the Water: Pull out the water plug and allow
all water to drain out.
5. Reinsert Water Plug: After draining, securely reinsert the water plug.
6. Reinstall Air Exhaust Duct: Attach the air exhaust duct and restart the appliance.
Maintenance
General Cleaning
Safety First: Always turn o and unplug the
appliance before cleaning to prevent electric
shock.
Cleaning the Body:
1. Unplug the Appliance:
Ensure it is unplugged from the power source.
2. Use a Soft Cloth:
Clean the appliance using a soft, slightly damp cloth.
3. Avoid Chemicals:
Do not use chemical agents such as benzene, alcohol, or gasoline, as these can
damage the appliance's exterior.
4. Prevent Water Intrusion: Ensure no water enters the appliance.
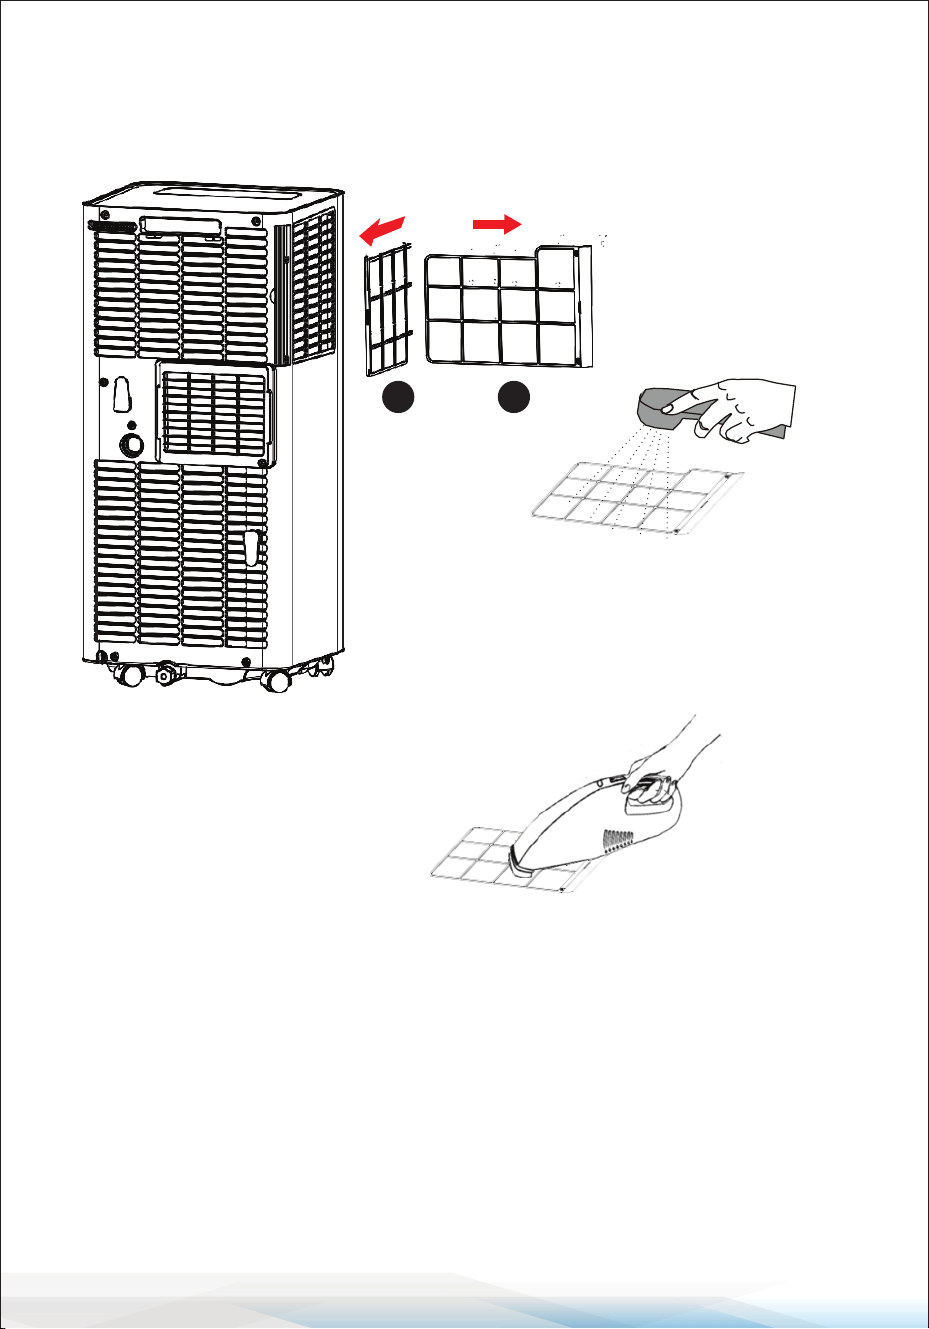
Filter Cleaning
Regular lter maintenance is crucial for optimal performance.
Clean the lter every two weeks, or more frequently if indoor air quality is poor.
www.SereneLifeHome.com
36
9
1. Remove Air-Inlet Grille:
Access Filters: Remove the air-inlet grille as shown in the accompanying image
and pull out the lters.
Important Notes:
• Avoid Hot Water: Do not clean lters with water above 40°C (104°F).
• No Harsh Chemicals: Avoid using irritating detergents like alcohol, gasoline, or
benzene.
• Drying: Keep lters away from heat sources and dry them naturally in a cool
place.
• Ensure Installation: Never operate the appliance without the lter installed.
2 1
Dry Filters: If the lter is not heavily soiled,
a vacuum cleaner can be used to remove dust.
Clean the Filters
Warm Water: Rinse the lters
in warm water (40°C or 104°F)
or with a neutral detergent.
www.SereneLifeHome.com
37
Seasonal Maintenance
If the appliance will not be in use for an extended
period, follow these steps for maintenance:
1. Drain Water: Pull out the water plug to drain any
remaining water.
2. Dry Internal Parts: Run the appliance in Fan mode
for at least 2 hours to dry the internal components.
3. Turn O and Unplug: Ensure the appliance is
turned o and unplugged.
4. Clean Filter: Clean the lter and reinstall it.
5. Store Air Exhaust Duct: Remove and properly store
the air exhaust duct.
6. Remove Batteries: Take out the batteries from the
remote control.
7. Wrap and Store: Wrap the appliance in a plastic
bag and store it in a cool, dry place.
Restarting After Extended Inactivity
If the appliance has not been used for a long time, perform the following checks
before restarting:
1. Ensure Installation: Verify that the water plug and lter are correctly installed.
2. Check Power Cord: Do not use the appliance if the power cord is damaged.
Inspect thoroughly before use.
3. Insert Batteries: Install the batteries back into the remote control.
4. Assemble Components: Reassemble other parts as per the instruction manual.
COMMON FAILURES AND DIAGNOSIS
Intelligent Error Detection
Error-detecting code Multi-functional defection
E1 Error of the coil’s temperature sensor
E2 Error of indoor temperature sensor
E4
Anti-freezing protection: temperature of the coil is too
low and the whole A/C is o. When temperature excesses
8°C (46.4°F), the protection is released and previous
working state is recovered.
www.SereneLifeHome.com
38
Troubleshooting
In case of any of the following issues, please contact professional maintenance
personnel immediately.
Notice: When there is any abnormality with the A/C, turn it o, unplug it, and
contact professional maintenance personnel.
The above technical parameters are subject to change without notice.
Disposal Notice:
• Do not dispose of electrical appliances as unsorted municipal
waste. Use separate collection facilities. Contact your local
government for information on available collection systems.
• If electrical appliances are disposed of in landlls or dumps,
hazardous substances can leak into the groundwater, damaging
your health and well-being. When replacing old appliances with
new ones, retailers are legally obligated to take back your old
appliance for disposal, at least free of charge.
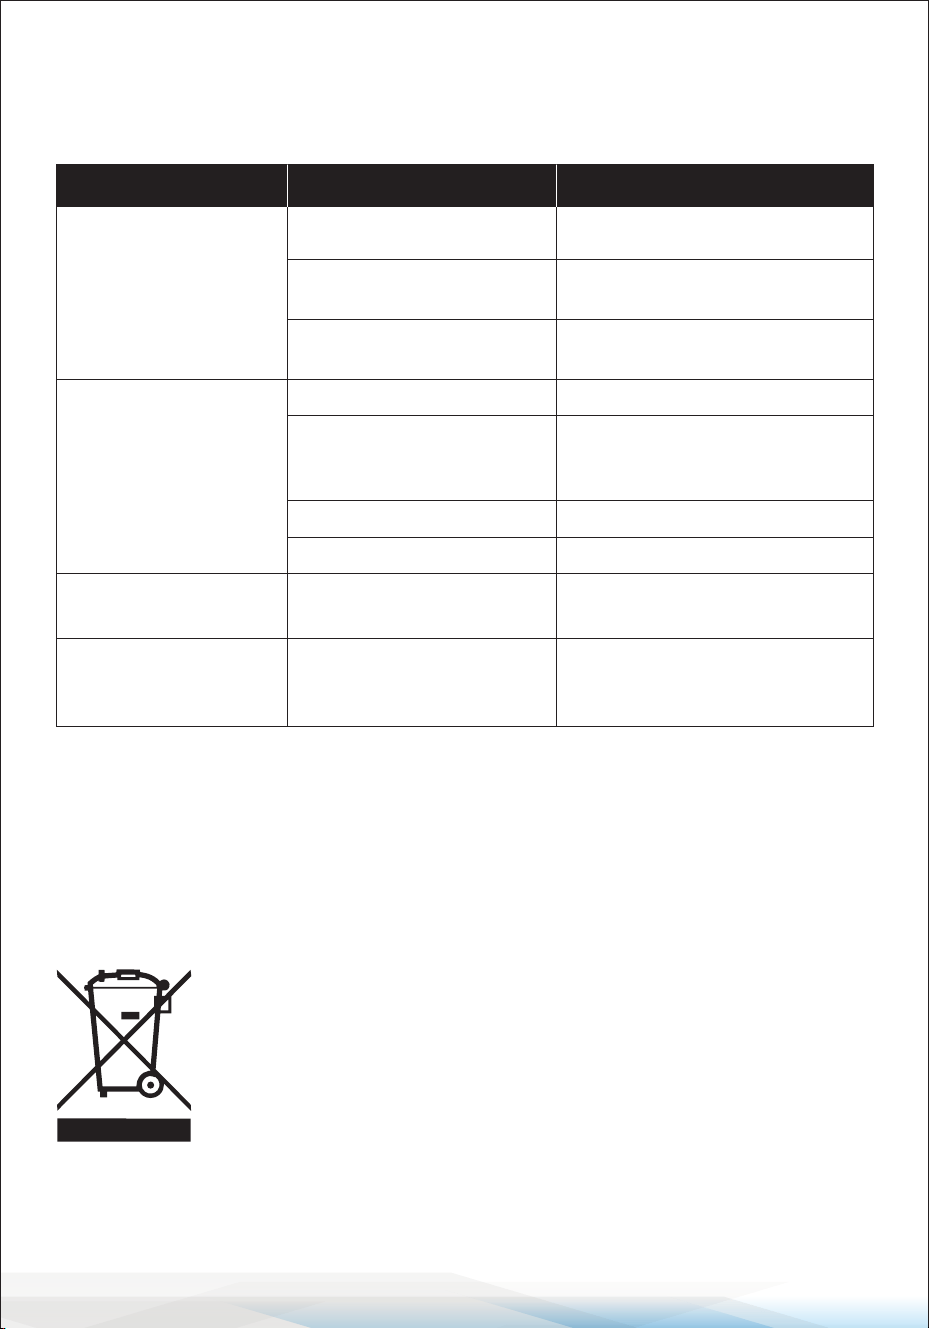
Trouble Cause Solution
The A/C doesn’t work
No display
Reset the circuit breaker on the
A/C cord
The display panel shows “FL”
Restart the A/C after powering
o and draining; it will normalize
The A/C starts
frequently
Direct sunlight Close the curtains
Filter screen is very dirty Clean or replace the lter screen
Big noise from the A/C The A/C is placed unevenly
Place the unit on even, rm
ground to prevent shaking
The compressor
doesn’t work
Delay protection activated
Wait for 3 minutes for the
temperature to decrease, then
turn on again
The Time OFF function is
started
The A/C can be restarted 3 min.
after being turned o
Open doors and windows
or too many people/heat
sources in the room
Close doors and windows,
remove heat sources
Air inlet or outlet is blocked Remove the obstruction

www.SereneLifeHome.com
39
Register Product
Thank you for choosing SereneLife. By registering your product,
you ensure that you receive the full benets of our exclusive
warranty and personalized customer support.
Complete the form to access expert support and to keep your
SereneLife purchase in perfect condition.
Start Here
Serenelifehome.com/pages/register
Questions or Comments?
We are here to help!
Phone: 1.718.535.1800
Serenelifehome.com/ContactUs