
CookTek Induction Systems, LLC
Phone: 1-800-908-8726
+1 214-379-6000
Fax: +1 214-379-6073
www.cooktek.com
INSTALLATION ● OPERATION
OWNER’S MANUAL
SinAqua
TM
Induction Holding Well
CAUTION: Read all instructions before using this appliance.
Models IHW061-22, IHW061-24,
IHW061-34, IHW061-36, IHW061-64,
IHW061-66, IHW062-22, IHW062-24,
IHW062-34, IHW062-36, IHW062-64,
IHW062-66
CT-103869 / Jan 2017
CookTek Induction Systems, LLC
Phone: 1-800-908-8726
+1 214-379-6000
Fax: +1 214-379-6073
www.cooktek.com

• O aparelho deve estar ligado à terra. Ligue apenas a uma tomada correctamente
ligada à terra. Antes de funcionar com o aparelho, leia as instruções relativas à
ligação à terra e os Requisitos para Instalação Eléctrica na Página 2 deste folheto.
Não utilize um cabo de extensão.
Antes de utilizar el anafe (cooktop), realice lo siguiente:
• Retire todo el material de embalaje.
• Coloquelaunidadsobreunasupercieseca,plana,dura,estableynoinamable.
• Mantengalaunidadalejadadeotrasfuentesdecalorydejeunmargendeal
menos5cmparaqueelairecirculeporlosladosylaspartesanterioryposterior
de la unidad.
Por su seguridad, nunca corte, quite ni inutilice la conexión eléctrica (tierra) del
enchufe. No utilice nunca el anafe con un enchufe adaptador ni un cable prolongador.
ADVERTENCIA: Se puede producir un choque eléctrico por un enchufe
conectado a tierra de manera incorrecta. Si tiene alguna duda relacionada con
las instrucciones de conexión a tierra, póngase en contacto con un electricista
cualicado.
Antes de comenzar:
AsegúresedequeelcableeléctricoestáunidormementealaunidadCookTek
ANTESdeconectarlaunidadalaelectricidadyantesdeintentarutilizarla.
• No toque la placa cerámica (situada en la parte superior del anafe) inmediatamente
despuésdeutilizarla.Elcalordelacazuelasetransferiráalaplacacerámicay
hará que ésta se caliente.
• La revisión de este producto únicamente puede realizarla un operario de
mantenimientoautorizadooelpersonaldeCookTek.Nointenteabrirlaunidad
ni realizar ninguna labor de mantenimiento. Para obtener información sobre el
mantenimiento,póngaseencontactoconCookTekllamandoal+1214-379-6000.
• Este aparato se debe conectar a tierra. Enchúfelo únicamente a una toma
conectada a tierra de manera adecuada. Antes de utilizarlo, lea las instrucciones
deconexiónatierraylos“Requisitosdelainstalacióneléctrica”delapágina2de
este folleto. No utilice cables prolongadores.
CAUTION: Read all instructions before using this appliance.
SPANISH
18

217
Przed rozpoczęciem używania:
Należysprawdzić,czyprzewódzasilaniajestpewnieprzymocowanydomodułu
CookTekPRZEDpodłączeniemurządzeniadogniazdkazasilaniaiprzed
rozpoczęciemjegoużywania.
• Niedotykaćpłytyceramicznej(lubwierzchniejczęściurządzeniaCooktop
bezpośredniopozakończeniujegoużywania.Wysokatemperaturapatelnimoże
przenosićsięnapłytęceramiczną,stwarzającmożliwośćoparzeniawprzypadku
jejdotknięcia.
• Obsługaserwisowategoproduktumożebyćprowadzonajedynieprzez
upoważnionegopracownikaserwisulubprzezpersonelrmyCookTek.Nie
podejmowaćsamodzielnejpróbyotwarciaurządzeniaaniniewykonywać
żadnychnapraw.Abyuzyskaćinformacjedotycząceobsługiserwisowej,należy
skontaktowaćsięzrmąCookTekpodnumerem+1214-379-6000.
• Niniejszeurządzeniewymagauziemienia.Podłączaćjedyniedowłaściwie
uziemionegogniazda.Przedużyciemnależyprzeczytaćinstrukcjędotyczącą
uziemieniaorazczęść„Wymogiinstalacjielektrycznej”nastronie2niniejszejulotki.
Nieużywaćprzedłużacza.
Antes de funcionar com o seu Cooktop, faça o seguinte:
• Retire todo o material de embalagem.
• Coloque a unidade numa superfície seca, nivelada, rígida, estável e não
inamável.
• Mantenha a unidade afastada de outras fontes de calor e deixe um espaço de pelo
menos 5 cm nos lados, frente e traseira da unidade, para circulação do ar.
Para sua segurança, nunca corte, retire nem desactive a ligação eléctrica (terra) da
cha.NuncautilizeumachaadaptadoranemcabodeextensãocomoCooktop.
ADVERTÊNCIA: Uma cha incorrectamente ligada à terra pode provocar
choque eléctrico. Se tiver alguma questão sobre estas instruções de ligação
à terra, por favor consulte um electricista qualicado.
Antes de Começar:
Porfavor,certique-sedequeestecabodeenergiaestáligadormementeàsua
unidadeCookTekANTESdeligaraunidadeàtomadadeenergiaeantesdetentar
funcionar com ela.
• Não toque na placa de cerâmica (no cimo do Cooktop) imediatamente depois
da sua utilização. O calor emitido pelo tabuleiro será transferido para a placa de
cerâmica,fazendocomqueestaquequenteaotoque.
• A assistência técnica deste produto só pode ser realizada por um agente de
assistênciatécnicaautorizadoouporpessoaldaCookTek.Nãotenteabrira
unidade nem efectuar assistência técnica de qualquer tipo. Para informações
referentesàassistênciatécnica,porfavorentreemcontactocomaCookTekpelo
telefone +1 214-379-6000.
Beforeoperatingyourinductionholdingwell(IHW),dothefollowing:
• Remove all packing material and save for subsequent shipment or in case of
concealed shipping damage.
• Keepunitawayfromotherheatsourcesandallowatleast2”(51mm)betweenall
sidesofthehousingandanysurfaceorobstacle,and6”(152mm)betweenthe
bottomofthehousingandanysurfaceorobstacle.Ifeithertheairintakeorexhaust
outlet is blocked, the internal temperature will rise, causing an error code to occur.
Grounding Instructions:
TheIHWmustbeproperlygrounded.Intheeventofanelectricalshortcircuit,
groundingreducestheriskofelectricshockbyprovidingasafepathfortheelectric
current.TheIHWhasapowercordwitha3-pronggroundingplug,whichmustbe
usedinacompatibleandproperlygroundedoutlet.Itistheowner’sresponsibilityto
replaceany2-prongwalloutletwithaproperlygrounded3-prongwallreceptacle.
Foryoursafety,nevercut,remove,ordisabletheelectrical(ground)connectionfrom
theplug.Neveruseanadapterplugoranextensioncordwiththedrywell.
WARNING: Electric shock can result from an improperly grounded plug. Please
consult a qualied electrician if you have any questions about these grounding
instructions.
Before you begin:
PleasemakesurethatthispowercordisrmlyattachedtoyourCookTekunit
BEFORE plugging the unit into the power receptacle and before attempting operation.
Everyinstallationsitehasdifferentelectricalwiring.Becausemanydifferentlocal
codesexist,itistheOwnerandInstaller’sresponsibilitytocomplywiththosecodes.
CookTekisnotresponsibleforanyconsequentialdamagesasaresultoffailureto
complywithinstallationrequirements.
• Readallinstallationinstructionscarefullybeforestartinginstallation.
• RemoveIHWholdingwellcarefullyfromcarton.
• Remove all loose packaging and accessories and save for subsequent shipment or
in case of concealed shipping damage.
• Itistheresponsibilityoftheinstallertocomplywithallfederal,stateandlocal
codes.
• Anyinstallationnotmatchingthespecicationsdiscussedinthismanual
automaticallyvoidstheproduct’swarranty.
• Insert the unit in the counter cutout and, if desired, caulk around the seam to seal.
• Plug one end of the control cable into the unit and thread the cable through the
cutout for the control box.
• Plug the other end of the control cable into the control box and mount the control
box with four screws in the desired location.
PORTUGUESE
PREPARING yOUR COOkTEk INDUCTION HOLDING WELL UNIT fOR USE
ELECTRICAL INSTALLATION REqUIREMENTS
MECHANICAL INSTALLATION
163
• Questo apparecchio deve essere collegato a terra. Collegarlo esclusivamente a
unapresaelettricadotatadimessaaterra.Primadimettereinfunzionel’unità,
leggere le istruzioni di messa a terra e i Requisiti di installazione elettrica a pagina
2 di questo opuscolo. Non utilizzare un cavo elettrico di prolunga.
Førdubrukerkomfyren,mådugjørefølgende:
• Fjern all emballasje.
• Plasserenhetenpåettørt,jevnt,hardt,stabiltogbrannsikkertunderlag.
• Holdenhetenunnaandrevarmekilder,ogladetværeminst5cmklaringfor
luftventilasjonpåsidene,foranogpåbaksidenavenheten.
Fordinegensikkerhetmåduikkekutte,fjerneellerødeleggedenelektriske(jordede)
koplingenfrakontakten.Ikkebrukenadapterkontaktellerskjøteledningforkomfyren.
ADVARSEL: Elektrisk støt kan oppstå fra kontakt som ikke er korrekt jordet.
Ta kontakt med en kvalisert elektriker dersom du har spørsmål om disse
jordingsinstruksene.
Førdubegynner:
KontrolleratstrømkabelenersattheltinniCookTek-enhetenFØRdukoplerenheten
til stikkontakten og før bruk.
• Denkeramiskeplaten(elleroveratenpåkomfyren)måikkeberøresumiddelbart
etter bruk. Varme fra kjeler vil overføres til den keramiske platen og gjøre den varm.
• DetteproduktetkanbarerepareresavenautorisertserviceagentelleravCookTek-
ansatte.Ikkeprøvååpneenhetenellerutførereparasjoneravnoeslag.For
serviceinformasjon,kontaktCookTekpåtlf.+1214-379-6000.
• Detteproduktetmåjordes.Måkunkoplestiletkorrektjordetstøpsel.Førbrukbør
dulesejordingsinstrukseneogkravenetilelektriskinstallasjonpåside2idenne
veiledningen. Ikke bruk skjøteledning.
PrzedrozpoczęciemużywaniaurządzeniaCooktop,należywykonaćponiższe
czynności:
• Usunąćwszystkieelementyopakowania.
• Ustawićurządzenienasuchej,poziomej,twardej,stabilnejiniepalnejpowierzchni.
• Ustawićurządzeniezdalaodinnychźródełciepłaizapewnićwokółurządzenia
wolnąprzestrzeń,conajmniej0,5cm,abyumożliwićobiegpowietrza
Dlabezpieczeństwaużytkownikaniewolnonigdyprzecinać,wyjmowaćani
wyłączaćpołączeniaelektrycznego(uziemienia)zwtyczki.Stosującurządzenie
Cooktopniewolnoużywaćzłączapośredniegoaniprzedłużacza.
OSTRZEŻENIE: Niewłaściwe uziemienie wtyczki może spowodować
porażenie prądem elektrycznym. W przypadku wątpliwości dotyczących
instrukcji uziemienia należy skontaktować się z wykwalikowanym
elektrykiem.
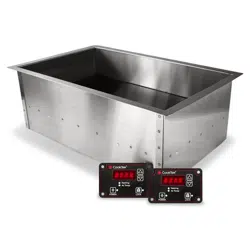
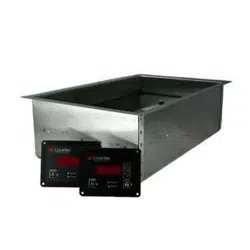
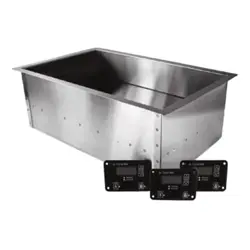
TheIHWholdingwellisavailableina21.75”x13.75”drop-inchassiswith
SmarTemp™technologytoactivelycontrolthetemperatureofthepan.Factory
setting allows the user to choose from four temperature settings in Fahrenheit or
Celsius.Thenumberoftemperaturesettingscanalsobeincreasedtofteentotal
usingthe“ChangingtheTemperatureSettings”option.
User Interface Buttons
Power Button–Usethisbuttontoturntheunitonandoff.AgreenLED
will indicate when the unit is on.
Lock Button – Use this button to prevent users from adjusting settings.
Pressingthisbuttonthreetimeswilllocktheunit.Whentheunitis
locked,theonlybuttonthatwillcontinuetoworkisthePowerbutton.
Tounlocktheunit,presstheLockbuttonthreetimes.TheredLEDto
the right of the button will indicate when the unit is locked.
Up and Down Arrows –Thesebuttonsallowyoutoquicklyset
the temperature.
Alphanumeric Display–Displaysholdingtemperature
(Fahrenheit or Celsius) and error code information.
Control Panel
CookTek’sIHWisinconformancewithANSI/UL197andCSA22.2No.109standards
andbearsthecommerciallyratedapprovals.CookTek’sIHWisinconformancewith
EuropeanEconomicAreastandardsandbearstheCEmarkingsignifyingEuropean
Conformity.
NORWEGIAN
POLISH
POWER LOCk
At Temp
Heating
APPROVED fOR COMMERCIAL USE
GENERAL INfORMATION
415
ΠΡΟΕΙΔΟΠΟΙΗΣΗ: Ένα εσφαλμένα γειωμένο φις μπορεί να έχει ως αποτέλεσμα
την ηλεκτροπληξία. Παρακαλείστε να συμβουλευτείτε αρμόδιο ηλεκτρολόγο εάν
έχετε τυχόν ερωτήσεις σχετικά με αυτές τις οδηγίες γείωσης.
Πριν ξεκινήσετε:
Βεβαιωθείτεότιαυτότοηλεκτρικόκαλώδιοείναισταθεράσυνδεδεμένοστημονάδα
CookTekσαςΠΡΙΝσυνδέσετετοφιςτηςμονάδαςσεηλεκτρικήπρίζακαιπριν
προσπαθήσετεναθέσετετημονάδασελειτουργία.
• Μηναγγίξετετηνκεραμικήπλάκα(ήτοάνωμέροςτουCooktop)αμέσωςμετάτη
χρήση.Ηθερμότητααπότηνκοιλότηταθαμεταφερθείστηνκεραμικήπλάκα.Ωςεκ
τούτου,αυτήθαείναιπολύζεστήγιανατηναγγίξετε.
• Οιεργασίεςεπισκευήςτουπροϊόντοςαυτούπρέπειναπραγματοποιούνταιμόνο
απόεξουσιοδοτημένοαντιπρόσωποεπισκευώνήαπόπροσωπικότηςCookTek.
Μηνεπιχειρήσετεναανοίξετετημονάδαήναεκτελέσετεοποιαδήποτεεργασία
επισκευήςσεαυτήν.Γιαπληροφορίεςσχετικάμετιςεπισκευές,επικοινωνήστεμε
τηνCookTekστοντηλεφωνικόαριθμό+1214-379-6000.
• Ησυσκευήαυτήπρέπειναείναιγειωμένη.Συνδέστεμόνοσεσωστάγειωμένη
πρίζα.Πριντηλειτουργία,διαβάστετιςοδηγίεςγείωσηςκαιτιςαπαιτήσεις
ηλεκτρικήςεγκατάστασηςστησελίδα2τουπαρόντοςφυλλαδίου.Μη
χρησιμοποιείτεκαλώδιοπροέκτασης(μπαλαντέζα).
Prima di mettere in funzione il piano cottura, eseguire le seguenti operazioni:
●Rimuoveretuttoilmaterialediimballaggio.
●Collocarel’unitàsuunasupercieasciutta,piana,rigida,stabileenoninammabile.
●Tenerel’unitàlontanadaaltrefontidicaloreelasciarealmeno5centimetridispazio
perconsentirelacircolazionedell’ariatuttointornoall’unità.
Per la propria sicurezza, non tagliare, rimuovere o disattivare mai il collegamento
elettrico di terra dalla spina. Non utilizzare mai una spina adattatore o un cavo
elettrico di prolunga per collegare il piano cottura.
AVVERTENZA: una spina elettrica non correttamente collegata all’impianto di
terra può provocare scosse elettriche. Rivolgersi a un elettricista qualicato in
caso di domande su queste istruzioni di messa a terra.
Prima di iniziare:
Assicurarsichequestocavodialimentazionesiacollegatosaldamenteall’unità
CookTekPRIMAdicollegarel’unitàallapresaelettricaeprimadimetterlainfunzione.
• Nontoccarelapiastradiceramica(olasuperciedelpianocottura)subitodopo
l’uso.Ilcaloredellapentolasitrasferisceallapiastradiceramica,rendendola
estremamente calda.
• Questo prodotto può essere riparato esclusivamente da un tecnico autorizzato
odalcentrodiassistenzaCookTek.Nontentarediaprirel’unitàodieseguire
interventidimanutenzionedialcuntipo.Perinformazionisull’assistenza,contattare
laCookTekalnumero+1214-379-6000.
ITALIAn
PlugtheIHWintoagrounded,single-phasereceptacle.ModelsIHW061-22/24will
runon100-120VACdrawinguptoamaximum1300W.ModelsIHW062-22/24will
runon200-240VACdrawingamaximumof1300W.ModelsIHW061-34/36/64/66will
runon100-120VACdrawingupto1800W.ModelsIHW062-34/36/64/66willrunon
200-240VACdrawingupto1800W.Checktheratingplateontheunittoverifycorrect
voltage and wattage. Voltages below 120VAC or 240VAC can result in less than rated
powerandslowerheatingtimes.Thisapplianceisdesignedforholdingfoodproducts
only.Note: for proper operation, an independent, dedicated circuit should be
used for units installed on a 15amp (120VAC) circuit, 2 1300W units installed
on a 20amp (120VAC) circuit, or up to 3 1300W or 2 1800W units installed on a
20amp (240VAC) circuit.
Tooperateallmodels:
• PressthePowerbuttontoturntheuniton.ThegreenLEDnexttothe
p o w e r b u t t o n w i l l i l l u m i n a t e . P r e s s t h e P o w e r b u t t o n w h e n y o u a r e
nishedtoturntheunitoff.
• Tolockthecontrols,presstheLockbuttonthreetimes.TheredLEDto
the right of the lock button will illuminate to indicate the unit is locked.
Locking the unit will prevent temperature settings from being changed.
ThePowerbuttonwillcontinuetofunctionwhiletheunitislocked.
Tounlockthecontrols,pressthelockbuttonthreemoretimes.
Unplugging the unit when powered on will also unlock the unit.
• PresstheUpandDownArrowstoselectthedesiredtemperature.
Thedefaultpresetchoicesare:
• FahrenheitSettings:160,170,180,190
• CelsiusSettings:70,75,80,90
Additionaltemperaturesettingsareavailablebychangingthetemperatresettings
option.See“ChangingtheSetTemperature”onpage6.
Note: When the unit has been left on for 5 minutes without a pan in the well, the unit will enter Sleep
Mode. When in Sleep Mode, the temperature display will be blank and the POWER LED will ash.
If less than 1 hour has passed since the unit entered Sleep Mode, the unit will automatically exit
Sleep Mode when a pan of hot food is placed in the well. If more than 1 hour has elapsed, press any
button on the control panel to exit Sleep Mode.
• Place standard hotel pan(s) of appropriate depth in the unit.
• “F”or“C”willashinthedisplaywindowandtheHeatingLEDwillturnon.
• Whenthepanhasreachedtheselectedtemperature,the“F”or“C”
willstopashingandremainsolid.TheHeatingLEDwillturnoffandthe
AtTempLEDwillturnon.
• Thesettemperaturecanbeadjustedatanytimewhilethepanisinthe
unitbypressingtheUpandDownArrows.
• Whenapanisremovedfromtheunit,theHeatingandAtTempLEDswillturnoff
andthe“F”or“C”willturnonsolidinthedisplay.Theunitisnotheatingorholding
thesettemperaturewhenbothLEDsareoff.
• Whennishedusingtheunit,pressthePowerbuttontoturntheunitoff.
ThePowerLEDwillturnoff.Removethenpan(s)fromtheunit.Theunit
will remember the last temperature setting the next time it is powered on.
GENERAL OPERATION
SMARTEMP
TM
OPERATION
At Temp
Heating
• Startingwiththeunitoff,holddowntheUpArrowwhilepressingthe
Power button.
• UsetheDownArrowtoselectthedesiredscale.
• Press the Power button to save the selection.
• Note:Ifabuttonisnotpressedformorethanveminutes,theunitwillpoweroff,
keepingthepreviouslysettemperaturescale.
• Startingwiththeunitoff,holddowntheUpArrowandDown
Arrow while pressing the Power button.
• Usethearrowkeysuntilthetext“SETS”appearsinthedisplay.Press
the Lock button to select this feature.
• UsetheDownArrowkeytotogglebetweenthetwooptions“PART”
and“FULL.”PressthePowerbuttontosavetheselection.
• Selecting“PART”willmakeavailablethestandardsettemperatureslistedin
the“GeneralOperation”section.
• Selecting“FULL”willmakeagreaternumberofsettemperaturesavailable.
Thesettemperaturesavailablewiththisselectionare:
Fahrenheit: 150, 160, 165, 170, 175, 180, 185, 190, 200, 210, 220, 230,
240, 250
Celsius: 40, 50, 60, 65, 70, 75, 80, 85, 90, 95, 100, 105, 110, 115, 120
• Note:Ifabuttonisnotpressedformorethanveminutes,theunitwillpoweroff,
keepingthepreviouslyselectedtemperaturesettings.
YourCookTekinductionholdingwelliseasytokeepclean.Besuretofollowthese
easyinstructions:
• TurntheunitOFFandremovetheplugfromanypoweroutletspriortocleaning.
• Whentheunitcools,wipeoffwithadampcloth.
• Tocleanthesurface,useamilddetergentorglasscleaningcream.
• Never immerse the holding well in water or put it in the dishwasher.
Tocleanthecontrolpanels:
• Controlpanelsshouldonlybecleanedwithadampcloth.
• Exposuretowaterspraymaycausecontrolpanelfailures.
• Controlpanelsshouldonlybemountedverticallyneverhorizontally.
• ControlpanelsareNOTwatertight.
145
VorInbetriebnahmedesCooktopverfahrenSiebittewiefolgt:
• EntfernenSiedasgesamteVerpackungsmaterial.
• StellenSiedasGerätaufeinetrockene,ebene,harte,stabileundnichtbrennbare
Fläche.
• HaltenSiedasGerätvonanderenWärmequellenfernundlassenSieumdasGerät
herum (vorne, hinten und seitlich) mindestens 5 cm für die Luftzirkulation frei.
ZuIhrereigenenSicherheitdarfdasErdungskabelkeinesfallsvomStecker
abgetrennt,entferntoderinschadhaftemZustandverwendetwerden.BenutzenSie
fürIhrenCooktopniemalseinenSteckeradapterodereinVerlängerungskabel.
WARNHINWEIS: Ein nicht fachgemäß geerdeter Stecker kann zu einem
Stromschlag führen. falls Sie noch fragen zu diesen Anweisungen in
Zusammenhang mit Schutzkontakt und Erdung haben, wenden Sie sich bitte an
einen Elektrofachmann.
Bevor Sie beginnen:
DiesesNetzkabelmussfestmitdemCookTekverbundensein,BEVORSiedasGerät
andieSteckdoseanschließenundesinBetriebnehmen.
• BerührenSiedieKeramikplatte(oderOberächedesCooktop)nichtunmittelbar
nachGebrauch.DieHitzederPfanneüberträgtsichaufdieKeramikplatte,diedann
ebenfallsheißwird.
• DiesesProduktdarfnurdurchbevollmächtigteWartungstechnikeroderdas
FachpersonalvonCookTekgewartetwerden.VersuchenSienicht,dasGerätzu
öffnenundselbstzuwarten.NähereInformationenzurWartungerhaltenSiebei
CookTekunterderRufnummer+1214-379-6000.
• DasGerätmussgeerdetwerden.DerSteckermussineineordnungsgemäß
geerdeteSteckdosegestecktwerden.VordemÖffnenlesenSiebittedie
AnweisungenzuSchutzkontakt/ErdungunddieAnforderungenandie
elektrischeInstallationaufSeite2diesesHandbuchs.VerwendenSiekein
Verlängerungskabel.
ΠρινθέσετετοCooktopσαςσελειτουργία,εκτελέστεταακόλουθα:
• Αφαιρέστεόλαταυλικάσυσκευασίας.
• Τοποθετήστετημονάδασεμιαστεγνή,επίπεδη,σκληρή,σταθερήκαιμηεύφλεκτη
επιφάνεια.
• Διατηρήστετημονάδαμακριάαπόάλλεςπηγέςθερμότηταςκαιαφήστεκενό
τουλάχιστον2ίντσες(5εκατοστά)γιατηνκυκλοφορίατουαέρασταπλαϊνά,το
μπροστινόμέροςκαιτοπίσωμέροςτηςμονάδας.
Γιατηνασφάλειάσας,ποτέμηνκόψετε,αφαιρέσετεήαπενεργοποιήσετετην
ηλεκτρική(γείωση)σύνδεσηαπότοφις.Μηχρησιμοποιήσετεποτέπροσαρμογέαφις
ήκαλώδιοπροέκτασης(μπαλαντέζα)μετοCooktop.
GERMAN
GREEk
CHANGING THE TEMPERATURE SCALE (f/C)
CHANGING THE TEMPERATURE SETTINGS
CARE AND CLEANING
613
Turvallisuussyistääläkoskaanleikkaa,irrotataipurasähköliitoksia(maadoitusjohtoa)
pistokkeesta.Äläkoskaankäytäkeittotasonkanssasovitinpistokettataijatkojohtoa.
VAROITUS: Väärin maadoitettu pistoke voi aiheuttaa sähköiskun. Neuvottele
valtuutetun sähköasentajan kanssa, jos sinulla on kysyttävää näistä
maadoitusohjeista.
Ennen kuin aloitat:
Varmista,ettätämävirtajohtoontiukastikiinnitettyCookTek:iinENNENlaitteen
pistokkeentyöntämistäpistorasiaanjaennenkäyttökokeilua.
• Äläkoskekeraamistalevyä(keittotasonpäällä)hetikäytönjälkeen.Astiankuumuus
siirtyykeraamiseenlevyynkuumentaensenliiankuumaksikoskettaa.
• TätätuotettasaahuoltaaainoastaanvaltuutettuhuoltopistetaiCookTekin
henkilökunta.Äläyritäavatalaitettajasuorittaasilleminkäänlaisiahuoltotoimia.
TietojahuollostasaatsoittamallaCookTekiinnumeroon+1214-379-6000.
• Tämälaitetäytyysuojamaadoittaa.Liitäainoastaanoikeinsuojamaadoitettuun
pistorasiaan.Ennenkäyttöäluemaadoitusohjeetjasähköasennusvaatimukset
tämänlehtisensivulta2.Äläkäytäjatkojohtoa.
Avantd’utiliserl’appareilCooktop,effectuerlesopérationssuivantes:
• Retirertouslesmatériauxd’emballage.
• Placerl’appareilsurunesurfacesèche,plane,solide,stableetnoninammable.
• Placerl’appareilàdistancedetouteautresourcesdechaleuretlaisserunespace
libred’aumoins5cm(2pouces)desdeuxcôtés,àl’avantetàl’arrièredecelui-ci
pourpermettrelacirculationdel’air.
Pour votre sécurité, ne jamais couper, déconnecter ou désactiver le raccordement
électrique (terre) de la prise de courant. Ne jamais utiliser un adaptateur ou une
rallongeélectriqueavecl’appareilCooktop.
MISE EN GARDE : Une prise de courant incorrectement raccordée à la terre
engendre un risque de choc électrique. Pour toute question concernant ces
instructions de mise à la terre, consulter un électricien qualié.
Avant de commencer :
S’assurerquelecâbled’alimentationestsolidementxéàl’appareilCookTekAVANT
deraccorderl’appareilàuneprisedecourantetd’essayerdelefairefonctionner.
• Nepastoucherlaplaquedecéramique(oulapartiesupérieuredel’appareil
Cooktop)immédiatementaprèsutilisation.Lachaleurdelacasserolesetransmetà
la plaque de céramique, aussi celle-ci est chaude au toucher.
• L’entretiendecetappareilnepeutêtreeffectuéqueparunréparateuragrééou
• parunmembredupersonneldeCookTek.Nejamaisessayerd’ouvrirl’appareilni
deleréparer.Pourdesinformationsconcernantl’entretien,contacterCookTekau
+1 214-379-6000.
• Cet appareil doit être raccordé à la terre. Le brancher exclusivement à une prise de
courant correctement raccordée à la terre. Avant utilisation, lire les instructions de
raccordementàlaterre,ainsiquelesexigencesenmatièred’installationélectrique
gurantàlapage2duprésentmanuel.Nepasutiliserdecâblederallonge.
fRENCH
• Toenable/disablethetimerfeature,see“SettingtheTimer”below.
• If the timer is enabled, the timer will start counting when a pan is
placedontheunitandtheHeatingorAtTempLEDwillturnon.
• Thetimerwillcountuptothepresetinterval(inminutes).Whenthe
interval is reached, the unit will start to beep once per second to alert
theoperatorandash“DonE”onthedisplay.Theunitwillcontinueto
maintain the temperature of the pan when the timer is expired.
• Thetimerisresetwhenthepanisremovedfromtheunitandthe
HeatingorAtTempLEDturnsoff.Thenexttimeapanisplacedon
the unit the timer will start again from the beginning.
• Toviewtheelapsedtimefromwhenthepanwasplaceontheunit,
presstheLockbuttononce.Thiswilldisplaythetime(inminutes)
from when the pan was placed on the unit for 5 seconds. After 5
secondsthenormaltemperaturedisplaywillreturn.
TheIHWunitsareequippedwithatimeralarmthatcanbesettoalerttheoperator
when a pan has been in the unit for a period of time up to 240 minutes (4 hours).
Toenable/disablethetimer:
• Startingwiththeunitoff,holdtheDownArrowwhilepressingthe
Power Button.
• Releasethebuttonswhenthedisplaycomeson.UsetheUpand
D o w n A r r o w s t o t o g g l e t h r o u g h t h e o p t i o n s u n t i l “ t E n ” i s s h o w n o n
thedisplay.PresstheLockButtononcetoselecttheenableoption.
• PresstheUpandDownarrowstotogglebetweenthetwosetting
o p t i o n s “ o n ” a n d “ o f f . ” W h e n t h e d e s i r e d o p t i o n i s d i s p l a y e d , p r e s s
t h e L o c k B u t t o n o n c e t o e n t e r t h i s o p t i o n . T h e d i s p l a y w i l l a s h t h r e e
times to indicate the option has been saved.
• Press the Power Button to exit this mode.
Tosetthetimerinterval:
• Startingwiththeunitoff,holdtheDownArrowwhilepressingthe
Power Button.
• Releasethebuttonswhenthedisplaycomeson.UsetheUpand
DownArrowstotogglethroughtheoptionsuntil“tInt”isshownon
thedisplay.PresstheLockButtontoselecttheintervaloption.
• PresstheUpandDownArrowstoincreaseordecreasethe
amountoftimedesiredforthetimerinterval.Whenthedesired
time(displayedinminutes)isshown,presstheLockButtontoenter
thisoption.Thedisplaywillashthreetimestoindicatetheoption
has been saved.
• Press the Power Button to exit this mode.
TIMER OPERATION
SETTING THE TIMER
Heating
Heating
At Temp
At Temp
Doehetvolgendevoordatuuwkooktopgaatgebruiken:
• Verwijder al het verpakkingsmateriaal
• Zethettoestelopeendroge,vlakke,harde,stabieleenonbrandbareondergrond
• Houdhettoesteluitdebuurtvananderewarmtebronnenenzorgdateraande
voor- en achterkant en de zijkanten minstens 5 cm vrij is voor luchtcirculatie.
Voor uw veiligheid mag u nooit de elektrische (massa) aansluiting uit de stekker
snijden,verwijderenofuitschakelen.Gebruiknooiteenaangepastestekkerofeen
verlengsnoer met de kooktop.
WAARSCHUWING: Een verkeerd geaarde stekker kan u een elektrische schok
bezorgen. Raadpleeg een erkende elektricien als u vragen heeft over deze
aardingsinstructies.
Voordat u begint:
ControleereerstofditsnoerstevigaanuwCookTek-apparaatisbevestigdVOORDAT
u de stekker van het toestel in het stopcontact steekt en u probeert het te gebruiken.
• Raak de keramische plaat (of de bovenkant van de kooktop) nooit onmiddellijk na
gebruikaan.Dehittevandepanwordtopdekeramischeplaatovergebrachtzodat
deze heet is bij aanraking.
• Ditproductmaguitsluitendwordengerepareerddooreengeautoriseerd
servicebedrijfofdoorpersoneelvanCookTek.Probeernietomhettoestelopente
maken of op enige wijze te repareren. Neem voor informatie over onderhoud en
reparatiecontactopmetCookTekop001-214-379-6000.
• Dittoestelmoetwordengeaard.Alleenaansluitenopeengoedgeaardstopcontact.
Lees voor het gebruik de aardingsinstructies en de vereisten voor de elektrische
aansluitingoppagina2vanditboekje.Gebruikgeenverlengsnoer.
Ennenkeittotasonkäyttöätoimiseuraavasti:
• Poista kaikki pakkausmateriaalit.
• Laita laite kuivalle, tasaiselle, kovalle, tukevalle ja palamattomalle pinnalle.
• Pidälaiteerossamuistalämmönlähteistäjajätälaitteensivuille,eteenjataakse
vähintään10cm(2tuumaa)vapaatilaailmallekiertää.
MANUAL TRANSLATION ADDENDUM
PAN COMPATIBILITy AND USE
DUTCH
fINNISH
127
• Units are designed to work with standard stainless steel hotel and gastronorm
pans.
• Pansmustbeofproperdepthtoalwaysmakebottomcontactwiththetemperature
sensors.
• Twosectionunitswithtwotemperaturesensorsaredesignedtoworkwithhalfand
full size pans.
• Threesectionunitswiththreesensorsaredesignedtoworkwith1/3sizepans.If
usedwith1/2sizepans,themiddlesectionmustbeturnedofftoavoidoverheating
of pans. If used with full size pans, all these sections should be set to the same
temperature.
• Threesectionunitswithsixsensorsaredesignedfor1/3and1/6sizepans.1/6th
sizepansmustalwaysbeusedinpairspersection,butotherwisemaybemixed
with1/3sizepans.Ifusedwith1/2sizepans,themiddlesectionmustbebeturned
off to avoid overheating of pans. If used with full size pans, all three sections should
besettothesametemperature.Rememberwhenusing1/6sizepansthatthey
sharea1/3sizeheatingzone,andtemperatureissetforthezone,andwillbe
commontoboth1/6pans.Itisadvisabletokeepboth16hpansinazonesimilarly
lledtooptimizeperformance.
WARNING: Whenoperatingthisappliance,strictlyadheretothefollowing
safetyprecautionstoreducetheriskofburns,electricshock,re,injury,and
damagetoapplianceorpropertynearappliance.
• Read all instructions before using this appliance.
• Thisappliancemustbegrounded.Connectonlytoaproperlygroundedoutlet.See
“GroundingInstructions”onpage2.DONOT use an extension cord.
• Installorlocatethisapplianceonlyinaccordancewiththeprovidedinstallation
instructions on page 2 of this manual.
• Keepapplianceawayfromperson(s)withreducedphysical,sensory,ormental
capabilitiesunlesssupervised/instructedonhowtoproperlyusetheappliance.
• Keepchildren8yearsandyoungerawayfromtheappliancewheninoperation.
Children8yearsandabovemayusetheappliancewithproperadultsupervision.
• DONOTallowchildrentocleanorperformmaintenanceonthisappliancewithout
adultsupervision.DONOTallowchildrentoplaywiththisappliance.
• Alwaysunplugtheapplianceimmediatelyafteruseandallowforcoolingtimeif
handling, transporting, or storing.
• Todisconnecttheappliance,pressthePOWERbuttonandwaitfortheLEDtono
longerbeilluminated.Youmaythenremovetheplugfromtheoutlet.
• DONOTusetheholdingwell’ssurfaceforstoragepurposes.
• Neverheatemptycookware.Doingsomaydamagetheunitorcookwareand
overheattheunit.Whenoverheatingoccurs,anerrorcodewillashonthedisplay
andtheunitwillshutitselfoffautomatically.Whenthetemperaturereturnstonormal,
the unit can be used again.
• ThecookwareintheappliancewillheatcontinuouslyaslongasthepowerisON.
Thecookwarewillbehotandcautionshouldbeexercisedwhenworkingonornear
the appliance.
• ThisproductmayonlybeservicedbyanauthorizedserviceagentorbyCookTek
personnel. DONOTattempttoopentheunitorperformserviceofanykind.For
serviceinformation,contactCookTekat+1(214)379-6000.
IMPORTANT INfORMATION AND SAfETy PRECAUTIONS
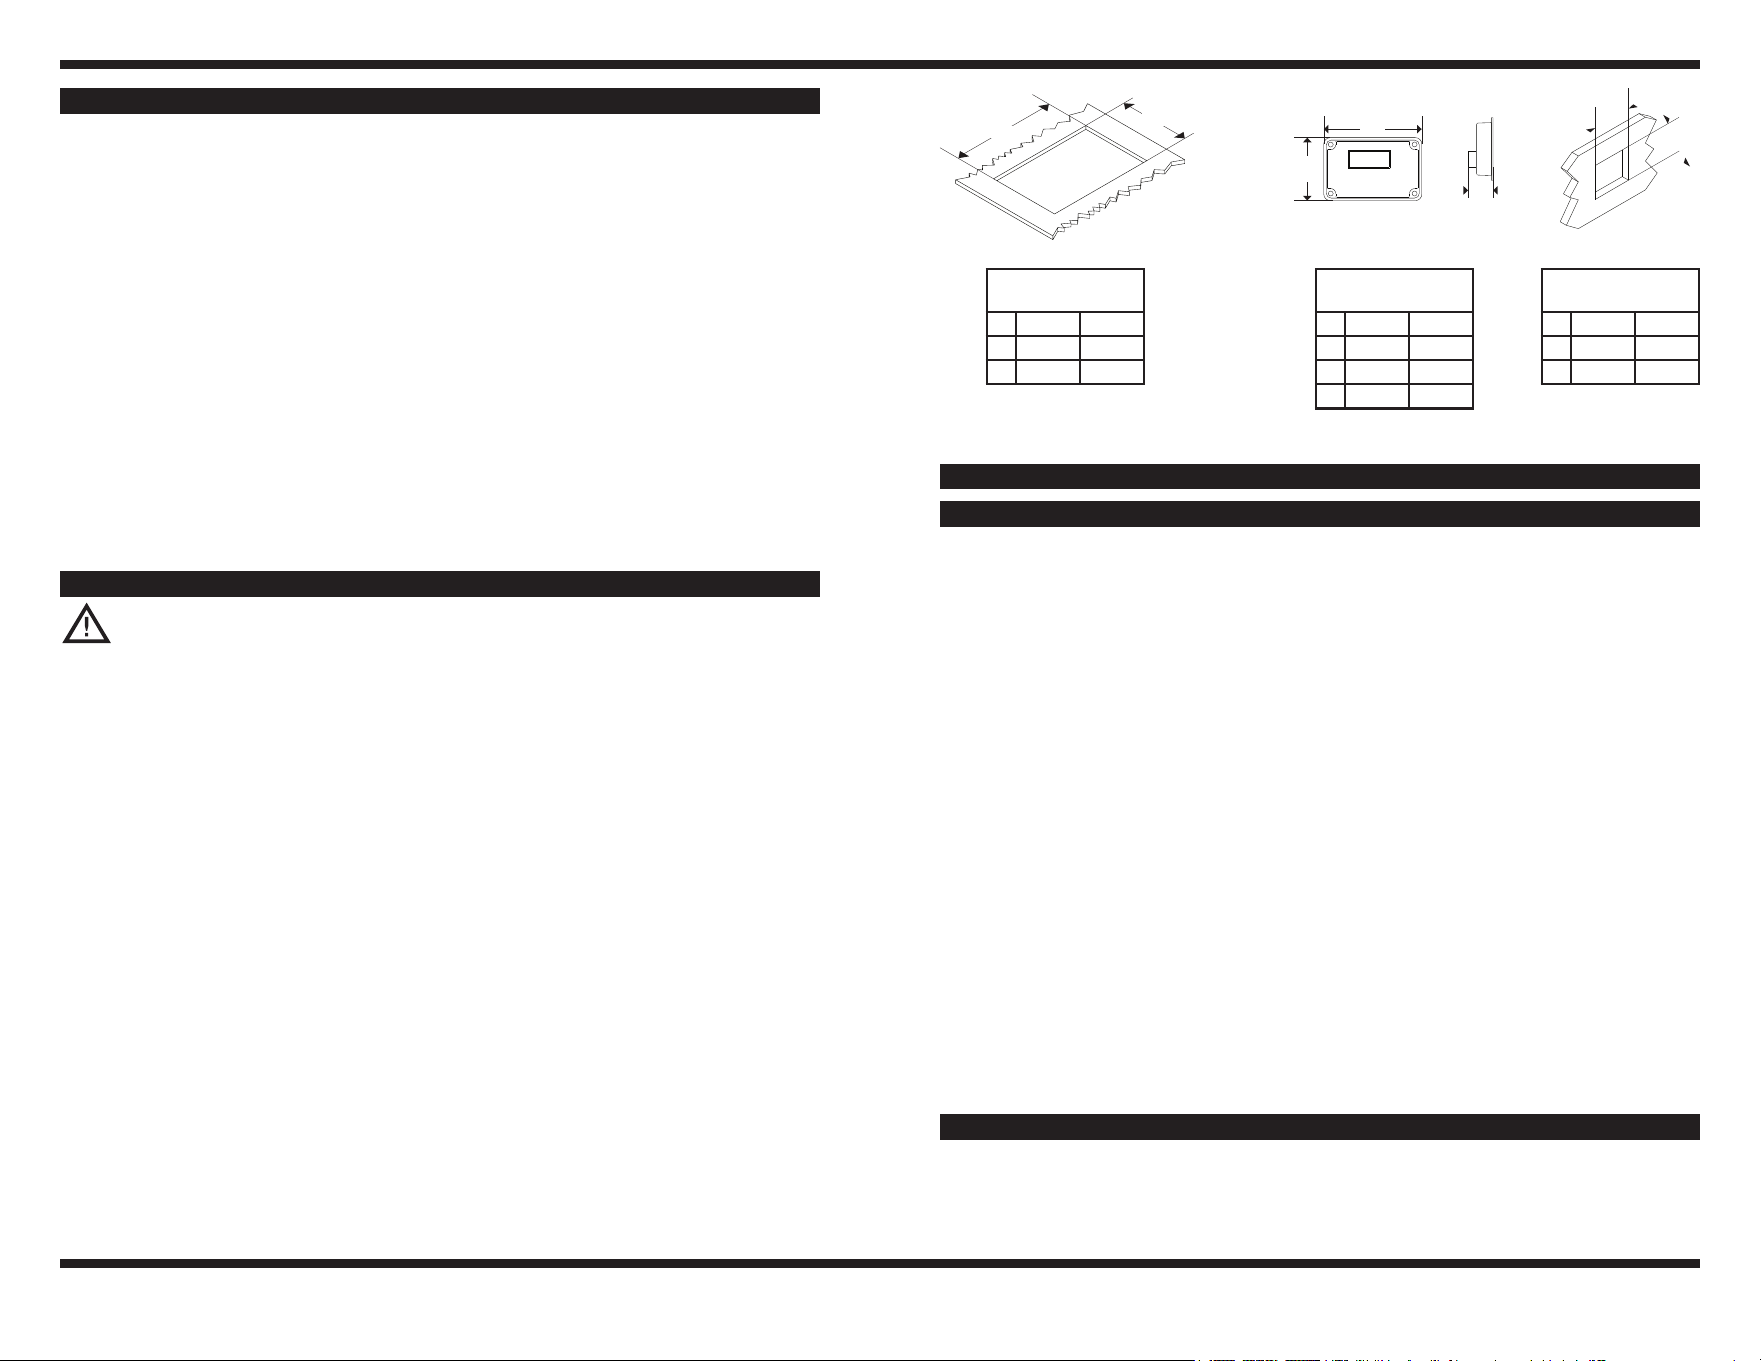
AllIHWCut-Out
Dimensions
Inches mm
A 20.625 524
B 12.625 321
Control Box
Dimensions
Inches mm
A 3.81 97
B 2.25 57
C 1.02 26
Control Box Cut-Out
Dimensions
Inches mm
D 2.9 74
E 2.25 57
A
B
A
B
C
D
E
Clearance: Besuretoallowforaminimumclearanceof2”(51mm)betweenall
sidesofthehousingandanysurfaceorobstacle,and6”(152mm)betweenthe
bottomofthehousingandanysurfaceorobstacle.Theholdingwellrequires
6-inch
2
(3870 mm
2
)offreeairspacewithin8”(203mm)ofthetopofcabinet,and
within24”(610mm)ofeachunit.Ventingcanbeslotsorholesasdesired.Ifthe
ambient air temperature is above 110
o
F (43.3
o
C),theunitmaynotfunctionproperly.
Dimensions
• DONOTusetheholdingwellforanythingotherthanitsintendeduseasdescribed
inthismanual.Thisunitisdesignedtoheatfoodandisnotintendedforlaboratory
or industrial use.
• TheCookTekholdingwellcomeswithastand-alone(notbuilt-in)controlboxforunit
operation.UseONLYthecontrolboxthatcomeswiththeunittoavoidanypossible
operation hazards.
• DONOTuseanyappliancethathasadamagedcordorplug,oronethathas
malfunctionedorbeendamaged.Consultthewarrantyatwww.cooktek.com/
warranty-serviceandfollowinstructionsforservice.
• TheIHWmodelsaredesignedtousestandardhotelandgastronormpans.DONOT
useanyhotelorgastronormpansmallerthanthe1/6size.
• DONOTuseanyaccessoriesorattachmentsthatarenotrecommendedbythe
manufacturer.Useofunapprovedaccessoriesmaycauseinjuriesandvoidthe
warranty.
• DONOTletthepowercordtouchhotsurfacesorhangovertheedgeofthecounter.
• DONOT move the appliance when electric power is connected.
• Never immerse cords, plugs, or the appliance in water.
• DONOTputfoodorunopenedcansontheholdingwell’ssurface.
• DONOTleavetheapplianceunattendedwhileinuse.
• Intheunlikelyeventofagreasere,smotheramebycoveringcookwarewitha
tight-ttinglid,cookiesheet,orattray.DONOTUSEWATER.Whenthereis
under control, turn off the appliance and unplug from wall.
• Users wearing a pacemaker should consult their doctor or the pacemaker
manufacturerpriortooperatingCookTekinductionequipment.Theelectro-magnetic
eldmayinterferewiththeproperfunctionofthepacemaker.
• Turnofftheholdingwelloffaftereachuse.
• Keeptheholdingwellawayfrommetallicsurfaces,gasandelectricranges,and
openames.DONOTplace in the oven. If the ambient air temperature is above
110
o
F (43
o
C),theunitmaynotfunctionproperly.
• Metallic objects such as kitchen utensils, knives, spoons, etc. should not be placed
on appliance. Use caution when wearing rings, watches, and other metallic objects
astheymaygethotifplacedneartheunit’ssurface.
• DONOTplacealuminumfoilorplasticobjectsontheholdingwell’ssurface.
• DONOTusetheholdingwellnearafaucet,swimmingpool,sink,orotherareas
where water can be found. Never store the unit upside down or in a non-climate
controlled environment.
• DONOTstrikeordamagetheholdingwell.DONOTputtheunitinyourluggage.
Throwingordroppingtheunitcandamagetheinternalcomponentsorcrack
it,voidingyourwarranty.Iftheholdingwellbecomescracked,unplugtheunit
immediatelyanddonotuseit.
• DONOTobstruct,block,oralteropeningsorholesintheholdingwellhousing.DO
NOTstickforeignobjectsintotheseopenings.
• DONOTuseawaterjettocleantheappliance.
• Ifthepowercordisdamaged,itmustbereplacedbythemanufacturer,itsservice
agent,orasimilarlyqualiedperson.
Pleasevisitwww.cooktek.com/warranty-serviceforCookTekWarrantyinformation.
CLEARANCE AND DIMENSIONS
WARRANTy STATEMENT
811
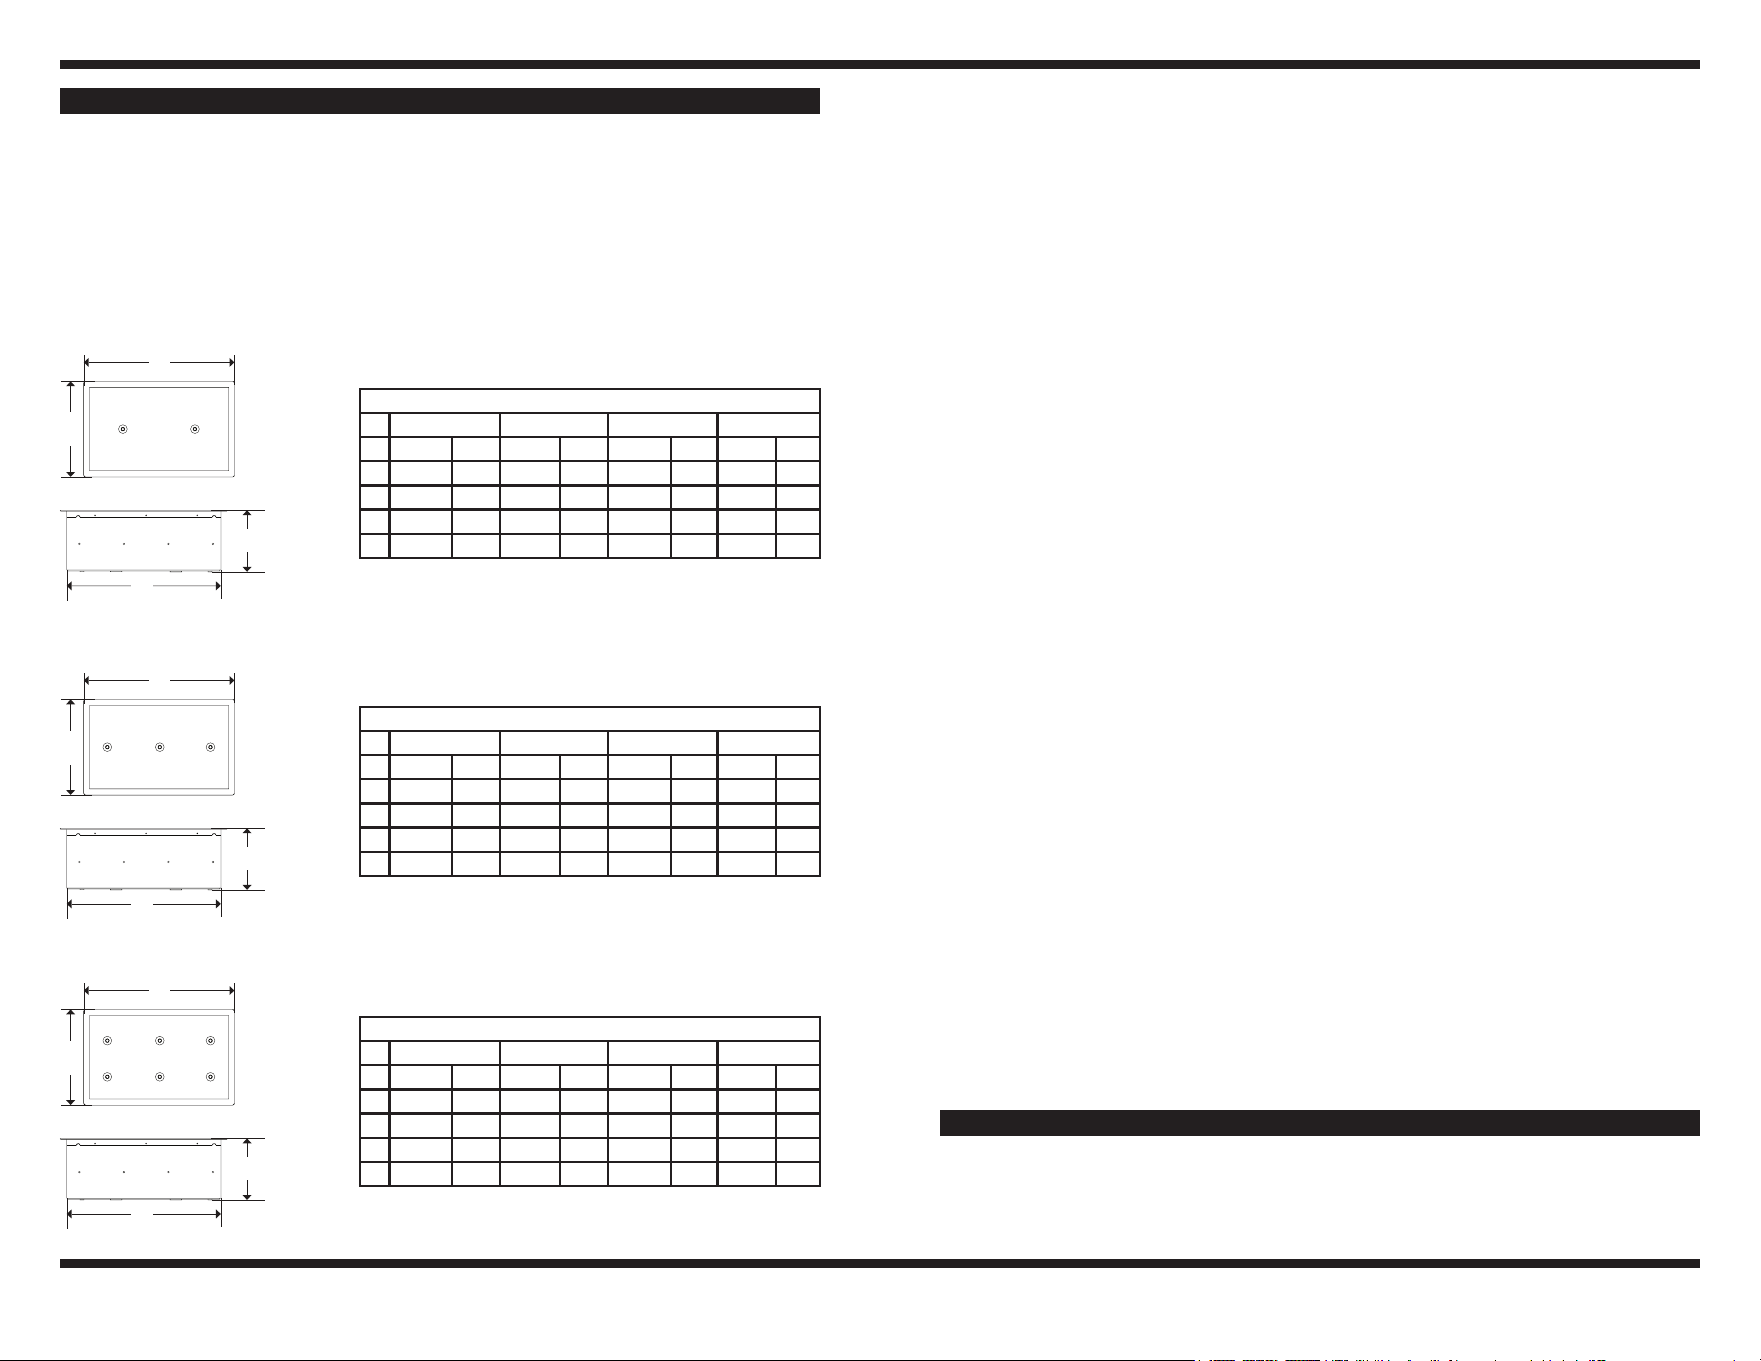
2-SensorIHWDimensions
IHW061-22 IHW061-24 IHW062-22 IHW62-24
Inches mm Inches mm Inches mm Inches mm
A 21.75 552 21.75 552 21.75 552 21.75 552
B 13.75 349 13.75 349 13.75 349 13.75 349
C 6.23 158 7.77 197 6.4 163 7.8 198
D 20.1 511 20.1 511 20.3 516 20.3 516
3-SensorIHWDimensions
IHW061-34 IHW061-36 IHW062-34 IHW062-36
Inches mm Inches mm Inches mm Inches mm
A 21.75 552 21.75 552 21.75 552 21.75 552
B 13.75 349 13.75 349 13.75 349 13.75 349
C 7.73 196 9.75 248 7.73 196 9.75 248
D 20.18 513 20.18 513 20.18 513 20.18 513
6-SensorIHWDimensions
IHW061-64 IHW061-66 IHW062-64 IHW062-66
Inches mm Inches mm Inches mm Inches mm
A 21.75 552 21.75 552 21.75 552 21.75 552
B 13.75 349 13.75 349 13.75 349 13.75 349
C 7.84 199 9.83 250 7.84 199 9.83 250
D 20.18 513 20.18 513 20.18 513 20.18 513
B
A
C
D
B
A
C
D
B
A
C
D
(Continued on next page...)
109
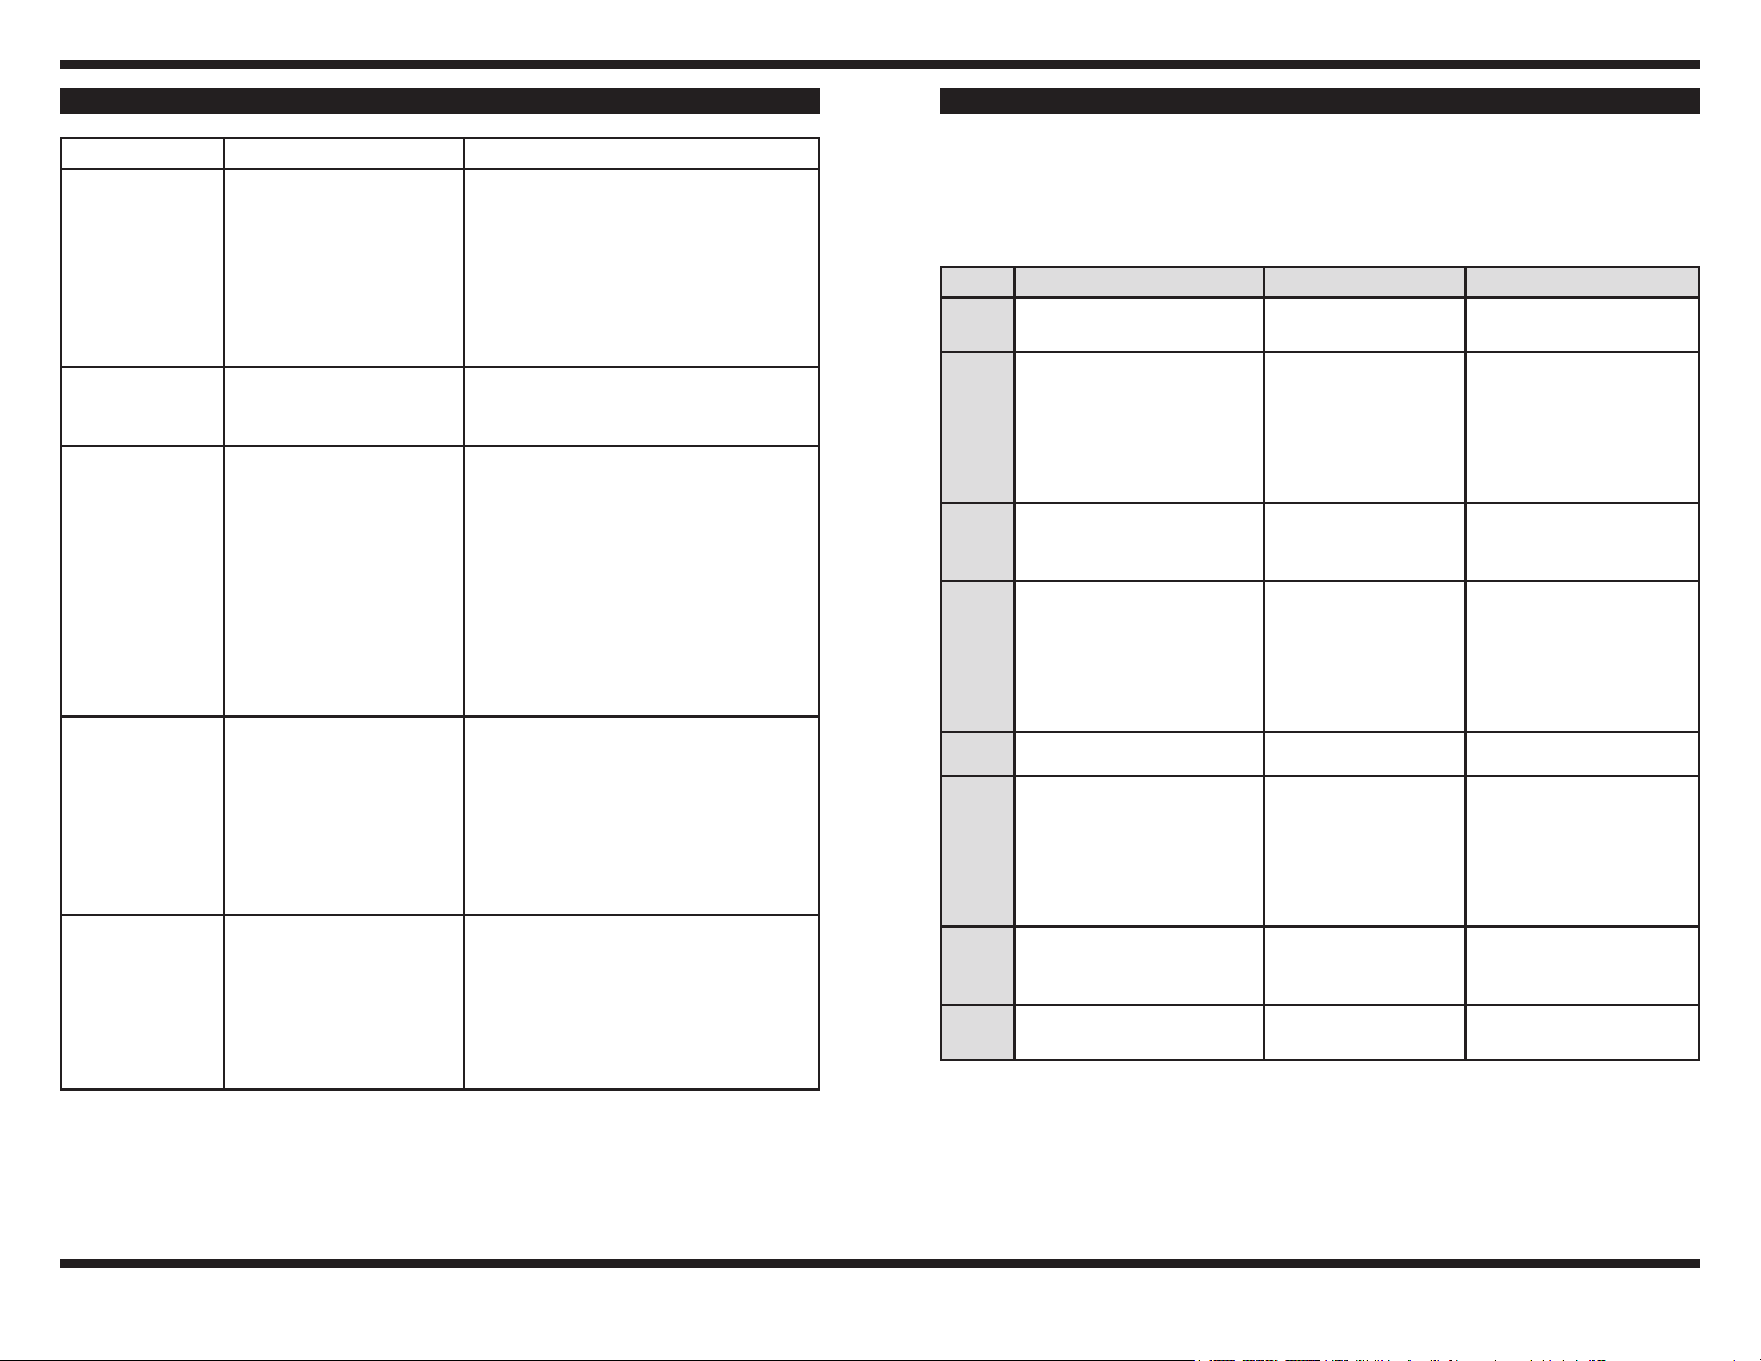
Intheeventofapossiblemalfunction,yourCookTekholdingwellwilldisplayan
errorcodeonthealphanumericdisplay.Somemodelswillbeepaspecicnumberof
times,indicatedbytheerrorandashthelightsonthecontrolbox.Pleaseconsultthe
followingtablewhenencounteringanerrorcode.Toreseterrorconditions,remove
the pan from the unit and press the Power button, or unplug the unit.
Error Error Cause Displayed Message Troubleshooting
1 Broken temperature
sensor.
E-01 Servicerequired.
2 Broken temperature
sensor. Pan temperature
is too high.
E-02 Removeanypansfrom
the holding well surface
andletcool.Turnunit
off and on to reset error.
If problem persists,
contact service provider.
3 Over current (peak). E-03 Trydifferentcookware.
Servicemaybe
required.
6 Highlinevoltage. E-06 Toreset,unplugunit,
wait 5 seconds, and
plug in again. If problem
persists, have an
electrician monitor the
line voltage.
7 Hardwarefailure. E-07 Servicerequired.
8 Zerocrosserror. E-08 Turnunitoff,thenon.
Plug unit into outlet on
different circuit breaker.
If problem persists,
service is required on
device.
13 User interface error. E-13 Check control panel
connection,cyclepower.
Servicerequired.
16 Critical error. E-16 Call dealer for service.
Servicerequired.
Symptom Error Cause Displayed Message
No power (no
lights or fan
noise.)
• Unit unplugged.
• No power to
receptacle.
• Plug unit into appropriate receptacle
• Make sure that receptacle is
energized.
• Check wall switches.
• Check circuit breaker.
• Plug a different electronic device
into the receptacle to make sure
that power is present.
Pan does not
heat.
• Pan is not induction
efcient.
• Pan not centered.
• Useinductionefcientpan.
• Center pan.
Drywell
suddenlystops
heating.
• Possible power brown
out.
• Circuit shared with
another electrical
device.
• Safetyshut-off
engaged.
• Assurepropervoltage/powerlevels.
• Makesurethedrywellisnot
sharing a circuit with electrical
devicesotherthanCookTekholding
well units.
• Thesafetyshut-offwillengageif
anemptypanisleftontheholding
well surface while the unit is working
at full power. Make sure that the
holdingwellsurfaceisclear.Wait
15-20 minutes for the unit to reset.
Pan does not
get hot enough
even though
power levels are
set to maximum
– induction
efcientpanin
use.
• Extension cord in use.
• Circuit shared with
another electrical
device.
• DONOTuseextensioncords.
Extensioncordsmayaffect
the power levels reaching the
appliance.
• Make sure that the holding well
is not sharing a circuit with other
electrical devices.
Pan heats
unevenly,does
not maintain
heat level, or
overheats.
• Pan is not induction
efcient.
• Panbottommaynot
beatenough.
• Pan not centered.
• Pan diameter is less
than7”(178mm).
• Useinductionefcientpan.
• Useatterpan.
• Center pan.
• Usealargerinductionefcientpan.
TROUBLESHOOTING ERROR CODES