
I = ATTENZIONE!
ALCUNI CONSIGLI PER UNA CORRETTA INSTALLAZIONE
DEL VOSTRO NUOVO FRIGORIFERO.
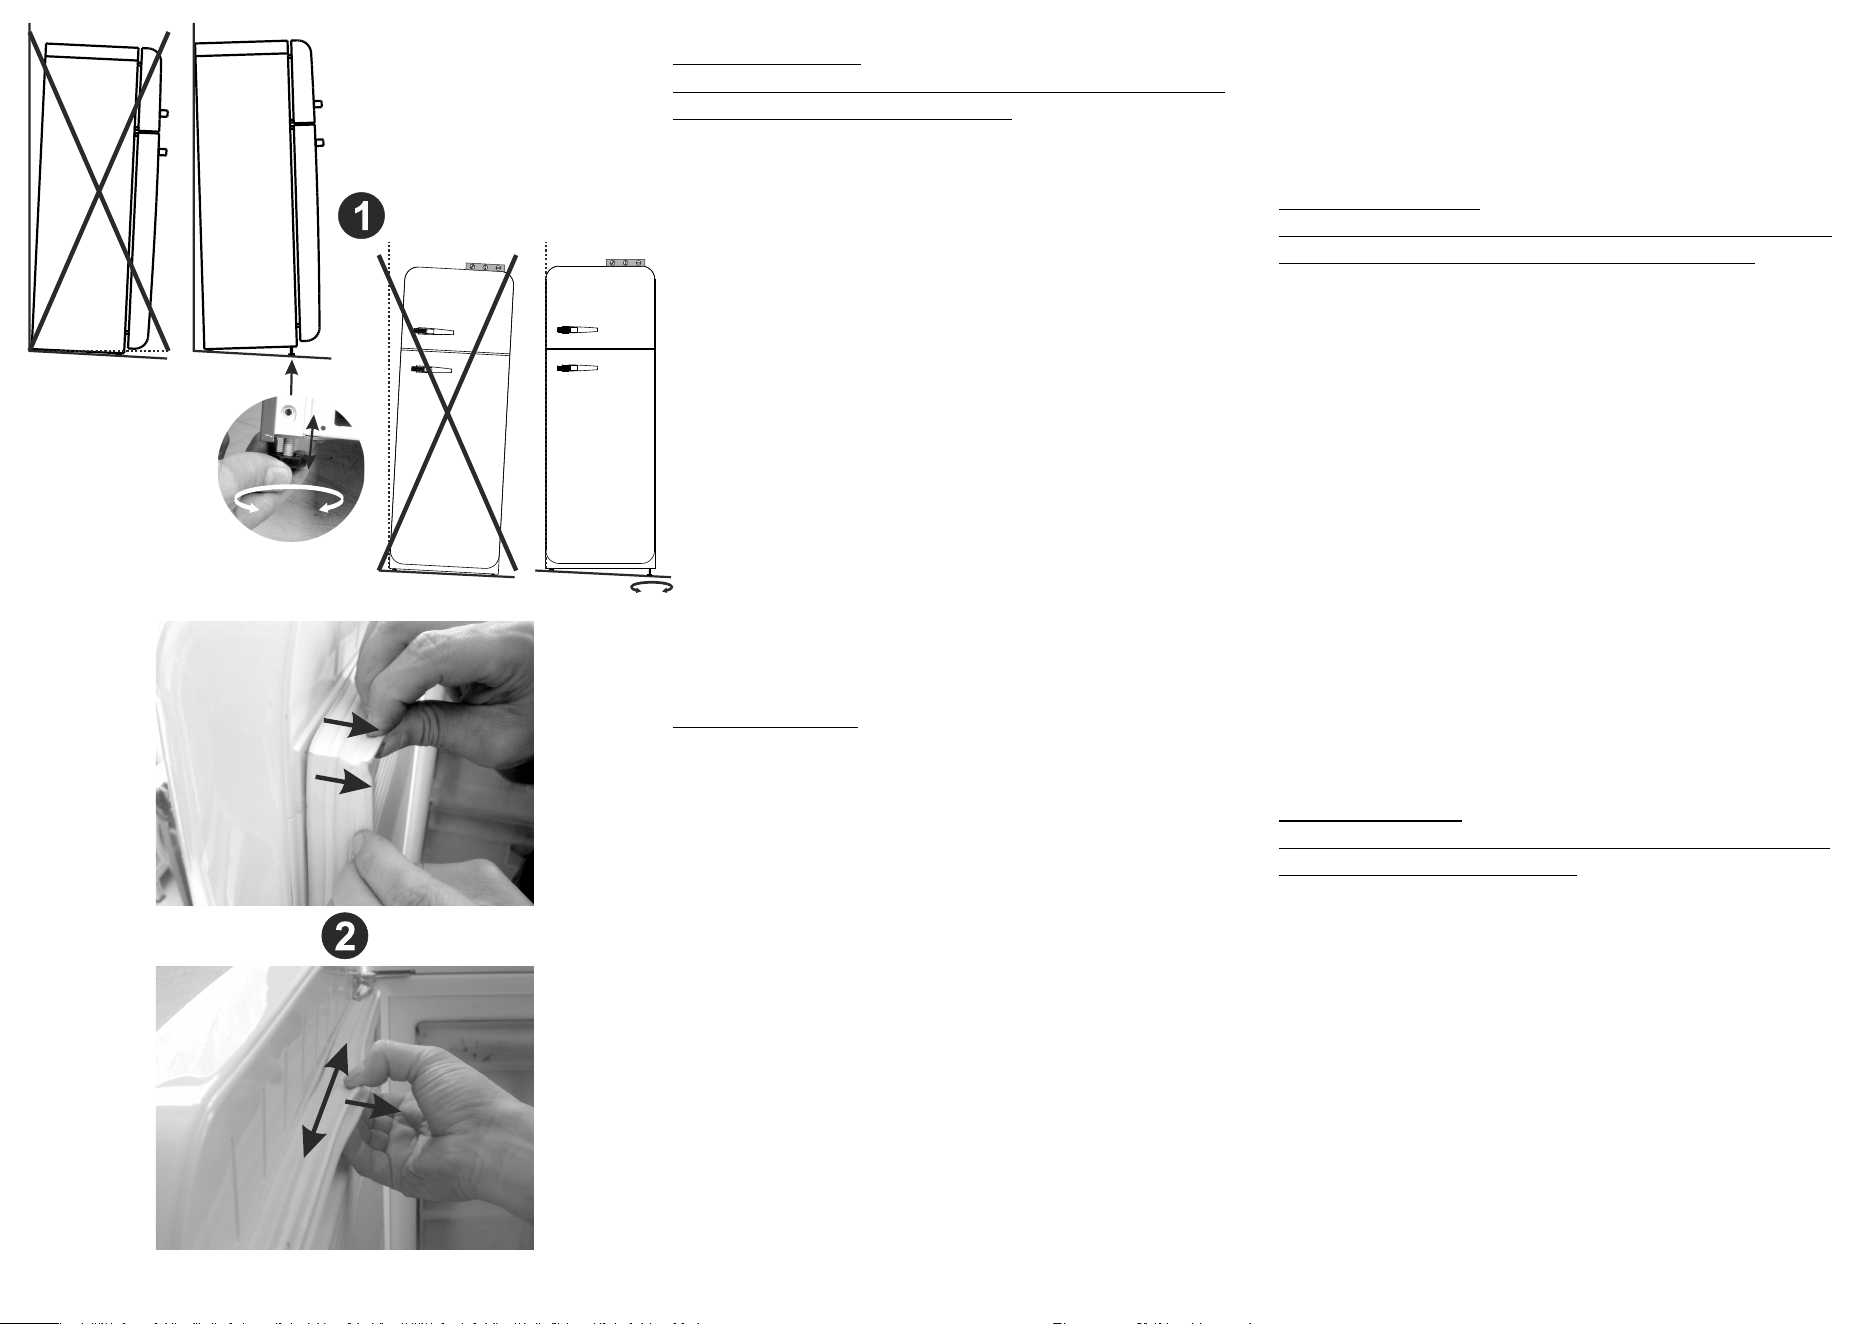
Dopo aver posizionato il frigorifero nell'area di installazione prevista,
regolare l'altezza dei due piedini anteriori (svitare come in figura 1) al fine
di rendere stabile il prodotto. Tale operazione consente di alzare la parte
anteriore del frigorifero e quindi inclinarlo verso la parte posteriore, per
agevolare una corretta chiusura delle porte.
Se l'altezza dei piedini non è sufficiente per rendere stabile il frigorifero
(ad esempio a causa di un'eccessivo dislivello della pavimentazione) o
per inclinarlo verso la parte posteriore, occorre aggiungere uno spessore
di materiale rigido (plastica o legno) sotto ai piedini stessi, in modo da
alzare ulteriormente la parte anteriore.
Controllare quindi che le guarnizioni porta chiudano ermeticamente
soprattutto negli angoli. In caso di chiusura non corretta verificate che
non vi siano residui di lavorazione del prodotto o residui del materiale
d'imballaggio tra guarnizione e frigorifero. Se necessario modellare la
guarnizione con le dita come in figura 2 . Attenzione: per compiere tale
operazione non è necessario esercitare forza. Non lacerare o distaccare
la guarnizione dalla porta.
Dopo qualche giorno dall'installazione verificare che il livellamento
iniziale sia ancora corretto. Controllare che a frigorifero funzionante e con
le porte caricate con bottiglie e contenitori di alimenti, risulti ancora
stabile e che le guarnizioni porta chiudano ermeticamente. Se necessario
effettuare un nuovo livellamento e modellare nuovamente le guarnizioni
come indicato sopra.
UK = WARNING!
TO ENSURE PRECISE INSTALLATION OF YOUR NEW
APPLIANCE (and to avoid any problems with your door
gasket not sealing, please read the following important
information).
Once you have positioned the fridge into the desired place (in accordance
with the recommendations in the instruction book provided), it is very
important to level the appliance by adjusting the height of the two front
feet (see figure 1). The front of the fridge should be slightly higher than the
back of the appliance in order to ensure easy closure of the door.
If the adjustable feet are not sufficient to level the appliance as described
above, due to excessive uneven floor, add a material spacer (wood or
plastic) underneath the feet.
Check that the door gaskets (seals) are providing an airtight seal,
especially in the corners. If necessary, remove any residue from
packaging that may have become dislodged during transportation. You
may need to gently pull the gasket (seal), without force, into shape with
your fingers (see figure 2). Be careful NOT to tear the gasket (seal) or
detach it from the door.
After a few days and when the appliance is full, especially with bottles,
verify that the levelling is still correct, the appliance is stable and that the
door gaskets (seal) are sealed tight.
Important: this document does not replace the instruction book provided
with the appliance but it should be read in conjunction with the
instruction book.
FR = ATTENTION !
QUELQUES CONSEILS POUR UNE INSTALLATION
CORRECTE DE VOTRE NOUVEAU RÉFRIGÉRATEUR.
Après la mise en place du réfrigérateur à l'endroit prévu, régler la hauteur
des deux pieds avant (dévisser comme le montre la figure 1) afin que
l'appareil soit stable. Cette opération permet de monter la partie avant du
réfrigérateur et donc de l'incliner vers l'arrière, pour faciliter une fermeture
correcte des portes.
Si la hauteur des pieds n'est pas suffisante pour rendre stable le
réfrigérateur (par exemple à cause d'une dénivelée excessive du sol) ou
pour l'incliner vers l'arrière, ajouter une cale de matériau rigide (plastique
ou bois) sous les pieds, afin de lever un peu plus la partie avant.
Contrôler que les joints de la porte ferment hermétiquement surtout dans
les angles. En cas de fermeture non correcte, vérifier qu'il n'y ait pas de
résidus de fabrication du produit ou de résidus d'emballage entre le joint
et le réfrigérateur. Si nécessaire, façonner le joint avec les doigts comme
sur la figure 2. Attention : pour cette opération, ne pas forcer. Ne pas
déchirer ou détacher le joint de la porte.
Quelques jours après l'installation, vérifier si la mise de niveau initiale est
encore correcte. Lorsque le réfrigérateur fonctionne et que les portes ont
été chargées avec les bouteilles et les bacs, contrôler s'il est encore stable
et si les joints de la porte ferment hermétiquement. Si nécessaire, faire
une nouvelle mise de niveau et modeler de nouveau les joints comme
indiqué ci-dessus.
DE = ACHTUNG!
EINIGE RATSCHLÄGE FÜR DIE RICHTIGE AUFSTELLUNG
IHRES NEUEN KÜHLSCHRANKS.
Nachdem Sie den Kühlschrank am vorgesehenen Ort aufgestellt haben,
sollten Sie die Höhe der zwei vorderen Füße regulieren (ausschrauben,
siehe Abb. 1), damit der Kühlschrank stabil steht. Hierdurch wird der
Kühlschrank vorne leicht angehoben und folglich nach hinten geneigt,
wodurch
sichergestellt wird, dass sich seine Türen richtig schließen.
Wenn die Höhe der Füße nicht ausreicht, um die Stabilität des
Kühlschranks zu gewährleisten (weil zum Beispiel der Boden zu
unregelmäßig ist) oder um ihn nach hinten zu neigen, muss man eine
Unterlage aus einem festen Material (Plastik oder Holz) unter den Füßen
anordnen, um ihn vorne um ein Weiteres anzuheben.
Kontrollieren Sie dann, ob die Türdichtungen vor allen an den Ecken dicht
schließen. Sollten die Türen nicht dicht schließen, kontrollieren, ob hierfür
Rückstände des Herstellungsprozesses oder der Verpackung
verantwortlich sind, die an der Dichtung haften. Bei Bedarf wie in Abb. 2
OK
OK
913531164/B

gezeigt mit den Fingern die Dichtung entlangfahren, um ihre Form
wiederherzustellen. Achtung: Hierbei muss keine Kraft aufgewendet
werden. Achten Sie darauf, dass Sie die Türdichtung nicht einreißen oder
lösen.
Kontrollieren Sie einige Tage nach der Aufstellung, ob die Nivellierung noch
stimmt. Kontrollieren Sie, ob der Kühlschrank, wenn er eingeschaltet ist und
wenn seine Türen mit Flaschen und Lebensmittelbehältern gefüllt sind, noch
stabil steht und ob die Türdichtungen dicht schließen. Nivellieren Sie den
Kühlschrank notfalls erneut und modellieren Sie die Türdichtungen wie oben
beschrieben noch einmal.
NL = LET OP!
EEN PAAR TIPS VOOR EEN CORRECTE INSTALLATIE VAN
UW NIEUWE KOELKAST.
Nadat u de koelkast op de voorziene plaats van installatie heeft geplaatst
moet u de hoogte van de twee pootjes aan de voorkant regelen
(losschroeven zoals afgebeeld in figuur 1) om het product stabiel te laten
staan. Met deze handeling kunt u de koelkast aan de voorkant hoger zetten
en naar achteren laten hellen om een goede sluiting van de deur mogelijk te
maken.
Wanneer de hoogte van de pootjes niet voldoende is voor een stabiele
stand van de koelkast (bijvoorbeeld als gevolg van een uitzonderlijk
onregelmatige vloer) of om hem naar achteren te laten hellen, moet u een
dikte van stijf materiaal (plastic of hout) onder de pootjes zelf leggen om de
voorkant nog verder te verhogen.
Controleer vervolgens of de deurpakkingen hermetisch afsluiten, vooral in
de hoeken. Bij een niet-correcte afsluiting moet u controleren of er zich
geen resten van de bewerking of van het verpakkingsmateriaal tussen de
pakking en de koelkast bevinden. Indien noodzakelijk kunt u de pakkingen
met de vingers modelleren, zoals afgebeeld in figuur 2. Let op: voor deze
handeling hoeft u niet geen kracht te gebruiken. Scheur de pakking niet en
zorg ervoor dat hij niet loskomt van de deur.
Controleer een paar dagen na de installatie of de oorspronkelijke
waterpasstelling nog correct is. Controleer of de werkende koelkast met de
deuren gevuld met flessen en voedsel nog stabiel is en of de
deurpakkingen hermetisch afsluiten. Herhaal indien noodzakelijk de
waterpasstelling en modelleer de pakking weer zoals bovenstaand
verklaard.
ES = ¡ATENCIÓN!
ALGUNOS CONSEJOS PARA UNA CORRECTA INSTALACIÓN
DE SU NUEVO FRIGORÍFICO.
Una vez instalado el frigorífico en el lugar previsto, regular la altura de los
dos pies delanteros (desenroscar tal como en figura 1) a fin de
estabilizarlo. Esta operación permite alzar la parte delantera del frigorífico,
inclinándolo hacia su parte trasera a fin de obtener un correcto cierre de
sus puertas.
En caso de que la altura de los pies no sea suficiente como para garantizar
la estabilidad del frigorífico (por ejemplo a causa de un desnivel excesivo
del pavimento) o para inclinarlo hacia su parte trasera, deberá aplicarse un
espesor de material rígido (plástico o madera) debajo de los pies mismos, a
fin de alzar ulteriormente su parte delantera.
Controlar a continuación que las juntas de la puerta se cierren
herméticamente, particularmente en las esquinas. En caso de cierre
incorrecto, controlar que no haya residuos de material de fabricación o del
embalaje entre guarnición y frigorífico. Si es necesario, modelar la junta
con los dedos procediendo de la manera ilustrada en figura 2. Atención.
Para ejecutar esta operación no es necesario ejercer fuerza. No dañar ni
separar la junta de la puerta.
Después de algunos días de efectuada la instalación, controlar que la
nivelación inicial se esté manteniendo correctamente. Controlar que el
frigorífico en funcionamiento y con las puertas cargadas con botellas y
contenedores de alimentos mantenga su estabilidad y que las
guarniciones de la puerta cierren de modo hermético. De ser necesario,
nivelar nuevamente y modelar una vez más las guarniciones de la manera
ya indicada.
PT = ATENÇÃO!
ALGUNS CONSELHOS PARA UMA INSTALAÇÃO CORRECTA
DO SEU NOVO FRIGORÍFICO.
Tendo colocado o frigorífico na posição de instalação prevista, regule a
altura dos dois pés de apoio frontais (desatarraxando-os, conforme
mostrado na figura 1) para que o aparelho fique estabilizado. Esta
operação permite levantar a parte dianteira do frigorífico e, assim, incliná-
lo em direcção da sua traseira para facilitar o fecho correcto das portas.
Se a altura dos pés de apoio não for suficiente para deixar o frigorífico
estável (por exemplo, se o desnível do pavimento for excessivo) ou para o
inclinar em direcção da parte traseira, será preciso colocar um calço de
material rígido (plástico ou madeira) em baixo dos pés de apoio para
levantar mais um pouco a parte dianteira.
Em seguida, verifique se as borrachas de vedação fecham a porta
hermeticamente, sobretudo nos cantos. Se o fecho não for correcto,
verifique se estão presentes resíduos de maquinagem do aparelho ou
resíduos do material de embalagem entre a borracha de vedação e o
frigorífico. Se necessário, modele a borracha de vedação com os dedos,
conforme mostrado na figura 2. Atenção: não é necessário exercer força
para efectuar esta operação. Cuidado para não rasgar nem destacar a
borracha de vedação da porta.
Ao fim de alguns dias da instalação, verifique se o nivelamento inicial
ainda está correcto. Com o frigorífico a funcionar e com as portas
carregadas com garrafas e recipientes contendo alimentos, verifique se o
aparelho ainda está estável e se as borrachas de vedação fecham a porta
hermeticamente. Se necessário, proceda a um novo nivelamento e volte a
modelar as borrachas de vedação seguindo as instruções fornecidas
acima.
SV = OBSERVERA!
NÅGRA TIPS FÖR EN KORREKT INSTALLATION AV DITT NYA
KYLSKÅP.
Ställ kylskåpet på sin plats. Skruva sedan på de två fötterna fram (lossa
dem som i fig. 1) tills apparaten står stabilt. På det här sättet höjs kylskåpet
fram och lutas bakåt vilket gör att dörrarna stängs bättre.
Ibland räcker fötternas längd inte till för att ställa kylskåpet stabilt (t.ex.
p.g.a. att golvet är mycket ojämnt) eller det behöver lutas ytterligare bakåt.
Du kan då lägga en trä- eller plastkloss (materialet får inte ge efter) under
fötterna för att höja apparaten ytterligare i framkant.
Kontrollera sedan att dörrarnas tätningslister stänger till hermetiskt
framför allt i hörnen. Kontrollera att det inte sitter kvar produktionsrester
eller förpackningsmaterial mellan tätningslisten och kylskåpet om dörren
inte stänger som den ska. Om det behövs kan du försiktigt rätta till
tätningslisten med fingrarna som i fig. 2. VARNING! Var inte hårdhänt när
du utför detta. Gör inte sönder eller lossa tätningslisten från dörren.
Kontrollera att apparaten fortfarande står helt plant några dagar efter
installationen. Kontrollera att kylskåpet står stabilt och att dörrarnas
tätningslister stänger till hermetiskt även när kylskåpet är på och dörrarna
är fyllda av flaskor och matförpackningar. Justera annars åter fötterna och
rätta återigen till tätningslisterna enligt ovan.
913531164/B
