VARIA
™
REARVUE 820
Radar Tail Light
Owner's
Manual

Table of Contents
Introduction......................................3
Device Overview.............................. 3
Pairing............................................. 4
Pairing with the Varia
™
App................ 4
Pairing with a Watch or Bike
Computer.......................................4
Installing the Device......................... 5
Installing the Seat Post Mount............ 5
Installing the Device on the Mount.......6
Light Modes..................................... 8
Varia
™
App........................................9
Customizing the Light Mode
Sequence....................................... 9
Creating a Custom Light Mode.......10
Device Settings..............................10
Varia
™
App Settings........................ 10
Customizing the Varia
™
App Sounds
and Alerts Settings...................... 10
Edge
®
Bike Computer...................... 11
Radar Data Screen..........................11
Alert Settings................................ 12
Light Network................................12
Viewing the Light Widget.............. 12
Configuring the Light Network........12
Bike Light Settings.......................13
Charging the Device....................... 14
Charging Status LED....................... 14
Software Updates........................... 15
Checking for Software Updates Using
the Varia
™
App............................... 15
Updating the Software Using the Garmin
Express
™
Application.......................15
Getting More Information............... 16
Specifications................................ 17
Status LED....................................17
Radar Detection............................. 18
Troubleshooting............................. 19
Resetting the Device....................... 19
Restoring All Device Settings to Factory
Defaults....................................... 19
The radar device disconnects from the
Edge
®
bike computer....................... 19
The radar device disconnects from the
Varia
™
app.................................... 19
The radar device is reporting an
error............................................ 19
My bike computer does not show the
lateral position of vehicles............... 19
The lateral position of vehicles appears
to be wrong...................................20
The device does not turn on............. 20
The device turns on but the tail light
does not turn on.............................20
The status LED flashes red while
charging.......................................20
The status LED turns red while updating
the software..................................20
The status LED flashes yellow...........20
Introduction
WARNING
See the Important Safety and Product Information guide in the product box for product warnings and other
important information.
The device can improve situational awareness. It is not a replacement for cyclist attentiveness and good
judgement. Always maintain awareness of your surroundings, and operate the bicycle in a safe manner. Failure
to do so could result in property damage, serious injury, or death.
Same-speed vehicle detection is limited or unavailable at slower speeds or when the device’s radar cannot
detect the road due to factors such as snow, ice, heavy rain, other obstructions, or incorrect device mounting.
The tail light can be programmed to emit light at varying degrees of brightness and flash at various intervals.
Consult your physician if you have epilepsy or are sensitive to bright or flashing lights.
The Varia
™
RearVue 820 radar tail light contains a micro radar that can detect vehicles behind your bike and
estimate the vehicle size.
You must pair the device with the Varia app on your phone, or a compatible Garmin
®
watch or bike computer to
use the radar features (Pairing, page4).
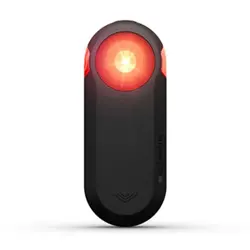
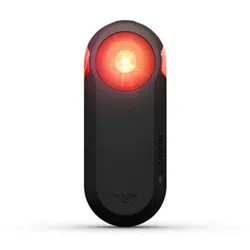
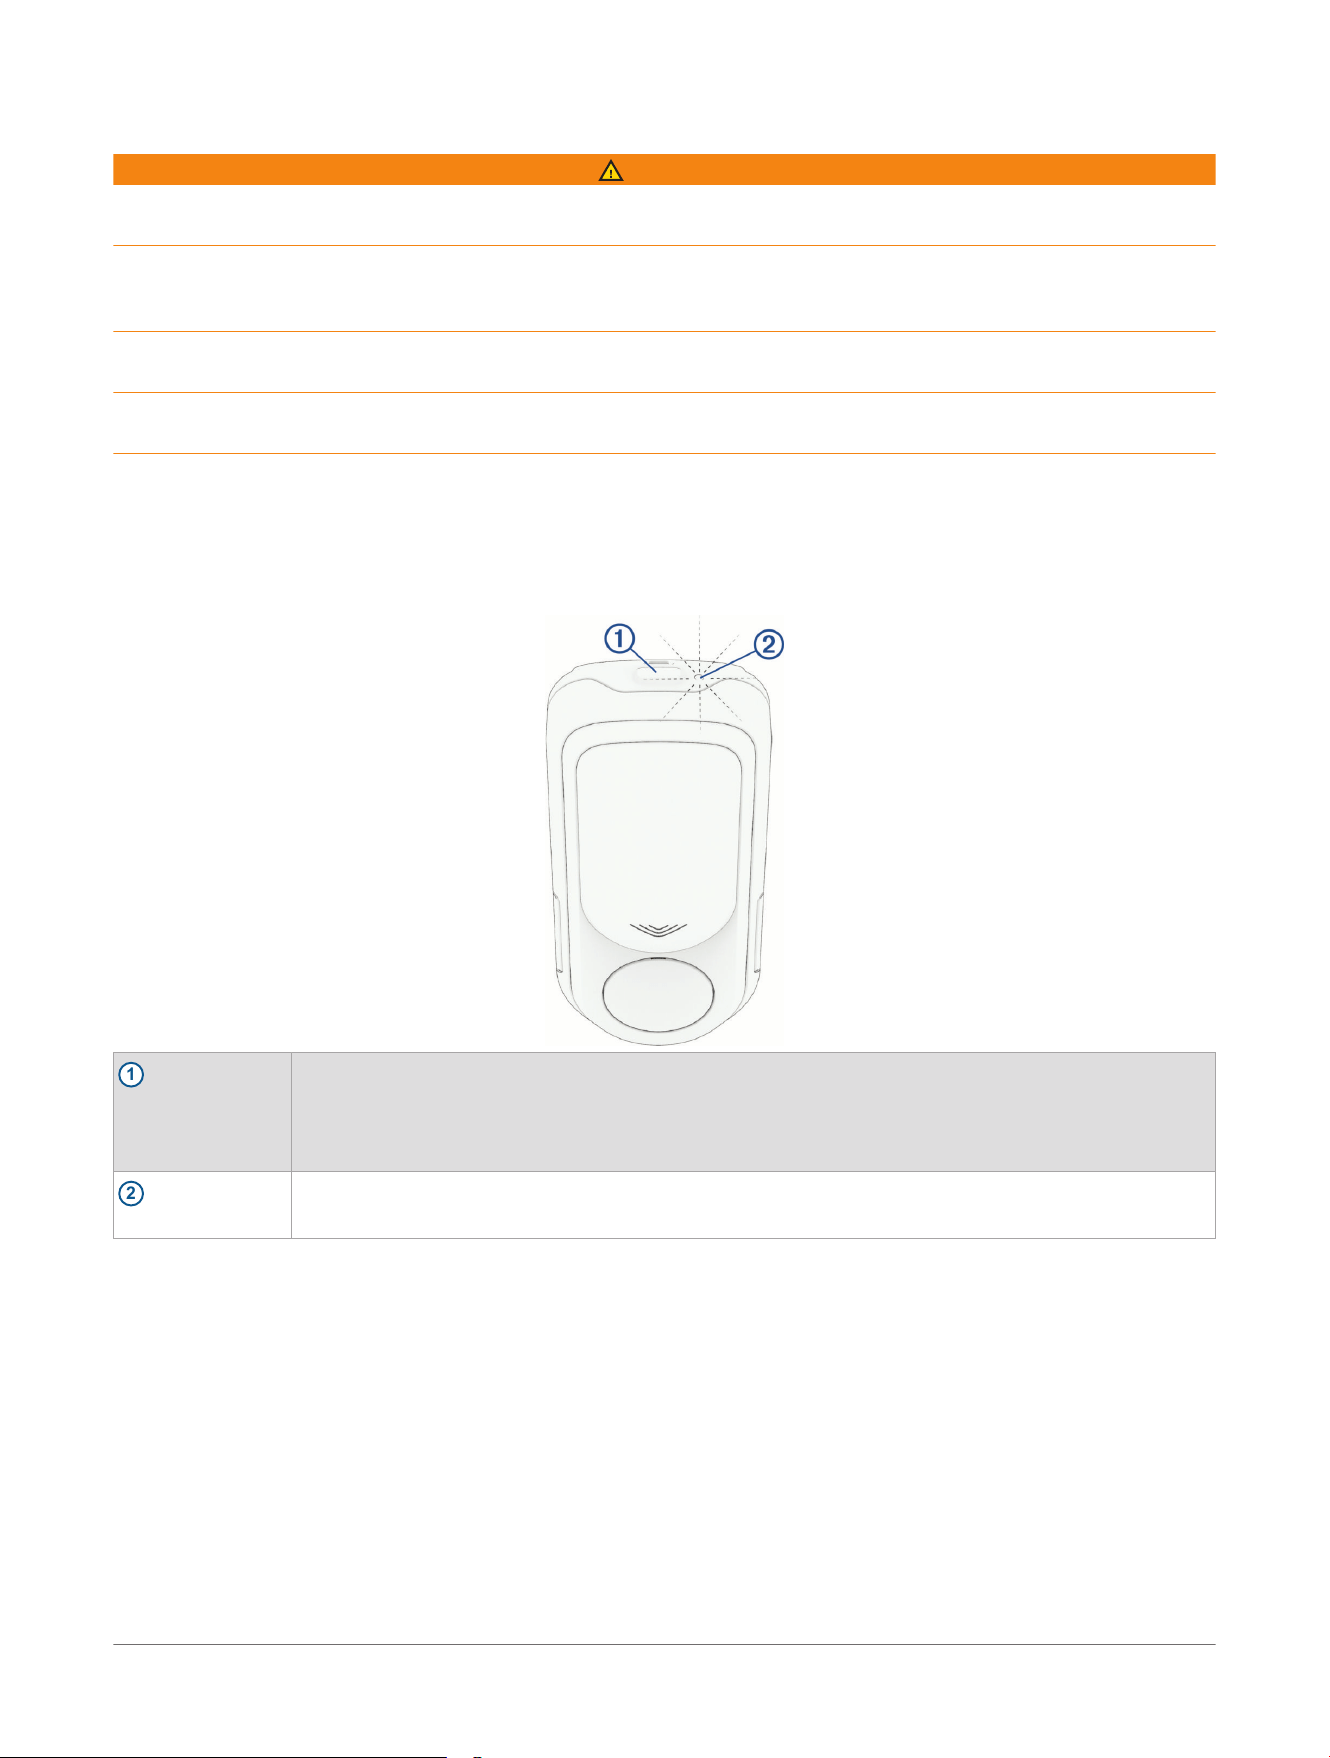
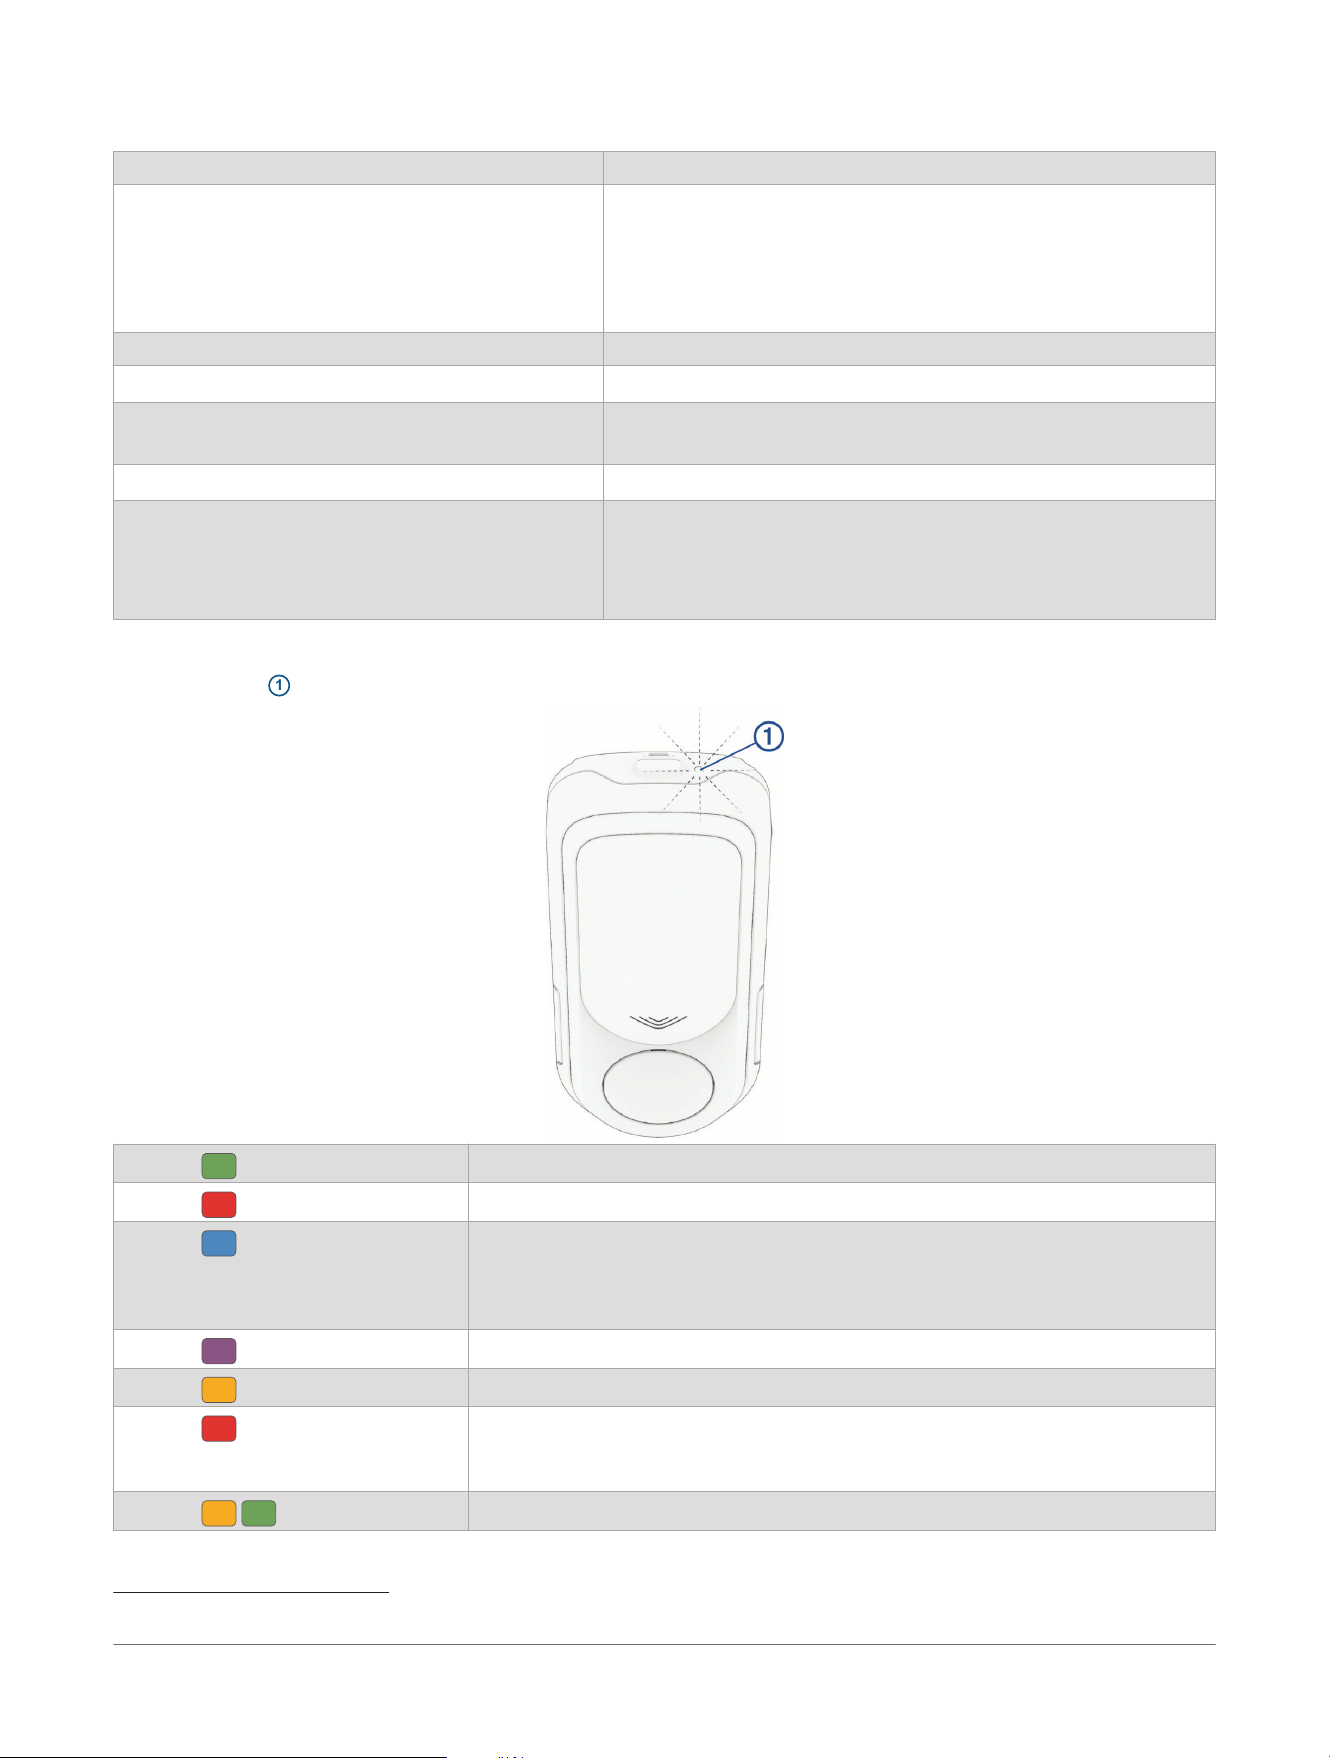
Device Overview
1
Device Button
Hold for 1 second to turn the device on.
Hold for 2 seconds to turn the device off.
When the device is off, hold for 2 seconds to enter pairing mode.
When the device is on, press to change light modes (Light Modes, page8).
2
Status LED
Indicates device status and battery level (Status LED, page17).
Introduction Varia™ RearVue 820 Radar Tail Light
Owner's Manual
3

Pairing
Pairing with the Varia
™
App
You can pair the Varia RearVue 820 radar tail light with the Varia app on your phone. The Varia app allows you to
view the radar screen, change settings, and update the device software.
1 Go to garmin.com/VariaApp, or scan the QR code to download and install the Varia app on your phone.
2 Bring your phone within range (0.3m) of the radar tail light.
NOTE: Stay 10m away from other Bluetooth
®
sensors while pairing.
3 While the Varia RearVue 820 radar tail light is turned off, hold the device button for 2 seconds to enter pairing
mode.
The device status LED flashes .
4 Open the Varia app on your phone.
5 Follow the on-screen instructions to pair the radar tail light.
If you already use the Varia app with another device, select > Devices> Add Device.
While the Varia RearVue 820 radar tail light is connected to your phone, the Varia app displays the radar screen
(Varia
™
App, page9).
You can use the Varia app to customize the light modes on the Varia RearVue 820 tail light (Light Modes,
page8).
Pairing with a Watch or Bike Computer
TIP: You can go to garmin.com/VariaRearVue820-CompatibleDevices to make sure your device is compatible
with the Varia
™
RearVue 820 radar tail light.
1 Make sure there are no other sensors within range that may interfere with pairing the Varia RearVue 820
device.
2 While the Varia RearVue 820 device is turned off, hold the device button for 2 seconds to enter pairing mode.
The status LED flashes .
3 Select an option:
● On a Garmin
®
bike computer, select > Sensors> Add Sensor> Search All.
● On a Garmin watch, from the menu, select Sensors & Accessories> Add New> Search All.
4 Select the Varia RearVue 820 device.
Your compatible Garmin device screen shows a sidebar and emits alert tones when it detects a vehicle
approaching behind you. Additional options are available on compatible Edge
®
bike computers (Edge
®
Bike
Computer, page11).
4
Varia™ RearVue 820 Radar Tail Light
Owner's Manual
Pairing
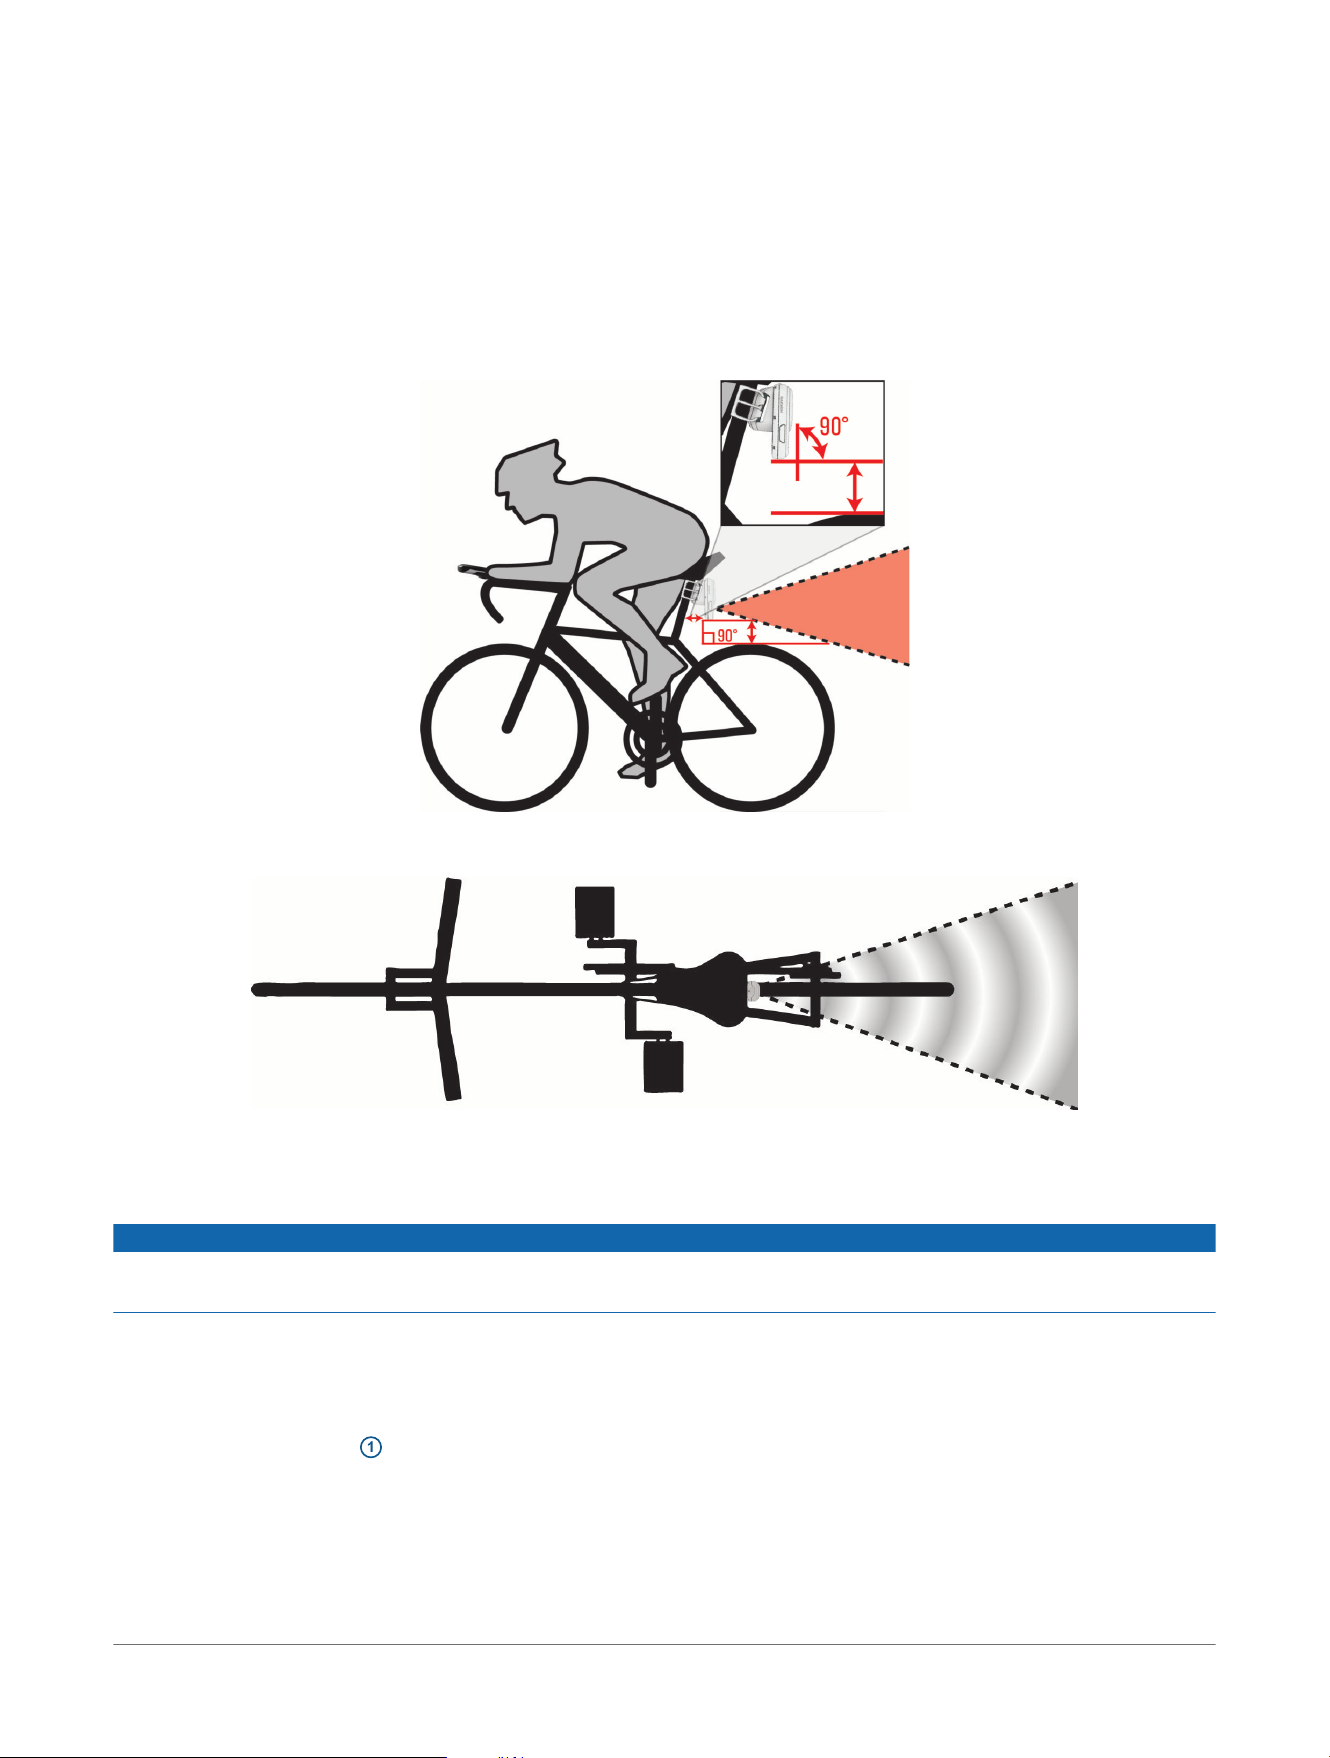
Installing the Device
To ensure maximum tail light visibility and radar detection range, you should install the mount according to
these considerations.
● Make sure the device does not interfere with the safe operation of your bike.
● Install the mount as high as possible on the bike.
● Mount the device 250 to 1200 mm above the road.
●
Mount the Varia
™
RearVue 820 device parallel to the longitudinal axis of the vehicle.
● Make sure there are no obstructions that may block the tail light or the radar.
● Make sure the mount surface is perpendicular to the road.
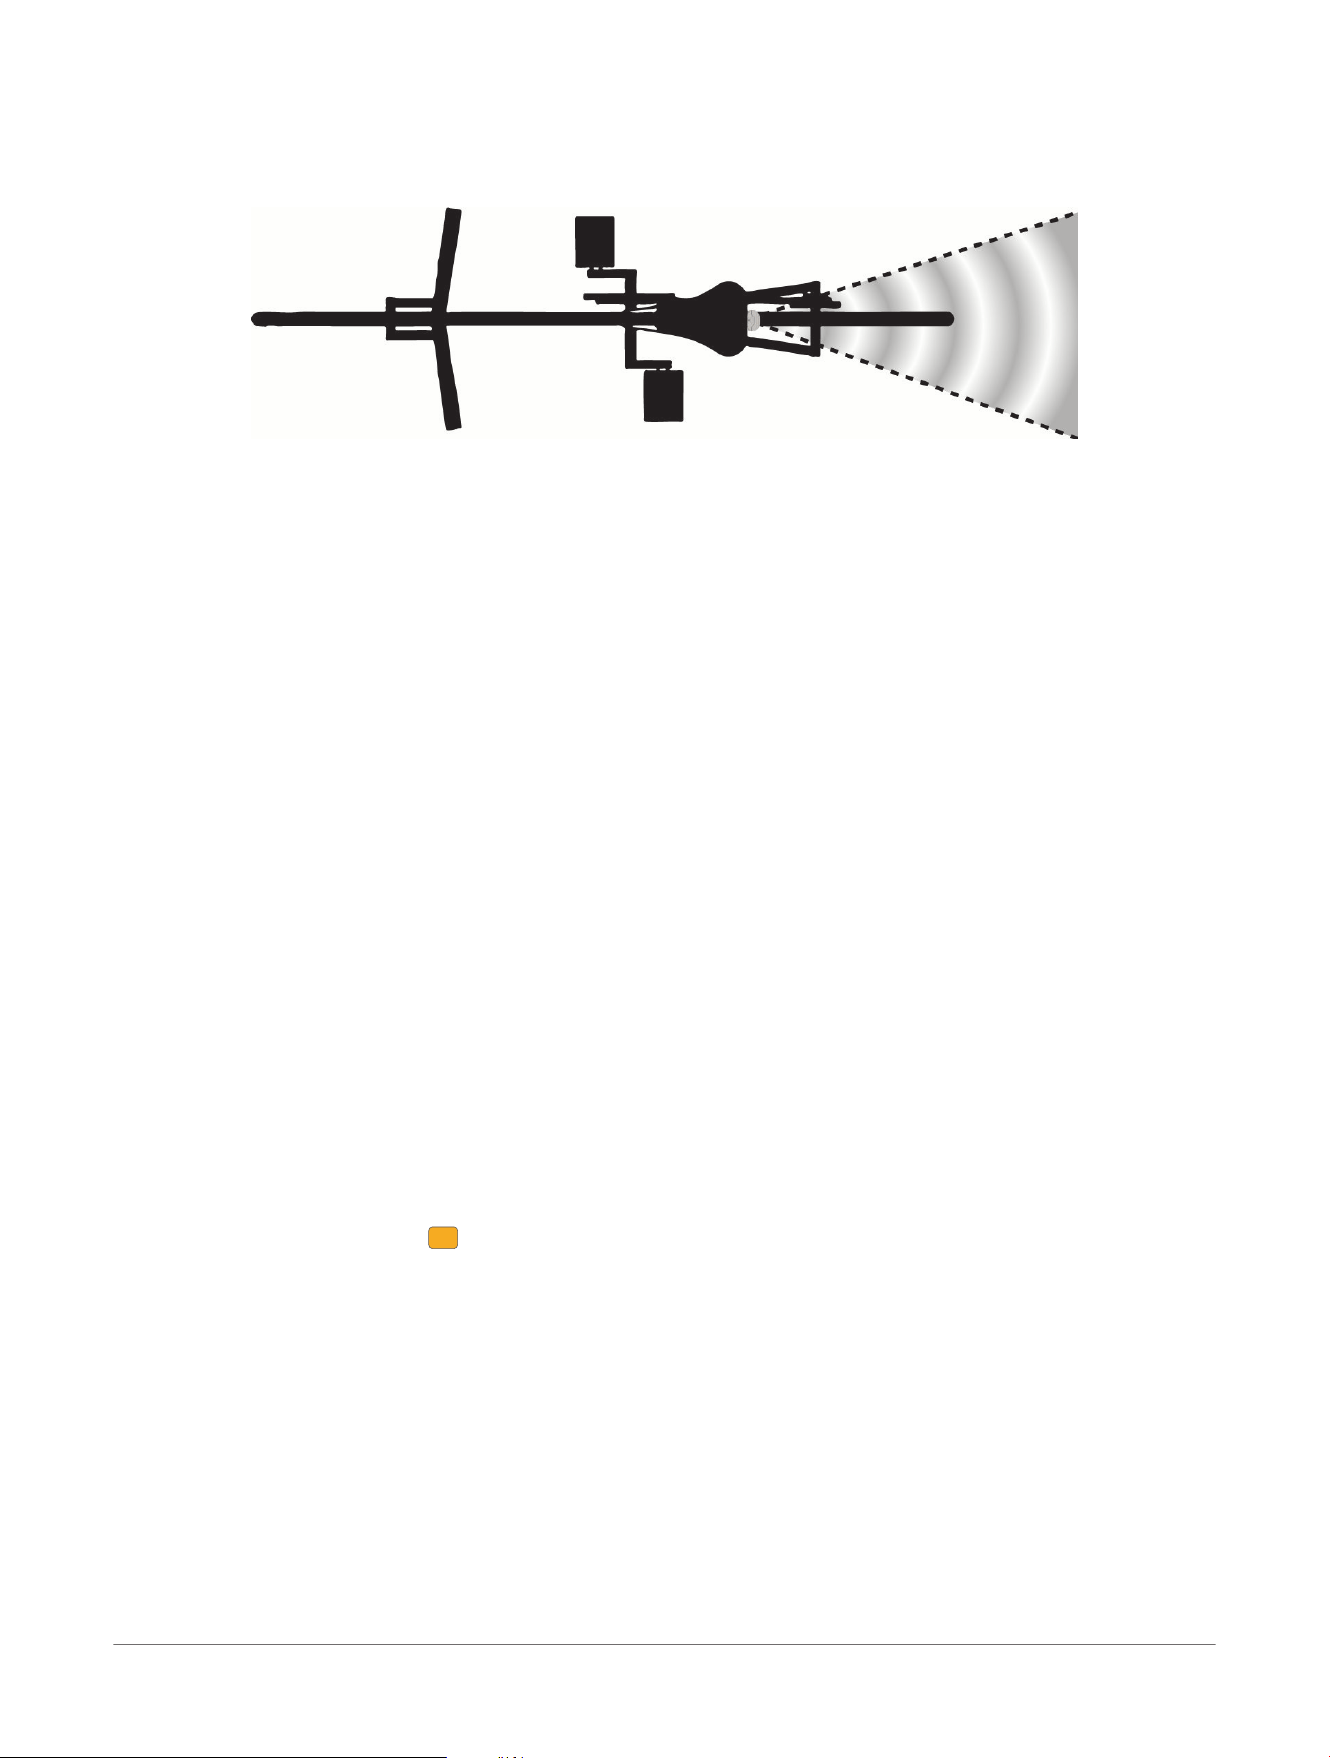
● Make sure the device faces straight back, so that the radar beam covers the maximum range behind your
bike.
You should go for a test ride during the day, in a safe environment, and adjust the mount, if necessary, before
using the tail light at night.
Installing the Seat Post Mount
NOTICE
You must install the mount surface perpendicular to the ground, to make sure the radar beam is horizontal. If
the seat post mount directs the radar beam up or down, the effective range of the radar is reduced.
NOTE: The mount is packaged with bands to fit round seat posts between 25.4mm (1in.) and 35mm (1
3
/
8
in.)
in diameter, and most D-shaped and aero seat posts. Seat post compatibility may vary depending on your bike
model.
The mount is packaged with rubber pads to fit round, D-shaped, or aero seat posts.
1 Select the rubber pad
1
that best fits the shape of your seat post.
Installing the Device
Varia™ RearVue 820 Radar Tail Light
Owner's Manual
5
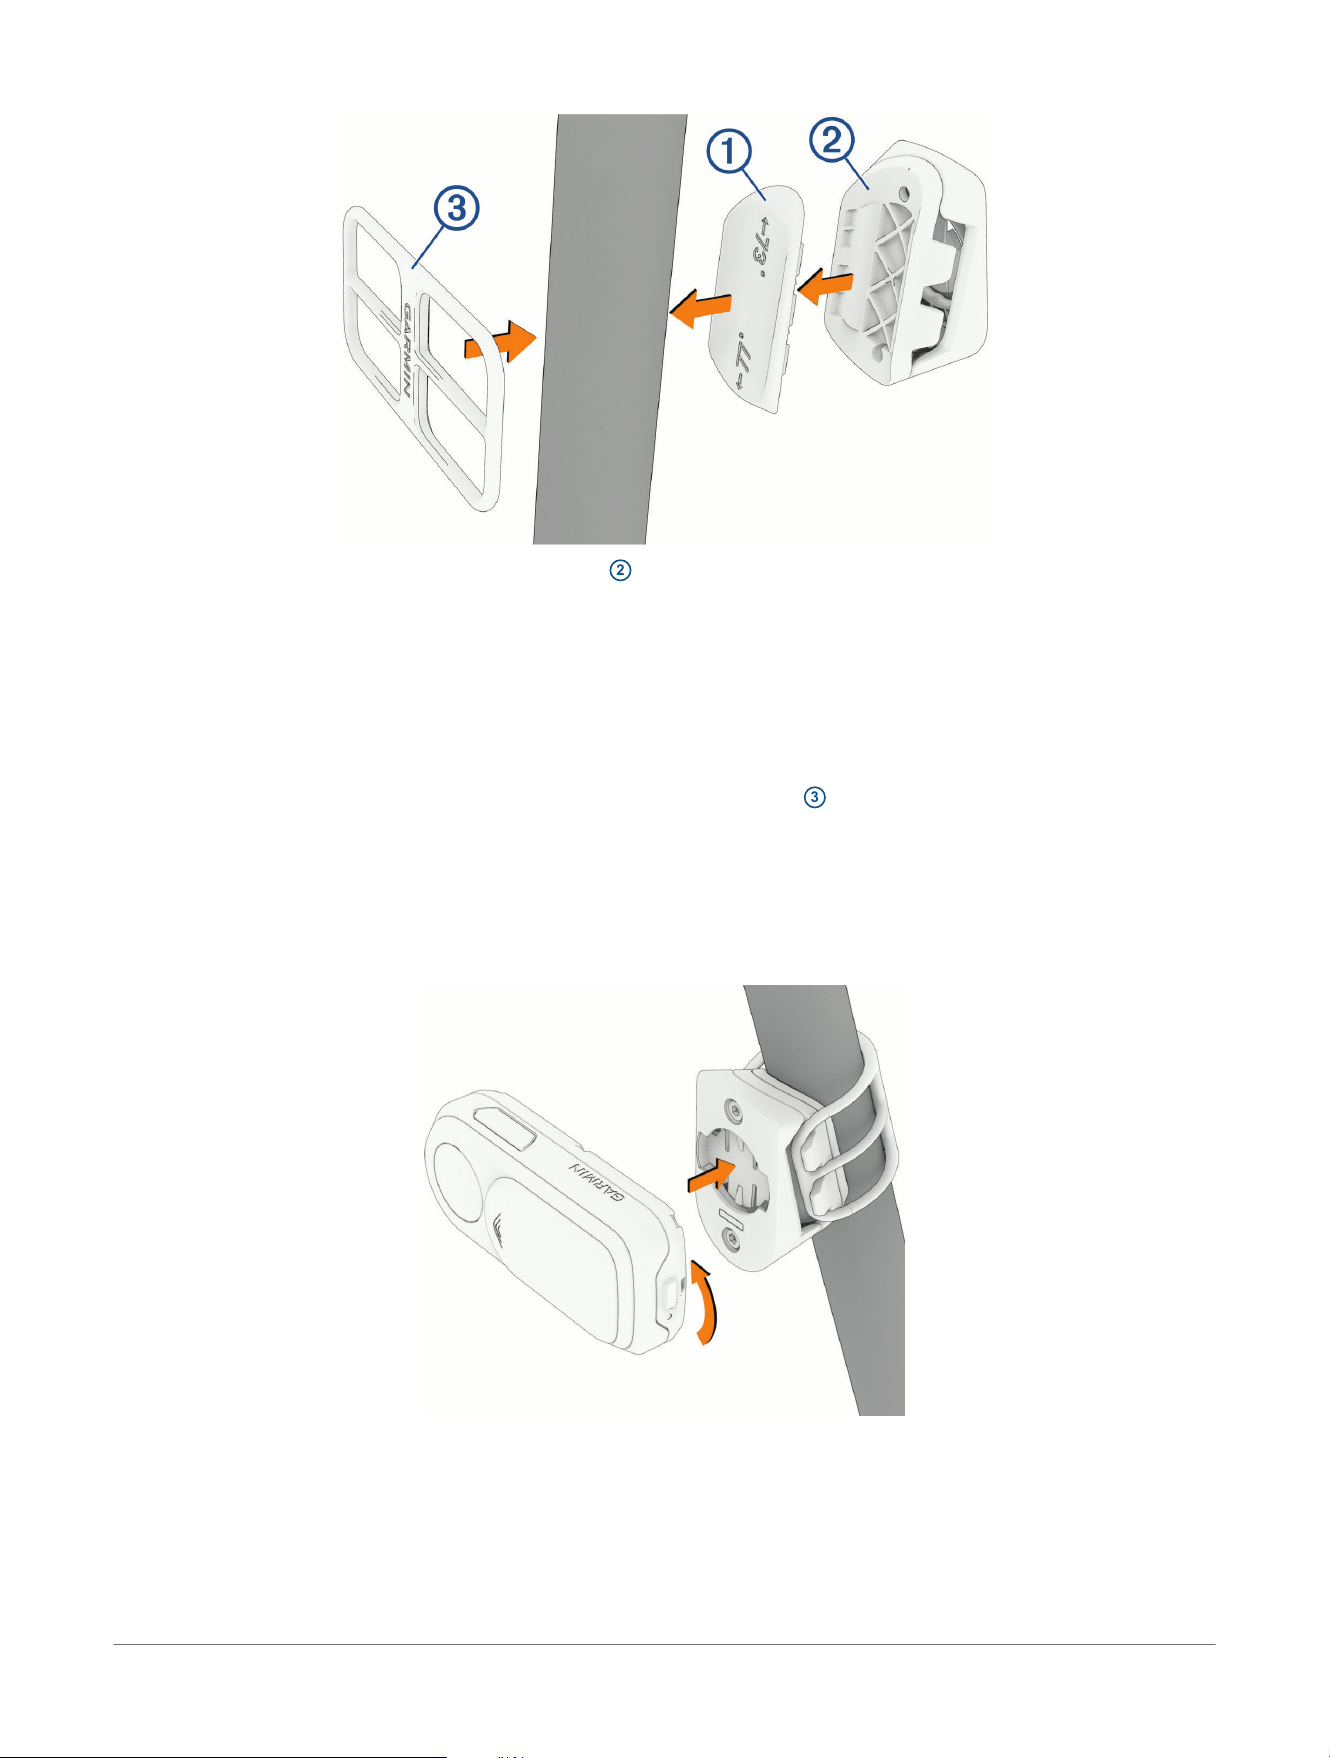
2 Select an option to place the pad on the mount
2
:
● If one of the numbers marked on the pad matches the angle of your seat post, place the pad on the
mount with the correct angle number up.
● If neither of the numbers on the pad matches the angle of your seat post, or if you don't know the angle of
your seat post, test both pad orientations, and select the best one.
The combined mount and pad must result in the device being perpendicular to the road surface, to maximize
your radar range and tail light visibility.
3 Place the mount on the seat post.
4 Secure the mount to the seat post using one of the included bands
3
.
NOTE: You can secure the mount using the included cable ties instead of the band.
Installing the Device on the Mount
NOTE: You can install the device on the mount vertically in either orientation. The device automatically detects
the mounting orientation.
1 Align the tabs on the back of the device with the seat post mount notches.
2 Press down slightly and turn the device clockwise until it locks into place.
3 Make sure the device faces straight back, so that the radar beam covers the maximum range behind your
bike.
6
Varia™ RearVue 820 Radar Tail Light
Owner's Manual
Installing the Device
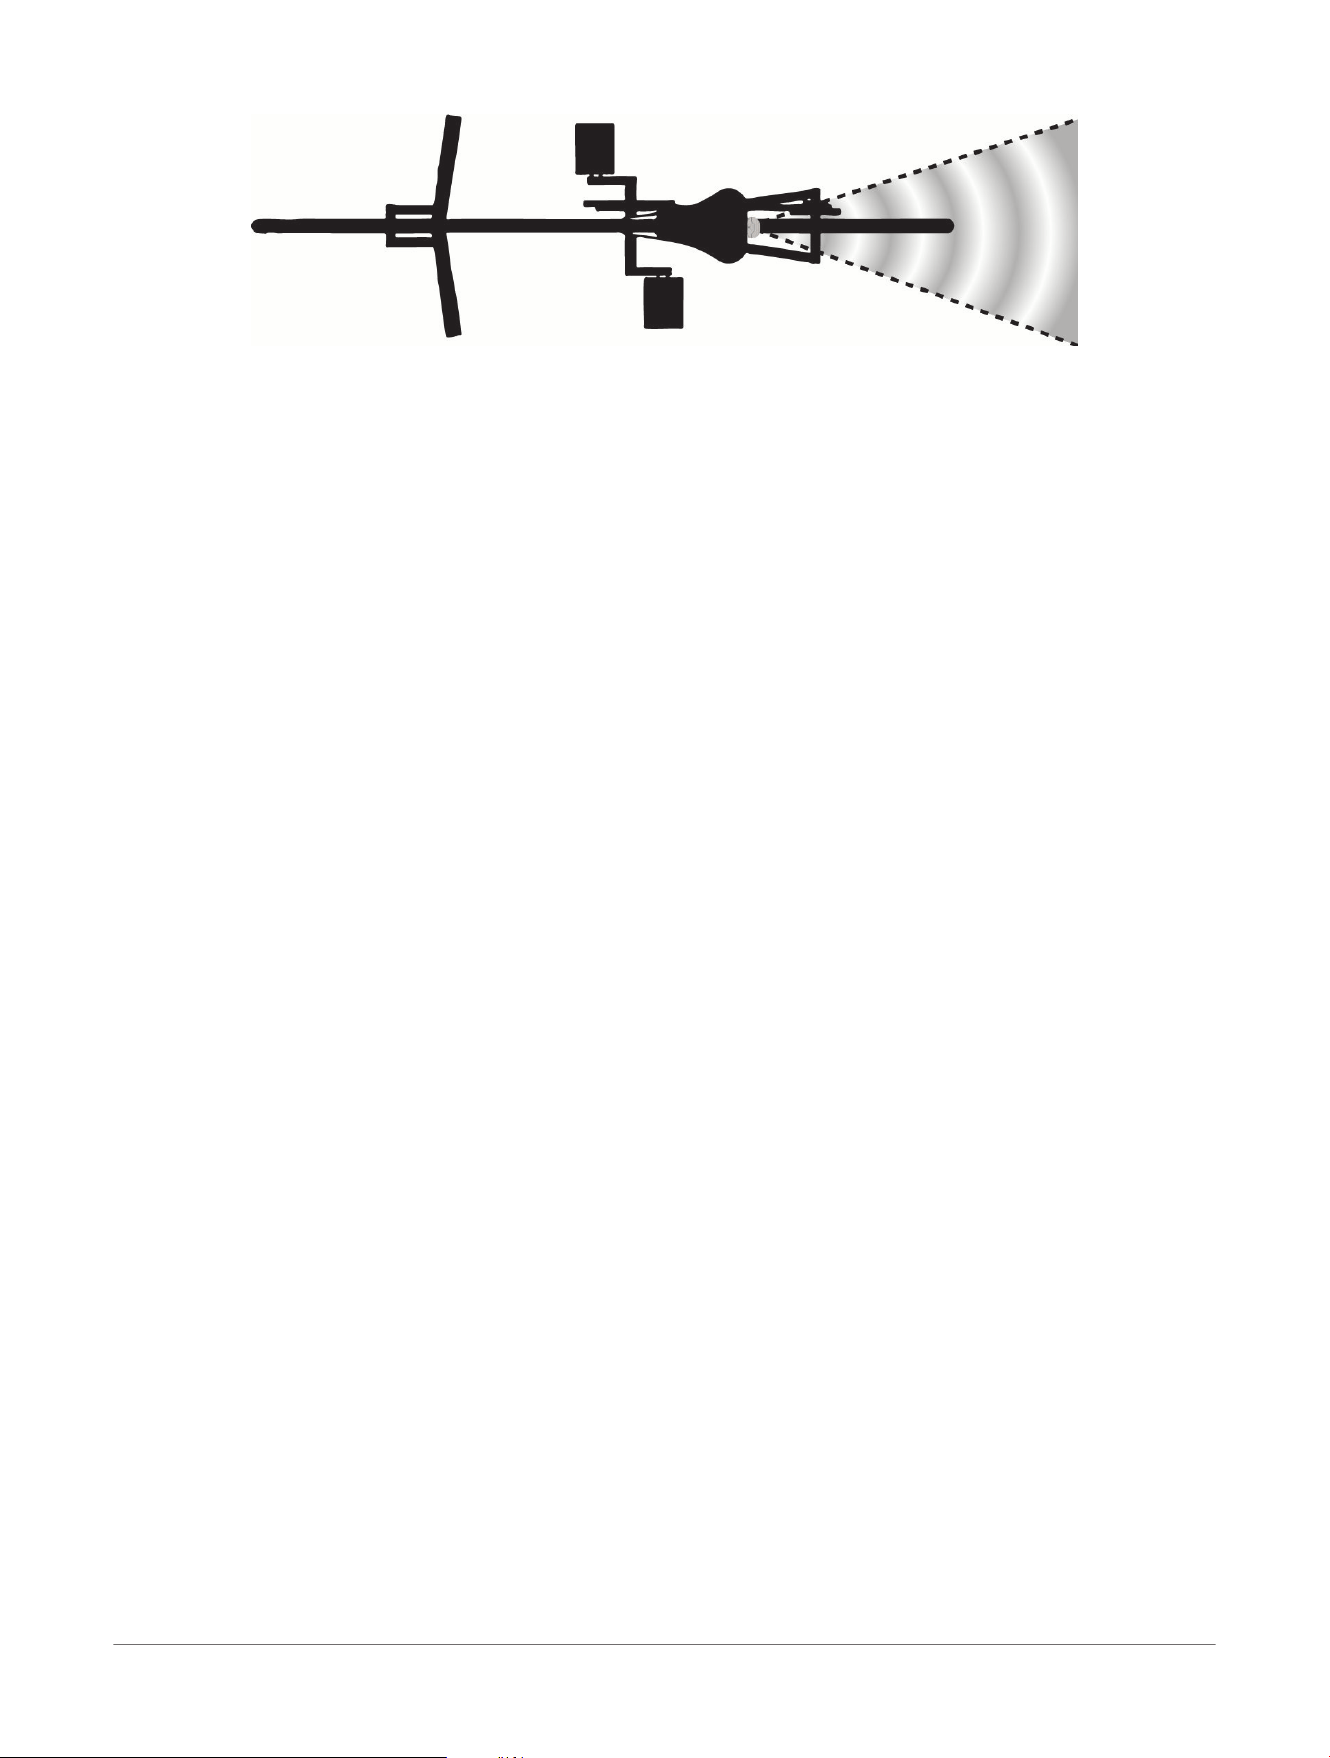
NOTE: If the device is mounted at an angle to the right or left, the radar does not track approaching vehicles
correctly.
Installing the Device Varia™ RearVue 820 Radar Tail Light
Owner's Manual
7
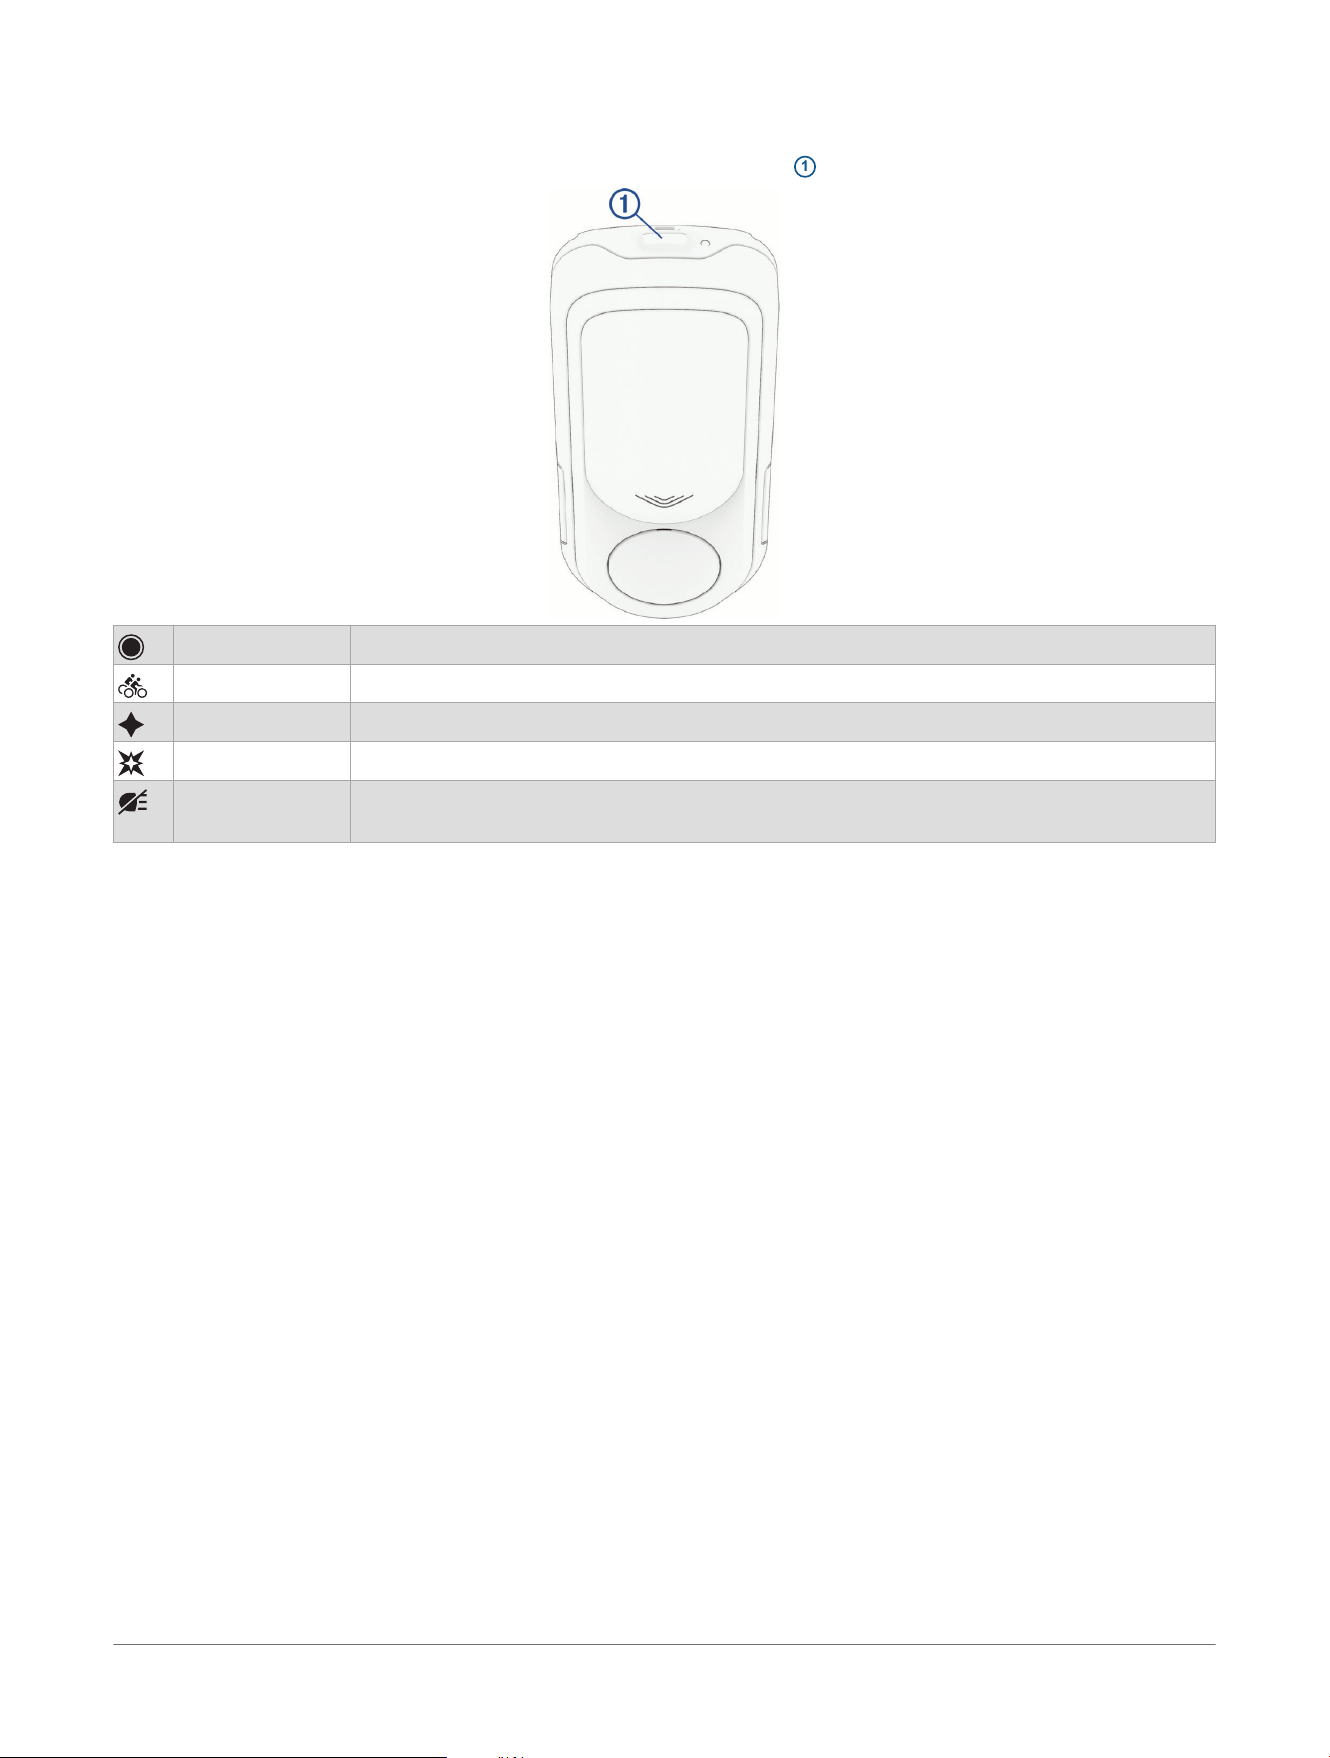
Light Modes
You can change the current light mode by pressing the device button
1
.
Solid The tail light is on at high brightness.
Peloton The tail light is on at low brightness.
Night Flash The tail light alternates between low and high brightness.
Day Flash The tail light flashes on and off continuously.
Off The tail light is off.
NOTE: The radar operates normally while the tail light is off.
When the tail light is on and the radar detects a vehicle approaching behind you, the flashing pattern changes
automatically to enhance your visibility.
You can customize your light mode sequence and create your own light modes in the Varia
™
app (Customizing
the Light Mode Sequence, page9).
8
Varia™ RearVue 820 Radar Tail Light
Owner's Manual
Light Modes
Varia
™
App
WARNING
The device can improve situational awareness. It is not a replacement for cyclist attentiveness and good
judgement. Always maintain awareness of your surroundings, and operate the bicycle in a safe manner. Failure
to do so could result in property damage, serious injury, or death.
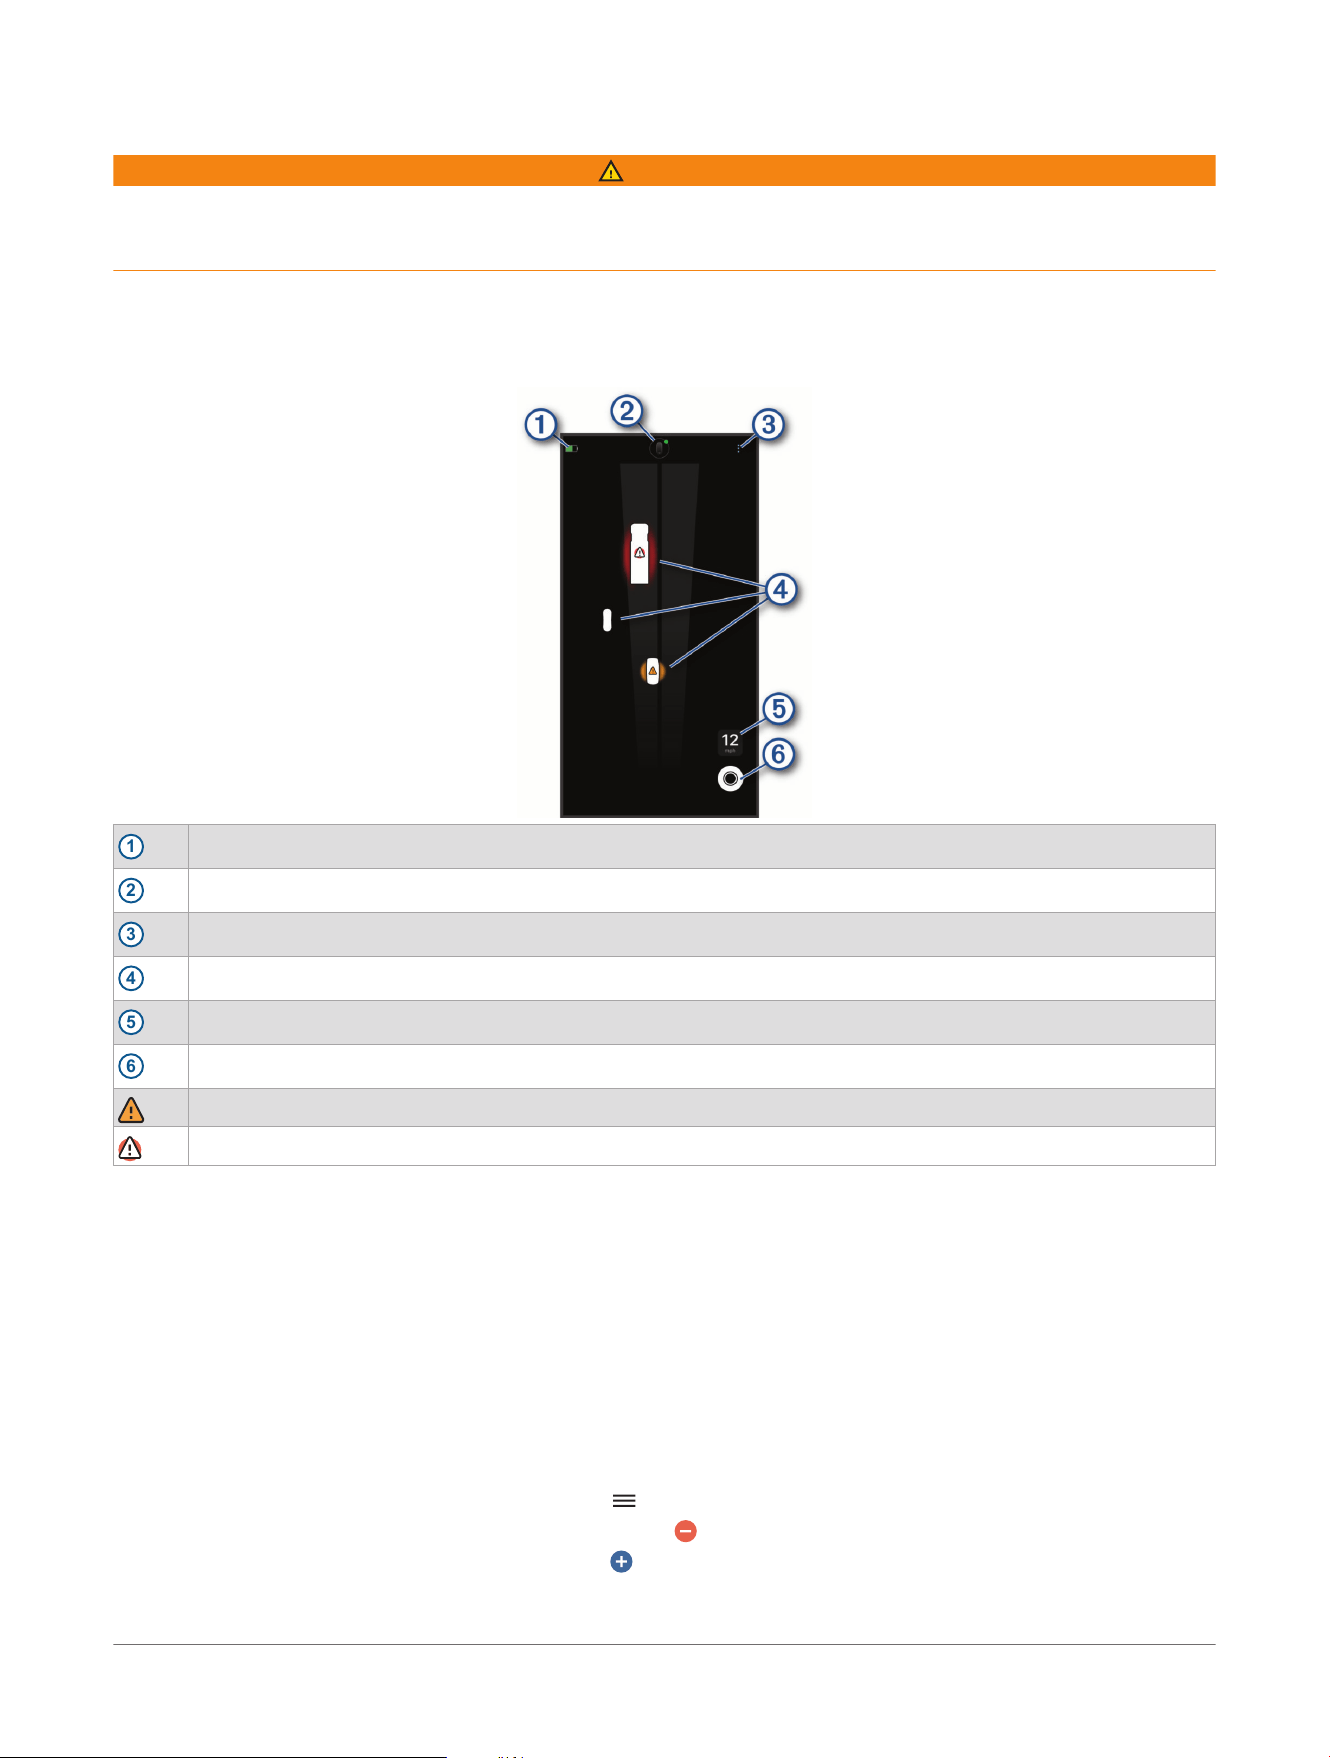
When connected to the Varia RearVue 820 radar tail light, the Varia app home screen shows a graphical
representation of the road behind you, as you ride.
NOTE: You must pair the Varia RearVue 820 radar tail light with your phone using the Varia app (Pairing with the
Varia
™
App, page4).
1
Radar tail light battery level
2
Radar tail light settings
3
Varia app settings (Varia
™
App Settings, page10)
4
Vehicles
5
Bike speed
6
Select to change light modes (Light Modes, page8).
Mid-level threat
High-level threat
Vehicle icons reflect the estimated size of the vehicle, as detected by the radar, and move up and across the
screen as they approach you. The radar continually reassesses and updates the icon to reflect the vehicle's
approximate size. When the vehicle size can't be estimated, vehicles are shown as an indistinct shape.
The radar calculates the threat level based on vehicle size, speed, and lateral distance from your path.
The app emits audible tones when a threat is detected and when all threats are cleared (Customizing the Varia
™
App Sounds and Alerts Settings, page10).
Customizing the Light Mode Sequence
1
From the Varia
™
app, select your device icon at the top of the screen.
2 Select Light Modes> Edit.
3 Select an option:
● To reorder your light mode sequence, select and drag it up or down in the list.
● To remove a light mode from the sequence, select .
● To add a light mode to the sequence, select .
● To create a custom light mode, select Create Custom Light Mode (Creating a Custom Light Mode,
page10).
Varia
™
App Varia™ RearVue 820 Radar Tail Light
Owner's Manual
9

4 Select Back.
Creating a Custom Light Mode
You can configure your own flashing pattern by creating a custom light mode.
1
From the Varia
™
app, select your device icon at the top of the screen.
2 Select Light Modes> Edit> Create Custom Light Mode.
3 Select an option:
● To create a solid light mode, select Solid, and use the slider to set the brightness level.
● To create a flashing light mode, select Add Flash.
● To set the duration and brightness level of a flash, select the flash from the list, and use the sliders to set
each parameter.
NOTE: To create a pause between flashes, you must add a flash and set its brightness to 0%. If you add
consecutive flashes with the same brightness level, the light does not turn off in between them.
● To reorder the flash sequence, select next to a flash, and drag it up or down in the list.
● To test your custom light mode, select Preview.
4 Select Save.
5 Enter a name, and select Save.
6 Select to add your custom light mode to the light mode sequence.
NOTE: You can have up to six light modes in the light mode sequence. If necessary, you can select to
remove a light mode from the sequence.
Device Settings
On the Varia
™
app, select the device icon at the top of the home screen, and select Device Settings.
Speed Indicator: Shows or hides the speed indicator on the Varia app radar screen.
Location: Sets the placement of the speed indicator on the Varia app screen.
Measurement Units: Sets the measurement unit for the speed indicator on the Varia app screen.
Device Orientation: Sets the orientation in which the device is installed on the mount.
NOTE: By default, the device automatically detects its orientation. If you manually set the orientation, the
device does not notify you of orientation errors, and you must make sure the setting matches the actual
device orientation.
Brake Light Pattern: Sets a flashing pattern for the tail light to use when the device detects that you are slowing
down.
Varia
™
App Settings
On the Varia app, select at the top-right corner of the home screen (Varia
™
App, page9).
Devices: Allows you to add or remove Varia devices from the Varia app.
Sounds & Alerts: Allows you to configure the vehicle proximity alerts for the Varia app.
Location Permission: Allows you to manage your phone permissions to support geolocation and connectivity
(applicable only to Varia devices equipped with a camera).
Help: Opens the product support page for the app with help topics, videos, and more.
Diagnostic Report: Allows you to enter a code from product support to view a diagnostic report for the Varia
app.
Vault Settings: Allows you to access the saved videos in your vault, update your vault settings, review your vault
subscription information, and update your Wi‑Fi
®
connections (applicable only to Varia devices equipped with
a camera).
Version: Displays the software version number.
User Warnings: Displays safety warnings and information.
Privacy Policy: Displays the full privacy policy and how Garmin
®
protects your data.
Copyright: Displays the license agreement information.
Customizing the Varia
™
App Sounds and Alerts Settings
1 From the Varia app, select > Sounds & Alerts.
2 Select an option.
10 Varia™ RearVue 820 Radar Tail Light
Owner's Manual
Varia
™
App
Edge
®
Bike Computer
WARNING
The device can improve situational awareness. It is not a replacement for cyclist attentiveness and good
judgement. Always maintain awareness of your surroundings, and operate the bicycle in a safe manner. Failure
to do so could result in property damage, serious injury, or death.
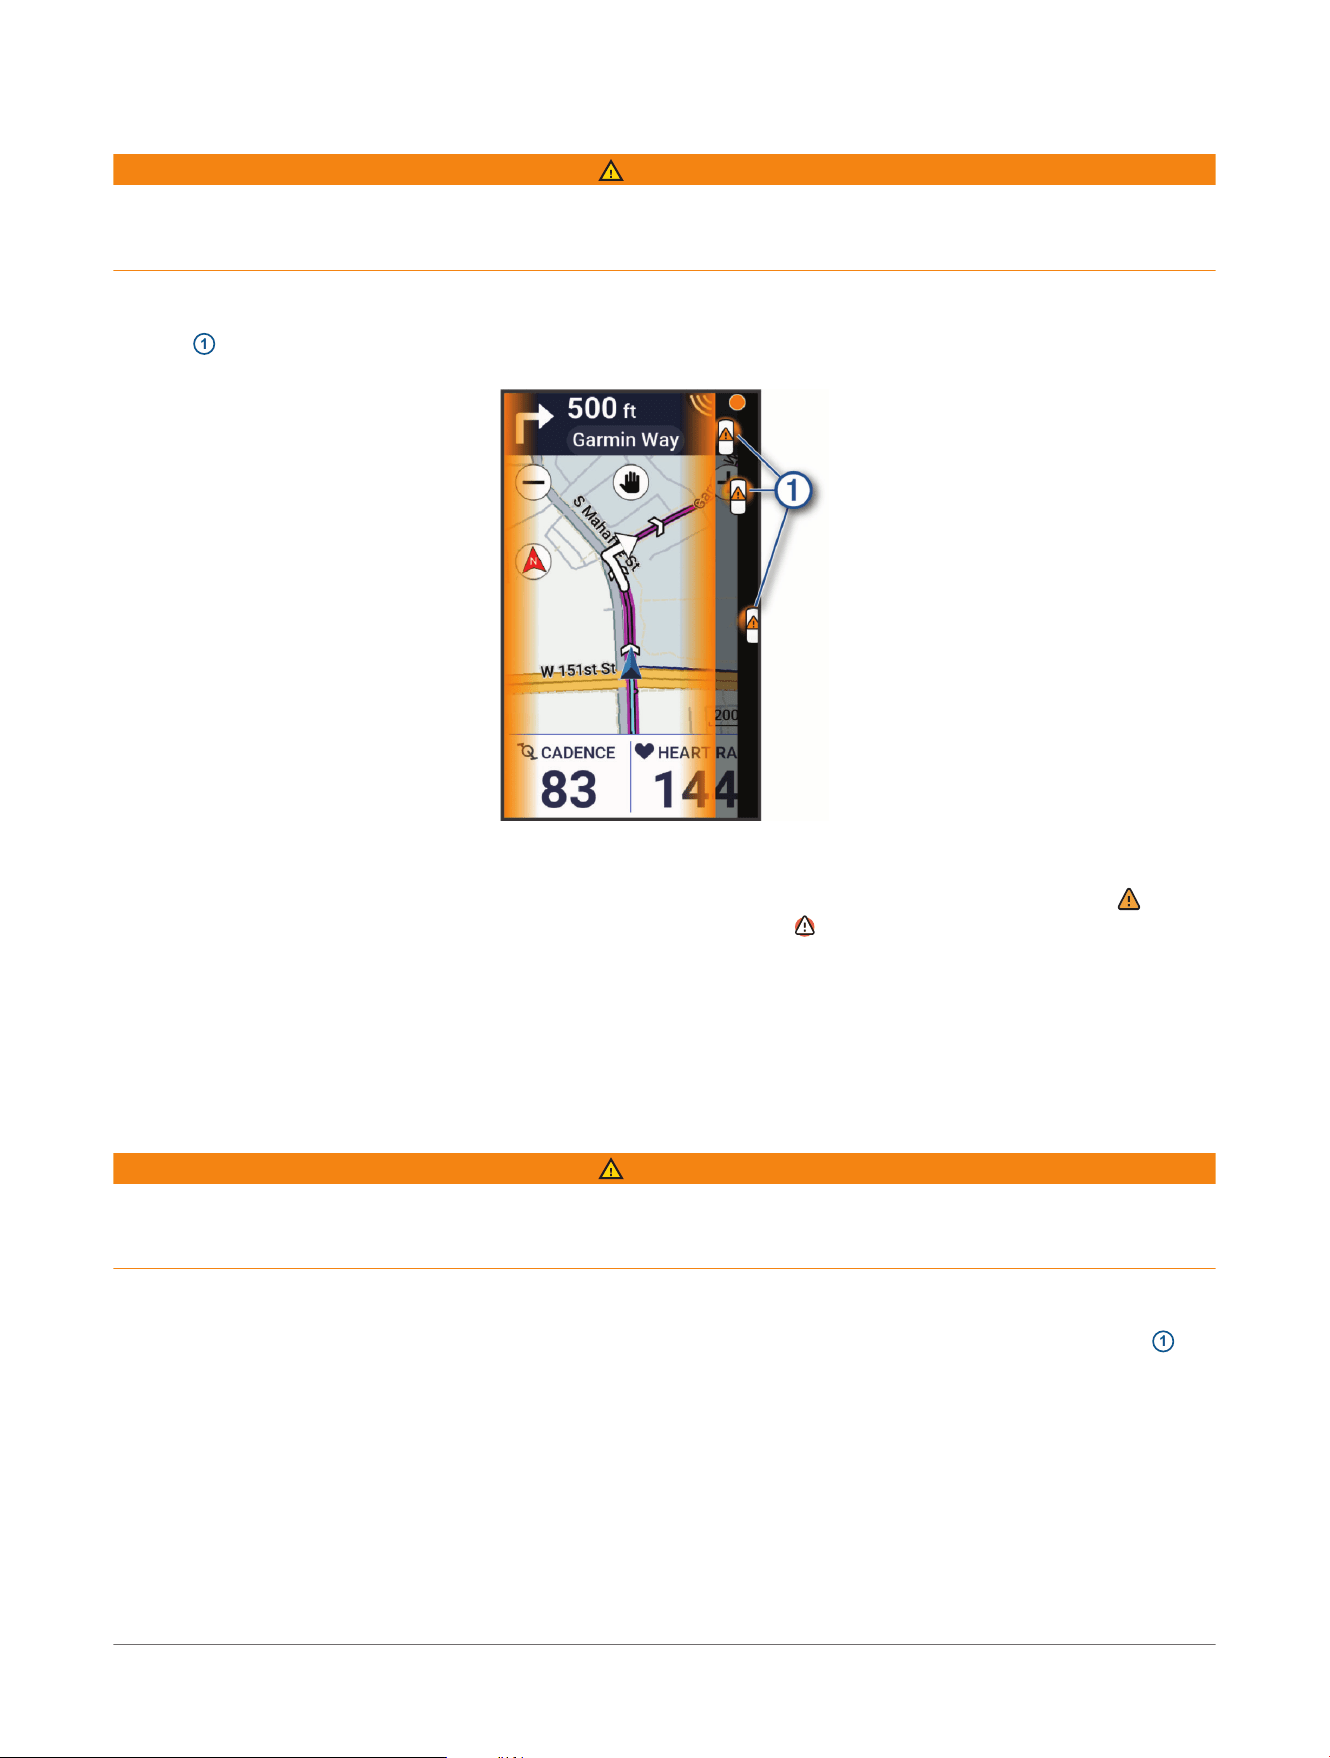
When connected to the Varia
™
RearVue 820 radar tail light, your compatible Edge bike computer shows the
vehicle column on the side of the screen when a vehicle is approaching you from behind.
An icon
1
along the side of the screen represents a vehicle behind you. The size of the icon represents the size
of the vehicle, as detected by the radar.
The vehicle icon moves up the screen as the vehicle approaches you, representing the vehicle's position relative
to you.
The radar calculates a threat level based on vehicle size, speed, and lateral distance from your path. A icon
over the vehicle icon indicates that the vehicle is a mid-level threat. A
icon over the vehicle icon indicates that
the vehicle is a high-level threat.
When the radar detects a threat, the bike computer emits an audible tone and the screen shows a red or orange
overlay on the sides of the screen, depending on the calculated threat level. When all threats are cleared, the
bike computer emits another tone and the screen shows a green overlay on the sides of the screen.
You can configure the threat alerts within the Sensors menu on your Edge bike computer (Alert Settings,
page12).
Radar Data Screen
WARNING
The device can improve situational awareness. It is not a replacement for cyclist attentiveness and good
judgement. Always maintain awareness of your surroundings, and operate the bicycle in a safe manner. Failure
to do so could result in property damage, serious injury, or death.
NOTE: The radar data screen is supported by Edge
®
bike computer models 540/840/1040 or newer. Some
devices may need a software update to enable the radar data screen.
The radar data screen shows a graphical representation of the road behind you, as you are riding. An icon
1
represents an approaching vehicle. The size of the icon represents the size of the vehicle, as detected by the
radar.
Edge
®
Bike Computer Varia™ RearVue 820 Radar Tail Light
Owner's Manual
11
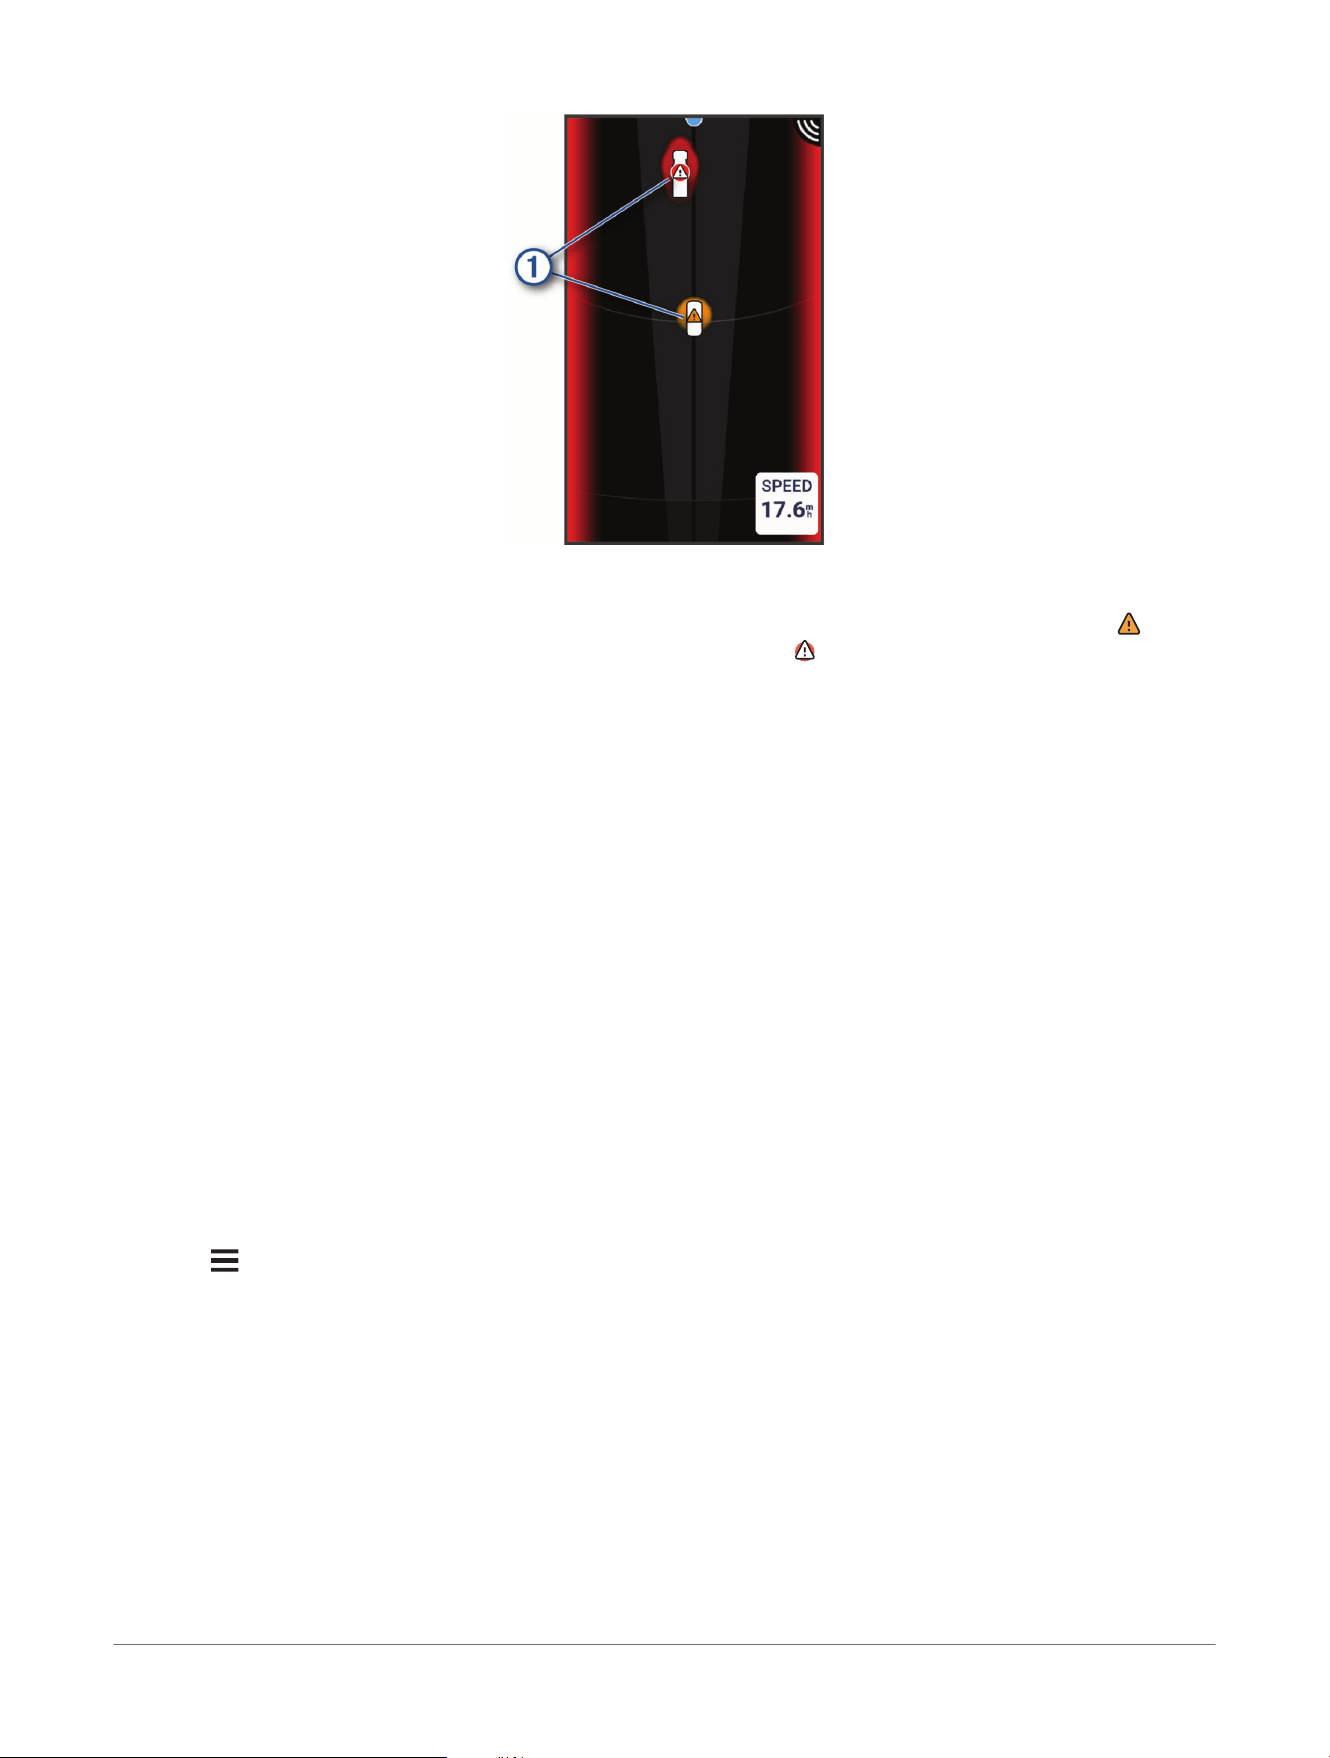
The vehicle icon moves up and across the screen as the vehicle approaches you, representing the vehicle's
position relative to you.
The radar calculates a threat level based on vehicle size, speed, and lateral distance from your path. A icon
over the vehicle icon indicates that the vehicle is a mid-level threat. A icon over the vehicle icon indicates that
the vehicle is a high-level threat.
TIP: You can add five data fields to this screen. For more information on customizing data fields, see the
owner's manual for the bike computer.
Alert Settings
From the Sensors menu, select the Varia
™
RearVue 820 device, and select Alert Settings.
Color Overlay: Enables the orange, red, and green overlays shown on the sides of the bike computer screen
when a threat is detected or cleared.
Vehicle Column: Sets the placement and size of the vehicle column sidebar shown on the bike computer screen
(Edge
®
Bike Computer, page11).
Tones: Allows you to customize the audible tones emitted by the bike computer when a threat is detected.
Green Threat Level Tone: Enables the audible tone emitted by the bike computer when all threats are cleared.
Light Network
The Edge
®
bike computer can control your connected bike lights while you ride.
Viewing the Light Widget
You can control your connected lights from the Light widget.
1 On the Edge
®
bike computer, swipe down from the top of the screen.
2 Swipe left or right until you see the Light widget.
Configuring the Light Network
1 Select > Sensors> Lights.
2 Select an option:
● Select Enable to enable the light network.
● Select Network Options to configure your light network (Light Network Options, page12).
● Select a bike light to configure it individually (Bike Light Settings, page13).
Light Network Options
From the Sensors menu, select Lights> Network Options.
Light Mode: Sets the light mode for your light network (Light Network Modes, page13).
Light Beam Activated: Sets whether your bike lights activate when you turn on the bike computer or when you
start an activity timer.
Test Lights: Allows you to test each connected bike light.
Auto Beam Adjustment: Allows a connected headlight to increase its brightness level when you increase your
speed (applicable only with a compatible headlight).
12
Varia™ RearVue 820 Radar Tail Light
Owner's Manual
Edge
®
Bike Computer

Light Network Modes
From the Sensors menu, select Lights> Network Options> Light Mode.
Auto: Sets the tail light and headlight modes automatically depending on ambient light.
High Visibility: Sets the tail light and headlight to the highest visibility mode.
Trail: Activates the tail light only when ambient light is low. Sets the headlight mode automatically depending on
ambient light.
Individual: Each connected bike light operates independently. You can manually select the light mode for each
light.
TIP: You can always override the light network mode and control individual bike lights in your network using the
Light widget (Viewing the Light Widget, page12).
Bike Light Settings
From the Sensors menu, select Lights, and select a paired light.
Not all settings are available for all Edge
®
bike computers.
Sensor ID: Displays the sensor's identification number.
Connection Type: Displays the technology that is used to connect to the sensor.
About: Displays device and software information.
Alert Settings: Allows you to configure how the bike computer alerts you about approaching vehicles (Alert
Settings, page12).
Light Mode: Sets the light mode (Light Modes, page8).
NOTE: This setting is available only when you select the Individual light network mode (Light Network Modes,
page13).
Edge
®
Bike Computer Varia™ RearVue 820 Radar Tail Light
Owner's Manual
13
Charging the Device
NOTICE
To prevent corrosion, thoroughly dry the USB port, the weather cap, and the surrounding area before charging or
connecting to a computer.
The device can operate normally while charging. If you use the device while charging, Garmin
®
recommends
using a cable with a right-angle connector (not included) to avoid strain on the device charging port.
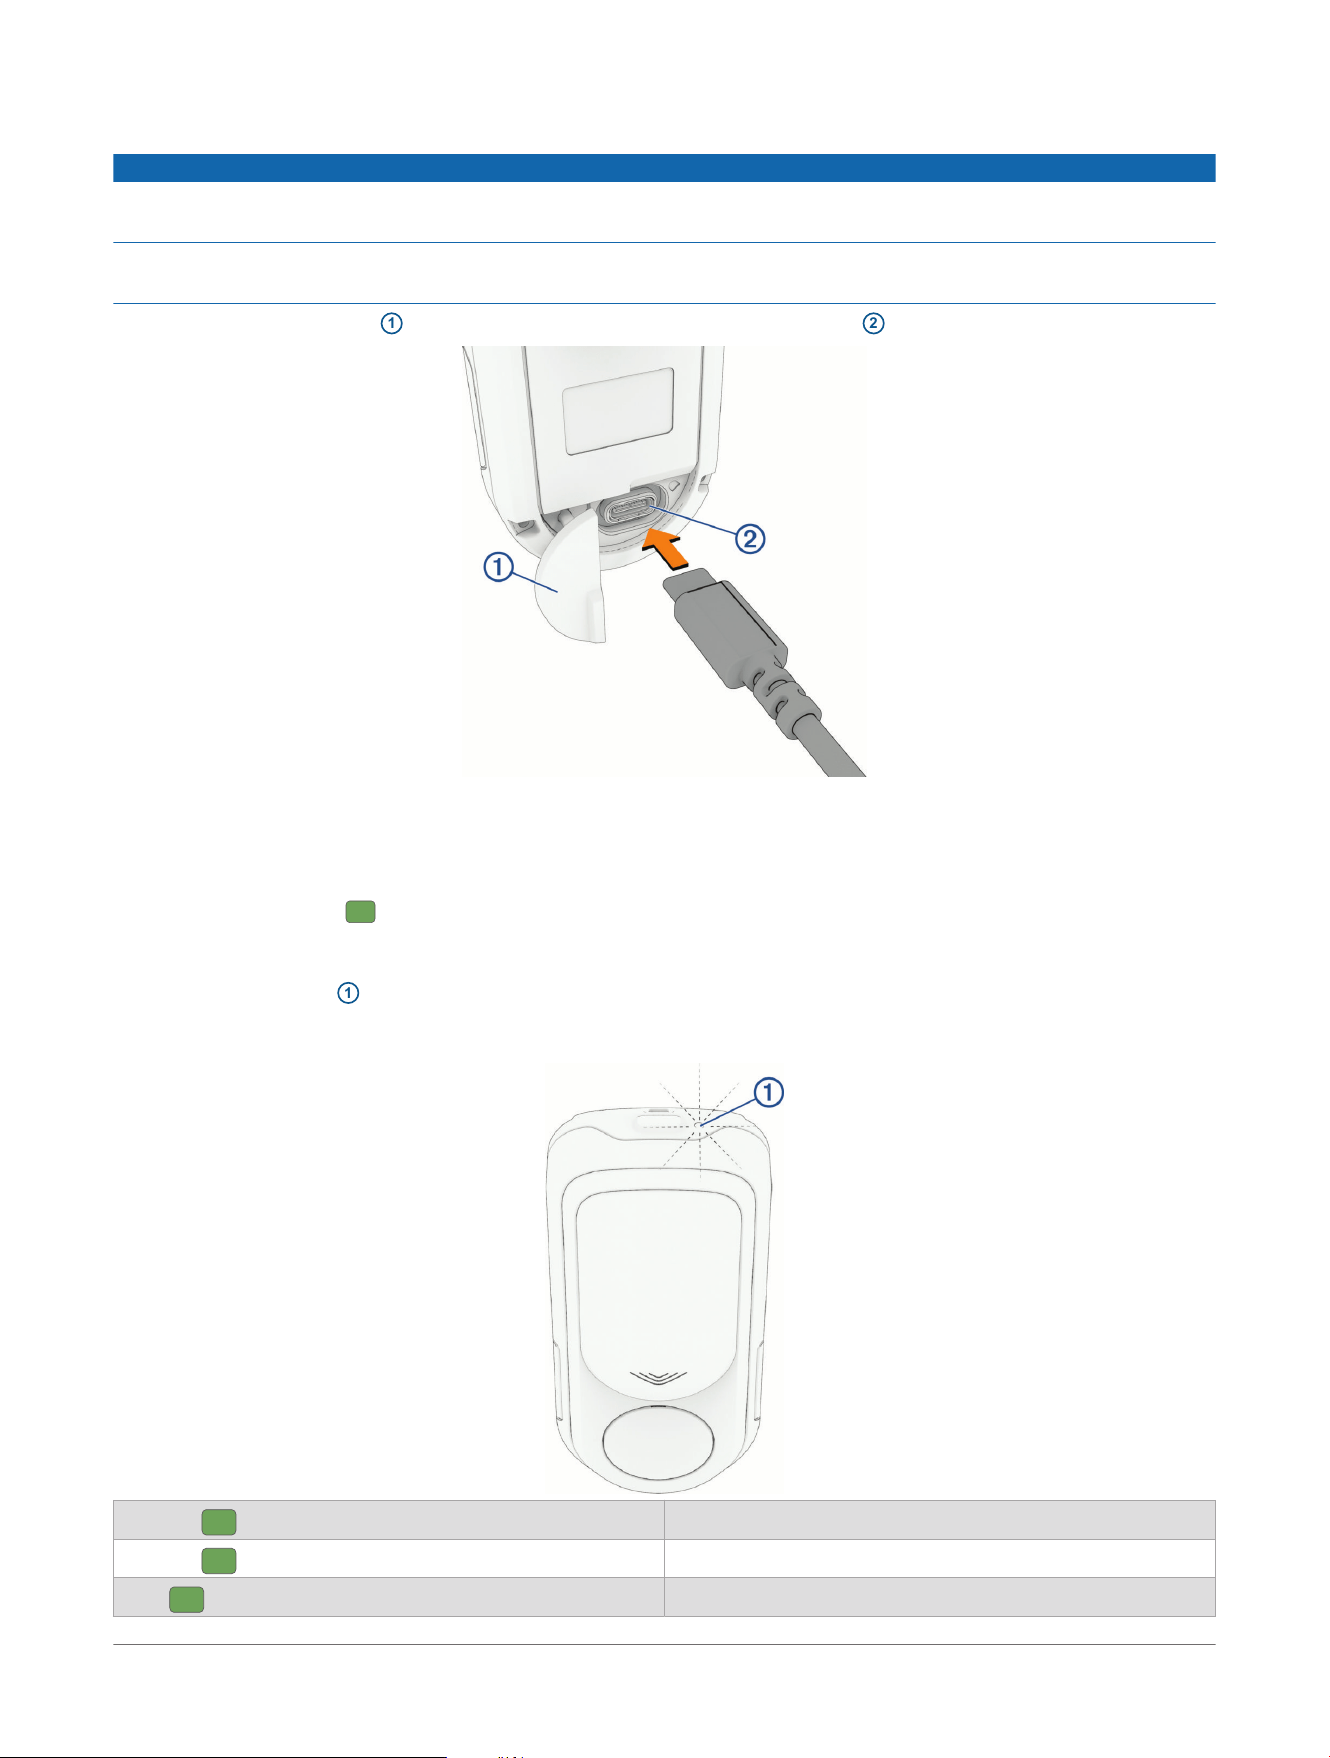
1 Pull up the weather cap
1
, and plug the USB cable into the charging port
2
on the device.
2 Connect the other end of the USB-C
®
cable to a power supply, such as a charging port or AC adapter (not
included).
After charging for 15 minutes, the device has at least 2 hours of battery life, depending on the light mode. It
takes up to 2.5 hours to complete a full charge.
The status LED flashes to indicate the charging status.
Charging Status LED
NOTE: The status LED
1
flashes to indicate the current charge status when the device is charging and turned
off. If the device is charging and turned on, the normal operating status LED patterns apply (Status LED,
page17).
Flashing rapidly
The device is less than 15% charged.
Flashing
The device is between 15% and 99% charged.
Solid
The device is fully charged.
14 Varia™ RearVue 820 Radar Tail Light
Owner's Manual
Charging the Device
Software Updates
Checking for Software Updates Using the Varia
™
App
Before you can check for software updates using the Varia app, you must pair the device with the Varia app
(Pairing with the Varia
™
App, page4).
The Varia app alerts you automatically when a software update is available. You can manually check for
updates to make sure you have the latest version.
1 In the Varia app, select the device icon at the top of the home screen.
2 Select Software Updates.
3 If a software update is available, follow the on-screen instructions to install it.
The radar LED flashes while the device is updating.
When the update is complete, the LED flashes 20 times.
If the update fails, the LED flashes 20 times. You should repeat the steps to try again.
Updating the Software Using the Garmin Express
™
Application
Before you can update your device software, you must download the Garmin Express application (garmin.com/
software/express).
1 Connect the radar device to your computer using the included cable.
The Garmin Express application looks for software updates automatically and sends them to your device.
2 If necessary, allow the device battery to charge to at least 15% (Charging Status LED, page14).
3 Follow the on-screen instructions.
4 Disconnect the device, and turn it on.
The radar LED flashes while the device is updating.
When the update is complete, the LED flashes 20 times.
If the update fails, the LED flashes 20 times (The status LED turns red while updating the software, page20).
Software Updates
Varia™ RearVue 820 Radar Tail Light
Owner's Manual
15

Getting More Information
● Go to support.garmin.com for additional manuals, articles, and software updates.
● Go to buy.garmin.com, or contact your Garmin
®
dealer for information about optional accessories and
replacement parts.
16 Varia™ RearVue 820 Radar Tail Light
Owner's Manual
Getting More Information
Specifications
Battery type Rechargeable, built-in, lithium-ion polymer battery
Battery life Up to 10 hr. (Solid mode)
Up to 15 hr. (Peloton mode)
Up to 11 hr. (Night Flash mode
Up to 24 hr. (Day Flash mode)
Up to 30 hr. with tail light off
Operating temperature range −15° to 50° C (5° to 122° F)
Charging temperature range
0° to 45° C (32° to 113° F)
1
Wireless frequency and transmit power 2400 – 2483,5 MHz: < 10dBm
57 – 59,4 GHz: < 20dBm
Water rating
IEC 60529 IPX7
2
LED luminous flux 25lm (Solid mode)
8 lm (Peloton mode)
40 lm (Night Flash mode)
100 lm (Day Flash mode)
Status LED
The status LED
1
is located next to the device button.
Flashing
The battery level is good, and the device is in active mode.
Flashing
The battery level is low.
Flashing
The device is in standby mode.
The device automatically goes into standby mode after you turn off your
connected bike computer. You can press the device button to reactivate the
device.
Flashing
The device is in pairing mode.
Flashing
The device is in demo mode (The status LED flashes yellow, page20).
Flashing continuously
An error has occurred.
NOTE: Most errors, such as radar interference, are temporary. If an error persist,
contact Product Support at support.garmin.com.
Flashing
The device is updating the software.
1
Charging speed is reduced when the ambient temperature is below 20° C (68° F).
2
The device withstands incidental exposure to water of up to 1m for up to 30min. For more information, go to www.garmin.com/waterrating.
Specifications Varia™ RearVue 820 Radar Tail Light
Owner's Manual
17

Flashing 20 times rapidly
The software update is complete.
Flashing 20 times rapidly
The software update failed.
Radar Detection
WARNING
The device can improve situational awareness. It is not a replacement for cyclist attentiveness and good
judgement. Always maintain awareness of your surroundings, and operate the bicycle in a safe manner. Failure
to do so could result in property damage, serious injury, or death.
Same-speed vehicle detection is limited or unavailable at slower speeds or when the device’s radar cannot
detect the road due to factors such as snow, ice, heavy rain, other obstructions, or incorrect device mounting.
● The radar detects approaching vehicles up to 170m (558ft.) away.
● The radar detects approaching vehicles traveling up to 170km/h (106mph).
NOTE: The radar may fail to detect vehicles traveling at exactly the same speed as you.
● The radar beam width is 60 degrees. It provides radar coverage for typical bends in the road.
● The radar is optimized to work outdoors. When used in an enclosed area, such as a parking garage or a
tunnel, the radar may report interference and temporarily stop functioning. After leaving the enclosed area,
the radar automatically resumes normal operation.
● The radar can detect up to eight approaching vehicles.
18 Varia™ RearVue 820 Radar Tail Light
Owner's Manual
Specifications
Troubleshooting
Resetting the Device
You can reset the device if it stops responding.
Resetting deletes the pairing connections from the device.
Hold the device button for 10 seconds.
The LED flashes continuously, until the reset is complete.
Restoring All Device Settings to Factory Defaults
You can use the Varia
™
app to clear all pairing connections and device settings.
NOTE: Restoring the default settings permanently deletes all custom light modes.
1 From the Varia app, select the device icon.
2 Select > Restore Default Settings
The LED flashes continuously, until the reset is complete.
The radar device disconnects from the Edge
®
bike computer
WARNING
If the radar device is not connected or sending radar data, Garmin
®
recommends that you stop riding and check
the devices in a safe location. Failure to do so could result in serious injury or death.
● Turn both devices off, and turn them back on.
● Pair the devices (Pairing with a Watch or Bike Computer, page4).
The Varia
™
RearVue 820 sends light and radar data to the Edge bike computer. The Edge bike computer
displays and when connected.
The radar device disconnects from the Varia
™
app
WARNING
If the radar device is not connected or sending radar data, Garmin
®
recommends that you stop riding and check
the devices in a safe location. Failure to do so could result in serious injury or death.
● Turn off Bluetooth
®
technology from your phone settings, and turn it back on.
● Turn off both devices, and turn them back on.
The radar device is reporting an error
WARNING
If the radar device status LED is flashes continuously, an error has occurred. Errors are also reported on the
Varia
™
app or your Garmin
®
watch or bike computer. While there is a radar error, the device cannot alert you to
vehicles behind you.
● Make sure the device is within the approved operating temperature range (Specifications, page17).
● Turn the device off, and turn it back on.
You can check the battery level on the Sensors menu of your Edge
®
device or on the Varia app.
● Move away from potential sources of radar interference, such as other bike radars or radar antennas.
My bike computer does not show the lateral position of vehicles
NOTE: The radar screen showing the lateral position of vehicles is supported only by the Varia
™
app and Edge
®
bike computer models 540/840/1040 or newer.
1 Update your compatible bike computer to the latest software version.
For more information on updating the device software, see the owner's manual for the bike computer.
2 On the bike computer, select > Sensors.
3 Select the Varia RearVue 820 radar device.
4 Select Sensor Details.
5 If Connection Type is not set to Secure (BLE), unpair the radar device, and pair it with your bike computer
again (Pairing with a Watch or Bike Computer, page4).
Troubleshooting
Varia™ RearVue 820 Radar Tail Light
Owner's Manual
19
The lateral position of vehicles appears to be wrong
● Make sure the device faces straight back, so that the radar beam covers the maximum range behind your
bike.
The device does not turn on
● Make sure the device is within the operating or charging temperature range (Specifications, page17).
● Charge the device for 4 hours (Charging the Device, page14).
If the device still does not turn on, reconnect it to the charger, and hold the device power button for at least
12 seconds.
The device turns on but the tail light does not turn on
● Turn the device off, and turn it back on.
● If the device is connected to an Edge
®
bike computer, start a ride on the bike computer.
TIP: By default, the Edge bike computer turns on the tail light when you start an activity timer (Light Network
Options, page12).
The status LED flashes red while charging
● If the device has been exposed to moisture, disconnect the charging cable, leave the weather cap open, and
allow the charging port to dry completely.
● Check the USB cable, connectors, and ports for damage.
● Make sure the AC adapter or computer USB port is generating power.
You can check this several ways. For example, you can check whether other devices powered by the source
are functioning.
● Charge the device within the approved charging temperature range (Specifications, page17).
The status LED turns red while updating the software
● Charge the device, and try again (Charging the Device, page14).
● Check the USB cable, connectors, and ports for damage.
● Turn off both devices, and turn them back on.
● Make sure the device is within the operating temperature range (Specifications, page17).
The status LED flashes yellow
If the device status LED flashes in a fast, continuous pattern while the device is on, the radar is in demo
mode. When in demo mode, the radar generates artificial data.
Press the device button up to six times, or until the status LED stops flashing, to exit demo mode.
20
Varia™ RearVue 820 Radar Tail Light
Owner's Manual
Troubleshooting


support.garmin.com
© 2026 Garmin Ltd. or its subsidiaries
Garmin
®
, the Garmin logo, ANT+
®
, and Edge
®
are trademarks of Garmin Ltd. or its subsidiaries, registered in the USA and other countries. Garmin Connect
™
,
Garmin Express
™
, and Varia
™
are trademarks of Garmin Ltd. or its subsidiaries. These trademarks may not be used without the express permission of Garmin.
USB-C
®
is a registered trademark of USB Implementers Forum. The Bluetooth
®
word mark and logos are owned by the Bluetooth SIG, Inc. and any use of such
marks by Garmin is under license.
M/N: A04986
Country restrictions apply. 010-03180-00 is approved for operation in France and the United Kingdom. 010-03180-10 is approved for operation in Germany.
February 2026 GUID-50AF77F9-6AD5-45A2-B352-C882BE5DE2B7 v1