Instrucon Sheet
Feuille d’instrucons
Hoja de instrucciones
www.sanjamar.com
PORTION CONTROL
DIGITAL SCALE
BALANCE NUMÉRIQUE
DE CONTRÔLE DES PORTIONS
BÁSCULA DIGITAL
CON CONTROL DE PORCIONES
SCDGPC13 / SCDGPCM13
2
BASIC SETUP
1. Plug in the 9-volt wall adapter (included).
2. RemovetheclearplasticlmfromtheDisplayUnitandthewhiteplasticlm
fromthestainlesssteelplatform.
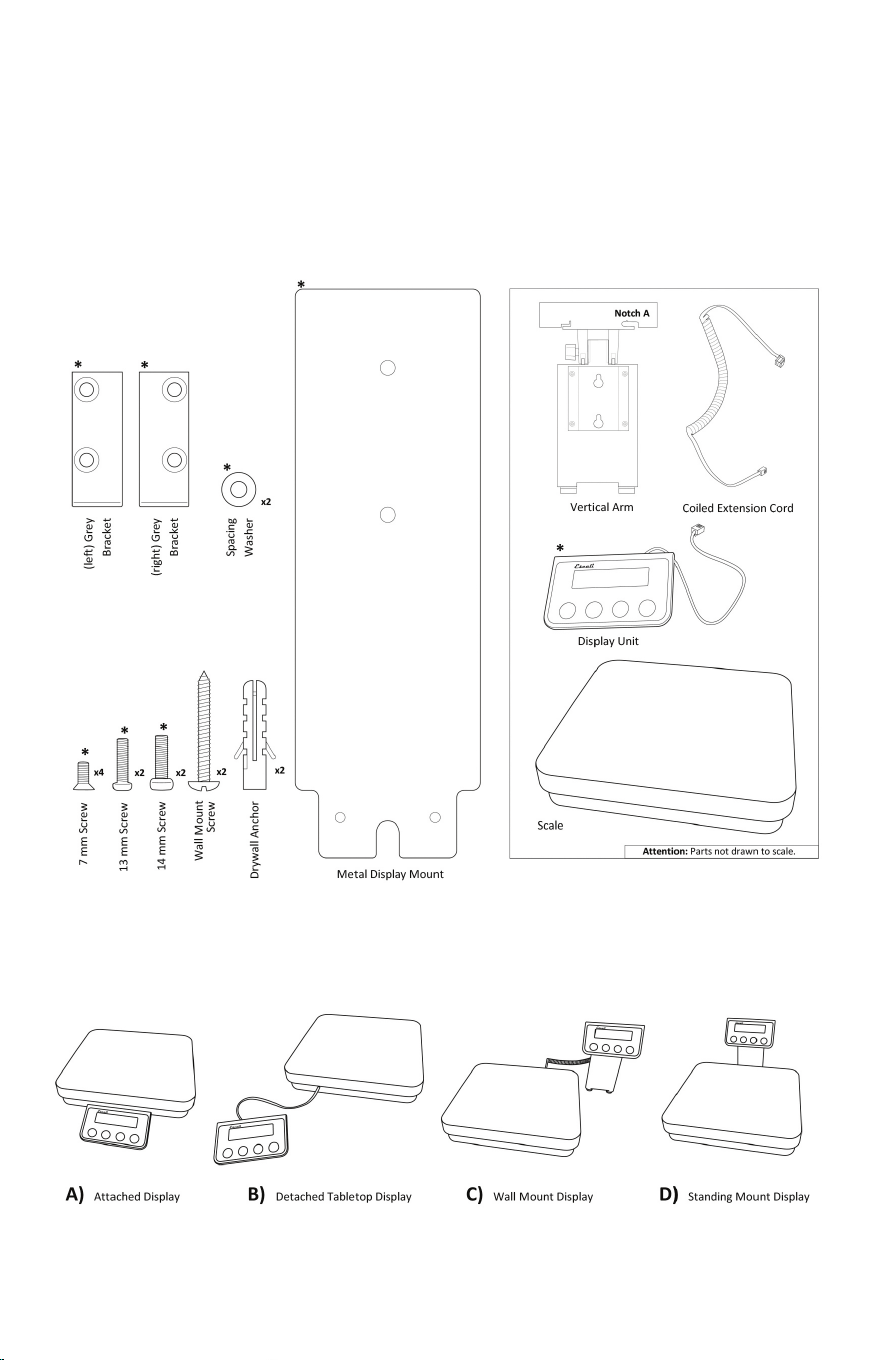
PARTS LABELED
*Denotespartsthatcomeattachedtothescale.Referencethedrawingsbelowduringassembly.
ASSEMBLYING THE DISPLAY CONFIGURATIONS

3
DISPLAY CONFIGURATION INSTRUCTIONS
A)AttachedDisplayConguration
• ThescalecomesassembledintheAttachedDisplayConguration.
• Followsteps1-9untilthedesireddisplaycongurationisassembled.
B)DetachedTabletopDisplayConguration
1. Unscrewthetwo13 mm Screws connecting the Display Unit to the
Metal Display Mount and save the two 13 mm Screwsforstep8.
Skip steps 2-3 for “D) Standing Mount Display Conguration.”
2. Unscrewthetwo14 mm Screws that attach the Metal Display Mount
totheundersideofthescale.SpintheMetal Display Mount around so it
nolongerprotrudesfromtheundersideofthescaleandreattachitwiththe
Spacing Washersremaininginbetween.
C)WallMountedDisplayConguration
3. Add the Coiled Extension Cord to the Display Cord.
4. Removethefour7 mm ScrewsfromthetwoGrey Brackets located
underneath the Display Unit, and save the 7 mm Screwsforstep6.
5. Tuck the Display CordallthewayintoNotch Aatthetopofthe
Vertical Arm, and slide the Vertical Arm into the Display Unit. It will
beatightt.
Reference “Vertical Arm” drawing on page 2 for Notch A.
6. Usethefour7 mm Screwssavedfromstep4tofastentheVertical Arm
to the Display Unit.
Skip step 7 for “D) Standing Mount Display Conguration.”
7. Attach the two Wall Mount Screwstoawallverticallyspacedand4cm
apart on center. Hang the Vertical Arm and Display Unit on the two
Wall Mount Screws.Pre-drill1/4inchdiameterholesfortheDrywall
Anchorswhenmountingontoadrywallsurface,or3/32inchdiameterholes
fortheWallMountScrewsalone.
D)StandingMountDisplayConguration
8. Usethetwo13 mm Screwssavedfromstep1toattachtheMetal
Display MountinbetweentherubberfeetoftheVertical Arm. The
Metal Display Mount should protrude in the direction the Display
Unitisfacing.
9. Plug the Display Cord into the scale.
ATTENTION! Saveallunusedpartsforfuturerecongurations.

4
WEIGHT MEASUREMENTS
1. Press ON/OFF to turn the scale on.
2. Press UNITStochangeunits:Pounds,pounds+ounces,ounces,uidounces,
kilograms and milliliters.
3. Placeanitemonthescaleinthecenteroftheplatform.
TARE (ADD & WEIGH)
Toignoretheweightofacontainer:
1. Placeacontainerontheplatformbeforeturningthescaleon.
-OR-
1. Turn on the scale, add the container and press TARE.
2. Additemsintothecontainertobeweighed.
Findtheindividualweightofmultipleitemsinonecontainer:
1. Press TAREtoresetthescalebacktozeroweight.
2. Addadditionalitemstobeweighed.
3. Repeatsteps1-2foreachadditionalitem.
Resetthescalebacktozeroweight:
1. Ifnothingisonthescaleanditdoesnotreadzeroweight,pressTARE to
resetthescalebacktozeroweight.
ATTENTION! The scale will tare any amount of weight. Once the total weight actually
on the scale reaches the maximum capacity of 13 pounds (6kg.) the overload warning
code (E) will display.
COUNTING MODE
1. Press UNITStoselectasamplequantity(5,10,25,50pcs)
2. Placeasampleoftheitemstobecountedonthescale.
3. Press ON/OFFtoconrm.
4. Placeyourtotalquantityontheplatform.Displaywillshowthetotalquantity.
PERCENTAGE WEIGHING
1. Press UNITSuntilyousee“100.0%”onthedisplay.
2. Placeobjectontheplatform.
3. Press ON/OFFtoconrm.
4. Removeobjectandreplacewithanewobjecttobeweighed.
5. Object’sweightpercentageascomparedtotheoriginalobject’sweight
willdisplay.

5
BLUE BACKLIGHT DISPLAY
• ThebacklightwillturnonwhentheLIGHTbuttonispressed.
• Thebacklightturnsoffautomaticallyafter1minuteofinactivity.
LCD WARNING MESSAGES & SYMBOLS
E Overload warning.
Er 1 Not enough sample weight on the scale in Counting Mode.
O Scaleisstableandreadytomeasure.
PROPER USE & CARE
• Useandstowthescaleatroomtemperature.
• Useonaat,levelandstablesurface.
• Thescaleisaninstrumentofprecision.Donotsubmitthescaletoshaking,
excessivevibrationorotherroughtreatment.
• Thedisplaymaybeaffectedbyelectromagneticdisturbancessuchasradios,
microwavesorcellphones.Ifsuchdisturbancesoccur,removethesourceof
thedisturbance&restartthescale.
• Disassemblingortamperingwiththescalevoidsthewarranty.
• Clean the scale with soap and a damp cloth.
• Donotsubmergeinliquid.Thescaleisnotwaterproof.
• Youmayremovethestainlesssteelweighingplatformtowashseparately.
PRODUCT SPECIFICATIONS
Model: SCDGPC13
Capacity: 13lb(6kg)
Graduation: 0.1oz.(2g)
Platform Dimensions: 12 inches x 12 inches
Product Dimensions: 12.5 x 15-3/4 x 3 inches
Power Source: 9-Volt wall adapter
Model: SCDGPCM13
Capacity: 13lb(6kg)
Graduation: 0.1oz.(1g)
Platform Dimensions:6.4inchesx6.4inches
Product Dimensions: 9.5x6.25x2.5inches
Power Source: 9-Volt wall adapter
6
CONFIGURATION DE BASE
1. Branchezl’adaptateurmuralde9volts(compris).
2. Retirezlelmdeplastiquetransparentdel’afcheuretlelmdeplastique
blancduplateauenacierinoxydable.
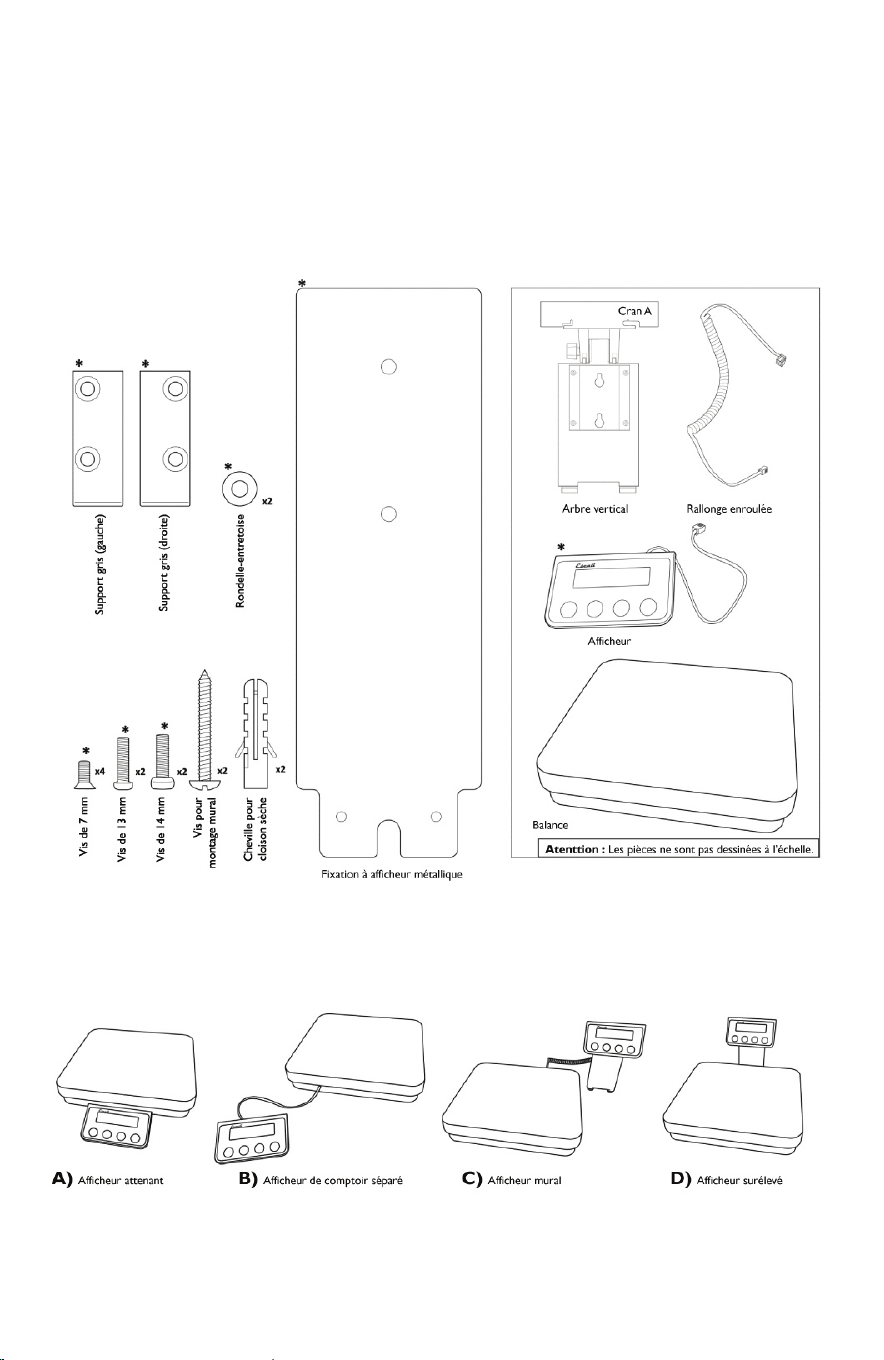
PIÈCES ÉTIQUETÉES
*Indiquelespiècesquisontdéjàxéesàlabalance.Reportez-vousauxdessinsci-dessouspendant
l’assemblage.
ASSEMBLAGE DES CONFIGURATIONS D’AFFICHEUR

7
INSTRUCTIONS DES CONFIGURATIONS D’AFFICHEUR
A)Congurationàafcheurattenant
• Labalanceestdéjàassembléeencongurationàafcheurattenant.
• Suivezlesétapes1à9jusqu’àl’assemblageselonlacongurationàafcheur
voulue.
B)Congurationàafcheurdecomptoirséparé
1. Desserrezlesdeuxvis de 13 mm qui relient l’afcheur à la xation à
afcheur métalliqueetconservezlesdeuxvis de 13 mmpourl’étape8.
Sautez les étapes 2 et 3 pour « D) Conguration à afcheur surélevé ».
2. Desserrezlesdeuxvis de 14 mm de la
xation à afcheur métallique
endessousdelabalance.Faitestournerlaxation à afcheur métallique
anqu’ellenedépasseplusendessousdelabalanceetremontez-lade
manière à ce que les rondelles-entretoises restent au milieu.
C)Congurationàafcheurmural
3. Branchezlarallonge enroulée au cordon de l’afcheur.
4. Retirezlesquatrevis de 7 mm des deux supports gris situés sous
l’afcheur,etconservezlesvis de 7 mmpourl’étape6.
5. Insérezlecordon de l’afcheurtoutaufondducran A en haut du bras
vertical,etfaitescoulisserlebras vertical dans l’afcheur.Ilyseraàl’étroit.
Reportez-vous au dessin du « bras vertical » à la page 2 relativement au cran A.
6. Utilisezlesquatrevis de 7 mmconservéesàl’étape4pourmonter
l’afcheur au bras vertical.
Sautez l’étape 7 pour la « D) Conguration à afcheur surélevé ».
7. Fixezlesdeuxvis pour montage mural à un mur de manière à ce
queleurscentressoientséparésverticalementde4cm.Accrochezlebras
vertical et l’afcheur aux deux vis pour montage mural. Faites des
trousde1/4pouce(6,35mm)dediamètrepourleschevillespourcloison
sèchesivouslemontezsurunecloisonsèche,oude3/32pouce(2,38mm)de
diamètrepourlesvispourfaireunmontagemuralsanscheville.
D)Congurationàafcheursurélevé
8. Utilisezlesdeuxvis de 13 mmconservéesàl’étape1pourinstallerla
xation à afcheur métallique entre les pieds de caoutchouc de
l’arbre vertical.Laxation à afcheur métalliquedevraitfaire
saillie dans le sens auquel l’afcheurfaitface.
9. Branchezlecordon de l’afcheuràlabalance.
ATTENTION! Conserveztouteslespiècesnonutiliséespourdes
recongurationsàvenir.

8
PESER DES ARTICLES
1. Appuyezsurl’interrupteurON/OFFpourmettrelabalancesoustension.
2. AppuyezsurUNITSpourchangerd’unité:livres,livres+onces,onces,onces
liquides, kilogrammes et millilitres.
3. Placezunarticlesurlabalance,aucentreduplateau.
TARE (AJOUTER ET PESER)
Pour ne pas tenir compte du poids du contenant :
1. Placezuncontenantsurleplateauavantdemettrelabalancesoustension.
-OU-
1. Mettezlabalancesoustension,ajoutezlecontenantetappuyezsurTARE.
2. Mettezlesarticlesàpeserdanslecontenant.
Déterminer le poids individuel de plusieurs articles dans un contenant :
1. AppuyezsurleboutonTAREpourréinitialiserlabalanceàzéro.
2. Ajoutezlesautresarticlesquevousdésirezpeser.
3. Répétezlesétapes1et2pourchaquearticlesupplémentaire.
Réinitialiserlabalanceàzéro:
1. S’iln’yariensurlabalanceetqu’ellen’afchepasunpoidsdezéro,appuyez
sur TAREpourréinitialiserlabalanceàzéro.
ATTENTION! La balance tarera n’importe quel poids. Lorsque le poids total sur la
balance dépasse la capacité maximum de 13 livres (6 kg), le code d'avertissement de
surcharge (E) s'afche.
MODE DE COMPTAGE
1. AppuyezsurUNITSpoursélectionnerunequantitéd’échantillonnage(5,10,
25,50mcx)
2. Placezunéchantillondesarticlesàcomptersurlabalance.
3. AppuyezsurON/OFFpourconrmer.
4. Placezlaquantitétotalesurleplateau.L’afcheurmontreralaquantitétotale.
POURCENTAGE DE POIDS
1. AppuyezsurUNITSjusqu’àcequel’afcheurindique«100.0%».
2. Placezunobjetsurleplateau.
3. AppuyezsurON/OFFpourconrmer.
4. Remplacezl’objetparunautreàpeser.
5. Lepourcentagedupoidsdel’objetparrapportaupremierobjetseraafché.

9
AFFICHAGE À RÉTROÉCLAIRAGE BLEU
• Lerétroéclairages’allumelorsquevousappuyezsurleboutonLIGHT.
• Lerétroéclairages’éteintautomatiquementauboutd’uneinactivitéde
1 minute.
SYMBOLES ET MESSAGES D’AVERTISSEMENT DE L’ACL
E Avertissement de surcharge
Er1 Poidsd’échantillonsurlabalanceinsufsantenmodedecomptage.
O Labalanceeststableetprêteàmesurer.
UTILISATION ET ENTRETIEN
• Utilisezetrangezlabalanceàlatempératureambiante.
• Utilisez-lasurunesurfaceplane,deniveauetstable.
• Labalanceestunappareildeprécision.Nesoumettezpaslabalanceàdes
secousses,àdesvibrationsexcessivesniàquelquemanipulationbrusque.
• L’afcheurrisqued’êtreaffectéparlesperturbationsélectromagnétiques
comme les radios, les micro-ondes ou les téléphones cellulaires. En cas de
perturbation,déplacezlasourcedeperturbationetredémarrezlabalance.
• Démonteroualtérerlabalanceannulelagarantie.
• Nettoyezlabalanceàl’aidedesavonetd’unlingehumide.
• Nel’immergezpasdansunliquide.Labalancen’estpasimperméableàl'eau.
• Vouspouvezenleverleplateauenacierinoxydablepourlelaverséparément.
SPÉCIFICATIONS DU PRODUIT
Modèle : SCDGPC13
Capacité : 13lb(6kg)
Graduation : 0,1oz(2g)
Dimensions du plateau :30,5cmx30,5cm
Dimensions du produit : 31,8cmx40cmx7,6cm
Alimentation : Adaptateur mural de 9 volts
Modèle : SCDGPCM13
Capacité : 13lb(6kg)
Graduation : 0,1oz(1g)
Dimensions du plateau :16,3cmx16,3cm
Dimensions du produit : 24,1cmx15,9cmx6,4cm
Alimentation : Adaptateur mural de 9 volts
10
INSTALACIÓN BÁSICA
1. Enchufeeladaptadordeparedde9voltios(incluido).
2. Retirelapelículaplásticatransparentedelaunidaddepantallaylapelícula
plásticablancadelaplataformadeaceroinoxidable.
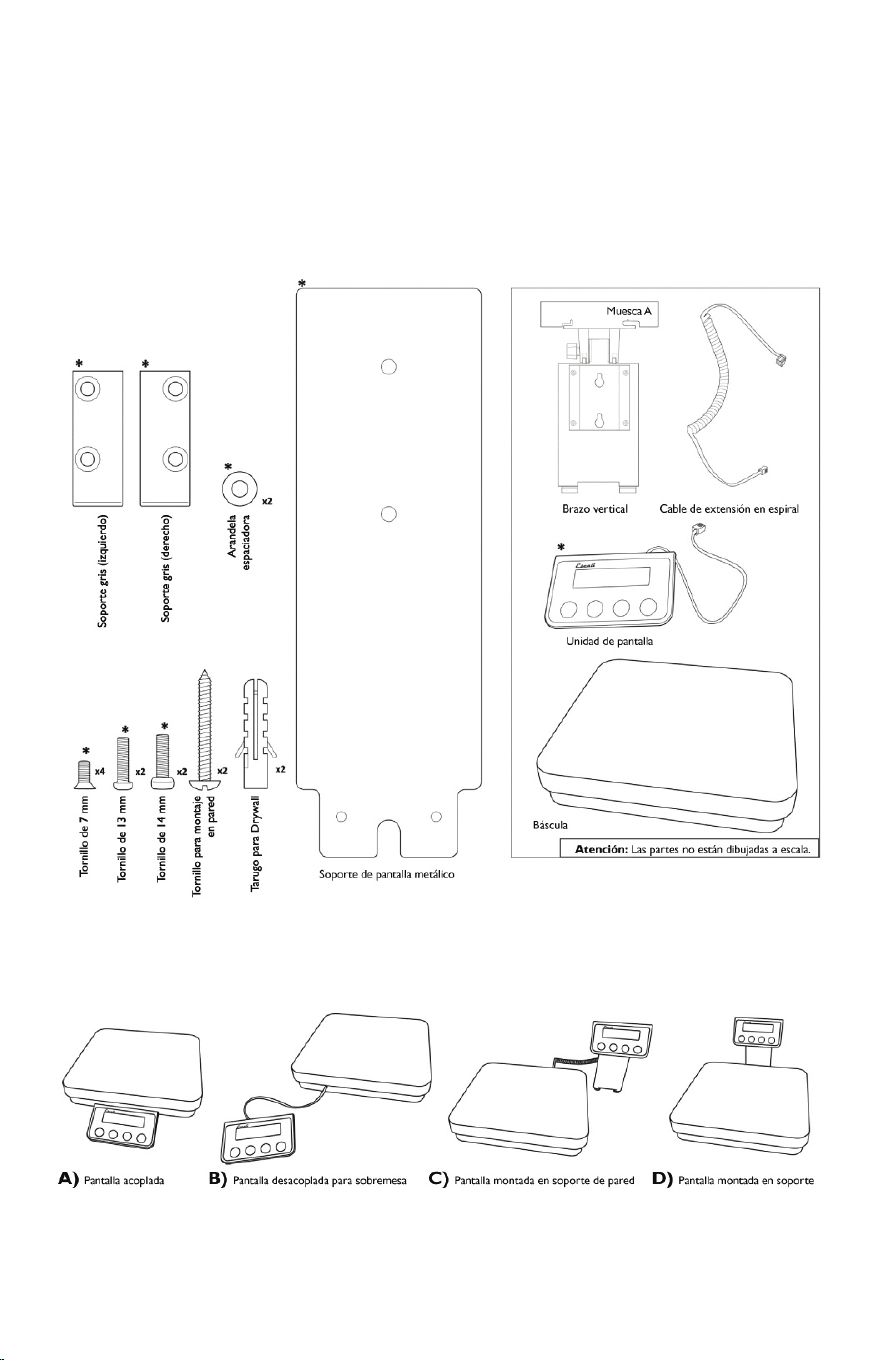
PIEZAS MARCADAS
*Indicalaspiezasqueestánacopladasalabáscula.Observelossiguientesdibujosduranteelensamblaje.
ENSAMBLAJE DE LAS CONFIGURACIONES DE PANTALLA

11
INSTRUCCIONES PARA LAS CONFIGURACIONES DE PANTALLA
A)Conguracióndepantallaacoplada
• Lapantallavieneensambladaenlaconguracióndepantallaacoplada.
• Sigalospasos1al9hastaensamblarlaconguracióndepantalladeseada.
B)Conguracióndepantalladesacopladaparasobremesa
1. Desatornille los dos tornillos de 13 mm que conectan la unidad de
pantalla al soporte de pantalla metálicoyguardelosdostornillos
de 13 mmparaelpaso8.
Omita los pasos 2 y 3 para la conguración "D) Pantalla montada en soporte".
2. Desatornille los dos tornillos de 14 mm que sujetan el soporte de
pantalla metálicoalaparteinferiordelabáscula.Girecompletamente
el soporte de pantalla metálicoparaquenosobresalgadelaparte
inferiordelabásculayfíjelodenuevoponiendoenmediolasarandelas
espaciadoras restantes.
C)Conguraciónpantallamontadaensoporte
3. Conecte el cable de extensión en espiral al cable de la pantalla.
4. Quite los cuatro tornillos de 7 mm de los dos soportes grises
ubicadosdebajodelaunidad de pantalla,yguardelostornillos de 7
mm paraelpaso6.
5. Meta el cable de la pantalla completamente en la muesca A en la parte
superior del brazo vertical,ydesliceelbrazo vertical entre la unidad
de pantalla. Entrará ajustado.
Consulte el dibujo "Brazo vertical" en la página 2 para ver la muesca A.
6. Useloscuatrotornillos de 7 mmqueguardódelpaso4paraacoplarel
brazo vertical a la unidad de pantalla.
Omita el paso 7 para la conguración "D) Pantalla montada en soporte".
7. Fije los dos tornillos para montaje en pared a una pared, espaciados
verticalmentey4cmapartedelcentro.Cuelgueelbrazo verticalyla
unidad de pantalla en los dos tornillos para montaje en pared.
Taladrepreviamenteagujerosde1/4depulgadaparalostarugosdeDrywallal
montarenunasuperciedeDrywall,oagujerosde3/32depulgadaparasolo
los tornillos para montaje en pared.
D)Conguracióndepantallamontadaensoporte
8. Uselosdostornillos de 13 mmqueguardóenelpaso1paraacoplar
el soporte de pantalla metálico entre las patas de caucho del brazo
vertical. El soporte de pantalla metálicodebesobresalirenlamisma
direccióndelaorientacióndelaunidad de pantalla.
9. Conecte el cable de la pantallaalabáscula.
¡ATENCIÓN! Guardetodaslaspiezasquenousaparafuturasconguraciones.

12
MEDICIONES DE PESO
1. Presione ON/OFF(Apagado/Encendido)paraencenderlabáscula.
2. Presione UNITS(Unidades)paracambiarlaunidaddemedida:libras,
libras+onzas,onzas,onzasuidas,kilogramosymililitros.
3. Pongaunobjetoenlabáscula,enelcentrodelaplataforma.
TARA (SUMA Y PESO)
Para ignorar el peso de un contenedor:
1. Pongaelcontenedorenlaplataformaantesdeencenderlabáscula.
O BIEN
1. Enciendalabáscula,pongaelcontenedorypresioneTARE (Tara).
2. Añadaobjetosalcontenedorparapesarlos.
Hallarelpesoindividualdemúltiplesobjetosenuncontenedor:
1. Presione TARE(Tara)pararestablecerlabásculaapesocero.
2. Agreguelosobjetosadicionalesquevaapesar.
3. Repitalospasos1a2paracadaobjetoadicional.
Restablecerlabásculadenuevoapesocero:
1. Sinohaynadaenlabásculaynomuestraunvalorcero,presioneelbotón
TARE(Tara)pararestablecerlaapesocero.
¡ATENCIÓN! La escala sumará a la tara cualquier cantidad de peso. Una vez que
el peso total de la báscula llegue a su capacidad máxima de 6 kg (13 lb), se mostrará el
código de advertencia de sobrecarga (E).
MODO CONTADOR
1. Presione UNITS(Unidades)paraseleccionarlacantidaddelamuestra(5,10,
25y50piezas)
2. Pongaunamuestradelosobjetosasercontadosenlabáscula.
3. Presione ON/OFF(Apagado/Encendido)paraconrmar.
4. Pongalacantidadtotalenlaplataforma.Lapantallamostrarálacantidadtotal.
PESO PORCENTUAL
1. Presione UNITS(Unidades)hastaquesemuestre"100.0%"enlapantalla.
2. Pongaunobjetoenlaplataforma.
3. Presione ON/OFF(Apagado/Encendido)paraconrmar.
4. Quiteelobjetoyreempláceloporunonuevoaserpesado.
5. Semostraráelporcentajedelpesodelobjetoencomparaciónconelpeso
originaldelobjeto.

13
PANTALLA CON RETROILUMINACIÓN AZUL
• Laretroiluminacióndelapantallaseencenderácuandosepresionaelbotón
LIGHT(Luz).
• Laretroiluminaciónseapagaautomáticamenteluegode1minutode
inactividad.
MENSAJES DE ADVERTENCIA Y SÍMBOLOS DE LA PANTALLA LCD
E Advertenciadesobrecarga.
Er1 Elpesodemuestraenlabásculaenmododecuentaesinsuciente.
O Labásculaestáestableypreparadaparamedir.
USO CORRECTO Y CUIDADO
• Useyguardelabásculaatemperaturaambiente.
• Úselaenunasupercieplanayestable.
• Labásculaesuninstrumentodeprecisión.Nosometalabásculaasacudidas,
vibraciónexcesivaniotrostratosduros.
• Lapantallapuedeserafectadaporinterferenciaselectromagnéticastalescomo
radios,microondasyteléfonoscelulares.Siocurrentalesinterferencias,retire
lafuentedelainterferenciayreinicielabáscula.
• Desensamblaromanipularlabásculaanulalagarantía.
• Limpielabásculaconjabónyuntrapohúmedo.
• Nosumergirenlíquido.Labásculanoesapruebadeagua.
• Puedequitarlaplataformadepesajedeaceroinoxidableparalavarlapor
separado.
ESPECIFICACIONES DEL PRODUCTO
Modelo: SCDGPC13
Capacidad: 6kg(13lb)
Graduación: 2g(0,1oz)
Dimensiones de la plataforma: 30,5cmx30,5cm
Dimensiones del producto: 31,8cmx40cmx7,6cm
Fuente de alimentación: Adaptador de pared de 9 voltios
Modelo: SCDGPCM13
Capacidad: 6kg(13lb)
Graduación: 1g(0,1oz)
Dimensiones de la plataforma: 16,3cmx16,3cm
Dimensiones del producto: 24,1cmx15,9cmx6,4cm
Fuente de alimentación: Adaptador de pared de 9 voltios

San Jamar
555 Koopman Lane
Elkhorn, Wisconsin 53121
USA
T: +1.262.723.6133
F: +1.262.723.4204
www.sanjamar.com
Europe
Schoorstraat 26a, bus 1
2220 Heist-op-den-Berg
BELGIUM
T: +32 15 22 81 40
F: +32 15 22 81 48
emea@sanjamar.com
México
Av. Paseo de la Reforma No. 350 - 10
Col. Juarez
Deleg. Cuauhtemoc, CP 06600
MEXICO, D.F.
T: +52 (55) 3626 0772
mexico@sanjamar.com
© Copyright San Jamar, Inc. 2017
Canada
3280 Bloor Street West
Suite 1140
11th Floor, Centre Tower
Toronto, ON M8X 2X3
CANADA
T: +1.262.723.6133
F: +1.262.723.4204
canada@sanjamar.com
San Jamar
555 Koopman Lane
Elkhorn, Wisconsin 53121
USA
T: +1.262.723.6133
F: +1.262.723.4204
www.sanjamar.com
Europe
Schoorstraat 26a, bus 1
2220 Heist-op-den-Berg
BELGIUM
T: +32 15 22 81 40
F: +32 15 22 81 48
emea@sanjamar.com
México
Av. Paseo de la Reforma No. 350 - 10
Col. Juarez
Deleg. Cuauhtemoc, CP 06600
MEXICO, D.F.
T: +52 (55) 3626 0772
mexico@sanjamar.com
© Copyright San Jamar, Inc. 2017
Canada
3280 Bloor Street West
Suite 1140
11th Floor, Centre Tower
Toronto, ON M8X 2X3
CANADA
T: +1.262.723.6133
F: +1.262.723.4204
canada@sanjamar.com
103567