Rev.6
EM204R4257F
SCARA ROBOT
LS10-B series
MANIPULATOR MANUAL

MANIPULATOR MANUAL
LS10-B series Rev.6

LS10-B Rev.6 i
SCARA ROBOT
LS10-B series Manipulator Manual
Rev.6
Copyright 2018-2020 SEIKO EPSON CORPORATION. All rights reserved.

ii LS10-B Rev.6
FOREWORD
Thank you for purchasing our robot products.
This manual contains the information necessary for the correct use of the manipulator.
Please carefully read this manual and other related manuals before installing the robot
system.
Keep this manual handy for easy access at all times.
WARRANTY
The Manipulator and its optional parts are shipped to our customers only after being
subjected to the strictest quality controls, tests, and inspections to certify its compliance with
our high performance standards.
Product malfunctions resulting from normal handling or operation will be repaired free of
charge during the normal warranty period. (Please contact the supplier of your region for
warranty period information.)
However, customers will be charged for repairs in the following cases (even if they occur
during the warranty period):
1.
Damage or malfunction caused by improper use which is not described in the manual, or
careless use.
2.
Malfunctions caused by customers
’ unauthorized disassembly.
3.
Damage due to improper adjustments or unauthorized repair attempts.
4.
Damage
caused by natural disasters such as earthquake, flood, etc.
Warnings, Cautions, Usage:
1.
If the Manipulator or associated equipment is used outside of the usage conditions and
product specifications described in the manuals, this warranty is void.
2.
If you do not follow the WARNINGS and CAUTIONS in this manual, we cannot be
responsible for any malfunction or accident, even if the result is injury or death.
3.
We cannot foresee all possible dangers and consequences. Therefore, this manual cannot
wa
rn the user of all possible hazards.

LS10-B Rev.6 iii
TRADEMARKS
Microsoft, Windows, and Windows logo are either registered trademarks or trademarks of
Microsoft Corporation in the United States and/or other countries. Other brand and
product names are trademarks or registered trademarks of the respective holders.
NOTICE
No part of this manual may be copied or reproduced without authorization.
The contents of this manual are subject to change without notice.
Please notify us if you should find any errors in this manual or if you have any comments
regarding its contents.
MANUFACTURER
CONTACT INFORMATION
Contact information is described in “SUPPLIERS” in the first pages of the following
manual:
Robot System Safety and Installation Read this manual first
iv LS10-B Rev.6
Regarding battery disposal
The crossed out wheeled bin label that can be found on your product indicates that this
product and incorporated batteries should not be disposed of via the normal household waste
stream. To prevent possible harm to the environment or human health please separate this
product and its batteries from other waste streams to ensure that it can be recycled in an
environmentally sound manner. For more details on available collection facilities please
contact your local government office or the retailer where you purchased this product. Use
of the chemical symbols Pb, Cd or Hg indicates if these metals are used in the battery.
This information only applies to customers in the European Union, according to
DIRECTIVE 2006/66/EC OF THE EUROPEAN PARLIAMENT AND OF THE
COUNCIL OF 6 September 2006 on batteries and accumulators and waste batteries and
accumulators and repealing Directive 91/157/EEC and legislation transposing and
implementing it into the various national legal systems.
For other countries, please contact your local government to investigate the possibility of
recycling your product.
The battery removal/replacement procedure is described in the following manuals:
Controller manual Maintenance section

LS10-B Rev.6 v
Before Reading This Manual
This section describes what you should know before reading this manual.
Structure of Control System
The LS10-B series Manipulators can be used with the following combinations of Controllers
and software.
Controller : RC90-B
Software : EPSON RC+ 7.0 Ver.7.4.2 or later
Turning ON/OFF Controller
When you see the instruction “Turn ON/OFF the Controller” in this manual, be sure to turn
ON/OFF all the hardware components. For the Controller composition, refer to the table
above.
Shape of Motors
The shape of the motors used for the Manipulator that you are using may be different from
the shape of the motors described in this manual because of the specifications.
Setting by Using Software
This manual contains setting procedures by using software. They are marked with the
following icon.
Figures in this Manual
The figures of manipulators indicated in this manual are basically Standard-model
Manipulator. Unless special instruction is provided, the specifications of Standard-model
and Cleanroom-model are the same.
Pictures in this Manual
Pictures and illustrations of the manipulator in this manual may differ from using
manipulator depending on the shipment date and the specifications.
EPSON
RC+

vi LS10-B Rev.6

TABLE OF CONTENTS
LS10-B Rev.6 vii
Setup & Operation
1. Safety 3
1.1 Conventions.............................................................................................. 3
1.2 Design and Installation Safety .................................................................. 4
1.2.1 Strength of the Ball Screw Spline ................................................. 5
1.3 Operation Safety ...................................................................................... 6
1.4 Emergency Stop ....................................................................................... 8
1.5 Emergency Movement Without Drive Power ......................................... 10
1.6 ACCELS Setting for CP Motions ............................................................. 11
1.7 Warning Labels ....................................................................................... 12
2. Specifications 14
2.1 Features of LS10-B series Manipulators ................................................ 14
2.2 Model Number ........................................................................................ 15
2.3 Part Names and Outer Dimensions ....................................................... 16
2.3.1 Standard-Model (LS10-B***S) .................................................... 16
2.3.2 Cleanroom-Model (LS10-B***C) ................................................ 18
2.4 Specifications ......................................................................................... 20
2.5 How to Set the Model ............................................................................. 22
3. Environments and Installation 23
3.1 Environmental Conditions ...................................................................... 23
3.2 Base Table .............................................................................................. 24
3.3 Mounting Dimensions ............................................................................. 25
3.4 Unpacking and Transportation ............................................................... 26
3.5 Installation Procedure............................................................................. 27
3.5.1 Standard-Model .......................................................................... 27
3.5.2 Cleanroom-Model ....................................................................... 28
3.6 Connecting the Cables ........................................................................... 28
3.7 User Wires and Pneumatic Tubes.......................................................... 30
3.8 Relocation and Storage .......................................................................... 31
3.8.1 Precautions for Relocation and Storage .................................... 31
3.8.2 Relocation ................................................................................... 32
4. Setting of End Effectors 33
4.1 Attaching an End Effector....................................................................... 33
4.2 Attaching Cameras and Valves .............................................................. 34
4.3 Weight and Inertia Settings .................................................................... 35
4.3.1 Weight Setting ............................................................................ 35
4.3.2 Inertia Setting ............................................................................. 37
4.4 Precautions for Auto Acceleration/Deceleration of Joint #3 ................... 42
5. Motion Range 43
5.1 Motion Range Setting by Pulse Range .................................................. 43
5.1.1 Max. Pulse Range of Joint #1 .................................................... 44

TABLE OF CONTENTS
viii LS10-B Rev.6
5.1.2 Max. Pulse Range of Joint #2 ..................................................... 44
5.1.3 Max. Pulse Range of Joint #3 ..................................................... 45
5.1.4 Max. Pulse Range of Joint #4 ..................................................... 45
5.2 Motion Range Setting by Mechanical Stops ........................................... 46
5.2.1 Setting the Mechanical Stops of Joints #1 and #2 ...................... 47
5.2.2 Setting the Mechanical Stop of Joint #3 ..................................... 49
5.3 Setting the Cartesian (Rectangular) Range in the XY Coordinate System
of the Manipulator ................................................................................... 51
5.4 Standard Motion Range .......................................................................... 52
Maintenance............................................................................................ 55
Maintenance
1. Safety Maintenance 57
2. General Maintenance 58
2.1 Maintenance Inspection .......................................................................... 58
2.1.1 Schedule for Maintenance Inspection ......................................... 58
2.1.2 Inspection Point ........................................................................... 59
2.2 Overhaul (Parts Replacement) ............................................................... 60
2.3 Greasing .................................................................................................. 62
2.4 Tightening Hexagon Socket Head Cap Bolts ......................................... 63
2.5 Matching Origins ..................................................................................... 63
2.6 Layout of Maintenance Parts .................................................................. 64
3. Covers 65
3.1 Arm Top Cover ........................................................................................ 66
3.2 Arm Bottom Cover ................................................................................... 67
3.3 Connector Plate ...................................................................................... 67
3.4 Connector Sub Plate ............................................................................... 69
3.5 User Plate................................................................................................ 70
4. Cable 71
4.1 Replacing Cable Unit .............................................................................. 72
4.2 Wiring Diagrams ...................................................................................... 77
4.2.1 Signal Cable ................................................................................ 77
4.2.2 Power Cable ................................................................................ 78
4.2.3 User Cable .................................................................................. 79
4.2.4 Color of Cables............................................................................ 79
4.3 Replacing M/C Cable .............................................................................. 80
5. Joint #1 85
5.1 Replacing Joint #1 Motor ........................................................................ 86
5.2 Replacing Joint #1 Reduction Gear Unit ................................................ 90
6. Joint #2 93

TABLE OF CONTENTS
LS10-B Rev.6 ix
6.1 Replacing Joint #2 Motor ....................................................................... 94
6.2 Replacing Joint #2 Reduction Gear Unit ................................................ 98
7. Joint #3 102
7.1 Replacing Joint #3 Motor ..................................................................... 103
7.2 Replacing the Timing Belt .................................................................... 107
7.3 Replacing the Brake .............................................................................. 111
7.4 Checking the Timing Belt Tension (Z Belt) ............................................ 115
8. Joint #4 116
8.1 Replacing Joint #4 Motor ...................................................................... 117
8.2 Replacing the Timing Belt .................................................................... 121
8.2.1 U2 Belt ...................................................................................... 122
8.2.2 U1 Belt ...................................................................................... 128
8.3 Replacing the Brake ............................................................................. 132
8.4 Checking the Timing Belt Tension (U1, U2 Belts) ................................ 135
9. Bellows 136
10. Ball Screw Spline Unit 138
10.1 Greasing the Ball Screw Spline Unit .................................................. 138
10.1.1 Standard-model ...................................................................... 139
10.1.2 Cleanroom-model ................................................................... 140
10.2 Replacing the Ball Screw Spline Unit ................................................. 141
11. Boards 144
11.1 Replacing the Converter Board .......................................................... 145
11.2 Replacing the Control Board .............................................................. 147
12. LED Lamp 148
13. Calibration 149
13.1 About Calibration ................................................................................ 149
13.2 Calibration Procedure......................................................................... 150
13.3 Accurate Calibration of Joint #2 ......................................................... 160
13.4 Calibration Procedure without using Calibration Wizard ................... 162
14. Maintenance Parts List 166

TABLE OF CONTENTS
x LS10-B Rev.6

Setup & Operation
This volume contains information for setup and operation of the LS10-B series Manipulators.
Please read this volume thoroughly before setting up and operating the Manipulators.

Setup & Operation 1. Safety
LS10-B Rev.6 3
1. Safety
Installation and transportation of manipulators and robotic equipment shall be performed by
qualified personnel and should conform to all national and local codes. Please read this
manual and other related manuals before installing the robot system or before connecting
cables.
Keep this manual handy for easy access at all times.
1.1 Conventions
Important safety considerations are indicated throughout the manual by the following
symbols. Be sure to read the descriptions shown with each symbol.
WARNING
This symbol indicates that a danger of possible serious injury or
death exists if the associated instructions are not followed
properly.
WARNING
This symbol indicates that a danger of possible serious injury or
death caused by
electric shock exists if the associated
instructions are not followed properly.
CAUTION
This symbol indicates that a danger of possible harm to people
or physical damage to equipment and facilities exists if the
associated instructions are not followed properly.
Setup & Operation 1. Safety
4 LS10-B Rev.6
1.2 Design and Installation Safety
Only trained personnel should design and install the robot system. Trained
personnel are defined as those who have taken robot system training and
maintenance training classes held by the manufacturer, dealer, or local
representative company, or those who understand the manuals thoroughly and
have the same knowledge and skill level as those who have completed the training
courses.
To ensure safety, a safeguard must be installed for the robot system. For details
on the safeguard, refer to the Installation and Design Precautions in the Safety
chapter of the EPSON RC+ User’s Guide.
The following items are safety precautions for design personnel:
WARNING
■
Personnel who design and/or construct the robot system with this product must
read the
Safety chapter in the EPSON RC+ User’s Guide to understand the safety
requirements before designing and/or constructing the robot system. Designing
and/or constructing the robot system without understanding the safety
requirements is extremely hazardous, may result in serious bodily injury and/or
sever
e equipment damage to the robot system, and may cause serious safety
problems.
■
The Manipulator and the Controller must be used within the environmental
conditions described in their respective manuals.
This product has been
designed and manufactured strictly for use in a normal indoor environment. Using
the product in an environment
that exceeds the specified environmental conditions
may not only shorten the life cycle of the product but may also cause serious
safety problems.
■
The robot system must be used within the installation requirements described in
the manuals.
Using the robot system outside of the installation requirements
may not only shorten the life cycle of the product but also cause serious safety
problems.
Further precautions for installation are mentioned in the chapter Setup & Operation:
3. Environments and Installation. Please read this chapter carefully to understand
safe installation procedures before installing the robots and robotic equipment.
Setup & Operation 1. Safety
LS10-B Rev.6 5
1.2.1 Strength of the Ball Screw Spline
If a load exceeding the allowable value is applied to the ball screw spline, it may not work
properly due to deformation or breakage of the shaft. If the ball screw spline is applied the
load exceeding the allowable value, it is necessary to replace the ball screw spline unit.
The allowable loads differ depending on distance where the load is applied to. For
calculating the allowable load, see the calculation formula below.
[Allowable bending moment]
M=50,000 N·mm
[Moment]
M=F·L
=
100·200
=
20,000 N·mm
Example:
If 100 N (10.2kgf) load is applied
at 200 mm from
the end of the spline nut
End of the
spline nut
F
L
Setup & Operation 1. Safety
6 LS10-B Rev.6
1.3 Operation Safety
The following items are safety precautions for qualified Operator personnel:
WARNING
■
Please carefully read the
Safety-related Requirements in the Safety chapter of the
Safety and Installation
manual before operating the robot system. Operating the
robot system without understanding the safety requirements is extremely
hazardous and may result in serious bodily injury and/or sever
e equipment
damage to the robot system.
■
Do not enter the operating area of the Manipulator while the power to the robot
system is turned ON.
Entering the operating area with the power ON is extremely
hazardous and may cause serious safety problems as the Manipulator may move
even if it seems to
be stopped.
■
Before operating the robot system, make sure that no one is inside the
safeguarded area.
The robot system can be operated in the mode for teaching
even when someone is inside the safeguarded area.
The motion of the Manipulator is always i
n restricted (low speed and low power)
status to secure the safety of an operator.
However, operating the robot system
while someone is inside the safeguarded area is extremely hazardous and may
result in serious safety problems in case that the
Manipulator moves unexpectedly.
■
Immediately press the Emergency Stop switch whenever the Manipulator moves
abnormally while the robot system is operated.
Continuing the operation while
the Manipulator moves abnormally is extremely hazardous and may result in
serious bodily injury and/or
severe equipment damage to the robot system.
WARNING
■
To shut off power
to the robot system, disconnect the power plug from the power
source. Be sure to connect the AC power cable to a power receptacle.
DO NOT connect it directly to a factory power
source.
■
Before
performing any replacement procedure, turn OFF the Controller and
related equipment,
and then disconnect the power plug from the power source.
Performing any replacement procedure with the power ON is extremely hazardous
and may
result in electric shock and/or malfunction of the robot system.
■
Do not connect or disconnect the motor connectors while the power to the robot
system is turned ON. Connecting or disconnecting the motor connectors
with the
power ON is extremely hazardous and may result
in serious bodily injury as the
Manipulator may mo
ve abnormally, and also may result in electric shock and/or
malfunction of the robot system.
Setup & Operation 1. Safety
LS10-B Rev.6 7
CAUTION
■
Whenever possible, only one person should operate the robot system.
If it is
necessary to operate the robot system with more than one person, ensure that all
people involved communicate with each other as to what they are doing and take
all necessary safety precautions.
■
Joint #1, #2, and #4:
If the joints are operated
repeatedly with the operating angle less than 5 degrees,
they may get damaged early because the bearings are likely to cause oil film
shortage in such situation. To prevent early breakdown, move the joints larger
than 50 degrees
for about five to ten times a day.
Joint #3:
If the up
-and-down motion of the hand is less than LS10-B: 50 mm, move the joint
a half of the maximum stroke for five to ten times a day.
■
Oscillation (resonance) may
occur continuously in low speed Manipulator motion
(Speed:
approx. 5 to 20%) depending on combination of Arm orientation and end
effector load. Oscillation arises from natural oscillation frequency of the Arm and
can be controlled by following measures.
Changing Manipulator speed
Changing the teach points
Changing the end effector load

Setup & Operation 1. Safety
8 LS10-B Rev.6
1.4 Emergency Stop
If the Manipulator moves abnormally during operation, immediately press the Emergency
Stop switch. Stops the power supply to the motor, and the arm stops in the shortest distance
with the dynamic brake and mechanical brake.
Do not press the Emergency Stop switch unnecessarily while the Manipulator is operating.
Pressing the switch during the operation makes the brakes work. This will shorten the life
of the brakes due to the worn friction plates.
Normal brake life: About 2 years (when the brakes are used 100 times/day)
To place the system in emergency mode during normal operation, press the Emergency Stop
switch when the Manipulator is not moving. Refer to the Controller manual for
instructions on how to wire the Emergency Stop switch circuit.
Do not turn OFF the Controller while the Manipulator is operating.
If you attempt to stop the Manipulator in emergency situations such as “Safeguard Open”,
make sure to stop the Manipulator using the Emergency Stop switch of the Controller.
If the Manipulator is stopped by turning OFF the Controller while it is operating, following
problems may occur:
Reduction of the life and damage of the reduction gear unit
Position gap at the joints
In addition, if the Controller was forced to be turned OFF by blackouts and the like while
the Manipulator is operating, make sure to check the following points after power
restoration:
Whether or not the reduction gear is damaged
Whether or not the joints are in their proper positions
If there is a position gap, perform calibration by referring to the Maintenance 13.
Calibration in this manual.
Before using the Emergency Stop switch, be aware of the followings:
- The Emergency Stop (E-STOP) switch should be used to stop the Manipulator only in
case of emergencies.
- To stop the Manipulator operating the program except in emergency, use Pause (halt)
or STOP (program stop) commands.
Pause and STOP commands do not turn OFF the motors. Therefore, the brake does
not function.
- For the Safeguard system, do not use the circuit for E-STOP.
For details on the Safeguard system, refer to the following manuals.
EPSON RC+ User’s Guide
2. Safety - Installation and Design Precautions - Safeguard System
Safety and Installation
2.6 Connection to EMERGENCY Connector
To check brake problems, refer to the following manuals.
Manipulator Manual Maintenance
2.1.2 Inspection Point - Inspection While the Power is ON
(Manipulator is operating)
Safety and Installation
5.1.1 Manipulator
- Inspection While the Power is ON (Manipulator is operating)
Setup & Operation 1. Safety
LS10-B Rev.6 9
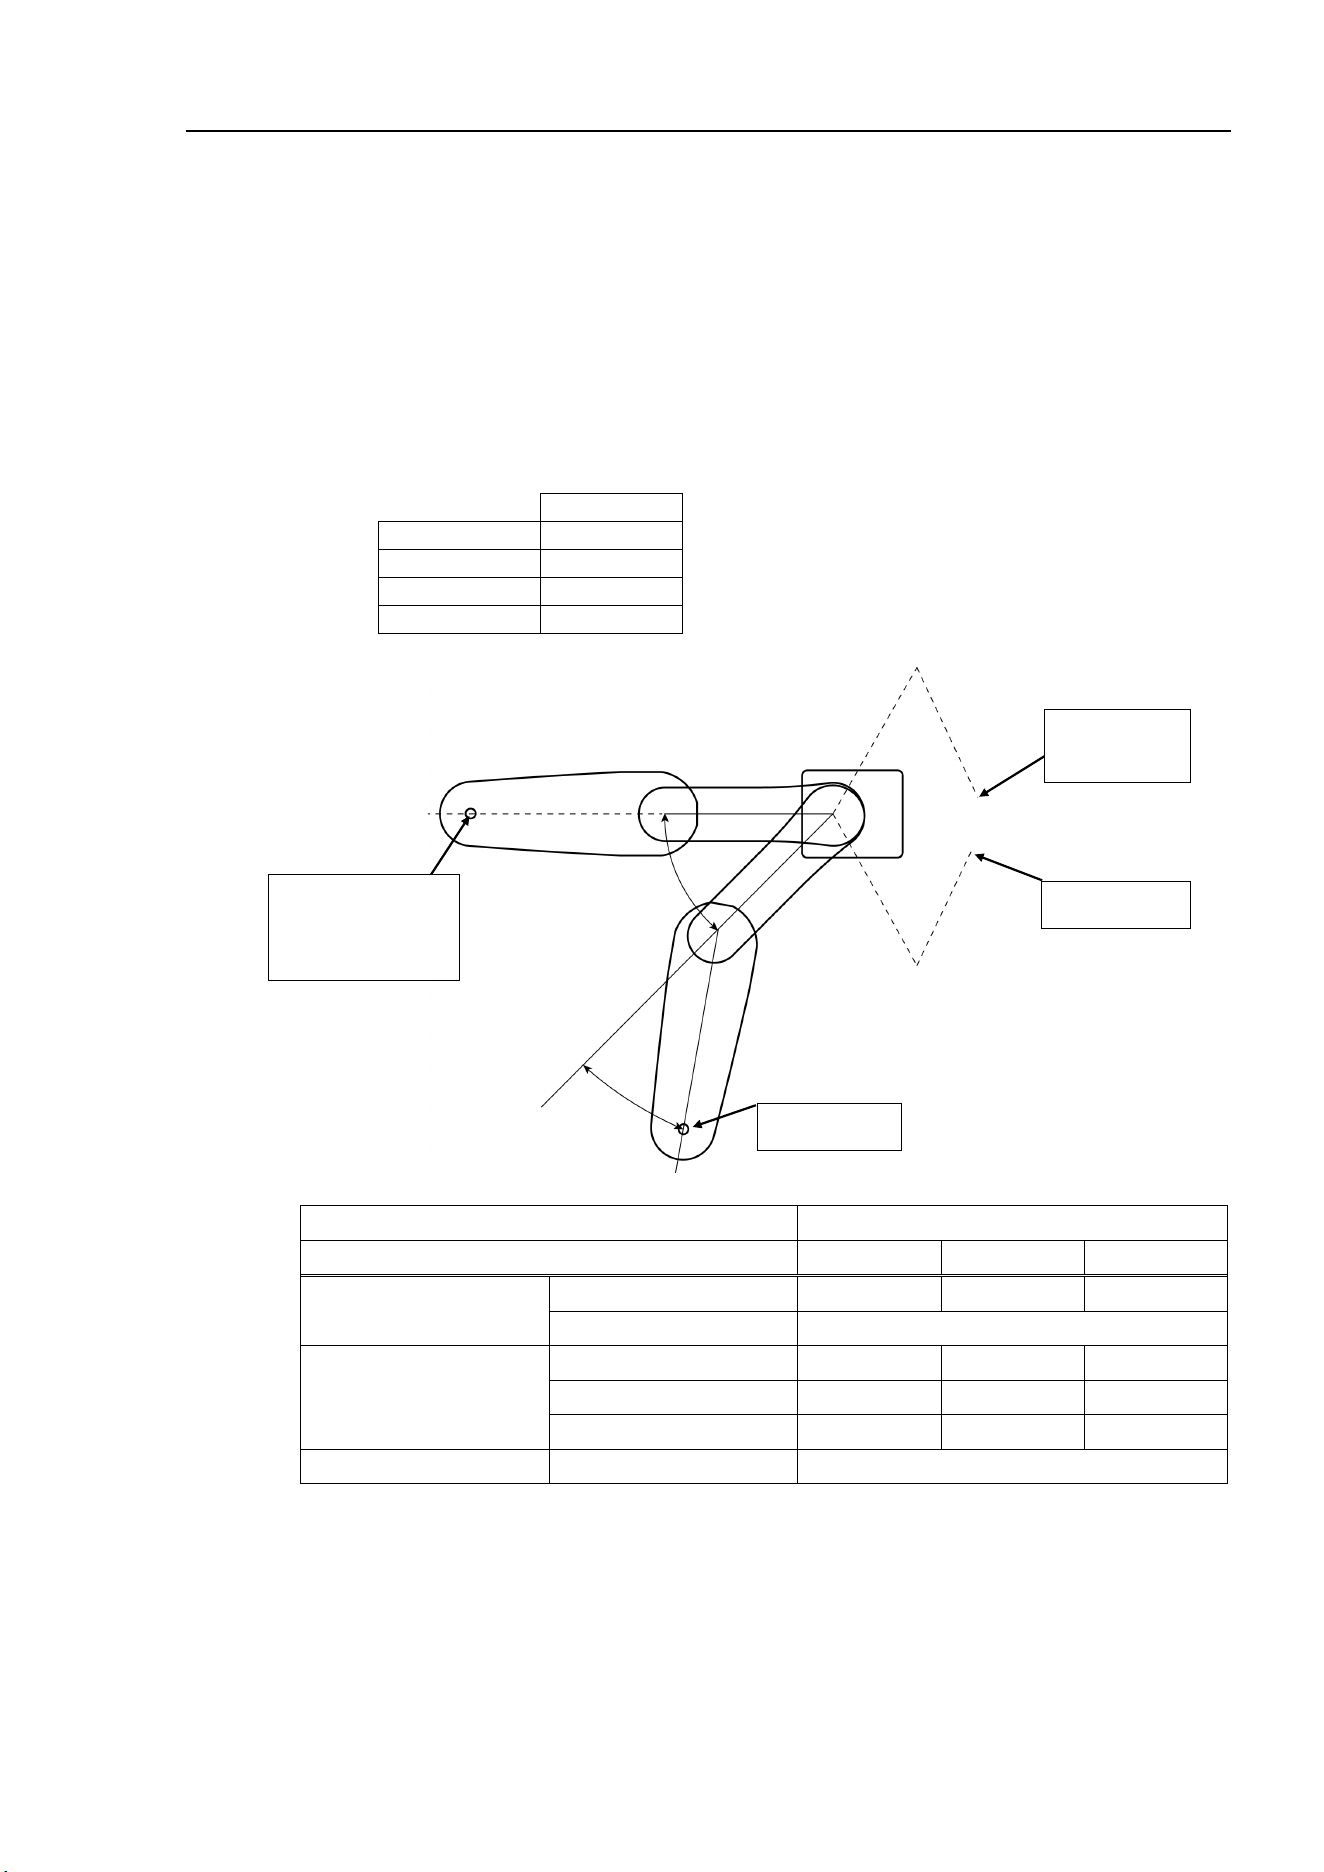
Free running distance in emergency
The operating Manipulator cannot stop immediately after the Emergency Stop switch is
pressed.
The free running time/angle/distance of the Manipulator are shown below. However,
remember that the values vary depending on following conditions.
Weight of the end effector Weight setting
Weight of work piece Speed setting
Operating pose Accel setting
Conditions for Measurement
LS10-B****
Accel Setting
100
Speed Setting
100
Load [kg]
10
Weight Setting
10
Joint #1
Stop point
Point where the
emergency stop
signal is input
Target point
Start point of
operation
Joint #2
Controller RC90-B
Manipulator LS10-B60** LS10-B70** LS10-B80**
Free running time
Joint #1 + Joint #2 [sec.]
0.7
0.9
0.7
Joint #3 [sec.]
0.2
Free running angle
Joint #1 [°]
35
75
65
Joint #2 [
°
]
115 105 55
Joint #1 + Joint #2 [°]
120 135 90
Free running distance Joint #3 [mm]
50
Setup & Operation 1. Safety
10 LS10-B Rev.6
1.5 Emergency Movement Without Drive Power
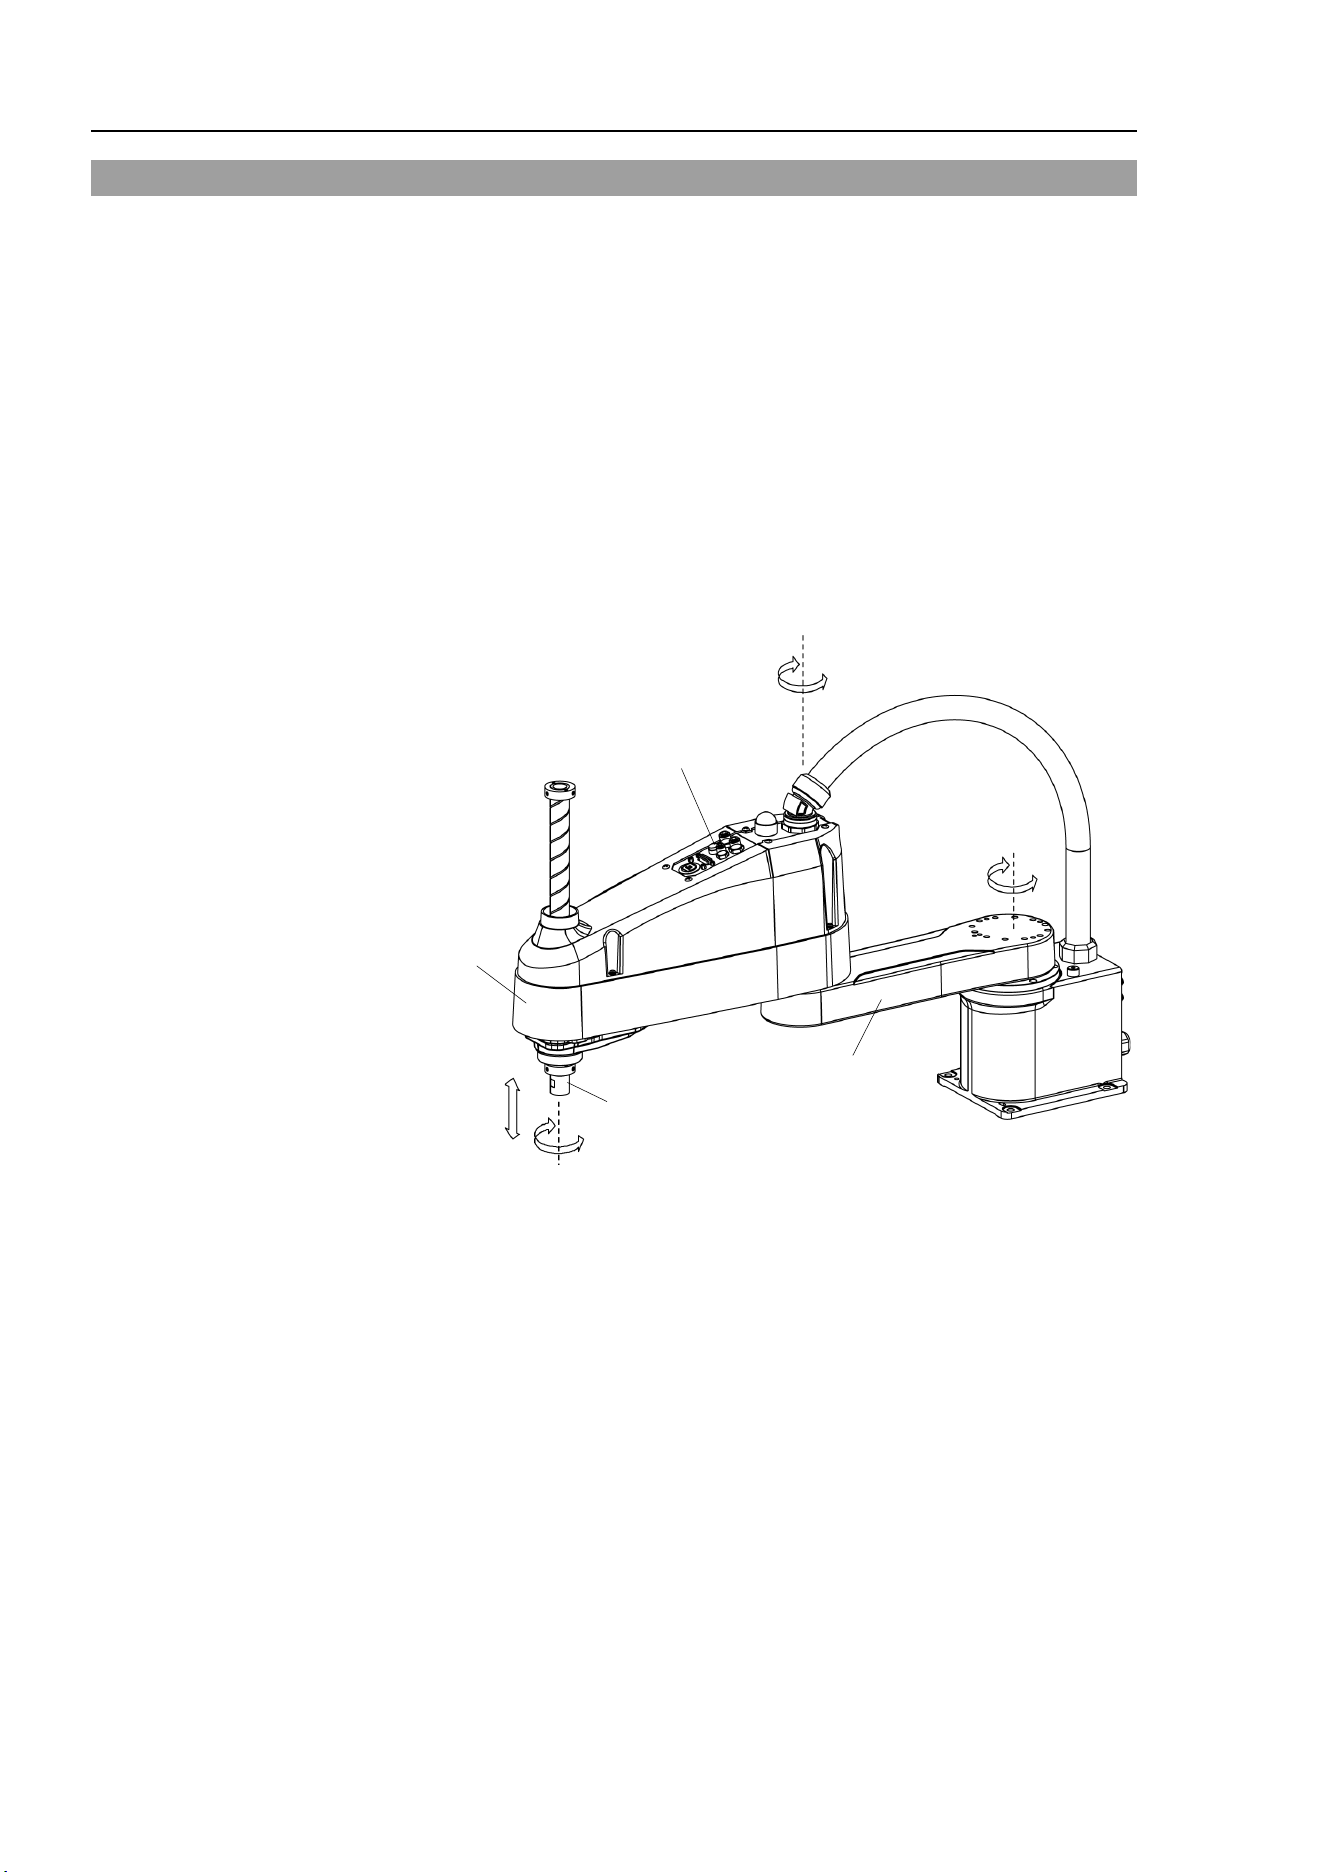
When the system is placed in emergency mode, push the arm or joint of the Manipulator by
hand as shown below:
Arm #1 Push the arm by hand.
Arm #2 Push the arm by hand.
Joint #3 The joint cannot be moved up/down by hand until the
electromagnetic brake applied to the joint has been released. Move
the joint up/down while pressing the brake release switch.
Joint #4 The shaft cannot be rotated by hand until the electromagnetic brake
applied to the shaft has been released. Move the shaft while
pressing the brake release switch.
Joint #3, #4
brake release switch
Joint #1
(rotating)
Joint #2
(rotating)
Joint #3
(up and down)
Joint #4
(rotating)
Arm #1
Arm #2
+
−
+
−
+
−
+
−
Shaft
(Figure: LS10-B702S)
The brake release switch affects both Joints #3 and #4. When the brake release switch is
pressed in emergency mode, the brake for both Joints #3 and #4 are released simultaneously.
Be careful of the shaft falling and rotating while the brake release switch is pressed because the
shaft may be lowered by the weight of an end effector.
NOTE
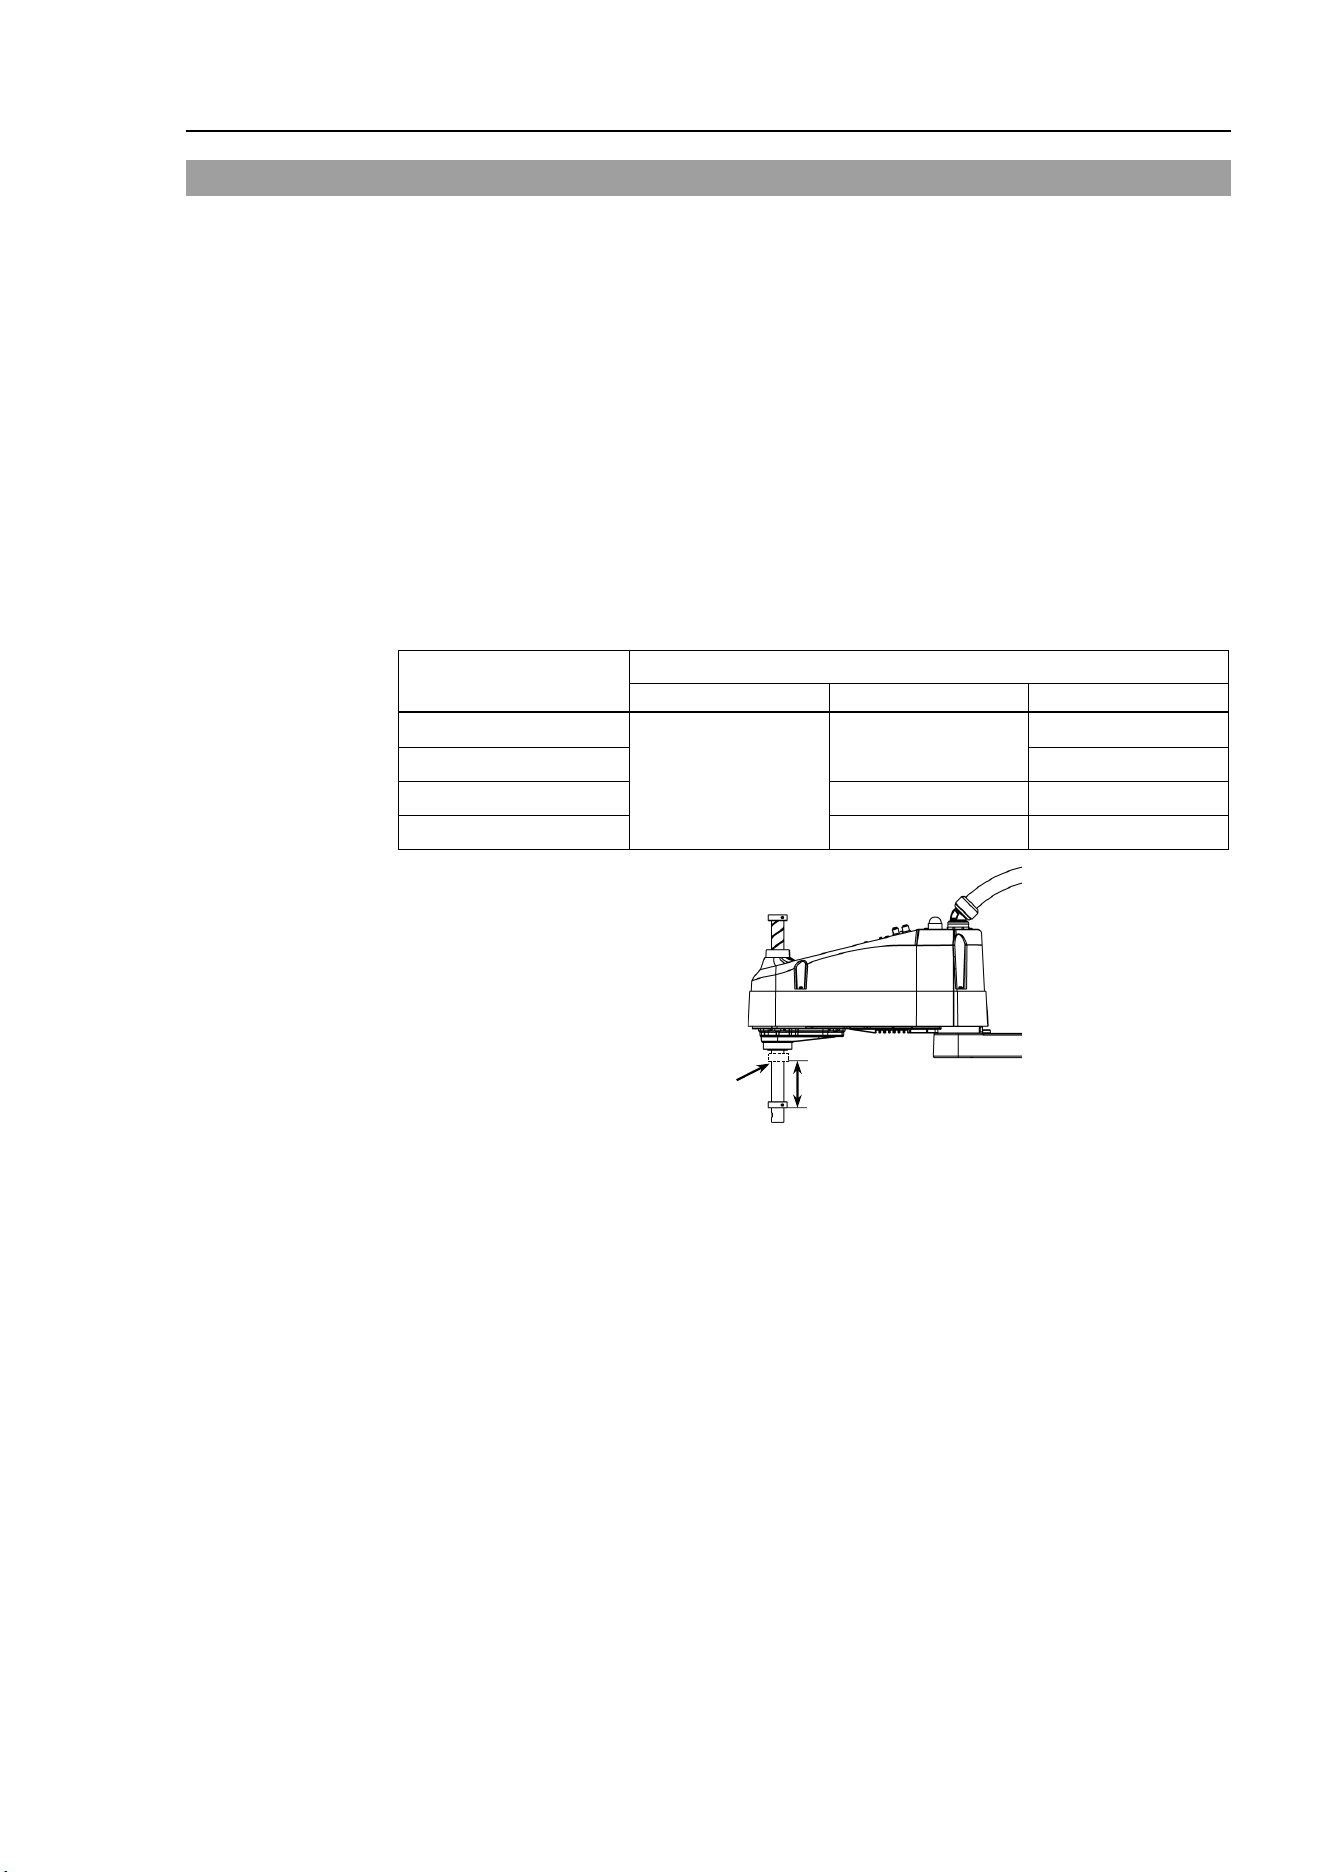
Setup & Operation 1. Safety
LS10-B Rev.6 11
1.6 ACCELS Setting for CP Motions
When operating the Manipulator in CP motion:
Acceleration/deceleration may be adjusted automatically depending on the tip load and
the Z-axis height to prevent damages of the ball screw spline.
ACCELS correction is performed by WEIGHT setting. If the Weight setting is not proper
for the tip load, the following problem occurs.
- Decline in the life and damage of the ball screw spline
Example:
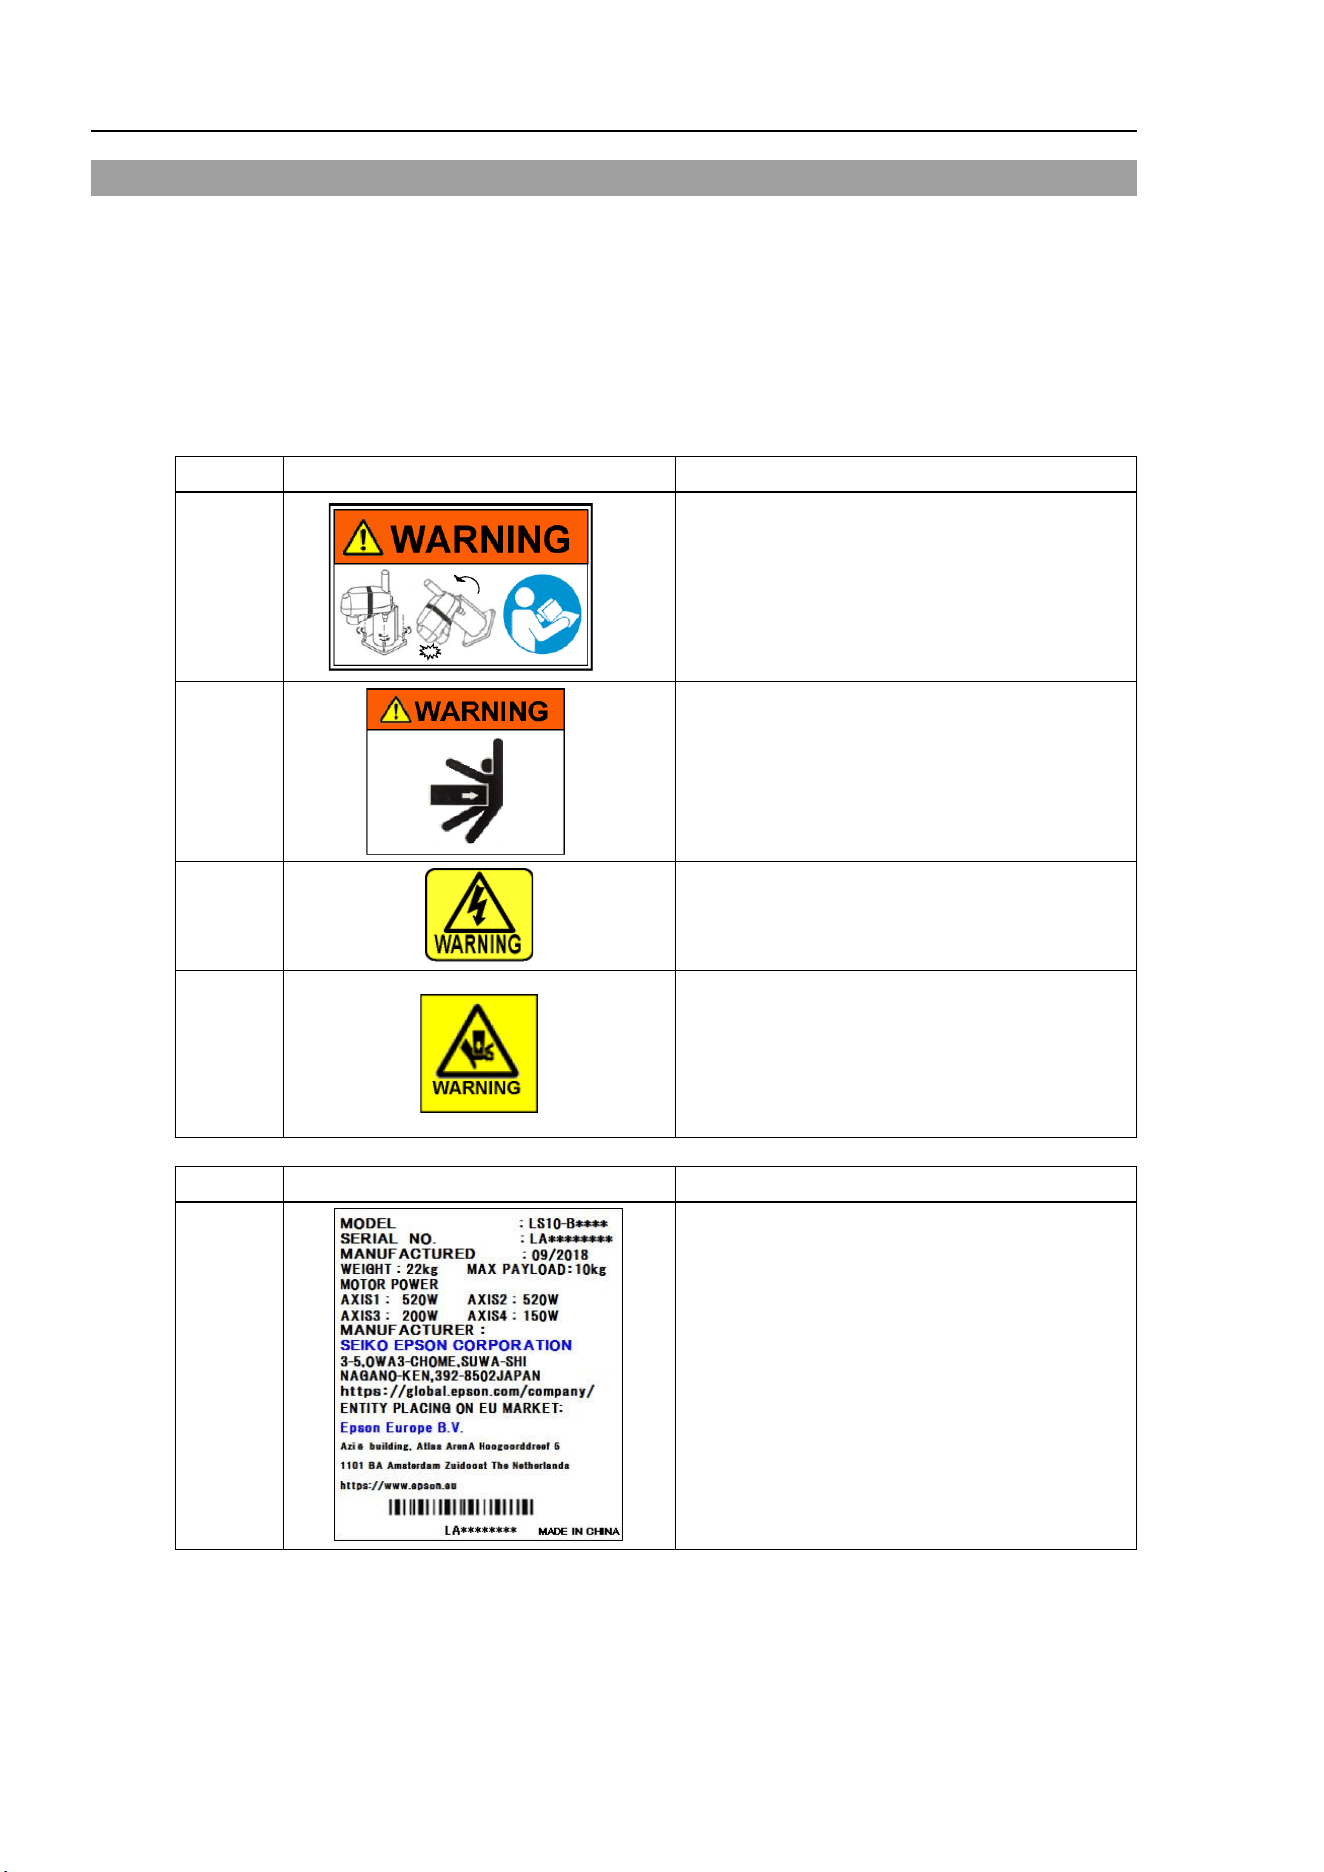
Maximum value of ACCELS is corrected automatically depending on the Z-axis height.
The following is an example of values which are corrected per 100mm (Z-axis height).
Maximum ACCELS correction values by Z-axis height and tip load
Z-axis height
(mm)
Tip load
3kg
6kg
10kg
Z = 0
25000 or less
25000 or less
25000 or less
Z =
−
100
18000 or less
Z =
−
200
18000 or less
11000 or less
Z =
−
300
13000 or less
7500 or less
Z
Z-axis height 0
(Origin position)
If the Manipulator is operated in CP motion with the wrong set values, make sure to check
the following.
- Whether or not the ball screw spline shaft is deformed or bent
NOTE
Setup & Operation 1. Safety
12 LS10-B Rev.6
1.7 Warning Labels
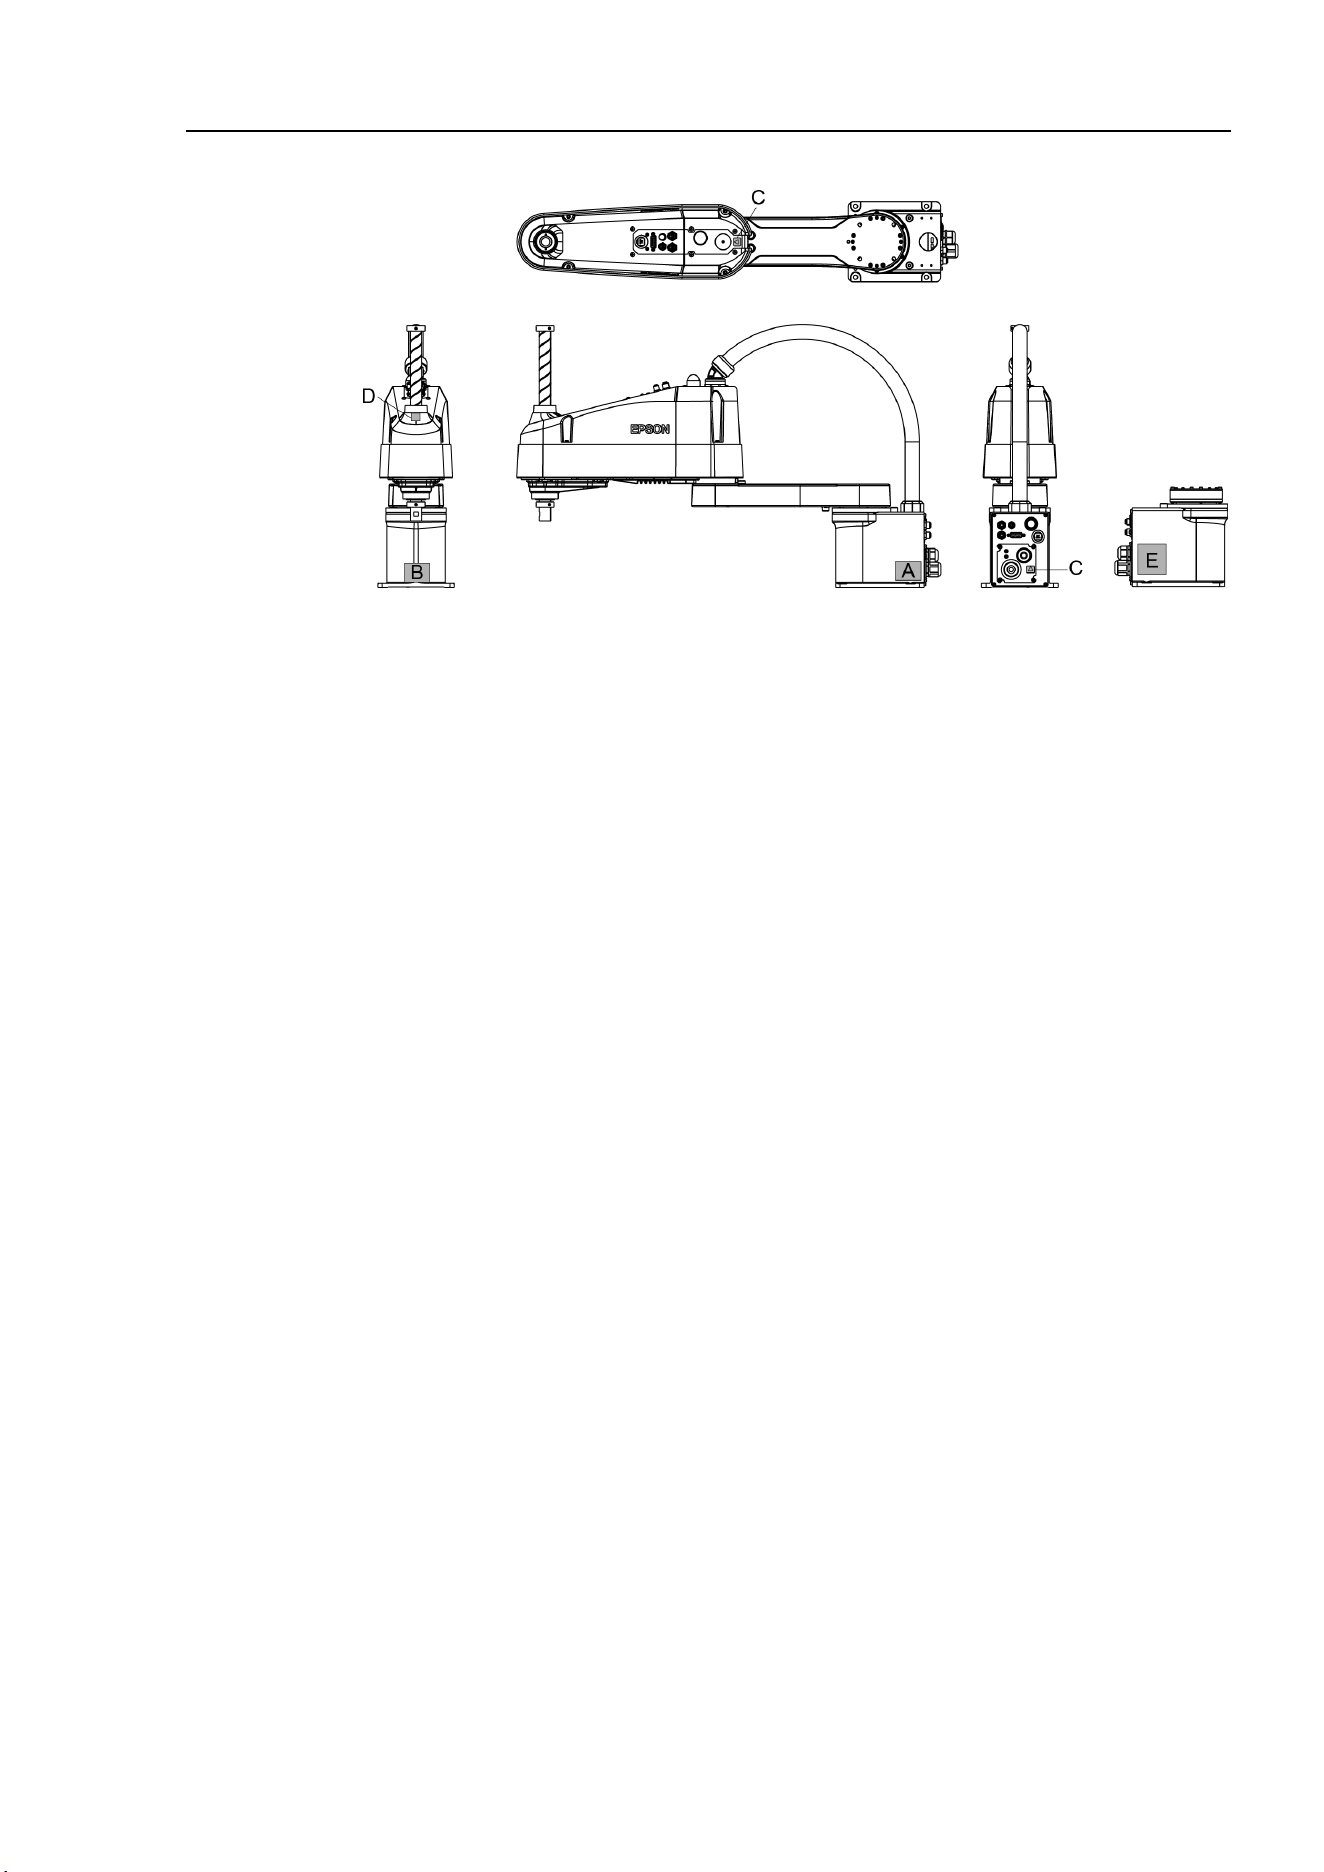
The Manipulator has the following warning labels.
The warning labels are attached around the locations where specific dangers exist.
Be sure to comply with descriptions and warnings on the labels to operate and maintain the
Manipulator safely.
Do not tear, damage, or remove the warning labels. Use meticulous care when handling
those parts or units to which the following warning labels are attached as well as the nearby
areas.
Location Warning Label NOTE
A
Before loosening the base mounting screws,
hold the arm and secure it tightly with a band to
prevent hands or fingers from being caught in the
Manipulator.
B
Do not enter the operation area while the
Manipulator is moving. The robot arm may
collide against the operator. This is extremely
hazardous and may result in serious safety
problems.
C
Hazardous voltage exists while the Manipulator
is ON. To avoid electric shock, do not touch any
internal electric parts.
D
You can catch your hand or fingers between the
shaft and cover when bringing your hand close to
moving parts.
* Manipulators with bellows do not have this label
for no danger of your hand or fingers being
caught.
Location Signature label NOTE
E
Manipulator’s serial No.
Setup & Operation 1. Safety
LS10-B Rev.6 13
LS10-B
(Figure: LS10-B702S)

Setup & Operation 2. Specifications
14 LS10-B Rev.6
2. Specifications
2.1 Features of LS10-B series Manipulators
The LS10-B series Manipulators are advanced manipulators pursuing high speed and high
cost-performance. The features of the LS10-B series Manipulators are as follows:
Large capacity
It supports the U-axis allowable moment up to 0.30 kg·m
2
.
Handle large loads stably by optimized control based on the each load.
Tact time improvement by high-speed motion
It improves the tact time of long-range movements by readjusting the highest speed.
It improves the tact time of delicate movements by acceleration/deceleration speed
optimized for each payload and stop short technology.
Ethernet connector for camera cable is equipped by default
Ethernet connector is equipped on #2 arm and base of the manipulator by default.
Easier to equip a camera (option: Vision Guide) than the conventional models.
Simplify the connection and disconnection of M/C cable
Connect the M/C cable and the cable inside the manipulator with the connector.
Easy to connect and disconnect the M/C cable and easier to transport the manipulator
than the conventional models.
Setup & Operation 2. Specifications
LS10-B Rev.6 15
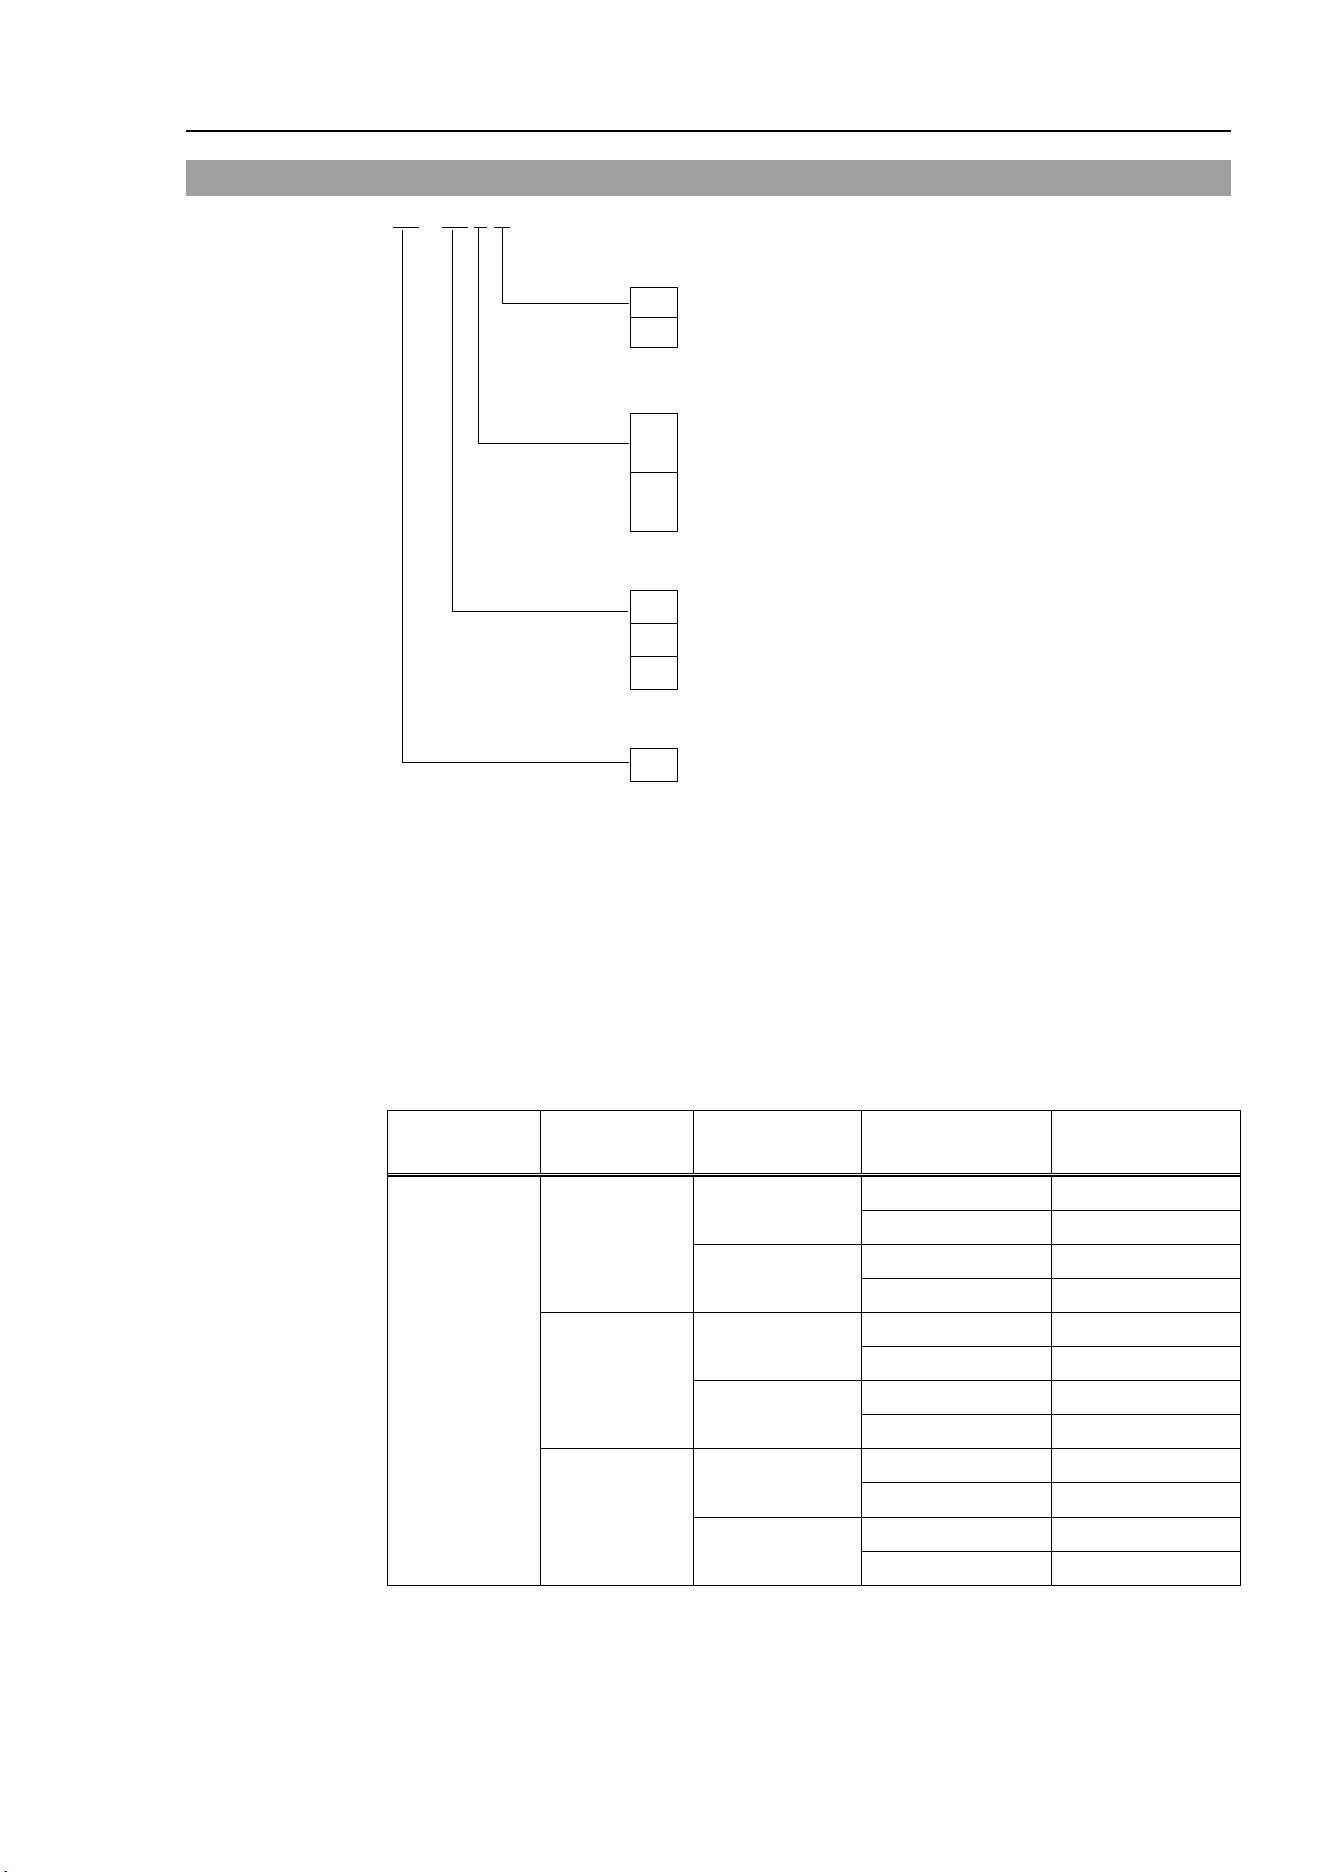
2.2 Model Number
LS10-B60 2 S
Environment
S
: Standard
C
: Cleanroom
Joint #3 stroke
2
: 200 mm : Standard-Model
: 170 mm : Cleanroom-Model (with bellows)
3
: 300 mm : Standard-Model
: 270 mm : Cleanroom-Model (with bellows)
Arm length
60 : 600 mm
70 : 700 mm
80
: 800 mm
Payload
10 : 10 kg
Environment
Cleanroom-model
This model has additional features that reduce dust emitted by the Manipulator to
enable use in clean room environments.
For details on the specifications, refer to Setup & Operation: 2.4 Specifications.
Models
Payload Arm length Environment Joint #3 stroke Model Number
10 kg
600 mm
Standard
200 mm
LS10-B602S
300 mm
LS10-B603S
Cleanroom
170 mm
LS10-B602C
270 mm
LS10-B603C
700 mm
Standard
200 mm
LS10-B702S
300 mm
LS10-B703S
Cleanroom
170 mm
LS10-B702C
270 mm
LS10-B703C
800 mm
Standard
200 mm
LS10-B802S
300 mm
LS10-B803S
Cleanroom
170 mm
LS10-B802C
270 mm
LS10-B803C
Setup & Operation 2. Specifications
16 LS10-B Rev.6
2.3 Part Names and Outer Dimensions
2.3.1 Standard-Model (LS10-B***S)
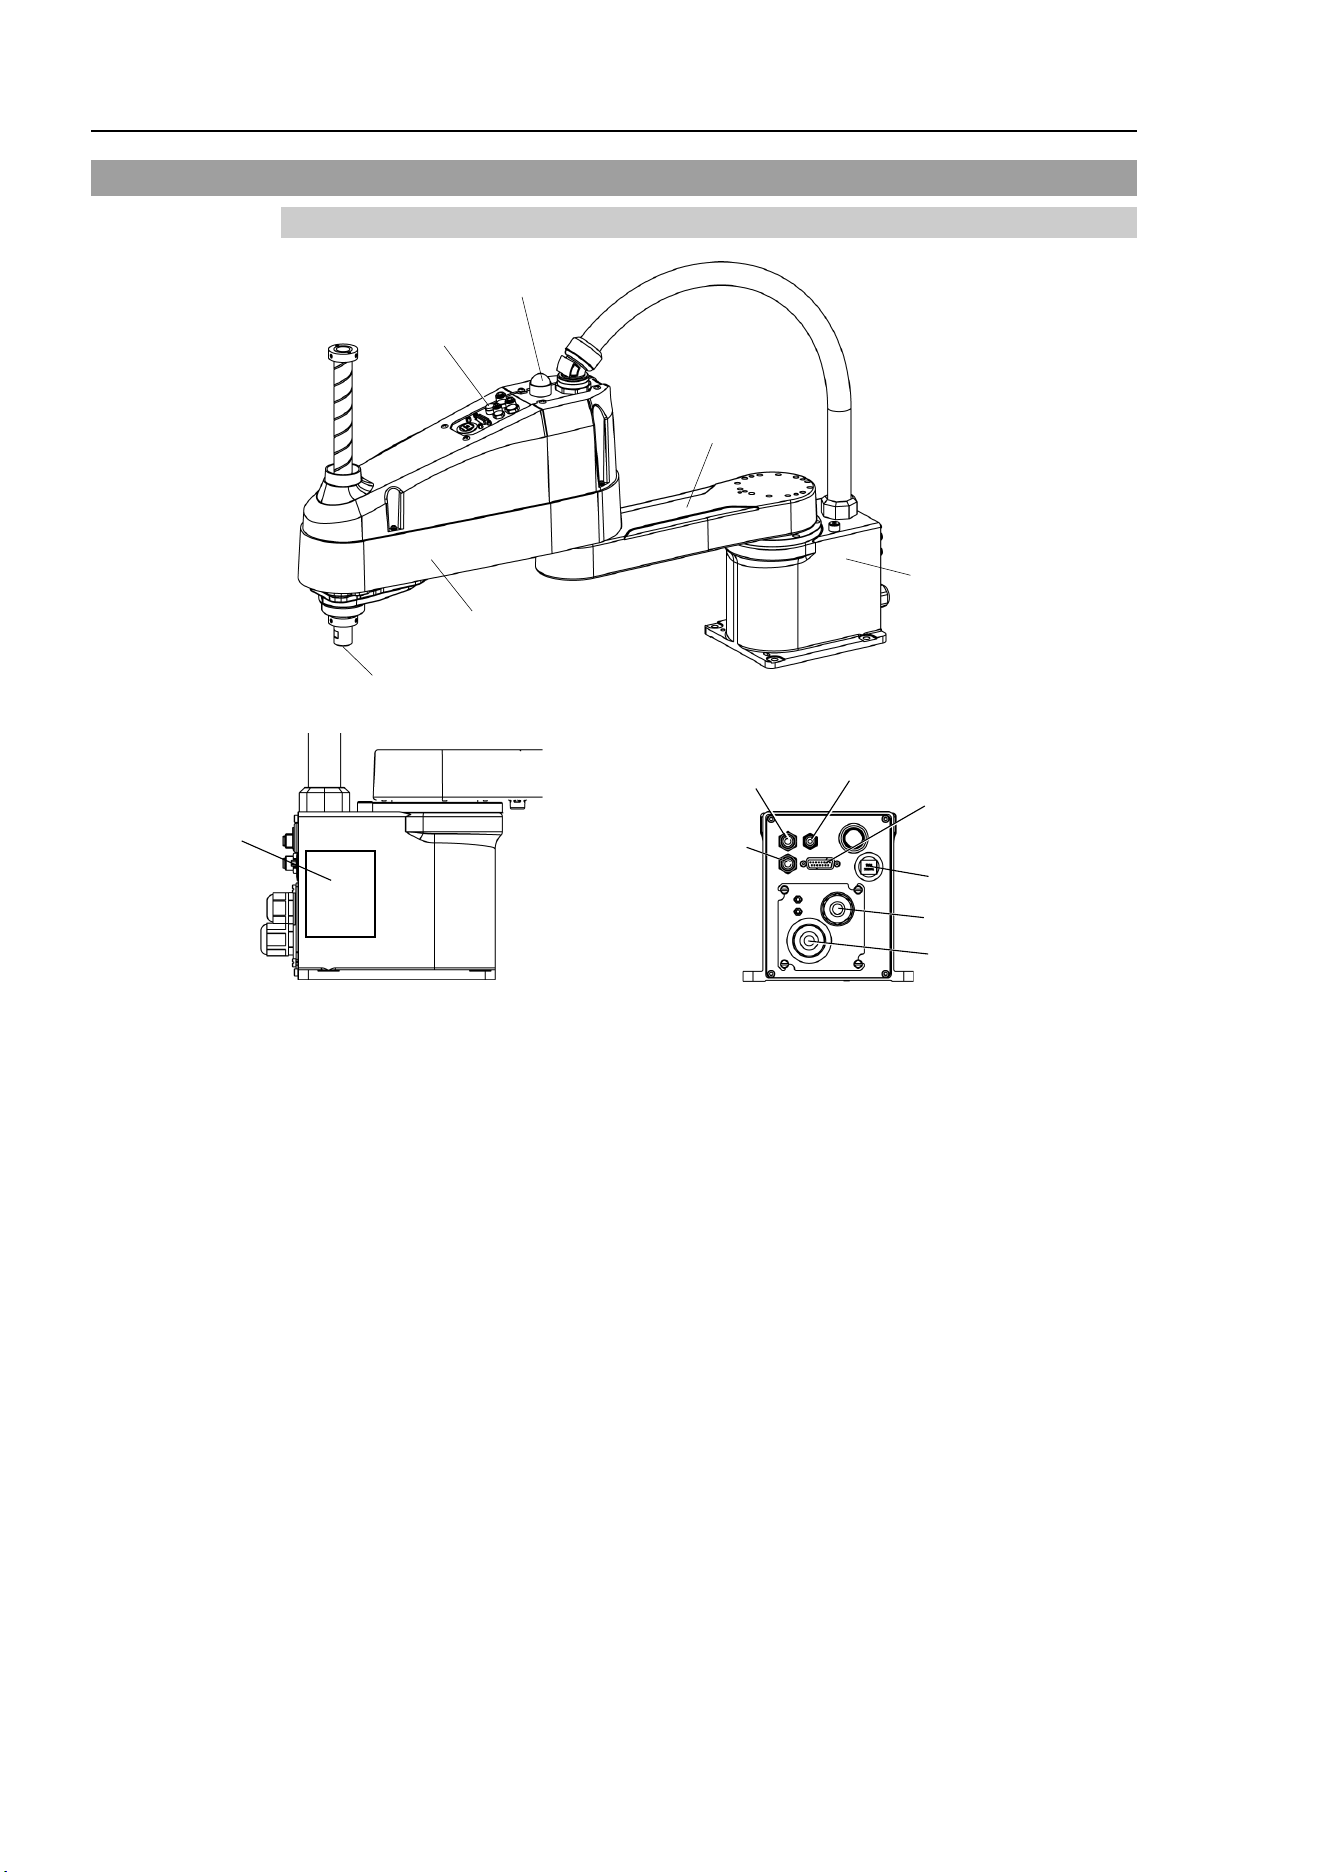
Joint #3, #4
Brake release switch
Arm #1
Arm #2
Base
Shaft
LED lamp
Signature label
(Serial No.
of Manipulator)
Power cable
Signal cable
Fittings (blue)
for ø4 mm pneumatic tube
Fittings (blue)
for ø6 mm
pneumatic tube
Fittings (white)
for ø6 mm
pneumatic tube
User connector
(15-pin
D-sub connector)
Ethernet connector
- The brake release switch affects both Joints #3 and #4. When the brake release switch
is pressed in emergency mode, the brakes for both Joint #3 and Joint #4 are released
simultaneously.
- While the LED lamp is on, current is being applied to the manipulator. Performing any
work with the power ON is extremely hazardous and it may result in electric shock and/or
improper function of the robot system. Make sure to turn OFF the controller power
before the maintenance work.
NOTE
Setup & Operation 2. Specifications
LS10-B Rev.6 17
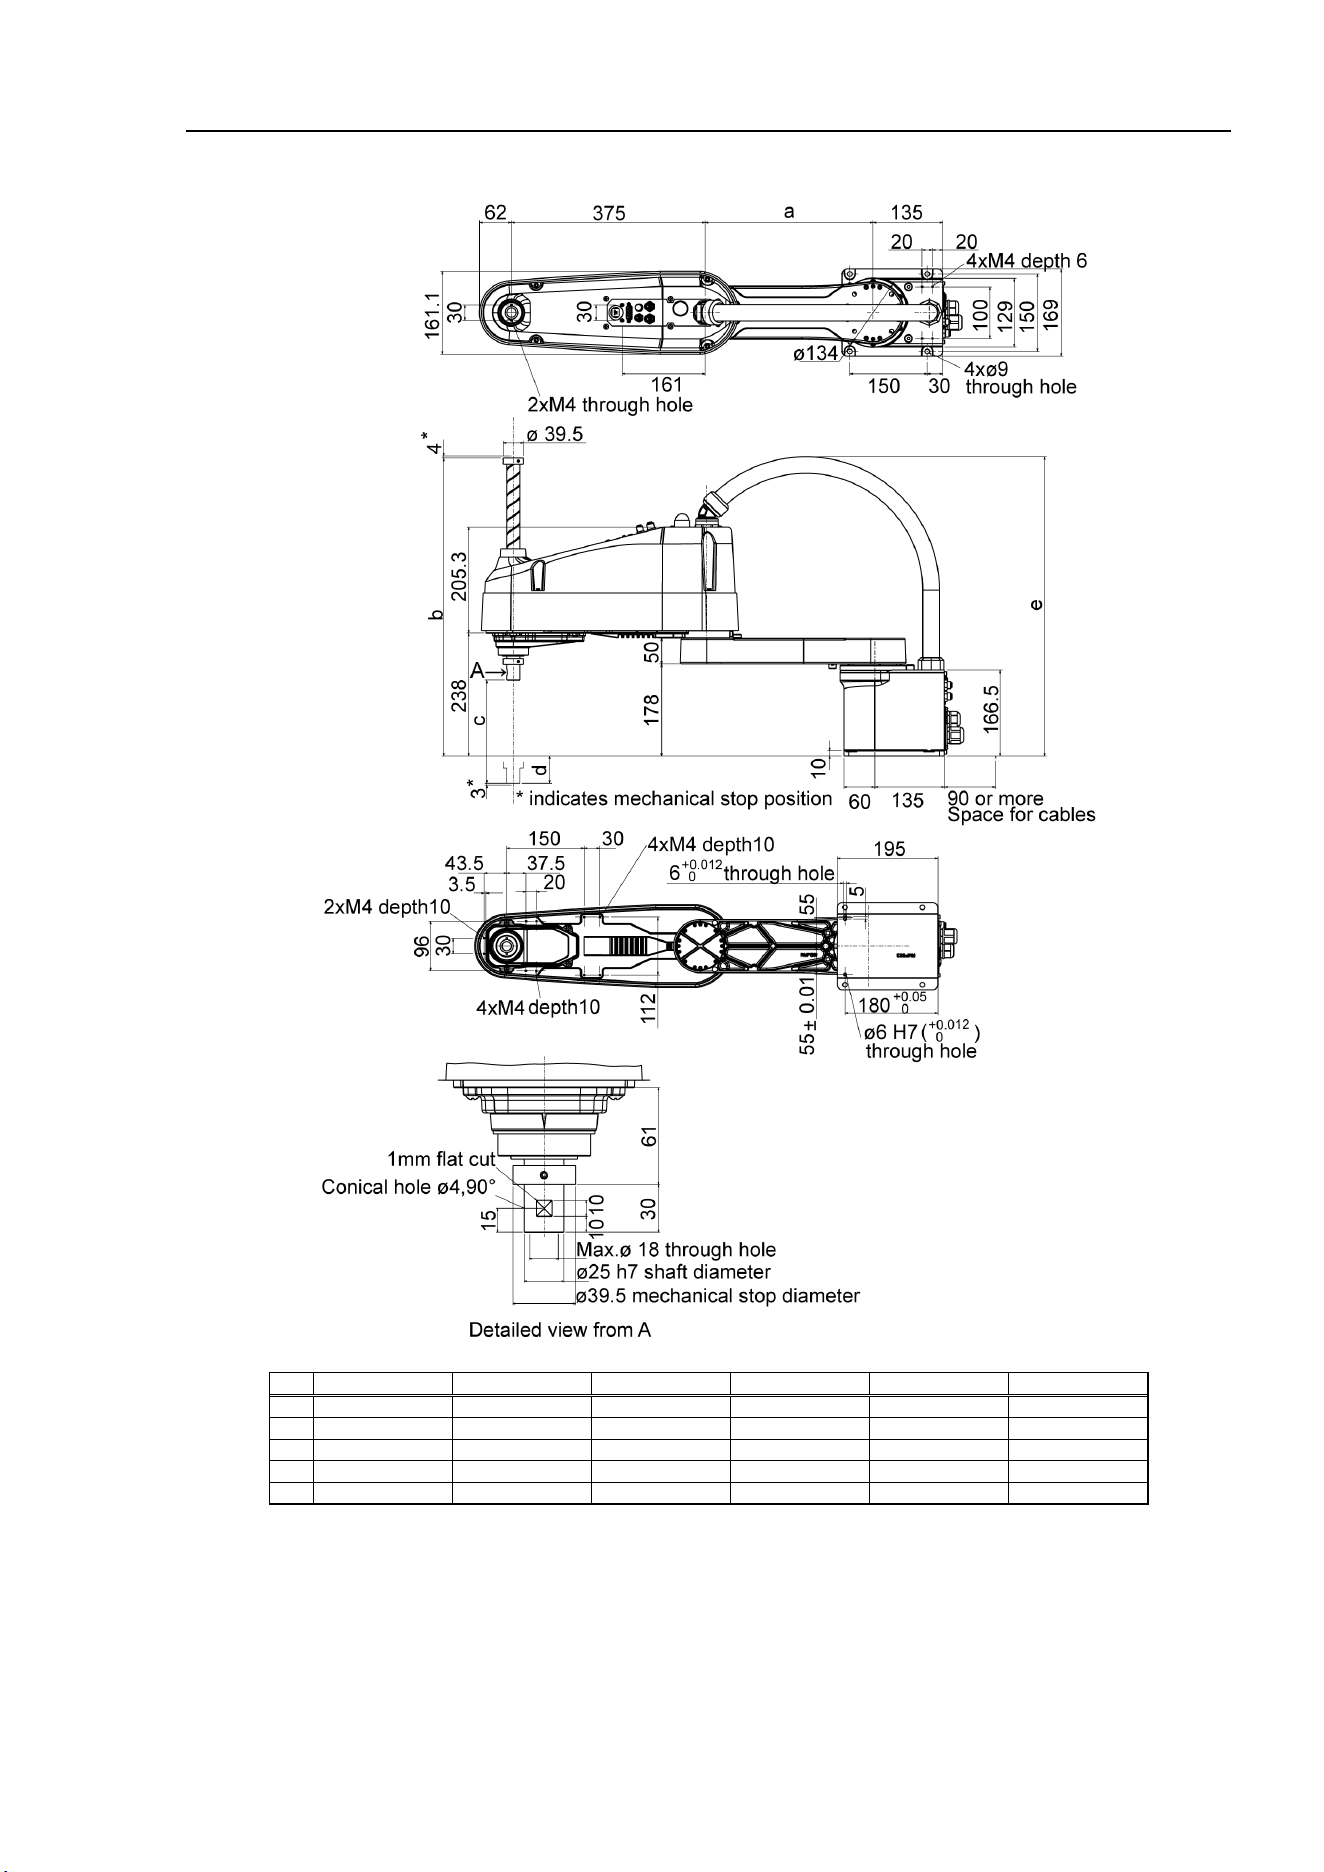
LS10-B***S (Standard-Model)
LS10-B602S
LS10-B702S
LS10-B802S
LS10-B603S
LS10-B703S
LS10-B803S
a
225
325
425
225
325
425
b
577
577
577
677
677
677
c
200
200
200
300
300
300
d
53
53
53
153
153
153
e
565
580
580
565
580
580
Setup & Operation 2. Specifications
18 LS10-B Rev.6
2.3.2 Cleanroom-Model (LS10-B***C)
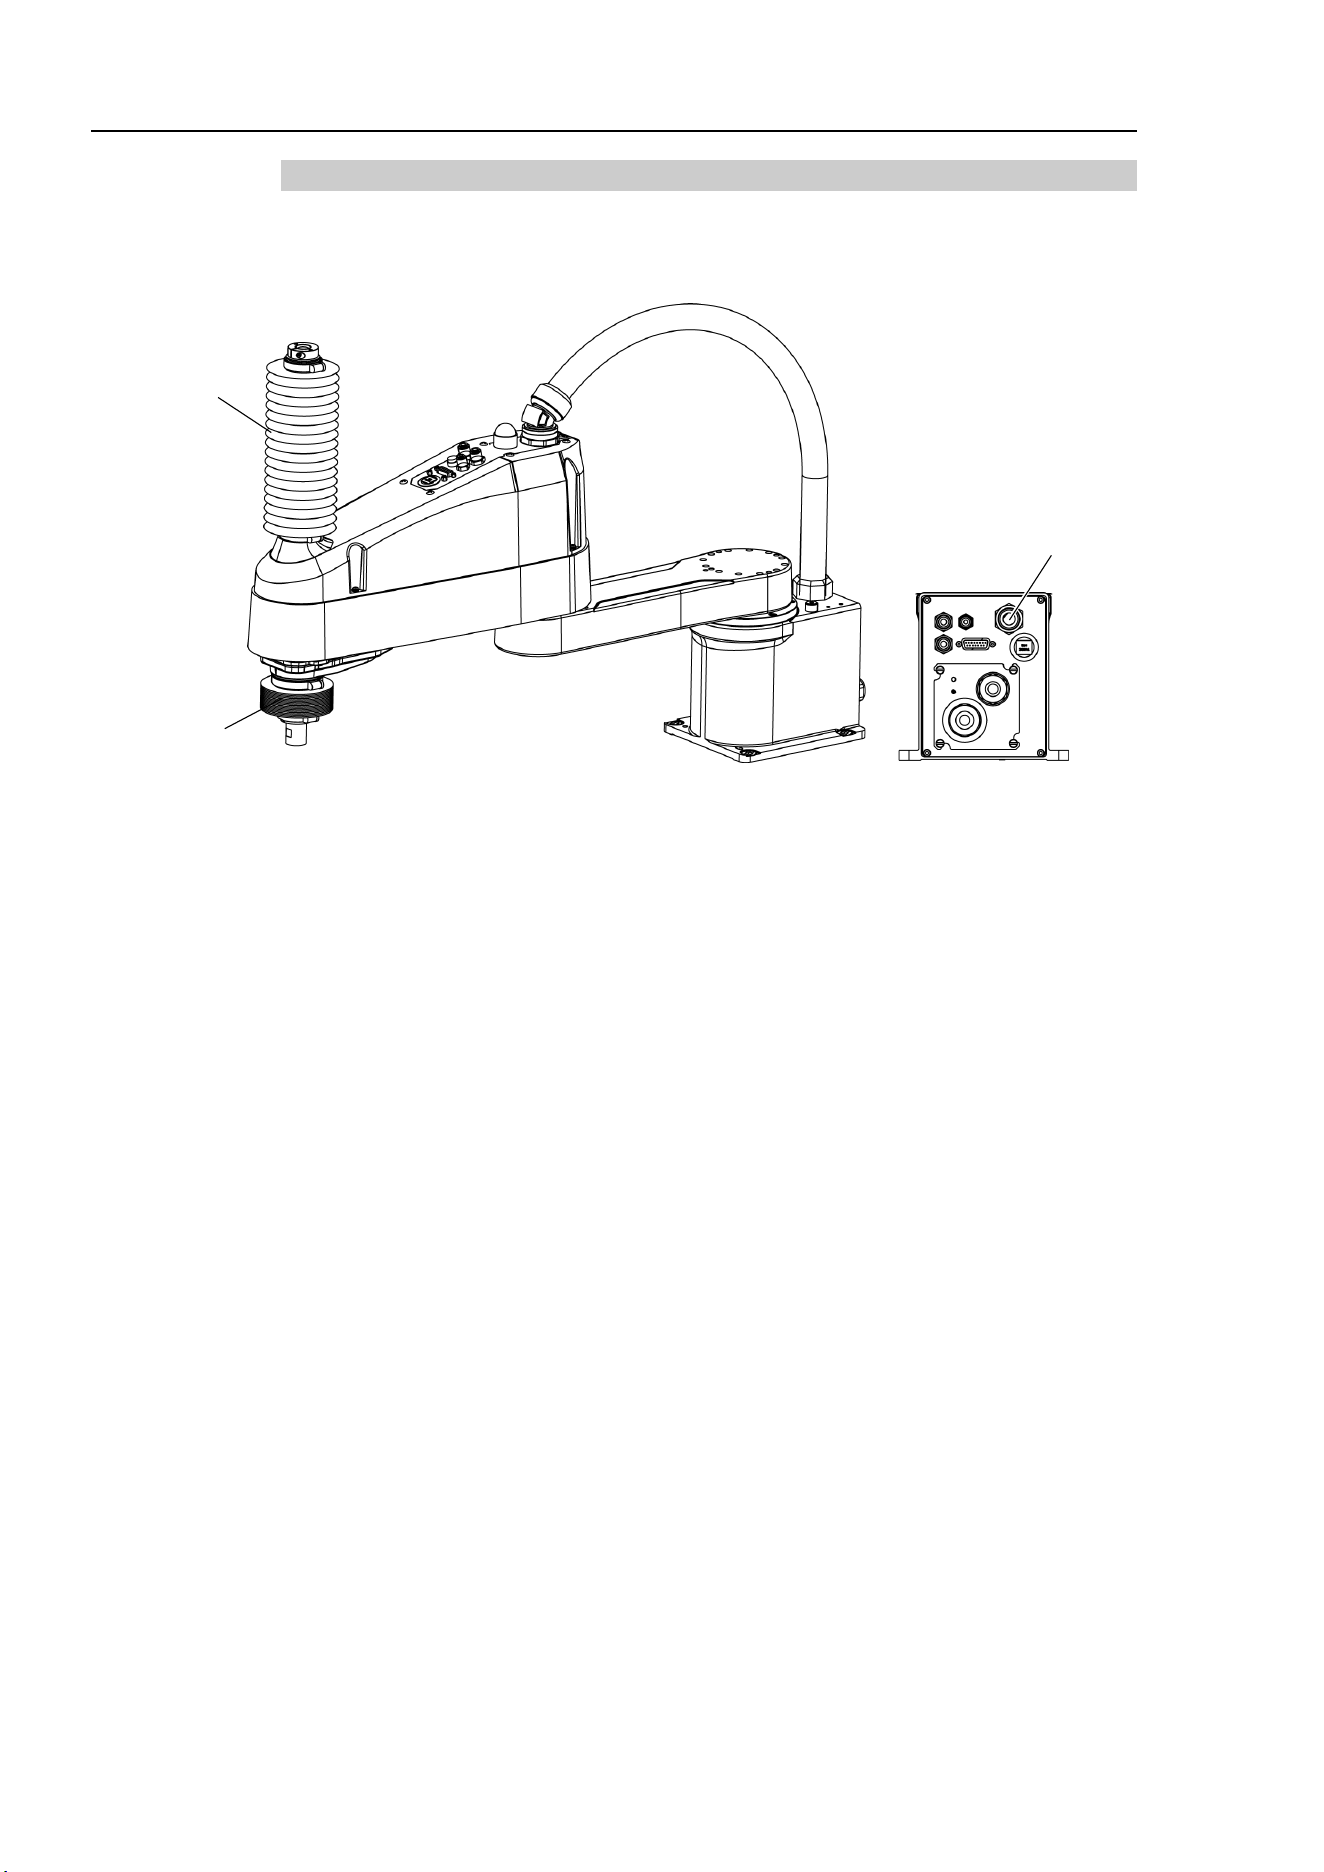
The following figures show the additional parts and specifications for Cleanroom-model
when compared with the Standard-model in appearance.
Upper bellows
Lower bellows
Exhaust port
Setup & Operation 2. Specifications
LS10-B Rev.6 19
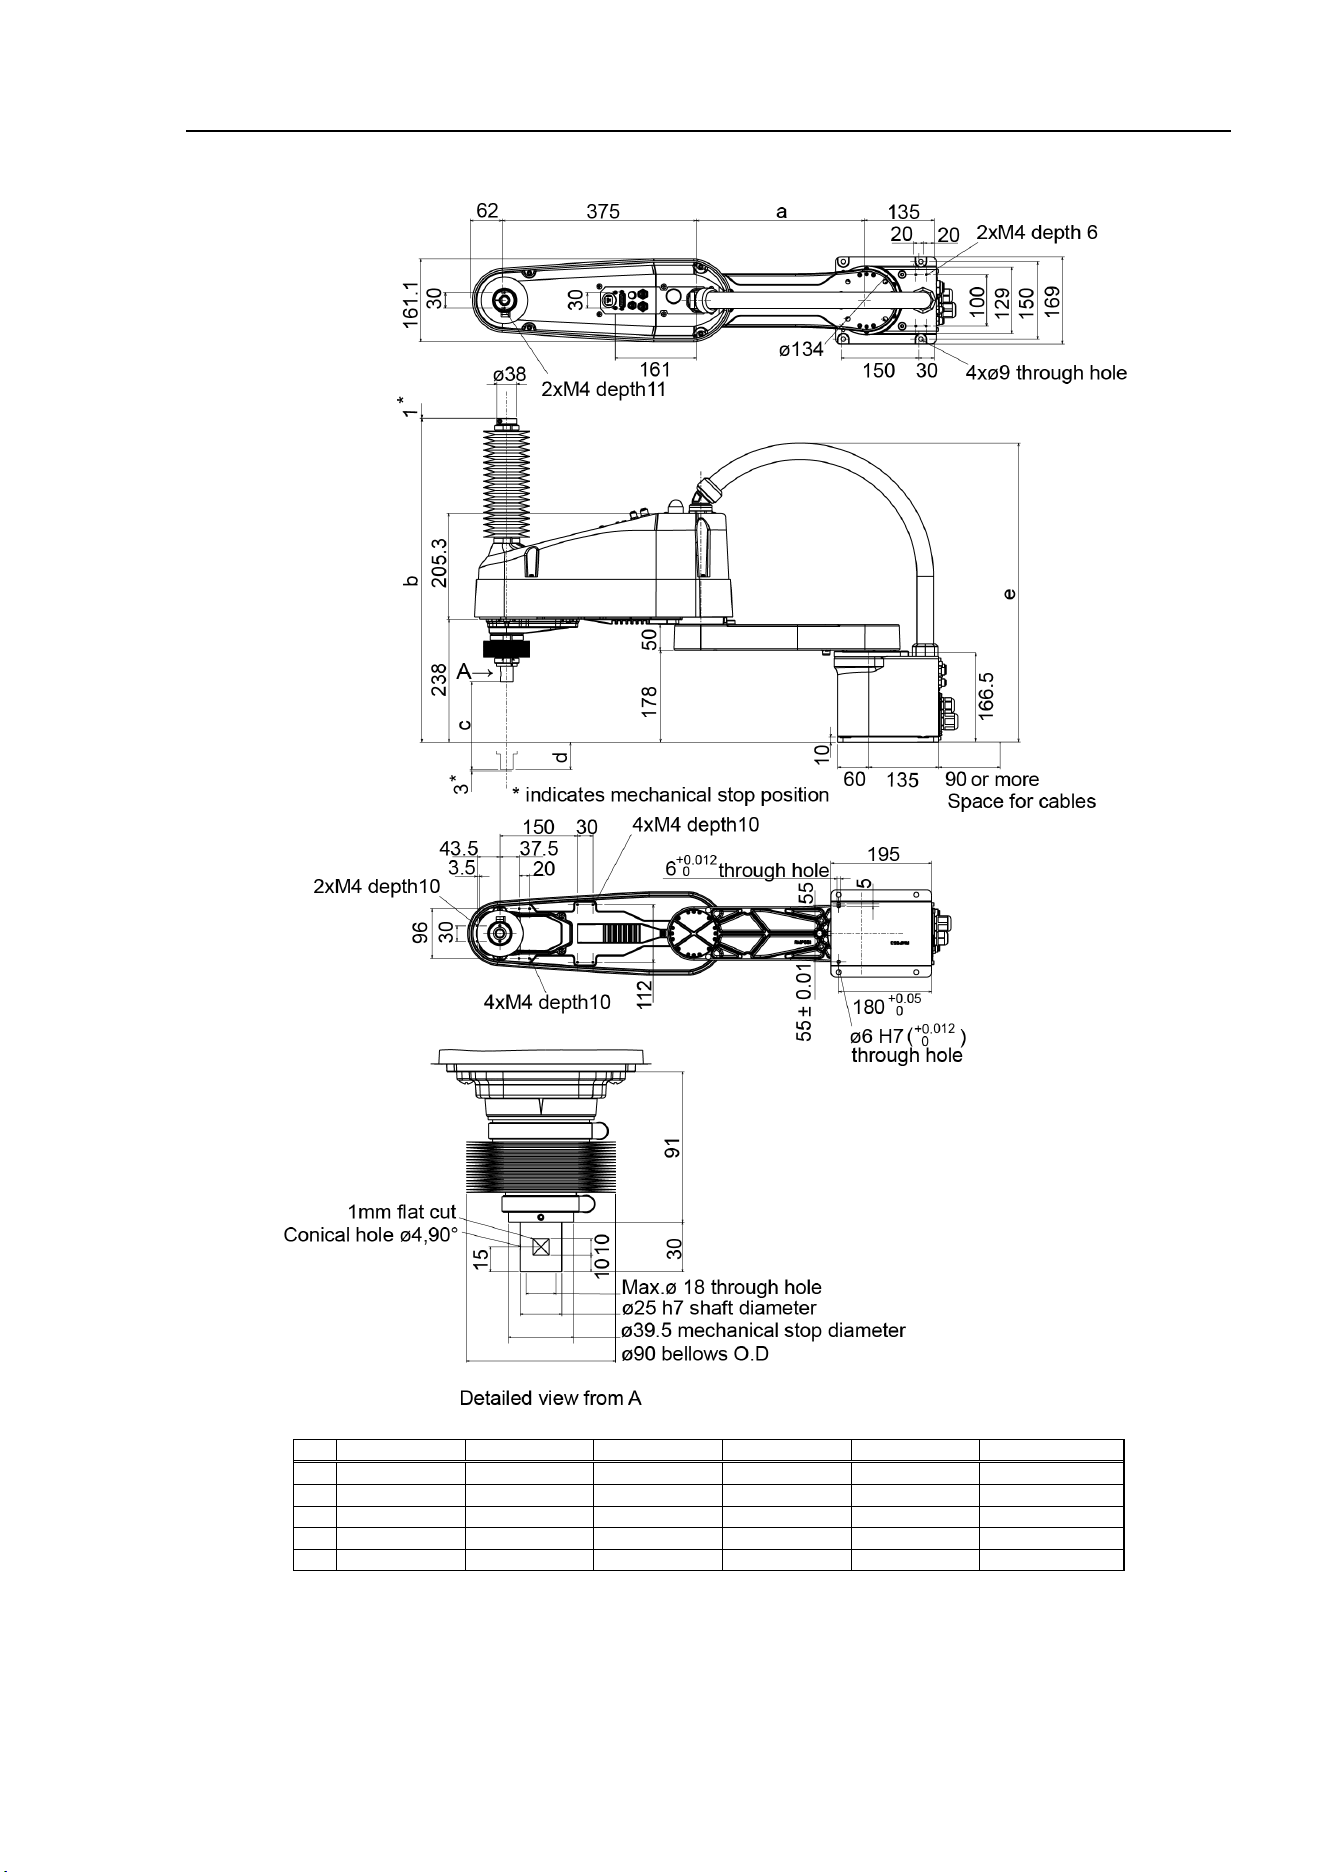
LS10-B***C (Cleanroom-Model)
LS10-B602C
LS10-B702C
LS10-B802C
LS10-B603C
LS10-B703C
LS10-B803C
a
225
325
425
225
325
425
b
627
627
627
727
727
727
c
170
170
170
270
270
270
d
53
53
53
153
153
153
e
565
580
580
565
580
580
Setup & Operation 2. Specifications
20 LS10-B Rev.6
2.4 Specifications
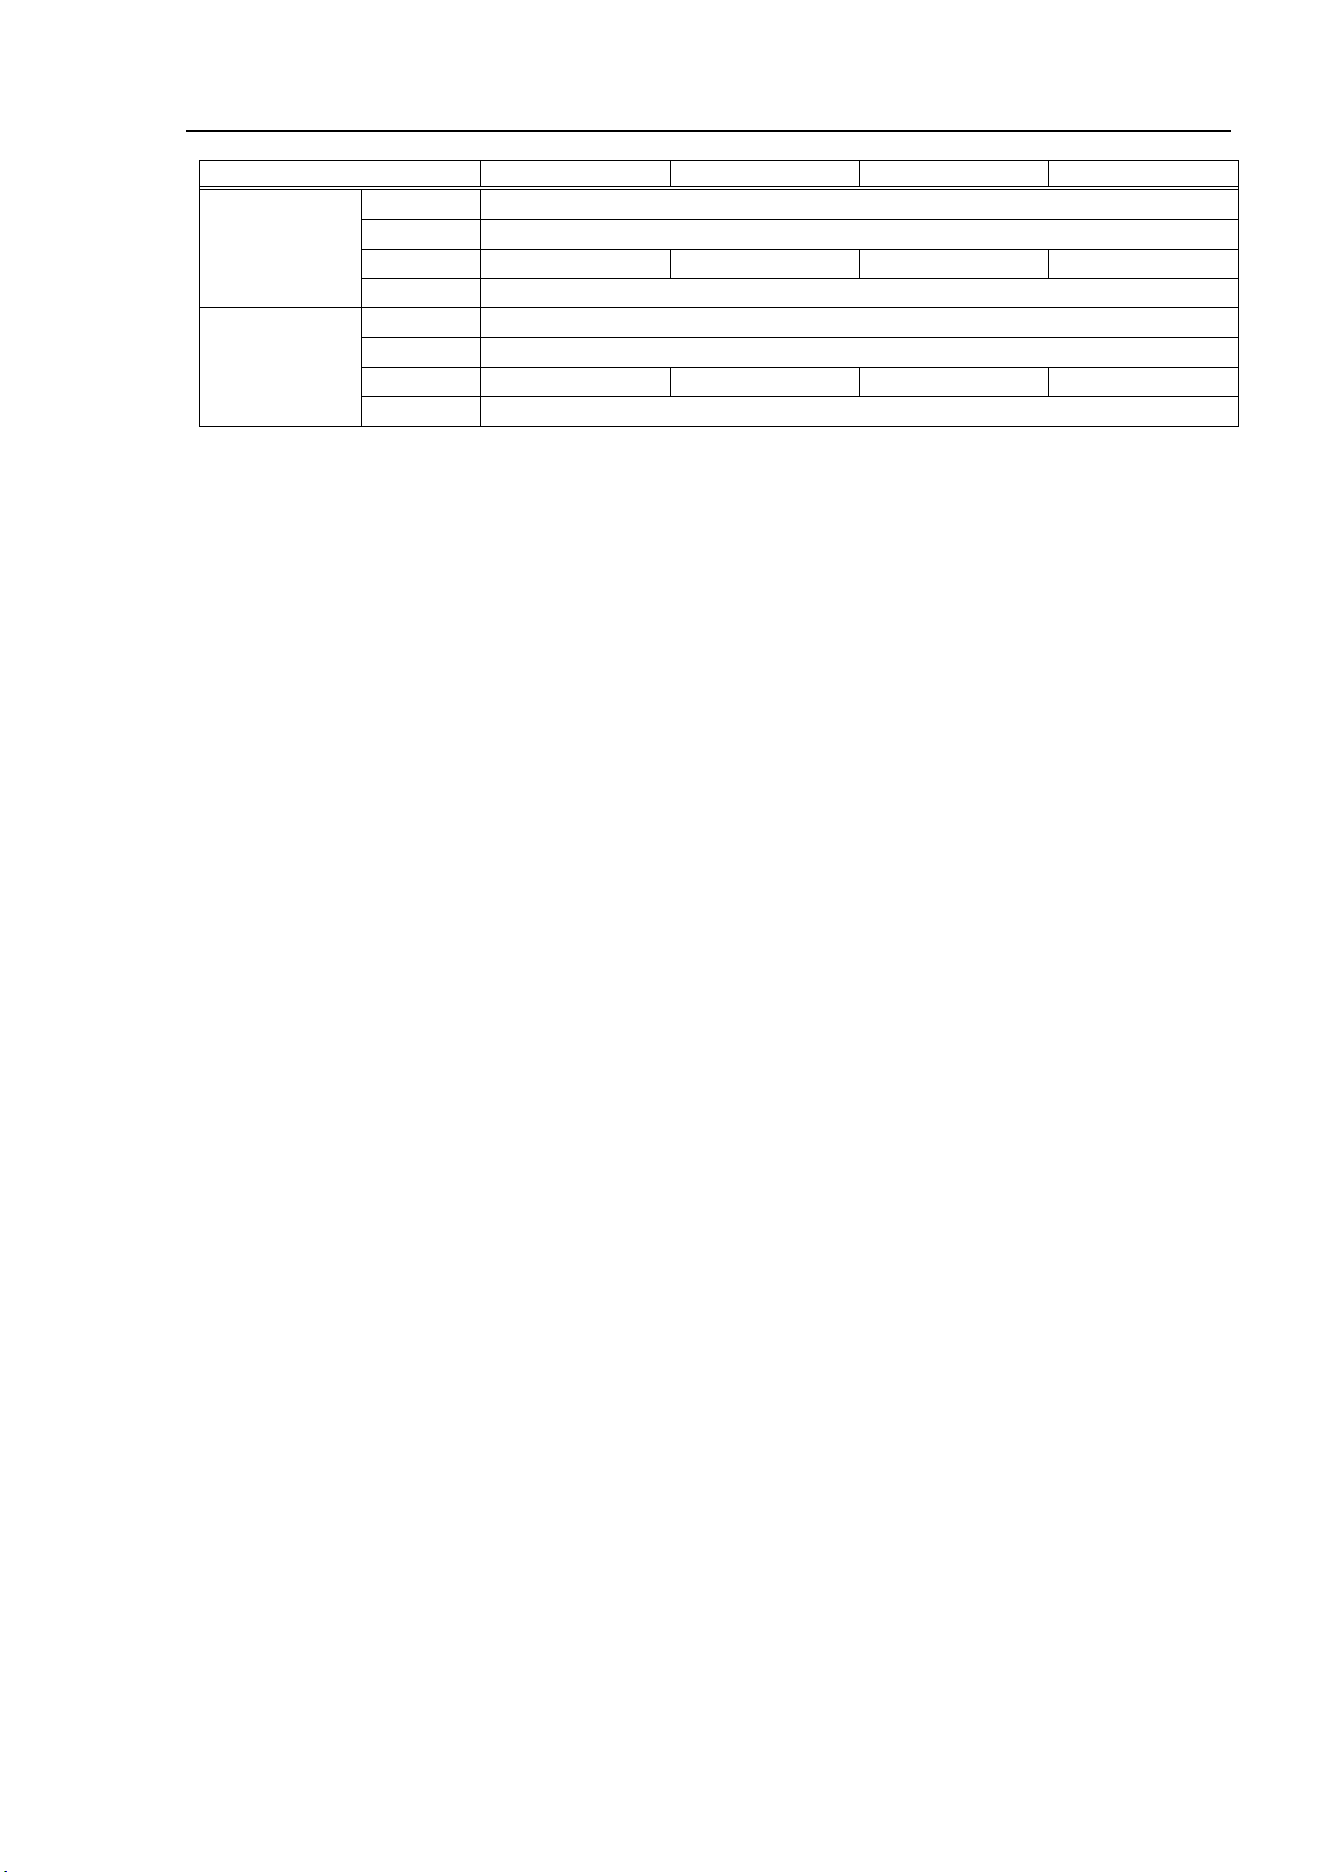
Item
LS10-B60**
LS10-B70**
LS10-B80**
Arm length
Arm #1+#2
600 mm
700 mm
800 mm
Arm #1
225 mm
325 mm
425 mm
Arm #2
375 mm
Max. operating speed
*1
Joints #1+#2
9100 mm/s
9800 mm/s
10500 mm/s
Joint #3
1100 mm/s
Joint #4
2700 °/s
Repeatability
Joints #1+#2
± 0.02 mm
± 0.025 mm
Joint #3
± 0.01 mm
Joint #4
± 0.01 °
Payload (Load)
Rated
5 kg
Max.
10 kg
Joint #4 allowable
moment of inertia *2
Rated
0.02 kg·m
2
Max.
0.3 kg·m
2
Resolution
Joint #1
0.000275 °/pulse
Joint #2
0.000439 °/pulse
Joint #3
0.000740 mm/pulse
Joint #4
0.001674 °/pulse
Hand
Shaft diameter
ø 25 mm
Through hole
ø 18 mm
Mounting hole
150 × 150 mm
4-M8
Weight (cables not included)
22 kg (48.5lbs.)
22 kg (48.5lbs.)
23 kg (50.7lbs.)
Driving method
All joints
AC servo motor
Motor
rated capacity
Joint #1
520 W
Joint #2
520 W
Joint #3
200 W
Joint #4
150 W
Option
Installation environment
Cleanroom *3
Joint #3 down force
200 N
Installed wire for customer use
15 (15 pin: D-sub)
Equivalent to 8 pin (RJ45) Cat.5e
Installed pneumatic
tube for customer use
2 pneumatic tubes (ø6 mm) : 0.59 MPa (6 kgf/cm
2
: 86 psi)
1 pneumatic tube (ø4 mm) : 0.59 MPa (6 kgf/cm
2
: 86 psi)
Environmental
requirements
Ambient Temp.
5 to 40 °C (with minimum temperature variation)
Ambient relative humidity
10 to 80% (no condensation)
Noise level *4
L
Aeq
= 70 dB (A) or under
Applicable Controller
RC90-B
Assignable Value
( ) Default values
Speed
1 ~ (4) ~ 100
Accel *5
1 ~ (10) ~ 120
SpeedS
1 ~ (50) ~ 2000
AccelS
1 ~ (200) ~ 25000
Fine
0 ~ (1250) ~ 65535
Weight
0,375 ~ (5,375) ~ 10,375
Safety standard
CE Marking
EMC Directive, Machinery Directive, RoHS Directive
KC Marking, KCs Marking
ANSI/RIA R15.06
NFPA 79
Setup & Operation 2. Specifications
LS10-B Rev.6 21
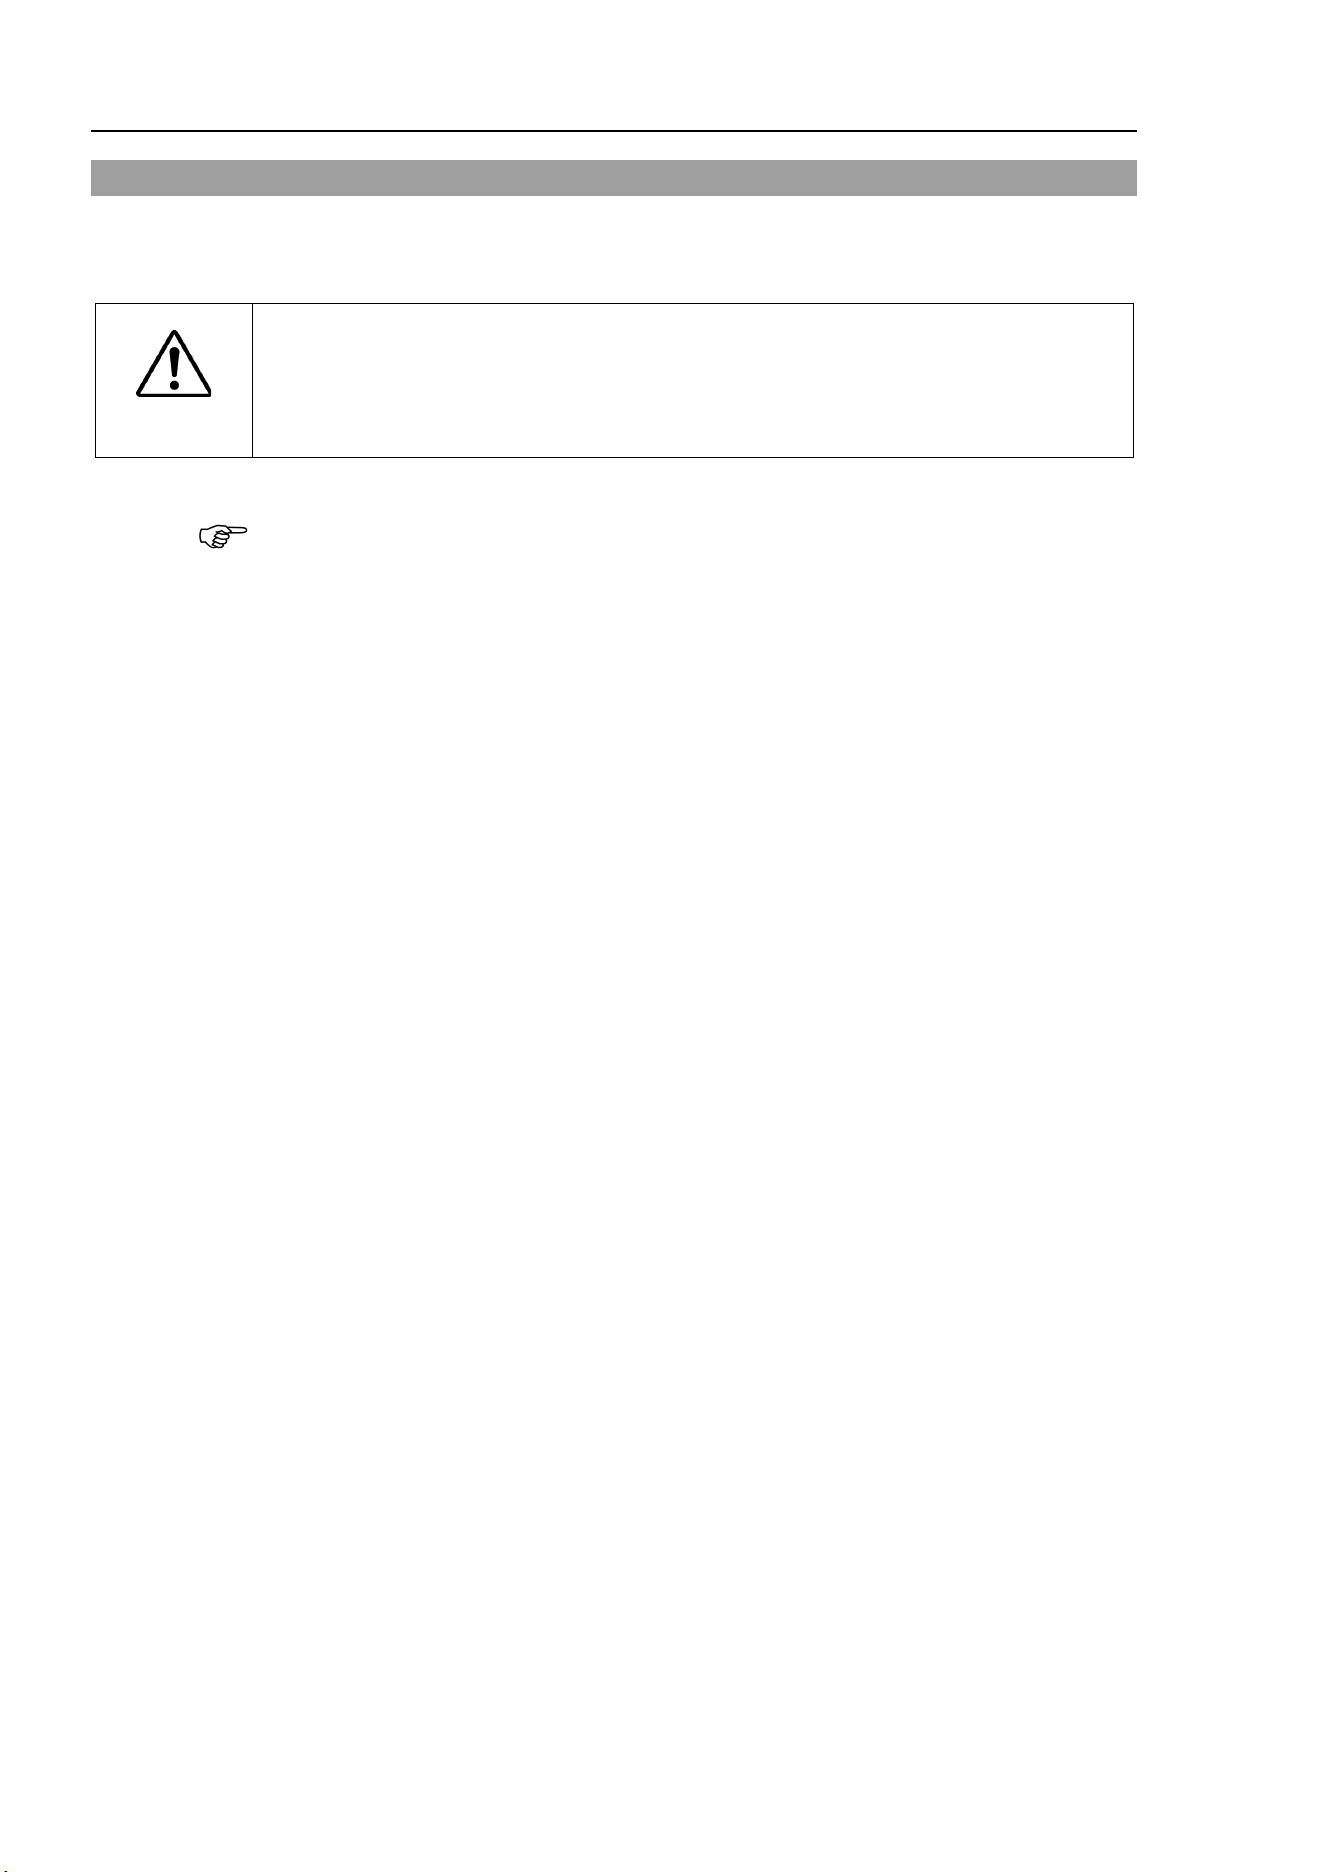
Item
LS10-B**2S
LS10-B**2C
LS10-B**3S
LS10-B**3C
Max.
motion range
Joint #1
± 132 °
Joint #2
± 150 °
Joint #3
200 mm
170 mm
300 mm
270 mm
Joint #4
± 360 °
Max.
pulse range
Joint #1
− 152918 ~ 808278
Joint #2
±
341334
Joint #3
− 270336 ~ 0
− 229786 ~ 0
− 405504 ~ 0
− 364954 ~ 0
Joint #4
± 215040
*1: In the case of PTP command.
Maximum operating speed for CP command is 2000 mm/s on horizontal plane.
*2: In the case where the center of gravity is at the center of Joint #4.
If the center of gravity is not at the center of Joint #4, set the parameter using INERTIA setting.
*3: The exhaust system in the Cleanroom-model Manipulator draws air from the base interior and arm cover
interior together.
A crack or other opening in the base unit can cause loss of negative air pressure in the outer part of the arm,
which can cause increased dust emission.
Cleanliness level : Class ISO 4 (ISO14644-1)
Exhaust System : Exhaust port diameter : Inner diameter: ø12 mm
Exhaust tube : Polyurethane tube
Outer diameter: ø12 mm (Inner diameter:ø8 mm)
Recommended exhaust flow rate : approx. 1000 cm
3
/s (Normal)
*4: Conditions of Manipulator during measurement as follows:
Operating conditions : Under rated load, 4-joints simultaneous motion, maximum speed, maximum
acceleration/deceleration, and duty 50%.
Measurement point : Rear of the Manipulator, 1000 mm apart from the motion range, 50 mm above the
base-installed surface.
*5: In general use, Accel setting 100 is the optimum setting that maintains the balance of acceleration and
vibration when positioning. Although values larger than 100 can be set to Accel, it is recommended to
minimize the use of large values to necessary motions since operating the manipulator continuously with
the large Accel setting may shorten the product life remarkably.
Setup & Operation 2. Specifications
22 LS10-B Rev.6
2.5 How to Set the Model
The Manipulator model for your system has been set before shipment from the factory.
It is normally not required to change the model when you receive your system.
CAUTION
■
When you need to change the setting of the Manipulator model, be sure to set the
Manipulator model properly.
Improper setting of the Manipulator model may
result in
abnormal or no operation of the Manipulator and/or cause safety
problems.
If the custom specifications number (MT***) is described on MODEL of the signature label
(S/N label), the Manipulator has custom specifications. (A label with only the custom
specifications number may be attached depending on shipment time.)
The custom specifications may require a different configuration procedure; check the
custom specifications number (MT***) and contact the supplier of your region when
necessary.
The Manipulator model can be set from software.
Refer to the chapter Robot Configuration in the EPSON RC+ User’s Guide.
NOTE
Setup & Operation 3. Environments and Installation
LS10-B Rev.6 23
3. Environments and Installation
3.1 Environmental Conditions
A suitable environment is necessary for the robot system to function properly and safely.
Be sure to install the robot system in an environment that meets the following conditions:
Item
Conditions
Ambient temperature
*
5 to 40°C (with minimum temperature variation)
Ambient relative humidity
10 to 80% (no condensation)
First transient burst noise
1 kV or less (Signal wire)
Electrostatic noise
4 kV or less
Environment · Install indoors.
· Keep away from direct sunlight.
· Keep away from dust, oily smoke, salinity, metal
powder or other contaminants.
· Keep away from flammable or corrosive solvents
and gases.
· Keep away from water.
· Keep away from shocks or vibrations.
· Keep away from sources of electric noise.
Manipulators are not suitable for operation in harsh environments such as painting areas, etc.
When using Manipulators in inadequate environments that do not meet the above conditions,
please contact the supplier of your region.
* The ambient temperature conditions are for the Manipulators only. For the Controller
the Manipulators are connected to, refer to the Controller manual.
Special Environmental Conditions
The surface of the Manipulator has general oil resistance. However, if your
requirements specify that the Manipulator must withstand certain kinds of oil, please
contact the supplier of your region.
Rapid change in temperature and humidity can cause condensation inside the Manipulator.
If your requirements specify that the Manipulator handles food, please contact the supplier
of your region to check whether the Manipulator will damage the food or not.
The Manipulator cannot be used in corrosive environments where acid or alkaline is used.
In a salty environment where the rust is likely to gather, the Manipulator is susceptible to
rust.
WARNING
■
Use an earth leakage breaker on the AC power cable of the
Controller to avoid
electric shock and circuit breakdown caused by
short circuit.
Prepare the earth leakage
breaker that pertains the Controller you are using.
For details, refer to the
Controller manual.
CAUTION
■
When cleaning the Manipulator, do not rub it strongly with alcohol or
benzene.
It may lose luster on the coated face.
NOTE
Setup & Operation 3. Environments and Installation
24 LS10-B Rev.6
3.2 Base Table
A base table for anchoring the Manipulator is not supplied. Please make or obtain the base
table for your Manipulator. The shape and size of the base table differs depending on the
use of the robot system. For your reference, we list some Manipulator table requirements
here.
The base table must not only be able to bear the weight of the Manipulator but also be able
to withstand the dynamic movement of the Manipulator when it operates at maximum
acceleration/deceleration. Ensure that there is enough strength on the base table by
attaching reinforcing materials such as crossbeams.
The torque and reaction force produced by the movement of the Manipulator are as follows:
LS10-B
Max. reaction torque on the horizontal plate
550
N·m
Max. horizontal reaction force
3200
N
Max. vertical reaction force
1500
N
The threaded holes required for mounting the Manipulator base are M8. Use mounting
bolts with specifications conforming to ISO898-1 property class: 10.9 or 12.9.
For dimensions, refer to Setup & Operation: 3.3 Mounting Dimensions.
The plate for the Manipulator mounting face should be 20 mm thick or more and made of
steel to reduce vibration. The surface roughness of the steel plate should be 25 μm or less.
The table must be secured on the floor or wall to prevent it from moving.
The Manipulator must be installed horizontally.
When using a leveler to adjust the height of the base table, use a screw with M16 diameter
or more.
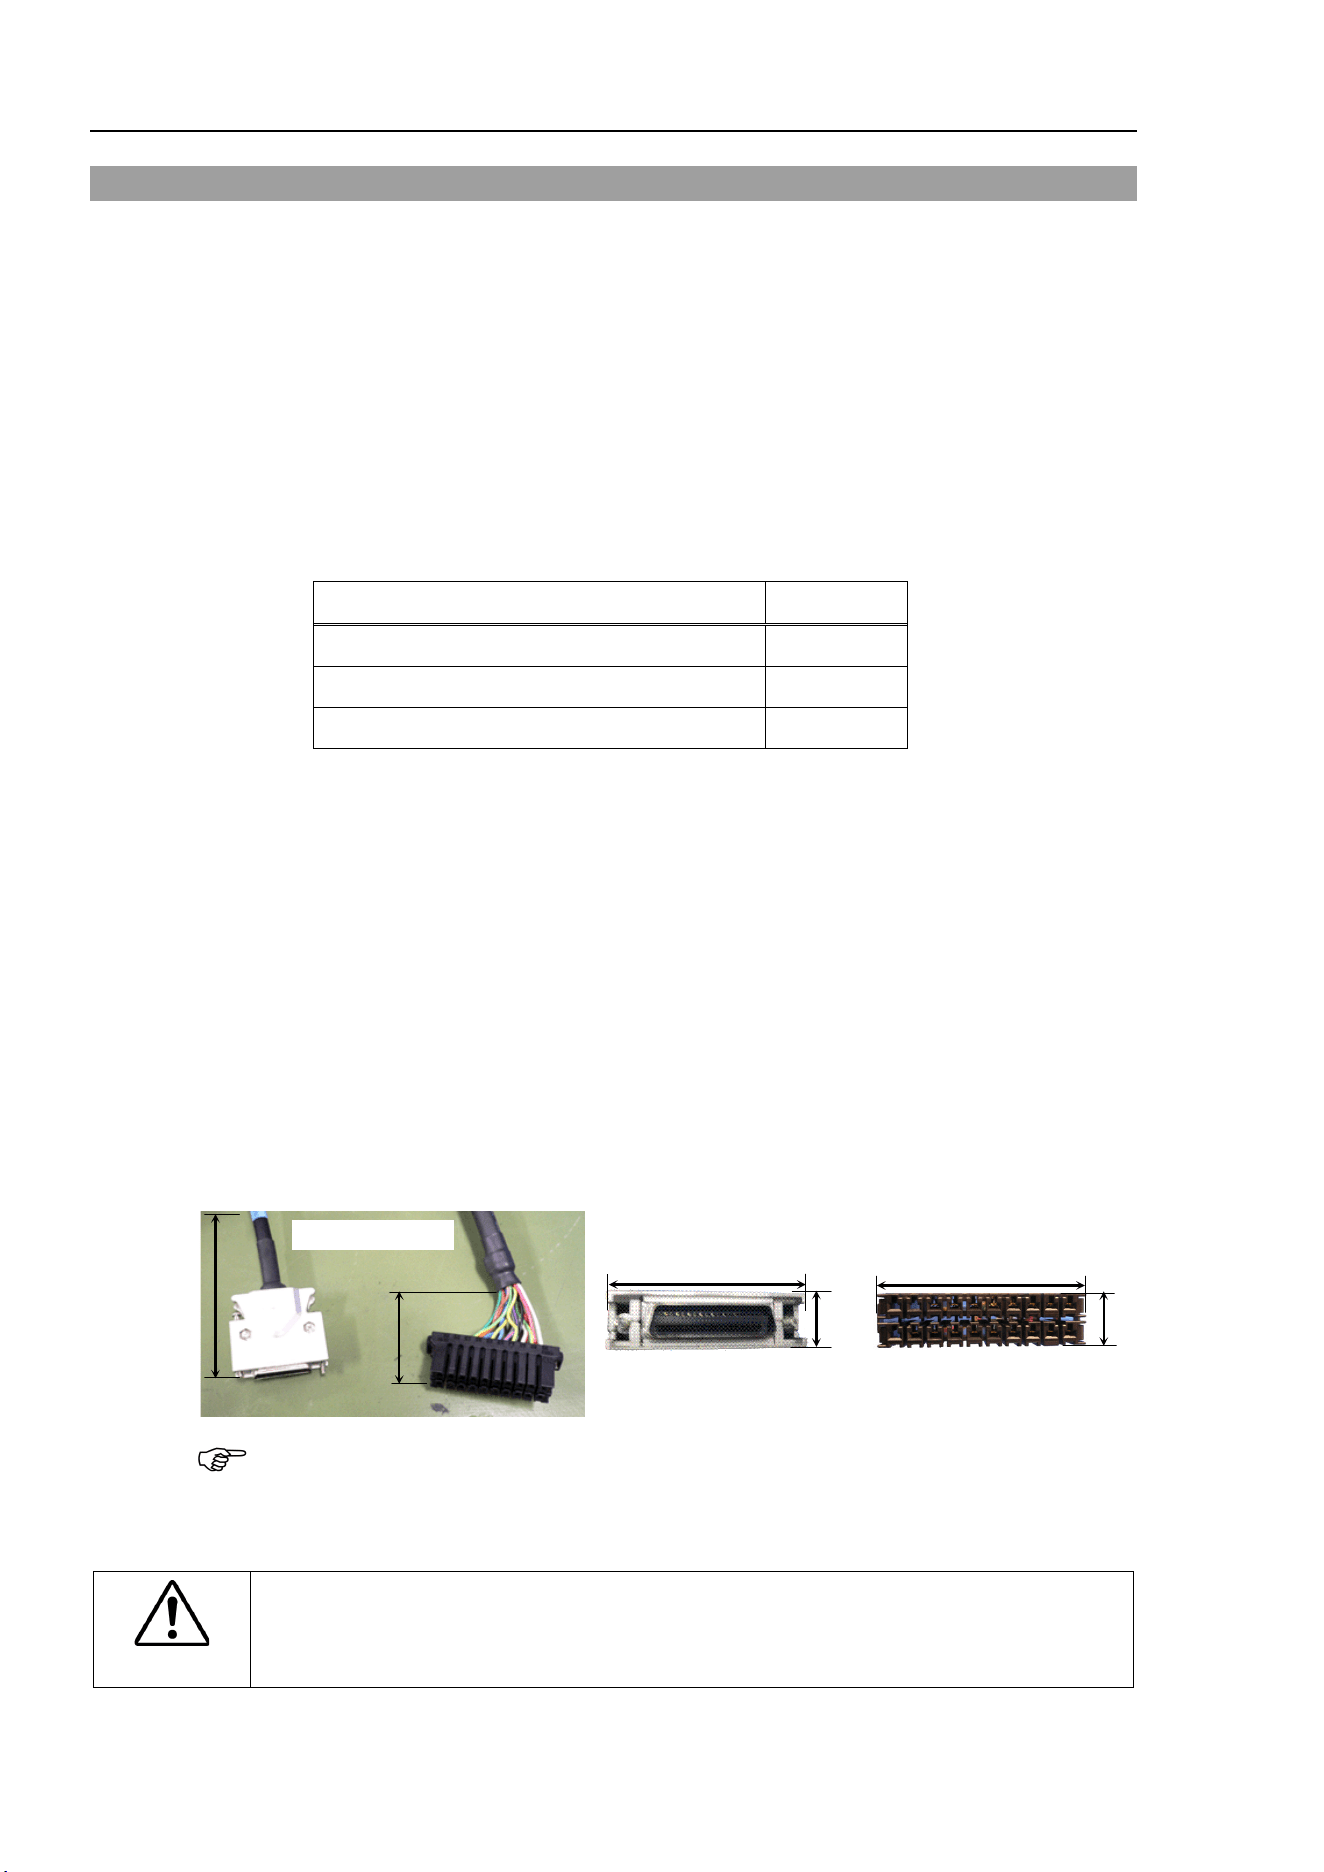
If you are passing cables through the holes on the base table, see the figures below.
Power Cable
Connector
Signal Cable
Connector
44
18
63
15
M/C Cables
(Unit : mm)
40
80
Do not remove the M/C cables from the Manipulator.
For environmental conditions regarding space when placing the Controller on the base table,
refer to the Controller manual.
WARNING
■
To ensure safety, a safeguard must be installed
for the robot system.
For details on the
safeguard, refer to the EPSON RC+ User’s Guide.
NOTE
Setup & Operation 3. Environments and Installation
LS10-B Rev.6 25
3.3 Mounting Dimensions
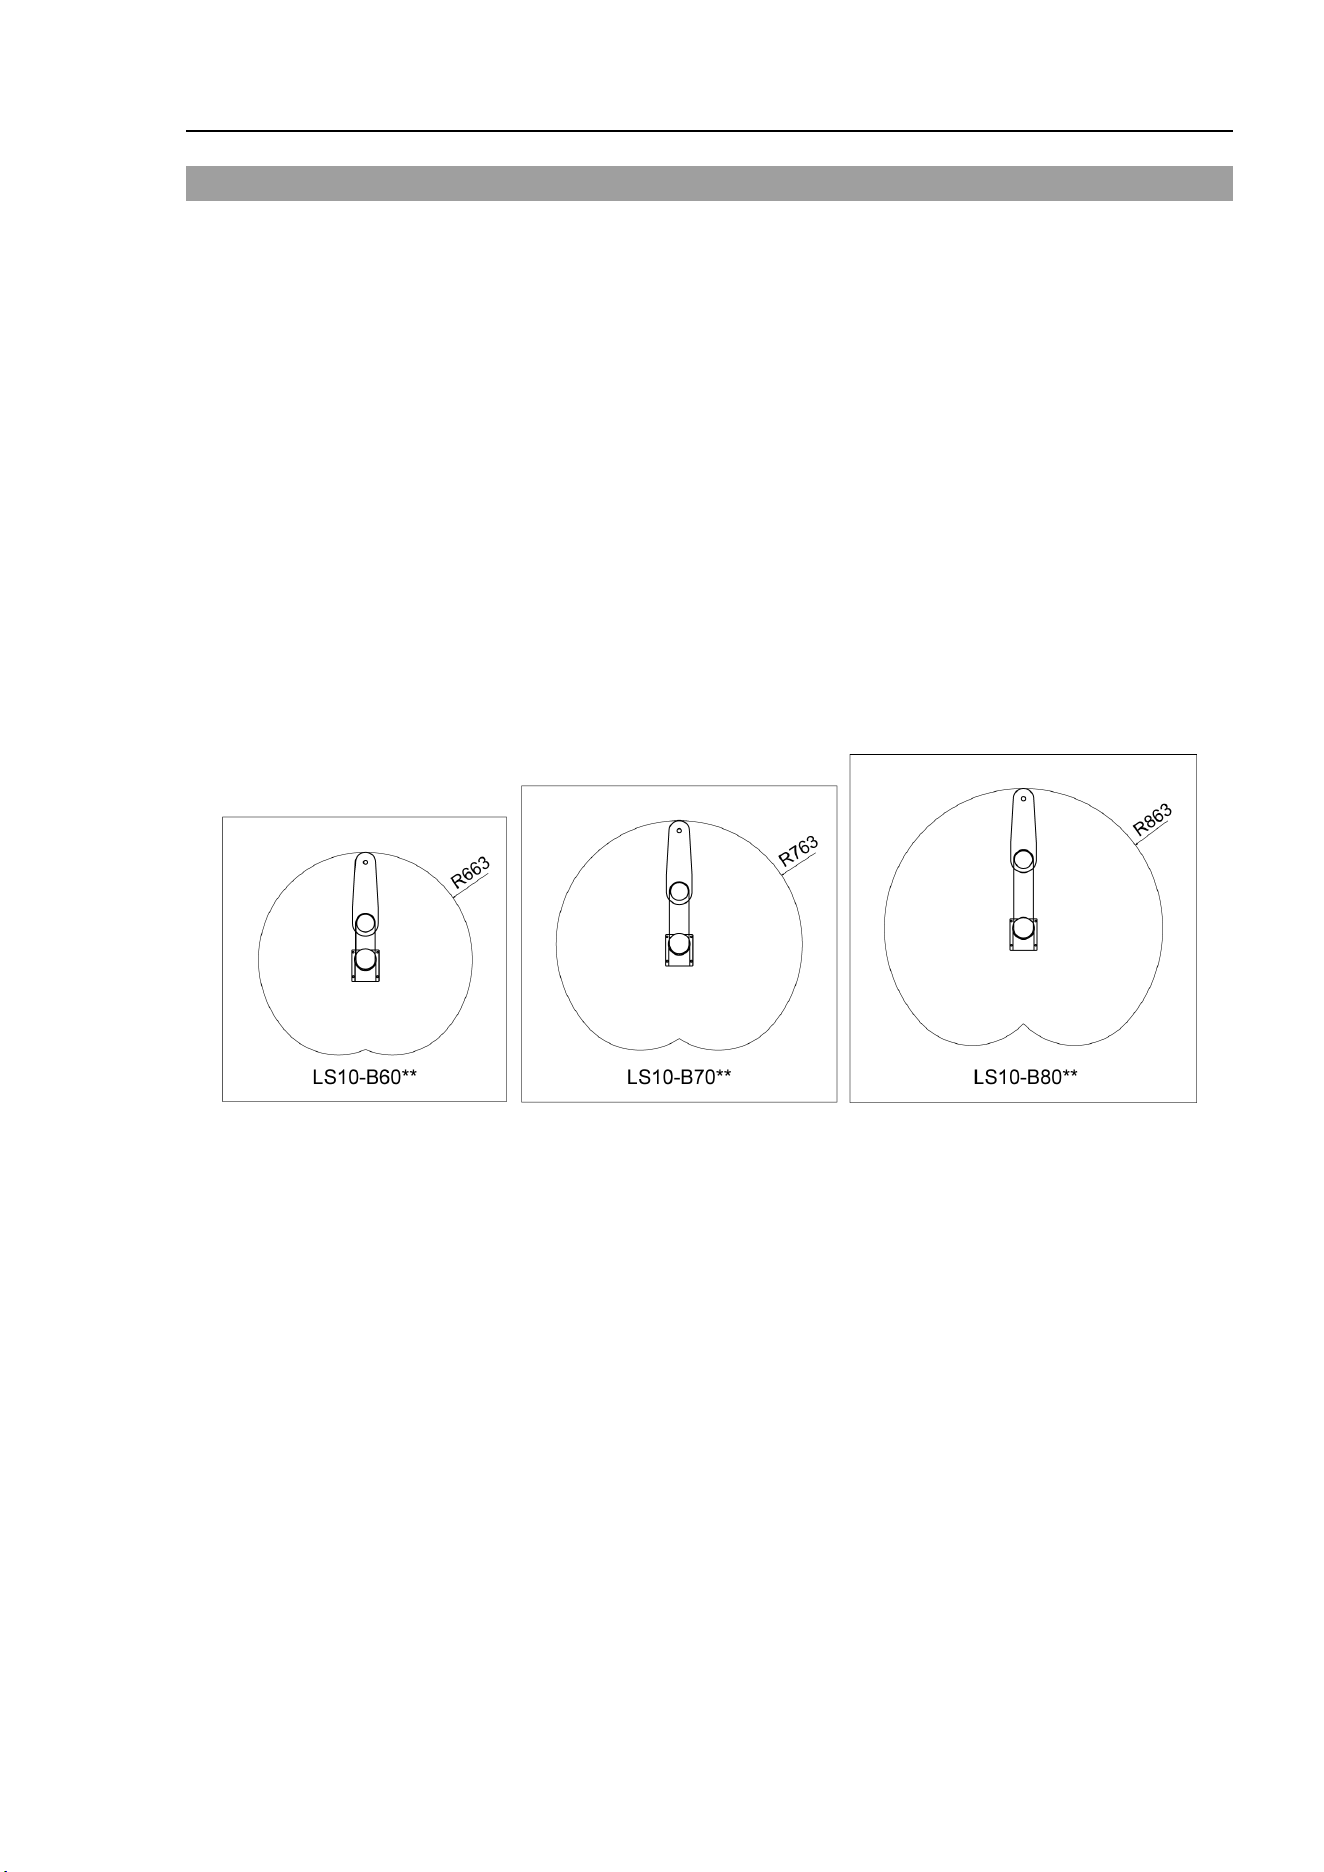
The maximum space (R) includes the radius of the end effector. If it exceeds 60 mm, define
the radius as the distance to the outer edge of maximum space.
If a camera or solenoid valve extends outside of the arm, set the maximum range including
the space that they may reach.
Be sure to allow for the following extra spaces in addition to the space required for mounting
the Manipulator, Controller, and peripheral equipment.
Space for teaching
Space for maintenance and inspection
(Ensure a space to open the covers and plates for maintenance.)
Space for cables
The minimum bend radius of the power cable is 90 mm. When installing the cable, be sure
to maintain sufficient distance from obstacles. In addition, leave enough space for other
cables so that they are not bent forcibly.
Ensure distance to the safeguard from the maximum motion range is more than 100 mm.
Setup & Operation 3. Environments and Installation
26 LS10-B Rev.6
3.4 Unpacking and Transportation
THE INSTALLATION SHALL BE PREFORMED BY QUALIFIED INSTALLATION
PERSONNEL AND SHOULD CONFORM TO ALL NATIONAL AND LOCAL CODES.
WARNING
■
Only authorized personnel
should perform sling work and operate a crane and a
forklift. When
these operations are performed by unauthorized personnel, it is
extremely
hazardous and may result in serious bodily injury and/or severe
equipment damage to the robot system.
CAUTION
■
Using a cart or similar equipment, transport the Manipulator in the same manner
as it was delivered.
■
After
removing the bolts securing the Manipulator to the delivery equipment, the
Manipulator
can fall. Be careful not to get hands or fingers caught.
■
The arm is
secured with a wire tie. Leave the wire tie secured until you finish the
installation so as not to get hands or fingers caught
.
■
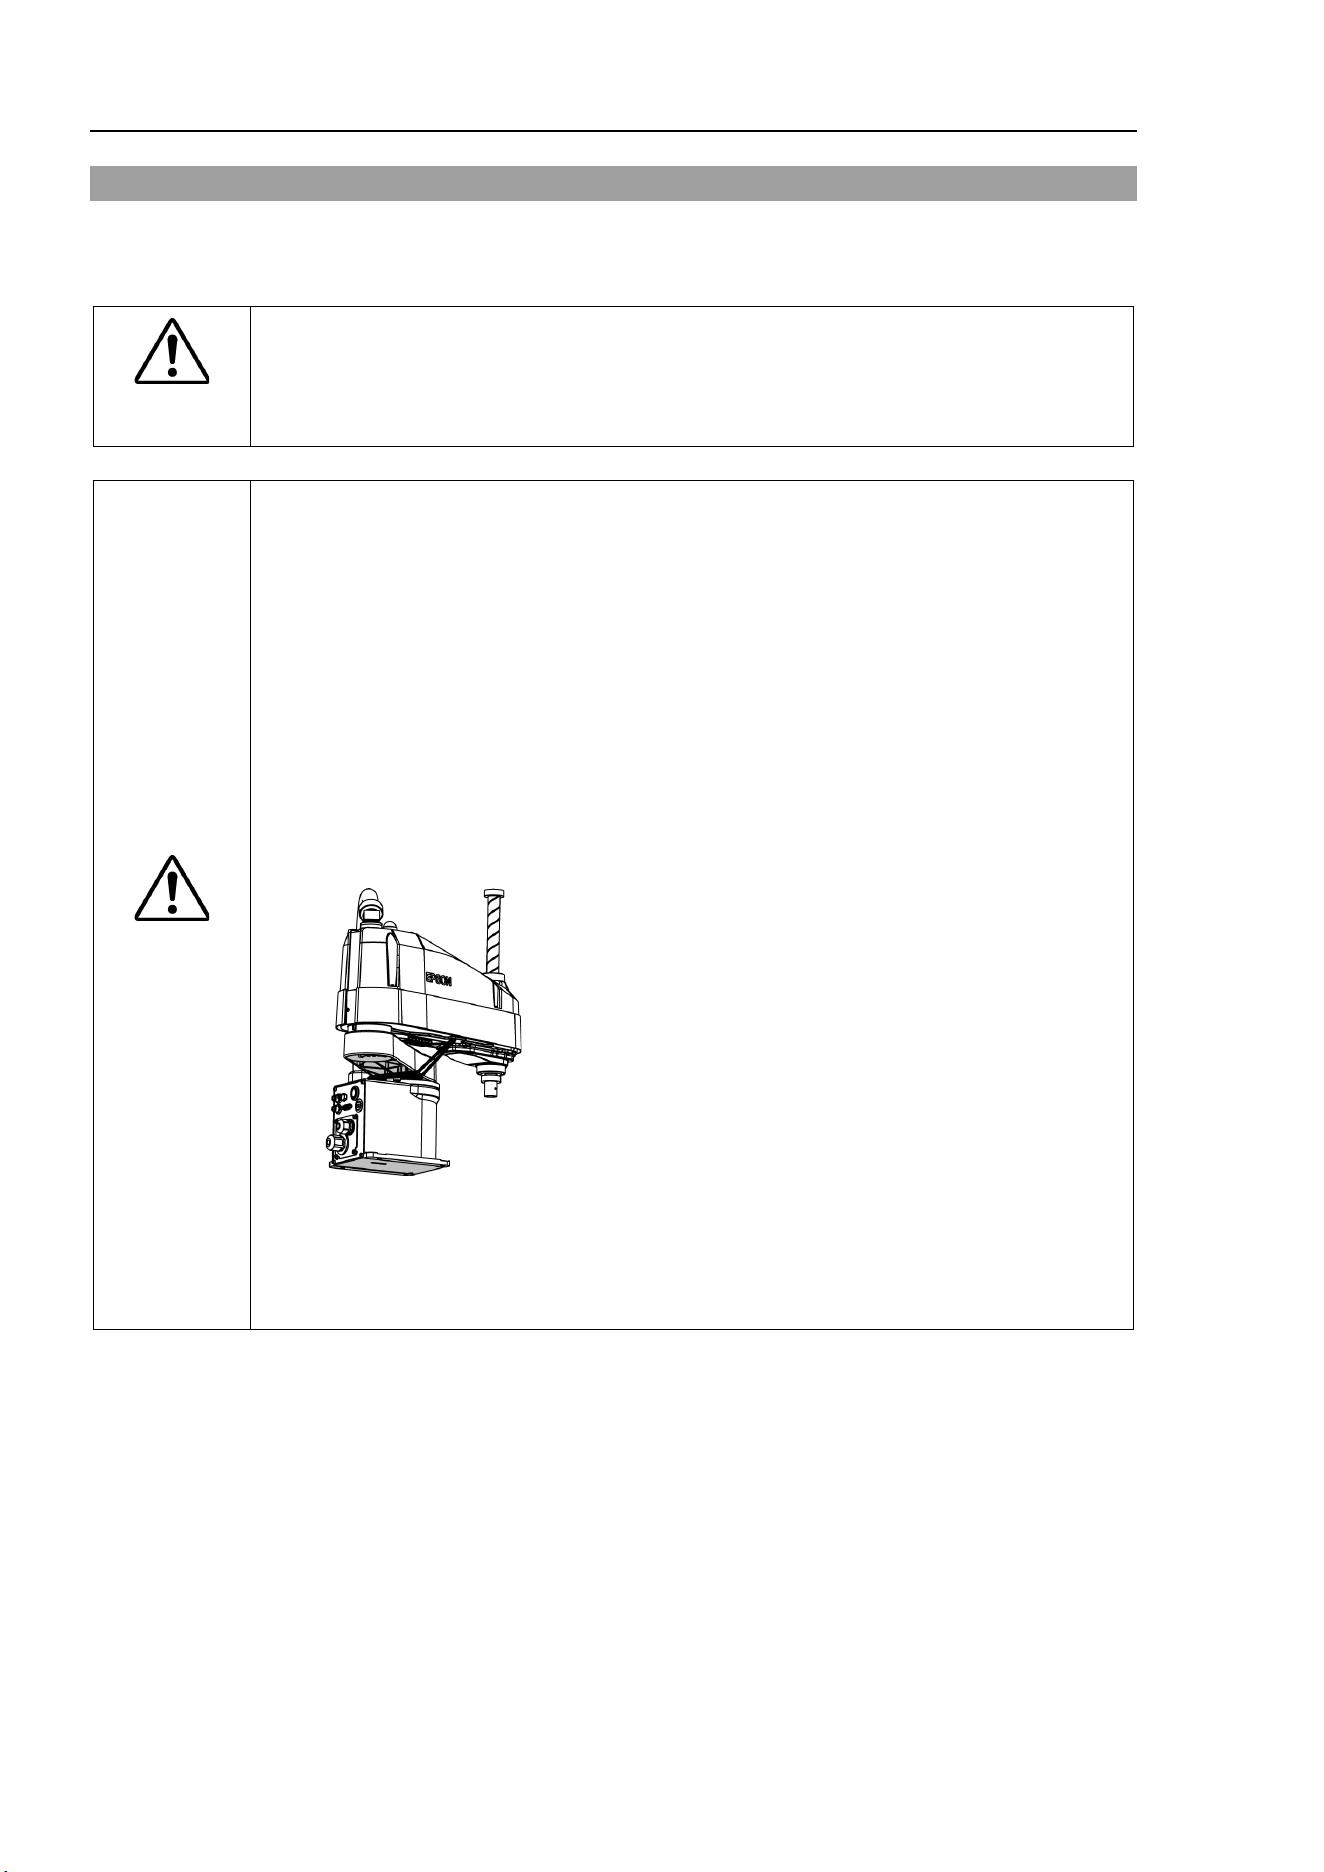
To carry the Manipulator, have two or more people to work on it and secure the
Manipulator to the delivery equipment or hold the areas indicated in gray in the
figure (bottom of Arm #1 and bottom of the base) by hand.
When holding the bottom of the base by hand, be very careful not to get your
hands or fingers caught.
LS10
-B60** : approx. 22 kg : 48.5 lbs.
LS10
-B70** : approx. 22 kg : 48.5 lbs.
LS10-B80** : approx. 23 kg : 50.7 lbs.
■
Stabilize the Manipulator with your hands when hoist
ing it.
■
When transporting the Manipulator for a long distance, secure it to the delivery
equipment directly so that the Manipulator never falls.
If necessary, pack the Manipulator in the same style as
it was delivered.
Setup & Operation 3. Environments and Installation
LS10-B Rev.6 27
3.5 Installation Procedure
CAUTION
■
The robot system
must be installed to avoid interference with buildings, structures,
utilities, other
machines and equipment that may create a trapping hazard or pinch
points.
■
Oscillation (resonance) may
occur during operation depending on rigidity of the
installation table.
If the oscillation occurs, improve rig
idity of the table or change the speed or
acceleration
and deceleration settings.
3.5.1 Standard-Model
CAUTION
■
Install the
Table Top Mounting Manipulator with two or more people.
The Manipulator weigh
ts are as follows. Be careful not to get hands, fingers, or
feet caught and/or have equipment damage
d by a fall of the Manipulator.
LS10-B60** : approx. 22 kg :48.5 lbs.
LS10-B70** : approx. 22 kg :48.5 lbs.
LS10-B80** : approx. 23 kg :50.7 lbs.
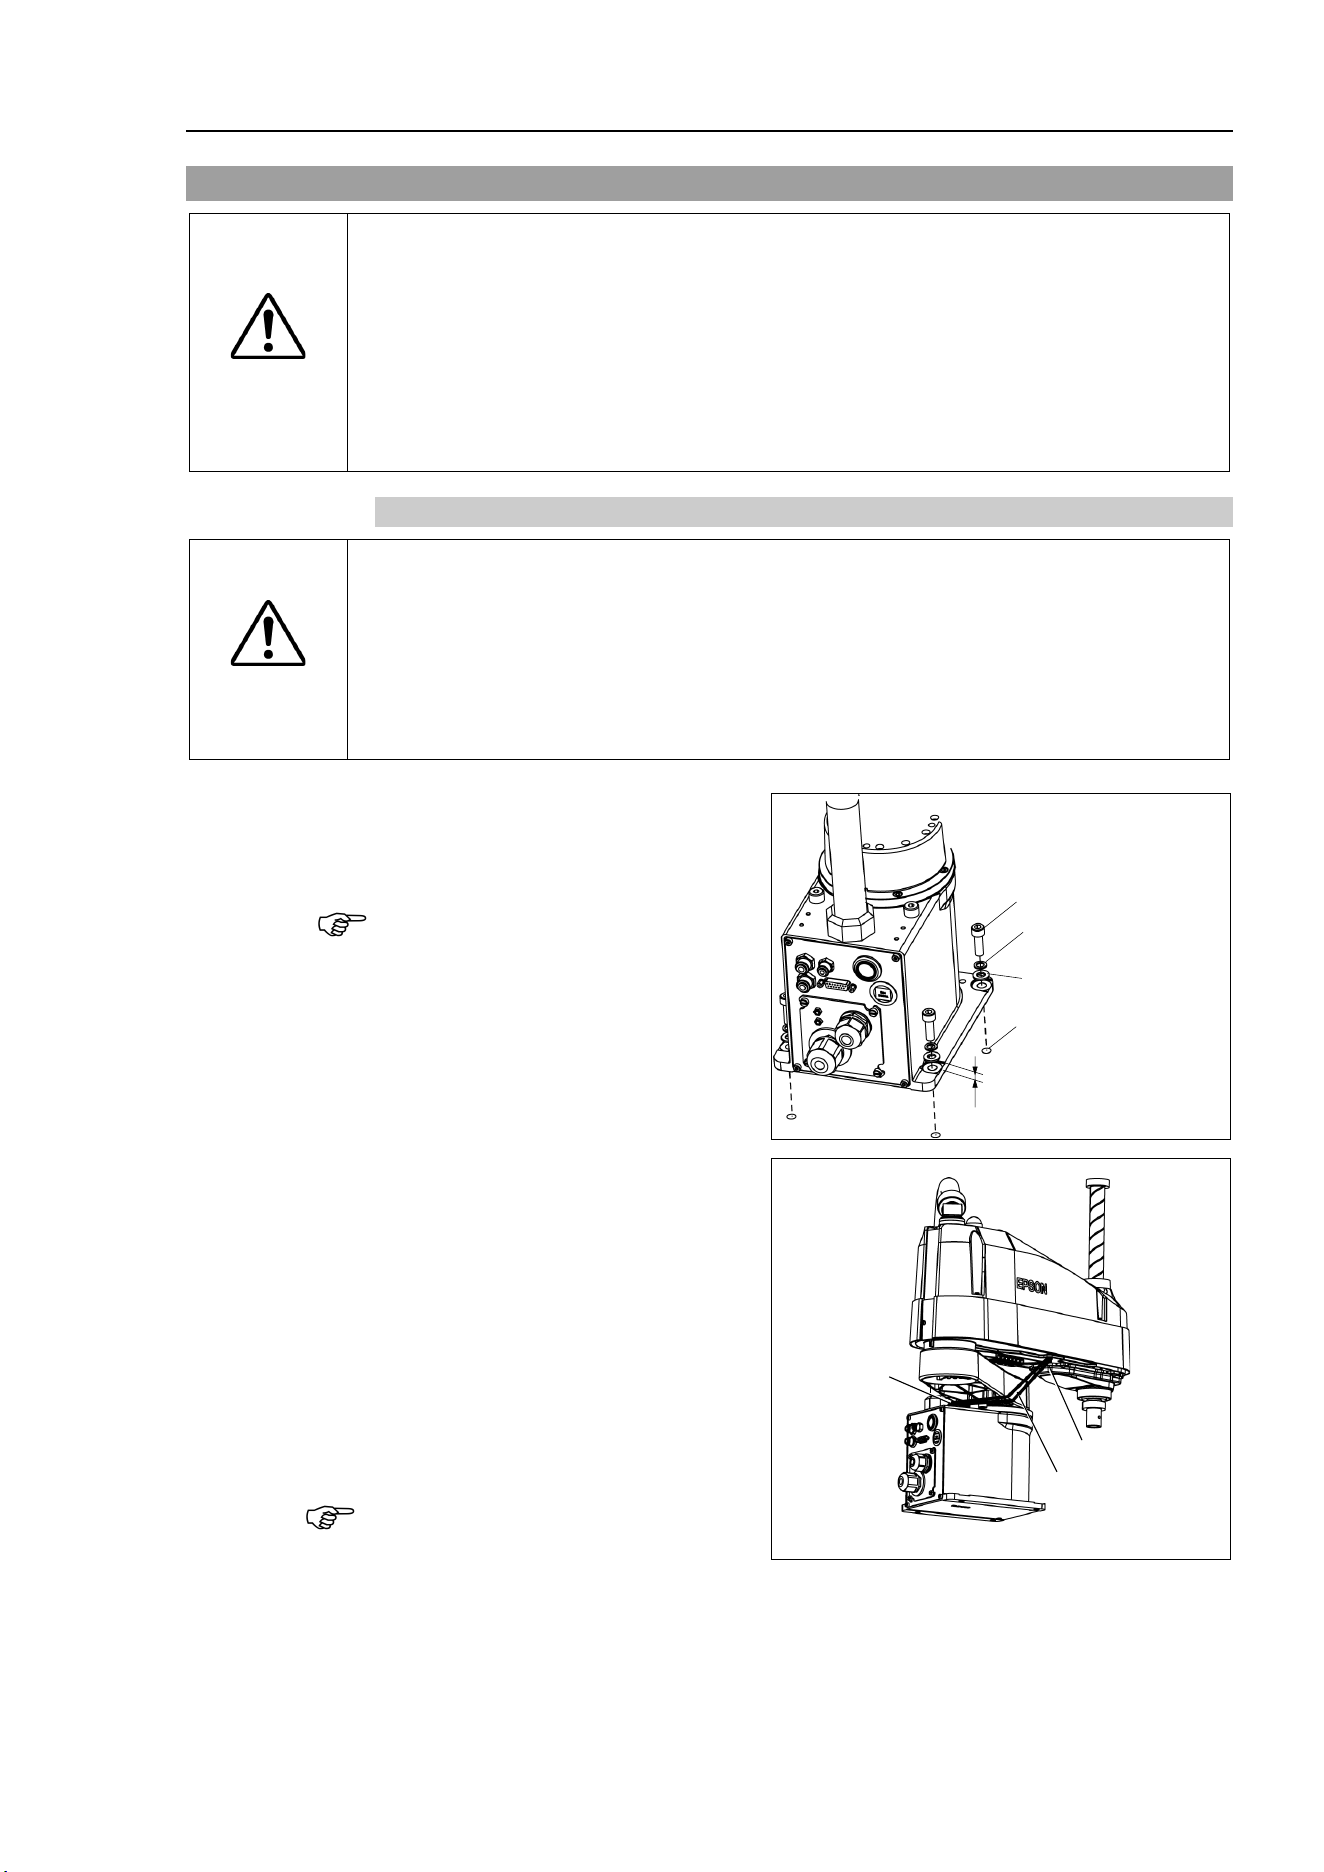
(1)
Secure the base to the
base table
with four bo
lts.
Use bolts
with specifications
conforming
to ISO898-1 Property
C
lass: 10.9 or 12.9.
Tightening torque:
32.0 N·m (326 kgf·cm)
10 mm
Screw Hole
(depth 20 mm or more)
4-M8×25
Spring
Washer
Plane Washer
(2)
Using nippers, cut off the wire tie
binding
the shaft and arm retaining
bracket on the
base.
Wire tie
Bolt: M4
Bolt
: M4
(3)
Remove the bolts securing the wire
ties removed in step (2).
Remove the fixing sheet for
transportation which is attached to
the arm.
Make sure to remove the
wire tie for
protection of mechanical stop.
NOTE
NOTE
Setup & Operation 3. Environments and Installation
28 LS10-B Rev.6
3.5.2 Cleanroom-Model
(1) Unpack the Manipulator outside of the clean room.
(2) Secure the Manipulator to delivery equipment such as a pallet with bolts so that the
Manipulator does not fall over.
(3) Wipe off the dust on the Manipulator with a little alcohol or distilled water on a lint-
free cloth.
(4) Transport the Manipulator to the clean room.
(5) Refer to the installation procedure of each Manipulator model and install the
Manipulator.
(6) Connect an exhaust tube to the exhaust port.
3.6 Connecting the Cables
WARNING
■
To shut off power
to the robot system, disconnect the power plug from the power
source. Be sure to connect the AC power cable to a power receptacle.
DO NOT connect it directly to a factory power source.
■
Before
performing any replacement procedure, turn OFF the Controller and related
equipment,
and then disconnect the power plug from the power source.
Performing any replacement procedure with the power ON is extremely hazardous
and may result in
electric shock and/or malfunction of the robot system.
■
Be sure to connect the cables properly. Do not allow unnecessary strain on the
cables. (Do not
put heavy objects on the cables. Do not bend or pull the cables
forcibl
y.) The unnecessary strain on the cables may result in damage to the
cables, disconne
ction, and/or contact failure.
Damaged cables, disconnection, or contact failure is extremely hazardous and may
result in electric shock and/or improper function of the robot system.
■
Grounding the manipulator is done by connecting with the controller. Ensu
re that
the controller is grounded and the cables are correctly connected. If the ground
wire is improperly connected to ground, it may result in the fire or electric shock.
Setup & Operation 3. Environments and Installation
LS10-B Rev.6 29
CAUTION
■
When connecting the Manipulator to the Controller, make sure that the serial
numbers on each equipment match. Improper connection between the Manipulator
and Controller may not only cause improper function of the robot system but also
serious safety problems. The connection method varies with the Controller used.
For details on the connection, refer to the Controller manual.
When the Manipulator is a Cleanroom-model, be aware of the followings.
For the Manipulator of Cleanroom-model, use it with an exhaust system.
For details, refer to Setup & Operation: 2.4 Specifications.
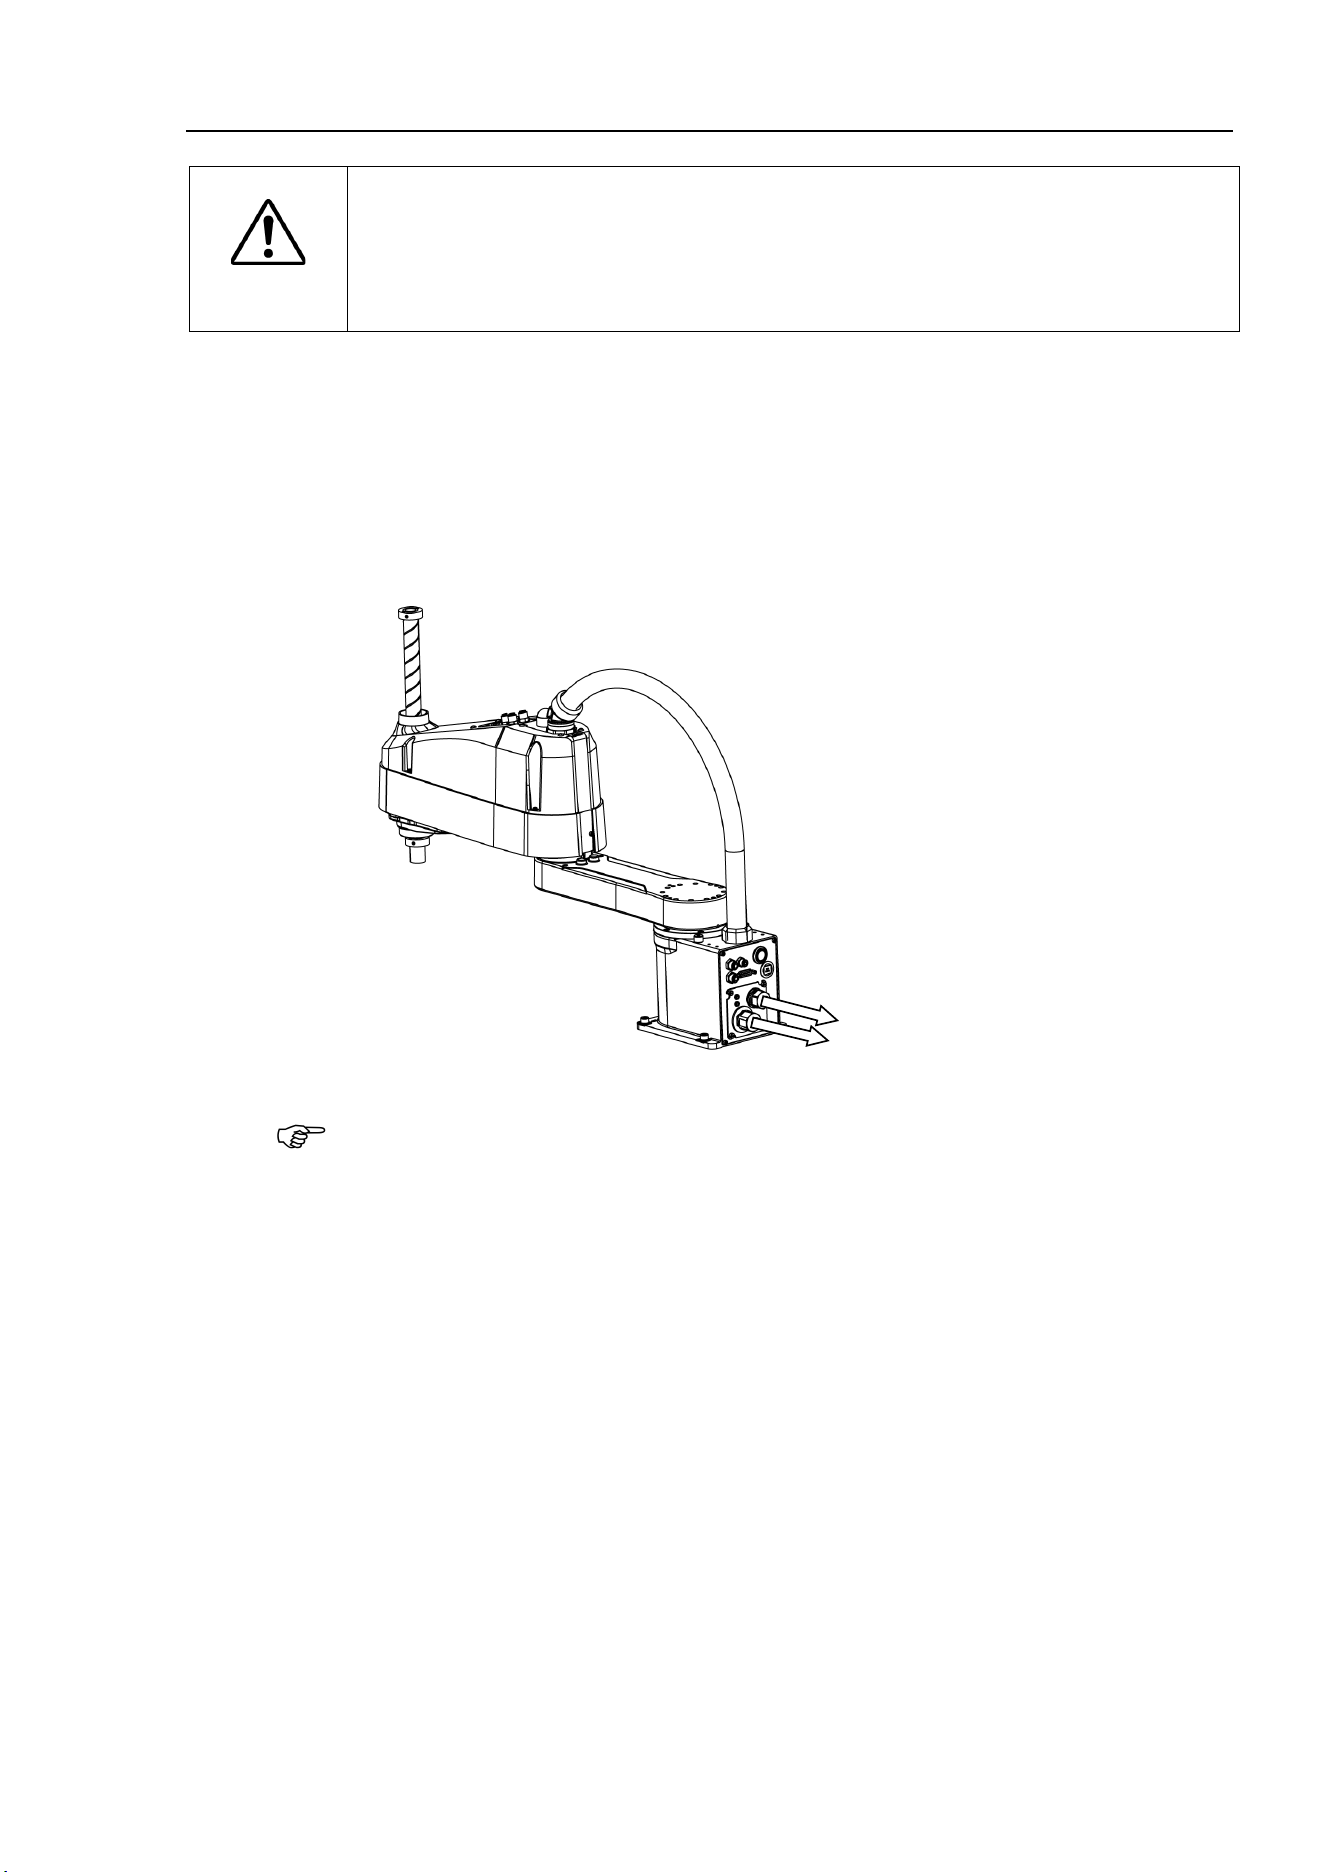
Cable Connections
Connect the power cable and the signal connector of the M/C cable to the Controller as
shown below.
Signal connector
Power connector
Connect and disconnect M/C cable
In LS10-B series, you can connect and disconnect the M/C cable to/from the manipulator
easily.
For details, refer to Maintenance: 4.3 Replacing M/C Cable.
NOTE
Setup & Operation 3. Environments and Installation
30 LS10-B Rev.6
3.7 User Wires and Pneumatic Tubes
CAUTION
■
Only authorized or certified personnel should be allowed to perform wiring.
Wiring by unauthorized
or uncertified personnel may result in bodily injury and/or
malfu
nction of the robot system.
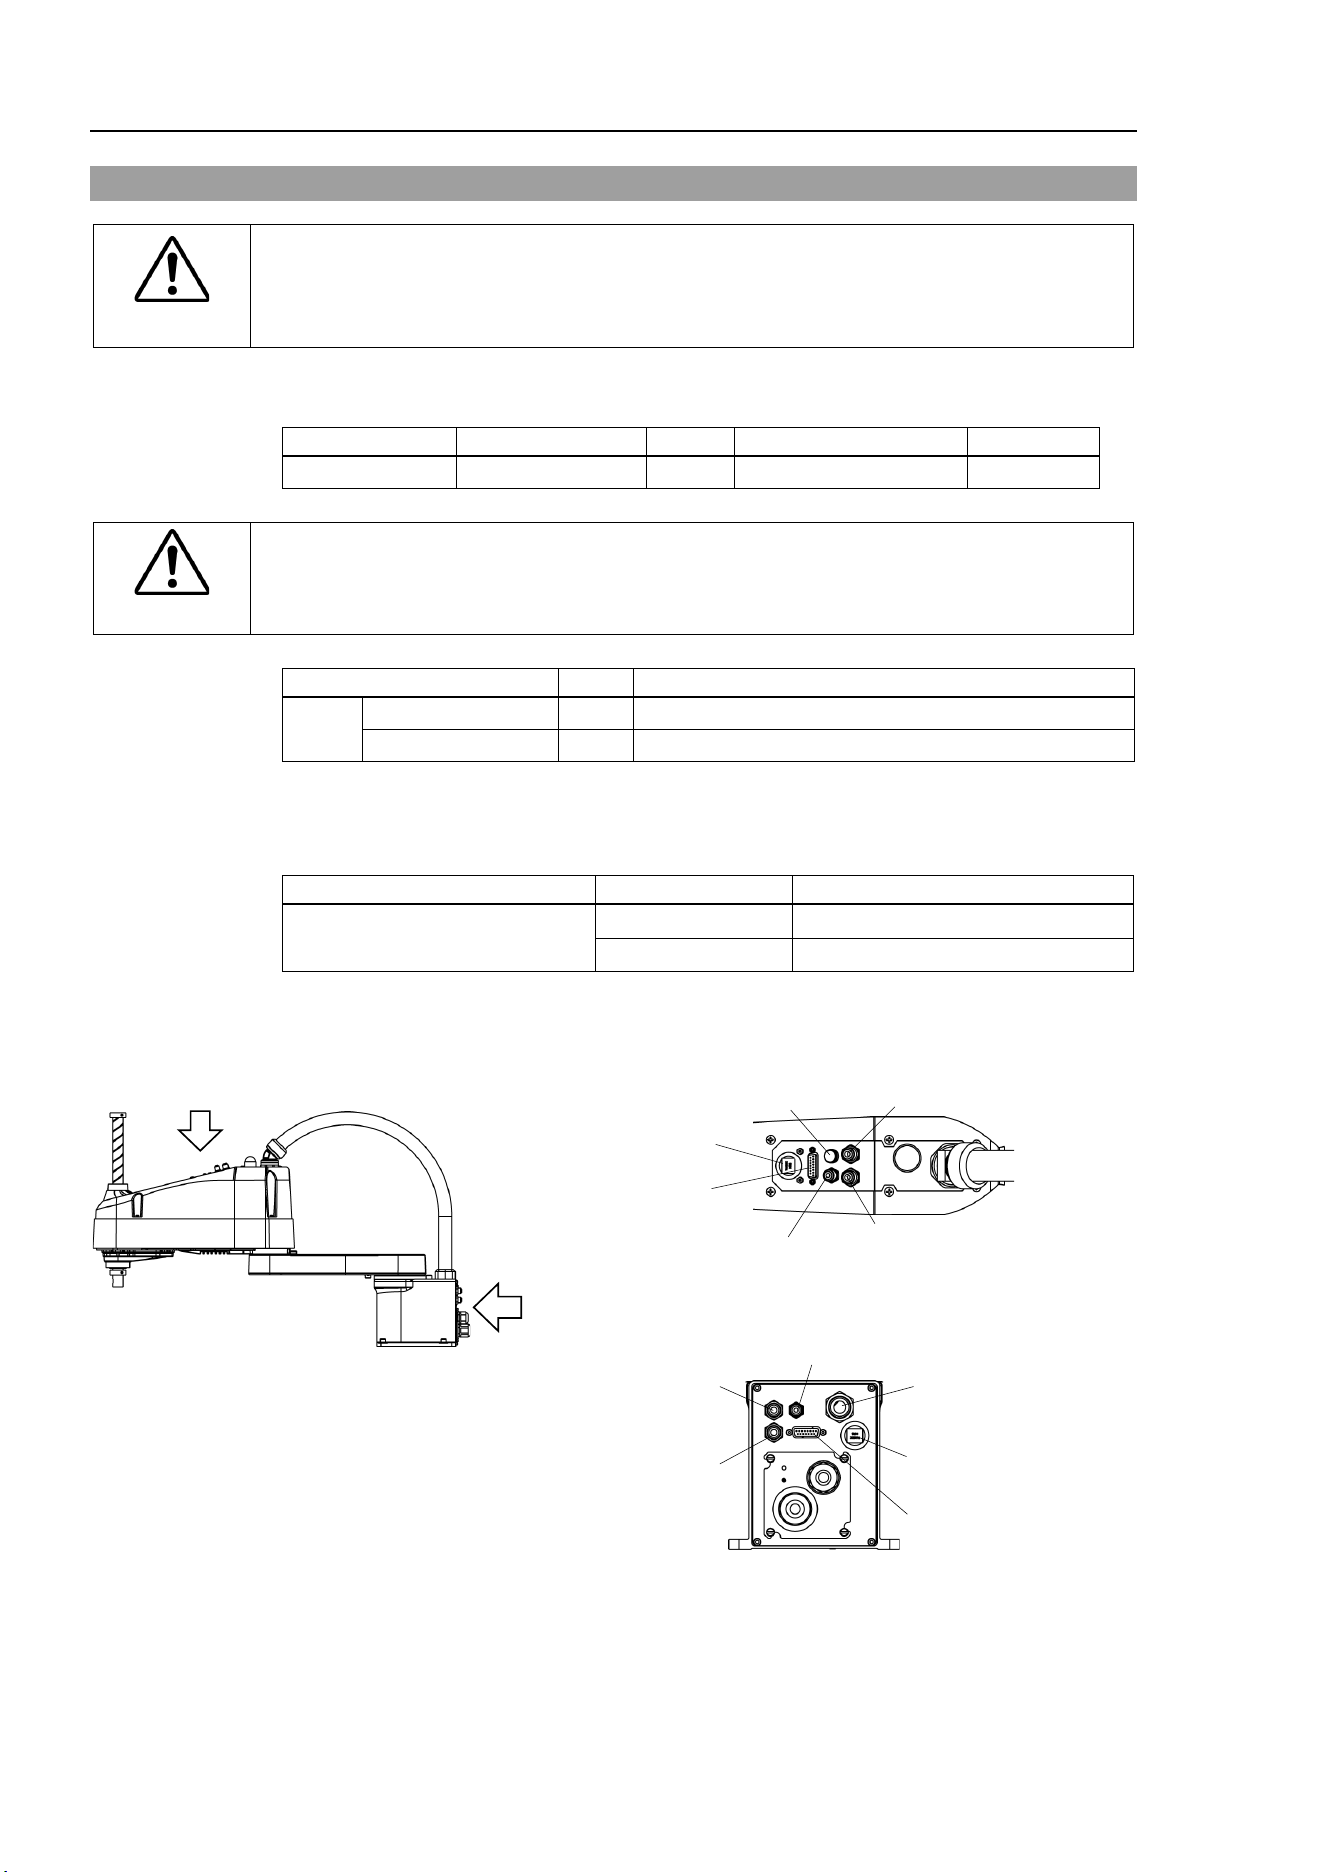
User electrical wires and pneumatic tubes are contained in the cable unit.
Electrical Wires
Rated Voltage
Allowable Current
Wires
Nominal Sectional Area
Note
AC/DC30 V
1 A
15
0.211 mm
2
Twist pair
WARNING
■
Do not
apply the current more than 1A to the manipulator.
Mfr.
Standard
15 pin
Suitable Connector
JAE
DA-15PF-N
(Solder type)
Clamp Hood
JAE
DA-C8-J10-F2-1R
(Connector setscrew: #4-40 NC)
Pins with the same number, indicated on the connectors on both ends of the cables, are
connected.
Pneumatic Tubes
Max. Usable Pneumatic Pressure
Pneumatic Tubes
Outer Diameter × Inner Diameter
0.59 MPa (6 kgf/cm
2
: 86 psi)
2
ø 6 mm × ø 4 mm
1
ø 4 mm
×
ø 2.5 mm
Fittings for ø6 mm and ø4 mm (outer diameter) pneumatic tubes are supplied on both ends
of the pneumatic tubes.
Fitting (blue)
for ø4 mm pneumatic tube
Fitting (blue)
for ø6 mm pneumatic tube
User connector
(15-pin D-sub connector)
User connector
(15-pin D-sub connector)
Fitting (white)
for ø6 mm pneumatic tube
Detail view from A
Detail view from B
A
B
Joint #3 brake
release switch
Fitting (white)
for ø6 mm pneumatic tube
Fitting (blue)
for ø6 mm pneumatic tube
Fitting (blue)
for ø4 mm pneumatic tube
Exhaust port
(Cleanroom-model only)
RJ45 connector
(
EtherNet
)
RJ45 connector
(
EtherNet
)
Setup & Operation 3. Environments and Installation
LS10-B Rev.6 31
3.8 Relocation and Storage
3.8.1 Precautions for Relocation and Storage
Observe the following when relocating, storing, and transporting the Manipulators.
THE INSTALLATION SHALL BE PREFORMED BY QUALIFIED INSTALLATION
PERSONNEL AND SHOULD CONFORM TO ALL NATIONAL AND LOCAL CODES.
WARNING
■
Only authorized personnel
should perform sling work and operate a crane and a
forklift. When
these operations are performed by unauthorized personnel, it is
extremely
hazardous and may result in serious bodily injury and/or severe
equipment damage to the robot system.
CAUTION
■
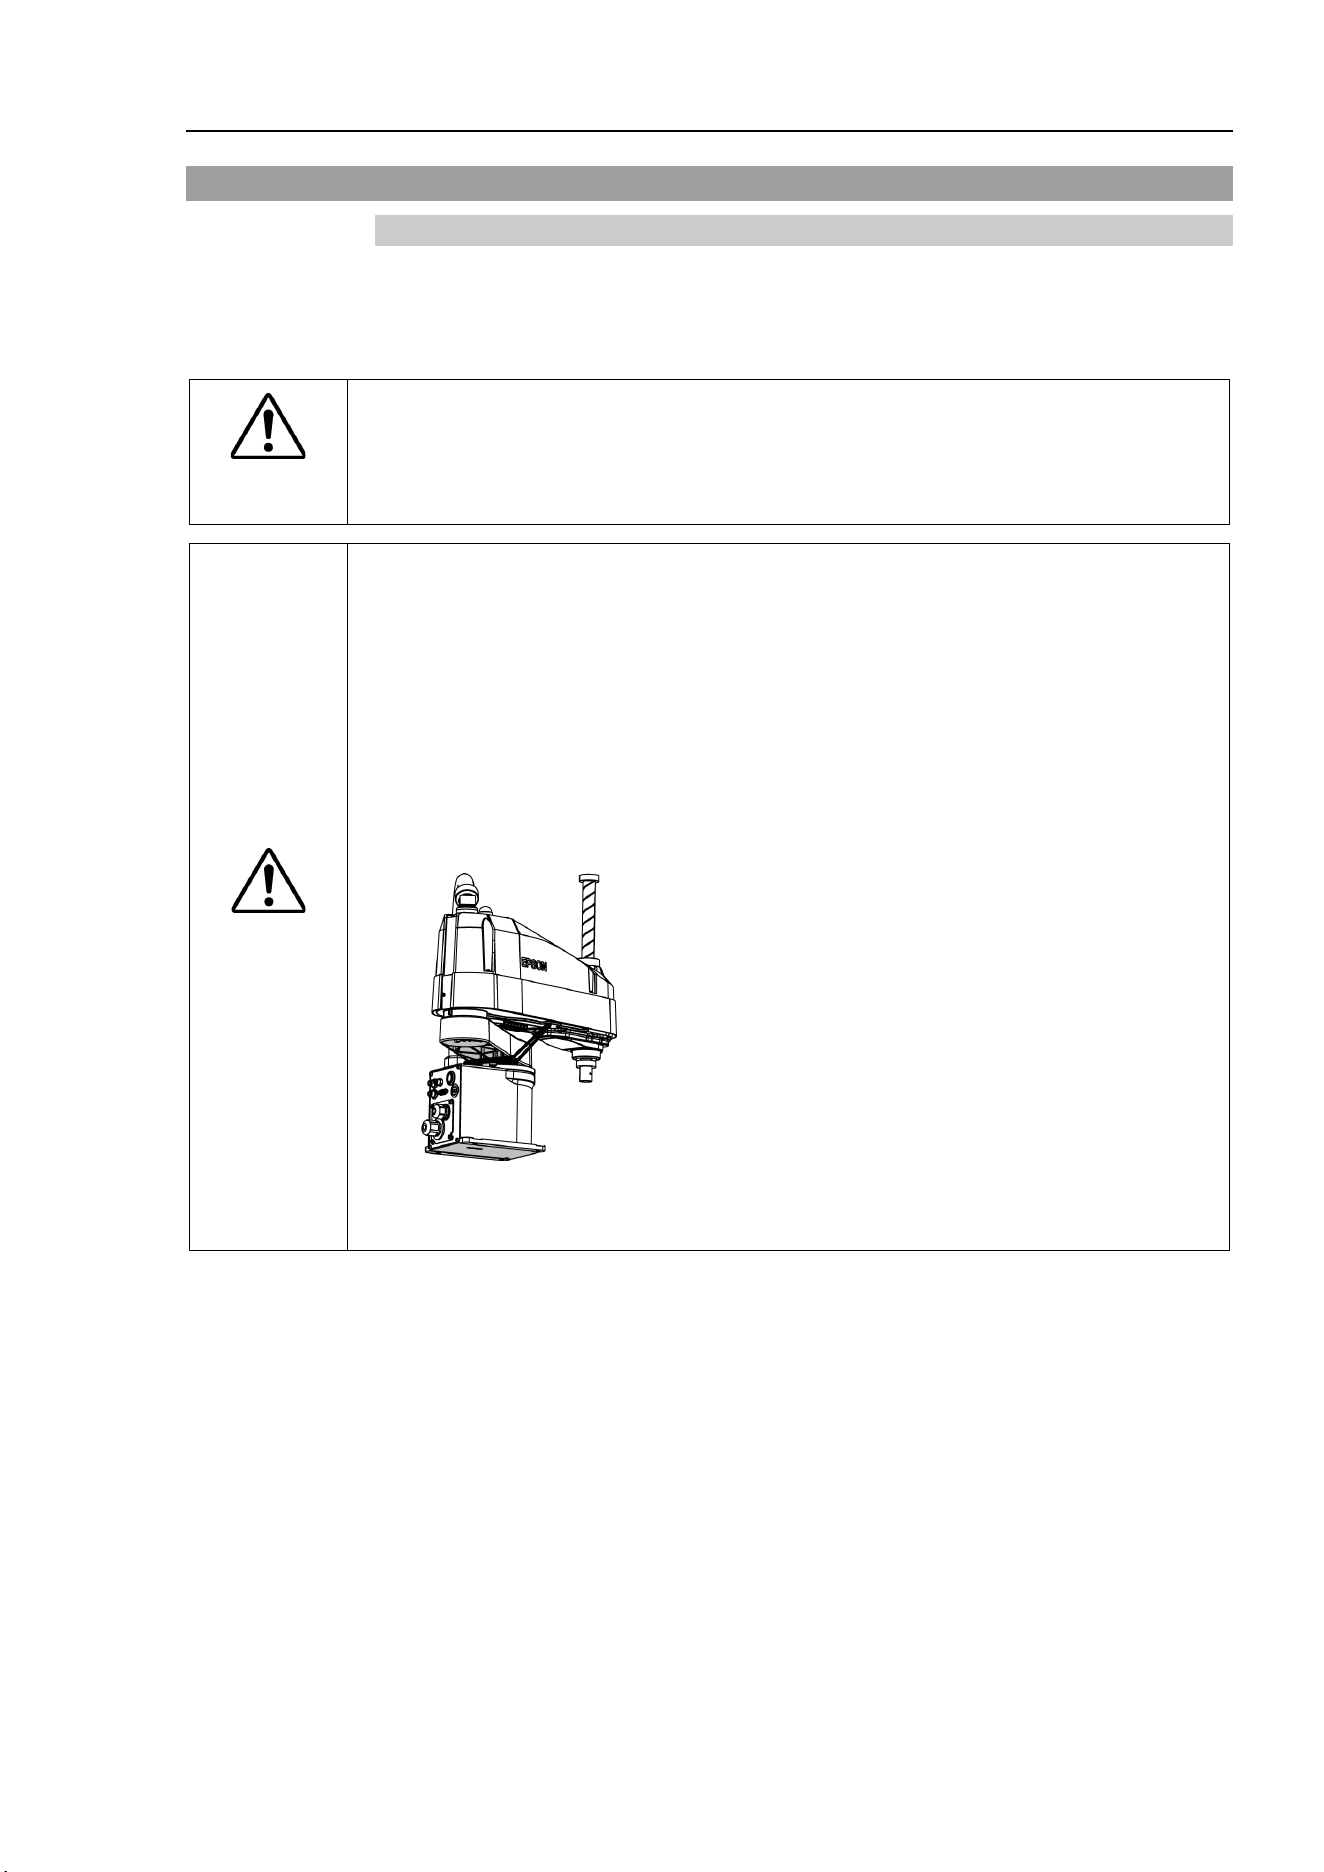
Before relocating the Manipulator,
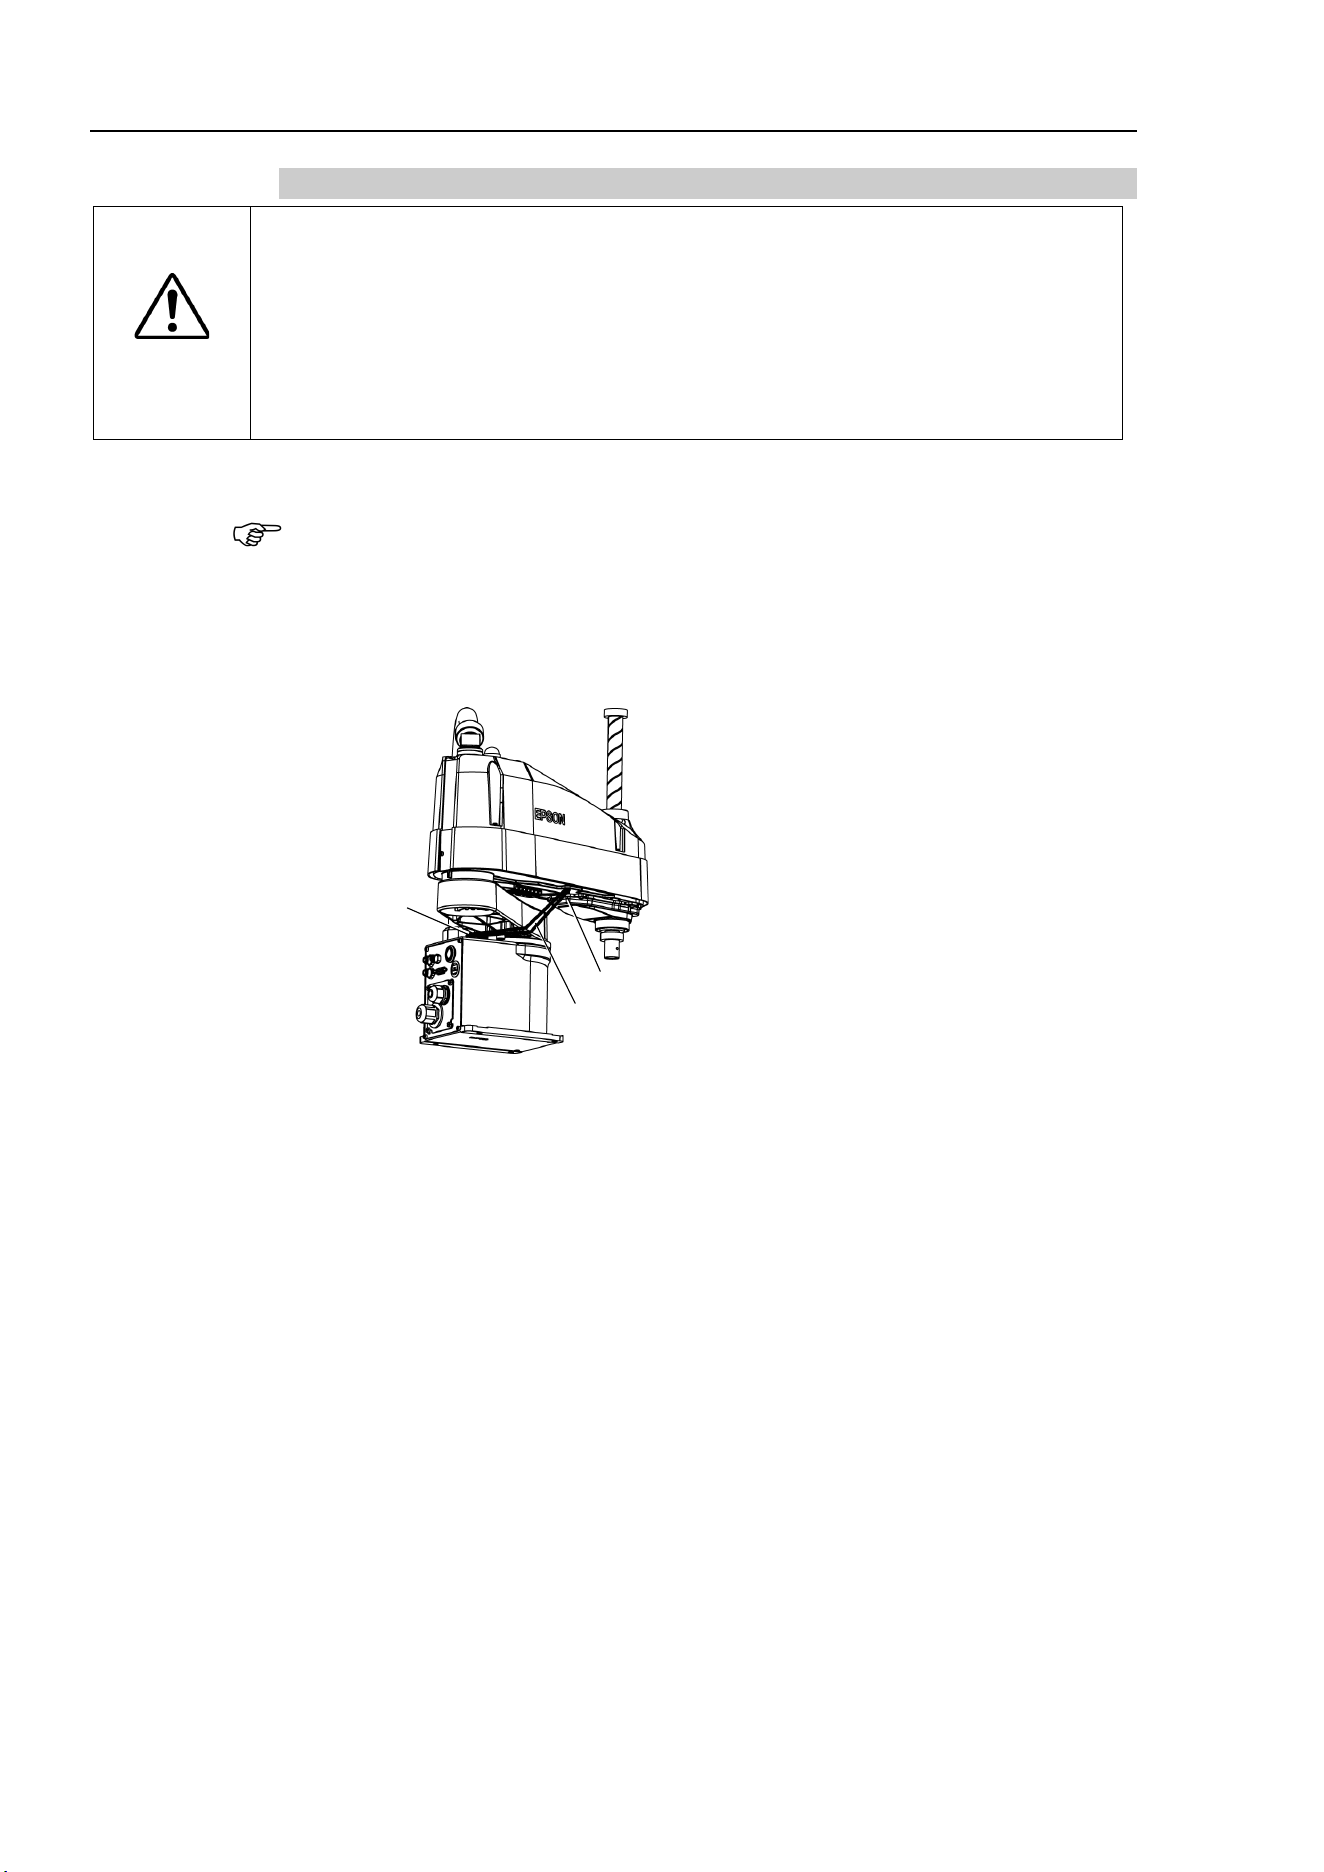
fold the arm and secure it tightly with a wire tie
to prevent hands or fingers from
being caught in the Manipulator.
■
When removing the anchor bolts, support the Manipulator to prevent falling.
Removing the
anchor bolts without support may result in a fall of the Manipulator,
and then get hands, fingers, or feet caught.
■
To
carry the Manipulator, have two or more people to work on it and secure the
Manipulator to the delivery
equipment or hold the shaded area (bottom of Arm #1
and the bottom of the
base) by hand. When holding the bottom of the base by
hand, be very careful not to get hands or fingers caught.
LS10
-B60** : approx. 22 kg : 48.5 lbs.
LS10
-B70** : approx. 22 kg : 48.5 lbs.
LS10
-B80** : approx. 23 kg : 50.7 lbs.
■
Stabilize the Manipulator with your hands when hoist
ing it. Unstable hoisting is
extremely hazardous and may result in fall of the Manipulator.
When transporting the Manipulator for a long distance, secure it to the delivery
equipment so that the Manipulator cannot fall.
If necessary, pack the Manipulator in the same way as it was delivered.
When the Manipulator is used for a robot system again after long-term storage,
perform a test run to verify that it works properly, and then operate it thoroughly.
Transport and store the Manipulator in the range of −25 °C to +55 °C.
Humidity within 10% to 90% is recommended.
When condensation occurs on the Manipulator during transport or storage, turn
ON the power only after the condensation dries.
Do not shock or shake the Manipulator during transport.
Setup & Operation 3. Environments and Installation
32 LS10-B Rev.6
3.8.2 Relocation
CAUTION
■
Install
or relocate the Manipulator with two or more people. The
Manipulator
weigh
ts are as follows. Be careful not to get hands,
fingers, or feet caught and/or
have equipment damage
d by a fall of the Manipulator.
LS10-B60** : approx. 22 kg :48.5 lbs.
LS10-B70** : approx. 22 kg :48.5 lbs.
LS10-B80** : approx. 23 kg :50.7 lbs.
(1) Turn OFF the power on all devices and unplug the cables.
Remove the mechanical stops if using them to limit the motion range of Joints #1 and
#2. For details on the motion range, refer to Setup & Operation: 5.2 Motion Range
Setting by Mechanical Stops.
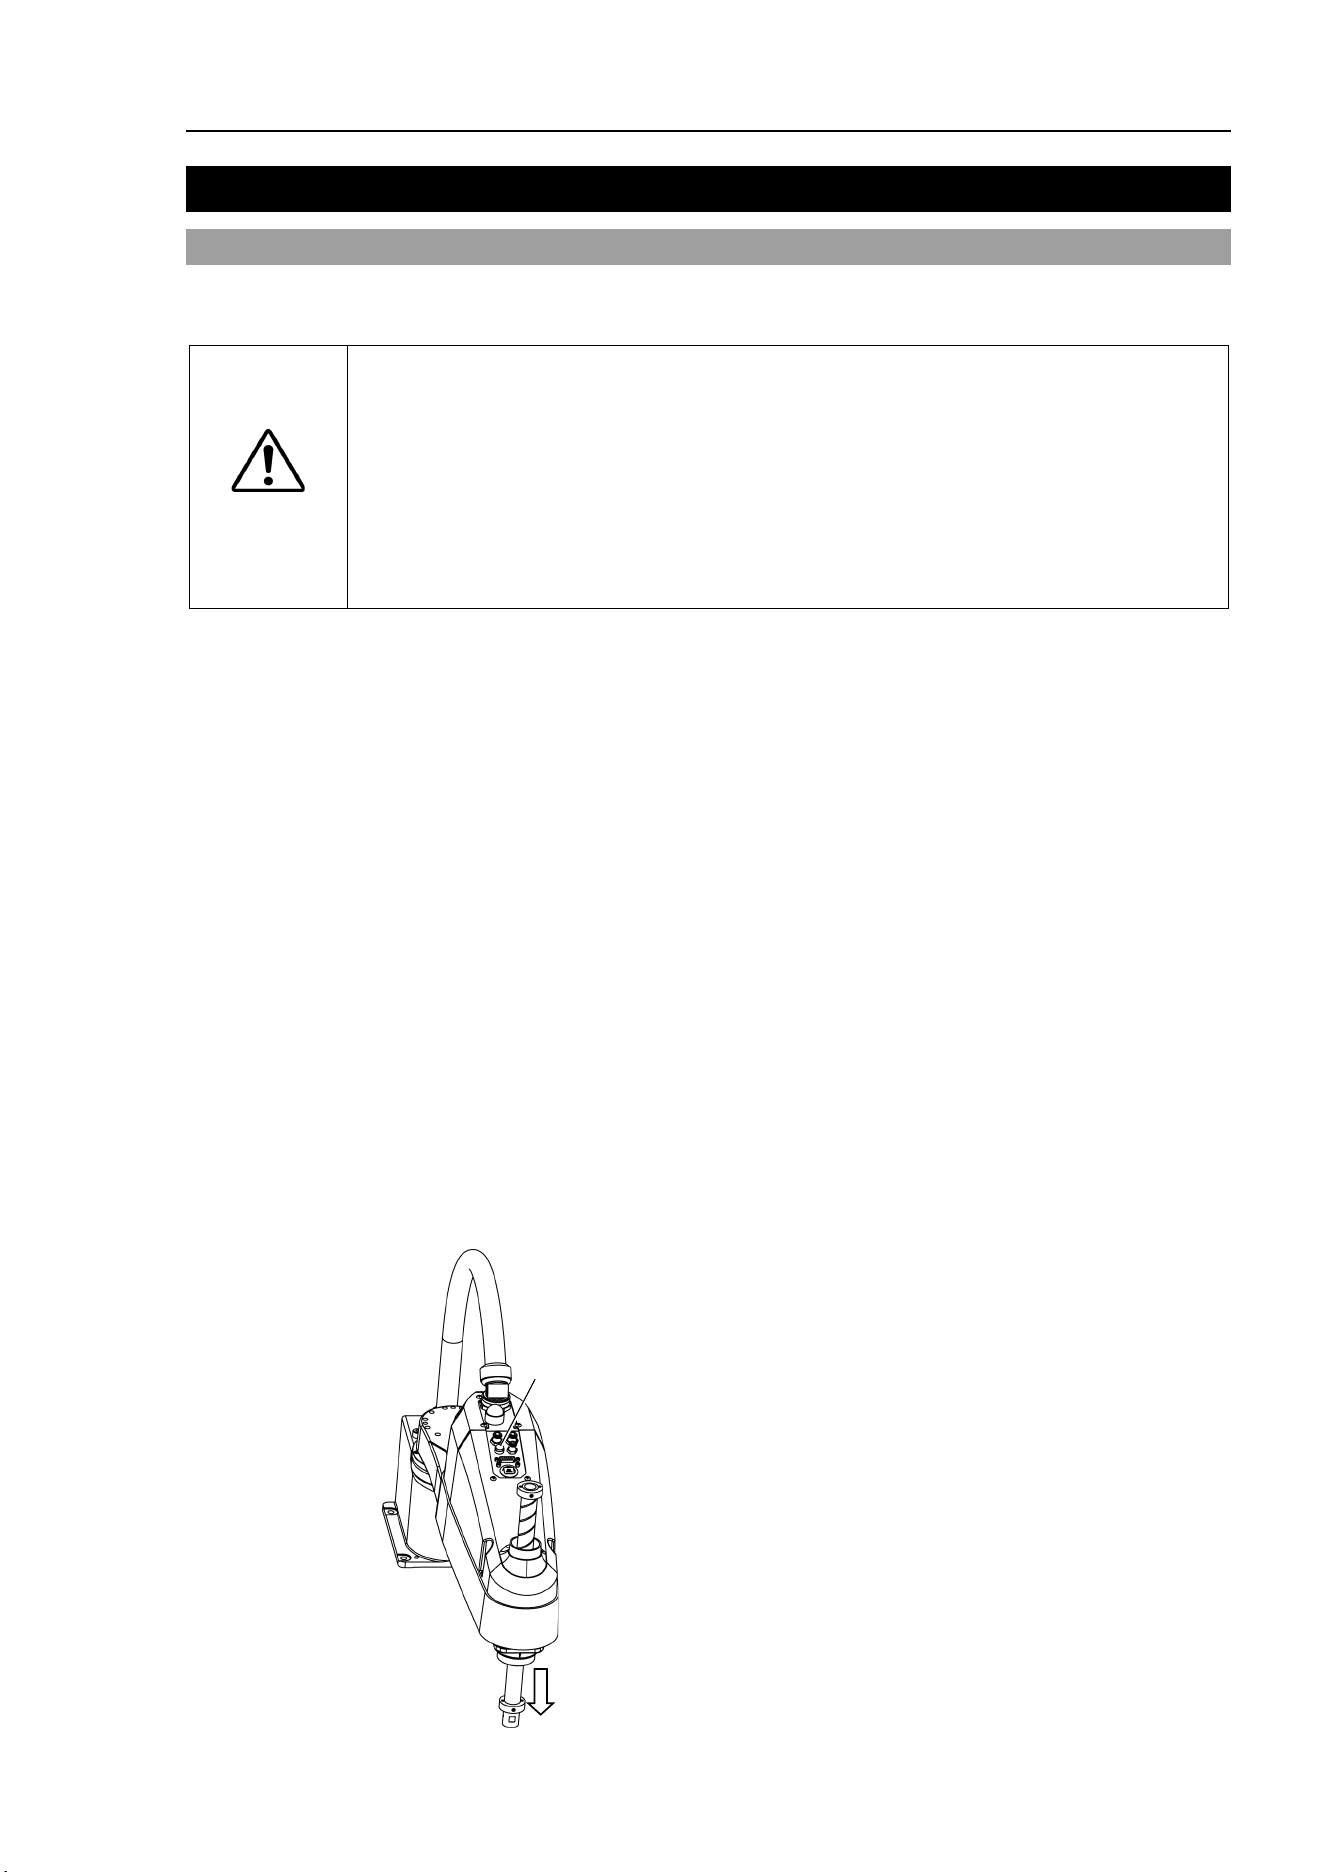
(2) Cover the arm with a sheet so that the arm will not be damaged.
Refer to the following figure and fix the arm.
Wire tie
Bolt: M4
Bolt
: M4
Example of Arm Fixed Posture
(3) Hold the bottom of Arm #1 by hand to unscrew the anchor bolts.
Then, remove the Manipulator from the base table.
NOTE
Setup & Operation 4. Setting of End Effectors
LS10-B Rev.6 33
4. Setting of End Effectors
4.1 Attaching an End Effector
Users are responsible for making their own end effector(s). Before attaching an end
effector, observe these guidelines.
CAUTION
■
If you use an end effector equipped with a gripper or chuck, connect wires and/or
pneumatic
tubes properly so that the gripper does not release the work piece
when the
power to the robot system is turned OFF. Improper connection of the
wires and/or pneuma
tic tubes may damage the robot system and/or work piece
as the work piece is released when the Emergency Stop switch is pressed.
I/O
outputs are configured at the factory so that they are automatically shut off (0)
by power disconnection, the
Emergency Stop switch, or the safety features of the
robot system
.
Shaft
-
Attach an end effector to the lower end of the shaft.
For the shaft dimensions,
and the overall dimensions of the Manipulator, refer to Setup
& Operation: 2. Specifications.
-
Do not move the upper limit mechanical stop on the lower side of the shaft.
Otherwise, when
“Jump motion”
is performed, the upper limit mechanical stop may hit
the Manipulator, and the robot system may not function properly.
-
Use a split muff coupling with an M4 bolt or larger to attach the end effector to the
shaft.
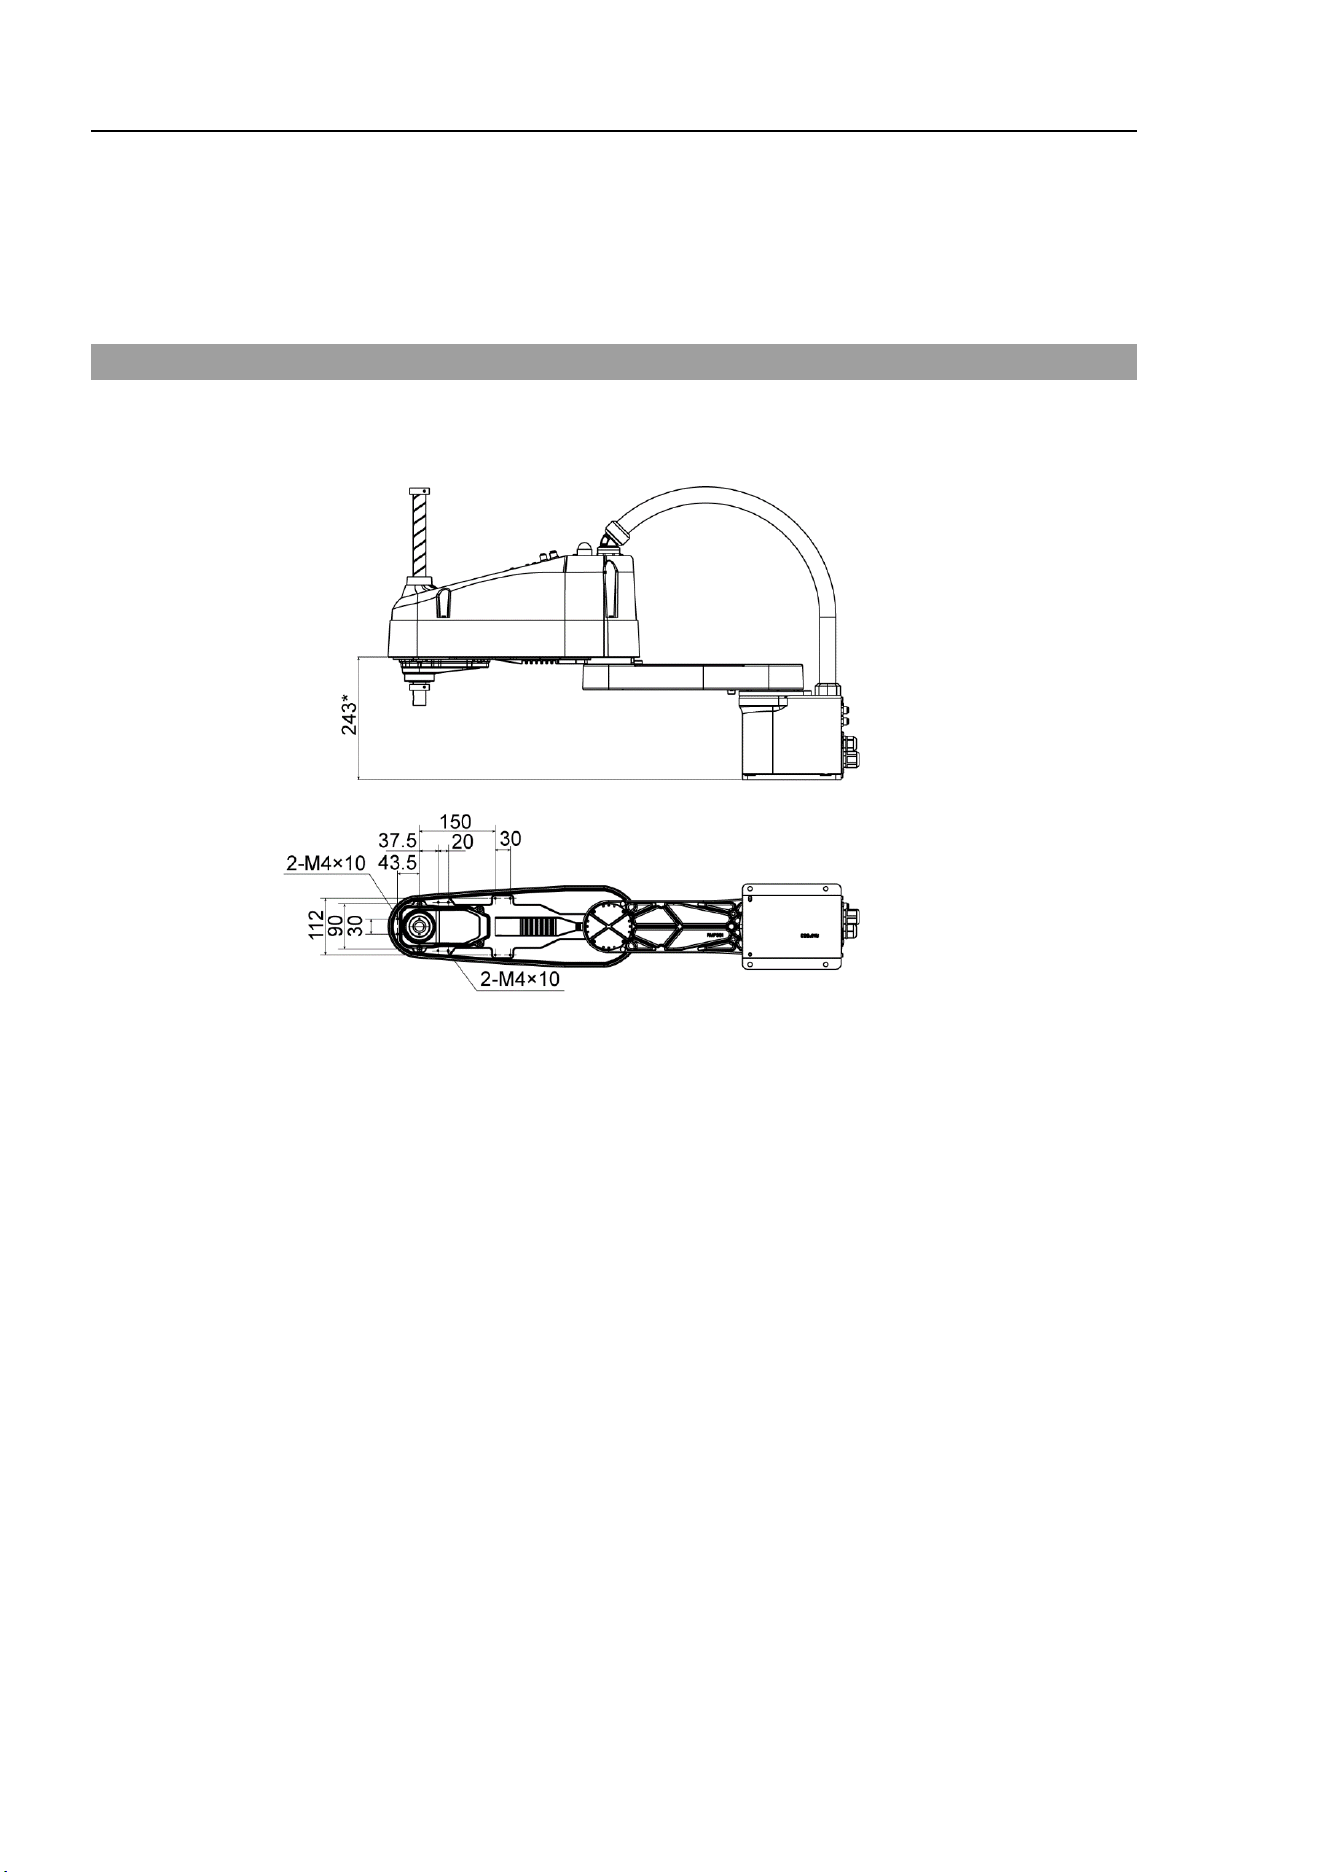
Brake release switch
-
Joint #3 and #4 cannot be moved up/down by hand because the electromagnetic brake
is applied to the joint while power
to the robot system is turned OFF.
This prevents the shaft f
rom hitting peripheral equipment in the case that the shaft is
lowered
by the weight of the end effector when the power is disconnected during
operation,
or when the motor is turned OFF even though the power is turned ON.
To move Joint #3 up/down or
rotate Joint #4 while attaching an end effector, turn ON
the
Controller and move the joint up/down or rotate the joint while pressing the brake
release
switch.
This button
switch is a momentary-type; the brake is released only while the button
switch
is being pressed
-
Be careful of the shaft while the brake release switch is being pressed because the shaft
may be lowered by the weight of the end effector.
Brake release switch
Shaft may be lowered by the
weight of the end effector.
Setup & Operation 4. Setting of End Effectors
34 LS10-B Rev.6
Layouts
-
When you operate the manipulator with an end effector, the end effector may interfere
with
the Manipulator because of the outer diameter of the end effector, the size of the
work piece
, or the position of the arms. When designing your system layout, pay
attention to the interference area of the end effector.
4.2 Attaching Cameras and Valves
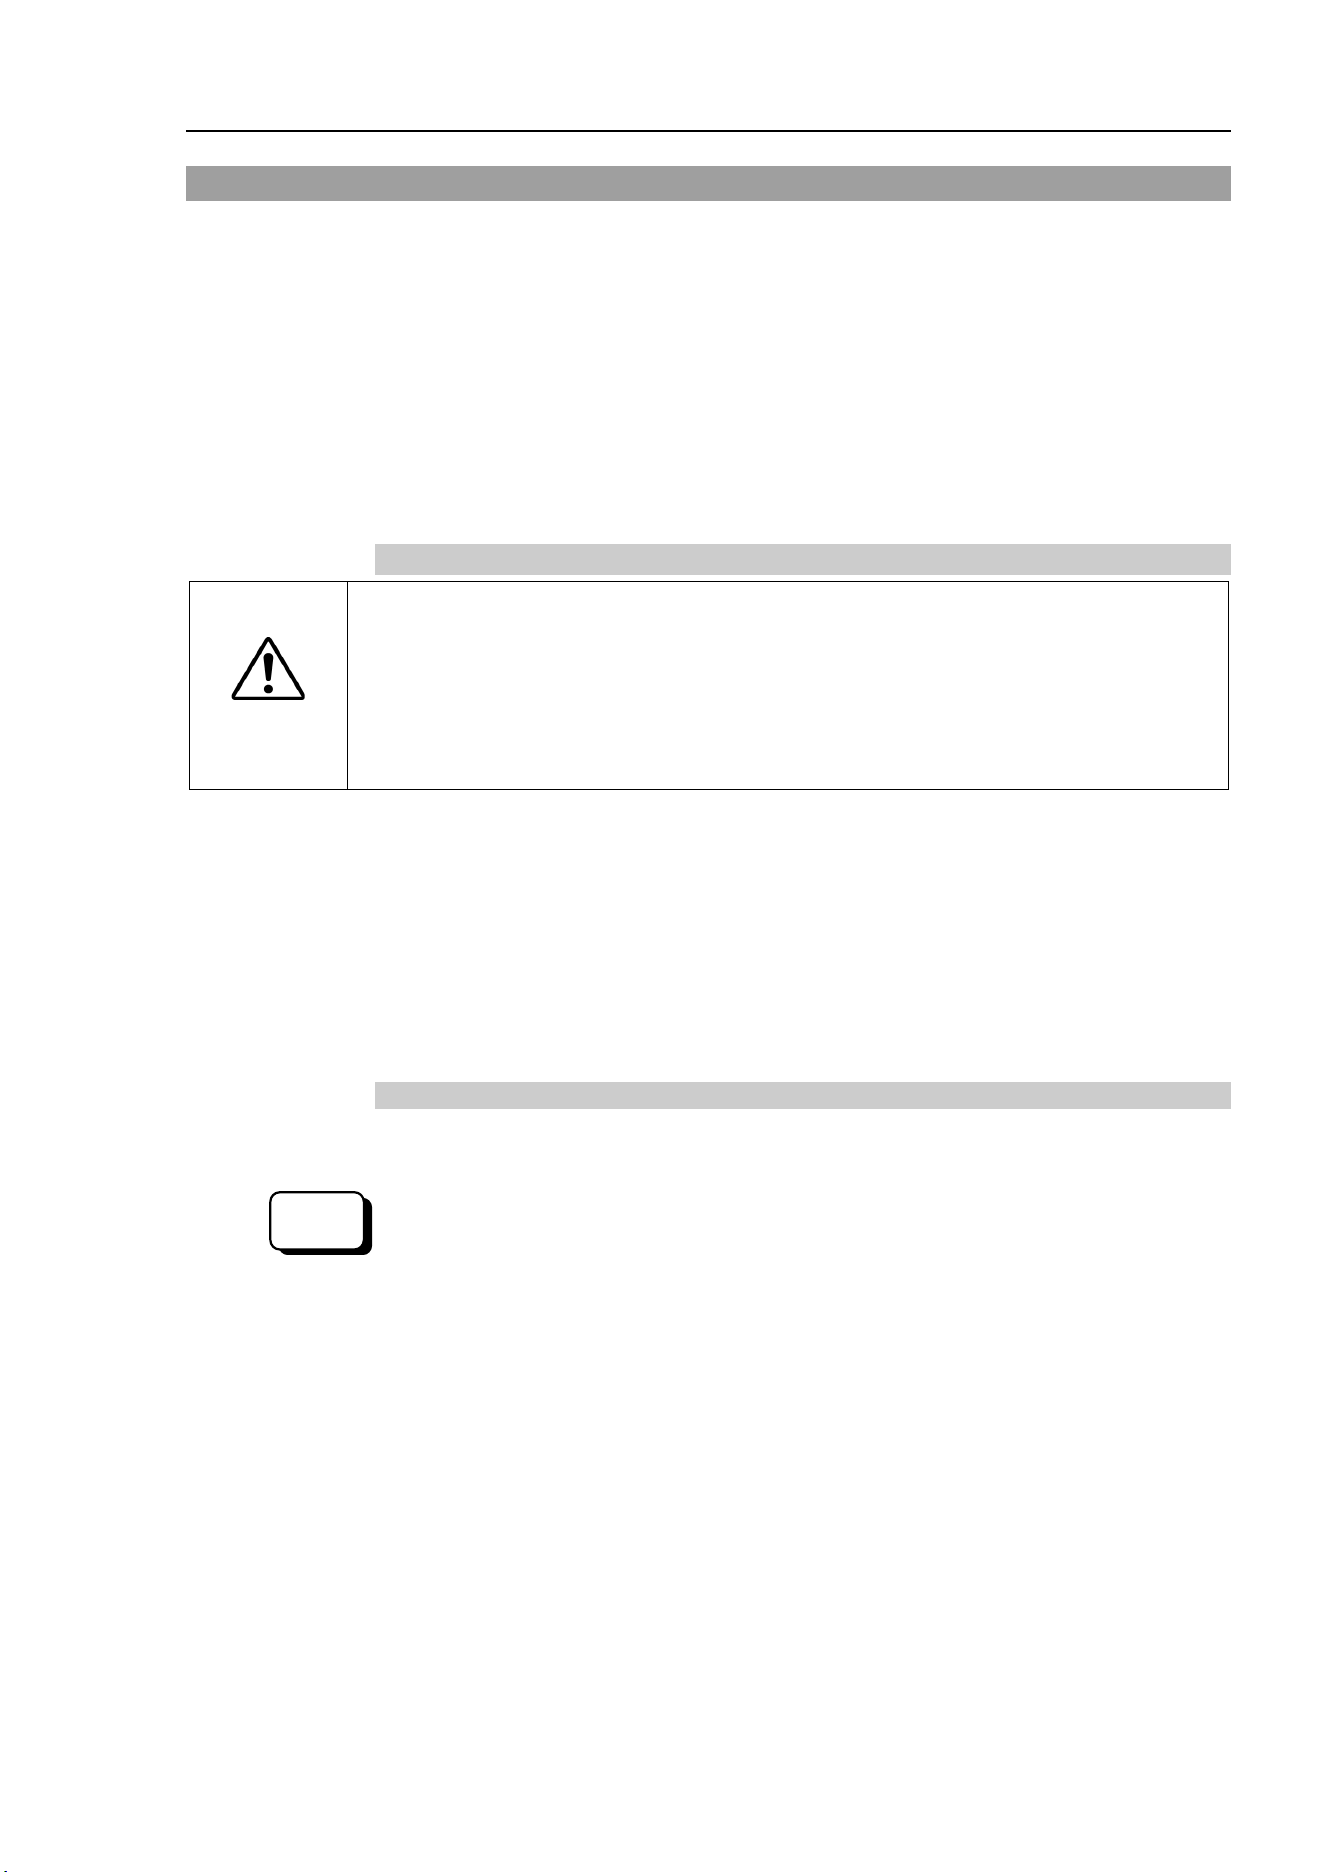
The bottom of the Arm #2 has threaded holes as shown in the figure below. Use these
holes for attaching cameras, valves, and other equipment.
[Unit: mm]
*: From base installation surface
Setup & Operation 4. Setting of End Effectors
LS10-B Rev.6 35
4.3 Weight and Inertia Settings
To ensure optimum Manipulator performance, it is important to make sure that the load
(weight of the end effector and work piece) and moment of inertia of the load are within the
maximum rating for the Manipulator, and that Joint #4 does not become eccentric.
If the load or moment of inertia exceeds the rating or if the load becomes eccentric, follow
the steps below, “4.3.1Weight Setting” and “4.3.2 Inertia Setting” to set parameters.
Setting parameters makes the PTP motion of the Manipulator optimal, reduces vibration to
shorten the operating time, and improves the capacity for larger loads. In addition, it
reduces persistent vibration produced when the moment of inertia of the end effector and
work piece is larger than the default setting.
4.3.1 Weight Setting
CAUTION
■
The total weight o
f the end effector and the workpiece must not exceed 10 kg
.
The
LS10-B series Manipulators are not designed to work with loads exceeding
10
kg. Always set the Weight parameters according to the load. Setting a value
that is smaller than the actual load may cause errors, excessive shock and
insufficient function of the Manipulator.
Also, the life cycle of parts will shorten
and belt tooth jumping will occur which will lead to potion shift.
The acceptable weight capacity (end effector and workpiece) in LS10-B series is
Default rating: 5 kg
Maximum: 10 kg
When the load (weight of the end effector and work piece) exceeds the rating, change the
setting of Weight parameter.
After the setting is changed, the maximum acceleration/deceleration speed of the robot
system at PTP motion corresponding to the “Weight Parameter” is set automatically.
Load on the Shaft
The load (weight of the end effector and work piece) on the shaft can be set by Weight
parameter.
EPSON
RC+
Enter a value into the [Load inertia:] text box on the [Inertia] panel (
[Tools]-
[Robot
M
anager]). (You may also execute the Inertia command from the [Command Window].)
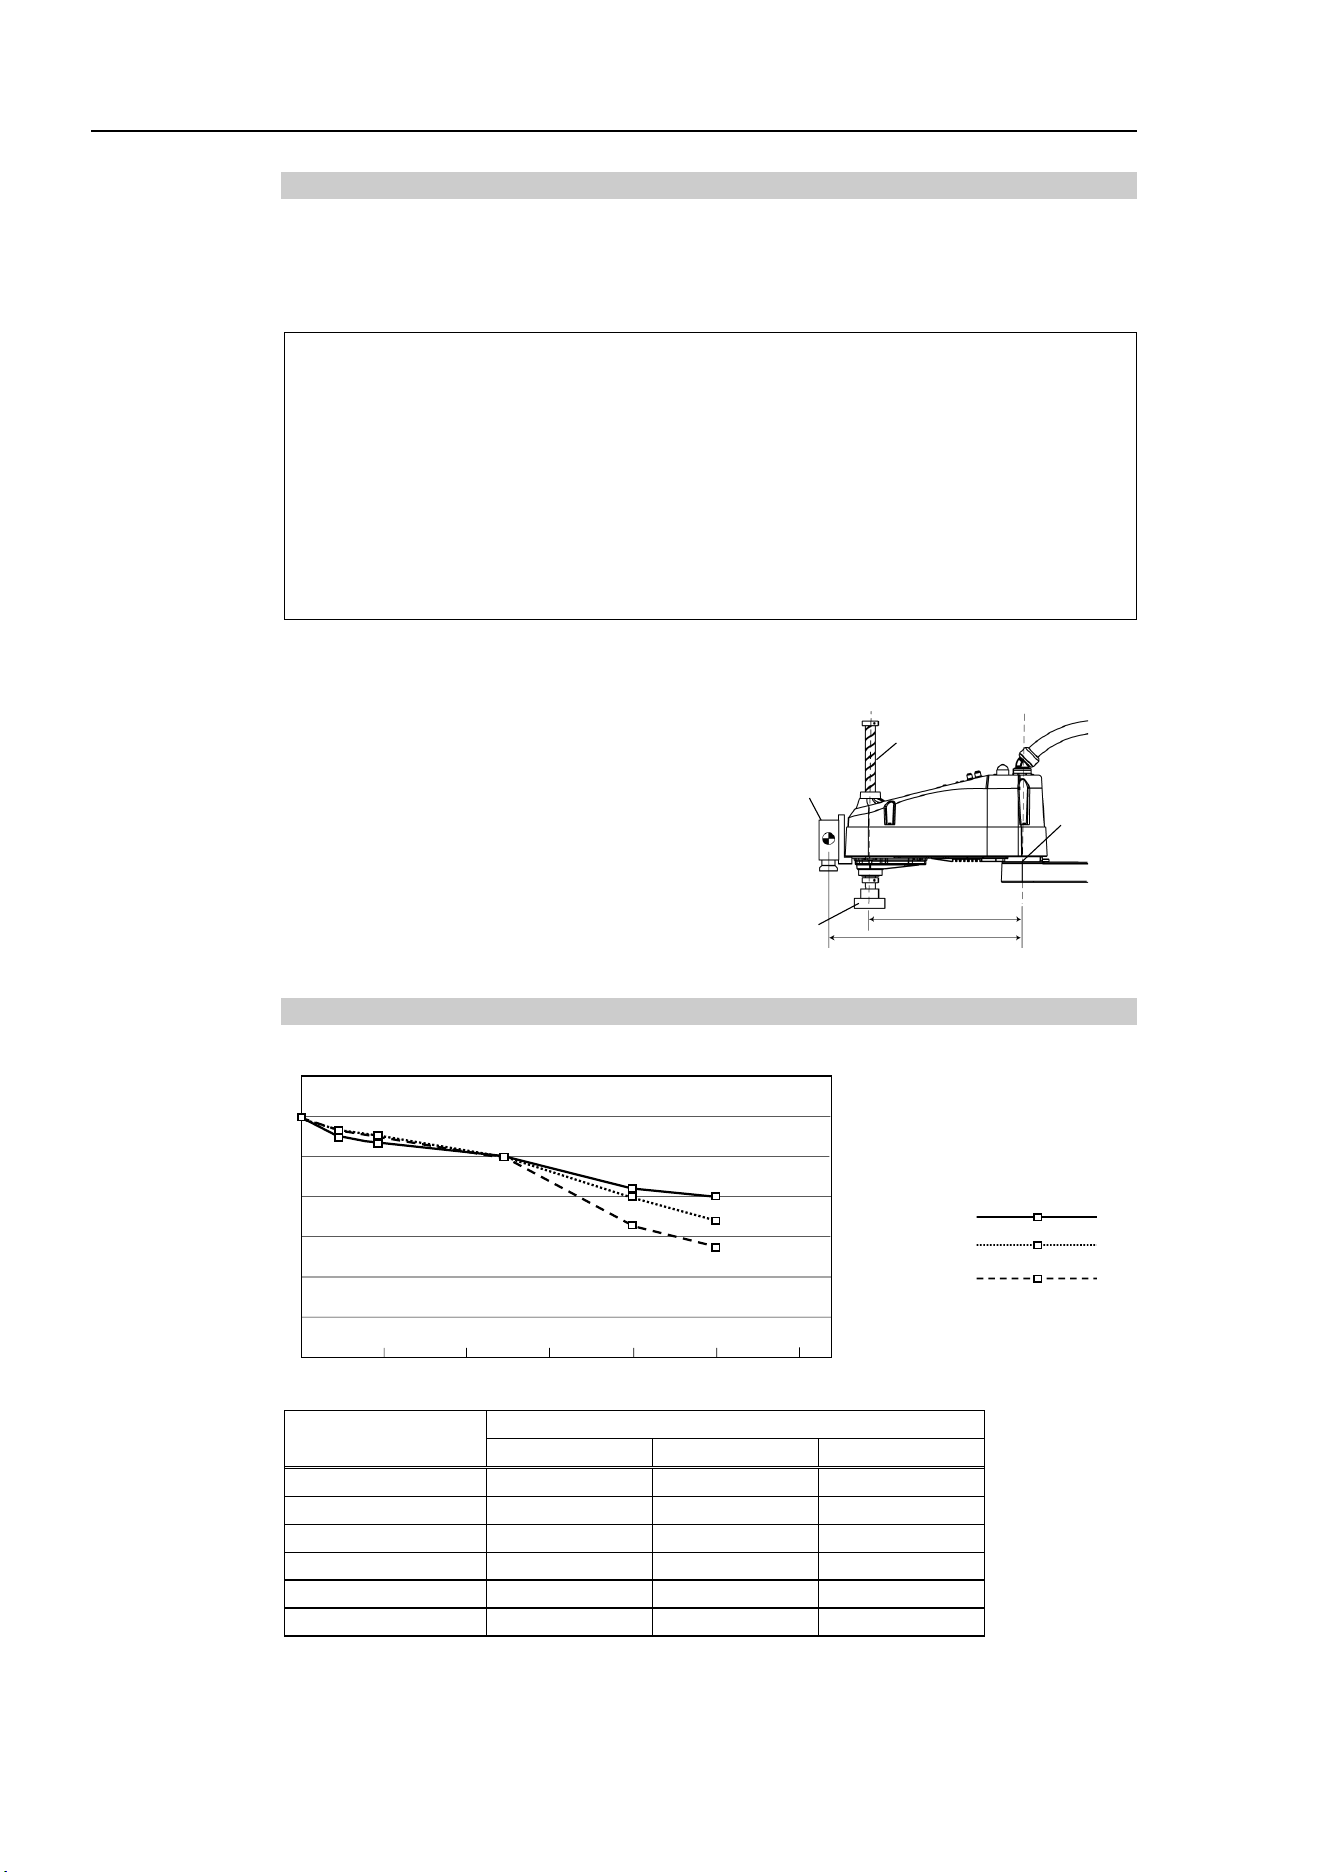
Setup & Operation 4. Setting of End Effectors
36 LS10-B Rev.6
Load on the Arm
When you attach a camera or other devices to the arm, calculate the weight as the equivalent
of the shaft. Then, add this to the load and enter the total weight to the Weight parameter.
Equivalent Weight Formula
When you attach the equipment near
Arm #2:
When you attach the equipment to the end of Arm #2:
W
M
= M (L
1
)
2
/(L
1
+L
2
)
2
W
M
= M (L
M
)
2
/(L
2
)
2
W
M
M
L
1
L
2
L
M
:
equivalent weight
:
weight of camera etc.
:
length of Arm #1
:
length of Arm #2
:
distance from rotation center of Joint #2 to center of gravity
of camera etc.
<Example>
A
“1 kg” camera is attached to the end of the LS10-B series arm (475
mm away from
the rotation center of Joint #2) with a load weight of “1 kg”.
M=1
L
2
=375
L
M
=475
W
M
=1×475
2
/375
2
=1.604
→ 1.7 (round up)
W+W
M
=1+1.7=2.7
Enter “2.7” for the Weight Parameter.
Shaft
Weight of
camera
M=1kg
W=1kg
L
2
=375 mm
L
M
=475 mm
Joint #2
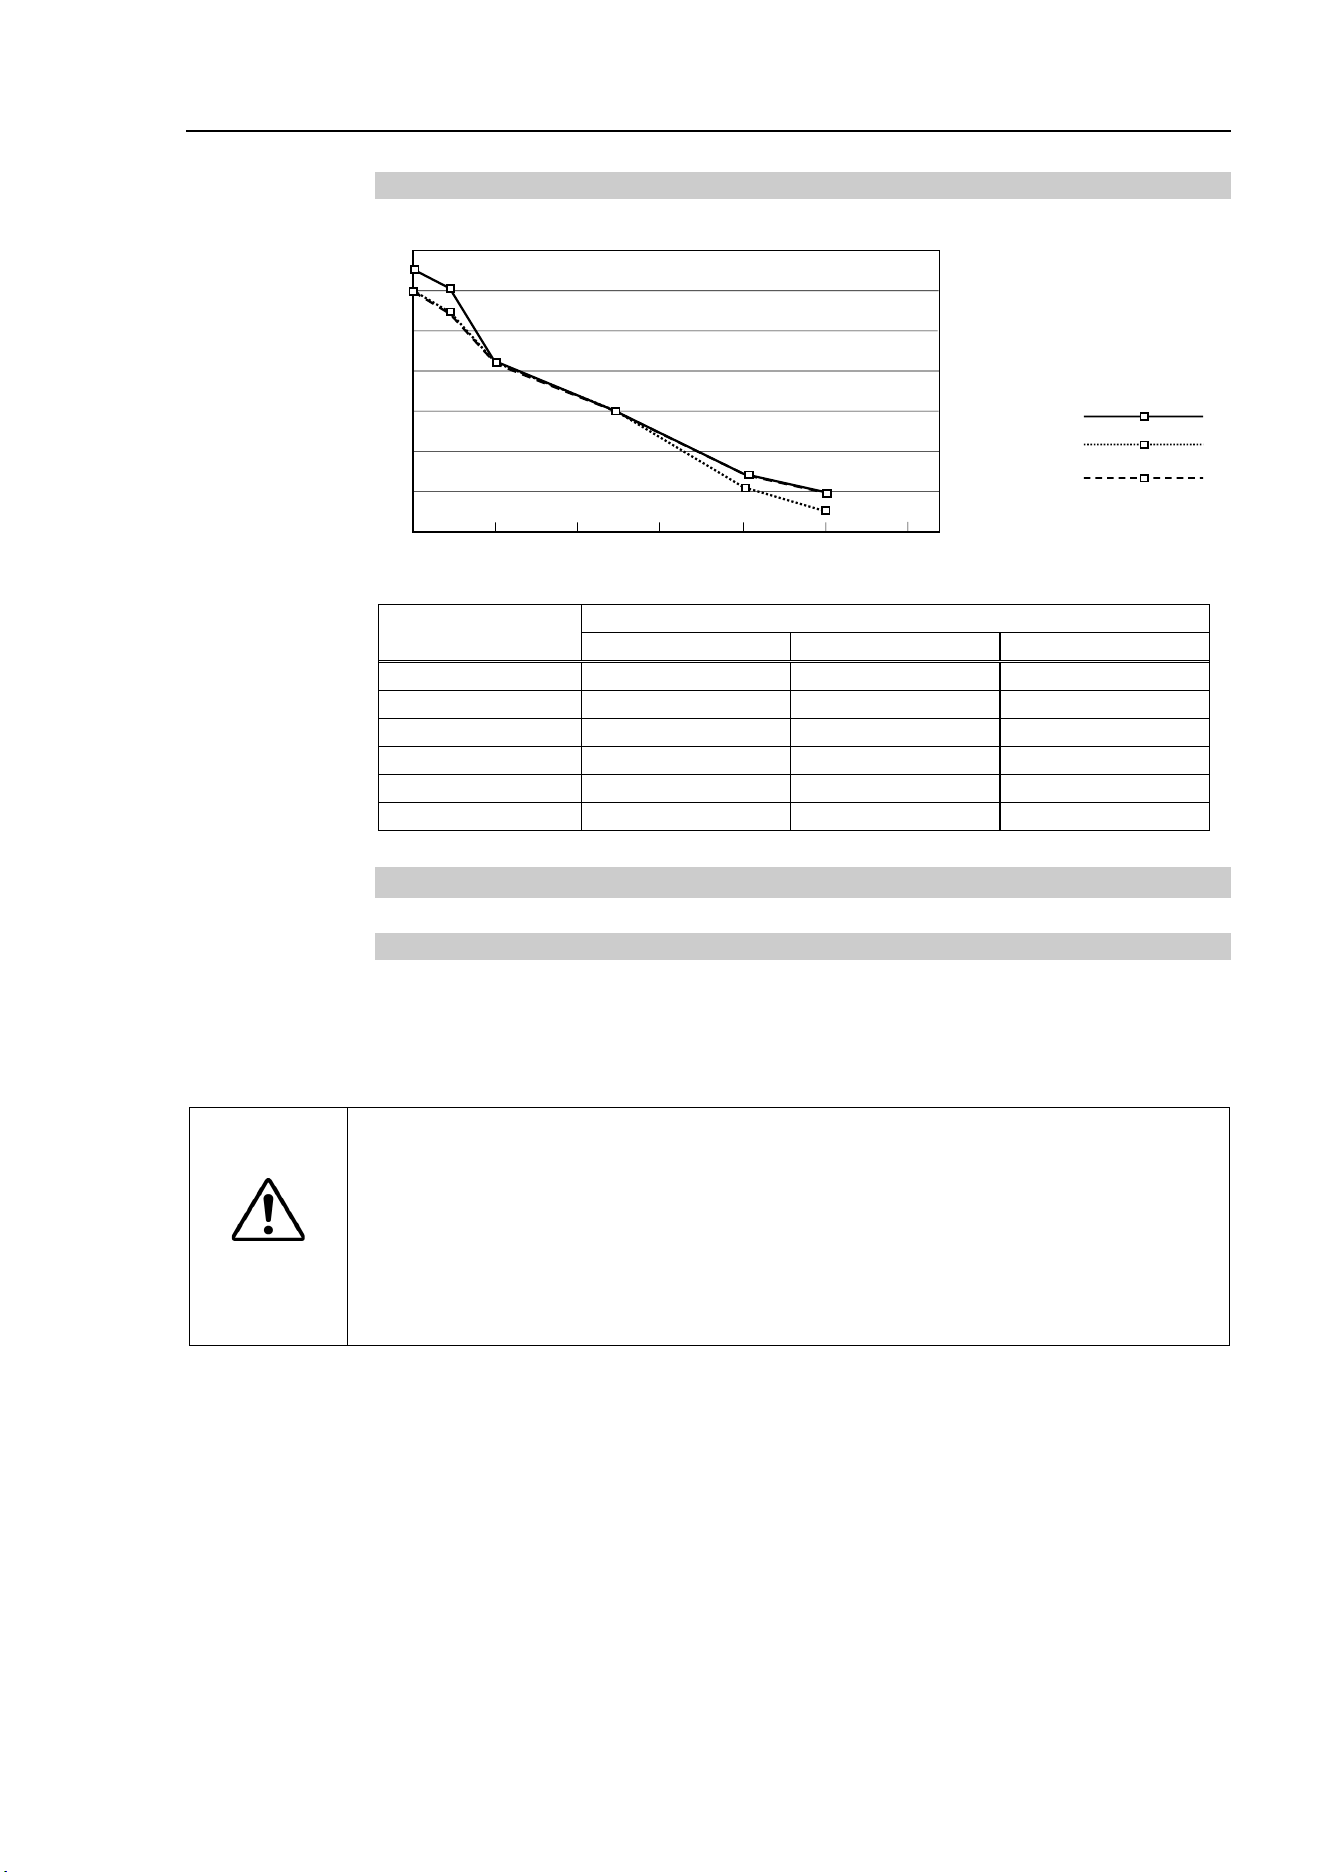
Automatic speed setting by Weight
140
120
100
80
60
40
20
0 2 4 6 8 10 12 (kg) Weight setting
(%)
* The percentage in the graph is
based on the speed at rated
weight (5 kg) as 100%.
120
116
100
LS10-B60**
LS10-B70**
LS10-B80**
112
111
110
85
80
65
80
70
54
End effector
weight (kg)
Automatic speed setting by Weight (%)
LS10-B60**
LS10-B70**
LS10-B80**
0
120
120
120
1
111
116
116
2
110
112
112
5
100
100
100
8
85
80
65
10
80
70
54
Setup & Operation 4. Setting of End Effectors
LS10-B Rev.6 37
Automatic acceleration/deceleration setting by Weight
180
160
140
120
100
80
60
0 2 4 6 8 10 12 (kg) Weight setting
(%)
* The percentage in the graph
is based on the acceleration/
deceleration at rated weight
(5 kg) as 100%.
170
164
100
LS10-B60**
LS10-B70**
LS10-B80**
160
125
75
64
60
51
≈
150
End effector
weight (kg)
Automatic acceleration/deceleration setting by Weight (%)
LS10-B60**
LS10-B70**
LS10-B80**
0
170
160
160
1
164
150
150
2
125
125
125
5
100
100
100
8
75
64
75
10
60
51
60
4.3.2 Inertia Setting
Moment of Inertia and the Inertia Setting
The moment of inertia is defined as “the ratio of the torque applied to a rigid body and its
resistance to motion”. This value is typically referred to as “the moment of inertia”,
“inertia”, or “GD
2
”. When the Manipulator operates with additional objects (such as an
end effector) attached to the shaft, the moment of inertia of load must be considered.
CAUTION
■
The
moment of inertia of the load (weight of the end effector and workpiece) must
be
0.30 kg·m
2
or less. The LS10-B series Manipulators are not designed to work
with
a moment of inertia exceeding 0.30 kg·m
2
.
Always set the Weight parameters according to the load. Setting a value that is
smaller than the actual load may cause errors, excessive shock and insufficient
function of the Manipulator. Also, the life cycle of parts is shortened and
positional
gap due to belt tooth bumping occurs.
The acceptable moment of inertia of load for a LS10-B series Manipulator is
Default rating: 0.02 kg·m
2
Maximum: 0.30 kg·m
2
When the moment of inertia of the load exceeds the rating, change the setting of the moment
of inertia parameter of the Inertia command. After the setting is changed, the maximum
acceleration/deceleration speed of Joint #4 at PTP motion corresponding to the “moment of
inertia” value is set automatically.
Setup & Operation 4. Setting of End Effectors
38 LS10-B Rev.6
Moment of inertia of load on the shaft
The moment of inertia of load (weight of the end effector and work piece) on the shaft can
be set by the “moment of inertia” parameter of the Inertia command.
EPSON
RC+
Enter a value into the [Load inertia:] text box on the
[Inertia] panel ([Tools]-
[Robot
M
anager]). (You may also execute the Inertia command from the [Command Window].)
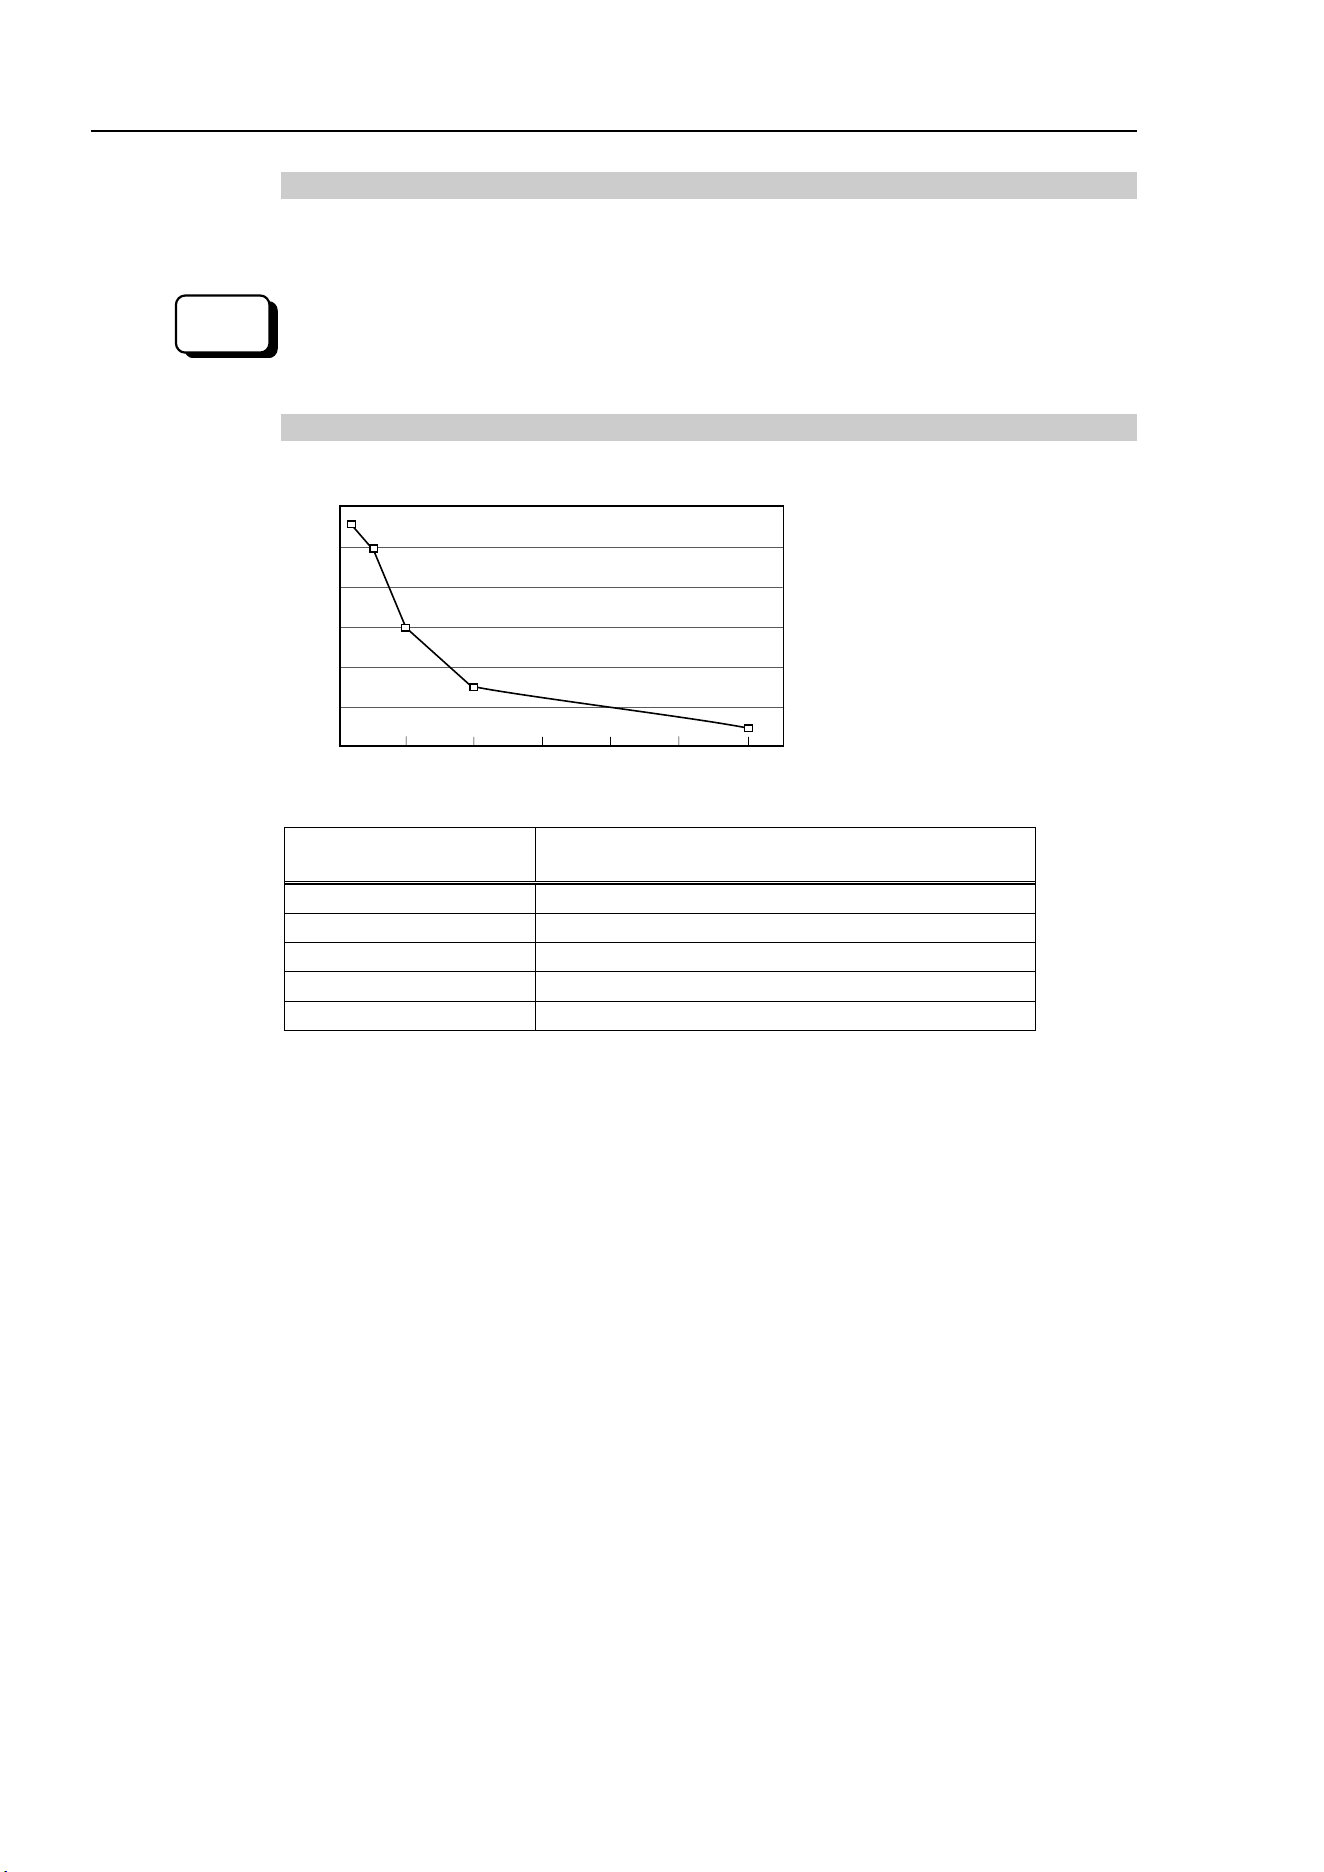
Automatic acceleration/deceleration setting of Joint #4 by Inertia (moment of inertia)
0
0.05 0.1 0.15 0.2 0.25 0.3 (kg·m
2
) Moment of inertia setting
120
100
80
60
40
20
(%)
113
60
30
10
100
Moment of inertia
setting (kg·m
2
)
Automatic acceleration/deceleration setting of
Joint #4 by Inertia (moment of inertia) (%)
0.01
113
0.02
100
0.05
60
0.1
30
0.3
10
Setup & Operation 4. Setting of End Effectors
LS10-B Rev.6 39
Eccentric Quantity and the Inertia Setting
CAUTION
■
The
eccentric quantity of load (weight of the end effector and workpiece) must be
200 mm
or less. The LS10-B series Manipulators are not designed to work with
eccentric quantity
exceeding 200 mm.
Always set the Weight parameters according to the load. Settin
g a value that is
smaller than the actual load may cause errors, excessive shock and insufficient
function of the Manipulator. Also, the life cycle of parts is shortened and
positional
gap due to belt tooth bumping occurs.
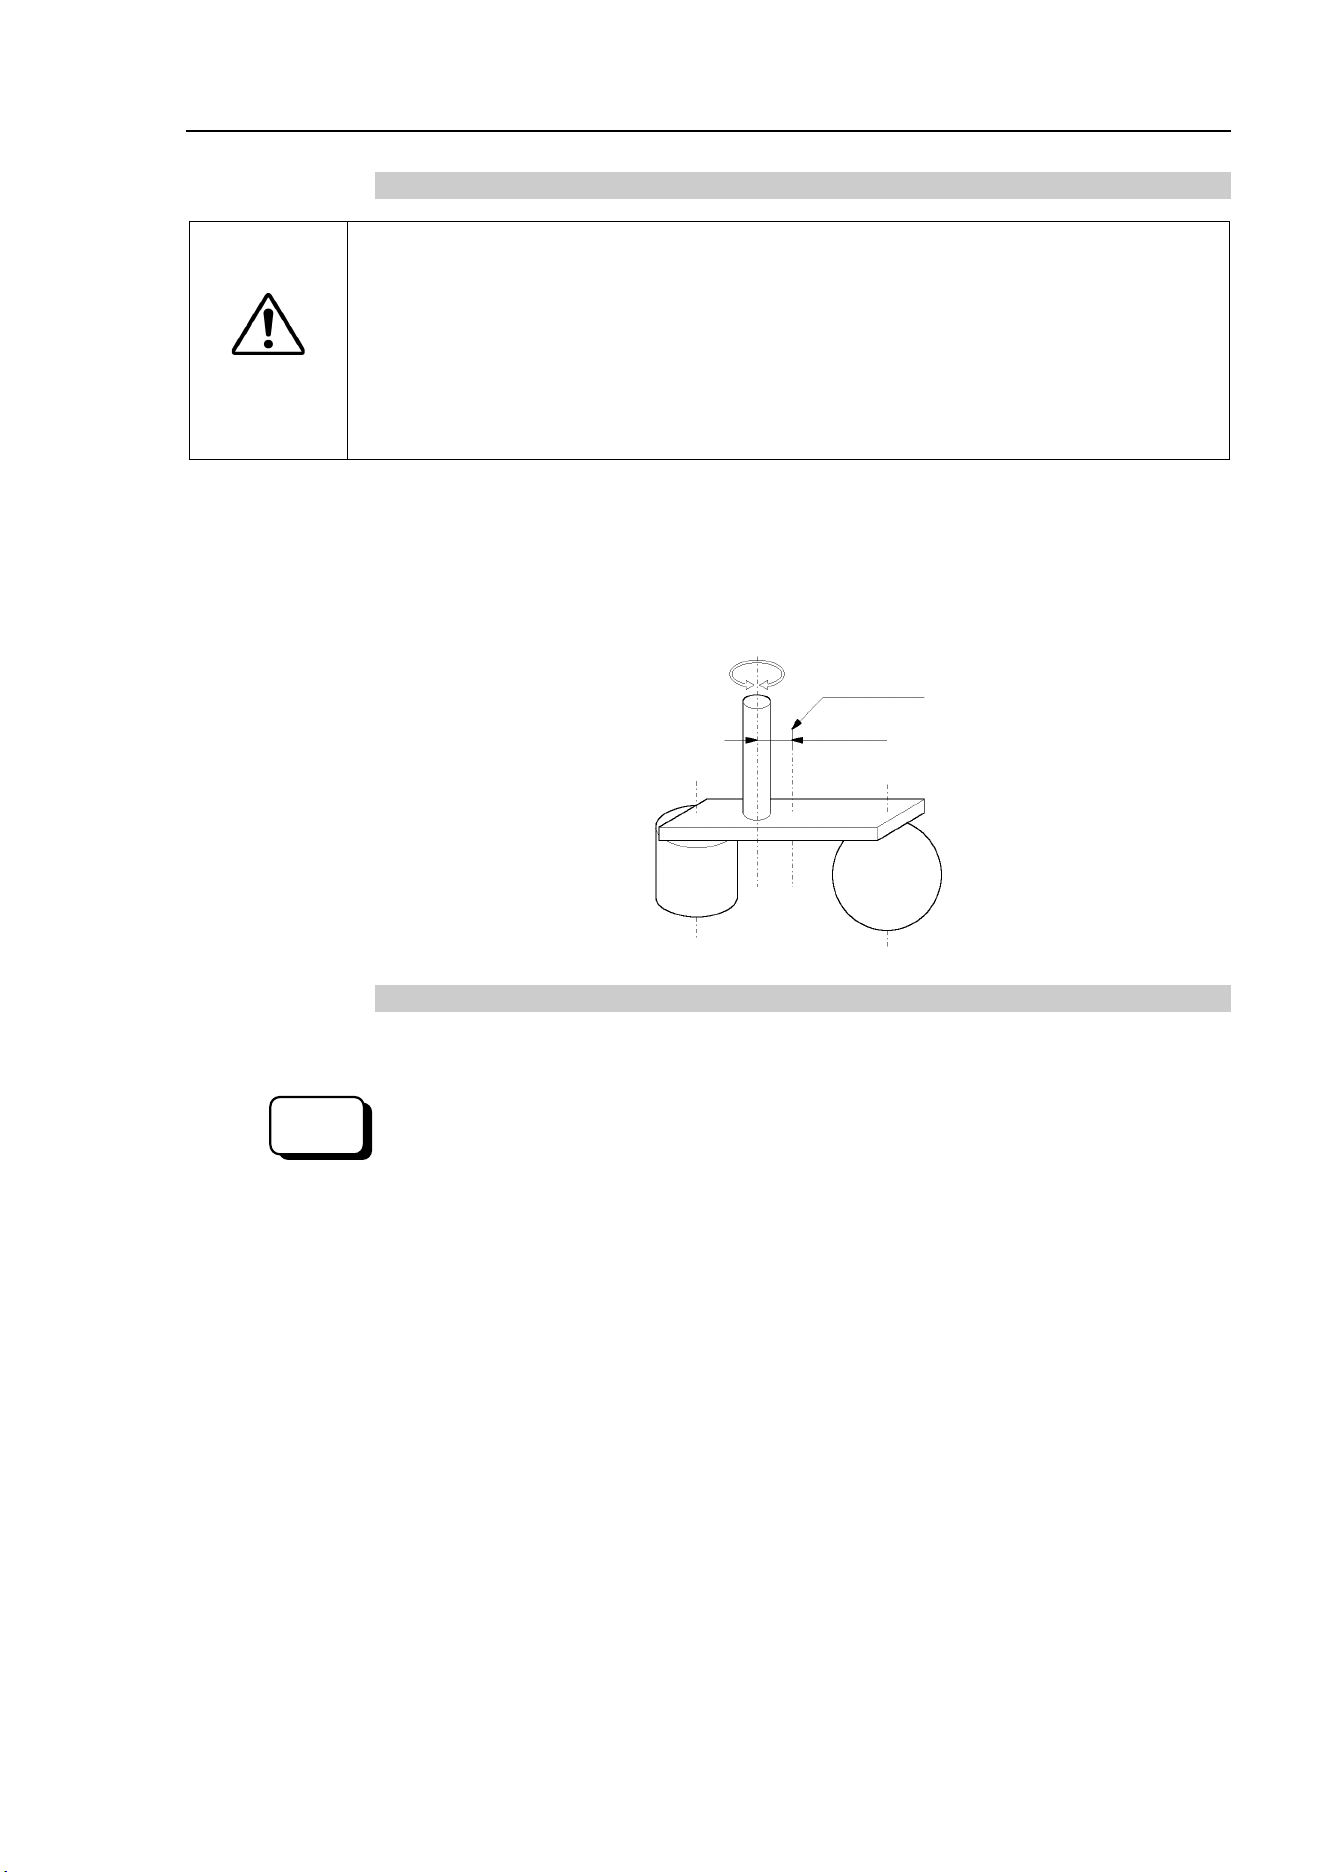
The acceptable eccentric quantity of load in LS10-B series is 0 mm at the default rating and
200 mm at the maximum. When the eccentric quantity of load exceeds the rating, change
the setting of eccentric quantity parameter of Inertia command. After the setting is
changed, the maximum acceleration/deceleration speed of the Manipulator at PTP motion
corresponding to the “eccentric quantity” is set automatically.
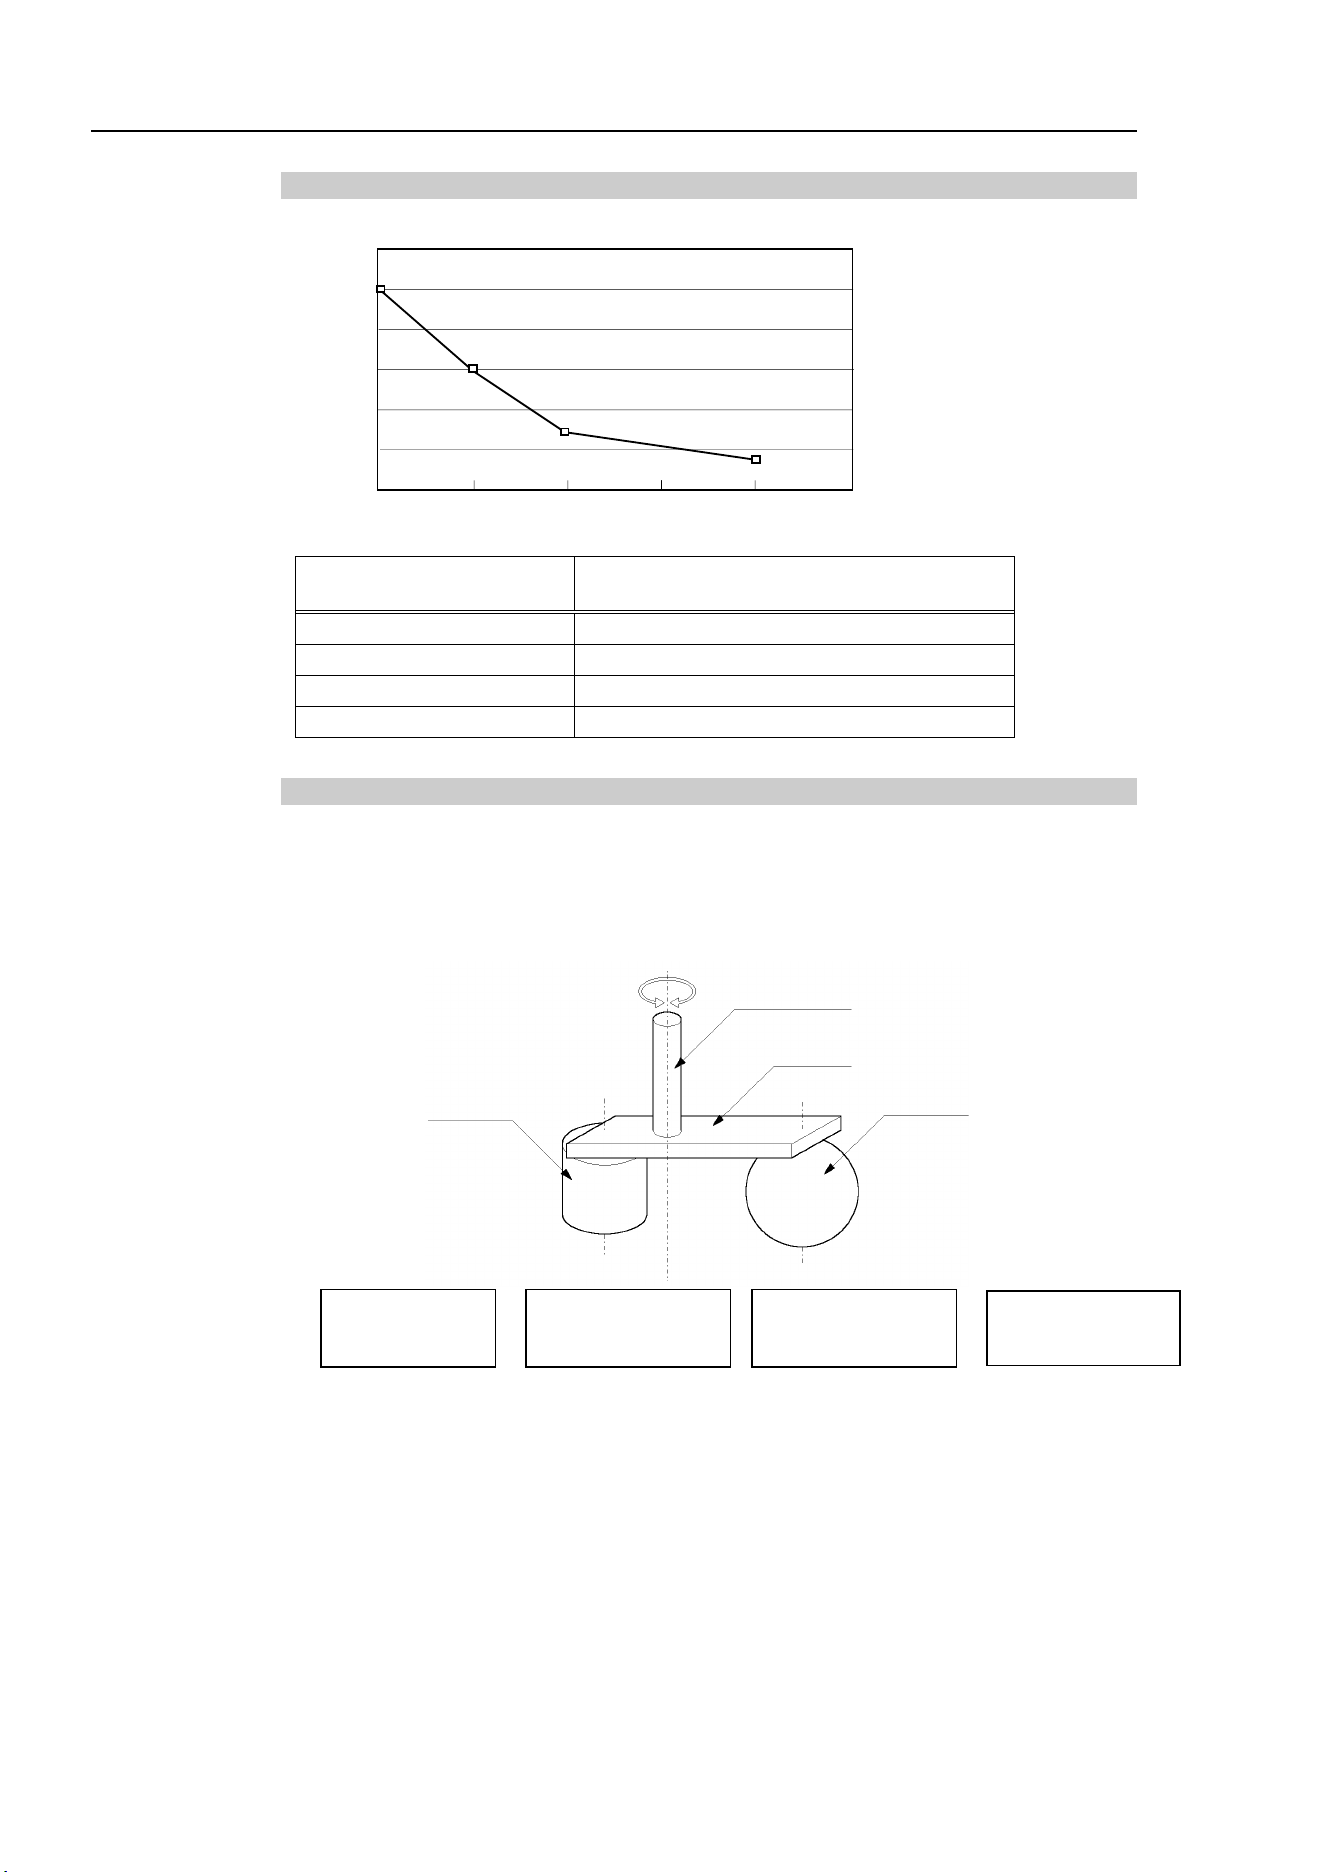
Position of load’s center of gravity
Rotation center
Eccentric quantity (200mm or less)
Eccentric Quantity
Eccentric quantity of load on the shaft
The eccentric quantity of load (weight of the end effector and work piece) on the shaft can
be set by “eccentric quantity” parameter of Inertia command.
EPSON
RC+
Enter a value into the [Eccentricity:] text box on the [Inertia] panel
([Tools]-
[Robot
M
anager]). (You may also execute the Inertia command from the [Command Window].)
Setup & Operation 4. Setting of End Effectors
40 LS10-B Rev.6
Automatic acceleration/deceleration setting by Inertia (eccentric quantity)
* The percentage in the
graph is based on the
acceleration /
deceleration at rated
eccentricity
(0 mm) as 100%.
120
100
80
60
40
20
0
50 100 150 200 250 (mm) Eccentricity setting
60
26
(%)
100
15
Eccentric quantity
parameter (mm)
Automatic acceleration/deceleration
setting by Inertia (eccentric quantity) (%)
0
100
50
60
100
26
200
15
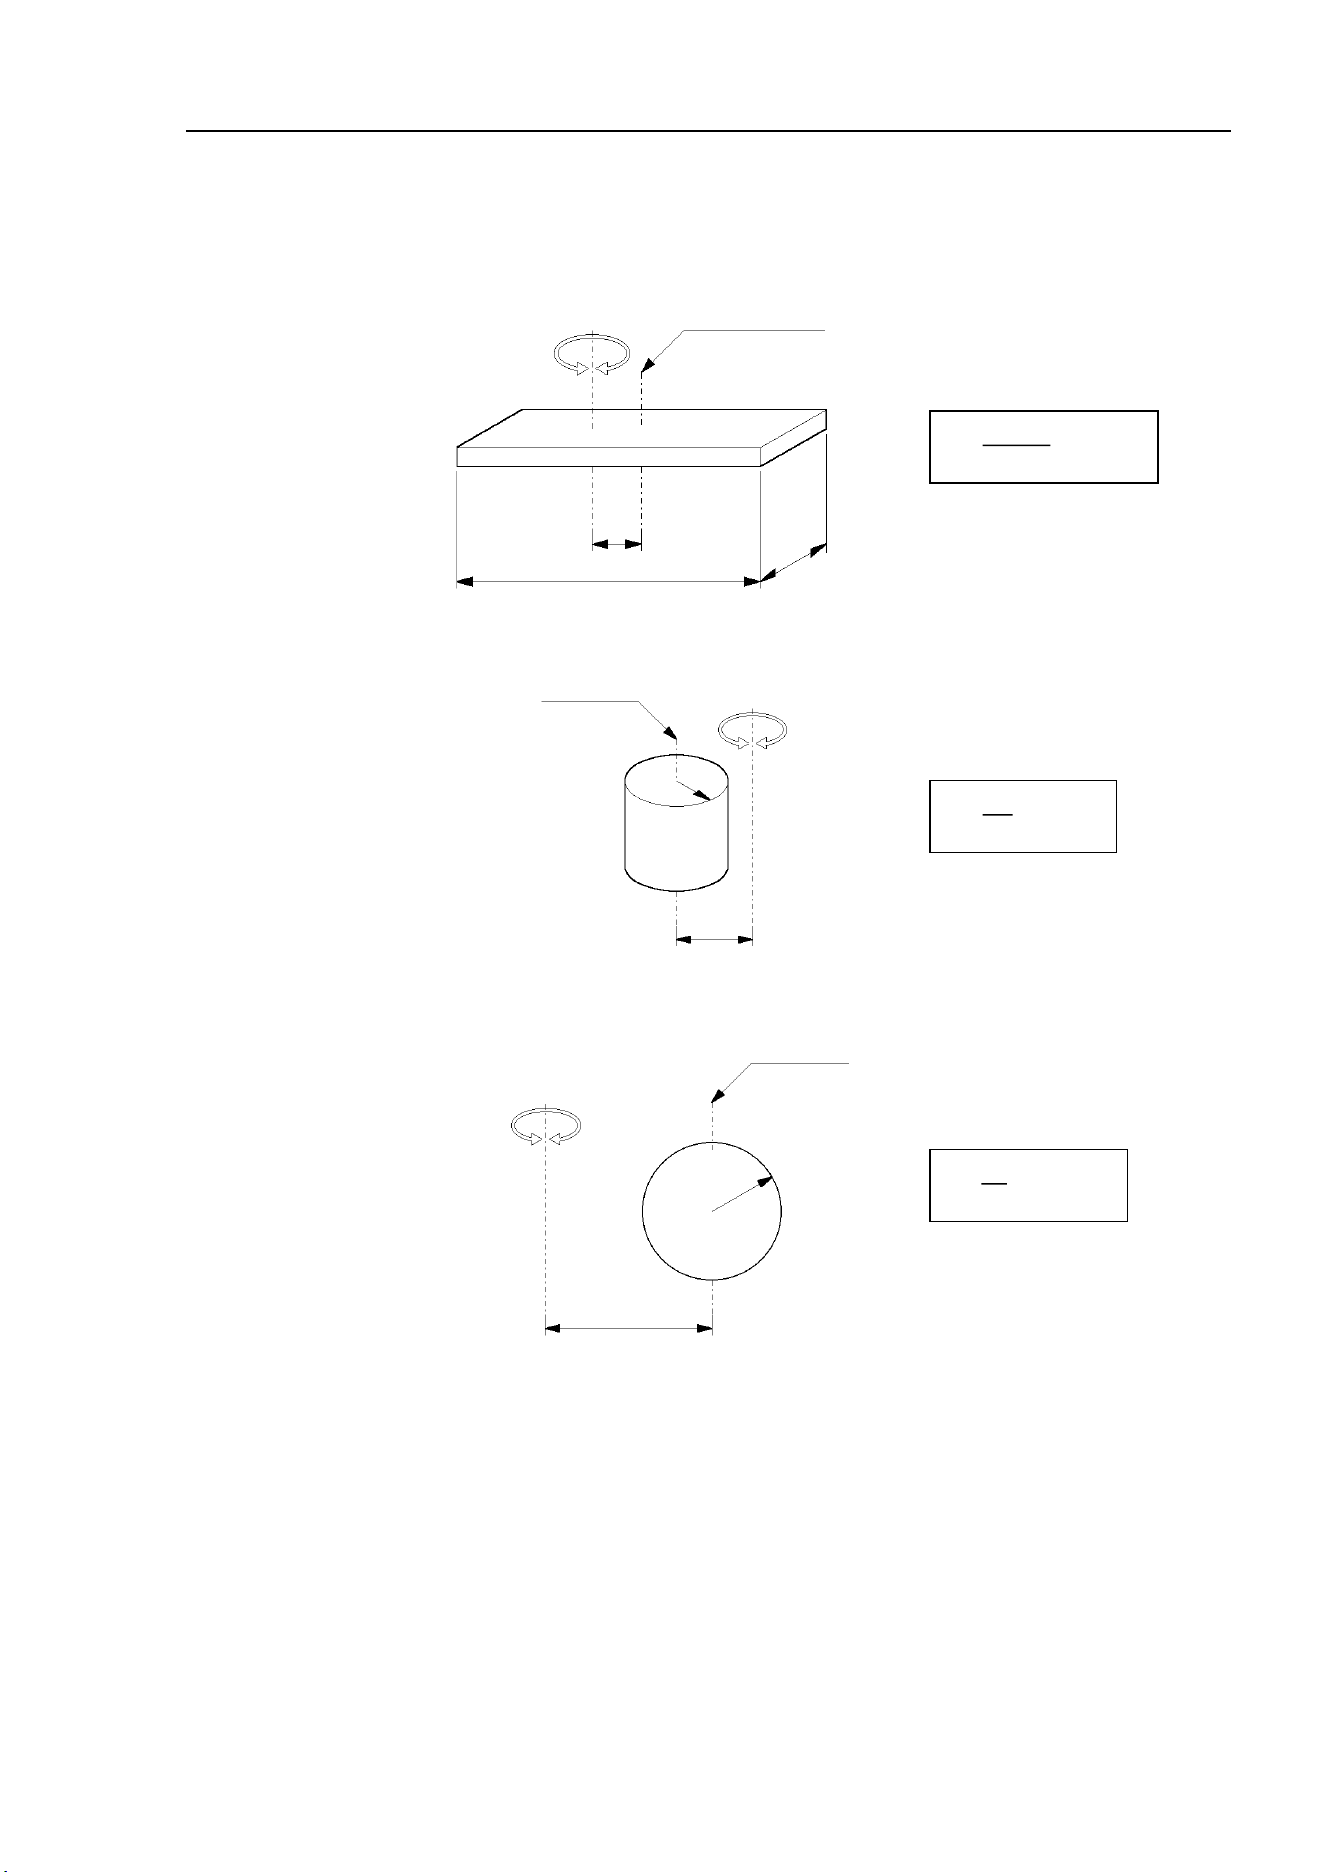
Calculating the Moment of Inertia
Refer to the following examples of formulas to calculate the moment of inertia of load (end
effector with work piece). The moment of inertia of the entire load is calculated by the
sum of each part (a), (b), and (c).
Workpiece (b)
Workpiece (c)
End effector (a)
Joint #3 shaft
Rotation center
Whole moment
of inertia
Moment of inertia
of end effector (a)
= +
Moment of inertia
of work piece (c)
+
Moment of inertia
of work piece (b)
Setup & Operation 4. Setting of End Effectors
LS10-B Rev.6 41
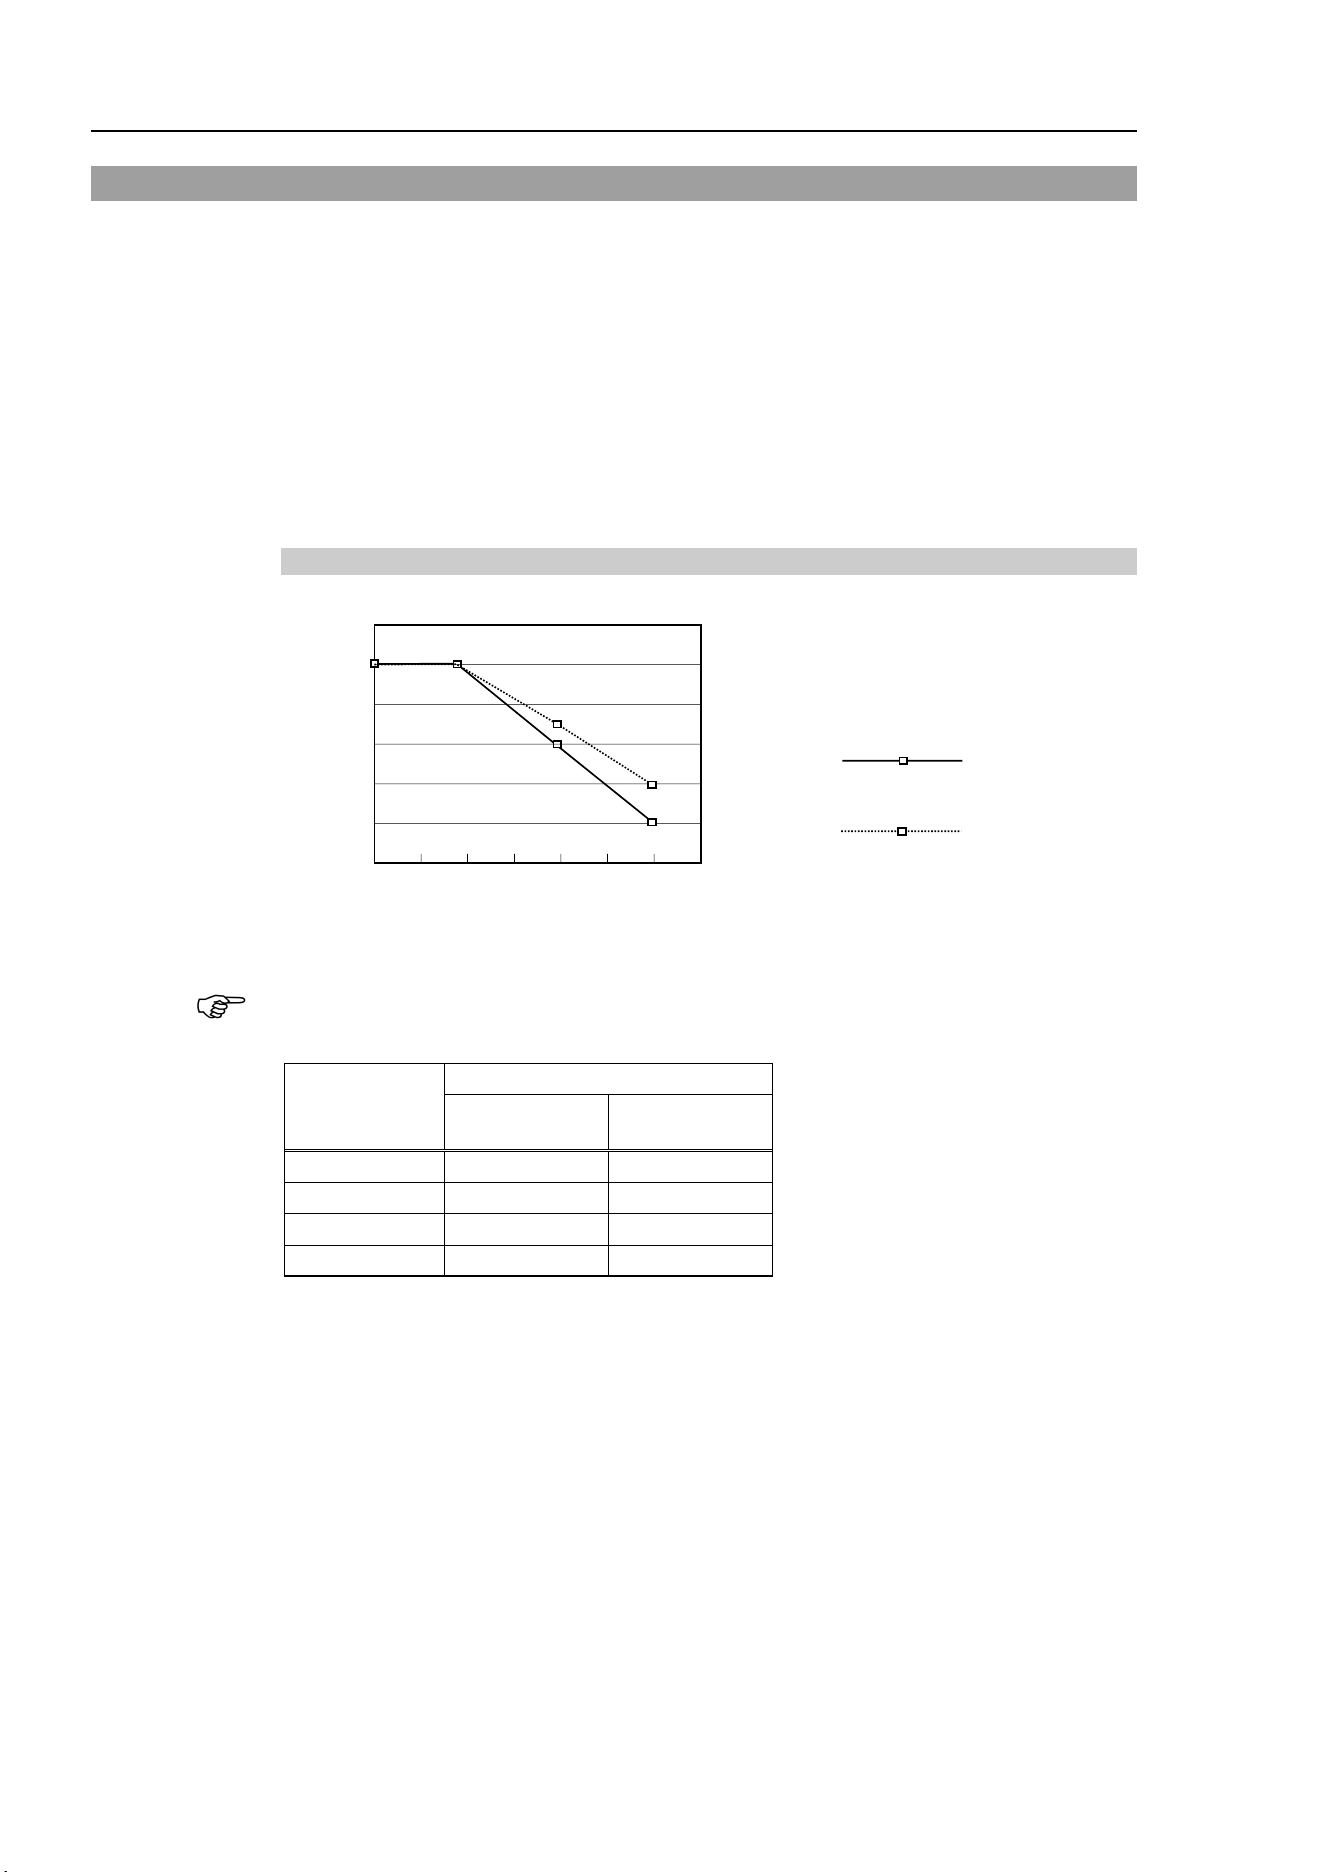
The methods for calculating the moment of inertia for (a), (b), and (c) are shown below.
Calculate the total moment of inertia using the basic formulas.
(a) Moment of inertia of a rectangular parallelepiped
h
b
L
m
Rectangular parallelepiped’s center of gravity
Rotation center
m
+ m × L
2
b
2
+ h
2
12
(b) Moment of inertia of a cylinder
m
+ m × L
2
r
2
2
m
L
r
Cylinder’s center of gravity
Rotation center
(c) Moment of inertia of a sphere
m
r
2
+ m × L
2
2
5
Sphere’s center of gravity
r
m
L
Rotation center
Setup & Operation 4. Setting of End Effectors
42 LS10-B Rev.6
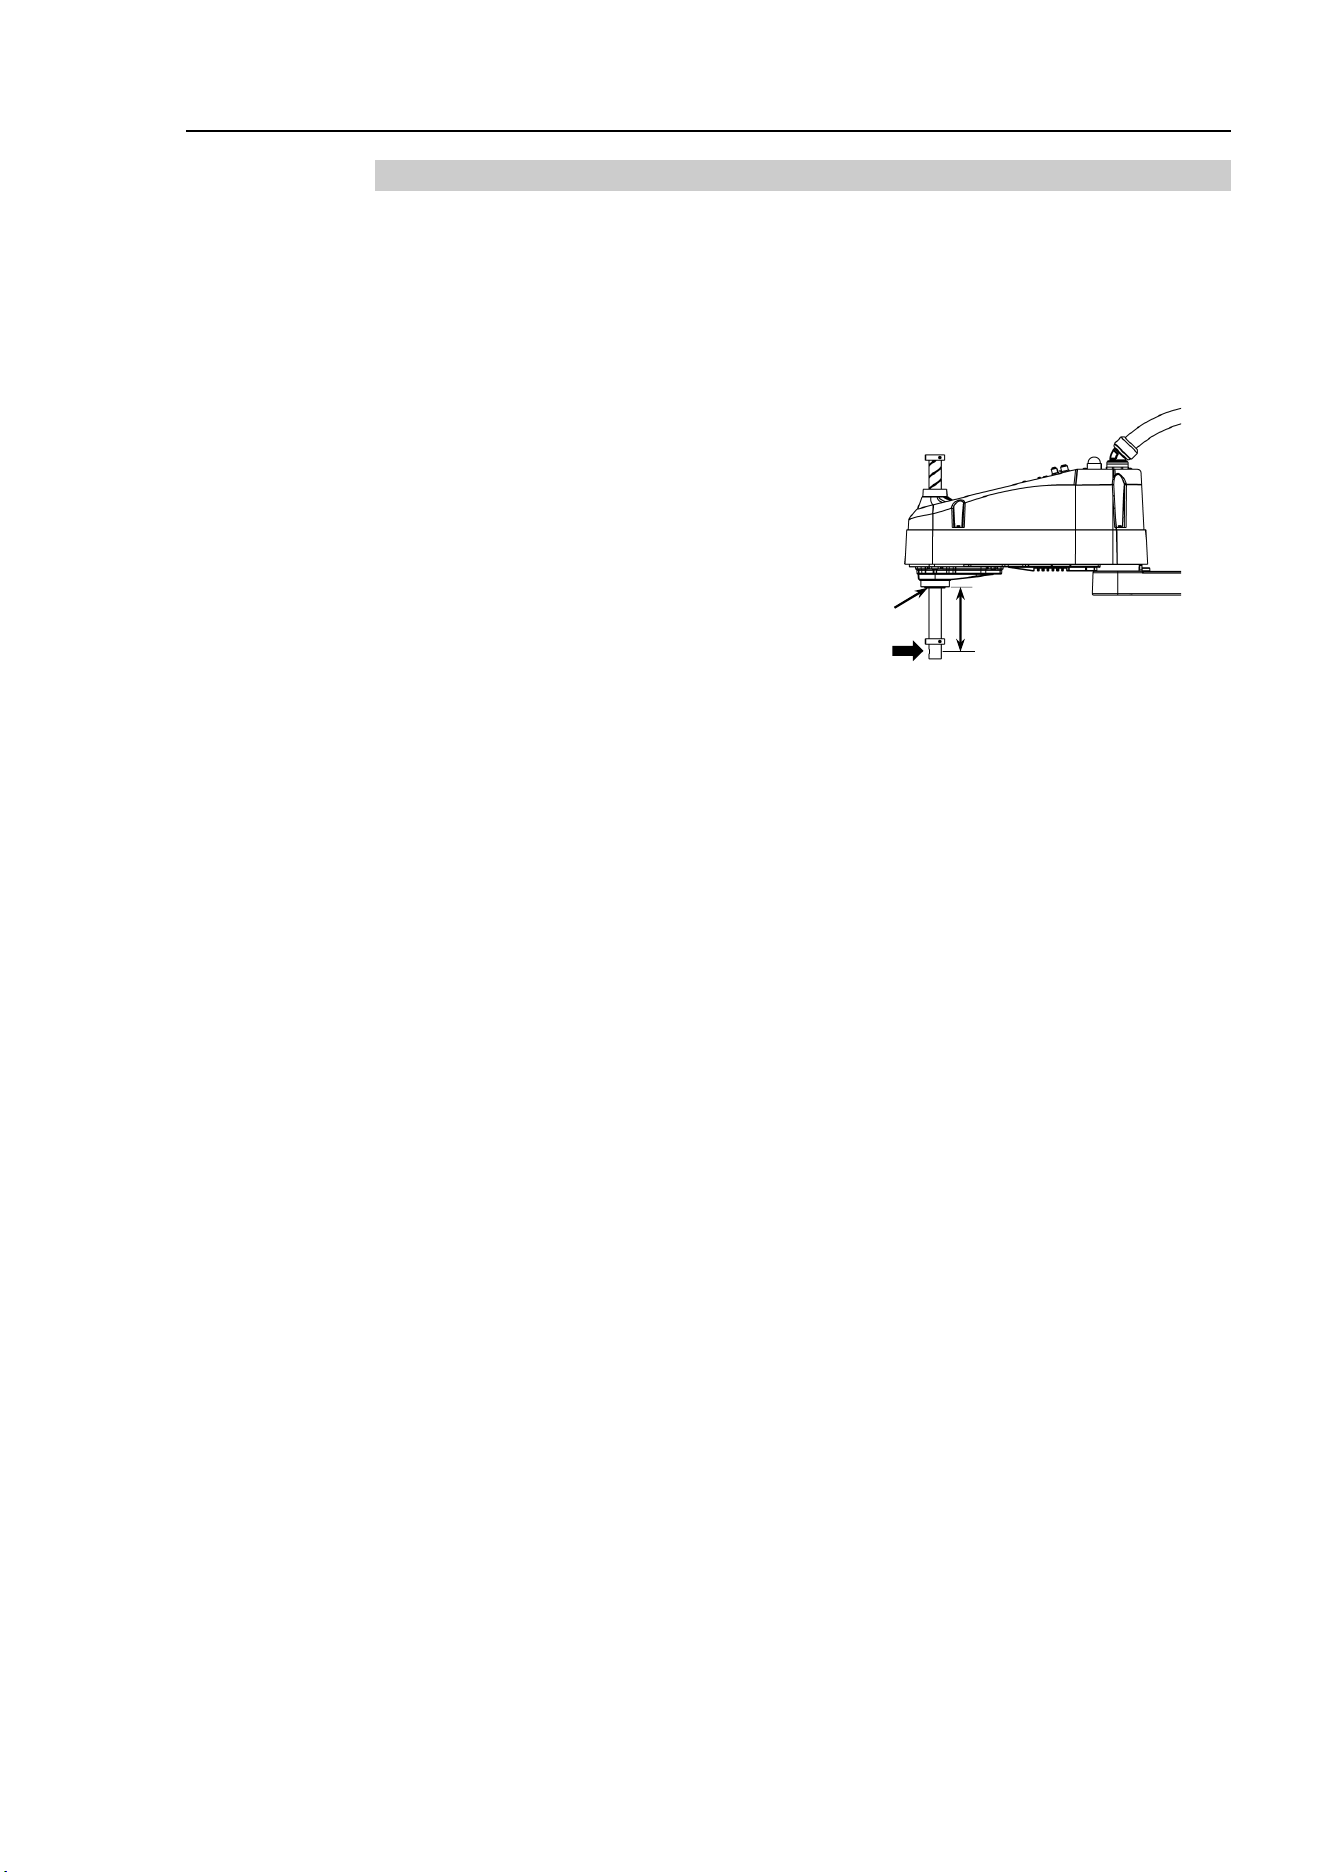
4.4 Precautions for Auto Acceleration/Deceleration of Joint #3
When you move the Manipulator in horizontal PTP motion with Joint #3 (Z) at a high
position, the motion time will be faster.
When Joint #3 gets below a certain point, then auto acceleration/deceleration is used to
reduce acceleration/deceleration. (Refer to the figures below) The higher the position of
the shaft is, the faster the motion acceleration/deceleration is. However, it takes more time
to move Joint #3 up and down. Adjust the position of Joint #3 for the Manipulator motion
after considering the relation between the current position and the destination position.
The upper limit of Joint #3 during horizontal motion using Jump command can be set by the
LimZ command.
Automatic acceleration/deceleration vs. Joint #3 position
* Figures on the graph (%) are the
proportion to the acceleration/deceleration
speed at the shaft upper limit position.
100
60
100
LS10-B60**
LS10-B70**
LS10-B80**
120
100
80
60
40
20
0 -100 -200 -300 (mm)
Shaft height
(%)
20
70
40
When moving the Manipulator horizontally while the shaft is being lowered, it may cause
over-shoot at the time of final positioning.
Shaft height
(mm)
Acceleration/Deceleration
LS10-B60**
LS10-B70**
LS10-B80**
0
100
100
−100
100
100
−200
60
70
−300
20
40
NOTE
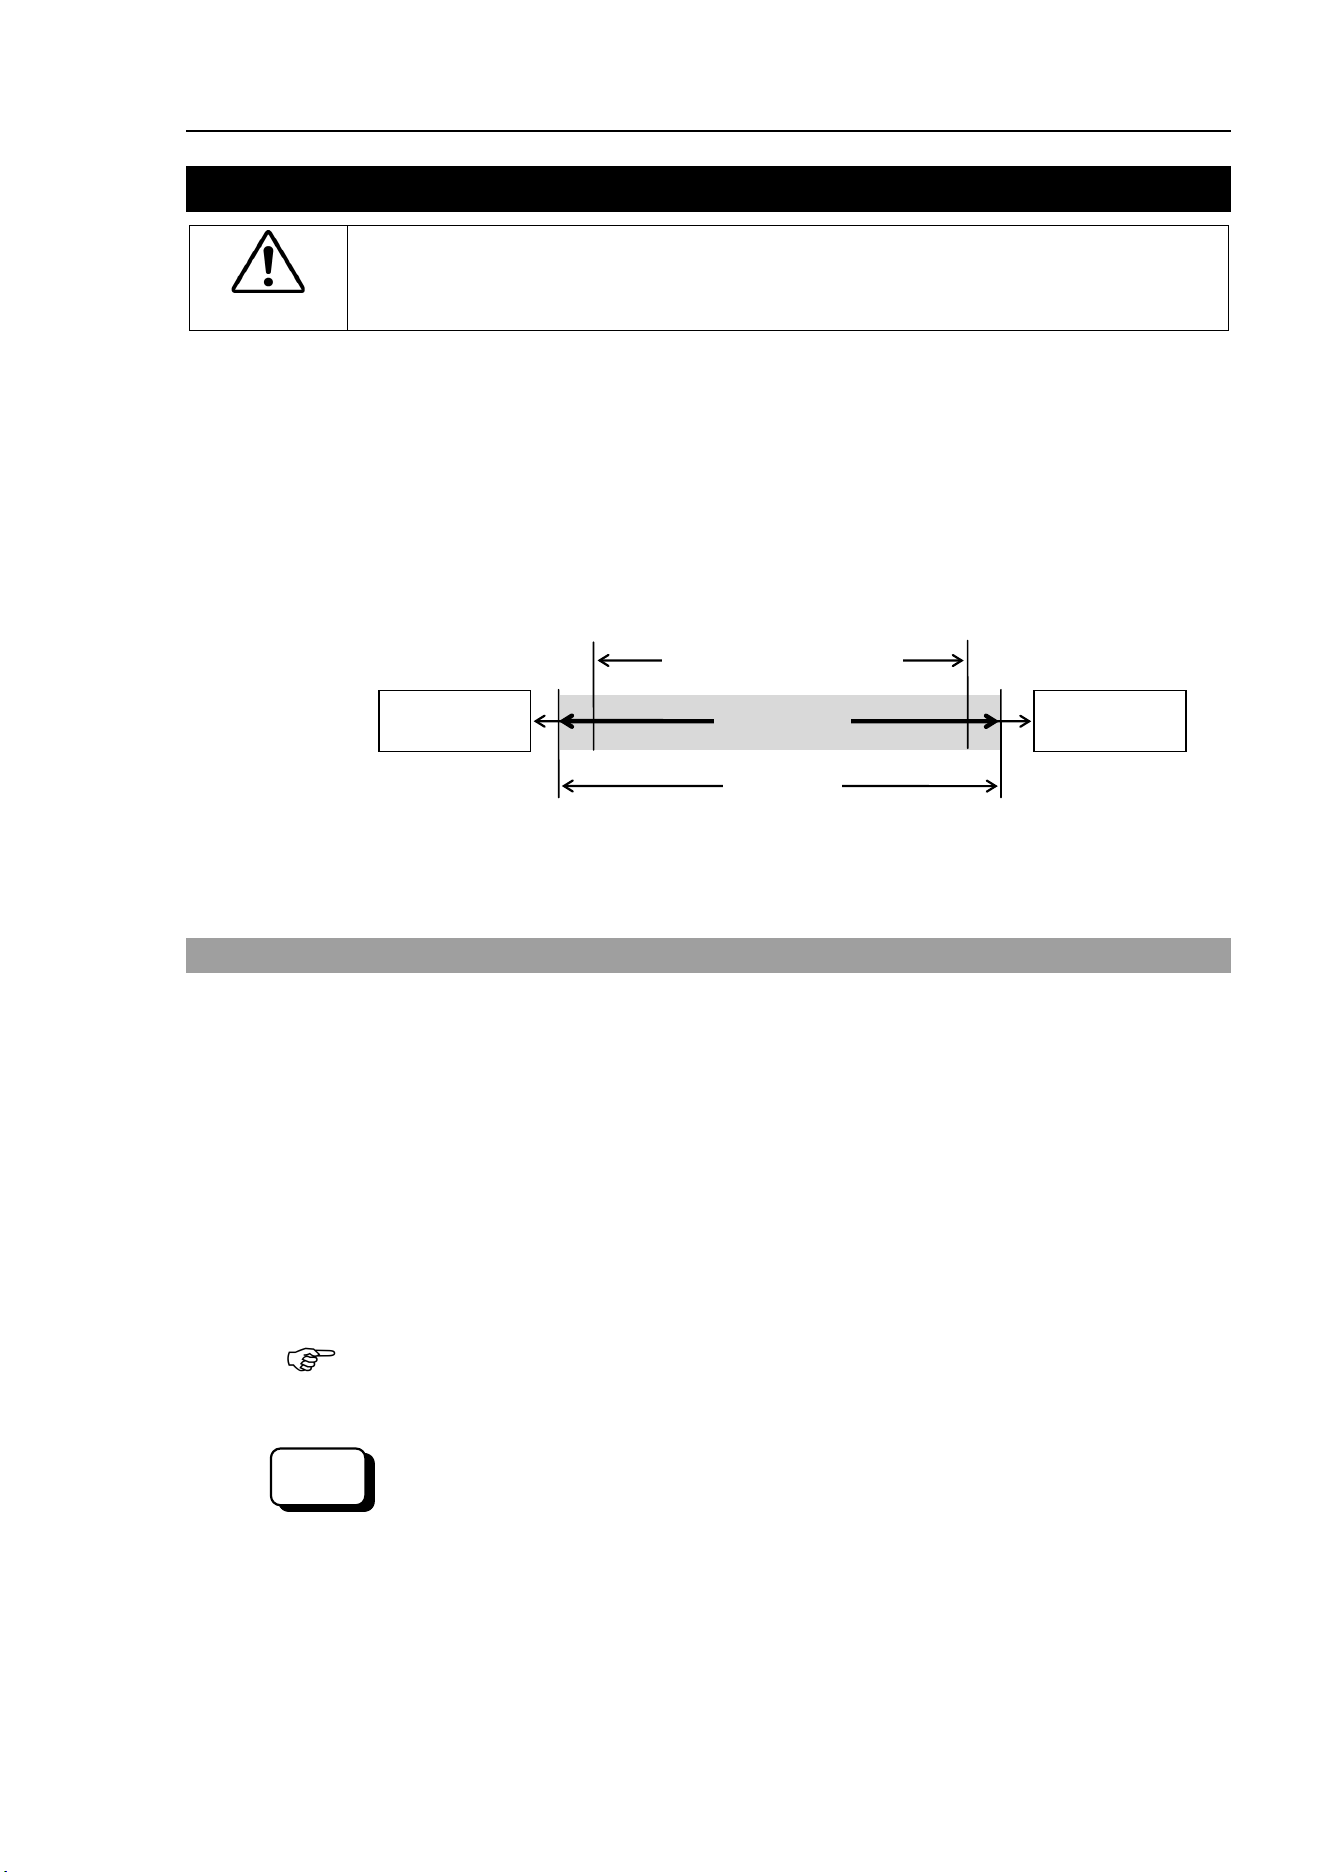
Setup & Operation 5. Motion Range
LS10-B Rev.6 43
5. Motion Range
CAUTION
■
When setting up the motion range for safety, both the pulse range and
mechanical stops must always be set at the same time.
The motion range is preset at the factory as explained in Setup & Operation: 5.4 Standard
Motion Range. That is the maximum motion range of the Manipulator.
There are three methods for setting the motion range described as follows:
1. Setting by pulse range (for all joints)
2. Setting by mechanical stops (for Joints #1 to #3)
3. Setting the Cartesian (rectangular) range in the X, Y coordinate system of the
Manipulator (for Joints #1 and #2)
Mechanical
stop
Rectangular range setting
Pulse range
Motion range
Mechanical
stop
When the motion range is changed due to layout efficiency or safety, follow the descriptions
in 5.1 through 5.3 to set the range.
5.1 Motion Range Setting by Pulse Range
Pulses are the basic unit of Manipulator motion. The motion range of the Manipulator is
controlled by the pulse range between the pulse lower limit and upper limit of each joint.
Pulse values are read from the encoder output of the servo motor.
For the maximum pulse range, refer to the following sections.
The pulse range must be set inside of the mechanical stop range.
5.1.1 Max. Pulse Range of Joint #1
5.1.2 Max. Pulse Range of Joint #2
5.1.3 Max. Pulse Range of Joint #3
5.1.4 Max. Pulse Range of Joint #4.
Once the Manipulator receives an operating command, it checks whether the target position
specified by the command is within the pulse range before operating. If the target position
is out of the set pulse range, an error occurs and the Manipulator does not move.
The
pulse range can be set on the [Range] panel shown by selecting [Tools]-[Robot
Manager]. (You may also execute the Range command from the [Command Window].)
EPSON
RC+
NOTE
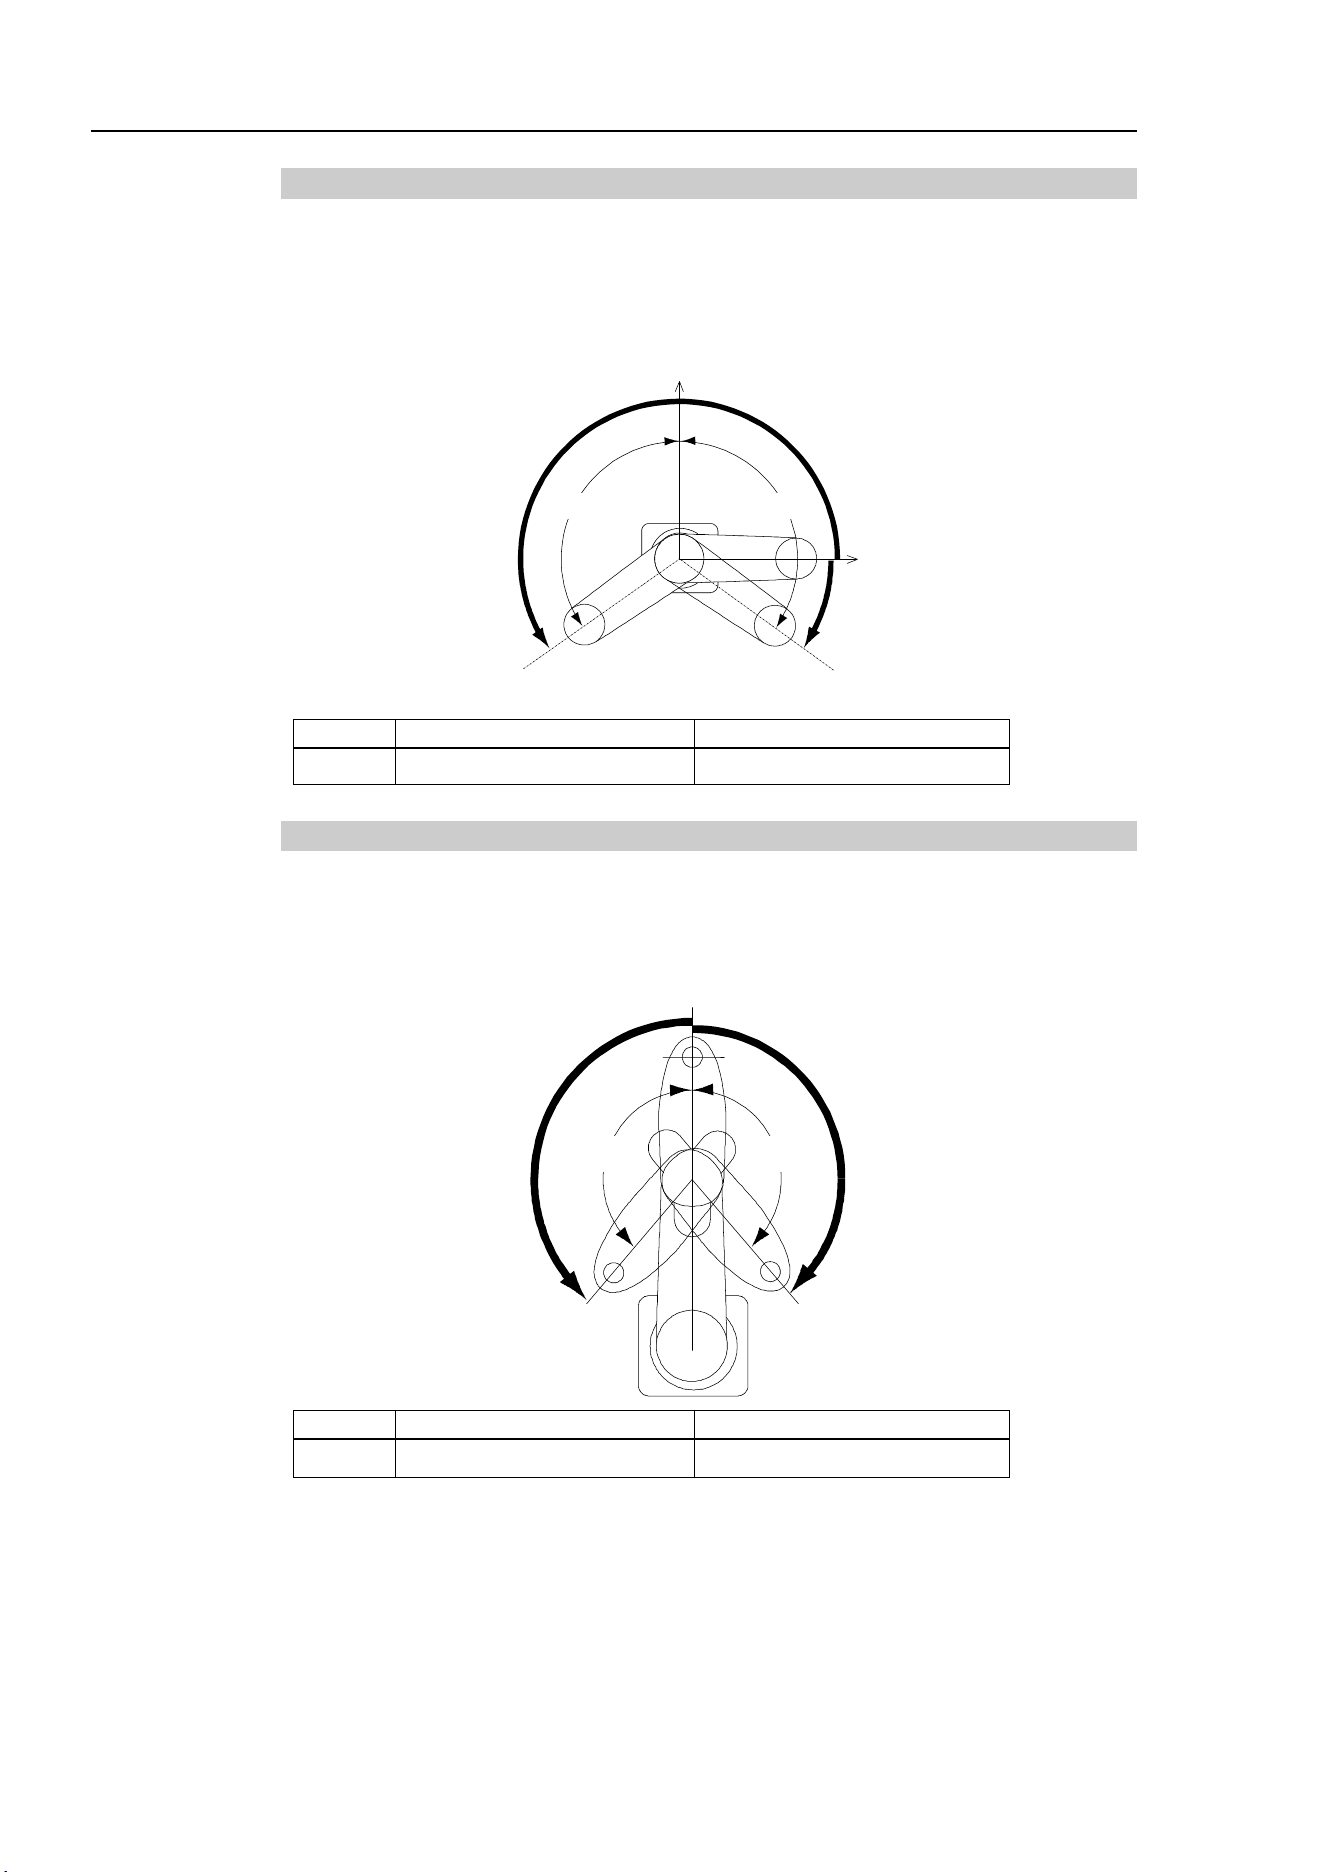
Setup & Operation 5. Motion Range
44 LS10-B Rev.6
5.1.1 Max. Pulse Range of Joint #1
The 0 (zero) pulse position of Joint #1 is the position where Arm #1 faces toward the positive
(+) direction on the X-coordinate axis.
When the 0 pulse is a starting point, the counterclockwise pulse value is defined as the
positive (+) and the clockwise pulse value is defined as the negative (-).
+Y
+X 0 pulse
+ B
− B
+ A
− A
A: Max. Motion Range
B: Max. Pulse Range
LS10-B
±
132 °
−
152918~808278 pulse
5.1.2 Max. Pulse Range of Joint #2
The 0 (zero) pulse position of Joint #2 is the position where Arm #2 is in-line with Arm #1.
With the 0 pulse as a starting point, the counterclockwise pulse value is defined as the
positive (+) and the clockwise pulse value is defined as the negative (-).
− B
+ B
0 pulse
− A
+ A
A: Max. Motion Range
B: Max. Pulse Range
LS10-B
± 150
° ± 341334 pulse
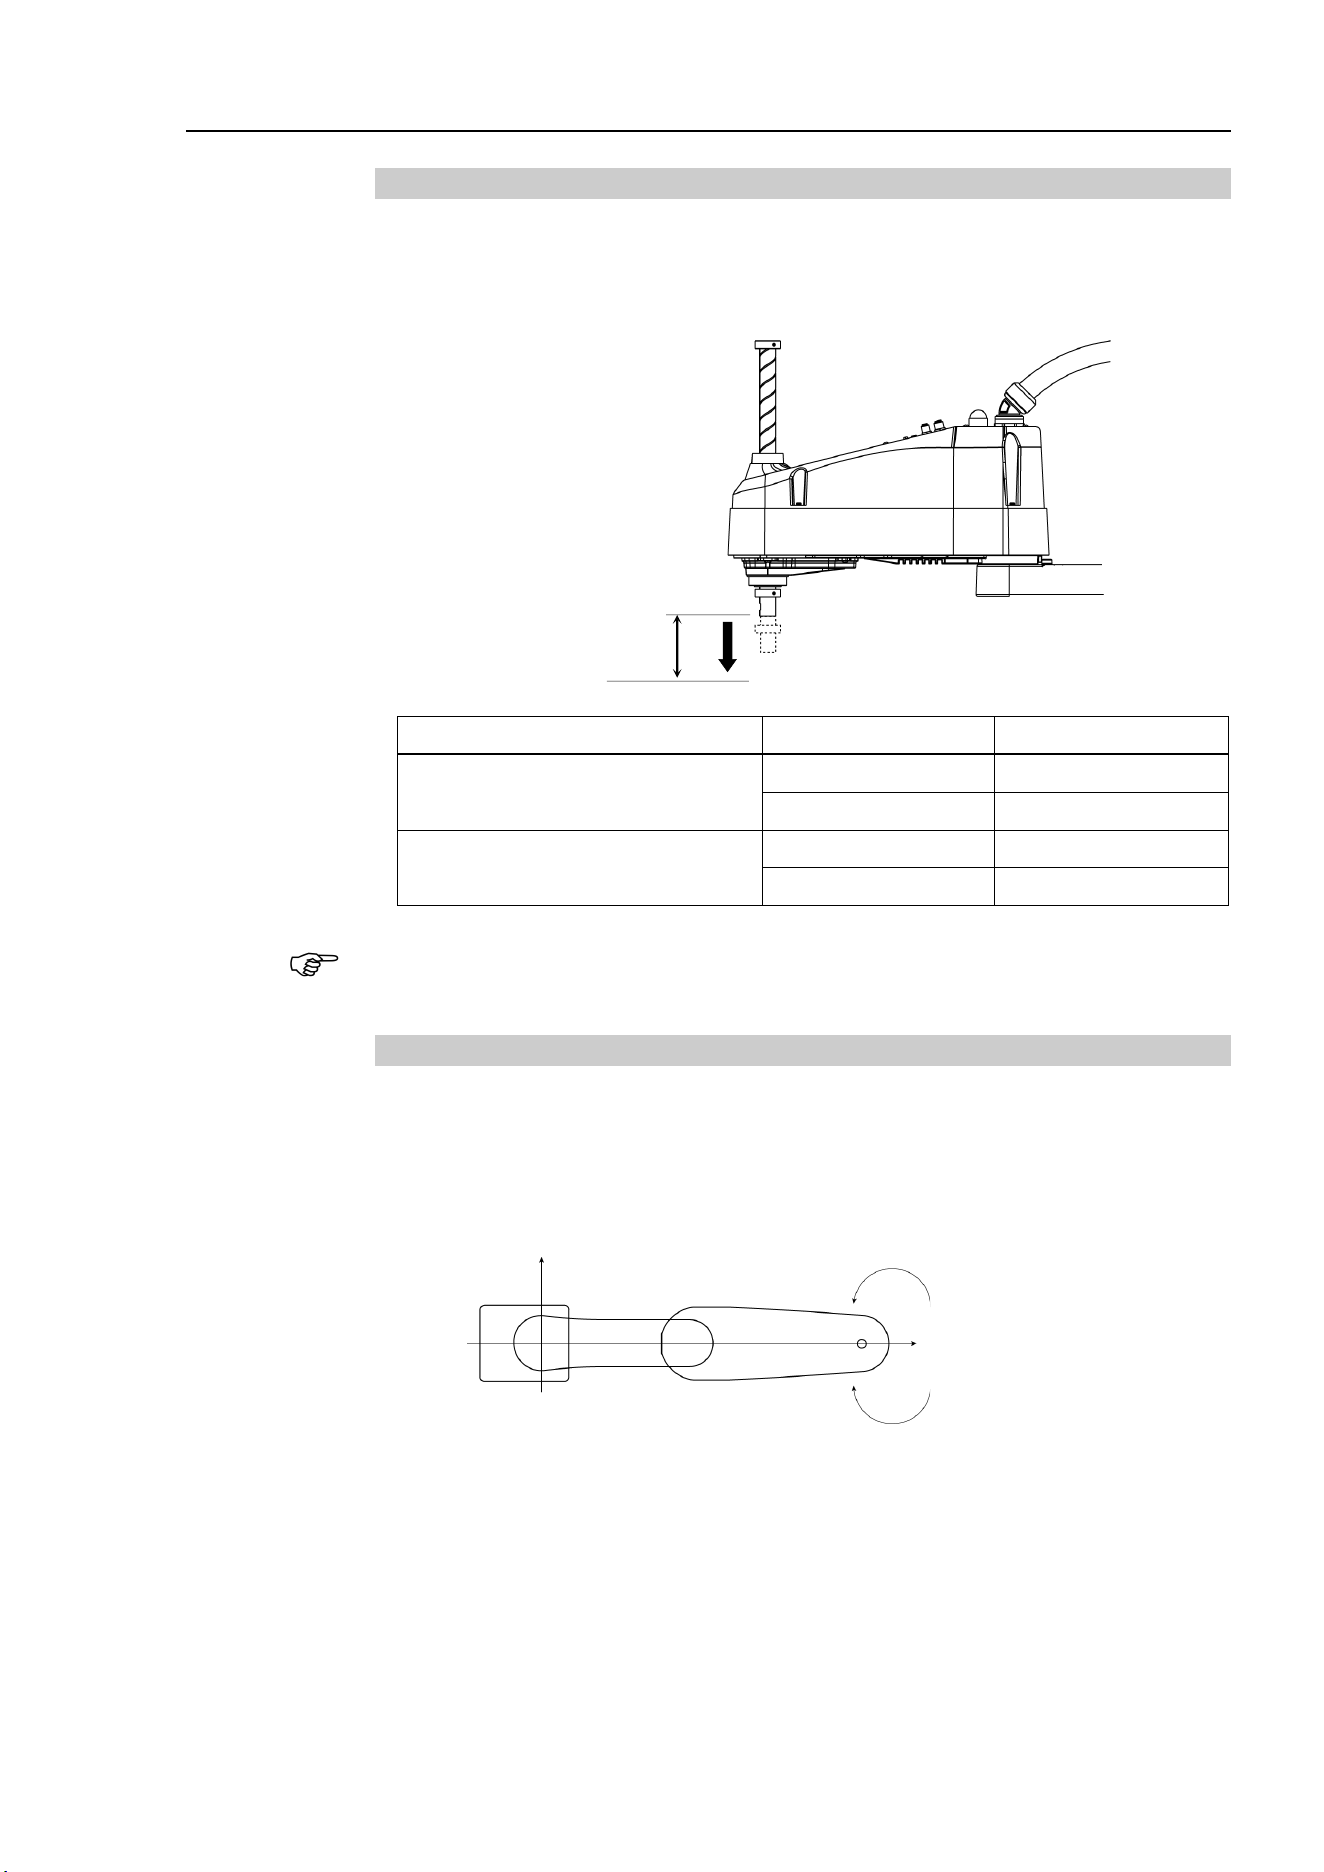
Setup & Operation 5. Motion Range
LS10-B Rev.6 45
5.1.3 Max. Pulse Range of Joint #3
The 0 (zero) pulse position of Joint #3 is the position where the shaft is at its upper limit.
The pulse value is always negative because Joint #3 always moves lower than the 0 pulse
position.
Upper limit: 0 pulse
Joint #3 Stroke Lower Limit Pulse
LS10-B***S (Standard-model)
200 mm
− 270336 pulse
300 mm − 405504 pulse
LS10-B***C (Cleanroom-model)
170 mm
− 229786 pulse
270 mm − 364954 pulse
For the Cleanroom-model, the motion range set with the Joint #3 mechanical stop cannot be
changed.
5.1.4 Max. Pulse Range of Joint #4
The 0 (zero) pulse position of Joint #4 is the position where the flat near the end of the shaft
faces toward the end of Arm #2. With the 0 pulse as a starting point, the counterclockwise
pulse value is defined as the positive (+) and the clockwise pulse value is defined as the
negative (-).
+X 0 ± 215040 pulse
+Y
Clockwise (-value)
Counterclockwise (+value)
NOTE
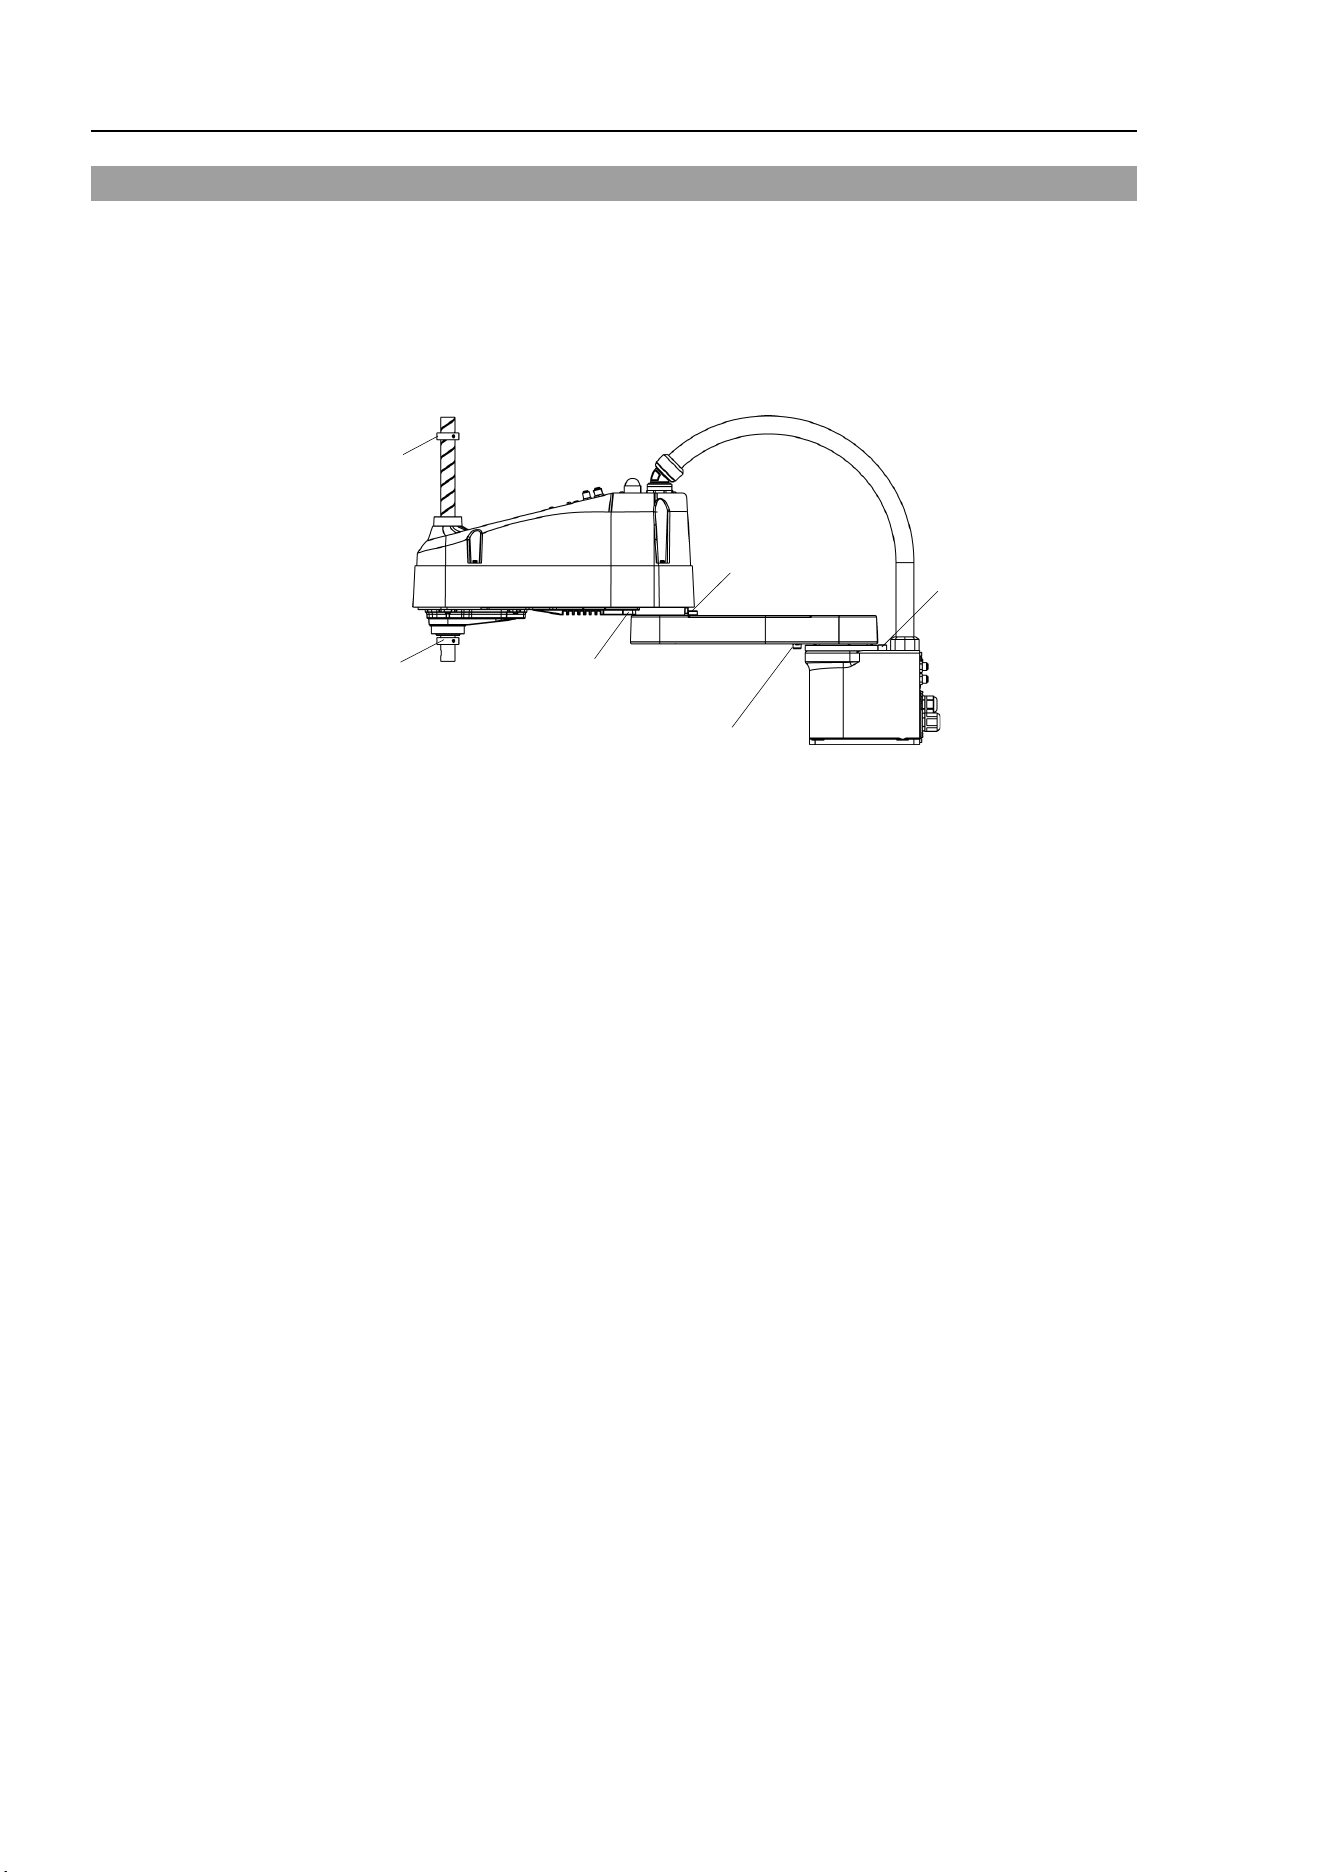
Setup & Operation 5. Motion Range
46 LS10-B Rev.6
5.2 Motion Range Setting by Mechanical Stops
Mechanical stops physically limit the absolute area that the Manipulator can move.
Both Joints #1 and #2 have threaded holes in the positions corresponding to the angle for
the mechanical stop settings. Install the bolts in the holes corresponding to the angle that
you want to set.
Joints #3 can be set to any length less than the maximum stroke.
Mechanical stop of
Joint #2 (Fixed)
Mechanical stop of
Joint #1 (Adjustable)
Mechanical stop of Joint #3
(Lower limit mechanical stop)
(Do not move the position of
upper limit mechanical stop.)
Mechanical stop of
Joint #1 (Fixed)
Mechanical stop of
Joint #2 (Adjustable)
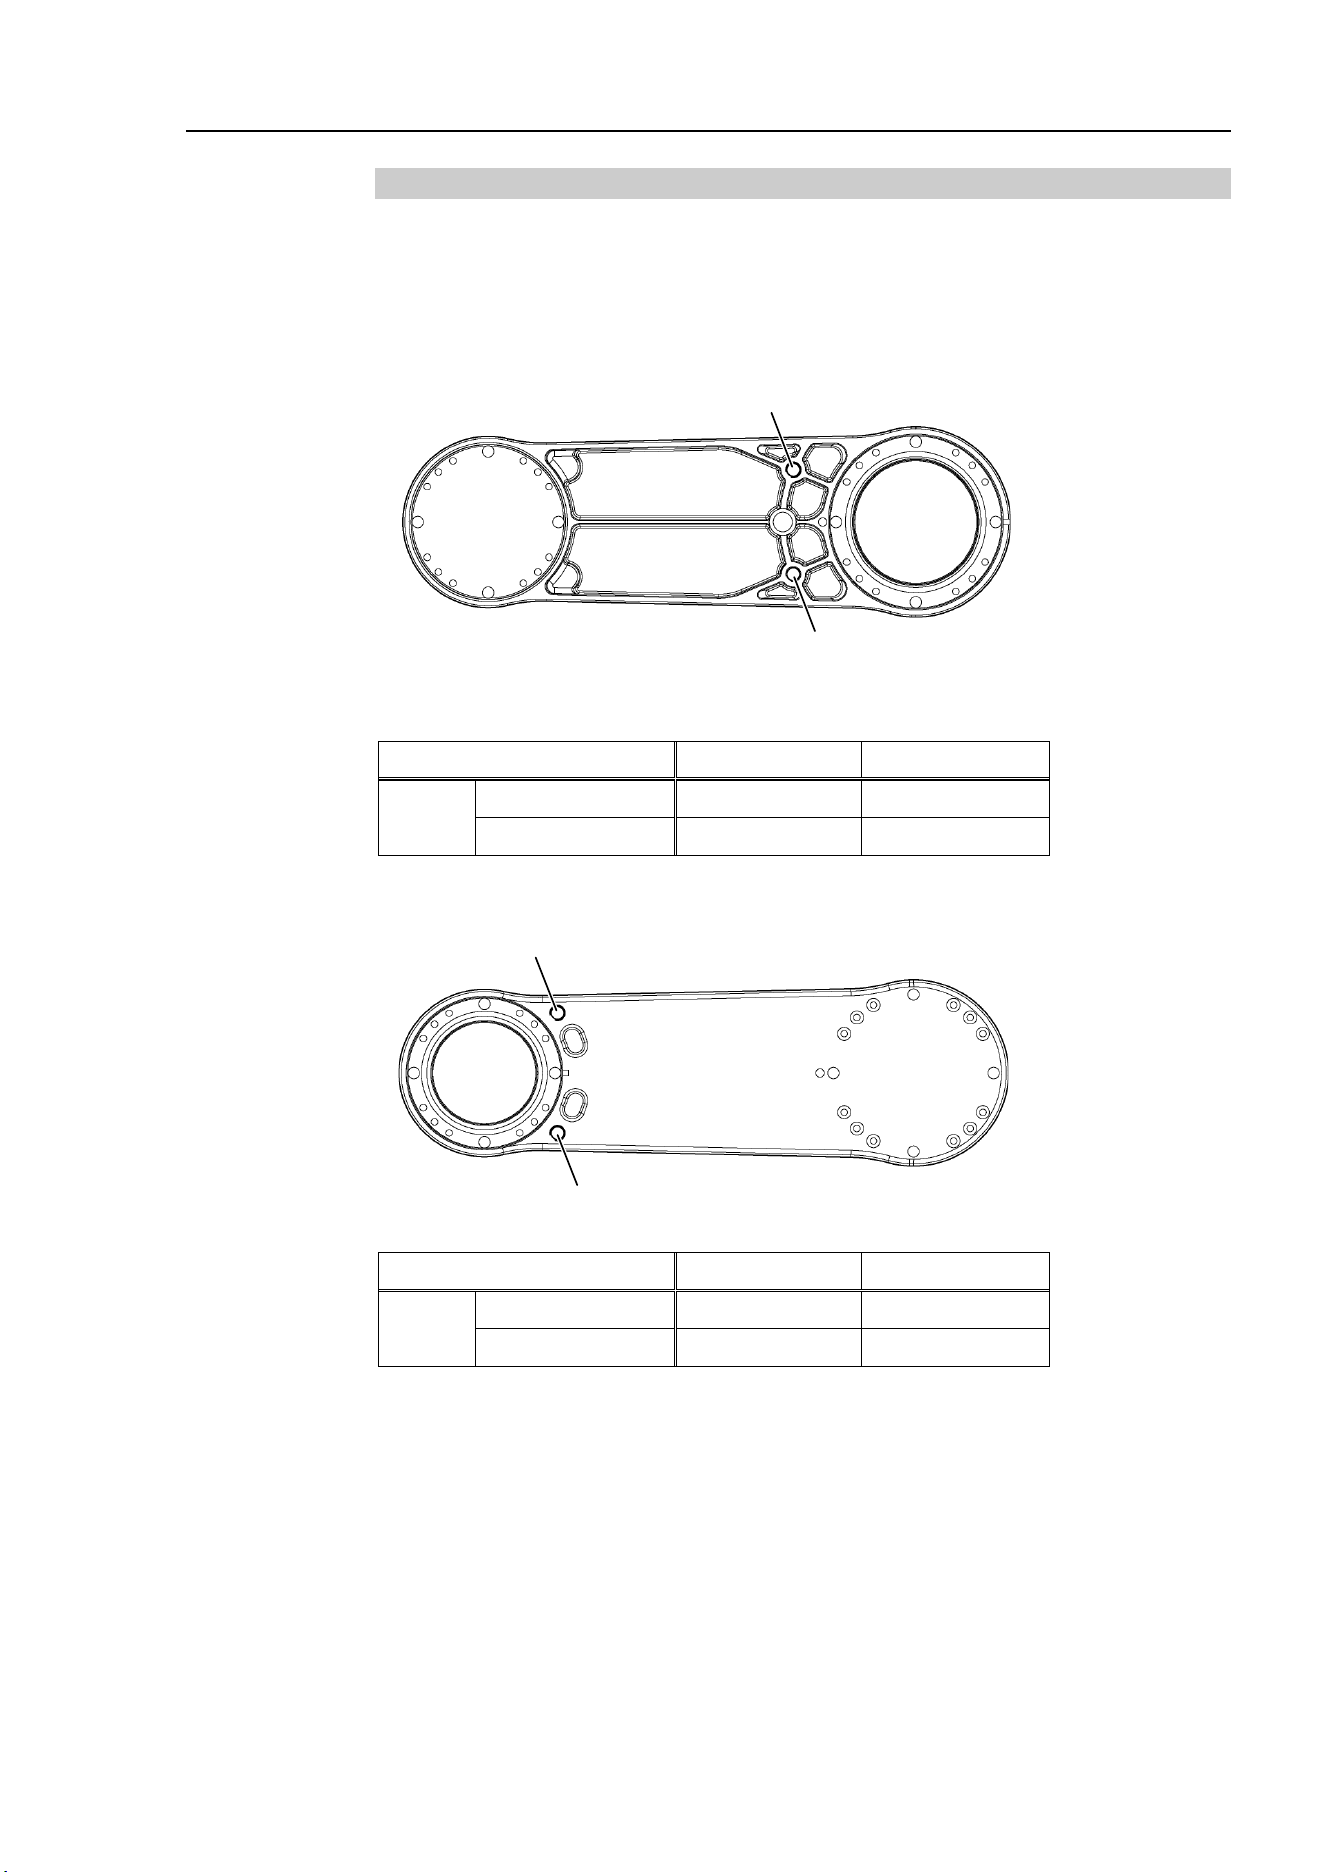
Setup & Operation 5. Motion Range
LS10-B Rev.6 47
5.2.1 Setting the Mechanical Stops of Joints #1 and #2
Both Joints #1 and #2 have threaded holes in the positions corresponding to the angle for
the mechanical stop settings. Install the bolts in the holes corresponding to the angle that
you want to set.
Install the bolts for the mechanical stop to the following position.
Views from the bottom of Arm #1
a
b
Joint #1 Mechanical Stops
a
b
LS10-B
Setting Angle (°)
115
−
115
Pulse Value (pulse)
746382
−
91022
Views from the top of Arm #1
b
a
Joint #2 Mechanical Stops
a
b
LS10-B
Setting Angle (°)
125
−
125
Pulse Value (pulse)
284444
−
284444
Setup & Operation 5. Motion Range
48 LS10-B Rev.6
(1)
Turn OFF the
Controller.
(2)
Install
a hexagon socket head cap bolt into the hole corresponding to the setting angle,
and
tighten it.
Joint
Hexagon socket head cap
bolt (fully threaded)
The number
of bolts
Recommended
tightening torque
1
M8 × 10
1 bolt / side
12.3 N⋅m (125 kgf⋅cm)
(3)
Turn ON the
Controller.
(4)
Set the pulse range corresponding to the new positions of the mechanical stops.
Be sure to set the pulse range
inside the positions of the mechanical stop range.
Example:
Using LS10-B602S
The angle of Joint #1 is set from −110
° to +110 °.
The angle of Joint #2 is set from −110
° to +110 °.
Execute the following command
s from the [Command Window].
>JRANGE 1, -72817, 728177 ' Sets the pulse range of Joint #1
>JRANGE 2,-
250331, 250331 ' Sets the pulse range of Joint #2
>RANGE ' Checks the setting using Range
-72817, 728177, -250311, 250311, -270336, 0,
-215040, 215040
(5)
Move the arm by hand until it touches the mechanical stops, and make sure that the arm
does
not hit any peripheral equipment during operation.
(6)
O
perate the joint changed at low speeds until it reaches the positions of the
minimum
and
maximum pulse range.
Make sure that the arm does not hit the mechanical stops.
(Check the
position of the mechanical stop and the motion range you set.)
Example
: Using LS10-B602S
The angle of Joint #1 is set from −110
° to +110 °.
The angle of Joint #2 is set from −110
° to +110 °.
Execute the following command
s from the [Command Window].
>MOTOR ON ' Turns ON the motor
>POWER LOW ' Enters low-power mode
>SPEED 5 ' Sets at low speeds
>PULSE -72817,0,0,0 ' Moves to the min. pulse position of Joint #1
>PULSE 728177,0,0,0 ' Moves to the max. pulse position of Joint #1
>PULSE 327680,-250311,0,0 ' Moves to the min. pulse position of Joint #2
>PULSE 327680,250311,0,0 ' Moves to the max. pulse position of Joint #2
The Pulse command (Go Pulse command) moves
all joints to the specified positions
at
the same time.
Specify safe positions after considering motion of not only the joints
whose pulse range have been changed, but also other joints
.
In this example, Joint #1 is moved to
0 ° position where is close to the
center of its
mot
ion range (pulse value: 327680) when checking Joint #2.
If the arm
is hitting the mechanical stop
s or if an error occurs after the arm hits the
mechanical stops
, either
reset the pulse range to a narrower setting or extend the
position
s of the mechanical stops within the limit.
EPSON
RC+
EPSON
RC+
NOTE
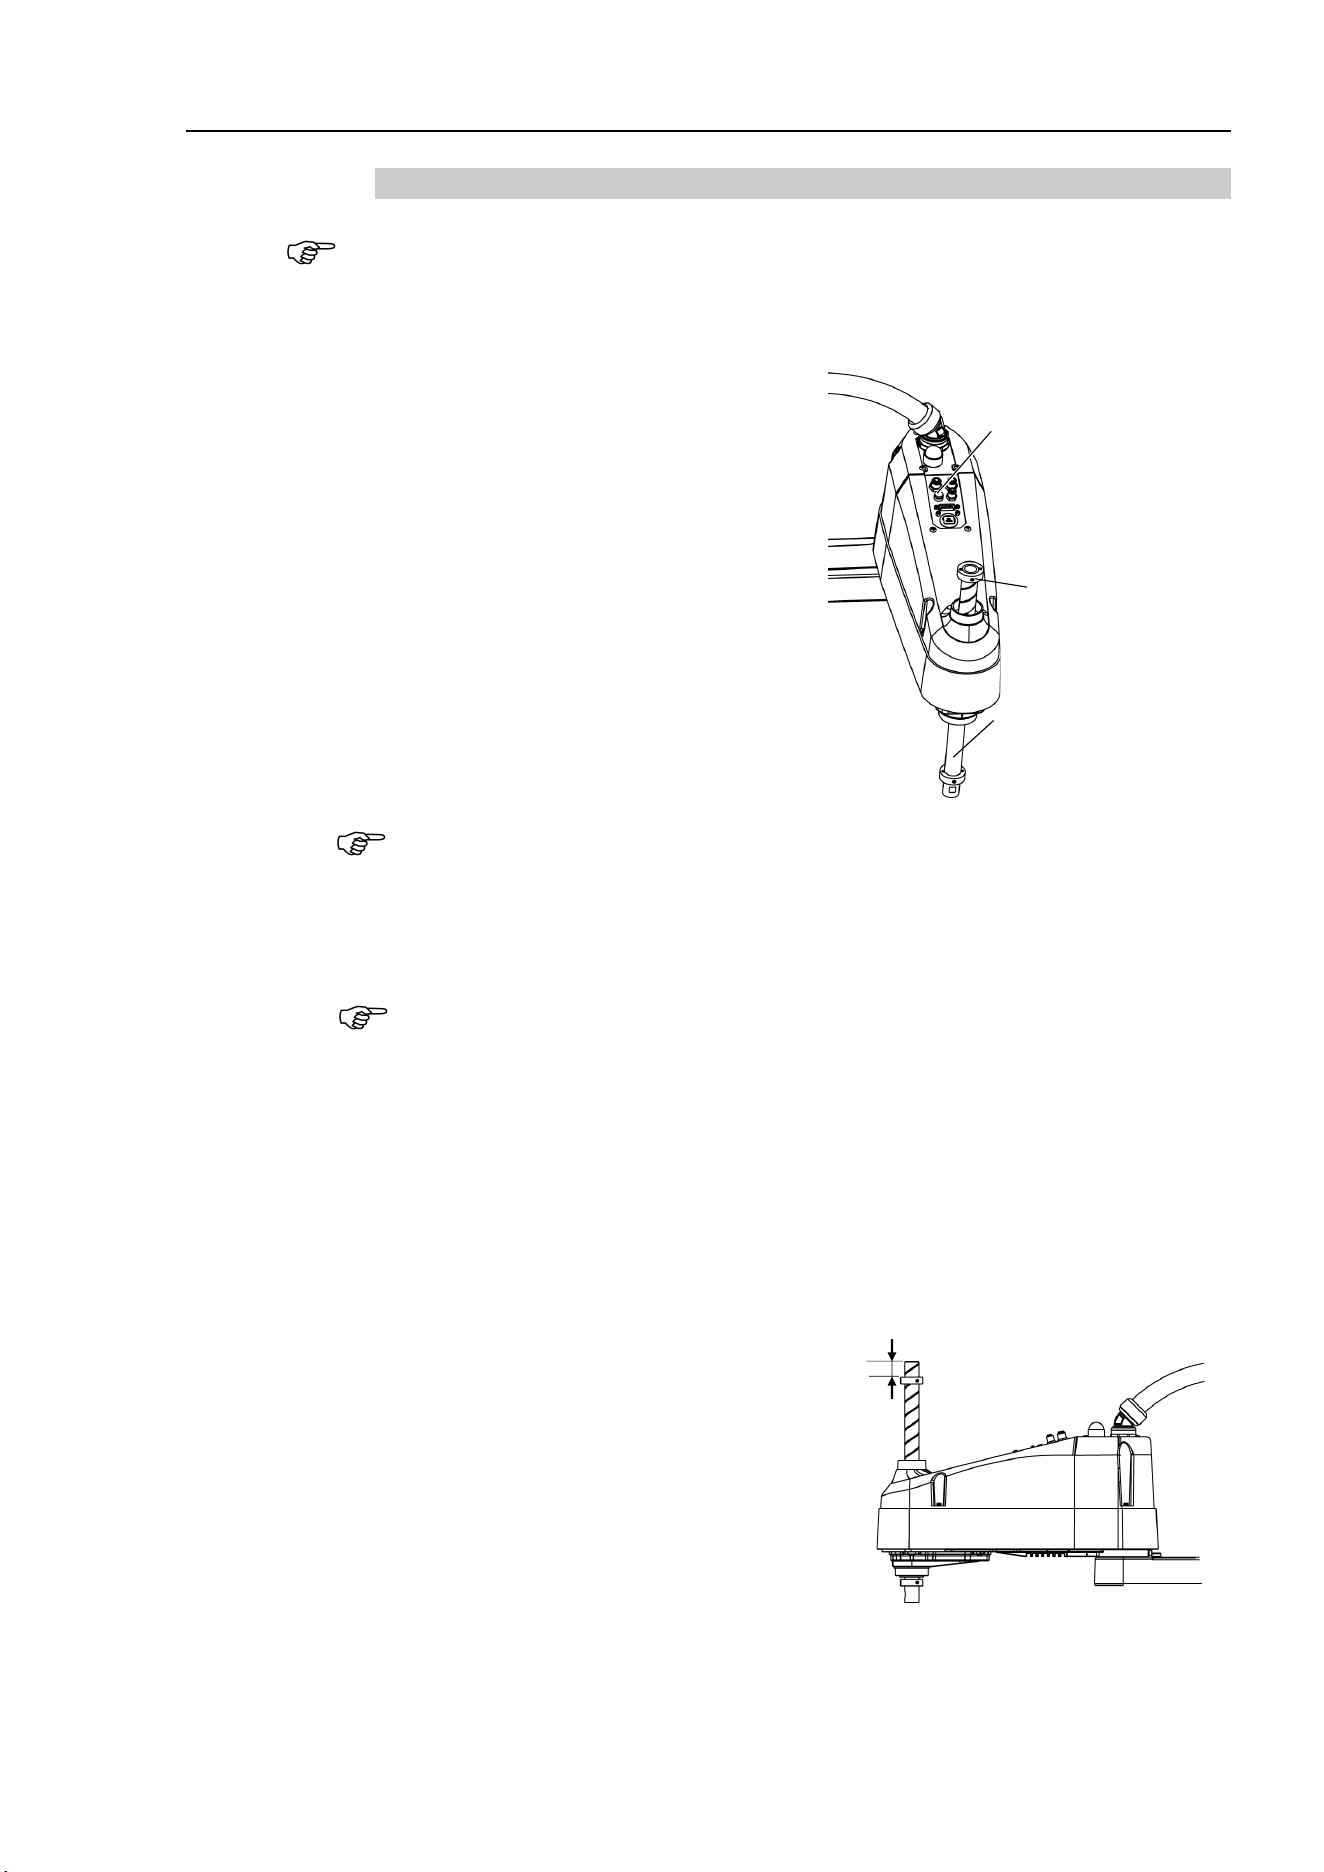
Setup & Operation 5. Motion Range
LS10-B Rev.6 49
5.2.2 Setting the Mechanical Stop of Joint #3
This method applies only to the Standard-model manipulator.
For the Cleanroom-model
, the motion range set with the Joint #3 mechanical stop cannot be
changed.
(1)
Turn ON the Controller and turn OFF the motors using the Motor OFF command.
(2)
Push up the shaft while pressing the
brake release switch.
Do not push the shaft up to its upper limit
or it will be difficult for the arm top cover
to be removed. Push
the shaft up to a
position where the Joint #3 mechanical
stop can be changed.
Lower limit mechanical
stop screw
Set screw: 2-M5×6
Brake release switch
Shaft
When you press
the brake release switch, the shaft may lower due to the weight of the
end effector. Be sure to hold the shaft by hand while pressing the button.
(3)
Turn OFF the
Controller.
(4)
Loosen the lower limit mechanical stop screw
(set screws: 2-M5×6).
A
mechanical stop is mounted on both the top and bottom of Joint #3. However,
only the position of the lower limit mechanical stop on
the top can be changed
Do not remove the upper limit mechanical stop on the bottom because the calibration
point of Joint #3 is specified using the stop.
(5)
The upper end of the shaft
defines the maximum stroke. Move the lower limit
mechanical stop down by the length you want to limit the stroke.
For example, when the lower limit mechanical stop is set at
“200 mm” stroke, the
lower limit Z coordinate value is
“−200”. To change the value to “−180”, move the
lower limit mechanical stop down
“20 mm”. Use calipers to measure the distance
when
adjusting the mechanical stop.
Measure this
distance
(6)
Firmly
tighten the lower limit mechanical stop screw (set screws: 2-M5×6).
Recommended tightening torque:
3.9 N·m (39.8 kgf·cm)
NOTE
NOTE
NOTE
Setup & Operation 5. Motion Range
50 LS10-B Rev.6
(7)
Turn ON the
Controller.
(8)
Move
Joint #3 to its lower limit while pressing the brake release switch, and
then check
the lower
limit position. Do not lower the mechanical stop too far
. Otherwise, the
joint
may not reach a target position.
(9)
Calculate the lower limit pulse
value of the pulse range using the formula
shown below
and set the value.
T
he result of the calculation is always negative because t
he lower limit Z coordinate
value
is negative.
Lower limit of pulse (pulse)
= lower limit Z coordinate value (mm) / Resolution (
mm/pulse)
** For the Joint #3 resolution,
refer to the section Setup & Operation 2.4 Specifications.
Execute the following command from the [Command Window].
Enter the
calculated value in X.
>JRANGE 3,X,0 ' Sets the pulse range of Joint #3
(10)
Using the
Pulse command (Go Pulse command), move
Joint #3 to the lower limit
position of the pulse range at low speed.
If the mechanical stop range is less
than
the pulse range, Joint #3
will hit the mechanical stop and an error will occur.
When
the
error occurs, either change the pulse range to a lower setting
or extend the position
of the mechanical stop within the limit.
If it is difficult to check whether Joint #3 hits a mechanical stop, turn OFF the Controller
and lift the arm top cover to check the condition causing the problem from the side.
Execute the following commands from the [Command Window].
Enter the value
calculated in Step (9) in X.
>MOTOR ON
' Turns ON the motor
>SPEED 5
' Sets low speed
>PULSE 0,0,
X,0 ' Moves to the lower limit-pulse position of Joint #3.
(In this example, all pulses except those for Joint #3 are “0”. S
ubstitute
these “0s” with the other pulse values specifying a position where there
is
no interference even when lowering Joint #3.)
EPSON
RC+
EPSON
RC+
NOTE

Setup & Operation 5. Motion Range
LS10-B Rev.6 51
5.3 Setting the Cartesian (Rectangular) Range in the XY
Coordinate System of the Manipulator
(for Joints #1 and #2)
Use this method to set the upper and lower limits of the X and Y coordinates.
This setting is only enforced by software. Therefore, it does not change the physical range.
The maximum physical range is based on the position of the mechanical stops.
Set the XYLim setting on the [XYZ Limits] panel shown by
selecting [Tools]-
[Robot
Manager].
(You may also execute the XYLim command from the [Command Window].)
EPSON
RC+
Setup & Operation 5. Motion Range
52 LS10-B Rev.6
5.4 Standard Motion Range
The following “motion range” diagrams show the standard (maximum) specification.
When each Joint motor is under servo control, the center of Joint #3’s (shaft’s) lowest point
moves in the areas shown in the figure.
“Area limited by mechanical stop” is the area where the center of Joint #3’s lowest point
can be moved when each joint motor is not under servo control.
“Mechanical stop” sets the limited motion range so that the center of Joint #3 cannot move
beyond the area mechanically.
“Maximum space” is the area that contains the farthest reach of the arms. If the maximum
radius of the end effector is over 60 mm, add the “Area limited by mechanical stop” and
“radius of the end effector”. The total value is specified as the maximum area.
A
Center of Joint #3
B
Motion range
C
Maximum range
D
Base mounting face
E
Area limited by a mechanical stop
LS10-B60**
LS10-B70**
LS10-B80**
a
Arm #1 + Arm #2 length [mm]
600
700
800
b
Arm #1 length [mm]
225
325
425
c
Arm #2 length [mm]
375
d
Joint #1 motion angle [°]
132
e
Joint #2 motion angle [°]
150
f
(Motion range)
212
188
213
g
(Motion range at the rear)
526
592
659
h
Angle of the Joint #1 mechanical stop [°]
2.0
i
Angle of the Joint #2 mechanical stop [°]
2.0
j
(Mechanical stop area)
206
176
200
k
(Mechanical stop area at the rear)
531
601
670
m (Joint #3 motion range)
LS10-B**2S
200
LS10-B**3S
300
LS10-B**2C
170
LS10-B**3C
270
n
(Distance from the base mounting
face)
LS10-B**2*
53
LS10-B**3*
153
p
(Joint #3 mechanical stop area upper
end)
LS10-B***S
4
LS10-B***C
1
q
(Joint #3 mechanical stop area lower end)
3
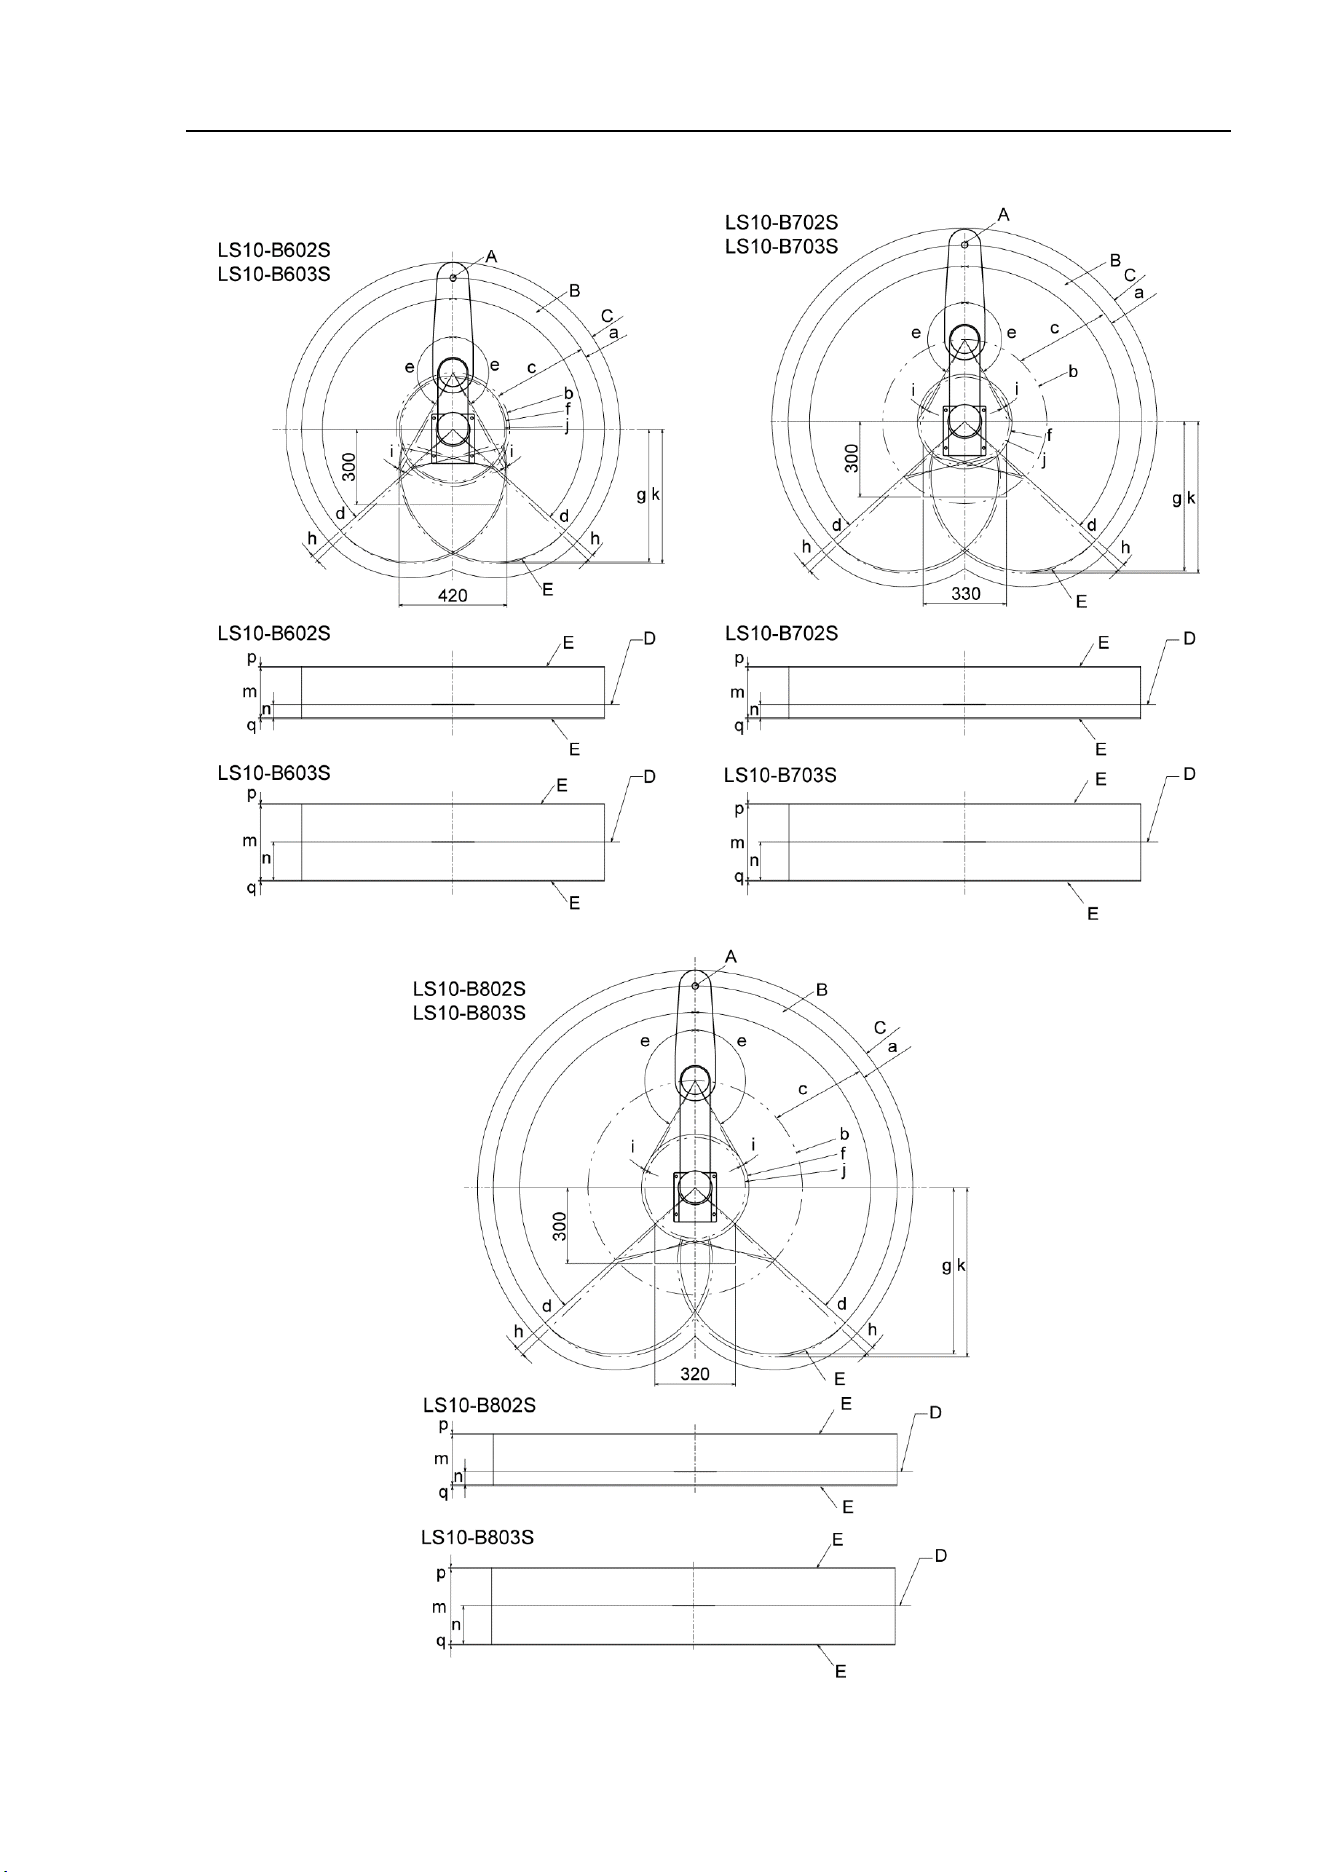
Setup & Operation 5. Motion Range
LS10-B Rev.6 53
Standard-model LS10-B***S
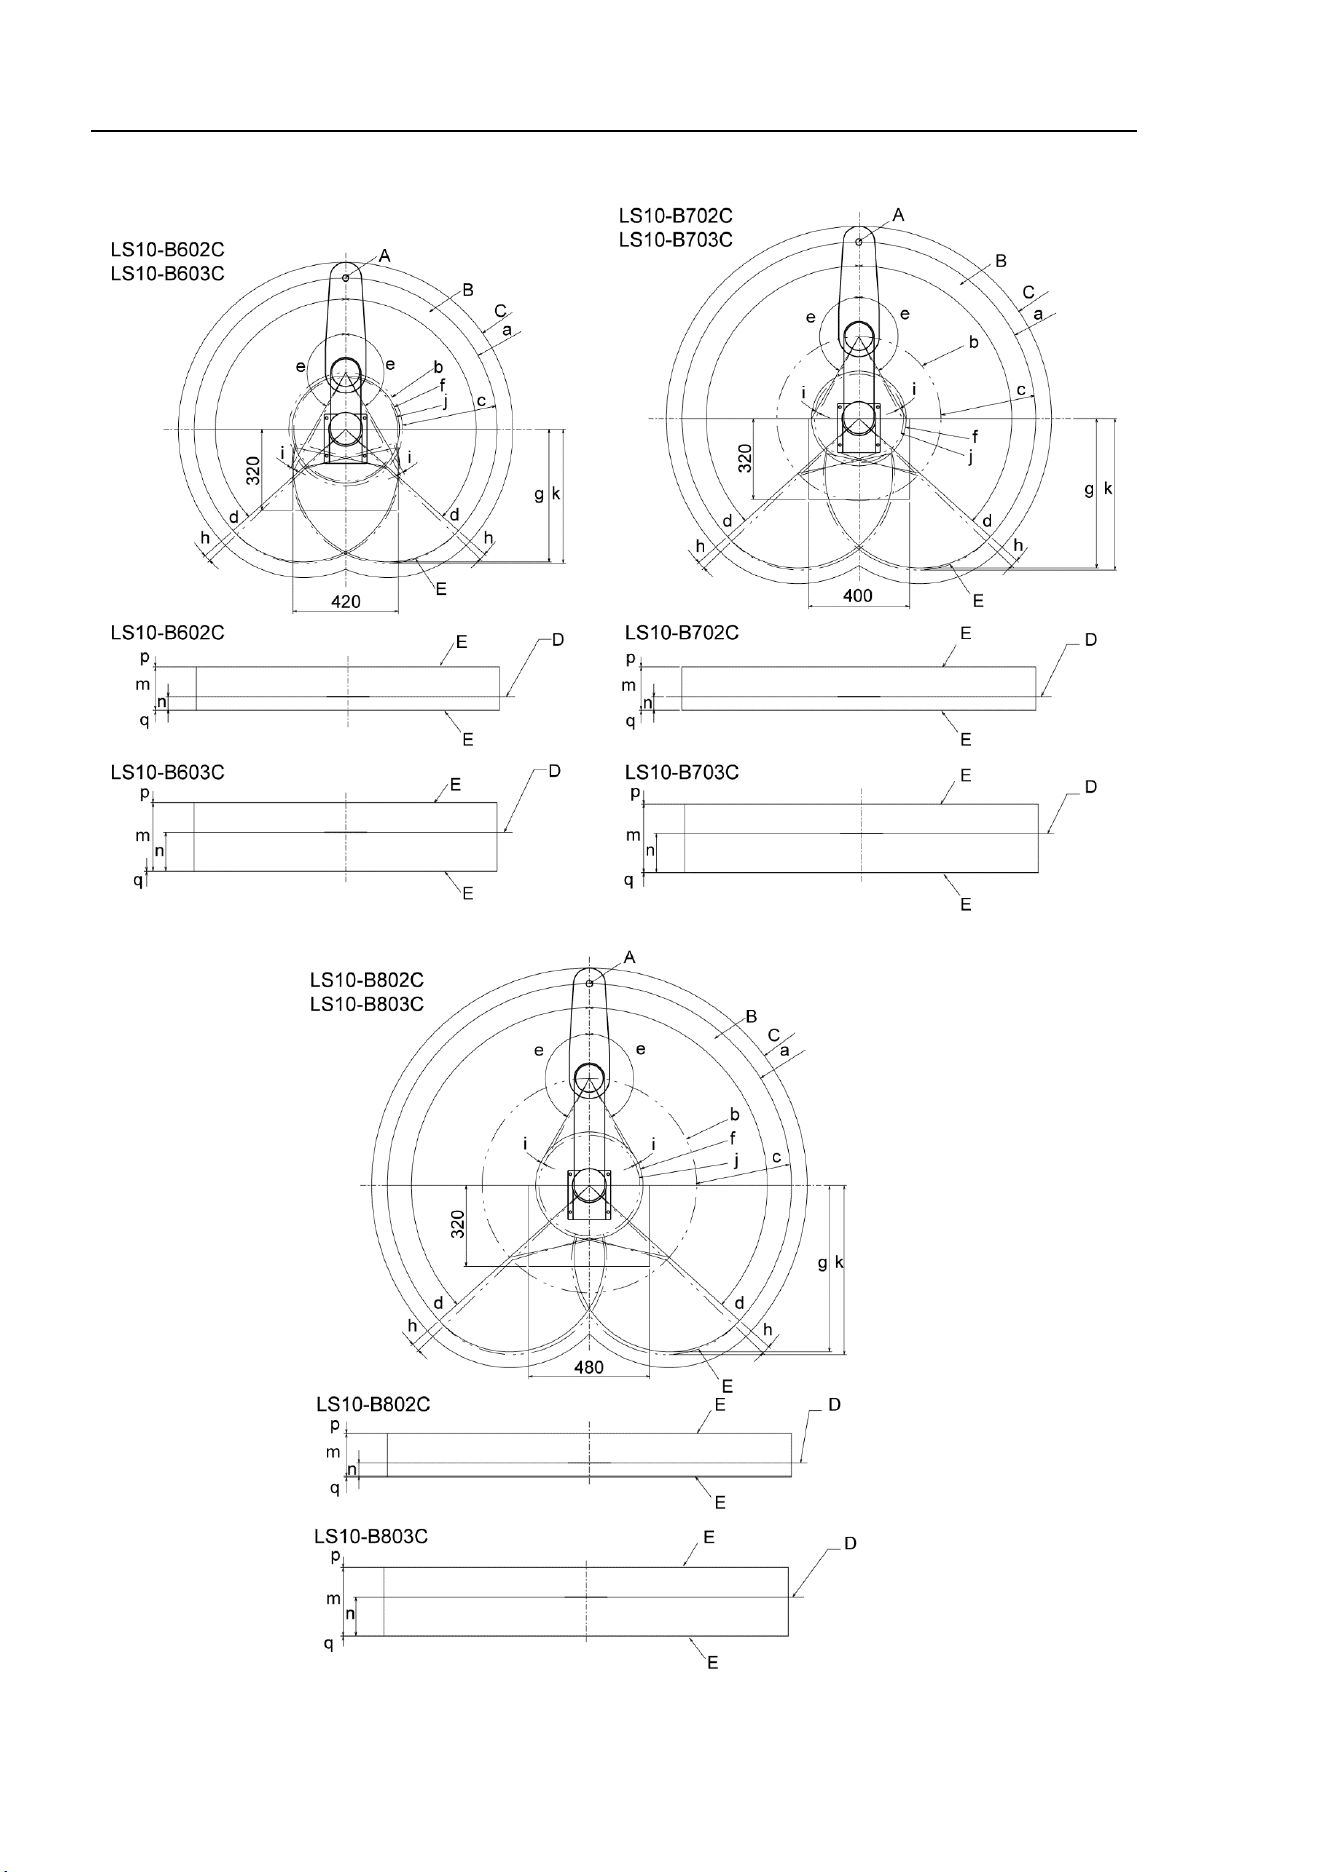
Setup & Operation 5. Motion Range
54 LS10-B Rev.6
Cleanroom-model LS10-B***C

Maintenance
This volume contains maintenance procedures with safety precautions
for LS10-B series Manipulators.

Maintenance 1. Safety Maintenance
LS10-B Rev.6 57
1. Safety Maintenance
Please read this chapter, this manual, and other relevant manuals carefully to understand
safe maintenance procedures before performing any routine maintenance.
Only authorized personnel who have taken safety training should be allowed to
maintain the robot system.
Safety training is the program for industrial robot operators that follows the laws
and regulations of each nation.
The personnel who have taken safety training acquire knowledge of industrial
robots (operations, teaching, etc.), knowledge of inspections, and knowledge of
related rules/regulations.
The personnel who have completed the robot system-training and maintenance-
training classes held by the manufacturer, dealer, or locally-incorporated company
are allowed to maintain the robot system.
WARNING
■
Do not
remove any parts that are not covered in this manual. Follow the
maintenance procedure strictly as described in this manual. Improper removal
of parts or
improper maintenance may not only cause improper function of the
robot system but also serious safet
y problems.
■
Keep away from the Manipulator while
the power is ON if you have not taken the
training courses.
Do not enter the operating area while the power
is ON.
Entering the operating area with the power ON is extremely hazardous and may
cause serious safety problems as the Manipulator may move
even it seems to be
stopped
.
■
When you check the operation of the Manipulator a
fter replacing parts, be sure to
check it
while you are outside of the safeguarded area. Checking the operation
of the Manipulator while you are inside of the safeguarded area may cause serious
safety problems as the Manipulator may move unexpectedly.
■
Before
operating the robot system, make sure that both the Emergency Stop
switches and safeguard switch function properly.
Operating the robot system
when the switches do not function properly is extremely hazardous and may result
in serious bodily injury and/or serious damage
to the robot system as the switches
cannot fulfill
their intended functions in an emergency.
WARNING
■
To shut off power
to the robot system, disconnect the power plug from the power
source. Be sure to connect the AC power cable to a power receptacle.
DO NOT connect it directly to a factory power source.
■
Before performing any replacement procedure, turn OFF the Controller and
related equipment,
and then disconnect the power plug from the power source.
Performing any replacement procedure with the power ON is extremely hazardous
and may result in
electric shock and/or malfunction of the robot system.
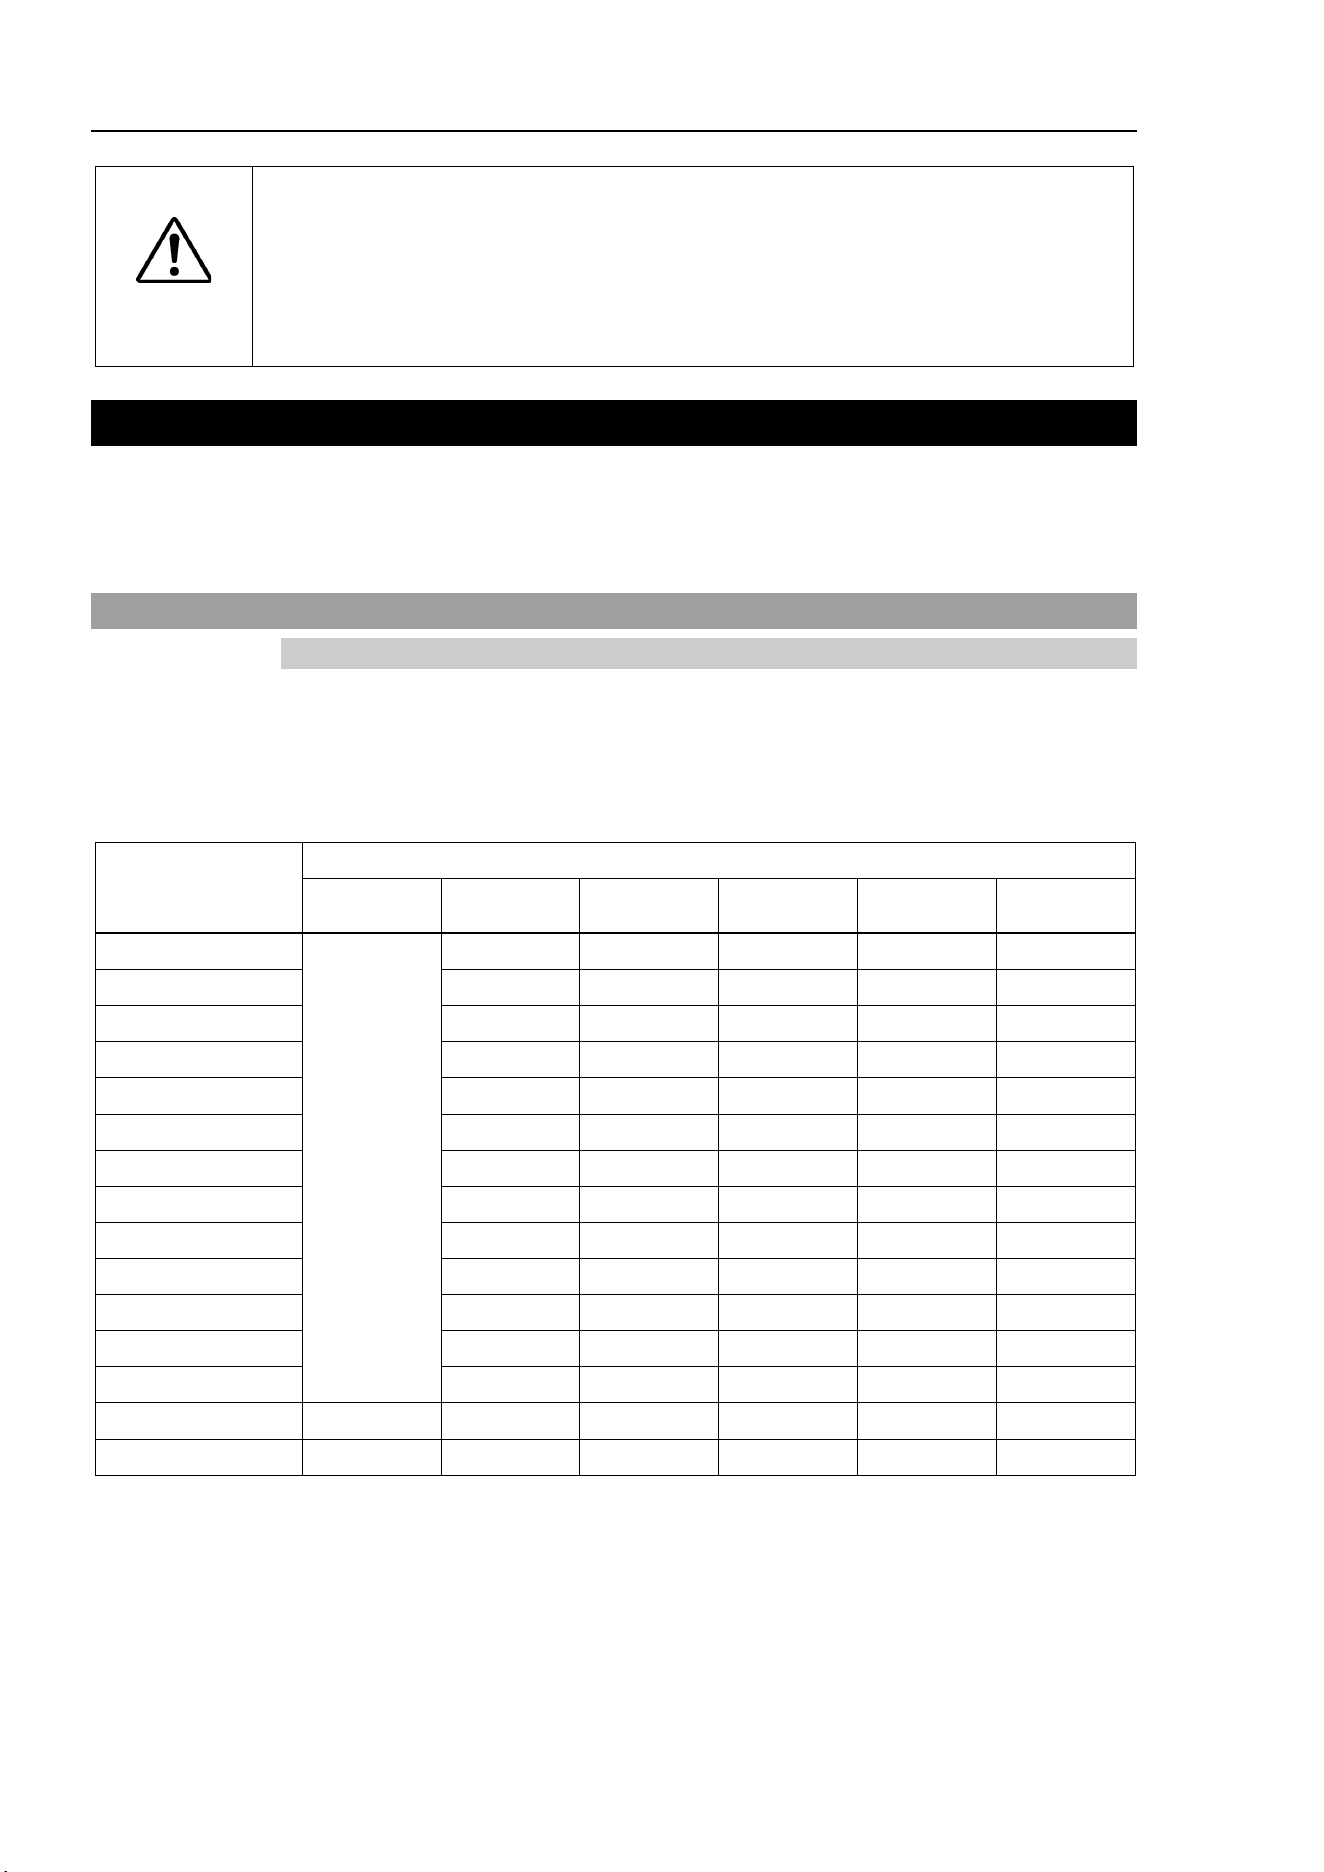
Maintenance 2. General Maintenance
58 LS10-B R ev.6
CAUTION
■
Be sure to connect the cables properly.
Do not allow unnecessary strain on the
cables. (Do not
put heavy objects on the cables. Do not bend or pull the cables
forcibl
y.) The unnecessary strain on the cables may result in damage to the
cables,
disconnection, and/or contact failure. Damaged cables, disconnection,
or contact failure is extremely hazardous and may result in electric shock and/or
improper function of the robot system.
2. General Maintenance
This chapter describes maintenance inspections and procedures. Performing maintenance
inspections and procedures properly is essential for preventing trouble and ensuring safety.
Be sure to perform the maintenance inspections in accordance with the schedule.
2.1 Maintenance Inspection
2.1.1 Schedule for Maintenance Inspection
Inspection points are divided into five stages: daily, monthly, quarterly, biannual, and annual.
The inspection points are added every stage.
If the Manipulator is operated for 250 hours or longer per month, the inspection points must
be added every 250 hours, 750 hours, 1500 hours, and 3000 hours operation.
Inspection Point
Daily
inspection
Monthly
inspection
Quarterly
inspection
Biannual
inspection
Annual
inspection
Overhaul
(replacement)
1 month (250 h)
Inspect every day
√
2 months (500 h)
√
3 months (750 h)
√
√
4 months (1000 h)
√
5 months (1250 h)
√
6 months (1500 h)
√
√
√
7 months (1750 h)
√
8 months (2000 h)
√
9 months (2250 h)
√
√
10 months (2500 h)
√
11 months (2750 h)
√
12 months (3000 h)
√
√
√
√
13 months (3250 h)
√
…
…
…
…
…
…
…
20000 h
√
h = hour
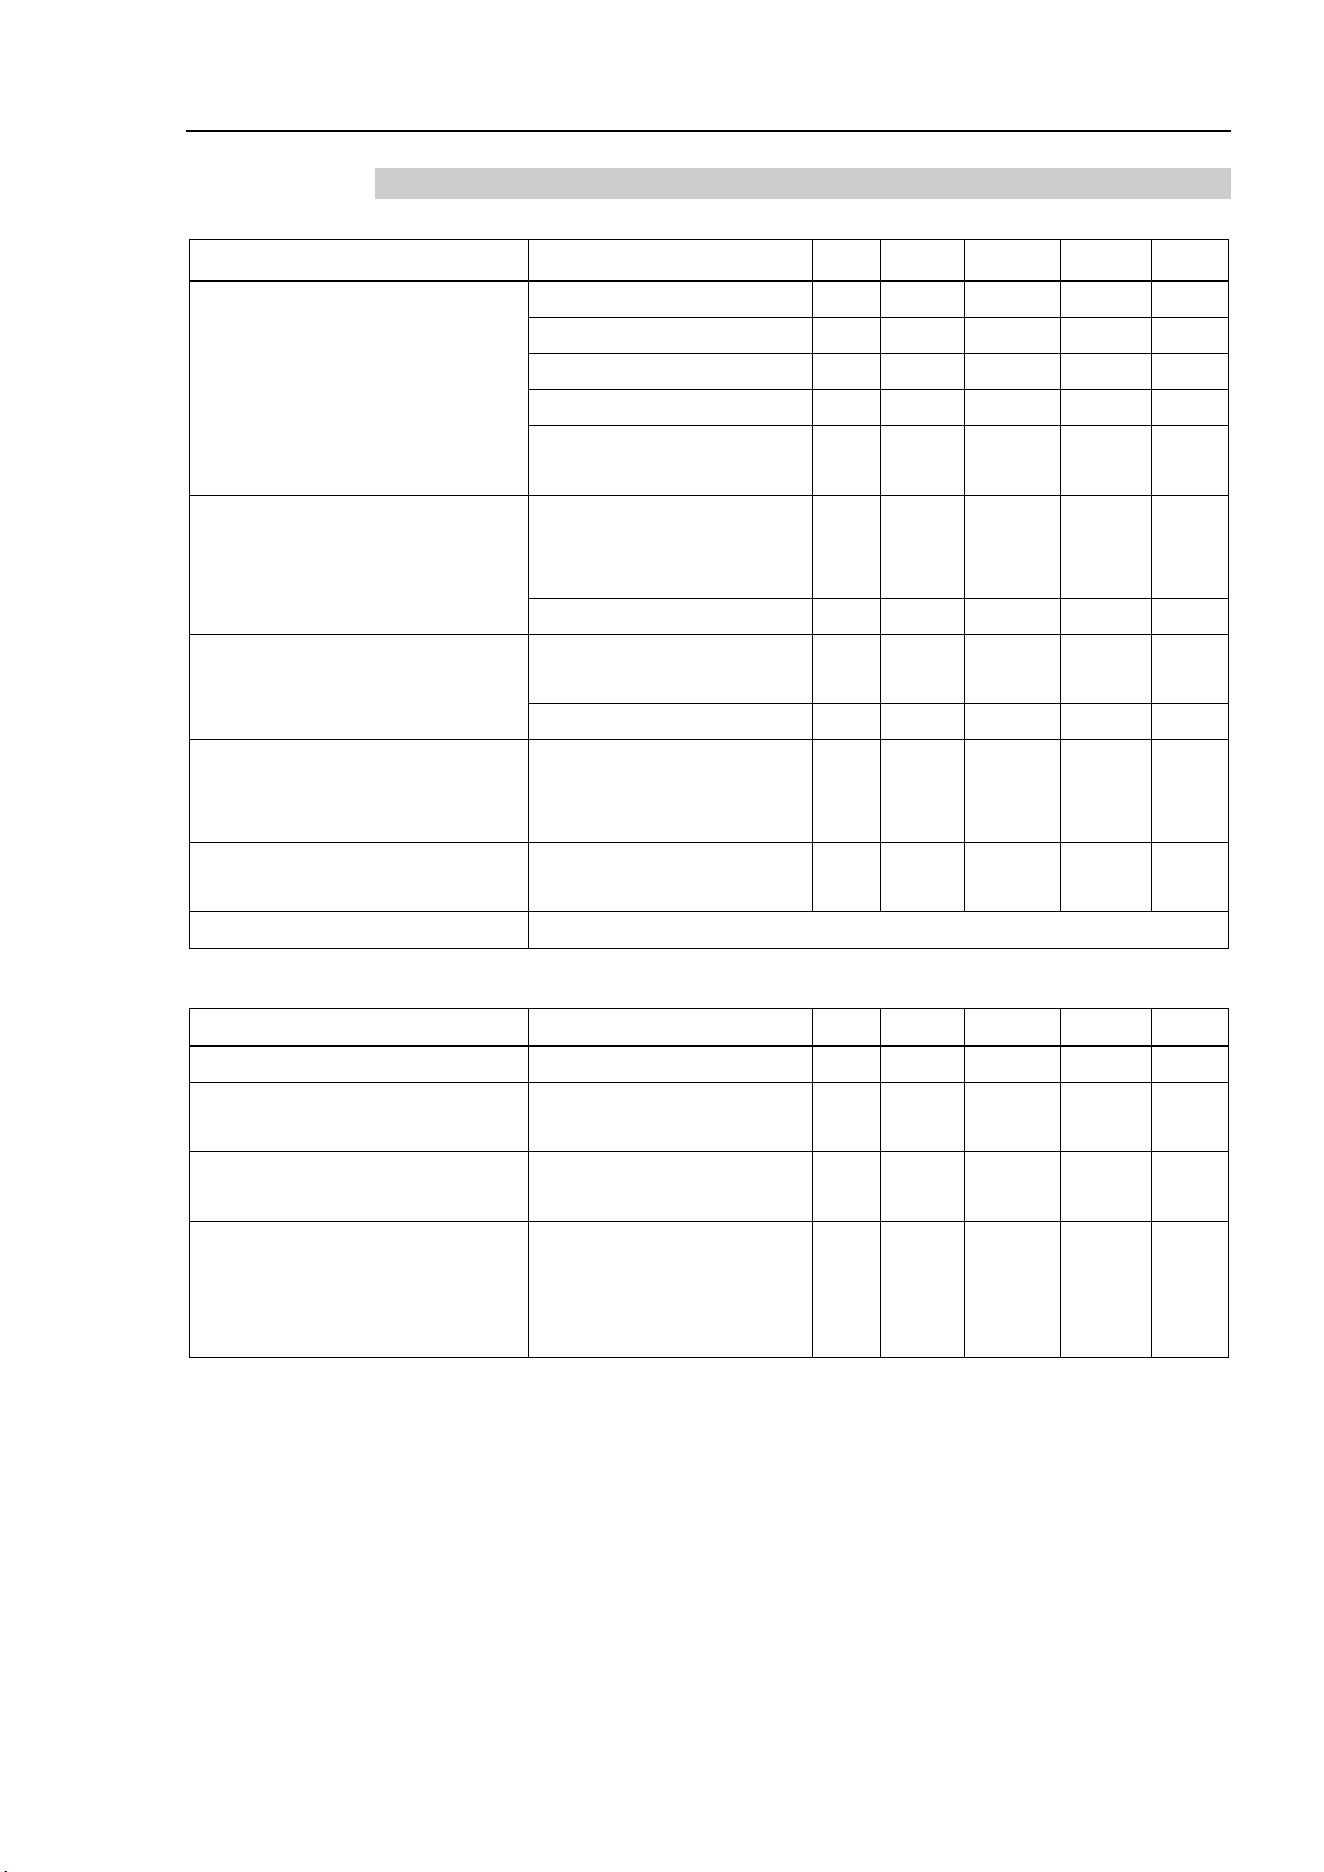
Maintenance 2. General Maintenance
LS10-B Rev.6 59
2.1.2 Inspection Point
Inspection While the Power is OFF (Manipulator is not operating)
Inspection Point Inspection Place Daily Monthly
Quarterly
Biannual Annual
Check looseness or backlash of
bolts, screws.
Tighten them if necessary.
(For the tightening torque, refer to
Maintenance: 2.4 Tightening
Hexagon Socket Head Cap Bolts.)
End effector mounting bolts
√
√
√
√
√
Manipulator mounting bolts
√
√
√
√
√
Each arm locking bolts
√
√
√
√
√
Bolts, screws around shaft
√
Bolts, screws securing motors
,
reduction gear units, etc.
√
Check looseness of connectors.
If the connectors are loosen, push it
securely or tighten.
External connectors on
Manipulator (on the connector
plates etc.)
√ √ √ √ √
Manipulator cable unit
√
√
√
√
Visually check for external defects.
Clean up if necessary.
External appearance of
Manipulator
√ √ √ √ √
External cables
√
√
√
√
Check for bends or improper
location. Repair or place it properly
if necessary.
Safeguard etc. √ √ √ √ √
Check tension of timing belts.
Tighten it if necessary.
Inside of Arm #2 √ √
Grease conditions
Refer to Maintenance: 2.3 Greasing.
Inspection While the Power is ON (Manipulator is operating)
Inspection Point
Inspection Place
Daily
Monthly
Quarterly
Biannual
Annual
Check motion range
Each joint
√
Check whether unusual sound or
vibration occurs.
Whole √ √ √ √ √
Measure the accuracy repeatedly by
a gauge.
Whole √
Turn ON and OFF the brake release
switch and check the sound of the
electromagnetic brake. If there is
no sound, replace the brake.
Brake √ √ √ √ √
Maintenance 2. General Maintenance
60 LS10-B R ev.6
2.2 Overhaul (Parts Replacement)
CAUTION
■
Overhaul timing is based on an assumption that all joints are operated for equal
distance. If a particular joint has a
high duty or high load, it is recommended to
overhaul all joints (as many as possible) before exceeding 20,000 operation hours
with the joint as a basis.
The parts for the manipulator joints may cause accuracy decline or malfunction due to
deterioration of the manipulator resulting from long term use. In order to use the
manipulator for a long term, it is recommended to overhaul the parts (parts replacement).
The time between overhauls is 20,000 operation hours of the Manipulator as a rough
indication.
However, it may vary depending on usage condition and degree of the load (such as when
operated with the maximum motion speed and maximum acceleration / deceleration in
continuous operation) applied on the Manipulator.
Recommended replacement time for the parts subject to maintenance (motors, reduction
gear units, and timing belts) can be checked in the [Maintenance] dialog box of the
EPSON RC+ 7.0.
For details, refer to the following manual.
Robot Controller RC90 /RC90-B Maintenance 6. Alarm
Note:
The recommended replacement time for the maintenance parts is when it reaches the L10
life (time until 10% failure probability). In the [Maintenance] dialog box, the L10 life is
displayed as 100%.
NOTE
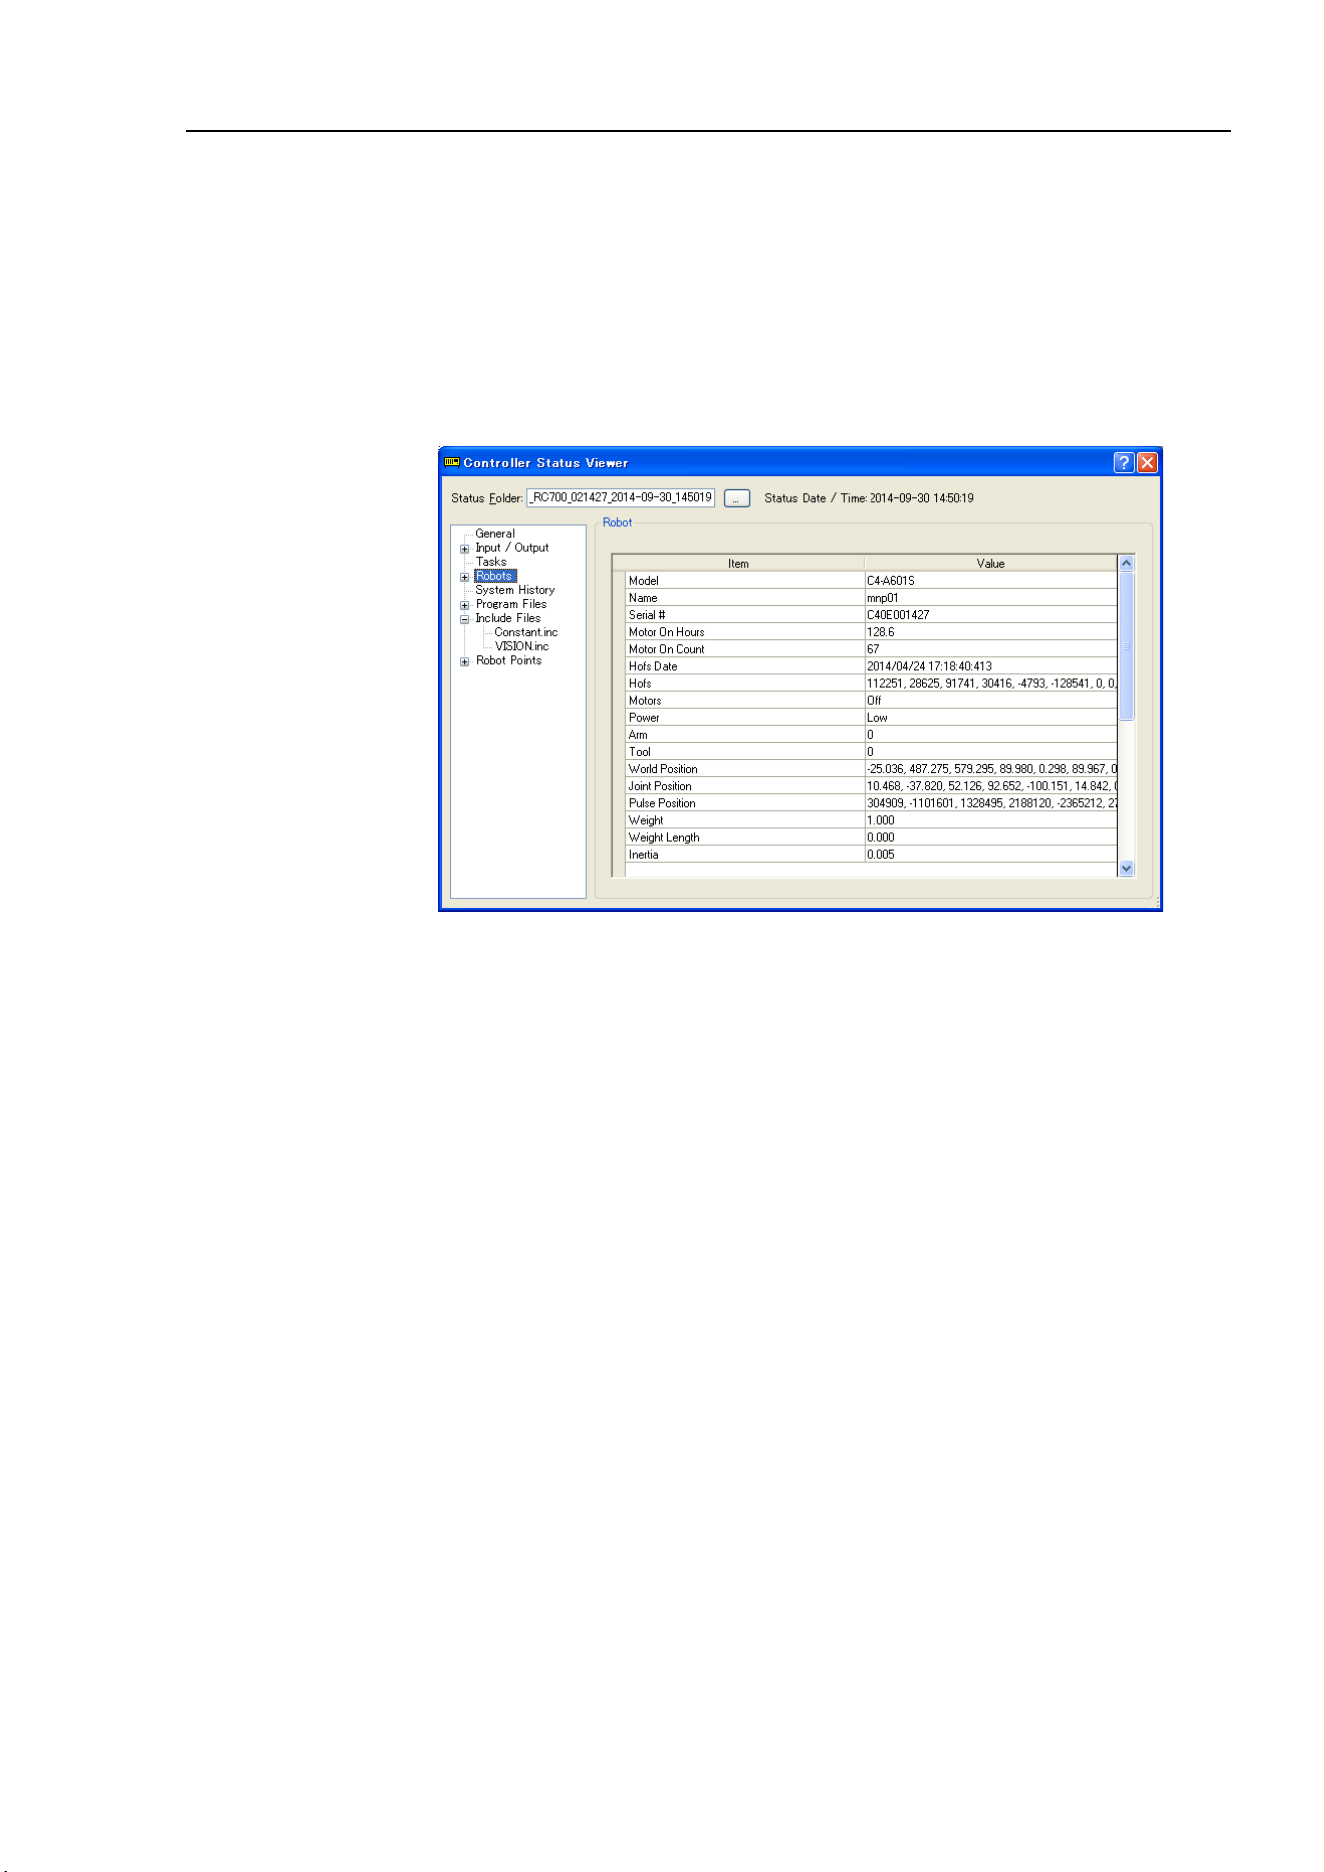
Maintenance 2. General Maintenance
LS10-B Rev.6 61
The manipulator operation hours can be checked in [Controller Status Viewer] dialog -
[Motor On Hours].
(1) Select EPSON RC+ menu-[Tools]-[Controller] to open the [Controller Tools] dialog.
(2) Click the <View Controller Status> button to open the [Browse For Folder] dialog.
(3) Select the folder where the information is stored.
(4) Click <OK> to view the [Controller Status Viewer] dialog.
(5) Select [Robot] from the tree menu on the left side.
For the parts subject to overhaul, refer to Maintenance 14. Maintenance Parts List.
For details of replacement of each part, refer to the Maintenance section.
Please contact the supplier of your region for further information.
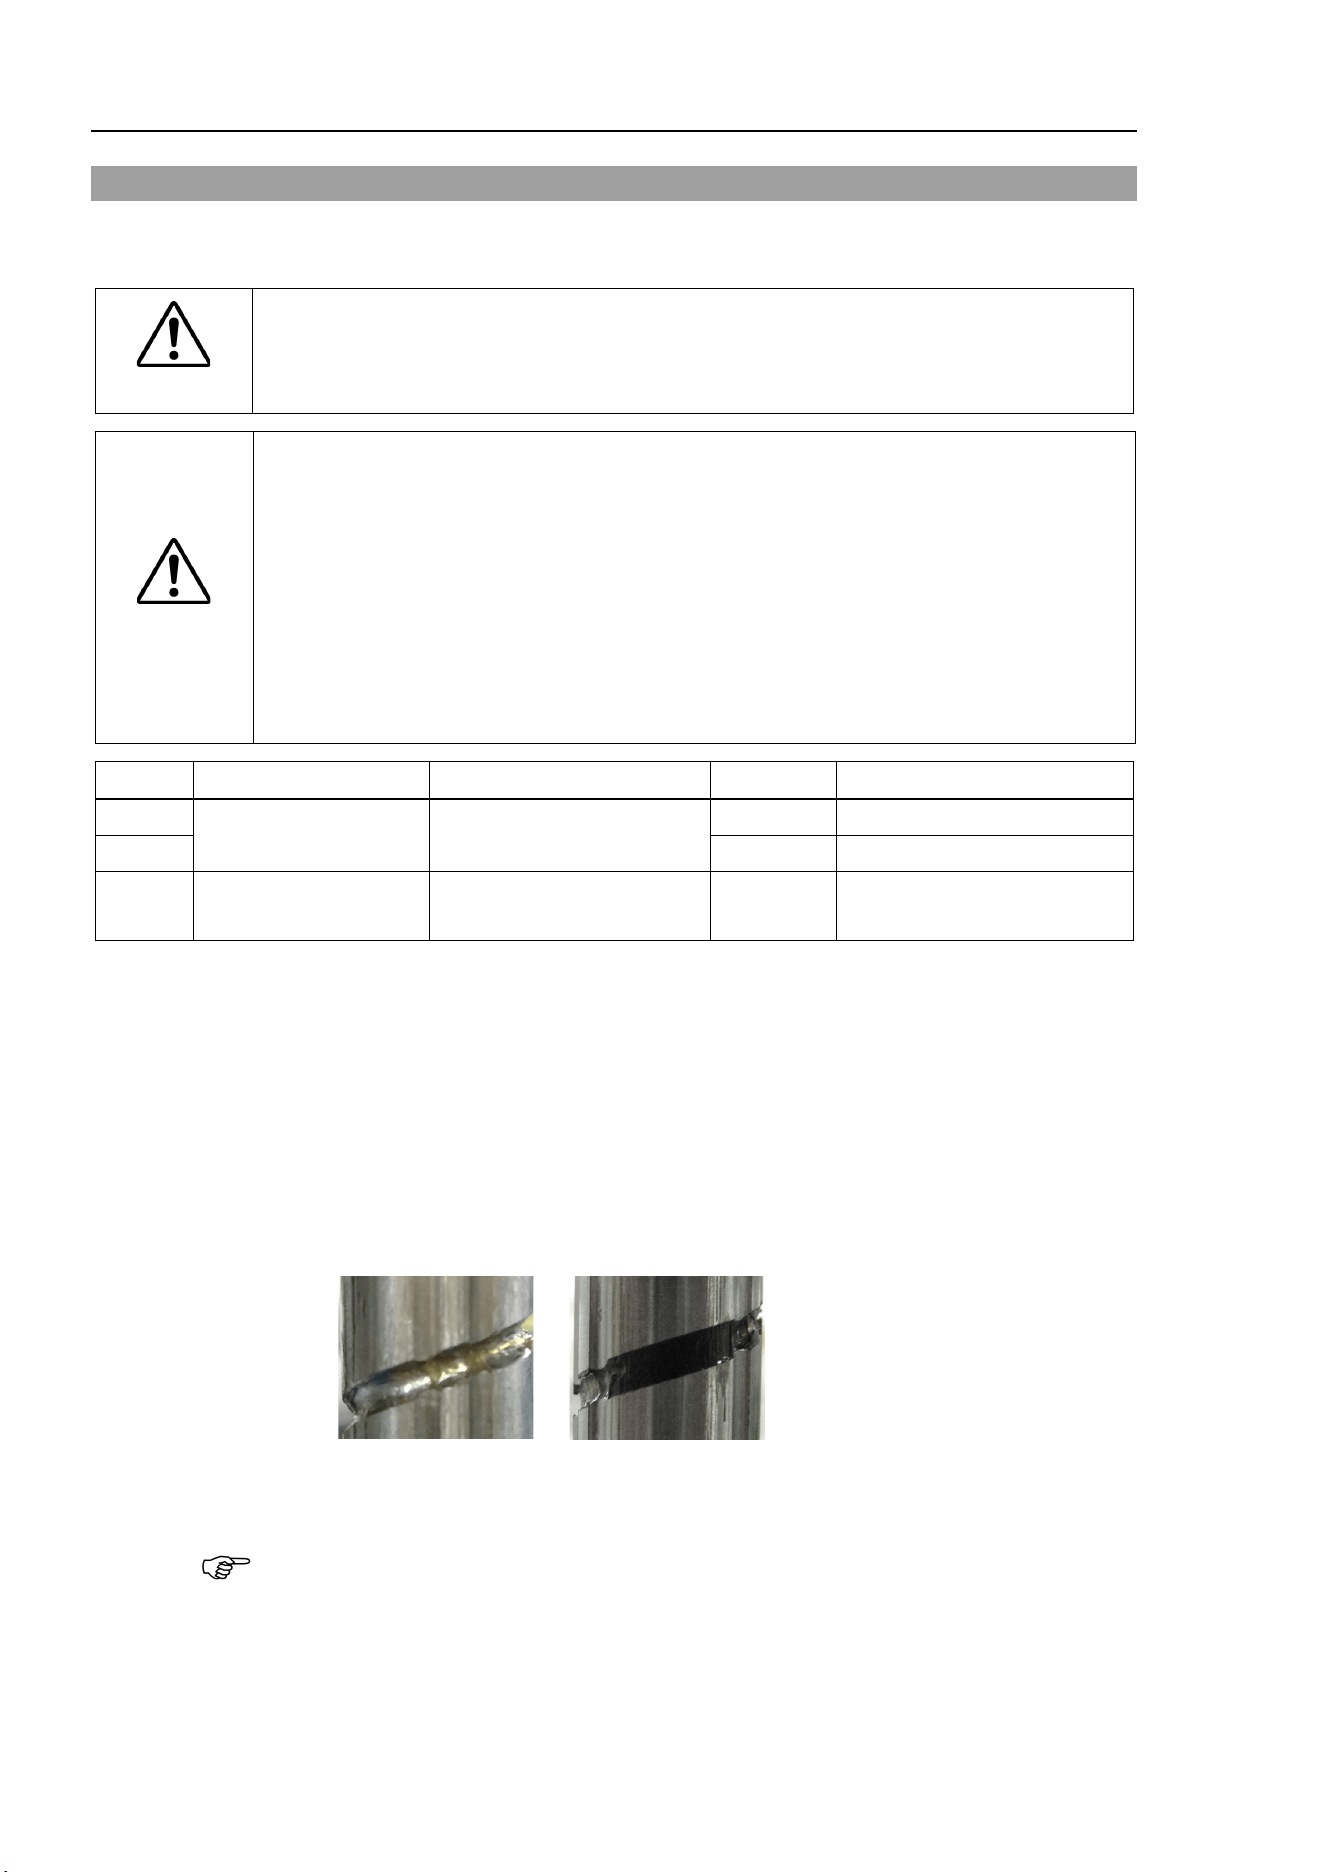
Maintenance 2. General Maintenance
62 LS10-B R ev.6
2.3 Greasing
The ball screw spline and reduction gear units need greasing regularly. Only use the grease
specified in the following table.
CAUTION
■
Keep enough grease in the Manipulator.
Operating the Manipulator with
insufficient
grease will damage sliding parts and/or result in insufficient function of
the Manipulator
. Once the parts are damaged, a lot of time and money will be
required for the repairs.
CAUTION
■
If grease gets into your eyes, mouth, or on your skin,
follow the instructions below.
If grease gets into your eyes
: Flush them thoroughly with clean water, and then see a doctor
immediately.
If grease gets into your mouth
: If swallowed, do not induce vomiting. See a doctor immediately.
: If grease just gets into your mouth, wash out your mouth with water
thoroughly.
If grease gets on your skin
: Wash the area thoroughly with soap and water.
Greasing part
Greasing Interval
Grease
Refer to Maintenance:
Joint #1
Reduction gear units Overhaul timing
SK-1A
5 Joint #1
Joint #2
SK-1A
6 Joint #2
Joint #3 Ball screw spline unit
At 100 km of operation
(50 km for first greasing)
AFB
10. Greasing the Ball
Screw Spline Unit
Joint #1, 2 reduction gear units
As a rough indication, perform greasing at the same timing as overhaul.
However, it may vary depending on usage condition and degree of the load (such as when
operated with the maximum motion speed and maximum acceleration / deceleration in
continuous operation) applied on the Manipulator.
Joint #3 Ball screw spline unit
The recommended greasing interval is at 100 km of operation. However, greasing timing
also can be checked from the grease condition. Perform greasing if the grease is
discolored or becomes dry.
Normal grease Discolored grease
Perform greasing at 50 km of operation for the first time of greasing.
Recommended replacement time for the grease on the ball screw spline unit can be
checked in the [Maintenance] dialog box of the EPSON RC+ 7.0.
For details, refer to the following manual.
Robot Controller RC90 / RC90-B Maintenance 6. Alarm
NOTE
Maintenance 2. General Maintenance
LS10-B Rev.6 63
2.4 Tightening Hexagon Socket Head Cap Bolts
Hexagon socket head cap bolts are used in places where mechanical strength is required.
(A hexagon socket head cap bolt will be called a “bolt” in this manual.) These bolts are
fastened with the tightening torques shown in the following table.
When it is necessary to refasten these bolts in some procedures in this manual (except special
cases as noted), use a torque wrench so that the bolts are fastened with the appropriate
tightening torques as shown below.
Bolt
Tightening Torque
Refer below for the set screw.
M2.5
1.4 ± 0.1 N⋅m
(14 ± 1 kgf⋅cm)
Bolt
Tightening Torque
M3
2.0 ± 0.1 N⋅m
(21
± 1 kgf⋅cm)
M3
0.7 ± 0.1 N⋅m
(7.1 ± 1
kgf⋅cm)
M4
4.0 ± 0.2 N⋅m
(41 ± 2 kgf⋅cm)
M4
2.4 ± 0.1 N⋅m
(26 ± 1 kgf⋅cm)
M5
8.0 ± 0.4 N⋅m
(82 ± 4 kgf⋅cm)
M5
3.9 ± 0.2 N⋅m
(40 ± 2 kgf⋅cm)
M6
13.0 ± 0.6 N⋅m
(133 ± 6 kgf⋅cm)
M8
32.0 ± 1.6 N⋅m
(326 ± 16 kgf⋅cm)
M10
58.0 ± 2.9 N⋅m
(590 ± 30 kgf⋅cm)
M12
100.0 ± 5.0 N⋅m
(1,020 ± 51 kgf⋅cm)
The bolts aligned on a circumference should be fastened in a crisscross pattern as shown in
the figure below.
1
5
3
7
2
6
4
8
Bolt hole
Do not fasten all bolts securely at one time. Divide
the number of times that the bolts are fastened into
two or three and fasten the bolts securely with a
hexagonal wrench. Then, use a torque wrench so
that the bolts are fastened with tightening torques
shown in the table above.
2.5 Matching Origins
After parts have been replaced (motors, reduction gear units, a brake, timing belts, a ball
screw spline unit, etc.), the Manipulator cannot operate properly because a mismatch exists
between the origin stored in each motor and its corresponding origin stored in the Controller.
After replacing the parts, it is necessary to match these origins.
For calibration, the pulse values for a specific position must be recorded in advance.
Before replacing parts, select easy point (pose) data from the registered point data to check
the accuracy. Then, follow the steps below to display the pulse values and record them.
Execute the following command from the
[Command Window].
>PULSE
PULSE: [Joint #1 Pulse value] pls [Joint #2 Pulse value] pls
[Joint #3 Pulse value]
pls [Joint #4 Pulse value] pls
EPSON
RC+
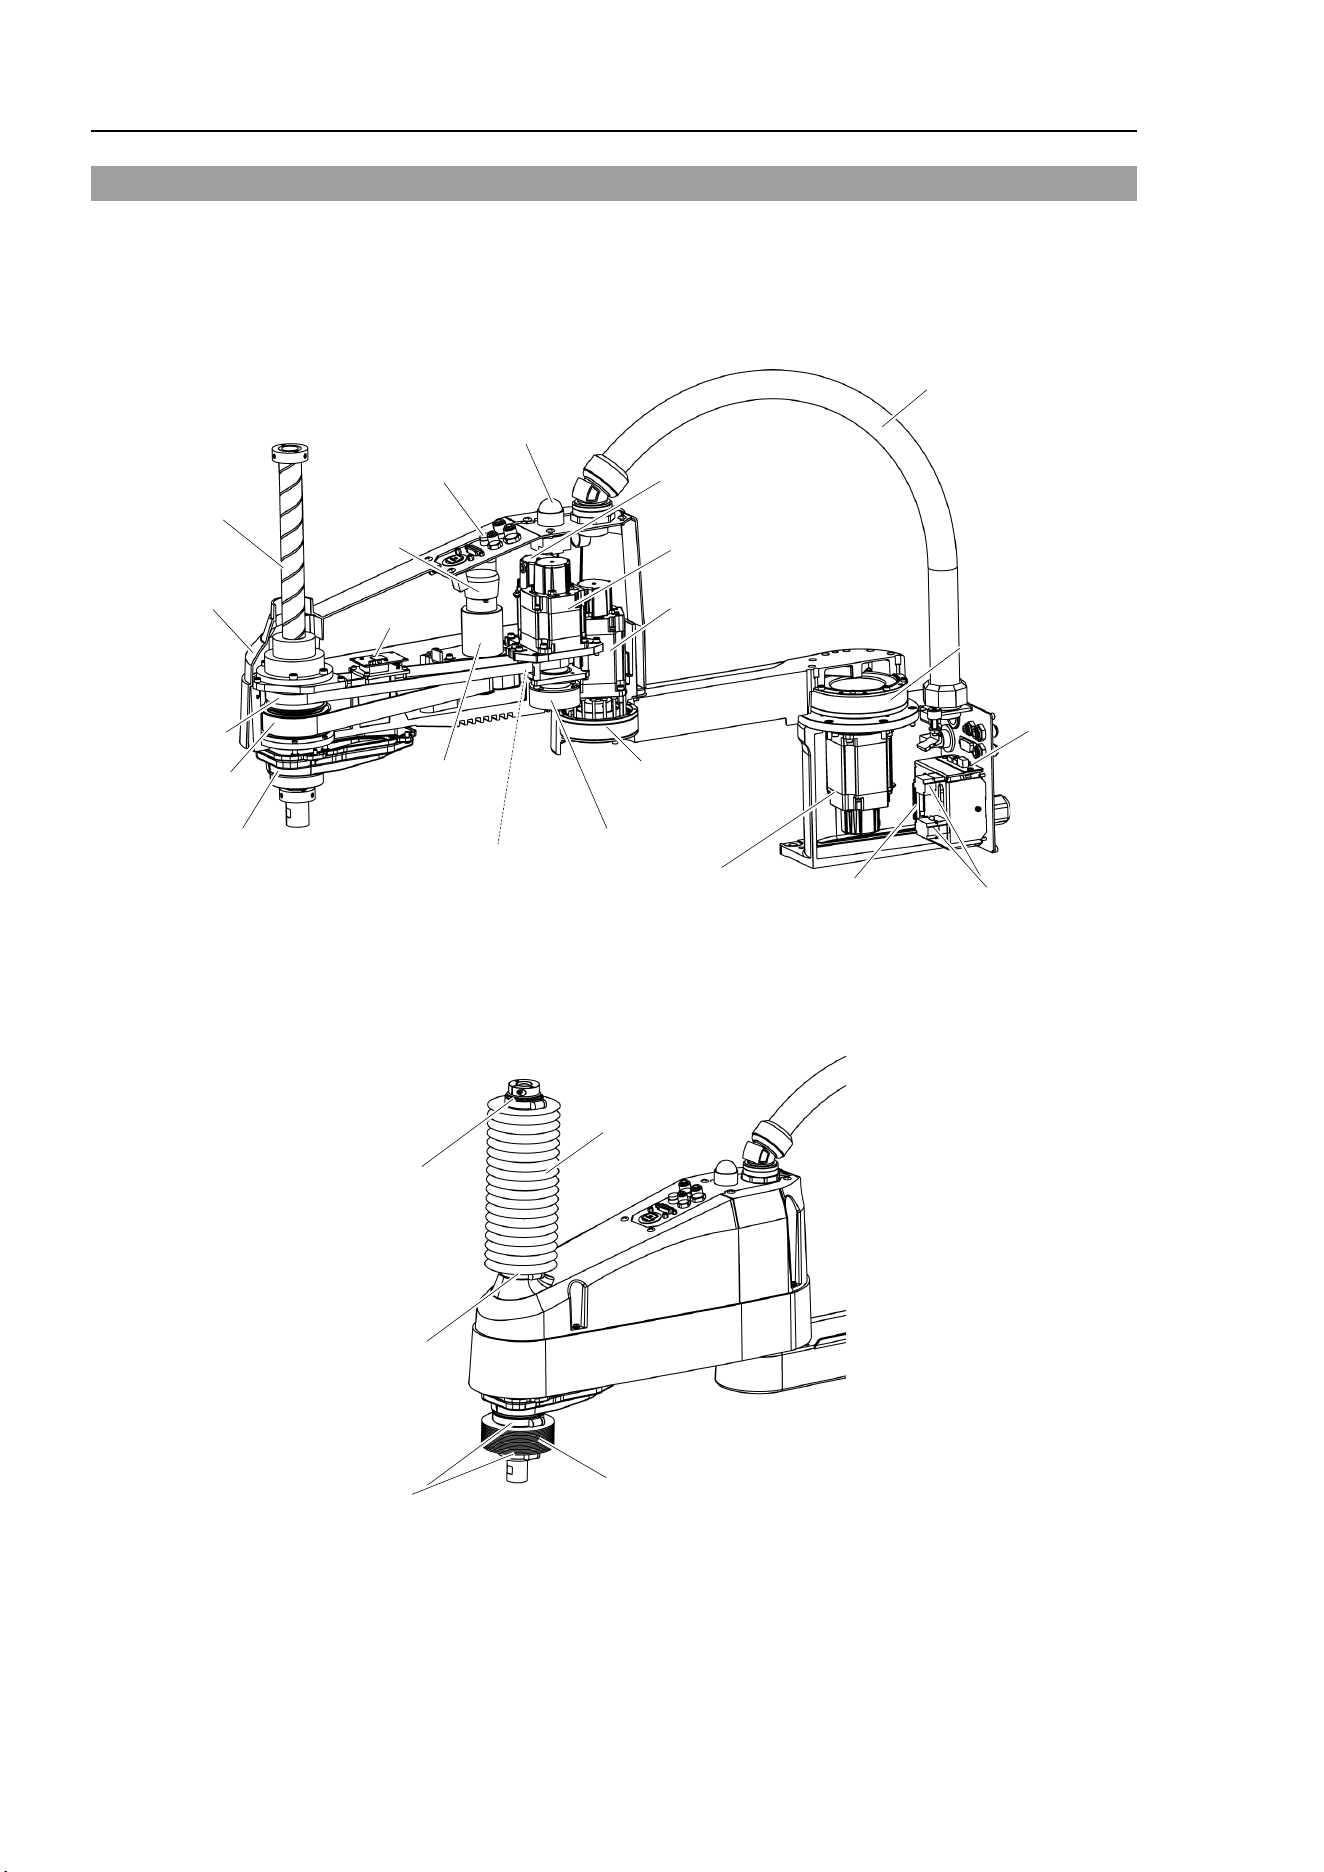
Maintenance 2. General Maintenance
64 LS10-B R ev.6
2.6 Layout of Maintenance Parts
Standard-model
Power cable
Cable unit
Joint #3 brake
Signal cable
Brake release
switch
LED lamp
Ball screw
spline unit
Arm Top Cover
Joint #4 motor
Z belt
U2 belt
U1 belt
Joint #2 motor
Joint #2
reduction gear
unit
Joint #1
reduction gear unit
Joint #1 motor
Joint #3 motor
(Figure: LS10-B602S)
Control
board
Arm Bottom Cover
Joint #4 brake
Intermediate
pulley
Converter
board
Cleanroom-model (with optional bellows)
For the Cleanroom-model, the following parts are added to the Standard-model.
Bellows
Bellows
Clamp Band
(Figure: LS10-B602C)
Clamp Band
Clamp Band
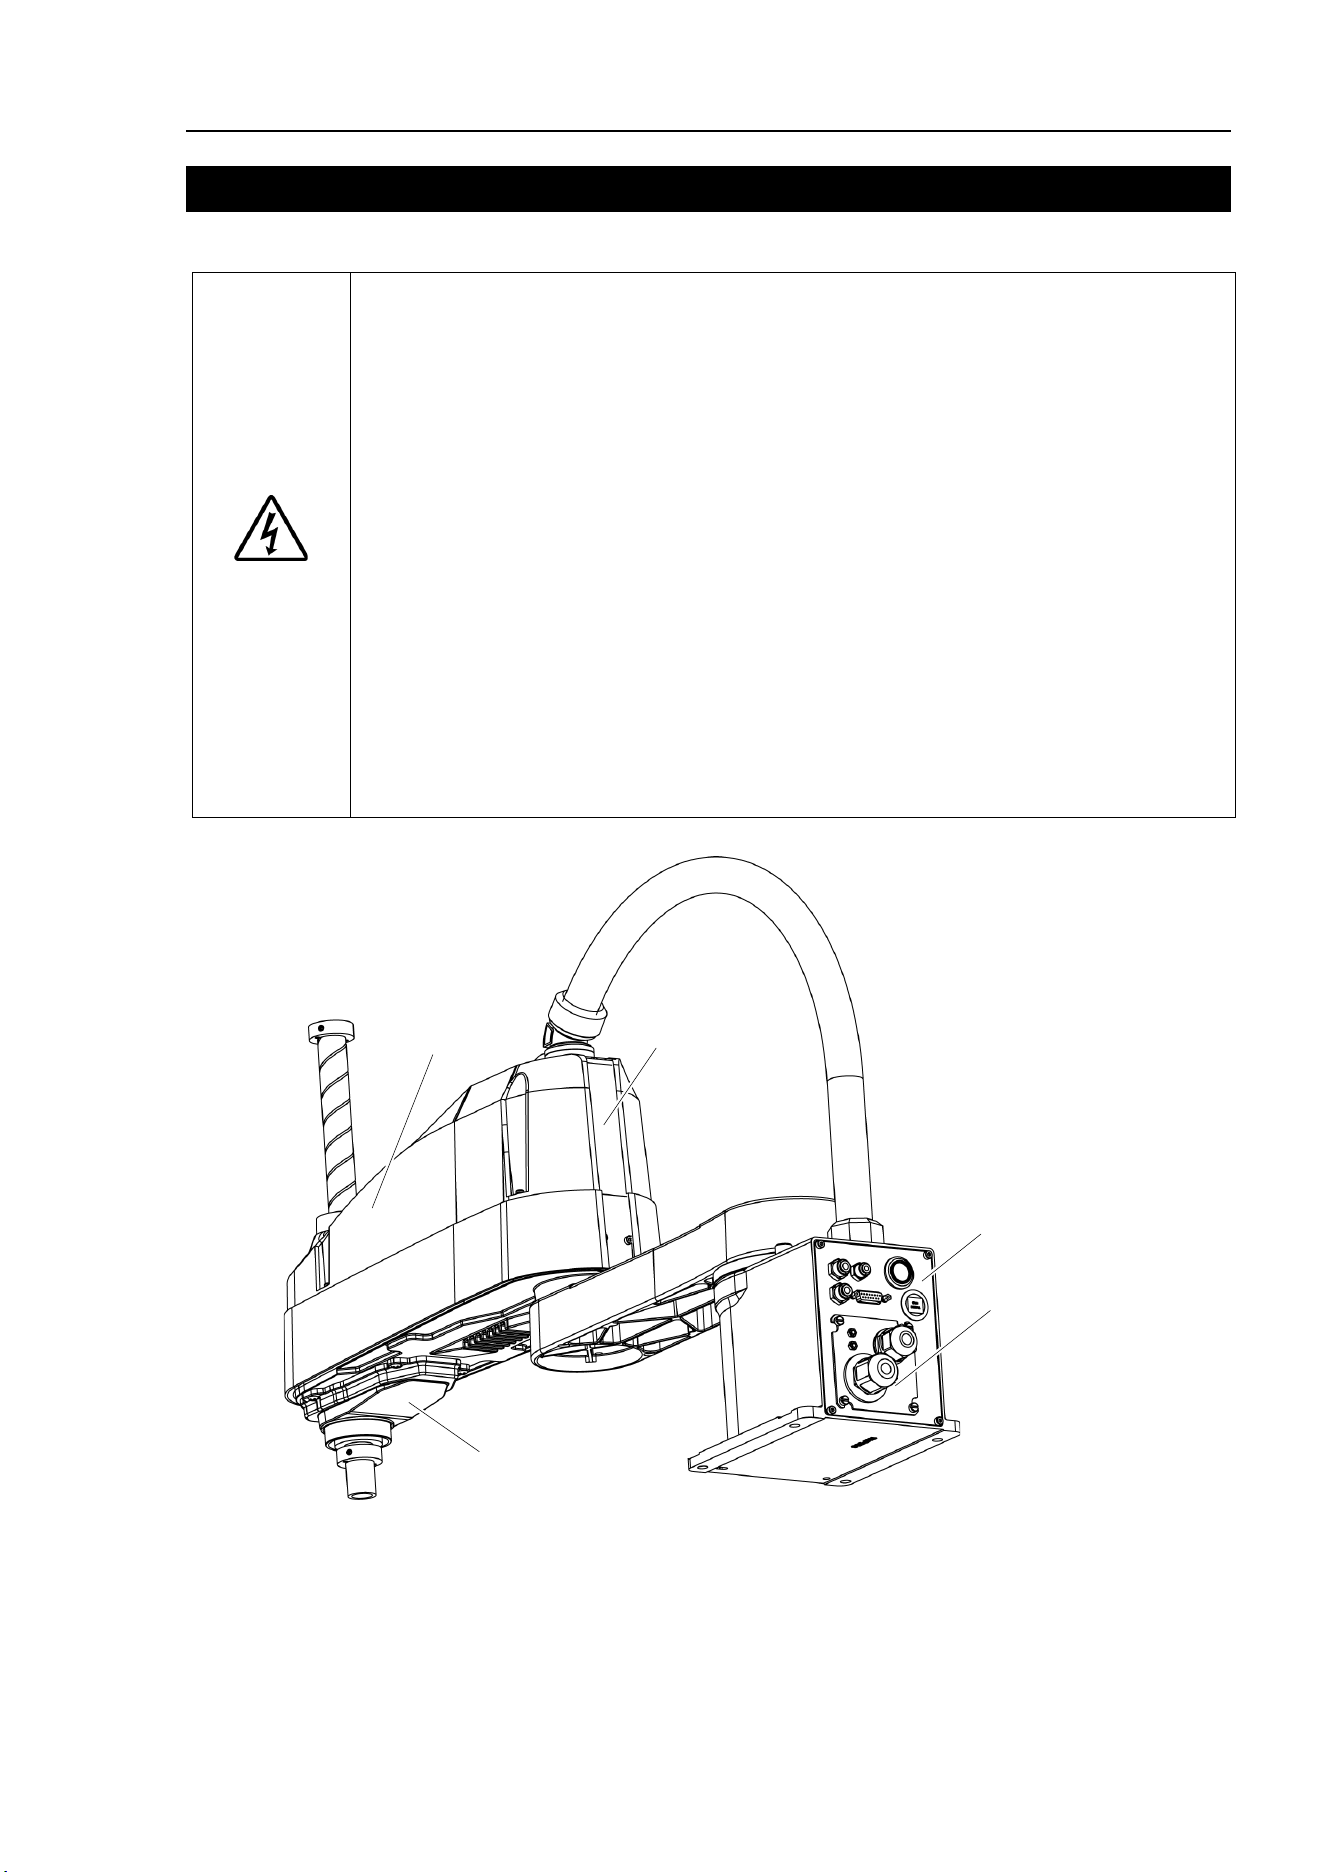
Maintenance 3. Covers
LS10-B Rev.6 65
3. Covers
All procedures for removing and installing covers in maintenance are described in this chapter.
WARNING
■
Do not connect or disconnect the motor connectors while the power to the robot
system is turned ON. Connecting or disconnecting the motor connector
s with the
power ON is extremely hazardous and may result
in serious bodily injury as the
Manipulator may move abnormally, and also may result in
electric shock and/or
malfunction of the robot system.
■
To shut off power
to the robot system, disconnect the power plug from the power
source. Be sure to connect the AC power cable to a power receptacle.
DO NOT connect it directly to a factory power source.
■
Before performing any replacement procedure, turn OFF the Controller and related
equipment,
and then disconnect the power plug from the power source.
Performing any replacement procedure with the power ON is extremely hazardous
and may result in
electric shock and/or malfunction of the robot system.
■
Be careful not to get any foreign substances in
the Manipulator, connectors, and
pins during maintenance.
Turning ON the power to the robot system when any
foreign substances exist in them is extremely
hazardous and may result in electric
shock
and/or malfunction of the robot system.
Arm
Bottom Cover
Connector Plate
Connector Sub Plate
User Plate
(Figure: LS10-B702S)
Arm Top Cover
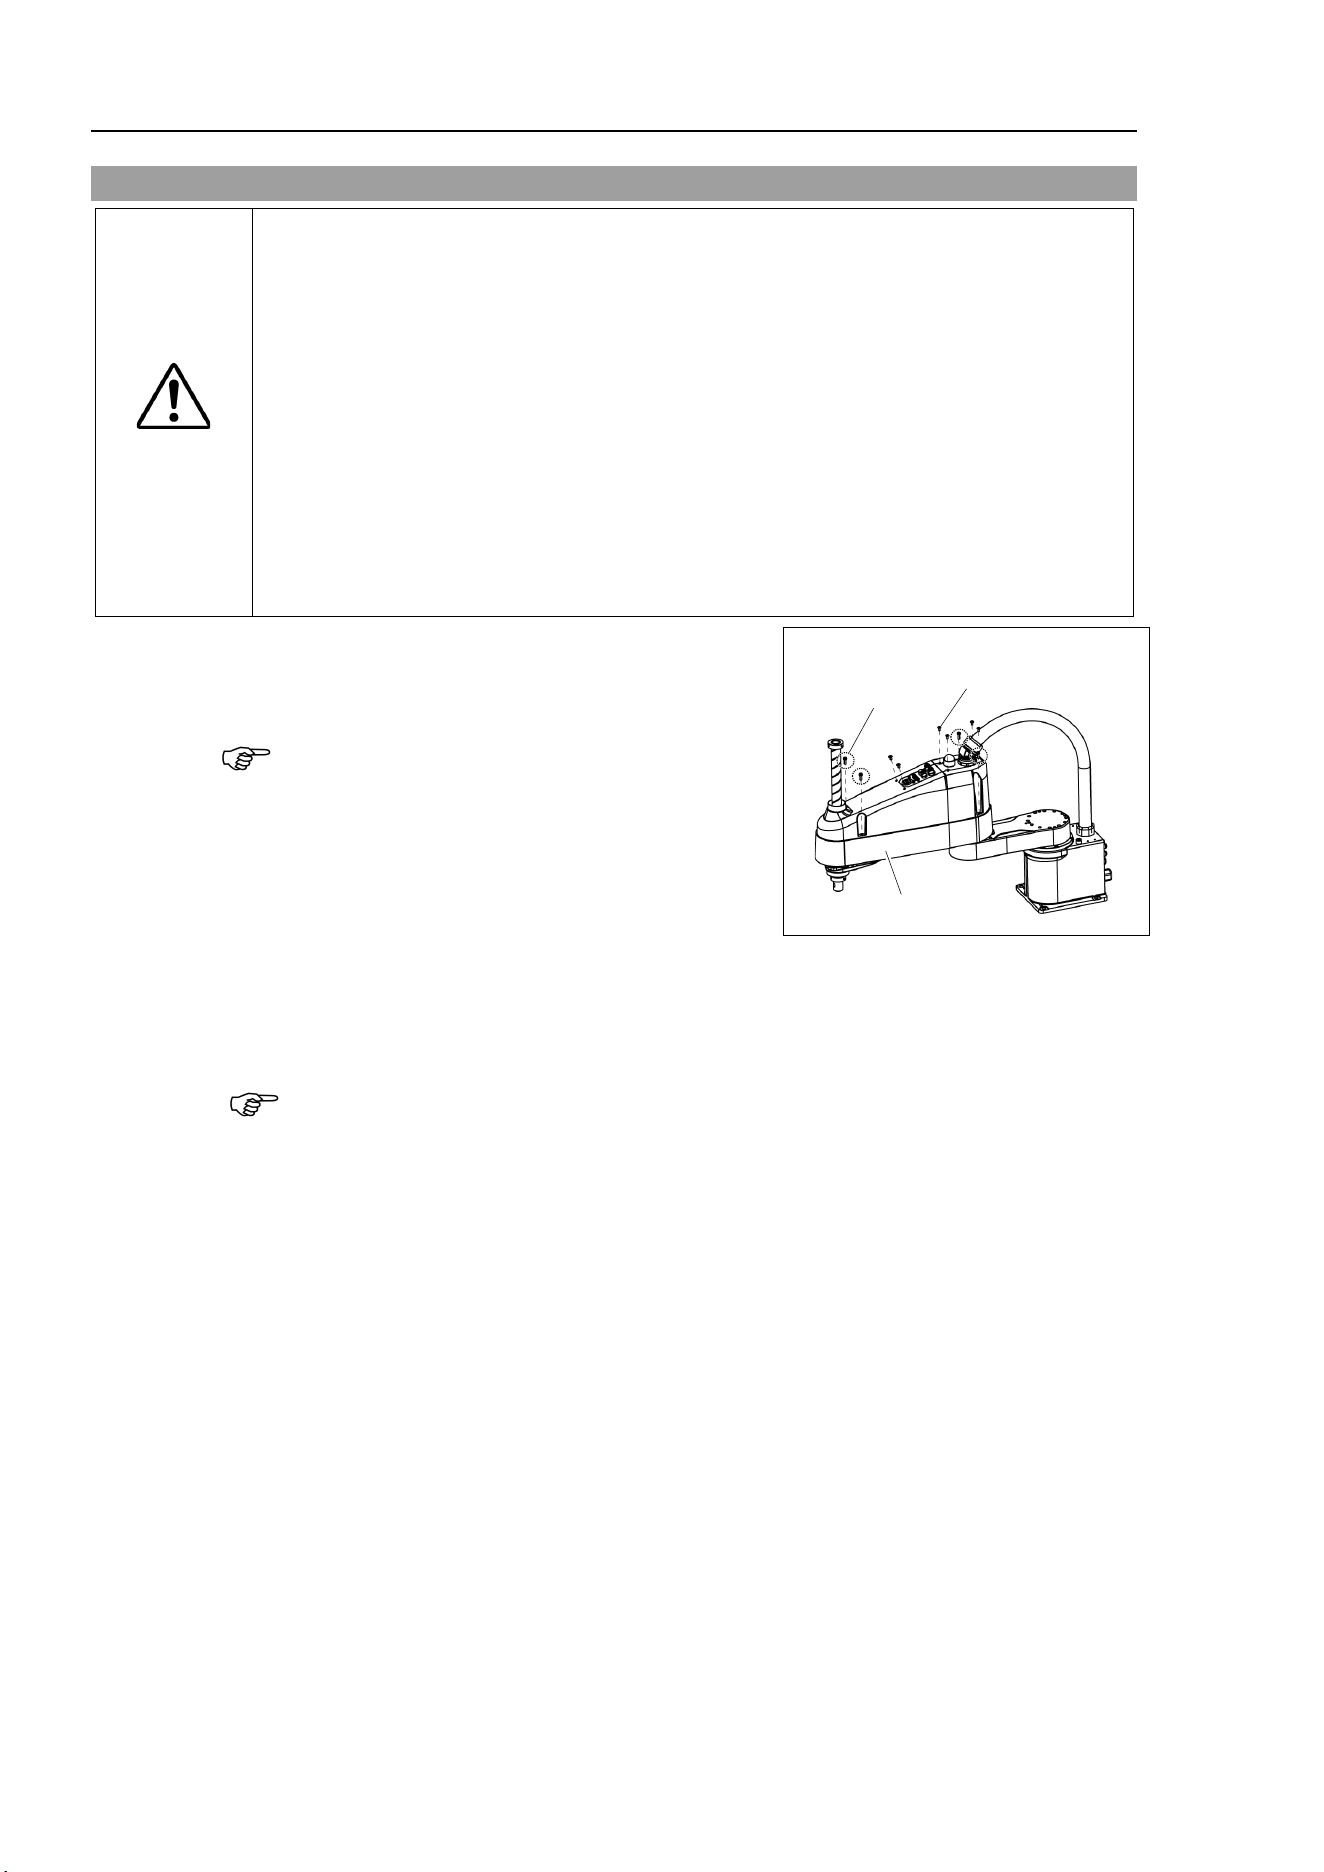
Maintenance 3. Covers
66 LS10-B R ev.6
3.1 Arm Top Cover
CAUTION
■
Do not remove the arm top cover
forcibly. Removing the cover forcibly may result
in damage to the cables, disconnection, and/or contact failure.
Damaged cables,
disconnection, or contact failure is extremely hazardous and may result in electric
shock and/or improper function of the robot system.
■
When mounting the cover, be careful not to allow the cables to interfere with the
cover mounting and
do not bend these cables forcibly to push them into the cover.
Unnecessary strain on cables may result in damage to the cables, disconnection,
and/or contact failure. Damaged cables, disconnection, or contact failure is
extremely hazardous and may result in electric shock and/or improper function of
the robot syste
m.
When
routing the cables, observe the cable locations
after removing the cover.
Be sure to
place the cables back to their original locations.
Arm Top Cover
Removal
Unscrew the Arm Top Cover mounting bolts, and
then lift the cover.
When bellows are installed to the manipulator,
remove the upper bellows and then remove the
Arm Top Cover. For bellows removal, refer to
Maintenance 9. Bellows
.
Be careful for user
wires and tubes when removing
t
he cover.
4-M4×16
Double sems
6-M4×8
Truss
Arm Top Cover
Arm Top Cover
Installation
Put the arm top cover to the arm and secure with the Arm Top Cover mounting bolts.
After
securing the Arm Top Cover, make sure that the lower limit mechanical stop is not
touch
ing the cylindrical part of the Arm Top Cover.
When bellows are
installed to the manipulator, install the Arm Top Cover and then set the
upper bellows
. For bellows installation, refer to Maintenance 9. Bellows.
NOTE
NOTE
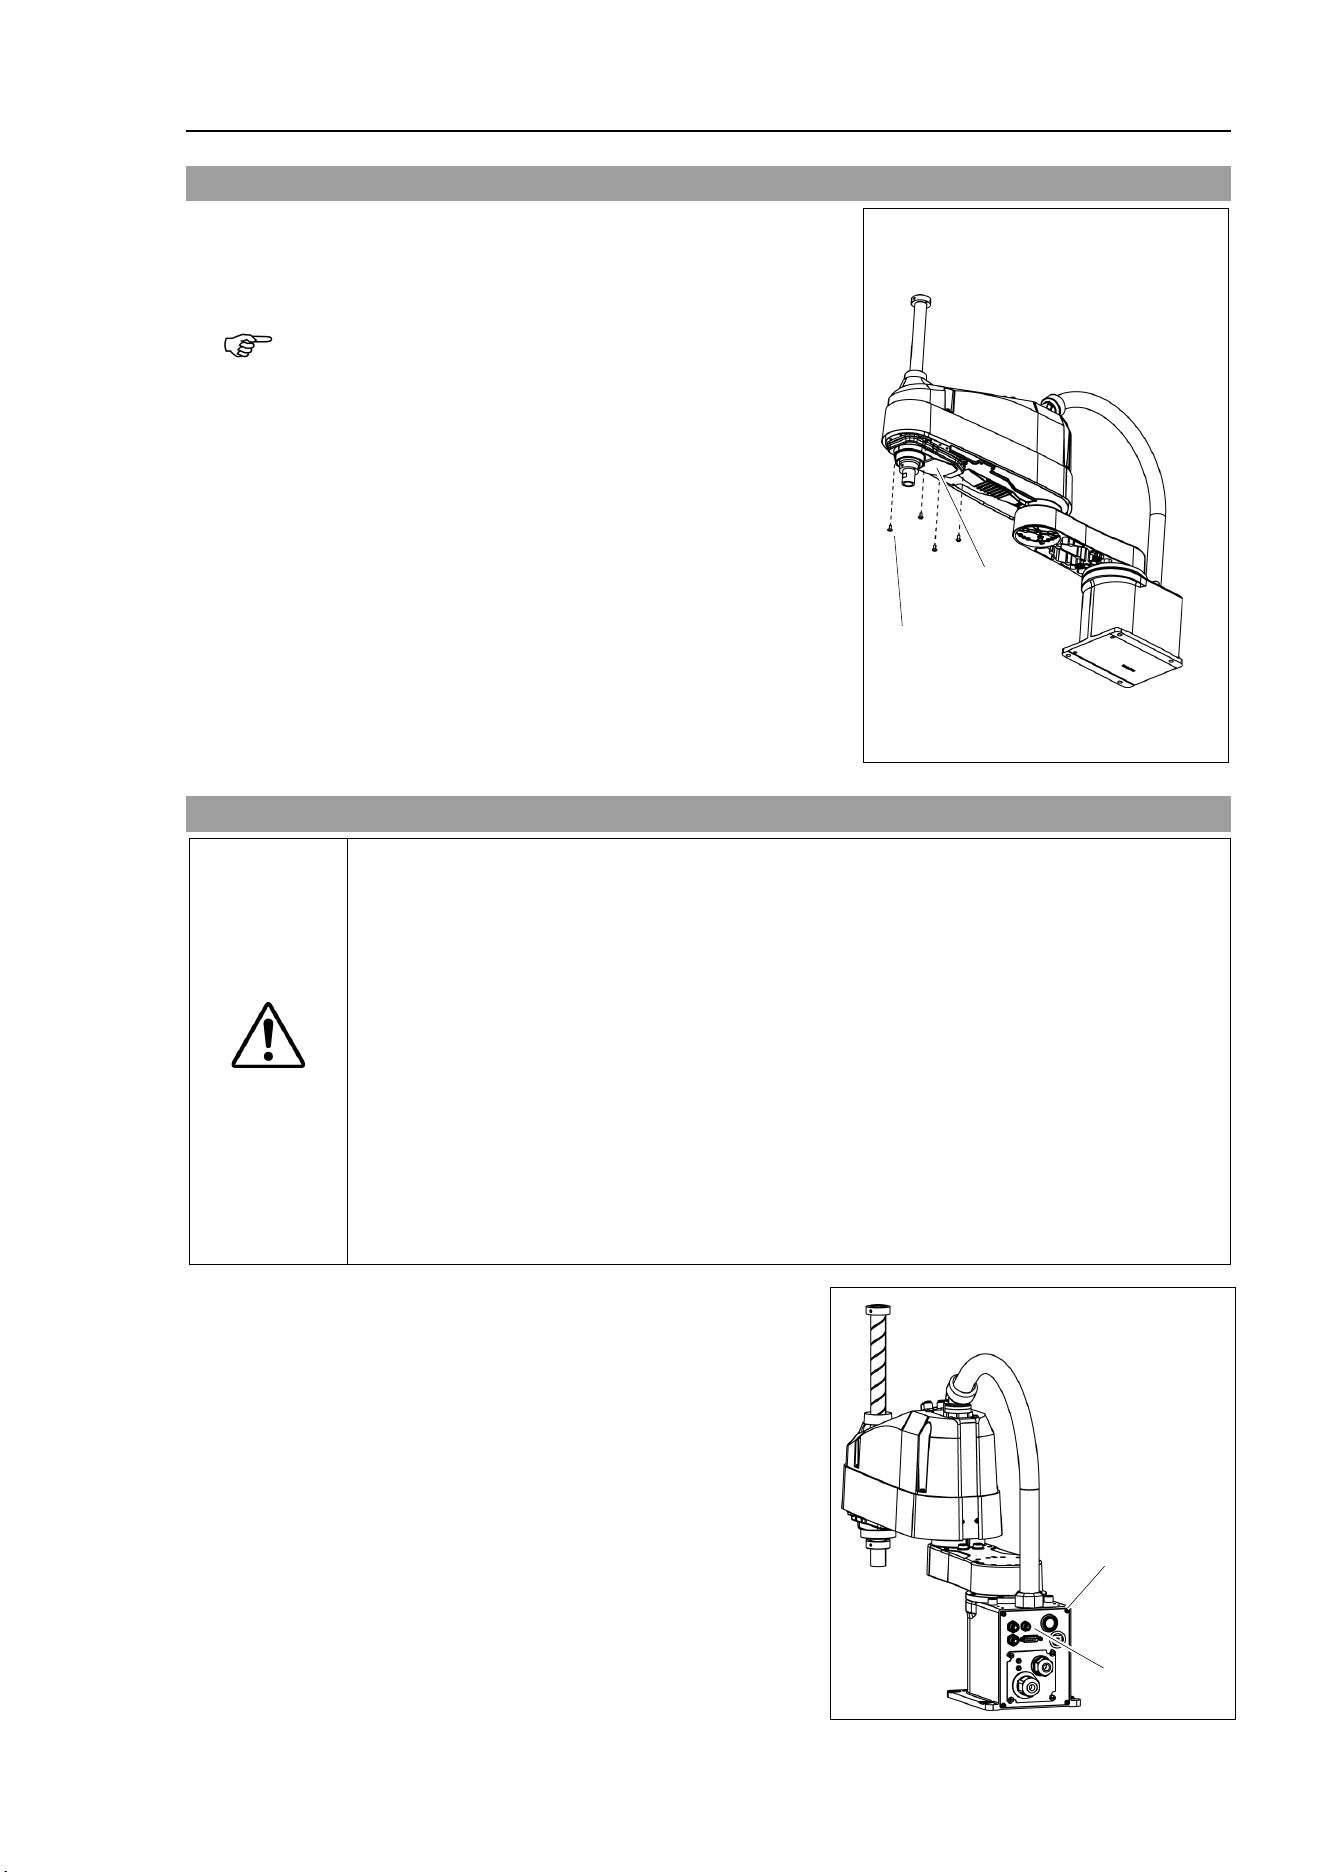
Maintenance 3. Covers
LS10-B Rev.6 67
3.2 Arm Bottom Cover
Unscrew the
Arm Bottom Cover mounting bolts and then
remove
the cover.
Be careful of the
end effector. When the end effector is
installed, t
he Arm Bottom Cover may not be removed from
the shaft.
When you replace the ball screw spline unit, y
ou need to
remove the end effector to remove the Arm Bottom Cover
completely.
When you can work (maintenance, inspection) without
removing the
cover completely, move the shaft to the lower
limit and lower the Arm Bottom C
over.
When bellows are installed to the manipulator, remove or
pull down the lower bellows and then remove the arm
bottom cover. For bellows removal, refer to
Maintenance
9. Bellows
.
4-M4×10
Arm Bottom Cover
3.3 Connector Plate
CAUTION
■
Do not remove the connector plate
forcibly. Removing the connector plate
forcibly may result in damage to the cables, disconnection, and/or contact failure.
Damaged cables, disconnection, or contact failure is extremely hazardous and
may result in electr
ic shock and/or improper function of the robot system.
■
When
mounting the connector plate, be careful not to allow the cables to interfere
with the plate mounting and d
o not bend these cables forcibly to push them into
the cover.
Unnecessary strain on cables may result in damage to the cables, disconnection,
and/or contact failure. Damaged cables, disconnection, or contact failure is
extremely hazardous and may result in electric shock and/or improper
function of
the robot system.
When
routing the cables, observe the cable locations after removing the connector
plate
. Be sure to place the cables back to their original locations.
Unscrew the Connector Plate mounting
bolts and remove the plate.
4-M4×10
Connector
Plate
NOTE
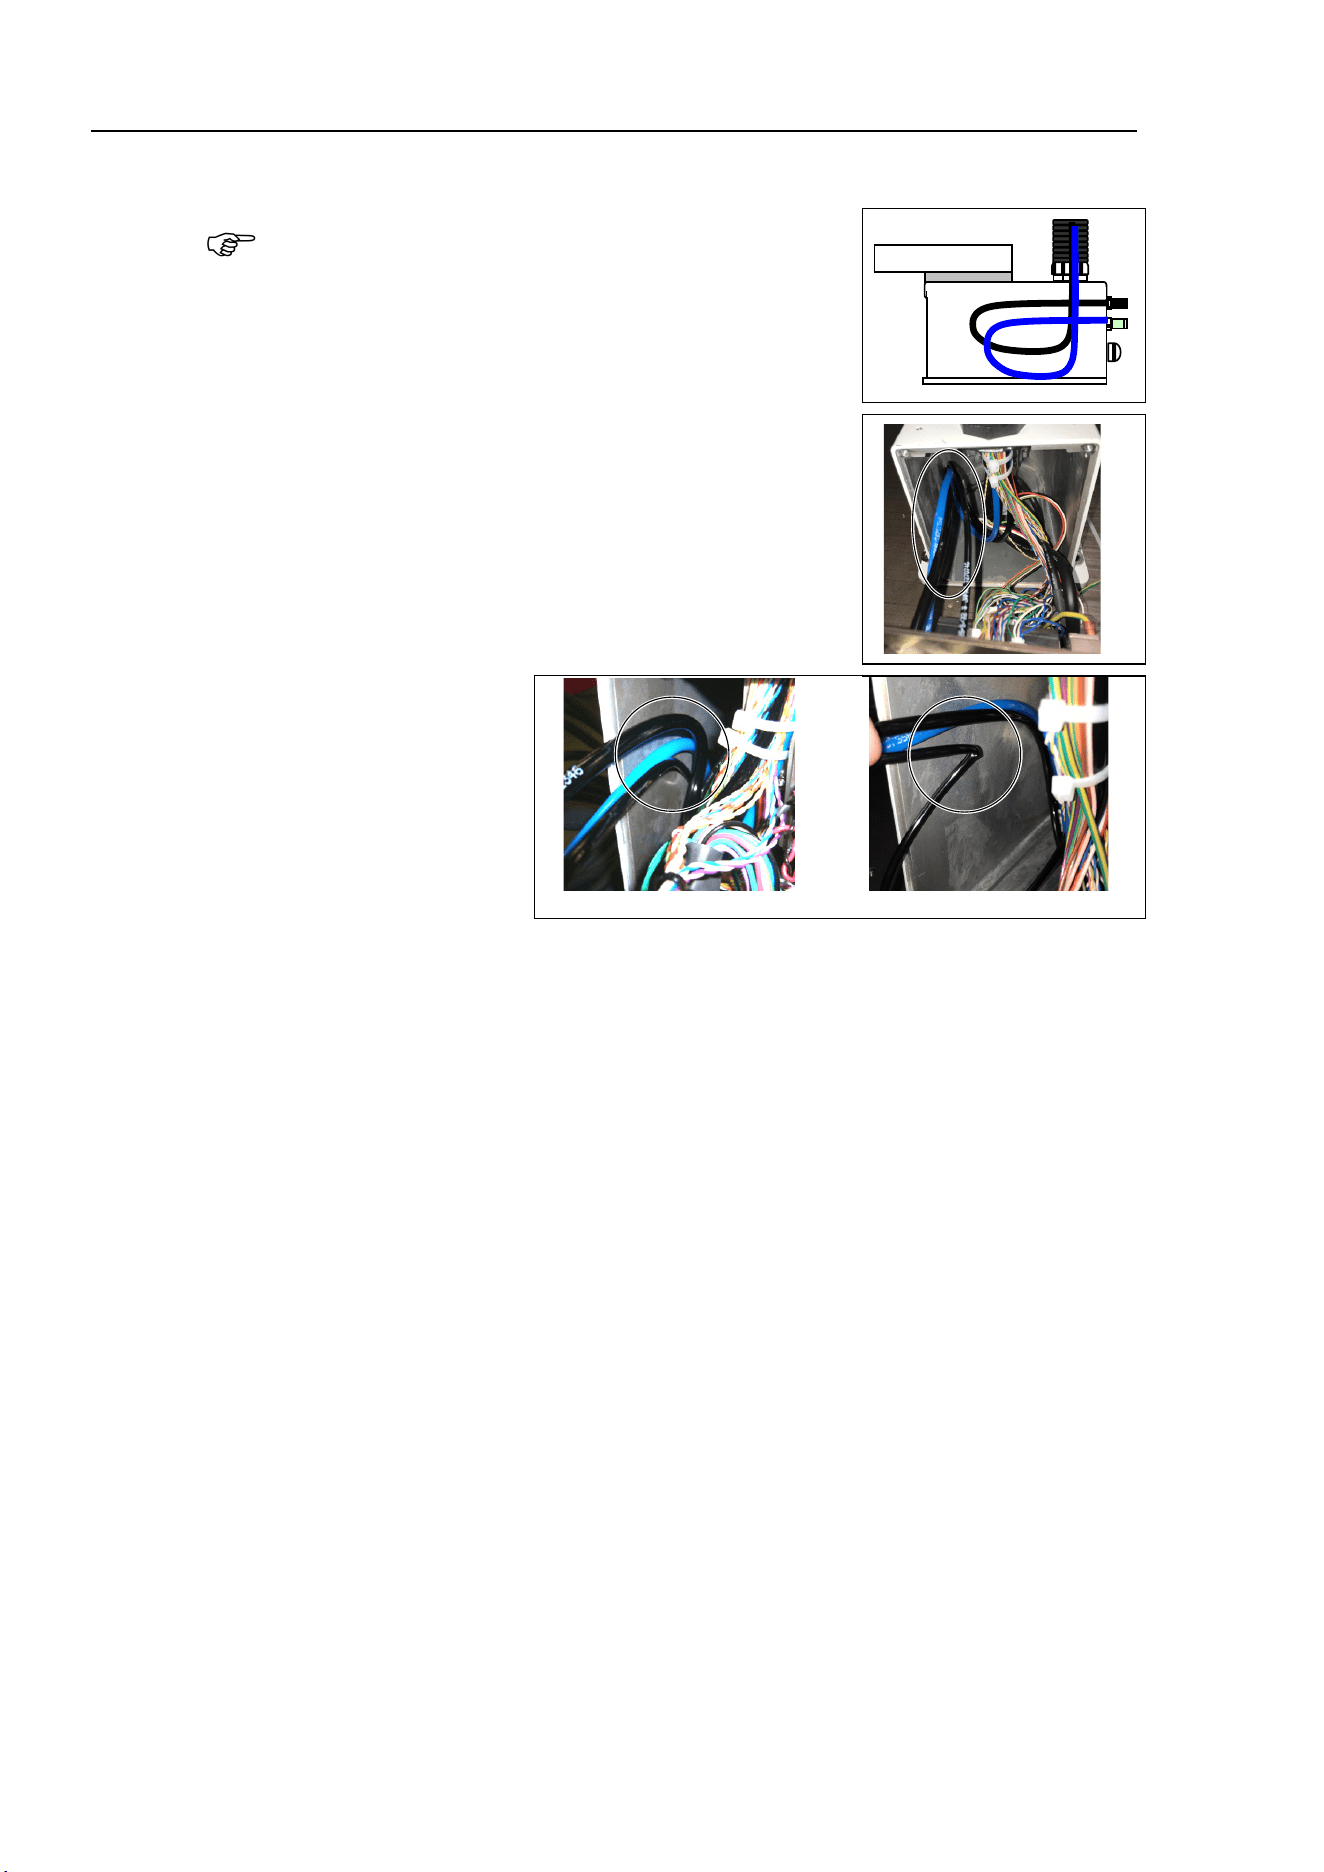
Maintenance 3. Covers
68 LS10-B R ev.6
When mounting the Connector Plate, be careful of the following.
Prevent the air tube from bending sharply inside the
manipulator. Also, do not block the air flow.
If there is a kink in the air tube, air flow is blocked while
the manipulator is operating and may cause a trouble.
Put the air tube along the left side wall as shown in the
picture.
GOOD: Curved
BAD: Bended
NOTE
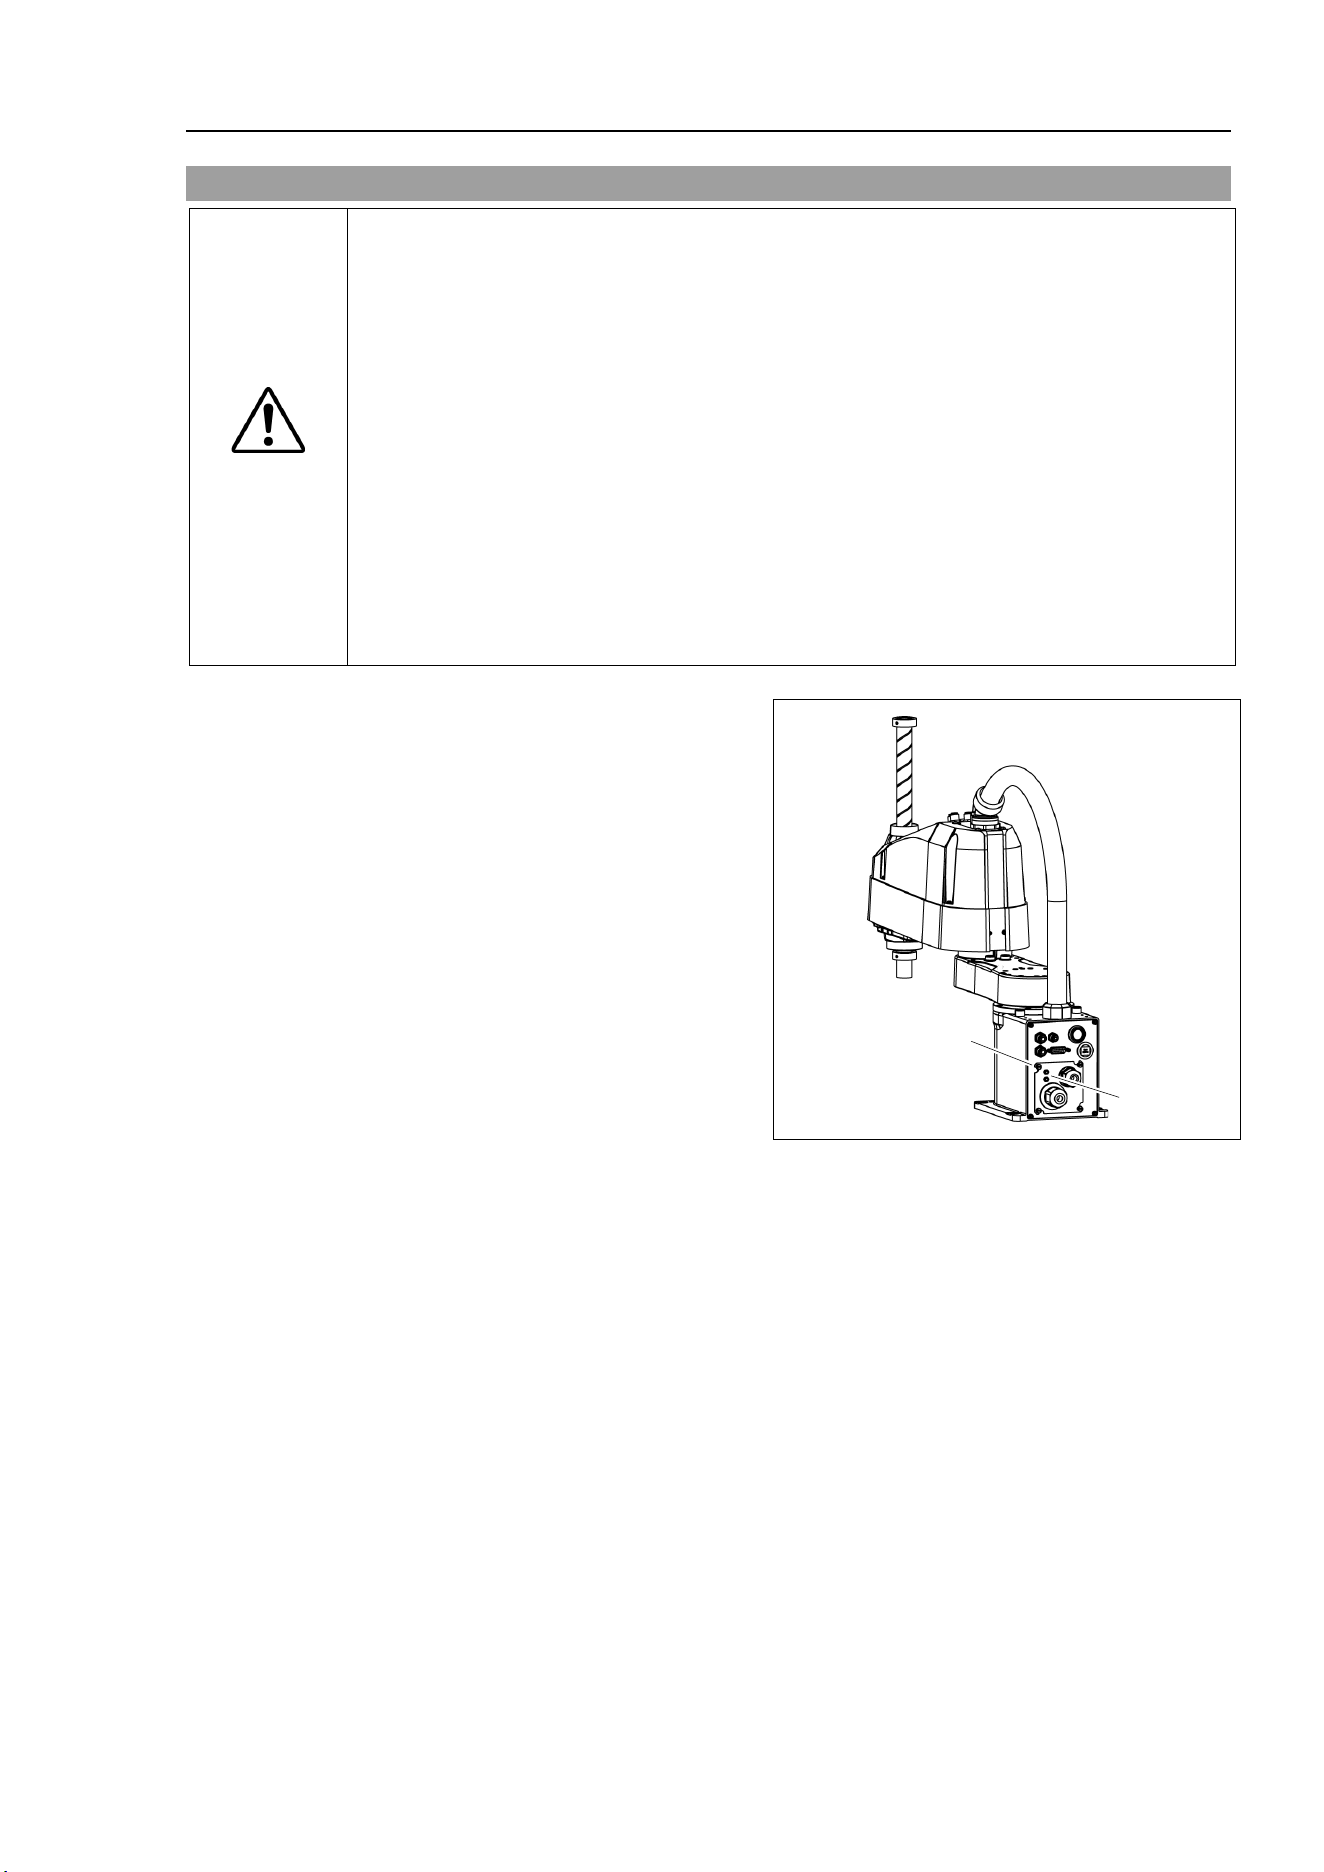
Maintenance 3. Covers
LS10-B Rev.6 69
3.4 Connector Sub Plate
CAUTION
■
Do not remove the connector sub plate
forcibly. Removing the connector sub
plate
forcibly may result in damage to the cables, disconnection, and/or contact
failure. Damaged cables, disconnection, or contact failure is extremely
hazardous and may result in electric shock and/or improper function of the robot
system.
■
When
mounting the connector sub plate, be careful not to allow the cables to
interfere with the plate mounting and d
o not bend these cables forcibly to push
them into the cover.
Unnecessary strain on cables may result in damage to the cables, disconnection,
and
/or contact failure. Damaged cables, disconnection, or contact failure is
extremely hazardous and may result in electric shock and/or improper
function of
the robot system.
When
routing the cables, observe the cable locations after removing the connector
sub plate
. Be sure to place the cables back to their original locations.
Unscrew the Connector Sub Plate
mounting bolts and remove the plate.
Refer to
Setup&Operation 3.6 Connecting
the Cables.
Connector
Sub Plate
4-M3
Finger screws
(No need to unscrew)
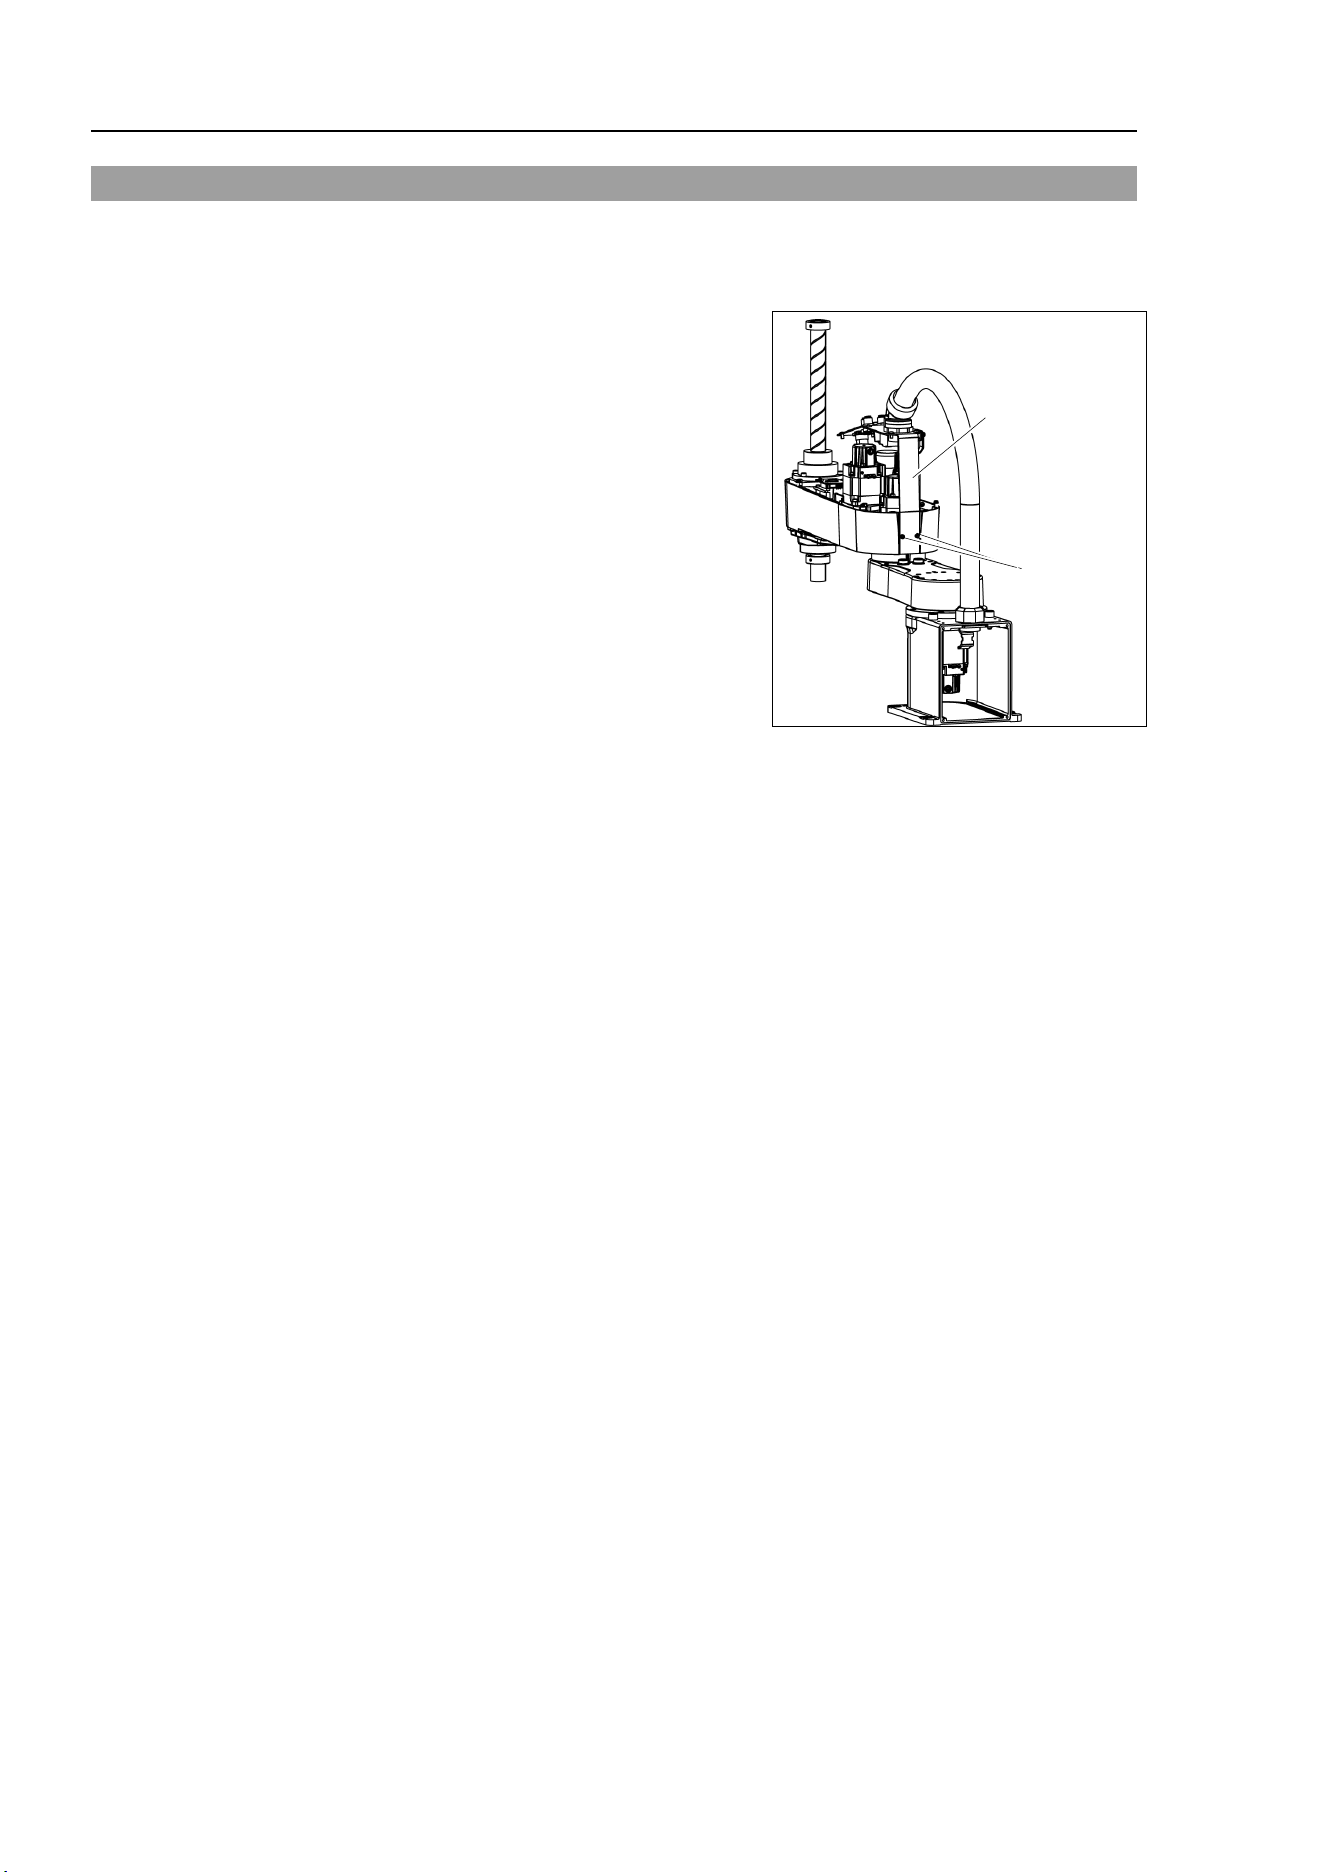
Maintenance 3. Covers
70 LS10-B R ev.6
3.5 User Plate
User Plate
Removal
(1)
Remove
the Arm Top Cover.
Refer to
Maintenance: 3.1 Arm Top Cover.
(2)
Unscrew the User Plate mounting bolts and
remove the plate.
2-M4×10
User Plate
User Plate
Installation
(1)
Put the User Plate to the arm and secure using the mounting bolts.
(2)
Mount the Arm Top Cover.
Refer to Maintenance: 3.1 Arm Top Cover.
Maintenance 4. Cable
LS10-B Rev.6 71
4. Cable
WARNING
■
Do not connect or disconnect the motor connectors while the power to the robot
system is turned ON. Connecting or disconnecting the motor connectors
with
the power ON is extremely hazardous and may result
in serious bodily injury as
the Manipulator may mo
ve abnormally, and also may result in electric shock
and/or malfunction of the robot system.
■
To shut off power
to the robot system, disconnect the power plug from the power
source. Be sure to connect the AC power cable to a power receptacle.
DO NOT connect it directly to a factory power source.
■
Before performing any replacement procedure, turn OFF the Controller and
related equipment,
and then disconnect the power plug from the power source.
Performing any replacement procedure with the power ON is extremely hazardous
and may result in
electric shock and/or malfunction of the robot system.
■
Be careful
not to get any foreign substances in the Manipulator, connectors, and
pins during maintenance.
Turning ON the power to the robot system when any
foreign substances exist in them is extremely
hazardous and may result in electric
shock
and/or malfunction of the robot system.
CAUTION
■
Be sure to connect the cables properly.
Do not allow unnecessary strain on the
cables. (Do not
put heavy objects on the cables. Do not bend or pull the cables
forcibl
y.) The unnecessary strain on the cables may result in damage to the
cables, disconnection, and/or contact failure. Damaged c
ables, disconnection,
or contact failure is extremely hazardous and may result in electric shock and/or
improper function of the robot system.
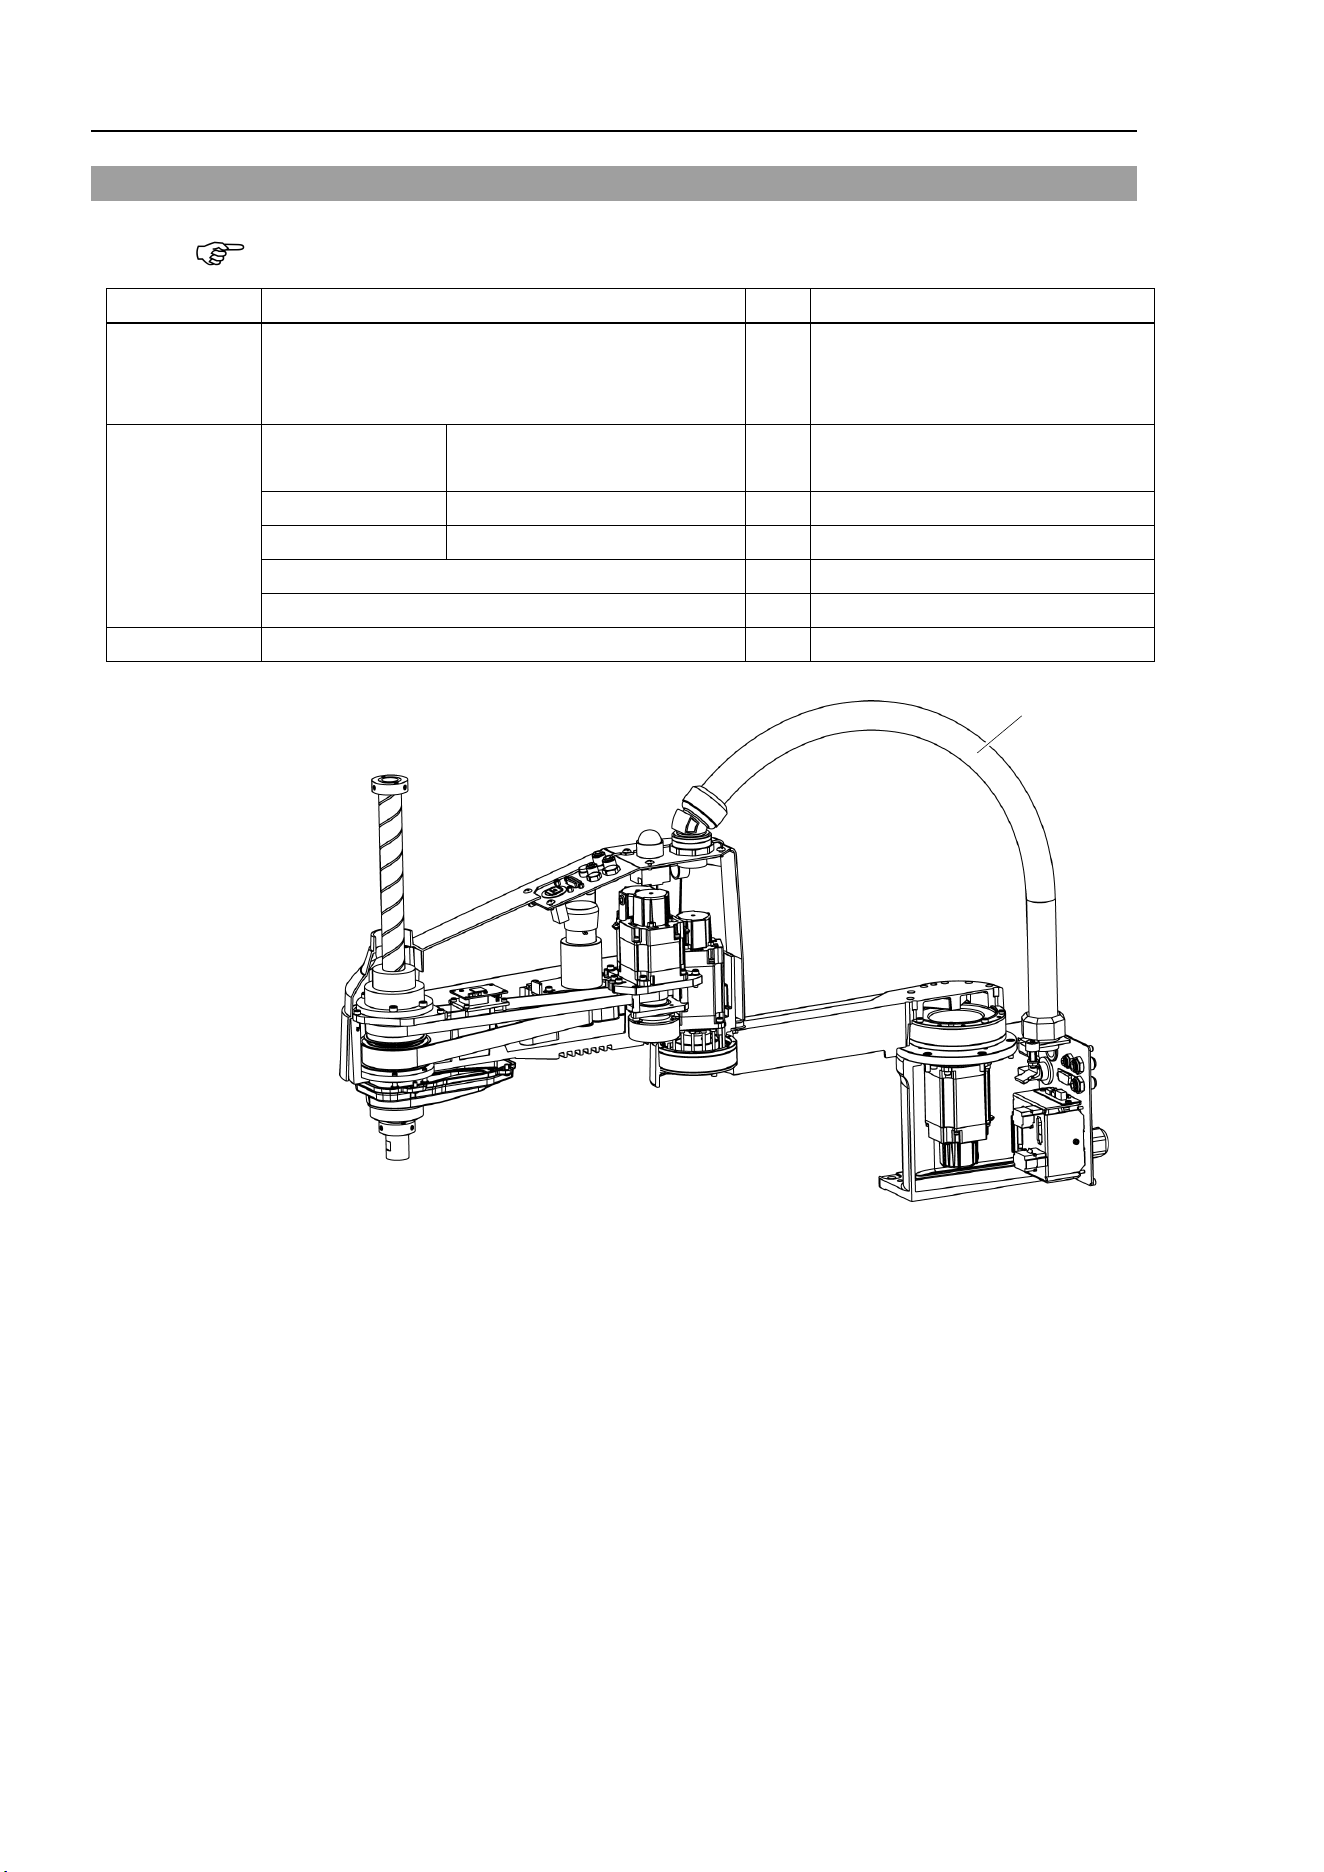
Maintenance 4. Cable
72 LS10-B R ev.6
4.1 Replacing Cable Unit
LS10-B series manipulator does not have batteries. Position data is memorized by the
motor. When replacing cables, calibration is not necessary.
Name
Qty.
Note
Maintenance
parts
Cable unit 1
LS10-B60** : 2196931
LS10-B70** : 2196932
LS10-B80** : 2196933
Tools
Hexagonal
wrench
width across flats: 3 mm
1
For M4 screw
Spanner
width across flats: 5 mm
1
For D-sub connector removal
Nut screwdriver
width across flats: 5 mm
1
For D-sub connector removal
Torque wrench
1
Nippers
1
For cutting wire tie
Material
Wire tie
-
Cable unit
(Figure: LS10-B602S)
NOTE
Maintenance 4. Cable
LS10-B Rev.6 73
CAUTION
■
If the connectors have been disconnected during the replacement of the cable
unit, b
e sure to reconnect the connectors to their proper positions. Refer to the
block diagrams.
Improper connection of the connectors may result in improper
function of the robot
system.
For details on the connections, refer to
Maintenance: 4.2 Wiring Diagrams.
■
When installing the cover, be careful not to allow the cables to interfere with the
co
ver mounting and do not bend these cables forcibly to push them into the cover.
Unnecessary strain on cables may result in damage to the cables, disconnection,
and/or contact failure. Damaged cables, disconnection, or contact failure is
extremely hazardo
us and may result in electric shock and/or improper function of
the robot system.
When
routing the cables, observe the cable locations
after removing the cover.
Be sure to
place the cables back to their original locations.
■
Be sure to connect the
cables properly. Do not allow unnecessary strain on the
cables. (Do not
put heavy objects on the cables. Do not bend or pull the cables
forcibl
y.) The unnecessary strain on the cables may result in damage to the
cables, disconnection, and/or contact fai
lure. Damaged cables, disconnection,
or contact failure is extremely hazardous and may result in electric shock and/or
improper function of the robot system.
A brake is mounted on the motor of Joints #3 and #4 to prevent the shaft from moving down
and rotating due to the weight of the end effector while the power to the Controller is OFF
or while the motor is in OFF status (MOTOR OFF).
Move the shaft down to its lower limit before the replacement procedure following the
removal steps.
NOTE
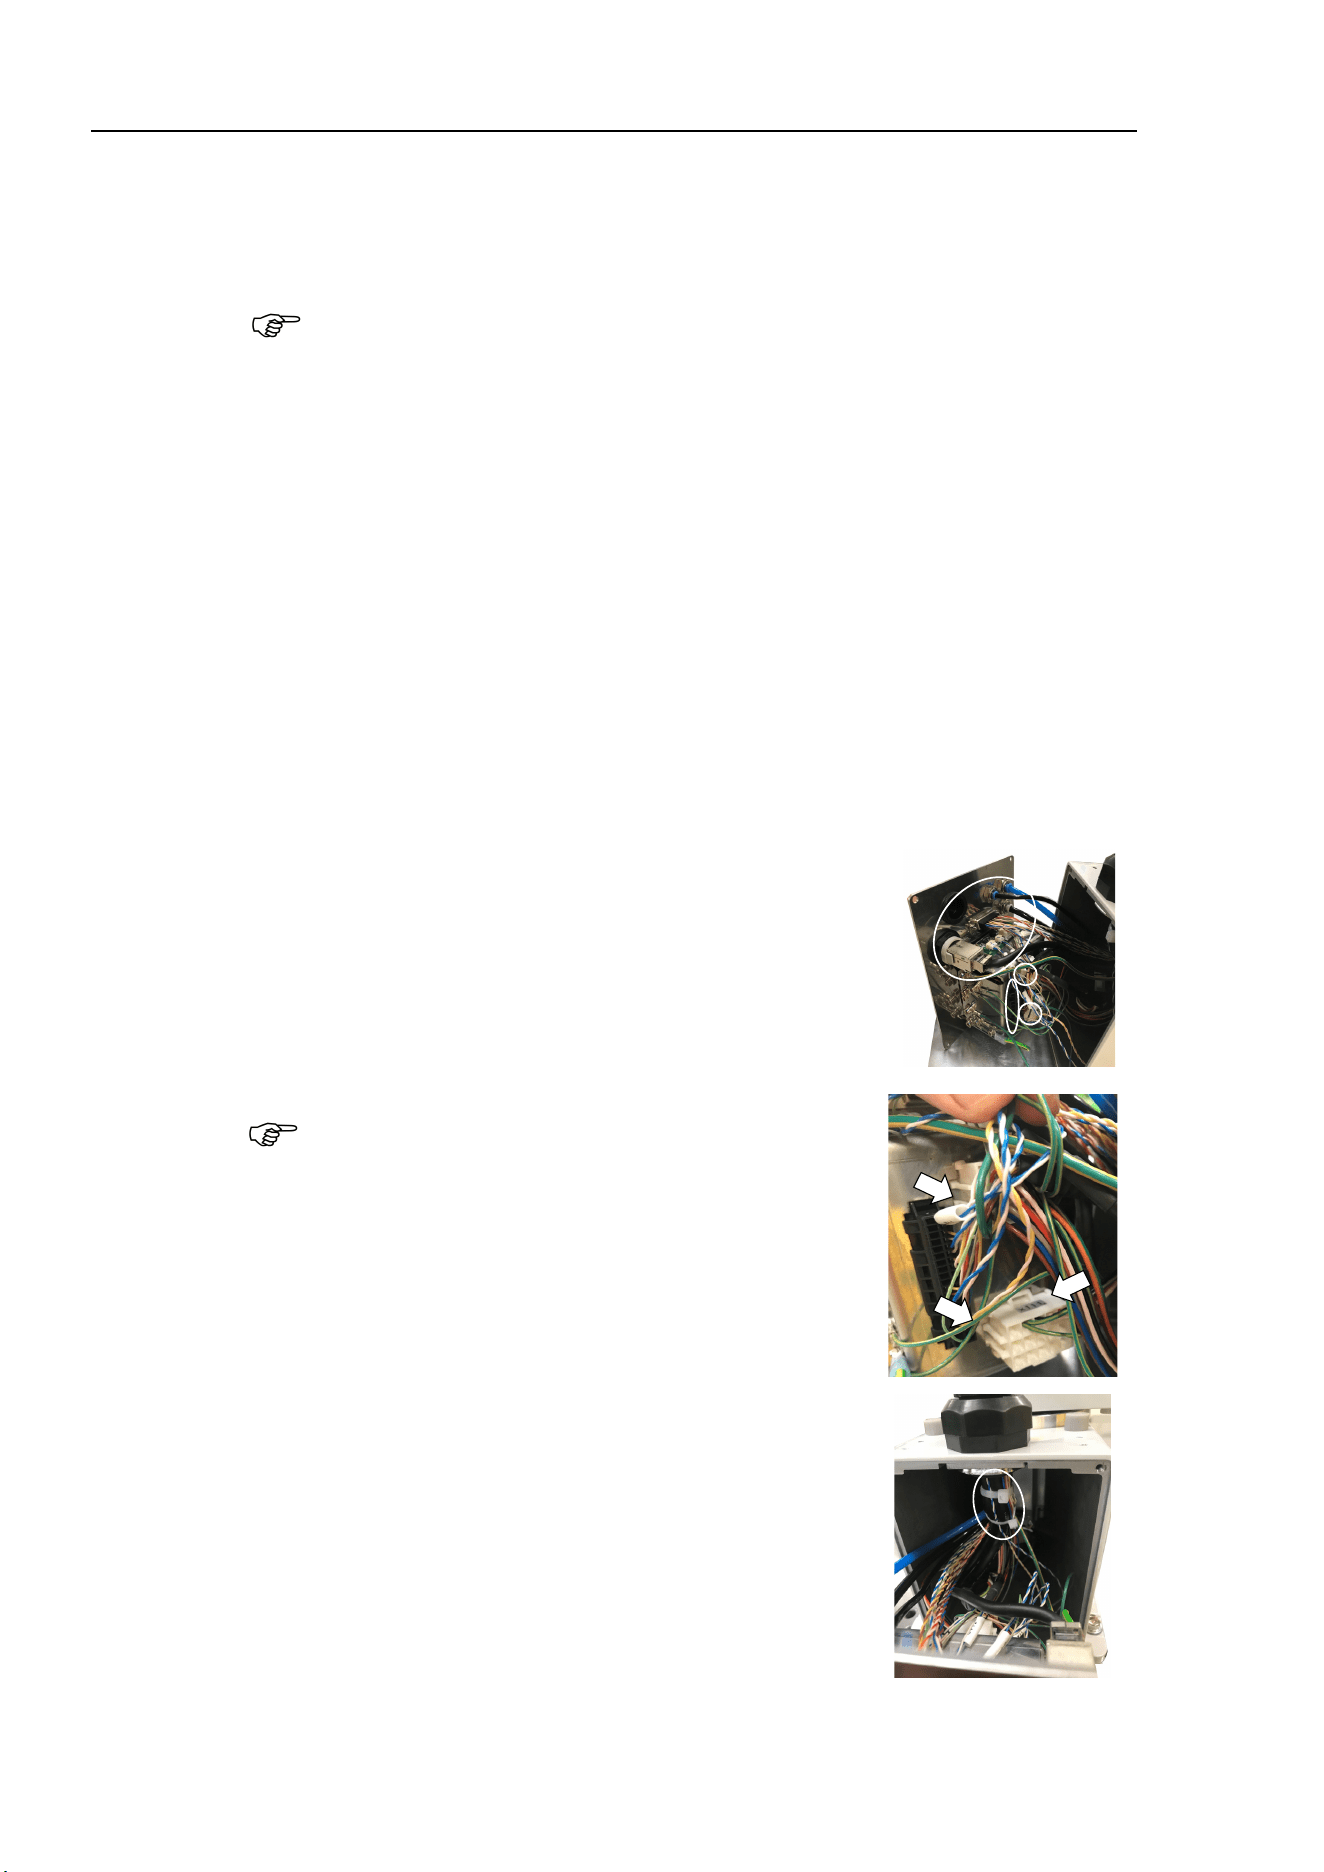
Maintenance 4. Cable
74 LS10-B R ev.6
Cable Unit
Removal
(1)
Turn ON the Controller and change the motor to OFF status (MOTOR OFF).
(2)
Press and hold
the brake release switch to let the shaft down. Be sure to keep enough
space and prevent the
end effector hitting any peripheral equipment.
The brake release switch is applied to both Joints #3 and Joint #4.
When the brake release switch is pressed, the respective brakes of the Joint #3 and Joint
#4 are released simultaneously.
Be careful of the
shaft falling and rotating while the brake release switch is
being
pressed
because the shaft may be lowered by the weight of an end effector.
(3)
Turn OFF
the Controller.
(4)
Remove the
Connector Sub Plate from the Connector Plate.
For details, refer to
Maintenance 3.4 Connector Sub Plate
(5)
Disconnect M/C cable.
For details, refer to
Setup & Operation 3.6 Connecting the Cables - Connect and
disconnect M/C cable.
(6)
Remove the Con
nector Plate.
For details, refer to Maintenance: 3.3 Connector Plate.
(7)
Remove the following that connected to the
(inside) of the
Connector Plate and Connector Sub Plate.
Air tube
D-sub cable
Ethernet cable (RJ45)
Connectors
: X11, X111, X121, CV11, CV12, CV13
F
or connectors fixed on the mount base, disconnect by
holding the
clip.
(8)
Cut off the two wire ties binding the cables on the base
side cable fixing plate.
NOTE
NOTE
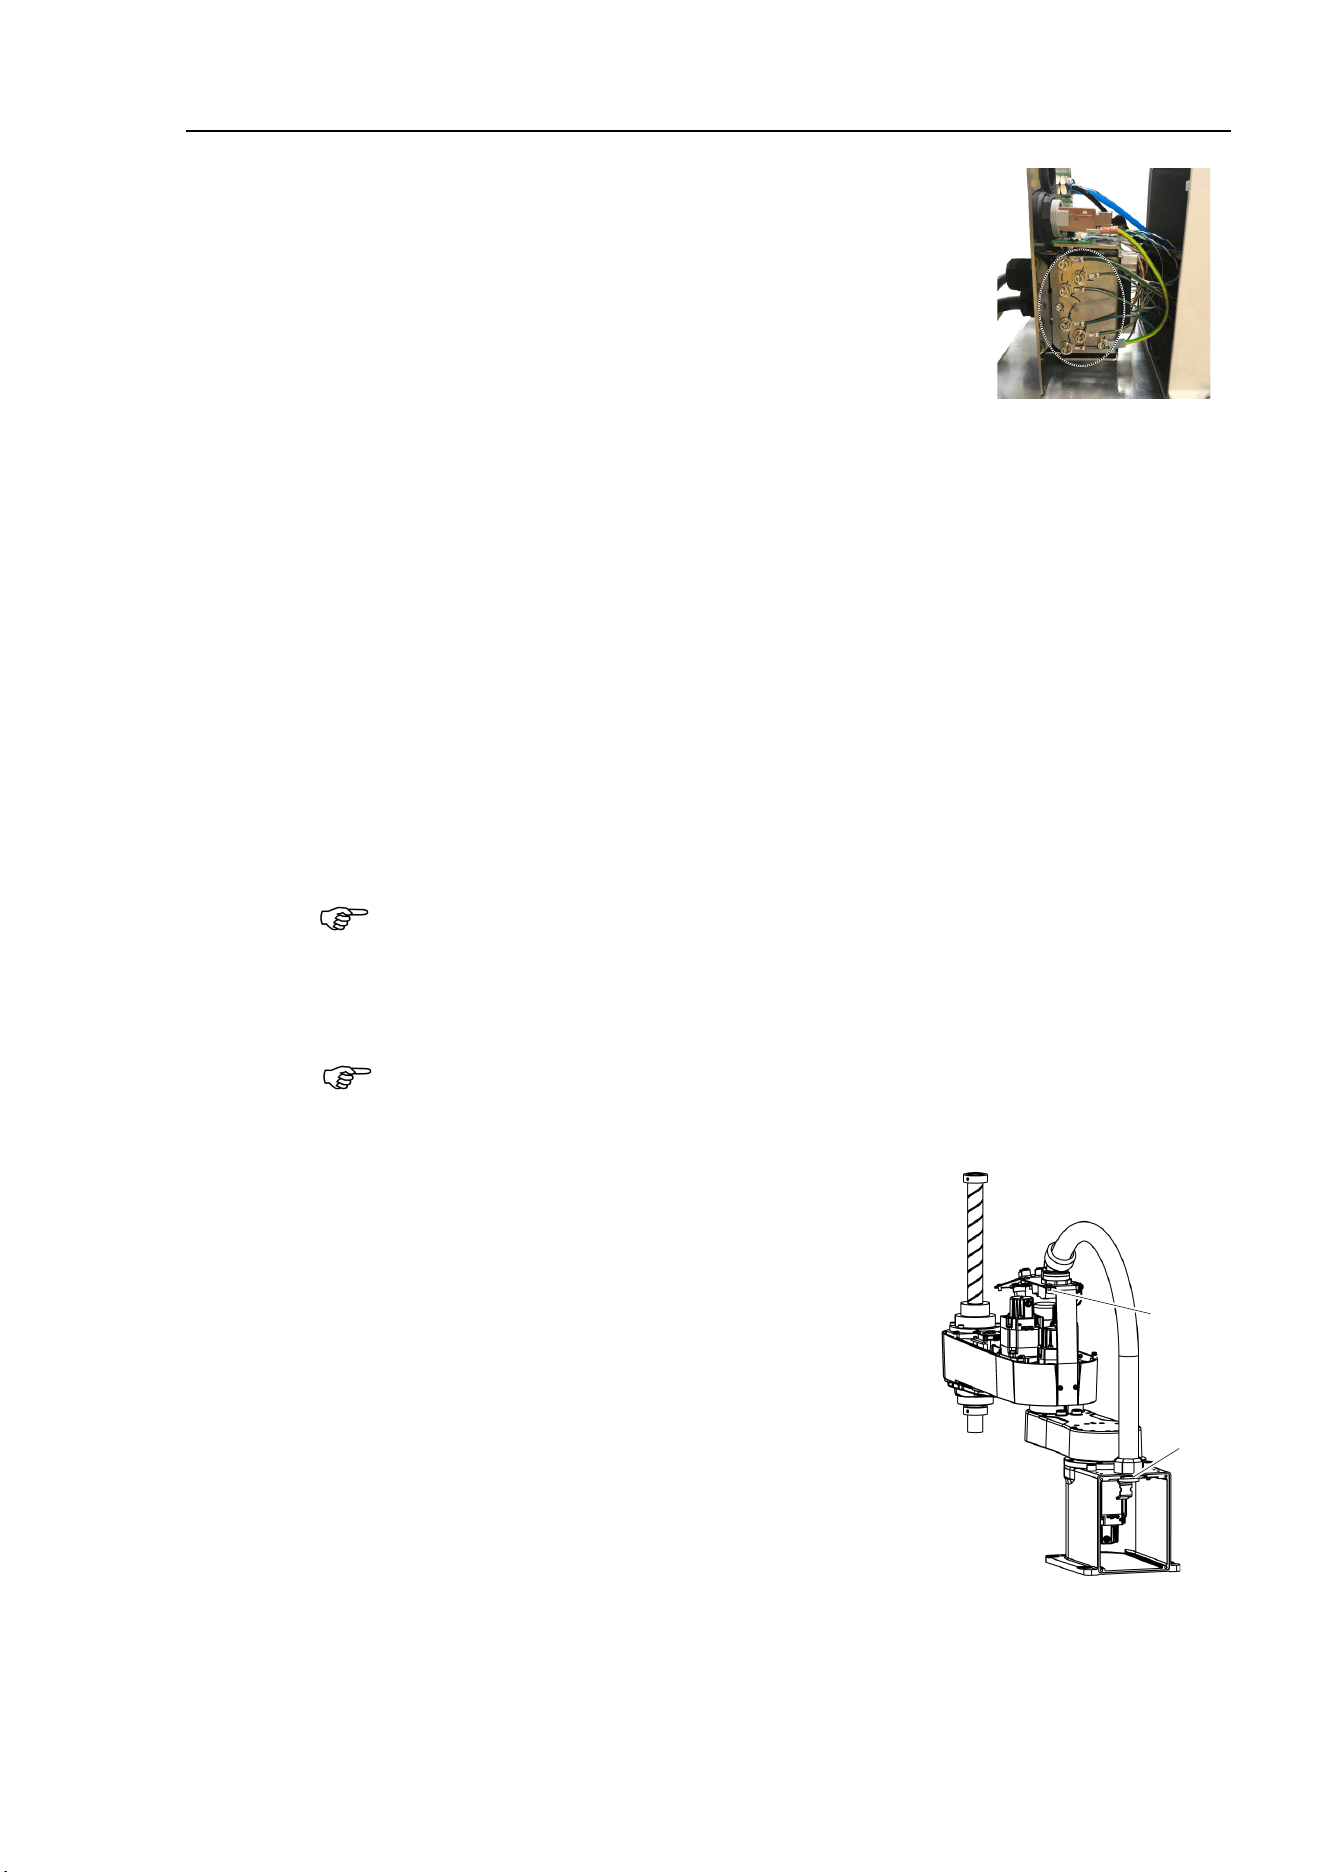
Maintenance 4. Cable
LS10-B Rev.6 75
(9)
Remove the seven ground wires that secured on the mount
base.
Be careful not to lose the spacer which holding the ground
wires.
(10)
Cut off the wire tie
binding the cables in the Base side.
(11)
Remove
the Arm Top Cover.
For details, refer to
Maintenance: 3.1 Arm Top Cover.
(12)
Remove the User Plate.
For details, refer to
Maintenance: 3.5 User Plate.
(13)
Disconnect 10 connectors on the Arm
side.
Connectors: X22, X33,X42, X43, X44, X51, BR, X221, X231, X241
(14)
Disconnect two connectors inside
the Base.
Connectors: X41, X211
(1
5)
Disconnect the D
-sub cable, air tube, and Ethernet cable (RJ45) from the User Plate.
Mounting screws for the D
-sub cable are very small. Be sure to keep the screws.
Press the ring on the fittings to pull out the air tube. (
ø6×2, ø4×1)
Remember
the cable layout for reconnecting the disconnected parts after replacement.
(1
6)
Remove the two ground wires from the User Plate.
Unscrew the cable clamp binding the cables in the Arm side
and
remove it and
protection sheet.
(1
7)
Be careful not to lose the cable clamp, protection sheet, and fixed screws.
(1
8)
The nut secures the cable duct fittings to the User
Plate. Rotate the nut to remove it, and pull out the
cables from the User Plate.
(16)
(17)
(19)
Rotate the cable duct fittings to remove the nut that
secures to the Base, and pull out the cables from the
Base.
NOTE
NOTE
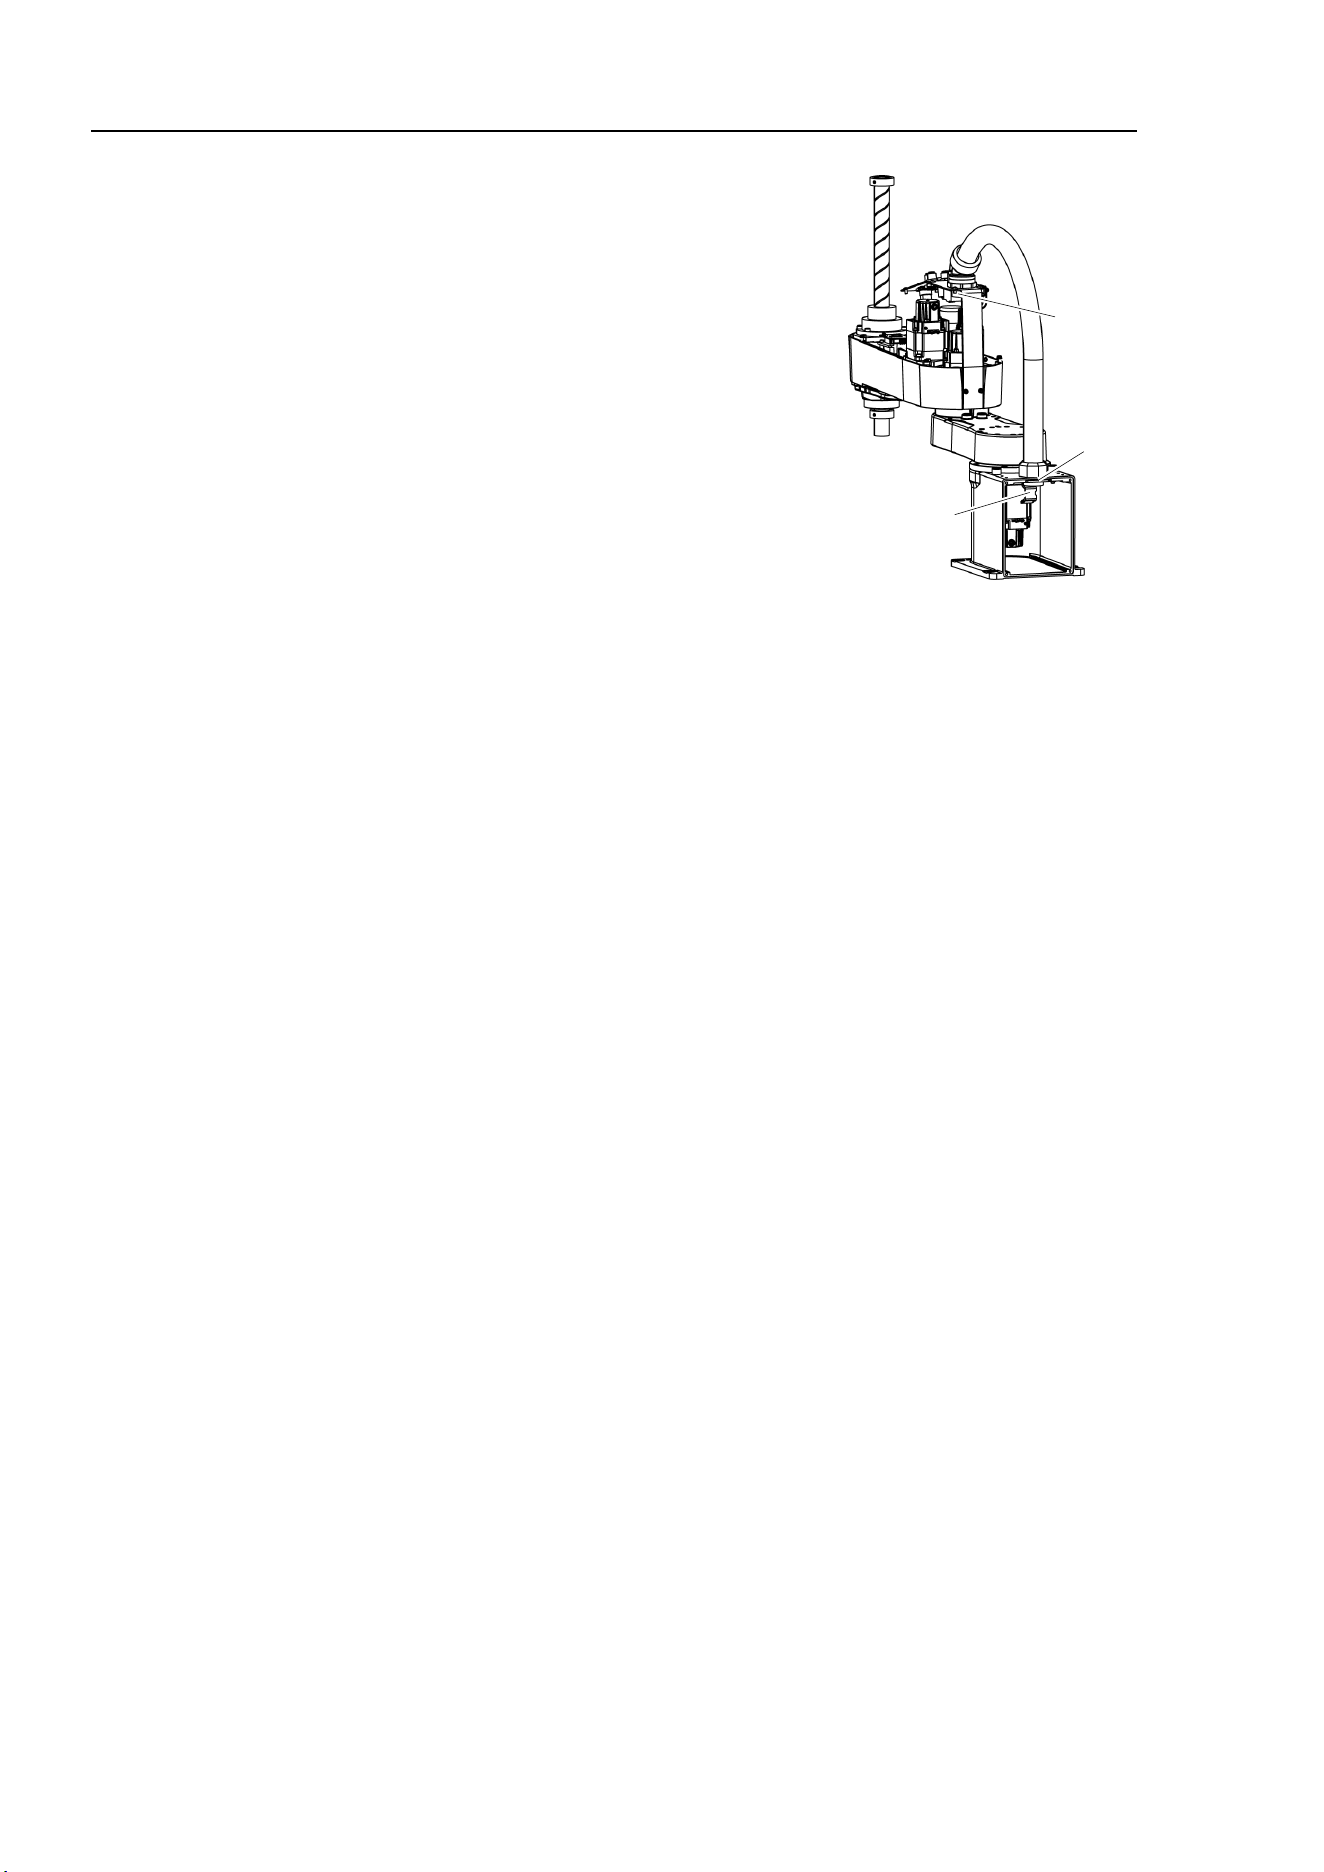
Maintenance 4. Cable
76 LS10-B R ev.6
Cable Unit
Installation
(1)
Pass the new cables through the Base, cable fixing
plate, and nut. Then, rotate the fittings to secure the
cables.
(2)
(1)
Cable fixing
plate
(2)
Pass the cables in the User Plate side through the User
Plate and nut and turn the
nut to secure the cables.
(3)
As with the wire tie cut off at the removal step
(8), bind the cables with a new wire tie.
(4)
Connect two connectors inside
the Base.
Connectors: X41, X211
(5)
Connect the following to mount base and the
Connector Plate.
Air tube, D-sub cable, Ethernet cable (RJ45)
Connectors: X11, X111, X121, CV11, CV12, CV13
(6)
Connect the ground wire on the Base side to the mount base.
(7)
Connect the air tube, D
-sub cable, and Ethernet cable (RJ45) to the User Plate.
(8)
Fix the ground wire on the User Plate.
(9)
Mount the User Plate.
For the details, refer to
Maintenance: 3.5 User Plate.
(10)
Connect the connectors.
Connectors: X22, X33,X42, X43, X44, X51, BR, X221, X231, X241
(11)
As with the wire tie cut off at the removal step (15), bind
the cables with a new wire tie.
(12)
Mount the Connector Plate.
For the details, refer to
Maintenance: 3.3 Connector Plate.
(13)
Place and secure the Arm Top Cover without the cables being stuck.
For
details, refer to Maintenance: 3.1 Arm Top Cover.
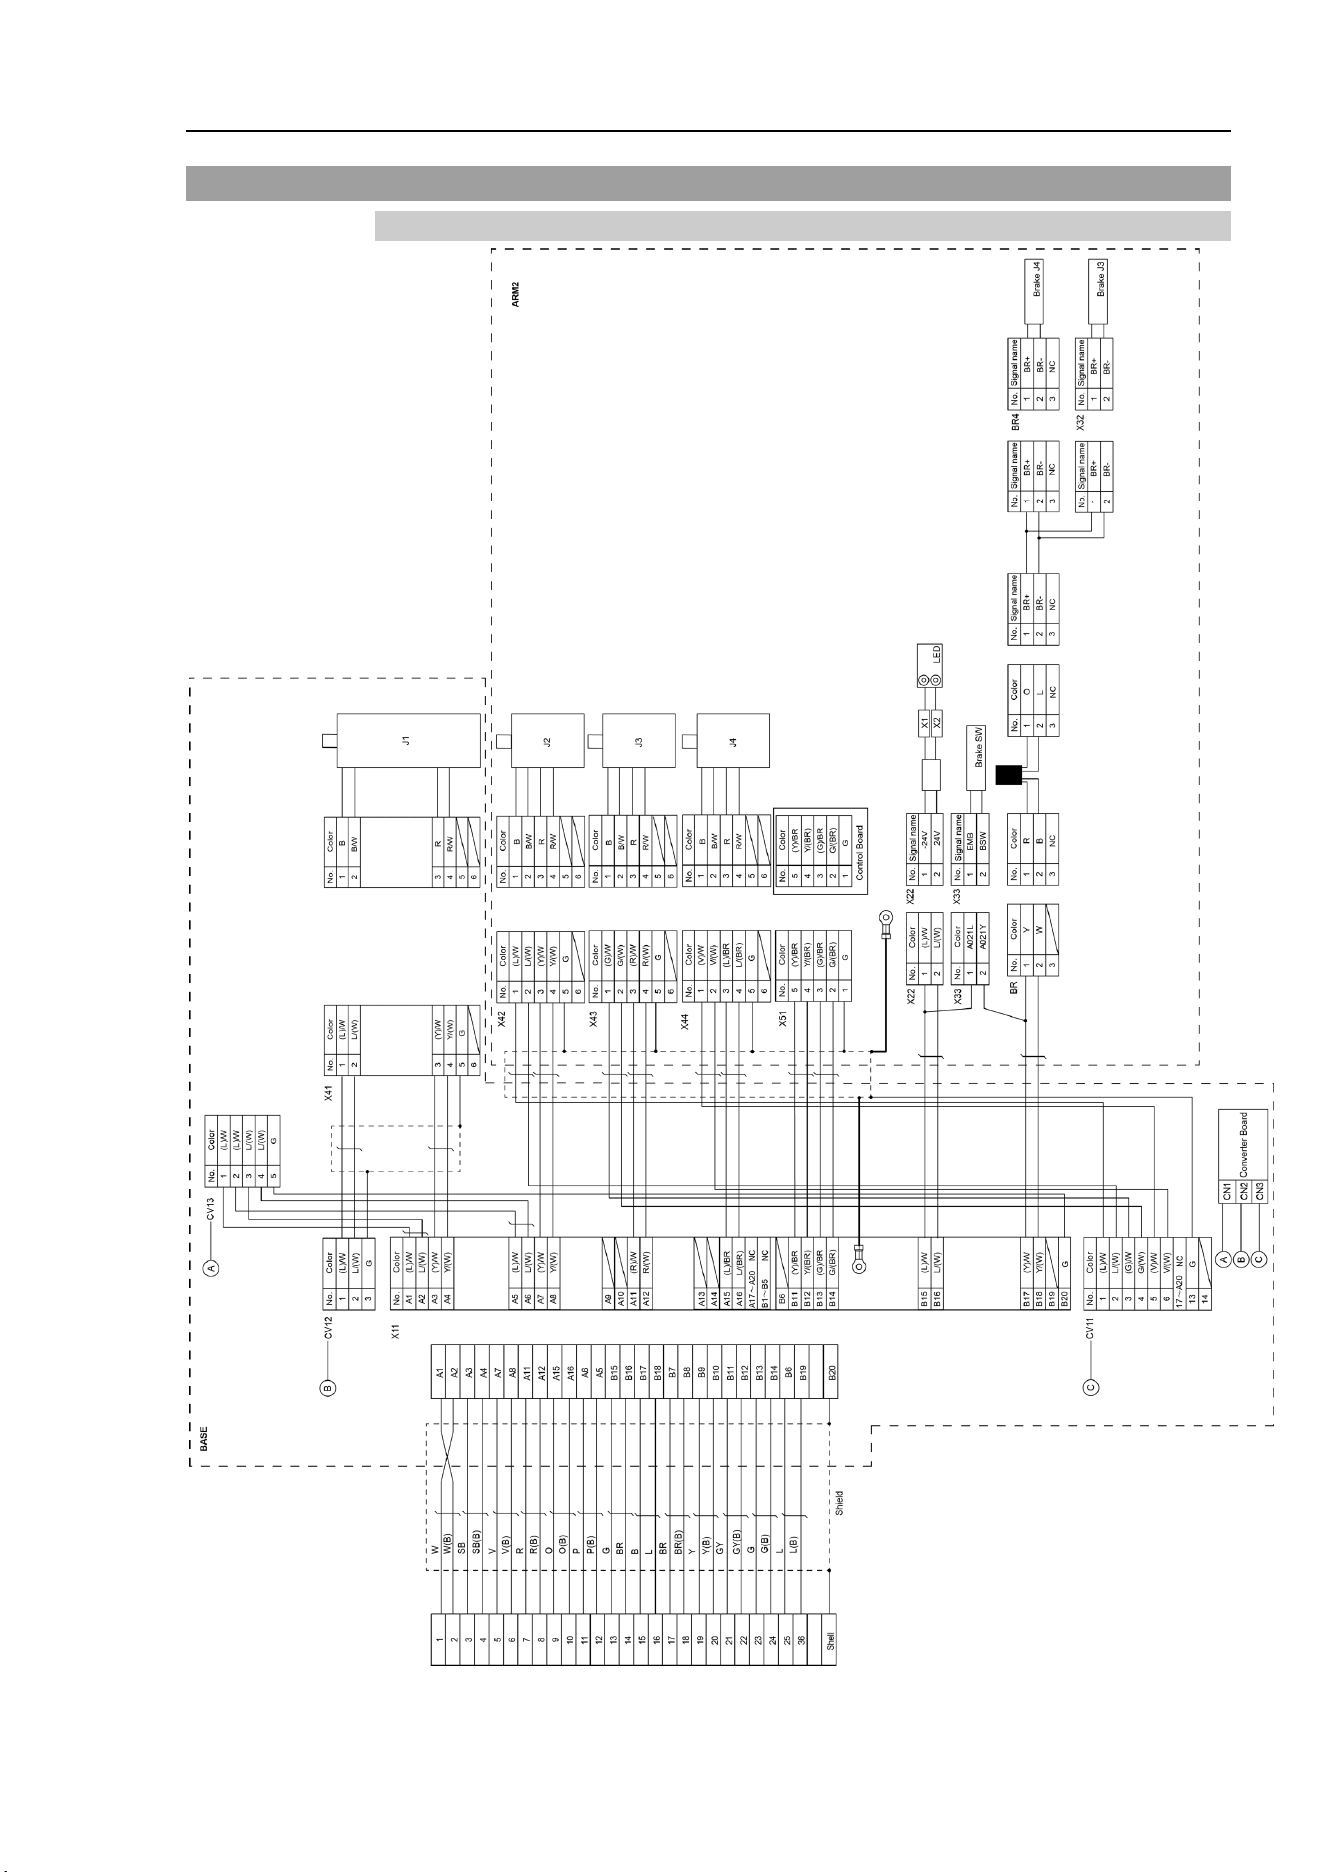
Maintenance 4. Cable
LS10-B Rev.6 77
4.2 Wiring Diagrams
4.2.1 Signal Cable
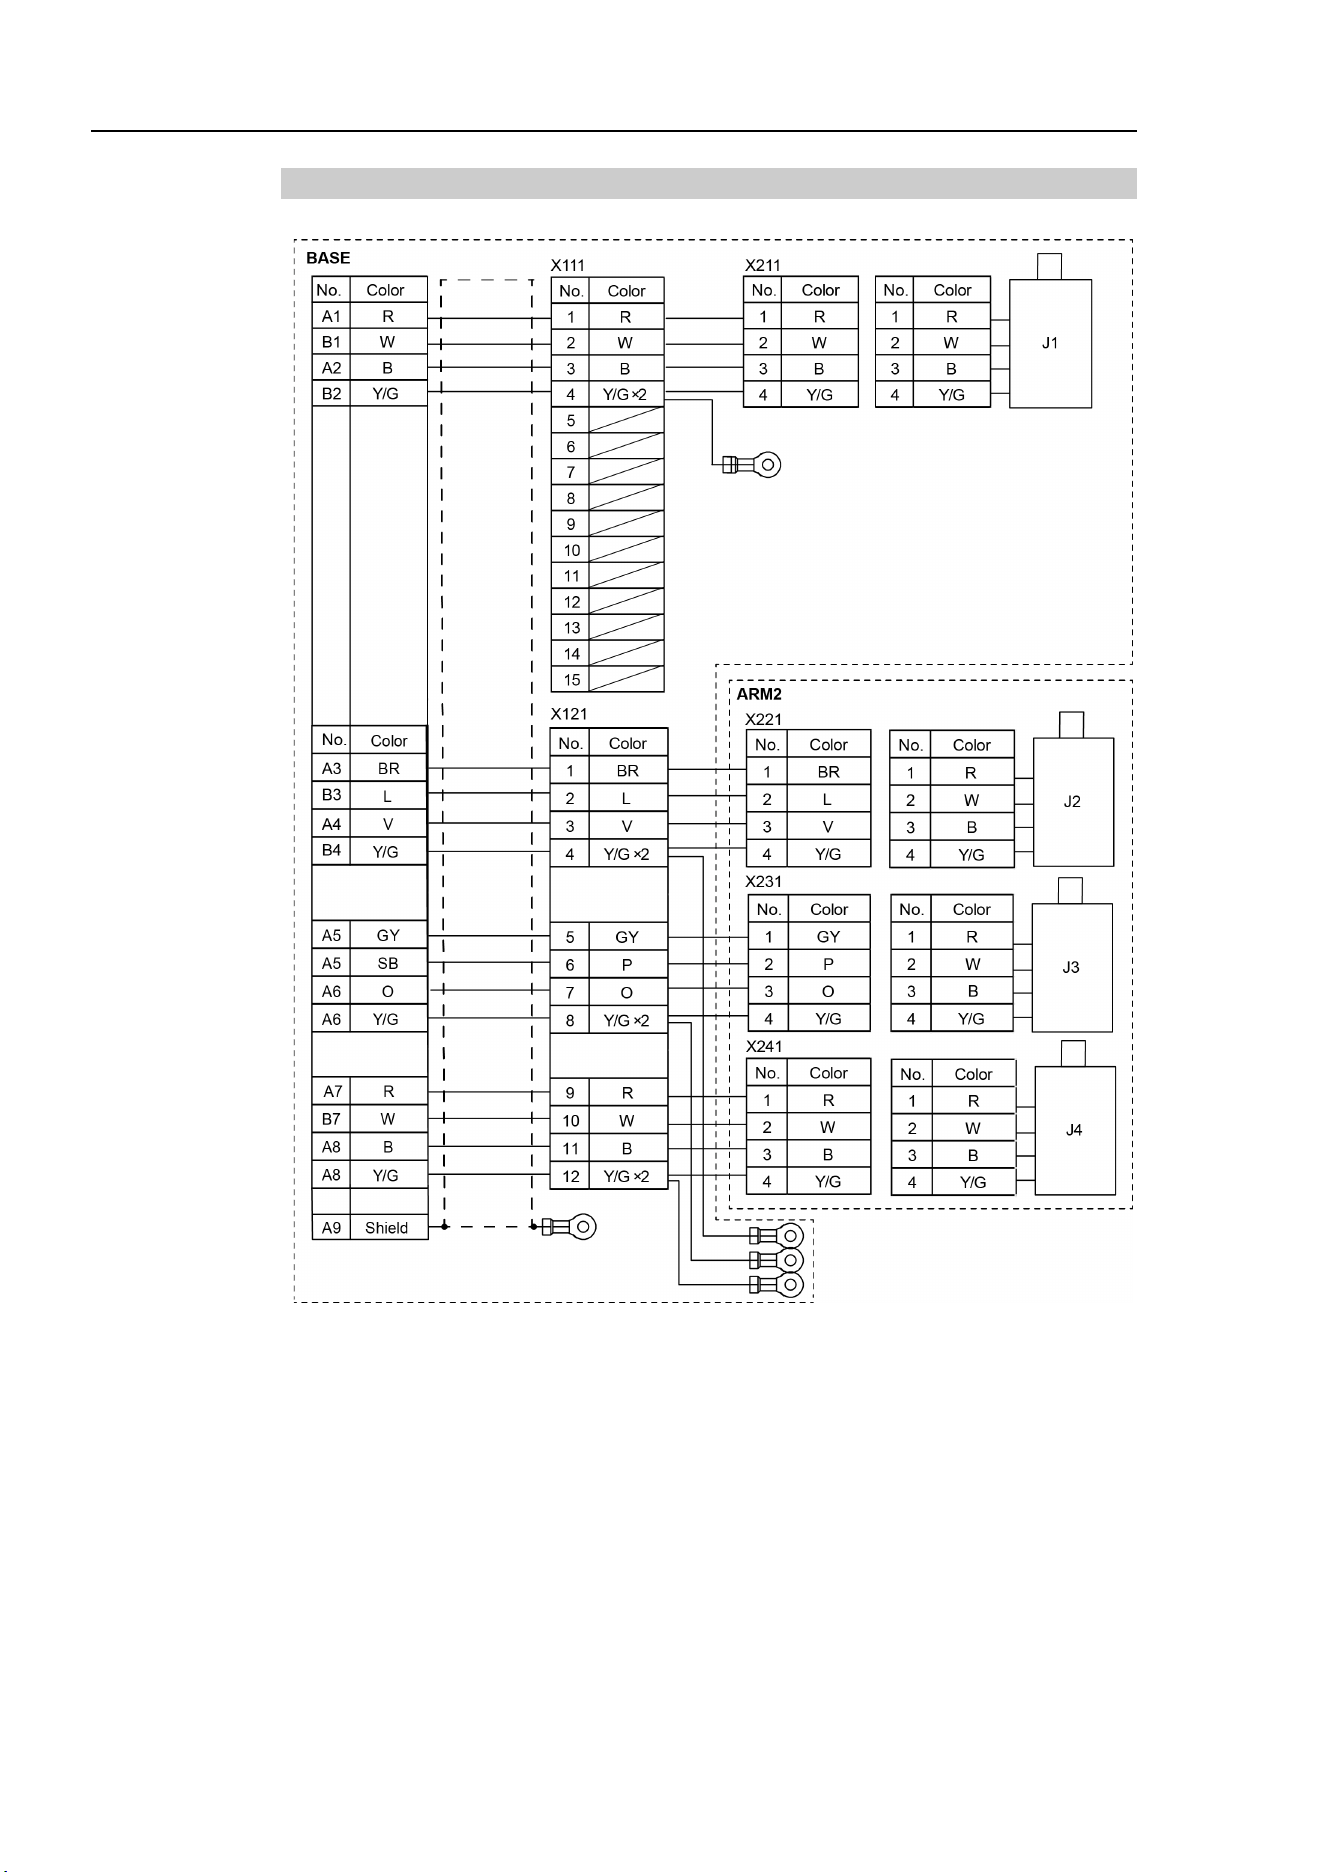
Maintenance 4. Cable
78 LS10-B R ev.6
4.2.2 Power Cable
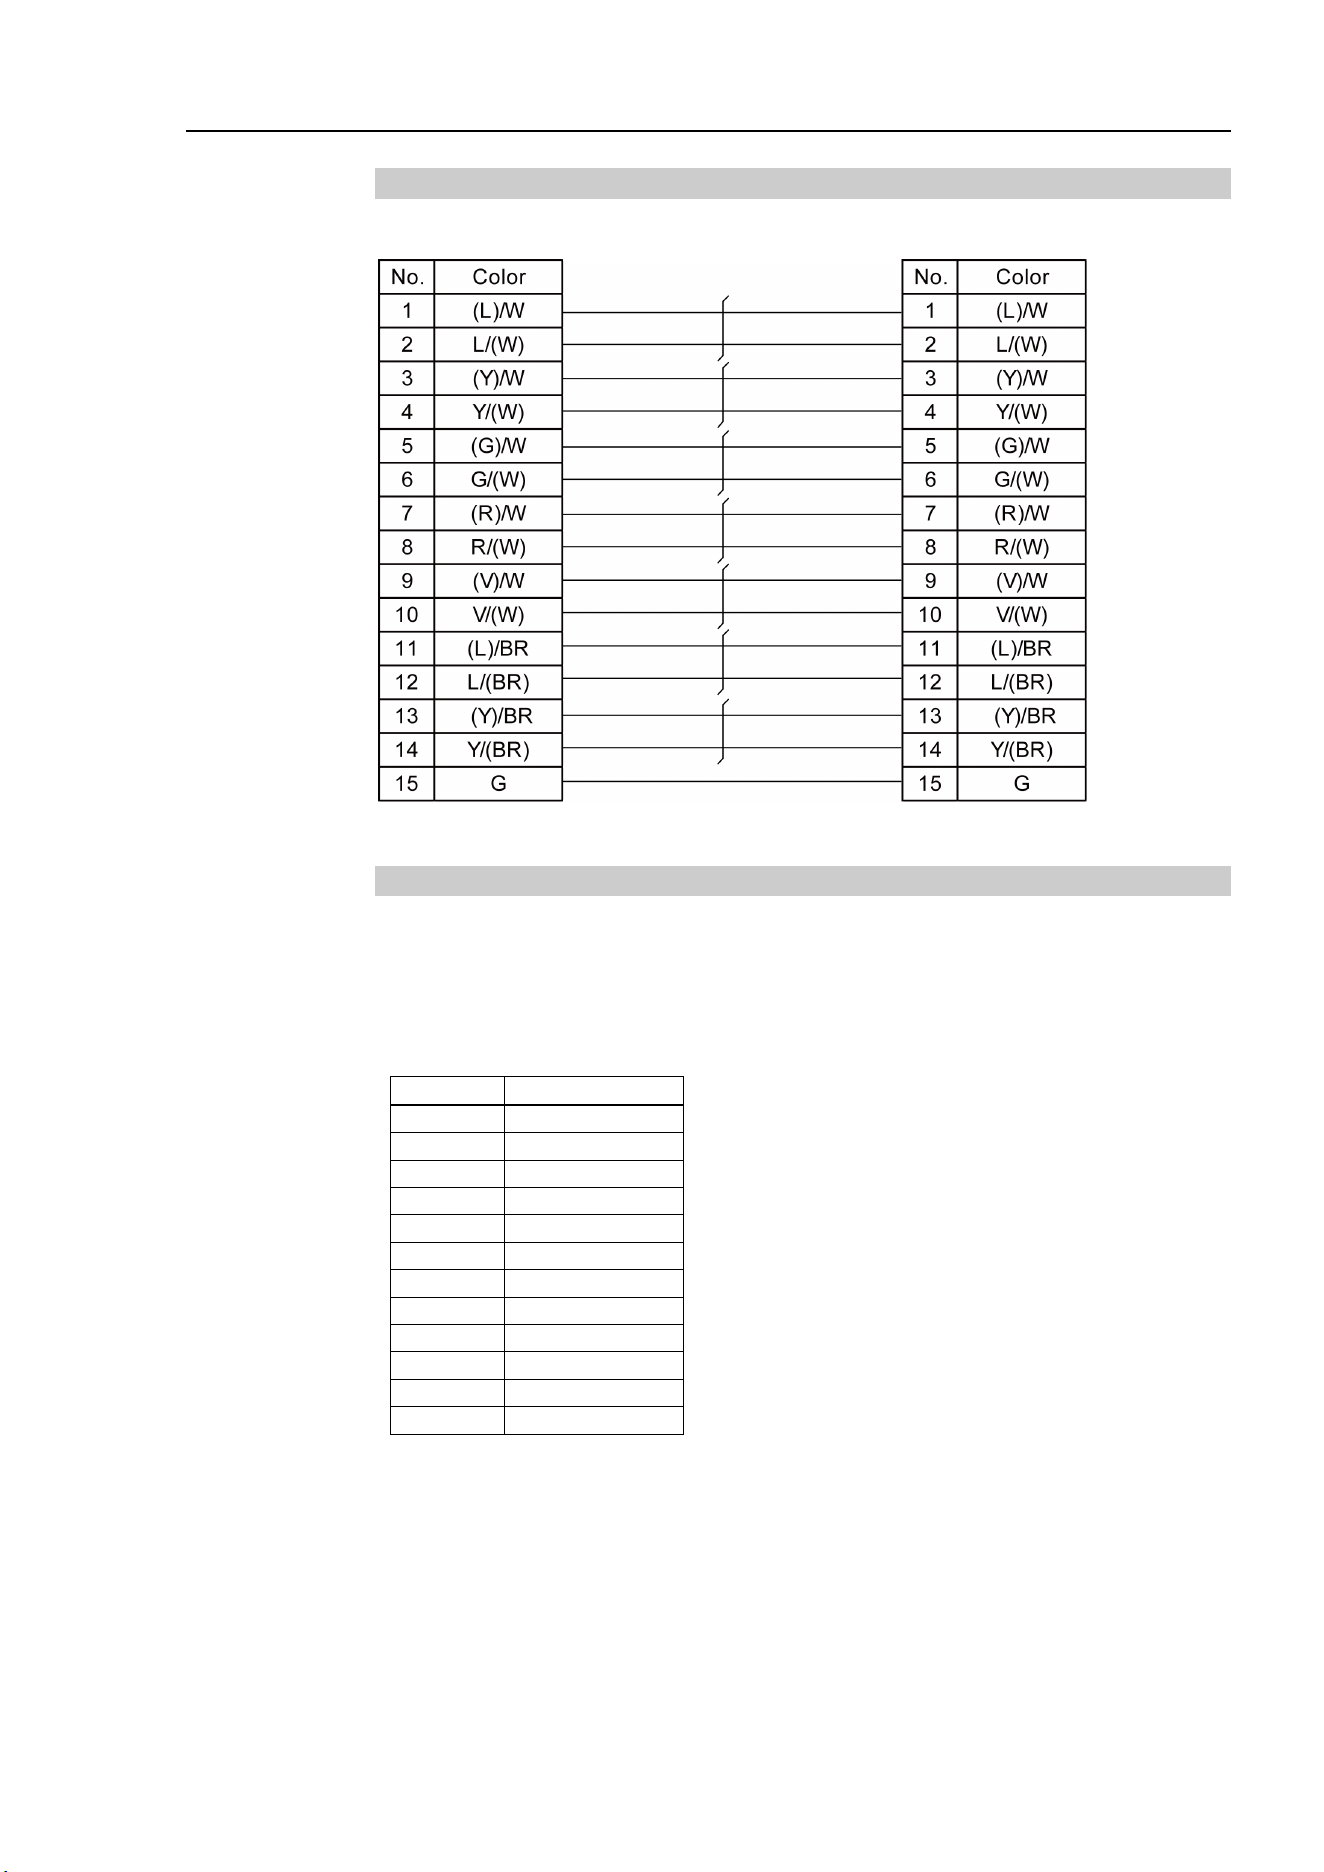
Maintenance 4. Cable
LS10-B Rev.6 79
4.2.3 User Cable
4.2.4 Color of Cables
The following table shows the codes and cable colors indicated in the pin assignments.
4.2.1 Signal Cable
4.2.2 Power Cable
4.2.3 User Cable
Code
Cable color
B
Black
W
White
R
Red
G
Green
Y
Yellow
BR
Brown
L
Blue
V
Violet
O
Orange
P
Pink
SB
Sky blue
GY
Gray
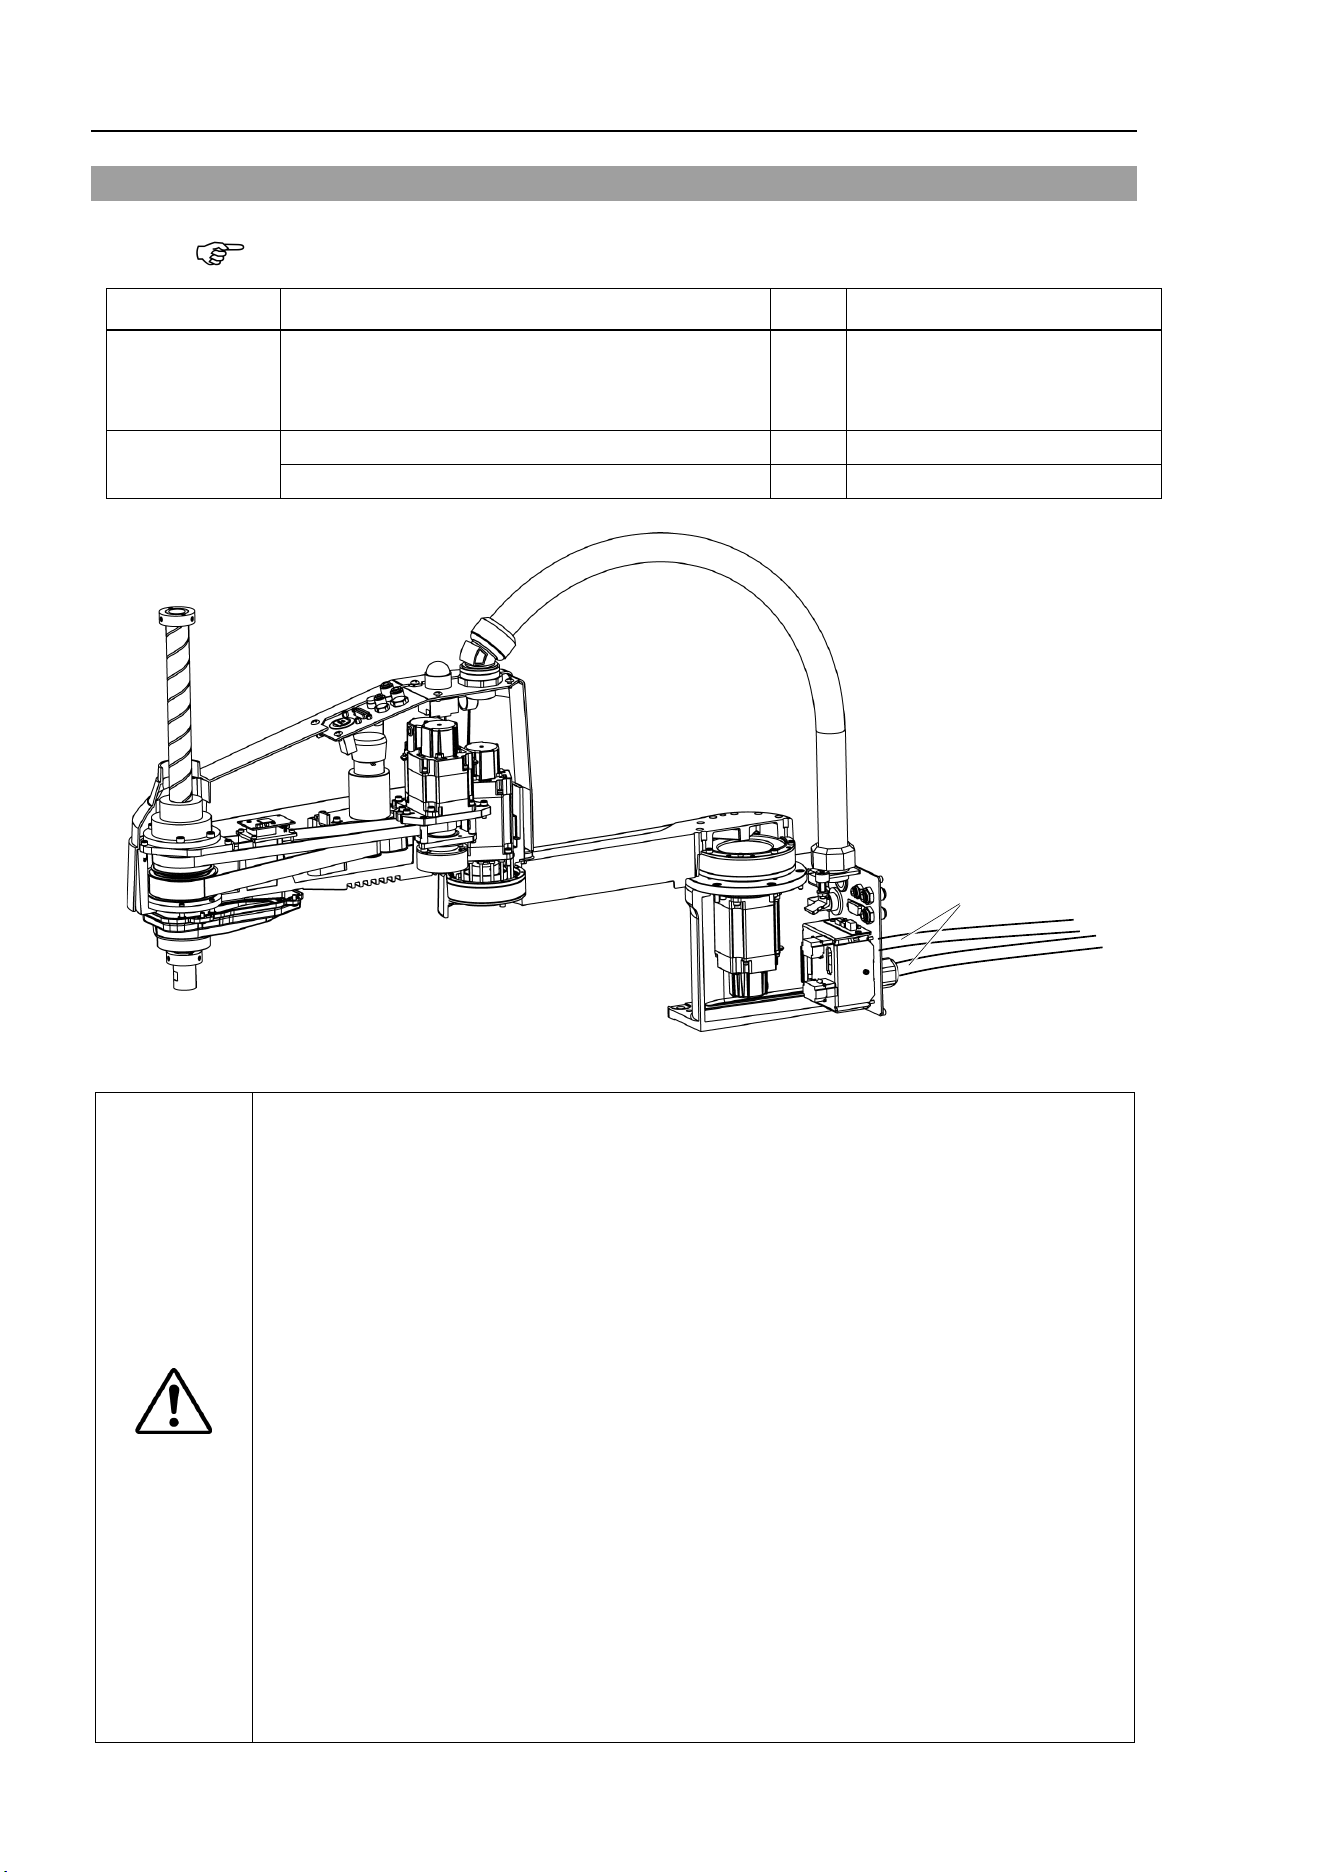
Maintenance 4. Cable
80 LS10-B R ev.6
4.3 Replacing M/C Cable
LS10-B series manipulator does not have batteries. Position data is memorized by the
motor. When replacing cables, calibration is not necessary.
Name
Qty.
Note
Maintenance
parts
M/C Cable 1
3 m: 2196934
5 m: 2196935
10 m: 2196936
Tools
Flathead screwdriver
1
Torque wrench
1
(Figure: LS10-B602S)
M/C cable
CAUTION
■
If the connectors have been disconnected during the replacement of the cable
unit, b
e sure to reconnect the connectors to their proper positions. Refer to the
block diagrams.
Improper connection of the connectors may result in improper
function of the robot
system.
For details on the connections, refer to
Maintenance: 4.2 Wiring Diagrams.
■
When installing the cover, b
e careful not to allow the cables to interfere with the
cover mounting and do
not bend these cables forcibly to push them into the cover.
Unnecessary strain on cables may result in damage to the cables, disconnection,
and
/or contact failure. Damaged cables, disconnection, or contact failure is
extremely hazardous and may result in electric shock and/or improper function of
the robot system.
When
routing the cables, observe the cable locations
after removing the cover.
Be
sure to place the cables back to their original locations.
■
Be sure to connect the cables properly. Do not allow unnecessary strain on the
cables. (Do not
put heavy objects on the cables. Do not bend or pull the cables
forcibl
y.) The unnecessary strain on the cables may result in damage to the
cables, disconnection, and/or contact failure. Damaged cables, disconnection,
or contact failure is extremely hazardous and may result in electric shock and/or
improper function of the
robot system.
NOTE
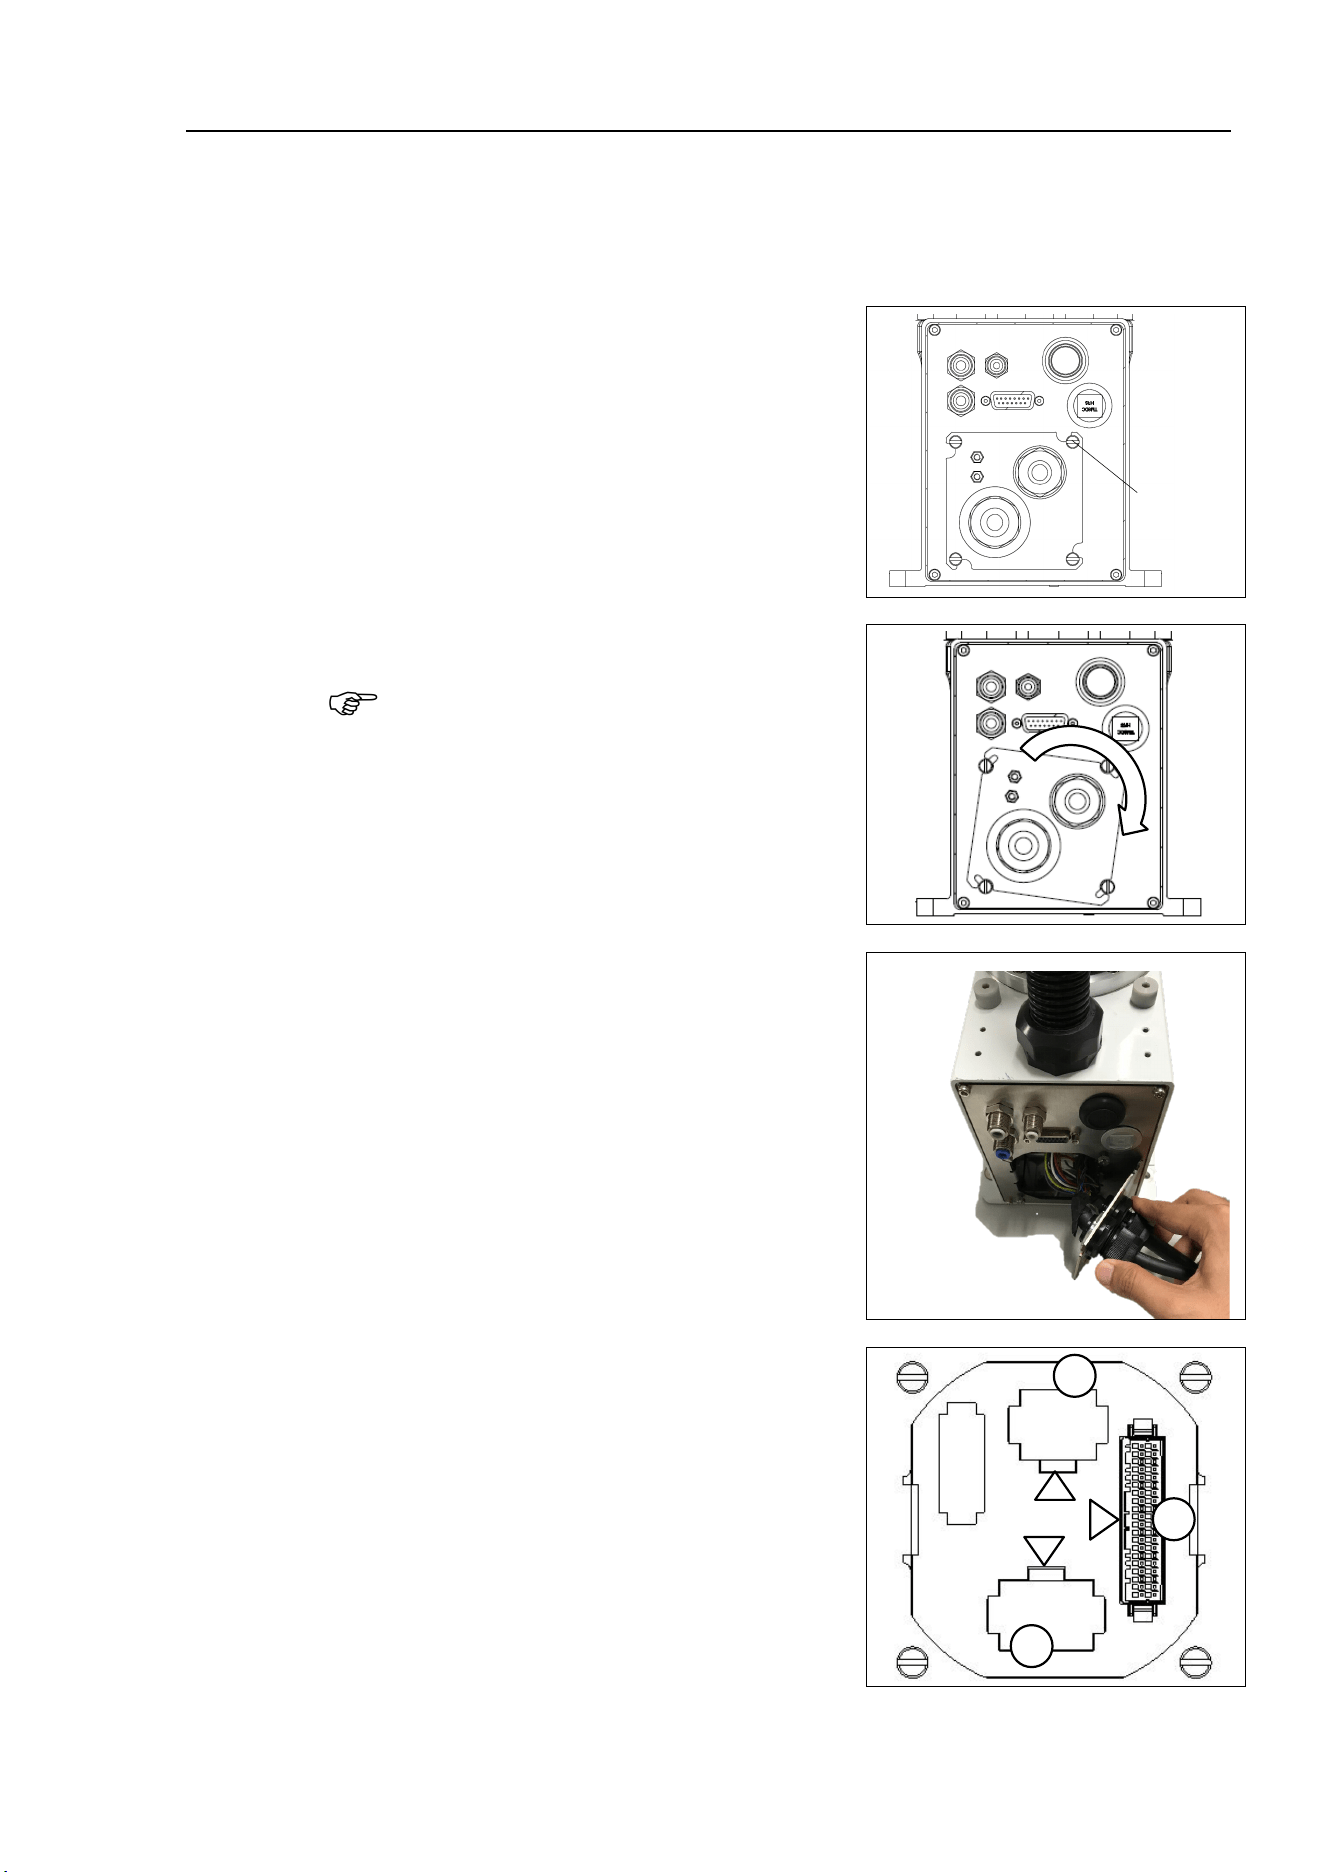
Maintenance 4. Cable
LS10-B Rev.6 81
M/C Cable
Removal
(1)
Turn OFF
the Controller.
(2)
Disconnect the following connectors form the controller.
Power cable connector Signal cable connector
(3)
Loosen the screws fixing the plate.
You do not need to remove them
completely.
For details, refer to
Maintenance:
3.3 Connector Plate.
Finger
screws
4-M3×10
(4)
Slide the plate to remove it from the base.
Do not pull the M/C cable after removing
the
plate.
M/C cables are connected by the
connectors.
Doing so may result in
disconnection of the cables.
(5)
As shown on the right, pull out the cables
from the Manipulator.
(6)
Disconnect
the
connectors in the order as
shown on the right.
C
lips of the connectors are△ positions in
the figure.
Push the cl
ip to disconnect the connector.
2
1
3
NOTE

Maintenance 4. Cable
82 LS10-B R ev.6
Connector (white) for the power cable is difficult to disconnect for safety purpose.
To disconnect the connector, securely push the clip.
If you cannot disconnect it, push the connector once, and then disconnect it by pushing
the clip.
Do not pull the cables. Doing so may result in disconnection.
Do not remove the M/C cable form the plate.
NOTE
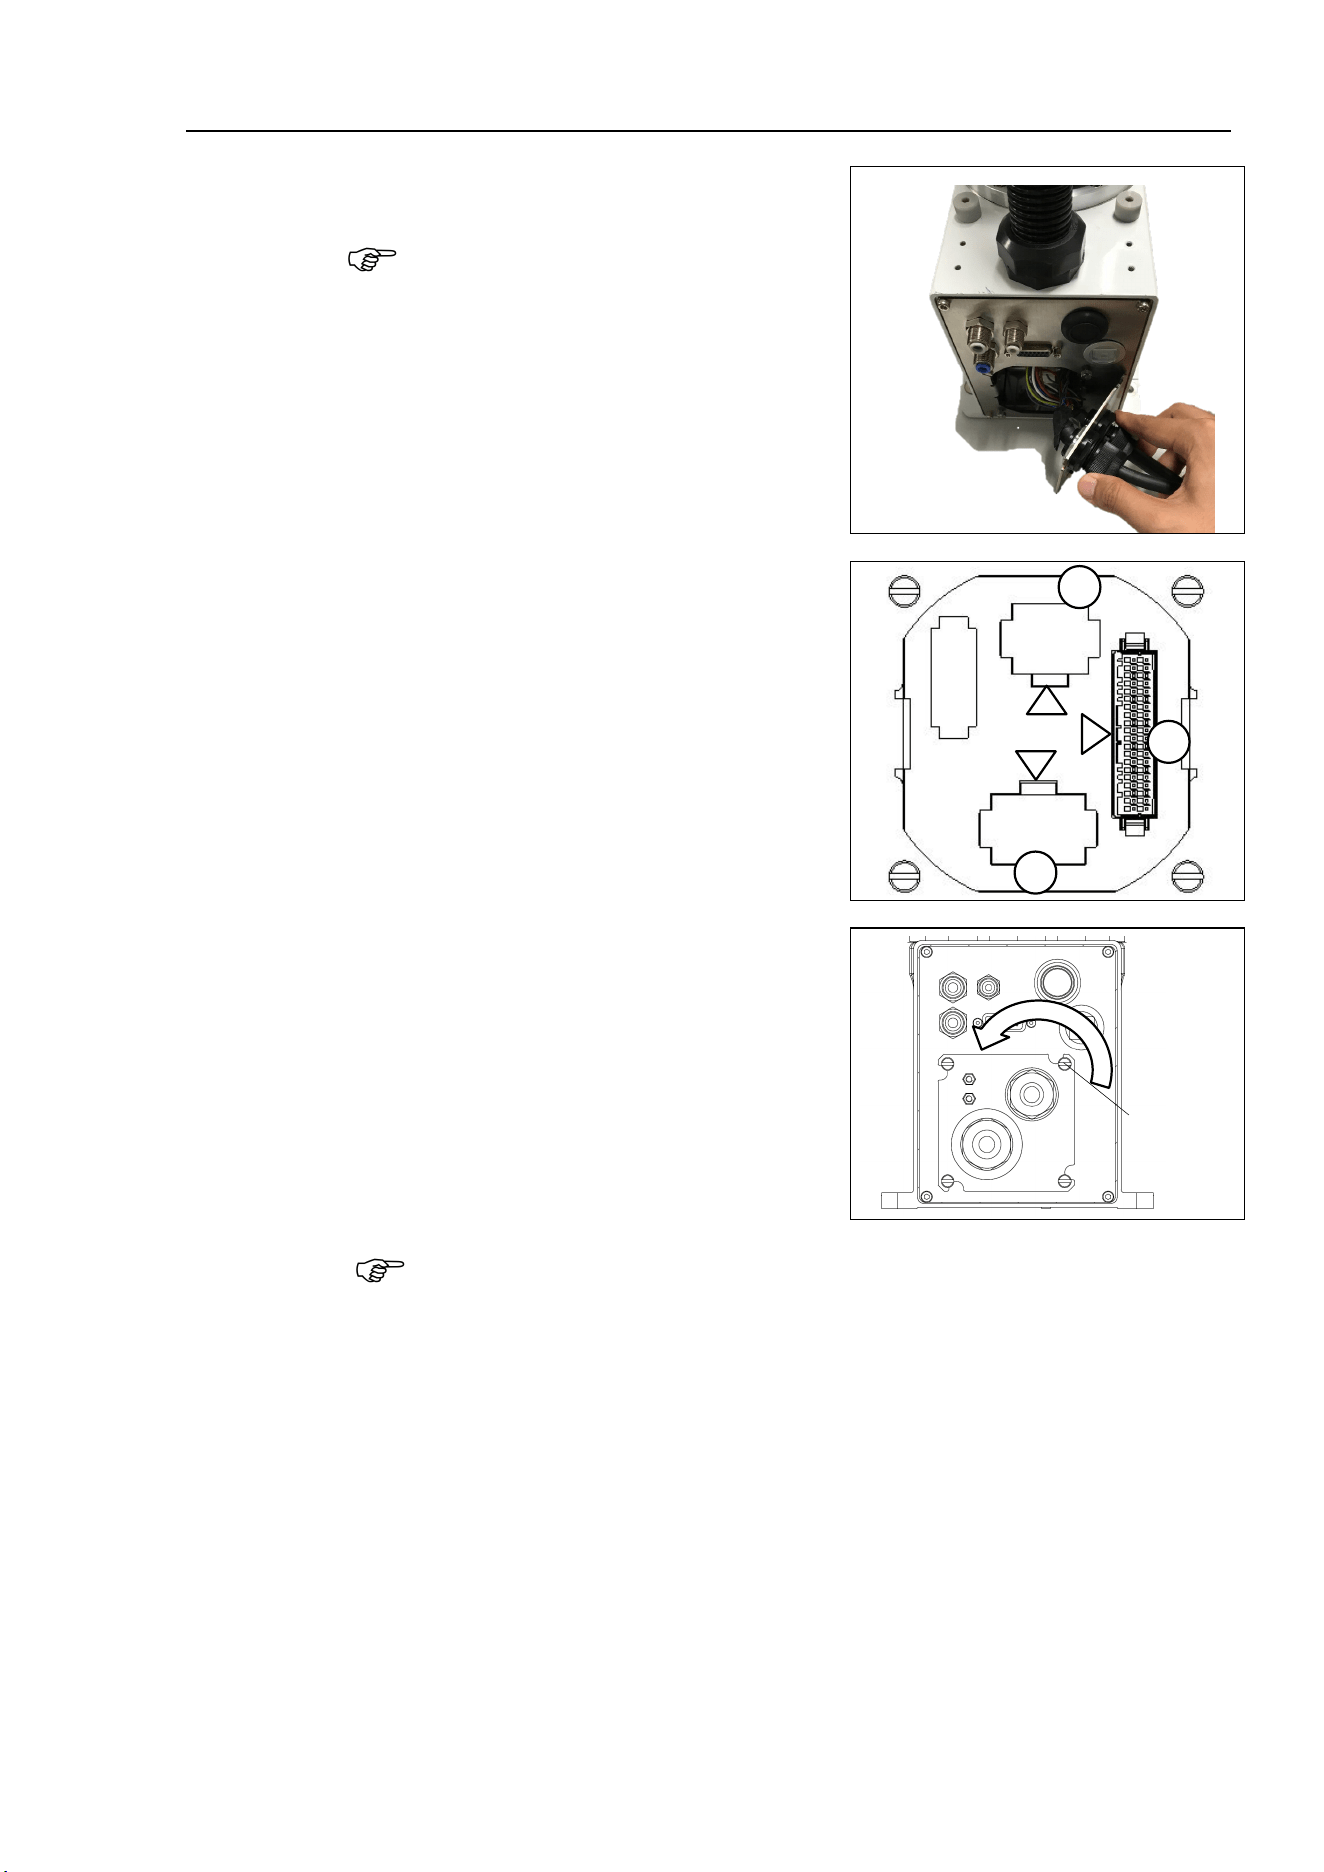
Maintenance 4. Cable
LS10-B Rev.6 83
M/C
cable
Installation
(
1)
Set
the M/C cable as shown on the right.
Be careful not to set the plate in wrong
direction.
(2)
Connect
the connectors in the order as
shown
on the right.
2
3
1
(3)
Slide
the plate to install it.
Finger screws : 4-M3×10
Tightening torque : 0.6±0.1 N·m
Finger
screws
4-M3×10
Slide the plate until it will be parallel to the
base table.
Be careful not to tighten
the screws with the cables get caught on the plate.
(4)
Connect
the following connectors to the controller.
Power cable connector Signal cable connector
(5)
Turn ON the Controller.
NOTE
NOTE
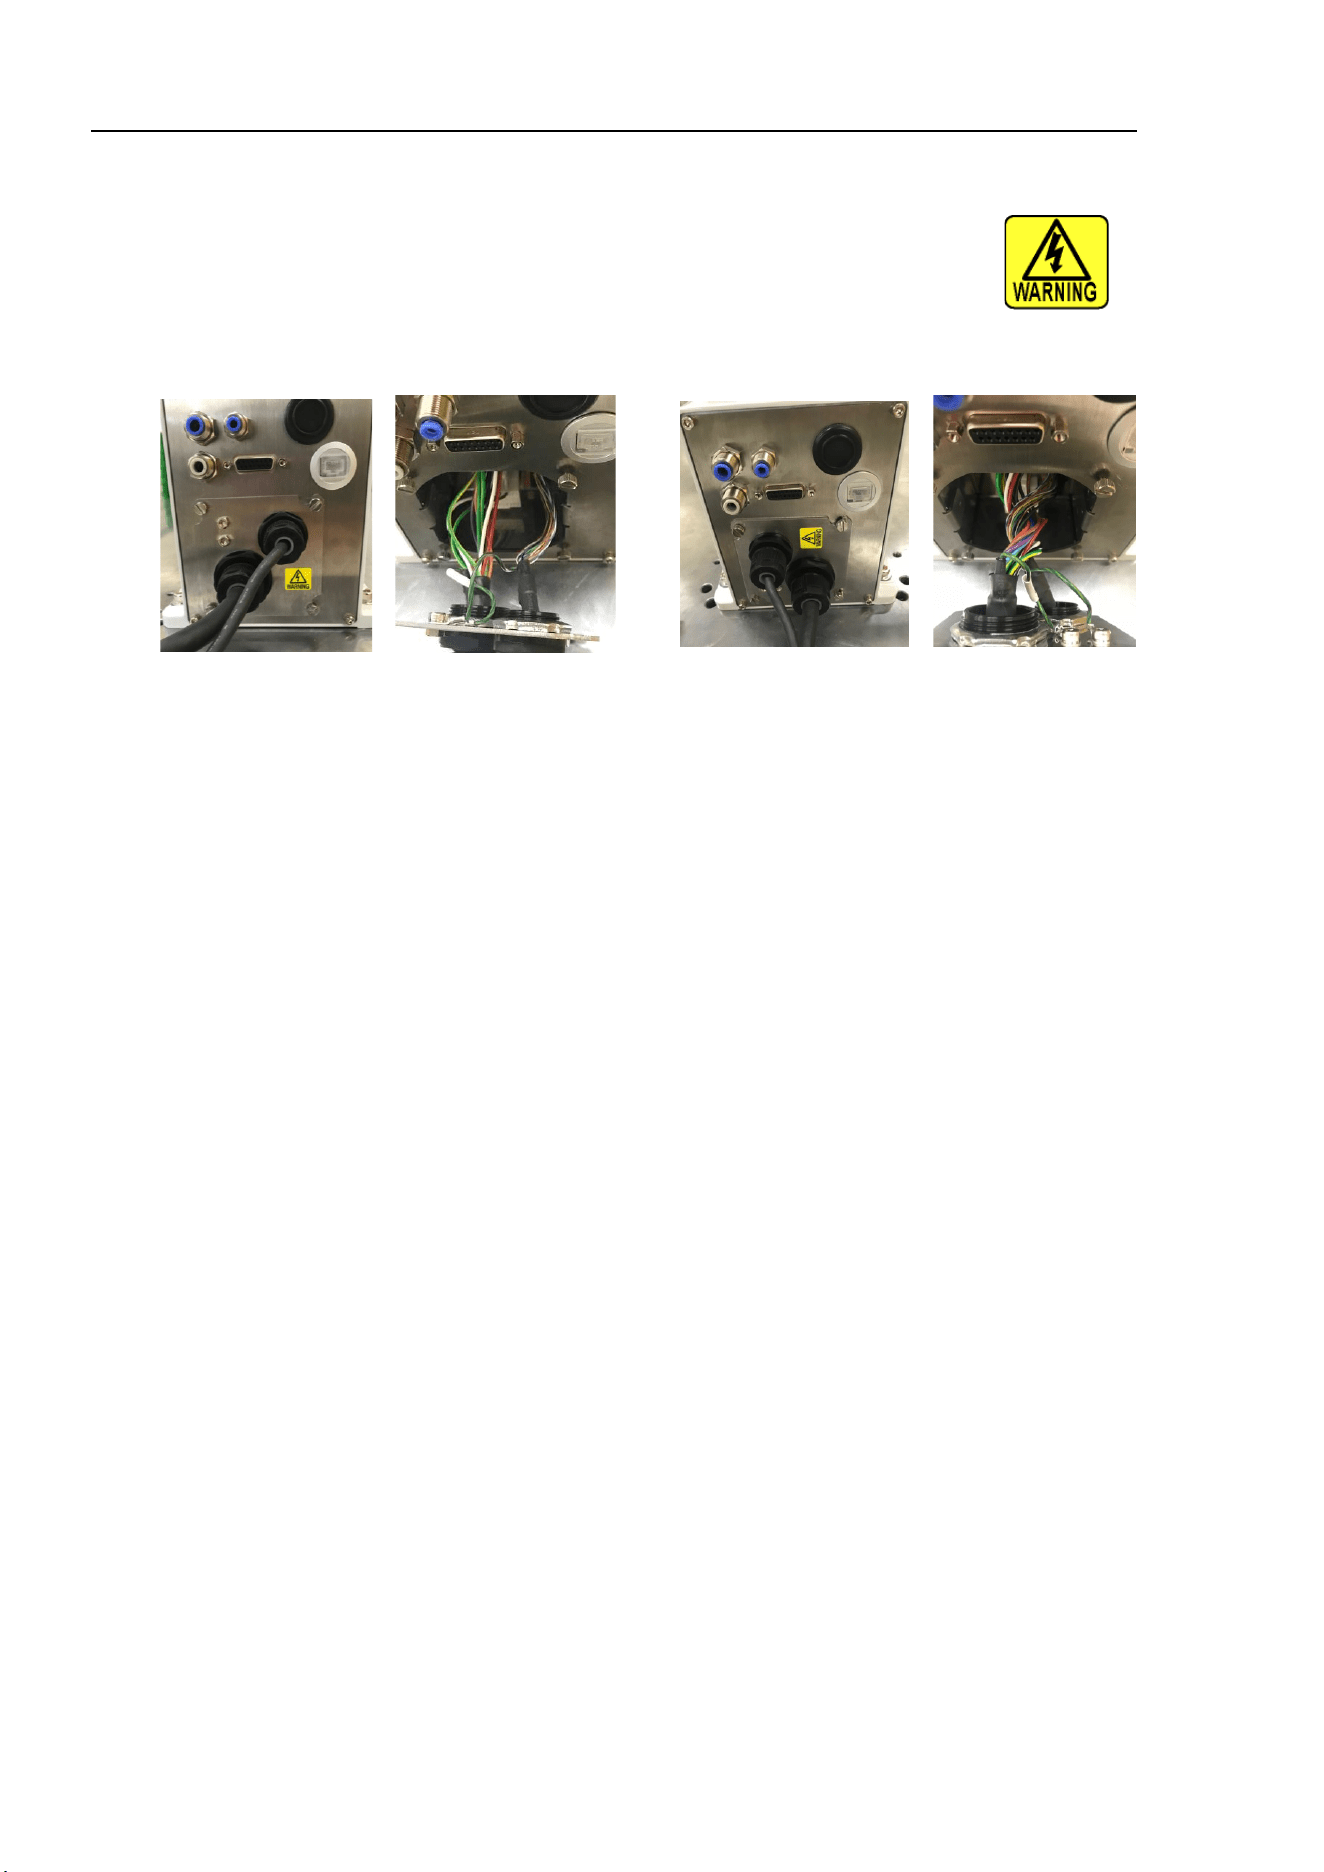
Maintenance 4. Cable
84 LS10-B R ev.6
Direction of the connector sub plate
When installing the plate, be careful for the direction.
Correct direction is where the letters: WARNING of warning label of electric shock will be
parallel to the base table.
If the plate is installed in wrong direction, the cables inside the Manipulator will be twisted
and may result in disconnection.
Correct: Cables are not twisted
Wrong: Cables are twisted
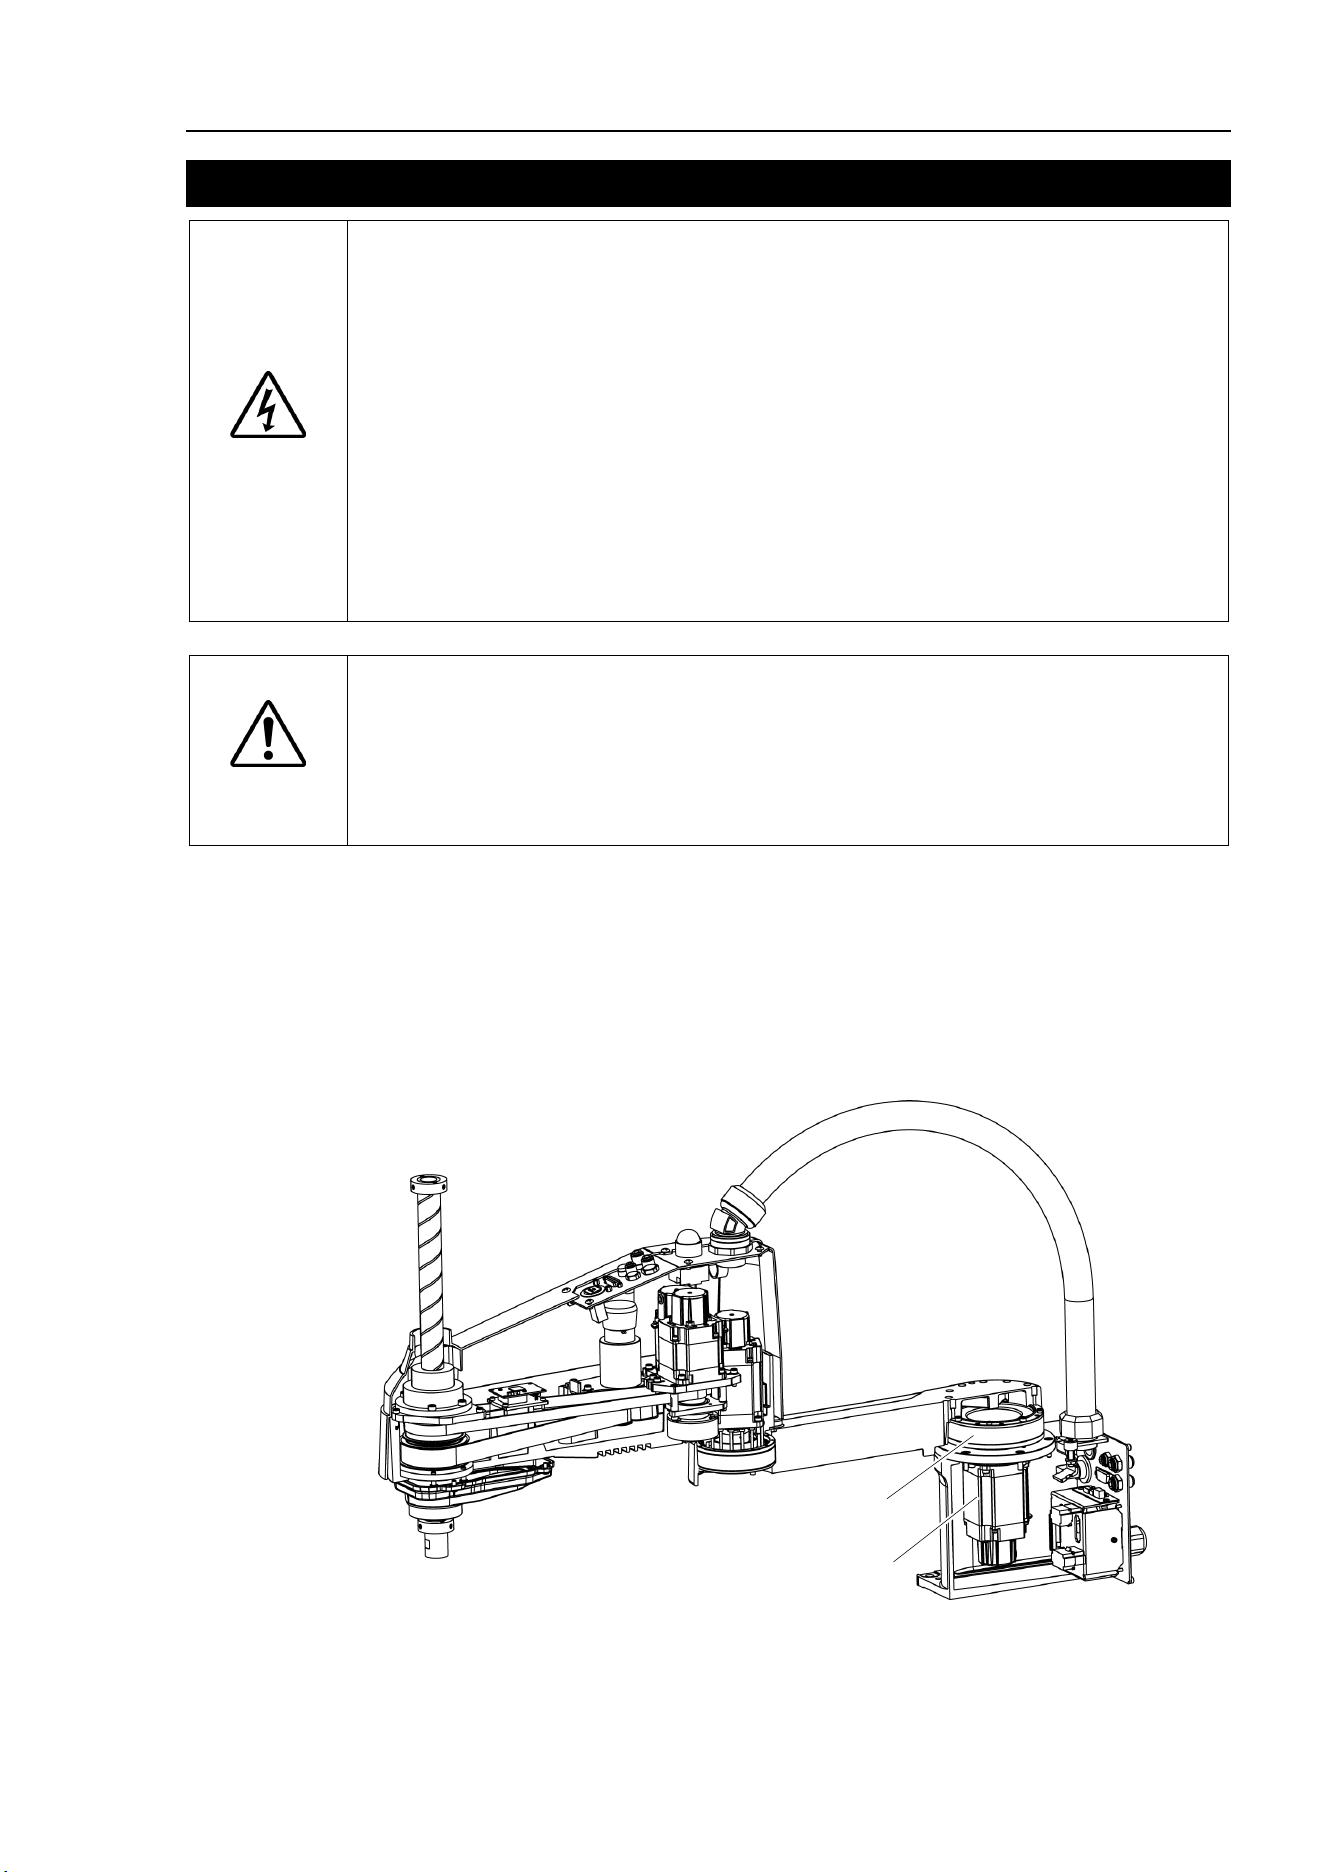
Maintenance 5. Joint #1
LS10-B Rev.6 85
5. Joint #1
WARNING
■
Do not connect or disconnect the motor connectors while the power to the robot
system is turned ON. Connecting or disconnecting the motor connectors
with
the power ON is extremely hazardous and may result
in serious bodily injury as
the Manipulator may mo
ve abnormally, and also may result in electric shock
and/or malfunction of the robot system.
■
To shut off power
to the robot system, disconnect the power plug from the power
source. Be sure to connect the AC power cable to a power receptacle.
DO NOT connect it directly to a factory power source.
■
Before
performing any replacement procedure, turn OFF the Controller and
related equipment,
and then disconnect the power plug from the power source.
Performing any replacement procedure with the power ON is extremely hazardous
and may result in
electric shock and/or malfunction of the robot system.
CAUTION
■
Be careful not to apply excessive shock to the motor shaft when replacing
the
motor
s. The shock may shorten the life cycle of the motors and encoder and/or
damage them.
■
Never disassemble the motor and encoder.
A disassembled motor and encoder
will cause a positional gap and cannot be used
again.
After parts have been replaced (motors, reduction gear units, brakes, timing belts, ball screw
spline unit, etc.), the Manipulator cannot operate properly because a mismatch exists
between the origin stored in each motor and its corresponding origin stored in the Controller.
After replacing the parts, it is necessary to match these origins.
The process of aligning the two origins is called “Calibration”.
Refer to Maintenance: 13. Calibration to execute the calibration.
Joint #1 reduction gear unit
Joint #1 motor
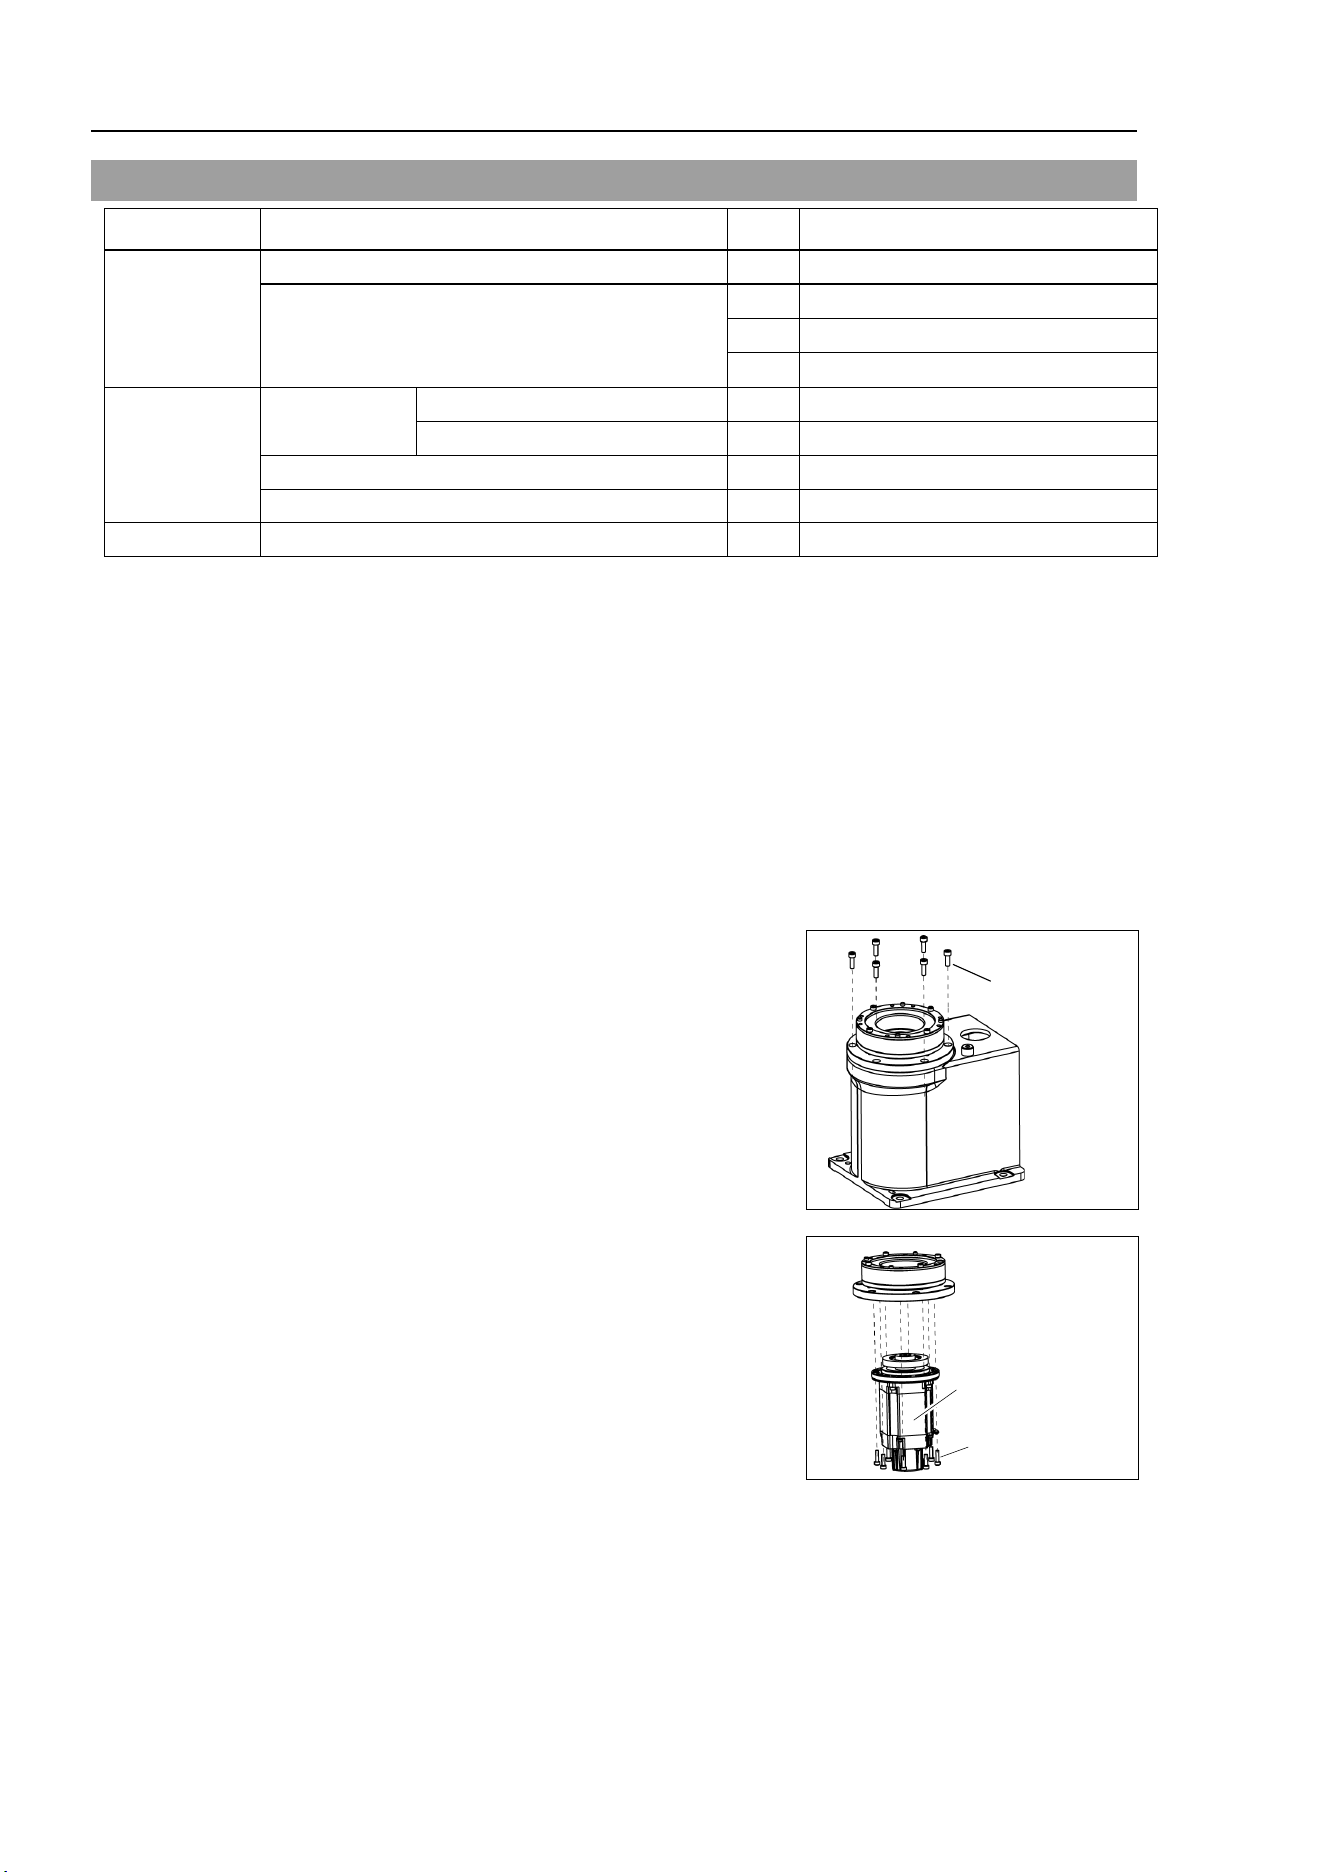
Maintenance 5. Joint #1
86 LS10-B R ev.6
5.1 Replacing Joint #1 Motor
Name Qty. Note
Maintenance
parts
AC Servo Motor 520W
1
2197984 (with oil seal)
O-ring
1
1213266 (CO0543A)
1
1520371 (CO0538A)
1
1510528 (CO0551A)
Tools
Hexagonal
wrench
width across flats: 2 mm
1
For M4 set screw
width across flats: 3 mm
1
For M4 screw
Torque wrench
1
Wiping cloth
1
For wiping grease
Grease
Grease (SK-1A)
-
-
Joint #1 motor
Removal
(1)
Remove the
Connector Plate.
For details, refer to
Maintenance: 3.3 Connector Plate.
(2)
Disconnect the connector
.
Connectors: X41, X211 (Hold the clip to remove.)
(3)
Remove the Arm #1 mounting bolt in the Joint #1 side and remove
the arm.
There is an O
-ring (CO0551A) between the Joint #1 unit and the arm. Be sure to
keep the O
-ring.
(4)
Remove the screw
s mounting the Joint #1 flange
on the B
ase.
6-M5×15
(5)
Hold
up the Joint #1 unit and remove it from the
base.
Be careful not to
damage the motor cable by
getting it
caught on the base.
(6)
Loosen the motor mounting
screws on the Joint
#1
motor flange and remove the motor unit
There is a
n O-ring in the assembly position of the
motor
flange and Joint #1 flange.
Be
careful not to lose the O-ring.
4-M4×15
Joint #1
Motor Unit
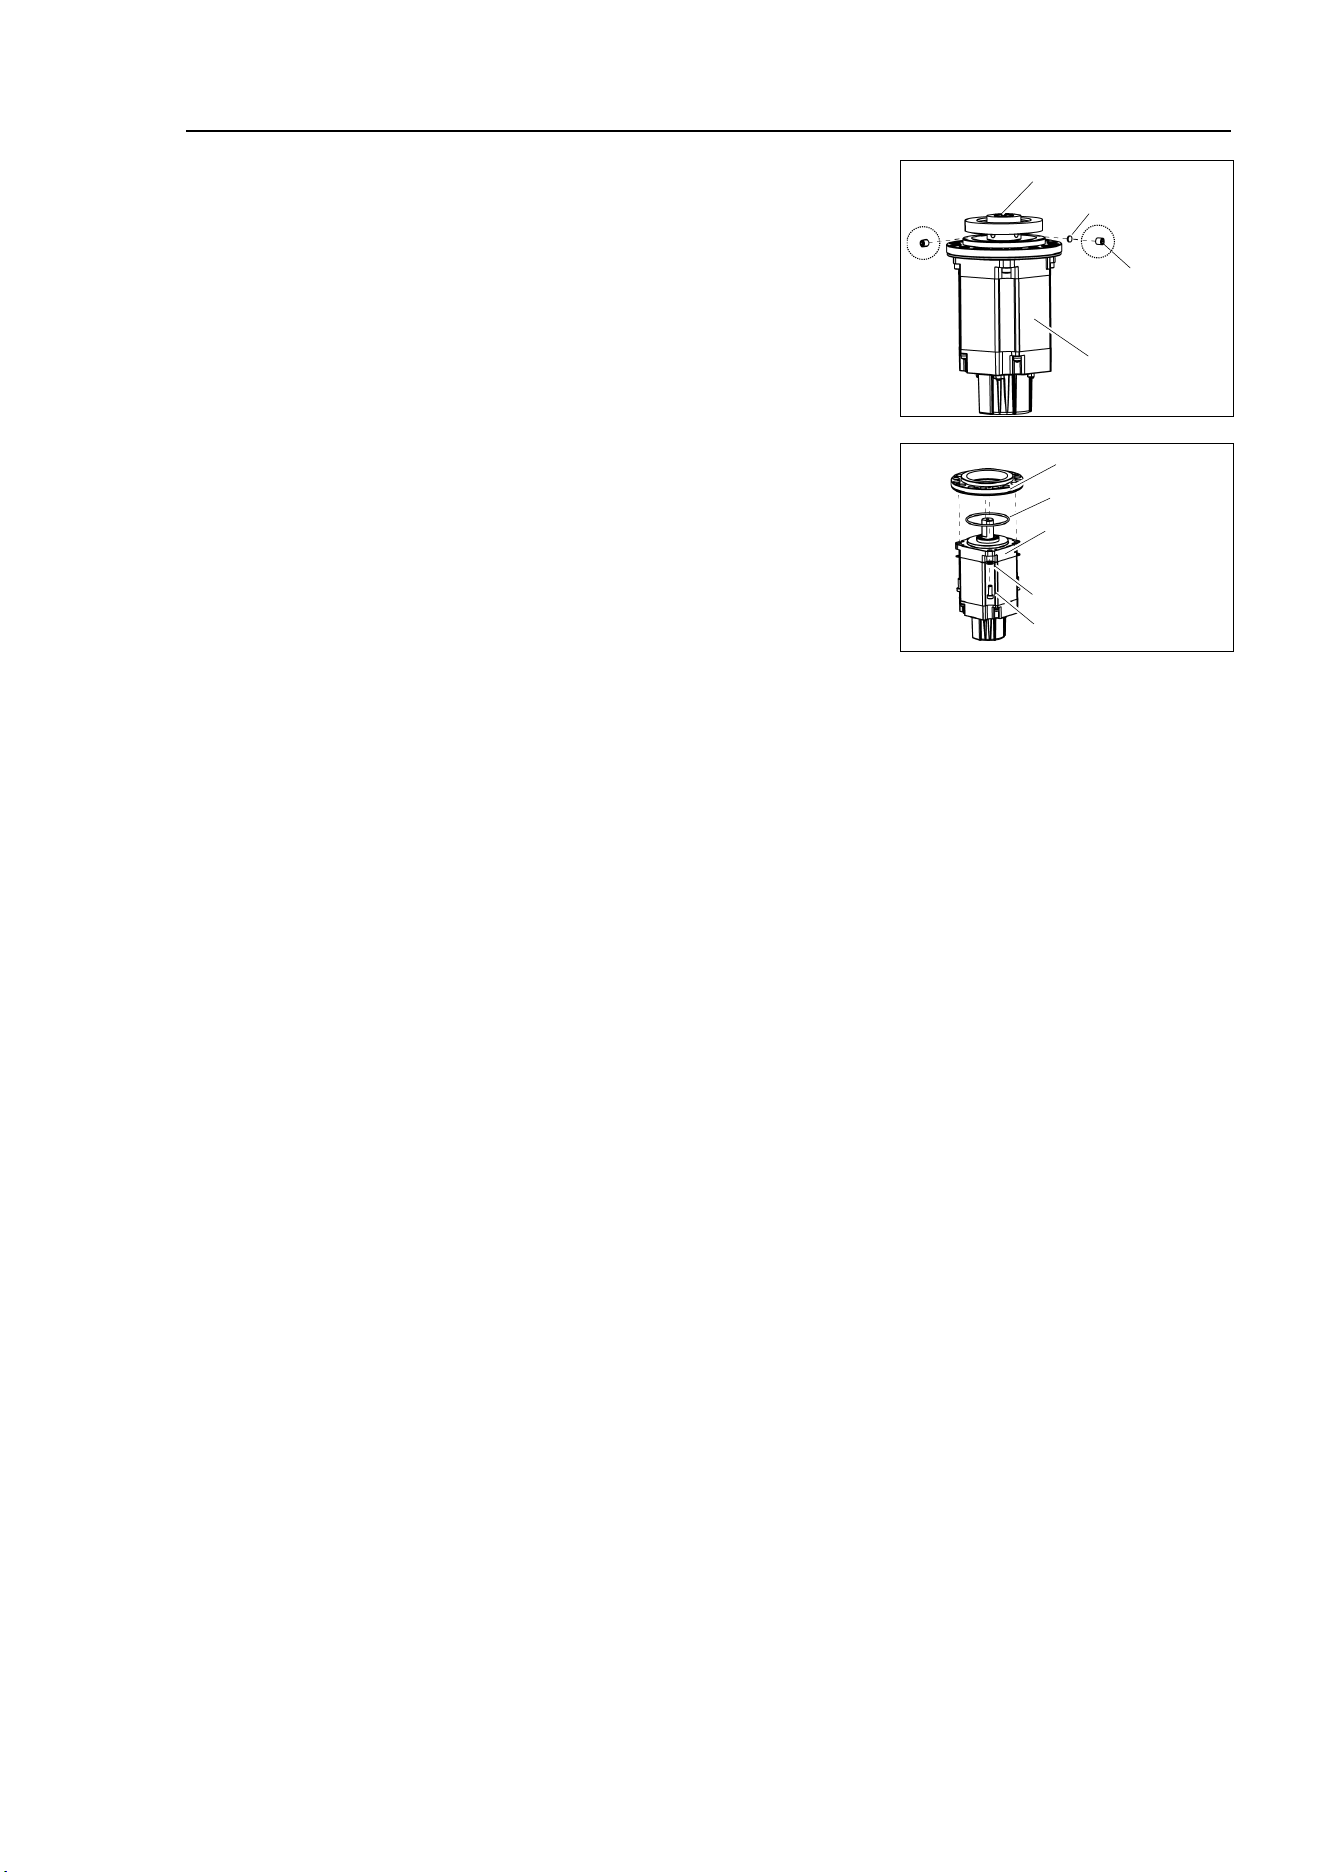
Maintenance 5. Joint #1
LS10-B Rev.6 87
(
7)
Remove the wave
form generator from the Joint
#1 motor.
There is a brass bushing in one of the set screw
holes.
Be careful not to lose the bushing.
A: Brass Bushing : M5
B: Set Screw : 2-M5×6
B: Set Screw
A: Brass Bushing
Waveform Generator
Joint #1 Motor
(8)
Remov
e the motor mounting screws to remove
the motor flange and O
-ring (CO0538A).
4-M4×12
Joint #1 Motor
Motor Flange
O-ring
4-M4 washer
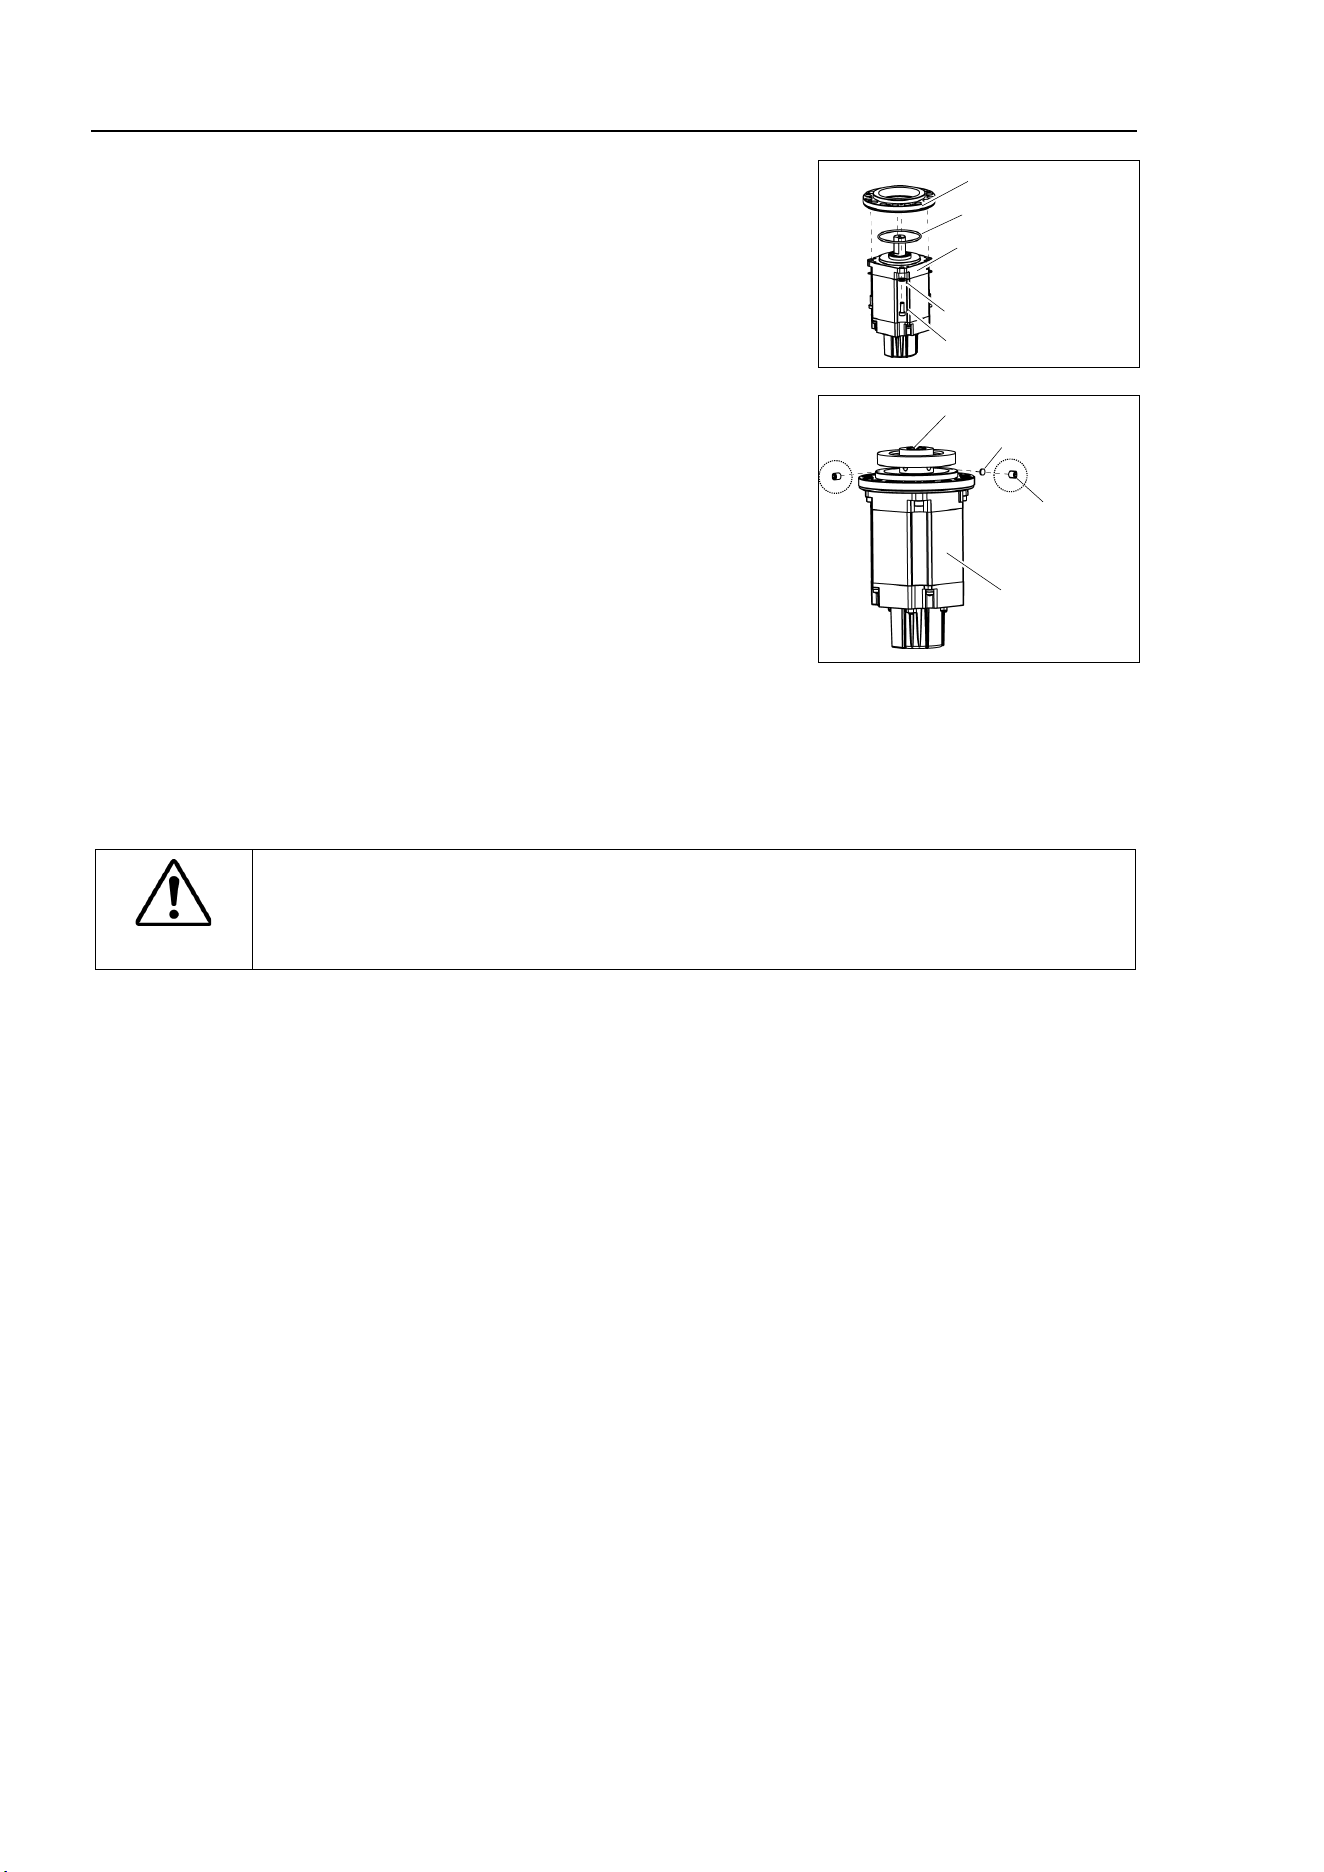
Maintenance 5. Joint #1
88 LS10-B R ev.6
Joint #1 motor
Installation
(
1)
Se
t the O-ring (CO0538A) on the motor
mounting surface and mount the motor flange.
4-M4×12
Joint #1 Motor
Motor Flange
O-ring
4-M4 washer
(
2)
Apply
grease (SK-1A) to the between the
waveform generator and motor.
Grease volume : 13 g
Mount the waveform generator on the Joint
#1
motor.
Be sure to
align the end face of the waveform
generator
to the end face of the motor shaft.
Tighten one of the set
screws vertically on the flat
face of the motor shaft.
Insert a bushing into the
other set
screw hole to prevent damage to the
motor shaft.
B: Set Screw
A: Brass Bushing
Waveform Generator
Joint #1 Motor
A: Brass Bushing : M5
B: Set Screw : 2-M5×6
CAUTION
■
See the figure above for the orientation of the waveform generator.
Be sure to
install the waveform generator properly.
Improper installation of the waveform
generator will result in improper function of the Manipulator.
(3)
Set an O
-ring (CO0538A) on the motor flange and assemble the motor with the Joint
#1 flange.
To insert the motor, turn it
slowly from side to side by hand and push in.
(4)
Mount the Joint #1 unit on the Base.
Secure the Joint #1 motor cables facing toward the
back of the Base.
(5)
Set the O
-ring (CO0538A) removed in the removal step (3) into the O-ring groove of
the arm. Then, mount the arm to the Joint #1 unit.
(6)
Connect the connector
s.
Connectors: X41, X211
(7)
Mount the Connector Plate.
For details, refer to
Maintenance: 3.3 Connector Plate.

Maintenance 5. Joint #1
LS10-B Rev.6 89
(8)
Check if the Joint #1 moves in a Jog motion by operating from
EPSON RC+ menu
-
[
Tools]-[Robot Manager]-[Jog & Teach].
If the Manipulator oscillates with
MotorON and the following errors are detected,
Error 5041: Motor torque output failure in low power state.
Error 4241: Over speed during low power mode was detected.
or when the joint other than Joint #1 moves, the connector for the other joint might be
connected to the Joint #1
motor. Check the connector connection.
(
9)
Execute the calibration f
or the Joint #1.
For details refer to
Maintenance: 13. Calibration.
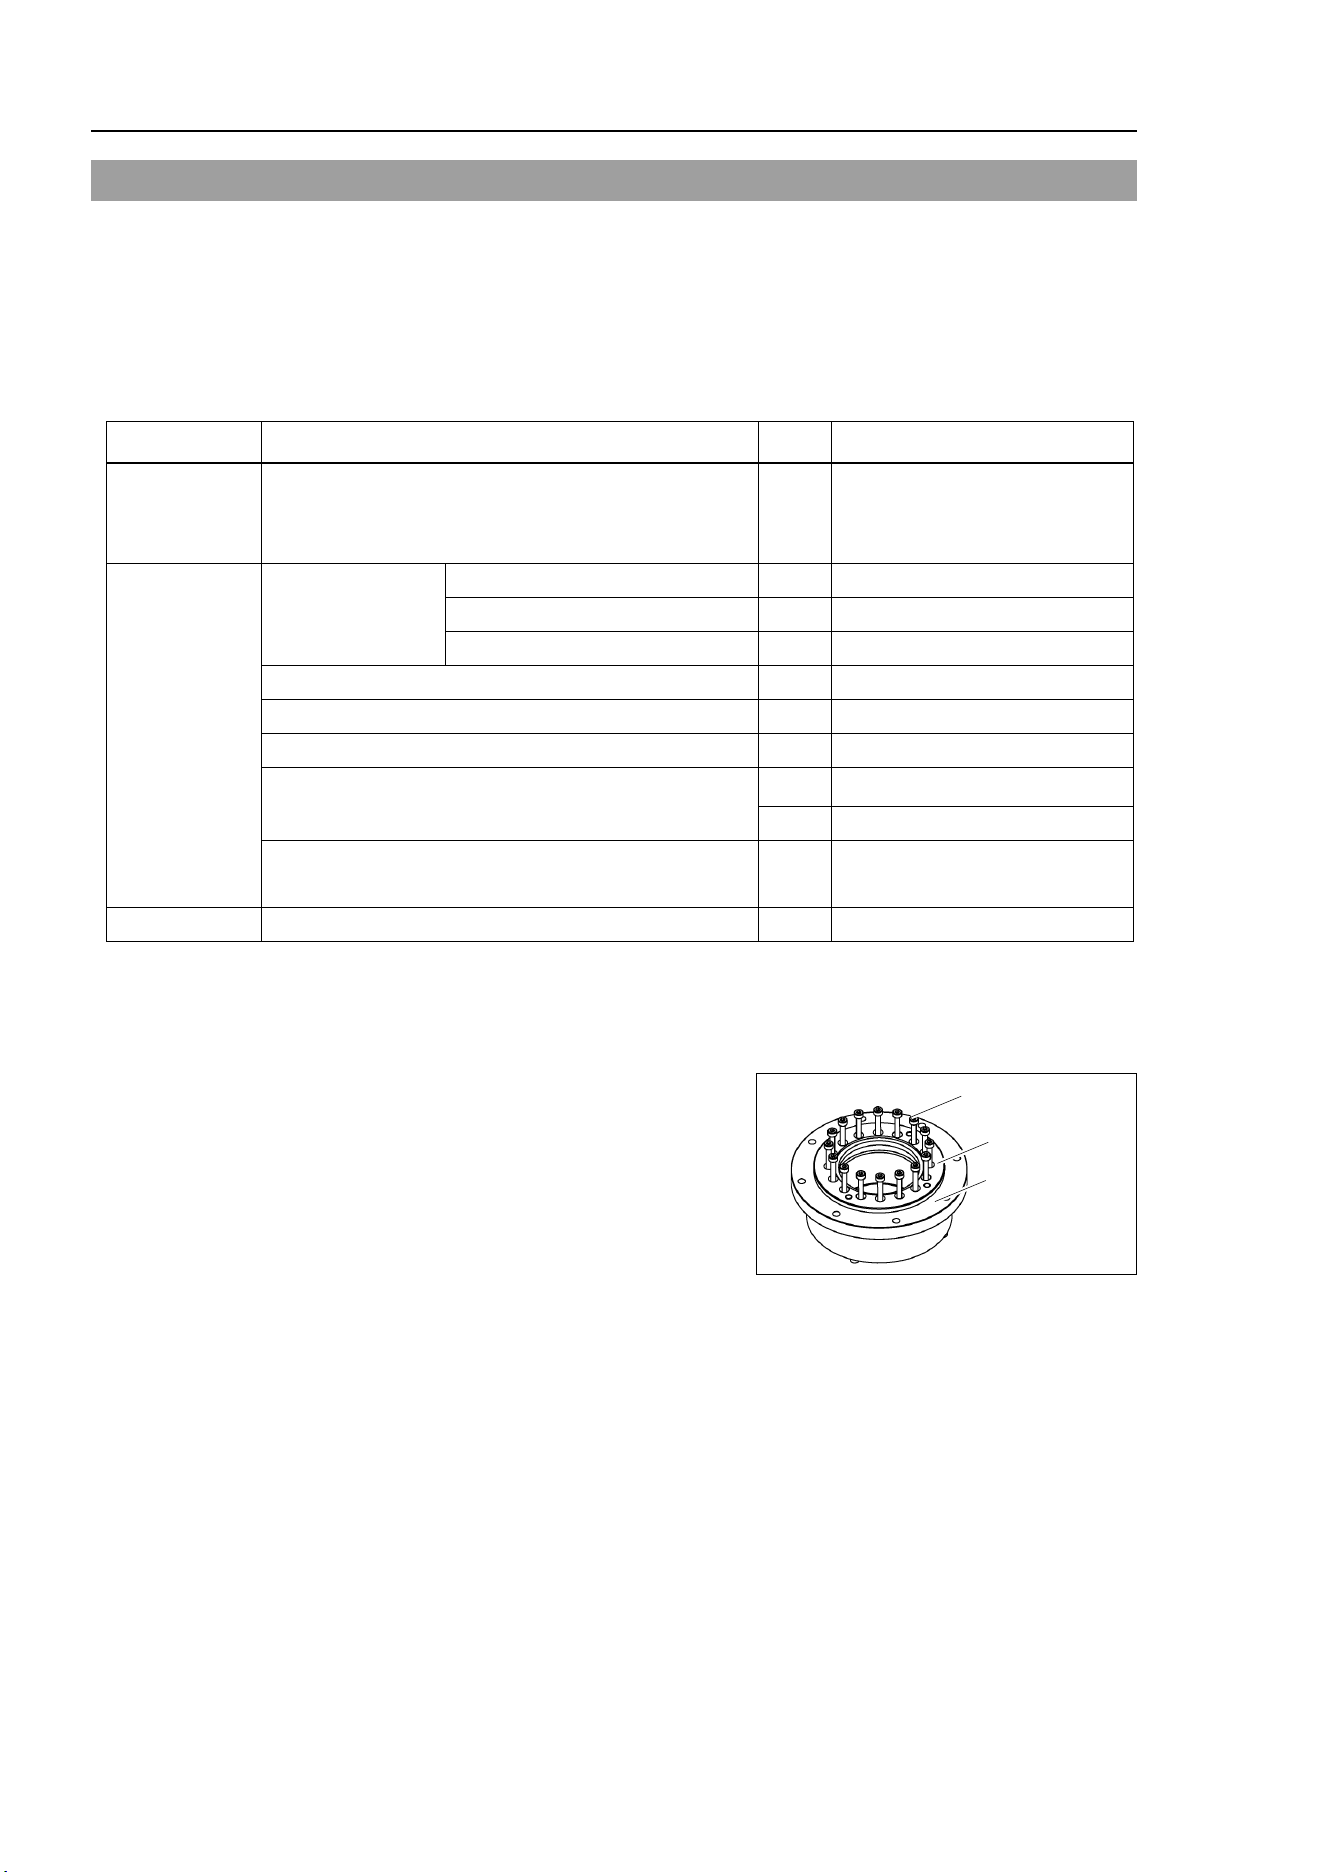
Maintenance 5. Joint #1
90 LS10-B R ev.6
5.2 Replacing Joint #1 Reduction Gear Unit
A reduction gear unit consists of the following three parts. When replacing the reduction
gear unit, be sure to always replace the waveform generator, flexspline, and circular spline
all together as one set.
Waveform generator, Flexspline, Circular spline
For details of the reduction gear unit, refer to Maintenance: 14. Maintenance Parts List.
Name
Qty.
Note
Maintenanc
e
Parts
Reduction Gear Unit 1 1765530
Tools
Hexagonal
wrench
width across flats: 2 mm
1
For M4 set screw
width across flats: 2.5 mm
1
For M3 screw
width across flats: 3 mm
1
For M4 screw
Torque wrench
1
Nippers
1
Spatula
1
For apply grease
Wiping cloth
1
For wiping grease (Flange)
1
For wiping grease (Bolt)
Screw (M4) 2
About 20 mm in length
For flexspline removal
Grease
Grease (SK-1A)
-
-
Joint #1
R
eduction
G
ear Unit
Removal
(1)
Remove the Joint #1 motor unit.
Follow
the removal steps in Maintenance: 5.1 Replacing Joint #1 Motor.
(2)
Remove the
reduction gear unit from the
Joint #1 flange.
16-M4×25
Flange
Reduction
Gear Unit
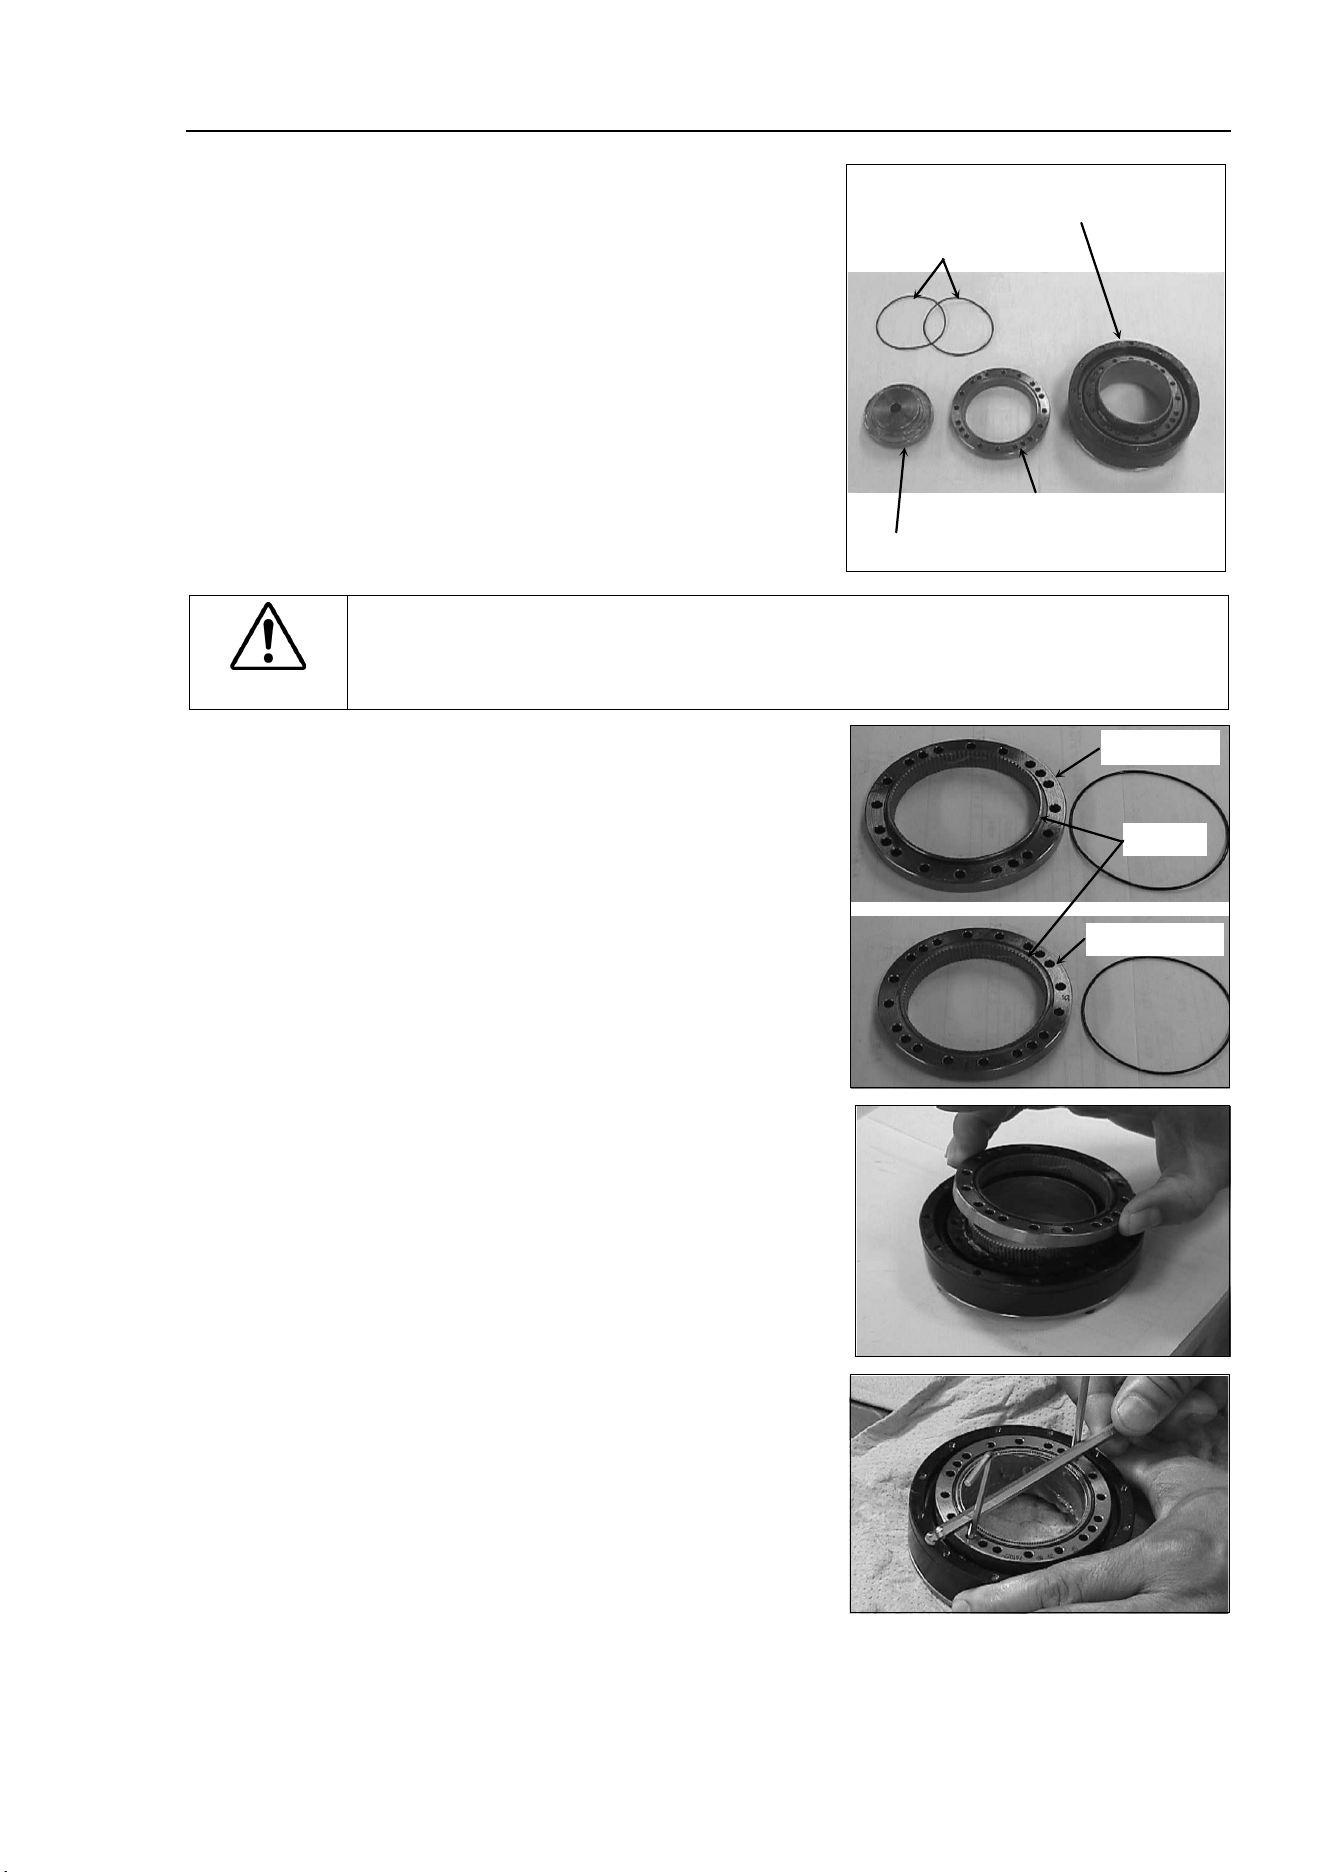
Maintenance 5. Joint #1
LS10-B Rev.6 91
Joint #1
R
eduction
G
ear Unit
Installation
(1)
A
new reduction gear unit contains the
parts shown
in the picture on the right
when it
is unpacked.
The gear grooves of the flexspline,
circular spline
, and the bearings of the
waveform generator
have been greased.
Wipe off excess grease
from the mounting
surface.
Flexspline and
Cross roller bearing unit
Circular spline
Waveform generator
O-ring
CAUTION
■
Never
adjust (loosen or tighten) the mounting bolts between the flexspline and
cross roller bearing unit.
If the mounting bolts are adjusted, the flexspline and
cross roller bearing unit must be
aligned by the maker of the reduction gear unit.
(2)
Fit the
O-rings into the grooves on both
side
s of the new circular spline.
Make
sure that the rings do not come out
of the grooves.
Convex side
Grooves
The other side
(3)
Face the convex side of the circular spline
down,
and then fit it into the flexspline.
(4)
M
atch the screw holes on the inner ring of
the cross roller bearing unit and the
through holes of the circular spline.
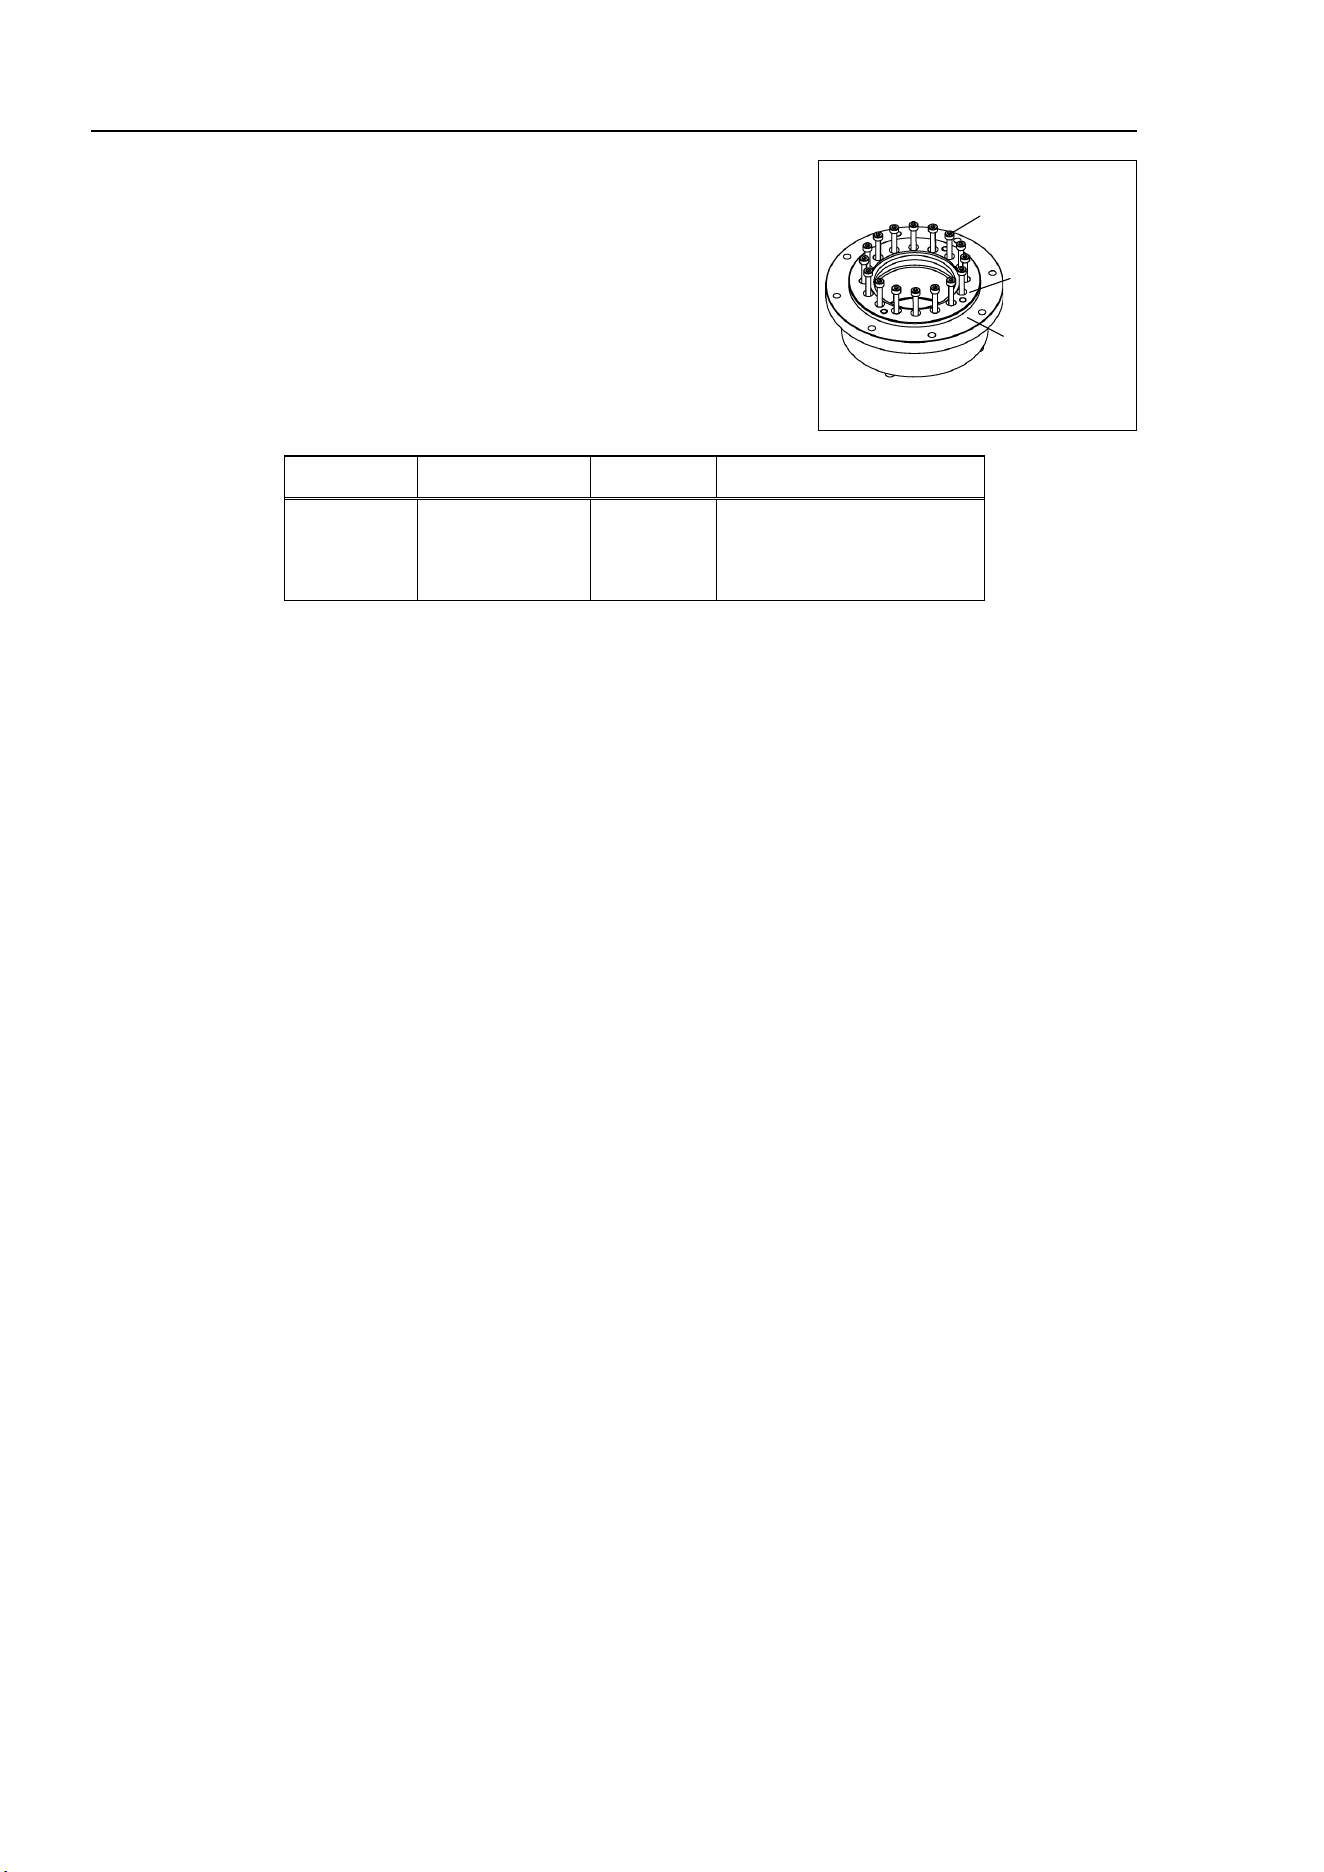
Maintenance 5. Joint #1
92 LS10-B R ev.6
(5)
Secure
the reduction gear flange to the circular
spline.
Loosely f
asten all bolts in a crisscross pattern so
that
the bolts will be fastened evenly. Then,
using a torque wrench,
tighten each bolt securely
in a crisscross pattern
at the torque specified in the
table below
.
Flange
Reduction
Gear Unit
16-M4×25
Item Bolt type Bolts Tightening torque
Joint #1
reduction
gear unit
M4×25
16
5.4 N⋅m (55 kgf⋅cm)
Be careful not to apply too much force since it may damage the parts
.
(6)
Apply grease (SK
-1A) inside the flexspline.
Grease volume : 37 g
(7)
Mount the Joint
#1 motor.
Follow the installation steps in
Maintenance: 5.1 Replacing Joint #1 Motor.
NOTE
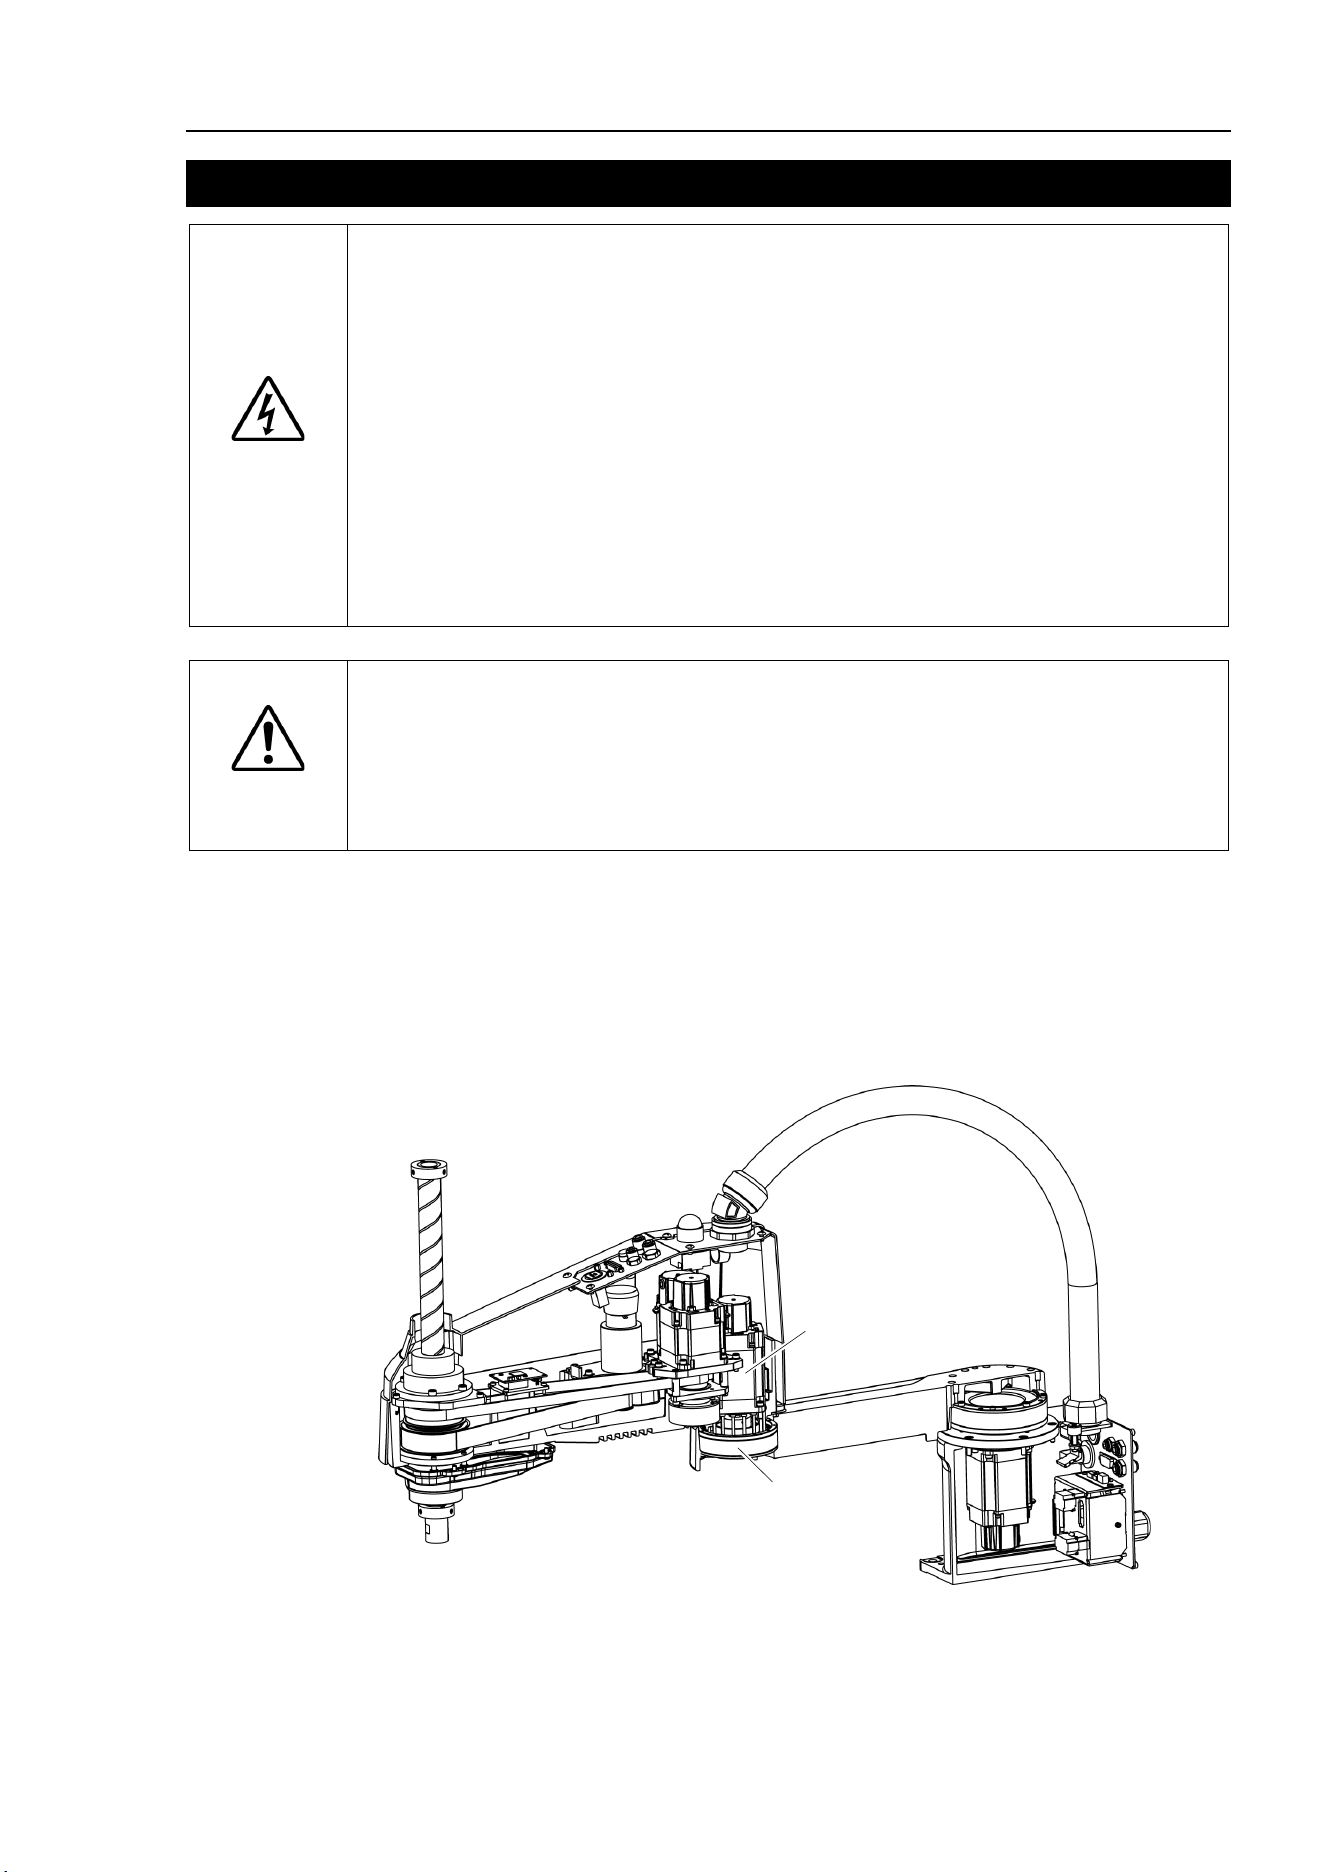
Maintenance 6. Joint #2
LS10-B Rev.6 93
6. Joint #2
WARNING
■
Do not connect or disconnect the motor connectors while the power to the robot
system is turned ON. Connecting or disconnecting the motor connectors
with
the power ON is extremely hazardous and may result
in serious bodily injury as
the Manipulator may mo
ve abnormally, and also may result in electric shock
and/or malfunction of the robot system.
■
To shut off power
to the robot system, disconnect the power plug from the power
source. Be sure to connect the AC power cable to a power receptacle.
DO NOT connect it directly to a factory power source.
■
Before
performing any replacement procedure, turn OFF the Controller and
related equipment,
and then disconnect the power plug from the power source.
Performing any replacement procedure with the power ON is extremely hazardous
and may result in
electric shock and/or malfunction of the robot system.
CAUTION
■
Be careful not to apply excessive shock to the motor shaft when replacing
the
motor
s. The shock may shorten the life cycle of the motors and encoder and/or
damage them.
■
Never disassemble the motor and encoder.
A disassembled motor and encoder
will cause a positional gap and cannot be used
again.
After parts have been replaced (motors, reduction gear units, brakes, timing belts, ball screw
spline unit, etc.), the Manipulator cannot operate properly because a mismatch exists
between the origin stored in each motor and its corresponding origin stored in the Controller.
After replacing the parts, it is necessary to match these origins.
The process of aligning the two origins is called “Calibration”.
Refer to Maintenance: 13. Calibration to execute the calibration.
Joint #2 Motor
Joint #2
Reduction Gear
Unit
Maintenance 6. Joint #2
94 LS10-B R ev.6
6.1 Replacing Joint #2 Motor
Name
Qty.
Note
Maintenance
Parts
AC Servo
Motor
520 W 1 2197985 (without oil seal)
Tools
Hexagonal
wrench
width across flats: 2 mm
1
For M4 set screw
width across flats: 3 mm
1
For M4 screw
Torque wrench
1
Nippers
1
For cutting wire tie
Wiping cloth
1
For wiping grease
Material
Wire tie
-
Grease
Grease
SK-1A
-
A brake is mounted on the motor of Joints #3 and #4 to prevent the shaft from moving down
and rotating due to the weight of the end effector while the power to the Controller is OFF
or while the motor is in OFF status (MOTOR OFF).
Move the shaft down to its lower limit before the replacement procedure following the
removal steps.
Joint #2
Motor
Removal
(1)
Turn ON the Controller.
(2)
Push down the shaft to its lower limit while pre
ssing the brake release switch.
Be sure to keep enough space and prevent
the end effector hitting any
peripheral
equipment.
The brake release switch is applied to both Joints #3 and Joint #4.
When the brake release switch is pressed, the respective brakes of the Joint #3 and Joint
#4 are
released simultaneously.
Be careful of the
shaft falling and rotating while the brake release switch is
being pressed
because
the shaft may be lowered by the weight of an end effector.
(3)
Turn OFF the Controller.
(4)
Remove the
Arm Top Cover.
For details, refer to
Maintenance: 3.1 Arm Top Cover.
(5)
Remove the User Plate.
For details, refer to
Maintenance: 3.5 User Plate.
(6)
Cut off the wire tie binding the cables.
D
o not cut the other wire ties.
(7)
Disconnect the connectors
.
Connectors: X221, X42 (Hold the clip to remove.)
NOTE
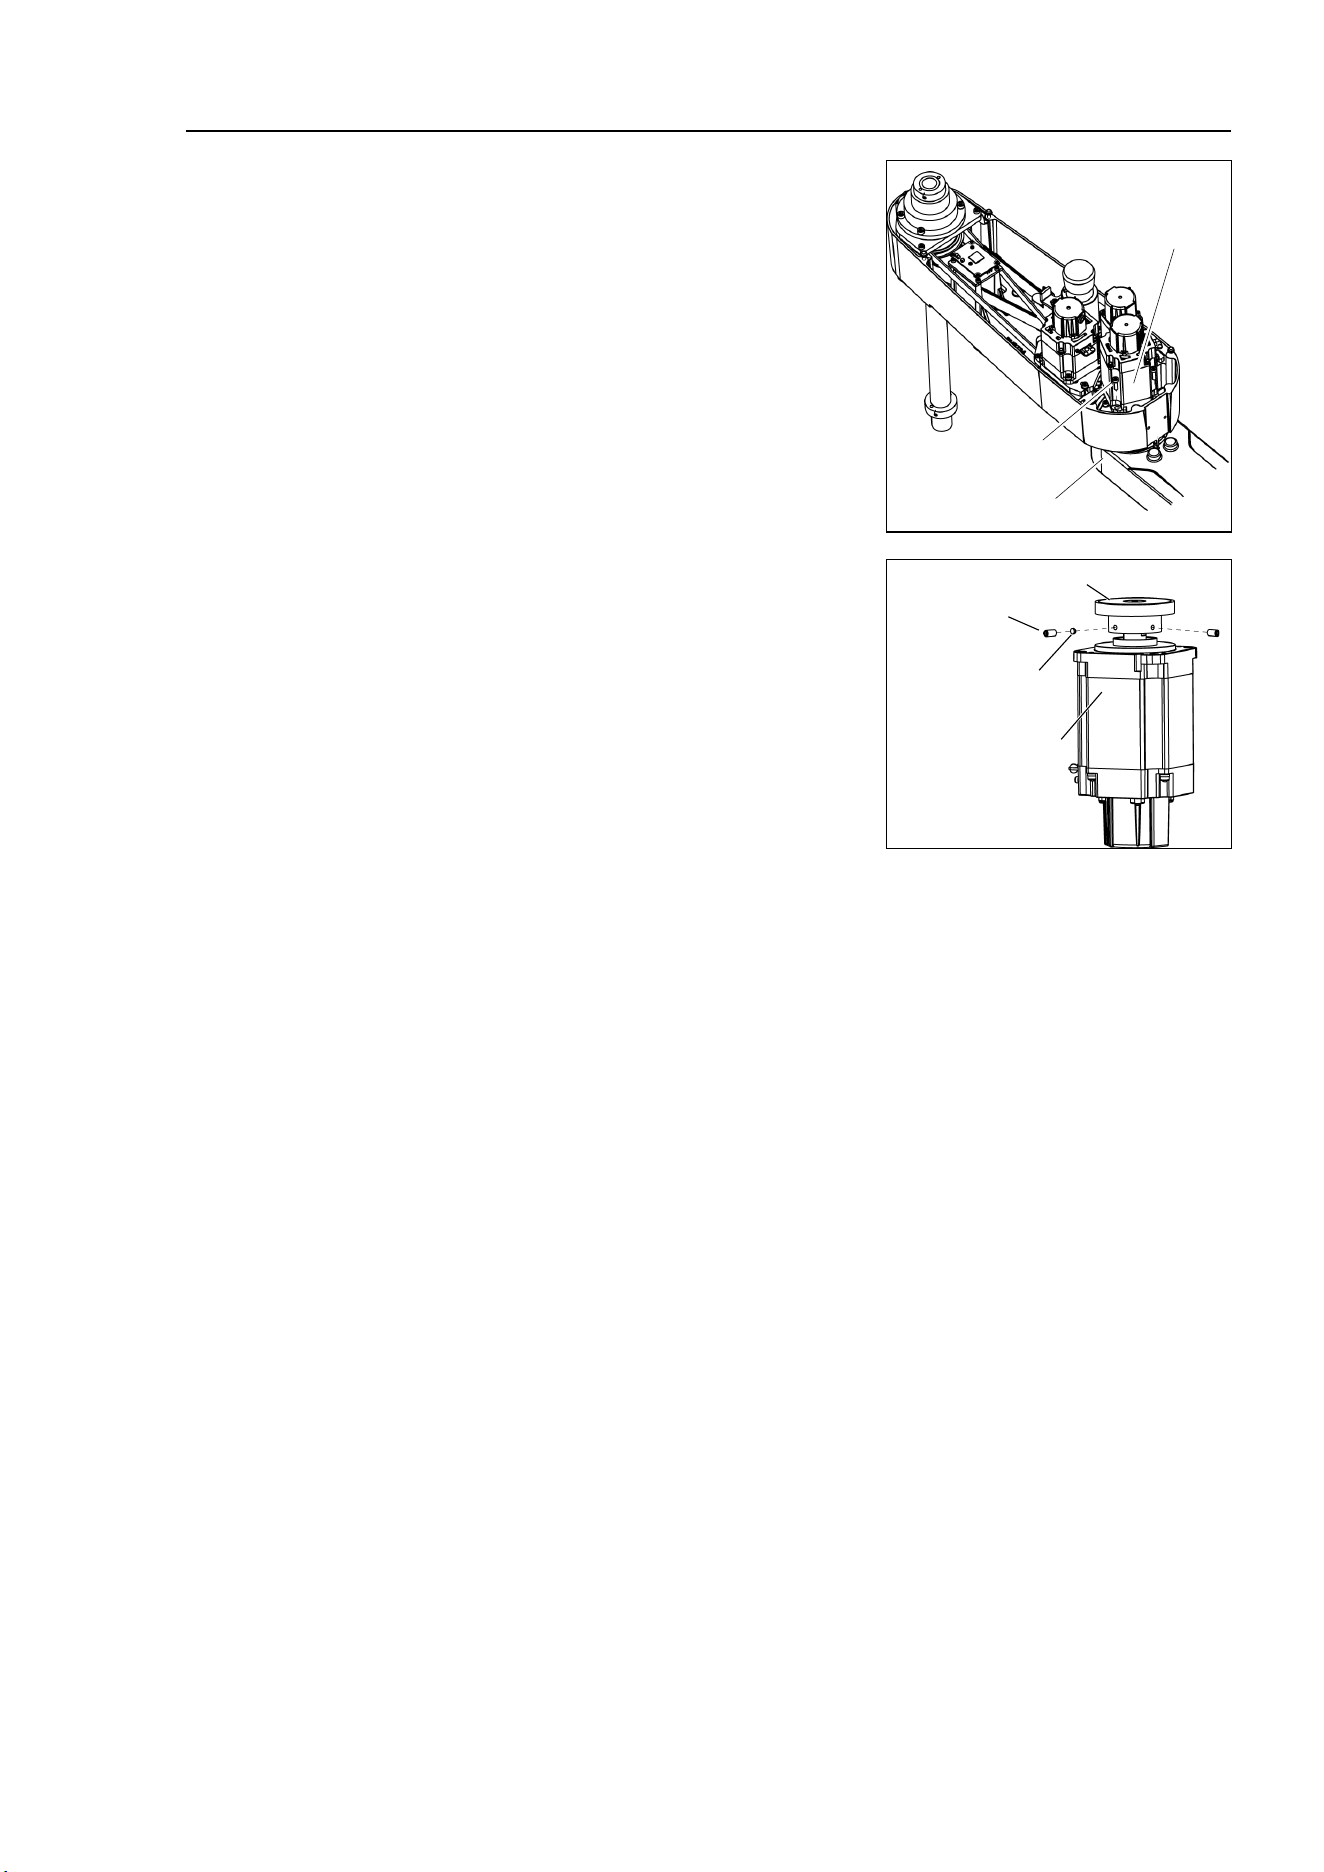
Maintenance 6. Joint #2
LS10-B Rev.6 95
(8)
Remove
the screws mounting the motor unit and
then remove
the Joint #2 motor unit from the
Arm #2.
Motor mounting screw 4-M4×15
To pull out
the motor smoothly, move the Arm
#2 slowly by
hand while pulling the motor.
Joint #2
Motor Unit
Arm #2
4-M4×15
(9)
Remove
the waveform generator from the Joint
#2 motor.
There is a brass bushing in one of the
set screw
holes.
Be sure to keep the bushing.
2-M4×6
Set Screw
M4 Brass Bushing
Joint #2 Motor
Waveform Generator
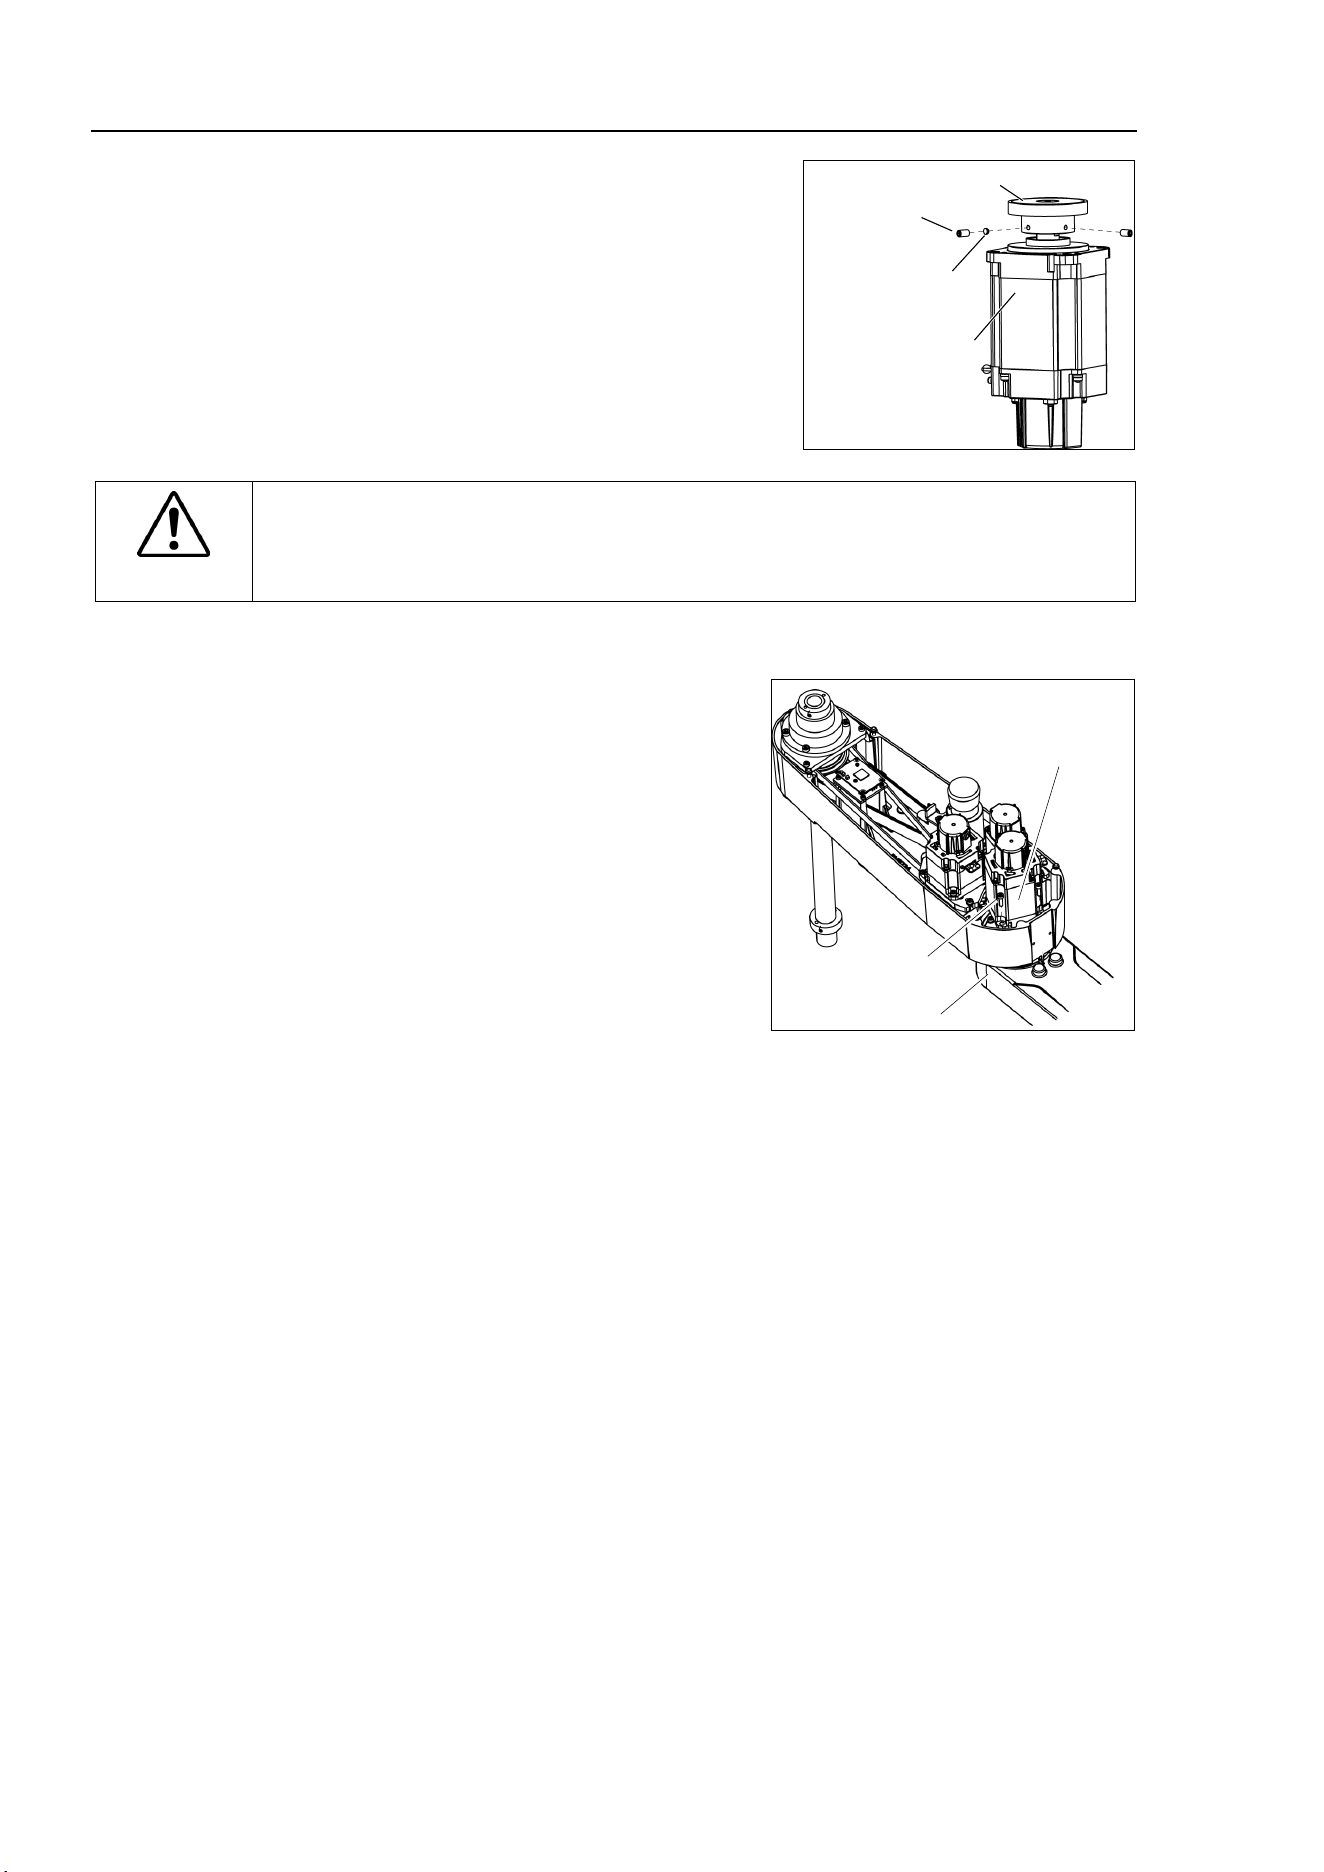
Maintenance 6. Joint #2
96 LS10-B R ev.6
Joint #2 Motor
Installation
(
1)
Mount the waveform generator on the Joint
#2
motor.
Be sure to
align the end face of the waveform
generator to the end face of the motor
shaft.
Tighten one of the set
screws vertically on the
flat face of the motor shaft.
Insert a bushing
into the other set
screw hole to prevent damage
to the motor shaft.
2-M4×6
Set Screw
M4 Brass Bushing
Joint #2 Motor
Waveform Generator
CAUTION
■
See the figures above for the orientation of the waveform
generator. Be sure to
install the waveform generator properly.
Improper installation of the waveform
generator will result in improper function of the Manipulator.
(
2) Apply grease between the waveform generator and motor flange.
Grease volume 6 g (SK-1A)
(
3)
M
ount the Joint #2 motor unit on the Arm #2.
To insert the motor, slowly move the Arm #2
by hand and push in.
Motor mounting screw 4-M4×15
Joint #2
Motor Unit
Arm #2
4-M4×15
(
4)
Mount the User Plate.
For details, refer to
Maintenance: 3.5 User Plate.
(5)
Connect the connectors.
Connectors: X221, X42.
(
6)
Bind
the cables with a wire tie in their original positions as before removed in the
r
emoval step (6).
Do not
allow unnecessary strain on the cables.
(
7)
Mount the Arm Top Cover.
For details, refer to
Maintenance: 3.1 Arm Top Cover.
(8)
Check if the Joint #2 moves in a Jog
motion by operating from EPSON RC+ menu
-
[Tools]
-[Robot Manager]-[Jog & Teach].
If the Manipulator oscillates with MotorON and the following errors are detected,
Error 5041: Motor torque output failure in low power state.
Error 4241: Over speed during low power mode was detected.
or when the joint other than Joint #2 moves, the connector for the other joint might be
connected to the Joint #2 motor.
Check the connector connection.

Maintenance 6. Joint #2
LS10-B Rev.6 97
(9)
Execute
the calibration for Joint #2.
For details refer to
Maintenance: 13. Calibration.
Maintenance 6. Joint #2
98 LS10-B R ev.6
6.2 Replacing Joint #2 Reduction Gear Unit
A reduction gear unit consists of the following three parts. When replacing the reduction
gear unit, be sure to always replace the following parts all together as one set.
Waveform generator, Flexspline, Circular spline
For details of the three parts, refer to Maintenance: 14. Maintenance parts list.
Name
Qty.
Note
Maintenance
parts
Reduction Gear Unit
1
1765520
O-ring
1
1213267 (CO0547A)
Tools
Hexagonal
wrench
width across flats: 2 mm
1
For M4 set screw
width across flats: 2.5 mm
1
For M3 screw
width across flats: 3 mm
1
For M4 screw
Torque wrench
1
Spatula
1
For apply grease
Wiping cloth
1
For wiping grease (Flange)
1
For wiping grease (Bolt)
Screw (M3) Length about 20 mm
2
For removing the flexspline
Material
Wire tie
-
Grease
Grease
SK-1A
-
A brake is mounted on the motor of Joints #3 and #4 to prevent the shaft from moving down
and rotating due to the weight of the end effector while the power to the Controller is OFF
or while the motor is in OFF status (MOTOR OFF).
Move the shaft down to its lower limit before the replacement procedure following the
removal steps.
NOTE
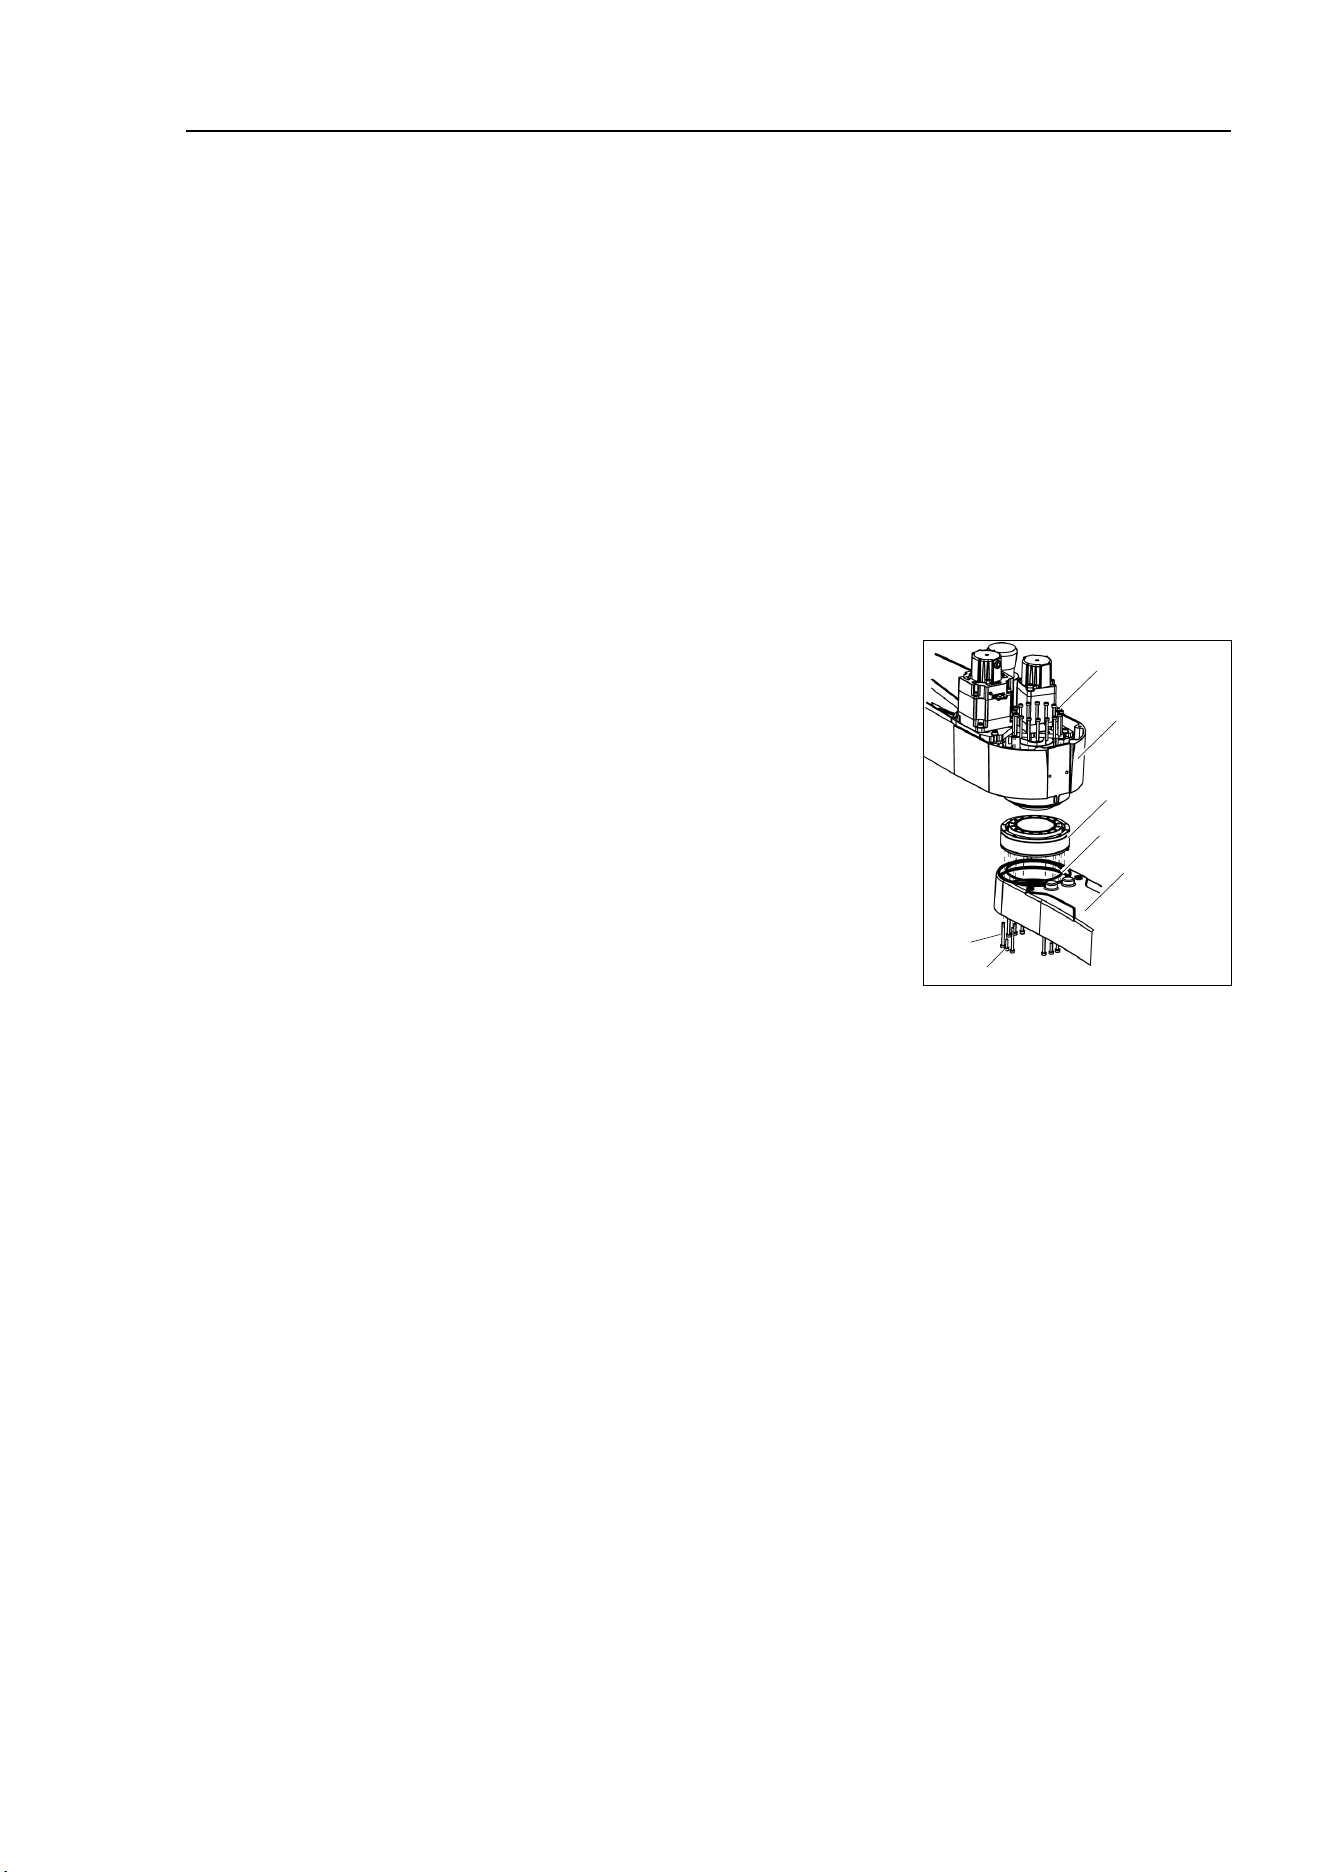
Maintenance 6. Joint #2
LS10-B Rev.6 99
Joint #2
R
eduction
G
ear Unit
Removal
(1)
Turn ON the Controller.
(2)
Push down the shaft to its lower limit while pressing the brake release switch.
Be sure to keep enough space and prevent the
end effector
hitting any peripheral
equipment.
The brake release switch is applied to both Joints #3 and Joint #4.
When the brake release switch is pressed, the respective brakes of the Joint #3 and Joint
#4 are
released simultaneously.
Be careful of the
shaft falling and rotating while the brake release switch is
being
pressed
because the shaft may be lowered by the weight of an end effector.
(3)
Turn OFF the Controller.
(4)
Remove the waveform
generator from the Joint #2 motor.
Follow
the removal steps in Maintenance: 6.1 Replacing Joint #2 Motor.
(5)
Remove the Arm #2 by removing the screws
mounting
the Arm #2 on the reduction gear unit.
A: 16-M3×28
B: 8-M3×32+8-M3 small washer
C: 4-M3×12+4-M3 small washer
Arm #2
アーム 2
Reduction
Gear Unit
Arm #1
B
C
O ring
A
(6)
Remove the reduction gear unit from the Arm #1 by
removing the screws that mounts the reduction gear
unit on the Arm #1.
There is an O
-ring between the Arm #1 and the
reduction gear unit.
Be careful not to lose the removed
O-ring.
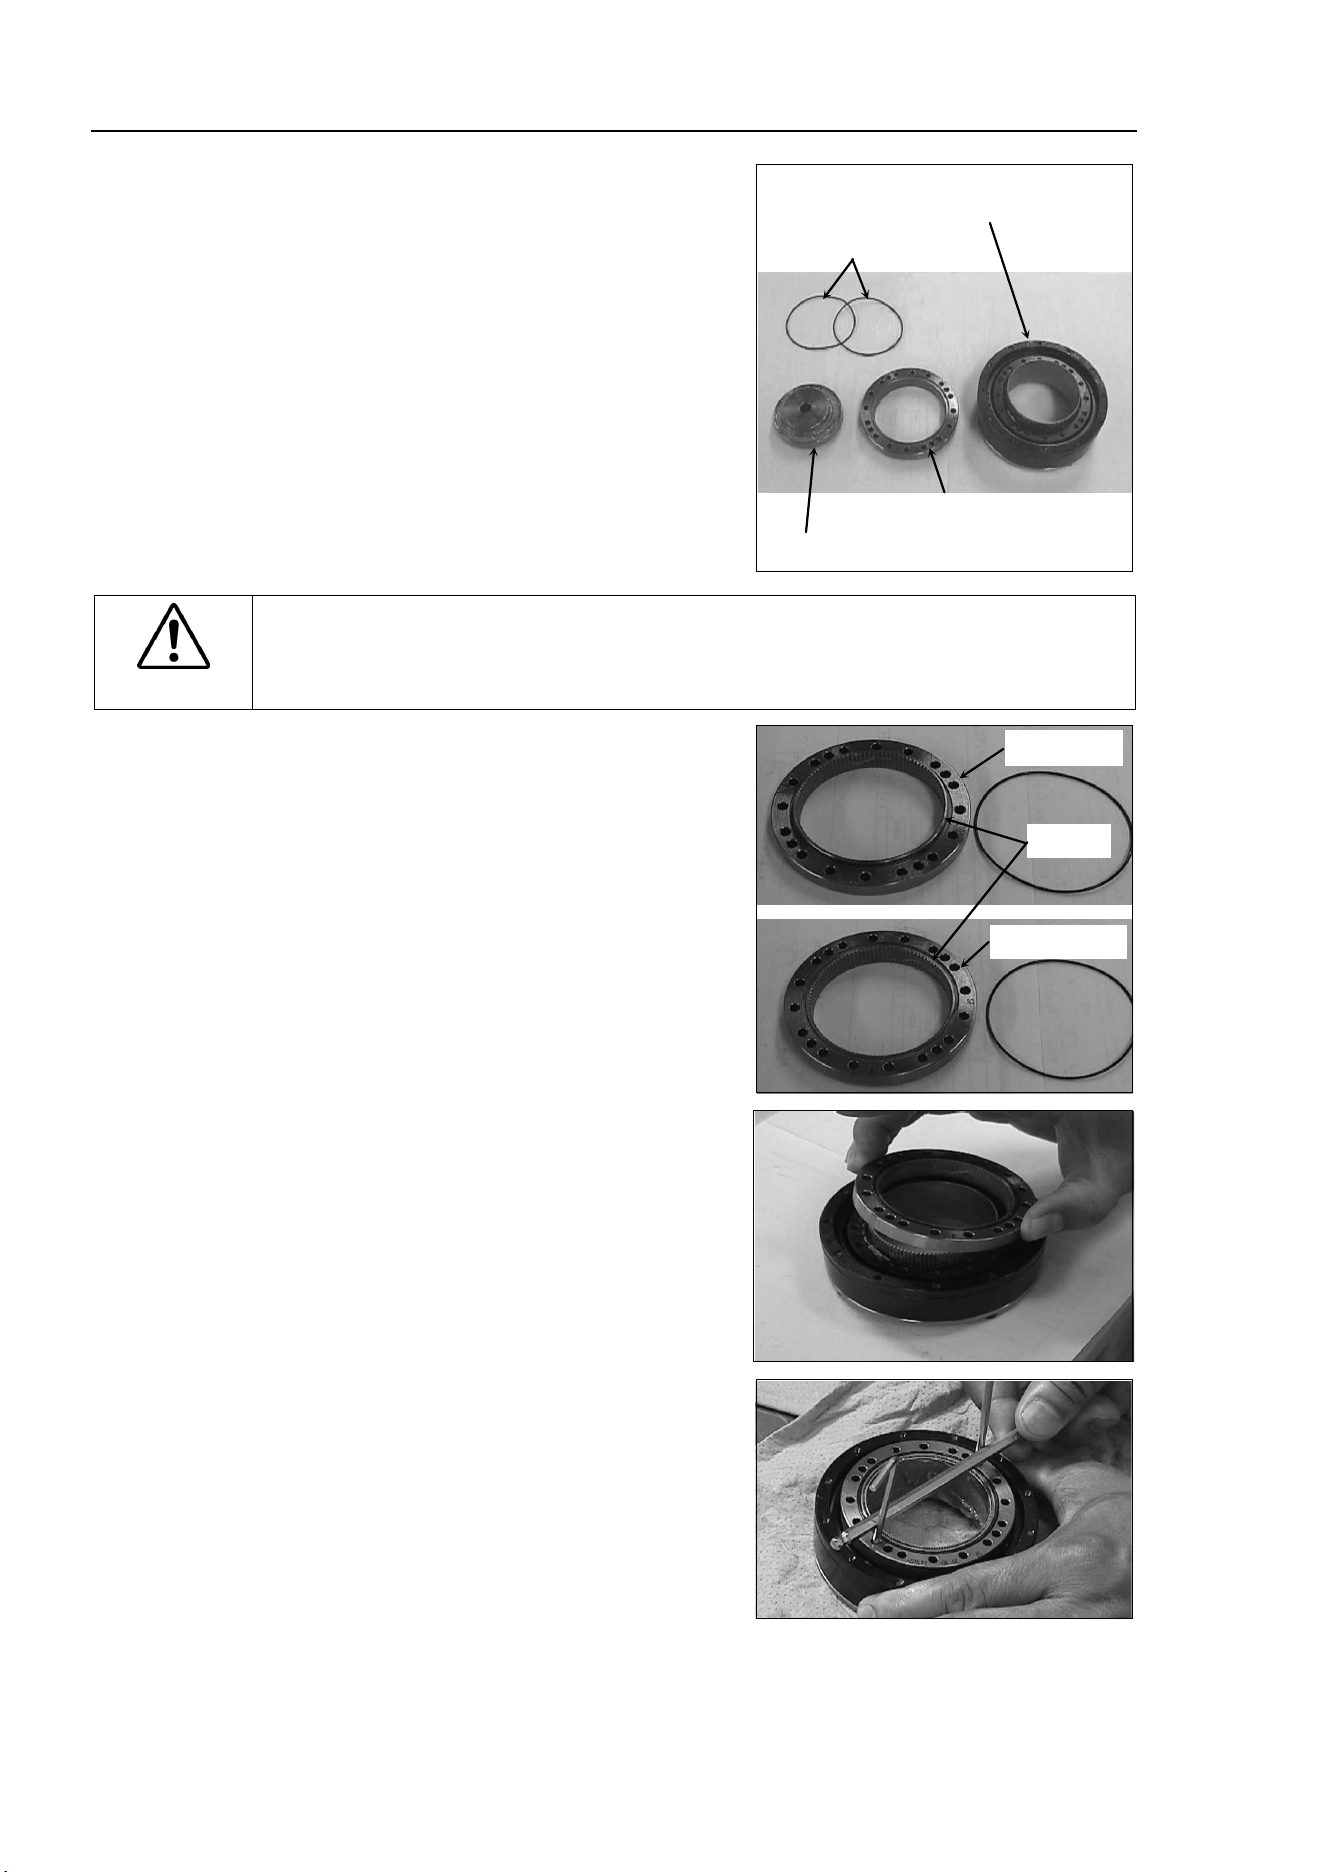
Maintenance 6. Joint #2
100 LS10-B Rev.6
Joint #2
R
eduction
G
ear Unit
Installation
(1)
A
new
reduction gear unit contains the
parts shown
in the picture on the right
when it
is unpacked.
T
he gear grooves of the flexspline, circular
spline
, and the bearings of the waveform
generator
have been greased. Wipe off
excess grease
from the mounting surface.
O-ring
Flexspline and
Cross roller bearing unit
Circular spline
Waveform generator
CAUTION
■
Never
adjust (loosen or tighten) the mounting bolts between the flexspline and
cross roller bearing unit.
If the mounting bolts are adjusted, the flexspline and
cross roller bearing unit must be
aligned by the maker of the reduction gear unit.
(2)
Fit the
O-rings into the grooves on both
side
s of the new circular spline.
Make
sure that the rings do not come out
of the grooves.
Convex side
Grooves
The other side
(3)
Face the convex side of the circular spline
down,
and then fit it into the flexspline.
(4)
M
atch the screw holes on the inner ring of
the cross roller bearing unit and the
through holes of the circular spline.
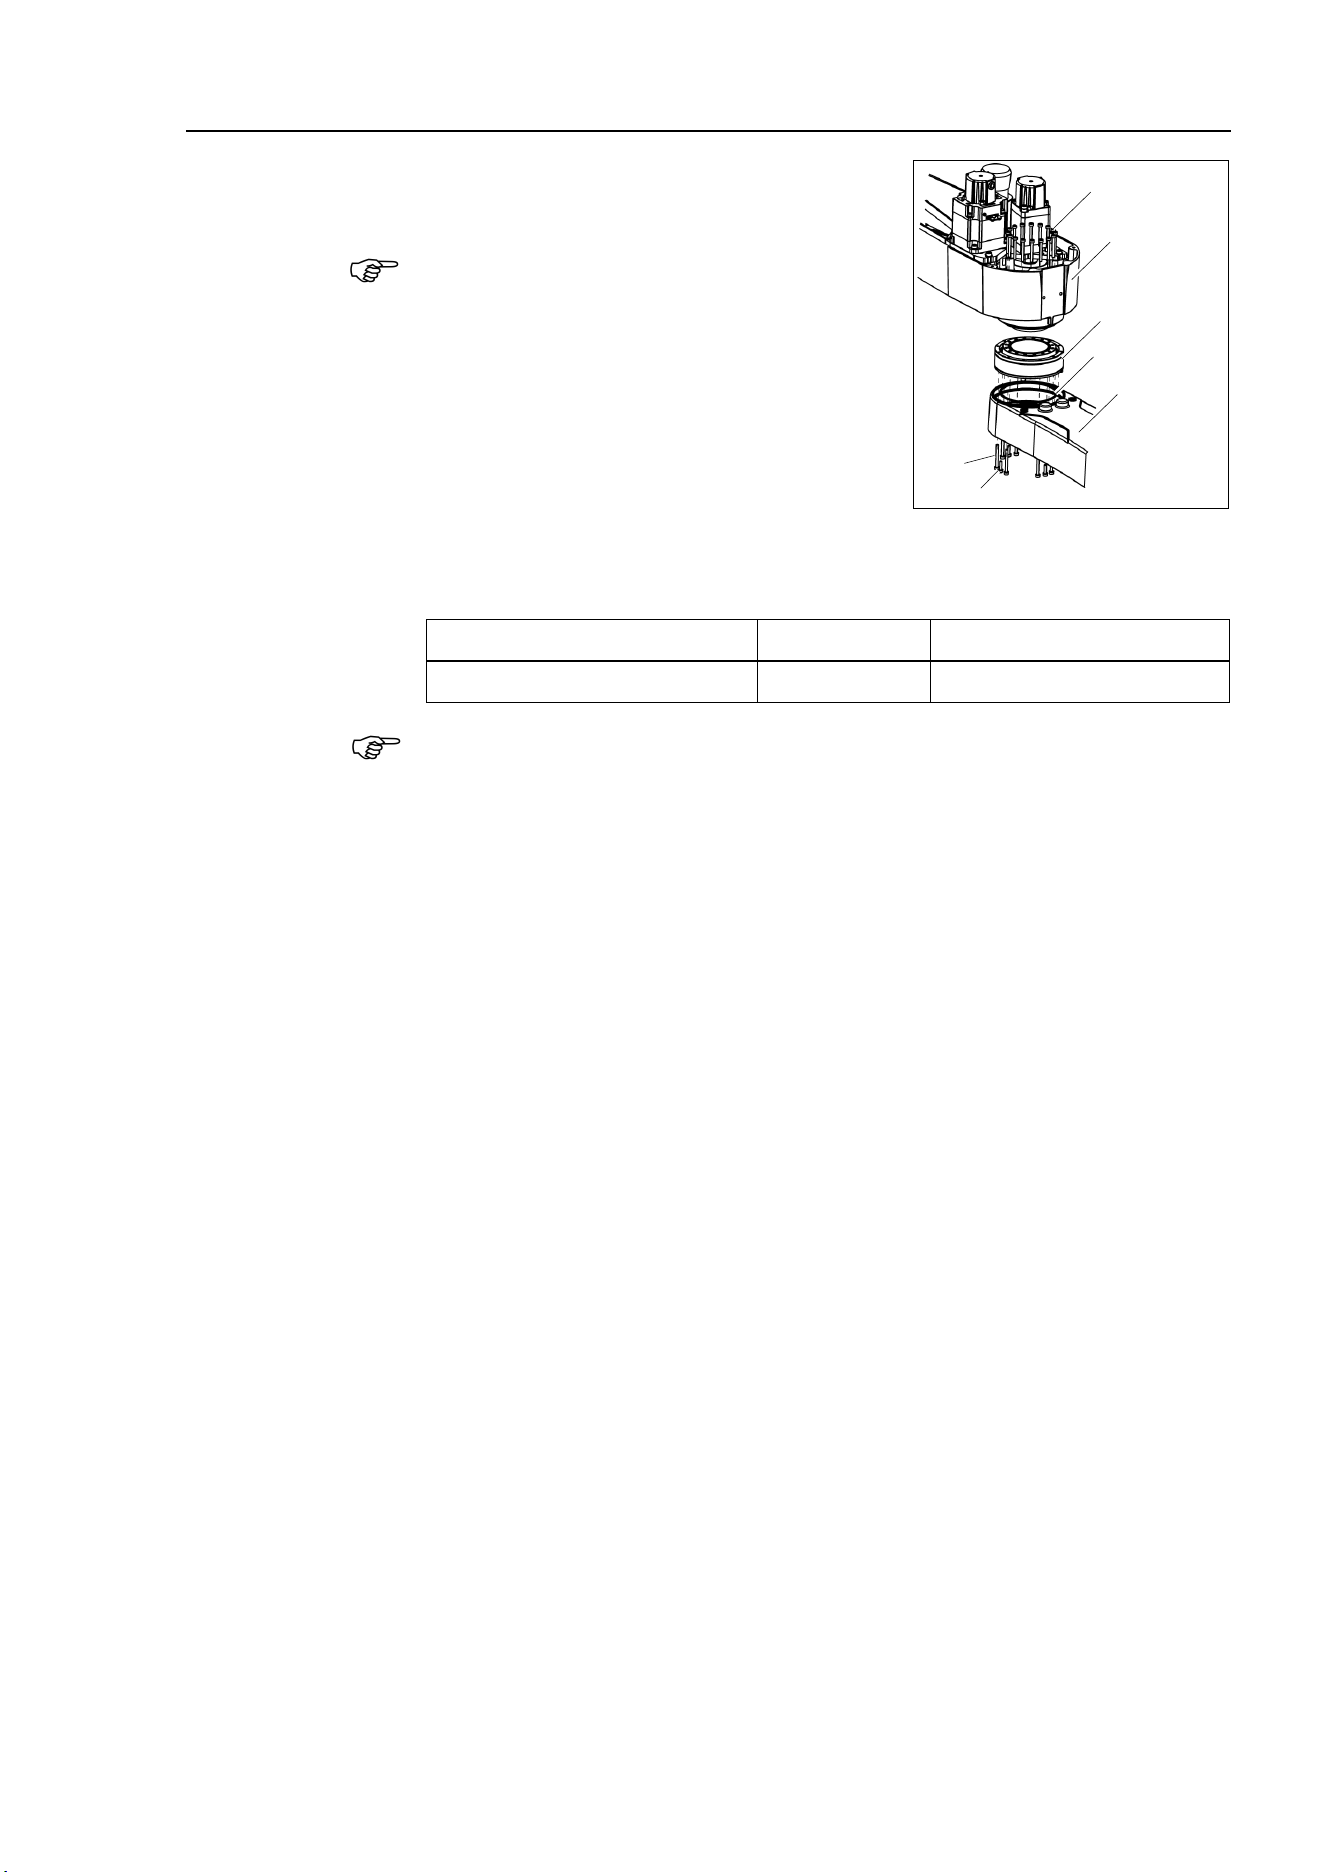
Maintenance 6. Joint #2
LS10-B Rev.6 101
(5)
Set the O-ring removed in the removal step (6)
into the O-ring groove of the Arm #1.
If the O-ring is not fit into the groove, please use
another O-ring which is prepared as maintenance
part.
Install the flexspline on the Arm #1.
A: 16-M3×28
B: 8-M3×32+8-M3 small washer
C: 4-M3×12+4-M3 small washer
Arm #2
Reduction
Gear Unit
Arm #1
B
C
O ring
A
Loosely
secure all bolts in a crisscross pattern so that the bolts will be secured
evenly.
Then, using a torque wrench,
tighten each bolt securely in a crisscross pattern at the
torque specified in the table below.
Item
Bolt type
Tightening torque
Joint #2 reduction gear unit M3
2.35 N⋅m (24 kgf⋅cm)
Be careful not to apply too much force since it may damage the parts
(6)
Apply grease between the motor flange and waveform
generator and next inside the
flexspline.
Between the motor flange and waveform generator:
Grease volume 6 g (SK-1A)
Inside the flexspline:
Grease volume
16 g (SK-1A)
(7)
Set the attached O-ring into the O-ring groove of the circular spline.
Secure the Arm #2 on the circular spline.
(8)
Mount
and Joint #2 motor.
Follow the installation steps in
Maintenance: 6.1 Replacing Joint #2 Motor.
NOTE
NOTE
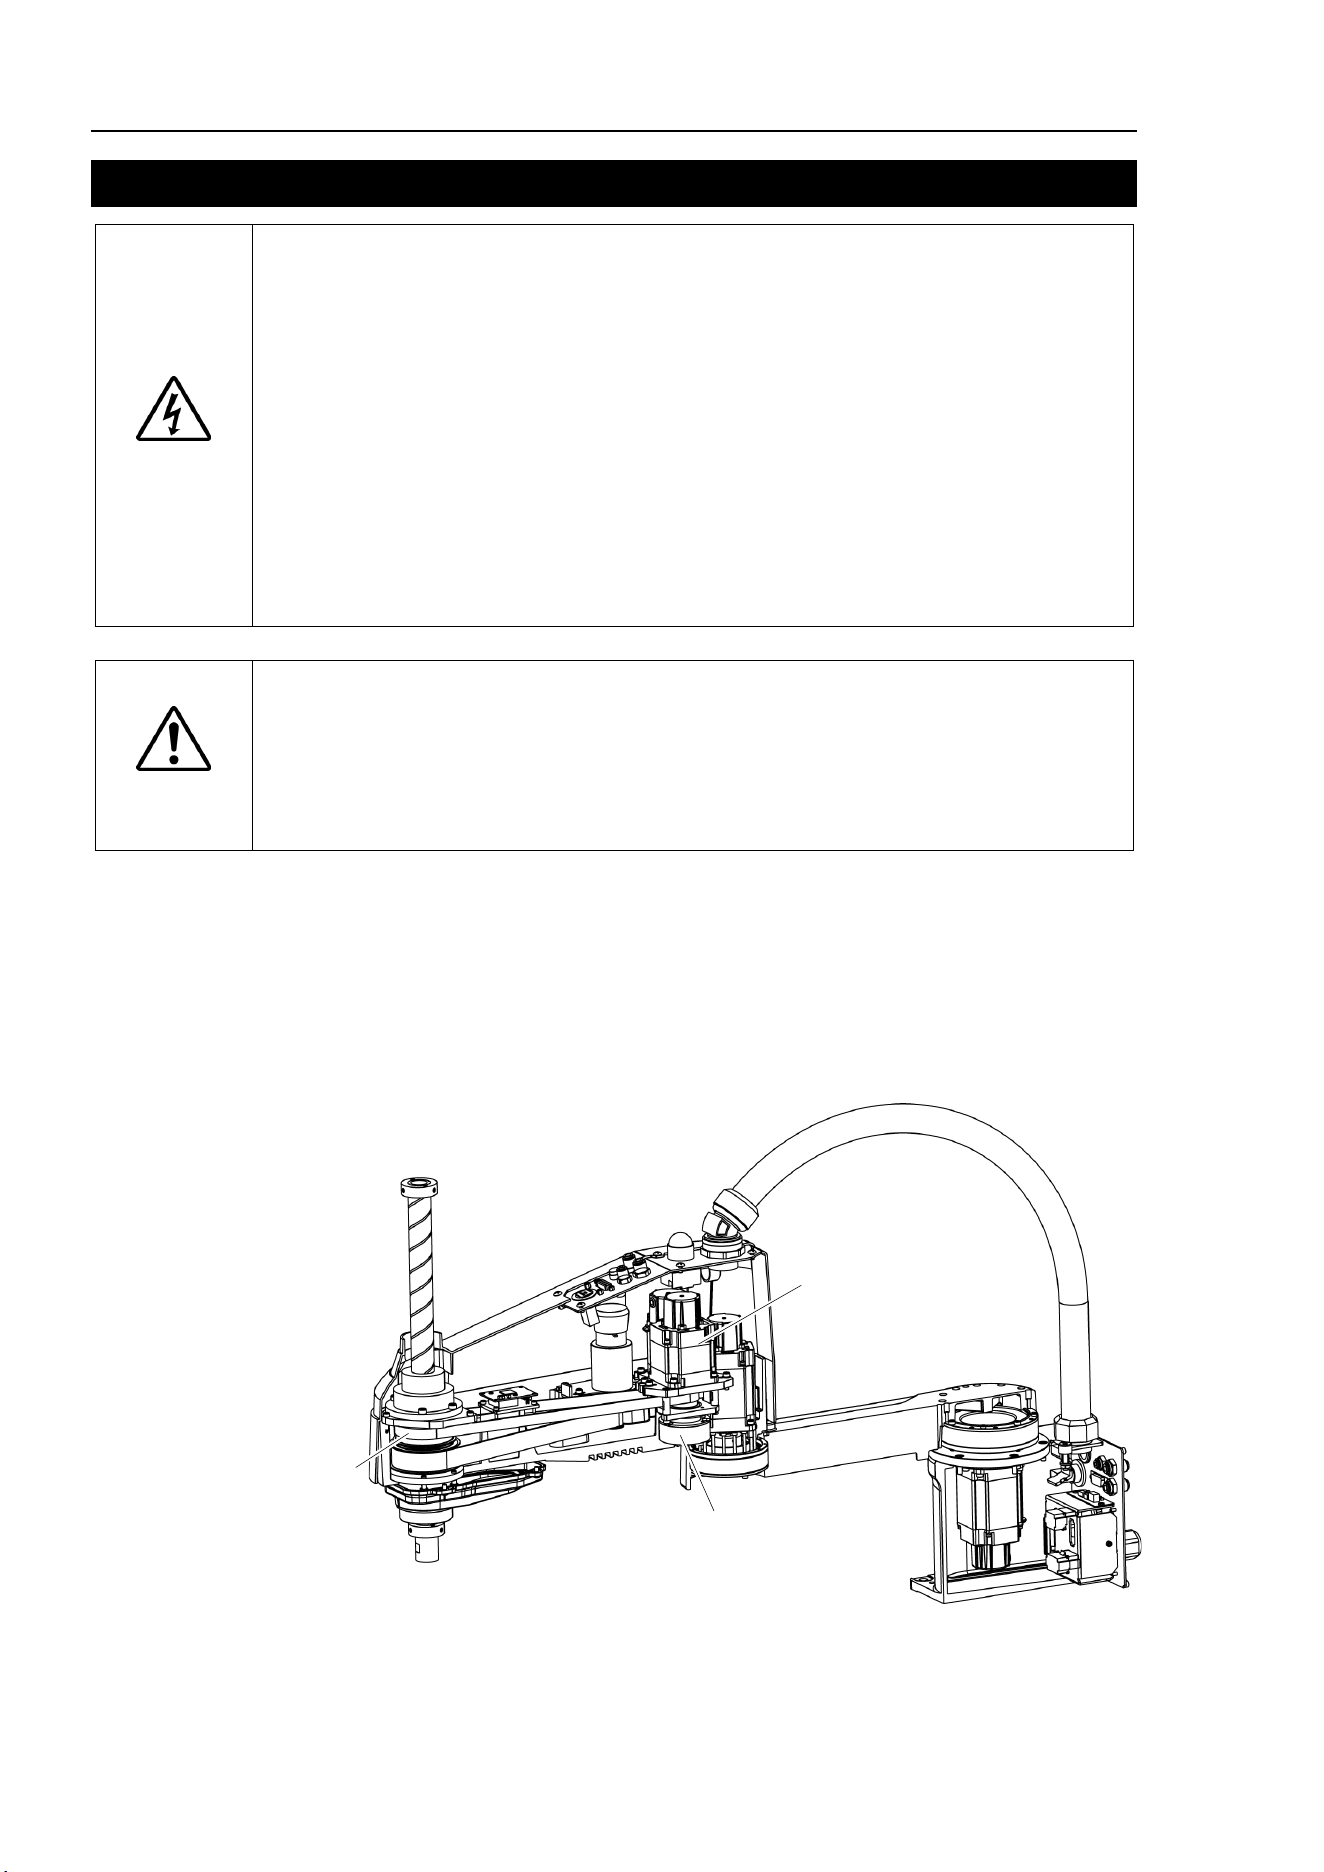
Maintenance 7. Joint #3
102 LS10-B Rev.6
7. Joint #3
WARNING
■
Do not connect or disconnect the motor connectors while the power to the robot
system is turned ON. Connecting or disconnecting the motor connectors
with
the power ON is extremely hazardous and may result
in serious bodily injury as
the Manipulator may mo
ve abnormally, and also may result in electric shock
and/or malfunction of the robot system.
■
To shut off power
to the robot system, disconnect the power plug from the power
source. Be sure to connect the AC power cable to a power receptacle.
DO NOT connect it directly to a factory power source.
■
Before
performing any replacement procedure, turn OFF the Controller and
related equipment,
and then disconnect the power plug from the power source.
Performing any replacement procedure with the power ON is extremely hazardous
and may result in
electric shock and/or malfunction of the robot system.
CAUTION
■
Be careful not to apply excessive shock to the motor shaft when replacing
the
motor
s. The shock may shorten the life cycle of the motors and encoder and/or
damage them.
■
Never disassemble the motor and encoder.
A disassembled motor and encoder
will cause a positional gap and cannot be used
again.
After parts have been replaced (motors, reduction gear units, brakes, timing belts, ball screw
spline unit, etc.), the Manipulator cannot operate properly because a mismatch exists
between the origin stored in each motor and its corresponding origin stored in the Controller.
After replacing the parts, it is necessary to match these origins.
The process of aligning the two origins is called “Calibration”.
Refer to Maintenance: 13. Calibration to execute the calibration.
Joint #3 Brake
Z Belt
Joint #3 Motor
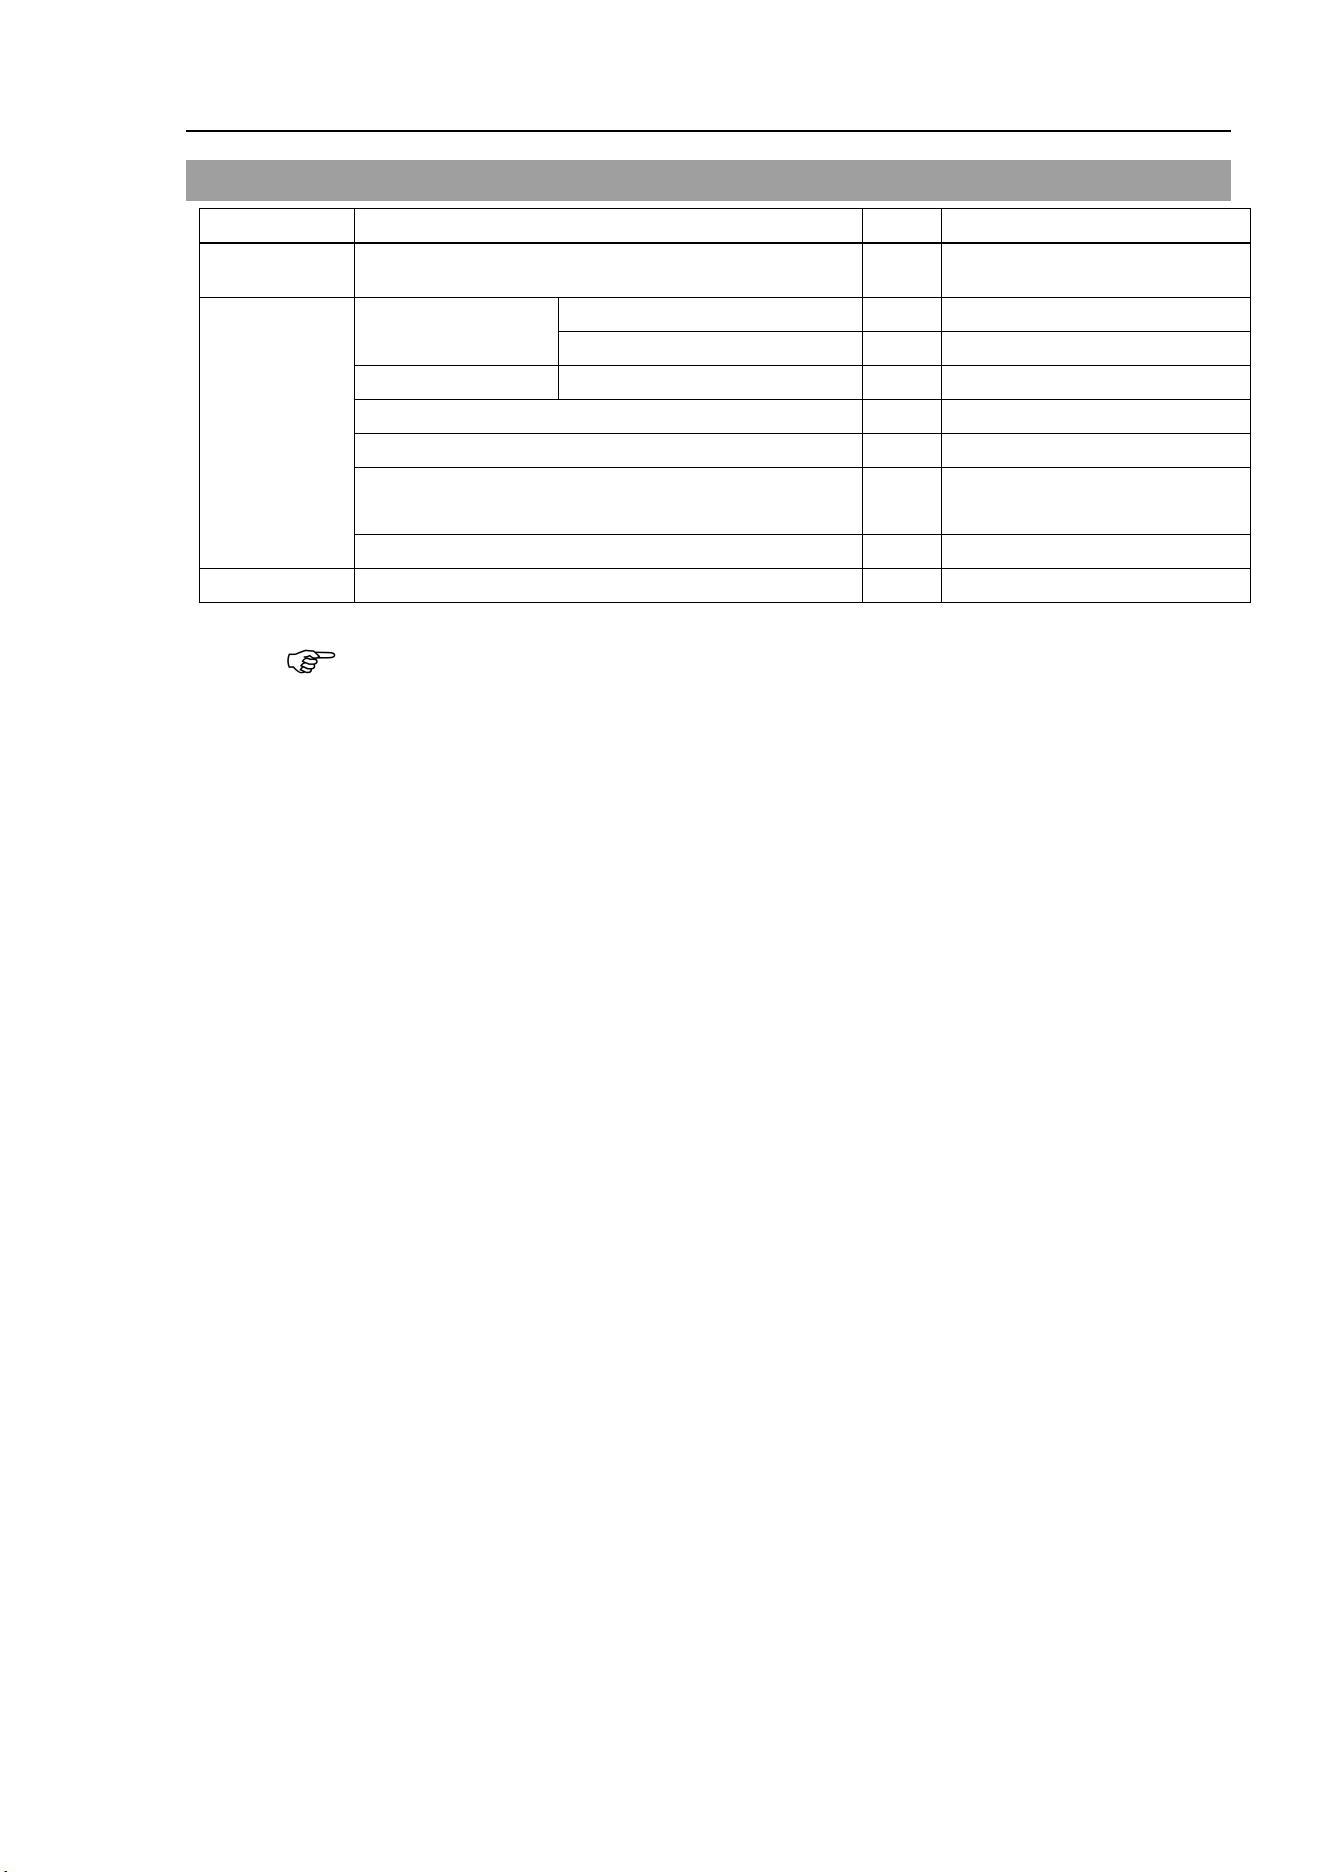
Maintenance 7. Joint #3
LS10-B Rev.6 103
7.1 Replacing Joint #3 Motor
Name
Qty.
Note
Maintenance
parts
AC Servo Motor 200W 1 2197986
Tools
Hexagonal
wrench
width across flats: 2 mm
1
For M4 set screw
width across flats: 4 mm
1
For M5 screw
Spanner
width across flats: 7 mm
For M4 bolt, M4 nut
Torque wrench
Nippers
1
For cutting wire tie
Sonic tension meter 1
Z: Belt tension
69N (7.0 ± 0.5 kgf)
Suitable cord (Length about 800 mm)
1
For belt tension
Material
Wire tie
-
A brake is mounted on the motor of Joints #3 and #4 to prevent the shaft from moving down
and rotating due to the weight of the end effector while the power to the Controller is OFF
or while the motor is in OFF status (MOTOR OFF).
Move the shaft down to its lower limit before the replacement procedure following the
removal steps.
Joint #3 motor
Removal
(1)
Turn ON the Controller.
(2)
Push down the shaft to its lower limit while pressing the brake release switch. Be sure
to keep enough space and prevent
the end effector hitting any peripheral equipment.
The brake release switch is applied to both Joints #3 and Joint #4.
When the brake release switch is pressed, the respective brakes of the Joint #3 and Joint
#4 are released simultaneously.
Be careful of the
shaft falling and rotating while the brake release switch is being
pressed
because the shaft may be lowered by the weight of an end effector.
(3)
Turn OFF the Controller.
(4)
Remove the
Arm Top Cover.
For details, refer to
Maintenance: 3.1 Arm Top Cover.
(5)
Cut off the wire tie binding the Joint #3 motor cables.
Do not cut off the other wire ties that do not relate with
removal of the User Plate.
(6)
Remove the User Plate.
For details, refer to
Maintenance: 3.5 User Plate.
(7)
Disconnect the following connectors.
Connectors: X231, X32, X43 (Hold the clip to remove.)
NOTE
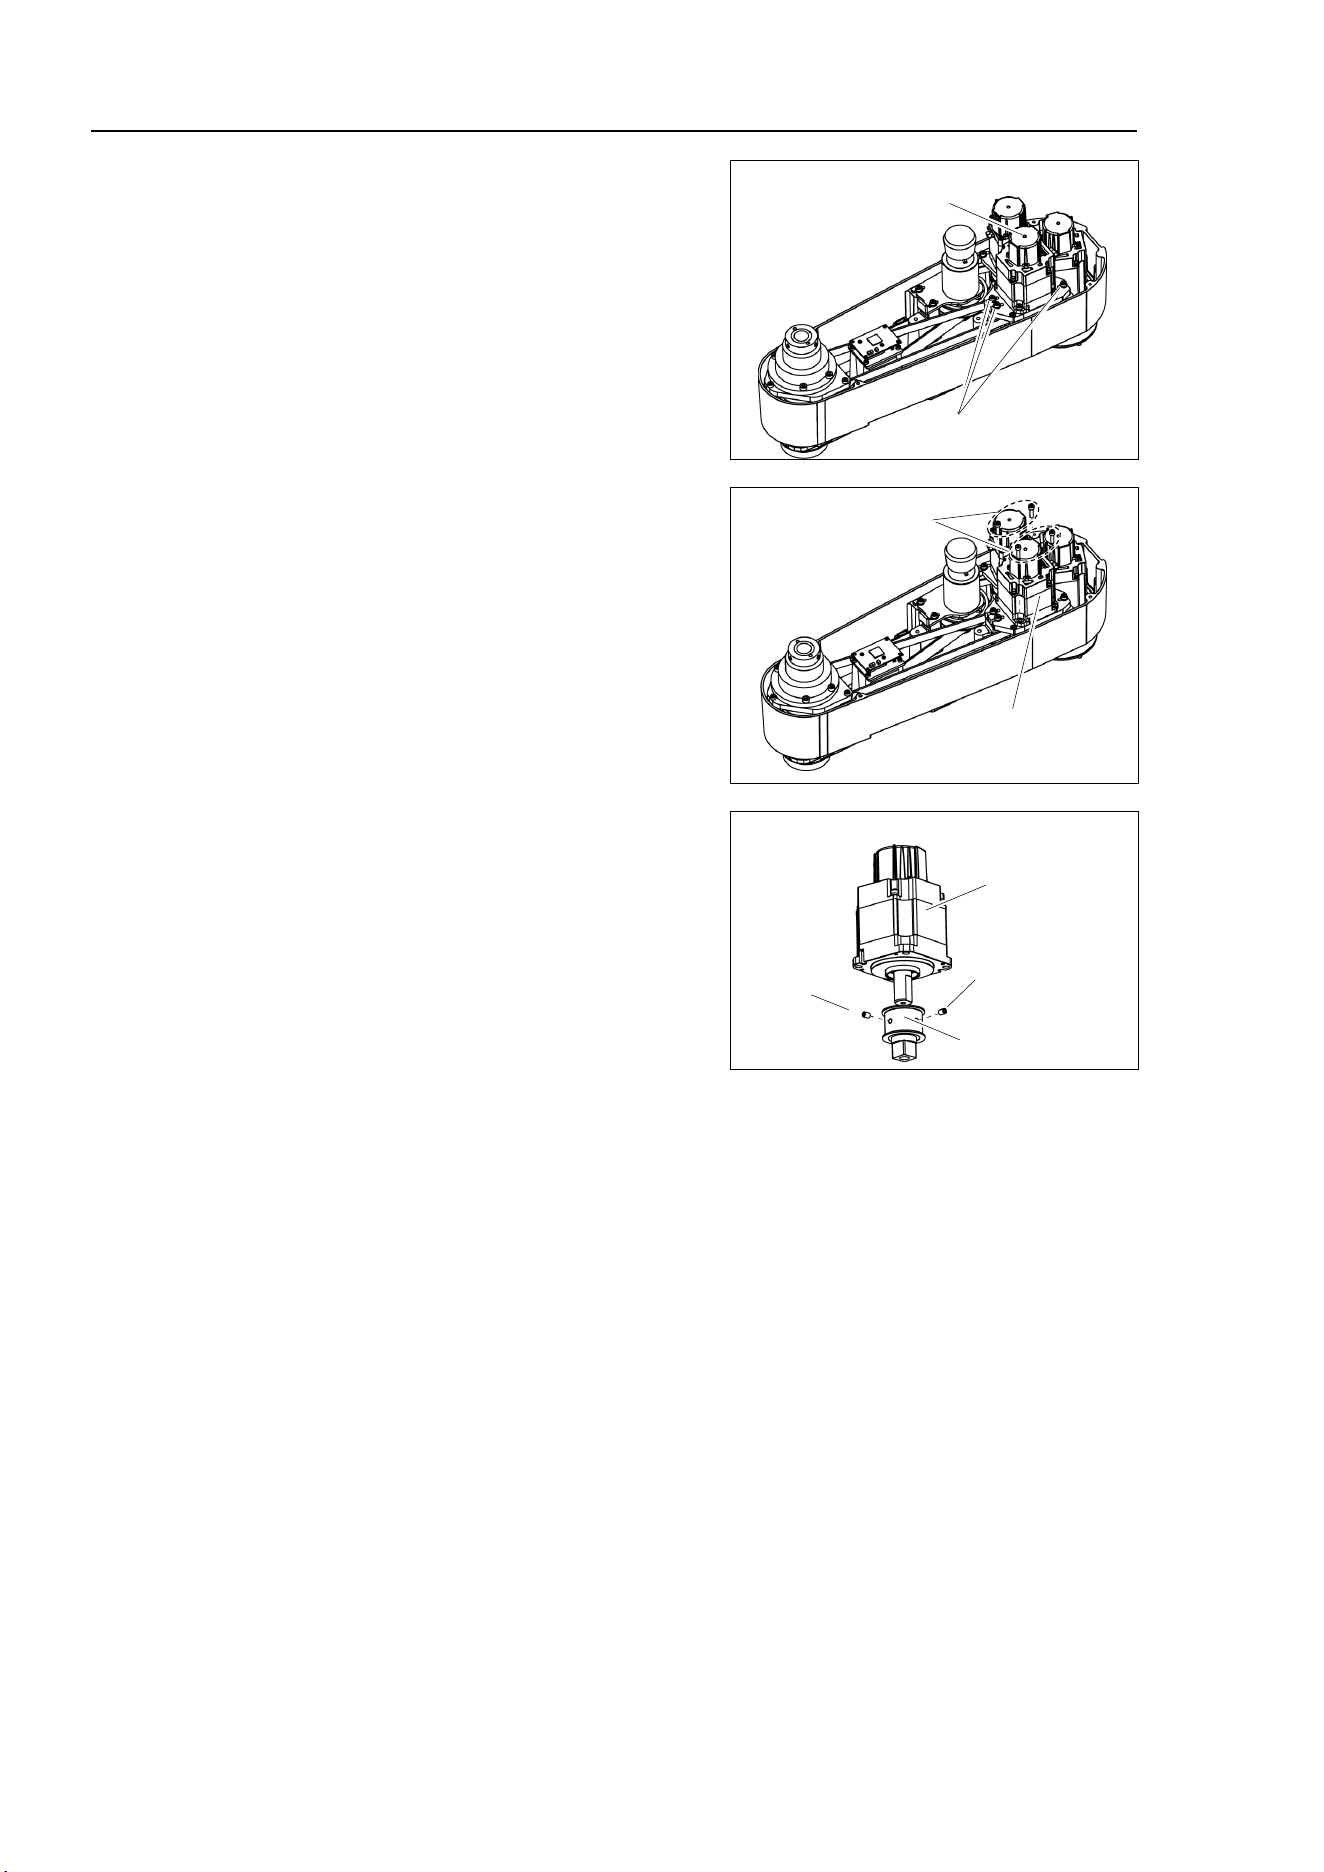
Maintenance 7. Joint #3
104 LS10-B Rev.6
(8)
Loosen the bolts for the Joint #3 motor
unit.
Joint #3
Motor Unit
3-M4×18 + Washer
(9)
Remove the Joint #3 motor from the Joint
#3 motor unit.
Joint #3 Motor
4-M4×15
+Washer
(10)
Loosen the screws of the pulley remove it
from the Joint #3 motor.
There is a brass bushing in one of the
set
screw
holes. Be sure to keep the
bushing.
Joint #3 Motor
M5×8
Set screw
+ M5 Bushing
Pulley
M5×8
Set Screw
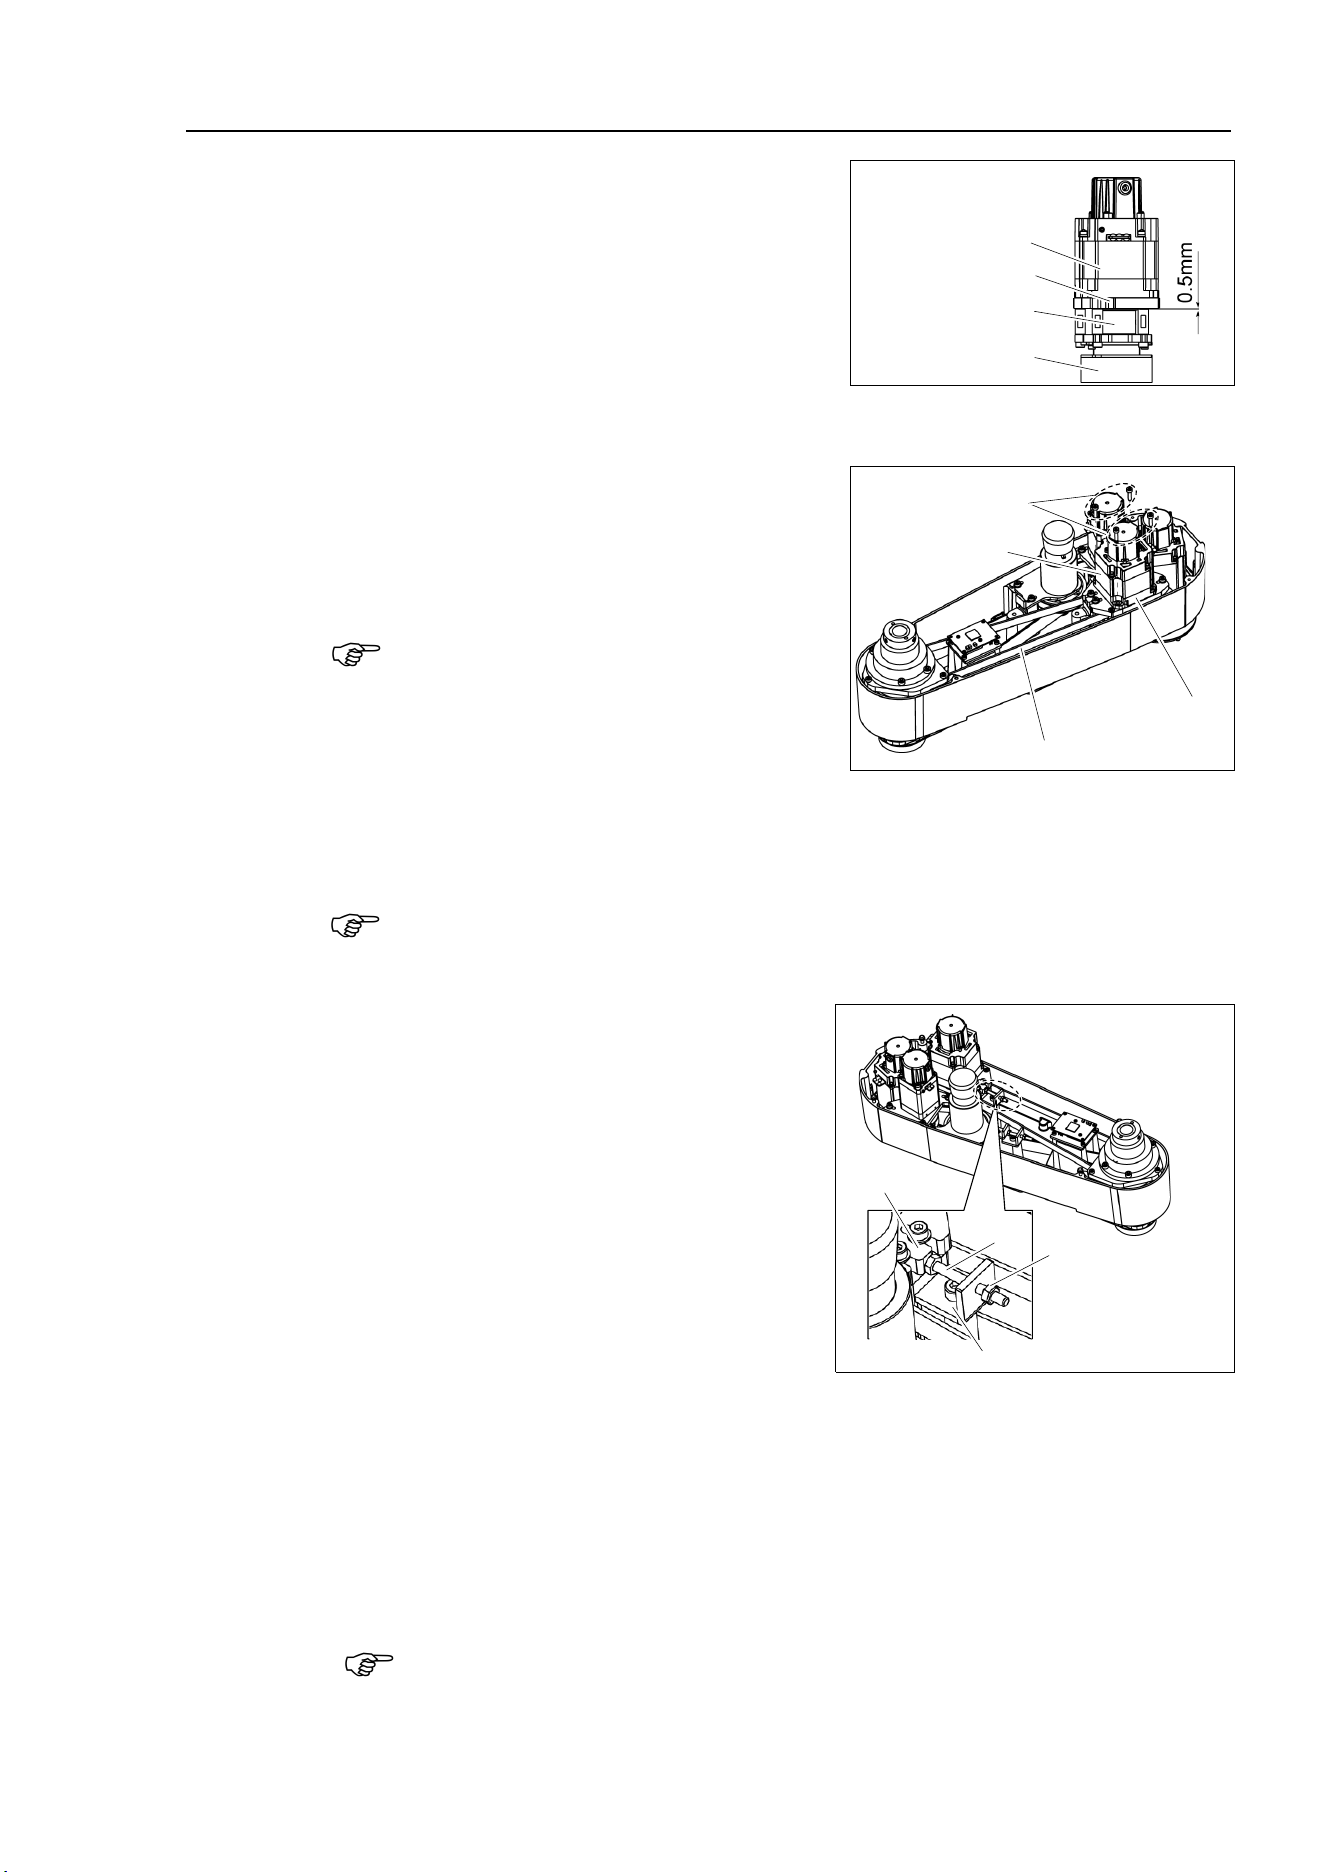
Maintenance 7. Joint #3
LS10-B Rev.6 105
Joint #3 motor
Installation
(1)
Mount
the pulley to the Joint #3 motor.
Insert
the pulley where its end face touches
the motor
shaft end face and secure by set
screws
.
Joint #3 Motor
Electromagnetic
brake
Pulley
Motor Plate
Tighten one of the set
screws vertically on the flat face of the motor shaft.
Insert a bushing into the other set
screw hole to prevent damage to the motor shaft.
(2)
Mount the Joint #3 motor to the motor plate
while
aligning the hub to the brake disc.
Before aligning the hub, set the motor so that
the
pulley will be inside of the Z belt.
Secure the motor cables facing to back of the
Arm.
Joint #3 Motor
4-M4×15
+Washer
Z Belt
Motor plate
(3)
Loosely secure the Joint #3 motor unit to the
Arm #2. Make sure that the teeth of
the timing belt are
engaged with those of the pulley.
At this point, make sure that the Joint #3 motor unit can be
moved by hand, and it
will not tilt when pushed by tensioner.
If the unit is secured too loose or too tight,
the belt will not have the proper tension
(4)
Apply the proper tension to the Z belt, and
secure the Joint #3 motor unit.
Nut
Plate
Bolt
Tensioner
Install
the tensioner in front of the Joint #3
motor unit
. Rotate the hexagonal bolt of
the tensioner and push
the plate to apply
the
specified tension.
Z belt tension
69 N (7.0 ± 0.5 kgf)
(4)-1 Loosen the nut and turn the bolt. Push in the Joint #3 motor unit.
(4)-2 After fixing the Joint #3 motor unit, turn the bolt to leave from the plate.
(4)-3 Check the tension using the sonic tension meter.
For details, refer to Maintenance 7.4 Checking the Timing Belt Tension.
(4)-4 Repeat the steps (4)-1 through (4)-3 until you get appropriate tension.
(4)-5 After the adjustment, put the bolt back to its original position and fix it with
the nut.
To
check belt tension with the tension meter, refer to Maintenance:
7.4 Checking the
Timing Belt Tension
(Z Belt).
NOTE
NOTE
NOTE

Maintenance 7. Joint #3
106 LS10-B Rev.6
(5)
Connect the
connectors.
Connectors: X231, X241, X32, X43, X44, X51
(6)
Mount the User Plate.
For details, refer to
Maintenance: 3.5 User Plate.
(7)
Bind the cables with a wire tie in their original positions as before removed in the
removal step (6).
Do not allow unnecessary strain
on the cables.
(8)
Install the
Arm Top Cover.
For details,
refer to Maintenance: 3.1 Arm Top Cover.
(9)
Check if the Joint #
3 moves in a Jog motion by operating from EPSON RC+ menu
-
[Tools]
-[Robot Manager]-[Jog & Teach].
If the Manipulator oscillates with
MOTOR ON and the following errors are detected,
Error 5041: Motor torque output failure in low power state.
Error 4241: Over speed during low power mode was detected.
or when the joint other than Joint #
3
moves, the connector for other joint might be
connected to the Joint #
3 motor. Check the connector connection.
(10)
Execute the calibration of Joints #3, #4.
For details, refer to Maintenance: 13. Calibration.
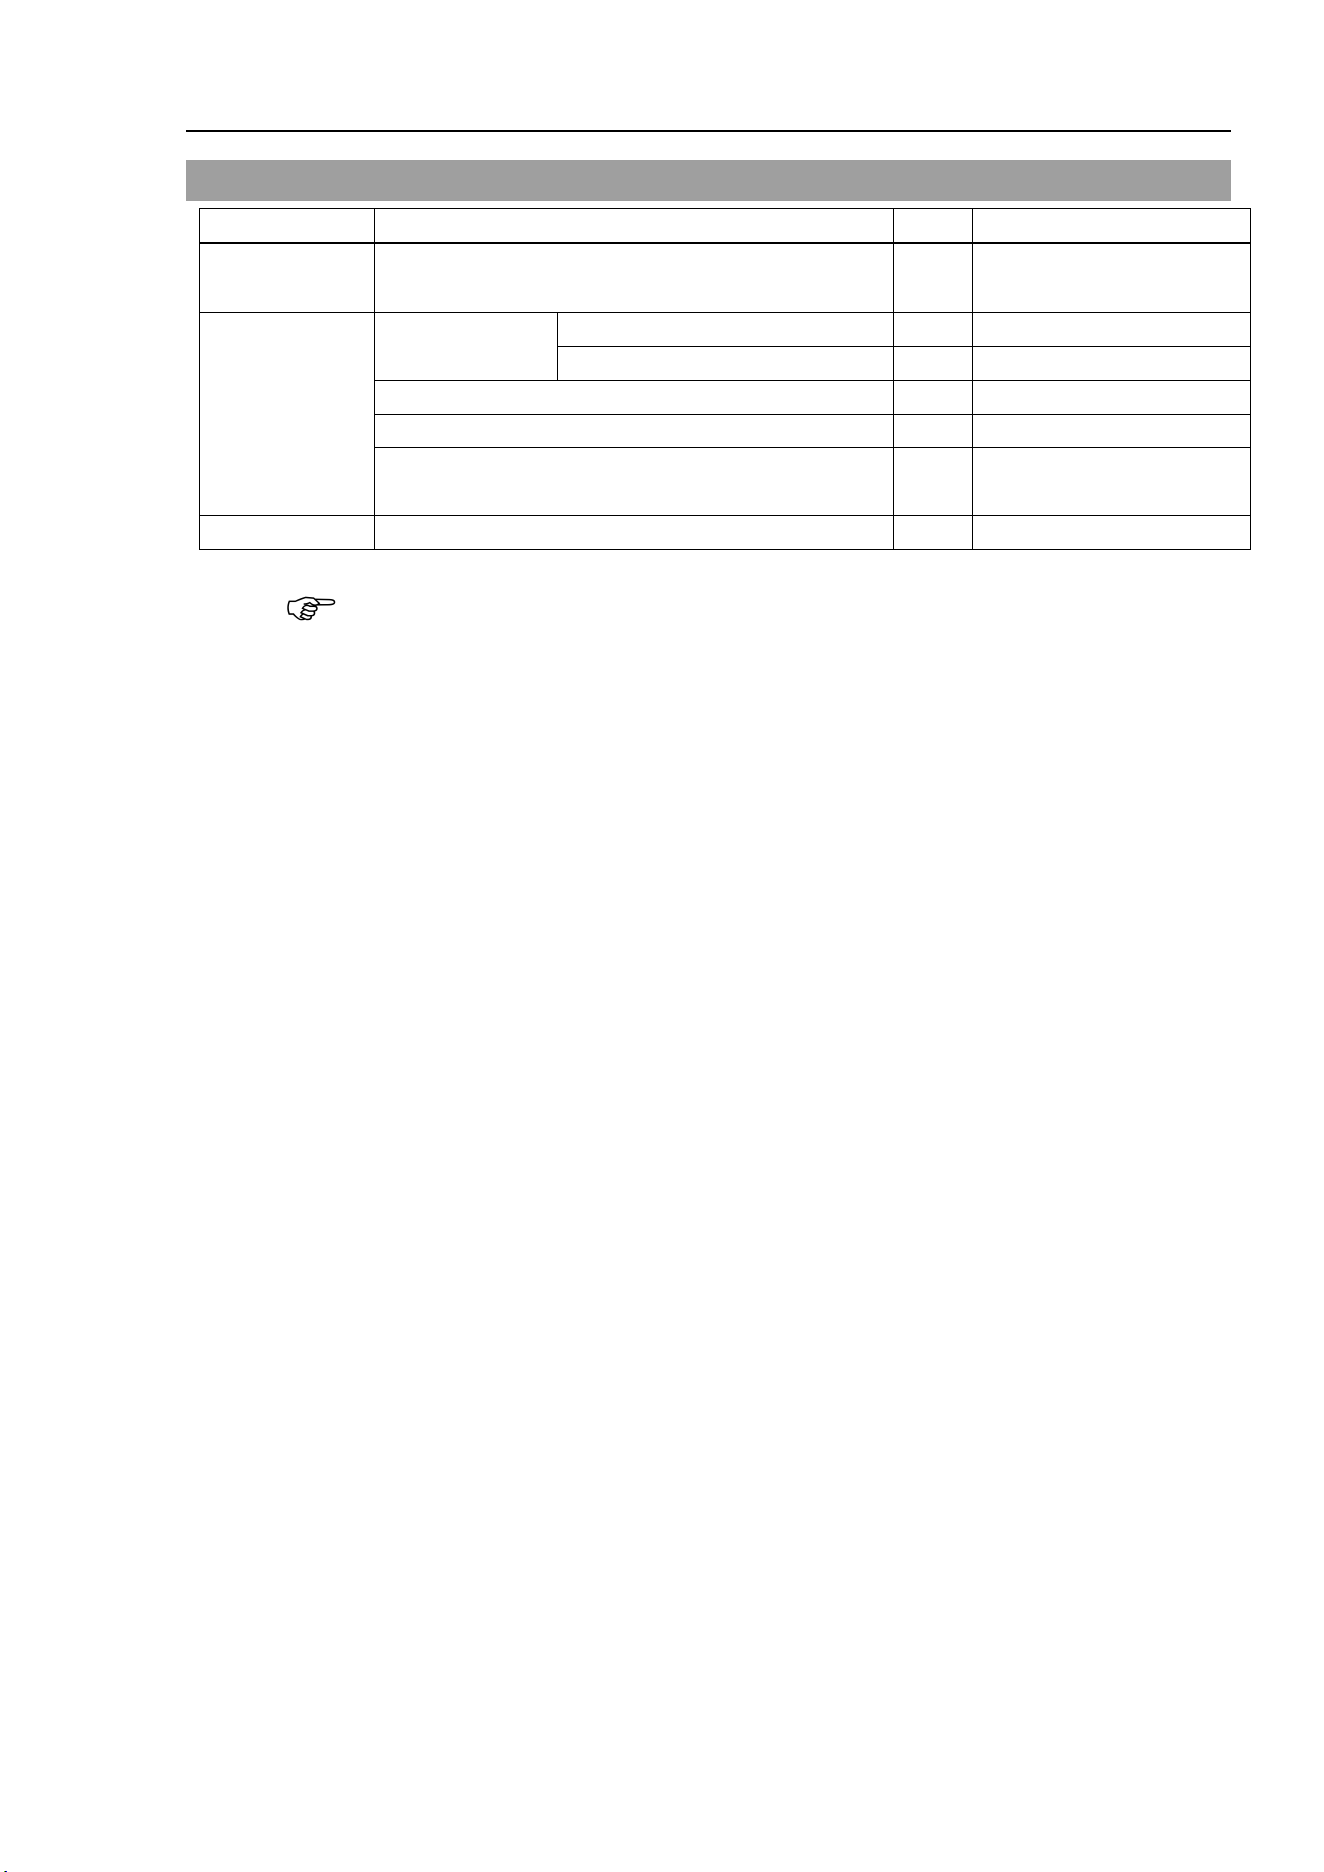
Maintenance 7. Joint #3
LS10-B Rev.6 107
7.2 Replacing the Timing Belt
Name
Qty.
Note
Maintenance
parts
Z belt 1 1758946
Tools
Hexagonal
wrench
width across flats: 2.5 mm
1
For M3 screw
width across flats: 3 mm
1
For M4 screw
Torque wrench
1
Nippers
1
For cutting wire tie
Sonic tension meter 1
Z: Belt tension
69N (7.0 ± 0.5 kgf)
Material
Wire tie
-
A brake is mounted on the motor of Joints #3 and #4 to prevent the shaft from moving down
and rotating due to the weight of the end effector while the power to the Controller is OFF
or while the motor is in OFF status (MOTOR OFF).
Move the shaft down to its lower limit before the replacement procedure following the
removal steps.
Z belt
Removal
(1)
Turn ON the Controller.
(2)
Push down the shaft to its lower limit while pressing the brake release switch. Be sure
to keep enough space and prevent
the end effector hitting any peripheral equipment.
The brake release switch is applied to both Joints #3 and Joint #4.
When the brake release switch is pressed, the respective brakes of the Joint #3 and Joint
#4 are released simultaneously.
Be careful of the
shaft falling and rotating while the brake release switch is
being pressed
because
the shaft may be lowered by the weight of an end effector.
(3)
Turn OFF the Controller.
(4)
Remove the
Arm Top Cover.
For details, refer to
Maintenance: 3.1 Arm Top Cover.
(5)
Cut off the wire tie binding the cables.
Cut off the wire tie binding the Joint #3 brake cable.
Do not cut off a wire
tie that binds the cables to the User Plate.
(6)
Disconnect the following connectors.
Connectors: BR4, X231, X43, X51 (Hold the clip to remove.)
(7)
Remove the User Plate.
For details, refer to
Maintenance: 3.5 User Plate.
NOTE
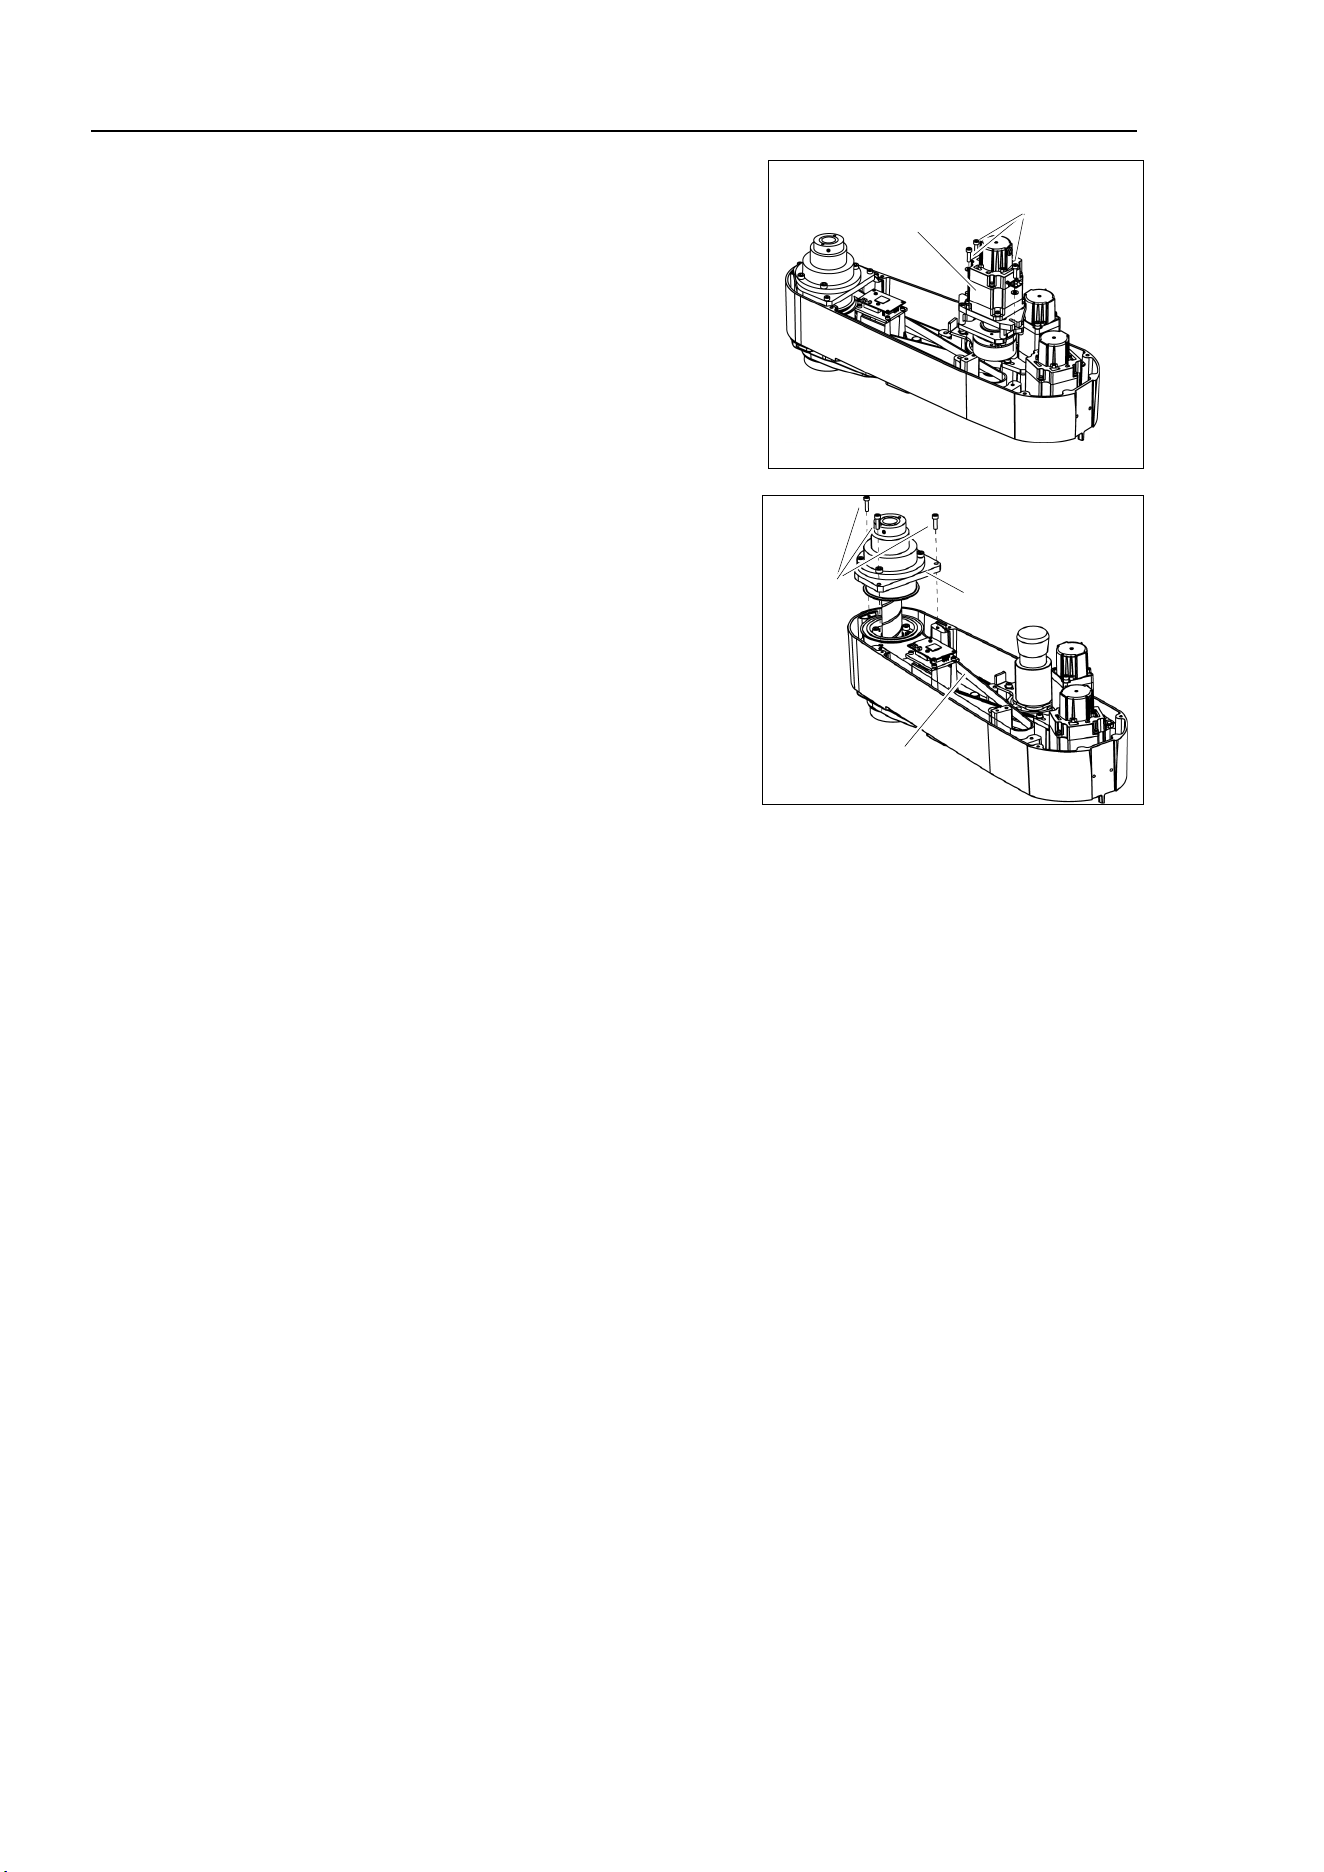
Maintenance 7. Joint #3
108 LS10-B Rev.6
(8)
Remove the
screws for the Joint #3 motor unit
and pull out the Joint #3 motor unit.
3-M4×18+Washer
Joint #3
Motor Unit
(9)
Remove the Joint #3 motor from the motor
plate and pull out the Z belt.
The belt is placed around the pulley.
To
remove the Joint #3 motor, tilt the motor
slightly and pull it upward while avoiding the
belt.
(10)
Remove the screws for the spline plate.
Holding the spline plate upward, pull out the
Z belt.
Z belt
Spline Plate
3-M4×15
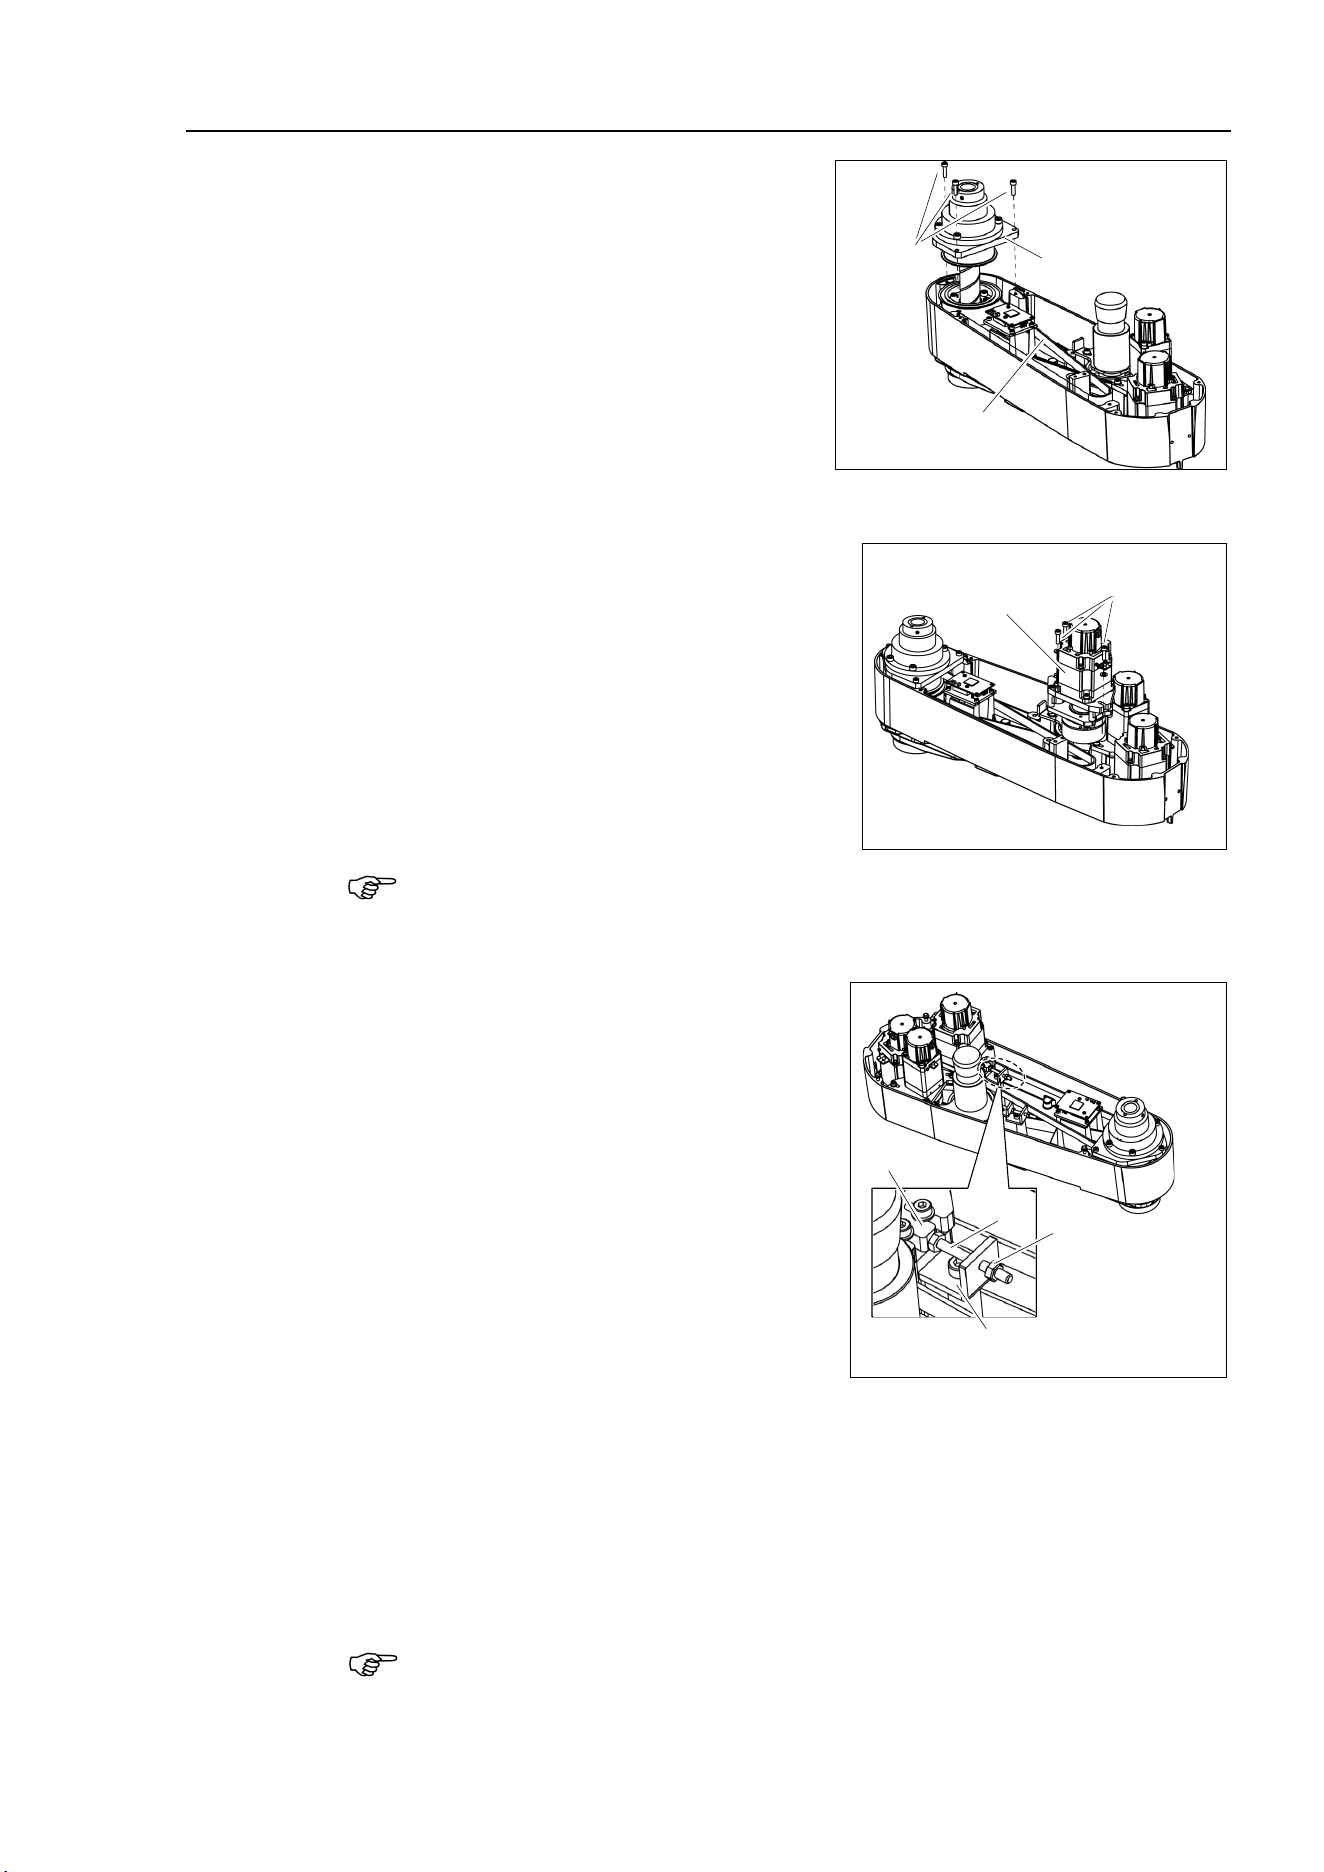
Maintenance 7. Joint #3
LS10-B Rev.6 109
Z belt
Installation
(1)
Pass
a new Z belt through the shaft.
Z belt
Spline Plate
3-M4×15
(2)
Lower the spline plate with the Z belt
placed around the spline plate pulley.
Secure the spline plate with 3 screws.
Loosely secure the spline plate on the Arm
#2 and move the shaft up and down several
times before firmly secure the spline plate.
(3)
Mount
the Joint #3 motor unit back in the arm.
(4)
Pass the brake cable and
over-excitation
power supply through the Z belt.
Place the Z belt around the Z1 pulley and Z2
pulley, with the gear grooves of the belt
fitting into grooves of the pulleys completely.
3-M4×18+Washer
Joint #3
Motor Unit
(5)
Loosely secure the Joint #3 motor unit to the
Arm #2.
At this point, make sure that the Joint #3 motor
unit can be moved by hand, and it
will
not tilt when pushed by tensioner. If the unit is secured too loose or too tight,
the belt will not have
the proper tension.
(6)
Apply the proper tension to the Z be
lt, and
then secure the Joint #3 motor unit.
Install
the tensioner in front of the Joint #3
motor unit
. Rotate the hexagonal bolt of
the tensioner and push
the plate to apply the
specified tension.
Z belt tension
69 N (7.0 ± 0.5 kgf)
Nut
Plate
Bolt
Tensioner
(6)-1 Loosen the nut and turn the bolt. Push in the Joint #3 motor unit.
(6)-2 After fixing the Joint #3 motor unit, turn the bolt to leave from the plate.
(6)-3 Check the tension using the sonic tension meter.
For details, refer to Maintenance 7.4 Checking the Timing Belt Tension.
(6)-4 Repeat the steps (6)-1 through (6)-3 until you get appropriate tension.
(6)-5 After the adjustment, put the bolt back to its original position and fix it with
the nut.
To
check belt tension with the tension meter, refer to Maintenance:
7.4 Checking the
Timing Belt Tension (Z Belt).
NOTE
NOTE

Maintenance 7. Joint #3
110 LS10-B Rev.6
(7)
Connect the connectors
.
Connectors: BR4, X231, X241, X32, X43, X44, X51
(
8)
Mount the User Plate.
For details, refer to
Maintenance: 3.5 User Plate.
(9)
Bind
the cables with a wire tie in their original positions as before removed in
the
removal
step (7). Do not allow unnecessary strain on the cables.
(
10)
Install the
Arm Top Cover.
For details, refer to
Maintenance: 3.1 Arm Top Cover.
(11)
Check if the Joint #
3 moves in a Jog motion by operating from EPSON RC+ menu
-
[Tools]
-[Robot Manager]-[Jog & Teach].
If the Manipulator oscillates with MotorON and the following errors are
detected,
Error 5041: Motor torque output failure in low power state.
Error 4241: Over speed during low power mode was detected.
or when the joint other than Joint #
3
moves, the connector for the other joint might be
connected to the Joint #
3 motor. Check the connector connection.
(1
2)
Execute
the calibration of Joint #3.
For details, refer to Maintenance: 13. Calibration.
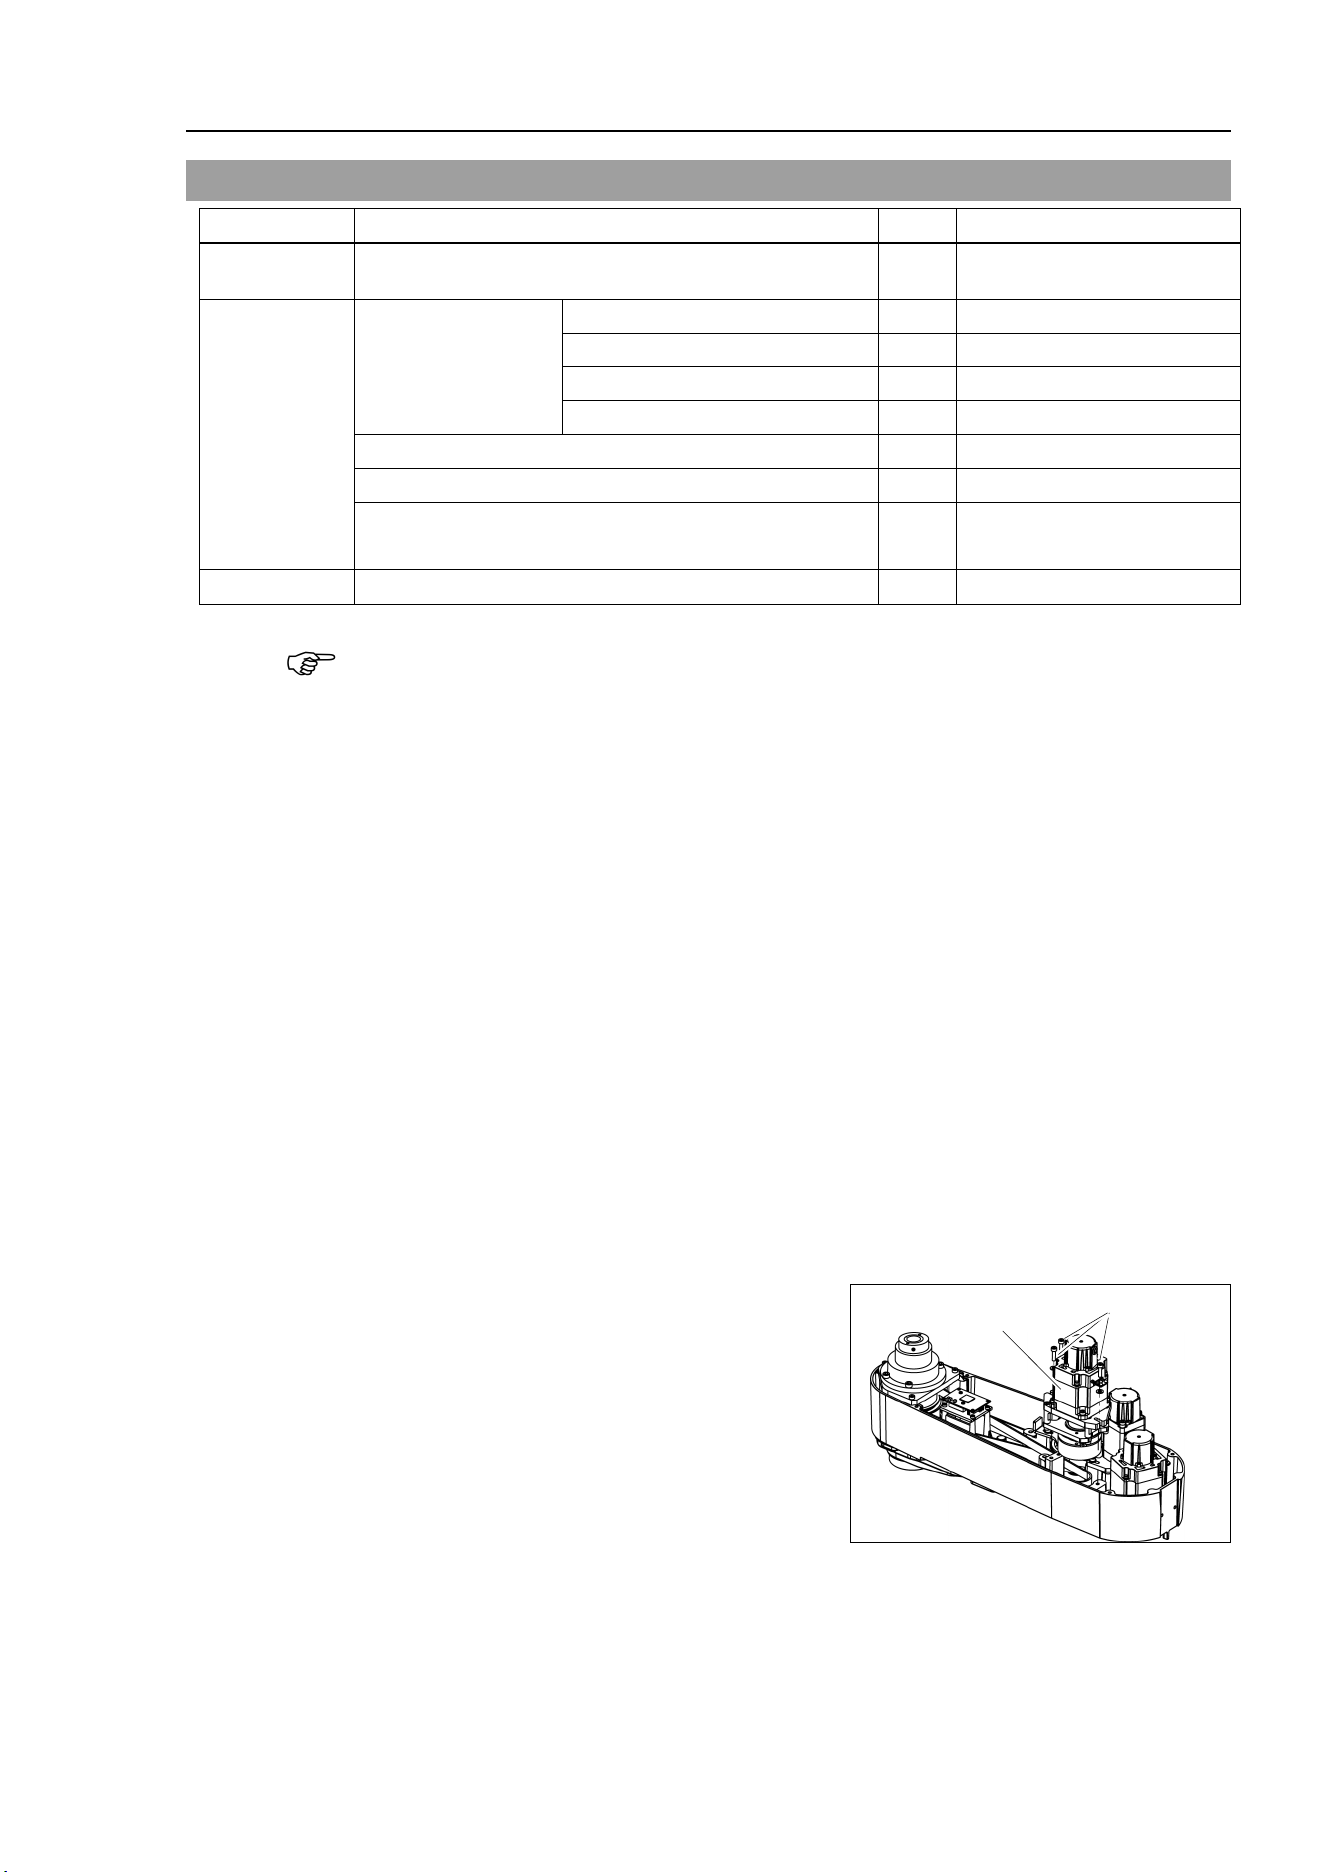
Maintenance 7. Joint #3
LS10-B Rev.6 111
7.3 Replacing the Brake
Name
Qty.
Note
Maintenance
parts
Electromagnetic Brake 1 1499588
Tools
Hexagonal
wrench
width across flats: 1.5 mm
1
For M3 set screw
width across flats: 2.5 mm
1
For M3 screw
width across flats: 3 mm
1
For M4 screw
width across flats: 4 mm
1
For M5 screw
Torque wrench
1
Nippers
1
For cutting wire tie
Sonic tension meter 1
Z: Belt tension
69N (7.0 ± 0.5 kgf)
Material
Wire tie
-
A brake is mounted on the motor of Joints #3 and #4 to prevent the shaft from moving down
and rotating due to the weight of the end effector while the power to the Controller is OFF
or while the motor is in OFF status (MOTOR OFF).
Move the shaft down to its lower limit before the replacement procedure following the
removal steps.
Joint #3 brake
Removal
(1)
Turn ON the Controller.
(2)
Push down the shaft to its lower limit while pres
sing the brake release switch.
Be sure to keep enough space and prevent
the end effector hitting any
peripheral
equipment.
The brake release switch is applied to both
Joints #3 and Joint #4.
When the brake release switch is pressed, the respective brakes of the Joint #3 and Joint
#4 are released simultaneously.
Be careful of the
shaft falling and rotating while the brake release switch is
being pressed
because
the shaft may be lowered by the weight of an end effector.
(3)
Turn OFF the Controller.
(4)
Remove the
Arm Top Cover.
For details, refer to
Maintenance: 3.1 Arm Top Cover.
(5)
Remove the Joint #3 motor unit.
For details, refer to
Maintenance: 7.2
Replacing
the Timing Belt.
3-M4×18+Washer
Joint #3
Motor Unit
NOTE
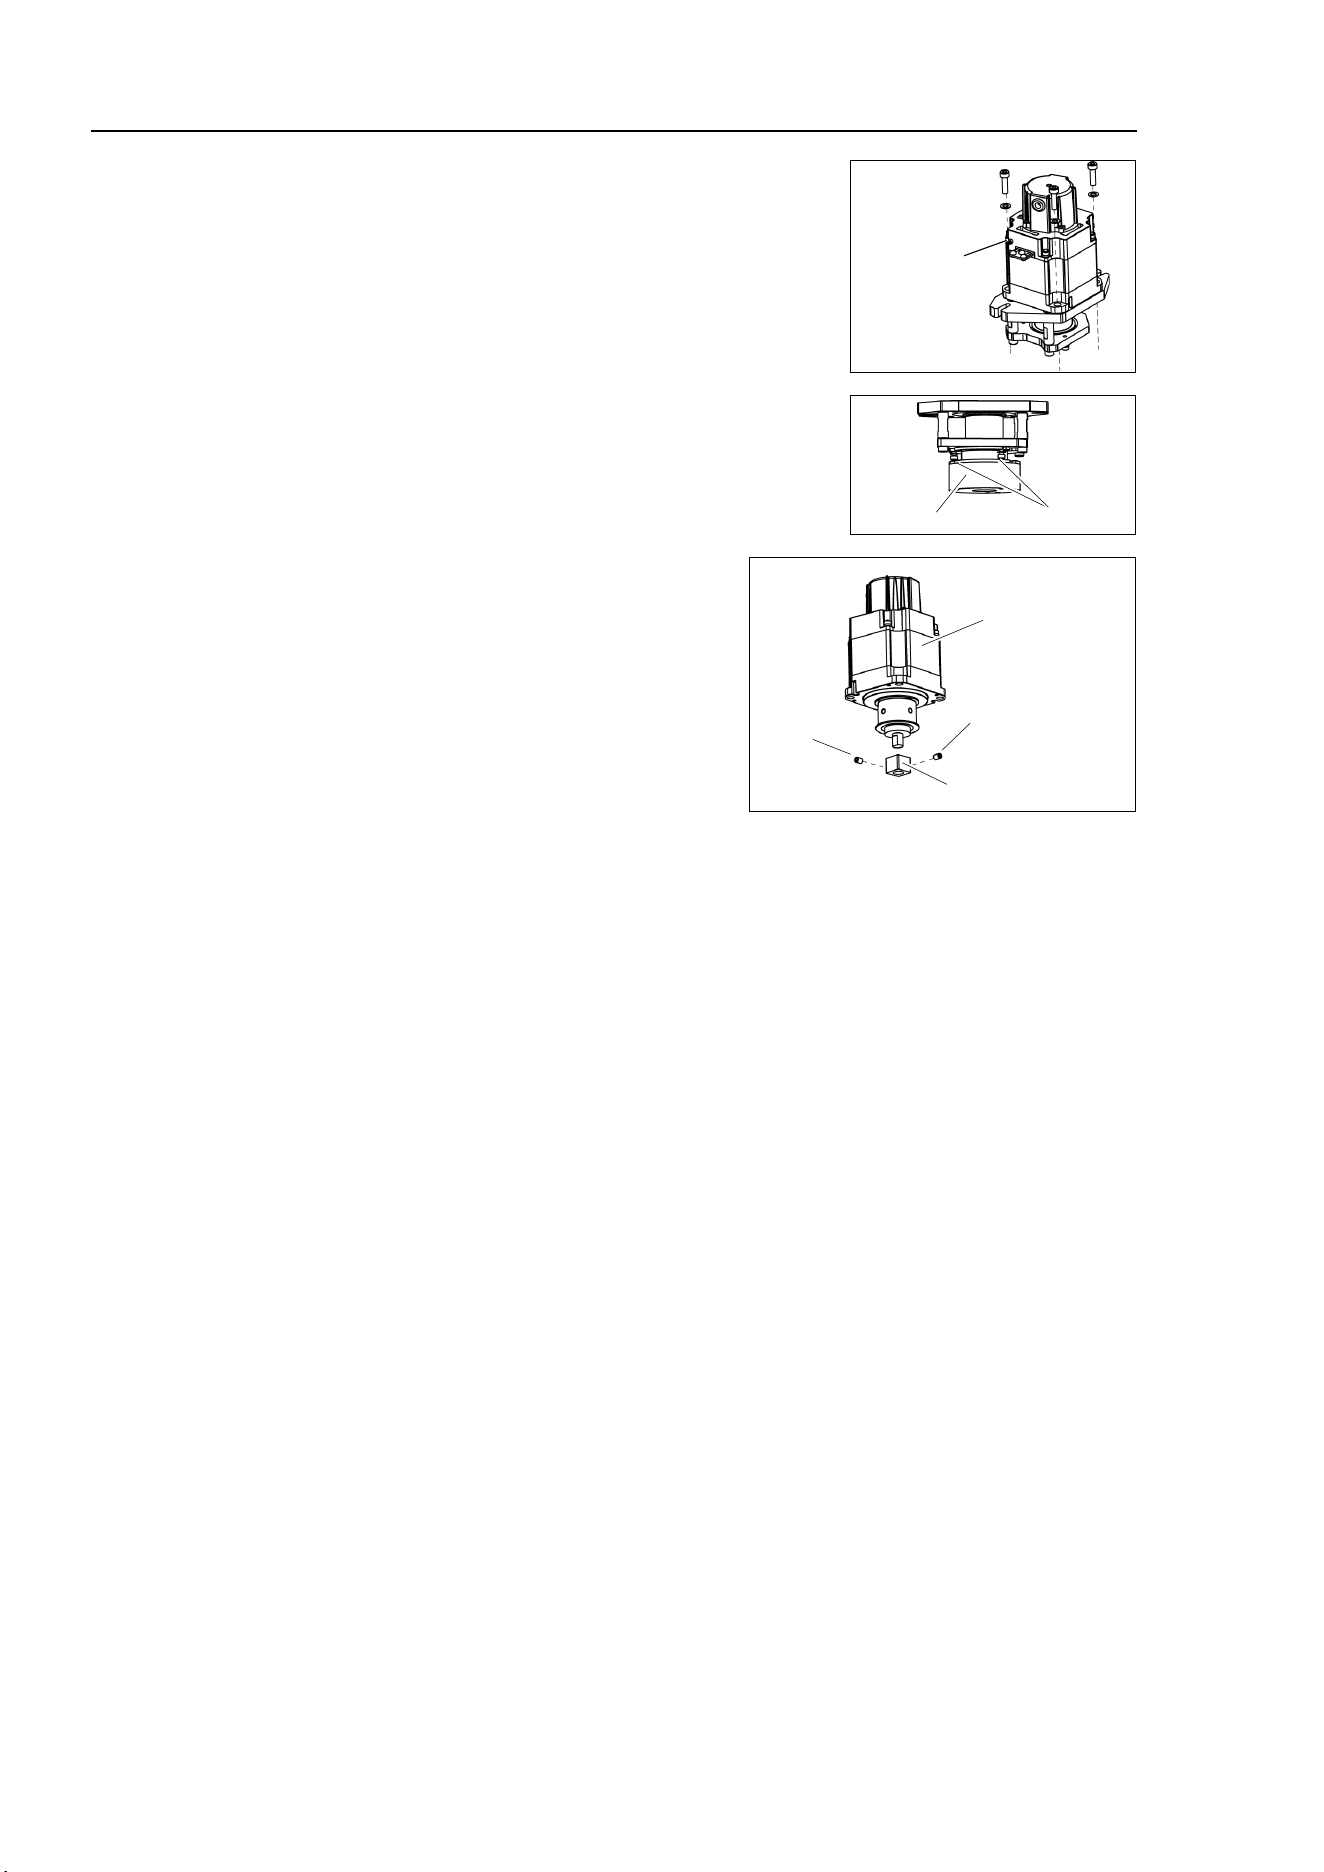
Maintenance 7. Joint #3
112 LS10-B Rev.6
(6)
Remove the Joint #3 motor from the Joint #3 motor unit.
The belt is placed around the pulley.
To remove the
Joint #3 motor, tilt the motor
slightly and pull it upward
while
avoiding the belt.
Joint #3
motor
4-M4×15
+Washer
(7)
Remove the brake from the brake
plate.
Brake
3-M3×8
(8)
Loosen the screws of
brake hub and remove
it
from the pulley of the Joint #3 motor.
There is a brass
bushing in one of the set
screw holes. Be sure to keep the bushing.
Joint #3
Motor
M5×8 Set Screws
+ M3 Bushing
Brake Hub
M3×4
Set screws
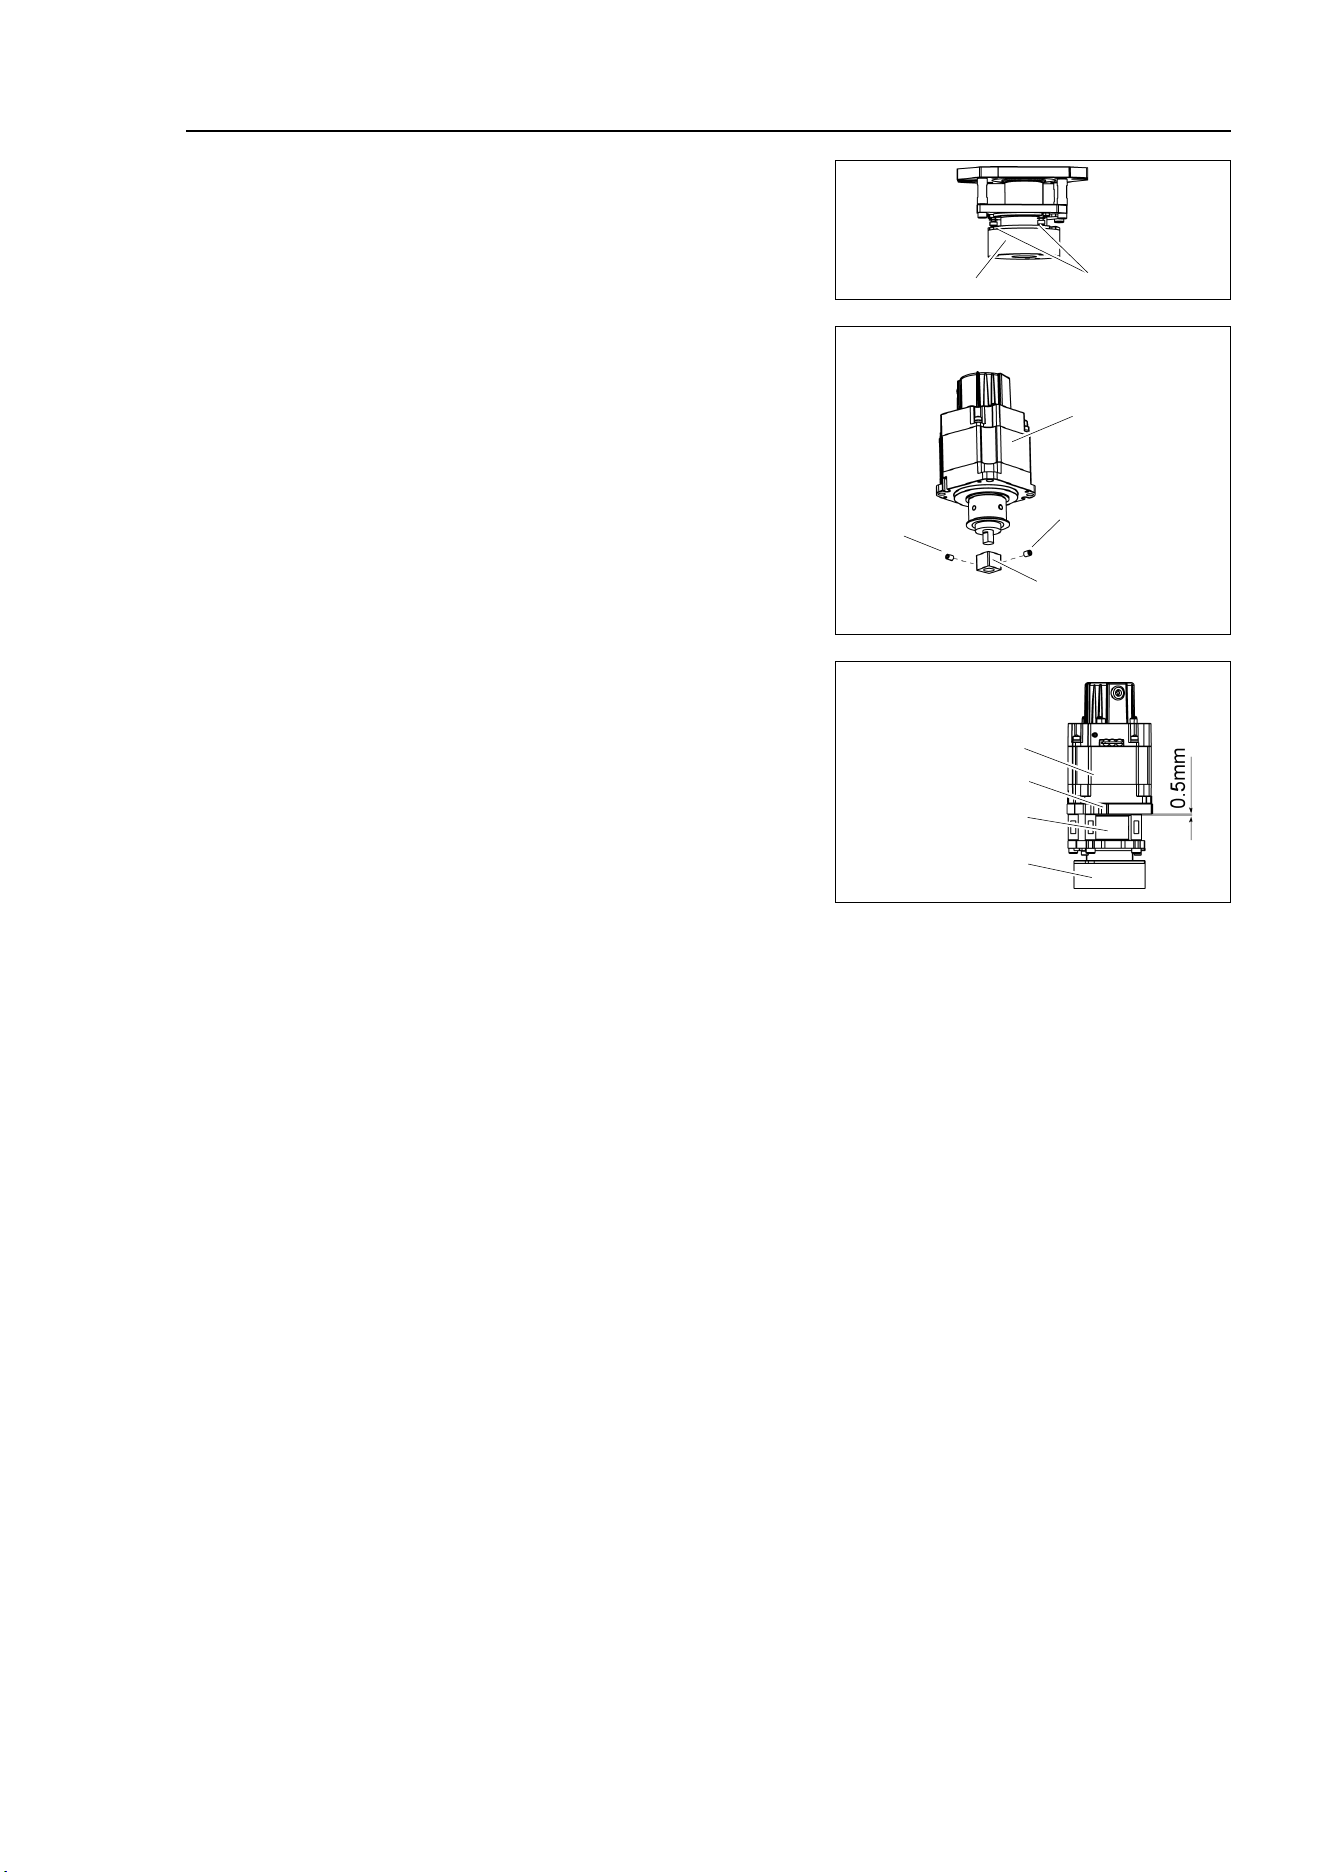
Maintenance 7. Joint #3
LS10-B Rev.6 113
Joint #3 brake
Installation
(1)
Mount the brake to the brake plate.
Brake
3-M3×8
(2)
Mount the brake hub to the
pulley of the
Joint #3 motor.
Insert the brake hub and secure it when it
touches the
pulley.
Tighten one of the set screws vertically on
the flat face of the motor shaft.
Insert a bushing into the other set screw
hole
to
prevent damage to the motor shaft.
Joint #3
Motor
M5×8 Set Screws
+ M3 Bushing
Brake Hub
M3×4
Set screws
(3)
Mount the Joint #3 motor to the motor
plate
while aligning the hub to the brake
disc.
Before aligning the hub, set the motor so
that
the pulley will be inside of the Z belt.
Be sure to fix the motor cable so
that it faces
opposite side of the brake support.
Joint #3 motor
Electromagnetic
brake
Pulley
Motor plate
When the brake disc is not aligned, manually adjust the position by following the
steps
below.
1. Connect the connector X32.
2. Press the brake release switch to release the brake.
3. Adjust the brake disk manually so that the hole is at the center.
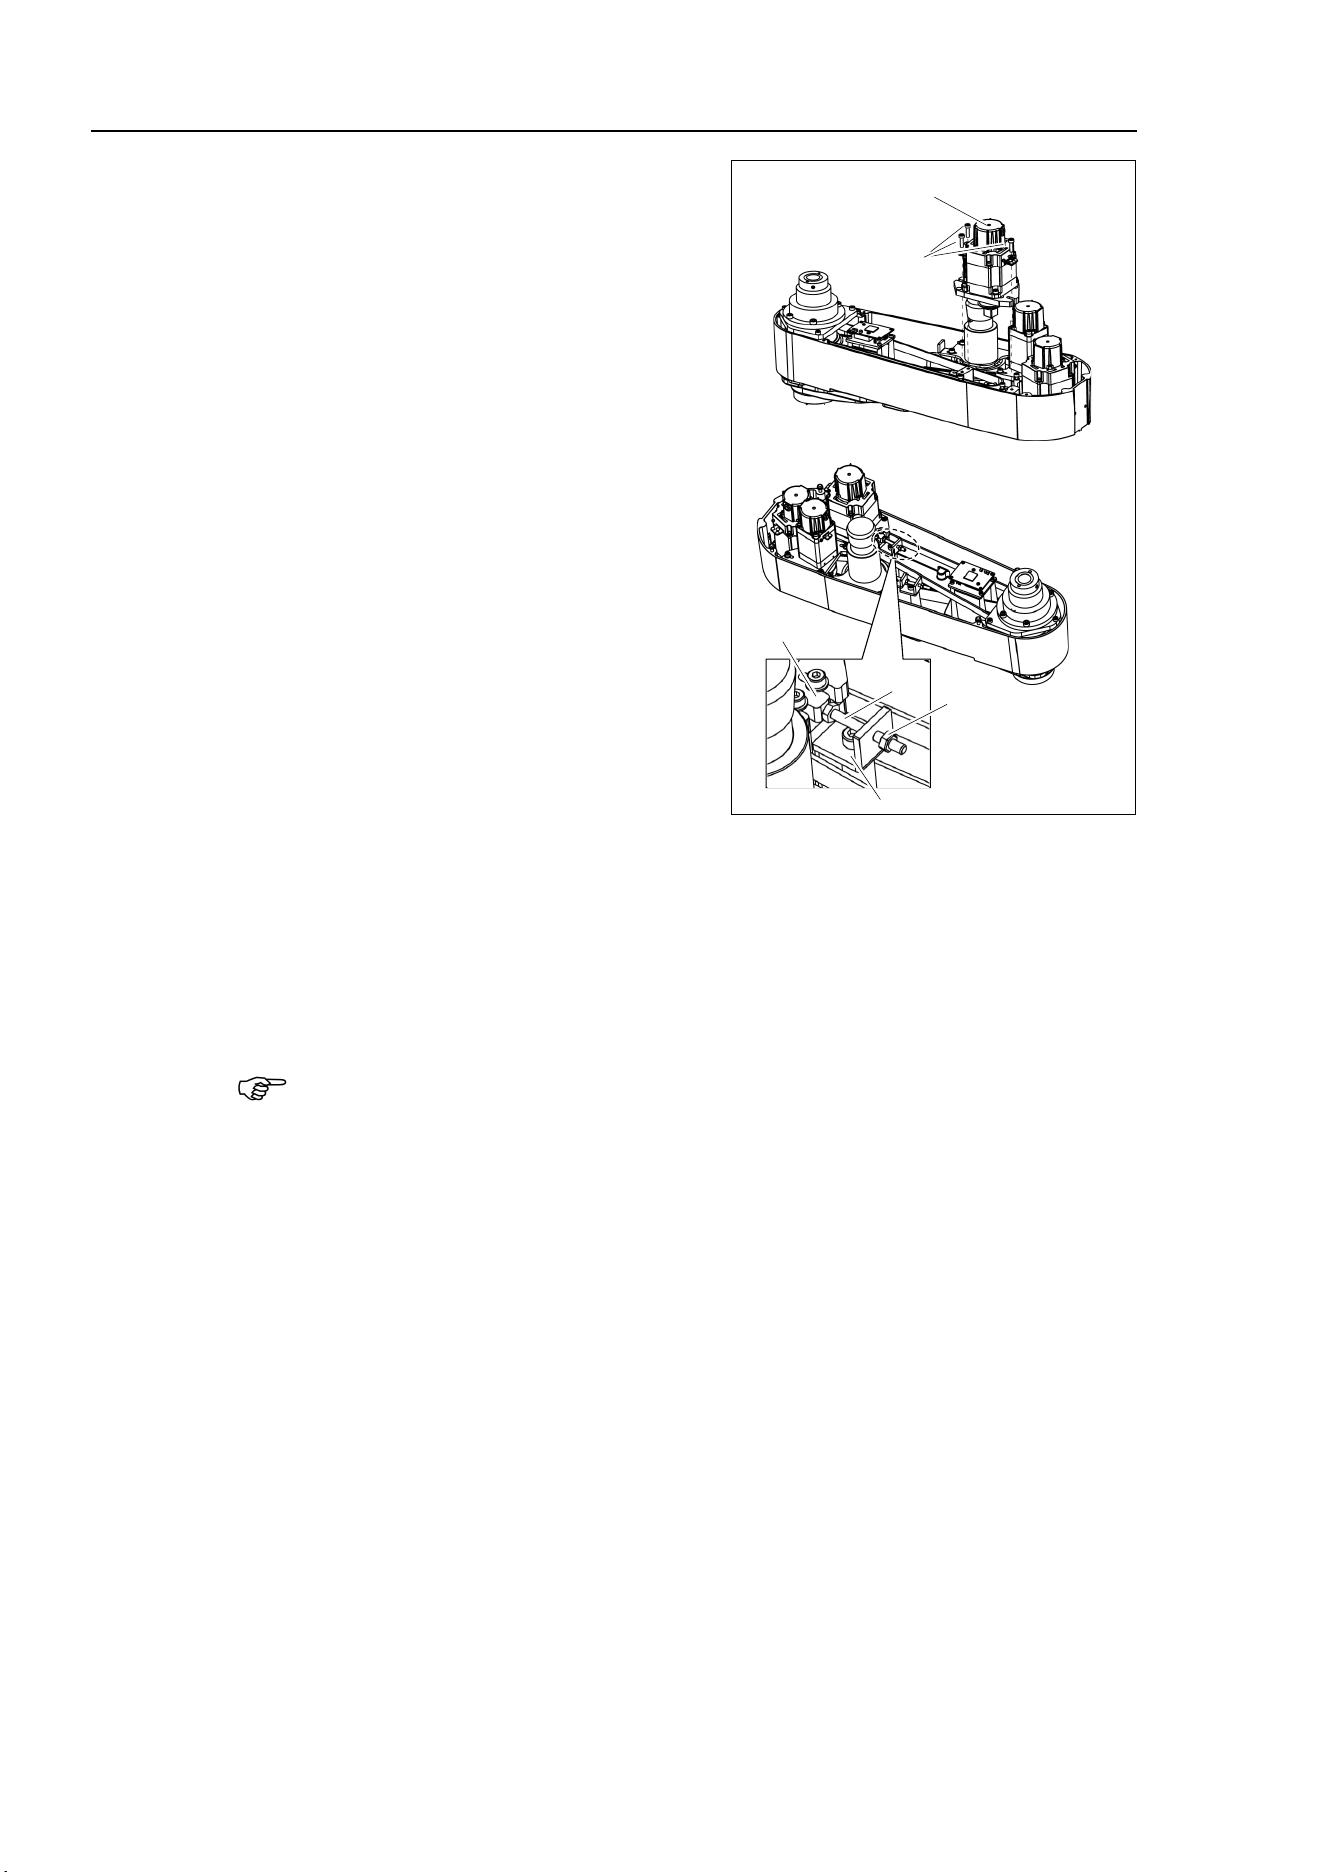
Maintenance 7. Joint #3
114 LS10-B Rev.6
(4)
Mount the Joint #3 motor unit
back in
the
Arm #2.
For
details, refer to the section 7.2
Replacing
the Timing Belt.
Z belt tension
69 N (7.0 ± 0.5 kgf)
3-M4×18
+ Washer
Joint #3
Motor Unit
Nut
Plate
Bolt
Tensioner
(4)-1 Loosen the nut and turn the bolt. Push in the Joint #3 motor unit.
(4)-2 After fixing the Joint #3 motor unit, turn the bolt to leave from the plate.
(4)-3 Check the tension using the sonic tension meter.
For details, refer to Maintenance 7.4 Checking the Timing Belt Tension.
(4)-4 Repeat the steps (4)-1 through (4)-3 until you get appropriate tension.
(4)-5 After the adjustment, put the bolt back to its original position and fix it
with
the nut.
To
check belt tension with the tension meter, refer to Maintenance:
7.4 Checking the
Timing Belt Tension (Z Belt).
(5)
Mount
the Arm Top Cover.
For details, refer to
Maintenance: 3.1 Arm Top Cover.
(6)
Check if the Joint #
3 moves in a Jog motion by operating from EPSON RC+ menu
-
[Tools]
-[Robot Manager]-[Jog & Teach].
If the Manipulator oscillates with
MOTOR ON and the following errors are detected,
Error 5041: Motor torque output failure in low power state.
Error 4241: Over speed during low power mode was detected.
or when the joint other than Joint #
3 moves, the connector for other joint might be
connected to the Joint #
3 motor. Check the connector connection.
(
7)
Execute
the calibration of Joint #3.
For details, refer to
Maintenance: 13. Calibration.
NOTE
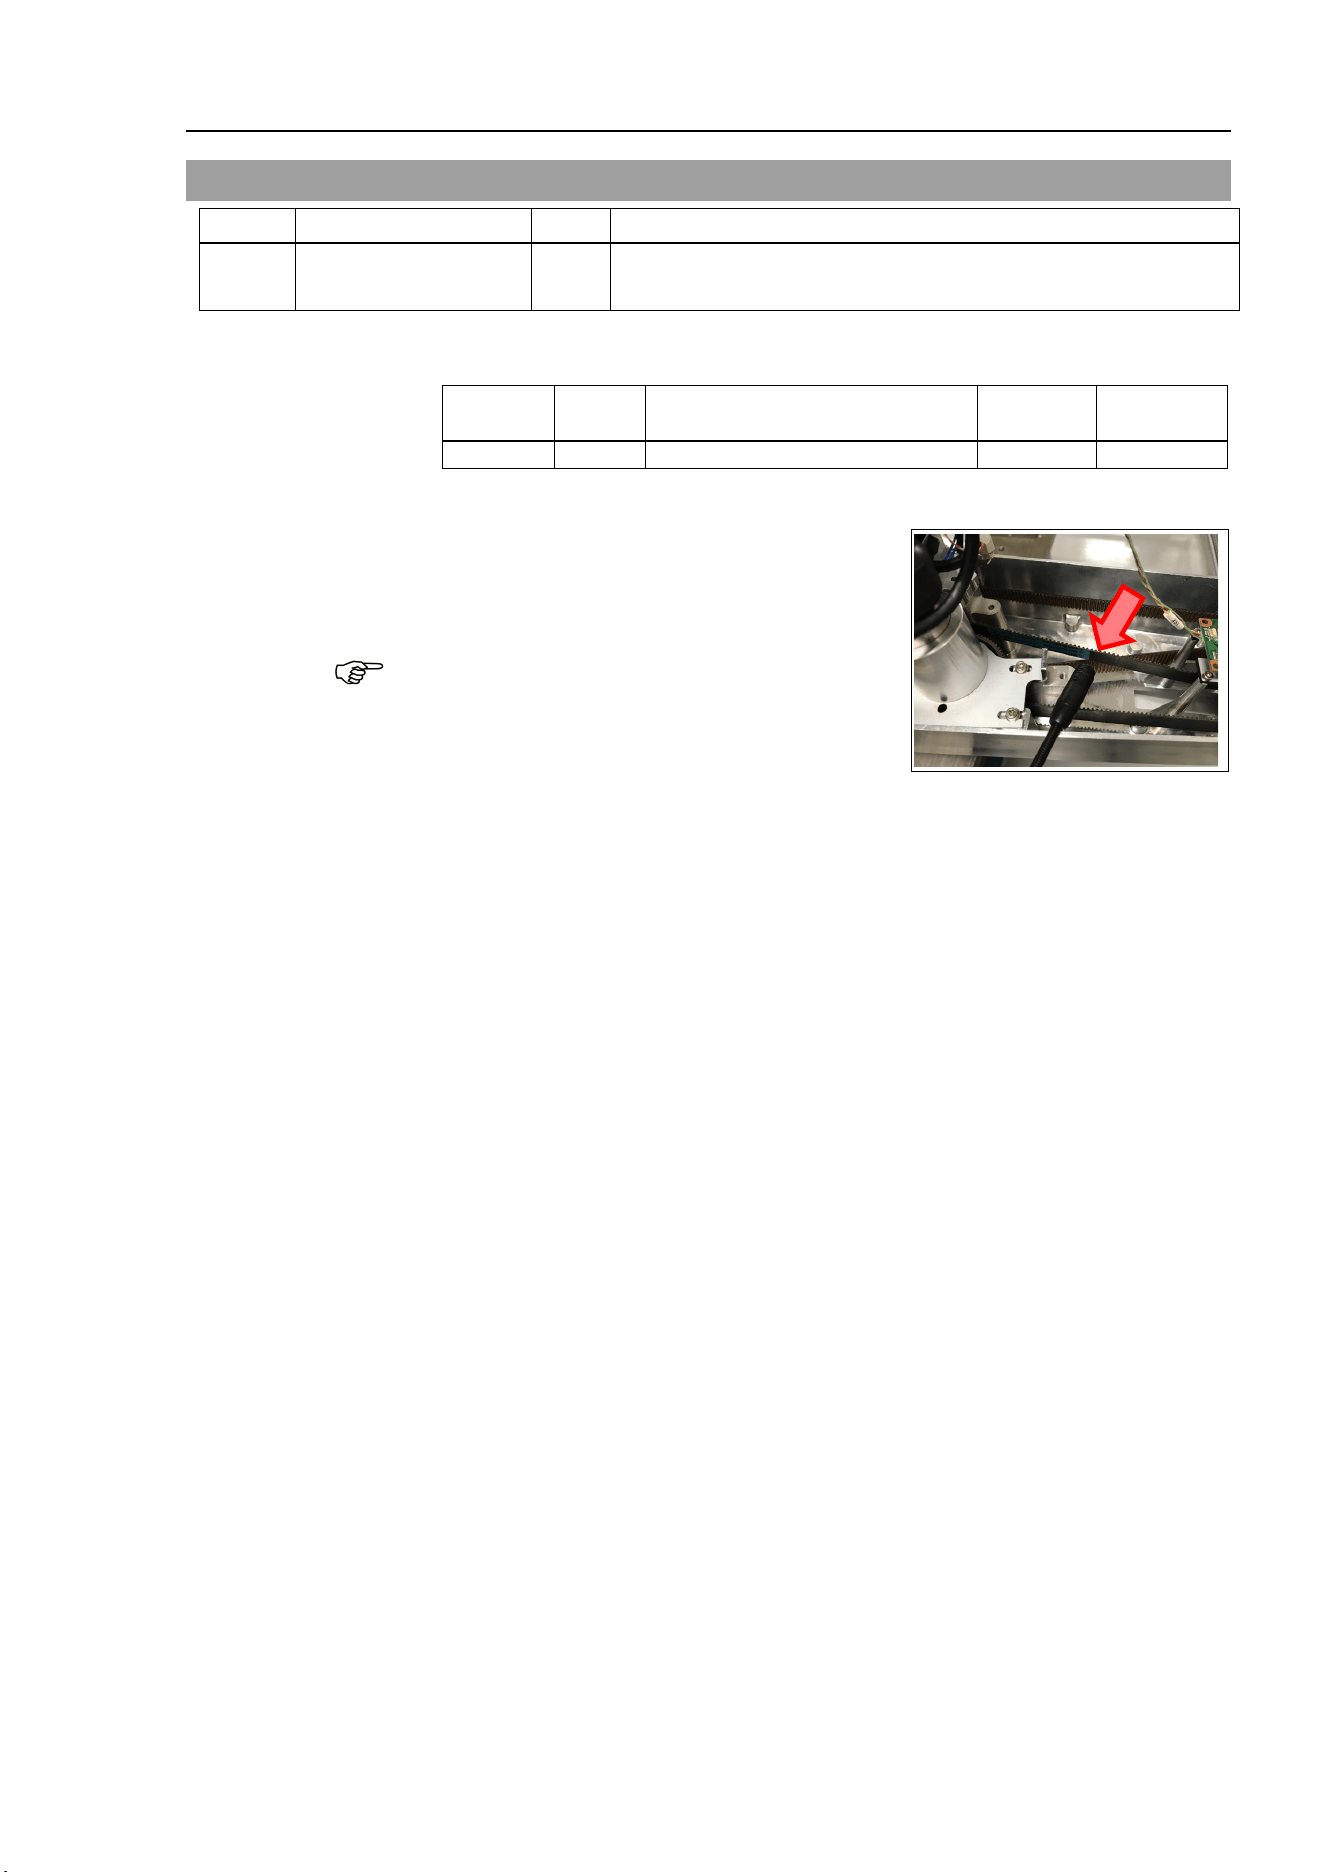
Maintenance 7. Joint #3
LS10-B Rev.6 115
7.4 Checking the Timing Belt Tension (Z Belt)
Name
Qty.
Note
Tool Sonic tension meter 1
Fo
r details of usage and measurement methods of the tension
meter, refer to the instruction manual of the tension meter.
Joint #3
Belt tension
check
(1)
Enter appropriate setting values to the sonic tension meter.
Model Belt
Unit mass M
[g/ (1 mm width ×1 m length)]
Width W
[mm]
Span S
[mm]
LS10-B
Z belt
2.5
17
303
(2)
Strum the belt
and measure tension.
Measurement failure may occur if the microphone
touches the belt during measurement.
NOTE
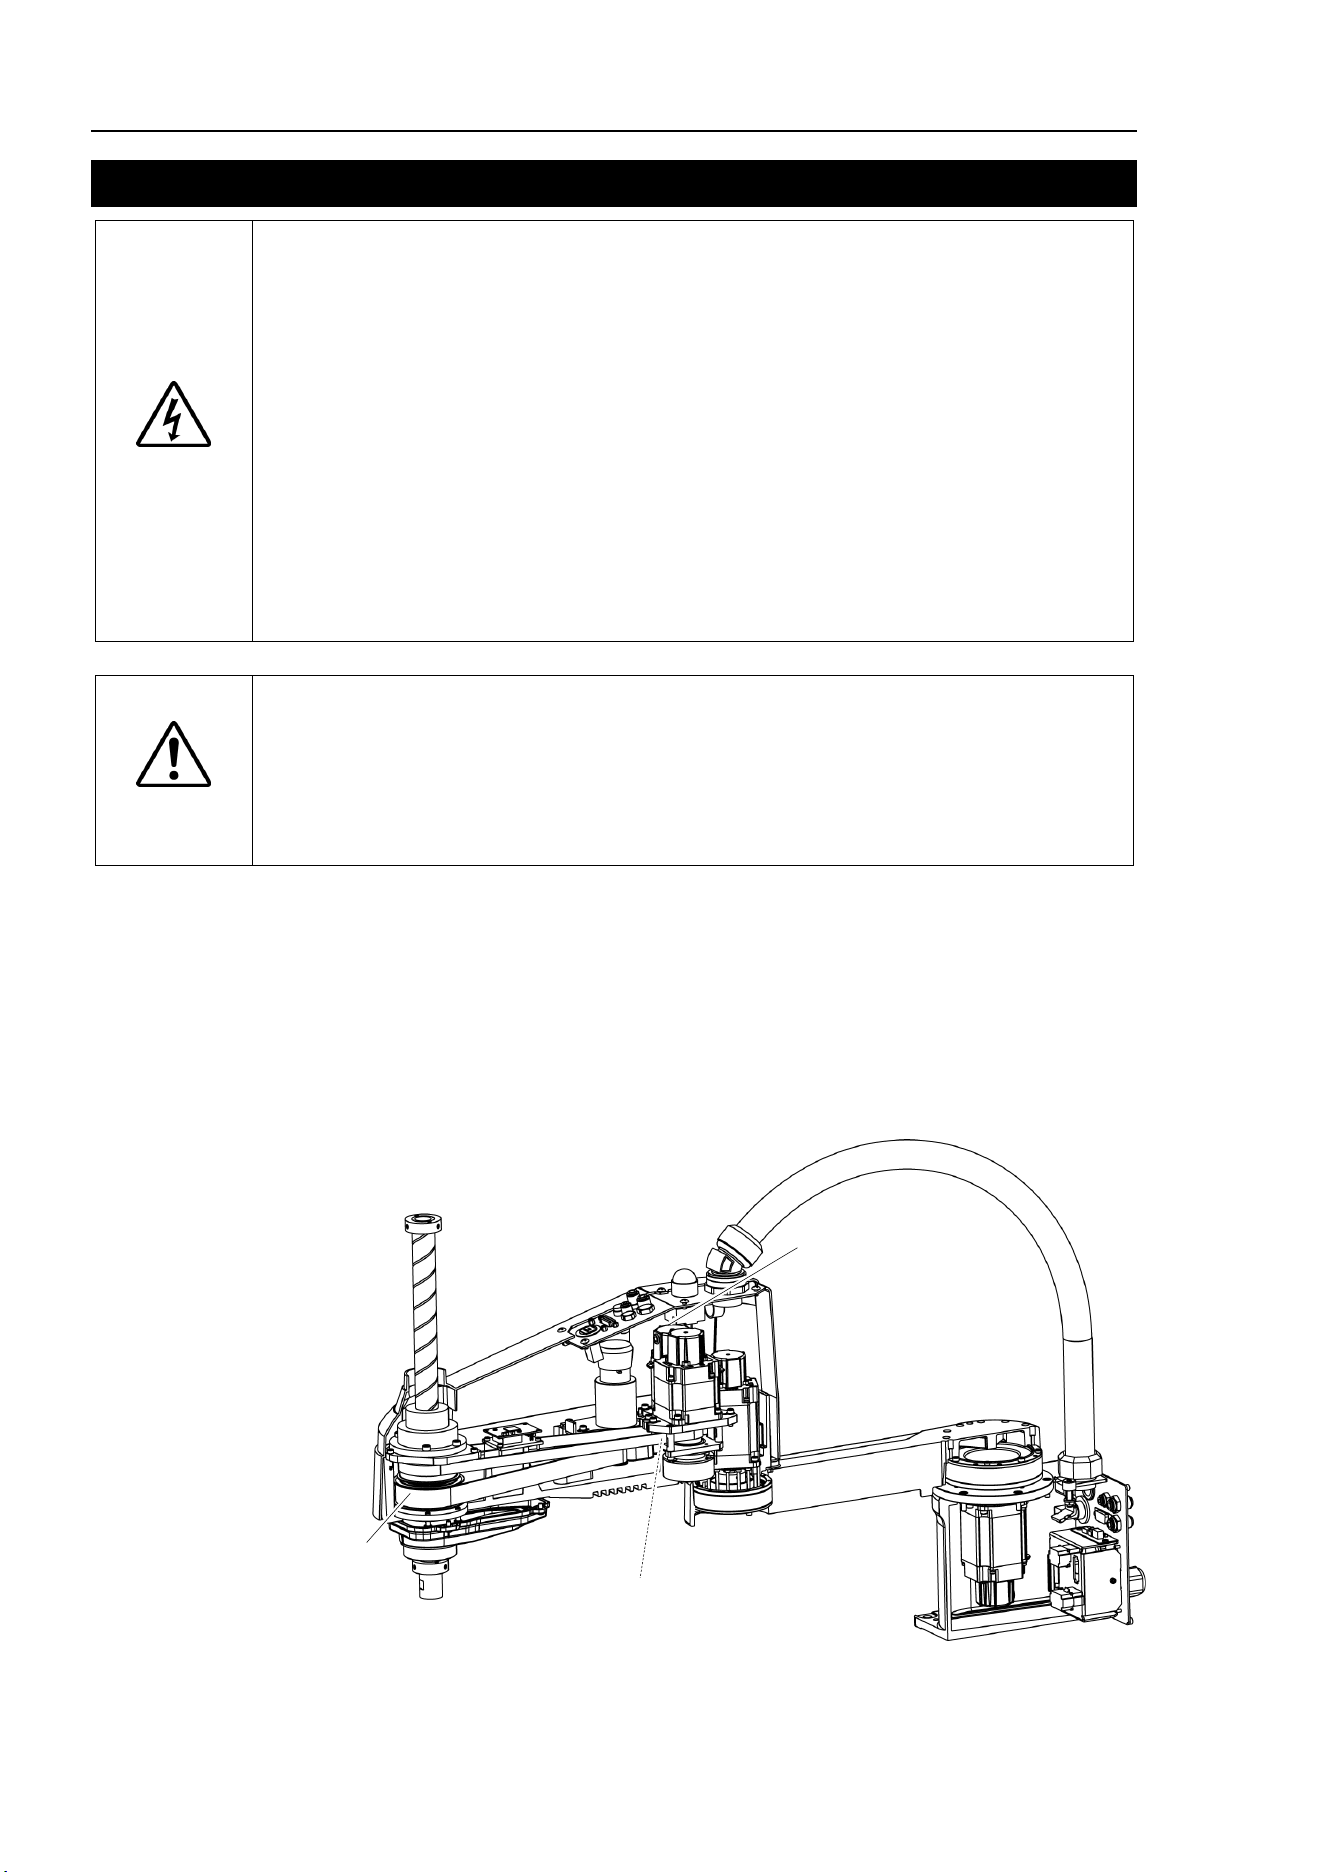
Maintenance 8. Joint #4
116 LS10-B Rev.6
8. Joint #4
WARNING
■
Do not insert or pull out the motor connectors while the power to the robot system
is turned ON. Inserting or pulling out the motor connectors
with the power ON is
extremely hazardous and may result
in serious bodily injury as the Manipulator
may move abn
ormally, and also may result in electric shock and/or malfunction of
the robot system.
■
To shut off power
to the robot system, pull out the power plug from the power
source. Be sure to connect the AC power cable to a power receptacle. DO
NOT connect it directly to a factory power source.
■
Before
performing any replacement, turn OFF the Controller
and related
equipment,
and then pull out the power plug from the power source.
Performing any replacement with the power ON is extremely hazardous and may
result in
electric shock and/or malfunction of the robot system.
CAUTION
■
Be careful not to apply excessive shock to the motor shaft when replacing
the
motor
s. The shock may shorten the life cycle of the motors and encoder and/or
damage them.
■
Never disassemble the motor and encoder.
A disassembled motor and encoder
will cause a positional gap and cannot be used
again.
After parts have been replaced (motors, reduction gear units, brakes, timing belts, ball screw
spline unit, etc.), the Manipulator cannot operate properly because a mismatch exists
between the origin stored in each motor and its corresponding origin stored in the Controller.
After replacing the parts, it is necessary to match these origins.
The process of aligning the two origins is called “Calibration”.
Refer to Maintenance: 13. Calibration to execute the calibration.
Joint #4 Motor
U2 belt
U1 Belt
Maintenance 8. Joint #4
LS10-B Rev.6 117
8.1 Replacing Joint #4 Motor
Name
Qty.
Note
Maintenance
parts
AC Servo Motor 150 W 1 2197987
Tools
Hexagonal
wrench
width across flats: 2 mm
1
For M4 set screw
width across flats: 3 mm
1
For M4 screw
Torque wrench
1
Nippers
1
For cutting wire tie
Force gauge 1
U1:
Axial tension (pulling force)
114N (11.6 ± 0.5 kgf)
Suitable cord (Length about 800 mm)
1
For belt tension
CAUTION
■
The belt must be installed with proper tension;
otherwise the following problems
may occur.
If falling below the lower limit : Jumping of the belt gears (position gap)
If exceeding the upper limit : Abnormal noise or vibration (oscillation),
decline in the life of driving parts
A brake is mounted on the motor of Joints #3 and #4 to prevent the shaft from moving down
and rotating due to the weight of the end effector while the power to the Controller is OFF
or while the motor is in OFF status (MOTOR OFF).
Move the shaft down to its lower limit before the replacement procedure following the
removal steps.
Joint #4 motor
Removal
(1)
Turn ON the Controller.
(2)
Push down the shaft to its lower limit while pressing the brake release switch. Be sure
to keep enough space and prevent
the end effector hitting any peripheral equipment.
The brake release switch is applied to both Joints #3 and Joint #4.
When the brake release switch is pressed, the respective brakes of the Joint #3 and Joint
#4 are released simultaneously.
Be careful of the
shaft falling and rotating while the brake release switch is
being pressed
because
the shaft may be lowered by the weight of an end effector.
(3)
Turn OFF the Controller.
(4)
Remove the
Arm Top Cover.
For details, refer to
Maintenance: 3.1 Arm Top Cover.
(5)
Cut off
the wire tie binding the cables.
At this point, d
o not cut off a wire tie (in the duct fittings outlet) that
binds the cables to
the User Plate.
(6)
Disconnect the connectors
.
Connectors: BR4, X241, X44 (Hold the clip to remove.)
NOTE
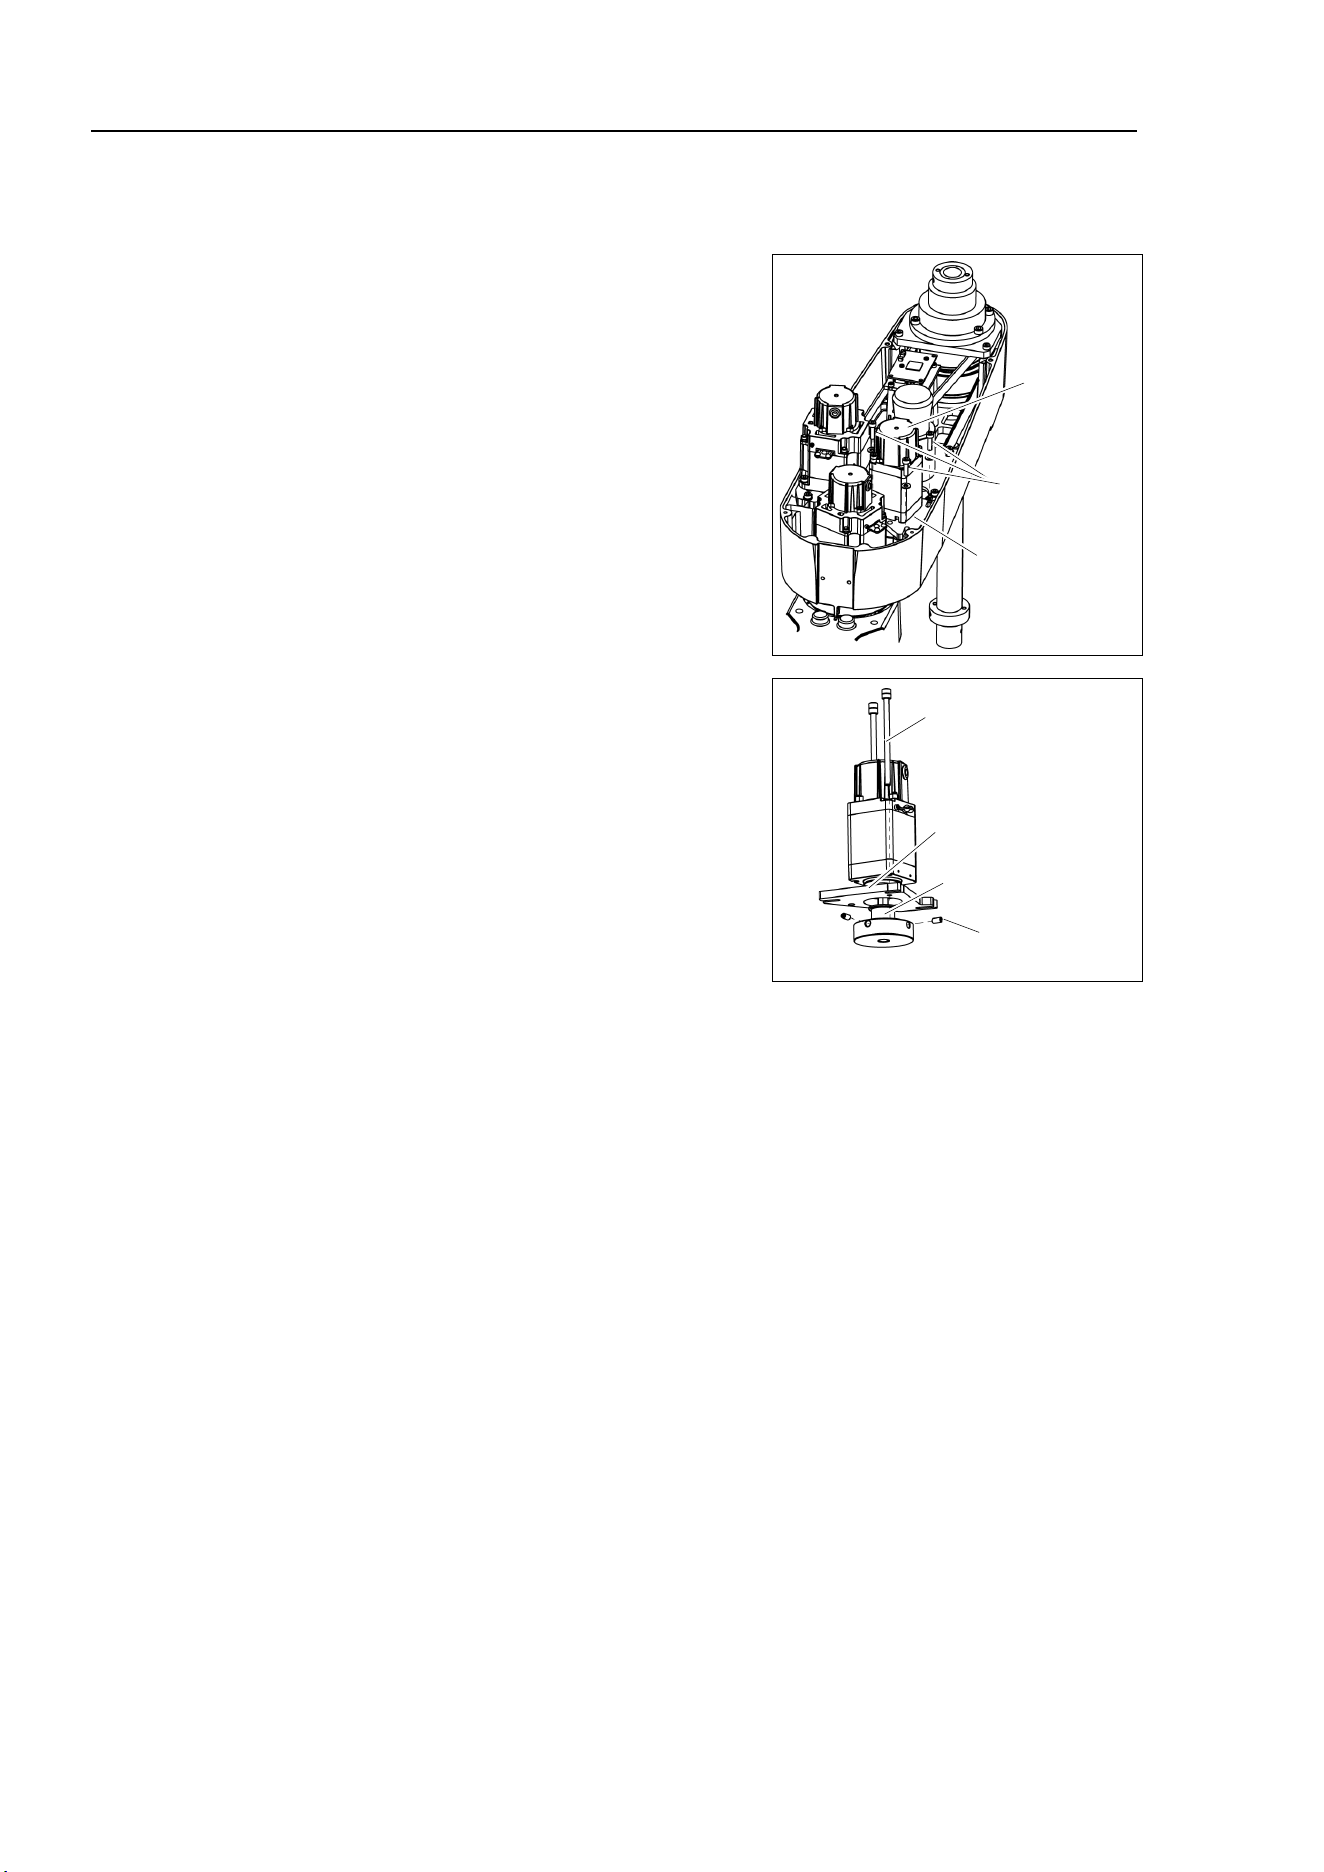
Maintenance 8. Joint #4
118 LS10-B Rev.6
(7)
Remove the User Plate.
For details, refer to
Maintenance: 3.5 User Plate.
(8)
Remove the Joint #4 motor unit from the
Arm
#2.
Remove the bolts securing the Joint #4 motor
on the motor plate and pull
out the motor.
The belt is placed around the pulley.
Tilt the
motor unit slightly and pull it out.
Joint #4
Motor Unit
3-M4×15
+Washer
Motor Plate
(9)
Remove the pulley from the
Joint #4 motor.
There is a brass bushing in one of the set
screw holes. Be sure to keep the bushing.
2-M4×8
Set Screw
+ Bushing
Pulley
2-M4×70
+ Spacer
Motor Plate
(10)
Remove the motor plate from the Joint #4
motor.
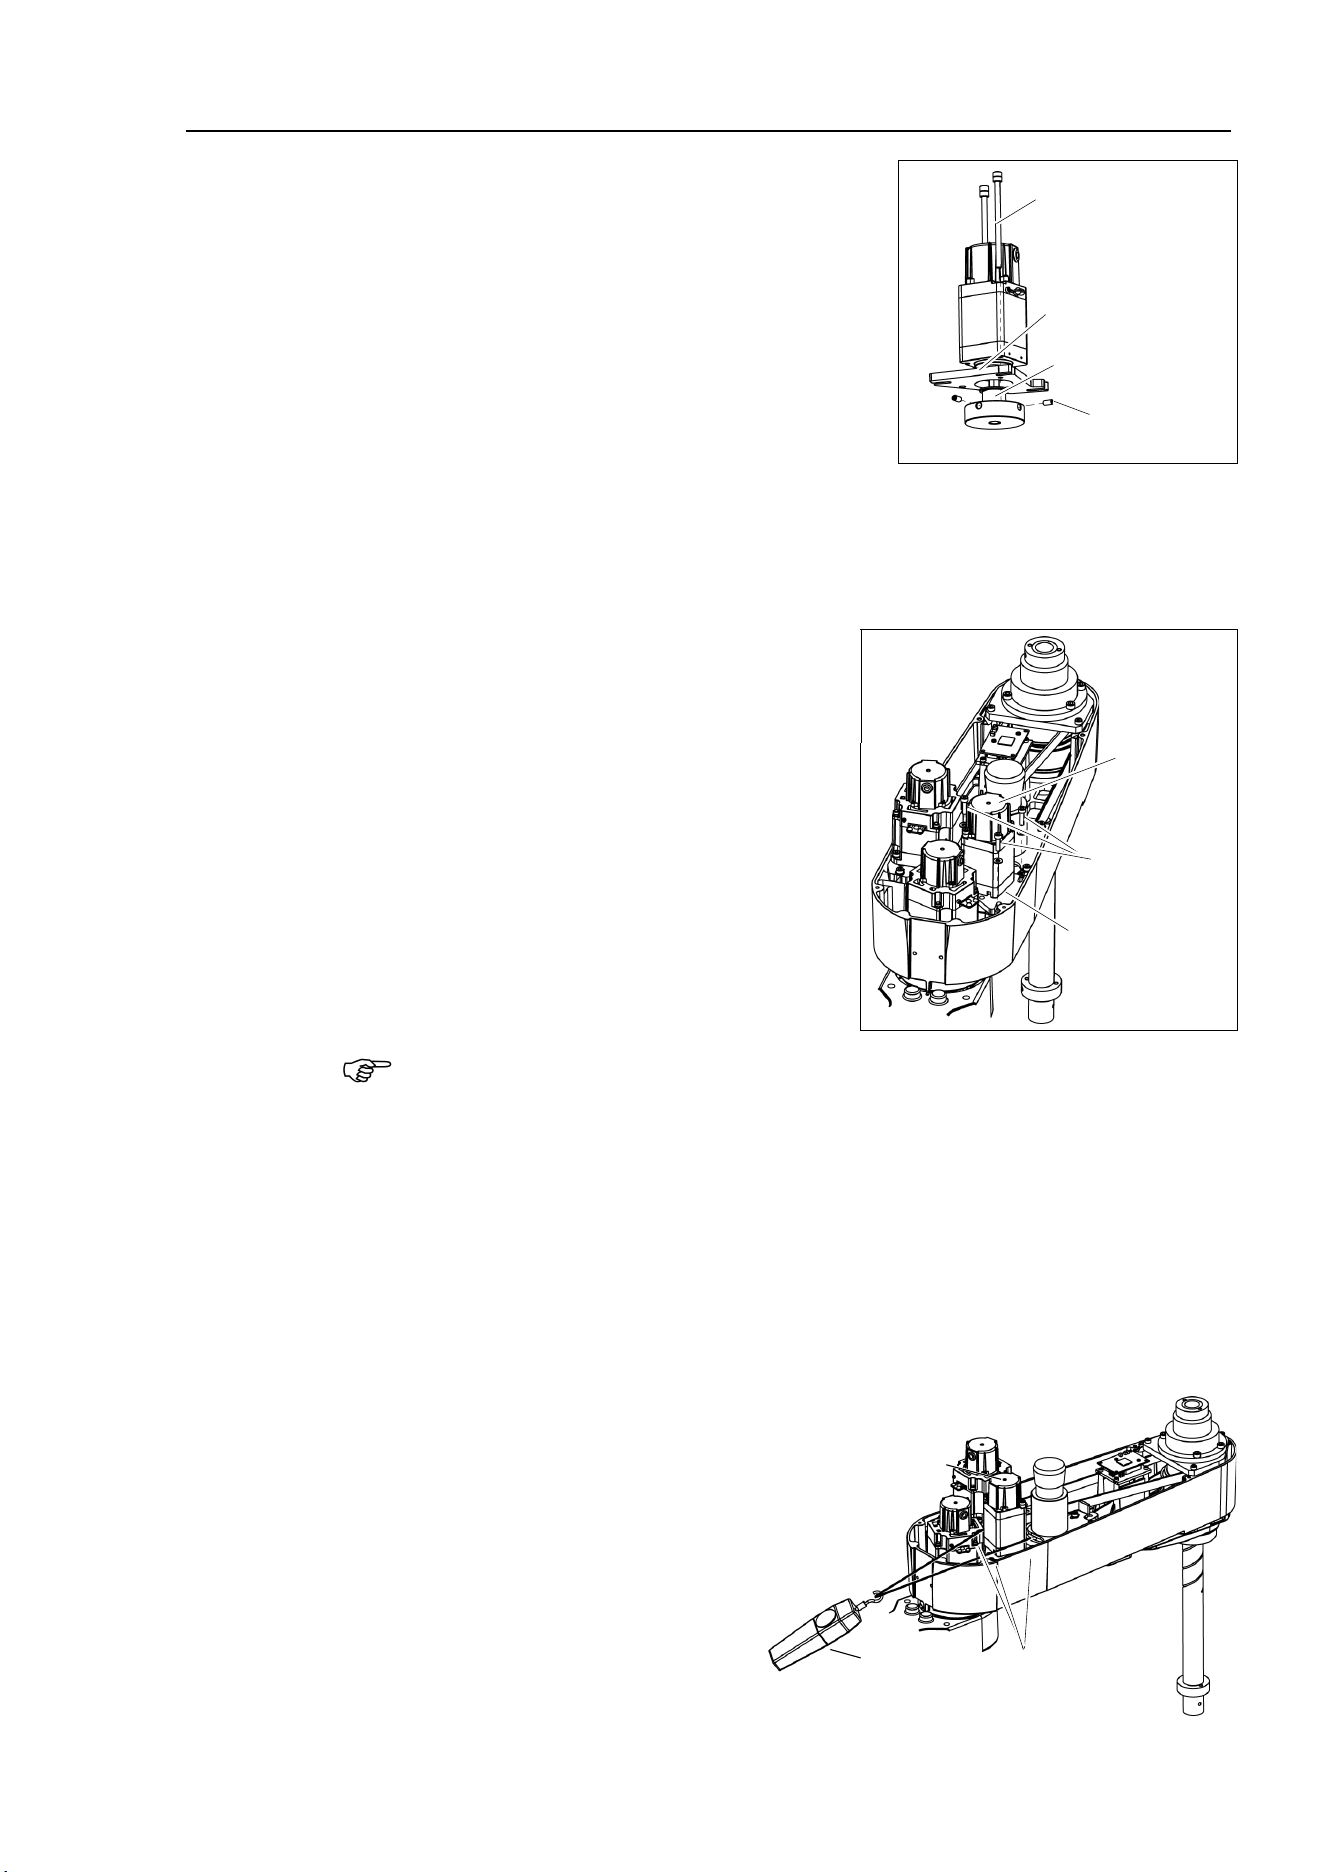
Maintenance 8. Joint #4
LS10-B Rev.6 119
Joint #4 motor
Installation
(1)
Mount the mot
or plate to the Joint #4 motor.
At this point, the m
otor cables must be in the
convex
shape side of the plate.
2-M4×8
Set Screw
+ Bushing
Pulley
2-M4×70
+ Spacer
Motor Plate
(2)
Mount
the pulley to the Joint #4 motor.
Be sure to fit the end face of the pulley to
the end face of the motor shaft.
Be sure to set the one set of the set screws + bushing
vertically on the flat face of the
motor shaft.
Be careful not to damage the the motor shaft to tighten the bushing into
the other set
screw hole.
(3)
Place the pulley around the U1
belt and place
the Joint #
4 motor unit in the upper face of the
A
rm #2.
Joint #4
Motor Unit
3-M4×15
+ Washer
Motor Plate
(4)
Loosely secure the Joint #4 motor unit to Arm
#2.
Make sure
the motor unit can be moved by hand, and it will not tilt when pulled.
I
f the unit is secured too loose or too tight, the belt will not have the proper tension.
Make sure the gear grooves of the belt are fit into those of the pulleys completely.
(5)
Apply the proper tension to the U1 belt and secure
the Joint #4 motor unit.
Pass
a suitable cord or string around the Joint #4 motor unit near its mounting plate.
Then, p
ull the cord using a force gauge or similar tool to apply the specified tension
shown in the figure
.
U1 axial tension (pulling force): 114 N (11.6 ± 0.5 kgf)
U1 belt tension: 58 N (5.9 ± 0.5 kgf)
3-M4×15
+ Washer
Force gauge
Joint #4
Motor Unit
NOTE

Maintenance 8. Joint #4
120 LS10-B Rev.6
To
check belt tension with the tension meter, refer to Maintenance: 8
.4 Checking the
Timing Belt Tension (U1, U2 Belt).
(6)
Connect the connectors
.
Connectors: BR4, X241, X44
(7)
Mount the User Plate
.
For details, refer to
Maintenance: 3.5 User Plate.
(8)
Bind
the cables with a wire tie in their original positions
as before removed in removal
step (5).
Do not allow unnecessary strain on the cables.
(9)
Mount the Arm Top Cover.
For details, refer to
Maintenance: 3.1 Arm Top Cover.
(10)
Check if the
Joint #4 moves in a Jog motion by operating from EPSON RC+ menu
-
[Tools]
-[Robot Manager]-[Jog & Teach].
If the Manipulator oscillates with
MOTOR ON and the following errors are detected,
Error 5041: Motor torque output failure in low power state.
Error 4241: Over speed during low power mode was detected.
or when the joint other than Joint #
4
moves, the connector for other joint might be
connected to the Joint #
4 motor. Check the connector connection.
(1
1)
Execute the calibration of Joint #4.
For details on the calibration method, refer to Maintenance: 13. Calibration.
NOTE
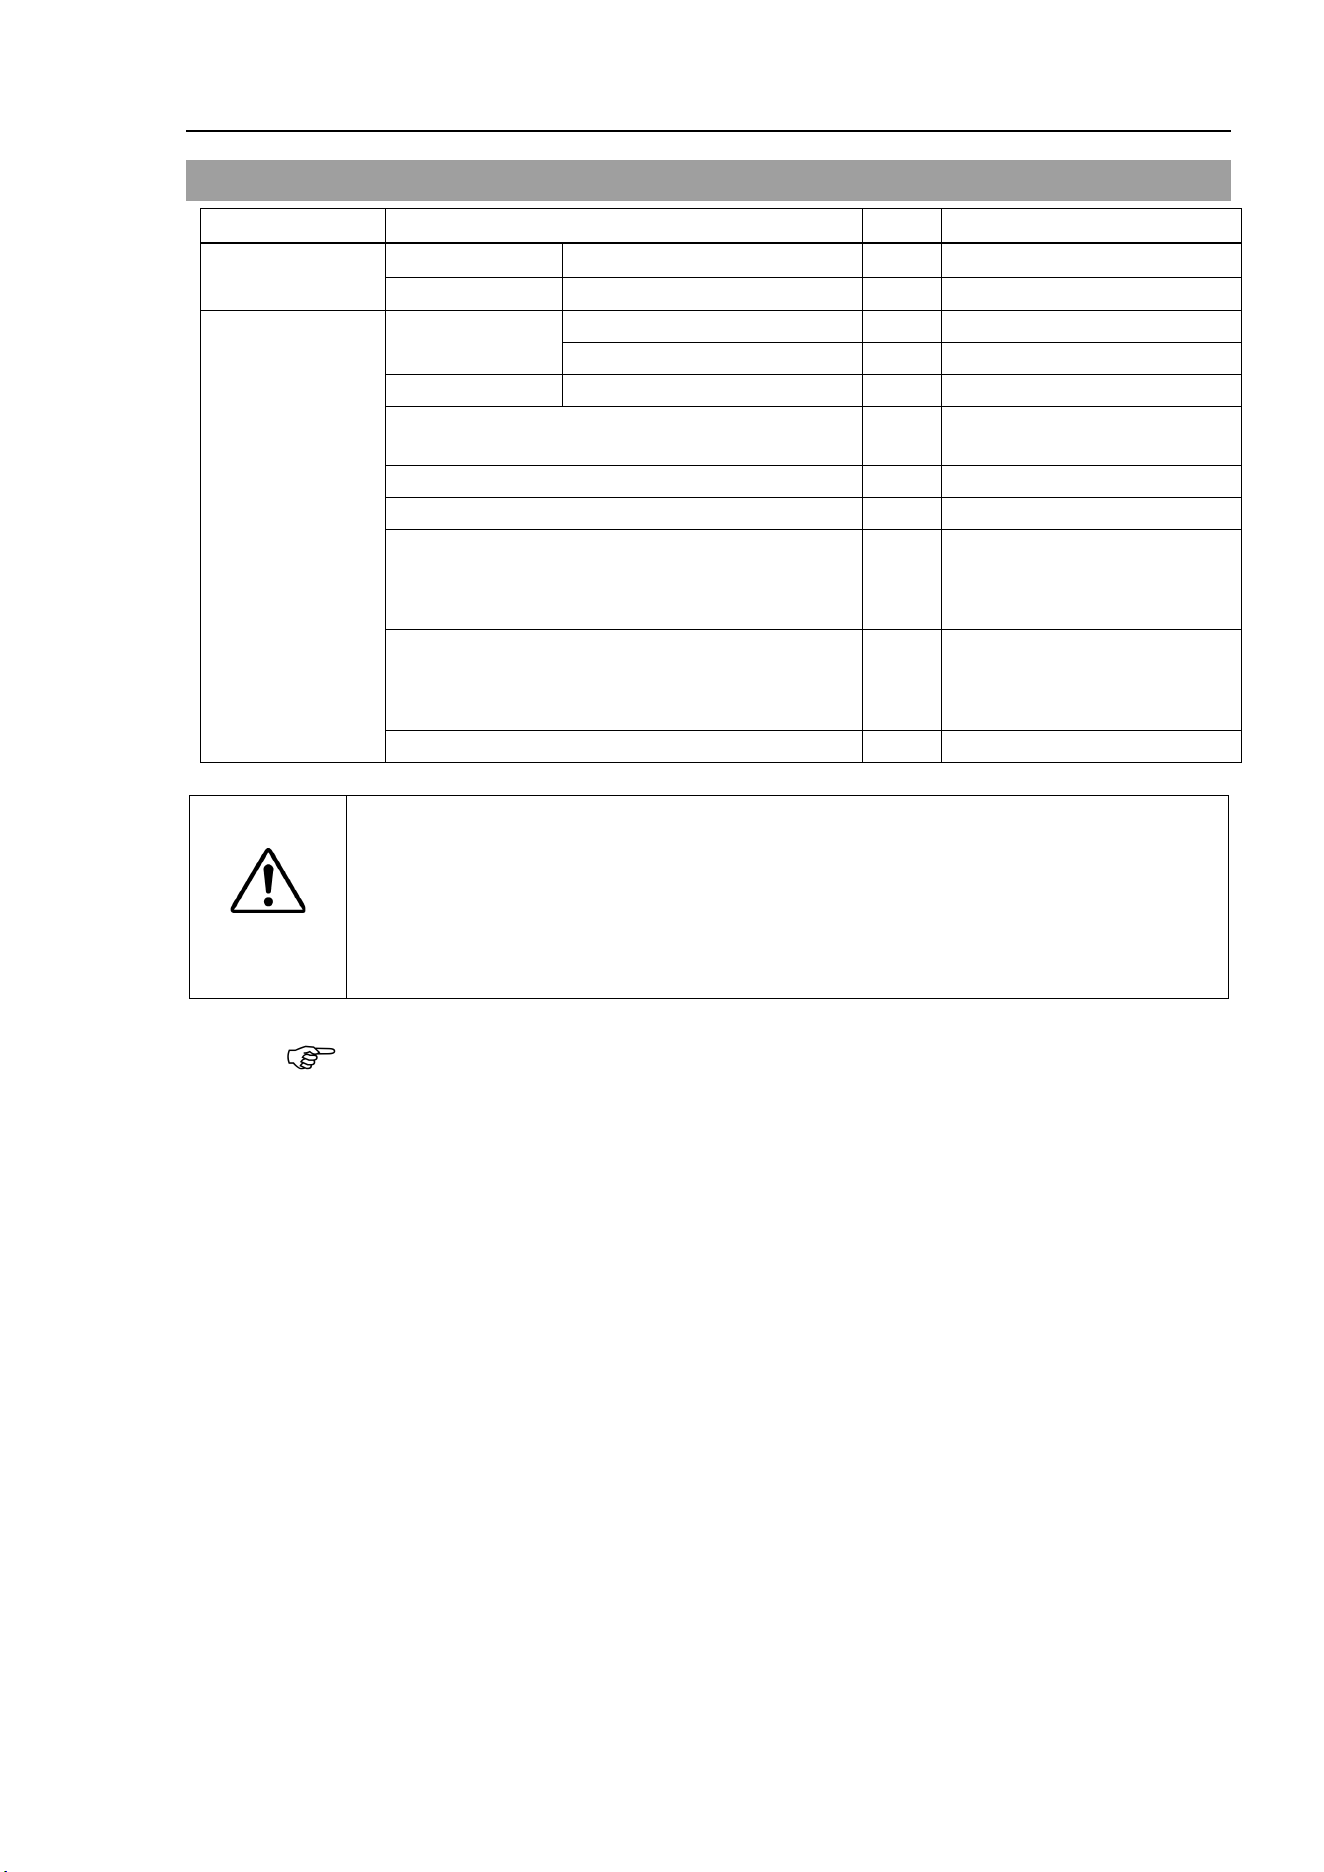
Maintenance 8. Joint #4
LS10-B Rev.6 121
8.2 Replacing the Timing Belt
Name
Qty.
Note
Maintenance
parts
U1 belt
width 10 mm
1
1757386
U2 belt
width 21 mm
1
1757387
Tools
Hexagonal
wrench
width across flats: 2.5 mm
1
For M3 screw
width across flats: 3 mm
1
For M4 screw
Spanner
width across flats: 7 mm
1
Cross-point screwdriver 1
For cross-recessed head
screws
Torque wrench
1
Nippers
1
For cutting wire tie
Force gauge 1
U1:
Axial tension (pulling force)
114 N (11.6 ± 0.5 kgf)
Sonic tension meter 1
U2:
Tension (belt tension)
102 N (10.4 ± 0.5 kgf)
Suitable cord (Length about 800 mm)
1
For belt tension
CAUTION
■
The belt must be installed with proper tension;
otherwise the following problems
may occur.
If falling below the lower limit : Jumping of the belt gears (position gap)
If exceeding the upper limit : Abnormal noise or vibration (oscillation),
decline in the life of driving parts
A brake is mounted on the motor of Joints #3 and #4 to prevent the shaft from moving down
and rotating due to the weight of the end effector while the power to the Controller is OFF
or while the motor is in OFF status (MOTOR OFF).
Move the shaft down to its lower limit before the replacement procedure following the
removal steps.
NOTE
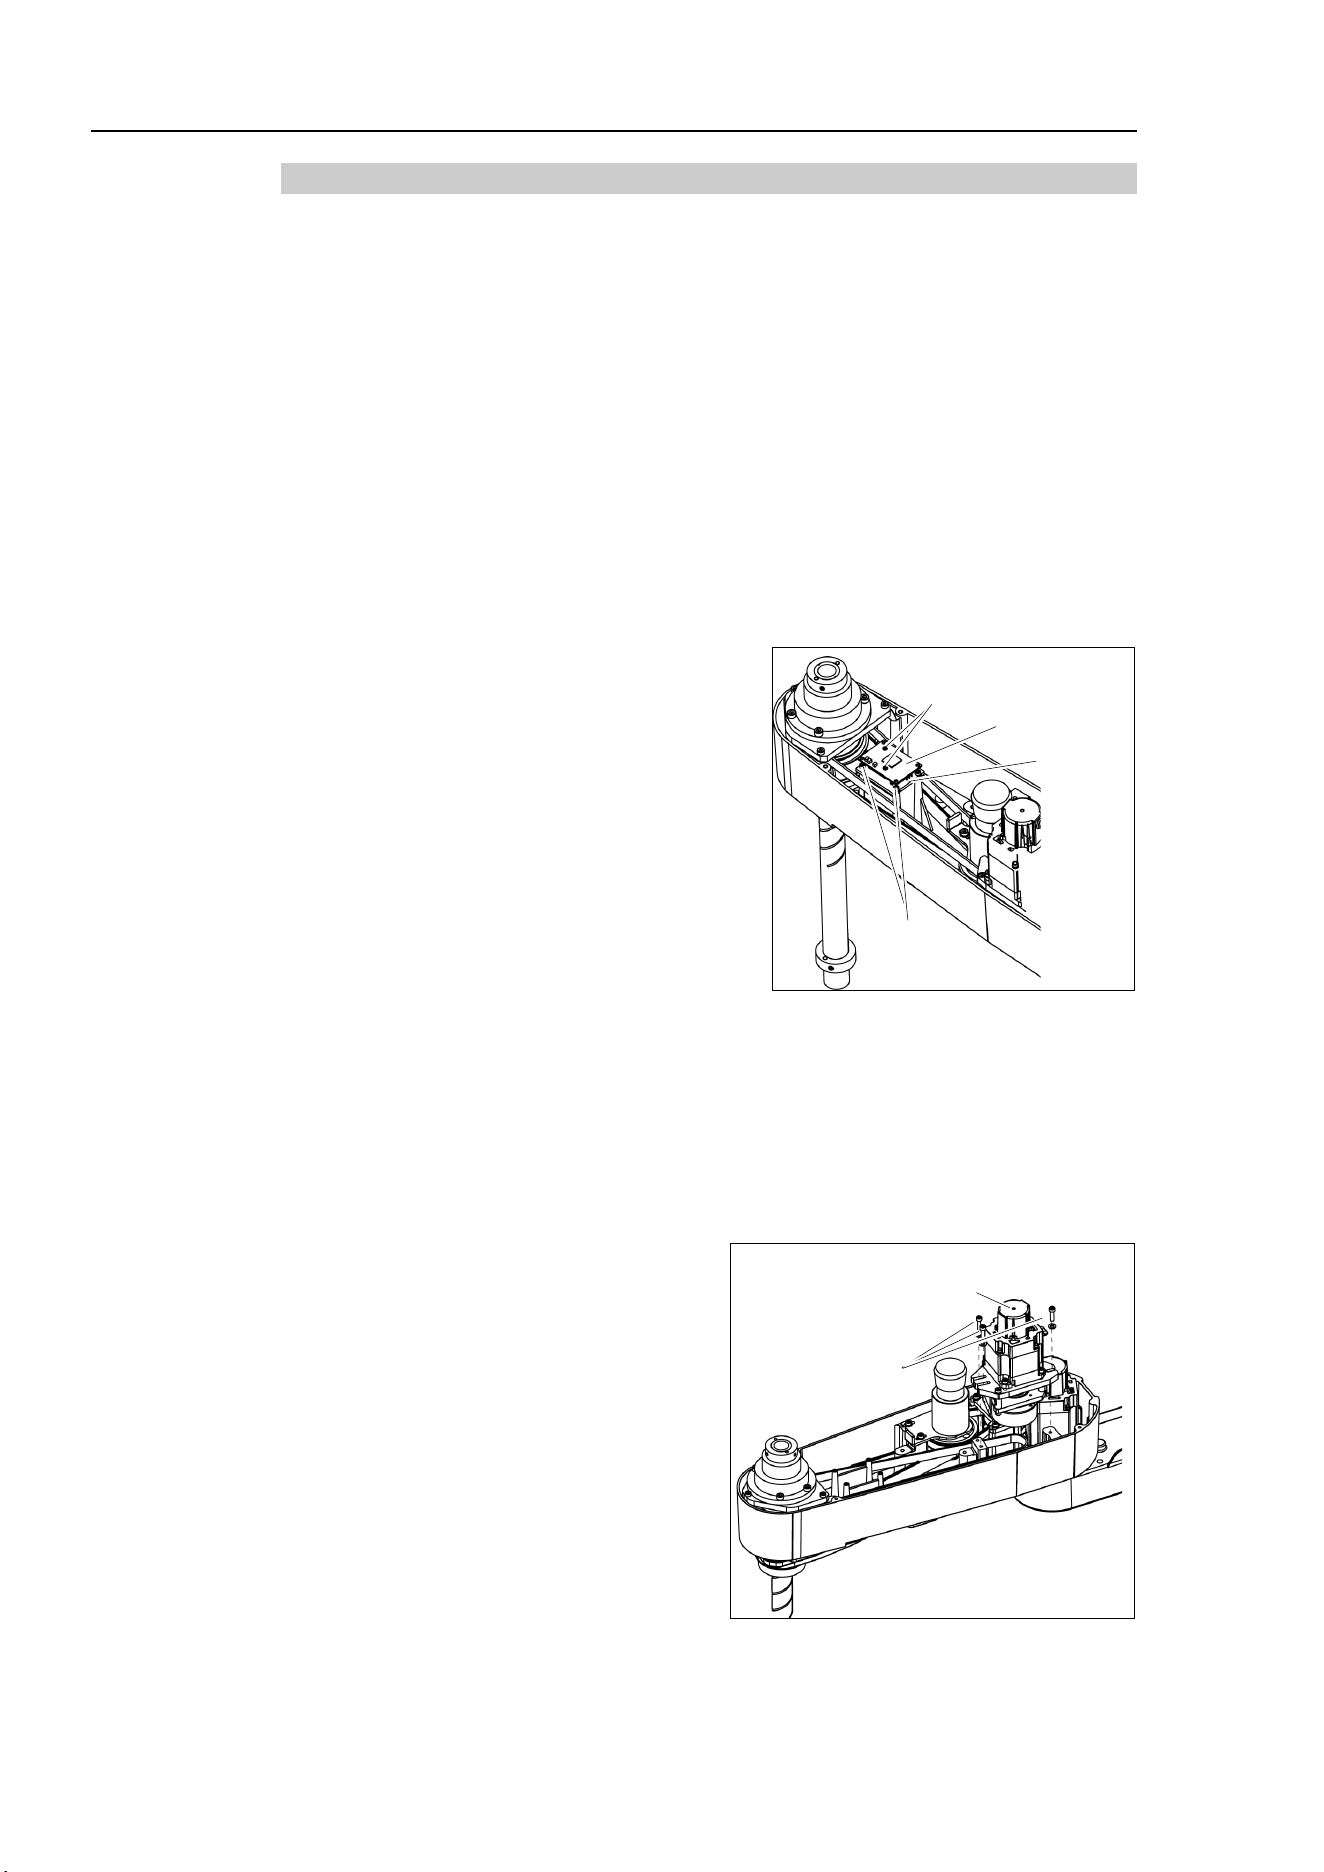
Maintenance 8. Joint #4
122 LS10-B Rev.6
8.2.1 U2 Belt
U2 belt
Removal
(1)
Turn ON the Controller.
(2)
Push down the shaft to its lower limit while pressing the brake release switch. Be sure
to keep enough space and prevent
the end effector hitting any peripheral equipment.
The brake release switch is
applied to both Joints #3 and Joint #4.
When the brake release switch is pressed, the respective brakes of the Joint #3 and Joint
#4 are released simultaneously.
Be careful of the
shaft falling and rotating while the brake release switch is
being pressed
because
the shaft may be lowered by the weight of an end effector.
(3)
Turn OFF the Controller.
(4)
Remove the
Arm Top Cover.
For details, refer to
Maintenance: 3.1 Arm Top Cover.
(5)
Remove
the control board and the plate.
2-M2×16
Pan head screws
Control Board
Plate
4-M3×10
(6)
Cut off the wire tie binding the cables.
Do not cut off the wire tie that binds the cables to the User Plate.
(7)
Disconnect the following connectors.
Connectors: BR4, X32, X43, X44, X51, X231, X241 (Hold the clip to remove.)
(8)
Remove the User Plate.
For details, refer to
Maintenance: 3.5 User Plate.
(9)
Remove the screws securing the Joint #3
motor unit and pull out the motor unit.
3-M4×18
+Washer
Joint #3
Motor Unit
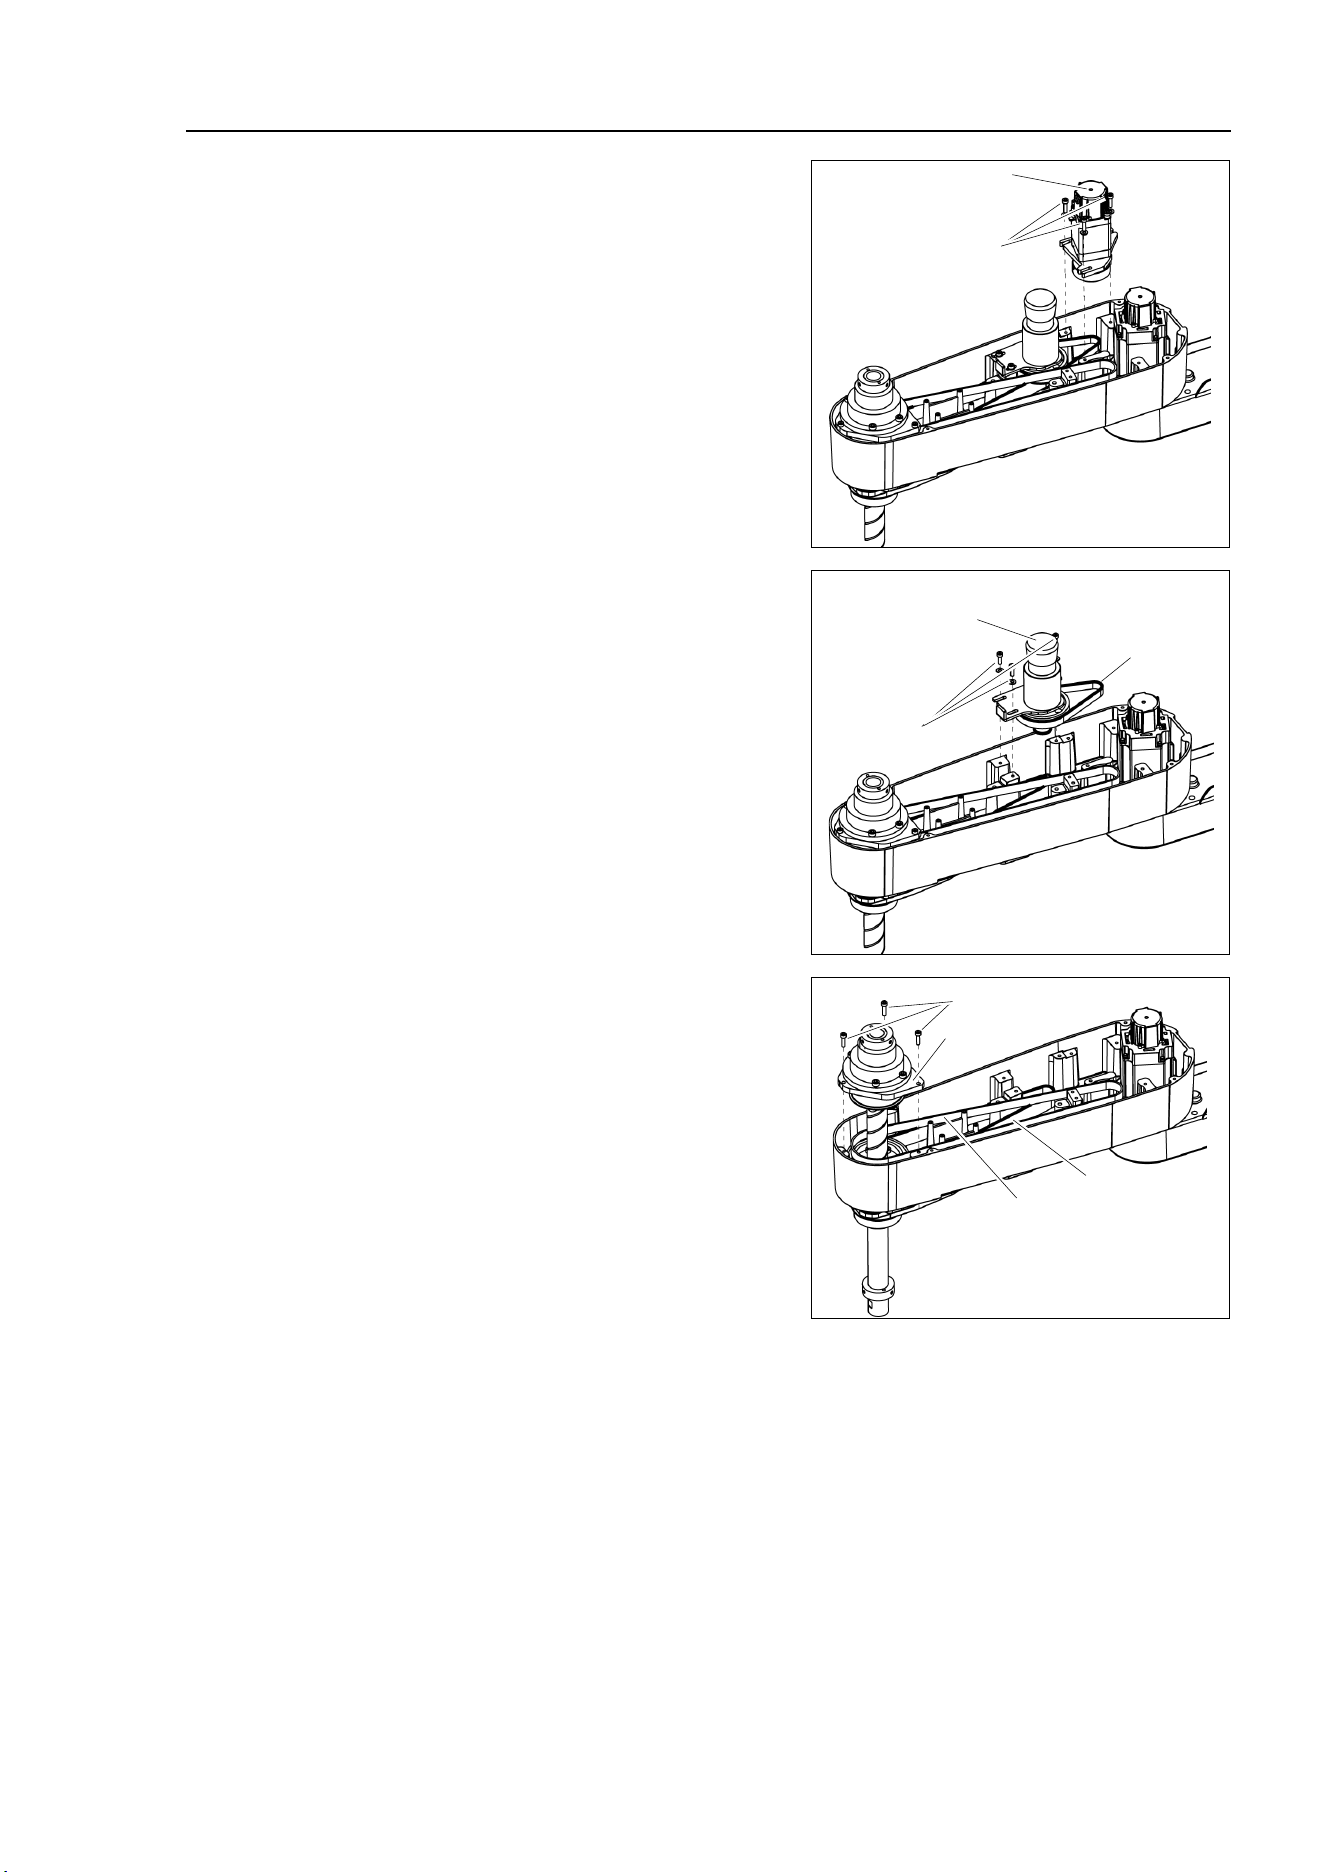
Maintenance 8. Joint #4
LS10-B Rev.6 123
(1
0)
Remove the
screws securing the Joint #4
motor unit and pull out the motor unit.
The belt is placed around the pulley.
Tilt the motor unit slightly and pull it out.
3-M4×15
+Washer
Joint #4
Motor Unit
(1
1)
Remove the screws securing the Joint #4
intermediate shaft unit.
Pull out the Joint #4 intermediate shaft
unit and U1 belt.
3-M4×12
+Washer
Joint #4
Intermediate Shaft Unit
U1 belt
(1
2)
Remove the screws mounting the spline
plate.
Hold up the spline plate and pull out the
Z belt and U2 belt.
3-M4×15
Spline Plate
Z belt
U2 belt
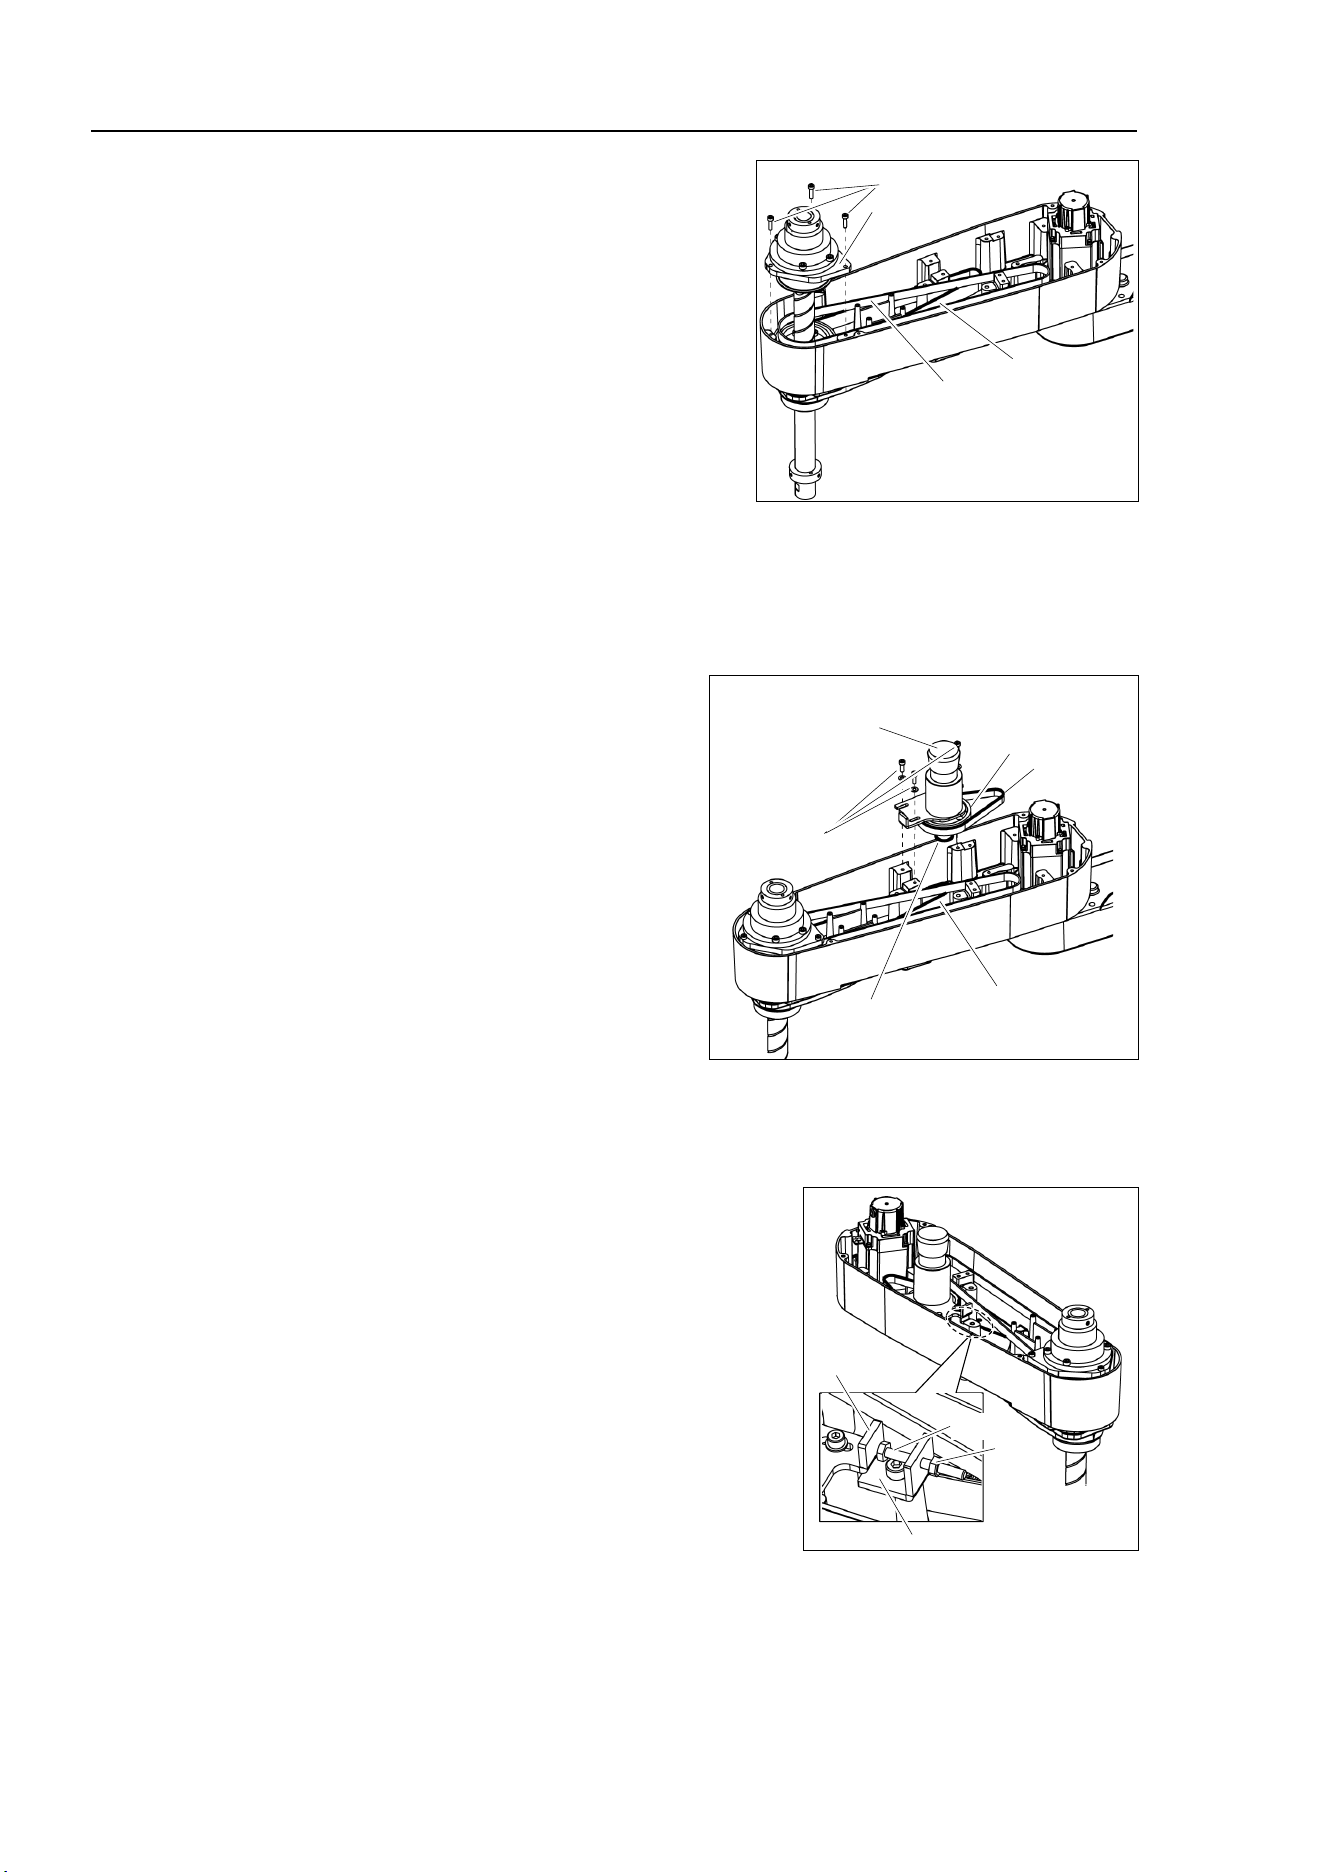
Maintenance 8. Joint #4
124 LS10-B Rev.6
U2 belt
Installation
(1)
Hold up the spline plate and set the U2 belt
around the U3 pulley.
Make sure
the gear grooves of the belt are
fit into those of the pulleys
completely.
3-M4×15
Spline Plate
Z belt
U2 belt
(2)
Hold up the spline plate and set the Z belt around the Z2 pulley.
Make sure
the gear grooves of the belt are fit into those of the pulleys completely.
(3)
Loosely secure the spline plate on the Arm #2
and move
the shaft up and down several
times
before firmly secure the spline plate.
(4)
Keeping the U1 belt on the large
pulley of the Joint #4 intermediate
shaft unit, set the U2 belt in the Arm
#2 on the small pulley and put them
on the Arm
#2 upper surface.
Make sure
the gear grooves of the
belt
s are fit into those of the pulleys
complete
ly.
3-M4×12
+Washer
Joint #4
Intermediate Shaft Unit
U1 belt
U2 belt
Pulley (Large)
Pulley (Small)
(5)
Loosely secure the Joint #
4 intermediate shaft unit.
Make sure
the unit can be moved by hand, and it will not tilt when pulled. If the unit
is
secured too loose or too tight, the belt will not have the proper tension.
(6)
Apply the proper tension to the U2 belt, and then
secure the Joint #4 intermediate shaft unit.
Install
the tensioner in front of the Joint #4 motor
unit
. Rotate the hexagonal bolt of the tensioner
and push
the plate to apply the specified tension.
U2 belt tension: 102 N (10.4 ± 0.75 kgf)
Nut
Plate
ボルト
Tensioner
Bolt
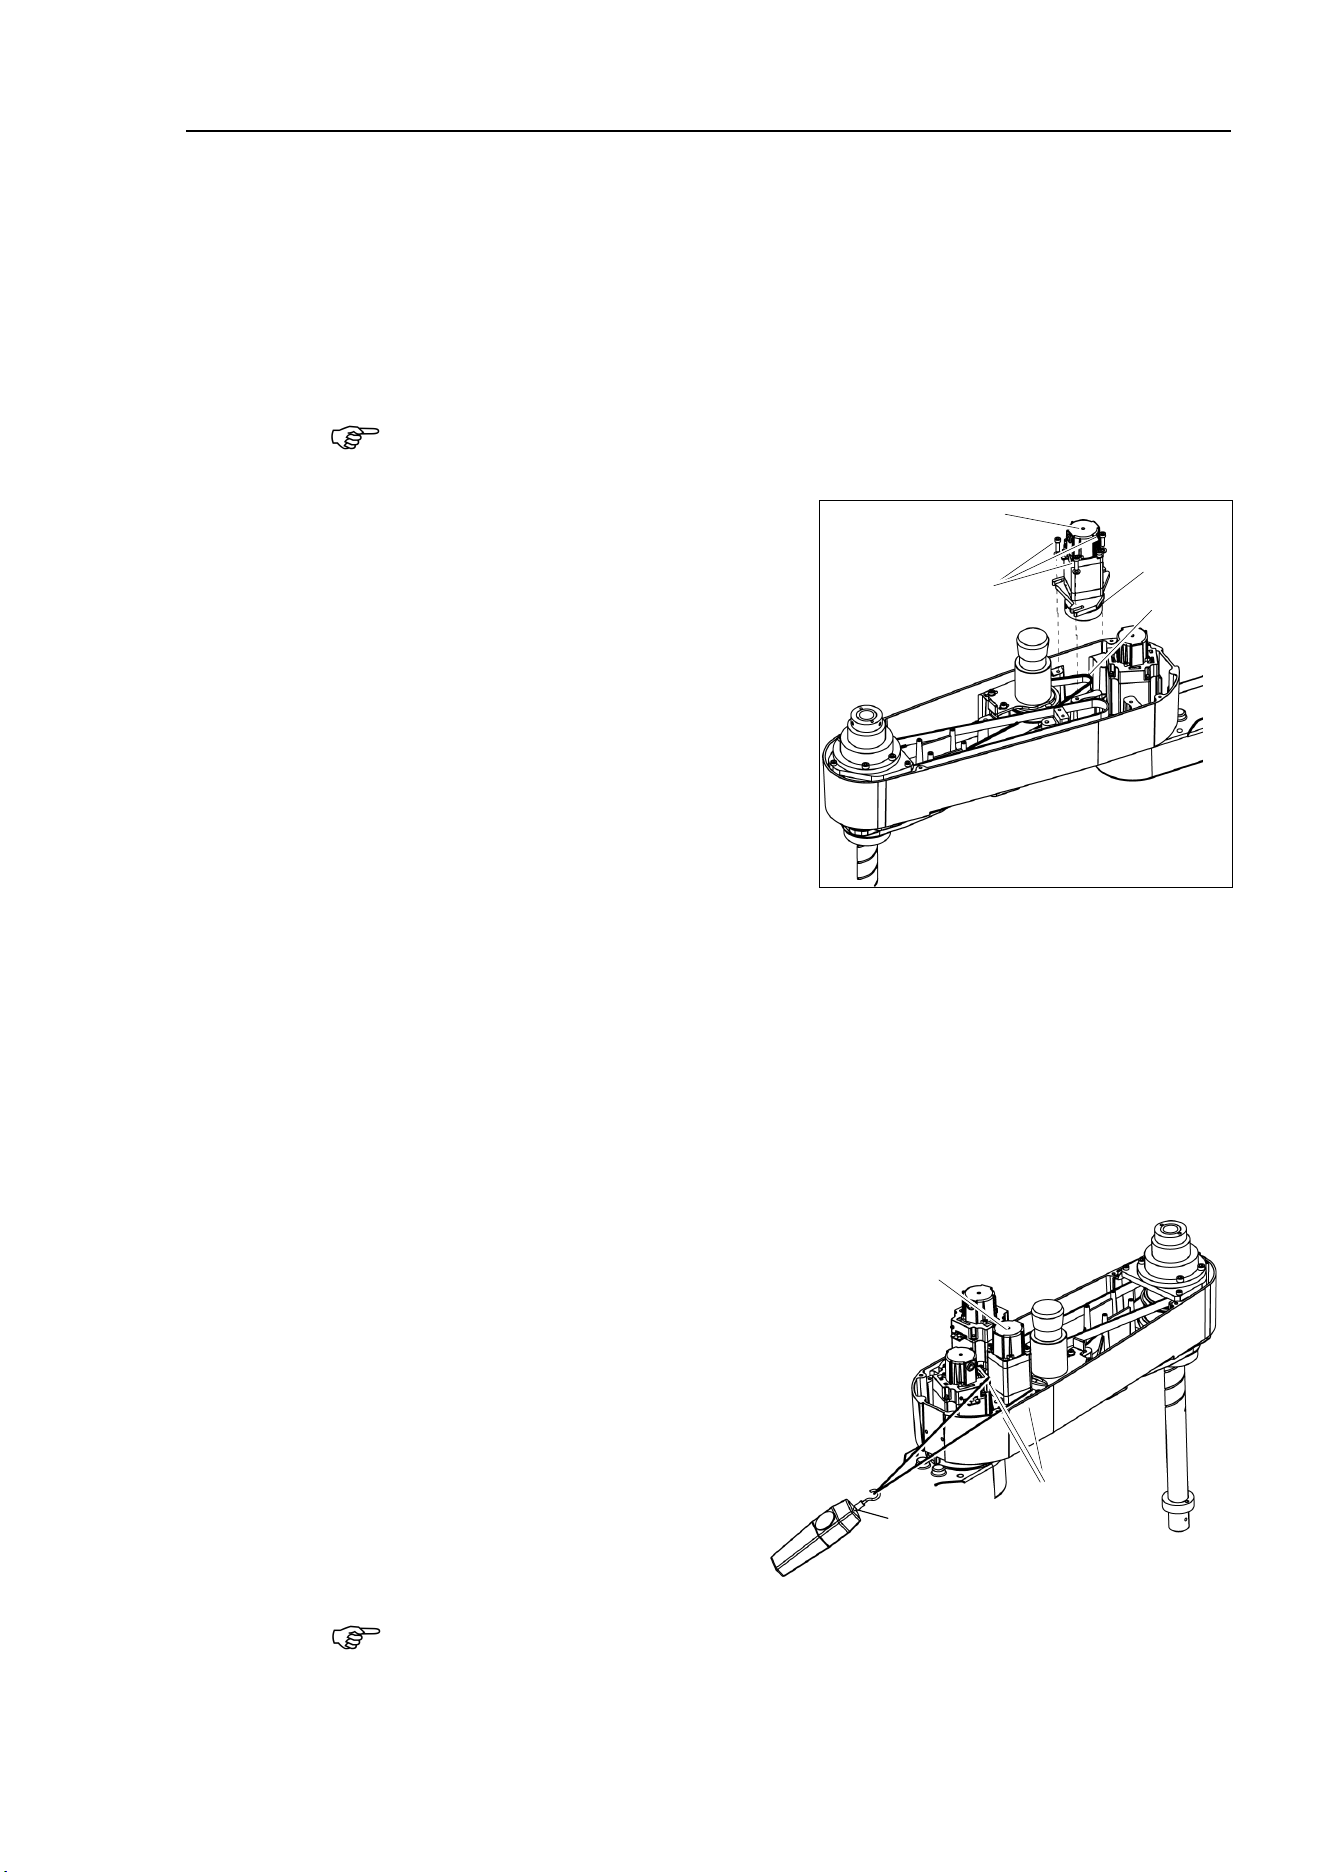
Maintenance 8. Joint #4
LS10-B Rev.6 125
(6)-1 Loosen the nut and turn the bolt. Push in the Joint #3 motor unit.
(6)-2 After fixing the Joint #3 motor unit, turn the bolt to leave from the plate.
(6)-3 Check the tension using the sonic tension meter.
For details, refer to Maintenance 7.4 Checking the Timing Belt Tension.
(6)-4 Repeat the steps (6)-1 through (6)-3 until you get appropriate tension.
(6)-5 After the adjustment, put the bolt back to its original position and fix it with
the nut.
To
check belt tension with the tension meter, refer to Maintenance: 8
.4 Checking the
Timing Belt Tension
(U1, U2 Belts).
(7)
Mount the Joint #4 motor unit on the
Arm #2 with the U1 belt around the
pulley.
3-M4×15
+Washer
Joint #4
Motor Unit
U1 belt
Pulley
(8)
Loosely secure the Joint #4
motor unit
to the Arm #2
.
Make sure the motor unit can be moved by hand, and it will not tilt when pulled.
If the unit is secured too loose or too tight, the belt will not have the proper tension.
(9)
Apply the proper tension to the U1 belt and secure the Joint #4 motor unit.
P
ass a suitable cord or string around the Joint #4 motor unit near its mounting plate.
Then, pull the cord using
a force gauge or similar tool to apply the specified tension
shown in the figure on
the right.
U1 axial tension (pulling force): 114 N (11.6 ± 0.5 kgf)
U1 belt tension: 58 N (5.9 ± 0.5 kgf)
3-M4×15
+ Washer
Force Gauge
Joint #4
Motor Unit
To
check belt tension with the tension meter, refer to Maintenance: 8
.4 Checking the
Timing Belt Tension
(U1, U2 Belts).
NOTE
NOTE
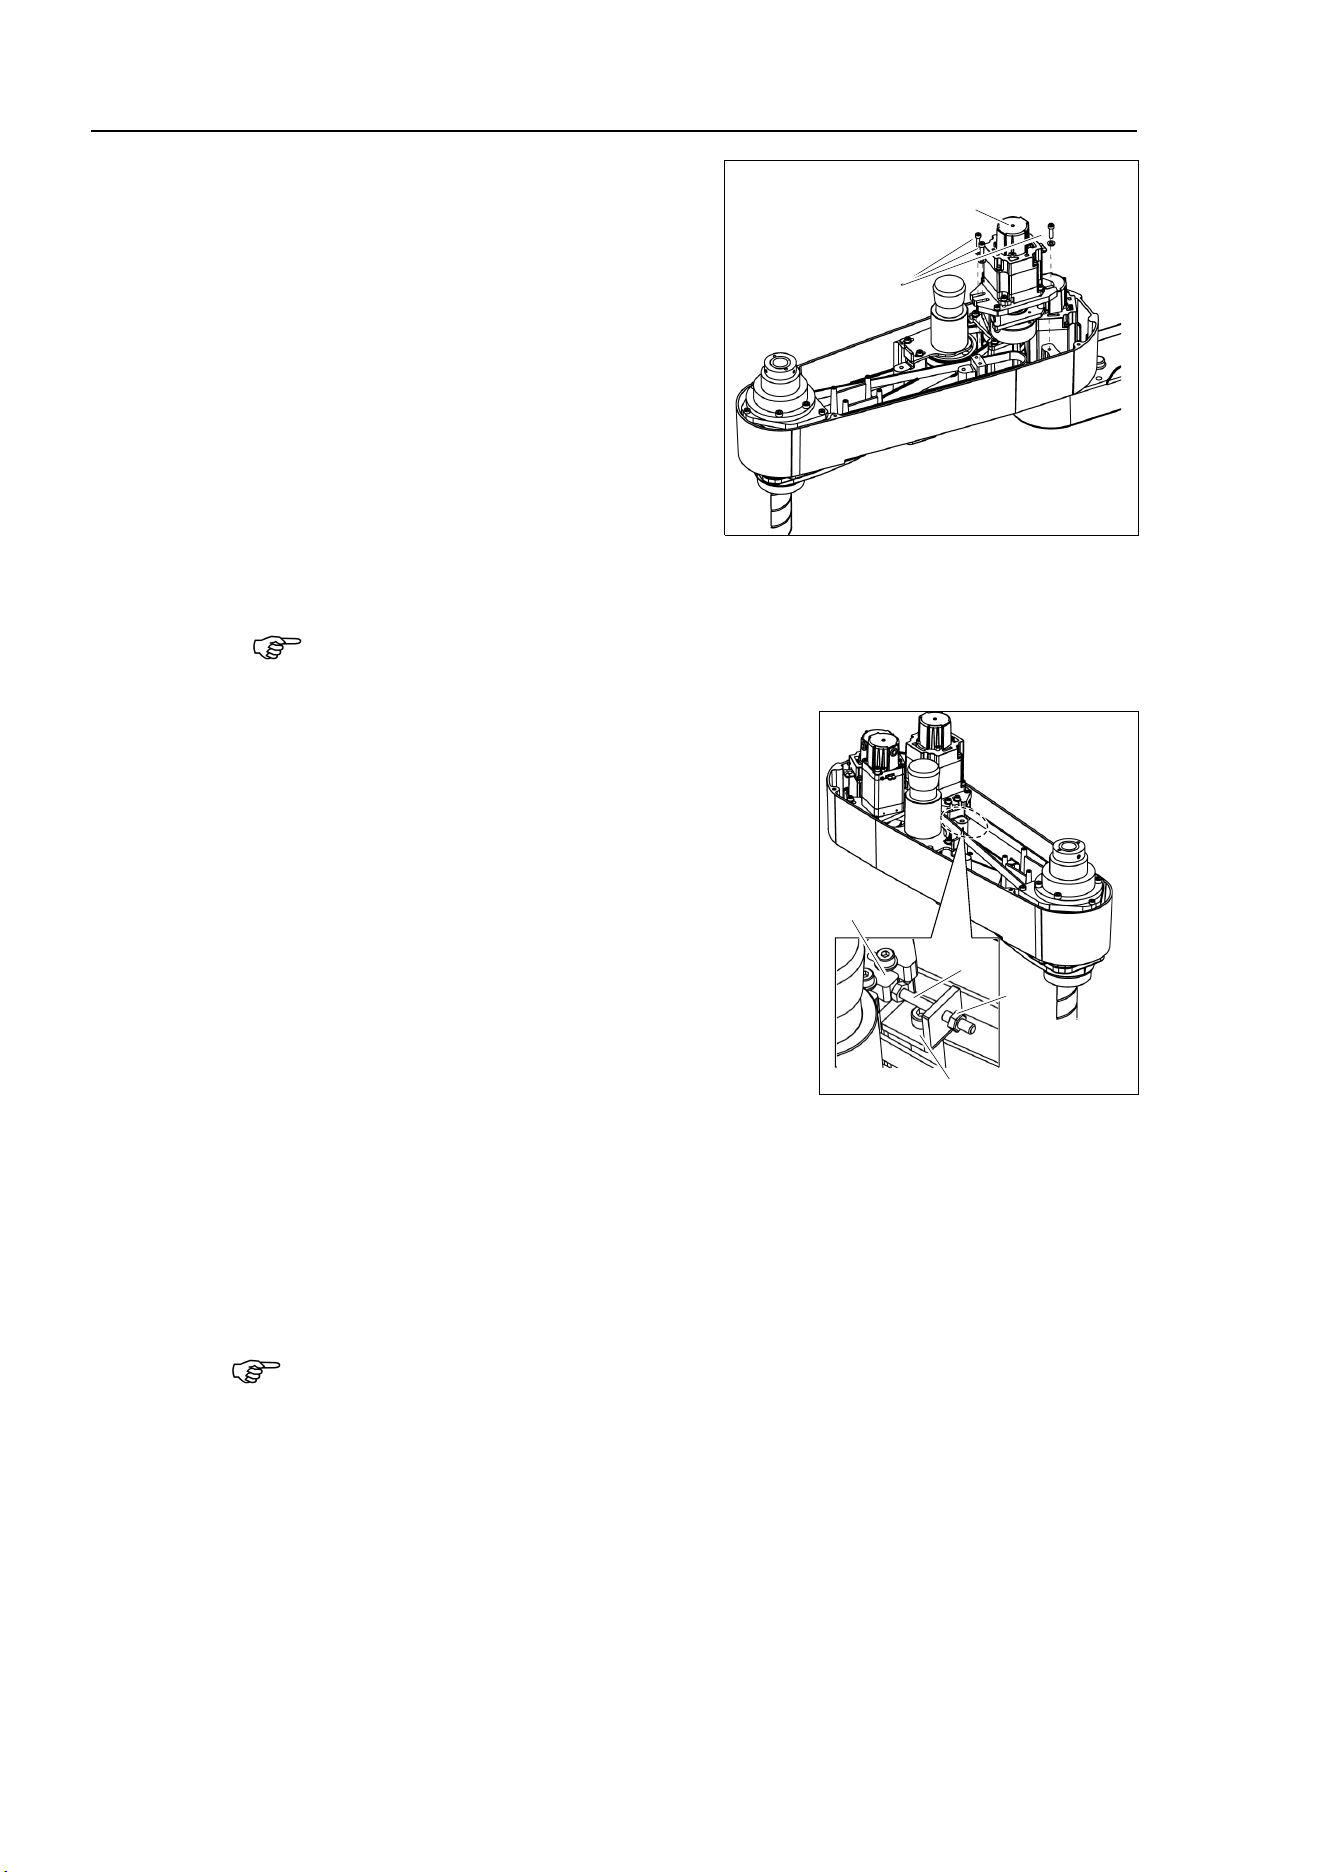
Maintenance 8. Joint #4
126 LS10-B Rev.6
(10)
Put the Joint #3 motor unit back in the
arm.
3-M4×18
+Washer
Joint #3
Motor Unit
(11)
Pass the brake cable and special power
supply through the Z belt.
Set the Z belt around the Z1 pulley and
Z2 pulley, with the gear grooves of the
belt fitting into grooves of the pulleys
completely.
(12)
Loosely secure the Joint #3 motor unit to Arm #2.
Make sure
the motor unit can be moved by hand, and it will not tilt when pulled. If
the unit is
secured too loose or too tight, the belt will not have the proper tension.
(13)
Apply the proper tension to the Z belt and secure
the Joint #3 motor unit.
Install
the tensioner in front of the Joint #3 motor
unit
. Rotate the hexagonal bolt of the tensioner
and push
the plate to apply the specified tension.
For details, refer to
Maintenance 7.2 Replacing
the
Timing Belt.
Z belt tension:
69 N (7.0 ± 0.5 kgf)
Nut
Plate
Bolt
Tensioner
(13)-1 Loosen the nut and turn the bolt. Push in the Joint #3 motor unit.
(13)-2 After fixing the Joint #3 motor unit, turn the bolt to leave from the plate.
(13)-3 Check the tension using the sonic tension meter.
For details, refer to Maintenance 7.4 Checking the Timing Belt Tension.
(13)-4 Repeat the steps (13)-1 through (13)-3 until you get appropriate tension.
(13)-5 After the adjustment, put the bolt back to its original position and fix it with
the nut.
To
check belt tension with the tension meter, refer to Maintenance: 7
.4 Checking the
Timing Belt Tension
(Z Belt).
(14)
Remove the control board
and the plate.
For details, refer to
Maintenance: 11.3 Replacing the Control Board.
(15)
Connect the following connectors.
Connectors: BR4, X32, X43, X44, X51, X231, X241
(16)
Mount the User Plate.
For details, refer to
Maintenance: 3.5 User Plate.
NOTE
NOTE

Maintenance 8. Joint #4
LS10-B Rev.6 127
(17)
Bind
the cables with a wire tie in their original positions
as before removed in the
removal step (7).
Do not allow unnecessary strain
on the cables.
(18)
Remove the
Arm Top Cover.
For details, refer to
Maintenance: 3.1 Arm Top Cover.
(19)
Check if the Joint #
4 moves in a Jog motion by operating from EPSON RC+ menu
-
[Tools]
-[Robot Manager]-[Jog & Teach].
If the Manipulator oscillates with
MOTOR ON and the following errors are detected,
Error 5041: Motor torque output failure in low power state.
Error 4241: Over speed during low power mode was detected.
or when the joint other than Joint #
4
moves, the connector for other joint might be
connected to the Joint #
4 motor. Check the connector connection.
(
20)
Execute the calibration for Joint #3.
For details on the
calibration method, refer to Maintenance: 13. Calibration.
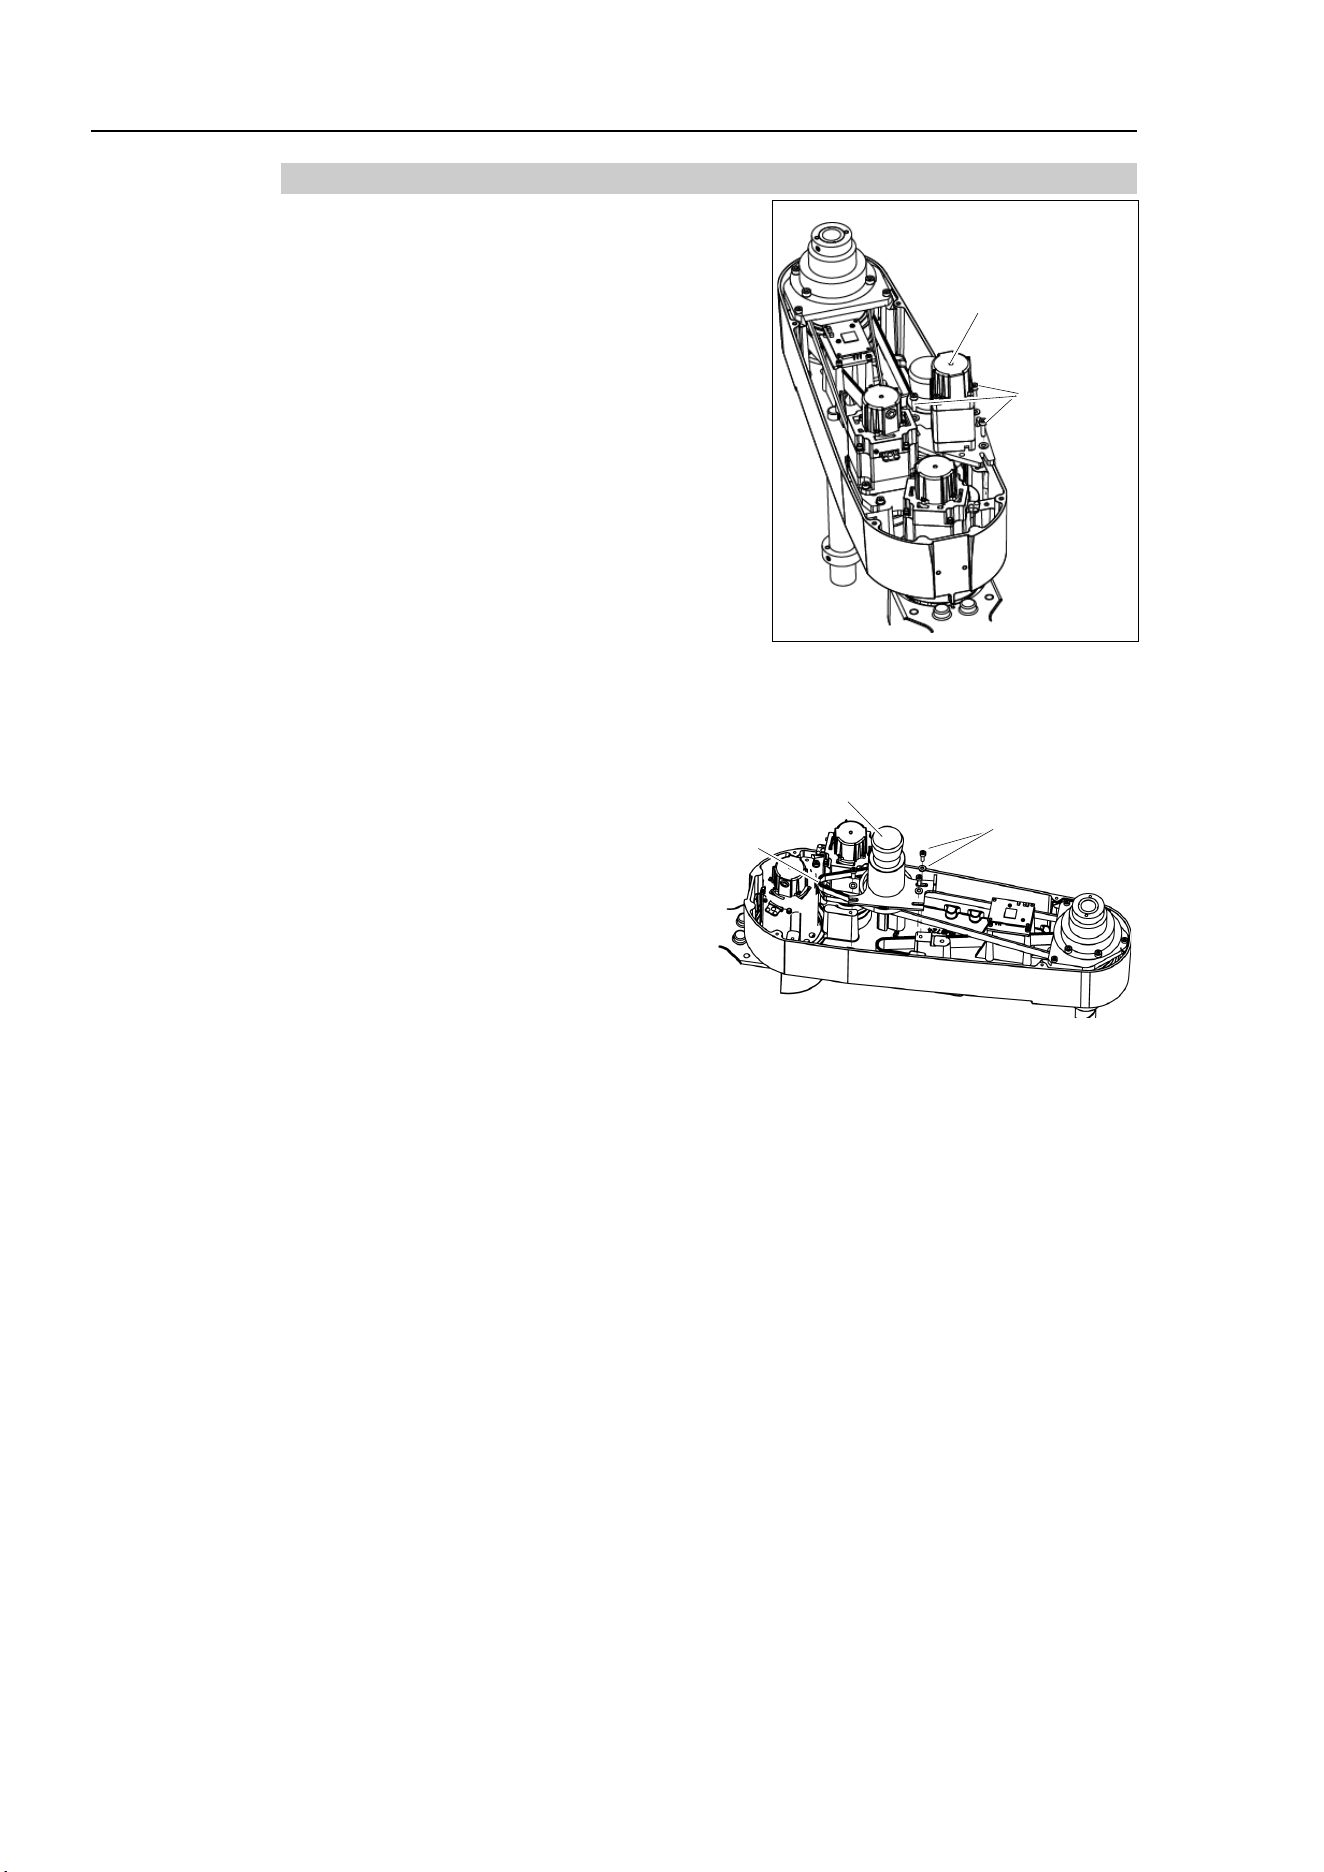
Maintenance 8. Joint #4
128 LS10-B Rev.6
8.2.2 U1 Belt
U1 belt
Removal
(1)
Remove the Joint #4 motor
unit.
Follow the removal
steps in Maintenance:
8.2.1 U2 Belt
.
Joint #4
Motor Unit
3-M4×15
+Washer
(2)
Remove the J
oint #4 intermediate shaft unit.
Refer to the removal steps in Maintenance: 8.2.1 U2 Belt.
Joint #4
Intermediate Shaft Unit
3-M4×12
+Washer
U1 belt
(3)
Remove the U1 belt.
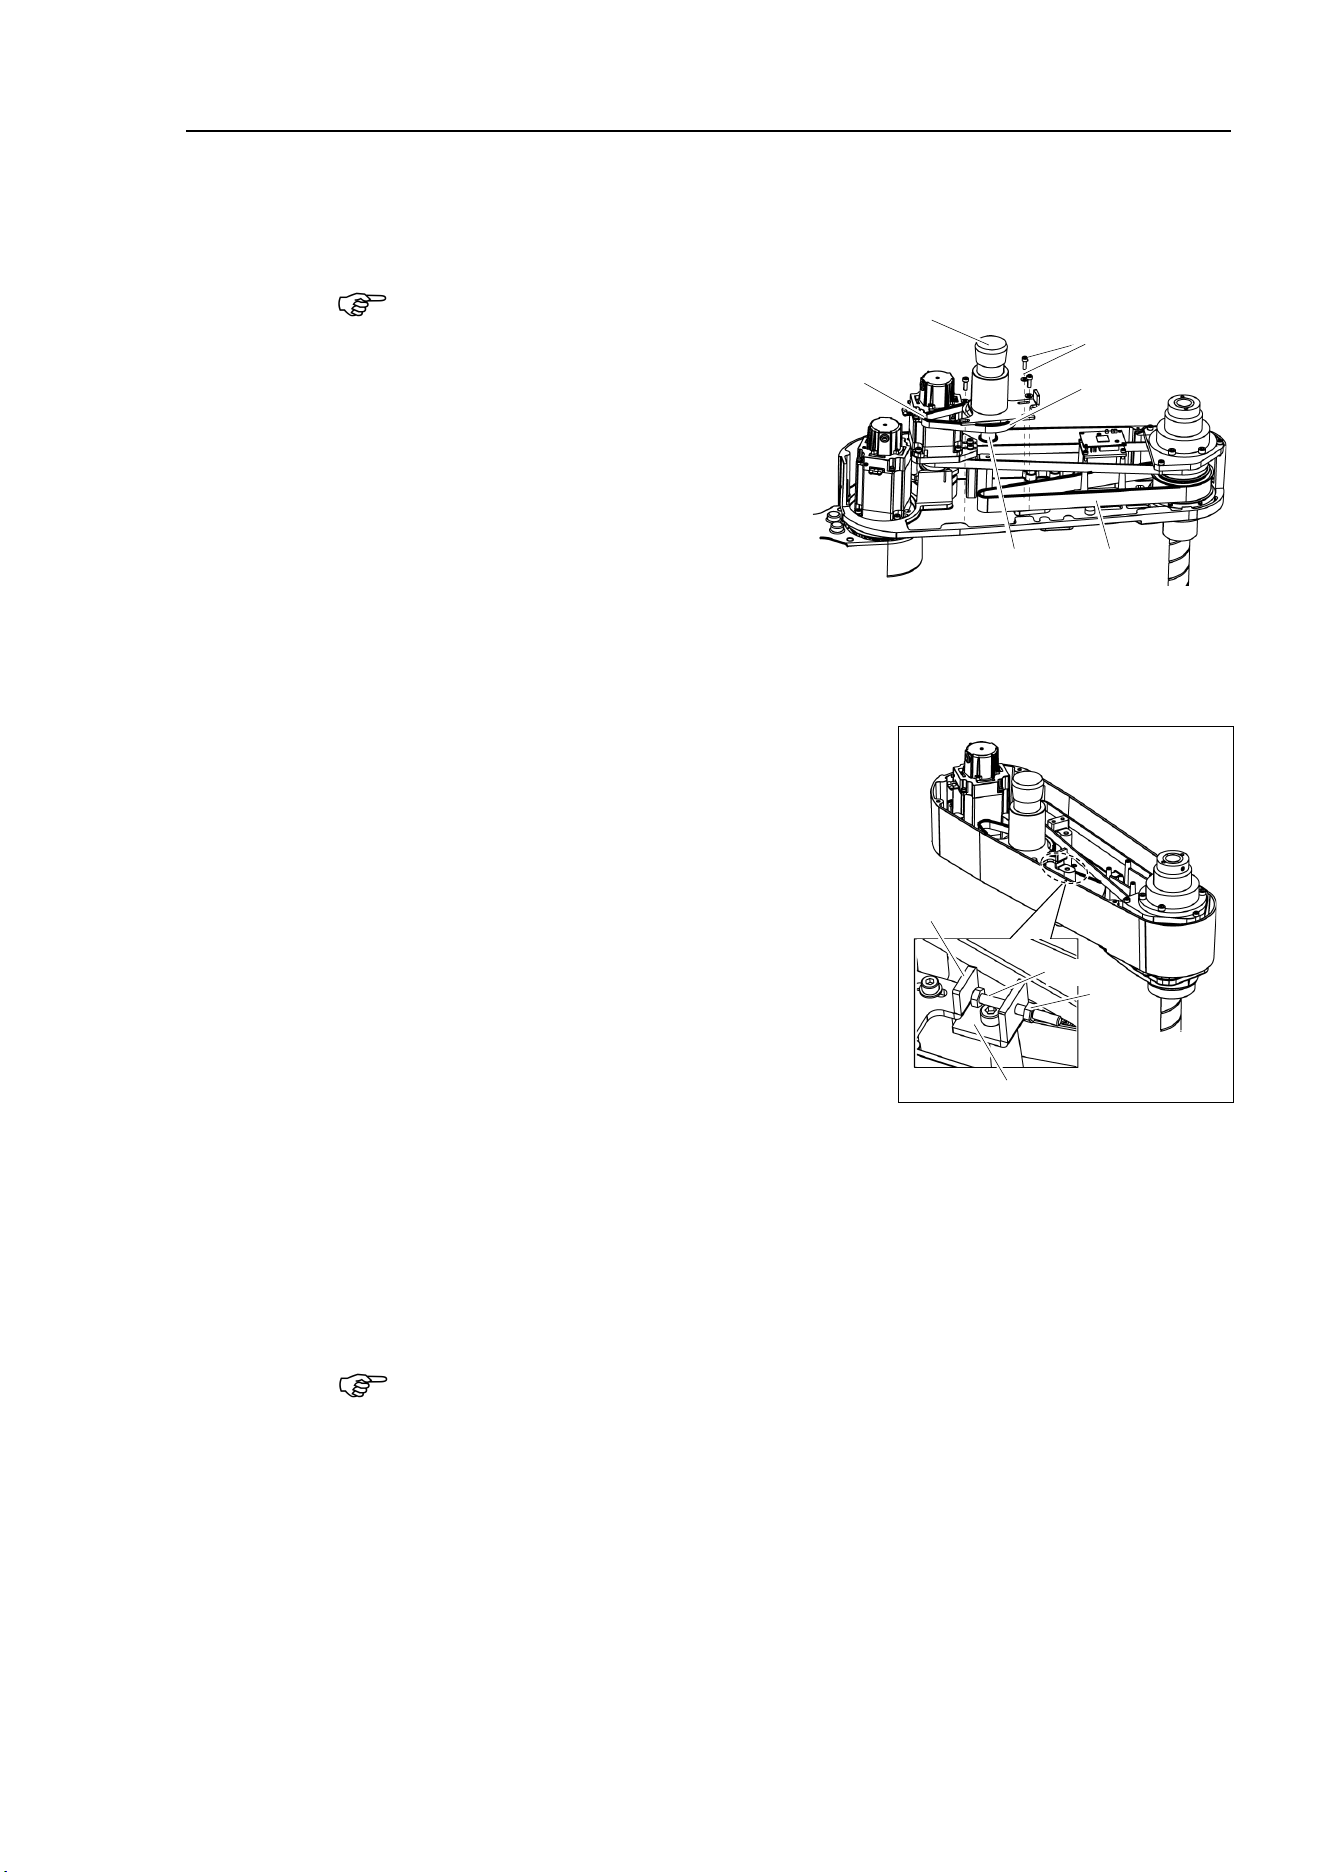
Maintenance 8. Joint #4
LS10-B Rev.6 129
U1 belt
Installation
(1)
Keeping the U1 belt on the large pulley of the Joint #4 intermediate shaft unit, set the
U2 belt in the Arm #2 on the small pulley and put them on the Arm
#2 upper surface.
Make sure the gear grooves of the belts are fit into those of the pulleys completely.
Joint #4
Intermediate Shaft Unit
3-M4×12
+Washer
U1 belt
U2 belt
Pulley (Large)
Pulley (Small)
(2)
Loosely secure the Joint #4
intermediate shaft unit.
Make sure the motor unit can be moved by hand, and it will not tilt when pulled.
If the unit is secured too loose or
too tight, the belt will not have the proper tension.
(3)
Apply the proper tension to the U2 belt, and
then secure the Joint #4 intermediate shaft unit.
Install
the tensioner in front of the Joint #4 motor
unit
. Rotate the hexagonal bolt of the tensioner
and push
the plate to apply the specified tension.
U2 belt tension: 102 N (10.4 ± 0.5 kgf)
(3)-1 Loosen the nut and turn the bolt. Push in the Joint #3 motor unit.
(3)-2 After fixing the Joint #3 motor unit, turn the bolt to leave from the plate.
(3)-3 Check the tension using the sonic tension meter.
For details, refer to Maintenance 7.4 Checking the Timing Belt Tension.
(3)-4 Repeat the steps (3)-1 through (3)-3 until you get appropriate tension.
(3)-5 After the adjustment, put the bolt back to its original position and fix it with
the nut.
To
check belt tension with the tension meter, refer to Maintenance: 8.4 Checking the
Timing Belt Tension
(U1, U2 Belts).
Nut
Plate
ボルト
Tensioner
Bolt
NOTE
NOTE
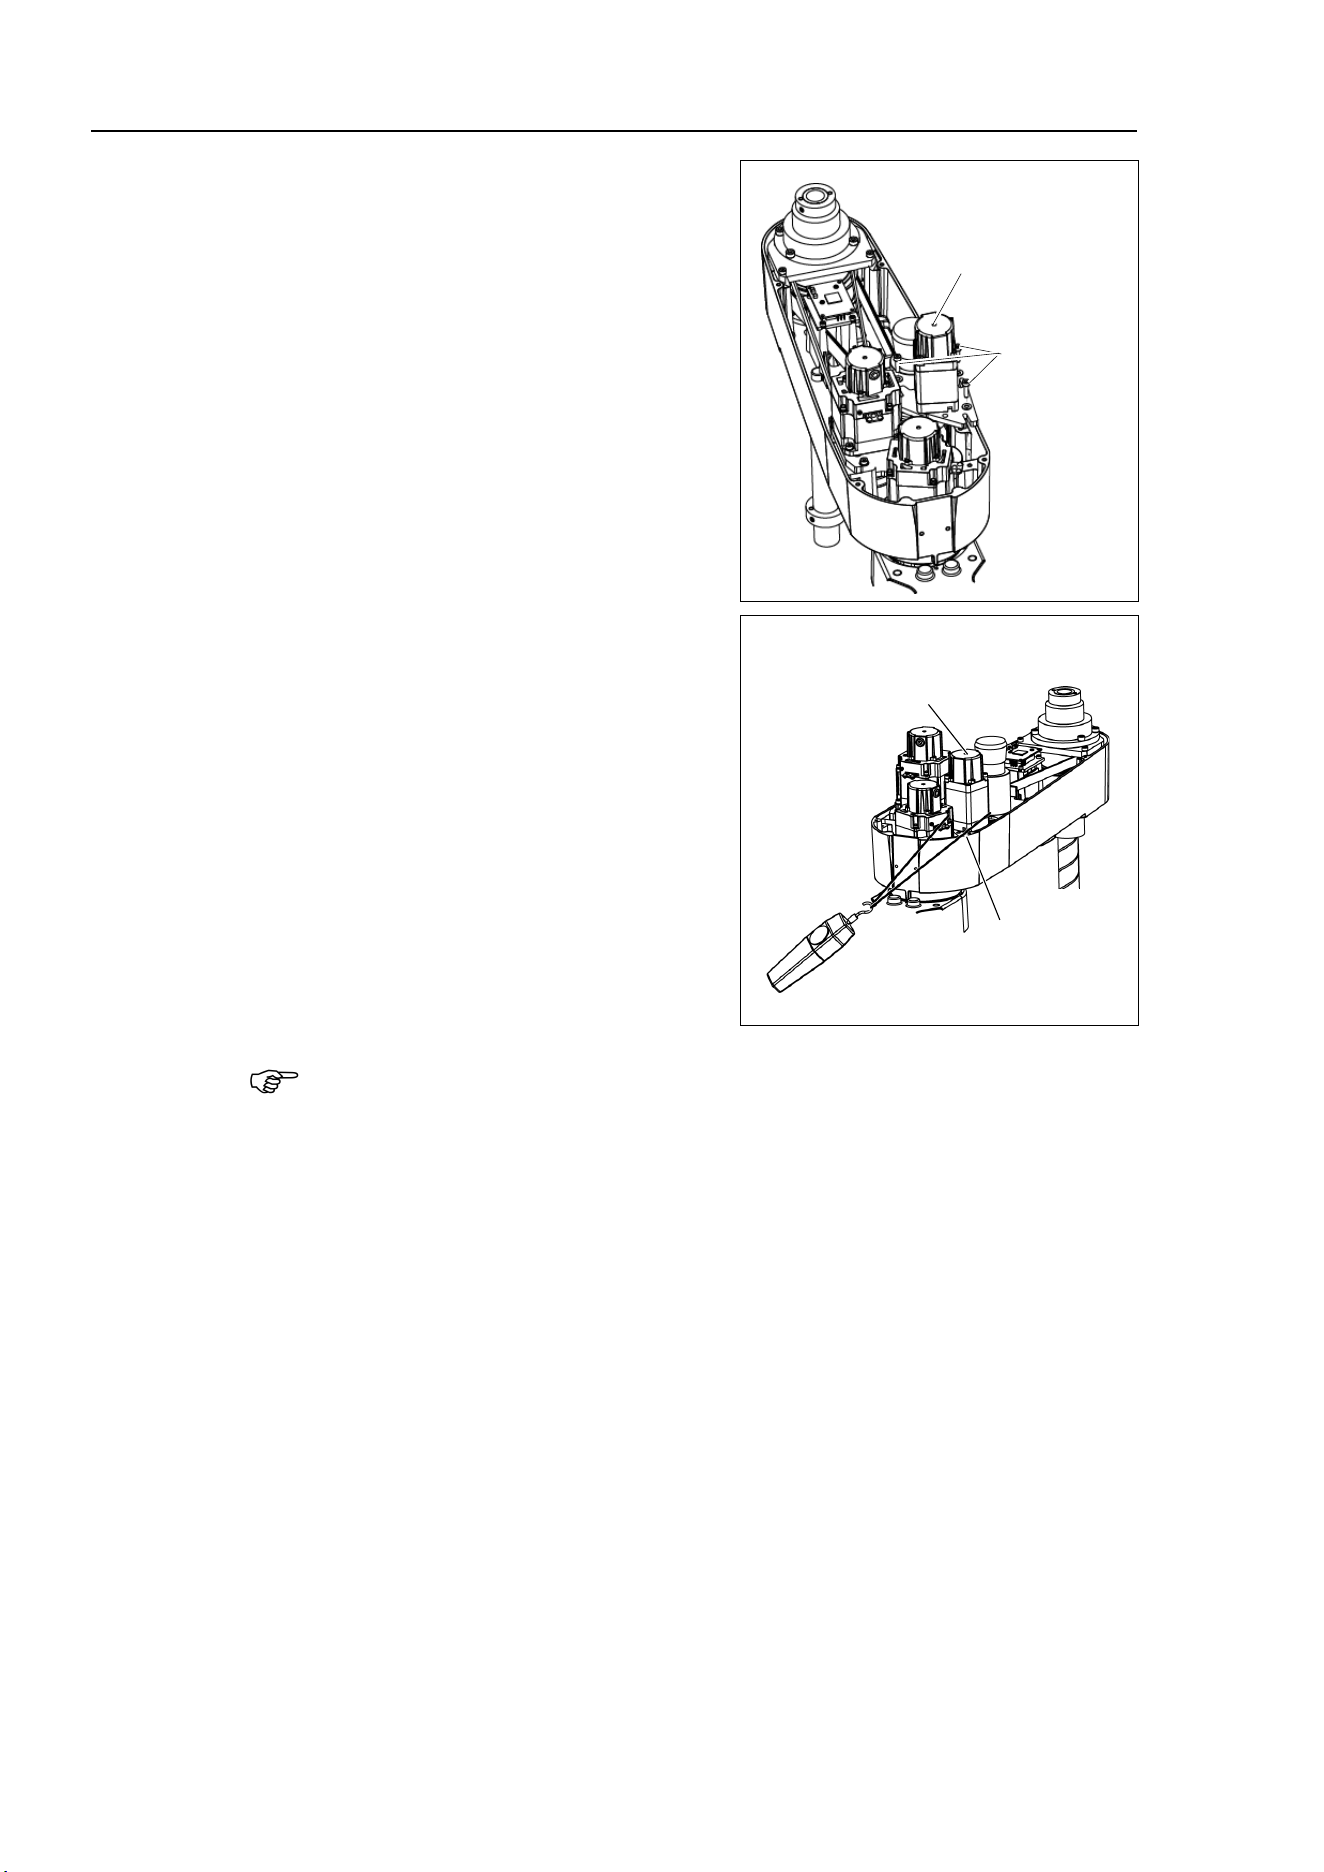
Maintenance 8. Joint #4
130 LS10-B Rev.6
(4)
Loosely secure the Joint #4
motor unit to
Arm #2
.
Make
sure the motor unit can be moved by
hand, and it will not tilt when pulled.
If the unit is secured too loose or too tight,
the belt will not have the proper tension.
Joint #4
Motor Unit
3-M4×12
+Washer
(5)
Apply the proper tension to the U1 belt,
and
then secure the Joint #4 intermediate
shaft unit.
P
ass a suitable cord or string around the
Joint #
4 motor unit near its mounting
plate.
Then, pull the cord using a force
gauge or similar tool to apply the
specified
tension shown in the figure on
the right.
U1 axial tension (pulling force):
114 N (11.6 ± 0.5 kgf)
U1 belt tension
58 N (5.9 ± 0.5 kgf)
3-M4×15
+ Washer
Force
Gauge
Joint #4
Motor Unit
To
check belt tension with the tension meter, refer to Maintenance: 8.4 Checking the
Timing Belt Tension
(U1, U2 Belts).
(6)
Connect the connector
s.
Connectors: BR4, X241, X44
(
7)
Bind
the cables with a wire tie in their original position as before removed in the
removal
step (5).
(8
)
Remove the User Plate.
For details, refer to
Maintenance: 3.5 User Plate.
(9
)
Install the
Arm Top Cover.
For details,
refer to Maintenance: 3.1 Arm Top Cover.
NOTE

Maintenance 8. Joint #4
LS10-B Rev.6 131
(10)
Check if
the Joint #4 moves in a Jog motion by operating from EPSON RC+ menu
-
[Tools]
-[Robot Manager]-[Jog & Teach].
If the Manipulator oscillates with
MOTOR ON and the following errors are detected,
Error 5041: Motor torque output failure in low power state.
Error 4241: Over speed during low power mode was detected.
or when the joint other than Joint #
4
moves, the connector for other joint might be
connected to the Joint #
4 motor. Check the connector connection.
(1
1)
Execute the calibration of Joint #4.
For details, refer to
Maintenance: 13. Calibration.
Maintenance 8. Joint #4
132 LS10-B Rev.6
8.3 Replacing the Brake
Name
Qty.
Note
Maintenance
parts
Electromagnetic brake 1 1750573
Tools
Hexagonal
wrench
width across flats: 1.5 mm
1
For M3 set screw
width across flats: 2 mm
1
For M2.5 screw
Nippers
1
For cutting wire tie
Material
Wire tie
1
A brake is mounted on the motor of Joints #3 and #4 to prevent the shaft from moving down
and rotating due to the weight of the end effector while the power to the Controller is OFF
or while the motor is in OFF status (MOTOR OFF).
Move the shaft down to its lower limit before the replacement procedure following the
removal steps.
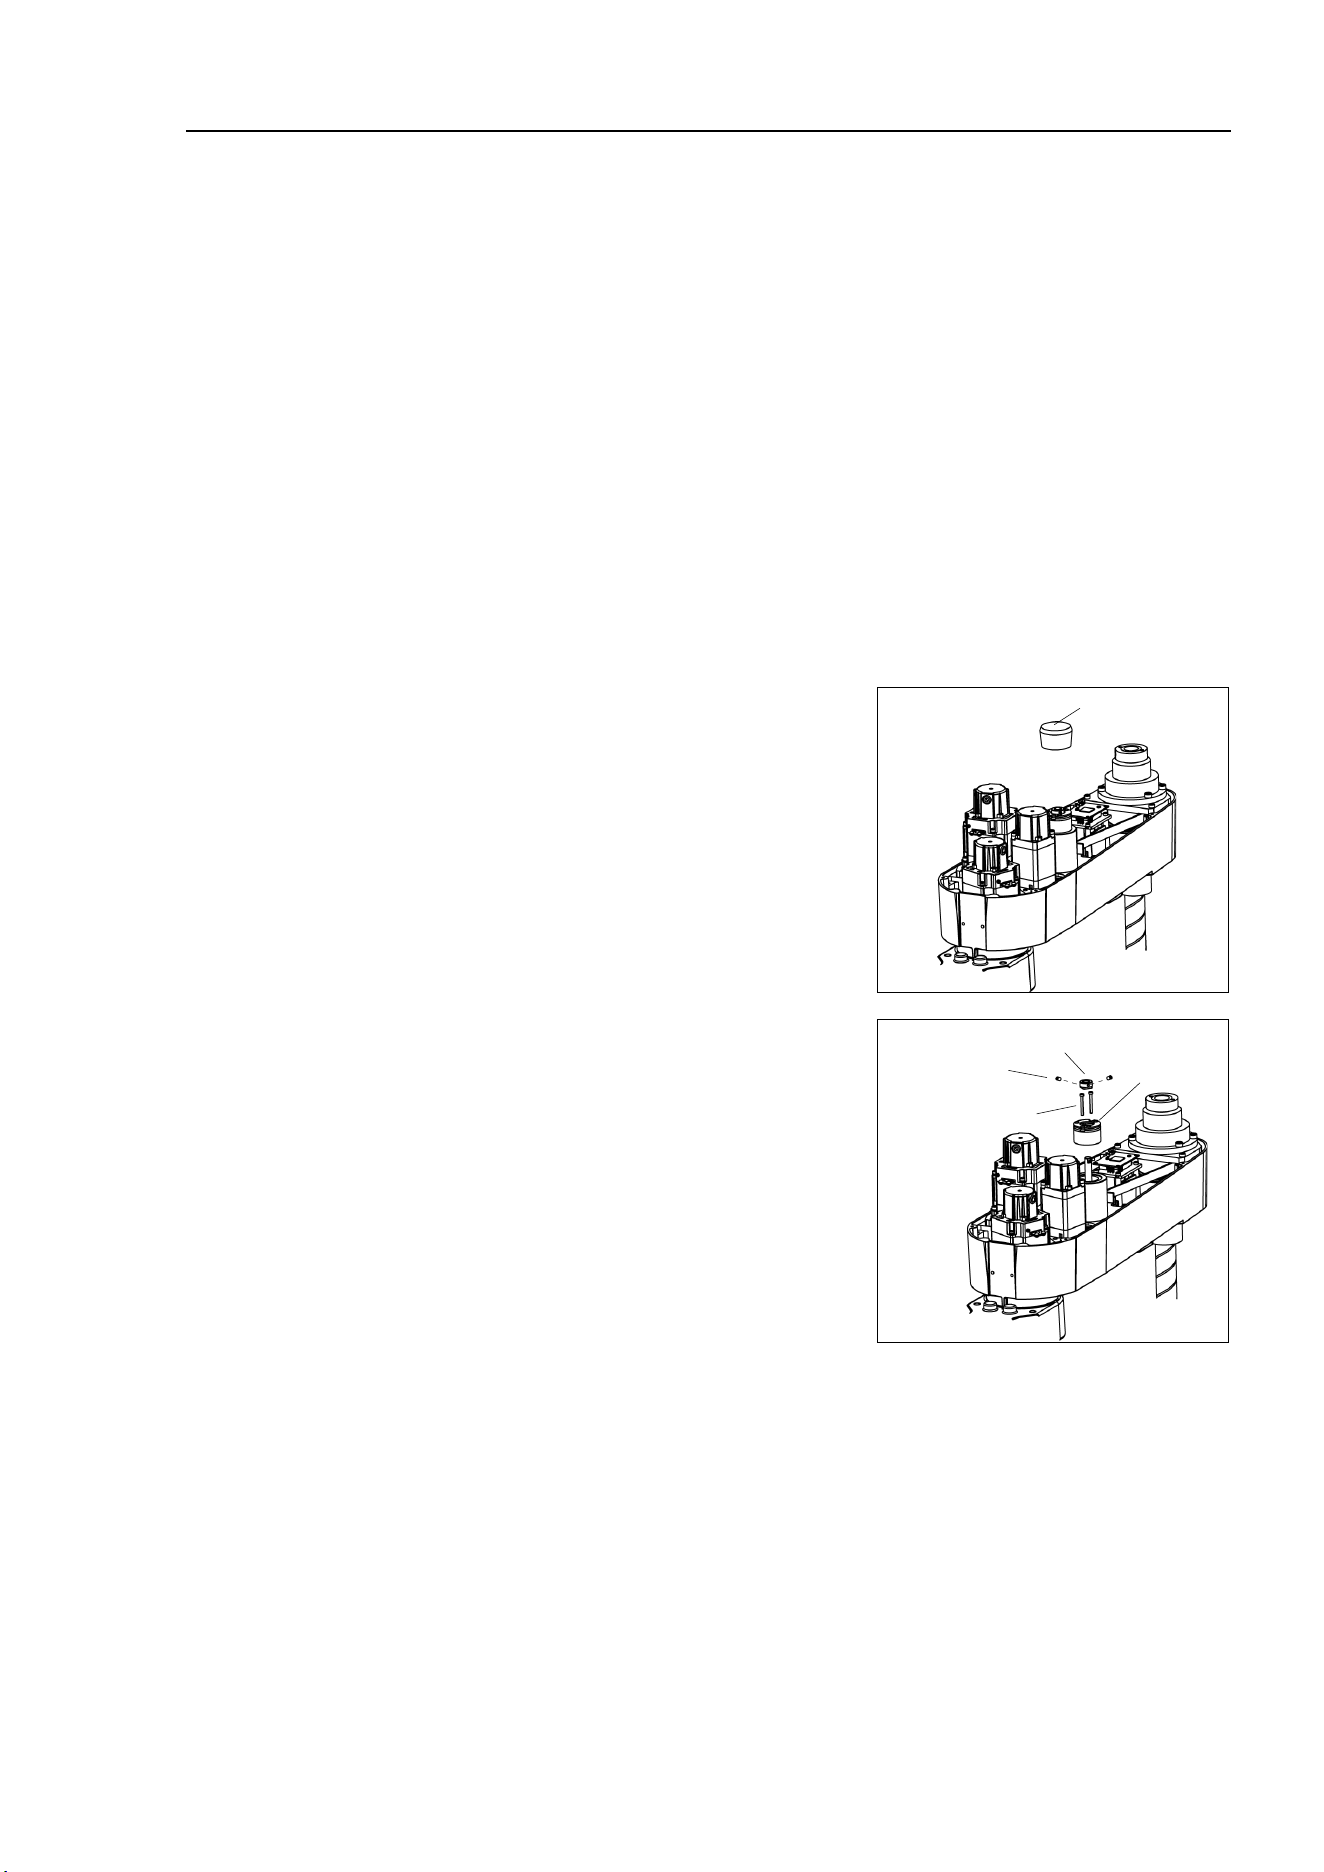
Maintenance 8. Joint #4
LS10-B Rev.6 133
Joint #4 brake
Removal
(
1)
Turn ON the Controller.
(2)
Push down the shaft to its lower limit while pressing the brake release switch. Be sure
to keep enough space and prevent the
end effector hitting any peripheral equipment.
The brake release switch is applied to both Joint #3 and #4. When the brake release
switch is pressed, the
respective
brake for Joints #3 and #4 are released simultaneously.
Be careful of the
shaft falling and rotating while the brake release switch is be
ing pressed
because
the shaft may be lowered by the weight of an end effector.
(3)
Turn OFF the Controller.
(4)
Remove the
Arm Top Cover.
For details, refer to
Maintenance: 3.1 Arm Top Cover.
(5)
Disconnect the connector
.
Connector BR4
(6)
Cut
off the wire tie banding brake cables.
(7)
Remove the rubber cap.
Rubber Cap
(8)
Remove the brake hub.
2-M2.5×25
Brake Hub
Brake
Set Screws :
M3×4+ Bushing
(9)
Remove the brake.
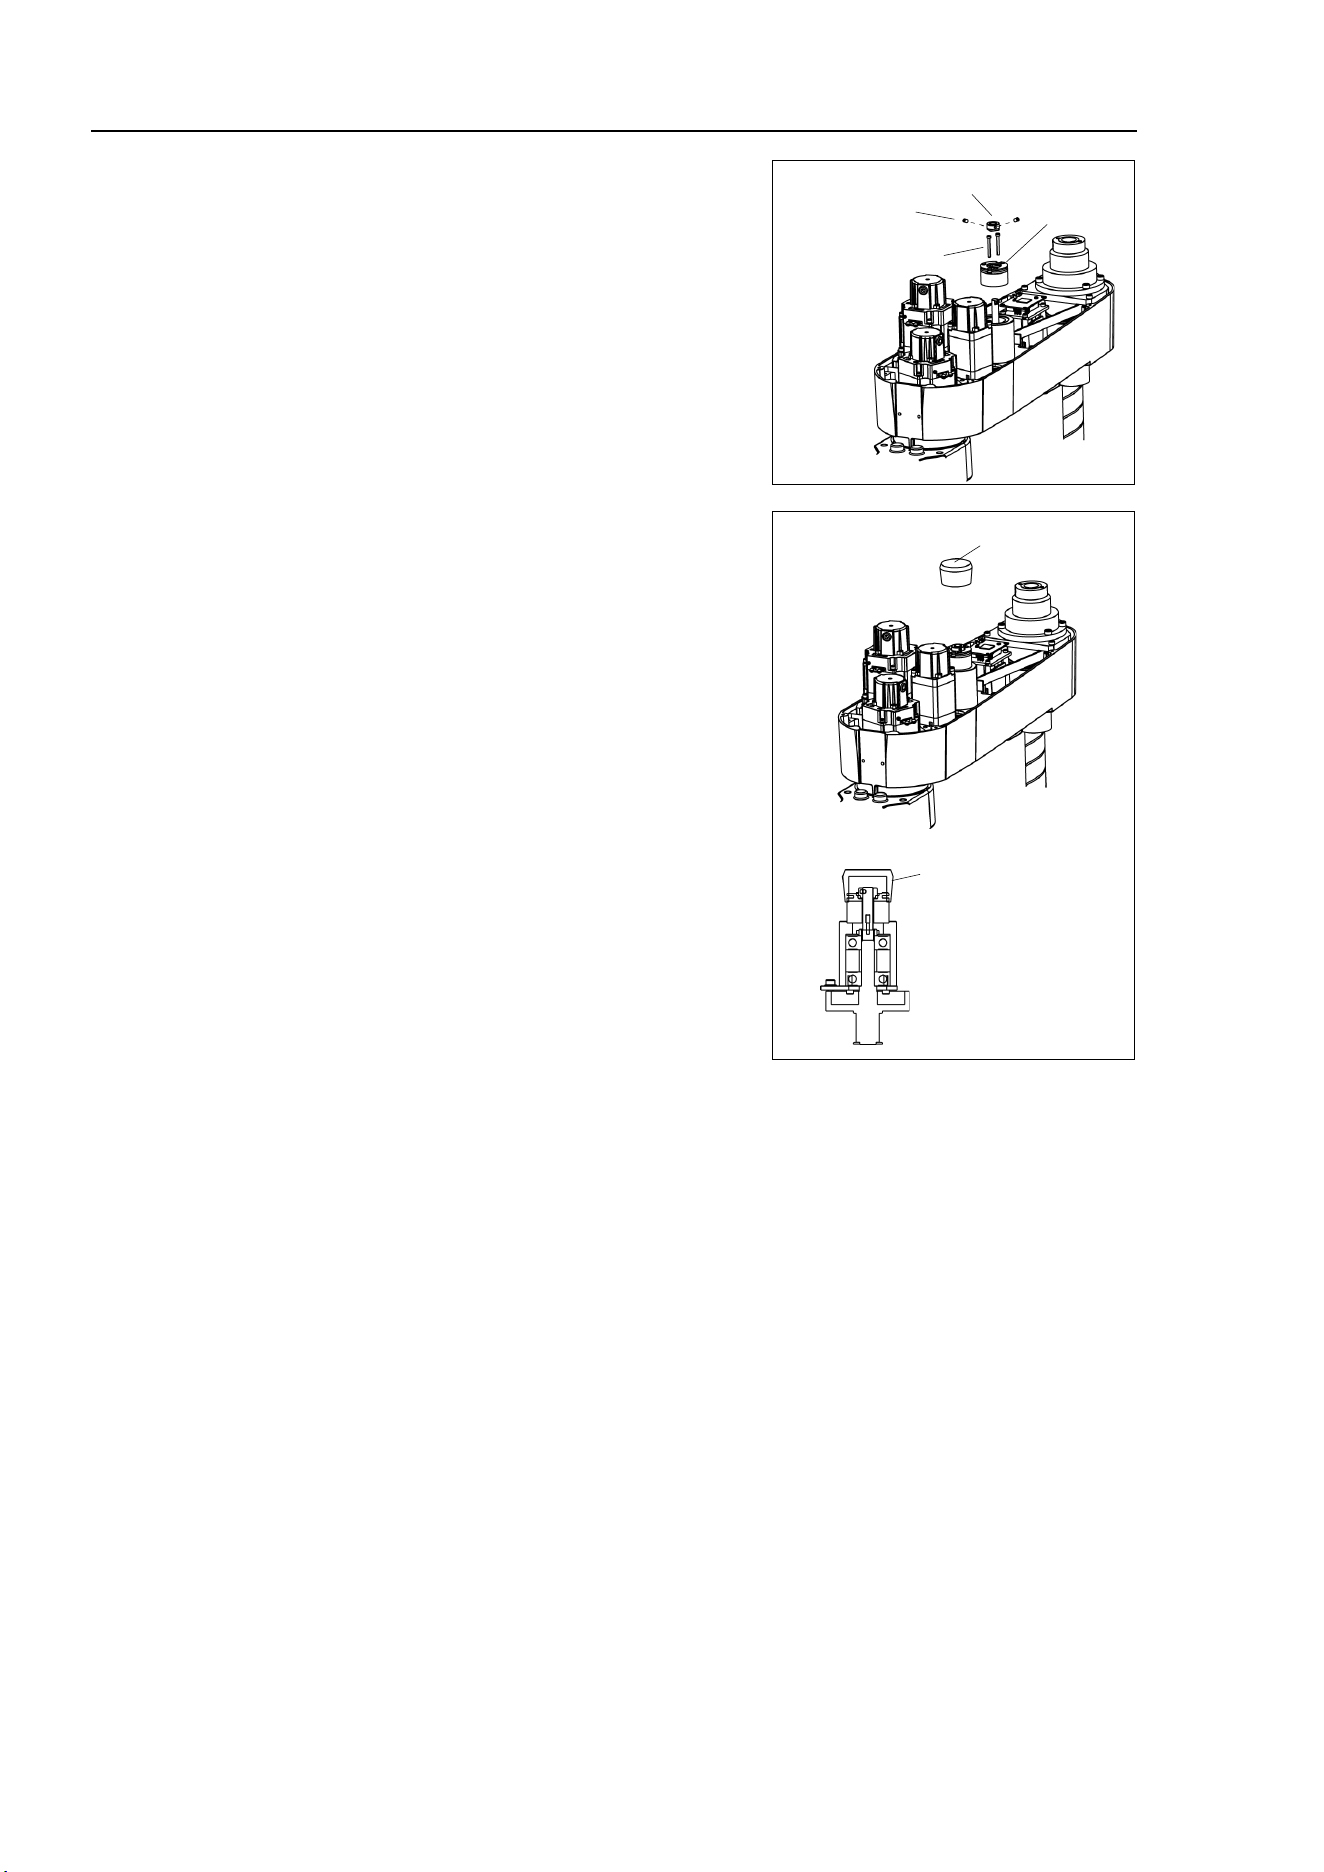
Maintenance 8. Joint #4
134 LS10-B Rev.6
Joint #4 brake
Installation
(1)
Mount the brake to the
Joint #4 intermediate
shaft unit.
2-M2.5×25
Brake Hub
Brake
Set Screws :
M3×4+ Bushing
(2)
Mount the brake hub to the Joint #4
intermediate shaft unit.
(3)
Mount the rubber cap.
Insert
the rubber cap until the cable part of
the
brake. If the cables get inside the
rubber cap, the cables may be disconnected
.
Rubber Cap
Rubber Cap
Rotator part
(Brake Hub)
(4)
Connect the connector
.
Connector: BR4
(5)
Re
-bundle the cables in their original positions with a wire tie removed in step (6).
Do not
allow unnecessary strain on the cables.
(6)
Install the
Arm Top Cover.
For details, refer to
Maintenance: 3.1 Arm Top Cover.
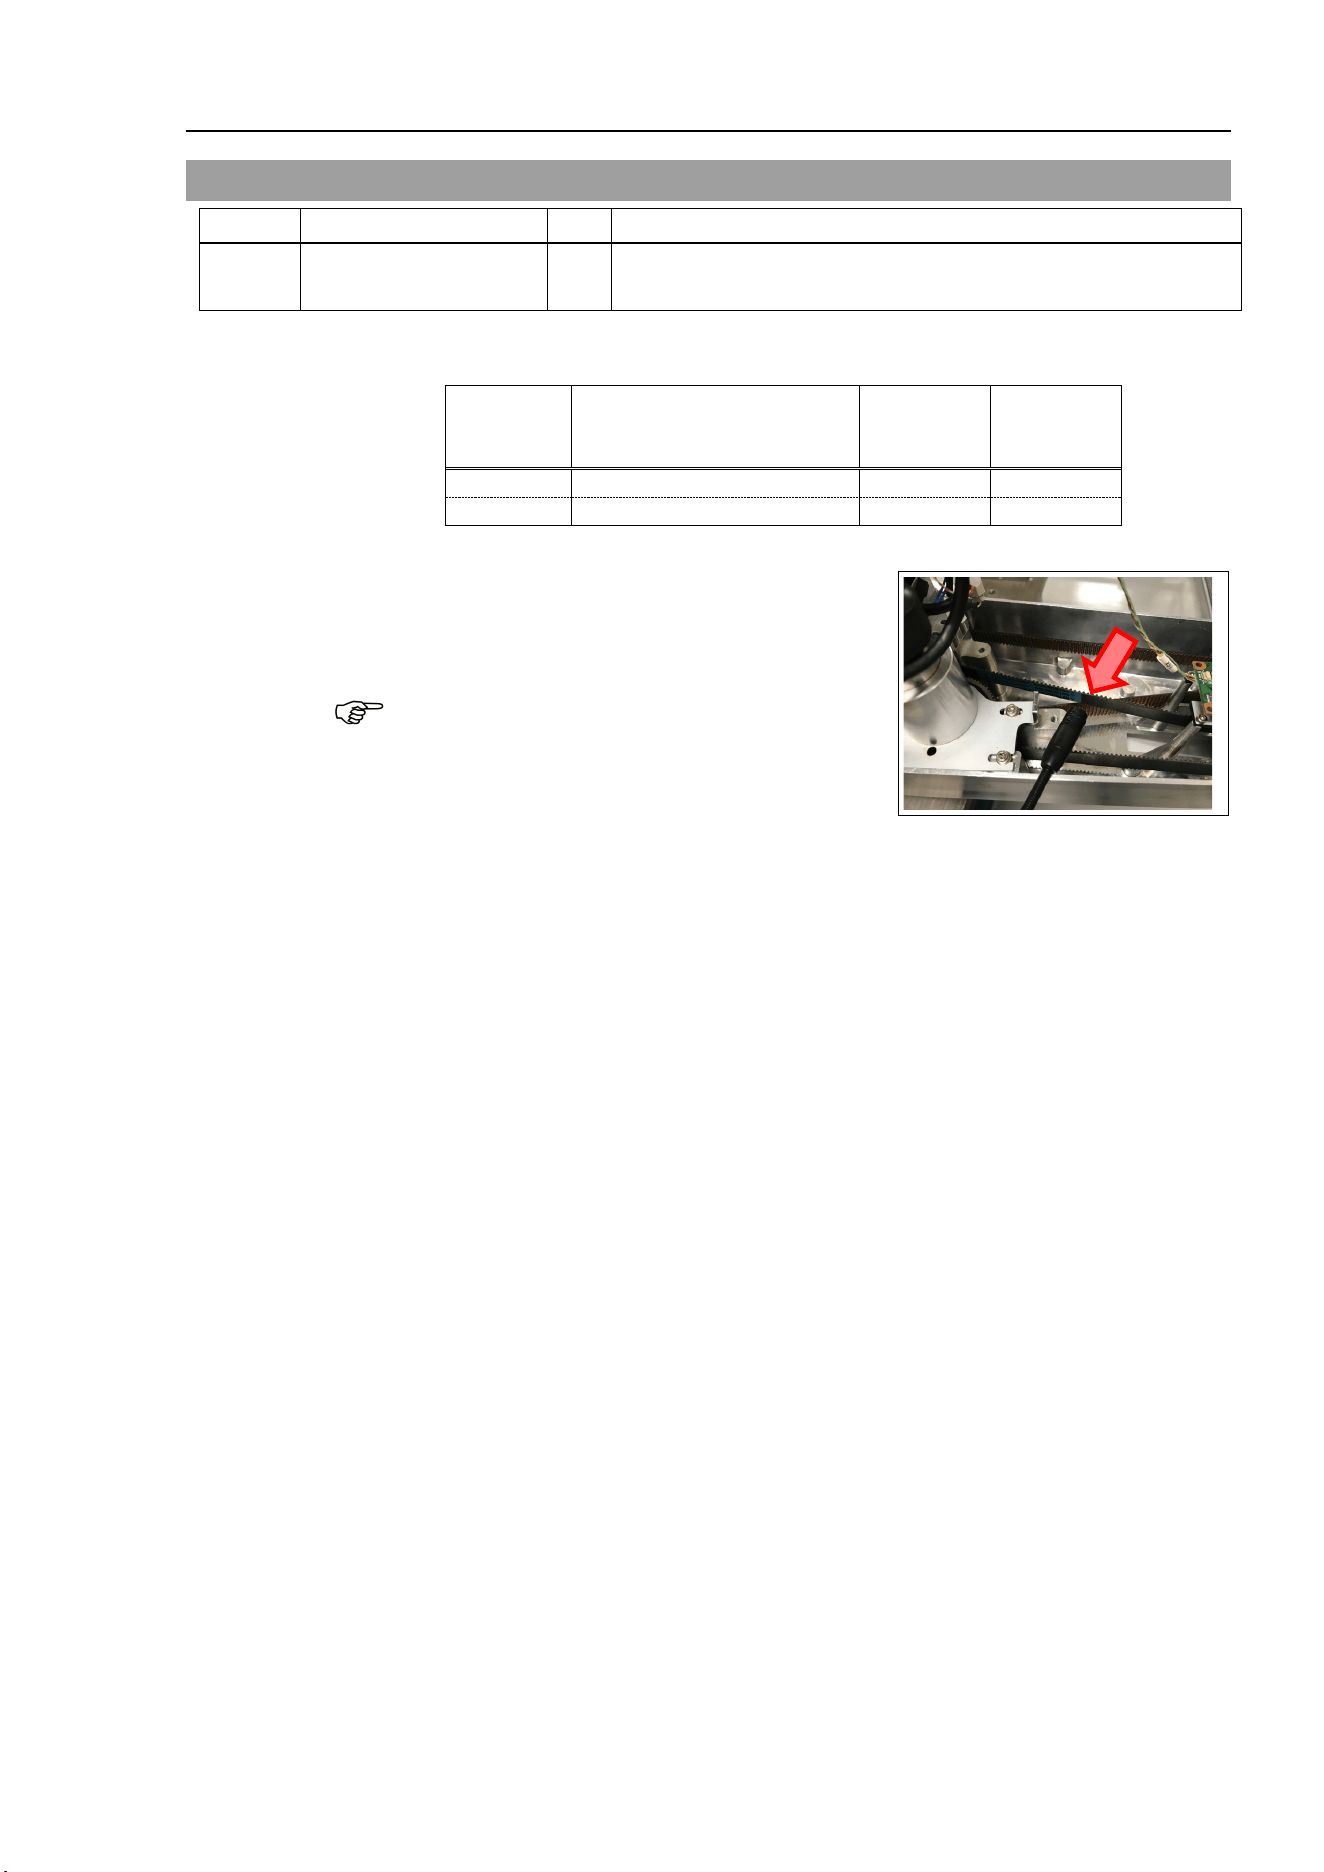
Maintenance 8. Joint #4
LS10-B Rev.6 135
8.4 Checking the Timing Belt Tension (U1, U2 Belts)
Name
Qty.
Note
Tool Sonic tension meter 1
Fo
r details of usage and measurement methods of the tension
meter, refer to the instruction manual of the tension meter.
Joint #4
Belt tension
check
(1)
Enter appropriate setting values to the sonic tension meter.
Belt
Unit mass M
[g/ (1 mm width ×1 m
length)]
Width W
[mm]
Span S
[mm]
U1 belt
2.5
10
70
U2 belt
2.5
21
250
(2)
Strum the belt and measure tension.
Measurement failure may occur if the microphone
touches the belt during measurement.
NOTE
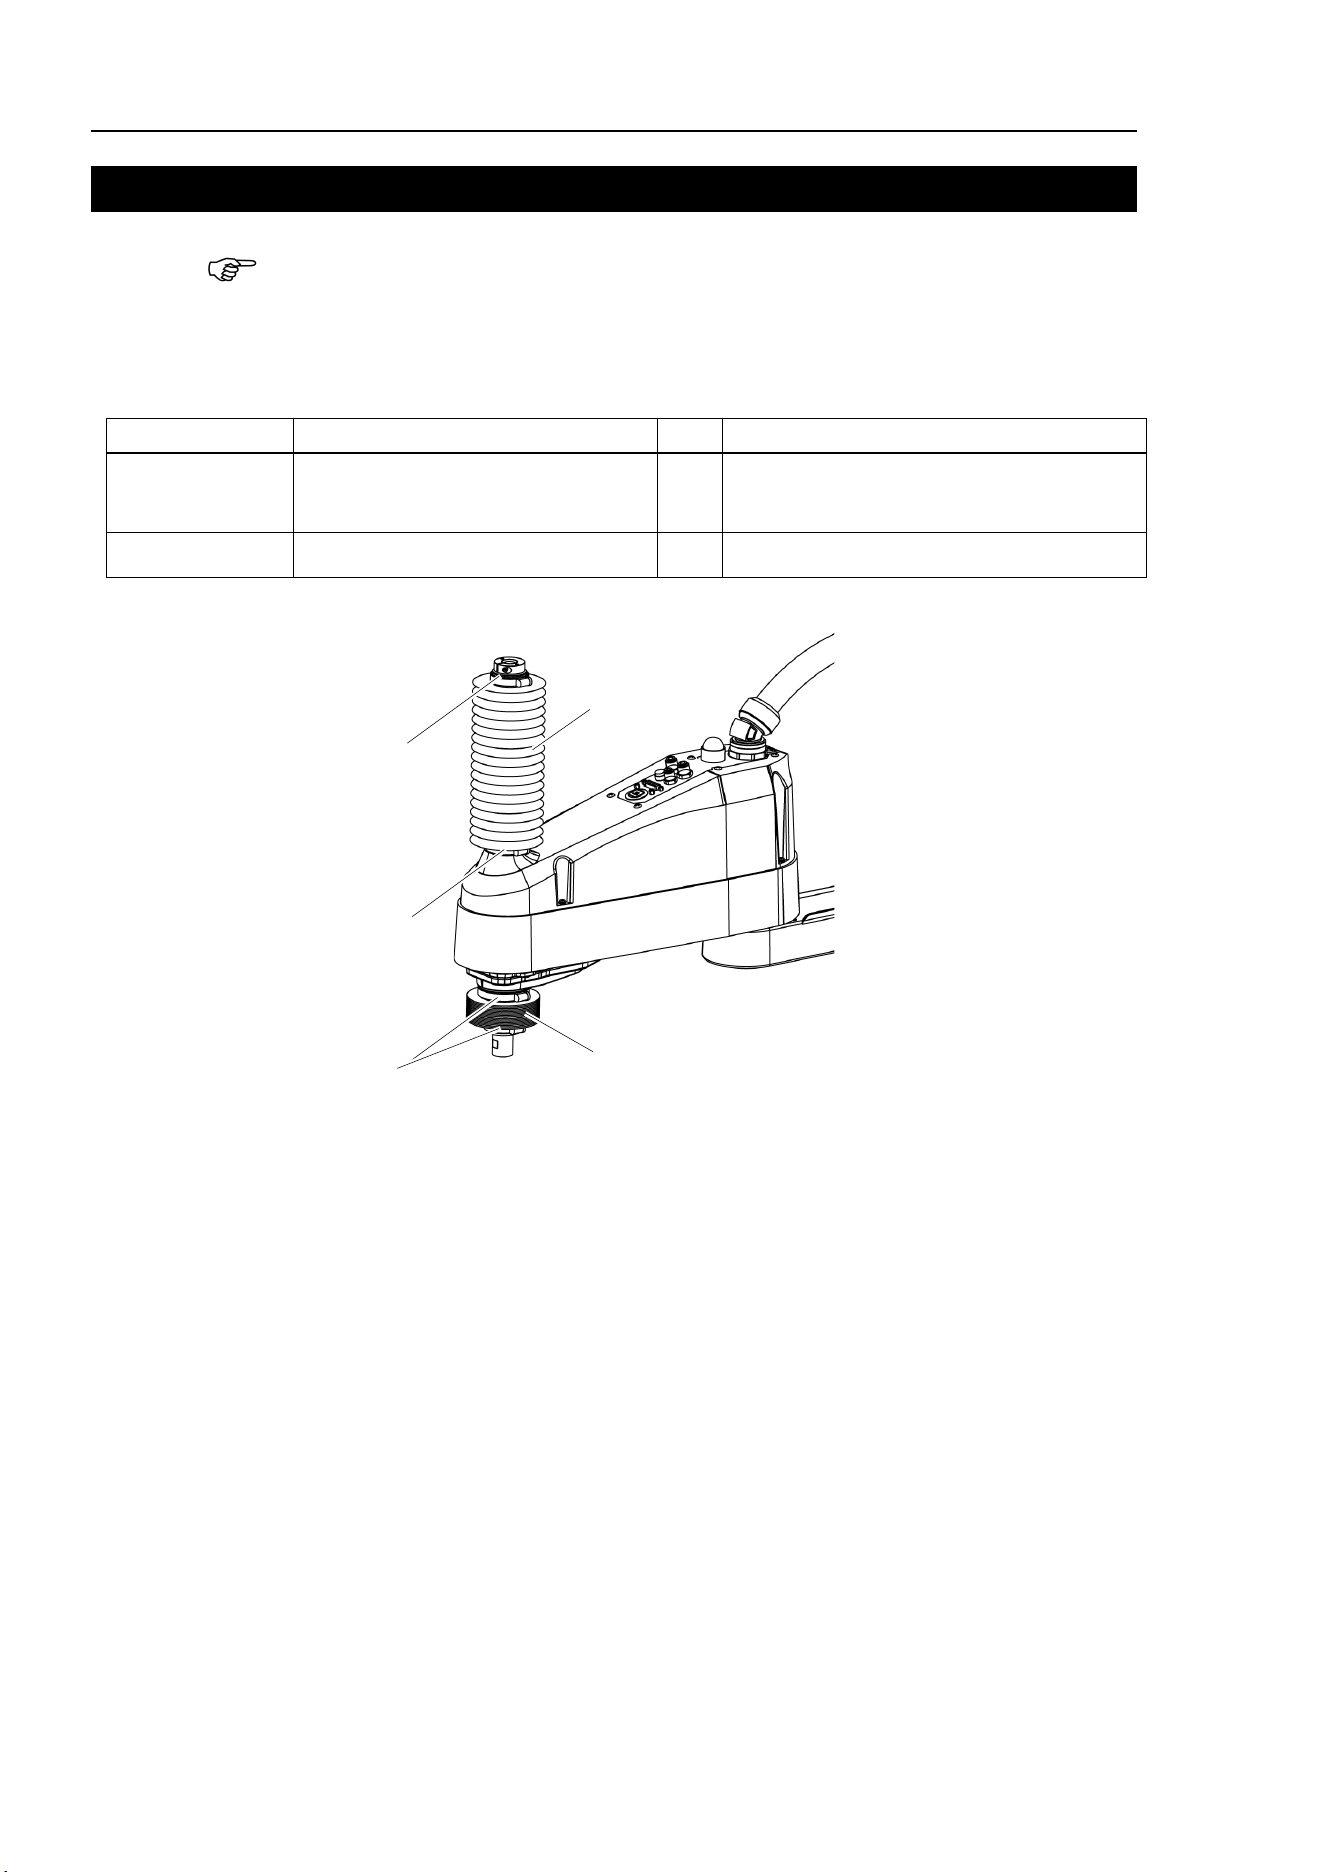
Maintenance 9. Bellows
136 LS10-B Rev.6
9. Bellows
The bellows for LS10-B***C are provided in a unit of two pieces. The shape varies
between the upper and lower bellows.
A large amount of dust is emitted when replacing the bellows.
Take the Manipulator to an outer room such as the room in front of the clean room’s entrance,
or take the necessary countermeasures to prevent dust emission before replacing the bellows.
Name
Qty.
Note
Maintenance
parts
Bellows 1
170 mm: 1765523
270 mm: 1765524
Tools
Cross-point screwdriver 1 For clamp band removal
Bellows
Bellows
Clamp band
Clamp band
Clamp band
Bellows
Removal
(1)
Remove the
cables and tubes from the end effector.
(2)
Remove the end effector.
(3)
Turn ON the controller. Stop motor excitation. (MOTOR
OFF)
(4)
L
oosen the two clamp bands on the bellows.
(5)
Pull
out the bellows and clamp bands from the shaft.
NOTE
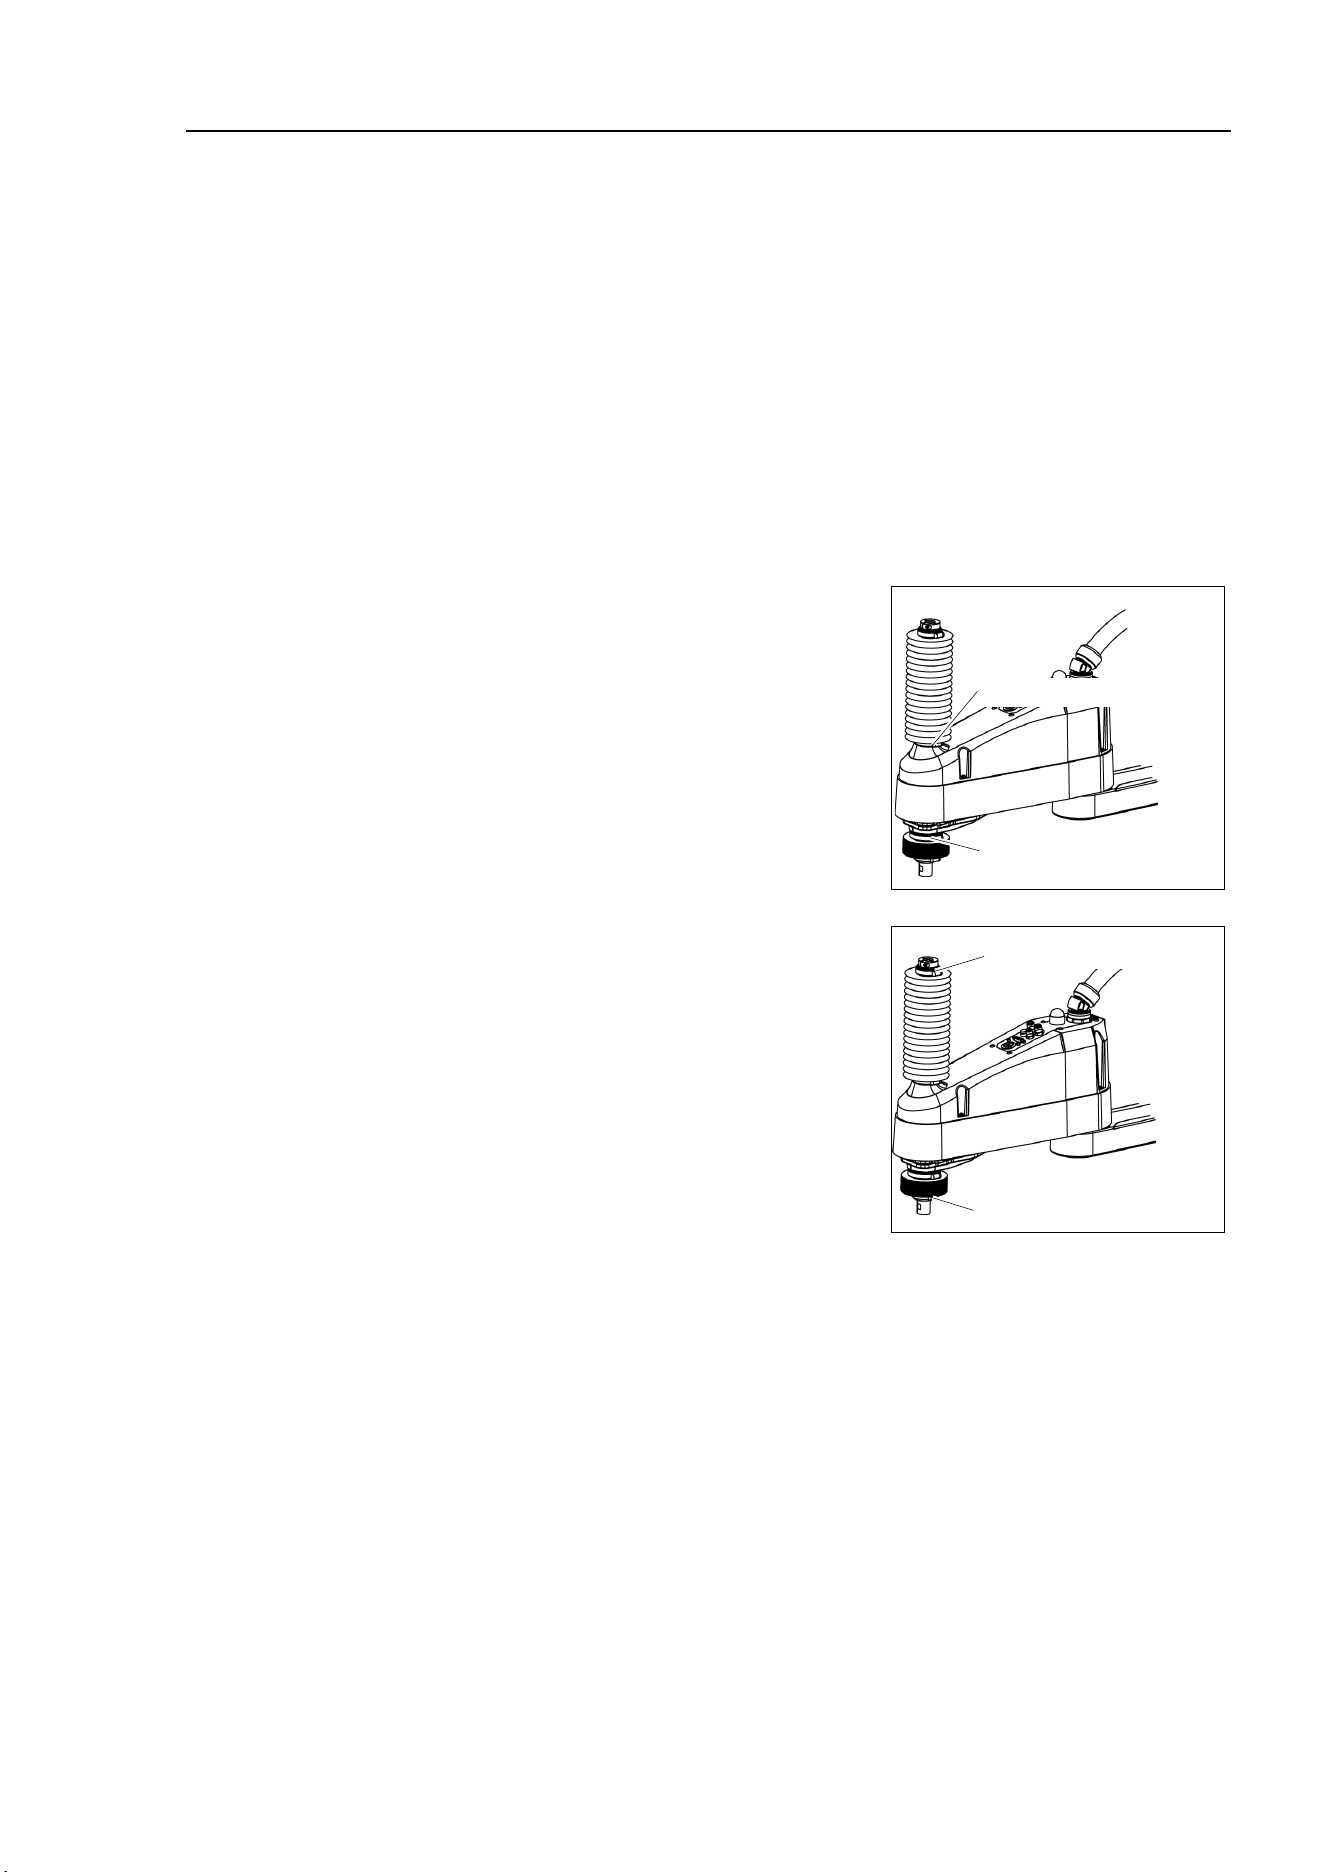
Maintenance 9. Bellows
LS10-B Rev.6 137
Bellows
Installation
(1)
To attach the upper
bellows, move the shaft to its lower limit.
To attach the lower bellows, move the shaft to
its upper limit.
To move the shaft up/down, press and hold the brake release switch.
Be sure to keep enough space and prevent the
end effector
hitting any peripheral
equipment.
The brake release switch is applied to both Joints #3 and Joint #4.
When
the brake release switch is pressed, the respective brakes of the Joint #3 and
Joint #4 are released simultaneously.
Be careful of the
shaft falling and rotating while the brake release switch is being
pressed
because the shaft may be lowered by the weight of an end effector.
(2)
Pass the shaft through the bellows
from the larger joint.
(3)
Secure the cover side of the bellows.
The bellows has two joints:
The larger joint must be attached to the cover
side.
The smaller joint must be attached to the
end
face side of the shaft.
Attach the mounting part of the bellows
until the
end touches the
cylindrical part of the cover.
Then, secure them with clamp bands.
Upper bellows cover side
Bottom bellows cover side
(4)
Secure the
shaft edge side of the bellows.
C
over the bearing case (black) on the edge of the
shaft with
the bellows mounting part.
Then, secure them with clamp bands.
Upper bellows shaft edge
Bottom bellows Shaft edge
(5)
When
completed the bellows installation, check that the bellows stretch
smoothly
without any excessive force
by moving the shaft up/down by hand and rotating
the
Joint #4.
(6)
Turn OFF the
Controller and peripheral equipment.
(7)
A
ttach the end effector.
(8)
C
onnect the cables and tubes to the end effector.
Maintenance 10. Ball Screw Spline Unit
138 LS10-B Rev.6
10. Ball Screw Spline Unit
WARNING
■
Do not connect or disconnect the motor connectors while the power to the robot
system is turned ON. Connecting or disconnecting the motor connectors
with
the power ON is extremely hazardous and may result
in serious bodily injury as
the Manipulator may mo
ve abnormally, and also may result in electric shock
and/or malfunction of the robot system.
■
To shut off power
to the robot system, disconnect the power plug from the power
source. Be sure to connect the AC power cable to a power receptacle.
DO NOT connect it directly to a factory power source.
■
Before performing any replacement procedure, turn OFF the Controller and
related equipment,
and then disconnect the power plug from the power source.
Performing any replacement procedure with the power ON is extremely hazardous
and may result in
electric shock and/or malfunction of the robot system.
After parts have been replaced (motors, reduction gear units, brakes, timing belts, ball screw
spline unit, etc.), the Manipulator cannot operate properly because a mismatch exists
between the origin stored in each motor and its corresponding origin stored in the Controller.
After replacing the parts, it is necessary to match these origins.
The process of aligning the two origins is called “Calibration”.
Refer to Maintenance: 13. Calibration to perform the calibration.
10.1 Greasing the Ball Screw Spline Unit
Name
Qty.
Note
Grease
For Ball Screw Spline Unit
(AFB grease)
Proper
quantity
Tools
Wiping cloth 1
For wiping grease
(Spline shaft)
Cross-point screwdriver 1
For clamp band removal
Only for Cleanroom-model
The brake release switch affects both Joints #3 and #4. When the brake release switch is
pressed in emergency mode, the brake for both Joints #3 and #4 are released simultaneously.
Be careful of the shaft falling and rotating while the brake release switch is pressed because the
shaft may be lowered by the weight of an end effector.
NOTE
NOTE
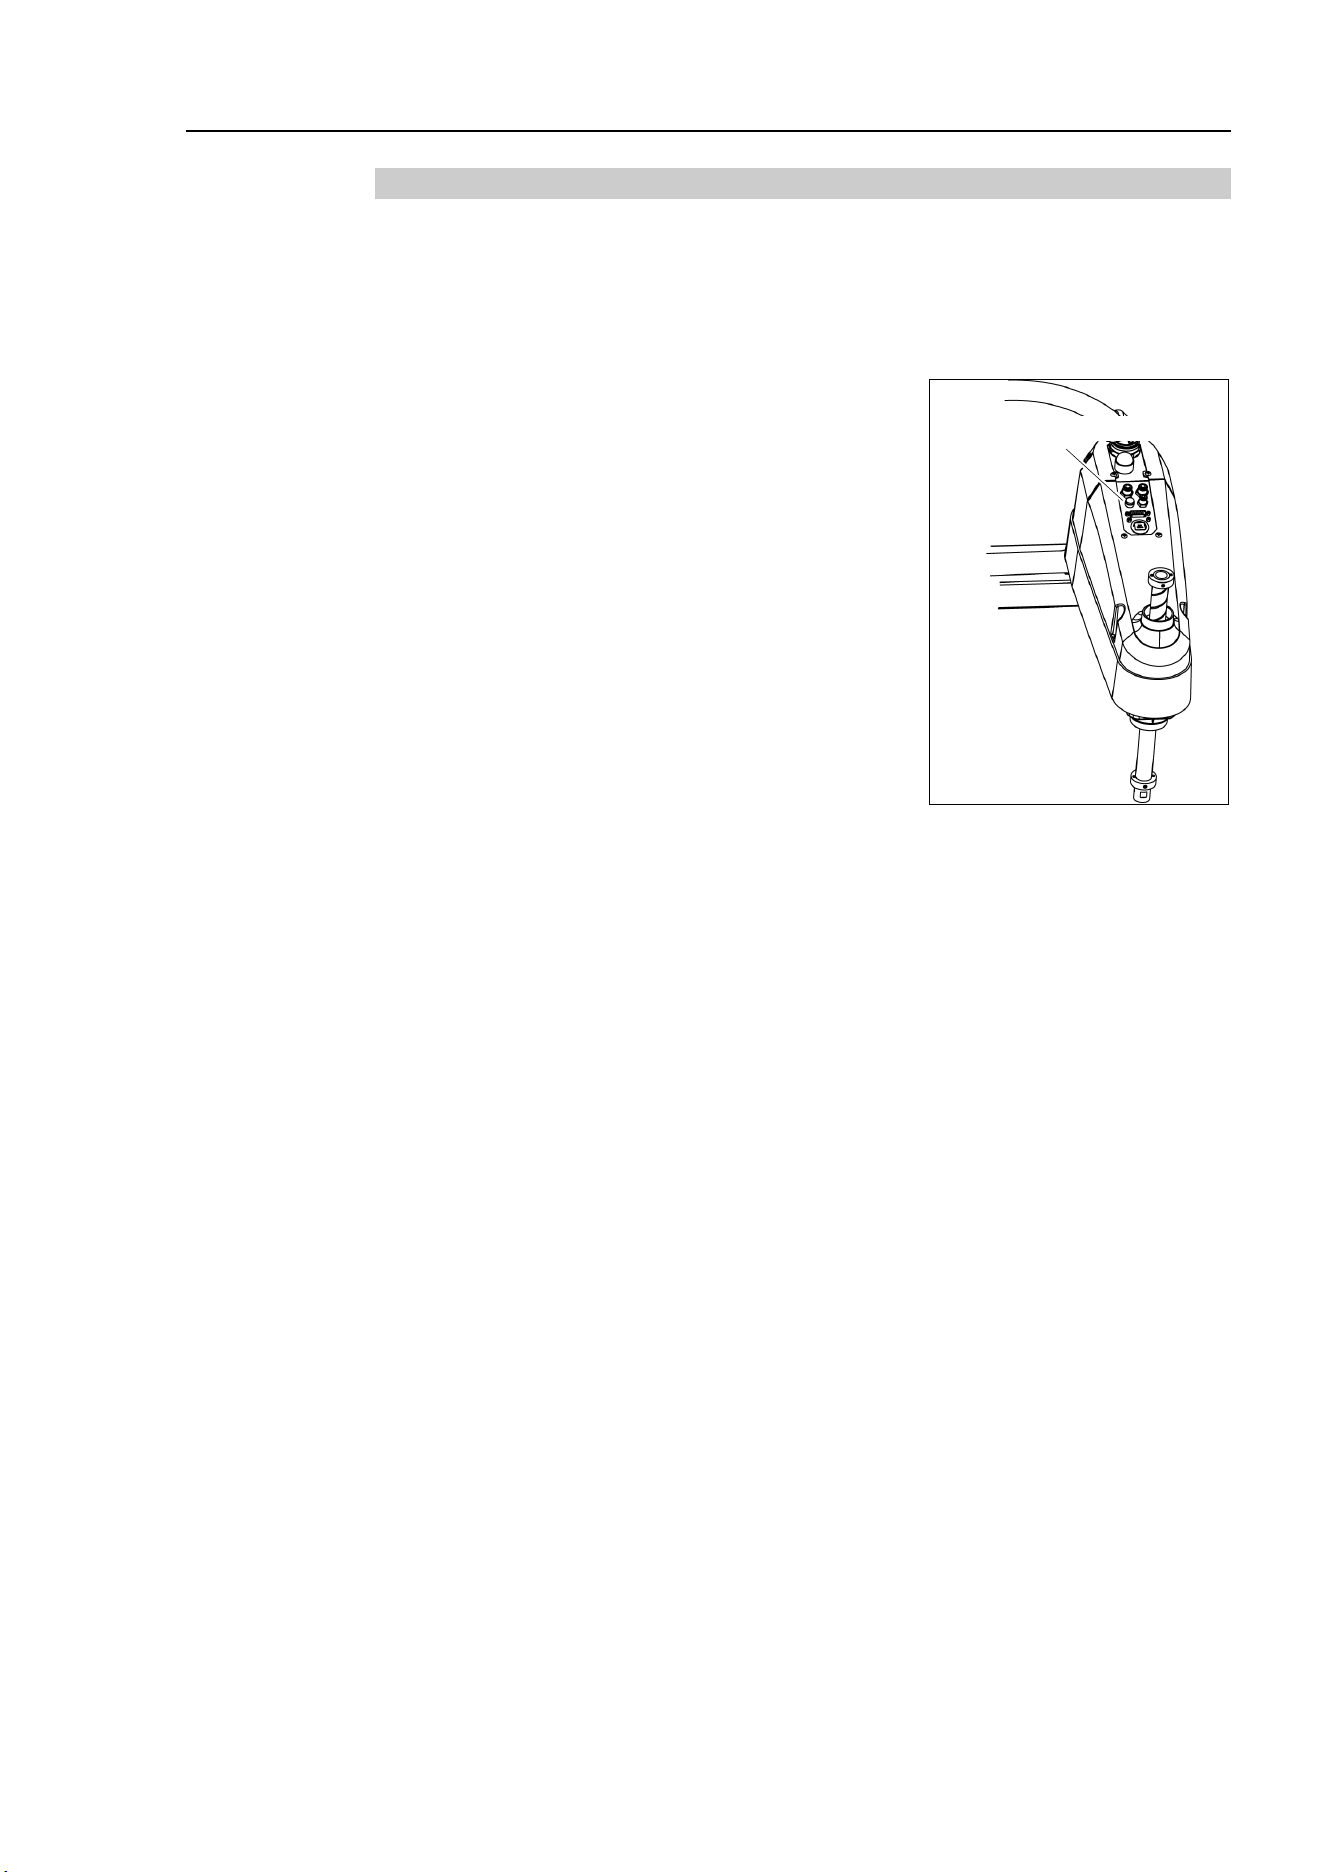
Maintenance 10. Ball Screw Spline Unit
LS10-B Rev.6 139
10.1.1 Standard-model
Cover the surrounding area such as the end effector and peripheral equipment in case the
grease drips.
(1)
Turn ON the
Controller. Stop motor excitation. (MOTOR OFF)
(2)
Move the arm to a position where Joint #3 can be moved in full stroke.
(3)
Move the shaft to its uppe
r limit manually while
pressing the brake release switch.
Brake Release Switch
(4)
Turn OFF the Controller.
(5)
Wipe off the old grease from the upper part of the
shaft, and then apply new grease to it.
When applying the new grease to
the upper part of
the shaft, directly fill the grooves on it by hand
.
Wipe off excess grease
from the shaft.
(6)
Turn ON the Controller.
(7)
Move the shaft to its lower limit by hand while pressing the brake release switch.
(8)
Wipe off the old grease from the lower part of the shaft, and then apply new grease to
it.
When applying the new grease to the lower part of the shaft, directly fill the grooves
on it by hand
. Wipe off excess grease from the shaft.
(9)
Move the
shaft up and down several
times while pressing the brake release switch to
smooth out the grease on the shaft.
Wipe off excess grease from the shaft.
When wiping off the excess grease from the upper part of shaft, turn OFF the
Controller and remove the Arm Top Cover.
For details,
refer to Maintenance: 3.1 Arm Top Cover.
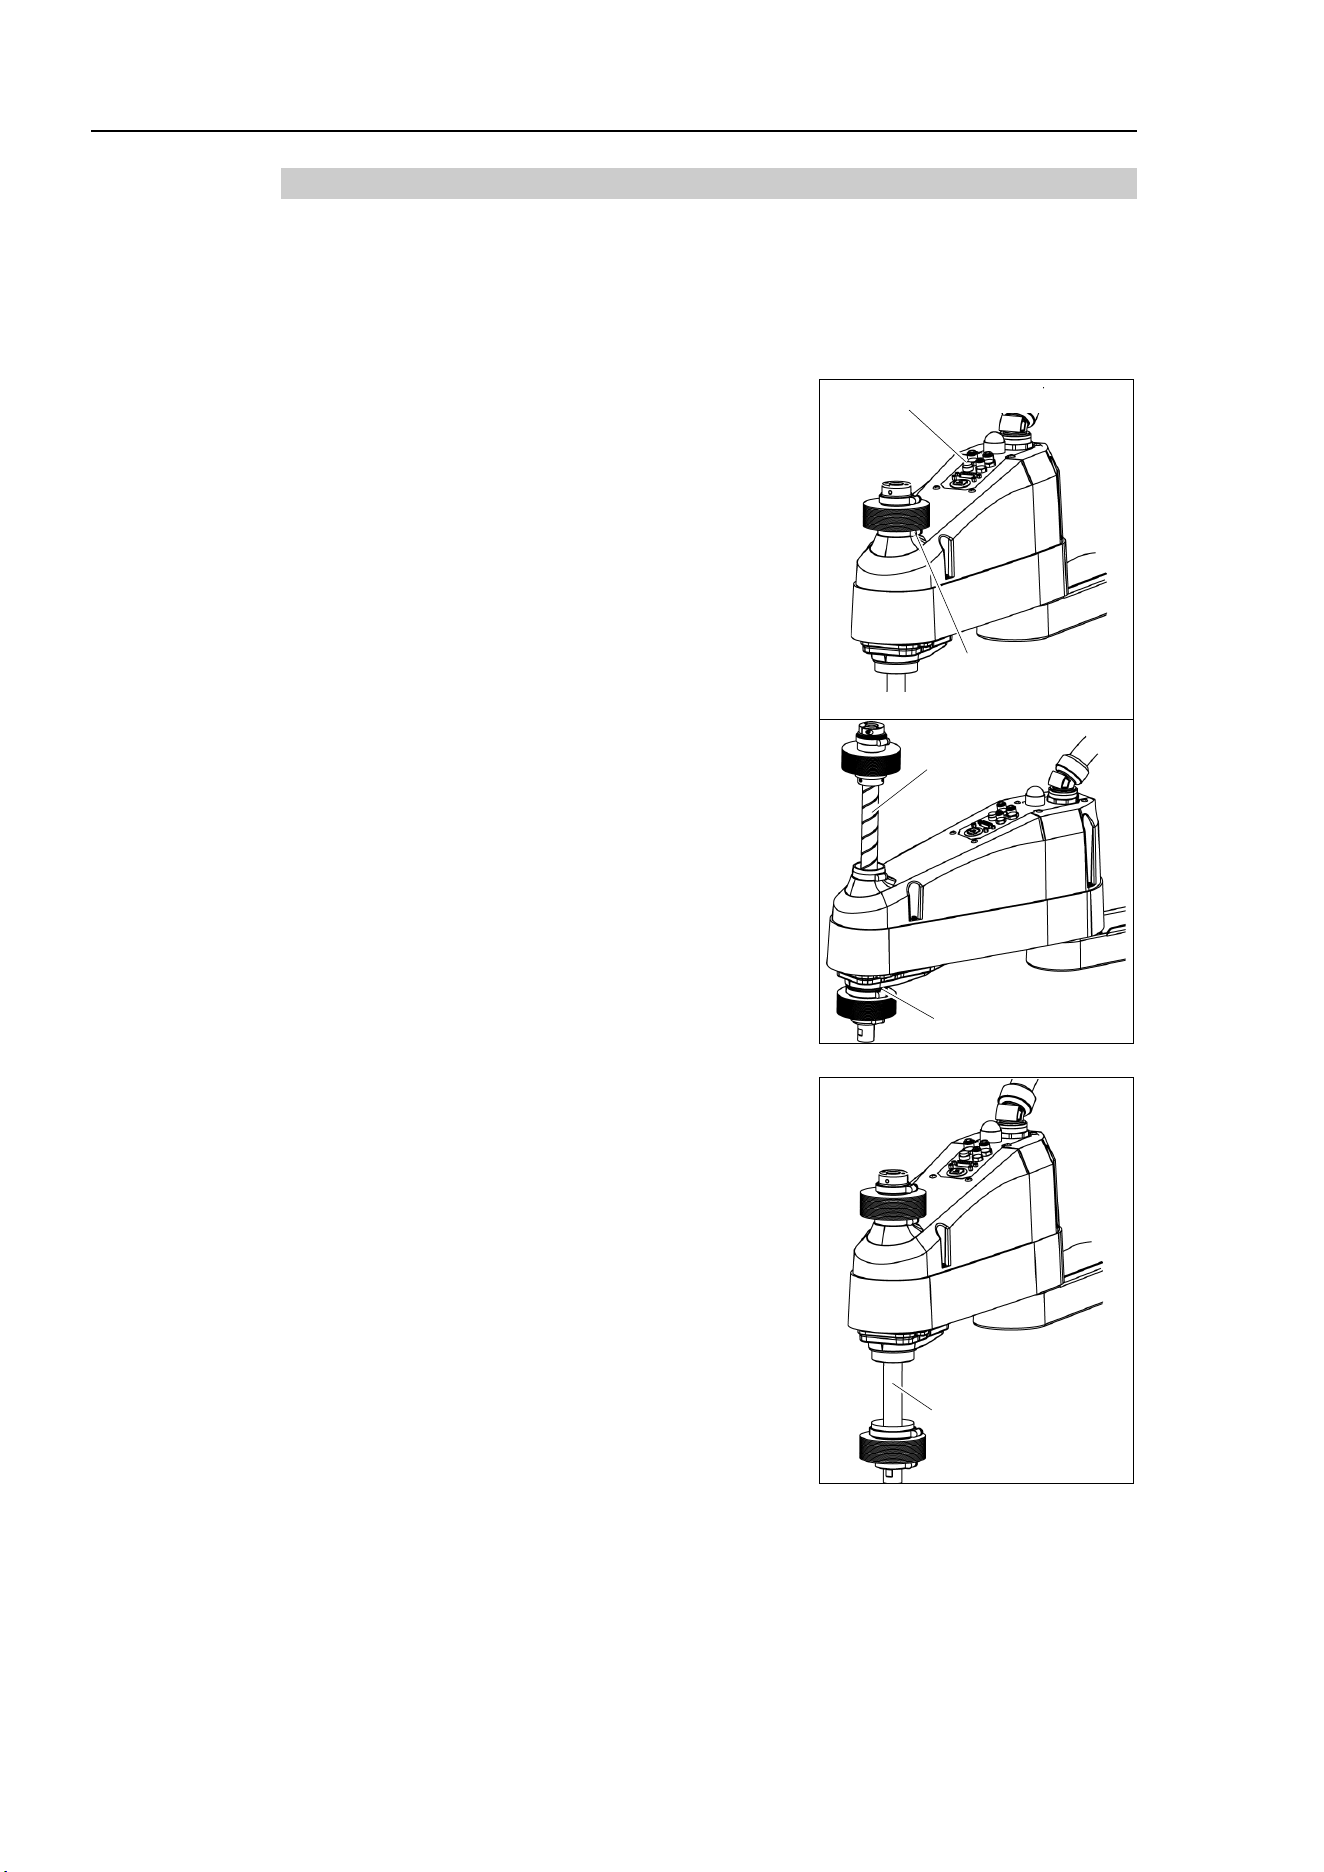
Maintenance 10. Ball Screw Spline Unit
140 LS10-B Rev.6
10.1.2 Cleanroom-model
Cover the surrounding area such as the end effector and peripheral equipment in case the
grease drips.
Upper Part
of the Shaft
(1)
Turn ON the
Controller. Stop motor excitation. (MOTOR OFF)
(2)
Move the arm to a position where Joint #3 can be moved in full stroke.
(3)
Move the shaft to
the lower limit manually while
pressing the brake release switch.
Brake Release Switch
(4) Clamp Band
(4)
Loosen the clamp band
under the bellows, and
then lift the bellows.
(5)
Move the shaft to
the upper limit manually while
pressing the brake release switch.
(6)
Wipe off the old grease from the upper part of the
shaft, and then apply new grease.
Directly fill the
grooves on the shaft inside the
bellows with grease by hand.
Wipe off excess grease
from the shaft.
(6) Shaft
(7) Clamp Band
Lower Part
of the Shaft
(7)
Loosen the clamp band on the bellows, and then
move the bellows downward.
(8)
Move the shaft to
the lower limit manually while
pressing the brake release switch.
(9)
Wipe off the old grease from the lower part of the
shaft, and then apply new grease
.
Directly fill the grooves on the shaft inside the
bellows with grease by
hand.
Wipe off excess grease
from the shaft.
(9) Shaft
(10)
Move the
shaft up and down several times while
pressing the brake release switch to
smooth out the
grease on the shaft.
Wipe off excess grease from
the shaft.
(11)
Secure the bellows.
To attach the upper
bellows, move the shaft to its lower limit.
To attach the lower bellows, move the shaft to its upper limit.
To move the shaft up/down, press and hold the brake release switch.
Attach the mounting part of the bellows
until it touches the cylindrical
part of the cover.
Then, secure them with clamp bands.
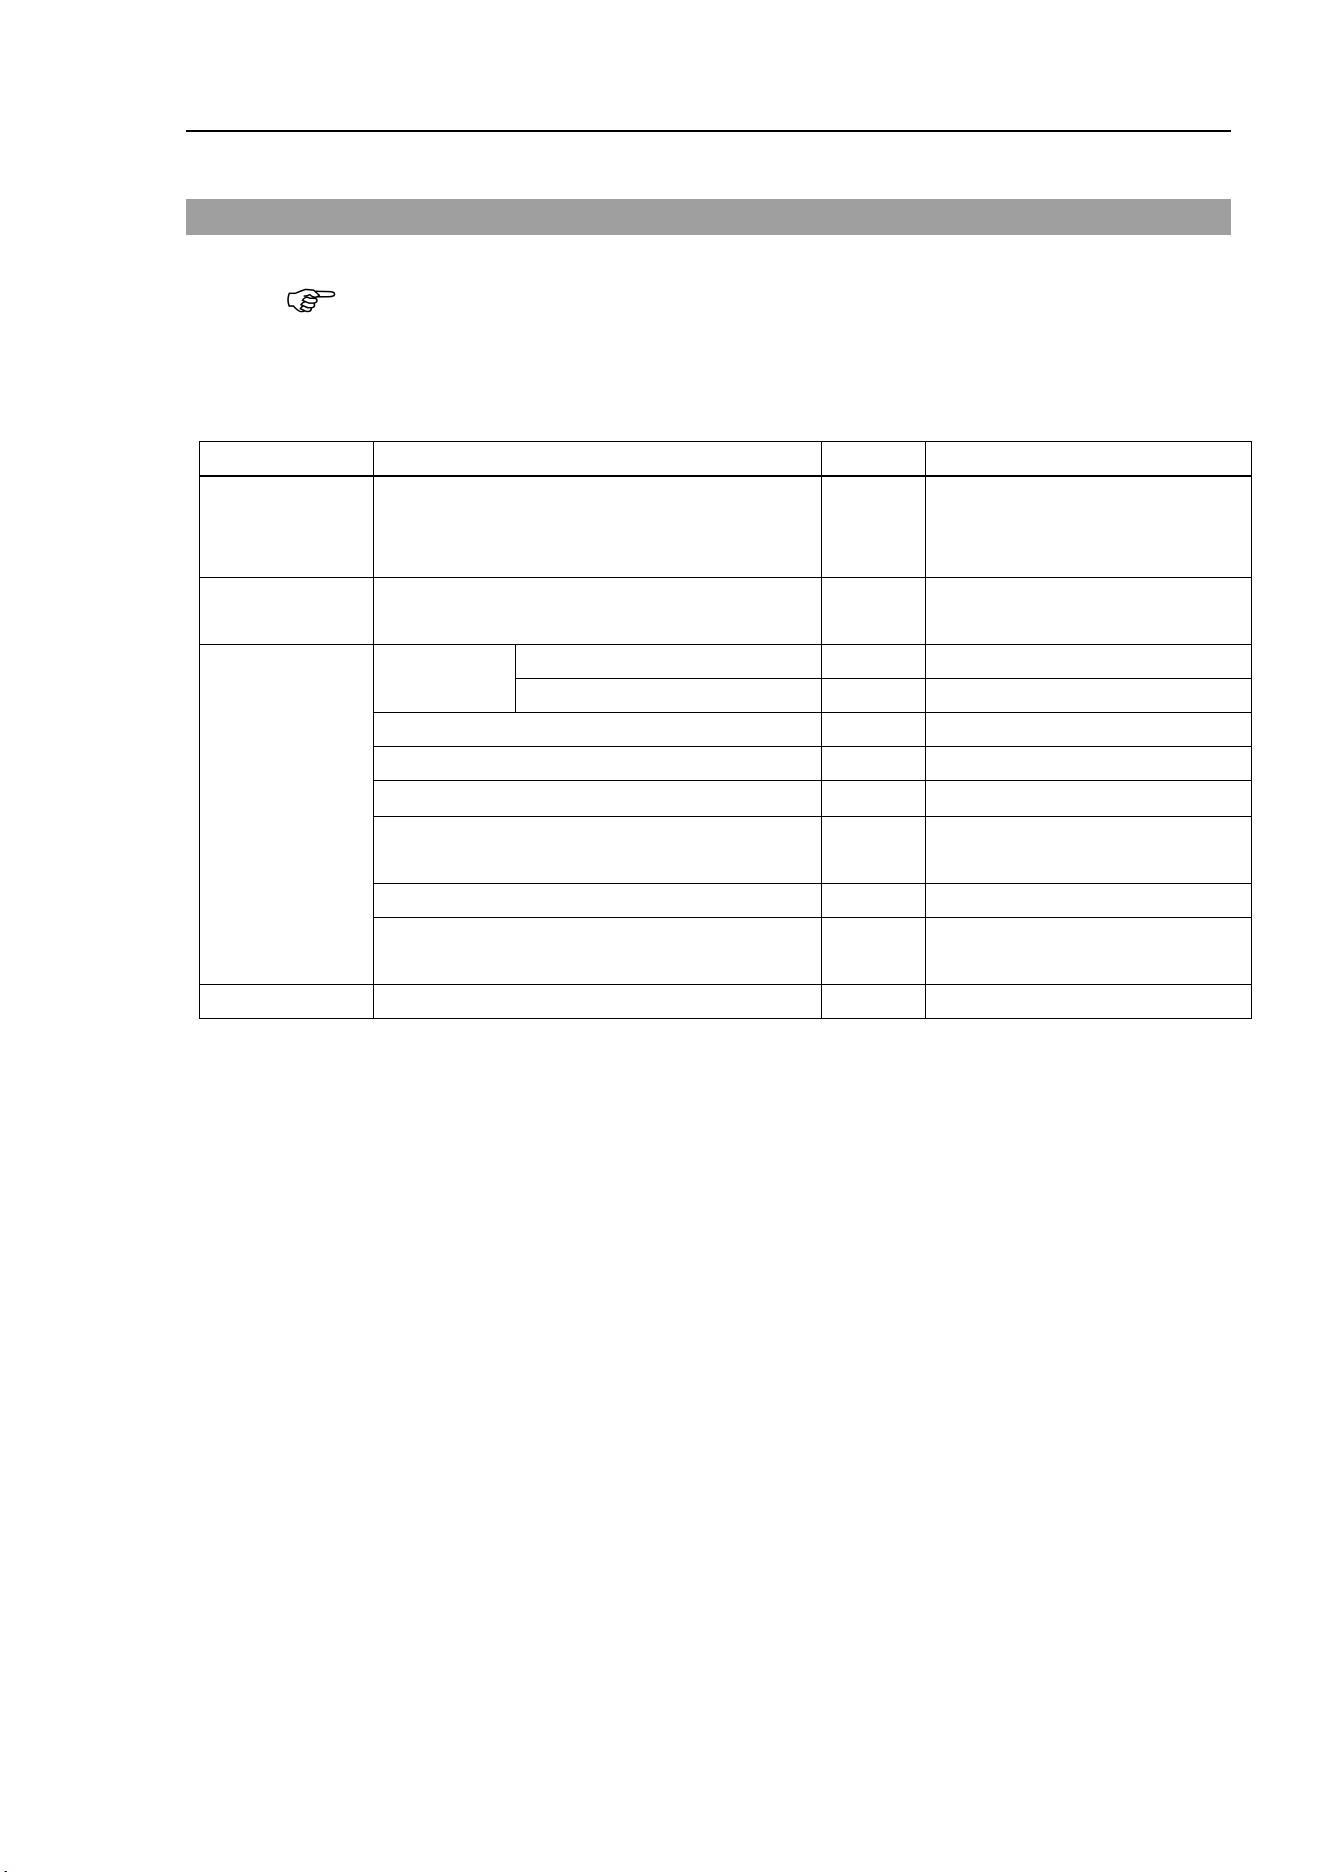
Maintenance 10. Ball Screw Spline Unit
LS10-B Rev.6 141
10.2 Replacing the Ball Screw Spline Unit
A brake is mounted on the motor of Joints #3 and #4 to prevent the shaft from moving down
and rotating due to the weight of the end effector while the power to the Controller is OFF
or while the motor is in OFF status (MOTOR OFF).
Move the shaft down to its lower limit before the replacement procedure following the
removal steps.
Name
Qty.
Note
Maintenance
parts
Ball Screw Spline Unit 1
Each manipulator model
(Refer to Maintenance:
14. Maintenance parts)
Grease
For Ball Screw Spline Unit
(AFB grease)
Proper
quantity
Tools
Hexagonal
wrench
(width across flats: 3 mm)
1
For M4 screw
(width across flats: 4 mm)
1
For M5 screw
Torque wrench
1
Nippers
1
For cutting wire tie
Cross-point screwdriver
1
Only for Cleanroom-model
Force gauge 1
Axial tension (pulling force):
114 N (11.6 ± 0.5 kgf)
Suitable cord (Length about 1000 mm)
1
For belt tension
Wiping cloth 1
For wiping grease
(Spline shaft)
Material
Wire tie
-
Ball
Screw
S
pline Unit
Removal
(1)
Turn ON the Controller.
(2)
Push down the shaft to its lower limit while pre
ssing the brake release switch.
Be sure to keep enough space and prevent
the end effector hitting any
peripheral
equipment.
The brake
release switch is applied to both Joints #3 and Joint #4.
When the brake release switch is pressed, the respective brakes of the Joint #3 and Joint
#4 are released simultaneously.
Be careful of the
shaft falling and rotating while the brake release switch is
being
pressed
because the shaft may be lowered by the weight of an end effector.
(3)
Turn OFF the Controller.
(4)
Detach the wires/tubes from the end effector, and remove the end effector.
(5)
This s
tep is only for Cleanroom-model.
Remove the
bellows. For details, refer to Maintenance: 9. Bellows.
(6)
Remove the
Arm Top Cover and Arm Bottom Cover.
For details, refer to
Maintenance: 3. Covers.
NOTE
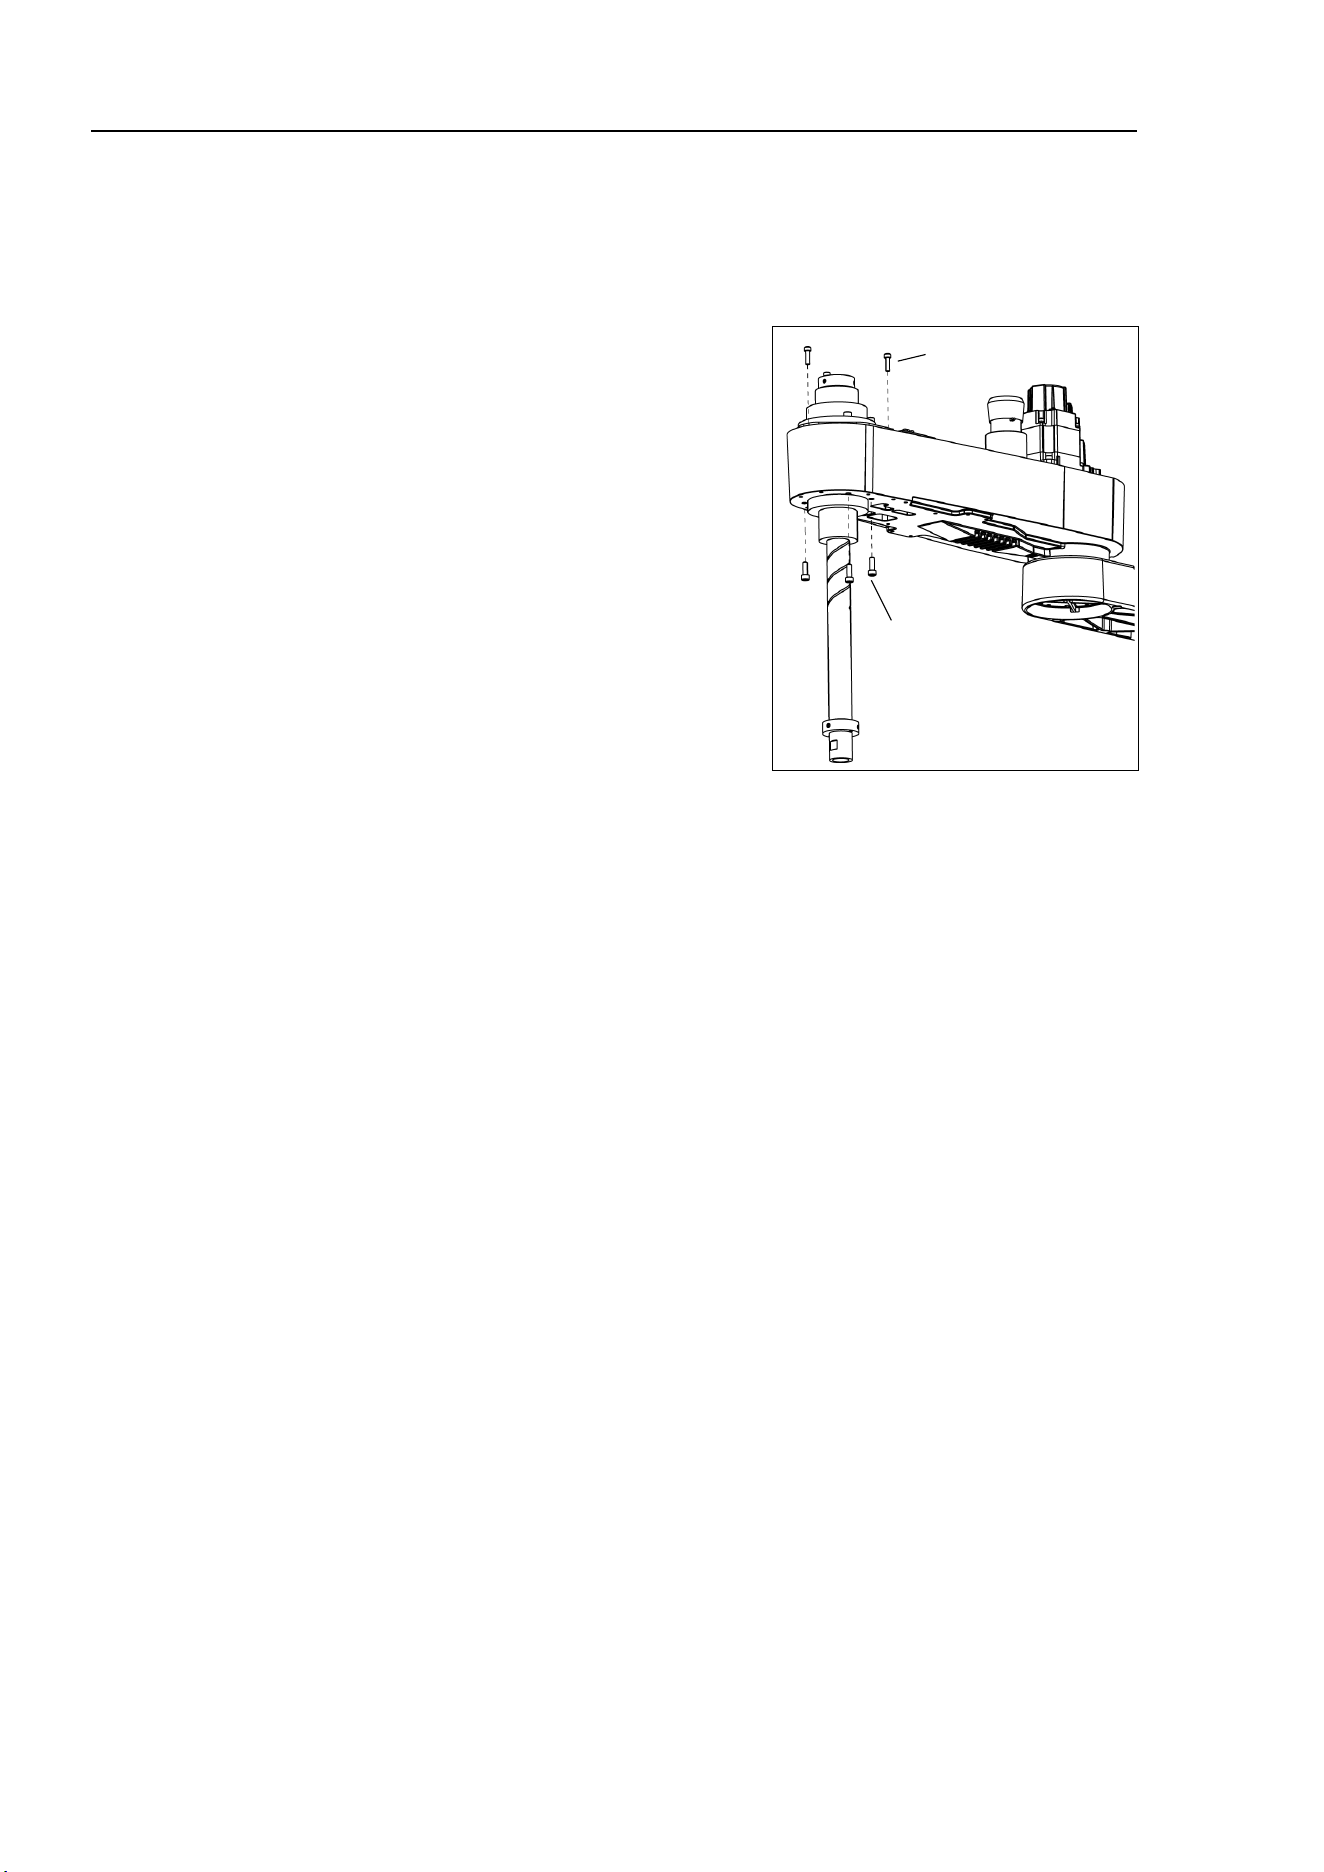
Maintenance 10. Ball Screw Spline Unit
142 LS10-B Rev.6
(7)
Remove the following.
Joint # motor unit Joint #4 motor unit Joint #4 intermediate pulley
U1 belt U2 belt Z belt
F
ollow the U2 belt removal steps in Maintenance: 8.2 Replacing the Timing Belt.
(8)
Remove three screws mounting the spline
plate.
3-M4×15
4-M5×15
(9)
Remove four screws
mounting the spline nut.
(10
)
Pull out the following toward the Arm #2 upper side.
Ball screw spline unit Z belt U2 belt
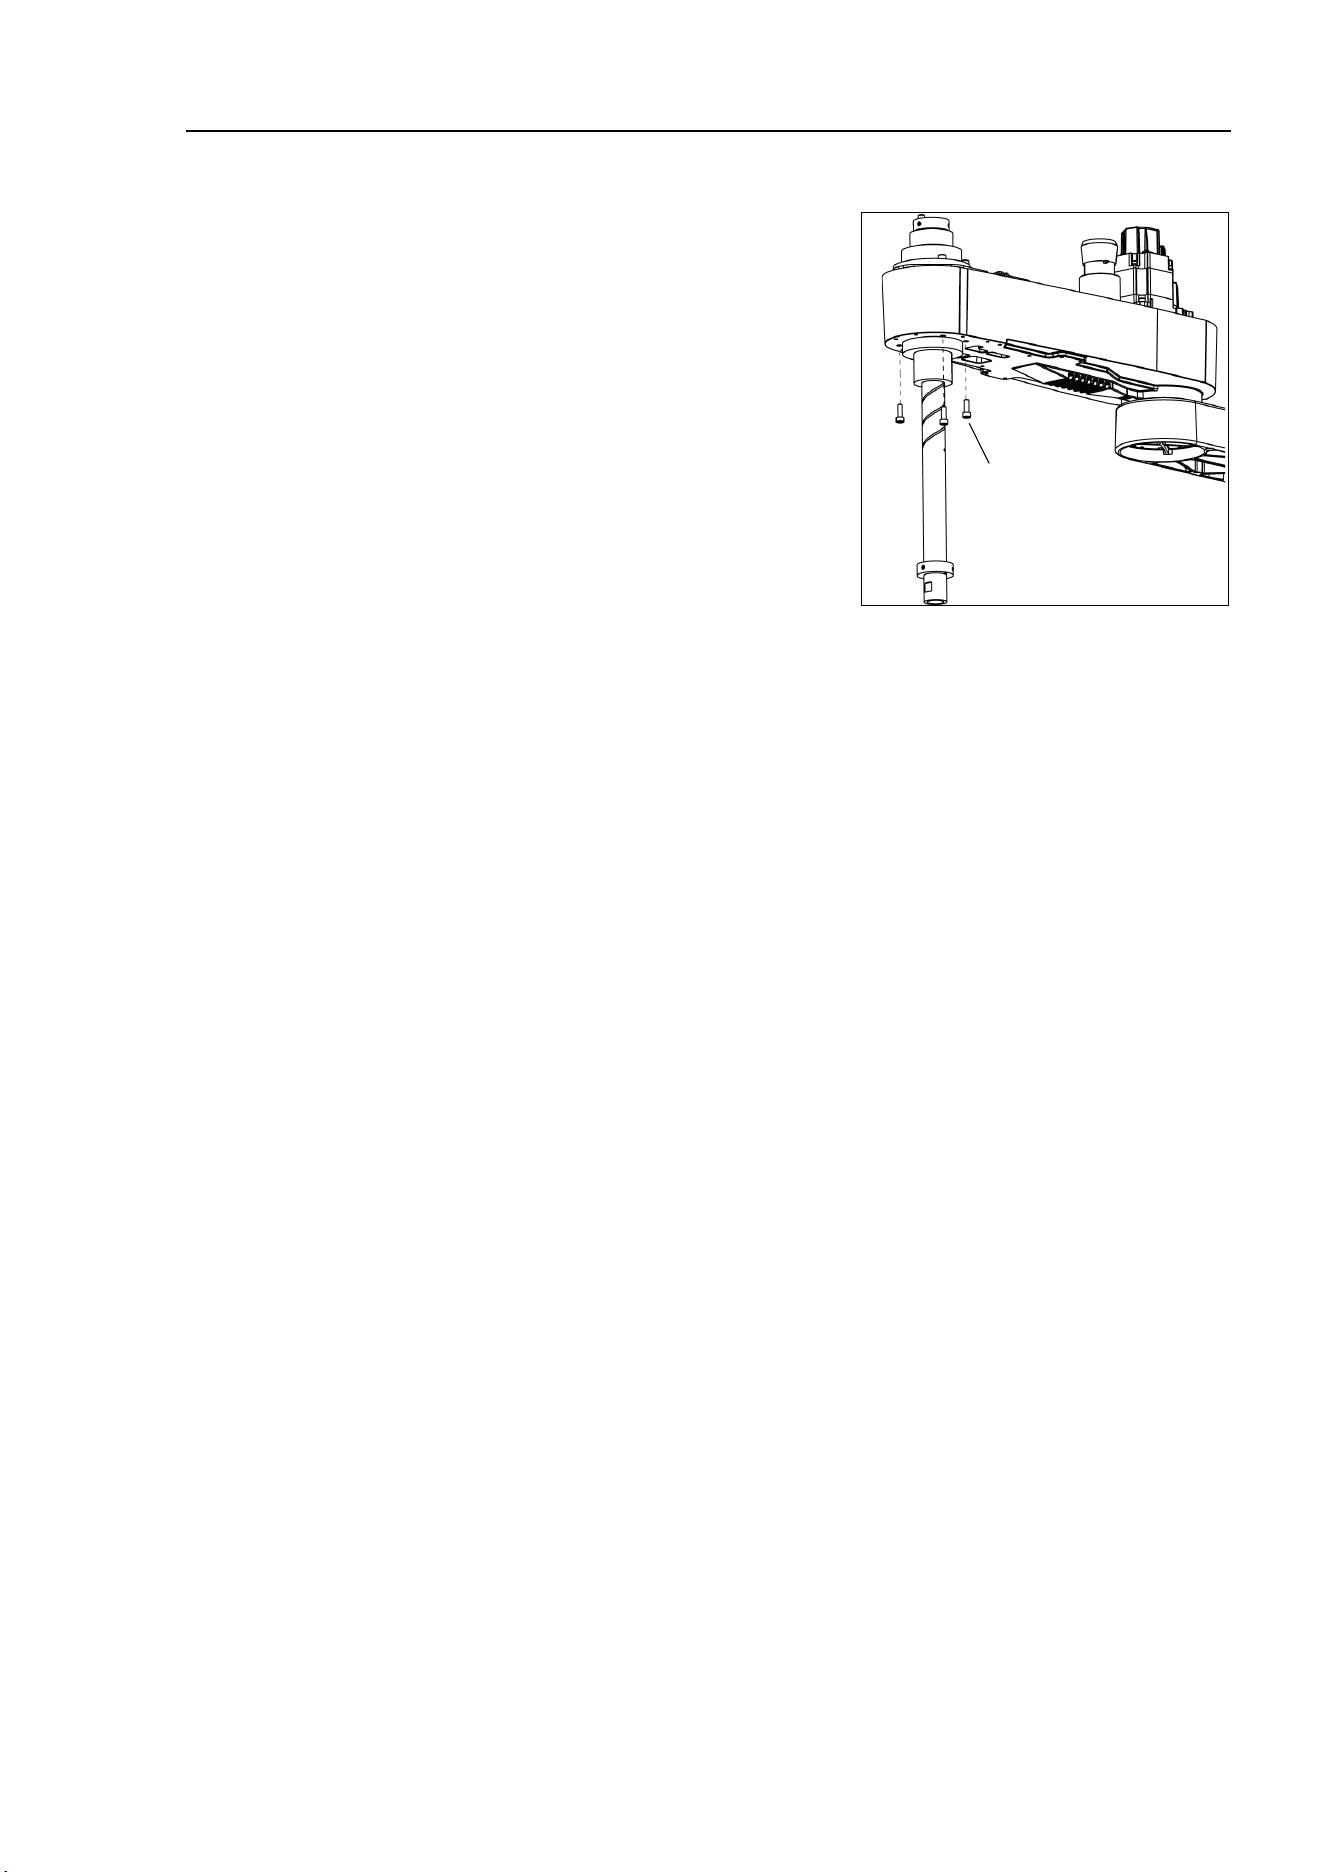
Maintenance 10. Ball Screw Spline Unit
LS10-B Rev.6 143
Ball Screw
Spline Unit
Installation
(1)
Insert a new ball screw spline unit in the Arm #2.
(2)
Secure the spline nut
from the bottom side of
the Arm #2.
4-M5×15
(3)
Mount the following.
Joint #3 motor unit / Joint #4 motor unit / Joint #4 intermediate pulley /
U1 belt / U2 belt / Z belt
Follow
the U2 belt installation steps in Maintenance: 8.2 Replacing the Timing Belt.
(4)
Mount the Arm Top Cover and Arm Bottom Cover.
For details, refer to
Maintenance: 3. Covers.
(5)
Grease the shaft.
For details, refer to
Maintenance: 10.1 Greasing the Ball Screw Spline Unit.
(6)
For the Cleanroom-model, mount the bellows.
For details, refer to
Maintenance: 9. Bellows.
(7)
Mount the end effector, cables, and tubes.
(8)
Perform the calibration of Joints #3, #4.
For details, refer to
Maintenance: 13. Calibration.
Maintenance 11. Boards
144 LS10-B Rev.6
11. Boards
WARNING
■
Do not connect or disconnect the motor connectors while the power to the robot
system is turned ON. Connecting or disconnecting the motor connectors
with
the power ON is extremely hazardous and may result
in serious bodily injury as
the Manipulator may mo
ve abnormally, and also may result in electric shock
and/or malfunction of the robot system.
■
To shut off power
to the robot system, disconnect the power plug from the power
source. Be sure to connect the AC power cable to a power receptacle.
DO NOT connect it directly to a factory power source.
■
Before performing any replacement procedure, turn OFF the Controller and
related equipment,
and then disconnect the power plug from the power source.
Performing any replacement procedure with the power ON is extremely hazardous
and may result in
electric shock and/or malfunction of the robot system.
Name
Qty.
Note
Maintenance
parts
Converter board 1 2196970
Control board
1
2196966
Tools
Nippers
1
For cutting wire tie
Cross-point screwdriver (#1)
1
Material
Wire tie
1
For fixing cables
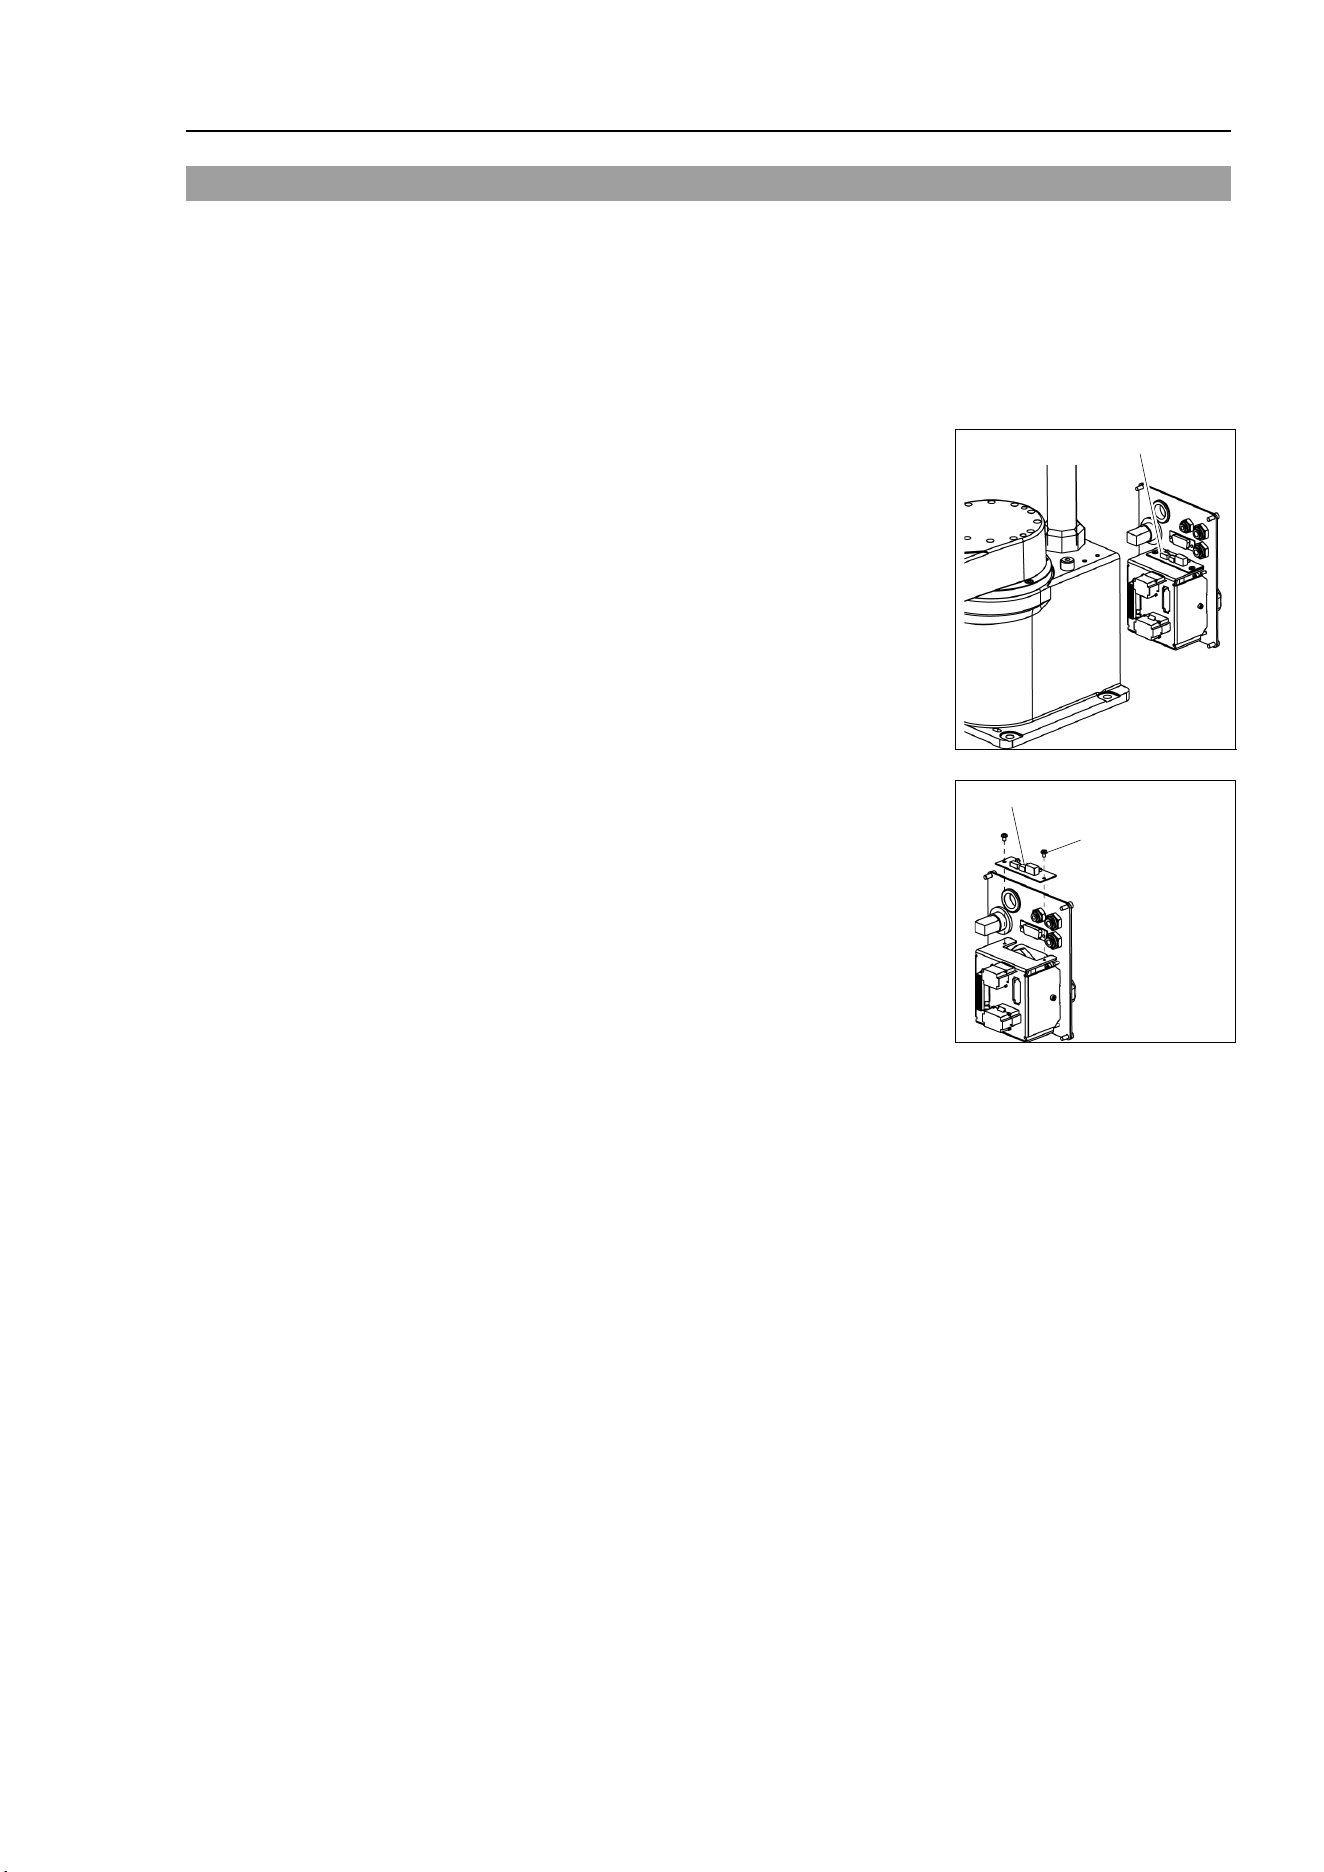
Maintenance 11. Boards
LS10-B Rev.6 145
11.1 Replacing the Converter Board
Board which supplies power to the encoder of the motor is mounted inside the base of the
manipulator. If the board gets damage, the manipulator will not operate.
Converter board
Removal
(1)
Turn OFF the
controller.
(2)
Remove the Connector Plate.
For details, refer to
Maintenance: 3.3 Connector Plate.
(3)
Disconnect
the connectors which are connected to the
converter board.
Connectors: CV11
, CV12, CV13
Converter board
(4)
Remove the
converter board from the mount base.
Binding head small screws:
2-M3 (cross-point screwdriver)
Converter board
2-M3
Binding head
small screws
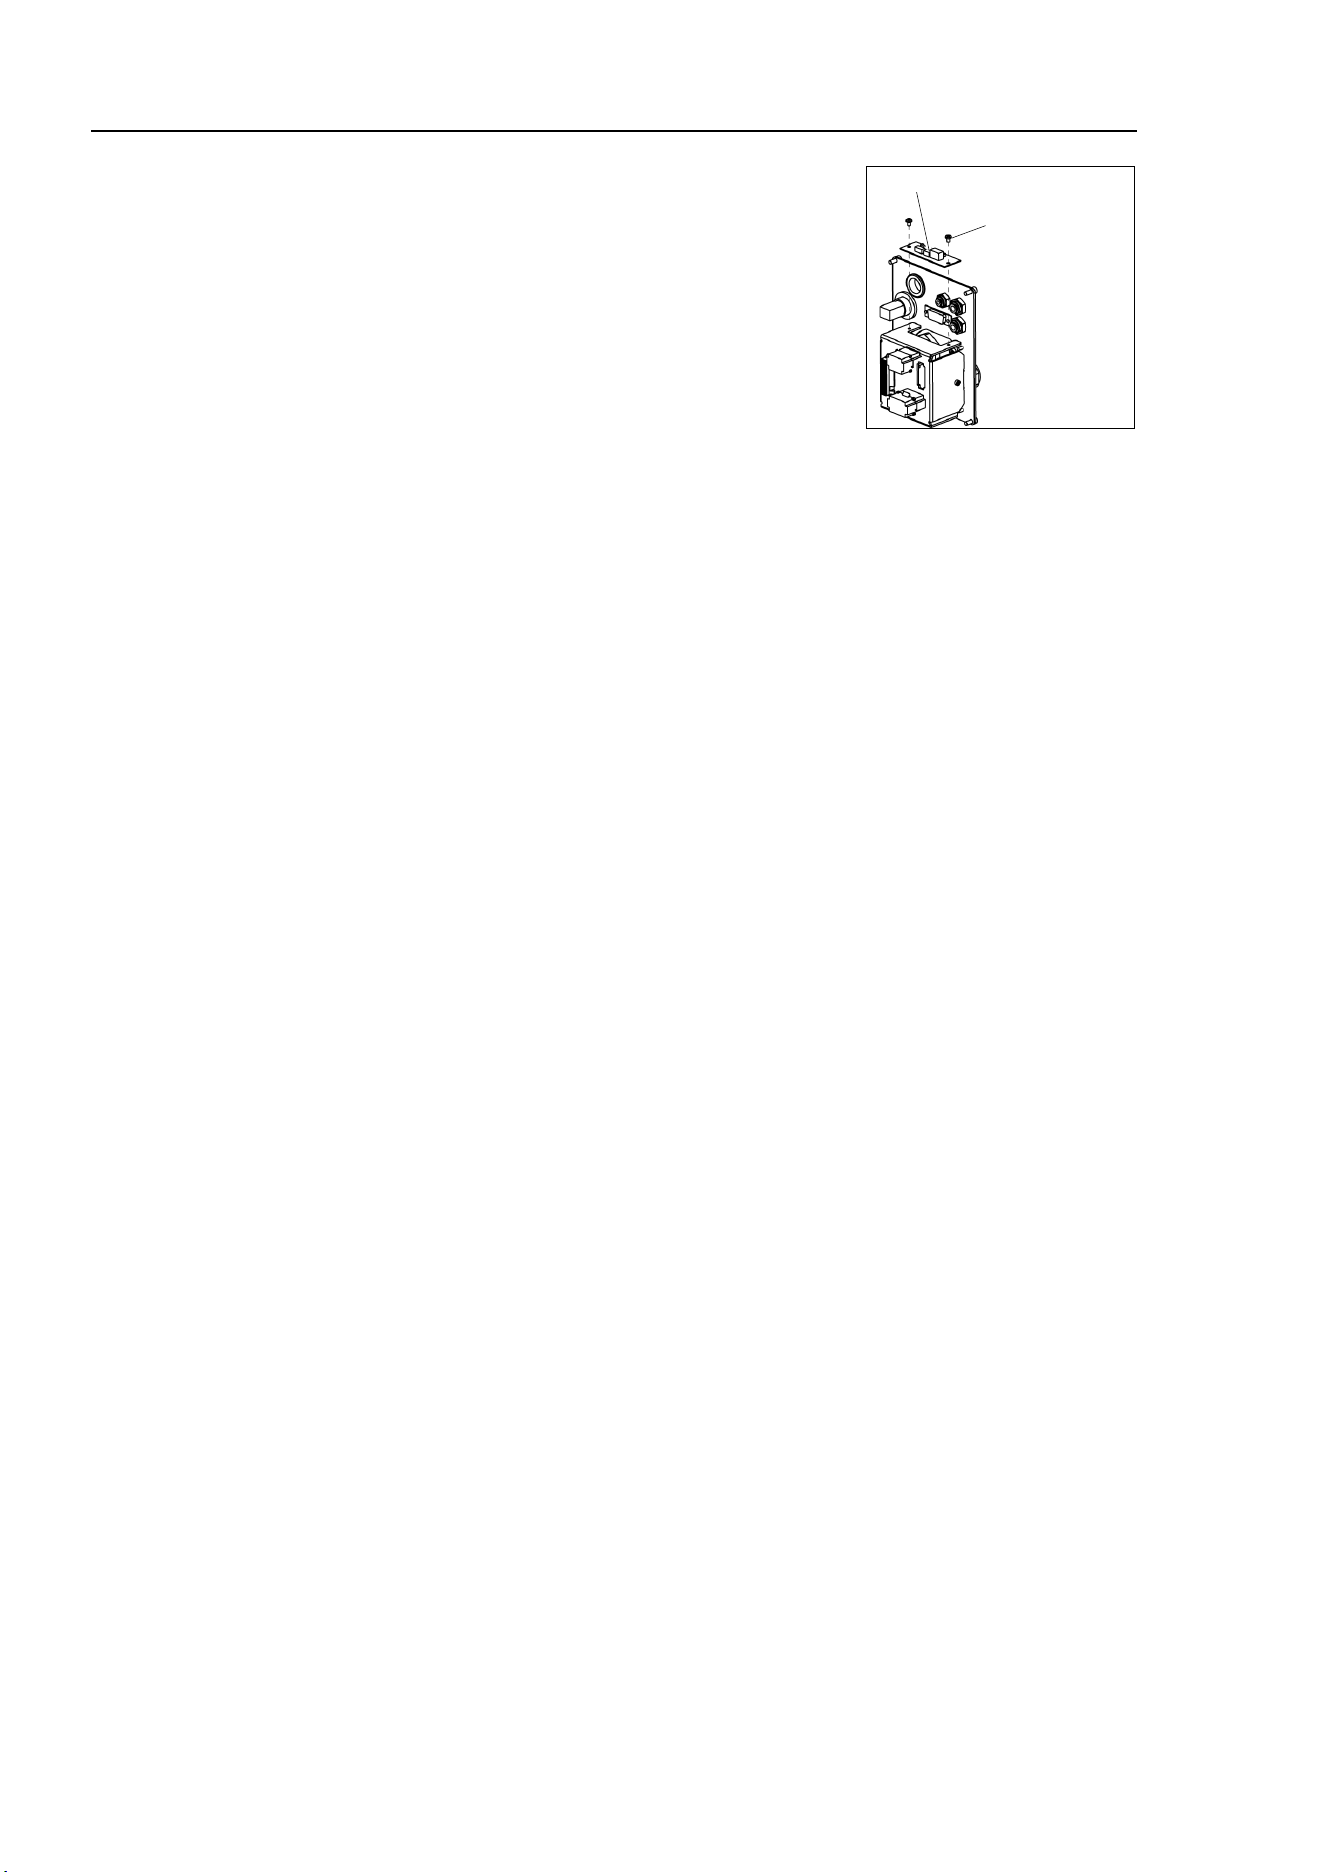
Maintenance 11. Boards
146 LS10-B Rev.6
C
onverter board
Installation
(1)
Mount the
converter board on the mount base.
Binding head small screws:
(2-M3)
Converter board
2-M3
Binding head
small screws
(2)
Connect the connectors to
the converter board.
Connectors: CV11, CV12, CV13
(3)
Mount the Connector Plate.
For details, refer to
Maintenance: 3.3 Connector Plate.
(4)
Turn ON the Controller.
(5)
Make sure no
errors occur in all joints.
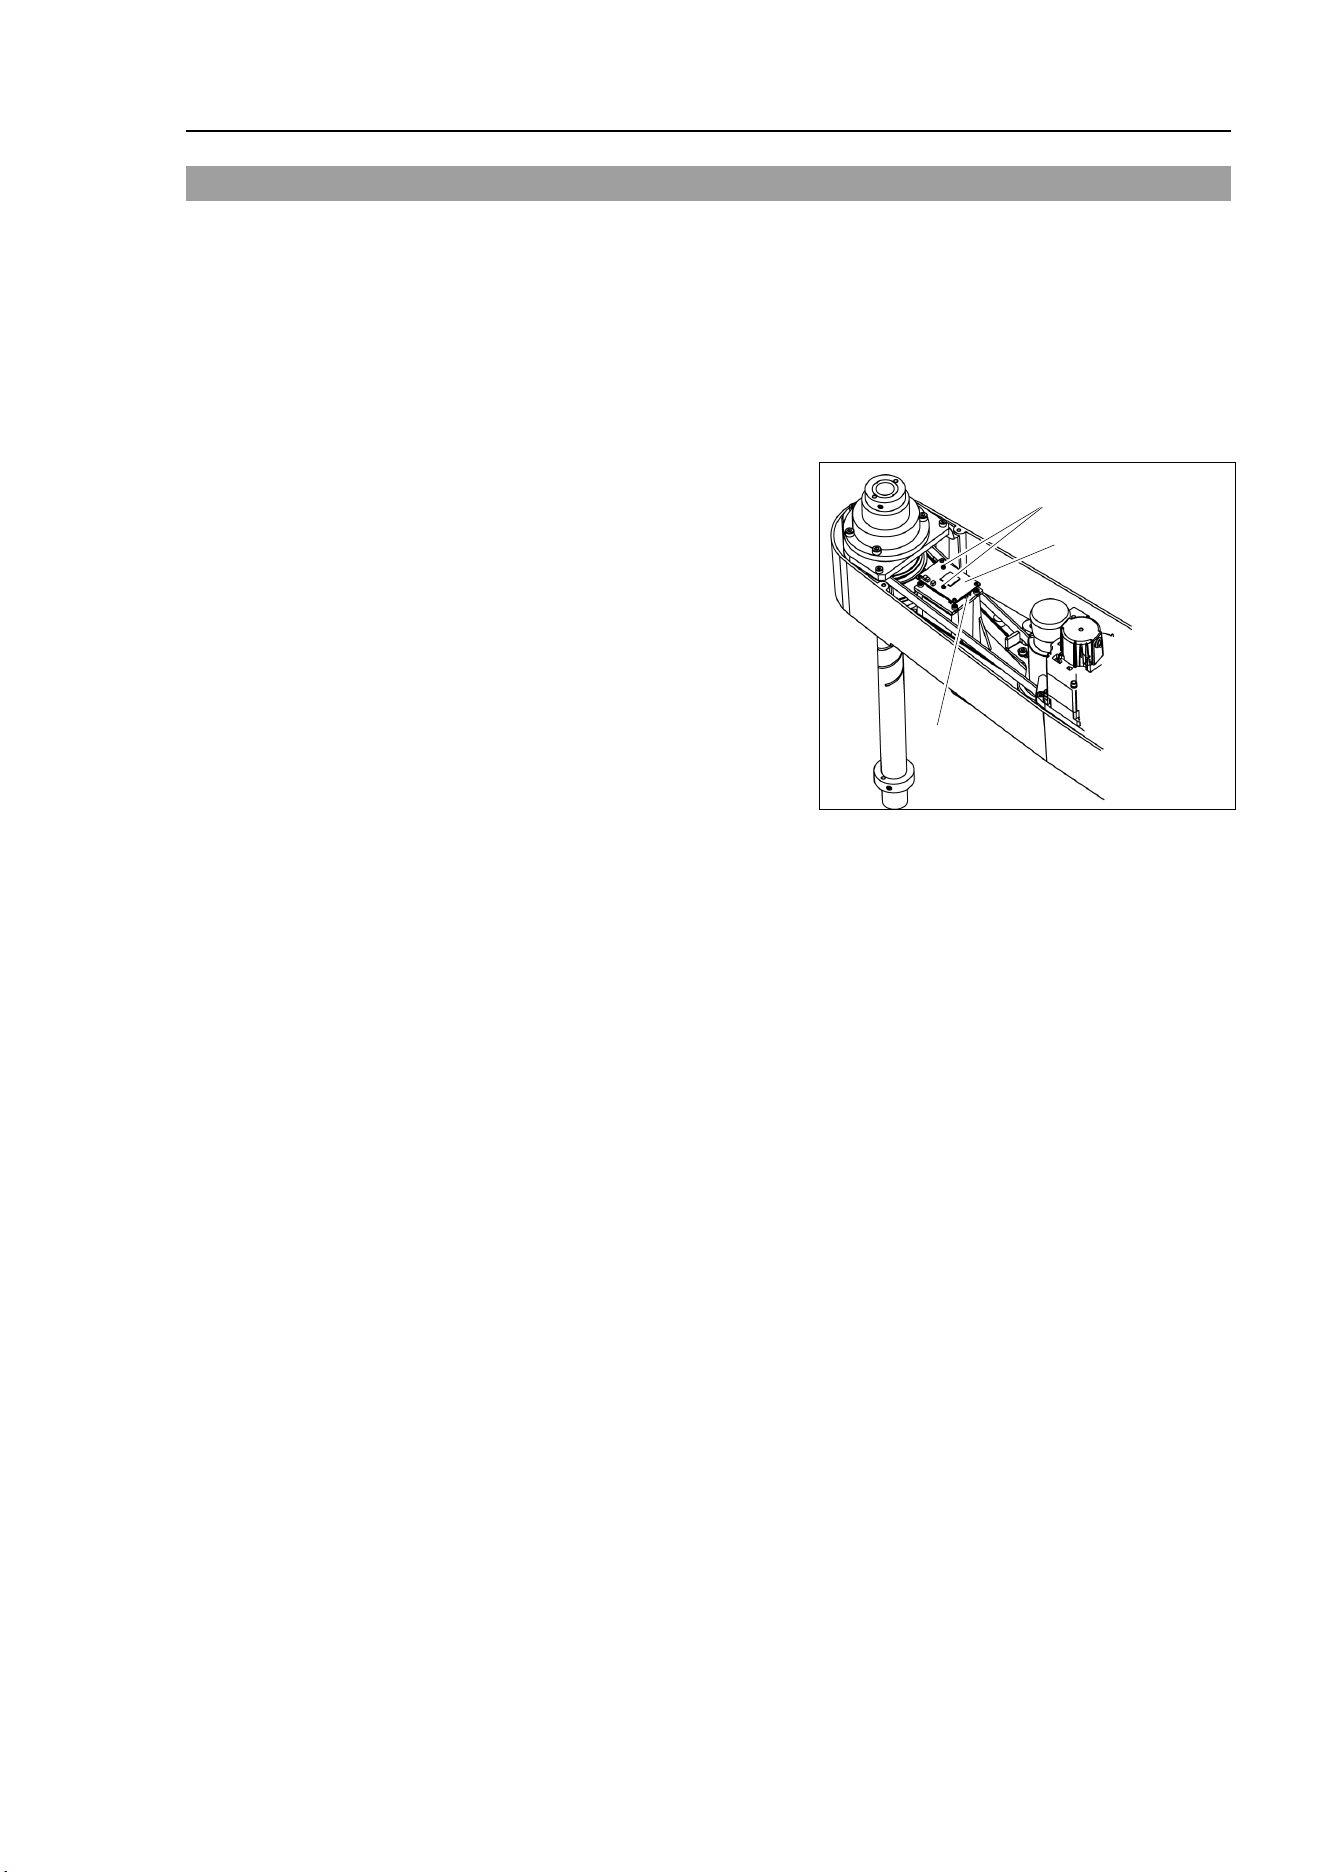
Maintenance 11. Boards
LS10-B Rev.6 147
11.2 Replacing the Control Board
Control
Board
Removal
(1)
Turn OFF the controller.
(2)
Remove the Arm Top Cover.
For details, refer to
Maintenance: 3.1 Arm Top Cover.
(3)
Disconnect the connector.
Connector: X51
(4)
Remove the Control board.
2-M2×16
Pan head screw
Control board
Connector
Control Board
Installation
(1)
Mount a new Control board.
Be careful of the board direction.
(Check the board direction by
the
connector position.)
(2)
Connect
the connector.
Connector: X51
(3)
Mount the Arm Top Cover.
For details, refer to
Maintenance: 3.1 Arm Top Cover.
(4)
Turn ON the controller.
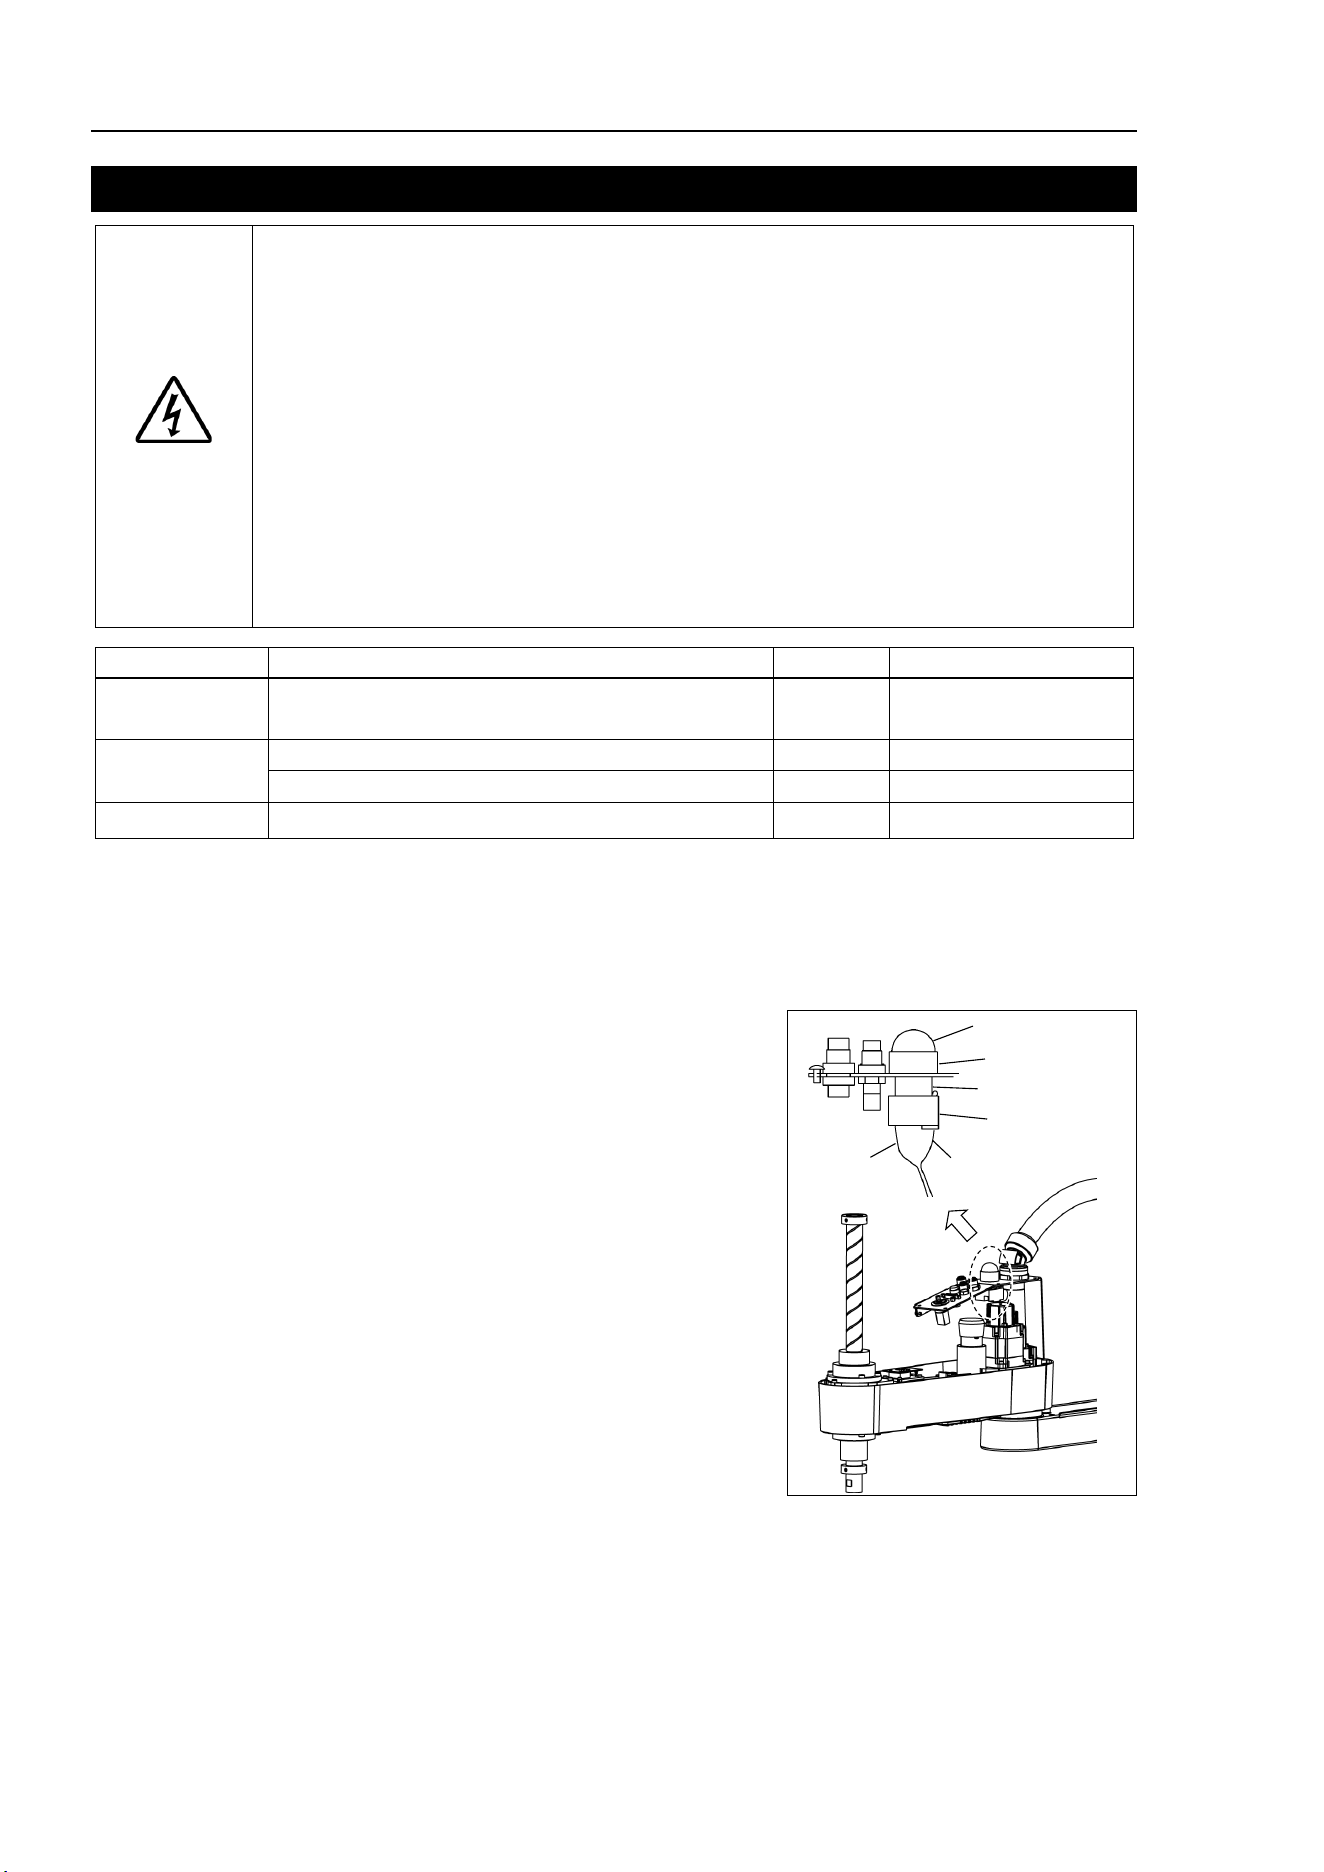
Maintenance 12. LED Lamp
148 LS10-B Rev.6
12. LED Lamp
WARNING
■
Do not connect or disconnect the motor connectors while the power to the robot
system is turned ON. Connecting or disconnecting the motor connectors
with
the power ON is extremely hazardous and may result
in serious bodily injury as
the Manipulator may mo
ve abnormally, and also may result in electric shock
and/or malfunction of the robot system.
■
To shut off power
to the robot system, disconnect the power plug from the power
source. Be sure to connect the AC power cable to a power receptacle.
DO NOT connect it directly to a factory power source.
■
Before performing any replacement procedure, turn OFF the Controller and
related equipment,
and then disconnect the power plug from the power source.
Performing any replacement procedure with the power ON is extremely hazardous
and may result in
electric shock and/or malfunction of the robot system.
Name
Qty.
Note
Maintenance
parts
LED Lamp 1
2077258
Tools
Cross-point screwdriver
1
For wire removal
Nippers
1
Material
Wire tie 1
LED Lamp
Removal
(1)
Remove the
Arm Top Cover.
For details, refer to
Maintenance: 3.1 Arm Top Cover.
(2)
Remove the
User Plate.
For details, refer to
Maintenance: 3.5 User Plate.
(3)
Disconnect the X1 and X2 terminals from the
LED.
X2
Terminal
X1
Terminal
Lens
Lens Holder
Ring
LED
(4)
Turn the lens counter
clockwise
to remove.
Then, turn the lens holder counter
clockwise to
remove.
(5)
Remove the LED and ring from the User Plate.
LED Lamp
Installation
(1)
Connect the X1 and X2 terminals to the LED.
Each terminal must be connected to the same
terminal
number on the LED.
(2)
Put the User Plate between the ring and lens
holder, and then secure the LED to the cover.
(3)
Mount the lens.
(4)
Mount the User Plate.
For details, refer to
Maintenance: 3.5 User Plate.
(5)
Install the
Arm Top Cover.
For details, refer to Maintenance: 3.1 Arm Top Cover.
Maintenance 13. Calibration
LS10-B Rev.6 149
13. Calibration
13.1 About Calibration
After parts have been replaced (motors, reduction gear units, timing belts, etc.), the
Manipulator cannot execute the positioning properly because a mismatch exists between the
origin stored in each motor and its corresponding origin stored in the Controller.
After replacing the parts, it is necessary to match these origins.
The process of aligning the two origins is called “Calibration”. Note that calibration is not
the same as teaching*.
*: “Teaching” means to teach the Controller coordinate points (including poses) anywhere
in the operating area of the Manipulator.
WARNING
■
To ensure safety, a safeguard must be installed for the robot
system.
For details on the safeguard, refer to EPSON RC+ User
’s Guide: 2.4 Installation
and Design Precautions
.
■
Before operating the robot system, make sure that no one is inside the
safeguard
ed area. The robot system can be operated in the mode for teaching
even when someone is inside the safeguard
ed area.
The motion of the Manipulator is always in restricted (low speeds and low power)
status to secure the safety of an operator. However, operating the robot system
while someone is inside the safeguar
ded area is extremely hazardous and may
result in serious safety problems in case that the Manipulator moves
unexpectedly.
Command Input
Calibration procedures include the process to input commands. Select EPSON RC+ menu-
[Tools]-[Command Window] to use the command window.
The information above is omitted in the calibration procedure.
Jog Motion
The process to set the jog motion is included in the [Jog & Teach] page of the Robot Manager.
Select EPSON RC+ menu-[Tools]-[Robot Manager] and select the [Jog & Teach] tab to use
the [Jog & Teach] page.
The page above is indicated as [Jog & Teach] in the calibration procedure.
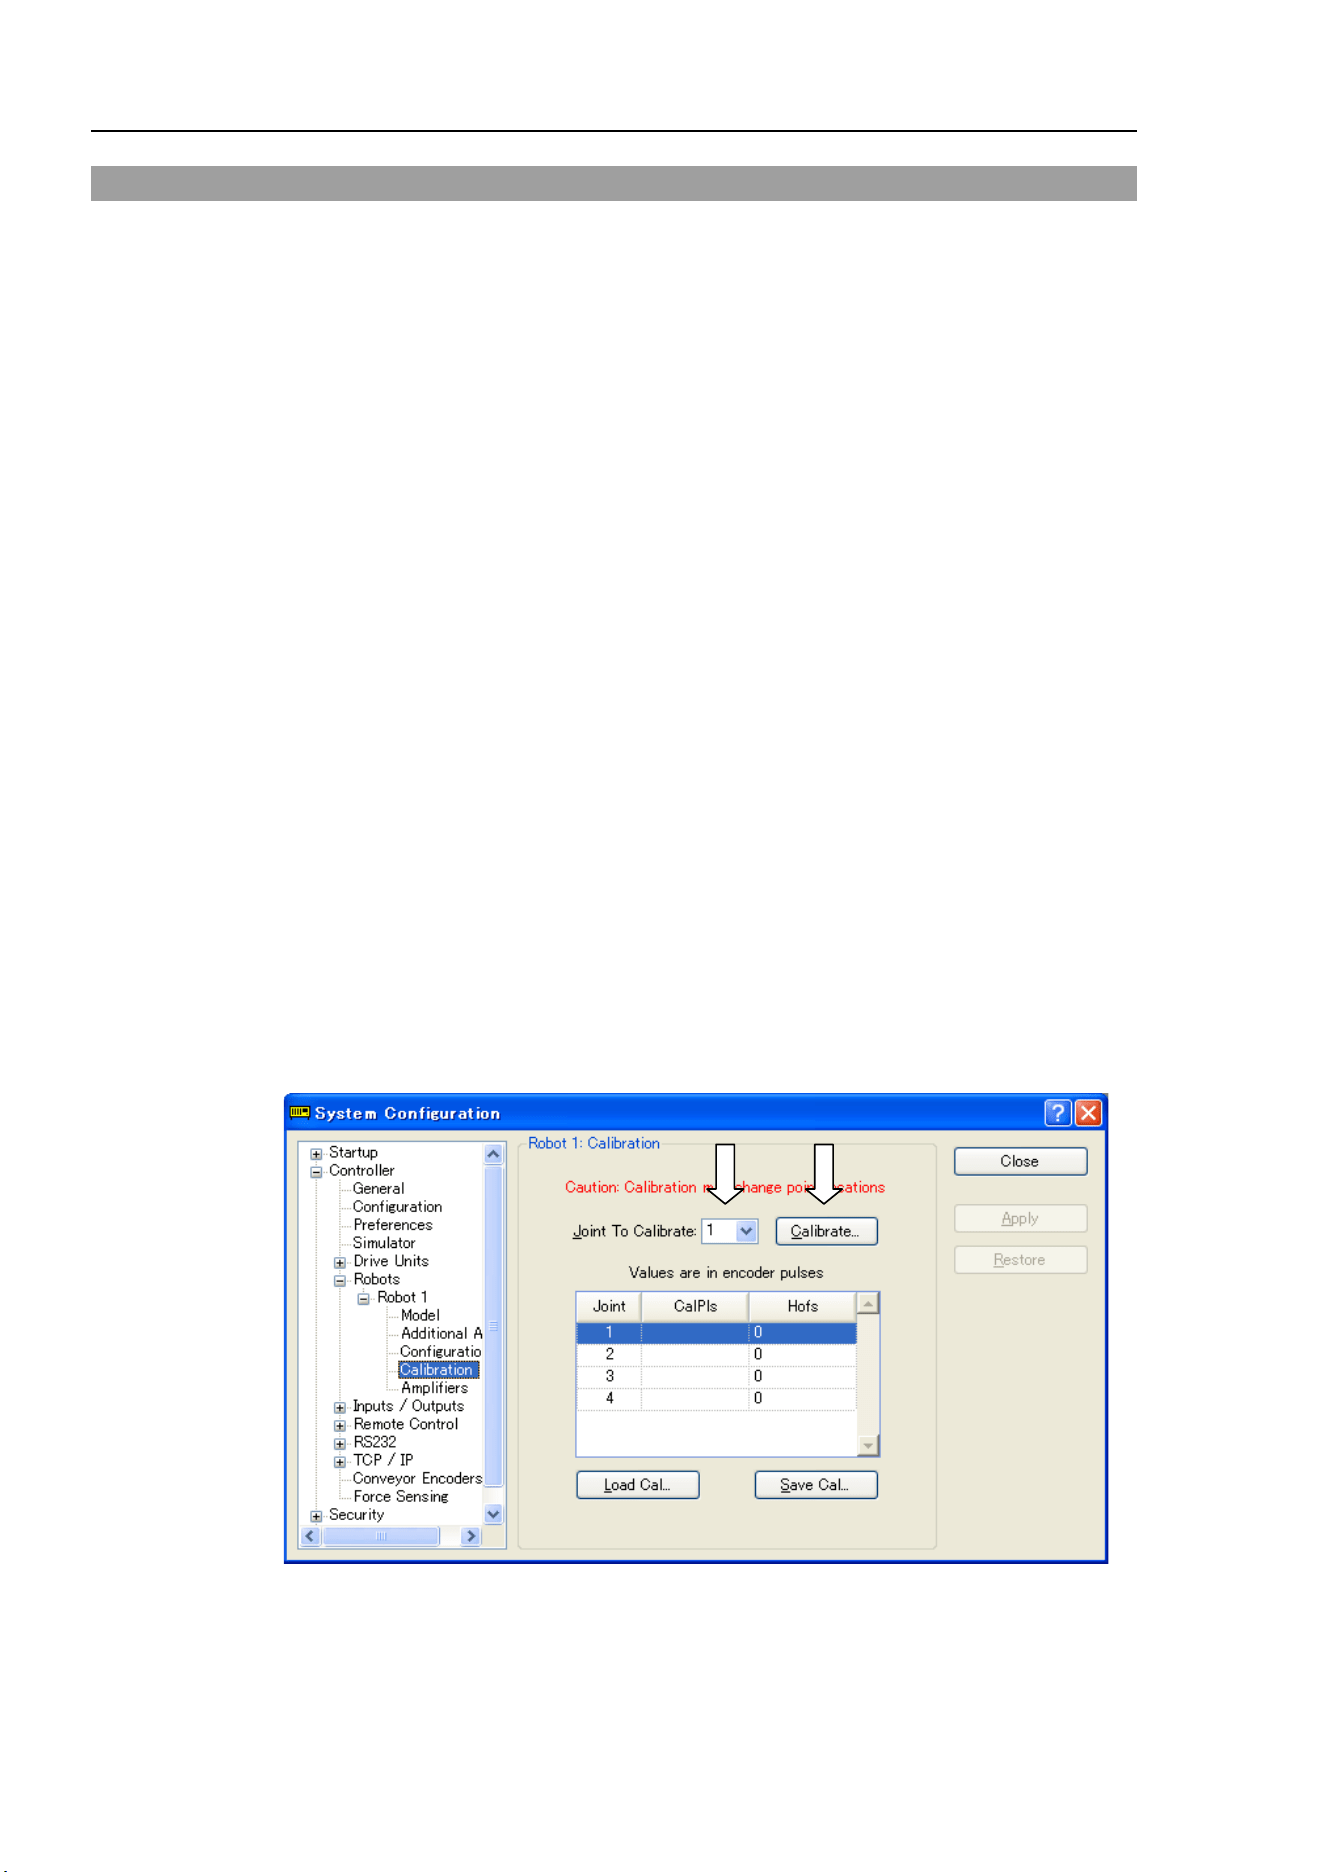
Maintenance 13. Calibration
150 LS10-B Rev.6
13.2 Calibration Procedure
EPSON RC+ has a wizard for calibration.
This section indicates the calibration using the calibration wizard of EPSON RC+.
The same calibration procedure is used for each joint.
The follow the steps below are calibration using Joint #1. Follow the steps below to
calibrate other joints.
When coordinates for the Manipulator working point require calculation, it is important for
Joint #2 to be calibrated accurately. Execute the procedure in “Calibration Using Right /
Left Arm Orientations” to accurately calibrate Joint #2. For details, refer to Maintenance:
13.3 Accurate Calibration of Joint #2.
When calibrating Joint #4, you must calibrate Joint #3 and #4 at the same time. You cannot
calibrate Joint #4 alone because of the structure of the Manipulator.
If Err9716 or 5016 (Power supply failure of the absolute encoder. Replace the battery.
Check the robot internal wiring) occurs, apply the procedure of 13.4 Calibration Procedure
without using Calibration Wizard - 3. Encoder Initialization and then, start the calibration
wizard.
The reference point (a point to check the accuracy) needs to be specified for calibration.
(1) Start the calibration wizard.
i. Select EPSON RC+ 7.0 menu - [Setup] to display the [System Configuration]
dialog.
ii. Select [Robots]-[Robot**] to display [Calibration].
iii. Select the joint and click the <Calibrate…> button.
NOTE
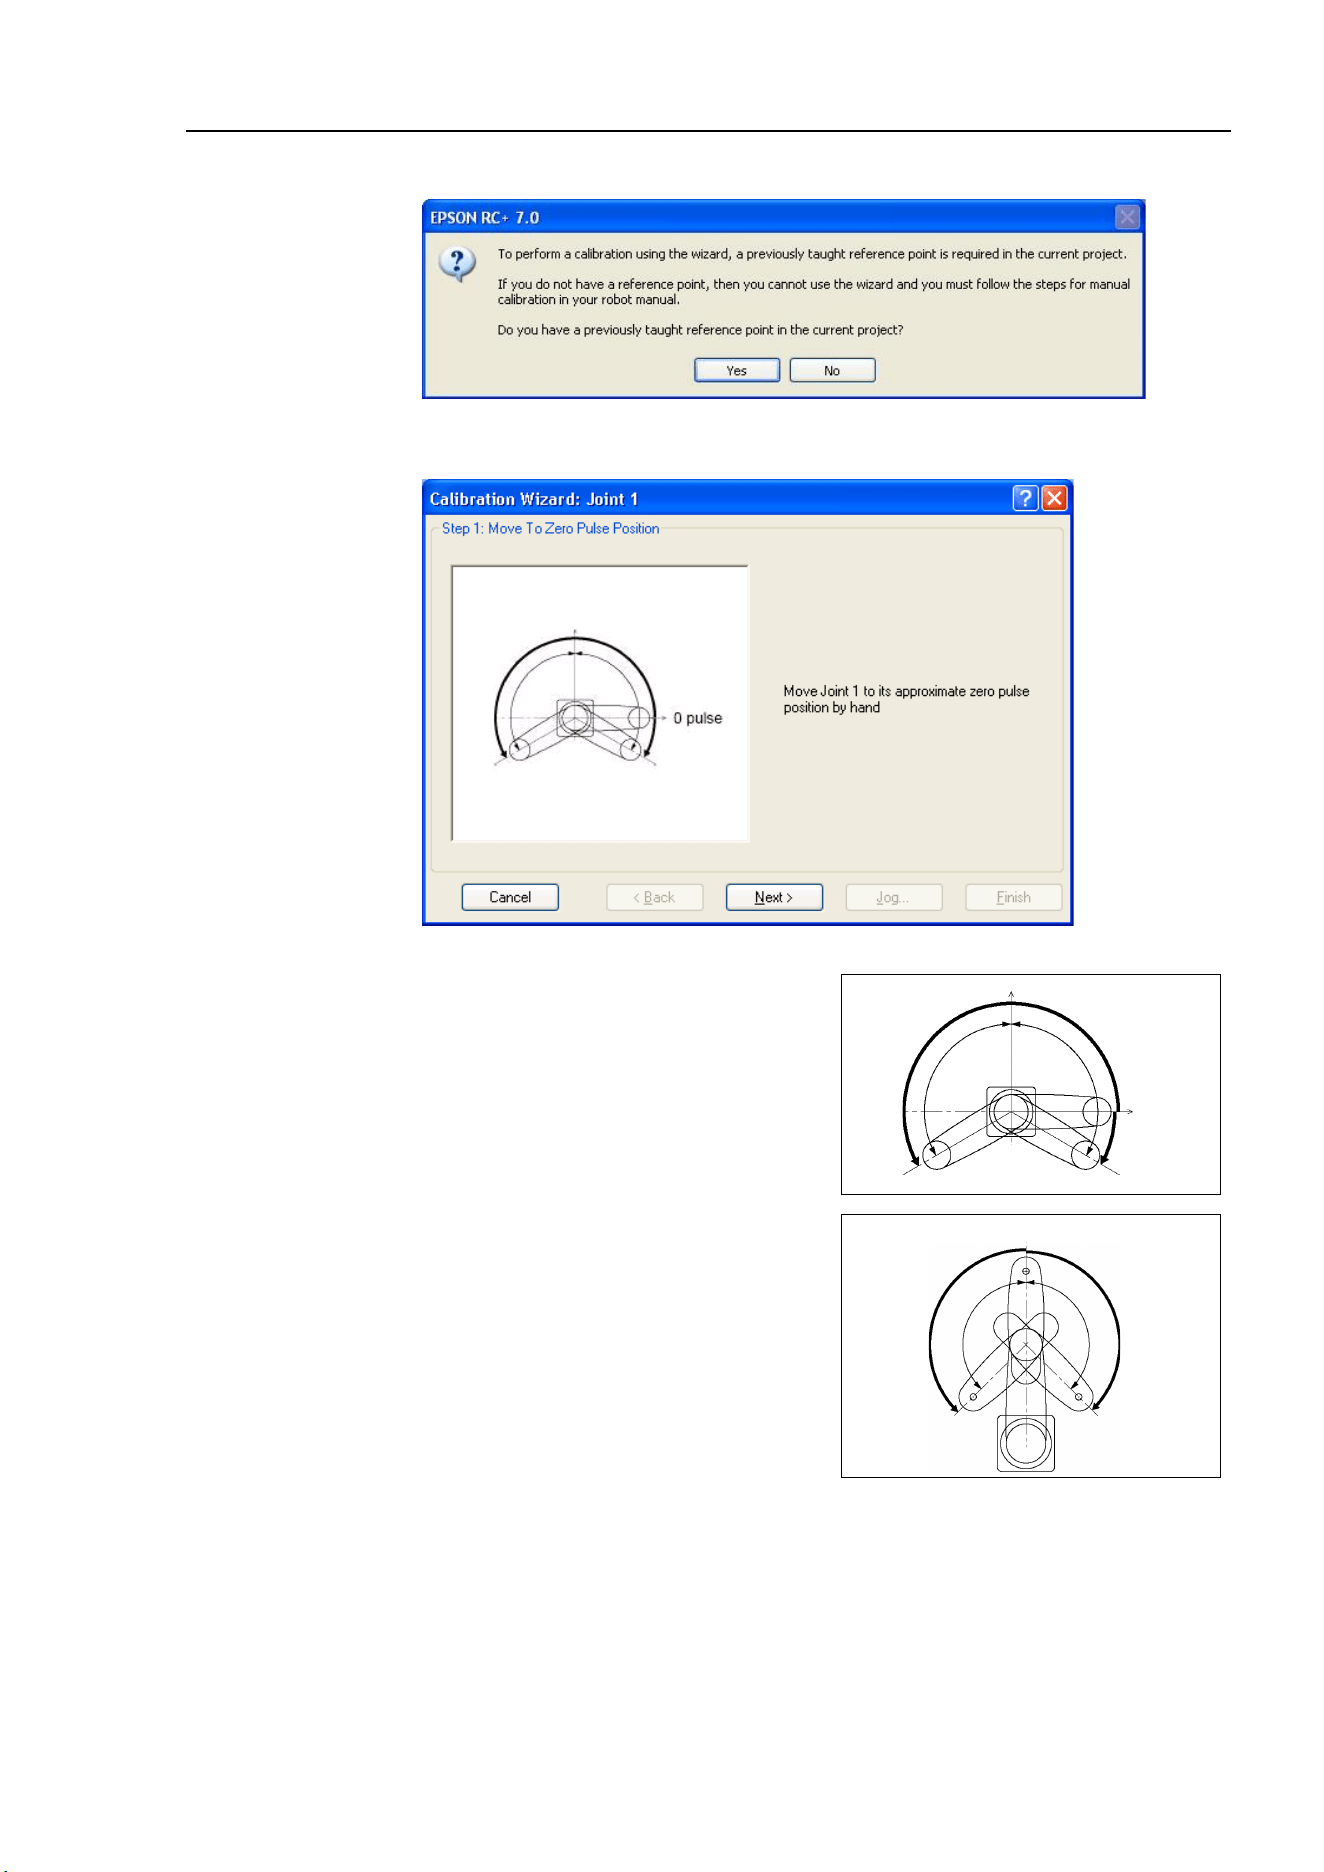
Maintenance 13. Calibration
LS10-B Rev.6 151
(2) Confirm the warning message and click the <Yes> button.
(3) Move the joint to calibrate manually to approximate zero position, as shown in the
dialog. After moving the joint click the <Next> button.
0 pulse position of Joint #1:
position aligned with X-axis in
Robot coordinate system
0 pulse
+
−
0 pulse position of Joint #2:
position where Arms #1 and #2
are in a straight line
(Regardless of the Joint #1
direction.)
0 pulse
+
−
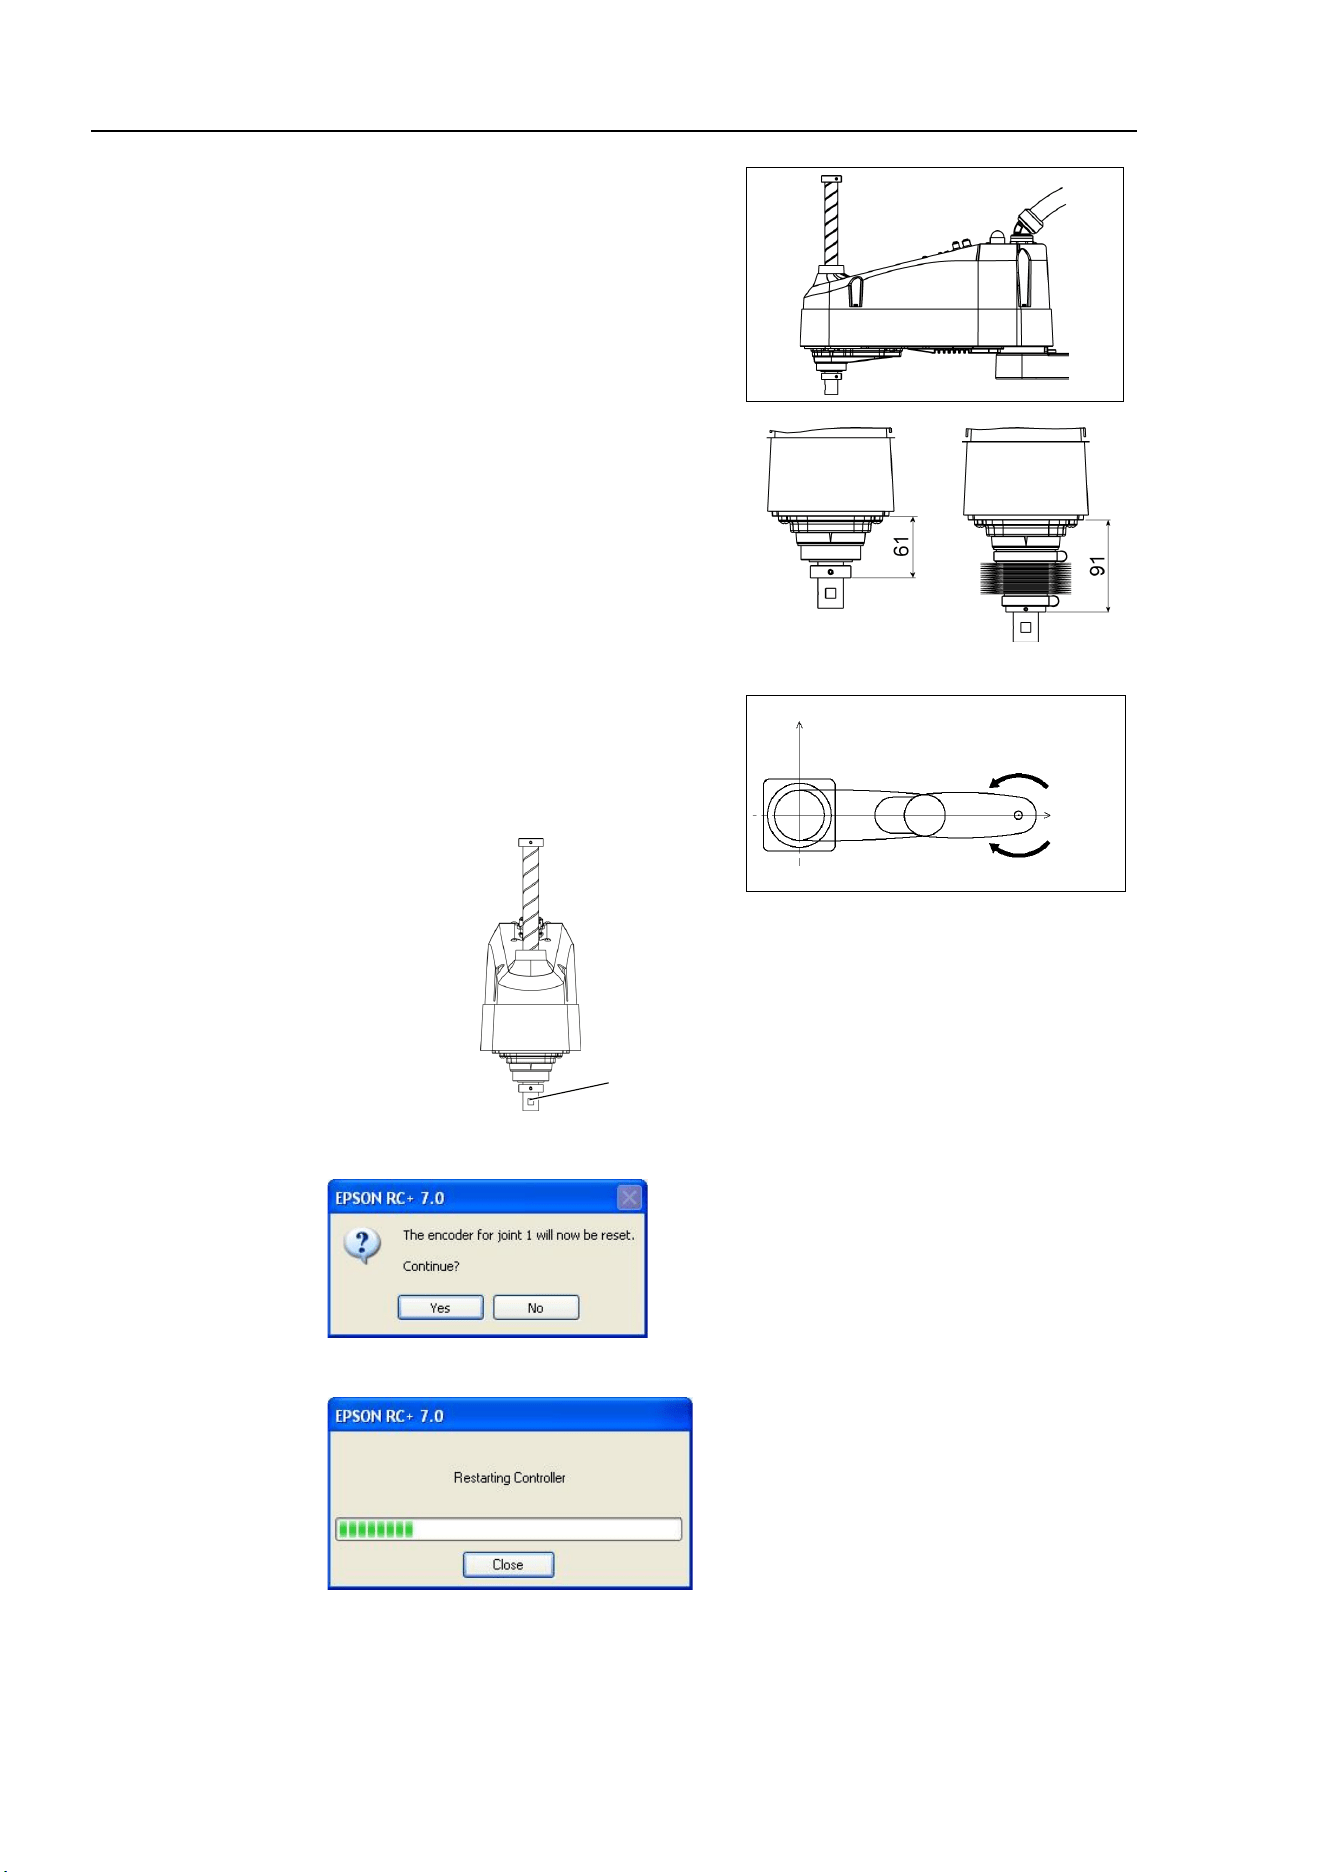
Maintenance 13. Calibration
152 LS10-B Rev.6
0 pulse position of Joint #3:
upper limit position in motion
range
The height of Joint #3 depends on
manipulator model.
Standard model
Cleranroom model
0 pulse position of Joint #4:
position where the flat surface
on the shaft faces toward the tip
of Arm #2
Flat surface
0 pulse
+
−
(4) Click the <Yes> button to reset the encoder.
(5) Reboot the Controller.
* This window will disappear when the Controller starts up.
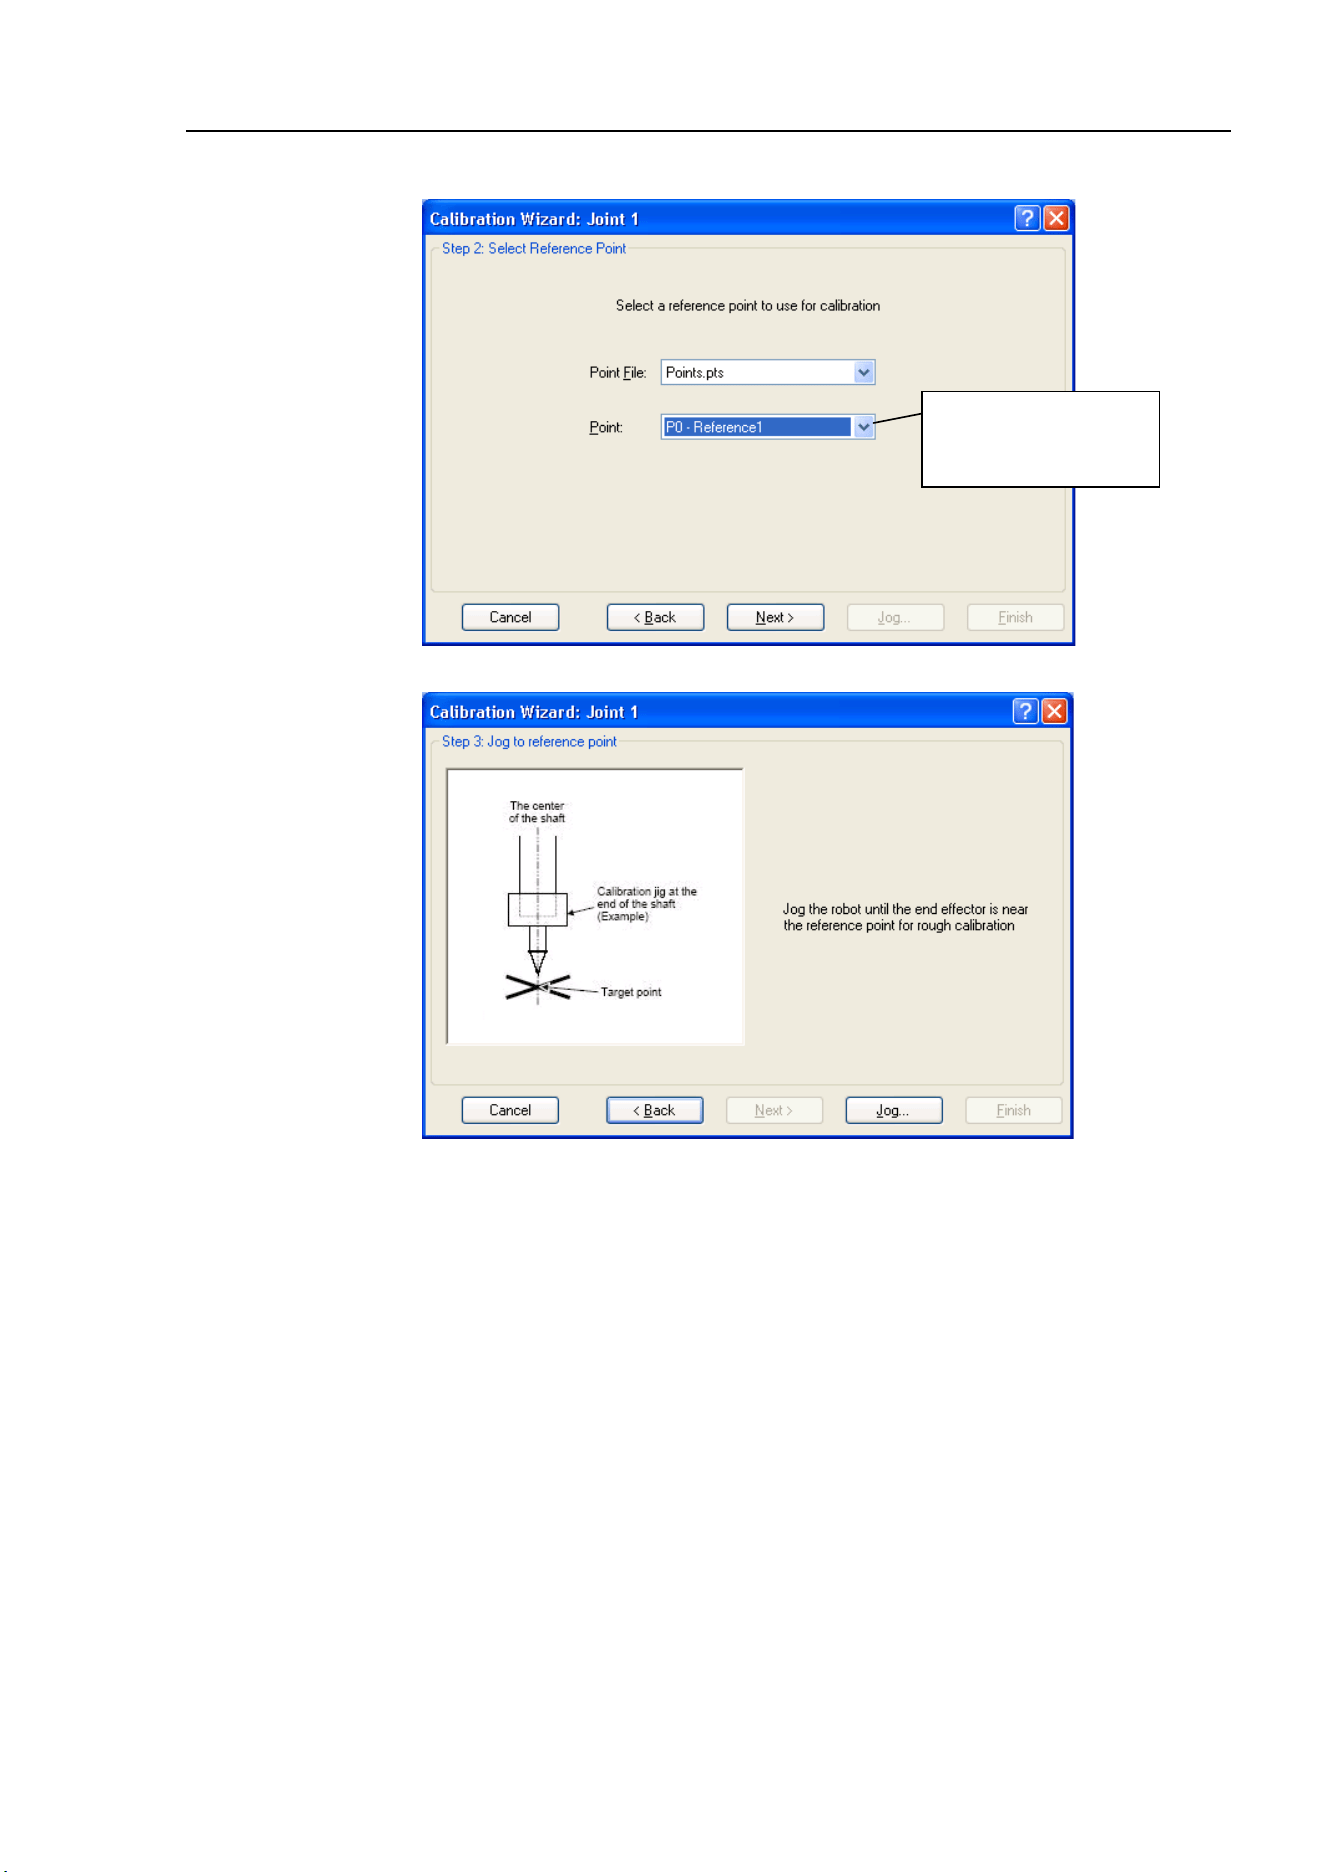
Maintenance 13. Calibration
LS10-B Rev.6 153
(6) Select the reference point to use for calibration, and click the <Next> button.
Select a point from the
current points to use for
checking the accuracy.
(7) Click the <Jog…> button to display the [Jog & Teach] dialog.
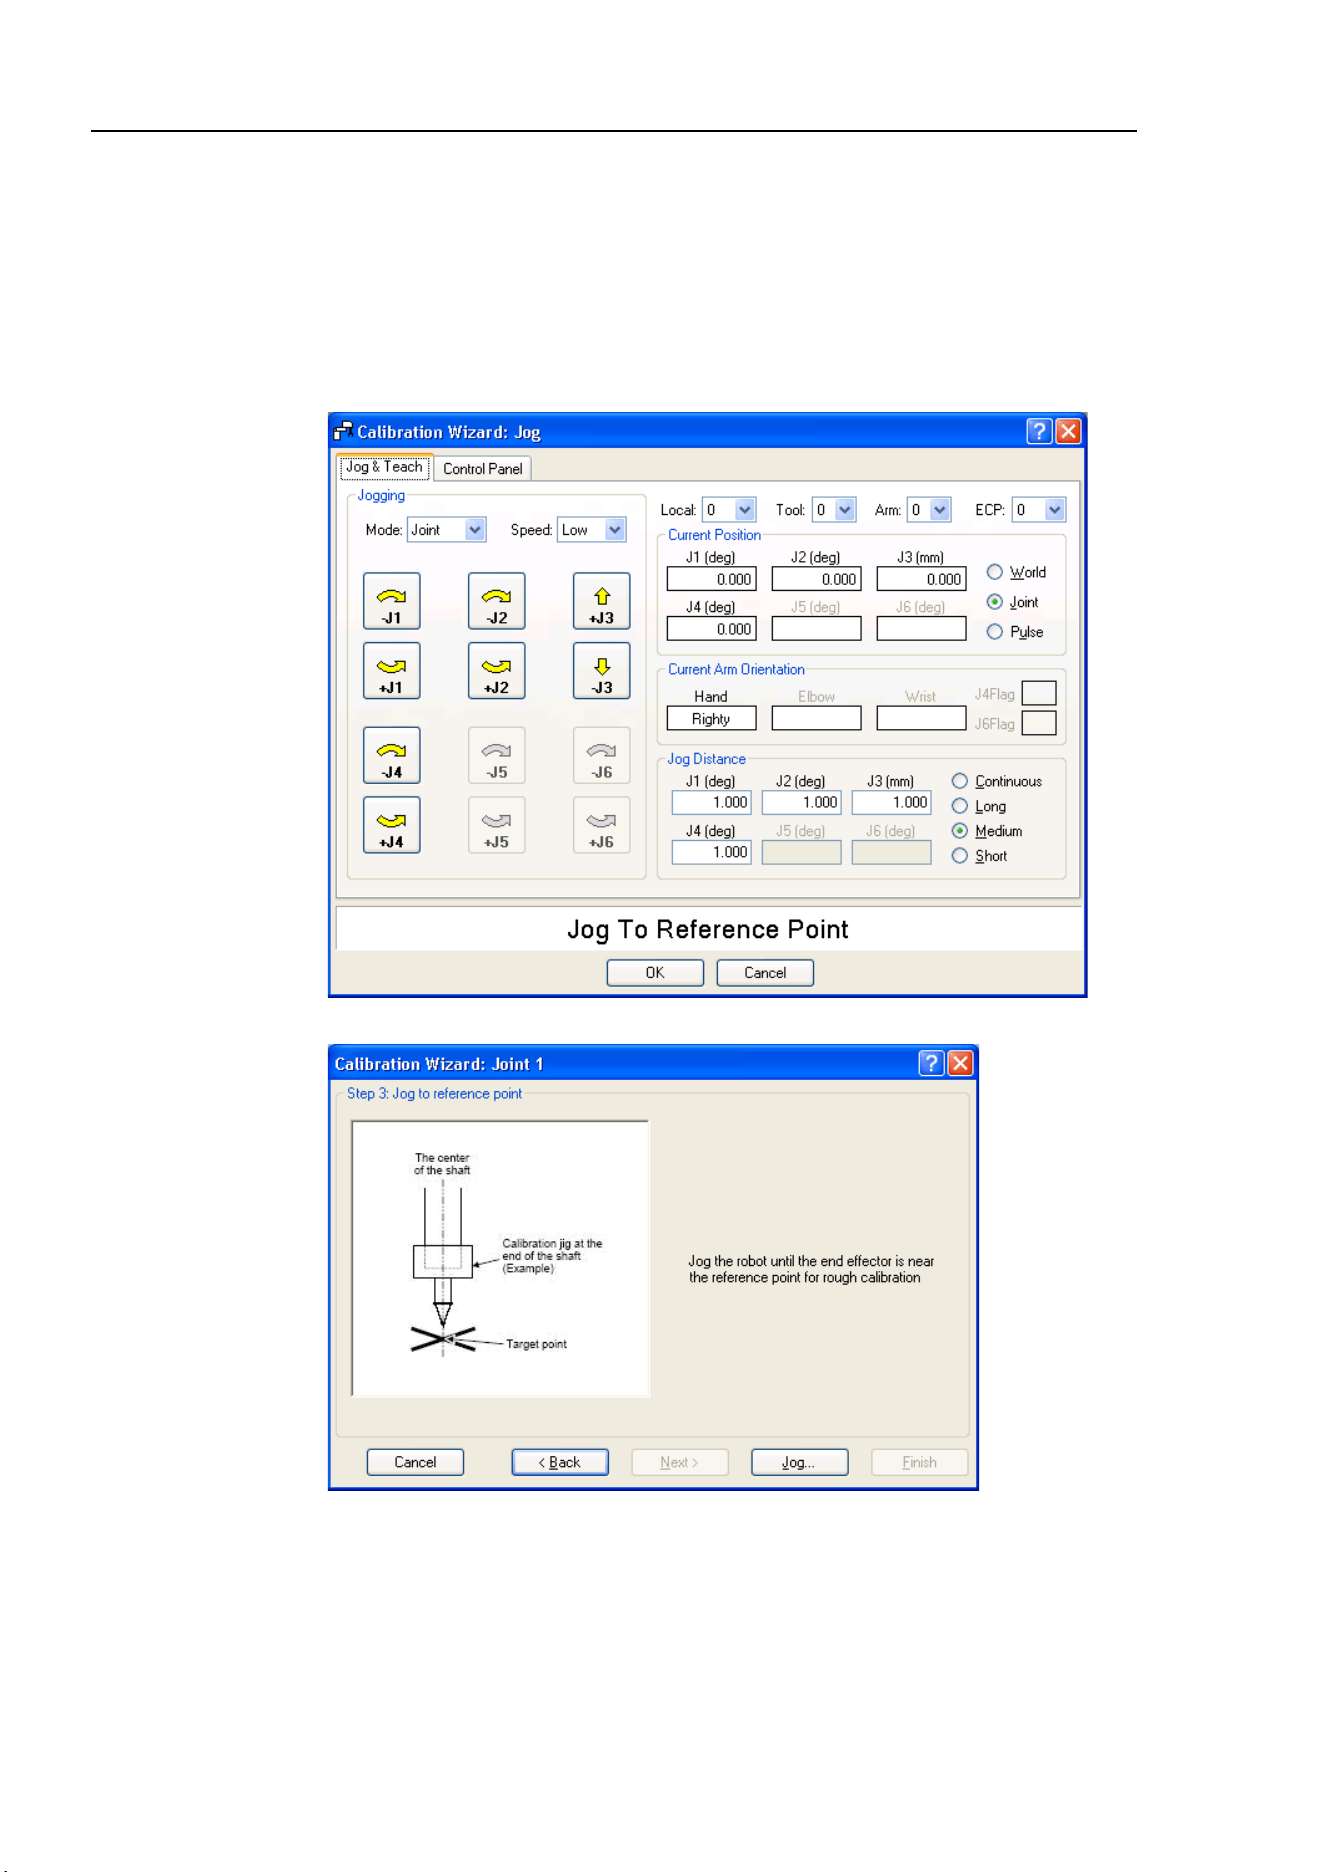
Maintenance 13. Calibration
154 LS10-B Rev.6
(8) Jog the end effector to approximate reference point in the [Jog & Teach] dialog for
rough calibration. Then click the <OK> button.
Before operating the robot, open the [Control Panel] and click on the <Motor ON>
button.
Move the end effector from the zero pulse position to the approximate reference point
where rough calibration will be executed at by the jog motion. Position gap may occur
if the end effector is not moved by the jog motion.
(9) Click the <Next> button.
NOTE
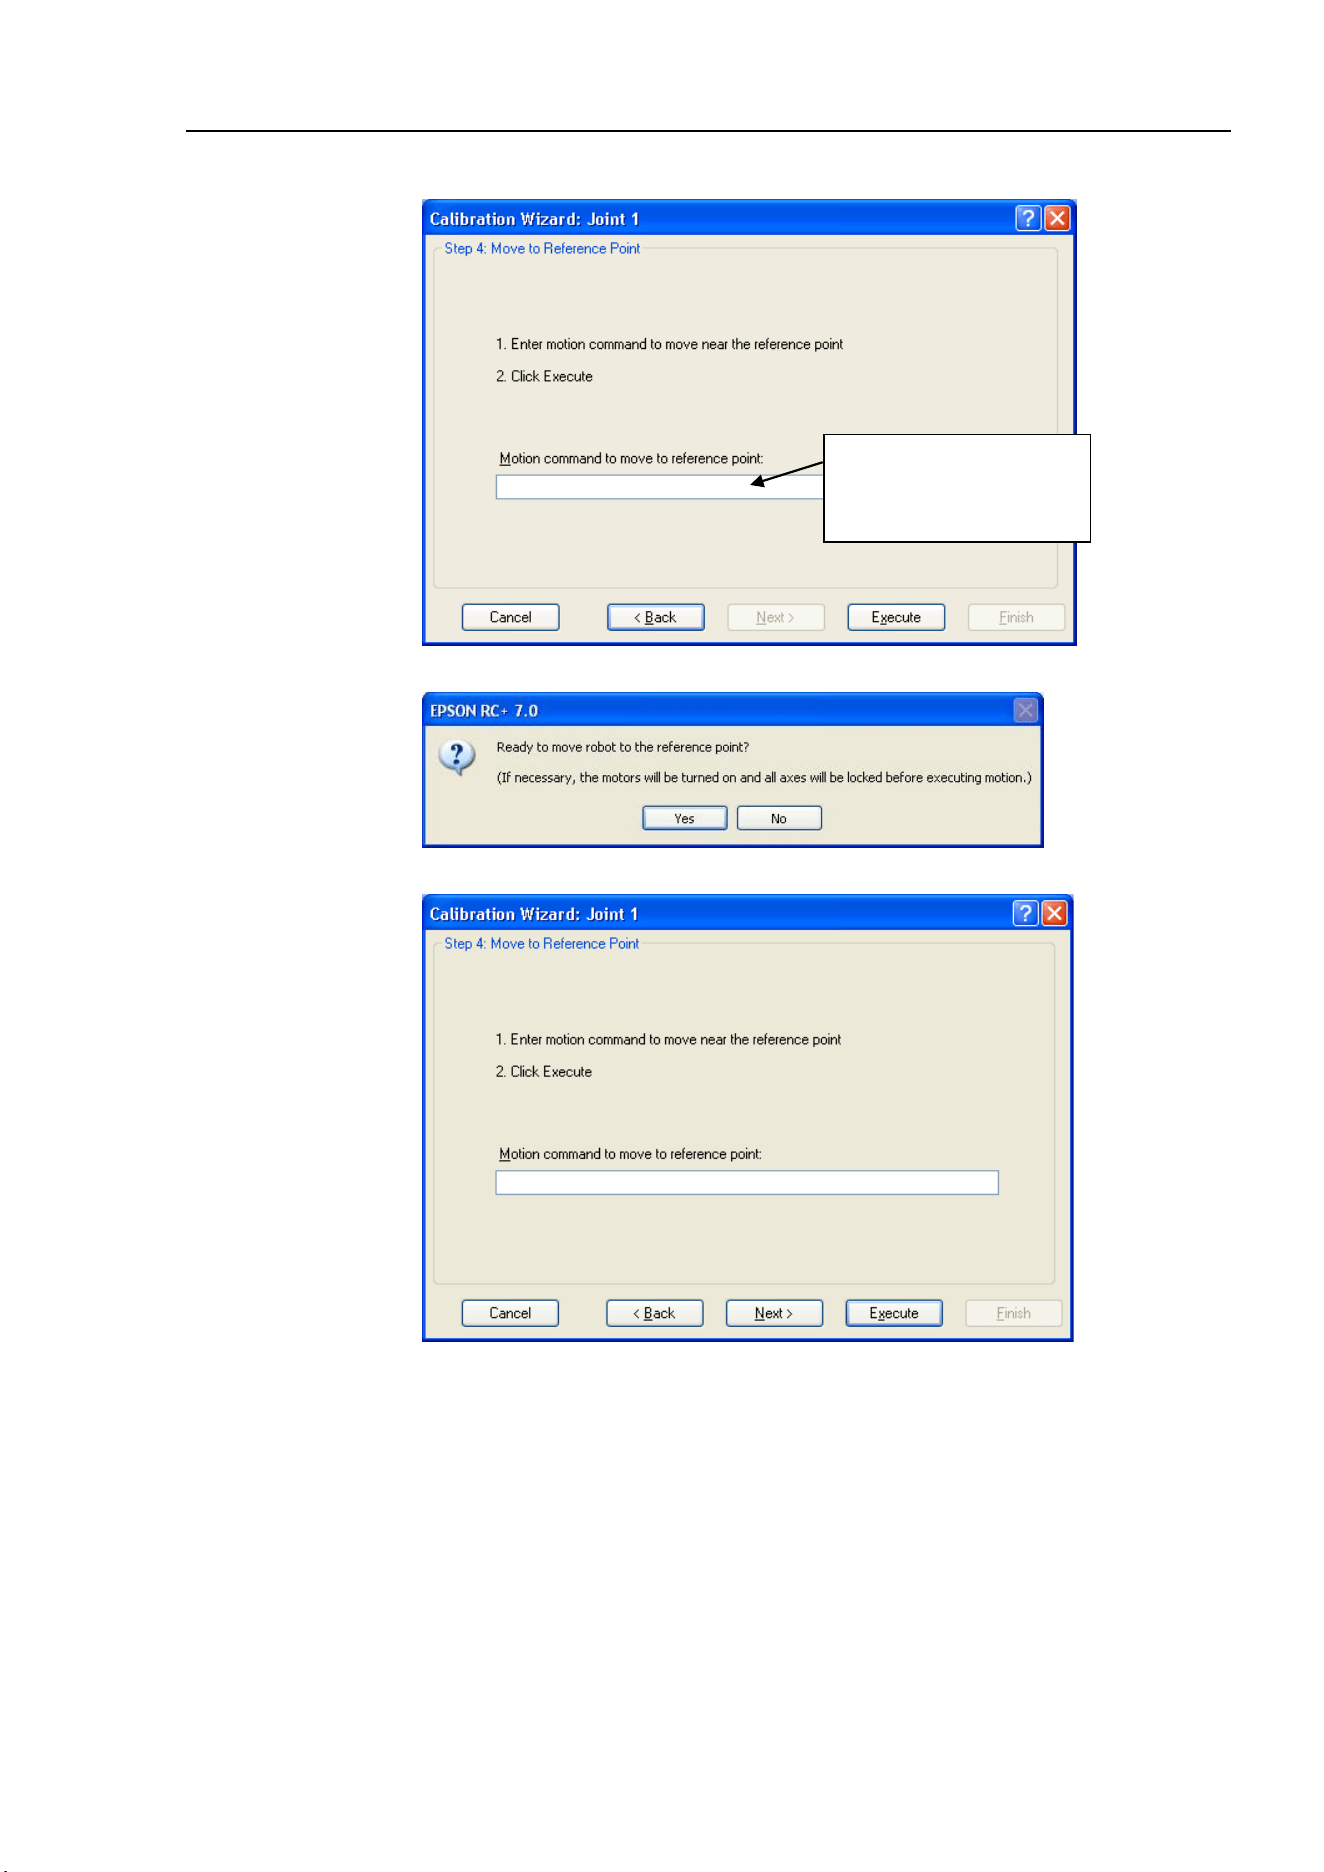
Maintenance 13. Calibration
LS10-B Rev.6 155
(10) The manipulator moves to the reference point. Click the <Execute> button.
Input JUMP P0:z(0).
↑
Point selected in step (6)
(11) Confirm the message and click the <Yes> button.
(12) After the manipulator moves to the reference point, click the <Next> button.
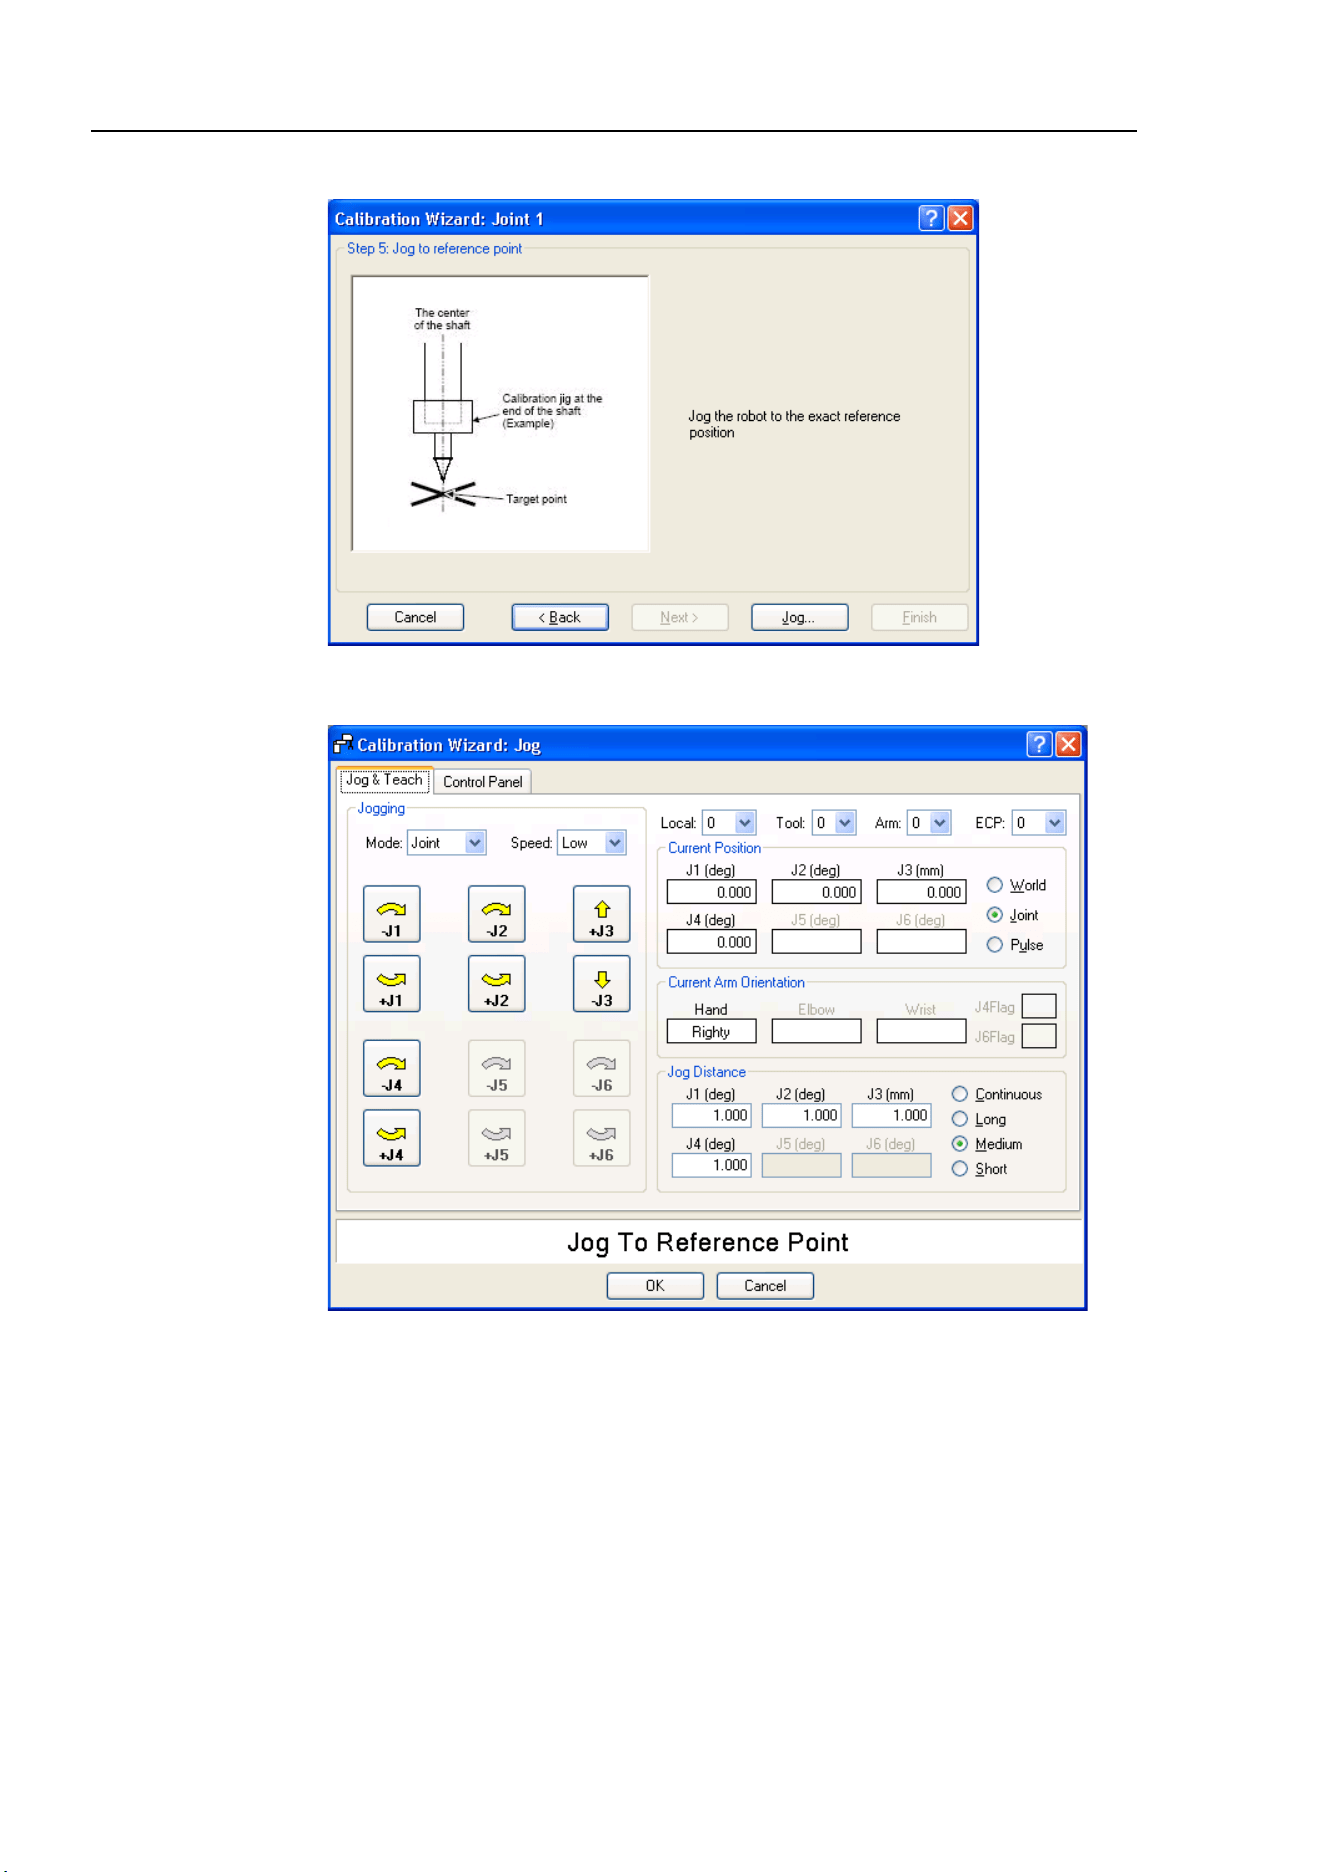
Maintenance 13. Calibration
156 LS10-B Rev.6
(13) Jog to the accurate reference position.
(14) Jog the end effector to approximate reference point in the [Jog & Teach] dialog for
rough calibration. Then click the <OK> button.
* Position Joint #2 only and move Joint #3 to around 0 pulse.
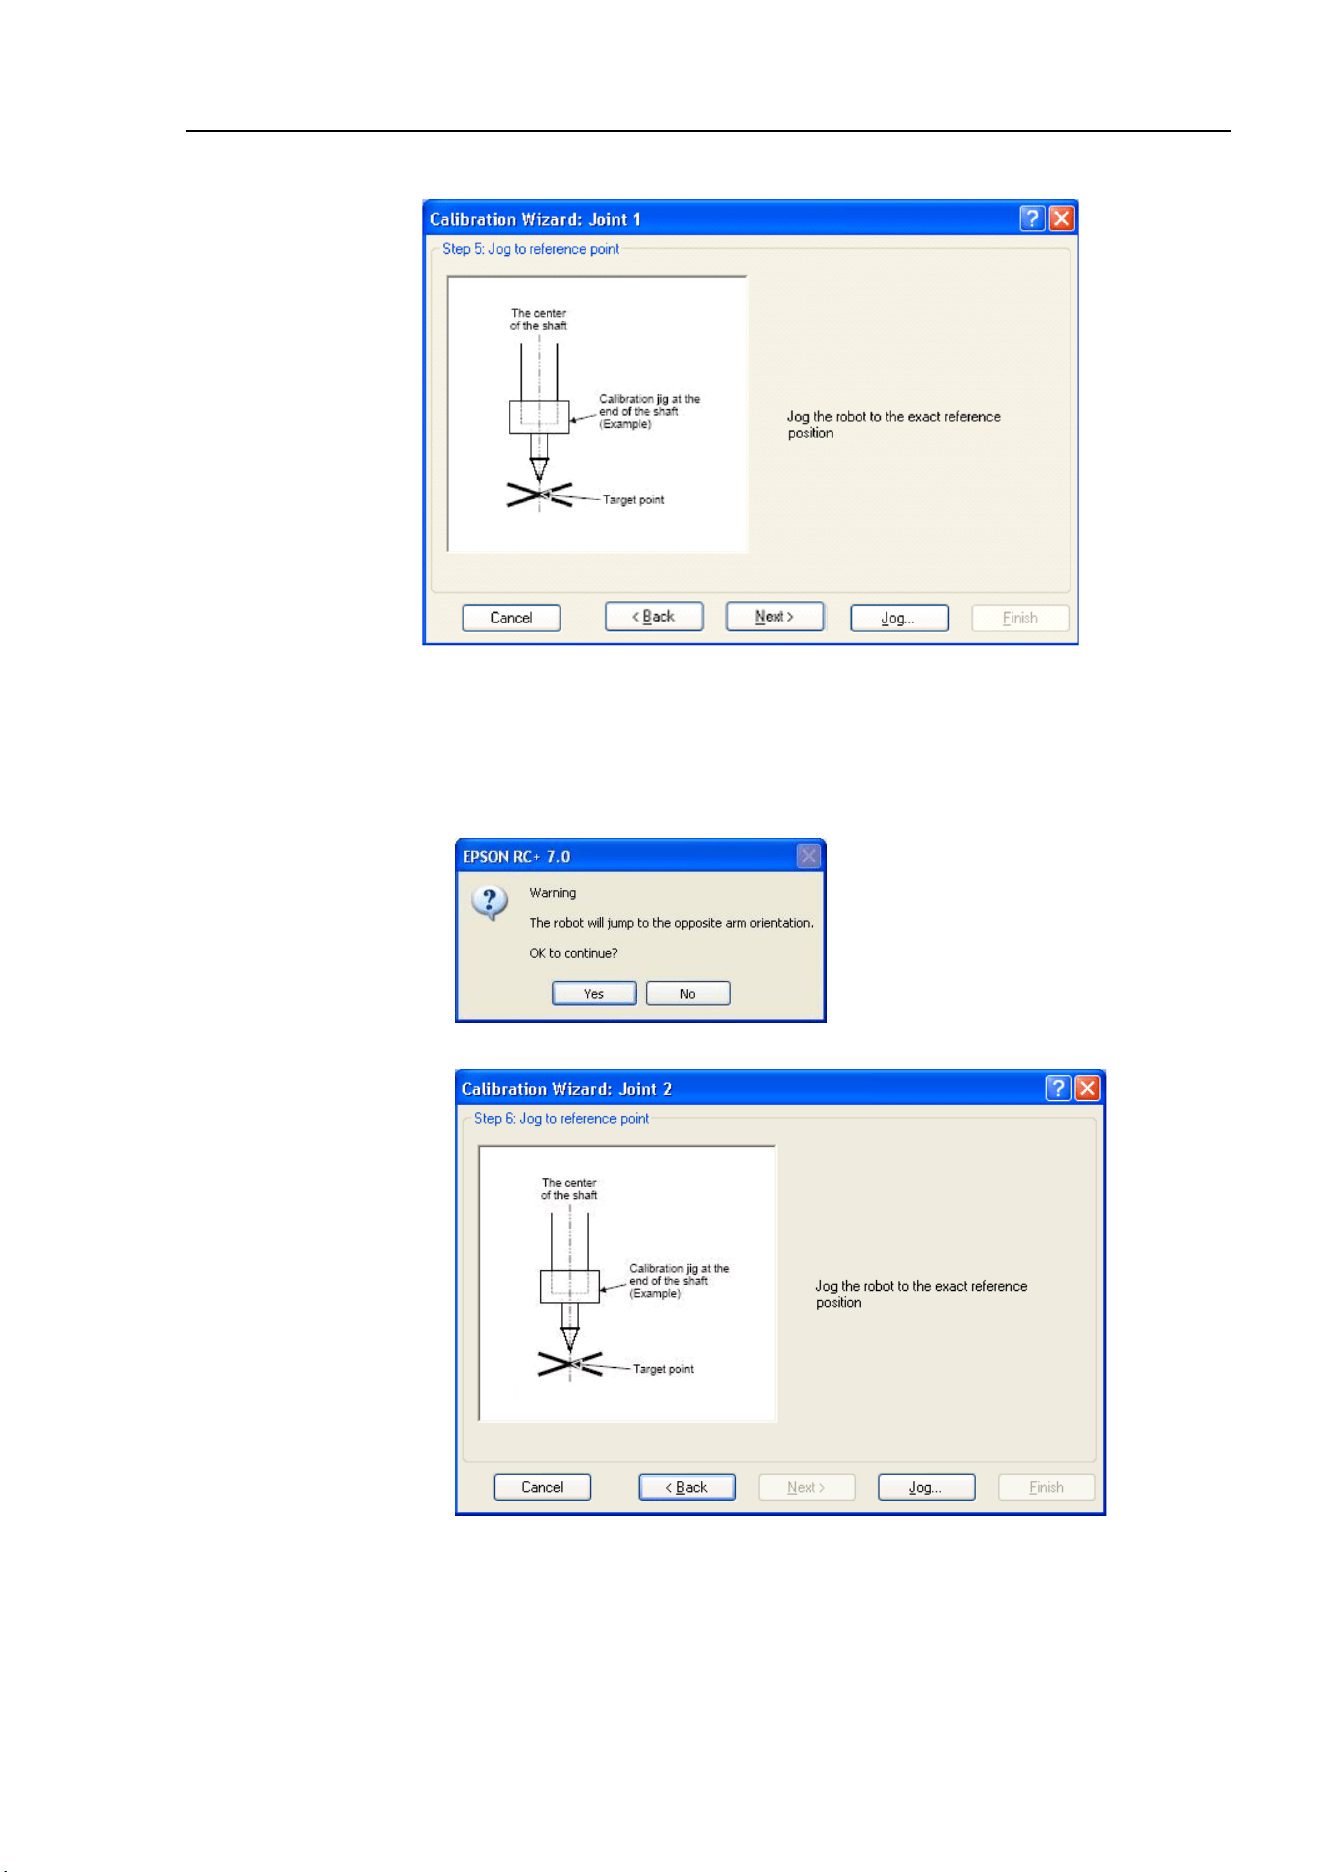
Maintenance 13. Calibration
LS10-B Rev.6 157
(15) Click the <Next> button.
(16) Execute the procedure in “Calibration Using Right / Left Arm Orientations” to
accurately calibrate Joint #2.
Go on to the step (17) for the other joints calibration.
i. Move to another point that has different pose (from righty to lefty) using Jump
command. Click the <Yes> button.
ii. Jog to the accurate reference position.
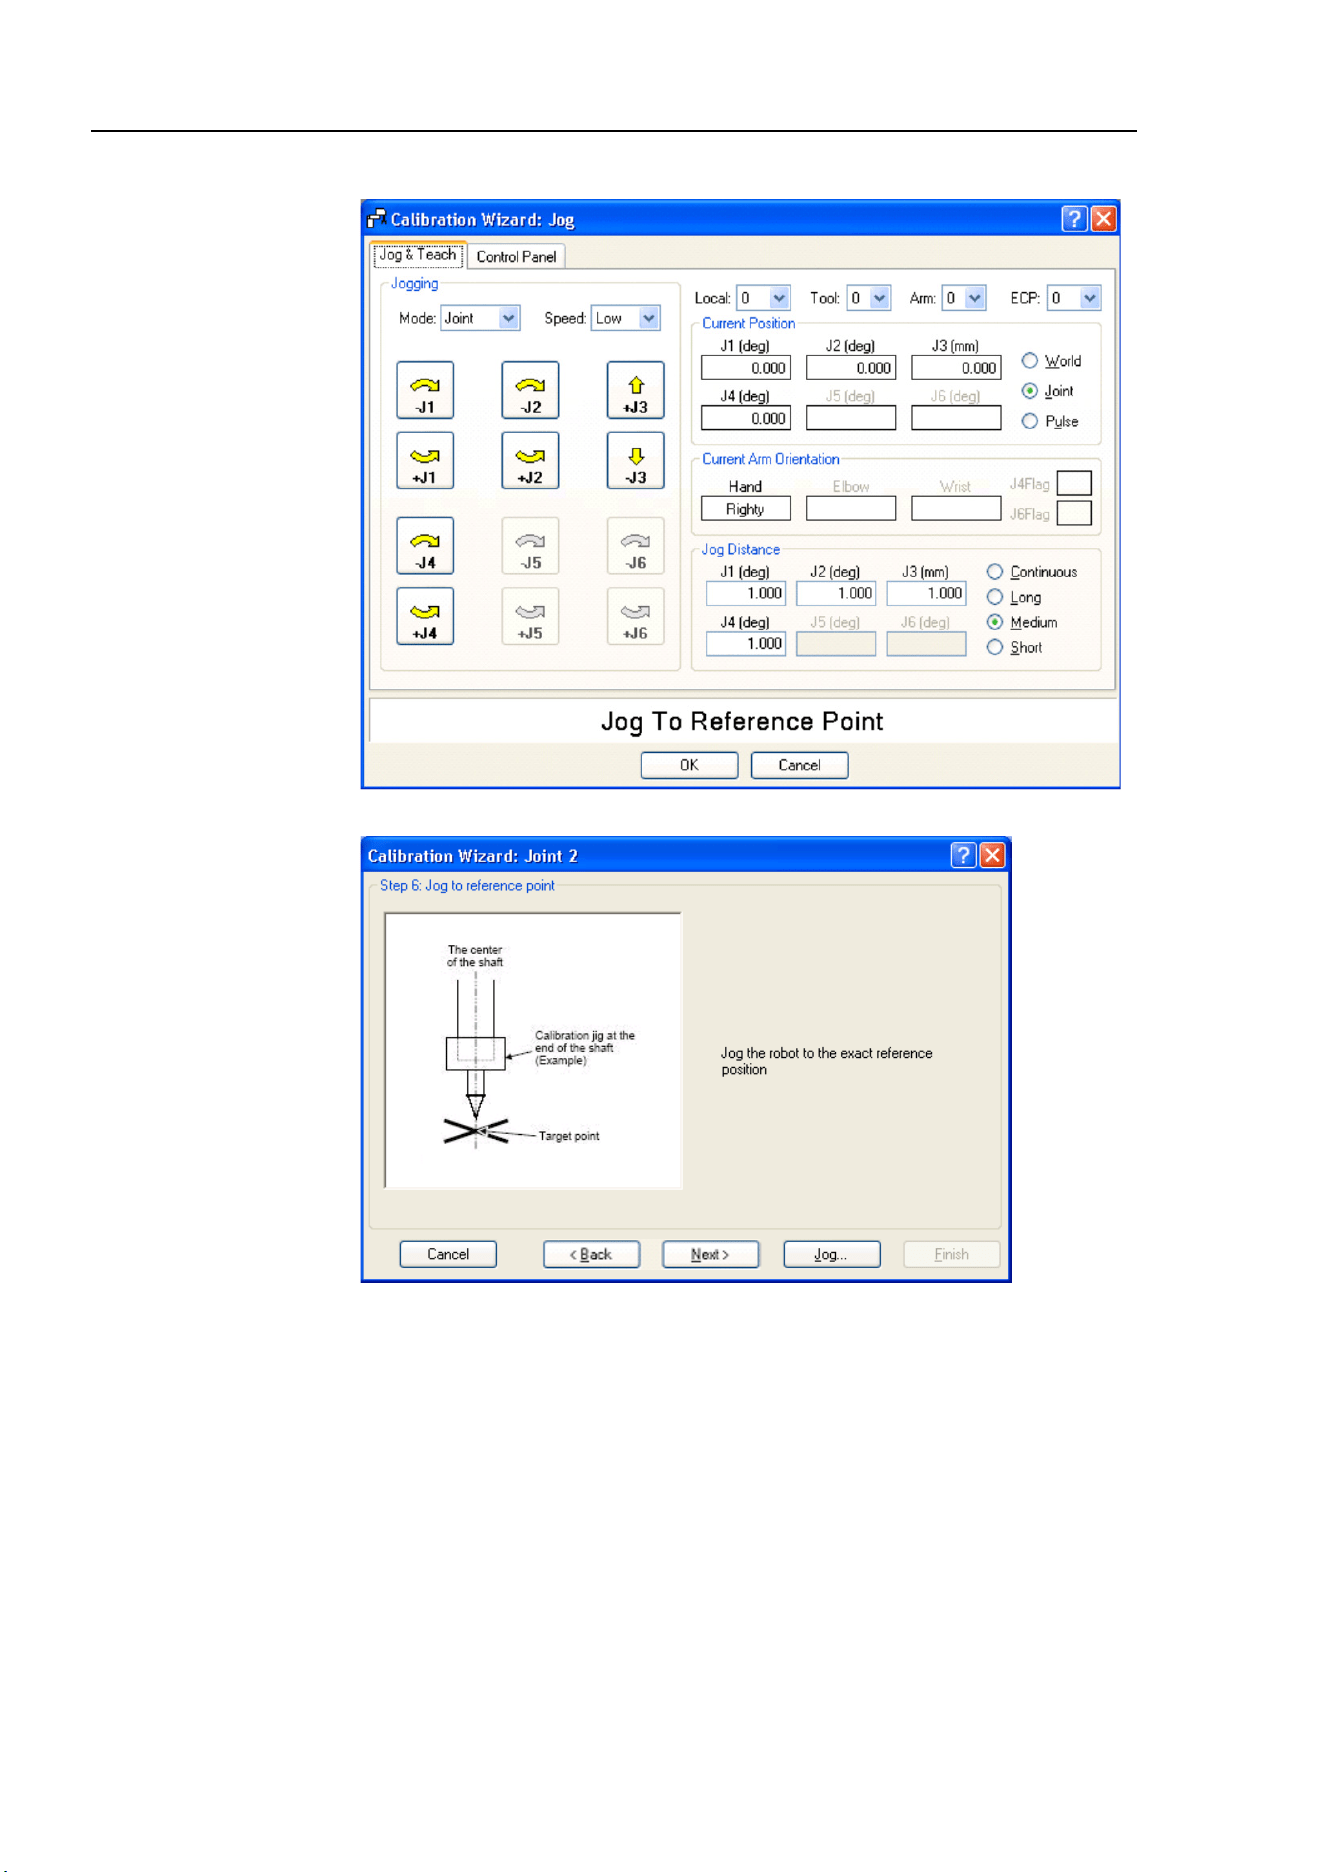
Maintenance 13. Calibration
158 LS10-B Rev.6
iii. Jog to the accurate reference position and adjust the position. Click the <OK> button.
iv. Click the <Next> button.
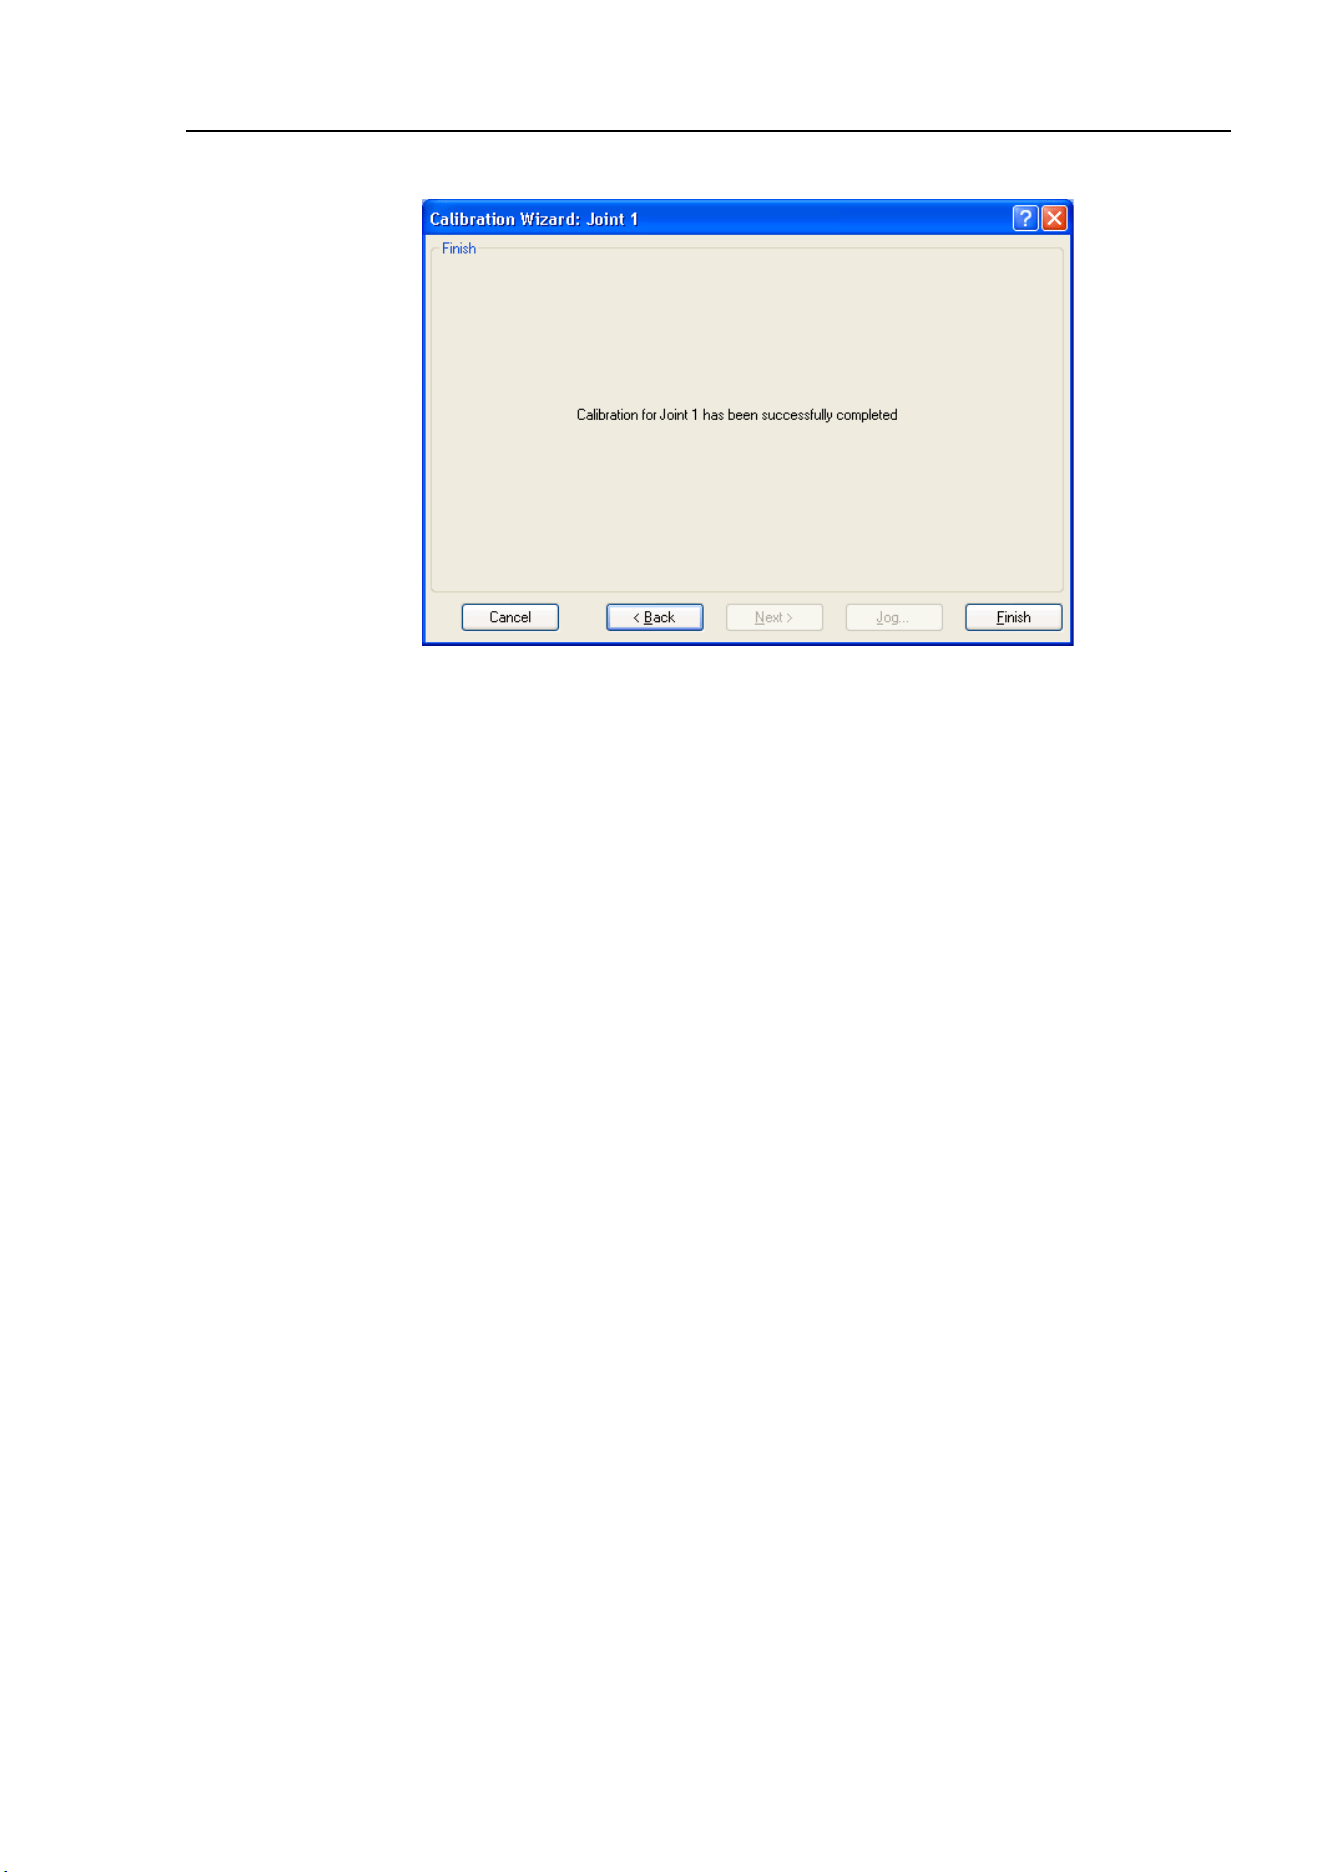
Maintenance 13. Calibration
LS10-B Rev.6 159
(17) Calibration is complete. Click the <Finish> button.
(18) Move the manipulator to other points and check if it can move without problems.
Teach points where appropriate.
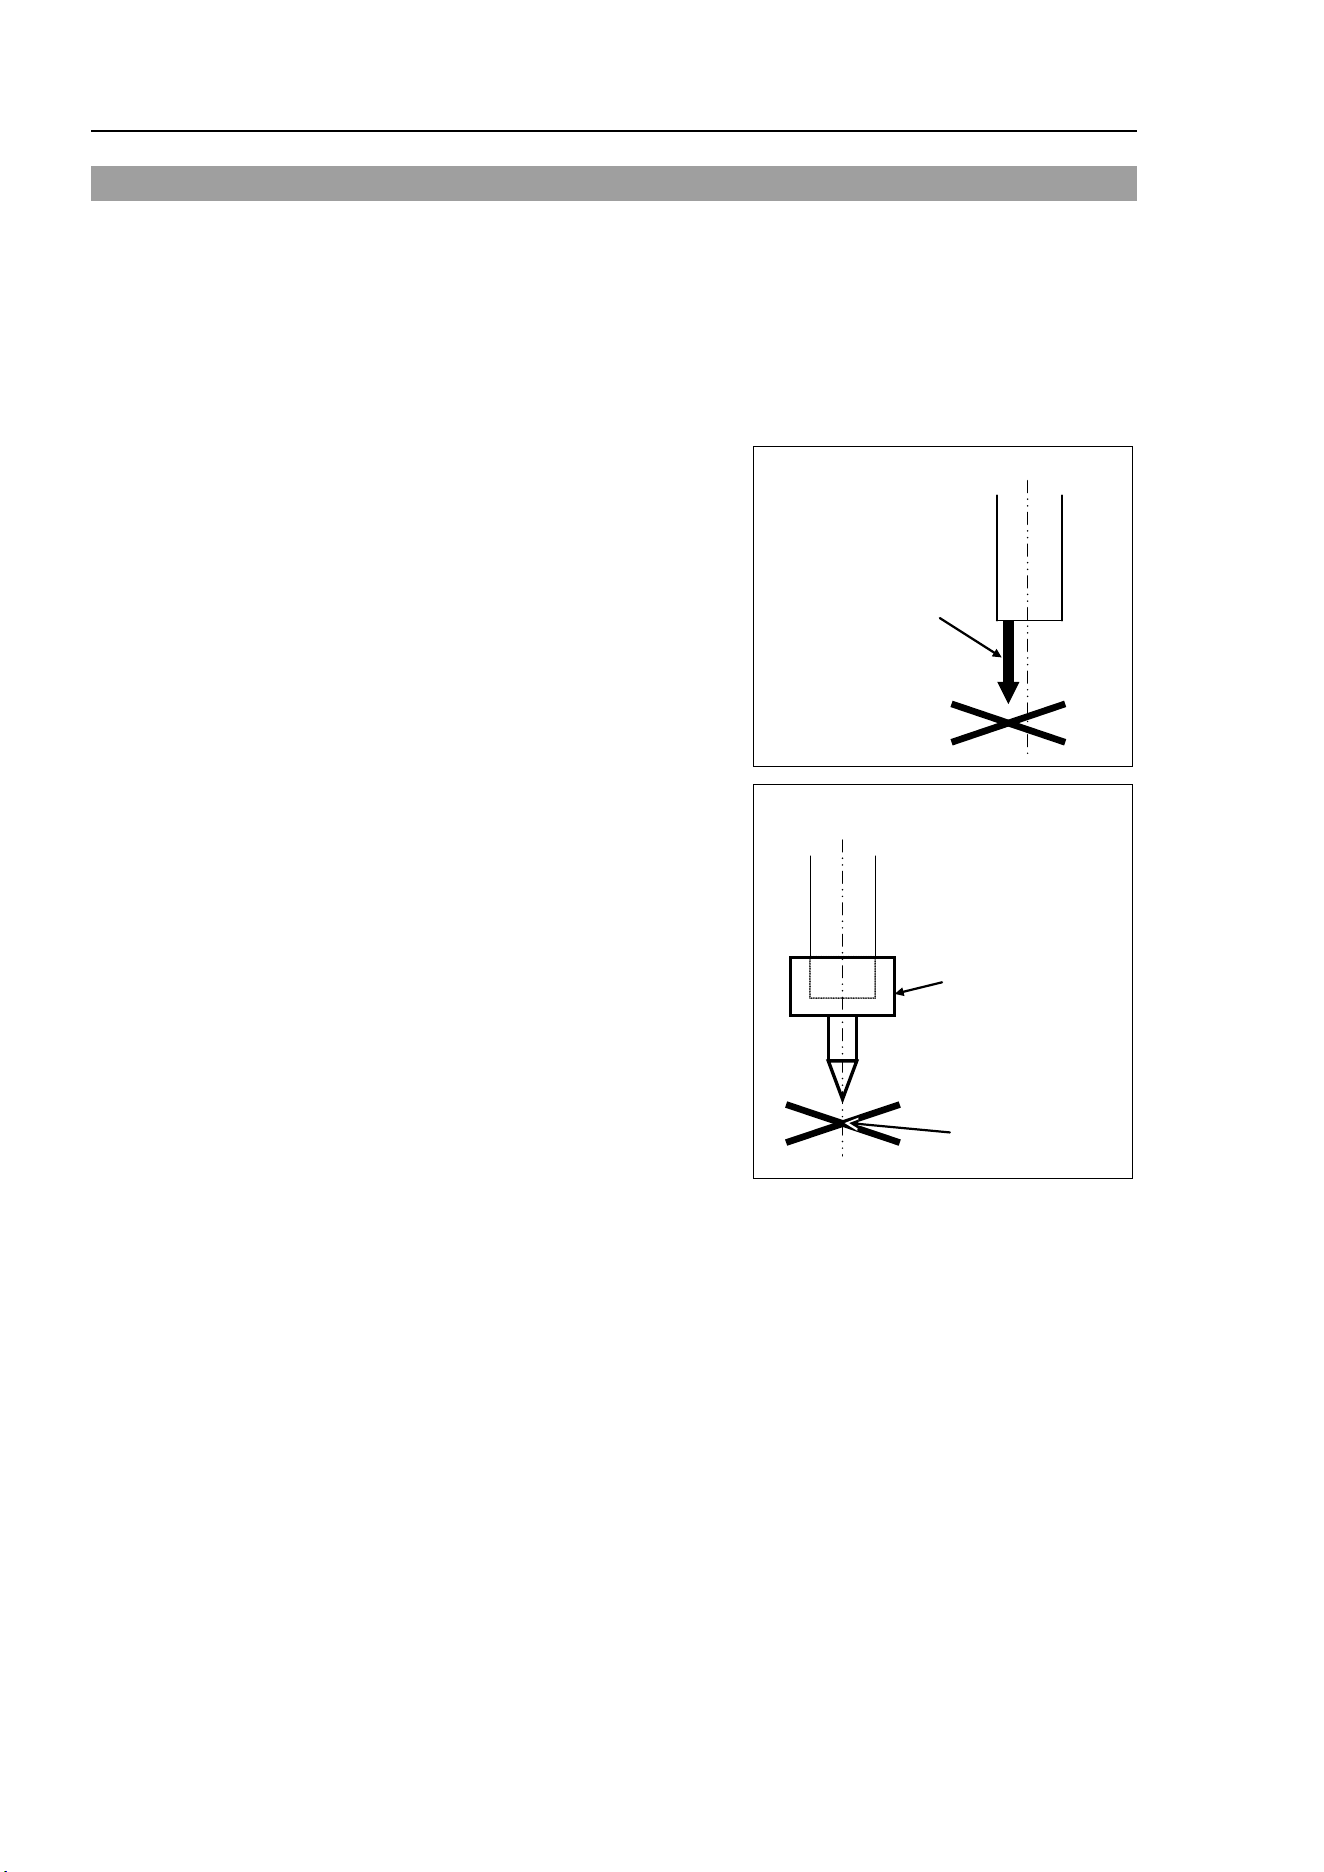
Maintenance 13. Calibration
160 LS10-B Rev.6
13.3 Accurate Calibration of Joint #2
When coordinates for the Manipulator working point require calculation, it is important for
Joint #2 to be calibrated accurately.
If the accuracy of Joint #2 is not obtained through the steps in the section Maintenance: 13.2
Calibration Procedure, follow the steps below “Calibration Using Right / Left Arm
Orientations” to accurately calibrate Joint #2.
The reference point is the center of the ball screw
spline shaft during this calibration.
When there is a misalignment between the center
of the end effector and the center of the ball screw
spline shaft, remove the end effector and execute
the calibration of the shaft.
The center of the shaft
There is a misalignment
between the center of
the end effector and the
center of the shaft.
Make a calibration jig as shown in the right figure
and attach it on the end of the shaft to make the
center of the shaft clear.
Decide a target point and mark a cross (
×
) on it
so that you can easily verify the center of the
shaft after switching the arm pose between right
and left.
Calibration jig at the
end of the shaft
(Example)
Target point
The center
of the shaft
After removing the end effector and
executing the calibration
, install the end effector and
move the Manipulator to the teaching point to verify whether there is a positional gap. If
there is a positional gap, fine
-tune the install
ation position of the end effector and teach the
point again.
Coordinates for the working point requires calculation in the following cases:
· Teaching the working point by entering the coordinate values (MDI teaching)
· Switching the arm orientation between right and left at a given point
· Using the Pallet command
· Executing CP control (such as liner or circular interpolation)
· Using the Local command
· Pose data specified with relative coordinates <Example: P1+X(100) >
· Vision Guide camera calibrations
NOTE

Maintenance 13. Calibration
LS10-B Rev.6 161
Calibration Using Right / Left Arm Orientations
(1)
Check the point data for calibration
Use
a point you can easily verify the accuracy within the work envelop of
both right
and left arm
. Then, check the number of points you want to use.
(2)
EPSON RC+ menu
-[Tools]-[Robot Manager]-[Control Panel] and
click the MOTOR
ON.
(3)
Click the
<Free All> button
to free all joints from servo control. Now, you can move
arms by hands.
(4)
Move the arms to the position of point data for calibration in rightly arm orientation.
(5)
From the current position, teach any point data number unused.
This
point is now called P1.
Specify the point number
“1” and click the <Teach> button in the [Jog & Teach].
(6)
Click
the Lock All in the [Control Panel] to lock all joints under servo control.
(7)
Switch to the lefty arm orientation. Then, move the arm to the
same point.
>Jump P1/L:Z(0) ' Change the arm orientation from righty to lefty
Z is the maximum position
* If there is interference on the way from right to lefty, click the Free All in the [Control
Panel] and change the arm orientation to lefty by
hands. Then, go to the step (6),
(7).
(8)
The joints are slightly out of position.
Adjust the gap with the
−
Z in the Jogging group in the [Jog & Teach]. Then, teach
another point data number unused.
This point is now called P2.
Specify point number
“P2” and click the <Teach> button in [Jog & Teach].
(9)
Input the new Hofs value.
>
Hofs Hofs (1), Hofs (2) + (Ppls(P1,2) + Ppls(P2,2)) /
2, Hofs(3), Hofs(4)
(10)
From the current lefty arm
orientation
(the position in the step (8)), teach the point data
number used in the step (8).
This point is called P2.
Specify point number
“P2” and click the <Teach> button in [Jog & Teach].
(11)
Switch to the righty arm orientation. Then, make sure the manipulator move to the
correct position.
>Jump P2/R ' Change the arm orientation from lefty to righty
* If there is any interference on the way from lefty to righty, click the Free All in the
[Control Panel] and change the arm orientation to righty by hands. Then, go to the
step (6), (11).
(12)
Move the manipulator to other point data and make sure it moves to the correct position.
Teach some more points if required.
* Delete the two points taught for the Joint #2 calibration.
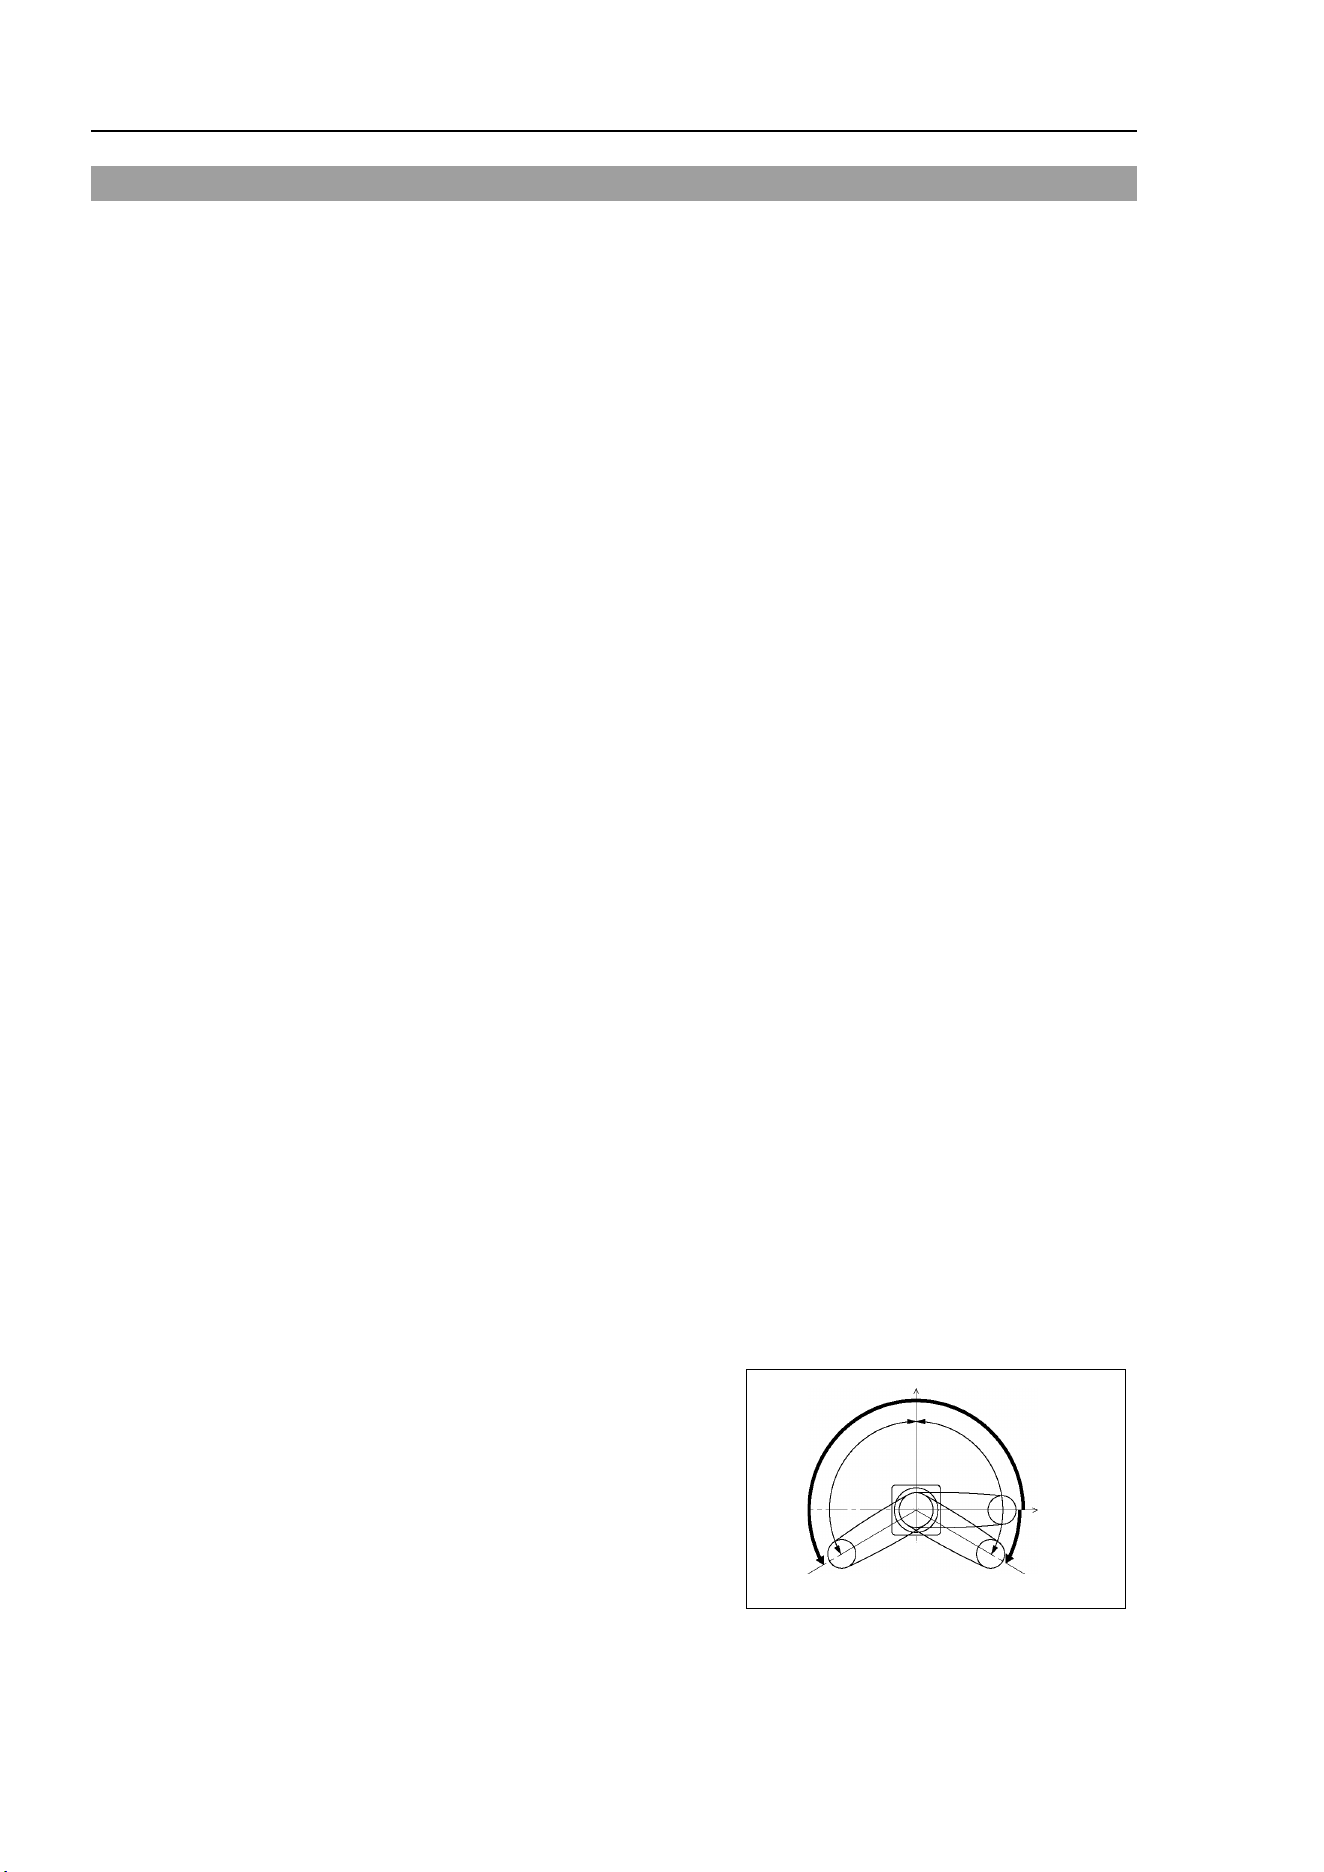
Maintenance 13. Calibration
162 LS10-B Rev.6
13.4 Calibration Procedure without using Calibration Wizard
This section indicates the calibration without using the calibration wizard of EPSON RC+.
For details of calibration using the calibration wizard, refer to Maintenance: 13.2
Calibration Procedure.
When coordinates for the Manipulator working point require calculation, it is important for
Joint #2 to be calibrated accurately. Execute the procedure in “Calibration Using Right /
Left Arm Orientations” to accurately calibrate Joint #2. For details, refer to Maintenance:
13.3 Accurate Calibration of Joint #2.
You cannot calibrate Joint #4 alone because of the structure of the Manipulator. When
calibrating Joint #4, you must calibrate Joint #3 and #4 at the same time.
The reference point (a point to identify the position of the manipulator) needs to be specified
for calibration.
Follow steps
1 to 6 described below in order to calibrate the origin.
1.
Basic Pose Confirmation
(1
)-1 After the part replacement, execute the calibration using the
point data currently
registered.
Confirm the point data number (P*) to reconstruct the correct manipulator
position.
* Point data before the parts replacement (motor, reduction gear, belt, etc.
) is
necessary for the calibration.
2.
Part Replacement
(2)
-1 Replace parts as dictated by this manual.
* Be careful not to injure yourself or damage parts during part replacement.
3.
Encoder Initialization
(3)
-1 Turn ON the Controller when all joints are in the motion range.
(3)
-2 Manually move the joint that needs origin alignment to its approximate 0
pulse position.
0 pulse position of Joint #1:
position aligned with X-axis in
Robot coordinate system
0 pulse
+
−
NOTE
NOTE
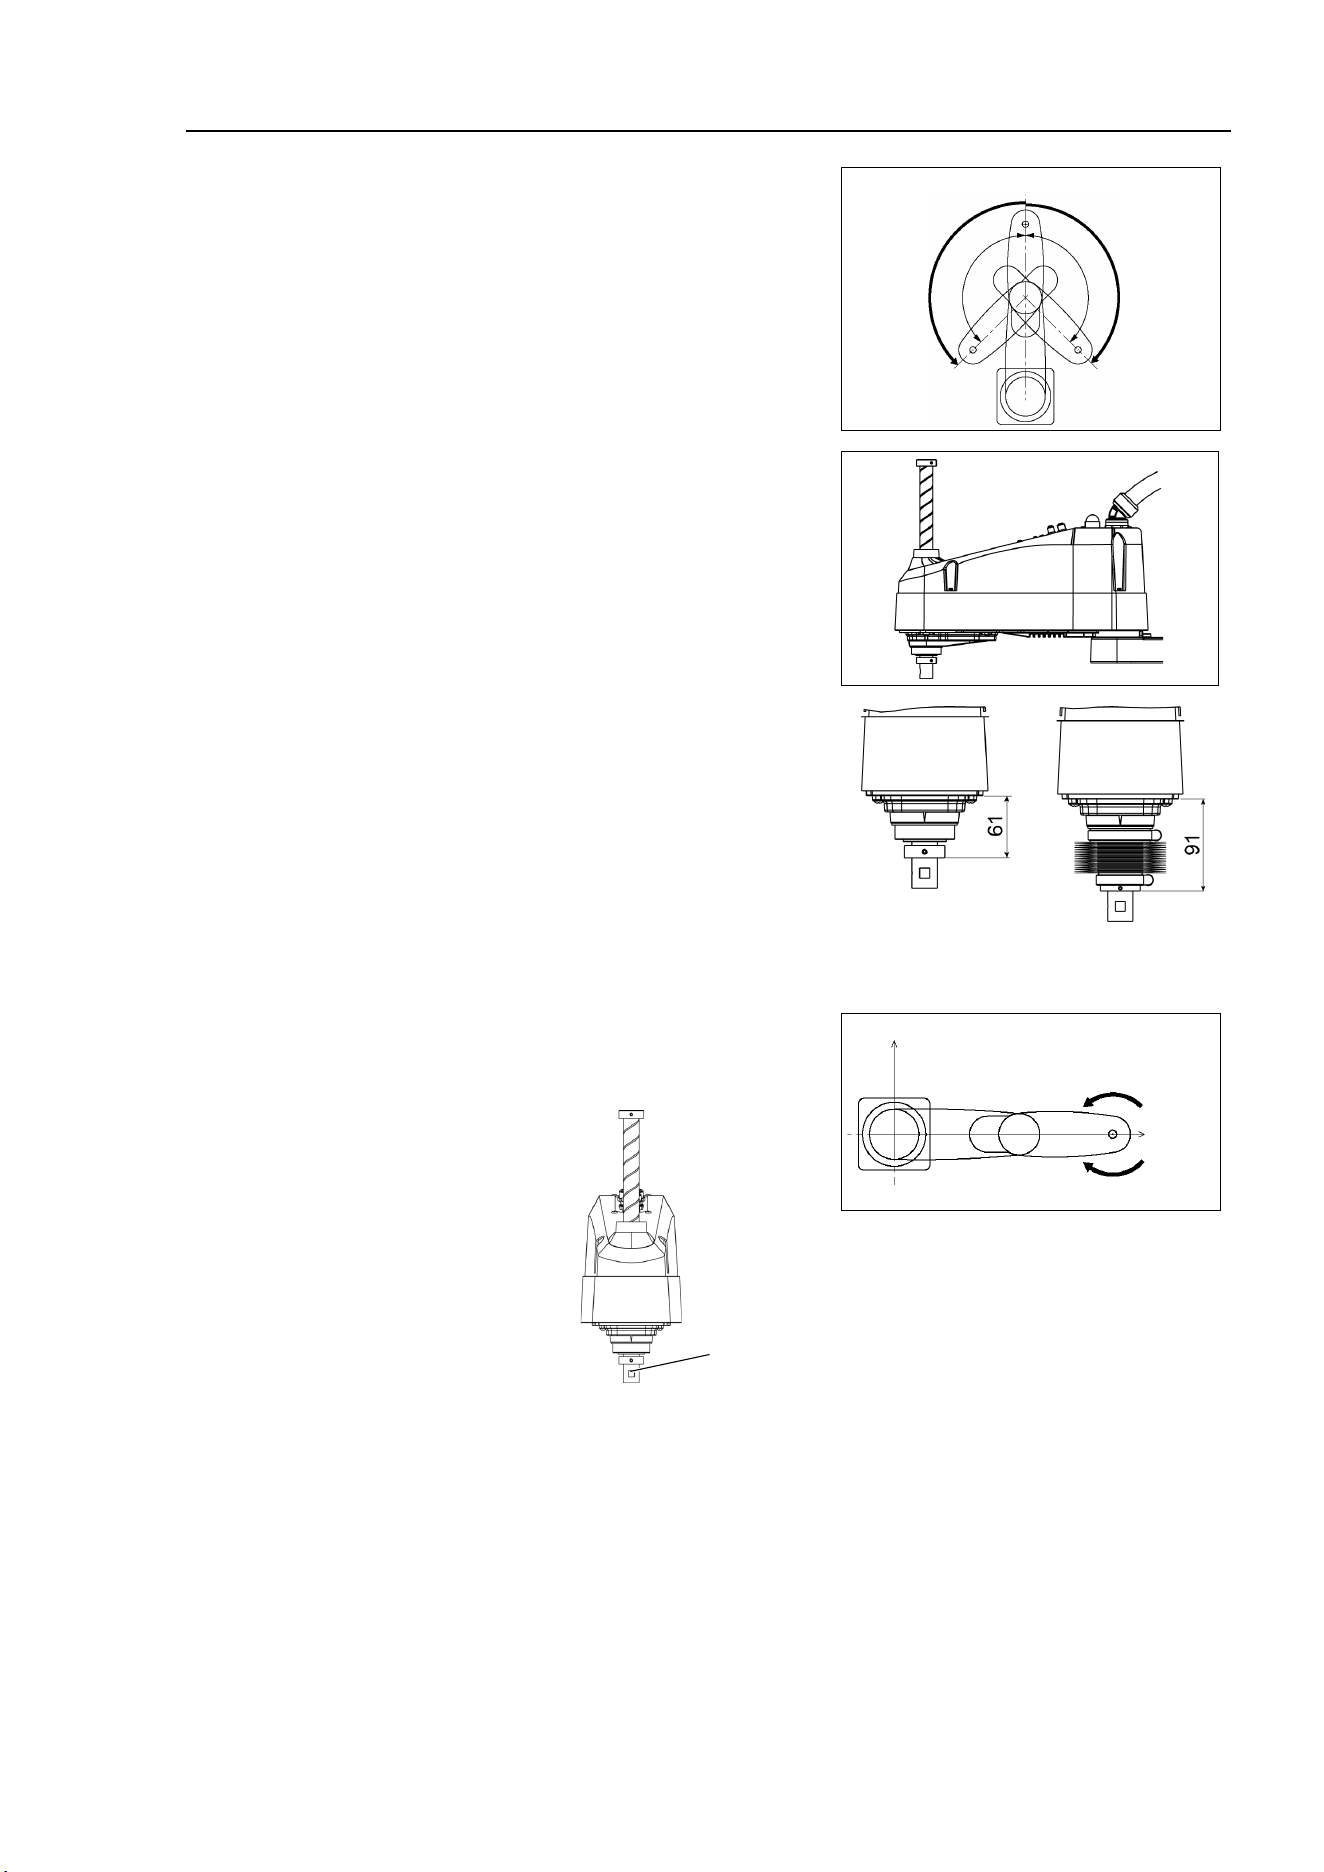
Maintenance 13. Calibration
LS10-B Rev.6 163
0 pulse position of Joint #2:
position where Arms #1 and
#2 are in a straight line
(Regardless of the Joint #1
direction.)
0 pulse
+
−
0 pulse position of Joint #3:
upper limit position in
motion range
The height of Joint #3 depends on
manipulator model.
Standard model
Cleranroom model
0 pulse position of Joint #4:
position where the flat surface
on the shaft faces toward the tip
of Arm #2
Flat surface
0 pulse
+
−
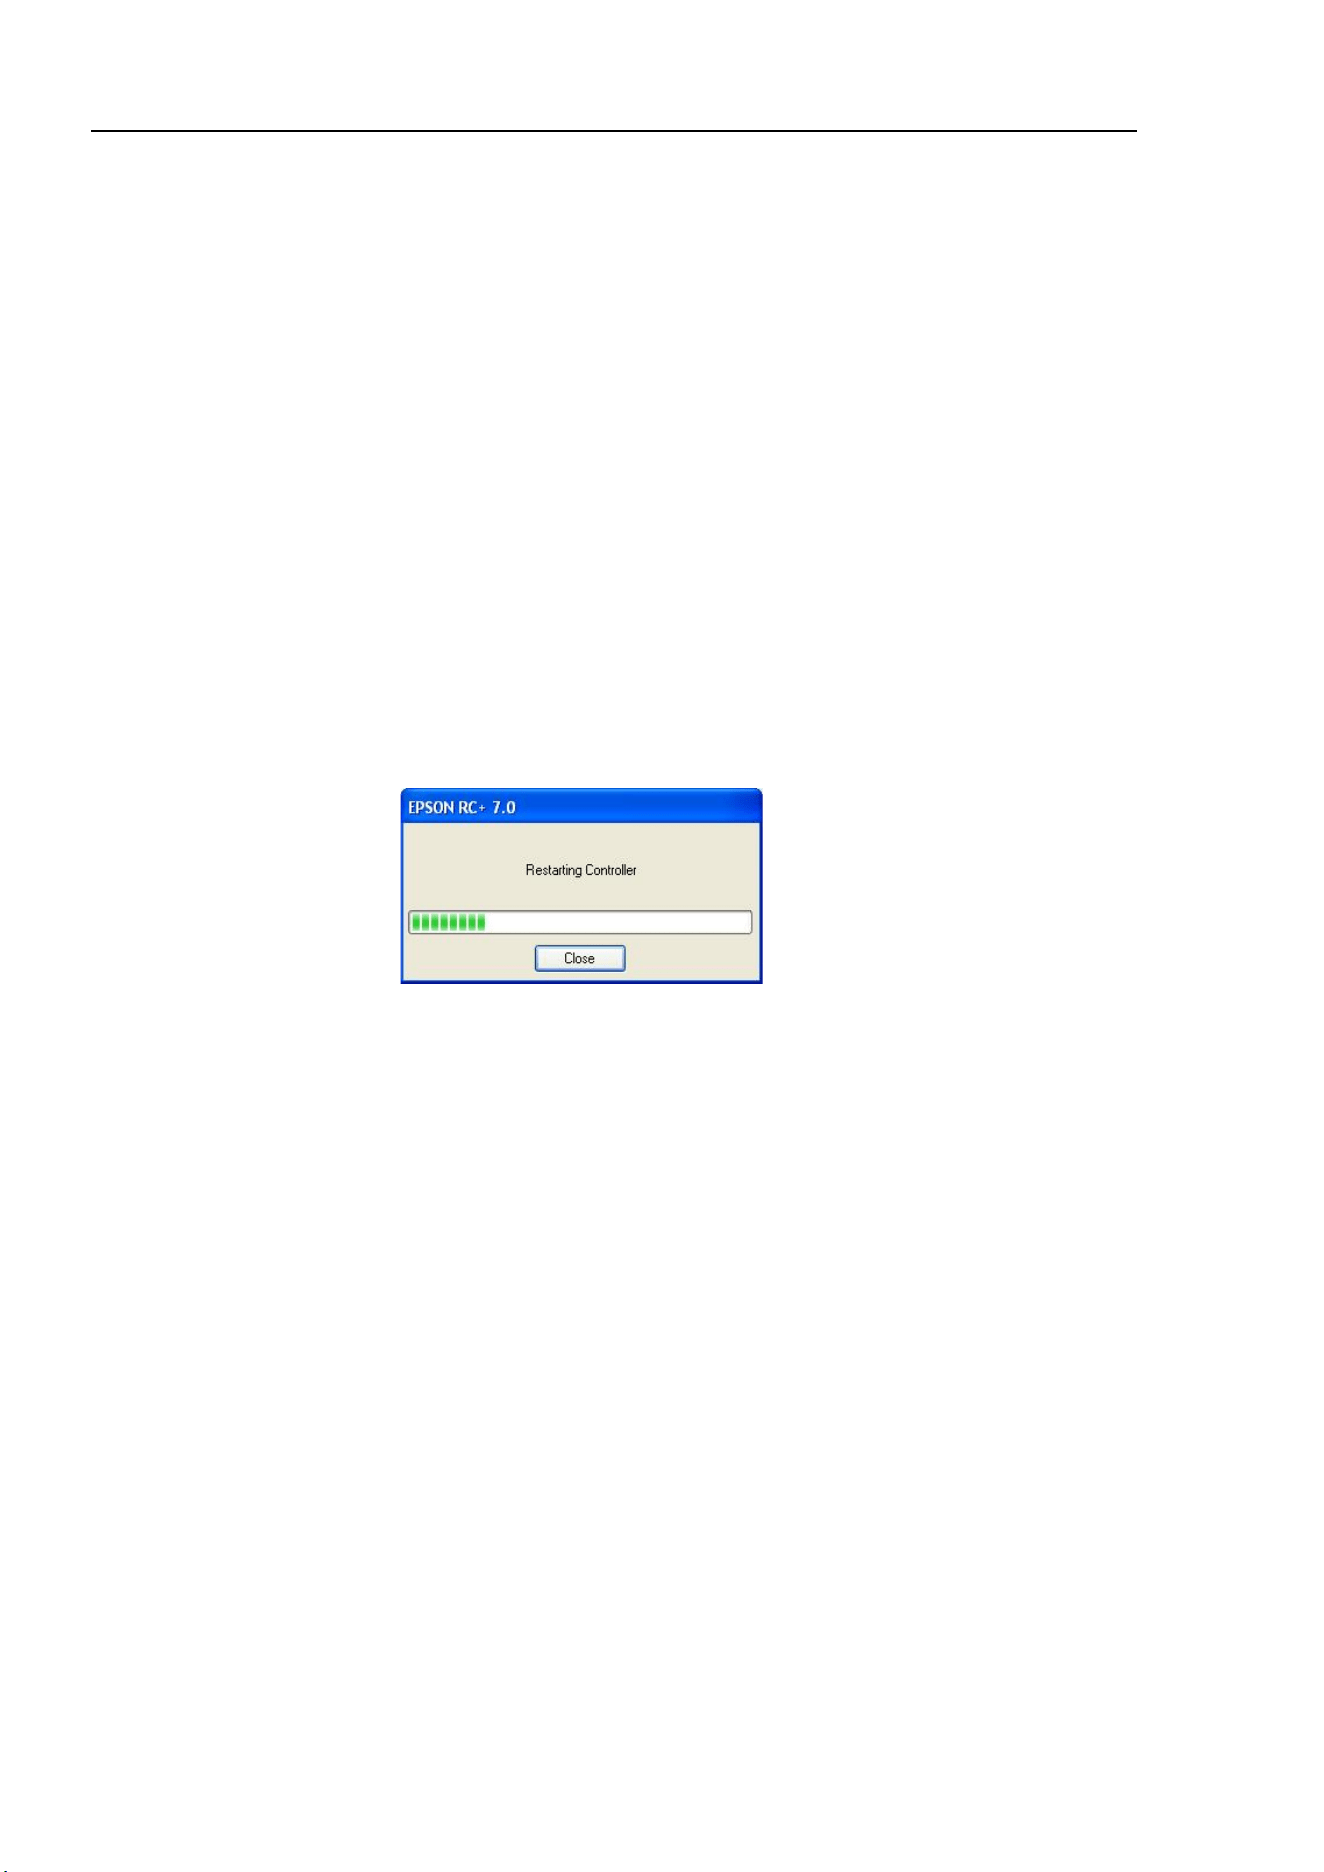
Maintenance 13. Calibration
164 LS10-B Rev.6
(3)
-3 Connect EPSON RC+ to the Controller.
Select a robot to be calibrated. Input as below in the [Command Window]
and execute it.
(This example uses “robot 1”.)
> robot 1
(3)
-4 Execute the absolute encoder initialization command.
Input one of the following commands
to [Command Window] according to the
joint being calibrated.
Joint #1:
>EncReset 1
Joint #2:
>EncReset 2
Joint #3:
>EncReset 3
Joint #4:
>EncReset 3, 4
(3)
-5 Reboot the Controller.
Select EPSON RC+ menu-[Tools]-
[Controller] and click the <Reset
Controller> button.
* This window will be disappeared when the Controller starts up.
4.
Rough
Calibration
(4)
-1 Execute the following command from the menu-[Tools]-[Command Window].
>calpls 0,0,0,0
* Manipulator does not move.
(4)
-2 Execute one of the following commands according to
the joint you want to
calibrate from the menu-[Tool]-[Command Window].
Joint #1 >calib 1
Joint #2 >calib 2
Joint #3 >calib 3
Joint #4 >calib 3, 4
5.
Calibration
(Accurate Positioning)
(5)
-1 Turn ON the motors from the EPSON RC+ menu -[Tools]-[Robot Manager]
-
[Control Panel].
(5)
-2
Click the <Free All> button to free all joints from servo control. Now, you can
move arms by hands.

Maintenance 13. Calibration
LS10-B Rev.6 165
(5
)-3 Move the Manipulator by hand to a rough
position/posture of the calibration
point data.
(5
)-4 Create the data from the calibration point data.
Enter and execute the following command in [Command Window].
(In this example, P1 is used as the calibration point data.)
> Calpls Ppls(P1,1), Ppls(P1,2), Ppls(P1
,3),
Ppls(P1,4)
(5)
-5 Move the joint to the specified point using a motion command.
For example, when the specified point data is “P1”,
execute “Jump P1:Z(0)” from [Jog & Teach].
* The joint NOT being calibrated moves to the original position.
(5)
-6 Accurately align the joint* being calibrated to the specified point using
jog
commands.
* You must move Joint #3 and #4 to the position when calibrating Joint #4.
Select the jog mode [Joint] from [Jog & Teach] to execute the jog motion.
(5)
-7 Execute the calibration.
Enter and execute one of the following commands in [Command Window]
according to the joint being calibrated.
Joint #1:
>Calib 1
Joint #2:
>Calib 2
Joint #3:
>Calib 3
Joint #4:
>Calib 3, 4
6.
Accuracy Testing
(6)
-1 Move the Manipulator to another point to confirm that
it moves to the same
position.
If it does not move to the same position, re-calibrate using another point.
You
must set the point again
if reproducibility cannot be assured through calibration.
Maintenance 14. Maintenance Parts List
166 LS10-B Rev.6
14. Maintenance Parts List
Part Name Code Note
Reference:
Maintenance
Overhaul
*3
Cable Unit
600 mm 2196931
4.1 -
700 mm
2196932
800 mm 2196933
AC Servo Motor
Joint #1
2197984
520 W (with oil seal) 5.1
Joint #2
2197985
520 W (without oil seal) 6.1
Joint #3
2197986
200 W 7.1
Joint #4 2197987 150 W 8.1
Reduction Gear
Unit *1
Joint #1
1765530
5.2
Joint #2 1765520 6.2
O-ring
Joint #1
1650901
Supplied with Joint #1
reduction gear unit
5.1 -
1213266 CO0543A
1520371
CO0538A
1510528 CO0551A
Joint #2
1653181
Supplied with Joint #2
reduction gear unit
6.2 -
1213267 CO0547A
Timing Belt
Joint #3
1758946
Z
7.2
Joint #4
1757386 U1
8.2
1757387
U2
Electromagnetic brake
1499588 Z-axis (Brake only) 7.3
1750573
U-axis (Brake + Power)
7.4
Brake Release Switch 2117817 - -
Bellows
LS10-B**2C
1765523
*4
9
-
LS10-B**3C 1765524 *4 9 -
Ball Screw Spline
LS10-B**2S
1765521
200 mm
10.2
LS10-B**3S 1765522 300 mm
LS10-B**2C
1765528
170 mm
LS10-B**3C 1765529 270 mm
Converter Board
2196970
11.1
-
Control Board 2196966 11.2 -
LED lamp
2077258
12
-
Grease *2
Ball Screw Spline:
AFB
-
For purchasing grease, and
adhesive, please the supplier
of your region.
10.1 -
Reduction Gear Unit:
SK-1A
5.2, 6.2 -
Arm Top Cover 1802514 White 3.1 -
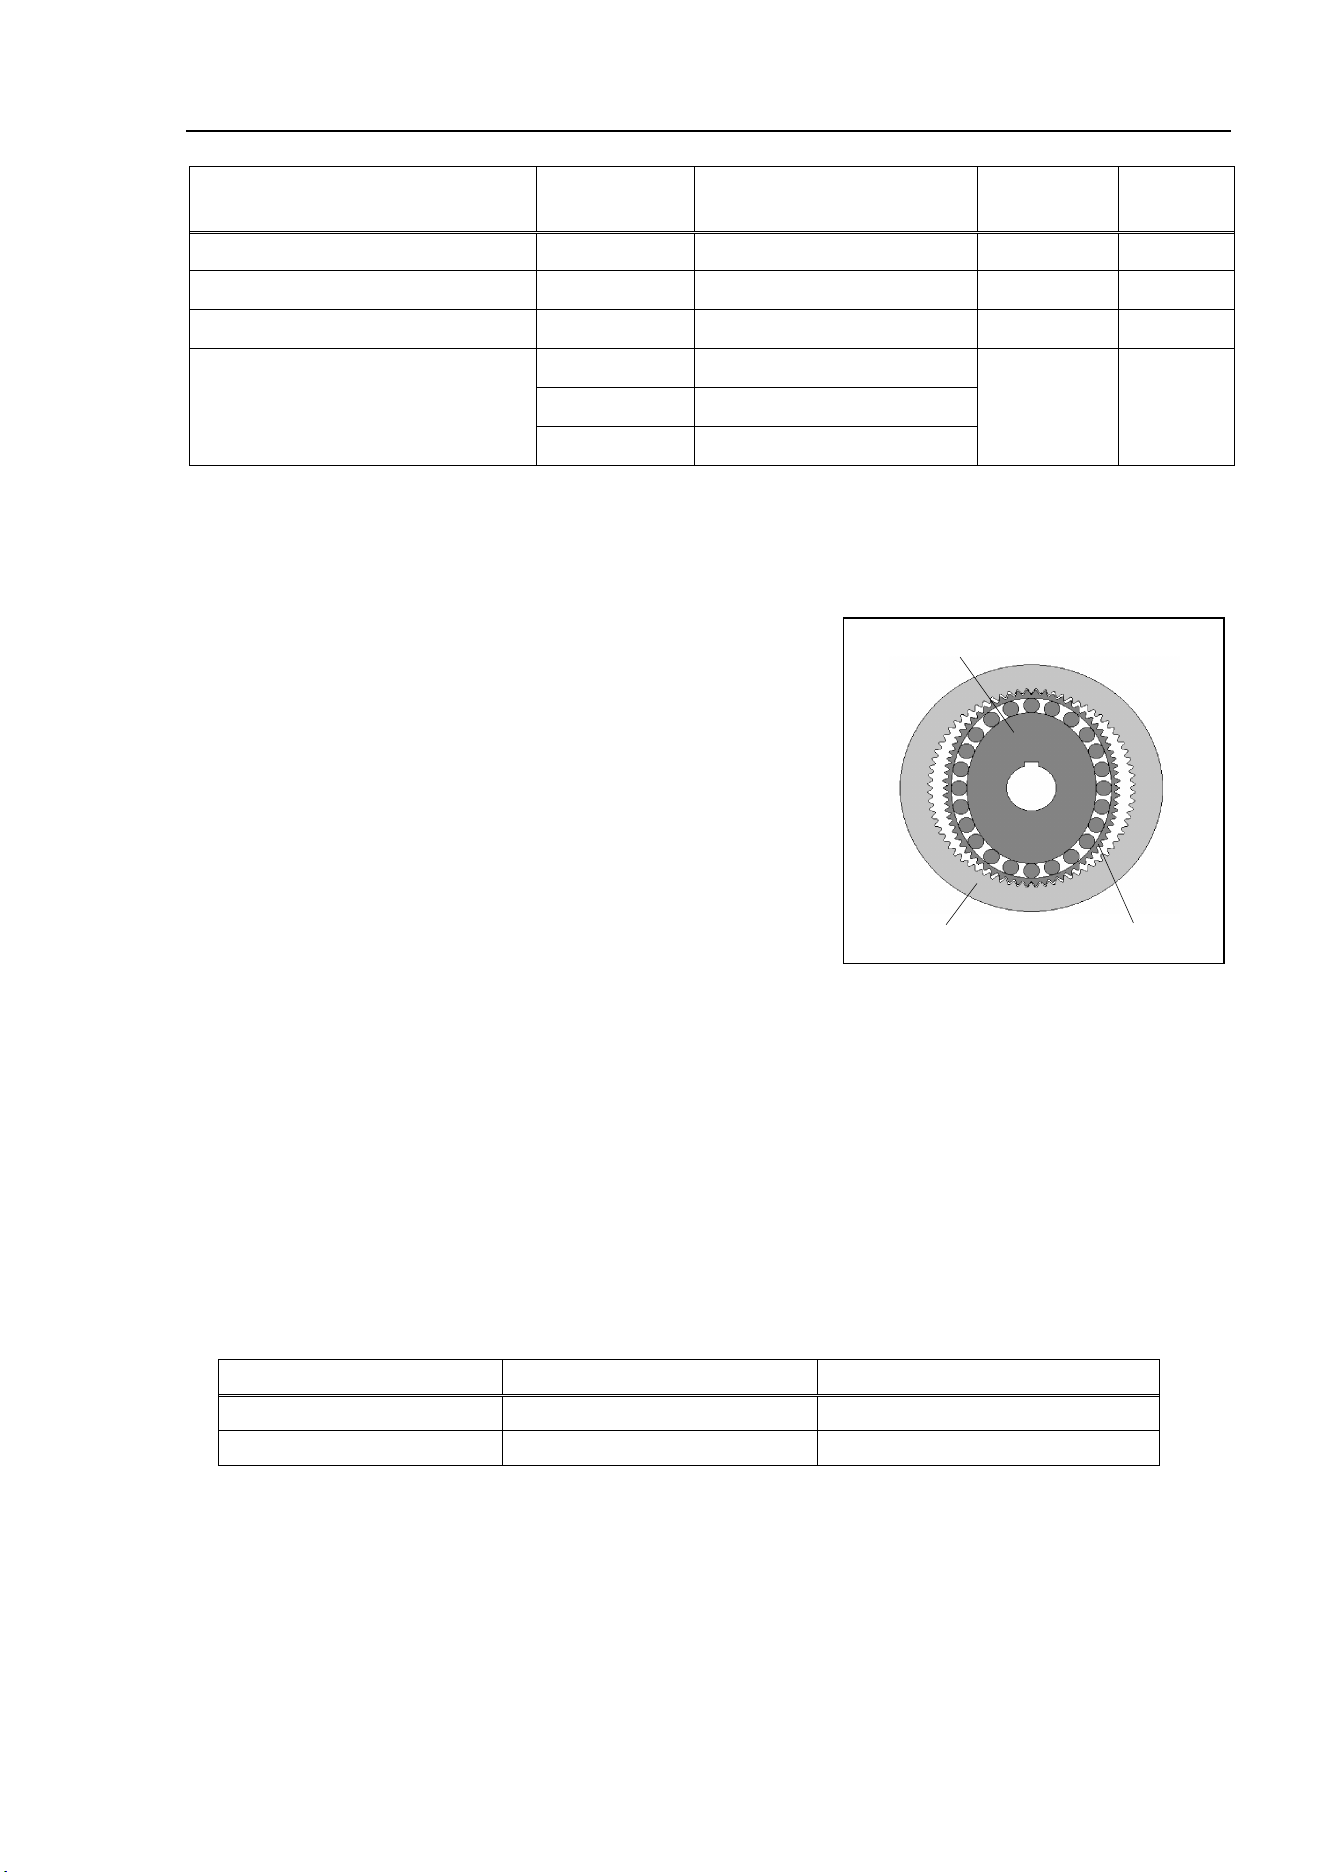
Maintenance 14. Maintenance Parts List
LS10-B Rev.6 167
Part Name Code Note
Reference:
Maintenance
Overhaul
*3
Arm Bottom Cover 1759511 Blue 3.2 -
Dust Cover 2014430 For RJ45 connector -
Mechanical stopper 1759366 1 -
M/C Cable
2196934 3 m
4.3 -
2196935
5 m
2196936 10 m
*1 Reduction Gear Unit
A reduction gear unit consists of the following three parts. When replacing the reduction gear unit, be sure
to always replace the waveform generator, flexspline, and circular spline all together as one set.
Waveform generator
This waveform generator consists of an ellipsoidal cam with ball
bearings
on its outer circumference.
The inner ring of bearings is
secur
ed to the cam, while the outer ring
is capable of flexible deformation through the ball bearings.
Circular spline
Flexspline
Waveform generator
Flexspline
A thin, elastic, cup
-
shaped metal body with gear teeth around the
outer circum
ference of the opening.
Circular spline
A rigid, ring
-shaped body with gear teeth on the inner
circumference.
The circular spline has
two more teeth than the flexspline does.
Splines are greased. Be careful not to let grease adhere to clothes.
*2 Regarding purchase of grease
Due to the chemicals regulations of individual countries (the UN GHS), we are requesting our customers to
purchase the grease required for maintenance from the manufacturers listed in the table below as of April 2015.
Regarding purchase of the grease, please contact the following manufacturers. If there is anything unclear,
please contact the suppliers of your region.
Product name
Manufacturer
URL
THK AFB-LF Grease
THK CO., LTD.
http://www.thk.com/
Harmonic Grease SK-1A
Harmonic Drive Systems Inc.
http://www.harmonicdrive.net/
*3 Overhaul
As a rough indication, perform the overhaul (parts replacement) before reaching 20,000 operation hours of the
Manipulator. The operation hours can be checked in [Controller Status Viewer] dialog-[Motor On Hours].
For details, refer to Maintenance 2.2 Overhaul (Parts Replacement).

Maintenance 14. Maintenance Parts List
168 LS10-B Rev.6
*4 Bellows
The bellows for LS10-B**C are provided in a unit of two pieces. The shape varies between the upper and
lower bellows.