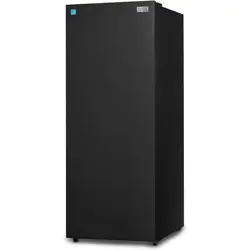
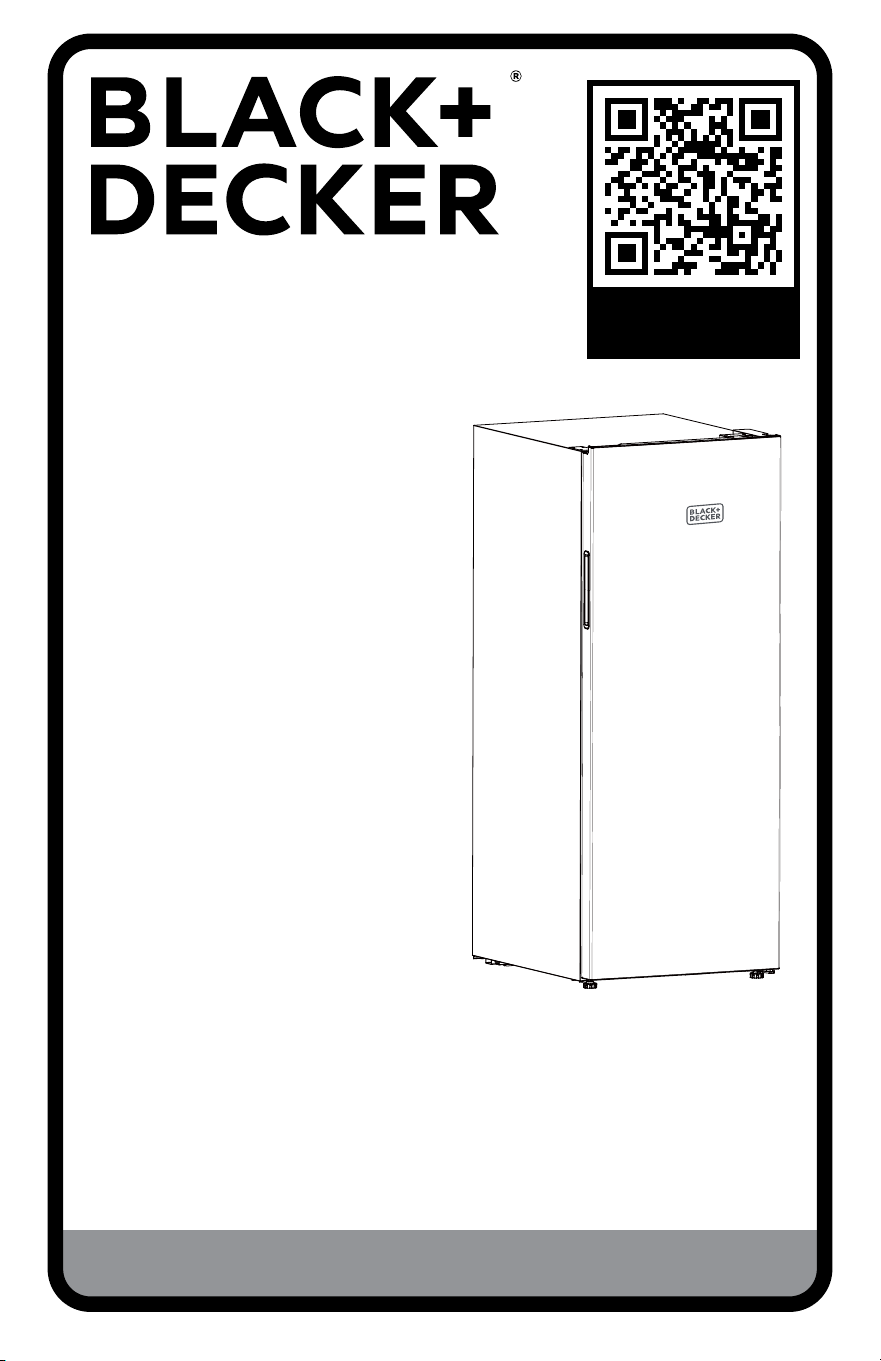
CONVERTIBLE FREEZER/
REFRIGERATOR
INSTRUCTION MANUAL
Thank you for choosing BLACK+DECKER!
PLEASE READ BEFORE RETURNING THIS PRODUCT FOR
ANY REASON.
If you have a question or experience a problem with your BLACK+DECKER
purchase, go to www.blackanddecker.com/instantanswers
If you can’t find the answer or do not have access to the Internet, call
844-299-0879 from 10:30 a.m. to 6:30 p.m. EST Mon. - Fri. to speak with an
agent. Please have the catalog number available when you call.
SAVE THIS MANUAL FOR FUTURE REFERENCE.
CATALOG NUMBER
BUC1100XW,
BUC1100XB,
BUC1100XS
ACTIVATE
WARRANTY

Page 2
Staple your receipt to your manual.
You will need it to obtain warranty service.
Thank you for purchasing our
BLACK+DECKER product. This
easy-to-use manual will guide you in
getting the best use of your freezer.
Remember to record the model and
serial numbers. They are on a label
on the back of the product.
_____________________________
Model number
_____________________________
Serial number
_____________________________
Date of purchase
PRODUCT REGISTRATION
ENGLISH
Page 3
IMPORTANT SAFETY INSTRUCTIONS
1. Use this appliance only for its intended purpose as described in this use and care
guide.
2. This freezer must be properly installed in accordance with the installation
instructions before it is used. See grounding instructions in the installation section.
3. Never unplug freezer by pulling on the power cord. Always grasp the plug firmly
and pull straight out from the outlet.
4. Do not operate any appliance with a damaged cord or plug. Return appliance to
the nearest authorized service facility for examination, repair or adjustment.
5. Unplug freezer before cleaning or before making any repairs.
Note: If for any reason this product requires service, we strongly recommend that
a certified technician performs the service. Component parts shall be replaced
with like components and servicing shall be done by factory authorized service
personnel, so as to minimize the risk of possible ignition due to incorrect parts or
improper service.
6. Do not use any electrical device or any sharp instrument in defrosting the freezer.
7. After the freezer is in operation, do not touch the cold surfaces in the freezer
compartment, particularly when hands are damp or wet. Skin may adhere to these
extremely cold surfaces.
8. Do not refreeze foods that have been thawed completely. The United States
Department of Agriculture in Home and Garden Bulletin No. 69 reads: “…You may
safely refreeze frozen foods that have thawed if they still contain ice crystals or if
they are still cold-below 40˚F.
“…Thawed ground meats, poultry, or fish that have any o-odor or o-color
should not be refrozen and should not be eaten. Thawed ice cream should be
discarded. If the odor or color of any food is poor or questionable, discard it. The
food may be dangerous to eat … Even partial thawing and re-freezing reduce the
eating quality of foods, particularly fruits, vegetables, and prepared foods. The
eating quality of red meats is aected less than that of many other foods. Use
refrozen foods as soon as possible, to save as much of its eating quality as you
can.”
NOTE: If the freezer has been placed in a horizontal or tilted position for any period
of time, wait 24 hours before plugging the unit in.
SAFETY INFORMATION
DANGER
DANGER - Immediate hazards
which WILL result in severe
personal injury or death
WARNING
WARNING - Hazards or unsafe
practices which COULD result in
severe personal injury or death
CAUTION
CAUTION - Hazards or unsafe
practices which COULD result in
minor personal injury
WARNING
When using electrical appliances, basic safety precautions
should be followed, including the following:
READ ALL INSTRUCTIONS BEFORE USING THE UNIT
ENGLISH
Page 4
9. This freezer should not be recessed or built-in in an enclosed cabinet. It is
designed for freestanding installation only.
10. Do not operate freezer in the presence of explosive fumes.
11. This appliance is not intended for use by persons (including children) with
reduced physical, sensory or mental capabilities, or lack of experience and
knowledge, unless they have been given supervision or instruction concerning use
of the appliance by a person responsible for their safety.
12. Children should be supervised to ensure that they do not play with the appliance.
13. If the supply cord is damaged, it must be replaced by the manufacturer, its service
agent or similar qualified person in order to avoid hazard.
14. Do not store explosive substances such as aerosol cans with a flammable
propellant in this appliance.
WARNING: Keep ventilation openings, in the appliance enclosure or in the built-in
structure, clear of obstruction.
WARNING: Do not damage the refrigerant circuit.
WARNING: Do not use electrical appliances inside the food storage
compartments of the appliance, unless they are of the type
recommended by the manufacturer.
SAVE THESE INSTRUCTIONS
HOUSEHOLD USE ONLY
REFRIGERANT
GAS WARNINGS
DANGER - Risk of fire or explosion. Flammable refrigerant used. DO NOT use
mechanical devices to defrost freezer. DO NOT puncture refrigerant tubing.
DANGER - Risk of fire or explosion. Flammable refrigerant used. To be repaired
only by trained service personnel. DO NOT puncture refrigerant tubing.
CAUTION - Risk of fire or explosion. Flammable refrigerant used. Consult repair
manual/owner’s guide before attempting to service this product. All safety
precautions must be followed.
CAUTION - Risk of fire or explosion. Dispose of property in accordance with
federal or local regulations. Flammable refrigerant used.
CAUTION - Risk of fire or explosion due to puncture of refrigerant tubing; Follow
handling instructions carefully. Flammable refrigerant used.
SAFETY INFORMATION
DANGER
Risk of child entrapment. Before disposing of any freezer or refrigerator,
remove door(s). Leave any shelves in place so that children may not easily
climb inside.
ENGLISH
Page 5
SAFETY INFORMATION
GROUNDING INSTRUCTIONS
ELECTRICAL REQUIREMENTS
In the event of malfunction or breakdown, grounding provides a path of
least resistance for electric current to reduce the risk of electric shock. The
appliance must be connected to a cord having an equipment-grounding
conductor and a grounding plug. The plug must be plugged into an
appropriate outlet that is properly installed and grounded in accordance
with all local codes and ordinances.
DANGER - Improper connection of the equipment grounding
conductor can result in a risk of electric shock. The conductor with
insulation having an outer surface that is green with or without yellow
stripes is the equipment grounding conductor. If repair or replacement of
the cord or plug is necessary, do not connect the equipment-grounding
conductor to a live terminal. Check with a qualified electrician or service
person if the grounding instructions are not completely understood, or if in
doubt as to whether the appliance is properly grounded. Do not modify the
plug connected to the appliance – if it will not fit the outlet, have a proper
outlet installed by a qualified electrician.
FOR GROUNDED, CORD-CONNECTED APPLIANCE RATED LESS THAN
15A AND INTENDED FOR USE ON A NOMINAL 120V SUPPLY CIRCUIT
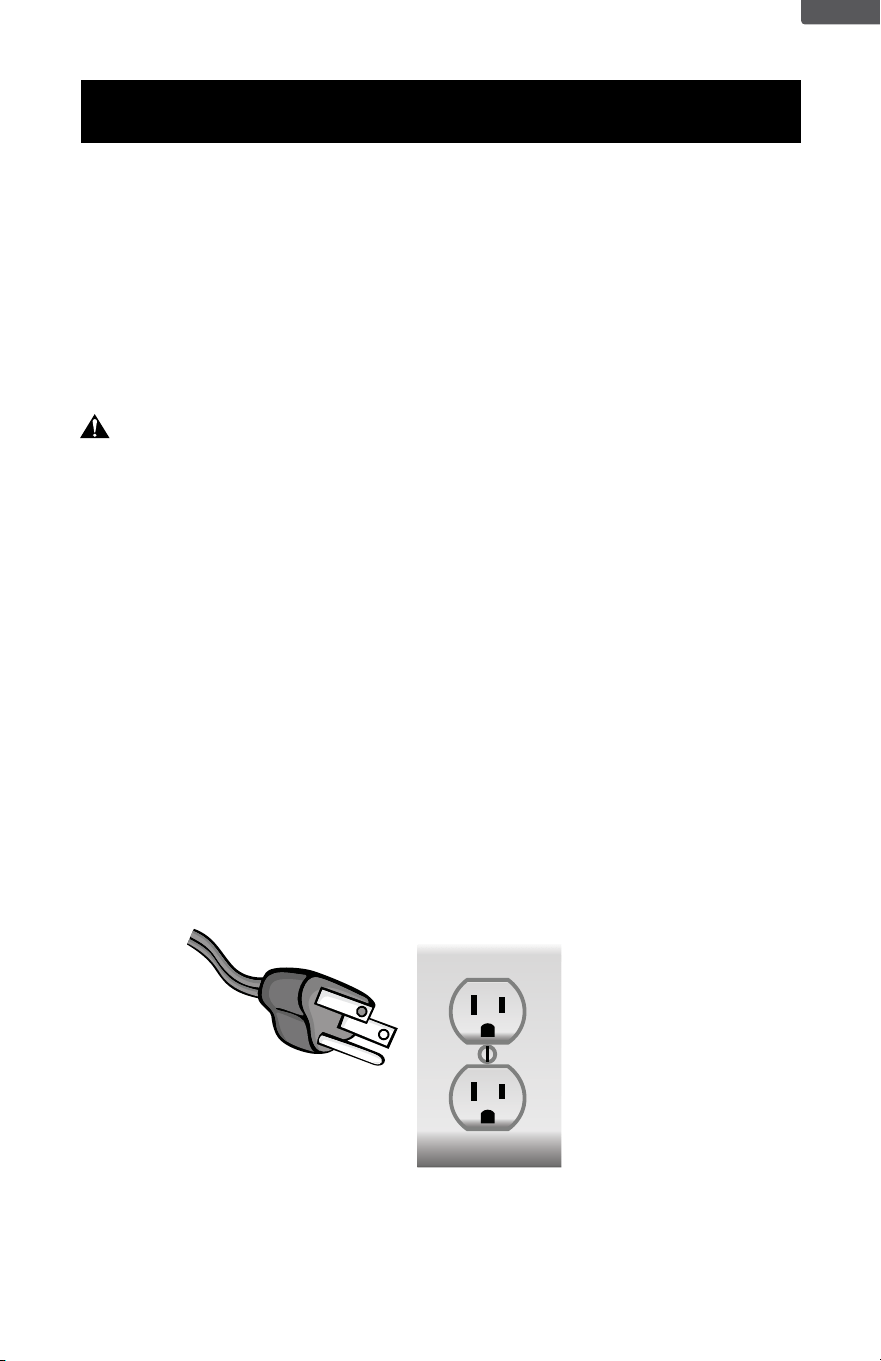
The appliance is for use on a nominal 120V circuit and should be connected
to a grounding outlet that looks like the one illustrated below. The use of a
temporary adaptor is not recommended.
ENGLISH
Page 6
POWER SUPPLY CORD
1. Avoid the use of an extension cord because of potential safety hazards under
certain conditions. Have a qualified electrician or serviceman to install an outlet
near the appliance.
2. If it is absolutely necessary to use an extension cord, extreme care must be
exercised.
SET UP & USE
ENGLISH
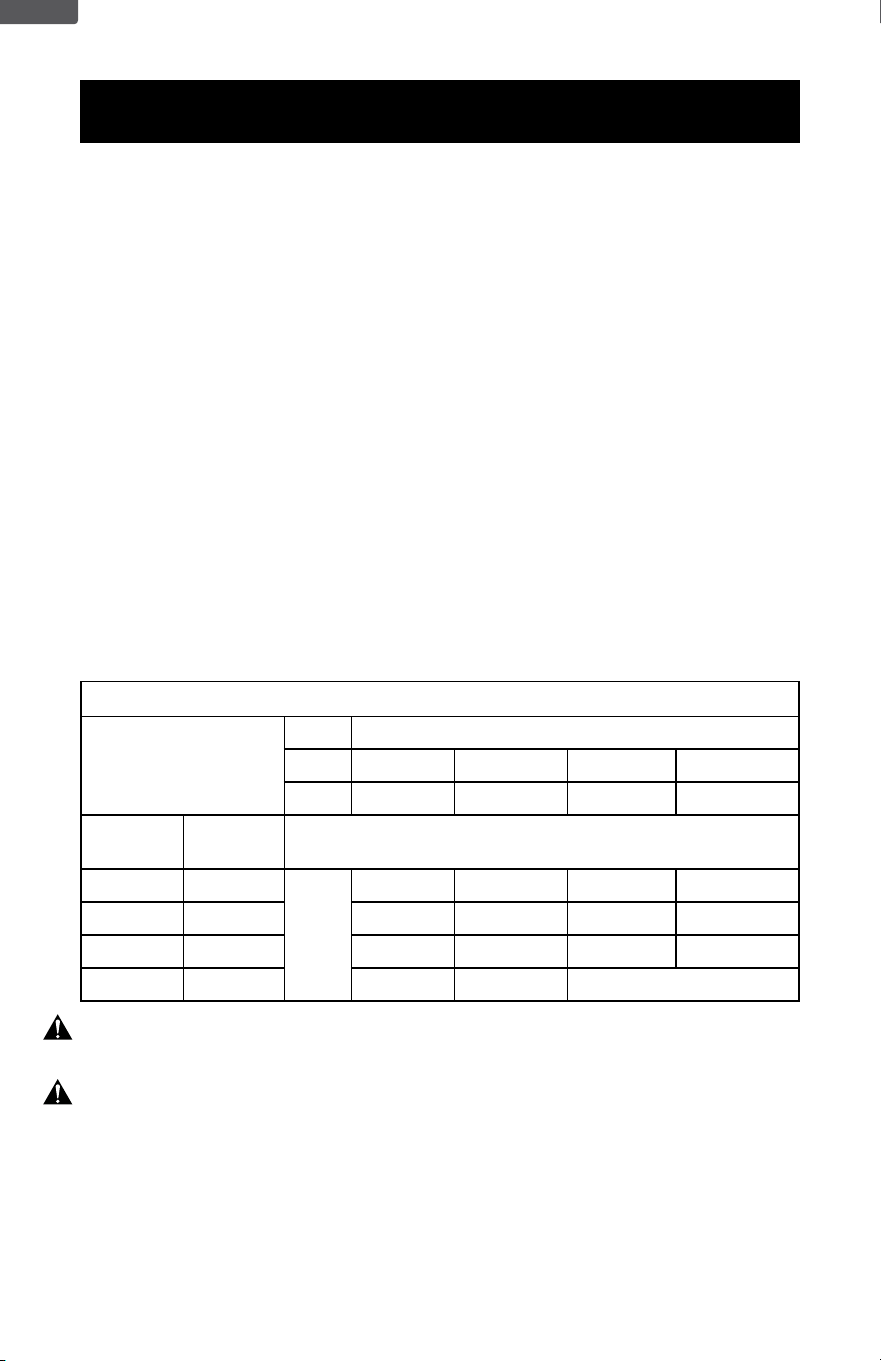
Minimum Gauge for Cord Sets
Ampere Rating
Volts Total Length of Cord in Feet (meters)
120V 25(7.6) 50(15.2) 100(30.5) 150(45.7)
240V 50(15.2) 100(30.5) 200(61.0) 300(91.4)
More
Than
Not More
Than
AWG
0 6 18 16 16 14
6 10 18 16 14 12
10 12 16 16 14 12
12 16 14 12 Not Recommended
WARNING: Keep electrical cords in good condition. Do not use worn, bare, or frayed
cords because they can cause electrical shock.
WARNING: Operating equipment at low voltage can cause it to overheat. Using an
excessively long extension cord can cause the cord to overheat.
NOTE: Neither BLACK+DECKER nor the dealer can accept any liability for damage to
the product or personal injury resulting from failure to observe the electrical
connection procedures.
USE OF EXTENSION CORDS WITH FREEZERS
Only use a grounded extension cord that is rated at least 15 amps and has a
third-wire ground. When a long extension cord is used to connect the freezer, a
voltage drop occurs. The longer the cord, the greater the voltage drop. This results in
less voltage being supplied to the freezer and increases the amount of current (amp)
draw or reduces performance. A heavier cord with a larger wire size will reduce the
voltage drop. Be sure to choose a cord that will supply enough voltage to operate
the freezer. The table below indicates appropriate gauge for extension cords.
Page 7
INSTALLATION GUIDE
1. Unpack your freezer by removing all packaging materials like carton, base, foams,
adhesive tape, etc.
2. Remove all accessories, internal packaging material used to hold shelves, ice tray,
etc. in place.
3. Clean the remains of all adhesive tape used and remove all printed material
supplied.
4. Install the freezer in a convenient location away from extreme heat and cold. Allow
sucient clearance between the freezer and side wall so the door(s) will open
without obstruction. Freezer is not designed for recessed installation.
5. The floor on which the freezer should be placed must be flat, hard, solid, and
even. The freezer should not be placed on any soft material such as foam, plastic,
carpeting, etc.
6. The following are recommended minimum clearances around the freezer for
proper air circulation:
Sides: 5” (127mm)
Top : 2” (50mm)
Back : 5” (127mm)
Proper air circulation will help your freezer work at maximum eciency.
NOTE: The appliance must be correctly connected to the power supply.
WARNING
It is important to keep the power cord away from the compressor at the
back of the freezer as during operation, the compressor can reach a high
temperature and could cause serious damage to the power cord.
CAUTION
Care should be taken during the handling moving and use of the freezer to
avoid damaging the refrigerant tubing or increasing the risk of a leak.
SET UP & USE
ENGLISH
STARTING YOUR NEW FREEZER
1. After cleaning your freezer thoroughly, wipe the outside with a soft dry cloth, the
interior with a clean moist cloth.
2. Insert the power supply cord into the electrical outlet.
NOTE: As the door gets pressed in during shipping, the gasket may have to be reset.
This is done to prevent the cool refrigerated air from escaping. If there is a gap
between the door gasket and the cabinet, set the gasket by gently pulling it
out of the seal gap.
Page 8
SET UP & USE
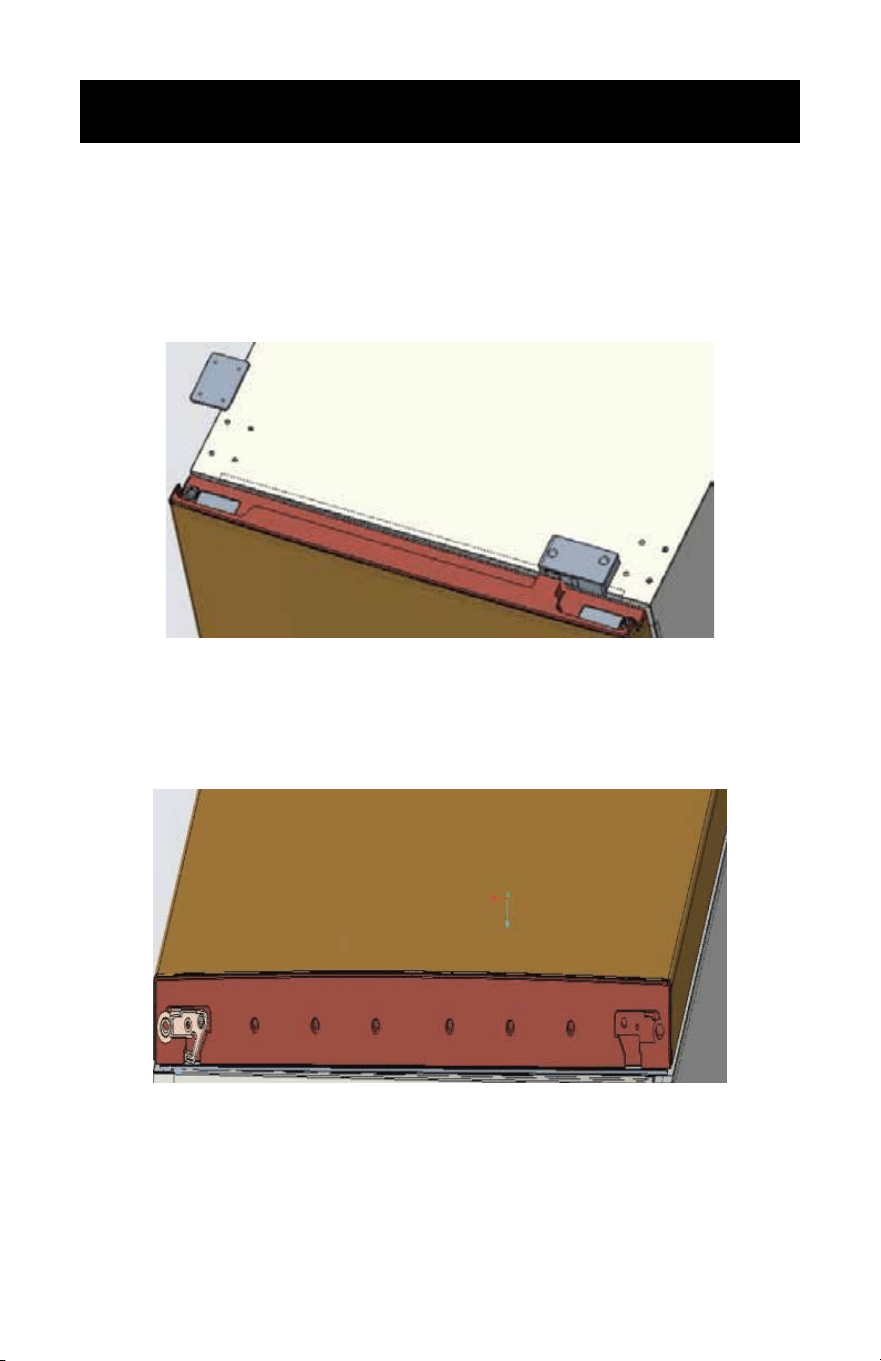
DOOR REVERSAL INSTRUCTIONS
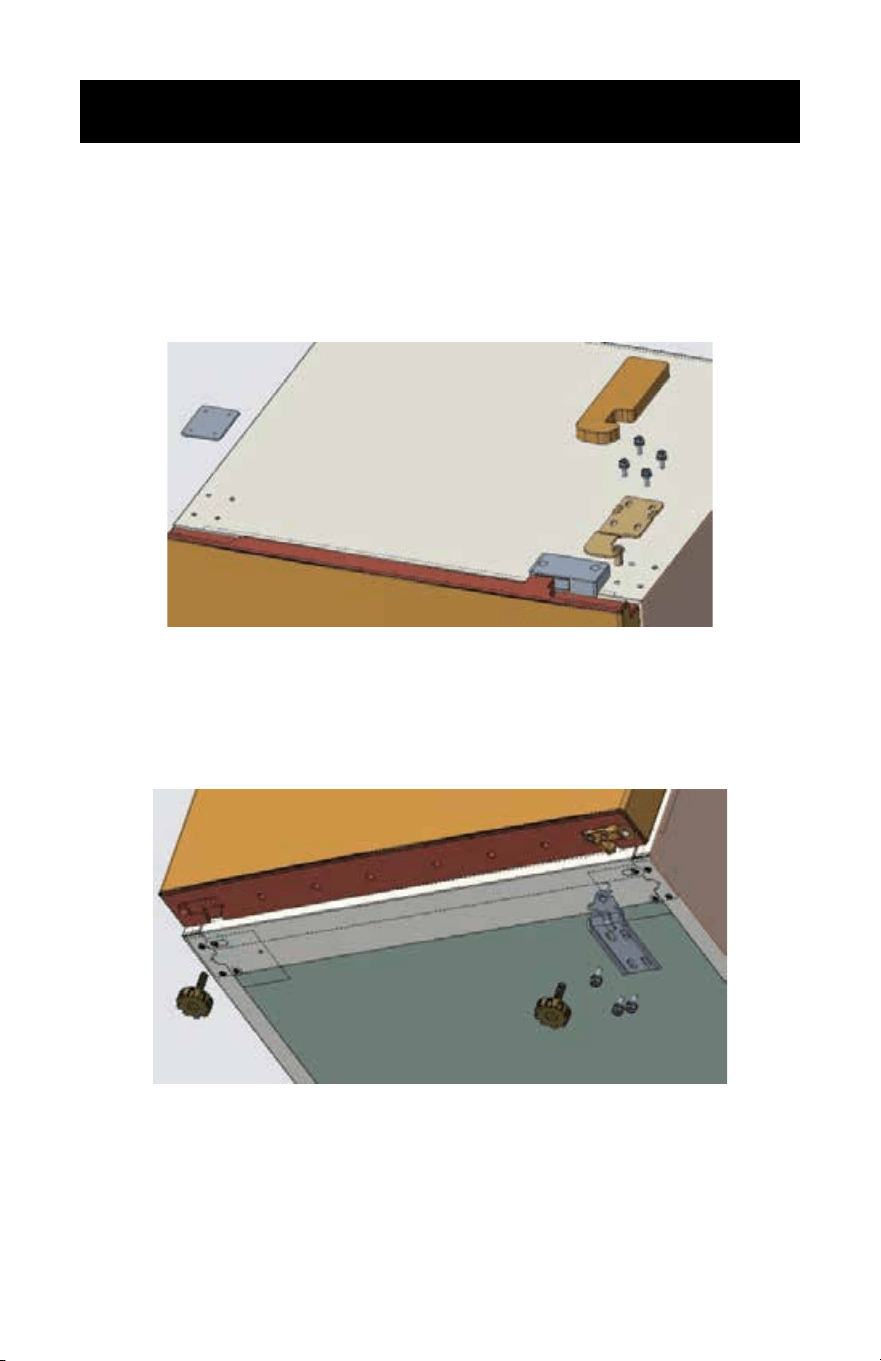
Tools required (not supplied): Philips head screwdriver, socket wrench.
(1) Remove the top right hinge cover, unscrew the 4 bolts and the upper right hinge,
also remove the protective cover at the top left side of the unit;
(2) Carefully lean unit on its back and unscrew the three bolts on the bottom right
hinge and the feet on both sides. Remove lower hinge, from the bottom of the
unit;
Page 9
SET UP & USE
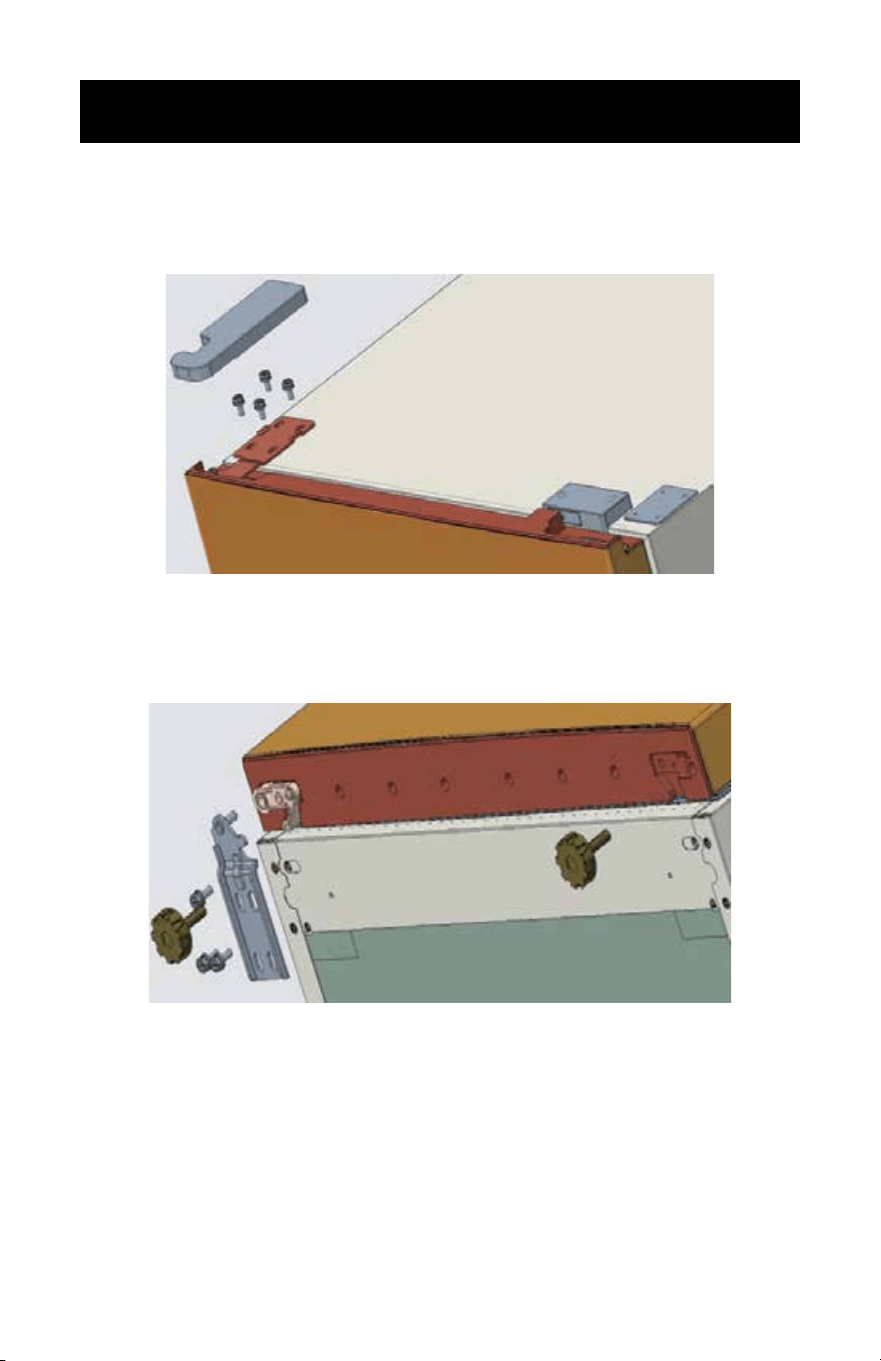
(3) Cover the holes on the top right side of the unit with the protective cover
removed from the left side;
(4) Remove the limit block and shaft sleeve on the bottom right side of the door.
Turn the limit block over, installing it on the bottom left side of the door;
Page 10
SET UP & USE
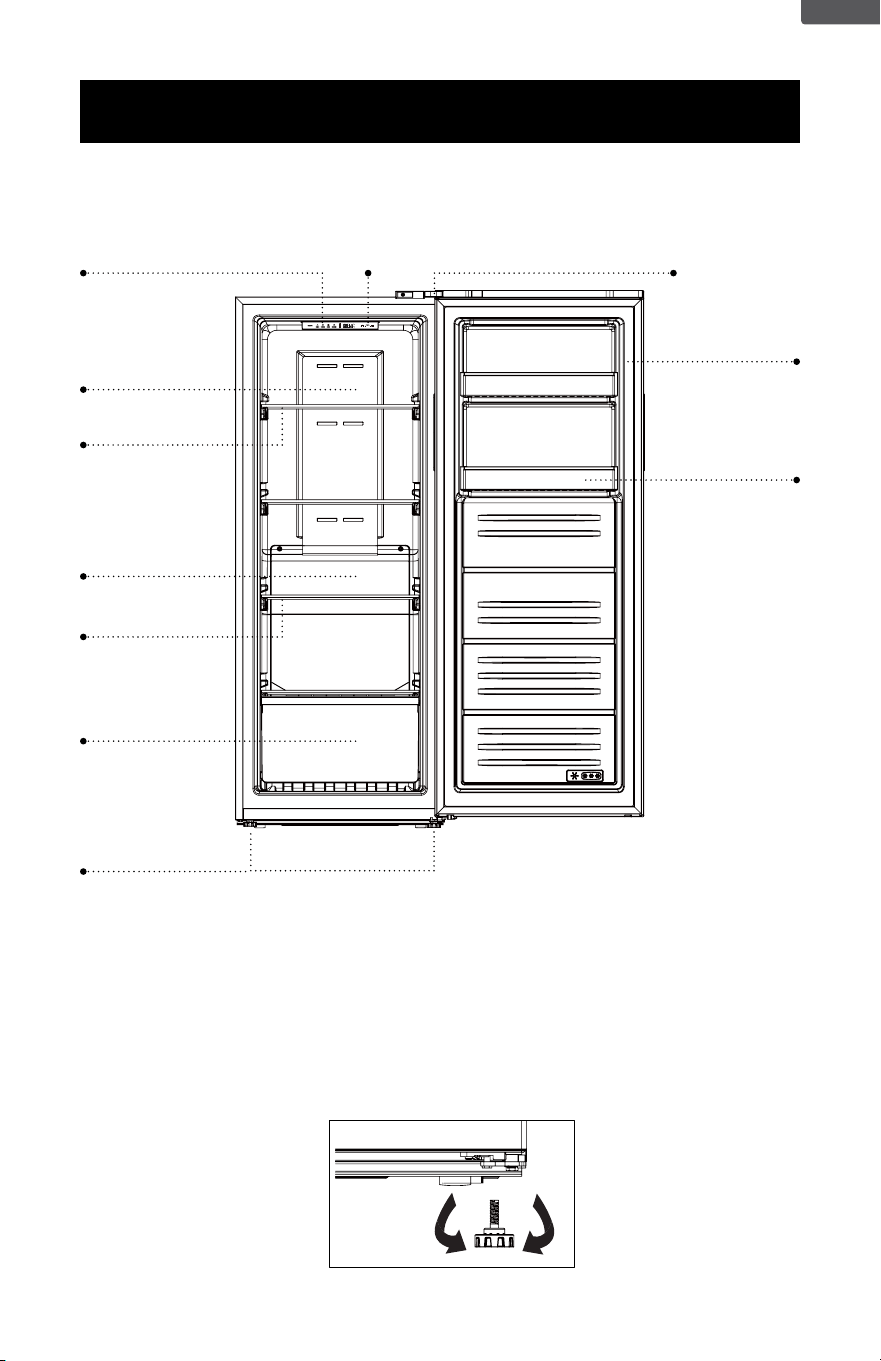
(5) Remove the upper left hinge cover and upper left hinge from the accessory bag,
afx the hinge to the top leftside of the refrigerator and then attach the hinge
cover;
(6) Take out the lower left hinge from the accessory bag, install the hinge on the left
side of the unit with 3 bolts and tighten it, and then screw on the two feet;
(7) Finally, check whether the two sides of the door are consistent with the main
compartment, and whether the upper and lower gaps between the door and
the main compartment are consistent. lf necessary, adjust the front foot so that
the product is completely horizontal. After the door body replacement step is
completed, return product to upright position and let stand for 4 hours before
plugging in.
Page 11
PARTS & FEATURES
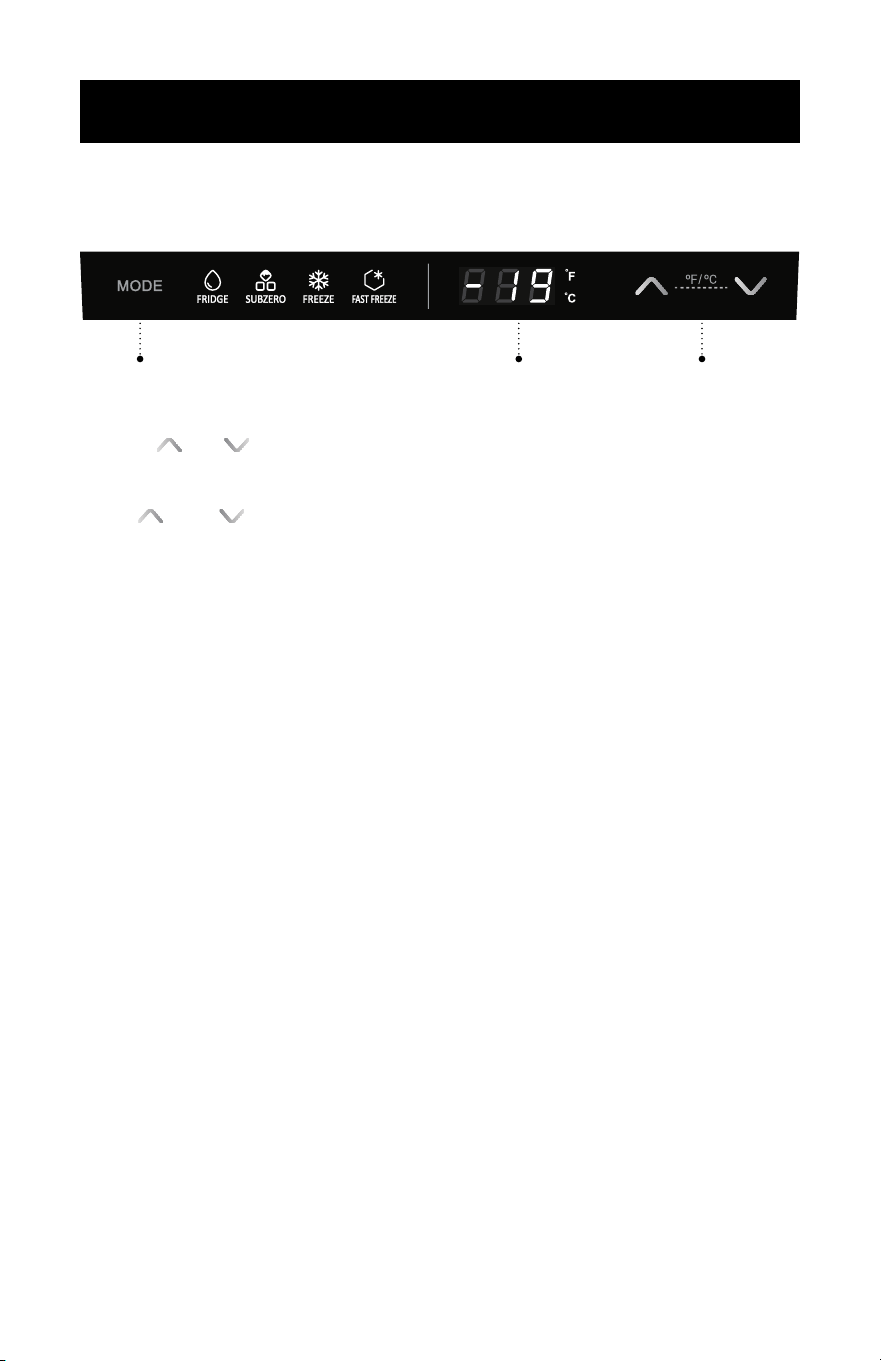
LEVELING INSTRUCTIONS
There are two adjustable legs on the bottom of the appliance that can be turned up
or down to ensure that the appliance is level.
1. Turn the leveling leg counter-clockwise as far as it will go, until the top of the foot is
touching the bottom of the chassis.
2. Slowly turn the leveling leg clockwise until the appliance is level.
Removable
Glass Shelf I
Removable
Glass Shelf II
Upper Air
Channel Cover
Lower Air
Channel Cover
Drawer
Adjustable Feet
SET UP & USE
Control Panel LED Light Light Switch
Light Switch
Door Shelves
ENGLISH
Page 12
CONTROL PANEL
SET UP & USE
1. Press MODE button to select temperature mode.
2. Temperature display.
3. Press “ ” or “ ” arrow button to set temperature.
CONVERT DEGREES FAHRENHEIT OR CELSIUS
Press “ ” and “ ” button at the same time for more than 3 seconds to switch
between °F and °C.
TEMPERATURE SETTING
This appliance can be used as either a refrigerator or a freezer. The table below
shows the MODE and temperature ranges. Select the MODE. Then set the desired
temperature by pressing the Up and Down arrows on the Control Panel. The
temperature increases or decreases in one degree increments. The display window
will show the selection.
TEMPERATURE SCALE
“FRIDGE”:0°C~8°C(32°F~46°F)” “SUBZERO”:-4°C~-8°C(25°F~18°F)”
“FREEZE”:-14°C~-24°C(7°F~-11°F)” “FAST FREEZE”:-28°C(-18°F)
Note: The appliance will automatically exit FAST FREEZE mode after 26 hours and
return to the last set temperature.
SETTING THE TEMPERATURE CONTROL
Freezer mode: To use the appliance as a freezer, the internal temperature will be
between -14 – 24°C (6.8 – 11.2°F). Do not place liquid items in sealed
bottles or containers into the appliance when it is being used as a
freezer to avoid damage caused by expansion and cracking of the
container. While set as a Freezer this model will perform in ambient
temperatures between 0°F – 110°F (-17°C – 43°C )
Refrigerator mode: To use the appliance as a refrigerator, the internal temperature
will be between 0 - 8°C (32 – 46.4°F). There are refrigerant
lines in the cabinet walls that will get very cold. When using
the appliance as a refrigerator, keep food items away from the
cabinet walls to avoid freezing food. While set as a Refrigerator
the ambient temperature must fall within 50°F – 109°F (10°C –
43°C )
1 2 3
Page 13
SET UP & USE
IMPORTANT
This appliance is considered “Garage Ready” if it is being used as a freezer. If this
appliance is used as the refrigerator , then the appliance should only be used in
climate-controlled spaces with an ambient temperature range of 50°F – 109°F (10°C
– 43°C ).
OPEN DOOR ALARM
This appliance is equipped with a door alarm that will sound if the door is left open
for more than 3 minutes. The alarm will beep and the display will ash continuously
until the door is closed.
ERROR CODES (Please contact customer service if they appear)
• E1: Temperature sensor failure
• E2: Defrosting sensor failure
• E3: Both defrosting sensor and temperature sensor failure
• C0: Communication failure
• dr : Door not closed alarm
• H1 : Defrosting heater failure alarm
Page 14
DEFROSTING & DRAINING
• Defrost whenever the frost becomes ⅛” thick. Never use a sharp or metallic
instrument to remove the frost as it may damage the cooling coils.
NOTE: A punctured coil will void the warranty.
• Turn the temperature control to OFF position and unplug the unit. Remove
all contents from the appliance and leave the door open until the ice and
frost melts thoroughly. Make sure a drip tray (not included) is in place. After
defrosting, empty water from the drip tray and wipe the compartment dry with
a soft cloth.
SET UP & USE
DANGER
Risk of child entrapment. Keep children away from freezer while defrosting.
Leave any shelves in place so that children may
not easily climb inside.
NOTE: Monitor the container under the drain to avoid overflow.
• Wipe the interior of the freezer and replace the electrical plug in the electrical
outlet.
• Reset the temperature control to the desired setting.
NOTE: • In case you want to speed up the defrosting, you may put a bowl of warm
water (about 122°F) into the freezer.
• Do not heat the evaporator directly with hot water or hair dryer while
defrosting, doing so will damage the freezer compartment.
• Never use a sharp or metallic instrument to remove frost as it may damage
the freezer and puncture the cooling coils. lt will also void the warranty. We
recommend using a plastic scraper.
VACATION AND MOVING CARE
• When going on vacation, it is best that you empty all the food from your freezer.
Unplug the freezer. Clean the unit as per “Cleaning Method” and leave the door
open to remove any odors. .
• When travelling or moving the freezer, always transport the unit vertically.
Moving the unit on its sides may damage the freezer and/or its compressor.
ENGLISH
Page 15
CLEANING AND
MAINTAINING
The freezer should be cleaned and
maintained once a month. Before doing
so, you must unplug the freezer.
POWER INTERRUPTION
In case of a power interruption/outage,
unplug the power cord from the wall
outlet. Replug the power cord to the
wall outlet once the power has been
restored. For long period of power
outage, inspect and discard the spoiled
or thawed foods from the freezer and
freezer compartments. Clean the freezer
thoroughly before using again.
CLEANING METHOD
Prepare a cleaning solution of 3-4
tablespoons of baking soda mixed with
warm water. Use sponge or soft cloth,
dampened with the cleaning solution to
wipe down your freezer.
• Rinse with clean warm water and dry
with a soft cloth,
• Do not use harsh chemicals,
abrasives, ammonia, chlorine bleach,
concentrated detergents, solvents or
metal scouring pads. Some of these
chemicals may dissolve, damage
and/or discolor your freezer.
DOOR GASKET
Clean door gaskets every three months
according to general instructions.
Gasket must be kept clean and pliable to
assure a proper seal.
• Petroleum jelly applied lightly on the
hinge sides of gaskets will keep the
gasket pliable and ensure a good
seal.
DISPOSAL
This appliance may not be treated as
regular household waste, it should
be taken to the appropriate waste
collection point for recycling of electrical
components. For information on
local waste collection points, contact
your local waste removal agency or
government oce.
CLEANING AND CARE
WARNING
Always unplug your freezer before
cleaning to avoid electric shock.
Ignoring this warning
may result in death or injury
CAUTION
To avoid personal injury or
product damage always read and
follow manufacturer’s instructions and
warnings before using any
cleaning products.
ENGLISH
Page 16
ENERGY SAVING TIPS
• The freezer should be located in the coolest area of the room, away from heat-
producing appliances or heating ducts, and out of direct sunlight.
• Let hot foods cool to room temperature before placing in the freezer. Overloading
the freezer forces the compressor to run longer and thus increase energy
consumption. Foods that refrigerate too slowly may lose quality or spoil.
• Be sure to wrap foods properly, and wipe containers dry before placing in the
freezer.
• The shelves should not be lined with aluminium foil, wax paper, or paper towels.
This will interfere with cold air circulation, making the freezer less ecient.
• Organize food to reduce door openings and extended searches. Remove as many
items as needed at one time, and close the door as soon as possible.
WARNING: DO NOT TRY TO REPAIR THE FREEZER YOURSELF.
CLEANING AND CARE
ENGLISH

Page 17
BEFORE YOU CALL FOR SERVICE
IF THE FREEZER FAILS TO OPERATE:
A) Check to make sure that the freezer is plugged in securely. If it is not, remove the
plug from the outlet, wait 10 seconds and plug it in again securely.
B) Check for a blown circuit fuse or a tripped main circuit breaker. If these seem to
be operating properly, test the outlet with another appliance.
IF NONE OF THE ABOVE SOLVES THE PROBLEM, CONTACT A QUALIFIED
TECHNICIAN. DO NOT TRY TO ADJUST OR REPAIR THE FREEZER YOURSELF.
CUSTOMER SERVICE
IMPORTANT
DO NOT RETURN THIS PRODUCT TO THE STORE
If you have a problem with this product, please contact the
BLACK+DECKER Customer Satisfaction Center at
844-299-0879 or service@appliance.com.
DATED PROOF OF PURCHASE, MODEL # AND SERIAL #
REQUIRED FOR WARRANTY SERVICE
TROUBLESHOOTING & WARRANTY
ENGLISH
Page 18
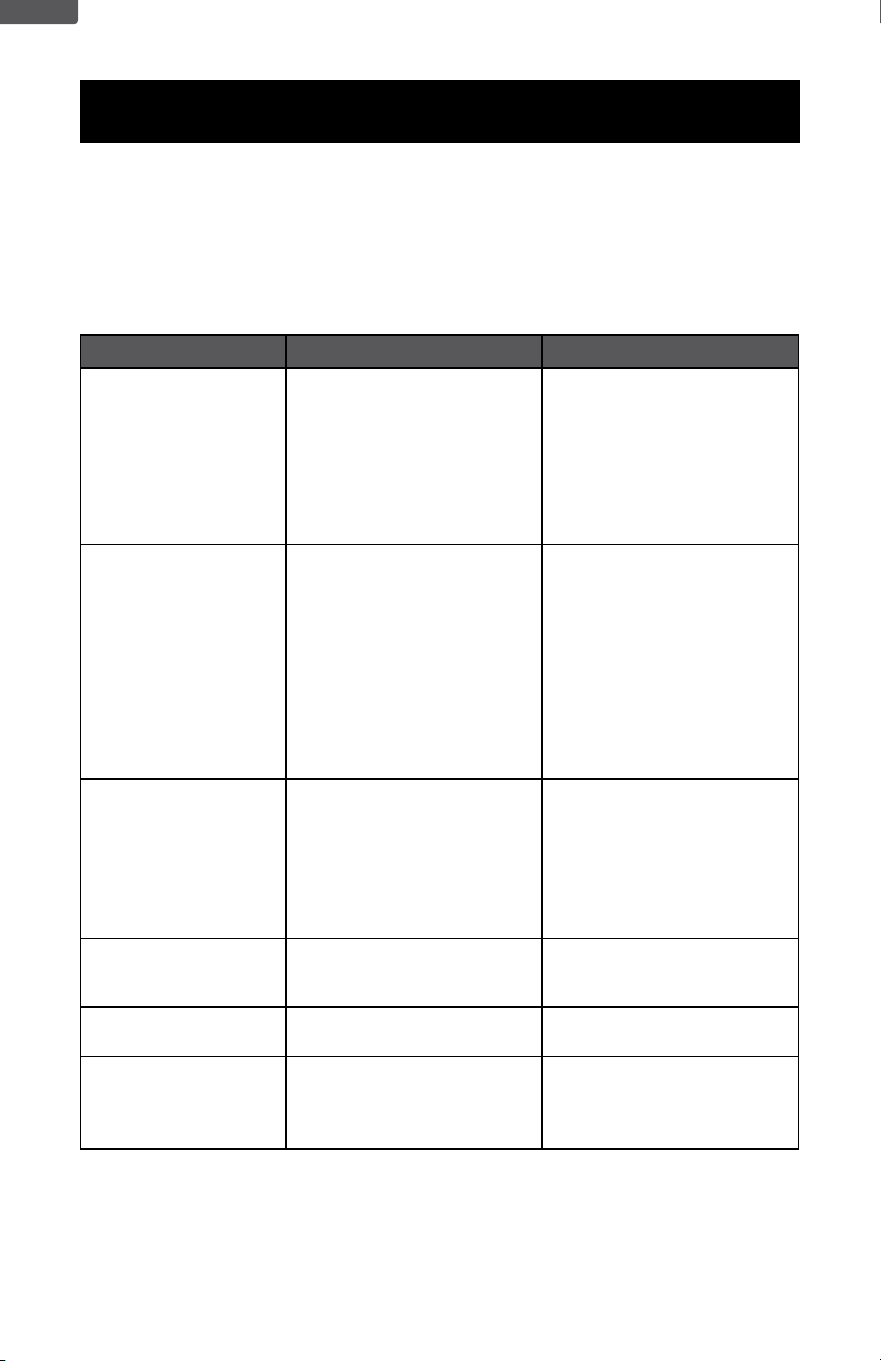
Troubleshoot your problem by using the chart below. If the freezer still does not work
properly, contact BLACK+DECKER customer service center or the nearest authorized
service center. Customers must never troubleshoot internal components.
TROUBLESHOOTING
TROUBLESHOOTING & WARRANTY
TROUBLE POSSIBLE CAUSE POSSIBLE REMEDY
Appliance does not
work.
A. Unit is not plugged in or is
loose.
B. Fuse has blown or is
defective.
C. Wall power socket is
defective.
A. Plug in the appliance.
B. Check fuse, replace if
necessary.
C. To be corrected by a
qualified electrician.
The food is too warm. A. Temperature is not properly
adjusted.
B. Door was open for an
extended period.
C. A large quantity of warm
food was placed in the
freezer within the last 24
hours.
D. The appliance is near a heat
source.
A. Set the temperature control
dial to a cooler setting.
B. Open the door only as long
as necessary. Check door
gasket for proper seal.
C. Set the temperature control
dial to a colder setting
temporarily.
D. Please look in the
“Protection From Heat and
Moisture” section.
Heavy build-up of frost.
NOTE: This is normal
during high humidity
periods. Frequent door
openings will also cause
heavy frost buildup.
A. Door seal is not air-tight. A. Carefully warm the leaking
sections of the door gasket
with a hair dryer (on a cool
setting). At the same time,
shape the warmed door
seal by hand such that it sits
correctly.
Popping or cracking
sounds.
A. When compressor comes
on.
A. This is a normal sound of
coolant flowing through
condenser coils.
Appliance door does not
shut properly.
A. Possible blockage from
food containers or shelves.
A. Ensure nothing is blocking
the door.
Appliance has an odor. A. Foods not properly sealed.
B. Interior needs cleaning.
A. Remove any contaminated
foods.
B. Please refer to “Cleaning
and Care” section.
ENGLISH
Page 19
ENGLISH
LIMITED WARRANTY
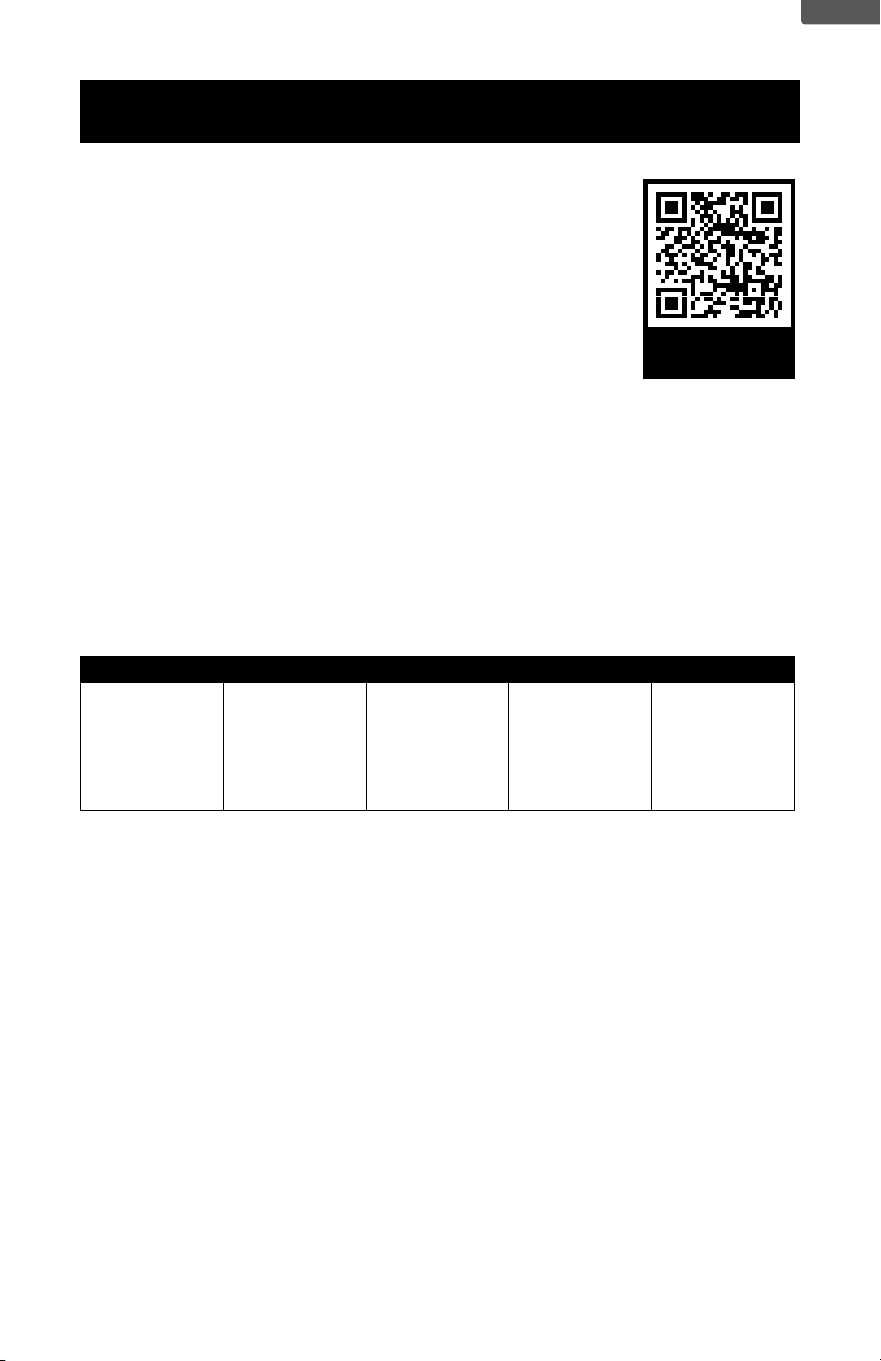
ACTIVATE WARRANTY
Any repair, replacement, or warranty service, and all questions about this product should be
directed to W Appliance Co. at 844-299-0879 from the US, including Puerto Rico, or Canada.
Some issues can be addressed without service. Before contacting regarding your warranty,
please visit the “Troubleshooting” section of your user manual.
All warranty service is provided exclusively by our authorized W Appliance Co. service providers.
For service in US, including Puerto Rico, and Canada call 1-844-299-0879 to create a ticket.
When calling, please have the following information available: date of purchase, model number,
proof of purchase and a brief description of the problem.
WHAT IS COVERED
YOUR SOLE AND EXCLUSIVE REMEDY UNDER THIS LIMITED WARRANTY SHALL BE PRODUCT REPAIR AS PROVIDED
HEREIN. This limited warranty is valid only in the United States or Canada and applies only when the major appliance is used in
the country in which it was purchased:
ONE (1) YEAR FROM THE DATE OF DELIVERY OF THE ORIGINAL PURCHASE (PARTS AND LABOR INCLUDED):
W Appliance Co. will pay for factory-specied replacement parts and labor to correct defects in materials or workmanship that
existed when this major appliance was purchased, or at its sole discretion, replace the product with a new, or remanufactured,
unit equivalent to your original purchase. In the event of product replacement, your appliance will be warranted for the
remaining term of the original unit’s warranty period.
YEARS TWO (2) THROUGH FIVE (5) FROM DATE OF DELIVERY OF THE ORIGINAL PURCHASE (CERTAIN COMPONENT
PARTS ONLY - LABOR NOT INCLUDED): W Appliance Co. will pay for factory-specied replacement parts for the component
parts listed below to correct non- cosmetic defects in materials or workmanship in these parts that prevent function of this
major appliance and that existed when this major appliance was purchased:
DISHWASHER WASHING MACHINE DRYER
REFRIGERATORS AND
FREEZERS
MICROWAVE
Lower, Upper and
Third Level (where
applicable) Wire
Racks (excludes cup
shelves, silverware
basket, and third rack
trays), Chopper Blade,
Stainless Steel Tub and
Inner Door Liner
Drive Motor
(Stator and Rotor
Only)
Drive Motor
Only
Compressor
Only
Magnetron Tube
Only
ACTIVATE
WARRANTY

Page 20
ENGLISH
1. Commercial, non-residential or multiple family use or use
inconsistent with the product instructions and manuals.
2. In-home instruction on how to use your product.
3. Repair to correct improper maintenance, installation not
in accordance with installation instructions or electrical
or plumbing codes, or repair of household electrical or
plumbing systems.
4. Consumable parts (e.g., light bulbs, batteries, air or water
lters, preservation solutions, etc.).
5. Defects or damage resulting from accident, misuse, abuse,
alteration, re, oods, acts of God or improper installation.
6. Damages, defects, or repairs caused by unauthorized
servicers or use of non-genuine or third- party parts.
7. Any damage to the nish of appliance or home incurred
during installation, including but not limited to oors,
cabinets, walls, etc.
8. Cosmetic damage (e.g., scratches, dents, chips, and other
damage to appliance nishes), unless such damage results
from defects in materials and workmanship and is reported
to W Appliance Co., within 48 hours from date of delivery.
9. If the appearance or exterior of the product has been
damaged or defaced, altered or modied in design or
construction.
10. Discoloration, rust or oxidation of surfaces resulting
from caustic or corrosive environments (e.g., high salt
concentrations, high moisture or humidity or exposure to
chemicals).
11. Product pick-up or delivery. This warranty is for in-home
repair only.
12. Travel or transportation expenses for service in remote
locations where an authorized servicer is not available.
13. Products not accessible to provide required service or for
expenses making the product accessible for servicing.
14. Surcharges including but not limited to, any after hour,
weekend, or holiday service calls, tolls, ferry trip charges,
or mileage expenses for service calls to remote areas,
including the state of Alaska.
15. Repair, removal or reinstallation of inaccessible appliances
or built-in xtures (e.g., trim, decorative panels, ooring,
cabinetry, islands, countertops, drywall) that interfere with
servicing, removal or replacement of the product.
16. Appliances with original, factory installed model/serial
numbers removed, altered or not easily determined.
17. Incidental or consequential damages (e.g., loss of food or
medicine) resulting from appliance breakdown or delay in
service, repair or replacement.
18. Transportation and shipping costs associated with the
replacement of the unit.
19. Glass parts and other accessory items included with the
unit.
20. Products that have been purchased as refurbished, like
new, second-hand, under “as is” or “nal sale” terms.
21. Units that have been transferred from the original owner/
purchaser.
22. If there is damage due to power line surge, user damage
to the AC power cord or connection to improper voltage
source.
23. Products which are not defective or broken, or which are
working as described in the owner’s manual.
WHAT IS NOT COVERED / EXCLUSIONS
LIMITED WARRANTY
DISCLAIMER OF IMPLIED WARRANTIES
Repair or replacement as provided under this warranty is the exclusive remedy to the customer. W. Appliance Co. shall not
be liable for any incidental or consequential damages for breach of any express or implied warranty on this product, except to
the extent prohibited by applicable law. Any implied warranties, including any implied warranty of merchantability or implied
warranty of tness for a particular purpose, are limited to the duration of this warranty or the shortest period allowed by law.
Some states do not allow the exclusion or limitations of consequential damages, or limitations on how long the warranty lasts.
In these cases, the above exclusions or limitations may not apply to you. This warranty gives you specic legal rights and you
may also have other rights which may vary from state to state.
W. Appliance Co. does not warrant that the appliance will work properly in all environmental conditions and makes no
warranty and representation, either implied or expressed, with respect to the quality, performance, merchantability, or tness
for a particular purpose other than the purpose identied within this user’s manual. W Appliance Co. has made every effort
to ensure that this user’s manual is accurate and disclaims liability for any inaccuracies or omissions that may have occurred.
Information in this user’s manual is subject to change without notice and does not represent a commitment on the part of
W Appliance Co. W Appliance Co. reserves the right to make improvements to this user’s manual and/or to the product
described at any time without notice. If you nd information in this manual that is incorrect, misleading or incomplete, please
call 844-299-0879.
W Appliance Co.
New York, NY 10018
Page 21
ENGLISH
EXTENDED WARRANTY COVERAGE
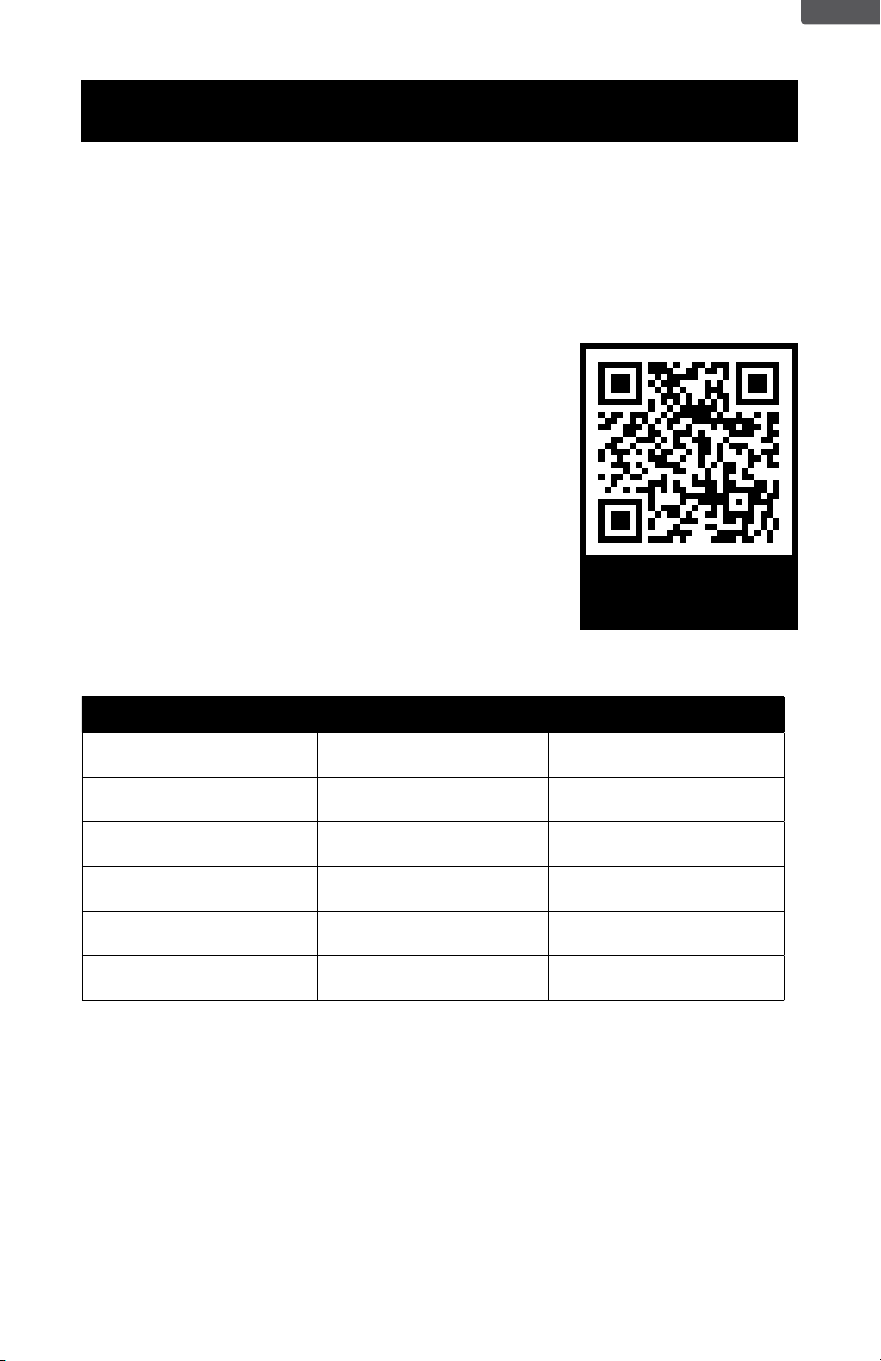
Protect Your Appliance with Extended Warranty Coverage
Thank you for purchasing your new appliance! Your product comes with our one-year limited
warranty, but why stop there? With our Extended Warranty and Accidental Damage Protection
Plan, provided by Mulberry, you can ensure your appliances are covered for longer—without
worrying about unexpected breakdowns or accidents.
Why Upgrade to the Extended Warranty Plan?
• Comprehensive Protection – Extend your warranty coverage
and get full protection for accidental damage and mechanical/
electrical failures, giving you peace of mind well beyond the
rst year.
• No Hidden Costs – You won’t pay any deductibles or service
fees for repairs or replacements. We’ve got you covered!
• Avoid Expensive Repairs – Appliances like refrigerators,
air conditioners, and dishwashers can be costly to repair.
Keep your products running smoothly without the worry of
unexpected repair bills.
• Quick & Easy Claims – Mulberry offers hassle-free claims and
quick, reliable service when you need it most—no complicated
paperwork, just fast and efcient help.
Coverage Basic Warranty Protection +
Mechanical / Electrical Failure
Coverage
Yes
(1 year)
Yes
(2 - 4 years)
Service Fee or Deductible
Yes
(may apply)
No
Parts & Labor
Costs Covered
Yes
(limited to 1 year)
Yes
(2 - 4 years)
Hassle-Free
Claims Process
Standard
Priority
(faster service)
Repair / Replacement Options
Yes
(limited to 1 year)
Yes
(2 - 4 years)
Convenience &
Peace of Mind
Limited to 1 year
Guaranteed for
up to 4 years
ACTIVATE
WARRANTY

BLACK & DECKER, BLACK+DECKER, the BLACK & DECKER and
BLACK+DECKER logos and product names are trademarks of The Black &
Decker Corporation, used under license. All rights reserved.
Product in this box may differ slightly from that pictured. Does not affect
function. Not all accessories shown in photography are included in this
package.
Imported by W Appliance, Inc., 1356 Broadway, New York, NY 10018
November 2024 Printed in China