Owner's manual
LIFE & ALOUD
DR5 DAB & FM RADIO
LIFE & ALOUD
www.lemegaaudio.com
DR5 DAB & FM RADIO
If you have any questions or suggestions, please share with us.
1
1. Introduction
1.1 Safety Instructions
Please store this instruction manual for future reference
Do not use this product near water or moisture
Clean only with a dry cloth
Unplug this product from the wall outlet before cleaning
Place the unit on a solid surface
Do not put it in a closed bookcase or a cabinet that may keep air
from flowing through its ventilation openings
Do not install near any heat sources such as radiators heat
registers
stoves or other appliances that produce heat
Protect the power cord from being walked on or pinched
particularly at plugs and the point where they exit from the product
Servicing is required when the product has been damaged Do not
attempt to service this product yourself
Opening or removing
covers may expose you to dangerous voltages or
other hazards.
Please contact the manufacturer to be referred to an authorized
service center near you
To prevent risk of fire or electric shock avoid over loading wall
outlets
extension cords or integral convenience receptacles
• Do not let objects or liquids enter the product
Use proper power sources Plug the product into a proper power
source
as described in the operating instructions or as marked on
the product.
1.2 Features
This manual describes how to use the DR5 with the following modes
DAB DAB digital radio with a wide choice of channels and digital
quality sound broadcast free
to air
FM with RDS Radio Data System
Bluetooth to act as a Bluetooth wireless speaker for Bluetooth
capable smart devices
1 3 Carton contents
After you unpack the box
you will find the following items:
DR5 unit
Owner’s manual
1 Quick Start Guide
Power adapter
USB Charging cable
2. Controls
connectors and display
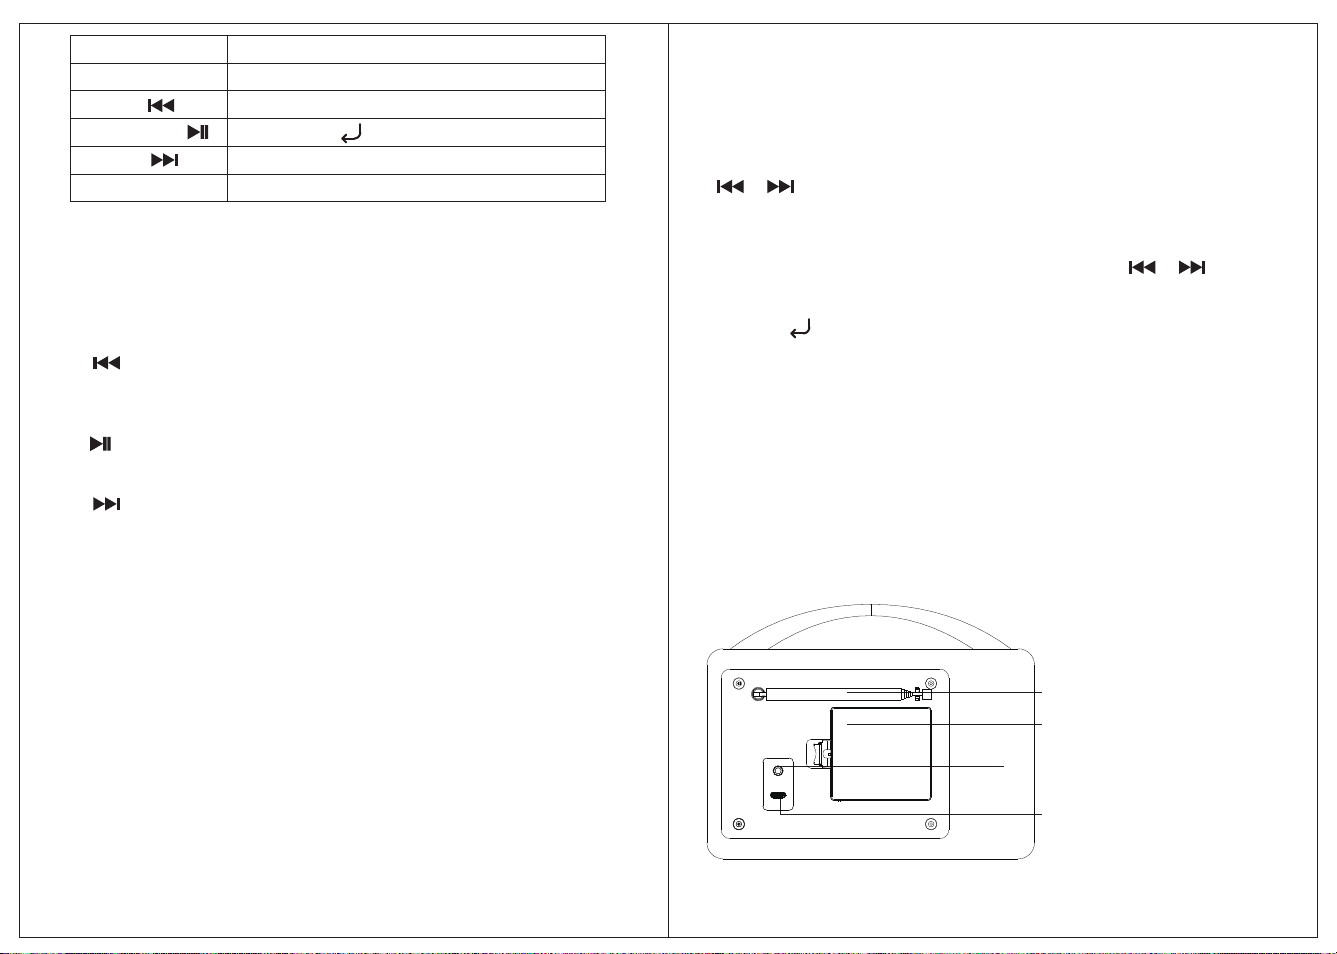
2.1 Main controls
1 8 2 3 9 4 10 5 6 11 7
2.
1.
Info
Alarm
Tune- /
Play/Pause /
Tune+ /
Preset
Power on/off & Volume/Mute/Snooze
Mode
3.
4.
5. Select 11.
8
.
7 .
9
.
10.Menu/Back
6.Sleep
3
4
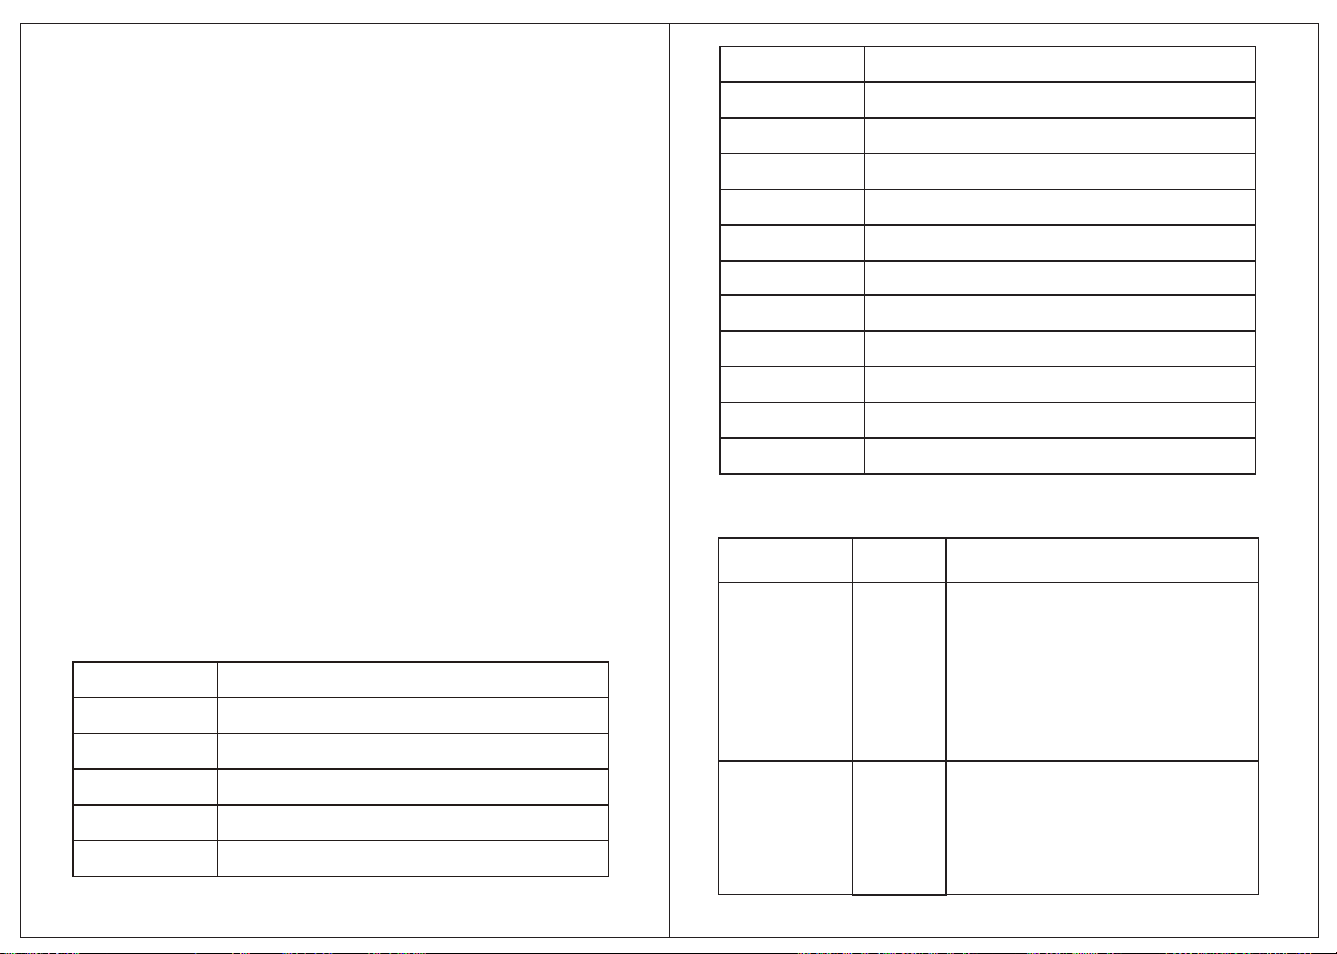
2.2 Connectors.
As shown below has connectors for the following:
Headphone Jack
DC power in [5V]
Battery compar
ttm
Telescope Antenna
en
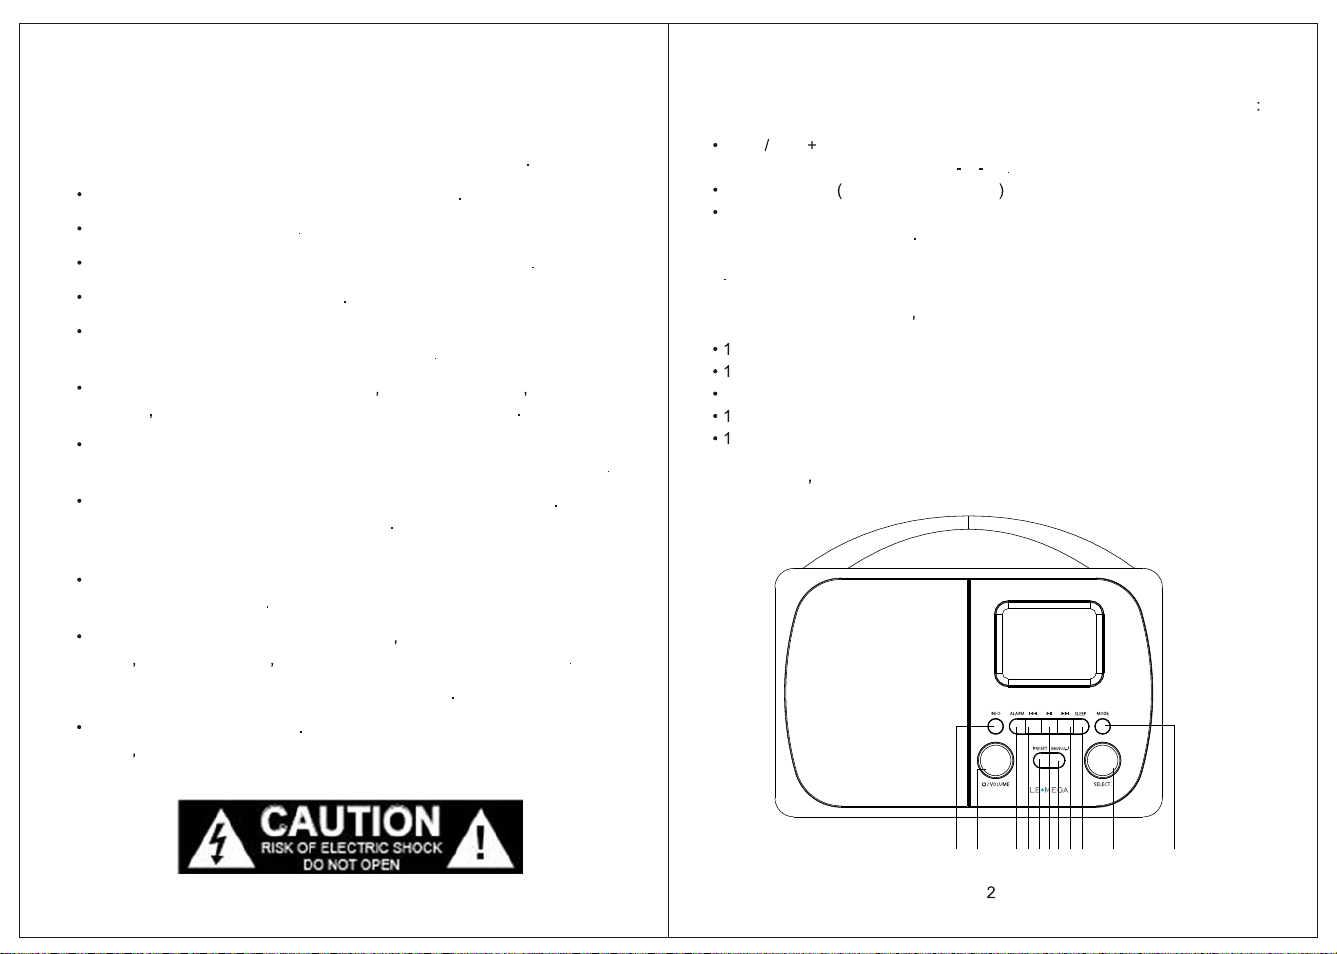
1. INFO: View more information about the station or track playing.
Press again to cycle through further information screens then
return to the normal playing screen.
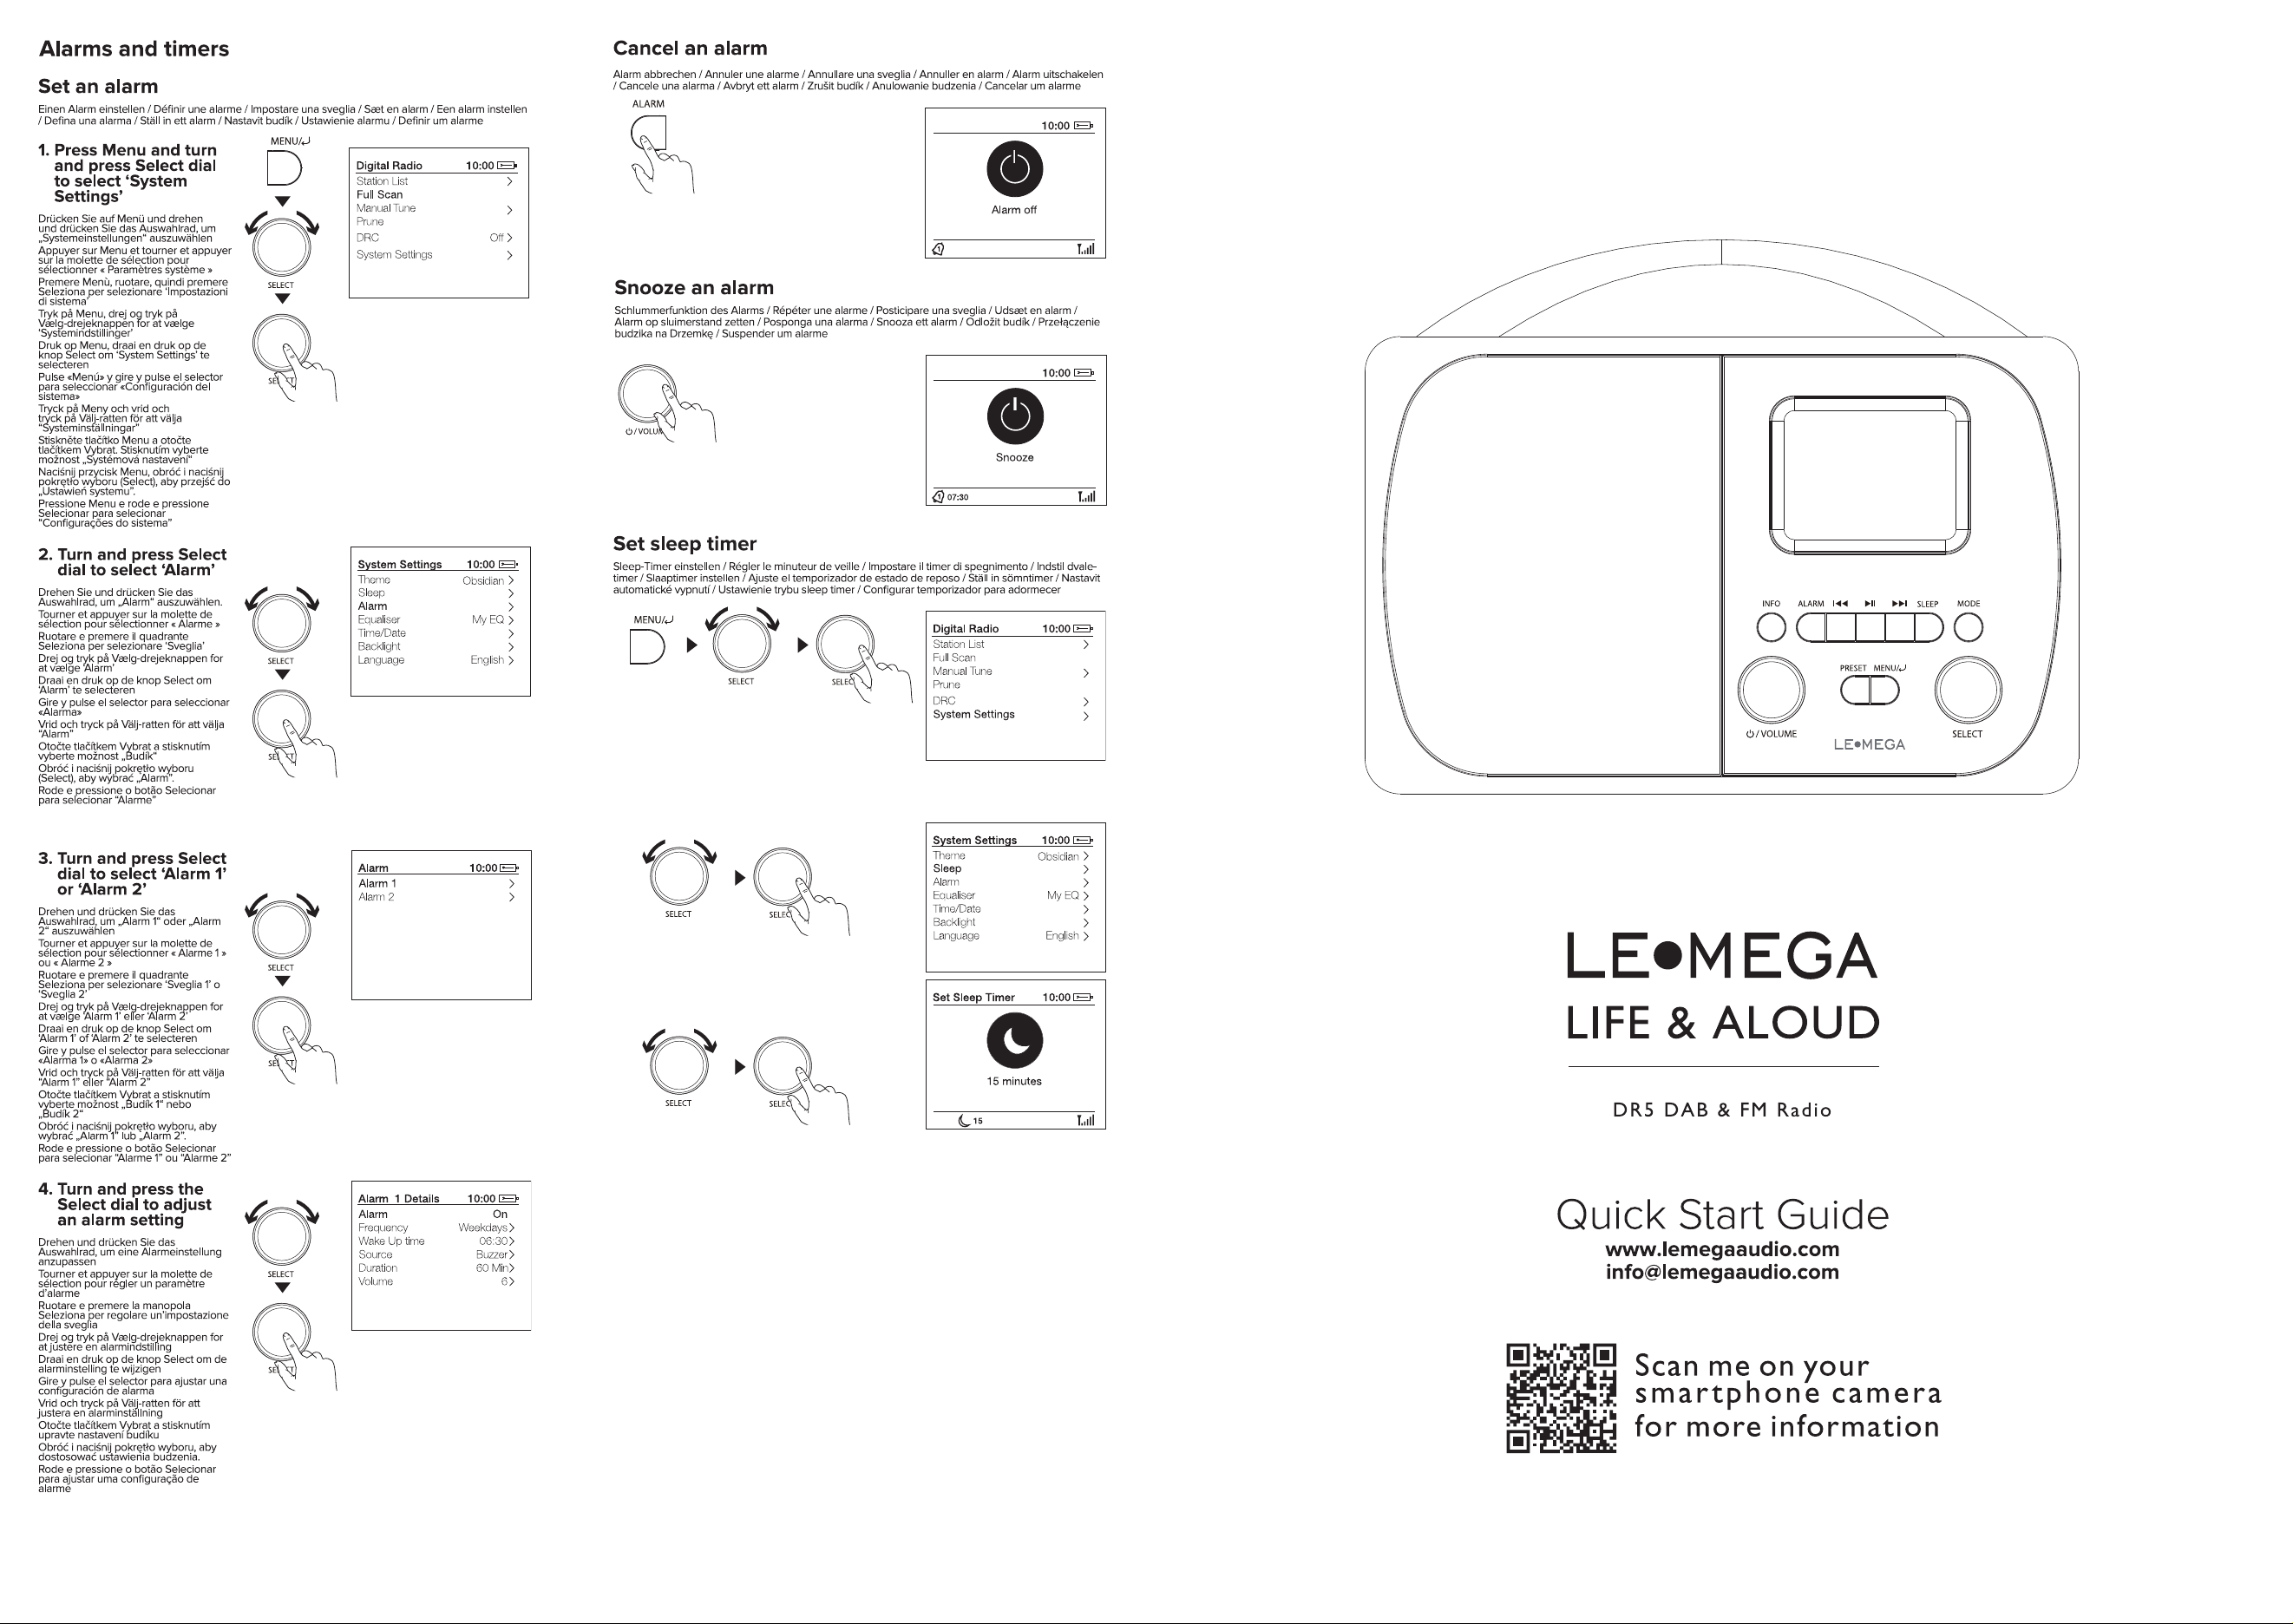
2. ALARM: Press Alarm button, use the Select control knob to
select the required Alarm 1 or 2.
3. / Tune-: Press to select the previous track under FM/DAB/
Bluetooth Mode; Press and hold the Tune- button 2 seconds to
auto-scan the stations under the FM/DAB mode.
4. : Press to do autoscan under DAB/FM mode, Press to select
Play/Pause under BT mode.
5. / Tune+: Press to select the next track under FM/DAB/
Bluetooth Mode; Press and hold the Tune+ button 2 seconds to
auto-scan the stations under the FM/DAB mode.
6. SLEEP: Press Sleep button, use the Select control knob to choose the
sleep delay time in minutes from: Sleep timer Off | 15 |30 | 45 | 60 | 90.
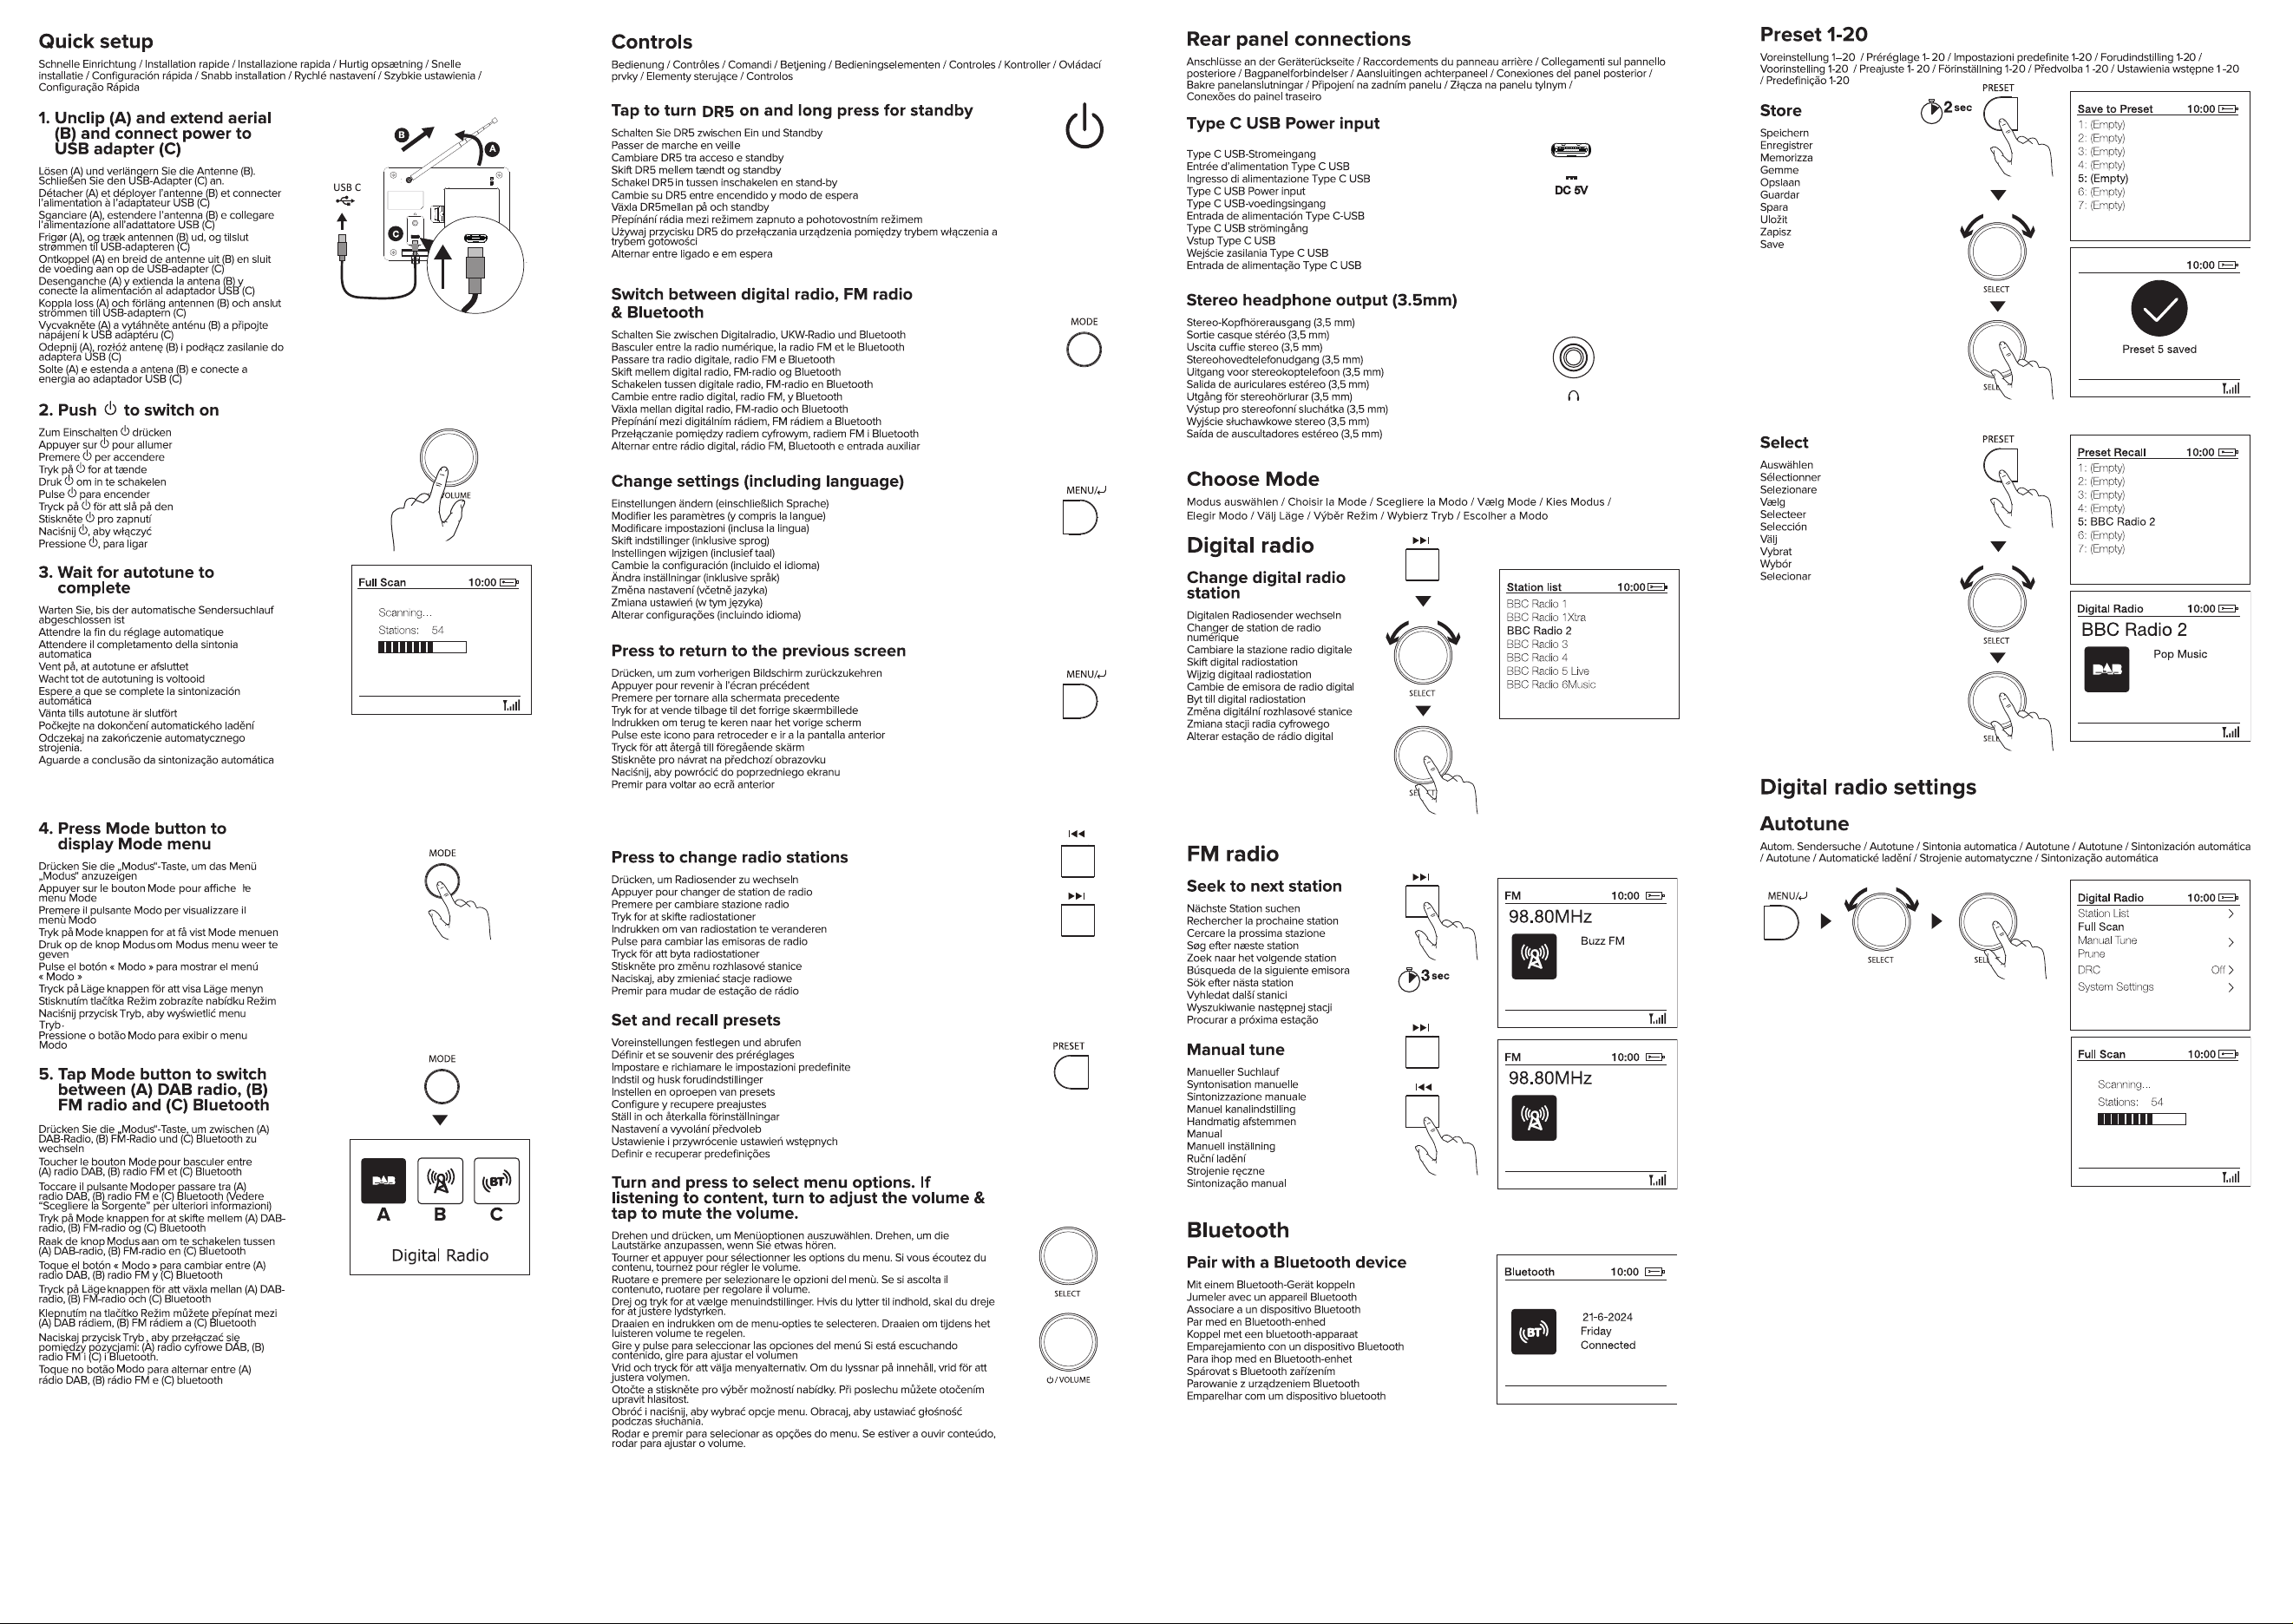
7. MODE: Press to Source to select different modes DAB, FM, Bluetooth.
8. KNOB: POWER/VOLUME/MUTE/SNOOZE:
8.1. POWER: Push and hold the knob for 3 seconds to Power off or go
Standby mode. [showing clock and date] depends on battery
power or Mains power, or cancel sleep, or cancel alarm function.
8.2. VOLUME: Rotate the knob to adjust the volume up or
down during playback.
8.3. MUTE: Press the knob to mute the music when playing.
8.4. SNOOZE: Press the knob to snooze a set time [5minitues]
when alarm sounding.
9. PRESET: Saving Presets--FM, DAB, total can save 40 preset
stations [20 DAB stations and 20 FM stations].
To save preset, press the Preset button for 2 seconds, use the navigation control
/ or rotate the Select knob to select and push Select knob to save.
Recall Presets-- FM, DAB
Press the Preset button and use the navigation control /
or rotate the Select knob to tune into the station.
10. MENU/ BACK BUTTON:
10.1. MENU: press the MENU to show the MENU for the current mode.
Press again to show now playing screen.
10.1. BACK: press the BACK to return to the previous screen.
11. KNOB: SELECT: Rotate the knob scroll through a menu or station list.
Press to the knob to select the chosen option.

3. Started and setup
DR5 is easy to use. To play DAB or FM radio, all you need is a power
Mode :
1). Place DR5 on a suitable shelf or table.
2). Extend the telescopic antenna.
3). Connect the power adaptor between DR5 and the mains supply.
DAB radio mode receives DAB/DAB+ digital radio and displays
information about the station and programme /track as broadcast. To
enter DAB mode, press Mode
until the display shows Digital Radio.
The first time you use DR5, or if the station list is empty,the radio
automatically performs a full scan to see what stations are available. You
may also need to start a scan manually to update the list of stations for
one of the following reasons:
New stations may become available from time to time.
If reception was not good for the original scan (for example the antenna
was not up), this may result in an empty or incomplete list of available
stations.
If you have poor reception of some stations causing the audio to break up,
you may wish to list only stations with good signal strength. To do a full
scan Select Menu > Full scan.
Once a scan is complete, the radio returns to playing the previously-
selected station or first station on the station list.
To remove stations that are listed but unavailable Select Menu > Prune
invalid. > Yes
65
4.2 Manual tune
4.3 Prune Invalid
4.1 Full Scan
4.4 DRC
Dynamic range compression (DRC)
This function reduces the difference between the loudest and
quietest audio being broadcast.
Effectively, this makes quiet sounds comparatively louder, and loud
sounds comparatively quieter.
Note: DRC only works if it is enabled by the broadcaster for a
specific station.
To change the DRC setting Select Menu > DRC > The options
available are: DRC high | low | off.
4. DAB radio mode
As well as the normal method of scanning, you can also manually tune to a
particular channel / frequency. This can be useful for adjusting your
antenna to achieve the best possible reception and scanning a particular
channel to update the station list.
To manually tune
Press Menu > Manual tune then use select control button to display a
particular channel/frequency, press Select to tune to that channel/
frequency.
The display shows a live indication of the received signal strength on the
selected frequency.
Adjustments to your antenna will be manifested in the received signal
strength displayed.
Note: The division in the signal strength bar indicates the audio quality
threshold – if the signal strength, as indicated by the solid rectangles, falls
below this threshold the audio quality will deteriorate.
When a channel/frequency is selected DR5 also scans for any DAB
stations on the selected frequency and updates the station list
with any
new stations found. To listen to any stations found return to the Now
playing screen and select the required station from the station list as
normal.

5 FM radio mode
FM radio mode receives analogue radio from the FM band and displays
RDS [Radio Data System] information about the station and show [where
broadcast].
To enter FM mode: Press Mode
until the display shows FM Mode.
5.1 Selecting stations
The first time you select FM radio, DR5 is set to the lowest frequency
in the FM band. On subsequent selections the last used frequency/station
is displayed.
To scan for a station in FM mode
Press Play/Pause button scans up through the FM band frequencies,
showing the current frequency on the screen display.
A scan stops when a signal is found. DR5 can be set to stop at each
station or only at stations with a strong signal.
Alternatively, you can tune, using the Tune+/Tune- button
in 50 kHz steps.
5.2 Now playing information
While FM radio is playing, the screen shows its frequency, or if RDS
information is available, station name and any further RadioText'
information. If no information is available, just the frequency and a No
RadioText message is shown.
To view further information about the broadcast Press Info.
Date /Service / Pty / Freq / Signal/Power status
8
7
5.3 Settings
Scan settings
By defaul t , FM scans stop at any available station (All stations ).This
may include poor quality audio from weak stations.
O
ptions: Strong stations only | All stations
To change the scan setting, s to stop only at stations with good
signal strength
Select Menu > Scan setting then Strong stations only.
Audio settings
By defaul t, all stereo stations are reproduced in ste r e o . For weak
stations , thi
s may result in poor quality aud. i o ,The audio quality can
be improved using mon. o .
Options: Stereo allowed | Forced mono
To play weak stations in mono
Select Menu > Audio setting > Forced mo.no
6 Bluetooth
Bluetooth mode allows DR5 to act as a wireless speaker playing audio
content from a connected Bluetooth capable device.
To enter Bluetooth mode
Press Mode
to choose Bluetooth mode to connect a Bluetooth capable
device.
Use your Bluetooth capable smart device to pair and connect with the
DR5.
6.1 Display information
The screen displays either a connected or disconnected message
depending on the connection state.
7 System settings
The System Settings allow you to tailor the DR5 with a variety of
options to
suit you.
To access system settings from any mode Select Menu >System Settings
>, then choose from the various options as described in the menu as
below.

109
The System Setting Menu options are:
• Sleep
• Alarm
• Equaliser
• Time/Date
• Backlight
• Language
• Factory Reset
• Software update
• Software version
To navigate through the menus
The following controls are used to move about the menu tree to
choose and select the required settings:
Select knob– [ push the Select control knob] this selects the currently
displayed option, if the option has a further sub-menu the first option of the
sub-menu is displayed. If the option is a setting value, the displayed value
is selected and either the next setting is highlighted or, if there are no
further settings, the display returns to the parent menu for that setting.
Select control knob– cycles forwards and backwards through the current
menu or setting options.
Back – jumps back to the parent menu of the currently displayed menu or
setting.
Menu to return to the Now Playing screen.
on the
7.1 Sleep
To set
the sleep timer while the radio is playing Press Sleep button
front panel. You can choose the sleep delay time in minutes from:
Sleep timer Off | 15 |30 | 45 | 60 | 90.
Use select control knob to cycle through the options or press Tune- / Tune+
button to choose the displayed option.
Once you select a sleep delay period, the display returns to the Now
playing screen displaying a Crescent moon icon and the remaining time,
in minutes, before the sleep time expires.
After the sleep delay period the radio switches to standby mode.
7
.2 Alarms
As well as a clock/calendar, there are two versatile wake-up alarms with
snooze facility, and a sleep function to turn the system off after a set
period of time. The alarm sound for each alarm can use a buzzer or a
selection from the audio sources.
Note: Alarms will only function when the DR5 unit is On or in Standby
mode.
An active alarm is indicated by its icon in the bottom line of the display.
Note: Alarms can be switched on or off in standby mode.
To set alarms
Press Alarm button on the front panel,
use the Select control knob to
select the required Alarm 1 or 2.
To exit alarm setting mode, press Menu / Back [alternatively, the Alarm
display will timeout and automatically return to the Now Playing screen
after a certain time].
The alarm setup prompts you for the following parameters. Select a value
for each parameter in turn turning the select control knob and push knob
to confirm and move to the next parameter.
Parameters
Alarm – Off | On
Frequency - Daily | Once | Weekends | Weekdays
Note: if you choose ' Once ', you are prompted to enter the required
date .
Wake Up time – hours and minutes
Sources – Buzzer | Digital Radio| FM
If DAB or FM is chosen as the audio Mode you will also be prompted to
select the Last played station.
Duration – 15 | 30 | 45 | 60 | 90 | 120 minutes
If the alarm is not canceled DR5 returns to standby after this time
period.
Volume – rotate the Select control knob to set the required alarm volume
1-16.

1211
7.3 Equaliser
This presents a My Equaliser option to allow you to create your own
equaliser settings.
My EQ… | Normal | Classic | Jazz | Pop | Rock | Speech
7.3.1 My EQ setup…
This option allows you to set a bias in the treble and bass audio
frequencies and turn 'Loudness' On or Off. Values can be set between -7
(Minus 7) and +7 (plus 7).
Treble – (Use the select control button to choose a bias value
between -7 and +7)
Bass – (Use the select control button to choose a bias value
between -7 and +7)
Loudness – No or Yes. (When Yes, low-level high and low frequency
sounds are boosted to give a ‘fuller' sound.)
This is the volume the alarm will build up to. [Initially the alarm sounds at
a low volume and gradually gets louder to the set volume].
In all listening modes active alarms are indicated by displaying the
relevant
Alarm 1 and/or Alarm 2 icons.
At the set time, the alarm will sound, quietly at first, then gradually building
up to the set volume. When an alarm sounds, the icon in the display
flashes.
To cancel a sounding alarm and switch the radio to standby,
press
Alarm button .
Snooze
To temporarily silence a sounding alarm, short press Power Knob for
5/10/15/30 minutes snooze period.
7.4 Time/Date
The time and date can be updated manually or automatically With
auto-update , the time and date are automatically synchronised with
national time signals broadcast over DAB and F M ([when available] .
You can also select the display format for the time and d. ate
The Time menu contains the following optio: ns
• Set Time/Date – [see below]
• Auto update - Update from Any | Update from Digital Radio |
Update from FM | No Update
• Set 12/24 hour - 12 | 24
•
•
Set date format - DD-MM-YYYY | MM-DD-YYYY.
Set time/date
This option is for manually setting the time and date displayed.The time
displays as hh:mm, with the first value, hh, active (flashing). Adjust each
value using the select control knob and push Select knob to confirm. The
next value then becomes active and flashes. The date values follow and
are set in the same way.
Note: The date displays as DD-MM-YYYY or MM-DD-YYYY depending on
your choice of date format (see above).
7.5 Backlight
The DR5 has a backlight with three brightness settings, and adjustable
timeout [this is the time delay, in seconds, after which the display switches
to the Dim level].
There are three settings:
•Timeout - On | 10 | 20 | 30 | 45 | 60 | 90 | 120 | 180 sec
•On level - High | Medium | Low
•Dim level - High | Medium | Low
Clock Style - Normal Digital / Big Digital / Classic Analog /
Modern Analog
13 14
No stations fo und
No DAB stations ar e av ai lab le – ch ec k ae ri a l .
FM mode
No RadioText
No RDS text
information
is ava ilabl e on this station .
No PTY
No RDS programme type information is av ai lab le.
No Name
No RDS station name is being broadcast
General messa ges
Update failed
Soft ware upgrade fai le d
8.2 Troubleshooting
Check /move antenna, Move radio
Rescan high - strength stations only.
For DAB or DAB +, check the
current status of local coverage
with your national digital radio
authority .
As above then rescan stations
Solutions
Low signal
Low signal
Cause
strength
strength
FM: Hiss
DAB: burbling /
intermittent
cut-out
DAB:
No stations
available’
message
Problem
Message
Description
Tim e is not set
No time value is cu rren tly se t o n this platform .
Time Not saved
Any ch an ge s mad e to th e time settings will b e los t.
Alarm Not saved
Any ch an ge s mad e to th e Alarm settings will b e
e
lost.
Invalid Date
The entered value does not match a va lid da t
7.6 Language
The default language is Engli s h . To change, select Menu > System
settings > Language > then select your languag. e
7.7 F
7.8 Software Update
From time to time, DR5 may make software upgrades available with
bug Fixes and/or additional features.
This feature is for service centre.
7.9 Software Version
This is used to display the current software version. Under the system
menu, or rotate SELECT knob to select “Software version” through
the list of menu, push the SELECT knob to confirm. Then, the existing
SW version will be showed.
actory reset
A factory reset clears all user defined settings, replacing them with
the original default valu e s , so time /date , preference s settings and
DAB station list are all lo s t .
If you select Factory res e t , you are asked to confi rm by selecting
“Yes”.
8 Troubleshooting and error messages
8.1 Error messages
Message
Descri ption
DAB mode
Service not availa ble
No DAB reception
Signal error
The DAB si gn a l has been interrupted
No DAB Station
The current statio n does not broadcast an identity name.
No Name
The list ed st ation cann ot be found .
Model:
Type:
Speaker:
Power:
Power Supply:
Dimension (mm):
Weight:
9 Technical Specification:
DR5
DAB & FM Radio
1X 2.5” full range speaker
5W RMS
5V DC or 4 x AA batteries [battery not included]
W203 X H160 X D100 MM
0.89KG
Specifications subject to change without no.t ice
This symbol indicates that the relevant electrical product or battery
should not be disposed of as general household waste in Europe.
To ensure the correct waste treatment of the product and battery,
please dispose them in accordance to any applicable local laws of
requirement for disposal of electrical equipment or batteries. In so
doing, you will help to conserve natural resources and improve
standards of environmental protection in treatment and disposal of
electrical waste (Waste Electrical and Electronic Equipment
Directive).
15