
by
1223R2-SKU 2103FP
Read all instructions before
assembling and using product.
IMPORTANT - Keep instructions
for future use.
Scan the QR code to
register your product
Scannez le code QR pour
enregistrer votre produit
Escanee el código QR para
registrar su producto
By
OWNER’S MANUAL
MANUEL DU PROPRIÉTAIRE MANUAL DEL USUARIO
Lisez toutes les instructions avant avant
d'assembler et d'utiliser le produit.
IMPORTANT - Conservez les instructions
pour pour une utilisation ultérieure.
Lea todas las instrucciones antes
de montar y utilizar el producto.
IMPORTANTE - Guarde las
instrucciones para uso futuro.
©2023 Mattel.
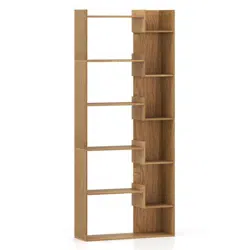
Go Bananas
Bookcase
2
By
WARNINGS
AVERTISSEMENTS
• Please read all instructions carefully before assembling and keep instructions for future use.
• For your safety, assembly by two adults is recommended.
• Improper assembly can result in damage to your furniture or cause harm to your child.
• Proper assembly is critical to ensure a safe and comfortable end result.
• Remove all parts and hardware from the box and lay them out on a carpeted or scratch-free work surface, as this will avoid damaging any parts during assembly.
• Only dispose of any contents once assembly is completed to avoid accidentally discarding small parts or hardware.
• Save all packing materials until assembly is complete to avoid accidentally discarding smaller parts or hardware.
• Use the parts and hardware lists to identify and separate each piece included before starting assembly.
• Do not fully tighten all bolts until all parts are in place. Failure to follow these instructions may cause the bolts to misalign during assembly.
• Check this product regularly before using it and do not use it if any parts are loose, sharp, or missing or if there are any signs of damage. Do not substitute parts.
Contact manufacturer replacements or additional instructions are needed.
• Keep children and animals away from the work area, small parts could choke if swallowed.
• Screws may have sharp edges or sharp points. Keep screws out of children's reach at all times. Do not stand on the product, this could cause damage.
• Assemble the item as close to its final position (in the same room) as possible.
• We do not recommend the use of power drill/drivers for inserting screws, as this could damage the unit. Only use hand screwdrivers.
• Serious or fatal crushing injuries can occur from furniture tip-over. To help prevent tip-overs,
• Place the heaviest items on the lowest shelves. Never allow children to climb, stand, or hang on shelves.
• Always monitor your child's activity when in the nursery. Do not allow standing on top of this product.
• Veuillez lire attentivement toutes les instructions avant de procéder à l'assemblage et conservez-les pour une utilisation ultérieure.
• Pour votre sécurité, il est recommandé que le montage soit effectué par deux adultes.
• Un montage incorrect peut endommager votre meuble ou blesser votre enfant.
• Un assemblage correct est essentiel pour garantir un résultat final sûr et confortable.
• Retirez toutes les pièces et la quincaillerie de la boîte et disposez-les sur une surface de travail recouverte de moquette ou exempte d'éraflures, afin
d'éviter d'endommager des pièces lors de l'assemblage.
• Ne jetez le contenu qu'une fois l'assemblage terminé afin d'éviter de jeter accidentellement de petites pièces ou de la quincaillerie.
• Conservez tous les matériaux d'emballage jusqu'à la fin de l'assemblage afin d'éviter de jeter accidentellement les petites pièces ou le matériel.
• Utilisez les listes de pièces et de matériel pour identifier et séparer chaque pièce incluse avant de commencer l'assemblage
• Ne serrez pas complètement les boulons tant que toutes les pièces ne sont pas en place. Le non-respect de ces instructions peut entraîner un
désalignement des boulons au cours de l'assemblage.
• Vérifiez régulièrement ce produit avant de l'utiliser et ne l'utilisez pas si des pièces sont desserrées, coupantes ou manquantes ou s'il y a des signes
d'endommagement. Ne remplacez pas les pièces. Contactez le fabricant si vous avez besoin de pièces de rechange ou d'instructions supplémentaires.
• Tenir les enfants et les animaux à l'écart de la zone de travail, les petites pièces pouvant provoquer un étouffement en cas d'ingestion.
• Les vis peuvent présenter des arêtes ou des pointes tranchantes. Gardez les vis hors de portée des enfants à tout moment.
• Ne montez pas sur le produit, cela pourrait l'endommager.
• Assemblez l'article aussi près que possible de sa position finale (dans la même pièce).
• Il est déconseillé d'utiliser des perceuses/visseuses électriques pour insérer des vis, car cela pourrait endommager l'appareil. N'utilisez que des tournevis à
main.
• Le basculement d'un meuble peut entraîner des blessures graves, voire mortelles, par écrasement. Pour éviter les basculements,
• Placez les articles les plus lourds sur les étagères les plus basses. Ne laissez jamais les enfants grimper, se tenir debout ou se suspendre aux étagères.
• Surveillez toujours les activités de votre enfant lorsqu'il se trouve dans la chambre d'enfant. N'autorisez pas les enfants à se tenir debout sur ce produit.
• Lea atentamente todas las instrucciones antes del montaje y consérvelas para un uso futuro.
• Para su seguridad, se recomienda que el montaje lo realicen dos adultos.
• Un montaje incorrecto puede dañar el mueble o causar lesiones a su hijo.
• El montaje correcto es fundamental para garantizar un resultado final seguro y cómodo.
• Saque todas las piezas y herrajes de la caja y colóquelas sobre una superficie de trabajo alfombrada o libre de arañazos, ya que así evitará dañar cualquier
pieza durante el montaje.
• Deshágase de todo el contenido una vez finalizado el montaje para evitar desechar accidentalmente piezas pequeñas o herrajes.
• Guarde todo el material de embalaje hasta que finalice el montaje para evitar desechar accidentalmente piezas pequeñas o herrajes.
• Utilice las listas de piezas y herrajes para identificar y separar cada pieza incluida antes de comenzar el montaje.
• No apriete completamente todos los tornillos hasta que todas las piezas estén en su lugar. El incumplimiento de estas instrucciones puede hacer que los
pernos se desalineen durante el montaje.
• Compruebe este producto con regularidad antes de utilizarlo y no lo utilice si alguna pieza está suelta, afilada o falta o si hay algún signo de daño. No
sustituya piezas. Póngase en contacto con el fabricante en caso de sustitución o si necesita instrucciones adicionales.
• Mantenga a los niños y a los animales alejados de la zona de trabajo, las piezas pequeñas podrían provocar asfixia en caso de ingestión.
• Los tornillos pueden tener bordes afilados o puntas afiladas. Mantenga los tornillos fuera del alcance de los niños en todo momento.
• No se ponga de pie sobre el producto, podría dañarlo.
• Monte el artículo lo más cerca posible de su posición final (en la misma habitación).
• No recomendamos el uso de taladros/atornilladores eléctricos para insertar tornillos, ya que podría dañar la unidad. Utilice únicamente destornilladores
manuales.
• El vuelco del mueble puede provocar lesiones graves o mortales por aplastamiento. Para evitar vuelcos
• Coloque los objetos más pesados en los estantes más bajos. Nunca permita que los niños trepen, se paren o se cuelguen de los estantes.
• Vigile siempre la actividad de su hijo cuando esté en la habitación infantil. No permita que se pongan de pie encima de este producto.
ADVERTENCIAS
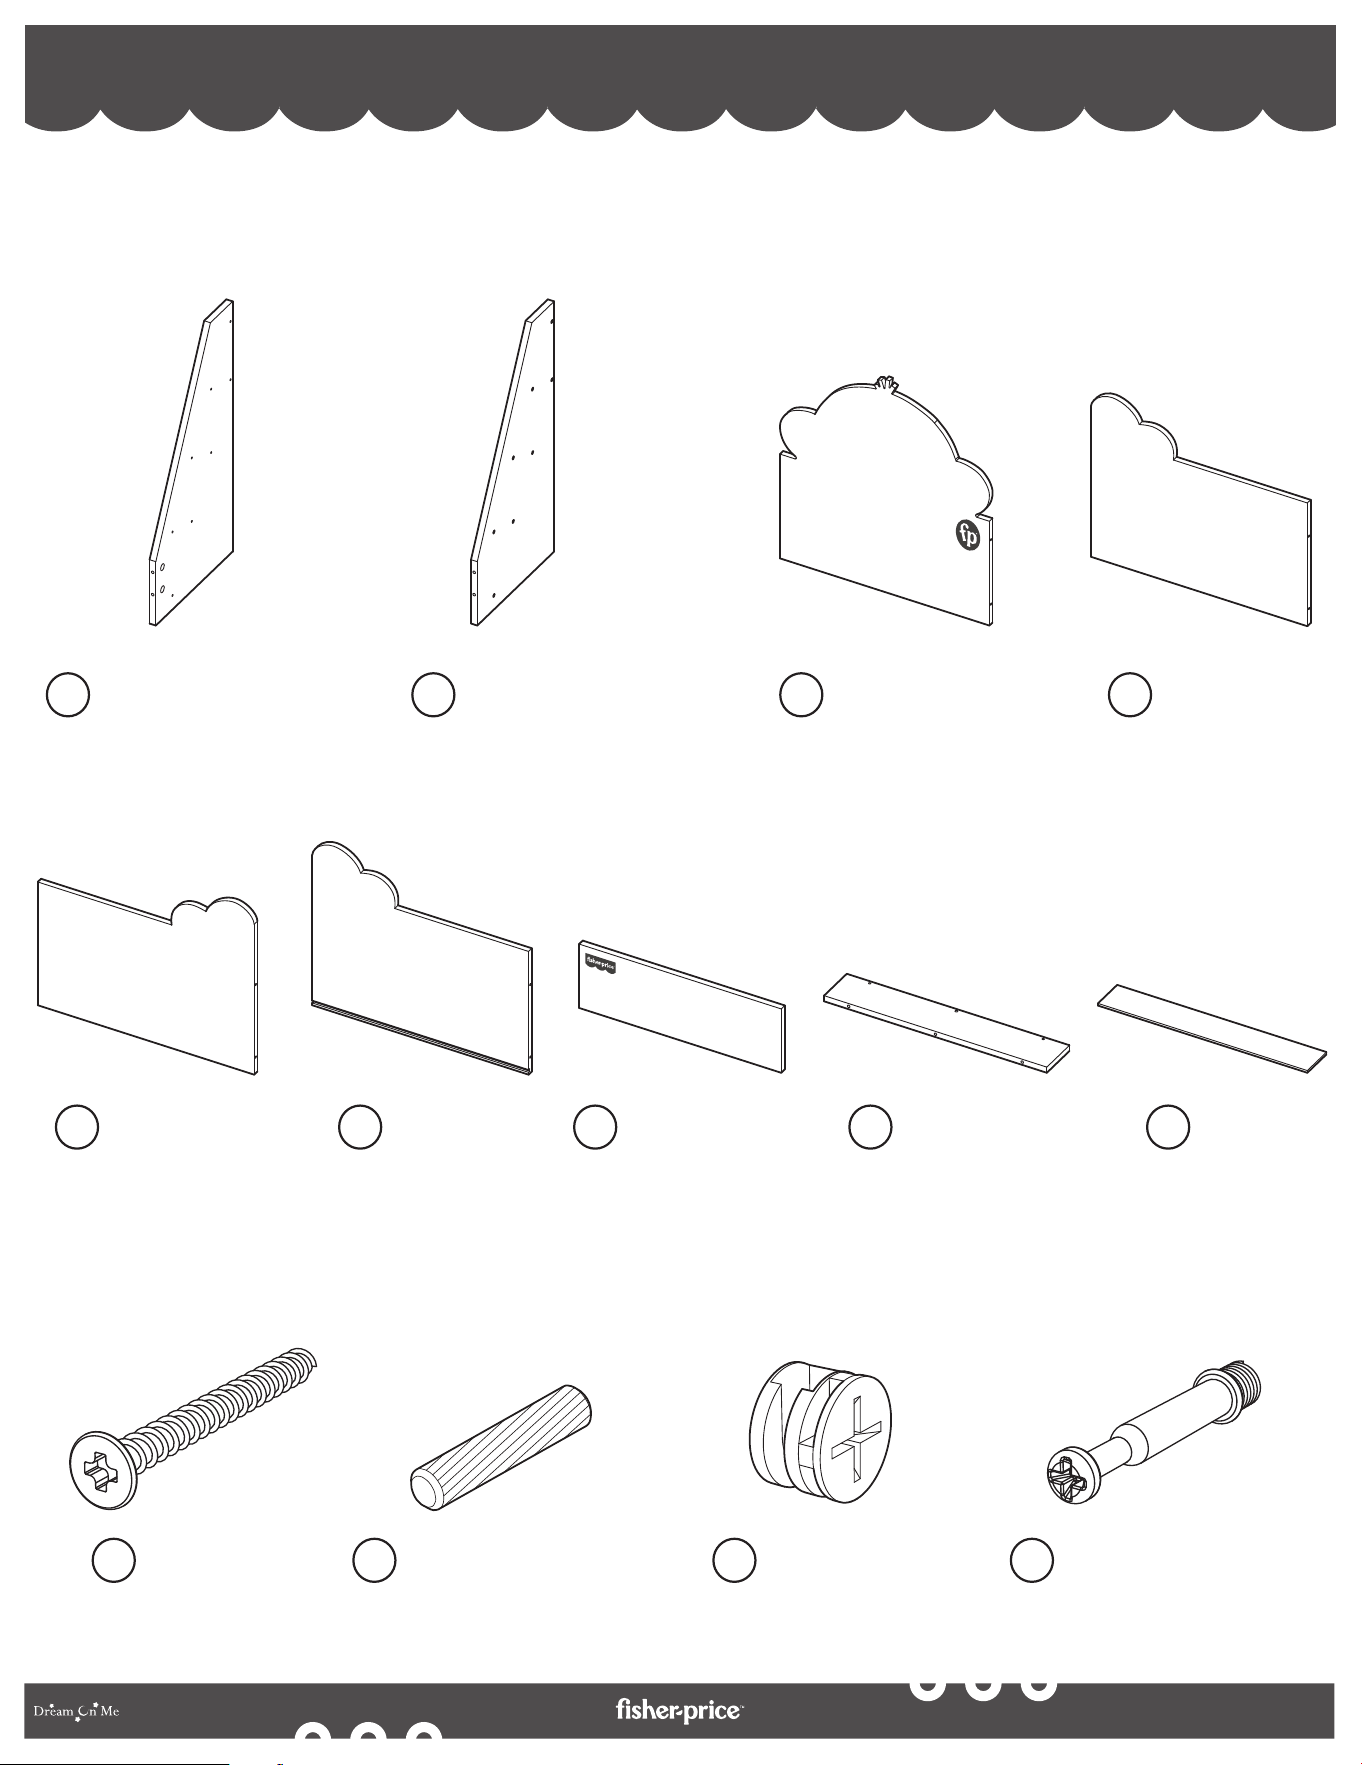
PARTS PIÈCES PARTES
If there are any missing parts, please contact Dream On Me before using the product.
S'il y a des pièces manquantes, veuillez contacter Dream On Me avant d'utiliser le produit.
Si falta alguna pieza, póngase en contacto con Dream On Me antes de utilizar el producto.
HARDWARE MATÉRIEL
3
By
Left Side Panel
Panneau latéral gauche
Panel lateral izquierdo
1
Right Side Panel
Panneau latéral droit
Panel lateral derecho
2
Rear Panel
Panneau arrière
Panel trasero
3
Panel 1
Groupe 1
Grupo 1
4
Panel 2
Groupe 2
Grupo 2
5
Panel 3
Groupe 3
Grupo 3
6
Front Panel
Face avant
Panel frontal
7
Base 1 (x3)
Socle 1 (x3)
Bases 1 (x3)
8
Base 2
Socle 2
Bases 2
9
Screw (x22)
Vis (x22)
Tornillo (x22)
A
Wooden Dowel (x12)
Cheville en bois (×12)
Clavija de madera (×12)
B
Cam Lock (x4)
Verrou à came (x4)
Cierre de leva (x4)
C
Cam Bolt (x4)
Boulon à came (x4)
Perno de leva (x4)
D
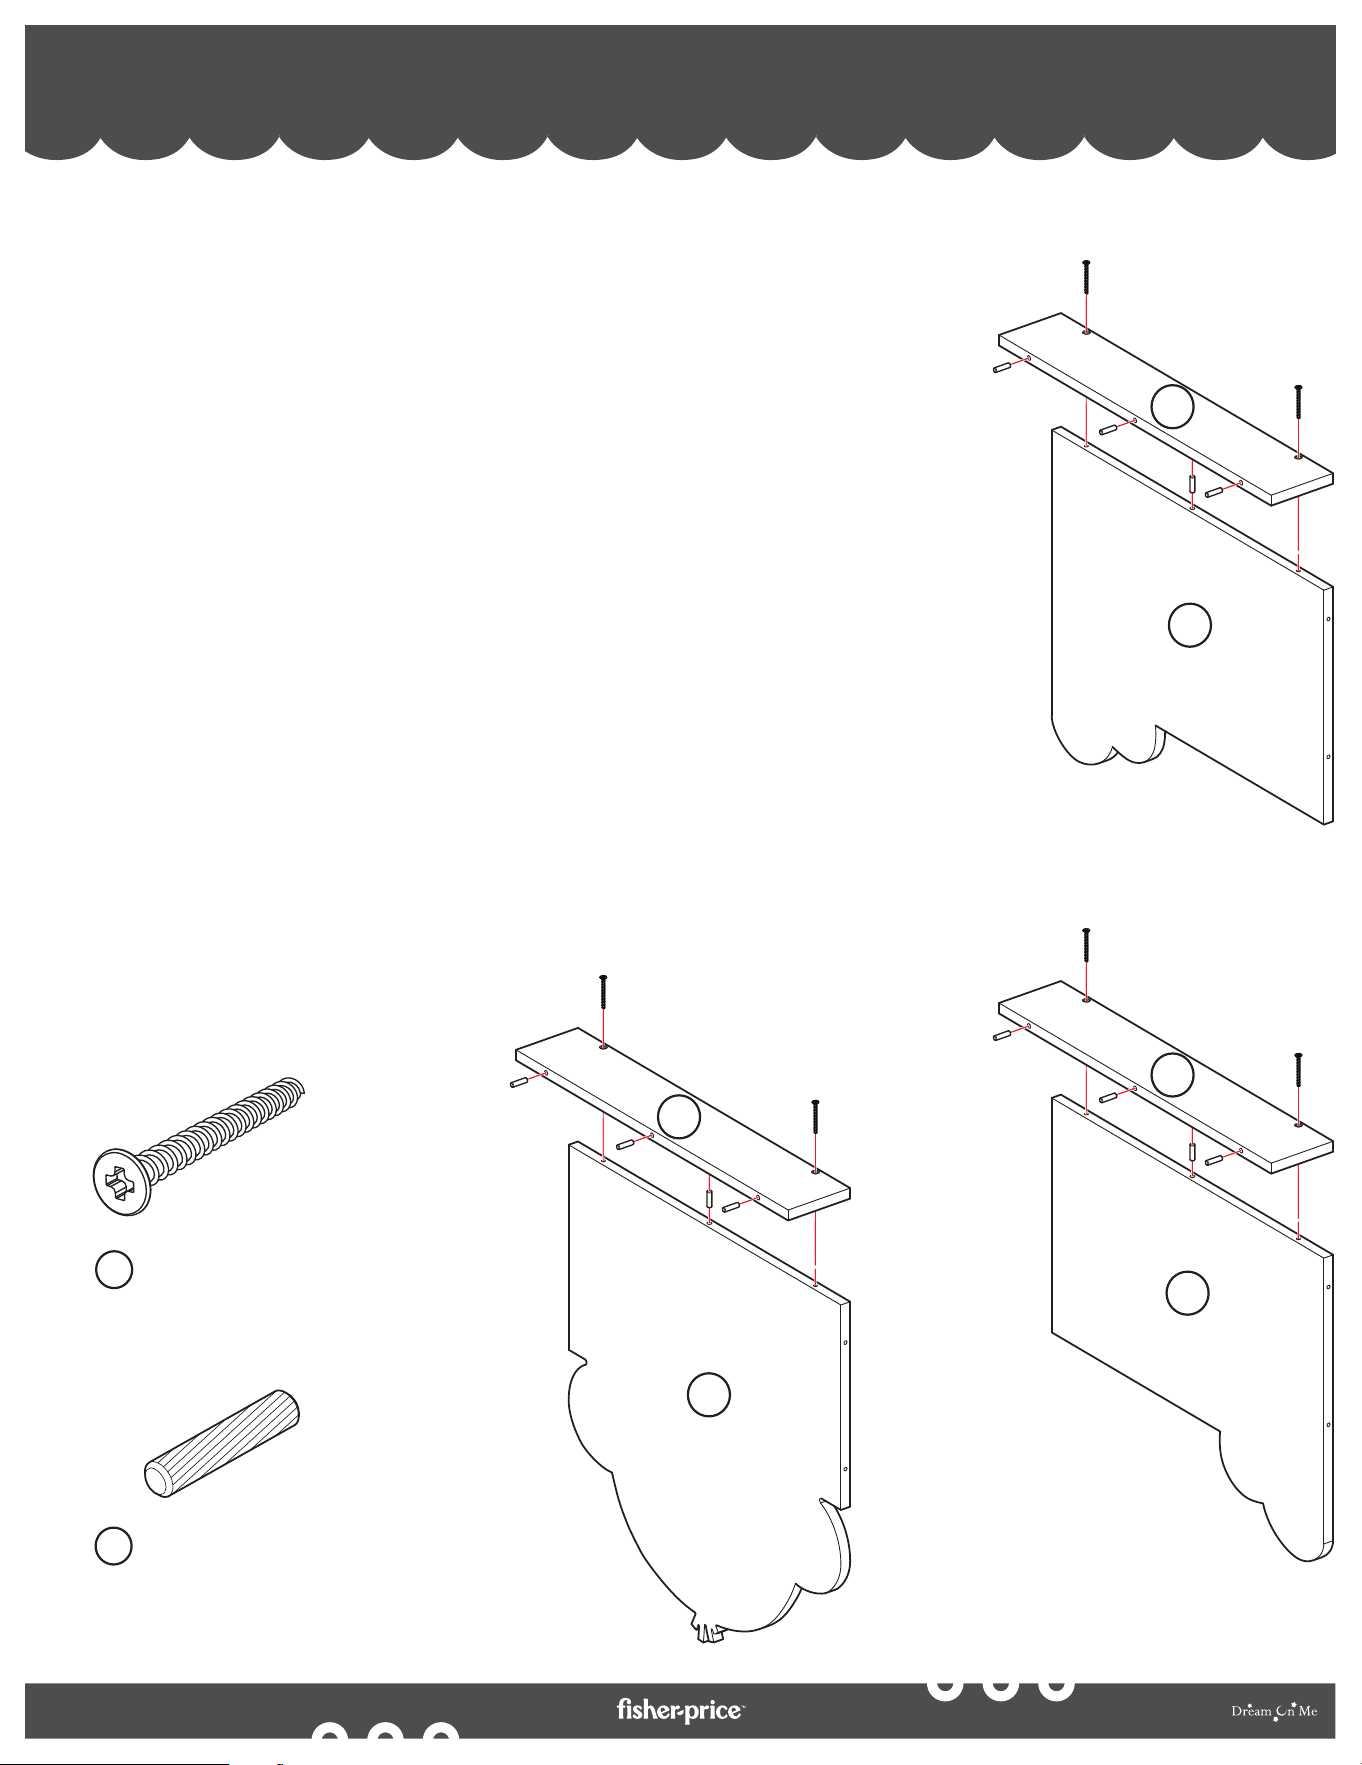
BOOKCASE ASSEMBLY - BASE ASSEMBLY
ASSEMBLAGE DE LA BIBLIOTHÈQUE - ASSEMBLAGE DE LA BASE
MONTAJE DE LA LIBRERÍA - MONTAJE DE LA BASE
1
4
By
Screw (x6)
Vis (x6)
Tornillo (x6)
A
Wooden Dowel (x12)
Cheville en bois (×12)
Clavija de madera (×12)
B
8
8
8
(A)
(A)
(B)
(B)
(B)
(B)
(A)
(A)
(B)
(B)
(B)
(B)
(A)
(A)
(B)
(B)
(B)
(B)
5
4
3
1a. Place the parts on a soft, level surface before assembly.
1b. Align the Base 1 (8) to the bottom of the Rear Panel (3), Panel 1 (4), and
Panel 2 (5) as shown in the illustration.
1c. Position and insert the Wooden Dowels (B) in the insertions provided in
the base and between the base and the panels as shown in the illustration.
1d. Position and insert the Screws (A) in the insertions provided on the
surface of the base panels. Tighten the screws using a Philips Screw Driver
(NOT INCLUDED) to fix the panels securely.
1a. Placer les pièces sur une surface souple et plane avant l'assemblage.
1b. Alignez la base 1 (8) sur le bas du panneau arrière (3), du panneau 1 (4) et du
panneau 2 (5), comme indiqué sur l'illustration.
1c. Positionnez et insérez les chevilles en bois (B) dans les insertions prévues dans la
base et entre la base et les panneaux, comme indiqué sur l'illustration.
1d. Positionnez et insérez les vis (A) dans les insertions prévues sur la surface des
panneaux de la base. Serrez les vis à l'aide d'un tournevis Philips (NON INCLU) pour
fixer solidement les panneaux.
1a. Coloque las piezas sobre una superficie blanda y nivelada antes del montaje.
1b. Alinee la Base 1 (8) con la parte inferior del Panel Trasero (3), Panel 1 (4) y Panel 2 (5) como
se muestra en la ilustración.
1c. Coloque e inserte los tacos de madera (B) en las inserciones previstas en la base y entre la
base y los paneles como se muestra en la ilustración.
1d. Coloque e inserte los Tornillos (A) en las inserciones previstas en la superficie de los paneles
de la base. Apriete los tornillos con un destornillador Philips (NO INCLUIDO) para fijar los
paneles de forma segura.

5
By
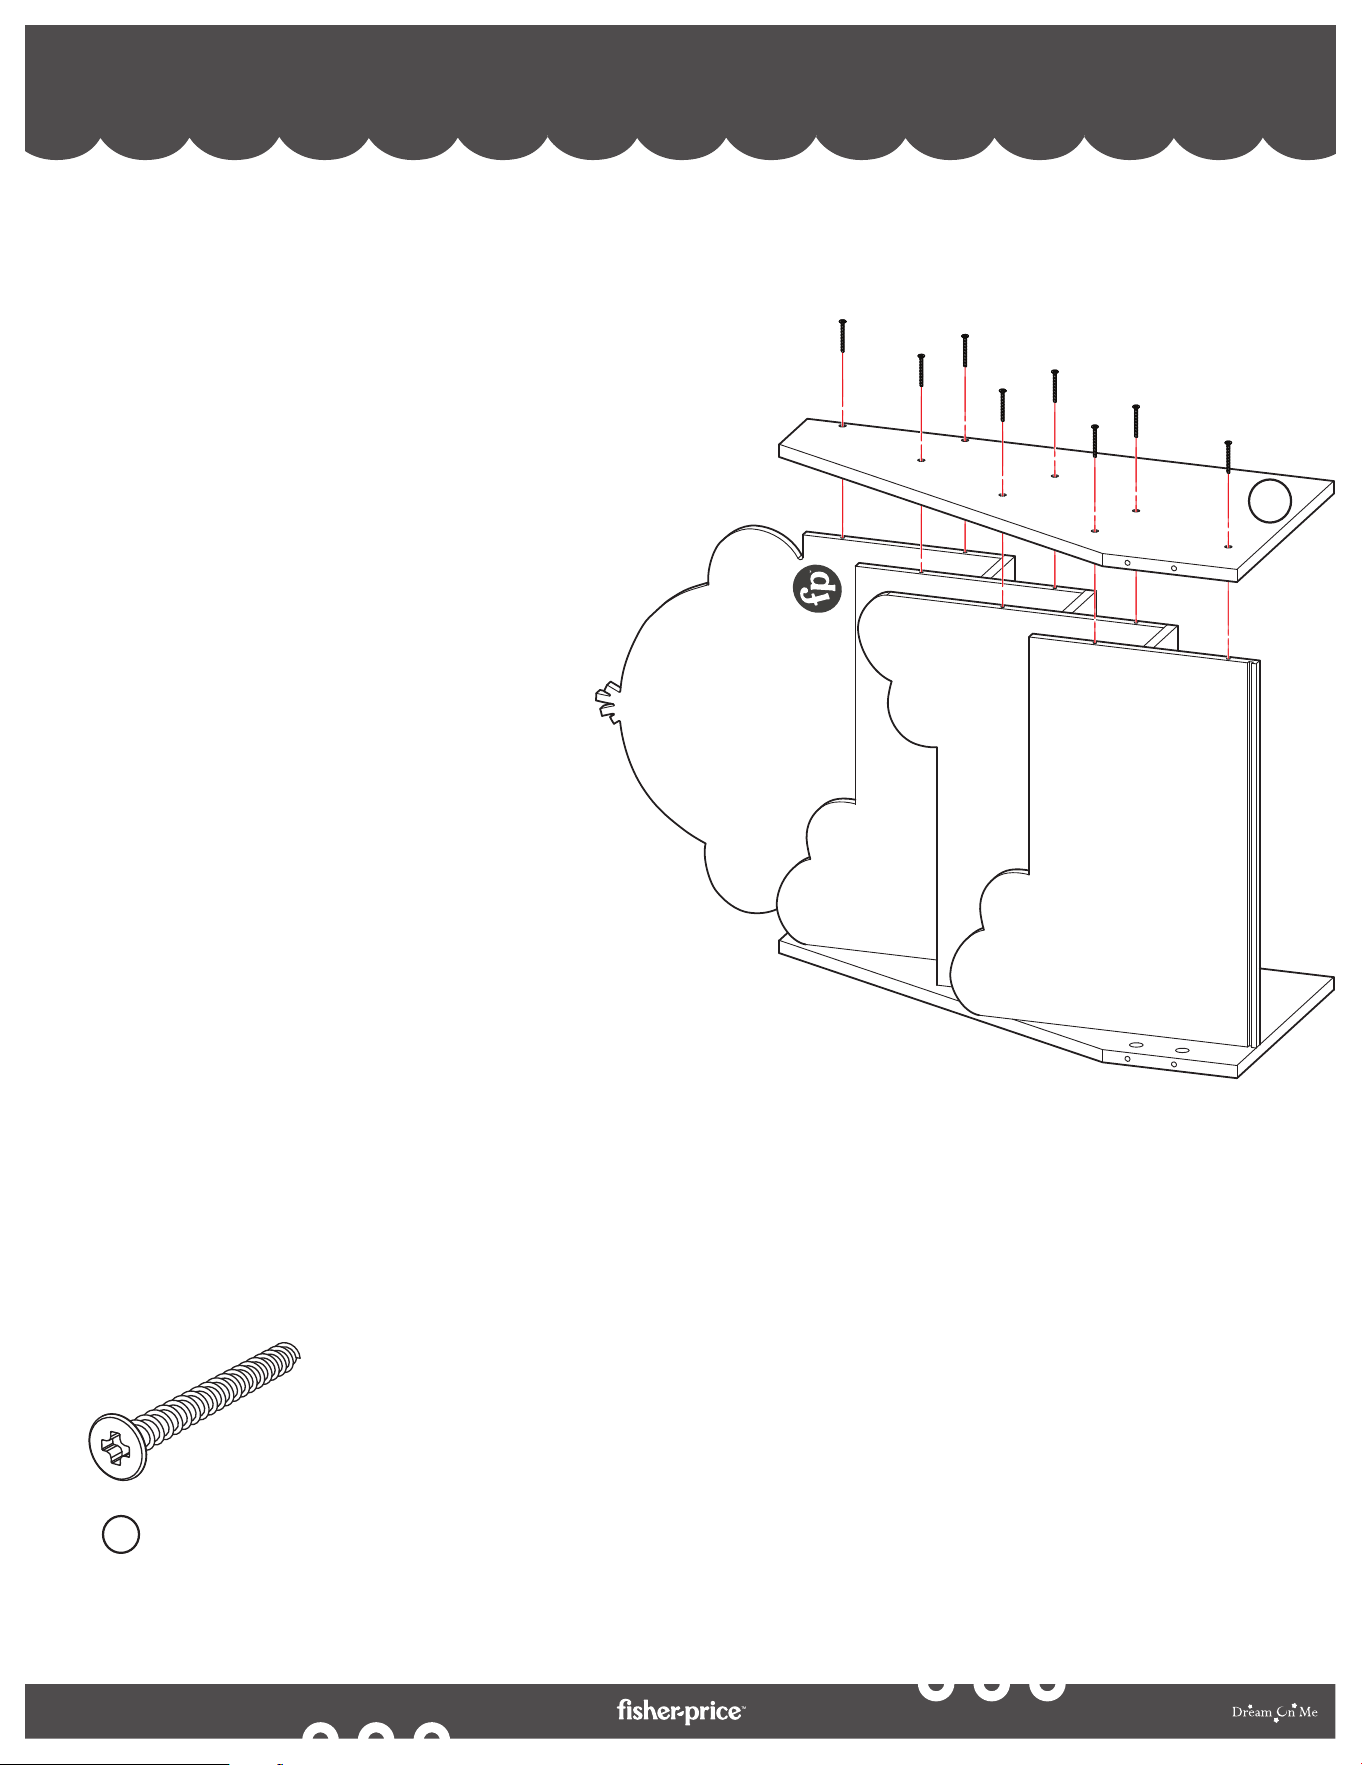
BOOKCASE ASSEMBLY - LEFT SIDE PANEL ASSEMBLY
ASSEMBLAGE DE LA BIBLIOTHÈQUE - ASSEMBLAGE DU PANNEAU LATÉRAL GAUCHE
MONTAJE DE LA LIBRERÍA - MONTAJE DEL PANEL LATERAL IZQUIERDO
2
Screw (x4)
Vis (x4)
Tornillo (x4)
A
(A)
(A)
(A)
(A)
4
3
1
2a. Align the assembled rear panel and panel 1 to
the Left Side Panel (1) as shown in the
illustration.
2b. Position and insert the screws in the
insertions provided in the left side panel as
shown in the illustration. Tighten the screws
using a Philips Screw Driver (NOT INCLUDED)
to fix the panels securely.
2a. Aligner le panneau arrière assemblé et le
panneau 1 sur le panneau latéral gauche (1)
comme indiqué sur l'illustration.
2b. Positionnez et insérez les vis dans les insertions
prévues dans le panneau latéral gauche, comme
indiqué sur l'illustration. Serrez les vis à l'aide
d'un tournevis Philips (NON INCLU) pour fixer
solidement les panneaux.
2a. Alinee el panel trasero ensamblado y el panel 1
con el panel lateral izquierdo (1) como se
muestra en la ilustración.
2b. Coloque e inserte los tornillos en las
inserciones previstas en el panel lateral
izquierdo como se muestra en la ilustración.
Apriete los tornillos con un destornillador
Philips (NO INCLUIDO) para fijar los paneles de
forma segura.
6
By
BOOKCASE ASSEMBLY - PANEL 2 ASSEMBLY
ASSEMBLAGE DE LA BIBLIOTHÈQUE - ASSEMBLAGE DU PANNEAU 2
MONTAJE LIBRERÍA - MONTAJE PANEL 2
3
Screw (x2)
Vis (x2)
Tornillo (x2)
A
(A)
(A)
5
3a. Align the assembled panel 2 to the
half-assembled left side panel as shown in
the illustration.
3b. Position and insert the screws in the
insertions provided in the left side panel as
shown in the illustration. Tighten the screws
using a Philips Screw Driver (NOT
INCLUDED) to fix the panels securely.
3a. Aligner le panneau 2 assemblé sur le panneau
latéral gauche à moitié assemblé, comme
indiqué sur l'illustration.
3b. Positionnez et insérez les vis dans les insertions
prévues dans le panneau latéral gauche, comme
indiqué sur l'illustration. Serrez les vis à l'aide
d'un tournevis Philips (NON INCLU) pour fixer
solidement les panneaux.
3a. Alinee el panel 2 montado con el panel lateral
izquierdo semimontado, tal como se muestra en
la ilustración.
3b. Coloque e inserte los tornillos en las inserciones
previstas en el panel lateral izquierdo como se
muestra en la ilustración. Apriete los tornillos
con un destornillador Philips (NO INCLUIDO)
para fijar los paneles de forma segura.
7
By
BOOKCASE ASSEMBLY - PANEL 3 ASSEMBLY
ASSEMBLAGE DE LA BIBLIOTHÈQUE - ASSEMBLAGE DU PANNEAU 3
MONTAJE LIBRERÍA - MONTAJE PANEL 3
4
Screw (x2)
Vis (x2)
Tornillo (x2)
A
(A)
(A)
6
4a. Align Panel 3 (6) to the half-assembled left
side panel as shown in the illustration.
4b. Position and insert the screws in the
insertions provided in the left side panel as
shown in the illustration. Tighten the screws
using a Philips Screw Driver (NOT
INCLUDED) to fix the panels securely.
4a. Aligner le panneau 3 (6) sur le panneau latéral
gauche à moitié assemblé, comme indiqué sur
l'illustration.
4b. Positionnez et insérez les vis dans les insertions
prévues dans le panneau latéral gauche, comme
indiqué sur l'illustration. Serrez les vis à l'aide
d'un tournevis Philips (NON INCLU) pour fixer
solidement les panneaux.
4a. Alinee el panel 3 (6) con el panel lateral izquierdo
semimontado como se muestra en la ilustración.
4b. Coloque e inserte los tornillos en las inserciones
previstas en el panel lateral izquierdo como se
muestra en la ilustración. Apriete los tornillos con
un destornillador Philips (NO INCLUIDO) para
fijar los paneles de forma segura.
8
By
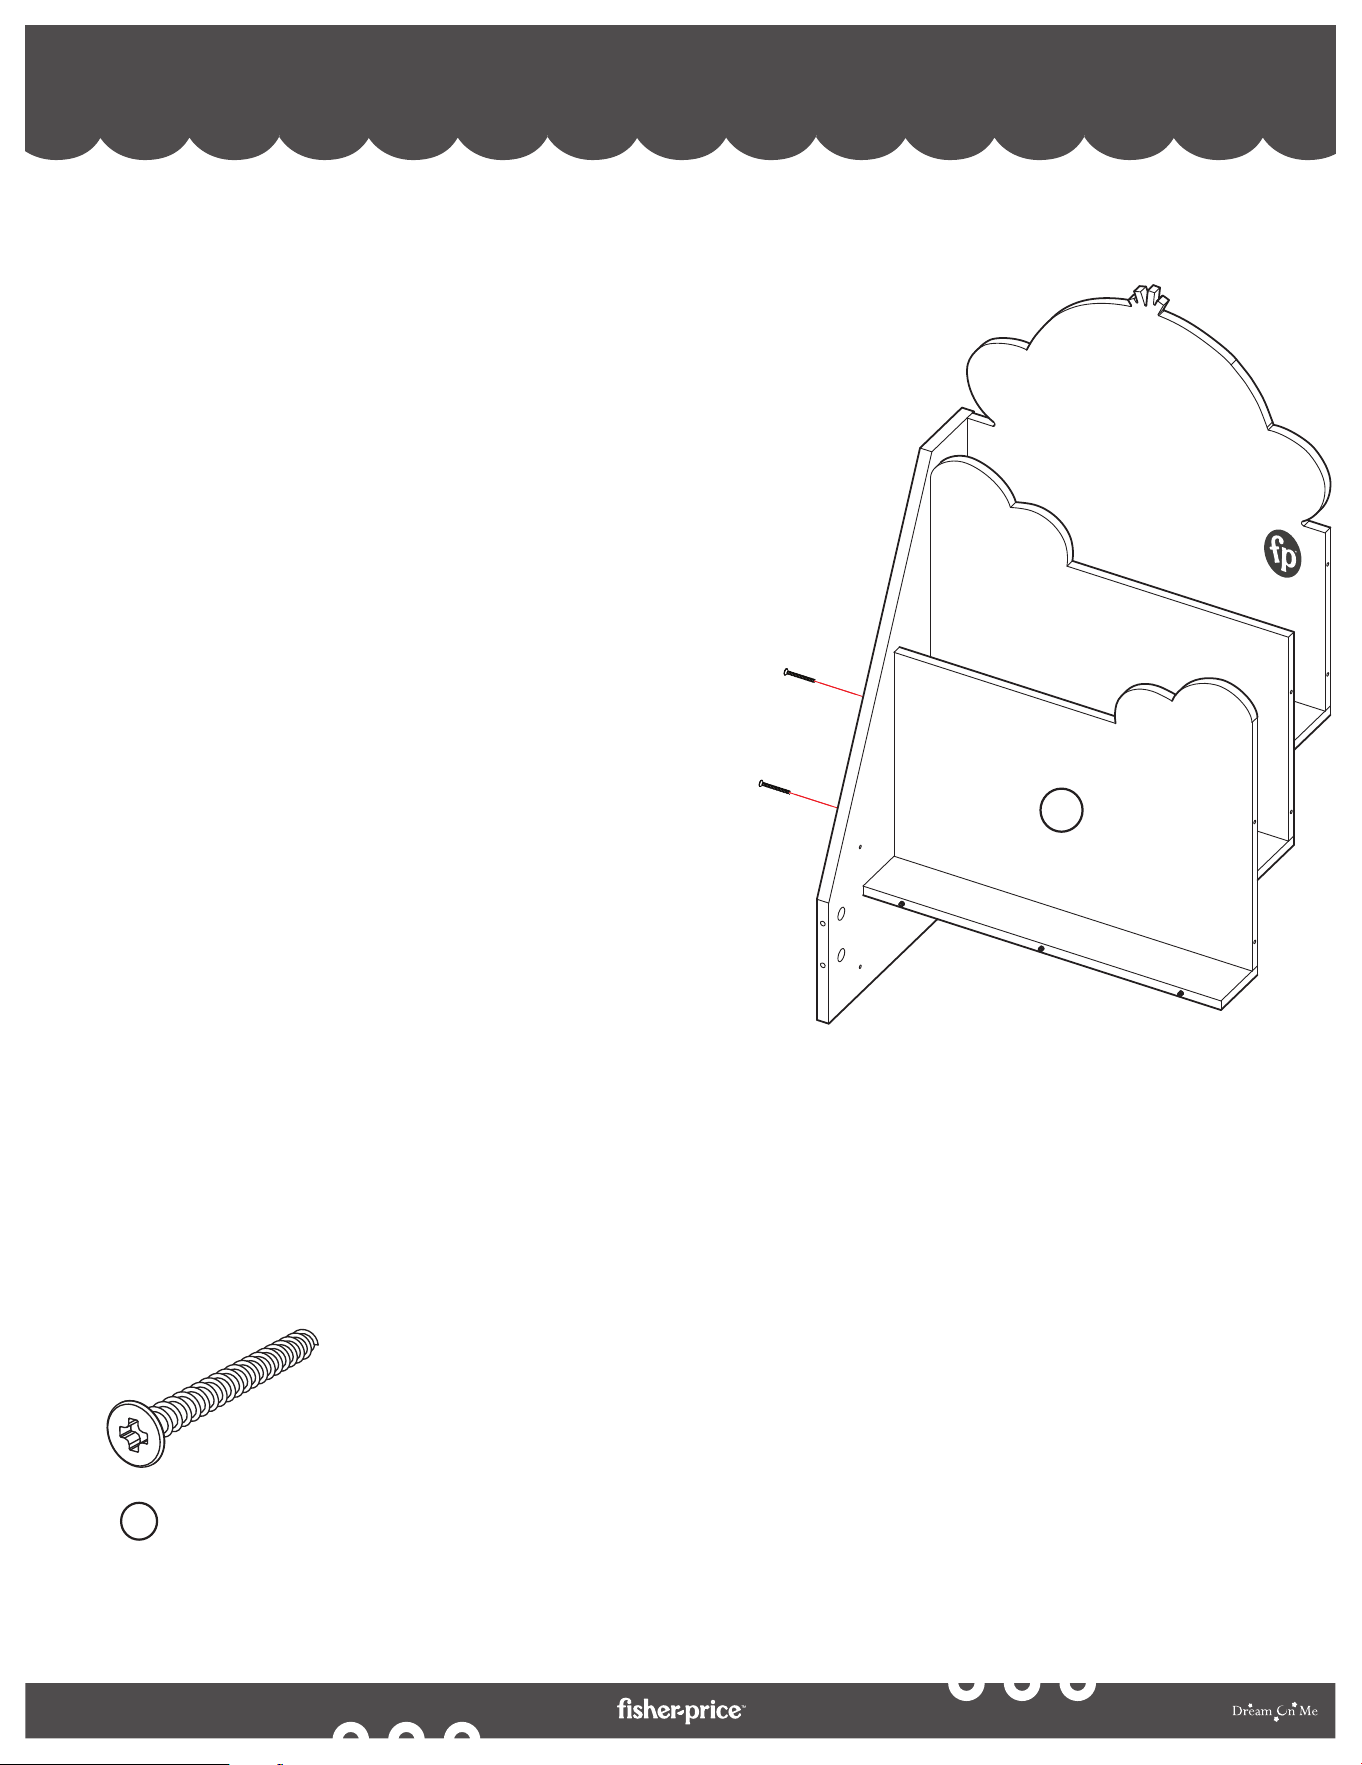
BOOKCASE ASSEMBLY - RIGHT SIDE PANEL ASSEMBLY
ASSEMBLAGE DE LA BIBLIOTHÈQUE - ASSEMBLAGE DU PANNEAU LATÉRAL DROIT
MONTAJE LIBRERÍA - MONTAJE DEL PANEL LATERAL DERECHO
5
Screw (x8)
Vis (x8)
Tornillo (x8)
A
(A)
(A)
(A)
(A)
(A)
(A)
(A)
(A)
2
5a. Align the Right Side Panel (2) to the
half-assembled bookcase as shown in the
illustration.
5b. Position and insert the screws in the
insertions provided in the right side panel as
shown in the illustration. Tighten the screws
using a Philips Screw Driver (NOT
INCLUDED) to fix the panels securely.
5a. Aligner le panneau latéral droit (2)
sur la bibliothèque à moitié
assemblée, comme indiqué sur
l'illustration.
5b. Positionnez et insérez les vis dans
les insertions prévues dans le
panneau latéral droit, comme
indiqué sur l'illustration. Serrez les
vis à l'aide d'un tournevis Philips
(NON INCLU) pour fixer solidement
les panneaux.
5a. Alinee el panel lateral derecho (2) con la librería
semimontada como se muestra en la ilustración.
5b. Coloque e inserte los tornillos en las inserciones
previstas en el panel lateral derecho como se muestra
en la ilustración. Apriete los tornillos con un
destornillador Philips (NO INCLUIDO) para fijar los
paneles de forma segura.
9
By
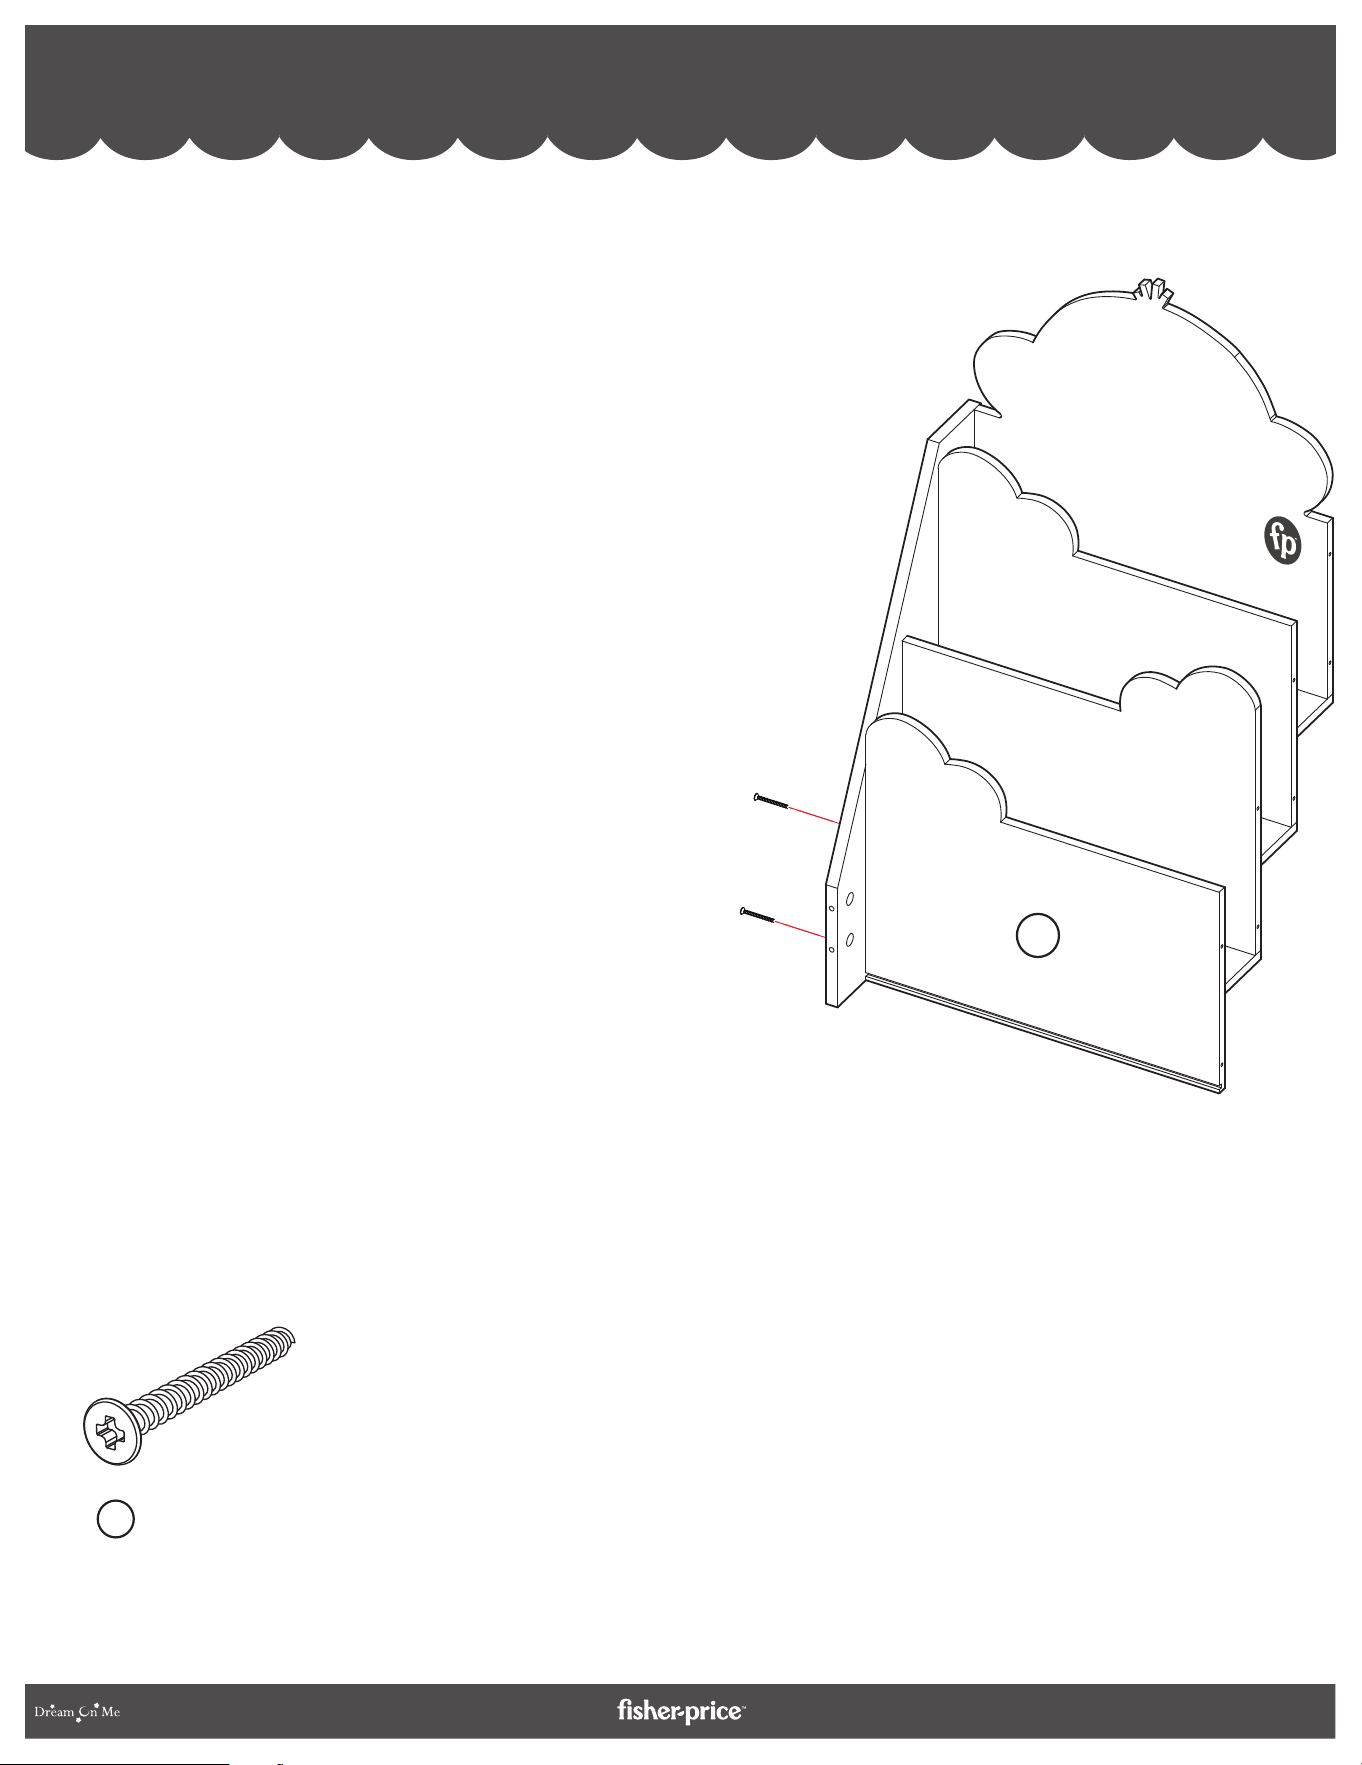
BOOKCASE ASSEMBLY - BASE 2 ASSEMBLY
ASSEMBLAGE DE LA BIBLIOTHÈQUE - ASSEMBLAGE DE LA BASE 2
MONTAJE LIBRERÍA - MONTAJE BASE 2
6
9
6a. As shown in the illustration, align and secure
Base 2 (9) in the slot in the half-assembled
bookcase.
6a. Comme indiqué sur l'illustration, alignez et
fixez la base 2 (9) dans la fente de la
bibliothèque à moitié assemblée.
6a. Como se muestra en la ilustración, alinee y fije
la Base 2 (9) en la ranura de la librería
semimontada.
10
By
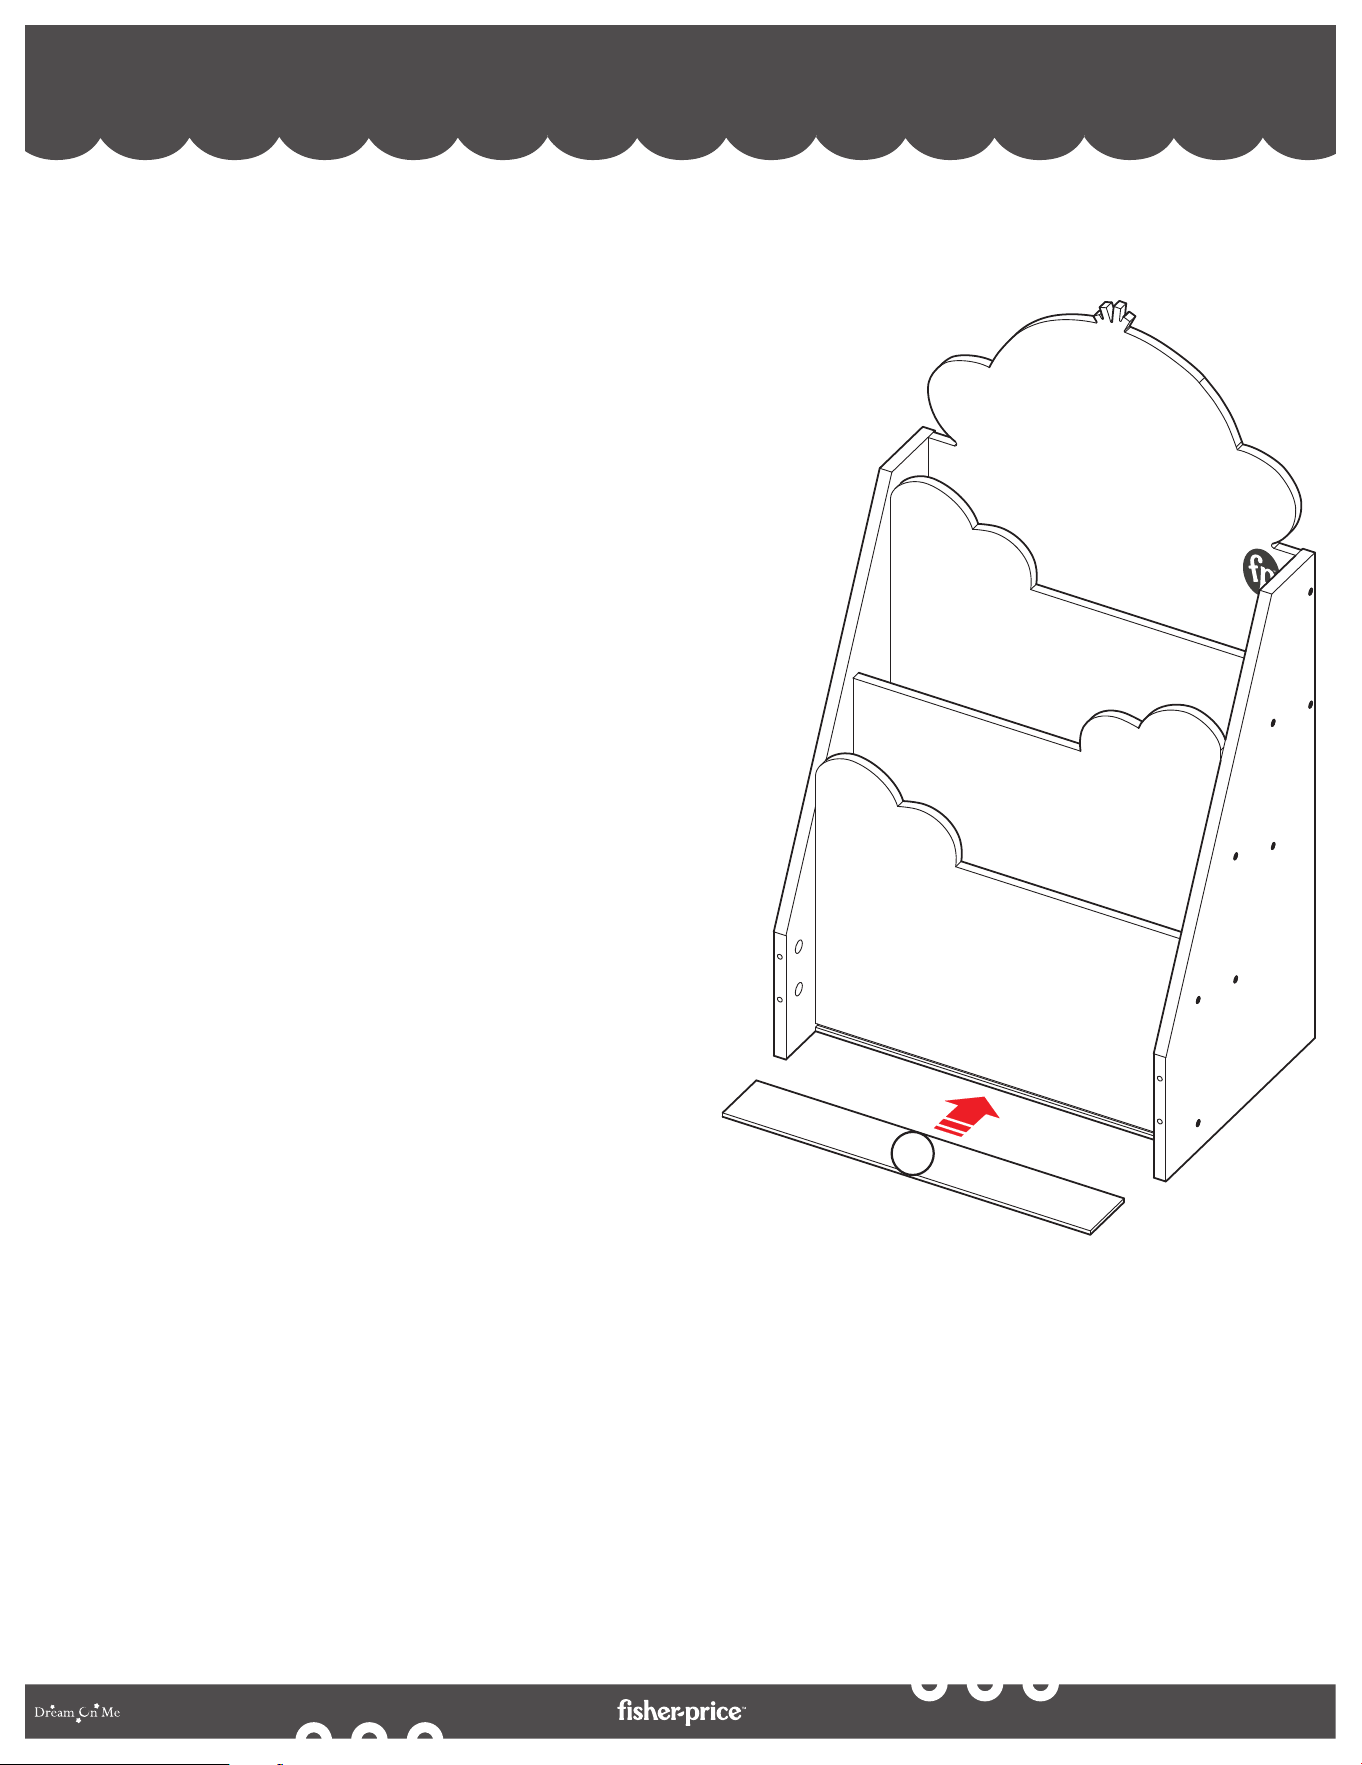
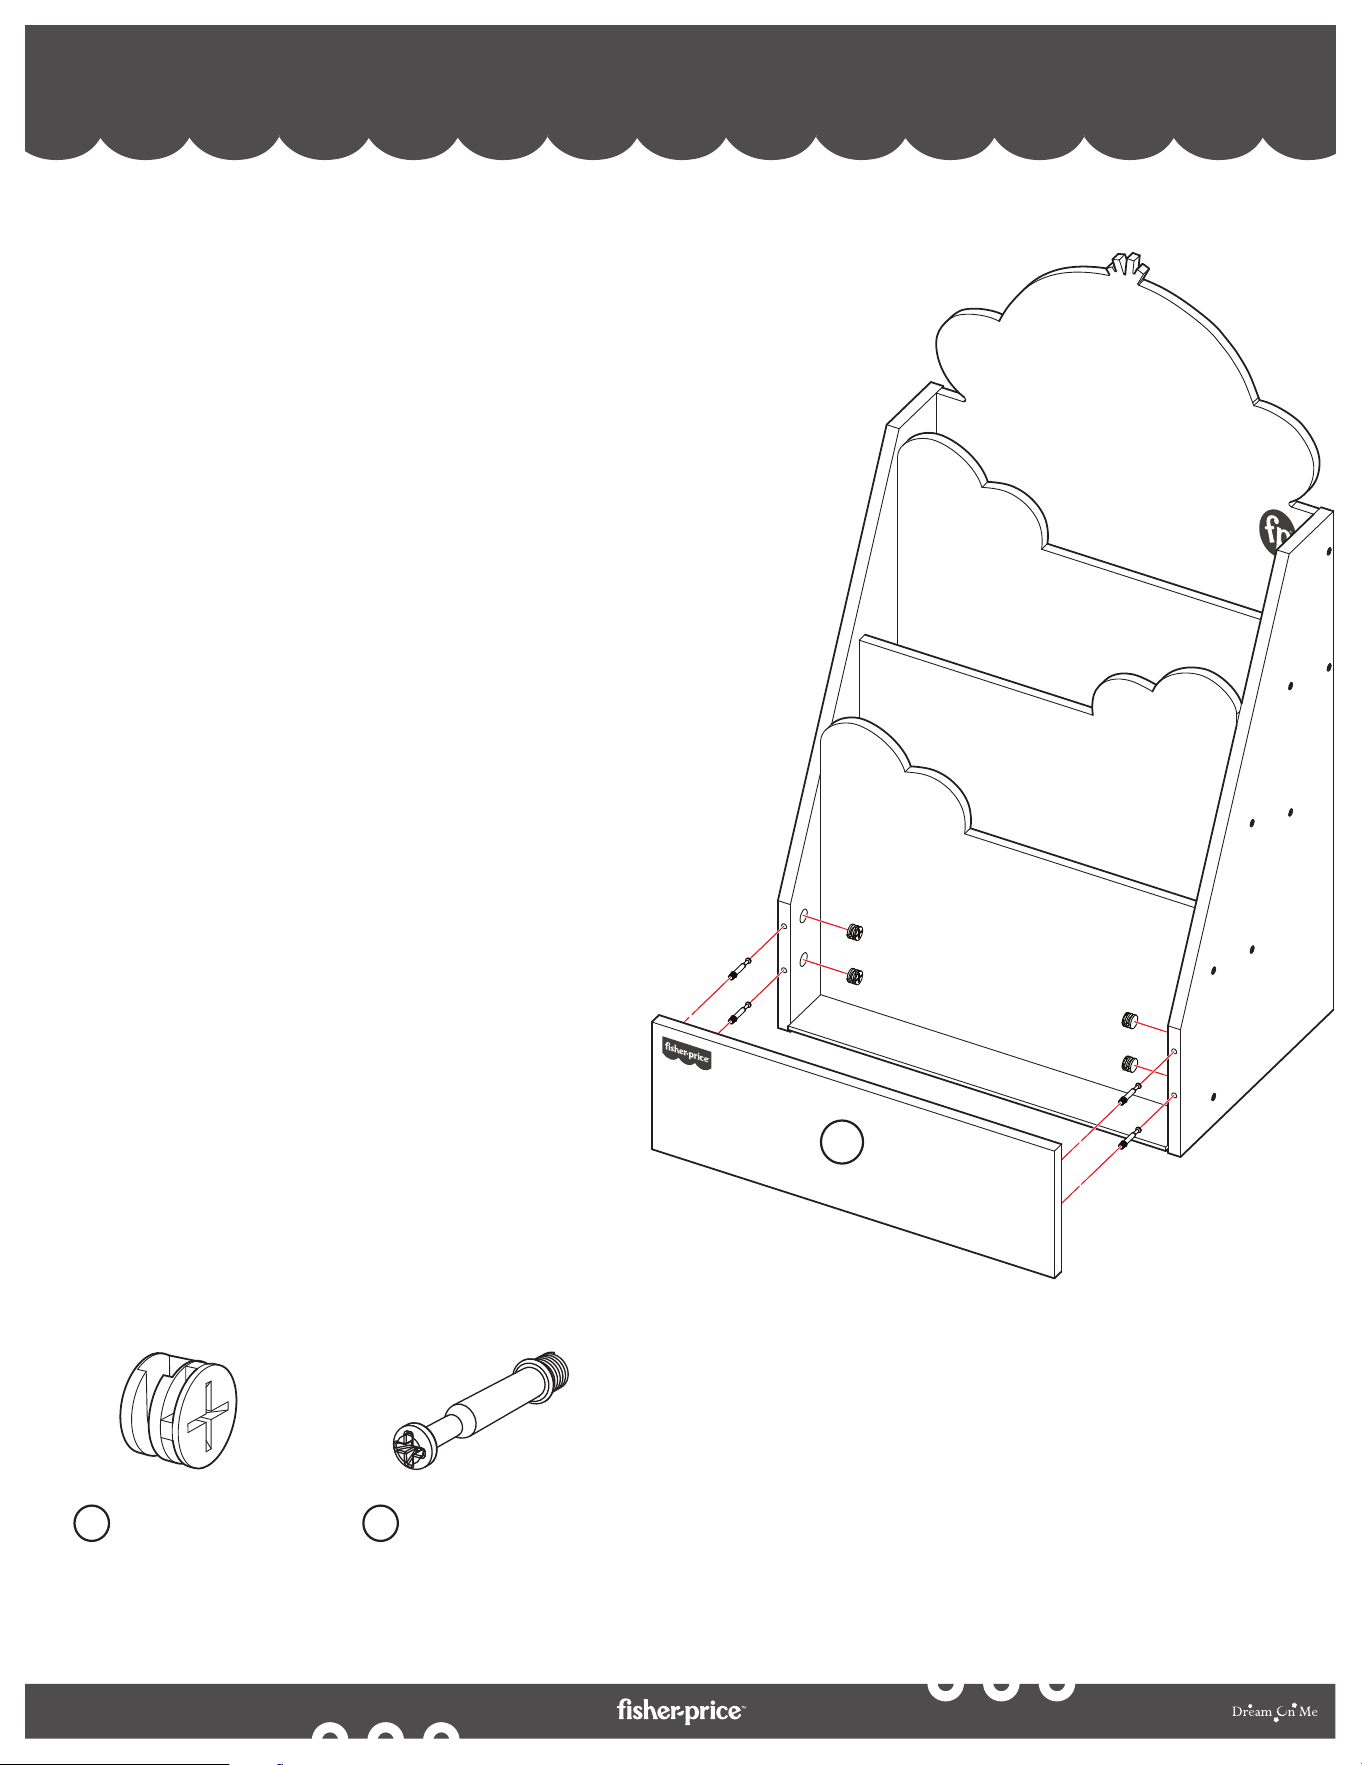
BOOKCASE ASSEMBLY - FRONT PANEL ASSEMBLY
ASSEMBLAGE DE LA BIBLIOTHÈQUE - ASSEMBLAGE DU PANNEAU AVANT
MONTAJE LIBRERÍA - MONTAJE DEL PANEL FRONTAL
7
7
Cam Lock (x4)
Verrou à came (x4)
Cierre de leva (x4)
C
Cam Bolt (x4)
Boulon à came (x4)
Perno de leva (x4)
D
7a. Align the Front Panel (7) to the base of the
half-assembled bookcase.
7b. Insert the Cam Locks (C) in the insertions provided
on the insides of the base of the bookcase.
7c. Insert and screw the Cam Bolts (D) between the
front panel and the left and right side panels using
a Screwdriver (NOT INCLUDED).
7a. Aligner le panneau avant (7) sur la base de la
bibliothèque à moitié assemblée.
7b. Insérer les verrous à came (C) dans les insertions
prévues à l'intérieur de la base de la bibliothèque.
7c. Insérer et visser les boulons à came (D) entre le
panneau avant et les panneaux latéraux gauche et
droit à l'aide d'un tournevis (NON INCLUS).
7a. Alinee el panel frontal (7) con la base de
la librería semimontada.
7b. Inserte los cierres de leva (C) en las
inserciones previstas en el interior de la
base de la librería.
7c. Inserte y atornille los pernos de leva (D)
entre el panel frontal y los paneles
laterales izquierdo y derecho utilizando
un destornillador (NO INCLUIDO).

11
By
CARE AND MAINTENANCE:
• ADULTS SHOULD CHECK ALL SCREWS WEEKLY OR IF THE PRODUCT GETS LOOSE AND OR WOBBLY, AND TIGHTEN AS AND IF
NECESSARY. IF THE PRODUCT CONTINUES TO NOT STURDY, THEN HALT THE USE OF THE PRODUCT IMMEDIATELY AND CONTACT
CUSTOMER SUPPORT AT THE EARLIEST VIA EMAIL: [email protected], OR THROUGH THE LIVE CHAT FEATURE ON OUR
WEBSITE (WWW.DREAMONME.COM).
• WITH A DAMP CLOTH, USE MILD LIQUID DISH SOAP TO WIPE CLEAN THE PRODUCT. YOU MAY WANT TO CLEAN THE UNDERSIDE
FIRST TO MAKE SURE YOU ARE NOT DAMAGING THE FINISH. BLOT SPILLS IMMEDIATELY, AND WIPE WITH A CLEAN, DAMP, CLOTH.
• WE DO NOT RECOMMEND THE USE OF CHEMICAL CLEANSERS, ABRASIVES, OR FURNITURE POLISH ON OUR LACQUERED FINISH.
• DO NOT LET THE PRODUCT ABSORB ANY LIQUIDS OR GET HUMID. AVOID ANY USE OF HOUSEHOLD ABRASIVE CLEANING
PRODUCTS.
• AVOID SETTING HOT OR DAMP ITEMS ON FURNITURE.
• TO PRESERVE THE QUALITY OF YOUR FURNITURE WE RECOMMEND PERIODICALLY WIPING WITH A DAMP, LINT-FREE COTTON
CLOTH.
• AVOID GETTING THE WOOD WET. AVOID FURNITURE POLISH OR CLEANING SPRAYS AS THEY MAY CHANGE THE SHEEN OF THE
WOOD FINISH.
• WOOD EXPANDS AND CONTRACTS WITH TEMPERATURE AND HUMIDITY.
• AVOID PLACING THE FURNITURE IN DIRECT SUNLIGHT OR NEAR A HEATING OR AIR CONDITIONING VENT.
• LES ADULTES DOIVENT VÉRIFIER TOUTES LES VIS CHAQUE SEMAINE OU SI LE PRODUIT SE DESSERRE OU VACILLE, ET LES
RESSERRER SI NÉCESSAIRE.
• ET OU VACILLE, ET LES RESSERRER SI NÉCESSAIRE. SI LE PRODUIT N'EST TOUJOURS PAS SI LE PRODUIT N'EST TOUJOURS PAS
SOLIDE, CESSEZ IMMÉDIATEMENT DE L'UTILISER ET CONTACTEZ LE SERVICE D'ASSISTANCE L'ASSISTANCE CLIENTÈLE AU PLUS TÔT
PAR E-MAIL : [email protected], OU PAR LE BIAIS DU CHAT EN DIRECT SUR NOTRE SITE WEB (WWW.DREAMONME.COM).
• UTILISEZ UN CHIFFON HUMIDE ET DU SAVON LIQUIDE DOUX POUR NETTOYER LE PRODUIT. VOUS POUVEZ COMMENCER PAR
NETTOYER LE DESSOUS DE L'APPAREIL POUR VOUS ASSURER QUE VOUS N'ENDOMMAGEZ PAS LA FINITION. DE NE PAS
ENDOMMAGER LA FINITION.
• ÉPONGEZ IMMÉDIATEMENT LES LIQUIDES RENVERSÉS ET ESSUYEZ-LES AVEC UN CHIFFON PROPRE ET HUMIDE.
• NOUS DÉCONSEILLONS L'UTILISATION DE NETTOYANTS CHIMIQUES, D'ABRASIFS OU DE PRODUITS DE POLISSAGE POUR MEUBLES
SUR NOTRE FINITION LAQUÉE.
• NE LAISSEZ PAS LE PRODUIT ABSORBER DES LIQUIDES OU S'HUMIDIFIER. ÉVITER L'UTILISATION DE PRODUITS D'ENTRETIEN
MÉNAGERS ABRASIFS.
• ÉVITER DE POSER DES OBJETS CHAUDS OU HUMIDES SUR LE MEUBLE.
• POUR PRÉSERVER LA QUALITÉ DE VOTRE MEUBLE, NOUS VOUS RECOMMANDONS DE L'ESSUYER PÉRIODIQUEMENT AVEC UN
CHIFFON EN COTON HUMIDE ET NON PELUCHEUX.
• ÉVITEZ DE MOUILLER LE BOIS. ÉVITEZ LES ENCAUSTIQUES OU LES SPRAYS NETTOYANTS, CAR ILS RISQUENT DE MODIFIER L'ÉCLAT
DE LA FINITION DU BOIS.
• LE BOIS SE DILATE ET SE CONTRACTE EN FONCTION DE LA TEMPÉRATURE ET DE L'HUMIDITÉ.
• ÉVITER DE PLACER LE MEUBLE EN PLEIN SOLEIL OU À PROXIMITÉ D'UNE BOUCHE DE CHAUFFAGE OU DE CLIMATISATION.
ENTRETIEN ET MAINTENANCE:
• LOS ADULTOS DEBEN COMPROBAR TODOS LOS TORNILLOS SEMANALMENTE O SI EL PRODUCTO SE AFLOJA O SE TAMBALEA, Y
APRETARLOS COMO Y SI ES NECESARIO. SI EL PRODUCTO SIGUE SI EL PRODUCTO SIGUE SIN SER ROBUSTO, DEJE DE USARLO
INMEDIATAMENTE Y PÓNGASE EN CONTACTO CON EL SERVICIO DE ATENCIÓN AL CLIENTE LO ANTES POSIBLE A TRAVÉS DEL
CORREO ELECTRÓNICO [email protected], O A TRAVÉS DE LA FUNCIÓN DE CHAT EN VIVO DE NUESTRO SITIO WEB
(WWW.DREAMONME.COM).
• LIMPIE EL PRODUCTO CON UN PAÑO HÚMEDO Y JABÓN LÍQUIDO SUAVE. LIMPIE PRIMERO LA PARTE INFERIOR PARA ASEGURARSE DE
NO DAÑAR EL ACABADO. DE NO DAÑAR EL ACABADO.
• SEQUE INMEDIATAMENTE LAS SALPICADURAS Y LIMPIE CON UN PAÑO LIMPIO Y HÚMEDO.
• NO RECOMENDAMOS EL USO DE LIMPIADORES QUÍMICOS, ABRASIVOS O LUSTRAMUEBLES EN NUESTRO ACABADO LACADO.
• NO DEJE QUE EL PRODUCTO ABSORBA LÍQUIDOS NI SE HUMEDEZCA. EVITE EL USO DE PRODUCTOS DE LIMPIEZA ABRASIVOS DE
USO DOMÉSTICO.
• EVITE COLOCAR OBJETOS CALIENTES O HÚMEDOS SOBRE LOS MUEBLES.
• PARA PRESERVAR LA CALIDAD DE SUS MUEBLES, LE RECOMENDAMOS QUE LOS LIMPIE PERIÓDICAMENTE CON UN PAÑO DE
ALGODÓN HÚMEDO Y SIN PELUSAS.
• EVITE MOJAR LA MADERA. EVITE EL USO DE ABRILLANTADORES DE MUEBLES O SPRAYS DE LIMPIEZA, YA QUE PUEDEN ALTERAR EL
BRILLO DEL ACABADO DE LA MADERA.
• LA MADERA SE DILATA Y CONTRAE CON LA TEMPERATURA Y LA HUMEDAD.
• EVITE EXPONER EL MUEBLE A LA LUZ DIRECTA DEL SOL O CERCA DE UNA REJILLA DE CALEFACCIÓN O AIRE ACONDICIONADO.
CUIDADO Y MANTENIMIENTO:
45 VERONICA AVENUE
SOMERSET NEW JERSEY 08873
5375 BOULEVARD DES GRANDES
PRAIRIES ST LEONARD, QUÉBEC H1R 1B1
FISHER-PRICE™ and associated trademarks are owned by
and used under license from Mattel. ©2023 Mattel.
FISHER-PRICEMC ainsi que les marques et les logos
afférents appartiennent à Mattel Europa B.V. et sont utilisés
sous licence. © 2023 Mattel.
FISHER-PRICE™ y las marcas comerciales asociadas son
propiedad de Mattel y se usan bajo licencia de Mattel.
©2023 Mattel.
www.dreamonme.com
by
Scan the QR code to register your product
Scannez le code QR pour enregistrer votre produit
Escanee el código QR para registrar su producto