
Induction Cooktops
USER GUIDE NZ AU
INDUCTION COOKTOPS
HCI905MFTB4, HCI604MFTB4


3
CONTENTS
Safety and warnings ................................................................................4
Cooktop overview
HCI905MFTB4
........................................................................................8
HCI604MFTB4 ........................................................................................9
Cookware............................................................................................. 10
First Use ............................................................................................... 11
Key Lock............................................................................................... 12
Induction cook zones............................................................................. 13
FlexZones............................................................................................. 15
Features............................................................................................... 16
Using the timer ..................................................................................... 17
Wifi/App connect .................................................................................. 18
Hob-to-hood connect ........................................................................... 19
Cooking guide....................................................................................... 20
Care and cleaning.................................................................................. 21
Troubleshooting.................................................................................... 22
Alert codes ........................................................................................... 24
Manufacturer's warranty........................................................................ 25
Customer service.................................................................................. 27
4
WARNING!
Electric Shock Hazard
Failure to follow this advice may result in electric
shock or death.
• Do not cook on a broken or cracked cooktop. If the
cooktop surface should break or crack, switch the
appliance off immediately at the mains power supply
(wall switch) and contact a qualified technician.
• Disconnect the appliance from the mains electricity
supply before carrying out any work or maintenance on
it.
• Connection to a good earth wiring system is essential
and mandatory.
• Alterations to the domestic wiring system must only be
made by a qualified electrician.
WARNING!
Fire Hazard
Failure to follow this advice may result in serious
burns or death.
• Unattended cooking on a hob with fat or oil can be
dangerous and may result in fire.
• Cover flame, eg with a lid or fire blanket, or use dry
chemical or foam-type extinguisher.
• Do not store items on cooking surfaces.
SAFETY AND WARNINGS
5
WARNING!
Cut Hazard
Failure to follow this advise could result in injury
and cuts.
• Take care - panel edges are sharp.
• The razor-sharp blade of a cooktop scraper is exposed
when the safety cover is retracted. Use with extreme
care and always store safely and out of reach of
children.
WARNING!
Hot Surface Hazard
Failure to follow this advice could result in burns and
scalds.
• Do not touch surface units or areas near units. Surface
units maybe hot even though they are dark in colour.
• During use, accessible parts of this appliance will
become hot enough to cause burns.
• Do not let your body, clothing or any item other than
suitable cookware contact the ceramic glass until the
surface is cool.
• Handles of saucepans may be hot to touch. Check
saucepan handles do not overhang other cooking zones
that are on. Keep handles out of reach of children.
• Metallic objects such as knives, forks, spoons and lids
should not be placed on the hob surface as they can get
hot.
• Keep children away.
• Handles of saucepans may be hot to touch. Check
saucepan handles do not overhang other cooking zones
that are on. Keep handles out of reach of children.
SAFETY AND WARNINGS

6
READ AND SAVE THIS GUIDE
General Use
z
Never leave the appliance unattended when in use. Boilover causes smoking and greasy spillovers
that may ignite.
z
Never use your appliance as a work or storage surface.
z
Never leave any objects or utensils on the appliance.
z
Never use your appliance for warming or heating the room.
z
After use, always turn off the cooking zones and the cooktop as described in this manual (i.e. by using
the touch controls).
z
Do not allow children to play with the appliance or sit, stand, or climb on it.
z
Do not store items of interest to children in cabinets above the appliance. Children climbing on the
cooktop could be seriously injured.
z
Do not leave children alone or unattended in the area where the appliance is in use.
z
Children or persons with a disability or lack of experience and knowledge, which limits their ability to
use the appliance should have a responsible and competent person to instruct them in its use. The
instructor should be satisfied that they can use the appliance without danger to themselves or their
surroundings.
z
Do not repair or replace any part of the appliance unless specifically recommended in the manual. All
other servicing should be done by a qualified technician.
z
Do not use a steam cleaner to clean your cooktop.
z
Do not place or drop heavy objects on your cooktop.
z
Do not stand on your cooktop.
z
Do not use pans with jagged edges or drag pans across the Ceramic glass surface as this can scratch
the glass.
z
Do not use scourers or any other harsh abrasive cleaning agents to clean your cooktop, as these can
scratch the Ceramic glass.
z
If the power supply cord is damaged, it must be replaced by the manufacturer, its service agent or
similarly qualified persons in order to avoid a hazard.
z
This appliance is not intended for use by persons (including children) with reduced physical, sensory
or mental capabilities, or lack of experience and knowledge, unless they have been given supervision
or instruction concerning use of the appliance by a person responsible for their safety.
z
Children should be supervised to ensure that they do not play with the appliance.
z
Cleaning and user maintenance shall not be made by children without supervision.
z
The appliance is not intended to be operated by means of an external timer or separate remote-
control system.
z
CAUTION: The cooking process has to be supervised. A short term cooking process has to be
supervised continuously.
z
After use, switch off the hob element using it's control and do not rely on the pan detector.
Installation
z
The cooktop must be installed by qualified personnel or technicians.
z
Read these instructions carefully before installing or using this appliance.
z
The bench top must be square and level, and no structural members should interfere with space
requirements.
z
The cooktop will not be installed directly above a dishwasher, fridge, freezer, washing machine or
clothes dryer, as the humidity may damage the cooktop.
z
If the cooktop is installed above an oven, the oven must have a built-in cooling fan.
z
The installation will comply with all clearance requirements and applicable standards and regulations.
z
The work surface must be made of a heat-resistant material
z
No combustible material or products should be placed on this appliance at any time.
SAFETY AND WARNINGS

7
z
Please make this information available to the person responsible for installing the appliance as it could
reduce your installation costs.
z
In order to avoid a hazard, this appliance must be installed according to these instructions for
installation.
z
This appliance should be connected to a circuit which incorporates an isolating switch providing full
disconnection from the power supply.
z
Failure to install the appliance correctly could invalidate any warranty or liability claims.
z
Use heat-resistant and easy-to-clean finishes (such as ceramic tiles) for the wall surfaces surrounding
the hob.
z
Consult local building authorities and by-laws if in doubt regarding installation
z
To avoid any damage, the foam seal and adhesive must be resistant to heat.
Electrical
z
This cooktop must be connected to the mains power supply only by a suitably qualified person.
z
This cooktop must be earthed by a suitably qualified person.
z
A suitable isolating switch providing full disconnection from the mains power supply is incorporated in
the permanent wiring, mounted and positioned to comply with the local wiring rules and regulations.
z
The isolating switch must be of an approved type and provide a 3 mm air gap contact separation
in all poles (or in all active [phase] conductors if the local wiring rules allow for this variation of the
requirements).
z
Before connecting the cooktop to the mains power supply, check that:
z
The domestic wiring system is suitable for the power drawn by the cooktop
z
The voltage corresponds to the value given on the rating plate
z
The power supply cable sections can withstand the load specified on the rating plate.
z
To connect the cooktop to the mains power supply, do not use adapters, reducers, or branching
devices, as they can cause overheating and fire.
z
The power supply cable must not be kinked and should not be touching the underside of the
cooktop which could get hot during operation.
z
If the cable is damaged or needs replacing, this should be done by an after-sales technician using
the proper tools, so as to avoid any accidents.
z
If the appliance is being connected directly to the mains supply, an omni-polar circuit breaker
must be installed with a minimum gap of 3mm between the contacts.
z
The installer must ensure that the correct electrical connection has been made and that it
complies with safety regulations.
z
The cable must be checked regularly and if the supply cord is damaged it must be replaced by a
properly qualified person.
z
The power supply should be connected in compliance with the relevant standard, or a single-pole
circuit breaker. The method of connection is shown below.
Electromagnetic hazards
z
This appliance complies with electromagnetic safety standards.
z
However, persons with cardiac pacemakers or other electrical implants (such as insulin pumps) must
consult with their doctor or implant manufacturer before using this appliance to make sure that their
implants will not be affected by the electromagnetic field.
z
Failure to follow this advice may result in death.
SAFETY AND WARNINGS

8
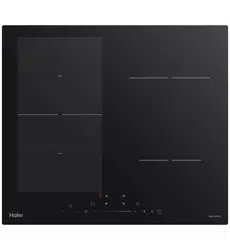
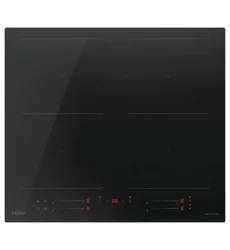
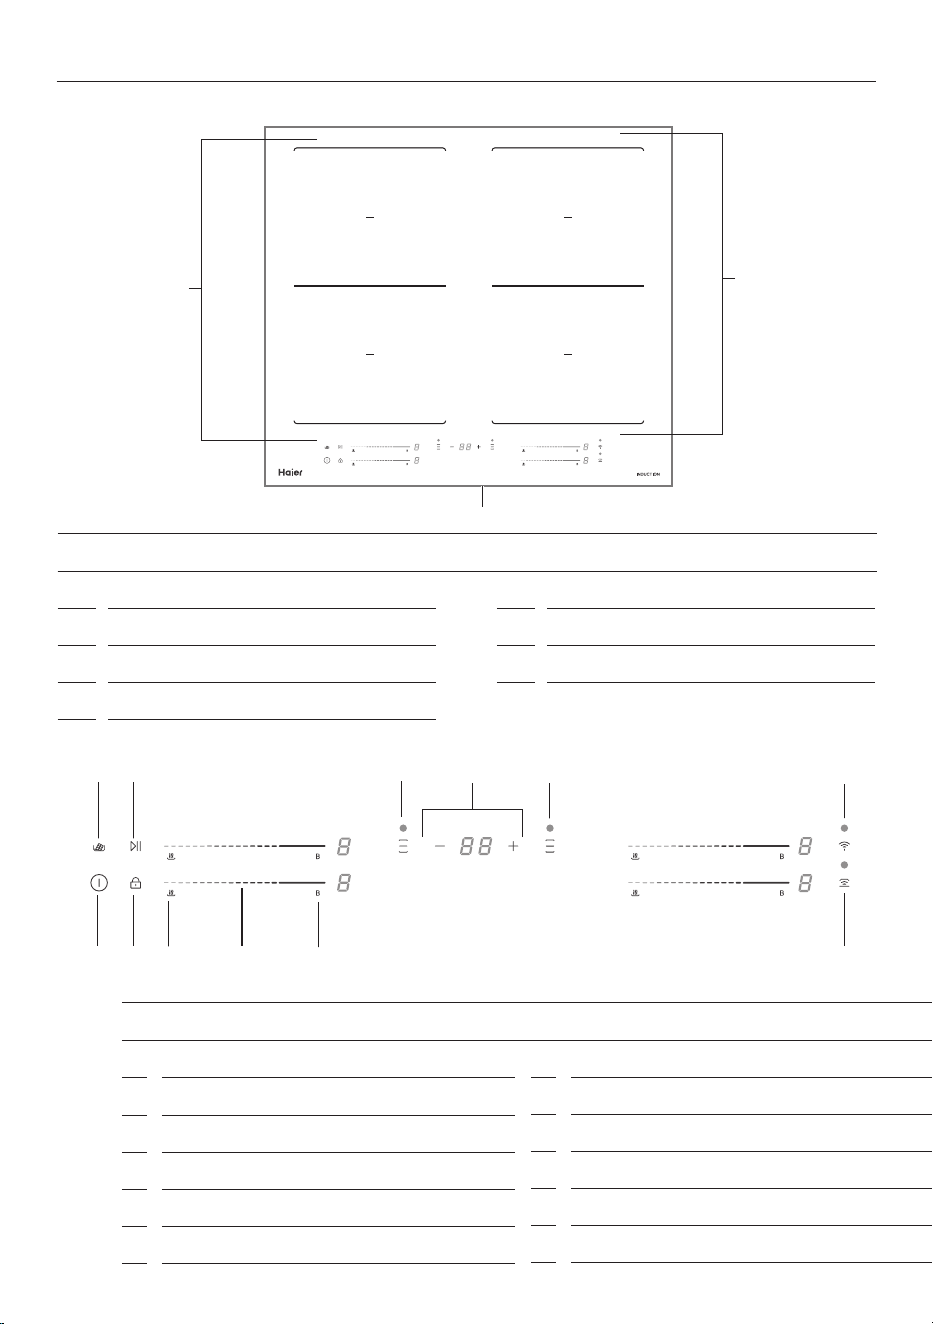
COOKTOP OVERVIEW HCI905MFTB4
1
2
4
3
7
5
6
8
FEATURES AND ACCESSORIES
1
Cook zone 2000W to 2600W (boost)
2
Cook zone 1500W to 2000W (boost)
3
Cook zone 2000W to 2600W (boost)
4
Cook zone 1500W to 2000W (boost)
5
FlexZone
6
FlexZone
7
MaxZone 2300W to 3000W (boost)
8
Control Panel
FEATURES AND ACCESSORIES
1
Power on/o
2
Key Lock
3
Warm
4
Cook zone power slider
5
Power boost
6
Melt
7
Start/pause all cooking
8
Flexzone left
9
Timer
10
FlexZone right
11
Wi/App connection
12
Hob-to-Hood
1 2 3
5
6 7
8
!1
9
!2
4
!0
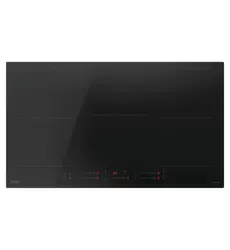
9
5
FlexZone
6
FlexZone
7
MaxZone 2300W to 3000W (boost)
8
Control Panel
COOKTOP OVERVIEW HCI604MFTB4
1
2
4
3
5
6
7
FEATURES AND ACCESSORIES
1
Cook zone 2000W to 2600W (boost)
2
Cook zone 1500W to 2000W (boost)
3
Cook zone 2000W to 2600W (boost)
4
Cook zone 1500W to 2000W (boost)
5
FlexZone
6
FlexZone
7
Control Panel
FEATURES AND ACCESSORIES
1
Power on/o
2
Key Lock
3
Warm
4
Cook zone power slider
5
Power boost
6
Melt
7
Start/pause all cooking
8
Flexzone left
9
Timer
10
FlexZone right
11
Wi/App connection
12
Hob-to-Hood
1 2
3
5
6 7
8
!1
9
!2
4
!0
10
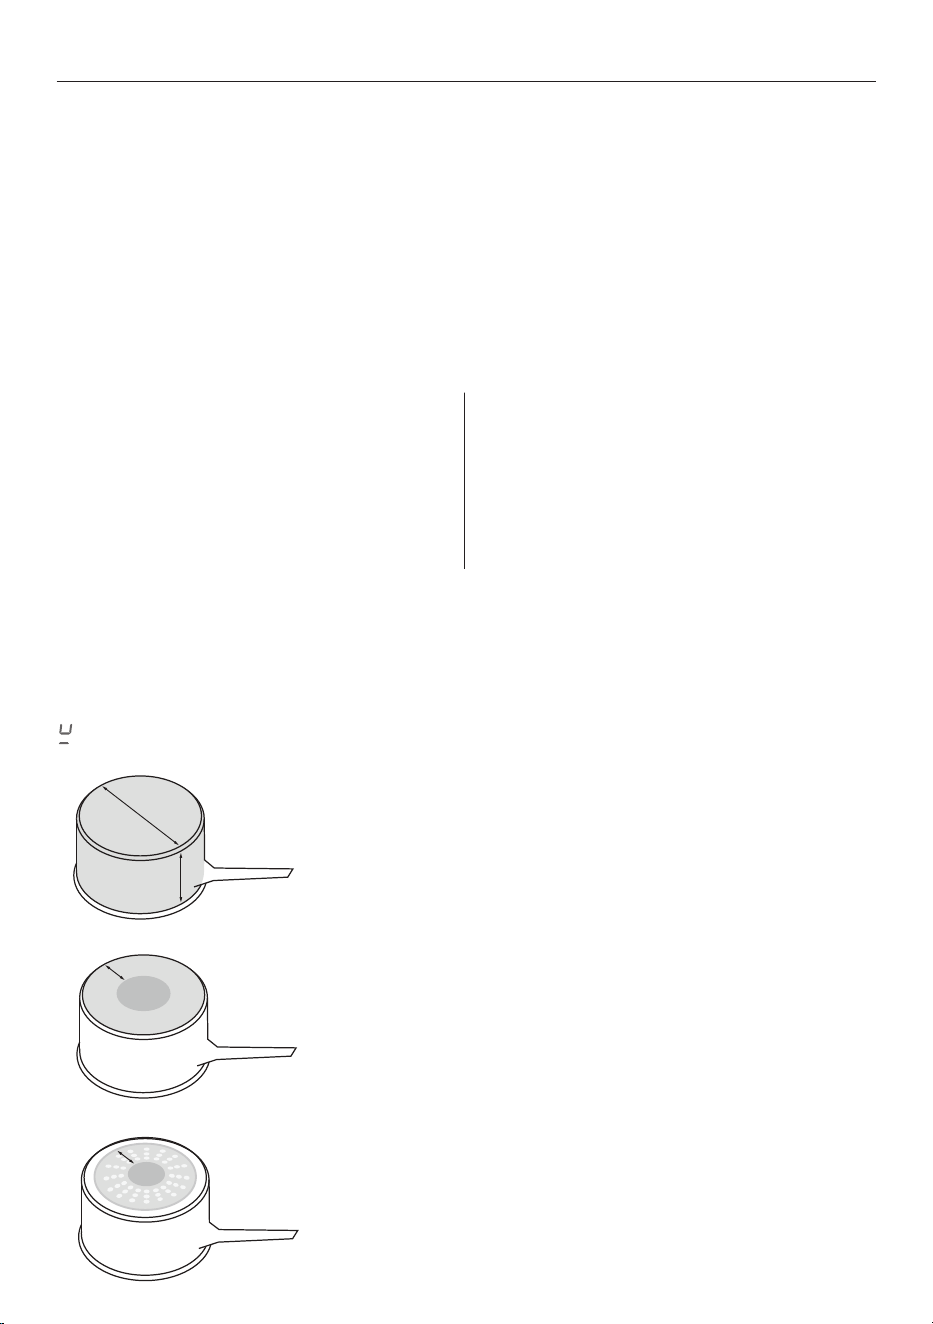
COOKWARE
Quickest heating Performance
High content of ferromagnetic material. Heating area is consistent
across the base and up the sides of pan.
Average heating Performance
Reduced area of ferromagnetic material. Reduced zone of heating,
results in poor performance and slower heating.
Slow heating Performance
Very limited area of ferromagnetic material. Results in very slow
heating performance.
Note: This type of pot is good for very delicate tasks such as melting
chocolate, as heating is very slow.
The quality of your cookware can affect cooking performance. Only use induction-compatible cookware
that has been specifically designed for induction cooking. Look for the induction symbol on the packaging
or the bottom of the pan.
Suitable cookware material:
z
stainless steel – with a magnetic base or core
z
aluminium and copper – with a
magnetic base or core
z
cast iron
z
steel
z
enamelled steel.
Unsuitable cookware material:
z
aluminium or copper – without
a magnetic base
z
glass
z
wood
z
porcelain
z
ceramic or earthenware.
To check if cookware material is suitable for induction use, carry out a magnet test:
Move a magnet across the base of the pan. If the magnet is attracted, the pan is induction suitable. Ensure
attraction is consistent across the base of the pan. If there are gaps, such as an indented manufacturer’s
logo, then the performance will be impaired.
If you do not have a magnet, fill the pan with some water and refer to section 'Induction cooking zones'. If
does not flash and the water is heating, pan is suitable.
Induction cookware
z
Ensure the base of your cookware is smooth, sits at against the glass, and is similar in size than
the cooking zone.
z
A small pot on a large cooking zone may not be detected. Always centre your pan on the cooking zone
z
Lift pans o the cooktop. Do not slide, or they may scratch the glass.
z
Minimum pan sizes in cooking zones are 140mm diameter and in FlexZones, 240mm diameter.
11
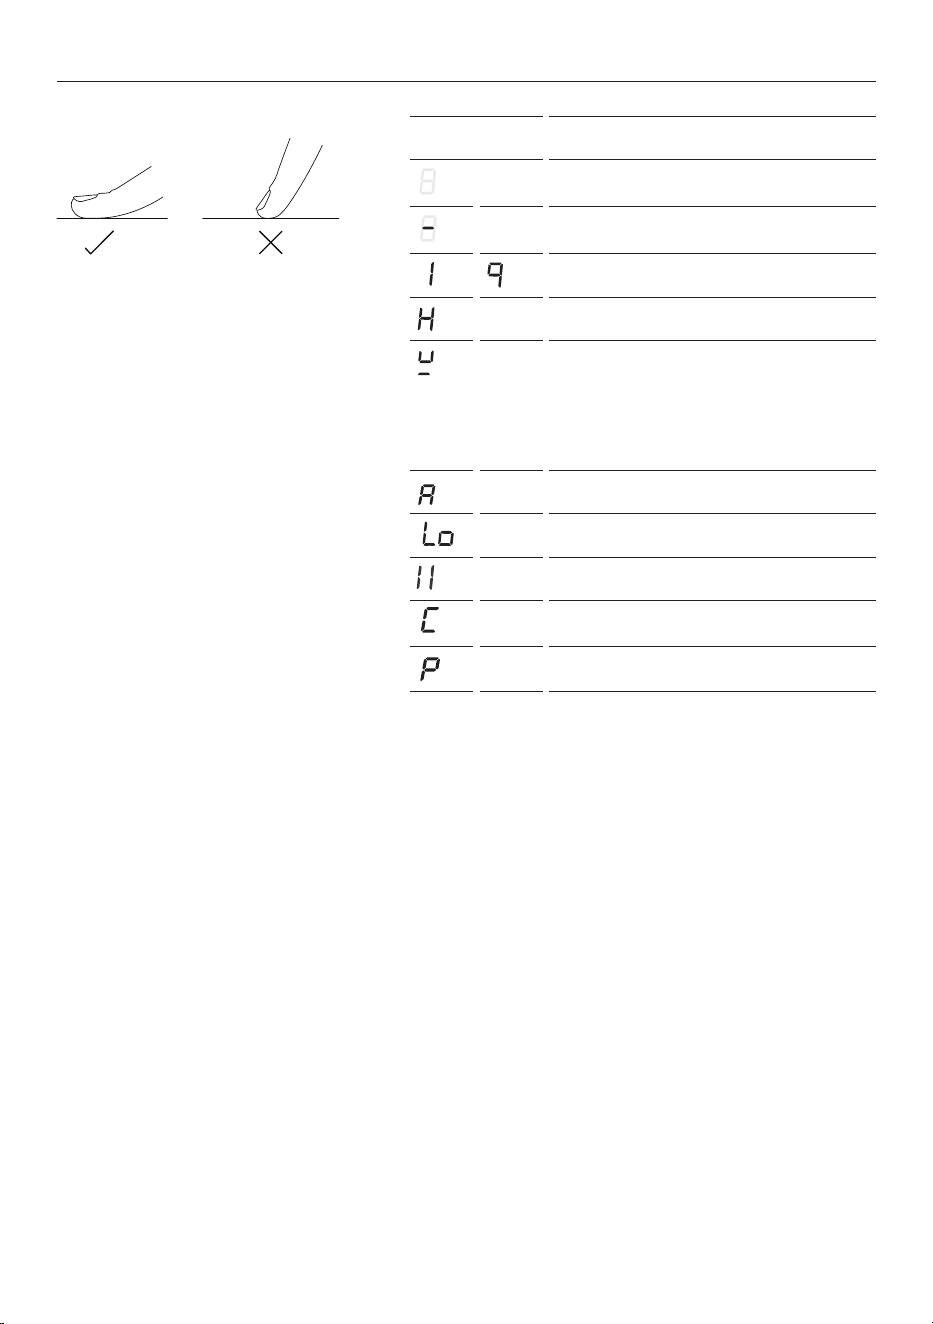
ZONE DISPLAY DESCRIPTION
Cooktop o
(not activated)
Cooking zone on
(activated but not operating)
Power levels
Hot surface indicator
Pan not detected indicator
Pan not suitable for induction
Control Panel Spill Detection
Warm indicator
Lock indicator
Pause function indicator
Melt indicator
Power Boost indicator
Touch display
Your cooktop is operated using an
intuitive touch display. Use the control
panel to navigate cooking settings.
Using the touch controls
Use the ball of your finger, not its tip. The
controls respond to touch, so pressure is
not needed.
Display overview
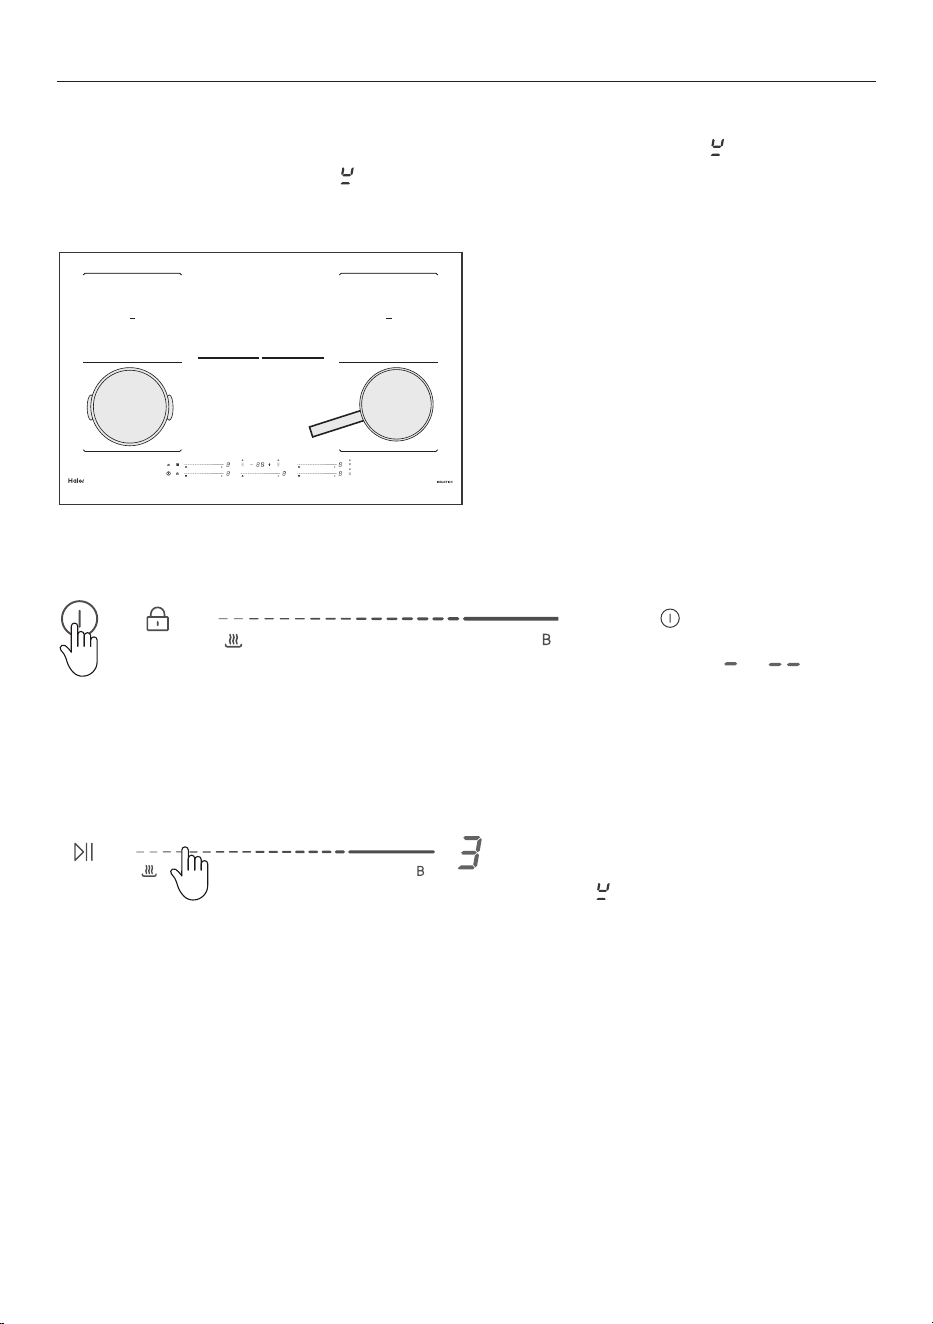
FIRST USE
POWER MANAGEMENT FOR LOW CURRENT MODELS
Low current models are unable to maintain high power output (boost) across all cooking areas at the same
time. If the power limit is reached on the selected zone, turn down one or more other zones to allow you
to further increase power on the selected zone.
AUTO TURN OFF
If the cooktop is powered on but a cook zone has not been selected for 1 minute the cooktop will
automatically power off.
SELECT COOKING ZONE
To use zone specific features such as PowerBoost and timer, press anywhere on the corresponding
control slider. The display to the right of the slider will flash to indicate the zone has been selected. While
the display is flashing, select the feature you wish to use.
12
KEY LOCK
Key Lock
ACTIVATING KEY LOCK
1. Hold the keylock control for 3
seconds until
is displayed.
DISABLING KEY LOCK
2. To unlock the cooktop, hold the
keylock control for 3 seconds until
is dim.
When the cooktop is locked any zones in use will remain on and the power levels cannot be changed.
13
INDUCTION COOK ZONES
To begin cooking
1. Place a suitable pan on the desired
cooking zone. Ensure the bottom
of the pan and the surface of the
cooking zone are clean and dry.
2. Press to switch the cooktop
on. The cooktop will beep once and
all displays show or
3. Select a cook zone heat setting by
pressing or sliding the zone power
control.
May flash for a moment as the
cooktop is detecting your pan.
If you don’t select a heat setting
within 1 minute, the cooktop will
automatically turn off.
Always place pans in the centre of the cooking zone. If the pan is not correctly placed
will flash.
If the pan is too small or not suitable
will flash.
14
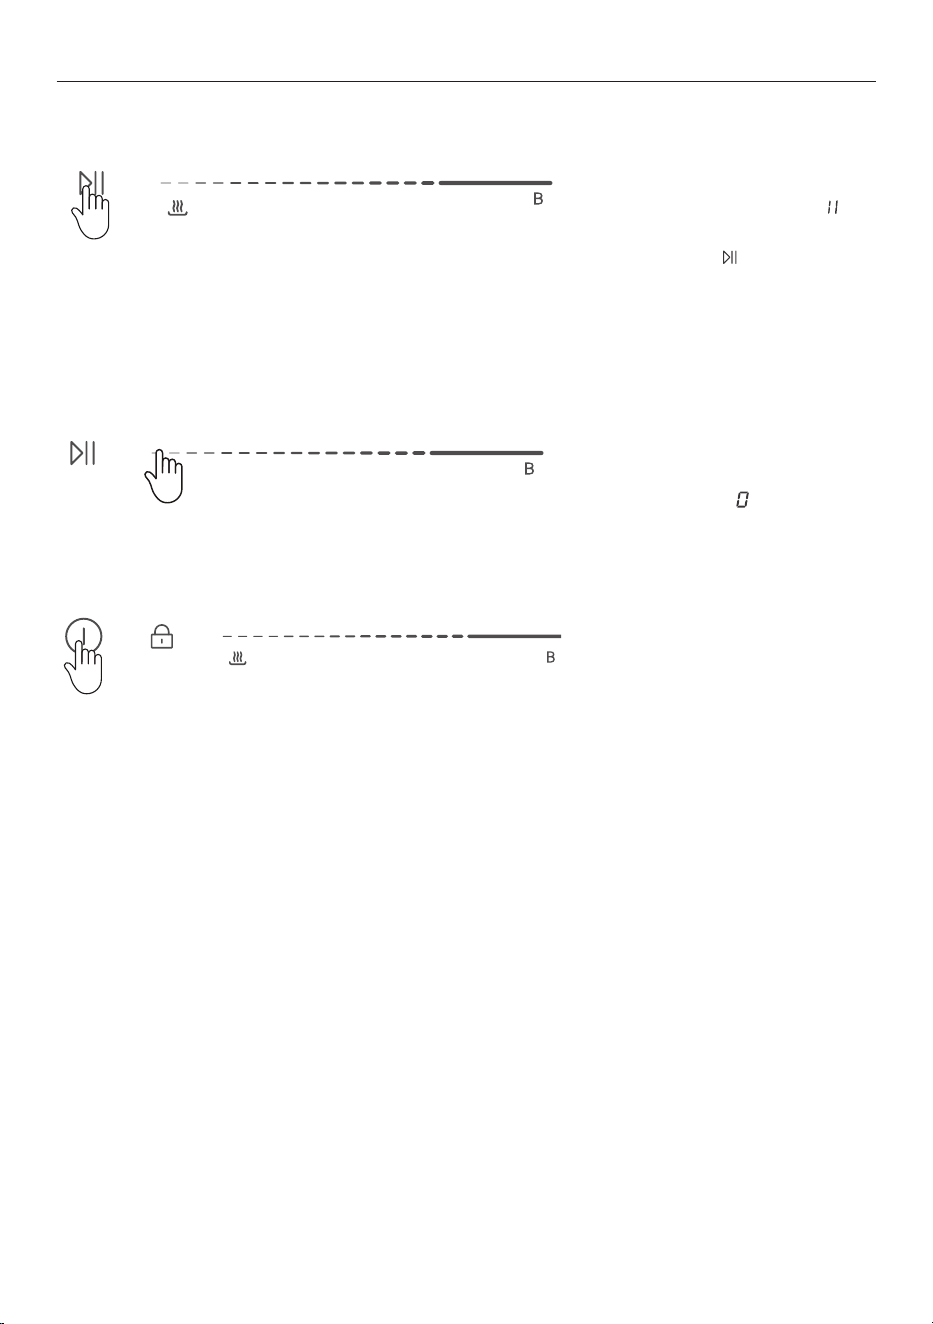
INDUCTION COOK ZONES
1. Hold start/pause for 3 seconds
to pause all cooking functions, will
illuminate in all cooking zones.
To re-start, hold
for 3 seconds.
2. To turn the cooking zone off, press
the left end of the power control until
the display shows
3. To turn the product off: Tap the
power control.
To pause cooking
To stop cooking
15
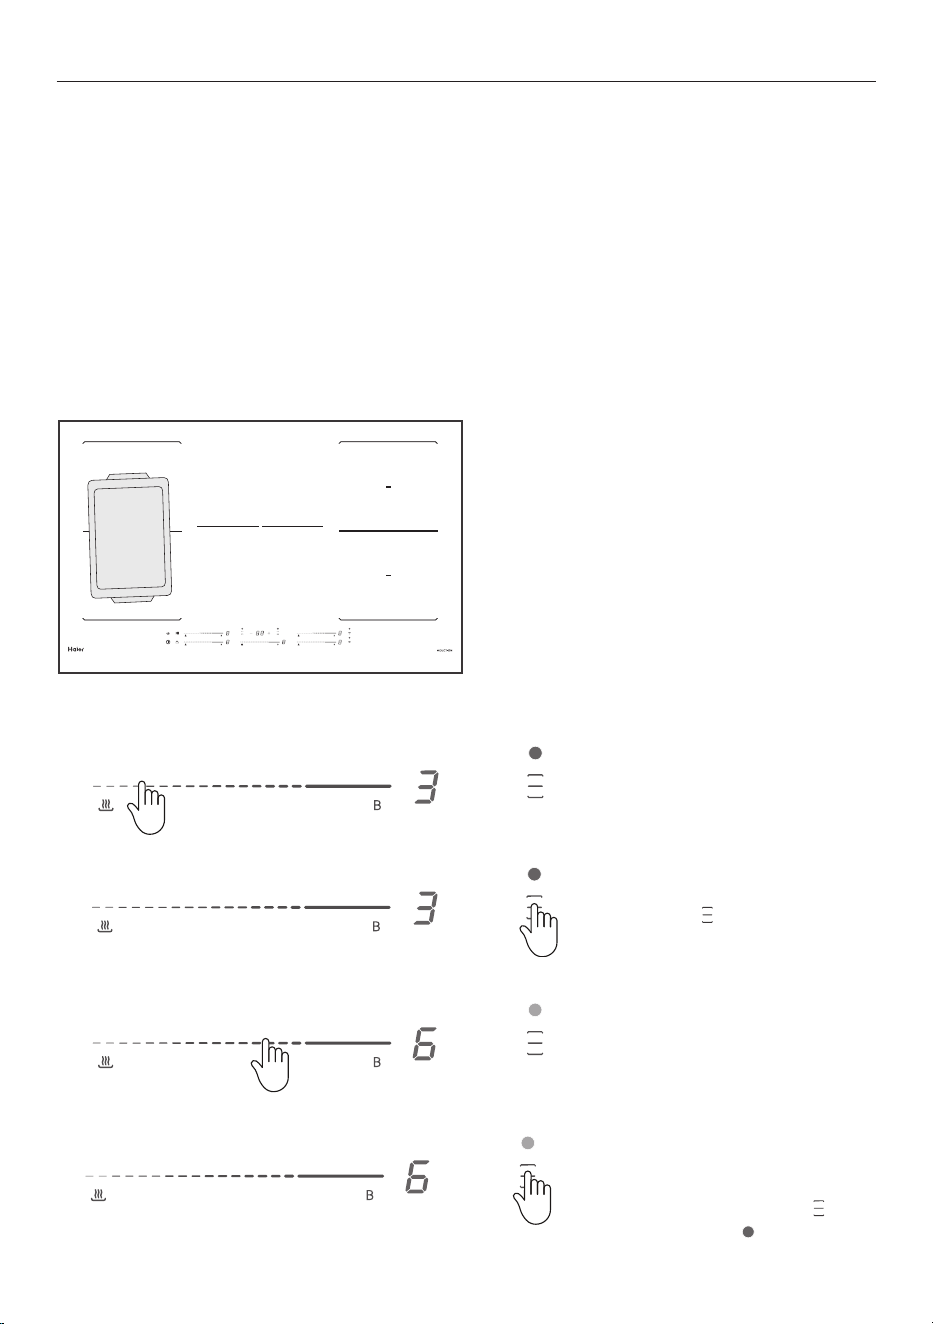
FLEXZONES
1. Place the pan over the two zones
you wish to flex.
2. Choose either the front or back
zone and select a power level.
3. While the power level display is
blinking, hold
for 3 seconds until
the indicator is on.
The FlexZone function allows you to use two zones together for a larger cooking area.
z
There may be a cooler area in the centre of the cooktop between the cooking zones.
z
You may need to move food around the pan to ensure even cooking.
z
When using FlexZone it is not possible to use the PowerBoost function.
IMPORTANT!
When a FlexZone is activated, the entire zone will heat up. To avoid burns, ensure cutlery and magnetic
items are never left on the cooktop.
4. Adjust the power level pressing
or sliding the front or back slider
control.
5. To cancel Flexzone, select one
of the cook zones. While the power
level display is blinking, hold
for 3 seconds until is no longer
illuminated.
16
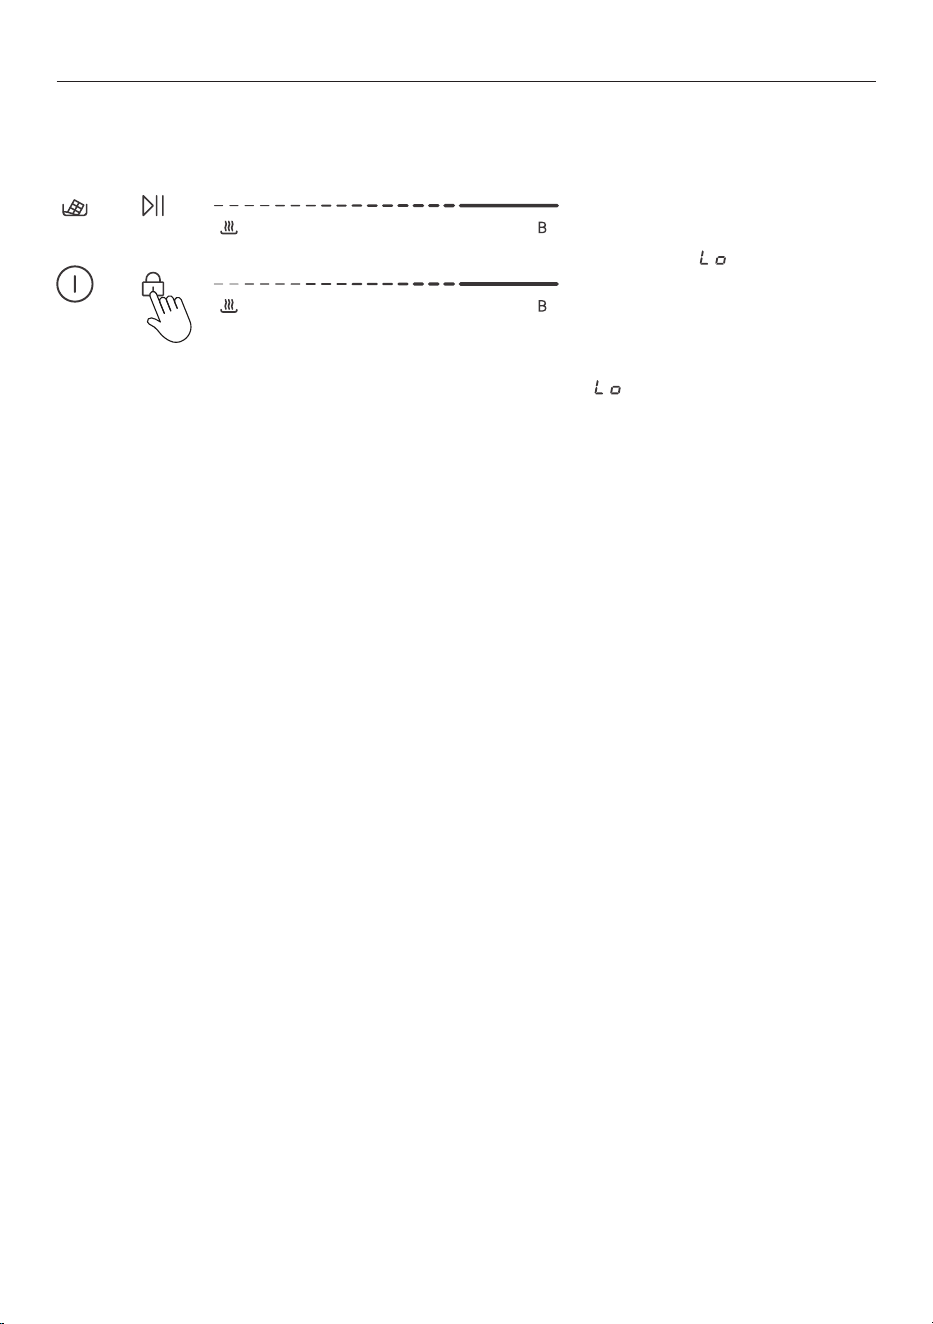
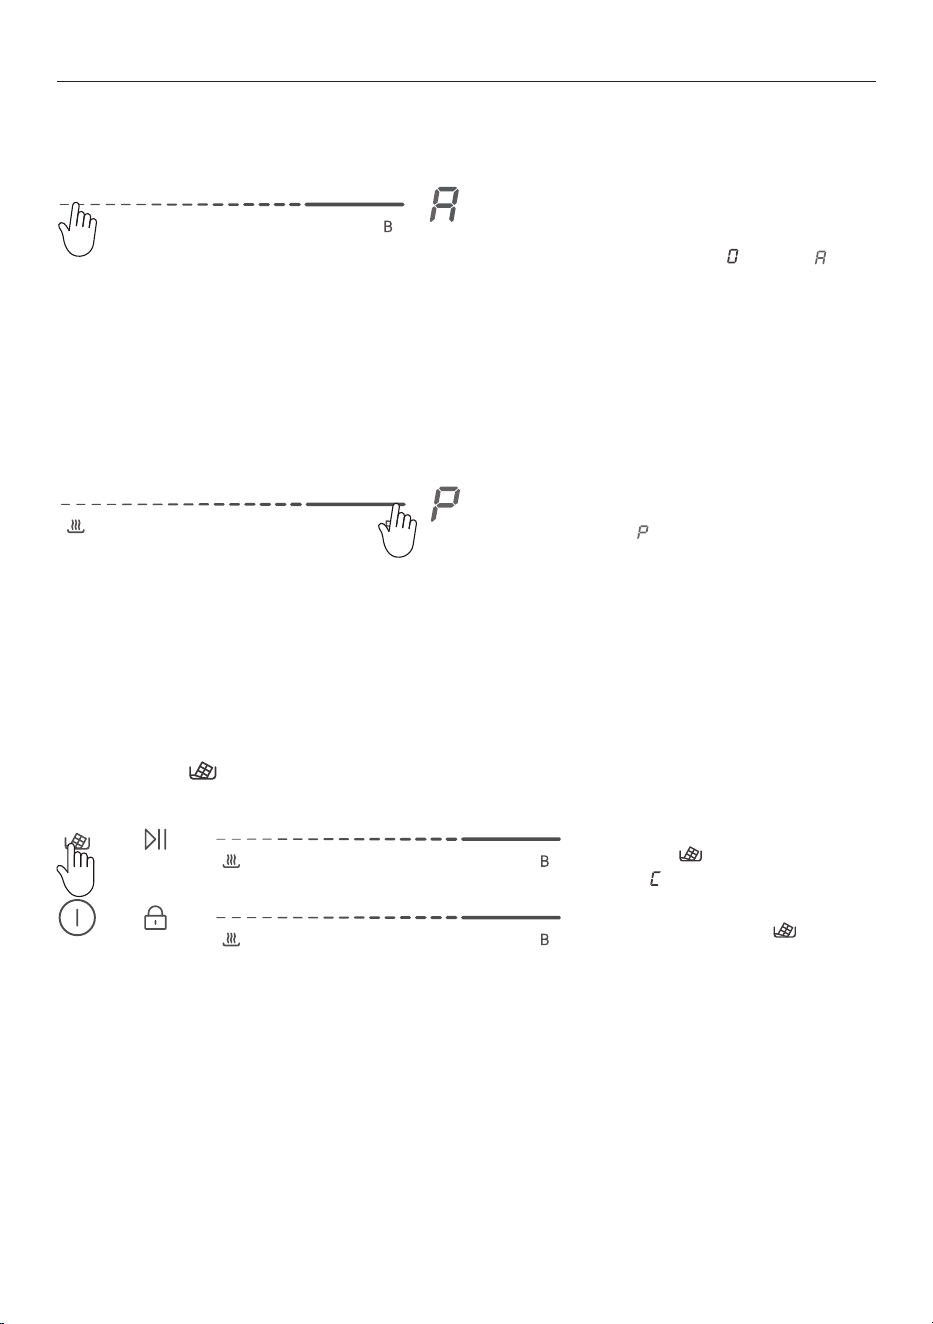
FEATURES
When the selected induction zone
has heated, hold the end of the slider
bar for 3 seconds until the display
cycles through to and then .
To exit Warm select any power level
using the cook zone control.
WARM FUNCTION
Select the induction zone you wish
use. Press , and the zone will
display .
To cancel, select the cook zone
control and then press
MELT FUNCTION
To heat or boil quickly, hold the end
of the slider bar for 3 seconds or
until is displayed. Power boost will
run for 5 minutes.
To exit power boost select any
power level in the cook zone control.
POWER BOOST
Use the warm function to maintain a gentle heat.
The Melt setting
is ideal for the most delicate cooking tasks (such as melting chocolate).
Use power boost to heat or boil quickly.
17
USING THE TIMER
Setting the timer for multiple cook zones.
1. Select a cook zone and choose a power level. While the zone is selected, press either + or - to activate
the timer. Minutes will show in the timer display and the selected cook zone will flash.
2. Adjust the time by tapping the – or + control.
Will be illuminated next to the corresponding slider
number.
3. Select the next cooking zone and when the zone is selected, press either + or - to start the timer.
Minutes will show in the timer display and is illuminated next to the corresponding slider number.
4. To check the time on a selected cook zone, select the cook zone and the timer display will show the
remaining time.
z
If you use this function to control more than one heating zone, the timer indicator will show
the shortest time.
z
If you want to check the set time of a heating zone, select the cook zone by pressing anywhere on the
slider control. The timer display will show the remaining time for the selected cook zone.
z
When the cooking time expires, the corresponding heating zone timer will beep once and
automatically switch o.
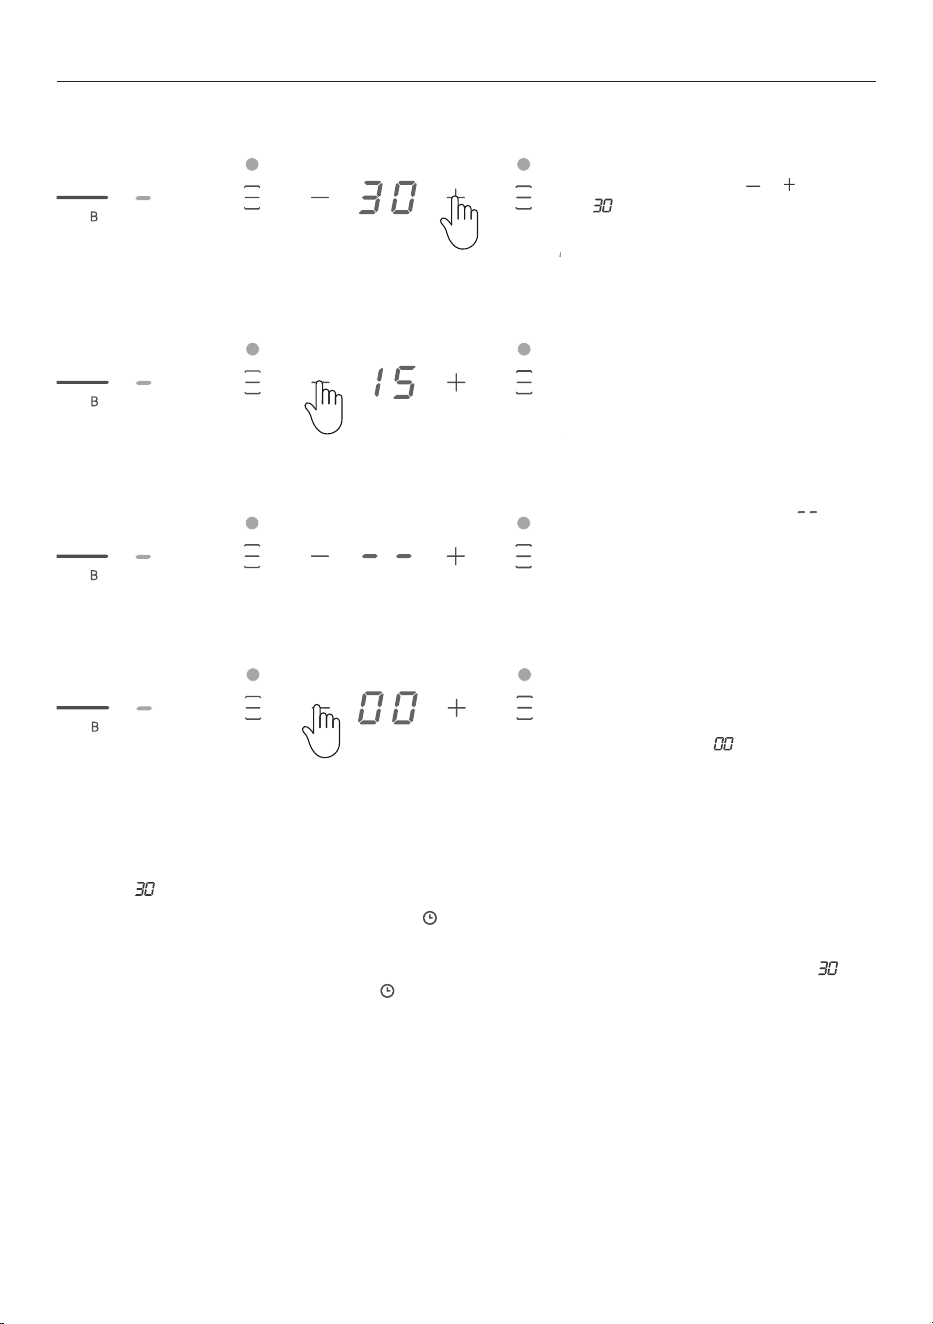
Setting the timer for a single cookzone
1. Select the cook zone and choose
a power level. Press or control.
Minutes will show in the timer
display and the selected cook zone
will flash.
The timer will start after 30 seconds.
2. Adjust the time by activating the
cooking zone and then pressing the
– or + control. The timer will start
after 3 seconds.
3. When the set time is up
will
flash, the timer will beep once and
the zone will turn off.
4. To cancel the timer, select the
cook zone and press - on the
cooking timer display until the
display reaches
.
18
WIFI/APP CONNECT
The SmartHQ app connects to your cooktop and contains useful information and tips.
The app ensures your Wi-Fi module firmware stays up to date, providing security and compatibility with
your connected appliances.
Getting started
Connecting the cooktop to Wi-Fi for the first time may take up to 10 minutes. To prevent the cooktop
automatically powering off while connecting, put a pot of water on one of the cooking zones and set it to
power level 1.
On your mobile device:
1. Download the SmartHQ app.
2. Register and create an account.
3. Add your appliance and set up the Wi-Fi connection.
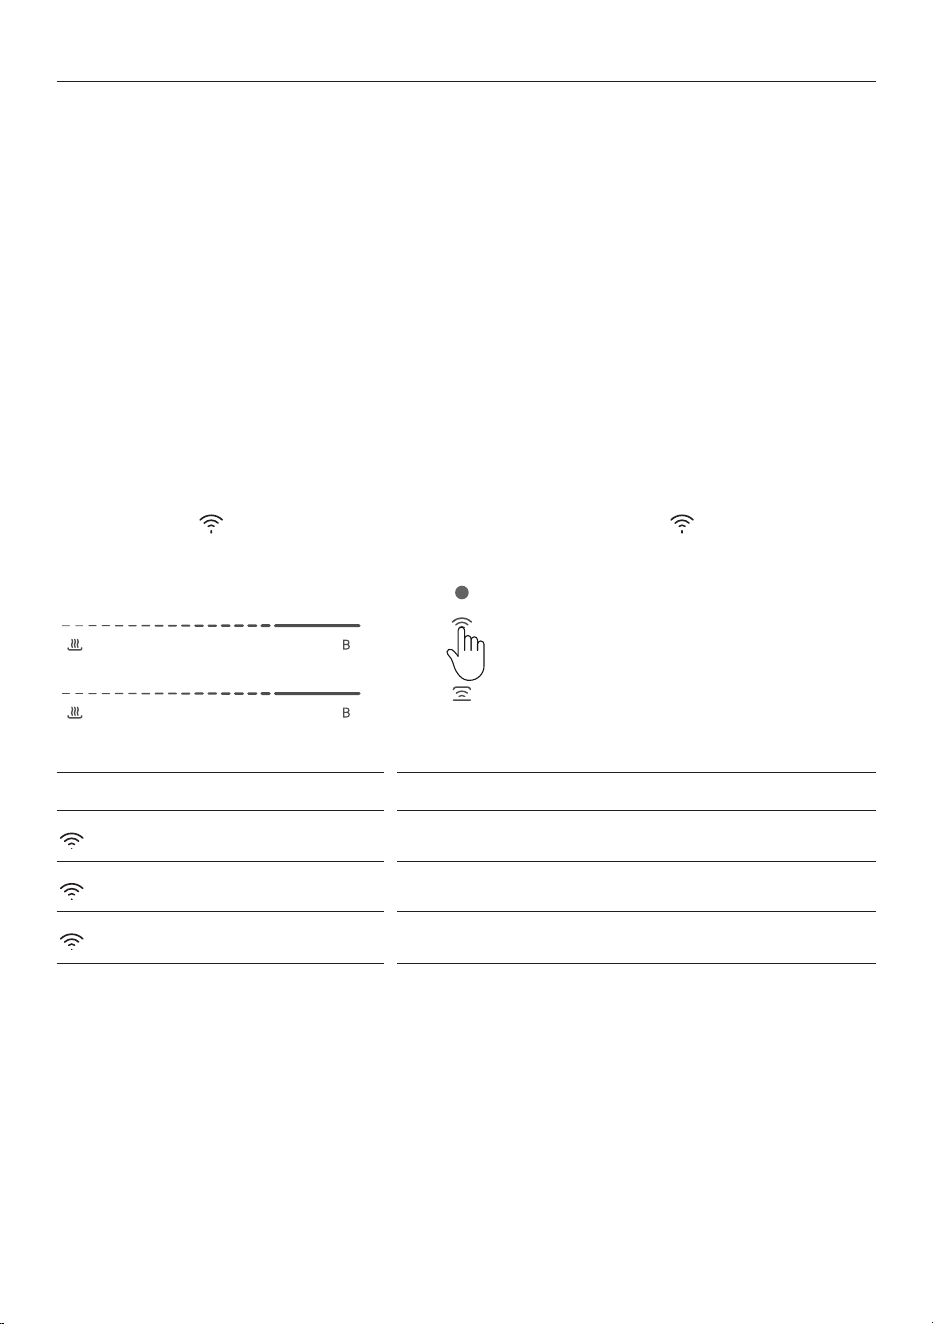
Connecting to your home Wi-Fi
1. Press and hold until you hear a beep. When the cooktop has connected, will stay illuminated.
Wifi indicator
What it means
Fast flash (.25s) on/off
Appliance is ready to connect
Slow flash (.5s) on/off
Appliance is re-connecting
Constant illumination
Appliance is connected
19
HOB-TO-HOOD CONNECT
Getting started
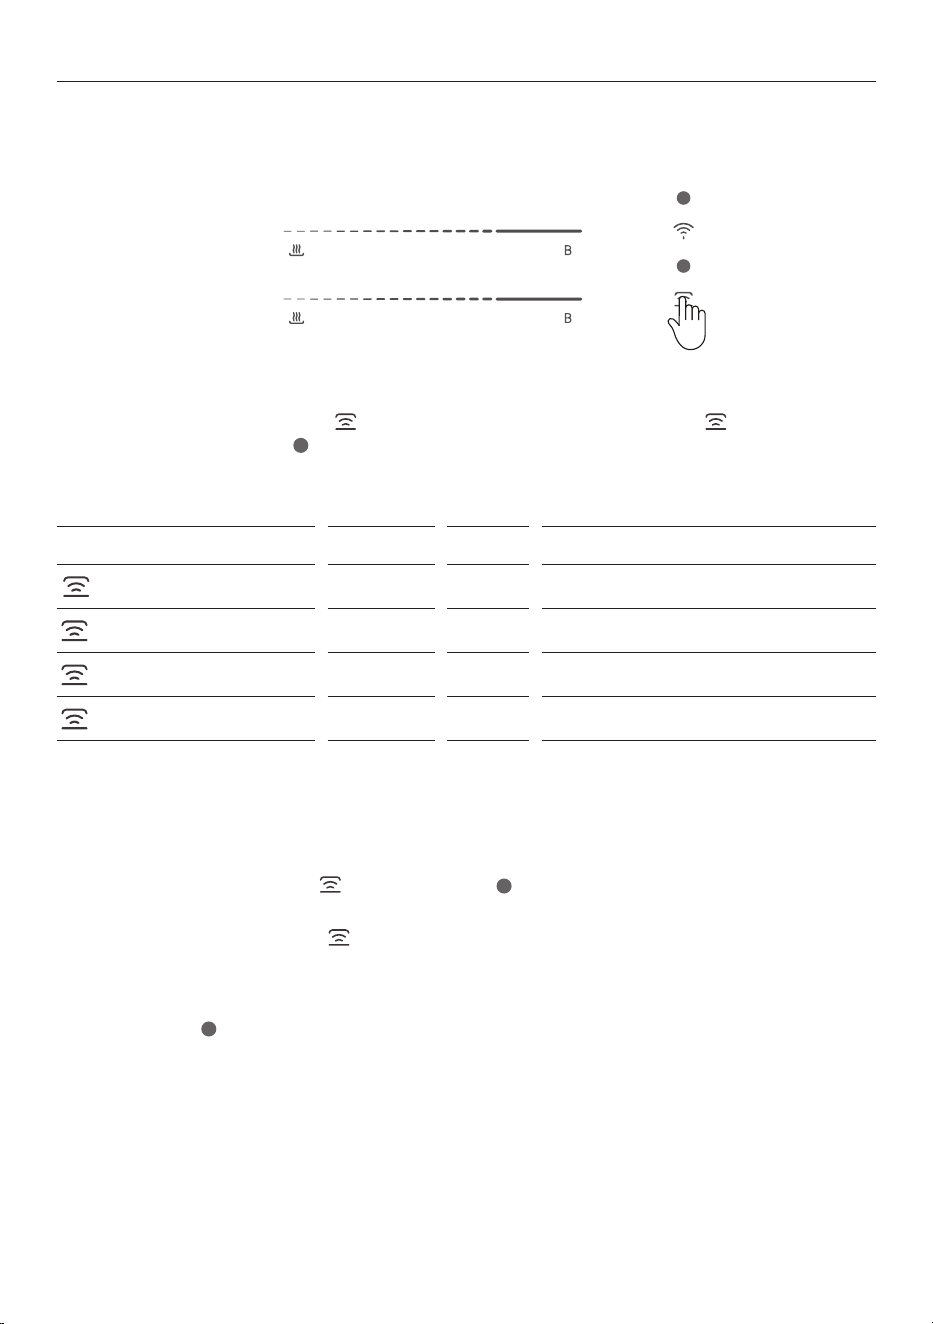
1. On your cook top press and hold until you hear a beep. Then press and hold on your
rangehood. The LED indicator will flash on and off while connecting and will stay illuminated (or flash
slowly) once the two appliances are paired.
This feature enables a compatible Haier rangehood to be paired with your cooktop. The rangehood
extraction speed automatically adjusts based on your cooktop power level.
Hob-to-Hood LED Indicator Cooktop Rangehood
What it means
Fast flash .25s on/off
Red White Appliance is ready to pair
Slow flash .5s on/off
Red White Appliance is re-connecting
Slow flash 3/.5s on/off
Red White Appliance is paired, rangehood is in Manual mode
Constant illumination
Red White Appliance is paired, rangehood is in Auto mode
Manual Mode
When in Manual mode, the rangehood will not be automatically controlled by the cooktop. It remains paired
and can be switched to Auto.
z
To switch to Auto mode, press . The LED indicator will be illuminated when the
rangehood is in Auto.
z
To switch back to Manual, press again or select a dierent fan speed setting on the rangehood.
Auto Mode
The LED indicator will be illuminated when the rangehood is in Auto mode. This mode allows the
rangehood to be automatically controlled based on the cooktop power level.
z
Pre-extraction: When the cooktop is powered on, the rangehood will automatically start at low fan
speed. This helps improve the extraction performance
z
During cooking: The rangehood speed will be automatically adjusted based on cooktop power level.
z
Extraction+: When the cooktop is powered o after cooking, the rangehood will switch to Extraction+
and will continue operating for 5 minutes.
20
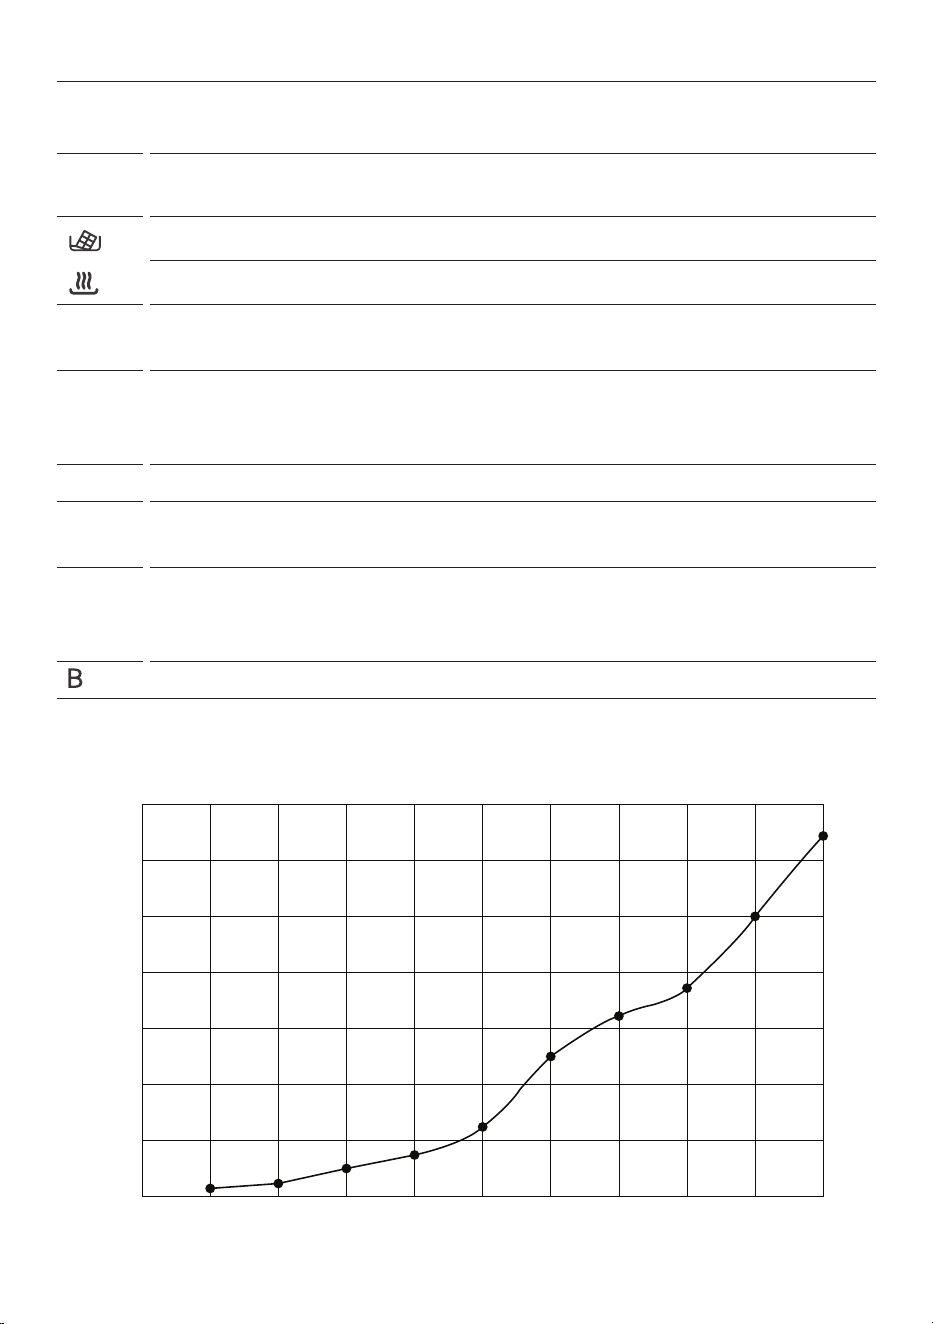
COOKING GUIDE
Induction heat settings
The settings below are guidelines only. The exact setting will depend on several factors, including your
cookware and the amount you are cooking. Experiment with the cooktop to find the settings that best suit
you.
Heat
setting
Suitability
z
Melting chocolate, butter, and foods that burn quickly
z
Warm
1 - 2
z
Gentle simmering
z
Slow warming
3 - 4
z
Reheating
z
Rapid simmering
z
Cooking rice
5 - 6
z
Pancakes
7 - 8
z
Pan-frying
z
Cooking pasta
9
z
Stir-frying
z
Searing
z
Bringing soup to the boil
z
Boiling water
140%
120%
100%
80%
60%
40%
20%
0%
0 1 2 3 4 5 6 7 8 9 P
Heat Setting
Power Output

21
CARE AND CLEANING
WHAT? HOW? IMPORTANT!
Everyday soiling on glass
(fingerprints, marks,
stains left by food or
non-sugary spillovers on
the glass)
1. Switch the power to the cooktop
off at the wall.
2. Clean with soapy water and a
damp cloth.
3. If soapy water and a damp cloth
is unsuccessful, apply induction/
ceramic cooktop cleaner while the
glass is still warm (but not hot)
4. Rinse and wipe dry with a clean
cloth or paper towel.
5. Switch the power to the cooktop
back on at the wall.
z
When the power to the cooktop
is switched o, there will be no
‘hot surface’ indication but the
cooking zone may still be hot!
Take extreme care.
z
Heavy-duty scourers, some
nylon scourers and harsh/
abrasive cleaning agents may
scratch the glass. Always read
the label to check if your cleaner
or scourer is suitable.
z
Never leave cleaning residue
on the cooktop: the glass may
become stained.
Boilovers, melts, and hot
sugary spills on the glass
1. Remove these immediately
with a knife or scraper suitable
for ceramic glass cooktops, but
beware of hot cooking zone
surfaces.
2. Switch the power to the cooktop
off at the wall.
3. Hold the blade or utensil at a 30°
angle and scrape the soiling or spill
to a cool area of the cooktop.
4. Clean the soiling or spill up with
a dish cloth or paper towel.
5. Follow steps 2 to 4 for ‘Everyday
soiling on glass’ above.
z
Remove stains left by melts
and sugary food or spillovers
as soon as possible. If left
to cool on the glass, they
may be dicult to remove or
even permanently damage
the glass surface.
z
Cut hazard: when the safety
cover is retracted, the blade
in a scraper is razor-sharp.
Use with extreme care and
always store safely and out of
reach of children.
Spillover on the touch
controls.
1. Switch the power to the cooktop
off at the wall.
2. Soak up the spill.
3. Wipe the touch control area with
a clean damp sponge or cloth.
4. Wipe the area completely dry
with a paper towel.
5. Switch the power to the cooktop
back on at the wall.
z
The cooktop may beep and
turn itself o, and the touch
controls may not function while
there is liquid on them. Make
sure you wipe the touch control
area dry before turning the
cooktop back on.

22
PROBLEM POSSIBLE CAUSES WHAT TO DO
The induction cooktop
cannot be turned on.
No power. Make sure the induction cooktop is connected to
the power supply and that it is switched on. Check
whether there is a power outage in your home or
area. If you’ve checked everything and the problem
persists, call a qualied technician.
The touch controls are
unresponsive.
The controls are locked. Unlock the controls. See section ‘Using your
induction cooktop’ for instructions.
The touch controls are
difficult to operate.
There may be a slight lm of
water over the controls or
you may be using the tip of
your nger when touching
the controls.
Make sure the touch control area is dry and use the
ball of your nger when touching the controls.
The glass is being
scratched.
Rough-edged cookware.
Unsuitable, abrasive scourer
or cleaning products being
used.
Use cookware with at and smooth bases. See
‘Choosing the right cookware’.
See ‘Care and cleaning’.
Some pans make
crackling or clicking
noises.
This may be caused by
the construction of your
cookware (layers of dierent
metals vibrating dierently).
This is normal for cookware and does not indicate
a fault.
The induction hob makes
a low humming noise
when used on
a high heat setting.
This is caused by the
technology of induction
cooking.
This is normal, but the noise should quieten down
or disappear completely when you decrease the
heat setting.
Fan noise coming from
the induction hob.
A cooling fan built into your
induction hob has come on to
prevent the electronics from
overheating. It may continue
to run even after you’ve
turned the induction hob o.
This is normal and needs no action. Do not switch
the power to the induction hob o at the wall while
the fan is running.
Pans do not become hot
and
appears in the
display.
The induction hob cannot
detect the pan because it
is not suitable for induction
cooking.
The induction hob cannot
detect the pan because it
is too small for the cooking
zone or not properly centred
on it.
Use cookware suitable for induction cooking. See
section ‘Choosing the right cookware’.
Centre the pan and make sure that its base
matches the size of the cooking zone.
TROUBLESHOOTING

23
PROBLEM POSSIBLE CAUSES WHAT TO DO
The induction hob or a
cooking zone has turned
itself off
unexpectedly, a tone
sounds and an error code
is displayed
(typically alternating with
one or two digits in the
cooking timer display).
Technical fault. Check the alert codes section in this guide.
If a solution can not be found in the alert codes
section, switch the power to the induction hob o
at the wall, and contact a qualied technician.
Cooktop is beeping. Too many cook zones are at
high power.
An object has been detected
on the cooktop.
Turn down one or more cook zones until the
beeping stops.
Remove the object from the cooktop.
Cooktop stopped
operating during cooking.
Excessive temperature. The hob will automatically shut down if there is
excessive temperature. The fan will keep cooling
down the induction hob for a further minute. When
the hob has cooled, re-start cooking.
An unsuitable size or
non-magnetic pan (e.g.
aluminium), or some other
small item (e.g. knife, fork,
key) has been left on the hob.
The cooktop will automatically go on standby for 1
minute. Remove items from cooktop.
CONNECT TO WIFI/APP
Wifi is not connecting Not enough time allowed. The connection process can take up to 10 minutes.
Try to connect again.
Internet connection is o or
the network is bad.
Check that your modem is connected and working.
HOB-TO-HOOD
Hood does not stop when
the cooktop is turned off.
This is normal. The rangehood will continue to run for 5 minutes
after the cooktop has been turned o unless in
Manual.
Hood starts as soon as
cooktop is turned on.
This is normal. The rangehood will turn on as soon as the cooktop
is powered on for maximum eciency.
Hood is no longer in Auto. The rangehood and hob have
been disconnected and is in
Manual.
Tap the Hob-to-Hood icon
on the cooktop to
toggle back to Auto. The LED should be solid to
indicate it is paired and in Auto.
AUTO SHUTDOWN PROTECTION - LONG COOKING OR COOKTOP LEFT ON
Power Level 1 2 3 4 5 6 7 8 9
Default shutdown (hours) 8 8 8 4 4 4 2 2 2
TROUBLESHOOTING
24
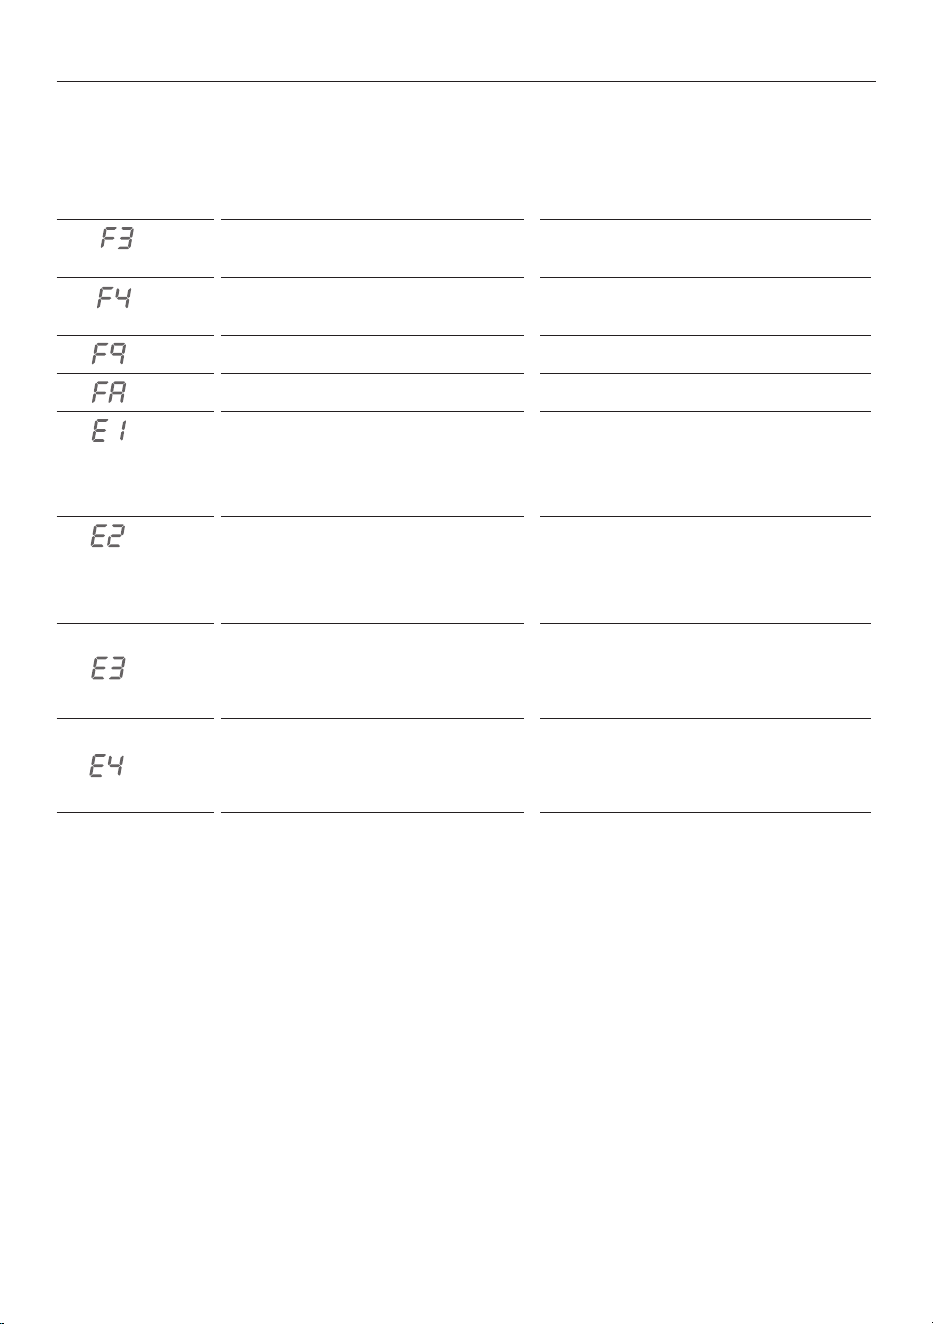
If an abnormality comes up, the induction cooktop will enter a protective state automatically and display
corresponding fault codes:
PROBLEM POSSIBLE CAUSES WHAT TO DO
Temperature sensor of the induction
coil failure
Please contact customer care.
Temperature sensor of the induction
coil failure
Please contact customer care.
Temperature sensor of the IGBT failure. Please contact customer care.
Temperature sensor of the IGBT failure. Please contact customer care.
Abnormal supply voltage Please check whether the power supply
is normal. Power on after the power
supply has been checked and is operating
normally
Abnormal supply voltage Please check whether the power supply
is normal. Power on after the power
supply has been checked and is operating
normally
High temperature of the induction coil
temperature sensor
Please contact customer care.
High temperature of the IGBT
temperature sensor
Please restart after the hob cools down.
ALERT CODES

25
Please read this warranty card carefully. Attach your purchase receipt to this warranty card and keep in a
safe place. You must produce both warranty card and proof of purchase in the event of a warranty repair
being required.
When you purchase any new Haier Product you automatically receive a two year Manufacturer's Warranty
covering parts and labour for servicing.
The Manufacturer undertakes to:
Repair or, at its option, replace without cost to the owner either for material or labour any part of the
Product, the serial number of which appears on the Product, which is found to be defective within TWO
YEARS from the date of purchase.
This warranty DOES NOT cover:
A Service calls which are not related to any defect in the Product. The cost of a service call will be charged
if the problem is not found to be a Product related fault. For example:
1 Correct the installation of the product.
2 Provide Instruction on use of the product or change the setup of the product.
3 Replace house fuses or correct house wiring.
4 Correcting faults) caused by the user.
5 Noise or vibration that is considered normal.
6 Water on the floor due to incorrect loading or excessive suds.
7 Blocked pumps, removal of foreign objects/substances from the machine, including the pump and
inlet house filters.
8 Correcting damage caused by pests, eg. rats, cockroaches etc.
9 Correct corrosion or discolouration due to chemical attack.
!0 Power outages or surges.
B Defects caused by factors other than:
1 Normal domestic use or
2 Use in accordance with the Product's User Guide.
C Defects to the Product caused by accident, neglect, misuse or 'Act of God'.
D The cost of repairs carried out by non-authorised repairers or the cost of correcting such
unauthorised repairs.
E Normal recommended maintenance as set out in the Product's User Guide.
F Repairs when the appliance has been dismantled, repaired or serviced by other than an AUTHORISED
CUSTOMER SERVICE CENTRE or the selling dealer.
G Pick up and delivery.
H Transportation or travelling costs involved in the repair when the product is installed outside the
AUTHORISED CUSTOMER SERVICE CENTRE'S normal service area.
This product has been designed for use in a normal domestic environment. It is not intended for
commercial use. Doing so may affect product warranty.
Service under this warranty must be provided by an Authorised Service Repairer (refer to the Customer
Care section for contact details). Such service shall be provided during normal business hours. This
warranty certificate should be shown when making any claim.
MANUFACTURER'S WARRANTY

26
Note:
This Warranty is an extra benefit and does not affect your legal rights and applies only to product
purchased in New Zealand and Australia. Please keep this Warranty Card in a safe place.
For Australian customers:
Our goods come with guarantees that cannot be excluded under the Australian Consumer Law. You are
entitled to a replacement or refund for a major failure and for compensation for any other reasonably
foreseeable loss or damage. You are also entitled to have the goods repaired or replaced if the goods fail to
be of acceptable quality and the failure does not amount to a major failure.
MANUFACTURER'S WARRANTY

27
Complete and keep for safe reference:
We recommend our Haier Customer Service and the use of original spare parts.
If you have a problem with your appliance, please first check TROUBLESHOOTING. If you cannot find a
solution there, please contact:
z
Your local dealer.
z
The Service & Support area at
www.haier.com.au or
www.haier.co.nz
where you can activate the service claim and also find FAQs.
To contact our Service, ensure that you have the following data available.
The information can be found on the rating plate at the door.
Model
Serial No.
Model
Serial No.
Purchase Date
Purchaser
Dealer
Suburb
To w n
Country
CUSTOMER SERVICE