
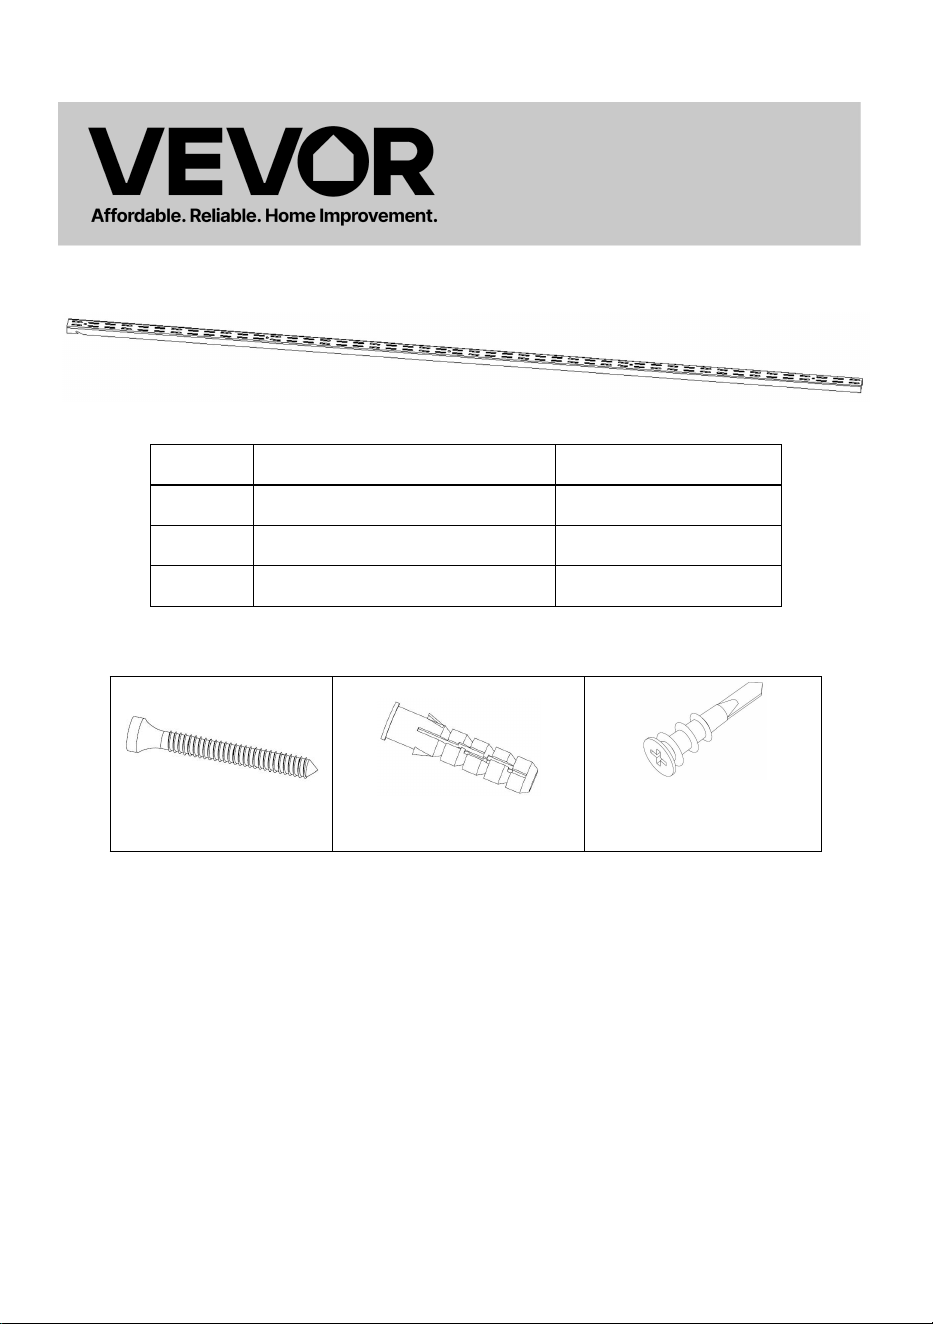
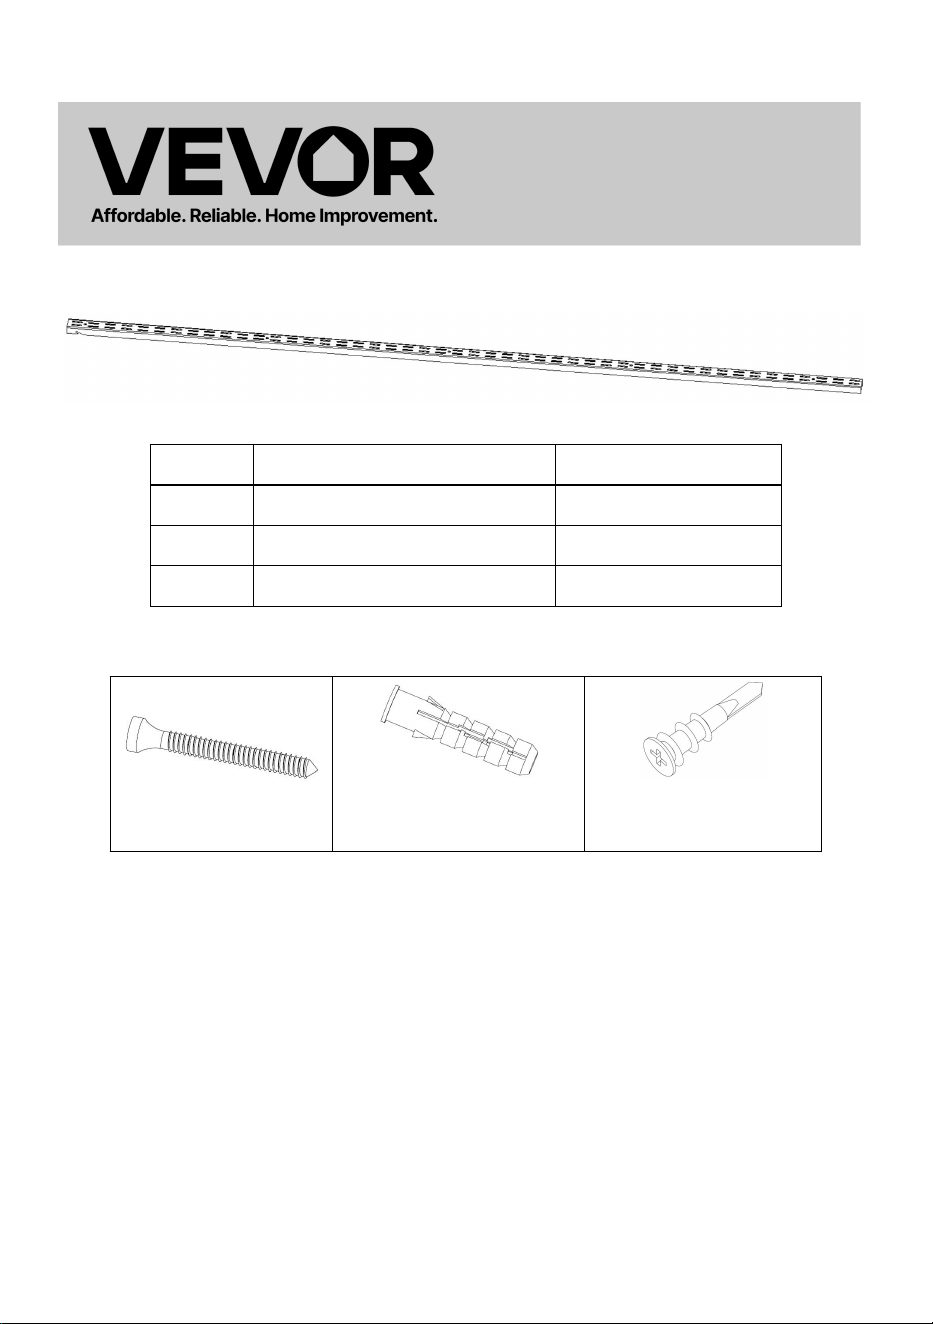
SHELF TRACK
MODEL:LZ02
Technical Support and E-Warranty Certificate
www.vevor.com/support
1
Model
LZ02
2
Packing Quantity
5 PCS
3
Colour
Bright Silver
4
Length of guide
1536mm
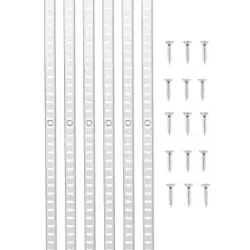
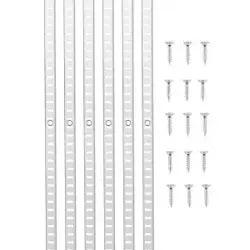
Hardware Fitting
Screw (x 30)
Expansion sleeve(x30)
Aircraft expansion
sleeve(x30)
This is the original instruction; please read all manual instructions carefully
before operating. VEVOR reserves a clear interpretation of our user
manual. The appearance of the product shall be subject to the product you
received. Please forgive us for not informing you again if there are any
technology or software updates on our product.
Thank you very much for choosing this product. Shelf track is an
installation accessory. Please select the appropriate shelf support to work
with it before installation.
Please read all of the instructions before using it. The information will help
you achieve the best possible results.
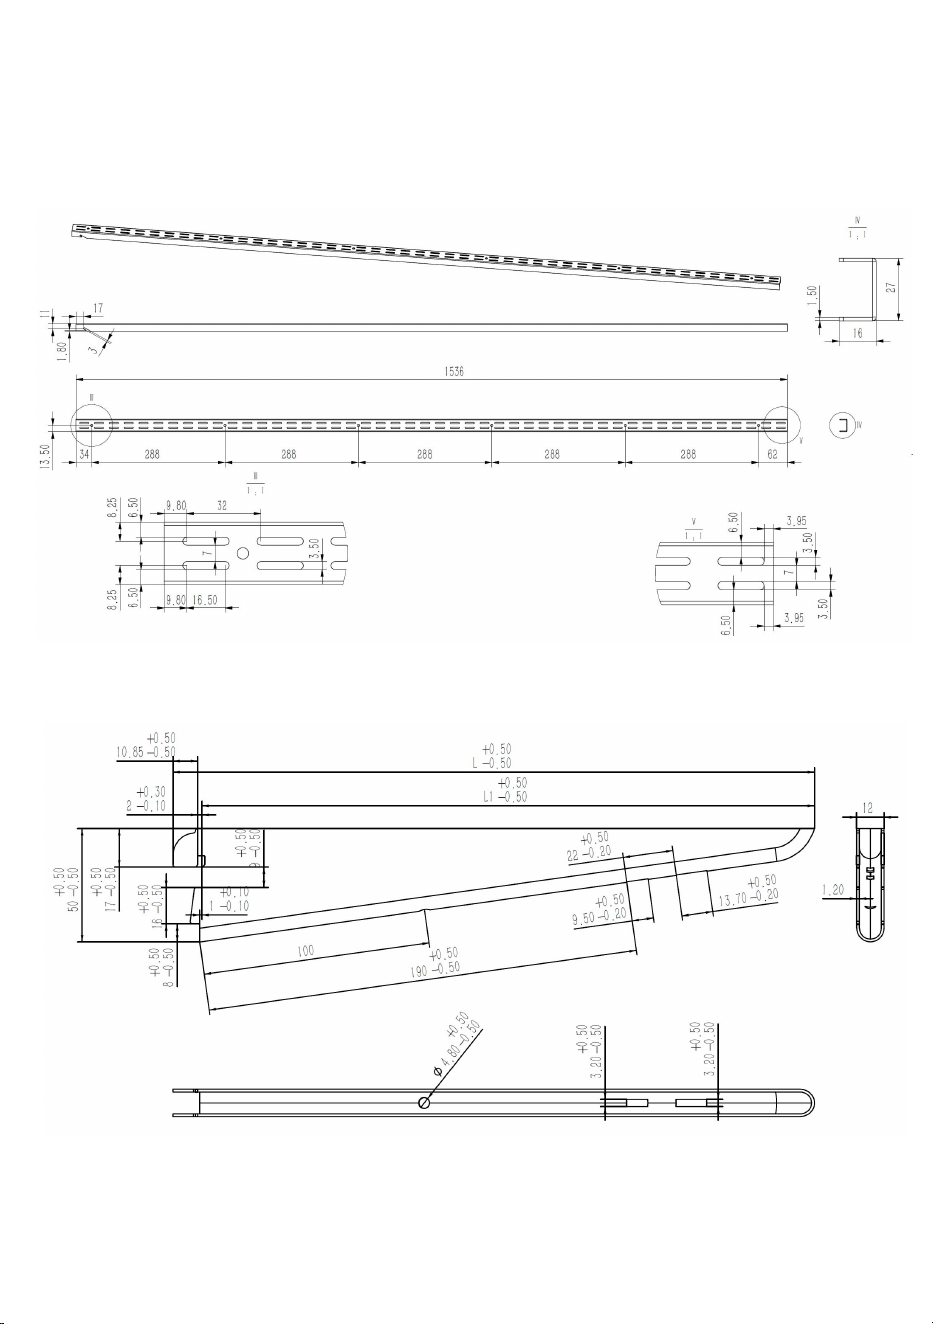
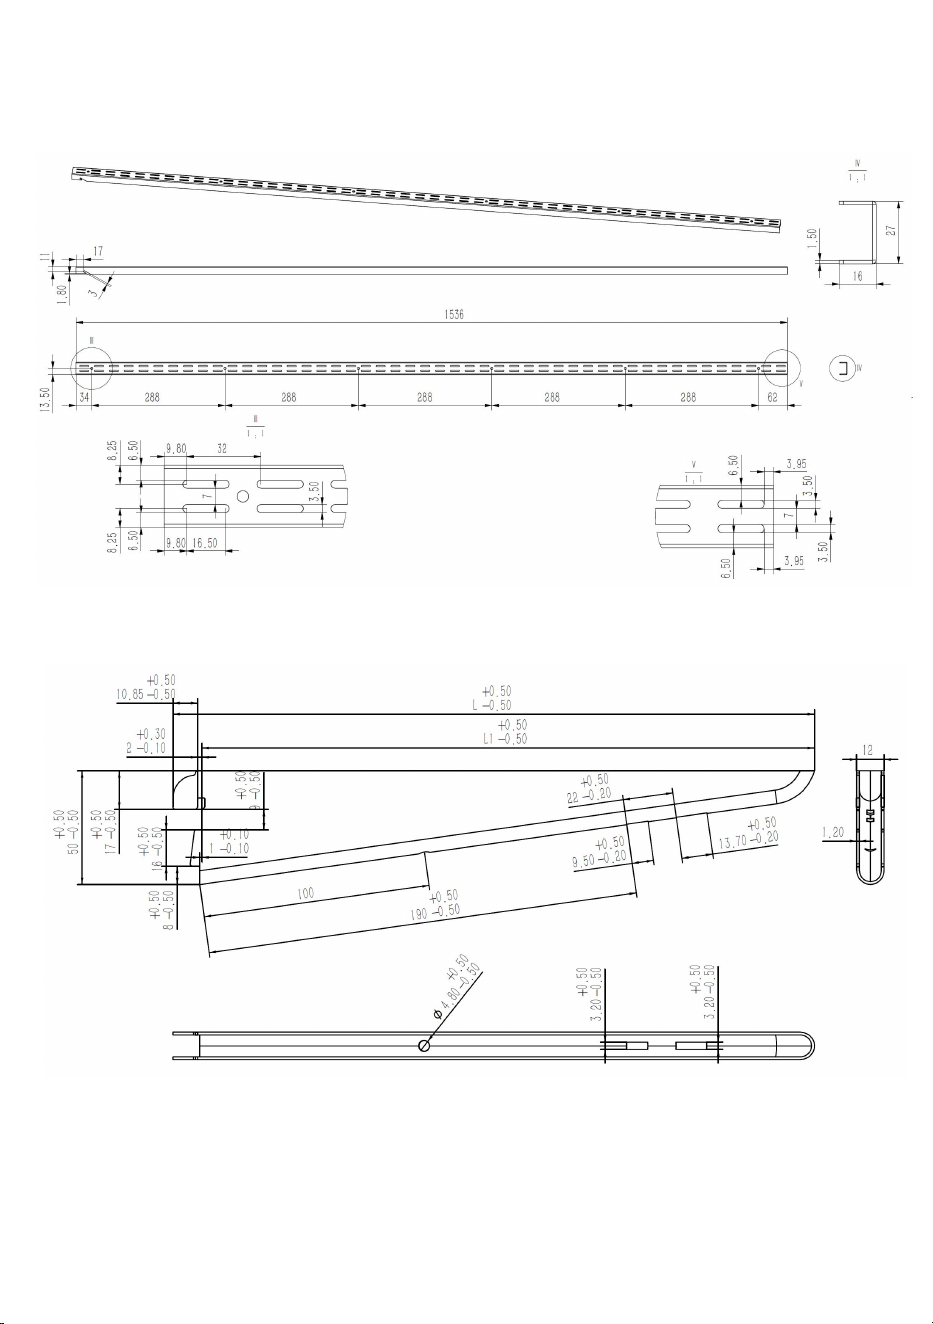
SHELF TRACK
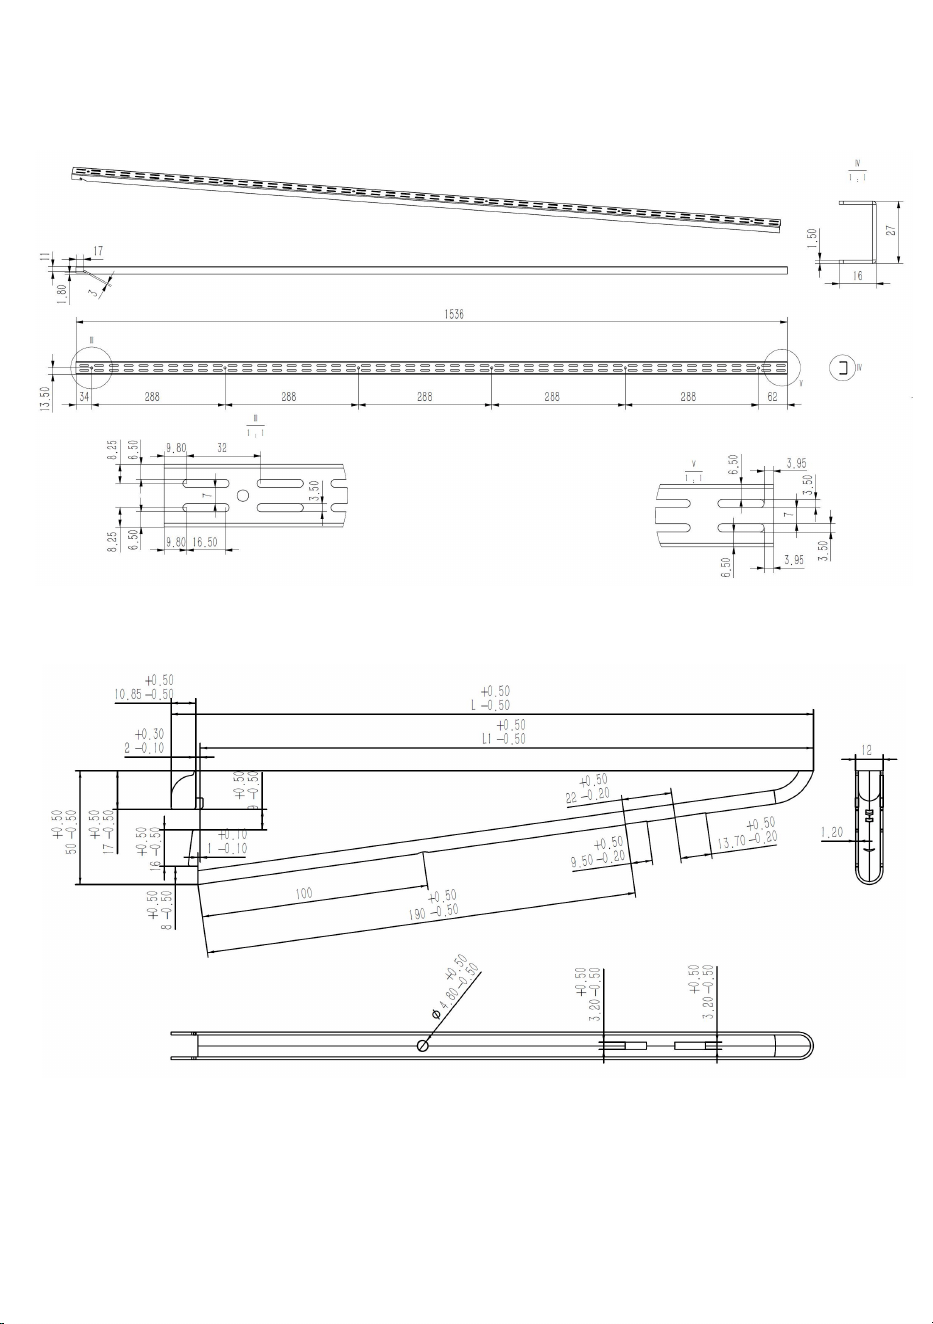
Product Structure
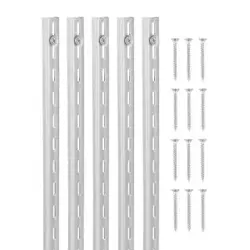
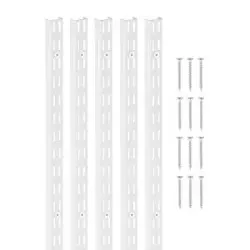
Dimension Figure
Fit shelf support
(Note:Shelf support is not included)
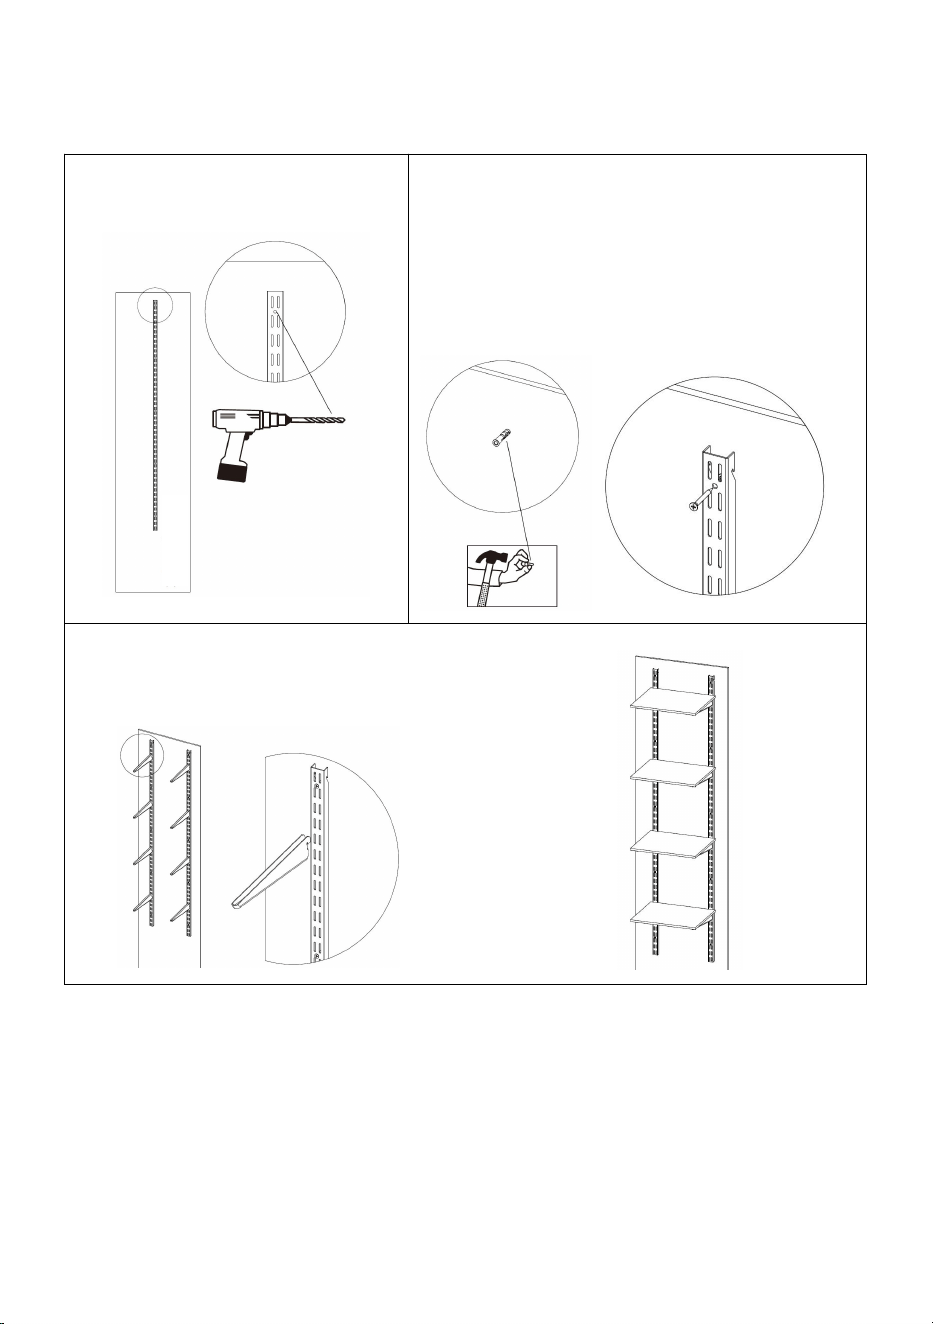
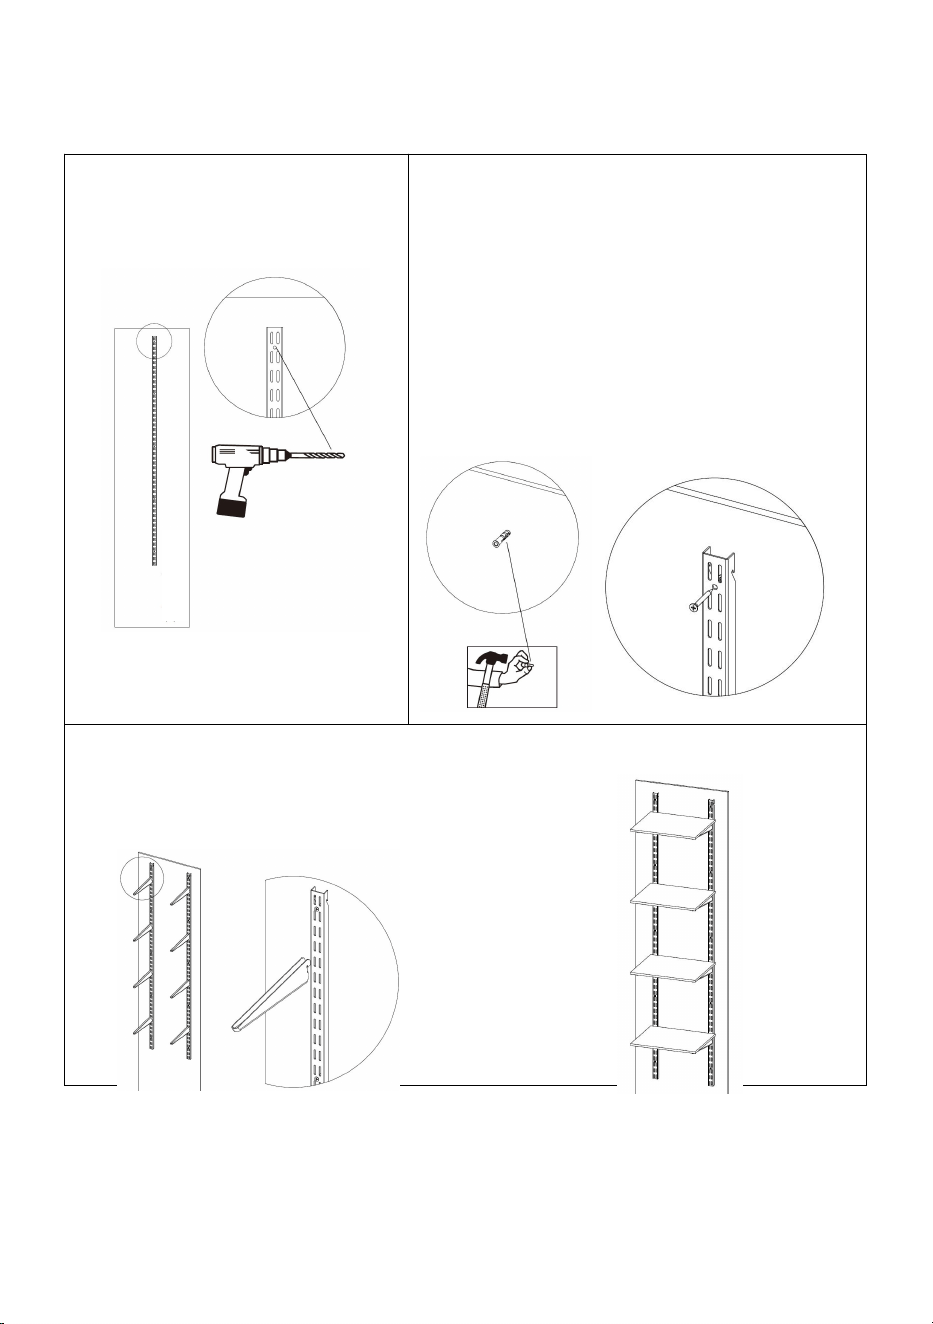
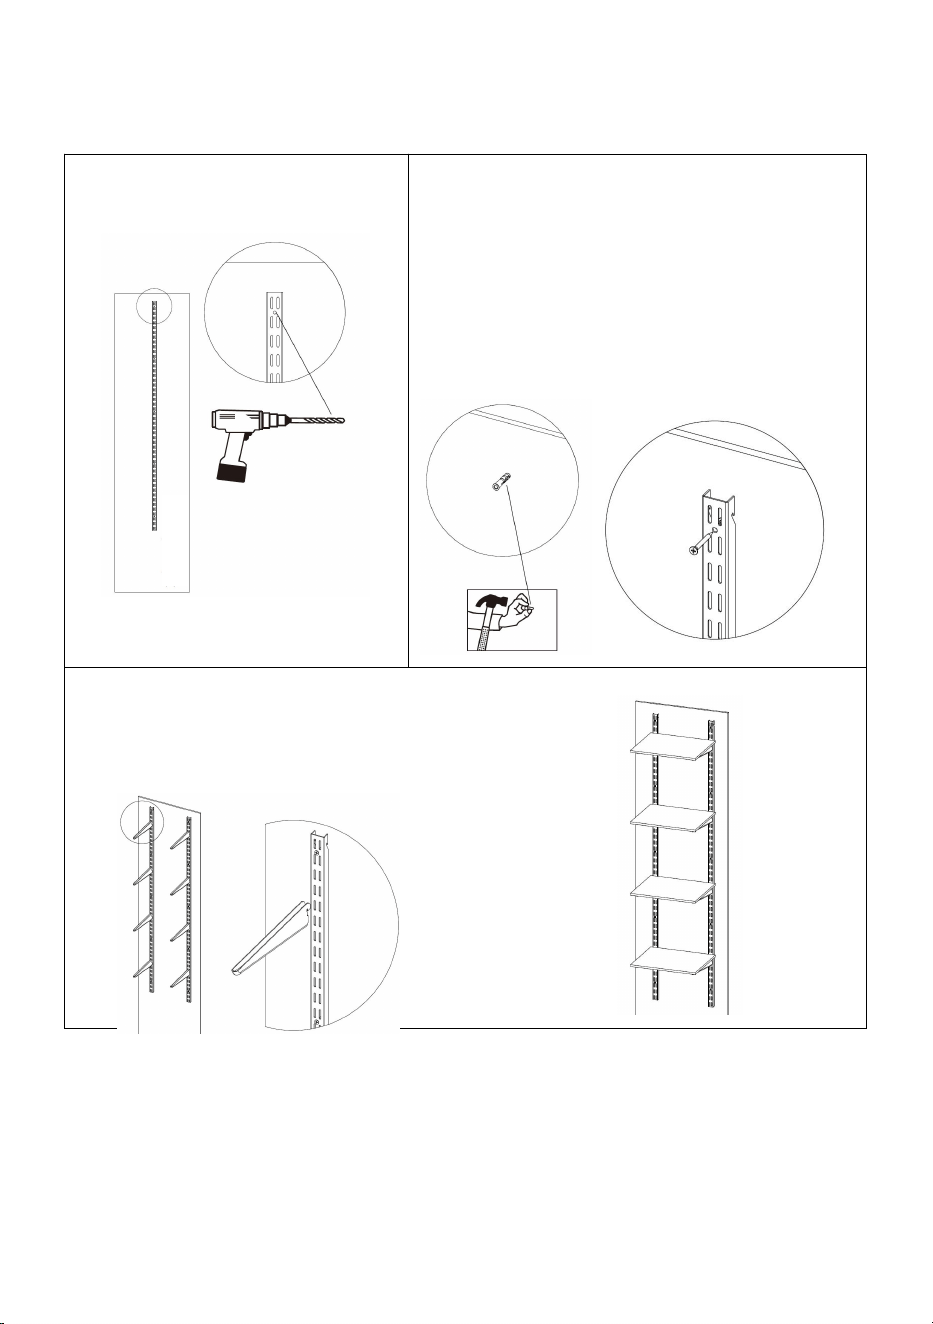
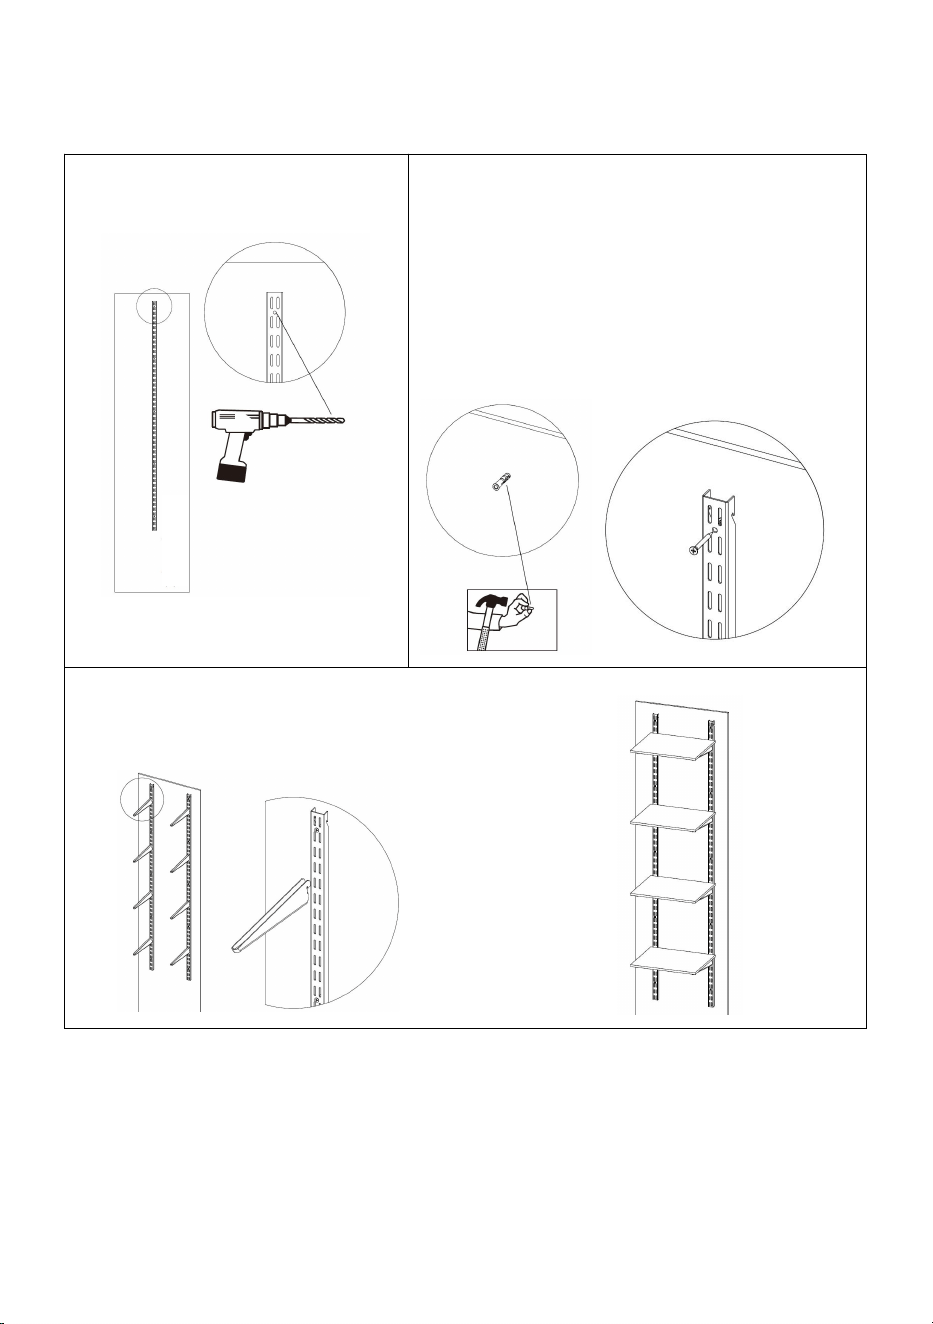
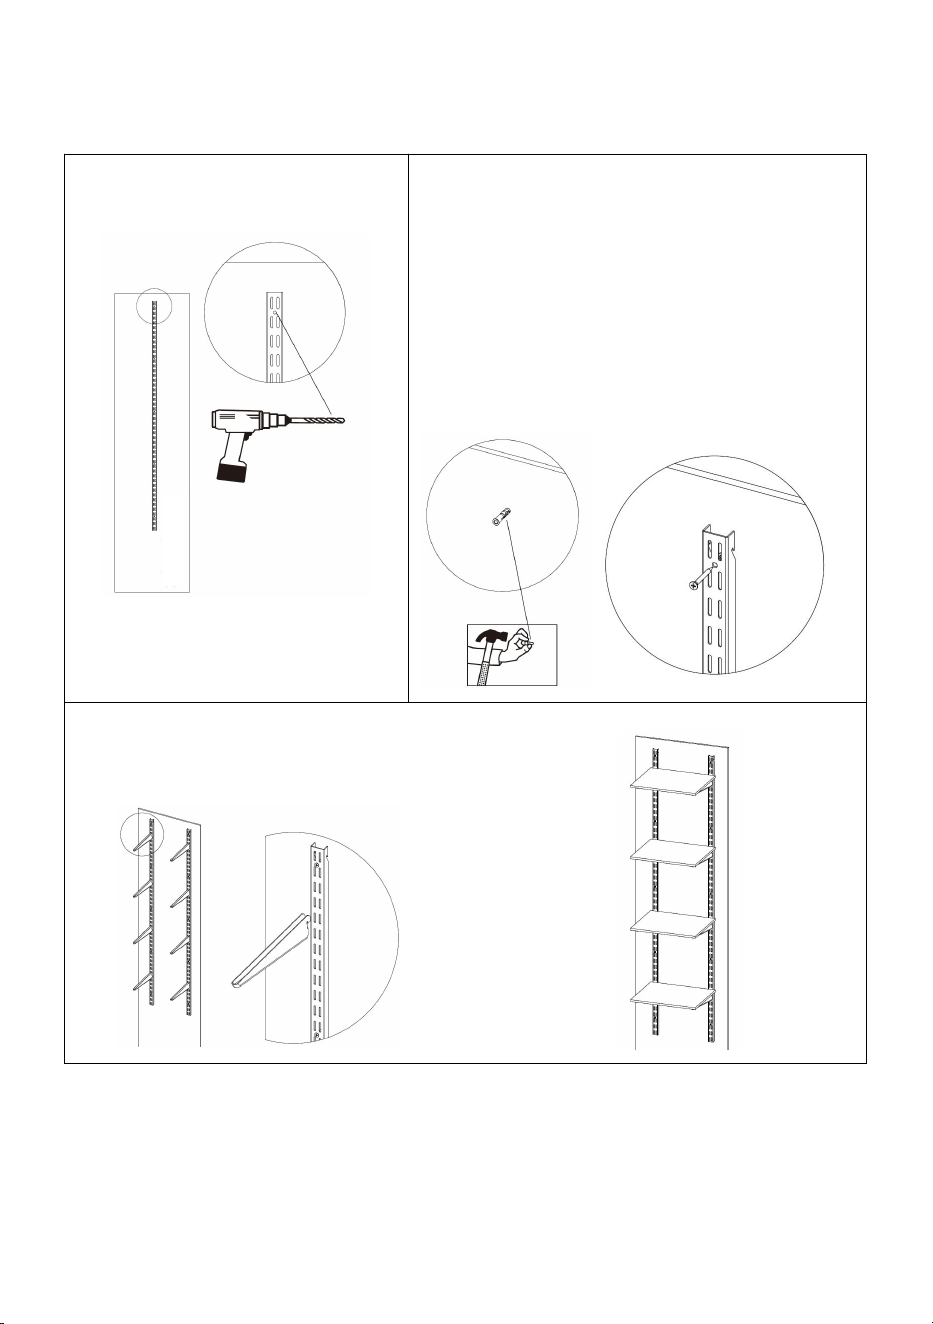
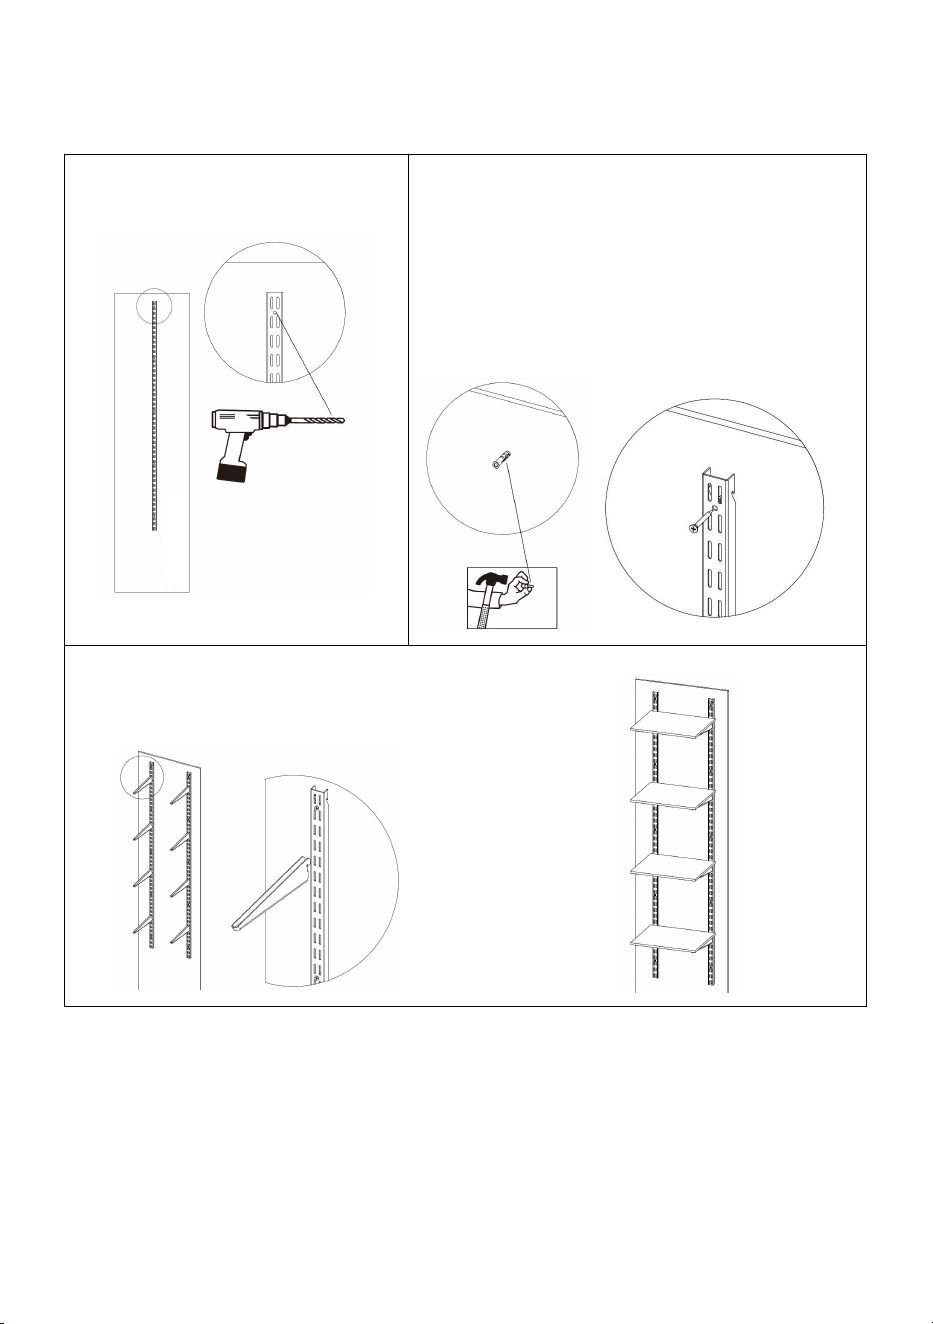
Installation introduction
(Note: This product only includes shelf track; other accessories are to be
provided by the customer.)
1. Use guide rail positioning to
punch holes in the wall.
2. Fasten the guide rail to the wall with screws.
(1) If the wall is a board, screw directly into the board.
(2) If the wall is a brick wall, first knock the expansion
sleeve into the wall hole, and then tighten the screw to
the expansion sleeve
(3) If the wall is drywall, first screw the aircraft
expansion sleeve into the drywall, and then install the
screw to the aircraft expansion sleeve.
3. Repeat steps 1 and 2 to install the remaining shelf track and shelf support.
(Note: All shelf tracks must be of the same height)
4. Install shelf support in an appropriate position as required.
5. Finally, place the board on the shelf support.
Manufacturer: Shanghaimuxinmuyeyouxiangongsi
Address: Shuangchenglu 803nong11hao1602A-1609shi, baoshanqu, shanghai 200000 CN.
EC REP: E-CrossStu GmbH. Mainzer Landstr.69, 60329 Frankfurt am Main.
UK REP: YH CONSULTING LIMITED. C/O YH Consulting Limited Office 147, Centurion House,
London Road, Staines-upon-Thames, Surrey, TW18 4AX
Imported to AUS: SIHAO PTY LTD. 1 ROKEVA STREETEASTWOOD NSW 2122 Australia
Imported to USA: Sanven Technology Ltd. Suite 250, 9166 Anaheim Place, Rancho
Cucamonga, CA 91730
wall

RAIL D'ÉTAGÈRE
MODÈLE:LZ02
Assistance technique et certificat de garantie électronique
www.vevor.com/support

1
Modèle
LZ02
2
Quantité d'emballage
5 pièces
3
Couleur
Argent brillant
4
Longueur du guide
1536 mm
Montage du matériel
Vis (x 30 )
Expansion manchon (x
30 )
Manchon
d'expansion pour
avion (x 30 )
Il s'agit de la notice d'utilisation d'origine. Veuillez lire attentivement toutes
les instructions du manuel avant de l'utiliser. VEVOR se réserve le droit
d'interpréter clairement notre manuel d'utilisation. L'apparence du produit
dépend du produit que vous avez reçu. Veuillez nous excuser de ne pas
vous informer à nouveau si des mises à jour technologiques ou logicielles
sont disponibles sur notre produit.
Nous vous remercions d'avoir choisi ce produit. Le rail d'étagère est un
accessoire d'installation. Veuillez sélectionner le support d' étagère
approprié pour l'utiliser avant l'installation.
Veuillez lire toutes les instructions avant de l'utiliser. Ces informations vous
aideront à obtenir les meilleurs résultats possibles.
SHELF TRACK

Structure du produit
D imension F igure
Support d'étagère F it
(Remarque : le support d'étagère n'est pas inclus)
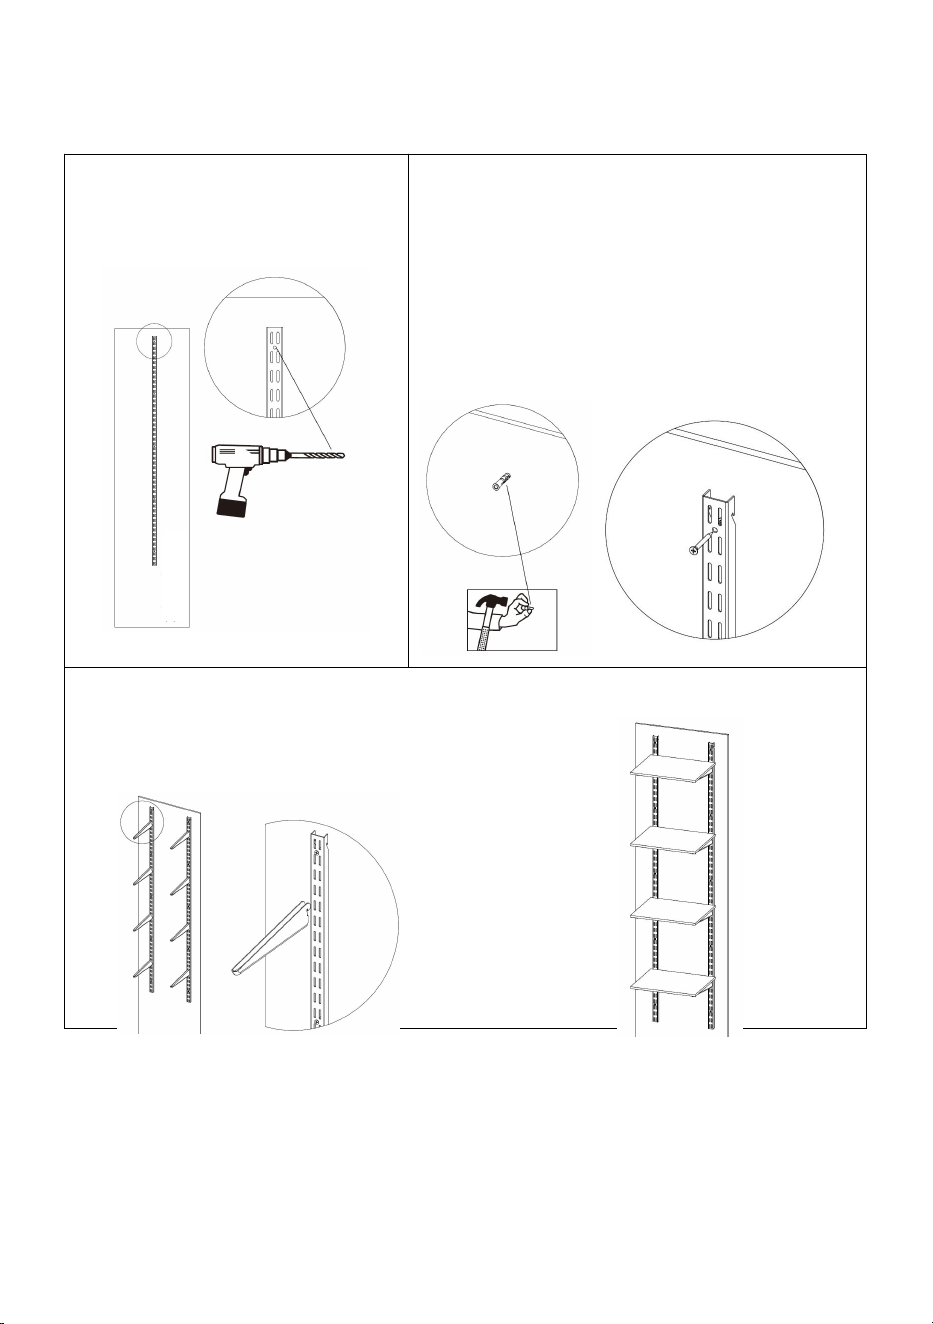
Présentation de l'installation
(Remarque : ce produit comprend uniquement le rail d'étagère ; les autres
accessoires doivent être fournis par le client.)
1. Utilisez le positionnement du rail
de guidage pour percer des trous
dans le mur.
3. Fixez le rail de guidage au mur avec des vis.
(4) Si le mur est une planche, vissez directement dans
la planche.
(5) Si le mur est un mur en briques, enfoncez d'abord
le manchon d'expansion dans le trou du mur, puis
serrez la vis sur le manchon d'expansion
(6) Si le mur est en cloison sèche, vissez d’abord le
manchon d’expansion de l’avion dans la cloison sèche,
puis installez la vis sur le manchon d’expansion de
l’avion.
6. Répétez les étapes 1 et 2 pour installer le rail d’étagère et le support d’étagère
restants.
(Remarque : tous les rails d'étagère doivent être de la même hauteur)
7. Installez le support d’étagère dans une position appropriée selon les besoins.
8. Enfin, placez la planche sur le support d’étagère.
Fabricant : Shanghaimuxinmuyeyouxiangongsi
Adresse : Shuangchenglu 803nong11hao1602A-1609shi, baoshanqu, Shanghai 200000 CN.
REPRÉSENTANT DE LA CE : E-CrossStu GmbH . Mainzer Landstr.69, 60329
Francfort-sur-le-Main.
REPRÉSENTANT DU ROYAUME-UNI : YH CONSULTING LIMITED. C/O YH Consulting Limited
Bureau 147, Centurion House, London Road, Staines-upon-Thames, Surrey, TW18 4AX
Importé en Australie : SIHAO PTY LTD. 1 ROKEVA STREETEASTWOOD NSW 2122 Australie
wall

Importé aux États-Unis : Sanven Technology Ltd. Suite 250, 9166 Anaheim Place, Rancho
Cucamonga, CA 9173 0

REGALSCHIENE
MODELL:LZ02
Technischer Support und E-Garantie-Zertifikat
www.vevor.com/support

1
Modell
LZ02
2
Verpackungsmenge
5 STK
3
Farbe
Helles Silber
4
Länge der Führung
1536 mm
Hardware-Montage
Schraube (x 30 )
Erweiterung Ärmel (x
30 )
Flugzeug-Spreizhüls
e (x 30 )
Dies ist die Originalanleitung. Bitte lesen Sie alle Anweisungen im
Handbuch sorgfältig durch, bevor Sie das Gerät in Betrieb nehmen.
VEVOR behält sich eine klare Auslegung unseres Benutzerhandbuchs vor.
Das Erscheinungsbild des Produkts hängt von dem Produkt ab, das Sie
erhalten haben. Bitte verzeihen Sie uns, dass wir Sie nicht erneut
informieren, wenn es Technologie- oder Software-Updates für unser
Produkt gibt .
Vielen Dank, dass Sie sich für dieses Produkt entschieden haben. Die
Regalschiene ist ein Montagezubehör. Bitte wählen Sie vor der Montage
die passende Regalstütze aus.
Bitte lesen Sie vor der Anwendung alle Hinweise sorgfältig durch. Die
Informationen helfen Ihnen dabei, optimale Ergebnisse zu erzielen.
SHELF TRACK

Produktstruktur
Maßbild
Passender Regalträger
(Hinweis: Regalstütze ist nicht im Lieferumfang enthalten)
Installationseinführung
(Hinweis: Dieses Produkt enthält nur die Regalschiene ; weiteres Zubehör
muss vom Kunden bereitgestellt werden.)
1. Verwenden Sie die
Führungsschienenpositionierung,
um Löcher in die Wand zu stanzen.
4. Befestigen Sie die Führungsschiene mit
Schrauben an der Wand.
(7) Wenn die Wand aus Brettern besteht, schrauben
Sie direkt in die Bretter.
(8) Handelt es sich bei der Wand um eine Ziegelwand,
schlagen Sie zunächst die Spreizhülse in das
Wandloch und ziehen Sie dann die Schraube an der
Spreizhülse fest
(9) Wenn es sich bei der Wand um eine
Trockenbauwand handelt, schrauben Sie zuerst die
Spreizhülse in die Trockenbauwand und montieren Sie
dann die Schraube an der Spreizhülse.
9. Wiederholen Sie die Schritte 1 und 2, um die verbleibende Regalschiene und
Regalstütze zu installieren.
(Hinweis: Alle Regalschienen müssen die gleiche Höhe haben)
10. Regalträger je nach Bedarf an geeigneter Stelle montieren.
11. Zum Schluss legen Sie das Brett auf den Regalträger.
Hersteller: Shanghaimuxinmuyeyouxiangongsi
Adresse : Shuangchenglu 803nong11hao1602A-1609shi, Baoshanqu, Shanghai 200000 CN.
Vertreter der EG: E-CrossStu GmbH . Mainzer Landstr.69, 60329 Frankfurt am Main.
UK REP: YH CONSULTING LIMITED. C/O YH Consulting Limited Office 147, Centurion House,
London Road, Staines-upon-Thames, Surrey, TW18 4AX
wall

Nach AUS importiert: SIHAO PTY LTD. 1 ROKEVA STREETEASTWOOD NSW 2122
Australien
Importiert in die USA: Sanven Technology Ltd. Suite 250, 9166 Anaheim Place, Rancho
Cucamonga, CA 9173 0

BINARIO DI RIPIANO
MODELLO:LZ02
Supporto tecnico e certificato di garanzia elettronica
www.vevor.com/support

1
Modello
LZ02
2
Quantità di imballaggio
5 PZ
3
Colore
Argento brillante
4
Lunghezza della guida
1536mm
Montaggio dell'hardware
Vite (x 30 )
Espansione manica (x
30 )
Manicotto di
espansione per
aeromobili (x 30 )
Questa è l'istruzione originale; leggere attentamente tutte le istruzioni del
manuale prima di utilizzare il prodotto. VEVOR si riserva una chiara
interpretazione del nostro manuale utente. L'aspetto del prodotto sarà
soggetto al prodotto ricevuto. Vi preghiamo di perdonarci per non avervi
più informato se ci sono aggiornamenti tecnologici o software sul nostro
prodotto.
Grazie mille per aver scelto questo prodotto. Il binario per mensole è un
accessorio di installazione. Selezionare il supporto per mensole
appropriato per lavorarci prima dell'installazione.
Si prega di leggere tutte le istruzioni prima di utilizzarlo. Le informazioni ti
aiuteranno a ottenere i migliori risultati possibili.
SHELF TRACK
Struttura del prodotto
D imensione Figura
Supporto per mensola F it
(Nota: il supporto per ripiano non è incluso)
Introduzione all'installazione
(Nota: questo prodotto include solo il binario per ripiani ; gli altri accessori
devono essere forniti dal cliente.)
1. Utilizzare il posizionamento della
guida per praticare i fori nel muro.
5. Fissare la guida alla parete con le viti.
(10) Se il muro è costituito da una tavola, avvitare
direttamente sulla tavola.
(11) Se il muro è in mattoni, prima inserisci il manicotto
di espansione nel foro del muro, quindi stringi la vite sul
manicotto di espansione.
(12) Se il muro è in cartongesso, avvitare prima il
manicotto di espansione per aeromobili nel
cartongesso, quindi installare la vite sul manicotto di
espansione per aeromobili.
12. Ripetere i passaggi 1 e 2 per installare il binario e il supporto del ripiano rimanenti.
(Nota: tutti i binari dei ripiani devono avere la stessa altezza)
13. Installare il supporto del ripiano nella posizione appropriata, a seconda delle
necessità.
14. Infine, posizionare la tavola sul supporto dello scaffale.
Produttore: Shanghaimuxinmuyeyouxiangongsi
Indirizzo : Shuangchenglu 803nong11hao1602A-1609shi, baoshanqu, shanghai 200000 CN.
RAPPRESENTANTE DELLA CE: E-CrossStu GmbH . Mainzer Landstr.69, 60329 Francoforte
sul Meno.
RAPPRESENTANZA DEL REGNO UNITO: YH CONSULTING LIMITED. C/O YH Consulting
Limited Ufficio 147, Centurion House, London Road, Staines-upon-Thames, Surrey, TW18 4AX
Importato in AUS: SIHAO PTY LTD. 1 ROKEVA STREETEASTWOOD NSW 2122 Australia
wall

Importato negli USA: Sanven Technology Ltd. Suite 250, 9166 Anaheim Place, Rancho
Cucamonga, CA 9173 0

PISTA DE ESTANTE
MODELO:LZ02
Soporte técnico y certificado de garantía electrónica
www.vevor.com/support

1
Modelo
LZ02
2
Cantidad de embalaje
5 piezas
3
Color
Plata brillante
4
Longitud de la guía
1536 mm
Montaje de hardware
Tornillo ( x30 )
Expansión
manga( x30 )
Manguito de
expansión para
aeronaves (x 30 )
Estas son las instrucciones originales; lea atentamente todas las
instrucciones del manual antes de utilizar el producto. VEVOR se reserva
una interpretación clara de nuestro manual de usuario. La apariencia del
producto estará sujeta al producto que recibió. Perdónenos por no
informarle nuevamente si hay actualizaciones de tecnología o software en
nuestro producto.
Muchas gracias por elegir este producto. El riel para estantes es un
accesorio de instalación. Seleccione el soporte de estante adecuado para
trabajar con él antes de la instalación.
Lea todas las instrucciones antes de usarlo. La información le ayudará a
lograr los mejores resultados posibles.
SHELF TRACK

Estructura del producto
Figura de dimensión
Soporte de estante Fit
(Nota: El soporte del estante no está incluido)
Introducción a la instalación
(Nota: Este producto solo incluye riel para estantes ; el resto de accesorios
deberán ser proporcionados por el cliente).
1. Utilice el riel guía para perforar
agujeros en la pared.
6. Fije el riel guía a la pared con tornillos.
(13) Si la pared es de tablas, atornillar directamente a
la tabla.
(14) Si la pared es de ladrillos, primero golpee el
manguito de expansión en el orificio de la pared y
luego apriete el tornillo al manguito de expansión.
(15) Si la pared es de yeso, primero atornille el
manguito de expansión de la aeronave en el panel de
yeso y luego instale el tornillo en el manguito de
expansión de la aeronave.
15. riel y el soporte del estante restantes .
(Nota: Todos los rieles de los estantes deben tener la misma altura)
16. Instale el soporte del estante en una posición adecuada según sea necesario.
17. Por último, coloca el tablero sobre el soporte del estante.
Fabricante: Shanghaimuxinmuyeyouxiangongsi
Dirección : Shuangchenglu 803nong11hao1602A-1609shi, baoshanqu, shanghai 200000 CN.
REPRESENTANTE CE: E-CrossStu GmbH . Mainzer Landstr.69, 60329 Fráncfort del Meno.
REPRESENTANTE DEL REINO UNIDO: YH CONSULTING LIMITED. A LA DIRECCIÓN DE YH
Consulting Limited Oficina 147, Centurion House, London Road, Staines-upon-Thames, Surrey,
TW18 4AX
Importado a AUS: SIHAO PTY LTD. 1 ROKEVA STREETEASTWOOD NSW 2122 Australia
wall

Importado a EE. UU.: Sanven Technology Ltd. Suite 250, 9166 Anaheim Place, Rancho
Cucamonga, CA 9173 0

SZYNA PÓŁKOWA
MODEL:LZ02
Wsparcie techniczne i certyfikat e-gwarancji
www.vevor.com/support
1
Model
LZ02
2
Ilość w opakowaniu
5 SZT.
3
Kolor
Jasny Srebrny
4
Długość przewodnika
1536 mm
Osprzęt montażowy
Śruba ( x30 )
Ekspansja rękaw (x
30 )
Tuleja rozprężna
samolotu (x 30 )
To jest oryginalna instrukcja; przed użyciem należy uważnie przeczytać
wszystkie instrukcje. VEVOR zastrzega sobie jasną interpretację naszej
instrukcji obsługi. Wygląd produktu będzie zależał od produktu, który
otrzymałeś. Prosimy o wybaczenie, że nie poinformujemy Cię ponownie,
jeśli w naszym produkcie pojawią się jakiekolwiek aktualizacje
technologiczne lub oprogramowania.
Dziękujemy bardzo za wybranie tego produktu. Szyna półkowa jest
akcesorium instalacyjnym. Przed instalacją należy wybrać odpowiednią
podporę półki , aby z nią pracować.
Przeczytaj wszystkie instrukcje przed użyciem. Informacje te pomogą Ci
osiągnąć najlepsze możliwe rezultaty.
SHELF TRACK

Struktura produktu
Rysunek wymiarowy
Zamontuj wspornik półki
(Uwaga: podpórka półki nie jest dołączona)
Wprowadzenie do instalacji
(Uwaga: Produkt zawiera wyłącznie szynę półkową , pozostałe akcesoria
zapewnia klient.)
1. Wywierć otwory w ścianie za
pomocą prowadnicy.
7. Przymocuj szynę prowadzącą do ściany za
pomocą śrub.
(16) Jeżeli ściana jest wykonana z płyty, przykręć
śrubę bezpośrednio do płyty.
(17) Jeżeli ściana jest murowana, najpierw wbij tuleję
rozporową w otwór w ścianie, a następnie dokręć śrubę
do tulei rozporowej.
(18) Jeżeli ściana jest wykonana z płyt
gipsowo-kartonowych, najpierw przykręć tuleję
rozporową do płyty gipsowo-kartonowej, a następnie
przykręć śrubę do tulei rozporowej.
18. Powtórz kroki 1 i 2, aby zamontować pozostałą szynę półki i wspornik półki.
(Uwaga: Wszystkie szyny półkowe muszą mieć tę samą wysokość)
19. zamontuj wspornik półki w odpowiednim miejscu.
20. Na koniec należy umieścić deskę na półce.
Producent: Shanghaimuxinmuyeyouxiangongsi
Adres : Shuangchenglu 803nong11hao1602A-1609shi, baoshanqu, szanghaj 200000 CN.
Przedstawiciel KE: E-CrossStu GmbH . Mainzer Landstr.69, 60329 Frankfurt nad Menem.
REPUBLIKA WIELKIEJ BRYTANII: YH CONSULTING LIMITED. C/O YH Consulting Limited
Biuro 147, Centurion House, London Road, Staines-upon-Thames, Surrey, TW18 4AX
Importowane do AUS: SIHAO PTY LTD. 1 ROKEVA STREETEASTWOOD NSW 2122 Australia
wall

Importowane do USA: Sanven Technology Ltd. Suite 250, 9166 Anaheim Place, Rancho
Cucamonga, CA 9173 0

PLANK SPOOR
MODEL:LZ02
Technische ondersteuning en e-garantiecertificaat
www.vevor.com/support

1
Model
LZ02
2
Verpakkingshoeveelheid
5 STUKS
3
Kleur
Helder zilver
4
Lengte van de gids
1536mm
Hardware-montage
Schroef (x 30 )
Uitbreiding mouw (x
30 )
Vliegtuig
expansiehuls (x 30 )
Dit is de originele instructie; lees alle handleidingen zorgvuldig door
voordat u ze gebruikt. VEVOR behoudt zich een duidelijke interpretatie van
onze gebruikershandleiding voor. Het uiterlijk van het product is afhankelijk
van het product dat u hebt ontvangen. Vergeef ons dat we u niet opnieuw
informeren als er technologische of software-updates voor ons product
zijn .
Hartelijk dank voor het kiezen van dit product. Plankrail is een
installatieaccessoire. Selecteer de juiste plankdrager om ermee te werken
vóór de installatie.
Lees alle instructies voordat u het gebruikt. De informatie zal u helpen de
best mogelijke resultaten te behalen.
SHELF TRACK
Productstructuur
Afmeting Figuur
F it plank ondersteuning
(Let op: Plankdrager is niet inbegrepen)

Installatie-introductie
(Let op: Dit product wordt alleen geleverd met een rail voor de plank .
Overige accessoires dienen door de klant te worden geleverd.)
1. Gebruik de geleiderail om gaten
in de muur te maken.
8. Bevestig de geleiderail met schroeven aan de
muur.
(19) Als de muur uit een plank bestaat, schroef dan
rechtstreeks in de plank.
(20) Als de muur een bakstenen muur is, sla dan eerst
de expansiehuls in het gat in de muur en draai
vervolgens de schroef op de expansiehuls vast
(21) Als de muur van gipsplaat is, schroeft u eerst de
expansiehuls van het vliegtuig in de gipsplaat en
plaatst u vervolgens de schroef in de expansiehuls van
het vliegtuig.
21. Herhaal stap 1 en 2 om de resterende plankrail en plankondersteuning te
installeren.
(Let op: alle plankenrails moeten dezelfde hoogte hebben)
22. Installeer de plankondersteuning op de juiste plaats, indien nodig.
23. Plaats ten slotte het bord op de plankdrager.
Fabrikant: Shanghaimuxinmuyeyouxiangongsi
Adres : Shuangchenglu 803nong11hao1602A-1609shi, baoshanqu, shanghai 200000 CN.
EC-REP: E-CrossStu GmbH . Mainzer Landstr.69, 60329 Frankfurt am Main.
VK REP: YH CONSULTING LIMITED. C/O YH Consulting Limited Kantoor 147, Centurion House,
London Road, Staines-upon-Thames, Surrey, TW18 4AX
Geïmporteerd naar AUS: SIHAO PTY LTD. 1 ROKEVA STREETEASTWOOD NSW 2122
wall

Australië
Geïmporteerd naar de VS: Sanven Technology Ltd. Suite 250, 9166 Anaheim Place, Rancho
Cucamonga, CA 9173 0

HYLLSPÅR
MODELL: LZ02
Teknisk support och e-garanticertifikat
www.vevor.com/support

1
Modell
LZ02
2
Förpackningsmängd
5 st
3
Färg
Bright Silver
4
Längd på guide
1536 mm
Hårdvaruanpassning
Skruv (x 30 )
Expansion ärm (x 30 )
Flygplansexpansions
hylsa (x 30 )
Detta är den ursprungliga instruktionen; läs noggrant igenom alla
bruksanvisningar innan du använder den. VEVOR reserverar sig för en
tydlig tolkning av vår användarmanual. Utseendet på produkten är
beroende av den produkt du fått. Ursäkta oss för att vi inte informerar dig
igen om det finns någon teknik eller mjukvaruuppdateringar på vår produkt.
Tack så mycket för att du valde denna produkt. Hyllspår är ett
installationstillbehör. Välj lämpligt stöd för att arbeta med det innan
installationen.
Läs alla instruktioner innan du använder den. Informationen hjälper dig att
uppnå bästa möjliga resultat.
SHELF TRACK

Produktstruktur
D imensionsbild
F it hyllstöd
(Obs: Hyllstöd ingår inte)
Installationsintroduktion
(Obs: Denna produkt inkluderar endast hyllspår ; andra tillbehör ska
tillhandahållas av kunden.)
1. Använd styrskenans placering för
att slå hål i väggen.
9. Fäst styrskenan i väggen med skruvar.
(22) Om väggen är en bräda, skruva fast direkt i
skivan.
(23) Om väggen är en tegelvägg, slå först
expansionshylsan i vägghålet och dra sedan åt skruven
till expansionshylsan
(24) Om väggen är gips, skruva först in flygplanets
expansionshylsa i gipsväggen och installera sedan
skruven på flygplanets expansionshylsa.
24. Upprepa steg 1 och 2 för att installera det återstående hyllspåret och hyllstödet.
(Obs: Alla hyllspår måste vara av samma höjd)
25. Installera hyllstöd i lämplig position efter behov.
26. Lägg slutligen brädan på hyllstödet.
Tillverkare: Shanghaimuxinmuyeyouxiangongsi
Adress : Shuangchenglu 803nong11hao1602A-1609shi, baoshanqu, shanghai 200000 CN.
EC REP: E-CrossStu GmbH . Mainzer Landstr.69, 60329 Frankfurt am Main.
UK REP: YH CONSULTING LIMITED. C/O YH Consulting Limited Office 147, Centurion House,
London Road, Staines-upon-Thames, Surrey, TW18 4AX
Importerad till AUS: SIHAO PTY LTD. 1 ROKEVA STREETEASTWOOD NSW 2122 Australien
Importerad till USA: Sanven Technology Ltd. Suite 250, 9166 Anaheim Place, Rancho
Cucamonga, CA 9173 0
wall