
Foldi 3S
Treadmill
USER MANUAL
Model.URTM037


02
03
Urevo YouTube Video
1.
2.
3.
•
•
•
4.
04
05
06
07
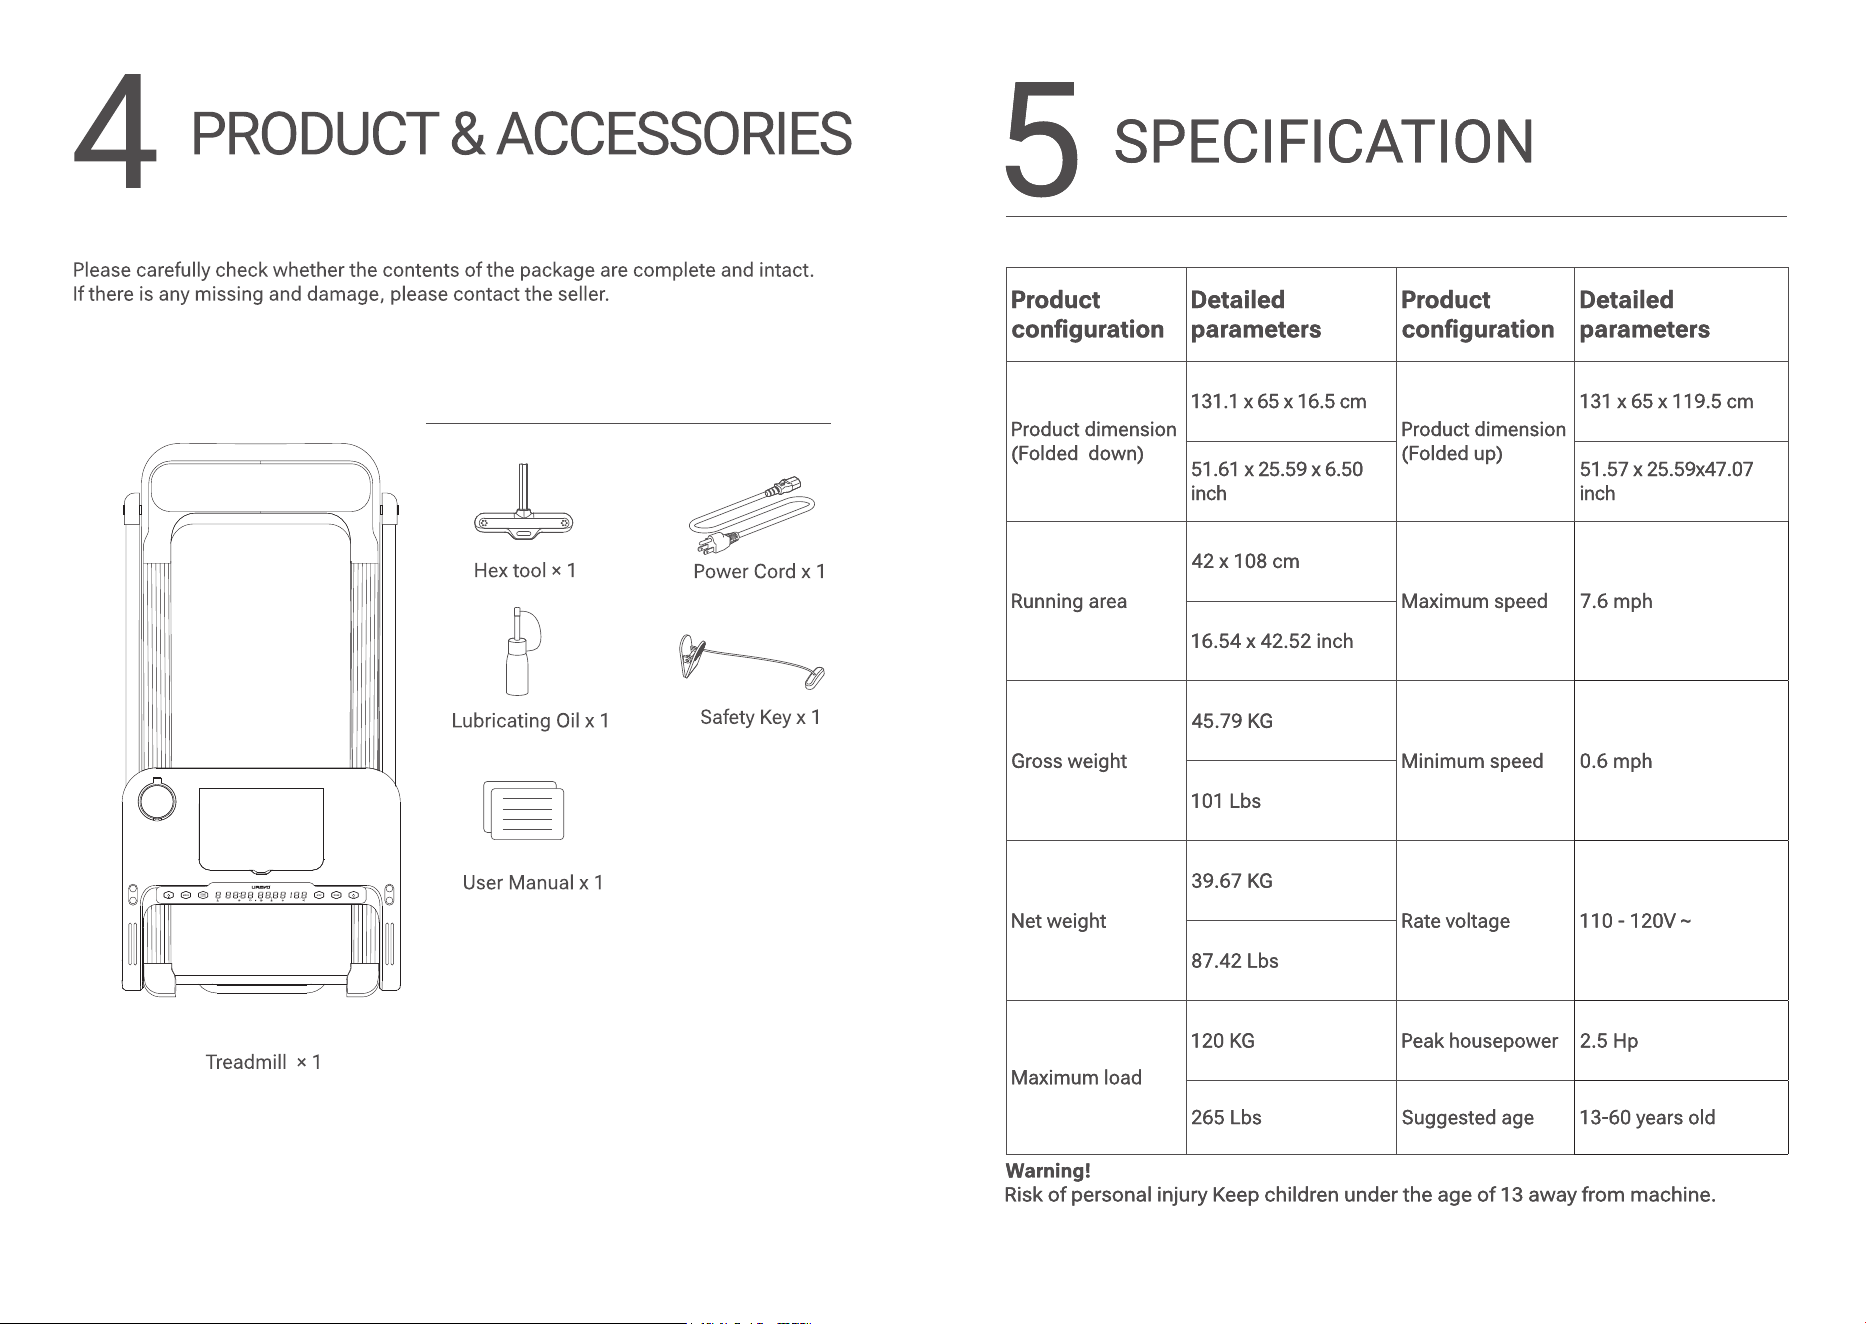
Accessories
08
09
7
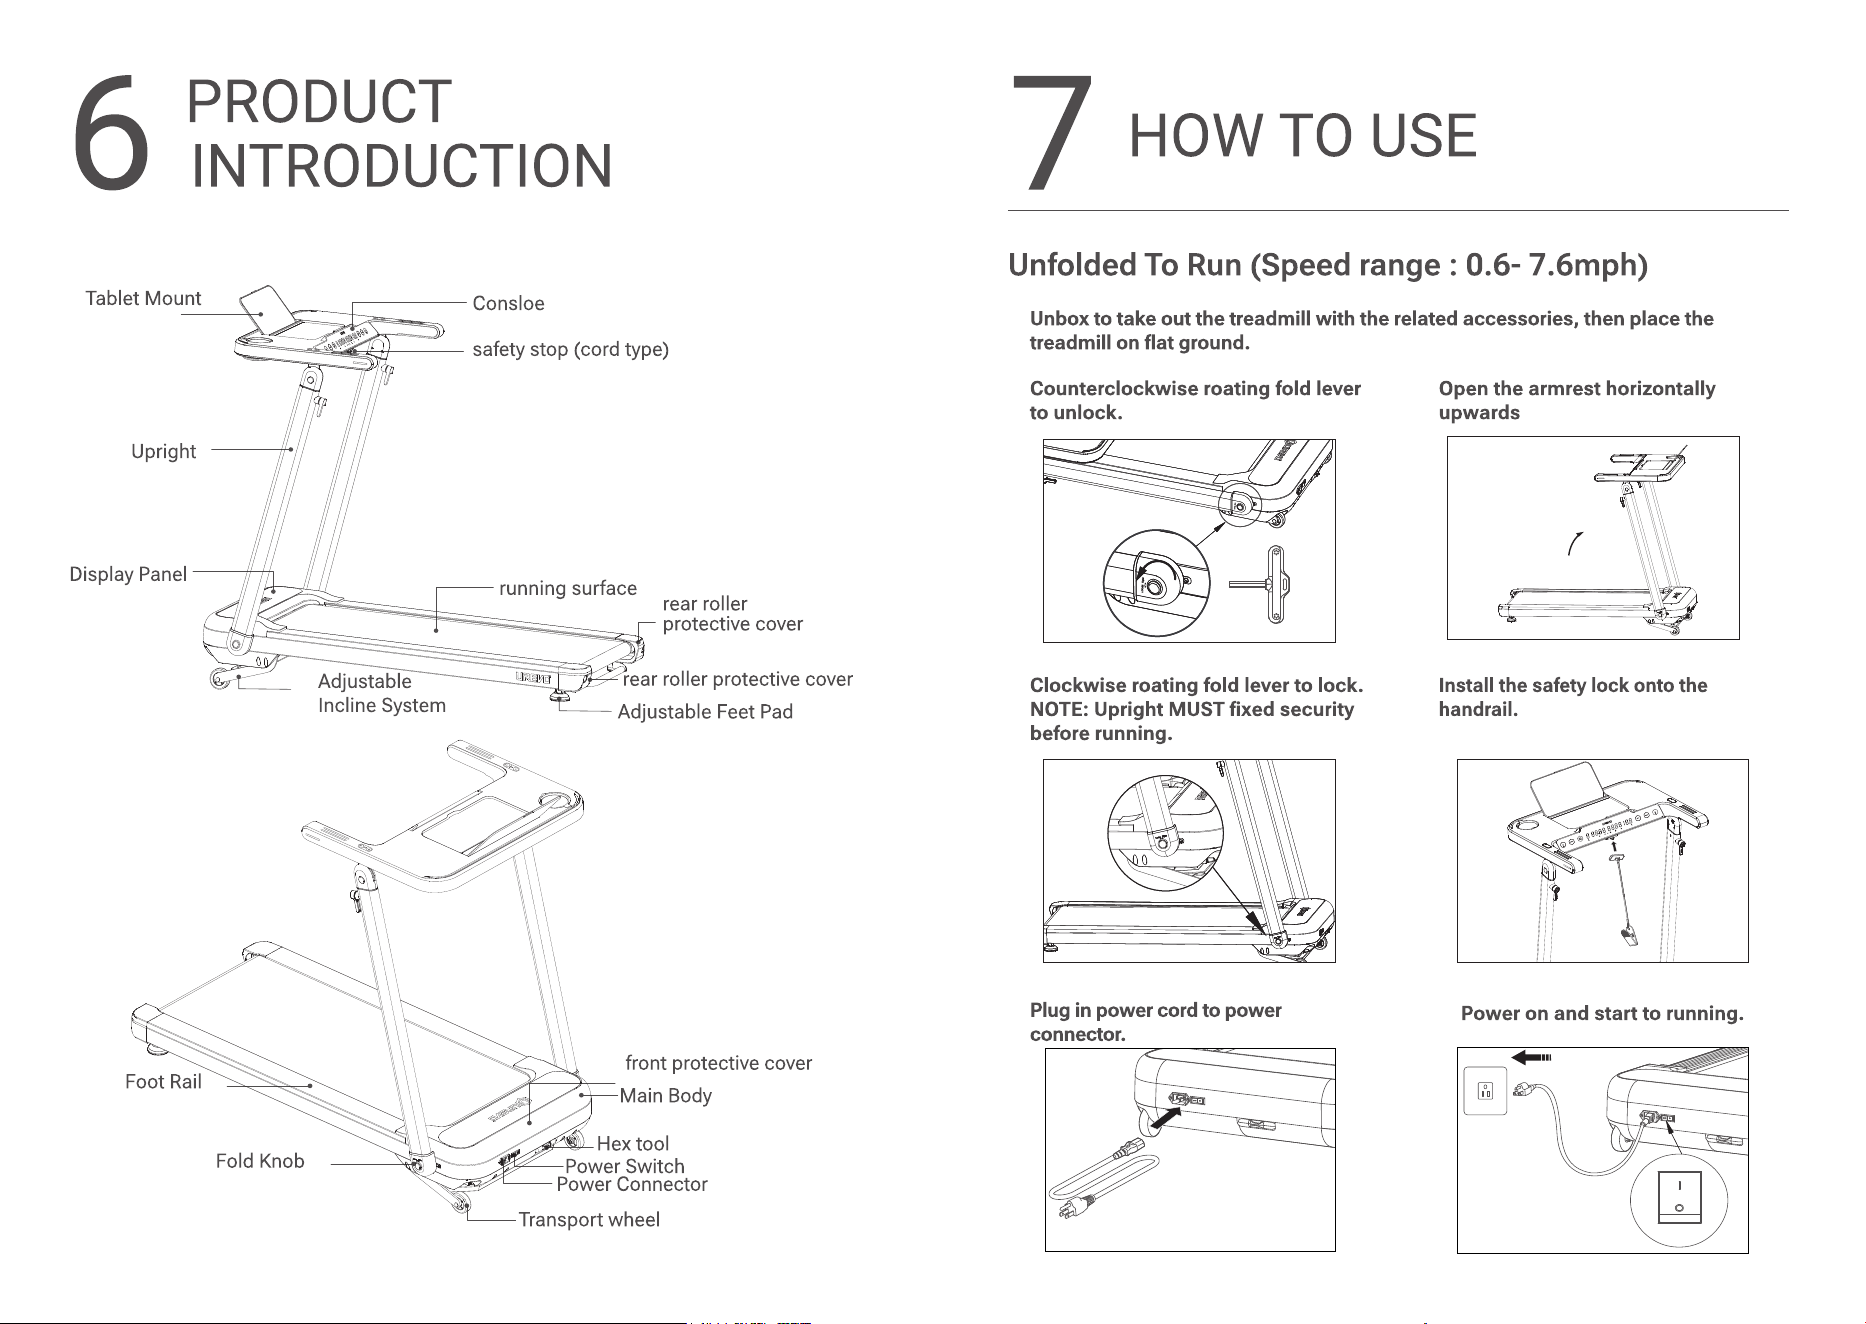
HOW TO USE
Unfolded To Run (Speed range : 0.6- 7.6mph)
1. Unbox to take out the treadmill with the related accessories, then place the
treadmill on at ground.
2. Counterclockwise roating fold lever
to unlock.
3. Open the armrest horizontally
upwards
4. Clockwise roating fold lever to lock.
NOTE: Upright MUST xed security
before running.
5. Install the safety lock onto the
handrail.
6. Plug in power cord to power
connector.
7. Power on and start to running.
10
11
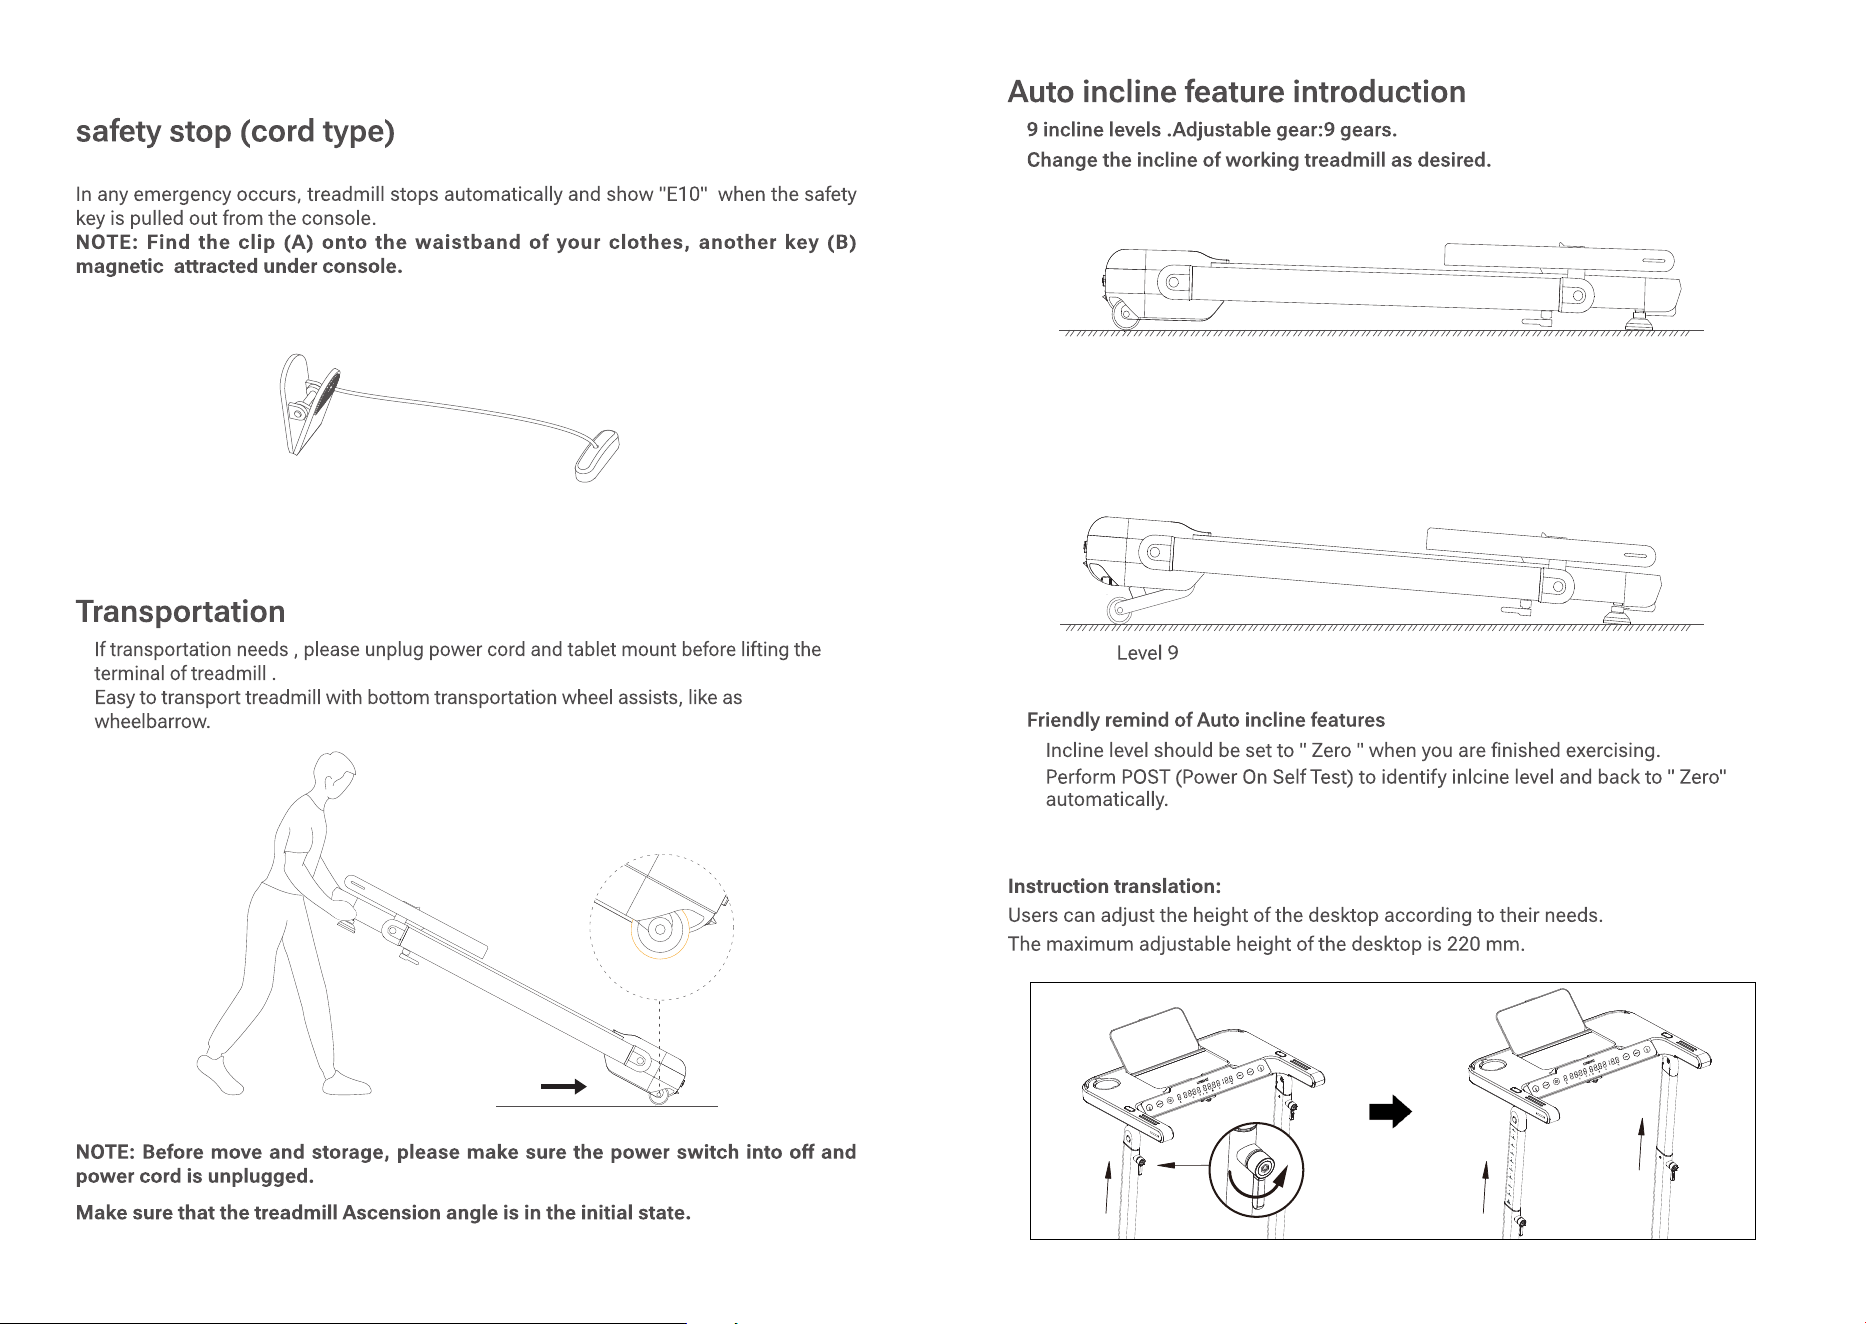
safety stop (cord type)
In any emergency occurs, treadmill stops automatically and show "E10" when the safety
key is pulled out from the console.
NOTE: Find the clip (A) onto the waistband of your clothes, another key (B)
magnetic attracted under console.
A
B
Level 0
12
13
8
OPERATION
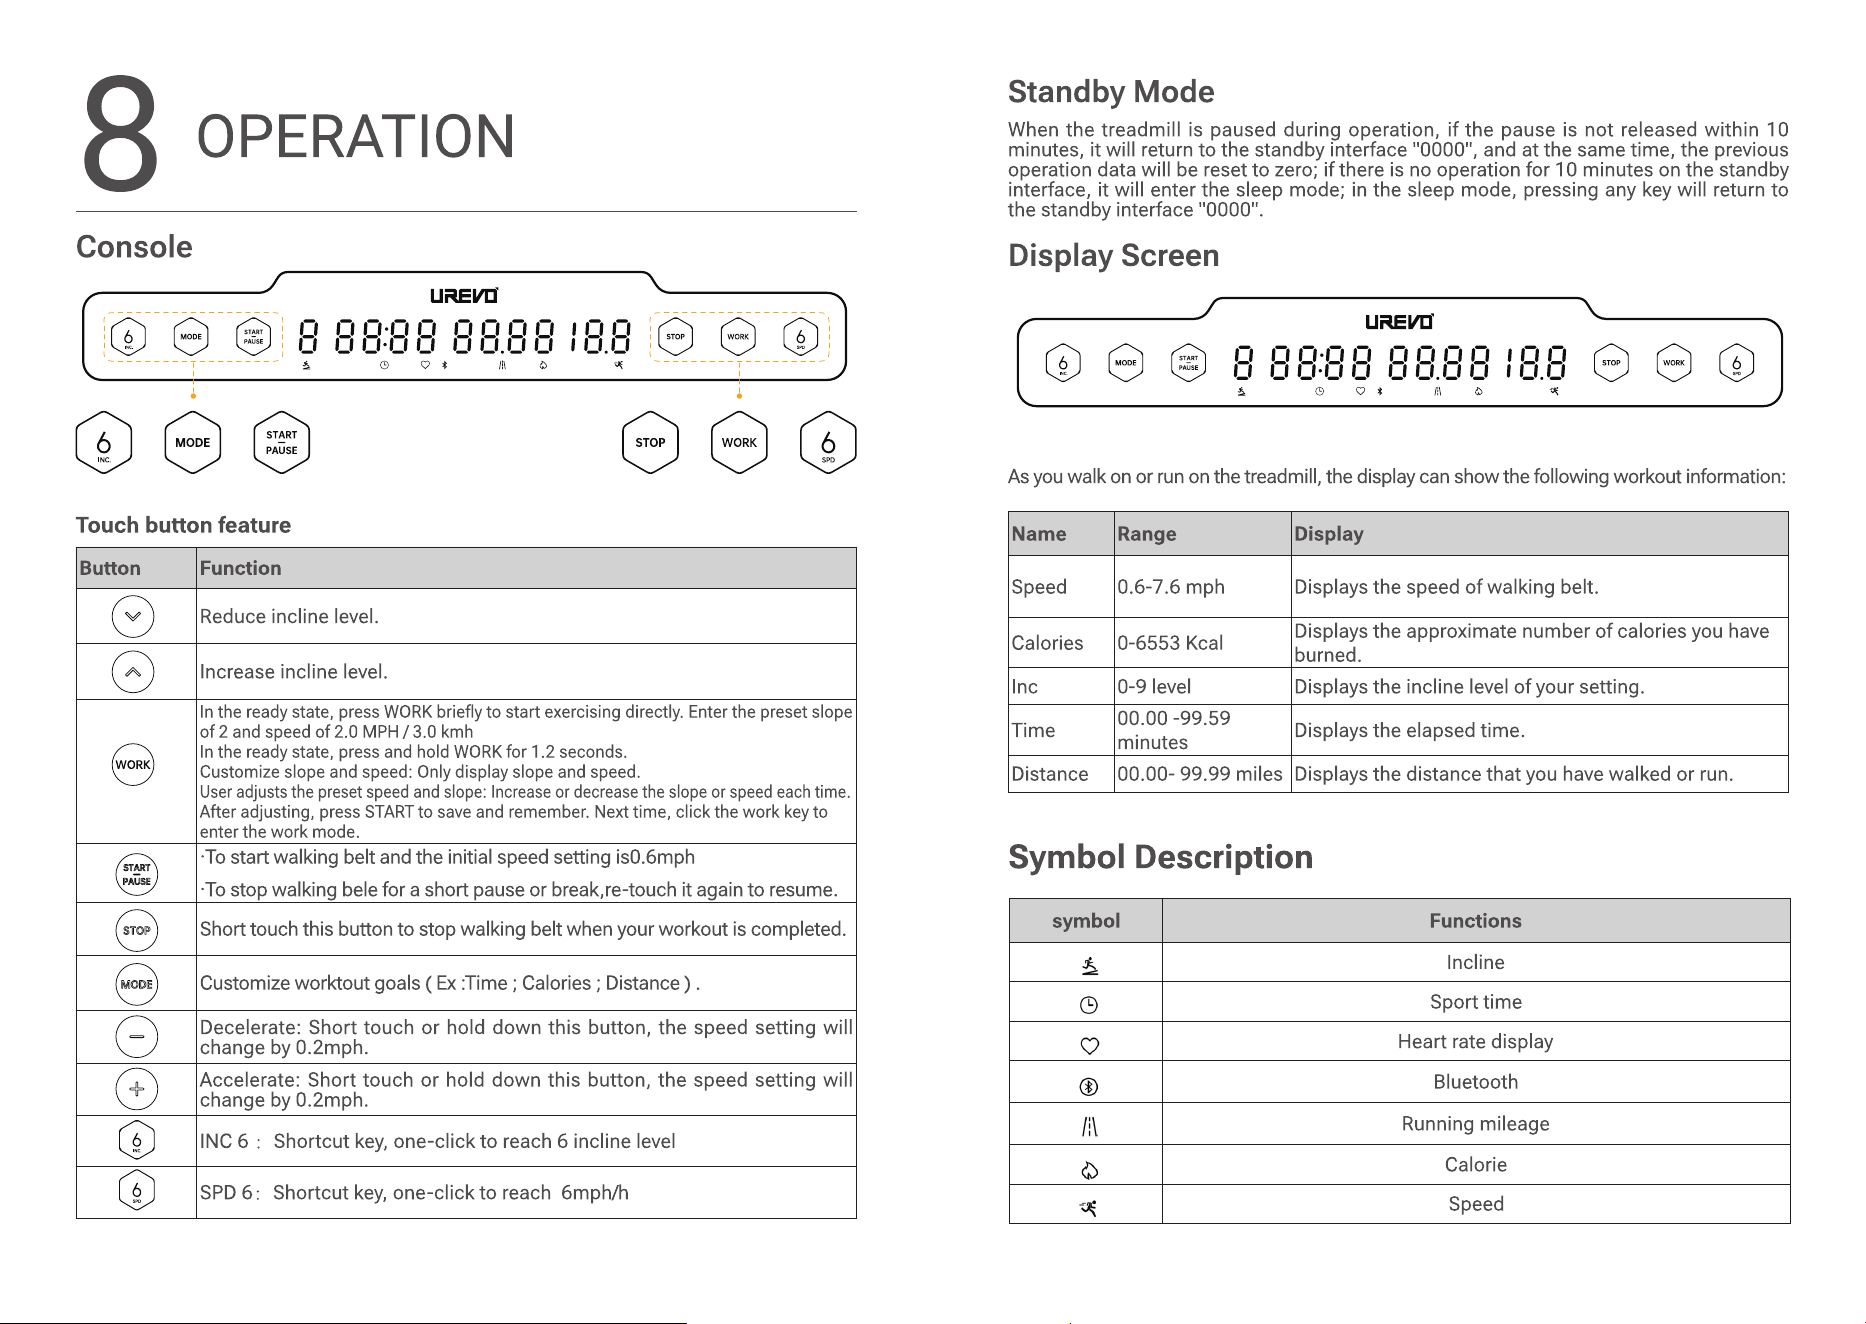
Console
Touch button feature
Button Function
Reduce incline level.
Increase incline level.
In the ready state, press WORK briey to start exercising directly. Enter the preset slope
of 2 and speed of 2.0 MPH / 3.0 kmh
In the ready state, press and hold WORK for 1.2 seconds.
Customize slope and speed: Only display slope and speed.
User adjusts the preset speed and slope: Increase or decrease the slope or speed each time.
After adjusting, press START to save and remember. Next time, click the work key to
enter the work mode.
·To start walking belt and the initial speed setting is0.6mph
·To stop walking bele for a short pause or break,re-touch it again to resume.
Short touch this button to stop walking belt when your workout is completed.
Customize worktout goals ( Ex :Time ; Calories ; Distance ) .
Decelerate: Short touch or hold down this button, the speed setting will
change by 0.2mph.
Accelerate: Short touch or hold down this button, the speed setting will
change by 0.2mph.
INC 6
:
Shortcut key, one-click to reach 6 incline level
SPD 6
:
Shortcut key, one-click to reach 6mph/h
Standby Mode
When the treadmill is paused during operation, if the pause is not released within 10
minutes, it will return to the standby interface "0000", and at the same time, the previous
operation data will be reset to zero; if there is no operation for 10 minutes on the standby
interface, it will enter the sleep mode; in the sleep mode, pressing any key will return to
the standby interface "0000".
Display Screen
As you walk on or run on the treadmill, the display can show the following workout information:
Name Range Display
Speed 0.6-7.6 mph Displays the speed of walking belt.
Calories 0-6553 Kcal
Displays the approximate number of calories you have
burned.
Inc 0-9 level Displays the incline level of your setting.
Time
00.00 -99.59
minutes
Displays the elapsed time.
Distance 00.00- 99.99 miles Displays the distance that you have walked or run.
14
15
9
CARE & MAINTENANCE
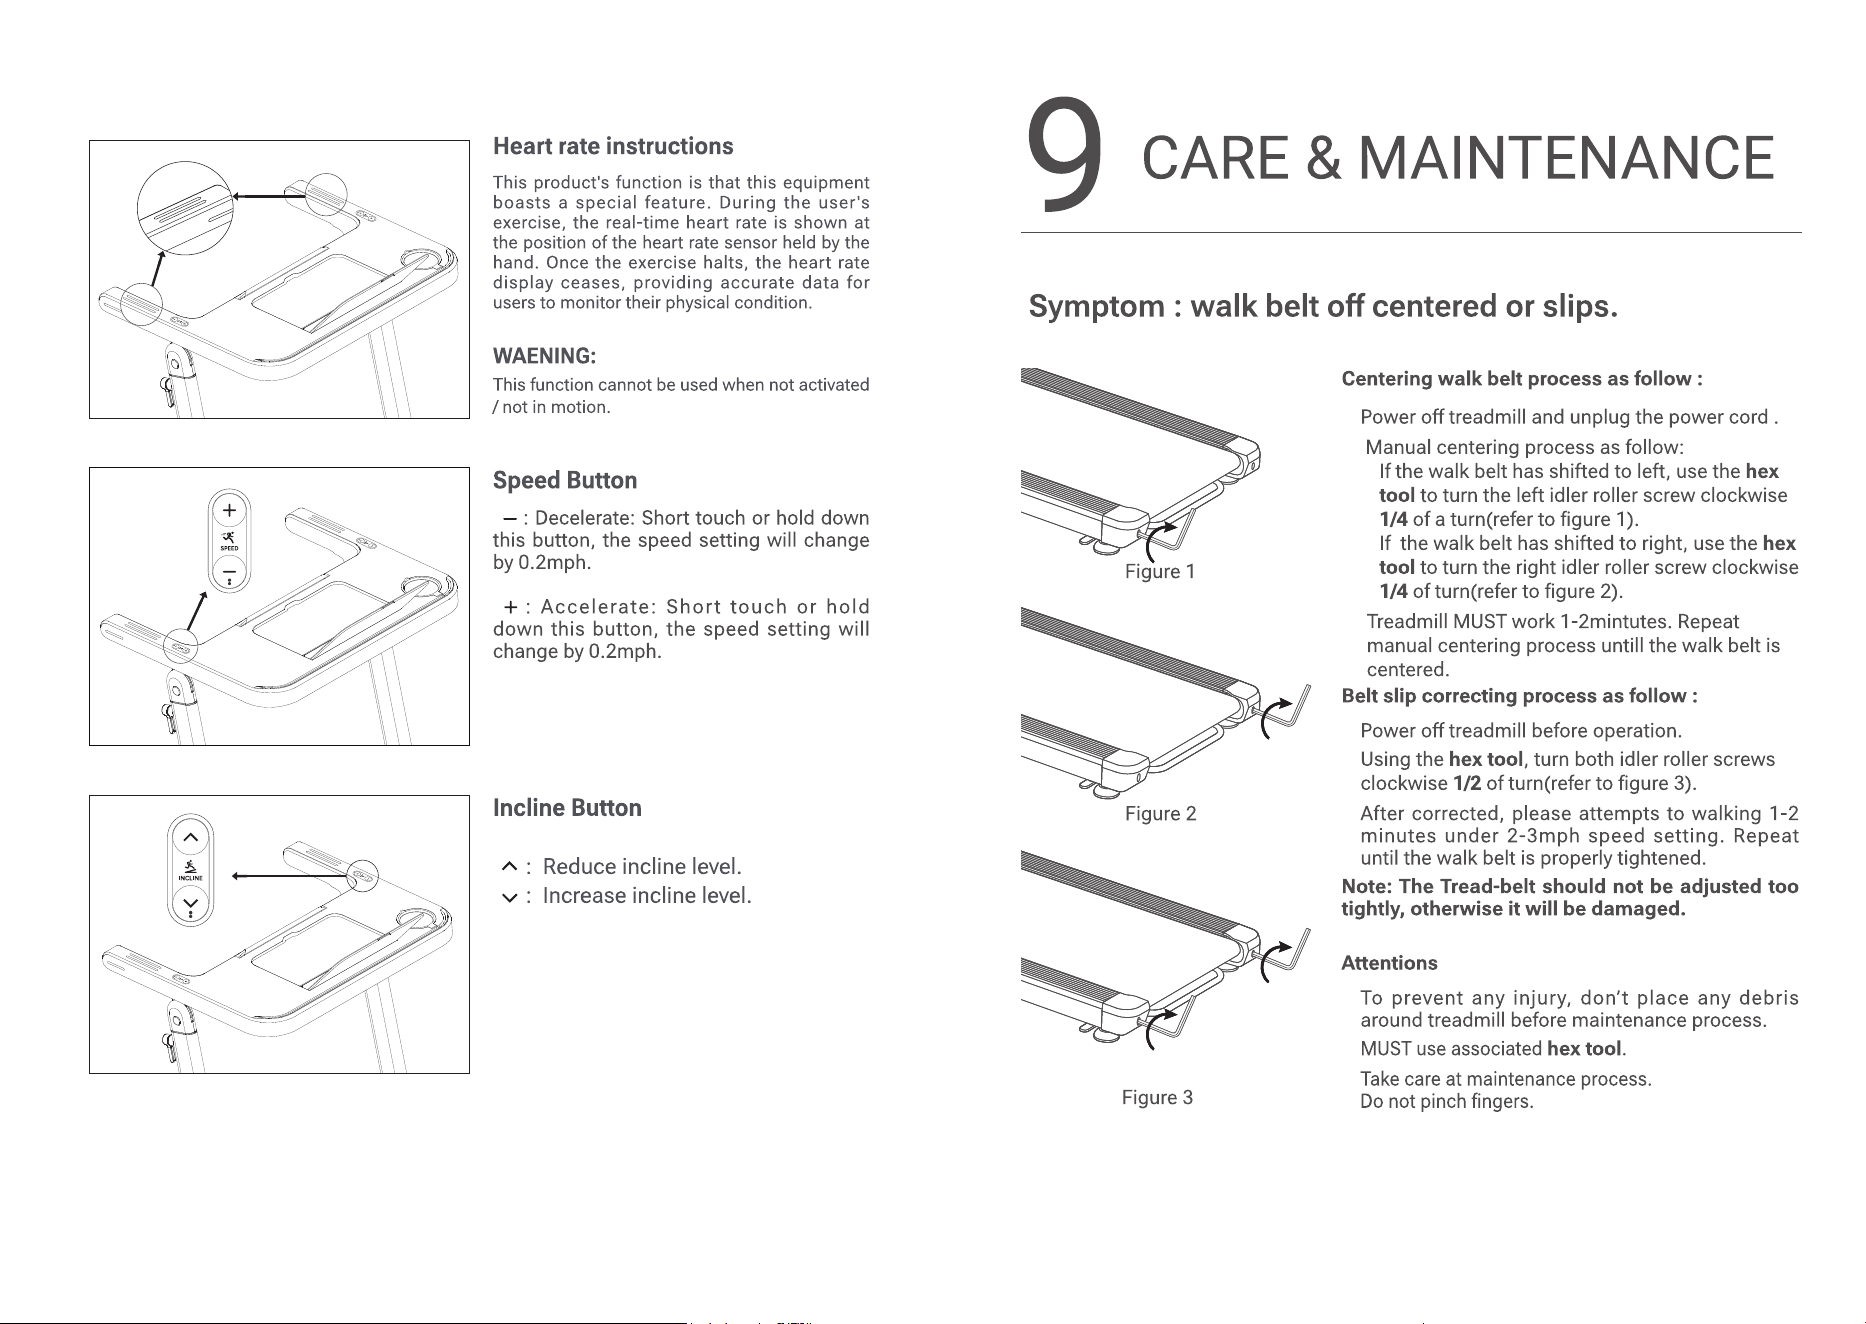
Symptom : walk belt o centered or slips.
Figure 1
Figure 2
Figure 3
Centering walk belt process as follow :
1. Power o treadmill and unplug the power cord .
2. Manual centering process as follow:
• If the walk belt has shifted to left, use the hex
tool to turn the left idler roller screw clockwise
1/4 of a turn(refer to gure 1).
• If the walk belt has shifted to right, use the hex
tool to turn the right idler roller screw clockwise
1/4 of turn(refer to gure 2).
3. Treadmill MUST work 1-2mintutes. Repeat
manual centering process untill the walk belt is
centered.
Belt slip correcting process as follow :
1. Power o treadmill before operation.
2. Using the hex tool, turn both idler roller screws
clockwise 1/2 of turn(refer to gure 3).
3. After corrected, please attempts to walking 1-2
minutes under 2-3mph speed setting. Repeat
until the walk belt is properly tightened.
Note: The Tread-belt should not be adjusted too
tightly, otherwise it will be damaged.
Attentions
1. To prevent any injury, don’t place any debris
around treadmill before maintenance process.
2. MUST use associated
hex tool
.
3. Take care at maintenance process.
Do not pinch ngers.
16
17
Belt lubrication process, follow instruction below to
lubricate belt.
1. Power o treadmill and unplug power cord.
2. Using the hex tool, turn both idler roller screws
counterclockwise till belt loosen and lifting easily.
Tips: please markdown hex tool rotating cycles
when loosen belt, which use for adapting belt
tension after lubrication process.
3. Lifting edges of belt and spraying lubrication oil
at center of walk platform evenly. Not necessary
to apply spray lubrication oil on entire walk
platform.
4. Lubrication oil volume Per time of maintenance:
5-10mL.
Attention: it would causes of belt slip if spray
too much.
5. Using the hex tool, turn the both idler screws
clockwise as previous markdown number of turns
untill walk belt tighten properly.
6. Power on treadmill and workout for a few
minutes, in order to spread lubrication oil to
whole belt surface evenly.
Attention: please hold handrail when workout
at 4mph setting.
Lubrication frequency: High recommend 100
Miles Per time.
Treadmill cleaning.
1. Power o treadmill and unplug power cord before
cleaning.
2. Wipe and clean with damp cloth, Do not cleaning
with acidic or caustic detergents.
3. Do not clean opposite of walk belt.
4. Its normal few black powders residual under
treadmill after long working.
10
ERROR CODE
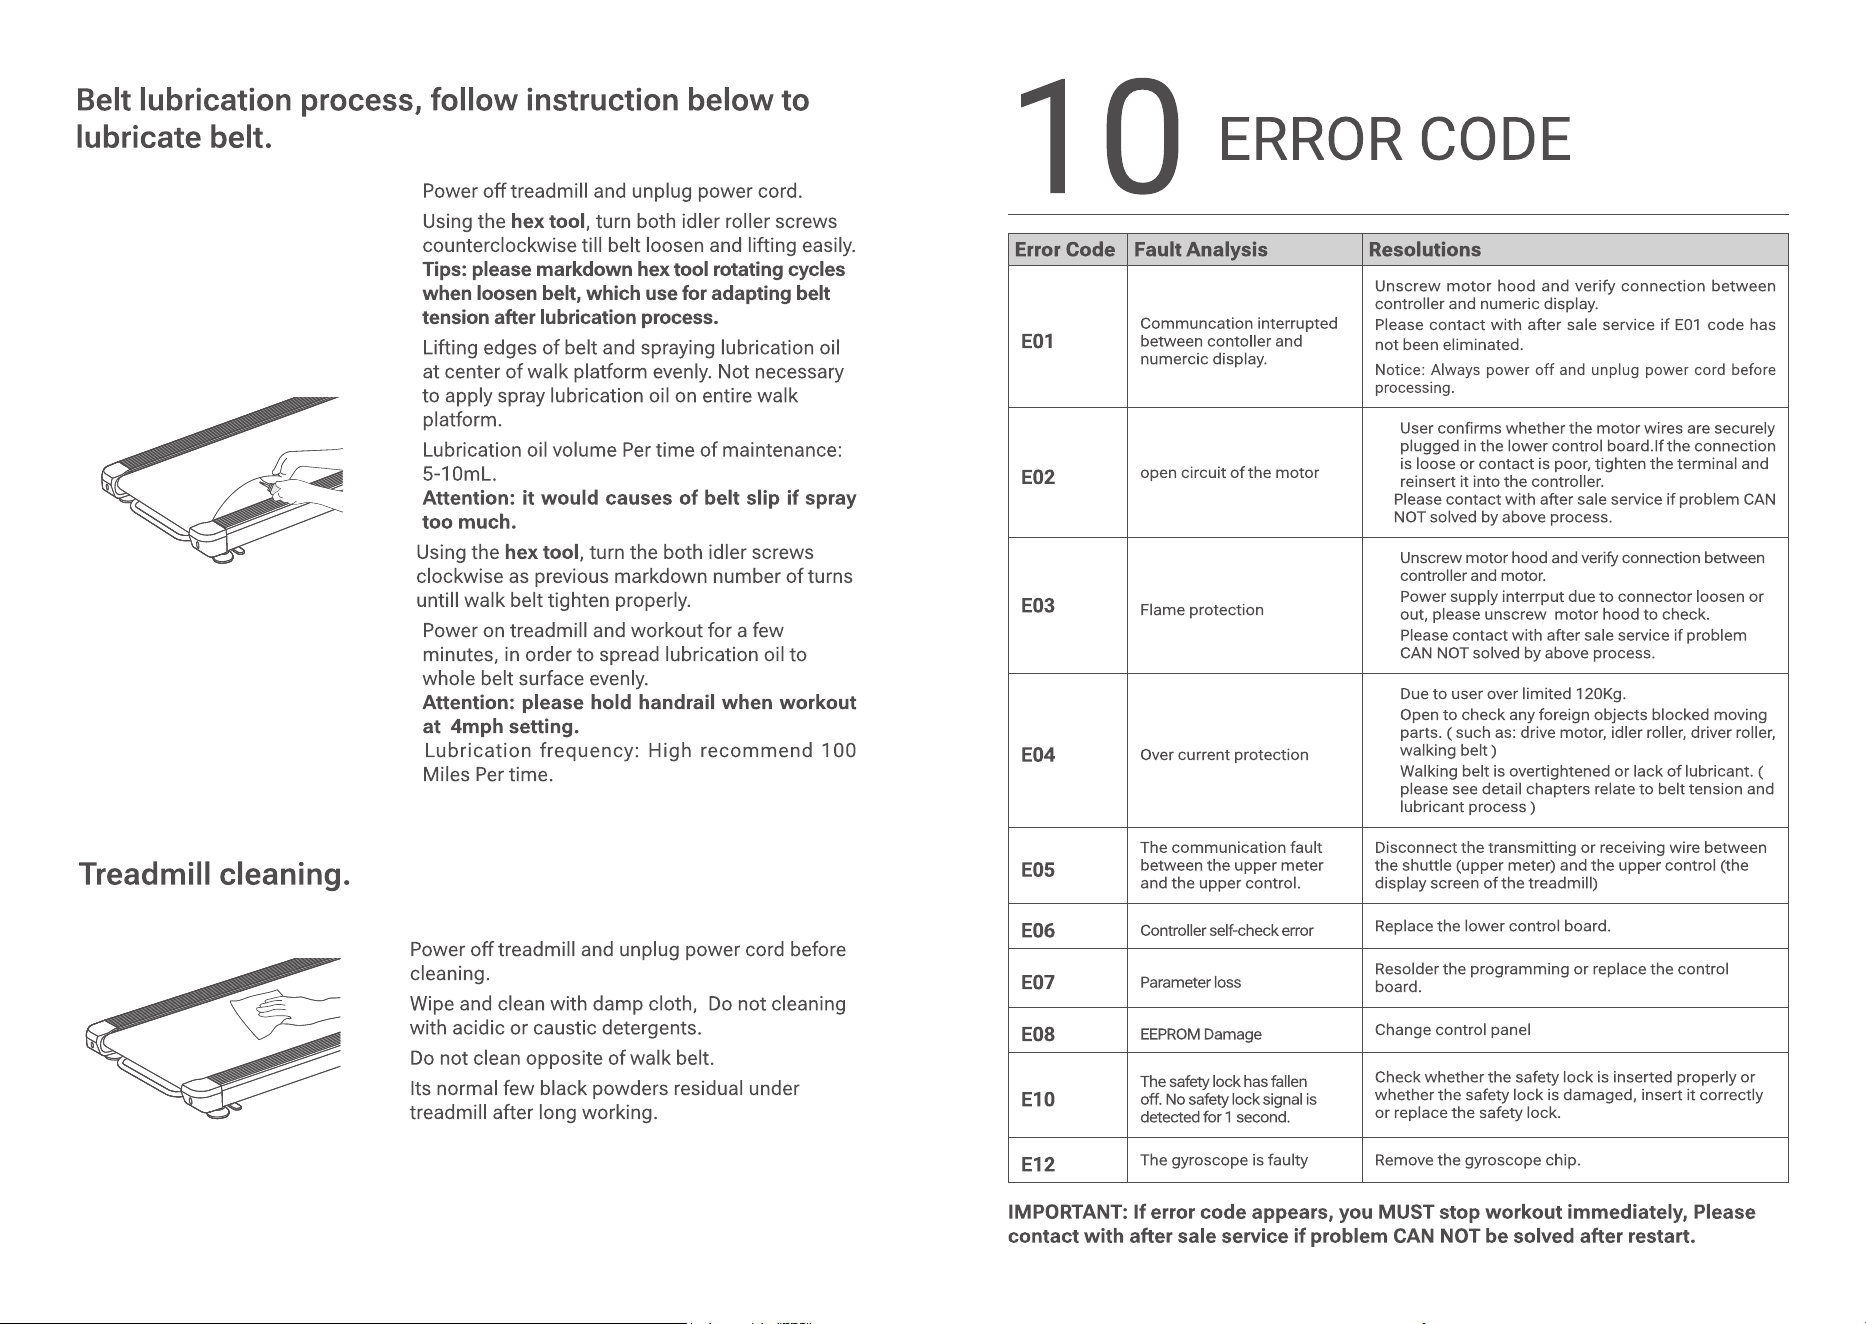
Error Code Fault Analysis Resolutions
E01
Communcation interrupted
between contoller and
numercic display.
Unscrew motor hood and verify connection between
controller and numeric display.
Please contact with after sale service if E01 code has
not been eliminated.
Notice: Always power off and unplug power cord before
processing.
E02
open circuit of the motor
1. User conrms whether the motor wires are securely
plugged in the lower control board.If the connection
is loose or contact is poor, tighten the terminal and
reinsert it into the controller.
2. Please contact with after sale service if problem CAN
NOT solved by above process.
E03
Flame protection
1. Unscrew motor hood and verify connection between
controller and motor.
2. Power supply interrput due to connector loosen or
out, please unscrew motor hood to check.
3. Please contact with after sale service if problem
CAN NOT solved by above process.
E04
Over current protection
1. Due to user over limited 120Kg.
2. Open to check any foreign objects blocked moving
parts. ( such as: drive motor, idler roller, driver roller,
walking belt )
3. Walking belt is overtightened or lack of lubricant. (
please see detail chapters relate to belt tension and
lubricant process )
E05
The communication fault
between the upper meter
and the upper control.
Disconnect the transmitting or receiving wire between
the shuttle (upper meter) and the upper control (the
display screen of the treadmill)
E06
Controller self-check error
Replace the lower control board.
E07
Parameter loss
Resolder the programming or replace the control
board.
E08
EEPROM Damage
Change control panel
E10
The safety lock has fallen
o. No safety lock signal is
detected for 1 second.
Check whether the safety lock is inserted properly or
whether the safety lock is damaged, insert it correctly
or replace the safety lock.
E12
The gyroscope is faulty Remove the gyroscope chip.
IMPORTANT: If error code appears, you MUST stop workout immediately, Please
contact with after sale service if problem CAN NOT be solved after restart.
18
19
11
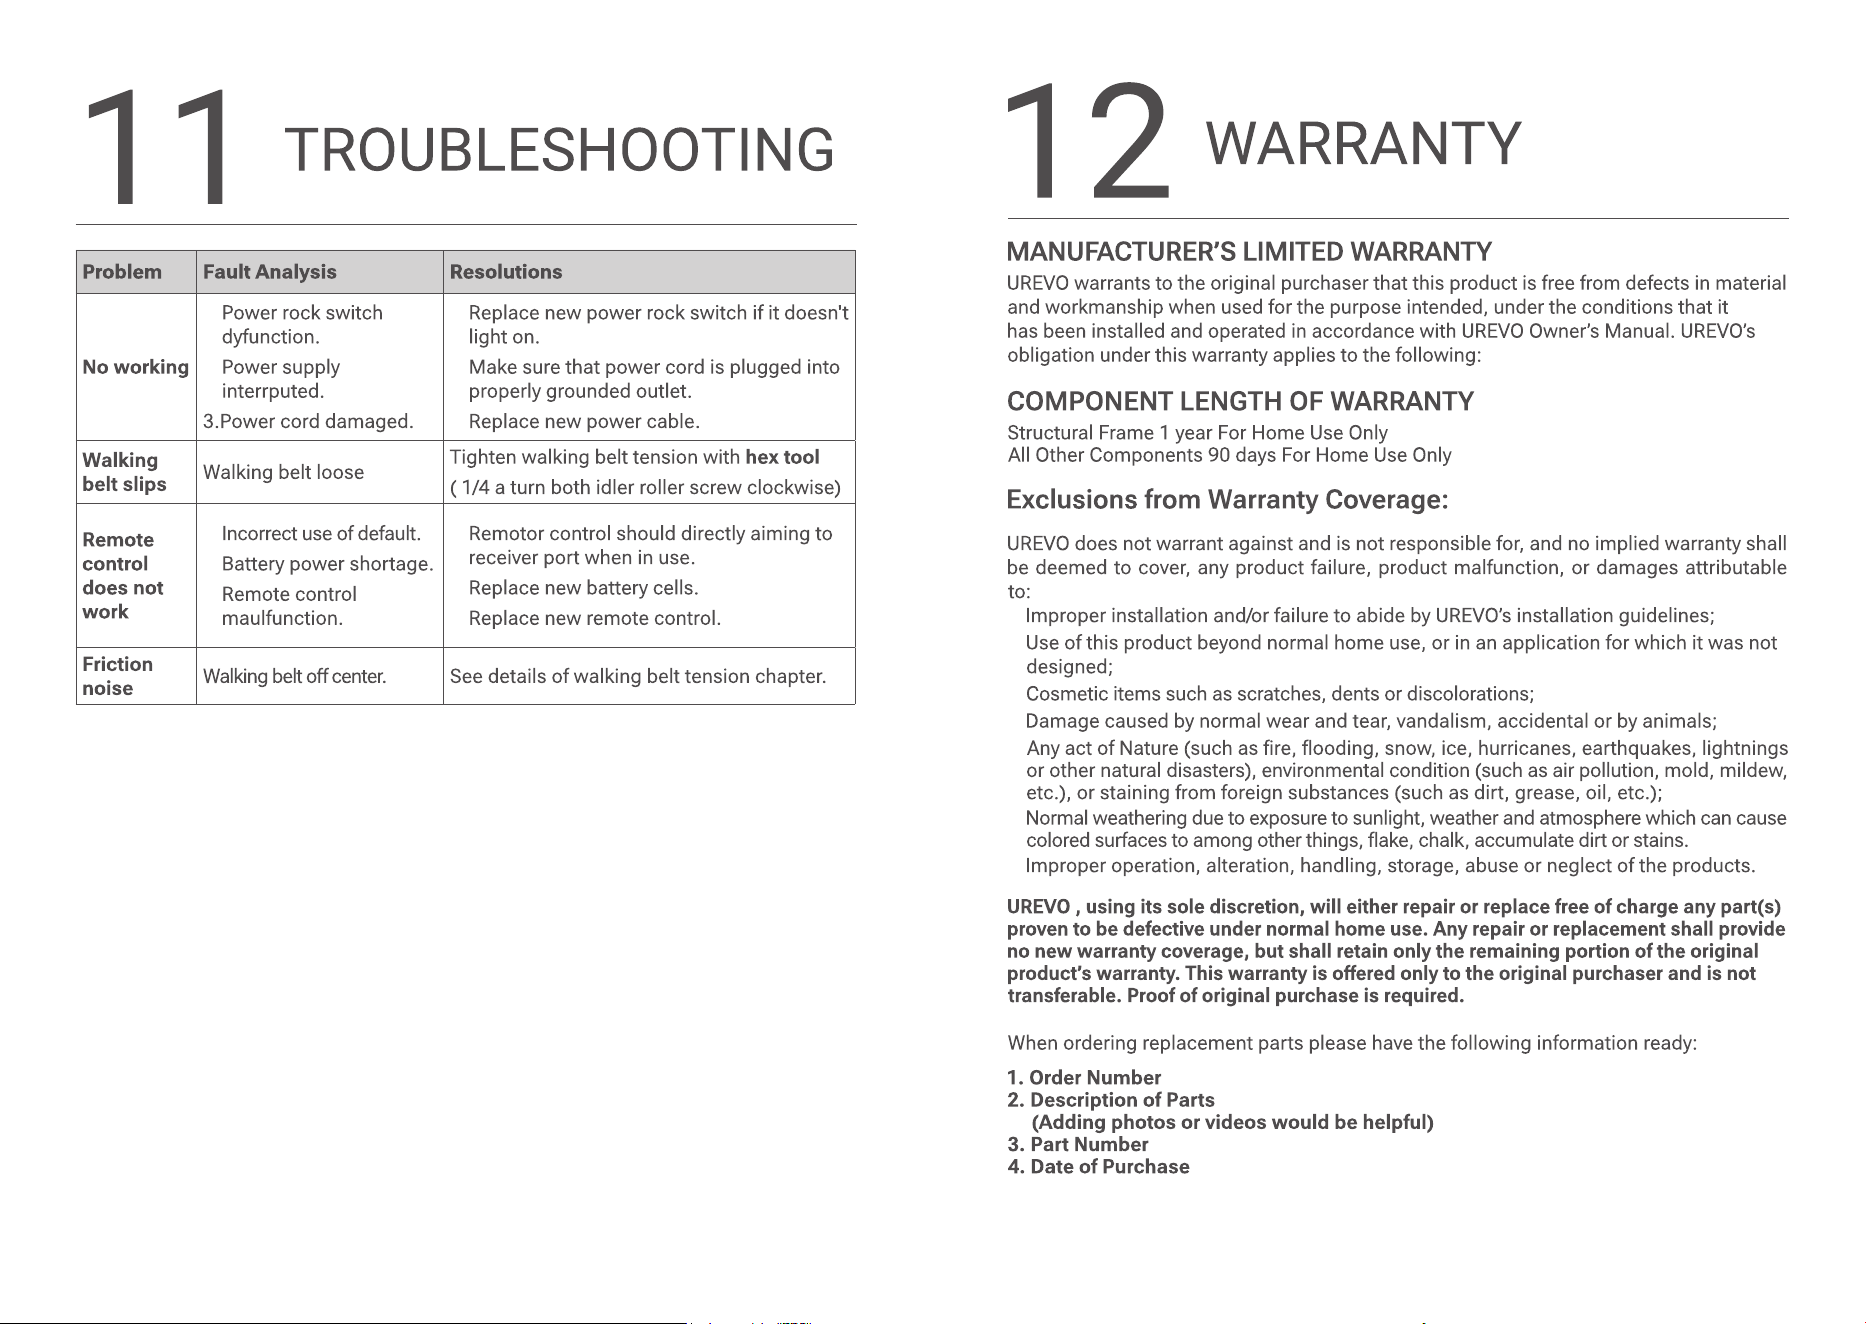
TROUBLESHOOTING
Problem Fault Analysis Resolutions
No working
1. Power rock switch
dyfunction.
2. Power supply
interrputed.
3.Power cord damaged.
1. Replace new power rock switch if it doesn't
light on.
2. Make sure that power cord is plugged into
properly grounded outlet.
3. Replace new power cable.
Walking
belt slips
Walking belt loose
Tighten walking belt tension with hex tool
( 1/4 a turn both idler roller screw clockwise)
Remote
control
does not
work
1. Incorrect use of default.
2. Battery power shortage.
3. Remote control
maulfunction.
1. Remotor control should directly aiming to
receiver port when in use.
2. Replace new battery cells.
3. Replace new remote control.
Friction
noise
Walking belt o center. See details of walking belt tension chapter.
1.
2.
3.
4.
5.
6.
7.
