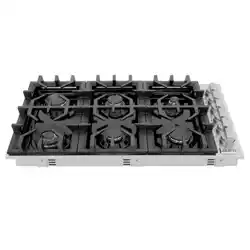

GAS DROPIN
www.zlinekitchen.com
Installation Manual

ZLINE Kitchen and Bath provides Attainable Luxury, where the kitchen and bath of your dreams
is never out of reach. Through our unique designs and unparalleled quality, we’re dedicated to
providing you an elevated experience in the heart of your home. With an endless selection of
features and finishes, our inspiration is your reality.

WARNING: This product can expose you to chemicals including nickel, which is known to the
State of California to cause cancer. For more information, go to www.P65Warnings.ca.gov.
ZLINE is fueled by a passion for innovation; A relentless pursuit of bringing the highest end luxury
designs and professional features into everyone’s homes. Because we continually strive to improve
our products, we may change specifications and designs without prior notice.


1
General Safety
IMPORTANT SAFETY INSTRUCTIONS
WARNING
If the information in this manual is not followed exactly, a fire or explosion
may result causing property damage, personal injury, or death.
• Before beginning installation, please read and follow these important instructions for the
safety of your home and the people living in it.
• The manufacturer will not be responsible for any damage to property or to persons
caused by incorrect installation, improper use of the appliance, or failure to heed the
warnings listed.
• The manufacturer reserves the right to make changes to its products when considered
necessary and useful, without affecting the essential safety and operating
characteristics.
• This appliance has been designed for non-commercial, domestic use only.
• Please observe all local, state, and national codes and ordinances. Please ensure the
range is properly grounded. The plug should always be accessible. Installation must
conform with local codes, or in the absence of codes, the National Fuel Gas Code
ANSI Z223.1/NFPA 54.
• The installer should leave these instructions with the consumer who should retain
for local inspectors’ use and for future reference. Electrical installation must be in
accordance with the National Electrical Code ANSI/NPA70-latest edition and/or
local codes.
• In Massachusetts: Installation must be performed by a “Massachusetts” licensed
plumber or gasfitter. A T-handle type manual gas valve must be installed in the gas line
connected to this appliance.
• In Canada: Installation must be in accordance with the current CAN/CGA-fe 149.1
natural gas installation code or CAN/CGA-B 149.2 propane installation code and/
or local codes. Electrical installation must be in accordance with the current CSA C22.1
Canadian electrical codes Part 1 and/or local codes.
• The installation of appliance designed for manufactured (mobile) home installation must
conform with the Manufactured Home Construction and Safety Standard, Title 24CFR,
Part 3280 [formerly the Federal Standard for Mobile Home Construction and Safety,
Title 24, HUD (Part280)] or with local codes where applicable.
• Installation of any gas-fired equipment should be made by a licensed plumber. A
manual gas shut-off valve must be installed in the gas supply line for safety and ease of
service.

2
Gas Safety
IMPORTANT SAFETY INSTRUCTIONS
WARNING
An air curtain or other overhead range/range top hood, which operates
by blowing downward airflow onto the dropin, shall not be used/installed
in conjunction with this gas dropin.
• Please ensure that the altitude of your home is conducive for the use of gas cooking
products. If the product is installed at higher altitudes above sea level, you may
experience issues with gas pressure that will affect product performance. Please consult
your local gas company for recommendations before purchasing or installing.
• Do not store or use gasoline or any other flammable substances in the vicinity of this or
any other appliance.
• NEVER use this appliance as a space heater to heat or warm the room. Doing so may
result in carbon monoxide poisoning.
• NEVER cover any slots, holes, or passages. Doing so blocks air flow and may cause
carbon monoxide poisoning. Aluminum foil linings may also trap heat, causing a fire
hazard.
WARNING
• NEVER leave the top surface cooking section of this appliance
unattended.
• Failure to follow this warning statement could result in fire, explosion,
or burn hazard that could cause property damage, personal injury, or
death.
• If a fire should occur, keep away from the appliance and immediately call your fire
department.
• DO NOT ATTEMPT TO EXTINGUISH AN OIL/GREASE FIRE WITH WATER.
WHAT TO DO IF YOU SMELL GAS
• DO NOT try to light any appliance.
• DO NOT touch any electrical switch.
• DO NOT use any phone in your building.
• DO NOT use any aerosol cans or combustibles.
• Immediately call your gas supplier from a neighbor’s phone. Follow the gas supplier’s
instructions.
• If you cannot reach your gas supplier, call the fire department.
• Installation and service must be conducted by a qualified installer, service agency, or
the gas supplier.
3
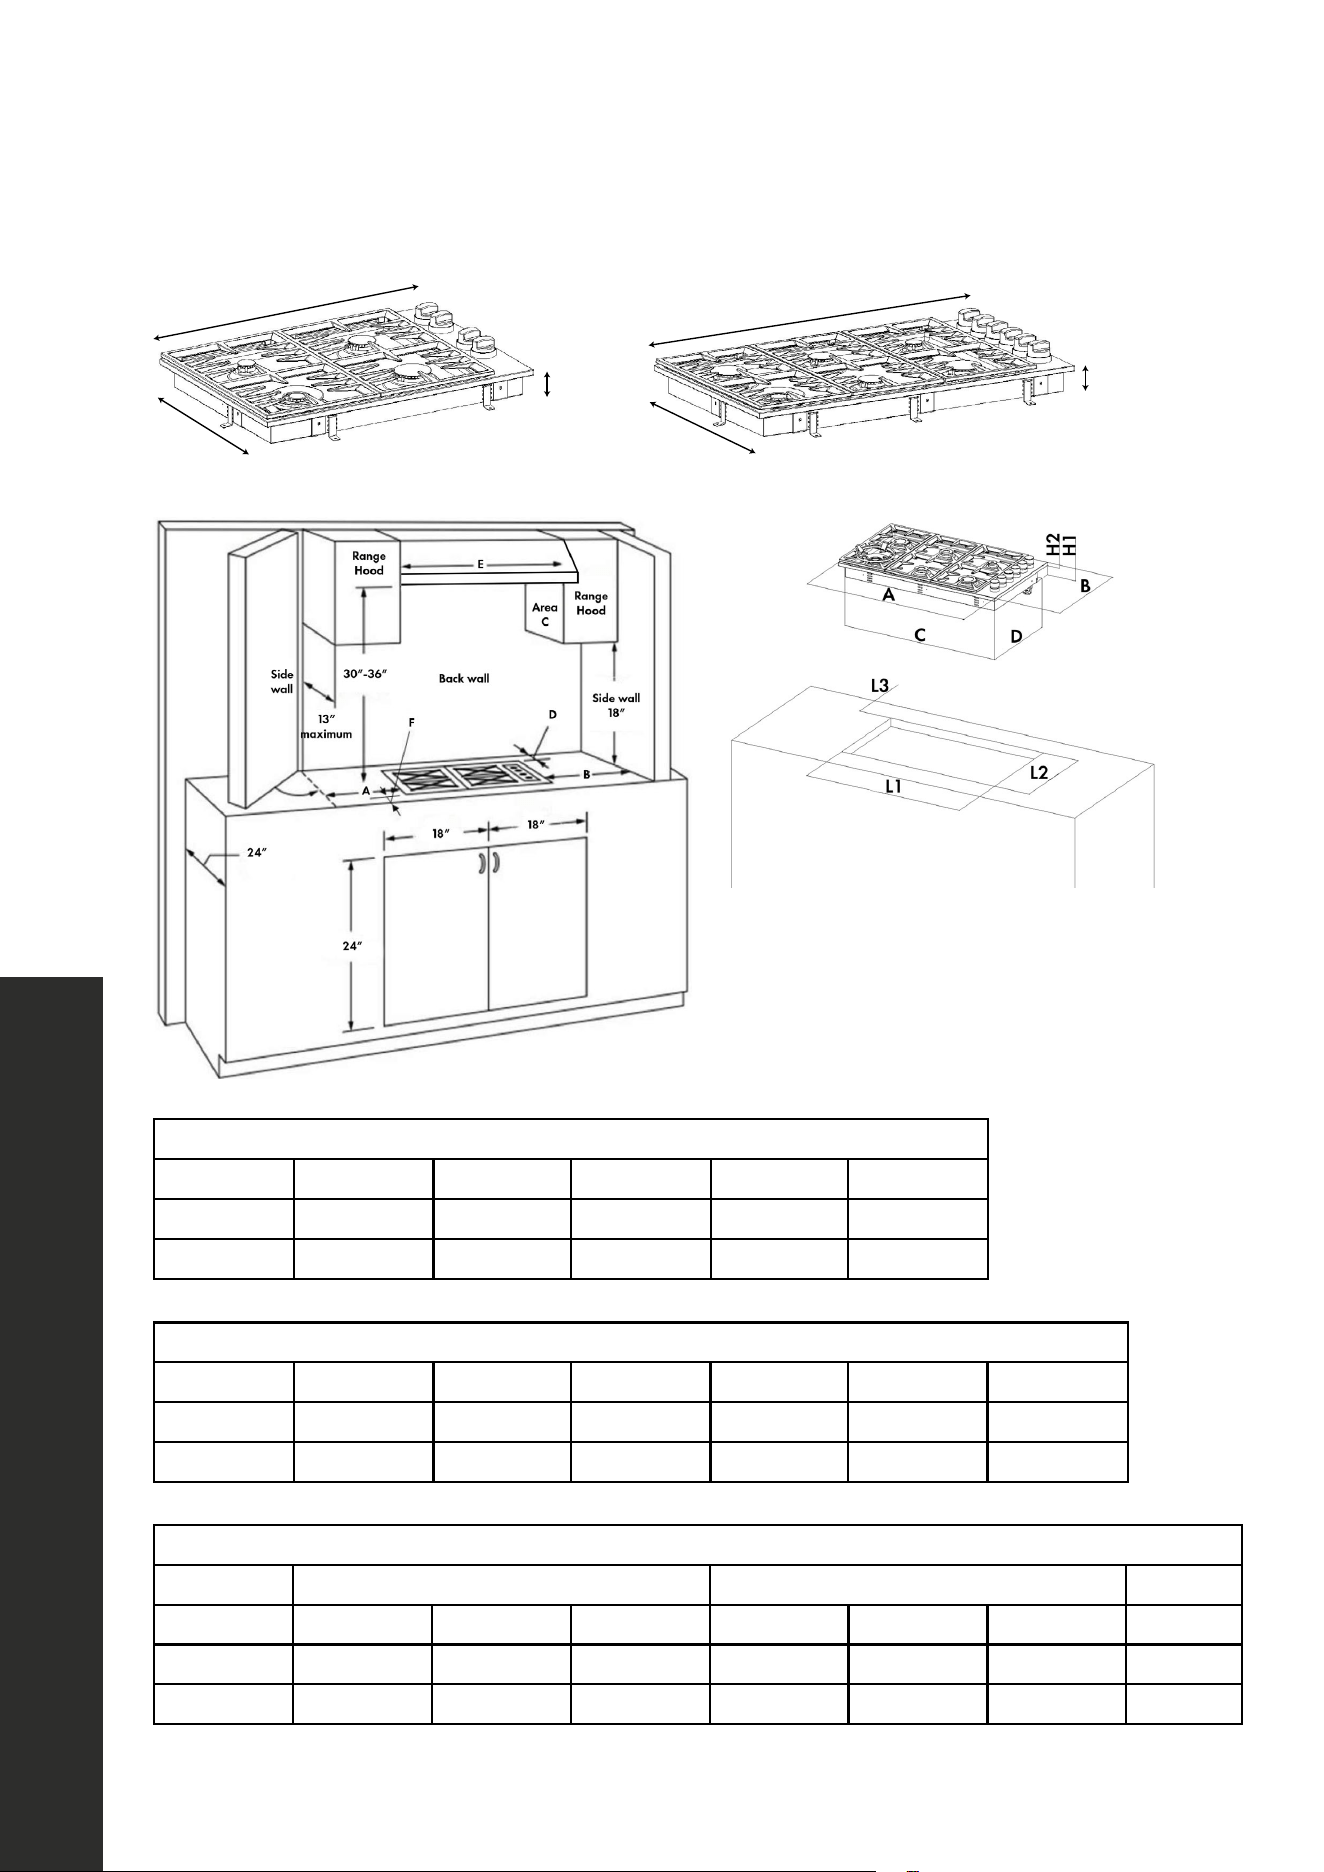
3 7/16”
30“
21 “
3 7/16”
36“
21 “
Figure 1
Figure 3
Figure 2
Figure 1
Refer to Figure 1
Clearances A B D E F
30” 6” min 6” min 3 1/2” min 30” 3 1/2” min
36” 6 min” 6” min 3 1/2” min 36” 3 1/2” min
Refer to Figure 2
Product size A B C D H1 H2
30” 30” 21 ” 28 3/8” 18 7/8” 2 13/16” 5/8”
36” 36” 21 ” 34 3/8” 18 7/8” 2 13/16” 5/8”
Refer to Figure 3
L1 L2 L3
Cut out size Suggestion Min Max Suggestion Min Max Min
30” 29” 28 9/16” 29 3/8” 19 1/2” 19 1/8” 20 3/8” 2 1/2”
36” 35” 34 9/16” 35 3/8” 19 1/2” 19 1/8” 20 3/8” 2 1/2”
Installation Requirements
BEFORE INSTALLATION
4
ATTACHING THE DROPIN
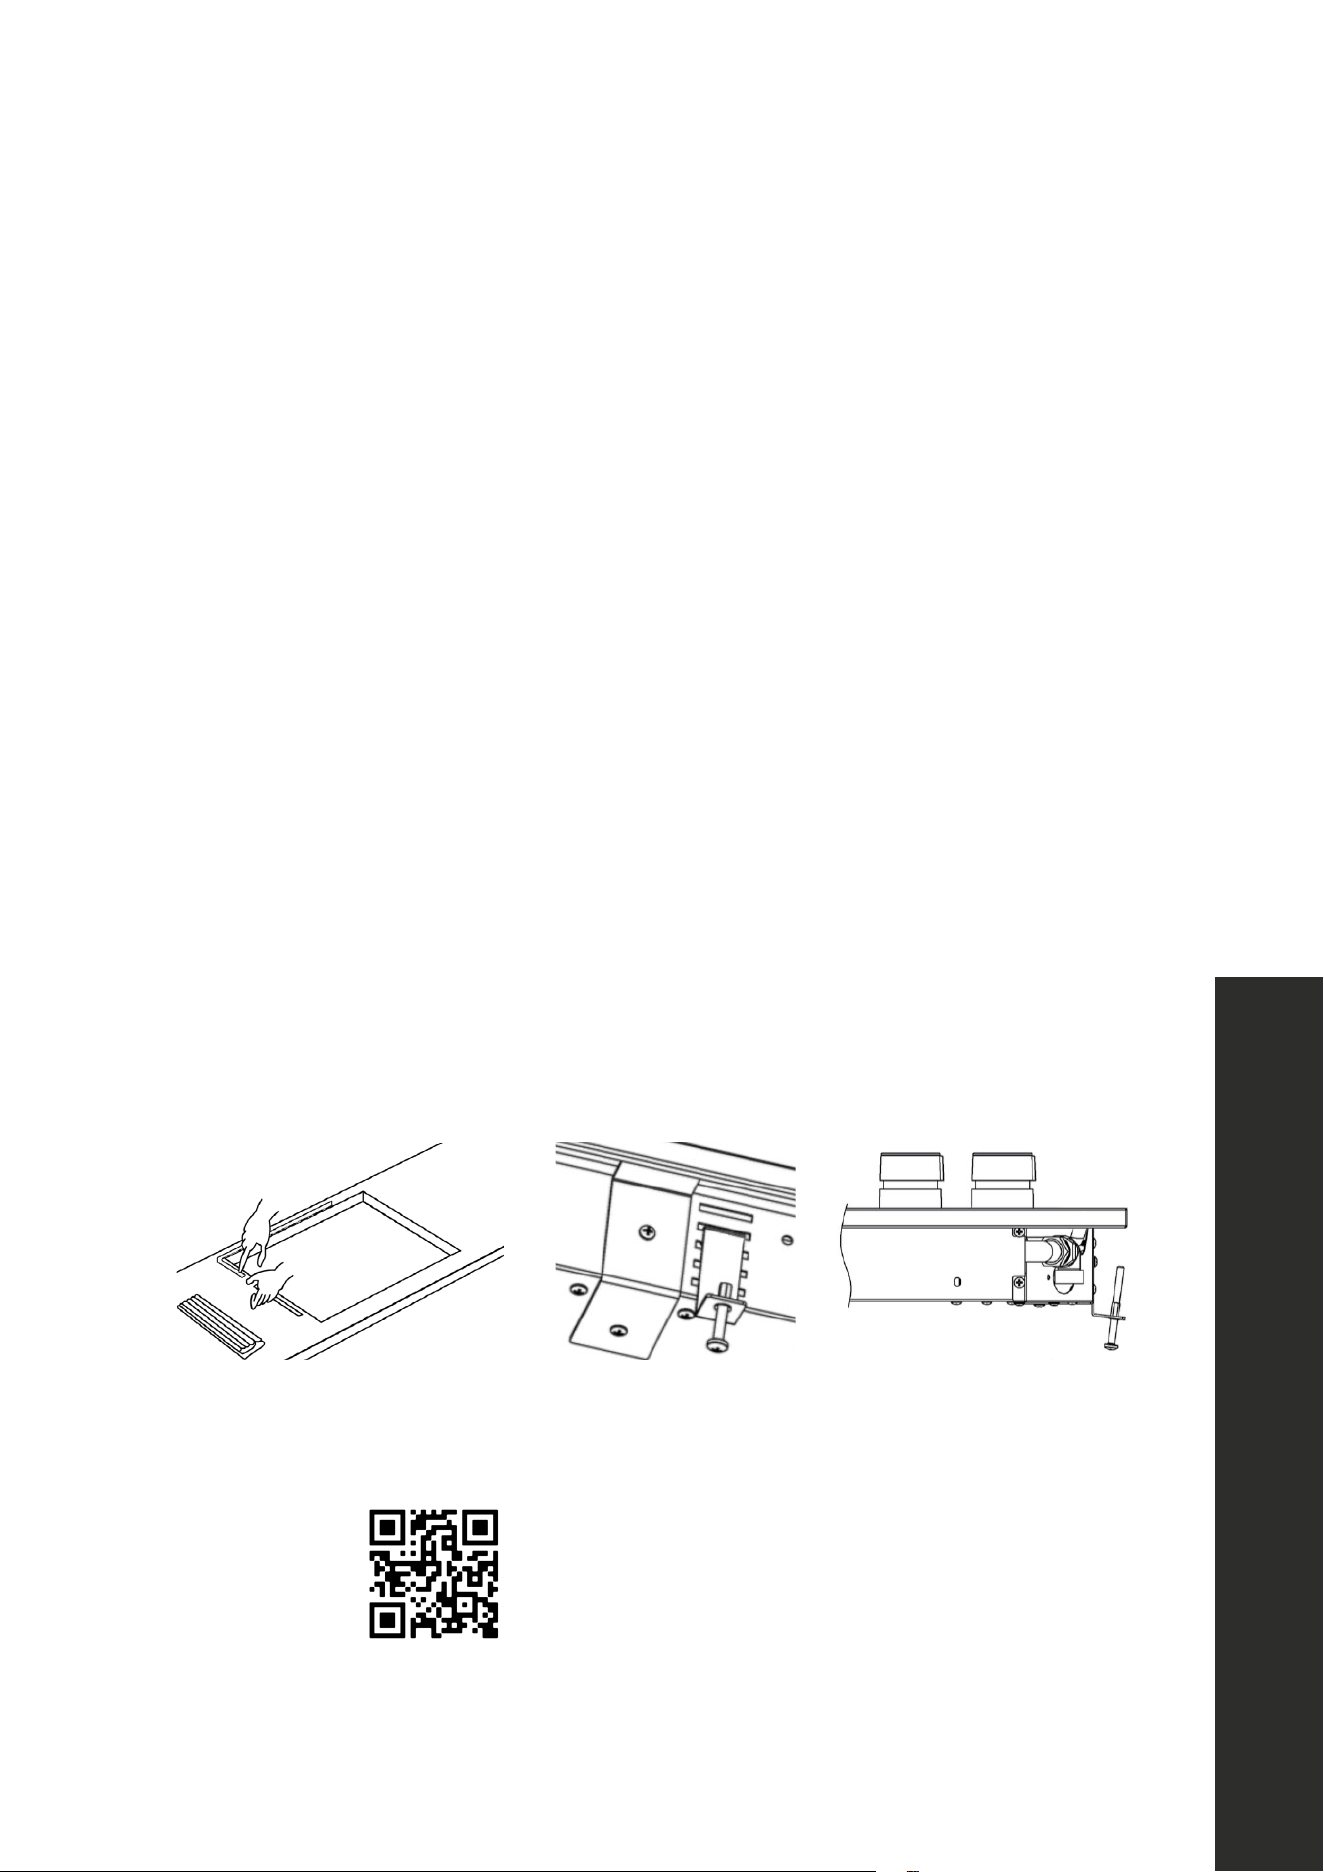
Be sure to carefully consider the critical dimensions of the appliance before making an
opening in the top surface of your countertop.
To prevent liquids from accidentally leaking into the underlying storage space, the
appliance is equipped with special adhesive sealing strips.
1. Lay out the protective sealing strips along the edges of the opening in the countertop
and carefully unpeel the protective stickers while overlapping each strip end (see
Figure 1).
2. Insert the dropin into the countertop opening and firmly press into place on the sealing
strips.
3. The appliance comes with 4 connector brackets and 4 long screws. Slide each bracket
into the slots on the front and back of the unit, making sure to use the same mounting
location to ensure the dropin is level (see Figure 2).
4. Once brackets are inserted properly, tighten each screw by hand into the countertop
above and ensure every connection is snug. Then tighten with a Phillips-head
screwdriver to secure the unit (see Figure 3).
5. Lastly, trim any part of the sealing strips that extend beyond the dropin base.
Figure 1 Figure 2 Figure 3
Scan to follow along with a video.
Installing the Dropin
INSTALLATION
5
Gas Supply
INSTALLATION
• This appliance shall only be installed by an authorized professional.
• If local codes permit, a flexible metal appliance connection with the new AGA or CGA
certified design, 3/4˝, is recommended for connecting this appliance to the gas supply
line. DO NOT bend or damage the flexible connector when moving the appliance.
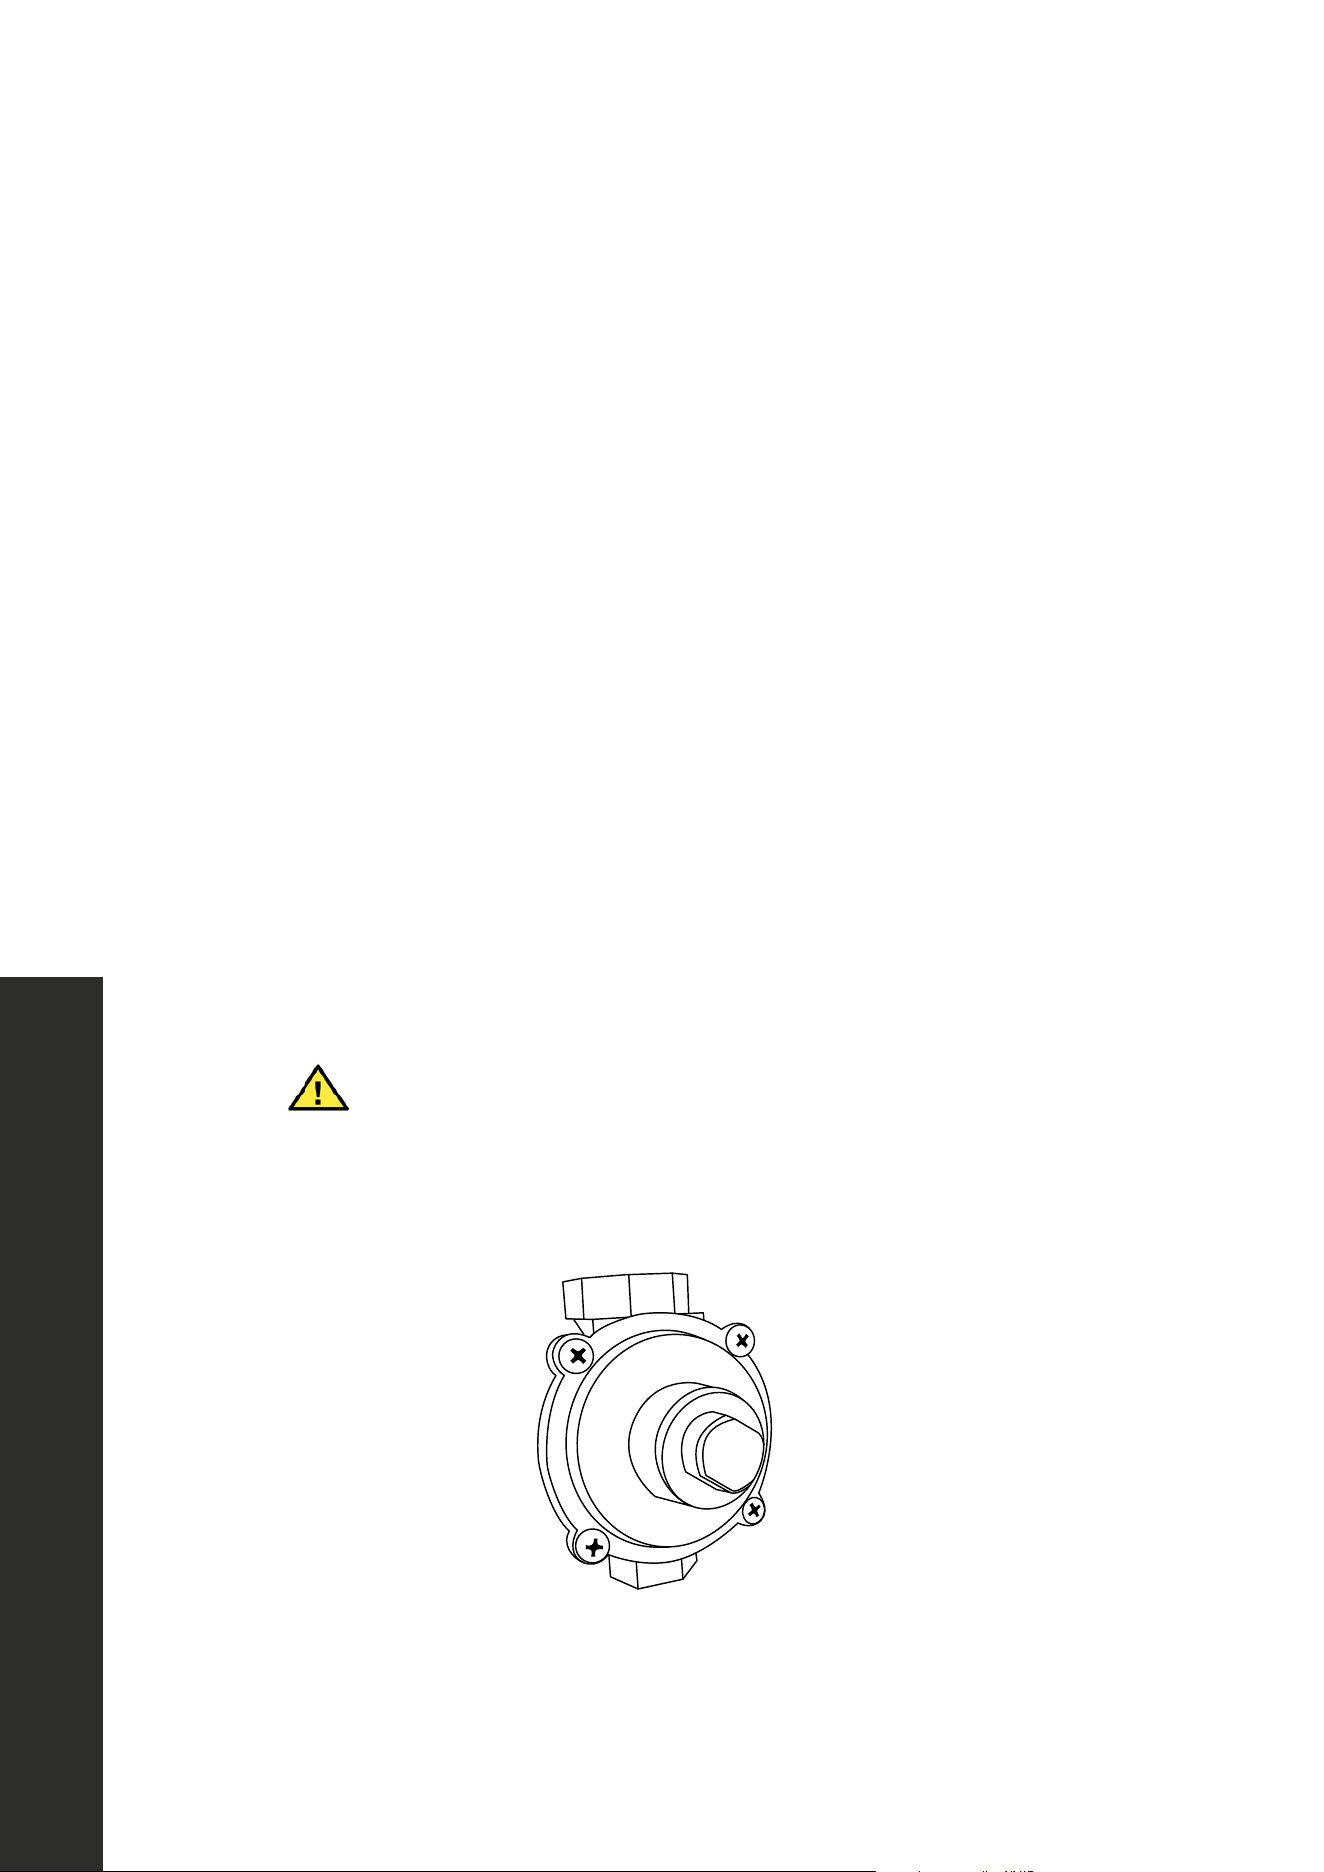
• This appliance must be used with the pressure regulator provided (see below). The
regulator must be properly installed in order to be accessible when the appliance is
installed in its final location. The pressure regulator must be set for the type of gas to be
used. The pressure regulator has 1/2” connection female pipe thread. The appropriate
fitting must be determined based on the size of your gas supply line, the flexible metal
connector, and the shut-off valve.
• The appliance must be isolated from the gas supply piping system by closing its
individual manual shut-off valve during any pressure testing of the gas supply piping
system at test pressures equal to or less than 1/2 PSI.
• All opening holes in the wall and floor, back and under the appliance shall be sealed
before installation of the appliance.
• A manual valve shall be installed in an accessible location in the gas line external to the
appliance for the purpose of turning on and shutting off the gas to the appliance.
Do not use aerosol sprays in the vicinity of this appliance
while it is hot.
WARNING
Pressure Regulator

6
Gas Supply
INSTALLATION
ROOM VENTILATION
An exhaust fan may be used with the appliance; in each case it shall be installed in conformity
with the appropriate national and local standards. Exhaust hood operation may affect
other vented appliances; in each case it shall be installed in conformity with the appropriate
national and local standards.
TYPE OF GAS
This appliance is shipped from the factory for use with natural gas. For use with liquid propane
gas, please follow the conversion procedure described on pages 13-16. A step by step
conversion procedure is also included with each set of liquid propane gas orifices.
GAS PRESSURE
• The maximum inlet gas supply pressure incoming to the gas appliance pressure regulator
is 1/2 PSI.
• The minimum gas supply pressure for checking the regulator setting shall be at least 1˝
W.C. (249 Pa) above the inlet specified manifold pressure to the appliance. This operating
pressure is 4˝ W.C. (1.00kPa) for natural gas and 10˝ W.C. (2.75 kPa) for liquid
propane gas.
• Gas dropin requires 1”- 6” side wall spacing above the counter height for proper
combustion. Please review specific model installation instructions for required dimensions;
30” to 36” between the dropin and bottom of the range hood above, 1/4” for sides
below countertop height.
NOTE: Please consult your local building codes for variations with installation.

7
Gas Connection
INSTALLATION
GAS CONNECTION
• All gas connections must comply with national and local codes. The gas supply line
(service) must be the same size or greater than the inlet line of the appliance. This dropin
uses a 1/2˝ NPT inlet. Use appropriate sealant on all pipe joints that are resistant to
gas.
• This dropin can be used with natural or liquid propane gas. The dropin is shipped from
the factory for use with natural gas.
• For liquid propane gas household installation, the appliance must be converted by a
factory-trained professional, or qualified licensed plumber or gas service company.
• Gas conversion is important for safe and effective use of the appliance. It is the
responsibility of the owner of the dropin to perform the appropriate gas conversion
following the directions of the manufacturer.
• The gas conversion procedure is described in this manual and in the package
containing the conversion orifices shipped with every dropin.
• Please provide the service person with this manual before work is started on the dropin.
DO NOT use an open flame when checking for leaks.
WARNING
Leak testing of the appliance shall be conducted according to the manufacturer’s
instructions. Always check for leaks with a soapy water solution or other acceptable
method. Check for gas leakage on all gas connections between inlet gas pipes of the
appliance, the gas regulator, and the manual shut-off valve. Bubbles will form with a soapy
water solution if there is a leak.
8
Gas Connection
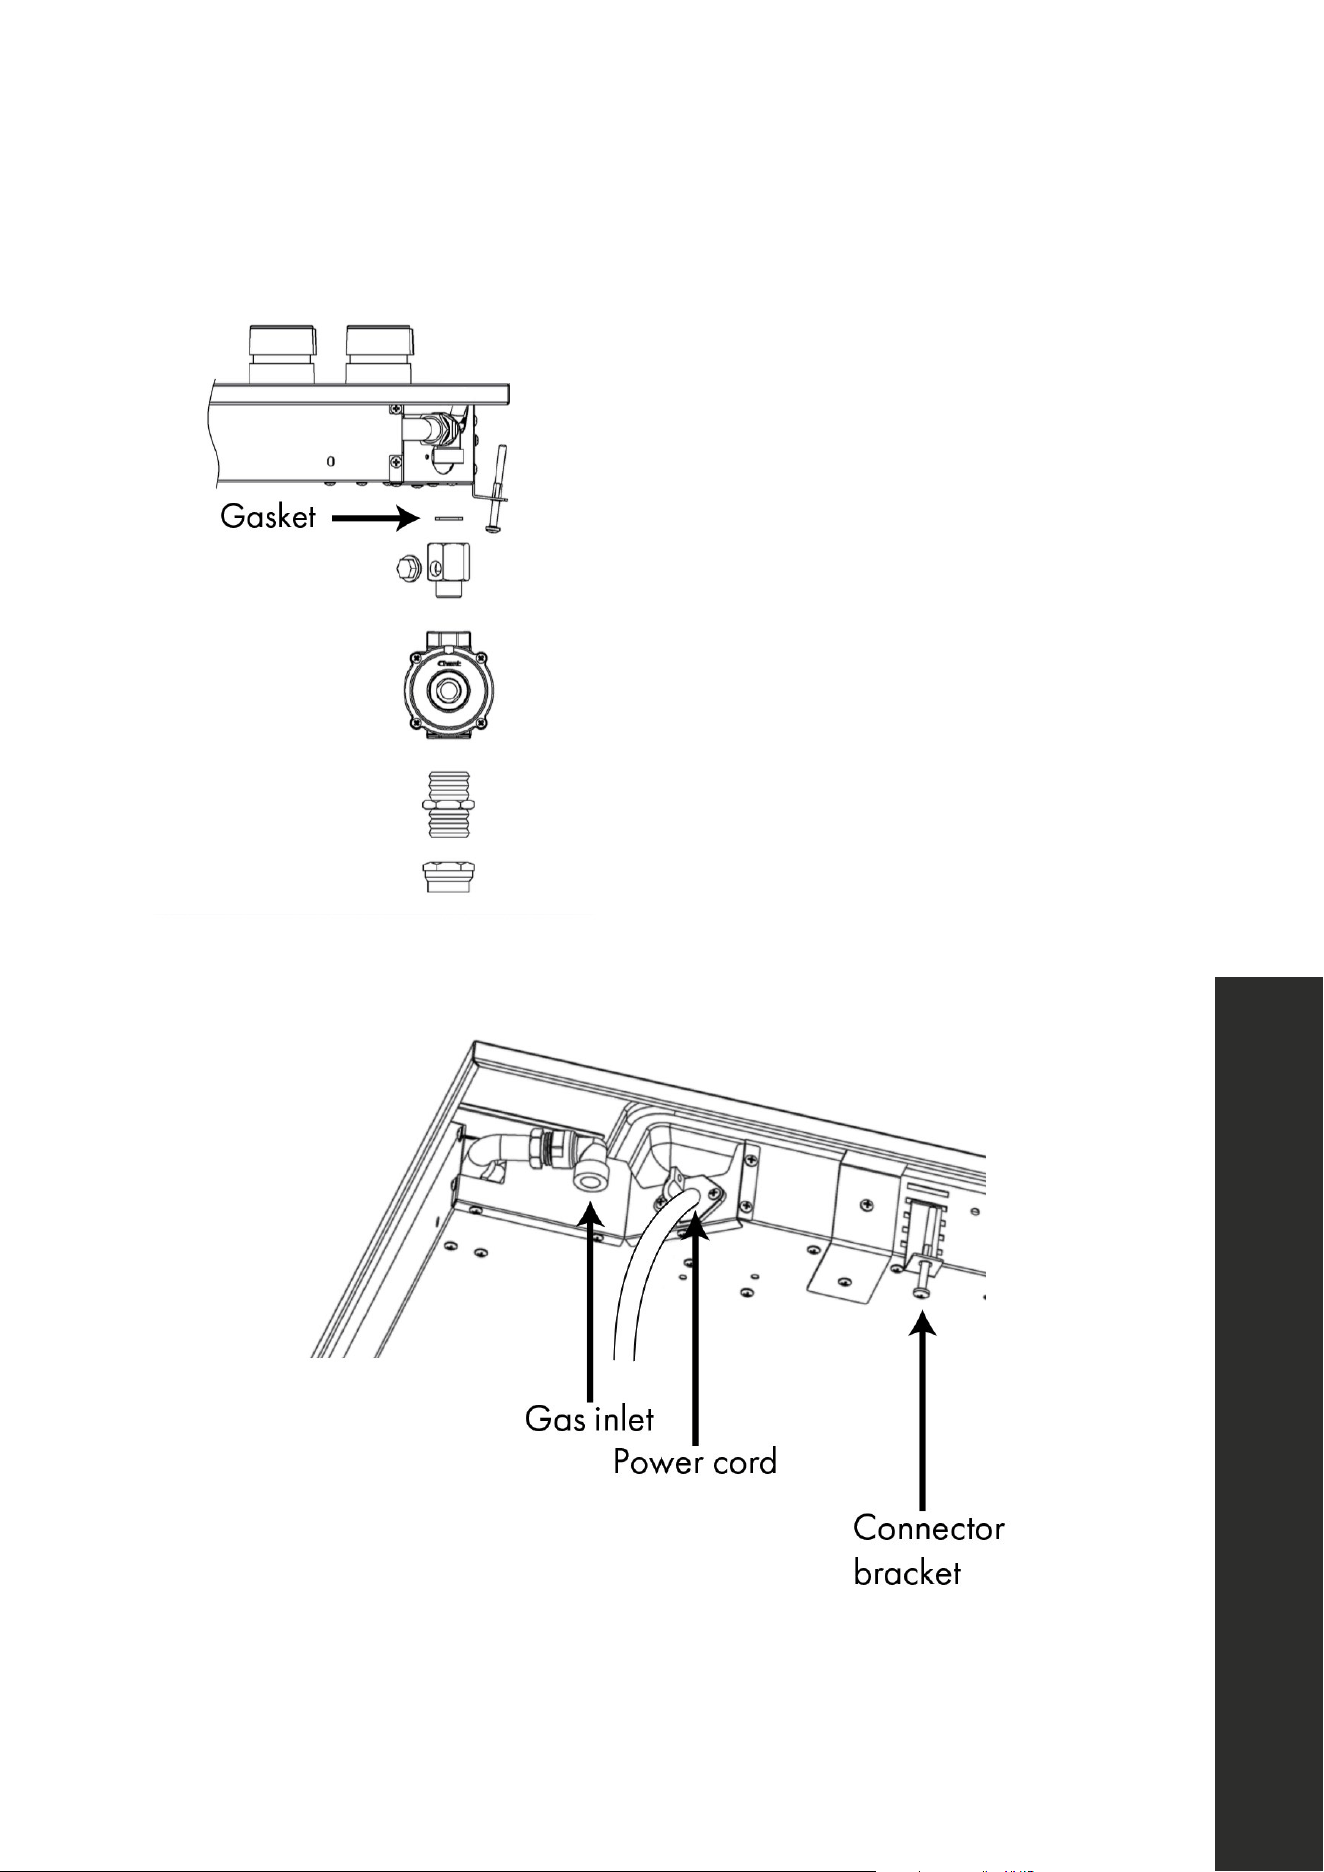
For gas inlet position of the appliance refer to
Figures 1 and 2. After installing the gas supply
and making all connections check thoroughly for
possible leaks. Turn all control knobs on the unit
to ‘OFF’ position. Open the valve on the gas
supply. Using a soap and water solution check
each gas connection one at a time by brushing
the solution over the connection. Presence of
bubbles will indicate a leak. Tighten the fitting
and re-check for leaks. If it is not possible to
correct the leak, replace fitting. Under no
circumstances use matches or flame for checking
leaks. It is essential that the gasket and the
pressure test point stopper are properly installed
to avoid gas leakage; see page 11 for installation
details.
Figure 2
INSTALLATION
Figure 1

9
Gas Connection
INSTALLATION
• To check inlet pressure of the appliance:
• Disconnect electric power before checking pressure.
• Take off one of the gas burner caps and the relative flame spreader in
order to get access to the burner injector.
• Place the pressure detector directly on the burner injector, then
open the relative burner knob at maximum position keeping
it pressed, then measure the outlet pressure from the burner injector.
• Once pressure is checked, replace the burner cap and flame spreader in the
correct and original position and re-connect electric power to the appliance.
• Turn on appliance control knob and light each burner. Check for a clear blue flame
without yellow tipping. If burners show any abnormalities check that they are installed
properly and in line with the with the appropriate natural gas or liquid propane orifice
(see page 13 for details on gas conversion).
• Sometimes, the burners will not ignite immediately and seem to ‘blow’ slightly when
they do ignite. This usually is due to air in the gas lines, which will clear itself within
seconds.
• If after following the instructions given, satisfactory performance cannot be obtained,
contact the local gas authority for advice and assistance.
Scan to follow along with a video.

10
INSTALLATION
Electrical Connection
The appliance shall be connected to a single phase electric line rated at 110-120VAC and
60HZ frequency. The true voltage in most homes is usually within this rating.
ELECTRIC POWER RATING
120V / 60HZ / 15A
ELECTRICAL GROUNDING
Our gas dropin is equipped with a three-prong plug for your protection against shock
hazard and should be plugged directly into a properly grounded receptacle. Do not cut or
remove the prong from this plug.
WARNING
Disconnect electrical power at the circuit breaker box or fuse box before
installing the appliance. Provide appropriate ground for the appliance. Use
copper conductors only.

11
Gas Connection
INSTALLATION
MANUAL SHUT-OFF VALVE
• This valve is not shipped with the appliance and must be provided by the installer.
• The valve must be installed in the gas service line between the gas hook-up on the wall
and the appliance inlet, in a position where it can be reached quickly in the event of an
emergency.
• In Massachusetts: A T-handle type manual gas shut-off valve must be installed in the gas
supply line to this appliance.
FLEXIBLE CONNECTIONS
• In case of installation with flexible couplings and/or quick-disconnect fittings, the installer
must use a heavy duty, AGA design-certified commercial flexible connector of at least
1/2˝ (1.3cm) NPT with a suitable strain relief in compliance with ANSI Z21.41 and
Z21.69 standards.
• In Massachusetts: The unit must be installed with a 36˝ flexible gas connector.
• In Canada: Use CAN 1-6, 10-88 metal connectors for gas appliances and CAN 1-6.9,
M79 quick disconnect devices for use with gas fuel.
PRESSURE TEST POINT STOPPER VALVE
When attaching the regulator, please use the blue gasket located within the liquid propane
gas orifice box. This will need to be placed at the top inside of the threads of the regulator
valve, where it connects to the gas rail manifold. If this is not installed properly, gas leaks may
occur.
Gasket
Gasket
Gas pipe
Pressure test-point stopper
Gas connection adaptor 1/2” NPT with
pressure test point 1/8” NPT (to be fixed
toward external side of the appliance)
Scan to follow
along with a video.
12
Gas Connection
INSTALLATION
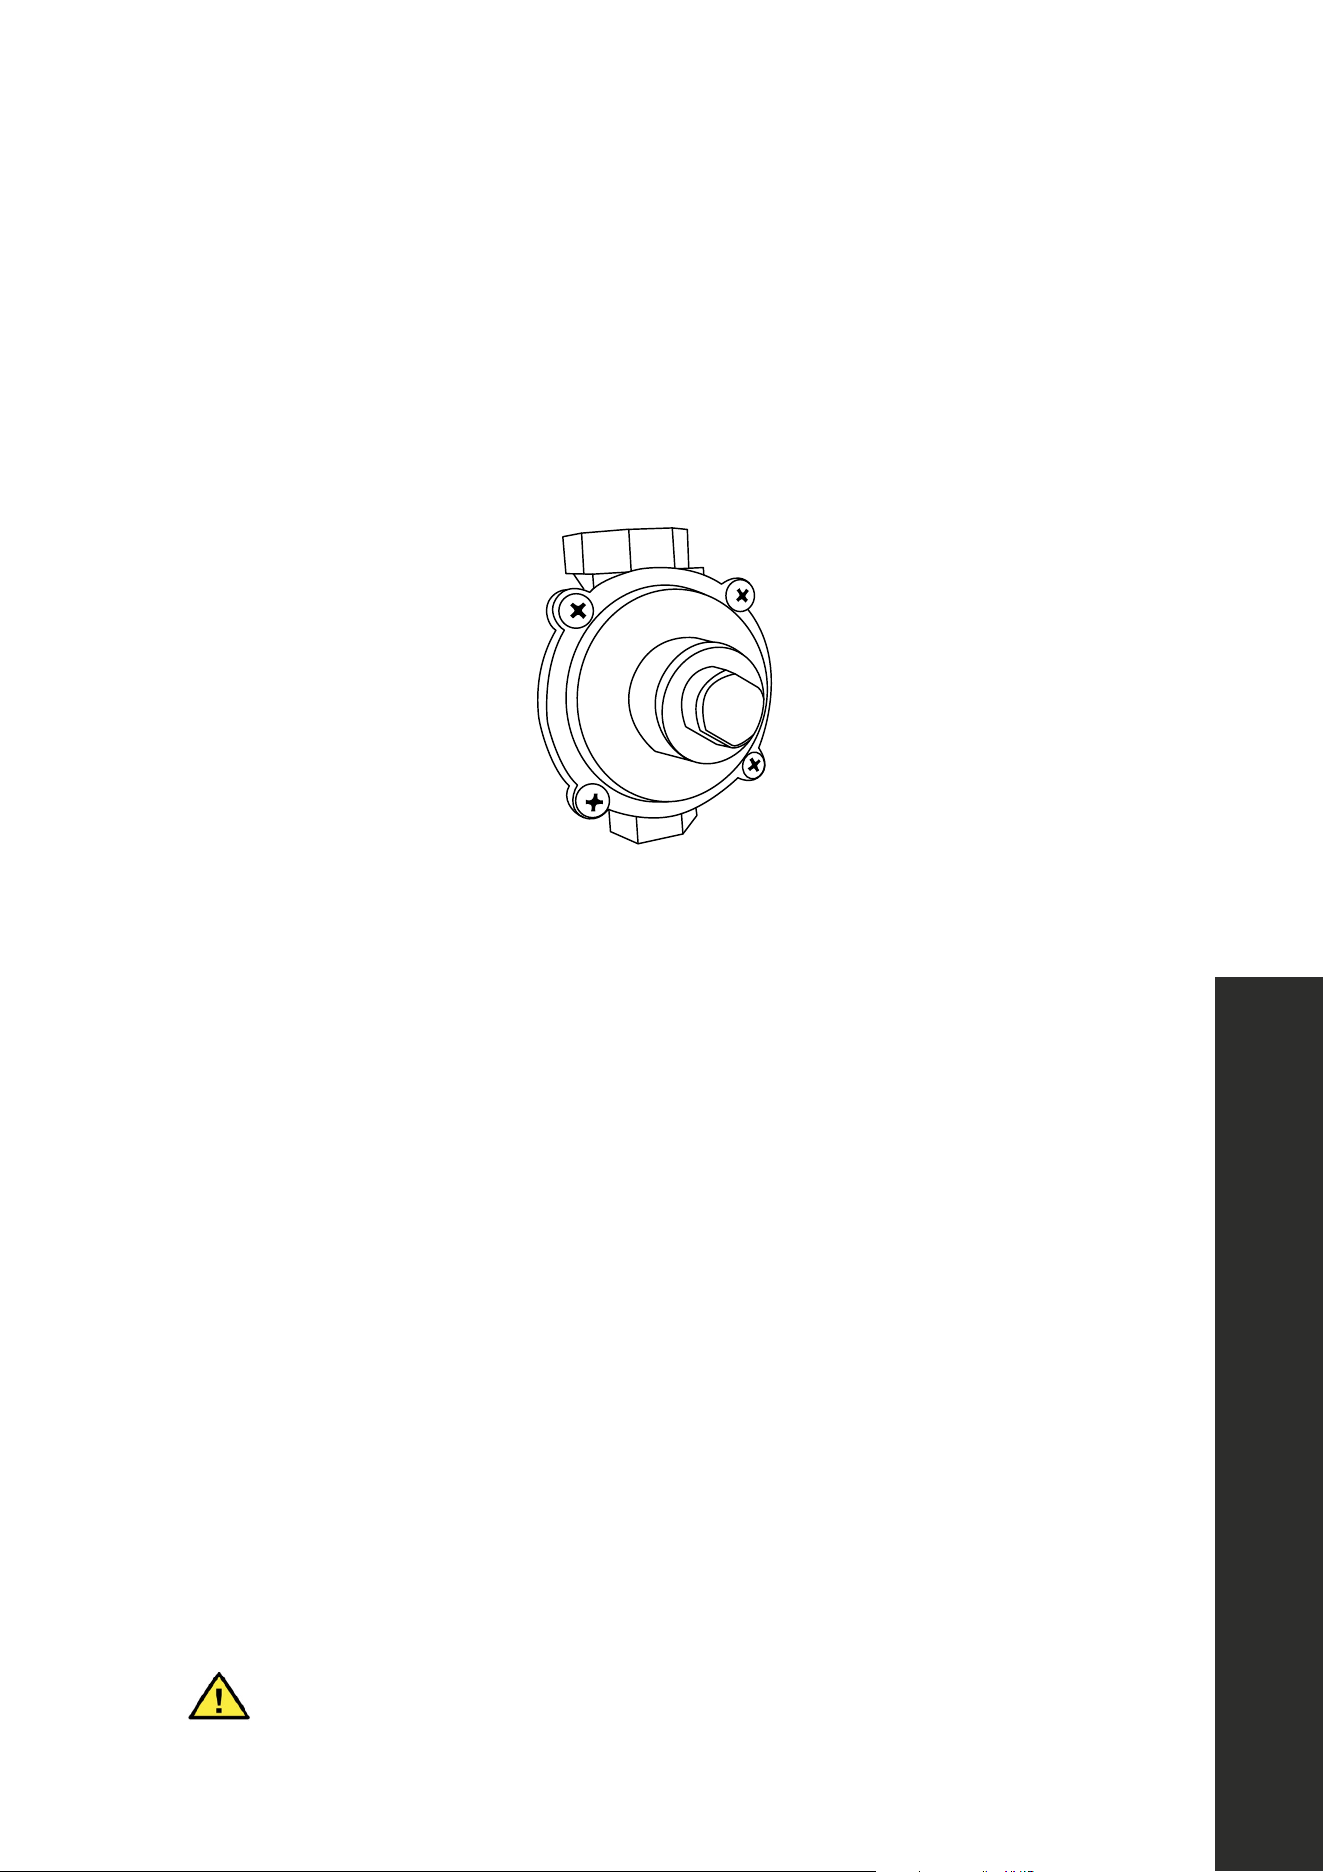
PRESSURE REGULATOR
Since service pressure may fluctuate with local demand, every gas cooking appliance
must be equipped with a pressure regulator on the incoming service line for safe and
efficient operation.
•
Pressure Regulator
The pressure regulator shipped with the appliance has two female 1/2” NPT threads.
• The regulator shall be installed properly in order to be accessible when the appliance
is installed in its final position.
• Manifold pressure should be checked with a manometer and comply with the values
indicated below.
Natural gas — 4.0” W.C.P.
Liquid propane gas — 10.0” W.C.P.
• Incoming line pressure upstream from the regulator must be 1˝ W.C.P. higher than the
manifold pressure in order to check the regulator.
• The regulator used on this dropin can withstand a maximum input pressure of 1/2
PSI (13.8˝ W.C. or 3.5 kPa). If the line pressure exceeds that amount, a step down
regulator is required.
• The appliance, its individual shut-off valve, and the pressure regulator must be
disconnected from the gas line during any pressure testing of that system at pressures in
excess of 1/2 PSI (13.8˝ W.C. or 3.5 kPa).
WARNING
Before carrying out this operation, disconnect the appliance from gas and
electricity. Gas conversion shall be conducted by a factory-trained
professional.
13
Gas Conversion Procedure
INSTALLATION
The gas conversion procedure for this dropin includes:
1. Pressure Regulator
2. Surface Burners
3. Flame Adjustment
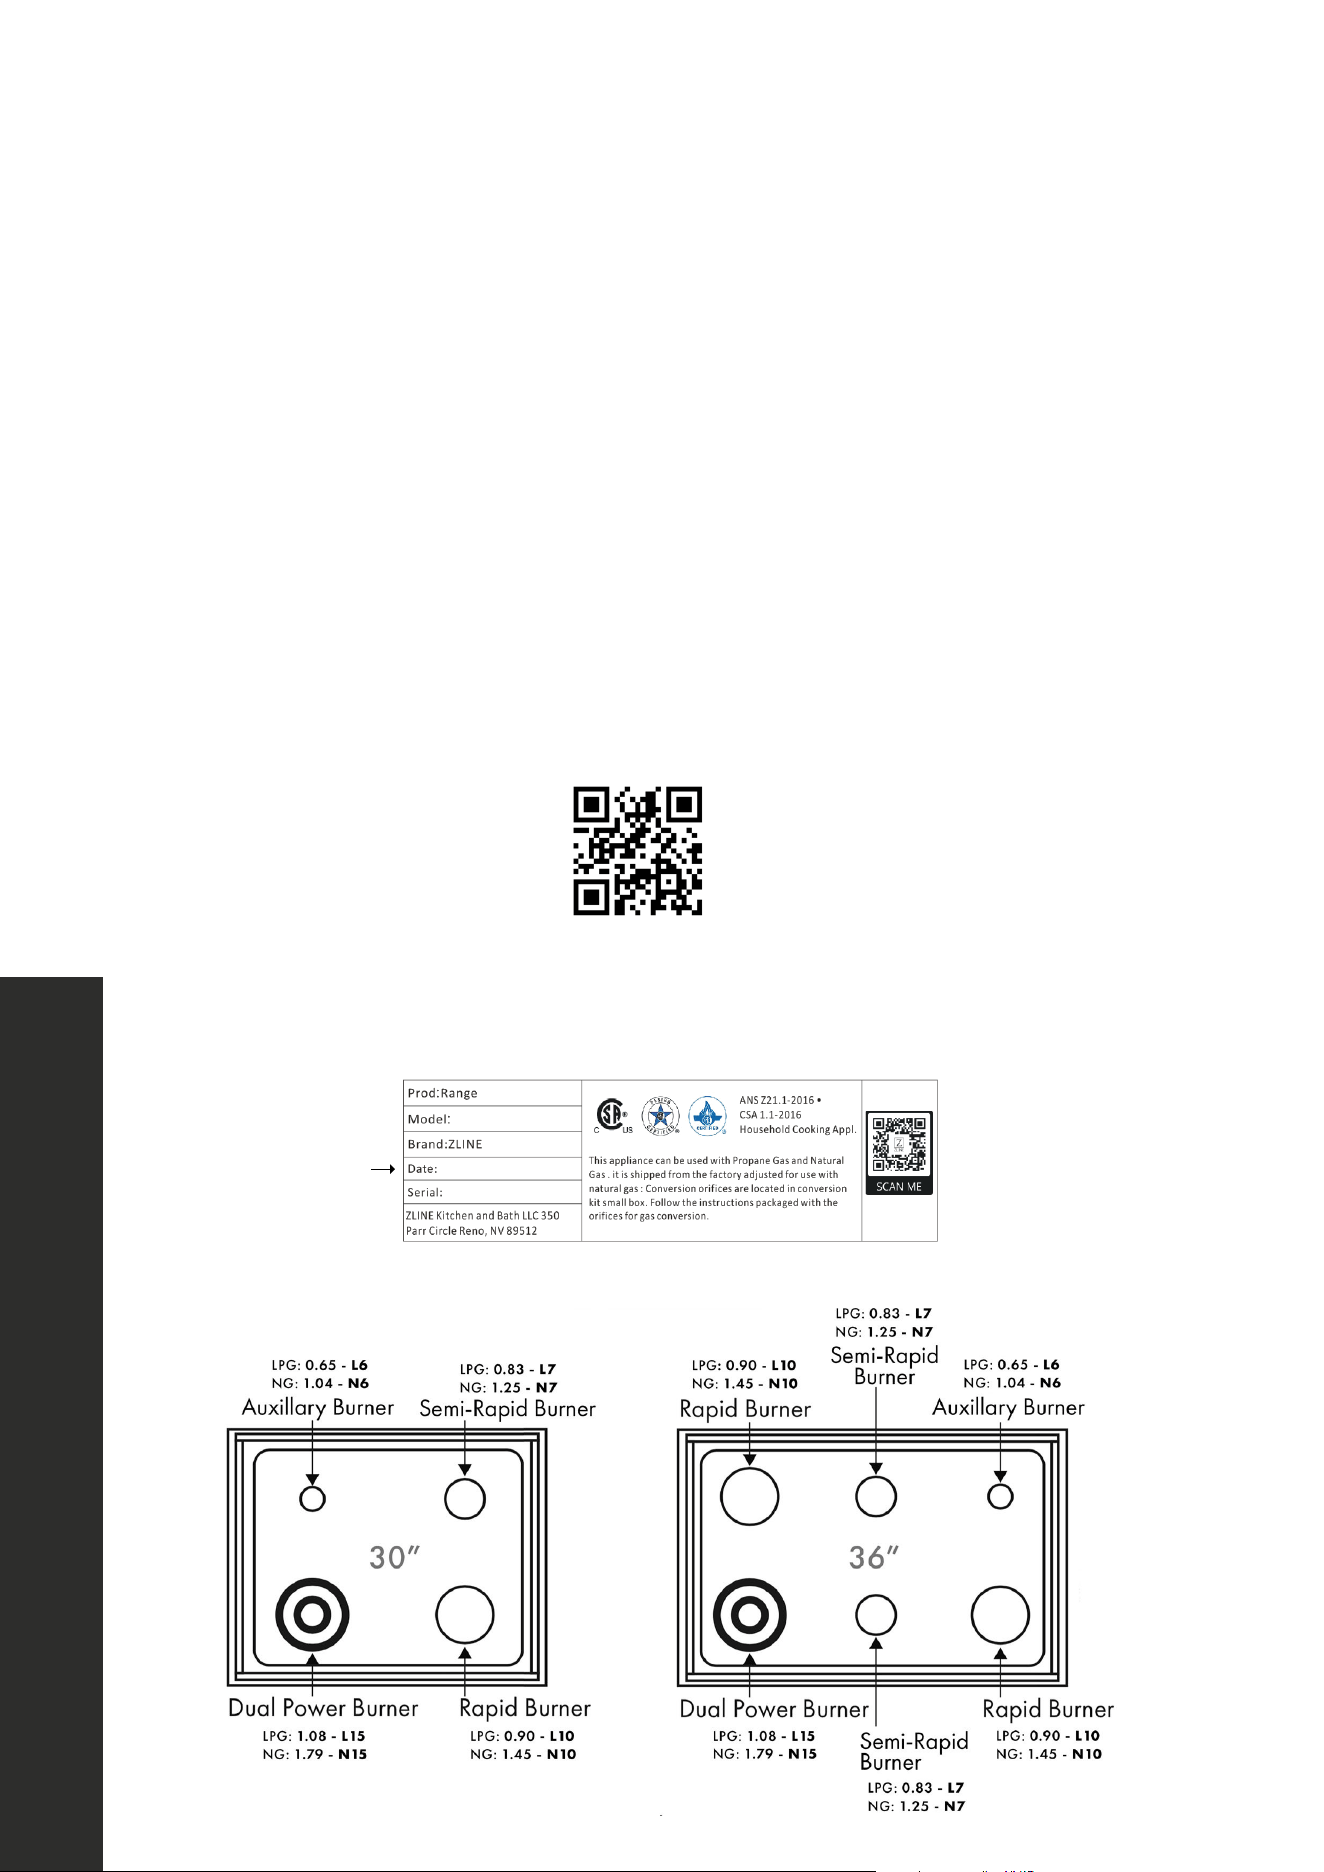
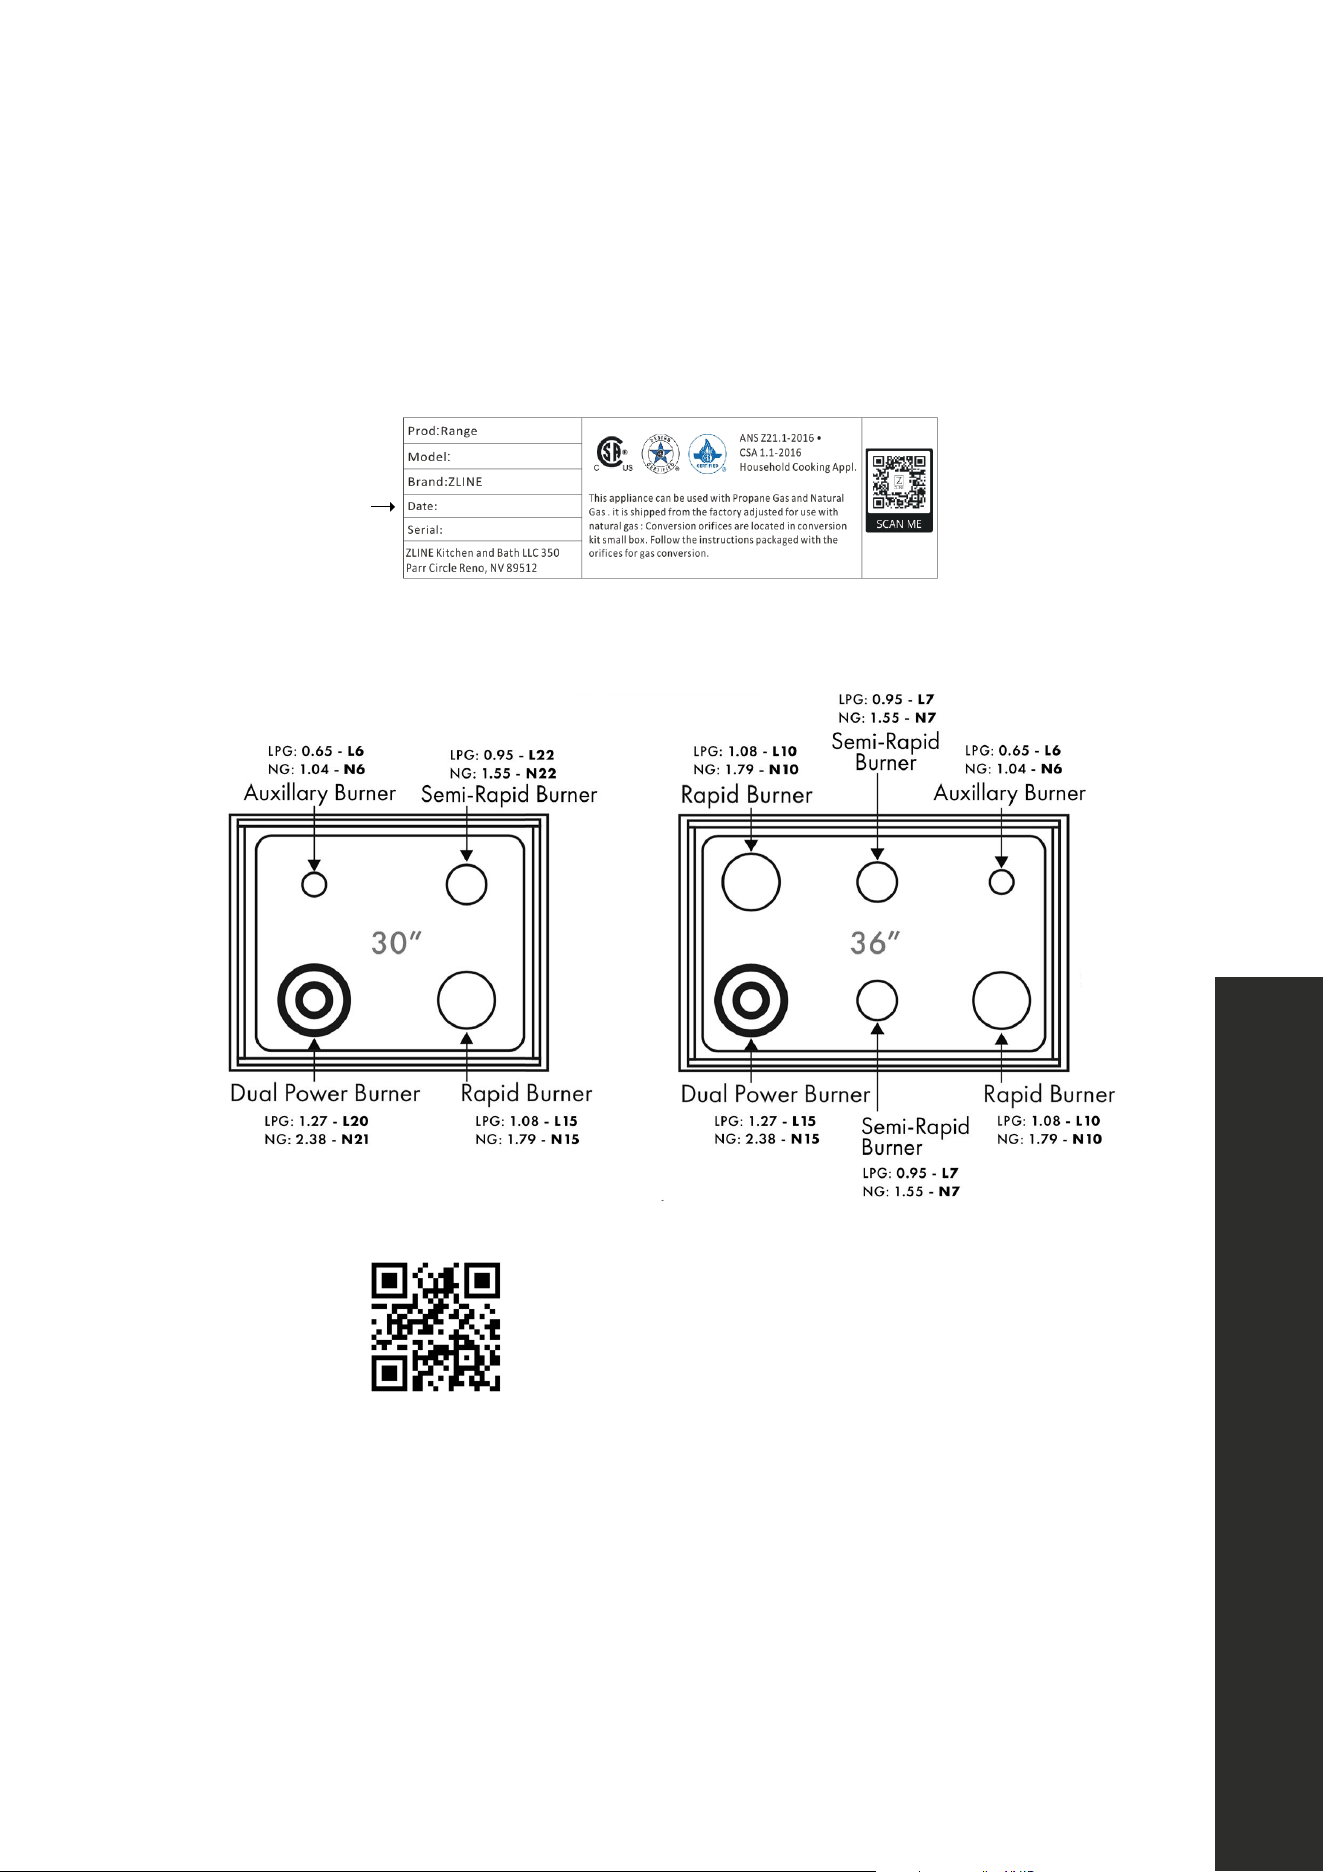
The conversion is not finished if all steps are not completed. Before performing the gas
conversion, locate the package containing the replacement orifices, which has a number
indicating its flow diameter printed on the body. Consult the table below for matching
orifices to burners.
Save the orifices removed from the dropin for future use.
LPG: Liquid Propane Gas
NG: Natural Gas
Reference the diagrams below if your dropin was manufactured before May 2021.
To check, reference the rating label on the underside of the product.
Example label
Scan to follow along with a video.
14
Gas Conversion Procedure
INSTALLATION
Reference the diagrams below if your dropin was manufactured after May 2021.
To check, reference the rating label on the underside of the product.
Example label
Scan to follow along with a video.
15
Gas Conversion Procedure
INSTALLATION
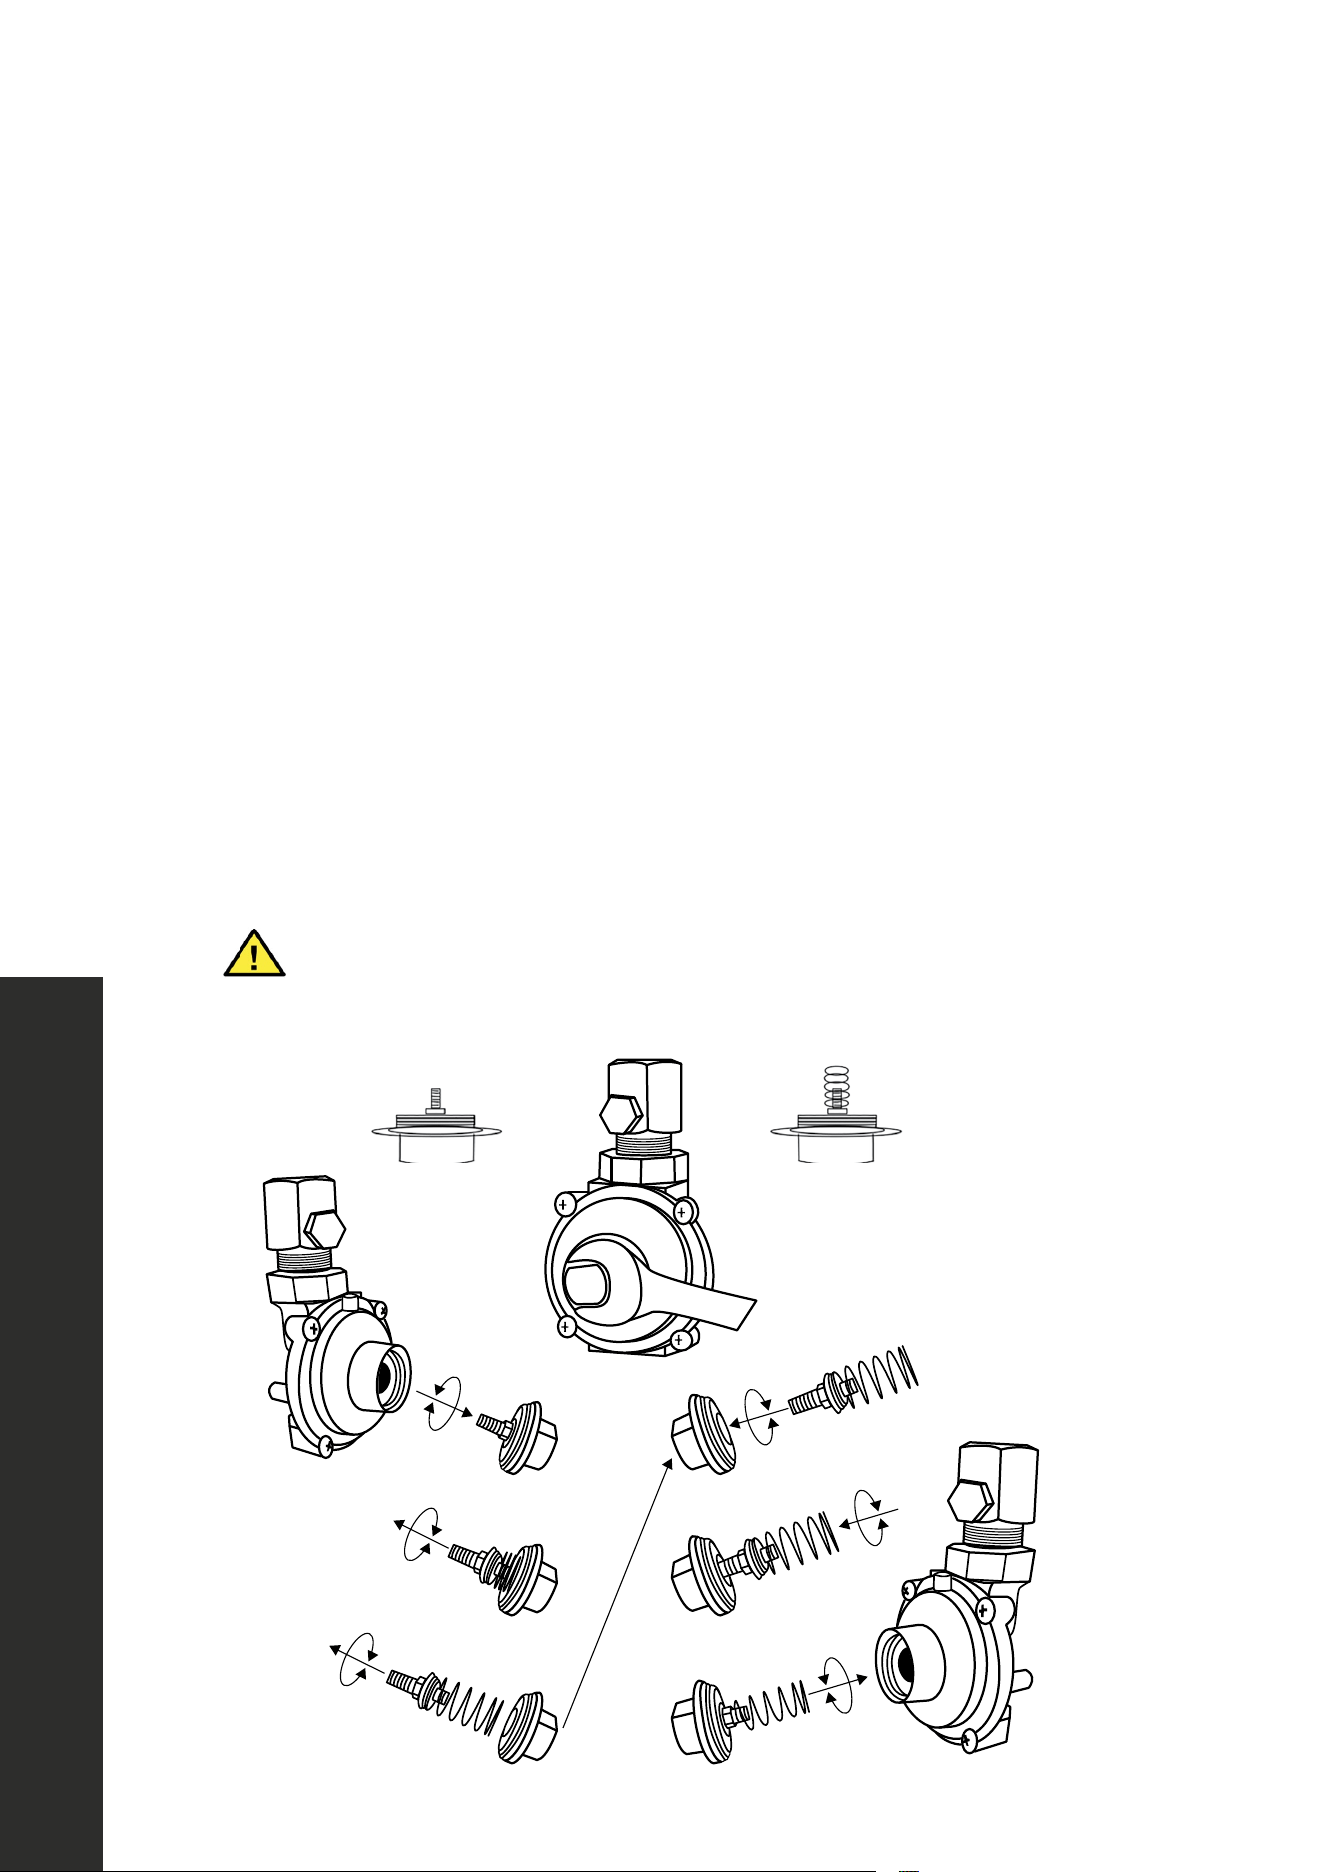
STEP 1: PRESSURE REGULATOR
The pressure regulator supplied with the appliance is a convertible type pressure regulator
for use with natural gas at a nominal outlet pressure of 4˝ W.C. or liquid propane gas
at a nominal outlet pressure of 10” W.C. and it is pre-assembled from the factory to
operate with one of these gas pressures as indicated in the labels affixed on the appliance,
package, and instruction booklet.
To convert the regulator for use with other liquid propane gas:
1. Unscrew the front cap of the regulator (as seen below). Inside the cap is a screw. By
hand, remove the screw to reveal a spring. Invert the screw back into the cap with the
spring on top.
2. With the spring sticking out of the cap, reinstall the cap back onto the regulator.
3. Using a manometer, double check pressure is at 10 W.C. If you need to adjust pressure,
screw or unscrew the black spacer where the spring is located.
Any issues related to improper propane conversion are NOT covered
under warranty.
WARNING
5/8
Reverse regulator
screw and spring.
Gas Conversion Procedure
Liquid Propane Gas
Natural Gas
16
Gas Conversion Procedure
INSTALLATION
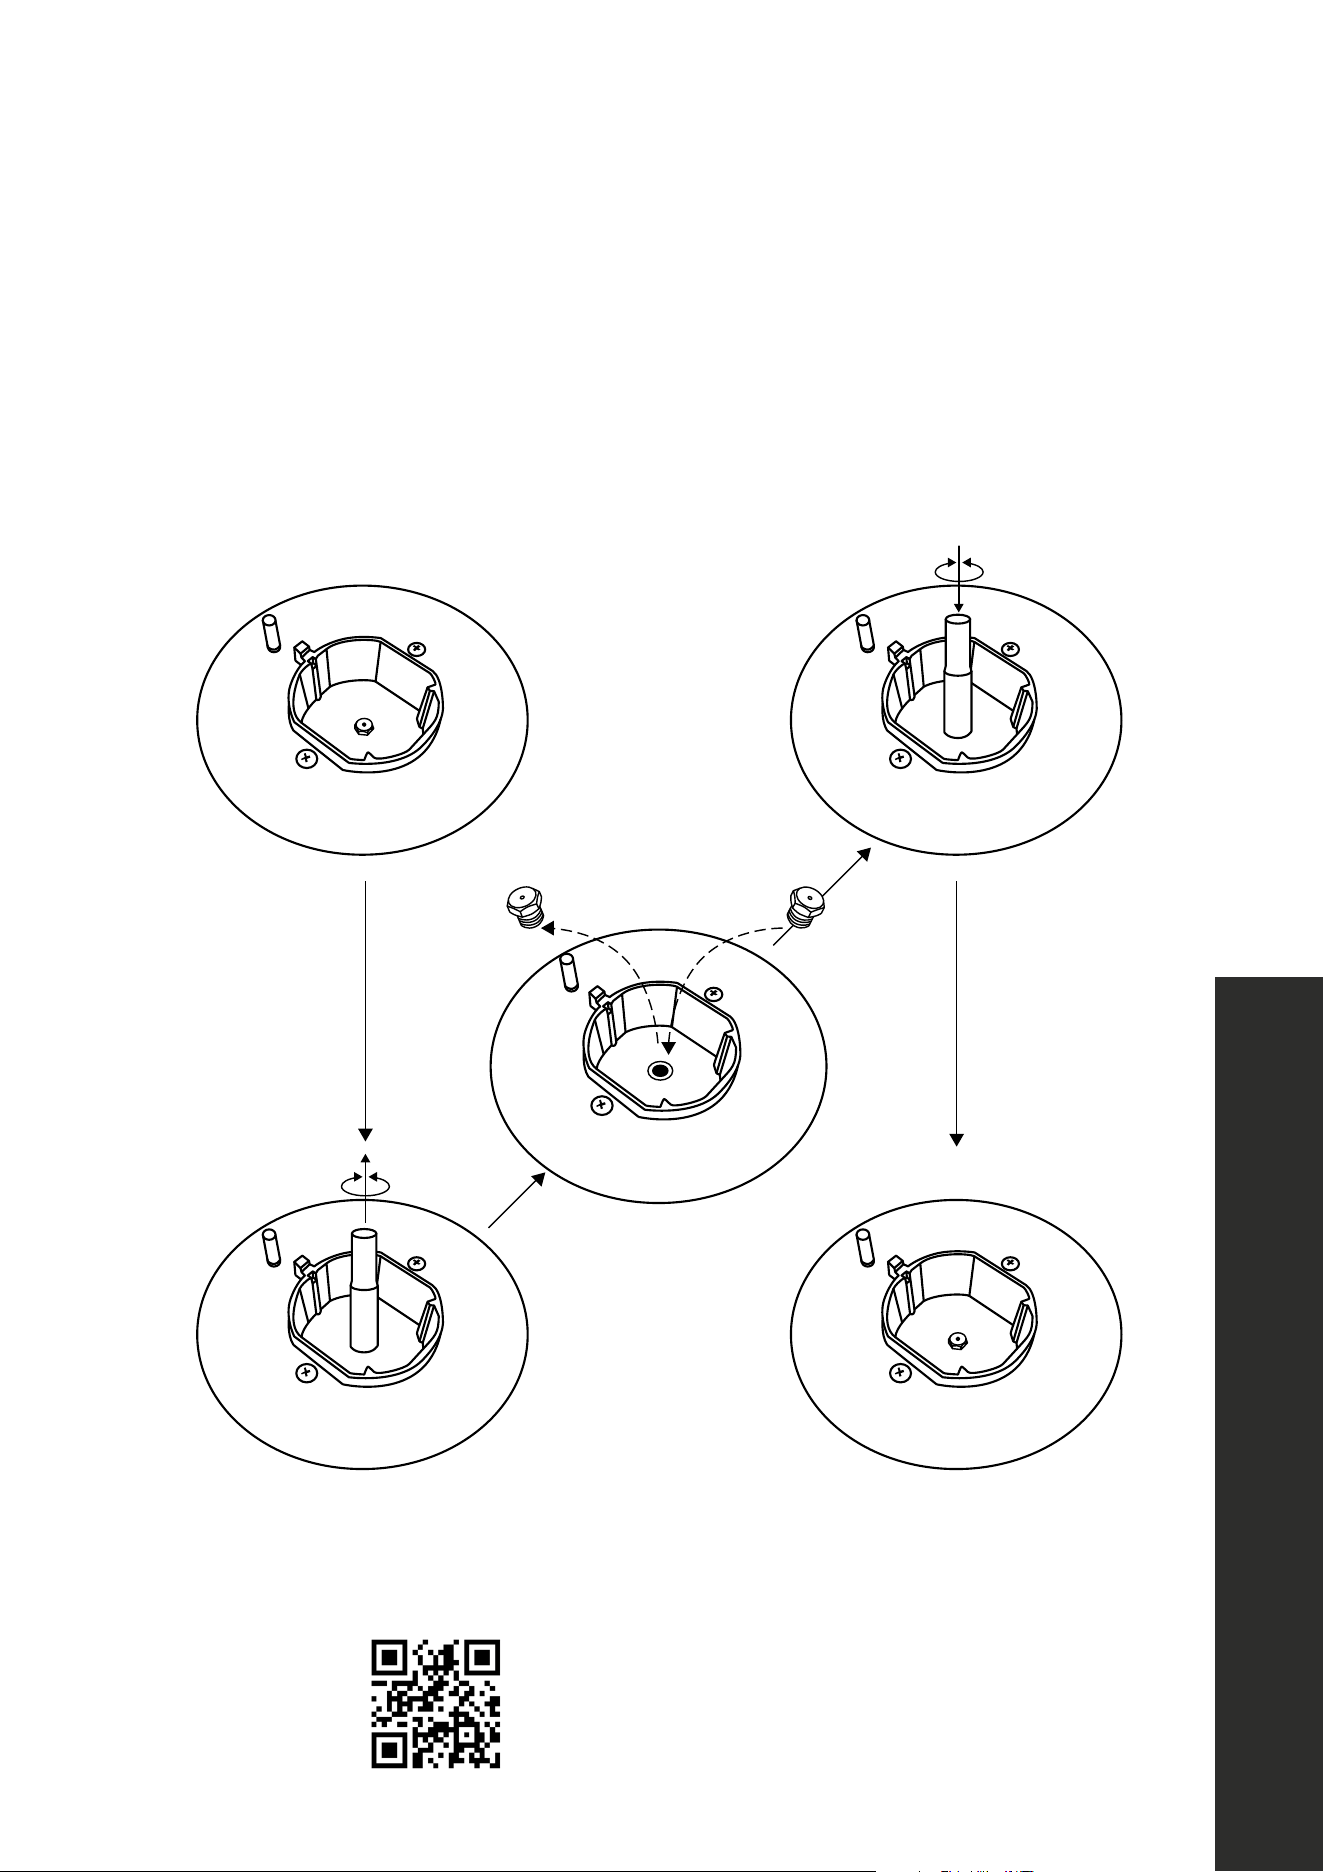
STEP 2: SURFACE BURNERS
1. To replace the orifices of the surface burners, lift up the burners and unscrew the
orifices shipped with the dropin using a 7 mm socket wrench.
2. Replace orifices using the conversion set supplied with the dropin. Each orifice has a
number indicating its flow diameter printed on the body. Consult the table on pages
13-14 for matching orifices to burners.
NG = Natural Gas
LPG = Liquid Propane Gas
NG LPG
7 mm
7 mm
Step1
Step 2
Step 3
Step 4
Step 5
Note: For the dual burner, the orifice is located on the side of the burner. Use a 7 mm socket
wrench to remove and tighten.
Scan to follow along with a video.
17
Flame Adjustment
INSTALLATION
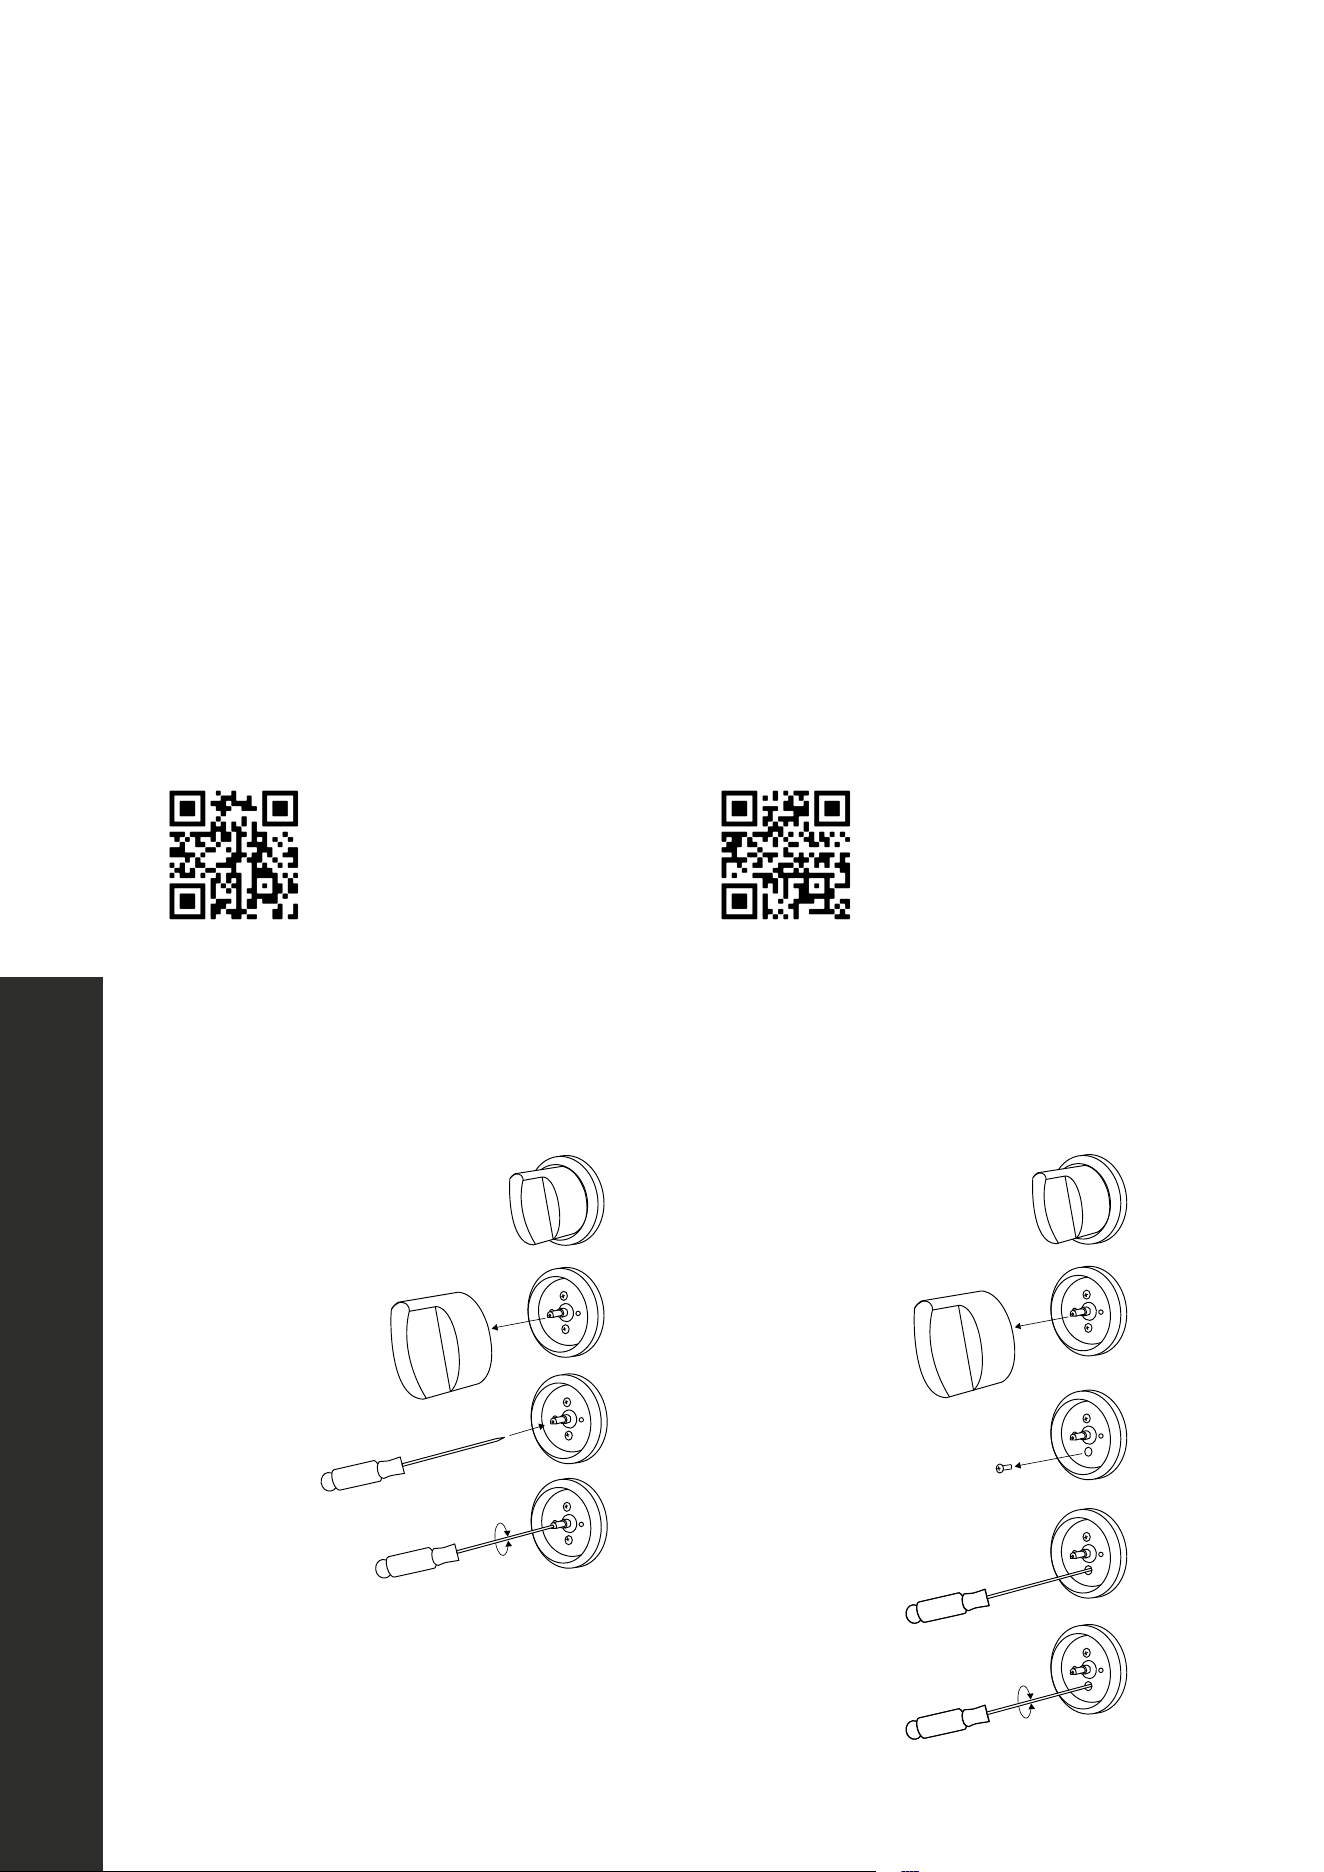
STEP 3: FLAME ADJUSTMENT
1. Light one burner at a time and set it to the MINIMUM position (small flame).
2. Remove the knob by firmly and carefully pulling it straight out.
3. The dropin is equipped with a safety valve. Using the small flat-head screwdriver
provided with this manual, locate the adjustment screw (see diagram below), hold the
metal stem with one hand and turn the screwdriver to the right or left until the burner
flame is adjusted to desired minimum.
4. Make sure that the flame does not go out when switching quickly from the MAXIMUM
to the MINIMUM position.
The high flame setting cannot be adjusted to be lower. If the height is too high, revisit the
conversion set-up. A step may have been missed.
Reference the diagrams
below if your dropin was
manufactured after June
2021. To check, reference
the rating label on the
underside of the dropin.
Scan the QR code to follow
along with a video.
Reference the diagrams
below if your dropin was
manufactured before June
2021. To check, reference
the rating label on the
underside of the dropin.
Scan the QR code to follow
along with a video.
WIRING DIAGRAM
DW7714-18 & DW7713-24
18” & 24“ Panel-Ready Dishwasher
0.0.0.
FLAME ADJUSTMENT
Germania
RA series, RG series
zlinekitchen.com 1-614-777-5004 0.0.0.zlinekitchen.com 1-614-777-5004
2.0 x 50 mm
2.0 x 50 mm
If the customer flame control valve looks like this (left), then they will not be able to adjust the
flame without removing one of the screws. These new ranges are already fielded, so please
do not process returns for this issue. The valves are different from the previous ones and are
not interchangeable.
2.0 x 50 mm
2.0 x 50 mm
Flame Adjustment

18
Installation Checklist
INSTALLATION
INSTALLATION CHECKLIST
1. Does the clearance from the side cabinets comply with the manufacturer’s direction?
2. Is the electricity properly grounded using the provided three-prong plug?
3. Is the gas service line connected following the directions of the manufacturer?
4. Have all the proper valves, stoppers, and gaskets been installed between the dropin
and the service line?
5. Has the gas connection been checked for leaks?
6. Has the dropin been set up for the type of gas available in the household (liquid
propane gas or natural gas)?
7. Does the flame appear sharp blue with no yellow tipping?
8. Has the minimum setting for all burners been adjusted?
9. Have the dropin flames been adjusted to customer preference?
FINAL PREPARATION
• All stainless steel body parts should be wiped with hot, soapy water and with a stainless
steel cleanser.
• If build-up occurs, do not use steel wool, abrasive cloths, cleaners, or powders. If it is
necessary to scrape stainless steel to remove encrusted materials, soak with hot, wet
cloths to loosen the material, and then use a wood or nylon scraper. DO NOT use
a metal knife or any other metal tool to scrape stainless steel. Scratches are almost
impossible to remove.

19
INSTALLATION
Room Ventilation
ROOM VENTILATION
The use of a gas cooking appliance generates heat and humidity in the room where it is
installed. Proper ventilation in the room is needed. Make sure the kitchen is equipped with a
range hood of appropriate power (400 CFM minimum) installed appropriately above the
dropin. Activate the exhaust fan/range hood when possible. Intensive and continuous use
of the appliance may require additional ventilation, for example, by opening a window.
DROPIN COOKING
• This product is intended for the cooking of food and must not be used for other
purposes.
• Unstable or deformed pans should not be placed on the burners in order to avoid
accidents caused by spillover.
• Particular care should be taken when cooking with oil or fat.
• Always ensure that the knobs are in the OFF position when the appliance is not in use.
• Before maintenance and cleaning, disconnect the appliance and allow cooling down.
For reasons of hygiene and safety, this appliance must always be kept clean.
• Take care when using cleaning products in spray form: never direct the spray onto the
electrical wiring and thermostat.
• Ensure that air can circulate around the gas appliance. Poor ventilation can result in
lack of oxygen and extinguish the flame.
• In case of doubt, ask installer for advice.
• Supply the appliance with the type of gas stamped on the relevant label situated in the
immediate vicinity of the gas connection tube.
• The appliance is heavy (roughly 50 pounds), move it carefully.
• To facilitate ignition, light the burners before placing pans on the grid.
• Check that the flame is regular.
• Always lower the flame or turn it off before removing the pan.
20
OPERATION
Dropin Cooking
SURFACE BURNER OPERATION - ELECTRIC IGNITION
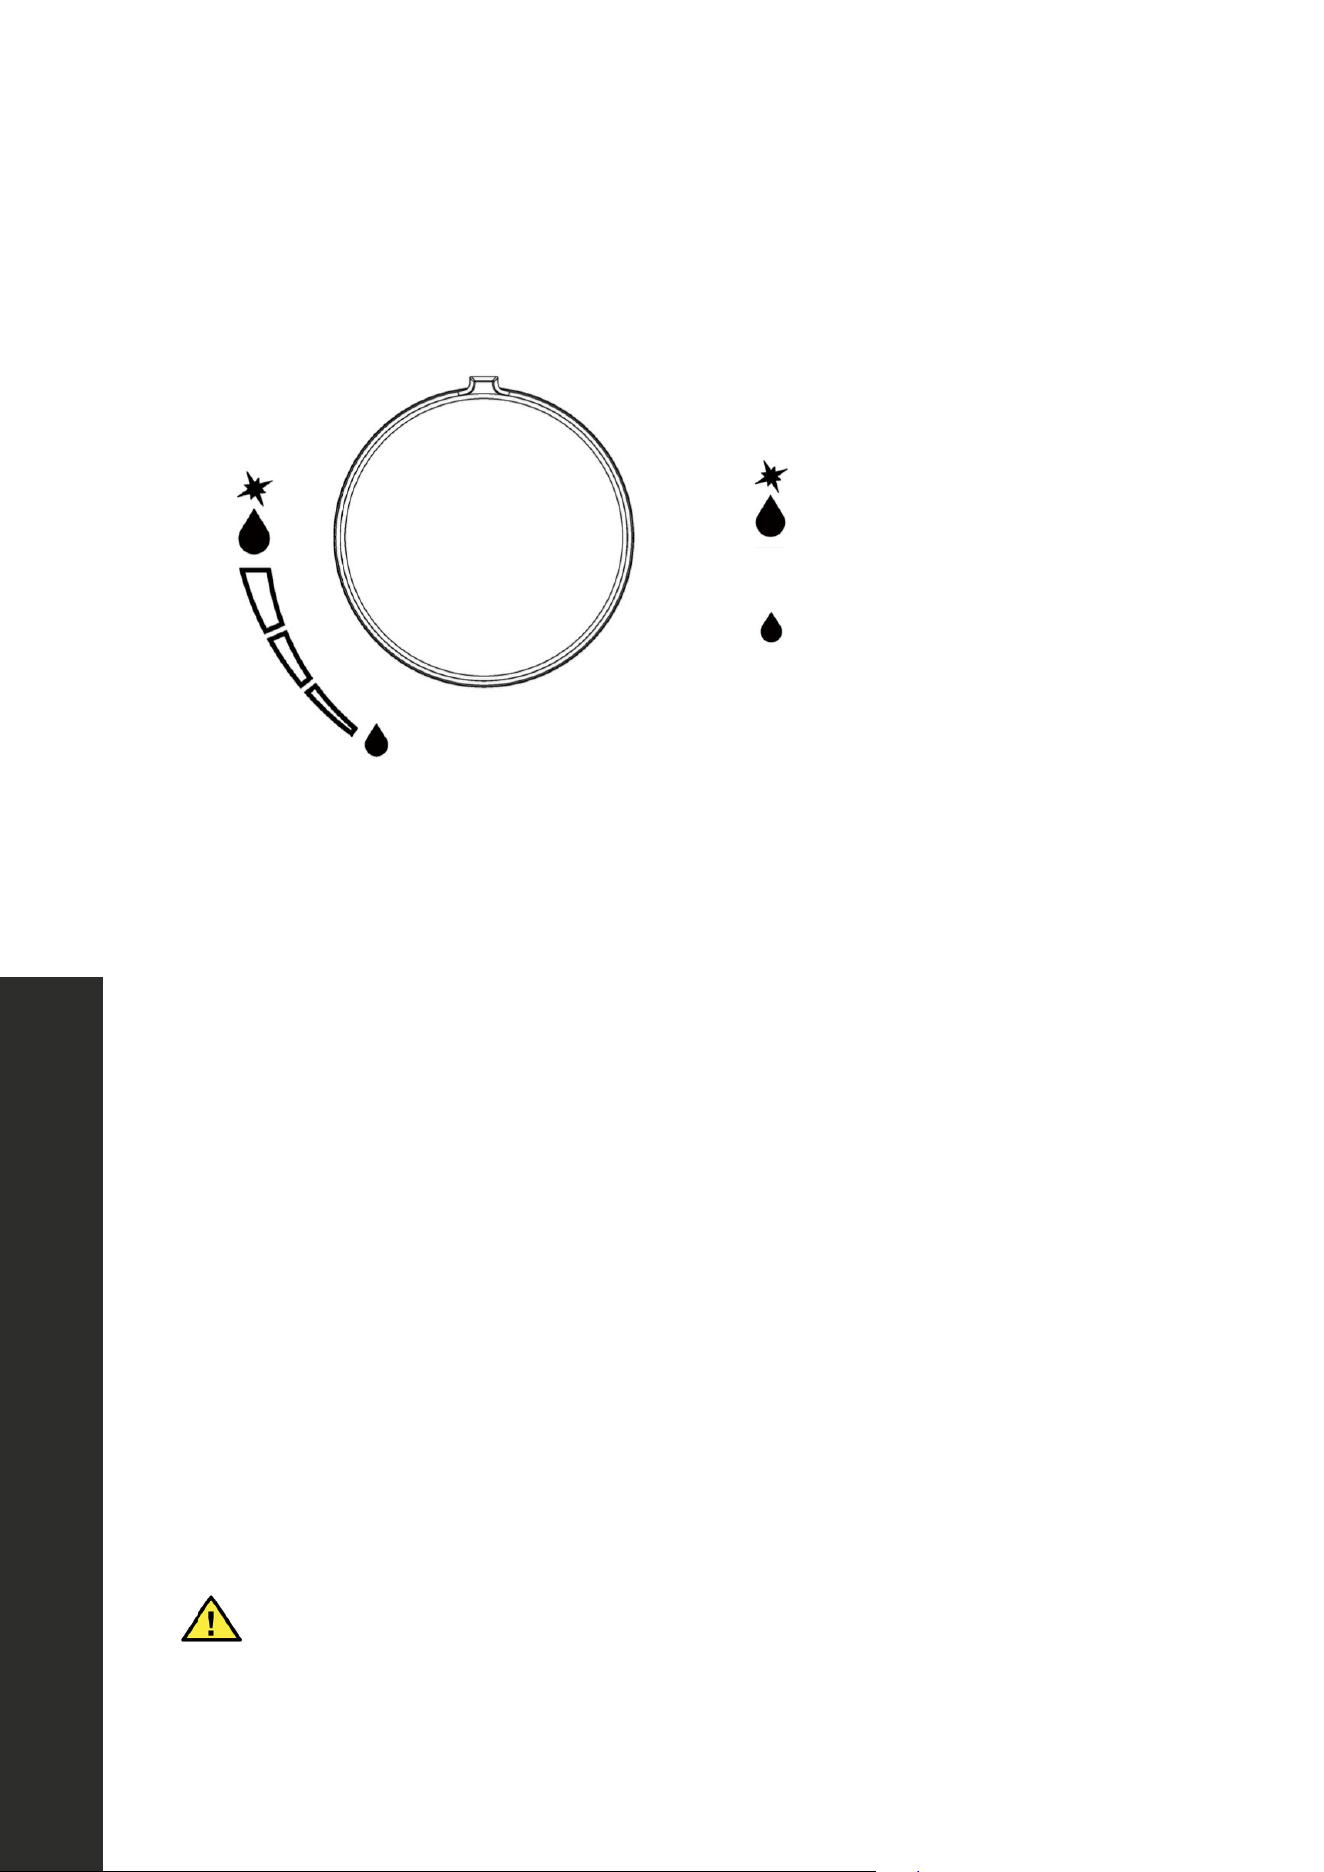
To activate the electric ignition, simply push the knob in to activate the spark. While still
pushing the knob in, turn the control knob counter-clockwise to release the gas. The spark
will be released at the metal electrode of the white ceramic spark tip located on the side
of the burner. Once the flame is on, release the control knob gently. If the flame turns off,
simply repeat the above procedure.
WARNING
DO NOT ignite the burners if the black burner cap is not installed or not
centered, the flame will be irregular.
MANUAL IGNITION
Manual ignition is always possible even when the power is cut off or in the event of a
power failure. Turn the control knob counter-clockwise to the MAXIMUM position; light the
flame with a kitchen lighter or with a match.
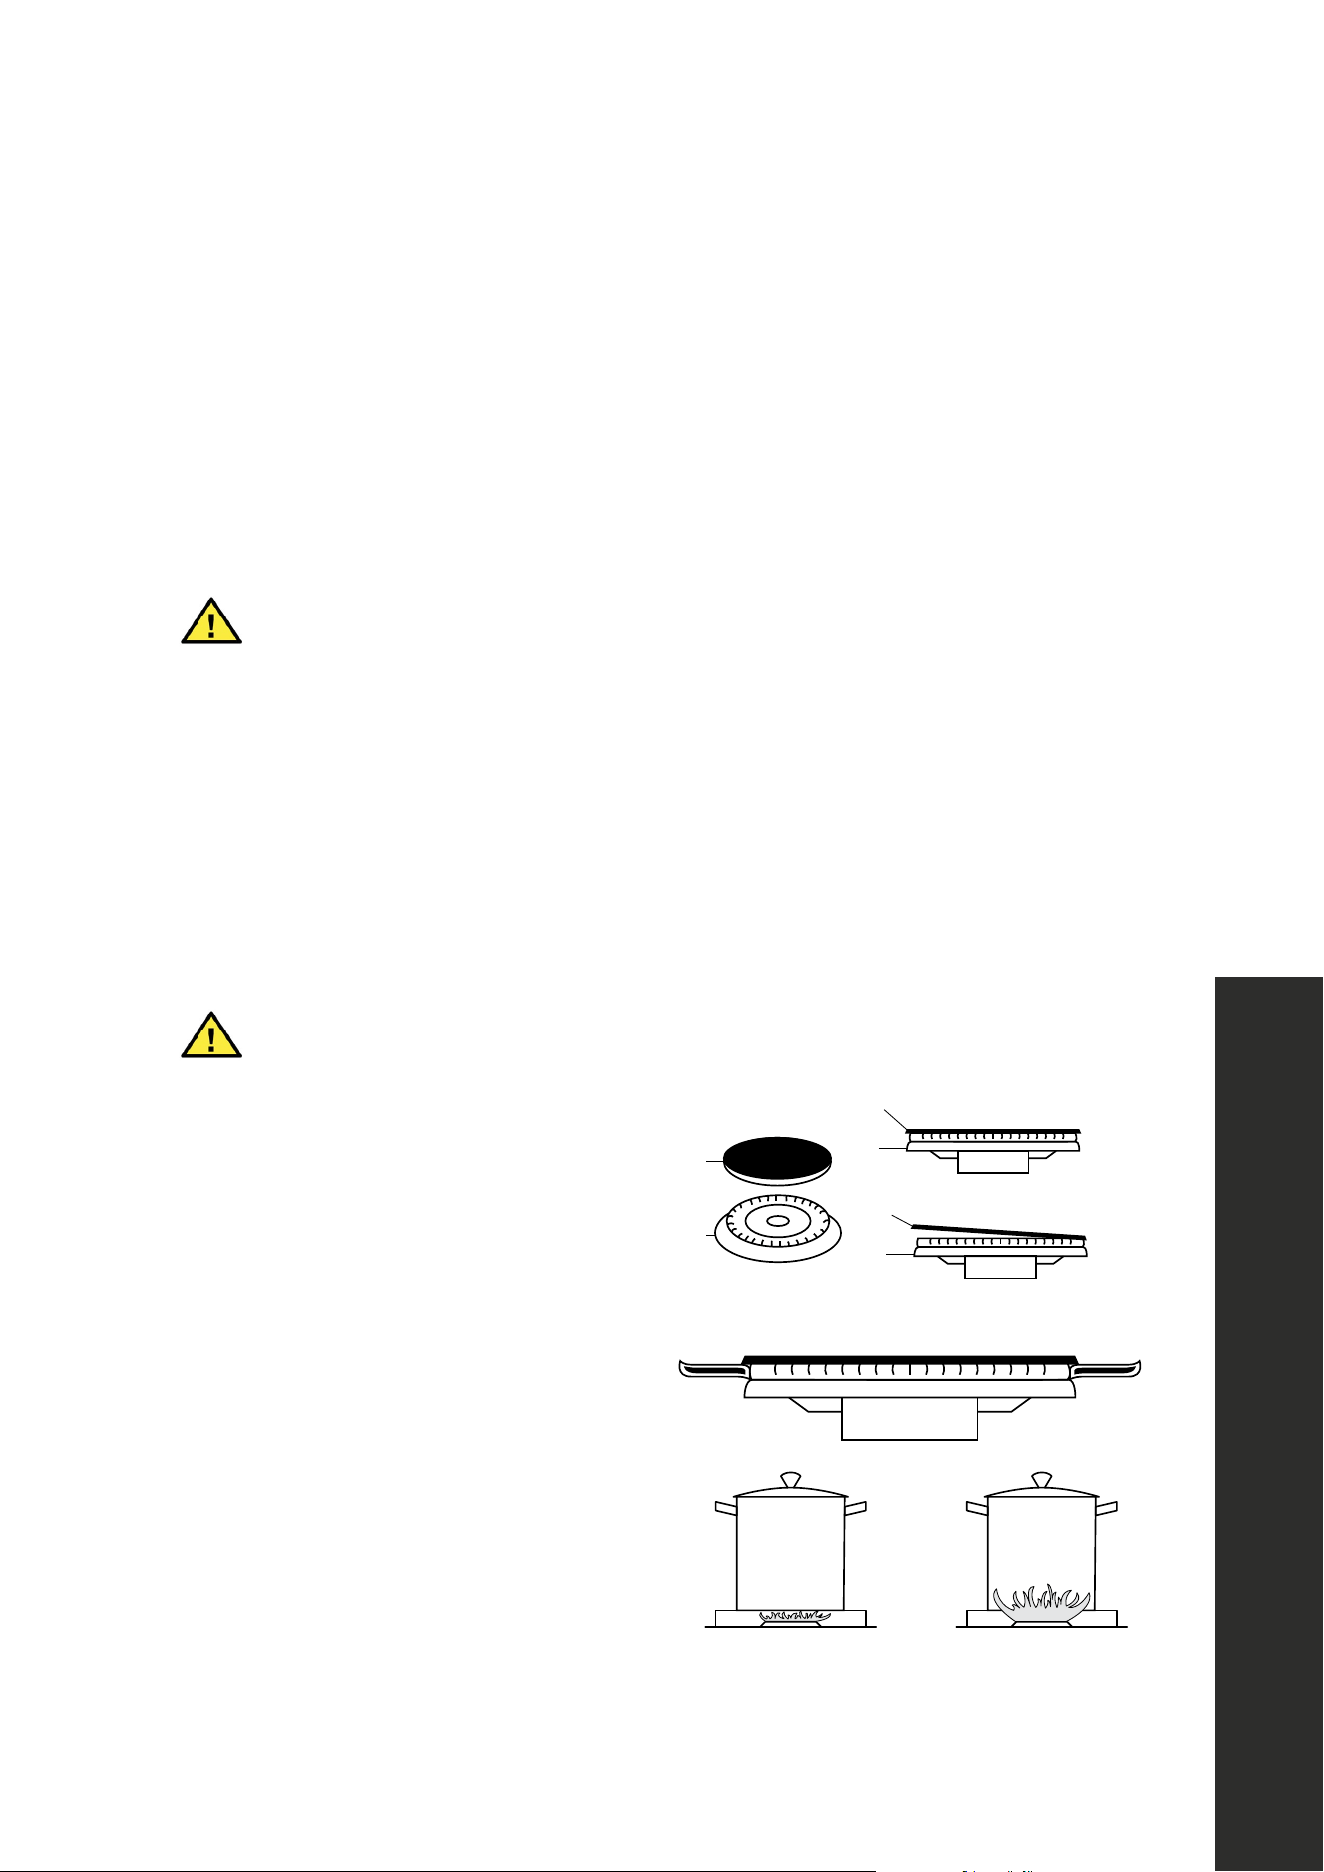
USING THE BURNERS CORRECTLY
WARNING
Keep children at a safe distance from the appliance during operation. DO
NOT allow children to operate the appliance.
1. Always check that the burner caps are
properly installed before operation:
2. Verify that the flame of the dropin burners
is completely blue and with
a regular aspect as shown at right:
3. Never let flames wrap around cookware:
A
B
A
B
Correct
Incorrect
Correct Incorrect
A
B
A
B
A
B
Correct
Incorrect
Correct Incorrect
A
B
A
B
A
B
Correct
Incorrect
Correct Incorrect
A
B
21
OPERATION
Dropin Cooking
Be sure to set all dropin burner controls to the OFF position after each use of the
appliance.
Maximum Flame Height
USE GUIDE
•
Ensure good ventilation of the room, keep adequate natural
ventilation or install an extractor hood with a discharge tube.
•
In case of doubt ask installer for advice.
•
Supply the appliance with the type of gas stamped on the relevant
label situated in the immediate vicinity of the gas connection tube.
•
To facilitate ignition, light the burners before placing pans on the
grid. Check that the flame is regular.
•
Always lower the flame or turn it off before removing the pan.
•
Ensure burner caps are installed correctly (See instruction as
below.)
Control knobs on the gas burners
The knobs for the gas burners of the cooker are found on the control
panel. The regulating knobs should be turned in anti-clockwise direction
until the small ame symbol, vice- versafor the larger ame symbol.
Ignition of the hob gas burners To light up the burner, keep pushing the
knob and turn it anti-clockwise to maximum, and hold it for 3 to 5
seconds. The ignition will spark and ignite the burner. At this position the
gas supply is at the maximum and the ame also at its maximum.
You can reduce the ame size by turning the knob in anti-clockwise
direction to achieve your requirements. Should the burner fail to light up,
turn the knob to its original position and try again. Your burner ame
should be blue in colour.
NOTE -When rst used, the gas burner will not ignite immediately.
Time is required for the LPG to fully ll the operating system.
USE GUIDE
•
Ensure good ventilation of the room, keep adequate natural
ventilation or install an extractor hood with a discharge tube.
•
In case of doubt ask installer for advice.
•
Supply the appliance with the type of gas stamped on the relevant
label situated in the immediate vicinity of the gas connection tube.
•
To facilitate ignition, light the burners before placing pans on the
grid. Check that the flame is regular.
•
Always lower the flame or turn it off before removing the pan.
•
Ensure burner caps are installed correctly (See instruction as
below.)
Control knobs on the gas burners
The knobs for the gas burners of the cooker are found on the control
panel. The regulating knobs should be turned in anti-clockwise direction
until the small ame symbol, vice- versafor the larger ame symbol.
Ignition of the hob gas burners To light up the burner, keep pushing the
knob and turn it anti-clockwise to maximum, and hold it for 3 to 5
seconds. The ignition will spark and ignite the burner. At this position the
gas supply is at the maximum and the ame also at its maximum.
You can reduce the ame size by turning the knob in anti-clockwise
direction to achieve your requirements. Should the burner fail to light up,
turn the knob to its original position and try again. Your burner ame
should be blue in colour.
NOTE -When rst used, the gas burner will not ignite immediately.
Time is required for the LPG to fully ll the operating system.
USE GUIDE
•
Ensure good ventilation of the room, keep adequate natural
ventilation or install an extractor hood with a discharge tube.
•
In case of doubt ask installer for advice.
•
Supply the appliance with the type of gas stamped on the relevant
label situated in the immediate vicinity of the gas connection tube.
•
To facilitate ignition, light the burners before placing pans on the
grid. Check that the flame is regular.
•
Always lower the flame or turn it off before removing the pan.
•
Ensure burner caps are installed correctly (See instruction as
below.)
Control knobs on the gas burners
The knobs for the gas burners of the cooker are found on the control
panel. The regulating knobs should be turned in anti-clockwise direction
until the small ame symbol, vice- versafor the larger ame symbol.
Ignition of the hob gas burners To light up the burner, keep pushing the
knob and turn it anti-clockwise to maximum, and hold it for 3 to 5
seconds. The ignition will spark and ignite the burner. At this position the
gas supply is at the maximum and the ame also at its maximum.
You can reduce the ame size by turning the knob in anti-clockwise
direction to achieve your requirements. Should the burner fail to light up,
turn the knob to its original position and try again. Your burner ame
should be blue in colour.
NOTE -When rst used, the gas burner will not ignite immediately.
Time is required for the LPG to fully ll the operating system.
Maximum temperature setting is the recommended control knob position for burner
ignition.
The regulating knobs should be turned in a counter-clockwise direction until reaching
the small flame symbol, vice-versa for the larger flame symbol. To light the burner, keep
pushing the knob and turn it counter-clockwise to maximum, and hold it for 3 to 5 seconds.
The ignition will spark and ignite the burner. At this position, the gas supply is at the
maximum and the flame also at its maximum. You can reduce the flame size by turning the
knob in counter-clockwise direction. Should the burner fail to light up, turn the knob to its
original position and try again. Your burner flame should be blue in color.
NOTE: When igniting a burner, all burners will spark, but only the burner’s knob you are
using will ignite the flame.
NOTE: When first used, the gas burner will not ignite immediately. Time is required for the
liquid propane gas to fully fill the operating system.
WARNING
The flame color should always be blue. Flickers of orange and yellow are
acceptable. If flames appear orange or yellow and stay that way, check the
surrounding area. Candles, cleaning products, and other changes in
atmosphere can affect the flame color.
Minimum Flame Height

22
MAINTENANCE AND CLEANING
Maintaining the Dropin
CLEANING YOUR DROPIN
During cleaning, never move the appliance from its original installation position.
Never use abrasive cleaners. Scratches on the stainless steel surfaces are
permanent. Do NOT clean the dropin when hot. Do not use Clorox bleach wipes
or alcohol wipes to clean any part of the stainless steel.
WARNING
• Cleaning after Installation: Use a stainless steel cleaning product or wipe to eliminate
the glue residues of the protection film after removal.
• Cleaning the Dropin: Periodically clean the burner heads, cast iron pan supports, and
burner caps using warm water. Remove burner food and fat residues with a rubber
spatula.
• Cleaning Stainless Steel: For the best results, use a stainless steel cleaner product with a
soft sponge or cloth with a warm soap and water solution. Never use abrasive powders
or liquids.
• Cleaning the Burner Caps: Lift the burner caps from the burner heads and wash them
in a warm soap and water solution. Dry thoroughly before using them again. Before
reinstalling them on the burner head, check that the gas flow holes are not clogged with
food residues or cleaning products.
• Cleaning Porcelain: Porcelain parts should be cleaned frequently with a warm soap
and water solution applied with a soft sponge or wipe. Never use abrasive powders
or liquids. Do not leave acid or alkaline substances on the porcelain parts (such as
vinegar, lemon juice, salt, tomato sauce, etc). Use a rubber spatula to remove food and
fat residues.
23
Troubleshooting
TROUBLESHOOTING
DROPIN PROBLEM POSSIBLE CAUSE AND/OR REMEDY
Dropin does not function Dropin is not connected to electrical power. Check
power circuit breaker, wiring, and fuses. If all electrical
components are properly installed, call 1-614-777-
5004 for help.
Burner does not ignite Gas supply valve is in the “OFF” position or gas supply
is interrupted.
Igniter barely sparking, no
flame ignition
Burner ports are clogged or the unit is not set to the
appropriate gas type. Call 1-614-777-5004 for help.
Burner ignites but flame is
large, distorted, or yellow
The air quality of the room may be affecting the flame
color. Ensure that there are no candles, cleaning
products, air purifiers, etc. in the room.
Low flames and longer
cooking times
The liquid propane gas conversion procedure may not
have been performed properly. Check that all orifices
are correctly placed. If not, contact your installer.
Brass burners change color (if
you purchased brass burners
for your dropin)
Brass burners naturally oxidize over time and form a
patina that is a beautiful deep brass hue. This process
ensures our brass burners are corrosion resistant and is
not cause for a return.
Dropin burner’s low/simmer
flame setting is too high
The liquid propane gas conversion procedure may not
have been performed properly, as all burners should
have been adjusted during installation with the flame
adjustment tool that comes with each dropin. See page
17 for how to adjust the burner flame’s height.
Need to purchase a part or accessory for your ZLINE product?
Visit ZLINEparts.com, ZLINE's official parts distribution partner.

COVERAGE
ZLINE Kitchen and Bath dropin products will be warrantied for one year from the original
purchase date for the original purchaser of the product. This warranty covers all parts and
labor for necessary repairs if any part of the product proves to be defective in materials or
workmanship. The product must be deemed serviceable via troubleshooting with the ZLINE
Kitchen and Bath service team. All service on ZLINE Kitchen and Bath dropin products under the
above warranty must be performed by ZLINE approved and certified service providers, unless
otherwise specified by ZLINE Kitchen and Bath. Service will be provided during normal business
hours.
TERMS
This warranty applies only to the original purchaser of a dropin product installed for normal
residential use. This is defined as a single-family, residential dwelling in a non-commercial
setting. Commercial settings include but are not limited to: schools, churches, hotels, restaurants,
vacation rentals such as Airbnb, day care centers, private clubs, fire stations, common areas
in multi-family dwellings, nursing homes, food service locations, and institutional food service
locations such as hospitals or correction facilities. This warranty is non-transferable and will not
be extended based on the date of installation. The warranty applies only to products installed in
the continental United States and the District of Columbia.
Failure to secure certified warranty service per these terms will result in a forfeiture of the
remaining warranty. Out of pocket payments will not be reimbursed unless prior approval is
received from ZLINE Kitchen and Bath and/or our service contract partner. Unapproved out of
pocket payments for service will not be reimbursed. All warranty procedures must be followed to
maintain warranty coverage.
Warranty shall not apply and ZLINE Kitchen and Bath is not responsible for damage resulting
from negligence, improper maintenance, misuse, abuse, alteration of or tampering with the
appliance, accident, natural disaster, improper electric supply, flare-up fires, unauthorized
service or repair, improper installation, or installation not in accordance with the instructions
contained in the manual, or with local government codes.
WARRANTY

WHAT IS NOT COVERED
1. Installation or start-up, damages or problems caused by improper installation or use.
2. Improper liquid propane gas conversion or damage related to improper liquid propane gas
conversion.
3. Dropin burner flame adjustments or related complaints.
4. Service by unauthorized service providers or damage related to unauthorized service or
unauthorized parts.
5. Installation in any commercial or non-residential application.
6. Corrections regarding normal adjustments or settings, or local gas supply issues resulting in
low gas pressure or other issues.
7. Removal or re-installation cost.
8. Aesthetic damage, scratches, or natural wear caused by normal use.
9. Second-hand, open box products, or products purchased from an unauthorized retailer.
10. Service for gas pressure issues related to installation at high altitudes. A high-altitude
pressure regulator must be sourced by the customer.
NOTE: In the event that service is dispatched, and it is discovered that the reported issue is not
covered under warranty based on the disclaimers above, the customer will be responsible for all
service fees. Failure to pay these fees will result in the forfeiture of remaining warranty coverage.
The rating tag shows the model and serial number of your dropin. The tag is located on the
underside of the product. Do not remove permanently affixed labels, warnings, or plates from
the product. This will void the warranty.
SERVICE
For warranty service, please contact our Customer Service team at 1-614-
777-5004 or visit www.zlinekitchen.com/contact to utilize our online
Customer Experience Portal.
REPLACEMENT PARTS
Only authorized replacement parts may be used in performing service on this appliance.
Replacement parts are available from ZLINE. Call 1-614-777-5004.
WARRANTY